junos automation cookbook - bitly
TRANSCRIPT


JUNOS Automation Cookbook
Automate network devices on Juniper's operating system
Adam Chappell
||||||||||||||||||||
||||||||||||||||||||

BIRMINGHAM - MUMBAI
||||||||||||||||||||
||||||||||||||||||||

JUNOS Automation Cookbook
Copyright © 2017 Packt Publishing
All rights reserved. No part of this book may be reproduced, stored in a retrievalsystem, or transmitted in any form or by any means, without the prior written permissionof the publisher, except in the case of brief quotations embedded in critical articles orreviews.
Every effort has been made in the preparation of this book to ensure the accuracy of theinformation presented. However, the information contained in this book is sold withoutwarranty, either express or implied. Neither the authors, nor Packt Publishing, and itsdealers and distributors will be held liable for any damages caused or alleged to becaused directly or indirectly by this book.
Packt Publishing has endeavored to provide trademark information about all of thecompanies and products mentioned in this book by the appropriate use of capitals.However, Packt Publishing cannot guarantee the accuracy of this information.
First published: September 2017
Production reference: 1220917
Published by Packt Publishing Ltd.Livery Place35 Livery StreetBirminghamB3 2PB, UK.
ISBN 978-1-78829-099-9
||||||||||||||||||||
||||||||||||||||||||

www.packtpub.com
||||||||||||||||||||
||||||||||||||||||||


Credits
Author
Adam Chappell
Copy Editor
Juliana Nair
Reviewer
Mohammad Mohsinul Malik
Project Coordinator
Judie Jose
Commissioning Editor
Vijin Boricha
Proofreader
Safis Editing
||||||||||||||||||||
||||||||||||||||||||

Acquisition Editor
Meeta Rajani
Indexer
Rekha Nair
Content Development Editor
Abhishek Jadhav
Graphics
Kirk D'Penha
Technical Editor
Manish Shanbhag
Production Coordinator
Aparna Bhagat
||||||||||||||||||||
||||||||||||||||||||


About the AuthorAdam Chappell first cut his teeth in the networking world in 1995 after an opportunityin Finchley, North London, at what would become one of the pioneering dial-up InternetISPs in the United Kingdom. His early forays into network automation generallyinvolved cron, Perl, expect, and a healthy dose of hope and luck. As the commercialnetworking market matured, he joined Interoute to develop one of the first large-scaleEuropean MPLS networks, leading the market in the provision of private packetnetworking.
Adam was responsible for Interoute's unique network automation technology thatseamlessly stitches together industry-standard MPLS VPNs and private cloud computelogical networks. Currently, he works in the thriving technology development team atInteroute, between London and Prague, focusing on network technologies, software, andsecurity.
I’d like to say a very big thankyou to the team at Packt Publishing for their support withthis book. Meeta, Abhishek, Nipu, and Manish, they all deserve my salute for theirprofessionalism and dedication to the effort of putting a book together. I owe a debt ofgratitude to some of my colleagues at Interoute, including Gary for his efforts at makingJuniper VRR and VMX dance to his tune, Ivan for tolerating my experimentation on thelive network, and Shish and Alistair for my inane questions at all hours. But writing abook like this doesn’t come without tolerance and support from those close to you. So,most importantly, I would like to say a big thank you to my wife, Mila, and my children,Maty and Tobi, for their extended patience.
||||||||||||||||||||
||||||||||||||||||||


About the ReviewerMohammad Mohsinul Malik is currently working as an advanced service consultantwith Juniper Networks, Malaysia.
He completed his engineering from Jamia Millia Islamia University, New Delhi, andhas around 11 years of experience in the IP networking industry. He has extensivehands-on experience in large enterprise networks and tier 1 and tier 2 serviceproviders.
His interests include SDN, NFV, network automation, IoT, network security, digitalforensics, and cloud technologies.
Malik has earned the networking industry’s most sought-after certifications and is amongan elite group of engineers in the world who hold such diverse certifications.
He has active triple JNCIE (SP, ENT, SEC), triple JNCSP (SP, ENT, SEC), tripleJNCDS (WAN, DC, SEC), JNCIP-DC, JNCIS-QFabric, and JNCIS-SDNA from JuniperNetworks. Also, he has earned other vendors certifications, such as CCIE-SP, CCNP-R&S, CISSP, PCNSE7, MCSE, BCEFP, SCP, and so on.
He also likes exploring new technologies and spends his spare time in his home lab,playing with software code.
||||||||||||||||||||
||||||||||||||||||||


www.PacktPub.comFor support files and downloads related to your book, please visit www.PacktPub.com.
Did you know that Packt offers eBook versions of every book published, with PDF andePub files available? You can upgrade to the eBook version at www.PacktPub.comand as aprint book customer, you are entitled to a discount on the eBook copy. Get in touch withus at [email protected] for more details.
At www.PacktPub.com, you can also read a collection of free technical articles, sign up fora range of free newsletters and receive exclusive discounts and offers on Packt booksand eBooks.
https://www.packtpub.com/mapt
Get the most in-demand software skills with Mapt. Mapt gives you full access to allPackt books and video courses, as well as industry-leading tools to help you plan yourpersonal development and advance your career.
||||||||||||||||||||
||||||||||||||||||||


Why subscribe?Fully searchable across every book published by PacktCopy and paste, print, and bookmark contentOn demand and accessible via a web browser
||||||||||||||||||||
||||||||||||||||||||


Customer FeedbackThanks for purchasing this Packt book. At Packt, quality is at the heart of our editorialprocess. To help us improve, please leave us an honest review on this book's Amazonpage at https://www.amazon.com/dp/1788290992.
If you'd like to join our team of regular reviewers, you can e-mail usat [email protected]. We award our regular reviewers with free eBooks andvideos in exchange for their valuable feedback. Help us be relentless in improving ourproducts!
||||||||||||||||||||
||||||||||||||||||||


Table of ContentsPreface
What this book covers?What you need for this bookWho this book is for
SectionsGetting readyHow to do it…How it works…There's more…See also
ConventionsReader feedbackCustomer support
Downloading the example codeDownloading the color images of this bookErrataPiracyQuestions
1. Configuring JUNOS through NETCONFIntroductionJUNOS NETCONF over SSH setup
Getting readyHow to do it...How it works...There's more...
Making NETCONF RPC requests and repliesGetting readyHow to do it...How it works...There's more...
Discovering NETCONF RPCsGetting readyHow to do it...How it works...There's more...See also
Using NETCONF to apply configuration changesGetting ready
||||||||||||||||||||
||||||||||||||||||||

How to do it...How it works...
Processing NETCONF using classic Expect/TCLGetting readyHow to do it...How it works...
Processing NETCONF with PythonGetting readyHow to do it...How it works...
Processing NETCONF with Node.jsGetting readyHow to do it...How it works...
2. Working with the Junos REST APIIntroductionJunos REST API setup
Getting readyHow to do it...How it works...There's more
Making REST API calls to Junos with PythonGetting ready...How to do it...How it works...There's more...
Making REST API calls to Junos with Node.jsGetting readyHow to do it...How it works...
Managing passwords safelyGetting readyHow to do it...How it works...
Applying configuration changes through the REST APIGetting readyHow to do it...How it works...
3. Using SLAX to Write Op ScriptsIntroductionMaking remote procedure calls
||||||||||||||||||||
||||||||||||||||||||

Getting readyHow to do it...How it works...
Using XPath predicate expressionsGetting startedHow to do it...How it works...
Working with regular expressionsGetting readyHow to do it...How it works...
Working with IP addressesGetting readyHow to do it...How it works...There's more
Debugging SLAX scriptsGetting readyHow to do it...How it works...There's more
Making custom show commandsGetting readyHow to do it...How it works...
Making configuration changesGetting readyHow to do it...How it works...
4. Event ProgrammingIntroductionArchiving configurations after a change
Getting readyHow to do it…How it works...There's more
Capturing output after an eventGetting readyHow to do it…How it works…
||||||||||||||||||||
||||||||||||||||||||

There's moreCustom responses to an event
Getting readyHow to do it…How it works…There's more
Dealing with a flapping interfaceGetting readyHow to do it…How it works…
Dealing with a flapping OSPF neighborGetting readyHow to do it…How it works…
DIY routing protocolGetting readyHow to do it…How it works…
Debugging event scriptsGetting readyHow to do it…How it works…
5. Automating JUNOS with PyEZIntroductionSetting up a PyEZ environment
Getting readyHow to do it…How it works…There’s more
Exploring the XML RPC using PyEZGetting readyHow to do it…How it works…
Calling operational RPCs and setting timeoutsGetting readyHow to do it…How it works…
Configuration analysis and reportingGetting readyHow to do it…How it works…
||||||||||||||||||||
||||||||||||||||||||

Making raw CLI commands from PyEZGetting readyHow to do it…How it works…There’s more
Using tables and viewsGetting readyHow to do it…How it works…There's more
Using custom tables and viewsGetting readyHow to do it…How it works…
Making configuration changes with PyEZGetting readyHow to do it…How it works...There’s more
Template configurations with Jinja2Getting readyHow to do it…How it works...
6. Advanced Visualization ApplicationsIntroductionVisualizing graphs
Getting readyGraph principlesGraph data
How to do it...Instantiating the templateDrawing the graphRunning the example graph
How it works...Instantiating the templateDrawing the graph
Extracting graphs from ISISGetting started
ISIS primerHow to do it...How it works...
||||||||||||||||||||
||||||||||||||||||||

Extracting graphs from OSPFGetting ready
OSPF primerHow to do it...How it works...
Extracting graphs from MPLS VPNsGetting ready
BGP MPLS VPN primerHow to do it...How it works...There's more
7. Monitoring and Maintaining JUNOSIntroductionMonitoring configuration changes network-wide
Getting readyHow to do it…
SSH file transferJUNOS OS event policyWeb server applicationWeb client application
How it works...SSH File TransferJUNOS OS event policyWeb server applicationWeb client application
There's moreMonitoring interface performance
Getting readyObject-oriented primer for Node.js
How to do it…Server applicationWeb client applicationSetting up and Running
How it works...Server applicationWeb client application
There's moreMonitoring system health
Getting readyHow to do it...
Server applicationWeb client application
||||||||||||||||||||
||||||||||||||||||||

How it works...Server applicationClient applicationRunning the application
There's moreMonitoring MPLS LDP statistics
Getting readyHow to do it...
Server applicationWeb client application
How it works...Server applicationWeb client application
8. Security ApplicationsIntroductionEnforcing configuration standards through commit scripts
Getting readyHow to do it...How it works...
Loopback addressIGP interface deletionEBGP policy default
Building BGP route filtersGetting readyHow to do it...How it works...
Applying anti-spoofing filtersGetting readyHow to do it...How it works...There's more
Operating a distributed ACL functionGetting readyHow to do it...How it works...
9. Extending JUNOS with AnsibleIntroductionInstalling Ansible
Getting readyHow to do it...How it works...
||||||||||||||||||||
||||||||||||||||||||

There's moreConfiguring Ansible for JUNOS
Getting readyHow to do it..How it works...
Extracting estate-wide configurationsGetting readyHow to do it...How it works...There's more...
Performing platform-specific or group-specific operationsGetting readyHow to do it...How it works...
Using variables and vaultsGetting readyHow to do it...How it works...
||||||||||||||||||||
||||||||||||||||||||

Technet24.ir||||||||||||||||||||
||||||||||||||||||||

PrefaceIn the world of networking, Juniper’s Junos operating system powers some of the largestand most demanding enterprise and service provider networks out there. Whether it’sthe flagship T, MX, and PTX series routers that power ISPs, the enterprise-friendly EXseries switches and SRX series firewalls or data center QFX-series, the aspect thatremains in common in Junos is the operating system originally based on BSD Unix.
What Juniper has capitalized on, however, is a universal configuration managementframework that powers all of the varied aspects of Junos and that is based on inter-communication using XML. The choice of XML puts Junos in a prime position forintegrating its capabilities into larger systems by exposing its XML machine-to-machineinterfaces—so-called RPCs or Remote Procedure Calls—to automation applications.
In this book, we take a recipe-based approach to investigating and exploring theautomation technologies surrounding Junos and provide some examples of how to tacklecommon network requirements.
||||||||||||||||||||
||||||||||||||||||||

Technet24.ir||||||||||||||||||||
||||||||||||||||||||

What this book covers?Chapter 1, Configuring JUNOS through NETCONF, explores the NETCONF standardoriginally defined in RFC 4741, specifically, how it’s used over SSH to communicatewith Junos devices. We will work through some practical examples of communicatingwith Junos programmatically from several technologies.
Chapter 2, Working with the Junos REST API, explores the relatively new REST interfacewith Junos and how to make use of it in HTTP and HTTPS environments. We willdevelop two sample REST clients that interact with Junos.
Chapter 3, Using SLAX to Write Op Scripts, explores Juniper’s SLAX technology formanipulating the XML representations used by the foundations of Junos. We will look athow to use SLAX as a macro language to make use of remote procedure calls andproduce customized, filtered output.
Chapter 4, Event Programming, builds upon the SLAX expertise and leverages thecapability to be proactive and respond to events. We’ll develop scripts to deal withcommon network situations and even a make shift routing protocol.
Chapter 5, Automating Junos with PyEZ, focuses on the Juniper extension module toPython, PyEZ, and its utility in programmatically working with Junos. You'll learn aboutPyEZ primitives, such as facts, views, and tables, and get a taste of using YAML towrite Jinja2 templates.
Chapter 6, Advanced Visualization Applications, helps us visualize some of the aspects ofour Junos network. We’ll build a basic graph utility for extracting information and thenwe'll use a popular rendering engine to visualize elements of our network, such asrouting protocols.
Chapter 7, Monitoring and Maintaining Junos, looks at ways of monitoring what happenson our Junos network. We’ll build a tool to monitor configuration changes as well aslook at how we can graphically monitor interface usage and other resources.
Chapter 8, Security Applications, looks at how we can use automation technologies tomaintain the security of our networks. We’ll build commit scripts to vet configurationchanges and look at BGP prefix filtering and anti-spoofing protection.
||||||||||||||||||||
||||||||||||||||||||

Chapter 9, Extending JUNOS with Ansible, explores how we can use the popular AnsibleIT automation framework in conjunction with Junos as part of a wider enterpriseorchestration system.
Technet24.ir||||||||||||||||||||
||||||||||||||||||||


What you need for this bookIn order to make use of the examples in this book, you’ll need a Unix-based managementdevice, which can be your laptop or a virtual machine on your laptop, and access to aJunos platform. In some cases, it’s possible to run Junos in a virtual environment, suchas with Juniper’s latest vMX developments or with vRR - virtual route reflector.Finally, if all else fails, you can also build an olive. But I'm not going to tell you how todo that!
Technet24.ir||||||||||||||||||||
||||||||||||||||||||


Who this book is forThis book is for you if you’re a network engineer or operator with enthusiasm fornetwork technology and a persistent thirst for wanting to know how you can get Juniperrouters and switches to do more with less.
Technet24.ir||||||||||||||||||||
||||||||||||||||||||


SectionsIn this book, you will find several headings that appear frequently (Getting ready, Howto do it…, How it works…, There's more…, and See also). To give clear instructionson how to complete a recipe, we use these sections as follows:
Technet24.ir||||||||||||||||||||
||||||||||||||||||||


Getting readyThis section tells you what to expect in the recipe, and describes how to set up anysoftware or any preliminary settings required for the recipe.
Technet24.ir||||||||||||||||||||
||||||||||||||||||||


How to do it…This section contains the steps required to follow the recipe.
Technet24.ir||||||||||||||||||||
||||||||||||||||||||


How it works…This section usually consists of a detailed explanation of what happened in the previoussection.
Technet24.ir||||||||||||||||||||
||||||||||||||||||||


There's more…This section consists of additional information about the recipe in order to make thereader more knowledgeable about the recipe.
Technet24.ir||||||||||||||||||||
||||||||||||||||||||


See alsoThis section provides helpful links to other useful information for the recipe.
Technet24.ir||||||||||||||||||||
||||||||||||||||||||


ConventionsIn this book, you will find a number of text styles that distinguish between differentkinds of information. Here are some examples of these styles and an explanation of theirmeaning.
Code words in text, database table names, folder names, filenames, file extensions,pathnames, dummy URLs, user input, and Twitter handles are shown as follows: In thiscase, the RPC that we call is get-interface-information
A block of code is set as follows:
<rpc-reply xmlns="urn:ietf:params:xml:ns:netconf:base:1.0" xmlns:JUNOS="http://xml.juniper.net/JUNOS/15.1F6/JUNOS"> <ok/> </rpc-reply>
When we wish to draw your attention to a particular part of a code block, the relevantlines or items are set in bold:
<isis-database-entry> <lsp-id>lon-lab-access-4.00-00</lsp-id> <sequence-number>0x1002</sequence-number>
Any command-line input or output is written as follows:
adamc@router> show configuration interfaces em0.0 | display xml <rpc-reply xmlns:JUNOS="http://xml.juniper.net/JUNOS/ 15.1F6/JUNOS">
New terms and important words are shown in bold.
Warnings or important notes appear like this.
Tips and tricks appear like this.
Technet24.ir||||||||||||||||||||
||||||||||||||||||||


Reader feedbackFeedback from our readers is always welcome. Let us know what you think about thisbook-what you liked or disliked. Reader feedback is important for us as it helps usdevelop titles that you will really get the most out of. To send us general feedback,simply e-mail [email protected], and mention the book's title in the subject of yourmessage. If there is a topic that you have expertise in and you are interested in eitherwriting or contributing to a book, see our author guide at www.packtpub.com/authors.
Technet24.ir||||||||||||||||||||
||||||||||||||||||||


Customer supportNow that you are the proud owner of a Packt book, we have a number of things to helpyou to get the most from your purchase.
Technet24.ir||||||||||||||||||||
||||||||||||||||||||


Downloading the example codeYou can download the example code files for this book from your account at http://www.packtpub.com. If you purchased this book elsewhere, you can visit http://www.packtpub.com/support,and register to have the files e-mailed directly to you. You can download the code filesby following these steps:
1. Log in or register to our website using your e-mail address and password.2. Hover the mouse pointer on the SUPPORT tab at the top.3. Click on Code Downloads & Errata.4. Enter the name of the book in the Search box.5. Select the book for which you're looking to download the code files.6. Choose from the drop-down menu where you purchased this book from.7. Click on Code Download.
You can also download the code files by clicking on the Code Files button on the book'swebpage at the Packt Publishing website. This page can be accessed by entering thebook's name in the Search box. Please note that you need to be logged in to your Packtaccount. Once the file is downloaded, please make sure that you unzip or extract thefolder using the latest version of:
WinRAR / 7-Zip for WindowsZipeg / iZip / UnRarX for Mac7-Zip / PeaZip for Linux
The code bundle for the book is also hosted on GitHub at https://github.com/PacktPublishing/JUNOS-Automation-Cookbook. We also have other code bundles from our rich catalog of booksand videos available at https://github.com/PacktPublishing/. Check them out!
Technet24.ir||||||||||||||||||||
||||||||||||||||||||


Downloading the color images of thisbookWe also provide you with a PDF file that has color images of the screenshots/diagramsused in this book. The color images will help you better understand the changes in theoutput. You can download this file from https://www.packtpub.com/sites/default/files/downloads/JUNOSAutomationCookbook_ColorImages.pdf.
Technet24.ir||||||||||||||||||||
||||||||||||||||||||


ErrataAlthough we have taken every care to ensure the accuracy of our content, mistakes dohappen. If you find a mistake in one of our books-maybe a mistake in the text or thecode-we would be grateful if you could report this to us. By doing so, you can saveother readers from frustration and help us improve subsequent versions of this book. Ifyou find any errata, please report them by visiting http://www.packtpub.com/submit-errata,selecting your book, clicking on the Errata Submission Form link, and entering thedetails of your errata. Once your errata are verified, your submission will be acceptedand the errata will be uploaded to our website or added to any list of existing errataunder the Errata section of that title. To view the previously submitted errata, go to https://www.packtpub.com/books/content/support, and enter the name of the book in the search field. Therequired information will appear under the Errata section.
Technet24.ir||||||||||||||||||||
||||||||||||||||||||


PiracyPiracy of copyrighted material on the Internet is an ongoing problem across all media.At Packt, we take the protection of our copyright and licenses very seriously. If youcome across any illegal copies of our works in any form on the Internet, please provideus with the location address or website name immediately so that we can pursue aremedy. Please contact us at [email protected] with a link to the suspected piratedmaterial. We appreciate your help in protecting our authors and our ability to bring youvaluable content.
Technet24.ir||||||||||||||||||||
||||||||||||||||||||


QuestionsIf you have a problem with any aspect of this book, you can contact us [email protected], and we will do our best to address the problem.
Technet24.ir||||||||||||||||||||
||||||||||||||||||||


Configuring JUNOS through NETCONFIn this chapter, we will cover the following recipes:
JUNOS NETCONF over SSH setupMaking NETCONF RPC requests and repliesUsing NETCONF to apply configuration changesProcessing NETCONF using classic Expect/TCLProcessing NETCONF with PythonProcessing NETCONF with Node.jsDiscovering NETCONF RPCs
Technet24.ir||||||||||||||||||||
||||||||||||||||||||


IntroductionThe Network Configuration Protocol (NETCONF) standard, defined most recently inRFC 6241, allows a network management application to access a JUNOS OS (or othervendor) network element through the use of a series of Remote Procedure Calls(RPCs) carried over a serialized XML transport.
For programmatic access to JUNOS OS devices, this method is preferable for the use ofraw command-line processing, since the data format is structured, precise, and suitablefor unambiguous machine reading.
In this chapter, we investigate how to setup NETCONF access to JUNOS OS devicesand then look at how to make use of that from common programming platforms.
Technet24.ir||||||||||||||||||||
||||||||||||||||||||


JUNOS NETCONF over SSH setupIn this recipe, we'll prepare a JUNOS OS router for interaction using the NETCONFservice. We can do this in one of two ways:
Using NETCONF-over-SSH on dedicated TCP port 830,Using NETCONF inline with mainstream SSH communications, on TCP port 22.
We'll set up secure SSH keys and a dedicated username for an automation application.Then we'll configure the systems services hierarchy within the Junos OS for the specificmethod.
Technet24.ir||||||||||||||||||||
||||||||||||||||||||


Getting readyIn order to complete this recipe, you need access to a JUNOS OS router, switch, orfirewall, and a general-purpose Linux/UNIX management host from which to control it.
Technet24.ir||||||||||||||||||||
||||||||||||||||||||


How to do it...The steps to prepare a JUNOS OS router for interaction using NETCONF services areas follows:
1. Verify that SSH is configured on your router by ensuring that you have thefollowing configuration present:
adamc@router> show configuration system services ssh;
2. Generate SSH keys. Generate a public/private key pair using the SSH utility, ssh-keygen:
unix$ ssh-keygen -C "JUNOS Automation" -f JUNOS_auto_id_rsa Generating public/private rsa key pair. Enter file in which to save the key (.ssh/id_rsa): JUNOS_auto_id_rsa Enter passphrase (empty for no passphrase): <type nothing here> Enter same passphrase again: <again, nothing> Your identification has been saved in JUNOS_auto_id_rsa. Your public key has been saved in JUNOS_auto_id_rsa.pub.
3. Once completed, verify that you have two new files in your working directory:
Filename Description
JUNOS_auto_id_rsaPrivate SSH key, reserved for use by your managementautomation application only
JUNOS_auto_id_rsa.pubCorresponding public SSH key (think of it as a certificate) isable to authenticate the private key.
4. Configure a dedicated user profile to be used for NETCONF access that makes useof the previously generated key-pair. Apply the .pub file contents to the Junosconfiguration.
adamc@router> show configuration system login user auto uid 2001; class super-user; authentication { ssh-rsa "ssh-rsa [ actual key omitted] JUNOS Automation"; ## SECRET-DATA }
5. Enable a dedicated NETCONF-over-SSH transport endpoint by configuring the
Technet24.ir||||||||||||||||||||
||||||||||||||||||||

following service:
adamc@router> show configuration system services ssh; netconf { ssh; }
6. Connect to the NETCONF service to witness the protocol greeting and validate thecorrect operation:
unix$ ssh -p 830 -i JUNOS_auto_id_rsa [email protected] -s netconf <!-- No zombies were killed during the creation of this user interface --> <!-- user auto, class j-super-user --> <hello xmlns="urn:ietf:params:xml:ns:netconf:base:1.0"> <capabilities> <capability>urn:ietf:params:netconf:base:1.0</capability> <capability>urn:ietf:params:netconf:capability:candidate:1.0 </capability> <capability>urn:ietf:params:netconf:capability:confirmed- commit:1.0</capability> <capability>urn:ietf:params:netconf:capability:validate:1.0 </capability> <capability>urn:ietf:params:netconf:capability:url:1.0? scheme=http,ftp,file</capability> <capability>urn:ietf:params:xml:ns:netconf:base:1.0</capability> <capability>urn:ietf:params:xml:ns:netconf:capability: candidate:1.0</capability> <capability>urn:ietf:params:xml:ns:netconf:capability:confirmed- commit:1.0</capability> <capability>urn:ietf:params:xml:ns:netconf:capability: validate:1.0 </capability> <capability>urn:ietf:params:xml:ns:netconf:capability:url:1.0? protocol=http,ftp,file</capability> <capability>http://xml.juniper.net/netconf/JUNOS/1.0</capability> <capability>http://xml.juniper.net/dmi/system/1.0</capability> </capabilities> <session-id>35980</session-id> </hello> ]]>]]>
7. On the same SSH session, issue a test RPC to prove that things are workingnormally. Enter the highlighted first line of the following text exactly as it is andobserve the response:
<rpc><get-software-information/></rpc> <rpc-reply xmlns="urn:ietf:params:xml:ns:netconf:base:1.0" xmlns:JUNOS="http://xml.juniper.net/JUNOS/15.1F6/JUNOS"> <software-information> <host-name>router</host-name> <product-model>olive</product-model> <product-name>olive</product-name> <JUNOS-version>15.1F6-S5.6</JUNOS-version> <package-information> <name>os-kernel</name> <comment>JUNOS OS Kernel 64-bit [ 20161130.340898_builder_stable_10]</comment>
||||||||||||||||||||
||||||||||||||||||||

</package-information> <package-information> <name>os-libs</name> <comment>JUNOS OS libs [20161130.340898_builder_stable_10] </comment> </package-information> <package-information> <name>os-runtime</name> <comment>JUNOS OS runtime [20161130.340898_builder_stable_10] </comment> </package-information> […]
Technet24.ir||||||||||||||||||||
||||||||||||||||||||


How it works...In step 1, we verified that the SSH protocol was configured and available in order toaccess the JUNOS device.
In step 2, we created an SSH public/private key-pair in order to allow any applicationsthat we create to be able to login and authenticate with the JUNOS device in the sameway that an ordinary user does. Key-based authentication is preferred over conventionalpassword authentication for this, because it removes the authentication step from theinteractive dialog under development.
In step 3, we created a dedicated user profile on the JUNOS device for automationapplications and associated it with the public key that we created. Any automationapplication that makes use of the corresponding private key can be authenticated on theJUNOS OS platform with the public key.
With step 4, we created a NETCONF-over-SSH service endpoint. This isn't technicallyrequired, but it can be useful if you would like to treat ordinary user management trafficindependently from machine-to-machine programmatic access, and want to enforce suchpolicies via a firewall or similar.
In step 5, we connected to the NETCONF-over-SSH service on port 830 and observedits welcome greeting. We used the -i switch in order to specify the private key that wegenerated in step 2.
NETCONF-over-SSH runs on a separate TCP port to the conventionalSSH transport. The default, Internet Assigned numbers Authority(IANA) is 830, but JUNOS OS allows you to select any arbitrary number.When NETCONF-over-SSH is used in this manner, the SSH server makesuse of a protocol feature called subsystems. This allows the SSH server todirectly connect to another internal component without consideration fordetails such as pseudo-terminal or user shell.
For this reason though, when we connect from an ordinary SSH client, weneed to use the -s switch in order to specify that we want the NETCONFsubsystem.
Alternatively, it is possible to connect to the NETCONF service using the
Technet24.ir||||||||||||||||||||
||||||||||||||||||||

convention SSH management interface in the following manner:
unix$ ssh -i JUNOS_auto_id_rsa [email protected] netconf
Finally, in step 6, we issued a very basic RPC request to ask the JUNOS OS device forinformation about its system software. We can see the regularity in the structure ofcommunications between client and NETCONF server. The client's communicationsconsists of a remote procedure call request, enclosed in <rpc></rpc> tags. And the serverresponds with a document structure enclosed within <rpc-reply></rpc-reply> tags. Theactual internal structure of the response depends on the exact RPC called, but the XMLformat is easier to machine-read than a free-form text interface designed to please ahuman.
||||||||||||||||||||
||||||||||||||||||||

Technet24.ir||||||||||||||||||||
||||||||||||||||||||

There's more...In step 5 and step 6, we saw the guts of the NETCONF protocol dialog occurring. Theserver said hello to us, and we issued a procedure call which the server duly answered.In actual fact, we were being a little lax in our use of the NETCONF protocol standardthere. If you want to speak RFC-compliant NETCONF, it is customary for both the clientand the server to issue hello messages that describe their capabilities. The capabilitiesannounced describe concepts over and above some of the base NETCONF principlesthat are supported by the element, and the manager. In this case, the JUNOS OS serverhas likely little concern for our client capabilities and takes the IETF mantra of beingliberal in acceptance, conservative in communication, to heart.
The other significant point to note is the special sequence of characters used to delimitsuccessive XML messages. We see it at the end of a hello message, and at the end ofevery RPC response the server answers:
]]>]]>
Technically, this framing sequence is actually deprecated within the latest specificationof the NETCONF-over-SSH standard, because it was discovered that it can legitimatelyappear within the XML payload. The JUNOS OS implementation currently makes use ofthe framing sequence to flag the end of its responses, but if you write software -- as wewill -- to read the NETCONF XML stream directly, then it is wise to be aware that thisbehavior could change in the future.
||||||||||||||||||||
||||||||||||||||||||

Technet24.ir||||||||||||||||||||
||||||||||||||||||||

Making NETCONF RPC requests andrepliesWith NETCONF-over-SSH happily configured on our network of JUNOS OS devices,we can now connect over the network and make RPCs in order to inspect theoperational status of the device. Lets look at a couple of examples to learn thefundamentals of how the JUNOS OS XML RPCs work.
||||||||||||||||||||
||||||||||||||||||||

Technet24.ir||||||||||||||||||||
||||||||||||||||||||

Getting readyEnsure you've completed the JUNOS NETCONF-over-SSH setup recipe previously andhave a working JUNOS OS device with a NETCONF interface in place. It doesn'tnecessarily matter what the configuration of that device is.
||||||||||||||||||||
||||||||||||||||||||

Technet24.ir||||||||||||||||||||
||||||||||||||||||||

How to do it...The steps for making NETCONF RPC requests and replies are as follows:
1. Connect to the NETCONF-over-SSH server in a similar manner to the previousrecipe:
unix$ ssh -i JUNOS_auto_id_rsa [email protected] netconf
2. Query the system ARP table by connecting to the NETCONF-over-SSH session ina similar manner to the previous recipe and issuing the appropriate RPC:
<rpc><get-arp-table-information/></rpc> <rpc-reply xmlns="urn:ietf:params:xml:ns:netconf:base:1.0" xmlns:JUNOS="http://xml.juniper.net/JUNOS/15.1F6/JUNOS"> <arp-table-information xmlns="http://xml.juniper.net/JUNOS/15.1F6/JUNOS-arp" JUNOS:style="normal"> <arp-table-entry> <mac-address> 0a:00:27:00:00:00 </mac-address> <ip-address> 10.0.201.1 </ip-address> <hostname> adamc-mac </hostname> <interface-name> em0.0 </interface-name> <arp-table-entry-flags> <none/> </arp-table-entry-flags> </arp-table-entry> </arp-table-information> </rpc-reply> ]]>]]>
3. Repeat the query, but use the format tag to modify the output to be a plain text:
<rpc><get-arp-table-information format="text"/></rpc> <rpc-reply xmlns="urn:ietf:params:xml:ns:netconf:base:1.0" xmlns:JUNOS="http://xml.juniper.net/JUNOS/15.1F6/JUNOS"> <output> MAC Address Address Name Interface Flags 0a:00:27:00:00:00 10.0.201.1 adamc-mac em0.0 none </output> </rpc-reply> ]]>]]>
4. Use an option to the ARP table RPC in order to disable the name resolution:
<rpc><get-arp-table-information format="text"><no-resolve/></get-
||||||||||||||||||||
||||||||||||||||||||

arp-table-information></rpc> <rpc-reply xmlns="urn:ietf:params:xml:ns:netconf:base:1.0" xmlns:JUNOS="http://xml.juniper.net/JUNOS/15.1F6/JUNOS"> <output> MAC Address Address Interface Flags 0a:00:27:00:00:00 10.0.201.1 em0.0 none </output> </rpc-reply> ]]>]]>
5. Query the system routing table and inspect the output:
<rpc><get-route-information/></rpc> [...]
6. Repeat the system routing table query, but apply an argument for a particulardestination:
<rpc><get-route-information> <destination>10.0.201.201</destination></get-route-information> </rpc> [...]
Technet24.ir||||||||||||||||||||
||||||||||||||||||||


How it works...In steps 1 and step 2, we connected and issued a simple RPC to query the ARP tablefrom the router. The rather verbose XML response encodes structure that is the machine-readable version of what we see in the CLI when we issue the show arp command. Eachdata atom is enclosed hierarchically within XML tags indicating its type and anyassociated properties. This structured output format lends itself particularly well formachine-to-machine automation applications.
In step 3, we issued the same RPC, but requested JUNOS OS to give us the plain textoutput so that we could compare the difference. In almost all cases, the plain text outputseen when we use the format="text" modifier to the RPC is identical to what we wouldsee in the CLI.
Since JUNOS OS 14.2, the XML API has also been able to output in theJavaScript Object Notation (JSON) format. The popularity of thisformat as a lightweight alternative to XML is bolstered by its support inlanguages like Python and Node.js. If you're working with JUNOS OS14.2 or later and using NETCONF directly with one of these languages,JSON might be a useful feature for you.
In step 4, we see how options to the CLI commands are encoded within the XML RPCformat. In this case the show arp no-resolve option is typically used to prevent any nameresolution of IP addresses. It's simply an XML subtag to the main <get-arp-table-information> tag.
Steps 5 and 6 go a step further looking at the RPC that implements the show routecommand. In step 5, we show how arguments are added to the RPC.
Technet24.ir||||||||||||||||||||
||||||||||||||||||||


There's more...Looking at these example RPCs and the XML format within, we can see two clearstyles. One pairs together the opening and closing tags in a strict manner, allowing theinclusion of options and arguments. The other allows an abbreviation of an otherwiseempty pair of tags by simply using a leading slash. Compare the following two RPCs,which are identically supported by the JUNOS OS XML NETCONF interpreter:
<rpc><get-route-information/></rpc><rpc><get-route-information></get-route-information></rpc>
Technet24.ir||||||||||||||||||||
||||||||||||||||||||

Discovering NETCONF RPCsWe've seen in the previous recipes how to use some common RPCs to query systemstate information on our JUNOS OS devices. But how exactly did we discover thecryptic connection between, for example, the CLI command show route and the RPCequivalent <get-route-information>? The JUNOS OS management daemon, mgd, isresponsible for speaking the necessary native protocol to the type of client requestinginformation: either a human operator on the CLI, or a machine interface via XML. Itmaps the available system calls to both a CLI and an RPC. In this recipe, we'll explorethis mapping.
Technet24.ir||||||||||||||||||||
||||||||||||||||||||


Getting readyEnsure you have access to a working JUNOS OS device. You don't necessarily need tohave completed the previous recipes on setting up NETCONF remote access.
Technet24.ir||||||||||||||||||||
||||||||||||||||||||


How to do it...The steps for the recipe are as follows:
1. Log in to the JUNOS OS device using your normal user credentials and choose theoperational mode CLI command that you'd like to work with:
adamc@router> show arp MAC Address Address Name Interface Flags 0a:00:27:00:00:00 10.0.201.1 adamc-mac em0.0 none
2. Execute the command, but use the pipe modifier in order to query the XML thatmaps to the corresponding RPC call:
adamc@router> show arp | display xml rpc <rpc-reply xmlns:JUNOS="http://xml.juniper.net/JUNOS/15.1F6/JUNOS"> <rpc> <get-arp-table-information> </get-arp-table-information> </rpc> <cli> <banner></banner> </cli> </rpc-reply>
3. Repeat the command, but this time use the pipe modifier in order to explore theXML which maps to the response from the RPC call:
adamc@router> show arp | display xml <rpc-reply xmlns:JUNOS="http://xml.juniper.net/JUNOS/15.1F6/JUNOS"> <arp-table-information xmlns="http://xml.juniper.net/JUNOS/15.1F6/JUNOS-arp" JUNOS:style="normal"> <arp-table-entry> <mac-address>0a:00:27:00:00:00</mac-address> <ip-address>10.0.201.1</ip-address> <hostname>adamc-mac</hostname> <interface-name>em0.0</interface-name> <arp-table-entry-flags> <none/> </arp-table-entry-flags> </arp-table-entry> </arp-table-information> <cli> <banner></banner> </cli> </rpc-reply>
Technet24.ir||||||||||||||||||||
||||||||||||||||||||


How it works...In step 1, we see the basic command that we're using as a CLI operator.
In step 2, the extra output pipe causes the JUNOS OS management daemon to notactually execute the command, but instead tell us the RPC that it would use if it wereexecuting the command. So, in this case, we can see that it's <get-arp-table-information>,which is the focus of our attention.
In step 3, we get to learn what the likely response from this RPC will be when ourautomation app makes the RPC call. In this case, the normal tabular format seen by thehuman is presented to a machine reader, with each of the fields decorated by XML tags.This allows easy and unambiguous interpretation of the response.
Technet24.ir||||||||||||||||||||
||||||||||||||||||||


There's more...Using the JUNOS OS | xml rpc modifier is also particularly useful for understanding howto present complicated arguments. In this case, for example, it's possible to see how wefilter the output of the show route command (which would ordinarily be large andunwieldy) for a specific destination and table:
adamc@router> show route table inet.0 1.0.0.1/32 | display xml rpc <rpc-reply xmlns:JUNOS=" http://xml.juniper.net/ JUNOS/15.1F6/JUNOS"> <rpc> <get-route-information> <destination>1.0.0.1/32</destination> <table>inet.0</table> </get-route-information> </rpc> <cli> <banner></banner> </cli> </rpc-reply>
Technet24.ir||||||||||||||||||||
||||||||||||||||||||


See alsoJuniper make great efforts to document the JUNOS OS XML API. You can find the latestversion of their XML API explorer at https://apps.juniper.net/xmlapi. It provides a browser-based explorer of the configuration tags available and the operational mode RPCsavailable as in the following screenshot:
Figure 1.1 Juniper XML API Explorer
Technet24.ir||||||||||||||||||||
||||||||||||||||||||


Using NETCONF to apply configurationchangesAs you might expect, NETCONF isn't limited to querying the JUNOS OS deviceoperational status using RPCs. It can also influence the operating state of the device byapplying configuration changes. In contrast to other management models like SNMPhowever, one doesn't manipulate individual data atoms to effect change. Instead, JUNOSOS makes use of the concept of a candidate configuration which is applied to thevarious software daemons when the candidate is committed. In this respect, NETCONFand the traditional user-based CLI are consistent.
In this recipe, we'll look at the NETCONF directives necessary to make configurationchanges. We'll make a simple interface description change, and we'll also look at howto delete configuration stanzas.
Technet24.ir||||||||||||||||||||
||||||||||||||||||||


Getting readyMake sure you've got access to a JUNOS OS platform that you can make changes on.Make sure that you've got a working NETCONF-over-SSH capability with the JUNOSOS platform as per the first recipe in this chapter, JUNOS NETCONF-over-SSH setup.
Technet24.ir||||||||||||||||||||
||||||||||||||||||||


How to do it...The steps for the recipe are as follows:
1. Familiarize yourself with the XML format used within JUNOS OS to representconfiguration data. Generally speaking, the XML representation follows the samehierarchy as the configuration format itself. JUNOS OS itself can help you here.Issue the show configuration | display xml command in order to see a portion of theconfiguration expressed in XML:
adamc@router> show configuration interfaces em0.0 | display xml <rpc-reply xmlns:JUNOS="http://xml.juniper.net/JUNOS/ 15.1F6/JUNOS"> <configuration JUNOS:commit-seconds="3780" JUNOS:commit- localtime="1970-01-01 01:03:00 UTC" JUNOS:commit-user="adamc"> <interfaces> <interface> <name>em0</name> <unit> <name>0</name> <family> <inet> <address> <name>10.0.201.201/24</name> </address> </inet> </family> </unit> </interface> </interfaces> </configuration>
2. Connect to the NETCONF-over-SSH server in the usual manner:
unix$ ssh -i JUNOS_auto_id_rsa [email protected] netconf
3. Use the NETCONF-standard edit-config operation to submit a configuration changeto the NETCONF server. In this example, we update the description on the em0.0interface to something trivial:
<rpc> <edit-config> <target> <candidate/> </target> <config> <configuration> <interfaces> <interface> <name>em0</name> <unit> <name>0</name> <description>Management interface</description>
Technet24.ir||||||||||||||||||||
||||||||||||||||||||

</unit> </interface> </interfaces> </configuration> </config> </edit-config> </rpc>
4. Verify that the operation was successful. The <ok/> RPC reply is what we want tosee here.
5. Commit the configuration by issuing the commit NETCONF primitive and checkingfor the <ok/> RPC reply again:
<rpc><commit/></rpc> <rpc-reply xmlns="urn:ietf:params:xml:ns:netconf:base:1.0" xmlns:JUNOS="http://xml.juniper.net/JUNOS/15.1F6/JUNOS"> <ok/> </rpc-reply> ]]>]]>
6. Apply the same configuration, but delete the description attribute by including thespecial operation="delete" XML attribute decoration:
<rpc> <edit-config> <target> <candidate/> </target> <default-operation>none</default-operation> <config> <configuration> <interfaces> <interface> <name>em0</name> <unit> <name>0</name> <description operation="delete"/> </unit> </interface> </interfaces> </configuration> </config> </edit-config> </rpc>
7. Commit the candidate configuration again, and analyze the configuration andsystem commit log by hand to verify what happened:
<rpc><commit/></rpc> <rpc-reply xmlns="urn:ietf:params:xml:ns:netconf:base:1.0" xmlns:JUNOS="http://xml.juniper.net/JUNOS/15.1F6/JUNOS"> <ok/> </rpc-reply> ]]>]]>
||||||||||||||||||||
||||||||||||||||||||

Technet24.ir||||||||||||||||||||
||||||||||||||||||||


How it works...In step 1, we need to work out what our configuration change looks like in the XMLrepresentation that JUNOS OS requires. We can use the CLI to help us with that process.
In step 2, we connect to the NETCONF-over-SSH server in the usual manner.
In step 3, we submit the configuration change that we need, represented in XML, andthen in step 4 we look for the server's response. If it isn't the standard <ok/> response,there are a couple of reasons why that might be:
1. The configuration submission contained an error:
<rpc-error> <error-type>protocol</error-type> <error-tag>operation-failed</error-tag> <error-severity>error</error-severity> <error-message>syntax error</error-message> <error-info> <bad-element>unti</bad-element> </error-info> </rpc-error>
2. The JUNOS OS configuration database is currently locked by another user:
<rpc-error> <error-type>protocol</error-type> <error-tag>lock-denied</error-tag> <error-severity>error</error-severity> <error-message> configuration database locked by: adamc terminal pts/0 (pid 19893) on since 1970-01-01 01:09:14 UTC, idle 00:03:11 exclusive [edit] </error-message> <error-info> <session-id>19893</session-id> </error-info> </rpc-error>
The Junos OS provides several ways to manipulate the configuration.Generally speaking a user modifies the configuration by taking a copy ofthe current configuration. This is called the candidate. The usermanipulates the candidate using set and delete commands, and when readycommits the configuration to make it live. The default behaviour is for allusers to manipulate a shared candidate configuration, but there are alsotwo other methods of operations. Configuring with private mode providesthe user with his own private candidate. The changes he makes are
Technet24.ir||||||||||||||||||||
||||||||||||||||||||

guaranteed to be his own, and when he commits, the system will apply hisdifferences to the current configuration (even if the configuration haschanged since he checked out his basis for a candidate). exclusive moderequests that the user lock the configuration, thereby preventing access byother individuals until the user relinquishes the lock.
If all is okay, we proceed to the commit operation in step 5. This is the part of the processwhere the new configuration actually gets applied. JUNOS OS produces the individualinstructions for each of the software processes from the configuration file, and thensignals each process to re-read the configuration and implement the change to the newstate.
This phase can also have errors if the new configuration causes a runtime error. It'sreally important to deal with this situation because the configuration change will not beremoved, so it has the potential to block up future commit operations as well.
Here's the RPC response that we get, for example, if we try to commit an Ethernet sub-interface with zero-host portion:
<rpc-reply xmlns="urn:ietf:params:xml:ns:netconf:base:1.0" xmlns:JUNOS="http://xml.juniper.net/JUNOS/15.1F6/JUNOS"> <rpc-error> <error-type>protocol</error-type> <error-tag>operation-failed</error-tag> <error-severity>error</error-severity> <source-daemon> dcd </source-daemon> <error-path> [edit interfaces em0 unit 10 family inet] </error-path> <error-info> <bad-element> address 1.0.10.0/24 </bad-element> </error-info> <error-message> Cannot assign address 0 on subnet </error-message> </rpc-error>
In order to ensure that we undo the failed configuration attempt, we can use the discard-changes RPC from NETCONF standard. This will cause the JUNOS OS device todiscard any changes in the global candidate configuration that we are working on.
<rpc><discard-changes/></rpc>
In steps 6 and 7, we undo the change by submitting a new configuration with a deletedirective and then committing to that. Configuration deletions are quite simple, but it's
||||||||||||||||||||
||||||||||||||||||||

important to understand them. There are two notable differences from the configurationaddition:
The default-operation RPC property is set to None.This property controls how JUNOS OS applies the supplied configuration withrespect to the existing candidate configuration. By default, JUNOS OS mergesconfiguration items, which is typically what we want when we're adding orchanging values. But when we're deleting configuration items, we don't wantJUNOS OS to accidentally create unnecessary configuration hierarchies.The operation property for the item to be deleted is set to Delete.This tells JUNOS OS that this particular element should be removed from theconfiguration.
Technet24.ir||||||||||||||||||||
||||||||||||||||||||


Processing NETCONF using classicExpect/TCLDon Libes' Expect, extending the ever-flexible Tool Command Language (TCL),forms one of the original ways of automating I/O interaction with terminal-based UNIXprocesses.
It has been used for numerous applications, from managing the login process on modemdial-up systems, to automating the interaction with network elements in ISP networks ina programmatic way. While this activity of so-called screen-scraping-reading andparsing output -- meant for humans in a machine-compatible way -- can be limited andsubject to future-proofing problems, it still represents a significant capability, andsometimes it can be useful to make use of Expect with NETCONF-based networkelements.
In this recipe, we explore using a simplistic Expect skeleton program to make RPC callsto our JUNOS OS devices in order to execute commands and extract data.
Technet24.ir||||||||||||||||||||
||||||||||||||||||||


Getting readyTo complete this recipe, you should have completed the previous recipe, JUNOSNETCONF- over-SSH setup for your device, particularly with respect to establishingSSH key-pairs.
You should ideally make use of Expect 5.45, or a compatible version on yourmanagement host. At the time of writing, this version was available in the built-insoftware package systems of OpenBSD 6.0 and Ubuntu Linux 16.04. Expect isparticularly mature and stable however, so if you can't match the exact version, it'sunlikely that you'll run into trouble with the example code that we have here.
Our Expect program, netconf.tcl, will be comprised of three main parts, which are asfollows:
Some initialization routines to read the command-line argumentsSet up of the NETCONF-over-SSH sessionInteraction with the NETCONF-over-SSH session to make an RPC call, and outputthe response
Technet24.ir||||||||||||||||||||
||||||||||||||||||||


How to do it...The steps for the recipe are as follows:
1. Create the interaction procedure first. To do this, create a TCL procedure thataccepts a string argument that will represent the command to run:
proc cmdrpc { cmd } { send -- "<rpc><command format=\"text\">[join $cmd]</command> </rpc>\r\n" set output "" expect { -re {<error-message>([^<]+)</error-message>} { send_error "Command RPC for $cmd caused error: $expect_out(1,string)\r\n" return }
-re {<(configuration-)?output[^>]*>} { expect { -re {^[^<]+} { append output $expect_out(0,string) exp_continue } -re "</(configuration-)?output>" {} } regsub -all "<" $output "<" output regsub -all ">" $output ">" output regsub -all "&" $output "&" output return $output }
default { send_error "Timeout waiting for RPC [join $cmd]\r\n" send_error [ concat "\t" [ regsub -all {[\r\n]+} $expect_out(buffer) "\r\n\t" ] ] return } } }
2. Read the environment command-line arguments in order to determine a hostnameand a command:
if { [ llength $argv ] != 2 } { send_user "Usage: netconf.tcl hostname command\r\n" exit 1 } set hostname [lrange $argv 0 0] set command [lrange $argv 1 1]
Technet24.ir||||||||||||||||||||
||||||||||||||||||||

3. Establish a NETCONF-over-SSH session and call the previously definedinteraction procedure to send the RPC and extract the results:
set DELIMITER {]]>]]>} if [ spawn -noecho ssh -p 830 -i JUNOS_auto_id_rsa auto@$hostname -s netconf ] { expect { $DELIMITER { set result [ cmdrpc $command ] if {$result ne ""} { send_user $result } } default { send_error "SSH protocol error (check authorized_keys?)\r\n" exit 1 } } } { send_error "Unable to start SSH client for connection to $hostname\r\n" exit 1 } close exit
||||||||||||||||||||
||||||||||||||||||||

Technet24.ir||||||||||||||||||||
||||||||||||||||||||

How it works...First of all, the command-line arguments are analyzed to get a hostname and a commandto run. Then we use the spawn command to start up a regular SSH client with thenecessary parameters to connect to the hostname. Note that we're using the autousername and the key that we explicitly generated in the previous recipes.
The hard work happens in the interaction procedure, cmdrpc. It's comprised of two nestedexpect loops. First of all, it open the dialog with the NETCONF host by sending thecommand RPC along with the textual command that we want to execute. The first expectloop runs, which attempts to determine if the RPC was successful or otherwise. If thesuccessful RPC branch is chosen, a second expect loop runs, which accumulates the linesof output in a variable, ready to return. The second expect loop determines the end of theoutput by looking for the appropriate XML closing tag. Finally the resulting output isscanned to expand some special XML tokens, as per the JUNOS OS specification, andwe print the output for the user to see.
Depending on your familiarity with TCL and Expect, you might have a little bit oftrouble following the example code. If so, take heart. TCL can seem a little bit dauntingbecause of the quoting and escaping rules that are implemented using braces. In thetable, there's a handy phrase - book to compare an example to the typical UNIX shell,which might be a little more widely understood.
TCL Shell Description
"text with$variable"
"text with$variable"
The double quotes group together the textual output alongwith white space, but expand any variables preceded withdollar signs ($)
{ literalstringblock }
{ literalstringblock }
Literal string block, including white space and notperforming variable expansion.
[ command]
$(command),or`command`
Sub-shell or command invocation expansion. Used tosubstitute the evaluation of an expression or the result of acommand or procedure call
||||||||||||||||||||
||||||||||||||||||||

Technet24.ir||||||||||||||||||||
||||||||||||||||||||

Processing NETCONF with PythonIn recent years, Python has become one of the de-facto software development languagesin the automation and scripting world. Its benefits include an accessible and readablesyntax, a just-in-time compilation/interpretation model that allows rapid developmentcycles, and a batteries included standard library that immediately lends itself to manycommon situations.
In this recipe, we'll make use of a Python script, netconf.py, to connect to a JUNOS OSdevice in order to issue CLI-like RPCs, much as in the Expect/TCL example. We'll dothis using just the basic standard libraries available out of the box in Python, so there islittle fussing about with pip or other package management tools.
||||||||||||||||||||
||||||||||||||||||||

Technet24.ir||||||||||||||||||||
||||||||||||||||||||

Getting readyIn order to complete this recipe, make sure you've got access to a working JUNOS OSdevice and have completed the JUNOS NETCONF over SSH setup recipe.Additionally, you need a suitable Python development environment. In this case, wemade use of macOS X and OpenBSD with Python 2.7.13.
||||||||||||||||||||
||||||||||||||||||||

Technet24.ir||||||||||||||||||||
||||||||||||||||||||

How to do it...The steps for the following recipe are as follows:
1. Import the necessary standard library modules that we're going to use. In this case,we just need access to basic system functionality, the subprocess module (formanaging child processes), and the XML parsing library:
#!/usr/bin/env python
import sys import subprocess import xml.etree.ElementTree as ET
2. Create a Python object class to represent the NETCONF client, making use of thesubprocess module in the Python standard library in order to call the underlyingoperating system's SSH client. Define an appropriate constructor and destructorfunction as shown:
class NETCONFClient(object):
DELIMITER = ']]>]]>\n'
def __init__(self, hostname): self.ssh = subprocess.Popen([ "/usr/bin/ssh", "-q", "-i", "JUNOS_auto_id_rsa", "-p", "830", "-s", hostname, "netconf", ], stdin=subprocess.PIPE, stdout=subprocess.PIPE)
def __del__(self): self.ssh.stdin.close()
3. Define a method to read from the NETCONF-over-SSH stream, in a chunked, line-by-line manner, attempting to parse the XML stream.
def read(self): data="" for line in iter(self.ssh.stdout.readline, NETCONFClient.DELIMITER): if line=='': raise IOError("ssh session ended unexpectedly") data += line
return ET.fromstring(data)
||||||||||||||||||||
||||||||||||||||||||
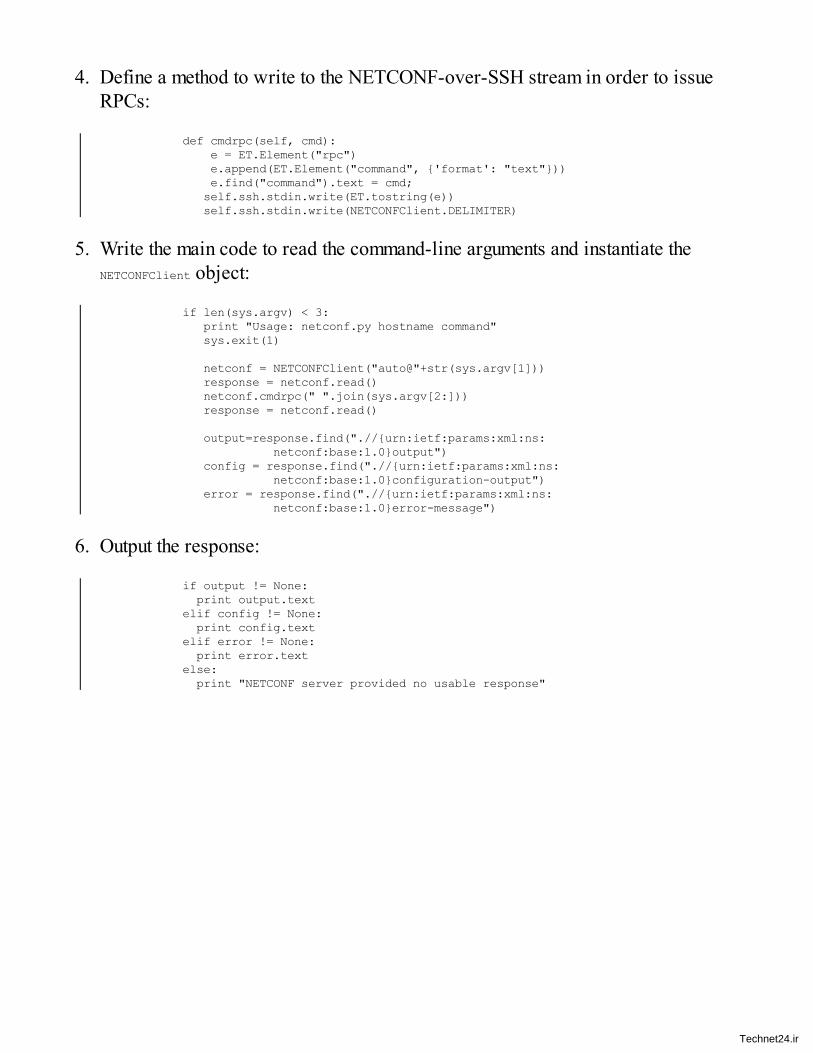
4. Define a method to write to the NETCONF-over-SSH stream in order to issueRPCs:
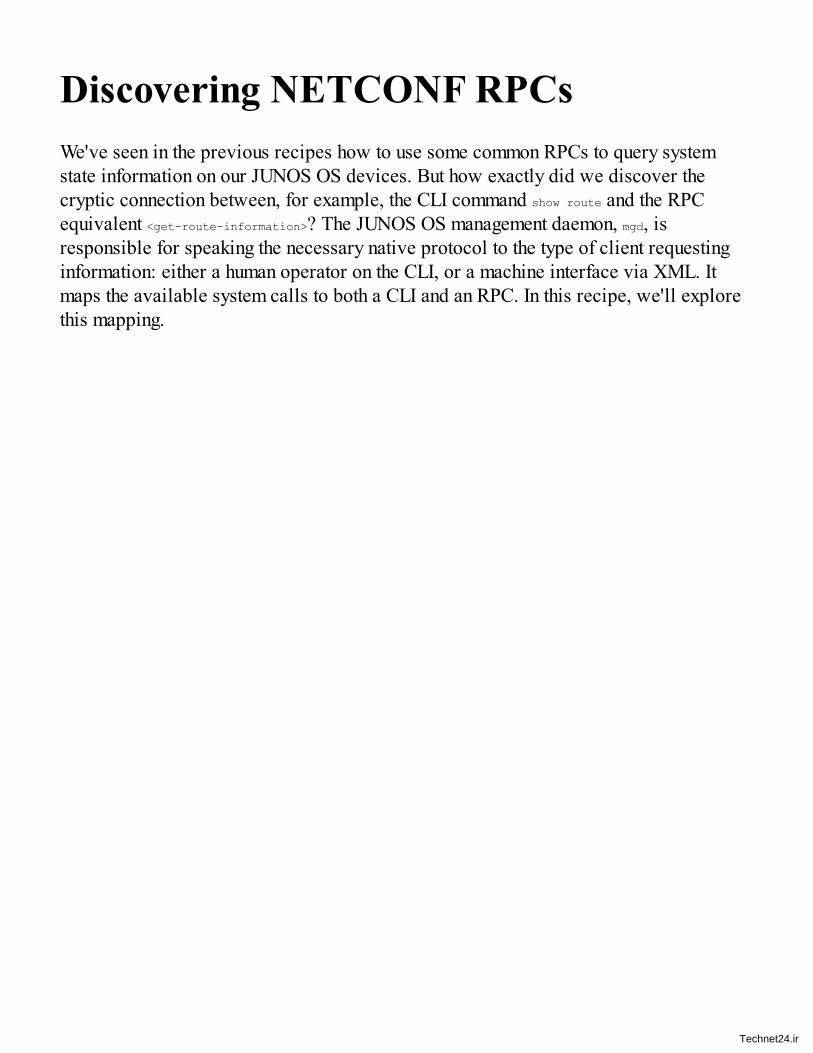
def cmdrpc(self, cmd): e = ET.Element("rpc") e.append(ET.Element("command", {'format': "text"})) e.find("command").text = cmd; self.ssh.stdin.write(ET.tostring(e)) self.ssh.stdin.write(NETCONFClient.DELIMITER)
5. Write the main code to read the command-line arguments and instantiate theNETCONFClient object:
if len(sys.argv) < 3: print "Usage: netconf.py hostname command" sys.exit(1)
netconf = NETCONFClient("auto@"+str(sys.argv[1])) response = netconf.read() netconf.cmdrpc(" ".join(sys.argv[2:])) response = netconf.read()
output=response.find(".//{urn:ietf:params:xml:ns: netconf:base:1.0}output") config = response.find(".//{urn:ietf:params:xml:ns: netconf:base:1.0}configuration-output") error = response.find(".//{urn:ietf:params:xml:ns: netconf:base:1.0}error-message")
6. Output the response:
if output != None: print output.text elif config != None: print config.text elif error != None: print error.text else: print "NETCONF server provided no usable response"
Technet24.ir||||||||||||||||||||
||||||||||||||||||||


How it works...Step 1 sets up the dependent standard library modules. In this case, we use only thewell-trodden modules included with the standard Python distribution. The sys moduleprovides access to the command-line environment. The subprocess module provides aflexible way of managing child processes. ElementTree is the Python built-in XML parsingenvironment.
In step 2, we create a Python new-style class with a constructor and a destructor. Theconstructor invokes the subprocess module in order to manage a child process consistingof an SSH client. We use the typical options of SSH to influence its behavior:
Option Description
-qQuiet mode. Typically omits message-of-the-day banners, which are nothelpful for machine reading.
-iJUNOS_auto_id_rsa Specify the private SSH key file.
-p 830 Establish TCP port 830 as the transport endpoint.
-s Invoke the SSH subsytem specified (netconf).
The destructor attempts to clean up by closing the standard input stream to the SSHclient, which will usually result in the SSH client disconnecting from the remoteendpoint.
In step 3, we define a method to read data from the SSH client. The data is read line-by-line until we see the special NETCONF delimiter token. When we see that, we know amessage has been completed and it is passed to the ElementTree routines for XMLdecomposition as a Python object.
Technet24.ir||||||||||||||||||||
||||||||||||||||||||

In step 4, we define the complimenting output method — a function to write a commandRPC. The method simply wraps the input parameter — which is the command line to beexecuted — in the necessary XML decoration in order to invoke the command RPC.
Step 5 is about putting it all together. We read the command-line arguments to determinethe hostname and the command to use. Since most commands consist of multiple words,the user is expected to quote the command. For example:
unix$ ./netconf.py 10.0.201.201 "show route summary"
We call the method to read data from the SSH stream in order to eat the hello message -we've no real need to understand its contents. Then we output a command RPC for thedesired command, and call the read method once more in order to receive the response.
As we handle the response from the command RPC, we anticipate receiving one of threetypes of tag, as shown in the following table:
Tag Description
<output> Normal output from a show command or otherwise
<configuration-output> Output from the show configuration command
<error-message> An error message when something goes wrong
Note that the response.find() calls in step 5 make use of the so-called fullyqualified XML tag name. The braces denote an XML namespace identifier.Namespaces allow the construction of XML documents comprising ofmultiple tag dictionaries from multiple sources without collision. They area flexible tool, but they can make for wordy and verbose text.
Finally, in step 6, we print what we've discovered for the user's attention.
||||||||||||||||||||
||||||||||||||||||||

Technet24.ir||||||||||||||||||||
||||||||||||||||||||

Processing NETCONF with Node.jsNode.js is a popular JavaScript-based language used originally in the server-side webenvironment, but now common in many application spaces. Its key benefit is its modernJavaScript-dialect allowing object-oriented and prototypal object inheritance models,fused together with Google's efficient V8 JavaScript engine, and an asynchronous,event-based programming framework from the get-go. The asynchronous nature ofNode.js makes it ideal for advanced automation and control applications where oneneeds to communicate with multiple elements at once.
In this recipe, we explore the use of a simple Node.js application acting as aNETCONF client in a similar manner to the previous Python and Expect/TCLapplications.
||||||||||||||||||||
||||||||||||||||||||

Technet24.ir||||||||||||||||||||
||||||||||||||||||||

Getting readyIn order to complete this recipe, you should have already completed the JUNOSNETCONF over SSH setup recipe and have a working JUNOS OS NETCONF host.You also need a Node.js installation on the operating system of your choice. For ourtesting, we used a variety of versions, from v0.10.35 through v6.10.0.
||||||||||||||||||||
||||||||||||||||||||

Technet24.ir||||||||||||||||||||
||||||||||||||||||||

How to do it...The steps for the recipe are as follows:
1. Firstly, install a viable XML parsing library. Out of the box, Node.js ships with noXML parsing capability within its standard modules, so make use of the popularxml2js library, written by Marek Kubica, and install it using the npm packagemanagement tool:
unix$ npm install xml2js
2. Import the required Node.js modules to operate. In this case, we make use of thechild_process module in order to control a child process and the XML parsingmodule:
#!/usr/bin/env node
const util = require("util"); const child_process = require('child_process'); const xml2js = require('xml2js');
3. Define some program constants that we can refer to consistently later, including theXML phrase for the command RPC and the invaluable NETCONF delimiter thatdenotes the space between XML messages:
const DELIMITER="]]>]]>";
const xmlRpcCommand = function(command) { return [ "<rpc>\n", "<command format=\"text\">\n", command, "</command>", "</rpc>\n", DELIMITER, "\n" ]; };
4. Define a convenience utility subroutine for accessing the nested JavaScript objectdictionaries, which will be the result of parsing the XML.
var walk = function(obj, path) { var result = obj; path.forEach(function (cur, ind, array) { if (result) result=result[cur]; }); return result; }
||||||||||||||||||||
||||||||||||||||||||

5. Parse the command-line arguments to determine a target hostname and a command:
if (process.argv.length!=4) { console.warn("Usage: netconf.js user@hostname command\n"); process.exit(1); } var hostname = process.argv[2]; var command = process.argv[3];
6. Start up a child process in order to run the SSH client to connect to the JUNOS OShost:
var child = child_process.spawn( "/usr/bin/ssh", [ "auto@"+hostname, "-q", "-p", "830", "-i", "JUNOS_auto_id_rsa", "-s", "netconf" ] );
7. Define the important event handlers to deal with the runtime interaction with theSSH session, including handling things like reading data from the SSH session andhandling error conditions:
var data="";
child.stderr.on('data', function(chunk) { process.stderr.write(chunk, "utf8"); });child.stdout.on('data', function(chunk) { data+=chunk; if ((index=data.indexOf(DELIMITER))!=-1) { var xml = data.slice(0, index); data = data.slice(index + DELIMITER.length); xml2js.parseString(xml, function(err, result) { if (err) throw err; if (result['hello']) return; if (output=walk(result, ['rpc-reply', 'output', 0])) { console.log(output); } else if (config=walk(result, ['rpc-reply', 'configuration-information', 0, 'configuration-output', 0])) { console.log(config); } else if (error=walk(result, ['rpc-reply', 'rpc-error', 0, 'error-message', 0])) { console.log(error); } else { console.log("Unexpected empty response"); } child.stdin.end(); }); }});
child.on('error', function(err) { console.log("SSH client error: ", err); })
Technet24.ir||||||||||||||||||||
||||||||||||||||||||

8. Finally, start the ball rolling by issuing a command RPC for the user-specified CLIcommand:
xmlRpcCommand(command).forEach(function(cur, ind, array) { child.stdin.write(cur, "utf8")});
||||||||||||||||||||
||||||||||||||||||||

Technet24.ir||||||||||||||||||||
||||||||||||||||||||

How it works...Step 1 sees us prepare the runtime environment by installing a module dependency.Node.js package management system has application dependencies installed in the samedirectory as the application, rather than polluting system directories. This makes for amore self-contained application, but be aware that the node_modules directory in yourapplication directory is an integral part of your application.
In step 2, we start the source code and we start by pulling in the necessary Node.jsmodules that we need to reference in this application. We use the child_process module tomanage a child SSH session, and we use the xml2js module to do the heavy work ofparsing the XML.
Step 3 defines some foundation constants. In this case, we need to use the NETCONFdelimiter, as in our other applications, in order to determine where XML messages startand stop. And we also include an XML template for the command RPC that we willcall.
In step 4, we create a helper routine. Because the XML parsing process will leave uswith complicated JavaScript dictionaries representing each of the tags in the XMLdocument, we want to make a nice, clean and easy syntax to walk an XML structure.Unfortunately, Node.js isn't particularly tolerant to us de-referencing dictionaryelements that are non-existent. For example, if we have an object structured like this:
routers = { 'paris--1': { version: '14.1R6', hardware: 'MX960' }, 'london--1': { version: '15.1F6-S6', hardware: 'MX960' }, 'frankfurt--1': { version: '15.1F6-S6', hardware: 'MX960' } }
We might look to query the software version using syntax like this:
> routers['paris--1']['version'] '14.1R6'
Unfortunately, this fails miserably if we try to reference a device that isn't in thedictionary. Node.js throws a TypeError exception, stopping the application in its track:
> routers['amsterdam--1']['version']TypeError: Cannot read property 'version' of undefined
Instead, we use the walk routine defined in step 4 to conditionally walk a path through aJavaScript object, returning the undefined sentinel value at the earliest failure. Thisallows us to deal with the error condition on an aggregate basis, rather than checking
||||||||||||||||||||
||||||||||||||||||||

validity of every element in the path:
> walk(routers, [ "paris--1", "version" ]) '14.1R6' > walk(routers, [ "amsterdam--1", "version" ]) undefined
Step 5 sees us use the JavaScript dialect to parse the command-line arguments, and likethe previous recipes, we simply look to glean the target hostname and the command toexecute.
Then the Node.js magic is put to work in steps 6 and 7. We start off a child process,which involves the operating system forking and executing an SSH client in a similarmanner to the previous recipes. But instead of interacting with the SSH client with aseries of read/writes, we instead simply define event handlers for what happens inresponse to certain events, and let the Node.js event loop do the rest.
In our case, we deal with different events, best described in pseudo code in thefollowing table:
Event Description
Data is received from the SSHclient's standard output
Read the data
Look for the NETCONF delimiter
If it's found, take all the data up to it, and try to parseit as XML
If it's not found, just store what we have for the nextread
Data is received from the SSHclient's standard error
Print the same data (probably an error message) to theapplication standard error channel
Technet24.ir||||||||||||||||||||
||||||||||||||||||||

Successful XML Parse Print the content of any output, configuration - output,or error-message tags
Step 8 actually solicits the output from the JUNOS OS device by emitting the RPCcommand which executes the user's command. When the response is received, theprepared event handlers perform their prescribed activities, which results in the outputbeing printed.
||||||||||||||||||||
||||||||||||||||||||

Technet24.ir||||||||||||||||||||
||||||||||||||||||||

Working with the Junos REST APIIn this chapter, we will cover the following recipes:
Setting up the Junos REST APIMaking REST API calls to Junos with PythonMaking REST API calls to Junos with Node.jsManaging passwords safelyApplying configuration changes through the REST API
||||||||||||||||||||
||||||||||||||||||||

Technet24.ir||||||||||||||||||||
||||||||||||||||||||

IntroductionRepresentational State Transfer (REST) is an architecture style that common in webapplication programming. Developed in tandem with HTTP/1.1, it encourages arepresentation of application object state within the underlying HTTP protocoltransactions and an adherence to the semantics of the underlying HTTP verbs whenapplied to higher-level application state.
Simplistically, one of the key principles is that one should use the HTTP verbs in amanner that is consistent with the application object state. The table illustrates thedifferent HTTP verbs and their specific applications:
HTTPVerb Application
GET Querying or reading the state of an object, given some sort of index
PUT Setting or directly writing the state of an object based on an index
POSTCreating a new object within an underlying collection; or otherwise calling aprocedure that may modify an object
DELETE Deleting an object based upon an index reference
As well as the NETCONF-over-SSH interface that we've seen in Chapter 1, ConfiguringJunos with NETCONF, more recent versions of JUNOS OS, starting with 14.2, includea directly-addressable REST API which exposes the same RPCs that we seen withNETCONF.
In this chapter, we explore the REST API and how to use it with common programminglanguages.
||||||||||||||||||||
||||||||||||||||||||

Technet24.ir||||||||||||||||||||
||||||||||||||||||||


Junos REST API setupIn this recipe, we'll prepare a Junos OS router for accessing the REST API in order toallow a software client to make RPC calls using convenient HTTP/HTTPS accessmethods.
Technet24.ir||||||||||||||||||||
||||||||||||||||||||


Getting readyIn order to complete this recipe, you'll need access to a Junos OS router device runningat least Junos 14.2 or later because the REST feature is relatively new. At the time ofwriting, it is available on T, M, MX, and SRX-series Juniper router devices.
Technet24.ir||||||||||||||||||||
||||||||||||||||||||


How to do it...The steps for the following recipe are as follows:
1. Generate a private/public key-pair for a certificate using the Junos OS commandline. Give the certificate a convenient name. In this case, we use the name AUTO:
adamc@router> request security pki generate-key-pair certificate- id AUTO Generated key pair AUTO, key size 1024 bits
2. Use the key-pair to create a local self-signed certificate, specifying the domainname, the IP address and the general host name as the subject:
adamc@router> request security pki local-certificate generate- self-signed certificate-id AUTO domain-name router.mydomain.com subject CN=router ip-address 10.0.201.201 Self-signed certificate generated and loaded successfully
3. Export the certificate to the filesystem:
adamc@router> request security pki local-certificate export certificate-id AUTO filename router.pem certificate exported successfully
4. Copy the certificate PEM file to your application host to be later used with anautomation app:
unix$ scp adamc@router:/var/tmp/router.pem .
5. Configure the REST system service:
adamc@router# set system services rest http port 8080 adamc@router# set system services rest https port 8443 adamc@router# set system services rest https server-certificate AUTO
6. Ensure that you have configured a user profile with a valid password:
adamc@router> show configuration system login user auto uid 2001; class super-user; authentication { encrypted-password “XXXXX”; }
Technet24.ir||||||||||||||||||||
||||||||||||||||||||


How it works...In step 1, we use the foundation cryptographic functions within Junos OS to generate apair of keys: one private, one public. In step 2, the public version of the key is used tocreate a certificate which is able to authenticate the router to connecting clients.Because we have no explicit Certificate Authority (CA) framework in place, we use aself-signed certificate.
Steps 3 and 4 export this self-signed certificate as a text-based X.509 certificate andcopy it to the network management station respectively.
With step 5, we configure Junos OS to run the REST service using HTTP and HTTPSspecifying appropriate port numbers. You can localize these port numbers to whateveryou wish depending on your environment, but it's advisable to settle on a standard forall your devices.
And finally, in step 6, we just set up a user account profile to be used by the REST APIaccess. If you already have something similar—perhaps from the previous recipes—justnote that in this case we need password authentication, not SSH key authentication.
If you only want to test, it's perfectly reasonable to simply configure plainHTTP which is unencrypted, and you can skip steps 1 through 4. Butdevelopment and test code sometimes has an uncanny knack of becomingproduction code quite quickly, so it's probably advisable to be familiarwith the HTTPS version as well.
Technet24.ir||||||||||||||||||||
||||||||||||||||||||


There's moreIn order to test that the REST API is working properly, Junos OS helpfully includes asimple HTML/JavaScript web page which allows you to make REST calls from yourbrowser. You can enable this while getting to grips with the REST API using thefollowing configuration:
adamc@router# set system services rest enable-explorer
Once configured, you can point your browser at the Junos OS device by using theconfigured port number and navigate to the REST API using a friendly web interface.
If you can't seem to get the REST API to work on your Junos OS platform, the best placeto start troubleshooting efforts is the Routing Engine (RE) traffic filter. The RE filter isused to police traffic destined towards the router's Routing Engine card or general CPUand it's extensively used in situations where the router is in an internet-exposedenvironment. Determine the name of the RE filter by using the command below, see thefilter name underscored, and then look up the corresponding firewall filter to see howyou might need to amend it in order to allow HTTP/HTTPS traffic from yourapplication to the Junos OS REST service. In most cases, it should be as easy as addinganother term.
adamc@router> show configuration interfaces lo0 unit 0 {
Technet24.ir||||||||||||||||||||
||||||||||||||||||||

family inet { filter { input PROTECT-RE; } } }
There are two ways to lock down access to the REST interface. One is thelow-level PROTECT-RE filter as we've seen. But additionally, Junos OSsupports a facility of white-listing client addresses.
adamc@router# set system services rest control allowed-sources [ 10.0.201.1 ]
You should use both. The PROTECT-RE filter can be used to filter down trafficdestined to the RE to just what is required for management and protocols,but you can then refine the traffic specification using the RESTconfiguration control to nominate hosts that you know will act as RESTclients.
||||||||||||||||||||
||||||||||||||||||||

Technet24.ir||||||||||||||||||||
||||||||||||||||||||

Making REST API calls to Junos withPythonIn this recipe, we'll use Python's built-in standard library routines for HTTPS in orderto access the Junos OS REST API. We'll build an example app, rest.py, that allows auser to make simple RPC calls. In order to control the operation of the application,we'll define some command-line arguments.
Command line option Description
-t xml | json | text Specify the output format
-r rpc Specify the actual RPC call
-c certificate Self-signed certificate from router
-p port HTTPS port number, default 8443
-u username Username to authenticate with
||||||||||||||||||||
||||||||||||||||||||

Technet24.ir||||||||||||||||||||
||||||||||||||||||||

Getting ready...In order to complete this recipe, you need access to a Junos OS router device running atleast Junos OS 14.2, and you should have completed the previous recipe, REST APISetup. You'll also need access to a Python development environment.
||||||||||||||||||||
||||||||||||||||||||

Technet24.ir||||||||||||||||||||
||||||||||||||||||||

How to do it...We're going to make a new Python app, rest.py, that will connect to the Junos OS RESTinterface over SSH.
1. Create the Python script preamble and import the necessary standard libraryroutines.
#!/usr/bin/env python
import sys import httplib import ssl import base64 import argparse import getpass import json import os import io
# Error handling def onError(exception_type, exception, traceback): sys,stderr.write("%s: %s\n" % (exception_type.__name__, exception)) sys.excepthook = onError
2. Parse the following command-line arguments:
cmdline = argparse.ArgumentParser(description="Python JUNOS REST Client") cmdline.add_argument("target", help="router - target router to query") cmdline.add_argument("-t", choices=["xml", "json", "text"], help="Type of output", default="xml") cmdline.add_argument("-r", metavar="rpc-call", help="RPC call to make", default="get-software- information") cmdline.add_argument("-c", metavar="certificate", help="Router's self-signed certificate .pem file") cmdline.add_argument("-p", metavar="port", help="TCP port", default=8443) cmdline.add_argument("-u", metavar="username", help="Remote username", default=getpass.getuser()) args=cmdline.parse_args()
3. Query the user for a password as shown in the following code:
password=getpass.getpass("Password: ") basicAuthorization = base64.b64encode(args.u+":"+password)
4. Initialize the SSL/TLS environment:
context = ssl.create_default_context( purpose=ssl.Purpose.SERVER_AUTH,
||||||||||||||||||||
||||||||||||||||||||

cafile=args.c) context.check_hostname=False if args.c==None: context.verify_mode=ssl.CERT_NONE
5. Make the TLS connection and send the HTTPS request:
conn = httplib.HTTPSConnection(args.target, args.p, context=context)
headers = { 'Authorization' : 'Basic %s' % basicAuthorization, 'Accept': "text/xml" if args.t=="xml" else "application/json" if args.t=="json" else "text/plain" }
try: conn.request("GET", '/rpc/'+args.r, headers=headers)
except ssl.SSLError as e: sys.stderr.write("SSL error: "+str(e)) sys.exit()
response = conn.getresponse() responseData = response.read()
6. Print the output:
print response.status, httplib.responses[response.status]
if responseData: print responseData
Technet24.ir||||||||||||||||||||
||||||||||||||||||||


How it works...Step 1 is the usual boilerplate for any Python app. We import the necessary standardlibrary routines. Important for this recipe is the httplib and ssl libraries which provideframework classes and methods for forming and comprehending HTTP requests andresponses as well as the same over SSL/TLS.
In step 2, we use the argparse library to implement a simple scan of the command line.Our application has several runtime knobs, visible with the –h switch, and as the userselects each one, we need to influence the internal variables to affect our applicationappropriately.
In step 3, we prompt the user for a password that we store, in order to use it in theHTTP authorization header.
Unlike the recipes where we communicate using NETCONF-over-SSH,the Junos OS REST API server requires us to authenticate on a formalusername and password basis, rather than with SSH keys. Becausepasswords are a relatively weaker layer of security, we deliberatelyavoid using a command-line argument to capture the password.
We use an SSL context in step 4, which is simply a way of collecting together all of therelevant SSL parameters into one place. Because we generated a self-signed certificateon the router in the previous recipe, there is an opportunity to validate that certificate atthis stage. But if the user doesn't specify a certificate with the –c switch, we disable theverification.
It's important to understand the concepts involved with SSL/TLS. Thecertificate required by the Junos OS HTTPS-based REST server is a waythat the server can prove its authenticity to connecting clients. Think of itas equivalent to the SSH host key check that happens when you firstconnect to a host. Regardless of whether you include this certificateverification step, the most important aspect of the HTTPS-based RESTserver is the fact that the user credentials are sent with an encryptedarmour.
Step 5 creates the HTTPS connection to the Junos OS router and makes the RPC aHTTP GET request. And finally in step 6, we report the received response to the user on
Technet24.ir||||||||||||||||||||
||||||||||||||||||||

the standard terminal output.
We can see an example interaction with our application in the following screenshot:
||||||||||||||||||||
||||||||||||||||||||

Technet24.ir||||||||||||||||||||
||||||||||||||||||||

Figure 2.2 Example interaction with rest.py
||||||||||||||||||||
||||||||||||||||||||

Technet24.ir||||||||||||||||||||
||||||||||||||||||||

There's more...The support for JSON output in the Junos OS REST API is incredibly useful because itis so easily convenient to parse by applications. We can make a small modification toour program, for instance, to extract the details of the running software version and onlyprint that rather than the raw response from the REST server:
print response.status, httplib.responses[response.status]
if args.t=="json": data = json.loads(responseData)
if 'software-information' in data: print "Software version: ", data['software-information'][0] ['junos-version'][0]['data']
When run, the application prompts for a password, combines this with the username inthe -u switch—or whatever the OS determines as the current username—and thenconnects to the specified REST server. If it has been provided with a certificate usingthe -c switch, it verifies this with the certificate presented by the server before issuingthe Junos OS RPC call specified with the -r switch.
||||||||||||||||||||
||||||||||||||||||||

Technet24.ir||||||||||||||||||||
||||||||||||||||||||

Making REST API calls to Junos withNode.jsIn this recipe, we'll make an example app, rest.js, using Node.js to connect to the JunosOS REST API in order to make procedure calls. We'll use Node.js's built-in HTTPSsupport, augmented with some extra external modules simply for convenience. Forutility value, we'll provide some command-line options to customize how theapplication runs.
Command line option Description
-t xml | json | text Specify the output format
-r rpc Specify the actual RPC call
-c certificate Self-signed certificate from router
-p port HTTPS port number, default 8443
-u username Username to authenticate with
||||||||||||||||||||
||||||||||||||||||||

Technet24.ir||||||||||||||||||||
||||||||||||||||||||

Getting readyIn order to complete this recipe, you need access to a JUNOS router device running atleast JUNOS 14.2, and you should have completed the previous recipe on REST APISetup. The JavaScript code that we'll use is compatible with Node.JS v0.12, v4.x andv6.x. You should also be familiar with npm, the Node.js package manager.
||||||||||||||||||||
||||||||||||||||||||

Technet24.ir||||||||||||||||||||
||||||||||||||||||||

How to do it...The steps for the recipe are as follows:
1. First of all, download two external dependencies that we require for theapplication, namely getpass—in order to read a password silently from the terminal,and argparse which is a convenient command-line parsing module that operates in analmost identical way to the Python built-in module of the same name. In yourapplication source directly, use npm to install the two modules:
unix$ npm install argparse unix$ npm install getpass
2. Start the Node.js app source code with the usual boilerplate which defines theinterpreter and imports the necessary modules:
#!/usr/bin/env node
const https = require("https"); const fs = require("fs"); const os = require("os");
const argparse = require("argparse"); const getpass = require("getpass");
3. Define a function to implement the outgoing HTTPS request to the Junos OS RESTAPI using the built-in Node.js HTTPS module. We'll call this from the main code:
var httpsRequest = function(args) { var mimeType="text/xml"; if (args.t=="json") mimeType="application/json"; if (args.t=="text") mimeType="text/plain";
var req = https.request({ hostname: args.target, port: args.p, path: "/rpc/"+args.r, method: "GET", auth: args.u+":"+password, headers: { 'Accept': mimeType, }, ca: args.c?[fs.readFileSync(args.c, {encoding: 'utf-8'})] : [], rejectUnauthorized: args.c?true:false, checkServerIdentity: function (host, cert) { return undefined; } }, function(response) { console.log(response.statusCode, response.statusMessage); // console.log('headers:', response.headers); response.on('data', function(data) { process.stdout.write(data.toString);
||||||||||||||||||||
||||||||||||||||||||

}); });
req.on('error', function(err) { console.error(err); });
req.end(); }
4. Continue to specify the main execution path by parsing the command-linearguments according to our pre-defined specification:
var cmdline = new argparse.ArgumentParser({description: "NodeJS JUNOS REST Client"});
cmdline.addArgument("target", { help: "Target router to query" } ); cmdline.addArgument("-t", { choices: ["xml", "json", "text"], help: "Type of output", defaultValue: "xml"} ); cmdline.addArgument("-r", { metavar: "rpc-call", help: "RPC call to make", defaultValue: "get-software-information" } ); cmdline.addArgument("-c", { metavar: "certificate", help: "Router's self-signed certificate .pem file" } ); cmdline.addArgument("-p", { metavar: "port", help: "TCP port", defaultValue: 8443 } ); cmdline.addArgument("-u", { metavar: "username", help: "Remote username", defaultValue: os.userInfo()['username'] } ); var args = cmdline.parseArgs();
5. Finally, prompt the user for a password that will be used to connect to the RESTAPI service, triggering the HTTPS request upon completion:
var password=null; getpass.getPass(function(err, pwd) { if (err) { console.warn(err) } else { password = pwd; process.nextTick(httpsRequest, args); } });
Technet24.ir||||||||||||||||||||
||||||||||||||||||||


How it works...In step 1, we must externally collect and install the extra Node.js modules that we needto work with. By default, Node.js stores modules that your application depends uponwithin the same directory as the application, in a sub-directory called node_modules. Thishas the advantage of making your application quite portable. You can simply zip up theapplication directory from your development environment, install it to production andreasonably expect things to work.
In step 2, we start writing the Node.js code for our application which begins with theusual interpreter definition to the operating system. We also create global constants torefer to both the built-in and the external modules that we're going to use.
In step 3, we define a function that, when called, will do the hard work. httpsRequesttakes a dictionary object as an argument which provides the necessary information forthe address of the REST server, the username credentials, the media types and so on.Using this information, we use Node.js's built-in HTTPS client to connect to the RESTserver, perform a TLS handshake and then interact with the server.
The first argument to https.request() is basically just a re-arrangement of the argumentparameters that we've been provided in a fashion usable by the library routine, but thereare some complexities to note here, regarding the use of a certificate or otherwise.
If the application has been provided a certificate—using the –c switch—then weconfigure the Node.js HTTPS client to:
Consider the certificate in the CA hierarchy chain, andValidate the certificate for authenticity
If there is no certificate, we disable the security verification. Regardless of the presenceof a certificate or otherwise, we configure the Node.js HTTPS client to not check thehostname.
The second argument to https.request() is a response handler which specifies whatshould happen with the response data that we receive from the server. We define this asa simple function that checks the HTTP status code to ensure that it is 200, and thenprints the received data as it is received.
Technet24.ir||||||||||||||||||||
||||||||||||||||||||

With the activity functions all pre-prepared and defined, step 4 continues to parse thecommand line arguments, using the utility functions provided by argparse, and step 5prompts for the password. The actual HTTPS request is triggered from within thecallback routine as soon as we have the password to proceed.
When run, the application prompts for a password, combines this with the username inthe -u switch—or whatever the OS determines as the current username—and thenconnects to the specified REST server. If it has been provided with a certificate usingthe -c switch, it verifies this with the certificate presented by the server before issuingthe Junos OS RPC call specified with the -r switch.
||||||||||||||||||||
||||||||||||||||||||

Technet24.ir||||||||||||||||||||
||||||||||||||||||||

Managing passwords safelyThe previous recipes to connect to the Junos OS REST server might cause frustrationfor any application that needs to run in an unattended manner. Who will enter thepassword? This is not automation!
Dealing with the safe storage of security credentials can be tricky. The automation scriptneeds to be able to read the credentials in a clear manner in order to complete theauthentication process with the Junos OS device. But in most application executionenvironments, the permission to execute the app usually coincides with the permissionto read the app executable file and, for just-in-time interpreted script languages, thatincludes the sensitive credentials.
People sometimes try to get around this problem by using a command line switch or anenvironment variable to store a password. This approach can be problematic thoughbecause, on most UNIX systems, an application's execution environment—such asenvironment variables or command-line arguments—can still be visible to other userson the system.
In this recipe, we present a way of dealing with the password problem for automationapps that avoids building passwords within scripts and instead makes a file cache ofpasswords which can be protected using the UNIX file system permissions.
||||||||||||||||||||
||||||||||||||||||||

Technet24.ir||||||||||||||||||||
||||||||||||||||||||

Getting readyIn order to complete this recipe, you should have a working Python or Node.js RESTclient from the previous chapters.
||||||||||||||||||||
||||||||||||||||||||

Technet24.ir||||||||||||||||||||
||||||||||||||||||||
How to do it...We're going to modify the initialization code within the application to check for thepresence of a password cache within a user-specific location. If the file is found, weread a JSON-structured dictionary of username, remote device, and password. If the fileis not found, or is otherwise inaccessible, then we assume an interactive operation andread a password from the terminal.
1. We can modify our Python rest.py app from the previous recipes to use thistechnique with the following code:
args=cmdline.parse_args()
try: passwordFile = os.path.expanduser("~")+"/.pwaccess" if os.stat(passwordFile)[0]&63==0: passwords = json.load(open(passwordFile)) password = passwords[args.u+"@"+args.target] else: sys.stderr.write("Warning: password file "+passwordFile+" must be user RW (0600) only!\n") sys.exit(1) except Exception as e: print(e) password=getpass.getpass("Password: ") basicAuthorization = base64.b64encode(args.u+":"+password)
2. We can modify our Node.js rest.js app from the previous recipes to use thistechnique with the following code:
var password=null;
try { var passwordFile = os.userInfo()['homedir']+"/.pwaccess"; var stat = fs.statSync(passwordFile); if ((stat.mode & 63) == 0) { var passwordList = JSON.parse( fs.readFileSync(passwordFile) ); password = passwordList[args.u+"@"+args.target]. toString(); } else { console.warn("Warning: password file " + passwordFile + " must be user RW (0600) only!\n"); process.exit(1); } process.nextTick(httpsRequest, args); } catch (e) { getpass.getPass(function(err, pwd) { if (err) { console.warn(err) } else {
||||||||||||||||||||
||||||||||||||||||||

password = pwd; process.nextTick(httpsRequest, args); } }); }
3. Prepare a password cache file to be used by the application, regardless of whetheruser-interactive or system-borne invocation is to be used. An example file is asfollows:
{ "[email protected]": "jackAndJill", "user@myrouter": "f00bar" }
4. Ensure that the permissions on the file are set securely so that only the owner of thefile can read it.
unix$ chmod 0600 ~/.pwaccess
Regardless of whether the app will be used interactively by a user, or will be startedfrom cron or another script, a password cache file, ~/.pwaccess, can now be providedwhich includes a mapping device to passwords.
Technet24.ir||||||||||||||||||||
||||||||||||||||||||


How it works...The modification in steps 1 and 2 are slightly different between Node.js and Python dueto the asynchronous nature of Node.js. But regardless, in both languages we use the statsystem call to check for both, the existence and the file permissions on a well-knownfile, ~/.pwaccess, in the user's home directory. If the file doesn't exist, the stat call willthrow an exception.
We use the synchronous version of the stat call in Node.js which results inthe exception behavior, rather than an error parameter in a callback. It'sgenerally not wise to mix synchronous and asynchronous code in Node.js,but using synchronous functions to set up execution before settling in aasynchronous mode for main runtime is a common pattern.
If the file exists and has adequately secure permissions, we read it and attempt to parseit as JSON. Again, any failures here will cause an exception, which we can handle later.Assuming the JSON structure is read correctly, we learn an object dictionary keyed byusername and router device. We use this to extract the password for the remote deviceand username, again ensuring that we throw an exception if the key is not found.
If any exceptions occur, we fallback to prompting the user for a password. Armed withthe password—either through the password cache or a diligent interactive user—therest of the code proceeds as previously.
In steps 3 and 4 we prepare the password file cache and ensure its permissions are safe.
Technet24.ir||||||||||||||||||||
||||||||||||||||||||

Applying configuration changes throughthe REST APISo far, we've only shown how to make use of operational RPCs. This allows us a fairamount of control and flexibility, but it's also possible to change the configuration ofJunos OS through the REST API. In this recipe, we'll modify the previous Python code,rest.py, and make a modified version, rest-conf.py, that takes a configuration change as atext file and applies it to the specified Junos OS host, checking the loading process andthe commit process as it goes.
Technet24.ir||||||||||||||||||||
||||||||||||||||||||


Getting readyIn order to complete this recipe, you'll need a Python development environment withaccess to a Junos OS device upon which you've previously completed the REST APIsetup recipe.
Technet24.ir||||||||||||||||||||
||||||||||||||||||||


How to do it...The steps for the recipe are as follows:
1. Start the Python source code with the usual boilerplate to define the interpreter andthe module import references. Include a general purpose exception handler.
#!/usr/bin/env python
import sys import argparse import getpass import os import io import email import xml.etree.ElementTree as ET import jxmlease import urllib3 import requests import re
def onError(exception_type, exception, traceback): sys.stderr.write("%s: %s\n" % (exception_type.__name__, exception)) sys.excepthook = onError
2. Define a function to specify the RPC calls necessary to load and commit aconfiguration. These will be concatenated together and delivered within a singlePOST request.
def configRpc(config): return str.format(( "<lock><target><candidate/></target></lock>\r\n" "<edit-config><target><candidate/></target><config>" "{config}</config></edit-config>\r\n" "<commit/>" "<unlock><target><candidate/></target></unlock>\r\n" ), config=config)
3. Define a function to get the user password associated with the Junos OS account:
def getPassword(): password="" try: passwordFile = os.path.expanduser("~")+"/.pwaccess" if os.stat(passwordFile)[0]&63==0: passwords = json.load(open(passwordFile)) password = passwords[args.u+"@"+args.target] else: raise RuntimError( "Warning: password file %s must be user RW 0600 only!" % passwordFile) except Exception as e: password=getpass.getpass("Password: ")
Technet24.ir||||||||||||||||||||
||||||||||||||||||||
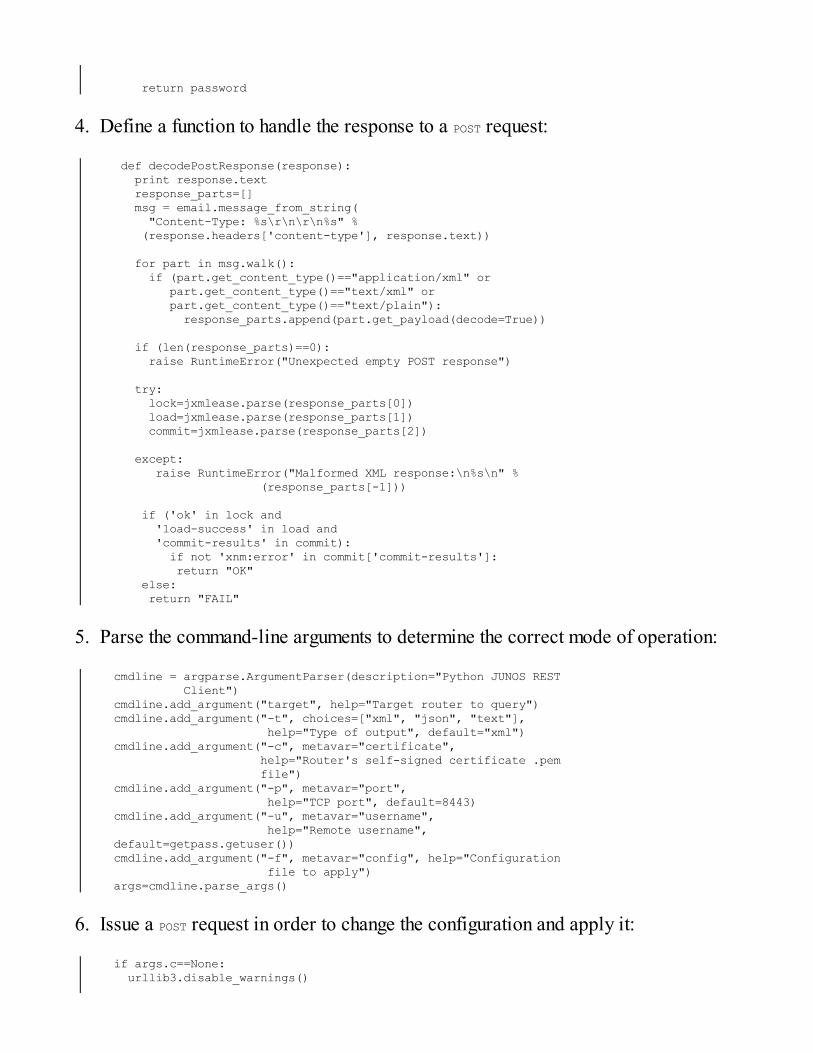
return password
4. Define a function to handle the response to a POST request:
def decodePostResponse(response): print response.text response_parts=[] msg = email.message_from_string( "Content-Type: %s\r\n\r\n%s" % (response.headers['content-type'], response.text))
for part in msg.walk(): if (part.get_content_type()=="application/xml" or part.get_content_type()=="text/xml" or part.get_content_type()=="text/plain"): response_parts.append(part.get_payload(decode=True)) if (len(response_parts)==0): raise RuntimeError("Unexpected empty POST response")
try: lock=jxmlease.parse(response_parts[0]) load=jxmlease.parse(response_parts[1]) commit=jxmlease.parse(response_parts[2]) except: raise RuntimeError("Malformed XML response:\n%s\n" % (response_parts[-1]))
if ('ok' in lock and 'load-success' in load and 'commit-results' in commit): if not 'xnm:error' in commit['commit-results']: return "OK" else: return "FAIL"
5. Parse the command-line arguments to determine the correct mode of operation:
cmdline = argparse.ArgumentParser(description="Python JUNOS REST Client") cmdline.add_argument("target", help="Target router to query") cmdline.add_argument("-t", choices=["xml", "json", "text"], help="Type of output", default="xml") cmdline.add_argument("-c", metavar="certificate", help="Router's self-signed certificate .pem file") cmdline.add_argument("-p", metavar="port", help="TCP port", default=8443) cmdline.add_argument("-u", metavar="username", help="Remote username", default=getpass.getuser()) cmdline.add_argument("-f", metavar="config", help="Configuration file to apply") args=cmdline.parse_args()
6. Issue a POST request in order to change the configuration and apply it:
if args.c==None: urllib3.disable_warnings()
||||||||||||||||||||
||||||||||||||||||||

config = open(args.f).read() MIME={ "xml": "text/xml", "json": "application/json", "text": "text/plain" }
r = requests.post("https://"+args.target+":"+str(args.p)+"/rpc", params={'stop-on-error': 1}, auth=(args.u, getPassword()), headers = { 'Content-Type': "text/xml", 'Accept': MIME[args.t] }, verify=args.c if args.c!=None else False, data=configRpc(config), )
if r.status_code==200: print decodePostResponse(r) else: raise RuntimeError("Unexpected server response: %s %s" % (str(r.status_code), r.reason))
Technet24.ir||||||||||||||||||||
||||||||||||||||||||


How it works...Step 1 imports all of the Python modules that we're going to use. Most are within thestandard library distribution, but in this recipe we also make use of Juniper's jxmleasemodule which makes parsing XML into Python data structures a bit easier.
Step 2 defines the sequence of RPCs that we will execute in order to make theconfiguration change. In this case, we are using a sequence of four RPCs: lock, edit-config, commit, unlock. We will encode an XML document defining these four RPCs in anHTTPS POST request and submit it to the REST server.
Step 3 defines a function to implement a cached credential in the user's home directory,falling back to an interactive prompt otherwise, as developed in the previous recipe.
Step 4 does the hard work of interpreting the response from the REST server to our POSTrequest. In ordinary circumstances we should get an XML response back for each RPCwe call, but there are some fringe circumstances where this doesn't happen. To create asrobust a logic as possible, we try to positively confirm the success of each part of theprocess in sequence—lock, edit, commit, reporting any available context for the firstone to fail.
In step 5, we make use of the argparse module in order to interpret the command line todetermine run-time parameters such as username, certificate file, and configuration file.
And then in step 6, we set the wheels in motion using the Python requests module, whichsimplifies HTTP/HTTPS operations quite significantly when compared to the standardlibrary function.
In operation, we can see rest-conf.py working here.
unix$ more config.xml <configuration> <system> <host-name>router</host-name> </system></configuration>
unix$ ./rest-rpc.py -u auto -f config.xml 10.0.201.201</span>OK
Technet24.ir||||||||||||||||||||
||||||||||||||||||||


Technet24.ir||||||||||||||||||||
||||||||||||||||||||

Using SLAX to Write Op ScriptsIn this chapter, we will cover the following recipes:
Making remote procedure callsUsing XPath predicate expressionsWorking with regular expressionsWorking with IP addressesDebugging SLAX scriptsMaking custom show commandsMaking configuration changes
||||||||||||||||||||
||||||||||||||||||||

Technet24.ir||||||||||||||||||||
||||||||||||||||||||

IntroductionJuniper's XML management interface foundation allows interaction with the operatingsystem in a disciplined and structured way, which is ideal for machine-to-machineinterfaces and automation applications. Working with XML, however, can be achallenge. Yes, it's structured and regular. Yes, it supports schemas that define thestructure, but when you have to manipulate data objects represented as XML, you need away of expressing data transformations.
The industry standard way to express the transformation of XML-formatted data isExtensible Stylesheet Language Transformations (XSLT). It is commonly used inweb applications for transforming structured XML data into presentable HTML webpages or similar.
Since the configuration state and operational state of JUNOS can be represented asXML, using XSLT to represent requests and changes to internal states is also logical,but XSLT itself is a bit cumbersome and unsightly. Instead, Juniper developed SLAX,which uses a C-like syntax fused with XML in order to allow the expression of logicthat transforms XML data structures. It is directly equivalent to XSLT, but easier to read.
If you're familiar with UNIX, the best way to think of a SLAX script is as a pipelineapplication that reads some input and delivers some output. The input and output inquestion depend upon the context and environment of the script, which includes thefollowing common types:
Op script: User-initiated script, complete with command line environment andarguments. Able to execute operational mode RPCs and make configurationchanges.Commit script: Script executed in the event of a commit operation, allowingcustom logic to validate, check, and manipulate the post-inheritance candidateconfiguration.
In this chapter, we delve into how JUNOS op scripts work and look at some practicalexamples to solving common tasks in the JUNOS network environment.
||||||||||||||||||||
||||||||||||||||||||

Technet24.ir||||||||||||||||||||
||||||||||||||||||||

Making remote procedure callsIn this recipe, we'll create a Stylesheet Language Alternative Syntax (SLAX) opscript, show-int.slax, in order to simulate the behavior of the show interfaces JUNOS CLIcommand. We'll do this by executing the normal RPC associated with the show interfacecommand and pick out the information that we need.
||||||||||||||||||||
||||||||||||||||||||

Technet24.ir||||||||||||||||||||
||||||||||||||||||||

Getting readyIn order to complete this recipe, you'll need access to a JUNOS router running with abasic configuration. If available, a simple VM-based Juniper Olive or virtual RouteReflector (vRR) is perfectly adequate for the level of complexity here.
||||||||||||||||||||
||||||||||||||||||||

Technet24.ir||||||||||||||||||||
||||||||||||||||||||

How to do it...We're going to create a SLAX script to call the necessary RPC to get the interfaceinformation and with the structured XML document that is returned, we're going to pickout a simple set of parameters and tabulate it in a neat form to make life simpler for theoperator. The example is a little contrived, but it's a good illustration of how to callRPCs from within SLAX. The steps are given as follows:
1. Start with the mandatory SLAX boilerplate as recommended by Juniper. Thistypically defines version numbers for compatibility and declares namespaces usingthe following code:
version 1.0; ns junos = "http://xml.juniper.net/junos/*/junos"; ns xnm = "http://xml.juniper.net/xnm/1.1/xnm"; ns jcs = "http://xml.juniper.net/junos/commit-scripts/1.0"; import "../import/junos.xsl";
2. Make the RPC call in order to query the operational state of the interfaces byquerying the internal mgd and dcd JUNOS daemons. Use the following code:
var $rpc = { <get-interface-information>; } var $result = jcs:invoke($rpc);
3. Use an unnamed template—or a match template—in order to discard script inputand simply respond with the XML structure associated with op script result sets.Print a header line and then a line for each interface that is found. Use thefollowing code:
match / { <op-script-results> { <output> { expr jcs:printf("%10s %6s %16s %16s %s\n", "Interface", "Status", "Local IP Addr", "Subnet", "Description"); } for-each ($result//logical-interface) { <output> { expr jcs:printf("%10s %6s %16s %16s %s\n", name, ../oper-status, address-family/interface-address[1]/ifa local, address-family/interface-address[1]/ifa destination, description); } } } }
||||||||||||||||||||
||||||||||||||||||||

4. Copy the SLAX script to the JUNOS host. Use the following code:
unix$ scp show-int.slax [email protected]:/var/db/scripts/op/ show-int.slax 100% 765 0.8KB/s 00:00
5. Configure the SLAX script to be used as an op script within JUNOS:
adamc@router# set system scripts op file show-int.slax
Remember to copy the SLAX script to both routing engines if you arerunning with a redundant routing-engine configuration. Alternatively, makesure that you've configured commit synchronize.
6. Invoke the op script to see the results.
Technet24.ir||||||||||||||||||||
||||||||||||||||||||

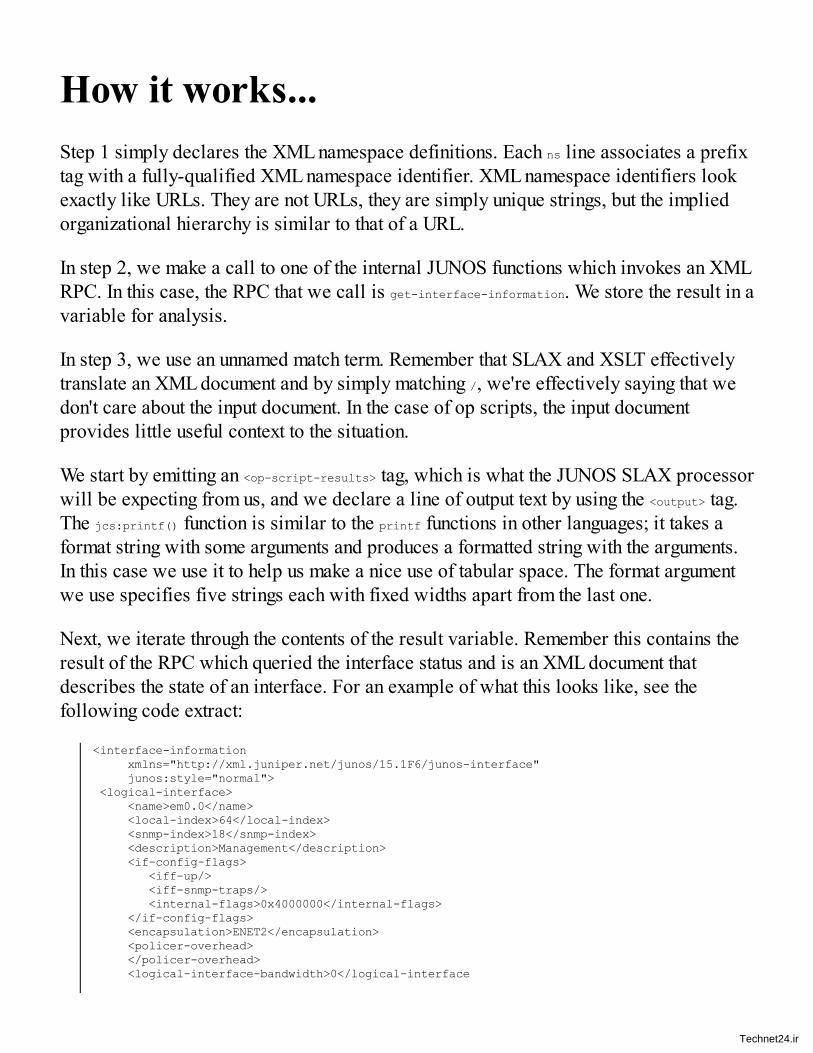
How it works...Step 1 simply declares the XML namespace definitions. Each ns line associates a prefixtag with a fully-qualified XML namespace identifier. XML namespace identifiers lookexactly like URLs. They are not URLs, they are simply unique strings, but the impliedorganizational hierarchy is similar to that of a URL.
In step 2, we make a call to one of the internal JUNOS functions which invokes an XMLRPC. In this case, the RPC that we call is get-interface-information. We store the result in avariable for analysis.
In step 3, we use an unnamed match term. Remember that SLAX and XSLT effectivelytranslate an XML document and by simply matching /, we're effectively saying that wedon't care about the input document. In the case of op scripts, the input documentprovides little useful context to the situation.
We start by emitting an <op-script-results> tag, which is what the JUNOS SLAX processorwill be expecting from us, and we declare a line of output text by using the <output> tag.The jcs:printf() function is similar to the printf functions in other languages; it takes aformat string with some arguments and produces a formatted string with the arguments.In this case we use it to help us make a nice use of tabular space. The format argumentwe use specifies five strings each with fixed widths apart from the last one.
Next, we iterate through the contents of the result variable. Remember this contains theresult of the RPC which queried the interface status and is an XML document thatdescribes the state of an interface. For an example of what this looks like, see thefollowing code extract:
<interface-information xmlns="http://xml.juniper.net/junos/15.1F6/junos-interface" junos:style="normal"> <logical-interface> <name>em0.0</name> <local-index>64</local-index> <snmp-index>18</snmp-index> <description>Management</description> <if-config-flags> <iff-up/> <iff-snmp-traps/> <internal-flags>0x4000000</internal-flags> </if-config-flags> <encapsulation>ENET2</encapsulation> <policer-overhead> </policer-overhead> <logical-interface-bandwidth>0</logical-interface
Technet24.ir||||||||||||||||||||
||||||||||||||||||||

bandwidth> <traffic-statistics junos:style="brief"> <input-packets>10845</input-packets> <output-packets>7565</output-packets> </traffic-statistics> <filter-information> </filter-information> <address-family> <address-family-name>inet</address-family-name> <mtu>1500</mtu> <address-family-flags> <ifff-is-primary/> <ifff-sendbcast-pkt-to-re/> </address-family-flags> <interface-address> <ifa-flags> <ifaf-current-preferred/> <ifaf-current-primary/> </ifa-flags> <ifa-destination>10.0.201/24</ifa-destination> <ifa-local>10.0.201.201</ifa-local> <ifa-broadcast>10.0.201.255</ifa-broadcast> </interface-address> </address-family> </logical-interface> </interface-information>
For each <logical-interface> tag we find in the result variable, we execute the control loopwhich consists of an <output> tag and another printf() call. In this case, we print interface-specific fields for each of the five headings that we previously printed. We identify theinterface-specific fields or properties by using their path within the XML document,also known as an XPath. The XPath references and descriptions are placed in thefollowing table:
XPath Reference Description
name The logical interface name
../oper-statusThe operational state of the parent physicalinterface
address-family/interface-address[1]/ifa-local The local interface address
address-family/interface-address[1]/ifa-destination
The link-layer address subnet associatedwith the interface
||||||||||||||||||||
||||||||||||||||||||

description The user-configured description
The resulting SLAX script iterates through the interfaces on the JUNOS router and printsa simple output allowing an operator a quick summary. The utility value of the tool isquite limited compared to the JUNOS built-in commands, but it's a starting point forlearning how to build custom SLAX scripts that execute RPCs and interpret results:
adamc@router> op show-int Interface Status Local IP Addr Subnet Description em0.0 up 10.0.201.201 10.0.201/24 Management gre.0 up 3.0.1.1 3.0.1/24 lo0.0 up 2.0.0.56 Loopback lo0.16384 up 127.0.0.1 lo0.16385 up 128.0.0.1
Technet24.ir||||||||||||||||||||
||||||||||||||||||||


Using XPath predicate expressionsIn this recipe, we'll build on our previous op script, show-int.slax, and enhance itsfunctionality so that it can limit the output based on characteristics of the interface. Toillustrate the capabilities of XPath predicates, we'll filter some of the annoying internalinterfaces that showed up in the output of the previous recipe.
Technet24.ir||||||||||||||||||||
||||||||||||||||||||


Getting startedIn order to complete this recipe, you'll need access to a JUNOS router running with abasic configuration. Ideally, build upon the previous recipe and modify the source code.
Technet24.ir||||||||||||||||||||
||||||||||||||||||||


How to do it...The steps for the recipe are as follows:
1. Start with the show-int.slax source code from the previous recipe, but use the newfilename show-int-xpath.slax.
2. Modify the for-each control statement and make use of an XPath predicate in orderto hone in the scope of the selected range of items. The following are someexamples:
Only include Gigabit Ethernet interfaces:
for-each ($result// logical-interface[starts-with(name, "ge-")] ) {
Only include loopback interfaces, if they are indexed with 0—ignore allothers:
for-each ($result// logical-interface[!starts-with(name, "lo0") || name=="lo0.0"]) {
3. Copy the script to the JUNOS router—both routing engines if necessary—andconfigure the script as a system op script:
adamc@router# set system scripts op file show-int-xpath.slax
4. Invoke the op script to see the results.
Technet24.ir||||||||||||||||||||
||||||||||||||||||||


How it works...The node-list constructed in the for-each control statement is reduced when theexpression is followed by square brackets. The square brackets contain the predicatefunction—a functional expression that must evaluate positively if the node is to beconsidered within the code block of the for-each control statement.
Using the second example, it's possible to filter out the extraneous Loopback interfacesdisplayed in our simple JUNOS virtual environment:
adamc@router> op show-int-xpath Interface Status Local IP Addr Subnet Description em0.0 up 10.0.201.201 10.0.201/24 Management gre.0 up 3.0.1.1 3.0.1/24 lo0.0 up 2.0.0.56 Loopback
This is a very simple example of how to use XPath predicates to manipulate thestructured data within the JUNOS XML API, but the technique is applicable in lots ofsituations within JUNOS.
Technet24.ir||||||||||||||||||||
||||||||||||||||||||


Working with regular expressionsIn this recipe, we'll build on our original op script show-int.slax, and enhance itsfunctionality so that it can limit the output based on characteristics of the interface. Inthis case, it will allow the user to specify a regular expression pattern and onlyinterfaces whose description match this pattern will be displayed.
Technet24.ir||||||||||||||||||||
||||||||||||||||||||


Getting readyIn order to complete this recipe, you'll need access to a JUNOS router running with abasic configuration.
Technet24.ir||||||||||||||||||||
||||||||||||||||||||


How to do it...The following are the steps for the recipe:
1. Start with the show-int.slax source code from the previous recipe, but this time usethe new filename show-int-regex.slax.
2. Right after the boiler-plate, declare a command-line argument that is to be userprovided in order to nominate the regular expression to use:
param $description=".*"; var $arguments = { <argument> { <name> "description"; <description> "Match subset of interfaces based upon description"; } }
3. Modify the for-each control statement and use an XPath predicate that references thejcs:regex() function in order to test a regular expression:
for-each ($result// logical-interface[jcs:regex( $description, description)] ) {
4. Copy the script to the JUNOS router—both routing engines if appropriate—andconfigure the script as a system op script:
adamc@router# set system scripts op file show-int-regex.slax
5. Invoke the op script to see the results. Use the optional description argument tosupply a regular expression in order to filter the list:
adamc@router> op show-int-regex Interface Status Local IP Addr Subnet Descriptionem0.0 up 10.0.201.201 10.0.201/24 Managementgre.0 up 3.0.1.1 3.0.1/24 gre.101 up 3.0.101.1 3.0.101/24 CST 1G FOOB1/IPAC/10024gre.102 up 3.0.102.1 3.0.102/24 CST 1G BODG1/IPAC/10089gre.103 up 3.0.103.1 3.0.103/24 CST 1G DEVN1/IPAC/10054gre.104 up 3.0.104.1 3.0.104/24 CST 1G BITB1/IPAC/10012lo0.0 up 2.0.0.56 Loopbacklo0.16384 up 127.0.0.1 lo0.16385 up 128.0.0.1
adamc@router> op show-int-regex description FOO Interface Status Local IP Addr Subnet Descriptiongre.101 up 3.0.101.1 3.0.101/24 CST 1GFOOB1/IPAC/10024
Technet24.ir||||||||||||||||||||
||||||||||||||||||||


Technet24.ir||||||||||||||||||||
||||||||||||||||||||

How it works...The param directive declares a parameter to the op script called description, and in ourcase, it sets a default value of .*—a regular expression which will match everything.The arguments structure simply provides an XML response that helps the JUNOS mgddaemon structure an interactive CLI help page for the command-line argument.
This time the XPath predicate calls jcs:regex() to determine whether a given logicalinterface should be processed or not. jcs:regex() performs a regular expressionevaluation upon the description of the interface. Regular expressions are powerfulexpressions used to match text values and have useful application in text search andvalidation. The following table gives a brief primer into regular expression syntax:
Regex Construct Matching Behavior
a Literal characters match themselves
a? Zero or one occurrences of the literal character
a* Any number of occurrences of the literal character
a{4,6} Between four and six occurrences of the literal character
[abcd] Any single character in the set
[abcd]? Zero or one occurrences of the literal character
[abcd]* Any number of occurrences of the characters in the set
. Any character at all (including a newline character)
||||||||||||||||||||
||||||||||||||||||||

.? Zero or one occurrence of any single character
.* Any number of occurrences of any single character
a | b Either a or b
If the regular expression matches the description of an interface, the interface isprocessed and printed. In this example, an ISP router with lots of customer interfacescan quickly be searched to find a specific customer.
Technet24.ir||||||||||||||||||||
||||||||||||||||||||


Working with IP addressesIn this recipe, we'll build on our original op script, show-int.slax, and enhance itsfunctionality so that it can limit the output based on characteristics of the interface. Inthis case, it will allow the user to nominate an IP address range in the CIDR notation,for example 8.0.0.0/24, and will then restrict its output to interfaces associated with thataddress range.
Technet24.ir||||||||||||||||||||
||||||||||||||||||||


Getting readyIn order to complete this recipe, you'll need access to a JUNOS router running with avaried set of network interfaces for different addresses.
Technet24.ir||||||||||||||||||||
||||||||||||||||||||


How to do it...We're going to write a SLAX script to call the interface information RPC and then filterthe output based upon the IP address. Save the code in a file called show-int-ipaddr.slax,or similar.
The steps for the recipe are as follows:
1. Start with the usual SLAX boilerplater which defines namespaces and versions:
version 1.0; ns junos = "http://xml.juniper.net/junos/*/junos"; ns xnm = "http://xml.juniper.net/xnm/1.1/xnm"; ns jcs = "http://xml.juniper.net/junos/commit-scripts/1.0"; import "../import/junos.xsl";
2. Declare an op script parameter called subnet and default this to the string 0/0—anacceptable abbreviation for the IPv4 default route, meaning all addresses:
param $subnet="0/0"; var $arguments = { <argument> { <name> "subnet"; <description> "Match interfaces based upon subnet"; } }
3. Make the RPC call to JUNOS to determine the operational state of the interfaces:
var $rpc = { <get-interface-information>; } var $result = jcs:invoke($rpc);
4. Process the response within an unnamed global match term. First of all, take theuser-provided subnet parameter and call jcs:parse-ip in order to parse the string andextract the various components:
match / { var $subnet-ip = jcs:parse-ip($subnet);
5. Print a standard heading to give context to the per-interface fields that are output:
<op-script-results> { <output> { expr jcs:printf("%10s %6s %16s %16s %s\n", "Interface", "Status", "Local IP Addr", "Subnet", "Description"); }
Technet24.ir||||||||||||||||||||
||||||||||||||||||||

6. Then iterate through all of the ifa-local XML elements which contain an interfaceaddress, and more specifically, the locally-defined address of an interface. Foreach of these elements, perform an IP lookup operation to compare the networkcomponents of the local interface address and the subnet search address:
for-each ($result//ifa-local) { var $iplookup = { var $check = jcs:parse-ip(. _ "/" _ $subnet-ip[3]); if ($check[4]==$subnet-ip[4]) { expr $check[4] _ "/" _ $check[3]; } }
7. If the lookup matches, print out a line of text with the relevant interfaceinformation:
if ($iplookup!="") { <output> { expr jcs:printf("%10s %6s %16s %16s %s\n", ../../../name, ../../../../oper status, ., ../ifa-destination, ../../../description); } } } } }
8. Copy the script to the JUNOS router—both routing engines if necessary—andconfigure the script as a system op script:
adamc@router# set system scripts op file show-int-ipaddr.slax
9. Invoke the script with the subnet argument in order to filter the view of interfaces tothose within a certain address range.
||||||||||||||||||||
||||||||||||||||||||

Technet24.ir||||||||||||||||||||
||||||||||||||||||||

How it works...First of all, we declare the subnet parameter and give it a default value. We also providesome help text to be digested by mgd so that the CLI looks helpful to an unenlighteneduser. Then we use the <get-interface-information> RPC in order to get the operational stateof the interfaces on the system.
But then things get interesting. We use jcs:parse-ip() in order to break down the simple IPaddress string provided by the user into five helpfully distinct components. We store thisin a new variable: $subnet-ip. Take a look at the following figure:
Figure 3.1 Illustration of jcs:parse-ip
After printing the header using the usual printf-style syntax, we iterate through theresponse to the <get-interface-information> RPC. Note that the XPath expression searchesfor ifa-local elements anywhere within the returned response. This is useful, because theelement lives at a rather deep hierarchy in the response. See Figure 3.2.
For each interface address that we find, we call upon the services of jcs:parse-ip() again,but with a subtle difference. We use the prefix length from the subnet search argument!We're basically saying, Consider the interface address, but apply this subnet mask.jcs:parse-ip() dutifully returns to us the network portion of the answer in index [4] andthis can be directly compared with the subnet search argument. If they match, it meansthat the interface address, when using the search criteria mask, shares the same networkportion or, rather, one is contained by the other.
||||||||||||||||||||
||||||||||||||||||||

Figure 3.2 Performing an IP lookup using jcs:parse-ip()
If the lookup operation yields a match, then we proceed to print out the interface-specific records, but note this time that we have to refer to the fields from the point ofview of where we are with the interface address context node, hence the parent-nodebacktracking with ../..
If you need to understand the XML structure of a particular JUNOS RPC,execute the command in the CLI, but pipe the command output to displayxml. The CLI will show you the native XML format for the commandoutput. For example:
adamc@router> show interfaces | display xml
Technet24.ir||||||||||||||||||||
||||||||||||||||||||


There's moreThe really neat thing about using the jcs:parse-ip() function in order to parse the IPaddress strings into structured data is that Juniper has thoughtfully made this functionmulti-protocol aware. Specifically, it is IPv6-friendly. So without any change, you'llfind that the script will equally search IPv6 interfaces as well.
Technet24.ir||||||||||||||||||||
||||||||||||||||||||


Debugging SLAX scriptsIn this recipe, we'll take the original show-int.slax script again, but pretend that it's notworking and investigate the options available when you're trying to debug a script.
Technet24.ir||||||||||||||||||||
||||||||||||||||||||


Getting readyIn order to complete this recipe, you'll need access to a JUNOS router. Only a basicoperating configuration is required.
Technet24.ir||||||||||||||||||||
||||||||||||||||||||


How to do it...We're going to use the original show-int.slax script from the first recipe, and modify it toadd diagnostic information. So load that file and follow the directions to makemodifications. The following are the steps for the recipe:
1. Decide what type of user interaction is most appropriate for the case that you areworking on. Consult the following table:
Use case Method
Immediate user feedback of runtime situationevents
<output> jcs:printf(“Somethinghappened”);
Notification of information that might have usebeyond immediate invocation
jcs:syslog(“user.notice”, “Somethinghappened”);
Developer feedback and diagnosticinformation
jcs:progress(“Something happened”) andobserve with detail knob
Detailed interactive developer feedback SLAX debugger
2. Modify the show-int.slax script to include one of these options in order to debug themain for-each loop. In this case, we'll use jcs:progress()
match / { <op-script-results> { <output> { expr jcs:printf("%10s %6s %16s %16s %s\n", "Interface", "Status", "Local IP Addr", "Subnet", "Description"); } for-each ($result//logical-interface) { expr jcs:progress("Checking interface ", name); <output> { expr jcs:printf("%10s %6s %16s %16s %s\n", name, ../oper-status, address-family/interface-address[1]/ ifa local, address-family/interface-address[1]/ifa destination, description); } } } }
3. Run the show-int.slax script once more, but this time ensure that it has the detail
Technet24.ir||||||||||||||||||||
||||||||||||||||||||

command line option invoked:
adamc@router> op show-int detail 1970-01-01 03:58:04 UTC: reading op script input details 1970-01-01 03:58:04 UTC: testing op details 1970-01-01 03:58:04 UTC: running op script 'show-int.slax' 1970-01-01 03:58:04 UTC: opening op script '/var/db/scripts/op/show-int.slax' 1970-01-01 03:58:04 UTC: reading op script 'show-int.slax' 1970-01-01 03:58:04 UTC: Checking interface em0.0 1970-01-01 03:58:04 UTC: Checking interface gre.0 1970-01-01 03:58:04 UTC: Checking interface gre.101 1970-01-01 03:58:04 UTC: Checking interface gre.102 1970-01-01 03:58:04 UTC: Checking interface gre.103 1970-01-01 03:58:04 UTC: Checking interface gre.104 1970-01-01 03:58:04 UTC: Checking interface lo0.0 1970-01-01 03:58:04 UTC: Checking interface lo0.16384 1970-01-01 03:58:04 UTC: Checking interface lo0.16385 1970-01-01 03:58:04 UTC: inspecting op output 'show-int.slax' Interface Status Local IP Addr Subnet Description em0.0 up 10.0.201.201 10.0.201/24 Management gre.0 up 3.0.1.1 3.0.1/24 gre.101 up 3.0.101.1 3.0.101/24 CST 1G FOOB1/IPAC/10024 // Foobar Saunders and his Unix Entendres gre.102 up 3.0.102.1 3.0.102/24 CST 1G BODG1/IPAC/10089 // Bodgit and Scarper, Inc. gre.103 up 3.0.103.1 3.0.103/24 CST 1G DEVN1/IPAC/10054 // Devnull Networks Limited gre.104 up 3.0.104.1 3.0.104/24 CST 1G BITB1/IPAC/10012 // Bitbucket Routing, s.r.o. lo0.0 up 2.0.0.56 Loopback lo0.16384 up 127.0.0.1 lo0.16385 up 128.0.0.1 1970-01-01 03:58:04 UTC: finished op script 'show-int.slax'
||||||||||||||||||||
||||||||||||||||||||

Technet24.ir||||||||||||||||||||
||||||||||||||||||||

How it works...When we call jcs:progress(), an event message is emitted to the SLAX processor whichrecords the supplied message and logs it, independently of any main output which isusually directed towards the XML processing input of mgd. This event message stream isordinarily not visible to casual users of op scripts unless they invoke the detail option.
||||||||||||||||||||
||||||||||||||||||||

Technet24.ir||||||||||||||||||||
||||||||||||||||||||

There's moreIn our preceding example, the debugging situation was quite simple. We just wanted toensure that we were processing all of the interfaces that we expected to be processing.But sometimes debugging is much more complicated than that. When the troubleshootingprocess is more complex than printf-style debugging, JUNOS comes with a fully-fledgedSLAX script debugger, which works in a similar manner to gdb and friends.
The steps for the recipe are as follows:
1. Start the debugger on the show-int.slax file. The code is as follows:
adamc@router> op invoke-debugger cli show-int sdb: The SLAX Debugger (version 0.17.1) Type 'help' for help (sdb)
2. List the code to get situational awareness (the optional line number argumentallows us to skip the usual boilerplate at the beginning):
(sdb) list 14 show-int.slax:14: match / { show-int.slax:15: <op-script-results> { show-int.slax:16: <output> { show-int.slax:17: expr jcs:printf("%10s %6s %16s %16s %s\n", "Interface", "Status", "Local IP Addr", "Subnet", "Description"); show-int.slax:18: } show-int.slax:19: for-each ($result//logical- interface) { show-int.slax:20: <output> { show-int.slax:21: expr jcs:printf("%10s %6s %16s %16s %s\n", show-int.slax:22: name, ../oper-status, show-int.slax:23: address family/interface-address[1]/ifa-local, show-int.slax:24: address family/interface-address[1]/ifa-destination, description); show-int.slax:25: }
3. Set a breakpoint within the for-each loop. Line 20 is a good place:
(sdb) break 20 Breakpoint 1 at file /var/db/scripts/op/show-int.slax, line 20
4. Let the script run and wait for it to hit the breakpoint.
(sdb) run Reached breakpoint 1, at /var/db/scripts/op/show-int.slax:20 show-int.slax:20: <output> {
||||||||||||||||||||
||||||||||||||||||||

5. Inspect the important variables of the script at this point, using XPath expressions:
(sdb) print . [node-set] (1) <logical-interface> <name>em0.0</name> <local-index>64</local-index> <snmp-index>18</snmp-index> <description>Management</description> […]
6. Let the script run the loop again:
(sdb) over Reached breakpoint 1, at /var/db/scripts/op/show-int.slax:20 show-int.slax:20: <output> {
7. Again inspect the loop variables to see how things have changed:
(sdb) print . [node-set] (1) <logical-interface> <name>gre.0</name> <local-index>65</local-index> <snmp-index>508</snmp-index>
The SLAX debugger is a comprehensive and full-featured debugging assistance forwhen your code becomes complex and requires troubleshooting.
Technet24.ir||||||||||||||||||||
||||||||||||||||||||


Making custom show commandsIn this recipe, we'll create a new SLAX op script, show-bgp.slax, in order to create aslightly more readable and visible show bgp summary command. We'll do this by executingthe normal RPC associated with the show bgp neighbor command, extracting the pertinentinformation, tabulating, and formatting it for output.
Technet24.ir||||||||||||||||||||
||||||||||||||||||||


Getting readyIn order to complete this recipe, you'll need access to a JUNOS router running BorderGateway Protocol (BGP) with a number of peers.
Technet24.ir||||||||||||||||||||
||||||||||||||||||||


How to do it...We're going to create a SLAX script to call the necessary RPC to get the BGPinformation, then iterate through the returned structure, printing only a small buthopefully relevant subset of the information. The steps for the recipe are as follows:
1. Start with the mandatory SLAX boilerplate as recommended by Juniper. Thistypically defines version numbers for compatibility and declares namespaces.
version 1.0; ns junos = "http://xml.juniper.net/junos/*/junos"; ns xnm = "http://xml.juniper.net/xnm/1.1/xnm"; ns jcs = "http://xml.juniper.net/junos/commit-scripts/1.0"; import "../import/junos.xsl";
2. Make the RPC call in order to query the operational state of the BGP protocolwithin the JUNOS routing protocol daemon:
var $rpc = { <get-bgp-neighbor-information>; } var $result = jcs:invoke($rpc);
3. Use an unnamed template—or a match template—in order to ignore any scriptinput and to respond with the appropriate <op-script-results> XML structurecontaining the necessary output. Make use of a for-each loop in order to iteratethrough each bgp-peer structure extracting the interesting data:
match / { <op-script-results> { <output> { expr jcs:printf("%16s %10s %10s %10s %10s %20s\n", "Peer", "ASN", "InMsgs", "OutMsgs", "OutQ", "State/PfxRcvd"); } for-each ($result//bgp-peer) { var $pattern="[+]"; var $peer-addrs = jcs:split($pattern, peer- address); if (peer-state=="Established") { if (bgp-rib/name=="inet.0") { <output> { expr jcs:printf("%16s %10u %10u %10u %10u %20u\n", $peer- addrs[1], peer-as, input-messages, output messages, bgp- output-queue/count,bgp rib[name=="inet.0"]/accepted-prefix-count); } } } else {
Technet24.ir||||||||||||||||||||
||||||||||||||||||||

<output> { expr jcs:printf("%16s %10u %10u %10u %10u %20s\n", $peer-addrs[1], peer-as, input-messages, output-messages,bgp-output- queue/count, peer-state); } } } } }
4. Copy the script to the JUNOS router—both routing engines if necessary—andconfigure the script as a system op script:
adamc@router# set system scripts op file show-bgp.slax
5. Invoke the op script to see the results:
adamc@router> op show-bgp Peer ASN InMsgs OutMsgs OutQ State/PfxRcvd 10.0.201.220 64500 757 848 0 2 10.0.201.230 64500 Connect
||||||||||||||||||||
||||||||||||||||||||

Technet24.ir||||||||||||||||||||
||||||||||||||||||||

How it works...The interesting activities start in step 2 where we make the actual call to JUNOS's mgdsoftware daemon in order to query the operational BGP state. mgd in turn queries rpd,formats the output nicely as XML, and returns it to us.
In step 3, we inspect the returned BGP structure and focus on several properties of it, asshown in the table:
XPath Reference Description
peer-state A textual description of the BGP peer's current state
peer-id Numeric identifier of the peer, usually IP address
peer-address IP address of the BGP peer
peer-as The autonomous system number of the BGP peer
input-messages The number of received BGP messages
output-messages The number of transmitted BGP messages
bgp-output-queue Structure including the count of queued messages
We iterate through each of the returned bgp-peer structures. Firstly, we make use of thejcs:split() built-in function in order to split up a string based upon a regular express.This is necessary because JUNOS will return both the IP address and the port number -
||||||||||||||||||||
||||||||||||||||||||

separated by a plus (+) character—in the peer-address field if the session is connected.This information is superfluous to our output requirements so we cut the string up andgrab the first field.
Note that the array index syntax starts at 1, not 0!
If the session is established and is connected to the main IPv4 internet routing table, thenwe print out a line of text summarizing the details of accepted prefixes. If the session isnot established, we simply print the peer state.
Technet24.ir||||||||||||||||||||
||||||||||||||||||||


Making configuration changesIn this recipe, we'll create a new SLAX-based op script, config-interface.slax, and use itas a provisioning frontend command intended to assist an operator in network serviceprovisioning on Ethernet interfaces.
We'll assume an environment similar to the following diagram: an ISP router providingan IP-layer service and connected to several Ethernet-layer access providers ondifferent interfaces. As a service request comes in to the provisioning center, anoperator is required to enter some configuration on the JUNOS router to provide theservice. This typically involves allocating some resources such as IP addresses andVLAN identifiers and applying them to a provisioning template configuration.
To automate this activity, we'll create our SLAX script so that it will take a series ofuser parameters and apply the configuration change directly to the JUNOS device.Additionally, we can make the SLAX script automatically determine the next free VLANidentifier.
Figure 3.3 Example service provider access router
Technet24.ir||||||||||||||||||||
||||||||||||||||||||

Getting readyIn order to complete this recipe, you'll need a JUNOS router with some physicalEthernet interfaces attached. If you don't have this and you're using virtual Olive or vRRfor testing, you can also make do with GRE interfaces, but you'll have to modify theconfiguration templates to remove the VLAN identifier configuration components, sincethese are not applicable for GRE.
You should also have a good understanding of the JUNOS CLI structure. In this recipe,we're going to use a feature called apply-macro. This feature allows a developer to extendthe JUNOS configuration by including opaque key-value pair attributes within theJUNOS configuration. In our case, we're going to use the feature in order to implement asimple mapping function between physical interfaces and the notion of carrierinterconnections, and to store some interconnect-specific metadata.
You might think that we could just use the physical interface name todefine the physical link to be used, and indeed this is possible. But inlarge-scale ISP environments, where routers often have a large number ofinterfaces and associated hardware, components get changed a lot. Justbecause a service is configured on ge-0/1/0 one day, it doesn't mean that itwill always be there. So, de-referencing or abstracting the servicedemarcation point from the physical asset or resource is a usefultechnique.
Technet24.ir||||||||||||||||||||
||||||||||||||||||||


How to do it...We're going to create a new SLAX op script called config-interfaces.slax, upload it to ourJUNOS device, and then test it to see how it automates the workflow involved whenconfiguring lots of repetitive services. In order to support the SLAX tool, we're going toaugment the configuration of the physical interfaces on our JUNOS router to addinformation such as the adjacent provider and the available VLAN ranges that can beused.
First of all, create the SLAX op script by making a new text file in your preferred texteditor and applying the source code, as described here:
1. First of all, include the usual Juniper op script boilerplater which definesnamespaces and versions.
version 1.0; ns junos = "http://xml.juniper.net/junos/*/junos"; ns xnm = "http://xml.juniper.net/xnm/1.1/xnm"; ns jcs = "http://xml.juniper.net/junos/commit-scripts/1.0"; import "../import/junos.xsl";
2. Then define within the SLAX scripts the special variable names that are expectedto be input parameters from the op script environment; for example, the argumentsprovided by the user to determine our operation. In this case, we need three crucialbits of data at a minimum as described in the following table:
Inputparameter Description
service-id
A descriptor used to identify the service. Commonly used in ISP environments wherelots of customers have similarly configured services, a service-id—usually analphanumeric string - helps us to quickly refer to the component that we're interestedin.
interconnectAn interconnect identifier. This helps us identify the underlying physical interface thatwe're going to configure the logical service on.
Technet24.ir||||||||||||||||||||
||||||||||||||||||||

wan-ip The point-to-point IP address that we'll use to configure the link.
As you get comfortable with the data flow, you'll likely be able to expand theseservice parameters to include more sophisticated items such as traffic shaping,QoS, ACLs, and so on. For now, we'll try to keep the example simple andreadable without bogging things down with lots of code, as follows:
var $arguments = { <argument> { <name> "service-id"; <description> "Service identifier"; } <argument> { <name> "interconnect"; <description> "Interconnect identifier"; } <argument> { <name> "wan-ip"; <description> "WAN IP address"; } }
3. Then define the configuration template that we're going to use in order to instantiatea service when a provisioning operator runs our SLAX script. In this case, we dothe bare minimum of defining an Ethernet VLAN, associating an IP address, andsetting a description field so that we can remember which services are configuredon which VLANs:
template configuration($interface, $unit, $wan-ip, $service-id) { <configuration> { <interfaces> { <interface> { <name> $interface; <unit> { <name> $unit; <description> $service-id; <vlan-id> $unit; <family> { <inet> { <address> { <name> $wan-ip; } } } } } } } }
4. Then begin defining the main flow of the op script within an unnamed match clauseas usual. In this case, start off by checking the input parameters to make sure thatthey are present, correct, and in the right format:
||||||||||||||||||||
||||||||||||||||||||

match / { <op-script-results> { if ($service-id=="") { <xsl:message terminate="yes"> "Must specify service identifier string"; } if ($interconnect=="") { <xsl:message terminate="yes"> "Must specify interconnect identifier string"; } if (count(jcs:regex("^[0-9]+\\.[0-9]+\\.[0-9]+\\.[0 9]+\\/[0-9]+$", $wan-ip))==0) { <xsl:message terminate="yes"> "WAN IP must be in form A.B.C.D/E " _ $wan-ip; }
5. Next use the RPC mechanisms to acquire a copy of the current configuration forreference, so that we can map the interconnect identifier to a physical interface:
var $config-rpc = { <get-configuration>; } var $result = jcs:invoke($config-rpc);
6. Use an XPath predicate expression to find the physical interface associated withthe interconnect identifier:
var $interface = ($result/interfaces/interface/name[../apply- macro[name="PROVISION"]/data/value[../name=="interconnect- name"]==$interconnect])[1]; if (count($interface)==0) { <xsl:message terminate="yes"> "No interface found for specified interconnect " _ $interconnect; }
7. Calculate the next available VLAN on the interconnect by making use of themetadata stored within the apply-macro element:
var $min = number($result/interfaces/ interface[name=$interface]/ apply-macro[name=="PROVISION"]/ data/value[../name=="first-id"]); var $max = number($result/interfaces/ interface[name=$interface]/ apply-macro[name=="PROVISION"]/ data/value[../name=="last-id"]); var $last = number($result/interfaces/ interface[name=$interface]/ unit[position()== last()]/name); if ($min<0 || $min>4094 || string($min)=="NaN") { <xsl:message terminate="yes"> "VLAN interface range lower limit on interface " _ $interface _ " invalid - reconfigure first-id"; } if ($max<0 || $max>4094 || string($max)=="NaN") { <xsl:message terminate="yes"> "VLAN interface range upper limit on interface " _ $interface _ " invalid - reconfigure last-id";
Technet24.ir||||||||||||||||||||
||||||||||||||||||||

} var $next = { if ($last<$min) { expr $min; } else { expr $last + 1; } } if ($next > $max) { <xsl:message terminate="yes"> "Exceeded VLAN interface range on interface " _ $interface; }
8. Print status message to let the operator know what we're doing, and then instantiatethe configuration template with the parameters and apply it using the load-configuration() call:
<output> "Interconnect ID " _ $interconnect _ " is on interface " _ $interface _ ": using ranges " _ $min _ "-" _ $max; <output> "Configuring next available logical VLAN " _ $next _ " with IP address " _ $wan-ip; var $connection = jcs:open(); var $configuration = call configuration($interface, $unit=$next, $wan-ip, $service-id); var $commit-options = { <commit-options> { <synchronize>; <log> "Configuring interface " _ $interface _ " unit " _ $next _ " with IP " _ $wan-ip _ " for service " _ $service id; } }; var $config-result := { call jcs:load-configuration( $connection, $configuration, $commit-options ); }; copy-of $config-result; expr jcs:close($connection); }}
9. Upload the op script to the JUNOS device in the usual manner by copying it to the/var/db/scripts/op directory and referencing it within the [ system scripts op ]configuration hierarchy.
10. Prepare the necessary apply-macro stanza on each of the physical interfaces for whichthe op script is going to configure the service.
adamc@router> show configuration interfaces xe-1/1/1 apply-macro PROVISION { first-id 1; interconnect-name PROVIDER-B; last-id 999; }
The apply-macro directive is a hidden command under JUNOS. Persevere,endure the lack of tab-completion, and be careful with typos.
11. Test the op script to make sure that it works:
||||||||||||||||||||
||||||||||||||||||||

adamc@router> op config-interfaces service-id FOOB1/IPAC/1234 wan-ip 192.168.0.1/30 interconnect VDC4 Interconnect ID VDC4 is on interface xe-1/1/1: using ranges 1-1004 Configuring next available logical VLAN 1001 with IP address 192.168.0.1/30 re0: configuration check succeeds re0: commit complete
adamc@router> show system commit 0 2017-08-24 17:33:52 UTC by adamc via junoscript commit synchronize Configuring interface xe-1/1/1 unit 1001 with IP 192.168.0.1/30 for service FOOB1/IPAC/1234
Technet24.ir||||||||||||||||||||
||||||||||||||||||||


How it works...While there is a lot in common between this op script and the previous recipes thatwe've worked with, there are also some new techniques in this recipe that requireexplanation. I'll call them out piece by piece.
Steps 1 and 2 are pretty regular now and form the part of most, if not all, op scripts. Instep 3, we have something new, however: a SLAX template. SLAX templates are smallusable components of XML and SLAX that can be called upon as required withparametric input. It can be convenient to think of templates like a function call inconventional programming languages.
A SLAX template isn't exactly like a function call however, so be careful.Note the fact that the variable namespace of the template is the same asthat of the main script which can be limiting.
In this case, we use a template to define the XML associated with the JUNOSconfiguration that we're planning to apply, along with some variable components thatare specified each time we call the template.
If you need to understand how the JUNOS configuration statements mapinto XML, the best method is to use the CLI to help you:
adamc@router> show configuration | display xml
In step 4, we start the main flow of the op script, with the unnamed match / template. Inthis case, we have to vet the incoming input parameters from the user so it's important tonote the use of the XML <xsl:message> directive. Previously, we've used the <output> tags,or a combination of jcs:output() and jcs:printf(). These functions are equally valid, but<xsl:message>—which unfortunately includes no obvious SLAX template function—isuseful for the cases where we need to output a message and then immediately stopprocessing. In that sense, it's similar to die() in Perl, or exit() in C.
In step 5, we invoke an RPC to get the XML representation of the configuration—apattern that we've seen before.
But in step 6, we make use of an XPath expression with a predicate in order to analyzethe configuration and to extract the name of the interface that we need to work on. Thisconcept requires a little focus to gain a full understanding, so I'll reproduce the relevant
Technet24.ir||||||||||||||||||||
||||||||||||||||||||

expression here for convenience:
$result/interfaces/interface/name[ ../apply-macro[name="PROVISION"]/ data/value[ ../name=="interconnect-name"]==$interconnect])[1];
The XPath expression is best thought of as a sequence of search operations within thehierarchical XML structure of the data. So assuming that the $result variable includes theconfiguration data from the RPC in the previous step, the expression $result/interfacesresolves to the interfaces child node of the main <configuration> node. Similarly,$result/interfaces/interface resolves to the set of <interface> nodes within the <interfaces>node, and $result/interfaces/interface/name further refines to a list of all of the interfacenames within the configuration hierarchy.
The clever bit occurs in the XPath predicate contained within the square brackets. Ifyou're familiar with databases and SQL, one way to think of predicates is the WHEREclause in SQL statements. Each of the square brackets constrains the current view of thenode-set according to the predicate expression. So an English explanation of the abovestatement might be something like, all interface names where the value of theinterconnect-name field of the apply-macro PROVISION element is equal to $interconnect.
Finally, note that we take the first element as – 1 and not 0!—in case the operatoraccidentally configured the macro more than once, because XPath expressions routinelyreturn node-sets: that is, a list of nodes.
In step 7, we use similar XPath expressions in order to extract the VLAN rangeinformation from the metadata stored within the apply-macros configuration element, butwe use an interesting technique to find the last logical interface unit configured:
var $last = number($result/interfaces/interface[name=$interface]/ unit[position()== last()]/name);
Here the XPath predicate is [position()==last()]. This works because position() returns thecurrent position of the item being considered within the context of its parent, and last()returns the last position in the same array. So we basically make use of the last VLANconfigured in order to determine the next VLAN to use.
Step 7 performs some logic to ensure that its determined next VLAN is within the rangeof allowed VLANs before proceeding.
If this automatic VLAN allocation strategy doesn't suit your environment,
||||||||||||||||||||
||||||||||||||||||||

you can simply run the code by removing the first-id and last-id metadataitems, and simply capturing the VLAN identifier as an input parameter.
In step 8, we now have all the information that we need in order to instantiate theconfiguration, so we do that with the jcs:open(), jcs:load-configuration(), jcs:close() pattern.This invokes the JUNOS RPCs in an exclusive edit mode which is usually appropriatefor automation applications.
Step 9 copies the op script to the JUNOS device as usual, but the extra step that we needin this example is in step 10, where we set up the special metadata that the op scriptuses to understand the VLAN configuration limits on the physical interface.
And then in step 11, we can witness the op script doing its magic. The operator invokesthe command, specifying a service identifier, an interconnect identifier, and an IPaddress, and the script will determine the appropriate physical interface, choose thenext free VLAN, and configure a logical interface setting the description and IP addressappropriately.
Technet24.ir||||||||||||||||||||
||||||||||||||||||||


Event ProgrammingIn this chapter, we'll cover the following recipes:
Archiving configurations after a changeCapturing output after an eventCustom responses to an eventDealing with a flapping interfaceDealing with a flapping OSPF neighborDIY routing protocolDebugging event scripts
Technet24.ir||||||||||||||||||||
||||||||||||||||||||


IntroductionThe JUNOS operating system provides a comprehensive set of network functionalitiesacross a series of platforms and in the previous chapters we've seen useful recipes thathelp us automate or simplify some operations and configuration changes.
But all the recipes that we've seen so far have always been user-initiated. They neededa user to invoke them in some way even if that user was a machine agent driving theJUNOS device through NETCONF-over-SSH or through the REST API. What if wewant to automatically deal with events that might happen on the network with someprescribed actions?
This is where the JUNOS event framework comes into its own. The JUNOS eventframework tightly integrates with the conventional syslog-style logging infrastructureand enables users and operators to trap certain events and trigger custom actions basedon them.
Event policies use a very similar syntax to conventional routing policies, matchingtrigger events, checking context or correlating events, and dispatching actions. Eventscripts are custom pieces of code, written in SLAX (or Python in modern versions ofJUNOS) in order to effect custom actions.
Technet24.ir||||||||||||||||||||
||||||||||||||||||||


Archiving configurations after a changeIn this recipe, we'll make use of a JUNOS event policy that fires whenever aconfiguration change is committed. It will respond by taking a snapshot of theconfiguration, and uploading it to a network management station for record-keeping.
Technet24.ir||||||||||||||||||||
||||||||||||||||||||


Getting readyIn order to complete this recipe, you need access to a JUNOS device and a UNIX-likenetwork management station running an OpenSSH (or equivalent) server.
Technet24.ir||||||||||||||||||||
||||||||||||||||||||


How to do it…We're going to locate a directory on the UNIX host where configuration backups will bestored, then configure the JUNOS device with the relevant event policy to respondappropriately. The steps for the recipe are as follows:
1. Create a user profile and home directory pair on the UNIX host that we can assignto the JUNOS device for login purposes. The exact steps for creating a user mayvary between operating systems, but adduser is normally the utility to employ as asuperuser (using the sudo or doas tool). Set the password to an appropriate passwordthat you can deploy on your JUNOS infrastructure:
Debian Linux OpenBSD
user$ sudo adduser junosAdding user junos...Adding new group junos (1001) ...Adding new user junos (1001) with group junos ...Creating home directory “/home/junos” ...Copying files from /etc/skel ...Enter new UNIX password:Retype new UNIX password:passwd: password updated successfully
$ doas adduserEnter username []: junosEnter full name []:Enter shell [ksh]:Uid [1001]:Login group junos [junos]:Login group is ``junos''.Invite junos into other groups: guest no [no]:Login class authpf bgpd daemon default pbuild staff unbound [default]:Enter password []:Enter password again []:
2. If necessary, take any site-specific steps you might need in order to restrict theaccess that the new UNIX access possesses. All we really require is the ability tolog in with SSH/SCP and write files. Steps to consider might include:
Using a restricted shellUsing disk quotas to restrict disk consumptionUsing a chroot or jail environment
3. On the JUNOS device, configure the destination network management server byreplacing the IP address, path, and password details with your own:
adamc@router# set event-options destinations NMS archive-sites "scp://[email protected]//home/junos" password MyPasswordHere [edit event-options] adamc@router# show destinations { NMS {
Technet24.ir||||||||||||||||||||
||||||||||||||||||||

archive-sites { "scp://[email protected]//home/junos" password "$9$fQ390BEevLBI-w"; ## SECRET-DATA } } }
4. Then configure the event policy logic to respond to a configuration commit with thecopy operation:
adamc@router# set event-options policy BACKUP-CONFIG events ui_commit_completed adamc@router# set event-options policy BACKUP-CONFIG then upload filename committed adamc@router# destination NMS
[edit event-options] adamc@router# show policy BACKUP-CONFIG { events ui_commit_completed; then { upload filename committed destination NMS; } }
5. Commit the new configuration and observe that the configuration file appears onthe UNIX NMS host in the correct place:
$ ls -l total 16 -rw-r----- 1 junos junos 2870 Aug 25 2017 router_20170825_192610_juniper.conf.gz -rw-r----- 1 junos junos 2866 Aug 25 2017 router_20170825_192835_juniper.conf.gz
||||||||||||||||||||
||||||||||||||||||||

Technet24.ir||||||||||||||||||||
||||||||||||||||||||
How it works...Steps 1 and 2 simply create an appropriate directory location on the UNIX-based NMShost. You can do this in any way suitable for your environment, but just take care thataccess to the NMS host that you are providing for use by the JUNOS devices cannot beabused by unauthorized users who can somehow get their details on the sharedcredentials.
In step 3, we tell the JUNOS router the details about the upload site. The specificdetails of the upload destination are captured separately like this so that they can bereferenced by many different triggered event policies. The format of the destinationstring is quite specific. It is as follows:
protocol://username@hostname[:port]//remote-path
protocol can be either SCP or FTP, but for the purposes of this recipe, we've preferredthe secure SSH-based SCP protocol. If you operate your SSH server on a non-standardTCP port, you can specify the port number in the port component of the URL. Note thatit's important to specify the remote-path. If we don't specify it, the JUNOS SCP client willtry to write to the root directory on the remote host, which is unlikely to be permissible.
The password field is specified separately and this needs to be synchronized with thepassword created on the network management host in step 1.
Step 4 then defines the specific event policy that is going to perform the action for us.The syntax is very similar to JUNOS routing policy language, so if you're familiar withthat, you'll likely be at home with it very quickly. We'll reproduce it here quickly forclarity:
policy BACKUP-CONFIG { events ui_commit_completed; then { upload filename committed destination NMS; } }
The events element specifies the events that we want to trap and the then clause definesthe activities that we want to occur. In our case, we match the UI_COMMIT_COMPLETED eventand respond with an activity to upload a file to the NMS destination that we previouslydefined. The filename that we upload can be any accessible file on the device, but thespecial name committed refers to the currently committed configuration.
||||||||||||||||||||
||||||||||||||||||||

We trap the UI_COMMIT_COMPLETED event here rather than any of the otherUI_COMMIT events because, the commit operation does take a measurabletime, and we don't want to try to copy the committed configuration filebefore it's really committed.
If you experienced any problems or difficulties with this recipe, it's probably best tofocus on the SSH access to the NMS host as the source of the problems. You canperform the copy operation manually to verify things using the following sequence ofcommands:
adamc@router> start shell % scp /config/juniper.conf.gz [email protected]:/home/junos/[email protected]'s password: juniper.conf.gz 100% 2935 2.9KB/s 00:00
Technet24.ir||||||||||||||||||||
||||||||||||||||||||


There's moreThe SSH/SCP method of transferring files to the network management host makes use ofa secure, encrypted transport; however, it comes with the downside that you need tostore access passwords within the JUNOS configuration. This is difficult to avoid,because Juniper doesn't provide an obvious, supported way of making use of SSH keysfor authentication. If you have a strong aversion to storing passwords in your JUNOSconfiguration file, and you understand the caveats of deviating from Juniper'srecommendations, then you can implement SSH key-based authentication for SCP filetransfers that originate from event-policies.
1. Start up a BSD shell from your JUNOS host and use the su command to become aroot user:
adamc@router> start shell % su - Password: [your root password here] root@router:~ #
2. Change into the root's home directory:
root@router:~ # cd /root
3. Use the OpenSSH key generation utility to make an RSA key-pair for the root useron the JUNOS device:
root@router:~ # ssh-keygen Generating public/private rsa key pair. Enter file in which to save the key (/root/.ssh/id_rsa): Enter passphrase (empty for no passphrase): [hit enter] Enter same passphrase again: [hit enter] Your identification has been saved in /root/.ssh/id_rsa. Your public key has been saved in /root/.ssh/id_rsa.pub. The key fingerprint is: 5a:81:c0:e9:d9:cc:c1:92:e7:44:bd:43:6f:48:2d:75 root@router The key's randomart image is: +--[ RSA 2048]----+ | ..=.. o. E | | =.=.= .. | | . X.+.= | | o = +.o | | So | | o | | . | | | | | +-----------------+ ssh-rsa [key removed]
Technet24.ir||||||||||||||||||||
||||||||||||||||||||

4. The OpenSSH utility will have made two files: a private and a public key. Copythe public key to the network management station host and append it to the JUNOSuser's trusted key file, like this:
root@router:~ # cat ~/.ssh/id_rsa.pub | ssh [email protected] "cat >> .ssh/authorized_keys" [email protected]'s password: [the JUNOS user password]
5. Now try to log in to the network management host from the JUNOS device againand, this time, the SSH session should be able to authenticate you based on the keyalone and without a password:
root@router:~ # ssh [email protected] Last login: Fri Aug 18 13:37:54 2017 from 127.0.0.1 OpenBSD 6.0 (GENERIC) #2148: Tue Jul 26 12:55:20 MDT 2016
$
This means that you can now remove the password parameter from the destination in theconfiguration. But, just as a final reminder, be cautious with this method, because you'vebasically configured functionality specific to the OpenSSH client that JUNOS is usingwithout JUNOS's explicit knowledge. It is possible that certain features, either now orin the future, might interfere with this.
||||||||||||||||||||
||||||||||||||||||||

Technet24.ir||||||||||||||||||||
||||||||||||||||||||

Capturing output after an eventIn this recipe, we'll configure a JUNOS event policy that reacts to an operational event,executes a CLI command to obtain output, and relays that command output to the NMSserver for record-keeping.
||||||||||||||||||||
||||||||||||||||||||

Technet24.ir||||||||||||||||||||
||||||||||||||||||||

Getting readyIn order to complete this recipe, you need access to a JUNOS device and a UNIX-likenetwork management station running an OpenSSH (or equivalent) server. You shouldhave configured the NMS host with a suitable account profile so that the JUNOS devicecan access it. Steps 1 and 2 in the previous recipe on archiving configurations can helpyou complete this if necessary.
||||||||||||||||||||
||||||||||||||||||||

Technet24.ir||||||||||||||||||||
||||||||||||||||||||

How to do it…The steps for the recipe are as follows:
1. Verify the configuration of the network management host to ensure that an accountprofile exists that can be used by the JUNOS router in order to upload files.
user$ touch test.txt user$ scp test.txt [email protected]:/home/junos/test.txt
2. If necessary, configure the JUNOS device with the access details for thedestination of the network management station.
adamc@router# set event-options destinations NMS archive-sites "scp://[email protected]//home/junos" password MyPasswordHere [edit event-options] adamc@router# show destinations { NMS { archive-sites { "scp://[email protected]//home/junos" password "$9$fQ390BEevLBI-w"; ## SECRET-DATA } } }
3. Configure an event policy on the JUNOS device to trap the SNMP_TRAP_LINK_DOWN eventand respond by executing a CLI command.
adamc@router# set event-options policy SHOW-INT events snmp_trap_link_down adamc@router# set event-options policy SHOW-INT then execute- commands commands "show interfaces" adamc@router# set event-options policy SHOW-INT then execute commands output-filename show-int adamc@router# set event-options policy SHOW-INT then execute- commands destination NMS [edit event-options] adamc@router# show policy SHOW-INT { events snmp_trap_link_down; then { execute-commands { commands { "show interfaces"; } output-filename show-int; destination NMS; } } }
4. Commit the configuration and then cause a physical interface event by removing an
||||||||||||||||||||
||||||||||||||||||||

Ethernet cable (or disabling a virtual NIC, if you're using VM testbed).5. On the network management host, observe the arrival of a text file containing the
output of the specified command. The file contains the XML format of the commandoutput.
$ ls -l -rw------- 1 junos junos 27973 Aug 25 2017 router_20170825_201345_show-int $ head -20 router_20170825_201345_show-int <?xml version="1.0" encoding="us-ascii"?> <junoscript xmlns="http://xml.juniper.net/xnm/1.1/xnm" xmlns:junos="http://xml.juniper.net/junos/15.1F6/junos" schemaLocation="http://xml.juniper.net/junos/15.1F6/junos junos/15.1F6/junos.xsd" os="JUNOS" release="15.1F6-S5.6" hostname="router" version="1.0"> <!-- session start at 2017-08-25 20:13:45 UTC --> <!-- No zombies were killed during the creation of this user interface--> <!-- user root, class super-user --> <rpc-reply xmlns:junos="http://xml.juniper.net/junos/15.1F6/junos"> <interface-information xmlns="http://xml.juniper.net/junos/15.1F6/junos-interface" junos:style="normal"> <physical-interface> <name>cbp0</name> <admin-status junos:format="Enabled">up</admin-status> <oper-status>up</oper-status> <local-index>130</local-index> <snmp-index>501</snmp-index> <if-type>Ethernet</if-type> <link-level-type>Ethernet</link-level-type> <mtu>1514</mtu> <if-device-flags> <ifdf-present/> <ifdf-running/> […]
Technet24.ir||||||||||||||||||||
||||||||||||||||||||


How it works…Step 1 validates that the network management host is able to act as a repository for anygenerated output files by trying a simple SCP operation in advance.
Step 2 defines the details of the network management host on the JUNOS device so thatit can be used as the subject of any event policy that may be triggered.
Step 3 defines the critical event policy that matches the event associated with a physicalinterface going down and specifies a response action for executing a command.
The JUNOS event framework is comprehensive and almost every eventgenerated by the system can be trapped and acted on with the event-policylogic. If you're looking to understand what events may be associated witha specific activity, the best way to explore the events is by using the CLIhelp feature, which will happily explain each of the events, its cause, andits attributes.
adamc@router> help syslog
The most significant part of this configuration is shown here:
execute-commands { commands { "show interfaces"; } output-filename show-int; destination NMS; }
Multiple commands can be specified, and the output-filename attribute is prefixed with therouter name and the date and time in order to facilitate chronological sorting of multipleextracts.
Technet24.ir||||||||||||||||||||
||||||||||||||||||||


There's moreIt's possible to arrange for the format of the captured output to be the native CLI ASCIItext rather than XML by using the output-format statement. In our example, we canmodify the configuration of the event-policy so that it looks like this in order to get theoutput as a plain text:
adamc@router> show configuration event-options policy SHOW-INT events snmp_trap_link_down; then { execute-commands { commands { "show interfaces"; } output-filename show-int; destination NMS; output-format text; } }
Technet24.ir||||||||||||||||||||
||||||||||||||||||||


Custom responses to an eventIn this recipe, we'll build on what we've learnt with the event policy framework in theprevious two recipes, but we'll explore custom scripts that can fire when an eventtriggers. Specifically, we'll enhance the previous recipe so that, instead of just capturingthe output to the show interface command, we actually interpret the SNMP_TRAP_LINK_DOWN eventto extract the effected interface and then only execute the command for that interface.
Technet24.ir||||||||||||||||||||
||||||||||||||||||||


Getting readyIn order to complete this recipe, you need access to a JUNOS device and a UNIX-likenetwork management station running an OpenSSH (or equivalent) server. You shouldhave configured your network management host with a suitable account profile so thatthe JUNOS device can access it. Steps 1 and 2 in the first recipe on archivingconfigurations can help you complete this step if necessary.
Technet24.ir||||||||||||||||||||
||||||||||||||||||||


How to do it…The steps for the recipe are as follows:
1. Verify the configuration of the network management host to ensure that an accountprofile exists that can be used by the JUNOS router in order to upload files:
user$ touch test.txt user$ scp test.txt [email protected]:/home/junos/test.txt
2. If necessary, configure the JUNOS device with the access details for thedestination of the network management station:
adamc@router# set event-options destinations NMS archive-sites "scp://[email protected]//home/junos" password MyPasswordHere [edit event-options] adamc@router# show destinations { NMS { archive-sites { "scp://[email protected]//home/junos" password "$9$fQ390BEevLBI-w"; ## SECRET-DATA } } }
3. Create a SLAX op script, show-interfaces.slax, that calls the <get-interface-information>RPC and outputs the results. Make the SLAX script take a command-line argumentinterface that determines which interface to show:
version 1.0; ns junos = "http://xml.juniper.net/junos/*/junos"; ns xnm = "http://xml.juniper.net/xnm/1.1/xnm"; ns jcs = "http://xml.juniper.net/junos/commit-scripts/1.0"; import "../import/junos.xsl";
param $interface="lo0"; var $arguments = { <argument> { <name> "interface"; <description> "Interface to show"; } }
var $rpc = { <get-interface-information> { <interface-name> $interface; } } var $result = jcs:invoke($rpc);
match / { <op-script-result> {
Technet24.ir||||||||||||||||||||
||||||||||||||||||||

copy-of $result; } }
4. Copy the op script to the JUNOS device and register it within the [system scripts op]hierarchy:
$ scp show-interfaces.slax [email protected]:/var/db/scripts/op adamc@router# set system scripts op file show-interfaces.slax
5. Test the op script by running it against an interface on the system to make sure thatit works:
adamc@router> op show-interfaces interface lo0.0 Logical interface lo0.0 (Index 72) (SNMP ifIndex 16) Description: Loopback Flags: SNMP-Traps Encapsulation: Unspecified Input packets : 14 Output packets: 14 Protocol inet, MTU: Unlimited Flags: Sendbcast-pkt-to-re Addresses, Flags: Primary Preferred Is-Default Is-Primary Local: 2.0.0.56 Addresses Local: 2.0.0.57
6. Create an event policy that triggers based upon the SNMP_TRAP_LINK_DOWN event, andresponds by running our new op script. Use the destination specifier to direct theoutput to your network management station:
adamc@router> show configuration event-options policy SHOW-INT { events snmp_trap_link_down; then { event-script show-interfaces.slax { arguments { interface "{$$.interface-name}"; } output-filename show-int; destination NMS; } } }
7. Commit the configuration and then test the event detection by disabling an Ethernetinterface or removing a cable. On the network management station, you shouldobserve the creation of a file in response to the event, and this time the commandexecuted should have included an argument that refers to the interface affectedwithin the event log:
$ more router_20170826_132342_show-int
root@router> op show-interfaces.slax interface "em1"
||||||||||||||||||||
||||||||||||||||||||

Physical interface: em1, Enabled, Physical link is Down Interface index: 9, SNMP ifIndex: 23 Type: Ethernet, Link-level type: Ethernet, MTU: 1514 Device flags : Present Running No-Carrier Interface flags: Hardware-Down SNMP-Traps Link type : Full-Duplex Current address: 08:00:27:17:3e:14, Hardware address: 08:00:27:17:3e:14 Last flapped : 2017-08-26 12:30:07 UTC (00:53:35 ago) Input packets : 292 Output packets: 0 Logical interface em1.0 (Index 65) (SNMP ifIndex 24) Flags: Device-Down SNMP-Traps 0x4000000 Encapsulation: ENET2 Input packets : 292 Output packets: 0 Protocol inet, MTU: 1500 Flags: Sendbcast-pkt-to-re Addresses, Flags: Dest-route-down Is-Preferred Is-Primary Destination: 4.4.4/24, Local: 4.4.4.4, Broadcast: 4.4.4.255
Technet24.ir||||||||||||||||||||
||||||||||||||||||||


How it works…Step 1 verifies that we can successfully login to the network management station andcreate files in a writable directory by running a local-only SSH session.
Step 2 defines the network management station and associated credentials as adestination within the JUNOS event management framework. Once declared in this way,the network management station can be the subject of upload activities from eventpolicies, which may fire in response to events triggered.
In step 3, we create a simple SLAX script that just executes the show interface commandfor a given interface. It calls the <get-interface-information> RPC and then uses the copy-ofdirective to directly copy the received XML node-set into the <op-script-result> XMLstream so that it is interpreted by the mgd, the JUNOS management daemon, and theCLI.
This script is a simple standalone op script that can be executed from the CLI andindeed that's exactly what we do in step 4 to ensure that it works correctly.
In step 5, we configure the JUNOS event management framework to listen out for aspecific event – in our case the SNMP_TRAP_LINK_DOWN event—and to take action when suchan event occurs. The action that we take is defined within the then clause to run a definedscript with some properties that can be summarized in the following table:
Action Description
event-script The filename of the script to run. In our case, show-interfaces.slax.
arguments Any arguments that should be supplied to the script.
output-filename
A name for the stem part of the file that will capture the output. (JUNOS willadd the router hostname and timestamp to the filename to facilitate logging andrecording).
Technet24.ir||||||||||||||||||||
||||||||||||||||||||

destination A reference for where to upload a copy of the generated file.
In this case, the arguments statement is the most useful part of the event policy because itallows us to extract data from the incoming event and channel it into the op script so thatuseful action can be taken. The syntax of the arguments statement warrants someexplanation.
arguments { interface "{$$.interface-name}"; }
The first token—interface—in the parameters is the name of the argument of the opscript. Recall that op scripts take their arguments as key-value pairs, so this is themechanism that links useful data from the received event to an input parameter in the opscript.
param $interface="lo0"; var $arguments = { <argument> { <name> "interface"; <description> "Interface to show"; } }
The second token is a meta-token that refers to the attributes of the event. Eventattributes are simply named properties of the event that can vary within each event. Ifwe use the help syslog command, we can analyze the attributes that are associated witheach event. The attributes are shown within angle brackets and underscored here forvisibility.
adamc@router> help syslog snmp_trap_link_down Name: SNMP_TRAP_LINK_DOWN Message: ifIndex <snmp-interface-index>, ifAdminStatus <admin status>, ifOperStatus <operational-status>, ifName <interface-name> Help: linkDown trap was sent Description: The SNMP agent process (snmpd) generated a linkDown trap because the indicated interface changed state to 'down'. Type: Event: This message reports an event, not an error Severity: warning Facility: LOG_DAEMON
In step 6, we actually see the logic all come together. When the configuration iscommitted, the JUNOS event management daemon, eventd, loads the information
||||||||||||||||||||
||||||||||||||||||||

associated with how to handle the SNMP_TRAP_LINK_DOWN event and when we simulate a linkdown—either by pulling a cable or otherwise disabling a network interface—the eventfires and runs the op script, resulting in the output of the SLAX script being copied bySSH/SCP to the network management station.
Technet24.ir||||||||||||||||||||
||||||||||||||||||||


There's moreThe most useful aspect of the event response op script above is the ability to bindattributes from events to arguments within an op script in order to take action. In therecipe, we used this behavior to communicate the name of the interface to the op script.However, there is an alternative method to using this channel of communication.
JUNOS also recognizes the notion of an event script, which is a SLAX script thatdirectly consumes the XML content associated with an event and can act on theincreased richness of information.
So instead of mapping attributes to arguments, we can write an event script that usesXPath expressions on an input document in order to analyze in detail the intricacies ofevents that occur on the JUNOS device. An equivalent of the show-interfaces.slax op scriptusing the native event framework input looks like this. Let's call it show-interfaces-event.slax.
version 1.0; ns junos = "http://xml.juniper.net/junos/*/junos"; ns xnm = "http://xml.juniper.net/xnm/1.1/xnm"; ns jcs = "http://xml.juniper.net/junos/commit-scripts/1.0"; import "../import/junos.xsl";
match / { var $interface = event-script-input/trigger-event/ attribute-list/attribute/ value[../name=="interface-name"]; <event-script-result> { var $rpc = { <get-interface-information> { <interface-name> $interface; } } var $result = jcs:invoke($rpc); copy-of $result; } }
We arrange for JUNOS to run this native event script with an almost identical syntax topreviously, just omitting the arguments statement and instead registering the scriptunderneath the [ event-options event-scripts ] hierarchy.
adamc@router# show event-options policy SHOW-INT { events snmp_trap_link_down; then { event-script show-interfaces-event.slax { output-filename show-int; destination NMS;
Technet24.ir||||||||||||||||||||
||||||||||||||||||||

} } } event-script { file show-interfaces-event.slax; }
Native event scripts also need to be copied into a different directory on the JUNOSdevice. They live within /var/db/scripts/event rather than /var/db/scripts/op.
user$ scp show-interfaces-event.slax [email protected]:/var/db/scripts/event show-interfaces-event.slax 100% 498 0.5KB/s 00:00
Now, when the event fires, the clever bit happens when we assign the $interface variablefrom the XPath expression. The XPath expression traces the route through the XMLdocument from the top-level root node of <event-script-input>, through <trigger-event>,through <attribute-list> to an <attribute> value where the adjacent name is interface-name.
The path through the XML data is emboldened in the extract below.
<event-script-input xmlns:junos="http://xml.juniper.net/junos/*/junos"> <trigger-event> <id>SNMP_TRAP_LINK_DOWN</id> <type>syslog</type> <generation-time junos:seconds="1503756206">2017-08-26 14:03:26UTC</generation-time> <process> <name>mib2d</name> <pid>3706</pid> </process> <hostname>router</hostname> <message>SNMP_TRAP_LINK_DOWN: ifIndex 23, ifAdminStatus up(1),ifOperStatus down(2), ifName em1</message> <facility>daemon</facility> <severity>warn</severity> <attribute-list> <attribute> <name>snmp-interface-index</name> <value>23</value> </attribute> <attribute> <name>admin-status</name> <value>up(1)</value> </attribute> <attribute> <name>operational-status</name> <value>down(2)</value> </attribute> <attribute> <name>interface-name</name> <value>em1</value> </attribute> </attribute-list></trigger-event>[...]</event-script-input>
||||||||||||||||||||
||||||||||||||||||||

While the structure of the <event-script-input> document remains largely thesame between events, the attributes themselves can vary. One way towitness the <event-script-input> document directly is to enable traceoptionsthen delve into escript.log within the log directory.adamc@router# set event-options event-script traceoptions flag input
One thing to note when using native event scripts, as opposed to op scripts triggered byan event policy, is that the output from event scripts is always in XML format. Theoutput-format directive has no effect on the output of event scripts.
When choosing whether to use an op script triggered by event policy, a native eventscript, or a CLI command, use the following table to help determine the best fit.
Feature/Capability Event Script Op Script Command
Input dataRich analysis ofinput event possibleusing XPath
Attributes must bemapped into argumentsby event-policy
No parametric inputpossible
Output format XML onlyXML or Plain Textusing output-formatdirective
XML or Plain Textusing output-formatdirective
Output locations Local or remoteSCP Local or remote SCP Local or remote
SCP
Technet24.ir||||||||||||||||||||
||||||||||||||||||||


Dealing with a flapping interfaceIn this recipe, we'll be building upon the code that we developed in the previous recipein order to deal with a situation where we have a flapping interface causing problems inthe network.
Often, when an interface goes down, several computational efforts get underway torecalculate alternate routing options, whether the interface is an internal or external link.When an interface flaps, that is, goes up and down repeatedly, this route recalculationburden can be excessive and can cause further complications and threats to networkstability.
We'll introduce some automation that can take an action that is similar to what a humanwould do when faced with the same situation. In this case, we'll catch the situationwhere we've seen the interface flap three times in the space of 60 seconds, and we'lldisable it, recording a comment.
Because shutting down an interface under automation could be hazardous, we'll makeuse of the JUNOS apply-macro feature in order to allow the operator to opt-in interfaces toautomated flap control.
Technet24.ir||||||||||||||||||||
||||||||||||||||||||


Getting readyIn order to complete this recipe, you'll need access to a JUNOS router upon which youcan influence the network interfaces, so that you can easily simulate network down andup events. If you're working in a virtualized environment with vRR, Olive, or vMX, youcan likely achieve the same effects through the hypervisor control application. Worstcase, if you can't create network down and up events for your interfaces, you can cheatand simulate events using logger. See the recipe on Debugging event scripts for the low-down on this technique.
Technet24.ir||||||||||||||||||||
||||||||||||||||||||


How to do it…We don't need to capture any detailed output from the operation of our event script inthis recipe, so we can skip the steps associated with ensuring that we have a validoutput destination and a compatible SSH/SCP server, and jump straight into the code.
1. Create a new SLAX script, handle-link-flap.slax, composed of three parts. First themandatory event script boilerplate:
version 1.0;
ns junos = "http://xml.juniper.net/junos/*/junos"; ns xnm = "http://xml.juniper.net/xnm/1.1/xnm"; ns jcs = "http://xml.juniper.net/junos/commit-scripts/1.0";
import "../import/junos.xsl";
2. Secondly, create the configuration template that we'll apply if we need to disablethe interface:
template disable-interface($interface, $comment) { <configuration> { <interfaces> { <interface> { <junos:comment> $comment; <name> $interface; <disable>; } } } }
3. Then use an unnamed match term to take the event script input and implement thenecessary logic to decide which interface is flapping and whether it is eligible forshutdown:
match / { <event-script-results> {
var $interface = event-script-input/trigger-event/ attribute-list/attribute/value[../name=="interface- name"];
var $get-config-rpc = { <get-configuration database="committed" inherit="inherit"> { <configuration> { <interfaces> { <interface> { <name> $interface; } }
Technet24.ir||||||||||||||||||||
||||||||||||||||||||

} } } var $result = jcs:invoke($get-config-rpc);
if (!jcs:empty($result/interfaces/ interface[apply-macro/name=="DISABLE-ON-FLAP" && name==$interface])) {
var $comment = "disabled by handle-link-flap.slax on " _ $localtime _ " because of flapping"; var $message = "handle-link-flap.slax " _ "disabled interface " _ $interface;
var $connection = jcs:open(); var $configuration = call disable-interface($interface, $comment); var $commit-options = { <commit-options> { <log> $message; } }; var $config-result := { call jcs:load-configuration( $connection, $configuration, $commit-options); }; expr jcs:close($connection);
if ($config-result//xnm:error ) { expr jcs:syslog("user.err", "handle-link-flap.slax failed to disable " _ "interface " _ $interface _ " because: " _ $config-result//xnm:error/message); } else { expr jcs:syslog("user.info", $message); } } } }
4. Upload the completed handle-link-flap.slax to your JUNOS device and register itwith the [ event-options event-scripts ] hierarchy:
$ scp handle-link-flap.slax [email protected]:/var/db/scripts/event
adamc@router# set event-options event-scripts file handle-link-flap.slax
5. Now use an event policy to determine the criteria needed for the event script torun. We want the script to run whenever the same interface has flapped (gone upand down) more than three times in a minute:
adamc@router> show configuration event-options policy LINK-FLAP { events snmp_trap_link_down; within 60 { trigger after 3; events snmp_trap_link_down; } attributes-match {
||||||||||||||||||||
||||||||||||||||||||

"{$$.interface-name}" equals snmp_trap_link_down.interface-name; } then { event-script handle-link-flap.slax; } }
6. Mark any interfaces that you want the script to work on by applying the speciallynamed macro term DISABLE-ON-FLAP:
adamc@router> show configuration interfaces em1 apply-macro DISABLE-ON-FLAP; unit 0 { family inet { address 10.0.211.201/24; } }
7. Commit the completed event policy and interface configuration, and then simulatenetwork events by taking an interface down and up in order to provoke the script.
Technet24.ir||||||||||||||||||||
||||||||||||||||||||


How it works…Steps 1, 2, and 3 jump straight in to defining custom logic that we want to run when theJUNOS event framework has determined that the criteria are met. So the SLAX scriptwe create can assume straight away that a link has been flapping and jump straight into adecisive action. Step 1 defines the usual boilerplate that we need for event scripts, andstep 2 creates an SLAX/XML template for the configuration snippet that we're going tocommit if we need to disable an interface. Step 3 is where all of the logic isimplemented and I'll walk you through it slowly.
Firstly, we use an XPath expression to extract the interface name attribute from theincoming event data. We do this using an XPath predicate, effectively saying, Give methe content of the path trigger-event/attribute-list/attribute/value where the attribute/namesibling node is interface-name.
XPath Expressionevent-script-input/trigger-event/attribute-list/attribute/value[../name=="interface-name"];
<event-script-input xmlns:junos="http://xml.juniper.net/junos/*/junos"> <trigger-event> <id>SNMP_TRAP_LINK_DOWN</id> <type>syslog</type> <generation-time junos:seconds="1503756206">2017-08-26 14:03:26 UTC</generation-time> <process> <name>mib2d</name> <pid>3706</pid> </process> <hostname>router</hostname> <message>SNMP_TRAP_LINK_DOWN: ifIndex 23, ifAdminStatus up(1), ifOperStatus down(2), ifName em1</message> <facility>daemon</facility> <severity>warn</severity> <attribute-list> <attribute> <name>snmp-interface-index</name> <value>23</value> </attribute> <attribute> <name>admin-status</name> <value>up(1)</value> </attribute> <attribute> <name>operational-status</name> <value>down(2)</value> </attribute> <attribute> <name>interface-name</name> <value>em1</value> </attribute> </attribute-list>
Technet24.ir||||||||||||||||||||
||||||||||||||||||||

</trigger-event> [...] </event-script-input>
Armed with the interface name, we can construct a <get-configuration> RPC call to get theconfiguration status of the interface. We do this so that we can check the status of theDISABLE-ON-FLAP macro.
We test for the presence of the macro using jcs:empty()—which tells us if we have anempty node-set—when we search through the interface nodes looking for an interfacewhere:
The name of the interface matches the name that we extracted from the event input,andThe interface contains an element called apply-macro, with a child element calledname, with a text value of DISABLE-ON-FLAP
If the interface is a candidate for us to disable, then we construct some text messages fordiagnostic purposes in the $comment and $message variables and then invoke a call tojcs:load-configuration() in order to install our configuration changes. The exactconfiguration changes are defined in the template disable-interface: we simply need topass in the interface name and a comment that is annotated on the interface to help theoperator.
After uploading the completed SLAX script to the events directory in step 4, step 5focuses on defining the event policy that will cause our event handling script to run. It'simportant to get this right. We don't want to disable interfaces in the wrong situations.The logic that we're looking for is as follows; we want to consider an interface forshutdown if, and only if:
The interface goes down, andWithin the last 60 seconds, the interface has gone down more than three times
The within 60 clause of the event policy allows us to specify coincidentallycorroborating events that must occur in order for our handler to fire, and the attributes-match clause provides a way for us to link attributes from the main triggering event to theancillary corroborating events. The $$ syntax is the notation for the triggering event.
Once we mark our interfaces of interest with the special DISABLE-ON-FLAP macro, we cansee the script in action if we create some network havoc in the background.
||||||||||||||||||||
||||||||||||||||||||

Aug 27 17:52:26 router mib2d[3713]: SNMP_TRAP_LINK_DOWN: ifIndex 23, ifAdminStatus up(1), ifOperStatus down(2), ifName em1Aug 27 17:52:33 router rpd[3714]: RPD_OSPF_NBRDOWN: OSPF neighbor 10.0.211.220 (realm ospf-v2 em1.0 area 0.0.0.0) state changed from Full to Down due to KillNbr (event reason: interface went down)Aug 27 17:52:33 router mib2d[3713]: SNMP_TRAP_LINK_DOWN: ifIndex 23, ifAdminStatus up(1), ifOperStatus down(2), ifName em1Aug 27 17:52:39 router rpd[3714]: RPD_OSPF_NBRDOWN: OSPF neighbor 10.0.211.220 (realm ospf-v2 em1.0 area 0.0.0.0) state changed from Loading to Down due to KillNbr (event reason: interface went down)Aug 27 17:52:39 router mib2d[3713]: SNMP_TRAP_LINK_DOWN: ifIndex 23, ifAdminStatus up(1), ifOperStatus down(2), ifName em1Aug 27 17:52:46 router rpd[3714]: RPD_OSPF_NBRDOWN: OSPF neighbor 10.0.211.220 (realm ospf-v2 em1.0 area 0.0.0.0) state changed from Loading to Down due to KillNbr (event reason: interface went down)Aug 27 17:52:46 router mib2d[3713]: SNMP_TRAP_LINK_DOWN: ifIndex 23, ifAdminStatus up(1), ifOperStatus down(2), ifName em1Aug 27 17:52:46 router mgd[23942]: UI_COMMIT: User 'root' requested 'commit' operation (comment: handle-link-flap.slax disabled interface em1)Aug 27 17:52:47 router mgd[23942]: UI_COMMIT_COMPLETED: commit complete
Looking at the interface configuration, we can see that the script has indeed shut downthe offending interface, pending operator intervention.
adamc@router> show configuration interfaces /* disabled by handle-link-flap.slax on Sun Aug 27 17:52:46 2017 because of flapping */ em1 { apply-macro DISABLE-ON-FLAP; disable; unit 0 { family inet { address 10.0.211.201/24; } } }
Technet24.ir||||||||||||||||||||
||||||||||||||||||||


Dealing with a flapping OSPF neighborIn this recipe, we'll look at the situation of a flapping internal OSPF neighbor, possiblycaused by a flapping physical layer interface. In contrast with the previous recipe,where we simply trapped multiple instances of a flapping interface and shut theinterface down, in this scenario, we'll deal with the situation slightly differently.
What we'll do is trap multiple sequential occurrences of an OSPF neighbor going away--for whatever reason—and, so long as he's the only OSPF neighbor on the link (whichis a common situation in large ISP backbones where point-to-point WAN links are thenorm), we'll poison the associated OSPF interface cost in order to influence trafficaway from the link.
The underlying issue that is causing the degraded communication to the OSPF neighborwill remain, which means that we're preserving scene-of-crime evidence for our NOCstaff to troubleshoot, but production traffic has been routed away from the problem inthe meantime.
Technet24.ir||||||||||||||||||||
||||||||||||||||||||


Getting readyIn order to complete this recipe, you'll need access to a pair of JUNOS routers, withtwo interfaces between them, able to speak OSPF. We're only going to work on one ofthe routers, however; thus as long as the second router implements OSPF, it doesn'tnecessarily have to be JUNOS.
In our case, we make use of OpenBSD which comes with its own OSPFimplementation, and the logical topology looks like this.
Figure 4.1 Dual-attached OSPF speakers
Technet24.ir||||||||||||||||||||
||||||||||||||||||||


How to do it…First of all we'll set up the environment in the topology diagram using two routers,JUNOS, and OpenBSD, speaking OSPF on common subnets.
1. Configure the JUNOS router with the appropriate network interfaces, em0, em1, andlo0.
adamc@router> show configuration interfaces em0 { unit 0 { family inet { address 10.0.201.201/24; } } } em1 { unit 0 { family inet { address 10.0.211.201/24; } } } lo0 { unit 0 { family inet { address 10.255.255.201/32 { primary; preferred; } } } }
2. On the OpenBSD router, effect the same thing by configuring the /etc/hostname.ifclass of files, then running the netstart shell script to configure the interfaces.
# cat /etc/hostname.em0 inet 10.0.201.220 255.255.255.0 10.0.201.255 description LAN # cat /etc/hostname.em1 inet 10.0.211.220 255.255.255.0 10.0.211.255 description LAN # cat /etc/hostname.lo0 inet 127.0.0.1 255.0.0.0 NONE inet alias 10.255.255.220 255.255.255.255 NONE # sh /etc/netstart # ifconfig em0 em0: flags=8843<UP,BROADCAST,RUNNING,SIMPLEX,MULTICAST> mtu 1500 lladdr 08:00:27:19:a2:d3 description: LAN index 1 priority 0 llprio 3 media: Ethernet autoselect (1000baseT full-duplex) status: active inet 10.0.201.220 netmask 0xffffff00 broadcast 10.0.201.255 # ifconfig em1 em1: flags=8843<UP,BROADCAST,RUNNING,SIMPLEX,MULTICAST> mtu 1500
Technet24.ir||||||||||||||||||||
||||||||||||||||||||

lladdr 08:00:27:ca:88:08 description: LAN index 2 priority 0 llprio 3 media: Ethernet autoselect (1000baseT full-duplex) status: active inet 10.0.211.220 netmask 0xffffff00 broadcast 10.0.211.255 # ifconfig lo0 lo0: flags=8049<UP,LOOPBACK,RUNNING,MULTICAST> mtu 32768 index 4 priority 0 llprio 3 groups: lo inet6 ::1 prefixlen 128 inet6 fe80::1%lo0 prefixlen 64 scopeid 0x4 inet 127.0.0.1 netmask 0xff000000 inet 10.255.255.220 netmask 0xffffffff
3. Create a simple OSPF area 0 configuration between the two devices that includesboth the em0 and em1 interfaces and the loopback addresses. Arrange for em1 to be thepreferred network link by setting a better (lower) metric than em0.
adamc@router> show configuration protocols ospf area 0.0.0.0 { interface lo0.0 { passive; } interface em0.0 { metric 100; } interface em1.0 { metric 10; } }
4. Do the same on the OpenBSD host, and then start the OSPF daemon.
# cat /etc/ospfd.conf area 0.0.0.0 { interface lo0:10.255.255.220 { metric 1 passive } interface em0 { metric 100 } interface em1 { metric 10 } } # ospfd
5. On the JUNOS device, use the show commands to verify that the OSPF adjacencieswith the BSD box are created and are in place.
adamc@router> show ospf neighbor Address Interface State ID Pri Dead 10.0.201.220 em0.0 Full 10.0.201.220 1 30 10.0.211.220 em1.0 Full 10.0.201.220 1 30
6. Show the routing table and verify that em1 is the preferred interface for traffic to the
||||||||||||||||||||
||||||||||||||||||||

BSD loopback address.
adamc@router> show route 10.255.255.220 inet.0: 40 destinations, 40 routes (40 active, 0 holddown, 0 hidden) + = Active Route, - = Last Active, * = Both 10.255.255.220/32 *[OSPF/10] 00:02:48, metric 11 > to 10.0.211.220 via em1.0
Once the OSPF routing environment is set up, we can proceed with themechanisms of responding to events in order to provide the logic for handlingthe OSPF cost change. We'll create an event script that will be called with aRPD_OSPF_NBRDOWN event that occurs when we lose sight of an OSPF neighbor. It willrespond by making an appropriate configuration change.
7. Create a new event script, handle-ospf-flap.slax, from the following components.First of all, include the required boilerplate:
version 1.0;
ns junos = "http://xml.juniper.net/junos/*/junos"; ns xnm = "http://xml.juniper.net/xnm/1.1/xnm"; ns jcs = "http://xml.juniper.net/junos/commit-scripts/1.0";
import "../import/junos.xsl";
8. Then include a configuration template for the change to the [ protocols ospf ]hierarchy that we'll make if we need to poison an interface.
template set-ospf-interface-cost($interface, $comment) { <configuration> { <protocols> { <ospf> { <area> { <name> "0.0.0.0"; <interface> { <junos:comment> $comment; <name> $interface; <metric> 65535; } } } } } }
9. Finally, use a standard unnamed match term in order to implement the main logic ofthe event script.
match / { <event-script-results> {
var $interface = event-script-input/
Technet24.ir||||||||||||||||||||
||||||||||||||||||||
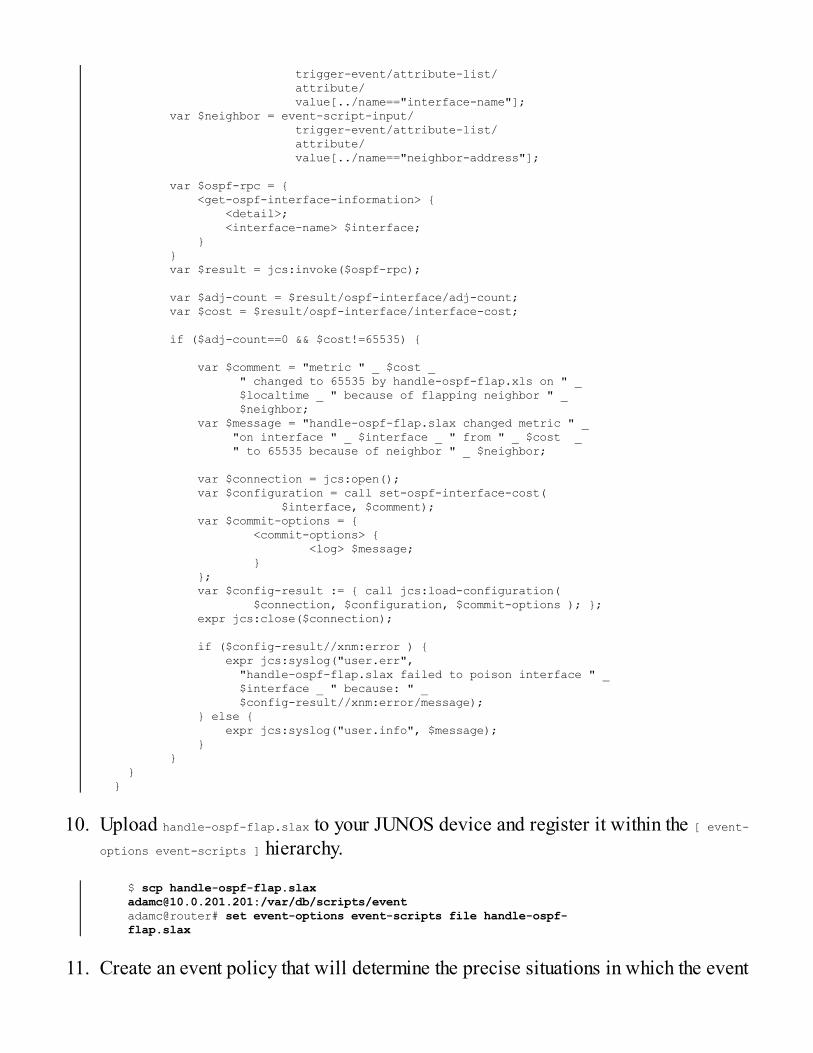
trigger-event/attribute-list/ attribute/ value[../name=="interface-name"]; var $neighbor = event-script-input/ trigger-event/attribute-list/ attribute/ value[../name=="neighbor-address"];
var $ospf-rpc = { <get-ospf-interface-information> { <detail>; <interface-name> $interface; } } var $result = jcs:invoke($ospf-rpc);
var $adj-count = $result/ospf-interface/adj-count; var $cost = $result/ospf-interface/interface-cost;
if ($adj-count==0 && $cost!=65535) {
var $comment = "metric " _ $cost _ " changed to 65535 by handle-ospf-flap.xls on " _ $localtime _ " because of flapping neighbor " _ $neighbor; var $message = "handle-ospf-flap.slax changed metric " _ "on interface " _ $interface _ " from " _ $cost _ " to 65535 because of neighbor " _ $neighbor;
var $connection = jcs:open(); var $configuration = call set-ospf-interface-cost( $interface, $comment); var $commit-options = { <commit-options> { <log> $message; } }; var $config-result := { call jcs:load-configuration( $connection, $configuration, $commit-options ); }; expr jcs:close($connection);
if ($config-result//xnm:error ) { expr jcs:syslog("user.err", "handle-ospf-flap.slax failed to poison interface " _ $interface _ " because: " _ $config-result//xnm:error/message); } else { expr jcs:syslog("user.info", $message); } } } }
10. Upload handle-ospf-flap.slax to your JUNOS device and register it within the [ event-options event-scripts ] hierarchy.
$ scp handle-ospf-flap.slax [email protected]:/var/db/scripts/event adamc@router# set event-options event-scripts file handle-ospf- flap.slax
11. Create an event policy that will determine the precise situations in which the event
||||||||||||||||||||
||||||||||||||||||||

script will be called. In this case, we have some strict criteria. We want the eventhandling routing to fire whenever an OSPF neighbor has bounced up and downmore than twice in three minutes.
adamc@router> show configuration event-options policy OSPF { events rpd_ospf_nbrdown; within 180 { trigger after 2; events rpd_ospf_nbrdown; } attributes-match { "{$$.interface-name}" equals rpd_ospf_nbrdown.interface- name; } then { event-script handle-ospf-flap.slax; } }
12. Commit the event policy and simulate a network interface breakage in order toobserve the event script magic in action.
Technet24.ir||||||||||||||||||||
||||||||||||||||||||


How it works…Steps 1 and 2 create the appropriate network addressing configuration on both theJUNOS device and the OpenBSD host. If you're working in an all JUNOS environment,this is probably slightly easier.
Steps 3 and 4 then proceed to set up the OSPF protocol as per the logical topologydiagram. We actively speak the OSPF protocol on interfaces em0 and em1, while using theloopback address as a passive OSPF interface, as is common practice.
In step 5, we validate that the JUNOS router and the OpenBSD router are happilytalking OSPF with one another.
Steps 6, 7, and 8 involve the creation of a custom event script handler on the JUNOSdevice that will be called whenever any OSPF neighbor goes away. We break theconstruction of the script down into three distinct sections.
Step 6 creates the usual boilerplate required for an event script and step 7 creates aframework template for the configuration change that we will apply to the JUNOSdevice in the event of an OSPF neighbor flapping. Note that we take the interface nameas a parameter, along with a comment, and we simply adjust the metric on that interfaceto 65535—the largest unsigned 16-bit number. The comment parameter is applied to theconfiguration in the same way that the CLI annotate command is used.
Step 8 encodes the crux of the logic of our event script. First of all we extract thefollowing pieces of information from the incoming event XML:
The interface from which the OSPF neighbor was lostThe address of the OSPF neighbor
We hold onto the latter for reporting in syslog and configuration commit logs, and weuse the former to call the JUNOS RPC in order to extract information about the OSPFproperties of an interface.
The response to the <get-ospf-interface-information> RPC looks like this:
<ospf-interface-information xmlns="http://xml.juniper.net/junos/15.1F6/junos-routing"> <ospf-interface> <interface-name>em1.0</interface-name> <ospf-interface-state>DR</ospf-interface-state>
Technet24.ir||||||||||||||||||||
||||||||||||||||||||

<ospf-area>0.0.0.0</ospf-area> <dr-id>10.0.201.201</dr-id> <bdr-id>10.0.201.220</bdr-id> <neighbor-count>1</neighbor-count> <interface-type>LAN</interface-type> <interface-address>10.0.211.201</interface-address> <address-mask>255.255.255.0</address-mask> <mtu>1500</mtu> <interface-cost>10</interface-cost> <dr-address>10.0.211.201</dr-address> <bdr-address>10.0.211.220</bdr-address> <router-priority>128</router-priority> <adj-count>1</adj-count> <hello-interval>10</hello-interval> <dead-interval>40</dead-interval> <retransmit-interval>5</retransmit-interval> <ospf-stub-type>Not Stub</ospf-stub-type> <authentication-type>None</authentication-type> <ospf-interface-protection-type>None</ospf-interface protection-type> <ospf-interface-topology> <ospf-topology-name>default</ospf-topology-name> <ospf-topology-id>0</ospf-topology-id> <ospf-topology-metric>10</ospf-topology-metric> </ospf-interface-topology> </ospf-interface> </ospf-interface-information>
Again we use XPath expressions to extract the <adj-count> and the <interface-cost>elements.
Element Description<adj-count> The number of adjacent neighbors attached to the interface<interface-cost> The cost metric associated with the interface
If there are no other neighbors on the interface (this is important, because we may notwant to interrupt other traffic!), and the interface cost is not already 65535, then weproceed to invoke a configuration change to amend the interface so that its metric is65535. We leave a helpful diagnostic annotation on the metric field reminding theoperator what the old value was so that he is able to restore it when the OSPF orinterface-related problem has gone away. And with that, we are done. We just need toupload the new event script to the JUNOS device and register it as an event script in the[ event-options event-scripts ] hierarchy, which we do in step 9.
In step 10, we are able to refine the exact situation in which the event script is called.We make use of JUNOS's rich event policy language for this. It allows us to specifyseveral criteria before the event script will be called, and the configuration change ismade:
||||||||||||||||||||
||||||||||||||||||||

The triggering event is RPD_OSPF_NBRDOWNThere are at least three other RPD_OSPF_NBRDOWN corroborating events within a 180second period of the triggering eventThe interface-name attribute on the corroborating events matches that of the triggeringevent
Testing out the event script in an environment where we can disrupt OSPF neighbourcommunications, we can see the following behavior.
The OSPF interface configuration is in its normal state:
adamc@router> show configuration protocols ospf area 0.0.0.0 interface lo0.0 { passive;}interface em0.0 { metric 100;}interface em1.0 { metric 10;}
The routing for the OpenBSD host is via the preferred em1 interface with the lowermetric.
adamc@router> show route 10.255.255.220 inet.0: 40 destinations, 40 routes (40 active, 0 holddown, 0 hidden) + = Active Route, - = Last Active, * = Both 10.255.255.220/32 *[OSPF/10] 00:49:24, metric 11 > to 10.0.211.220 via em1.0
Then, once we observe the OSPF neighbor flapping, we see the intervention of the eventscript modifying the configuration.
Aug 27 15:36:47 router rpd[3714]: RPD_OSPF_NBRDOWN: OSPF neighbor 10.0.211.220 (realm ospf-v2 em1.0 area 0.0.0.0) state changed from Full to Down due to InActiveTimer (event reason: neighbor was inactive and declared dead)Aug 27 15:37:36 router rpd[3714]: RPD_OSPF_NBRDOWN: OSPF neighbor 10.0.211.220 (realm ospf-v2 em1.0 area 0.0.0.0) state changed from Full to Down due to InActiveTimer (event reason: neighbor was inactive and declared dead)Aug 27 15:38:24 router rpd[3714]: RPD_OSPF_NBRDOWN: OSPF neighbor 10.0.211.220 (realm ospf-v2 em1.0 area 0.0.0.0) state changed from Full to Down due to InActiveTimer (event reason: neighbor was inactive and declared dead)Aug 27 15:38:24 router mgd[22585]: UI_COMMIT: User 'root' requested 'commit' operation (comment: handle-ospf-flap.slax changed metric on interface em1.0 from 10 to 65535 because of neighbor 10.0.211.220)Aug 27 15:38:25 router mgd[22585]: UI_COMMIT_COMPLETED: commit complete
If we look at the configuration, we can see that interface em1.0 has been reconfiguredwith a much higher metric in order to dissuade any transit traffic.
adamc@router> show configuration protocols ospf area 0.0.0.0 interface lo0.0 { passive;}interface em0.0 { metric 100;}/* metric 10 changed to 65535 by handle-ospf-flap.xls on Sun Aug 27 15:38:24 2017 because of flapping neighbor 10.0.211.220 */
Technet24.ir||||||||||||||||||||
||||||||||||||||||||

interface em1.0 { metric 65535;}
In summary, the event script is able to harness an information-rich stream of informationfrom the JUNOS event management framework and respond with a prescribed action toa link problem in order to do our best for the routing system as a whole until an operatorcan troubleshoot it in detail.
||||||||||||||||||||
||||||||||||||||||||

Technet24.ir||||||||||||||||||||
||||||||||||||||||||

DIY routing protocolIn this recipe, we're going to deal with the perennial problem of static routes. Staticroutes are wonderful for allowing network operators to customize their networktopology, but they're just that—static. In contrast to a dynamic routing protocol, nothingabout a static route gives us any assurance that the route we're following is really aliveor dead. This is especially the case in modern environments dominated by multi-accesslink-layers such as Ethernet where there is no inherent mechanism for determining hostliveness on the subnet beyond ARP and neighbor discovery.
The standards-based way to solve this problem is Bidirectional Forwarding Detection(BFD) defined in IETF RFC 5880—and I encourage you to explore that option as well,but if you're in a situation where you can't run a dynamic protocol, or the other endcannot run BFD for some reason, the technique that we present here might help you out.
||||||||||||||||||||
||||||||||||||||||||

Technet24.ir||||||||||||||||||||
||||||||||||||||||||

Getting readyTo complete this recipe, you'll need access to a single JUNOS router that supportsReal-time Performance Monitoring (RPM) probes, and a host on a directly connectednetwork who can act as our next-hop.
We'll use a logical topology such as this:
Figure 4.2 DIY routing protocol topology
We'll configure static routing from the JUNOS device to the 10.255.255.220/32 host addresson the BSD box on the understanding that it is running some sort of service of interest,such as a web server.
We're then going to configure an RPM probe on the JUNOS device to monitor theliveness of the next-hop on the BSD box. This is all without the BSD box doing anythingto assist in this, beyond answering ICMP pings as it ordinarily would.
We'll feed the output events from the RPM probe into an event script that willmanipulate the static routing configuration on the JUNOS router. We will call our scriptBrilliantly Useful Routing Protocol (BURP)!
The name BURP pays a small homage to an innovative piece of software written by ateam of people who were significantly influential in the embryonic phase ofcommercially viable dial-up Internet access in the UK. Years before commercial routervendors had ISP-grade solutions (and, in fact, before Juniper even existed!), DemonInternet ran its own proprietary routing protocol (with the same acronym, albeit aslightly less affectionate expansion!) to track the static IP addresses of connecting
||||||||||||||||||||
||||||||||||||||||||

subscribers. This author was fortunate enough to work amongst the team of people thatmade that work and gained huge experience in doing so.
Technet24.ir||||||||||||||||||||
||||||||||||||||||||


How to do it…First of all, let's set up the network elements so that they are consistent with the logicaltopology in the diagram.
1. Configure the OpenBSD UNIX host so that it has the appropriate networkaddresses on its interfaces.
# cat /etc/hostname.em1 inet 10.0.211.220 255.255.255.0 10.0.211.255 description LAN # cat /etc/hostname.lo0 inet 127.0.0.1 255.0.0.0 NONE inet alias 10.255.255.220 255.255.255.255 NONE
2. Next configure the JUNOS router with a static route for the special address ofinterest, 10.255.255.220, which we'll call the service address. However, don't use theordinary syntax for defining a static route with a next-hop. Instead, use the followingmethod, which deploys a qualified-next-hop where we can adjust the routing-preference level.
adamc@router> show configuration routing-options static { route 10.255.255.220/32 { next-hop 10.255.255.220; qualified-next-hop 10.0.211.220 { preference 4; } } }
3. Now create the SLAX script, burp.slax, that will act as an event handler for whenpings respond and when they don't.
version 1.0;
ns junos = "http://xml.juniper.net/junos/*/junos"; ns xnm = "http://xml.juniper.net/xnm/1.1/xnm"; ns jcs = "http://xml.juniper.net/junos/commit-scripts/1.0";
import "../import/junos.xsl";
match / { <event-script-results> {
var $owner = event-script-input/ trigger-event/ attribute-list/ attribute/value[../name=="test-owner"]; var $nexthop = event-script-input/ trigger-event/ attribute-list/ attribute/value[../name=="test-name"];
Technet24.ir||||||||||||||||||||
||||||||||||||||||||

var $event = event-script-input/trigger-event/id;
if ($owner=="BURP") {
var $get-config-rpc = { <get-configuration> { <configuration> { <routing-options> { <static>; } } } }
var $result = jcs:invoke($get-config-rpc);
var $configuration := { <configuration> { <routing-options> { <static> { for-each ($result//routing-options/ static/ route/ qualified-next-hop) { if (name==$nexthop) { if ($event=="PING_TEST_COMPLETED" && @inactive=="inactive") { <route> { <name> ../name; <qualified-next-hop active="active"> { <name> name; } } } if ($event=="PING_TEST_FAILED" && !@inactive=="inactive") { <route> { <name> ../name; <qualified-next-hop inactive="inactive"> { <name> name; } } } } } } } } }
if (count($configuration/configuration/ routing-options/ static/ route/ qualified-next-hop)>0) { var $connection = jcs:open(); var $commit-options = { <commit-options> { if ($event=="PING_TEST_COMPLETED") { <log> "Activating NH(s) with address: " _ $nexthop; } if ($event=="PING_TEST_FAILED") { <log> "De-activating NH(s) with address: " _ $nexthop; } } };
||||||||||||||||||||
||||||||||||||||||||

var $config-result := { call jcs:load-configuration( $connection, $configuration, $commit-options ); }; if ($config-result//xnm:error ) { expr jcs:syslog("user.err", "burp.slax failed to reconfigure static routes " _ "in response to "_ $event _ " for " _ $nexthop _ " because: " _ $config-result//xnm:error/message); } expr jcs:close($connection); } } } }
4. Copy the event script to the JUNOS host and register it within the [ event-optionsevent-scripts ] configuration hierarchy.
$ scp burp.slax [email protected]:/var/db/scripts/event adamc@router# set event-options event-scripts file burp.slax
5. Configure an RPM probe to track the ping-ability or otherwise of the BSD em1interface.
adamc@router> show configuration services rpm probe BURP { test 10.0.211.220 { probe-type icmp-ping; target address 10.0.211.220; probe-count 5; test-interval 15; } /* can add more test addresses in here, as required */ }
6. Configure an event policy to co-ordinate the communication between the RPMprobe and the event handling script.
adamc@router> show configuration event-options policy BURP { events [ ping_test_completed ping_test_failed ]; then { event-script burp.slax; } }
7. Test out the BURP event handler's ability to activate and deactivate qualified-next-hop elements in the configuration based upon the RPM—eported reachability.
Technet24.ir||||||||||||||||||||
||||||||||||||||||||


How it works…In step 1, we're simply configuring the BSD host as we would do for any normal host orgateway device. The em1 interface on the BSD host acts as intermediate transportaddress. The address itself isn't relevant to the actual end-application. The importantaddress, for which we'll manage the routing, is the lo0 address on the BSD host.
In step 2, we tell the JUNOS device about the lo0 interface on the BSD box. We use anunusual static route configuration on JUNOS that you might not be used to.
Typical static route configuration Our static route configuration
static { route 10.255.255.220/32 { next-hop 10.255.211.220; }}
static { route 10.255.255.220/32 { next-hop 10.255.255.220; qualified-next-hop 10.0.211.220 { preference 4; } }}
qualified-next-hop is identical to ordinary next-hops associated with staticroutes, but the properties of the static route, such as the route preferenceand metric, can be adjusted for next-hop.
What's unusual here is that we set the main next-hop to be the same as the destination ofthe static route. This obviously doesn't achieve much, but because a static route needs tohave some sort of next-hop, this element acts as a dummy placeholder, making the staticroute a valid configuration, even if our event handling script deactivates the real next-hop defined in the qualified-next-hop element because of reachability.
The other thing to note here is the preference 4 clause. All routes in the routing tablepossess a preference, and the preference is associated with the source of the route, thatis, which software agent installed the route into the routing table. Static routes usuallyhave a preference of 5, so we install our qualified-next-hop with preference 4 (lower isbetter), since it is based on more refined information.
Route source Route preference (lowest is best)
Technet24.ir||||||||||||||||||||
||||||||||||||||||||
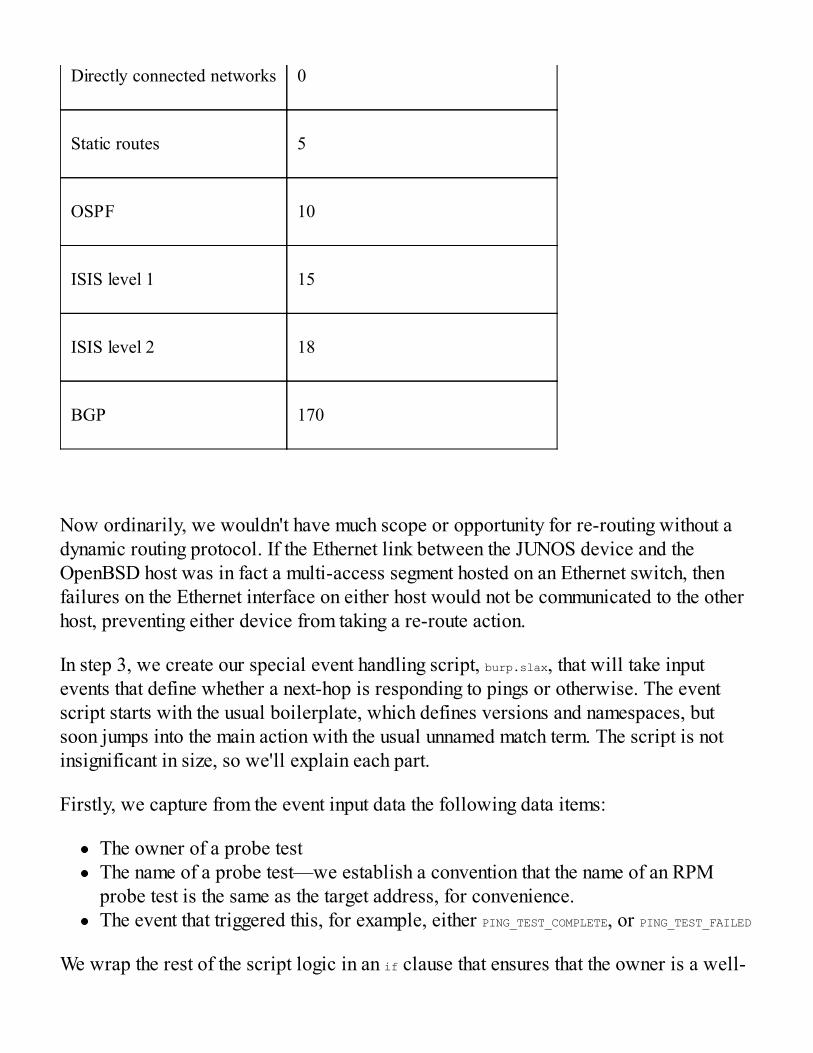
Directly connected networks 0
Static routes 5
OSPF 10
ISIS level 1 15
ISIS level 2 18
BGP 170
Now ordinarily, we wouldn't have much scope or opportunity for re-routing without adynamic routing protocol. If the Ethernet link between the JUNOS device and theOpenBSD host was in fact a multi-access segment hosted on an Ethernet switch, thenfailures on the Ethernet interface on either host would not be communicated to the otherhost, preventing either device from taking a re-route action.
In step 3, we create our special event handling script, burp.slax, that will take inputevents that define whether a next-hop is responding to pings or otherwise. The eventscript starts with the usual boilerplate, which defines versions and namespaces, butsoon jumps into the main action with the usual unnamed match term. The script is notinsignificant in size, so we'll explain each part.
Firstly, we capture from the event input data the following data items:
The owner of a probe testThe name of a probe test—we establish a convention that the name of an RPMprobe test is the same as the target address, for convenience.The event that triggered this, for example, either PING_TEST_COMPLETE, or PING_TEST_FAILED
We wrap the rest of the script logic in an if clause that ensures that the owner is a well-
||||||||||||||||||||
||||||||||||||||||||

known name that we define as BURP. This will allow us to group together all of theRPM tests within one single owning group, which will aid configuration managementlater.
Assuming that the event owner of an incoming event is indeed BURP (and not someother RPM-based activity), the next thing we do is extract the static route configuration,so that we know the active or inactive state of the qualified-next-hop elementsassociated with all static routes on the JUNOS device.
Then we prepare an XML node-set fragment to represent and capture the configurationchanges that we need. We store this as $configuration, and the encapsulated XML isgenerated conditionally depending upon:
The presence of any static routes in the current configuration that use as next-hopthe address reported in the triggering event,The activated or deactivated state of the same, andThe type of event that triggered this, either PING_TEST_COMPLETED or PING_TEST_FAILED
The following table explains our logic:
Current static route configuration fornext-hop described in event information
Reachability of next-hopas reported by RPM
Configurationchange
Not present n/a No action
Activated PING_TEST_COMPLETED No action
Activated PING_TEST_FAILEDDeactivatenext-hop
Deactivated PING_TEST_COMPLETEDActivate next-hop
Deactivated PING_TEST_FAILED No action
Technet24.ir||||||||||||||||||||
||||||||||||||||||||

If the $configuration variable includes any lines of configuration involving qualified-next-hop elements, we invoke a configuration operation with jcs:load-configuration() in order toeffect the change. Now, jcs:load-configuration() deploys the configuration in exclusivemode, so there is a chance that the operation will fail if an operator is already busychanging configuration in exclusive mode. However, this situation recovers itself assoon as the configuration database is free again. So if the change operation fails, wesimply use jcs:syslog() to report the event.
With the script completed, uploaded to the JUNOS host, and registered correctly in the [event-options event-scripts ] configuration hierarchy, we define the RPM probe that willtest the reachability of the next-hop. We simply use a basic ICMP ping test, with thefollowing properties:
5 probesSpaced 1 second apart,Every 15 seconds
As a final step, we use the event policy framework to stitch together the RPM eventoutcomes with our custom event handler. We trap the two events that we're interested in:
PING_TEST_COMPLETED: meaning that all is well, and the next-hop is pingablePING_TEST_FAILED: meaning that the next-hop experienced loss while pinging
And we respond by firing our burp.slax event script.
Finally, we're ready to observe our new BURP script operating by simulating networkinterface failure on the OpenBSD box. First of all, we inspect the current routingconfiguration and observe that there are two qualified-next-hop elements defining thedestination routing for 10.255.255.220.
adamc@router> show configuration routing-options static route 10.255.255.220/32 { next-hop 10.255.255.220; qualified-next-hop 10.0.211.220 { preference 4; } qualified-next-hop 10.0.201.220 { preference 4; } } route 1.2.3.4/32 { next-hop 1.2.3.4;
||||||||||||||||||||
||||||||||||||||||||

qualified-next-hop 10.0.211.220 { preference 4; } }
adamc@router> show route 10.255.255.220
inet.0: 20 destinations, 20 routes (20 active, 0 holddown, 0 hidden) + = Active Route, - = Last Active, * = Both
10.255.255.220/32 *[Static/4] 00:00:10 > to 10.0.201.220 via em0.0 to 10.0.211.220 via em1.0
If we then shutdown the BSD box em1 interface, thus preventing the ping response to the10.0.211.220 address, we see the script fire up.
Aug 28 13:53:12 router rmopd[3725]: PING_TEST_FAILED: pingCtlOwnerIndex = BURP, pingCtlTestName = 10.0.211.220Aug 28 13:53:13 router mgd[12978]: UI_COMMIT: User 'root' requested 'commit' operation (comment: De-activating NH(s) with address: 10.0.211.220)Aug 28 13:53:13 router mgd[12978]: UI_COMMIT_COMPLETED: commit complete
If we then inspect the routing configuration, we can see that BURP has intervened anddeactivated the broken next-hop. This is reflected in the current routing table, thusallowing the JUNOS to disqualify broken network paths, and choose alternatives.
adamc@router> show configuration routing-options static route 10.255.255.220/32 { next-hop 10.255.255.220; inactive: qualified-next-hop 10.0.211.220 { preference 4; } qualified-next-hop 10.0.201.220 { preference 4; }}route 1.2.3.4/32 { next-hop 1.2.3.4; inactive: qualified-next-hop 10.0.211.220 { preference 4; }}
adamc@router> show route 10.255.255.220
inet.0: 19 destinations, 19 routes (19 active, 0 holddown, 0 hidden)+ = Active Route, - = Last Active, * = Both
10.255.255.220/32 *[Static/4] 00:00:50 > to 10.0.201.220 via em0.0
At the time of writing, a bug or other anomaly seemed to cause double-reporting of PING_TEST_FAILURE events, and this causes two independent eventhandling scripts to both try to commit a configuration change. The situationisn't fatal, however, since the JUNOS configuration management engineensures that only one of them can win, and they both determine the correct
Technet24.ir||||||||||||||||||||
||||||||||||||||||||

change to make. It can be slightly annoying though because the messageslog will show errors associated with configuration database access.
||||||||||||||||||||
||||||||||||||||||||

Technet24.ir||||||||||||||||||||
||||||||||||||||||||

Debugging event scriptsIn this recipe, we explore the options available for troubleshooting and debugging eventscripts. Because event scripts are, by their nature, triggered by network, or device-related events rather than human interaction, the ordinary interactive methods fortroubleshooting software complexity and bugs are left wanting. In order to optimize thecode/run/debug cycle for event scripts, we outline some useful techniques here to help.
||||||||||||||||||||
||||||||||||||||||||

Technet24.ir||||||||||||||||||||
||||||||||||||||||||

Getting readyIn order to complete this recipe, you should have access to the JUNOS router or device.You don't need an actual event script to debug. We'll just walk through the techniqueswith some examples.
||||||||||||||||||||
||||||||||||||||||||

Technet24.ir||||||||||||||||||||
||||||||||||||||||||

How to do it…Take a structured approach to event script debugging. Don't let the disassociationbetween the execution of the code and the actions of the user frustrate you. Work throughthese check items step-by-step to help find where your code is diverging from expectedbehavior and why. Apply patience.
1. First of all, start with the event policy configuration that is supposed to be firingyour event. Is it configured correctly? It must define the event to match and theaction to take. If you want to capture the output then you also need to specify anoutput-filename and a destination. The events can be multiple in nature, in which caseyour event script should be called when any of the events fire.
2. Next look at how your policy interacts with other event policies. The JUNOS eventddaemon will process event policies sequentially in configuration file order and it'spossible for an earlier policy to trap an event and re-prioritize it, or even ignore itcompletely, which might mean that you don't get called. Pay attention to eventpolicy order and optimize it as required.
3. Check your script code source, its location on the filesystem, and its registration inthe configuration file. Event scripts must be stored in /var/db/scripts/event andconfigured within the [ event-options event-script ] hierarchy. Op scripts must bestored in /var/db/scripts/op and configured within the [ system scripts op ] hierarchy.
The boilerplate for event scripts and op scripts is subtly different, so make surethat you've got that right.
Event scripts should match this pattern:
version 1.0;
ns junos = "http://xml.juniper.net/junos/*/junos"; ns xnm = "http://xml.juniper.net/xnm/1.1/xnm"; ns jcs = "http://xml.juniper.net/junos/commit-scripts/1.0";
import "../import/junos.xsl";
match / { <event-script-results> { // your code here } }
Op scripts should match this pattern, including the param declaration for inputparameters.
||||||||||||||||||||
||||||||||||||||||||

version 1.0;
ns junos = "http://xml.juniper.net/junos/*/junos"; ns xnm = "http://xml.juniper.net/xnm/1.1/xnm"; ns jcs = "http://xml.juniper.net/junos/commit-scripts/1.0";
import "../import/junos.xsl";
param $interface="lo0";
var $arguments = { <argument> { <name> "interface"; <description> "Interface to show"; } } match / { <op-script-result> { // your code here } }
4. If you're not sure that your script is getting called, or you're not sure that it's gettingthe right data, use this basic set of steps to catch events and record the XML datastructure associated with them so that you can be sure that the data you're lookingfor is definitely there.
Create debug-event.slax with the following content and copy it to/var/db/scripts/event.
version 1.0; ns junos = "http://xml.juniper.net/junos/*/junos"; ns xnm = "http://xml.juniper.net/xnm/1.1/xnm"; ns jcs = "http://xml.juniper.net/junos/commit-scripts/1.0";
import "../import/junos.xsl";
match / { <event-script-results> { copy-of .; } }
Pair that up with the following JUNOS configuration:
adamc@router# show event-options event-script { file debug-event.slax; } policy MY-POLICY { events snmp_trap_link_down; /* specific events sought */ then { event-script debug-event.slax { output-filename debug; destination DEBUG; } } } destinations {
Technet24.ir||||||||||||||||||||
||||||||||||||||||||

DEBUG { archive-sites { /var/tmp; } } }
When your event fires, the simple debug-event.slax script will simply echo it tothe output destination which will write it to a file in to the /var/tmp directoryon the JUNOS device. You'll be able to find the file as router_DATE_TIME_debug.Analyze the file, and look at the XML attributes in order to compare themwith your XPath or a similar logic for matching.
5. Use help syslog EVENT_NAME to get the CLI view on the valid attributes that areassociated with an event.
<strong> adamc@router> help syslog BGP_PREFIX_LIMIT_EXCEEDED Name: BGP_PREFIX_LIMIT_EXCEEDED Message: <peer-name>: Configured <message>(<limit>) exceeded for <nlri-type> nlri: <prefix-count> (instance <instance>) Help: Number of prefixes exceeds the maximum limit Description: The number of prefixes received/accepted on the BGP session exceeds the configured maximum limit. Type: Event: This message reports an event, not an error Severity: warning Facility: LOG_DAEMON Action: You may want to modify the configuration statement to use a higher value for the received/accepted number of prefixes.
6. If you're happy with your event script, but you need an easy way to trigger itwithout causing the real event, consider using the Juniper-modified version of theBSD tool logger. This tool will create a synthetic event and inject it into the eventmanagement framework in much the same way as a real event. Use this tool fromthe BSD system shell as follows:
Command lineswitch Description
-e Specify the event by name, for example, UI_COMMIT,SNMP_TRAP_LINK_DOWN
-a Set a key=value attribute pair (can be multiple)
% logger -e SNMP_TRAP_LINK_DOWN -a interface-name=gre.0 "gre.0 interface changed state to down"
||||||||||||||||||||
||||||||||||||||||||

Technet24.ir||||||||||||||||||||
||||||||||||||||||||


How it works…In steps 1 and 2, we're looking at the JUNOS event-policy logic because this is the firstport of call when the event management framework has to map an incoming event tosome action or activity. We look at not only the policy that we're interested in, but alsothe other policies to consider any unanticipated interaction. It's crucially important thatthe event handling process works in tandem with the rest of the system, or we can easilycreate catastrophic event loops.
In step 3, we do some basic schoolboy error checking to make sure that we've adheredto all the correct protocols for the use of the event script technology that we're using.Because op scripts and event scripts are similar, it can be easy to make mistakes here.
In step 4, we're stopping short of pulling our hair out in frustration and taking a known-good configuration that has expected results and making sure that it works correctly. Thedebug-event.slax script is the simplest possible shim layer between the event managementframework and the output channels, but it's a good way to test that:
We are receiving the event that we're expecting to receive when something happenson the networkThe event that we are receiving contains the data that we need in order to apply ourspecific logic
Because we use a local file as an output channel, we also eliminate any problems withbotched SSH keys or passwords that might get in the way and prevent us from seeing theoutput of the script.
Step 5 makes use of the interactive help available in the JUNOS system. The help syslogcommand has information about all of the known events in the event managementframework and can be considered authoritative.
Finally in step 6, we make use of a synthetic way of injecting an event to see if theproblem lies with the generation of the event itself. The advantage with this method isthat we can easily manipulate the attributes to see how our event script logic responds.
In summary, these steps provide a comprehensive set of troubleshooting procedures tohelp make event script programming more productive.
Technet24.ir||||||||||||||||||||
||||||||||||||||||||


Technet24.ir||||||||||||||||||||
||||||||||||||||||||

Automating JUNOS with PyEZIn this chapter, we’ll cover the following recipes:
Setting up a PyEZ environmentExploring the XML RPC using PyEZCalling operational RPCs and setting timeoutsConfiguration analysis and reportingMaking raw CLI commands from PyEZUsing tables and viewsDefining custom tables and views with YAMLMaking configuration changes with PyEZTemplate configurations with Jinja2
||||||||||||||||||||
||||||||||||||||||||

Technet24.ir||||||||||||||||||||
||||||||||||||||||||

IntroductionWith a formidable history starting in December 1989, Guido van Rossum’s Pythonprogramming language – fusing a desire for simplicity, clarity and reliability over codeelegance, speed and performance – continues to be a highly popular technology choicefor engineers writing glue code: the sort of code that interfaces different systemstogether.
Juniper have recognized Python’s dominance in the area of scripting and automation,and supported the development of the open source framework PyEZ, a Python librarymodule that provides a useful abstraction layer over and above SSH and NETCONF inorder to allow you to write Python code using high-level functional primitives thatachieve useful actions on the JUNOS network elements.
In this chapter, we’ll explore a series of recipes that makes use of the PyEZ frameworkin order to achive commonly sought after activities.
||||||||||||||||||||
||||||||||||||||||||

Technet24.ir||||||||||||||||||||
||||||||||||||||||||

Setting up a PyEZ environmentIn this recipe, we’ll set up PyEZ for Python and make a simple application to connect toone of our JUNOS devices and gather a basic outline of the system.
||||||||||||||||||||
||||||||||||||||||||

Technet24.ir||||||||||||||||||||
||||||||||||||||||||

Getting readyIn order to complete this recipe, you’ll need Python 2.7 in a Linux or BSD-baseddevelopment environment of your choice. For ease of illustration here, we’ll use Ubuntu16.04 LTS and Python 2.7.12, which is supplied from the default software repositories,but I’ll also comment on some potential installation hiccups on other OSes and how toget around them.
You should have also completed Chapter 1, JUNOS NETCONF over SSH Setup in orderto prepare your JUNOS device for management.
||||||||||||||||||||
||||||||||||||||||||

Technet24.ir||||||||||||||||||||
||||||||||||||||||||

How to do it…the steps for the recipe are as follows:
1. Verify that your JUNOS device can be accessed via the NETCONF protocol:
unix$ ssh -p 830 -i junos_auto_id_rsa [email protected] -s netconf <!-- No zombies were killed during the creation of this user interface --> <!-- user auto, class j-super-user --> [...]
2. If not, revisit Chapter 1, JUNOS NETCONF over SSH Setup in order to:Generate SSH keysSet up an automation userConfigure NETCONF over SSH
3. On your automation or management server, proceed to install the necessary Pythoncomponents in order to enable PyEZ. Firstly, you need pip – which is the Pythonpackage manger, a successor to easy_install:
ubuntu@ubuntu-xenial:~$ sudo apt-get install python-pip Reading package lists... Done Building dependency tree Reading state information... Done The following additional packages will be installed: build-essential dpkg-dev g++ g++-5 libalgorithm-diff-perl libalgorithm-diff-xs-perl libalgorithm-merge-perl libdpkg-perl libexpat1-dev libfile-fcntllock-perl libpython-all-dev libpython-dev libpython2.7 libpython2.7-dev libstdc++-5-dev python-all python all-dev python-dev python-pip-whl python-pkg-resources python-setuptools python wheel python2.7-dev Suggested packages: debian-keyring g++-multilib g++-5-multilib gcc-5-doc libstdc++6 5-dbg libstdc++-5-doc python-setuptools-doc The following NEW packages will be installed: build-essential dpkg-dev g++ g++-5 libalgorithm-diff-perl libalgorithm-diff-xs-perl libalgorithm-merge-perl libdpkg-perl libexpat1-dev libfile-fcntllock-perl libpython-all-dev libpython-dev libpython2.7 libpython2.7-dev libstdc++-5-dev python-all python all-dev python-dev python-pip python-pip-whl python-pkg-resources python-setuptools python- wheel python2.7-dev 0 upgraded, 24 newly installed, 0 to remove and 10 not upgraded. Need to get 41.5 MB of archives. After this operation, 91.8 MB of additional disk space will be used. Do you want to continue? [Y/n] y […]
||||||||||||||||||||
||||||||||||||||||||

4. Continue to install the PyEZ framework package, using pip:
ubuntu@ubuntu-xenial:~$ pip install junos-eznc Collecting junos-eznc Collecting netaddr (from junos-eznc) Collecting PyYAML>=3.10 (from junos-eznc) Collecting pyserial (from junos-eznc) Collecting ncclient>=0.5.3 (from junos-eznc) Collecting jinja2>=2.7.1 (from junos-eznc) Collecting six (from junos-eznc) Collecting paramiko>=1.15.2 (from junos-eznc) Collecting lxml>=3.2.4 (from junos-eznc) Collecting scp>=0.7.0 (from junos-eznc) Collecting setuptools>0.6 (from ncclient>=0.5.3->junos-eznc) Collecting MarkupSafe>=0.23 (from jinja2>=2.7.1->junos-eznc) Collecting pynacl>=1.0.1 (from paramiko>=1.15.2->junos-eznc) Collecting pyasn1>=0.1.7 (from paramiko>=1.15.2->junos-eznc) Collecting bcrypt>=3.1.3 (from paramiko>=1.15.2->junos-eznc) Collecting cryptography>=1.1 (from paramiko>=1.15.2->junos-eznc) Collecting cffi>=1.4.1 (from pynacl>=1.0.1->paramiko>=1.15.2 >junos-eznc) Collecting ipaddress (from cryptography>=1.1->paramiko>=1.15.2 >junos-eznc) Collecting idna>=2.1 (from cryptography>=1.1->paramiko>=1.15.2 >junos-eznc) Collecting asn1crypto>=0.21.0 (from cryptography>=1.1 >paramiko>=1.15.2->junos-eznc) Collecting enum34 (from cryptography>=1.1->paramiko>=1.15.2 >junos-eznc) Collecting pycparser (from cffi>=1.4.1->pynacl>=1.0.1 >paramiko>=1.15.2->junos-eznc) Successfully built PyYAML ncclient MarkupSafe pycparser Installing collected packages: netaddr, PyYAML, pyserial, setuptools, six, pycparser, cffi, pynacl, pyasn1, bcrypt, ipaddress, idna, asn1crypto, enum34, cryptography, paramiko, lxml, ncclient, MarkupSafe, jinja2, scp, junos-eznc Successfully installed MarkupSafe PyYAML asn1crypto bcrypt cffi cryptography enum34 idna ipaddress jinja2 junos-eznc lxml ncclient netaddr paramiko pyasn1 pycparser pynacl pyserial scp setuptools- 20.7.0 six
5. Use the following basic Python program as a basis for testing access to yourJUNOS device. Replace the parameters in the device constructor call as follows:The table gives the value of different parameters:
Parameter Value
hostIP address or DNS/hostname corresponding to your JUNOSdevice
user Username configured for automation
ssh_private_key_fileFile containing the private key portion of the SSH key generated foruse by the automation user profile
#!/usr/bin/env python
Technet24.ir||||||||||||||||||||
||||||||||||||||||||

from pprint import pprint from jnpr.junos import Device dev = Device(host='10.0.201.201', user='auto', ssh_private_key_file="junos_auto_id_rsa") dev.open() pprint(dev.facts) dev.close()
6. Run the program, and observe that you should the output of so-called facts. Factsare PyEZ’s abstraction of critical properties that determine the operation of yourJUNOS device.
{'2RE': False, 'HOME': '/var/home/user', 'RE0': {'last_reboot_reason': '0x10:misc hardware reason', 'mastership_state': 'master', 'model': 'RE-VRR', 'status': 'Testing', 'up_time': '10 days, 1 hour, 57 minutes, 37 seconds'}, 'RE1': None, 'RE_hw_mi': False, 'current_re': ['master', 'node', 'fwdd', 'member', 'pfem', 're0'], 'domain': None, 'fqdn': 'vrr-fra-c0b', 'hostname': 'vrr-fra-c0b', 'hostname_info': {'re0': 'vrr-fra-c0b'}, 'ifd_style': 'CLASSIC', 'junos_info': {'re0': {'object': junos.version_info(major=(15, 1), type=F, minor=6-S5, build=6), 'text': '15.1F6-S5.6'}}, 'master': 'RE0', 'model': 'VRR', 'model_info': {'re0': 'VRR'}, 'personality': 'MX', 're_info': {'default': {'0': {'last_reboot_reason': '0x10:misc hardware reason', 'mastership_state': 'master', 'model': 'RE-VRR', 'status': 'Testing'}, 'default': {'last_reboot_reason': '0x10:misc hardware reason', 'mastership_state': 'master', 'model': 'RE-VRR', 'status': 'Testing'}}}, 're_master': {'default': '0'}, 'serialnumber': 'VR5568416ECE', 'srx_cluster': None, 'srx_cluster_id': None, 'srx_cluster_redundancy_group': None, 'switch_style': 'BRIDGE_DOMAIN', 'vc_capable': False, 'vc_fabric': None, 'vc_master': None, 'vc_mode': None, 'version': '15.1F6-S5.6', 'version_RE0': '15.1F6-S5.6', 'version_RE1': None, 'version_info': junos.version_info(major=(15, 1), type=F, minor=6-S5, build=6), 'virtual': True}
||||||||||||||||||||
||||||||||||||||||||

Technet24.ir||||||||||||||||||||
||||||||||||||||||||


How it works…Step 1 validates that access to JUNOS works correctly. This tests:
IP-layer connectivity between our management host and the JUNOS device,That the NETCONF-over-SSH service is running on TCP port 830Our ability to create an SSH session with the provided key.
If any of these conditions don’t hold, then we circle back on one of the recipes asdescribed in step 2.
In step 3, we use the apt-get features of Ubuntu in order to download the Python packagemanager, pip. pip provides a simplistic way of managing external Python packages andmodules. In a lot of cases, pip will be installed along with Python and this step may noteven be necessary.
Step 4 makes use of pip in order to install PyEZ, which has the Python module name ofjunos-eznc. pip automatically works out any dependencies that PyEZ requires from thepackage manifest and downloads them. There are a significant number of dependencies.
Some are more important than others, but at a high-level the important dependencypackages are:
Package Description
lxmlXML parsing library based on libxml2; alternative to Python standardElementTree API
paramiko SSH client/server library to implement in native Python
ncclientNETCONF client, used for communicating with JUNOS NETCONF-over-SSH service
jinja2Modern, Django-like template language; useful for parameterizing XMLdocuments
If you’re installing on BSD or an alternate non-Linux system and youexperience problems installing the PyEZ dependency packages, checkwith your operating system vendor native package repository before usingpip. You may find there are pre-prepared packages that install thenecessary Python modules. This is particularly the case for the Python
Technet24.ir||||||||||||||||||||
||||||||||||||||||||

modules that make use of underlying C and require compilation. ThePython lxml library is one such example. On OpenBSD, look in the portscollection for packages starting with py-.
In step 5, we create the Hello, World! equivalent of a PyEZ framework program: aprogram that connects to a single JUNOS device, logs in and extract overview summaryinformation.
While the source code looks rather simplistic, what is going on under the hood is morecomplex. When we call the Device() constructor and open() the resulting object, PyEZ iscreating a NETCONF session with the target that we specify and making use of thencclient Python package to do so. The paramiko module provides the underlying SSHtransport and that is passed the necessary credentials in order to authenticate the SSHsession.
When the NETCONF client/server communication begins, the lxml routines are used toparse the messages, and one of the first things that occurs is that PyEZ framework makesa series of operational RPC calls to establish basic system information, or facts. Thisdictionary is printed to the Terminal. The following table shows some of the significantfacts:
Key Description
2REBoolean indicating whether or not there is more than one routing engineinstalled
modelString indicating the model of the chassis, for example, MX960,MX480, VRR and so on.
master Either RE0 or RE1 depending upon master arbitration processserialnumber Unit serial numberversion String indicating the JUNOS version
||||||||||||||||||||
||||||||||||||||||||

Technet24.ir||||||||||||||||||||
||||||||||||||||||||

There’s moreIf you’re not using SSH key-based authentication for whatever reason, there are acouple of options available for managing passwords. You can either default to using theexecuting user’s username and prompt interactively for a password:
#!/usr/bin/env python
from pprint import pprintfrom jnpr.junos import Devicefrom getpass import getpass
dev = Device(host='10.0.201.201', password=getpass()) dev.open()
pprint(dev.facts)dev.close()
Or, you can use a strategy similar to that deployed in Chapter 3, Using Slax to Write OpScripts when using the REST interface. Adopt a user-specific file cache of the storedcredentials for the target hosts:
#!/usr/bin/env python
import sysimport getpassimport osimport jsonfrom pprint import pprintfrom jnpr.junos import Device
def getPass(target): try: passwordFile = os.path.expanduser("~")+"/.pwaccess" if os.stat(passwordFile)[0]&63==0: passwords = json.load(io.open(passwordFile)) return(passwords[target]) else: sys.stderr.write("Warning: password file "+passwordFile+" must be user RW (0600) only!\n") sys.exit(1)
except Exception as e: return(getpass.getpass("Password: "))
target="10.0.201.201"user="auto"password=getPass(user+"@"+target)
dev = Device(host=target, user=user, password=password)dev.open()
pprint(dev.facts)
dev.close()
If you run into trouble while trying these basic methods for connecting, use the following
||||||||||||||||||||
||||||||||||||||||||

guide to help you troubleshoot:
Error message Description
jnpr.junos.exception.ConnectAuthError:ConnectAuthError
One of:Provided password is incorrect.Provided SSH key filename is incorrectPublic/private keys don’t match
jnpr.junos.exception.ConnectRefusedError:ConnectRefusedError NETCONF-over-SSH service not configured
jnpr.junos.exception.ConnectTimeoutError:ConnectTimeoutError
Remote IP address did not responding, orintermediate network routing problem orfirewall filter
Technet24.ir||||||||||||||||||||
||||||||||||||||||||


Exploring the XML RPC using PyEZIn this recipe, we’ll use the PyEZ framework to explore the XML RPC APIs todetermine the necessary calls for equivalent command lines and parameters.Introspecting the XML RPC API like this can be a useful technique for building biggerfully-fledged automation applications.
Technet24.ir||||||||||||||||||||
||||||||||||||||||||


Getting readyIn order to complete this recipe, you’ll need Python 2.7 in a Linux or BSD-baseddevelopment environment of your choice. You should have already:
Configured NETCONF-over-SSH setup (Chapter 1, Configuring JUNOS throughNETCONF)Set up a PyEZ Environment (Chapter 2, Working with Junos REST API).
Technet24.ir||||||||||||||||||||
||||||||||||||||||||


How to do it…We’re going to use the Python interactive shell (or REPL – read-evaluate-print loop) inorder to use PyEZ to connect to a JUNOS device, and then we’re going to explore theXML RPCs for certain commands:
1. Start up the Python interpreter and load the essential PyEZ framework classes andthe associated XML parsing routines:
Python 2.7.13 (default, Dec 17 2016, 23:03:43) [GCC 4.2.1 Compatible Apple LLVM 8.0.0 (clang-800.0.42.1)] on darwin Type "help", "copyright", "credits" or "license" for more information. >>> from jnpr.junos import Device >>> from lxml import etree
2. Instantiate a device profile for the JUNOS router, and call the open() method inorder to connect:
>>> router = Device(host="10.0.201.201", user="auto", ssh_private_key=”junos_auto_rsa_id”) >>> router.open() Device(10.0.201.201)
3. Call the display_xml_rpc() method for the command that you want to know the XMLRPC representation for, and use the etree.dump() method to show the XML:
>>> etree.dump(router.display_xml_rpc("show interfaces")) <get-interface-information> </get-interface-information>
4. Investigate how the different command line options, such as extensive or detail, areencoded within the XML RPC call:
>>> etree.dump(router.display_xml_rpc("show interfaces detail")) <get-interface-information> <detail/> </get-interface-information>
>>> etree.dump(router.display_xml_rpc("show interfaces extensive")) <get-interface-information> <extensive/> </get-interface-information>
>>> etree.dump(router.display_xml_rpc("show interfaces media")) <get-interface-information> <media/> </get-interface-information>
Technet24.ir||||||||||||||||||||
||||||||||||||||||||

5. Also investigate how arguments to the command line are encoded within the XMLRPC:
>>> etree.dump(router.display_xml_rpc("show interfaces em0")) <get-interface-information> <interface-name>em0</interface-name> </get-interface-information>
>>> etree.dump(router.display_xml_rpc("show route 10.0.201.0/24 table inet.0")) <get-route-information> <destination>10.0.201.0/24</destination> <table>inet.0</table> </get-route-information>
6. Notice that some command lines don’t have a direct equivalent within the XMLRPC namespace:
>>> etree.dump(router.display_xml_rpc("show system processes")) Traceback (most recent call last): File "<stdin>", line 1, in <module> TypeError: Argument 'elem' has incorrect type (expected lxml.etree._Element, got str) >>> router.display_xml_rpc("show system processes") 'invalid command: show system processes| display xml rpc'
||||||||||||||||||||
||||||||||||||||||||

Technet24.ir||||||||||||||||||||
||||||||||||||||||||

How it works…In steps 1 and 2, we simply initialize the Python environment and connect to the remoteJUNOS node.
In the subsequent steps, we use the display_xml_rpc() method on the Device object in orderto make an RPC call to the JUNOS device which executes the equivalent of the | displayxml rpc command modifier in order to determine the XML RPC associated with thecommand line.
Because Juniper haven’t implemented absolutely every aspect of the command linefunctionality into the XML RPI API, sometimes it isn’t possible to translate thecommand line into an RPC call, as seen in step 6.
But when an XML RPC call is available, it is returned within an XML structureddocument and the lxml.etree.dump() function shows the raw format. Once learned, theXML RPC can be called directly using its name as a method appended to the Device.rpcattribute:
>>> result = router.rpc.get_interface_information(terse=True, interface_name="em0") >>> etree.dump(result) <interface-information style="terse"> <physical-interface> <name> em0 </name> <admin-status> up </admin-status> <oper-status> up </oper-status> <logical-interface> <name> em0.0 </name> <admin-status> up </admin-status> <oper-status> up </oper-status> <filter-information> </filter-information> <address-family> <address-family-name> inet </address-family-name> <interface-address> <ifa-local emit="emit"> 10.0.201.201/24
||||||||||||||||||||
||||||||||||||||||||

</ifa-local> </interface-address> </address-family> </logical-interface> </physical-interface> </interface-information>
The names of the RPC, and indeed any arguments or options, must bevetted and filtered before being made available to Python. The hyphensfrom the XML are converted into underscores for the PyEZ RPC call.
PyEZ synthesizes the RPC call upon demand based upon the child attribute supplied tothe Device.rpc object. This has the advantage that PyEZ itself doesn’t necessarily need tochange or update as and when the JUNOS XML RPC API updates. But it also means thatPyEZ cannot help validate the well-formedness of the RPC call before supplying it tothe JUNOS device. It simply acts as a re-formatting intermediary between the JUNOSNETCONF channel and the Python environment in which you might develop yourautomation application.
Technet24.ir||||||||||||||||||||
||||||||||||||||||||


Calling operational RPCs and settingtimeoutsIn this recipe, we’ll learn how to make operational RPC calls to JUNOS through theXML RPC API using the PyEZ framework, and we’ll use that knowledge to build up thebeginning of a software tool that could be used as an ISP looking glass.
A looking glass is a read-only view onto an ISP’s routers in order toallow customers and peers alike an ability to perform a self-servetroubleshoot activity by querying the provider’s routers to understand therouting of traffic to specific destinations.
We’ll also tweak PyEZ’s default settings to make it more patient for RPCs that mightissue lots of output, taking significant time, such as when dealing with largeconfiguration files.
Technet24.ir||||||||||||||||||||
||||||||||||||||||||


Getting readyIn order to complete this recipe, you’ll need Python 2.7 in a Linux or BSD-baseddevelopment environment of your choice. You should have already:
Configured NETCONF-over-SSH setup (Chapter 1, Configuring JUNOS throughNETCONF)Set up a PyEZ Environment (Chapter 2, Working with Junos REST API).
Technet24.ir||||||||||||||||||||
||||||||||||||||||||


How to do it…We’re going to build a Python script, pyez-show-route.py, which will use the PyEZframework to login to a JUNOS router and query the routing table for an internetdestination, extract the returned data, and print it nicely on the user’s console. The userwill be able to invoke our script in the following way:
pyez-show-route.py [-h] [-p port] [-u username] [-t target] [-R instance] destination
The following table provides the different arguments and their description:
Argument Description-p TCP port to contact NETCONF-over-SSH-u Username-t Target device-R Routing instance on the JUNOS router
The steps for the recipe are as follows:
1. Start by defining the interpreter as usual and defining the Python modules that we’lluse. Most importantly, include the jnpr.junos.Device reference.
#!/usr/bin/env python
from jnpr.junos import Device import sys import getpass import os import json import argparse
2. Use a general exception handling function to report any errors simply and neatly.(You can comment the last line out while developing if you need a full stack trace):
def onError(exception_type, exception, traceback): print "%s: %s" % (exception_type.__name__, exception) sys.excepthook = onError
3. Use the argparse module to query the command line arguments invoked by the user:
Technet24.ir||||||||||||||||||||
||||||||||||||||||||

cmdline = argparse.ArgumentParser(description="Python JUNOS PyEZ Route lookup") cmdline.add_argument("destination", help="Network destination to lookup") cmdline.add_argument("-p", metavar="port", help="TCP port", default=8443) cmdline.add_argument("-u", metavar="username", help="Remote username", default=getpass.getuser()) cmdline.add_argument("-t", metavar="target", help="Target router to query", required=True) cmdline.add_argument("-R", metavar="instance", help="Routing instance to use", default="") args=cmdline.parse_args()
4. If you’re using passwords, instead of SSH key-based authentication, you can makeuse of the getPass() function from the first recipe in this chapter to store passwords.For brevity, I haven’t included that code again.
password=getPass(args.u+"@"+args.t) if 'getPass' in globals() else ""
5. Open a connection to the JUNOS device.
dev = Device(host=args.t, user=args.u, port=args.p, password=password) dev.open() dev.timeout = 60
6. Call the RPC to query the routing table.
result = dev.rpc.get_route_information(normalize=True, destination=args.destination, detail=True, table=args.R+".inet.0" if args.R!="" else "inet.0")
7. Extract the destination from the routing table lookup.
print "%s/%s" % (result.findtext("route-table/rt/rt- destination"), result.findtext("route-table/rt/rt-prefix-length"))
8. Iterate through the routes returned for the destination, extracting key parameters andprinting them in an easy to read format:
for route in result.findall("route-table/rt/rt-entry"): protocol = route.findtext("protocol-name") task = route.findtext("task-name") age = route.findtext("age") active = len(route.findall("current-active")) info = "" if protocol=="BGP": info+="NEXT_HOP "+route.findtext("gateway")+" LOCAL_PREF "+route.findtext("local-preference")+" AS_PATH "+route.findtext("as- path") print "%c\t%s (%s) %s" % ("*" if active==1 else " ", task if
||||||||||||||||||||
||||||||||||||||||||
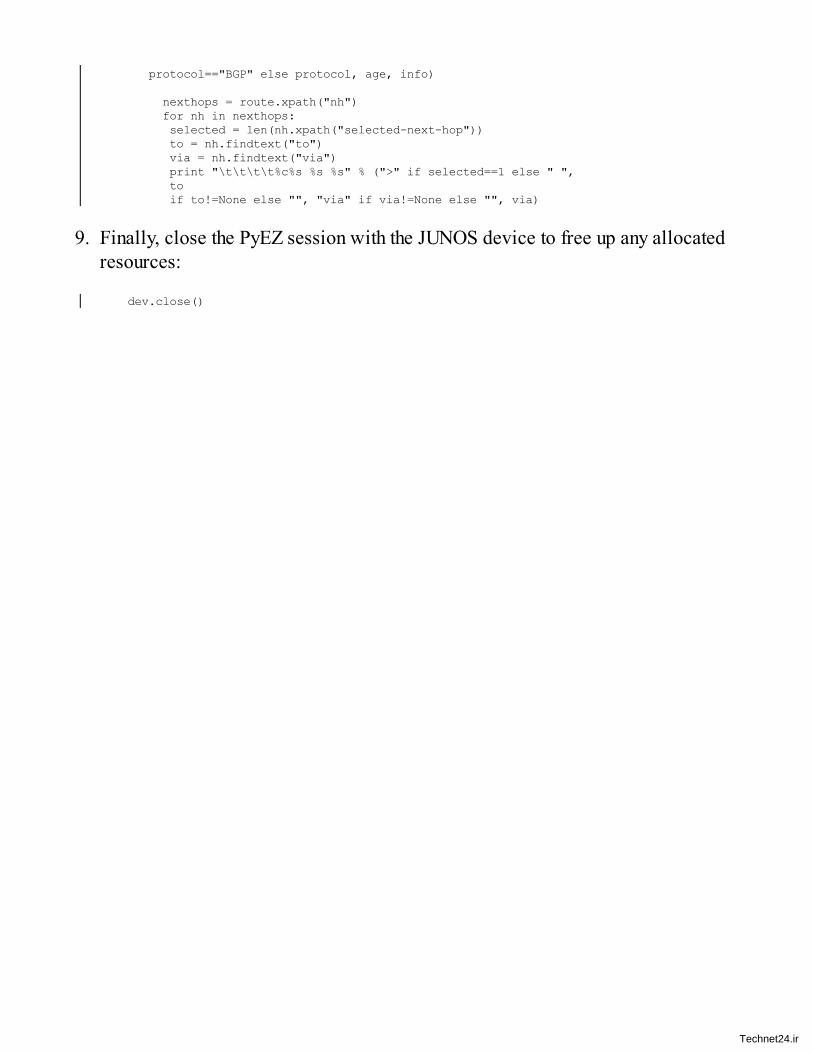
protocol=="BGP" else protocol, age, info)
nexthops = route.xpath("nh") for nh in nexthops: selected = len(nh.xpath("selected-next-hop")) to = nh.findtext("to") via = nh.findtext("via") print "\t\t\t\t%c%s %s %s" % (">" if selected==1 else " ", to if to!=None else "", "via" if via!=None else "", via)
9. Finally, close the PyEZ session with the JUNOS device to free up any allocatedresources:
dev.close()
Technet24.ir||||||||||||||||||||
||||||||||||||||||||


How it works…In step 1, we create a Python environment with the required modules imported into thenamespace. In step 2, we define a simple exception handler to print a message and exitif and when things go wrong.
As we move to step 3, we set up the execution of our script by parsing the command linearguments in order to set the runtime options. We use the argparse module to do the workfor us here, because it’s quick, convenient, and is included in the standard Pythondistribution. The only change from previous recipes using Python’s argparse compared tothis is that we demote the target device to be specified by a –t switch rather than themain argument. This is because we want the main argument to be the destination toquery.
In step 4, we include an optional hook to our password caching code that we’ve used inprevious recipes. The getPass() code isn’t included in this recipe, but can be found in thefirst recipe on Setting up a PyEZ environment. The syntax in step 4 arranges for thegetPass() function to be called if it exists in the scope of the global namespace, so if youinclude it in the source code, it will be used, but otherwise we set the password to anempty string and assume that we’ll use SSH key-based authentication to login to ourJUNOS devices.
In step 5, we use the PyEZ framework Device() constructor to create an objectrepresenting our JUNOS device, and then call the open() method in order to have PyEZconnect to the JUNOS device. We also take a moment to adjust the default timeoutperiod from 30 seconds to 60 seconds.
Changing the timeout period will affect any RPCs called on the JUNOSdevice. It is also possible to change the timeout on a per-RPC basis byincluding the dev_timeout attribute in the RPC method call.
In step 6, we actually make the RPC call to ask JUNOS to look up the route and give usthe information. As we saw from the previous recipe, Exploring the XML RPC API, thename of the RPC has its hyphens replaced by underscores to work with PyEZ.
The extra arguments given to the RPC warrant explanation, however:
RPC Argument Behavior
Technet24.ir||||||||||||||||||||
||||||||||||||||||||

destination =args.destination
Provides the destination argument to the RPC for the show routecommand. Extracted directly from the command line.
detail = TrueProvides the detail option to the show route RPC so that we getthe detailed response structure in return.
table =args.R+".inet.0" ifargs.R!="" else"inet.0"
Uses the default inet.0 table unless the user specified a routing-instance with the –R switch
normalize = True
An internal switch used by PyEZ in order to normalize thewhitespace between XML tags. Recommended to include it sothat data responses are consistent.
When the RPC call completes, we get the result of the route lookup stored in the resultvariable as an XML structure. Here’s an extract of some example XML output of theroute information. I’ve underscored the attributes of the XML document that we’reinterested in, and in steps 7 and 8, you can see how we use the lxml functions in order toreference the various parts of the XML document.
<route-information> <route-table> <table-name>inet.0</table-name> <destination-count>649440</destination-count> <total-route-count>649460</total-route-count> <active-route-count>649411</active-route-count> <holddown-route-count>20</holddown-route-count> <hidden-route-count>9</hidden-route-count> <rt style="detail"> <rt-destination>212.23.32.0</rt-destination> <rt-prefix-length>19</rt-prefix-length> <rt-entry-count format="1 entry">1</rt-entry-count> <rt-announced-count>1</rt-announced-count> <rt-entry> <active-tag>*</active-tag> <current-active/> <last-active/> <protocol-name>BGP</protocol-name> <preference>170</preference> <preference2>-201</preference2> <nh-type>Router</nh-type> <nh-index>10792</nh-index> <nh-address>0x1e4412c</nh-address> <nh-reference-count>1947711</nh-reference-count> <nh-kernel-id>0</nh-kernel-id> <gateway>89.202.210.101</gateway> <nh indent="16"> <nh-string>Next hop</nh-string> <to>89.202.210.101</to> <via>ge-11/0/0.200</via> <selected-next-hop/> <session>16a</session> </nh> <rt-entry-state>Active Ext</rt-entry-state> <local-as>3291</local-as> <peer-as>8928</peer-as>
||||||||||||||||||||
||||||||||||||||||||

<age seconds="799463">1w2d 6:04:23</age> <metric>10</metric> <validation-state>unverified</validation-state> <task-name>BGP_8928.89.202.210.101</task-name> <announce-bits>4</announce-bits> <announce-tasks>0-KRT 3-RT 11-BGP_RT_Background 12- Resolve tree 4</announce-tasks> <as-path>AS path: 8928 I AS path: Recorded</as-path> <!- buggy!> <communities> <community>3291:10301</community> <community>3291:10901</community> <community>3291:11001</community> <community>8928:10900</community> <community>8928:11002</community> <community>8928:20901</community> <community>8928:65190</community> <community>8928:65191</community> </communities> <bgp-rt-flag>Accepted</bgp-rt-flag> <local-preference>200</local-preference> <peer-id>212.23.38.217</peer-id> </rt-entry> </rt> </route-table> </route-information>
lxml provides us with three useful functions for analyzing the XML data structure. Theyare explained in the following table:
lxml
function Functionality
find()Returns the first occurrence of an XML node with this tag name,supporting limited XPath location specification
findtext()Returns the text associated with an XML node (that is the inner text insidethe node).
findall()Returns a list of all of the nodes that match the limited XPath locationspecification
In step 8, we run through two nested for loops to run iterating through:
The route entries returned for the destination: the <rt-entry> tags,The nexthops associated with the routes (in the case of equal-cost multi-pathrouting): the <nh> tags.
We include some special logic for BGP in order to print the specific BGP attributes thatmake internet route lookup useful, such as the <as path> and <local-preference> attributes.
Technet24.ir||||||||||||||||||||
||||||||||||||||||||

Some versions of JUNOS 14.1 feature a bug where the AS Path attributereported by the XML interface is garbled and includes data from otherfields. This can be seen in our preceding sample output.
When troubleshooting the fields and attributes of the returned XMLdocument, lxml’s etree.dump() function is invaluable. While debugging, youmay want to import from lxml etree in order to be able to write statementssuch as the following to extract the raw XML output:print etree.dump(result)
||||||||||||||||||||
||||||||||||||||||||

Technet24.ir||||||||||||||||||||
||||||||||||||||||||

Configuration analysis and reportingIn this recipe, we’ll use the PyEZ framework to make operational RPCs to the JUNOSdevice in order to query configuration information. We’ll apply some logic andsummarization with a view to producing a report that offers some indication on the levelof load or configuration burden experienced by the JUNOS device. Such benchmarkingis a common requirement in ISP networks, where it is not always possible to dimensionthe capacity of a router simply by its physical interfaces. Logical configurationconsumes control plane resource as well and needs to be considered. This in turn canaffect decision making for chassis sizing. The following table presents the descriptionfor different resources used:
Resource Description
Physicalinterfaces
The number of physical interfaces likely determines the amount of trafficcapacity bandwidth available, and also the diversity of traffic
Logicalinterfaces
Each logical interface usually represents a customer service, or aninterconnect peer. This comes with the responsibility of next-hop resolution,ARP, possibly Netflow and so on.
ACLs The number of interfaces with ACLs might affect the performance of theunderlying packet forwarding engines.
VRRPCommonly used LAN redundancy protocol, allowing default-route hosts tohave a resilient gateway, VRRP requires the routing-engines on the JUNOSdevice to send regular keepalives
VRRP withauthentication
Like VRRP, but the authentication requirement often means that suchworkload cannot be off-loaded to the distributed linecards
Layer 2 Logical service provided to a customer to provide a transparent point-to-
||||||||||||||||||||
||||||||||||||||||||

Circuits point LAN service. Brings with it the overhead of an LDP session at least.
RoutingInstances
Virtual routing tables for customers, containing routing information,interfaces, and ARP tables. Each routing instance consumes memory
BGP peers Resources are required for each BGP peer, and depend on the peer-specificconfigurations and routing policy
BGP peerswithaggressivehold timers
External domain convergence requirements sometimes drive theconfiguration of aggressive hold-timers on BGP sessions. These require therouting-engine to send regular keepalives on the BGP sessions more often,consuming more resources.
bgp precision-timers causes modern JUNOS (>14) to off-load BGPkeepalive processing to an alternate thread of execution. When combinedwith modern FreeBSD kernels that allow symmetric multi-processing onmodern routing engines, this can go a long way to easing the resourceconsumption experienced with the last point.
Technet24.ir||||||||||||||||||||
||||||||||||||||||||


Getting readyIn order to complete this recipe, you’ll need Python 2.7 in a Linux or BSD-baseddevelopment environment of your choice. You should have already completed:
Configured NETCONF-over-SSH setup (Chapter 1, Configuring JUNOS throughNETCONF)Set up a PyEZ Environment (Chapter 2, Working with Junos REST API).
Technet24.ir||||||||||||||||||||
||||||||||||||||||||


How to do it…We’re going to write a Python script, pyez-config-scan.py, in order to get the configurationof a JUNOS device and then sum up the totals of various configuration aspects. We’llthen output in a tabular form the totals for consideration by an operator. You can modifythe patterns used to look for different configuration resources without much difficulty.The steps for the recipe are as follows:
1. Start the Python script by defining the interpreter and importing the necessarymodules:
#!/usr/bin/env python
from jnpr.junos import Device import sys import getpass import os import json import argparse
2. Next, include a simple general purpose exception handler:
def onError(exception_type, exception, traceback): print "%s: %s" % (exception_type.__name__, exception) sys.excepthook = onError
3. Use the argparse Python standard library module in order to parse the command linearguments and determine the runtime logic needed.
cmdline = argparse.ArgumentParser(description="Python JUNOS PyEZ Client") cmdline.add_argument("target", help="Target router to query") cmdline.add_argument("-p", metavar="port", help="TCP port", default=8443) cmdline.add_argument("-u", metavar="username", help="Remote username", default=getpass.getuser()) args=cmdline.parse_args()
4. Include a hook for password-based authentication using the getPass() routinedefined in the first recipe, Setting up a PyEZ environment:
password=getPass(args.u+"@"+args.target) if 'getPass' in globals() else ""
5. Call the PyEZ framework to connect to the JUNOS device and gather basic facts.Change the RPC timeout to 60 seconds in case the configuration file is large:
dev = Device(host=args.target, user=args.u, port=args.p,
Technet24.ir||||||||||||||||||||
||||||||||||||||||||

password=password) dev.open() dev.timeout = 60
6. Call the RPC in order to extract the current committed configuration:
config = dev.rpc.get_configuration(normalize=True)
7. Use XPath expressions in order to evaluate the structure of the XML configurationand determine the presence, absence, and extent of certain features:
ifd = config.xpath("interfaces/interface") ifl = config.xpath("interfaces/interface/unit") iflacli = config.xpath("interfaces/interface/unit/family /inet/filter/input") iflaclo = config.xpath("interfaces/interface/unit/ family/inet/filter/output") vrrp = config.xpath("interfaces/interface/unit/family /inet/address/vrrp-group") vrrpauth = config.xpath("interfaces/interface/unit/ family/inet/address/vrrp-group/authentication-key") vrf = config.xpath("routing-instances/instance[instance- type='vrf']") ibgp = config.xpath("protocols/bgp//neighbor[type='internal' or ../type='internal']") ebgp = config.xpath("protocols/bgp//neighbor[type='external' or ../type='external']") bgpv = config.xpath("routing- instances/instance/protocols/bgp//neighbor") bgpht = config.xpath("//bgp//neighbor[hold-time<30 or ../hold- time<30]") l2c = config.xpath("protocols/l2circuit//virtual-circuit-id")
8. Print out the summary totals of the configuration resources observed:
print " Hostname:\t %s" % dev.facts['hostname'] print " Model:\t %s" % dev.facts['model'] print " Version:\t %s\n" % dev.facts['version']
print "Physical interfaces:\t %u" % len(ifd) print " Logical interfaces:\t %u" % len(ifl) print " with input ACL:\t %u" % len(iflacli) print " with output ACL:\t %u" % len(iflaclo) print " with VRRP:\t %u" % len(vrrp) print " with VRRP/auth:\t %u" % len(vrrpauth) print " L2 circuits:\t %u" % len (l2c) print " Routing instances:\t %u" % len(vrf) print " IBGP peers:\t %u" % len(ibgp) print " EBGP peers:\t %u" % len(ebgp) print " L3VPN BGP peers:\t %u" % len(bgpv) print " BGP w/ HOLD < 30:\t %u" % len(bgpht)
9. Finally, close the PyEZ framework device object, freeing up associated memoryand resources:
dev.close()
||||||||||||||||||||
||||||||||||||||||||

Technet24.ir||||||||||||||||||||
||||||||||||||||||||


How it works…In step 1, we begin as always with the standard Python preamble, referencing themodules that we’re going to make use of. In step 2, we define a custom exceptionhandler that will run in the event of an unanticipated exception. It will print the errormessage and exit, which is appropriate behavior for a short-lived script like this.
In step 3, we read the command line argument using the standard library argparsefunctions. The only command line options present influence the connection strategyaffecting variables such as the remote TCP port number and username.
In step 4, we call the custom getPass() function if it is present and defined. If you’re in anenvironment where you’re using passwords rather than SSH-based key authentication,remember to include the getPass() code from the first recipe, and prepare the appropriate~/.pwaccess cache file.
In step 5, we use the PyE framework Device() constructor to create an object representingthe remote JUNOS device and then call the open() method in order to connect. For goodmeasure, we adjust the timeout for RPCs to 60 seconds, from the default of 30 seconds.
In step 6, we call the get-configuration RPC in order to get the current committedconfiguration and we use the normalize=True directive to have PyEZ cleanse the incomingXML for us and make whitespace regular.
In step 7, we use the xpath() method on the returned result set in order to process theresults and obtain some summary totals. In previous recipes, we used the find(),findtext() and findall() methods. The xpath() method is similar to the findall() method;however, it provides support for a richer set of XPath expressions including XPathpredicates that support syntax, as described in the following table:
XPath Expression Description
/ The absolute root node in the result set.
. The current node in the result set.
Technet24.ir||||||||||||||||||||
||||||||||||||||||||

.. The parent node in the result set.
tag A node called tag.
//tag Multi-node search operator. Will find the shallowest occurrence of tag.
[tag] A child node called tag.
[tag=’text’] A child node called tag, with text value.
[@attribute=’text’] A node attribute of text value.
Let’s look at some of the XPath expressions we use to extract the configuration data.
The first one, ifd, is pretty simple. We simply extract all of the <interface> nodes from the<interfaces> parent node. Because the result set returned to us is essentially a single nodeof type <configuration>, the expression that we give to xpath() starts with the name of thefirst tag that we want to match: in this case interfaces. Within the XML structure, eachinterface has an <interface> tag within the <interfaces> container. So ifd ends up storing alist of <interface> objects. All we need to do is count them. ifl follows an identicalprinciple, but counting the <unit> objects instead.
vrf is the next interesting one. We’re counting the number of routing-instances, but only ifthe instance-type is set to VRF. The XPath predicate whittles down the selection for us.
Note here in lxml’s xpath() implementation that we have to use the singleequals (=) operator for comparison, while in a lot of languages singleequals means assignment. It’s unfortunate, especially when otherimplementations of XPath allow us to use the more conventional doubleequals (==) to mean an equality test. Try not to let it become a bad habit.
||||||||||||||||||||
||||||||||||||||||||

bgp builds upon the same principle. Count the number of peers where the <type> field isset to either external or internal. But bgp has to deal with the configuration complexity thatthe type property can be set at either the neighbor level or the group level. The predicatesyntax uses the ../ operator to shift up the tree from the neighbour to the group to checkboth.
bgpht shows that we can do numeric comparisons on fields as well. In this case, wecheck if the hold timer is set to less than 30 seconds, and if so we class it as anaggressive timer and count it.
In step 8, we simply print the results of all our hard work in a neat fashion, giving a nicesummary to the operator of the workload presented to our JUNOS device.
Let’s see some example output:
w200324:ch5 chappa10$ ./pyez-config-scan.py -p 8931 -u auto_script 127.0.0.1 Hostname: lon-lab-score-2-re0 Model: MX960 Version: 15.1F6-S4.2
Physical interfaces: 99 Logical interfaces: 1292 with input ACL: 6 with output ACL: 8 with VRRP: 1064 with VRRP/auth: 1041 L2 circuits: 3 Routing instances: 116 IBGP peers: 17 EBGP peers: 6 L3VPN BGP peers: 48 BGP w/ HOLD < 30: 0
w200324:ch5 chappa10$ ./pyez-config-scan.py -p 8930 -u auto_script 127.0.0.1 Hostname: lon-lab-score-1-re1 Model: MX960 Version: 14.1R6.4
Physical interfaces: 103 Logical interfaces: 3809 with input ACL: 11 with output ACL: 11 with VRRP: 3609 with VRRP/auth: 2058 L2 circuits: 12 Routing instances: 141 IBGP peers: 12 EBGP peers: 10 L3VPN BGP peers: 42 BGP w/ HOLD < 30: 0
pyez_config_scan.py can easily produce the basis of a really useful tool for logical resourceplanning.
Technet24.ir||||||||||||||||||||
||||||||||||||||||||


Technet24.ir||||||||||||||||||||
||||||||||||||||||||

Making raw CLI commands from PyEZIn this recipe, we’ll use the PyEZ framework to execute an RPC on our JUNOS devicethat simply executes a raw command line string. Even though the unstructured, human-focused, command line text output is perilous to work with for automation applications,sometimes there are situations where you just need the output to a specific command.
We’ll look at ways that PyEZ can help with that.
||||||||||||||||||||
||||||||||||||||||||

Technet24.ir||||||||||||||||||||
||||||||||||||||||||

Getting readyIn order to complete this recipe, you’ll need Python 2.7 in a Linux or BSD-baseddevelopment environment of your choice. You should have already completed:
Configured NETCONF-over-SSH setup (Chapter 1, Configuring JUNOS throughNETCONF)Set up a PyEZ Environment (Chapter 2, Working with Junos REST API)
||||||||||||||||||||
||||||||||||||||||||

Technet24.ir||||||||||||||||||||
||||||||||||||||||||

How to do it…We’re going to write a new Python script, pyez-command-line.py, that will take an argumenta Junos device name and a command line to execute on the device:
pyez-show-route.py [-h] [-p port] [-u username] target “command”
The following table gives the argument and description used with pyez-show-route.py:
Argument Description-p TCP port to contact NETCONF-over-SSH-u Username
1. Start by defining the UNIX script interpreter in the first line of the file as usual andthen import the Python standard library and PyEZ definitions required to do thejob:
#!/usr/bin/env python
import sys import getpass import os import json import argparse from jnpr.junos import Device from lxml import etree
2. Define a general-purpose exception handler to pick up any errors:
def onError(exception_type, exception, traceback): print "%s: %s" % (exception_type.__name__, exception) sys.excepthook = onError
3. Parse the command line arguments using the Python argparse module:
cmdline = argparse.ArgumentParser(description="Python JUNOS PyEZ Command Line Tool") cmdline.add_argument("target", help="Target router to query") cmdline.add_argument("command", help="Command line to run") cmdline.add_argument("-p", metavar="port", help="TCP port", default=830) cmdline.add_argument("-u", metavar="username", help="Remote username", default=getpass.getuser()) args=cmdline.parse_args()
4. Look up a user password using the getPass() routine:
||||||||||||||||||||
||||||||||||||||||||

password=getPass(args.u+"@"+args.target) if 'getPass' in globals() else ""
5. Create a PyEZ Device object, specifying the necessary connection specifications,and have PyEZ open() it:
dev = Device(host=args.target, user=args.u, port=args.p, password=password) dev.open() dev.timeout = 60
6. Determine the XML RPC that corresponds to the command and then make anappropriate RPC call. Print the results:
rpc = dev.display_xml_rpc(args.command)
if type(rpc) is etree._Element: rpc.attrib['format']='text' result = dev.rpc(rpc) print result.text
else: print "XML RPC for command not available: ", rpc
7. Close the device, freeing up any consumed resources:
dev.close()
Technet24.ir||||||||||||||||||||
||||||||||||||||||||


How it works…In step 1, we pull the necessary Python standard library and PyEZ frameworkdefinitions into the global namespace so that we can make use of them. And then in step2, we establish a general-purpose handler routine that should be called if any exceptionsare thrown.
In step 3, we pick apart the command-line arguments with arpgarse help. We’reconfigured to recognise switches to define the user name and the destination TCP portfor the NETCONF over SSH session. Then the extra parameters after the switches arethe target hostname, and the actual command line – in quotation marks – respectively:
unix$ ./pyez-command-line.py -husage: pyez-command-line.py [-h] [-p port] [-u username] target command
Python JUNOS PyEZ Command Line Tool
positional arguments: target Target router to query command Command line to run
optional arguments: -h, --help show this help message and exit -p port TCP port -u username Remote username
In step 4, we check for the presence of the getPass() routine in the global namespace. Ifit’s present, we call it in order to obtain a password to use with the username, otherwisewe assume SSH key authentication.
In step 5, we invoke PyEZ by creating a Device object, specifying everything that we’velearned from the command line switches to assist connection and authentication. Whenwe make the open() call, PyEZ actually connects to the JUNOS device and collects initialdevice information.
We don’t actually make any use of that information, but instead we use thedisplay_xml_rpc() method of the Device object in order to translate the requested commandline into the XML RPC format. Under the hood, PyEZ is actually doing this byconnecting to the JUNOS device and issuing something similar to the | display xml rpccommand.
With the response XML structure, we need to make a simple change. We use the lxmlfunctionality in order to add an attribute to the RPC to specify that we want to see theoutput in plain text. This is because we have no idea about which RPCs the user will
Technet24.ir||||||||||||||||||||
||||||||||||||||||||
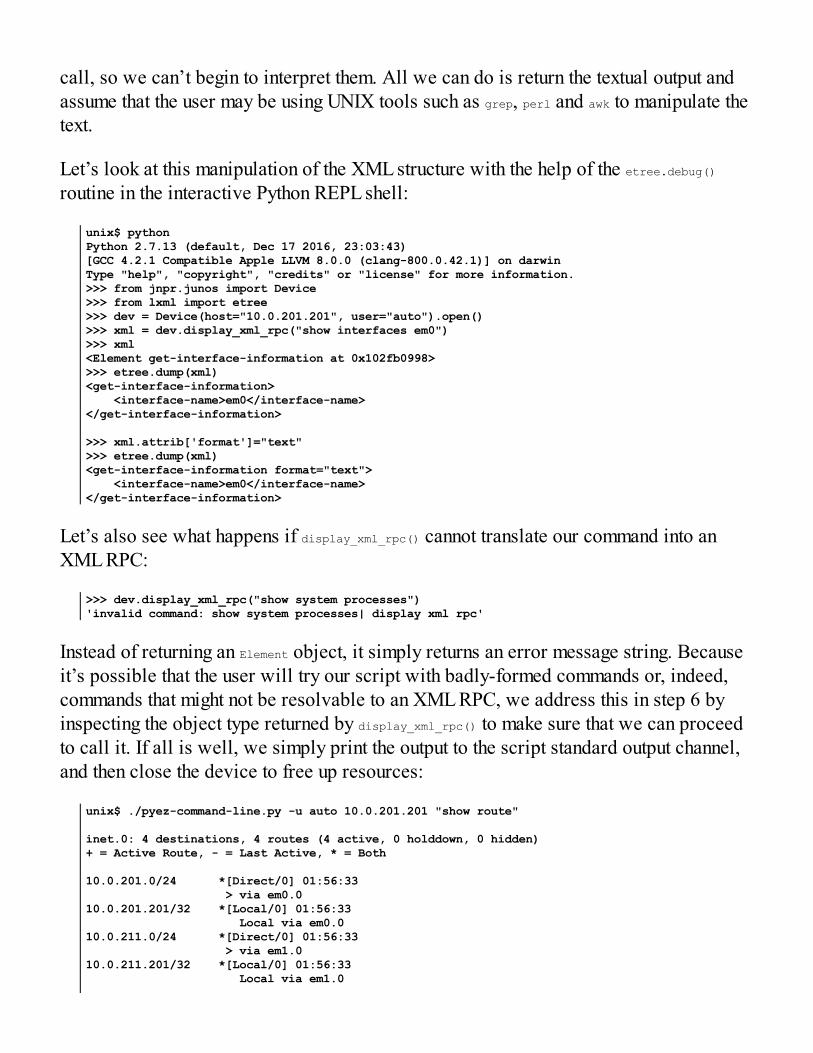
call, so we can’t begin to interpret them. All we can do is return the textual output andassume that the user may be using UNIX tools such as grep, perl and awk to manipulate thetext.
Let’s look at this manipulation of the XML structure with the help of the etree.debug()routine in the interactive Python REPL shell:
unix$ pythonPython 2.7.13 (default, Dec 17 2016, 23:03:43) [GCC 4.2.1 Compatible Apple LLVM 8.0.0 (clang-800.0.42.1)] on darwinType "help", "copyright", "credits" or "license" for more information.>>> from jnpr.junos import Device>>> from lxml import etree>>> dev = Device(host="10.0.201.201", user="auto").open()>>> xml = dev.display_xml_rpc("show interfaces em0")>>> xml<Element get-interface-information at 0x102fb0998>>>> etree.dump(xml)<get-interface-information> <interface-name>em0</interface-name></get-interface-information>
>>> xml.attrib['format']="text">>> etree.dump(xml)<get-interface-information format="text"> <interface-name>em0</interface-name></get-interface-information>
Let’s also see what happens if display_xml_rpc() cannot translate our command into anXML RPC:
>>> dev.display_xml_rpc("show system processes")'invalid command: show system processes| display xml rpc'
Instead of returning an Element object, it simply returns an error message string. Becauseit’s possible that the user will try our script with badly-formed commands or, indeed,commands that might not be resolvable to an XML RPC, we address this in step 6 byinspecting the object type returned by display_xml_rpc() to make sure that we can proceedto call it. If all is well, we simply print the output to the script standard output channel,and then close the device to free up resources:
unix$ ./pyez-command-line.py -u auto 10.0.201.201 "show route"
inet.0: 4 destinations, 4 routes (4 active, 0 holddown, 0 hidden)+ = Active Route, - = Last Active, * = Both
10.0.201.0/24 *[Direct/0] 01:56:33 > via em0.010.0.201.201/32 *[Local/0] 01:56:33 Local via em0.010.0.211.0/24 *[Direct/0] 01:56:33 > via em1.010.0.211.201/32 *[Local/0] 01:56:33 Local via em1.0
||||||||||||||||||||
||||||||||||||||||||

unix$ ./pyez-command-line.py -u auto 10.0.201.201 "show interfaces em0"
Physical interface: em0, Enabled, Physical link is Up Interface index: 8, SNMP ifIndex: 17 Type: Ethernet, Link-level type: Ethernet, MTU: 1514, Speed: 1000mbps Device flags : Present Running Interface flags: SNMP-Traps Link type : Full-Duplex Current address: 08:00:27:2d:4c:9f, Hardware address: 08:00:27:2d:4c:9f Last flapped : 1970-01-01 00:03:03 UTC (13:46:11 ago) Input packets : 10628 Output packets: 7320
Logical interface em0.0 (Index 69) (SNMP ifIndex 18) Flags: Up SNMP-Traps 0x4000000 Encapsulation: ENET2 Input packets : 10623 Output packets: 7320 Protocol inet, MTU: 1500 Flags: Sendbcast-pkt-to-re, Is-Primary Addresses, Flags: Is-Default Is-Preferred Is-Primary Destination: 10.0.201/24, Local: 10.0.201.201, Broadcast: 10.0.201.255
Technet24.ir||||||||||||||||||||
||||||||||||||||||||


There’s morePyEZ actually includes a more direct way of invoking command line output, using thecli() method. However, the cli() method comes with a stark warning about only beingused for debugging and development and emits a Python warning, which is usuallyenough to put you off using this technique in production applications.
>>> dev.cli("show interfaces em0")/usr/local/Cellar/python/2.7.13/Frameworks/Python.framework/Versions/2.7/lib/python2.7/site-packages/jnpr/junos/device.py:598: RuntimeWarning: CLI command is for debug use only!Instead of:cli('show interfaces em0')Use:rpc.get_interface_information(interface_name='em0')
warnings.warn(warning_string, RuntimeWarning)'\nPhysical interface: em0, Enabled, Physical link is Up\n Interface index: 8, SNMP ifIndex: 17\n Type: Ethernet, Link-level type: Ethernet, MTU: 1514, Speed: 1000mbps\n Device flags : Present Running\n Interface flags: SNMP-Traps\n Link type : Full-Duplex\n Current address: 08:00:27:2d:4c:9f, Hardware address: 08:00:27:2d:4c:9f\n Last flapped : 1970-01-01 00:03:03 UTC (13:13:28 ago)\n Input packets : 9874\n Output packets: 6717\n\n Logical interface em0.0 (Index 69) (SNMP ifIndex 18)\n Flags: Up SNMP-Traps 0x4000000 Encapsulation: ENET2\n Input packets : 9869\n Output packets: 6717\n Protocol inet, MTU: 1500\n Flags: Sendbcast-pkt-to-re, Is-Primary\n Addresses, Flags: Is-Default Is-Preferred Is-Primary\n Destination: 10.0.201/24, Local: 10.0.201.201, Broadcast: 10.0.201.255\n'
The cli() method is slightly less pious with its warnings for the commandsthat lack an XML RPC equivalent.
Technet24.ir||||||||||||||||||||
||||||||||||||||||||


Using tables and viewsIn this recipe, we’ll make use of a PyEZ framework feature that greatly eases thecomplexity of calling RPCs and parsing XML result sets with XPath expressions. Tablesare used to map data atoms from the XML responses structured returned by RPCs intoPython-friendly data structures for easy use and analysis by automation software.
In this case, we’ll use a table and a view in order to inspect the Junos device hardwareinventory.
Technet24.ir||||||||||||||||||||
||||||||||||||||||||


Getting readyIn order to complete this recipe, you’ll need Python 2.7 in a Linux or BSD-baseddevelopment environment of your choice. You should have already completed:
Configured NETCONF-over-SSH set up (Chapter 1, Configuring JUNOS throughNETCONF)Set up a PyEZ environment (Chapter 2, Working with Junos REST API)
Technet24.ir||||||||||||||||||||
||||||||||||||||||||


How to do it…We’re going to write a new Python script, pyez-hardware.pyez, that will take an argument aJUNOS device name, and will respond with a list of hardware components within.
pyez-table-hardware.py [-h] [-p port] [-u username] target
Argument Description
-p TCP port to contact NETCONF-over-SSH
-u Username
We’re going to do this using a pre-defined Table/View combination that ships with thePyEZ framework. The steps for the recipe are as follows:
1. First of all, start by including the usual Python preamble of script interpreter andPython modules. Include the jnpr.junos.op.inventory.ModuleTable definition:
#!/usr/bin/env python
import sys import getpass import os import json import argparse from jnpr.junos import Device from jnpr.junos.op.inventory import ModuleTable
2. Define a general-purpose exception handler to pick up any errors:
def onError(exception_type, exception, traceback): print "%s: %s" % (exception_type.__name__, exception) sys.excepthook = onError
3. Then, parse the command line arguments using the Python argparse module:
cmdline = argparse.ArgumentParser(description="Python JUNOS PyEZ Hardware Tool") cmdline.add_argument("target", help="Target router to query") cmdline.add_argument("-p", metavar="port", help="TCP port",
Technet24.ir||||||||||||||||||||
||||||||||||||||||||

default=830) cmdline.add_argument("-u", metavar="username", help="Remote username", default=getpass.getuser()) args=cmdline.parse_args()
4. Look up a user password using the getPass() routine:
password=getPass(args.u+"@"+args.target) if 'getPass' in globals() else ""
5. For the target device, create a PyEZ Device object, specifying the necessaryconnection specifications, and have PyEZ open() it:
dev = Device(host=args.target, user=args.u, port=args.p, password=password) dev.open() dev.timeout = 60
6. Call the ModuleTable() constructor on the device in order to create the table, theninvoke its get() method. With the resulting list, iterate through each of the items,printing the five key properties of a module:
NameSerial numberPart numberRevisionDescription
modules = ModuleTable(dev).get() for item in modules: print "%s\t%s\t%s\t%s\t%s" % (item.jname, item.sn, item.pn, item.ver, item.type)
7. Finally, once done, close the device to free any allocated resources:
dev.close()
||||||||||||||||||||
||||||||||||||||||||

Technet24.ir||||||||||||||||||||
||||||||||||||||||||

How it works…In step 1, we pull the necessary Python standard library and PyEZ frameworkdefinitions into the global namespace so that we can make use of them. Steps 2 through 5are all very similar to what we’ve seen in previous recipes: setting error handlers,parsing command- line arguments, and opening the PyEZ Device() constructorrespectively.
But of particular note, though, in step 1 is the reference tojnpr.junos.op.inventory.ModuleTable, which is, PyEZ-included class that represents a JUNOSdevice hardware module and is instantiated through a Python factory loader shim from apiece of YAML definition.
YAML is a markup language that is able to define hierarchicaldatastructures, in a similar way to JSON and XML. It is able to representsimple key-value pairs, lists and associative arrays. Like Python, it placessignificance on indent to define depth and logical scoping.
Let’s take a look at the source files involved to get a good understanding of what’s goingon:
$ more /usr/local/lib/python2.7/site-packages/jnpr/junos/op/inventory.py"""Pythonifier for Inventory Table/View"""from jnpr.junos.factory import loadyamlfrom os.path import splitext_YAML_ = splitext(__file__)[0] + '.yml'globals().update(loadyaml(_YAML_))
The inventory.py module does little more than import a helper function to load in classrepresentation in YAML. The trick in the magic is in the YAML file itself;
$ more /usr/local/lib/python2.7/site-packages/jnpr/junos/op/inventory.yml ---
ModuleTable: rpc: get-chassis-inventory item: .//chassis-sub-module|.//chassis-module|.//chassis-sub-sub-module key: - name view: ModuleTableView
ModuleTableView: fields: jname: name sn: serial-number pn: part-number
||||||||||||||||||||
||||||||||||||||||||

ver: version type: description
The YAML file describes two structures:
A table, which is simply an encapsulation of an RPC call to JUNOS with theidentification of a key fieldA view, which is the list of attributes for each “row” in the database that is ofinterest.
In the following table, there are several properties which are important. We include adescription of them here (even though not all of the parameters are used in ourexample).
Parameter Description
rpcThe specific RPC that should be called in order to return the data; forexample, <get-chassis-inventory>
argsOptional arguments to the RPC in order to influence its output. Forexample, <detail> and <brief> are related.
item
The main XML data entity to select as the table container. In ourexample, we actually use a union of several items (using the | syntax),because the <get-chassis-inventory> RPC returns several different typesbased on the hierarchical nature of the hardware installation taxonomy.
keyA unique identifier that distinguishes the data items within the tablecontainer. By default, name is used.
view
A reference to a mapping object that is responsible for translating theXML fields within the table container, or XPath expressions, into thefields into Python attributes
Within the view, we then have a simple mapping from fields of a Python object to dataatoms within the XML document.
Skipping forward to step 6, we invoke the YAML-instantiated Python class calledModuleTable against our freshly created JUNOS device, and when we invoke the get()method, this causes PyEZ to make the necessary RPC calls specified in the YAMLdefinition. In our case, it will issue a <get-chassis-inventory> call and pick out chassismodule, sub-module, and sub-sub-module entities.
Technet24.ir||||||||||||||||||||
||||||||||||||||||||

For each of the fields that are defined in the YAML view, we receive a property on theresulting Python object, so we can iterate through the table using a for loop and simplyprint the properties. The result is very similar to the JUNOS show chassis hardwarecommand, but the obvious benefit is that each of the underlying data atoms have beenprocessed intimately by our Python application so, for instance, if we wanted to extractinformation about the routine engine, we could do so by only including rows of the tablewhere the jname field was appropriate.
Let's see some example output from our MX in the lab:
$ ./pyez-table-hardware.py -u auto_script -p 8930 127.0.0.1Midplane TR2396 710-013698 REV 03 MX960 BackplaneFPM Board KE9580 710-014974 REV 03 Front Panel DisplayPDM QCS1148501L 740-013110 Rev 03 Power Distribution ModulePEM 2 QCS1831V1ST 740-029344 Rev 08 DC 4.1kW Power Entry ModulePEM 3 QCS1831V1S4 740-029344 Rev 08 DC 4.1kW Power Entry ModuleRouting Engine 0 9009199007 740-031116 REV 10 RE-S-1800x4Routing Engine 1 9009218911 740-031116 REV 10 RE-S-1800x4CB 0 CADL7370 750-031391 REV 23 Enhanced MX SCBCB 1 CADL7322 750-031391 REV 23 Enhanced MX SCBCB 2 CADL7487 750-031391 REV 23 Enhanced MX SCBFPC 0 KD6421 750-018124 REV 04 DPCE 4x 10GE RCPU KD0609 710-013713 REV 06 DPC PMBPIC 0 BUILTIN BUILTIN None 1x 10GE(LAN/WAN)PIC 1 BUILTIN BUILTIN None 1x 10GE(LAN/WAN)Xcvr 0 T08L87866 740-014279 REV 01 XFP-10G-LRPIC 2 BUILTIN BUILTIN None 1x 10GE(LAN/WAN)Xcvr 0 7Z3019B00768 740-014279 REV 01 XFP-10G-LRPIC 3 BUILTIN BUILTIN None 1x 10GE(LAN/WAN)FPC 4 KD5670 750-018124 REV 04 DPCE 4x 10GE RCPU KD3497 710-013713 REV 06 DPC PMBPIC 0 BUILTIN BUILTIN None 1x 10GE(LAN/WAN)Xcvr 0 7Z3019B00778 740-014279 REV 01 XFP-10G-LRPIC 1 BUILTIN BUILTIN None 1x 10GE(LAN/WAN)Xcvr 0 T08K64723 740-014279 REV 01 XFP-10G-LRPIC 2 BUILTIN BUILTIN None 1x 10GE(LAN/WAN)PIC 3 BUILTIN BUILTIN None 1x 10GE(LAN/WAN)Xcvr 0 7Z3019B00771 740-014279 REV 01 XFP-10G-LRFan Tray 0 ACDD0456 740-057995 REV 01 Enhanced Fan TrayFan Tray 1 ACDD0581 740-057995 REV 01 Enhanced Fan Tray
||||||||||||||||||||
||||||||||||||||||||

Technet24.ir||||||||||||||||||||
||||||||||||||||||||

There's moreThe PyEZ framework comes with a large number of pre-defined tables and viewsaffording a high-level abstraction on a significant variety of JUNOS operational andconfiguration resources and elements.
Some of the most common ones include:
Import File Module(s) Description
jnpr.junos.op.arp ArpTable
Mappings between IP addresses andEthernet MAC addresses in the globalrouting instance
jnpr.junos.op.bfd BfdSessionTable BFD session information
jnpr.junos.op.bgp bgpTable BGP neighbor information
jnpr.junos.op.ethports EthPortTable
Table of interface, filtered to be Ethernetmedia only, with Ethernet media relatedinformation
jnpr.junos.op.inventory ModuleTableDistributed line card and modularhardware information
jnpr.junos.op.l2circuit L2CircuitConnectionTable Layer 2 pseudowire circuit information
jnpr.junos.op.routes RouteTable,RouteSummaryTable
Routing table views. (tip: use thedestination arg in order to avoid long-running and resource consumingoperations on full-table Internet routers)
||||||||||||||||||||
||||||||||||||||||||

Summarizing, we can see that tables and views greatly simplify the process ofinspecting JUNOS operational state by providing an abstraction layer over and abovethe foundation RPC calls, allowing us to map the resulting XML from RPC calls directlyinto Python data structures where we can implement our automation logic.
Technet24.ir||||||||||||||||||||
||||||||||||||||||||


Using custom tables and viewsIn this recipe, we’ll build on the learning from the previous recipe, regarding tables andviews. PyEZ includes a built-in table for looking at BGP neighbors but with operationalexperience, it can be a bit lacking in utility. The deficiencies include:
The table uses the peer_id attribute to identify the remote peer. When the peeringsession is not established, this is simply the value of the configured neighbor towhom TCP sessions will be directed and it’s generally useful. But when thesession establishes, this field changes to show the router ID of the remote peer - asystem-wide identifier, rather than an interface identifier - which is unlikely to bethe same for EBGP peers in an internet context.The view associated with the table omits some of the BGP I/O parameters, whichcan be useful in troubleshooting slow readers and writers and associatedproblems.
So, as we did in Chapter 5, Automating JUNOS with PyEZ, let’s try to re-invent theinfamous Cisco-style of show ip bgp output for our JUNOS OS BGP-speaking device,without the usual address-family breakdown.
Technet24.ir||||||||||||||||||||
||||||||||||||||||||


Getting readyIn order to complete this recipe, you’ll need Python 2.7 in a Linux or BSD-baseddevelopment environment of your choice.
You should have already completed the following activities:
Junos NETCONF-over-SSH setup (Chapter 1, Configuring JUNOS with NETCONF)Setting up PyEZ environment (Chapter 2, Working with the JUNOS REST API).
Technet24.ir||||||||||||||||||||
||||||||||||||||||||


How to do it…We’re going to borrow the basic definitions from the PyEZ bundled BGP table and viewbut we’re going to modify them so that they include the extra fields in the view thatwe’re interested in.
We’ll do that by writing a new YAML definition to define our improved table and view,and loading that on-the-fly into the PyEZ class framework, without using a separatestatic import file.
1. Start in the usual way by specifying the Python interpreter and import thenamespaces that we require for the recipe:
#!/usr/bin/env python
import sys import getpass import os import json import argparse from jnpr.junos import Device from jnpr.junos.factory.factory_loader import FactoryLoader import yaml
2. Trap any encountered errors:
def onError(exception_type, exception, traceback): print "%s: %s" % (exception_type.__name__, exception) sys.excepthook = onError
3. Parse the command line to determine the essential endpoint connectivityparameters:
cmdline = argparse.ArgumentParser(description="Python JUNOS PyEZ BGP Tool (custom)") cmdline.add_argument("target", help="Target router to query") cmdline.add_argument("-p", metavar="port", help="TCP port", default=830) cmdline.add_argument("-u", metavar="username", help="Remote username", default=getpass.getuser()) args=cmdline.parse_args()
4. Optionally, look up a user password using the getPass() routine:
password=getPass(args.u+"@"+args.target) if 'getPass' in globals() else ""
5. Specify the YAML source for a custom BGP table and view that will include the
Technet24.ir||||||||||||||||||||
||||||||||||||||||||

necessary parameters that we want:
bgpYAML = """ --- BgpTable: rpc: get-bgp-summary-information key: peer-address item: bgp-peer view: BgpView
BgpView: fields: asn: peer-as address: peer-address state: peer-state routes_accepted: bgp-rib/accepted-prefix-count routes_received: bgp-rib/received-prefix-count output_msgs: output-messages input_msgs: input-messages out_q: route-queue-count """
6. Dynamically load the YAML into the PyEZ class framework:
myModule = FactoryLoader().load(yaml.load(bgpYAML)) globals().update(myModule)
7. For the target device, create a PyEZ device object, specifying the necessaryconnection specifications, and have PyEZ open() it. Disable automatic factsgathering:
dev = Device(host=args.target, user=args.u, port=args.p, password=password, gather_facts=False) dev.open() dev.timeout = 60
8. Create an instance of the BGP table bound to the newly created device, andpopulate it using the get() method:
peers = BgpTable(dev).get()
9. Use a for loop to iterate through the members of the table, print out for each BGPpeer, the critical information:
peers = BgpTable(dev).get()
print "%20s\t%10s\t%10s\t%10s\t%s\t%s" % ("Peer", "ASN", "InMsgs", "OutMsgs", "OutQ", "State/PfxRcvd") for peer in peers: routes_received = reduce(lambda x, y: int(x)+int(y), peer.routes_received) if type(peer.routes_received)==list else peer.routes_received routes_accepted = reduce(lambda x, y: int(x)+int(y), peer.routes_accepted) if type(peer.routes_accepted)==list else peer.routes_accepted
||||||||||||||||||||
||||||||||||||||||||

print "%20s\t%10s\t%10s\t%10s\t%s\t%s" % (peer.address.split("+")[0], peer.asn, peer.input_msgs, peer.output_msgs, peer.out_q, str(routes_accepted)+"/"+str(routes_received) if (peer.state=="Established") else peer.state)
10. Once completed, close() the device and free resources:
dev.close()
Technet24.ir||||||||||||||||||||
||||||||||||||||||||


How it works…Steps 1 through 4 are common to most of the previous recipes that we’ve covered in thischapter, so I won’t linger on them. Step 5 is where the action starts. We define a newtable and view using the YAML format language in order to describe the relationshipsbetween objects and encapsulate it within a Python triple-quoted string.
In the BGP table that we define, we replicate some of the original BGP table and view,but we also make some changes:
The RPC is changed to get-bgp-summary-information. It’s a slightly lighter call, withless information, but it’s all we need.The table key is changed to be that of a peer-address, on the understanding that it ismuch more likely to be a unique parameter. It’s not impossible that we might seethe same peer-id attribute if we have multiple peering sessions between the samerouter on different interfaces.Extra fields are added to the view in order to reflect the additional inspection thatwe want on the BGP peers: specifically, a view onto the received and acceptedroutes, per RIB, and the average output queue length.
In step 6, we perform the actual dynamic loading of the YAML-defined object. We usethe Python YAML library and PyEZ’s FactoryLoader() constructor in order to load theYAML from a string, and instantiate it into a PyEZ table and view, respectively.
The update() method is used in order to merge the myModule dictionary into the globalnamespace, making available the BgpTable and BgpView names for our application.
In step 7, we create the PyEZ device profile along with connection parameters asnormal and then open() it, causing PyEZ to attempt to connect to the NETCONF serviceon our JUNOS device.
In this case, we opt to disable fact-gathering due to some experiences oftrouble when associated with PyEZ tables that use significant response-sized RPCs. Your mileage may vary.
Then in step 8, we instantiate one of our custom BgpTable objects and have it populatedfrom the status of the PyEZ JUNOS device. Under the hood, PyEZ calls the RPCspecified within the YAML definition, and collects all of the fields nominated in the
Technet24.ir||||||||||||||||||||
||||||||||||||||||||

view.
The peers object that is returned is enumerable – iterable in Python-speak - usingPython’s standard iterator functionality and so, in step 9, we can walk through the tablewith a simple for loop and inspect each of the attributes of each peer and print them in auseful representation.
In our case, this gives us an opportunity to deal with the slight inconsistency surroundingthe peer-address field that is observable on the RPC responses.
When the BGP session is established, the peer-address field returns additionalinformation about the TCP port number endpoint, suffixed after a (+) sign. See thefollowing figure. This is helpful for some situations, but it makes our nice tabular outputmessy. To deal with the problem, we can massage the field in Python with the split()method.
XML format comparison of BGP peers in different states
Note also the returned data for accepted_routes and received_routes can vary. Usually it’ssimply a string representation of an integer, but if the BGP peer has multiple addressfamilies configured (using multi-protocol BGP – common in MPLS and otherapplications), then JUNOS thoughtfully returns this data per address-family, or moreaccurate, per routing information base (RIB) used. In this PyEZ converts the multipleitems into a list.
For our summary view, such detail isn’t required. We just want a count of prefixes heardand accepted, so we make use of the Python lambda function to quickly add up all itemsin the list, if indeed the returned item is a list.
||||||||||||||||||||
||||||||||||||||||||

The final output can be seem here, offering a simple view on BGP session status andperformance, per-session, per-line:
w200324:ch5 chappa10$ ./pyez-custom-table.py -u auto 10.0.201.201 Peer ASN InMsgs OutMsgs OutQ State/PfxRcvd 10.0.201.90 90 0 0 0 Connect 10.0.201.91 91 0 0 0 Connect 10.0.201.92 92 0 0 0 Active 10.0.201.93 93 0 0 0 Active 10.0.201.94 94 0 0 0 Active 10.0.201.220 64500 666 728 0 10/10
Technet24.ir||||||||||||||||||||
||||||||||||||||||||


Making configuration changes withPyEZIn this recipe, we’ll explore the PyEZ framework and the facilities it provides formanipulating the configuration on JUNOS devices. We’ll create an PyEZ application,pyez-edit-prefix-list.py, that can manipulate a named prefix-list on a JUNOS device. Theprefix-list list might be part of an advanced routing protocol policy configuration whichwe won’t attempt to configure, but we’ll provide the ability to add and remove prefixesfrom the prefix-list, using a command line interface like this:
Command line argument Description
-h Offers brief help text
-t router IP address of JUNOS router to target
-a prefix/len Prefix to add to the list
-d prefix/len Prefix to delete from the list
-l prefix-list Name of the prefix-list
-p port Connects to NETCONF-over-SSH using a specified TCP port
-u username Authenticates with NETCONF-over-SSH using this userename
The user mandatorily specifies the target Junos device using the –t switch and the
Technet24.ir||||||||||||||||||||
||||||||||||||||||||

prefix-list name using –l. If required, the user can customise the connection method byspecifying the NETCONF-over-SSH port with –p, and he can also influence theusername used to authenticate using –u.
Following this, the user mandatorily specifies –a to add a prefix or –d to delete a prefix,or alternatively the user can specify mixed, multiple instances of either operation. Atruntime, the tool deletes the specified prefixes first, and then adds the required newprefixes.
Any observed errors at configuration load time, or at commit time, are reported simplyand clearly, and then the program exits.
||||||||||||||||||||
||||||||||||||||||||

Technet24.ir||||||||||||||||||||
||||||||||||||||||||

Getting readyTo complete this recipe, you’ll need a working PyEZ environment and an accessibleJunos OS platform to configure. The following pre-requisite recipes can help.
Junos NETCONF-over-SSH setup (Chapter 1, Configuring JUNOS throughNETCONF )Setting up PyEZ environment (Chapter 2, Working wih the JUNOS REST API)
||||||||||||||||||||
||||||||||||||||||||

Technet24.ir||||||||||||||||||||
||||||||||||||||||||

How to do it…The steps for the recipe are as follows:
1. Use the boilerplate that has become standard in the PyEZ recipes: import Pythonnamespaces, set up error handling, and then parse the command-line arguments:
#!/usr/bin/env python
import sys import getpass import os import json import argparse from jnpr.junos import Device from jnpr.junos.utils.config import Config from jnpr.junos.exception import ConfigLoadError def onError(exception_type, exception, traceback): print "%s: %s" % (exception_type.__name__, exception) sys.excepthook = onError
cmdline = argparse.ArgumentParser(description="Python JUNOS PyEZ Prefix List Tool") cmdline.add_argument("-t", metavar="router", help="Target router to query", required=True) cmdline.add_argument("-a", metavar="prefix/len", help="Prefix to add", action="append") cmdline.add_argument("-d", metavar="prefix/len", help="Prefix to delete", action="append") cmdline.add_argument("-l", metavar="prefix-list", help="prefix- list name", required=True) cmdline.add_argument("-p", metavar="port", help="TCP port", default=830) cmdline.add_argument("-u", metavar="username", help="Remote username", default=getpass.getuser()) args=cmdline.parse_args()
2. Optionally, call the getPass() routine, if you’re using it, to consult the passwordcache for the target router:
password=getPass(args.u+"@"+args.target) if 'getPass' in globals() else ""
3. Validate the input arguments to make sure that we at least have some prefixes toadd or remove:
if (args.a==None and args.d==None): print "Nothing to do!" sys.exit(1)
4. Create a PyEZ framework device with the appropriate connection profileinformation and call the open() method upon it to have PyEZ connect:
||||||||||||||||||||
||||||||||||||||||||

dev = Device(host=args.t, user=args.u, port=args.p, password=password) dev.open() dev.timeout = 120
5. Create a Config() object, specifying private mode, and then repeatedly load the setor delete operations depending on the type of operation specified by the user:
with Config(dev, mode="private") as config: if args.d!=None: for p in args.d: try: config.load("delete policy-options prefix-list %s %s" % (args.l, p), format="set") except ConfigLoadError, e: if (e.rpc_error['severity']=='warning'): print "Warning: %s" % e.message else: raise if args.a!=None: for p in args.a: try: config.load("set policy-options prefix-list %s %s" % (args.l, p), format="set") except ConfigLoadError, e: if (e.rpc_error['severity']=='warning'): print "Warning: %s" % e.message else: raise
6. Output a configuration difference to the Terminal so that user can validateoperations:
diff = config.diff() if (diff!=None): print diff
7. Commit the configuration and close the device:
config.commit()
dev.close()
Technet24.ir||||||||||||||||||||
||||||||||||||||||||


How it works...In step 1, we import the usual Python standard library and PyEZ frameworks. Thenotable additions, compared with previous recipes, are:
Module Descriptionjnpr.junos.utils.config.Config Models a JUNOS candidate configuration
jnpr.junos.exception.ConfigLoadErrorRepresents an error that can occur duringconfiguration load
argparse is used, as usual, to parse the command line arguments. We make use of theaction=“Append” direction to the add_argument() method to ensure that the –a and –d switchescan take on multiple values. In return, argparse will build a list of values rather than asingle token. We make sure that the prefix-list and the target router are mandatory itemsby setting the attribute required=True.
If SSH authentication is being done by username and password, the getPass() routine,defined earlier in the chapter, can be used to consult a vault of passwords from the userhome directory in step 2.
In step 3, we check the command-line argument args.a and args.d, respectively, in orderto make sure that at least one of them has some prefixes to work on. If both are empty,the program exits, reporting the situation.
In step 4, we called the PyEZ Device() constructor with the device address andauthentication parameters in order to prepare a NETCONF session with the device.When we call the open() method, PyEZ tries to make the connection and complete theauthentication.
In this case, because configuration commit operations can sometimes takelonger than ordinary operational commands, we change the default timeoutvalue associated with the device to be a generous 2 minutes.
In step 5, we make use of a Python with construct to create a context block. The Config()constructor creates an object from the device parameter and the requested private
Technet24.ir||||||||||||||||||||
||||||||||||||||||||
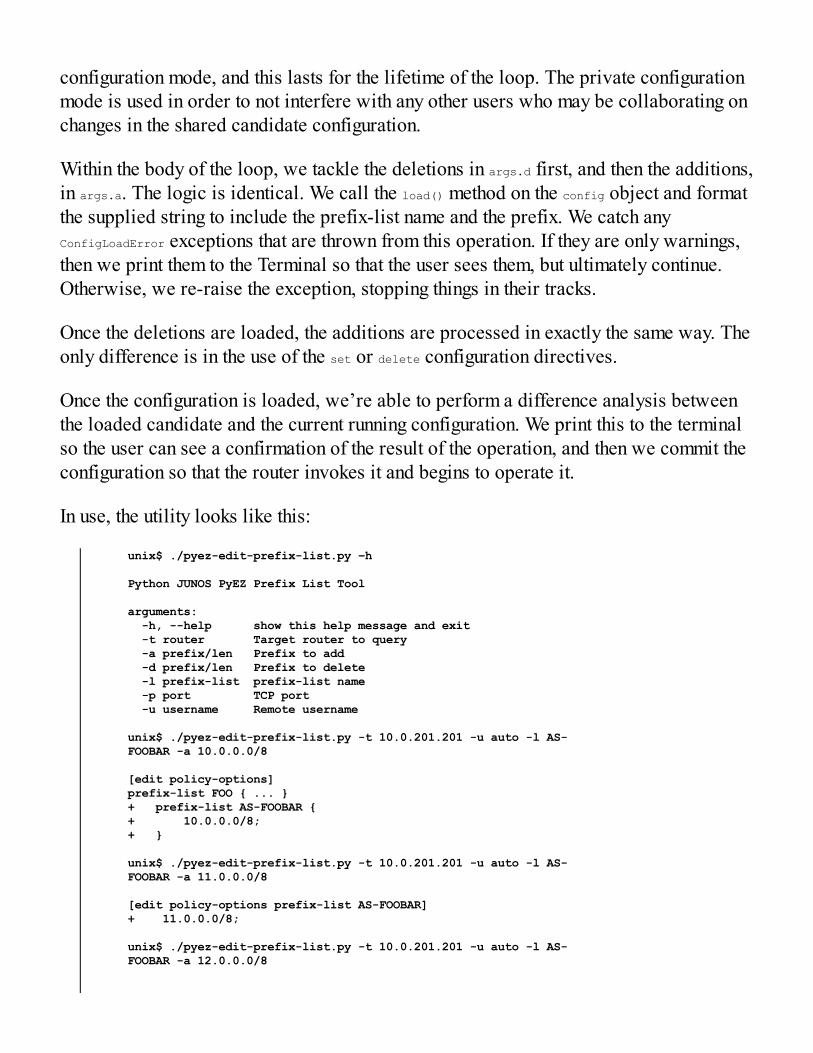
configuration mode, and this lasts for the lifetime of the loop. The private configurationmode is used in order to not interfere with any other users who may be collaborating onchanges in the shared candidate configuration.
Within the body of the loop, we tackle the deletions in args.d first, and then the additions,in args.a. The logic is identical. We call the load() method on the config object and formatthe supplied string to include the prefix-list name and the prefix. We catch anyConfigLoadError exceptions that are thrown from this operation. If they are only warnings,then we print them to the Terminal so that the user sees them, but ultimately continue.Otherwise, we re-raise the exception, stopping things in their tracks.
Once the deletions are loaded, the additions are processed in exactly the same way. Theonly difference is in the use of the set or delete configuration directives.
Once the configuration is loaded, we’re able to perform a difference analysis betweenthe loaded candidate and the current running configuration. We print this to the terminalso the user can see a confirmation of the result of the operation, and then we commit theconfiguration so that the router invokes it and begins to operate it.
In use, the utility looks like this:
unix$ ./pyez-edit-prefix-list.py –h
Python JUNOS PyEZ Prefix List Tool
arguments: -h, --help show this help message and exit -t router Target router to query -a prefix/len Prefix to add -d prefix/len Prefix to delete -l prefix-list prefix-list name -p port TCP port -u username Remote username
unix$ ./pyez-edit-prefix-list.py -t 10.0.201.201 -u auto -l AS- FOOBAR -a 10.0.0.0/8
[edit policy-options] prefix-list FOO { ... } + prefix-list AS-FOOBAR { + 10.0.0.0/8; + }
unix$ ./pyez-edit-prefix-list.py -t 10.0.201.201 -u auto -l AS- FOOBAR -a 11.0.0.0/8
[edit policy-options prefix-list AS-FOOBAR] + 11.0.0.0/8; unix$ ./pyez-edit-prefix-list.py -t 10.0.201.201 -u auto -l AS- FOOBAR -a 12.0.0.0/8
||||||||||||||||||||
||||||||||||||||||||

[edit policy-options prefix-list AS-FOOBAR] + 12.0.0.0/8;
unix$ ./pyez-edit-prefix-list.py -t 10.0.201.201 -u auto -l AS- FOOBAR -a 13.0.0.0/8
[edit policy-options prefix-list AS-FOOBAR] + 13.0.0.0/8;
unix$ ./pyez-edit-prefix-list.py -t 10.0.201.201 -u auto -l AS- FOOBAR -d 13.0.0.0/8
[edit policy-options prefix-list AS-FOOBAR] - 13.0.0.0/8;
unix$ ./pyez-edit-prefix-list.py -t 10.0.201.201 -u auto -l AS- FOOBAR -d 13.0.0.0/8 Warning: warning: statement not found
Technet24.ir||||||||||||||||||||
||||||||||||||||||||


There’s moreIn this recipe, we called the load() method of the Config object in order to submit theconfiguration as a plain string. We can also use the load() method with the namedparameter path=“filename” in order to have PyEZ directly read the configuration from afile on disk.
We used the named parameter, format=“set”, to tell PyEZ the format in which theconfiguration should be expected. It is also possible to supply configuration to JUNOSthrough PyEZ in one of the alternate formats.
Formatparameter Description Default file
extension
format=“set” Plain-text set/delete instructions .set
format=“text”Plain-text hierarchical braced configuration (as seen in theshow configuration) .conf, .txt
format=“xml” Structured XML document representing the configuration .xml
When loading the configuration from a file, PyEZ will guess at the format based on thefilename, but this can be overriden with the format parameter. PyEZ will also guess atthe format the plain string input to the load() method as well.
On newer versions of JUNOS (l4.2) and later, it is also possible to submitJSON-based configuration instruction, and PyEZ can facilitate this.
Technet24.ir||||||||||||||||||||
||||||||||||||||||||


Template configurations with Jinja2In this recipe, we’ll build on the abilities from the previous recipe by using PyEZ tomake configuration changes on JUNOS devices. But we’ll expand our skill set bydefining a template that describes a class of change in terms of mandatory boilerplateconfiguration and parametric resources. We’ll use the Jinja2 template language for this.
Then we'll see how we can instantiate the template configuration, by simply specifyingthe parametric values each time in order to make repeated configuration changes in anefficient and error-free manner.
This type of capability is extremely useful for large-scale service providers who wantto achieve deterministic, repeated configurations with low error rates. The followingfigure is about the ISP topology using template-based configuration:
Example ISP topology using template-based configuration
Technet24.ir||||||||||||||||||||
||||||||||||||||||||


Getting readyIn order to complete this recipe, you should have access to a Python 2.7 developmentenvironment and a JUNOS OS router that you have configuration rights on. You shouldbe faimilar with the PyEZ patterns used in this chapter until now, and you should also befamiliar with using PyEZ to load configurations.
First of all, we’re going to look at a typical simple configuration representing acustomer’s service and identify the invariants – the components that never change. Wecan represent these components in the template statically. In our basic customerconfiguration, we might configure these aspects:
Point-to-point interface to the customer site equipmentVLAN encapsulationAssociation with a private routing-instanceStatic routing for networks routes to the customer site
Here’s an example, JUNOS configuration representing the preceding aspects:
interfaces { em2 { unit 100 { vlan-id 100; family inet { address 192.168.100.1/30; } } } }
routing-instances { VRF-100 { instance-type vrf; interface em2.100; route-distinguisher 8928:100; vrf-target target:8928:100; routing-options { static { route 10.0.0.0/8 next-hop 192.168.100.2; } } } }
Technet24.ir||||||||||||||||||||
||||||||||||||||||||


How to do it…We’ll identify the variables, build a Jinja2 template, then create a PyEZ application totake the input parameters from the user and deploy them to the router:
1. Determine the variable components of our configuration task. They are summarizedin the following list:
Physical interfaceLogical unit identifierVLAN identifierLocal interface IP addressVRF identifierRoute distinguisher (for MPLS VPN configuration)Route target community (for MPLS VPN configuration)Customer site router IP addressCustomer-located networks
2. Reduce the variable components of the configuration into the most minimalist formby using derivations: deriving one value in the configuration from another inputparameter. This brings simplicity through minimizing input parameters, but it alsoenforces consistency. Sometimes derivations are obvious: for example, the logicalunit identifier can be the same as the VLAN identifier. At times, the derivationsrequire solid adherences to a local convention. For example, in our case we couldsay that we have a local convention that re-uses the VRF numeric identifier withthe route-target community and the route distinguisher. In this way, variablesbecome primary or secondary depending on whether they require direct parameterinput, or whether they can be derived from another parameter.
Variable Component Source
Physical Interface Primary input parameter
VLAN Identifier Primary input parameter
Point-to-point subnet Primary input parameter
VRF identifier Primary input parameter
Customer LAN subnet(s) Primary input parameter
PE interface IP address Derived from point-to-point subnet
Technet24.ir||||||||||||||||||||
||||||||||||||||||||

CE interface IP address Derived from point-to-point subnet
Route distinguisher Derived from VRF identifier
Route target Derived from VRF identifier
Logical unit identifier Derived from VLAN identifier
In this case, reduce the input parameters to five primary items that need to be providedby our upstream automation client. All of the other parameters of the configuration canbe derived from those five input data atoms:
Input parameter Descriptionifd Physical interfacep2p Point to point subnetvrf VRF identifiercst Customer LAN subnet(s)vlan VLAN identifier
3. Define a configuration template using Jinja2 syntax with XML, making use of theinput parameters to define the parts of the configuration that will change. Save thefile as config.xml:
<configuration> <interfaces> <interface> <name>{{ifd}}</name> <unit> <name>{{vlan}}</name> <vlan-id>{{vlan}}</vlan-id> <family> <inet> <address> <name>{{p2p_pe}}/30</name> </address> </inet> </family> </unit> </interface> </interfaces> <routing-instances> <instance> <name>VRF-{{vrf}}</name> <instance-type>vrf</instance-type> <interface> <name>{{ifd}}.{{vlan}}</name>
||||||||||||||||||||
||||||||||||||||||||

</interface> <route-distinguisher> <rd-type>8928:{{vrf}}</rd-type> </route-distinguisher> <vrf-target> <community>target:8928:{{vrf}}</community> </vrf-target> <routing-options> <static> {% for route in cst %} <route> <name>{{route}}</name> <next-hop>{{p2p_ce}}</next-hop> </route> {% endfor %} </static> </routing-options>
</instance> </routing-instances> </configuration>
4. Create a new Python PyEZ application, pyez-jinja.py, to load the template anddeploy it to the router. Use the standard boilerplate that we’ve adopted for the restof this chapter, but also include the struct and socket Python libraries in order toallow us to manipulate the point-to-point subnet parameter:
#!/usr/bin/env python
import sys import getpass import os import json import argparse import struct import socket from jnpr.junos import Device from jnpr.junos.utils.config import Config from jnpr.junos.exception import ConfigLoadError
def onError(exception_type, exception, traceback): print "%s: %s" % (exception_type.__name__, exception) sys.excepthook = onError
5. Parse the command line arguments, but add the template input parameters toargparse’s list of arguments:
cmdline = argparse.ArgumentParser(description="Python JUNOS PyEZ Config Template Tool") cmdline.add_argument("-f", metavar="template", help="Template file to use", required=True) cmdline.add_argument("-t", metavar="router", help="Target router to configure", required=True) cmdline.add_argument("-p", metavar="port", help="TCP port", default=830) cmdline.add_argument("-u", metavar="username", help="Remote username", default=getpass.getuser()) cmdline.add_argument("--p2p", metavar="subnet", help="PE-CE subnet, A.B.C.D", required=True)
Technet24.ir||||||||||||||||||||
||||||||||||||||||||

cmdline.add_argument("--ifd", metavar="interface", help="Physical interface", required=True) cmdline.add_argument("--vlan", metavar="vlan", help="VLAN identifer", required=True) cmdline.add_argument("--vrf", metavar="VRF", help="VRF identifier", required=True)
cmdline.add_argument("--cst", metavar="prefix/len", help="Prefix to statically route", action="append")
args=cmdline.parse_args()
6. Optionally use getPass() to load a password from a user file:
password=getPass(args.u+"@"+args.target) if 'getPass' in globals() else ""
7. Use the Python struct and socket library routines to convert the p2p input parameterinto two forms: one for the ISP PE router, and one for the customer site router:
p2p_pe = socket.inet_ntoa(struct.pack("!L", (struct.unpack("!L", socket.inet_aton(args.p2p))[0] & 0xfffffffd) + 1)) p2p_ce = socket.inet_ntoa(struct.pack("!L", (struct.unpack("!L", socket.inet_aton(args.p2p))[0] & 0xfffffffd) + 2))
8. Call the PyEZ Device() constructor with the usual host access and authenticationsettings, and then call the open() method.
dev = Device(host=args.t, user=args.u, port=args.p, password=password) dev.open() dev.timeout = 120
9. Deploy the configuration by creating a Config() object, calling its load() method andreferencing the template file with a set of parameters representing the input. Printthe difference report and commit the change.
with Config(dev, mode="private") as config: try: config.load(template_path=args.f, template_vars={ 'ifd': args.ifd, 'vlan':args.vlan, 'vrf': args.vrf, 'p2p_pe': p2p_pe, 'p2p_ce': p2p_ce, 'cst': args.cst if args.cst!=None else [] }) except ConfigLoadError, e: if (e.rpc_error['severity']=='warning'): print "Warning: %s" % e.message else: raise
diff = config.diff() if (diff!=None):
||||||||||||||||||||
||||||||||||||||||||

print diff config.commit()
dev.close()
Technet24.ir||||||||||||||||||||
||||||||||||||||||||


How it works...Steps 1 and 2 are important preparatory and planning steps. In these steps, we look atexamples of how we configure the customer's service and identify the invariants - theparts that don't change. Anything else is parametric input to the process and will need tobe supplied to the automation application. We can reduce the dataset that needs to bespecified to the automation application by deriving resources and variables whereappropriate.
Reducing variable input through derivation requires an understanding ofthe JUNOS configuration, and sometimes a thorough understanding of theprotocol mechanics involved. For example, it's perfectly reasonable to saythat we can derive logical interface unit numbers from VLAN numbersbecause they share scope and range. Unit numbers can typically rangefrom 0-16383, while VLAN numbers have a 12-bit address space allowing arange of up to 4096. If the situation were reversed, we couldn't haveencoded the VLAN identifier within the logical unit number.
In step 3, we get stuck into writing a template using the Jinja language. Jinja isn'tparticularly complicated as a template language and it shares a lot of properties withother template languages. In this recipe, we show two key features of Jinja:
Variable substitution: When a string is enclosed within double-brackets, the textis replaced with the variable definition of the same name. So for example <name>{{ifd}}</name> gets replaced by the XML necessary to describe the physical interfacename, for example, xe-0/0/1, or similar.Iteration: We can introduce a for loop to iterate through the customer static routesin cst input parameter by writing Jinja directives within {% -- %} constructs. Thisis an ideal mechanism for implementing repeating or optional configuration.
In step 5, we modify the command-line argument parsing routine from the previousrecipes to make sure that we include parameters that will be expanded in the template.We add our five key parameters to the argparse list of arguments.
Step 7 is responsible for the magic that allows us to take a single IP address from theuser, but derive two usable addresses for either end of the point-to-point link. It requiressome explanation. inet_aton() converts an IP address to an unsigned integer. For IPv4,this is a 32-bit integer. We can easily take this number and use a binary mask, 0xfffffffd,
Technet24.ir||||||||||||||||||||
||||||||||||||||||||

in order to clear the last two least significant bits of the address. This is the equivalentof applying a /30 subnet mask to the IP address in order to obtain the network-layeraddress. From this base network-layer address, we can then either add 1, or add 2,depending on whether we want to get an IP address for the ISP router or for thecustomer site router.
In this case, we're making an assumption that the ISP adheres to aconvention that sees it take the lowest IP address on the link, while thecustomer takes the highest address.
With the simple mathematical addition applied, we can then use inet_ntoa() again toreturn the numeric format IP address back to a string. Python's struct pack/unpack callsare just useful helper functions for mapping a character string of four-characters to anunsigned integer of the same size, and back again.
In step 8, we create the Device() object and open() it, causing PyEZ to connect to theremote JUNSO OS device and start talking to NETCONF, and then in step 9, we invokethe high-level PyEZ configuration object on the device, referencing both the templatefile that we want to use, and the parameters that we want to apply.
Notice that we have to check whether the user supplies any optional customer networks,because Jinja won't like executing a for loop without a list, and argparse willunfortunately not give us an empty list if the user doesn't specify the option.
Looking at the tool in action, we can see that it's a great step on the way to mass-producing repeatable configurations, provided one is able to clearly identify theparameters of the service that need to vary:
unix$ ./pyez-jinja.py -t 10.0.201.201 -u auto -f config.xml --p2p 192.168.10.0 --ifd em2 --vlan 210 --vrf 210 --cst 1.2.0.0/16 -- cst 1.3.0.0/16
[edit interfaces em2] + unit 210 { + vlan-id 210; + family inet { + address 192.168.10.1/30; + } + }
[edit routing-instances] + VRF-210 { + instance-type vrf; + interface em2.210; + route-distinguisher 8928:210; + vrf-target target:8928:210; + routing-options { + static {
||||||||||||||||||||
||||||||||||||||||||

+ route 1.2.0.0/16 next-hop 192.168.10.2; + route 1.3.0.0/16 next-hop 192.168.10.2; + } + } + }
unix$ ./pyez-jinja.py -t 10.0.201.201 -u auto -f config.xml --p2p 192.168.10.0 --ifd em2 --vlan 210 --vrf 210 --cst 1.4.0.0/16
[edit routing-instances VRF-210 routing-options static] route 1.3.0.0/16 { ... } + route 1.4.0.0/16 next-hop 192.168.10.2;
Technet24.ir||||||||||||||||||||
||||||||||||||||||||


Advanced Visualization ApplicationsIn this chapter, we'll cover the following recipes:
Visualizing graphsExtracting graphs from ISISExtracting graphs from OSPFExtracting graphs from MPLS VPN
Technet24.ir||||||||||||||||||||
||||||||||||||||||||


IntroductionIn a lot of work that we do with network routers, switches and firewalls, we are forcedto work with the raw command-line based interface that JUNOS supports. This has theadvantage of being precise, exact, and always consistent and up to date with thefunctionalities and capabilities of the software. But it doesn't always lend itself well tocommunicating complex concepts to humans who might often benefit from alternatevisual representations in order to process ideas more quickly and with betterunderstanding.
One of the great benefits of Juniper's tightly-integrated XML API is the fact that there isa machine-readable interface to manipulate the core primitives and fundamentals of theJUNOS device. But secondarily, with this machine interface it is also possible to buildalternate interface models onto the aspects of the working JUNOS OS system.
We've already seen the benefits of being able to use the same RPC that an in-builtJUNOS command might use, but modifying the output to focus on a particularcomponent, based upon our use-case of interest.
In this chapter, we'll focus on some of the core routing protocols and servicefunctionalities, and explore options for graphically representing the insights that we canglean from the JUNOS XML RPCs.
Technet24.ir||||||||||||||||||||
||||||||||||||||||||


Visualizing graphsIn this recipe, we'll build a generic utility function for taking a graph (in other words anetwork of nodes and links), and representing it on an HTML canvas so that it can beviewed in a web browser. We'll create a Python application, render-graph.py, that willtake as input a JSON representation of a graph and output a completed HTML page thatrenders the graph and allows user manipulation.
Combining graph data with HTML template to produce interactive map
Technet24.ir||||||||||||||||||||
||||||||||||||||||||


Getting readyIn order to complete this recipe, you don't need access to a JUNOS device—yet! Youneed a Python 2.7 development environment and a web browser. We'll make use of theexcellent VivaGraph graph visualization library, written by Andrei Kashcha, and simplywrite the HTML and JavaScript that call the fundamental functions in that library to dothe work for us.
Technet24.ir||||||||||||||||||||
||||||||||||||||||||


Graph principlesUnsurprisingly, graph theory underpins a lot of the work that we do in networking, so itcan be helpful to have a basic understanding of the terminology especially where thesame terms are not universally used. Let's make some terms clear and unambiguous sowe know what we're talking about going forward.
Term Description
Node, or vertex(plural: vertices) A single element within the network.
Link or edge A connection between nodes.
Directed link A uni-directional connection between nodes.
Graph The collection of nodes and links within the network.
Directed graph A graph where the links (or edges) are single-directional only.
Pseudo-node A node introduced into the graph to represent a link that isn't purelypoint-to-point, such as a multi-access LAN segment.
Modern IP networks very rarely have single-directional links in normal operation, butthe routing protocols that underpin them do, in fact, consider network links in thismanner. This allows the operator, for example, to configure different metrics (or costs)to a link depending on the direction.
Technet24.ir||||||||||||||||||||
||||||||||||||||||||


Technet24.ir||||||||||||||||||||
||||||||||||||||||||

Graph dataFor our recipe, we need to establish a neutral software-readable format to exchangeinformation about network graphs. In this case, we'll use JSON—with the simplicity ofa well-known schema that defines our nodes and links.
At the top-level of our JSON extract is a JavaScript object—a hash, or associativearray.
Field Description
nodes A list of node identifiers
linksA list of link 3-tuples, describing source node, destination node, and link metricrespectively
In our case, we're likely to use router names as node identifiers, and the IGP distance orcost metric can be used as the link metric. Furthermore, we'll establish a convention thatpseudo-nodes—false nodes added to artificially represent multi-access links—will usean identifier that starts with an underscore (_). This will allow downstreamvisualization programs to treat them differently if required.
An example graph structure might look like this in the Python interactive interpreter:
{'links': [['Ams', 'Fra', 10], ['Fra', 'Par', 10], ['Par', 'Lon', 10], ['Lon', 'Ams', 10]], 'nodes': ['Ams', 'Fra', 'Lon', 'Par']}
When written in compressed white-space JSON, it looks like this:
'{"nodes": ["Ams", "Fra", "Lon", "Par"], "links": [["Ams", "Fra", 10], ["Fra", "Par", 10], ["Par", "Lon", 10], ["Lon", "Ams", 10]]}'
This encoding will be the vehicle by which we can communicate a description of anetwork graph between:
Discovery agents: Components that are extracting graphs from the network
||||||||||||||||||||
||||||||||||||||||||

Visualizing agents: Components that are rendering a graph visually for a user'sconsumption
In this recipe, we're creating the latter.
Technet24.ir||||||||||||||||||||
||||||||||||||||||||


How to do it...We're going to produce a Python template instantiation tool that will combine the JSONrepresentation of the graph with an HTML template that renders the graph. And we'regoing to produce an HTML/JavaScript template which reads the JSON and usesVivaGraph's capabilities to render an SVG canvas representing the graph.
Technet24.ir||||||||||||||||||||
||||||||||||||||||||


Instantiating the templateProduce a simplistic Python template instantiation tool, render-graph.py, that will combinea graph.json file with a graph.html.template file in order to produce a final graph.html file.
#!/usr/bin/env python
import sysimport argparseimport osimport iofrom string import Template
# Error handlingdef onError(exception_type, exception, traceback): print "%s: %s" % (exception_type.__name__, exception)sys.excepthook = onError
cmdline = argparse.ArgumentParser(description="Python Graph processor")cmdline.add_argument("graph", help="JSON file describing graph")cmdline.add_argument("-t", metavar="template", help="Template file", default="graph.html.template")cmdline.add_argument("-o", metavar="output filename", help="File to output completed HTML", default="graph.html")args=cmdline.parse_args()
jsonGraph = open(args.graph).read()template = Template(open(args.t).read())
open(args.o, "w").write(template.substitute(graph=jsonGraph))
Technet24.ir||||||||||||||||||||
||||||||||||||||||||


Drawing the graphWe'll create an HTML/JavaScript template, graph.html.template, based loosely on one ofthe many rich VivaGraph examples in order to interpret the JSON and invoke VivaGraph inorder to make an interactive graph.
1. First of all, make a directory for the project, download the VivaGraph librarysource from the repository on GitHub and extract the distribution library:
$ mkdir graphdev $ cd graphdev $ git clone https://github.com/anvaka/VivaGraphJS.git Cloning into 'VivaGraphJS'... remote: Counting objects: 3135, done. remote: Total 3135 (delta 0), reused 0 (delta 0), pack-reused 3135 Receiving objects: 100% (3135/3135), 2.64 MiB | 1.44 MiB/s, done. Resolving deltas: 100% (1673/1673), done. $ cp VivaGraphJS/dist/vivagraph.js .
2. Next begin work on the actual HTML template file, graph.html.template. Produce theboilerplate HTML header defining the title, referencing our dependency on theVivaGraph library and then inlining our own code:
<!DOCTYPE html> <html> <head> <title>Test Graph</title> <script type="text/javascript" src="vivagraph.js"></script> <script type="text/javascript">
3. Start the main JavaScript code by declaring a placeholder for the JSON networkgraph data. This will be substituted by our Python template rendering tool. Parsethe JSON and reconstruct JavaScript objects and then proceed to inspect theobjects and create VivaGraph data structures representing the graph:
var json=${graph};
function main () { var filter = new RegExp(window.location.search.slice(1)); var data = JSON.parse(json); var graph = Viva.Graph.graph();
for (var n=0; n<data['nodes'].length; n++) { if (filter!="" && data['nodes'][n].match(filter)) { graph.addNode(data['nodes'][n]); } } for (var l=0; l<data['links'].length; l++) { if (filter!="" && (data['links'][l][0].match(filter) || data['links'][l][1].match(filter))) {
Technet24.ir||||||||||||||||||||
||||||||||||||||||||

graph.addLink(data['links'][l][0], data['links'][l][1], { metric:data['links'][l][2] }); } }
4. Make use of VivaGraph's directed layout engine which allows us a customizationover how nodes interact with each other. Use a custom springTransform method inorder to force VivaGraph to consider the link metrics from our JSON networkrepresentation when defining the properties of the links between nodes:
var optimalSpringLength = 42; var directedLayout = Viva.Graph.Layout.forceDirected(graph, { springLength : optimalSpringLength, springTransform: function (link, spring) { spring.length = Math.log(link.data.metric) * optimalSpringLength } });
5. Call the VivaGraph SVG graphics constructor in order to create a view pane based onSVG for our network graph. Also define two constants that will determine that sizeof a node:
var svgGraphics = Viva.Graph.View.svgGraphics(); var WIDTH = 180; var HEIGHT = 32;
6. Define a hook function that is able to influence the identity of a node on the graph.In our case, we want a node to include at least a rectangular box and a textual labelbased upon the node's identifier. Additionally, though, we don't want to draw thesame attention to pseudo-nodes.
// Node placement hook svgGraphics.node(function(node) { var svg = Viva.Graph.svg('g'); if (node.id.startsWith("_")) { var svgCircle = Viva.Graph.svg('circle').attr('r', "8").attr('stroke', "black").attr('fill', "white"); svg.append(svgCircle); } else { var svgText = Viva.Graph.svg('text').text(node.id).attr('y', "+16px").attr('font-family', "monospace"); var svgRect = Viva.Graph.svg('rect').attr('width', WIDTH).attr('height', HEIGHT).attr('fill', "cyan"); svg.append(svgRect); svg.append(svgText); } svg.addEventListener('click', function () { directedLayout.pinNode(node, !directedLayout.isNodePinned(node)); }); return svg; });
||||||||||||||||||||
||||||||||||||||||||

7. Define another hook function that is able to influence the placement process fornodes on the graph. The VivaGraph layout engine will initially select randompositioning for new nodes on the graph, and inform us of an origin location, buttypically we need to center our nodes around this origin position.
svgGraphics.placeNode(function(svg, pos) { if (svg.firstChild.tagName=="rect") { svg.attr('transform', 'translate(' + (pos.x - WIDTH/2) + ',' + (pos.y - HEIGHT/2) +')'); } else { svg.attr('transform', 'translate(' + (pos.x) + ',' + (pos.y) +')'); } });
8. Finish our customizations of the VivaGraph objects and run() the renderer in orderto get the nodes on the SVG canvas and showing.
var renderer = Viva.Graph.View.renderer(graph, { graphics: svgGraphics, layout: directedLayout }); renderer.run(); }
9. Finish the HTML definitions and set our main() function to run as soon as the mainHTML body component has loaded.
</script>
<style type="text/css" media="screen"> html, body, svg { width: 100%; height: 100%;} </style> </head> <body onload='main()'> </body> </html>
Technet24.ir||||||||||||||||||||
||||||||||||||||||||


Running the example graphTake the example graph that we proposed at the beginning of the recipe, and use it as atest:
$ cat test.json'{"nodes": ["Ams", "Fra", "Lon", "Par"], "links": [["Ams", "Fra", 10], ["Fra", "Par", 10], ["Par", "Lon", 10], ["Lon", "Ams", 10]]}'
Run the template instantiation Python code on it in order to produce a finalized graph.htmlfile.
$ ./render-graph.py test.json
Use your browser to view the resulting file. Observe that VivaGraph has placed the fournodes from the example graph in the center and has placed links between them and thatyou can freely interact with the graph, moving nodes about as you please.
Technet24.ir||||||||||||||||||||
||||||||||||||||||||


How it works...There are two main processes at work here:
the Python-based template instantiation tool, andthe HTML/Javascript-based template to invoke VivaGraph.
Technet24.ir||||||||||||||||||||
||||||||||||||||||||


Instantiating the templateFor render-graph.py, we leverage the standard Python library framework Template which isvery happy to process a text file and make variable substitutions based on a specialsequence. So our tool reads in the JSON graph specified on the command line and thenreads a template from a default file, graph.html.template.
With both the JSON graph data and template content available to the tool, it uses theTemplate.substitute() method in order to search through the template text, substituting anyoccurrences of $graph with the JSON data from the file we specify on the command line.The output is written to a file with a default filename of graph.html.
Both the template filename and the output filename can be customized using argparse, asusual.
Technet24.ir||||||||||||||||||||
||||||||||||||||||||


Drawing the graphThe HTML file is defined in template form in graph.html.template. There is actually notmuch template activity happening here at all. We're simply using the template capabilityso that we can rapidly substitute different graphs—all in JSON format—into the sameHTML/JavaScript logic without much overhead.
After we've defined the usual HTML headings, we create a main() function in which wedo all of our work. We start by extracting a possible filtering expression from the URLand making a regular expression from it. This means that the user can append a filterexpression to the URL using the query string (?) operator, and we can act upon hiswishes to restrict the list of nodes that we view. This is a particularly useful featurewhen analyzing large graphs that are too unwieldy when laid out automatically orpseudo-randomly by a computer. It allows the user to look at the part of the network thathe wants to focus on.
In the rest of step 3, we iterate firstly through the nodes list, and then the links list,adding the nodes and links respectively, to the VivaGraph data structures, but only if theypass the filtering regular expression.
In step 4, we create an instance of the ForceDirectedLayout class, which is an encapsulationof logic for laying out nodes in a graph according to physical rules such as elasticity andmass-related gravity. We do this because it allows us to customize the length of linksbetween nodes, depending upon the metric that we've defined in our graph. This meanswe can represent whether a link is a long-distance link or a short-distance link, either interms of physical geography or in terms of routing protocol distance.
We use the Math.log() function in order to make the wide variety of link metrics morepalatable for the units in which VivaGraph will work, which at some point have totranslate to screen real estate.
If you're interested in the behaviour of the ForceDirectedLayout graphs, youmight want to consult the VivaGraph documentation for more information. Ofparticular interest are the other parameters that we can supply in theconstructor options, namely, springCoeff, dragCoeff, gravity.
In step 5, we construct the VivaGraph SVG rendering engine and set the default geometryparameters for a node, and in step 6 we influence the logic for deciding how a node
Technet24.ir||||||||||||||||||||
||||||||||||||||||||

should be drawn. We implement two different methods depending on the node type.
Type Visualization
Node Light-blue rectangle with a labeling text box shifted to overlap
Pseudonode Simple white-filled circle, with light-blue stroke and no label
It's also here in step 6 that we define what happens in response to a click event. This isuseful because the dynamic, force-based layout engine--while enticing to look at as itarranges nodes within the universe of our browser window and its own physical laws--can become frustrating if a user cannot manipulate the view to move elements. Wedefine a handler for the click event that causes the node to toggle its pinned status.
When a node is pinned, it is fixed in space, will not move, and acts as an immovableconstraint to the objects around it. In this way, when the user is focusing on a situation,he can pin the nodes that he is interested in, and see the adjacent nodes float aroundaccording to effects that loosely might represent a network metric such as IGP cost.
In step 7, we override the default placement logic, but not to do anything significant. Wejust adjust the transform on the SVG element and adjust it depending on whether it is acircle or a rectangle. We need to do this because the origin co-ordinates of a circle isthe center, as you might expect, but the origin of a rectangle is the top-left corner. So weapply a negative x and y offset equal to half our width and height, respectively, in orderto compensate for this and re-center the rectangle.
Finally in steps 8 and 9, we finish the definition of our main() function by calling therenderer's run() method and then we set up the main() to be called as soon as the mainHTML body load event fires.
The resulting graph--based upon our test JSON from earlier in the recipe--is simple, buteffective at demonstrating the capabilities. VivaGraph has used the link metrics from thefile--all equal in our example--in order to define a link length, and it has applied somedefault physical elastic and gravitational properties that allow the link length to be
||||||||||||||||||||
||||||||||||||||||||

stretched or compressed depending upon the constraints imposed by the other nodes.
Observe that you can drag the nodes about in order to satisfy your own placementrequirements, and that when you click on a node--to drag it--the node is also pinned tothe canvas so that it won't move. When you click on it again, it will revert to a position,determined mainly by its location in the graph and the forces imposed upon it.
This reminds us about the fun aspects of network engineering!
Finally rendering the test graph from JSON data
Technet24.ir||||||||||||||||||||
||||||||||||||||||||


Extracting graphs from ISISIn this recipe, we'll write a Python PyEZ-based script, process-isis.py, to connect to oneof our JUNOS OS devices and extract the ISIS link-state database. Because of the natureof link-state protocols like ISIS, a single router in the estate holds all of the informationof the whole network. In this case, the link-state database knows about all other routersin the IGP domain and the adjacent devices to which they connect. We can use thisinformation to help visualise our network.
Technet24.ir||||||||||||||||||||
||||||||||||||||||||


Getting startedIn order to complete this recipe, you'll need a Python 2.7 development environment andaccess to an ISIS-speaking JUNOS OS device. Ideally, you'll also have completed theprevious recipe on visualizing graphs, so that you can provide the extracted informationand obtain a visual representation of the protocol in return.
Technet24.ir||||||||||||||||||||
||||||||||||||||||||


ISIS primerISIS is the link-state routing protocol of choice in the OSI suite. Though the OSIprotocol suite never came to be at a global internet scale, it does hold some interestingcontrasts when compared to the TCP/IP protocol suite that we're all very muchaccustomed to. In summary, the key features of the OSI suite are:
Multi-domain, multi-area, multi-level addressing, with variable length addressingfields, but fixed hierarchyNode-based addressing rather than interface-based addressing
Despite the difference in underlying the transport protocol suite, ISIS found popularityon large-scale service-provider networks during the years that the IETF were stillstandardising OSPF. Today, it is a first-class link-state routing protocol used as aninterior gateway protocol in many networks.
ISIS operates by flooding Link State Packets (LSPs): not to be confused with MPLSLSPs. Each router (or Intermediate System in OSI-speak) emits an LSP that describesitself and the adjacencies it possesses. The LSP packet is populated by so-called TLVs,type-length-value tuples. The flexibility of TLVs means that ISIS is quite extensible.New features can be bolted on to new TLV types that flood throughout the domainwithout obstacles even across routers that aren't aware of the features.
On JUNOS, one can inspect the ISIS link state database with the show isis database detailcommand. We'll use the equivalent XML RPC in our Python script to extract the crucialinformation from the ISIS link state database and output a JSON representation of ournetwork graph.
Technet24.ir||||||||||||||||||||
||||||||||||||||||||


How to do it...We're going to write a Python PyEZ script, process-isis.py, to connect to one of ourJUNOS OS routers, extract the link-state database, and then output a compressed JSONrepresentation of the network graph seen by ISIS.
1. Include the standard boilerplate that we base all of our Python-based automationapps on. Define the interpreter, import the standard library modules, set a generalpurpose exception handler
#!/usr/bin/env python
import sys import getpass import os import json import argparse import struct import socket import io from jnpr.JUNOS import Device from lxml import etree # Error handling def onError(exception_type, exception, traceback): sys.stderr.write("%s: %s\n" % (exception_type.__name__, exception)) sys.excepthook = onError
2. Use argparse to process the command-line options, and if necessary call getPass() toobtain a per-user, per-device password.
cmdline = argparse.ArgumentParser( description="Python JUNOS PyEZ ISIS Database Extraction Tool") cmdline.add_argument("target", metavar="target", help="Target router to query") cmdline.add_argument("-p", metavar="port", help="TCP port", default=830) cmdline.add_argument("-u", metavar="username", help="Remote username", default=getpass.getuser())
args=cmdline.parse_args()
password=getPass(args.u+"@"+args.target) if 'getPass' in globals() else ""
3. Call upon the PyEZ framework using the Device() constructor, specifying thecredentials and then open() the device to actually connect. Set an appropriatetimeout, then issue the <get-isis-information> RPC in order to extract the information.
dev = Device(host=args.target, user=args.u, port=args.p, password=password)
Technet24.ir||||||||||||||||||||
||||||||||||||||||||

dev.open() dev.timeout = 60 result = dev.rpc.get_isis_database_information (normalize=True, detail=True)
4. Iterate through the results of the RPC, and populate a Python dictionary containinga nodes and links entry.
graph={'nodes': [], 'links': []} for entry in result.xpath("isis-database[level='2']/isis- database-entry"): lspid = entry.findtext("lsp-id") node=lspid[:-3] if not node.endswith(".00"): node="_"+node; if not node in graph['nodes']: graph['nodes'].append(node) for neighbor in entry.xpath("isis-neighbor"): neighborid = neighbor.findtext("is-neighbor-id") metric = neighbor.findtext("metric") topology = neighbor.findtext("isis-topology-id") if topology=="" or topology=="IPV4 Unicast": if not neighborid.endswith(".00"): neighborid="_"+neighborid; if not neighborid in graph['nodes']: graph['nodes'].append(neighborid) graph['links'].append([node, neighborid, metric])
5. Close the device and output the JSON representation to the standard output stream.
dev.close()
print repr(json.dumps(graph))
||||||||||||||||||||
||||||||||||||||||||

Technet24.ir||||||||||||||||||||
||||||||||||||||||||

How it works...The first steps should all be quite familiar by now. Connect to the JUNOS device,authenticate, and make a remote procedure call. Let's take a look at an example responseto the RPC, and the parts of the message that we're interested in.
<isis-database-information xmlns="http://xml.juniper.net/JUNOS/14.1R6/JUNOS-routing" JUNOS:style="detail"> <isis-database> <level>1</level> </isis-database> <isis-database> <level>2</level> <isis-database-entry> <lsp-id>lon-lab-access-4.00-00</lsp-id> <sequence-number>0x1002</sequence-number> <checksum>0x6e7</checksum> <remaining-lifetime>26185</remaining-lifetime> <isis-neighbor> <isis-topology-id>IPV4 Unicast</isis-topology-id> <is-neighbor-id>lon-lab-access-4.01</is-neighbor- id> <metric>1000</metric> </isis-neighbor> <isis-neighbor> <isis-topology-id>IPV4 Unicast</isis-topology-id> <is-neighbor-id>lon-lab-access-4.02</is-neighbor- id> <metric>1001</metric>
The main logic is contained within step 4 where we create an initial Python dictionaryto represent our container JSON object and set empty lists for the nodes and linkscomponent respectively. We then proceed to use an XPath predicate selector to find anyof the <isis-database-entry> records from the <isis-database> parent node.
We use the predicate because we only want to look at the level 2 database.ISIS operates a link-state protocol at two levels. Level 1 routing controlsthe propagation of OSI system IDs within a given area, where an area isan address prefix. Level 2 routing controls the propagation of OSI systemIDs between areas. In most cases, the level 2 database is going to be therichest source of information about our network. The level 1 database willonly contain system IDs for a single area.
Next, we attempt a reasonable attempt at extracting the node name. This is complicatedin ISIS because the name of the link state packet update incorporates several differentcomponents. At the end of the hostname are a pair of hexadecimal numbers separated bya hypen (-). These have the following semantics in order:
||||||||||||||||||||
||||||||||||||||||||

The first number represents the circuit or interface identifier with 00 being reservedas being for the main node, and all other non-zero numbers representing a pseudo-node LSP for which this router is the designated router on the segmentThe second number represents a fragment identifier, allowing a link-state update tocross several packets
ISIS LSP formats: main system node on the left; pseudo-nodes on the right
So to identify the node name—be it a real physical node, or a pseudo-node—we chopoff the last three characters in order to leave us with the system name. Then we take alook at the end of the string to see if it ends with a double-zero. If it does, it means it's areal node, otherwise it's a pseudo-node. Because we probably want these two differenttypes of node rendered differently in the graphical browser, we make a point ofadhering to a convention prefixing the pseudo-node with an underscore (_).
If you happen to name your network nodes with names that actually dobegin with underscores, then you might need to reconsider this tack andmake a slight change!
Then we iterate through every neighbor listed in the link-state packet and infer anadjacency between the main node and the declare neighbor. We add it to the list of links.
Note that ISIS has recently implemented a multi-topology feature that can make thistroublesome. It's possible to maintain a per-address family ISIS adjacency. As a resultin dual-stack IPv4/IPv6 environments, where the ISIS multi-topologies feature is used,we can easily get a situation with duplicate links. So as a result, we look for the <isis-topology-id> field to either be empty, meaning basic single topology mode, or set to IPv4
Technet24.ir||||||||||||||||||||
||||||||||||||||||||
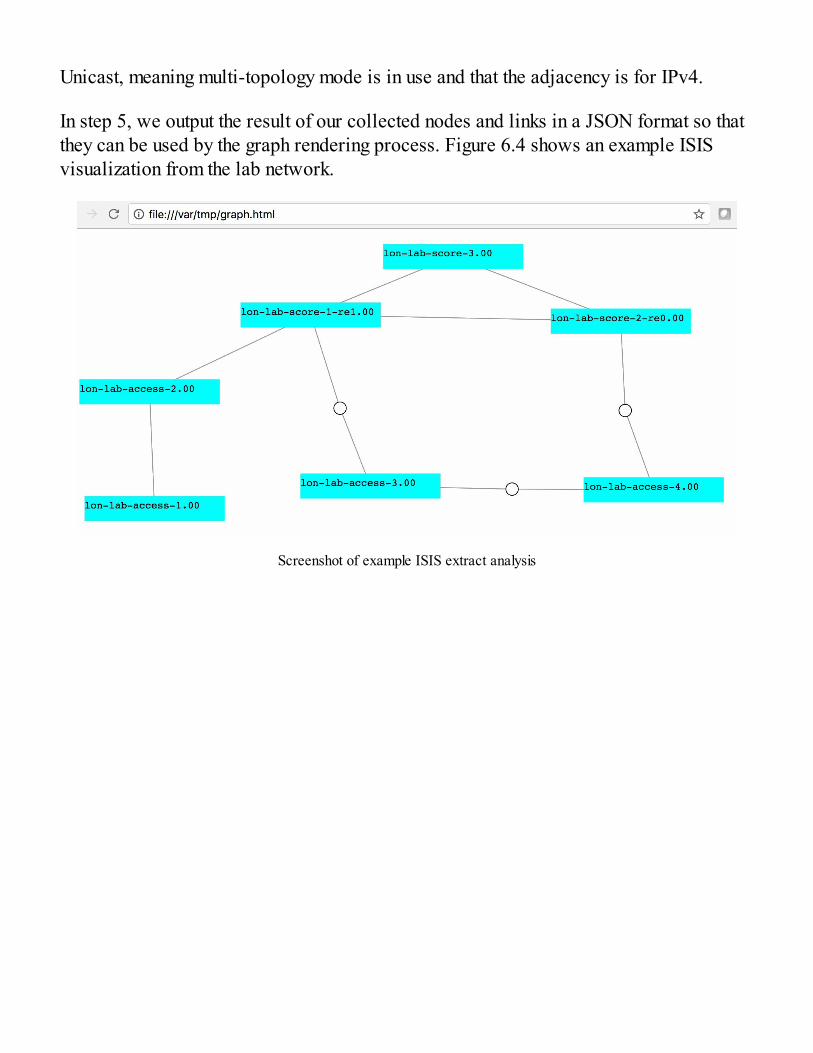
Unicast, meaning multi-topology mode is in use and that the adjacency is for IPv4.
In step 5, we output the result of our collected nodes and links in a JSON format so thatthey can be used by the graph rendering process. Figure 6.4 shows an example ISISvisualization from the lab network.
Screenshot of example ISIS extract analysis
||||||||||||||||||||
||||||||||||||||||||

Technet24.ir||||||||||||||||||||
||||||||||||||||||||

Extracting graphs from OSPFIn this recipe, we'll write a Python PyEZ-based script, process-ospf.py, to connect to oneof our JUNOS OS devices and extract the OSPF link-state database. Like the previousrecipe looking at ISIS, OSPF is a link-state protocol that shares a lot of properties withISIS. A single router usually holds the link-state database information for all otherrouters in the same area, and single-area backbone environments are common. We canuse this information to help visualize our network.
||||||||||||||||||||
||||||||||||||||||||

Technet24.ir||||||||||||||||||||
||||||||||||||||||||

Getting readyIn order to complete this recipe, you'll need a Python 2.7 development environment andaccess to an OSPF-speaking JUNOS OS device. Ideally, you'll also have completed thefirst recipe on visualizing graphs, so that you can provide the extracted information andobtain a visual representation of the protocol in return.
||||||||||||||||||||
||||||||||||||||||||

Technet24.ir||||||||||||||||||||
||||||||||||||||||||

OSPF primerOSPF Version 2 was first specified in IETF RFC 1247 in 1991. Version 2 was mainly aresponse to critique and early operational experience of the original draft specification,and while many extensions and additions have been made to the protocol, they aregenerally backwardly compatible with this specification. OSPF operates within theTCP/IP protocol suite, unlike ISIS, but otherwise behaves in a very similar manner.Each router within the interior domain floods link state advertisements (LSAs)sharing information with all other routers about itself, its neighbors and their IP-layerattachments. Receiving routers receive LSAs, build a topology graph, execute aDjikstra-style shortest path first algorithm on the graph and install the resulting networkroutes into the router forwarding table.
On JUNOS, one can inspect the OSPF link state advertisments with the show ospf databasedetail command. We'll use the equivalent XML RPC in our Python script to extract thecrucial information from the OSPF link state advertisements and output a JSON-representation of our network graph.
||||||||||||||||||||
||||||||||||||||||||

Technet24.ir||||||||||||||||||||
||||||||||||||||||||

How to do it...We're going to write a Python PyEZ script, process-ospf.py, to connect to one of ourJUNOS OS routers, extract the OSPF link-state advertisements, and then output acompressed JSON representation of the network graph.
1. Start with the typical boilerplate to start a Python script. Define the scriptinterpreter. Import the required standard library modules. Define a general errorhandler.
!/usr/bin/env python
import sys import getpass import os import json import argparse import struct import socket import io from jnpr.JUNOS import Device from lxml import etree
# Error handling def onError(exception_type, exception, traceback): sys.stderr.write("%s: %s\n" % (exception_type.__name__, exception)) sys.excepthook = onError
2. Use the argparse module as usual to parse any command-line arguments. Optionallycall the getPass() routine to get a password from the cache if required for yourenvironment.
cmdline = argparse.ArgumentParser( description="Python JUNOS PyEZ OSPF Database Extraction Tool") cmdline.add_argument("target", metavar="target", help="Target router to query") cmdline.add_argument("-p", metavar="port", help="TCP port", default=830) cmdline.add_argument("-u", metavar="username", help="Remote username", default=getpass.getuser()) args=cmdline.parse_args()
password=getPass(args.u+"@"+args.target) if 'getPass' in globals() else ""
3. Call upon the PyEZ framework to connect to the JUNOS OS device by calling theDevice() constructor with the appropriate authentication options and then calling theopen() method.
dev = Device(host=args.target, user=args.u, port=args.p,
||||||||||||||||||||
||||||||||||||||||||

password=password) dev.open() dev.timeout = 60 result = dev.rpc.get_ospf_database_information( normalize=True, detail=True)
4. Create a Python dictionary object to store the nodes and links and then iteratethrough the results of the RPC call using a for loop in order to extract the importantdata.
graph={'nodes': [], 'links': []}
for entry in result.xpath( "ospf-database[../ospf-area-header/ospf-area='0.0.0.0']"): lsaid = entry.findtext("lsa-id") lsatype = entry.findtext("lsa-type") if (lsatype=="Router"): graph['nodes'].append(lsaid) for link in entry.xpath("ospf-router-lsa/ospf-link"): linkid=link.findtext("link-id") linktype=link.findtext("link-type-name") metric=link.findtext("metric")
if (linktype=="PointToPoint"): graph['links'].append([lsaid, linkid, metric]) if (linktype=="Transit"): graph['links'].append([lsaid, "_"+linkid, metric])
5. Close the device and print the JSON representation to the standard output stream.
dev.close()
print repr(json.dumps(graph))
Technet24.ir||||||||||||||||||||
||||||||||||||||||||


How it works...As in the ISIS recipe, the initial steps of this recipe should be quite familiar. Connect tothe JUNOS device, authenticate and then make a remote procedure call. In this case wecall the <get-ospf-database-information> RPC, so let's take a look at a typical response fromthat RPC so that we can get an understanding of the fields that we have to extract.
<ospf-database-information xmlns="http://xml.juniper.net/JUNOS/15.1F6/JUNOS-routing"> <ospf-area-header> <ospf-area>0.0.0.0</ospf-area> </ospf-area-header> <ospf-database heading=" Type ID Adv Rtr Seq Age Opt Cksum Len"> <lsa-type>Router</lsa-type> <lsa-id>10.0.4.15</lsa-id> <advertising-router>10.0.4.15</advertising-router> <sequence-number>0x80000030</sequence-number> <age>603</age> <options>0x2</options> <checksum>0xead9</checksum> <lsa-length>60</lsa-length> <ospf-router-lsa> <bits>0x0</bits> <link-count>3</link-count> <ospf-link> <link-id>10.0.211.201</link-id> <link-data>10.0.211.220</link-data> <link-type-name>Transit</link-type-name> <link-type-value>2</link-type-value> <ospf-topology-count>0</ospf-topology-count> <metric>10</metric> </ospf-link> <ospf-link> <link-id>10.0.201.201</link-id> <link-data>10.0.201.220</link-data> <link-type-name>Transit</link-type-name> <link-type-value>2</link-type-value> <ospf-topology-count>0</ospf-topology-count> <metric>100</metric> </ospf-link>
We iterate through the results of the RPC simply looking for Router-type LSAs only.Within the Router LSA, we can find the name of the originating router from the <lsa-id>field. Then we iterate through the <ospf-link> entries to glean an understanding of theadjacencies that the router is claiming. If the <link-type-name> field is PointToPoint then weknow that we're talking about a direct router-router adjacency so we create a link in ourPython dictionary to reflect that. If the <link-type-name> field is Transit, then we know thereis a multi-access or broadcast segment attached and we use our convention of namingthe connecting node with an underscore (_) in order to represent a pseudo-node ratherthan an actual active OSPF speaker.
Technet24.ir||||||||||||||||||||
||||||||||||||||||||

We have no real need to look at the other types of LSA that OSPF floods, although doingso might help us understand the actual IP-layer topology involved. In this case, we makean assumption that an OSPF adjacency between routers is sufficient for a routingprotocol exchange and a traffic forwarding relationship, which is pragmatic and notunreasonable.
Figure 6.5 shows an example screenshot of our OSPF analysis as applied to my virtualrouter setup, connected to OpenBSD's ospfd.
Screenshot of OSPF graph analysis
||||||||||||||||||||
||||||||||||||||||||

Technet24.ir||||||||||||||||||||
||||||||||||||||||||

Extracting graphs from MPLS VPNsIn this recipe, we'll write a Python PyEZ-based script, process-mplsvpn.py, to connect toone of our JUNOS OS devices and query the BGP table for routing information relatedto a specific customer VPN. We'll use the associated BGP information to determine thecustomer-level network prefixes within the VPN and the Provider Edge (PE) routersinvolved in serving that MPLS VPN. We can visualize this information in a graphformat.
||||||||||||||||||||
||||||||||||||||||||

Technet24.ir||||||||||||||||||||
||||||||||||||||||||

Getting readyIn order to complete this recipe, you'll need a Python 2.7 development environment andaccess to a BGP-speaking JUNOS OS device. Ideally, you'll also have completed thefirst recipe on visualizing graphs, so that you can provide the extracted information andobtain a visual representation of the protocol in return.
||||||||||||||||||||
||||||||||||||||||||

Technet24.ir||||||||||||||||||||
||||||||||||||||||||

BGP MPLS VPN primerBGP-based MPLS VPNs were first specified in IETF RFC 2547 in 1999. MPLS VPNtechnology spent the early 2000s competing hard with legacy private networktechnologies such as ATM/Frame Relay and overlay IPSec-based networks. It finallyestablished ground as the most technically viable and cost-effective way for a service-provider network to logically partition his physical network into private routinginstances for use by customers.
Under the hood, the service-provider's typical BGP topology is augmented with an extraaddress family that widens the address space field in order to carry a route distinguisher—something to distinguish one customer's private address space from another's. Inaddition to the route distinguisher, the extended community attributes are used toindicate VPN membership of the routing information through what is known as a route-target. A route-target can best be thought of as an identifier of a group of sites who allparticipate in the same private network routing.
On JUNOS, we can query the BGP routing table through the use of the <get-route-information> XML RPC, and we can qualify the RPC further by specifying that we want tolook at the layer-3 VPN routing table, and that we want to only look at routes with aroute-target community that matches the VPN that we wish to analyze.
||||||||||||||||||||
||||||||||||||||||||

Technet24.ir||||||||||||||||||||
||||||||||||||||||||

How to do it...We're going to write a Python PyEZ script, process-mplsvpn.py, to connect to one of ourJUNOS OS routers, extract the BGP routing information for the VPN community ofinterest, and then output a compressed JSON representation of the resulting networkgraph.
1. Start with the typical boilerplate in order to define the script interpreter, import thePython standard library modules. Define a general purpose error handler to print apolite message and exit.
#!/usr/bin/env python
import sys import getpass import os import json import argparse import struct import socket import io from jnpr.JUNOS import Device from lxml import etree # Error handling def onError(exception_type, exception, traceback): print "%s: %s" % (exception_type.__name__, exception) sys.excepthook = onError
2. Use the argparse module, in order to scan the command-line arguments for anynecessary variations in operation. In this case, we simply include options to varythe username and remote TCP port. Call the getPass() routine to locate a passwordfrom the cache, if required.
cmdline = argparse.ArgumentParser( description="Python JUNOS PyEZ MPLS VPN Extraction Tool") cmdline.add_argument("target", metavar="target", help="Target router to query") cmdline.add_argument("community", metavar="community", help="target:NNN:NNN") cmdline.add_argument("-p", metavar="port", help="TCP port", default=830) cmdline.add_argument("-u", metavar="username", help="Remote username", default=getpass.getuser()) args=cmdline.parse_args() password=getPass(args.u+"@"+args.target) if 'getPass' in globals() else ""
3. Call upon the PyEZ framework to establish a session with the remote JUNOS OSdevice by calling the Device() constructor with the appropriate authentication
||||||||||||||||||||
||||||||||||||||||||

parameters and then calling the open() method on the returned object. Call the <get-route-information> RPC, being sure to specify the bgp.l3vpn.0 table and including theroute-target community.
dev = Device(host=args.target, user=args.u, port=args.p, password=password) dev.open() dev.timeout = 60 result = dev.rpc.get_route_information(normalize=True, detail=True, table="bgp.l3vpn.0", community=args.community)
4. Initialize a Python dictionary in preparation for storing the nodes and links, andstart by entering the route-target VPN community attribute as a central point. Theuser is expected to input this on the command line. Then iterate through the routingtable results from the RPC and add the appropriate nodes and links to thedictionary.
graph={'nodes': [], 'links': []} graph['nodes'].append(args.community)
for route in result.xpath("route-table/rt"): destination = route.findtext("rt-destination") if not destination in graph['nodes']: graph['nodes'].append(destination) for entry in route.xpath("rt-entry"): nh = entry.findtext("protocol-nh/to") if not nh in graph['nodes']: graph['nodes'].append(nh) graph['links'].append([args.community, nh, 10]) graph['links'].append([nh, destination, 10])
5. Close the device and output the JSON representation of the graph to the standardoutput stream.
dev.close()
print repr(json.dumps(graph))
Technet24.ir||||||||||||||||||||
||||||||||||||||||||


How it works...The initial steps in this recipe are quite simple to follow. Our Python script parsescommand line arguments in order to obtain two mandatory parameters:
A router hostname to connect toA route-target community to search for
Then we call the <get-route-information> RPC in order to query the routing table, but weconstrain the query by specifying the BGP layer-3 VPN table, and we also stipulate thatwe only want to see routes that carry our specific route-target extended communityattribute.
It's crucially important to add the constraining parameters to the <get-route-information> RPC. If you don't, you may find yourself downloading theglobal Internet table, decorated with XML. PyEZ will likely timeout theRPC on duration, but not before eating through significant memory on yourmanagement station, and you might impose an inconsiderate CPU burdenon your JUNOS OS device if you keep trying the operation.
Let's take a look at the likely XML response to our RPC.
<route-information xmlns="http://xml.juniper.net/JUNOS/14.1R6/JUNOS-routing"> <!-- keepalive --> <route-table> <table-name>bgp.l3vpn.0</table-name> <destination-count>6834</destination-count> <total-route-count>6849</total-route-count> <active-route-count>6834</active-route-count> <holddown-route-count>0</holddown-route-count> <hidden-route-count>0</hidden-route-count> <rt JUNOS:style="detail"> <rt-destination>4886:1:1.1.1.1</rt-destination> <rt-prefix-length>32</rt-prefix-length> <rt-entry-count JUNOS:format="1 entry">1</rt-entry- count> <rt-announced-count>1</rt-announced-count> <rt-state></rt-state> <rt-entry> <active-tag>*</active-tag> <current-active/> <last-active/> <protocol-name>BGP</protocol-name> <preference>170</preference> <preference2>-101</preference2> <route-distinguisher>4886:1</route-distinguisher> <nh-type>Indirect</nh-type> <nh-address>0x429db97c</nh-address> <nh-reference-count>1</nh-reference-count>
Technet24.ir||||||||||||||||||||
||||||||||||||||||||

<nh-kernel-id>0</nh-kernel-id> <gateway>89.202.215.3</gateway> <protocol-nh JUNOS:indent="16"> <to>89.202.215.3</to> <mpls-label>Push 165</mpls-label> <label-ttl-action>prop-ttl</label-ttl-action> <load-balance-label>Label 165: None; </load- balance-label> <indirect-nh>0x2 no-forward INH Session ID: 0x0</indirect-nh>
Our iteration logic is quite simple here. We scan each returned route to extract thedestination and its associated <protocol-nh> attribute, which will typically represent theBGP-layer next-hop for the destination.
It looks like we could take the BGP next-hop attribute from the <gateway>field in the extract above. Indeed, there is also a <learned-from> field in thenon-detailed view. The information is not the same however. If you'reusing BGP route reflection in your network, the BGP next-hop attributemay not be the same as the learned router. Typically, the route reflectorwill preserve the original BGP next-hop attribute in order to avoid gettinginto the traffic flow. He's simply there to pass on the BGP messages, notthe traffic.
Figure 6.6 includes a screenshot of an example MPLS VPN discovery.
MPLS VPN graph analysis
||||||||||||||||||||
||||||||||||||||||||

Technet24.ir||||||||||||||||||||
||||||||||||||||||||

There's moreWith the MPLS VPN analysis, we successfully extracted and representedthe following information:
The customer site network prefixThe BGP-speaking PE router serving the customerThe VPN route-target attribute
The later specifications of the BGP MPLS VPNs RFC, RFC4364, in section 7.4, makesa recommendation in the use Route Origin extended communities in order tounambiguously identify CE-layer routers in MPLS VPN topologies. We could add thiscapability to our process-mplsvpn.py tool by extracting the <extended-community> attribute of therouting table output. This would provide an extra layer in the graph, allowing a user tosee which customer networks were at which site, served by which CE.
||||||||||||||||||||
||||||||||||||||||||

Technet24.ir||||||||||||||||||||
||||||||||||||||||||

Monitoring and Maintaining JUNOSIn this chapter, we'll cover the following recipes:
Monitoring configuration changes network-wideMonitoring interface performanceMonitoring system healthMonitoring MPLS LDP statistics
||||||||||||||||||||
||||||||||||||||||||

Technet24.ir||||||||||||||||||||
||||||||||||||||||||

IntroductionJuniper supports a large variety of hardware platforms, each enriched with thefunctionality of JUNOS, enabling customers to operate various applications: fromsingle-domain enterprise networking through to large-scale, carrier-grade, serviceprovider multi-tenanted networking. Regardless of where you are on that scale, onceyou've used the rich JUNOS functionality to solve a particular network problem, nothingstays constant. Unsolicited change is inevitable, whether it be caused by growth innetwork traffic and the need to upgrade, or outside intervention in network links causinglogical topology changes.
An invaluable aid to any network engineer's toolkit is a rich capability when it comes tomonitoring variables and metrics associated with the JUNOS device. Is the deviceoperating in the designed tolerances? Are there any outstanding cautions or warningsthat require human intervention to address? Remember that automation is not aboutwalking away from the maintenance of a platform, rather it is about being moreintelligent and raising the sophistication of the activities with which we labor our humanengineer counterparts in order to maximize usefulness.
In this chapter, we'll explore a series of recipes that help provide capability in the fieldof monitoring your JUNOS device, allowing you to develop applications and systemsthat help keep your network healthy and working.
||||||||||||||||||||
||||||||||||||||||||

Technet24.ir||||||||||||||||||||
||||||||||||||||||||
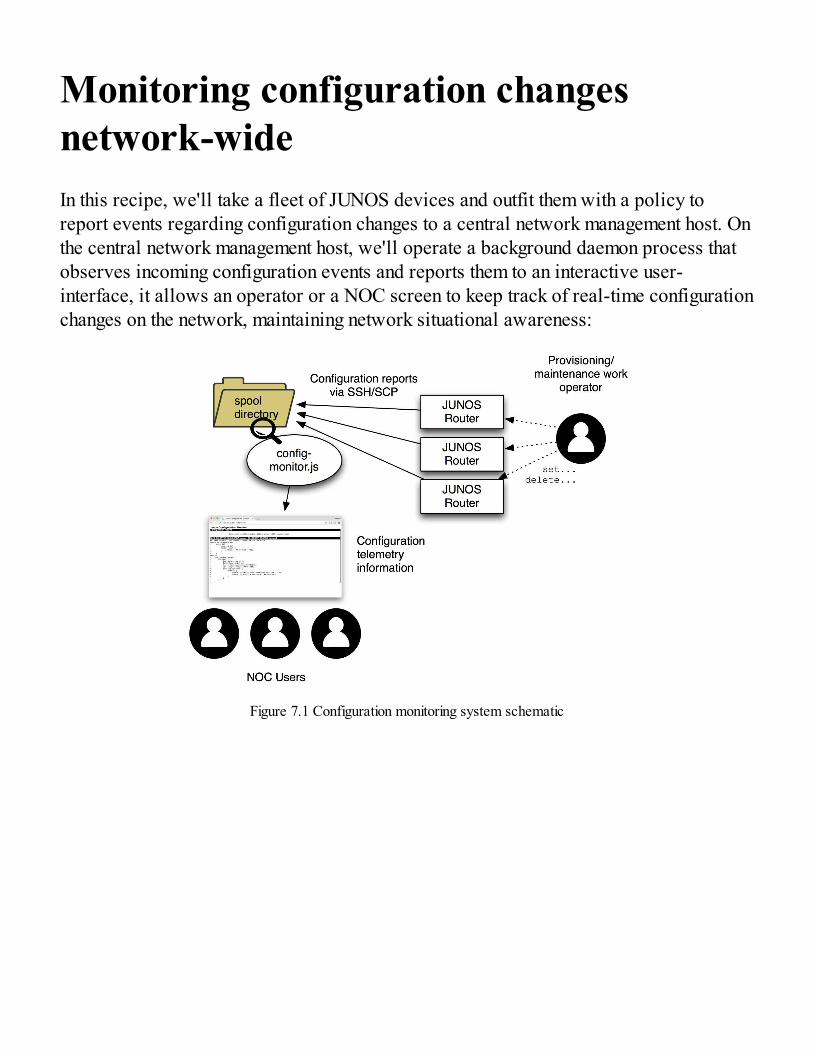
Monitoring configuration changesnetwork-wideIn this recipe, we'll take a fleet of JUNOS devices and outfit them with a policy toreport events regarding configuration changes to a central network management host. Onthe central network management host, we'll operate a background daemon process thatobserves incoming configuration events and reports them to an interactive user-interface, it allows an operator or a NOC screen to keep track of real-time configurationchanges on the network, maintaining network situational awareness:
Figure 7.1 Configuration monitoring system schematic
||||||||||||||||||||
||||||||||||||||||||

Technet24.ir||||||||||||||||||||
||||||||||||||||||||

Getting readyIn order to complete this recipe, you'll need:
Access to the development/management platform, with the following softwareavailable:
OpenSSH server software or equivalentNode.js v4 or v6
Administrative rights in order to configure user accounts on thedevelopment/management platformConfiguration access to JUNOS devices in order to setup event policy
||||||||||||||||||||
||||||||||||||||||||

Technet24.ir||||||||||||||||||||
||||||||||||||||||||

How to do it…There are four separate components to the recipe:
An OpenSSH server that accepts incoming file transfers to a spool directory,A JUNOS configuration that will instruct the device to respond to configurationcommit events, and execute commands to upload configuration via SSH to a serverA web server application that:
Listens for web client connections and interacts with them to present a log ofchangesMonitors the contents of an incoming spool directory and reacts to arrivals bycommunicating the contents to any connected web clients in real-time
A basic web page incorporating JavaScript in order to implement the web client
||||||||||||||||||||
||||||||||||||||||||

Technet24.ir||||||||||||||||||||
||||||||||||||||||||

SSH file transferThe steps are as follows:
1. First of all prepare a UNIX user account on the development/management platformin order to allow the JUNOS host (or hosts) to upload a report after a configurationchange. The exact method to create a user account on your system might vary buthere are two common methods on Debian Linux and OpenBSD respectively:
Debian Linux OpenBSD
user$ sudo adduser junosAdding user junos...Adding new group junos (1001) ...Adding new user junos (1001) with group junos ...Creating home directory “/home/junos” ...Copying files from /etc/skel ...Enter new UNIX password:Retype new UNIX password:passwd: password updated successfully
$ doas adduserEnter username []: junos Enter full name []: Enter shell csh ksh nologin sh [ksh]: uid [1001]:Login group [junos]:Login group is ``junos''. Invite junos into other groups: guest no [no]:Login class authpf bgpd daemon default pbuild staff unbound [default]:Enter password []:Enter password again []:
2. Take the time to secure this account on the management host. We only want it to beable to accept files from the JUNOS devices and not be abused by anyunauthorized user in the network. Consider any of the following possible steps tosecure the account:
Using a restricted shellUsing disk quotas to restrict disk consumptionUsing a chroot or jail environment
3. Create some sub-directories in the newly-created user's home directory to store theincoming configuration reports, and to store the web application:
$ mkdir config-monitor $ mkdir spool
||||||||||||||||||||
||||||||||||||||||||

Technet24.ir||||||||||||||||||||
||||||||||||||||||||

JUNOS OS event policyThe steps are as follows:
1. On the JUNOS host, configure an event handling policy that should be run inresponse to the configuration commit completions and specify an archiverepository for uploading files. Use the execute-commands mechanism to run a series ofJUNOS OS commands in response to the event:
adamc@router> show configuration event-options policy CONFIG-DIFF { events ui_commit_completed; then { execute-commands { commands { "show configuration | match Last\ commit:"; "show configuration | compare rollback 1"; } output-filename commit; destination NMS; output-format text; } } }
2. Repeat this step for any and all JUNOS devices that you want to monitor in thismanner.
3. Optionally, make some test commit operations and verify that the output of the filesmakes it to the management server:
$ ls -l *_commit -rw------- 1 JUNOS JUNOS 56 Sep 7 12:12 router_20170907_121209_commit -rw------- 1 JUNOS JUNOS 102 Sep 7 12:12 router_20170907_121237_commit -rw------- 1 JUNOS JUNOS 341 Sep 7 12:18 router_20170907_121845_commit -rw------- 1 JUNOS JUNOS 229 Sep 7 12:18 router_20170907_121853_commit
$ more router_20170907_121853_commit
root@router> show configuration | match Last\ commit:
## Last commit: 2017-09-07 12:18:53 UTC by adamc
root@router> show configuration | compare rollback 1
[edit interfaces em2] - description Foo; + description bar;
||||||||||||||||||||
||||||||||||||||||||

Technet24.ir||||||||||||||||||||
||||||||||||||||||||


Web server applicationWe're going to create a Node.js application that will act as a long-running daemonfulfilling the responsibilities of interacting with the client web users and monitoring afile spool directory where JUNOS OS devices will upload their configuration reportsfollowing a commit event:
1. Create a directory to keep the application components in one place. We're going touse some external library components and modules, and Node.js implements third-party linkage by storing the required modules in a node_modules directory within thedependent app, rather than installing modules system-wide. This goes some way tohelp create a self-contained application:
$ cd config-monitor
2. Install into your application development directory the socket.io package. socket.ioprovides a rich and comprehensive functionality enabling real-time sockets forweb applications:
$ npm install socket.io | [email protected] node_modules/socket.io ├── [email protected] ├── [email protected] ├── [email protected] ([email protected], [email protected], [email protected]) ├── [email protected] ([email protected]) ├── [email protected] ([email protected], component- [email protected], [email protected], [email protected], base64- [email protected], [email protected], [email protected], [email protected], [email protected], [email protected], engine.io- [email protected]) └── [email protected] ([email protected], [email protected], [email protected], [email protected], [email protected], [email protected])
3. Proceed to create the main Node.js application, config-monitor.js, in the mainapplication directory. Do this all in a single file for ease and simplicity. Start bydefining the interpreter, some configurable run-time constants, and the modulesupon which we depend:
#!/usr/bin/env node
// Runtime configurationconst SPOOLDIR = process.env['HOME'] + "/spool"; // Where to collect filesconst INTERVAL = 5000; // How often to scanconst GRACE = 2000; // Minimum age of file before processing
// Dependency modulesconst fs = require("fs");
Technet24.ir||||||||||||||||||||
||||||||||||||||||||

const os = require("os");const util = require("util");const app = require('http').createServer(handler)const io = require('socket.io')(app);
4. Declare a global associative array that will keep track of files in the spooldirectory:
var CACHE={};
5. To aid diagnostics, implement a simple printf style interface for printing debuggingmessages:
const STDOUT=1; const STDERR=2; const fprintf = function(fd, fmt) { utilfmt_args = Array.prototype.slice.call(arguments, 1); var str = util.format.apply(null, utilfmt_args); fs.writeSync(fd, str); } const printf = function() { Array.prototype.unshift.call(arguments, STDOUT); fprintf.apply(null, arguments); }
6. Start the main part of the program by defining a function, startFileScan(), that willread a directory asynchronously and call a callback function to handle the results:
const startFileScan = function() { fs.readdir(SPOOLDIR, processFileResults); }
7. Then implement the callback function, processFileResults(), that will take a list offiles that have been found in the spool directory. The function needs to compare theresults from the scan against the results in our own CACHE variable. First of all, itshould remove any files from the CACHE variable if they don't exist in the most recentscan, since they've obviously been deleted. Then it must analyze any files found inthe scan that we either don't know about (since they're new), or that have adifferent modification time (since they've been changed). Any interesting files thatwe find, we promote them by calling outputDiffReport():
const processFileResults = function(err, files) { fprintf(STDERR, "processFileResult: %d file(s) found in %s\n", files.length, SPOOLDIR); if (err!=undefined) { fprintf(STDERR, "Can't read spool directory %s: %s\n", SPOOLDIR, err.code); return; }
for (var f in CACHE) {
||||||||||||||||||||
||||||||||||||||||||

if (files.indexOf(f)==-1) { delete CACHE[f]; } }
var currentFile = undefined; const doStat = function(err, stats) { if (err) { fprintf(STDERR, "Error stat()ing %s: %s\n", currentFile, err.code); } else { if (currentFile!==undefined) { if (!(currentFile in CACHE) || ! (CACHE[currentFile].getTime()== stats.mtime.getTime())) { if (stats.mtime.getTime() + GRACE < Date.now()) { CACHE[currentFile]=stats.mtime; process.nextTick(outputDiffReport, currentFile, CACHE[currentFile]); } } } } currentFile = files.pop(); if (currentFile===undefined) { process.nextTick(function() { setTimeout(startFileScan, INTERVAL); }); } else { fs.stat(SPOOLDIR + "/" + currentFile, doStat); } }; process.nextTick(doStat); }
8. Continue by defining the logic for outputDiffReport(), the function that deals with thesituation where a new file has been found, or an old file modified. The handlershould take the filename and its modification time as parameters, and should send amessage to all connected web clients, then remove the file in order to tidy up:
const outputDiffReport = function(filename, mtime) { var data=""; try { data = fs.readFileSync(SPOOLDIR + "/" + filename, { encoding: "utf8" }); } catch(err) { fprintf(STDERR, "Can't read incoming filename %s: %s\n", filename, err.code); } content = data.split(/\n/).filter(function(x) { return x.match(/^[+\-#\[]/); }).join("\n");
io.emit('update', { 'content': content, 'mtime': mtime.toISOString(), 'file': filename });
fs.unlink(SPOOLDIR + "/" + filename, function() {}); }
Technet24.ir||||||||||||||||||||
||||||||||||||||||||

9. Implement the web-based interface by defining a response handler that will becalled when web requests are received. The response handler simply needs toserve out a static piece of HTML which will also include the client-side Javascriptweb client implementation:
function handler (req, res) { fs.readFile(__dirname + '/index.html', function (err, data) { if (err) { res.writeHead(500); return res.end('Error loading index.html'); } res.writeHead(200); res.end(data); }); }
10. Arrange for any errors to be dealt with in a consistent way:
process.on('uncaughtException', function(err) { console.log("ERROR: ", err.message); process.exit(1); });
11. Kick things off by configuring the HTTP instance to listen on a port number, andscheduling a call to scan the spool directory:
app.listen(8080); process.nextTick(startFileScan);
||||||||||||||||||||
||||||||||||||||||||

Technet24.ir||||||||||||||||||||
||||||||||||||||||||

Web client applicationThe steps for this section are as follows:
1. Create a file index.html within the web application directory. In the <head> of theHTML tag, implement some simplistic CSS styling rules in order to differentiatethe configuration extract text from the comment text:
<!DOCTYPE HTML> <html> <head> <title>JUNOS Configuration Monitor</title>
<style> div { margin: 0px; }
.heading { display: block; font-family: sans-serif; font-size: 18px; font-weight: bold; }
.comment { display: block; font-family: sans-serif; background-color: black; color: white; }
.log { border: solid 1pt black; display: block; font-family: monospace; white-space: pre; } </style>
2. Then include a client-side JavaScript in order to connect the server to eventconfiguration changes:
<script src="/socket.io/socket.io.js"></script> <script> var socket = io(); socket.on('update', function (data) {
var comment = document.createElement("div"); comment.className="comment"; comment.appendChild(document.createTextNode(data['mtime'] + ": " + data['file']));
var log = document.createElement("div"); log.className="log"; log.appendChild(document.createTextNode(data['content']));
||||||||||||||||||||
||||||||||||||||||||

var container = document.getElementById("container"); container.appendChild(comment); container.appendChild(log);
window.scrollTo(0,document.body.scrollHeight);
}); </script> </head>
3. Finally, add a basic HTML body skeleton to index.html which defines the containerelement which the JavaScript will dynamically update in response to events fromthe server:
<body> <div class="heading"> Junos Configuration Monitor </div>
<div id="container"> <div class="comment"> Configuration reports </div>
<div class="log"> Committed configuration differences will appear here </div>
</div> </body></html>
With all the files in place, start the server by invoking ./config-monitor.js at the commandline with no arguments.
Technet24.ir||||||||||||||||||||
||||||||||||||||||||


How it works...The config-monitor.js server process is the central work-horse behind the magic thathappens within this recipe. It receives the transcripts of JUNOS OS show commandswhich report differences and floods them out to the connected web clients using theimpressive socket.io real-time framework library. However, config-monitor.js workload ismade significantly easier, by being able to rely on the underlying operating system'sSSH facility, and UNIX permissions system in order to receive files and authenticateincoming connections. Instead of the dealing with the complexity of the SSH protocol, itcan simply monitor a spool directory to watch for new files.
Technet24.ir||||||||||||||||||||
||||||||||||||||||||

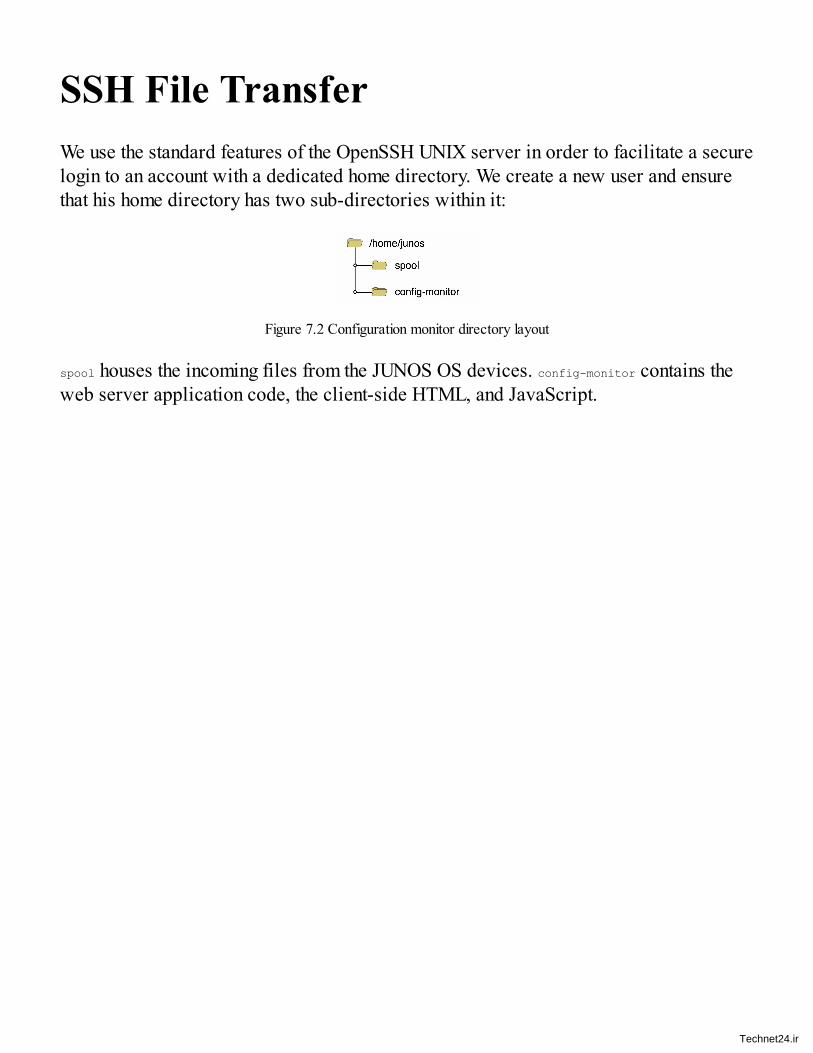
SSH File TransferWe use the standard features of the OpenSSH UNIX server in order to facilitate a securelogin to an account with a dedicated home directory. We create a new user and ensurethat his home directory has two sub-directories within it:
Figure 7.2 Configuration monitor directory layout
spool houses the incoming files from the JUNOS OS devices. config-monitor contains theweb server application code, the client-side HTML, and JavaScript.
Technet24.ir||||||||||||||||||||
||||||||||||||||||||


JUNOS OS event policyIn order to get the JUNOS OS device to signal when a user has made a configurationchange, we use the event policy framework to define rules and actions for when eventsoccur. We trap the event that occurs when a commit operation has been completed:
adamc@router> help syslog ui_commit_completed Name: UI_COMMIT_COMPLETEDMessage: commit completeHelp: 'commit' operation completed successfullyDescription: Changes to the candidate configuration were committed successfully.Type: Event: This message reports an event, not an errorSeverity: warningFacility: ANY
We then use the execute-commands action in order to tell JUNOS that when the event occursit should run a series of operational mode commands. In this case, we run two differentcommands and it's worth exploring each one to understand what we're trying to achieve:
The first one simply extracts the header from the configuration file which gives us somemeta-data about the commit that recorded this configuration:
adamc@router> show configuration | match Last\ commit:## Last commit: 2017-09-07 17:52:14 UTC by auto
The second command compares the current committed configuration with that of theprevious version:
adamc@router> show configuration | compare rollback 1[...]
We have to be sure to use the output-format directive in order to stipulate that we want atext output format rather than XML, since the eventual audience for this information is adiligent NOC operator who will be sitting at a terminal screen.
In order to get the output of these two commands off-box and onto our managementserver, we make use of the destination directive to reference a specific archive site. Inthe archive site definition, we can specify all of the attributes of the remote server,including the remote SSH password.
If you want to avoid encoding passwords in your configuration and wouldrather that the JUNOS device used SSH keys, it is possible, but a littletricky. See Chapter 4, Event Programming, recipe, Archiving configurations
Technet24.ir||||||||||||||||||||
||||||||||||||||||||


Technet24.ir||||||||||||||||||||
||||||||||||||||||||

Web server applicationThe web server application forms a fully-fledged Node.js application written in asingle file for ease of instruction and illustration here.
The built-in Node.js HTTP module is used to implement the web server, and socket.iointegrates into the web server in order to catch some URLs. In particular it will captureURLs to the path /socket.io/ in order to deliver the extra payload to the client to helpwith the task of achieving real-time communication with the various web technologies.
Like all Node.js applications, this one sits in an event loop waiting for I/O or eventsand responding with prescribed handling functions. Cataloging the events and theirprogrammed responses can be insightful for understanding the operation of the program:
Event Response
Start ofprogram
Create HTTP serverCreate socket.io implementation on HTTP serverSchedule a file scan
HTTPrequest/socket.io
Serve socket.io supporting files (implemented by socket.io)
HTTPrequest(other)
Serve the file index.html from the application direction
File scancompletes
Take the first file in the list and check its modified time using the stat()system call
stat() callcompletes
Check if the file is interesting (not previously known, or known but withdifferent modified time). If so, emit an update event with the filename,modified time and contentTake the next file in the list and check its modified time using the stat()system call. If there is no next file, schedule another file scan within 5seconds (or the value of INTERVAL)
||||||||||||||||||||
||||||||||||||||||||

Updateevent
Flood the information (filename, modified time, file contents) to allcurrently connected web clients (Implemented by socket.io).Delete the file
The web application scans the spool directory at a frequency defined by the INTERVALconstant, which we default to be 5000 milliseconds. First of all, it removes from itscache information any files which don't now exist on the disk (Perhaps the operator hascleaned the spool directory manually).
Then it proceeds to find any and all files which are either:
Not known in the CACHE variableKnown in the CACHE variable with a different timestamp
It adds any newly found files to the cache, and then reports their contents to anyconnected web clients.
We make use of a grace period, specified by the constant GRACE, to avoid trying to readfiles just as they're being written. Because read and write operations are necessarilybroken up into small units based on block sizes, underlying disk resources and networkpacket sizes, it is possible that we could wake up to scan the spool directory and noticea new file before the SSH copy process has finished writing it. The grace period helpsus avoid this. The file is only promoted to be reported on if its last modification is atleast at certain time ago. In our case, we determine a good grace period to be twoseconds.
Our reliance on timestamps to put distance between the JUNOS SCPwrites is not infallible. It should be noted that while the server process iswriting the file, we depend on the fact that the timestamp is legitimatelycomparable to the current time. This might not be the case if the spooldirectory is on a network share or similar. And it could also be the casethat a network glitch causes the upload operation to stall and writeoperations to pause for a time long enough that we think the file is done.Generally, the grace period logic is simply designed to prevent us gettingahead of ourselves in normal situations.
When we do finally report on a newly-found file, we apply a little bit of regularexpression munging on the content. To make for a nice condensed log view on the webclient operator browser, we pull out any blank lines, or lines which we think are not
Technet24.ir||||||||||||||||||||
||||||||||||||||||||

part of the important story. For example, the JUNOS OS device will upload a fulltranscript of the execute-commands session, including the shell prompt and typed command.
This isn't of interest to our web client operator, so we can just grab any lines thatcontain +, - or #.
content = data.split(/\n/).filter(function(x) { return x.match(/^[+\-#\[]/); }).join("\n");
||||||||||||||||||||
||||||||||||||||||||

Technet24.ir||||||||||||||||||||
||||||||||||||||||||

Web client applicationThe web client is implemented in a single piece of HTML, which creates the skeletonstructure of a document and then uses JavaScript event handlers in conjunction with theclient-side socket.io framework to generate the page content as and when eventinformation is received from the server. When a new update is received, we use thestandard JavaScript DOM manipulation function in order to find the container <div> andadd a new pair of child <div> elements to that thus representing the heading comment, andthe configuration commit extract respectively.
As a final touch, when we update the DOM, we take time to adjust the window scrollposition to the bottom of the document, allowing useful viewing without constant userattention.
If you're considering something like this for a NOC screen view, be warythat in its current form, the web document will simply get bigger andbigger, causing the browser to consume more and more memory. Astrategy of occasional refresh, or more intelligent expiring of elementsmight be preferable.
In use then, we can see a clear view of configuration events accompanied by timestamp,source router and an actual configuration difference. This is an invaluable view on anetwork of many elements when one is trying to troubleshoot or co-ordinate plannedworks in a maintenance window:
||||||||||||||||||||
||||||||||||||||||||

Figure 7.3 Configuration monitor screenshot
Technet24.ir||||||||||||||||||||
||||||||||||||||||||


There's moreThe web application we developed here is actually quite simple. It monitors a spooldirectory and floods any received information to any connected web client browsers.Because of this simplicity, and the flexibility of the JUNOS OS event policy framework,it is quite possible to extend this functionality into a structured syslog() replacementsystem. We define the events that we're interested in on the JUNOS devices, and anyfollow-up command that we might need to execute, and the output is sent to our unifiedweb-based console for immediate attention.
For example, if we add the following event policy across our estate, we can get alertson BGP prefix-limits as they happen, with an accompanying show bgp summary commandoutput:
policy BGP { events BGP_PREFIX_LIMIT_EXCEEDED; then { execute-commands { commands { "show bgp summary"; } output-filename bgp; destination NMS; output-format text; } }
Now when a BGP peer trips its configured advertised prefix limit, the event will fire,execute the show bgp summary command and upload the results to the management serverwhere they will be flooded to the web console:
Technet24.ir||||||||||||||||||||
||||||||||||||||||||

Figure 7.4 Configuration monitor extended to report on more general events
Sadly, the one problem with this approach is that the execute-commands action of eventpolicies cannot currently include parameterized substitutions from event information.Full-on event scripts have access to structured event information and they can be usedinstead of execute-commands actions, but event scripts have the slight downside that theiroutput format is always XML, which would require a translation layer within the config-monitor.js or web client layer. This translation would necessarily have to be aware of theoutput commands so that the XML model can be interpreted and presented.
||||||||||||||||||||
||||||||||||||||||||

Technet24.ir||||||||||||||||||||
||||||||||||||||||||

Monitoring interface performanceIn this recipe, we'll use the JUNOS OS NETCONF interface in order to extract real-time interface performance data and present it in a web interface. We'll write a serverapplication that connects to the devices in our estate, issues a NETCONF remoteprocedure call to extract the data, and then shares this data amongst web-based clients.For convenience and simplicity, we'll avoid the task of storing the actual interface usagedata and focus our application on real-time uses such as monitoring the state ofinterfaces while performing reconfiguration work. Consider it an extension to thecommand line interface, but in a visual form:
Figure 7.5 Interface monitoring system schematic
||||||||||||||||||||
||||||||||||||||||||

Technet24.ir||||||||||||||||||||
||||||||||||||||||||

Getting readyIn order to complete this recipe, you'll need:
Access to a development/management platform, with the following softwareavailable:
Node.js v4 or v6Access to JUNOS OS devices that you want to monitor, all pre-configured withNETCONF-over-SSH services enabled, and with credentials available.A basic knowledge of JavaScript and the Node.js frameworks surrounding it, andfamiliarity with the Node.js way: the asynchronous pattern of calling a function todo something, and specifying what should happen next.
We're going to stand on the shoulders of some extra third-party routines and libraries inorder to support us. In no particular order of significance:
Brian White's ssh2 library for Node.js: an SSH implementation in pure JavaScriptwhich allows us to run SSH with multiple endpoints in an asynchronous mannerwithout the need for child_processes to the ssh command line binary (like we've donepreviously in Chapter 1, Configuring JUNOS through NETCONF and Chapter 3, UsingSLAX to write Op Scripts).Marek Kubica's xml2js library for Node.js: a simple XML parsing library thatpresents objects in JSON.Richard Heyes's RGraph library: a client-side JavaScript library for producingattractive graphs in the browser.The MIT-licensed socket.io real-time application framework for Node.js.
||||||||||||||||||||
||||||||||||||||||||

Technet24.ir||||||||||||||||||||
||||||||||||||||||||

Object-oriented primer for Node.jsIn the code that we create, we'll generally be using a simple object-oriented techniqueof abstracting related data types into encapsulating objects. If this sounds a bit technical,it can be useful to re-acquaint yourself with some of the basic tenets of implementingclassic object-oriented programming techniques in JavaScript, which is notable by itsprototypal model.
To create a class of object in Javascript, we use a function definition. But when thefunction is invoked with Javascript's new operator, a new object is created and thefunction is used as the constructor for the class:
function Thing(name) { // do construction activities here};var t = new Thing();
Instance variables are defined immediately within the constructor definition andanchored to this. this has a controversial reputation in JavaScript because of theconfusion that can sometimes be caused by its scoping rules. Suffice to say, in thisexample, we avoid these scoping problems by adhering to a practice of alwaysexplicitly defining an alternate to this - self, bound to the functional scope block - andusing it where we would normally use this:
function Thing(name) { var self=this; self.name = name;};
var t = new Thing(“Fred”);console.log(t.name); // prints “Fred”
When we want to define methods that act on our object, we add them to the prototypechain. The prototype chain is a fundamental principle central to JavaScript's prototypalinheritance model, but the important aspect to understand here is that it helps define asearch method for seeking object properties that is ordered in terms of specificity. Forexample, a class of objects might all inherit a common method, but it's possible forspecific objects to override that implementation with their own:
function Thing(name) { var self=this; self.name = name;};
Thing.prototype.sayGreeting = function() { var self = this;
||||||||||||||||||||
||||||||||||||||||||

console.log("Hello " + self.name);}
var t = new Thing(“Fred”);t.sayGreeting(); // prints “Hello Fred”
But a common pattern that we see, when using Node.js, is the need to call a function andprovide a callback completion handler for when an asynchronous operation hascompleted (or failed). When we use this with classic object-oriented methods, we needto be cautious not to fall into the JavaScript this scope trap:
function Thing(name) { var self=this; self.name = name;};
Thing.prototype.sayGreeting = function() { var self = this; console.log("Hello " + self.name);}
Thing.prototype.delayedGreeting = function(delay) { var self = this; setTimeout(self.sayGreeting, delay);}
var t = new Thing(“Fred”);t.delayedGreeting(1000); // doesn't work – prints Hello undefined…
The right way to solve the problem is to use a technique known as currying – creating ananonymous function in order to preserve the scope of the self variable in order to ensurethat the function gets called with the correct this context:
Thing.prototype.delayedGreeting = function(delay) { var self = this; setTimeout(function() { self.sayGreeting(); }, delay);}var t = new Thing(“Fred”);t.delayedGreeting(1000); // works: prints “Hello Fred” after 1000ms
With that quick primer out of the way, you should hopefully find it easier to understandthe code that we use in this and other Node.js recipes.
Technet24.ir||||||||||||||||||||
||||||||||||||||||||


How to do it…We're going to create two different pieces of code. The server application, collector.js,will run on the management server and will be responsible for collecting data from theJUNOS OS devices. The client-side web application, interfaces.html, will be deliveredby the server to the web client and will run in the user's browser, displaying the graphand any associated data.
Technet24.ir||||||||||||||||||||
||||||||||||||||||||


Server applicationThe server application will take a simple command-line argument to refer it to aconfiguration file, which will define a series of JUNOS OS devices that will be polled.The configuration file will include the necessary SSH credentials for access to thedevices to be polled:
1. Make a directory on the management server in order to store all of the resourcesassociated with this project and start by downloading all of the necessary pre-requisite Node.js packages:
$ npm install socket.io └─┬ [email protected] ├─┬ [email protected] │ └── [email protected] [...]
$ npm install xml2js └─┬ [email protected] ├── [email protected] └── [email protected]
$ npm install argparse └─┬ [email protected] └── [email protected]
2. Create collector.js in your preferred text editor environment and start by adding thefollowing boilerplate which imports the Node.js modules and defines some run-time constants:
#!/usr/bin/env node
const INTERVAL = 10000;
// Dependency modules const fs = require("fs"); const path = require("path"); const repl = require("repl"); const os = require("os"); const util = require("util"); const app = require('http').createServer(httpHandler) const io = require('socket.io')(app);
const xml2js = require('xml2js'); const ssh2 = require('ssh2'); const argparse = require('argparse'); const Client = require('ssh2').Client;
3. Include the definition of some utility functions that will help us out. In this case,fprintf() satisfies our appetite for retro C-style formatting of debug messages, andwalk() helps us navigate a hierarchical JavaScript dictionary without tripping up
Technet24.ir||||||||||||||||||||
||||||||||||||||||||

over undefined dictionary de-references:
const STDOUT=1; const STDERR=2; const fprintf = function(fd, fmt) { utilfmt_args = Array.prototype.slice.call(arguments, 1); var str = util.format.apply(null, utilfmt_args); fs.writeSync(fd, str); } const printf = function() { Array.prototype.unshift.call(arguments, STDOUT); fprintf.apply(null, arguments); }
var walk = function(obj, path) { var result = obj; path.forEach(function (cur, ind, array) { if (result!=undefined) result=result[cur]; }); return result; }
4. Next define the XML dialogs that will be used when conversing with the JUNOSOS devices:
const DELIMITER="]]>]]>"; const xmlhello = '<?xml version="1.0" encoding="UTF-8"?>' + '<hello xmlns="urn:ietf:params:xml:ns:netconf:base:1.0">' + '<capabilities>' + '<capability>urn:ietf:params:netconf:base:1.0</capability>'+ '</capabilities>' + '</hello>\n'; const xmlrpc = "<rpc><get-interface-information> " + "<media/></get-interface-information></rpc>\n"; const xmlclose = "<rpc><close-session/></rpc>\n";
5. Define a JavaScript-style class to represent the remote JUNOS OS devices andhandle our communication with it, interfacing with the underlying ssh2 and xml2jslibraries are required:
function JUNOSDevice(id, host, port, username, password, privateKey) { var self = this; self.id = id; self.host = host; self.port = port; self.username = username; self.password = password; self.privateKey = privateKey; self.stream = null; self.client = null; self.buffer = ""; self.connectTimer=null;
self.scheduleConnect(0); };
6. Continue by defining some methods associated with the JUNOS OS device, starting
||||||||||||||||||||
||||||||||||||||||||

with methods for connecting an SSH session to the devices:
JUNOSDevice.prototype.scheduleConnect = function(interval) { var self = this; if (self.connectTimer) return; self.connectTimer = setTimeout(function() { self.connect(); }, interval); }
JUNOSDevice.prototype.connect = function() { var self = this; self.connectTimer=null; fprintf(STDERR, "%s:%s: Trying to connect SSH\n", self.host, self.port); self.client = new Client(); self.client.on("ready", function() { self.client.subsys('netconf', function(err, stream) { if (err) { fprintf(STDERR, "%s:%s: SSH failed: %s\n", self.host, self.port, err.message); } else { self.stream = stream; stream.on('data', function(chunk) { self.doRead(chunk); }); stream.on('close', function(code, signal) { self.client.end(); }); stream.on('error', function(err) { fprintf(STDERR, "%s:%s: NETCONF SSH stream error: %s\n", self.host, self.port, err.message); }); self.stream.write(xmlhello+DELIMITER+"\n"); } }); }); self.client.on("error", function(err) { if (err.level=="client-socket") { fprintf(STDERR, "%s:%s: socket connection error\n", self.host, self.port); } if (err.level=="client-ssh") { fprintf(STDERR, "%s:%s: SSH protocol error: %s\n", self.host, self.port, err.description); } self.scheduleConnect(INTERVAL); }); self.client.on("end", function() { fprintf(STDERR, "%s:%s: SSH session ended\n", self.host, self.port); self.scheduleConnect(INTERVAL); });
var connectOptions = { host: self.host, port: self.port, username: self.username, password: self.password }; try { connectOptions['privateKey'] = fs.readFileSync(self.privateKey); } catch(e) {}
Technet24.ir||||||||||||||||||||
||||||||||||||||||||

self.client.connect(connectOptions); }
7. Then define a method to handle read events. When data is available from theremote JUNOS devices, the received XML needs to be parsed and decoded:
JUNOSDevice.prototype.doRead = function(chunk) { var self = this;
self.buffer += chunk.toString(); var index=self.buffer.indexOf(DELIMITER)
if (index!=-1) { var xml = self.buffer.slice(0, index); self.buffer = self.buffer.slice(index + DELIMITER.length + 1);
xml2js.parseString(xml, { normalize: true, ignoreAttrs: true }, function(err, result) { self.processXMLResponse(err, result); }); } }
8. Pair this up with a method to handle responses from the XML parser which will beproducing the structured data that we can work with. The XML message handlerneeds to define actions for each of the potential messages that might be received:
JUNOSDevice.prototype.processXMLResponse = function(err, result) { var self = this; var interfaces=null; if (err) { fprintf(STDERR, "Unable to parse XML in response from %s: %s\n", self.host, err.message); } else if (result['hello']) { fprintf(STDERR, "%s:%s: Hello message received\n", self.host, self.port); self.stream.write(xmlrpc+DELIMITER+"\n");
} else if (interfaces=walk(result, ['rpc-reply', 'interface-information', 0, 'physical-interface'])) { fprintf(STDERR, "%s:%s: Interface information received: %d interface(s) found\n", self.host, self.port, interfaces.length); for (i=0; i<interfaces.length; i++) { var name = walk(interfaces, [i, "name", 0]); var description = walk(interfaces, [i, "description", 0]); var stats = walk(interfaces, [i, "traffic-statistics", 0]); var opstatus = walk(interfaces, [i, "oper-status", 0]);
if ((name.startsWith("xe-") || name.startsWith("ge-") || name.startsWith("et-")) && opstatus=="up") {
||||||||||||||||||||
||||||||||||||||||||

GROUPS[self.id].emit('interface-stats', { __time: Date.now(), name: name, description: description, stats: stats }); } } setTimeout(function() { self.stream.write(xmlrpc+DELIMITER); }, INTERVAL); } else if (error=walk(result, ['rpc-reply', 'rpc-error', 0, 'error-message', 0])) { fprintf(STDERR, "%s:%s: RPC error message received: %s\n", self.host, self.port, error); } else if (ok=walk(result, ['rpc-reply', 'ok', 0])=="") { fprintf(STDERR, "%s:%s: OK message received\n", self.host, self.port); } else { fprintf(STDERR, "%s:%s: Unexpected XML message received\n", self.host, self.port); fprintf(STDERR, "%s\n", util.inspect(result, { depth: 8}) ); } }
9. Get the main block of code rolling, by defining the GROUPS variable to keep track ofwhich web client is interested in which device. Then use the familiar argparsemodule to process the command line arguments and read the configuration file:
var GROUPS=[];
var cmdline = new argparse.ArgumentParser({ description: "NodeJS JUNOS Interface monitoring server" }); cmdline.addArgument("-f", { metavar: "file", help: "JSON configuration file", defaultValue: "config.json" }); var args = cmdline.parseArgs();
const CONFIG = JSON.parse(fs.readFileSync(args.f));
10. Use socket.io to create a real-time web socket available to connect clients anddefine a connection handler that outputs the configuration to clients so that theyknow which devices are available to monitor:
io.on('connection', function (socket) { fprintf(STDERR, "Connection on main socket from %s\n", socket.id); socket.emit('config', Object.keys(CONFIG).map(function(id) { return CONFIG[id]['host']+ ":"+CONFIG[id]['port']})); });
11. Then go through each line in the configuration file which represents a JUNOS OS
Technet24.ir||||||||||||||||||||
||||||||||||||||||||

device, and create:A group socket that web clients can join, in order to be informed of statisticsA JUNOSDevice object, which we defined earlier to represent the device and itsSSH communications:
for (id in CONFIG) {
var group = io.of("/device"+id); GROUPS[id]=group;
group.on('connection', function(socket) { fprintf(STDERR, "Connection on group socket from %s\n", socket.id); socket.on('disconnect', function(reason) { fprintf(STDERR, "Disconnection from group socket by %s\n", socket.id); }); });
var session = new JUNOSDevice(id, CONFIG[id]['host'], CONFIG[id]['port'], CONFIG[id]['user'], CONFIG[id]['password'], CONFIG[id]['key'] ); }
12. Include a general purpose exception handling routine that will catch anyunanticipated errors, print a simple message and then exit:
process.on('uncaughtException', function(err) { console.log("ERROR: ", err.message); process.exit(1); });
13. Use the Node.js built-in HTTP web server in order to service requests from theclient and set up a simple configuration that supports the delivery of:
The main interfaces.html file,Supporting client-side libraries such as RGraph:
function httpHandler (req, res) { var filename=__dirname + "/interfaces.html"; if (req.url.startsWith("/RGraph")) { filename=__dirname+"/RGraph/"+path.basename(req.url); } fs.readFile(filename, function (err, data) { if (err) { res.writeHead(404, "Not found"); return res.end(); } res.writeHead(200); res.end(data); }); }
||||||||||||||||||||
||||||||||||||||||||

14. Start the server listening on an appropriate TCP port:
app.listen(8080);
Technet24.ir||||||||||||||||||||
||||||||||||||||||||


Web client applicationThe client application is downloaded from the server and is run in the user's browser. Itestablishes a real-time web socket to the server, and upon connection the server informsthe client of devices available for inspection. As the user chooses a device of interest,the client attaches to the associated socket group in order to receive updates. As theupdates arrive, the client will draw the graph within the browser environment:
1. Create interfaces.html in a text editor of your preference and input the followingHTML framework to define some simple stylesheets and to reference the socket.ioand RGraph client-side libraries. Leave a space within the <script> tags for placingour web client logic:
<!DOCTYPE HTML> <html> <head> <title> JUNOS Interface Performance Monitor</title>
<style> div { /*display: block;*/ font-family: sans-serif; font-size: 12px; margin: 25px; }
div.heading { display: block; font-family: sans-serif; font-size: 18px; font-weight: bold; } </style>
<script src="RGraph.common.core.js" ></script> <script src="RGraph.common.key.js"></script> <script src="RGraph.line.js" ></script> <!--[if lt IE 9]><script src="excanvas.js"></script><![endif]-->
<script src="/socket.io/socket.io.js"></script>
<script> <!-- Our code will go here --> </script>
</head>
<body> <div class="heading"> JUNOS Interface Performance Monitor </div>
<div> Please select device: <select id="selector"></select>
Technet24.ir||||||||||||||||||||
||||||||||||||||||||

</div>
<div id="container"> <!-- Graphs go here --> </div>
</body>
</html>
2. Within the <script> tags, continue the main code which starts with some run-timeconstants and a utility function to convert a number into an appropriately suffixedabbreviation. For example, Mbps, Gbps:
const MAXDATA = 12; // maximum number of data samples const CANVAS_WIDTH = 750; const CANVAS_HEIGHT = 300;
// Graph helper: add a suitable suffix to a number function scaleBits(obj, x) { if (x>1e12) return x/1e12 + "T"; if (x>1e9) return x/1e9 + "G"; if (x>1e6) return x/1e6 + "M"; if (x>1e3) return x/1e3 + "k"; return x; };
3. Define the WebClient constructor function, which is the central component of theclient:
function WebClient() { var self = this; self.GRAPHS={}; // references to the RGraph objects self.DATA={}; // the data collected from the server self.socket = io(); self.socket_device = null; self.container = document.getElementById("container"); self.selector = document.getElementById("selector");
self.socket.on('config', function(data) { self.configureDevices(data); }); };
4. Define a method for configuring the user interface to reflect the server's report ofavailable devices:
WebClient.prototype.configureDevices = function(config) { var self = this; while (self.selector.firstChild) { self.selector.removeChild(selector.firstChild); } for (i=0; i<config.length; i++) { self.selector.appendChild(new Option(config[i])); } self.selector.onchange = function() { self.selectNewDevice(); } self.selector.selectedIndex=0; self.selectNewDevice();
||||||||||||||||||||
||||||||||||||||||||

};
5. Define a method for selecting one of the available devices, and updating the localuser interface appropriately.
WebClient.prototype.selectNewDevice = function() { var self = this; if (self.socket_device!=null) self.socket_device.close();
// Clear the data stores for (var name in self.GRAPHS) { RGraph.reset(document.getElementById(name)); delete self.GRAPHS[name]; } for (var name in self.DATA) { delete self.DATA[name]; }
// Remove the canvas objects while (self.container.firstChild) { self.container.removeChild(self.container.firstChild); }
RGraph.ObjectRegistry.clear();
// Create new socket, bound to new device namespace self.socket_device = io("/device"+self.selector.selectedIndex); self.socket_device.on('interface-stats', function(data) { self.updateGraphs(data) }); };
6. Define a method for updating the displayed graphs when the server reports newdata for the device:
WebClient.prototype.updateGraphs = function(data) { var self = this; var name = data['name']; var stats = data['stats']; var description = data['description']; var timestamp = data['__time'];
if (self.DATA[name]==undefined) { self.DATA[name]={}; } for (var key in stats) { if (self.DATA[name][key]==undefined) { self.DATA[name][key]=[]; } self.DATA[name][key].push(stats[key][0]); if (self.DATA[name][key].length>MAXDATA) { self.DATA[name][key].shift(); } } if (self.DATA[name]['__time']==undefined) { self.DATA[name]['__time']=[]; }; self.DATA[name]['__time'].push(timestamp); if (self.DATA[name]['__time'].length>MAXDATA) { self.DATA[name]['__time'].shift(); }
Technet24.ir||||||||||||||||||||
||||||||||||||||||||

var canvas = document.getElementById(name); if (canvas==null) { canvas = document.createElement("canvas"); canvas.width=CANVAS_WIDTH; canvas.height=CANVAS_HEIGHT; canvas.setAttribute("id", name); self.container.appendChild(canvas); } var graph = new RGraph.Line({ id: name, data: [ self.DATA[name]['input-bps'], self.DATA[name]['output-bps'] ], options: { colors: ['green', 'red'], key: ['in', 'out'], title: name + " (" + description + ")" + " (bps)", labels: self.DATA[name]['__time'].map(function(d) { return new Date(d).toTimeString().split(" ")[0]; }), textSize: 10, // spline: true, scaleFormatter: scaleBits, } }); self.GRAPHS[name]=graph; RGraph.reset(canvas); graph.draw(); };
7. Arrange for the WebClient class to be kick-started when the page has loaded, finallyclosing the <script> tags.
||||||||||||||||||||
||||||||||||||||||||

Technet24.ir||||||||||||||||||||
||||||||||||||||||||

Setting up and Running1. Download and unzip the RGraph software into the application project directory.
For the purposes of this recipe, I have used the latest stable version, dated 2017-08-26, available at https://www.rgraph.net/downloads.
2. Prepare a JSON configuration file in the application project directory listing eachof the JUNOS OS devices to connect to. For my SSH-tunnelled lab environment, Iuse the following:
$ more config.json [ { "host": "127.0.0.1", "user": "auto", "privateKey": "JUNOS_auto_id_rsa", "port": 8930 }, { "host": "127.0.0.1", "user": "auto", "privateKey": "JUNOS_auto_id_rsa", "port": 8931 } ]
3. On the management server in your application project directory, you should havethe following files:
Filename Description
interfaces.htmlThe client-side HTML/Javascript to be delivered to a connectingweb client
collector.js The server-side componentconfig.json Configuration file specifying the JUNOS OS devicesnode_modules Directory containing all pre-requisite Node.js packages and modulesRGraph Directory containing the RGraph Javascript graphing software
4. Start the collector.js server running and use your browser to open the appropriateURL. In our case, we used TCP port 8080.
||||||||||||||||||||
||||||||||||||||||||

Technet24.ir||||||||||||||||||||
||||||||||||||||||||

How it works...The server application and web client application work in tandem to distribute theextracted interface performance data from the JUNOS routers efficiently to the user'sbrowsers, depending on user interface selections.
||||||||||||||||||||
||||||||||||||||||||

Technet24.ir||||||||||||||||||||
||||||||||||||||||||

Server applicationThe server application is a multi-protocol Node.js application, written in a single filefor convenience and ease of illustration here. It has two major I/O functions:
Speaking HTTP and the WebSocket overlay (for real-time sockets communication) toweb clientsCommunicating NETCONF over SSH to JUNOS OS routers
The asynchronous I/O model of Node.js allows us to implement this quite efficientlywithin a single application. An event loop polls for I/O from the operating system anddispatches prescribed event handlers as required.
Steps 1 through 3 see us setup the beginning of a Node.js application, download thenecessary library modules and reference the namespace of our application. Notice alsothat in step 2, we identify a run-time constant, INTERVAL, which defines how long we waitbetween poll cycles.
In step 4, we define the XML dialog that we are going to be working with. In this case,we're working with the <get-interface-information> RPC and specifically the <media> versionof it, which returns us a structured XML that typically looks like the following. Theparts of the XML that we're interested in are: the name, the operational status, and thetraffic statistics, shown in bold type:
<interface-information xmlns="http://xml.juniper.net/JUNOS/14.1R6/JUNOS-interface" JUNOS:style="normal"> <physical-interface> <name>xe-0/0/0</name> <admin-status JUNOS:format="Enabled">up</admin-status> <oper-status>down</oper-status> <local-index>194</local-index> <snmp-index>760</snmp-index> <link-level-type>Ethernet</link-level-type>[…] <traffic-statistics JUNOS:style="brief"> <input-bps>0</input-bps> <input-pps>0</input-pps> <output-bps>0</output-bps> <output-pps>0</output-pps> </traffic-statistics>[…]</interface-information>
In order to be able to connect to the JUNOS OS device and extract the XML associatedwith a remote procedure call, we need to implement a NETCONF-over-SSH transport.And that's what we start to do in step 5, in the form of the JUNOSDevice class definition.
||||||||||||||||||||
||||||||||||||||||||

This class implements a simplistic NETCONF protocol over the top of an SSH sessioncreated by the ssh2 library. The JUNOSDevice class manages the SSH session and associatedcredentials, and deals with connecting to the remote endpoints and sending andreceiving messages.
In step 6, we define a strategy for making connections to the NETCONF-over-SSHservice. We make use of two-phase connect strategies using the connectTimer flag in theJUNOSDevice. This looks overly complicated, but it affords us the luxury of being ableto try to connect more than once and not have anything go awry. This means that we caneasily specify the scheduleConnect method as a remedy in exception handlers that deal witherrors without unduly worrying about the state or duplicating connections.
Step 6 deals with a multi-layer SSH setup. First of all we set up the SSH client sessionwhich has to deal with authentication. Then we request the NETCONF subsystem whichresults in us getting a readable and writable stream. We tie up the data event on theNETCONF subsystem stream to our doRead() method which we define in step 7. doRead()simply takes a chunk of data and looks for the presence of the special NETCONFdelimiting sequence. It uses this to break up messages and send them off to the xml2jslibrary for parsing into structured data.
In step 8, we define the function that deals with the output from the XML processingactivity. We run an if-then-else ladder implementing intelligent responses to the XMLmessages that we might hear from the server. The only messages that we're reallyinterested in at this stage are the <hello> message, in which case we issue our <get-interface-information> RPC, and the <rpc-reply> message, in which case we try to extract thecommunicated information and relay it onto interested web clients.
Having defined all the event handlers, we get the main part of the code underway in step9. The GROUPS variable is initialized to a JavaScript array. It will hold, in each element, asocket.io group socket for each device declared in the configuration file. Sending amessage to the group socket will result in it being sent to any of the web clients thathave subscribed to the group. This is a nice, easy and convenient way of avoiding theserver flooding all information to all clients. The server only sends information for agiven JUNOS OS device to the web clients that have selected that device in their userinterface.
In step 10, we specify the socket.io prescribed action that should happen when a webclient connects. In our case, we emit a data package containing the details of ourconfiguration. This allows the client to read the list of devices that are available and to
Technet24.ir||||||||||||||||||||
||||||||||||||||||||

present them to the UI.
In step 11, we go through each device that has been specified in the configuration file,and we kick off a JUNOSDevice() constructor call for each one. This will, in turn, attempt toconnect to all of the remote devices, simultaneously, and asynchronously.
The final steps needed for making the server work are in steps 12 and 13. socket.io andNode.js's HTTP module are doing the lion's share of work with respect to the real-timeweb sockets and HTTP, but we do need to let the HTTP server know how to serveinterfaces.html, the source code for the web client on the browser, and any relateddependencies (such as RGraph). We do that with the logic defined in the httpHandlerfunction.
Finally, we start listening for incoming HTTP requests from clients in step 13.
||||||||||||||||||||
||||||||||||||||||||

Technet24.ir||||||||||||||||||||
||||||||||||||||||||

Web client applicationIn the client application, life starts when the user downloads interfaces.html, which isserved by the server in response to almost any URL on the server, for convenience.interfaces.html is a simple HTML5 document with a basic layout which defines a headingand an empty drop-down selection box.
The Javascript attached to interfaces.html defines the WebClient class, which encapsulatesthe main cut and thrust of the web client logic. The web client is triggered as soon as thepage is loaded and starts by connecting a socket.io resource to the server for real-timecommunications. When the server notices us connect, he responds with a config event.The event structure contains a configuration data package which gives us a list ofdevices that he's monitoring and are available for selection:
Figure 7.6 Chrome Javascript object inspection: configuration event
configureDevices() uses this to dynamically update the drop-down selection box with thenames of the devices so that the user can choose from the list.
Whenever the user makes a selection from the drop-down list, selectNewDevice() signalsthe interest to the server by joining the associated socket.io group socket namespace.Then, when the server issues an update for the device we've selected, it will come tothe group socket for the device and will be picked up by updateGraphs().
updateGraphs() responds to an update event from the server by manipulating the browserdocument in order to create a drawing canvas for any interfaces that are reported in theupdate. It captures the data, stores it in a global array, then calls RGraph in order to renderthe graph based on the current data:
||||||||||||||||||||
||||||||||||||||||||

Figure 7.7 Chrome Javascript objection inspection: data event
Each and every time the server issues an update event with statistics, the web clientapplies the data to the graph, giving us a rapidly available visual indication of physicalinterface performance. The figure give below shows us the system in action:
Figure 7.8 Screenshot of JUNOS interface performance monitoring
Technet24.ir||||||||||||||||||||
||||||||||||||||||||


Technet24.ir||||||||||||||||||||
||||||||||||||||||||

There's moreIn our examples, we used the interface statistics from 10 Gigabit Ethernet interfaces onMX-960s running JUNOS 14.1 and 15.1F. In both these cases, the <get-interface-information> RPC responses can be seen to provide us with interface counters alreadydifferentiated over unit time. This greatly eases the burden for our application becausewe can rely on the JUNOS metering and calculations, and simply plot the reportednumber.
On some platforms, you may not always get a reported rate. Or the statistic that you'reinterested in monitoring might simply be an absolute gauge in the XML responses. If thisis the case, and you require the graph to show the rate of change, then it's necessary totake a slightly more complicated tactic. Instead of plotting the value directly, as we dohere, you must collect the data into a global array - as we already do - but then populatethe graph by using the rate of change between samples. So if you have ten data pointsfrom the network element, that will translate to nine segments of rate of change. Becauseour collector code reports a timestamp with each data point, it's possible to reasonablycalculate a rate of change in this manner.
We look at such a tactic later, when we look at graphing MPLS traffic accountingstatistics.
||||||||||||||||||||
||||||||||||||||||||

Technet24.ir||||||||||||||||||||
||||||||||||||||||||

Monitoring system healthIn this recipe, we'll build on the techniques and the code produced in Chapter 7,Monitoring and Maintaing JUNOS, and we'll extend it to make a more generalizedNETCONF collector tool that is able to poll general system health properties such asCPU workload.
||||||||||||||||||||
||||||||||||||||||||

Technet24.ir||||||||||||||||||||
||||||||||||||||||||

Getting readyIn order to complete this recipe, you'll need:
Access to a development/management platform, with the following softwareavailable:
Node.js v4 or v6Access to JUNOS devices that you want to monitor, all pre-configured withNETCONF-over-SSH services enabled and credentials available.
You need a working knowledge of JavaScript, and the common Node.js pattern ofcalling a function or method and providing a callback completion handler to deal withthe result of the call. You should have already completed Chapter 7, Monitoring andMaintaining JUNOS, because we'll use that source code, and monitor it to extend it.
||||||||||||||||||||
||||||||||||||||||||

Technet24.ir||||||||||||||||||||
||||||||||||||||||||

How to do it...We're going to use the existing framework established in the previous recipe in order toextract the data associated with the <get-routing-engine-information> XML remote procedurecall. We're going to look at the fields associated with the system load average, which isroughly defined as the average number of processes waiting for CPU time over a periodof time. The JUNOS OS device reports have three common averaging periods:
1-minute5-mintes15-minutes
||||||||||||||||||||
||||||||||||||||||||

Technet24.ir||||||||||||||||||||
||||||||||||||||||||

Server applicationWe're going to update the collector.js tool in order to support the collection of multipleRPCs, and we'll write a new HTML client component to show a graph based upon thedata that we've collected:
1. Copy the existing collector.js from the previous recipe directory into a newdirectory.
2. Modify the collector.js application so that it can support more than a single RPC.Update the constant xmlrpc at the top of the file to use a JavaScript array instead of asimple string:
const xmlrpc = [ "<rpc><get-interface-information><media/></get-interface- information></rpc>\n", "<rpc><get-route-engine-information/></rpc>\n" ];
3. Modify the constructor function for the JUNOSDevice class so that it has an instancemember which can track the state of which RPCs have run and which are still to berequested.
function JUNOSDevice(id, host, port, username, password, privateKey) { var self = this; self.id = id; self.host = host; self.port = port; self.username = username; self.password = password; self.privateKey = privateKey; self.stream = null; self.client = null; self.buffer = ""; self.connectTimer=null; self.cursor=0;
self.scheduleConnect(0); };
4. Define a method for the JUNOSDevice class which can be used to send the nextmessage in the running sequence:
JUNOSDevice.prototype.sendNextMsg = function() { var self = this; if (self.cursor<xmlrpc.length) { setTimeout( function() { self.stream.write(xmlrpc[self.cursor]+ DELIMITER+"\n");
||||||||||||||||||||
||||||||||||||||||||

self.cursor++; }, 0); } else { self.cursor=0; setTimeout(function() { self.stream.write(xmlrpc[self.cursor]+ DELIMITER+"\n"); self.cursor++; }, INTERVAL); } };
5. Update the processXMLResponse() method in order to:
Make use of the sendNextMsg() method instead of calling stream.write() directlyAdd logic to handle the receipt of the <route-engine-information> message:
JUNOSDevice.prototype.processXMLResponse = function(err, result) { var self = this; var interfaces=null; if (err) { fprintf(STDERR, "Unable to parse XML in response from %s: %s\n", self.host, err.message); } else if (result['hello']) { fprintf(STDERR, "%s:%s: Hello message received\n", self.host, self.port); self.sendNextMsg();
} else if (routingEngines=walk(result, ['rpc-reply', 'route-engine-information', 0, 'route-engine'])) { fprintf(STDERR,"%s:%s: Routing engine information received: %d item(s) found\n", self.host, self.port, routingEngines.length); for (i=0; i<routingEngines.length; i++) { var name = walk(routingEngines, [i, "serial-number", 0]); var model = walk(routingEngines, [i, "model", 0]); var slot = walk(routingEngines, [i, "slot", 0]); var master = walk(routingEngines, [i, "mastership-state", 0]); var load1 = walk(routingEngines, [i, "load-average-one", 0]); var load5 = walk(routingEngines, [i, "load-average-five", 0]); var load15 = walk(routingEngines, [i, "load-average-fifteen", 0]); GROUPS[self.id].emit('system-stats', { __time: Date.now(), name: name, model: model, slot: slot, master: master, stats: [ load1, load5, load15 ]}); } self.sendNextMsg();
} else if (interfaces=walk(result, ['rpc-reply', 'interface-information', 0,
Technet24.ir||||||||||||||||||||
||||||||||||||||||||

'physical-interface'])) { fprintf(STDERR, "%s:%s: Interface information received: %d interface(s) found\n", self.host, self.port, interfaces.length); for (i=0; i<interfaces.length; i++) { var name = walk(interfaces, [i, "name", 0]); var description = walk(interfaces, [i, "description", 0]); var stats = walk(interfaces, [i, "traffic-statistics", 0]); var opstatus = walk(interfaces, [i, "oper-status", 0]);
if ((name.startsWith("xe-") || name.startsWith("ge-") || name.startsWith("et-")) && opstatus=="up") { GROUPS[self.id].emit('interface-stats', { __time: Date.now(), name: name, description: description, stats: stats }); } } self.sendNextMsg();
} else if (error=walk(result, ['rpc-reply', 'rpc-error', 0, 'error-message', 0])) { fprintf(STDERR, "%s:%s: RPC error message received: %s\n", self.host, self.port, error); } else if (ok=walk(result, ['rpc-reply', 'ok', 0])=="") { fprintf(STDERR, "%s:%s: OK message received\n", self.host, self.port); } else { fprintf(STDERR, "%s:%s: Unexpected XML message received\n", self.host, self.port); fprintf(STDERR, "%s\n", util.inspect(result, { depth: 8})); } }
6. Update the HTTP handler routine in order to allow it to serve a new web clientfile, system.html, as well as the existing file:
function httpHandler (req, res) { var filename=__dirname + "/system.html"; if (req.url=="/interfaces.html") filename=__dirname + "/interfaces.html"; if (req.url.startsWith("/RGraph")) { filename=__dirname+"/RGraph/"+path.basename(req.url); } fs.readFile(filename, function (err, data) { if (err) { res.writeHead(404, "Not found"); return res.end(); } res.writeHead(200); res.end(data); }); }
||||||||||||||||||||
||||||||||||||||||||

Technet24.ir||||||||||||||||||||
||||||||||||||||||||


Web client applicationWe're going to create a new web client that will query the collected data and display itusing RGraph with appropriately worded legends and text:
1. Start by copying interfaces.html from the previous recipe directory into a newdirectory. Give the HTML file a new name - system.html to match the expectations ofthe server HTTP configuration.
2. Modify the <title> and heading-class <div> tags to change the text to reflect thedifferent metrics and graph report:
<!DOCTYPE HTML> <html> <head> <title> JUNOS System Health Monitor</title> [...]
[...] <body> <div class="heading"> JUNOS System Health Monitor </div>
3. Modify the selectNewDevice() method of WebClient in order to change the name of theevent of interest that the client listens out for:
WebClient.prototype.selectNewDevice = function() { var self = this; if (self.socket_device!=null) self.socket_device.close();
// Clear the data stores for (var name in self.GRAPHS) { RGraph.reset(document.getElementById(name)); delete self.GRAPHS[name]; } for (var name in self.DATA) { delete self.DATA[name]; }
// Remove the canvas objects while (self.container.firstChild) { self.container.removeChild(self.container.firstChild); }
RGraph.ObjectRegistry.clear();
// Create new socket, bound to new device namespace self.socket_device = io("/device"+self.selector.selectedIndex); self.socket_device.on('system-stats', function(data) { self.updateGraphs(data) }); };
Technet24.ir||||||||||||||||||||
||||||||||||||||||||

4. Modify the updateGraphs() method of WebClient in order to:Include the extra data fields that we're interested in: routing-engine model,slot, mastership stateUpdate the method of storing the time-series data in the DATA global variableUpdate the graph configuration to include three traces, one for each of theextracted items of dataInclude a key legend to explain the association to the userFormat the number on the Y-axis to two decimal places:
WebClient.prototype.updateGraphs = function(data) { var self = this; console.log(data); var name = data['name']; var stats = data['stats']; var model = data['model']; var slot = data['slot']; var master = data['master']; var timestamp = data['__time'];
var description = model + " (serial " + name + ")"; if (slot!=undefined) description+=": slot " + slot; if (master=="master") description+=": master";
if (self.DATA[name]==undefined) { self.DATA[name]={}; } for (var i=0; i<stats.length; i++) { if (self.DATA[name][i]==undefined) { self.DATA[name][i]=[]; } self.DATA[name][i].push(stats[i]); if (self.DATA[name][i].length>MAXDATA) { self.DATA[name][i].shift(); } } if (self.DATA[name]['__time']==undefined) { self.DATA[name]['__time']=[]; } self.DATA[name]['__time'].push(timestamp); if (self.DATA[name]['__time'].length>MAXDATA) { self.DATA[name]['__time'].shift(); }
var canvas = document.getElementById(name); if (canvas==null) { canvas = document.createElement("canvas"); canvas.width=CANVAS_WIDTH; canvas.height=CANVAS_HEIGHT; canvas.setAttribute("id", name); self.container.appendChild(canvas); } var graph = new RGraph.Line({ id: name, data: [ self.DATA[name][0], self.DATA[name][1], self.DATA[name][2] ], options: { colors: ['green', 'red', 'blue'], key: ['1min avg', '5min avg', '15min avg'], title: "Number of processes in CPU ready queue: " + description,
||||||||||||||||||||
||||||||||||||||||||

labels: self.DATA[name]['__time'].map(function(d) { return new Date(d).toTimeString().split(" ")[0]; }), textSize: 10, scaleDecimals: 2, } }); self.GRAPHS[name]=graph; RGraph.reset(canvas); graph.draw(); };
Technet24.ir||||||||||||||||||||
||||||||||||||||||||


How it works...The structure of the server application and its interaction with the network elements andclient application is very similar to the previous recipe, Monitoring interfaceperformance. The most significant difference is the implementation of a queue of XMLmessages in the collection server. This allows a single collection server to be used witha variety of web client applications, with the web client application focusing on adifferent aspect of the collected data, or perhaps presenting the data in a different way.
Technet24.ir||||||||||||||||||||
||||||||||||||||||||


Server applicationIn step 1, we simply copy the previous recipe collector.js file as a basis for ourimprovements. In step 2, we modify the variable determining the XML dialog with thenetwork elements so that instead of maintaining a single string, it now maintains a list ofstrings which we intend the server to cycle through within an polling interval. In orderto keep track of where we are in this list, we need a cursor - something to remind us ofthe message that we sent, and the next message that we should send. So in step 3, weadd this to the constructor of JUNOSDevice() as an instance variable.
Next, in step 4, we implement sendNextMsg(), a method that can be used by the XMLprocessing results in order to kick off the next request. This can be called uponcompletion of the processing of a request, in order to set flight to the next request.sendNextMsg() includes the necessary logic to understand when it has reached the end ofthe list, and when it is necessary to cycle back round to the beginning after waiting forthe interval time.
In step 5, we update the if-then-else ladder-structure in processXMLResponse() to bolt in ahandler for the <route-engine-information> response. We do this while leaving the existing<interface-information> handler in place so that the same collector server process can doboth jobs. The two different response handlers both perform similar logic:
They test for the presence of the requisite XML tag,If it's found, they extract the data of interest to the downstream application,Then they emit a response-specific event and send it to the socket group associatedwith the response and specifically the device.
This means that a web client connected to the socket group for a router, say, Lon-004-score-1 will receive events for each and any of the XML responses that the serverreceives from that device. The web client may only have a client-side logic that is ableto prepare visual graphs for a small portion of this, but it means that the scope forenhanced, multi-view web client applications is not restricted.
Note that each handler for XML responses calls upon the services of sendNextMsg() tobounce the next request back to the server, keeping the dialog warm.
In step 6, we need to update the logic for serving static files, since we need the webclient to be able to download the new source code, system.html. Indeed we go as far as
Technet24.ir||||||||||||||||||||
||||||||||||||||||||

making the system.html source file the default option.
||||||||||||||||||||
||||||||||||||||||||

Technet24.ir||||||||||||||||||||
||||||||||||||||||||

Client applicationThere are two major modifications to the web client application to make it render agraph that displays the load average. After adjusting the titles in step 2, we update theselectNewDevice() method in step 3 in order to change the name of the event of interestwhich fires the updateGraph() method. Previously, for the interface.html application, weused an event name called interface-stats. For this application, we use a different name,system-stats. The different unique names allows us to support multiple web clientapplications with the same collector server process.
Then in step 4, we modify the updateGraphs() function in order to render the new graph.The differences from the interfaces graph are slight; the name of each graph is built upfrom a description of the model of the routing engine, its serial number and whether it ishoused in a slot in a distributed chassis. And we also make an effort to include themaster ship status of the route engine.
The data sources are in a different array, and we have three of them, rather than two andthe metric being plotted is likely to be a low number where we value decimals, so weinclude the scaleDecimal directive for RGraph to ensure that we get enough resolutionon the Y-axis.
||||||||||||||||||||
||||||||||||||||||||

Technet24.ir||||||||||||||||||||
||||||||||||||||||||

Running the applicationWhen we start the server application at the command line, we see a series of eventreports as things happen. The server application first of all tried to connect to the SSHclient for each of the JUNOS endpoints that are declared in the configuration file. It thentried to retrieve, in order, interface and route-engine information from all endpoints.Then it recorded the web socket connections from the web clients. The main sockettelemetry is a client connecting to the main page and receiving a configuration eventtelling it about available devices. The group socket telemetry is an attachment to adevice of interest, based upon the drop-down list in the user interface:
0$ ./collector.js -f config.json 127.0.0.1:8930: Trying to connect SSH127.0.0.1:8931: Trying to connect SSH127.0.0.1:8933: Trying to connect SSH127.0.0.1:8933: Hello message received127.0.0.1:8933: Interface information received: 18 interface(s) found127.0.0.1:8933: Routing engine information received: 1 item(s) found127.0.0.1:8931: Hello message received127.0.0.1:8930: Hello message received127.0.0.1:8931: Interface information received: 155 interface(s) found127.0.0.1:8931: Routing engine information received: 2 item(s) foundConnection on main socket from k7ONwkTpAEwLhTcEAAAAConnection on group socket from /device2#k7ONwkTpAEwLhTcEAAAA127.0.0.1:8930: Interface information received: 246 interface(s) foundConnection on main socket from PlqINze0J88-_XHWAAABConnection on group socket from /device0#PlqINze0J88-_XHWAAAB127.0.0.1:8930: Routing engine information received: 2 item(s) found127.0.0.1:8933: Interface information received: 18 interface(s) found127.0.0.1:8933: Routing engine information received: 1 item(s) found127.0.0.1:8931: Interface information received: 155 interface(s) found127.0.0.1:8931: Routing engine information received: 2 item(s) found127.0.0.1:8930: Interface information received: 246 interface(s) found127.0.0.1:8930: Routing engine information received: 2 item(s) found
||||||||||||||||||||
||||||||||||||||||||

Figure 7.9 Screenshot of JUNOS system health monitoring
Technet24.ir||||||||||||||||||||
||||||||||||||||||||


There's moreThe other metric that is particularly useful in assessing general system health is the CPUutilization percentages. Generally an operating system is able to account for the numberof cycles spent by the CPU on user activities, operating system activities and interrupttime. These statistics are available to us in the RPC response to <get-route-engine-information>, and so it is possible for us to modify this recipe to:
Capture <cpu-user>, <cpu-background>, <cpu-system>, <cpu-interrupt>, <cpu-idle> elementsfrom the RPC response,Add these to the system-stats event emitted,Create a system.html modification that produces a pie-chart showing the percentageof time spent within each state.
The steps are as follows:
1. Within the server application, we just need to add the extra data items that need tobe extracted from the RPC. In the processXMLResponse() method, add these parts(emboldened):
} else if (routingEngines=walk(result, ['rpc-reply', 'route-engine-information', 0, 'route-engine'])) { fprintf(STDERR, "%s:%s: Routing engine information received: %d item(s) found\n", self.host, self.port, routingEngines.length); for (i=0; i<routingEngines.length; i++) { var name = walk(routingEngines, [i, "serial-number", 0]); var model = walk(routingEngines, [i, "model", 0]); var slot = walk(routingEngines, [i, "slot", 0]); var master = walk(routingEngines, [i, "mastership-state", 0]); var load1 = walk(routingEngines, [i, "load-average-one", 0]); var load5 = walk(routingEngines, [i, "load-average-five", 0]); var load15 = walk(routingEngines, [i, "load-average-fifteen", 0]);
var cpu_user = walk(routingEngines, [i, "cpu-user", 0]); var cpu_background = walk(routingEngines, [i, "cpu-background", 0]); var cpu_system = walk(routingEngines, [i, "cpu-system", 0]); var cpu_interrupt = walk(routingEngines, [i, "cpu-interrupt", 0]); var cpu_idle = walk(routingEngines, [i, "cpu-idle", 0]);
Technet24.ir||||||||||||||||||||
||||||||||||||||||||

GROUPS[self.id].emit('system-stats', { __time: Date.now(), name: name, model: model, slot: slot, master: master, stats: [ load1, load5, load15 ], cpustats: [ cpu_idle, cpu_interrupt, cpu_system, cpu_background, cpu_user ] }); } self.sendNextMsg();
2. Modify the HTTP source file list to include a new web client application; let's callit system-cpu.html:
// HTTP bootstrap handler routine. Serves out the client HTML function httpHandler (req, res) { var filename=__dirname + "/system.html"; if (req.url=="/system-cpu.html") filename=__dirname + "/system-cpu.html"; if (req.url=="/interfaces.html") filename=__dirname + "/interfaces.html"; if (req.url.startsWith("/RGraph")) { filename=__dirname+"/RGraph/"+path.basename(req.url); } fs.readFile(filename, function (err, data) { if (err) { res.writeHead(404, "Not found"); return res.end(); } res.writeHead(200); res.end(data); });
3. Copy system.html to a new file system-cpu.html, and at the top of the file, include theRGraph bar chart module. We'll display the CPU utilisation percentages as a stackedbar-graph against time:
<script src="RGraph.common.core.js" ></script> <script src="RGraph.common.key.js"></script> <script src="RGraph.line.js" ></script> <script src="RGraph.bar.js" ></script>
4. Then modify the updateGraphs() method in order to deal with the five-tuple of CPUutilization percentages coming in from the server:
WebClient.prototype.updateGraphs = function(data) { var self = this; console.log(data); var name = data['name']; var stats = data['stats']; var cpustats = data['cpustats']; var model = data['model']; var slot = data['slot']; var master = data['master']; var timestamp = data['__time'];
||||||||||||||||||||
||||||||||||||||||||
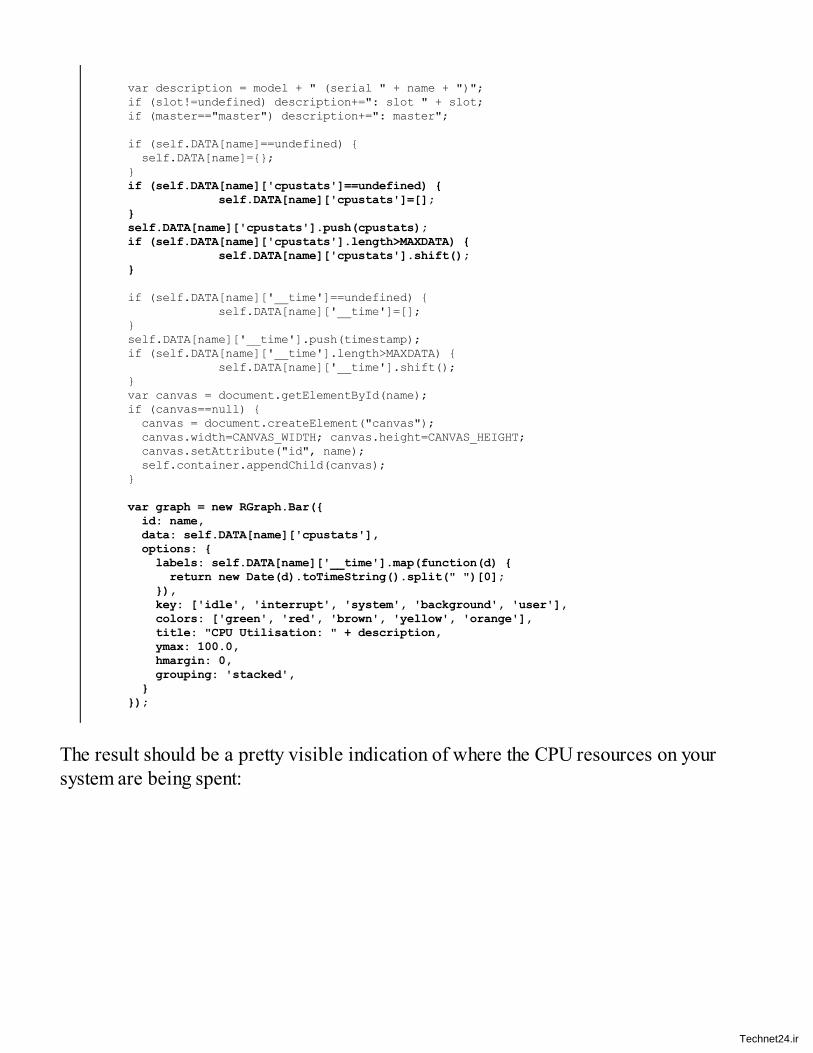
var description = model + " (serial " + name + ")"; if (slot!=undefined) description+=": slot " + slot; if (master=="master") description+=": master";
if (self.DATA[name]==undefined) { self.DATA[name]={}; } if (self.DATA[name]['cpustats']==undefined) { self.DATA[name]['cpustats']=[]; } self.DATA[name]['cpustats'].push(cpustats); if (self.DATA[name]['cpustats'].length>MAXDATA) { self.DATA[name]['cpustats'].shift(); }
if (self.DATA[name]['__time']==undefined) { self.DATA[name]['__time']=[]; } self.DATA[name]['__time'].push(timestamp); if (self.DATA[name]['__time'].length>MAXDATA) { self.DATA[name]['__time'].shift(); } var canvas = document.getElementById(name); if (canvas==null) { canvas = document.createElement("canvas"); canvas.width=CANVAS_WIDTH; canvas.height=CANVAS_HEIGHT; canvas.setAttribute("id", name); self.container.appendChild(canvas); }
var graph = new RGraph.Bar({ id: name, data: self.DATA[name]['cpustats'], options: { labels: self.DATA[name]['__time'].map(function(d) { return new Date(d).toTimeString().split(" ")[0]; }), key: ['idle', 'interrupt', 'system', 'background', 'user'], colors: ['green', 'red', 'brown', 'yellow', 'orange'], title: "CPU Utilisation: " + description, ymax: 100.0, hmargin: 0, grouping: 'stacked', } });
The result should be a pretty visible indication of where the CPU resources on yoursystem are being spent:
Technet24.ir||||||||||||||||||||
||||||||||||||||||||

Figure 7.10 Screenshot of JUNOS system health monitoring with CPU utilisation
||||||||||||||||||||
||||||||||||||||||||

Technet24.ir||||||||||||||||||||
||||||||||||||||||||

Monitoring MPLS LDP statisticsIn this recipe, we'll use the Node.js framework that we created in the previous recipesin order to query the JUNOS XML API and extract MPLS LDP information about label-switched paths across the network. The MPLS label-switched path information isvaluable to understand because it generally provides an insight into end-to-end trafficflows, in contrast with the per-link interface monitoring that we've already completed.
||||||||||||||||||||
||||||||||||||||||||

Technet24.ir||||||||||||||||||||
||||||||||||||||||||

Getting readyIn order to complete this recipe, you'll need:
Access to a development/management platform, with the following softwareavailable:
Node.js v4 or v6Access to JUNOS OS devices that you want to monitor, all pre-configured withNETCONF-over-SSH services enabled and credentials available.
It's useful to understand the XML RPC message that we're going to process in thisrecipe, so let's take a look at it:
<rpc-reply xmlns:JUNOS="http://xml.juniper.net/JUNOS/14.1R6/JUNOS"> <ldp-traffic-statistics-information xmlns="http://xml.juniper.net/JUNOS/14.1R6/JUNOS-routing"> <ldp-traffic-statistics> <ldp-prefix>10.0.146.16/30</ldp-prefix> <ldp-traffic-type>Transit</ldp-traffic-type> <ldp-traffic-statistics-packet-count>513949</ldp-traffic- statistics-packet-count> <ldp-traffic-statistics-byte-count>32049814</ldp-traffic- statistics-byte-count> <ldp-traffic-multiple-fec>No</ldp-traffic-multiple-fec> </ldp-traffic-statistics> <ldp-traffic-statistics> <ldp-prefix JUNOS:display="none">10.0.146.16/30</ldp- prefix> <ldp-traffic-type>Ingress</ldp-traffic-type> <ldp-traffic-statistics-packet-count>1240</ldp-traffic- statistics-packet-count> <ldp-traffic-statistics-byte-count>41212</ldp-traffic- statistics-byte-count> <ldp-traffic-multiple-fec>No</ldp-traffic-multiple-fec> </ldp-traffic-statistics>
The <get-ldp-traffic-statistics-information> RPC produces a table of information thatreports the number of bytes and packets switched down a given label-switched path.Because a label-switched path is synonymous with a FEC - a forwarding equivalenceclass - which is simply another term for an IP destination. On most MPLS/IP networkshowever, the IP destination is simply the destination of the outgoing router - asdetermined by the ingress JUNOS PE router, not the actual packet destination itself.
Notice how the JUNOS router gives two entries in the table: one for transit LSPs andone for ingress LSPs. This is a differentiation between traffic that originated at thisnode, versus traffic that originated at another node and is simply transiting through thisnode as MPLS. We're interested in the first category because it allows us to build up a
||||||||||||||||||||
||||||||||||||||||||

matrix of source-destination pairs, which can help us plan where to put new circuits.
Technet24.ir||||||||||||||||||||
||||||||||||||||||||


How to do it...We're going to take the source code from the previous recipes as a basis and modify it.We want the server application to collect the <get-ldp-traffic-statistics-information> dataand send it to the web client, and we want the web client to visualise the data in anappropriate graph.
Technet24.ir||||||||||||||||||||
||||||||||||||||||||


Server applicationWe'll use the existing framework from one of the previous recipes as a basis, andmodify it for our needs.
1. Take the collector.js source code from the system health monitoring recipe. (Ensureit has the modification so that it can poll multiple XML RPCs).
2. Add in the <get-ldp-traffic-statistics-information> RPC to the list of XML RPCs at thetop of the file. (There's no need to keep any of the other RPCs unless you intend touse the collector with the other associated web clients):
const xmlrpc = ["<rpc><get-interface-information><media/></get-interface-information></rpc>\n","<rpc><get-route-engine-information/></rpc>\n","<rpc><get-ldp-traffic-statistics-information/></rpc>\n"];
3. Modify the processXMLResponse() function in order to deal with the response to theLDP information RPC, and emit an ldp-stats event to any interested, connected webclient:
} else if (ldp=walk(result, ['rpc-reply', 'ldp-traffic-statistics-information', 0, 'ldp-traffic-statistics'])) { fprintf(STDERR, "%s:%s: LDP traffic statistics: %d interface(s) found\n", self.host, self.port, ldp.length); var stats={}; for (i=0; i<ldp.length; i++) {
var prefix = walk(ldp, [i, "ldp-prefix", 0]); var type = walk(ldp, [i, "ldp-traffic-type", 0]); var bytes = walk(ldp, [i, "ldp-traffic-statistics-byte-count", 0]);
if (type=="Ingress") { stats[prefix]=bytes; } } GROUPS[self.id].emit('ldp-stats', { __time: Date.now(), stats: stats });
self.sendNextMsg();
4. Update the httpHandler routine to allow the Node.js web server to serve a sourcefile for a new web client that we will create. We'll call it mpls.html. As previously,there is no need to keep the logic to allow the other HTML files if you are not usingthem:
Technet24.ir||||||||||||||||||||
||||||||||||||||||||

function httpHandler (req, res) { var filename=__dirname + "/system.html"; if (req.url=="/mpls.html") filename=__dirname + "/mpls.html"; if (req.url=="/system-cpu.html") filename=__dirname + "/system-cpu.html"; if (req.url=="/interfaces.html") filename=__dirname + "/interfaces.html"; if (req.url.startsWith("/RGraph")) { filename=__dirname+"/RGraph/"+path.basename(req.url); } fs.readFile(filename, function (err, data) { if (err) { res.writeHead(404, "Not found"); return res.end(); } res.writeHead(200); res.end(data); });}
||||||||||||||||||||
||||||||||||||||||||

Technet24.ir||||||||||||||||||||
||||||||||||||||||||

Web client applicationAgain we'll take the web client framework from one of the previous recipes, and modifythat to our needs. What we want to achieve is a horizontal bar chart that lists the MPLSdestinations downwards, illustrating the traffic level on the x-axis.
1. Copy the system.html example from the Monitoring system health recipe, and renameit to mpls.html.
2. First of all, change the title of the HTML document to something more appropriate:
<!DOCTYPE HTML> <html> <head> <title>JUNOS MPLS Traffic Monitor</title>
3. Then, include the necessary RGraph Javascript source code to support horizontal bargraphs:
<script src="RGraph.common.core.js" ></script> <script src="RGraph.common.key.js"></script> <script src="RGraph.hbar.js"></script>
<script src="/socket.io/socket.io.js"></script>
4. Because we're only displaying a single graph on a page, rather than a graph per-interface, or per-routing engine, we can simplify the web client a somewhat. Itdoesn't need to keep track of the graphs on the page any more, so remove thereference to self.GRAPHS in the constructor.
function WebClient() { var self = this; //self.GRAPHS={}; self.DATA={}; // the data collected from the server self.socket = io(); self.socket_device = null; self.container = document.getElementById("container"); self.selector = document.getElementById("selector");
self.socket.on('config', function(data) { self.configureDevices(data); });
};
5. Likewise, simplify the selectNewDevice() method as well. It has no need to clear anyexisting graphs or canvases as the previous version did. It simply needs to clearany data held: in the DATA array. It should also set an event handler for the ldp-statsevent:
||||||||||||||||||||
||||||||||||||||||||

WebClient.prototype.selectNewDevice = function() { var self = this; if (self.socket_device!=null) self.socket_device.close();
for (var name in self.DATA) { delete self.DATA[name]; }
// Remove the canvas objects while (self.container.firstChild) { self.container.removeChild(self.container.firstChild); }
RGraph.ObjectRegistry.clear();
// Create new socket, bound to new device namespace self.socket_device = io("/device"+self.selector.selectedIndex); self.socket_device.on('ldp-stats', function(data) { self.updateGraphs(data) }); };
6. Re-define the updateGraphs() method which is called whenever any new data arrives.This needs complete re-definition because it changes quite significantly from theprevious versions. In this case, the function takes the incoming data and determinesthe rate of change since the last sample:
WebClient.prototype.updateGraphs = function(data) { var self = this; var stats = data['stats']; var timestamp = data['__time'];
var rates={};
if (self.DATA['last']!=undefined) {
for (var fec in stats) { rates[fec] = ((stats[fec] - self.DATA['last'][fec])*8) / ((timestamp - self.DATA['timestamp'])/1000); }
var sortFunction = function(a,b) { if (rates[b]<rates[a]) return -1; if (rates[b]>rates[a]) return 1; return 0; } var labels = Object.keys(stats).sort(sortFunction); var graphData = []; for (var i=0; i<labels.length; i++) { graphData.push(rates[labels[i]]); }
var canvas = document.getElementById("ldp-stats"); if (canvas==null) { canvas = document.createElement("canvas"); canvas.width=CANVAS_WIDTH; canvas.height= 25 * labels.length; canvas.setAttribute("id", "ldp-stats"); self.container.appendChild(canvas); }
RGraph.reset(canvas);
Technet24.ir||||||||||||||||||||
||||||||||||||||||||

var graph = new RGraph.HBar({ id: 'ldp-stats', data: graphData, options: { // backgroundBarcolor1: 'white', // backgroundBarcolor2: 'white', title: "MPLS LDP-signalled Ingress LSPs (bps)", backgroundGrid: true, labelsAbove: true, // colors: ['red'], labels: labels, scaleFormatter: scaleBits } });
graph.grow();
}
7. Update the title of the web client in the HTML body, to match the heading meta-data.
<body> <div class="heading"> JUNOS MPLS Traffic Monitor </div>
||||||||||||||||||||
||||||||||||||||||||

Technet24.ir||||||||||||||||||||
||||||||||||||||||||

How it works...The server application collects the essential accounting statistics from the Junosnetwork element, while the web client application data pro-rates the data over time andrenders a visible graph to the user. Let's take a look at each part in detail.
||||||||||||||||||||
||||||||||||||||||||

Technet24.ir||||||||||||||||||||
||||||||||||||||||||

Server applicationThe server application follows the same principles learned in the previous recipes. Itinstantiates a JUNOSDevice Javascript object for each of the declared JUNOS OS devicesin the configuration file, making use of ssh2 to manage the SSH session, and usingxml2js in order to maintain a flowing XML dialog with each element simultaneously.
After exchanging pleasant XML greetings, the server eventually issues the <get-ldp-traffic-statistics-information> RPC to the JUNOS device and when the response comesback, the new code introduced in this recipe fires. It proceeds to extract the followingdata from the XML RPC response:
Element Description
ldp-prefixThe IP-layer prefix, or forwarding equivalence class, represented bythe label-switched path
ldp-traffic-type
Whether the traffic statistics represents traffic originated on this nodefrom external sources (Ingress), or whether the traffic is in-flight fromother MPLS PE routers (Transit).
ldp-traffic-statistics-byte-count
The bytes switched into this label-switched path
Note that the byte count reported is an absolute gauge number, increasing with each newpacket switched. It is not a measure of the rate of traffic flow, which is usually what isinteresting for the purposes of dimensioning networks.
For any reported statistics that are Ingress in nature, a key-value pair is added to adictionary, representing the prefix and the associated byte count. All of the key-valuepairs are packaged up into an ldp-stats event and dispatched to interesting web clientsusing socket.io's group socket feature.
||||||||||||||||||||
||||||||||||||||||||

Technet24.ir||||||||||||||||||||
||||||||||||||||||||

Web client applicationOn the web client, life starts as usual with a config event message being received fromthe server as soon as he notices us connect. The associated data identifies the elementsthat the server is currently communicating with according to his configuration file, so theconfigureDevices() method of WebClient is able to customize a drop-down control to includethese elements for user selection.
When an element is selected, selectNewDevice() prepares the scene by clearing away thecanvas - in case there was a previous graph - and resetting the data structures. It opens agroup socket to the server, which is associated with the device, and sets up a callbackof updateGraphs() to be run whenever there is an ldp-stats message.
updateGraphs() maintains two sets of data:
The current set of byte counters, per prefix as reported by the incoming servereventThe previous set of byte counters, per prefix
Each data set has an associated timestamp, and if both data sets are present - that is, it isnot the first time that we've been called - then updateGraphs() proceeds to calculate therate of change of the per-prefix statistics based on the difference in the timestamps.Because the reported counts are in bytes and the timestamps are in milliseconds, weneed to do a bit of multiplication to get the bits-per-second number that is mostconvenient in network circles.
The resulting set of numbers, in bits-per-second, are sorted in descending order alongwith the prefix names associated with them. These are then fed into RGraph's horizontalbar graph constructor in order for it to render a visualization of the data.
In this case, because the graph isn't constantly moving against a time-series source, wecan also use the grow() RGraph call in order to animate the drawing of the graph and adda little bit of pizzazz to the mix.
The resulting output is real-time snapshot of the interior destinations within the network,sorted by current traffic rate to the destination:
||||||||||||||||||||
||||||||||||||||||||

Figure 7.11 Screenshot of MPLS LDP statistics reporting
Technet24.ir||||||||||||||||||||
||||||||||||||||||||


Security ApplicationsIn this chapter, we'll look at the following recipes:
Enforcing configuration checks with commit scriptsBuilding BGP route filtersApplying anti-spoofing filtersOperating a distributed ACL function
Technet24.ir||||||||||||||||||||
||||||||||||||||||||


IntroductionOne of the most significant motivating factors associated with increasing automation inour networks is that of reliability. If we can increase the determinism in our network—through software regularly applying the same templates and processes—then we gainconfidence and assurance in behavior through predictability and regularity. A networkthat behaves regularly is simpler to operate, easier to troubleshoot and generally easierto manage. But the other benefit that comes out of regularity and reduced complexity isimproved security. In this chapter, we'll look at a series of recipes that help take someof the manual labour costs out of security-related tasks and procedures.
Technet24.ir||||||||||||||||||||
||||||||||||||||||||


Enforcing configuration standardsthrough commit scriptsIn this recipe, we'll look at how we improve the security and stability of our networkenvironment by ensuring that configuration standards are maintained and that commonconfiguration errors are detected and prevented by the JUNOS system.
Technet24.ir||||||||||||||||||||
||||||||||||||||||||


Getting readyIn order to complete this recipe, you just need access to a working JUNOS system thatyou can configure and upon which you can deploy SLAX scripts.
We will implement logic on the JUNOS device that prevents the following situationsfrom occurring, thus warning the operator about the problem.
Loopback interface deletion: The loopback interface often acts as a systemidentifier for some protocols and features and so deletion or deactivation of theloopback address creates a problematic situationInternal ISIS/OSPF interface deletions: The interior gateway protocol is usuallya fundamental mainstay of the network topology and configurations that removeinterfaces from a working ISIS or OSPF configuration that are likely to be errorsEBGP peers without import policies: Unfiltered EBGP peering relationships cancause the import of bad or unauthorized routing information which can affect thestability of the network
Indeed, so significant is the last issue related to route leakage, that the IETF has issuedRFC 8212, asking BGP implementations to not permit EBGP sessions to operate withoutsome sort of policy intention input from the operator.
Technet24.ir||||||||||||||||||||
||||||||||||||||||||


How to do it...We're going to deploy a SLAX commit script which will operate after each candidateconfiguration is submitted and which will apply logic rules to validate whether theconfiguration is sensible before either allowing the configuration to continue or abortingthe operation with an error message.
1. Create a new SLAX script, commit.slax, and start with the required SLAXboilerplate for a commit script:
version 1.0;
ns JUNOS = "http://xml.juniper.net/JUNOS/*/JUNOS"; ns xnm = "http://xml.juniper.net/xnm/1.1/xnm"; ns jcs = "http://xml.juniper.net/JUNOS/commit-scripts/1.0";
import "../import/JUNOS.xsl"; match configuration { /* our code goes here */ }
2. Within the configuration braces, insert logic to validate:
The presence of internet addresses on the loopback interface, andThat the status of the interface is not disabled:
/* lo0.0 needs to exist and have address */ var $num_lo0_inets = count(interfaces/interface[name=="lo0"]/ unit[name=="0"]/family/inet/address); if ($num_lo0_inets==0) { <xnm:error> { <edit-path> "[edit interfaces lo0]"; <message> "interface must exist and have inet address"; } }
/* lo0.0 cannot be disabled */ var $num_lo0_disabled = count(interfaces/interface[name=="lo0"]/disable | interfaces/interface[name=="lo0"]/ unit[name=="0"]/disable); if ($num_lo0_disabled!=0) { <xnm:error> { <edit-path> "[edit interfaces lo0]"; <message> "loopback interface nor unit 0 must not be disabled " _ $num_lo0_disabled; } }
3. Continue with logic to scan the proposed configuration for interfaces, checkingthem against the current operational OSPF interface state:
Technet24.ir||||||||||||||||||||
||||||||||||||||||||

var $candidate = .; var $ospfrpc = { <get-ospf-interface-information>; } var $ospfresult = jcs:invoke($ospfrpc); for-each ($ospfresult/ospf-interface) { var $if = jcs:split("\\.", interface-name); var $nbrs = neighbor-count; var $ifd = $if[1]; var $ifl = $if[2]; if (jcs:empty($candidate/interfaces/ interface[name==$ifd]/ unit[name==$ifl]) && $nbrs!=0) { <xnm:error> { <edit-path> "[edit interfaces " _ $ifd _ " unit " _ $ifl _ "]"; <message> "interface currently operating OSPF " _ "(non-zero neighbor count): deactivate OSPF before removing"; } } }
4. Do the same for ISIS, adjusting the operational RPC involved:
var $isisrpc = { <get-isis-interface-information> { <detail>; } } var $isisresult = jcs:invoke($isisrpc); for-each ($isisresult/isis-interface) { var $if = jcs:split("\\.", interface-name); var $adjs = interface-level-data[level=='2']/adjacency-count; var $ifd = $if[1]; var $ifl = $if[2]; if (jcs:empty($candidate/interfaces/interface [name==$ifd]/unit[name==$ifl]) && $adjs!=0) { <xnm:error> { <edit-path> "[edit interfaces " _ $ifd _ " unit " _ $ifl _ "]"; <message> "interface currently operating ISIS " _ "(non-zero adj count): deactivate ISIS before removing"; } } }
5. Finally, include logic to scan all BGP peers that are external and ensure that theyhave a defined import policy:
for-each (protocols/bgp/group[type=="external"]/ neighbor[count(import)==0 && count(../import)==0]) { var $group = ../name; var $peer = name; <xnm:error> { <edit-path> "[edit protocols bgp group " _ $group _ " neighbor " _ $peer _ "]"; <message> "EBGP peers must have an import policy"; } }
||||||||||||||||||||
||||||||||||||||||||

6. Upload the commit.slax commit script to your JUNOS device, copying it to both therouting engines if necessary.
$ scp commit.slax 10.0.201.201:/var/db/scripts/commit
adamc@router# run copy /var/db/scripts/commit/commit.slax re1:/var/db/scripts/commit adamc@router# set system scripts commit file commit.slax
7. Test out the commit script by simply running a commit check. This will run the commitscript as part of the checking process but without actually deploying the change.
adamc@router# delete interfaces lo0
[edit] adamc@router# commit check [edit interfaces lo0] interface must exist and have inet address error: 1 error reported by commit scripts error: commit script failure
Technet24.ir||||||||||||||||||||
||||||||||||||||||||


How it works...The JUNOS configuration commit process is already a complex and comprehensiveprocess. When a user types commit, several activities go on under the hood to get theconfiguration where it should be. In normal operation, without commit scripts, theJUNOS validates the new candidate configuration file against a set of internal rules andthen attempts to determine which parts of the configuration have changed. Based on thecomponents that have changed, it signals the underlying daemons that may need to reloadconfiguration.
The commit full command is also available which signals all daemons andinstructs them to re-read their configuration directives. It can be a usefultroubleshooting tool if you suspect a problem with the detection ofconfiguration changes.
When we deploy a commit script, however, the process changes. JUNOS takes thecandidate configuration, processes any apply-groups directives and the result is called thepost-inheritance candidate configuration. It passes this configuration to each and everycommit script configured on the system and allows the commit scripts to implement theirown logic and output actions, which can be any or all of:
Emitting a warning messageEmitting an error messageWriting something to the system logSubmitting a changeSubmitting a transient change (a change to the configuration right now, but one thatwon't be persistent).
By default, if the commit script emits no actions, the operation is deemed to besuccessful. But if the commit script emits an error event, the commit operation isstopped, and the user is informed of the message and the context.
In our case we make use of the ability to stop a commit operation through the issuance ofan error in the event that any of our required checks fail. Let's look at the requiredchecks in detail.
Technet24.ir||||||||||||||||||||
||||||||||||||||||||


Loopback addressThe loopback address is often used as a point of significance in IP networks, providingrouter identifiers and other lynchpins that are not dependent on any single physicalinterface. Accidental deletion or deletion of the loopback address can cause significantdisruption, so commit script logic to prevent that is welcome.
In our commit script, we perform two checks. First of all we could check that thenumber of IP addresses configured on the Lo0.0 interface is non-zero. Then we check thatthere is no attempt to disable either the main loopback interface, or the logical unit 0interface.
Note that sometimes SLAX has a problem with processing conditionalswhich mix functional SLAX expression with XPath expressions. Whenthis is the case, the answer is usually to pre-compute the SLAX expressionand function call first of all and store in a variable.
Technet24.ir||||||||||||||||||||
||||||||||||||||||||


IGP interface deletionInterfaces within the IGP—be it ISIS or OSPF—often have rules or conventionsregarding their manipulation. Formal out-of-service procedures might require operatorsto increase metrics before a shutdown or similar. What is unusual and unhelpful is thedeletion or removal of an interface from the configuration, especially if it is currentlyparticipating in the IGP.
For this test, we make use of jcs:invoke() in order to make an RPC call to query theactive interfaces within the protocols. We check the returned list to ensure that eachinterface is present in the configuration, and for each one that isn't, we emit an errormessage informing the user of the situation.
Technet24.ir||||||||||||||||||||
||||||||||||||||||||


EBGP policy defaultInadvertently, accepting inter-domain routes via BGP can be hazardous to health.Generally speaking, networks have only a small number of EBGP peering sessions thatprovide a full-table of internet routing information, and any other EBGP peers whichaccidentally advertise routes that they should not, can be contained by deploying importpolicies to filter the routes accepted.
In order to implement this check, we use an XPath expression to analyze theconfiguration under the [ protocols bgp ] hierarchy. What we want to see is that for everyBGP group we have that is an external type, every neighbor within that group has animport directive. Or if that is not the case, the group itself should have an import directive.
Technet24.ir||||||||||||||||||||
||||||||||||||||||||


Building BGP route filtersIn this recipe, we'll look at leveraging some automation power into the task ofmaintaining BGP route filters. BGP route filters are an essential part of any internetservice provider's toolkit for maintaining a safe and stable network, and indeedprotecting the safe-running of the global internet. BGP route filters apply a permit/denypolicy to the BGP routing protocol relationship between ISP's autonomous systemsaccording to a prescribed and documented policy. This means that if one party to therelationship accidentally misconfigures their BGP-speaking router and advertises routesthat they don't intend to, the other party's BGP-speaking router should be equipped withfilters that understand the malfunction in behavior.
The theory is good, but the history of the internet has shown that the practice is oftendifficult to get right. Sometimes customers don't register their routes correctly.Sometimes they are in a desperate time-critical need to turn up a BGP session and getservice. Sometimes providers forget to filter a customer if they have a specialconfiguration.
In this recipe, we'll produce a tool that will scan a JUNOS router device configurationlooking for prefix-lists that match a specific naming convention, and for those that itfinds, it will consult the public Internet Routing Registry (IRR) databases in order todownload the latest version of the equivalent prefix-list and then upload it to the router.
We'll build in some safety checks:
If a prefix-list is bigger than a certain size, we won't process it. There comes alimit to the usefulness of prefix-based filtering for routing policies involving lotsof routes.If the IRR copy of the prefix-list looks like it has a lot of deletions, compared tothe existing loaded prefix-list, we'll also bail out of automatically updating it, andask the user to issue an explicit switch instructing us to go further.
We'll want to see the command-line interface that looks something like this:
Argument/Parameter Description
Technet24.ir||||||||||||||||||||
||||||||||||||||||||

build-route-filter.py Main executable filename
-h Display help and summary usage
-p TCP port Specify an alternative TCP port to connect to the JUNOS device
-u username Specify a username to authenticate
-f prefix-list-name Force an update of the named prefix-list
target The router whose configuration we wish to process
||||||||||||||||||||
||||||||||||||||||||

Technet24.ir||||||||||||||||||||
||||||||||||||||||||

Getting readyIn order to complete this recipe, you'll need access to a JUNOS router device withconfigured prefix-lists. You don't actually need to be running BGP to dry-run this recipe—the software we'll create will simply update the prefix-list resources themselves andallow the operator to bind a BGP session with a prefix-list. But you should be familiarwith BGP and concepts such as:
Peering sessionsAutonomous systems and AS numbersAdvertising and accepting routing information, Network-Layer ReachabilityInformation (NLRI) or, more simply, prefixesRoute filters and AS path filters
You'll also need Alexandre Snarskii's excellent bgpq3 package which is a blazingly fastcommand-line utility designed to communicate with IRRs such as RIPE, ARIN andRADB and output a prefix-list containing the appropriate entries.
You can download bgpq3 from here: http://snar.spb.ru/prog/bgpq3/.
||||||||||||||||||||
||||||||||||||||||||

Technet24.ir||||||||||||||||||||
||||||||||||||||||||

How to do it...We're going to create a Python script, build-route-filters.py, that will login to a specifiedrouter, audit the prefix-list names, and then consult the IRRs in order to create updatedversions of those prefix-lists.
1. First of all, ensure that bgpq3 is installed on your system and working by running atest query.
$ bgpq3 -Jl eltel AS20597 policy-options { replace: prefix-list eltel { 81.9.0.0/20; 81.9.32.0/20; 81.9.96.0/20; 81.222.128.0/20; 81.222.160.0/20; 81.222.192.0/18; 85.249.8.0/21; 85.249.224.0/19; 89.112.0.0/17; 217.170.64.0/19; } }
2. Assuming all is good, continue to create build-route-filters.py in your preferreddevelopment or text editor environment. Start by specifying Python as the scriptinterpreter and importing the standard library modules required for this recipe.
import sys import io import getpass import os import json import argparse import subprocess import tempfile from jnpr.JUNOS import Device from jnpr.JUNOS.utils.config import Config from jnpr.JUNOS.exception import RpcError
3. Continue by defining some runtime constant definitions that will influence how theprogram works.
SUFFIX=".auto" IRRTOOL="bgpq3" MAX_PREFIXES=5000 MAX_DELS=10
4. Include a general purpose exception handler, defined to print a simple one-line
||||||||||||||||||||
||||||||||||||||||||

error message and exit.
# Error handling def onError(exception_type, exception, traceback): sys.stderr.write("%s: %s\n" % (exception_type.__name__, exception)) sys.excepthook = onError
5. Use the argparse module in order to parse the command-line arguments according tothe specification defined in the beginning of the recipe. Make use of the getPass()routine defined in the earlier chapters if required.
cmdline = argparse.ArgumentParser( description="Python JUNOS BGP Prefix-list build tool") cmdline.add_argument("target", metavar="router", help="Target router to analyse/configure") cmdline.add_argument("-p", metavar="port", help="TCP port", default=830) cmdline.add_argument("-u", metavar="username", help="Remote username", default=getpass.getuser()) cmdline.add_argument("-f", metavar="prefix-list", help="Dismiss change size concerns for prefix-list", action="append", default=[]) args=cmdline.parse_args() password=getPass(args.u+"@"+args.target) if 'getPass' in globals() else ""
6. Make use of the PyEZ framework and connect to the specified device by calling theDevice() constructor and then calling open() on the returned object.
dev = Device(host=args.target, user=args.u, port=args.p, password=password) dev.open() dev.timeout = 120
7. Use the get_config() RPC in order to request the current configuration file from theJUNOS device. Apply a filter to restrict the returned configuration to that which iscontained within the policy-options hierarchy.
configuration = dev.rpc.get_config(filter_xml='<policy-options> </policy-options>')
8. Iterate through the prefix-lists discovered on the device configuration, lookingspecifically for any prefix-lists that end with the suffix defined at the top of the file,.auto. For each prefix-list of interest, call upon the services of bgpq3 in order toquery the IRR databases and write the results to a temporary file. The use oftypical PyEZ configuration deployment pattern to deploy the new prefix-list to therouter is as follows:
for name in configuration.xpath("policy-options/prefix-list/name"):
Technet24.ir||||||||||||||||||||
||||||||||||||||||||

if name.text.endswith(SUFFIX): sys.stdout.write("Checking prefix list: %s\n" % (name.text))
try: with tempfile.NamedTemporaryFile() as file: subprocess.check_call([ IRRTOOL, '-J', '-S', 'RIPE', ("-l %s"%name.text), name.text[:-len(SUFFIX)] ], stdout=file) prefix_count = len(open(file.name).read(). splitlines()) if (prefix_count>MAX_PREFIXES): sys.stdout.write( "Skipping %s: too many prefixes (%d>%d)\n" % (name.text, prefix_count, MAX_PREFIXES)) else:
try: with Config(dev, mode="private") as config: config.load(path=file.name, format="text") diff = config.diff() if (diff!=None): adds=0 dels=0 for line in diff.splitlines(): if line.startswith("+"): adds+=1 if line.startswith("-"): dels+=1 sys.stdout.write(diff) if (dels>MAX_DELS and not name.text in args.f): sys.stdout.write( "%s: %d add(s), %d del(s): too many deletes - skipping\n" % (name.text, adds, dels)) else: sys.stdout.write( "%s: %d add(s), %d del(s): committing\n" % (name.text, adds, dels)) config.commit(comment= "Automatic prefix-filter update for %s" % name.text) else: sys.stdout.write( "No work to do for %s\n" % (name.text))
except RpcError, e: sys.stderr.write( "Error occurred while trying to configure %s: %s\n" % (name.text, e.message))
except subprocess.CalledProcessError, e: print e sys.stderr.write( "Failed to run %s: return code %d\n" % (IRRTOOL, e.returncode))
9. Having now repeated the prefix-list generation process using bgpq3 for all of theprefix-lists discovered on the JUNOS device, close the PyEZ device resource tofree up any associated resources.
||||||||||||||||||||
||||||||||||||||||||

dev.close()
Technet24.ir||||||||||||||||||||
||||||||||||||||||||


How it works...Our Python script starts up and scans the command line argument for options thatinfluence its behaviour. We allow the user to specify the parameters associated withusername, port number, and target router address. We also grant the user access to a -fswitch—to force the update of a particular prefix-list.
Once established, the script scans the JUNOS device looking for any prefix-list objectsin the policy-options hierarchy that are named with the SUFFIX denoted at the top of the file.We've chosen an initial default value of .auto for this.
For every matching prefix-list found, the script will call upon bgpq3—specified by nameusing the runtime constant IRRTOOL, in case the full pathname needs to be provided—inorder to build the prefix-list. We use several switches to the invocation of bgpq3 thatshould be explained.
Command option Purpose
-J Indicates output in the Juniper text-based format
-l name Specifies a name for the generated prefix-list
-S RIPE Specifies the use of the RIPE database IRR platform
There are other IRR platforms that can be used and in fact bgpq3 willdefault to scanning a recommended series of RIPE, RADB and APNIC.The different IRR choices offer different balances between completenessof information, security and authenticity. Some of the IRR services willalso mirror their peers, offering a mixed view. In our case, the RIPE IRRplatform offers a benefit for European customers because the IRR platformis intrinsically linked into the address resource allocation system thatassigns IP addresses and autonomous system numbers. This means that arouting policy registered in RIPE is very likely to be correct if it's basedupon European resources.
Technet24.ir||||||||||||||||||||
||||||||||||||||||||

If bgpq3 returns a prefix-list that exceeds MAX_PREFIXES in number, then build_route_filters.pywill record an error message and ignore it. Prefix-lists take up resources on the routerplatforms and so, for large routing policies that consist of a lot of routing prefixesexchanged between BGP peers, it might be more efficient to use AS path filtering, orother techniques.
Peer-locking is one novel approach to tackling the problem of preventingroute leaks of bad advertisements. It was pioneered by Job Snijders atNTT and designed to secure peering sessions between large ISPs frombeing overriden by invalid data from customer BGP peers. A lightervariation on peer-locking, where one filters BGP customers of any ASpath attributes that contain well-known large-scale ISPs can also be aneffective way to ensure that you're not a part of a route leakage event.
Assuming that the prefix-list is of a manageable size, PyEZ will configure it on therouter device and obtain a difference report. At this point, build-route-filters.py will lookto ensure that there are no more than MAX_DELS deletions from the prefix-list. If there aremore than this, it could conceivably represent some sort of error, and blindly followingthe reduction in prefixes might result in the filtration of legitimate prefixes that arecurrently being accepted.
It's at this point that we need the auto-pilot to switch off, and an intelligent human tocome along and assess the situation. If the human determines that the deletions from theprefix-list are acceptable, he can simply re-invoke the tool again using the -f switchwith the specified prefix-list name in order to accept and commit that prefix-list.
Regardless of intervention or not, when build-route-filters.py commits the prefix-listchange, it also submits a commit message so that a later operator can see what'shappened and when.
Let's see build-route-filters.py in action. First of all we log on to our test JUNOS router,and create some empty prefix-lists and deliberately break some other ones. Then we runthe tool and watch it fill in the blanks.
$ ./build-route-filters.py -u auto 10.0.201.201Checking prefix list: AS-COLOCLUE.auto
[edit policy-options prefix-list AS-COLOCLUE.auto]+ 94.142.240.0/21;+ 185.52.224.0/22;+ 193.135.150.0/24;+ 195.72.124.0/22;+ 195.114.12.0/24;
||||||||||||||||||||
||||||||||||||||||||

+ 195.114.13.0/24;AS-COLOCLUE.auto: 6 addition(s), 0 deletion(s): committingChecking prefix list: AS-INTEROUTE.autoSkipping AS-INTEROUTE.auto: too many prefixes (119450>5000)Checking prefix list: AS-PCH.autoNo work to do for AS-PCH.autoChecking prefix list: AS-EIRCOM.auto
[edit policy-options prefix-list AS-EIRCOM.auto]+ 185.136.252.0/24;+ 185.136.253.0/24;+ 185.136.254.0/24;AS-EIRCOM.auto: 3 addition(s), 0 deletion(s): committingChecking prefix list: AS-LINX.autoNo work to do for AS-LINX.auto
If we cause trouble and go to add some fake prefixes to the prefix-list AS-COLOCLUE.auto onthe router, we'll be able to see that the script will bail out and require us to re-steady thesituation manually.
adamc@router# show | compare [edit policy-options prefix-list AS-COLOCLUE.auto]+ 1.1.1.1/32;+ 1.1.1.2/32;+ 1.1.1.3/32;+ 1.1.1.4/32;+ 1.1.1.5/32;+ 1.1.1.6/32;+ 1.1.1.7/32;+ 1.1.1.8/32;+ 1.1.1.9/32;+ 1.1.1.10/32;+ 1.1.1.11/32;
$ ./build-route-filters.py -u auto 10.0.201.201Checking prefix list: AS-COLOCLUE.auto
[edit policy-options prefix-list AS-COLOCLUE.auto]- 1.1.1.1/32;- 1.1.1.2/32;- 1.1.1.3/32;- 1.1.1.4/32;- 1.1.1.5/32;- 1.1.1.6/32;- 1.1.1.7/32;- 1.1.1.8/32;- 1.1.1.9/32;- 1.1.1.10/32;- 1.1.1.11/32;AS-COLOCLUE.auto: 0 addition(s), 11 deletion(s): too many deletions - skipping
$ ./build-route-filters.py -u auto -f AS-COLOCLUE.auto 10.0.201.201[edit policy-options prefix-list AS-COLOCLUE.auto]- 1.1.1.1/32;- 1.1.1.2/32;- 1.1.1.3/32;- 1.1.1.4/32;- 1.1.1.5/32;- 1.1.1.6/32;- 1.1.1.7/32;- 1.1.1.8/32;- 1.1.1.9/32;
Technet24.ir||||||||||||||||||||
||||||||||||||||||||

- 1.1.1.10/32;- 1.1.1.11/32;AS-COLOCLUE.auto: 0 addition(s), 11 deletion(s): committing
Hopefully, build-route-filters.py, or a variation on it, can help you take the sting out ofBGP filter maintenance on your network.
||||||||||||||||||||
||||||||||||||||||||

Technet24.ir||||||||||||||||||||
||||||||||||||||||||

Applying anti-spoofing filtersIn this recipe, we'll create an automation assistant to help us deploy anti-spoofing filtersin our network. Anti-spoofing filters are packet filters that validate the source addressesof packets received from an interface to make sure that they are consistent with routinginformation in the reverse direction. They are important because they defeat one of themost significant vectors of distributed denial-of-service (DDOS) attacks: trafficseemingly originating from false source addresses. To implement source addressfiltering, the router's receiving interface is configured to perform a Reverse PathForwarding (RPF) check: a lookup of the source address in the routing table to see ifthe same interface would be used for outgoing traffic if the source was a destination.
The IETF and internet community blessed RFC 2827—a recommendation onimplementing source address filtering as Best Common Practice 38 (BCP.38), a strongmandate that network operators should endeavor to implement the feature whereverpossible.
But as with BGP route filtering, the theory can be simpler than the practice. One of thepractical problems with source address filtering is that it doesn't make any allowancesfor asymmetric traffic: traffic that takes one route on the way out, but returns via anotherroute. If the node performing source address filtering doesn't see your source address inits routing table via the interface that you've just come in from, you will be discarded.
Because of this brutal response, network service providers must be extremely cautiousin mass deployment of a technology that could otherwise bring great mitigating benefitsto some of the DDoS problems that threaten the internet.
The generally accepted wisdom is that BCP.38—source address filtering—canreasonably be applied at the very edge of the network where most information is knownabout the network addressing, and where a dynamic routing protocol is not in use.
What we provide in this recipe is some assistance in performing checks to ensure that adynamic protocol is indeed not running and the RPF checking is eligible to be turned onfor an interface.
||||||||||||||||||||
||||||||||||||||||||

Technet24.ir||||||||||||||||||||
||||||||||||||||||||

Getting readyIn this recipe, we'll produce a SLAX op script that will audit a running configuration tofind interfaces that are eligible to run source address filtering—known in JUNOS as rpf-check—and will optionally configure it, either across the whole box or on an interface byinterface basis.
Our script will use a command-line interface that operates in the following manner:
Parameter Description
mode check Audits interfaces for RPF check eligibility (Default mode).
mode apply Configures interfaces for RPF checking.
mode remove Remove RPF checking from an interface.
interface interface Specifies an interface to operate on.
In order to complete this recipe, you need access to a general management anddevelopment UNIX host in order to create the SLAX script and access to the JUNOSdevice upon which you'll run the script.
||||||||||||||||||||
||||||||||||||||||||

Technet24.ir||||||||||||||||||||
||||||||||||||||||||

How to do it...We're going to create a SLAX script, rpf-tool.slax, piece by piece, that will run as aJUNOS op script and will both audit and configure the JUNOS feature rpf-check in orderto implement a source address check upon the traffic received on an interface.
1. Firstly, define the SLAX boilerplate required for all JUNOS op scripts:
version 1.0;
ns JUNOS = "http://xml.juniper.net/JUNOS/*/JUNOS"; ns xnm = "http://xml.juniper.net/xnm/1.1/xnm"; ns jcs = "http://xml.juniper.net/JUNOS/commit-scripts/1.0";
import "../import/JUNOS.xsl";
2. Then declare the command-line arguments:
param $interface=""; param $mode="check"; var $arguments = { <argument> { <name> "interface"; <description> "Operate on the nominated interface only"; } <argument> { <name> "mode"; <description> "check | apply | remove"; } } var $if = jcs:split("\\.", $interface);
3. Make an XML API request to extract the current configuration using jcs:invoke():
var $rtf = { <get-configuration database="committed"> { <configuration> { <interfaces>; <routing-instances>; <protocols>; } } } var $currentConfiguration = jcs:invoke($rtf);
4. Start the main op-script-result loop by printing out a tabular header, but only ifwe're in the check-only mode:
match / { <op-script-results> {
/* If we're just checking, print a header to help readability
||||||||||||||||||||
||||||||||||||||||||

*/ if ($mode=="check") { expr jcs:output(jcs:printf( "Interface RPF analysis/configuration tool")); expr jcs:output(jcs:printf( " Flags: + eligible, - ineligible, * running, ! excluded")); expr jcs:output(jcs:printf( "%-1.1s %-14.14s %-12.12s %-24.24s %s", " ", "Interface", "Instance", "Description", "Address/Config")); }
5. And then follow up by creating a new $configuration variable by using the node-setoperator in order to prepare a new candidate configuration. Use a for loop toiterate through all of the interfaces, determining:
The physical and logical names of the interfacesThe description of the interfacesThe routing instance of the interfacesWhether the interface is configured for IPv4Whether the interface is configured for IPv6Whether RPF check is currently configured for IPv4Whether RPF check is currently configured for IPv6
var $configuration := { <configuration> { <interfaces> { for-each ($currentConfiguration/ interfaces/interface/ unit[../name==$if[1]][name==$if[2]] | $currentConfiguration/ interfaces/interface/ unit[$interface==""]) {
var $physical = ../name; var $unit = name; var $logical = $physical _ "." _ $unit; var $description = jcs:first-of(description, ../description); var $instance = $currentConfiguration// routing-instances/ instance/name[../interface/name==$logical]; var $rpf = { if (count(family/inet/ rpf-check)>0) { expr "Y"; } else { expr "N"; } } var $rpf6 = { if (count(family/inet6/ rpf-check)>0) { expr "Y"; } else { expr "N"; } } var $inet = { if (count(family/inet)>0) { expr "Y"; } else { expr "N"; } } var $inet6 = {
Technet24.ir||||||||||||||||||||
||||||||||||||||||||

if (count(family/inet6)>0) { expr "Y"; } else { expr "N"; } }
var $address = { for-each (family/inet/address) { expr "inet " _ name _ " "; } for-each (family/inet6/address) { expr "inet6 " _ name _ " "; } }
6. Then continue surveying the interface properties, but move on to whether theinterface is declared within the dynamic routing protocol sections:
var $ospf = { if (count($currentConfiguration// protocols/ ospf// interface/ name[.==$logical])>0) { expr "Y"; } else { expr "N"; } } var $ospf3 = { if (count($currentConfiguration// protocols/ ospf3// interface/ name[.==$logical])>0) { expr "Y"; } else { expr "N"; } } var $rip = { if (count($currentConfiguration// protocols/ rip// neighbor/ name[.==$logical])>0) { expr "Y"; } else { expr "N"; } } var $ripng = { if (count($currentConfiguration// protocols/ ripng// neighbor/name[.==$logical])>0) { expr "Y"; } else { expr "N"; } } var $isis = { if (count($currentConfiguration// protocols/ isis// interface/ name[.==$logical])>0) { expr "Y"; } else { expr "N"; } } var $ldp = { if (count($currentConfiguration// protocols/ ldp// interface/ name[.==$logical])>0) { expr "Y"; } else { expr "N"; } }
||||||||||||||||||||
||||||||||||||||||||

7. Include some special logic for BGP determination, because with BGP we don'tdefine an interface. We define a neighbor and use the routing table to find theinterface:
var $bgp-peers = { for-each (family/inet/address | family/inet6/address) { var $addr = jcs:parse-ip(name); var $network = $addr[4]; var $plen = $addr[3];
for-each ($currentConfiguration/ protocols/bgp// neighbor[jcs:empty($instance)] | $currentConfiguration/ routing-instances/ instance//protocols/bgp// neighbor[../../../../name==$instance]) { var $peer = { var $ip-peer = jcs:parse-ip(name); if ($addr[2] == $ip-peer[2]) { expr name _ "/" _ $plen; } } if ($peer!="") { var $ip-peer = jcs:parse-ip($peer); if ($network==$ip-peer[4]) { expr $peer _ " "; } } } } }
var $bgp = { if ($bgp-peers!="") { expr "Y"; } else { expr "N"; } }
8. Include an opportunity to call a locally-defined procedure in order to performlocal policy logic for including or excluding an interface from RPF checking:
var $exclude = { call local-policy-exclusions($physical, $logical, $unit, $description, $currentConfiguration); }
9. Then, based upon the information surveyed about the interface, define a flagcharacter to indicate eligibility for RPF checking versus the current status of RPFchecking:
Flag Meaning
Technet24.ir||||||||||||||||||||
||||||||||||||||||||

* Interface is currently running RPF checks
! Interface is excluded by the local policy function
+ Interface is eligible for RPF checking
- Interface is not eligible for RPF checking
The following is the code for the same:
var $flag = { /* IPv4 and IPv6: both running RPF? */ if ($inet=="Y" && $inet6=="Y" && $rpf=="Y" && $rpf6=="Y") { expr "*"; /* running */ /* IPv4 only: running RPF */ } else if ($inet=="Y" && $inet6=="N" && $rpf=="Y") { expr "*"; /* IPv6 only: running RPF */ } else if ($inet=="N" && $inet6=="Y" && $rpf6=="Y") { expr "*";
/* Otherwise, check local exclusions */ } else if ($exclude=="Y") { expr "!";
/* If not running protocols, eligible */ } else if (($inet=="Y" || $inet6=="Y") && $bgp=="N" && $ospf=="N" && $ospf3=="N" && $isis=="N" && $rip=="N" && $ripng=="N" && $ldp=="N") { expr "+";
/* ... otherwise, it is not eligible */ } else { expr "-"; } }
10. Create textual comments—for the display mode—to explain the association withrouting protocols:
var $comment = { if ($bgp=="Y") { expr "BGP "; } if ($ospf=="Y") { expr "OSPF "; }
||||||||||||||||||||
||||||||||||||||||||

if ($ospf3=="Y") { expr "OSPFv3 "; } if ($rip=="Y") { expr "RIP "; } if ($ripng=="Y") { expr "RIP-NG "; } if ($isis=="Y") { expr "IS-IS "; } if ($ldp=="Y") { expr "LDP "; } }
11. If we are in the apply mode, then build up the configuration stanzas necessary toconfigure RPF checking:
if ($mode=="apply") {
if ($flag=="+") { <interface> { <name> $physical; <unit> { <name> $unit; if ($inet=="Y" && $rpf=="N") { expr jcs:output( "Applying RPF inet configuration to interface ", $logical); <family> { <inet> { <rpf-check>; } } } if ($inet6=="Y" && $rpf6=="N") { expr jcs:output( "Applying RPF inet6 configuration to interface ", $logical); <family> { <inet6> { <rpf-check>; } } } }
12. But emit a comment if the interface is not eligible for RPF checking, yet we'vebeen explicitly asked to configure it:
} else if ($interface!="") { if ($flag=="!") { expr jcs:output("Interface ", $logical, "specifically excluded by local-policy-exclusions"); } else if ($flag=="-") { expr jcs:output("Interface ", $logical, " not eligible for RPF configuration: ", $comment); } else if ($flag=="*") { expr jcs:output("Interface ", $logical, " already includes RPF configuration"); } }
13. If we're in the remove mode, build up the necessary configuration stanza:
} else if ($mode=="remove") { if ($rpf=="Y" || $rpf6=="Y") { <interface> { <name> $physical;
Technet24.ir||||||||||||||||||||
||||||||||||||||||||

<unit> { <name> $unit; if ($rpf=="Y") { expr jcs:output( "Removing RPF inet configuration from interface ", $logical); <family> { <inet> { <rpf-check delete="delete">; } } } if ($rpf6=="Y") { expr jcs:output( "Removing RPF inet6 configuration from interface ", $logical); <family> { <inet6> { <rpf-check delete="delete">; } } } } } }
14. Otherwise, simply print a tabular row for the interface, describing its name,description, address family and eligibility for RPF checking:
} else { expr jcs:output( jcs:printf( "%-1.1s %-14.14s %-12.12s %-24.24s %s%s", $flag, $logical, $instance, $description, $address, $comment)); } } } } }
15. Finally, if we're about to make changes, prepare a summary report describing howmany interfaces are affected:
if ($mode=="apply" || $mode=="remove") {
var $numIf = count($configuration//interface); var $numInet = count($configuration//inet); var $numInet6 = count($configuration//inet6);
var $logmsg = { if ($mode=="apply" && $interface=="") { expr "Apply RPF to all interfaces: " _ $numIf _ " interface(s) affected: " _ $numInet _ " inet, " _ $numInet6 _ " inet6"; } else if ($mode=="remove" && $interface=="") { expr "Remove RPF from all interfaces: " _ $numIf _ " interface(s) affected: " _ $numInet _ " inet, " _ $numInet6 _ " inet6"; } else if ($mode=="apply" && $interface!="") { expr "Apply RPF to interface: " _ $interface _ ": " _ $numInet _ " inet, " _ $numInet6 _ " inet6";
||||||||||||||||||||
||||||||||||||||||||

} else if ($mode=="remove" && $interface!="") { expr "Remove RPF from interface: " _ $interface _ ": " _ $numInet _ " inet, " _ $numInet6 _ " inet6"; } }
16. Commit the configuration, outputting the summary report:
var $commit-options = { <commit-options> { <log> $logmsg; } }
expr jcs:output($logmsg); if ($numIf > 0) { var $connection = jcs:open(); var $result := { call jcs:load-configuration( $connection, $configuration, $commit-options); } copy-of $result; expr jcs:close($connection); } else { expr jcs:output("No affected interfaces: configuration not applied"); } } } }
Technet24.ir||||||||||||||||||||
||||||||||||||||||||


How it works...The structure and layout of the op script can make it difficult to follow, partly becauseSLAX op scripts are an XML pipeline, but we can focus on the cut and thrust of thelogic that each step is trying to achieve.
In step 1, we define the standard boilerplate required for every SLAX op script onJUNOS. In step 2 we declare interface and mode special global parameters. This tells theCLI to expect the user to try to use these keywords for parameters. In the argumentsnode-set, we can actually include some tokens that will populate the CLI interactivehelp. Finally we take the interface and split it into two parts, separated by a period (.),because we'll likely need the interface components in this way as we explore the XMLrepresentation of the configuration.
In step 3, we use the jcs:invoke() call in order to request a copy of the configuration inXML format. Technically speaking, all op script code should be within the global matchterms but simple variable assignment like this is permissible.
In step 4, we're inside the global match term and the first thing we do is print a tableheader if we've been invoked in the check mode—or indeed, if the user hasn't bothered tospecify a mode.
And then in step 5, we start off the beginning of a mammoth $configuration node-setassignment in order to capture a new candidate configuration to reconfigure interfaces inthe system based upon:
Whether we're in apply or remove modeWhether the interfaces are currently running RPF checkWhether the interfaces are running a routing protocolWhether the interfaces are excluded for other, local policy reasons
Step 6 performs the tests to determine whether the interface is currently configuredwithin any of the usual interior gateway protocols. And step 7 does the morecomplicated step of answering the same question for BGP. In this case, we look throughthe BGP neighbors and see if any match the directly connected subnet of the interfacethat we're currently assessing.
Note that this double for-each loop—processing both interfaces and BGP
Technet24.ir||||||||||||||||||||
||||||||||||||||||||

sessions—can get quite computationally expensive if we have a lot ofBGP sessions and a lot of interface. We have to circle around each loop,considering both factors.
In step 8, we include a call to a local-policy-exclusions function, which we haven't actuallyincluded in the source code. The idea is to provide a locally-customizable hook in orderto add logic to the per-interface decision. We'll look at an example local-policy-exclusionsfunction later.
In step 9, we define a symbolic flag variable based on the determinations that we'vemade from the assessment of routing protocol association and interface eligibility. Thisflag will be used in the tabular column if the user is in show mode. In step 10, we makefurther preparation for the tabular view again, by creating short textual labels toannotate each interface and the reason for our decision on eligibility of RPF check.
In step 11, if the user has invoked us in apply mode, then we begin to build the XMLstructure that represents a reconfiguration of the interface to enable the rpf-checkdirective. If we're trying to apply an interface because it's been explicitly nominatedusing the interface parameter, but it isn't eligible, then we print a message explaining theproblem in step 12. In step 13, we do the equivalent of step 11 but for the remove modelogic.
In step 14, if we're in show mode, we simply render the table row for the interface,including the flag and textual annotation that we prepared. Finally in steps 15 and 16 weprepare a log message and send the prepared configuration off to jcs:load-configuration()for processing and eventual commit.
The end result is that the operator gets a simple interface to help him assess theinterfaces on his router for the suitability of running the RPF check logic in order toimprove security through anti-spoofing filters.
Here's an example of the tool in action. With no parameters, we get a tabular reportshowing us each interface:
adamc@router> op rpf-tool Interface RPF analysis/configuration tool Flags: + eligible, - ineligible, * running, ! excluded Interface Instance Description Address/Config- em0.0 inet 10.0.201.201/24 BGP OSPF - em1.0 inet 10.0.211.201/24 OSPF + em2.145 VRF-145 Customer inet 192.168.12.1/30
From there we can choose to apply RPF checking to an interface explicitly, or just apply
||||||||||||||||||||
||||||||||||||||||||

it across the whole box.
adamc@router> op rpf-tool mode apply Applying RPF inet configuration to interface em2.145Apply RPF to all interfaces: 1 interface(s) affected: 1 inet, 0 inet6commit complete
adamc@router> op rpf-tool Interface RPF analysis/configuration tool Flags: + eligible, - ineligible, * running, ! excluded Interface Instance Description Address/Config- em0.0 inet 10.0.201.201/24 BGP OSPF - em1.0 inet 10.0.211.201/24 OSPF * em2.145 VRF-145 Customer inet 192.168.12.1/30
Technet24.ir||||||||||||||||||||
||||||||||||||||||||


There's moreIn step 8, we left scope for including a locally-defined function that could apply extralogic to determining whether or not an interface was eligible for RPF checking. Let'slook at an example function that could help with that logic.
In this case, the function gets called with information about the interface under scrutiny.It gets a copy of the physical interface name, the logical unit number, the description andthe result set from the current configuration. Based on whether the template functionreturns a Y or a N we determine if we want to exclude the interface from RPF checking ornot.
template local-policy-exclusions($physical, $logical, $unit, $description, $currentConfiguration) {
/* No interfaces where the physical interface is "lo0" */ if ($physical == "lo0" || $physical == "fxp0") { expr "Y";
/* No interfaces that contain the magic description tag */ } else if (jcs:empty(jcs:regex("\\{.*no-rpf.*\\}", $description))==false) { expr "Y";
/* No unnumbered interfaces: they might be hiding * BGP that we didn't spot */ } else if (jcs:empty($currentConfiguration/interfaces// family/inet/unnumbered-address[ ../../../name==$unit && ../../../../name==$physical])==false) { expr "Y";
/* Example: No interfaces where we find DHCP in the configuration */ } else if (jcs:empty($currentConfiguration/interfaces// family/inet/dhcp[ ../../../name==$unit && ../../../../name==$physical])==false) { expr "Y";
/* Default behaviour: no exclusion */ } else { expr "N"; }}
Technet24.ir||||||||||||||||||||
||||||||||||||||||||

Operating a distributed ACL functionIn this recipe, we'll develop a capability to rapidly deploy packet filters to all devicesin our network, making use of BGP to transport the specification of the packet filterrules to all the routers in our network. The capability, defined formally in IETF RFC5575 and often informally called FlowSpec, is particularly useful in defending largenetworks against distributed DOS attacks.
It's important to note that these are not full-on session-based firewall rules, but rather aspecification of packet-level characteristics that can be applied to incoming traffic inorder to determine if special handling is needed. In our case, we'll take a specificationof packets based on the following fields in the IP header and we will apply the discardaction.
Source addressDestination addressSource TCP/UDP portDestination TCP/UDP portProtocol
In this way, the capability is very useful when implementing black-list type policiesacross a large network estate with an abundance of entry-points.
Technet24.ir||||||||||||||||||||
||||||||||||||||||||


Getting readyIn order to complete this recipe, you'll need access to at least one JUNOS OS router thatyou want to install FlowSpec rules on and a Python 2.7 development environment.We're going to make use of Thomas Mangin's invaluable ExaBGP tool, which is a BGPimplementation written in Python in order to implement a fast and flexible way to injectFlowSpec rules into our network.
ExaBGP deploying access-control lists to multiple JUNOS OS routers
Technet24.ir||||||||||||||||||||
||||||||||||||||||||


How to do it...We're going to set up ExaBGP on our Python development and management host and thenconfigure it to connect to our JUNOS OS routers in order to provide them with a feed ofaccess control rules that they should apply to all interfaces. For the purposes of thisrecipe, we'll use our test JUNOS OS VM on 10.0.201.201 as our router, and ourmanagement host will be on 10.0.201.1.
1. Download and install ExaBGP. For the purposes of this recipe, we're usingExaBGP 3.4.18 with Python 2.7.12.
$ pip install exabgp
2. Create an ExaBGP configuration file, flowspec.cfg, which is responsible forconfiguring ExaBGP to connect to our JUNOS routers, communicate with them byusing the IP flow address family, and take instructions from a downstream Pythonhelper script, acl-server.py, which we will write. Replace the parameter values withlocally significant and appropriate values:
router-id and local-address should be the local interface address of yourExaBGP host.local-as and peer-as should be the autonomous system number you use forinternet routing. If you don't have an autonomous system number, choose onefrom the range 64512 - 65534 which are reserved for private use.
group GROUP { router-id 10.0.201.1; local-address 10.0.201.1; local-as 8928; peer-as 8928; hold-time 180;
process ACL-SERVER { encoder text; run acl-server.py; }
neighbor 10.0.201.201 { family { ipv4 flow; } } }
3. Create a simple Python ExaBGP helper script which will feed FlowSpec accesscontrol rules to ExaBGP.
Technet24.ir||||||||||||||||||||
||||||||||||||||||||

#!/usr/bin/env python
import sys import time
FILENAME = "/var/tmp/rules.txt"
rules = open(FILENAME).read().splitlines() for r in rules: sys.stdout.write( "announce flow route { match { " + r + " } then { discard; } }\n") sys.stdout.flush() while True: sys.stdin.read()
4. On the JUNOS OS routers that will participate in the distributed packet filter,configure a BGP session for the inet flow address family. Use a no-validation policyto effectively disable validation.
protocols { bgp { group FLOWSPEC { type internal; neighbor 10.0.201.1 { passive; family inet { flow { no-validate ANY; } } } } } } policy-options { policy-statement ANY { then accept; } }
5. Create an initial rules file with a test rule to block.
$ cat /var/tmp/rules.txt source 1.2.3.4/32; destination 5.6.7.8/32; destination-port 5959; protocol 6;
6. Start up ExaBGP using the configuration file that we specified in step 2.
# exabgp flowspec.cfg[...]Sat, 16 Sep 2017 17:39:35 | INFO | 24267 | reactor | Flow added to neighbor 10.0.201.201 local-ip 10.0.201.1 local-as 8928 peer-as 8928 router-id 10.0.201.1 family-allowed in-open : flow destination 5.6.7.8/32 source 1.2.3.4/32 protocol =TCP destination-port =5959 extended-community rate-limit 0Sat, 16 Sep 2017 17:39:36 | INFO | 24267 | reactor | Performing dynamic route updateSat, 16 Sep 2017 17:39:36 | INFO | 24267 | reactor | Updated peers dynamic routes successfullySat, 16 Sep 2017 17:39:38 | INFO | 24267 | network | Connected to peer neighbor 10.0.201.201 local-ip 10.0.201.1 local-as 8928 peer-as 8928 router-id 10.0.201.1 family-allowed in-open (out)
7. Confirm that the JUNOS OS BGP session is up and running with the inet flow
||||||||||||||||||||
||||||||||||||||||||

address family.
adamc@router> show bgp summary Peer AS InPkt OutPkt OutQ Flaps Last Up/Dwn 10.0.201.1 8928 8 9 0 3 2:50 Establ inetflow.0: 1/1/1/0
8. Examine the JUNOS routing table inetflow.0 to confirm that the FlowSpecroutes have indeed been learned.
adamc@router> show route table inetflow.0
inetflow.0: 1 destinations, 1 routes (1 active, 0 holddown, 0 hidden)+ = Active Route, - = Last Active, * = Both
5.6.7.8,1.2.3.4,proto=6,dstport=5959/term:1 *[BGP/170] 00:05:40, localpref 100, from 10.0.201.1 AS path: I, validation-state: unverified Fictitious
Technet24.ir||||||||||||||||||||
||||||||||||||||||||

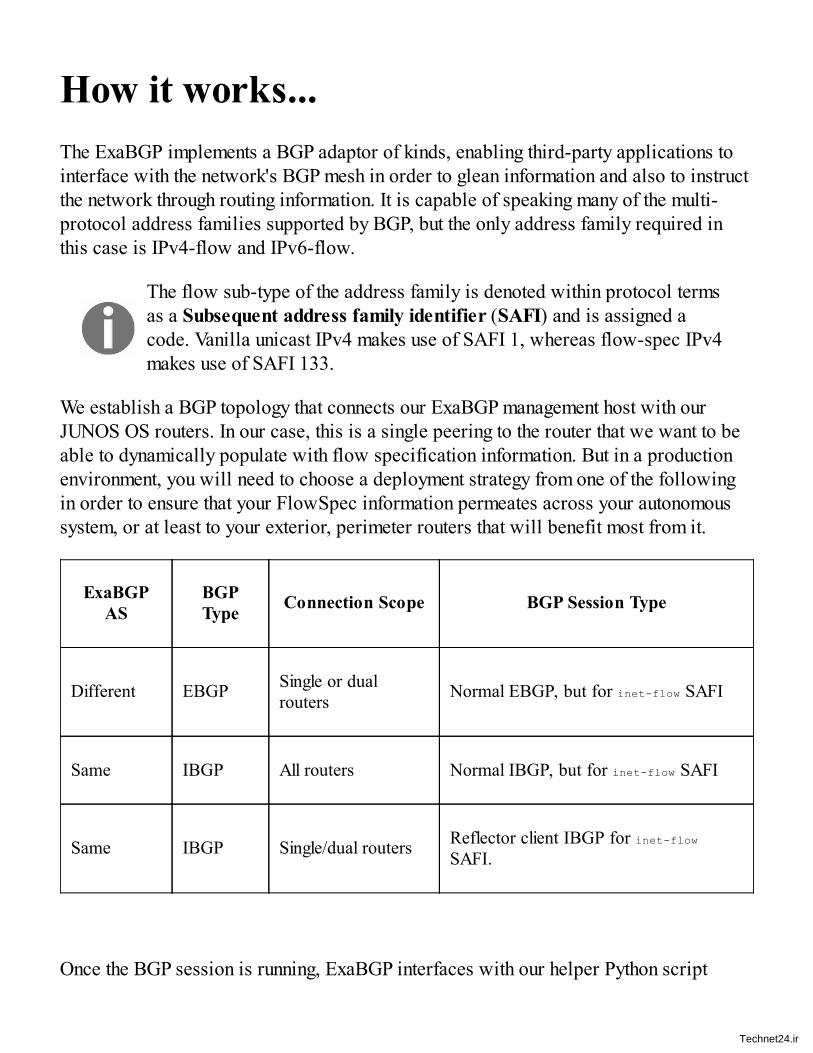
How it works...The ExaBGP implements a BGP adaptor of kinds, enabling third-party applications tointerface with the network's BGP mesh in order to glean information and also to instructthe network through routing information. It is capable of speaking many of the multi-protocol address families supported by BGP, but the only address family required inthis case is IPv4-flow and IPv6-flow.
The flow sub-type of the address family is denoted within protocol termsas a Subsequent address family identifier (SAFI) and is assigned acode. Vanilla unicast IPv4 makes use of SAFI 1, whereas flow-spec IPv4makes use of SAFI 133.
We establish a BGP topology that connects our ExaBGP management host with ourJUNOS OS routers. In our case, this is a single peering to the router that we want to beable to dynamically populate with flow specification information. But in a productionenvironment, you will need to choose a deployment strategy from one of the followingin order to ensure that your FlowSpec information permeates across your autonomoussystem, or at least to your exterior, perimeter routers that will benefit most from it.
ExaBGPAS
BGPType Connection Scope BGP Session Type
Different EBGP Single or dualrouters Normal EBGP, but for inet-flow SAFI
Same IBGP All routers Normal IBGP, but for inet-flow SAFI
Same IBGP Single/dual routers Reflector client IBGP for inet-flowSAFI.
Once the BGP session is running, ExaBGP interfaces with our helper Python script
Technet24.ir||||||||||||||||||||
||||||||||||||||||||

which simply takes the contents of a file and communicates it to ExaBGP. ExaBGPconverts each line from the file into a BGP advertisement within the inet-flow addressfamily. Our Python script does little messaging or syntax checking of the data within therules.txt file, so the file format is dependent upon ExaBGP's comprehensiveunderstanding of the inet-flow address family, a subset of which is described in the tablebelow.
Criteria Example Matching method
source 1.2.3.4/32Source address of packet is checked against address andmask
destination 5.6.7.8/32Destination address of packet is checked against addressand mask
port 80 Source and destination TCP/UDP port is checkedsource-port 80 Source TCP/UDP port is checkeddestination-port
80 Destination TCP/UDP port is checked
protocol 6 IP-layer protocol is checked
Under the hood, in the FlowSpec encoding of packet matching criteria lies a complexand capable method that allows the specification of multiple values and, indeed, ranges.This is exposed within ExaBGP in several ways.
Port ranges can be described by making use of the (operator, value) internal structureused within the BGP protocol. When one speaker communicates a FlowSpec ruleconcerning a port number to another speaker, he doesn't simply pass a 16-bit integer asyou might expect. Instead, he passes a variable length structure which is comprised of achain of operations and values. This means that arguments such as >5959, >=5959, <5959,<=5959 are all legal and valid within the FlowSpec protocol and understood by ExaBGP.An entry like this in the rules file, produces the expected results.
source 1.1.1.1/32; destination 1.1.1.1/32; port >=5959; protocol 6;
adamc@router> show route table inetflow.0
inetflow.0: 1 destinations, 1 routes (1 active, 0 holddown, 0 hidden)+ = Active Route, - = Last Active, * = Both
1.1.1.1,1.1.1.1,proto=6,port>=5959&<=65535/term:1 *[BGP/170] 00:00:01, localpref 100, from 10.0.201.1
||||||||||||||||||||
||||||||||||||||||||

AS path: I, validation-state: unverified Fictitious
The output as seen from the JUNOS OS device above likely gives you a clue on how tohandle inclusive ranges such as 100-200. You'd be right.
source 1.1.1.1/32; destination 1.1.1.1/32; port >=100&<=200; protocol 6;
adamc@router> show route table inetflow.0
inetflow.0: 1 destinations, 1 routes (1 active, 0 holddown, 0 hidden)+ = Active Route, - = Last Active, * = Both
1.1.1.1,1.1.1.1,proto=6,port>=100&<=200/term:1 *[BGP/170] 00:00:00, localpref 100, from 10.0.201.1 AS path: I, validation-state: unverified Fictitious
The internal protocol mechanisms that combine the port value comparisons include anAND field, that determines whether the result of consecutive operations should beAND'd or OR'd together. Thus, it's possible to implement port range operations
Multiple port directives can be included in a single rule. Even though normally allcriteria in the rule have to match, a repeated port match has logical OR semantics. Sofor example, the following rules (which should be on a single-line):
source 1.1.1.1/32; destination-port =5959; destination-port =5960; protocol 6;
adamc@router> show route table inetflow.0 inetflow.0: 1 destinations, 1 routes (1 active, 0 holddown, 0 hidden)+ = Active Route, - = Last Active, * = Both*,1.1.1.1,proto=6,dstport=5959,=5960/term:1 *[BGP/170] 00:00:04, localpref 100, from 10.0.201.1 AS path: I, validation-state: unverified Fictitious
One intriguing thing that is seemingly difficult to achieve in ExaBGP'ssyntax, and even in the equivalent JUNOS OS syntax, is a logical NOT ona parameter. For example, traffic not destined to port 80. The RFC hints atthe fact that the greater-than and less-than operators can be joined tocreate the logically equivalent predicate, less than 80 or greater than 80,but neither the ExaBGP syntax nor the JUNOS OS syntax seems to acceptthis or implement it correctly.
Once the JUNOS device accepts the BGP route, it is subject to some RFC-mandatedvalidation checking. The validation checking is designed to align the FlowSpec rulewith the equivalent BGP route in the unicast address family and to ensure that the originsof packet filtering information and the origins of routing information are consistent. Thevalidation is important, but if you're implementing a centrally run FlowSpec server like
Technet24.ir||||||||||||||||||||
||||||||||||||||||||

we are, the rules that you apply are certainly not going to share BGP origin or neighborqualities with the underlying unicast routing table. As a result, we need to take out thevalidation step. Thankfully, JUNOS allows us to do just this using its capable policyengine. So we define a promiscuous policy which allows all addresses to be acceptedwithout the usual FlowSpec validation steps.
Once validated, the JUNOS router accepts the FlowSpec route into his local routinginformation base, and if BGP policies allow it, advertises it to his other FlowSpec-capable neighbours. This way the information disseminates throughout the network.Additionally, the JUNOS OS router installs the FlowSpec rules into the firewall rule setof all attached packet forwarding engines.
This can be observed by looking at the special firewall filter called__flowspec_default_inet__.
adamc@router> show firewall filter __flowspec_default_inet__
Filter: __flowspec_default_inet__ Counters:Name Bytes Packets1.1.1.1,* 0 0
||||||||||||||||||||
||||||||||||||||||||

Technet24.ir||||||||||||||||||||
||||||||||||||||||||

Extending JUNOS with AnsibleIn this chapter, we'll cover the following recipes:
Installing AnsibleConfiguring Ansible for JUNOSExtracting estate-wide configurationsPerforming platform-specific or group-specific operationsUsing variables and vaults
||||||||||||||||||||
||||||||||||||||||||

Technet24.ir||||||||||||||||||||
||||||||||||||||||||

IntroductionWe've already covered a wide variety of technologies that help us reduce the labourinvolved with operating and maintaining our JUNOS routers and devices, but in thischapter we'll look in detail at how to integrate some of these JUNOS automation effortswith other IT systems, using the automation and orchestration software frameworkcalled Ansible.
Ansible is an open-source automation toolkit that assists with provisioning software andinventory, application deployment and configuration management. It's well suited toJUNOS because Ansible's fundamental method of communicating with elements is viaSSH, which of course is the native method of managing JUNOS devices. Ansible is alsosupported by Juniper, who has led the open-source development of Ansible roles—vendor- or task-related plugins specific to an application environment—specifically tosupport JUNOS devices.
||||||||||||||||||||
||||||||||||||||||||

Technet24.ir||||||||||||||||||||
||||||||||||||||||||

Installing AnsibleIn this recipe, we'll set up an Ansible control server and demonstrate some basicAnsible commands. We'll run some basic commands using Ansible to gain anunderstanding of the fundamentals.
||||||||||||||||||||
||||||||||||||||||||

Technet24.ir||||||||||||||||||||
||||||||||||||||||||

Getting readyIn order to complete this recipe, you'll need a Python 2.7 development environment. Forthe purposes of this recipe, we used Ubuntu 16.04, which ships by default with Python 3out of the box, but Python 2.7 is also available from the Ubuntu repositories.
||||||||||||||||||||
||||||||||||||||||||

Technet24.ir||||||||||||||||||||
||||||||||||||||||||

How to do it...We're going to install Ansible on our management host and then use it to connect to itselfto test basic Ansible commands.
1. First of all, we're going to install Python 2.7, since it may not be installed as thedefault Python interpreter in Ubuntu 16.04:
ubuntu@ubuntu-xenial:~$ sudo apt-get install -y python2.7 python-pip
2. Then, we'll install Ansible using the Python package manager:
ubuntu@ubuntu-xenial:~$ pip install ansibleCollecting ansible[...]Successfully built ansible pycryptoInstalling collected packages: MarkupSafe, jinja2, PyYAML, six, pycparser, cffi, pynacl, pyasn1, bcrypt, ipaddress, idna, asn1crypto, enum34, cryptography, paramiko, pycrypto, setuptools, ansibleSuccessfully installed MarkupSafe-1.0 PyYAML-3.12 ansible-2.3.2.0 asn1crypto-0.22.0 bcrypt-3.1.3 cffi-1.11.0 cryptography-2.0.3 enum34-1.1.6 idna-2.6 ipaddress-1.0.18 jinja2-2.9.6 paramiko-2.2.1 pyasn1-0.3.4 pycparser-2.18 pycrypto-2.6.1 pynacl-1.1.2 setuptools-36.3.0 six-1.10.0
3. Verify that you're using Ansible 2.1 or greater, which has core in-built support forJUNOS network elements:
ubuntu@ubuntu-xenial:~$ ansible --versionansible 2.3.2.0 config file = configured module search path = Default w/o overrides python version = 2.7.12 (default, Nov 19 2016, 06:48:10) [GCC 5.4.0 20160609]
4. Create a working directory to test basic Ansible functionality:
ubuntu@ubuntu-xenial:~$ mkdir ansibleubuntu@ubuntu-xenial:~$ cd ansible/ubuntu@ubuntu-xenial:~/ansible$
5. Create a basic inventory file that simply includes the local UNIX host as anelement:
ubuntu@ubuntu-xenial:~/ansible$ echo "127.0.0.1" > hostsubuntu@ubuntu-xenial:~/ansible$ cat hosts127.0.0.1
6. Generate an SSH key-pair if not already done, and ensure that the localauthorized_keys configuration allows the key (so that key-based SSH logins can beused):
ubuntu@ubuntu-xenial:~$ ssh-keygen
||||||||||||||||||||
||||||||||||||||||||

Generating public/private rsa key pair. Enter file in which to save the key (/home/ubuntu/.ssh/id_rsa): Enter passphrase (empty for no passphrase): Enter same passphrase again: Your identification has been saved in /home/ubuntu/.ssh/id_rsa. Your public key has been saved in /home/ubuntu/.ssh/id_rsa.pub. The key fingerprint is: SHA256:Akpv6g4/11I97IGuFKNHs/Y3AfikkuIMLXSSKEeGKiQ ubuntu@ubuntu- xenial The key's randomart image is: +---[RSA 2048]----+ | . | |E.o | |=oo .. | |==.+..o | |+o+.B+.=S | |+ +=.=+.* | |=oo.=+ . + | | *.+o.o + | | .+o.o.. . | +----[SHA256]-----+ ubuntu@ubuntu-xenial:~$ cat ~/.ssh/id_rsa.pub >> ~/.ssh/authorized_keys
7. Test out Ansible by performing a basic ping test to ensure that it has managementaccess to the local node:
ubuntu@ubuntu-xenial:~/ansible$ ansible -i hosts -m ping all 127.0.0.1 | SUCCESS => { "changed": false, "ping": "pong" }
Technet24.ir||||||||||||||||||||
||||||||||||||||||||


How it works...In step 1, we're making sure that we've got Python 2.7 available. Even though this isn'tthe latest and greatest version of Python, it is unfortunately the case that not all softwareis compatible and ready for the Python 3 change which breaks some syntactic features.Ansible 2.x has recently become Python 3 capable, and the Juniper PyEZ frameworkworks with Python 3.5 and above, but at the time of writing, some of the other JuniperAnsible modules that we'll want to look at have not been certified as compatible withPython 3. So for the purpose of this recipe, we'll make use of Python 2.7.
In step 2, we use the built-in Python package manager, pip, to install Ansible. It is acomplex package and has many dependencies on other components. If you experiencedifficulty in installing any of these components using pip, check whether your operatingsystem vendor has pre-packaged versions. Then in step 3, we verify which versionwe've installed. In our case, it's the latest stable release, which is version 2.3.2.0.
Ansible 2.1 and greater includes native support within the corefunctionality for working with JUNOS devices. On versions of Ansibleprior to 2.1, it was necessary to use the ansible-galaxy functionality in orderto import roles and modules defined by Juniper. The core JUNOS supportand the Juniper-provided role support can co-exist and some of thefunctionality does overlap.
We then make a working directory in order to experiment with Ansible and start bycreating the most basic resource: the inventory file. In Ansible, the inventory file is thelist of hosts under management. The file is simply a text file containing the hostname orIP addresses, and it can optionally be separated into section use .INI-file style [sections]to define groups of hosts.
For the purposes of testing, we define a single host, localhost or 127.0.0.1, in order totest Ansible's basic operation. At its core, Ansible makes use of SSH in order tomanage the elements in its charge and has a philosophy of agent-less behavior. Theremote nodes only need an SSH service and a Python interpreter in order to bemanageable. It achieves this through a tactic of pushing out agent code on demand byusing the SSH-based SCP and SFTP protocols.
In order to make sure that SSH works in the way that Ansible expects it to, we generatea public-private key-pair in step 6. Now, if you've already done this step from some of
Technet24.ir||||||||||||||||||||
||||||||||||||||||||

our earlier recipes, you have no need to repeat it. But to complete this recipe, just makesure that the key you generated—which you probably installed onto your JUNOSdevices—is also installed on your management host as well in the ~/.ssh/authorized_keysfile.
In step 7, we finally test Ansible by asking it to perform a ping operation on all of thenodes under its control. Since this is only a single node at this time, the response isslightly underwhelming but assuring nonetheless. Ansible comes back with a report forthe host that reports success, and no system state change. This is quite an importantnotion, because Ansible's main benefit is the ability to schedule tasks on remote nodescombined with contextual awareness of the environment and the state. So consequently,Ansible has to understand state changes.
A ping operation in this sense simply means that the SSH client connected to the remoteelement and validated that everything was as it should be.
Let's break down the command line to remind ourselves what the different options are.
Commandline option Meaning
-i hostsSpecification of the inventory file. If not specified, Ansible will attempt to usea global, system-wide hosts file, usually /etc/ansible/hosts.
-m ping Invoke the ping module.
allThe target specification, or the list of devices within the inventory that aresubject to the task.
We specify the custom inventory file by using the -i switch, and we load in an Ansiblemodule, called ping using the -m switch.
||||||||||||||||||||
||||||||||||||||||||

Technet24.ir||||||||||||||||||||
||||||||||||||||||||


There's moreThe Ansible inventory file is flexible and can deal with per-host parameter association.For example, we don't have to rely on IP addressing to nominate hosts, and we can alsodeal with situations where Ansible needs to access the devices using differentusernames. If we modify our hosts file in order to add an extra OpenBSD device fromour LAN with different credentials, we can update the inventory file to look like this.
localhost ansible_host=127.0.0.1 ansible_user=ubuntuopenbsd ansible_host=10.0.201.220 ansible_user=user
Now, when we run our Ansible ping test, we can see both boxes respond and report asavailable.
ubuntu@ubuntu-xenial:~/ansible$ ansible -i hosts -m ping alllocalhost | SUCCESS => { "changed": false, "ping": "pong" } openbsd | SUCCESS => { "changed": false, "ping": "pong" }
Pinging boxes is all well and good, but it's a long way from large-scale systemmanagement. Ansible's core foundation is built upon the notion of modules—smallsoftware components that deal with a particular aspect of system management. Themodule directory included with Ansible is large and comprehensive and third-partyvendors can also provide their own modules. Here are some of the basic examples, buta complete list is available at the Ansible documentation web site http://docs.ansible.com/ansible/latest/list_of_all_modules.html.
shell: Executes commands in nodessetup: Gathers facts about remote hostsfile: Sets attributes of filescopy: Copies files to remote locationsget_url: Downloads files from HTTP, HTTPS, or FTP to node
Here we can see a basic shell tool module being used to query the uptime of all of theservers in our estate. In this case, we add the -a switch in order to pass in an argument tothe Ansible module.
ubuntu@ubuntu-xenial:~/ansible$ ansible -i hosts -m shell -a uptime all
Technet24.ir||||||||||||||||||||
||||||||||||||||||||

localhost | SUCCESS | rc=0 >> 22:08:24 up 2:35, 2 users, load average: 0.01, 0.01, 0.00
openbsd | SUCCESS | rc=0 >> 3:11AM up 2 days, 12:43, 2 users, load averages: 0.22, 0.13, 0.10
||||||||||||||||||||
||||||||||||||||||||

Technet24.ir||||||||||||||||||||
||||||||||||||||||||

Configuring Ansible for JUNOSIn this recipe, we'll enhance our Ansible environment to work with JUNOS devices bymaking some changes. We'll use the core modules that ship with Ansible 2.1 and greaterin order to remotely execute commands on the JUNOS devices.
||||||||||||||||||||
||||||||||||||||||||

Technet24.ir||||||||||||||||||||
||||||||||||||||||||

Getting readyIn order to complete this recipe, you should have completed the previous recipe,Installing Ansible, and you'll need access to a JUNOS device for testing.
||||||||||||||||||||
||||||||||||||||||||

Technet24.ir||||||||||||||||||||
||||||||||||||||||||

How to do it..We're going to install the specific Python modules that enable the Ansible JUNOS_*modules to effectively communicate with JUNOS devices, routers, and switches. We'llalso make some Ansible system changes in order to accommodate this.
1. First of all, we're going to install the PyEZ JUNOS-eznc package on our Ansiblecontrol host because it contains some essential NETCONF-over-SSH functionalitythat Ansible will use:
ubuntu@ubuntu-xenial:~$ pip install JUNOS-eznc Collecting JUNOS-eznc Collecting netaddr (from JUNOS-eznc) Collecting PyYAML>=3.10 (from JUNOS-eznc) Collecting pyserial (from JUNOS-eznc) [...] Successfully built ncclient Installing collected packages: netaddr, PyYAML, pyserial, setuptools, six, pycparser, cffi, pynacl, pyasn1, bcrypt, ipaddress, idna, asn1crypto, enum34, cryptography, paramiko, lxml, ncclient, MarkupSafe, jinja2, scp, JUNOS-eznc Successfully installed MarkupSafe-1.0 PyYAML-3.12 asn1crypto- 0.22.0 bcrypt-3.1.3 cffi-1.11.0 cryptography-2.0.3 enum34-1.1.6 idna-2.6 ipaddress-1.0.18 jinja2-2.9.6 JUNOS-eznc-2.1.6 lxml-3.8.0 ncclient-0.5.3 netaddr-0.7.19 paramiko-2.2.1 pyasn1-0.3.5 pycparser-2.18 pynacl-1.1.2 pyserial-3.4 scp-0.10.2 setuptools- 36.5.0 six-1.10.0
2. Then we're going to make a change to the Ansible configuration file in order todisable SSH host key checking. Firstly, we need to check if there is an existingAnsible configuration file. We can do this with the base ansible command, by usingthe --version switch:
ubuntu@ubuntu-xenial:~$ ansible --version ansible 2.3.2.0 config file = configured module search path = Default w/o overrides python version = 2.7.12 (default, Nov 19 2016, 06:48:10) [GCC 5.4.0 20160609]
3. If the section marked config file is blank, as it is in our output above, then it's clearthat there is currently no explicit configuration file present, and Ansible is usingburned-in defaults. This is a common situation. If this is the case, you can simplyproceed to make a new file in your home directory called .ansible.cfg. If a file isreported in the output above, however, you need to modify that file. Regardless ofwhether a new file is being created or not, an entry must be made within the file todisable the SSH host key checking:
||||||||||||||||||||
||||||||||||||||||||

[defaults] host_key_checking = False
4. Proceed to add the JUNOS device to the Ansible inventory file, but include with itsome special metadata variables that will customize how Ansible will treat thedevice. From the following example, you must customize the values for:
ansible_host: the IP address or DNS name of your JUNOS deviceansible_user: the username of the user account profile to be used for automationansible_ssh_private_key_file: the name of the file that stores the SSH private key
JUNOS-vm ansible_host=10.0.201.201 ansible_user=auto ansible_ssh_private_key_file=/home/user/auto/JUNOS_auto_id_rsa ansible_connection=local
5. With the device added to the Ansible inventory file, it is time to do a test operationto see if Ansible is able to communicate correctly:
ubuntu@ubuntu-xenial:~/ansible$ ansible -i hosts JUNOS -m ping JUNOS-vm | SUCCESS => { "changed": false, "ping": "pong" }
6. Beyond verifying connectivity and operation, we can use test one of the newerAnsible 2.1—and—above modules for gathering facts about the JUNOS device:
ubuntu@ubuntu-xenial:~/ansible$ ansible -i hosts JUNOS-vm -m JUNOS_facts JUNOS-vm | SUCCESS => { "ansible_facts": { "ansible_net_filesystems": [ [...] ], "ansible_net_gather_subset": [ "hardware", "default", "interfaces" ], "ansible_net_hostname": "router", "ansible_net_interfaces": { "em0": { "admin-status": "up", "macaddress": "08:00:27:2d:4c:9f", "mtu": "1514", "oper-status": "up", "speed": "1000mbps", "type": "Ethernet" }, "em1": { "admin-status": "up", "macaddress": "08:00:27:17:3e:14", "mtu": "1514", "oper-status": "up", "speed": "1000mbps", "type": "Ethernet" },
Technet24.ir||||||||||||||||||||
||||||||||||||||||||

"gre": { "admin-status": "up", "macaddress": null, "mtu": "Unlimited", "oper-status": "up", "speed": "Unlimited", "type": "GRE" }, "lo0": { "admin-status": "up", "macaddress": "Unspecified", "mtu": "Unlimited", "oper-status": "up", "speed": "Unspecified", "type": "Loopback" }, "ansible_net_memfree_mb": 1074000, "ansible_net_memtotal_mb": 2061144, "ansible_net_model": "olive", "ansible_net_serialnum": null, "ansible_net_version": "15.1F6-S5.6" }, "changed": false }
||||||||||||||||||||
||||||||||||||||||||

Technet24.ir||||||||||||||||||||
||||||||||||||||||||

How it works...Ansible is focused on dealing with Linux/UNIX systems out of the box, and some of thefeatures don't translate perfectly smoothly to JUNOS, even if JUNOS is based upon aBSD UNIX platform. One of the first things to understand is that while Ansible itselfuses SSH to communicate with most nodes, it makes some assumptions about the SSHenvironment that it logs in to that are typical for Linux/UNIX systems, but notnecessarily appropriate for fixed applications underlying UNIX operating systems suchas JUNOS.
For example, when you log in to a JUNOS device with SSH, you don't see the vanillaUNIX shell command. And you don't have direct access to the underlying UNIXcommand line that the base operating system brings. It isn't restricted, of course—JUNOS allows you to start shell if you need to interact with the underlying system - butthe established way to communicate with the device via SSH is using the JUNOS CLI.Using the JUNOS CLI as the shell environment to SSH prevents Ansible fromperforming the typical activities that it performs for other devices. So, when it comes tomanaging JUNOS devices with Ansible, we need to make some allowances andadjustments.
Instead of using SSH directly, we make use of NETCONF interface provided by thePython PyEZ and NETCONF libraries. It's this reason that requires us to install thePyEZ framework and the all of the supporting modules such as ncclient and paramiko instep 1.
We tell Ansible not to communicate with the nodes directly over SSH by using theansible_connection=local directive in the inventory file. This results in the modules beinginvoked locally on the management host. The modules are still able to understand thatthey need to work on behalf of a remote JUNOS node, so they invoke the necessaryNETCONF facilities to get the job done.
It is perhaps a little confusing that the underlying NETCONF facilitiesused on the local management host still actually use SSH in order tocommunicate to the JUNOS host. They connect directly to the NETCONF-over-SSH subsystem, and as a result need to understand the detailsrequired for authentication, for which they refer to the per-host variablesdefined in the inventory file, even though the connection mode is local.
||||||||||||||||||||
||||||||||||||||||||

An incompatibility in the underlying NETCONF and SSH libraries is the reason that weneed to disable SSH host key checking in step 3. The first time that an SSH clientconnects to a host, a key exchange and caching exercise is usually done and, ininteractive sessions, this involves the user having an opportunity to validate the hostkey. This interaction gets blocked when Ansible invokes the automatic tasks, so to workaround that problem, we disable the host key checking.
But once the SSH host key checking is disabled, and the JUNOS element is correctlyregistered within the inventory database, normal Ansible business can continue, and insteps 5 and step 6 we see some examples of so-called ad-hoc commands, one involvingthe ping module and one invoking the JUNOS_facts module to connect to the JUNOS deviceand extract information.
At the time of writing, the Ansible core support for JUNOS devices is in the previewstatus, which means it is subject to change, but it currently includes a wide range offunctionality, including the following notable modules.
Module Capabilities
junos_commandAbility to run a CLI command on a Junos device and return the output ineither plain-text, XML, or JSON format. Can implement wait/retry logic.
junos_config
Ability to upload a configuration fragment to the Junos host in any of plain-text, XML, JSON or set-mode command format. Can optionally backup thecurrent configuration file before applying any changes.
junos_facts
Ability to connect to a Junos host and extract a dictionary of useful dataincluding software version, and optionally, a download of the configurationfile.
junos_rpcAbility to run an arbitrary NETCONF RPC on a Junos host with arguments.Output format can be XML (default), plain-text or JSON.
junos_static_route
Higher-level abstraction of junos_config allowing Ansible playbook-writer tocreate/delete/manipulate static routing entries.
Technet24.ir||||||||||||||||||||
||||||||||||||||||||

The full list of Ansible core modules for Junos can be found here: http://docs.ansible.com/ansible/latest/list_of_network_modules.html#junos.
In addition to this, Juniper has its own GitHub-hosted repository of similar andenhanced functionality, which can be installed by using the ansible-galaxy tools. Togetherthis can make Ansible a powerful choice in an environment where it's necessary tointegrate automation development together with other enterprise technologies.
||||||||||||||||||||
||||||||||||||||||||

Technet24.ir||||||||||||||||||||
||||||||||||||||||||
Extracting estate-wide configurationsIn this recipe, we'll make use of Ansible for JUNOS in order to have the configurationfiles from all of our routers copied back to the central Ansible control and managementserver. We'll define the hosts that we want managed, and how to authenticate with them,and we'll write a playbook—a series of activities that daisy-chain together—in order toorchestrate the activity.
||||||||||||||||||||
||||||||||||||||||||

Technet24.ir||||||||||||||||||||
||||||||||||||||||||

Getting readyIn order to complete this recipe, you need a working Ansible environment, and youshould have installed the PyEZ framework and related NETCONF client libraries inorder to be able to communicate with the JUNOS nodes with NETCONF-over-SSH.
||||||||||||||||||||
||||||||||||||||||||

Technet24.ir||||||||||||||||||||
||||||||||||||||||||
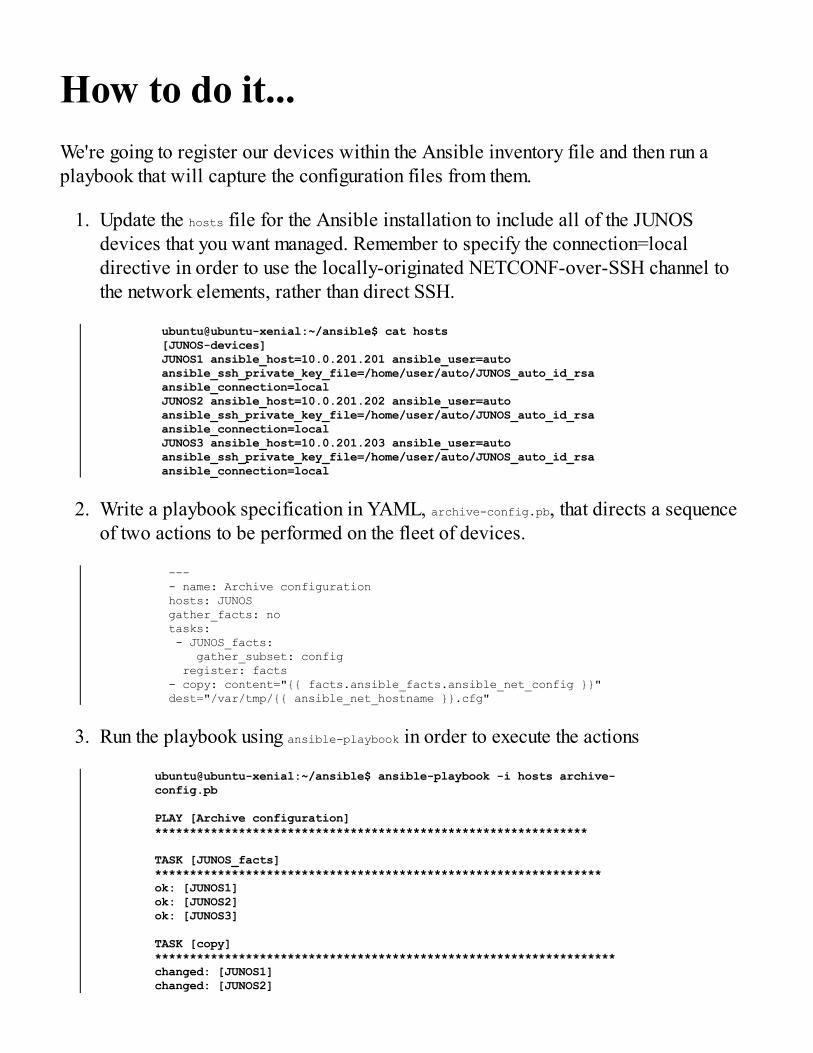
How to do it...We're going to register our devices within the Ansible inventory file and then run aplaybook that will capture the configuration files from them.
1. Update the hosts file for the Ansible installation to include all of the JUNOSdevices that you want managed. Remember to specify the connection=localdirective in order to use the locally-originated NETCONF-over-SSH channel tothe network elements, rather than direct SSH.
ubuntu@ubuntu-xenial:~/ansible$ cat hosts [JUNOS-devices] JUNOS1 ansible_host=10.0.201.201 ansible_user=auto ansible_ssh_private_key_file=/home/user/auto/JUNOS_auto_id_rsa ansible_connection=local JUNOS2 ansible_host=10.0.201.202 ansible_user=auto ansible_ssh_private_key_file=/home/user/auto/JUNOS_auto_id_rsa ansible_connection=local JUNOS3 ansible_host=10.0.201.203 ansible_user=auto ansible_ssh_private_key_file=/home/user/auto/JUNOS_auto_id_rsa ansible_connection=local
2. Write a playbook specification in YAML, archive-config.pb, that directs a sequenceof two actions to be performed on the fleet of devices.
--- - name: Archive configuration hosts: JUNOS gather_facts: no tasks: - JUNOS_facts: gather_subset: config register: facts - copy: content="{{ facts.ansible_facts.ansible_net_config }}" dest="/var/tmp/{{ ansible_net_hostname }}.cfg"
3. Run the playbook using ansible-playbook in order to execute the actions
ubuntu@ubuntu-xenial:~/ansible$ ansible-playbook -i hosts archive- config.pb
PLAY [Archive configuration] **************************************************************
TASK [JUNOS_facts] **************************************************************** ok: [JUNOS1] ok: [JUNOS2] ok: [JUNOS3]
TASK [copy] ****************************************************************** changed: [JUNOS1] changed: [JUNOS2]
||||||||||||||||||||
||||||||||||||||||||

changed: [JUNOS3]
PLAY RECAP ******************************************************************** JUNOS1 : ok=2 changed=1 unreachable=0 failed=0 JUNOS2 : ok=2 changed=1 unreachable=0 failed=0 JUNOS3 : ok=2 changed=1 unreachable=0 failed=0
Check the /var/tmp/ directory to find the resulting files.
ubuntu@ubuntu-xenial:~/ansible$ ls -l /var/tmp/total 3404-rw-rw-r-- 1 ubuntu ubuntu 24816 Sep 17 06:03 JUNOS1.cfg-rw-rw-r-- 1 ubuntu ubuntu 9846 Sep 17 06:03 JUNOS2.cfg-rw-rw-r-- 1 ubuntu ubuntu 14250 Sep 17 06:03 JUNOS3.cfg
Technet24.ir||||||||||||||||||||
||||||||||||||||||||


How it works...All of the JUNOS OS devices are placed within the hosts inventory file in a group calledJUNOS-devices, using the INI-file style [group] syntax. This allows us to refer to thecollective, rather than individual hosts, when we go to define actions and tasks.
Then we create a playbook, which is a set of task definitions. In our case, we have usedone playbook that consists of two tasks, executed in sequence:
1. JUNOS_facts: The module to extract basic platform and inventory information,including configuration.
2. copy: An Ansible core module used to manipulate files.
The playbook defines the scope of the activities as JUNOS-devices. This could be a singlehost, a host group or a host pattern, but in our case it's a reference to the group in theinventory file.
The JUNOS_facts task is given a gather_subset: config key-value pair as a sub-parameter.This instructs it to augment its usual behaviour of collecting basic system facts with aprocess to actively extract the currently committed configuration.
It also contains the register directive which is the main directive to extract output fromAnsible tasks. The register directive creates a playbook-scope variable that can be usedby subsequent tasks in the play. So in our case, we register our interest in the output ofthe fact extraction process, which is documented to be a Python dictionary of varioususeful properties, and give it a simple name, facts. This is then usable by subsequentmodules.
The second task in the play proceeds to copy a file into the /var/tmp directory on thelocal Ansible management control system. It uses Jinja2-style {{ template substitution }}in order to expand the facts variable that its predecessor has captured. In this case, theconfiguration on the JUNOS router is available within the facts dictionary, so thecopying task can directly refer to that content and output it to a destination file. Thedestination file is determined also through variable substitution. We use theansible_net_hostname variable to obtain the name of the remote JUNOS device.
So for each affected host, Ansible proceeds to run each of the named tasks against thehost, using the variables that we've defined in the inventory file. When a task runs, you'll
Technet24.ir||||||||||||||||||||
||||||||||||||||||||

notice that it has one of the several return codes:
Response Meaning
ok The operation completed successfully.
changed The operation completed and the internal state of the resource was changed.
unreachable The operation couldn't complete because the host couldn't be reached.
failed The operation was attempted but didn't complete successfully.
The play continues to run while the operations succeed, and the copy task notes that it haschanged the destination file through its operation, so it returns the changed response.
If you run the playbook again, you'll see that the copy operation is smartenough to understand when the content hasn't changed, and on the secondtime through, it will simply record an ok response.
The end result is a directory containing the configuration files from all of the JUNOSdevices declared in the inventory file.
||||||||||||||||||||
||||||||||||||||||||

Technet24.ir||||||||||||||||||||
||||||||||||||||||||

There's more...Quite often when we're trying to do a combined task across a large fleet of devices, it isuseful to break down any serialization of the process. Ansible can help with thatbecause it is able to run a playbook task list in parallel forked threads. If we define the -f switch on the invocation of the ansible-playbook, the job can be divided down into thespecified number of threads.
||||||||||||||||||||
||||||||||||||||||||

Technet24.ir||||||||||||||||||||
||||||||||||||||||||

Performing platform-specific or group-specific operationsIn this recipe, we'll build on the experiences of previous recipes by using Ansible todeploy to configurations to a restricted set of devices without our estate, perhaps basedupon either hardware type or software type. We'll explore adding variables to ourinventory record which can influence playbooks, and we'll also look at dynamicallydetermining playbook execution.
||||||||||||||||||||
||||||||||||||||||||

Technet24.ir||||||||||||||||||||
||||||||||||||||||||

Getting readyIn order to complete this recipe, you need a working Ansible environment, and youshould have installed the PyEZ framework and related NETCONF client libraries inorder to be able to communicate with the JUNOS nodes with NETCONF-over-SSH.
||||||||||||||||||||
||||||||||||||||||||

Technet24.ir||||||||||||||||||||
||||||||||||||||||||

How to do it...We're going to update our inventory list to add a custom variable to each host recordwhich defines its hardware type, and then we're going to run a playbook that selectivelyadds some firewall configuration, based on the value of this variable.
1. Modify our inventory file in order to collect together all of the common variablesunder one INI-style group called [JUNOS-devices:vars].
[JUNOS-devices:vars] ansible_user=auto ansible_ssh_private_key_file=/home/user/auto/JUNOS_auto_id_rsa ansible_connection=local
2. Then define the JUNOS devices themselves with the variables that actually varyper-host.
[JUNOS-devices] JUNOS1 ansible_host=10.0.201.201 hardware=vm JUNOS2 ansible_host=10.0.201.202 hardware=mx960-mpc JUNOS3 ansible_host=10.0.201.203 hardware=mx960-dpc
3. Create a playbook YAML definition, config.pb, to call upon the JUNOS_config modulein order to apply set-mode style configuration to the JUNOS device. Use the whenmodifier to specify a condition for when the activity should occur.
--- - name: Conditional configuration hosts: JUNOS gather_facts: no tasks: - JUNOS_config: lines: - set firewall filter BORDER term 10 from protocol icmp - set firewall filter BORDER term 10 then reject comment: Firewall filter update when: hardware == "mx960-mpc"
4. Use the ansible-playbook command in order to invoke the playbook and see theresults.
ubuntu@ubuntu-xenial:~/ansible$ ansible-playbook -i hosts config.pb
PLAY [Conditional configuration] ******************************************************* **********************************
TASK [JUNOS_config] ***************************************************** ************************************
||||||||||||||||||||
||||||||||||||||||||

skipping: [JUNOS1] ok: [JUNOS2] skipping: [JUNOS3]
PLAY RECAP ************************************************* **************************************** JUNOS1 : ok=0 changed=0 unreachable=0 failed=0 JUNOS2 : ok=1 changed=1 unreachable=0 failed=0 JUNOS3 : ok=0 changed=0 unreachable=0 failed=0
5. Modify the playbook specification to include an initial JUNOS_facts task. Use this tocapture the software version of the device in question and then adjust the whenmodifier to make a decision based upon this, rather than the hardware.
--- - name: Conditional configuration hosts: JUNOS gather_facts: no tasks: - JUNOS_facts: gather_subset: config register: facts - JUNOS_config: lines: - set firewall filter BORDER term 10 from protocol icmp - set firewall filter BORDER term 10 then reject comment: Firewall filter update when: facts.ansible_facts.ansible_net_version == "15.1F6- S5.6"
6. Run the playbook again and observe that Ansible now completes the sameconfiguration tasks on a different device.
ubuntu@ubuntu-xenial:~/ansible$ ansible-playbook -i hosts config.pb
PLAY [Conditional configuration] ****************************************************************
TASK [JUNOS_facts] **************************************************************** ok: [JUNOS1] ok: [JUNOS2] ok: [JUNOS3]
TASK [JUNOS_config] ************************************************************* ok: [JUNOS1] skipping: [JUNOS2] skipping: [JUNOS3]
PLAY RECAP *************************************************************** JUNOS1 : ok=2 changed=1 unreachable=0 failed=0 JUNOS2 : ok=1 changed=0 unreachable=0 failed=0 JUNOS3 : ok=1 changed=0 unreachable=0 failed=0
Technet24.ir||||||||||||||||||||
||||||||||||||||||||


Technet24.ir||||||||||||||||||||
||||||||||||||||||||

How it works...The playbook execution environment inherits all of the variables defined with the hostinventory specification so it is able to act upon assertions or other information presenttherein. When Ansible reads the group specifications, it also looks for a section in thehosts file with the same name as the group suffixed with :vars, in our case JUNOS-devices:vars. It applies the variables observed in this section to all devices within themain JUNOS-devices section.
In the first playbook, we simply had the JUNOS_config task run on the condition that thehardware variable that we defined in the hosts file was an appropriate value. So if wewent to the trouble to class each device under management and record it within theinventory file, this would be a useful way to perform hardware-specific activitiesacross the whole fleet of devices.
Sometimes though, we need to make a decision based upon what we have seen in thefield. In the second playbook, we first perform an exploratory JUNOS_facts task on alldevices under management and ensure that this will register its captured facts in avariable accessible to the later playbook tasks.
Then, once the JUNOS_facts task has run, the JUNOS_config task can run as previously, but itcan act on the information learned from the first task. We can use the when modifier inorder to limit execution of the JUNOS_config task to situations when the data obtained fromthe fact-deriving mission exhibits the characteristics we want. In our case, we use thisability to verify the software version.
||||||||||||||||||||
||||||||||||||||||||

Technet24.ir||||||||||||||||||||
||||||||||||||||||||

Using variables and vaultsIn this recipe, we'll explore one of the recommended Ansible principles of separatinghost inventory information from variables that define per-host and per-group behaviour.We've already seen in the previous recipes that we can break out variables into a groupdefinition within the Ansible inventory file, and in this recipe, we'll take it further bymaking a specific file to define per-group variables. We'll consider the case wheresome of the variables in that per-group profile might contain sensitive information andrequire protection. Indeed that is the case for our use of the JUNOS_* Ansible core modulesbecause they require us to communicate SSH username and passwords.
||||||||||||||||||||
||||||||||||||||||||

Technet24.ir||||||||||||||||||||
||||||||||||||||||||

Getting readyIn order to complete this recipe, you need a working Ansible environment. You shouldalso have installed the PyEZ framework and related NETCONF client libraries in orderto be able to communicate with the JUNOS nodes with NETCONF-over-SSH.
||||||||||||||||||||
||||||||||||||||||||

Technet24.ir||||||||||||||||||||
||||||||||||||||||||

How to do it...We're going to create a new Ansible host inventory with a group to encapsulate all ofour JUNOS OS devices. We'll define per-group variables for the JUNOS OS devices ina separate file and we'll encrypt that file by using an Ansible vault.
1. First of all, create an Ansible hosts file to describe the estate of devices. Includewith each host the IP address and the port number of the NETCONF-over-SSHservice:
[JUNOS-devices] JUNOS1 ansible_host=10.0.201.201 ansible_port=830 JUNOS2 ansible_host=10.0.201.202 ansible_port=830 JUNOS3 ansible_host=10.0.201.203 ansible_port=830
2. Create a subdirectory in the Ansible inventory directory—the directory thatcontains the host files—and name it group_vars.
ubuntu@ubuntu-xenial:~/ansible$ mkdir group_vars
3. In this directory, create a YAML-file specifying the group-level variables thatapplies to all hosts in JUNOS-devices. In this, we're going to include a common SSHusername and password, rather than using a key-based authentication.
--- ansible_connection: local netconf_auth: username: auto password: my-secret-password
4. In order to keep this file under lock and key, use the ansible-vault utility to encryptthe file with a password.
ubuntu@ubuntu-xenial:~/ansible/group_vars$ ansible-vault encrypt JUNOS-devices.yml New Vault password: [enter a password here] Confirm New Vault password: [repeat the password] Encryption successful
5. Now, to test out the Ansible vault configuration, create a playbook that simplyextracts the facts from the JUNOS devices in the inventory and reports the sofwareversion. Call this file facts.pb.
--- - name: Getting facts using vault secured password hosts: JUNOS-devices gather_facts: no tasks:
||||||||||||||||||||
||||||||||||||||||||

- JUNOS_facts: gather_subset: config provider: host: "{{ ansible_host }}" port: "{{ ansible_port }}" username: "{{ username }}" password: "{{ password }}" register: facts - debug: var: facts.ansible_facts.ansible_net_version
6. Run the playbook to see the interaction with the secure vault.
ubuntu@ubuntu-xenial:~/ansible$ ansible-playbook -i hosts facts.pb ERROR! Decryption failed on /home/ubuntu/ansible/group_vars/JUNOS-devices.yml
7. Ansible is unable to read the file JUNOS-devices.yml, because it's been encrypted.However, Ansible can read the file if we provide the password as we invoke theplaybook. We can do that with the --ask-vault-pass switch.
ubuntu@ubuntu-xenial:~/ansible$ ansible-playbook --ask-vault- pass -i hosts facts.pb Vault password:
PLAY [Getting facts using vault secured password] ********************************************************
TASK [JUNOS_facts] ******************************************************* ok: [JUNOS1] ok: [JUNOS2] ok: [JUNOS3]
TASK [debug] ************************************************************** ok: [JUNOS1] => { "facts.ansible_facts.ansible_net_version": "15.1F6-S5.6" } ok: [JUNOS2] => { "facts.ansible_facts.ansible_net_version": "15.1F4-S7.1" } ok: [JUNOS3] => { "facts.ansible_facts.ansible_net_version": "14.1R6.4" } PLAY RECAP ************************************************************* JUNOS1 : ok=2 changed=0 unreachable=0 failed=0 JUNOS2 : ok=2 changed=0 unreachable=0 failed=0 JUNOS3 : ok=2 changed=0 unreachable=0 failed=0
Technet24.ir||||||||||||||||||||
||||||||||||||||||||

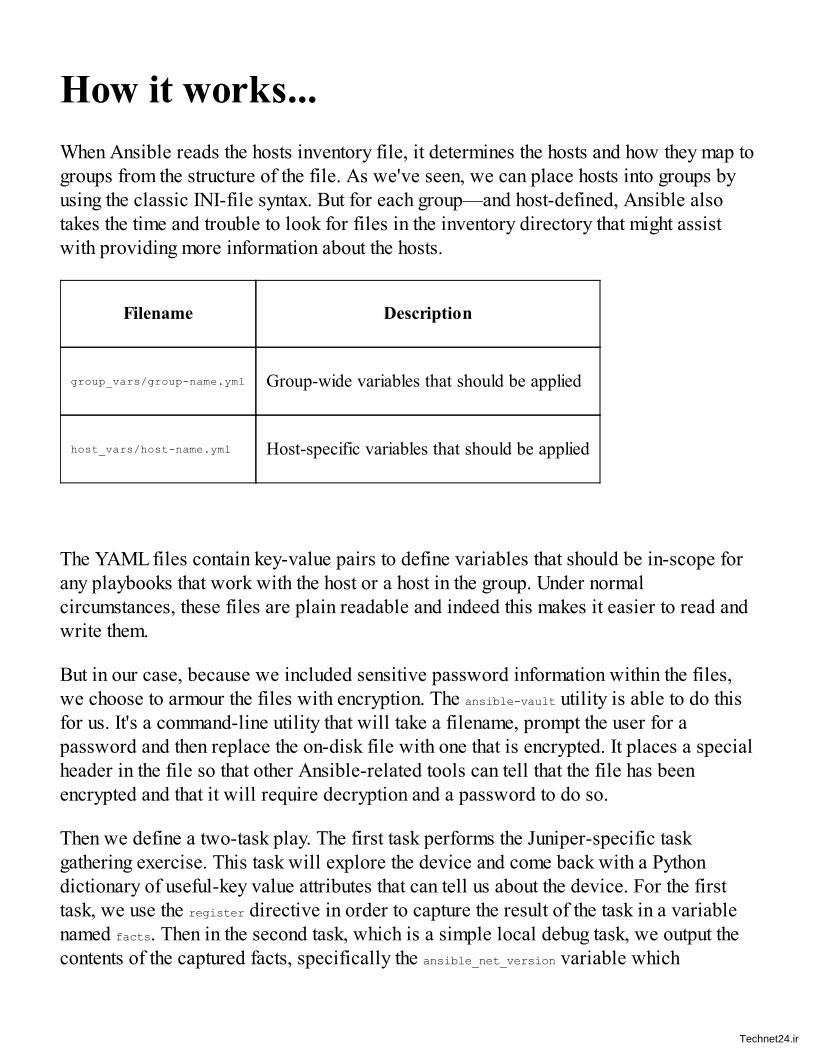
How it works...When Ansible reads the hosts inventory file, it determines the hosts and how they map togroups from the structure of the file. As we've seen, we can place hosts into groups byusing the classic INI-file syntax. But for each group—and host-defined, Ansible alsotakes the time and trouble to look for files in the inventory directory that might assistwith providing more information about the hosts.
Filename Description
group_vars/group-name.yml Group-wide variables that should be applied
host_vars/host-name.yml Host-specific variables that should be applied
The YAML files contain key-value pairs to define variables that should be in-scope forany playbooks that work with the host or a host in the group. Under normalcircumstances, these files are plain readable and indeed this makes it easier to read andwrite them.
But in our case, because we included sensitive password information within the files,we choose to armour the files with encryption. The ansible-vault utility is able to do thisfor us. It's a command-line utility that will take a filename, prompt the user for apassword and then replace the on-disk file with one that is encrypted. It places a specialheader in the file so that other Ansible-related tools can tell that the file has beenencrypted and that it will require decryption and a password to do so.
Then we define a two-task play. The first task performs the Juniper-specific taskgathering exercise. This task will explore the device and come back with a Pythondictionary of useful-key value attributes that can tell us about the device. For the firsttask, we use the register directive in order to capture the result of the task in a variablenamed facts. Then in the second task, which is a simple local debug task, we output thecontents of the captured facts, specifically the ansible_net_version variable which
Technet24.ir||||||||||||||||||||
||||||||||||||||||||

encapsulates the software version information.
When we launch ansible-playbook however, it cannot read the group_vars/JUNOS-devices file,because it is encrypted. Ansible recognizes the encryption header and prompts the userfor a password. After it successfully opens the vaulted file, it can progress the play asdefined in the playbook.
In this way, we've managed to take all the best precautions to protect sensitivecredential information used for accessing our device, but we have also managed to unifyall activities that require the access under the umbrella of a single supervising agentwhich can unlock and provide the data as required.
As of Ansible 2.3, there is support for providing SSH private key materialfrom within variables vaulted within files, but unfortunately this is onlyapplicable to native Ansible SSH connected devices. For JUNOS, theJUNOS modules are limited to support for specifying username, passwordand private key file—as we did previously. This is subtly different ofcourse, because in this case the actual key contents are kept outside of thesecure Ansible vault. If the SSH key material is password protected, thenthe underlying NETCONF client may be able to use the Ansible-providedpassword to unlock the SSH key, but this is quite dependent on NETCONFclient functionality.
||||||||||||||||||||
||||||||||||||||||||