arduino cookbook
TRANSCRIPT


Arduino Cookbookby Michael Margolis
Copyright © 2011 Michael Margolis and Nicholas Weldin. All rights reserved.Printed in the United States of America.
Published by O’Reilly Media, Inc., 1005 Gravenstein Highway North, Sebastopol, CA 95472.
O’Reilly books may be purchased for educational, business, or sales promotional use. Online editionsare also available for most titles (http://my.safaribooksonline.com). For more information, contact ourcorporate/institutional sales department: (800) 998-9938 or [email protected].
Editors: Simon St. Laurent and Brian JepsonProduction Editor: Teresa ElseyCopyeditor: Audrey DoyleProofreader: Teresa Elsey
Indexer: Lucie HaskinsCover Designer: Karen MontgomeryInterior Designer: David FutatoIllustrator: Robert Romano
Printing History:March 2011: First Edition.
Nutshell Handbook, the Nutshell Handbook logo, and the O’Reilly logo are registered trademarks ofO’Reilly Media, Inc. Arduino Cookbook, the image of a toy rabbit, and related trade dress are trademarksof O’Reilly Media, Inc.
Many of the designations used by manufacturers and sellers to distinguish their products are claimed astrademarks. Where those designations appear in this book, and O’Reilly Media, Inc., was aware of atrademark claim, the designations have been printed in caps or initial caps.
While every precaution has been taken in the preparation of this book, the publisher and authors assumeno responsibility for errors or omissions, or for damages resulting from the use of the information con-tained herein.
ISBN: 978-0-596-80247-9
[LSI]
1299267108
www.it-ebooks.info

Table of Contents
Preface . . . . . . . . . . . . . . . . . . . . . . . . . . . . . . . . . . . . . . . . . . . . . . . . . . . . . . . . . . . . . . . . . . . . xiii
1. Getting Started . . . . . . . . . . . . . . . . . . . . . . . . . . . . . . . . . . . . . . . . . . . . . . . . . . . . . . . . . 11.1 Installing the Integrated Development Environment (IDE) 41.2 Setting Up the Arduino Board 61.3 Using the Integrated Development Environment (IDE) to Prepare
an Arduino Sketch 81.4 Uploading and Running the Blink Sketch 111.5 Creating and Saving a Sketch 131.6 Using Arduino 15
2. Making the Sketch Do Your Bidding . . . . . . . . . . . . . . . . . . . . . . . . . . . . . . . . . . . . . . . 192.1 Structuring an Arduino Program 202.2 Using Simple Primitive Types (Variables) 212.3 Using Floating-Point Numbers 232.4 Working with Groups of Values 252.5 Using Arduino String Functionality 282.6 Using C Character Strings 302.7 Splitting Comma-Separated Text into Groups 322.8 Converting a Number to a String 342.9 Converting a String to a Number 36
2.10 Structuring Your Code into Functional Blocks 382.11 Returning More Than One Value from a Function 412.12 Taking Actions Based on Conditions 442.13 Repeating a Sequence of Statements 452.14 Repeating Statements with a Counter 472.15 Breaking Out of Loops 492.16 Taking a Variety of Actions Based on a Single Variable 502.17 Comparing Character and Numeric Values 522.18 Comparing Strings 542.19 Performing Logical Comparisons 55
v
www.it-ebooks.info

2.20 Performing Bitwise Operations 562.21 Combining Operations and Assignment 58
3. Using Mathematical Operators . . . . . . . . . . . . . . . . . . . . . . . . . . . . . . . . . . . . . . . . . . . 613.1 Adding, Subtracting, Multiplying, and Dividing 613.2 Incrementing and Decrementing Values 623.3 Finding the Remainder After Dividing Two Values 633.4 Determining the Absolute Value 643.5 Constraining a Number to a Range of Values 653.6 Finding the Minimum or Maximum of Some Values 663.7 Raising a Number to a Power 673.8 Taking the Square Root 683.9 Rounding Floating-Point Numbers Up and Down 68
3.10 Using Trigonometric Functions 693.11 Generating Random Numbers 703.12 Setting and Reading Bits 723.13 Shifting Bits 753.14 Extracting High and Low Bytes in an int or long 773.15 Forming an int or long from High and Low Bytes 78
4. Serial Communications . . . . . . . . . . . . . . . . . . . . . . . . . . . . . . . . . . . . . . . . . . . . . . . . . 814.1 Sending Debug Information from Arduino to Your Computer 864.2 Sending Formatted Text and Numeric Data from Arduino 894.3 Receiving Serial Data in Arduino 924.4 Sending Multiple Text Fields from Arduino in a Single Message 954.5 Receiving Multiple Text Fields in a Single Message in Arduino 984.6 Sending Binary Data from Arduino 1014.7 Receiving Binary Data from Arduino on a Computer 1054.8 Sending Binary Values from Processing to Arduino 1074.9 Sending the Value of Multiple Arduino Pins 109
4.10 How to Move the Mouse Cursor on a PC or Mac 1124.11 Controlling Google Earth Using Arduino 1154.12 Logging Arduino Data to a File on Your Computer 1214.13 Sending Data to Two Serial Devices at the Same Time 1244.14 Receiving Serial Data from Two Devices at the Same Time 1284.15 Setting Up Processing on Your Computer to Send
and Receive Serial Data 131
5. Simple Digital and Analog Input . . . . . . . . . . . . . . . . . . . . . . . . . . . . . . . . . . . . . . . . . 1335.1 Using a Switch 1365.2 Using a Switch Without External Resistors 1395.3 Reliably Detecting the Closing of a Switch 1415.4 Determining How Long a Switch Is Pressed 144
vi | Table of Contents
www.it-ebooks.info

5.5 Reading a Keypad 1495.6 Reading Analog Values 1525.7 Changing the Range of Values 1545.8 Reading More Than Six Analog Inputs 1555.9 Displaying Voltages Up to 5V 158
5.10 Responding to Changes in Voltage 1615.11 Measuring Voltages More Than 5V (Voltage Dividers) 162
6. Getting Input from Sensors . . . . . . . . . . . . . . . . . . . . . . . . . . . . . . . . . . . . . . . . . . . . . 1656.1 Detecting Movement 1676.2 Detecting Light 1706.3 Detecting Motion (Integrating Passive Infrared Detectors) 1716.4 Measuring Distance 1736.5 Measuring Distance Accurately 1766.6 Detecting Vibration 1806.7 Detecting Sound 1816.8 Measuring Temperature 1856.9 Reading RFID Tags 187
6.10 Tracking the Movement of a Dial 1906.11 Tracking the Movement of More Than One Rotary Encoder 1936.12 Tracking the Movement of a Dial in a Busy Sketch 1956.13 Using a Mouse 1976.14 Getting Location from a GPS 2016.15 Detecting Rotation Using a Gyroscope 2066.16 Detecting Direction 2086.17 Getting Input from a Game Control Pad (PlayStation) 2116.18 Reading Acceleration 213
7. Visual Output . . . . . . . . . . . . . . . . . . . . . . . . . . . . . . . . . . . . . . . . . . . . . . . . . . . . . . . . 2177.1 Connecting and Using LEDs 2207.2 Adjusting the Brightness of an LED 2237.3 Driving High-Power LEDs 2247.4 Adjusting the Color of an LED 2267.5 Sequencing Multiple LEDs: Creating a Bar Graph 2297.6 Sequencing Multiple LEDs: Making a Chase Sequence (Knight
Rider) 2327.7 Controlling an LED Matrix Using Multiplexing 2347.8 Displaying Images on an LED Matrix 2367.9 Controlling a Matrix of LEDs: Charlieplexing 239
7.10 Driving a 7-Segment LED Display 2457.11 Driving Multidigit, 7-Segment LED Displays: Multiplexing 2487.12 Driving Multidigit, 7-Segment LED Displays Using MAX7221 Shift
Registers 250
Table of Contents | vii
www.it-ebooks.info

7.13 Controlling an Array of LEDs by Using MAX72xx Shift Registers 2537.14 Increasing the Number of Analog Outputs Using PWM Extender
Chips (TLC5940) 2557.15 Using an Analog Panel Meter As a Display 259
8. Physical Output . . . . . . . . . . . . . . . . . . . . . . . . . . . . . . . . . . . . . . . . . . . . . . . . . . . . . . . 2618.1 Controlling the Position of a Servo 2648.2 Controlling One or Two Servos with a Potentiometer
or Sensor 2668.3 Controlling the Speed of Continuous Rotation Servos 2678.4 Controlling Servos from the Serial Port 2698.5 Driving a Brushless Motor (Using a Hobby Speed Controller) 2718.6 Controlling Solenoids and Relays 2728.7 Making an Object Vibrate 2738.8 Driving a Brushed Motor Using a Transistor 2768.9 Controlling the Direction of a Brushed Motor
with an H-Bridge 2778.10 Controlling the Direction and Speed of a Brushed Motor with an
H-Bridge 2808.11 Using Sensors to Control the Direction and Speed of Brushed
Motors (L293 H-Bridge) 2828.12 Driving a Bipolar Stepper Motor 2878.13 Driving a Bipolar Stepper Motor (Using the EasyDriver Board) 2908.14 Driving a Unipolar Stepper Motor (ULN2003A) 293
9. Audio Output . . . . . . . . . . . . . . . . . . . . . . . . . . . . . . . . . . . . . . . . . . . . . . . . . . . . . . . . . 2979.1 Playing Tones 2999.2 Playing a Simple Melody 3019.3 Generating More Than One Simultaneous Tone 3039.4 Generating Audio Tones and Fading an LED 3059.5 Playing a WAV File 3089.6 Controlling MIDI 3119.7 Making an Audio Synthesizer 314
10. Remotely Controlling External Devices . . . . . . . . . . . . . . . . . . . . . . . . . . . . . . . . . . . 31710.1 Responding to an Infrared Remote Control 31810.2 Decoding Infrared Remote Control Signals 32110.3 Imitating Remote Control Signals 32410.4 Controlling a Digital Camera 32710.5 Controlling AC Devices by Hacking a Remote Controlled Switch 330
11. Using Displays . . . . . . . . . . . . . . . . . . . . . . . . . . . . . . . . . . . . . . . . . . . . . . . . . . . . . . . . 33311.1 Connecting and Using a Text LCD Display 334
viii | Table of Contents
www.it-ebooks.info

11.2 Formatting Text 33711.3 Turning the Cursor and Display On or Off 34011.4 Scrolling Text 34211.5 Displaying Special Symbols 34511.6 Creating Custom Characters 34711.7 Displaying Symbols Larger Than a Single Character 34911.8 Displaying Pixels Smaller Than a Single Character 35211.9 Connecting and Using a Graphical LCD Display 355
11.10 Creating Bitmaps for Use with a Graphical Display 35911.11 Displaying Text on a TV 361
12. Using Time and Dates . . . . . . . . . . . . . . . . . . . . . . . . . . . . . . . . . . . . . . . . . . . . . . . . . . 36712.1 Creating Delays 36712.2 Using millis to Determine Duration 36812.3 More Precisely Measuring the Duration of a Pulse 37212.4 Using Arduino As a Clock 37312.5 Creating an Alarm to Periodically Call a Function 38012.6 Using a Real-Time Clock 384
13. Communicating Using I2C and SPI . . . . . . . . . . . . . . . . . . . . . . . . . . . . . . . . . . . . . . . 38913.1 Controlling an RGB LED Using the BlinkM Module 39213.2 Using the Wii Nunchuck Accelerometer 39713.3 Interfacing to an External Real-Time Clock 40113.4 Adding External EEPROM Memory 40413.5 Reading Temperature with a Digital Thermometer 40813.6 Driving Four 7-Segment LEDs Using Only Two Wires 41213.7 Integrating an I2C Port Expander 41613.8 Driving Multidigit, 7-Segment Displays Using SPI 41813.9 Communicating Between Two or More Arduino Boards 421
14. Wireless Communication . . . . . . . . . . . . . . . . . . . . . . . . . . . . . . . . . . . . . . . . . . . . . . . 42514.1 Sending Messages Using Low-Cost Wireless Modules 42514.2 Connecting Arduino to a ZigBee or 802.15.4 Network 43114.3 Sending a Message to a Particular XBee 43814.4 Sending Sensor Data Between XBees 44014.5 Activating an Actuator Connected to an XBee 446
15. Ethernet and Networking . . . . . . . . . . . . . . . . . . . . . . . . . . . . . . . . . . . . . . . . . . . . . . 45115.1 Setting Up the Ethernet Shield 45315.2 Obtaining Your IP Address Automatically 45515.3 Resolving Hostnames to IP Addresses (DNS) 45815.4 Requesting Data from a Web Server 46215.5 Requesting Data from a Web Server Using XML 466
Table of Contents | ix
www.it-ebooks.info

15.6 Setting Up an Arduino to Be a Web Server 46915.7 Handling Incoming Web Requests 47115.8 Handling Incoming Requests for Specific Pages 47415.9 Using HTML to Format Web Server Responses 479
15.10 Serving Web Pages Using Forms (POST) 48315.11 Serving Web Pages Containing Large Amounts of Data 48615.12 Sending Twitter Messages 49315.13 Sending and Receiving Simple Messages (UDP) 49615.14 Getting the Time from an Internet Time Server 50215.15 Monitoring Pachube Feeds 50715.16 Sending Information to Pachube 510
16. Using, Modifying, and Creating Libraries . . . . . . . . . . . . . . . . . . . . . . . . . . . . . . . . . . 51516.1 Using the Built-in Libraries 51516.2 Installing Third-Party Libraries 51716.3 Modifying a Library 51816.4 Creating Your Own Library 52216.5 Creating a Library That Uses Other Libraries 527
17. Advanced Coding and Memory Handling . . . . . . . . . . . . . . . . . . . . . . . . . . . . . . . . . . 53117.1 Understanding the Arduino Build Process 53217.2 Determining the Amount of Free and Used RAM 53517.3 Storing and Retrieving Numeric Values in Program Memory 53717.4 Storing and Retrieving Strings in Program Memory 54017.5 Using #define and const Instead of Integers 54217.6 Using Conditional Compilations 543
18. Using the Controller Chip Hardware . . . . . . . . . . . . . . . . . . . . . . . . . . . . . . . . . . . . . . 54718.1 Storing Data in Permanent EEPROM Memory 55118.2 Using Hardware Interrupts 55418.3 Setting Timer Duration 55718.4 Setting Timer Pulse Width and Duration 55918.5 Creating a Pulse Generator 56218.6 Changing a Timer’s PWM Frequency 56518.7 Counting Pulses 56718.8 Measuring Pulses More Accurately 56918.9 Measuring Analog Values Quickly 571
18.10 Reducing Battery Drain 57218.11 Setting Digital Pins Quickly 574
A. Electronic Components . . . . . . . . . . . . . . . . . . . . . . . . . . . . . . . . . . . . . . . . . . . . . . . . 579
B. Using Schematic Diagrams and Data Sheets . . . . . . . . . . . . . . . . . . . . . . . . . . . . . . . 585
x | Table of Contents
www.it-ebooks.info

C. Building and Connecting the Circuit . . . . . . . . . . . . . . . . . . . . . . . . . . . . . . . . . . . . . . 591
D. Tips on Troubleshooting Software Problems . . . . . . . . . . . . . . . . . . . . . . . . . . . . . . . 595
E. Tips on Troubleshooting Hardware Problems . . . . . . . . . . . . . . . . . . . . . . . . . . . . . . 599
F. Digital and Analog Pins . . . . . . . . . . . . . . . . . . . . . . . . . . . . . . . . . . . . . . . . . . . . . . . . 603
G. ASCII and Extended Character Sets . . . . . . . . . . . . . . . . . . . . . . . . . . . . . . . . . . . . . . . 607
Index . . . . . . . . . . . . . . . . . . . . . . . . . . . . . . . . . . . . . . . . . . . . . . . . . . . . . . . . . . . . . . . . . . . . . 611
Table of Contents | xi
www.it-ebooks.info

Preface
This book was written by Michael Margolis with Nick Weldin to help you explore theamazing things you can do with Arduino.
Arduino is a family of microcontrollers (tiny computers) and a software creation envi-ronment that makes it easy for you to create programs (called sketches) that can interactwith the physical world. Things you make with Arduino can sense and respond totouch, sound, position, heat, and light. This type of technology, often referred to asphysical computing, is used in all kinds of things, from the iPhone to automobile elec-tronics systems. Arduino makes it possible for anyone—even people with no program-ming or electronics experience—to use this rich and complex technology.
Who This Book Is ForUnlike in most technical cookbooks, experience with software and hardware is notassumed. This book is aimed at a broad range of readers interested in using computertechnology to interact with the environment. It is for people who want to quickly findthe solution to hardware and software problems.
You may have no programming experience—perhaps you have a great idea for an in-teractive project but don’t have the skills to develop it. This book will help you learnwhat you need to know to write code that works, using examples that cover the kindsof tasks you want to perform.
If you have some programming experience but are new to Arduino, the book will helpyou become productive quickly by demonstrating how to implement specific Arduinocapabilities for your project.
People already using Arduino should find the content helpful for quickly learning newtechniques, which are explained using practical examples. This will help you to embarkon more complex projects by showing how to solve problems and use capabilities thatmay be new to you.
Experienced C/C++ programmers will find examples of how to use the low-level AVRresources (interrupts, timers, I2C, Ethernet, etc.) to build applications using theArduino environment.
xiii
www.it-ebooks.info

How This Book Is OrganizedThe book contains information that covers the broad range of the Arduino’s capabili-ties, from basic concepts and common tasks to advanced technology. Each techniqueis explained in a recipe that shows you how to implement a specific capability. You donot need to read the content in sequence.
Chapter 1, Getting Started, introduces the Arduino environment and provides help ongetting the Arduino development environment and hardware installed and working.
The next couple of chapters introduce Arduino software development. Chapter 2,Making the Sketch Do Your Bidding, covers essential software concepts and tasks, andChapter 3, Using Mathematical Operators, shows how to make use of the most commonmathematical functions.
Chapter 4, Serial Communications, describes how to get Arduino to connect and com-municate with your computer and other devices. Serial is the most common methodfor Arduino input and output, and this capability is used in many of the recipesthroughout the book.
Chapter 5, Simple Digital and Analog Input, introduces a range of basic techniques forreading digital and analog signals. Chapter 6, Getting Input from Sensors, builds on thiswith recipes that explain how to use devices that enable Arduino to sense touch, sound,position, heat, and light.
Chapter 7, Visual Output, covers controlling light. Recipes cover switching on one ormany LEDs and controlling brightness and color. This chapter explains how you candrive bar graphs and numeric LED displays, as well as create patterns and animationswith LED arrays. In addition, the chapter provides a general introduction to digital andanalog output for those who are new to this.
Chapter 8, Physical Output, explains how you can make things move by controllingmotors with Arduino. A wide range of motor types are covered: solenoids, servo motors,DC motors, and stepper motors.
Chapter 9, Audio Output, shows how to generate sound with Arduino through an out-put device such as a speaker. It covers playing simple tones and melodies and playingWAV files and MIDI.
Chapter 10, Remotely Controlling External Devices, describes techniques that can beused to interact with almost any device that uses some form of remote controller, in-cluding TV, audio equipment, cameras, garage doors, appliances, and toys. It buildson techniques used in previous chapters for connecting Arduino to devices andmodules.
Chapter 11, Using Displays, covers interfacing text and graphical LCD displays. Thechapter shows how you can connect these devices to display text, scroll or highlightwords, and create special symbols and characters.
xiv | Preface
www.it-ebooks.info

Chapter 12, Using Time and Dates, covers built-in Arduino time-related functions andintroduces many additional techniques for handling time delays, time measurement,and real-world times and dates.
Chapter 13, Communicating Using I2C and SPI, covers the Inter-Integrated Circuit(I2C) and Serial Peripheral Interface (SPI) standards. These standards provide simpleways for digital information to be transferred between sensors and Arduino. This chap-ter shows how to use I2C and SPI to connect to common devices. It also shows how toconnect two or more Arduino boards, using I2C for multiboard applications.
Chapter 14, Wireless Communication, covers wireless communication with XBee. Thischapter provides examples ranging from simple wireless serial port replacements tomesh networks connecting multiple boards to multiple sensors.
Chapter 15, Ethernet and Networking, describes the many ways you can use Arduinowith the Internet. It has examples that demonstrate how to build and use web clientsand servers and shows how to use the most common Internet communication protocolswith Arduino.
Arduino software libraries are a standard way of adding functionality to the Arduinoenvironment. Chapter 16, Using, Modifying, and Creating Libraries, explains how touse and modify software libraries. It also provides guidance on how to create your ownlibraries.
Chapter 17, Advanced Coding and Memory Handling, covers advanced programmingtechniques, and the topics here are more technical than the other recipes in this bookbecause they cover things that are usually concealed by the friendly Arduino wrapper.The techniques in this chapter can be used to make a sketch more efficient—they canhelp improve performance and reduce the code size of your sketches.
Chapter 18, Using the Controller Chip Hardware, shows how to access and use hard-ware functions that are not fully exposed through the documented Arduino language.It covers low-level usage of the hardware input/output registers, timers, and interrupts.
Appendix A, Electronic Components, provides an overview of the components usedthroughout the book.
Appendix B, Using Schematic Diagrams and Data Sheets, explains how to use schematicdiagrams and data sheets.
Appendix C, Building and Connecting the Circuit, provides a brief introduction to usinga breadboard, connecting and using external power supplies and batteries, and usingcapacitors for decoupling.
Appendix D, Tips on Troubleshooting Software Problems, provides tips on fixing com-pile and runtime problems.
Appendix E, Tips on Troubleshooting Hardware Problems, covers problems with elec-tronic circuits.
Preface | xv
www.it-ebooks.info

Appendix F, Digital and Analog Pins, provides tables indicating functionality providedby the pins on standard Arduino boards.
Appendix G, ASCII and Extended Character Sets, provides tables showing ASCIIcharacters.
What Was Left OutThere isn’t room in this book to cover electronics theory and practice, although guid-ance is provided for building the circuits used in the recipes. For more detail, readersmay want to refer to material that is widely available on the Internet or to books suchas the following:
• Make: Electronics by Charles Platt (O’Reilly)
• Getting Started in Electronics by Forrest Mims (Master Publishing)
• Physical Computing by Tom Igoe (Cengage)
• Practical Electronics for Inventors by Paul Scherz (McGraw-Hill)
This cookbook explains how to write code to accomplish specific tasks, but it is not anintroduction to programming. Relevant programming concepts are briefly explained,but there is insufficient room to cover the details. If you want to learn more aboutprogramming, you may want to refer to the Internet or to one of the following books:
• Practical C Programming by Steve Oualline (O’Reilly)
• A Book on C by Al Kelley and Ira Pohl (Addison-Wesley)
My favorite, although not really a beginner’s book, is the book I used to learnC programming:
• The C Programming Language by Brian W. Kernighan and Dennis M. Ritchie(Prentice Hall)
Code Style (About the Code)The code used throughout this book has been tailored to clearly illustrate the topiccovered in each recipe. As a consequence, some common coding shortcuts have beenavoided, particularly in the early chapters. Experienced C programmers often use richbut terse expressions that are efficient but can be a little difficult for beginners to read.For example, the early chapters increment variables using explicit expressions that areeasy for nonprogrammers to read:
result = result + 1; // increment the count
Rather than the following, commonly used by experienced programmers, that does thesame thing:
result++; // increment using the post increment operator
xvi | Preface
www.it-ebooks.info

Feel free to substitute your preferred style. Beginners should be reassured that there isno benefit in performance or code size in using the terse form.
Some programming expressions are so common that they are used in their terse form.For example, the loop expressions are written as follows:
for(int i=0; i < 4; i++)
This is equivalent to the following:
int i;for(i=0; i < 4; i = i+1)
See Chapter 2 for more details on these and other expressions used throughout thebook.
Good programming practice involves ensuring that values used are valid (garbage inequals garbage out) by checking them before using them in calculations. However, tokeep the code focused on the recipe topic, very little error-checking code has beenincluded.
Arduino Platform Release NotesThe code has been tested using Arduino releases from version 0018 through version0020. This book was written before Arduino v1.0 was finalized, and although almostall of the examples should still work, small changes required for running with v1.0 willbe published on the site for the book:
http://www.oreilly.com/catalog/9780596802479/
There’s also a link to errata there. Errata give readers a way to let us know about typos,errors, and other problems with the book. Errata will be visible on the page immedi-ately, and we’ll confirm them after checking them out. O’Reilly can also fix errata infuture printings of the book and on Safari, making for a better reader experience prettyquickly.
If you have problems making examples work, check the web link to see if the code hasbeen updated. If that doesn’t fix the problem, see Appendix D, which covers trouble-shooting software problems. The Arduino forum is a good place to post a question ifyou need more help: http://www.arduino.cc.
We hope to keep this book updated for future Arduino versions, and we will alsoincorporate suggestions and complaints into future editions.
If you like—or don’t like—this book, by all means, please let people know. Amazonreviews are one popular way to share your happiness (or lack of happiness), or you canleave reviews at the site for the book.
Preface | xvii
www.it-ebooks.info

Conventions Used in This BookThe following font conventions are used in this book:
ItalicIndicates pathnames, filenames, and program names; Internet addresses, such asdomain names and URLs; and new items where they are defined
Constant widthIndicates command lines and options that should be typed verbatim; names andkeywords in programs, including method names, variable names, and class names;and HTML element tags
Constant width boldIndicates emphasis in program code lines
Constant width italicIndicates text that should be replaced with user-supplied values
This icon signifies a tip, suggestion, or general note.
This icon indicates a warning or caution.
Using Code ExamplesThis book is here to help you make things with Arduino. In general, you may use thecode in this book in your programs and documentation. You do not need to contactus for permission unless you’re reproducing a significant portion of the code. For ex-ample, writing a program that uses several chunks of code from this book does notrequire permission. Selling or distributing a CD-ROM of examples from this bookdoes require permission. Answering a question by citing this book and quoting examplecode does not require permission. Incorporating a significant amount of example codefrom this book into your product’s documentation does require permission.
We appreciate, but do not require, attribution. An attribution usually includes the title,author, publisher, and ISBN. For example: “Arduino Cookbook by Michael Margoliswith Nick Weldin (O’Reilly). Copyright 2011 Michael Margolis and Nicholas Weldin,9780596802479.”
If you feel your use of code examples falls outside fair use or the permission given here,feel free to contact us at [email protected].
xviii | Preface
www.it-ebooks.info

Safari® Books OnlineSafari Books Online is an on-demand digital library that lets you easilysearch over 7,500 technology and creative reference books and videos tofind the answers you need quickly.
With a subscription, you can read any page and watch any video from our library online.Read books on your cell phone and mobile devices. Access new titles before they areavailable for print, and get exclusive access to manuscripts in development and postfeedback for the authors. Copy and paste code samples, organize your favorites, down-load chapters, bookmark key sections, create notes, print out pages, and benefit fromtons of other time-saving features.
O’Reilly Media has uploaded this book to the Safari Books Online service. To have fulldigital access to this book and others on similar topics from O’Reilly and other pub-lishers, sign up for free at http://my.safaribooksonline.com.
How to Contact UsWe have tested and verified the information in this book to the best of our ability, butyou may find that features have changed (or even that we have made a few mistakes!).Please let us know about any errors you find, as well as your suggestions for futureeditions, by writing to:
O’Reilly Media, Inc.1005 Gravenstein Highway NorthSebastopol, CA 95472800-998-9938 (in the United States or Canada)707-829-0515 (international/local)707-829-0104 (fax)
We have a web page for this book, where we list errata, examples, and any additionalinformation. You can access this page at:
http://www.oreilly.com/catalog/9780596802479
To comment or ask technical questions about this book, send email to:
For more information about our books, courses, conferences, and news, see our websiteat http://www.oreilly.com.
Find us on Facebook: http://facebook.com/oreilly
Follow us on Twitter: http://twitter.com/oreillymedia
Watch us on YouTube: http://www.youtube.com/oreillymedia
Preface | xix
www.it-ebooks.info

AcknowledgmentsNick Weldin’s contribution was invaluable for the completion of this book. It was90 percent written when Nick came on board—and without his skill and enthusiasm,it would still be 90 percent written. His hands-on experience running Arduino work-shops for all levels of users enabled us to make the advice in this book practical for ourbroad range of readers. Thank you, Nick, for your knowledge and genial collaborativenature.
Simon St. Laurent was the editor at O’Reilly who first expressed interest in this book.And in the end, he is the man who pulled it together. His support and encouragementkept us inspired as we sifted our way through the volumes of material necessary to dothe subject justice.
Brian Jepson helped me get started with the writing of this book. His vast knowledgeof things Arduino and his concern and expertise for communicating about technologyin plain English set a high standard. He was an ideal guiding hand for shaping the bookand making technology readily accessible for readers. We also have Brian to thank forthe XBee content in Chapter 14.
Audrey Doyle worked tirelessly to stamp out typos and grammatical errors in themanuscript and untangle some of the more convoluted expressions.
Philip Lindsay collaborated on Chapter 15, and his combination of deep technicalknowledge and clear understanding of the needs of nontechnical people was essentialin making the complex subject of Ethernet accessible.
Mikal Hart wrote recipes covering GPS and software serial. Mikal was the naturalchoice for this—not only because he wrote the libraries, but also because he is a fluentcommunicator, an Arduino enthusiast, and a pleasure to collaborate with.
Arduino is possible because of the creativity of the core Arduino development team:Massimo Banzi, David Cuartielles, Tom Igoe, Gianluca Martino, and David Mellis. Onbehalf of all Arduino users, I wish to express our appreciation for their efforts in makingthis fascinating technology simple and their generosity in making it free.
Special thanks to Alexandra Deschamps-Sonsino, CEO of Tinker London, whoseworkshops provided important understanding of the needs of users. Thanks also toPeter Knight, who has provided all kinds of clever Arduino solutions as well as the basisof a number of recipes in this book.
On behalf of everyone who has downloaded user-contributed Arduino libraries, Iwould like to thank the authors who have generously shared their knowledge.
The availability of a wide range of hardware is a large part of what makes Arduinoexciting—thanks to the suppliers for stocking and supporting a broad range of greatdevices. The following were helpful in providing hardware used in the book: SparkFun,Maker Store, Gravitech, and NKC Electronics. Other suppliers that have been helpful
xx | Preface
www.it-ebooks.info

include Modern Device, Liquidware, Adafruit, Makerbot Industries, Mindkits,Oomlout, and SK Pang.
Nick would like to thank Alexandra and Peter at Tinker London, as well as Brock Craft,and especially Daniel Soltis for all the workshops we have done together.
Nick would also like to thank everyone who has assisted at workshops, and participantswho asked a “silly” question, as there are no silly questions. Many of those have led toclarifications and corrections in this book.
Nick’s final thanks go to his family, Jeanie, Emily, and Finn, who agreed to let him dothis over their summer holiday, and of course, much longer after that than they origi-nally thought, and to his parents, Frank and Eva, for bringing him up to take thingsapart.
Last but not least, I express thanks to the following people:
Joshua Noble for introducing me to O’Reilly. His book, Programming Interactivity, ishighly recommended for those interested in broadening their knowledge in interactivecomputing.
Robert Lacy-Thompson for offering advice early on with the book.
Mark Margolis for his support and help as a sounding board in the book’s conceptionand development.
I thank my parents for helping me to see that the creative arts and technology were notdistinctive entities and that, when combined, they can lead to extraordinary results.
And finally, this book would not have been started or finished without the support ofmy wife, Barbara Faden. My grateful appreciation to her for keeping me motivated andfor her careful reading and contributions to the manuscript.
Preface | xxi
www.it-ebooks.info

CHAPTER 1
Getting Started
1.0 IntroductionThe Arduino environment has been designed to be easy to use for beginners who haveno software or electronics experience. With Arduino, you can build objects that canrespond to and/or control light, sound, touch, and movement. Arduino has been usedto create an amazing variety of things, including musical instruments, robots, lightsculptures, games, interactive furniture, and even interactive clothing.
If you’re not a beginner, please feel free to skip ahead to recipes thatinterest you.
Arduino is used in many educational programs around the world, particularly by de-signers and artists who want to easily create prototypes but do not need a deep under-standing of the technical details behind their creations. Because it is designed to be usedby nontechnical people, the software includes plenty of example code to demonstratehow to use the Arduino board’s various facilities.
Though it is easy to use, Arduino’s underlying hardware works at the same level ofsophistication that engineers employ to build embedded devices. People already work-ing with microcontrollers are also attracted to Arduino because of its agile developmentcapabilities and its facility for quick implementation of ideas.
Arduino is best known for its hardware, but you also need software to program thathardware. Both the hardware and the software are called “Arduino.” The combinationenables you to create projects that sense and control the physical world. The softwareis free, open source, and cross-platform. The boards are inexpensive to buy, or you canbuild your own (the hardware designs are also open source). In addition, there is anactive and supportive Arduino community that is accessible worldwide through theArduino forums and the wiki (known as the Arduino Playground). The forums and the
1
www.it-ebooks.info

wiki offer project development examples and solutions to problems that can provideinspiration and assistance as you pursue your own projects.
The recipes in this chapter will get you started by explaining how to set up the devel-opment environment and how to compile and run an example sketch.
Source code containing computer instructions for controlling Arduinofunctionality is usually referred to as a sketch in the Arduino community.The word sketch will be used throughout this book to refer to Arduinoprogram code.
The Blink sketch, which comes with Arduino, is used as an example for recipes in thischapter, though the last recipe in the chapter goes further by adding sound and col-lecting input through some additional hardware, not just blinking the light built intothe board. Chapter 2 covers how to structure a sketch for Arduino and provides anintroduction to programming.
If you already know your way around Arduino basics, feel free to jumpforward to later chapters. If you’re a first-time Arduino user, patiencein these early recipes will pay off with smoother results later.
Arduino SoftwareSoftware programs, called sketches, are created on a computer using the Arduino inte-grated development environment (IDE). The IDE enables you to write and edit codeand convert this code into instructions that Arduino hardware understands. The IDEalso transfers those instructions to the Arduino board (a process called uploading).
Arduino HardwareThe Arduino board is where the code you write is executed. The board can only controland respond to electricity, so specific components are attached to it to enable it tointeract with the real world. These components can be sensors, which convert someaspect of the physical world to electricity so that the board can sense it, or actuators,which get electricity from the board and convert it into something that changes theworld. Examples of sensors include switches, accelerometers, and ultrasound distancesensors. Actuators are things like lights and LEDs, speakers, motors, and displays.
There are a variety of official boards that you can use with Arduino software and a widerange of Arduino-compatible boards produced by members of the community.
The most popular boards contain a USB connector that is used to provide power andconnectivity for uploading your software onto the board. Figure 1-1 shows a basicboard, the Arduino Uno.
2 | Chapter 1: Getting Started
www.it-ebooks.info

You can get boards as small as a postage stamp, such as the Arduino Mini and Pro Mini;larger boards that have more connection options and more powerful processors, suchas the Arduino Mega; and boards tailored for specific applications, such as the LilyPadfor wearable applications, the Fio for wireless projects, and the Arduino Pro for em-bedded applications (standalone projects that are often battery-operated). Many otherArduino-compatible boards are also available, including the following:
• Arduino Nano, a tiny board with USB capability, from Gravitech (http://store.gravitech.us/arna30wiatn.html)
• Bare Bones Board, a low-cost board available with or without USB capability, fromModern Device (http://www.moderndevice.com/products/bbb-kit)
• Boarduino, a low-cost breadboard-compatible board, from Adafruit Industries(http://www.adafruit.com/)
• Seeeduino, a flexible variation of the standard USB board, from Seeed StudioBazaar (http://www.seeedstudio.com/)
• Teensy and Teensy++, tiny but extremely versatile boards, from PJRC (http://www.pjrc.com/teensy/)
A comprehensive list of Arduino-compatible boards is available at http://www.freeduino.org/.
See AlsoAn overview of Arduino boards: http://www.arduino.cc/en/Main/Hardware.
Online guides for getting started with Arduino are available at http://arduino.cc/en/Guide/Windows for Windows, http://arduino.cc/en/Guide/MacOSX for Mac OS X, andhttp://www.arduino.cc/playground/Learning/Linux for Linux.
Figure 1-1. Basic board: the Arduino Uno
1.0 Introduction | 3
www.it-ebooks.info

1.1 Installing the Integrated Development Environment (IDE)ProblemYou want to install the Arduino development environment on your computer.
SolutionThe Arduino software for Windows, Mac, and Linux can be downloaded from http://arduino.cc/en/Main/Software.
The Windows download is a ZIP file. Unzip the file to any convenient directory—Program Files/Arduino is a sensible place.
A free utility for unzipping files, called 7-Zip, can be downloaded fromhttp://www.7-zip.org/.
Unzipping the file will create a folder named Arduino-00<nn> (where <nn> is the ver-sion number of the Arduino release you downloaded). The directory contains theexecutable file (named Arduino.exe), along with various other files and folders. Double-click the Arduino.exe file and the splash screen should appear (see Figure 1-2), followedby the main program window (see Figure 1-3). Be patient, as it can take some time forthe software to load.
Figure 1-2. Arduino splash screen (version 0019 in Windows 7)
4 | Chapter 1: Getting Started
www.it-ebooks.info

The Arduino download for the Mac is a disk image (.dmg); double-click the file whenthe download is complete. The image will mount (it will appear like a memory stickon the desktop). Inside the disk image is the Arduino application. Copy this to some-where convenient—the Applications folder is a sensible place. Double-click the appli-cation once you have copied it over (it is not a good idea to run it from the disk image).The splash screen will appear, followed by the main program window.
Linux installation varies depending on the Linux distribution you are using. See theArduino wiki for information (http://www.arduino.cc/playground/Learning/Linux).
To enable the Arduino development environment to communicate with the board, youneed to install drivers.
Figure 1-3. Arduino IDE main window (version 0019 in Windows 7)
1.1 Installing the Integrated Development Environment (IDE) | 5
www.it-ebooks.info

On Windows, use the USB cable to connect your PC and the Arduino board and waitfor the Found New Hardware Wizard to appear. If you are using Windows Vista orWindows 7 and are online, you can let the wizard search for drivers and they will installautomatically. On Windows XP, you should specify the location of the drivers. Use thefile selector to navigate to the drivers directory, located in the directory where youunzipped the Arduino files. When the driver has installed, the Found New HardwareWizard will appear again, saying a new serial port has been found. Follow the sameprocess as before.
It is important that you go through the sequence of steps to install thedrivers two times, or the software will not be able to communicate withthe board.
On the Mac, the latest Arduino boards, such as the Uno, can be used without additionaldrivers, but if you are using earlier boards, you will need to install driver software. Thereis a package named FTDIUSBSerialDriver, with a range of numbers after it, inside thedisk image. Double-click this and the installer will take you through the process. Youwill need to know an administrator password to complete the process.
On Linux, most distributions have the driver already installed, but follow the Linuxlink given in this chapter’s introduction for specific information for your distribution.
DiscussionIf the software fails to start, check the troubleshooting section of the Arduino website,http://arduino.cc/en/Guide/Troubleshooting, for help solving installation problems.
See AlsoOnline guides for getting started with Arduino are available at http://arduino.cc/en/Guide/Windows for Windows, http://arduino.cc/en/Guide/MacOSX for Mac OS X, andhttp://www.arduino.cc/playground/Learning/Linux for Linux.
1.2 Setting Up the Arduino BoardProblemYou want to power up a new board and verify that it is working.
SolutionPlug the board into a USB port on your computer and check that the green LED powerindicator on the board illuminates. Standard Arduino boards (Uno, Duemilanove, andMega) have a green LED power indicator located near the reset switch.
6 | Chapter 1: Getting Started
www.it-ebooks.info

An orange LED near the center of the board (labeled “Pin 13 LED” in Figure 1-4) shouldflash on and off when the board is powered up (boards come from the factory preloadedwith software to flash the LED as a simple check that the board is working).
Figure 1-4. Basic Arduino board (Uno and Duemilanove)
DiscussionIf the power LED does not illuminate when the board is connected to your computer,the board is probably not receiving power.
The flashing LED (connected to digital output pin 13) is being controlled by coderunning on the board (new boards are preloaded with the Blink example sketch). If thepin 13 LED is flashing, the sketch is running correctly, which means the chip on theboard is working. If the green power LED is on but the pin 13 LED is not flashing, itcould be that the factory code is not on the chip; follow the instructions in Rec-ipe 1.3 to load the Blink sketch onto the board to verify that the board is working. Ifyou are not using a standard board, it may not have a built-in LED on pin 13, so checkthe documentation for details of your board.
See AlsoOnline guides for getting started with Arduino are available at http://arduino.cc/en/Guide/Windows for Windows, http://arduino.cc/en/Guide/MacOSX for Mac OS X, andhttp://www.arduino.cc/playground/Learning/Linux for Linux.
A troubleshooting guide can be found at http://arduino.cc/en/Guide/Troubleshooting.
1.2 Setting Up the Arduino Board | 7
www.it-ebooks.info

1.3 Using the Integrated Development Environment (IDE) toPrepare an Arduino SketchProblemYou want to get a sketch and prepare it for uploading to the board.
SolutionUse the Arduino IDE to create, open, and modify sketches that define what the boardwill do. You can use buttons along the top of the IDE to perform these actions (shownin Figure 1-5), or you can use the menus or keyboard shortcuts (shown in Figure 1-6).
The Sketch Editor area is where you view and edit code for a sketch. It supports com-mon text editing keys such as Ctrl-F (⌘+F on a Mac) for find, Ctrl-Z (⌘+Z on a Mac)for undo, Ctrl-C (⌘+C on a Mac) to copy highlighted text, and Ctrl-V (⌘+V on a Mac)to paste highlighted text.
Figure 1-6 shows how to load the Blink sketch (the sketch that comes preloaded on anew Arduino board).
After you’ve started the IDE, go to the File→Examples menu and select 1.Basics→Blink,as shown in Figure 1-6. The code for blinking the built-in LED will be displayed in theSketch Editor window (refer to Figure 1-5).
Before the code can be sent to the board, it needs to be converted into instructions thatcan be read and executed by the Arduino controller chip; this is called compiling. Todo this, click the compile button (the top-left button with a triangle inside), or selectSketch→Verify/Compile.
You should see a message that reads “Compiling...” in the message area below the textediting window. After a second or two, a message that reads “Done Compiling” willappear. The black console area will contain the following additional message:
Binary sketch size: 1008 bytes (of a 32256 byte maximum)
The exact message may differ depending on the Arduino version; it is telling you thesize of the sketch and the maximum size that your board can accept.
8 | Chapter 1: Getting Started
www.it-ebooks.info
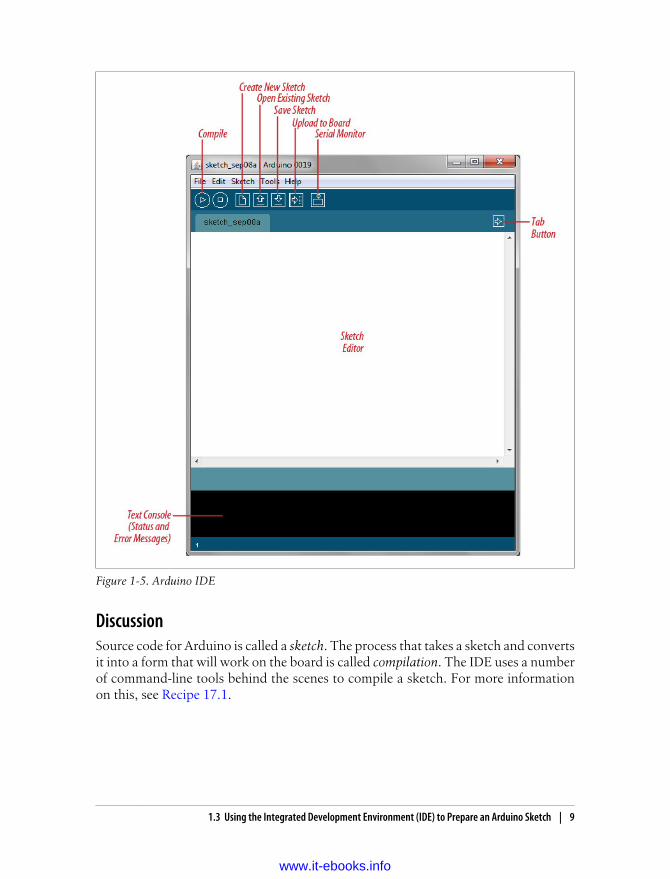
Figure 1-5. Arduino IDE
DiscussionSource code for Arduino is called a sketch. The process that takes a sketch and convertsit into a form that will work on the board is called compilation. The IDE uses a numberof command-line tools behind the scenes to compile a sketch. For more informationon this, see Recipe 17.1.
1.3 Using the Integrated Development Environment (IDE) to Prepare an Arduino Sketch | 9
www.it-ebooks.info

Figure 1-6. IDE menu (selecting the Blink example sketch)
The final message telling you the size of the sketch indicates how much program spaceis needed to store the controller instructions on the board. If the size of the compiledsketch is greater than the available memory on the board, the following error messageis displayed:
Sketch too big; see http://www.arduino.cc/en/Guide/Troubleshooting#size for tips on reducing it.
If this happens, you need to make your sketch smaller to be able to put it on the board,or get a board with higher capacity.
10 | Chapter 1: Getting Started
www.it-ebooks.info

If there are errors in the code, the compiler will print one or more error messages in theconsole window. These messages can help identify the error—see Appendix D on soft-ware errors for troubleshooting tips.
To prevent accidental overwriting of the examples, the Arduino IDEdoes not allow you to save changes to the provided example sketches.You must rename them using the Save As menu option. You can savesketches you write yourself with the Save button (see Recipe 1.5).
As you develop and modify a sketch, you should also consider using the File→Save Asmenu option and using a different name or version number regularly so that as youimplement each bit, you can go back to an older version if you need to.
Code uploaded onto the board cannot be downloaded back onto yourcomputer. Make sure you save your sketch code on your computer. Youcannot save changes back to the example files; you need to use Save Asand give the changed file another name.
See AlsoRecipe 1.5 shows an example sketch. Appendix D has tips on troubleshooting softwareproblems.
1.4 Uploading and Running the Blink SketchProblemYou want to transfer your compiled sketch to the Arduino board and see it working.
SolutionConnect your Arduino board to your computer using the USB cable. Load the Blinksketch into the IDE as described in Recipe 1.3.
Next, select Tools→Board from the drop-down menu and select the name of the boardyou have connected (if it is the standard Uno board, it is probably the first entry in theboard list).
Now select Tools→Serial Port. You will get a drop-down list of available serial ports onyour computer. Each machine will have a different combination of serial ports, de-pending on what other devices you have used with your computer.
On Windows, they will be listed as numbered COM entries. If there is only one entry,select it. If there are multiple entries, your board will probably be the last entry.
1.4 Uploading and Running the Blink Sketch | 11
www.it-ebooks.info

On the Mac, your board will be listed twice if it is an Uno board:
/dev/tty.usbmodem-XXXXXXX/dev/cu.usbmodem-XXXXXXX
If you have an older board, it will be listed as follows:
/dev/tty.usbserial-XXXXXXX/dev/cu.usbserial-XXXXXXX
Each board will have different values for XXXXXXX. Select either entry.
Click on the upload button (in Figure 1-5, it’s the fifth button from the left), or chooseFile→Upload to I/O board.
The software will compile the code, as in Recipe 1.3. After the software is compiled, itis uploaded to the board. If you look at your board, you will see the LED stop flashing,and two lights (labeled as Serial LEDs in Figure 1-4) just below the previously flashingLED should flicker for a couple of seconds as the code uploads. The original light shouldthen start flashing again as the code runs.
DiscussionFor the IDE to send the compiled code to the board, the board needs to be pluggedinto the computer, and you need to tell the IDE which board and serial port you areusing.
When an upload starts, whatever sketch is running on the board is stopped (if you wererunning the Blink sketch, the LED will stop flashing). The new sketch is uploaded tothe board, replacing the previous sketch. The new sketch will start running when theupload has successfully completed.
Older Arduino boards and some compatibles do not automatically in-terrupt the running sketch to initiate upload. In this case, you need topress the Reset button on the board just after the software reports thatit is done compiling (when you see the message about the size of thesketch). It may take a few attempts to get the timing right between theend of the compilation and pressing the Reset button.
The IDE will display an error message if the upload is not successful. Problems areusually due to the wrong board or serial port being selected or the board not beingplugged in.
If you have trouble identifying the correct port on Windows, try unplugging the boardand then selecting Tools→Serial Port to see which COM port is no longer on the displaylist. Another approach is to select the ports, one by one, until you see the lights on theboard flicker to indicate that the code is uploading.
12 | Chapter 1: Getting Started
www.it-ebooks.info

See AlsoThe Arduino troubleshooting page: http://www.arduino.cc/en/Guide/Troubleshooting
1.5 Creating and Saving a SketchProblemYou want to create a sketch and save it to your computer.
SolutionTo open an editor window ready for a new sketch, launch the IDE (see Recipe 1.3), goto the File menu, and select New. Paste the following code into the Sketch Editor win-dow (it’s similar to the Blink sketch, but the blinks last twice as long):
const int ledPin = 13; // LED connected to digital pin 13
void setup(){ pinMode(ledPin, OUTPUT);}
void loop(){ digitalWrite(ledPin, HIGH); // set the LED on delay(2000); // wait for two seconds digitalWrite(ledPin, LOW); // set the LED off delay(2000); // wait for two seconds}
Compile the code by clicking the compile button (the top-left button with a triangleinside), or select Sketch→Verify/Compile (see Recipe 1.3).
Upload the code by clicking on the upload button, or choose File→Upload to I/O board(see Recipe 1.4). After uploading, the LED should blink, with each flash lasting twoseconds.
You can save this sketch to your computer by clicking the Save button, or selectFile→Save.
You can save the sketch using a new name by selecting the Save As menu option. Adialog box will open where you can enter the filename.
DiscussionWhen you save a file in the IDE, a standard dialog box for the operating system willopen. It suggests that you save the sketch to a folder called Arduino in your My Docu-ments folder (or your Documents folder on a Mac). You can replace the default sketch
1.5 Creating and Saving a Sketch | 13
www.it-ebooks.info

name with a meaningful name that reflects the purpose of your sketch. Click Save tosave the file.
The default name is the word sketch followed by the current date. Se-quential letters starting from a are used to distinguish sketches createdon the same day. Replacing the default name with something meaning-ful helps you to identify the purpose of a sketch when you come backto it later.
If you use characters that the IDE does not allow (e.g., the space character), the IDEwill automatically replace these with valid characters.
Arduino sketches are saved as plain text files with the extension .pde. They are auto-matically saved in a folder with the same name as the sketch.
You can save your sketches to any folder on your computer, but if you use the defaultfolder (the Arduino folder in your Documents folder) your sketches will automaticallyappear in the Sketchbook menu of the Arduino software and be easier to locate.
If you have edited one of the examples from the Arduino download, youwill not be able to save the changed file using the same filename. Thispreserves the standard examples intact. If you want to save a modifiedexample, you will need to select another location for the sketch.
After you have made changes, you will see a dialog box asking if you want to save thesketch when a sketch is closed.
The § symbol following the name of the sketch in the top bar of the IDEwindow indicates that the sketch code has changes that have not yetbeen saved on the computer. This symbol is removed when you save thesketch.
The Arduino software does not provide any kind of version control, so if you want tobe able to revert to older versions of a sketch, you can use Save As regularly and giveeach revision of the sketch a slightly different name.
Frequent compiling as you modify or add code is a good way to check for errors as youwrite your code. It will be easier to find and fix any errors because they will usually beassociated with what you have just written.
Once a sketch has been uploaded onto the board there is no way todownload it back to your computer. Make sure you save any changesto your sketches that you want to keep.
14 | Chapter 1: Getting Started
www.it-ebooks.info

If you open sketches you get from other people that are not in a folder with the samename as the sketch, the IDE will tell you and you can click OK to put them in a folderwith the same name.
Sketches must be located in a folder with the same name as the sketch.The IDE will create the folder automatically when you save a new sketch.
1.6 Using ArduinoProblemYou want to get started with a project that is easy to build and fun to use.
SolutionThis recipe provides a taste of some of the techniques that are covered in detail in laterchapters.
The sketch is based on the LED blinking code from the previous recipe, but instead ofusing a fixed delay, the rate is determined by a light-sensitive sensor called a light de-pendent resistor or LDR (see Recipe 6.2). Wire the LDR as shown in Figure 1-7.
Figure 1-7. Arduino with light dependent resistor
The following sketch reads the light level of an LDR connected to analog pin 0. Thelight level striking the LDR will change the blink rate of the internal LED connected topin 13:
1.6 Using Arduino | 15
www.it-ebooks.info

const int ledPin = 13; // LED connected to digital pin 13const int sensorPin = 0; // connect sensor to analog input 0
void setup(){ pinMode(ledPin, OUTPUT); // enable output on the led pin}
void loop(){ int rate = analogRead(sensorPin); // read the analog input Serial.println(rate); rate = map(rate, 200,800,minDuration, maxDuration); // convert to blink rate digitalWrite(ledPin, HIGH); // set the LED on delay(rate); // wait duration dependent on light level digitalWrite(ledPin, LOW); // set the LED off delay(rate);}
DiscussionThe value of the 4.7K resistor is not critical. Anything from 1K to 10K can be used. Thelight level on the LDR will change the voltage level on analog pin 0. The analogReadcommand (see Chapter 6) provides a value that ranges from around 200 when the LDRis dark to 800 or so when it is very bright. This value determines the duration of theLED on and off times, so the blink rate increases with light intensity.
You can scale the blink rate by using the Arduino map function as follows:
const int ledPin = 13; // LED connected to digital pin 13const int sensorPin = 0; // connect sensor to analog input 0
// the next two lines set the min and max delay between blinksconst int minDuration = 100; // minimum wait between blinksconst int maxDuration = 1000; // maximum wait between blinks
void setup(){ pinMode(ledPin, OUTPUT); // enable output on the led pin}
void loop(){ int rate = analogRead(sensorPin); // read the analog input // the next line scales the blink rate between the min and max values rate = map(rate, 200,800,minDuration, maxDuration); // convert to blink rate digitalWrite(ledPin, HIGH); // set the LED on delay(rate); // wait duration dependent on light level digitalWrite(ledPin, LOW); // set the LED off delay(rate);}
Recipe 5.7 provides more details on using the map function to scale values.
16 | Chapter 1: Getting Started
www.it-ebooks.info

If you want to view the value of the rate variable on your computer, you can print thisto the Arduino Serial Monitor as shown in the revised loop code that follows. Thesketch will display the blink rate in the Serial Monitor. You open the Serial Monitorwindow in the Arduino IDE (see Chapter 4 for more on using the Serial Monitor):
const int ledPin = 13; // LED connected to digital pin 13const int sensorPin = 0; // connect sensor to analog input 0
// the next two lines set the min and max delay between blinksconst int minDuration = 100; // minimum wait between blinksconst int maxDuration = 1000; // maximum wait between blinks
void setup(){ pinMode(ledPin, OUTPUT); // enable output on the led pin Serial.begin(9600); // initialize Serial}
void loop(){ int rate = analogRead(sensorPin); // read the analog input // the next line scales the blink rate between the min and max values rate = map(rate, 200,800,minDuration, maxDuration); // convert to blink rate Serial.println(rate); // print rate to serial monitor digitalWrite(ledPin, HIGH); // set the LED on delay(rate); // wait duration dependent on light level digitalWrite(ledPin, LOW); // set the LED off delay(rate);}
You can use the LDR to control the pitch of a sound by connecting a small speaker tothe pin, as shown in Figure 1-8.
Figure 1-8. Connections for a speaker with the LDR circuit
1.6 Using Arduino | 17
www.it-ebooks.info

You will need to increase the on/off rate on the pin to a frequency in the audio spectrum.This is achieved, as shown in the following code, by dividing the rate by 100 in the lineafter the map function:
const int ledPin = 13; // LED connected to digital pin 13const int sensorPin = 0; // connect sensor to analog input 0
const int minDuration = 100; // minimum wait between blinksconst int maxDuration = 1000; // maximum wait between blinks
void setup(){ pinMode(ledPin, OUTPUT); // enable output on the led pin}
void loop(){ int sensorReading = analogRead(sensorPin); // read the analog input int rate = map(sensorReading, 200,800,minDuration, maxDuration); rate = rate / 100; // add this line for audio frequency digitalWrite(ledPin, HIGH); // set the LED on delay(rate); // wait duration dependent on light level digitalWrite(ledPin, LOW); // set the LED off delay(rate);}
See AlsoSee Chapter 9 for more on creating sound with Arduino.
18 | Chapter 1: Getting Started
www.it-ebooks.info

CHAPTER 2
Making the Sketch Do Your Bidding
2.0 IntroductionThough much of an Arduino project will involve integrating the Arduino board withsupporting hardware, you need to be able to tell the board what to do with the rest ofyour project. This chapter introduces core elements of Arduino programming, showingnonprogrammers how to use common language constructs and providing an overviewof the language syntax for readers who are not familiar with C or C++, the languagebeing used.
Since making the examples interesting requires making Arduino do something, therecipes use physical capabilities of the board that are explained in detail in later chap-ters. If any of the code in this chapter is not clear, feel free to jump forward, particularlyto Chapter 4 for more on serial output and Chapter 5 for more on using digital andanalog pins. You don’t need to understand all the code in the examples, though, to seehow to perform the specific capabilities that are the focus of the recipes. Here are someof the more common functions used in the examples that are covered in the next fewchapters:
Serial.println(value);Prints the value to the Serial Monitor on your computer; see Recipe 4.1
pinMode(pin, mode);Configures a digital pin to read (input) or write (output) a digital value; see theintroduction to Chapter 5
digitalRead(pin);Reads a digital value (HIGH or LOW) on a pin set for input; see Recipe 5.1
digitalWrite(pin, value);Writes the digital value (HIGH or LOW) to a pin set for output; see Recipe 5.1
19
www.it-ebooks.info

2.1 Structuring an Arduino ProgramProblemYou are new to programming and want to understand the building blocks of an Arduinoprogram.
SolutionPrograms for Arduino are usually referred to as sketches, to emphasize the agile natureof development. The terms sketch and program are interchangeable. Sketches containcode—the instructions the board will carry out. Code that needs to run only once (suchas to set up the board for your application) should be placed in the setup function.Code to be run continuously after the initial setup has finished goes into the loop func-tion. Here is a typical sketch:
const int ledPin = 13; // LED connected to digital pin 13
// The setup() method runs once, when the sketch starts void setup() { pinMode(ledPin, OUTPUT); // initialize the digital pin as an output }
// the loop() method runs over and over again, void loop() { digitalWrite(ledPin, HIGH); // turn the LED on delay(1000); // wait a second digitalWrite(ledPin, LOW); // turn the LED off delay(1000); // wait a second }
When the board finishes uploading the code, or is turned on once it contains this code,it starts at the top of the sketch and carries out the instructions sequentially. It runs thecode in setup once and then goes through the code in loop. When it gets to the end ofloop (marked by the closing bracket, }) it goes back to the beginning of loop.
DiscussionThis example continuously flashes an LED by writing HIGH and LOW outputs to a pin.See Chapter 5 to learn more about using Arduino pins. When the sketch begins, thecode in setup sets the pin mode (so it’s capable of lighting an LED). After the code insetup is completed, the code in loop is repeatedly called (to flash the LED) for as longas the Arduino board is powered on.
You don’t need to know this to write Arduino sketches, but experienced C/C++ pro-grammers may wonder where the expected main() entry point function has gone. It’sthere, but it’s hidden under the covers by the Arduino build environment. The build
20 | Chapter 2: Making the Sketch Do Your Bidding
www.it-ebooks.info

process creates an intermediate file that includes the sketch code and the followingadditional statements:
int main(void){ init();
setup();
for (;;) loop();
return 0;}
The first thing that happens is a call to an init() function that initializes the Arduinohardware. Next, the sketch’s setup() function is called. Finally, the loop() function iscalled over and over. Because the for loop never terminates, the return statement isnever executed.
See AlsoChapter 17 and http://www.arduino.cc/en/Hacking/BuildProcess provide more on thebuild process.
2.2 Using Simple Primitive Types (Variables)ProblemArduino has different types of variables to efficiently represent values. You want toknow how to select and use these Arduino data types.
SolutionAlthough the int (short for integer, a 16-bit value in Arduino) data type is the mostcommon choice for the numeric values encountered in Arduino applications, you canuse Table 2-1 to determine the data type that fits the range of values your applicationexpects.
Table 2-1. Arduino data types
Numeric types Bytes Range Use
int 2 -32768 to 32767 Represents positive and negative integer values.
unsigned int 2 0 to 65535 Represents only positive values; otherwise, similar to int.
long 4 -2147483648 to2147483647
Represents a very large range of positive and negative values.
unsignedlong
4 4294967295 Represents a very large range of positive values.
2.2 Using Simple Primitive Types (Variables) | 21
www.it-ebooks.info

Numeric types Bytes Range Use
float 4 3.4028235E+38 to-3.4028235E+38
Represents numbers with fractions; use to approximate real-world measurements.
double 4 Same as float In Arduino, double is just another name for float.
boolean 1 false (0) or true (1) Represents true and false values.
char 1 -128 to 127 Represents a single character. Can also represent a signed valuebetween -128 and 127.
byte 1 0 to 255 Similar to char, but for unsigned values.
Other types
string Represents arrays of chars (characters) typically used to contain text.
void Used only in function declarations where no value is returned.
DiscussionExcept in situations where maximum performance or memory efficiency is required,variables declared using int will be suitable for numeric values if the values do notexceed the range (shown in the first row in Table 2-1) and if you don’t need to workwith fractional values. Most of the official Arduino example code declares numericvariables as int. But sometimes you do need to choose a type that specifically suits yourapplication.
Sometimes you need negative numbers and sometimes you don’t, so numeric typescome in two varieties: signed and unsigned. unsigned values are always positive. Vari-ables without the keyword unsigned in front are signed so that they can represent neg-ative and positive values. One reason to use unsigned values is when the range ofsigned values will not fit the range of the variable (an unsigned variable has twice thecapacity of a signed variable). Another reason programmers choose to use unsignedtypes is to clearly indicate to people reading the code that the value expected will neverbe a negative number.
boolean types have two possible values: true or false. They are commonly used forthings like checking the state of a switch (if it’s pressed or not). You can also use HIGHand LOW as equivalents to true and false where this makes more sense; digitalWrite(pin, HIGH) is a more expressive way to turn on an LED than digitalWrite(pin,true) or digitalWrite(pin,1), although all of these are treated identically when thesketch actually runs, and you are likely to come across all of these forms in code postedon the Web.
See AlsoThe Arduino reference at http://www.arduino.cc/en/Reference/HomePage provides de-tails on data types.
22 | Chapter 2: Making the Sketch Do Your Bidding
www.it-ebooks.info

2.3 Using Floating-Point NumbersProblemFloating-point numbers are used for values expressed with decimal points (this is theway to represent fractional values). You want to calculate and compare these values inyour sketch.
SolutionThe following code shows how to declare floating-point variables, illustrates problemsyou can encounter when comparing floating-point values, and demonstrates how toovercome them:
/* * Floating-point example * This sketch initialized a float value to 1.1 * It repeatedly reduces the value by 0.1 until the value is 0 */
float value = 1.1;
void setup(){ Serial.begin(9600);}
void loop(){ value = value - 0.1; // reduce value by 0.1 each time through the loop if( value == 0) Serial.println("The value is exactly zero"); else if(fabs(value) < .0001) // function to take the absolute value of a float Serial.println("The value is close enough to zero"); else Serial.println(value);
delay(100);}
DiscussionFloating-point math is not exact, and values returned can have a small approximationerror. The error occurs because floating-point values cover a huge range, so the internalrepresentation of the value can only hold an approximation. Because of this, you needto test if the values are within a range of tolerance rather than exactly equal.
The output from this sketch is as follows:
1.000.90
2.3 Using Floating-Point Numbers | 23
www.it-ebooks.info

0.800.700.600.500.400.300.200.10The value is close enough to zero-0.10-0.20
The output continues to produce negative numbers.
You may expect the loop to stop after value is 0.1 and then 0.1 is subtracted from this.But value never equals zero; it gets very close, but that is not good enough to pass thetest if (value == 0). This is because the only memory-efficient way that floating-pointnumbers can contain the huge range in values they can represent is by storing an ap-proximation of the number.
The solution to this is to check if a variable is close to the desired value, as shown inthe code in this recipe’s Solution:
else if(fabs(value) < .0001) // function to take absolute value of a float Serial.println("The value is close enough to zero");
This tests if the variable value is within 0.0001 of the desired target and prints a messageif so. The function named fabs (short for floating-point absolute value) returns the ab-solute value of a floating-point variable. The function returns the magnitude of thevalue, and if this is within 0.0001 of 0, the code will print the message that the valuesare close enough.
Floating point approximates numbers because it only uses 32 bits tohold all values within a huge range. Eight bits are used for the decimalmultiplier (the exponent), and that leaves 24 bits for the sign andvalue—only enough for seven significant decimal digits.
Although float and double are exactly the same on Arduino, doubles dohave a higher precision on many other platforms. If you are importingcode that uses float and double from another platform, check that thereis sufficient precision for your application.
See AlsoThe Arduino reference for float: http://www.arduino.cc/en/Reference/Float
24 | Chapter 2: Making the Sketch Do Your Bidding
www.it-ebooks.info

2.4 Working with Groups of ValuesProblemYou want to create and use a group of values (called arrays). The arrays may be a simplelist or they could have two or more dimensions. You want to know how to determinethe size of the array and how to access the elements in the array.
SolutionThis sketch creates two arrays: an array of integers for pins connected to switches andan array of pins connected to LEDs, as shown in Figure 2-1:
/* array sketch an array of switches controls an array of LEDs see Chapter 5 for more on using switches see Chapter 7 for information on LEDs */
int inputPins[] = {2,3,4,5}; // create an array of pins for switch inputs
int ledPins[] = {10,11,12,13}; // create array of output pins for LEDs
void setup(){ for(int index = 0; index < 4; index++) { pinMode(ledPins[index], OUTPUT); // declare LED as output pinMode(inputPins[index], INPUT); // declare pushbutton as input digitalWrite(inputPins[index],HIGH); // enable pull-up resistors //(see Recipe 5.2) }}
void loop(){ for(int index = 0; index < 4; index++) { int val = digitalRead(inputPins[i]); // read input value if (val == LOW) // check if the switch is pressed { digitalWrite(ledPins[index], HIGH); // turn LED on if switch is pressed } else { digitalWrite(ledPins[i], LOW); // turn LED off } }}
2.4 Working with Groups of Values | 25
www.it-ebooks.info

DiscussionArrays are collections of consecutive variables of the same type. Each variable in thecollection is called an element. The number of elements is called the dimension of thearray.
The preceding example demonstrates a common use of arrays in Arduino code: storinga collection of pins. Here the pins connect to switches and LEDs (a topic covered inmore detail in Chapter 5). The important parts of this example are the declaration ofthe array and access to the array elements.
The following line of code declares (creates) an array of integers with four elements andinitializes each element. The first element is set equal to 2, the second to 3, and so on:
int inputPins[] = {2,3,4,5};
Figure 2-1. Connections for LEDs and switches
26 | Chapter 2: Making the Sketch Do Your Bidding
www.it-ebooks.info

If you don’t need to initialize the values when you declare an array (perhaps the valueswill only be available when the sketch is running) you can declare the array as follows:
int array[4];
This declares an array of four elements with the initial value of each element set to zero.The number within the square brackets ([]) is the dimension, and this sets the numberof elements. This array has a dimension of four and can hold, at most, four integervalues. The dimension can be omitted if array declaration contains initializers (as shownin the first example) because the compiler figures out how big to make the array bycounting the number of initializers.
The first element of the array is element[0]:
int firstElement = inputPin[0]; // this is the first element
The last element is one less than the dimension, so in the preceding example, with adimension of four, the last element is element 3:
Int lastElement = inputPin[3]; // this is the last element
It may seem odd that an array with a dimension of four has the last element accessedusing array[3], but because the first element is array[0], the four elements are:
array[0],array[1],array[2],array[3]
In the previous sketch, the four elements are accessed using a for loop:
for(int index = 0; index < 4; index++){ //get the pin number by accessing each element in the pin arrays pinMode(ledPins[index], OUTPUT); // declare LED as output pinMode(inputPins[index], INPUT); // declare pushbutton as input}
This loop will step through the variable index with values starting at 0 and ending at3. It is a common mistake to accidentally access an element that is beyond the actualdimension of the array. This is a bug that can have many different symptoms and caremust be taken to avoid it. One way to keep your loops under control is to set thedimension of an array by using a constant as follows:
const int PIN_COUNT = 4; // define a constant for the number of elementsint inputPins[PIN_COUNT] = {2,3,4,5};
for(int index = 0; index < PIN_COUNT; index++) pinMode(inputPins[index], INPUT);
The compiler will not report an error if you accidentally try to store orread beyond the size of the array. You must be careful that you onlyaccess elements that are within the bounds you have set. Using a con-stant to set the dimension of an array and in code referring to its elementshelps your code stay within the bounds of the array.
2.4 Working with Groups of Values | 27
www.it-ebooks.info

Another common use of arrays is to hold a string of text characters. In Arduino code,these are called character strings (strings for short). A character string consists of oneor more characters, followed by the null character (the value 0) to indicate the end ofthe string.
The null at the end of a character string is not the same as the character0. The null has an ASCII value of 0, whereas 0 has an ASCII value of 48.
Methods to use strings are covered in Recipes 2.5 and 2.6.
See AlsoRecipe 5.2; Recipe 7.1
2.5 Using Arduino String FunctionalityProblemYou want to manipulate text. You need to copy it, add bits together, and determinethe number of characters.
SolutionRecipe 2.4 describes Arduino arrays in general. Text is stored in arrays of characters.They are usually called strings. Arduino has an added capability for using an array ofcharacters called String that can store and manipulate text strings.
The word String with an uppercase S refers to the Arduino text capabilityprovided by the Arduino String library. The word string with a lowercases refers to the group of characters rather than the Arduino Stringfunctionality.
This recipe demonstrates how to use Arduino strings.
The String capability was introduced in version 19 of Arduino. If youare using an older version, you can use the TextString library; see thelink at the end of this recipe.
Load the following sketch onto your board, and open the Serial Monitor to view the results:
28 | Chapter 2: Making the Sketch Do Your Bidding
www.it-ebooks.info

/* Basic_Strings sketch */
String text1 = "This string";String text2 = " has more text";String text3; // to be assigned within the sketch
void setup(){ Serial.begin(9600);
Serial.print( text1); Serial.print(" is "); Serial.print(text1.length()); Serial.println(" characters long.");
Serial.print("text2 is "); Serial.print(text2.length()); Serial.println(" characters long.");
text1.concat(text2); Serial.println("text1 now contains: "); Serial.println(text1);}
void loop(){}
DiscussionThis sketch creates two variables of type String, called message and anotherMessage.Variables of type String have built-in capabilities for manipulating text. The statementmessage.length() returns (provides the value of) the length (number of characters) inthe string message.
message.concat(anotherMessage) combines the contents of strings; in this case, it ap-pends the contents of anotherMessage to the end of message (concat is short forconcatenate).
The Serial Monitor will display the following:
This string is 11 characters long.text2 is 14 characters long.text1 now contains:This string has more text
Another way to combine strings is to use the string addition operator. Add these twolines to the end of the setup code:
text3 = text1 + " and more"; Serial.println(text3);
2.5 Using Arduino String Functionality | 29
www.it-ebooks.info

The new code will result in the Serial Monitor adding the following line to the end ofthe display:
This is a string with more text and more
You can use the indexOf and lastIndexOf functions to find an instance of a particularcharacter in a string.
Because the String class is a new addition to Arduino, you will comeacross a lot of code that uses arrays of characters rather than theString type. See Recipe 2.6 for more on using arrays of characters with-out the help of the Arduino String functionality.
If you see a line such as the following:
char oldString[] = "this is a character array";
the code is using C-style character arrays (see Recipe 2.6). If the declaration looks likethis:
String newString = "this is a string object";
the code uses Arduino Strings. To convert a C-style character array to an ArduinoString, just assign the contents of the array to the String object:
char oldString[] = "I want this character array in a String object";String newsString = oldString;
See AlsoThe Arduino distribution provides String example sketches.
Tutorials for the new String library are available at http://arduino.cc/en/Tutorial/HomePage, and a tutorial for the original String library is available at http://www.arduino.cc/en/Tutorial/TextString.
2.6 Using C Character StringsProblemYou want to understand how to use raw character strings: you want to know how tocreate a string, find its length, and compare, copy, or append strings. The C languagedoes not support the Arduino-style String capability, so you want to understand codewritten to operate with primitive character arrays.
30 | Chapter 2: Making the Sketch Do Your Bidding
www.it-ebooks.info

SolutionArrays of characters are sometimes called character strings (or simply strings for short).Recipe 2.5 describes Arduino arrays in general. This recipe describes functions thatoperate on character strings.
You declare strings like this:
char StringA[8]; // declare a string of up to 7 chars plus terminating nullchar StringB[8] = "Arduino"; // as above and init(ialize) the string to"Arduino";char StringC[16] = "Arduino"; // as above, but string has room to growchar StringD[ ] = "Arduino"; // the compiler inits the stringand calculates size
Use strlen (short for string length) to determine the number of characters before thenull:
int length = strlen(string); // return the number of characters in the string
length will be 0 for StringA and 7 for the other strings shown in the preceding code.The null that indicates the end of the string is not counted by strlen.
Use strcpy (short for string copy) to copy one string to another:
strcpy(destination, source); // copy string source to destination
Use strncpy to limit the number of characters to copy (useful to prevent writing morecharacters than the destination string can hold). You can see this used in Recipe 2.7:
strncpy(destination, source, 6); // copy up to 6 characters from source todestination
Use strcat (short for string concatenate) to append one string to the end of another:
strcat(destination, source); // append source string to the end of thedestination string
Always make sure there is enough room in the destination when copyingor concatenating strings. Don’t forget to allow room for the terminatingnull.
Use strcmp (short for string compare) to compare two strings. You can see this used inRecipe 2.7:
if(strcmp(str, "Arduino") == 0) // do something if the variable str is equal to "Arduino"
DiscussionText is represented in the Arduino environment using an array of characters calledstrings. A string consists of a number of characters followed by a null (the value 0). Thenull is not displayed, but it is needed to indicate the end of the string to the software.
2.6 Using C Character Strings | 31
www.it-ebooks.info

See AlsoSee one of the many online C/C++ reference pages, such as http://www.cplusplus.com/reference/clibrary/cstring/ and http://www.cppreference.com/wiki/string/c/start.
2.7 Splitting Comma-Separated Text into GroupsProblemYou have a string that contains two or more pieces of data separated by commas (orany other separator). You want to split the string so that you can use each individualpart.
SolutionThis sketch prints the text found between each comma:
/* * SplitSplit sketch * split a comma-separated string */
String message= "Peter,Paul,Mary"; // an example stringint commaPosition; // the position of the next comma in the string
void setup(){ Serial.begin(9600);}
void loop(){
Serial.println(message); // show the source string do { commaPosition = message.indexOf(','); if(commaPosition != -1) { Serial.println( message.substring(0,commaPosition)); message = message.substring(commaPosition+1, message.length()); } else { // here after the last comma is found if(message.length() > 0) Serial.println(message); // if there is text after the last comma,print it } } while(commaPosition >=0); delay(5000);}
32 | Chapter 2: Making the Sketch Do Your Bidding
www.it-ebooks.info

The Serial Monitor will display the following:
Peter,Paul,MaryPeterPaul
DiscussionThis sketch uses String functions to extract text from between commas. The followingcode:
commaPosition = message.indexOf(',');
sets the variable commaPosition with the position of the first comma in the String namedmessage (it will be set to -1 if no comma is found). If there is a comma, the substringfunction is used to print the text from the beginning of the string to the position of thecomma. The text that was printed is removed from message in this line:
message = message.substring(commaPosition+1, message.length());
substring returns a string starting from commaPosition+1 (the position just after the firstcomma) up to the length of the message. This results in that message containing onlythe text following the first comma. This is repeated until no more commas are found(commaIndex will be equal to -1).
If you are an experienced programmer, you can also use the low-level functions thatare part of the standard C library. The following sketch has similar functionality to thepreceding one using Arduino strings:
/* * SplitSplit sketch * split a comma-separated string */
const int MAX_STRING_LEN = 20; // set this to the largest string you'll processchar stringList[] = "Peter,Paul,Mary"; // an example string
char stringBuffer[MAX_STRING_LEN+1]; // a static buffer for computation andoutput
void setup(){ Serial.begin(9600);}
void loop(){ char *str; char *p; strncpy(stringBuffer, stringList, MAX_STRING_LEN); // copy source string Serial.println(stringBuffer); // show the source string for( str = strtok_r(stringBuffer, ",", &p); // split using comma str; // loop while str is not null str = strtok_r(NULL, ",", &p) // get subsequent tokens )
2.7 Splitting Comma-Separated Text into Groups | 33
www.it-ebooks.info

{ Serial.println(str); if(strcmp(str, "Paul") == 0) Serial.println("found Paul"); } delay(5000);}
The core functionality comes from the function named strtok_r (the name of the ver-sion of strtok that comes with the Arduino compiler). The first time you callstrtok_r you pass it the string you want to tokenize (separate into individual values).But strtok_r overwrites the characters in this string each time it finds a new token, soit’s best to pass a copy of the string as shown in this example. Each call that followsuses a NULL to tell the function that it should move on to the next token. In this example,each token is printed to the serial port and also compared to a target string ("Paul").
If your tokens consist only of numbers, see Recipe 4.5. This shows how to extractnumeric values separated by commas in a stream of serial characters.
See AlsoRecipe 2.5; online references to the C/C++ functions strtok_r and strcmp
2.8 Converting a Number to a StringProblemYou need to convert a number to a string, perhaps to show the number on an LCD orother display.
SolutionThe String variable will convert numbers to strings of characters automatically. Youcan use literal values, or the contents of a variable. For example, the following codewill work:
String myNumber = 1234;
As will this:
int value = 127String myReadout = "The reading was ";myReadout.concat(value);
Or this:
int value = 127;String myReadout = "The reading was ";myReadout += value;
34 | Chapter 2: Making the Sketch Do Your Bidding
www.it-ebooks.info

DiscussionIf you are converting a number to display as text on an LCD or serial device, the simplestsolution is to use the conversion capability built into the LCD and Serial libraries (seeRecipe 4.2). But perhaps you are using a device that does not have this built-in support(see Chapter 13) or you want to manipulate the number as a string in your sketch.
The Arduino String class automatically converts numerical values when they are as-signed to a String variable. You can combine (concatenate) numeric values at the endof a string using the concat function or the string + operator.
The + operator is used with number types as well as strings, but it be-haves differently with each.
The following code results in number having a value of 13:
int number = 12; number += 1;
With a String, as shown here:
String textNumber = 12 textNumber += 1;
textNumber is the text string "121".
Prior to the introduction of the String class, it was common to find Arduino code usingthe itoa or ltoa function. The names come from “integer to ASCII” (itoa) and “longto ASCII” (ltoa). The String version described earlier is easier to use, but the followingwill help if you want to understand code that uses itoa or ltoa.
These functions take three parameters: the value to convert, the buffer that will holdthe output string, and the number base (10 for a decimal number, 16 for hex, and 2 forbinary).
The following sketch illustrates how to convert numeric values using ltoa:
/* * NumberToString * Creates a string from a given number*/
void setup(){ Serial.begin(9600);}
char buffer[12]; // long data type has 11 characters (including the // minus sign) and a terminating null
2.8 Converting a Number to a String | 35
www.it-ebooks.info

void loop(){long value = 12345; ltoa(value, buffer, 10); Serial.print( value); Serial.print(" has "); Serial.print(strlen(buffer)); Serial.println(" digits"); value = 123456789; ltoa(value, buffer, 10); Serial.print( value); Serial.print(" has "); Serial.print(strlen(buffer)); Serial.println(" digits"); delay(1000);}
Your buffer must be large enough to hold the maximum number of characters in thestring. For 16-bit integers, that is seven characters (five digits, a possible minus sign,and a terminating 0 that always signifies the end of a string); 32-bit long integers need12 character buffers (10 digits, the minus sign, and the terminating 0). No warning isgiven if you exceed the buffer size; this is a bug that can cause all kinds of strangesymptoms, because the overflow will corrupt some other part of memory that may beused by your program. The easiest way to handle this is to always use a 12-characterbuffer and always use ltoa because this will work on both 16-bit and 32-bit values.
2.9 Converting a String to a NumberProblemYou need to convert a string to a number. Perhaps you have received a value as a stringover a communication link and you need to use this as an integer or floating-point value.
SolutionThere are a number of ways to solve this. If the string is received as serial data, it canbe converted on the fly as each character is received. See Recipe 4.3 for an example ofhow to do this using the serial port.
Another approach to converting text strings representing numbers is to use the C lan-guage conversion function called atoi (for int variables) or atol (for long variables).
This code fragment terminates the incoming digits on any character that is not a digit(or if the buffer is full):
int blinkRate; // blink rate stored in this variablechar strValue[6]; // must be big enough to hold all the digits and the // 0 that terminates the stringint index = 0; // the index into the array storing the received digits
36 | Chapter 2: Making the Sketch Do Your Bidding
www.it-ebooks.info

void loop(){ if( Serial.available()) { char ch = Serial.read(); if(index < 5 && ch >= '0' && ch <= '9'){ strValue[index++] = ch; // add the ASCII character to the string; } else { // here when buffer full or on the first non digit strValue[index] = 0; // terminate the string with a 0 blinkRate = atoi(strValue); // use atoi to convert the string to an int index = 0; } } blink();}
DiscussionThe obscurely named atoi (for ASCII to int) and atol (for ASCII to long) functionsconvert a string into integers or long integers. To use them, you have to receive andstore the entire string in a character array before you can call the conversion function.The code creates a character array named strValue that can hold up to five digits (it’sdeclared as char strValue[6] because there must be room for the terminating null). Itfills this array with digits from Serial.read until it gets the first character that is not avalid digit. The array is terminated with a null and the atoi function is called to convertthe character array into the variable blinkRate.
A function called blink is called that uses the value stored in blinkRate. The blinkfunction is shown in Recipe 4.3.
As mentioned in the warning in Recipe 2.4, you must be careful not to exceed the boundof the array. If you are not sure how to do that, read through Recipe 2.13.
This example builds a character array, rather than using the String class. At the timeof this writing, the Arduino String library did not have the functionality to convert astring of numbers into a numeric value.
See AlsoSee one of the many online C/C++ reference pages, such as http://www.cplusplus.com/reference/clibrary/cstdlib/atoi/ or http://www.cppreference.com/wiki/string/c/atoi.
2.9 Converting a String to a Number | 37
www.it-ebooks.info

2.10 Structuring Your Code into Functional BlocksProblemYou want to know how to add functions to a sketch, and the correct amount of func-tionality to go into your functions. You also want to understand how to plan the overallstructure of the sketch.
SolutionFunctions are used to organize the actions performed by your sketch into functionalblocks. Functions package functionality into well-defined inputs (information given toa function) and outputs (information provided by a function) that make it easier tostructure, maintain, and reuse your code. You are already familiar with the two func-tions that are in every Arduino sketch: setup and loop. You create a function bydeclaring its return type (the information it provides), its name, and any optional pa-rameters (values) that the function will receive when it is called. Here is a simple func-tion that just blinks an LED. It has no parameters and doesn’t return anything (thevoid preceding the function indicates that nothing will be returned):
// blink an LED oncevoid blink1(){ digitalWrite(13,HIGH); // turn the LED on delay(500); // wait 500 milliseconds digitalWrite(13,LOW); // turn the LED off delay(500); // wait 500 milliseconds}
The following version has a parameter (the integer named count) that determines howmany times the LED will flash:
// blink an LED the number of times given in the count parametervoid blink2(int count){ while(count > 0 ) // repeat until count is no longer greater than zero { digitalWrite(13,HIGH); delay(500); digitalWrite(13,LOW); delay(500); count = count -1; // decrement count }}
That version checks to see if the value of count is 0. If not, it blinks the LED and thenreduces the value of count by one. This will be repeated until count is no longer greater than 0.
38 | Chapter 2: Making the Sketch Do Your Bidding
www.it-ebooks.info

A parameter is sometimes referred to as an argument in some documen-tation. For practical purposes, you can treat these terms as meaning thesame thing.
Here is an example sketch that takes a parameter and returns a value. The parameterdetermines the LED on and off times (in milliseconds). The function continues to flashthe LED until a button is pressed, and the number of times the LED flashed is returnedfrom the function:
/* blink3 sketch demonstrates calling a function with a parameter and returning a value uses the same wiring as the pull-up sketch from Recipe 5.2 The LED flashes when the program starts and stops when a switch connected to pin 2 is pressed the program prints the number of times the LED flashes. */
const int ledPin = 13; // output pin for the LEDconst int inputPin = 2; // input pin for the switch
void setup() { pinMode(ledPin, OUTPUT); pinMode(inputPin, INPUT); digitalWrite(inputPin,HIGH); // use internal pull-up resistor (Recipe 5.2) Serial.begin(9600);}
void loop(){ Serial.println("Press and hold the switch to stop blinking"); int count = blink3(250); // blink the LED 250ms on and 250ms off Serial.print("The number of times the switch blinked was "); Serial.println(count);}
// blink an LED using the given delay period// return the number of times the LED flashedint blink3(int period){ int result = 0; int switchVal = HIGH; //with pull-ups, this will be high when switch is up
while(switchVal == HIGH) // repeat this loop until switch is pressed // (it will go low when pressed) { digitalWrite(13,HIGH); delay(period); digitalWrite(13,LOW); delay(period); result = result + 1; // increment the count switchVal = digitalRead(inputPin); // read input value }
2.10 Structuring Your Code into Functional Blocks | 39
www.it-ebooks.info

// here when switchVal is no longer HIGH because the switch is pressed return result; // this value will be returned}
DiscussionThe code in this recipe’s Solution illustrates the three forms of function call that youwill come across. blink1 has no parameter and no return value. Its form is:
void blink1(){ // implementation code goes here...}
blink2 takes a single parameter but does not return a value:
void blink2(int count){ // implementation code goes here...}
blink3 has a single parameter and returns a value:
int blink3(int period){ // implementation code goes here...}
The data type that precedes the function name indicates the return type (or no returntype if void). When declaring the function (writing out the code that defines the functionand its action), you do not put a semicolon following the parenthesis at the end. Whenyou use (call) the function, you do need a semicolon at the end.
Most of the functions you come across will be some variation on these forms. Forexample, here is a function that takes a parameter and returns a value:
int sensorPercent(int pin){int percent;
val = analogRead(pin); // read the sensor (ranges from 0 to 1023) percent = map(val,0,1023,0,100); // percent will range from 0 to 100. return percent;}
The function name is sensorPercent. It is given an analog pin number to read andreturns the value as a percent (see Recipe 5.7 for more on analogRead and map). Theint in front of the declaration tells the compiler (and reminds the programmer) thatthe function will return an integer. When creating functions, choose the return typeappropriate to the action the function performs. This function returns an integer valuefrom 0 to 100, so a return type of int is appropriate.
40 | Chapter 2: Making the Sketch Do Your Bidding
www.it-ebooks.info

It is recommended that you give your functions meaningful names, andit is a common practice to combine words by capitalizing the first letterof each word, except for the first word. Use whatever style you prefer,but it helps others who read your code if you keep your naming styleconsistent.
sensorPercent has a parameter called pin (when the function is called, pin is given thevalue that is passed to the function).
The body of the function (the code within the brackets) performs the action you want—here it reads a value from an analog input pin and maps it to a percentage. In thepreceding example, the percentage is temporarily held in a variable called percent. Thefollowing statement causes the value held in the temporary variable percent to be re-turned to the calling application:
return percent;
The same functionality can be achieved without using a temporary variable:
int sensorPercent(int pin){ val = analogRead(pin); // read the sensor (ranges from 0 to 1023) return map(val,0,1023,0,100); // percent will ranges from 0 to 100.}
Here is how the function can be called:
// print the percent value of 6 analog pinsfor(int sensorPin = 0; sensorPin < 6; sensorPin++){ Serial.print("Percent of sensor on pin "); Serial.print(sensorPin); Serial.print(" is "); int val = sensorPercent(sensorPin); Serial.print(val);}
See AlsoThe Arduino function reference page: http://www.arduino.cc/en/Reference/FunctionDeclaration
2.11 Returning More Than One Value from a FunctionProblemYou want to return two or more values from a function. Recipe 2.10 provided examplesfor the most common form of a function, one that returns just one value or none at all.But sometimes you need to modify or return more than one value.
2.11 Returning More Than One Value from a Function | 41
www.it-ebooks.info

SolutionThere are various ways to solve this. The easiest to understand is to have the functionchange some global variables and not actually return anything from the function:
/* swap sketch demonstrates changing two values using global variables */
int x; // x and y are global variablesint y;
void setup() { Serial.begin(9600);}
void loop(){ x = random(10); // pick some random numbers y = random(10);
Serial.print("The value of x and y before swapping are: "); Serial.print(x); Serial.print(","); Serial.println(y); swap();
Serial.print("The value of x and y after swapping are: "); Serial.print(x); Serial.print(","); Serial.println(y);Serial.println();
delay(1000);}
// swap the two global valuesvoid swap(){ int temp; temp = x; x = y; y = temp;}
The swap function changes two values by using global variables. Global variables areeasy to understand (global variables are values that are accessible everywhere and any-thing can change them), but they are avoided by experienced programmers because it’seasy to inadvertently modify the value of a variable or to have a function stop workingbecause you changed the name or type of a global variable elsewhere in the sketch.
A safer and more elegant solution is to pass references to the values you want to changeand let the function use the references to modify the values. This is done as follows:
/* functionReferences sketch demonstrates returning more than one value by passing references */
42 | Chapter 2: Making the Sketch Do Your Bidding
www.it-ebooks.info

void swap(int &value1, int &value2); // functions with references must bedeclared before use
void setup() { Serial.begin(9600);}
void loop(){ int x = random(10); // pick some random numbers int y = random(10);
Serial.print("The value of x and y before swapping are: "); Serial.print(x); Serial.print(","); Serial.println(y); swap(x,y);
Serial.print("The value of x and y after swapping are: "); Serial.print(x); Serial.print(","); Serial.println(y);Serial.println();
delay(1000);}
// swap the two given valuesvoid swap(int &value1, int &value2){ int temp; temp = value1; value1 = value2; value2 = temp;}
DiscussionThe swap function is similar to the functions with parameters described in Rec-ipe 2.10, but the ampersand (&) symbol indicates that the parameters are references.This means changes in values within the function will also change the value of thevariable that is given when the function is called. You can see how this works by firstrunning the code in this recipe’s Solution and verifying that the parameters are swap-ped. Then modify the code by removing all four ampersands (the two in the declarationat the top and the two in the definition at the bottom).
The two changed lines should look like this:
void swap(int value1, int value2); // functions with references must be declaredbefore use...
void swap(int value1, int value2)
Running the code shows that the values are not swapped—changes made within thefunction are local to the function and are lost when the function returns.
2.11 Returning More Than One Value from a Function | 43
www.it-ebooks.info

A function declaration is a prototype—a specification of the name, thetypes of values that may be passed to the function, and the function’sreturn type. The Arduino build process usually creates the declarationsfor you under the covers. But when you use nonstandard (for Arduino)syntax, the build process will not create the declaration and you needto add it to your code yourself, as done here with the line just beforesetup.
A function definition is the function header and the function body. Thefunction header is similar to the declaration except it does not have asemicolon at the end. The function body is the code within the bracketsthat is run to perform some action when the function is called.
2.12 Taking Actions Based on ConditionsProblemYou want to execute a block of code only if a particular condition is true. For example,you may want to light an LED if a switch is pressed or if an analog value is greater thansome threshold.
SolutionThe following code uses the wiring shown in Recipe 5.1:
/* Pushbutton sketch a switch connected to pin 2 lights the LED on pin 13*/
const int ledPin = 13; // choose the pin for the LEDconst int inputPin = 2; // choose the input pin (for a pushbutton)
void setup() { pinMode(ledPin, OUTPUT); // declare LED pin as output pinMode(inputPin, INPUT); // declare pushbutton pin as input}
void loop(){ int val = digitalRead(inputPin); // read input value if (val == HIGH) // check if the input is HIGH { digitalWrite(ledPin, HIGH); // turn LED on if switch is pressed }}
DiscussionThe if statement is used to test the value of digitalRead. An if statement must have atest within the parentheses that can only be true or false. In the example in this recipe’s
44 | Chapter 2: Making the Sketch Do Your Bidding
www.it-ebooks.info

Solution, it’s val == HIGH, and the code block following the if statement is only exe-cuted if the expression is true. A code block consists of all code within the brackets (orif you don’t use brackets, the block is just the next executable statement terminated bya semicolon).
If you want to do one thing if a statement is true and another if it is false, use theif...else statement:
/* Pushbutton sketch a switch connected to pin 2 lights the LED on pin 13*/
const int ledPin = 13; // choose the pin for the LEDconst int inputPin = 2; // choose the input pin (for a pushbutton)
void setup() { pinMode(ledPin, OUTPUT); // declare LED pin as output pinMode(inputPin, INPUT); // declare pushbutton pin as input}
void loop(){ int val = digitalRead(inputPin); // read input value if (val == HIGH) // check if the input is HIGH { // do this if val is HIGH digitalWrite(ledPin, HIGH); // turn LED on if switch is pressed } else { // else do this if val is not HIGH digitalWrite(ledPin, LOW); // turn LED off }}
See AlsoSee the discussion on Boolean types in Recipe 2.2.
2.13 Repeating a Sequence of StatementsProblemYou want to repeat a block of statements while an expression is true.
2.13 Repeating a Sequence of Statements | 45
www.it-ebooks.info

SolutionA while loop repeats one or more instructions while an expression is true:
while(analogRead(sensorPin) > 100){ flashLED(); // call a function to turn an LED on and off}
This code will execute the statements in the block within the brackets, {}, while thevalue from analogRead is greater than 100. This could be used to flash an LED as avisible warning that some value exceeded a threshold. The LED is off when the sensorvalue is 100 or less; it flashes continuously when the value is greater than 100.
The {} symbols that define a block of code are given various names,including brackets, curly braces, and braces. This book refers to themas brackets.
DiscussionBrackets define the extent of the code block to be executed in a loop. If brackets arenot used, only the first line of code will be repeated in the loop:
while(analogRead(sensorPin) > 100) flashLED(); // line immediately following the loop expression is executed Serial.print(analogRead(sensorPin)); // this is not executed until after // the while loop finishes!!!
Loops without brackets can behave unexpectedly if you have more thanone line of code.
The do...while loop is similar to the while loop, but the instructions in the code blockare executed before the condition is checked. Use this form when you must have thecode executed at least once, even if the expression is false:
do{ flashLED(); // call a function to turn an LED on and off}while (analogRead(sensorPin) > 100);
The preceding code will flash the LED at least once and will keep flashing as long asthe value read from a sensor is greater than 100. If the value is not greater than 100, theLED will only flash once. This code could be used in a battery-charging circuit, if itwere called once every 10 seconds or so: a single flash shows that the circuit is active,whereas continuous flashing indicates the battery is charged.
46 | Chapter 2: Making the Sketch Do Your Bidding
www.it-ebooks.info

See AlsoChapters 4 and 5
2.14 Repeating Statements with a CounterProblemYou want to repeat one or more statements a certain number of times. The for loop issimilar to the while loop, but you have more control over the starting and endingconditions.
SolutionThis sketch counts from zero to four by printing the value of the variable i in a for loop:
/* ForLoop sketch demonstrates for loop*/
void setup() { Serial.begin(9600);}
void loop(){ Serial.println("for(int i=0; i < 4; i++)"); for(int i=0; i < 4; i++) { Serial.println(i); }}
The output from this is as follows:
for(int i=0; i < 4; i++)0123
DiscussionA for loop consists of three parts: initialization, conditional test, and iteration (a state-ment that is executed at the end of every pass through the loop). Each part is separatedby a semicolon. In the code in this recipe’s Solution, int i=0; initializes the variablei to 0; i < 4; tests the variable to see if it’s less than 4; and i++ increments i.
2.14 Repeating Statements with a Counter | 47
www.it-ebooks.info

A for loop can use an existing variable, or it can create a variable for exclusive use inthe loop. This version uses the value of the variable j created earlier in the sketch:
int j;
Serial.println("for(j=0; j < 4; j++ )"); for(j=0; j < 4; j++ ) { Serial.println(j); }
This is almost the same as the earlier example, but it does not have the int keyword inthe initialization part because the variable j was already defined. The output of thisversion is similar to the output of the earlier version:
for(j=0; i < 4; i++)0123
You can leave out the initialization part completely if you want the loop to use the valueof a variable defined earlier. This code starts the loop with j equal to 1:
int j = 1;
Serial.println("for( ; j < 4; j++ )"); for( ; j < 4; j++ ) { Serial.println(j); }
The preceding code prints the following:
for( ; j < 4; j++)123
You control when the loop stops in the conditional test. The previous examples test ifthe loop variable is less than 4 and will terminate when the condition is no longer true.
If your loop variable starts at 0 and you want it to repeat four times,your conditional statement should test for a value less than 4. The looprepeats while the condition is true and there are four values that are lessthan 4 with a loop starting at 0.
The following code tests if the value of the loop variable is less than or equal to 4. Itwill print the digits from 0 to 4:
Serial.println("for(int i=0; i <= 4; i++)"); for(int i=0; i <= 4; i++) {
48 | Chapter 2: Making the Sketch Do Your Bidding
www.it-ebooks.info

Serial.println(i); }
The third part of a for loop is the iterator statement that gets executed at the end ofeach pass through the loop. This can be any valid C/C++ statement. The followingincreases the value of i by two on each pass:
Serial.println("for(int i=0; i < 4; i+= 2)"); for(int i=0; i < 4; i+=2) { Serial.println(i); }
That expression only prints the values 0 and 2.
The iterator expression can be used to cause the loop to count from high to low, in thiscase from 3 to 0:
Serial.println("for(int i=3; i > = 0 ; i--)"); for(int i=3; i > = 0 ; i--) { Serial.println(i); }
Like the other parts of a for loop, the iterator expression can be left blank (you mustalways have the two semicolons separating the three parts even if they are blank).
This version only increments i when an input pin is high. The for loop does not changethe value of i; it is only changed by the if statement after Serial.print:
Serial.println("for(int i=0; i < 4; )"); for(int i=0; i < 4; ) { Serial.println(i); if(digitalRead(inPin) == HIGH); i++; // only increment the value if the input is high }
See AlsoArduino reference for the for statement: http://www.arduino.cc/en/Reference/For
2.15 Breaking Out of LoopsProblemYou want to terminate a loop early based on some condition you are testing.
SolutionUse the following code:
while(analogRead(sensorPin) > 100){
2.15 Breaking Out of Loops | 49
www.it-ebooks.info

if(digitalRead(switchPin) == HIGH) { break; //exit the loop if the switch is pressed } flashLED(); // call a function to turn an LED on and off}
DiscussionThis code is similar to the one using while loops, but it uses the break statement to exitthe loop if a digital pin goes high. For example, if a switch is connected on the pin asshown in Recipe 5.1, the loop will be exited and the LED will stop flashing even if thecondition in the while loop is true.
See AlsoArduino reference for the break statement: http://www.arduino.cc/en/Reference/Break
2.16 Taking a Variety of Actions Based on a Single VariableProblemYou need to do different things depending on some value. You could use multiple ifand else if statements, but the code soon gets complex and difficult to understand ormodify. Additionally, you may want to test for a range of values.
SolutionThe switch statement provides for selection of a number of alternatives. It is function-ally similar to multiple if/else if statements but is more concise:
/* * SwitchCase sketch * example showing switch statement by switching on chars from the serial port * * sending the character 1 blinks the LED once, sending 2 blinks twice * sending + turns the LED on, sending - turns it off * any other character prints a message to the Serial Monitor */const int ledPin = 13; // the pin the LED is connected to
void setup(){ Serial.begin(9600); // Initialize serial port to send and receive at 9600 baud pinMode(13, OUTPUT);}
void loop(){ if ( Serial.available()) // Check to see if at least one character is available {
50 | Chapter 2: Making the Sketch Do Your Bidding
www.it-ebooks.info

char ch = Serial.read(); switch(ch) { case '1': blink(); break; case '2': blink(); blink(); break; case '+': digitalWrite(ledPin,HIGH); break; case '-': digitalWrite(ledPin,LOW); break; default : Serial.print(ch); Serial.println(" was received but not expected"); break; } }}
void blink(){ digitalWrite(ledPin,HIGH); delay(500); digitalWrite(ledPin,LOW); delay(500);}
DiscussionThe switch statement evaluates the variable ch received from the serial port andbranches to the label that matches its value. The labels must be numeric constants (youcan use strings in a case statement) and no two labels can have the same value. If youdon’t have a break statement following each expression, the execution will fallthrough into the statement:
case '1': blink(); // no break statement before the next label case '2': blink(); // case '1' will continue here blink(); break; // break statement will exit the switch expression
If the break statement at the end of case '1': was removed (as shown in the precedingcode), when ch is equal to the character 1 the blink function will be called three times.Accidentally forgetting the break is a common mistake. Intentionally leaving out thebreak is sometimes handy; it can be confusing to others reading your code, so it’s agood practice to clearly indicate your intentions with comments in the code.
2.16 Taking a Variety of Actions Based on a Single Variable | 51
www.it-ebooks.info

If your switch statement is misbehaving, check to ensure that you havenot forgotten the break statements.
The default: label is used to catch values that don’t match any of the case labels. Ifthere is no default label, the switch expression will not do anything if there is no match.
See AlsoArduino reference for the switch and case statements: http://www.arduino.cc/en/Reference/SwitchCase
2.17 Comparing Character and Numeric ValuesProblemYou want to determine the relationship between values.
SolutionCompare integer values using the relational operators shown in Table 2-2.
Table 2-2. Relational and equality operators
Operator Test for Example
== Equal to 2 == 3 // evaluates to false
!= Not equal to 2 != 3 // evaluates to true
> Greater than 2 > 3 // evaluates to false
< Less than 2 < 3 // evaluates to true
>= Greater than or equal to 2 >= 3 // evaluates to false
<= Less than or equal to 2 <= 3 // evaluates to true
The following sketch demonstrates the results of using the comparison operators:
/* * RelationalExpressions sketch * demonstrates comparing values */
int i = 1; // some values to start withint j = 2;
void setup() { Serial.begin(9600);}
52 | Chapter 2: Making the Sketch Do Your Bidding
www.it-ebooks.info

void loop(){ Serial.print("i = "); Serial.print(i); Serial.print(" and j = "); Serial.println(j);
if(i < j) Serial.println(" i is less than j"); if(i <= j) Serial.println(" i is less than or equal to j"); if(i != j) Serial.println(" i is not equal to j"); if(i == j) Serial.println(" i is equal to j"); if(i >= j) Serial.println(" i is greater than or equal to j"); if(i > j) Serial.println(" i is greater than j");
Serial.println(); i = i + 1; if(i > j + 1) delay(10000); // long delay after i is no longer close to j}
Here is the output:
i = 1 and j = 2 i is less than j i is less than or equal to j i is not equal to j
i = 2 and j = 2 i is less than or equal to j i is equal to j i is greater than or equal to j
i = 3 and j = 2 i is not equal to j i is greater than or equal to j i is greater than j
DiscussionNote that the equality operator is the double equals sign, ==. One of the most commonprogramming mistakes is to confuse this with the assignment operator, which uses asingle equals sign.
The following expression will compare the value of i to 3. The programmer intendedthis:
if(i == 3) // test if i equals 3
But he put this in the sketch:
if(i = 3) // single equals sign used by mistake!!!!
2.17 Comparing Character and Numeric Values | 53
www.it-ebooks.info

This will always return true, because i will be set to 3, so they will be equal whencompared.
A tip to help avoid that trap when comparing variables to constants (fixed values) is toput the constant on the left side of the expression:
if(3 = i) // single equals sign used by mistake!!!!
The compiler will tell you about this error because it knows that you can’t assign adifferent value to a constant.
The error message is the somewhat unfriendly “value required as leftoperand of assignment”. If you see this message, the compiler is tellingyou that you are trying to assign a value to something that cannot bechanged.
See AlsoArduino reference for conditional and comparison operators: http://www.arduino.cc/en/Reference/If
2.18 Comparing StringsProblemYou want to see if two character strings are identical.
SolutionThere is a function to compare strings, called strcmp (short for string compare). Hereis a fragment showing its use:
char String1[ ] = "left"; char String2[ ] = "right";
if(strcmp(String1, String2) == 0) Serial.print("strings are equal)
Discussionstrcmp returns the value 0 if the strings are equal and a value greater than zero if thefirst character that does not match has a greater value in the first string than in thesecond. It returns a value less than zero if the first nonmatching character in the firststring is less than in the second. Usually you only want to know if they are equal, andalthough the test for zero may seem unintuitive at first, you’ll soon get used to it.
54 | Chapter 2: Making the Sketch Do Your Bidding
www.it-ebooks.info

Bear in mind that strings of unequal length will not be evaluated as equal even if theshorter string is contained in the longer one. So:
strcmp("left", "leftcenter") == 0) // this will evaluate to false
You can compare strings up to a given number of characters by using the strncmp func-tion. You give strncmp the maximum number of characters to compare and it will stopcomparing after that many characters:
strncmp("left", "leftcenter", 4) == 0) // this will evaluate to true
See AlsoMore information on strcmp is available at http://www.cplusplus.com/reference/clibrary/cstring/strcmp/.
2.19 Performing Logical ComparisonsProblemYou want to evaluate the logical relationship between two or more expressions. Forexample, you want to take a different action depending on the conditions of an ifstatement.
SolutionUse the logical operators as outlined in Table 2-3.
Table 2-3. Logical operators
Symbol Function Comments
&& Logical And Evaluates as true if the condition on both sides of the && operator are true
|| Logical Or Evaluates as true if the condition on at least one side of the || operator is true
! Not Evaluates as true if the expression is false, and false if the expression is true
DiscussionLogical operators return true or false values based on the logical relationship.
The logical And operator && will return true if both its two operands are true, andfalse otherwise. The logical Or operator || will return true if either of its two operandsare true, and false if both operands are false. The Not operator ! has only one operand,whose value is inverted—it results in false if its operand is true and true if its operandis false.
2.19 Performing Logical Comparisons | 55
www.it-ebooks.info
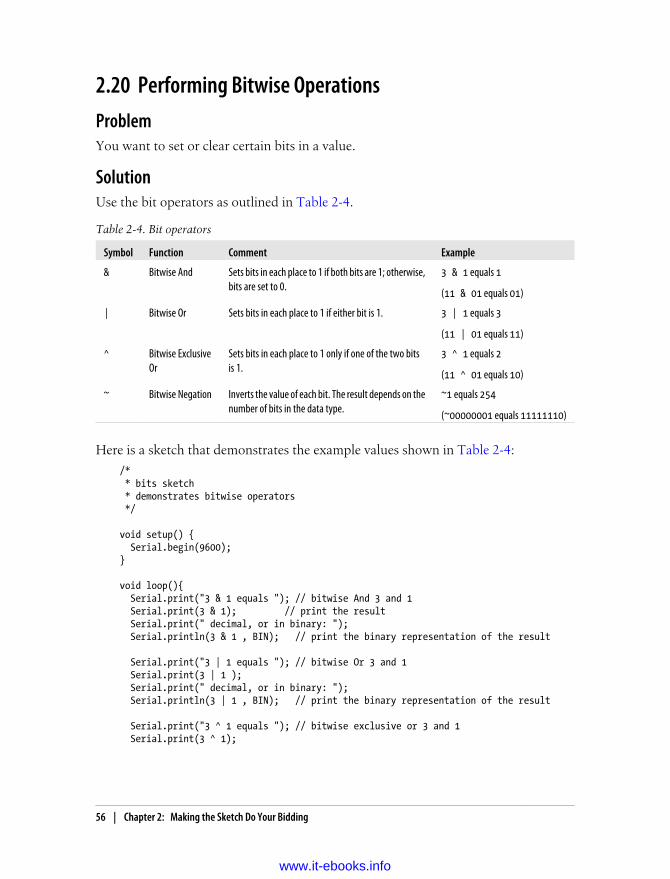
2.20 Performing Bitwise OperationsProblemYou want to set or clear certain bits in a value.
SolutionUse the bit operators as outlined in Table 2-4.
Table 2-4. Bit operators
Symbol Function Comment Example
& Bitwise And Sets bits in each place to 1 if both bits are 1; otherwise,bits are set to 0.
3 & 1 equals 1
(11 & 01 equals 01)
| Bitwise Or Sets bits in each place to 1 if either bit is 1. 3 | 1 equals 3
(11 | 01 equals 11)
^ Bitwise ExclusiveOr
Sets bits in each place to 1 only if one of the two bitsis 1.
3 ^ 1 equals 2
(11 ^ 01 equals 10)
~ Bitwise Negation Inverts the value of each bit. The result depends on thenumber of bits in the data type.
~1 equals 254
(~00000001 equals 11111110)
Here is a sketch that demonstrates the example values shown in Table 2-4:
/* * bits sketch * demonstrates bitwise operators */
void setup() { Serial.begin(9600);}
void loop(){ Serial.print("3 & 1 equals "); // bitwise And 3 and 1 Serial.print(3 & 1); // print the result Serial.print(" decimal, or in binary: "); Serial.println(3 & 1 , BIN); // print the binary representation of the result
Serial.print("3 | 1 equals "); // bitwise Or 3 and 1 Serial.print(3 | 1 ); Serial.print(" decimal, or in binary: "); Serial.println(3 | 1 , BIN); // print the binary representation of the result
Serial.print("3 ^ 1 equals "); // bitwise exclusive or 3 and 1 Serial.print(3 ^ 1);
56 | Chapter 2: Making the Sketch Do Your Bidding
www.it-ebooks.info

Serial.print(" decimal, or in binary: "); Serial.println(3 ^ 1 , BIN); // print the binary representation of the result
byte byteVal = 1; int intVal = 1;
byteVal = ~byteVal; // do the bitwise negate intVal = ~intVal;
Serial.print("~byteVal (1) equals "); // bitwise negate an 8 bit value Serial.println(byteVal, BIN); // print the binary representation of the result Serial.print("~intVal (1) equals "); // bitwise negate a 16 bit value Serial.println(intVal, BIN); // print the binary representation of the result
delay(10000);}
This is what is displayed on the Serial Monitor:
3 & 1 equals 1 decimal, or in binary: 13 | 1 equals 3 decimal, or in binary: 113 ^ 1 equals 2 decimal, or in binary: 10~byteVal (1) equals 11111110~intVal (1) equals 11111111111111111111111111111110
DiscussionBitwise operators are used to set or test bits. When you “And” or “Or” two values, theoperator works on each individual bit. It is easier to see how this works by looking atthe binary representation of the values.
Decimal 3 is binary 00000011, and decimal 1 is 00000001. Bitwise And operates oneach bit. The rightmost bits are both 1, so the result of And-ing these is 1. Moving tothe left, the next bits are 1 and 0; And-ing these results in 0. All the remaining bits are0, so the bitwise result of these will be 0. In other words, for each bit position wherethere is a 1 in both places, the result will have a 1; otherwise, it will have a 0. So, 11 &01 equals 1.
Tables 2-5, 2-6, and 2-7 should help to clarify the bitwise And, Or, and Exclusive Orvalues.
Table 2-5. Bitwise And
Bit 1 Bit 2 Bit 1 and Bit 2
0 0 0
0 1 0
1 0 0
1 1 1
2.20 Performing Bitwise Operations | 57
www.it-ebooks.info

Table 2-6. Bitwise Or
Bit 1 Bit 2 Bit 1 or Bit 2
0 0 0
0 1 1
1 0 1
1 1 1
Table 2-7. Bitwise Exclusive Or
Bit 1 Bit 2 Bit 1 ^ Bit 2
0 0 0
0 1 1
1 0 1
1 1 0
All the bitwise expressions operate on two values, except for the negation operator.This simply flips each bit, so 0 becomes 1 and 1 becomes 0. In the example, the byte(8-bit) value 00000001 becomes 11111110. The int value has 16 bits, so when each isflipped, the result is 15 ones followed by a single zero.
See AlsoArduino reference for the bitwise And, Or, and Exclusive Or operators: http://www.arduino.cc/en/Reference/Bitwise
2.21 Combining Operations and AssignmentProblemYou want to understand and use compound operators. It is not uncommon to seepublished code that uses expressions that do more than one thing in a single statement.You want to understand a += b, a >>= b, and a &= b.
SolutionTable 2-8 shows the compound assignment operators and their equivalent full expression.
58 | Chapter 2: Making the Sketch Do Your Bidding
www.it-ebooks.info

Table 2-8. Compound operators
Operator Example Equivalent expression
+= Value += 5; Value = Value + 5; // add 5 to Value
-= Value -= 4; Value = Value - 4; // subtract 4 from Value
*= Value *= 3; Value = Value * 3; // multiply Value by 3
/= Value /= 2; Value = Value / 2; // divide Value by 2
>>= Value >>= 2; Value = Value >> 2; // shift Value right two places
<<= Value <<= 2; Value = Value << 2; // shift Value left two places
&= Mask &= 2; Mask = Mask & 2; // binary and Mask with 2
|= Mask |= 2; Mask = Mask | 2; // binary or Mask with 2
DiscussionThese compound statements are no more efficient at runtime than the equivalent fullexpression, and if you are new to programming, using the full expression is clearer.Experienced coders often use the shorter form, so it is helpful to be able to recognizethe expressions when you run across them.
See AlsoSee http://www.arduino.cc/en/Reference/HomePage for an index to the reference pagesfor compound operators.
2.21 Combining Operations and Assignment | 59
www.it-ebooks.info

CHAPTER 3
Using Mathematical Operators
3.0 IntroductionAlmost every sketch uses mathematical operators to manipulate the value of variables.This chapter provides a brief overview of the most common mathematical operators.As the preceding chapter is, this summary is primarily for nonprogrammers or pro-grammers who are not familiar with C or C++. For more details, see one of theC reference books mentioned in the Preface.
3.1 Adding, Subtracting, Multiplying, and DividingProblemYou want to perform simple math on values in your sketch. You want to control theorder in which the operations are performed and you may need to handle differentvariable types.
SolutionUse the following code:
int myValue;myValue = 1 + 2; // additionmyValue = 3 - 2; // subtractionmyValue = 3 * 2; // multiplicationmyValue = 3 / 2; // division (the result is 1)
DiscussionAddition, subtraction, and multiplication for integers work much as you expect.
61
www.it-ebooks.info

Make sure your result will not exceed the maximum size of the desti-nation variable. See Recipe 2.2.
Integer division truncates the fractional remainder in the division example shown inthis recipe’s Solution; myValue will equal 1 after the division (see Recipe 2.3 if yourapplication requires fractional results):
int value = 1 + 2 * 3 + 4;
Compound statements, such as the preceding statement, may appear ambiguous, butthe precedence (order) of every operator is well defined. Multiplication and divisionhave a higher precedence than addition and subtraction, so the result will be 11. It’sadvisable to use brackets in your code to make the desired calculation precedence clear.int value = 1 + (2 * 3) + 4; produces the same result but is easier to read.
Use parentheses if you need to alter the precedence, as in this example:
int value = ((1 + 2) * 3) + 4;
The result will be 13. The expression in the inner parentheses is calculated first, so 1gets added to 2, this then gets multiplied by 3, and finally is added to 4, yielding 13.
See AlsoRecipe 2.2; Recipe 2.3
3.2 Incrementing and Decrementing ValuesProblemYou want to increase or decrease the value of a variable.
SolutionUse the following code:
int myValue = 0;
myValue = myvalue + 1; // this adds one to the variable myValuemyValue += 1; // this does the same as the above
myValue = myvalue - 1; // this subtracts one from the variable myValuemyValue -= 1; // this does the same as the above
myValue = myvalue + 5; // this adds five to the variable myValuemyValue += 5; // this does the same as the above
62 | Chapter 3: Using Mathematical Operators
www.it-ebooks.info

DiscussionIncreasing and decreasing the values of variables is one of the most common program-ming tasks, and the Arduino board has operators to make this easy. Increasing a valueby one is called incrementing, and decreasing it by one is called decrementing. Thelonghand way to do this is as follows:
myValue = myvalue + 1; // this adds one to the variable myValue
But you can also combine the increment and decrement operators with the assign op-erator, like this:
myValue += 1; // this does the same as the above
See AlsoRecipe 3.1
3.3 Finding the Remainder After Dividing Two ValuesProblemYou want to find the remainder after you divide two values.
SolutionUse the % symbol (the modulus operator) to get the remainder:
int myValue0 = 20 % 10; // get the modulus(remainder) of 20 divided by 10int myValue1 = 21 % 10; // get the modulus(remainder) of 21 divided by 10
myValue0 equals 0 (20 divided by 10 has a remainder of 0). myValue1 equals 1 (21 dividedby 10 has a remainder of 1).
DiscussionThe modulus operator is surprisingly useful, particularly when you want to see if avalue is evenly divisible by a number. For example, the code in this recipe’s Solutioncan be enhanced to detect when a value is a multiple of 10:
int myValue;//... code here to set the value of myValueif( myValue % 10 == 0){ Serial.println("The value is a multiple of 10";}
The preceding code takes the modulus of the myValue variable and compares the resultto zero (see Recipe 2.17). If it is zero, a message is printed saying the result is divisibleby 10.
3.3 Finding the Remainder After Dividing Two Values | 63
www.it-ebooks.info

Here is a similar example, but by using 2 with the modulus operator, the result can beused to check if a value is odd or even:
int myValue;//... code here to set the value of myValueif( myValue % 2 == 0){ Serial.println("The value is even";}else{ Serial.println("The value is odd";}
This example tracks the day of the week from a variable that is incremented (by othercode) each day and reports when it is the first day of the week:
int dayCount;
int day = dayCount % 7;if( day == 0){ Serial.println("This is the first day of the week");}
See AlsoArduino reference for % (the modulus operator): http://www.arduino.cc/en/Reference/Modulo
3.4 Determining the Absolute ValueProblemYou want to get the absolute value of a number.
Solutionabs(x) computes the absolute value of x. The following example takes the absolutevalue of the difference between readings on two analog input ports (see Chapter 5 formore on analogRead()):
int x = analogRead(0);int y = analogRead(1);
if(abs(x-y) > 10){ Serial.println("The analog values differ by more than 10");}
64 | Chapter 3: Using Mathematical Operators
www.it-ebooks.info

Discussionabs(x-y); returns the absolute value of the difference between x and y. It is used forinteger (and long integer) values. To return the absolute value of floating-point values,see Recipe 2.3.
See AlsoArduino reference for abs: http://www.arduino.cc/en/Reference/Abs
3.5 Constraining a Number to a Range of ValuesProblemYou want to ensure that a value is always within some lower and upper limit.
Solutionconstrain(x, min, max) returns a value that is within the bounds of min and max:
myConstrainedValue = constrain(myValue, 100, 200);
DiscussionmyConstrainedValue is set to a value that will always be greater than or equal to 100 andless than or equal to 200. If myValue is less than 100, the result will be 100; if it is morethan 200, it will be set to 200.
Table 3-1 shows some example output values using a min of 100 and a max of 200.
Table 3-1. Output from constrain with min = 100 and max = 200
myValue (the input value) constrain(myValue, 100, 200)
99 100
100 100
150 150
200 200
201 200
See AlsoRecipe 3.6
3.5 Constraining a Number to a Range of Values | 65
www.it-ebooks.info

3.6 Finding the Minimum or Maximum of Some ValuesProblemYou want to find the minimum or maximum of two or more values.
Solutionmin(x,y) returns the smaller of two numbers. max(x,y) returns the larger of twonumbers.
myValue = analogRead(0);myMinValue = min(myValue, 200); // myMinValue will be the smaller of // myVal or 200
myMaxValue = max(myValue, 100); // myMaxValue will be the larger of // myVal or 100
DiscussionTable 3-2 shows some example output values using a min of 200. The table shows thatthe output is the same as the input (myValue) until the value becomes greater than 200.
Table 3-2. Output from min(myValue, 200)
myValue (the input value) Min(myValue, 200)
99 99
100 100
150 150
200 200
201 200
Table 3-3 shows the output using a max of 100. The table shows that the output is thesame as the input (myValue) when the value is greater than or equal to 100.
Table 3-3. Output from max(myValue, 100)
myValue (the input value) Max(myValue, 200)
99 100
100 100
150 150
200 200
201 201
66 | Chapter 3: Using Mathematical Operators
www.it-ebooks.info

Use min when you want to limit the upper bound. That may be counterintuitive, butby returning the smaller of the input value and the minimum value, the output frommin will never be higher than the minimum value (200 in the example).
Similarly, use max to limit the lower bound. The output from max will never be lowerthan the maximum value (100 in the example).
If you want to find the min or max value from more than two values, you can cascadethe values as follows:
// myMinValue will be the smaller of the three analog readings:int myMinValue = min(analogRead(0), min(analogRead(1), analogRead(2)) );
In this example, the minimum value is found for analog ports 1 and 2, and then theminimum of that and port 0. This can be extended for as many items as you need, buttake care to position the parentheses correctly. The following example gets the maxi-mum of four values:
int myMaxValue = max(analogRead(0), max(analogRead(1), max(analogRead(2), analogRead(3))));
See AlsoRecipe 3.5
3.7 Raising a Number to a PowerProblemYou want to raise a number to a power.
Solutionpow(x, y) returns the value of x raised to the power of y:
myValue = pow(3,2);
This calculates 32, so myValue will equal 9.
DiscussionThe pow function can operate on integer or floating-point values and it returns the resultas a floating-point value:
Serial.print(pow(3,2)); // this prints 9.00int z = pow(3,2);Serial.println(z); // this prints 9
The first output is 9.00 and the second is 9; they are not exactly the same because thefirst print displays the output as a floating-point number and the second treats thevalue as an integer before printing, and therefore displays without the decimal point.
3.7 Raising a Number to a Power | 67
www.it-ebooks.info

If you use the pow function, you may want to read Recipe 2.3 to understand the differ-ence between these and integer values.
Here is an example of raising a number to a fractional power:
float s = pow(2, 1.0 / 12); // the twelfth root of two
The twelfth root of two is the same as 2 to the power of 0.083333. The resultant value,s, is 1.05946 (this is the ratio of the frequency of two adjacent notes on a piano).
3.8 Taking the Square RootProblemYou want to calculate the square root of a number.
SolutionThe sqrt(x) function returns the square root of x:
Serial.print( sqrt(9) ); // this prints 3.00
DiscussionThe sqrt function returns a floating-point number (see the pow function discussed inRecipe 3.7).
3.9 Rounding Floating-Point Numbers Up and DownProblemYou want the next smallest or largest integer value of a floating-point number (flooror ceil).
Solutionfloor(x) returns the largest integral value that is not greater than x. ceil(x) returns thesmallest integral value that is not less than x.
DiscussionThese functions are used for rounding floating-point numbers; use floor to round downand ceil to round up.
Here is some example output using floor:
Serial.println( floor(1) ); // this prints 1.00 Serial.println( floor(1.1) ); // this prints 1.00 Serial.println( floor(0) ); // this prints 0.00
68 | Chapter 3: Using Mathematical Operators
www.it-ebooks.info

Serial.println( floor(.1) ); // this prints 0.00 Serial.println( floor(-1) ); // this prints -1.00 Serial.println( floor(-1.1) ); // this prints -2.00
Here is some example output using ceil:
Serial.println( ceil(1) ); // this prints 1.00 Serial.println( ceil(1.1) ); // this prints 2.00 Serial.println( ceil(0) ); // this prints 0.00 Serial.println( ceil(.1) ); // this prints 1.00 Serial.println( ceil(-1) ); // this prints -1.00 Serial.println( ceil(-1.1) ); // this prints -1.00
You can truncate a floating-point number by casting (converting) to anint, but this does not round correctly. Negative numbers such as -1.9should round down to -2, but when cast to an int they are rounded upto -1. The same problem exists with positive numbers: 1.9 should roundup to 2 but will round down to 1. Use floor and ceil to get the correctresults.
3.10 Using Trigonometric FunctionsProblemYou want to get the sine, cosine, or tangent of an angle given in radians or degrees.
Solutionsin(x) returns the sine of angle x. cos(x) returns the cosine of angle x. tan(x) returnsthe tangent of angle x.
DiscussionAngles are specified in radians and the result is a floating-point number (see Rec-ipe 2.3). The following example illustrates the trig functions:
float deg = 30; // angle in degrees float rad = deg * PI / 180; // convert to radians Serial.println(rad); // print the radians Serial.println sin(rad)); // print the sine Serial.println (cos(rad)); // print the cosine
This converts the angle into radians and prints the sine and cosine. Here is the outputwith annotation added:
0.52 30 degrees is 0.5235988 radians, print only shows two decimal places0.50 sine of 30 degrees is .5000000, displayed here to two decimal places0.87 cosine is .8660254, which rounds up to 0.87
3.10 Using Trigonometric Functions | 69
www.it-ebooks.info

Although the sketch calculates these values using the full precision of floating-pointnumbers, the Serial.print routine shows the values of floating-point numbers to twodecimal places.
The conversion from radians to degrees and back again is textbook trigonometry. PI is the familiar constant for π (3.14159265...). PI and 180 are both constants, and Arduinoprovides some precalculated constants you can use to perform degree/radianconversions:
rad = deg * DEG_TO_RAD; // a way to convert degrees to radiansdeg = rad * RAD_TO_DEG; // a way to convert radians to degrees
Using deg * DEG_TO_RAD looks more efficient than deg * PI / 180, but it’s not, sincethe Arduino compiler is smart enough to recognize that PI / 180 is a constant (the valuewill never change), so it substitutes the result of dividing PI by 180, which happens tobe the value of the constant (DEG_TO_RAD is 0.017453292519...). So, you can use which-ever approach you prefer.
See AlsoArduino references for sin (http://www.arduino.cc/en/Reference/Sin), cos (http://arduino.cc/en/Reference/Cos), and tan (http://arduino.cc/en/Reference/Tan)
3.11 Generating Random NumbersProblemYou want to get a random number, either ranging from zero up to a specified maximumor constrained between a minimum and maximum value you provide.
SolutionUse the random function to return a random number. Calling random with a single pa-rameter sets the upper bound; the values returned will range from zero to one less thanthe upper bound:
random(max); // returns a random number between 0 and max -1
Calling random with two parameters sets the lower and upper bounds; the values re-turned will range from the lower bound (inclusive) to one less than the upper bound:
random(min, max); // returns a random number between min and max -1
DiscussionAlthough there appears to be no obvious pattern to the numbers returned, the valuesare not truly random. Exactly the same sequence will repeat each time the sketch starts.In many applications, this does not matter. But if you need a different sequence eachtime your sketch starts, use the function randomSeed(seed) with a different seed value
70 | Chapter 3: Using Mathematical Operators
www.it-ebooks.info

each time (if you use the same seed value, you’ll get the same sequence). This functionstarts the random number generator at some arbitrary place based on the seed param-eter you pass:
randomSeed(1234); // change the starting sequence of random numbers.
Here is an example that uses the different forms of random number generation availableon Arduino:
// Random// demonstrates generating random numbers
int randNumber;
void setup(){ Serial.begin(9600);
// Print random numbers with no seed value Serial.println("Print 20 random numbers between 0 and 9"); for(int i=0; i < 20; i++) { randNumber = random(10); Serial.print(randNumber); Serial.print(" "); } Serial.println(); Serial.println("Print 20 random numbers between 2 and 9"); for(int i=0; i < 20; i++) { randNumber = random(2,10); Serial.print(randNumber); Serial.print(" "); }
// Print random numbers with the same seed value each time randomSeed(1234); Serial.println(); Serial.println("Print 20 random numbers between 0 and 9 after constant seed "); for(int i=0; i < 20; i++) { randNumber = random(10); Serial.print(randNumber); Serial.print(" "); }
// Print random numbers with a different seed value each time randomSeed(analogRead(0)); // read from an analog port with nothing connected Serial.println(); Serial.println("Print 20 random numbers between 0 and 9 after floating seed "); for(int i=0; i < 20; i++) { randNumber = random(10); Serial.print(randNumber); Serial.print(" ");
3.11 Generating Random Numbers | 71
www.it-ebooks.info

} Serial.println(); Serial.println();}
void loop(){}
Here is the output from this code:
Print 20 random numbers between 0 and 97 9 3 8 0 2 4 8 3 9 0 5 2 2 7 3 7 9 0 2Print 20 random numbers between 2 and 99 3 7 7 2 7 5 8 2 9 3 4 2 5 4 3 5 7 5 7Print 20 random numbers between 0 and 9 after constant seed8 2 8 7 1 8 0 3 6 5 9 0 3 4 3 1 2 3 9 4Print 20 random numbers between 0 and 9 after floating seed0 9 7 4 4 7 7 4 4 9 1 6 0 2 3 1 5 9 1 1
If you press the reset button on your Arduino to restart the sketch, the first three linesof random numbers will be unchanged. Only the last line changes each time the sketchstarts, because it sets the seed to a different value by reading it from an unconnectedanalog input port as a seed to the randomSeed function. If you are using analog port 0for something else, change the argument to analogRead to an unused analog port.
See AlsoArduino references for random (http://www.arduino.cc/en/Reference/Random) andrandomSeed (http://arduino.cc/en/Reference/RandomSeed)
3.12 Setting and Reading BitsProblemYou want to read or set a particular bit in a numeric variable.
SolutionUse the following functions:
• bitSet(x, bitPosition) sets (writes a 1 to) the given bitPosition of variable x.
• bitClear(x, bitPosition) clears (writes a 0 to) the given bitPosition of variable x.
• bitRead(x, bitPosition) returns the value (as 0 or 1) of the bit at the givenbitPosition of variable x.
• bitWrite(x, bitPosition, value) sets the given value (as 0 or 1) of the bit at thegiven bitPosition of variable x.
• bit(bitPosition) returns the value of the given bit position: bit(0) is 1, bit(1) is2, bit(2) is 4, and so on.
72 | Chapter 3: Using Mathematical Operators
www.it-ebooks.info

In all these functions, bitPosition 0 is the least significant (rightmost) bit.
Here is a sketch that uses these functions to manipulate the bits of an 8-bit variablecalled flags:
// bitFunctions// demonstrates using the bit functions
byte flags = 0; // these examples set, clear or read bits in a variable called flags.
// bitSet examplevoid setFlag( int flagNumber){ bitSet(flags, flagNumber);}
// bitClear examplevoid clearFlag( int flagNumber){ bitClear(flags, flagNumber);}
// bitPosition example
int getFlag( int flagNumber){ return bitRead(flags, flagNumber);}
void setup(){ Serial.begin(9600);}
void loop(){ showFlags(); setFlag(2); // set some flags; setFlag(5); showFlags(); clearFlag(2); showFlags();
delay(10000); // wait a very long time}
// reports flags that are setvoid showFlags(){ for(int flag=0; flag < 8; flag++) { if(getFlag(flag) == true) Serial.print("* bit set for flag ");
3.12 Setting and Reading Bits | 73
www.it-ebooks.info

else Serial.print("bit clear for flag ");
Serial.println(flag); } Serial.println();}
This code will print the following:
bit clear for flag 0bit clear for flag 1bit clear for flag 2bit clear for flag 3bit clear for flag 4bit clear for flag 5bit clear for flag 6bit clear for flag 7
bit clear for flag 0bit clear for flag 1* bit set for flag 2bit clear for flag 3bit clear for flag 4* bit set for flag 5bit clear for flag 6bit clear for flag 7
bit clear for flag 0bit clear for flag 1bit clear for flag 2bit clear for flag 3bit clear for flag 4* bit set for flag 5bit clear for flag 6bit clear for flag 7
DiscussionReading and setting bits is a common task, and many of the Arduino libraries use thisfunctionality. One of the more common uses of bit operations is to efficiently store andretrieve binary values (on/off, true/false, 1/0, high/low, etc.).
Arduino defines the constants true and HIGH as 1 and false and LOW as 0.
The state of eight switches can be packed into a single 8-bit value instead of requiringeight bytes or integers. The example in this recipe’s Solution shows how eight valuescan be individually set or cleared in a single byte.
74 | Chapter 3: Using Mathematical Operators
www.it-ebooks.info

The term flag is a programming term for values that store the state of some aspect of aprogram. In this sketch, the flag bits are read using bitRead, and they are set or clearedusing bitSet or bitClear. These functions take two parameters: the first is the value toread or write (flags in this example), and the second is the bit position indicating wherethe read or write should take place. Bit position 0 is the least significant (rightmost) bit;position 1 is the second position from the right, and so on. So:
bitRead(2, 1); // returns 1 because 2 is binary 10 and the bit in position 1is 1bitRead(4, 1); // returns 0 because 4 is binary 100 and the bit in position 1is 0
There is also a function called bit that returns the value of each bit position:
bit(0) is equal to 1;bit(1) is equal to 2;bit(2) is equql to 4;...bit(7) is equal to 128
See AlsoArduino references for bit and byte functions:
lowBytehttp://www.arduino.cc/en/Reference/LowByte
highBytehttp://arduino.cc/en/Reference/HighByte
bitReadhttp://www.arduino.cc/en/Reference/BitRead
bitWritehttp://arduino.cc/en/Reference/BitWrite
bitSethttp://arduino.cc/en/Reference/BitSet
bitClearhttp://arduino.cc/en/Reference/BitClear
bithttp://arduino.cc/en/Reference/Bit
3.13 Shifting BitsProblemYou need to perform bit operations that shift bits left or right in a byte, int, or long.
3.13 Shifting Bits | 75
www.it-ebooks.info

SolutionUse the << (bit-shift left) and >> (bit-shift right) operators to shift the bits of a value.
DiscussionThis fragment sets variable x equal to 6. It shifts the bits left by one and prints the newvalue (12). Then that value is shifted right two places (and in this example becomesequal to 3):
int x = 6;int result = x << 1; // 6 shifted left 1 is 12Serial.println(result);int result = x >> 2; // 12 shifted right 2 is 3;Serial.println(result);
Here is how this works: 6 shifted left one place equals 12, because the decimal number6 is 0110 in binary. When the digits are shifted left, the value becomes 1100 (decimal12). Shifting 1100 right two places becomes 0011 (decimal 3). You may notice thatshifting a number left by n places is the same as multiplying the value by 2 raised to thepower of n. Shifting a number right by n places is the same as dividing the value by 2raised to the power of n. In other words, the following pairs of expressions are the same:
• x << 1 is the same as x * 2.
• x << 2 is the same as x * 4.
• x << 3 is the same as x * 8.
• x >> 1 is the same as x / 2.
• x >> 2 is the same as x / 4.
• x >> 3 is the same as x / 8.
The Arduino controller chip can shift bits more efficiently than it can multiply anddivide, and you may come across code that uses the bit shift to multiply and divide:
int c = (a << 1) + (b >> 2); //add (a times 2) plus ( b divided by 4)
The expression (a << 1) + (b >> 2); does not look much like (a * 2) + (b / 4);, butboth expressions do the same thing. Indeed, the Arduino compiler is smart enough torecognize that shifting an integer by a constant that is a power of two is identical to ashift and will produce the same machine code as the version using shift. The sourcecode using arithmetic operators is easier for humans to read, so it is preferred when theintent is to multiply and divide.
See AlsoArduino references for bit and byte functions: lowByte, highByte, bitRead, bitWrite,bitSet, bitClear, and bit (see Recipe 3.12)
76 | Chapter 3: Using Mathematical Operators
www.it-ebooks.info

3.14 Extracting High and Low Bytes in an int or longProblemYou want to extract the high byte or low byte of an integer; for example, when sendinginteger values as bytes on a serial or other communication line.
SolutionUse lowByte(i) to get the least significant byte from an integer. Use highByte(i) to getthe most significant byte from an integer.
The following sketch converts an integer value into low and high bytes:
//ByteOperators
int intValue = 258; // 258 in hexadecimal notation is 0x102
void setup(){ Serial.begin(9600);}
void loop(){ int loWord,hiWord; byte loByte, hiByte;
hiByte = highByte(intValue); loByte = lowByte(intValue);
Serial.println(intValue,DEC); Serial.println(intValue,HEX); Serial.println(loByte,DEC); Serial.println(hiByte,DEC);
delay(10000); // wait a very long time}
DiscussionThe example sketch prints intValue followed by the low byte and high byte:
258 // the integer value to be converted102 // the value in hexadecimal notation2 // the low byte1 // the high byte
To extract the byte values from a long, the 32-bit long value first gets broken into two16-bit words which can then be converted into bytes as shown in the earlier code. Atthe time of this writing, the standard Arduino library did not have a function to perform
3.14 Extracting High and Low Bytes in an int or long | 77
www.it-ebooks.info

this operation on a long, but you can add the following lines to your sketch to providethis:
#define highWord(w) ((w) >> 16)#define lowWord(w) ((w) & 0xffff)
These are macro expressions: hiWord performs a 16-bit shift operation to produce a 16-bit value, and lowWord masks the lower 16 bits using the bitwise And operator (seeRecipe 2.20).
The number of bits in an int varies on different platforms. On Arduinoit is 16 bits, but in other environments it is 32 bits. The term word asused here refers to a 16-bit value.
This code converts the 32-bit hex value 0x1020304 to its 16-bit constituent high andlow values:
loword = lowWord(longValue); hiword = highWord(longValue); Serial.println(loword,DEC); Serial.println(hiword,DEC);
This prints the following values:
772 // 772 is 0x0304 in hexadecimal258 // 258 is 0x0102 in hexadecimal
Note that 772 in decimal is 0x0304 in hexadecimal, which is the low-order word (16bits) of the longValue 0x1020304. You may recognize 258 from the first part of this recipeas the value produced by combining a high byte of 1 and a low byte of 2 (0x0102 inhexadecimal).
See AlsoArduino references for bit and byte functions: lowByte, highByte, bitRead, bitWrite,bitSet, bitClear, and bit (see Recipe 3.12)
3.15 Forming an int or long from High and Low BytesProblemYou want to create a 16-bit (int) or 32-bit (long) integer value from individual bytes;for example, when receiving integers as individual bytes over a serial communicationlink. This is the inverse operation of Recipe 3.14.
78 | Chapter 3: Using Mathematical Operators
www.it-ebooks.info

SolutionUse the word(h,l) function to convert two bytes into a single Arduino integer. Here isthe code from Recipe 3.14 expanded to convert the individual high and low bytes backinto an integer:
//ByteOperators
int intValue = 0x102; // 258
void setup(){ Serial.begin(9600);}
void loop(){ int loWord,hiWord; byte loByte, hiByte;
hiByte = highByte(intValue); loByte = lowByte(intValue);
Serial.println(intValue,DEC); Serial.println(loByte,DEC); Serial.println(hiByte,DEC);
loWord = word(hiByte, loByte); // convert the bytes back into a word Serial.println(loWord,DEC); delay(10000); // wait a very long time}
DiscussionThe word(high,low) expression assembles a high and low byte into a 16-bit value. Thecode in this recipe’s Solution takes the low and high bytes formed as shown in Rec-ipe 3.14, and assembles them back into a word. The output is the integer value, thelow byte, the high byte, and the bytes converted back to an integer value:
25821258
Arduino does not have a function to make a 32-bit long value two 16-bit words (at thetime of this writing), but you can add your own makeLong() capability by adding thefollowing line to the top of your sketch:
#define makeLong(hi, low) ((hi) << 16 & (low))
3.15 Forming an int or long from High and Low Bytes | 79
www.it-ebooks.info

This defines a command that will shift the high value 16 bits to the left and add it tothe low value:
#define makeLong(hi, low) (((long) hi) << 16 | (low))#define highWord(w) ((w) >> 16)#define lowWord(w) ((w) & 0xffff)
// declare a value to testlong longValue = 0x1020304; // in decimal: 16909060 // in binary : 00000001 00000010 00000011 00000100
void setup(){ Serial.begin(9600);}
void loop(){ int loWord,hiWord;
Serial.println(longValue,DEC); // this prints 16909060 loWord = lowWord(longValue); // convert long to two words hiWord = highWord(longValue); Serial.println(loWord,DEC); // print the value 772 Serial.println(hiWord,DEC); // print the value 258 longValue = makeLong( hiWord, loWord); // convert the words back to a long Serial.println(longValue,DEC); // this again prints 16909060
delay(10000); // wait a very long time}
The output is:
1690906077225816909060
See AlsoArduino references for bit and byte functions: lowByte, highByte, bitRead, bitWrite,bitSet, bitClear, and bit (see Recipe 3.12)
80 | Chapter 3: Using Mathematical Operators
www.it-ebooks.info

CHAPTER 4
Serial Communications
4.0 IntroductionSerial communications provide an easy and flexible way for your Arduino board tointeract with your computer and other devices. This chapter explains how to send andreceive information using this capability.
Chapter 1 described how to connect the Arduino serial port to your computer to uploadsketches. The upload process sends data from your computer to Arduino and Arduinosends status messages back to the computer to confirm the transfer is working. Therecipes here show how you can use this communication link to send and receive anyinformation between Arduino and your computer or another serial device.
Serial communications are also a handy tool for debugging. You cansend debug messages from Arduino to the computer and display themon your computer screen.
The Arduino IDE (described in Recipe 1.3) provides a Serial Monitor (shown in Fig-ure 4-1) to display serial data received by Arduino.
You can also send data from the Serial Monitor to Arduino by entering text in the textbox to the left of the Send button. Baud rate is selected using the drop-down box onthe bottom right. You can use the drop down labeled “No line ending” to automaticallysend a carriage return or a combination of a carriage return and a line at the end of eachmessage sent when clicking the Send button.
Your Arduino sketch can use the serial port to indirectly access (usually via a proxyprogram written in a language like Processing) all the resources (memory, screen, key-board, mouse, network connectivity, etc.) that your computer has. Your computer canalso use the serial link to interact with sensors or other devices connected to Arduino.
Implementing serial communications involves hardware and software. The hardwareprovides the electrical signaling between Arduino and the device it is talking to. The
81
www.it-ebooks.info

software uses the hardware to send bytes or bits that the connected hardware under-stands. The Arduino serial libraries insulate you from most of the hardware complexity,but it is helpful for you to understand the basics, especially if you need to troubleshootany difficulties with serial communications in your projects.
Serial HardwareSerial hardware sends and receives data as electrical pulses that represent sequential bits. The zeros and ones that carry the information that makes up a byte can be repre-sented in various ways. The scheme used by Arduino is 0 volts to represent a bit valueof 0, and 5 volts (or 3.3 volts) to represent a bit value of 1.
Using 0 volts (for 0) and 5 volts (for 1) is very common. This is referredto as the TTL level because that was how signals were represented inone of the first implementations of digital logic, called Transistor-Transistor Logic (TTL).
Boards including the Uno, Duemilanove, Diecimila, Nano, and Mega have a chip toconvert the hardware serial port on the Arduino chip to Universal Serial Bus (USB) forconnection to the hardware serial port. Other boards, such as the Mini, Pro, Pro Mini,Boarduino, Sanguino, and Modern Device Bare Bones Board, do not have USB supportand require an adapter for connecting to your computer that converts TTL to USB. Seehttp://www.arduino.cc/en/Main/Hardware for more details on these boards.
Figure 4-1. Arduino Serial Monitor screen
82 | Chapter 4: Serial Communications
www.it-ebooks.info

Some popular USB adapters include:
• Mini USB Adapter (http://arduino.cc/en/Main/MiniUSB)
• FTDI USB TTL Adapter (http://www.ftdichip.com/Products/FT232R.htm)
• Modern Device USB BUB board (http://shop.moderndevice.com/products/usb-bub)
Some serial devices use the RS-232 standard for serial connection. These usually havea nine-pin connector, and an adapter is required to use them with the Arduino. RS-232is an old and venerated communications protocol that uses voltage levels not compat-ible with Arduino digital pins.
You can buy Arduino boards that are built for RS-232 signal levels, such as the Free-duino Serial v2.0 (http://www.nkcelectronics.com/freeduino-serial-v20-board-kit-arduino-diecimila-compatib20.html).
RS-232 adapters that connect RS-232 signals to Arduino 5V (or 3.3V) pins include thefollowing:
• RS-232 to TTL 3V-5.5V adapter (http://www.nkcelectronics.com/rs232-to-ttl-converter-board-33v232335.html)
• P4 RS232 to TTL Serial Adapter Kits (http://shop.moderndevice.com/products/p4)
• RS232 Shifter SMD (http://www.sparkfun.com/commerce/product_info.php?products_id=449)
A standard Arduino has a single hardware serial port, but serial communication is alsopossible using software libraries to emulate additional ports (communication channels)to provide connectivity to more than one device. Software serial requires a lot of helpfrom the Arduino controller to send and receive data, so it’s not as fast or efficient ashardware serial.
The Arduino Mega has four hardware serial ports that can communicate with up tofour different serial devices. Only one of these has a USB adapter built in (you couldwire a USB-TTL adapter to any of the other serial ports). Table 4-1 shows the portnames and pins used for all of the Mega serial ports.
Table 4-1. Arduino Mega serial ports
Port name Transmit pin Receive pin
Serial 1 (also USB) 0 (also USB)
Serial1 18 19
Serial2 16 17
Serial3 14 15
4.0 Introduction | 83
www.it-ebooks.info

Software SerialYou will usually use the built-in Arduino serial library to communicate with the hard-ware serial ports. Serial libraries simplify the use of the serial ports by insulating youfrom hardware complexities.
Sometimes you need more serial ports than the number of hardware serial ports avail-able. If this is the case, you can use an additional library that uses software to emulateserial hardware. Recipes 4.13 and 4.14 show how to use a software serial library tocommunicate with multiple devices.
Serial Message ProtocolThe hardware or software serial libraries handle sending and receiving information.This information often consists of groups of variables that need to be sent together. Forthe information to be interpreted correctly, the receiving side needs to recognize whereeach message begins and ends. Meaningful serial communication, or any kind ofmachine-to-machine communication, can only be achieved if the sending and receivingsides fully agree how information is organized in the message. The formal organizationof information in a message and the range of appropriate responses to requests is calleda communications protocol.
Messages can contain one or more special characters that identify the start of the mes-sage—this is called the header. One or more characters can also be used to identify theend of a message—this is called the footer. The recipes in this chapter show examplesof messages in which the values that make up the body of a message can be sent ineither text or binary format.
Sending and receiving messages in text format involves sending commands and nu-meric values as human-readable letters and words. Numbers are sent as the string ofdigits that represent the value. For example, if the value is 1234, the characters 1, 2, 3,and 4 are sent as individual characters.
Binary messages comprise the bytes that the computer uses to represent values. Binarydata is usually more efficient (requiring fewer bytes to be sent), but the data is not ashuman-readable as text, which makes it more difficult to debug. For example, Arduinorepresents 1234 as the bytes 4 and 210 (4 * 256 + 210 = 1234). If the device you areconnecting to sends or receives only binary data, that is what you will have to use, butif you have the choice, text messages are easier to implement and debug.
84 | Chapter 4: Serial Communications
www.it-ebooks.info

There are many ways to approach software problems, and some of the recipes in thischapter show two or three different ways to achieve a similar result. The differences(e.g., sending text instead of raw binary data) may offer a different balance betweensimplicity and efficiency. Where choices are offered, pick the solution that you findeasiest to understand and adapt—this will probably be the first solution covered. Al-ternatives may be a little more efficient, or they may be more appropriate for a specificprotocol that you want to connect to, but the “right way” is the one you find easiest toget working in your project.
The Processing Development EnvironmentSome of the examples in this chapter use the Processing language to send and receiveserial messages on a computer talking to Arduino.
Processing is a free open source tool that uses a similar development environment toArduino. You can read more about Processing and download everything you need atthe Processing website.
Processing is based on the Java language, but the Processing code samples in this bookshould be easy to translate into other environments that support serial communica-tions. Processing comes with some example sketches illustrating communicationbetween Arduino and Processing. SimpleRead is a Processing example that includesArduino code. In Processing, select File→Examples→Libraries→Serial→SimpleRead tosee an example that reads data from the serial port and changes the color of a rectanglewhen a switch connected to Arduino is pressed and released.
See AlsoAn Arduino RS-232 tutorial is available at http://www.arduino.cc/en/Tutorial/ArduinoSoftwareRS232. Lots of information and links are available at the Serial Port Centralwebsite, http://www.lvr.com/serport.htm.
In addition, a number of books on Processing are also available:
• Getting Started with Processing: A Quick, Hands-on Introduction by Casey Reas andBen Fry (Make).
• Processing: A Programming Handbook for Visual Designers and Artists by CaseyReas and Ben Fry (MIT Press).
• Visualizing Data by Ben Fry (O’Reilly).
• Processing: Creative Coding and Computational Art by Ira Greenberg (Apress).
• Making Things Talk by Tom Igoe (Make). This book covers Processing and Arduinoand provides many examples of communication code.
4.0 Introduction | 85
www.it-ebooks.info

4.1 Sending Debug Information from Arduino toYour ComputerProblemYou want to send text and data to be displayed on your PC or Mac using the ArduinoIDE or the serial terminal program of your choice.
SolutionThis sketch prints sequential numbers on the Serial Monitor:
/* * SerialOutput sketch * Print numbers to the serial port*/void setup(){ Serial.begin(9600); // send and receive at 9600 baud}
int number = 0;
void loop(){ Serial.print("The number is "); Serial.println(number); // print the number
delay(500); // delay half second between numbers number++; // to the next number}
Connect Arduino to your computer just as you did in Chapter 1 and upload this sketch.Click the Serial Monitor icon in the IDE and you should see the output displayed asfollows:
The number is 0The number is 1The number is 2
DiscussionTo print text and numbers from your sketch, put the Serial.begin(9600) statement insetup(), and then use Serial.print() statements to print the text and values you wantto see.
The Arduino Serial Monitor function can display serial data sent from Arduino. Tostart the Serial Monitor, click the Serial Monitor toolbar icon as shown in Figure 4-2.A new window will open for displaying output from Arduino.
86 | Chapter 4: Serial Communications
www.it-ebooks.info

Your sketch must call the Serial.begin() function before it can use serial input oroutput. The function takes a single parameter: the desired communication speed. Youmust use the same speed for the sending side and the receiving side, or you will seegobbledygook (or nothing at all) on the screen. This example and most of the othersin this book use a speed of 9,600 baud (baud is a measure of the number of bits trans-mitted per second). The 9,600 baud rate is approximately 1,000 characters per second.You can send at lower or higher rates (the range is 300 to 115,200), but make sure bothsides use the same speed. The Serial Monitor sets the speed using the baud rate dropdown (at the bottom right of the Serial Monitor window in Figure 4-2). If your outputlooks something like this:
`3??f<ÌxÌ▯▯▯ü`³??f<
you should check that the selected baud rate on your computer matches the rate set bySerial.begin() in your sketch.
If your sending and receiving serial speeds are set correctly but you arestill getting unreadable text, check that you have the correct board se-lected in the IDE Tools→Board menu. If you have selected the wrongboard, change it to the correct one and upload to the board again.
Figure 4-2. Clicking the Serial Monitor icon to see serial output
4.1 Sending Debug Information from Arduino to Your Computer | 87
www.it-ebooks.info
You can display text using the Serial.print() function. Strings (text within doublequotes) will be printed as is (but without the quotes). For example, the following code:
Serial.print("The number is ");
prints this:
The number is
The values (numbers) that you print depend on the type of variable; see Recipe 4.2 formore about this. But for now, printing an integer will print its numeric value, so if thevariable number is 1, the following code:
Serial.println(number);
will print this:
1
In the example sketch, the number printed will be 0 when the loop starts and willincrease by one each time through the loop. The ln at the end of println causes thenext print statement to start on a new line.
That should get you started printing text and the decimal value of integers. See Rec-ipe 4.2 for more detail on print formatting options.
You may want to consider a third-party terminal program that has more features thanSerial Monitor. Displaying data in text or binary format (or both), displaying controlcharacters, and logging to a file are just a few of the additional capabilities availablefrom the many third-party terminal programs. Here are some that have been recom-mended by Arduino users:
CuteComAn open source terminal program for Linux
Bray TerminalA free executable for the PC
GNU screenAn open source virtual screen management program that supports serial commu-nications; included with Linux and Mac OS X
moserialAnother open source terminal program for Linux
PuTTYAn open source SSH program for Windows; supports serial communications
RealTermAn open source terminal program for the PC
ZTermA shareware program for the Mac
88 | Chapter 4: Serial Communications
www.it-ebooks.info

In addition, an article in the Arduino wiki explains how to configure Linux to com-municate with Arduino using TTY (see http://www.arduino.cc/playground/Interfacing/LinuxTTY).
You can use a liquid crystal display as a serial output device, although it will be verylimited in functionality. Check the documentation to see how your display handlescarriage returns, as some displays may not automatically advance to a new line afterprintln statements.
See AlsoThe Arduino LiquidCrystal library for text LCDs uses underlying print functionalitysimilar to the Serial library, so you can use many of the suggestions covered in thischapter with that library (see Chapter 11).
4.2 Sending Formatted Text and Numeric Data from ArduinoProblemYou want to send serial data from Arduino displayed as text, decimal values, hexadec-imal, or binary.
SolutionYou can print data to the serial port in many different formats; here is a sketch thatdemonstrates all the format options:
/* * SerialFormatting * Print values in various formats to the serial port*/char chrValue = 65; // these are the starting values to printint intValue = 65;float floatValue = 65.0;
void setup(){ Serial.begin(9600);}
void loop(){ Serial.println("chrValue: "); Serial.println(chrValue); Serial.println(chrValue,BYTE); Serial.println(chrValue,DEC);
4.2 Sending Formatted Text and Numeric Data from Arduino | 89
www.it-ebooks.info

Serial.println("intValue: "); Serial.println(intValue); Serial.println(intValue,BYTE); Serial.println(intValue,DEC); Serial.println(intValue,HEX); Serial.println(intValue,OCT); Serial.println(intValue,BIN);
Serial.println("floatValue: "); Serial.println(floatValue);
delay(1000); // delay a second between numbers chrValue++; // to the next value intValue++;}
The output (condensed here onto a few lines) is as follows:
chrValue: A A 65intValue: 65 A 65 41 101 1000001floatValue: 65.00
chrValue: B B 66intValue: 66 B 66 42 102 1000010
DiscussionPrinting a text string is simple: Serial.print("hello world"); sends the text string“hello world” to a device at the other end of the serial port. If you want your output toprint a new line after the output, use Serial.println() instead of Serial.print().
Printing numeric values can be more complicated. The way that byte and integer valuesare printed depends on the type of variable and an optional formatting parameter. TheArduino language is very easygoing about how you can refer to the value of differentdata types (see Recipe 2.2 for more on data types). But this flexibility can be confusing,because even when the numeric values are similar, the compiler considers them to beseparate types with different behaviors. For example, printing a char will not necessarilyproduce the same output as printing an int of the same value.
Here are some specific examples; all of them create variables that have similar values:
char asciiValue = 'A'; // ASCII A has a value of 65char chrValue = 65; // an 8 bit character, this also is ASCII 'A'int intValue = 65; // a 16 bit integer set to a value of 65float floatValue = 65.0; // float with a value of 65
Table 4-2 shows what you will see when you print variables using Arduino routines.
90 | Chapter 4: Serial Communications
www.it-ebooks.info

Table 4-2. Output formats using Serial.print
Data type
(val)
(val,DEC)
(val,BYTE)
(val,HEX)
(val,OCT)
(val,BIN)
char A 65 A 41 101 1000001
int 65 65 A 41 101 1000001
long Format of long is the same as int
float 65.00 Formatting not supported for floating-point values
double 65.00 double is the same as float
The sketch in this recipe uses a separate line of source code for each print statement.This can make complex print statements bulky. For example, to print the following line:
At 5 seconds: speed = 17, distance = 120
you’d typically have to code it like this:
Serial.print("At ");Serial.print(seconds);Serial.print(" seconds: speed = ");Serial.print(speed);Serial.print(", distance = ");Serial.println(distance);
That’s a lot of code lines for a single line of output. You could combine them like this:
Serial.print("At "); Serial.print(seconds); Serial.print(" seconds, speed = ");Serial.print(speed); Serial.print(", distance = ");Serial.println(distance);
Or you could use the insertion-style capability of the compiler used by Arduino toformat your print statements. You can take advantage of some advanced C++ capa-bilities (streaming insertion syntax and templates) that you can use if you declare astreaming template in your sketch. This is most easily achieved by including theStreaming library developed by Mikal Hart. You can read more about this library anddownload the code from Mikal’s website.
If you use the Streaming library, the following gives the same output as the lines shownearlier:
Serial << "At " << seconds << " seconds, speed = " << speed << ", distance =" << distance;
See AlsoChapter 2 provides more information on data types used by Arduino. The Arduino webreference at http://arduino.cc/en/Reference/HomePage covers the serial commands, andthe Arduino web reference at http://www.arduino.cc/playground/Main/StreamingOutput covers streaming (insertion-style) output.
4.2 Sending Formatted Text and Numeric Data from Arduino | 91
www.it-ebooks.info

4.3 Receiving Serial Data in ArduinoProblemYou want to receive data on Arduino from a computer or another serial device; forexample, to have Arduino react to commands or data sent from your computer.
SolutionIt’s easy to receive 8-bit values (chars and bytes), because the Serial functions use 8-bit values. This sketch receives a digit (single characters 0 through 9) and blinks theLED on pin 13 at a rate proportional to the received digit value:
/* * SerialReceive sketch * Blink the LED at a rate proportional to the received digit value*/const int ledPin = 13; // pin the LED is connected toint blinkRate=0; // blink rate stored in this variable
void setup(){ Serial.begin(9600); // Initialize serial port to send and receive at 9600 baud pinMode(ledPin, OUTPUT); // set this pin as output}
void loop(){ if ( Serial.available()) // Check to see if at least one character is available { char ch = Serial.read(); if(ch >= '0' && ch <= '9') // is this an ascii digit between 0 and 9? { blinkRate = (ch - '0'); // ASCII value converted to numeric value blinkRate = blinkRate * 100; // actual blinkrate is 100 mS times receiveddigit } } blink();}
// blink the LED with the on and off times determined by blinkRatevoid blink(){ digitalWrite(ledPin,HIGH); delay(blinkRate); // delay depends on blinkrate value digitalWrite(ledPin,LOW); delay(blinkRate);}
Upload the sketch and send messages using the Serial Monitor. Open the Serial Monitorby clicking the Monitor icon (see Recipe 4.1) and type a digit in the text box at the top
92 | Chapter 4: Serial Communications
www.it-ebooks.info

of the Serial Monitor window. Clicking the Send button will send the character typedinto the text box; you should see the blink rate change.
DiscussionConverting the received ASCII characters to numeric values may not be obvious if youare not familiar with the way ASCII represents characters. The following converts thecharacter ch to its numeric value:
blinkRate = (ch - '0'); // ASCII value converted to numeric value
This is done by subtracting 48, because 48 is the ASCII value of the digit 0. For example,if ch is representing the character 1, its ASCII value is 49. The expression 49- '0' is thesame as 49-48. This equals 1, which is the numeric value of the character 1.
In other words, the expression (ch - '0') is the same as (ch - 48); this converts theASCII value of the variable ch to a numeric value.
To get a clearer idea of the relationship between the ASCII values of characters repre-senting the digits 0 through 9 and their actual numeric values, see the ASCII table inAppendix G.
Receiving numbers with more than one digit involves accumulating characters until acharacter that is not a valid digit is detected. The following code uses the samesetup() and blink() functions as those shown earlier, but it gets digits until the newlinecharacter is received. It uses the accumulated value to set the blink rate.
The newline character (ASCII value 10) can be appended automaticallyeach time you click Send. The Serial Monitor has a drop-down box atthe bottom of the Serial Monitor screen (see Figure 4-1); change theoption from “No line ending” to “Newline.”
Change the code that the loop code follows. Enter a value such as 123 into the Monitortext box and click Send, and the blink delay will be set to 123 milliseconds:
int value;
void loop(){ if( Serial.available()) { char ch = Serial.read(); if(ch >= '0' && ch <= '9') // is this an ascii digit between 0 and 9? { value = (value * 10) + (ch - '0'); // yes, accumulate the value } else if (ch == 10) // is the character the newline character { blinkRate = value; // set blinkrate to the accumulated value Serial.println(blinkRate); value = 0; // reset val to 0 ready for the next sequence of digits
4.3 Receiving Serial Data in Arduino | 93
www.it-ebooks.info

} } blink();}
Each digit is converted from its ASCII value to its numeric value. Because the numbersare decimal numbers (base 10), each successive number is multiplied by 10. For ex-ample, the value of the number 234 is 2 * 100 + 3 * 10 + 4. The code to accomplish thatis:
if(ch >= '0' && ch <= '9') // is this an ascii digit between 0 and 9? { value = (value * 10) + (ch - '0'); // yes, accumulate the value }
If you want to handle negative numbers, your code needs to recognize the minus('-') sign. For example:
int value = 0;int sign = 1;
void loop(){ if( Serial.available()) { char ch = Serial.read(); if(ch >= '0' && ch <= '9') // is this an ascii digit between 0 and 9? value = (value * 10) + (ch - '0'); // yes, accumulate the value else if( ch == '-') sign = -1; else // this assumes any char not a digit or minus sign terminates the value { value = value * sign ; // set value to the accumulated value Serial.println(value); value = 0; // reset value to 0 ready for the next sequence of digits sign = 1; } }}
Another approach to converting text strings representing numbers is to use the C lan-guage conversion function called atoi (for int variables) or atol (for long variables).These obscurely named functions convert a string into integers or long integers. To usethem you have to receive and store the entire string in a character array before you cancall the conversion function.
This code fragment terminates the incoming digits on any character that is not a digit(or if the buffer is full):
const int MaxChars = 5; // an int string contains up to 5 digits and // is terminated by a 0 to indicate end of stringchar strValue[MaxChars+1]; // must be big enough for digits and terminating nullint index = 0; // the index into the array storing the received digits
void loop()
94 | Chapter 4: Serial Communications
www.it-ebooks.info

{ if( Serial.available()) { char ch = Serial.read(); if(index < MaxChars && ch >= '0' && ch <= '9'){ strValue[index++] = ch; // add the ASCII character to the string; } else { // here when buffer full or on the first non digit strValue[index] = 0; // terminate the string with a 0 blinkRate = atoi(strValue); // use atoi to convert the string to an int index = 0; } } blink();}
strValue is a numeric string built up from characters received from the serial port.
See Recipe 2.6 for information about character strings.
atoi (short for ASCII to integer) is a function that converts a character string to aninteger (atol converts to a long integer).
See AlsoA web search for “atoi” or “atol” provides many references to these functions. Also seethe Wikipedia reference at http://en.wikipedia.org/wiki/Atoi.
4.4 Sending Multiple Text Fields from Arduino in aSingle MessageProblemYou want to send a message that contains more than one piece of information (field).For example, your message may contain values from two or more sensors. You wantto use these values in a program such as Processing, running on your PC or Mac.
SolutionThe easiest way to do this is to send a text string with all the fields separated by a delimiting (separating) character, such as a comma:
// CommaDelimitedOutput sketch
void setup()
4.4 Sending Multiple Text Fields from Arduino in a Single Message | 95
www.it-ebooks.info

{ Serial.begin(9600);}
void loop(){ int value1 = 10; // some hardcoded values to send int value2 = 100; int value3 = 1000;
Serial.print('H'); // unique header to identify start of message Serial.print(","); Serial.print(value1,DEC); Serial.print(","); Serial.print(value2,DEC); Serial.print(","); Serial.print(value3,DEC); Serial.print(","); // note that a comma is sent after the last field Serial.println(); // send a cr/lf delay(100);}
Here is the Processing sketch that reads this data from the serial port:
//CommaDelimitedInput.pde (Processing Sketch)
import processing.serial.*;
Serial myPort; // Create object from Serial classchar HEADER = 'H'; // character to identify the start of a messageshort LF = 10; // ASCII linefeedshort portIndex = 0; // select the com port, 0 is the first port
void setup() { size(200, 200);
// WARNING! // If necessary, change the definition of portIndex at the top of this // sketch to the desired serial port. // println(Serial.list()); println(" Connecting to -> " + Serial.list()[portIndex]); myPort = new Serial(this,Serial.list()[portIndex], 9600);}
void draw() {
}
void serialEvent(Serial p){ String message = myPort.readStringUntil(LF); // read serial data
96 | Chapter 4: Serial Communications
www.it-ebooks.info

if(message != null) { print(message); String [] data = message.split(","); // Split the comma-separated message if(data[0].charAt(0) == HEADER) // check for header character in thefirst field { for( int i = 1; i < data.length-1; i++) // skip the header and terminatingcr and lf { int value = Integer.parseInt(data[i]); println("Value" + i + " = " + value); //Print the value for each field } println(); } }}
DiscussionThe code in this recipe’s Solution will send the following text string to the serial port(\r indicates a carriage return and \n indicates a line feed):
H10,100,1000,\r\n
You must choose a separating character that will never occur within actual data; if yourdata consists only of numeric values, a comma is a good choice for a delimiter. Youmay also want to ensure that the receiving side can determine the start of a message tomake sure it has all the data for all the fields. You do this by sending a header characterto indicate the start of the message. The header character must also be unique; it shouldnot appear within any of the data fields and it must also be different from the separatorcharacter. The example here uses an uppercase H to indicate the start of the message.The message consists of the header, three comma-separated numeric values as ASCIIstrings, and a carriage return and line feed.
The carriage return and line-feed characters are sent whenever Arduino prints usingthe println() function, and this is used to help the receiving side know that the fullmessage string has been received. A comma is sent after the last numerical value to aidthe receiving side in detecting the end of the value.
The Processing code reads the message as a string and uses the Java split() method tocreate an array from the comma-separated fields.
In most cases, the first serial port will be the one you want when usinga Mac and the last serial port will be the one you want when usingWindows. The Processing sketch includes code that shows the portsavailable and the one currently selected—check that this is the portconnected to Arduino.
4.4 Sending Multiple Text Fields from Arduino in a Single Message | 97
www.it-ebooks.info

See AlsoThe Processing website provides more information on installing and using this pro-gramming environment. See http://processing.org/.
4.5 Receiving Multiple Text Fields in a Single Messagein ArduinoProblemYou want to receive a message that contains more than one field. For example, yourmessage may contain an identifier to indicate a particular device (such as a motor orother actuator) and what value (such as speed) to set it to.
SolutionArduino does not have the split() function used in the Processing code in Rec-ipe 4.4, but the functionality can be implemented as shown in this recipe. The followingcode receives a message with three numeric fields separated by commas. It uses thetechnique described in Recipe 4.4 for receiving digits, and it adds code to identifycomma-separated fields and store the values into an array:
/* * SerialReceiveMultipleFields sketch * This code expects a message in the format: 12,345,678 * This code requires a newline character to indicate the end of the data * Set the serial monitor to send newline characters */
const int NUMBER_OF_FIELDS = 3; // how many comma separated fields we expectint fieldIndex = 0; // the current field being receivedint values[NUMBER_OF_FIELDS]; // array holding values for all the fields
void setup(){ Serial.begin(9600); // Initialize serial port to send and receive at 9600 baud}
void loop(){ if( Serial.available()) { char ch = Serial.read(); if(ch >= '0' && ch <= '9') // is this an ascii digit between 0 and 9? { // yes, accumulate the value values[fieldIndex] = (values[fieldIndex] * 10) + (ch - '0'); }
98 | Chapter 4: Serial Communications
www.it-ebooks.info

else if (ch == ',') // comma is our separator, so move on to the next field { if(fieldIndex < NUMBER_OF_FIELDS-1) fieldIndex++; // increment field index } else { // any character not a digit or comma ends the acquisition of fields // in this example it's the newline character sent by the Serial Monitor Serial.print( fieldIndex +1); Serial.println(" fields received:"); for(int i=0; i <= fieldIndex; i++) { Serial.println(values[i]); values[i] = 0; // set the values to zero, ready for the next message } fieldIndex = 0; // ready to start over } }}
DiscussionThis sketch accumulates values (as explained in Recipe 4.3), but here each value isadded to an array (which must be large enough to hold all the fields) when a commais received. A character other than a digit or comma (such as the newline character; seeRecipe 4.3) triggers the printing of all the values that have been stored in the array.
Another approach is to use a library called TextFinder, which is available from theArduino Playground or from the website for this book. TextFinder was created to ex-tract information from web streams (see Chapter 15), but it works just as well withserial data. The following sketch uses TextFinder to provide similar functionality to theprevious sketch:
#include <TextFinder.h>
TextFinder finder(Serial);
const int NUMBER_OF_FIELDS = 3; // how many comma-separated fields we expectint fieldIndex = 0; // the current field being receivedint values[NUMBER_OF_FIELDS]; // array holding values for all the fields
void setup(){ Serial.begin(9600); // Initialize serial port to send and receive at 9600 baud}
void loop(){
for(fieldIndex = 0; fieldIndex < 3; fieldIndex ++) { values[fieldIndex] = finder.getValue(); // get a numeric value
4.5 Receiving Multiple Text Fields in a Single Message in Arduino | 99
www.it-ebooks.info

} Serial.print( fieldIndex); Serial.println(" fields received:"); for(int i=0; i < fieldIndex; i++) { Serial.println(values[i]); } fieldIndex = 0; // ready to start over}
You can download the TextFinder library from http://www.arduino.cc/playground/Code/TextFinder.
Here is a summary of the methods supported by TextFinder (not all are used in thepreceding example):
boolean find(char *target);Reads from the stream until the given target is found. It returns true if the targetstring is found. A return of false means the data has not been found anywhere inthe stream and that there is no more data available. Note that TextFinder takes asingle pass through the stream; there is no way to go back to try to find or getsomething else (see the findUntil method).
boolean findUntil(char *target, char *terminate);Similar to the find method, but the search will stop if the terminate string is found.Returns true only if the target is found. This is useful to stop a search on a keywordor terminator. For example:
finder.findUntil("target", "\n");
will try to seek to the string "value", but will stop at a newline character so thatyour sketch can do something else if the target is not found.
long getValue();Returns the first valid (long) integer value. Leading characters that are not digitsor a minus sign are skipped. The integer is terminated by the first nondigit characterfollowing the number. If no digits are found, the function returns 0.
long getValue(char skipChar);Same as getValue, but the given skipChar within the numeric value is ignored. Thiscan be helpful when parsing a single numeric value that uses a comma betweenblocks of digits in large numbers, but bear in mind that text values formatted withcommas cannot be parsed as a comma-separated string.
float getFloat();The float version of getValue.
int getString(char *pre_string,char *post_string,char *buf,int length);Finds the pre_string and then puts the incoming characters into the given bufferuntil the post_string is detected. The end of the string is determined by a matchof a character to the first char post_string. Strings longer than the given length
100 | Chapter 4: Serial Communications
www.it-ebooks.info

are truncated to fit. The function returns the number of characters placed in thebuffer (0 means no valid data was found).
See AlsoChapter 15 provides more examples of TextFinder used to find and extract data froma stream.
4.6 Sending Binary Data from ArduinoProblemYou need to send data in binary format, because you want to pass information withthe fewest number of bytes or because the application you are connecting to only han-dles binary data.
SolutionThis sketch sends a header followed by two integer (16-bit) values as binary data. Thevalues are generated using the Arduino random function (see Recipe 3.11):
/* * SendBinary sketch * Sends a header followed by two random integer values as binary data.*/
int intValue; // an integer value (16 bits)
void setup(){ Serial.begin(9600);}
void loop(){ Serial.print('H'); // send a header character
// send a random integer intValue = random(599); // generate a random number between 0 and 599 // send the two bytes that comprise an integer Serial.print(lowByte(intValue), BYTE); // send the low byte Serial.print(highByte(intValue), BYTE); // send the high byte
// send another random integer intValue = random(599); // generate a random number between 0 and 599 // send the two bytes that comprise an integer Serial.print(lowByte(intValue), BYTE); // send the low byte Serial.print(highByte(intValue), BYTE); // send the high byte
delay(1000);}
4.6 Sending Binary Data from Arduino | 101
www.it-ebooks.info

DiscussionSending binary data requires careful planning, because you will get gibberish unless thesending side and the receiving side understand and agree exactly how the data will besent. Unlike text data, where the end of a message can be determined by the presenceof the terminating carriage return (or another unique character you pick), it may notbe possible to tell when a binary message starts or ends by looking just at the data—data that can have any value can therefore have the value of a header or terminatorcharacter.
This can be overcome by designing your messages so that the sending and receivingsides know exactly how many bytes are expected. The end of a message is determinedby the number of bytes sent rather than detection of a specific character. This can beimplemented by sending an initial value to say how many bytes will follow. Or you canfix the size of the message so that it’s big enough to hold the data you want to send.Doing either of these is not always easy, as different platforms and languages can usedifferent sizes for the binary data types—both the number of bytes and their order maybe different from Arduino. For example, Arduino defines an int as two bytes, but Pro-cessing (Java) defines an int as four bytes (short is the Java type for a 16-bit integer).Sending an int value as text (as seen in earlier text recipes) simplifies this problembecause each individual digit is sent as a sequential digit (just as the number is written).The receiving side recognizes when the value has been completely received by a carriagereturn or other nondigit delimiter. Binary transfers can only know about the compo-sition of a message if it is defined in advance or specified in the message.
This recipe’s Solution requires an understanding of the data types on the sending andreceiving platforms and some careful planning. Recipe 4.7 shows example code usingthe Processing language to receive these messages.
Sending single bytes is easy; use Serial.print(byteVal). To send an integer fromArduino you need to send the low and high bytes that make up the integer (see Rec-ipe 2.2 for more on data types). You do this using the lowByte and highByte functions(see Recipe 3.14):
Serial.print(lowByte(intValue), BYTE);Serial.print(highByte(intValue), BYTE);
The preceding code sends the low byte followed by the high byte. The code can alsobe written without the BYTE parameter (see Recipe 4.2), but using the parameter is auseful reminder (when you come back later to make changes, or for others who mayread your code) that your intention is to send bytes rather than ASCII characters.
Sending a long integer is done by breaking down the four bytes that comprise a long intwo steps. The long is first broken into two 16-bit integers; each is then sent using themethod for sending integers described earlier:
int longValue = 1000;int intValue;
102 | Chapter 4: Serial Communications
www.it-ebooks.info

First you send the lower 16-bit integer value:
intValue = longValue && 0xFFFF; // get the value of the lower 16 bitsSerial.print(lowByte(intVal), BYTE);Serial.print(highByte(intVal), BYTE);
Then you send the higher 16-bit integer value:
intValue = longValue >> 16; // get the value of the higher 16 bitsSerial.print(lowByte(intVal), BYTE);Serial.print(highByte(intVal), BYTE);
You may find it convenient to create functions to send the data. Here is a function thatuses the code shown earlier to print a 16-bit integer to the serial port:
// function to send the given integer value to the serial portvoid sendBinary(int value){ // send the two bytes that comprise a two byte (16 bit) integer Serial.print(lowByte(value), BYTE); // send the low byte Serial.print(highByte(value), BYTE); // send the high byte}
The following function sends the value of a long (4-byte) integer by first sending thetwo low (rightmost) bytes, followed by the high (leftmost) bytes:
// function to send the given long integer value to the serial portvoid sendBinary(long value){ // first send the low 16 bit integer value int temp = value && 0xFFFF; // get the value of the lower 16 bits sendBinary(temp); // then send the higher 16 bit integer value: temp = value >> 16; // get the value of the higher 16 bits sendBinary(temp);}
These functions to send binary int and long values have the same name: sendBinary.The compiler distinguishes them by the type of value you use for the parameter. If yourcode calls printBinary with a 2-byte value, the version declared as void sendBinary(intvalue) will be called. If the parameter is a long value, the version declared as voidsendBinary(long value) will be called. This behavior is called function overloading.Recipe 4.2 provides another illustration of this; the different functionality you saw inSerial.print is due to the compiler distinguishing the different variable types used.
You can also send binary data using structures. Structures are a mechanism for organ-izing data, and if you are not already familiar with their use you may be better off stickingwith the solutions described earlier. For those who are comfortable with the conceptof structure pointers, the following is a function that will send the bytes within a struc-ture to the serial port as binary data:
void sendStructure( char *structurePointer, int structureLength){ int i;
4.6 Sending Binary Data from Arduino | 103
www.it-ebooks.info

for (i = 0 ; i < structureLength ; i++) serial.print(structurePointer[i], BYTE); }
sendStructure((char *)&myStruct, sizeof(myStruct));
Sending data as binary bytes is more efficient than sending data as text, but it will onlywork reliably if the sending and receiving sides agree exactly on the composition of thedata. Here is a summary of the important things to check when writing your code:
Variable sizeMake sure the size of the data being sent is the same on both sides. An integer is2 bytes on Arduino, 4 bytes on most other platforms. Always check your program-ming language’s documentation on data type size to ensure agreement. There isno problem with receiving a 2-byte Arduino integer as a 4-byte integer in Processingas long as Processing expects to get only two bytes. But be sure that the sendingside does not use values that will overflow the type used by the receiving side.
Byte orderMake sure the bytes within an int or long are sent in the same order expected bythe receiving side.
SynchronizationEnsure that your receiving side can recognize the beginning and end of a message.If you start listening in the middle of a transmission stream, you will not get validdata. This can be achieved by sending a sequence of bytes that won’t occur in thebody of a message. For example, if you are sending binary values from analogRead, these can only range from 0 to 1,023, so the most significant byte must beless than 4 (the int value of 1,023 is stored as the bytes 3 and 255); therefore, therewill never be data with two consecutive bytes greater than 3. So, sending two bytesof 4 (or any value greater than 3) cannot be valid data and can be used to indicatethe start or end of a message.
Structure packingIf you send or receive data as structures, check your compiler documentation tomake sure the packing is the same on both sides. Packing is the padding that acompiler uses to align data elements of different sizes in a structure.
Flow controlEither choose a transmission speed that ensures that the receiving side can keepup with the sending side, or use some kind of flow control. Flow control is a hand-shake that tells the sending side that the receiver is ready to get more data.
See AlsoChapter 2 provides more information on the variable types used in Arduino sketches.
Also, check the Arduino references for lowByte at http://www.arduino.cc/en/Reference/LowByte and highByte at http://www.arduino.cc/en/Reference/HighByte.
104 | Chapter 4: Serial Communications
www.it-ebooks.info

The Arduino compiler packs structures on byte boundaries; see the documentation forthe compiler you use on your computer to set it for the same packing. If you are notclear on how to do this, you may want to avoid using structures to send data.
For more on flow control, see http://en.wikipedia.org/wiki/Flow_control.
4.7 Receiving Binary Data from Arduino on a ComputerProblemYou want to respond to binary data sent from Arduino in a programming languagesuch as Processing. For example, you want to respond to Arduino messages sent inRecipe 4.6.
SolutionThis recipe’s Solution depends on the programming environment you use on your PCor Mac. If you don’t already have a favorite programming tool and want one that iseasy to learn and works well with Arduino, Processing is an excellent choice.
Here are the two lines of Processing code to read a byte, taken from the ProcessingSimpleRead example (see this chapter’s introduction):
if ( myPort.available() > 0) { // If data is available, val = myPort.read(); // read it and store it in val
As you can see, this is very similar to the Arduino code you saw in earlier recipes.
The following is a Processing sketch that sets the size of a rectangle proportional to theinteger values received from the Arduino sketch in Recipe 4.6:
/* * ReceiveBinaryData_P * * portIndex must be set to the port connected to the Arduino*/import processing.serial.*;
Serial myPort; // Create object from Serial classshort portIndex = 1; // select the com port, 0 is the first port
char HEADER = 'H';int value1, value2; // Data received from the serial port
void setup(){ size(600, 600); // Open whatever serial port is connected to Arduino. String portName = Serial.list()[portIndex]; println(Serial.list()); println(" Connecting to -> " + Serial.list()[portIndex]); myPort = new Serial(this, portName, 9600);
4.7 Receiving Binary Data from Arduino on a Computer | 105
www.it-ebooks.info

}
void draw(){ // read the header and two binary *(16 bit) integers: if ( myPort.available() >= 5) // If at least 5 bytes are available, { if( myPort.read() == HEADER) // is this the header { value1 = myPort.read(); // read the least significant byte value1 = myPort.read() * 256 + value1; // add the most significant byte
value2 = myPort.read(); // read the least significant byte value2 = myPort.read() * 256 + value2; // add the most significant byte
println("Message received: " + value1 + "," + value2); } } background(255); // Set background to white fill(0); // set fill to black// draw rectangle with coordinates based on the integers received from Arduino rect(0, 0, value1,value2);}
DiscussionThe Processing language influenced Arduino, and the two are intentionally similar. Thesetup function in Processing is used to handle one-time initialization, just like inArduino. Processing has a display window, and setup sets its size to 600 × 600 pixelswith the call to size(600,600).
The line String portName = Serial.list()[portIndex]; selects the serial port—in Pro-cessing, all available serial ports are contained in the Serial.list object and this ex-ample uses the value of a variable called portIndex. println(Serial.list()) prints allthe available ports, and the line myPort = new Serial(this, portName, 9600); opensthe port selected as portName. Ensure that you set portIndex to the serial port that isconnected to your Arduino.
The draw function in Processing works like loop in Arduino; it is called repeatedly. Thecode in draw checks if data is available on the serial port; if so, bytes are read andconverted to the integer value represented by the bytes. A rectangle is drawn based onthe integer values received.
See AlsoYou can read more about Processing on the Processing website.
106 | Chapter 4: Serial Communications
www.it-ebooks.info

4.8 Sending Binary Values from Processing to ArduinoProblemYou want to send binary bytes, integers, or long values from Processing to Arduino.For example, you want to send a message consisting of a message identifier “tag,” anindex (perhaps indicating a particular device attached to Arduino), and a 16-bit value.
SolutionUse this code:
/* SendingBinaryToArduino * Language: Processing */import processing.serial.*;
Serial myPort; // Create object from Serial classpublic static final char HEADER = '|';public static final char MOUSE = 'M';
void setup(){ size(200, 400); String portName = Serial.list()[0]; myPort = new Serial(this, portName, 9600);}
void draw(){}
void serialEvent(Serial p) { // handle incoming serial data String inString = myPort.readStringUntil('\n'); if(inString != null) { println( inString ); // echo text string from Arduino }}
When the mouse is clicked in the Processing window, sendMessage will be called withindex equal to the vertical position of the mouse in the window when clicked andvalue equal to the horizontal position. The window size was set to 200,400, so indexwould fit into a single byte and value would fit into two bytes:
void mousePressed() { int index = mouseY; int value = mouseX; sendMessage(MOUSE, index, value);}
4.8 Sending Binary Values from Processing to Arduino | 107
www.it-ebooks.info

sendMessage sends a header, tag, and index as single bytes. It sends the value as twobytes, with the most significant byte first:
void sendMessage(char tag, int index, int value){ // send the given index and value to the serial port myPort.write(HEADER); myPort.write(tag); myPort.write(index); char c = (char)(value / 256); // msb myPort.write(c); c = (char)(value & 0xff); // lsb myPort.write(c);}
The Arduino code to receive this and echo the results back to Processing is:
//BinaryDataFromProcessing
The next three defines must mirror the definitions used in the sending program:
#define HEADER '|'#define MOUSE 'M'#define MESSAGE_BYTES 5 // the total bytes in a message
void setup(){ Serial.begin(9600);}
void loop(){
The check to ensure that at least MESSAGE_BYTES have been received ensures that wedon’t try to process the message until all the required data is available:
if ( Serial.available() >= MESSAGE_BYTES) {
Only read the rest of the message if a valid header has been received:
if( Serial.read() == HEADER) { char tag = Serial.read(); if(tag == MOUSE) { int index = Serial.read(); // this was sent as a charbut it's ok to use it as an int
The next lines convert the two bytes back to an integer. Serial.read() * 256; restoresthe most significant byte to its original value. Compare this to Processing code that sentthe two bytes comprising the value:
int val = Serial.read() * 256; val = val + Serial.read(); Serial.print("Received mouse msg, index = "); Serial.print(index); Serial.print(", value ");
108 | Chapter 4: Serial Communications
www.it-ebooks.info

Serial.println(val); } else {
If the code gets here, the tag was not recognized. This helps you to ignore data that maybe incomplete or corrupted:
Serial.print("got message with unknown tag "); Serial.println(tag); } } }}
DiscussionThis code is similar to the Processing code in the previous recipes, with the addition ofa function called sendMessage. In this example, the function is called with three pa-rameters: a tag, an index, and a value. The function first sends the header character toidentify the start of the message. Then the single byte index is sent, followed by the twobytes that comprise the integer value. You can make your own version of this functionto send the combination of values that you need for your application.
4.9 Sending the Value of Multiple Arduino PinsProblemYou want to send groups of binary bytes, integers, or long values from Arduino. Forexample, you may want to send the values of the digital and analog pins to Processing.
SolutionThis recipe sends a header followed by an integer containing the bit values of digitalpins 2 to 13. This is followed by six integers containing the values of analog pins 0through 5. Chapter 5 has many recipes that set values on the analog and digital pinsthat you can use to test this sketch:
/* * SendBinaryFields * Sends digital and analog pin values as binary data */
const char HEADER = 'H'; // a single character header to indicate the startof a message// these are the values that will be sent in binary format
void setup(){ Serial.begin(9600); for(int i=2; i <= 13; i++)
4.9 Sending the Value of Multiple Arduino Pins | 109
www.it-ebooks.info

{ pinMode(i, INPUT); // set pins 2 through 13 to inputs digitalWrite(i, HIGH); // turn on pull-ups }}
void loop(){ Serial.print(HEADER,BYTE); // send the header // put the bit values of the pins into an integer int values = 0; int bit = 0; for(int i=2; i <= 13; i++) { bitWrite(values, bit, digitalRead(i)); // set the bit to 0 or 1 depending // on value of the given pin bit = bit + 1; // increment to the next bit } sendBinary(values); // send the integer
for(int i=0; i < 6; i++) { values = analogRead(i); sendBinary(values); // send the integer } delay(1000); //send every second}
// function to send the given integer value to the serial portvoid sendBinary( int value){ // send the two bytes that comprise an integer Serial.print(lowByte(value), BYTE); // send the low byte Serial.print(highByte(value), BYTE); // send the high byte}
DiscussionThe code sends a header (the character H), followed by an integer holding the digitalpin values using the bitRead function to set a single bit in the integer to correspond tothe value of the pin (see Chapter 3). It then sends six integers containing the values readfrom the six analog ports (see Chapter 5 for more information). All the integer valuesare sent using sendBinary, introduced in Recipe 4.6. The message is 15 bytes long—1byte for the header, 2 bytes for the digital pin values, and 12 bytes for the six analogintegers. The code for the digital and analog inputs is explained in Chapter 5.
Assuming analog pins have values of 0 on pin 0, 100 on pin 1, and 200 on pin 2 through500 on pin 5, and digital pins 2 through 7 are high and 8 through 13 are low, this is thedecimal value of each byte that gets sent:
72 // the character 'H' - this is the header // two bytes in low high order containing bits representing pins 2-1363 // binary 00111111 : this indicates that pins 2-7 are high
110 | Chapter 4: Serial Communications
www.it-ebooks.info

0 // this indicates that 8-13 are low
// two bytes for each pin representing the analog value0 // pin 0 has an integer value of 0 so this is sent as two bytes0
100 // pin 1 has a value of 100, sent as a byte of 100 and a byte of 00... // pin 5 has a value of 500244 // the remainder when dividing 500 by 2561 // the number of times 500 can be divided by 256
This Processing code reads this message and prints the values to the Processing console:
/* * ReceiveMultipleFieldsBinary_P * * portIndex must be set to the port connected to the Arduino*/
import processing.serial.*;
Serial myPort; // Create object from Serial classshort portIndex = 0; // select the com port, 0 is the first port
char HEADER = 'H';
void setup(){ size(200, 200); // Open whatever serial port is connected to Arduino. String portName = Serial.list()[portIndex]; println(Serial.list()); println(" Connecting to -> " + Serial.list()[portIndex]); myPort = new Serial(this, portName, 9600);}
void draw(){int val;
if ( myPort.available() >= 15) // wait for the entire message to arrive { if( myPort.read() == HEADER) // is this the header { println("Message received:"); // header found // get the integer containing the bit values val = readArduinoInt(); // print the value of each bit for(int pin=2, bit=1; pin <= 13; pin++){ print("digital pin " + pin + " = " ); int isSet = (val & bit); if( isSet == 0) println("0");
4.9 Sending the Value of Multiple Arduino Pins | 111
www.it-ebooks.info

else println("1"); bit = bit * 2; // shift the bit } println(); // print the six analog values for(int i=0; i < 6; i ++){ val = readArduinoInt(); println("analog port " + i + "= " + val); } println("----"); } }}
// return the integer value from bytes received on the serial port (in low,highorder)int readArduinoInt(){ int val; // Data received from the serial port
val = myPort.read(); // read the least significant byte val = myPort.read() * 256 + val; // add the most significant byte return val;}
The Processing code waits for 15 characters to arrive. If the first character is the header,it then calls the function named readArduinoInt to read two bytes and transform themback into an integer by doing the complementary mathematical operation that wasperformed by Arduino to get the individual bits representing the digital pins. The sixintegers are then representing the analog values.
See AlsoTo send Arduino values back to the computer or drive the pins from the computer(without making decisions on the board), consider using Firmata (http://www.firmata.org). The Firmata library is included in the Arduino software, and a library is availableto use in Processing. You load the Firmata code onto Arduino, control whether pinsare inputs or outputs from the computer, and then set or read those pins.
4.10 How to Move the Mouse Cursor on a PC or MacProblemYou want Arduino to interact with an application on your computer by moving themouse cursor. Perhaps you want to move the mouse position in response to Arduinoinformation. For example, suppose you have connected a Wii nunchuck (seeRecipe 13.2) to your Arduino and you want your hand movements to control the po-sition of the mouse cursor in a program running in a PC.
112 | Chapter 4: Serial Communications
www.it-ebooks.info

SolutionYou can send serial commands that contain the mouse cursor position to a programrunning on the target computer. Here is a sketch that moves the mouse cursor basedon the position of two potentiometers:
// SerialMouse sketch#define potXPin 4#define potYPin 5
void setup(){ Serial.begin(9600);}
void loop(){ int x = analogRead(potXPin); int y = analogRead(potYPin); Serial.print(x,DEC); Serial.print(","); Serial.print(y,DEC); Serial.println(); // send a cr/lf delay(50); // send position 20 times a second}
Figure 4-3 illustrates the wiring for two potentiometers (see Chapter 5 for more details).
Figure 4-3. Wiring for two potentiometers
4.10 How to Move the Mouse Cursor on a PC or Mac | 113
www.it-ebooks.info

The Processing code is based on the code shown in Recipe 4.4:
/* * ArduinoMouse.pde (Processing sketch) */
/* WARNING: This sketch takes over your mouse Press escape to close running sketch */
import processing.serial.*;
Serial myPort; // Create object from Serial classRobot myRobot; // create object from Robot class;
public static final char HEADER = 'M'; // character to identify the start ofa messagepublic static final short LF = 10; // ASCII linefeedpublic static final short portIndex = 1; // select the com port, 0 is the firstport
void setup() { size(200, 200); println(Serial.list()); println(" Connecting to -> " + Serial.list()[portIndex]); myPort = new Serial(this,Serial.list()[portIndex], 9600); try { myRobot = new Robot(); // the Robot class gives access to the mouse } catch (AWTException e) { // this is the Java exception handler e.printStackTrace(); }}
void draw() {
}
void serialEvent(Serial p) { String message = myPort.readStringUntil(LF); // read serial data if(message != null) { print(message); String [] data = message.split(","); // Split the comma-separated message if(data[0].charAt(0) == HEADER) // check for header character in the firstfield { if( data.length > 3) { int x = Integer.parseInt(data[1]); int y = Integer.parseInt(data[2]); print("x= " + x); println(", y= " + y); myRobot.mouseMove(x,y); // move mouse to received x and y position } }
114 | Chapter 4: Serial Communications
www.it-ebooks.info

}}
The Processing code splits the message containing the x and y coordinates and sendsthem to the mouseMove method of the Java Robot class.
DiscussionThis technique for controlling applications running on your computer is easy to im-plement and should work with any operating system that can run the Processingapplication.
Some platforms require special privileges or extensions to access low-level input control. If you can’t get control of the mouse, check thedocumentation for your operating system.
If you require Arduino to actually appear as though it were a mouse to the computer,you have to emulate the actual USB protocol real mice use. This protocol, for HumanInterface Devices (HID), is complex, but Phillip Lindsay has some useful informationand code at http://code.google.com/p/vusb-for-arduino/.
A runaway Robot object has the ability to remove your control over themouse and keyboard if used in an endless loop.
See AlsoGo to http://java.sun.com/j2se/1.3/docs/api/java/awt/Robot.html for more informationon the Java Robot class.
An article on using the Robot class is available at http://www.developer.com/java/other/article.php/10936_2212401_1.
If you prefer to use a Windows programming language, the low-level Windows APIfunction to insert keyboard and mouse events into the input stream is calledSendInput. You can visit http://msdn.microsoft.com/en-us/library/ms646310(VS.85).aspx for more information.
4.11 Controlling Google Earth Using ArduinoProblemYou want to control movement in an application such as Google Earth using sensorsattached to Arduino. For example, you want sensors to detect hand movements to act
4.11 Controlling Google Earth Using Arduino | 115
www.it-ebooks.info

as the control stick for the flight simulator in Google Earth. The sensors could use a joystick (see Recipe 6.17) or a Wii nunchuck (see Recipe 13.2).
SolutionGoogle Earth lets you “fly” anywhere on Earth to view satellite imagery, maps, terrain,and 3D buildings (see Figure 4-4). It contains a flight simulator that can be controlledby a mouse, and this recipe uses techniques described in Recipe 4.10 combined with asensor connected to Arduino to provide the joystick input.
Figure 4-4. Google Earth flight simulator
This recipe’s Solution is based on the method used in Recipe 4.10 for emulating a mouseby sending Arduino data to Processing. The Arduino code sends the horizontal andvertical positions determined by reading the joystick values (the joystick code is dis-cussed in Recipe 6.17) from a PlayStation game controller:
* * GoogleEarthPSX * * Send joystick data from PSX to Processing * uses PSX library discussed in Recipe 6.17 */
#include <Psx.h> // Includes the Psx Library
Psx Psx; // Create an instance of the Psx libraryconst int dataPin = 5;
116 | Chapter 4: Serial Communications
www.it-ebooks.info

const int cmndPin = 4;const int attPin = 3;const int clockPin = 2;const int psxDelay = 10; // this determines the clock delay in microseconds
const byte nudge = 64; // the amount of movement to be sent when stick is pushedconst byte HEADER = 255; // this value is sent as the headerunsigned int data;byte x,y, buttons;
void setup(){ Serial.begin(9600); Psx.setupPins(dataPin, cmndPin, attPin, clockPin, psxDelay); // initialize Psx}
void loop(){
data = Psx.read(); // get the psx controller button data x = y = 127; // center x & y values, offsets are added if buttons pressed buttons = 0;
if(data & psxLeft || data & psxSqu) x = x - nudge; if(data & psxDown ||data & psxX) y = y + nudge; if(data & psxRight ||data & psxO) x = x + nudge; if(data & psxUp ||data & psxTri) y = y - nudge; if(data & psxStrt) // (Z button) buttons = buttons + 2; if(data & psxSlct) // (C button) buttons = buttons + 1;
Serial.print(HEADER); Serial.print(x); Serial.print(y); Serial.print(buttons);
delay(20); // send position 50 times a second}
The Processing sketch reads the header byte and three data bytes for x and y mouseposition and button state. The technique for handling binary data is discussed inRecipe 4.7:
/** * GoogleEarthFS_P * * Read Arduino Serial packets * and send mouse position to Google Earth
4.11 Controlling Google Earth Using Arduino | 117
www.it-ebooks.info

* */
import processing.serial.*;
Serial myPort; // Create object from Serial classint portIndex = 1; // select the com port, 0 is the first portint HEADER = 255;int val; // Data received from the serial port
GoogleFS myGoogle;
void setup(){ size(256, 256); println(Serial.list()); println(" Connecting to -> " + Serial.list()[portIndex]); myPort = new Serial(this,Serial.list()[portIndex], 9600); myGoogle = new GoogleFS(); smooth(); fill(255); background(255); println("Start Google FS in the center of your screen"); println("center the mouse pointer in google earthand press Z button to start"); do{ getData(); } while(buttons != 2 ); // wait for data and Z button to start
println("started"); myGoogle.mousePress(InputEvent.BUTTON1_MASK); // starts the FS}
int accx,accy,buttons;int xOffset, yOffset = 0;
boolean getData(){ if ( myPort.available() >= 4) { // If a data packet is available, if(myPort.read() == HEADER){ // check for header // erase the old markers stroke(255); ellipse(accx, accy,4,4);
accx = myPort.read(); accy = myPort.read(); buttons = myPort.read(); if(xOffset == 0){ // here if first time xOffset = accx; yOffset = accy; } if( buttons == 1) { println("tbutton: c");
118 | Chapter 4: Serial Communications
www.it-ebooks.info

xOffset = accx; yOffset = accy; } if(buttons == 3 ){ exit(); } return true; // data available } } return false;}
void draw(){ if(getData()){ if(buttons != 2 ){ // only activate the mouse when the Z button is not pressed myGoogle.move(accx- xOffset, accy - yOffset); }
print("accx: "); print(accx); print("\taccy: "); print(accy); println();
stroke(255,0,0); ellipse(accx, accy,4,4); }}
class GoogleFS { Robot myRobot; // create object from Robot class; int centerX,centerY; GoogleFS(){ try { myRobot = new Robot(); } catch (AWTException e) { e.printStackTrace(); } Dimension screen = java.awt.Toolkit.getDefaultToolkit().getScreenSize(); centerY = (int)screen.getHeight() / 2 ; centerX = (int)screen.getWidth() / 2; } // moves mouse from center of screen by given offset void move(int offsetX, int offsetY){ myRobot.mouseMove(centerX + 4 * offsetX,centerY + -4 * offsetY); } void mousePress( int button){ myRobot.mousePress(button) ; }}
DiscussionArduino determines the horizontal and vertical positions by reading the joystick valuefrom the PSX (PlayStation game controller). This control does not actually provide a
4.11 Controlling Google Earth Using Arduino | 119
www.it-ebooks.info

value proportional to the stick position, so the Arduino code sends an offset from thecenter when the stick is moved—this is the nudge variable and it determines the valueof this offset, and therefore the sensitivity of the control. The state of the Select andStart switches is also sent (when pressed, Select has a value of 2 and Start has a valueof 1; when both are pressed the value is 3, and when no button is pressed the value is 0).
Follow the instructions for connecting the PSX in Recipe 6.17.
Google Earth is a free download; you can get it from the Google website, http://earth.google.com/download-earth.html. Download and run the version for your operatingsystem to install it on your computer. Start Google Earth, and from the Tools menu,select Enter Flight Simulator. Select an aircraft (the SR22 is easier to fly than the F16)and an airport. The Joystick support should be left unchecked—you will be using themouse to control the aircraft. Click the Start Flight button and immediately press thespace bar to pause the simulator so that you can get the Processing sketch running.
Run the GoogleEarthFS_P sketch and press the Start button on the PSX controller. Youwill see a dot in the Processing draw window showing the joystick position, and youshould see this move as you press the PSX controller joystick buttons. At this point,the mouse position is under the control of Arduino, but control returns to your com-puter mouse when you hold the PSX Start button. Make Google Earth the Active win-dow by holding the PSX Start button and clicking on Google Earth.
You are now ready to fly. Release the PSX Start button, press Page Up on your keyboarda few times to increase the throttle, and then press the space bar on your keyboard tounpause the simulator. When the SR22 reaches an air speed that is a little over 100knots, you can “pull back” on the stick and fly. Information explaining the simulatorcontrols is available in the Help menu.
Here is another variation that sends a similar message to the Processing sketch. Thisone uses the Wii nunchuck code from Recipe 13.2:
/* * WiichuckSerial * * based on code from Tod E. Kurt, http://thingm.com/ * Modified to send serial packets to Processing * */
#include <Wire.h>#include "nunchuck_funcs.h"
int loop_cnt=0;const byte header = 254; // a value to indicate start of message
byte accx,accy,joyx,joyy,buttons;
// set the current coordinates as the center points
120 | Chapter 4: Serial Communications
www.it-ebooks.info

void setup(){ Serial.begin(9600); nunchuck_setpowerpins(); nunchuck_init(); // send the initialization handshake nunchuck_get_data(); // ignore the first time delay(50);}
void loop(){ if( loop_cnt > 50 ) { // every 50 msecs get new data loop_cnt = 0;
nunchuck_get_data();
accx = nunchuck_accelx(); accy = nunchuck_accely(); buttons = nunchuck_zbutton() * 2; buttons = buttons + nunchuck_cbutton(); // cbutton is least significant bit
Serial.print((byte)HEADER); // value indicating start of message Serial.print((byte)accx); Serial.print((byte)accy); Serial.print((byte)buttons);
} loop_cnt++; delay(1);}
The connections are shown in Recipe 13.2. Operation is similar to the PSX version,except you use the Z button on the nunchuck instead of the Start button.
See AlsoThe Google Earth website contains the downloadable code and instructions needed toget this going on your computer: http://earth.google.com/.
4.12 Logging Arduino Data to a File on Your ComputerProblemYou want to create a file containing information received over the serial port fromArduino. For example, you want to save the values of the digital and analog pins atregular intervals to a logfile.
SolutionWe covered sending information from Arduino to your computer in previous recipes.This solution uses the same Arduino code explained in Recipe 4.9. The Processing
4.12 Logging Arduino Data to a File on Your Computer | 121
www.it-ebooks.info

sketch that handles file logging is based on the Processing sketch also described in thatrecipe.
This Processing sketch creates a file (using the current date and time as the filename)in a directory called Arduino. Messages received from Arduino are added to the file.Pressing any key saves the file and exits the program:
/* * ReceiveMultipleFieldsBinaryToFile_P * * portIndex must be set to the port connected to the Arduino * based on ReceiveMultipleFieldsBinary, this version saves data to file * Press any key to stop logging and save file */
import processing.serial.*;
PrintWriter output;DateFormat fnameFormat= new SimpleDateFormat("yyMMdd_HHmm");DateFormat timeFormat = new SimpleDateFormat("hh:mm:ss");String fileName;
Serial myPort; // Create object from Serial classshort portIndex = 0; // select the com port, 0 is the first portchar HEADER = 'H';
void setup(){ size(200, 200); // Open whatever serial port is connected to Arduino. String portName = Serial.list()[portIndex]; println(Serial.list()); println(" Connecting to -> " + Serial.list()[portIndex]); myPort = new Serial(this, portName, 9600); Date now = new Date(); fileName = fnameFormat.format(now); output = createWriter(fileName + ".txt"); // save the file in the sketch folder}
void draw(){ int val; String time;
if ( myPort.available() >= 15) // wait for the entire message to arrive { if( myPort.read() == HEADER) // is this the header { String timeString = timeFormat.format(new Date()); println("Message received at " + timeString); output.println(timeString); // header found // get the integer containing the bit values val = readArduinoInt();
122 | Chapter 4: Serial Communications
www.it-ebooks.info

// print the value of each bit for(int pin=2, bit=1; pin <= 13; pin++){ print("digital pin " + pin + " = " ); output.print("digital pin " + pin + " = " ); int isSet = (val & bit); if( isSet == 0){ println("0"); output.println("0"); } else { println("1"); output.println("0"); } bit = bit * 2; // shift the bit } // print the six analog values for(int i=0; i < 6; i ++){ val = readArduinoInt(); println("analog port " + i + "= " + val); output.println("analog port " + i + "= " + val); } println("----"); output.println("----"); } }}
void keyPressed() { output.flush(); // Writes the remaining data to the file output.close(); // Finishes the file exit(); // Stops the program}
// return the integer value from bytes received on the serial port (in low,highorder)int readArduinoInt(){ int val; // Data received from the serial port
val = myPort.read(); // read the least significant byte val = myPort.read() * 256 + val; // add the most significant byte return val;}
Don’t forget that you need to set portIndex to the serial port connected to Arduino.
DiscussionThe base name for the logfile is formed using the DateFormat function in Processing:
DateFormat fnameFormat= new SimpleDateFormat("yyMMdd_HHmm");
The full filename is created with code that adds a directory and file extension:
output = createWriter(fileName + ".txt");
4.12 Logging Arduino Data to a File on Your Computer | 123
www.it-ebooks.info

The file will be created in the same directory as the Processing sketch (the sketch needsto be saved at least once to ensure that the directory exists). createWriter is the Pro-cessing function that opens the file; this creates an object (a unit of runtime function-ality) called output that handles the actual file output. The text written to the file is thesame as what is printed to the console in Recipe 4.9, but you can format the file contentsas required by using the standard string handling capabilities of Processing. For exam-ple, the following variation on the draw routine produces a comma-separated file thatcan be read by a spreadsheet or database. The rest of the Processing sketch can be thesame, although you may want to change the extension from .txt to .csv:
void draw(){ int val; String time;
if ( myPort.available() >= 15) // wait for the entire message to arrive { if( myPort.read() == HEADER) // is this the header { String timeString = timeFormat.format(new Date()); output.print(timeString); val = readArduinoInt(); // read but don't output the digital values
// output the six analog values delimited by a comma for(int i=0; i < 6; i ++){ val = readArduinoInt(); output.print("," + val); } output.println(); } }}
See AlsoFor more on createWriter, see http://processing.org/reference/createWriter_.html.
4.13 Sending Data to Two Serial Devices at the Same TimeProblemYou want to send data to a serial device such as a serial LCD, but you are already usingthe built-in serial port to communicate with your computer.
SolutionOn a Mega this is not a problem, as it has four hardware serial ports; just create twoserial objects and use one for the LCD and one for the computer:
124 | Chapter 4: Serial Communications
www.it-ebooks.info

void setup() { // initialize two serial ports on a megaL Serial.begin(9600); Serial1.begin(9600);}
On a standard Arduino board (such as the Uno or Duemilanove) that only has onehardware serial port, you will need to create an emulated or “soft” serial port.
You can use Mikal Hart’s NewSoftSerial, a serial port emulation library, available athttp://arduiniana.org/libraries/newsoftserial. Download and install NewSoftSerial.
The Arduino team is planning to provide NewSoftSerial with futureArduino downloads. Check the release notes for your Arduino versionto see if this software is already included.
Select two available digital pins, one each for transmit and receive, and connect yourserial device to them. It is convenient to use the hardware serial port for communicationwith the computer because this has a USB adapter on the board. Connect the device’stransmit line to the receive pin and the receive line to the transmit pin. In Figure 4-5,we have selected pin 2 as the receive pin and pin 3 as the transmit pin.
Figure 4-5. Connecting a serial device to a “soft” serial port
In your sketch, create a NewSoftSerial object and tell it which pins you chose as youremulated serial port. In this example, we’re creating an object named serial_lcd, whichwe instruct to use pins 2 and 3:
/* * NewSoftSerialOutput sketch * Output data to a software serial port*/
4.13 Sending Data to Two Serial Devices at the Same Time | 125
www.it-ebooks.info

#include <NewSoftSerial.h>...const int rxpin = 2; // pin used to receive from LCDconst int txpin = 3; // pin used to send to LCDNewSoftSerial serial_lcd(txpin, rxpin); // new serial port on pins 2 and 3
void setup(){ Serial.begin(9600); // 9600 baud for the built-in serial port serial_lcd.begin(9600); //initialize the software serial port also for 9600}
int number = 0;
void loop(){ serial_lcd.print("The number is "); // send text to the LCD serial_lcd.println(number); // print the number on the LCD Serial.print("The number is "); Serial.println(number); // print the number on the PC console
delay(500); // delay half second between numbers number++; // to the next number}
This sketch assumes that a serial LCD has been connected to pins 2 and 3 as shown inFigure 4-5, and that a serial console is connected to the built-in port. The loop willrepeatedly display the same message on each:
The number is 0The number is 1...
DiscussionEvery Arduino microcontroller contains at least one built-in serial port. This specialpiece of hardware is responsible for generating the series of precisely timed pulses itspartner device sees as data and for interpreting the similar stream that it receives inreturn. Although the Mega has four such ports, most Arduino flavors have only one.For projects that require connections to two or more serial devices, you’ll need a soft-ware library that emulates the additional ports. A “software serial” library effectivelyturns an arbitrary pair of digital I/O pins into a new serial port.
Although one such library, SoftwareSerial, is included in every Arduino distribution,most programmers prefer to use the more powerful and feature-laden NewSoftSeriallibrary. NewSoftSerial supports a wider range of baud rates and uses some advancedfeatures of the Arduino processor to ensure more reliable data reception. It also sup-ports multiple simultaneous emulated ports. You can read more about NewSoftSerialon Mikal Hart’s website.
Table 4-3 compares the features of the NewSoftSerial and SoftwareSerial libraries.
126 | Chapter 4: Serial Communications
www.it-ebooks.info

Table 4-3. Feature comparison of two emulation libraries
Feature NewSoftSerial SoftwareSerial
Distributed with Arduino software Noa Yes
Max transmit baud rate 115.2K To about 9,600
Max receive baud rate 38.4K To about 9,600
Supports 8 MHz processors Yes No
Reliable interrupt-driven receives Yes No
Supports multiple emulated ports Yes No
.available() and .overflow() methods Yes N/Aa Note that as of Arduino release 22, NewSoftSerial was available only as a third-party library, but future releases may include it with the
base distribution.
To build your software serial port, you select a pair of pins that will act as the port’stransmit and receive lines in much the same way that pins 1 and 0 are controlled byArduino’s built-in port. In Figure 4-5, pins 3 and 2 are shown, but any available digitalpins can be used. It’s wise to avoid using 0 and 1, because these are already being drivenby the built-in port.
The syntax for writing to the soft port is identical to that for the hardware port. In theexample sketch, data is sent to both the “real” and emulated ports using print() andprintln():
serial_lcd.print("The number is "); // send text to the LCD serial_lcd.println(number); // send the number on the LCD
Serial.print("The number is "); // send text to the hardware port Serial.println(number); // to output on Arduino Serial Monitor
If you are using a unidirectional serial device—that is, one that only sends or receives—you can conserve resources by specifying a nonexistent pin number in theNewSoftSerial constructor for the line you don’t need. For example, a serial LCD isfundamentally an output-only device. If you don’t expect (or want) to receive data fromit, you can tell NewSoftSerial using this syntax:
#include <NewSoftSerial.h>...const int no_such_pin = 255;const int txpin = 3;NewSoftSerial serial_lcd(txpin, no_such_pin); // TX-only on pin 3
In this case, we would only physically connect a single pin (3) to the serial LCD’s “input”or “RX” line.
4.13 Sending Data to Two Serial Devices at the Same Time | 127
www.it-ebooks.info

4.14 Receiving Serial Data from Two Devices at the Same TimeProblemYou want to receive data from a serial device such as a serial GPS, but you are alreadyusing the built-in serial port to communicate with your computer.
SolutionThis problem is similar to the preceding one, and indeed the solution is much the same.If your Arduino’s serial port is connected to the console and you want to attach a secondserial device, you must create an emulated port using a software serial library such asNewSoftSerial. In this case, we will be receiving data from the emulated port insteadof writing to it, but the basic solution is very similar.
Download NewSoftSerial from Mikal Hart’s website. Select two pins to use as yourtransmit and receive lines.
Connect your GPS as shown in Figure 4-6. Rx (receive) is not used in this example, soyou can ignore the Rx connection to pin 3 if your GPS does not have a receive pin.
Figure 4-6. Connecting a serial GPS device to a “soft” serial port
As you did in Recipe 4.13, create a NewSoftSerial object in your sketch and tell it whichpins to control. In the following example, we define a soft serial port calledserial_gps, using pins 2 and 3 for receive and transmit, respectively:
/* * NewSoftSerialInput sketch * Read data from a software serial port*/
128 | Chapter 4: Serial Communications
www.it-ebooks.info

#include <NewSoftSerial.h>const int rxpin = 2; // pin used to receive from GPSconst int txpin = 3; // pin used to send to GPSNewSoftSerial serial_gps(txpin, rxpin); // new serial port on pins 2 and 3
void setup(){ Serial.begin(9600); // 9600 baud for the built-in serial port serial_gps.begin(4800); // initialize the port, most GPS devices use 4800 baud}
void loop(){ if (serial_gps.available() > 0) // any character arrived yet? { char c = serial_gps.read(); // if so, read it from the GPS Serial.print(c, BYTE); // and echo it to the serial console }}
This short sketch simply forwards all incoming data from the GPS to the Arduino SerialMonitor. If the GPS is functioning and your wiring is correct, you should see GPS datadisplayed on the Serial Monitor.
DiscussionYou initialize an emulated NewSoftSerial port by providing pin numbers for transmitand receive. The following code will set up the port to send on pin 2 and receive onpin 3:
const int rxpin = 2; // pin used to receive from GPSconst int txpin = 3; // pin used to send to GPSNewSoftSerial serial_gps(txpin, rxpin); // new serial port on pins 2 and 3
The syntax for reading an emulated port is very similar to that for reading from a built-in port. First check to make sure a character has arrived from the GPS withavailable(), and then read it with read().
It’s important to remember that software serial ports consume time and resources. Anemulated serial port must do everything that a hardware port does, using the sameprocessor your sketch is trying to do “real work” with. Whenever a new characterarrives, the processor must interrupt whatever it was doing to handle it. This can betime-consuming. At 4,800 baud, for example, it takes the Arduino about twomilliseconds to process a single character. While two milliseconds may not sound likemuch, consider that if your peer device—say, the GPS unit shown earlier—transmits200 to 250 characters per second, your sketch is spending 40 to 50 percent of its timetrying to keep up with the serial input. This leaves very little time to actually process allthat data. The lesson is that if you have two serial devices, when possible connect theone with the higher bandwidth consumption to the built-in (hardware) port. If youmust connect a high-bandwidth device to a software serial port, make sure the rest ofyour sketch’s loop is very efficient.
4.14 Receiving Serial Data from Two Devices at the Same Time | 129
www.it-ebooks.info

Receiving data from multiple NewSoftSerial ports
With NewSoftSerial (but not SoftwareSerial), it is possible to create multiple “soft”serial ports in the same sketch. This is a useful way to control, say, several XBee radiosin the same project. The caveat is that at any given time, only one of these ports canactively receive data. Reliable reception on a software port requires the processor’sundivided attention. That’s why NewSoftSerial can only activate one port for data re-ception at a given time. (This restriction does not apply to sending data, only receivingit. See the NewSoftSerial documentation for specifics.)
It is possible to receive on two different NewSoftSerial ports in the same sketch. Youjust have to take some care that you aren’t trying to receive from both at the same time.There are many successful designs which, say, monitor a serial GPS device for a while,then later in the sketch accept input from an XBee. The key is to alternate betweenthem. NewSoftSerial considers the “active” port to be whichever port you have mostrecently accessed using the read, print, println, or available method. The followingcode fragment illustrates how you design a sketch to read first from one port and thenfrom another:
/* * MultiRX sketch * Receive data from two software serial ports*/
#include <NewSoftSerial.h>const int rxpin1 = 2;const int txpin1 = 3;const int rxpin2 = 4;const int txpin2 = 5;NewSoftSerial gps(txpin1, rxpin1); // gps device connected to pins 2 and 3NewSoftSerial xbee(txpin2, rxpin2); // gps device connected to pins 2 and 3
void setup(){ gps.begin(4800); xbee.begin(9600);}
void loop(){ if (xbee.available() > 0) // xbee is active. Any characters available? { if (xbee.read() == 'y') // if xbee received a 'y' character { unsigned long start = millis(); // begin listening to the GPS while (start + 100000 > millis()) // listen for 10 seconds
130 | Chapter 4: Serial Communications
www.it-ebooks.info

{ if (gps.available() > 0) // now gps device is active { char c = gps.read(); // *** process gps data here } } } }}
This sketch is designed to treat the XBee radio as the active port until it receives ay character, at which point the GPS becomes active. After processing GPS data for10 seconds, the sketch once again returns to listening to the XBee port. Data that arriveson an inactive port is simply discarded.
Note that the “active port” restriction only applies to multiple soft ports. If your designreally must receive data from more than one serial device simultaneously, considerattaching one of these to the built-in hardware port. Alternatively, it is perfectly possibleto add additional hardware ports to your projects using external chips, devices calledUARTs.
4.15 Setting Up Processing on Your Computer to Sendand Receive Serial DataProblemYou want to use the Processing development environment to send and receive serialdata.
SolutionYou can get the Processing application from the Downloads section of the Processingwebsite, http://processing.org. Files are available for each major operating system.Download the appropriate one for your operating system and unzip the file to some-where that you normally store applications. On a Windows computer, this might be alocation like C:\Program Files\Processing\. On a Mac, it might be somethinglike /Applications/Processing/.
If you installed Processing on the same computer that is running the Arduino IDE, theonly other thing you need to do is identify the serial port in Processing. The followingProcessing sketch prints the serial ports available:
/** * GettingStarted * * A sketch to list the available serial ports * and display characters received */
4.15 Setting Up Processing on Your Computer to Send and Receive Serial Data | 131
www.it-ebooks.info

import processing.serial.*;
Serial myPort; // Create object from Serial classint portIndex = 0; // set this to the port connected to Arduinoint val; // Data received from the serial port
void setup(){ size(200, 200); println(Serial.list()); // print the list of all the ports println(" Connecting to -> " + Serial.list()[portIndex]); myPort = new Serial(this, Serial.list()[portIndex], 9600);}
void draw(){ if ( myPort.available() > 0) // If data is available, { val = myPort.read(); // read it and store it in val print(val); }}
If you are running Processing on a computer that is not running the Arduino develop-ment environment, you need to install the Arduino USB drivers (Chapter 1 describeshow to do this).
Set the variable portIndex to match the port used by Arduino. You can see the portnumbers printed in the Processing text window (the area below the source code, notthe separate Display window; see http://processing.org/reference/environment).Recipe 1.4 describes how to find out which serial port your Arduino board is using.
132 | Chapter 4: Serial Communications
www.it-ebooks.info

CHAPTER 5
Simple Digital and Analog Input
5.0 IntroductionThe Arduino’s ability to sense digital and analog inputs allows it to respond to you andto the world around you. This chapter introduces techniques you can use to do usefulthings with these inputs. This is the first of many chapters to come that cover electricalconnections to Arduino. If you don’t have an electronics background, you may wantto look through Appendix A on electronic components, Appendix B on schematic di-agrams and data sheets, Appendix C on building and connecting circuits, and Appen-dix E on hardware troubleshooting. In addition, many good introductory tutorials areavailable covering electronics. Two that are particularly relevant to Arduino are GettingStarted with Arduino by Massimo Banzi (O’Reilly) and Making Things Talk by TomIgoe (O’Reilly). Other books offering a background on electronics topics covered inthis and the following chapters include Getting Started in Electronics by Forrest Mims(Master Publishing) and Physical Computing by Tom Igoe (Cengage).
If wiring components to your Arduino is new to you, be careful abouthow you connect and power the things you attach. Arduino uses a ro-bust controller chip that can take a fair amount of abuse, but you candamage the chip if you connect the wrong voltages or short-circuit anoutput pin. Most Arduino controller chips are powered by 5 volts, andyou must not connect external power to Arduino pins with a highervoltage than this (or 3.3 volts if your Arduino controller runs on thisvoltage).
Arduino boards that are aimed at beginners have the main chip in asocket that can be removed and replaced, so you don’t need to replacethe whole board if you damage the chip.
Figure 5-1 shows the arrangement of pins on a standard Arduino board. See http://www.arduino.cc/en/Main/Hardware for a list of all the official boards along with links toconnection information for each. If your board is not on that list, check your boardsupplier’s website for connection information.
133
www.it-ebooks.info

This chapter covers the Arduino pins that can sense digital and analog inputs. Digitalinput pins sense the presence and absence of voltage on a pin. Analog input pins meas-ure a range of voltages on a pin.
The Arduino function to detect digital input is digitalRead and it tells your sketch if avoltage on a pin is HIGH (5 volts) or LOW (0 volts). The Arduino function to configure apin for reading input is pinMode(pin, INPUT).
On a typical board, there are 14 digital pins (numbered 0 to 13) as shown at the top ofFigure 5-1. Pins 0 and 1 (marked RX and TX) are used for the USB serial connectionand should be avoided for other uses. If you need more digital pins on a standard board,you can use the analog pins as digital pins (analog pins 0 through 5 can be used asdigital pins 14 through 19).
The Mega board has many more digital and analog pins. Digital pins 0 through 13 andanalog pins 0 through 5 are located in the same place as on the standard board so thathardware shields designed for the standard board can fit onto a Mega. As with thestandard board, you can use analog pins as digital pins, but with the Mega, analog pins0 through 15 are digital pin numbers 54 through 69. Figure 5-2 shows the Mega pinlayout.
Most boards have an LED connected to pin 13, and some of the recipes use this as anoutput indicator. If your board does not have an LED on pin 13, skip ahead to Rec-ipe 7.1 if you need help connecting an LED to a digital pin.
Recipes covering digital input sometimes use external resistors to provide the voltagethat is sensed by digitalRead. These resistors are called pull-up resistors (so namedbecause the voltage is “pulled up” to the 5V line that the resistor is connected to) or
Figure 5-1. Standard Arduino board
134 | Chapter 5: Simple Digital and Analog Input
www.it-ebooks.info

pull-down resistors (the voltage is “pulled down” to 0 volts). Although 10K ohms is acommonly used value, anything between 4.7K and 20K or more will work; see Appen-dix A for more information about the components used in this chapter.
Unlike a digital value, which is only on or off, analog values are continuously variable.The volume setting of a device is a good example; it is not just on or off, but it can havea range of values in between. Many sensors provide information by varying the voltageto correspond to the sensor measurement. Arduino code uses a function calledanalogRead to get a value proportional to the voltage it sees on one of its analog pins.The value will be 0 if there are 0 volts on the pin and 1,023 for 5 volts. The value inbetween will be proportional to the voltage on the pin, so 2.5 volts (half of 5 volts) willresult in a value of roughly 511 (half of 1,023). You can see the six analog input pins(marked 0 to 5) at the bottom of Figure 5-1 (these pins can also be used as digital pins14 to 19 if they are not needed for analog). Some of the analog recipes use a potenti-ometer (pot for short, also called a variable resistor) to vary the voltage on a pin. Whenchoosing a potentiometer, a value of 10K is the best option for connecting to analogpins.
Although most of the circuits in this chapter are relatively easy to connect, you maywant to consider getting a solderless breadboard to simplify your wiring to externalcomponents: some choices are the Jameco 20723 (two bus rows per side); RadioShack276-174 (one bus row per side); Digi-Key 438-1045-ND; and SparkFun PRT-00137.
Another handy item is an inexpensive multimeter. Almost any will do, as long as it canmeasure voltage and resistance. Continuity checking and current measurement are niceadditional features to have. (The Jameco 220812, RadioShack 22-810, and SparkFunTOL-00078 offer these features.)
Figure 5-2. Arduino Mega board
5.0 Introduction | 135
www.it-ebooks.info

5.1 Using a SwitchProblemYou want your sketch to respond to the closing of an electrical contact; for example, apushbutton or other switch or an external device that makes an electrical connection.
SolutionUse digitalRead to determine the state of a switch connected to an Arduino digital pinset as input. The following code lights an LED when a switch is pressed (Figure 5-3shows how it should be wired up):
/* Pushbutton sketch a switch connected to pin 2 lights the LED on pin 13*/
const int ledPin = 13; // choose the pin for the LEDconst int inputPin = 2; // choose the input pin (for a pushbutton)
void setup() { pinMode(ledPin, OUTPUT); // declare LED as output pinMode(inputPin, INPUT); // declare pushbutton as input}
void loop(){ int val = digitalRead(inputPin); // read input value if (val == HIGH) // check if the input is HIGH { digitalWrite(ledPin, HIGH); // turn LED on if switch is pressed } else { digitalWrite(ledPin, LOW); // turn LED off }}
Standard Arduino boards have a built-in LED connected to pin 13. Ifyour board does not, see Recipe 7.1 for information on connecting anLED to an Arduino pin.
DiscussionThe setup function configures the LED pin as OUTPUT and the switch pin as INPUT.
136 | Chapter 5: Simple Digital and Analog Input
www.it-ebooks.info

A pin must be set to OUTPUT mode for digitalWrite to control the pin’soutput voltage. It must be in INPUT mode to read the digital input.
The digitalRead function monitors the voltage on the input pin (inputPin), and it re-turns a value of HIGH if the voltage is high (5 volts) and LOW if the voltage is low (0 volts).Actually, any voltage that is greater than 2.5 volts (half of the voltage powering thechip) is considered HIGH and less than this is treated as LOW. If the pin is left unconnected(known as floating) the value returned from digitalRead is indeterminate (it may beHIGH or LOW, and it cannot be reliably used). The resistor shown in Figure 5-3 ensuresthat the voltage on the pin will be low when the switch is not pressed, because theresistor “pulls down” the voltage to ground. When the switch is pushed, a connectionis made between the pin and +5 volts, so the value on the pin interpreted by digitalRead changes from LOW to HIGH.
Do not connect a digital or analog pin to a voltage higher than 5 volts(or 3.3 volts on a 3.3V board). This can damage the pin and possiblydestroy the entire chip. Also, make sure you don’t wire the switch sothat it shorts the 5 volts to ground (without a resistor). Although thismay not damage the Arduino chip, it is not good for the power supply.
Figure 5-3. Switch connected using pull-down resistor
5.1 Using a Switch | 137
www.it-ebooks.info

In this example, the value from digitalRead is stored in the variable val. This will beHIGH if the button is pressed, LOW otherwise.
The switch used in this example (and almost everywhere else in thisbook) makes electrical contact when pressed and breaks contact whennot pressed. These switches are called Normally Open (NO); see thisbook’s website for part numbers. The other kind of momentary switchis called Normally Closed (NC).
The output pin connected to the LED is turned on when you set val to HIGH, illuminatingthe LED.
Although Arduino sets all digital pins as inputs by default, it is a good practice to setthis explicitly in your sketch to remind yourself about the pins you are using.
You may see similar code that uses true instead of HIGH; these can be used interchange-ably (they are also sometimes represented as 1). Likewise, false is the same as LOW and0. Use the form that best expresses the meaning of the logic in your application.
Almost any switch can be used, although the ones called momentary tactile switches arepopular because they are inexpensive and can plug directly into a breadboard. See thewebsite for this book for some supplier part numbers.
Here is another way to implement the logic in the preceding sketch:
void loop(){ digitalWrite(ledPin, digitalRead(inputPin)); // turn LED ON if input pin isHIGH, else turn OFF}
This doesn’t store the button state into a variable. Instead, it sets the LED on or offdirectly from the value obtained from digitalRead. It is a handy shortcut, but if youfind it overly terse, there is no practical difference in performance, so pick whicheverform you find easier to understand.
The pull-up code is similar to the pull-down version, but the logic is reversed: the valueon the pin goes LOW when the button is pressed (see Figure 5-4 for a schematic diagramof this). It may help to think of this as pressing the switch DOWN, causing the output togo LOW:
void loop(){ int val = digitalRead(inputPin); // read input value if (val == HIGH) // check if the input is HIGH { digitalWrite(ledPin, LOW); // turn LED OFF }
138 | Chapter 5: Simple Digital and Analog Input
www.it-ebooks.info

else { digitalWrite(ledPin, HIGH); // turn LED ON }}
Figure 5-4. Switch connected using pull-up resistor
See AlsoThe Arduino reference for digitalRead: http://arduino.cc/en/Reference/DigitalRead
The Arduino reference for digitalWrite: http://arduino.cc/en/Reference/DigitalWrite
The Arduino reference for pinMode: http://arduino.cc/en/Reference/PinMode
The Arduino references for constants (HIGH, LOW, etc.): http://arduino.cc/en/Reference/Constants
Arduino tutorial on digital pins: http://arduino.cc/en/Tutorial/DigitalPins
5.2 Using a Switch Without External ResistorsProblemYou want to simplify your wiring by eliminating external pull-up resistors when con-necting switches.
5.2 Using a Switch Without External Resistors | 139
www.it-ebooks.info

SolutionAs explained in Recipe 5.1, digital inputs must have a resistor to hold the pin to a knownvalue when the switch is not pressed. Arduino has internal pull-up resistors that canbe enabled by writing a HIGH value to a pin that is in INPUT mode (the code for this isshown in Recipe 5.1).
For this example, the switch is wired as shown in Figure 5-5. This is almost exactly thesame as Figure 5-4, but without an external resistor.
Figure 5-5. Switch wired for use with internal pull-up resistor
The switch is only connected between pin 2 and Gnd. Gnd is short for ground and isat 0 volts by definition:
/* Pullup sketch a switch connected to pin 2 lights the LED on pin 13*/
const int ledPin = 13; // output pin for the LEDconst int inputPin = 2; // input pin for the switch
void setup() { pinMode(ledPin, OUTPUT); pinMode(inputPin, INPUT); digitalWrite(inputPin,HIGH); // turn on internal pull-up on the inputPin
140 | Chapter 5: Simple Digital and Analog Input
www.it-ebooks.info

}
void loop(){ int val = digitalRead(inputPin); // read input value if (val == HIGH) // check if the input is HIGH { digitalWrite(ledPin, HIGH); // turn LED OFF } else { digitalWrite(ledPin, LOW); // turn LED ON }}
There are a few Gnd pins on an Arduino board; they are all connected,so pick whichever is convenient.
DiscussionYou enable internal pull-up resistors by writing a HIGH value to a pin in input mode.Using digitalWrite(pin, HIGH) on a pin in input mode may not be intuitive at first,but you’ll soon get used to it. You can turn the pull-up off by writing a LOW value to thepin.
If your application switches the pin mode back and forth between input and output,bear in mind that the state of the pin will remain HIGH or LOW when you change modes.In other words, if you have set an output pin HIGH and then change to input mode, thepull-up will be on, and reading the pin will produce a HIGH. If you set the pin LOW inoutput mode with digitalWrite(pin, LOW) and then change to input mode with pinMode(pin, INPUT), the pull-up will be off. If you turn a pull-up on, changing to outputmode will set the pin HIGH, which could, for example, unintentionally light an LEDconnected to it.
The internal pull-up resistors are 20K ohms. This is suitable for most applications, butsome devices may require lower-value resistors—see the data sheet for external devicesyou want to connect to Arduino to see if the internal pull-ups are suitable or not.
5.3 Reliably Detecting the Closing of a SwitchProblemYou want to avoid false readings due to contact bounce (contact bounce produces spu-rious signals at the moment the switch contacts close or open). The process of elimi-nating spurious readings is called debouncing.
5.3 Reliably Detecting the Closing of a Switch | 141
www.it-ebooks.info

SolutionThere are many ways to solve this problem; here is one using the wiring shown inFigure 5-3 from Recipe 5.1:
/* Debounce sketch a switch connected to pin 2 lights the LED on pin 13 debounce logic prevents misreading of the switch state*/
const int inputPin = 2; // the number of the input pinconst int ledPin = 13; // the number of the output pinconst int debounceDelay = 10; // milliseconds to wait until stable
// debounce returns true if the switch in the given pin is closed and stableboolean debounce(int pin){ boolean state; boolean previousState;
previousState = digitalRead(pin); // store switch state for(int counter=0; counter < debounceDelay; counter++) { delay(1); // wait for 1 millisecond state = digitalRead(pin); // read the pin if( state != previousState) { counter = 0; // reset the counter if the state changes previousState = state; // and save the current state } } // here when the switch state has been stable longer than the debounce period
return state;}
void setup(){ pinMode(inputPin, INPUT); pinMode(ledPin, OUTPUT);}
void loop(){ if(debounce(inPin)) { digitalWrite(outPin, HIGH); }}
The debounce function is called (used) with the pin number of the switch you want todebounce; the function returns true if the switch is pressed and stable. It returnsfalse if it is not pressed or not yet stable.
142 | Chapter 5: Simple Digital and Analog Input
www.it-ebooks.info

DiscussionThe debounce method checks to see if it gets the same reading from the switch after adelay that needs to be long enough for the switch contacts to stop bouncing. You mayrequire longer intervals for “bouncier” switches (some switches can require as much as50 ms or more). The function works by repeatedly checking the state of the switch foras many milliseconds as defined in the debounce time. If the switch remains stable forthis time, the state of the switch will be returned (true if pressed and false if not). Ifthe switch state changes within the debounce period, the counter is reset so that thechecks start over until the switch state does not change within the debounce time.
If your wiring uses pull-up resistors instead of pull-down resistors (see Recipe 5.2) youneed to invert the value returned from the debounce function, because the state goesLOW when the switch is pressed using pull-ups, but the function should return true(true is the same as HIGH) when the switch is pressed. The debounce code using pull-ups is as follows; only the last four lines (highlighted) are changed from the previousversion:
boolean debounce(int pin){ boolean state; boolean previousState;
previousState = digitalRead(pin); // store switch state for(int counter=0; counter < debounceDelay; counter++) { delay(1); // wait for 1 millisecond state = digitalRead(pin); // read the pin if( state != previousState) { counter = 0; // reset the counter if the state changes previousState = state; // and save the current state } } // here when the switch state has been stable longer than the debounce period if(state == LOW) // LOW means pressed (because pull-ups are used) return true; else return false;}
For testing, you can add a count variable to display the number of presses. If you viewthis on the Serial Monitor (see Chapter 4), you can see whether it increments once perpress. Increase the value of debounceDelay until the count keeps step with the presses.The following fragment prints the value of count when used with the debounce functionshown earlier:
int count; // add this variable to store the number of presses
void setup(){ pinMode(inPin, INPUT);
5.3 Reliably Detecting the Closing of a Switch | 143
www.it-ebooks.info

pinMode(outPin, OUTPUT); Serial.begin(9600); // add this to the setup function}
void loop(){ if(debounce(inPin)) { digitalWrite(outPin, HIGH); count++; // increment count Serial.println(count); // display the count on the Serial Monitor }}
This debounce() function will work for any number of switches, but you must ensurethat the pins used are in input mode.
A potential disadvantage of this method for some applications is that from the time thedebounce function is called, everything waits until the switch is stable. In most casesthis doesn’t matter, but your sketch may need to be attending to other things whilewaiting for your switch to stabilize. You can use the code shown in Recipe 5.4 to over-come this problem.
See AlsoSee the Debounce example sketch distributed with Arduino. From the File menu, selectExamples→Digital→Debounce.
5.4 Determining How Long a Switch Is PressedProblemYour application wants to detect the length of time a switch has been in its currentstate. Or you want to increment a value while a switch is pushed and you want the rateto increase the longer the switch is held (the way many electronic clocks are set). Oryou want to know if a switch has been pressed long enough for the reading to be stable(see Recipe 5.3).
SolutionThe following sketch demonstrates the setting of a countdown timer. The wiring is thesame as in Figure 5-5 from Recipe 5.2. Pressing a switch sets the timer by incrementingthe timer count; releasing the switch starts the countdown. The code debounces theswitch and accelerates the rate at which the counter increases when the switch is heldfor longer periods. The timer count is incremented by one when the switch is initiallypressed (after debouncing). Holding the switch for more than one second increases theincrement rate by four; holding the switch for four seconds increases the rate by ten.
144 | Chapter 5: Simple Digital and Analog Input
www.it-ebooks.info

Releasing the switch starts the countdown, and when the count reaches zero, a pin isset HIGH (in this example, lighting an LED):
/* SwitchTime sketch Countdown timer that decrements every tenth of a second lights an LED when 0 Pressing button increments count, holding button down increases rate of increment
*/const int ledPin = 13; // the number of the output pinconst int inPin = 2; // the number of the input pin
const int debounceTime = 20; // the time in milliseconds requiredfor the switch to be stableconst int fastIncrement = 1000; // increment faster after this manymillisecondsconst int veryFastIncrement = 4000; // and increment even faster afterthis many millisecondsint count = 0; // count decrements every tenth of asecond until reaches 0
void setup(){ pinMode(inPin, INPUT); digitalWrite(inPin, HIGH); // turn on pull-up resistor pinMode(ledPin, OUTPUT); Serial.begin(9600);}
void loop(){ int duration = switchTime(); if( duration > veryFastIncrement) count = count + 10; else if ( duration > fastIncrement) count = count + 4; else if ( duration > debounceTime) count = count + 1;
else { // switch not pressed so service the timer if( count == 0) digitalWrite(ledPin, HIGH); // turn the LED on if the count is 0 else { digitalWrite(ledPin, LOW); // turn the LED off if the count is not 0 count = count - 1; // and decrement the count } }
5.4 Determining How Long a Switch Is Pressed | 145
www.it-ebooks.info

Serial.println(count); delay(100);}
// return the time in milliseconds that the switch has been in pressed (LOW)long switchTime(){ // these variables are static - see Discussion for an explanation static unsigned long startTime = 0; // the time the switch state change wasfirst detected static boolean state; // the current state of the switch
if(digitalRead(inPin) != state) // check to see if the switch has changed state { state = ! state; // yes, invert the state startTime = millis(); // store the time } if( state == LOW) return millis() - startTime; // switch pushed, return time in milliseconds else return 0; // return 0 if the switch is not pushed (in the HIGH state);}
DiscussionThe heart of this recipe is the switchTime function. This returns the number of milli-seconds that the switch has been pressed. Because this recipe uses internal pull-upresistors (see Recipe 5.2), the digitalRead of the switch pin will return LOW when theswitch is pressed.
The loop checks the value returned from switchTime to see what should happen. If thetime the switch has been held down is long enough for the fastest increment, the counteris incremented by that amount; if not, it checks the fast value to see if that should beused; if not, it checks if the switch has been held down long enough to stop bouncingand if so, it increments a small amount. At most, one of those will happen. If none ofthem are true, the switch is not being pressed, or it has not been pressed long enoughto have stopped bouncing. The counter value is checked and an LED is turned on if itis zero; if it’s not zero, the counter is decremented and the LED is turned off.
You can use the switchTime function just for debouncing a switch. The following codehandles debounce logic by calling the switchTime function:
const int debounceTime = 20; // the time in milliseconds that the switchneeds to be stable
if( switchTime() > debounceTime); Serial.print("switch is debounced");
This approach to debouncing can be handy if you have more than one switch, becauseyou can peek in and look at the amount of time a switch has been pressed and processother tasks while waiting for a switch to become stable. To implement this, you needto store the current state of the switch (pressed or not) and the time the state last
146 | Chapter 5: Simple Digital and Analog Input
www.it-ebooks.info

changed. There are many ways to do this—in this example, you will use a separatefunction for each switch. You could store the variables associated with all the switchesat the top of your sketch as global variables (called “global” because they are accessibleeverywhere). But it is more convenient to have the variables for each switch containedwith the function.
Retaining values of variables defined in a function is achieved by using static varia-bles. Static variables within a function provide permanent storage for values that mustbe maintained between function calls. A value assigned to a static variable is retainedeven after the function returns. The last value set will be available the next time thefunction is called. In that sense, static variables are similar to the global variables (var-iables declared outside a function, usually at the beginning of a sketch) that you sawin the other recipes. But unlike global variables, static variables declared in a functionare only accessible within that function. The benefit of static variables is that theycannot be accidentally modified by some other function.
This sketch shows an example of how you can add separate functions for differentswitches. The wiring for this is similar to Recipe 5.2, with the second switch wiredsimilarly to the first (as shown in Figure 5-5) but connected between pin 3 and Gnd:
/* SwitchTimeMultiple sketch Prints how long more than one switch has been pressed */
const int switchAPin = 2; // the pin for switch Aconst int switchBPin = 3; // the pin for switch B
// functions with references must be explicitly declaredunsigned long switchTime(int pin, boolean &state, unsigned long &startTime);
void setup(){ pinMode(switchAPin, INPUT); digitalWrite(switchAPin, HIGH); // turn on pull-up resistors pinMode(switchBPin, INPUT); digitalWrite(switchBPin, HIGH); // turn on pull-up resistors Serial.begin(9600);}
void loop(){unsigned long time;
Serial.print("switch A time ="); time = switchATime(); Serial.print(time);
Serial.print(", switch B time ="); time = switchBTime(); Serial.println(time); delay(1000);
5.4 Determining How Long a Switch Is Pressed | 147
www.it-ebooks.info

}
unsigned long switchTime(int pin, boolean &state, unsigned long &startTime){ if(digitalRead(pin) != state) // check to see if the switch has changed state { state = ! state; //yes, invert the state startTime = millis(); // store the time } if( state == LOW) return millis() - startTime; // return the time in milliseconds else return 0; // return 0 if the switch is not pushed (in the HIGH state);}
long switchATime(){ // these variables are static - see text for an explanation static unsigned long startTime = 0; // the time the switch state change wasfirst detected static boolean state; // the current state of the switch return switchTime(switchAPin, state, startTime);}
long switchBTime(){ // these variables are static - see text for an explanation static unsigned long startTime = 0; // the time the switch state change wasfirst detected static boolean state; // the current state of the switch return switchTime(switchBPin, state, startTime);}
The time calculation is performed in a function called switchTime(). This functionexamines and updates the switch state and duration. The function uses references tohandle the parameters—references were covered in Recipe 2.11. A function for eachswitch (switchATime() and switchBTime()) is used to retain the start time and state foreach switch. Because the variables holding the values are declared as static, the valueswill be retained when the functions exit. Holding the variables within the functionensures that the wrong variable will not be used. The pins used by the switches aredeclared as global variables because the values are needed by setup to configure thepins. But because these variables are declared with the const keyword, the compilerwill not allow the values to be modified, so there is no chance that these will be acci-dentally changed by the sketch code.
Limiting the exposure of a variable becomes more important as projects become morecomplex. The Arduino environment provides a more elegant way to handle this; seeRecipe 16.4 for a discussion on how to implement this using classes.
148 | Chapter 5: Simple Digital and Analog Input
www.it-ebooks.info

5.5 Reading a KeypadProblemYou have a matrix keypad and want to read the key presses in your sketch. For example,you have a telephone-style keypad similar to the SparkFun 12-button keypad (Spark-Fun COM-08653).
SolutionWire the rows and columns from the keypad connector to the Arduino, as shown inFigure 5-6.
Figure 5-6. Connecting the SparkFun keyboard matrix
If you’ve wired your Arduino and keypad as shown in Figure 5-6, the following sketchwill print key presses to the Serial Monitor:
/* Keypad sketch prints the key pressed on a keypad to the serial port*/
const int numRows = 4; // number of rows in the keypadconst int numCols = 3; // number of columnsconst int debounceTime = 20; // number of milliseconds for switch to be stable
5.5 Reading a Keypad | 149
www.it-ebooks.info

// keymap defines the character returned when the corresponding key is pressedconst char keymap[numRows][numCols] = { { '1', '2', '3' } , { '4', '5', '6' } , { '7', '8', '9' } , { '*', '0', '#' }};
// this array determines the pins used for rows and columnsconst int rowPins[numRows] = { 7, 2, 3, 6 }; // Rows 0 through 3const int colPins[numCols] = { 5, 8, 4 }; // Columns 0 through 2
void setup(){ Serial.begin(9600); for (int row = 0; row < numRows; row++) { pinMode(rowPins[row],INPUT); // Set row pins as input digitalWrite(rowPins[row],HIGH); // turn on Pull-ups } for (int column = 0; column < numCols; column++) { pinMode(colPins[column],OUTPUT); // Set column pins as outputs for writing digitalWrite(colPins[column],HIGH); // Make all columns inactive }}
void loop(){ char key = getKey(); if( key != 0) { // if the character is not 0 then it's a valid key press Serial.print("Got key "); Serial.println(key); }}
// returns with the key pressed, or 0 if no key is pressedchar getKey(){ char key = 0; // 0 indicates no key pressed
for(int column = 0; column < numCols; column++) { digitalWrite(colPins[column],LOW); // Activate the current column. for(int row = 0; row < numRows; row++) // Scan all rows for a key press. { if(digitalRead(rowPins[row]) == LOW) // Is a key pressed? { delay(debounceTime); // debounce while(digitalRead(rowPins[row]) == LOW) ; // wait for key to be released key = keymap[row][column]; // Remember which key was pressed. } }
150 | Chapter 5: Simple Digital and Analog Input
www.it-ebooks.info

digitalWrite(colPins[column],HIGH); // De-activate the current column. } return key; // returns the key pressed or 0 if none}
This sketch will only work correctly if the wiring agrees with the code. Table 5-1 showshow the rows and columns should be connected to Arduino pins. If you are using adifferent keypad, check your data sheet to determine the row and column connections.Check carefully, as incorrect wiring can short out the pins, and that could damage yourcontroller chip.
Table 5-1. Mapping of Arduino pins to SparkFun connector and keypad rows and columns
Arduino pin Keypad connector Keypad row/column
2 7 Row 1
3 6 Row 2
4 5 Column 2
5 4 Column 0
6 3 Row 3
7 2 Row 0
8 1 Column 1
DiscussionMatrix keypads typically consist of Normally Open switches that connect a row witha column when pressed. (A Normally Open switch only makes electrical connectionwhen pushed.) Figure 5-6 shows how the internal conductors connect the button rowsand columns to the keyboard connector. Each of the four rows is connected to an inputpin and each column is connected to an output pin. The setup function sets the pinmodes and enables pull-up resistors on the input pins (see the pull-up recipes in thebeginning of this chapter).
The getkey function sequentially sets the pin for each column LOW and then checks tosee if any of the row pins are LOW. Because pull-up resistors are used, the rows will behigh (pulled up) unless a switch is closed (closing a switch produces a LOW signal on theinput pin). If they are LOW, this indicates that the switch for that row and column isclosed. A delay is used to ensure that the switch is not bouncing (see Recipe 5.3); thecode waits for the switch to be released, and the character associated with the switchis found in the keymap array and returned from the function. A 0 is returned if no switchis pressed.
A library in the Arduino Playground that is similar to the preceding example providesmore functionality. The library makes it easier to handle different numbers of keys andit can be made to work while sharing some of the pins with an LCD. You can find thelibrary at http://www.arduino.cc/playground/Main/KeypadTutorial.
5.5 Reading a Keypad | 151
www.it-ebooks.info

See AlsoFor more information on the SparkFun 12-button keypad, go to http://www.sparkfun.com/commerce/product_info.php?products_id=8653.
5.6 Reading Analog ValuesProblemYou want to read the voltage on an analog pin. Perhaps you want a reading from a potentiometer (pot) or a device or sensor that provides a voltage between 0 and 5 volts.
SolutionThis sketch reads the voltage on an analog pin and flashes an LED in a proportionalrate to the value returned from the analogRead function. The voltage is adjusted by apotentiometer connected as shown in Figure 5-7:
/* Pot sketch blink an LED at a rate set by the position of a potentiometer*/
const int potPin = 0; // select the input pin for the potentiometerconst int ledPin = 13; // select the pin for the LEDint val = 0; // variable to store the value coming from the sensor
void setup(){ pinMode(ledPin, OUTPUT); // declare the ledPin as an OUTPUT}
void loop() { val = analogRead(potPin); // read the voltage on the pot digitalWrite(ledPin, HIGH); // turn the ledPin on delay(val); // blink rate set by pot value (in milliseconds) digitalWrite(ledPin, LOW); // turn the ledPin off delay(val); // turn led off for same period as it was turned on}
DiscussionThis sketch uses the analogRead function to read the voltage on the potentiometer’swiper (the center pin). A pot has three pins; two are connected to a resistive materialand the third pin (usually in the middle) is connected to a wiper that can be rotated tomake contact anywhere on the resistive material. As the potentiometer rotates, theresistance between the wiper and one of the pins increases, while the other decreases.The schematic diagram for this recipe (Figure 5-7) may help you visualize how a po-tentiometer works; as the wiper moves toward the bottom end, the wiper (the line with
152 | Chapter 5: Simple Digital and Analog Input
www.it-ebooks.info

the arrow) will have lower resistance connecting to Gnd and higher resistance con-necting to 5 volts. As the wiper moves down, the voltage on the analog pin will decrease(to a minimum of 0 volts). Moving the wiper upward will have the opposite effect, andthe voltage on the pin will increase (up to a maximum of 5 volts).
If the voltage on the pin decreases, rather than increases, as you increasethe rotation of the potentiometer, you can reverse the connections tothe +5 volts and Gnd pins.
The voltage is measured using analogRead, which provides a value proportional to theactual voltage on the analog pin. The value will be 0 when there are 0 volts on the pinand 1,023 when there are 5 volts. A value in between will be proportional to the ratioof the voltage on the pin to 5 volts.
Potentiometers with a value of 10K ohms are the best choice for connecting to analogpins. See this book’s website for recommended part numbers.
potPin does not need to be set as input. (This is done for you automat-ically each time you call analogRead.)
See AlsoAppendix B, for tips on reading schematic diagrams
Arduino reference for analogRead: http://www.arduino.cc/en/Reference/AnalogRead
Figure 5-7. Connecting a potentiometer to Arduino
5.6 Reading Analog Values | 153
www.it-ebooks.info

Getting Started with Arduino by Massimo Banzi (Make)
5.7 Changing the Range of ValuesProblemYou want to change the range of a value, such as the value from analogRead obtainedby connecting a potentiometer or other device that provides a variable voltage. Forexample, suppose you want to display the position of a potentiometer knob as a per-centage from 0 percent to 100 percent.
SolutionUse the Arduino map function to scale values to the range you want. This sketch readsthe voltage on a pot into the variable val and scales this from 0 to 100 as the pot isrotated from one end to the other. It blinks an LED with a rate proportional to thevoltage on the pin and prints the scaled range to the serial port (see Recipe 4.2 forinstructions on monitoring the serial port). Recipe 5.6 (see Figure 5-7) shows how thepot is connected:
/* * Map sketch * map the range of analog values from a pot to scale from 0 to 100 * resulting in an LED blink rate ranging from 0 to 100 milliseconds. * and Pot rotation percent is written to the serial port*/
const int potPin = 0; // select the input pin for the potentiometerint ledPin = 13; // select the pin for the LED
void setup(){ pinMode(ledPin, OUTPUT); // declare the ledPin as an OUTPUT Serial.begin(9600);}
void loop() { int val; // The value coming from the sensor int percent; // The mapped value
val = analogRead(potPin); // read the voltage on the pot (val ranges // from 0 to 1023) percent = map(val,0,1023,0,100); // percent will range from 0 to 100. digitalWrite(ledPin, HIGH); // turn the ledPin on delay(percent); // On time given by percent value digitalWrite(ledPin, LOW); // turn the ledPin off delay(100 - percent); // Off time is 100 minus On time Serial.println(percent); // show the % of pot rotation on Serial Monitor}
154 | Chapter 5: Simple Digital and Analog Input
www.it-ebooks.info

DiscussionRecipe 5.6 describes how the position of a pot is converted to a value. Here you usethis value with the map function to scale the value to your desired range. In this example,the value provided by analogRead (0 to 1023) is mapped to a percentage (0 to 100). Thevalues from analogRead will range from 0 to 1023 if the voltage ranges from 0 to 5 volts,but you can use any appropriate values for the source and target ranges. For example,a typical pot only rotates 270 degrees from end to end, and if you wanted to displaythe angle of the knob on your pot, you could use this code:
angle = map(val,0,1023,0,270); // angle of pot derived from analogRead val
Range values can also be negative. If you want to display 0 when the pot is centeredand negative values when the pot is rotated left and positive values when it is rotatedright, you can do this:
angle = map(val,0,1023,-135,135); // show angle of 270 degree pot with centeras 0
The map function can be handy where the input range you are concerned with does notstart at zero. For example, if you have a battery where the available capacity is propor-tional to a voltage that ranges from 1.1 volts (1,100 millivolts) to 1.5 volts (1,500 mil-livolts), you can do the following:
const int empty = 5000 / 1100; // the voltage is 1.1 volts (1100mv) when emptyconst int full = 5000 / 1500; // the voltage is 1.5 volts (1500mv) when full
int val = analogRead(potPin); // read the analog voltageint percent = map(val, empty, full, 0,100); // map the actual range of voltageto a percentSerial.println(percent);
(See Recipe 5.9 for more details on how analogRead values relate to actual voltage.)
See AlsoThe Arduino reference for map: http://www.arduino.cc/en/Reference/Map
5.8 Reading More Than Six Analog InputsProblemYou have more analog inputs to monitor than you have available analog pins. A stand-ard Arduino board has six analog inputs (the Mega has 16) and there may not be enoughanalog inputs available for your application. Perhaps you want to adjust eight param-eters in your application by turning knobs on eight potentiometers.
5.8 Reading More Than Six Analog Inputs | 155
www.it-ebooks.info

SolutionUse a multiplexer chip to select and connect multiple voltage sources to one analoginput. By sequentially selecting from multiple sources, you can read each source in turn.This recipe uses the popular 4051 chip connected to Arduino as shown in Figure 5-8.Your analog inputs get connected to the 4051 pins marked Ch 0 to Ch 7. Make surethe voltage on the channel input pins is never higher than 5 volts:
/* multiplexer sketch read 1 of 8 analog values into single analog input pin with 4051 multiplexer*/
// array of pins used to select 1 of 8 inputs on multiplexerconst int select[] = {2,3,4}; // array of the pins connected to the 4051 inputselect linesconst int analogPin = 0; // the analog pin connected to the multiplexeroutput
// this function returns the analog value for the given channelint getValue( int channel){ // the following sets the selector pins HIGH and LOW to match the binaryvalue of channel for(int bit = 0; bit < 3; bit++) { int pin = select[bit]; // the pin wired to the multiplexer select bit int isBitSet = bitRead(channel, bit); // true if given bit set in channel digitalWrite(pin, isBitSet); } return analogRead(analogPin);}
void setup(){ for(int bit = 0; bit < 3; bit++) pinMode(select[bit], OUTPUT); // set the three select pins to output Serial.begin(9600);}
void loop () { // print the values for each channel once per second for(int channel = 0; channel < 8; channel++) { int value = getValue(channel); Serial.print("Channel "); Serial.print(channel); Serial.print(" = "); Serial.println(value); } delay (1000);}
156 | Chapter 5: Simple Digital and Analog Input
www.it-ebooks.info

Figure 5-8. The 4051 multiplexer connected to Arduino
DiscussionAnalog multiplexers are digitally controlled analog switches. The 4051 selects one ofeight inputs through three selector pins (S0, S1, and S2). There are eight different com-binations of values for the three selector pins, and the sketch sequentially selects eachof the possible bit patterns; see Table 5-2.
Table 5-2. Truth table for 4051 multiplexer
Selector pins Selected input
S2 S1 S0
0 0 0 0
0 0 1 1
0 1 0 2
0 1 1 3
1 0 0 4
1 0 1 5
1 1 0 6
1 1 1 7
You may recognize the pattern in Table 5-2 as the binary representation of the decimalvalues from 0 to 7.
In the preceding sketch, getValue() is the function that sets the correct selector bits forthe given channel using digitalWrite(pin, isBitSet) and reads the analog value from
5.8 Reading More Than Six Analog Inputs | 157
www.it-ebooks.info

the selected 4051 input with analogRead(analogPin). The code to produce the bit pat-terns uses the built-in bitRead function (see Recipe 3.12).
Don’t forget to connect the ground from the devices you are measuringto the ground on the 4051 and Arduino, as shown in Figure 5-8.
Bear in mind that this technique selects and monitors the eight inputs sequentially, soit requires more time between the readings on a given input compared to using analogRead directly. If you are reading eight inputs, it will take eight times longer for eachinput to be read. This may make this method unsuitable for inputs that change valuequickly.
See AlsoArduino Playground tutorial for the 4051: http://www.arduino.cc/playground/Learning/4051
CD4051 data sheet: http://www.fairchildsemi.com/ds/CD%2FCD4052BC.pdf
Analog/digital MUX breakout board data sheet: http://www.nkcelectronics.com/analogdigital-mux-breakout.html
5.9 Displaying Voltages Up to 5VProblemYou want to monitor and display the value of a voltage between 0 and 5 volts. Forexample, suppose you want to display the voltage of a single 1.5V cell on the SerialMonitor.
SolutionUse AnalogRead to measure the voltage on an analog pin. Convert the reading to avoltage by using the ratio of the reading to the reference voltage (5 volts), as shown inFigure 5-9.
158 | Chapter 5: Simple Digital and Analog Input
www.it-ebooks.info

Figure 5-9. Measuring voltages up to 5 volts using 5V board
The simplest solution uses a floating-point calculation to print the voltage; this examplesketch calculates and prints the ratio as a voltage:
/* Display5vOrless sketch prints the voltage on analog pin to the serial port Warning - do not connect more than 5 volts directly to an Arduino pin.*/
const int referenceVolts = 5; // the default reference on a 5-volt boardconst int batteryPin = 0; // battery is connected to analog pin 0
void setup(){ Serial.begin(9600);}
void loop(){ int val = analogRead(batteryPin); // read the value from the sensor float volts = (val / 1023) * referenceVolts; // calculate the ratio Serial.println(volts); // print the value in volts}
The formula is: Volts = (analog reading / analog steps) × Reference voltage
Printing a floating-point value to the serial port with println will format the value totwo decimal places.
5.9 Displaying Voltages Up to 5V | 159
www.it-ebooks.info

Make the following change if you are using a 3.3V board:
const int referenceVolts = 3.3;
Floating-point numbers consume lots of memory, so unless you are already using float-ing point elsewhere in your sketch, it is more efficient to use integer values. The fol-lowing code looks a little strange at first, but because analogRead returns a value of1023 for 5 volts, each step in value will be 5 divided by 1,023. In units of millivolts, thisis 5,000 divided by 1,023.
This code prints the value in millivolts:
const int batteryPin = 0;
void setup(){ Serial.begin(9600);}
void loop(){ long val = analogRead(batteryPin); // read the value from the sensor - noteval is a long int Serial.println( (val * (500000/1023)) / 100); // print the value in millivolts}
The following code prints the value using decimal points. It prints 1.5 if the voltage is1.5 volts.
const int batteryPin 0;
void setup(){ Serial.begin(9600);}
void loop(){ int val = analogRead(batteryPin); // read the value from the sensor Serial.println(val/(1023/5)); // print the integer value of the voltage Serial.print('.'); Serial.println(val % (1023/5)); // print the fraction}
If you are using a 3.3V board, change (1023/5) to (int)(1023/3.3).
160 | Chapter 5: Simple Digital and Analog Input
www.it-ebooks.info

DiscussionThe analogRead() function returns a value that is proportional to the ratio of the meas-ured voltage to the reference voltage (5 volts). To avoid the use of floating point, yetmaintain precision, the code operates on values as millivolts instead of volts (there are1,000 millivolts in 1 volt). Because a value of 1023 indicates 5,000 millivolts, each unitrepresents 5,000 divided by 1,023 millivolts (that is, 4.89 millivolts). To eliminate thedecimal point, the values are multiplied by 100. In other words, 5,000 millivolts times100 divided by 1,023 gives the number of millivolts times 100. Dividing this by 100yields the value in millivolts. If multiplying fractional numbers by 100 to enable thecompiler to perform the calculation using fixed-point arithmetic seems convoluted, youcan stick to the slower and more memory-hungry floating-point method.
This solution assumes you are using a standard Arduino powered from 5 volts. If youare using a 3.3V board, the maximum voltage you can measure is 3.3 volts withoutusing a voltage divider—see Recipe 5.11.
5.10 Responding to Changes in VoltageProblemYou want to monitor one or more voltages and take some action when the voltage risesor falls below a threshold. For example, you want to flash an LED to indicate a lowbattery level—perhaps to start flashing when the voltage drops below a warningthreshold and increasing in urgency as the voltage drops further.
SolutionYou can use the connections shown in Figure 5-7 in Recipe 5.9, but here we’ll comparethe value from analogRead to see if it drops below a threshold. This example startsflashing an LED at 1.2 volts and increases the on-to-off time as the voltage decreasesbelow the threshold. If the voltage drops below a second threshold, the LED stays lit:
/* RespondingToChanges sketch flash an LED to indicate low voltage levels*/
long warningThreshold = 1200; // Warning level in millivolts - LED flasheslong criticalThreshold = 1000; // Critical voltage level - LED stays on
const int batteryPin = 0;const int ledPin = 13;
void setup(){ pinMode(ledPin, OUTPUT);}
5.10 Responding to Changes in Voltage | 161
www.it-ebooks.info

void loop(){ int val = analogRead(batteryPin); // read the value from the sensor if( val < (warningThreshold * 1023L)/5000) { // in the line above, L following a number makes it a 32 bit value flash(val) ; }}
// function to flash an led with on/off time determined by value passedas percentvoid flash(int percent){ digitalWrite(ledPin, HIGH); delay(percent + 1); digitalWrite(ledPin, LOW); delay(100 - percent ); // check delay == 0?}
DiscussionThe highlighted line in this sketch calculates the ratio of the value read from the analogport to the value of the threshold voltage. For example, with a warning threshold of1 volt and a reference voltage of 5 volts, you want to know when the analog reading isone-fifth of the reference voltage. The expression 1023L tells the compiler that this is along integer (a 32-bit integer; see Recipe 2.2), so the compiler will promote all thevariables in this expression to long integers to prevent overflowing the capacity of anint (a normal 16-bit integer).
When reading analog values, you can work in the units that are returned from analogRead—ranging from 0 to 1023—or you can work in the actual voltages they represent(see Recipe 5.7). As in this recipe, if you are not displaying voltage, it’s simpler andmore efficient to use the output of analogRead directly.
5.11 Measuring Voltages More Than 5V (Voltage Dividers)ProblemYou want to measure voltages greater than 5 volts. For example, you want to displaythe voltage of a 9V battery and trigger an alarm LED when the voltage falls below acertain level.
SolutionUse a solution similar to Recipe 5.9, but connect the voltage through a voltage divider(see Figure 5-10). For voltages up to 10 volts, you can use two 4.7K ohm resistors. Forhigher voltages, you can determine the required resistors using Table 5-3.
162 | Chapter 5: Simple Digital and Analog Input
www.it-ebooks.info

Figure 5-10. Voltage divider for measuring voltages greater than 5 volts
Table 5-3. Resistor values
Max voltage R1 R2
Calculation
R2(R1 + R2) value of resistorFactor
5 Short (+V connected toanalog pin)
None (Gnd connected toGnd)
None 1023
10 1K 1K 1(1 + 1) 511
15 2K 1K 1(2 + 1) 341
20 3K 1K 1(3 + 1) 255
30 4K (3.9K) 1K 1(4 + 1) 170
Select the row with the highest voltage you need to measure to find the values for thetwo resistors:
/* DisplayMoreThan5V sketch prints the voltage on analog pin to the serial port Do not connect more than 5 volts directly to an Arduino pin.*/
const int referenceVolts = 5; // the default reference on a 5-volt board//const float referenceVolts = 3.3; // use this for a 3.3-volt board
const int R1 = 1000; // value for a maximum voltage of 10 voltsconst int R2 = 1000;// determine by voltage divider resistors, see textconst int resistorFactor = 1023.0 / (R2/(R1 + R2)); const int batteryPin = 0; // +V from battery is connected to analog pin 0
5.11 Measuring Voltages More Than 5V (Voltage Dividers) | 163
www.it-ebooks.info

void setup(){ Serial.begin(9600);}
void loop(){ int val = analogRead(batteryPin); // read the value from the sensor float volts = (val / resistorFactor) * referenceVolts ; // calculate the ratio Serial.println(volts); // print the value in volts}
DiscussionLike the previous analog recipes, this recipe relies on the fact that the analogRead valueis a ratio of the measured voltage to the reference. But because the measured voltage isdivided by the two dropping resistors, the analogRead value needs to be multiplied toget the actual voltage. This code is similar to Recipe 5.7, but the value ofresistorFactor is selected based on the voltage divider resistors as shown in Table 5-3:
const int resistorFactor = 511; // determine by voltage divider resistors,see Table 5-3
The value read from the analog pin is divided not by 1,023, but by a value determinedby the dropping resistors:
float volts = (val / resistorFactor) * referenceVolts ; // calculate the ratio
The calculation used to produce the table is based on the following formula: the outputvoltage is equal to the input voltage times R2 divided by the sum of R1 and R2. In theexample where two equal-value resistors are used to drop the voltage from a 9V batteryby half, resistorFactor is 511 (half of 1,023), so the value of the volts variable will betwice the voltage that appears on the input pin. With resistors selected for 10 volts, theanalog reading from a 9V battery will be approximately 920.
More than 5 volts on the pin can damage the pin and possibly destroythe chip; double-check that you have chosen the right value resistorsand wired them correctly before connecting them to an Arduino inputpin. If you have a multimeter, measure the voltage before connectinganything that could possibly carry voltages higher than 5 volts.
164 | Chapter 5: Simple Digital and Analog Input
www.it-ebooks.info

CHAPTER 6
Getting Input from Sensors
6.0 IntroductionGetting and using input from sensors enables Arduino to respond to or report on theworld around it. This is one of the most common tasks you will encounter. This chapterprovides simple and practical examples of how to use the most popular input devicesand sensors. Wiring diagrams show how to connect and power the devices, and codeexamples demonstrate how to use data derived from the sensors.
Sensors respond to input from the physical world and convert this into an electricalsignal that Arduino can read on an input pin. The nature of the electrical signal providedby a sensor depends on the kind of sensor and how much information it needs totransmit. Some sensors (such as photoresistors and Piezo knock sensors) are construc-ted from a substance that alters their electrical properties in response to physicalchange. Others are sophisticated electronic modules that use their own microcontrollerto process information before passing a signal on for the Arduino.
Sensors use the following methods to provide information:
Digital on/offSome devices, such as the tilt sensor in Recipe 6.1 and the motion sensor in Rec-ipe 6.3, simply switch a voltage on and off. These can be treated like the switchrecipes shown in Chapter 5.
AnalogOther sensors provide an analog signal (a voltage that is proportional to what isbeing sensed, such as temperature or light level). The recipes for detecting light(Recipe 6.2), motion (Recipes 6.1 and 6.3), vibration (Recipe 6.6), sound (Rec-ipe 6.7), and acceleration (Recipe 6.18) demonstrate how analog sensors can beused. All of them use the analogRead command that is discussed in Chapter 5.
Pulse widthDistance sensors, such as the PING))) in Recipe 6.4, provide data using pulse du-ration proportional to the distance value. These sensors measure the duration of apulse using the pulseIn command.
165
www.it-ebooks.info

SerialSome sensors provide values using a serial protocol. For example, the RFID readerin Recipe 6.9 and the GPS in Recipe 6.14 communicate through the Arduino serialport (see Chapter 4 for more on serial). Most Arduino boards only have one hard-ware serial port, so read Recipe 6.14 for an example of how you can add additionalsoftware serial ports if you have multiple serial sensors or the hardware serial portis occupied for some other task.
Synchronous protocols: I2C and SPIThe I2C and SPI digital standards were created for microcontrollers like Arduinoto talk to external sensors and modules. Recipe 6.16 shows how a compass moduleis connected using synchronous digital signaling. These protocols are used exten-sively for sensors, actuators, and peripherals, and they are covered in detail inChapter 13.
There is another generic class of sensing devices that you may make use of. These areconsumer devices that contain sensors but are sold as devices in their own right, ratherthan as sensors. Examples of these in this chapter include a PS2 mouse and a PlayStationgame controller. These devices can be very useful; they provide sensors already incor-porated into robust and ergonomic devices. They are also inexpensive (often less ex-pensive than buying the raw sensors that they contain), as they are mass-produced.You may have some of these lying around.
If you are using a device that is not specifically covered in a recipe, you may be able toadapt a recipe for a device that produces a similar type of output. Information about asensor’s output signal is usually available from the company from which you boughtthe device or from a data sheet for your device (which you can find through a Googlesearch of the device part number or description).
Data sheets are aimed at engineers designing products to be manufactured, and theyusually provide more detail than you need to just get the product up and running. Theinformation on output signal will usually be in a section referring to data format, in-terface, output signal, or something similar. Don’t forget to check the maximum voltage(usually in a section labeled “Absolute Maximum Ratings”) to ensure that you don’tdamage the component.
Sensors designed for a maximum of 3.3 volts can be destroyed by con-necting them to 5 volts. Check the absolute maximum rating for yourdevice before connecting.
Reading sensors from the messy analog world is a mixture of science, art, and perse-verance. You may need to use ingenuity and trial and error to get a successful result. Acommon problem is that the sensor just tells you a physical condition has occurred,not what caused it. Putting the sensor in the right context (location, range, orientation)and limiting its exposure to things that you don’t want to activate it are skills you willacquire with experience.
166 | Chapter 6: Getting Input from Sensors
www.it-ebooks.info

Another issue concerns separating the desired signal from background noise; Rec-ipe 6.6 shows how you can use a threshold to detect when a signal is above a certainlevel, and Recipe 6.7 shows how you can take the average of a number of readings tosmooth out noise spikes.
See AlsoFor information on connecting electronic components, see Make: Electronics byCharles Platt (Make).
See the introduction to Chapter 5 and Recipe 5.6 for more on reading analog valuesfrom sensors.
6.1 Detecting MovementProblemYou want to detect when something is moved, tilted, or shaken.
SolutionThis sketch uses a switch that closes a circuit when tilted, called a tilt sensor. The switchrecipes in Chapter 5 (Recipes 5.1 and 5.2) will work with a tilt sensor substituted forthe switch.
The sketch below (circuit shown in Figure 6-1) will switch on the LED attached to pin11 when the tilt sensor is tilted one way, and the LED connected to pin 12 when it istilted the other way:
/*tilt sketch
a tilt sensor attached to pin 2, lights one of the LEDs connected to pins 11 and 12 depending on which way the sensor is tilted*/
const int tiltSensorPin = 2; //pin the tilt sensor is connected toconst int firstLEDPin = 11; //pin for one LEDconst int secondLEDPin = 12; //pin for the other
void setup(){ pinMode (tiltSensorPin, INPUT); //the code will read this pin digitalWrite (tiltSensorPin, HIGH); // and use a pull-up resistor
pinMode (firstLEDPin, OUTPUT); //the code will control this pin pinMode (secondLEDPin, OUTPUT); //and this one}
6.1 Detecting Movement | 167
www.it-ebooks.info

void loop(){ if (digitalRead(tiltSensorPin)){ //check if the pin is high digitalWrite(firstLEDPin, HIGH); //if it is high turn on firstLED digitalWrite(secondLEDPin, LOW); //and turn off secondLED } else{ //if it isn't digitalWrite(firstLEDPin, LOW); //do the opposite digitalWrite(secondLEDPin, HIGH); }}
Figure 6-1. Tilt sensor and LEDs
DiscussionThe most common tilt sensor is a ball bearing in a box with contacts at one end. Whenthe box is tilted the ball rolls away from the contacts and the connection is broken.When the box is tilted to roll the other way the ball touches the contacts and completesa circuit. Markings, or pin configurations, show which way the sensor should be ori-ented. Tilt sensors are sensitive to small movements of around 5 to 10 degrees whenoriented with the ball just touching the contacts. If you position the sensor so that theball bearing is directly above (or below) the contacts, the LED state will only change ifit is turned right over. This can be used to tell if something is upright or upside down.
To determine if something is being shaken, you need to check how long it’s been sincethe state of the tilt sensor changed (this recipe’s Solution just checks if the switch wasopen or closed). If it hasn’t changed for a time you consider significant, the object isnot shaking. Changing the orientation of the tilt sensor will change how vigorous theshaking needs to be to trigger it. The following code lights an LED when the sensor is shaken:
168 | Chapter 6: Getting Input from Sensors
www.it-ebooks.info

/* shaken sketch tilt sensor connected to pin 2 led connected to pin 13*/
const int tiltSensorPin = 2;const int ledPin = 13;int tiltSensorPreviousValue = 0;int tiltSensorCurrentValue = 0;long lastTimeMoved = 0;int shakeTime=50;
void setup(){ pinMode (tiltSensorPin, INPUT); digitalWrite (tiltSensorPin, HIGH); pinMode (ledPin, OUTPUT);}
void loop(){ tiltSensorCurrentValue=digitalRead(tiltSensorPin); if (tiltSensorPreviousValue != tiltSensorCurrentValue){ lastTimeMoved = millis(); tiltSensorPreviousValue = tiltSensorCurrentValue; }
if (millis() - lastTimeMoved < shakeTime){ digitalWrite(ledPin, HIGH); } else{ digitalWrite(ledPin, LOW); }}
Many mechanical switch sensors can be used in similar ways. A float switch can turnon when the water level in a container rises to a certain level (similar to the way a ballcock works in a toilet cistern). A pressure pad such as the one used in shop entrancescan be used to detect when someone stands on it. If your sensor turns a digital signalon and off, something similar to this recipe’s sketch should be suitable.
See AlsoChapter 5 contains background information on using switches with Arduino.
Recipe 12.2 has more on using the millis function to determine delay.
6.1 Detecting Movement | 169
www.it-ebooks.info

6.2 Detecting LightProblemYou want to detect changes in light levels. You may want to detect a change whensomething passes in front of a light detector or to measure the light level—for example,detecting when a room is getting too dark.
SolutionThe easiest way to detect light levels is to use a light dependent resistor (LDR). Thischanges resistance with changing light levels, and when connected in the circuit shownin Figure 6-2 it produces a change in voltage that the Arduino analog input pins cansense.
Figure 6-2. Connecting a light dependent resistor
DiscussionThe circuit for this recipe is the standard way to use any sensor that changes its resist-ance based on some physical phenomenon (see Chapter 5 for background informationon responding to analog signals). The circuit in Figure 6-2 will change the voltage onanalog pin 0 when the resistance of the LDR changes with varying light levels.
A circuit such as this will not give the full range of possible values from the analoginput—0 to 1,023—as the voltage will not be swinging from 0 volts to 5 volts. This isbecause there will always be a voltage drop across each resistance, so the voltage wherethey meet will never reach the limits of the power supply. When using sensors such asthese, it is important to check the actual values the device returns in the situation you
170 | Chapter 6: Getting Input from Sensors
www.it-ebooks.info

will be using it. Then you have to determine how to convert them to the values youneed to control whatever you are going to control. See Recipe 5.7 for more details onchanging the range of values.
The LDR is a simple kind of sensor called a resistive sensor. A range of resistive sensorsrespond to changes in different physical characteristics. The same circuit will work forany kind of simple resistive sensor.
6.3 Detecting Motion (Integrating Passive Infrared Detectors)ProblemYou want to detect when people are moving near a sensor.
SolutionUse a motion sensor such as a Passive Infrared (PIR) sensor to change values on a digitalpin when someone moves nearby.
Sensors such as the SparkFun PIR Motion Sensor (SEN-08630) and the Parallax PIRSensor (555-28027) can be easily connected to Arduino pins, as shown in Figure 6-3.
Figure 6-3. Connecting a PIR motion sensor
Check the data sheet for your sensor to identify the correct pins. The Parallax sensorhas pins marked “OUT”, “-”, and “+” (for Output, Gnd, and +5V). The SparkFunsensor is marked with “Alarm”, “GND”, and “DC” (for Output, Gnd, and +5V).
6.3 Detecting Motion (Integrating Passive Infrared Detectors) | 171
www.it-ebooks.info

The following sketch will light the LED on Arduino pin 13 when the sensor detectsmotion:
/* PIR sketch a Passive Infrared motion sensor connected to pin 2 lights the LED on pin 13*/
const int ledPin = 13; // choose the pin for the LEDconst int inputPin = 2; // choose the input pin (for the PIR sensor)
void setup() { pinMode(ledPin, OUTPUT); // declare LED as output pinMode(inputPin, INPUT); // declare pushbutton as input}
void loop(){ int val = digitalRead(inputPin); // read input value if (val == HIGH) // check if the input is HIGH { digitalWrite(ledPin, HIGH); // turn LED on if motion detected delay(500); digitalWrite(ledPin, LOW); // turn LED off }}
DiscussionThis code is similar to the pushbutton examples shown in Chapter 5. That’s becausethe sensor acts like a switch when motion is detected. Different kinds of PIR sensorsare available, and you should check the information for the one you have connected.
Some sensors, such as the Parallax, have a jumper that determines how the outputbehaves when motion is detected. In one mode, the output remains HIGH while motionis detected, or it can be set so that the output goes HIGH briefly and then LOW whentriggered. The example sketch in this recipe’s Solution will work in either mode.
Other sensors may go LOW on detecting motion. If your sensor’s output pin goes LOWwhen motion is detected, change the line that checks the input value so that the LEDis turned on when LOW:
if (val == LOW) // motion when the input is LOW
PIR sensors come in a variety of styles and are sensitive over different distances andangles. Careful choice and positioning can make them respond to movement in part ofa room, rather than all of it.
PIR sensors respond to heat and can be triggered by animals such as catsand dogs, as well as by people and other heat sources.
172 | Chapter 6: Getting Input from Sensors
www.it-ebooks.info

6.4 Measuring DistanceProblemYou want to measure the distance to something, such as a wall or someone walkingtoward the Arduino.
SolutionThis recipe uses the popular Parallax PING))) ultrasonic distance sensor to measurethe distance of an object ranging from 2 cm to around 3 m. It displays the distance onthe Serial Monitor and flashes an LED faster as objects get closer (Figure 6-4 shows the connections):
/* Ping))) Sensor * prints distance and changes LED flash rate * depending on distance from the Ping))) sensor */
const int pingPin = 5;const int ledPin = 13; // pin connected to LED
void setup(){ Serial.begin(9600); pinMode(ledPin, OUTPUT);}
void loop(){ int cm = ping(pingPin) ; Serial.println(cm); digitalWrite(ledPin, HIGH); delay(cm * 10 ); // each centimeter adds 10 milliseconds delay digitalWrite(ledPin, LOW); delay( cm * 10);}
// following code based on http://www.arduino.cc/en/Tutorial/Ping// returns the distance in cmint ping(int pingPin){ // establish variables for duration of the ping, // and the distance result in inches and centimeters: long duration, cm;
// The PING))) is triggered by a HIGH pulse of 2 or more microseconds. // Give a short LOW pulse beforehand to ensure a clean HIGH pulse: pinMode(pingPin, OUTPUT); digitalWrite(pingPin, LOW); delayMicroseconds(2); digitalWrite(pingPin, HIGH);
6.4 Measuring Distance | 173
www.it-ebooks.info

delayMicroseconds(5); digitalWrite(pingPin, LOW);
pinMode(pingPin, INPUT); duration = pulseIn(pingPin, HIGH);
// convert the time into a distance cm = microsecondsToCentimeters(duration); return cm ;}
long microsecondsToCentimeters(long microseconds){ // The speed of sound is 340 m/s or 29 microseconds per centimeter. // The ping travels out and back, so to find the distance of the // object we take half of the distance travelled. return microseconds / 29 / 2;}
Figure 6-4. Ping))) sensor connections
DiscussionUltrasonic sensors provide a measurement of the time it takes for sound to bounce offan object and return to the sensor.
The “ping” sound pulse is generated when the pingPin level goes HIGH for two micro-seconds. The sensor will then generate a pulse that terminates when the sound returns.The width of the pulse is proportional to the distance the sound traveled and the sketchthen uses the pulseIn function to measure that duration. The speed of sound is 340meters per second, which is 29 microseconds per centimeter. The formula for the dis-tance of the round trip is: RoundTrip = microseconds / 29
174 | Chapter 6: Getting Input from Sensors
www.it-ebooks.info

So, the formula for the one-way distance in centimeters is: microseconds / 29 / 2
The MaxBotix EZ1 is another ultrasonic sensor that can be used to measure distance.It is easier to integrate than the Ping))) because it does not need to be “pinged.” It canprovide continuous distance information, either as an analog voltage or proportionalto pulse width. Figure 6-5 shows the connections.
Figure 6-5. Connecting EZ1 PW output to a digital input pin
The sketch that follows uses the EZ1 pulse width output to produce output similar tothat of the previous sketch:
/* * EZ1Rangefinder Distance Sensor * prints distance and changes LED flash rate * depending on distance from the Ping))) sensor */
const int sensorPin = 5;const int ledPin = 13; // pin connected to LED
long value = 0;int cm = 0;int inches = 0;
void setup(){ Serial.begin(9600); pinMode(ledPin, OUTPUT);}
void loop(){ value = pulseIn(sensorPin, HIGH) ; cm = value / 58; // pulse width is 58 microseconds per cm inches = value / 147; // which is 147 microseconds per inch
6.4 Measuring Distance | 175
www.it-ebooks.info

Serial.print(cm); Serial.print(','); Serial.println(inches);
digitalWrite(ledPin, HIGH); delay(cm * 10 ); // each centimeter adds 10 milliseconds delay digitalWrite(ledPin, LOW); delay( cm * 10);
delay(20);}
The EZ1 is powered through +5V and ground pins and these are connected to therespective Arduino pins. Connect the EZ1 PW pin (PW is the Pulse Width output) toArduino digital pin 5. The sketch measures the width of the pulse with the pulseIncommand. The width of the pulse is 58 microseconds per centimeter, or 147 micro-seconds per inch.
You can also obtain a distance reading from the EZ1 through its analog output—connect the AN pin to an analog input and read the value with analogRead. The fol-lowing code prints the analog input converted to inches:
value = analogRead(0); inches = value / 2; // each digit of analog read is around 5mv Serial.println(inches);
The analog output is around 9.8 mV per inch. The value from analogRead is around4.8 mV per unit (see Recipe 5.6 for more on analogRead) and the preceding code roundsthese so that each group of two units is one inch. The rounding error is small comparedto the accuracy of the device, but if you want a more precise calculation you can usefloating point as follows:
value = analogRead(0); float mv = (value /1024.0) * 5000 ; float Inches = mv / 9.8; // 9.8mv per inch Serial.println(Inches) ;
See AlsoRecipe 5.6 explains how to convert readings from analogInput into voltage values.
The Arduino reference for pulseIn: http://www.arduino.cc/en/Reference/PulseIn
6.5 Measuring Distance AccuratelyProblemYou want to measure how far objects are from the Arduino with more accuracy thanin Recipe 6.4.
176 | Chapter 6: Getting Input from Sensors
www.it-ebooks.info

SolutionInfrared (IR) sensors generally provide an analog output that can be measured usinganalogRead. They can have greater accuracy than ultrasonic sensors, albeit with a small-er range (a range of 10 cm to 1 m or 2 m is typical for IR sensors). This sketch providessimilar functionality to Recipe 6.4, but it uses an infrared sensor—the SharpGP2Y0A02YK0F (Figure 6-6 shows the connections):
/* ir-distance sketch * prints distance and changes LED flash rate based on distance from IR sensor */
const int ledPin = 13; // the pin connected to the LED to flashconst int sensorPin = 0; // the analog pin connected to the sensor
const long referenceMv = 5000; // long int to prevent overflow when multiplied
void setup(){ Serial.begin(9600); pinMode(ledPin, OUTPUT);}
void loop(){ int val = analogRead(sensorPin); int mV = (val * referenceMv) / 1023;
Serial.print(mV); Serial.print(","); int cm = getDistance(mV); Serial.println(cm);
digitalWrite(ledPin, HIGH); delay(cm * 10 ); // each centimeter adds 10 milliseconds delay digitalWrite(ledPin, LOW); delay( cm * 10);
delay(100);}
// the following is used to interpolate the distance from a table// table entries are distances in steps of 250 millivoltsconst int NBR_ELEMS = 10;const int firstElement = 250; // first entry is 250 mVconst int interval = 250; // millivolts between each elementstatic int distance[TABLE_ENTRIES] = {150,140,130,100,60,50,40,35,30,25,20,15};
int getDistance(int mV){ if( mV > INTERVAL * TABLE_ENTRIES ) return distance[TABLE_ENTRIES-1]; else {
6.5 Measuring Distance Accurately | 177
www.it-ebooks.info

int index = mV / INTERVAL; float frac = (mV % 250) / (float)INTERVAL; return distance[index] - ((distance[index] - distance[index+1]) * frac); }}
Figure 6-6. Connecting the Sharp IR distance sensor
DiscussionThe output from the IR sensor is not linear—in other words, the value read fromanalogRead is not proportional to distance. So, the calculation is more complicated thanthe one used in Recipe 6.4. The sketch in this recipe’s Solution uses a table to interpolatethe actual distance by finding the nearest entry in the table and adjusting it based onthe ratio of the measured value to the next table entry (this technique is called inter-polating). You may need to adjust the table values for your sensor—you can do thiswith information from your data sheet or through trial and error.
As values for the table can be found by trial and error (measuring thevoltage until it changes by the required amount, and then measuring thedistance), this technique can also be used when you don’t have an equa-tion to interpret the values—for example, when you don’t have a partdata sheet for the device you are using.
The conversion from voltage to distance is done in this function:
int getDistance(int mV)
178 | Chapter 6: Getting Input from Sensors
www.it-ebooks.info

The function first checks if the value is within the range given in the table. The shortestvalid distance is returned if the value is not within range:
if( mV > INTERVAL * TABLE_ENTRIES ) return distance[TABLE_ENTRIES-1]; //TABLE_ENTRIES-1 is last valid entry
If the value is within the table range, integer division calculates which entry is closestbut is lower than the reading:
int index = mV / INTERVAL ;
The modulo operator (see Chapter 3) is used to calculate a fractional value when areading falls between two entries:
float frac = (mV % 250) / (float)INTERVAL;
return distance[index] + (distance[index]* (frac / interval));
The last line in the getDistance function uses the index and fraction to calculate andreturn a distance value. It reads the value from the table, and then adds a proportionof that value based on the frac value. This final element is an approximation, but as itis for a small range of the result, it gives acceptable results. If it is not accurate enoughfor you, you need to produce a table with more values closer together.
A table can also be used to improve performance if the calculation takes significanttime to complete, or is done repeatedly with a limited number of values. Calculations,particularly with floating point, can be slow. Replacing the calculation with a table canspeed things up.
The values can either be hardcoded into the sketch, like this one, or be calculated insetup(). This may make the sketch take longer to start, but as this only happens onceeach time the Arduino gets power, you will then get a speed gain every time around themain loop(). The trade-off for the speed is that the table consumes memory—the biggerthe table, the more RAM memory used. See Chapter 17 for help using Progmem to storedata in program memory.
You may need to add a capacitor across the +5V and Gnd lines to sta-bilize the power supply to the sensor so that the connecting leads arenot kept short. If you get erratic readings, connect a 10 uF capacitor atthe sensor (see Appendix C for more on using decoupling capacitors).
See AlsoA detailed explanation of the Sharp IR sensor is available at http://www.societyofrobots.com/sensors_sharpirrange.shtml.
6.5 Measuring Distance Accurately | 179
www.it-ebooks.info

6.6 Detecting VibrationProblemYou want to respond to vibration; for example, when a door is knocked.
SolutionA Piezo sensor responds to vibration. It works best when connected to a larger surfacethat vibrates. Figure 6-7 shows the connections:
/* piezo sketch * lights and LED when the Piezo is tapped */
const int sensorPin = 0; // the analog pin connected to the sensorconst int ledPin = 13; // pin connected to LEDconst int THRESHOLD = 100;
void setup(){ pinMode(ledPin, OUTPUT);}
void loop(){ int val = analogRead(sensorPin); if (val >= THRESHOLD) { digitalWrite(ledPin, HIGH); delay(100); // to make the LED visible } else digitalWrite(ledPin, LOW);}
DiscussionA Piezo sensor, also known as a knock sensor, produces a voltage in response to physicalstress. The more it is stressed, the higher the voltage. The Piezo is polarized and thepositive side (usually a red wire or a wire marked with a “+”) is connected to the analoginput; the negative wire (usually black or marked with a “-”) is connected to ground.A high-value resistor (1 megohm) is connected across the sensor.
180 | Chapter 6: Getting Input from Sensors
www.it-ebooks.info

Figure 6-7. Knock sensor connections
The voltage is detected by Arduino analogRead to turn on an LED (see Chapter 5 formore about the analogRead function). The THRESHOLD value determines the level fromthe sensor that will turn on the LED, and you can decrease or increase this value tomake the sketch more or less sensitive.
Piezo sensors can be bought in plastic cases or as bare metal disks with two wiresattached. The components are the same; use whichever fits your project best.
Some sensors, such as the Piezo, can be driven by the Arduino to produce the thingthat they can sense. Chapter 9 has more about using a Piezo to generate sound.
6.7 Detecting SoundProblemYou want to detect sounds such as clapping, talking, or shouting.
SolutionThis recipe uses the BOB-08669 breakout board for the Electret Microphone (Spark-Fun). Connect the board as shown in Figure 6-8 and load the code to the board.
6.7 Detecting Sound | 181
www.it-ebooks.info

Figure 6-8. Microphone board connections
The built-in LED on Arduino pin 13 will turn on when you clap, shout, or play loudmusic near the microphone. You may need to adjust the threshold—use the SerialMonitor to view the high and low values, and change the threshold value so that it isbetween the high values you get when noise is present and the low values when thereis little or no noise. Upload the changed code to the board and try again:
/*microphone sketch
SparkFun breakout board for Electret Microphone is connected to analog pin 0*/
const int ledPin = 13; //the code will flash the LED in pin 13const int middleValue = 512; //the middle of the range of analog valuesconst int numberOfSamples = 128; //how many readings will be taken each time
int sample; //the value read from microphone each timelong signal; //the reading once you have removed DC offsetlong averageReading; //the average of that loop of readings
long runningAverage=0; //the running average of calculated valuesconst int averagedOver= 16; //how quickly new values affect running average //bigger numbers mean slower
const int threshold=400; //at what level the light turns on
void setup() { pinMode(ledPin, OUTPUT); Serial.begin(9600);}
void loop() { long sumOfSquares = 0; for (int i=0; i<numberOfSamples; i++) { //take many readings and average them
182 | Chapter 6: Getting Input from Sensors
www.it-ebooks.info

sample = analogRead(0); //take a reading signal = (sample - middleValue); //work out its offset from the center signal *= signal; //square it to make all values positive sumOfSquares += signal; //add to the total } averageReading = sumOfSquares/numberOfSamples; //calculate running average runningAverage=(((averagedOver-1)*runningAverage)+averageReading)/averagedOver;
if (runningAverage>threshold){ //is average more than the threshold ? digitalWrite(ledPin, HIGH); //if it is turn on the LED }else{ digitalWrite(ledPin, LOW); //if it isn't turn the LED off } Serial.println(runningAverage); //print the value so you can check it}
DiscussionA microphone produces very small electrical signals. If you connected it straight to thepin of an Arduino, you would not get any detectable change. The signal needs to beamplified first to make it usable by Arduino. The SparkFun board has the microphonewith an amplifier circuit built in to amplify the signal to a level readable by Arduino.
Because you are reading an audio signal in this recipe, you will need to do some addi-tional calculations to get useful information. An audio signal is changing fairly quickly,and the value returned by analogRead will depend on what point in the undulating signalyou take a reading. If you are unfamiliar with using analogRead, see Chapter 5 andRecipe 6.2. An example waveform for an audio tone is shown in Figure 6-9. As timechanges from left to right, the voltage goes up and down in a regular pattern. If youtake readings at the three different times marked on it, you will get three different values.If you used this to make decisions, you might incorrectly conclude that the signal gotlouder in the middle.
An accurate measurement requires multiple readings taken close together. The peaksand troughs increase as the signal gets bigger. The difference between the bottom of atrough and the top of a peak is called the amplitude of the signal, and this increases asthe signal gets louder.
6.7 Detecting Sound | 183
www.it-ebooks.info

Figure 6-9. Audio signal measured in three places
To measure the size of the peaks and troughs, you measure the difference between themidpoint voltage and the levels of the peaks and troughs. You can visualize this mid-point value as a line running midway between the highest peak and the lowest trough,as shown in Figure 6-10. The line represents the DC offset of the signal (it’s the DCvalue when there are no peaks or troughs). If you subtract the DC offset value fromyour analogRead values, you get the correct reading for the signal amplitude.
Figure 6-10. Audio signal showing DC offset (signal midpoint)
As the signal gets louder, the average size of these values will increase, but as some ofthem are negative (where the signal has dropped below the DC offset), they will canceleach other out, and the average will tend to be zero. To fix that, we square each value(multiply it by itself). This will make all the values positive, and it will increase thedifference between small changes, which helps you evaluate changes as well. The aver-age value will now go up and down as the signal amplitude does.
184 | Chapter 6: Getting Input from Sensors
www.it-ebooks.info

To do the calculation, we need to know what value to use for the DC offset. To get aclean signal, the amplifier circuit for the microphone will have been designed to havea DC offset as close as possible to the middle of the possible range of voltage so thatthe signal can get as big as possible without distorting. The code assumes this and usesthe value 512 (right in the middle of the analog input range of 0 to 1,023).
The values of variables at the top of the sketch can be varied if the sketch does nottrigger well for the level of sound you want.
The numberOfSamples is set at 128—if it is set too small, the average may not adequatelycover complete cycles of the waveform and you will get erratic readings. If the value isset too high, you will be averaging over too long a time, and a very short sound mightbe missed as it does not produce enough change once a large number of readings areaveraged. It could also start to introduce a noticeable delay between a sound and thelight going on. Constants used in calculations, such as numberOfSamples and averagedOver, are set to powers of 2 (128 and 16, respectively). Try to use values evenly divisibleby two for these to give you the fastest performance (see Chapter 3 for more on math functions).
6.8 Measuring TemperatureProblemYou want to display the temperature or use the value to control a device; for example,to switch something on when the temperature reaches a threshold.
SolutionThis recipe displays the temperature in Fahrenheit and Celsius (Centigrade) using thepopular LM35 heat detection sensor. The sensor looks similar to a transistor and isconnected as shown in Figure 6-11:
/* lm35 sketch prints the temperature to the Serial Monitor */
const int inPin = 0; // analog pin
void setup(){ Serial.begin(9600);}
void loop(){ int value = analogRead(inPin);
6.8 Measuring Temperature | 185
www.it-ebooks.info

Serial.print(value); Serial.print(" > "); float millivolts = (value / 1024.0) * 5000; float celsius = millivolts / 10; // sensor output is 10mV per degree Celsius Serial.print(celsius); Serial.print(" degrees Celsius, ");
Serial.print( (celsius * 9)/ 5 + 32 ); // converts to fahrenheit Serial.println(" degrees Fahrenheit");
delay(1000); // wait for one second
}
Figure 6-11. Connecting the LM35 temperature sensor
DiscussionThe LM35 temperature sensor produces an analog voltage directly proportional totemperature with an output of 1 millivolt per 0.1°C (10 mV per degree).
The sketch converts the analogRead values into millivolts (see Chapter 5) and dividesthis by 10 to get degrees.
The sensor accuracy is around 0.5°C, and in many cases you can use integer mathinstead of floating point.
The following sketch turns on pin 2 when the temperature is above a threshold:
const int inPin = 0; // sensor connected to this analog pinconst int outPin = 13; //2; // digital output pin
const int threshold = 25; // the degrees celsius that will trigger the output pin
186 | Chapter 6: Getting Input from Sensors
www.it-ebooks.info

void setup(){ Serial.begin(9600); pinMode(outPin, OUTPUT);}
void loop(){ int value = analogRead(inPin); long celsius = (value * 500L) /1024; // 10 mV per degree c, see text Serial.print(celsius); Serial.print(" degrees Celsius: "); if(celsius > threshold) { digitalWrite(outPin, HIGH); Serial.println("pin is on"); } else { digitalWrite(outPin, LOW); Serial.println("pin is off"); } delay(1000); // wait for one second}
The sketch uses long (32-bit) integers to calculate the value. The letter L after the num-ber causes the calculation to be performed using long integer math, so the multiplica-tion of the maximum temperature (500 on a 5V Arduino) and the value read from theanalog input does not overflow. See the recipes in Chapter 5 for more about convertinganalog levels into voltage values.
If you need the values in Fahrenheit, you could use the LM34 sensor, as this producesan output in Fahrenheit, or you can convert the values in this recipe using the following formula:
float f = (celsius * 9)/ 5 + 32 );
6.9 Reading RFID TagsProblemYou want to read an RFID tag and respond to specific IDs.
SolutionFigure 6-12 shows a Parallax RFID (radio frequency identification) reader connectedto the Arduino serial port. (You may need to disconnect the reader from the serial portwhen uploading the sketch.)
6.9 Reading RFID Tags | 187
www.it-ebooks.info

The sketch reads and displays the value of an RFID tag:
/* RFID sketch Displays the value read from an RFID tag */
const int startByte = 10; // ASCII line feed precedes each tagconst int endByte = 13; // ASCII carriage return terminates each tagconst int tagLength = 10; // the number of digits in tagconst int totalLength = tagLength + 2; //tag length + start and end bytes
char tag[tagLength + 1]; // holds the tag and a terminating null
int bytesread = 0;
void setup(){ Serial.begin(2400); // set this to the baud rate of your RFID reader pinMode(2,OUTPUT); // connected to the RFID ENABLE pin digitalWrite(2, LOW); // enable the RFID reader}
void loop(){ if(Serial.available() >= totalLength) // check if there's enough data { if(Serial.read() == startByte) { bytesread = 0; // start of tag so reset count to 0
Figure 6-12. Serial RFID reader connected to Arduino
188 | Chapter 6: Getting Input from Sensors
www.it-ebooks.info

while(bytesread < tagLength) // read 10 digit code { int val = Serial.read(); if((val == startByte)||(val == endByte)) // check for end of code break; tag[bytesread] = val; bytesread = bytesread + 1; // ready to read next digit } if( Serial.read() == endByte) // check for the correct end character { tag[bytesread] = 0; // terminate the string Serial.print("RFID tag is: "); Serial.println(tag); } } }}
DiscussionA tag consists of a start character followed by a 10-digit tag and is terminated by anend character. The sketch waits for a complete tag message to be available and displaysthe tag if it is valid. The tag is received as ASCII digits (see Recipe 4.4 for more onreceiving ASCII digits). You may want to convert this into a number if you want tostore or compare the values received. To do this, change the last few lines as follows:
if( Serial.read() == endByte) // check for the correct end character { tag[bytesread] = 0; // terminate the string long tagValue = atol(tag); // convert the ASCII tag to a long integer Serial.print("RFID tag is: "); Serial.println(tagValue); }
RFID stands for radio frequency identification, and as the name implies, it is sensitiveto radio frequencies and can be prone to interference. The code in this recipe’s Solutionwill only use code of the correct length that contains the correct start and end bits,which should eliminate most errors. But you can make the code more resilient by read-ing the tag more than once and only using the data if it’s the same each time. (RFIDreaders such as the Parallax will repeat the code while a valid card is near the reader.)To do this, add the following lines to the last few lines in the preceding code snippet:
if( Serial.read() == endByte) // check for the correct end character{ tag[bytesread] = 0; // terminate the string long tagValue = atol(tag); // convert the ASCII tag to a long integer if (tagValue == lastTagValue) { Serial.print("RFID tag is: "); Serial.println(tagValue); lasTagValue = tagValue; }}
6.9 Reading RFID Tags | 189
www.it-ebooks.info

You will need to add the declaration for lastTagValue at the top of the sketch:
Long lastTagValue=0;
This approach is similar to the code from Recipe 5.3. It means you will only get con-firmation of a card if it is presented long enough for two readings to be taken, but falsereadings will be less likely. You can avoid accidental triggering by making it necessaryfor the card to be present for a certain amount of time before the number is reported.
6.10 Tracking the Movement of a DialProblemYou want to measure and display the rotation of something to track its speed and/ordirection.
SolutionTo sense this kind of movement you could use a rotary encoder. Connect the encoderas shown in Figure 6-13:
/* Read a rotary encoder This simple version polls the encoder pins The position is displayed on the Serial Monitor */
const int encoderPinA = 4;const int encoderPinB = 2;const int encoderStepsPerRevolution=16;int angle = 0;
int val;
int encoderPos = 0;boolean encoderALast = LOW; // remembers the previous pin state
void setup(){ pinMode(encoderPinA, INPUT); pinMode(encoderPinB, INPUT); digitalWrite(encoderPinA, HIGH); digitalWrite(encoderPinB, HIGH); Serial.begin (9600);}
void loop(){ boolean encoderA = digitalRead(encoderPinA);
190 | Chapter 6: Getting Input from Sensors
www.it-ebooks.info

if ((encoderALast == HIGH) && (encoderA == LOW)) { if (digitalRead(encoderPinB) == LOW) { encoderPos--; } else { encoderPos++; } angle=(encoderPos % encoderStepsPerRevolution)*360/encoderStepsPerRevolution; Serial.print (encoderPos); Serial.print (" "); Serial.println (angle); }
encoderALast = encoderA;}
Figure 6-13. Rotary encoder
DiscussionA rotary encoder produces two signals as it is turned. Both signals alternate betweenHIGH and LOW as the shaft is turned, but the signals are slightly out of phase with eachother. If you detect the point where one of the signals changes from HIGH to LOW, thestate of the other pin (whether it is HIGH or LOW) will tell you which way the shaft isrotating.
6.10 Tracking the Movement of a Dial | 191
www.it-ebooks.info

So, the first line of code in the loop function reads one of the encoder pins:
int encoderA = digitalRead(encoderPinA);
Then it checks this value and the previous one to see if the value has just changed to LOW:
if ((encoderALast == HIGH) && (encoderA == LOW))
If it has not, the code doesn’t execute the following block; it goes to the bottom ofloop, saves the value it has just read in encoderALast, and goes back around to take afresh reading.
When the following expression is true:
if ((encoderALast == HIGH) && (encoderA == LOW))
the code reads the other encoder pin and increments or decrements encoderPos de-pending on the value returned. It calculates the angle of the shaft (taking 0 to be thepoint the shaft was at when the code started running). It then sends the values downthe serial port so that you can see it in the Serial Monitor.
Encoders come in different resolutions, quoted as steps per revolution. This indicateshow many times the signals alternate between HIGH and LOW for one revolution of theshaft. Values can vary from 16 to 1,000. The higher values can detect smaller move-ments, and these encoders cost much more money. The value for the encoder is hard-coded in the code in the following line:
const int encoderStepsPerRevolution=16;
If your encoder is different, you need to change that to get the correct angle values.
If you get values out that don’t go up and down, but increase regardless of the directionyou turn the encoder, try changing the test to look for a rising edge rather than a fallingone. Swap the LOW and HIGH values in the line that checks the values so that it looks likethis:
if ((encoderALast == LOW) && (encoderA == HIGH))
Rotary encoders just produce an increment/decrement signal; they cannot directly tellyou the shaft angle. The code calculates this, but it will be relative to the start positioneach time the code runs. The code monitors the pins by polling (continuously checkingthe value of) them. There is no guarantee that the pins have not changed a few timessince the last time the code looked, so if the code does lots of other things as well, andthe encoder is turned very quickly, it is possible that some of the steps will be missed.For high-resolution encoders this is more likely, as they will send signals much moreoften as they are turned.
To work out the speed, you need to count how many steps are registered in one directionin a set time.
192 | Chapter 6: Getting Input from Sensors
www.it-ebooks.info

6.11 Tracking the Movement of More Than One Rotary EncoderProblemYou have two or more rotary encoders and you want to measure and display rotation.
SolutionThe circuit uses two encoders, connected as shown in Figure 6-14. You can read moreabout rotary encoders in Recipe 6.10:
/* RotaryEncoderMultiPoll This sketch has two encoders connected. One is connected to pins 2 and 3 The other is connected to pins 4 and 5 */
const int ENCODERS = 2; // the number of encoders
const int encoderPinA[ENCODERS] = {2,4}; // encoderA pins on 2 and 4const int encoderPinB[ENCODERS] = {3,5}; // encoderB pins on 3 and 5int encoderPos[ ENCODERS] = { 0,0}; // initialize the positions to 0boolean encoderALast[ENCODERS] = { LOW,LOW}; // holds last state of encoderA pin
void setup(){ for (int i=2; i<6; i++){ pinMode(i, HIGH); digitalWrite(i, HIGH); } Serial.begin (9600);}
int updatePosition( int encoderIndex){ boolean encoderA = digitalRead(encoderPinA[encoderIndex]); if ((encoderALast[encoderIndex] == HIGH) && (encoderA == LOW)) { if (digitalRead(encoderPinB[encoderIndex]) == LOW) { encoderPos[encoderIndex]--; } else { encoderPos[encoderIndex]++; } Serial.print("Encoder "); Serial.print(encoderIndex,DEC); Serial.print("="); Serial.print (encoderPos[encoderIndex]); Serial.println ("/"); }
6.11 Tracking the Movement of More Than One Rotary Encoder | 193
www.it-ebooks.info

encoderALast[encoderIndex] = encoderA;}
void loop(){ for(int i=0; i < ENCODERS;i++) { updatePosition(i); }}
Figure 6-14. Connecting two rotary encoders
DiscussionThis recipe uses the same code logic as Recipe 6.10, which was reading one encoder,but it uses arrays for all the variables that must be remembered separately for eachencoder. You can then use a for loop to go through each one and read it and calculateits rotation. To use more encoders, set the ENCODERS values to the number of encodersyou have and extend the arrays and the definitions to say which pins they are attachedto.
If you get values out that don’t go up and down, but increase regardless of the directionyou turn the encoder, try changing the test to look for a rising edge rather than a fallingone. Swap the LOW and HIGH values in the line that checks the values from this:
if ((encoderALast[encoderIndex] == HIGH) && (encoderA == LOW))
194 | Chapter 6: Getting Input from Sensors
www.it-ebooks.info

to this:
if ((encoderALast[encoderIndex] == LOW) && (encoderA == HIGH))
If one of the encoders works but the other just counts up, switch over the A and Bconnections for the one that just counts up.
6.12 Tracking the Movement of a Dial in a Busy SketchProblemAs you extend your code and it is doing other things in addition to reading the encoder,reading the encoder starts to get unreliable. This problem is particularly bad if the shaftrotates quickly.
SolutionThe circuit is the same as the one for Recipe 6.11. We will use an interrupt on theArduino to make sure that every time a step happens, the code responds to it:
/* RotaryEncoderInterrupt sketch */
const int encoderPinA = 2;const int encoderPinB = 4;int Pos, oldPos;volatile int encoderPos = 0; // variables changed within interrupts are volatile
void setup(){ pinMode(encoderPinA, INPUT); pinMode(encoderPinB, INPUT); digitalWrite(encoderPinA, HIGH); digitalWrite(encoderPinB, HIGH); Serial.begin(9600);
attachInterrupt(0, doEncoder, FALLING); // encoder pin on interrupt 0 (pin 2)}
void loop(){ uint8_t oldSREG = SREG;
cli(); Pos = encoderPos; SREG = oldSREG; if(Pos != oldPos) { Serial.println(Pos,DEC); oldPos = Pos;
6.12 Tracking the Movement of a Dial in a Busy Sketch | 195
www.it-ebooks.info

} Delay(1000);}
void doEncoder(){ if (digitalRead(encoderPinA) == digitalRead(encoderPinB)) encoderPos++; // count up if both encoder pins are the same else encoderPos--; //count down if pins are different}
This code will only report the Pos value on the serial port, at most, once every second(because of the delay), but the values reported will take into account any movementthat may have happened while it was delaying.
DiscussionAs your code has more things to do, the encoder pins will be checked less often. If thepins go through a whole step change before getting read, the Arduino will not detectthat step. Moving the shaft quickly will cause this to happen more often, as the stepswill be happening more quickly.
To make sure the code responds every time a step happens, you need to use interrupts.When the interrupt condition happens, the code jumps from wherever it is, does whatneeds to happen, and then returns to where it was and carries on.
On a standard Arduino board, two pins can be used as interrupts: pins 2 and 3. Theinterrupt is enabled through the following line:
attachInterrupt(0, doEncoder, FALLING);
The three parameters needed are the interrupt pin identifier (0 for pin 2, 1 for pin 3);the function to jump to when the interrupt happens, in this case doEncoder; and finally,the pin behavior to trigger the interrupt, in this case when the voltage falls from 5 to0 volts. The other options are RISING (voltage rises from 0 to 5 volts) and CHANGE (voltagefalls or rises).
The doEncoder function checks the encoder pins to see which way the shaft turned, andchanges encoderPos to reflect this.
If the values reported only increase regardless of the direction of rotation, try changingthe interrupt to look for RISING rather than FALLING.
Because encoderPos is changed in the function that is called when the interrupt happens,it needs to be declared as volatile when it is created. This tells the compiler that itcould change at any time; don’t optimize the code by assuming it won’t have changed,as the interrupt can happen at any time.
196 | Chapter 6: Getting Input from Sensors
www.it-ebooks.info

The Arduino build process optimizes the code by removing code andvariables that are not used by your sketch code. Variables that are onlymodified in an interrupt handler should be declared as volatile to tellthe compiler not to remove these variables.
To read this variable in the main loop, you should take special precautions to makesure the interrupt does not happen in the middle of reading it. This chunk of code doesthat:
uint8_t oldSREG = SREG;
cli(); Pos = encoderPos; SREG = oldSREG;
First you save the state of SREG (the interrupt registers), and then cli turns the interruptoff. The value is read, and then restoring SREG turns the interrupt back on and setseverything back as it was. Any interrupt that occurs when interrupts are turned off willwait until interrupts are turned back on. This period is so short that interrupts will notbe missed (as long as you keep the code in the interrupt handler as short as possible).
6.13 Using a MouseProblemYou want to detect movements of a PS2-compatible mouse and respond to changes inthe x and y coordinates.
SolutionThis solution uses LEDs to indicate mouse movement. The brightness of the LEDschanges in response to mouse movement in the x (left and right) and y (nearer andfarther) directions. Clicking the mouse buttons sets the current position as the referencepoint. Figure 6-15 shows the connections:
/* Mouse an arduino sketch using ps2 mouse library see: http://www.arduino.cc/playground/ComponentLib/Ps2mouse */
// mouse library from : http://www.arduino.cc/playground/ComponentLib/Ps2mouse#include <ps2.h>
const int dataPin = 5const int clockPin = 6;
const int xLedPin = 9;const int yLedPin = 11;
6.13 Using a Mouse | 197
www.it-ebooks.info

const int mouseRange = 255; // the maximum range of x/y values
int xPosition = 0; // values incremented and decremented when mouse movesint yPosition = 0;int xBrightness = 128; // values increased and decreased based on mouse positionint yBrightness = 128;
const byte REQUEST_DATA = 0xeb; // command to get data from the mouse
PS2 mouse(clockPin, dataPin);
void setup(){ Serial.begin(115200); // note the higher than usual serial speed mouseBegin();}
// get a reading from mouse and report it back to the host via the serial linevoid loop(){ char x; // values read from the mouse char y; byte status;
// get a reading from the mouse mouse.write(REQUEST_DATA); // ask the mouse for data mouse.read(); // ignore ack status = mouse.read(); // read the mouse buttons if(status & 1) // this bit is set if the left mouse btn pressed xPosition = 0; // center the mouse x position if(status & 2) // this bit is set if the right mouse btn pressed yPosition = 0; // center the mouse y position
x = mouse.read(); y = mouse.read(); if( x != 0 || y != 0) { // here if there is mouse movement
xPosition = xPosition + x; // accumulate the position xPosition = constrain(xPosition,-mouseRange,mouseRange);
xBrightness = map(xPosition, -mouseRange, mouseRange, 0,255); analogWrite(xLedPin, xBrightness);
yPosition = constrain(yPosition + y, -mouseRange,mouseRange); yBrightness = map(yPosition, -mouseRange, mouseRange, 0,255); analogWrite(yLedPin, yBrightness); }}
void mouseBegin(){ // reset and initialize the mouse
198 | Chapter 6: Getting Input from Sensors
www.it-ebooks.info

mouse.write(0xff); // reset delayMicroseconds(100); mouse.read(); // ack byte mouse.read(); // blank mouse.read(); // blank mouse.write(0xf0); // remote mode mouse.read(); // ack delayMicroseconds(100);}
Figure 6-15. Connecting a mouse to indicate position and light LEDs
DiscussionConnect the mouse signal (clock and data) and power leads to Arduino, as shown inFigure 6-15. This solution only works with PS2-compatible devices, so you may needto find an older mouse—most mice with the round PS2 connector should work.
The mouseBegin function initializes the mouse to respond to requests for movement andbutton status. The PS2 library from http://www.arduino.cc/playground/ComponentLib/Ps2mouse handles the low-level communication. The mouse.write command is used toinstruct the mouse that data will be requested. The first call to mouse.read gets anacknowledgment (which is ignored in this example). The next call to mouse.read gets
6.13 Using a Mouse | 199
www.it-ebooks.info

the button status, and the last two mouse.read calls get the x and y movement that hastaken place since the previous request.
The sketch tests to see which bits are HIGH in the status value to determine if the leftor right mouse button was pressed. The two rightmost bits will be HIGH when the leftand right buttons are pressed, and these are checked in the following lines:
status = mouse.read(); // read the mouse buttons if(status & 1) // rightmost bit is set if the left mouse btn pressed xPosition = 0; // center the mouse x position if(status & 2) // this bit is set if the right mouse btn pressed yPosition = 0; // center the mouse y position
The x and y values read from the mouse represent the movement since the previousrequest, and these values are accumulated in the variables xPosition and yPosition.
The values of x and y will be positive if the mouse moves right or away from you, andnegative if it moves left or toward you.
The sketch ensures that the accumulated value does not exceed the defined range(mouseRange) using the constrain function:
xPosition = xPosition + x; // accumulate the position xPosition = constrain(xPosition,-mouseRange,mouseRange);
The yPosition calculation shows a shorthand way to do the same thing; here the cal-culation for the y value is done within the call to constrain:
yPosition = constrain(yPosition + y,-mouseRange,mouseRange);
The xPosition and yPosition variables are reset to zero if the left and right mousebuttons are pressed.
LEDs are illuminated to correspond to position using analogWrite—half brightness inthe center, and increasing and decreasing in brightness as the mouse position increasesand decreases.
The position can be displayed on the Serial Monitor by adding the following line justafter the analogWrite function:
printValues(); // show button and x and y values on Serial Monitor
Add the following function to the end of the sketch to print the values received fromthe mouse:
void printValues(){ Serial.println(status, BIN);
Serial.print("X="); Serial.print(x,DEC); Serial.print(", position= "); Serial.print(xPosition); Serial.print(", brightness= "); Serial.println(xBrightness);
200 | Chapter 6: Getting Input from Sensors
www.it-ebooks.info

Serial.print("Y="); Serial.print(y,DEC); Serial.print(", position= "); Serial.print(yPosition); Serial.print(", brightness= "); Serial.println(yBrightness); Serial.println();}
6.14 Getting Location from a GPSProblemYou want to determine location using a GPS module.
SolutionA number of fine Arduino-compatible GPS units are available today. Most use a familiarserial interface to communicate with their host microcontroller using a protocol knownas NMEA 0183. This industry standard provides for GPS data to be delivered to “lis-tener” devices such as Arduino as human-readable ASCII “sentences.” For example,the following NMEA sentence:
$GPGLL,4916.45,N,12311.12,W,225444,A,*1D
describes, among other things, a location on the globe at 49 16.45' North latitude by123 11.12' West longitude.
To establish location, your Arduino sketch must parse these strings and convert therelevant text to numeric form. Writing code to manually extract data from NMEAsentences can be tricky and cumbersome in the Arduino’s limited address space, butfortunately there is a useful library that does this work for you: Mikal Hart’s TinyGPS.Download it from http://arduiniana.org/ and install it. (For instructions on installingthird-party libraries, see Chapter 16.)
The general strategy for using a GPS is as follows:
1. Physically connect the GPS device to the Arduino.
2. Read serial NMEA data from the GPS device.
3. Process the data to determine location.
Using TinyGPS you do the following:
1. Physically connect the GPS device to the Arduino.
2. Create a TinyGPS object.
3. Read serial NMEA data from the GPS device.
4. Process each byte with TinyGPS’s encode() method.
5. Periodically query TinyGPS’s get_position() method to determine location.
6.14 Getting Location from a GPS | 201
www.it-ebooks.info

The following sketch illustrates how you can acquire data from a GPS attached toArduino’s serial port. It lights the built-in LED connected to pin 13 whenever the deviceis in the Southern Hemisphere:
// A simple sketch to detect the Southern Hemisphere// Assumes: LED on pin 13, GPS connected to Hardware Serial pins 0/1
#include "TinyGPS.h"TinyGPS gps; // create a TinyGPS object
#define HEMISPHERE_PIN 13void setup(){
Start serial communications using the rate required by your GPS. See Chapter 4 if youneed more information on using Arduino serial communications:
Serial.begin(4800); // GPS devices frequently operate at 4800 baud pinMode(HEMISPHERE_PIN, OUTPUT); digitalWrite(HEMISPHERE_PIN, LOW); // turn off LED to start}
void loop(){ while (Serial.available()) { int c = Serial.read();
// Encode() each byte // Check for new position if encode() returns "True" if (gps.encode(c)) { long lat, lon; gps.get_position(&lat, &lon); if (lat < 0) // Southern Hemisphere? digitalWrite(HEMISPHERE_PIN, HIGH); else digitalWrite(HEMISPHERE_PIN, LOW); } }}
Here a 4,800 baud connection is established with the GPS. Once bytes begin flowing,they are processed by encode(), which parses the NMEA data. A true return fromencode() indicates that TinyGPS has successfully parsed a complete sentence and thatfresh position data may be available. This is a good time to check the device’s currentlocation with a call to get_position().
TinyGPS’s get_position() returns the most recently observed latitude and longitude.The example examines latitude; if it is less than zero, that is, south of the equator, theLED is illuminated.
202 | Chapter 6: Getting Input from Sensors
www.it-ebooks.info

DiscussionAttaching a GPS unit to an Arduino is usually as simple as connecting two or three datalines from the GPS to input pins on the Arduino. Using the popular USGlobalSatEM-406A GPS module as an example, you can connect the lines as shown in Table 6-1.
Table 6-1. EM-406A GPS pin connections
EM-406A line Arduino pin
GND Gnd
VIN +Vcc
RX TX (pin 1)
TX RX (pin 0)
GND Gnd
Some GPS modules use RS-232 voltage levels, which are incompatiblewith Arduino’s TTL logic. These require some kind of intermediate logicconversion device like the MAX232 integrated circuit.
The code in this recipe’s Solution assumes that the GPS is connected directly toArduino’s built-in serial port, but this is not usually the most convenient design. Inmany projects, the hardware serial port is needed to communicate with a host PC orother peripheral and cannot be used by the GPS. In cases like this, select another pairof digital pins and use a serial port emulation (“soft serial”) library to talk to the GPSinstead.
SoftwareSerial is the emulation library that currently ships with the Arduino IDE, butit is inadequate for most GPS processing, especially for modern devices that commu-nicate at higher speeds. As of Arduino revision 0015, the most robust and popular “softserial” package is a third-party library called NewSoftSerial, also published at http://arduiniana.org/. From the programmer’s point of view, NewSoftSerial is used similarlyto hardware serial, so migrating is not usually very difficult. (For a more detailed dis-cussion on using NewSoftSerial, see Recipes 4.13 and 4.14.)
You can move the GPS’s RX and TX lines to pins 2 and 3 to free up the hardware serialport for debugging. Leaving the serial cable connected to the host PC, modify the pre-ceding sketch to use NewSoftSerial to get a detailed glimpse of TinyGPS in actionthrough the Arduino’s Serial Monitor:
// Another simple sketch to detect the Southern Hemisphere// Assumes: LED on pin 13, GPS connected to pins 2/3// (Optional) Serial debug console attached to hardware serial port 0/1
#include "TinyGPS.h"#include "NewSoftSerial.h"
6.14 Getting Location from a GPS | 203
www.it-ebooks.info

#define HEMISPHERE_PIN 13#define GPS_RX_PIN 2#define GPS_TX_PIN 3
TinyGPS gps; // create a TinyGPS objectNewSoftSerial nss(GPS_RX_PIN, GPS_TX_PIN); // create soft serial object
void setup(){
Note that you can use a different baud rate for connection to the Serial Monitor andthe GPS:
Serial.begin(9600); // for debugging nss.begin(4800); // Use NewSoftSerial object to talk to GPS pinMode(HEMISPHERE_PIN, OUTPUT); digitalWrite(HEMISPHERE_PIN, LOW); // turn off LED to start}
void loop(){ while (nss.available()) { int c = nss.read();
Serial.print(c, BYTE); // display NMEA data for debug
// Send each byte to encode() // Check for new position if encode() returns "True" if (gps.encode(c)) { long lat, lon; gps.get_position(&lat, &lon);
// Display new lat/lon on debug console Serial.print("Lat: "); Serial.print(lat); Serial.print(" Lon: "); Serial.println(lon);
if (lat < 0) // Southern Hemisphere? digitalWrite(HEMISPHERE_PIN, HIGH); else digitalWrite(HEMISPHERE_PIN, LOW); }}}
This new sketch behaves exactly the same as the earlier example but is much easier todebug. At any time, you can simply hook a monitor up to the built-in serial port towatch the NMEA sentences and TinyGPS data scrolling by.
When power is turned on, a GPS unit immediately begins transmitting NMEA senten-ces. But because it usually takes awhile to establish a fix—up to two minutes in somecases—these early sentences typically do not contain valid location data. Stormyweather or the presence of buildings or other obstacles may also interfere with the GPS’s
204 | Chapter 6: Getting Input from Sensors
www.it-ebooks.info

ability to pinpoint location. So, how does the sketch know whether TinyGPS is deliv-ering valid position data? The answer lies in the third parameter to get_position(), theoptional fix_age.
If you supply a pointer to an unsigned long variable as get_position()’s third param-eter, TinyGPS sets it to the number of milliseconds since the last valid position datawas acquired; see also Recipe 2.11. A value of 0xFFFFFFFF here (symbolically,GPS_INVALID_AGE) means TinyGPS has not yet parsed any valid sentences containingposition data. In this case, the returned latitude and longitude are invalid as well(GPS_INVALID_ANGLE).
Under normal operation, you can expect to see quite low values for fix_age. ModernGPS devices are capable of reporting position data as frequently as one to five times persecond or more, so a fix_age in excess of 2,000 ms or so suggests that there may be aproblem. Perhaps the GPS is traveling through a tunnel or a wiring flaw is corruptingthe NMEA data stream, invalidating the checksum (a calculation to check that the datais not corrupted). In any case, a large fix_age indicates that the coordinates returnedby get_position() are stale. The following code is an example of how fix_age can beused to ensure that the position data is fresh:
long lat, lon; unsigned long fix_age; gps.get_position(&lat, &lon, &fix_age); if (fix_age == TinyGPS::INVALID_AGE) Serial.println("No fix ever detected!"); else if (fix_age > 2000) Serial.println("Data is getting STALE!"); else Serial.println("Latitude and longitude valid!");
See AlsoTinyGPS and NewSoftSerial are available for download at http://arduiniana.org/libraries/newsoftserial.
For a deeper understanding of the NMEA protocol, read the Wikipedia article at http://en.wikipedia.org/wiki/NMEA.
Several shops sell GPS modules that interface well with TinyGPS and Arduino. Thesediffer mostly in power consumption, voltage, accuracy, physical interface, and whetherthey support serial NMEA. SparkFun (http://www.sparkfun.com) carries a large rangeof GPS modules and has an excellent buyer’s guide.
GPS technology has inspired lots of creative Arduino projects. A very popular exampleis the GPS data logger, in which a moving device records location data at regular in-tervals to the Arduino EEPROM or other on-board storage. See the breadcrumbsproject at http://code.google.com/p/breadcrumbs/wiki/UserDocument for an example. Ladyada makes a popular GPS data logging shield; see http://www.ladyada.net/make/gpsshield/.
6.14 Getting Location from a GPS | 205
www.it-ebooks.info

Other interesting GPS projects include hobby airplanes and helicopters that maneuverthemselves to preprogrammed destinations under Arduino software control. MikalHart built a GPS-enabled “treasure chest” with an internal latch that cannot be openeduntil the box is physically moved to a certain location. See http://arduiniana.org.
6.15 Detecting Rotation Using a GyroscopeProblemYou want to respond to the rate of rotation. This can be used to keep a vehicle movingin a straight line or turning at a desired rate.
SolutionMost low-cost gyroscopes use an analog voltage proportional to rotation rate, althoughsome also provide output using I2C (see Chapter 13 for more on using I2C tocommunicate with devices). This recipe works with a gyro with an analog output pro-portional to rotation rate. Figure 6-16 shows an LISY300AL breakout board fromSparkFun. Many low-cost gyros, such as the one used here, are 3.3V devices and mustnot be plugged into the 5V power pin.
Check the maximum voltage of your gyro before connecting power.Plugging a 3.3V gyro into 5 volts can permanently damage the device.
Figure 6-16. LISY300AL gyro connected using 3.3V pin
The Gyro OUT connection is the analog output and is connected to Arduino analoginput 0. The PD connection enables the gyro to be switched into low power mode and
206 | Chapter 6: Getting Input from Sensors
www.it-ebooks.info

is connected to analog pin 1 (in this sketch, it is used as a digital output pin). You canconnect PD to any digital pin; the pin used here was chosen to keep the wiring neater.If you don’t need to switch the gyro into low-power mode, you can connect the PD lineto Gnd.
Analog pins can also be used as digital pins 14 to 19 if they are not neededfor reading analog values. See the introduction to Chapter 5 for moreon using Arduino analog and digital pins.
The ST (self-test) line is for testing and can be left unconnected:
/* gyro sketch displays the rotation rate on the Serial Monitor */
const int inputPin = 0; // analog input 0const int powerDownPin = 15; // analog input 1 is digital input 15
int rotationRate = 0;
void setup(){ Serial.begin(9600); // sets the serial port to 9600 pinMode(powerDownPin, OUTPUT); digitalWrite(powerDown, LOW); // gyro not in power down mode}
void loop(){ rotationRate = analogRead(inputPin); // read the gyro output Serial.print("rotation rate is "); Serial.println(rotation rate); delay(100); // wait 100ms for next reading}
DiscussionThis sketch sets the powerDownPin to LOW to get the gyro running in normal mode (youcan eliminate this code from setup if you have wired the PD pin to Gnd).
Analog input pins can be used as digital pins (but not the other wayaround). Analog input 0 is digital pin 14; analog input 1 is digital pin15, and so on.
The loop code reads the gyro value on analog pin 0 and displays this on the Serial Monitor.
6.15 Detecting Rotation Using a Gyroscope | 207
www.it-ebooks.info

6.16 Detecting DirectionProblemYou want your sketch to determine direction from an electronic compass.
SolutionThis recipe uses the HM55B compass module from Parallax (#29123). Figure 6-17shows the connections:
/* HM55bCompass sketch uses 'software SPI' serial protocol implemented using Arduino bit functions (see Chapter 3) prints compass angle to Serial Monitor */
const int enablePin = 2;const int clockPin = 3;const int dataPin = 4;
// command codes (from HM55B data sheet)const byte COMMAND_LENGTH = 4; // the number of bits in a commandconst byte RESET_COMMAND = B0000; // reset the chipconst byte MEASURE_COMMAND = B1000; // start a measurementconst byte READ_DATA_COMMAND = B1100; // read data and end flagconst byte MEASUREMENT_READY = B1100; // value returned when measurement complete
int angle;
void setup(){ Serial.begin(9600); pinMode(enablePin, OUTPUT); pinMode(clockPin, OUTPUT); pinMode(dataPin, INPUT); reset(); // reset the compass module}
void loop(){ startMeasurement(); delay(40); // wait for the data to be ready if (readStatus()==MEASUREMENT_READY); // check if the data is ready { angle = readMeasurement(); //read measurement and calculate angle Serial.print("Angle = "); Serial.println(angle); // print angle } delay(100);}
208 | Chapter 6: Getting Input from Sensors
www.it-ebooks.info

void reset(){ pinMode(dataPin, OUTPUT); digitalWrite(enablePin, LOW); serialOut(RESET_COMMAND, COMMAND_LENGTH); digitalWrite(enablePin, HIGH);}
void startMeasurement(){ pinMode(dataPin, OUTPUT); digitalWrite(enablePin, LOW); serialOut(MEASURE_COMMAND, COMMAND_LENGTH); digitalWrite(enablePin, HIGH);}
int readStatus(){ int result = 0; pinMode(dataPin, OUTPUT); digitalWrite(enablePin, LOW); serialOut(READ_DATA_COMMAND, COMMAND_LENGTH); result = serialIn(4); return result; // returns the status}
int readMeasurement(){ int X_Data = 0; int Y_Data = 0; int calcAngle = 0; X_Data = serialIn(11); // Field strength in X Y_Data = serialIn(11); // and Y direction digitalWrite(enablePin, HIGH); // deselect chip calcAngle = atan2(-Y_Data , X_Data) / M_PI * 180; // angle is atan(-y/x) if(calcAngle < 0) calcAngle = calcAngle + 360; // angle from 0 to 259 instead of plus/minus 180 return calcAngle;}
void serialOut(int value, int numberOfBits){ for(int i = numberOfBits; i > 0; i--) // shift the MSB first { digitalWrite(clockPin, LOW); if(bitRead(value, i-1) == 1) digitalWrite(dataPin, HIGH); else digitalWrite(dataPin, LOW); digitalWrite(clockPin, HIGH); }}
int serialIn(int numberOfBits){
6.16 Detecting Direction | 209
www.it-ebooks.info

int result = 0;
pinMode(dataPin, INPUT); for(int i = numberOfBits; i > 0; i--) // get the MSB first { digitalWrite(clockPin, HIGH); if (digitalRead(dataPin) == HIGH) result = (result << 1) + 1; else result = (result << 1) + 0; digitalWrite(clockPin, LOW); }
// the following converts the result to a twos-complement negative number // if the most significant bit in the 11 bit data is 1 if(bitRead(result, 11) == 1) result = (B11111000 << 8) | result; // twos complement negation
return result;}
Figure 6-17. HM55B compass connections
210 | Chapter 6: Getting Input from Sensors
www.it-ebooks.info

DiscussionThe compass module provides magnetic field intensities on two perpendicular axes (xand y). These values vary as the compass orientation is changed with respect to theEarth’s magnetic field (magnetic north).
The data sheet for the device tells you what values to send to reset the compass; checkif a valid reading is ready (if so, it will transmit it).
The sketch uses the functions serialIn() and serialOut() to handle the pin manipu-lations that send and receive messages.
The compass module is initialized into a known state in the reset() function calledfrom setup(). The startMeasurement() function initiates the measurement, and after abrief delay, the readStatus() function indicates if the data is ready. A value of 0 isreturned if the measurement is not ready, or 12 (binary 1100) if the compass is readyto transmit data.
Eleven bits of data are read into the X_Data and Y_Data variables. If you use a differentdevice, you will need to check the data sheet to see how many bits and in what formatthe data is sent. X_Data and Y_Data store the magnetic field readings, and the angle tomagnetic north is calculated as follows: Radians = arctan(-x/y)
This is implemented in the sketch in the line:
angle = 180 * (atan2(-1 * Y_Data , X_Data) / M_PI);
To make a servo follow the compass direction over the first 180 degrees, add thefollowing:
#include <Servo.h>Servo myservo;
in setup:
myservo.attach(8);
and in loop after the angle is calculated:
angle = constrain(angle, 0,180); // the servo is driven only up to 180degrees myservo.write(angle);
6.17 Getting Input from a Game Control Pad (PlayStation)ProblemYou want to respond to joystick positions or button presses from a game control pad.
6.17 Getting Input from a Game Control Pad (PlayStation) | 211
www.it-ebooks.info

SolutionThis recipe uses a Sony PlayStation 2–style controller with the PSX library at http://www.arduino.cc/playground/Main/PSXLibrary; Figure 6-18 shows the connections.
Figure 6-18. PlayStation controller plug connected to Arduino
The sketch uses the Serial Monitor to show which button is pressed:
/* * PSX sketch * * Display joystick and button values * uses PSX library written by Kevin Ahrendt * http://www.arduino.cc/playground/Main/PSXLibrary */
#include <wProgram.h>#include <Psx.h> // Includes the Psx Library
Psx Psx; // Create an instance of the Psx libraryconst int dataPin = 5;const int cmndPin = 4;const int attPin = 3;const int clockPin = 2;const int psxDelay = 50; // determine the clock delay in microseconds
unsigned int data = 0; // data stores the controller response
void setup(){ // initialize the Psx library Psx.setupPins(dataPin, cmndPin, attPin, clockPin, psxDelay); Serial.begin(9600); // results will be displayed on the Serial Monitor}
212 | Chapter 6: Getting Input from Sensors
www.it-ebooks.info

void loop(){ data = Psx.read(); // get the psx controller button data
// check the button bits to see if a button is pressed if(data & psxLeft) Serial.println("left button"); if(data & psxDown) Serial.println("down button"); if(data & psxRight) Serial.println("right button"); if(data & psxUp) Serial.println("up button"); if(data & psxStrt) Serial.println("start button"); if(data & psxSlct) Serial.println("select button");
delay(100);}
DiscussionGame controllers provide information in many different ways. Most recent controllerscontain chips that read the switches and joystick in the controller and communicatethe information using a protocol depending on the game platform. Older controllersare more likely to give direct access to switches and joysticks using connectors withmany connections. The latest wave of game platforms uses USB as the connection.These are more difficult to work with using Arduino.
See AlsoRecipe 4.1; Recipe 4.11
PlayStation controller protocol: http://www.gamesx.com/controldata/psxcont/psxcont.htm
6.18 Reading AccelerationProblemYou want to respond to acceleration; for example, to detect when something starts orstops moving. Or you want to detect how something is oriented with respect to theEarth’s surface (measure acceleration due to gravity).
6.18 Reading Acceleration | 213
www.it-ebooks.info

SolutionLike many of the sensors discussed in this chapter, there is a wide choice of devices andmethods of connection. Recipe 4.11 gave an example of a virtual joystick using theaccelerometer in the Wii nunchuck to follow hand movements. Recipe 13.2 has moreinformation on using the Wii nunchuck accelerometer. The recipe here uses analogoutput proportional to acceleration. Suitable devices include the ADXL203CE (SFSEN-00844), ADXL320 (SF SEN 00847), and MMA7260Q (SF SEN00252)—check theSparkFun accelerometer selection guide on the SparkFun website for more information.
Figure 6-19 shows the connections for the x- and y-axes of an analog accelerometer.
Figure 6-19. Connections for x- and y-axes of an analog accelerometer
Check the data sheet for your device to ensure that you don’t exceedthe maximum voltage. Many accelerometers are designed for 3.3V op-eration and can be damaged if connected to the 5V power connectionon an Arduino board.
214 | Chapter 6: Getting Input from Sensors
www.it-ebooks.info

The simple sketch here uses the ADXL320 to display the acceleration in the x- and y-axes:
/* accel sketch simple sketch to output values on the x- and y-axes */
const int xPin = 0; // analog input pinsconst int yPin = 1;
void setup(){ Serial.begin(9600); // note the higher than usual serial speed}
void loop(){int xValue; // values from accelerometer stored hereint yValue;
xValue = analogRead(xPin); yValue = analogRead(yPin);
Serial.print("X value = "); Serial.println(xValue);
Serial.print("Y value = "); Serial.println(yValue); delay(100);}
DiscussionYou can use techniques from the previous recipes to extract information from the ac-celerometer readings. You might need to check for a threshold to work out movement.You may need to average values like the sound example to get values that are of use. Ifthe accelerometer is reading horizontally, you can use the values directly to work outmovement. If it is reading vertically, you will need to take into account the effects ofgravity on the values. This is similar to the DC offset in the audio example, but it canbe complicated, as the accelerometer may be changing orientation so that the effect ofgravity is not a constant value for each reading.
See AlsoSparkFun selection guide: http://www.sparkfun.com/commerce/tutorial_info.php?tutorials_id=167
6.18 Reading Acceleration | 215
www.it-ebooks.info

CHAPTER 7
Visual Output
7.0 IntroductionVisual output lets the Arduino show off, and toward that end, the Arduino supports abroad range of LED devices. Before delving into the recipes in this chapter, we’ll discussArduino digital and analog output. This introduction will be a good starting point ifyou are not yet familiar with using digital and analog outputs (digitalWrite andanalogWrite).
Digital OutputAll the pins that can be used for digital input can also be used for digital output.Chapter 5 provided an overview of the Arduino pin layout; you may want to lookthrough the introduction section in that chapter if you are unfamiliar with connectingthings to Arduino pins.
Digital output causes the voltage on a pin to be either high (5 volts) or low (0 volts).Use the digitalWrite(outputPin, value) function to turn something on or off. Thefunction has two parameters: outputPin is the pin to control, and value is either HIGH(5 volts) or LOW (0 volts).
For the pin voltage to respond to this command, the pin must have been set in outputmode using the pinMode(outputPin, OUTPUT) command. The sketch in Recipe 7.1 pro-vides an example of how to use digital output.
Analog OutputAnalog refers to levels that can be gradually varied up to their maximum level (think oflight dimmers and volume controls). Arduino has an analogWrite function that can beused to control such things as the intensity of an LED connected to the Arduino.
The analogWrite function is not truly analog, although it can behave like analog, as youwill see. analogWrite uses a technique called Pulse Width Modulation (PWM) thatemulates an analog signal using digital pulses.
217
www.it-ebooks.info

PWM works by varying the proportion of the pulses’ on time to off time, as shown inFigure 7-1. Low-level output is emulated by producing pulses that are on for only ashort period of time. Higher level output is emulated with pulses that are on more thanthey are off. When the pulses are repeated quickly enough (almost 500 times per secondon Arduino), the pulsing cannot be detected by human senses, and the output fromthings such as LEDs looks like it is being smoothly varied as the pulse rate is changed.
Figure 7-1. PWM output for various analogWrite values
Arduino has a limited number of pins that can be used for analog output. On a standardboard, you can use pins 3, 5, 6, 9, 10, and 11. On the Arduino Mega board, you canuse pins 2 through 13 for analog output. Many of the recipes that follow use pins thatcan be used for both digital and analog to minimize rewiring if you want to try outdifferent recipes. If you want to select different pins for analog output, remember tochoose one of the supported analogWrite pins (other pins will not give any output).
Controlling LightControlling light using digital or analog output is a versatile, effective, and widely usedmethod for providing user interaction. Single LEDs, arrays, and numeric displays are
218 | Chapter 7: Visual Output
www.it-ebooks.info

covered extensively in the recipes in this chapter. LCD text and graphical displays re-quire different techniques and are covered in Chapter 11.
LED specifications
An LED is a semiconductor device (diode) with two leads, an anode and a cathode.When the voltage on the anode is more positive than that on the cathode (by an amountcalled the forward voltage) the device emits light (photons). The anode is usually thelonger lead, and there is often a flat spot on the housing to indicate the cathode (seeFigure 7-2). The LED color and the exact value of the forward voltage depend on theconstruction of the diode.
A typical red LED has a forward voltage of around 1.8 volts. If the voltage on the anodeis not 1.8 volts more positive than the cathode, no current will flow through the LEDand no light will be produced. When the voltage on the anode becomes 1.8 volts morepositive than that on the cathode, the LED “turns on” (conducts) and effectively be-comes a short circuit. You must limit the current with a resistor, or the LED will (sooneror later) burn out. Recipe 7.1 shows you how to calculate values for current limitingresistors.
You may need to consult an LED data sheet to select the correct LED for your appli-cation, particularly to determine values for forward voltage and maximum current.Tables 7-1 and 7-2 show the most important fields you should look for on an LED datasheet.
Table 7-1. Key data sheet specifications: absolute maximum ratings
Parameter Symbol Rating Units Comment
Forward current If 25 mA The maximum continuous current for this LED
Peak forward current (1/10 duty @1 KHz)
If 160 mA The maximum pulsed current (given here for apulse that is 1/10 on and 9/10 off)
Table 7-2. Key data sheet specifications: electro-optical characteristics
Parameter Symbol Rating Units Comment
Luminous intensity Iv 2 mcd If = 2 mA - brightness with 2 mA current
Iv 40 mcd If = 20 mA - brightness with 20 mA current
Viewing angle 120 Degrees The beam angle
Wavelength 620 nm The dominant or peak wavelength (color)
Forward voltage Vf 1.8 Volts The voltage across the LED when on
Arduino pins can supply up to 40 mA of current. This is plenty for a typical medium-intensity LED, but not enough to drive the higher brightness LEDs or multiple LEDsconnected to a single pin. Recipe 7.3 shows how to use a transistor to increase thecurrent through the LED.
7.0 Introduction | 219
www.it-ebooks.info

Multicolor LEDs consist of two or more LEDs in one physical package. These may havemore than two leads to enable separate control of the different colors. There are manypackage variants, so you should check the data sheet for your LED to determine howto connect the leads.
Self-color-changing, multicolor LEDs with an integrated chip cannot becontrolled in any way; you can’t change their colors from Arduino.Because PWM rapidly cycles the power on and off, you are effectivelyrebooting the integrated chip many times each second, so these LEDsare unsuitable for PWM applications as well.
Multiplexing
Applications that need to control many LEDs can use a technique called multiplexing.Multiplexing works by switching groups of LEDs (usually arranged in rows or columns)in sequence. Recipe 7.11 shows how 32 individual LEDs (eight LEDs per digit, includ-ing decimal point) with four digits can be driven with just 12 pins. Eight pins drive adigit segment for all the digits and four pins select which digit is active. Scanningthrough the digits quickly enough (at least 25 times per second) creates the impressionthat the lights remain on rather than pulsing, through the phenomenon of persistenceof vision.
Charlieplexing uses multiplexing along with the fact that LEDs have polarity (they onlyilluminate when the anode is more positive than the cathode) to switch between twoLEDs by reversing the polarity.
7.1 Connecting and Using LEDsProblemYou want to control one or more LEDs and select the correct current-limiting resistorso that you do not damage the LEDs.
SolutionTurning an LED on and off is easy to do with Arduino, and some of the recipes inprevious chapters have included this capability (see Recipe 5.1 for an example thatcontrols the built-in LED on pin 13). The recipe here provides guidance on choosingand using external LEDs. Figure 7-2 shows the wiring for three LEDs, but you can runthis sketch with just one or two.
220 | Chapter 7: Visual Output
www.it-ebooks.info

The schematic symbol for the cathode (the negative pin) is k, not c. Theschematic symbol c is used for a capacitor.
The following sketch lights up three LEDs connected to pins 3, 5, and 6 in sequencefor one second:
/* LEDs sketch Blink three LEDs each connected to a different digital pin */
const int firstLedPin = 3; // choose the pin for each of the LEDsconst int secondLedPin = 5;const int thirdLedPin = 6;
void setup(){ pinMode(firstLedPin, OUTPUT); // declare LED pins as output pinMode(secondLedPin, OUTPUT); // declare LED pins as output pinMode(thirdLedPin, OUTPUT); // declare LED pins as output}
void loop(){ // flash each of the LEDs for 1000 milliseconds (1 second) blinkLED(firstLedPin, 1000); blinkLED(secondLedPin, 1000); blinkLED(thirdLedPin, 1000);}
Figure 7-2. Connecting external LEDs
7.1 Connecting and Using LEDs | 221
www.it-ebooks.info

// blink the LED on the given pin for the duration in millisecondsvoid blinkLED(int pin, int duration){ digitalWrite(pin, HIGH); // turn LED on delay(duration); digitalWrite(pin, LOW); // turn LED off delay(duration);}
The sketch sets the pins connected to LEDs as output in the setup function. The loopfunction calls blinkLED to flash the LED for each of the three pins. blinkLED sets theindicated pin HIGH for one second (1,000 milliseconds).
DiscussionBecause the anodes are connected to Arduino pins and the cathodes are connected toground, the LEDs will light when the pin goes HIGH and will be off when the pin is low.If you had connected the LEDs the other way around (the cathodes to the pins and theanodes to ground), the LEDs would light when the pin goes LOW (the visual effect wouldreverse—one of the LEDs would turn off for a second while the other two would be lit).
LEDs require a series resistor to control the current or they can quicklyburn out. The built-in LED on pin 13 has a resistor on the circuit board.External LEDs need to be connected through a series resistor on eitherthe anode or the cathode.
A resistor in series with the LED is used to control the amount of current that will flowwhen the LED conducts. To calculate the resistor value you need to know the inputpower supply voltage (Vs, usually 5 volts), the LED forward voltage (Vf), and theamount of current (I) that you want to flow through the LED.
The formula for the resistance in ohms (known as Ohm’s law) is: R = (Vs - Vf) / I
For example, driving an LED with a forward voltage of 1.8 volts with 15 mA of currentusing an input supply voltage of 5 volts would use the following values:
Vs = 5 (for a 5V Arduino board)Vf = 1.8 (the forward voltage of the LED)I = 0.015 (1 milliamp [mA] is one one-thousandth of an amp, so 15 mA is 0.015amps)
The voltage across the LED when it is on (Vs - Vf) is: 5 - 1.8, which is 3.2 volts
Therefore, the calculation for the series resistor is: 3.2 / 0.015, which is 213 ohms
The value of 213 ohms is not a standard resistor value, so you can round this up to220 ohms.
222 | Chapter 7: Visual Output
www.it-ebooks.info

The resistor is shown in Figure 7-2 connected between the cathode and ground, but itcan be connected to the other side of the LED instead (between the voltage supply andthe anode).
Arduino pins have a maximum current of 40 mA. If your LED needsmore current than this, you should use a transistor to switch the LED,as shown in Recipe 7.3.
See AlsoRecipe 7.3
7.2 Adjusting the Brightness of an LEDProblemYou want to control the intensity of one or more LEDs from your sketch.
SolutionConnect each LED to an analog (PWM) output. Use the wiring shown in Figure 7-2.The sketch will fade the LED(s) from off to maximum intensity and back to off, witheach cycle taking around five seconds:
/* * LedBrightness sketch * controls the brightness of LEDs on analog output ports*/
const int firstLed = 3; // specify the pin for each of the LEDsconst int secondLed = 5;const int thirdLed = 6;
int brightness = 0;int increment = 1;
void setup(){ // pins driven by analogWrite do not need to be declared as outputs}
void loop(){ if(brightness > 255) { increment = -1; // count down after reaching 255 } else if(brightness < 1) { increment = 1; // count up after dropping back down to 0
7.2 Adjusting the Brightness of an LED | 223
www.it-ebooks.info

} brightness = brightness + increment; // increment (or decrement sign is minus)
// write the brightness value to the LEDs analogWrite(firstLed, brightness); analogWrite(secondLed, brightness); analogWrite(thirdLed, brightness );
delay(10); // 10ms for each step change means 2.55 secs to fade up or down}
DiscussionThis uses the same wiring as the previous sketch, but here the pins are controlled us-ing analogWrite instead of digitalWrite. analogWrite uses PWM to control the powerto the LED; see this chapter’s introduction section for more on analog output.
The sketch fades the light level up and down by increasing (on fade up) or decreasing(on fade down) the value of the brightness variable in each pass through the loop. Thisvalue is given to the analogWrite function for the three connected LEDs. The minimumvalue for analogWrite is 0—this keeps the voltage on the pin at 0. The maximum valueis 255, and this keeps the pin at 5 volts.
When the brightness variable reaches the maximum value, it will start to decrease,because the sign of the increment is changed from +1 to -1 (adding -1 to a value is thesame as subtracting 1 from that value).
See AlsoThis chapter’s introduction describes how Arduino analog output works.
7.3 Driving High-Power LEDsProblemYou need to switch or control the intensity of LEDs that need more power than theArduino pins can provide. Arduino pins can only handle current up to 40 mA.
SolutionUse a transistor to switch on and off the current flowing through the LEDs. Connectthe LED as shown in Figure 7-3. You can use the same code as shown in the previousrecipes (just make sure the pins connected to the transistor base match the pin numberused in your sketch).
224 | Chapter 7: Visual Output
www.it-ebooks.info

DiscussionThe LEDs may need a power source separate from the Arduino if the total current ismore than a few hundred mA. See Appendix C for information on using an externalpower supply.
Remember to connect the ground of the external supply to the Arduinoground.
Current is allowed to flow from the collector to the emitter when the transistor isswitched on. No significant current flows when the transistor is off. The Arduino canturn a transistor on by making the voltage on a pin HIGH with digitalWrite. A resistoris necessary between the pin and the transistor base to prevent too much current fromflowing—1K ohms is a typical value (this provides 5 mA of current to the base of thetransistor). See Appendix B for advice on how to read a data sheet and pick and use atransistor. You can also use specialized integrated circuits such as the ULN2003A fordriving multiple outputs. These contain seven high-current (0.5 amp) output drivers.
The resistor used to limit the current flow through the LED is calculated using thetechnique given in Recipe 7.1, but you may need to take into account that the sourcevoltage will be reduced slightly because of the small voltage drop through the transistor.
Figure 7-3. Using transistors to drive high-current LEDs
7.3 Driving High-Power LEDs | 225
www.it-ebooks.info

This will usually be less than three-fourths of a volt (the actual value can be found bylooking at collector-emitter saturation voltage; see Appendix B). High-current LEDs (1watt or more) are best driven using a constant current source (a circuit that activelycontrols the current) to manage the current through the LED.
See AlsoWeb reference for constant current drivers: http://blog.makezine.com/archive/2009/08/constant_current_led_driver.html
7.4 Adjusting the Color of an LEDProblemYou want to control the color of an RGB LED under program control.
SolutionRGB LEDs have red, green, and blue elements in a single package with either the anodesconnected together (known as common anode) or the cathodes connected together(known as common cathode). Use the wiring in Figure 7-4 for common anode (theanodes are connected to +5 volts and the cathodes are connected to pins). Use Fig-ure 7-2 if your RGB LEDs are common cathode.
Figure 7-4. RGB connections (common anode)
226 | Chapter 7: Visual Output
www.it-ebooks.info

This sketch continuously fades through the color spectrum by varying the intensity ofthe red, green, and blue elements:
/* * RGB_LEDs sketch * RGB LEDs driven from analog output ports*/
const int redPin = 3; // choose the pin for each of the LEDsconst int greenPin = 5;const int bluePin = 6;const boolean invert = true; // set true if common anode, false if common cathode
int color = 0; // a value from 0 to 255 representing the hueint R, G, B; // the Red Green and Blue color components
void setup(){ // pins driven by analogWrite do not need to be declared as outputs}
void loop(){ int brightness = 255; // 255 is maximum brightness hueToRGB( color, brightness); // call function to convert hue to RGB // write the RGB values to the pins analogWrite(redPin, R); analogWrite(greenPin, G); analogWrite(bluePin, B );
color++; // increment the color if(color > 255) // color = 0; delay(10);}
// function to convert a color to its Red, Green, and Blue components.
void hueToRGB( int hue, int brightness){ unsigned int scaledHue = (hue * 6); unsigned int segment = scaledHue / 256; // segment 0 to 5 around the colorwheel unsigned int segmentOffset = scaledHue - (segment * 256); // position withinthe segment
unsigned int complement = 0; unsigned int prev = (brightness * ( 255 - segmentOffset)) / 256; unsigned int next = (brightness * segmentOffset) / 256;
7.4 Adjusting the Color of an LED | 227
www.it-ebooks.info

if(invert) { brightness = 255-brightness; complement = 255; prev = 255-prev; next = 255-next; }
switch(segment ) { case 0: // red R = brightness; G = next; B = complement; break; case 1: // yellow R = prev; G = brightness; B = complement; break; case 2: // green R = complement; G = brightness; B = next; break; case 3: // cyan R = complement; G = prev; B = brightness; break; case 4: // blue R = next; G = complement; B = brightness; break; case 5: // magenta default: R = brightness; G = complement; B = prev; break; }}
DiscussionThe color of an RGB LED is determined by the relative intensity of its red, green, andblue elements. The core function in the sketch (hueToRGB) handles the conversion of ahue value ranging from 0 to 255 into a corresponding color ranging from red throughto blue. The spectrum of visible colors is often represented using a color wheel con-sisting of the primary and secondary colors with their intermediate gradients. Thespokes of the color wheel representing the six primary and secondary colors are handledby six case statements. The code in a case statement is executed if the segment variable
228 | Chapter 7: Visual Output
www.it-ebooks.info

matches the case number, and if so, the RGB values are set as appropriate for each.Segment 0 is red, segment 1 is yellow, segment 2 is green, and so on.
If you also want to adjust the brightness, you can reduce the value of the brightnessvariable. The following shows how to adjust the brightness with a variable resistor orsensor connected as shown in Figure 7-11 or Figure 7-15:
int brightness = map( analogRead(0),0,1023, 0, 255); // get brightness from sensor
The brightness variable will range in value from 0 to 255 as the analog input rangesfrom 0 to 1,023, causing the LED to increase brightness as the value increases.
See AlsoRecipe 2.16; Recipe 13.1
7.5 Sequencing Multiple LEDs: Creating a Bar GraphProblemYou want an LED bar graph that lights LEDs in proportion to a value in your sketchor a value read from a sensor.
SolutionYou can connect the LEDs as shown in Figure 7-2 (using additional pins if you wantmore LEDs). Figure 7-5 shows six LEDs connected on consecutive pins.
Figure 7-5. Six LEDs with cathodes connected to Arduino pins
7.5 Sequencing Multiple LEDs: Creating a Bar Graph | 229
www.it-ebooks.info

The following sketch turns on a series of LEDs, with the number being proportional tothe value of a sensor connected to an analog input port (see Figure 7-11 or Fig-ure 7-15 to see how a sensor is connected):
/* Bargraph sketch
Turns on a series of LEDs proportional to a value of an analog sensor. Six LEDs are controlled but you can change the number of LEDs by changing the value of NbrLEDs and adding the pins to the ledPins array */
const int NbrLEDs = 6;const int ledPins[] = { 2, 3, 4, 5, 6, 7};const int analogInPin = 0; // Analog input pin connected to the variableresistorconst int wait = 30;
// Swap values of the following two constants if cathodes are connected to Gndconst boolean LED_ON = LOW;const boolean LED_OFF = HIGH;
int sensorValue = 0; // value read from the sensorint ledLevel = 0; // sensor value converted into LED 'bars'
void setup() { for (int led = 0; led < NbrLEDs; led++) { pinMode(ledPins[led], OUTPUT); // make all the LED pins outputs }}
void loop() { sensorValue = analogRead(analogInPin); // read the analog in value ledLevel = map(sensorValue, 0, 1023, 0, NbrLEDs); // map to the number of LEDs for (int led = 0; led < NbrLEDs; led++) { if (led < ledLevel ) { digitalWrite(ledPins[led], LED_ON); // turn on pins less than the level } else { digitalWrite(ledPins[led], LED_OFF); // turn off pins higher than thelevel: } }}
DiscussionThe pins connected to LEDs are held in the array ledPins. To change the number ofLEDs, you can add (or remove) elements from this array, but make sure the variableNbrLEDs is the same as the number of elements (which should be the same as the numberof pins). You can have the compiler calculate the value of NbrLEDs for you by replacingthis line:
230 | Chapter 7: Visual Output
www.it-ebooks.info

const int NbrLEDs = 6;
with this line:
const int NbrLEDs = sizeof(ledPins) / sizof(ledPins[0];
The sizeof function returns the size (number of bytes) of a variable—in this case, thenumber of bytes in the ledPins array. Because it is an array of integers (with two bytesper element), the total number of bytes in the array is divided by the size of one element(sizeof(ledPins[0])) and this gives the number of elements.
The Arduino map function is used to calculate the number of LEDs that should be lit asa proportion of the sensor value. The code loops through each LED, turning it on ifthe proportional value of the sensor is greater than the LED number. For example, ifthe sensor value is 0, no pins are lit; if the sensor is at half value, half are lit. When thesensor is at maximum value, all the LEDs are lit.
Figure 7-5 shows all the anodes connected together (known as common anode) and thecathodes connected to the pins; the pins need to be LOW for the LED to light. If the LEDshave the anodes connected to pins (as shown in Figure 7-2) and the cathodes are con-nected together (known as common cathode), the LED is lit when the pin goes HIGH.The sketch in this recipe uses the constant names LED_ON and LED_OFF to make it easyto select common anode or common cathode connections. To change the sketch forcommon cathode connection, swap the values of these constants as follows:
const boolean LED_ON = HIGH; // HIGH is on when using common cathode connectionconst boolean LED_OFF = LOW;
You may want to slow down the decay (rate of change) in the lights; for example, toemulate the movement of the indicator of a sound volume meter. Here is a variationon the sketch that slowly decays the LED bars when the level drops:
/* LED bar graph - decay version*/
const int NbrLEDs = sizeof(ledPins) / sizof(ledPins[0];const int ledPins[] = { 2, 3, 4, 5, 6, 7};const int analogInPin = 0; // Analog input pin connected to variable resistorconst int decay = 10; // increasing this reduces decay rate of storedValue
int sensorValue = 0; // value read from the sensorint storedValue = 0; // the stored (decaying) sensor valueint ledLevel = 0; // value converted into LED 'bars'
void setup() { for (int led = 0; led < NbrLEDs; led++) { pinMode(ledPins[led], OUTPUT); // make all the LED pins outputs }}
7.5 Sequencing Multiple LEDs: Creating a Bar Graph | 231
www.it-ebooks.info

void loop() { sensorValue = analogRead(analogInPin); // read the analog in value storedValue = max(sensorValue, storedValue); // only use sensor value ifhigher ledLevel = map(storedValue, 0, 1023, 0, NbrLEDs); // map to number of LEDs for (int led = 0; led < NbrLEDs; led++) { if (led < ledLevel ) { digitalWrite(ledPins[led], HIGH); // turn on pins less than the level } else { digitalWrite(ledPins[led], LOW); // turn off pins higher than the level } } storedValue = storedValue - decay; // decay the value delay(10); // wait 10 ms before next loop}
The decay is handled by the line that uses the max function. This returns either thesensor value or the stored decayed value, whichever is higher. If the sensor is higherthan the decayed value, this is saved in storedValue. Otherwise, the level ofstoredValue is reduced by the constant decay each time through the loop (set to 10milliseconds by the delay function). Increasing the value of the decay constant willreduce the time for the LEDs to fade to all off.
See AlsoSee Recipes 12.1 and 12.2 if you need greater precision in your decay times. The totaltime through the loop is actually greater than 10 milliseconds because it takes an ad-ditional millisecond or so to execute the rest of the loop code.
Recipe 3.6 explains the max function.
Recipe 5.6 has more on reading a sensor with the analogRead function.
Recipe 5.7 describes the map function.
7.6 Sequencing Multiple LEDs: Making a Chase Sequence(Knight Rider)ProblemYou want to light LEDs in a “chasing lights” sequence (as seen on the TV show KnightRider).
232 | Chapter 7: Visual Output
www.it-ebooks.info

SolutionYou can use the same connection as shown in Figure 7-5:
/* KnightRider */
const int NbrLEDs = 6;const int ledPins[] = {2, 3, 4, 5, 6, 7};const int wait = 30;
void setup(){ for (int led = 0; led < NbrLEDs; led++) { pinMode(ledPins[led], OUTPUT); }}
void loop() { for (int led = 0; led < NbrLEDs-1; led++) { digitalWrite(ledPins[led], HIGH); delay(wait); digitalWrite(ledPins[led + 1], HIGH); delay(wait); digitalWrite(ledPins[led], LOW); delay(wait*2); } for (int led = NbrLEDs; led > 0; led--) { digitalWrite(ledPins[led], HIGH); delay(wait); digitalWrite(ledPins[led - 1], HIGH); delay(wait); digitalWrite(ledPins[led], LOW); delay(wait*2); }}
DiscussionThis code is similar to the code in Recipe 7.5, except the pins are turned on and off ina fixed sequence rather than depending on a sensor level. There are two for loops; thefirst produces the left-to-right pattern by lighting up LEDs from left to right. This loopstarts with the first (leftmost) LED and steps through adjacent LEDs until it reachesand illuminates the rightmost LED. The second for loop lights the LEDs from right toleft by starting at the rightmost LED and decrementing (decreasing by one) the LEDthat is lit until it gets to the first (rightmost) LED. The delay period is set by the waitvariable and can be chosen to provide the most pleasing appearance.
7.6 Sequencing Multiple LEDs: Making a Chase Sequence (Knight Rider) | 233
www.it-ebooks.info

7.7 Controlling an LED Matrix Using MultiplexingProblemYou have a matrix of LEDs and want to minimize the number of Arduino pins neededto turn LEDs on and off.
SolutionThis sketch uses an LED matrix of 64 LEDs with anodes connected in rows and cath-odes in columns (as in the Futurlec LEDM88R). Dual-color LED displays may be easierto obtain, and you can drive just one of the colors if that is all you need. Figure 7-6shows the connections:
/* matrixMpx sketch
Sequence LEDs starting from first column and row until all LEDS are lit Multiplexing is used to control 64 LEDs with 16 pins */
const int columnPins[] = { 2, 3, 4, 5, 6, 7, 8, 9};const int rowPins[] = { 10,11,12,15,16,17,18,19};
int pixel = 0; // 0 to 63 LEDs in the matrixint columnLevel = 0; // pixel value converted into LED columnint rowLevel = 0; // pixel value converted into LED row
void setup() { for (int i = 0; i < 8; i++) { pinMode(columnPins[i], OUTPUT); // make all the LED pins outputs pinMode(rowPins[i], OUTPUT); }}
void loop() { pixel = pixel + 1; if(pixel > 63) pixel = 0;
columnLevel = pixel / 8; // map to the number of columns rowLevel = pixel % 8; // get the fractional value for (int column = 0; column < 8; column++) { digitalWrite(columnPins[column], LOW); // connect this column to Ground for(int row = 0; row < 8; row++) { if (columnLevel > column) { digitalWrite(rowPins[row], HIGH); // connect all LEDs in row to +5 volts } else if (columnLevel == column && rowLevel >= row)
234 | Chapter 7: Visual Output
www.it-ebooks.info

{ digitalWrite(rowPins[row], HIGH); } else { digitalWrite(columnPins[column], LOW); // turn off all LEDs in this row } delayMicroseconds(300); // delay gives frame time of 20ms for 64 LEDs digitalWrite(rowPins[row], LOW); // turn off LED }
digitalWrite(columnPins[column], HIGH); // disconnect this columnfrom Ground }}
Figure 7-6. An LED matrix connected to 16 digital pins
LED matrix displays do not have a standard pinout, so you must checkthe data sheet for your display. Wire the rows of anodes and columnsof cathodes as shown in Figure 7-13 or Figure 7-14, but use the LED pinnumbers shown in your data sheet.
7.7 Controlling an LED Matrix Using Multiplexing | 235
www.it-ebooks.info

DiscussionThe resistor’s value must be chosen to ensure that the maximum current through a pindoes not exceed 40 mA. Because the current for up to eight LEDs can flow througheach column pin, the maximum current for each LED must be one-eighth of 40 mA,or 5 mA. Each LED in a typical small red matrix has a forward voltage of around 1.8volts. Calculating the resistor that results in 5 mA with a forward voltage of 1.8 voltsgives a value of 680 ohms. Check your data sheet to find the forward voltage of thematrix you want to use. Each column of the matrix is connected through the seriesresistor to a digital pin. When the column pin goes low and a row pin goes high, thecorresponding LED will light. For all LEDs where the column pin is high or its row pinis low, no current will flow through the LED and it will not light.
The for loop scans through each row and column and turns on sequential LEDs untilall LEDs are lit. The loop starts with the first column and row and increments the rowcounter until all LEDs in that row are lit; it then moves to the next column, and so on,lighting another LED with each pass through the loop until all the LEDs are lit.
You can control the number of lit LEDs in proportion to the value from a sensor (seeRecipe 5.6 for connecting a sensor to the analog port) by making the following changesto the sketch.
Comment out or remove these three lines from the beginning of the loop:
pixel = pixel + 1; if(pixel > 63) pixel = 0;
Replace them with the following lines that read the value of a sensor on pin 0 and mapthis to a number of pixels ranging from zero to 63:
int sensorValue = analogRead(0); // read the analog in value pixel = map(sensorValue, 0, 1023, 0, 63); // map sensor value to pixel(LED)
You can test this with a variable resistor connected to analog input pin 0 connected asshown in Figure 5-7 in Chapter 5. The number of LEDs lit will be proportional to thevalue of the sensor.
7.8 Displaying Images on an LED MatrixProblemYou want to display one or more images on an LED matrix, perhaps creating an ani-mation effect by quickly alternating multiple images.
236 | Chapter 7: Visual Output
www.it-ebooks.info

SolutionThis Solution can use the same wiring as in Recipe 7.7. The sketch creates the effect ofa heart beating by briefly lighting LEDs arranged in the shape of a heart. A small heartfollowed by a larger heart is flashed for each heartbeat (the images look like Figure 7-7):
/* * matrixMpxAnimation sketch * animates two heart images to show a beating heart */
// the heart images are stored as bitmaps - each bit corresponds to an LED// a 0 indicates the LED is off, 1 is onbyte bigHeart[] = { B01100110, B11111111, B11111111, B11111111, B01111110, B00111100, B00011000, B00000000};
byte smallHeart[] = { B00000000, B00000000, B00010100, B00111110, B00111110, B00011100, B00001000, B00000000};
const int columnPins[] = { 2, 3, 4, 5, 6, 7, 8, 9};const int rowPins[] = { 10,11,12,15,16,17,18,19};
void setup() { for (int i = 0; i < 8; i++) { pinMode(rowPins[i], OUTPUT); // make all the LED pins outputs pinMode(columnPins[i], OUTPUT); digitalWrite(columnPins[i], HIGH); // disconnect column pins from Ground }}
void loop() { int pulseDelay = 800 ; // milliseconds to wait between beats
show(smallHeart, 80); // show the small heart image for 100 ms show(bigHeart, 160); // followed by the big heart for 200ms delay(pulseDelay); // show nothing between beats}
7.8 Displaying Images on an LED Matrix | 237
www.it-ebooks.info

// routine to show a frame of an image stored in the array pointed to by theimage parameter.// the frame is repeated for the given duration in millisecondsvoid show( byte * image, unsigned long duration){ unsigned long start = millis(); // begin timing the animation while (start + duration > millis()) // loop until the duration periodhas passed { for(int row = 0; row < 8; row++) { digitalWrite(rowPins[row], HIGH); // connect row to +5 volts for(int column = 0; column < 8; column++) { boolean pixel = bitRead(image[row],column); if(pixel == 1) { digitalWrite(columnPins[column], LOW); // connect column to Gnd } delayMicroseconds(300); // a small delay for each LED digitalWrite(columnPins[column], HIGH); // disconnect column from Gnd } digitalWrite(rowPins[row], LOW); // disconnect LEDs } }}
Figure 7-7. The two heart images displayed on each beat
DiscussionColumns and rows are multiplexed (switched) similar to Recipe 7.7, but here the valuewritten to the LED is based on images stored in the bigHeart and smallHeart arrays.Each element in the array represents a pixel (a single LED) and each array row represents
238 | Chapter 7: Visual Output
www.it-ebooks.info

a row in the matrix. A row consists of eight bits represented using binary format (asdesignated by the capital B at the start of each row). A bit with a value of 1 indicatesthat the corresponding LED should be on; a 0 means off. The animation effect is createdby rapidly switching between the arrays.
The loop function waits a short time (800 milliseconds) between beats and then callsthe show function, first with the smallheart array and then followed by the bigHeartarray. The show function steps through each element in all the rows and columns, light-ing the LED if the corresponding bit is 1. The bitRead function (see Recipe 2.20) is usedto determine the value of each bit.
A short delay of 300 microseconds between each pixel allows the eye time to perceivethe LED. The timing is chosen to allow each image to repeat quickly enough (50 timesper second) so that blinking is not visible.
Here is a variation that changes the rate at which the heart beats, based on the valuefrom a sensor. You can test this using a variable resistor connected to analog input pin0, as shown in Recipe 5.6. Use the wiring and code shown earlier, except replace theloop function with this code:
void loop() { sensorValue = analogRead(analogInPin); // read the analog in value int pulseRate = map(sensorValue,0,1023,40,240); // convert to beats / minute int pulseDelay = (60000 / pulseRate ); // milliseconds to wait between beats
show(smallHeart, 80); // show the small heart image for 100 ms show(bigHeart, 160); // followed by the big heart for 200ms delay(pulseDelay); // show nothing between beats}
This version calculates the delay between pulses using the map function (see Rec-ipe 5.7) to convert the sensor value into beats per minute. The calculation does notaccount for the time it takes to display the heart, but you can subtract 240 milliseconds(80 ms plus 160 ms for the two images) if you want more accurate timing.
See AlsoRecipes 12.1 and 12.2 provide more information on how to manage time using themillis function.
See Recipes 7.12 and 7.13 for information on how to use shift registers to drive LEDsif you want to reduce the number of Arduino pins needed for driving an LED matrix.
7.9 Controlling a Matrix of LEDs: CharlieplexingProblemYou have a matrix of LEDs and you want to minimize the number of pins needed toturn any of them on and off.
7.9 Controlling a Matrix of LEDs: Charlieplexing | 239
www.it-ebooks.info

SolutionCharlieplexing is a special kind of multiplexing that increases the number of LEDs thatcan be driven by a group of pins. This sketch sequences through six LEDs using justthree pins (Figure 7-8 shows the connections):
/* * Charlieplexing sketch * light six LEDs in sequence that are connected to pins 2, 3, and 4 */
byte pins[] = {2,3,4}; // the pins that are connected to LEDs
// the next two lines infer number of pins and LEDs from the above arrayconst int NUMBER_OF_PINS = sizeof(pins)/ sizeof(pins[0]);const int NUMBER_OF_LEDS = NUMBER_OF_PINS * (NUMBER_OF_PINS-1);
byte pairs[NUMBER_OF_LEDS/2][2] = { {0,1}, {1,2}, {0,2} }; // maps pins to LEDs
void setup(){ // nothing needed here}
void loop(){ for(int i=0; i < NUMBER_OF_LEDS; i++) { lightLed(i); // light each LED in turn delay(1000); }}
// this function lights the given LED, the first LED is 0void lightLed(int led){ // the following four lines convert LED number to pin numbers int indexA = pairs[led/2][0]; int indexB = pairs[led/2][1]; int pinA = pins[indexA]; int pinB = pins[indexB];
// turn off all pins not connected to the given LED for(int i=0; i < NUMBER_OF_PINS; i++) if( pins[i] != pinA && pins[i] != pinB) { // if this pin is not one of our pins pinMode(pins[i], INPUT); // set the mode to input digitalWrite(pins[i],LOW); // make sure pull-up is off } // now turn on the pins for the given LED pinMode(pinA, OUTPUT); pinMode(pinB, OUTPUT); if( led % 2 == 0) {
240 | Chapter 7: Visual Output
www.it-ebooks.info

digitalWrite(pinA,LOW); digitalWrite(pinB,HIGH); } else { digitalWrite(pinB,LOW); digitalWrite(pinA,HIGH); }}
Figure 7-8. Six LEDs driven through three pins using Charlieplexing
DiscussionThe term Charlieplexing comes from Charlie Allen (of Microchip Technology, Inc.),who published the method. The technique is based on the fact that LEDs only turn onwhen connected the “right way” around (with the anode more positive than the cath-ode). Here is the table showing the LED number (see Figure 7-6) that is lit for the validcombinations of the three pins. L is LOW, H is HIGH, and i is INPUT mode. Setting a pin inINPUT mode effectively disconnects it from the circuit:
Pins LEDs2 3 4 1 2 3 4 5 6L L L 0 0 0 0 0 0L H i 1 0 0 0 0 0H L i 0 1 0 0 0 0i L H 0 0 1 0 0 0i H L 0 0 0 1 0 0L i H 0 0 0 0 1 0H i L 0 0 0 0 0 1
7.9 Controlling a Matrix of LEDs: Charlieplexing | 241
www.it-ebooks.info

You can double the number of LEDs to 12 using just one more pin. The first six LEDsare connected in the same way as in the preceding example; add the additional six LEDsso that the connections look like Figure 7-9.
Figure 7-9. Charlieplexing using four pins to drive 12 LEDs
Modify the preceding sketch by adding the extra pin to the pins array:
byte pins[] = {2,3,4,5}; // the pins that are connected to LEDs
Add the extra entries to the pairs array so that it reads as follows:
byte pairs[NUMBER_OF_LEDS/2][2] = { {0,1}, {1,2}, {0,2}, {2,3}, {1,3}, {0,3} };
Everything else can remain the same, so the loop will sequence through all 12 LEDsbecause the code determines the number of LEDs from the number of entries in thepins array.
Because Charlieplexing works by controlling the Arduino pins so that only a single LEDis turned on at a time, it is more complicated to create the impression of lighting mul-tiple LEDs. But you can light multiple LEDs using a multiplexing technique modifiedfor Charlieplexing.
This sketch creates a bar graph by lighting a sequence of LEDs based on the value of asensor connected to analog pin 0:
byte pins[] = {2,3,4};const int NUMBER_OF_PINS = sizeof(pins)/ sizeof(pins[0]);const int NUMBER_OF_LEDS = NUMBER_OF_PINS * (NUMBER_OF_PINS-1);
byte pairs[NUMBER_OF_LEDS/2][2] = { {0,1}, {1,2}, {0,2} };
int ledStates = 0; //holds states for up to 15 LEDsint refreshedLed; // the LED that gets refreshed
void setup(){ // nothing here}
242 | Chapter 7: Visual Output
www.it-ebooks.info

void loop(){const int analogInPin = 0; // Analog input pin connected to the variable resistor
// here is the code from the bargraph recipe int sensorValue = analogRead(analogInPin); // read the analog in value int ledLevel = map(sensorValue, 0, 1023, 0, NUMBER_OF_LEDS); // map to thenumber of LEDs for (int led = 0; led < NUMBER_OF_LEDS; led++) { if (led < ledLevel ) { setState(led, HIGH); // turn on pins less than the level } else { setState(led, LOW); // turn off pins higher than the level } } ledRefresh();
}
void setState( int led, boolean state){ bitWrite(ledStates,led, state);}
void ledRefresh(){ // refresh a different LED each time this is called. if( refreshedLed++ > NUMBER_OF_LEDS) // increment to the next LED refreshedLed = 0; // repeat from the first LED if all have been refreshed
if( bitRead(ledStates, refreshedLed ) == HIGH) lightLed( refreshedLed );}
// this function is identical to the sketch above// it lights the given LED, the first LED is 0void lightLed(int led){ // the following four lines convert LED number to pin numbers int indexA = pairs[led/2][0]; int indexB = pairs[led/2][1]; int pinA = pins[indexA]; int pinB = pins[indexB];
// turn off all pins not connected to the given LED for(int i=0; i < NUMBER_OF_PINS; i++) if( pins[i] != pinA && pins[i] != pinB) { // if this pin is not one of our pins pinMode(pins[i], INPUT); // set the mode to input digitalWrite(pins[i],LOW); // make sure pull-up is off } // now turn on the pins for the given LED pinMode(pinA, OUTPUT);
7.9 Controlling a Matrix of LEDs: Charlieplexing | 243
www.it-ebooks.info

pinMode(pinB, OUTPUT); if( led % 2 == 0) { digitalWrite(pinA,LOW); digitalWrite(pinB,HIGH); } else { digitalWrite(pinB,LOW); digitalWrite(pinA,HIGH); }}
This sketch uses the value of the bits in the variable ledStates to represent the state ofthe LEDs (0 if off, 1 if on). The refresh function checks each bit and lights the LEDsfor each bit that is set to 1. The refresh function must be called quickly and repeatedly,or the LEDs will appear to blink.
Adding delays into your code can interfere with the “persistence of vi-sion” effect that creates the illusion that hides the flashing of the LEDs.
You can use an interrupt to service the refresh function in the background (withoutneeding to explicitly call the function in loop). Timer interrupts are covered in Chap-ter 18, but here is a preview of one approach for using an interrupt to service your LEDrefreshes. This uses a third-party library called FrequencyTimer2 (available from theArduino Playground) to create the interrupt:
#include <FrequencyTimer2.h>
byte pins[] = {2,3,4,5};const int NUMBER_OF_PINS = sizeof(pins)/ sizeof(pins[0]);const int NUMBER_OF_LEDS = NUMBER_OF_PINS * (NUMBER_OF_PINS-1);
byte pairs[NUMBER_OF_LEDS/2][2] = { {0,1}, {1,2}, {0,2} };
int ledStates = 0; //holds states for up to 15 LEDsint refreshedLed; // the LED that gets refreshed
---#include <FrequencyTimer2.h> // include this library to handle the refresh
byte pins[] = {2,3,4};const int NUMBER_OF_PINS = sizeof(pins)/ sizeof(pins[0]);const int NUMBER_OF_LEDS = NUMBER_OF_PINS * (NUMBER_OF_PINS-1);
byte pairs[NUMBER_OF_LEDS/2][2] = { {0,1}, {1,2}, {0,2} };
int ledStates = 0; //holds states for up to 15 LEDsint refreshedLed; // the LED that gets refreshed
244 | Chapter 7: Visual Output
www.it-ebooks.info

void setup(){ FrequencyTimer2::setPeriod(20000/ NUMBER_OF_LEDS); // set the period // the next line tells FrequencyTimer2 the function to call (ledRefresh) FrequencyTimer2::setOnOverflow(ledRefresh); FrequencyTimer2::enable();}
void loop(){const int analogInPin = 0; // Analog input pin connected to the variable resistor
// here is the code from the bargraph recipe int sensorValue = analogRead(analogInPin); // read the analog in value int ledLevel = map(sensorValue, 0, 1023, 0, NUMBER_OF_LEDS); // map to thenumber of LEDs for (int led = 0; led < NUMBER_OF_LEDS; led++) { if (led < ledLevel ) { setState(led, HIGH); // turn on pins less than the level } else { setState(led, LOW); // turn off pins higher than the level } } // the LED is no longer refreshed in loop, it's handled by FrequencyTimer2}
// the remaining code is the same as the previous example
The FrequencyTimer2 library has the period set to 1,666 microseconds (20 ms dividedby 12, the number of LEDs). The FrequencyTimer2setOnOverflow method gets the func-tion to call (ledRefresh) each time the timer “triggers.”
See AlsoChapter 18 provides more information on timer interrupts.
7.10 Driving a 7-Segment LED DisplayProblemYou want to display numerals using a 7-segment numeric display.
SolutionThe following sketch displays numerals from zero to nine on a single-digit, 7-segmentdisplay. Figure 7-10 shows the connections. The output is produced by turning oncombinations of segments that represent the numerals:
/* * SevenSegment sketch
7.10 Driving a 7-Segment LED Display | 245
www.it-ebooks.info

* Shows numerals ranging from 0 through 9 on a single-digit display * This example counts seconds from 0 to 9 */
// bits representing segments A through G (and decimal point) for numerals 0-9const byte numeral[10] = { //ABCDEFG /dp B11111100, // 0 B01100000, // 1 B11011010, // 2 B11110010, // 3 B01100110, // 4 B10110110, // 5 B00111110, // 6 B11100000, // 7 B11111110, // 8 B11100110, // 9};
// pins for decimal point and each segment// dp,G,F,E,D,C,B,Aconst int segmentPins[8] = { 5,9,8,7,6,4,3,2};
void setup(){ for(int i=0; i < 8; i++) { pinMode(segmentPins[i], OUTPUT); // set segment and DP pins to output }}
void loop(){ for(int i=0; i <= 10; i++) { showDigit(i); delay(1000); } // the last value if i is 10 and this will turn the display off delay(2000); // pause two seconds with the display off}
// Displays a number from 0 through 9 on a 7-segment display// any value not within the range of 0-9 turns the display offvoid showDigit( int number){ boolean isBitSet;
for(int segment = 1; segment < 8; segment++) { if( number < 0 || number > 9){ isBitSet = 0; // turn off all segments } else{
246 | Chapter 7: Visual Output
www.it-ebooks.info

// isBitSet will be true if given bit is 1 isBitSet = bitRead(numeral[number], segment); } isBitSet = ! isBitSet; // remove this line if common cathode display digitalWrite( segmentPins[segment], isBitSet); }}
Figure 7-10. Connecting a 7-segment display
DiscussionThe segments to be lit for each numeral are held in the array called numeral. There isone byte per numeral where each bit in the byte represents one of seven segments (orthe decimal point).
The array called segmentPins holds the pins associated with each segment. TheshowDigit function checks that the number ranges from zero to 9, and if valid, looks ateach segment bit and turns on the segment if the bit is set (equal to 1). See Rec-ipe 3.12 for more on the bitRead function.
7.10 Driving a 7-Segment LED Display | 247
www.it-ebooks.info

As mentioned in Recipe 7.4, a pin is set HIGH when turning on a segment on a commoncathode display, and it’s set LOW when turning on a segment on a common anodedisplay. The code here is for a common anode display, so it inverts the value (sets 0 to1 and 1 to 0) as follows:
isBitSet = ! isBitSet; // remove this line if common cathode display
The ! is the negation operator—see Recipe 2.20. If your display is a common cathodedisplay (all the cathodes are connected together; see the data sheet if you are not sure),you can remove that line.
7.11 Driving Multidigit, 7-Segment LED Displays: MultiplexingProblemYou want to display numbers using a 7-segment display that shows two or more digits.
SolutionMultidigit, 7-segment displays usually use multiplexing. In earlier recipes, multiplexedrows and columns of LEDs were connected together to form an array; here, corre-sponding segments from each digit are connected together (see Figure 7-11):
/* * SevenSegmentMpx sketch * Shows numbers ranging from 0 through 9999 on a four-digit display * This example displays the value of a sensor connected to an analog input*/
// bits representing segments A through G (and decimal point) for numerals 0-9const int numeral[10] = { //ABCDEFG /dp B11111100, // 0 B01100000, // 1 B11011010, // 2 B11110010, // 3 B01100110, // 4 B10110110, // 5 B00111110, // 6 B11100000, // 7 B11111110, // 8 B11100110, // 9};
// pins for decimal point and each segment // dp,G,F,E,D,C,B,Aconst int segmentPins[] = { 4,7,8,6,5,3,2,9};
const int nbrDigits= 4; // the number of digits in the LED display
//dig 1 2 3 4const int digitPins[nbrDigits] = { 10,11,12,13};
248 | Chapter 7: Visual Output
www.it-ebooks.info

void setup(){ for(int i=0; i < 8; i++) pinMode(segmentPins[i], OUTPUT); // set segment and DP pins to output
for(int i=0; i < nbrDigits; i++) pinMode(digitPins[i], OUTPUT);}
void loop(){ int value = analogRead(0); showNumber(value);}
void showNumber( int number){ if(number == 0) showDigit( 0, nbrDigits-1) ; // display 0 in the rightmost digit else { // display the value corresponding to each digit // leftmost digit is 0, rightmost is one less than the number of places for( int digit = nbrDigits-1; digit >= 0; digit--) { if(number > 0) { showDigit( number % 10, digit) ; number = number / 10; } } }}
// Displays given number on a 7-segment display at the given digit positionvoid showDigit( int number, int digit){ digitalWrite( digitPins[digit], HIGH ); for(int segment = 1; segment < 8; segment++) { boolean isBitSet = bitRead(numeral[number], segment); // isBitSet will be true if given bit is 1 isBitSet = ! isBitSet; // remove this line if common cathode display digitalWrite( segmentPins[segment], isBitSet); } delay(5); digitalWrite( digitPins[digit], LOW );}
7.11 Driving Multidigit, 7-Segment LED Displays: Multiplexing | 249
www.it-ebooks.info

Figure 7-11. Connecting a multidigit, 7-segment display (LTC-2623)
DiscussionThis sketch has a showDigit function similar to that discussed in Recipe 7.10. Here thefunction is given the numeral and the digit place. The logic to light the segments tocorrespond to the numeral is the same, but in addition, the code sets the pin corre-sponding to the digit place HIGH, so only that digit will be written (see the earlier mul-tiplexing explanations).
7.12 Driving Multidigit, 7-Segment LED Displays UsingMAX7221 Shift RegistersProblemYou want to control multiple 7-segment displays, but you want to minimize the numberof required Arduino pins.
SolutionThis Solution uses the popular MAX7221 LED driver chip to control four-digit com-mon cathode displays, such as the Lite-On LTC-4727JR (Digi-Key 160-1551-5-ND).The MAX7221 provides a simpler solution than Recipe 7.11, because it handles mul-tiplexing and digit decoding in hardware.
This sketch will display a number between zero and 9,999 (Figure 7-12 shows theconnections):
250 | Chapter 7: Visual Output
www.it-ebooks.info

/* Max7221_digits */
#include <SPI.h> // Arduino SPI library introduced in Arduino version 0019
const int slaveSelect = 10; //pin used to enable the active slave
const int numberOfDigits = 2; // change these to match the number of digitswired upconst int maxCount = 99;
int number = 0;
void setup(){ Serial.begin(9600); SPI.begin(); // initialize SPI pinMode(slaveSelect, OUTPUT); digitalWrite(slaveSelect,LOW); //select slave // prepare the 7221 to display 7-segment data - see data sheet sendCommand(12,1); // normal mode (default is shutdown mode); sendCommand(15,0); // Display test off sendCommand(10,8); // set medium intensity (range is 0-15) sendCommand(11,numberOfDigits); // 7221 digit scan limit command sendCommand(9,255); // decode command, use standard 7-segment digits digitalWrite(slaveSelect,HIGH); //deselect slave}
void loop(){ // display a number from the serial port terminated by the end of linecharacter if(Serial.available()) { char ch = Serial.read(); if( ch == '\n') { displayNumber(number); number = 0; } else number = (number * 10) + ch - '0'; // see Chapter 4 for details }}
// function to display up to four digits on a 7-segment displayvoid displayNumber( int number){ for(int i = 0; i < numberOfDigits; i++) { byte character = number % 10; // get the value of the rightmost decade if(number == 0 && i > 0) character = 0xf; // the 7221 will blank the segments when receiving value // send digit number as command, first digit is command 1
7.12 Driving Multidigit, 7-Segment LED Displays Using MAX7221 Shift Registers | 251
www.it-ebooks.info

sendCommand(numberOfDigits-i, character); number = number / 10; }}
void sendCommand( int command, int value){ digitalWrite(slaveSelect,LOW); //chip select is active low //2-byte data transfer to the 7221 SPI.transfer(command); SPI.transfer(value); digitalWrite(slaveSelect,HIGH); //release chip, signal end transfer}
Figure 7-12. MAX7221 driving a multidigit common cathode 7-segment display
SolutionThis recipe uses Arduino SPI communication to talk to the MAX7221 chip. Chap-ter 13 covers SPI in more detail, and Recipe 13.8 explains the SPI-specific code used.
This sketch displays a number if up to four digits are received on the serial port—seeChapter 4 for an explanation of the serial code in loop. The displayNumber functionextracts the value of each digit, starting from the rightmost digit, to the MAX7221 usingthe sendCommand function that sends the values to the MAX7221.
The wiring shown uses a four-digit, 7-segment display, but you can use single- ordual-digit displays for up to eight digits. When combining multiple displays, each cor-responding segment pin should be connected together. (Recipe 13.8 shows the con-nections for a common dual-digit display.)
252 | Chapter 7: Visual Output
www.it-ebooks.info

The MAX72xx chips are designed for common cathode displays. Theanode of each segment is available on a separate pin, and the cathodesof all the segments for each digit are connected together.
7.13 Controlling an Array of LEDs by Using MAX72xx ShiftRegistersProblemYou have an 8x8 array of LEDs to control, and you want to minimize the number ofrequired Arduino pins.
SolutionAs in Recipe 7.12, you can use a shift register to reduce the number of pins needed tocontrol an LED matrix. This solution uses the popular MAX7219 or MAX7221 LEDdriver chip to provide this capability. The sketch uses the matrix library distributedwith Arduino, but it uses different Arduino pins than the Arduino example sketch. Torun the following code, connect your Arduino, matrix, and MAX72xx as shown inFigure 7-13.
Figure 7-13. MAX72xx driving an 8x8 LED array
7.13 Controlling an Array of LEDs by Using MAX72xx Shift Registers | 253
www.it-ebooks.info

This sketch is based on the Arduino hello_matrix library by Nicholas Zambetti, withonly the pin number changed to be consistent with the wiring used elsewhere in thischapter:
#include <Sprite.h>#include <Matrix.h>
// Hello Matrix// by Nicholas Zambetti <http://www.zambetti.com>
// Demonstrates the use of the Matrix library// For MAX7219 LED Matrix Controllers// Blinks welcoming face on screen
const int loadPin = 2;const int clockPin = 3;const int dataPin = 4;
Matrix myMatrix = Matrix(dataPin, clockPin, loadPin); // create a new Matrixinstance
void setup(){}
void loop(){ myMatrix.clear(); // clear display
delay(1000);
// turn some pixels on myMatrix.write(1, 5, HIGH); myMatrix.write(2, 2, HIGH); myMatrix.write(2, 6, HIGH); myMatrix.write(3, 6, HIGH); myMatrix.write(4, 6, HIGH); myMatrix.write(5, 2, HIGH); myMatrix.write(5, 6, HIGH); myMatrix.write(6, 5, HIGH);
delay(1000);}
DiscussionA matrix is created by passing pin numbers for the data, load, and clock pins. loop usesthe write method to turn pixels on; the clar method turns the pixels off. write has threeparameters: the first two identify the column and row (x and y) of an LED and the thirdparameter (HIGH or LOW) turns the LED on or off.
254 | Chapter 7: Visual Output
www.it-ebooks.info

The pin numbers shown here are for the green LEDs in the dual-color 8x8 matrixavailable from these suppliers:
SparkFun: COM-00681NKC Electronics Item #: COM-0006
The resistor (marked R1 in Figure 7-13) is used to control the maximum current thatwill be used to drive an LED. The MAX72xx data sheet has a table that shows a rangeof values (see Table 7-3).
Table 7-3. Table of resistor values (from MAX72xx data sheet)
LED forward voltage
Current 1.5V 2.0V 2.5V 3.0V 3.5V
40 mA 12 kΩ 12 kΩ 11 kΩ 10 kΩ 10 kΩ
30 mA 18 kΩ 17 kΩ 16 kΩ 15 kΩ 14 kΩ
20 mA 30 kΩ 28 kΩ 26 kΩ 24 kΩ 22 kΩ
10 mA 68 kΩ 64 kΩ 60 kΩ 56 kΩ 51 kΩ
The green LED in the LED matrix shown in Figure 7-13 has a forward voltage of 2.0volts and a forward current of 20 mA. Table 7-3 indicates 28K ohms, but to add a littlesafety margin, a resistor of 30K or 33K would be a suitable choice. The capacitors(0.1 uf and 10 uf) are required to prevent noise spikes from being generated when theLEDs are switched on and off—see “Using Capacitors for Decoupling” on page 593in Appendix C if you are not familiar with connecting decoupling capacitors.
See AlsoMAX72xx data sheet: http://pdfserv.maxim-ic.com/en/ds/MAX7219-MAX7221.pdf
7.14 Increasing the Number of Analog Outputs Using PWMExtender Chips (TLC5940)ProblemYou want to have individual control of the intensity of more LEDs than Arduino cansupport (6 on a standard board and 12 on the Mega).
SolutionThe TLC5940 chip drives up to 16 LEDs using only five data pins. Figure 7-14 shows the connections. This sketch is based on the excellent Tlc5940 library written by Alex Leone ([email protected]). You can download the library from http://code.google.com/p/tlc5940arduino/:
7.14 Increasing the Number of Analog Outputs Using PWM Extender Chips (TLC5940) | 255
www.it-ebooks.info

/* * TLC sketch * Create a Knight Rider-like effect on LEDs plugged into all the TLC outputs * this version assumes one TLC with 16 LEDs */
#include "Tlc5940.h"
void setup(){ Tlc.init(); // initialize the TLC library}
void loop(){ int direction = 1; int intensity = 4095; // an intensity from 0 to 4095, full brightness is 4095 int dim = intensity / 4; // 1/4 the value dims the LED for (int channel = 0; channel < 16; channel += direction) { // the following TLC commands set values to be written by the update method Tlc.clear(); // turn off all LEDs if (channel == 0) { direction = 1; } else { Tlc.set(channel - 1, dim); // set intensity for prev LED } Tlc.set(channel, intensity); // full intensity on this LED if (channel < 16){ Tlc.set(channel + 1, dim); // set the next LED to dim } else { direction = -1; }
Tlc.update(); // this method sends data to the TLC chips to change the LEDs delay(75); }}
DiscussionThis sketch loops through each channel (LED), setting the previous LED to dim, thecurrent channel to full intensity, and the next channel to dim. The LEDs are controlledthrough a few core methods.
The Tlc.init method initializes Tlc functions prior to any other function.
256 | Chapter 7: Visual Output
www.it-ebooks.info

Figure 7-14. Sixteen LEDs driven using external PWM
The following functions only take effect after calling the update() method:
Tlc.clearTurns off all channels
Tlc.setSets the intensity for the given channel to a given value
Tlc.setAllSets all channels to a given value
Tlc.updateSends the changes from any of the preceding commands to the TLC chip
More functions are available in the library; see the link to the reference at the end ofthis recipe.
The 2K resistor between TLC pin 20 (Iref) and Gnd will let around 20 mA through eachLED. You can calculate the resistor value R for a different current (in milliamperes)using the formula R = 40,000 / mA. R is 1 ohm, and the calculation does not dependon the LED driving voltage.
If you want the LEDs to turn off when the Arduino is reset, put a pull-up resistor (10K)between +5V and BLANK (pin 23 of the TLC and Arduino pin 10).
7.14 Increasing the Number of Analog Outputs Using PWM Extender Chips (TLC5940) | 257
www.it-ebooks.info

Here is a variation that uses a sensor value to set the maximum LED intensity. You cantest this using a variable resistor connected as shown in Figure 7-11 or Figure 7-15:
#include "Tlc5940.h"
const int sensorPin = 0; // connect sensor to analog input 0
void setup(){ Tlc.init(); // initialize the TLC library}
void loop(){ int direction = 1; int sensorValue = analogRead(0); // get the sensor value int intensity = map(sensorValue, 0,1023, 0, 4095); // map to TLC range int dim = intensity / 4; // 1/4 the value dims the LED for (int channel = 0; channel < NUM_TLCS * 16; channel += direction) { // the following TLC commands set values to be written by the update method Tlc.clear(); // turn off all LEDs if (channel == 0) { direction = 1; } else { Tlc.set(channel - 1, dim); // set intensity for prev LED } Tlc.set(channel, intensity); // full intensity on this LED if (channel != NUM_TLCS * 16 - 1) { Tlc.set(channel + 1, dim); // set the next LED to dim } else { direction = -1; }
Tlc.update(); // this method sends data to the TLC chips to change the LEDs delay(75); }}
This version also allows for multiple TLC chips if you want to drive more than 16 LEDs.You do this by “daisy-chaining” the TLC chips—connect the Sout (pin 17) of the firstTLC to the Sin (pin 26) of the next. The Sin (pin 26) of the first TLC chip is connectedto Arduino pin 11, as shown in Figure 7-14.
The following pins should be connected together when daisy-chaining TLC chips:
• Arduino pin 9 to XLAT (pin 24) of each TLC
• Arduino pin 10 to BLANK (pin 23) of each TLC
• Arduino pin 13 to SCLK (pin 25) of each TLC
Each TLC needs its own resistor between Iref (pin 20) and Gnd.
258 | Chapter 7: Visual Output
www.it-ebooks.info

You must change the value of the NUM_TLCS constant defined in the Tlc5940 library tomatch the number of chips you have wired.
See AlsoGo to http://code.google.com/p/tlc5940arduino/ to download this library and access itsdocumentation.
7.15 Using an Analog Panel Meter As a DisplayProblemYou would like to control the pointer of an analog panel meter from your sketch. Fluc-tuating readings are easier to interpret on an analog meter, and analog meters add acool retro look to a project.
SolutionConnect the meter through a series resistor (5K ohms for the typical 1 mA meter) andconnect to an analog (PWM) output (see Figure 7-15).
Figure 7-15. Driving an analog meter
7.15 Using an Analog Panel Meter As a Display | 259
www.it-ebooks.info

The pointer movement corresponds to the position of a pot (variable resistor):
/* * AnalogMeter sketch * Drives an analog meter through an Arduino PWM pin * The meter level is controlled by a variable resistor on an analog input pin */
const int analogInPin = 0; // Analog input pin connected to the variable resistorconst int analogMeterPin = 9; // Analog output pin connecting to the meter
int sensorValue = 0; // value read from the potint outputValue = 0; // value output to the PWM (analog out)
void setup(){ // nothing in setup}
void loop(){ sensorValue = analogRead(analogInPin); // read the analog in value outputValue = map(sensorValue, 0, 1023, 0, 255); // map to the range of theanalog out analogWrite(analogMeterPin, outputValue); // write the analog out value}
DiscussionIn this variation on Recipe 7.2, the Arduino analogWrite output drives a panel meter.Panel meters are usually much more sensitive than LEDs; a resistor must be connectedbetween the Arduino output and the meter to drop the current to the level for the meter.
The value of the series resistor depends on the sensitivity of the meter; 5K ohms givefull-scale deflection with a 1 mA meter. You can use 4.7K resistors, as they are easierto obtain than 5K, although you will probably need to reduce the maximum value givento analogWrite to 240 or so. Here is how you can change the range in the map functionif you use a 4.7K ohm resistor with a 1 mA meter:
outputValue = map(sensorValue, 0, 1023, 0, 240); // map to meter's range
If your meter has a different sensitivity than 1 mA, you will need to use a different valueseries resistor. The resistor value in ohms is: Resistor = 5,000 / mA
So, a 500 microamp meter (0.5 mA) is 5,000 / 0.5, which is 10,000 (10K) ohms.
Some surplus meters already have an internal series resistor—you may need to experi-ment to determine the correct value of the resistor, but be careful not to apply too muchvoltage to your meter.
See AlsoRecipe 7.2
260 | Chapter 7: Visual Output
www.it-ebooks.info

CHAPTER 8
Physical Output
8.0 IntroductionYou can make things move by controlling motors with Arduino. Different types ofmotors suit different applications, and this chapter shows how Arduino can drive manydifferent kinds of motors.
Motion Control Using ServosServos enable you to accurately control physical movement because they generallymove to a position instead of continuously rotating. They are ideal for making some-thing rotate over a range of 0 to 180 degrees. Servos are easy to connect and controlbecause the motor driver is built into the servo.
Servos contain a small motor connected through gears to an output shaft. The outputshaft drives a servo arm and is also connected to a potentiometer to provide positionfeedback to an internal control circuit (see Figure 8-1).
You can get continuous rotation servos that have the positional feedback disconnectedso that you can instruct the servo to rotate continuously clockwise and counterclock-wise with some control over the speed. These function a little like the brushed motorscovered in Recipe 8.3, except that continuous rotation servos use the servo library codeinstead of analogWrite.
Servos respond to changes in the duration of a pulse. A short pulse of 1 ms or less willcause the servo to rotate to one extreme; a pulse duration of 2 ms or so will rotate theservo to the other extreme (see Figure 8-2). Pulses ranging between these values willrotate the servo to a position proportional to the pulse width. There is no standard forthe exact relationship between pulses and position, and you may need to tinker withthe commands in your sketch to adjust for the range of your servos.
261
www.it-ebooks.info

Although the duration of the pulse is modulated (controlled), servosrequire pulses that are different from the Pulse Width Modulation(PWM) output from analogWrite. You can damage a hobby servo byconnecting it to the output from analogWrite—use the Servo libraryinstead.
Solenoids and RelaysAlthough most motors produce rotary motion, a solenoid produces linear movementwhen powered. A solenoid has a metallic core that is moved by a magnetic field that iscreated when current is passed through a coil. A mechanical relay is a type of solenoidthat connects or disconnects electrical contacts (it’s a solenoid operating a switch).Relays are controlled just like solenoids. Relays and solenoids, like most motors, requiremore current than an Arduino pin can safely provide, and the recipes in this chaptershow how you can use a transistor or external circuit to drive these devices.
Brushed and Brushless MotorsMost low-cost direct current (DC) motors are simple devices with two leads connectedto brushes (contacts) that control the magnetic field of the coils that drives a metalliccore (armature). The direction of rotation can be reversed by reversing the polarity ofthe voltage on the contacts. DC motors are available in many different sizes, but eventhe smallest (such as vibration motors used in cell phones) require a transistor or otherexternal control to provide adequate current. The recipes that follow show how tocontrol motors using a transistor or an external control circuit called an H-Bridge.
Figure 8-1. Elements inside a hobby servo
262 | Chapter 8: Physical Output
www.it-ebooks.info

The primary characteristic in selecting a motor is torque. Torque determines how muchwork the motor can do. Typically, higher torque motors are larger and heavier anddraw more current than lower torque motors.
Brushless motors usually are more powerful and efficient for a given size than brushedmotors, but they require more complicated electronic control. Where the performancebenefit of a brushless motor is desired, components called electronics speed control-lers intended for hobby radio control use can be easily controlled by Arduino becausethey are controlled much like a servo motor.
Stepper MotorsSteppers are motors that rotate a specific number of degrees in response to controlpulses. The number of degrees in each step is motor-dependent, ranging from one ortwo degrees per step to 30 degrees or more.
Two types of steppers are commonly used with Arduino: bipolar (typically with fourleads attached to two coils) and unipolar (five or six leads attached to two coils). Theadditional wires in a unipolar stepper are internally connected to the center of the coils(in the five-lead version, each coil has a center tap and both center taps are connectedtogether). The recipes covering bipolar and unipolar steppers have diagrams illustratingthese connections.
Figure 8-2. Relationship between the pulse width and the servo angle; the servo output arm movesproportionally as the pulse width increases from 1 ms to 2 ms
8.0 Introduction | 263
www.it-ebooks.info

Troubleshooting SidebarThe most common cause of problems when connecting devices that require externalpower is neglecting to connect all the grounds together. Your Arduino ground must beconnected to the external power supply ground and the grounds of external devicesbeing powered.
8.1 Controlling the Position of a ServoProblemYou want to control the position of a servo using an angle calculated in your sketch.For example, you want a sensor on a robot to swing through an arc or move to a positionyou select.
SolutionUse the Servo library distributed with Arduino. Connect the servo power and groundto a suitable power supply (a single hobby servo can usually be powered from theArduino 5V line). Recent versions of the library enable you to connect the servo signalleads to any Arduino digital pin.
Here is the example Sweep sketch distributed with Arduino; Figure 8-3 shows theconnections:
#include <Servo.h>
Servo myservo; // create servo object to control a servo
int angle = 0; // variable to store the servo position
void setup(){ myservo.attach(9); // attaches the servo on pin 10 to the servo object}
void loop(){ for(angle = 0; angle < 180; angle += 1) // goes from 0 degrees to 180 degrees { // in steps of 1 degree myservo.write(angle); // tell servo to go to position in variable 'angle' delay(20); // waits 20ms between servo commands } for(angle = 180; angle >= 1; angle -= 1) // goes from 180 degrees to 0 degrees { myservo.write(pos); // tell servo to go to position in variable 'pos' delay(20); // waits 20ms between servo commands }}
264 | Chapter 8: Physical Output
www.it-ebooks.info

DiscussionThis example sweeps the servo between 0 and 180 degrees. You may need to tell thelibrary to adjust the minimum and maximum positions so that you get the range ofmovement you want. Calling Servo.attach with optional arguments for minimum andmaximum positions will adjust the movement:
myservo.attach(9,1000,2000 ); // use pin 9, set min to 1000us, max to 2000us
Because typical servos respond to pulses measured in microseconds and not degrees,the arguments following the pin number inform the Servo library how many micro-seconds to use when 0 degrees or 180 degrees are requested. Not all servos will moveover a full 180-degree range, so you may need to experiment with yours to get the rangeyou want.
The parameters for servo.attach(pin, min, max) are the following:
pinThe pin number that the servo is attached to (must be 9 or 10)
min (optional)The pulse width, in microseconds, corresponding to the minimum (0-degree) angleon the servo (defaults to 544)
max (optional)The pulse width, in microseconds, corresponding to the maximum (180-degree)angle on the servo (defaults to 2,400)
Power requirements vary depending on the servo and how much torque is needed torotate the shaft.
Figure 8-3. Connecting a servo for testing with the example Sweep sketch
8.1 Controlling the Position of a Servo | 265
www.it-ebooks.info

You may need an external source of 5 or 6 volts when connecting mul-tiple servos. Four AA cells work well if you want to use battery power.Remember that you must connect the ground of the external powersource to Arduino ground.
8.2 Controlling One or Two Servos with a Potentiometeror SensorProblemYou want to control the rotational direction and speed of one or two servos with apotentiometer. For example, you want to control the pan and tilt of a camera or sensorconnected to the servos. This recipe can work with any variable voltage from a sensorthat can be read from an analog input.
SolutionThe same library can be used as in Recipe 8.1, with the addition of code to read thevoltage on a potentiometer. This value is scaled so that the position of the pot (from0 to 1023) is mapped to a value between 0 and 180 degrees. The only difference in thewiring is the addition of the potentiometer; see Figure 8-4:
#include <Servo.h>
Servo myservo; // create servo object to control a servo
int potpin = 0; // analog pin used to connect the potentiometerint val; // variable to read the value from the analog pin
void setup(){ myservo.attach(9); // attaches the servo on pin 9 to the servo object}
void loop(){ val = analogRead(potpin); // reads the value of the potentiometer val = map(val, 0, 1023, 0, 179); // scale it to use it with the servo myservo.write(val); // sets position to the scaled value delay(15); // waits for the servo to get there}
266 | Chapter 8: Physical Output
www.it-ebooks.info

Figure 8-4. Controlling a servo with a potentiometer
DiscussionAnything that can be read from analogRead (see Chapter 5 and Chapter 6) can be used—for example, the gyro and accelerometer recipes in Chapter 6 can be used so that theangle of the servo is controlled by the yaw of the gyro or angle of the accelerometer.
8.3 Controlling the Speed of Continuous Rotation ServosProblemYou want to control the rotational direction and speed of servos modified for contin-uous rotation. For example, you are using two continuous rotation servos to power arobot and you want the speed and direction to be controlled by your sketch.
SolutionContinuous rotation servos are a form of gear reduced motor with forward and back-ward speed adjustment. Control of continuous rotation servos is similar to normalservos. The servo rotates in one direction as the angle is increased from 90 degrees; itrotates in the other direction when the angle is decreased from 90 degrees. The actualdirection forward or backward depends on how you have the servos attached. Fig-ure 8-5 shows the connections for controlling two servos.
This example sweeps the servos from 90 to 180 degrees, so if the servos were connectedto wheels, the vehicle would move forward at a slowly increasing pace and then slow
8.3 Controlling the Speed of Continuous Rotation Servos | 267
www.it-ebooks.info

down to a stop. Because the servo control code is in loop, this will continue for as longas there is power:
#include <Servo.h>
Servo myservoLeft; // create servo object to control a servoServo myservoRight; // create servo object to control a servo
int pos = 0; // variable to store the servo position
void setup(){ myservoLeft.attach(9); // attaches left servo on pin 9 to servo object myservoRight.attach(10); // attaches right servo on pin 10 to servo object}
void loop(){ for(angle = 90; angle < 180; angle += 1) // goes from 90 to 180 degrees { // in steps of 1 degree // 90 degrees is stopped myservoLeft.write(angle); // rotate servo at speed given by 'angle' myservoRight.write(180-angle); // go in the opposite direction
delay(20); // waits 20ms between servo commands } for(angle = 180; angle >= 90; angle -= 1) // goes from 180 to 90 degrees { myservoLeft.write(angle); // rotate at a speed given by 'angle' myservoRight.write(180-angle); // other servo goes in opposite direction }}
Figure 8-5. Controlling two servos
268 | Chapter 8: Physical Output
www.it-ebooks.info

DiscussionYou can use similar code for continuous rotation and normal servos, but be aware thatcontinuous rotation servos may not stop rotating when writing exactly 90 degrees.Some servos have a small potentiometer you can trim to adjust for this, or you can addor subtract a few degrees to stop the servo. For example, if the left servo stops rotatingat 92 degrees, you can change the lines that write to the servos as follows:
myservoLeft.write(angle+TRIM); // declare int TRIM=2; at beginning of sketch
8.4 Controlling Servos from the Serial PortProblemYou want to provide commands to control servos from the serial port. Perhaps youwant to control servos from a program running on your computer.
SolutionYou can use software to control the servos. This has the advantage that any number ofservos can be supported. However, your sketch needs to constantly attend to refreshingthe servo position, so the logic can get complicated as the number of servos increasesif your project needs to perform a lot of other tasks.
This recipe drives four servos according to commands received on the serial port. Thecommands are of the following form:
• 180a writes 180 to servo a
• 90b writes 90 to servo b
• 0c writes 0 to servo c
• 17d writes 17 to servo d
Here is the sketch that drives four servos connected on pins 7 through 10:
#include <Servo.h> // the servo library
#define SERVOS 4 // the number of servosint servoPins[SERVOS] = {7,8,9,10}; // servos on pins 7 through 10
Servo myservo[SERVOS];
void setup(){ Serial.begin(9600); for(int i=0; i < SERVOS; i++) myservo[i].attach(servoPins[i]);}
void loop()
8.4 Controlling Servos from the Serial Port | 269
www.it-ebooks.info

{ serviceSerial();}
// serviceSerial checks the serial port and updates position with received data// it expects servo data in the form:// "180a" writes 180 to servo a// "90b writes 90 to servo bvoid serviceSerial(){ static int pos = 0;
if ( Serial.available()) { char ch = Serial.read();
if(ch >= '0' && ch <= '9') // is ch a number? pos = pos * 10 + ch - '0'; // yes, accumulate the value else if(ch >= 'a' && ch <= 'a'+ SERVOS) // is ch a letter for our servos? myservo[ch - 'a'].write(pos); // yes, save position in position array }}
DiscussionConnecting the servos is similar to the previous recipes. Each servo line wire gets con-nected to a digital pin. All servo grounds are connected to Arduino ground. The servopower lines are connected together, and you may need an external 5V or 6V powersource if your servos require more current than the Arduino power supply can provide.
An array named myservo (see Recipe 2.4) is used to hold references for the four servos.A for loop in setup attaches each servo in the array to consecutive pins defined in theservoPins array.
If the character received from serial is a digit (the character will be greater than or equalto zero and less than or equal to 9), its value is accumulated in the variable pos. If thecharacter is the letter a, the position is written to the first servo in the array (the servoconnected to pin 7). The letters b, c, and d control the subsequent servos.
See AlsoSee Chapter 4 for more on handling values received over serial.
270 | Chapter 8: Physical Output
www.it-ebooks.info

8.5 Driving a Brushless Motor (Using a Hobby Speed Controller)ProblemYou have a hobby brushless motor and you want to control its speed.
SolutionThis sketch uses the same code as Recipe 8.2. The wiring is similar, except for the speedcontroller and motor. Brushless motors have three windings and these should be con-nected following the instructions for your speed controller (see Figure 8-6).
Figure 8-6. Connecting an electronics speed controller
DiscussionConsult the documentation for your speed controller to confirm that it is suitable foryour brushless motor and to verify the wiring. Brushless motors have three connectionsfor the three motor wires and two connections for power. Many speed controllers pro-vide power on the center pin of the servo connector. Unless you want to power theArduino board from the speed controller, you must disconnect or cut this center wire.
If your speed controller has a feature that provides 5V power to servosand other devices (called a battery eliminator circuit or BEC for short),you must disconnect this wire when attaching the Arduino to the speedcontroller (see Figure 8-6).
8 5 Driving a Brushless Motor (Using a Hobby Speed Controller) | 271
www.it-ebooks.info

8.6 Controlling Solenoids and RelaysProblemYou want to activate a solenoid or relay under program control. Solenoids are electro-magnets that convert electrical energy into mechanical movement. An electromagneticrelay is a switch that is activated by a solenoid.
SolutionMost solenoids require more power than an Arduino pin can provide, so a transistoris used to switch the current needed to activate a solenoid. Activating the solenoid isachieved by using digitalWrite to set the pin HIGH.
This sketch turns on a transistor connected as shown in Figure 8-7. The solenoid willbe activated for one second every hour:
int solenoidPin = 2; // Solenoid connected to transitor on pin 2
void setup(){ pinMode(ledPin, OUTPUT);}
void loop(){long interval = 1000 * 60 * 60 ; // interval = 60 minutes digitalWrite(solenoidPin, HIGH); // activates the solenoid delay(1000); // waits for a second digitalWrite(ledPin, LOW); // deactivates the solenoid delay(interval); // waits one hour}
DiscussionThe choice of transistor is dependent on the amount of current required to activate thesolenoid or relay. The data sheet may specify this in milliamperes (mA) or as theresistance of the coil. To find the current needed by your solenoid or relay, divide thevoltage of the coil by its resistance in ohms. For example, a 12V relay with a coil of 185ohms draws 65 mA: 12 (volts) / 185 (ohms) = 0.065 amps, which is 65 mA.
Small transistors such as the 2N2222 are sufficient for solenoids requiring up to a fewhundred milliamps. Larger solenoids will require a higher power transistor, like theTIP102/TIP120 or similar. There are many suitable transistor alternatives; see Appen-dix B for help reading a data sheet and choosing transistors.
The purpose of the diode is to prevent reverse EMF from the coil from damaging thetransistor (reverse EMF is a voltage produced when current through a coil is switched
272 | Chapter 8: Physical Output
www.it-ebooks.info

off). The polarity of the diode is important; there is a colored band indicating thecathode—this should be connected to the solenoid positive power supply.
Electromagnetic relays are activated just like solenoids. A special relay called a solidstate relay (SSR) has internal electronics that can be driven directly from an Arduinopin without the need for the transistor. Check the data sheet for your relay to see whatvoltage and current it requires; anything more than 40 mA at 5 volts will require a circuitsuch as the one shown in Figure 8-7.
8.7 Making an Object VibrateProblemYou want something to vibrate under Arduino control. For example, you want yourproject to shake for one second every minute.
SolutionConnect a vibration motor as shown in Figure 8-8.
Figure 8-7. Driving a solenoid with a transistor
8.7 Making an Object Vibrate | 273
www.it-ebooks.info

Figure 8-8. Connecting a vibration motor
The following sketch will turn on the vibration motor for one second each minute:
/* * Vibrate sketch * Vibrate for one second every minute * */
const int motorPin = 3; // vibration motor transistor is connected to pin 3
void setup(){ pinMode(motorPin, OUTPUT);}
void loop(){ digitalWrite(motorPin, HIGH); //vibrate delay(1000); // delay one second digitalWrite(motorPin, LOW); // stop vibrating delay(59000); // wait 59 seconds.}
DiscussionThis recipe uses a motor designed to vibrate, such as the SparkFun ROB-08449. If youhave an old cell phone you no longer need, it may contain tiny vibration motors thatwould be suitable. Vibration motors require more power than an Arduino pin canprovide, so a transistor is used to switch the motor current on and off. Almost any NPNtransistor can be used; Figure 8-3 shows the common 2N2222 (see this book’s web-site for supplier information on this and the other components used). A 1 kilohm re-sistor connects the output pin to the transistor base; the value is not critical, and youcan use values up to 4.7 kilohm or so (the resistor prevents too much current flowing
274 | Chapter 8: Physical Output
www.it-ebooks.info

through the output pin). The diode absorbs (or snubs—it’s sometimes called a snubberdiode) voltages produced by the motor windings as it rotates. The capacitor absorbsvoltage spikes produced when the brushes (contacts connecting electric current to themotor windings) open and close. The 33 ohm resistor is needed to limit the amount ofcurrent flowing through the motor.
This sketch sets the output pin HIGH for one second (1,000 milliseconds) and then waitsfor 59 seconds. The transistor will turn on (conduct) when the pin is HIGH, allowingcurrent to flow through the motor.
Here is a variation of this sketch that uses a sensor to make the motor vibrate. Thewiring is similar to that shown in Figure 8-3, with the addition of a photocell connectedto analog pin 0 (see Recipe 1.6):
/* * Vibrate_Photocell sketch * Vibrate when photosensor detects light above ambient level * */
const int motorPin = 3; // vibration motor transistor is connected to pin 3const int sensorPin = 0; // Photodetector connected to analog input 0int sensorAmbient = 0; // ambient light level (calibrated in setup)const int thresholdMargin = 100; // how much above ambient needed to vibrate
void setup(){ pinMode(motorPin, OUTPUT); sensorAmbient = analogRead(sensorPin); // get startup light level;}
void loop(){ int sensorValue = analogRead(sensorPin); if( sensorValue > sensorAmbient + thresholdMargin) { digitalWrite(motorPin, HIGH); //vibrate } else { digitalWrite(motorPin, LOW); // stop vibrating }}
Here the output pin is turned on when a light shines on the photocell. When the sketchstarts, the background light level on the sensor is read and stored in the variablesensorAmbient. Light levels read in loop that are higher than this will turn on thevibration motor.
8.7 Making an Object Vibrate | 275
www.it-ebooks.info

8.8 Driving a Brushed Motor Using a TransistorProblemYou want to turn a motor on and off. You may want to control its speed. The motoronly needs to turn in one direction.
SolutionThis sketch turns the motor on and off and controls its speed from commands receivedon the serial port (Figure 8-9 shows the connections):
/* * SimpleBrushed sketch * commands from serial port control motor speed * digits '0' through '9' are valid where '0' is off, '9' is max speed */
const int motorPins = 3; // motor driver is connected to pin 3
void setup(){ Serial.begin(9600);}
void loop(){ if ( Serial.available()) { char ch = Serial.read();
if(ch >= '0' && ch <= '9') // is ch a number? { int speed = map(ch, '0', '9', 0, 255); analogWrite(3, speed); Serial.println(speed); } else { Serial.print("Unexpected character "); Serial.println(ch); } }}
DiscussionThis recipe is similar to Recipe 8.7; the difference is that analogWrite is used to controlthe speed of the motor. See “Analog Output” on page 217 in Chapter 7 for more onanalogWrite and Pulse Width Modulation (PWM).
276 | Chapter 8: Physical Output
www.it-ebooks.info

8.9 Controlling the Direction of a Brushed Motorwith an H-BridgeProblemYou want to control the direction of a brushed motor—for example, you want to causea motor to rotate in one direction or the other from serial port commands.
SolutionAn H-Bridge can control two brushed motors. Figure 8-10 shows the connections forthe L293D H-Bridge IC; you can also use the SN754410 which has the same pin layout:
/* * Brushed_H_Bridge_simple sketch * commands from serial port control motor direction * + or - set the direction, any other key stops the motor */
const int in1Pin = 5; // H-Bridge input pinsconst int in2Pin = 4;
void setup(){ Serial.begin(9600); pinMode(in1Pin, OUTPUT); pinMode(in2Pin, OUTPUT); Serial.println("+ - to set direction, any other key stops motor");}
Figure 8-9. Driving a brushed motor
8.9 Controlling the Direction of a Brushed Motor with an H-Bridge | 277
www.it-ebooks.info

void loop(){ if ( Serial.available()) { char ch = Serial.read(); if (ch == '+') { Serial.println("CW"); digitalWrite(in1Pin,LOW); digitalWrite(in2Pin,HIGH); } else if (ch == '-') { Serial.println("CCW"); digitalWrite(in1Pin,HIGH); digitalWrite(in2Pin,LOW); } else { Serial.print("Stop motor"); digitalWrite(in1Pin,LOW); digitalWrite(in2Pin,LOW); } }}
Figure 8-10. Connecting two brushed motors using an L293D H-Bridge
278 | Chapter 8: Physical Output
www.it-ebooks.info

DiscussionTable 8-1 shows how the values on the H-Bridge input affect the motor. In the sketchin this recipe’s Solution, a single motor is controlled using the IN1 and IN2 pins; theEN pin is permanently HIGH because it is connected to +5V.
Table 8-1. Logic table for H-Bridge
EN IN1 IN2 Function
HIGH LOW HIGH Turn clockwise
HIGH HIGH LOW Turn counterclockwise
HIGH LOW LOW Motor stop
HIGH HIGH HIGH Motor stop
LOW Ignored Ignored Motor stop
Figure 8-5 shows how a second motor can be connected. The following sketch controlsboth motors together:
/* * Brushed_H_Bridge_simple2 sketch * commands from serial port control motor direction * + or - set the direction, any other key stops the motors */
const int in1Pin = 5; // H-Bridge input pinsconst int in2Pin = 4;
const int in3Pin = 3; // H-Bridge pins for second motorconst int in4Pin = 2;
void setup(){ Serial.begin(9600); pinMode(in1Pin, OUTPUT); pinMode(in2Pin, OUTPUT); pinMode(in3Pin, OUTPUT); pinMode(in4Pin, OUTPUT); Serial.println("+ - sets direction of motors, any other key stops motors");}
void loop(){ if ( Serial.available()) { char ch = Serial.read(); if (ch == '+')
8.9 Controlling the Direction of a Brushed Motor with an H-Bridge | 279
www.it-ebooks.info

{ Serial.println("CW"); // first motor digitalWrite(in1Pin,LOW); digitalWrite(in2Pin,HIGH); //second motor digitalWrite(in3Pin,LOW); digitalWrite(in4Pin,HIGH); } else if (ch == '-') { Serial.println("CCW"); digitalWrite(in1Pin,HIGH); digitalWrite(in2Pin,LOW);
digitalWrite(in3Pin,HIGH); digitalWrite(in4Pin,LOW); } else { Serial.print("Stop motors"); digitalWrite(in1Pin,LOW); digitalWrite(in2Pin,LOW); digitalWrite(in3Pin,LOW); digitalWrite(in4Pin,LOW); } }}
8.10 Controlling the Direction and Speed of a Brushed Motorwith an H-BridgeProblemYou want to control the direction and speed of a brushed motor. This extends thefunctionality of Recipe 8.9 by controlling both motor direction and speed throughcommands from the serial port.
SolutionConnect a brushed motor to the output pins of the H-Bridge as shown in Figure 8-11.
280 | Chapter 8: Physical Output
www.it-ebooks.info
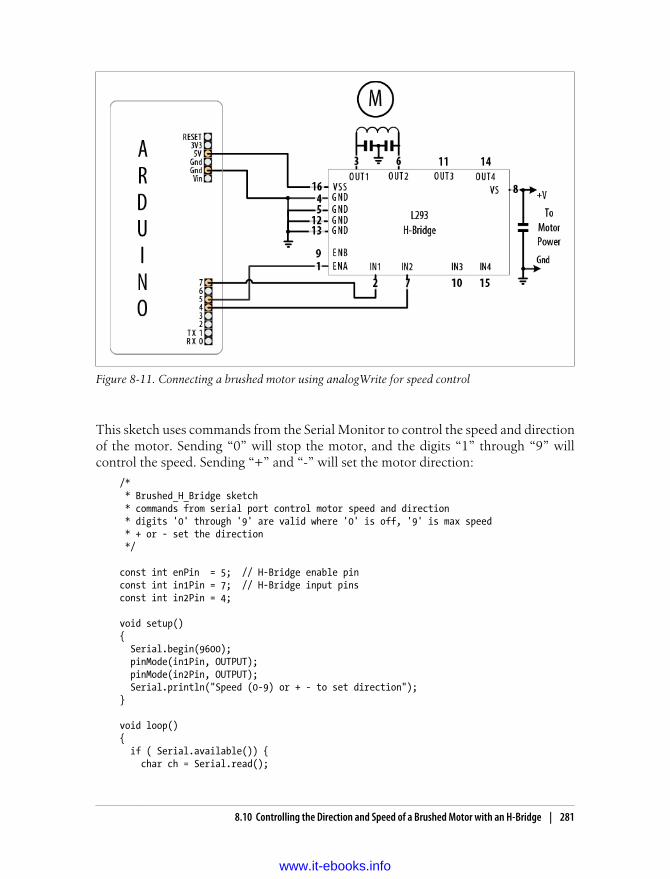
Figure 8-11. Connecting a brushed motor using analogWrite for speed control
This sketch uses commands from the Serial Monitor to control the speed and directionof the motor. Sending “0” will stop the motor, and the digits “1” through “9” willcontrol the speed. Sending “+” and “-” will set the motor direction:
/* * Brushed_H_Bridge sketch * commands from serial port control motor speed and direction * digits '0' through '9' are valid where '0' is off, '9' is max speed * + or - set the direction */
const int enPin = 5; // H-Bridge enable pinconst int in1Pin = 7; // H-Bridge input pinsconst int in2Pin = 4;
void setup(){ Serial.begin(9600); pinMode(in1Pin, OUTPUT); pinMode(in2Pin, OUTPUT); Serial.println("Speed (0-9) or + - to set direction");}
void loop(){ if ( Serial.available()) { char ch = Serial.read();
8.10 Controlling the Direction and Speed of a Brushed Motor with an H-Bridge | 281
www.it-ebooks.info

if(ch >= '0' && ch <= '9') // is ch a number? { int speed = map(ch, '0', '9', 0, 255); analogWrite(enPin, speed); Serial.println(speed); } else if (ch == '+') { Serial.println("CW"); digitalWrite(in1Pin,LOW); digitalWrite(in2Pin,HIGH); } else if (ch == '-') { Serial.println("CCW"); digitalWrite(in1Pin,HIGH); digitalWrite(in2Pin,LOW); } else { Serial.print("Unexpected character "); Serial.println(ch); } }}
DiscussionThis recipe is similar to Recipe 8.9, in which motor direction is controlled by the levelson the IN1 and IN2 pins. But in addition, speed is controlled by the analogWrite valueon the EN pin (see Chapter 7 for more on PWM). Writing a value of 0 will stop themotor; writing 255 will run the motor at full speed. The motor speed will vary in pro-portion to values within this range.
8.11 Using Sensors to Control the Direction and Speed ofBrushed Motors (L293 H-Bridge)ProblemYou want to control the direction and speed of brushed motors with feedback fromsensors. For example, you want two photo sensors to control motor speed and directionto cause a robot to move toward a beam of light.
SolutionThis Solution uses similar motor connections to those shown in Figure 8-10, but withthe addition of two light dependent resistors, as shown in Figure 8-12.
282 | Chapter 8: Physical Output
www.it-ebooks.info

Figure 8-12. Two motors controlled using sensors
The sketch monitors the light level on the sensors and drives the motors to steer towardthe sensor detecting the brighter light level:
/* * Brushed_H_Bridge_Direction sketch * uses photo sensors to control motor direction * robot moves in the direction of a light */
int leftPins[] = {5,7,4}; // on pin for PWM, two pins for motor direction int rightPins[] = {6,3,2};
const int leftSensorPin = 0; // analog pins with sensorsconst int rightSensorPin = 1;
int sensorThreshold = 0; // must have this much light on a sensor to moveint looks = 0; // the number of attempts to turn and find light
void setup(){ for(int i=1; i < 3; i++) { pinMode(leftPins[i], OUTPUT); pinMode(rightPins[i], OUTPUT); }}
void loop(){ int leftVal = analogRead(leftSensorPin);
8.11 Using Sensors to Control the Direction and Speed of Brushed Motors (L293 H-Bridge) | 283
www.it-ebooks.info

int rightVal = analogRead(rightSensorPin); if(sensorThreshold == 0) // have the sensors been calibrated ? sensorThreshold = (leftVal + rightVal) / 2; // no, calibrate sensors
if( leftVal < sensorThreshold && rightVal < sensorThreshold) { if(looks < 4) // limit the number of consecutive looks { lookAround(); looks = looks + 1; } } else { // if there is adequate light to move ahead setSpeed(rightPins, map( rightVal,0,1023, 0,255)); setSpeed(leftPins, map(leftVal,0,1023,0,255)); looks = 0; // reset the looks counter }}
void lookAround(){ // rotate left for half a second setSpeed(leftPins, -127 ); setSpeed(rightPins, 127 ); delay(500); setSpeed(rightPins, 0 ); setSpeed(leftPins, 127 );}
void setSpeed(int pins[], int speed ){ if(speed < 0) { digitalWrite(pins[1],HIGH); digitalWrite(pins[2],LOW); speed = -speed; } else { digitalWrite(pins[1],LOW); digitalWrite(pins[2],HIGH); } analogWrite(pins[0], speed);}
DiscussionThis sketch controls the speed of two motors in response to the amount of light detectedby two photocells. The photocells are arranged so that an increase in light on one sidewill increase the speed of the motor on the other side. This causes the robot to turntoward the side with the brighter light. Light shining equally on both cells makes the
284 | Chapter 8: Physical Output
www.it-ebooks.info

robot move forward in a straight line. Insufficient light causes the robot to stop andlook around to see if there is a light source coming from any other direction.
Light is sensed through analog inputs 0 and 1 (see Recipe 6.2). When the programstarts, the ambient light is measured and this threshold is used to determine the mini-mum light level needed to move the robot. When light drops below the threshold,the lookAround function is called to rotate the robot to search for more light.
Motor speed is controlled in the setSpeed function. Two pins are used to control thedirection for each motor and with another pin to control speed. The pin numbers areheld in the leftPins and rightPins arrays. The first pin in each array is the speed pin;the other two pins are for direction.
An alternative to the L293 is the Toshiba FB6612FNG. This can be used in any of therecipes showing the L293D. Figure 8-13 shows the wiring for the FB6612 as used onthe Pololu breakout board (SparkFun ROB-09402).
Figure 8-13. H-Bridge wiring for the Pololu breakout board
You can reduce the number of pins needed by adding additional hardware to controlthe direction pins. This is done by using only one pin per motor for direction, with atransistor or logic gate to invert the level on the other H-Bridge input. You can findcircuit diagrams for this in the Arduino wiki, but if you want something already wiredup, you can use an H-Bridge shield such as the Freeduino Motor control shield (NKC
8.11 Using Sensors to Control the Direction and Speed of Brushed Motors (L293 H-Bridge) | 285
www.it-ebooks.info

Electronics ARD-0015) or the Ardumoto from SparkFun (DEV-09213). These shieldsplug directly into Arduino and only require connections to the motor power supplyand windings.
Here is the sketch revised for the Ardumoto shield:
/* * Brushed_H_Ardumoto sketch * uses photo sensors to control motor direction * robot moves in the direction of a light */
int leftPins[] = {10,12}; // one pin for PWM, one pin for motor direction int rightPins[] = {11,13};
const int leftSensorPin = 0; // analog pins with sensorsconst int rightSensorPin = 1;
int sensorThreshold = 0; // must have this much light on a sensor to moveint looks = 0; // the number of attempts to turn and find light
void setup(){ pinMode(leftPins[1], OUTPUT); pinMode(rightPins[1], OUTPUT); Serial.begin(9600);}
The loop and lookAround functions are identical to the preceding sketch. setSpeed hasless code because hardware on the shield allows a single pin to control motor direction:
void setSpeed(int pins[], int speed ){ if(speed < 0) { digitalWrite(pins[1],HIGH); speed = -speed; } else { digitalWrite(pins[1],LOW); } analogWrite(pins[0], speed);}
The pin assignments for the Freeduino shield are as follows:
int leftPins[] = {10,13}; // PWM, Directionint rightPins[] = {9,12}; // PWM, Direction
If you have a different shield, you will need to see the data sheet and make sure thevalues in the sketch match the pins used for PWM and direction.
286 | Chapter 8: Physical Output
www.it-ebooks.info

See AlsoThe data sheet for the Pololu board: http://www.pololu.com/file/0J86/TB6612FNG.pdf
The product page for the Freeduino shield: http://www.nkcelectronics.com/freeduino-arduino-motor-control-shield-kit.html
The product page for the Ardumoto shield: http://www.sparkfun.com/commerce/product_info.php?products_id=9213
8.12 Driving a Bipolar Stepper MotorProblemYou have a bipolar (four-wire) stepper motor and you want to step it under programcontrol using an H-Bridge.
SolutionThis sketch steps the motor in response to serial commands. A numeric value followedby a + steps in one direction; a - steps in the other. For example, 24+ steps a 24-stepmotor through one complete revolution in one direction, and 12- steps half a revolutionin the other direction. Figure 8-14 shows the connections to a four-wire bipolar stepperusing the L293 H-Bridge:
/* * Stepper_bipolar sketch * * stepper is controlled from the serial port. * a numeric value followed by '+' or '-' steps the motor * * * http://www.arduino.cc/en/Reference/Stepper */
#include <Stepper.h>
// change this to the number of steps on your motor#define STEPS 24
// create an instance of the stepper class, specifying// the number of steps of the motor and the pins it's// attached toStepper stepper(STEPS, 2, 3, 4, 5);
int steps = 0;
void setup(){ // set the speed of the motor to 30 RPMs
8.12 Driving a Bipolar Stepper Motor | 287
www.it-ebooks.info

stepper.setSpeed(30); Serial.begin(9600);}
void loop(){ if ( Serial.available()) { char ch = Serial.read();
if(ch >= '0' && ch <= '9'){ // is ch a number? steps = steps * 10 + ch - '0'; // yes, accumulate the value } else if(ch == '+'){ stepper.step(steps); steps = 0; } else if(ch == '-'){ stepper.step(steps * -1); steps = 0; } }}
Figure 8-14. Four-wire bipolar stepper using L293 H-Bridge
DiscussionIf your stepper requires a higher current than the L293 can provide (600 mA for theL293D), you can use the SN754410 chip that handles up to 1 amp. For current up to2 amps, you can use the L298 chip. The L298 can use the same sketch as shown in thisrecipe’s Solution, and it should be connected as shown in Figure 8-15.
288 | Chapter 8: Physical Output
www.it-ebooks.info

Figure 8-15. Unipolar stepper with L298
A simple way to connect an L298 to Arduino is to use the SparkFun Ardumoto shield(DEV-09213). This plugs on top of an Arduino board and only requires external con-nection to the motor windings; the motor power comes from the Arduino Vin (externalVoltage Input) pin. In1/2 is controlled by pin 12, and ENA is pin 10. In3/4 is connectedto pin 13, and ENB is on pin 11. Make the following changes to the code to use thepreceding sketch with Ardumoto:
Stepper stepper(STEPS, 12,13);int steps = 0;
In setup:
pinMode(10, OUTPUT);digitalWrite(10, LOW); // enable A// set the speed of the motor to 30 RPMsstepper.setSpeed(30);Serial.begin(9600);pinMode(11, OUTPUT);digitalWrite(11, LOW); // enable B
The loop code is the same as the previous sketch.
8.12 Driving a Bipolar Stepper Motor | 289
www.it-ebooks.info

8.13 Driving a Bipolar Stepper Motor (Using the EasyDriverBoard)ProblemYou have a bipolar (four-wire) stepper motor and you want to step it under programcontrol using the EasyDriver board.
SolutionThis Solution is similar to Recipe 8.12, but it uses the popular EasyDriver board.Figure 8-16 shows the connections.
Figure 8-16. Connecting the EasyDriver board
The following sketch controls the step direction and count from the serial port. Unlikethe code in Recipe 8.12, it does not require the stepper library, because the EasyDriverboard handles the control of the motor coils in hardware:
/* * Stepper_Easystepper sketch * * stepper is controlled from the serial port. * a numeric value followed by '+' or '-' steps the motor
290 | Chapter 8: Physical Output
www.it-ebooks.info

* */
const int dirPin = 2;const int stepPin = 3;
int speed = 100; // desired speed in steps per secondint steps = 0; // the number of steps to make
void setup(){ pinMode(dirPin, OUTPUT); pinMode(stepPin, OUTPUT); Serial.begin(9600);}
void loop(){ if ( Serial.available()) { char ch = Serial.read();
if(ch >= '0' && ch <= '9'){ // is ch a number? steps = steps * 10 + ch - '0'; // yes, accumulate the value } else if(ch == '+'){ step(steps); steps = 0; } else if(ch == '-'){ step(-steps); steps = 0; } else if(ch == 's'){ speed = steps; Serial.print("Setting speed to "); Serial.println(steps); steps = 0; } }}
void step(int steps){ int stepDelay = 1000 / speed; //delay in ms for speed given as steps per sec int stepsLeft;
// determine direction based on whether steps_to_mode is + or - if (steps > 0) { digitalWrite(dirPin, HIGH); stepsLeft = steps; } if (steps < 0) { digitalWrite(dirPin, LOW);
8.13 Driving a Bipolar Stepper Motor (Using the EasyDriver Board) | 291
www.it-ebooks.info

stepsLeft = -steps; } // decrement the number of steps, moving one step each time while(stepsLeft > 0) { digitalWrite(stepPin,HIGH); delayMicroseconds(1); digitalWrite(stepPin,LOW); delay(stepDelay); stepsLeft--; // decrement the steps left }}
DiscussionThe EasyDriver board is powered through the pins marked “M+” and “Gnd” (shownin the upper right of Figure 8-16). The board operates with voltages between 8 voltsand 30 volts; check the specifications of your stepper motor for the correct operatingvoltage. If you are using a 5V stepper, you must provide 5 volts to the pins marked“Gnd” and “+5V” (these pins are on the lower left of the EasyDriver board) and cutthe jumper on the printed circuit board marked “APWR” (this disconnects the on-board regulator and powers the motor and EasyDriver board from an external 5Vsupply).
You can reduce current consumption when the motor is not stepping by connectingthe Enable pin to a spare digital output and setting this HIGH to disable output (a LOWvalue enables output).
Stepping options are selected by connecting the MS1 and MS2 pins to +5V (HIGH) orGnd (LOW), as shown in Table 8-2. The default options with the board connected asshown in Figure 8-16 will use eighth-step resolution (MS1 and MS2 are HIGH, Reset isHIGH, and Enable is LOW).
Table 8-2. Microstep options
Resolution MS1 MS2
Full step LOW LOW
Half step HIGH LOW
Quarter step LOW HIGH
Eighth step HIGH HIGH
You can modify the code so that the speed value determines the revolutions per secondas follows:
// use the following for speed given in RPMint speed = 100; // desired speed in RPMint stepsPerRevolution = 200; // this line sets steps for one revolution
292 | Chapter 8: Physical Output
www.it-ebooks.info

Change the step function so that the first line is as follows:
int stepDelay = 60L * 1000L / stepsPerRevolution / speed; // speed as RPM
Everything else can remain the same, but now the speed command you send will bethe RPM of the motor when it steps.
8.14 Driving a Unipolar Stepper Motor (ULN2003A)ProblemYou have a unipolar (five- or six-wire) stepper motor and you want to control it usinga ULN2003A Darlington driver chip.
SolutionConnect a unipolar stepper as shown in Figure 8-17. The +V connection goes to a powersupply rated for the voltage and current needed by your motor.
Figure 8-17. Unipolar stepper connected using ULN2003 driver
8.14 Driving a Unipolar Stepper Motor (ULN2003A) | 293
www.it-ebooks.info

The following sketch steps the motor using commands from the serial port. A numericvalue followed by a + steps in one direction; a - steps in the other:
/* * Stepper sketch * * stepper is controlled from the serial port. * a numeric value followed by '+' or '-' steps the motor * * * http://www.arduino.cc/en/Reference/Stepper */
#include <Stepper.h>
// change this to the number of steps on your motor#define STEPS 24
// create an instance of the stepper class, specifying// the number of steps of the motor and the pins it's// attached toStepper stepper(STEPS, 2, 3, 4, 5);
int steps = 0;
void setup(){ stepper.setSpeed(30); // set the speed of the motor to 30 RPMs Serial.begin(9600);}
void loop(){ if ( Serial.available()) { char ch = Serial.read();
if(ch >= '0' && ch <= '9'){ // is ch a number? steps = steps * 10 + ch - '0'; // yes, accumulate the value } else if(ch == '+'){ stepper.step(steps); steps = 0; } else if(ch == '-'){ stepper.step(steps * -1); steps = 0; }
294 | Chapter 8: Physical Output
www.it-ebooks.info

else if(ch == 's'){ stepper.setSpeed(steps); Serial.print("Setting speed to "); Serial.println(steps); steps = 0; } }}
DiscussionThis type of motor has two pairs of coils, and each coil has a connection to the center.Motors with only five wires have both center connections brought out on a single wire.If the connections are not marked, you can identify the wiring using a multimeter.Measure the resistance across pairs of wires to find the two pairs of wires that have themaximum resistance. The center tap wire should have half the resistance of the full coil.A step-by-step procedure is available at http://techref.massmind.org/techref/io/stepper/wires.asp.
8.14 Driving a Unipolar Stepper Motor (ULN2003A) | 295
www.it-ebooks.info
CHAPTER 9
Audio Output
9.0 IntroductionThe Arduino isn’t built to be a synthesizer, but it can certainly produce sound throughan output device such as a speaker.
Sound is produced by vibrating air. A sound has a distinctive pitch if the vibrationrepeats regularly. The Arduino can create sound by driving a loudspeaker or Piezodevice (a small ceramic transducer that produces sound when pulsed), converting elec-tronic vibrations into speaker pulses which vibrate the air. The pitch (frequency) of thesound is determined by the time it takes to pulse the speaker in and out; the shorterthe amount of time, the higher the frequency.
The unit of frequency is measured in hertz, and it refers to the number of times thesignal goes through its repeating cycle in one second. The range of human hearing isfrom around 20 hertz (Hz) up to 20,000 hertz (although it varies by person and changeswith age).
The Arduino software includes a tone function for producing sound. Recipes 9.1 and9.2 show how to use this function to make sounds and tunes. The tone function useshardware timers. On a standard Arduino board, only one tone can be produced at atime. Sketches where the timer (timer2) is needed for other functions, such as analogWrite on pin 9 or 10, cannot use the tone function. To overcome this limitation, Rec-ipe 9.3 shows how to use an enhanced tone library for multiple tones, and Recipe 9.4shows how sound can be produced without using the tone function or hardware timers.
The sound that can be produced by pulsing a speaker is limited and does not soundvery musical. The output is a square wave (see Figure 9-1), which sounds harsh andmore like an antique computer game than a musical instrument.
It is difficult for Arduino to produce more musically complex sounds without externalhardware. You can add a shield that extends Arduino’s capabilities; Recipe 9.5 showshow to use the Adafruit wave shield to play back audio files from a memory card onthe shield.
297
www.it-ebooks.info

You can also use Arduino to control an external device that is built to make sound.Recipe 9.6 shows how to send Musical Instrument Digital Interface (MIDI) messagesto a MIDI device. These devices produce high-quality sounds of a huge variety of in-struments and can produce the sounds of many instruments simultaneously. Thesketch in Recipe 9.6 shows how to generate MIDI messages to play a musical scale.
Recipe 9.7 provides an overview of an application called Auduino that uses complexsoftware processing to synthesize sound.
This chapter covers the many ways you can generate sound electronically. If you wantto make music by getting Arduino to play acoustic instruments (such as glockenspiels,drums, and acoustic pianos), you can employ actuators such as solenoids and servosthat are covered in Chapter 8.
Many of the recipes in this chapter will drive a small speaker or Piezo device. The circuitfor connecting one of these to an Arduino pin is shown in Figure 9-2.
The 100 ohm resistor is used to limit the current that can flow through the speaker (toomuch current can damage an Arduino pin). A speaker will work regardless of whichwire is attached to ground, but a Piezo is polarized, so connect the negative wire (usuallyblack) to the Gnd pin. If you want to adjust the volume, you can connect a 500 or1K ohm variable resistor, as shown in Figure 9-2.
Alternatively, you can connect the output to an external audio amplifier. Recipe 5.7shows how an output pin can be connected to an audio jack.
Figure 9-1. Generating sound using digital pulses
298 | Chapter 9: Audio Output
www.it-ebooks.info

The voltage level (5 volts) is higher than audio amplifiers expect, so youmay need to use another 4.7K variable resistor to reduce the voltage(connect one end to pin 3 and the other end to ground; then connectthe slider to the tip of the jack plug).
9.1 Playing TonesProblemYou want to produce audio tones through a speaker or other audio transducer. Youwant to specify the frequency and duration of the tone.
SolutionUse the Arduino tone function. This sketch plays a tone with the frequency set by avariable resistor (or other sensor) connected to analog input 0 (see Figure 9-3):
/* * Tone sketch * * Plays tones through a speaker on digital pin 9 * frequency determined by values read from analog port */
const int speakerPin = 9; // connect speaker to pin 9const int pitchPin = 0; // pot that will determine the frequency of the tone
void setup(){}
void loop(){ int sensor0Reading = analogRead(pitchPin); // read input to set frequency
Figure 9-2. Connecting to an audio transducer
9.1 Playing Tones | 299
www.it-ebooks.info

// map the analog readings to a meaningful range int frequency = map(sensor0Reading, 0, 1023, 100,5000); //100Hz to 5kHz int duration = 250; // how long the tone lasts tone(speakerPin, frequency, duration); // play the tone delay(1000); //pause one second}
Figure 9-3. Connections for the Tone sketch
The tone function can take up to three parameters: the pin attached to the speaker, thefrequency to play (in hertz), and the length of time (in milliseconds) to play the note.The third parameter is optional. If it is omitted, the note will continue until there isanother call to tone, or a call to noTone. The value for the frequency is mapped to sensiblevalues for audio frequencies in the following line:
int frequency = map(sensor0Reading, 0, 1023, 100,5000); //100Hz to 5kHz
This variation uses a second variable resistor (the right-hand pot in Figure 9-3) to setthe duration of the tone:
const int speakerPin = 9; // connect speaker to pin 9const int pitchPin = 0; // input that determines frequency of the toneconst int durationPin = 1; // input that will determine the duration of the tone
void setup(){}
void loop(){ int sensor0Reading = analogRead(pitchPin); // read input for frequency int sensor1Reading = analogRead(durationPin); // read input for duration
// map the analog readings to a meaningful range
300 | Chapter 9: Audio Output
www.it-ebooks.info

int frequency = map(sensor0Reading, 0, 1023, 100,5000); // 100Hz to 5kHz int duration = map(sensor1Reading, 0, 1023, 100,1000); // dur 0.1-1 second tone(speakerPin, frequency, duration); // play the tone delay(duration); //wait for the tone to finish}
Another variation is to add a switch so that tones are generated only when the switchis pressed.
Enable pull-up resistors in setup with this line (see Recipe 5.2 for a connection diagramand explanation):
digitalWrite(inputPin,HIGH); // turn on internal pull-up on the inputPin
Modify the loop code so that the tone and delay functions are only called when theswitch is pressed:
if( digitalRead(inputPin) = LOW) // read input value{ tone(speakerPin, frequency, duration); // play the tone delay(duration); //wait for the tone to finish}
You can use almost any audio transducer to produce sounds with Arduino. Smallspeakers work very well. Piezo transducers also work and are inexpensive, robust, andeasily salvaged from old audio greeting cards. Piezos draw little current (they are high-resistance devices), so they can be connected directly to the pin. Speakers are usuallyof much lower resistance and need a resistor to limit the current flow. The componentsto build the circuit pictured in Figure 9-3 should be easy to find; see this book’s web-site for suggestions on getting parts.
See AlsoYou can achieve enhanced functionality using the Tone library by Brett Hagman thatis described in Recipe 9.3.
9.2 Playing a Simple MelodyProblemYou want Arduino to play a simple melody.
SolutionYou can use the tone function described in Recipe 9.1 to play sounds corresponding tonotes on a musical instrument. This sketch uses tone to play a string of notes, the “Helloworld” of learning the piano, “Twinkle, Twinkle Little Star”:
/* * Twinkle sketch *
9.2 Playing a Simple Melody | 301
www.it-ebooks.info

* Plays "Twinkle, Twinkle Little Star" * * speaker on digital pin 9 */
const int speakerPin = 9; // connect speaker to pin 9
char noteNames[] = {'C','D','E','F','G','a','b'};unsigned int frequencies[] = {262,294,330,349,392,440,494};const byte noteCount = sizeof(noteNames); // the number of notes (7 in thisexample)
//notes, a space represents a restchar score[] = "CCGGaaGFFEEDDC GGFFEEDGGFFEED CCGGaaGFFEEDDC "; const byte scoreLen = sizeof(score); // the number of notes in the score
void setup(){}
void loop(){ for (int i = 0; i < scoreLen; i++) { int duration = 333; // each note lasts for a third of a second playNote(score[i], duration); // play the note }
delay(4000); // wait four seconds before repeating the song}
void playNote(char note, int duration){ // play the tone corresponding to the note name for (int i = 0; i < noteCount; i++) { // try and find a match for the noteName to get the index to the note if (noteNames[i] == note) // find a matching note name in the array tone(speakerPin, frequencies[i], duration); // play the note using thefrequency } // if there is no match then the note is a rest, so just do the delay delay(duration);}
noteNames is an array of characters to identify notes in a score. Each entry in the arrayis associated with a frequency defined in the notes array. For example, note C (the firstentry in the noteNames array) has a frequency of 262 Hz (the first entry in the notes array).
score is an array of notes representing the note names you want to play:
char score[] = "CCGGaaGFFEEDDC GGFFEEDGGFFEED CCGGaaGFFEEDDC "; // a spacerepresents a rest
302 | Chapter 9: Audio Output
www.it-ebooks.info

Each character in the score that matches a character in the noteNames array will makethe note play. The space character is used as a rest, but any character not defined innoteNames will also produce a rest (no note playing).
The sketch calls playNote with each character in the score and a duration for the notesof one-third of a second.
The playNote function does a lookup in the noteNames array to find a match and usesthe corresponding entry in the frequencies array to get the frequency to sound.
Every note has the same duration. If you want to specify the length of each note, youcan add the following code to the sketch:
byte beats[scoreLen] = {1,1,1,1,1,1,2, 1,1,1,1,1,1,2,1, 1,1,1,1,1,1,2, 1,1,1,1,1,1,2,1, 1,1,1,1,1,1,2, 1,1,1,1,1,1,2};byte beat = 180; // beats per minute for eighth notesunsigned int speed = 60000 / beat; // the time in ms for one beat
beats is an array showing the length of each note: 1 is an eighth note, 2 a quarter note,and so on.
beat is the number of beats per minute.
speed is the calculation to convert beats per minute into a duration in milliseconds.
The only change to the loop code is to set the duration to use the value in the beatsarray. Change:
int duration = 333; // each note lasts for a third of a second
to:
int duration = beats[i] * speed; // use beats array to determine duration
9.3 Generating More Than One Simultaneous ToneProblemYou want to play two tones at the same time. The Arduino Tone library only producesa single tone on a standard board, and you want two simultaneous tones. Note thatthe Mega board has more timers and can produce up to six tones.
SolutionThe Arduino Tone library is limited to a single tone because a different timer is requiredfor each tone, and although a standard Arduino board has three timers, one is used forthe millis function and another for servos. This recipe uses a library written by Brett Hagman, the author of the Arduino tone function. The library enables you to generatemultiple simultaneous tones. You can download it from http://code.google.com/p/rogue-code/wiki/ToneLibraryDocumentation.
9.3 Generating More Than One Simultaneous Tone | 303
www.it-ebooks.info

This is an example sketch from the download that plays two tones selectable from theserial port:
/* * Dual Tones - Simultaneous tone generation. * plays notes 'a' through 'g' sent over the Serial Monitor. * lowercase letters for the first tone and uppercase for the second. * 's' stops the current playing tone. */#include <Tone.h>
int notes[] = { NOTE_A3, NOTE_B3, NOTE_C4, NOTE_D4, NOTE_E4, NOTE_F4, NOTE_G4 };
// You can declare the tones as an arrayTone notePlayer[2];
void setup(void){ Serial.begin(9600); notePlayer[0].begin(11); notePlayer[1].begin(12);}
void loop(void){ char c;
if(Serial.available()) { c = Serial.read();
switch(c) { case 'a'...'g': notePlayer[0].play(notes[c - 'a']); Serial.println(notes[c - 'a']); break; case 's': notePlayer[0].stop(); break;
case 'A'...'G': notePlayer[1].play(notes[c - 'A']); Serial.println(notes[c - 'A']); break; case 'S': notePlayer[1].stop(); break;
304 | Chapter 9: Audio Output
www.it-ebooks.info

default: notePlayer[1].stop(); notePlayer[0].play(NOTE_B2); delay(300); notePlayer[0].stop(); delay(100); notePlayer[1].play(NOTE_B2); delay(300); notePlayer[1].stop(); break; } }}
DiscussionTo mix the output of the two tones to a single speaker, use 500 ohm resistors from eachoutput pin and tie them together at the speaker. The other speaker lead connects toGnd, as shown in the previous sketches.
On a standard Arduino board, the first tone will use timer 2 (so PWM on pins 9 and10 will not be available); the second tone uses timer 1 (preventing the Servo library andPWM on pins 11 and 12 from working). On a Mega board, each simultaneous tonewill use timers in the following order: 2, 3, 4, 5, 1, 0.
Playing three simultaneous notes on a standard Arduino board, or morethan six on a Mega, is possible, but millis and delay will no longer workproperly. It is safest to use only two simultaneous tones (or five on aMega).
9.4 Generating Audio Tones and Fading an LEDProblemYou want to produce sounds through a speaker or other audio transducer, and youneed to generate the tone in software instead of with a timer; for example, if you needto use analogWrite on pin 9 or 10.
SolutionThe tone function discussed in earlier recipes is easier to use, but it requires a hardwaretimer, which may be needed for other tasks such as analogWrite. This code does notuse a timer, but it will not do anything else while the note is played. Unlike the Arduinotone function, the playTone function described here will block—it will not return untilthe note has finished.
This sketch generates tones without a timer. It plays six notes, each one twice thefrequency of (an octave higher than) the previous one. The playTone function generates
9.4 Generating Audio Tones and Fading an LED | 305
www.it-ebooks.info

a tone for a specified duration on a speaker or Piezo device connected to a digital outputpin and ground; see Figure 9-4:
byte speakerPin = 9;byte ledPin = 10;
void setup(){ pinMode(speakerPin, OUTPUT);}
void playTone(int period, int duration){// period is one cycle of tone// duration is how long the pulsing should last in milliseconds int pulse = period / 2; for (long i = 0; i < duration * 1000L; i += period ) { digitalWrite(speakerPin, HIGH); delayMicroseconds(pulse); digitalWrite(speakerPin, LOW); delayMicroseconds(pulse); }}
void fadeLED(){ for (int brightness = 0; brightness < 255; brightness++) { analogWrite(ledPin, brightness); delay(2); } for (int brightness = 255; brightness >= 0; brightness--) { analogWrite(ledPin, brightness); delay(2); }
}void loop(){ // a note with period of 15289 is deep C (second lowest C note on piano) for(int period=15289; period >= 477; period=period / 2) // play 6 octaves { playTone( period, 200); // play tone for 200 milliseconds } fadeLED();}
DiscussionTwo values are used by playTone: period and duration. The variable period representsthe time for one cycle of the tone to play. The speaker is pulsed high and then low for
306 | Chapter 9: Audio Output
www.it-ebooks.info

the number of microseconds given by period. The for loop repeats the pulsing for thenumber of milliseconds given in the duration argument.
If you prefer to work in frequency rather than period, you can use the reciprocal rela-tionship between frequency and period; period is equal to 1 divided by frequency. Youneed the period value in microseconds; because there are 1 million microseconds inone second, the period is calculated as 1000000L / frequency (the “L” at the end of thatnumber tells the compiler that it should calculate using long integer math to preventthe calculation from exceeding the range of a normal integer—see the explanation oflong integers in Recipe 2.2):
void playFrequency(int frequency, int duration){ int period = 1000000L / frequency; int pulse = period / 2;
The rest of the code is the same as playTone:
for (long i = 0; i < duration * 1000L; i += period ) { digitalWrite(speakerPin, HIGH); delayMicroseconds(pulse); digitalWrite(speakerPin, LOW); delayMicroseconds(pulse); }}
The code in this recipe stops and waits until a tone has completed before it can do anyother processing. It is possible to produce the sound in the background (without wait-ing for the sound to finish) by putting the sound generation code in an interrupt handler.The source code for the tone function that comes with the Arduino distribution showshow this is done.
See AlsoRecipe 9.7
Figure 9-4. Connections for speaker and LED
9.4 Generating Audio Tones and Fading an LED | 307
www.it-ebooks.info

Here are some examples of more complex audio synthesis that can be accomplishedwith the Arduino:
Pulse-Code ModulationPCM allows you to approximate analog audio using digital signaling. An Arduinowiki article that explains how to produce 8-bit PCM using a timer is available athttp://www.arduino.cc/playground/Code/PCMAudio.
Pocket Piano shieldCritter and Guitari’s Pocket Piano shield gives you a piano-like keyboard, wavetable synthesis, FM synthesis, and more; see http://www.critterandguitari.com/home/store/arduino-piano.php.
9.5 Playing a WAV FileProblemUnder program control, you want Arduino to trigger the playing of a WAV file.
SolutionThis sketch uses the Adafruit wave shield and is based on one of the example sketcheslinked from the product page at http://www.adafruit.com/index.php?main_page=product_info&products_id=94.
This sketch will play one of nine files depending on readings taken from a variableresistor connected to analog input 0 when pressing a button connected to pin 15 (analoginput 1):
/* * WaveShieldPlaySelection sketch * * play a selected WAV file * * Position of variable resistor slider when button pressed selects file to play * */
#include <FatReader.h>#include <SdReader.h>//#include <avr/pgmspace.h>
#include "WaveHC.h"#include "WaveUtil.h"
SdReader card; // This object holds the information for the cardFatVolume vol; // This holds the information for the partition on the cardFatReader root; // This holds the information for the volumes root directoryFatReader file; // This object represents the WAV fileWaveHC wave; // Only wave (audio) object - only one file played at a time
308 | Chapter 9: Audio Output
www.it-ebooks.info

const int buttonPin = 15;const int potPin = 0; // analog input pin 0
char * wavFiles[] = {"1.WAV","2.WAV","3.WAV","4.WAV","5.WAV","6.WAV","7.WAV","8.WAV","9.WAV"};
void setup(){ Serial.begin(9600); pinMode(buttonPin, INPUT); digitalWrite(buttonPin, HIGH); // turn on pull-up resistor
if (!card.init()) { // Something went wrong, sdErrorCheck prints an error number putstring_nl("Card init. failed!"); sdErrorCheck(); while(1); // then 'halt' - do nothing! }
// enable optimized read - some cards may time out card.partialBlockRead(true);
// find a FAT partition! uint8_t part; for (part = 0; part < 5; part++) // we have up to 5 slots to look in { if (vol.init(card, part)) break; // found one so break out of this for loop } if (part == 5) // valid parts are 0 to 4, more not valid { putstring_nl("No valid FAT partition!"); sdErrorCheck(); // Something went wrong, print the error while(1); // then 'halt' - do nothing! }
// tell the user about what we found putstring("Using partition "); Serial.print(part, DEC); putstring(", type is FAT"); Serial.println(vol.fatType(),DEC); // FAT16 or FAT32?
// Try to open the root directory if (!root.openRoot(vol)) { putstring_nl("Can't open root dir!"); // Something went wrong, while(1); // then 'halt' - do nothing! }
// if here then all the file prep succeeded. putstring_nl("Ready!");}
9.5 Playing a WAV File | 309
www.it-ebooks.info

void loop(){ if(digitalRead(buttonPin) == LOW) { int value = analogRead(potPin); int index = map(value,0,1023,0,8); // index into one of the 9 files playcomplete(wavFiles[index]); Serial.println(value); }}
// Plays a full file from beginning to end with no pause.void playcomplete(char *name){ // call playfile find and play this name playfile(name); while (wave.isplaying) { // do nothing while it's playing } // now it's done playing}
void playfile(char *name) { // see if the wave object is currently doing something if (wave.isplaying) { // already playing something, so stop it! wave.stop(); // stop it } // look in the root directory and open the file if (!file.open(root, name)) { putstring("Couldn't open file "); Serial.print(name); return; } // read the file and turn it into a wave object if (!wave.create(file)) { putstring_nl("Not a valid WAV"); return; } // start playback wave.play();}
void sdErrorCheck(void){ if (!card.errorCode()) return; putstring("\n\rSD I/O error: ");
310 | Chapter 9: Audio Output
www.it-ebooks.info

Serial.print(card.errorCode(), HEX); putstring(", "); Serial.println(card.errorData(), HEX); while(1) ; // stay here if there is an error}
DiscussionThe wave shield reads data stored on an SD card. It uses its own library that is availablefrom the Ladyada website (http://www.ladyada.net/make/waveshield/). The WAV filesto be played need to be put on the memory card using a computer. They must be22 KHz, 12-bit uncompressed mono files, and the filenames must be in 8.3 format. Theopen source audio utility Audacity can be used to edit or convert audio files to thecorrect format. The wave shield accesses the audio file from the SD card, so the lengthof the audio is only limited by the size of the memory card.
See AlsoThe Ladyada wave shield library and documentation: http://www.ladyada.net/make/waveshield/
Audacity audio editing and conversion software: http://audacity.sourceforge.net/
SparkFun offers a range of audio modules, including an Audio-Sound Module (http://www.sparkfun.com/products/9534) and MP3 breakout board (http://www.sparkfun.com/products/8954).
9.6 Controlling MIDIProblemYou want to get a MIDI synthesizer to play music using Arduino.
SolutionTo connect to a MIDI device, you need a five-pin DIN plug or socket. If you use asocket, you will also need a lead to connect to the device. Connect the MIDI connectorto Arduino using a 220-ohm resistor, as shown in Figure 9-5.
9.6 Controlling MIDI | 311
www.it-ebooks.info

Figure 9-5. MIDI connections
To upload the code onto Arduino, you should disconnect the MIDI device as it mayinterfere with the upload. After the sketch is uploaded, connect a MIDI sound deviceto the Arduino output. A musical scale will play each time you press the button con-nected to pin 2:
/*midiOut sketchsends MIDI messages to play a scale on a MIDI instrumenteach time the switch on pin 2 is pressed*/
//these numbers specify which noteconst byte notes[8] = {60, 62, 64, 65, 67, 69, 71, 72}; //they are part of the MIDI specificationconst int length = 8;const int switchPin = 2;const int ledPin = 13;
void setup() { Serial.begin(31250); pinMode(switchPin, INPUT); digitalWrite(switchPin, HIGH); pinMode(ledPin, OUTPUT);}
void loop() { if (digitalRead(switchPin == LOW)) { for (byte noteNumber = 0; noteNumber < 8; noteNumber++)
312 | Chapter 9: Audio Output
www.it-ebooks.info

{ playMidiNote(1, notes[noteNumber], 127); digitalWrite(ledPin, HIGH); delay(70); playMidiNote(1, notes[noteNumber], 0); digitalWrite(ledPin, HIGH); delay(30); } }}
void playMidiNote(byte channel, byte note, byte velocity){ byte midiMessage= 0x90 + (channel - 1); Serial.print(midiMessage, BYTE); Serial.print(note, BYTE); Serial.print(velocity, BYTE);}
DiscussionThis sketch uses the serial port to send MIDI information. The circuit connected topin 1 may interfere with uploading code to the board. Remove the wire from pin 1 whileyou upload, and plug it back in afterward.
MIDI was originally used to connect digital musical instruments together so that onecould control another. The MIDI specification describes the electrical connections andthe messages you need to send.
MIDI is actually a serial connection (at a nonstandard serial speed, 31,250 baud), soArduino can send MIDI messages using its serial port hardware from pins 0 and 1.Because the serial port is occupied by MIDI messages, you can’t print messages to theSerial Monitor, so the sketch flashes the LED on pin 13 each time it sends a note.
Each MIDI message consists of at least one byte. This byte specifies what is to be done.Some commands need no other information, but other commands need data to makesense. The message in this sketch is note on, which needs two pieces of information:which note and how loud. Both of these bits of data are in the range of zero to 127.
The sketch initializes the serial port to a speed of 31,250 baud; the other MIDI-specificcode is in the function playMidiNote:
void playMidiNote(byte channel, byte note, byte velocity){ byte midiMessage= 0x90 + (channel - 1); Serial.print(midiMessage, BYTE); Serial.print(note, BYTE); Serial.print(velocity, BYTE);}
This function takes three parameters and calculates the first byte to send using thechannel information.
9.6 Controlling MIDI | 313
www.it-ebooks.info

MIDI information is sent on different channels between 1 and 16. Each channel can beset to be a different instrument, so multichannel music can be played. The commandfor note on (to play a sound) is a combination of 0x90 (the top four bits at b1001), withthe bottom four bits set to the numbers between b0000 and b1111 to represent theMIDI channels. The byte represents channels using zero to 15 for channels 1 to 16, so1 is subtracted first.
Then the note value and the volume (referred to as velocity in MIDI, as it originallyrelated to how fast the key was moving on a keyboard) are sent.
The serial print statements specify that the values must be sent as bytes (rather than aseries of ASCII characters) spelling out the numerals. println is not used because a linereturn character would insert additional bytes into the signal that are not wanted.
The sound is turned off by sending a similar message, but with velocity set to 0.
This recipe works with MIDI devices having five-pin DIN MIDI in connectors. If yourMIDI device only has a USB connector, this will not work. It will not enable the Arduinoto control MIDI music programs running on your computer without additional hard-ware (a MIDI to USB adapter). Although Arduino has a USB connector, your computerrecognizes it as a serial device, not a MIDI device.
See AlsoTo send and receive MIDI, have a look at the MIDI library available at http://www.arduino.cc/playground/Main/MIDILibrary.
MIDI messages are described in detail at http://www.midi.org/techspecs/midimessages.php.
For more information on the SparkFun MIDI breakout shield (BOB-09598), see http://www.sparkfun.com/products/9598.
9.7 Making an Audio SynthesizerProblemYou want to generate complex sounds similar to those used to produce electronicmusic.
SolutionThe simulation of audio oscillators used in a sound synthesizer is complex, but TinkerLondon engineer Peter Knight has created a sketch called Auduino that enables Arduinoto produce more complex and interesting sounds.
Download the sketch by following the link on http://code.google.com/p/tinkerit/wiki/Auduino.
314 | Chapter 9: Audio Output
www.it-ebooks.info

Connect five 4.7K-ohm linear potentiometers to analog pins 0 through 4, as shown inFigure 9-6. Potentiometers with full-size shafts are better than small presets becauseyou can easily twiddle the settings. Pin 5 is used for audio output and is connected toan amplifier using a jack plug.
Figure 9-6. Auduino
DiscussionThe Sketch code is complex because it is directly manipulating hardware timers togenerate the desired frequencies, which are transformed in software to produce theaudio effects. It is not included in the text because you do not need to understand thecode to use Auduino.
Auduino uses a technique called granular synthesis to generate the sound. It uses twoelectronically produced sound sources (called grains). The variable resistors control thefrequency and decay of each grain (inputs 0 and 2 for one grain and inputs 3 and 1 forthe other). Input 4 controls the synchronization between the grains.
If you want to tweak the code, you can change the scale used to calculate the frequency.The default setting is pentatonic, but you can comment that out and uncomment an-other option to use a different scale.
Be careful when adding code to the main loop, because the sketch is highly optimizedand additional code could slow things down too much, causing the audio synthesis tonot work well.
9.7 Making an Audio Synthesizer | 315
www.it-ebooks.info

You can replace any of the pots with sensors that can produce an analog voltage signal(see Chapter 6). For example, a light dependent resistor (see Recipe 6.2) or a distancesensor (the analog output described toward the end of Recipe 6.4) connected to one ofthe frequency inputs (pin 0 or 3) would enable you to control the pitch by moving yourhand closer to or farther from the sensor (look up “theremin” in Wikipedia or Googleto read more about this musical instrument that is played by sensing hand movement).
See AlsoVideo demonstration of Auduino: http://www.vimeo.com/2266458
Wikipedia article explaining granular synthesis: http://en.wikipedia.org/wiki/Granular_synthesis
Wikipedia article on the theremin: http://en.wikipedia.org/wiki/Theremin
316 | Chapter 9: Audio Output
www.it-ebooks.info

CHAPTER 10
Remotely Controlling External Devices
10.0 IntroductionThe Arduino can interact with almost any device that uses some form of remote control,including TVs, audio equipment, cameras, garage doors, appliances, and toys. Mostremote controls work by sending digital data from a transmitter to a receiver using infrared light (IR) or wireless radio technology. Different protocols (signal patterns) areused to translate key presses into a digital signal, and the recipes in this chapter showyou how to use commonly found remote controls and protocols.
An IR remote works by turning an LED on and off in patterns to produce unique codes.The codes are typically 12 to 32 bits (pieces of data). Each key on the remote is asso-ciated with a specific code that is transmitted when the key is pressed. If the key is helddown, the remote usually sends the same code repeatedly, although some remotes (e.g.,NEC) send a special repeat code when a key is held down. For Philips RC-5 or RC-6remotes, a bit in the code is toggled each time a key is pressed; the receiver uses thistoggle bit to determine when a key is pressed a second time. You can read more aboutthe technologies used in IR remote controls at http://www.sbprojects.com/knowledge/ir/ir.htm.
The recipes here use a low-cost IR receiver module to detect the signal and provide adigital output that the Arduino can read. The digital output is then decoded by a librarycalled IRremote, which was written by Ken Shirriff and can be downloaded from http://www.arcfn.com/2009/08/multi-protocol-infrared-remote-library.html.
The same library is used in the recipes in which Arduino sends commands to act likea remote control.
To install the library, place it in the folder named libraries in your Arduino sketch folder.If you need help installing libraries, see Chapter 16.
Remote controls using wireless radio technology are more difficult to emulate than IRcontrols. However, the button contacts on these controls can be activated by Arduino.The recipes using wireless remotes simulate button presses by closing the button
317
www.it-ebooks.info

contacts circuit inside the remote control. With wireless remotes, you may need to takeapart the remote control and connect wires from the contacts to Arduino to be able touse these devices. Components called optocouplers are used to provide electrical sep-aration between Arduino and the remote control. This isolation prevents voltages fromArduino from harming the remote control, and vice versa.
Optocouplers (also called optoisolators) enable you to safely control another circuitthat may be operating at different voltage levels from Arduino. As the “isolator” partof the name implies, optoisolators provide a way to keep things electrically separated.These devices contain an LED, which can be controlled by an Arduino digital pin. Thelight from the LED in the optocoupler shines onto a light-sensitive transistor. Turningon the LED causes the transistor to conduct, closing the circuit between its twoconnections—the equivalent of pressing a switch.
10.1 Responding to an Infrared Remote ControlProblemYou want to respond to any key pressed on a TV or other remote control.
SolutionArduino responds to IR remote signals using a device called an IR receiver module.Common devices are the TSOP4838, PNA4602, and TSOP2438. The first two have thesame connections, so the circuit is the same; the TSOP2438 has the +5V and Gnd pinsreversed. Check the data sheet for your device to ensure that you connect it correctly.
This recipe uses the IRremote library from http://www.arcfn.com/2009/08/multi-protocol-infrared-remote-library.html. Connect the IR receiver module according to yourdata sheet. The Arduino wiring in Figure 10-1 is for the TSOP4838/PNA4602 devices.
This sketch will toggle an LED when any button on an infrared remote control ispressed:
/* IR_remote_detector sketch An IR remote receiver is connected to pin 2. The LED on pin 13 toggles each time a button on the remote is pressed. */
#include <IRremote.h> //adds the library code to the sketch
const int irReceiverPin = 2; //pin the receiver is connected toconst int ledPin = 13;
IRrecv irrecv(irReceiverPin); //create an IRrecv objectdecode_results decodedSignal; //stores results from IR detector
318 | Chapter 10: Remotely Controlling External Devices
www.it-ebooks.info

void setup(){ pinMode(ledPin, OUTPUT); irrecv.enableIRIn(); // Start the receiver object}
boolean lightState = false; //keep track of whether the LED is onunsigned long last = millis(); //remember when we last received an IRmessage
void loop(){ if (irrecv.decode(&decodedSignal) == true) //this is true if a message hasbeen received
Figure 10-1. Connecting an infrared receiver module
10.1 Responding to an Infrared Remote Control | 319
www.it-ebooks.info

{ if (millis() - last > 250) { //has it been 1/4 sec since last message lightState = !lightState; //toggle the LED digitalWrite(ledPin, lightState); } last = millis(); irrecv.resume(); // watch out for another message }}
DiscussionThe IR receiver converts the IR signal to digital pulses. These are a sequence of onesand zeros that correspond to buttons on the remote. The IRremote library decodesthese pulses and provides a numeric value for each key (the actual values that yoursketch will receive are dependent on the specific remote control you use).
#include <IRremote.h> at the top of the sketch makes the library code available to yoursketch, and the line IRrecv irrecv(irReceiverPin); creates an IRrecv object namedirrecv to receive signals from an IR receiver module connected to irReceiverPin (pin2 in the sketch). Chapter 16 has more on using libraries.
You use the irrecv object to access the signal from the IR receiver. You can give itcommands to look for and decode signals. The decoded responses provided by thelibrary are stored in a variable named decode_results. The receiver object is started insetup with the line irrecv.enableIRIn();. The results are checked in loop by calling thefunction irrecv.decode(&decodedSignal).
The decode function returns true if there is data, which will be placed in the decodedSignal variable. Recipe 2.11 explains how the ampersand symbol is used in functioncalls where parameters are modified so that information can be passed back.
If a remote message has been received, the code toggles the LED (flips its state) if it ismore than one-quarter of a second since the last time it was toggled (otherwise, theLED will get turned on and off quickly by remotes that send codes more than oncewhen you press the button, and may appear to be flashing randomly).
The decodedSignal variable will contain a value associated with a key. This value isignored in this recipe (although it is used in the next recipe)—you can print the valueby adding to the sketch the Serial.println line highlighted in the following code:
if (irrecv.decode(&decodedSignal) == true) //this is true if a message has beenreceived Serial.println(results.value); // add this line to see decoded results
The library needs to be told to continue monitoring for signals, and this is achievedwith the line irrecv.resume();.
This sketch flashes an LED when any button on the remote control is pressed, but youcan control other things—for example, you can use a servo motor to dim a lamp (formore on controlling physical devices, see Chapter 8).
320 | Chapter 10: Remotely Controlling External Devices
www.it-ebooks.info

10.2 Decoding Infrared Remote Control SignalsProblemYou want to detect a specific key pressed on a TV or other remote control.
SolutionThis sketch uses remote control key presses to adjust the brightness of an LED. Thecode prompts for remote control keys 0 through 4 when the sketch starts. These codesare stored in Arduino memory (RAM), and the sketch then responds to these keys bysetting the brightness of an LED to correspond with the button pressed, with 0 turningthe LED off and 1 through 4 providing increased brightness:
/* RemoteDecode sketch Infrared remote control signals are decoded to control LED brightness The values for keys 0 through 4 are detected and stored when the sketch starts key 0 turns the LED off, the brightness increases in steps with keys 1 through 4 */
#include <IRremote.h> // IR remote control library
const int irReceivePin = 2; // pin connected to the output of the IRdetectorconst int ledPin = 9; // LED is connected to a PWM pin
const int numberOfKeys = 5; // 5 keys are learned (0 through 4)long irKeyCodes[numberOfKeys]; // holds the codes for each key
IRrecv irrecv(irReceivePin); // create the IR librarydecode_results results; // IR data goes here
void setup(){ Serial.begin(9600); pinMode(irReceivePin, INPUT); pinMode(ledPin, OUTPUT); irrecv.enableIRIn(); // Start the IR receiver learnKeycodes(); // learn remote control key codes Serial.println("Press a remote key");}
void loop(){ long key; int brightness;
if (irrecv.decode(&results)) { // here if data is received irrecv.resume(); key = convertCodeToKey(results.value);
10.2 Decoding Infrared Remote Control Signals | 321
www.it-ebooks.info

if(key >= 0) { Serial.print("Got key "); Serial.println(key); brightness = map(key, 0,numberOfKeys-1, 0, 255); analogWrite(ledPin, brightness); } }}
/* * get remote control codes */void learnKeycodes(){ while(irrecv.decode(&results)) // empty the buffer irrecv.resume(); Serial.println("Ready to learn remote codes"); long prevValue = -1; int i=0; while( i < numberOfKeys) { Serial.print("press remote key "); Serial.print(i); while(true) { if( irrecv.decode(&results) ) { if(results.value != -1 && results.value != prevValue) { showReceivedData(); irKeyCodes[i] = results.value; i = i + 1; prevValue = results.value; irrecv.resume(); // Receive the next value break; } irrecv.resume(); // Receive the next value } } } Serial.println("Learning complete");}
/* * converts a remote protocol code to a logical key code (or -1 if no digitreceived) */int convertCodeToKey(long code){ for( int i=0; i < numberOfKeys; i++) { if( code == irKeyCodes[i]) { return i; // found the key so return it
322 | Chapter 10: Remotely Controlling External Devices
www.it-ebooks.info

} } return -1;}
/* * display the protocol type and value */void showReceivedData(){ if (results.decode_type == UNKNOWN) { Serial.println("-Could not decode message"); } else { if (results.decode_type == NEC) { Serial.print("- decoded NEC: "); } else if (results.decode_type == SONY) { Serial.print("- decoded SONY: "); } else if (results.decode_type == RC5) { Serial.print("- decoded RC5: "); } else if (results.decode_type == RC6) { Serial.print("- decoded RC6: "); } Serial.print("hex value = "); Serial.println( results.value, HEX); }}
DiscussionThis solution is based on the IRremote library; see this chapter’s introduction fordetails.
The sketch starts the remote control library with the following code:
irrecv.enableIRIn(); // Start the IR receiver
It then calls the learnKeyCodes function to prompt the user to press keys 0 through 4.The code for each key is stored in an array named irKeyCodes. After all the keys aredetected and stored, the loop code waits for a key press and checks if this was one ofthe digits stored in the irKeyCodes array. If so, the value is used to control the brightnessof an LED using analogWrite.
See Recipe 5.7 for more on using the map function and analogWrite tocontrol the brightness of an LED.
10.2 Decoding Infrared Remote Control Signals | 323
www.it-ebooks.info

The library should be capable of working with most any IR remote control; it candiscover and remember the timings and repeat the signal on command.
You can permanently store the key code values so that you don’t need to learn themeach time you start the sketch. Replace the declaration of irKeyCodes with the followinglines to initialize the values for each key. Change the values to coincide with the onesfor your remote (these will be displayed in the Serial Monitor when you press keys inthe learnKeycodes function):
long irKeyCodes[numberOfKeys] = { 0x18E758A7, //0 key 0x18E708F7, //1 key 0x18E78877, //2 key 0x18E748B7, //3 key 0x18E7C837, //4 key };
See AlsoRecipe 18.1 explains how you can store learned data in EEPROM (nonvolatilememory).
10.3 Imitating Remote Control SignalsProblemYou want to use Arduino to control a TV or other remotely controlled appliance byemulating the infrared signal. This is the inverse of Recipe 10.2—it sends commandsinstead of receiving them.
SolutionThis sketch uses the remote control codes from Recipe 10.2 to control a device. Fivebuttons select and send one of five codes. Connect an infrared LED to send the signalas shown in Figure 10-2:
/* irSend sketch this code needs an IR LED connected to pin 3 and 5 switches connected to pins 4 - 8*/
#include <IRremote.h> // IR remote control library
const int numberOfKeys = 5;const int firstKey = 4; // the first pin of the 5 sequential pins connected tobuttonsboolean buttonState[numberOfKeys];boolean lastButtonState[numberOfKeys];
324 | Chapter 10: Remotely Controlling External Devices
www.it-ebooks.info

long irKeyCodes[numberOfKeys] = { 0x18E758A7, //0 key 0x18E708F7, //1 key 0x18E78877, //2 key 0x18E748B7, //3 key 0x18E7C837, //4 key};
IRsend irsend;
void setup(){ for (int i = 0; i < numberOfKeys; i++){ buttonState[i]=true; lastButtonState[i]=true; int physicalPin=i + firstKey; pinMode(physicalPin, INPUT); digitalWrite(physicalPin, HIGH); // turn on pull-ups } Serial.begin(9600);}
void loop() { for (int keyNumber=0; keyNumber<numberOfKeys; keyNumber++) { int physicalPinToRead=keyNumber+4; buttonState[keyNumber] = digitalRead(physicalPinToRead); if (buttonState[keyNumber] != lastButtonState[keyNumber]) { if (buttonState[keyNumber] == LOW) { irsend.sendSony(irKeyCodes[keyNumber], 32); Serial.println("Sending"); } lastButtonState[keyNumber] = buttonState[keyNumber]; } }}
You won’t see anything when the codes are sent because the light fromthe infrared LED isn’t visible to the naked eye.
10.3 Imitating Remote Control Signals | 325
www.it-ebooks.info

Figure 10-2. Buttons and LED for IR sender
DiscussionHere Arduino controls the device by flashing an IR LED to duplicate the signal thatwould be sent from your remote control. This requires an IR LED. The specificationsare not critical; see Appendix A for suitable components.
The IR library handles the translation from numeric code to IR LED flashes. You needto create an object for sending IR messages. The following line creates an IRsend objectthat will control the LED on pin 3 (you are not able to specify which pin to use; this ishardcoded within the library):
IRsend irsend;
The code uses an array (see Recipe 2.4) called irKeyCodes to hold the range of valuesthat can be sent. It monitors five switches to see which one has been pressed and sendsthe relevant code in the following line:
irsend.sendSony(irKeyCodes[keyNumber], 32);
The irSend object has different functions for various popular infrared code formats, socheck the library documentation if you are using one of the other remote control for-mats. You can use Recipe 10.2 if you want to display the format used in your remotecontrol.
The sketch passes the code from the array, and the number after it tells the functionhow many bits long that number is. The 0x at the beginning of the numbers in thedefinition of irKeyCodes at the top of the sketch means the codes are written in hex (see
326 | Chapter 10: Remotely Controlling External Devices
www.it-ebooks.info

Chapter 2 for details about hex numbers). Each character in hex represents a 4-bit value.The codes here use eight characters, so they are 32 bits long.
The LED is connected with a current limiting resistor (see the Recipe 10.0 section inChapter 7).
You can verify that an infrared diode is working with a digital camera—you should be able to see it flashing in the camera’s LCD viewfinder.
If you need to increase the sending range, you can use multiple LEDs or select one withgreater output.
See AlsoChapter 7 provides more information on controlling LEDs.
10.4 Controlling a Digital CameraProblemYou want Arduino to control a digital camera to take pictures under program control.You may want to do time lapse photography or take pictures triggered by an eventdetected by the Arduino.
SolutionThere are a few ways to do this. If your camera has an infrared remote, use Rec-ipe 10.2 to learn the relevant remote codes and Recipe 10.3 to get Arduino to send thosecodes to the camera.
If your camera doesn’t have an infrared remote but does have a socket for a wiredremote, you can use this recipe to control the camera.
A camera shutter connector, usually called a TRS (tip, ring, sleeve) con-nector, typically comes in 2.5 mm or 3.5 mm sizes, but the length andshape of the tip may be nonstandard. The safest way to get the correctplug is to buy a cheap wired remote switch for your model of cameraand modify that or buy an adapter cable from a specialist supplier (Goo-gle “TRS camera shutter”).
10.4 Controlling a Digital Camera | 327
www.it-ebooks.info

You connect the Arduino to a suitable cable for your camera using optocouplers, asshown in Figure 10-3.
This sketch takes a picture every 20 seconds:
/* camera sketch takes 20 pictures with a digital camera using pin 4 to trigger focus pin 3 to trigger the shutter */
int focus = 4; //optocoupler attached to focusint shutter = 3; //optocoupler attached to shutterlong exposure = 250; //exposure time in millisecondslong interval = 10000; //time between shots, in milliseconds
void setup(){ pinMode(focus, OUTPUT); pinMode(shutter, OUTPUT); for (int i=0; i<20; i++) //camera will take 20 pictures { takePicture(exposure); //takes picture delay(interval); //wait to take the next picture }}
void loop(){ //once it's taken 20 pictures it is done,so loop is empty //but loop still needs to be here or thesketch won't compile}
void takePicture(long exposureTime){ int wakeup = 10; //camera will take some time to wake upand focus //adjust this to suit your camera digitalWrite(focus, HIGH); //wake the camera and focus delay(wakeup); //wait for it to wake up and focus digitalWrite(shutter, HIGH); //open the shutter delay(exposureTime); //wait for the exposure time digitalWrite(shutter, LOW); //release shutter digitalWrite(focus, LOW); //release the focus}
328 | Chapter 10: Remotely Controlling External Devices
www.it-ebooks.info

Figure 10-3. Using optocouplers with a TRS camera connector
DiscussionIt’s not advisable to connect Arduino pins directly to a camera—the voltages may notbe compatible and you risk damaging your Arduino or your camera. Optocouplers areused to isolate Arduino from your camera; see the introduction of this chapter for moreabout these devices.
You will need to check the user manual for your camera to identify the correct TRSconnector to use.
You may need to change the order of the pins turning on and off in the takePicturefunction to get the behavior you want. For a Canon camera to do bulb exposures, youneed to turn on the focus, then open the shutter without releasing the focus, then releasethe shutter, and then release the focus (as in the sketch). To take a picture and have thecamera calculate the exposure, press the focus button, release it, and then press theshutter.
See AlsoIf you want to control aspects of a camera’s operation, have a look at the Canon HackDevelopment Kit at http://chdk.wikia.com/wiki/CHDK.
Also see The Canon Camera Hackers Manual: Teach Your Camera New Tricks by Bert-hold Daum (Rocky Nook).
It is also possible to control video cameras in a similar fashion using LANC. You canfind details on this by searching for “LANC” in the Arduino Playground.
10.4 Controlling a Digital Camera | 329
www.it-ebooks.info

10.5 Controlling AC Devices by Hacking a Remote ControlledSwitchProblemYou want to safely switch AC line currents on and off to control lights and appliancesusing a remote controlled switch.
SolutionArduino can trigger the buttons of a remote controlled switch using an optocoupler.This may be necessary for remotes that use wireless instead of infrared technology. Thistechnique can be used for almost any remote control. Hacking a remote is particularlyuseful to isolate potentially dangerous AC voltages from you and Arduino because onlythe battery operated controller is modified.
Opening the remote control will void the warranty and can potentiallydamage the device. The infrared recipes in this chapter are preferablebecause they avoid modifying the remote control.
Open the remote control and connect the optocoupler so that the photo-emitter (pins1 and 2 in Figure 10-4) is connected to Arduino and the photo-transistor (pins 3 and4) is connected across the remote control contacts.
Figure 10-4. Optocouplers connected to remote control contacts
330 | Chapter 10: Remotely Controlling External Devices
www.it-ebooks.info

This sketch uses a switch connected to Arduino to “push” the remote ON and OFF buttons:
/* OptoRemote sketch A switch connected to pin 2 turns a device on and off using optocouplers The outputs are pulsed for half a second when the switch is pressed or released*/const int inputPin = 2; // input pin for the switchconst int remoteOnPin = 3; // output pin to turn the remote onconst int remoteOffPin = 4; // output pin to turn the remote offconst int PUSHED = LOW; // value when button is pressedboolean isOn; // variable stores the last command
void setup() { Serial.begin(9600); pinMode(remoteOnPin, OUTPUT); pinMode(remoteOffPin, OUTPUT); pinMode(inputPin, INPUT); digitalWrite(inputPin,HIGH); // turn on internal pull-up on the inputPin}void loop(){ int val = digitalRead(inputPin); // read input value // if the switch is pushed then switch on if not already on if( val == PUSHED) { if(isOn != true) // if it's not already on, turn the remote button on { pulseRemote(remoteOnPin); isOn = true; // remember that the remote is now on } } // if the switch is not pushed then switch off if not already off else { // here if the button is not pushed if(isOn == true) // if it's on, turn the remote button off { pulseRemote(remoteOffPin); isOn = false; // remember that the remote is now off } }}// turn the optocoupler on for half a second to blip the remote control buttonvoid pulseRemote(int pin ){ digitalWrite(pin, HIGH); // turn the optocoupler on delay(500); // wait half a second digitalWrite(pin, LOW); // turn the optocoupler off}
DiscussionOptocouplers are explained in Recipe 10.4, so check that out if you are unfamiliar withoptocouplers.
10.5 Controlling AC Devices by Hacking a Remote Controlled Switch | 331
www.it-ebooks.info

The switches in most remote controls consist of interleaved bare copper traces with aconductive button that closes a connection across the traces when pressed. Less com-mon are controls that contain conventional push switches; these are easier to use asthe legs of the switches provide a convenient connection point.
The original remote button and the optocoupler can be used together—the switchingaction will be performed if either method is activated (pressing the button or turningon the optocoupler).
The transistor in the optocoupler will only allow electricity to flow in one direction, soif it doesn’t work the first time, try switching the transistor side connections over andsee if that fixes it.
Some remotes have one side of all of the switches connected together (usually to theground of that circuit). You can trace the connections on the board to check for this oruse a multimeter to see what the resistance is between the traces on different switches.If traces have common connections, it is only necessary to connect one wire to eachcommon group. Fewer traces are easier because connecting the wires can be fiddly ifthe remote is small.
The remote control may have multiple contacts corresponding to each button. Youmay need more than one optocoupler for each button position to connect the contacts.Figure 10-5 shows three optocouplers that are controlled from a single Arduino pin.
Figure 10-5. Multiple optocouplers connected to a single remote control button
332 | Chapter 10: Remotely Controlling External Devices
www.it-ebooks.info

CHAPTER 11
Using Displays
11.0 IntroductionLiquid crystal displays (LCDs) offer a convenient and inexpensive way to provide a userinterface for a project. This chapter explains how to connect and use common text andgraphical LCD panels with Arduino. By far the most popular LCD is the text panelbased on the Hitachi HD44780 chip. This displays two or four lines of text, with 16 or20 characters per line (32- and 40-character versions are available, but usually at muchhigher prices). A library for driving text LCD displays is provided with Arduino, andyou can print text on your LCD as easily as on the Serial Monitor (see Chapter 4)because LCD and serial share the same underlying print functions.
LCDs can do more than display simple text: words can be scrolled or highlighted andyou can display a selection of special symbols and non-English characters.
You can create your own symbols and block graphics with a text LCD, but if you wantfine graphical detail, you need a graphical display. Graphical LCD (GLCD) displaysare available at a small price premium over text displays, and many popular GLCDpanels can display up to eight lines of 20 text characters in addition to graphics.
LCD displays have more wires connecting to Arduino than most other recipes in thisbook. Incorrect connections are the major cause of problems with LCDs, so take yourtime wiring things up and triple-check that things are connected correctly. An inex-pensive multimeter capable of measuring voltage and resistance is a big help for veri-fying that your wiring is correct. It can save you a lot of head scratching if nothing isbeing displayed. You don’t need anything fancy, as even the cheapest multimeter willhelp you verify that the correct pins are connected and that the voltages are correct.
You can even find a video tutorial and PDF explaining how to use a multimeter at http://blog.makezine.com/archive/2007/01/multimeter_tutorial_make_1.html.
For projects that require a bigger display than available in inexpensive LCD panels,Recipe 11.11 shows how you can use a television as an output device for Arduino.
333
www.it-ebooks.info

11.1 Connecting and Using a Text LCD DisplayProblemYou have a text LCD based on the industry-standard HD44780 or a compatible con-troller chip, and you want to display text and numeric values.
SolutionThe Arduino software includes the LiquidCrystal library for driving LCD displays basedon the HD44780 chip.
Most text LCDs supplied for use with Arduino will be compatible withthe Hitachi HD44780 controller. If you are not sure about your con-troller, check the data sheet to see if it is a 44780 or compatible.
To get the display working, you need to wire the power, data, and control pins. Connectthe data and status lines to digital output pins, and wire up a contrast potentiometerand connect the power lines. If your display has a backlight, this needs connecting,usually through a resistor.
Figure 11-1 shows the most common LCD connections. It’s important to check thedata sheet for your LCD to verify the pin connections. Table 11-1 shows the mostcommon pin connections, but if your LCD uses different pins, make sure it is compat-ible with the Hitachi HD44780—this recipe will only work on LCD displays that arecompatible with that chip. The LCD will have 16 pins (or 14 pins if there is nobacklight)—make sure you identify pin 1 on your panel; it may be in a different positionthan shown in the figure.
You may wonder why LCD pins 7 through 10 are not connected. TheLCD display can be connected using either four pins or eight pins fordata transfer. This recipe uses the four-pin mode because this frees upthe other four Arduino pins for other uses. There is a theoretical per-formance improvement using eight pins, but it’s insignificant and notworth the loss of four Arduino pins.
334 | Chapter 11: Using Displays
www.it-ebooks.info

Table 11-1. LCD pin connections
LCD pin Function Arduino pin
1 Gnd or 0V or Vss Gnd
2 +5V or Vdd 5V
3 Vo or contrast
4 RS 12
5 R/W
6 E 11
7 D0
8 D1
9 D2
10 D3
11 D4 5
12 D5 4
13 D6 3
14 D7 2
15 A or analog
16 K or cathode
Figure 11-1. Connections for a text LCD
11.1 Connecting and Using a Text LCD Display | 335
www.it-ebooks.info

You will need to connect a 10K potentiometer to provide the contrast voltage to LCDpin 3. Without the correct voltage on this pin, you may not see anything displayed. InFigure 11-1, one side of the pot connects to Gnd (ground), the other side connects toArduino +5V, and the center of the pot goes to LCD pin 3. The LCD is powered byconnecting Gnd and +5V from Arduino to LCD pins 1 and 2.
Many LCD panels have an internal lamp called a backlight to illuminate the display.Your data sheet should indicate whether there is a backlight and if it requires an externalresistor—many do need this to prevent burning out the backlight LED assembly (if youare not sure you can be safe by using a 220 ohm resistor). The backlight is polarized,so make sure pin 15 is connected to +5V and pin 16 to Gnd. (The resistor is shownconnected between pin 16 and Gnd, but it can also be connected between pin 15 and+5V.)
Double-check the wiring before you apply power, as you can damage the LCD if youconnect the power pins incorrectly. To run the HelloWorld sketch provided withArduino, click the IDE Files menu item and navigate to Exam-ples→Library→LiquidCrystal→HelloWorld.
The following code is modified slightly to print numbers in addition to “hello world”.Change numRows and numCols to match the rows and columns in your LCD:
/* LiquidCrystal Library - Hello World
Demonstrates the use of a 16 × 2 LCD display. http://www.arduino.cc/en/Tutorial/LiquidCrystal */
#include <LiquidCrystal.h> // include the library code
//constants for the number of rows and columns in the LCDconst int numRows = 2;const int numCols = 16;
// initialize the library with the numbers of the interface pinsLiquidCrystal lcd(12, 11, 5, 4, 3, 2);
void setup(){ lcd.begin(numCols, numRows); lcd.print("hello, world!"); // Print a message to the LCD.}
void loop(){ // set the cursor to column 0, line 1 // (note: line 1 is the second row, since counting begins with 0): lcd.setCursor(0, 1); // print the number of seconds since reset:
336 | Chapter 11: Using Displays
www.it-ebooks.info

lcd.print(millis()/1000);}
Run the sketch; you should see “hello world” displayed on the first line of your LCD.The second line will display a number that increases by one every second.
DiscussionIf you don’t see any text and you have double-checked that all wires are connectedcorrectly, you may need to adjust the contrast pot. With the pot shaft rotated to oneside (usually the side connected to Gnd), you will have maximum contrast and shouldsee blocks appear in all the character positions. With the pot rotated to the other ex-treme, you probably won’t see anything at all. The correct setting will depend on manyfactors, including viewing angle and temperature—turn the pot until you get the best-looking display.
If you can’t see blocks of pixels appear at any setting of the pot, check that the LCD isbeing driven on the correct pins.
Once you can see text on the screen, using the LCD in a sketch is easy. You use similarprint commands to those for serial printing, covered in Chapter 4. The next recipereviews the print commands and explains how to control text position.
See AlsoLiquidCrystal reference: http://arduino.cc/en/Reference/LiquidCrystalPrint
See Chapter 4 for details on print commands.
The data sheet for the Hitachi HD44780 LCD controller is the definitive reference fordetailed, low-level functionality. The Arduino library insulates you from most of thecomplexity, but if you want to read about the raw capabilities of the chip, you candownload the data sheet from http://www.sparkfun.com/datasheets/LCD/HD44780.pdf.
The LCD page in the Arduino Playground contains software and hardware tips andlinks: http://www.arduino.cc/playground/Code/LCD.
11.2 Formatting TextProblemYou want to control the position of text displayed on the LCD screen; for example, todisplay values in specific positions.
11.2 Formatting Text | 337
www.it-ebooks.info

SolutionThis sketch displays a countdown from 9 to 0. It then displays a sequence of digits inthree columns of four characters. Change numRows and numCols to match the rows and columns in your LCD:
/* LiquidCrystal Library - FormatText */
#include <LiquidCrystal.h> // include the library code:
//constants for the number of rows and columns in the LCDconst int numRows = 2;const int numCols = 16;
int count;
// initialize the library with the numbers of the interface pinsLiquidCrystal lcd(12, 11, 5, 4, 3, 2);
void setup(){ lcd.begin(numCols, numRows); lcd.print("Starting in "); // this string is 12 characters long for(int i=9; i > 0; i--) // count down from 9 { // the top line is row 0 lcd.setCursor(12,0); // move the cursor to the end of the stringprinted above lcd.print(i); delay(1000); }}
void loop(){ int columnWidth = 4; //spacing for the columns int displayColumns = 3; //how many columns of numbers
lcd.clear(); for( int col=0; col < displayColumns; col++) { lcd.setCursor(col * columnWidth, 0); count = count+ 1; lcd.print(count); } delay(1000);}
338 | Chapter 11: Using Displays
www.it-ebooks.info

DiscussionThe lcd.print functions are similar to Serial.print. In addition, the LCD library hascommands that control the cursor location (the row and column where text will beprinted).
The lcd.print statement displays each new character after the previous one. Text prin-ted beyond the end of a line may not be displayed or may be displayed on another line.The lcd.setCursor() command enables you to specify where the next lcd.print willstart. You specify the column and row position (the top-left corner is 0,0). Once thecursor is positioned, the next lcd.print will start from that point, and it will overwriteexisting text. The sketch in this recipe’s Solution uses this to print numbers in fixedlocations.
For example, in setup:
lcd.setCursor(12,0); // move the cursor to the 13th positionlcd.print(i);
lcd.setCursor(12,0) ensures that each number is printed in the same position, thethirteenth column, first row, producing the digit shown at a fixed position, rather thaneach number being displayed after the previous number.
Rows and columns start from zero, so setCursor(4,0) would set thecursor to the fifth column on the first row. This is because there are fivecharacters located in positions 0 through 4. If that is not clear, it mayhelp you if you count this out on your fingers starting from zero.
The following lines use setCursor to space out the start of each column to providecolumnwidth spaces from the start of the previous column:
lcd.setCursor(col * columnWidth, 0);count = count+ 1;lcd.print(count);lcd.clear();
lcd.clear clears the screen and moves the cursor back to the top-left corner.
Here is a variation on loop that displays numbers using all the rows of your LCD.Replace your loop code with the following (make sure you set numRows and numCols atthe top of the sketch to match the rows and columns in your LCD):
void loop(){int columnWidth = 4;int displayColumns = 3;
lcd.clear(); for(int row=0; row < numRows; row++) { for( int col=0; col < displayColumns; col++)
11.2 Formatting Text | 339
www.it-ebooks.info

{ lcd.setCursor(col * columnWidth, row); count = count+ 1; lcd.print(count); } } delay(1000);}
The first for loop steps through the available rows, and the second for loop stepsthrough the columns.
To adjust how many numbers are displayed in a row to fit the LCD, calculate thedisplayColumns value rather than setting it. Change:
int displayColumns = 3;
to:
int displayColumns = numCols / columnWidth;
See AlsoThe LiquidCrystal library tutorial: http://arduino.cc/en/Reference/LiquidCrystal?from=Tutorial.LCDLibrary
11.3 Turning the Cursor and Display On or OffProblemYou want to blink the cursor and turn the display on or off. You may also want to drawattention to a specific area of the display.
SolutionThis sketch shows how you can cause the cursor (a flashing block at the position wherethe next character will be displayed) to blink. It also illustrates how to turn the displayon and off; for example, to draw attention by blinking the entire display:
/* blink */
// include the library code:#include <LiquidCrystal.h>
// initialize the library with the numbers of the interface pinsLiquidCrystal lcd(12, 11, 5, 4, 3, 2);
void setup(){ // set up the LCD's number of columns and rows and: lcd.begin(16, 2);
340 | Chapter 11: Using Displays
www.it-ebooks.info

// Print a message to the LCD. lcd.print("hello, world!");}
void loop(){ lcd.setCursor(0, 1);
lcd.print("cursor blink"); lcd.blink(); delay(2000);
lcd.noBlink(); lcd.print(" noBlink"); delay(2000);
lcd.clear();
lcd.print("Display off ..."); delay(1000); lcd.noDisplay(); delay(2000);
lcd.display(); // turn the display back on
lcd.setCursor(0, 0); lcd.print(" display flash !"); displayBlink(2, 250); // blink twice displayBlink(2, 500); // and again for twice as long
lcd.clear();}
void displayBlink(int blinks, int duration){ while(blinks--) { lcd.noDisplay(); delay(duration); lcd.display(); delay(duration); }}
DiscussionThe sketch calls blink and noBlink functions to toggle cursor blinking on and off.
The code to blink the entire display is in a function named displayBlink that makesthe display flash a specified number of times. The function uses lcd.display() andlcd.noDisplay() to turn the display text on and off (without clearing it from the screen’sinternal memory).
11.3 Turning the Cursor and Display On or Off | 341
www.it-ebooks.info

11.4 Scrolling TextProblemYou want to scroll text; for example, to create a marquee that displays more charactersthan can fit on one line of the LCD display.
SolutionThis sketch demonstrates both lcd.ScrollDisplayLeft and lcd.ScrollDisplayRight.
It scrolls a line of text to the left when tilted and to the right when not tilted. Connectone side of a tilt sensor to pin 7 and the other pin to Gnd (see Recipe 6.1 if you are notfamiliar with tilt sensors):
/* Scroll * this sketch scrolls text left when tilted * text scrolls right when not tilted. */
#include <LiquidCrystal.h>
// initialize the library with the numbers of the interface pinsLiquidCrystal lcd(12, 11, 5, 4, 3, 2);const int numRows = 2;const int numCols = 16;
const int tiltPin = 7; // pin connected to tilt sensor
const char textString[] = "tilt to scroll";const int textLen = sizeof(textString) -1; // the number of charactersboolean isTilted = false;
void setup(){ // set up the LCD's number of columns and rows: lcd.begin(numCols, numRows); digitalWrite(tiltPin, HIGH); // turn on pull-ups for the tilt sensor lcd.print(textString);}
void loop(){ if(digitalRead(tiltPin) == LOW && isTilted == false ) { // here if tilted left so scroll text left isTilted = true; for (int position = 0; position < textLen; position++) { lcd.scrollDisplayLeft(); delay(150); }
342 | Chapter 11: Using Displays
www.it-ebooks.info

} if(digitalRead(tiltPin) == HIGH && isTilted == true ) { // here if previously tilted but now flat, so scroll text right isTilted = false; for (int position = 0; position < textLen; position++) { lcd.scrollDisplayRight(); delay(150); } }}
DiscussionThe first half of the loop code handles the change from not tilted to tilted. The codechecks to see if the tilt switch is closed (LOW) or open (HIGH). If it’s LOW and the currentstate (stored in the isTilted variable) is not tilted, the text is scrolled left. The delay inthe for loop controls the speed of the scroll; adjust the delay if the text moves too fastor too slow.
The second half of the code uses similar logic to handle the change from tilted to nottilted.
A scrolling capability is particularly useful when you need to display more text thancan fit on an LCD line.
This sketch has a marquee function that will scroll text up to 32 characters in length:
/* Marquee * this sketch scrolls a long line of text */
#include <LiquidCrystal.h>
// initialize the library with the numbers of the interface pinsLiquidCrystal lcd(12, 11, 5, 4, 3, 2);const int numRows = 2;const int numCols = 16;
void setup(){ // set up the LCD's number of columns and rows: lcd.begin(numCols, numRows);}
void loop(){ marquee("A message too long to fit !"); delay(1000); lcd.clear();}
11.4 Scrolling Text | 343
www.it-ebooks.info

// this function uses scrolling to display a message up to 32 bytes longvoid marquee( char *text){ int length = strlen(text); // the number of characters in the text if(length < numCols) lcd.print(text); else { int pos; for( pos = 0; pos < numCols; pos++) lcd.print(text[pos]); delay(1000); // allow time to read the first line before scrolling while(pos < length) { lcd.scrollDisplayLeft(); lcd.print(text[pos]); pos = pos + 1; delay(300); } }}
The sketch uses the lcd.scrollDisplayLeft function to scroll the display when the textis longer than the width of the screen.
The LCD chip has internal memory that stores the text. This memory is limited (32bytes on most four-line displays). If you try to use longer messages, they may start towrap over themselves. If you want to scroll longer messages (e.g., a tweet), or controlscrolling more precisely, you need a different technique. The following function storesthe text in RAM on Arduino and sends sections to the screen to create the scrollingeffect. These messages can be any length that can fit into Arduino memory:
// this version of marquee uses manual scrolling for very long messagesvoid marquee( char *text){ int length = strlen(text); // the number of characters in the text if(length < numCols) lcd.print(text); else { int pos; for( pos = 0; pos < numCols; pos++) lcd.print(text[pos]); delay(1000); // allow time to read the first line before scrolling while(pos <= length - numCols) { lcd.setCursor(0,0); for( int i=0; i < numCols; i++) lcd.print(text[pos+i]); delay(300); pos = pos + 1; }
344 | Chapter 11: Using Displays
www.it-ebooks.info

}}
11.5 Displaying Special SymbolsProblemYou want to display special symbols: ° (degrees), ¢, ÷, π (pi), or any other symbol storedin the LCD character memory.
SolutionIdentify the character code you want to display by locating the symbol in the characterpattern table in the LCD data sheet. This sketch prints some common symbols insetup. It then shows all displayable symbols in loop:
/* LiquidCrystal Library - Special Chars */
#include <LiquidCrystal.h>
//set constants for number of rows and columns to match your LCDconst int numRows = 2;const int numCols = 16;
// defines for some useful symbolsconst byte degreeSymbol = B11011111;const byte piSymbol = B11110111;const byte centsSymbol = B11101100;const byte sqrtSymbol = B11101000;const byte omegaSymbol = B11110100; // the symbol used for ohms
byte charCode = 32; // the first printable ascii characterint col;int row;
// initialize the library with the numbers of the interface pinsLiquidCrystal lcd(12, 11, 5, 4, 3, 2);
void setup(){ lcd.begin(numRows, numCols);
showSymbol(degreeSymbol, "degrees"); showSymbol (piSymbol, "pi"); showSymbol(centsSymbol, "cents"); showSymbol(sqrtSymbol, "sqrt"); showSymbol(omegaSymbol, "ohms"); lcd.clear();
}
11.5 Displaying Special Symbols | 345
www.it-ebooks.info

void loop(){ lcd.print(charCode); calculatePosition(); if(charCode == 255) { // finished all characters so wait another few seconds and start over delay(2000); lcd.clear(); row = col = 0; charCode = 32; } charCode = charCode + 1;}
void calculatePosition(){ col = col + 1; if( col == numCols) { col = 0; row = row + 1; if( row == numRows) { row = 0; delay(2000); // pause lcd.clear(); } lcd.setCursor(col, row); }}
// function to display a symbol and its descriptionvoid showSymbol( byte symbol, char * description){ lcd.clear(); lcd.print(symbol); lcd.print(' '); // add a space before the description lcd.print(description); delay(3000);}
DiscussionA table showing the available character patterns is in the data sheet for the LCD con-troller chip (you can find it on page 17 of the data sheet at http://www.sparkfun.com/datasheets/LCD/HD44780.pdf).
To use the table, locate the symbol you want to display. The code for that character isdetermined by combining the binary values for the column and row for the desiredsymbol (see Figure 11-2).
346 | Chapter 11: Using Displays
www.it-ebooks.info

For example, the degree symbol, °, is the third-from-last entry at the bottom row of thetable shown in Figure 11-2. Its column indicates the upper four bits are 1101 and itsrow indicates the lower four bits are 1111. Combining these gives the code for thissymbol: B11011111. You can use this binary value or convert this to its hex value(0xDF) or decimal value (223). Note that Figure 11-2 shows only 4 of the 16 actualrows in the data sheet.
The LCD screen can also show any of the displayable ASCII characters by using theASCII value in lcd.print.
The sketch uses a function named showSymbol to print the symbol and its description:
void showSymbol( byte symbol, char * description)
(See Recipe 2.6 if you need a refresher on using character strings and passing them tofunctions.)
See AlsoData sheet for Hitachi HD44780 display: http://www.sparkfun.com/datasheets/LCD/HD44780.pdf
11.6 Creating Custom CharactersProblemYou want to define and display characters or symbols (glyphs) that you have created.The symbols you want are not predefined in the LCD character memory.
Figure 11-2. Using data sheet to derive character codes
11.6 Creating Custom Characters | 347
www.it-ebooks.info

SolutionUploading the following code will create an animation of a face, switching betweensmiling and frowning:
/* custom_char sketch creates an animated face using custom characters*/
#include <LiquidCrystal.h>LiquidCrystal lcd(12, 11, 5, 4, 3, 2);
byte happy[8] ={ B00000, B10001, B00000, B00000, B10001, B01110, B00000, B00000};
byte saddy[8] ={ B00000, B10001, B00000, B00000, B01110, B10001, B00000, B00000};
void setup() { lcd.createChar(0, happy); lcd.createChar(1, saddy); lcd.begin(16, 2);
}
void loop() { for (int i=0; i<2; i++) { lcd.setCursor(0,0); lcd.write(i); delay(500); }}
348 | Chapter 11: Using Displays
www.it-ebooks.info

DiscussionThe LiquidCrystal library enables you to create up to eight custom characters, whichcan be printed as character codes 0 through 8. Each character on the screen is drawnon a grid of 5 × 8 pixels. To define a character, you need to create an array of eightbytes. Each byte defines one of the rows in the character. When written as a binarynumber, the 1 indicates a pixel is on, 0 is off (any values after the fifth bit are ignored).The sketch example creates two characters, named happy and saddy (see Figure 11-3).
Figure 11-3. Defining custom characters
The following line in setup creates the character using data defined in the happy arraythat is assigned to character 0:
lcd.createChar(0, happy);
To print the custom character to the screen you would use this line:
lcd.write(0);
Note the difference between writing a character with or without anapostrophe. The following will print a zero, not the happy symbol:
lcd.write('0'); // this prints a zero
Code in the for loop switches between character 0 and character 1 to produce an animation.
11.7 Displaying Symbols Larger Than a Single CharacterProblemYou want to combine two or more custom characters to print symbols larger than asingle character; for example, double-height numbers on the screen.
11.7 Displaying Symbols Larger Than a Single Character | 349
www.it-ebooks.info

SolutionThe following sketch writes double-height numbers using custom characters:
/* * customChars * * This sketch displays double-height digits * the bigDigit arrays were inspired by Arduino forum member dcb */
#include <LiquidCrystal.h>
LiquidCrystal lcd(12, 11, 5, 4, 3, 2);
byte glyphs[5][8] = { { B11111,B11111,B00000,B00000,B00000,B00000,B00000,B00000 } , { B00000,B00000,B00000,B00000,B00000,B00000,B11111,B11111 } , { B11111,B11111,B00000,B00000,B00000,B00000,B11111,B11111 } , { B11111,B11111,B11111,B11111,B11111,B11111,B11111,B11111 } , { B00000,B00000,B00000,B00000,B00000,B01110,B01110,B01110 } };
const int digitWidth = 3; // the width in characters of a big digit (excludesspace between characters)//arrays to index into custom characters that will comprise the big numbers// digits 0 - 4 0 1 2 3 4const char bigDigitsTop[10][digitWidth]={ 3,0,3, 0,3,32, 2,2,3, 0,2,3, 3,1,3,// digits 5-9 5 6 7 8 9 3,2,2, 3,2,2, 0,0,3, 3,2,3, 3,2,3};
const char bigDigitsBot[10][ digitWidth]={ 3,1,3, 1,3,1, 3,1,1, 1,1,3, 32,32,3, 1,1,3, 3,1,3, 32,32,3, 3,1,3, 1,1,3};
char buffer[12]; // used to convert a number into a string
void setup (){ lcd.begin(20,4); // create the custom glyphs for(int i=0; i < 5; i++) lcd.createChar(i, glyphs[i]); // create the 5 custom glyphs
// show a countdown timer for(int digit = 9; digit >= 0; digit--) { showDigit(digit, 2); // show the digit delay(1000); } lcd.clear();}
350 | Chapter 11: Using Displays
www.it-ebooks.info

void loop (){ // now show the number of seconds since the sketch started int number = millis() / 1000; showNumber( number, 0); delay(1000);}
void showDigit(int digit, int position){ lcd.setCursor(position * (digitWidth + 1), 0); for(int i=0; i < digitWidth; i++) lcd.print(bigDigitsTop[digit][i]); lcd.setCursor(position * (digitWidth + 1), 1); for(int i=0; i < digitWidth; i++) lcd.print(bigDigitsBot[digit][i]);}
void showNumber(int value, int position){ int index; // index to the digit being printed, 0 is the leftmost digit
itoa(value, buffer, 10); // see Recipe 2.8 for more on using itoa // dislay each digit in sequence for(index = 0; index < 10; index++) // display up to ten digits { char c = buffer[index]; if( c == 0) // check for null (not the same as '0') return; // the end of string character is a null, see Chapter 2 c = c - 48; // convert ascii value to a numeric value (see Recipe 2.9) showDigit(c, position + index); }}
DiscussionThe LCD display has fixed-size characters, but you can create larger symbols by com-bining characters. This recipe creates five custom characters using the technique de-scribed in Recipe 11.6. These symbols (see Figure 11-4) can be combined to createdouble-sized digits (see Figure 11-5). The sketch displays a countdown from 9 to 0 onthe LCD using the big digits. It then displays the number of seconds since the sketchstarted.
The glyphs array defines pixels for the five custom characters. The array has two di-mensions given in the square brackets:
byte glyphs[5][8] = {
[5] is the number of glyphs and [8] is the number of rows in each glyph. Each elementcontains 1s and 0s to indicate whether a pixel is on or off in that row. If you compare
11.7 Displaying Symbols Larger Than a Single Character | 351
www.it-ebooks.info

the values in glyph[0] (the first glyph) with Figure 11-2, you can see that the 1s corre-spond to dark pixels:
{ B11111,B11111,B00000,B00000,B00000,B00000,B00000,B00000 } ,
Each big number is built from six of these glyphs, three forming the upper half of thebig digit and three forming the lower half. bigDigitsTop and bigDigitsBot are arraysdefining which custom glyph is used for the top and bottom rows on the LCD screen.
See AlsoSee Chapter 7 for information on 7-segment LED displays if you need really big nu-merals. Note that 7-segment displays can give you digit sizes from one-half inch to twoinches or more. They can use much more power than LCD displays and don’t presentletters and symbols very well, but they are a good choice if you need something big.
11.8 Displaying Pixels Smaller Than a Single CharacterProblemYou want to display information with finer resolution than an individual character; forexample, to display a bar chart.
Figure 11-4. Custom characters used to form big digits
Figure 11-5. Ten big digits composed of custom glyphs
352 | Chapter 11: Using Displays
www.it-ebooks.info

SolutionRecipe 11.7 describes how to build big symbols composed of more than one character.This recipe uses custom characters to do the opposite; it creates eight small symbols,each a single pixel higher than the previous one (see Figure 11-6).
Figure 11-6. Eight custom characters used to form vertical bars
These symbols are used to draw bar charts, as shown in the sketch that follows:
/* * customCharPixels */
#include <LiquidCrystal.h>
LiquidCrystal lcd(12, 11, 5, 4, 3, 2);
//set constants for number of rows and columns to match your LCDconst int numRows = 2;const int numCols = 16;
// array of bits defining pixels for 8 custom characters// ones and zeros indicate if a pixel is on or off
byte glyphs[8][8] = { {B00000,B00000,B00000,B00000,B00000,B00000,B00000,B11111}, // 0 {B00000,B00000,B00000,B00000,B00000,B00000,B11111,B11111}, // 1 {B00000,B00000,B00000,B00000,B00000,B11111,B11111,B11111}, // 2 {B00000,B00000,B00000,B00000,B11111,B11111,B11111,B11111}, // 3 {B00000,B00000,B00000,B11111,B11111,B11111,B11111,B11111}, // 4 {B00000,B00000,B11111,B11111,B11111,B11111,B11111,B11111}, // 5 {B00000,B11111,B11111,B11111,B11111,B11111,B11111,B11111}, // 6 {B11111,B11111,B11111,B11111,B11111,B11111,B11111,B11111}}; // 7
void setup (){ lcd.begin(numCols, numRows); for(int i=0; i < 8; i++) lcd.createChar(i, glyphs[i]); // create the custom glyphs lcd.clear();}
11.8 Displaying Pixels Smaller Than a Single Character | 353
www.it-ebooks.info

void loop (){ for( byte i=0; i < 8; i++) lcd.print(i); // show all eight single height bars delay(2000); lcd.clear();}
DiscussionThe sketch creates eight characters, each a single pixel higher than the previous one;see Figure 11-6. These are displayed in sequence on the top row of the LCD. These“bar chart” characters can be used to display values in your sketch that can be mappedto a range from 0 to 7. For example, the following will display a value read from analoginput 0:
int value = analogRead(0);byte glyph = map(value, 0, 1023,0,8);// returns a proportional valuefrom 0 through 7lcd.print(glyph);
You can stack the bars for greater resolution. The doubleHeightBars function shown inthe following code displays a value from 0 to 15 with a resolution of 16 pixels, usingtwo lines of the display:
void doubleHeightBars(int value, int column){char upperGlyph;char lowerGlyph;
if(value < 8) { upperGlyph = ' '; // no pixels lit lowerGlyph = value; } else { upperGlyph = value - 8; lowerGlyph = 7; // all pixels lit }
lcd.setCursor(column, 0); // do the upper half lcd.print(upperGlyph); lcd.setCursor(column, 1); // now to the lower half lcd.print(lowerGlyph);}
The doubleHeightBars function can be used as follows to display the value of an analoginput:
for( int i=0; i < 16; i++){
354 | Chapter 11: Using Displays
www.it-ebooks.info

int value = analogRead(0); value = map(value, 0, 1023,0,16); doubleHeightBars(value, i); // show a value from 0 to 15 delay(1000); // one second interval between readings}
If you want horizontal bars, you can define five characters, each a single pixel widerthan the previous one, and use similar logic to the vertical bars to calculate the characterto show.
A more complex example of this technique can be found in a sketch implementing thewell-known computer simulation known as John Conway’s Game of Life. The sketchcan be downloaded from this book’s website.
11.9 Connecting and Using a Graphical LCD DisplayProblemYou want to display graphics and text on an LCD that uses the KS0108 or compatibleLCD driver chip.
SolutionThis Solution uses the Arduino GLCD library to control the display. You can downloadit from http://www.arduino.cc/playground/Code/GLCDks0108 (see Chapter 16 if youneed help installing libraries).
There are many different types of GLCD controllers, so check that yoursis a KS0108 or compatible.
The pin connections for GLCD displays are not standardized, and it is important tocheck the data sheet for your panel to confirm how it should be wired. Incorrect con-nections of the signal lines are the most common cause of problems, and particular careshould be taken with the power leads, as wiring these incorrectly can destroy a panel.
Most GLCD panels require an external variable resistor to set the LCD working voltage(contrast) and may require a fixed resistor to limit the current in the backlight. Thedata sheet for your panel should provide specific information on the wiring and choiceof components for this.
11.9 Connecting and Using a Graphical LCD Display | 355
www.it-ebooks.info

Table 11-2 indicates the default connections from a KS0108 panel to an Arduino (orMega). You will need to check the documentation for your particular panel to findwhere each function is connected on your display. The table shows the three mostcommon panel layouts: the first, labeled “Panel A” in the table, is the one illustratedin Figure 11-7. The documentation with the GLCD library download includes colorwiring diagrams for the more common displays.
Table 11-2. Default connections from a KS0108 panel to an Arduino or Mega
Arduino pins Mega pins GLCD function Panel A Panel B Panel C Comments
5V 5V +5 volts 1 2 13
Gnd Gnd Gnd 2 1 14
N/A N/A Contrast in 3 3 12 Wiper of contrast pot
8 22 D0 4 7 1
9 23 D1 5 8 2
10 24 D2 6 9 3
11 25 D3 7 10 4
4 26 D4 8 11 5
5 27 D5 9 12 6
6 28 D6 10 13 7
7 29 D7 11 14 8
14 (analog 0) 33 CSEL1 12 15 15 Chip 1 select
15 (analog 1) 34 CSEL2 13 16 16 Chip 2 select
Reset Reset 14 17 18 Connect to reset
16 (analog 2) 35 R_W 15 5 10 Read/write
17 (analog 3) 36 D_I 16 4 11 Data/instruction (RS)
18 (analog 4) 37 EN 17 6 9 Enable
N/A N/A Contrast out 18 18 17 10K or 20K preset
N/A N/A Backlight +5 19 19 19 See data sheet
Gnd Gnd Backlight Gnd 20 20 20 See data sheet
The numbers under the Arduino and Mega columns are the Arduino (or Mega) pinsused in the configuration file provided in the library. It is possible to use other pins ifthese pins conflict with something else you want to connect. If you do change theconnections, you will also need to change the pin assignments in the configuration fileand should study the library documentation to learn how to edit the configuration file.
356 | Chapter 11: Using Displays
www.it-ebooks.info

Wiring the panel using the default configuration and running the sketchin this recipe enables you to test that everything is working before youmodify the configuration. A configuration that does not match the wir-ing is the most common source of problems, so testing with minimalchanges makes it more likely that things will work the first time.
The following sketch prints some text and then draws some graphical objects:
/* glcd */
#include <glcd.h>
#include "fonts/allFonts.h" // this makes all the distributed fontsavailable to your sketch
int count = 0;
void setup(){ GLCD.Init(NON_INVERTED); // initialize the library GLCD.ClearScreen(); GLCD.SelectFont(System5x7); // select fixed width system font GLCD.print("hello world"); // print a message delay(3000);}
Figure 11-7. GLCD wiring for type “A” panels; check your data sheet for pinout
11.9 Connecting and Using a Graphical LCD Display | 357
www.it-ebooks.info

void loop(){
GLCD.ClearScreen(); GLCD.DrawRect(0, 0, 64, 61, BLACK); // rectangle in left side of screen // rounded rectangle around text area GLCD.DrawRoundRect(68, 0, 58, 61, 5, BLACK); for(int i=0; i < 62; i += 4) { // draw lines from upper left down right side of rectangle GLCD.DrawLine(1,1,63,i, BLACK); } GLCD.DrawCircle(32,31,30,BLACK); // circle centered on left side of screen GLCD.FillRect(92,40,16,16, WHITE); // clear previous spinner position GLCD.CursorTo(5,5); // locate cursor for printing text GLCD.PrintNumber(count); // print a number at current cursor position count = count + 1; delay(1000);}
DiscussionThe library provides a wide range of basic high-level graphical drawing functions, someof which are demonstrated in this sketch. All the functions are described in the docu-mentation provided with the library.
Graphic and text screen coordinates start at 0,0 in the top-lefthand corner. Most pop-ular GLCD panels are 128 × 64 pixels, and the library uses this resolution by default.If your screen is a different resolution, you will need to edit the configuration file in thelibrary to match your panel (up to 255 × 255 pixel panels are currently supported).
GLCD enables printing text to the screen using statements similar to Arduino printcommands used for printing to the serial port. In addition, you can specify the type andsize of font. You can also specify an area of the screen that can be used as a text window.This enables you to define an area on the screen and then send text to that area, pro-viding you with a “virtual terminal” that will contain and scroll text within the boundsyou define. For instance, the following code creates an area 32 pixels square in thecenter of the screen:
gText myTextArea = gText(GLCD.CenterX-16, GLCD.CenterY -16, GLCD.CenterX +16,GLCD.CenterY+16);
You can select a font and print to the text area using code such as the following:
myTextArea.SelectFont(System5x7); // select the system font for the text areaname textTopmyTextArea.println("Go"); // print a line of text to the text area.
The example sketch supplied with the library download has a demo that shows howmultiple text areas can be used along with graphical drawings.
358 | Chapter 11: Using Displays
www.it-ebooks.info

These graphical displays have many more connections than the text LCD displays, andcare should be taken to ensure that your panel is connected correctly.
If there are no pixels visible on the display, or the pixels are garbled, do the following:
• Check +5V and Gnd connections between Arduino and the GLCD panel.
• Check that all data and command pins are wired according to the data sheet andmatch the configuration settings. This is the most common cure for this problem.
• Check the data sheet for your panel to verify that appropriate timing values are setin the configuration file.
• Check the contrast voltage (typically between -3 and -4 volts) on the contrast-inpin of the LCD panel. While the sketch is operating, try gradually adjusting thepot through its range. Some displays are very sensitive to this setting.
• Check that the sketch has compiled correctly and has downloaded to Arduino.
• Run the GLCDdiags test sketch. The test sketch is available from the menuExamples→GLCD→GLCDdiags.
If the left and right sides of the image are reversed, swap the CSEL1 and CSEL2 wires(you can also swap pin assignments in the configuration file).
11.10 Creating Bitmaps for Use with a Graphical DisplayProblemYou want to create and use your own graphical images (bitmaps) with the GLCD dis-play discussed in Recipe 11.9. You want the font definition and text stored in programmemory to minimize RAM usage.
SolutionYou can use bitmaps distributed with the library or create your own. Bitmaps are de-fined in header files with an extension of .h; for example, an Arduino icon imagenamed ArduiniIcon.h is stored in the bitmap folder of the GLCD library directory. Thisfolder also contains a file named allBitmaps.h that has details of all the distributedbitmaps, so you can include this to make all the supplied (or newly created) bitmapsavailable:
#include "bitmaps/allBitmaps.h" // this line includes all distributed bitmaps
Note that including all the bitmaps will not consume any memory if they are not ex-plicitly referenced in your sketch with the DrawBitmap function.
To enable you to add your own bitmaps, the GLCD library includes a utility calledglcdMakeBitmap which converts a .gif, .jpg, .bmp, .tga, or .png file to a header file thatcan be used by the GLCD library. The file glcdMakeBitmap.pde is a Processing sketchthat can be run using the Processing environment. The sketch is located in the bitmaps/
11.10 Creating Bitmaps for Use with a Graphical Display | 359
www.it-ebooks.info

utils/glcdMakeBitmap directory. For more information on Processing, see http://processing.org/.
There is also a .java (Java) runtime file (glcdMakeBitmap.jar) and a .java (Java) source(glcdMakeBitmap.java) in the bitmaps/utils/Java directory.
Run the utility by loading the sketch into Processing (or click on the .jar file) and dragand drop the image file to be converted into the window. The utility will create a headerfile with the same name as the image file dropped into the window. The file is saved inthe bitmaps directory and an entry is automatically added to the allBitMaps.h file sothat the new image can be used in your sketch.
To demonstrate this, rename an image on your computer as me.jpg. Then runglcdMakeBitmap and drop the image into the window that appears.
Compile and upload the following sketch to show the supplied Arduino icon followedby the image you created:
/* * GLCDImage * Display an image defined in me.h */
#include <glcd.h>
#include "bitmaps/allBitmaps.h" // all images in the bitmap folder
void setup(){ GLCD.Init(); // initialize the library GLCD.ClearScreen(); GLCD.DrawBitmap(ArduinoIcon, 0,0); //draw the supplied bitmap delay(5000); GLCD.ClearScreen(); GLCD.DrawBitmap(me, 0,0); //draw your bitmap}
void loop(){
}
The following line draws the image defined in the file ArduinoIcon.h that is suppliedwith the library:
GLCD.DrawBitmap(ArduinoIcon, 0,0); //draw the supplied bitmap
After a delay, the following line draws the image you created that is stored in the fileme.h:
GLCD.DrawBitmap(me, 0,0);
360 | Chapter 11: Using Displays
www.it-ebooks.info

See AlsoSee the documentation supplied with the library for more on creating and using graph-ical images.
The documentation also describes how you can create your own fonts.
11.11 Displaying Text on a TVProblemYou want to display text on a television or monitor with a video input.
SolutionThis recipe uses a shield called TellyMate to print text or block graphics to a television.The shield plugs into Arduino and has an output jack that connects to the video inputof a television.
The sketch prints all the characters the TellyMate can display on a TV screen:
/* TellyMate Simple demo for TellMmate Shield*/
const byte ESC = 0x1B; // ASCII escape character used in TellyMate commands
void setup(){ Serial.begin(57600); //57k6 baud is default TellyMate speed clear(); // clear the screen Serial.print(" TellyMate Character Set"); // write some text delay(2000);}
void loop(){
byte charCode = 32; // characters 0 through 31 are control codes for(int row=0; row < 7; row++) // show 7 rows { setCursor(2, row + 8); // center the display for(int col= 0; col < 32; col++) // 32 characters per row { Serial.print(charCode); charCode = charCode + 1; delay(20); } } delay(5000); clear();
11.11 Displaying Text on a TV | 361
www.it-ebooks.info

}
// TellyMate helper functions
void clear( ) // clear the screen{ // <ESC>E Serial.print(ESC); Serial.print('E');}
void setCursor( int col, int row) // set the cursor{ // <ESC>Yrc Serial.print(ESC); Serial.print('Y' ) ; Serial.print((unsigned char)(32 + row)) ; Serial.print((unsigned char)(32 + col)) ;}
DiscussionArduino controls the TellyMate display by sending commands to the serial port.
TellyMate communicates with the Arduino through the serial port, soyou may need to unplug the shield to upload sketches.
Figure 11-8 shows the characters that can be displayed. You can find a table of valuesfor each character at http://en.wikipedia.org/wiki/Code_page_437.
Figure 11-8. TellyMate character set (code page 437)
Characters 0 through 31 are interpreted as screen control commands,so only characters 32 to 255 can be displayed.
362 | Chapter 11: Using Displays
www.it-ebooks.info

The sketch uses nonprintable codes, called escape codes, to differentiate printable char-acters from commands to control the screen. Control codes consist of the ESC (shortfor escape) character (hex value 0x1b) followed by one or more characters indicatingthe nature of the control function. Details of all the control codes are covered in theTellyMate documentation.
The sketch has a number of helper functions that send the appropriate sequence ofcharacters to achieve the desired results, enabling you to concentrate on the higher levelactivity of the sketch—what you want it to do, rather than the details of how it willdo it.
The screen will show a flashing cursor; you can turn this off using a control code.Adding the cursorHide function will turn off the cursor when the function is called:
void cursorHide(){ // <ESC>f Serial.print(ESC) ; // the escape character Serial.print('f' ) ; // ... followed by the letter f will turn off the cursor.}
To add a box around the edge of the screen, add the drawBox and showXY functions atthe bottom of the previous sketch. To get the sketch to use them, add this line justinside the opening bracket of the loop:
drawBox(1,0, 38, 24); // the screen is 38 characters wide and 25 high
The drawBox function prints characters for the four corners and the top, bottom, andside edges using the line drawing character codes:
// characters that form the box outline// see http://en.wikipedia.org/wiki/Code_page_437const byte boxUL = 201;const byte boxUR = 187;const byte boxLL = 200;const byte boxLR = 188;const byte HLINE = 205; // horizontal lineconst byte VLINE = 186; // vertical line
void drawBox( int startRow, int startCol, int width, int height){ //draw top line showXY(boxUL, startCol,startRow); // the upper-left corner for(int col = startCol + 1; col < startCol + width-1; col++) Serial.print(HLINE); // the line characters Serial.print(boxUR); // upper-right character
// draw left and right edges for(int row = startRow + 1; row < startRow + height -1; row++) { showXY(VLINE, startCol,row); // left edge showXY(VLINE, startCol + width-1,row); // right edge }
11.11 Displaying Text on a TV | 363
www.it-ebooks.info

// draw bottom line showXY(boxLL, 0, startRow+height-1); // the lower-left corner character for(int col = startCol + 1; col < startCol + width-1; col++) Serial.print(HLINE); Serial.print(boxLR);
}
A convenience function used by drawBox, named showXY, combines cursor positioningand printing:
void showXY( char ch, int x, int y){ // display the given character at the screen x and y location setCursor(x,y); Serial.print(ch);}
Here is an additional sketch that uses the cursor control commands to animate a ballbouncing around the screen:
/* TellyBounce*/
// define the edges of the screen:const int HEIGHT = 25; // the number of text rowsconst int WIDTH = 38; // the number of characters in a rowconst int LEFT = 0; // useful constants derived from the aboveconst int RIGHT = WIDTH -1;const int TOP = 0;const int BOTTOM = HEIGHT-1;
const byte BALL = 'o'; // character code for ballconst byte ESC = 0x1B; // ASCII escape character used in TellyMate commands
int ballX = WIDTH/2; // X position of the ballint ballY = HEIGHT/2; // Y position of the ballint ballDirectionY = 1; // X direction of the ballint ballDirectionX = 1; // Y direction of the ball
// this delay moves ball across the 38-character screen in just under 4 secondslong interval = 100;
void setup(){ Serial.begin(57600); // 57k6 baud is default TellyMate speed clear(); // clear the screen cursorHide(); // turn cursor off}
void loop(){ moveBall(); delay(interval);}
364 | Chapter 11: Using Displays
www.it-ebooks.info

void moveBall() { // if the ball goes off the top or bottom, reverse its Y direction if (ballY == BOTTOM || ballY == TOP) ballDirectionY = -ballDirectionY;
// if the ball goes off the left or right, reverse its X direction if ((ballX == LEFT) || (ballX == RIGHT)) ballDirectionX = -ballDirectionX;
// clear the ball's previous position showXY(' ', ballX, ballY);
// increment the ball's position in both directions ballX = ballX + ballDirectionX; ballY = ballY + ballDirectionY;
// show the new position showXY(BALL, ballX, ballY);}
// TellyMate helper functions
void clear( ) // clear the screen{ // <ESC>E Serial.print(ESC); Serial.print('E');}
void setCursor( int col, int row) // set the cursor{ // <ESC>Yrc Serial.print(ESC); Serial.print('Y' ) ; Serial.print((unsigned char)(32 + row)) ; Serial.print((unsigned char)(32 + col)) ;}
void cursorShow( ){ // <ESC>e Serial.print(ESC) ; Serial.print('e') ;}
void cursorHide(){ // <ESC>f Serial.print(ESC) ; Serial.print('f' ) ;}
void showXY( char ch, int x, int y){ // display the given character at the screen x and y location setCursor(x,y); Serial.print(ch);}
11.11 Displaying Text on a TV | 365
www.it-ebooks.info

See AlsoDetailed information on the TellyMate shield is available at http://www.batsocks.co.uk/products/Shields/index_Shields.htm.
Much more information on code page 437, including a table of characters, is availableat http://en.wikipedia.org/wiki/Code_page_437.
366 | Chapter 11: Using Displays
www.it-ebooks.info

CHAPTER 12
Using Time and Dates
12.0 IntroductionManaging time is a fundamental element of interactive computing. This chapter coversbuilt-in Arduino functions and introduces many additional techniques for handlingtime delays, time measurement, and real-world times and dates.
12.1 Creating DelaysProblemYou want your sketch to pause for some period of time. This may be some number ofmilliseconds, or a time given in seconds, minutes, hours, or days.
SolutionThe Arduino delay function is used in many sketches throughout this book. delaypauses a sketch for the number of milliseconds specified as a parameter. (There are1,000 milliseconds in one second.) The sketch that follows shows how you can usedelay to get almost any interval:
/* * delay sketch */
const long oneSecond = 1000; // a second is a thousand millisecondsconst long oneMinute = oneSecond * 60;const long oneHour = oneMinute * 60;const long oneDay = oneHour * 24;
void setup(){ Serial.begin(9600);}
367
www.it-ebooks.info

void loop(){ Serial.println("delay for 1 millisecond"); delay(1); Serial.println("delay for 1 second"); delay(oneSecond); Serial.println("delay for 1 minute"); delay(oneMinute); Serial.println("delay for 1 hour"); delay(oneHour); Serial.println("delay for 1 day"); delay(oneDay); Serial.println("Ready to start over");}
DiscussionThe delay function has a range from one one-thousandth of a second to around 25 days(just less than 50 days if using an unsigned long variable type; see Chapter 2 for moreon variable types).
The delay function pauses the execution of your sketch for the duration of the delay.If you need to perform other tasks within the delay period, using millis, as explainedin Recipe 12.2, is more suitable.
You can use delayMicroseconds to delay short periods. There are 1,000 microsecondsin one millisecond, and 1 million microseconds in one second. delayMicroseconds willpause from one microsecond to around 16 milliseconds, but for delays longer than afew thousand microseconds you should use delay instead:
delayMicroseconds(10); // delay for 10 microseconds
delay and delayMicroseconds will delay for at least the amount of timegiven as the parameter, but they could delay a little longer if interruptsoccur within the delay time.
See AlsoThe Arduino reference for delay: http://www.arduino.cc/en/Reference/Delay
12.2 Using millis to Determine DurationProblemYou want to know how much time has elapsed since an event happened; for example,how long a switch has been held down.
368 | Chapter 12: Using Time and Dates
www.it-ebooks.info

SolutionArduino has a function named millis (short for milliseconds) that is used in the fol-lowing sketch to print how long a button was pressed (see Recipe 5.2 for details onhow to connect the switch):
/* millisDuration sketch returns the number of milliseconds that a button has been pressed */
const int switchPin = 2; // the number of the input pin
long startTime; // the value returned from millis when the switch is pressedlong duration; // variable to store the duration
void setup(){ pinMode(switchPin, INPUT); digitalWrite(switchPin, HIGH); // turn on pull-up resistor Serial.begin(9600);}
void loop(){ if(digitalRead(switchPin) == LOW) { // here if the switch is pressed startTime = millis(); while(digitalRead(switchPin) == LOW) ; // wait while the switch is still pressed long duration = millis() - startTime; Serial.println(duration); }}
DiscussionThe millis function returns the number of milliseconds since the current sketch startedrunning. This number will overflow (go back to zero) in approximately 50 days.
By storing the start time for an event, you can determine the duration of the event bysubtracting the start time from the current time, as shown here:
long duration = millis() - startTime;
You can create your own delay function using millis that can continue to do otherthings while checking repeatedly to see if the delay period has passed. One example ofthis can be found in the BlinkWithoutDelay sketch provided with the Arduino distri-bution. Here is the loop code in that sketch:
12.2 Using millis to Determine Duration | 369
www.it-ebooks.info

void loop(){ // here is where you'd put code that needs to be running all the time...
The next line checks to see if the desired interval has passed:
if (millis() - previousMillis > interval) { // save the last time you blinked the LED
If the interval has passed, the current millis value is saved in the variablepreviousMillis:
previousMillis = millis();
// if the LED is off turn it on and vice versa: if (ledState == LOW) ledState = HIGH; else ledState = LOW;
// set the LED with the ledState of the variable: digitalWrite(ledPin, ledState); }}
Here is a way to package this logic into a function named myDelay that will delay thecode in loop but can perform some action during the delay period. You can customizethe functionality for your application, but in this example, an LED is flashed five timesper second even while the print statement in loop is delayed for four-second intervals:
// blink an LED for a set amount of timeconst int ledPin = 13; // the number of the LED pin
int ledState = LOW; // ledState used to set the LEDlong previousMillis = 0; // will store last time LED was updated
void setup(){ pinMode(ledPin, OUTPUT); Serial.begin(9600);}
void loop(){ Serial.println(millis() / 1000); // print the number of elapsed seconds everyfour seconds // wait four seconds (but at the same time, quickly blink an LED) myDelay(4000); }
// duration is delay time in millisecondsvoid myDelay(unsigned long duration){ unsigned long start = millis();
370 | Chapter 12: Using Time and Dates
www.it-ebooks.info

while (millis() - start <= duration) { blink(100); // blink the LED inside the while loop }}
// interval is the time that the LED is on and offvoid blink(long interval){ if (millis() - previousMillis > interval) { // save the last time you blinked the LED previousMillis = millis(); // if the LED is off turn it on and vice versa: if (ledState == LOW) ledState = HIGH; else ledState = LOW; digitalWrite(ledPin, ledState); }}
You can put code in the myDelay function for an action that you want to happen re-peatedly while the function waits for the specified time to elapse.
Another approach is to use a third-party library available from the Arduino Playground,called TimedAction (http://www.arduino.cc/playground/Code/TimedAction):
#include <TimedAction.h>
//this initializes a TimedAction class that will change the state of an LEDevery second.TimedAction timedAction = TimedAction(NO_PREDELAY,1000,blink);
const int ledPin = 13; // the number of the LED pinboolean ledState = false;
void setup(){ pinMode(ledPin,OUTPUT); digitalWrite(ledPin,ledState);}
void loop(){ timedAction.check();}
void blink(){ if (ledState == LOW) ledState = HIGH; else
12.2 Using millis to Determine Duration | 371
www.it-ebooks.info

ledState = LOW;
ledState ? ledState=false : ledState=true; digitalWrite(ledPin,ledState);}
See AlsoThe Arduino reference for millis: http://www.arduino.cc/en/Reference/Millis
12.3 More Precisely Measuring the Duration of a PulseProblemYou want to determine the duration of a pulse with microsecond accuracy; for example,to measure the exact time between two button presses.
SolutionThe pulseIn function returns the duration in microseconds for a changing signal on adigital pin. This sketch prints the time that the voltage on a digital pin is held LOW by abutton press. As in Recipe 12.2, this uses the wiring shown in Recipe 5.2:
/* PulseIn sketch uses pulseIn to display how long a switch is pressed and released */
const int inputPin = 2; // input pin for the switch
long val;
void setup(){ pinMode(inputPin, INPUT); digitalWrite(inputPin,HIGH); // turn on internal pull-up on the inputPin Serial.begin(9600); Serial.println("Press and release switch");}
void loop(){
val = pulseIn(inputPin, LOW); if( val != 0) // timeout returns 0 { Serial.print("switch pressed for "); Serial.print(val); Serial.println(" microseconds"); }}
372 | Chapter 12: Using Time and Dates
www.it-ebooks.info

DiscussionpulseIn can measure how long a pulse is either HIGH or LOW:
pulseIn(pin, HIGH); // returns microseconds that pulse is HIGHpulseIn(pin, LOW) // returns microseconds that pulse is LOW
The pulseIn function waits for the pulse to start (or for a timeout if there is no pulse).By default, it will stop waiting after one second, but you can change that by specifyingthe time to wait in microseconds as a third parameter (note that 1,000 microsecondsequals 1 millisecond):
pulseIn(pin, HIGH, 5000); // wait 5 milliseconds for the pulse to start
The timeout value only matters if the pulse does not start within thegiven period. Once the start of a pulse is detected, the function will starttiming and will not return until the pulse ends.
pulseIn can measure values between around 10 microseconds to three minutes in du-ration, but the value of long pulses may not be very accurate.
See AlsoThe Arduino reference for pulseIn: http://www.arduino.cc/en/Reference/PulseIn
Recipe 6.4 shows pulseIn used to measure the pulse width of an ultrasonic distancesensor.
Recipe 18.2 provides more information on using hardware interrupts.
12.4 Using Arduino As a ClockProblemYou want to use the time of day (hours, minutes, and seconds) in a sketch, and youdon’t want to connect external hardware.
SolutionThis sketch uses the Time library to display the time of day:
/* * Time sketch * */
#include <Time.h>
12.4 Using Arduino As a Clock | 373
www.it-ebooks.info

void setup(){ Serial.begin(9600); setTime(12,0,0,1,1,11); // set time to noon Jan 1 2011}
void loop(){ digitalClockDisplay(); delay(1000);}
void digitalClockDisplay(){ // digital clock display of the time Serial.print(hour()); printDigits(minute()); printDigits(second()); Serial.print(" "); Serial.print(day()); Serial.print(" "); Serial.print(month()); Serial.print(" "); Serial.print(year()); Serial.println();}
void printDigits(int digits){ // utility function for clock display: prints preceding colon and leading 0 Serial.print(":"); if(digits < 10) Serial.print('0'); Serial.print(digits);}
DiscussionThe Time library enables you to keep track of the date and time. A standard Arduinoboard uses a quartz crystal for timing, and this is accurate to a couple of seconds perday, but it does not have a battery to remember the time when power is switched off.Therefore, time will restart from 0 each time a sketch starts, so you need to set the timeusing the setTime function. The sketch sets the time to noon on January 1 each time it starts.
The Time library uses a standard known as Unix (also called POSIX)time. The values represent the number of elapsed seconds since January1, 1970. Experienced C programmers may recognize that this is the sameas the time_t used in the ISO standard C library for storing time values.
Of course, it’s more useful to set the time to your current local time instead of a fixedvalue. The following sketch gets the numerical time value (the number of elapsedseconds since January 1, 1970) from the serial port to set the time. You can enter a
374 | Chapter 12: Using Time and Dates
www.it-ebooks.info

value using the Serial Monitor (the current Unix time can be found on a number ofwebsites using the Google search terms “Unix time convert”):
/* * TimeSerial sketch * example code illustrating Time library set through serial port messages. * * Messages consist of the letter T followed by ten digit time (as seconds sinceJan 1 1970) * You can send the text on the next line using Serial Monitor to set the clockto noon Jan 1 2011 T 1293883200 * * A Processing example sketch to automatically send the messages is included inthe download */
#include <Time.h>
#define TIME_MSG_LEN 11 // time sync consists of a HEADER followed by tenascii digits#define TIME_HEADER 'T' // Header tag for serial time sync message
void setup() { Serial.begin(9600); Serial.println("Waiting for time sync message");}
void loop(){ if(Serial.available() ) { processSyncMessage(); } if(timeStatus()!= timeNotSet) { // here if the time has been set digitalClockDisplay(); } delay(1000);}
void digitalClockDisplay(){ // digital clock display of the time Serial.print(hour()); printDigits(minute()); printDigits(second()); Serial.print(" "); Serial.print(day()); Serial.print(" "); Serial.print(month()); Serial.print(" "); Serial.print(year()); Serial.println();}
12.4 Using Arduino As a Clock | 375
www.it-ebooks.info

void printDigits(int digits){ // utility function for digital clock display: prints preceding colon andleading 0 Serial.print(":"); if(digits < 10) Serial.print('0'); Serial.print(digits);}
void processSyncMessage() { // if time sync available from serial port, update time and return true // time message consists of a header and ten ascii digits while(Serial.available() >= TIME_MSG_LEN ){ char c = Serial.read() ; Serial.print(c); if( c == TIME_HEADER ) { time_t pctime = 0; for(int i=0; i < TIME_MSG_LEN -1; i++){ c = Serial.read(); if( c >= '0' && c <= '9'){ pctime = (10 * pctime) + (c - '0') ; // convert digits to a number } } setTime(pctime); // Sync clock to the time received on serial port } }}
The code to display the time and date is the same as before, but now the sketch waitsto receive the time from the serial port. See the Discussion in Recipe 4.3 if you are notfamiliar with how to receive numeric data using the serial port.
A processing sketch named SyncArduinoClock is included with the Time library ex-amples (it’s in the Time/Examples/Processing/SyncArduinoClock folder). This Process-ing sketch will send the current time from your computer to Arduino at the click of amouse. Run SyncArduinoClock in Processing, ensuring that the serial port is the oneconnected to Arduino (Chapter 4 describes how to run a Processing sketch that talksto Arduino). You should see the message Waiting for time sync message sent byArduino and displayed in the Processing text area (the black area for text messages atthe bottom of the Processing IDE). Click the Processing application window (it’s a 200-pixel gray square) and you should see the text area display the time as printed by theArduino sketch.
You can also set the clock from the Serial Monitor if you can get the current Unix time;http://www.epochconverter.com/ is one of many websites that provide the time in thisformat. Copy the 10-digit number indicated as the current Unix time and paste thisinto the Serial Monitor Send window. Precede the number with the letter T and clickSend. For example, if you send this:
T1282041639
376 | Chapter 12: Using Time and Dates
www.it-ebooks.info

Arduino should respond by displaying the time every second:
10:40:49 17 8 201010:40:50 17 8 201010:40:51 17 8 201010:40:52 17 8 201010:40:53 17 8 201010:40:54 17 8 2010. . .
You can also set the time using buttons or other input devices such as tilt sensors, ajoystick, or a rotary encoder.
The following sketch uses two buttons to move the clock “hands” forward or backward.Figure 12-1 shows the connections (see Recipe 5.2 if you need help using switches):
/* AdjustClockTime sketch buttons on pins 2 and 3 adjust the time */
#include <Time.h>
const int btnForward = 2; // button to move time forwardconst int btnBack = 3; // button to move time back
unsigned long prevtime; // when the clock was last displayed
void setup(){ digitalWrite(btnForward, HIGH); // enable internal pull-up resistors digitalWrite(btnBack, HIGH); setTime(12,0,0,1,1,11); // start with the time set to noon Jan 1 2011 Serial.begin(9600); Serial.println("ready");}
void loop(){ prevtime = now(); // note the time while( prevtime == now() ) // stay in this loop till the second changes { // check if the set button pressed while waiting for second to roll over if(checkSetTime()) prevtime = now(); // time changed so reset start time } digitalClockDisplay();}
The sketch uses the same digitalClockDisplay and printDigits functions fromRecipe 12.3, so copy those prior to running the sketch.
12.4 Using Arduino As a Clock | 377
www.it-ebooks.info

Here is a variation on this sketch that uses the position of a variable resistor to determinethe direction and rate of adjustment when a switch is pressed:
#include <Time.h>
const int potPin = 0; // pot to determine direction and speedconst int buttonPin = 2; // button enables time adjustment
unsigned long prevtime; // when the clock was last displayed
void setup(){ digitalWrite(buttonPin, HIGH); // enable internal pull-up resistors setTime(12,0,0,1,1,11); // start with the time set to noon Jan 1 2011 Serial.begin(9600);}
void loop(){ prevtime = now(); // note the time while( prevtime == now() ) // stay in this loop till the second changes { // check if the set button pressed while waiting for second to roll over if(checkSetTime()) prevtime = now(); // time changed so reset start time } digitalClockDisplay();}
// functions checks to see if the time should be adjusted// returns true if time was changedboolean checkSetTime()
Figure 12-1. Two buttons used to adjust the time
378 | Chapter 12: Using Time and Dates
www.it-ebooks.info

{int value; // a value read from the potint step; // the number of seconds to move (backwards if negative)boolean isTimeAdjusted = false; // set to true if the time is adjusted
while(digitalRead(buttonPin)== LOW) { // here while button is pressed value = analogRead(potPin); // read the pot value step = map(value, 0,1023, 10, -10); // map value to the desired range if( step != 0) { adjustTime(step); isTimeAdjusted = true; // to tell the user that the time has changed digitalClockDisplay(); // update clock delay(100); } } return isTimeAdjusted;}
The preceding sketch uses the same digitalClockDisplay and printDigits functionsfrom Recipe 12.3, so copy those prior to running the sketch. Figure 12-2 shows howthe variable resistor and switch are connected.
Figure 12-2. A variable resistor used to adjust the time
12.4 Using Arduino As a Clock | 379
www.it-ebooks.info

All these examples print to the serial port, but you can print the output to LEDs orLCDs. The download for the Graphical LCD covered in Recipe 11.9 contains examplesketches for displaying and setting time using an analog clock display drawn on theLCD.
The Time library includes convenience functions for converting to and from varioustime formats. For example, you can find out how much time has elapsed since the startof the day and how much time remains until the day’s end. You can look in Time.h inthe libraries folder for the complete list. More details are available in Chapter 16:
dayOfWeek( now() ); //the day of the week (Sunday is day 1)elapsedSecsToday( now() ); // returns the number of seconds since the startof todaynextMidnight( now() ); // how much time to the end of the dayelapsedSecsThisWeek( now() ); // how much time has elapsed since the start ofthe week
You can also print text strings for the days and months; here is a variation on the digitalclock display code that prints the names of the day and month:
void digitalClockDisplay(){ // digital clock display of the time Serial.print(hour()); printDigits(minute()); printDigits(second()); Serial.print(" "); Serial.print(dayStr(weekday())); // print the day of the week Serial.print(" "); Serial.print(day()); Serial.print(" "); Serial.print(monthShortStr(month())); // print the month (abbreviated) Serial.print(" "); Serial.print(year()); Serial.println();}
See AlsoArduino Time library reference: http://www.arduino.cc/playground/Code/Time
Wikipedia article on Unix time: http://en.wikipedia.org/wiki/Unix_time
http://www.epochconverter.com/ and http://www.onlineconversion.com/unix_time.htmare two popular Unix time conversion tools.
12.5 Creating an Alarm to Periodically Call a FunctionProblemYou want to perform some action on specific days and at specific times of the day.
380 | Chapter 12: Using Time and Dates
www.it-ebooks.info

SolutionTimeAlarms is a companion library included in the Time library download discussedin Recipe 12.4 (installing the Time library will also install the TimeAlarms library).TimeAlarms makes it easy to create time and date alarms:
/* * TimeAlarmExample sketch * * This example calls alarm functions at 8:30 am and at 5:45 pm (17:45) * and simulates turning lights on at night and off in the morning * * A timer is called every 15 seconds * Another timer is called once only after 10 seconds * * At startup the time is set to Jan 1 2010 8:29 am */
#include <Time.h>#include <TimeAlarms.h>
void setup(){ Serial.begin(9600); Serial.println("TimeAlarms Example"); Serial.println("Alarms are triggered daily at 8:30 am and 17:45 pm"); Serial.println("One timer is triggered every 15 seconds"); Serial.println("Another timer is set to trigger only once after 10 seconds"); Serial.println();
setTime(8,29,40,1,1,10); // set time to 8:29:40am Jan 1 2010
Alarm.alarmRepeat(8,30,0, MorningAlarm); // 8:30am every day Alarm.alarmRepeat(17,45,0,EveningAlarm); // 5:45pm every day
Alarm.timerRepeat(15, RepeatTask); // timer for every 15 seconds Alarm.timerOnce(10, OnceOnlyTask); // called once after 10 seconds}
void MorningAlarm(){ Serial.println("Alarm: - turn lights off");}
void EveningAlarm(){ Serial.println("Alarm: - turn lights on");}
void RepeatTask(){ Serial.println("15 second timer");}
void OnceOnlyTask()
12.5 Creating an Alarm to Periodically Call a Function | 381
www.it-ebooks.info

{ Serial.println("This timer only triggers once");}
void loop(){ digitalClockDisplay(); Alarm.delay(1000); // wait one second between clock display}
void digitalClockDisplay(){ // digital clock display of the time Serial.print(hour()); printDigits(minute()); printDigits(second()); Serial.println();}
void printDigits(int digits){ // utility function for digital clock display: prints preceding colon andleading 0 Serial.print(":"); if(digits < 10) Serial.print('0'); Serial.print(digits);}
DiscussionYou can schedule tasks to trigger at a particular time of day (these are called alarms)or schedule tasks to occur after an interval of time has elapsed (called timers). Each ofthese tasks can be created to continuously repeat or to occur only once.
To specify an alarm to trigger a task repeatedly at a particular time of day use:
Alarm.alarmRepeat(8,30,0, MorningAlarm);
This calls the function MorningAlarm at 8:30 a.m. every day.
If you want the alarm to trigger only once, you can use the alarmOnce method:
Alarm.alarmOnce(8,30,0, MorningAlarm);
This calls the function MorningAlarm a single time only (the next time it is 8:30 a.m.)and will not trigger again.
Timers trigger tasks that occur after a specified interval of time has passed rather thanat a specific time of day. The timer interval can be specified in any number of seconds,or in hour, minutes, and seconds:
Alarm.timerRepeat(15, Repeats); // timer task every 15 seconds
This calls the Repeats function in your sketch every 15 seconds.
382 | Chapter 12: Using Time and Dates
www.it-ebooks.info

If you want a timer to trigger once only, use the timerOnce method:
Alarm.timerOnce(10, OnceOnly); // called once after 10 seconds
This calls the onceOnly function in a sketch 10 seconds after the timer is created.
Your code needs to call Alarm.delay regularly because this functionchecks the state of all the scheduled events. Failing to regularly callAlarm.delay will result in the alarms not being triggered. You can callAlarm.delay(0) if you need to service the scheduler without a delay.Always use Alarm.delay instead of delay when using TimeAlarms in asketch.
The TimeAlarms library requires the Time library to be installed—see Recipe 12.4. Nointernal or external hardware is required to use the TimeAlarms library. The schedulerdoes not use interrupts, so the task-handling function is the same as any other functionsyou create in your sketch (code in an interrupt handler has restrictions that are dis-cussed in Chapter 18, but these do not apply to TimeAlarms functions).
Timer intervals can range from one second to several years. (If you need timer intervalsshorter than one second, the TimedAction library by Alexander Brevig may be moresuitable; see http://www.arduino.cc/playground/Code/TimedAction.)
Tasks are scheduled for specific times designated by the system clock in the Time library(see Recipe 12.4 for more details). If you change the system time (e.g., by calling setTime), the trigger times are not adjusted. For example, if you use setTime to move onehour ahead, all alarms and timers will occur one hour sooner. In other words, if it’s1:00 and a task is set to trigger in two hours (at 3:00), and then you change the currenttime to 2:00, the task will trigger in one hour. If the system time is set backward—forexample, to 12:00—the task will trigger in three hours (i.e., when the system timeindicates 3:00). If the time is reset to earlier than the time at which a task was scheduled,the task will be triggered immediately (actually, on the next call to Alarm.delay).
This is the expected behavior for alarms—tasks are scheduled for a specific time of dayand will trigger at that time—but the effect on timers may be less clear. If a timer isscheduled to trigger in five minutes’ time and then the clock is set back by one hour,that timer will not trigger until one hour and five minutes have elapsed (even if it is arepeating timer—a repeat does not get rescheduled until after it triggers).
Up to six alarms and timers can be scheduled to run at the same time. You can modifythe library to enable more tasks to be scheduled; Recipe 16.3 shows you how to do this.
onceOnly alarms and timers are freed when they are triggered, and you can reschedulethese as often as you want so long as there are no more than six pending at one time.The following code gives one example of how a timerOnce task can be rescheduled:
Alarm.timerOnce(random(10), randomTimer); // trigger after random number ofseconds
12.5 Creating an Alarm to Periodically Call a Function | 383
www.it-ebooks.info

void randomTimer(){ int period = random(2,10); // get a new random period Alarm.timerOnce(period, randomTimer); // trigger for another random period}
12.6 Using a Real-Time ClockProblemYou want to use the time of day provided by a real-time clock (RTC). External boardsusually have battery backup, so the time will be correct even when Arduino is reset orturned off.
SolutionThe simplest way to use an RTC is with a companion library for the Time library, namedDS1307RTC.h. This recipe is for the widely used DS1307 and DS1337 RTC chips:
/* * TimeRTC sketch * example code illustrating Time library with real-time clock. * */
#include <Time.h>#include <Wire.h>#include <DS1307RTC.h> // a basic DS1307 library that returns time as a time_t
void setup() { Serial.begin(9600); setSyncProvider(RTC.get); // the function to get the time from the RTC if(timeStatus()!= timeSet) Serial.println("Unable to sync with the RTC"); else Serial.println("RTC has set the system time");}
void loop(){ digitalClockDisplay(); delay(1000);}
void digitalClockDisplay(){ // digital clock display of the time Serial.print(hour()); printDigits(minute()); printDigits(second()); Serial.print(" "); Serial.print(day()); Serial.print(" "); Serial.print(month());
384 | Chapter 12: Using Time and Dates
www.it-ebooks.info

Serial.print(" "); Serial.print(year()); Serial.println();}
void printDigits(int digits){ // utility function for digital clock display: prints preceding colon andleading 0 Serial.print(":"); if(digits < 10) Serial.print('0'); Serial.print(digits);}
Most RTC boards for Arduino use the I2C protocol for communicating (see Chap-ter 13 for more on I2C). Connect the line marked “SCL” (or “Clock”) to Arduino analogpin 5 and “SDA” (or “Data”) to analog pin 4, as shown in Figure 12-3. (Analog pins 4and 5 are used for I2C; see Chapter 13). Take care to ensure that you connect the +5Vpower line and Gnd pins correctly.
Figure 12-3. Connecting a real-time clock
DiscussionThe code is similar to other recipes using the Time library, but it gets its value from theRTC rather than from the serial port or hardcoded value. The only additional lineneeded is this:
setSyncProvider(RTC.get); // the function to get the time from the RTC
The setSyncProvider function tells the Time library how it should get information forsetting (and updating) the time. RTC.get is a method within the RTC library that returnsthe current time in the format used by the Time library (Unix time).
12.6 Using a Real-Time Clock | 385
www.it-ebooks.info

Each time Arduino starts, the setup function will call RTC.get to set the time from theRTC hardware.
Before you can get the correct time from the module, you need to set its time. Here isa sketch that enables you to set the time on the RTC hardware—you only need to dothis when you first attach the battery to the RTC, when replacing the battery, or if thetime needs to be changed:
/* * TimeRTCSet sketch * example code illustrating Time library with real-time clock. * * RTC is set in response to serial port time message * A Processing example sketch to set the time is included in the download */
#include <Time.h>#include <Wire.h>#include <DS1307RTC.h> // a basic DS1307 library that returns time as a time_t
void setup() { Serial.begin(9600); setSyncProvider(RTC.get); // the function to get the time from the RTC if(timeStatus()!= timeSet) Serial.println("Unable to sync with the RTC"); else Serial.println("RTC has set the system time");}
void loop(){ if(Serial.available()) { time_t t = processSyncMessage(); if(t >0) { RTC.set(t); // set the RTC and the system time to the received value setTime(t); } } digitalClockDisplay(); delay(1000);}
void digitalClockDisplay(){ // digital clock display of the time Serial.print(hour()); printDigits(minute()); printDigits(second()); Serial.print(" "); Serial.print(day()); Serial.print(" "); Serial.print(month()); Serial.print(" ");
386 | Chapter 12: Using Time and Dates
www.it-ebooks.info

Serial.print(year()); Serial.println();}
void printDigits(int digits){ // utility function for digital clock display: prints preceding colon andleading 0 Serial.print(":"); if(digits < 10) Serial.print('0'); Serial.print(digits);}
/* code to process time sync messages from the serial port */#define TIME_MSG_LEN 11 // time sync to PC is HEADER followed by unix time_tas ten ascii digits#define TIME_HEADER 'T' // Header tag for serial time sync message
time_t processSyncMessage() { // return the time if a valid sync message is received on the serial port. // time message consists of a header and ten ascii digits while(Serial.available() >= TIME_MSG_LEN ){ char c = Serial.read() ; Serial.print(c); if( c == TIME_HEADER ) { time_t pctime = 0; for(int i=0; i < TIME_MSG_LEN -1; i++){ c = Serial.read(); if( c >= '0' && c <= '9'){ pctime = (10 * pctime) + (c - '0') ; // convert digits to a number } } return pctime; } } return 0;}
This sketch is almost the same as the TimeSerial sketch in Recipe 12.4 for setting thetime from the serial port, but here the following function is called when a time messageis received from the computer to set the RTC:
RTC.set(t); // set the RTC and the system time to the received value
setTime(t);
The RTC chip uses I2C to communicate with Arduino. I2C is explained in Chap-ter 13; see Recipe 13.3 if you are interested in more details on I2C communication withthe RTC chip.
See AlsoThe SparkFun BOB-00099 data sheet: http://store.gravitech.us/i2crecl.html
12.6 Using a Real-Time Clock | 387
www.it-ebooks.info

CHAPTER 13
Communicating Using I2C and SPI
13.0 IntroductionThe I2C (Inter-Integrated Circuit) and SPI (Serial Peripheral Interface) standards werecreated to provide simple ways for digital information to be transferred between sensorsand microcontrollers such as Arduino. Arduino libraries for both I2C and SPI make iteasy for you to use both of these protocols.
The choice between I2C and SPI is usually determined by the devices you want toconnect. Some devices provide both standards, but usually a device or chip supportsone or the other.
I2C has the advantage that it only needs two signal connections to Arduino—usingmultiple devices on the two connections is fairly easy, and you get acknowledgmentthat signals have been correctly received. The disadvantages are that the data rate isslower than SPI and data can only be traveling in one direction at a time, lowering thedata rate even more if two-way communication is needed. It is also necessary to connectpull-up resistors to the connections to ensure reliable transmission of signals (see theintroduction to Chapter 5 for more on pull-ups).
The advantages of SPI are that it runs at a higher data rate, and it has separate inputand output connections, so it can send and receive at the same time. It uses one addi-tional line per device to select the active device, so more connections are required ifyou have many devices to connect.
Most Arduino projects use SPI devices for high data rate applications such as Ethernetand memory cards, with just a single device attached. I2C is more typically used withsensors that don’t need to send a lot of data.
This chapter shows how to use I2C and SPI to connect to common devices. It alsoshows how to connect two or more Arduino boards together using I2C for multiboardapplications.
389
www.it-ebooks.info

I2CThe two connections for the I2C bus are called SCL and SDA. These are available ona standard Arduino board using analog pin 5 for SCL, which provides a clock signal,and analog pin 4 for SDL, which is for transfer of data (on the Mega, use digital pin 20for SDA and pin 21 for SCL). One device on the I2C bus is considered the master device.Its job is to coordinate the transfer of information between the other devices (slaves) that are attached. There must be only one master, and in most cases the Arduino is themaster, controlling the other chips attached to it. Figure 13-1 depicts an I2C masterwith multiple I2C slaves.
Figure 13-1. An I2C master with one or more I2C slaves
I2C devices need a common ground to communicate. The Arduino Gndpin must be connected to ground on each I2C device.
Slave devices are identified by their address number. Each slave must have a uniqueaddress. Some I2C devices have a fixed address (an example is the nunchuck in Rec-ipe 13.2) while others allow you to configure their address by setting pins high or low(see Recipe 13.7) or by sending initialization commands.
Arduino uses 7-bit values to specify I2C addresses. Some device datasheets use 8-bit address values. If yours does, divide that value by 2 toget the correct 7-bit value.
I2C and SPI only define how communication takes place between devices—the mes-sages that need to be sent depend on each individual device and what it does. You willneed to consult the data sheet for your device to determine what commands are requiredto get it to function, and what data is required, or returned.
390 | Chapter 13: Communicating Using I2C and SPI
www.it-ebooks.info

The Arduino Wire library hides all the low-level functionality for I2C and enables sim-ple commands to be used to initialize and communicate with devices. Recipe 13.1provides a basic introduction to the library and its use.
SPIRecent Arduino releases (from release 0019) include a library that allows communica-tion with SPI devices. SPI has separate input (labeled “MOSI”) and output (labeled“MISO”) lines and a clock line. These three lines are connected to the respective lineson one or more slaves. Slaves are identified by signaling with the Slave Select (SS) line.Figure 13-2 shows the SPI connections.
Figure 13-2. Signal connections for SPI master and slaves
The pin numbers to use for the SPI pins are shown in Table 13-1.
Table 13-1. Arduino digital pins used for SPI
SPI signal Standard Arduino board Arduino Mega
SCLK (clock) 13 52
MISO (data out) 12 50
MOSI (data in) 11 51
SS (slave select) 10 53
See AlsoApplications note comparing I2C to SPI: http://www.maxim-ic.com/app-notes/index.mvp/id/4024
Arduino Wire library reference: http://www.arduino.cc/en/Reference/Wire
Arduino SPI library reference: http://www.arduino.cc/playground/Code/Spi
13.0 Introduction | 391
www.it-ebooks.info

13.1 Controlling an RGB LED Using the BlinkM ModuleProblemYou want to control I2C-enabled LEDs such as the BlinkM module.
SolutionBlinkM is a preassembled color LED module that gets you started with I2C with min-imal fuss.
Insert the BlinkM pins onto analog pins 2 through 5, as shown in Figure 13-3.
Figure 13-3. BlinkM module plugged into analog pins
The following sketch is based on Recipe 7.4, but instead of directly controlling thevoltage on the red, green, and blue LED elements, I2C commands are sent to the BlinkMmodule with instructions to produce a color based on the red, green, and blue levels.The hueToRGB function is the same as what we used in Recipe 7.4 and is not repeatedhere, so copy the function into the bottom of your sketch before compiling (this book’swebsite has the complete sketch):
/* * BlinkM sketch * This sketch continuously fades through the color wheel */
#include <Wire.h>
const int address = 0; //Default I2C address for BlinkM
392 | Chapter 13: Communicating Using I2C and SPI
www.it-ebooks.info

int color = 0; // a value from 0 to 255 representing the huebyte R, G, B; // the Red, Green, and Blue color components
void setup(){ Wire.begin(); // set up Arduino I2C support
// turn on power pins for BlinkM pinMode(17, OUTPUT); // pin 17 (analog out 4) provides +5V to BlinkM digitalWrite(17, HIGH); pinMode(16, OUTPUT); // pin 16 (analog out 3) provides Ground digitalWrite(16, LOW);}
void loop(){ int brightness = 255; // 255 is maximum brightness hueToRGB( color, brightness); // call function to convert hue to RGB // write the RGB values to BlinkM
Wire.beginTransmission(address);// join I2C, talk to BlinkM Wire.send('c'); // 'c' == fade to color Wire.send(R); // value for red channel Wire.send(B); // value for blue channel Wire.send(G); // value for green channel Wire.endTransmission(); // leave I2C bus
color++; // increment the color if(color > 255) // color = 0; delay(10);}
The following sketch uses a function named hueToRGB that was introduced in Chap-ter 7 to convert an integer value into its red, green, and blue components:
// function to convert a color to its Red, Green, and Blue components.void hueToRGB( int hue, int brightness){ unsigned int scaledHue = (hue * 6); unsigned int segment = scaledHue / 256; // segment 0 to 5 around color wheel unsigned int segmentOffset = scaledHue - (segment * 256); // position withinthe segment
unsigned int complement = 0; unsigned int prev = (brightness * ( 255 - segmentOffset)) / 256; unsigned int next = (brightness * segmentOffset) / 256;
switch(segment ) { case 0: // red R = brightness; G = next; B = complement; break;
13.1 Controlling an RGB LED Using the BlinkM Module | 393
www.it-ebooks.info

case 1: // yellow R = prev; G = brightness; B = complement; break; case 2: // green R = complement; G = brightness; B = next; break; case 3: // cyan R = complement; G = prev; B = brightness; break; case 4: // blue R = next; G = complement; B = brightness; break; case 5: // magenta default: R = brightness; G = complement; B = prev; break; }}
DiscussionThe Wire library is added to the sketch using the following:
#include <Wire.h>
For more details about using libraries, see Chapter 16.
The code in setup initializes the Wire library and the hardware in the Arduino to driveSCA and SDL on analog pins 4 and 5 and turns on the pins used to power the BlinkMmodule.
The loop code calls the function hueToRGB to calculate the red, green, and blue valuesfor the color.
The R, G, and B values are sent to BlinkM using this sequence:
Wire.beginTransmission(address); // start an I2C message to the BlinkM addressWire.send('c'); // 'c' is a command to fade to the color that followsWire.send(R); // value for redWire.send(B); // value for blueWire.send(G); // value for greenWire.endTransmission(); // complete the I2C message
All data transmission to I2C devices follows this pattern: beginTransmission, a numberof send messages, and endTransmission.
394 | Chapter 13: Communicating Using I2C and SPI
www.it-ebooks.info

I2C supports up to 127 devices connected to the clock and data pins, and the addressdetermines which device will respond. The default address for BlinkM is 0, but this canbe altered by sending a command to change the address—see the BlinkM user manualfor information on all commands.
To connect multiple BlinkMs, connect all the clock pins (marked “c” on BlinkM, analogpin 5 on Arduino) and all the data pins (marked “d” on BlinkM, analog pin 4 on Ar-duino), as shown in Figure 13-4. The power pins should be connected to +5V and Gndon Arduino or an external power source, as the analog pins cannot provide enoughcurrent for more than a couple of modules.
Figure 13-4. Multiple BlinkM modules connected together
Each BlinkM can draw up to 60 mA, so if you’re using more than ahandful, they should be powered using an external supply.
You need to set each BlinkM to a different I2C address, and you can use the BlinkM-Tester sketch that comes with the BlinkM examples downloadable from http://thingm.com/fileadmin/thingm/downloads/BlinkM_Examples.zip.
Compile and upload the BlinkMTester sketch. Plug each BlinkM module into Arduinoone at a time (switch off power when connecting and disconnecting the modules). Usethe BlinkMTester scan command, s, to display the current address, and use the A com-mand to set each module to a different address.
13.1 Controlling an RGB LED Using the BlinkM Module | 395
www.it-ebooks.info

BlinkMTester uses 19,200 baud, so you may need to set the baud ratein the Serial Monitor to this speed to get a readable display.
After all the BlinkMs have a unique address, you can set the address variable in thepreceding sketch to the address of the BlinkM you want to control. This example as-sumes addresses from 9 to 11:
#include <Wire.h>
int addressA = 9; //I2C address for BlinkMint addressB = 10;int addressC = 11;
int color = 0; // a value from 0 to 255 representing the huebyte R, G, B; // the red, green, and blue color components
void setup(){ Wire.begin(); // set up Arduino I2C support
// turn on power pins for BlinkM pinMode(17, OUTPUT); // pin 17 (analog out 4) provides +5V to BlinkM digitalWrite(17, HIGH); pinMode(16, OUTPUT); // pin 16 (analog out 3) provides Ground digitalWrite(16, LOW);}
void loop(){ int brightness = 255; // 255 is maximum brightness hueToRGB( color, brightness); // call function to convert hue to RGB // write the RGB values to each BlinkM setColor(addressA, R,G,B); setColor(addressB, G,B,R); setColor(addressA, B,R,G);
color++; // increment the color if(color > 255) // ensure valid value color = 0; delay(10);}
void setColor(int address, byte R, byte G, byte B){ Wire.beginTransmission(address);// join I2C, talk to BlinkM Wire.send('c'); // 'c' == fade to color Wire.send(R); // value for red channel Wire.send(B); // value for blue channel Wire.send(G); // value for green channel Wire.endTransmission(); // leave I2C bus}
396 | Chapter 13: Communicating Using I2C and SPI
www.it-ebooks.info

The setColor function writes the given RGB values to the BlinkM at the given address.
The code uses the hueToRGB function from earlier in this recipe to convert an integervalue into its red, green, and blue components.
See AlsoThe BlinkM User Manual: http://thingm.com/fileadmin/thingm/downloads/BlinkM_datasheet.pdf
Example Arduino sketches: http://thingm.com/fileadmin/thingm/downloads/BlinkM_Examples.zip
13.2 Using the Wii Nunchuck AccelerometerProblemYou want to connect a Wii nunchuck to your Arduino as an inexpensive way to useaccelerometers. The nunchuck is a popular low-cost game device that can be used toindicate the orientation of the device by measuring the effects of gravity.
SolutionThe nunchuck uses a proprietary plug. If you don’t want to use your nunchuck withyour Wii again, you can cut the lead to connect it. Alternatively, it is possible to use asmall piece of matrix board to make the connections in the plug if you are careful (thepinouts are shown in Figure 13-5) or you can buy an adapter made by Todbot (http://todbot.com/blog/2008/02/18/wiichuck-wii-nunchuck-adapter-available/).
Figure 13-5. Connecting a nunchuck to Arduino
13.2 Using the Wii Nunchuck Accelerometer | 397
www.it-ebooks.info

The library supporting the nunchuck functions is available from http://todbot.com/blog/2008/02/18/wiichuck-wii-nunchuck-adapter-available/:
/* * nunchuck_lines sketch * sends data to Processing to draw line that follows nunchuk movement */
#include <Wire.h> // initialize wire#include "nunchuck_funcs.h"
byte accx;
void setup(){ Serial.begin(9600); nunchuck_setpowerpins(); nunchuck_init();}
void loop(){ nunchuck_get_data(); accx = nunchuck_accelx(); if( accx >= 75 && accx <= 185) { // map returns a value from 0 to 63 for values from 75 to 185 byte y = map(accx, 75, 185, 0, 63); Serial.print(y); } delay(100); // the time in milliseconds between redraws}
DiscussionI2C is often used in commercial products such as the nunchuck for communicationbetween devices. There are no official data sheets for this device, but the nunchucksignaling was analyzed (reverse engineered) to determine the commands needed tocommunicate with it.
You can use the following Processing sketch to display a line that follows the nunchuckmovement, as shown in Figure 13-6 (see Chapter 4 for more on using Processing toreceive Arduino serial data; also see Chapter 4 for advice on setting up and using Pro-cessing with Arduino):
// Processing sketch to draw line that follows nunchuck dataimport processing.serial.*;
Serial myPort; // Create object from Serial classpublic static final short portIndex = 1;
void setup(){
398 | Chapter 13: Communicating Using I2C and SPI
www.it-ebooks.info

size(200, 200); // Open whatever port is the one you're using - See Chapter 4 myPort = new Serial(this,Serial.list()[portIndex], 9600);}
void draw(){ if ( myPort.available() > 0) { // If data is available, int y = myPort.read(); // read it and store it in val background(255); // Set background to white line(0,63-y,127,y); // draw the line }}
Figure 13-6. Nunchuck movement represented by tilted line in Processing
The sketch includes the Wire library for I2C communication and the nunchuck_funcscode from the earlier link:
#include <Wire.h> // initialize wire#include "nunchuck_funcs.h"
Wire.h is the I2C library that is included with the Arduino release.
nunchuck_funcs.h is the name of the library for communicating with the nunchuckusing I2C.
The library hides the I2C interface, but here is an overview of how this library uses I2C:The nunchuck_setpowerpins function is used to provide power through analog pins 2and 3. This is only needed if the nunchuck adapter is providing the power source. Thecode sets these pins as outputs, with pin 2 LOW and pin 3 HIGH. Using digital pins as apower source is not usually recommended, unless you are certain, as with the nun-chuck, that the device being powered will not exceed a pin’s maximum current capa-bility (40 mA; see Chapter 5).
13.2 Using the Wii Nunchuck Accelerometer | 399
www.it-ebooks.info

nunchuck_init establishes I2C communication with the nunchuck; here is the code forthis function:
// initialize the I2C system, join the I2C bus,// and tell the nunchuck we're talking to itstatic void nunchuck_init(){ Wire.begin(); // join I2C bus as master Wire.beginTransmission(0x52);// transmit to device 0x52 Wire.send(0x40); // sends memory address Wire.send(0x00); // sends a zero. Wire.endTransmission();}
I2C communication starts with Wire.begin(). In this example, Arduino as the masteris responsible for initializing the desired slave device, the nunchuck, on address 0x52.
The following line tells the Wire library to prepare to send a message to the device athexadecimal address 52 (0x52):
beginTransmission(0x52);
I2C documentation typically has addresses shown using theirhexadecimal values, so it’s convenient to use this notation in yoursketch.
Wire.send puts the given values into a buffer within the Wire library where data is storeduntil Wire.endTransmission is called to actually do the sending.
nunchuck_get_data is used to receive data from the nunchuck:
// returns 1 on successful read. returns 0 on failureint nunchuck_get_data(){ int cnt=0; Wire.requestFrom (0x52, 6);// request data from nunchuck while (Wire.available ()) { // receive byte as an integer nunchuck_buf[cnt] = nunchuck_decode_byte(Wire.receive()); cnt++; } nunchuck_send_request(); // send request for next data payload // If we received the 6 bytes, then go print them if (cnt >= 5) { return 1; // success } return 0; //failure}
This uses the Wire library requestFrom function to get six bytes of data from device0x52 (the nunchuck).
400 | Chapter 13: Communicating Using I2C and SPI
www.it-ebooks.info

The nunchuck returns its data using six bytes as follows:
Byte number Description
Byte 1 X-axis analog joystick value
Byte 2 Y-axis analog joystick value
Byte 3 X-axis acceleration value
Byte 4 Y-axis acceleration value
Byte 5 Z-axis acceleration value
Byte 6 Button states and least significant bits of acceleration
Wire.available works like Serial.available (see Chapter 4) to indicate how manybytes have been received, but over the I2C interface rather than the serial interface.If data is available, it is read using Wire.receive and then decoded usingnunchuck_decode_byte. Decoding is required to convert the values sent into numbersthat are usable by your sketch, and these are stored in a buffer (named nunchuck_buf).A request is sent for the next six bytes of data so that it will be ready and waiting forthe next call to get data:
accx = nunchuck_accelx();
The function nunchuck_accelx is used to get the value of acceleration in the x-axis fromthe nunchuck and store it in the variable accx.
13.3 Interfacing to an External Real-Time ClockProblemYou want to use the time of day provided by an external real-time clock (RTC).
SolutionThis solution uses the Wire library to access an RTC. It uses the same hardware as inRecipe 12.6. Figure 13-7 shows the connections:
/* * I2C_RTC sketch * example code for using Wire library to access real-time clock * */
#include <Wire.h>
const byte DS1307_CTRL_ID = 0x68; // address of the DS1307 real-time clockconst byte NumberOfFields = 7; // the number of fields (bytes) to request fromthe RTC
13.3 Interfacing to an External Real-Time Clock | 401
www.it-ebooks.info

int Second ;int Minute;int Hour;int Day;int Wday;int Month;int Year;
void setup() { Serial.begin(9600); Wire.begin();}
void loop(){ Wire.beginTransmission(DS1307_CTRL_ID); Wire.send(0x00); Wire.endTransmission();
// request the 7 data fields (secs, min, hr, dow, date, mth, yr) Wire.requestFrom(DS1307_CTRL_ID, NumberOfFields);
Second = bcd2dec(Wire.receive() & 0x7f); Minute = bcd2dec(Wire.receive() ); Hour = bcd2dec(Wire.receive() & 0x3f); // mask assumes 24hr clock Wday = bcd2dec(Wire.receive() ); Day = bcd2dec(Wire.receive() ); Month = bcd2dec(Wire.receive() ); Year = bcd2dec(Wire.receive() ); Year = Year + 2000; // RTC year 0 is year 2000
digitalClockDisplay(); // display the time delay(1000);}
// Convert Binary Coded Decimal (BCD) to Decimalbyte bcd2dec(byte num){ return ((num/16 * 10) + (num % 16));}
void digitalClockDisplay(){ // digital clock display of the time Serial.print(Hour); printDigits(Minute); printDigits(Second); Serial.print(" "); Serial.print(Day); Serial.print(" "); Serial.print(Month); Serial.print(" "); Serial.print(Year); Serial.println();
402 | Chapter 13: Communicating Using I2C and SPI
www.it-ebooks.info

}
// utility function for clock display: prints preceding colon and leading 0void printDigits(int digits){ Serial.print(":"); if(digits < 10) Serial.print('0'); Serial.print(digits);}
Figure 13-7. Connecting a real-time clock
DiscussionAlthough this recipe uses the same hardware as in Recipe 12.6, it accesses the hardwarethrough explicit I2C calls, instead of through a library, so that the interaction betweenArduino and the I2C clock can be clearly seen.
The following line initializes the RTC:
Wire.beginTransmission(DS1307_CTRL_ID); Wire.send(0x00); Wire.endTransmission();
The requestFrom method of the Wire library is used to request seven time fields fromthe clock (DS1307_CTRL_ID is the address identifier of the clock):
Wire.requestFrom(DS1307_CTRL_ID, NumberOfFields);
The date and time values are obtained by making seven calls to the Wire.receivemethod:
bcd2dec(Wire.receive()
13.3 Interfacing to an External Real-Time Clock | 403
www.it-ebooks.info

The values returned by the module are Binary Coded Decimal (BCD) values, so thefunction bcd2dec is used to convert each value as it is received. (BCD is a method forstoring decimal values in four bits of data.)
See AlsoRecipe 12.6 provides details on how to set the time on the clock.
13.4 Adding External EEPROM MemoryProblemYou need more permanent data storage than Arduino has onboard, and you want touse an external memory chip to increase the capacity.
SolutionThis recipe uses the 24LC128 I2C-enabled serial EEPROM from Microchip. Fig-ure 13-8 shows the connections.
Figure 13-8. I2C EEPROM connections
This recipe provides functionality similar to the Arduino EEPROM library (see Rec-ipe 18.1), but it uses an external EEPROM connected using I2C to provide greatlyincreased storage capacity:
404 | Chapter 13: Communicating Using I2C and SPI
www.it-ebooks.info

/* * I2C EEPROM sketch * this version for 24LC128 */#include <Wire.h>
const byte EEPROM_ID = 0x50; // I2C address for 24LC128 EEPROM
// first visible ASCII character '!' is number 33:int thisByte = 33;
void setup(){ Serial.begin(9600); Wire.begin();
Serial.println("Writing 1024 bytes to EEPROM"); for(int i=0; i < 1024; i++) { I2CEEPROM_Write(i, thisByte); // go on to the next character thisByte++; if(thisByte == 126) // you could also use if (thisByte == '~') thisByte = 33; // start over }
Serial.println("Reading 1024 bytes from EEPROM"); int thisByte = 33; for(int i=0; i < 1024; i++) { char c = I2CEEPROM_Read(i); if( c != thisByte) { Serial.println("read error"); break; } else { Serial.print(c); } thisByte++; if(thisByte == 126) { Serial.println(); thisByte = 33; // start over on a new line } } Serial.println();}
void loop(){
}
13.4 Adding External EEPROM Memory | 405
www.it-ebooks.info

// This function is similar to EEPROM.write()void I2CEEPROM_Write( unsigned int address, byte data ){ Wire.beginTransmission(EEPROM_ID); Wire.send((int)highByte(address) ); Wire.send((int)lowByte(address) ); Wire.send(data); Wire.endTransmission(); delay(5); // wait for the I2C EEPROM to complete the write cycle}
// This function is similar to EEPROM.read()byte I2CEEPROM_Read(unsigned int address ){ byte data; Wire.beginTransmission(EEPROM_ID); Wire.send((int)highByte(address) ); Wire.send((int)lowByte(address) ); Wire.endTransmission(); Wire.requestFrom(EEPROM_ID,(byte)1); while(Wire.available() == 0) // wait for data ; data = Wire.receive(); return data;}
DiscussionThis recipe shows the 24LC128, which has 128K of memory; although there are similarchips with higher and lower capacities (the microchip link in this recipe’s See Alsosection has a cross-reference). The chip’s address is set using the three pins marked“A0” through “A2” and is in the range 0x50 to 0x57, as shown in Table 13-2.
Table 13-2. Address values for 24LC128
A0 A1 A2 Address
Gnd Gnd Gnd 0x50
+5V Gnd Gnd 0x51
Gnd +5V Gnd 0x52
+5V +5V Gnd 0x53
Gnd Gnd +5V 0x54
+5V Gnd +5V 0x55
+5V +5V Gnd 0x56
+5V +5V +5V 0x57
Use of the Wire library in this recipe is similar to its use in Recipes 13.1 and 13.2, soread through those for an explanation of the code that initializes and requests data froman I2C device.
406 | Chapter 13: Communicating Using I2C and SPI
www.it-ebooks.info

The write and read operations that are specific to the EEPROM are contained in thefunctions i2cEEPROM_Write and i2cEEPROM_Read. These operations start with aWire.beginTransmission to the device’s I2C address. This is followed by a 2-byte valueindicating the memory location for the read or write operation. In the write function,the address is followed by the data to be written—in this example, one byte is writtento the memory location.
The read operation sends a memory location to the EEPROM followed byWire.requestFrom(EEPROM_ID,(byte)1);. This returns one byte of data from the memoryat the address just set.
If you need to speed up writes, you can replace the 5 ms delay with a status check todetermine if the EEPROM is ready to write a new byte. See the “Acknowledge Polling”technique described in Section 7 of the data sheet. You can also write data in pages of64 bytes rather than individually; details are in Section 6 of the data sheet.
The chip remembers the address it is given and will move to the next sequential addresseach time a read or write is performed. If you are reading more than a single byte, youcan set the start address and then perform multiple requests and receives.
The Wire library can read or write up to 32 bytes in a single request.Attempting to read or write more than this can result in bytes beingdiscarded.
The pin marked “WP” is for setting write protection. It is connected to ground in thecircuit here to enable the Arduino to write to memory. Connecting it to 5V preventsany writes from taking place. This could be used to write persistent data to memoryand then prevent it from being overwritten accidentally.
See AlsoThe 24LC128 data sheet: http://ww1.microchip.com/downloads/en/devicedoc/21191n.pdf
If you need to speed up writes, you can replace the 5 ms delay with a status check todetermine if the EEPROM is ready to write a new byte. See the “Acknowledge Polling”technique described in Section 7 of the data sheet.
A cross-reference of similar I2C EEPROMs with a wide range of capacities is availableat http://ww1.microchip.com/downloads/en/DeviceDoc/21621d.pdf.
A shield is available that combines reading temperature, storing in EEPROM, and 7-segment display: http://store.gravitech.us/7segmentshield.html
13.4 Adding External EEPROM Memory | 407
www.it-ebooks.info

13.5 Reading Temperature with a Digital ThermometerProblemYou want to measure temperature, perhaps using more than one device, so you cantake readings in different locations.
SolutionThis recipe uses the TMP75 temperature sensor from Texas Instruments. You connecta single TMP75 as shown in Figure 13-9:
/* * I2C_Temperature sketch * I2C access the TMP75 digital Thermometer * */
#include <Wire.h>
const byte TMP75_ID = 0x49; // address of the TMP75const byte NumberOfFields = 2; // the number of fields (bytes) to request
// high byte of temperature (this is the signed integer value in degrees c)char tempHighByte;// low byte of temperature (this is the fractional temperature) char tempLowByte;
float temperature; // this will hold the floating-point temperature
void setup() { Serial.begin(9600); Wire.begin();
Wire.beginTransmission(TMP75_ID); Wire.send(1); // 1 is the configuration register // set default configuration, see data sheet for significance of config bits Wire.send(0); Wire.endTransmission();
Wire.beginTransmission(TMP75_ID); Wire.send(0); // set pointer register to 0 (this is the 12-bit temperature) Wire.endTransmission();
}
void loop(){ Wire.requestFrom(TMP75_ID, NumberOfFields); tempHighByte = Wire.receive(); tempLowByte = Wire.receive(); Serial.print("Integer temperature is ");
408 | Chapter 13: Communicating Using I2C and SPI
www.it-ebooks.info

Serial.print(tempHighByte, DEC); Serial.print(",");
// least significant 4 bits of LowByte is the fractional temperature int t = word( tempHighByte, tempLowByte) / 16 ; temperature = t / 16.0; // convert the value to a float Serial.println(temperature); delay(1000);}
Figure 13-9. TMP75 I2C thermometer
DiscussionAs with all the I2C devices in this chapter, signaling is through the two-wire SCL andSDA pins. Power and ground need to be connected to the device, as well, to power it.
Setup sends data to configure the device for normal operation—there are a number ofoptions for specialized applications (interrupts, power down, etc.), but the value usedhere is for normal mode with a precision of .5°C.
To get the device to send the temperature, with the Arduino (as the master), the codein loop tells the slave (at the address given by the constant TMP75_ID) that it wants twobytes of data:
Wire.requestFrom(TMP75_ID, NumberOfFields);
13 5 Reading Temperature with a Digital Thermometer | 409
www.it-ebooks.info

Wire.receive gets the two bytes of information (the data sheet has more detail on howdata is requested from this device):
tempHighByte = Wire.receive();tempLowByte = Wire.receive();
The first byte is the integer value of the temperature in degrees Celsius. The secondbyte contains four significant bits indicating the fractional temperature.
The two bytes are converted to a 16-bit word (see Chapter 3) and then shifted by fourto form the 12-bit number. As the first four bits are the fractional temperature, the valueis again shifted by four to get the floating-point value.
The TNP75 can be configured for eight different addresses, allowing eight devices tobe connected to the same bus (see Figure 13-10). This sketch uses I2C address 0x48(the TMP75 address pins labeled “A”) connected to +5V, and A1 and A2 connected toGnd). Table 13-3 shows the connections for the eight addresses.
Figure 13-10. Multiple devices with SDA and SCL connected in parallel with different addresses
Table 13-3. Address values for TMP75
A0 A1 A2 Address
Gnd Gnd Gnd 0x48
+5V Gnd Gnd 0x49
Gnd +5V Gnd 0x4A
+5V +5V Gnd 0x4B
Gnd Gnd +5V 0x4C
+5V Gnd +5V 0x4D
+5V +5V Gnd 0x4E
+5V +5V +5V 0x4F
410 | Chapter 13: Communicating Using I2C and SPI
www.it-ebooks.info

When connecting more than one I2C device, you wire all the SDA lines together andall the SCL lines together. Each device connects to power and should have 0.1 bypasscapacitors. The Gnd lines must be connected together, even if the devices use separatepower supplies (e.g., batteries).
This sketch prints the temperature of two devices with consecutive addresses startingfrom 0x49:
#include <Wire.h>
const byte TMP75_ID = 0x49; // address of the first TMP75
const byte NumberOfFields = 2; // the number of fields (bytes) to requestconst byte NumberOfDevices = 2; // the number of TMP75 devices (with consecutiveaddresses)
char tempHighByte; // high byte of temperature (this is the signed integervalue in degrees c)char tempLowByte; // low byte of temperature (this is the fractionaltemperature)
float temperature; // this will hold the floating-point temperature
void setup() { Serial.begin(9600); Wire.begin();
for(int i=0; i < NumberOfDevices; i++) { Wire.beginTransmission(TMP75_ID+i); Wire.send(1); // set default configuration, see data sheet for significance of config bits Wire.send(0); Wire.endTransmission();
Wire.beginTransmission(TMP75_ID+i); Wire.send(0); // set pointer register to 0 (this is the 12-bit temperature) Wire.endTransmission(); }}
void loop(){ for(int i=0; i < NumberOfDevices; i++) { byte id = TMP75_ID + i; // address IDs are consecutive Wire.requestFrom(id, NumberOfFields); tempHighByte = Wire.receive(); tempLowByte = Wire.receive(); Serial.print(id,HEX); // print the device address Serial.print(": integer temperature is "); Serial.print(tempHighByte, DEC);
13 5 Reading Temperature with a Digital Thermometer | 411
www.it-ebooks.info

Serial.print(",");
// least significant 4 bits of LowByte is the fractional temperature int t = word( tempHighByte, tempLowByte) / 16 ; temperature = t / 16.0; // convert the value to a float Serial.println(temperature); } delay(1000);}
You can add more devices by changing the constant NumberOfDevices and wiring thedevices to use addresses that are consecutive, in this example starting from 0x49.
The Alert line (pin 3) can be programmed to provide a signal when thetemperature reaches a threshold. See the data sheet for details if youwant to use this feature.
See AlsoThe TMP75 data sheet: http://focus.ti.com/docs/prod/folders/print/tmp75.html
See Recipe 3.15 for more on the word function.
13.6 Driving Four 7-Segment LEDs Using Only Two WiresProblemYou want to use a multidigit, 7-segment display, and you need to minimize the numberof Arduino pins required for the connections.
SolutionThis recipe uses the Gravitech 7-segment display shield that has the SAA1064 I2C to7-segment driver from Philips (see Figure 13-11).
Figure 13-11. Gravitech I2C shield
412 | Chapter 13: Communicating Using I2C and SPI
www.it-ebooks.info

This simple sketch lights each segment in sequence on all the digits:
/* * I2C_7Segment sketch */
#include <Wire.h>
const byte LedDrive = 0x38; /* I2C address for 7-Segment */
int segment,decade;
void setup() { Serial.begin(9600); Wire.begin(); /* Join I2C bus */
Wire.beginTransmission(LedDrive); Wire.send(0); Wire.send(B01000111); // show digits 1 through 4, use maximum drive current Wire.endTransmission();}
void loop(){ for (segment = 0; segment < 8; segment++) { Wire.beginTransmission(LedDrive); Wire.send(1); for (decade = 0 ; decade < 4; decade++) { byte bitValue = bit(segment); Wire.send(bitValue); } Wire.endTransmission(); delay (250); }}
DiscussionThe SAA1064 chip (using address 0x38) is initialized in setup. The value used config-ures the chip to display four digits using maximum drive current (see the data sheetsection on control bits for configuration details).
The loop code lights each segment in sequence on all the digits. The Wire.send(1);command tells the chip that the next received byte will drive the first digit and subse-quent bytes will drive sequential digits.
Initially, a value of 1 is sent four times and the chip lights the “A” (top) segment on allfour digits. (See Chapter 2 for more on using the bit function.)
The value of segment is incremented in the for loop, and this shifts the bitValue to lightthe next LED segment in sequence.
13.6 Driving Four 7-Segment LEDs Using Only Two Wires | 413
www.it-ebooks.info

Each bit position corresponds to a segment of the digit. These bit position values canbe combined to create a number that will turn on more than one segment.
The following sketch will display a count from 0 to 9999. The array calledlookup[10] contains the values needed to create the numerals from 0 to 9 in a segment:
#include <Wire.h>
const byte LedDrive = 0x38; /* I2C address for 7-Segment */
// lookup array containing segments to light for each digitconst int lookup[10] = {0x3F,0x06,0x5B,0x4F,0x66,0x6D,0x7D,0x07,0x7F,0x6F};
int count;
void setup(){ Wire.begin(); // join I2C bus (address optional for master)// delay(500);}
void loop(){ Wire.beginTransmission(LedDrive); Wire.send(0); Wire.send(B01000111); // init the 7-segment driver - see data sheet Wire.endTransmission();
// show numbers from 0 to 9999 for (count = 0; count <= 9999; count++) { displayNumber(count); delay(10); }}
// function to display up to four digits on a 7-segment I2C displayvoid displayNumber( int number){ number = constrain(number, 0, 9999); Wire.beginTransmission(LedDrive); Wire.send(1); for(int i =0; i < 4; i++) { byte digit = number % 10; { Wire.send(lookup[digit]); } number = number / 10; } Wire.endTransmission();}
414 | Chapter 13: Communicating Using I2C and SPI
www.it-ebooks.info

The function displayNumber is given a number to be displayed. The value to be sent foreach segment in the for loop is handled in two steps. First, the digit is determined bytaking the remainder after dividing the number by 10. This value (a digit from 0 through9) is used to get the bit pattern from the lookup[] array to light the segments needed todisplay the digit.
Each successive digit is obtained by looking at the remainder after dividing the numberby 10. When the remainder becomes 0, all digits have been sent.
You can suppress leading zeros (unnecessary zeros in front of digits) by changing thedisplayNumber function as follows:
// function to display up to four digits on a 7-segment I2C displayvoid displayNumber( int number){ number = constrain(number, 0, 9999); Wire.beginTransmission(LedDrive); Wire.send(1); for(int i =0; i < 4; i++) { byte digit = number % 10; // this check will suppress leading zeros if(number == 0 && i > 0) { Wire.send(0); // this suppresses leading zeros, it turns off all segments } else { Wire.send(lookup[digit]); } number = number / 10; } Wire.endTransmission();}
The following statement checks if the value is 0 and it’s not the first (least significant)digit:
if(number == 0 && i > 0)
If so, it sends a value of 0, which turns off all segments for that digit. This suppressesleading zeros, but it displays a single zero if the number passed to the function was 0.
See AlsoSAA1064 data sheet: http://www.nxp.com/documents/data_sheet/SAA1064_CNV.pdf
A shield is available that combines reading temperature, storing in EEPROM, and 7-segment display: http://store.gravitech.us/7segmentshield.html
13.6 Driving Four 7-Segment LEDs Using Only Two Wires | 415
www.it-ebooks.info

13.7 Integrating an I2C Port ExpanderProblemYou want to use more input/output ports than your board provides.
SolutionYou can use an external port expander, such as the PCF8574A, which has eight input/output pins that can be controlled using I2C. The sketch creates a bar graph with eightLEDs. Figure 13-12 shows the connections.
Figure 13-12. PCF8574A port expander driving eight LEDs
The sketch has the same functionality as described in Recipe 7.5, but it uses the I2Cport expander to drive the LEDs so that only two pins are required:
/* * I2C_7segment * Uses I2C port to drive a bar graph * Turns on a series of LEDs proportional to a value of an analog sensor. * see Recipe 7.5 */
#include <Wire.h>
//address for PCF8574 with pins connected as shown in Figure 13-12const int address = 0x38; const int NbrLEDs = 8;
416 | Chapter 13: Communicating Using I2C and SPI
www.it-ebooks.info

const int analogInPin = 0; // Analog input pin connected to the variableresistor
int sensorValue = 0; // value read from the sensorint ledLevel = 0; // sensor value converted into LED 'bars'int ledBits = 0; // bits for each LED will be set to 1 to turn on LED
void setup(){ Wire.begin(); // set up Arduino I2C support Serial.begin(9600);}
void loop() { sensorValue = analogRead(analogInPin); // read the analog in value ledLevel = map(sensorValue, 0, 1023, 0, NbrLEDs); // map to number of LEDs for (int led = 0; led < NbrLEDs; led++) { if (led < ledLevel ) { bitWrite(ledBits,led, HIGH); // turn on LED if less than the level } else { bitWrite(ledBits,led, LOW); // turn off LED if higher than the level } // send the value to I2C Wire.beginTransmission(address); Wire.send(ledBits); Wire.endTransmission(); } delay(100);}
DiscussionThe resistors should be 220 ohms or more (see Chapter 7 for information on selectingresistors).
The PCF8574A has a lower capacity for driving LEDs than Arduino. Ifyou need more capacity (refer to the data sheet for details) see Rec-ipe 13.8 for a more appropriate device.
You can change the address by changing the connections of the pins marked “A0”,“A1”, and “A2”, as shown in Table 13-4.
13.7 Integrating an I2C Port Expander | 417
www.it-ebooks.info

Table 13-4. Address values for PCF8574A
A0 A1 A2 Address
Gnd Gnd Gnd 0x38
+5V Gnd Gnd 0x39
Gnd +5V Gnd 0x3A
+5V +5V Gnd 0x3B
Gnd Gnd +5V 0x3C
+5V Gnd +5V 0x3D
+5V +5V Gnd 0x3E
+5V +5V +5V 0x3F
To use the port expander for input, read a byte from the expander as follows:
Wire.requestFrom(address, 1); if(Wire.available()) { data = Wire.receive(); Serial.println(data,BIN); }
See AlsoPCF8574 data sheet: http://www.nxp.com/documents/data_sheet/PCF8574.pdf
13.8 Driving Multidigit, 7-Segment Displays Using SPIProblemYou want to control 7-segment displays, but you don’t want to use many pins.
SolutionThis recipe provides similar functionality to Recipe 7.12, but it only requires threeoutput pins. The text here explains the SPI commands used to communicate with theMAX7221 device. Figure 13-13 shows the connections:
* SPI_Max7221_0019 */
#include <SPI.h>
const int slaveSelect = 10; //pin used to enable the active slave
418 | Chapter 13: Communicating Using I2C and SPI
www.it-ebooks.info

const int numberOfDigits = 2; // change to match the number of digits wired upconst int maxCount = 99;
int count = 0;
void setup(){ SPI.begin(); // initialize SPI pinMode(slaveSelect, OUTPUT); digitalWrite(slaveSelect,LOW); //select slave // prepare the 7221 to display 7-segment data - see data sheet sendCommand(12,1); // normal mode (default is shutdown mode); sendCommand(15,0); // Display test off sendCommand(10,8); // set medium intensity (range is 0-15) sendCommand(11,numberOfDigits); // 7221 digit scan limit command sendCommand(9,255); // decode command, use standard 7-segment digits digitalWrite(slaveSelect,HIGH); //deselect slave}
void loop(){ displayNumber(count); count = count + 1; if( count > maxCount) count = 0; delay(100);}
// function to display up to four digits on a 7-segment displayvoid displayNumber( int number){ for(int i = 0; i < numberOfDigits; i++) { byte character = number % 10; // get the value of the rightmost decade // send digit number as command, first digit is command 1 sendCommand(numberOfDigits-i, character); number = number / 10; }}
void sendCommand( int command, int value){ digitalWrite(slaveSelect,LOW); //chip select is active low //2 byte data transfer to the 7221 SPI.transfer(command); SPI.transfer(value); digitalWrite(slaveSelect,HIGH); //release chip, signal end transfer}
13.8 Driving Multidigit, 7-Segment Displays Using SPI | 419
www.it-ebooks.info

Figure 13-13. Connections for MAX7221 with Lite-On LTD-6440G
DiscussionThe MAX7221 needs a common cathode LED. The pinouts in Figure 13-13 are for aLite-On LTD-6440G (Jameco 2005366). This is a two-digit, 7-segment LED and thecorresponding segments for each digit must be connected together. For example, thedecimal point is on pin 4 for digit 1 and pin 9 for digit 2. The figure indicates that pins4 and 9 are connected together and wired to the MAX7221 pin 22.
The MAX7221 can display up to eight digits (or an 8x8 matrix) and is controlled bysending commands that determine which LED segment is lit.
After initializing the library, the SPI code is contained within the sendCommand function.Because SPI uses the select slave wire connected to the chip, the chip is selected bysetting that pin LOW. All SPI commands are then received by that chip until it is set HIGH.SPI.transfer is the library function for sending an SPI message. This consists of twoparts: a numerical code to specify which register should receive the message, followedby the actual data. The details for each SPI device can be found in the data sheet.
Setup initializes the 7221 by sending commands to wake up the chip (it starts up in alow-power mode), adjust the display intensity, set the number of digits, and enabledecoding for 7-segment displays. Each command consists of a command identifier (re-ferred to as a register in the data sheet) and a value for that command.
420 | Chapter 13: Communicating Using I2C and SPI
www.it-ebooks.info

For example, command (register) 10 is for intensity, so it sets medium intensity (theintensity range is from 0 to 15):
sendCommand(10,8); // set medium intensity (range is 0-15)
Command numbers 1 through 8 are used to control the digits. The following codewould light the segments to display the number 5 in the first (leftmost) digit. Note thatdigit numbers shown in the data sheet (and Figure 13-13) start from 0, so you mustremember that you control digit 0 with command 1, digit 1 with command 2, and so on:
sendCommand(1, 5); // display 5 on the first digit
You can suppress leading zeros by adding two lines of code in displayNumber that send0xf to the 7221 to blank the segments if the residual value is 0:
void displayNumber( int number){ for(int i = 0; i < numberOfDigits; i++) { byte character = number % 10;
The next two lines are added to suppress leading zeros:
if(number == 0 && i > 0) character = 0xf; // value to blank the 7221 segments sendCommand(numberOfDigits-i, character); number = number / 10; }}
13.9 Communicating Between Two or More Arduino BoardsProblemYou want to have two or more Arduino boards working together. You may want toincrease the I/O capability or perform more processing than can be achieved on a singleboard. You can use I2C to pass data between boards so that they can share theworkload.
SolutionThe two sketches in this recipe show how I2C can be used as a communications linkbetween two or more Arduino boards. Figure 13-14 shows the connections.
13.9 Communicating Between Two or More Arduino Boards | 421
www.it-ebooks.info

Figure 13-14. Arduino as I2C master and slave
The master sends characters received on the serial port to an Arduino slave using I2C:
/* * I2C_Master * Echo Serial data to an I2C slave */
#include <Wire.h>
const int address = 4; //the address to be used by the communicating devices
void setup(){ Wire.begin();}
void loop(){char c;
if(Serial.available() > 0 ) { // send the data Wire.beginTransmission(address); // transmit to device Wire.send(c); Wire.endTransmission(); }}
The slave prints characters received over I2C to its serial port:
/* * I2C_Slave * monitors I2C requests and echoes these to the serial port * */
422 | Chapter 13: Communicating Using I2C and SPI
www.it-ebooks.info

#include <Wire.h>
const int address = 4; //the address to be used by the communicating devices
void setup(){ Wire.begin(address); // join I2C bus using this address Wire.onReceive(receiveEvent); // register event to handle requests}
void loop(){ // nothing here, all the work is done in receiveEvent}
void receiveEvent(int howMany){ while(Wire.available() > 0) { char c = Wire.receive(); // receive byte as a character Serial.print(c); // echo }}
DiscussionThis chapter focused on Arduino as the I2C master accessing various I2C slaves. Herea second Arduino acts as an I2C slave that responds to requests from another Arduino.Techniques covered in Chapter 4 for sending bytes of data can be applied here. TheWire library does not have a print method, but it’s not difficult to add this.
The following sketch creates an object named I2CDebug that sends its output over I2C.Using this with the I2C slave sketch shown previously enables you to print data on themaster without using the serial port (the slave’s serial port is used to display the output):
/* * I2C_Master * Sends serial data to an I2C slave */
#include <Wire.h>
const int address = 4; //the address to be used by the communicating devicesconst int sensorPin = 0; // select the analog input pin for the sensorint val; // variable to store the sensor value
class I2CDebugClass : public Print{ private: int I2CAddress; byte count; void write(byte c);
13.9 Communicating Between Two or More Arduino Boards | 423
www.it-ebooks.info

public: I2CDebugClass(); boolean begin(int id);};
I2CDebugClass::I2CDebugClass() { } boolean I2CDebugClass::begin(int id) { I2CAddress = id; // save the slave's address Wire.begin(); // join I2C bus (address optional for master) return true; }
void I2CDebugClass::write(byte c) { if( count == 0) { // here if the first char in the transmission Wire.beginTransmission(I2CAddress); // transmit to device } Wire.send(c); // if the I2C buffer is full or an end of line is reached, send the data // BUFFER_LENGTH is defined in the Wire library if(++count >= BUFFER_LENGTH || c == '\n') { // send data if buffer full or newline character Wire.endTransmission(); count = 0; } }
I2CDebugClass I2CDebug; // the I2C print object
void setup(){ Wire.begin(); Serial.begin(9600);}
void loop(){ val = analogRead(sensorPin); // read the voltage on the pot (val rangesfrom 0 to 1023) Serial.println(val); I2CDebug.println(val);}
See AlsoChapter 4 has more information on using the Arduino print functionality.
424 | Chapter 13: Communicating Using I2C and SPI
www.it-ebooks.info

CHAPTER 14
Wireless Communication
14.0 IntroductionArduino’s ability to interact with the world is fantastic, but sometimes you might wantto communicate with your Arduino from a distance, without wires, and without theoverhead of a full TCP/IP network connection. This chapter begins with a recipe forsimple wireless modules for applications where low cost is the primary requirement,but most of the recipes focus on the versatile XBee wireless modules.
XBee provides flexible wireless capability to the Arduino, but that very flexibility canbe confusing. This chapter provides examples ranging from simple “wireless serial portreplacements” through to mesh networks connecting multiple boards to multiplesensors.
A number of different XBee modules are available. The most popular are the XBee802.15.4 (also known as XBee Series 1) and XBee ZB Series 2. Series 1 is easier to usethan Series 2, but it does not support mesh networks. See http://www.digi.com/support/kbase/kbaseresultdetl.jsp?id=2213.
14.1 Sending Messages Using Low-Cost Wireless ModulesProblemYou want to transmit data between two Arduino boards using simple, low-cost wirelessmodules.
SolutionThis recipe uses simple transmit and receive modules such as the SparkFunWRL-08946 and WRL-08770.
Wire the transmitter as shown in Figure 14-1 and the receiver as in Figure 14-2.
425
www.it-ebooks.info

Figure 14-2. Simple wireless receiver using VirtualWire
Figure 14-1. Simple wireless transmitter using VirtualWire
426 | Chapter 14: Wireless Communication
www.it-ebooks.info

The transmit sketch sends a simple text message to the receive sketch, which echoesthe text to the Serial Monitor. The transmit and receive sketches use the VirtualWirelibrary written by Mike McCauley to provide the interface to the wireless hardware.The library can be downloaded from http://www.open.com.au/mikem/arduino/VirtualWire-1.5.zip:
/* SimpleSend This sketch transmits a short text message using the VirtualWire library connect the Transmitter data pin to Arduino pin 12*/
#include <VirtualWire.h>
void setup(){ // Initialize the IO and ISR vw_setup(2000); // Bits per sec}
void loop(){ send("hello"); delay(1000);}
void send (char *message){ vw_send((uint8_t *)message, strlen(message)); vw_wait_tx(); // Wait until the whole message is gone}
The receive sketch also uses the VirtualWire library:
/* SimpleReceive This sketch displays text strings received using VirtualWire Connect the Receiver data pin to Arduino pin 11*/#include <VirtualWire.h>
byte message[VW_MAX_MESSAGE_LEN]; // a buffer to hold the incoming messagesbyte msgLength = VW_MAX_MESSAGE_LEN; // the size of the message
void setup(){ Serial.begin(9600); Serial.println("Ready");
// Initialize the IO and ISR vw_setup(2000); // Bits per sec vw_rx_start(); // Start the receiver}
14.1 Sending Messages Using Low-Cost Wireless Modules | 427
www.it-ebooks.info

void loop(){ if (vw_get_message(message, &msgLength)) // Non-blocking { Serial.print("Got: "); for (int i = 0; i < msgLength; i++) { Serial.write(message[i]); } Serial.println(); }}
DiscussionThe VirtualWire library defaults to pin 12 for transmit and pin 11 for receive, but seethe documentation link at the end of this recipe if you want to use different pins.Setup initializes the library. The loop code simply calls a send function that calls thelibrary vw_send and waits for the message to be transmitted.
The receive side initializes the library receive logic and then waits in loop for the mes-sage. vw_get_message will return true if a message is available, and if so, each characterin the message is printed to the Serial Monitor.
The VirtualWire library handles the assembly of multiple bytes into packets, so sendingbinary data consists of passing the address of the data and the number of bytes to send.
The sending sketch that follows is similar to the transmit sketch in this recipe’s Solution,but it fills the message buffer with binary values from reading the analog input portsusing analogRead. The size of the buffer is the number of integers to be sent multipliedby the number of bytes in an integer (the six analog integer values take 12 bytes becauseeach int is two bytes):
/* SendBinary Sends digital and analog pin values as binary data using VirtualWire library See SendBinary in Chapter 4*/
#include <VirtualWire.h>
const int numberOfAnalogPins = 6; // how many analog pins to read
int data[numberOfAnalogPins]; // the data buffer
const int dataBytes = numberOfAnalogPins * sizeof(int); // the number of bytesin the data buffer
void setup(){ // Initialize the IO and ISR vw_setup(2000); // Bits per sec}
428 | Chapter 14: Wireless Communication
www.it-ebooks.info

void loop(){ int values = 0; for(int i=0; i <= numberOfAnalogPins; i++) { // read the analog ports data[i] = analogRead(i); // store the values into the data buffer } send((byte*)data, dataBytes); delay(1000); //send every second}
void send (byte *data, int nbrOfBytes){ vw_send(data, nbrOfBytes); vw_wait_tx(); // Wait until the whole message is gone}
The sizeof operator is used to determine the number of bytes in an int.
The receive side waits for messages, checks that they are the expected length, and con-verts the buffer back into the six integer values for display on the Serial Monitor:
/* ReceiveBinary This sketch receives six integer values as binary data Connect the Receiver data pin to Arduino pin 11 */#include <VirtualWire.h>
/* SendBinary Sends digital and analog pin values as binary data using VirtualWire library See SendBinary in Chapter 4 */
#include <VirtualWire.h>
const int numberOfAnalogPins = 6; // how many analog integer values to receiveint data[numberOfAnalogPins]; // the data buffer
// the number of bytes in the data bufferconst int dataBytes = numberOfAnalogPins * sizeof(int);
byte msgLength = dataBytes;
void setup(){
14.1 Sending Messages Using Low-Cost Wireless Modules | 429
www.it-ebooks.info

Serial.begin(9600); Serial.println("Ready");
// Initialize the IO and ISR vw_set_ptt_inverted(true); // Required for DR3100 vw_setup(2000); // Bits per sec
vw_rx_start(); // Start the receiver}
void loop(){ if (vw_get_message((byte*)data, &msgLength)) // Non-blocking { Serial.println("Got: "); if(msgLength == dataBytes) { for (int i = 0; i < numberOfAnalogPins; i++) { Serial.print("pin "); Serial.print(i); Serial.print("="); Serial.println(data[i]); } } else { Serial.print("unexpected msg length of "); Serial.println(msgLength); } Serial.println(); }}
The Serial Monitor will display the analog values on the sending Arduino:
Got:pin 0=1023pin 1=100pin 2=227pin 3=303pin 4=331pin 5=358
Bear in mind that the maximum buffer size for VirtualWire is 30 bytes long (the con-stant VW_MAX_MESSAGE_LEN is defined in the library header file).
Wireless range can be up to 100 meters or so depending on supply voltage and antennaand is reduced if there are obstacles between the transmitter and the receiver.
Also note that the messages are not guaranteed to be delivered, and if you get out ofrange or there is excessive radio interference some messages could get lost. If you needa guaranteed wireless delivery mechanism, the ZigBee API used in recipes at the end ofthis chapter is a better choice, but these inexpensive modules work well for tasks such
430 | Chapter 14: Wireless Communication
www.it-ebooks.info

as displaying the status of Arduino sensors—each message contains the current sensorvalue to display and any lost messages get replaced by messages that follow.
See AlsoA technical document on the VirtualWire Library can be downloaded from http://www.open.com.au/mikem/arduino/VirtualWire.pdf.
Data sheets for the transmitter and receiver modules can be found at http://www.sparkfun.com/datasheets/Wireless/General/MO-SAWR.pdf and http://www.sparkfun.com/datasheets/Wireless/General/MO-RX3400.pdf.
14.2 Connecting Arduino to a ZigBee or 802.15.4 NetworkProblemYou’d like your Arduino to participate in a ZigBee or 802.15.4 network.
802.15.4 is an IEEE standard for low-power digital radios that are implemented inproducts such as the inexpensive XBee modules from Digi International. ZigBee is analliance of companies and also the name of a standard maintained by that alliance.ZigBee is based on IEEE 802.15.4 and is a superset of it. ZigBee is implemented in manyproducts, including certain XBee modules from Digi.
Only XBee modules that are listed as ZigBee-compatible, such as theXBee ZB modules, are guaranteed to be ZigBee-compliant. That beingsaid, you can use a subset of the features (IEEE 802.15.4) of ZigBee evenwith the older XBee Series 1 modules. In fact, all the recipes here willwork with the Series 1 modules.
Troubleshooting XBeeIf you have trouble getting your XBees to talk, make sure they both have the same typeof firmware (e.g., XB24-ZB under the Modem: XBEE setting shown in Figure 14-5),and that they are both running the most current version of the firmware (the Versionsetting shown in Figure 14-5). For a comprehensive set of XBee troubleshooting tips,see Robert Faludi’s “Common XBee Mistakes” at http://www.faludi.com/projects/common-xbee-mistakes/. For extensive details on working with XBees, see his book, BuildingWireless Sensor Networks, published by O’Reilly.
SolutionObtain two or more XBee modules, configure them to communicate with one another,and hook them up to at least one Arduino. You can connect the other XBee modulesto another Arduino, a computer, or an analog sensor (see Recipe 14.4).
14.2 Connecting Arduino to a ZigBee or 802.15.4 Network | 431
www.it-ebooks.info

If you connect the Arduino to the XBee and run this simple sketch, the Arduino willreply to any message it receives by simply echoing what the other XBee sends it:
/* XBeeEcho Reply with whatever you receive over the serial port */
void setup(){ Serial.begin(9600);}
void loop(){ while (Serial.available() ) { Serial.write(Serial.read()); // reply with whatever you receive }}
Figure 14-3 shows the connection between an Adafruit XBee Adapter and Arduino.Notice that the Arduino’s RX is connected to the XBee’s TX and vice versa.
Figure 14-3. Connecting an Arduino to an XBee using the Adafruit XBee Adapter
If you are using a different adapter that does not have an on-board volt-age regulator, it will be sending voltage directly into the XBee. If this isthe case, you must connect the 3V3 pin from the Arduino to the adapt-er’s power supply, or you risk burning out your XBee.
432 | Chapter 14: Wireless Communication
www.it-ebooks.info

With the XBees configured and connected to a computer and/or Arduino, you can sendmessages back and forth.
You must disconnect the Arduino from the XBee before you attempt toprogram the Arduino. This is because Arduino uses pins 0 and 1 forprogramming, and the signals will get crossed if anything else, such asan XBee, is connected to those pins.
DiscussionTo configure your XBees, plug them into an XBee adapter such as the Adafruit XBeeAdapter kit ($10; Maker Shed part number MKAD13, Adafruit 126) and use a USB-to-TTL serial adapter such as the TTL-232R ($20; Maker Shed TTL232R, Adafruit 70) toconnect the adapter to a computer.
You should purchase at least two adapters (and if needed, two cables),which will allow you to have two XBees connected to your computer atthe same time. These same adapters can be used to connect an XBee toan Arduino.
You could also use an all-in-one XBee USB adapter, such as the Parallax XBee USBAdapter ($20; Adafruit 247, Parallax 32400) or the SparkFun XBee Explorer USB ($25;SparkFun WRL-08687).
Figure 14-4 shows the Adafruit XBee Adapter and the SparkFun XBee Explorer USBwith Series 2 XBee modules connected.
Series 2 configuration
For the initial configuration of Series 2 XBees, you will need to plug your XBees into a Windows computer (the configuration utility is not available for Mac or Linux). Plugonly one into a USB port for now. The TTL-232R and Parallax XBee USB Adapter bothuse the same USB-to-serial driver as the Arduino itself, so you should not need to installan additional driver.
1. Open Device Manager (press Windows-R, type devmgmt.msc, and press Enter), ex-pand the Ports (COM & LPT) section, and take note of the number of the USBSerial Port the XBee you just plugged in is connected to. Exit Device Manager.
2. Run the X-CTU application (http://www.digi.com/support/productdetl.jsp?pid=3352), then select your serial port, and press Test/Query to ensure that X-CTUrecognizes your XBee. (If not, see the support document at http://www.digi.com/support/kbase/kbaseresultdetl.jsp?id=2103.)
3. Switch to the Modem Configuration tab, and click Read. X-CTU will determinewhich model of XBee you are using as well as the current configuration.
14.2 Connecting Arduino to a ZigBee or 802.15.4 Network | 433
www.it-ebooks.info

4. Under Function Set, choose ZIGBEE COORDINATOR AT (not API).
5. Click Show Defaults.
6. Change the PAN ID setting from 0 to 1234 (or any hexadecimal number you want,as long as you use the same PAN ID for all devices on the same network), as shownin Figure 14-5.
7. Click Write.
8. Click the Terminal tab.
Next, leave X-CTU running and leave that XBee plugged in. Plug your second XBeeinto a different serial port. Repeat the preceding steps (in step 2, you will be startingup a second copy of X-CTU), but instead of choosing ZIGBEE COORDINATOR ATin step 4, choose ZIGBEE ROUTER AT. On this XBee, you should also set ChannelVerification (JV) to 1 to make sure it will confirm that it’s on the right channel, whichmakes its connection to the coordinator more reliable.
If you have two computers running Windows, you can connect eachXBee into a separate computer.
With both XBees connected and two copies of X-CTU showing their Terminal tab, typeinto either Terminal window. You’ll see whatever you type into one XBee appear on
Figure 14-4. Two XBees, one connected to an Adafruit adapter and the other connected to a SparkFunadapter
434 | Chapter 14: Wireless Communication
www.it-ebooks.info

the Terminal of the other one. You’ve set up your first simple XBee Personal AreaNetwork (PAN).
Series 1 configuration
For Series 1 XBees, you can use a Mac or a PC running Linux or Windows. However,if you wish to update the firmware on the XBees, you will need to use the X-CTU utilitydescribed in “Series 2 configuration” on page 433.
Using a serial terminal program such as CoolTerm or PuTTY, connect to the XBee’sUSB serial port at 9,600 bits per second.
Figure 14-5. Configuring the XBee
14.2 Connecting Arduino to a ZigBee or 802.15.4 Network | 435
www.it-ebooks.info

You can download CoolTerm for Windows and Mac at http://freeware.the-meiers.org/. PuTTY is available for Windows and Linux at http://www.chiark.greenend.org.uk/~sgtatham/putty/download.html. You mayalso be able to install PuTTY under Linux using your Linux system’spackage manager. For example, on Ubuntu, PuTTY is available in theUniverse repository with apt-get install putty.
To determine the serial port assigned to your XBee under Windows, see step 1 in“Series 2 configuration” on page 433. To determine the serial port under Mac OS X,open the Mac OS X Terminal window (located in /Applications/Utilities) and type thiscommand: ls /dev/tty.usbserial-*. On Linux, open an xterm or similar console ter-minal and type ls /dev/ttyUSB*.
If you see more than one result here, unplug all USB serial devices except the XBee youwish to configure and type the command again. You should only see one result.
You’ll see output like this on the Mac:
/dev/tty.usbserial-A700eYw1
And like this on Linux:
/dev/ttyUSB0
The result you see is the filename that corresponds to your XBee’s USB serial port.Connect to this port in your serial terminal program. To connect to your XBee usingCoolTerm (Windows or Mac), follow these steps:
1. Run CoolTerm.
2. Click the Options button in the toolbar.
3. Select the USB serial port (such as tty.usbserial-A700eYw1 on a Mac or COM8 ona PC). Make sure it is set to a baud rate of 9,600, 8 data bits, no parity, 1 stop bit(these are the defaults).
4. Check the box labeled Local Echo.
5. Click OK.
6. Click the Save button in the toolbar and save your session settings.
7. In future sessions, you can skip steps 2 through 6 by clicking Open and selectingthe settings file you saved.
8. Click the Connect button in the toolbar.
To connect to your XBee using PuTTY (Windows or Linux), follow these steps:
1. Run PuTTY.
2. Click Serial under Connection Type.
3. Type the name of your serial port in the Serial Line field (such as /dev/ttyUSB0 onLinux or COM7 on Windows). Make sure Speed is set to 9600 (the default).
436 | Chapter 14: Wireless Communication
www.it-ebooks.info

4. On the left side of the window, under Category, click Terminal.
5. Under Local Echo, choose Force On.
6. Under “Set various terminal options,” choose Implicit LF in Every CR.
7. On the left side of the window, under Category, click Session.
8. Type a name for the session, such as “XBee 1”, then click Save.
9. In future sessions, you can skip steps 2 through 8 by double-clicking the savedsession name. This will open the serial connection.
Now that you’re connected, configure the first XBee with the following AT commands.You will need to type +++ and wait a second to get the XBee’s attention (it will respondwith “OK”):
ATMY1234ATDL5678ATDH0ATID0ATWR
Keep your serial terminal up and running so that you can continue to type commandsinto it. Next, plug in the second XBee, and follow the earlier instructions to connect toit with PuTTY or CoolTerm (to open a new PuTTY window, you can simply launchthe program again; you can start a new CoolTerm window with File→New). Then,configure the second XBee with these commands:
ATMY5678ATDL1234ATDH0ATID0ATWR
Now you can type commands into the Serial Terminal window for one XBee and theywill appear in the Serial Terminal window for the other XBee (and vice versa).
The ATMY command sets the identifier for an XBee. ATDL and ATDH set the low byte andthe high byte of the destination XBee. ATID sets the network ID (it needs to be the samefor XBees to talk to one another) and ATWR saves the settings into the XBee so that itremembers the settings even if you power it down and back up.
Talking to the Arduino
Now that you’ve got your XBee modules configured, close the serial terminal that wasconnected to it, and disconnect the XBee from your computer. Next, program yourArduino with the code shown in this recipe’s Solution, and connect the XBee to yourArduino as shown in Figure 14-3. When you type characters into the serial terminalprogram connected to your other XBee, you’ll see the characters echoed back (if youtype a, you’ll see aa).
14.2 Connecting Arduino to a ZigBee or 802.15.4 Network | 437
www.it-ebooks.info

See AlsoRecipe 14.3; Recipe 14.4; Recipe 14.5
14.3 Sending a Message to a Particular XBeeProblemYou want to configure which node your message goes to from your Arduino sketch.
SolutionSend the AT commands directly from your Arduino sketch:
/* XBeeMessage Send a message to an XBee using its address */
boolean configured = false;
boolean configureRadio() {
// put the radio in command mode: Serial.print("+++");
String ok_response = "OK\r"; // the response we expect.
// Read the text of the response into the response variable String response = String(""); while (response.length() < ok_response.length()) { if (Serial.available() > 0) { response += (char) Serial.read(); } }
// If we got the right response, configure the radio and return true. if (response.equals(ok_response)) { Serial.print("ATDH0013A200\r"); // destination high-REPLACE THIS Serial.print("ATDL403B9E1E\r"); // destination low-REPLACE THIS Serial.print("ATCN\r"); // back to data mode return true; } else { return false; // This indicates the response was incorrect. }}
void setup () { Serial.begin(9600); // Begin serial configured = configureRadio();}
void loop () {
438 | Chapter 14: Wireless Communication
www.it-ebooks.info

if (configured) { Serial.print("Hello!"); delay(3000); } else { delay(30000); // Wait 30 seconds configureRadio(); // try again }}
DiscussionAlthough the configurations in Recipe 14.2 work for two XBees, they are not as flexiblewhen used with more than two.
For example, consider a three-node network of Series 2 XBees, with one XBee config-ured with the COORDINATOR AT firmware and the other two with the ROUTERAT firmware. Messages you send from the coordinator will be broadcast to the tworouters. Messages you send from each router are sent to the coordinator.
The Series 1 configuration in that recipe is a bit more flexible, in that it specifies explicitdestinations. But by configuring the devices with AT commands and then writing theconfiguration, you effectively hardcode the destination addresses in the firmware.
This solution instead lets the Arduino code send the AT commands to configure theXBees on the fly. The heart of the solution is the configureRadio() function. It sendsthe +++ escape sequence to put the XBee in command mode, just as the Series 1 con-figuration did at the end of Recipe 14.2. After sending this escape sequence, the Arduinosketch waits for the OK response before sending these AT commands:
ATDH0013A200 ATDL403B9E1E ATCN
In your code, you must replace 0013A200 and 403B9E1E with the high andlow addresses of the destination radio.
The first two commands are similar to what is shown in the Series 1 configuration atthe end of Recipe 14.2, but the numbers are longer. That’s because the example shownin that recipe’s Solution uses Series 2–style addresses. As you saw in Recipe 14.2, youcan specify the address of a Series 1 XBee with the ATMY command, but in a Series 2XBee, each module has a unique address that is embedded in each chip. You can lookup the high (ATDH) and low (ATDL) portions of the serial number using X-CTU, as shownin Figure 14-6. The numbers are also printed on the label underneath the XBee.
The ATCN command exits command mode; think of it as the reverse of what the +++sequence accomplishes.
14.3 Sending a Message to a Particular XBee | 439
www.it-ebooks.info

Figure 14-6. Looking up the high and low serial numbers in X-CTU
See AlsoRecipe 14.2
14.4 Sending Sensor Data Between XBeesProblemYou want to send the status of digital and analog pins or control pins based on com-mands received from XBee.
440 | Chapter 14: Wireless Communication
www.it-ebooks.info

SolutionHook one of the XBees (the transmitting XBee) up to an analog sensor and configureit to read the sensor and transmit the value periodically. Connect the Arduino to anXBee (the receiving XBee) configured in API mode and read the value of the API framesthat it receives from the other XBee.
DiscussionXBees have a built-in analog-to-digital converter (ADC) that can be polled on a regularbasis. The XBee can be configured to transmit the values (between 0 and 1023) to otherXBees in the network. The configuration and code differ quite a bit between Series 2and Series 1 XBees.
Series 2 XBees
Using X-CTU (see “Series 2 configuration” on page 433 in Recipe 14.2), configure thetransmitting XBee with the ZIGBEE ROUTER AT (not API) function set and the fol-lowing settings:
PAN ID: 1234 (or a number you pick, as long as you use the same one for bothXBees)Channel Verification (JV): 1 (this makes sure the router will confirm that it’s onthe right channel when talking to the coordinator)Destination Address High (DH): the high address (SH) of the other XBee, usually13A200Destination Address Low (DL): the low address (SL) of the other XBeeUnder I/O Settings, AD0/DIO0 Configuration (D0): 2Under I/O Settings→Sampling Rate (IR): 64 (100 milliseconds in hex)
You can look up the high (ATDH) and low (ATDL) portions of the serialnumber using X-CTU, as shown earlier in Figure 14-6. The numbers arealso printed on the label underneath the XBee.
Configure the receiving XBee with the ZIGBEE COORDINATOR API (not AT) func-tion set with the following settings:
PAN ID: 1234 (or a number you pick, as long as you use the same one for bothXBees)Destination Address High (DH): the high address (SH) of the other XBee, usually13A200Destination Address Low (DL): the low address (SL) of the other XBee
Wire up the transmitting XBee to the sensor, as shown in Figure 14-7. The value of R1should be double whatever your potentiometer is (if you are using a 10K pot, use a 20K
14.4 Sending Sensor Data Between XBees | 441
www.it-ebooks.info

resistor). This is because the Series 2 XBees’ analog-to-digital converters read a rangeof 0 to 1.2 volts, and R1 reduces the 3.3V to stay below 1.2 volts.
Figure 14-7. Connecting a Series 2 XBee to an analog sensor
Next, load the following sketch onto the Arduino, and wire the transmitting XBee tothe Arduino as shown in Recipe 14.2. If you need to reprogram the Arduino, rememberto disconnect it from the XBee first:
/* XBeeAnalogReceive Read an analog value from an XBee API frame and set the brightness of an LED accordingly. */
#define LEDPIN 9
void setup() { Serial.begin(9600); pinMode(LEDPIN, OUTPUT);}
void loop() {
if (Serial.available() >= 21) { // Wait until we have a mouthful of data
if (Serial.read() == 0x7E) { // Start delimiter of a frame
// Skip over the bytes in the API frame we don't care about for (int i = 0; i < 18; i++) { Serial.read();
442 | Chapter 14: Wireless Communication
www.it-ebooks.info

}
// The next two bytes are the high and low bytes of the sensor reading int analogHigh = Serial.read(); int analogLow = Serial.read(); int analogValue = analogLow + (analogHigh * 256);
// Scale the brightness to the Arduino PWM range int brightness = map(analogValue, 0, 1023, 0, 255);
// Light the LED analogWrite(LEDPIN, brightness); } }}
Series 1 XBees
Using a terminal program as described in “Series 1 configuration” on page 435 inRecipe 14.2, send the following configuration commands to the transmitting XBee:
ATREATMY1234ATDL5678ATDH0ATID0ATD02ATIR64ATWR
Next, send the following configuration commands to the receiving XBee:
ATREATMY5678ATDL1234ATDH0ATID0ATWR
Both XBeesATRE resets the XBee to factory defaults. The ATMY command sets the identifier foran XBee. ATDL and ATDH set the low byte and the high byte of the destination XBee.ATID sets the network ID (it needs to be the same for XBees to talk to one another).ATWR saves the settings into the XBee so that it remembers the settings even if youpower it down and back up.
Transmitting XBeeATD02 configures pin 20 (analog or digital input 0) as an analog input; ATIR64 tellsthe XBee to sample every 100 (64 hex) milliseconds and send the value to the XBeespecified by ATDL and ATDH.
14.4 Sending Sensor Data Between XBees | 443
www.it-ebooks.info

Wire up the transmitting XBee to the sensor, as shown in Figure 14-8.
Figure 14-8. Series 1 XBee connected to an analog sensor
Next, load the following sketch onto the Arduino, and wire the transmitting XBee tothe Arduino as shown in Recipe 14.2. If you need to reprogram the Arduino, disconnectit from the XBee first:
/* XBeeAnalogReceiveSeries1 Read an analog value from an XBee API frame and set the brightness of an LED accordingly. */
const int ledPin = 9;
void setup() { Serial.begin(9600); pinMode(ledPin, OUTPUT); configureRadio(); // check the return value if you need error handling}
boolean configureRadio() {
// put the radio in command mode: Serial.flush(); Serial.print("+++");
444 | Chapter 14: Wireless Communication
www.it-ebooks.info

delay(100);
String ok_response = "OK\r"; // the response we expect.
// Read the text of the response into the response variable String response = String(""); while (response.length() < ok_response.length()) { if (Serial.available() > 0) { response += (char) Serial.read(); } }
// If we got the right response, configure the radio and return true. if (response.equals(ok_response)) { Serial.print("ATAP1\r"); // Enter API mode delay(100); Serial.print("ATCN\r"); // back to data mode return true; } else { return false; // This indicates the response was incorrect. }}
void loop() {
if (Serial.available() >= 14) { // Wait until we have a mouthful of data
if (Serial.read() == 0x7E) { // Start delimiter of a frame
// Skip over the bytes in the API frame we don't care about for (int i = 0; i < 10; i++) { Serial.read(); }
// The next two bytes are the high and low bytes of the sensor reading int analogHigh = Serial.read(); int analogLow = Serial.read(); int analogValue = analogLow + (analogHigh * 256);
// Scale the brightness to the Arduino PWM range int brightness = map(analogValue, 0, 1023, 0, 255);
// Light the LED analogWrite(ledPin, brightness); } }}
See AlsoRecipe 14.2
14.4 Sending Sensor Data Between XBees | 445
www.it-ebooks.info

14.5 Activating an Actuator Connected to an XBeeProblemYou want to tell an XBee to activate a pin, which could be used to turn on an actuatorconnected to it, such as a relay or LED.
SolutionConfigure the XBee connected to the actuator so that it will accept instructions fromanother XBee. Connect the other XBee to an Arduino to send the commands neededto activate the digital I/O pin that the actuator is connected to.
DiscussionThe XBee digital/analog I/O pins can be configured for digital output. Additionally,XBees can be configured to accept instructions from other XBees to take those pinshigh or low. In Series 2 XBees, you’ll be using the Remote AT Command feature. InSeries 1 XBees, you can use the direct I/O, which creates a virtual wire between XBees.
Series 2 XBees
Using X-CTU (see “Series 2 configuration” on page 433), configure the receiving XBeewith the ZIGBEE ROUTER AT (not API) function set and the following settings:
PAN ID: 1234 (or a number you pick, as long as you use the same one for bothXBees)Channel Verification (JV): 1 (this makes sure the router will confirm that it’s onthe right channel when talking to the coordinator)Destination Address High (DH): the high address (SH) of the other XBee, usually13A200Destination Address Low (DL): the low address (SL) of the other XBeeUnder I/O Settings, AD1/DIO1 Configuration (D1): 4 (digital output, low)
You can look up the high (ATDH) and low (ATDL) portions of the serialnumber using X-CTU, as shown earlier in Figure 14-6. The numbers arealso printed on the label underneath the XBee.
Configure the transmitting XBee with the ZIGBEE COORDINATOR API (not AT)function set with the following settings:
PAN ID: 1234 (or a number you pick, as long as you use the same one for bothXBees)Destination Address High (DH): the high address (SH) of the other XBee, usually13A200
446 | Chapter 14: Wireless Communication
www.it-ebooks.info

Destination Address Low (DL): the low address (SL) of the other XBee
Wire up the receiving XBee to an LED, as shown in Figure 14-9.
Figure 14-9. Connecting an LED to an XBee’s digital I/O pin 1
Next, load the following sketch onto the Arduino, and wire the transmitting XBee tothe Arduino as shown in Recipe 14.2. If you need to reprogram the Arduino, rememberto disconnect it from the XBee first. This sketch sends a Remote AT command (ATD14or ATD15) that sets the state of pin 1 (ATD1) alternatingly on (digital out high, 5) and off(digital out low, 4):
/* XBeeActuate Send a Remote AT command to activate a digital pin on another XBee. */
const byte frameStartByte = 0x7E;const byte frameTypeRemoteAT = 0x17;const byte remoteATOptionApplyChanges = 0x02;
void setup() { Serial.begin(9600);}
void loop(){
toggleRemotePin(1); delay(3000); toggleRemotePin(0); delay(2000);}
14.5 Activating an Actuator Connected to an XBee | 447
www.it-ebooks.info

byte sendByte(byte value) { Serial.print(value, BYTE); return value;}
void toggleRemotePin(int value) { // 0 = off, nonzero = on
byte pin_state; if (value) { pin_state = 0x5; } else { pin_state = 0x4; }
sendByte(frameStartByte); // Begin the API frame
// High and low parts of the frame length (not counting checksum) sendByte(0x0); sendByte(0x10);
long sum = 0; // Accumulate the checksum
sum += sendByte(frameTypeRemoteAT); // Indicate this frame contains aRemote AT command
sum += sendByte(0x0); // frame ID set to zero for no reply
// The following 8 bytes indicate the ID of the recipient. // Use 0xFFFF to broadcast to all nodes. sum += sendByte(0x0); sum += sendByte(0x0); sum += sendByte(0x0); sum += sendByte(0x0); sum += sendByte(0x0); sum += sendByte(0x0); sum += sendByte(0xFF); sum += sendByte(0xFF);
// The following 2 bytes indicate the 16-bit address of the recipient. // Use 0xFFFE to broadcast to all nodes. sum += sendByte(0xFF); sum += sendByte(0xFF);
sum += sendByte(remoteATOptionApplyChanges); // send Remote AT options
// The text of the AT command sum += sendByte('D'); sum += sendByte('1');
// The value (0x4 for off, 0x5 for on) sum += sendByte(pin_state);
// Send the checksum sendByte( 0xFF - ( sum & 0xFF));
448 | Chapter 14: Wireless Communication
www.it-ebooks.info

delay(10); // Pause to let the microcontroller settle down if needed}
Series 1 XBees
Using a terminal program as described in “Series 1 configuration” on page 435, sendthe following configuration commands to the transmitting XBee (the one you’ll connectto the Arduino):
ATREATMY1234ATDL5678ATDH0ATID0ATD13ATICFFATWR
Next, send the following configuration commands to the receiving XBee:
ATREATMY5678ATDL1234ATDH0ATID0ATD14ATIU0ATIA1234ATWR
Both XBeesATRE resets the XBee to factory defaults. The ATMY command sets the identifier foran XBee. ATDL and ATDH set the low byte and the high byte of the destination XBee.ATID sets the network ID (it needs to be the same for XBees to talk to one another).ATWR saves the settings into the XBee so that it remembers the settings even if youpower it down and back up.
Transmitting XBeeATICFF tells the XBee to check every digital input pin and send their values to theXBee specified by ATDL and ATDH. ATD13 configures pin 19 (analog or digital input1) to be in digital input mode. The state of this pin will be relayed from the trans-mitting XBee to the receiving XBee.
Receiving XBeeATIU1 tells the XBee to not send the frames it receives to the serial port. ATIA1234tells it to accept commands from the other XBee (whose MY address is 1234).ATD14 configures pin 19 (analog or digital input 1) to be in low digital output mode(off by default).
Wire up the transmitting XBee to the Arduino, as shown in Figure 14-10.
Next, wire the receiving XBee to an Arduino, as shown in Recipe 14.2. Note that insteadof sending AT commands over the serial port, we’re using an electrical connection to
14.5 Activating an Actuator Connected to an XBee | 449
www.it-ebooks.info

take the XBee’s pin high. The two 10K resistors form a voltage divider that drops theArduino’s 5V logic to about 2.5 volts (high enough for the XBee to recognize, but lowenough to avoid damaging the XBee’s 3.3V logic pins).
Figure 14-10. Connecting the Arduino to XBee’s digital I/O pin 1
Next, load the following sketch onto the Arduino. This sketch takes the XBee’s digitalI/O pin 1 alternatingly on (digital out high, 5) and off (digital out low, 4). Because thetransmitting XBee is configured to relay its pin states to the receiving XBee, when itspin 1 changes state the receiving XBee’s pin 1 changes as well:
/* XBeeActuateSeries1 Activate a digital pin on another XBee. */
const int ledPin = 9;const int xbeePin = 2;
void setup() { Serial.begin(9600); pinMode(ledPin, OUTPUT); pinMode(xbeePin, OUTPUT);}
void loop(){
digitalWrite(xbeePin, HIGH); delay(3000); digitalWrite(xbeePin, LOW); delay(3000);}
See AlsoRecipe 14.2
450 | Chapter 14: Wireless Communication
www.it-ebooks.info

CHAPTER 15
Ethernet and Networking
15.0 IntroductionWant to share your sensor data? Let other people take control of your Arduino’s ac-tions? Your Arduino can communicate with a broader world over Ethernet and net-works. This chapter describes the many ways you can use Arduino with the Internet.It has examples that demonstrate how to build and use web clients and servers and itshows how to use the most common Internet communication protocols withArduino.
The Internet allows a client (e.g., your web browser) to request information from aserver (a web server or other Internet service provider). This chapter contains recipesshowing how to make an Internet client that retrieves information from a service suchas Google or Yahoo! Other recipes in this chapter show how Arduino can be an Internetserver that provides information to clients using Internet protocols and act as a webserver that creates pages for viewing in web browsers.
The Arduino Ethernet library supports a range of methods (protocols) that enable yoursketches to be an Internet client or a server. The Ethernet library uses the suite ofstandard Internet protocols, and most of the low-level plumbing is hidden. Gettingyour clients or servers up and running and doing useful tasks will require some under-standing of the basics of network addressing and protocols, and you may want to con-sult one of the many references available online or one of these introductory books:
• Head First Networking by Al Anderson and Ryan Benedetti (O’Reilly)
• Network Know-How: An Essential Guide for the Accidental Admin by John Ross(No Starch Press)
• Windows NT TCP/IP Network Administration by Craig Hunt and Robert BruceThompson (O’Reilly)
• Making Things Talk by Tom Igoe (O’Reilly)
451
www.it-ebooks.info

Here are some of the key concepts in this chapter. You may want to explore them inmore depth than is possible here:
EthernetThis is the low-level signaling layer providing basic physical message-passing ca-pability. Source and destination addresses for these messages are identified by aMedia Access Control (MAC) address. Your Arduino sketch defines a MAC ad-dress value that must be unique on your network.
TCP and IPTransmission Control Protocol (TCP) and Internet Protocol (IP) are core Internetprotocols built above Ethernet. They provide a message-passing capability thatoperates over the global Internet. TCP/IP messages are delivered through uniqueIP addresses for the sender and receiver. A server on the Internet uses a numericlabel (address) that no other server will have so that it can be uniquely identified.This address consists of four bytes, usually represented with dots separating thebytes (e.g., 64.233.187.64 is an IP address used by Google). The Internet uses theDirectory Name System (DNS) service to translate the common service name (http://www.google.com) to the numeric IP address, but the standard Arduino Ethernetlibrary does not include the DNS capability. Recipe 15.3 shows how to use a third-party DNS library to add this capability to your sketches.
Local IP addressesIf you have more than one computer connected to the Internet on your home net-work using a broadband router or gateway, each computer probably uses a localIP address that is provided by your router. The local address is created using aDynamic Host Configuration Protocol (DHCP) service in your router. The ArduinoEthernet library does not include a DHCP service, so you either need to select alocal IP address or use a third-party library that adds DHCP. Most of the recipesin this chapter show a user-selected IP address that you may need to modify to suityour network. Recipe 15.2 shows how the IP address can be obtained automaticallyusing DHCP.
Web requests from a web browser and the resultant responses use Hypertext TransferProtocol (HTTP) messages. For a web client or server to respond correctly, it mustunderstand and respond to HTTP requests and responses. Many of the recipes in thischapter use this protocol, and referring to one of the references listed earlier for moredetails will help with understanding how these recipes work in detail.
Web pages are usually formatted using Hypertext Markup Language (HTML). Al-though it’s not essential to use HTML if you are making an Arduino web server, asRecipe 15.9 illustrates, the web pages you serve can use this capability.
Extracting data from a web server page intended to be viewed by people using a webbrowser can be a little like finding a needle in a haystack because of all the extraneoustext, images, and formatting tags used on a typical page. This task is simplified in therecipes here with a library written for this book, called TextFinder. It is available from
452 | Chapter 15: Ethernet and Networking
www.it-ebooks.info

the Arduino Playground and on the website for this book. TextFinder extracts infor-mation from a stream of data. It is used with the Arduino Ethernet library to findparticular sequences of characters and to get strings and numeric values.
Web interchange formats have been developed to enable reliable extraction of web databy computer software. XML and JSON are two of the most popular formats, andRecipe 15.5 shows an example of how to do this using Arduino.
15.1 Setting Up the Ethernet ShieldProblemYou want to set up the Ethernet shield to use a hardcoded IP address.
SolutionThis sketch is based on the Ethernet client example sketch distributed with Arduino.Check the documentation for your network to ensure that the Arduino IP address (thevalue of the ip variable) is valid for your network:
#if ARDUINO > 18#include <SPI.h> // needed for Arduino versions later than 0018#endif
#include <Ethernet.h>
byte mac[] = { 0xDE, 0xAD, 0xBE, 0xEF, 0xFE, 0xED };byte ip[] = { 192, 168 1, 177 }; // change to a valid address for your networkbyte server[] = { 64, 233, 187, 99 }; // Google
// see text for more on IP addressing
Client client(server, 80);
void setup(){ Ethernet.begin(mac, ip); // start ethernet using the mac and IP address Serial.begin(9600); // start the serial library: delay(1000); // give the ethernet hardware a second to initialize
Serial.println("connecting...");
if (client.connect()) { Serial.println("connected"); client.println("GET /search?q=arduino HTTP/1.0"); // the HTTP request client.println(); } else { Serial.println("connection failed"); }}
15.1 Setting Up the Ethernet Shield | 453
www.it-ebooks.info

void loop(){ if (client.available()) { char c = client.read(); Serial.print(c); // echo all data received to the Serial Monitor }
if (!client.connected()) { Serial.println(); Serial.println("disconnecting."); client.stop(); for(;;) ; }}
DiscussionThis sketch performs a Google search using the word “arduino”. Its purpose is to pro-vide working code that you can use to verify that your network configuration is suitablefor the Arduino Ethernet shield.
There are four addresses that must be set up correctly for the sketch to successfullyconnect and display the results of the search on the Serial Monitor:
byte mac[] = { 0xDE, 0xAD, 0xBE, 0xEF, 0xFE, 0xED };
The MAC address uniquely identifies your Ethernet shield. Every network device musthave a different MAC address, and if you use more than one Arduino shield on yournetwork, each must use a different address. If you have a single Ethernet shield, youdon’t need to change this:
byte ip[] = { 192, 168 1, 177 }; // change this to a valid address for yournetwork
The IP address is used to identify something that is communicating on the Internet andmust also be unique on your network. The address consists of four bytes, and the rangeof valid values for each byte depends on how your network is configured. IP addressesare usually expressed with dots separating the bytes—for example, 192.168.1.177. Inall the Arduino sketches, commas are used instead of dots because the bytes are storedin an array (see Recipe 2.4).
If your network is connected to the Internet using a router or gateway, you may needto provide the IP address of the gateway when you call the ethernet.begin function.You can find the address of the gateway in the documentation for your router/gateway.Add a line after the IP and server addresses at the top of the sketch with the address ofyour gateway:
byte gateway[] ={ 192, 168, 1, 254 }; // add this if needed by your router orgateway
454 | Chapter 15: Ethernet and Networking
www.it-ebooks.info

And change the first line in setup to include the gateway address in the startup valuesfor Ethernet:
Ethernet.begin(mac, ip, gateway);
The server address consists of the 4-byte IP address of the server you want to connectto—in this case, Google. Server IP addresses change from time to time, so you mayneed to use the ping utility of your operating system to find a current IP address for theserver you wish to connect to:
byte server[] = { 64, 233, 187, 99 }; // Google
The line at the top of the sketch that includes <SPI.h> is required forArduino releases starting at 0019, but not for earlier versions. The codein the sketch here uses a conditional check to enable it to work in anyversion. See Recipe 17.6 for more on conditional defines.
See AlsoThe web reference for getting started with the Arduino Ethernet shield is at http://arduino.cc/en/Guide/ArduinoEthernetShield.
15.2 Obtaining Your IP Address AutomaticallyProblemThe IP address you use for the Ethernet shield must be unique on your network andyou would like this to be allocated automatically. You want the Ethernet shield toobtain an IP address from a DHCP server.
SolutionThis is the sketch from Recipe 15.1 with the bolded lines added to use the DHCP library:
#if ARDUINO > 18#include <SPI.h> // needed for Arduino versions later than 0018#endif
#include <Ethernet.h>#include "Dhcp.h" // add this for the DHCP library
byte mac[] = { 0xDE, 0xAD, 0xBE, 0xEF, 0xFE, 0xED }; // IP addressing lines removedbyte server[] = { 209,85,229,104 }; // Google
Client client(server, 80);
15.2 Obtaining Your IP Address Automatically | 455
www.it-ebooks.info

void setup(){ Serial.begin(9600); if(Dhcp.beginWithDHCP(mac) == 1) // begin method returns 1 if successful { Serial.println("got IP address, connecting..."); delay(5000); } else { Serial.println("unable to acquire ip address!"); while(true) ; // do nothing }
if (client.connect()) { Serial.println("connected"); client.println("GET /search?q=arduino HTTP/1.0"); client.println(); } else { Serial.println("connection failed"); }}
void loop(){ if (client.available()) { char c = client.read(); Serial.print(c); }
if (!client.connected()) { Serial.println(); Serial.println("disconnecting."); client.stop(); for(;;) ; }}
DiscussionThe library distributed with the Arduino release does not support DHCP (at the timeof this writing), but you can obtain a third-party library from this book’s website orfrom http://blog.jordanterrell.com/post/Arduino-DHCP-Library-Version-04.aspx. Copythe contents of the download into the Arduino\hardware\libraries\Ethernet folder.
The highlighted lines show the differences from the sketch in Recipe 15.1. There is noIP or gateway address variable; these are acquired from your DHCP server when thesketch starts.
456 | Chapter 15: Ethernet and Networking
www.it-ebooks.info

If you want to see the values returned from the DHCP server on the Serial Monitor, usethe following setup function:
void setup(){ Serial.begin(9600); if(Dhcp.beginWithDHCP(mac) == 1) // begin method returns 1 if successful { byte buffer[6]; Serial.println("ip acquired...");
// show the values returned from the DHCP server Dhcp.getLocalIp(buffer); Serial.print("ip address: "); printArray(&Serial, ".", buffer, 4, 10);
Dhcp.getSubnetMask(buffer); Serial.print("subnet mask: "); printArray(&Serial, ".", buffer, 4, 10);
Dhcp.getGatewayIp(buffer); Serial.print("gateway ip: "); printArray(&Serial, ".", buffer, 4, 10);
Dhcp.getDhcpServerIp(buffer); Serial.print("dhcp server ip: "); printArray(&Serial, ".", buffer, 4, 10);
Dhcp.getDnsServerIp(buffer); Serial.print("dns server ip: "); printArray(&Serial, ".", buffer, 4, 10);
delay(5000); } else { Serial.println("unable to acquire ip address!"); while(true) ; // do nothing } if (client.connect()) { Serial.println("connected"); client.println("GET /search?q=arduino HTTP/1.0"); client.println(); } else { Serial.println("connection failed"); }}
And add this function to the end of the sketch to produce the formatted output that issent to the Serial Monitor:
void printArray(Print *output, char* delimeter, byte* data, int len, int base){ char buf[10] = {0, 0, 0, 0, 0, 0, 0, 0, 0, 0};
15.2 Obtaining Your IP Address Automatically | 457
www.it-ebooks.info

for(int i = 0; i < len; i++) { if(i != 0) output->print(delimeter);
output->print(itoa(data[i], buf, base)); }
output->println();}
Running this sketch will display the IP configuration information received from yourDHCP server on the Serial Monitor:
IP address: 192.168.1.177subnet mask: 255.255.255.0gateway IP: 192.168.1.254DHCP server IP: 192.168.1.254DNS server IP: 192.168.1.254
15.3 Resolving Hostnames to IP Addresses (DNS)ProblemYou want to use a server name—for example, yahoo.com—rather than a specific IPaddress. Web providers often have a range of IP addresses used for their servers and aspecific address may not be in service when you need to connect.
SolutionYou can use DNS to look up a valid IP address for the name you provide. This exampleuses DNS code from Matt Robertson at http://kegger.googlecode.com/files/Ethernet.zip:
/* * WebClientDNS sketch */
#if ARDUINO > 18#include <SPI.h> // needed for Arduino versions later than 0018#endif
#include "Ethernet_dns.h"#include "Dns.h" // uses DNS library from Matt Robertson
byte mac[] = {0xDE, 0xAD, 0xBE, 0xEF, 0xFE, 0xED };byte ip[] = {192, 168, 1, 177 }; // change to a valid address for your network
byte gateway[] ={192, 168, 1, 254 }; // add this if you use a router or gateway// see text for more on IP addressingbyte subnet[] ={255, 255, 255, 0 }; // this defines the subnet address
458 | Chapter 15: Ethernet and Networking
www.it-ebooks.info

byte ipBuffer[6]; // this will get the server IP address from DNS
Client client(ipBuffer, 80);DnsClass Dns;
//Client client(ipBuffer, server, 80);
void setup(){ Serial.begin(9600); Ethernet.begin(mac, ip, gateway, subnet);
//// Do DNS Lookup Serial.println("getting server address"); Dns.init("google.com", ipBuffer); //Buffer has IP address of the DNS server Dns.resolve();
int results; while(!(results=Dns.finished())) ; //wait for DNS to resolve the name
if(results != 1){ Serial.print("DNS Error code: "); Serial.print(results,DEC); while(true) ; // do nothing }
delay(5000);
if (client.connect()) { Serial.println("connected"); client.println("GET /search?q=arduino HTTP/1.0"); client.println(); } else { Serial.println("connection failed"); }}
void loop(){ if (client.available()) { char c = client.read(); Serial.print(c); }
if (!client.connected()) { Serial.println(); Serial.println("disconnecting."); client.stop(); for(;;) ; }}
15.3 Resolving Hostnames to IP Addresses (DNS) | 459
www.it-ebooks.info

DiscussionThis code is similar to the code in Recipe 15.1; it does a Google search for “arduino”.But in this version it is not necessary to provide the Google IP address—it is obtainedthrough a request to the Internet DNS service.
The request is achieved through these function calls:
Dns.init("google.com", ipBuffer); //Buffer contains the IP address of the DNSserver Dns.resolve(); while(!(results=Dns.finished())) ; //wait for DNS to resolve the name
The Dns.Init function is called with two parameters: the server (host) name to look upand the character array to hold the IP address if the lookup is successful. Dns.resolve sends the request, and Dns.finished returns the status of the reply. Here are the valuesthat can be returned from Dns.finished:
1 = success 2 = No DNS records found 3 = timeout greater than 16 is an error code provided by the DNS server
The sketch checks the value returned from Dns.finished—if it is 1, the variableipBuffer will contain a valid IP address; otherwise, it is an error that is printed to theSerial Monitor.
You can view the IP address using the following code:
Dns.getIP(ipBuffer); //buffer now contains the IP address for server given inDns.Init()Serial.print("Google address: ");printIp(ipBuffer);
The printIp function is:
void printIp(byte *rawData){ for(int i=0; i < 4; i++){ Serial.print(rawData[i],DEC); if(i < 3) Serial.print('.'); } Serial.println();}
You can use DNS and DHCP together. Here is the sketch with DHCP functionality added (see Recipe 15.2):
/* * WebClientDHCP_DNS sketch */#if ARDUINO > 18#include <SPI.h> // needed for Arduino versions later than 0018#endif
460 | Chapter 15: Ethernet and Networking
www.it-ebooks.info

#include "Ethernet_dns.h"#include "Dhcp.h" // add this for the DHCP library#include "Dns.h" // uses DNS library from Matt Robertson
byte mac[] = { 0xDE, 0xAD, 0xBE, 0xEF, 0xFE, 0xED };
byte ipBuffer[6];Client client(ipBuffer, 80);DnsClass Dns;
//Client client(ipBuffer, server, 80);
void setup(){ Serial.begin(9600); if(Dhcp.beginWithDHCP(mac) == 1) // begin method returns 1 if successful { Serial.println("got IP address"); //// Do DNS Lookup Serial.println("getting server address"); Dns.init("google.com", ipBuffer); //Buffer has IP address of the DNS server Dns.resolve();
int results; while(!(results=Dns.finished())) ; //wait for DNS to resolve the name
if(results != 1){ Serial.print("DNS Error code: "); Serial.print(results,DEC); while(true) ; // do nothing } delay(5000); } else { Serial.println("unable to acquire ip address!"); while(true) ; // do nothing } if (client.connect()) { Serial.println("connected"); client.println("GET /search?q=arduino HTTP/1.0"); client.println(); } else { Serial.println("connection failed"); }}
void loop(){ if (client.available()) { char c = client.read(); Serial.print(c); }
15.3 Resolving Hostnames to IP Addresses (DNS) | 461
www.it-ebooks.info

if (!client.connected()) { Serial.println(); Serial.println("disconnecting."); client.stop(); for(;;) ; }}
15.4 Requesting Data from a Web ServerProblemYou want Arduino to get data from a web server. For example, you want to find anduse specific values returned from a web server.
SolutionThis sketch uses Google Calculator to convert 50 kilometers to miles. It sends the query“what+is+50+km+in+mi” and prints the result to the Serial Monitor:
/* * SimpleClientwFinder sketch * */
#if ARDUINO > 18#include <SPI.h> // needed for Arduino versions later than 0018#endif
#include <Ethernet.h>#include <TextFinder.h>
byte mac[] = { 0xDE, 0xAD, 0xBE, 0xEF, 0xFE, 0xED };byte ip[] = { 192,168,1,177 };//byte gateway[] ={ 192, 168, 1, 254 };//byte subnet[] ={ 255, 255, 255, 0 };
byte server[] = { 173,194,33,104 }; // Google
Client client(server, 80);TextFinder finder( client);
int result; // the result of the google calculation
void setup(){ Ethernet.begin(mac, ip); Serial.begin(9600); delay(2000); Serial.println("connecting...");
462 | Chapter 15: Ethernet and Networking
www.it-ebooks.info

}
void loop(){ if (client.connect()) { Serial.print("connected... "); client.println("GET /search?hl=en&q=what+is+50+km+in+mi HTTP/1.1"); client.println(); } else { Serial.println("connection failed"); } if (client.connected()) { if(finder.find("<b>50 kilometers")){ if(finder.find("=")){ result = finder.getValue(); Serial.println(result); } } else Serial.println("result not found"); client.stop(); delay(10000); // check again in 10 seconds } else { Serial.println(); Serial.println("not connected"); client.stop(); delay(1000); }}
DiscussionThe sketch assumes the results will be returned in bold (using the HTML <b> tag)followed by the value given in the query and the word kilometers.
The searching is done using the TextFinder library described in this chapter’s intro-duction. The find method searches through the received data and returns true if it findsthe target string. The code looks for text associated with the reply. In this example, ittries to find “<b>50 kilometers” using this line:
if(finder.find("<b>50 kilometers")){
finder is used again to find the equals sign (=) that precedes the numerical value of theresult.
The result is obtained using the getvalue method and is printed to the Serial Monitor.
getValue returns an integer value; if you want to get a floating-point value, use getFloat instead:
Float floatResult = finder.getFloat(); Serial.println(floatResult);
15.4 Requesting Data from a Web Server | 463
www.it-ebooks.info

If you want your searches to be robust, you need to look for a unique tag that will onlybe found preceding the data you want. This is easier to achieve on pages that use uniquetags for each field, such as this example that gets the Google stock price from GoogleFinance and writes the value to analog output pin 0 and to the Serial Monitor:
/* * WebClientGoogleFinance sketch * get the stock value for google and write to analog pin. */#if ARDUINO > 18#include <SPI.h> // needed for Arduino versions later than 0018#endif
#include <Ethernet.h>#include <TextFinder.h>
byte mac[] = { 0xDE, 0xAD, 0xBE, 0xEF, 0xFE, 0xED };byte ip[] = { 192, 168,1,177 };byte gateway[] ={ 192, 168, 1, 254 };byte subnet[] ={ 255, 255, 255, 0 };
byte server[] = {209,85,229,147 }; // googleClient client(server, 80);
TextFinder finder( client );float value;
void setup(){ Ethernet.begin(mac, ip, gateway, subnet); Serial.begin(9600); delay(2000);}
void loop(){ Serial.print("Connecting..."); if (client.connect()) { client.println("GET //finance?q=google HTTP/1.0"); // todo client.println("User-Agent: AVR ethernet"); client.println(); } else { Serial.println("connection failed"); } if (client.connected()) { if(finder.find("<span class=\"pr\">")) { finder.find(">"); // seek past the next '>' value = finder.getFloat(); Serial.println(value); analogWrite(0, value); }
464 | Chapter 15: Ethernet and Networking
www.it-ebooks.info

else Serial.print("Could not find field"); } else { Serial.println("Disconnected"); } client.stop(); client.flush(); delay(5000); // 5 seconds between each connect attempt}
These examples use the GET command to request a specific page. Some web requestsneed data to be sent to the server within the body of the message, because there is moredata to be sent than can be handled by the GET command. These requests are handledusing the POST command. Here is an example of POST that uses the Babel Fish language translation service to translate text from Italian into English:
/* * WebClient_Babelfish sketch * Uses Post to get data from a web server * */#if ARDUINO > 18#include <SPI.h> // needed for Arduino versions later than 0018#endif
#include <Ethernet.h>#include <TextFinder.h>
byte mac[] = { 0xDE, 0xAD, 0xBE, 0xEF, 0xFE, 0xED };byte ip[] = { 192, 168,1,177 };byte gateway[] ={ 192, 168, 1, 254 };byte subnet[] ={ 255, 255, 255, 0 };
byte server[] = {66,196,80,202 }; //babelfish.yahoo.com
Client client(server, 80);
// the text to translatechar * transText = "trtext=Ciao+mondo+da+Arduino.&lp=it_en";
char buffer [31]; // room for 30 characters and the terminating null
TextFinder finder(client);
void setup(){ Ethernet.begin(mac, ip, gateway, subnet); Serial.begin(9600); delay(3000);}
void loop(){ postPage( "/translate_txt", transText);
15.4 Requesting Data from a Web Server | 465
www.it-ebooks.info

delay(5000);}
void postPage(char *webPage, char *parameter){ if (client.connect()) { client.print("POST "); client.print(webPage); client.println(" HTTP/1.0"); client.println("Content-Type: application/x-www-form-urlencoded"); client.println("Host: babelfish.yahoo.com"); client.print("Content-Length: "); client.println(strlen(parameter)); client.println(); client.println(parameter); } else { Serial.println(" connection failed"); } if (client.connected()) { finder.find("<div id=\"result\">"); finder.getString( ">", "<" ,buffer, sizeof(buffer)); Serial.println(buffer); } else { Serial.println("Disconnected"); } client.stop(); client.flush();}
Sites such as Google Weather and Google Finance generally keep the tags used toidentify fields unchanged. But if some future update to a site does change the tags youare searching for, your sketch will not function correctly until you correct the searchcode. A more reliable way to extract data from a web server is to use a formal protocol,such as XML or JSON. The next recipe shows how to extract information from a sitethat uses XML.
15.5 Requesting Data from a Web Server Using XMLProblemYou want to retrieve data from a site that publishes information in XML format. Forexample, you want to use values from specific fields in one of the Google API services.
SolutionThis sketch retrieves the weather in London from the Google Weather site. It uses theGoogle XML API:
/* * SimpleClientGoogleWeatherDHCP
466 | Chapter 15: Ethernet and Networking
www.it-ebooks.info

* gets xml data from http://www.google.com/ig/api?weather=london,uk * reads temperature from field: <temp_f data="66" /> * writes temperature to analog output port. */
#if ARDUINO > 18#include <SPI.h> // needed for Arduino versions later than 0018#endif
#include <Ethernet.h>#include "Dhcp.h" //from: http://blog.jordanterrell.com/post/Arduino-DHCP-Library-Version-04.aspx#include <TextFinder.h>
byte mac[] = { 0xDE, 0xAD, 0xBE, 0xEF, 0xFE, 0xED };byte server[] = {209,85,229,104 }; // Google
Client client(server, 80);
TextFinder finder( client );
void setup(){ Serial.begin(9600); if(Dhcp.beginWithDHCP(mac) == 1) { // begin method returns 1 if successful Serial.println("got IP address, connecting..."); delay(5000); } else { Serial.println("unable to acquire ip address!"); while(true) ; // do nothing }}
void loop(){ if (client.connect()) { // get google weather for London client.println("GET /ig/api?weather=london,uk HTTP/1.0"); client.println(); } else { Serial.println(" connection failed"); } if (client.connected()) { // get temperature in fahrenheit (use field "<temp_c data=\"" for Celsius) if(finder.find("<temp_f data=") ) { int temperature = finder.getValue(); analogWrite(3, temperature); // write value to analog port Serial.print("Temperature is "); // and echo it to the serial port Serial.println(temperature); }
15.5 Requesting Data from a Web Server Using XML | 467
www.it-ebooks.info

else Serial.print("Could not find temperature field"); } else { Serial.println("Disconnected"); } client.stop(); client.flush(); delay(60000); // wait a minute before next update}
Each field is preceded by a tag, and the one indicating the temperature in Fahrenheiton Google Weather is "<temp_f data=".
On this site, if you want the temperature in Celsius you would look for the tag "<temp_cdata=".
You will need to consult the documentation for the page you are interested in to findthe relevant tag for the data you want.
You select the page through the information sent in your GET statement. This also de-pends on the particular site, but in the preceding example, the city is selected by thetext after the equals sign following the GET statement. For example, to change the lo-cation from London to New York, change:
client.println("GET /ig/api?weather=london,uk HTTP/1.0"); // weather for London
to:
client.println("GET /ig/api?weather=New York,NY HTTP/1.0"); // weather forNew York
You can use a variable if you want the location to be selected under program control:
char *cityString[4] = { "London", "New%20York", "Rome", "Tokyo"};int city;
void loop(){ city = random(4); // get a random city if (client.connect()) { client.print("GET /ig/api?weather="); client.print(cityString[city]); // print one of 4 random cities client.println(" HTTP/1.0"); client.println(); } else { Serial.println(" connection failed"); } if (client.connected()) { // get temperature in fahrenheit (use field "<temp_c data=\"" for Celsius) if(finder.find("<temp_f data=") ) { int temperature = finder.getValue(); analogWrite(3, temperature); // write value to the analog port Serial.print(cityString[city]);
468 | Chapter 15: Ethernet and Networking
www.it-ebooks.info

Serial.print(" temperature is "); // and echo it to the serial port Serial.println(temperature); } else Serial.println("Could not find temperature field"); }// the remainder of the code is the same as the previous sketch
Information sent in URLs cannot contain spaces, which is why NewYork is written as “New%20York”. The encoding to indicate a space is%20. Your browser does the encoding before it sends a request, but onArduino you must translate spaces to %20 yourself.
15.6 Setting Up an Arduino to Be a Web ServerProblemYou want Arduino to serve web pages. For example, you want to use your web browserto view the values of sensors connected to Arduino analog pins.
SolutionThis is the standard Arduino WebServer example sketch distributed with Arduino thatshows the value of the analog input pins. This recipe explains how this sketch worksand how it can be extended:
/* * Web Server * * A simple web server that shows the value of the analog input pins. */#if ARDUINO > 18#include <SPI.h> // needed for Arduino versions later than 0018#endif
#include <Ethernet.h>
byte mac[] = { 0xDE, 0xAD, 0xBE, 0xEF, 0xFE, 0xED };byte ip[] = { 192, 168, 1, 177};
Server server(80);
void setup(){ Ethernet.begin(mac, ip); server.begin();}
void loop(){ Client client = server.available();
15.6 Setting Up an Arduino to Be a Web Server | 469
www.it-ebooks.info

if (client) { // an http request ends with a blank line boolean current_line_is_blank = true; while (client.connected()) { if (client.available()) { char c = client.read(); // if we've gotten to the end of the line (received a newline // character) and the line is blank, the http request has ended, // so we can send a reply if (c == '\n' && current_line_is_blank) { // send a standard http response header client.println("HTTP/1.1 200 OK"); client.println("Content-Type: text/html"); client.println();
// output the value of each analog input pin for (int i = 0; i < 6; i++) { client.print("analog input "); client.print(i); client.print(" is "); client.print(analogRead(i)); client.println("<br />"); } break; } if (c == '\n') { // we're starting a new line current_line_is_blank = true; } else if (c != '\r') { // we've gotten a character on the current line current_line_is_blank = false; } } } // give the web browser time to receive the data delay(1); client.stop(); }}
DiscussionAs discussed in Recipe 15.1, all of the sketches using the Ethernet library need a uniqueMAC address and IP address. The IP address you assign in this sketch determines theaddress of the web server. In this example, typing 192.168.1.177 into your browser’saddress bar should display a page showing the values on analog input pins 0 through6 (see Chapter 5 for more on the analog ports).
As described in this chapter’s introduction, 192.168.1.177 is a local address that is onlyvisible on your local network. If you want to expose your web server to the entireInternet, you will need to configure your router to forward incoming messages toArduino. The technique is called port forwarding and you will need to consult thedocumentation for your router to see how to set this up. (For more on port forwarding
470 | Chapter 15: Ethernet and Networking
www.it-ebooks.info

in general, see SSH, The Secure Shell: The Definitive Guide by Daniel J. Barrett, RichardE. Silverman, and Robert G. Byrnes [O’Reilly].)
Configuring your Arduino Ethernet board to be visible on the Internetmakes the board accessible to anyone with the IP address. The ArduinoEthernet library does not offer secure connections, so be careful aboutthe information you expose.
The two lines in setup initialize the Ethernet library and configure your web server tothe IP address you provide. The loop waits for and then processes each request receivedby the web server:
Client client = server.available();
The client class here is actually the web server—it processes messages for the IP addressyou gave the server.
if (client) tests that the client has been successfully started.
while (client.connected()) tests if the web server is connected to a client making arequest.
client.available() and client.read() check if data is available, and read a byte if itis. This is similar to Serial.available(), discussed in Chapter 4, except the data iscoming from the Internet rather than the serial port. The code reads data until it findsthe first line with no data, signifying the end of a request. An HTTP header is sent usingthe client.println commands followed by the printing of the values of the analog ports.
15.7 Handling Incoming Web RequestsProblemYou want to control digital and analog outputs with Arduino acting as a web server.For example, you want to control the values of specific pins through parameters sentfrom your web browser.
SolutionThis sketch reads requests sent from a browser and changes the values of digital andanalog output ports as requested.
The URL (browser request) contains one or more fields starting with the word pinfollowed by a D for digital or A for analog and the pin number. The value for the pinfollows an equals sign.
15.7 Handling Incoming Web Requests | 471
www.it-ebooks.info

For example, sending http://192.168.1.177/?pinD2=1 from your browser’s address barturns digital pin 2 on; http://192.168.1.177/?pinD2=0 turns pin 2 off. (See Chapter 7 ifyou need information on connecting LEDs to Arduino pins.)
Figure 15-1 shows what you will see on your web browser when connected to the webserver code that follows:
/* * WebServerParsing * * Respond to requests in the URL to change digital and analog output ports * show the number of ports changed and the value of the analog input pins. **/#if ARDUINO > 18#include <SPI.h> // needed for Arduino versions later than 0018#endif
##include <Ethernet.h>#include <TextFinder.h>
byte mac[] = { 0xDE, 0xAD, 0xBE, 0xEF, 0xFE, 0xED };byte ip[] = { 192,168,1,177 };
Server server(80);
void setup(){ Serial.begin(9600); Ethernet.begin(mac, ip); server.begin(); Serial.println("ready");}
void loop(){ Client client = server.available(); if (client) { TextFinder finder(client ); while (client.connected()) { if (client.available()) { // counters to show the number of pin change requests int digitalRequests = 0; int analogRequests = 0; if( finder.find("GET /") ) { // find tokens starting with "pin" and stop on the first blank line while(finder.findUntil("pin", "\n\r")){ char type = client.read(); // D or A int pin = finder.getValue(); int val = finder.getValue(); if( type == 'D') { Serial.print("Digital pin "); pinMode(pin, OUTPUT); digitalWrite(pin, val); digitalRequests++;
472 | Chapter 15: Ethernet and Networking
www.it-ebooks.info

} else if( type == 'A'){ Serial.print("Analog pin "); analogWrite(pin, val); analogRequests++; } else { Serial.print("Unexpected type "); Serial.print(type); } Serial.print(pin); Serial.print("="); Serial.println(val); } } Serial.println();
// the findUntil has detected the blank line (a lf followed by cr) // so the http request has ended and we can send a reply // send a standard http response header client.println("HTTP/1.1 200 OK"); client.println("Content-Type: text/html"); client.println();
// output the number of pins handled by the request client.print(digitalRequests); client.print(" digital pin(s) written"); client.println("<br />"); client.print(analogRequests); client.print(" analog pin(s) written"); client.println("<br />"); client.println("<br />");
// output the value of each analog input pin for (int i = 0; i < 6; i++) { client.print("analog input "); client.print(i); client.print(" is "); client.print(analogRead(i)); client.println("<br />"); } break; } } // give the web browser time to receive the data delay(1); client.stop(); }}
15.7 Handling Incoming Web Requests | 473
www.it-ebooks.info

DiscussionThis is what was sent: http://192.168.1.177/?pinD2=1. Here is how the information isbroken down: Everything before the question mark is treated as the address of the webserver (192.168.1.177 in this example; this address is the IP address set at the top ofthe sketch for the Arduino board). The remaining data is a list of fields, each beginningwith the word pin followed by a D indicating a digital pin or A indicating an analogpin. The numeric value following the D or A is the pin number. This is followed by anequals sign and finally the value you want to set the pin to. pinD2=1 sets digital pin 2HIGH. There is one field per pin, and subsequent fields are separated by an ampersand.You can have as many fields as there are Arduino pins you want to change.
The sketch can be extended to handle multiple parameters by using ampersands toseparate multiple fields. For example: http://192.168.1.177/?pinD2=1&pinD3=0&pi-nA9=128&pinA11=255
Each field within the ampersand is handled as described earlier. You can have as manyfields as there are Arduino pins you want to change.
15.8 Handling Incoming Requests for Specific PagesProblemYou want to have more than one page on your web server; for example, to show thestatus of different sensors on different pages.
Figure 15-1. Browser page displaying output created by this recipe’s Solution
474 | Chapter 15: Ethernet and Networking
www.it-ebooks.info

SolutionThis sketch looks for requests for pages named “analog” or “digital” and displays thepin values accordingly:
/* * WebServerMultiPage * * Respond to requests in the URL to view digital and analog output ports * * http://192.168.1.177/analog/ displays analog pin data * http://192.168.1.177/digital/ displays digital pin data*/#if ARDUINO > 18#include <SPI.h> // needed for Arduino versions later than 0018#endif
#include <Ethernet.h>#include <TextFinder.h>
byte mac[] = { 0xDE, 0xAD, 0xBE, 0xEF, 0xFE, 0xED };byte ip[] = { 192,168,1,177 };
char buffer[8]; // make this buffer big enough to hold requested page names
Server server(80);
void setup(){ Serial.begin(9600); Ethernet.begin(mac, ip); server.begin(); Serial.println("Ready");}
void loop(){ Client client = server.available(); if (client) { TextFinder finder(client ); while (client.connected()) { if (client.available()) { if( finder.find("GET ") ) { // look for the page name if(finder.getString( "/", "/", buffer, sizeof(buffer) )) { if(strcmp(buffer, "analog") == 0) showAnalog(client); else if(strcmp(buffer, "digital") == 0) showDigital(client); else unknownPage(client, buffer); } }
15.8 Handling Incoming Requests for Specific Pages | 475
www.it-ebooks.info

Serial.println(); break; } } // give the web browser time to receive the data delay(1); client.stop(); }}
void showAnalog(Client client){ Serial.println("analog"); sendHeader(client); client.println("<h1>Analog Pins</h1>"); // output the value of each analog input pin
for (int i = 0; i < 6; i++) { client.print("analog pin "); client.print(i); client.print(" = "); client.print(analogRead(i)); client.println("<br />"); }}
void showDigital(Client client){ Serial.println("digital"); sendHeader(client); client.println("<h1>Digital Pins</h1>"); // show the value of digital pins for (int i = 2; i < 8; i++) { pinMode(i, INPUT); client.print("digital pin "); client.print(i); client.print(" is "); if(digitalRead(i) == LOW) client.print("LOW"); else client.print("HIGH"); client.println("<br />"); } client.println("</body></html>");}
void unknownPage(Client client, char *page){ Serial.print("Unknown : "); Serial.println("page");
sendHeader(client); client.println("<h1>Unknown Page</h1>"); client.println(page); client.println("</body></html>");
476 | Chapter 15: Ethernet and Networking
www.it-ebooks.info

}
void sendHeader(Client client){ // send a standard http response header client.println("HTTP/1.1 200 OK"); client.println("Content-Type: text/html"); client.println(); client.println("<html><head><title>Web server multi-page Example</title>"); client.println("<body>");}
DiscussionYou can test this from your web browser by typing http://192.168.1.177/analog/ orhttp://192.168.1.177/digital/ (if you are using a different IP address for your server,change the URL to match).
Figure 15-2 shows the expected output.
Figure 15-2. Browser output showing digital pin values
The sketch looks for the “/” character to determine the end of the page name. Theserver will report an unknown page if the “/” character does not terminate the pagename.
Here is an enhancement that includes some code from Recipe 15.7 to allow control ofArduino pins from a private page. Here is the new loop code:
void loop(){ Client client = server.available(); if (client) { TextFinder finder(client ); while (client.connected()) {
15.8 Handling Incoming Requests for Specific Pages | 477
www.it-ebooks.info

if (client.available()) { if( finder.find("GET ") ) { if(finder.getString( "/", "/", buffer, sizeof(buffer) )) // look forthe page name { if(strcmp(buffer, "analog") == 0) showAnalog(client); else if(strcmp(buffer, "digital") == 0) showDigital(client); else if(strcmp(buffer, "private") == 0) // add this check showPrivate(client); // and this function call
else unknownPage(client, buffer); } } Serial.println(); break; } } // give the web browser time to receive the data delay(1); client.stop(); }}
Here is the showPrivate function:
void showPrivate(Client client, TextFinder finder){ Serial.println("private"); sendHeader(client); // find tokens starting with "pin" and stop on the first blank line while(finder.findUntil("pin", "\n\r")){ char type = client.read(); // D or A int pin = finder.getValue(); int val = finder.getValue(); if( type == 'D') { Serial.print("Digital pin "); pinMode(pin, OUTPUT); digitalWrite(pin, val);
} else if( type == 'A'){ Serial.print("Analog pin "); analogWrite(pin, val);
} else { Serial.print("Unexpected type "); Serial.print(type); } Serial.print(pin); Serial.print("="); Serial.println(val);
478 | Chapter 15: Ethernet and Networking
www.it-ebooks.info

}}
Sending http://192.168.1.177/private/?pinA5=128 from your browser’s address barwrites the value 128 to analog output pin 5.
15.9 Using HTML to Format Web Server ResponsesProblemYou want to use HTML elements such as tables and images to improve the look of webpages served by Arduino. For example, you want the output from Recipe 15.8 to berendered in an HTML table.
SolutionFigure 15-3 shows how the web server in this recipe’s Solution formats the browserpage to display pin values. (You can compare this to the unformatted values shown inFigure 15-2.)
Figure 15-3. Browser pages using HTML formatting
This sketch shows the functionality from Recipe 15.8 with output formatted usingHTML:
/* * WebServerMultiPageHTML * * Display analog and digital pin values using HTML formatting*/#if ARDUINO > 18#include <SPI.h> // needed for Arduino versions later than 0018#endif
#include <Ethernet.h>
15.9 Using HTML to Format Web Server Responses | 479
www.it-ebooks.info

#include <TextFinder.h>
byte mac[] = { 0xDE, 0xAD, 0xBE, 0xEF, 0xFE, 0xED };byte ip[] = { 192,168,1,177 };
char buffer[8]; // make this buffer big enough to hold requested page names
Server server(80);
void setup(){ Ethernet.begin(mac, ip); server.begin(); pinMode(13,OUTPUT); for(int i=0; i < 3; i++) { digitalWrite(13,HIGH); delay(500); digitalWrite(13,LOW); delay(500); }}
void loop(){ Client client = server.available(); if (client) { TextFinder finder(client ); while (client.connected()) { if (client.available()) { if( finder.find("GET ") ) { // look for the page name if(finder.getString( "/", "/", buffer, sizeof(buffer) )) { if(strcasecmp(buffer, "analog") == 0) showAnalog(client); else if(strcasecmp(buffer, "digital") == 0) showDigital(client); else if(strcmp(buffer, "private")== 0) showPrivate(client, finder); else unknownPage(client, buffer); } } break; } } // give the web browser time to receive the data delay(1); client.stop(); }}
480 | Chapter 15: Ethernet and Networking
www.it-ebooks.info

void showAnalog(Client client){ sendHeader(client,"Multi-page: Analog"); client.println("<h2>Analog Pins</h2>"); client.println("<table border='1' >"); for (int i = 0; i < 6; i++) { // output the value of each analog input pin client.print("<tr><td>analog pin "); client.print(i); client.print(" </td><td>"); client.print(analogRead(i)); client.println("</td></tr>"); } client.println("</table>"); client.println("</body></html>");}
void showDigital(Client client){ sendHeader(client,"Multi-page: Digital"); client.println("<h2>Digital Pins</h2>"); client.println("<table border='1'>"); for (int i = 2; i < 8; i++) { // show the value of digital pins pinMode(i, INPUT); digitalWrite(i, HIGH); // turn on pull-ups client.print("<tr><td>digital pin "); client.print(i); client.print(" </td><td>"); if(digitalRead(i) == LOW) client.print("Low"); else client.print("High"); client.println("</td></tr>"); } client.println("</table>"); client.println("</body></html>");}
void showPrivate(Client client, TextFinder finder){ sendHeader(client,"Multi-page: Private"); // find tokens starting with "pin" and stop on the first blank line while(finder.findUntil("pin", "\n\r")){ char type = client.read(); // D or A int pin = finder.getValue(); int val = finder.getValue(); if( type == 'D') { pinMode(pin, OUTPUT); digitalWrite(pin, val);
} else if( type == 'A'){ analogWrite(pin, val); }
15.9 Using HTML to Format Web Server Responses | 481
www.it-ebooks.info

else { client.print(Serial.print("Unexpected type "); client.println(type); } }}
void unknownPage(Client client, char *page){ sendHeader(client, "Unknown Page"); client.println("<h1>Unknown Page</h1>"); client.println(page); client.println("</body></html>");}
void sendHeader(Client client, char *title){ // send a standard http response header client.println("HTTP/1.1 200 OK"); client.println("Content-Type: text/html"); client.println(); client.print("<html><head><title>"); client.println(title); client.println("</title><body>");}
DiscussionThe same information is provided as in Recipe 15.8, but here the data is formattedusing an HTML table. The following code indicates that the web browser should createa table with a border width of 1:
client.println("<table border='1' >");
The for loop defines the table data cells with the <td> tag and the row entries withthe <tr> tag. The following code places the string "analog pin" in a cell starting on anew row:
client.print("<tr><td>analog pin ");
This is followed by the value of the variable i:
client.print(i);
The next line contains the tag that closes the cell and begins a new cell:
client.print(" </td><td>");
This writes the value returned from analogRead into the cell:
client.print(analogRead(i));
The tags to end the cell and end the row are written as follows:
client.println("</td></tr>");
482 | Chapter 15: Ethernet and Networking
www.it-ebooks.info

The for loop repeats this until all six analog values are written. Any of the books men-tioned in “Series 1 configuration” on page 435 or one of the many HTML referencesites can provide more details on HTML tags.
See AlsoLearning Web Design by Jennifer Niederst Robbins (O’Reilly)
Web Design in a Nutshell by Jennifer Niederst Robbins (O’Reilly)
HTML & XHTML: The Definitive Guide by Chuck Musciano and Bill Kennedy (O’Re-illy)
15.10 Serving Web Pages Using Forms (POST)ProblemYou want to create web pages with forms that allow users to select an action to beperformed by Arduino. Figure 15-4 shows the web page created by this recipe’sSolution.
Figure 15-4. Web form with buttons
SolutionThis sketch creates a web page that has a form with buttons. Users navigating to thispage will see the buttons in the web browser and the Arduino web server will respondto the button clicks. In this example, the sketch turns a pin on and off depending onwhich button is pressed:
/* * WebServerPost sketch *
15.10 Serving Web Pages Using Forms (POST) | 483
www.it-ebooks.info

*/#if ARDUINO > 18#include <SPI.h> // needed for Arduino versions later than 0018#endif
#include <Ethernet.h>#include <TextFinder.h>
byte mac[] = { 0xDE, 0xAD, 0xBE, 0xEF, 0xFE, 0xED };byte ip[] = { 192,168,1,177 };
char buffer[8]; // buffer holding the requested page name
Server server(80);
void setup(){ Serial.begin(9600); Ethernet.begin(mac, ip); server.begin(); delay(3000); Serial.println("Ready");}
void loop(){ Client client = server.available(); if (client) { TextFinder finder(client ); int type = 0; while (client.connected()) { if (client.available()) { // GET, POST, or HEAD if(finder.getString("","/", buffer,sizeof(buffer))){ if(strcmp(buffer,"POST ") == 0){ finder.find("\n\r"); // skip to the body // find string starting with "pin", stop on first blank line // the POST parameters expected in the form pinDx=Y // where x is the pin number and Y is 0 for LOW and 1 for HIGH while(finder.findUntil("pinD", "\n\r")){ int pin = finder.getValue(); // the pin number int val = finder.getValue(); // 0 or 1 pinMode(pin, OUTPUT); digitalWrite(pin, val); } } sendHeader(client,"Post example"); //create HTML button to control pin 8 client.println("<h2>Click buttons to turn pin 8 on or off</h2>"); client.print("<form action='/' method='POST'><p><input type='hidden'name='pinD8'"); client.println(" value='0'><input type='submit' value='Off'/></form>"); //create HTML button to turn on pin 8 client.print("<form action='/' method='POST'><p><input type='hidden'name='pinD8'");
484 | Chapter 15: Ethernet and Networking
www.it-ebooks.info

client.print(" value='1'><input type='submit' value='On'/></form>"); client.println("</body></html>"); client.stop(); } break; } } // give the web browser time to receive the data delay(1); client.stop(); }}
void sendHeader(Client client, char *title){ // send a standard http response header client.println("HTTP/1.1 200 OK"); client.println("Content-Type: text/html"); client.println(); client.print("<html><head><title>"); client.print(title); client.println("</title><body>");}
DiscussionA web page with a user interface form consists of HTML tags that identify the controls(buttons, checkboxes, labels, etc.) that comprise the user interface. This recipe usesbuttons to provide the user interface.
These lines create a form with a button named pinD8 that is labeled “OFF”, which willsend back a value of 0 (zero) when clicked:
client.print("<form action='/' method='POST'><p><input type='hidden'name='pinD8'");client.println(" value='0'><input type='submit' value='Off'/></form>");
When the server receives a request from a browser, it looks for the "POST " string toidentify the start of the posted form:
if(strcmp(buffer,"POST ") == 0) // find the start of the posted form
finder.find("\n\r"); // skip to the body // find parameters starting with "pin" and stop on the first blank line // the POST parameters expected in the form pinDx=Y // where x is the pin number and Y is 0 for LOW and 1 for HIGH
If the OFF button was pressed, the received page will contain the string pinD8=0, orpinD8=1 for the ON button.
The sketch searches until it finds the button name (pinD):
while(finder.findUntil("pinD", "\n\r"))
15.10 Serving Web Pages Using Forms (POST) | 485
www.it-ebooks.info

The findUntil method in the preceding code will search for “pinD” and stop searchingat the end of a line (\n\r is the newline carriage return sent by the web browser at theend of a form).
The number following the name pinD is the pin number:
int pin = finder.getValue(); // the pin number
And the value following the pin number will be 0 if button OFF was pressed or 1 ifbutton ON was pressed:
int val = finder.getValue(); // 0 or 1
The value received is written to the pin after setting the pin mode to output:
pinMode(pin, OUTPUT); digitalWrite(pin, val);
More buttons can be added by inserting tags for the additional controls. The followinglines add another button to turn on digital pin 9:
//create HTML button to turn on pin 9client.print("<form action='/' method='POST'><p><input type='hidden'name='pinD9'");client.print(" value='1'><input type='submit' value='On'/></form>");
15.11 Serving Web Pages Containing Large Amounts of DataProblemYour web pages require more memory than you have available, so you want to useprogram memory (also known as progmem or flash memory) to store data (seeRecipe 17.4).
SolutionThis sketch combines the POST code from Recipe 15.10 with the HTML code fromRecipe 15.9 and adds new code to access text stored in progmem. As in Recipe 15.9,the server can display analog and digital pin status and turn digital pins on and off (seeFigure 15-5):
/* * WebServerMultiPageHTMLProgmem sketch * * Respond to requests in the URL to change digital and analog output ports * show the number of ports changed and the value of the analog input pins. * * http://192.168.1.177/analog/ displays analog pin data * http://192.168.1.177/digital/ displays digital pin data * http://192.168.1.177/private/ allows changing digital pin data * * Progmem code derived from webduino library by Ben Combee and Ran Talbott */
486 | Chapter 15: Ethernet and Networking
www.it-ebooks.info

#if ARDUINO > 18#include <SPI.h> // needed for Arduino versions later than 0018#endif
#include <Ethernet.h>#include <TextFinder.h>#include <avr/pgmspace.h> // for progmem#define P(name) static const prog_uchar name[] PROGMEM // declare a staticstring
byte mac[] = { 0xDE, 0xAD, 0xBE, 0xEF, 0xFE, 0xED };byte ip[] = { 192,168,1,177 };
char buffer[8]; // make this buffer big enough to hold requested page names
Server server(80);
void setup(){ Serial.begin(9600);
Figure 15-5. Web page with LED images
15.11 Serving Web Pages Containing Large Amounts of Data | 487
www.it-ebooks.info

Ethernet.begin(mac, ip); server.begin(); delay(3000); Serial.println("Ready");}
void loop(){
Client client = server.available(); if (client) { TextFinder finder(client ); int type = 0; while (client.connected()) { if (client.available()) { // GET, POST, or HEAD if(finder.getString("","/", buffer,sizeof(buffer))){ if(strcmp(buffer, "GET ") == 0 ) type = 1; else if(strcmp(buffer,"POST ") == 0) type = 2; Serial.print("Type = "); Serial.println(type); // look for the page name if(finder.getString( "", "/", buffer, sizeof(buffer) )) { Serial.print(buffer); Serial.print("|"); if(strcasecmp(buffer, "analog") == 0) showAnalog(client); else if(strcasecmp(buffer, "digital") == 0) showDigital(client); else if(strcmp(buffer, "private")== 0) showPrivate(client, finder, type == 2); else unknownPage(client, buffer); } } Serial.println(); break; } } // give the web browser time to receive the data delay(1); client.stop(); }}
void showAnalog(Client client){ Serial.println("analog"); sendHeader(client,"Multi-page example-Analog"); client.println("<h1>Analog Pins</h1>"); // output the value of each analog input pin
488 | Chapter 15: Ethernet and Networking
www.it-ebooks.info

client.println("<table border='1' >"); for (int i = 0; i < 6; i++) { client.print("<tr><td>analog pin "); client.print(i); client.print(" </td><td>"); client.print(analogRead(i)); client.println("</td></tr>"); } client.println("</table>"); client.println("</body></html>");}
// mime encoded data for the led on and off images:// see: http://www.motobit.com/util/base64-decoder-encoder.aspP(led_on) = "<img src=\"data:image/jpg;base64,""/9j/4AAQSkZJRgABAgAAZABkAAD/7AARRHVja3kAAQAEAAAAHgAA/+4ADkFkb2JlAGTAAAAAAf/b""AIQAEAsLCwwLEAwMEBcPDQ8XGxQQEBQbHxcXFxcXHx4XGhoaGhceHiMlJyUjHi8vMzMvL0BAQEBA""QEBAQEBAQEBAQAERDw8RExEVEhIVFBEUERQaFBYWFBomGhocGhomMCMeHh4eIzArLicnJy4rNTUw""MDU1QEA/QEBAQEBAQEBAQEBA/8AAEQgAGwAZAwEiAAIRAQMRAf/EAIIAAAICAwAAAAAAAAAAAAAA""AAUGAAcCAwQBAAMBAAAAAAAAAAAAAAAAAAACBAUQAAECBAQBCgcAAAAAAAAAAAECAwARMRIhQQQF""UWFxkaHRMoITUwYiQnKSIxQ1EQAAAwYEBwAAAAAAAAAAAAAAARECEgMTBBQhQWEiMVGBMkJiJP/a""AAwDAQACEQMRAD8AcNz3BGibKie0nhC0v3A+teKJt8JmZEdHuZalOitgUoHnEpQEWtSyLqgACWFI""nixWiaQhsUFFBiQSbiMvvrmeCBp27eLnG7lFTDxs+Kra8oOyium3ltJUAcDIy4EUMN/7Dnq9cPMO""W90E9kxeyF2d3HFOQ175olKudUm7TqlfKqDQEDOFR1sNqtC7k5ERYjndNPFSArtvnI/nV+ed9coI""ktd2BgozrSZO3J5jVEXRcwD2bbXNdq0zT+BohTyjgPp5SYdPJZ9NP2jsiIz7vhjLohtjnqJ/ouPK""co//2Q==""\"/>";
P(led_off) = "<img src=\"data:image/jpg;base64,""/9j/4AAQSkZJRgABAgAAZABkAAD/7AARRHVja3kAAQAEAAAAHgAA/+4ADkFkb2JlAGTAAAAAAf/b""AIQAEAsLCwwLEAwMEBcPDQ8XGxQQEBQbHxcXFxcXHx4XGhoaGhceHiMlJyUjHi8vMzMvL0BAQEBA""QEBAQEBAQEBAQAERDw8RExEVEhIVFBEUERQaFBYWFBomGhocGhomMCMeHh4eIzArLicnJy4rNTUw""MDU1QEA/QEBAQEBAQEBAQEBA/8AAEQgAHAAZAwEiAAIRAQMRAf/EAHgAAQEAAwAAAAAAAAAAAAAA""AAYFAgQHAQEBAQAAAAAAAAAAAAAAAAACAQQQAAECBQAHBQkAAAAAAAAAAAECAwAREhMEITFhoSIF""FUFR0UIGgZHBMlIjM1MWEQABAwQDAQEAAAAAAAAAAAABABECIWESA1ETIyIE/9oADAMBAAIRAxEA""PwBvl5SWEkkylpJMGsj1XjXSE1kCQuJ8Iy9W5DoxradFa6VDf8IJZAQ6loNtBooTJaqp3DP5oBlV""nWrTpEouQS/Cf4PO0uKbqWHGXTSlztSvuVFiZjmfLH3GUuMkzSoTMu8aiNsXet5/17hFyo6PR64V""ZnuqfqDDDySFpNpYH3E6aFjzGBr2DkMuFBSFDsWkilUdLftW13pWpcdWqnbBzI/l6hVXKZlROUSe""L1KX5zvAPXESjdHsTFWpxLKOJ54hIA1DZCj+Vx/3r96fCNrkvRaT0+V3zV/llplr9sVeHZui/ONk""H3dzt6cL/9k=""\"/>";;
void showDigital(Client client){ Serial.println("digital"); sendHeader(client,"Multi-page example-Digital"); client.println("<h2>Digital Pins</h2>"); // show the value of digital pins client.println("<table border='1'>"); for (int i = 2; i < 8; i++) { pinMode(i, INPUT); digitalWrite(i, HIGH); // turn on pull-ups client.print("<tr><td>digital pin "); client.print(i);
15.11 Serving Web Pages Containing Large Amounts of Data | 489
www.it-ebooks.info

client.print(" </td><td>"); if(digitalRead(i) == LOW) printP(client, led_off); else printP(client, led_on); client.println("</td></tr>"); } client.println("</table>");
client.println("</body></html>");}
void showPrivate(Client client, TextFinder finder, boolean isPost){ Serial.println("private"); if(isPost) { Serial.println("isPost"); finder.find("\n\r"); // skip to the body // find parameters starting with "pin" and stop on the first blank line Serial.println("searching for parms"); while(finder.findUntil("pinD", "\n\r")){ int pin = finder.getValue(); // the pin number int val = finder.getValue(); // 0 or 1 Serial.print(pin); Serial.print("="); Serial.println(val); pinMode(pin, OUTPUT); digitalWrite(pin, val); } } sendHeader(client,"Multi-page example-Private"); // table with buttons from 2 through 9 // 2 to 5 are inputs, the other buttons are outputs
client.println("<table border='1'>");
// show the input pins for (int i = 2; i < 6; i++) { // pins 2-5 are inputs pinMode(i, INPUT); digitalWrite(i, HIGH); // turn on pull-ups client.print("<tr><td>digital input "); client.print(i); client.print(" </td><td>");
client.print("  </td><td>"); client.print(" </td><td>"); client.print("  </td><td>");
if(digitalRead(i) == LOW) //client.print("Low"); printP(client, led_off); else
490 | Chapter 15: Ethernet and Networking
www.it-ebooks.info

//client.print("high"); printP(client, led_on); client.println("</td></tr>"); }
// show output pins 6-9 // note pins 10-13 are used by the ethernet shield for (int i = 6; i < 10; i++) { client.print("<tr><td>digital output "); client.print(i); client.print(" </td><td>"); htmlButton(client, "On", "pinD", i, "1"); client.print(" </td><td>"); client.print(" </td><td>"); htmlButton(client, "Off", "pinD", i, "0"); client.print(" </td><td>");
if(digitalRead(i) == LOW) //client.print("Low"); printP(client, led_off); else //client.print("high"); printP(client, led_on); client.println("</td></tr>"); } client.println("</table>");}
// create an HTML buttonvoid htmlButton( Client client, char * label, char *name, int nameId, char *value){ P(buttonBegin) = "<form action='/private' method='POST'><p><input type='hidden'name='"; printP(client, buttonBegin); client.print(name); client.print(nameId); client.print("' value='"); client.print(value); P(buttonType) = "'><input type='submit' value='"; printP(client, buttonType); client.print(label); P(buttonEnd) = "'/></form>"; printP(client, buttonEnd);}
void unknownPage(Client client, char *page){ Serial.print("Unknown : "); Serial.println("page");
sendHeader(client,"Unknown Page"); client.println("<h1>Unknown Page</h1>"); client.println(page); client.println("</body></html>");}
15.11 Serving Web Pages Containing Large Amounts of Data | 491
www.it-ebooks.info

void sendHeader(Client client, char *title){ // send a standard http response header client.println("HTTP/1.1 200 OK"); client.println("Content-Type: text/html"); client.println(); client.print("<html><head><title>"); client.println(title); client.println("</title><body>");}
void printP(Client client, const prog_uchar *str){ // copy data out of program memory into local storage, write out in // chunks of 32 bytes to avoid extra short TCP/IP packets // from webduino library Copyright 2009 Ben Combee, Ran Talbott uint8_t buffer[32]; size_t bufferEnd = 0;
while (buffer[bufferEnd++] = pgm_read_byte(str++)) { if (bufferEnd == 32) { client.write(buffer, 32); bufferEnd = 0; } }
// write out everything left but trailing NUL if (bufferEnd > 1) client.write(buffer, bufferEnd - 1);}
DiscussionThe logic used to create the web page is similar to that used in the previous recipes.The form here is based on Recipe 15.10, but it has more elements in the table and usesembedded graphical objects to represent the state of the pins. If you have ever createda web page, you may be familiar with the use of JPEG images within the page. Arduinodoes not have the capability to store images as .jpg files.
Images need to be encoded using one of the Internet standards such as MultipurposeInternet Mail Extensions (MIME). This provides a way to represent graphical (or other)media using text. The sketch in this recipe’s Solution shows what the LED images looklike when they are MIME-encoded. Many web-based services will MIME-encode yourimages; the ones in this recipe were created using the service at http://www.motobit.com/util/base64-decoder-encoder.asp.
Even the small LED images used in this example are too large to fit into Arduino RAM.Program memory (flash) is used; see Recipe 17.3 for an explanation of the P(name)expression.
492 | Chapter 15: Ethernet and Networking
www.it-ebooks.info

The images representing the LED on and off states are stored in a sequence of charac-ters; the LED on array begins like this:
P(led_on) = "<img src=\"data:image/jpg;base64,"
P(led_on) = defines led_on as the name of this array. The characters are the HTMLtags identifying an image followed by the MIME-encoded data comprising the image.
This example is based on code produced for the Webduino web server. Webduino ishighly recommended for building web pages if your application is more complicatedthan the examples shown in this chapter.
See AlsoWebduino web page: http://code.google.com/p/webduino/
15.12 Sending Twitter MessagesProblemYou want Arduino to send messages to Twitter; for example, when a sensor detectssome activity that you want to monitor via Twitter.
SolutionThis sketch sends a Twitter message when a switch is closed. It uses the Twitter li-brary developed by neocat, which you can download from http://www.arduino.cc/playground/Code/TwitterLibrary:
#if ARDUINO > 18#include <SPI.h> // needed for Arduino versions later than 0018#endif
#include <Ethernet.h>#include <Twitter.h>
byte mac[] = { 0xDE, 0xAD, 0xBE, 0xEF, 0xFE, 0xED };byte ip[] = { 192, 168, 1, 177 };byte gateway[] = { 192, 168, 1, 254 };byte subnet[] = { 255, 255, 255, 0 };
Twitter twitter("YourID:Password");
boolean MsgSent = false;const int Sensor = 2;
void setup(){ Ethernet.begin(mac, ip, gateway, subnet); Serial.begin(9600);
15.12 Sending Twitter Messages | 493
www.it-ebooks.info

pinMode(Sensor, INPUT); digitalWrite(Sensor, HIGH); //turn on pull-up resistors delay(1000);}
void loop(){ if(digitalRead(Sensor) == LOW) { // here if mailbox is open if(MsgSent == false){ // check if message already sent MsgSent = sendMessage("Mail has been delivered"); } } else{ MsgSent = false; // door closed so reset the state } delay(100);}
boolean sendMessage( char *message){boolean isSent = false;
Serial.println("connecting ..."); if (twitter.post(message)) { int status = twitter.wait(); if (status == 200) { Serial.println("OK."); isSent = true; } else { Serial.print("failed : code "); Serial.println(status); } } else { Serial.println("connection failed."); } delay(100); return isSent;}
DiscussionThe Twitter interface is encapsulated in the Twitter library. This posts to Twitterthrough an intermediary, http://arduino-tweet.appspot.com/, which spares you theproblem of keeping up with changes to Twitter, most notably its authentication.
Twitter twitter("YourID:Password"); initializes the Twitter library; you will need tosubstitute your ID and password in that string in order to log on to Twitter.
twitter.post(message); attempts to send the message string “Mail has been delivered”to Twitter and returns true if it is able to connect.
twitter.wait(); gets the resultant status. A value of 200 (200 is the Internet standardreply for success) prints OK; otherwise, the error code is printed. See the documentation
494 | Chapter 15: Ethernet and Networking
www.it-ebooks.info

for the Twitter library (or the Twitter API documentation) for more details on the errorcodes.
The following version uses the same sendMessage function but can monitor an array ofsensors:
#if ARDUINO > 18#include <SPI.h> // needed for Arduino versions later than 0018#endif
#include <Ethernet.h>#include <Twitter.h>
byte mac[] = { 0xDE, 0xAD, 0xBE, 0xEF, 0xFE, 0xED };byte ip[] = { 192, 168, 1, 177 };byte gateway[] = { 192, 168, 1, 254 };byte subnet[] = { 255, 255, 255, 0 };
Twitter twitter("YourID:Password");
char frontOpen[] = "The front door was opened";char backOpen[] = "The back door was opened";
const int frontSensor = 2;const int backSensor = 3;
boolean frontMsgSent = false;boolean backMsgSent = false;
void setup(){ Ethernet.begin(mac, ip, gateway, subnet); Serial.begin(9600);
pinMode(frontSensor, INPUT); pinMode(backSensor, INPUT); digitalWrite(frontSensor, HIGH); // pull-ups digitalWrite(backSensor, HIGH);
delay(1000);}
void loop(){ if(digitalRead(frontSensor) == LOW) { // here if door is open if(frontMsgSent == false){ // check if message already sent frontMsgSent = sendMessage(frontOpen); } } else{ frontMsgSent = false; // door closed so reset the state } if(digitalRead(backSensor) == LOW) {
15.12 Sending Twitter Messages | 495
www.it-ebooks.info

if(frontMsgSent == false) { backMsgSent = sendMessage(backOpen); } } else { backMsgSent = false; } delay(100);}// add in the sendMessage function from the sketch above
The code that communicates with Twitter is the same, but the message string here isconstructed from the values read from sensors connected to two Arduino digital pins.
15.13 Sending and Receiving Simple Messages (UDP)ProblemYou want to send and receive simple messages over the Internet.
SolutionThis sketch uses the Arduino UDP (User Datagram Protocol) library to send and receivestrings. In this simple example, Arduino prints the received string to the Serial Monitorand a string is sent back to the sender saying “acknowledged”:
* * UDPSendReceiveStrings * This sketch receives UDP message strings, prints them to the serial port * and sends an "acknowledge" string back to the sender **/
#if ARDUINO > 18#include <SPI.h> // needed for Arduino versions later than 0018#endif
#include <Ethernet.h>#include <Udp.h> // UDP library from: [email protected] 12/30/2008
byte mac[] = { 0xDE, 0xAD, 0xBE, 0xEF, 0xFE, 0xED }; // MAC address to usebyte ip[] = {192, 168, 1, 177 }; // Arduino's IP address
unsigned int localPort = 8888; // local port to listen on
// the next two variables are set when a packet is receivedbyte remoteIp[4]; // holds received packet's originating IPunsigned int remotePort; // holds received packet's originating port
// buffers for receiving and sending databyte packetBuffer[UDP_TX_PACKET_MAX_SIZE]; //buffer to hold incoming packet,char replyBuffer[] = "acknowledged"; // a string to send back
496 | Chapter 15: Ethernet and Networking
www.it-ebooks.info

void setup() { // start the Ethernet and UDP: Ethernet.begin(mac,ip); Udp.begin(localPort);
Serial.begin(9600);}
void loop() { // if there's data available, read a packet int packetSize = Udp.available(); // note that this includes the UDP header if(packetSize) { packetSize = packetSize - 8; // subtract the 8 byte header Serial.print("Received packet of size "); Serial.println(packetSize);
// read packet into packetBuffer and get sender's IP addr and port number Udp.readPacket(packetBuffer,UDP_TX_PACKET_MAX_SIZE, remoteIp, &remotePort); Serial.println("Contents:"); Serial.println((char*)packetBuffer);
// send a string back to the sender Udp.sendPacket((byte*)replyBuffer,strlen(replyBuffer),remoteIp,remotePort);
} delay(10);}
You can test this by running the following Processing sketch on your computer (seeChapter 4 for guidance on installing and running Processing):
// Processing UDP example to send and receive string data from Arduino// press any key to send the "Hello Arduino" message
import hypermedia.net.*;
UDP udp; // define the UDP object
void setup() { udp = new UDP( this, 6000 ); // create a new datagram connection on port 6000 //udp.log( true ); // <-- print out the connection activity udp.listen( true ); // and wait for incoming message}
void draw(){}
void keyPressed() { String ip = "192.168.1.177"; // the remote IP address int port = 8888; // the destination port
15.13 Sending and Receiving Simple Messages (UDP) | 497
www.it-ebooks.info

udp.send("Hello World", ip, port ); // the message to send
}
void receive( byte[] data ) { // <-- default handler//void receive( byte[] data, String ip, int port ) { // <-- extended handler
for(int i=0; i < data.length; i++) print(char(data[i])); println();}
DiscussionPlug the Ethernet shield into Arduino and connect the Ethernet cable to your computer.Upload the Arduino sketch and run the Processing sketch on your computer. Hit anykey to send the “hello Arduino” message. Arduino sends back “acknowledged”, whichis displayed in the Processing text window. String length is limited by a constant set inthe Udp.h library file; the default value is 24 bytes, but you can increase this by editingthe following line in Udp.h if you want to send longer strings:
#define UDP_TX_PACKET_MAX_SIZE 24
UDP is a simple and fast way to send and receive messages over Ethernet. But it doeshave limitations—the messages are not guaranteed to be delivered, and on a very busynetwork some messages could get lost or get delivered in a different order than that inwhich they were sent. But UDP works well for things such as displaying the status ofArduino sensors—each message contains the current sensor value to display, and anylost messages get replaced by messages that follow.
This sketch demonstrates sending and receiving sensor messages. It receives messagescontaining values to be written to the analog output ports and replies back to the senderwith the values on the analog input pins:
/* * UDPSendReceive sketch:*/#if ARDUINO > 18#include <SPI.h> // needed for Arduino versions later than 0018#endif
#include <Ethernet.h>#include <Udp.h> // UDP library from: [email protected] 12/30/2008
byte mac[] = { 0xDE, 0xAD, 0xBE, 0xEF, 0xFE, 0xED }; // MAC address to usebyte ip[] = {192, 168, 1, 177 }; // Arduino's IP addressbyte gw[] = {192, 168, 1, 254 }; // Gateway IP addressunsigned int localPort = 8888; // local port to listen on
byte packetBuffer[UDP_TX_PACKET_MAX_SIZE]; //buffer to hold incoming packet,int packetSize; // holds received packet sizebyte remoteIp[4]; // holds received packet's originating IP
498 | Chapter 15: Ethernet and Networking
www.it-ebooks.info

unsigned int remotePort; // holds received packet's originating port
const int analogOutPins[] = { 3,5,6,9}; // pins 10 and 11 used by ethernet shield
void setup() { Ethernet.begin(mac,ip); Udp.begin(localPort); Serial.begin(9600); Serial.println("Ready");}
void loop() { // if there's data available, read a packet packetSize = Udp.available(); if(packetSize > 0 ) { packetSize = packetSize - 8; // 8 byte UDP header so subtract 8 bytes Serial.print("Received packet of size "); Serial.print(packetSize); Serial.println(" with contents:"); // read packet into packetBuffer and get sender's IP addr and port number packetSize = min(packetSize,UDP_TX_PACKET_MAX_SIZE); Udp.readPacket(packetBuffer,UDP_TX_PACKET_MAX_SIZE, remoteIp, &remotePort);
for( int i=0; i < packetSize; i++) { byte value = packetBuffer[i]; if( i < 4) { // only write to the first four analog out pins analogWrite(analogOutPins[i], value); } Serial.println(value, DEC); } Serial.println(); // tell the sender the values of our analog ports sendAnalogValues(remoteIp, remotePort); } //wait a bit delay(10);}
void sendAnalogValues( byte targetIp[], int targetPort ){ int index = 0; for(int i=0; i < 6; i++) { int value = analogRead(i);
packetBuffer[index++] = lowByte(value); // the low byte); packetBuffer[index++] = highByte(value); // the high byte); } } //send a packet to specified peer Udp.sendPacket(packetBuffer, index, targetIp, targetPort); }
15.13 Sending and Receiving Simple Messages (UDP) | 499
www.it-ebooks.info

The sketch sends and receives the values on analog ports 0 through 5 using binary data.If you are not familiar with messages containing binary data, see the introduction toChapter 4, as well as Recipes 4.6 and 4.7, for a detailed discussion on how this is doneon Arduino.
The difference here is that the data is sent using UdpSendPacket instead of Serial.print.
Here is a Processing sketch you can use with the preceding sketch. It has six scroll barsthat can be dragged with a mouse to set the six analogWrite levels; it prints the receivedsensor data to the Processing text window:
/* * UDPTest * * Demo to send and receive data from Arduino using UDP */
import hypermedia.net.*;
UDP udp; // define the UDP object
HScrollbar[] scroll = new HScrollbar[6]; //see: topics/gui/scrollbar
void setup() { size(256, 200); noStroke(); for(int i=0; i < 6; i++) // create the scroll bars scroll[i] = new HScrollbar(0, 10 + (height / 6) * i, width, 10, 3*5+1);
udp = new UDP( this, 6000 ); // create a new datagram connection on port 6000 //udp.log( true ); // <-- print out the connection activity udp.listen( true ); // and wait for incoming message}
void draw(){ background(255); fill(255); for(int i=0; i < 6; i++) { scroll[i].update(); scroll[i].display(); }}
void keyPressed() { String ip = "192.168.1.177"; // the remote IP address int port = 8888; // the destination port
byte[] message = new byte[6] ; for(int i=0; i < 6; i++){ message[i] = byte(scroll[i].getPos()); println(int(message[i]) ); } println(); udp.send( message, ip, port );
500 | Chapter 15: Ethernet and Networking
www.it-ebooks.info

}
void receive( byte[] data ) { // <-- default handler//void receive( byte[] data, String ip, int port ) { // <-- extended handler
println("incoming data is:"); for(int i=0; i < 6; i++){ scroll[i].setPos(data[i]); println((int)data[i]); }}
class HScrollbar{ int swidth, sheight; // width and height of bar int xpos, ypos; // x and y position of bar float spos, newspos; // x position of slider int sposMin, sposMax; // max and min values of slider int loose; // how loose/heavy boolean over; // is the mouse over the slider? boolean locked; float ratio;
HScrollbar (int xp, int yp, int sw, int sh, int l) { swidth = sw; sheight = sh; int widthtoheight = sw - sh; ratio = (float)sw / (float)widthtoheight; xpos = xp; ypos = yp-sheight/2; spos = xpos + swidth/2 - sheight/2; newspos = spos; sposMin = xpos; sposMax = xpos + swidth - sheight; loose = l; }
void update() { if(over()) { over = true; } else { over = false; } if(mousePressed && over) { locked = true; } if(!mousePressed) { locked = false; } if(locked) { newspos = constrain(mouseX-sheight/2, sposMin, sposMax); } if(abs(newspos - spos) > 1) {
15.13 Sending and Receiving Simple Messages (UDP) | 501
www.it-ebooks.info

spos = spos + (newspos-spos)/loose; } }
int constrain(int val, int minv, int maxv) { return min(max(val, minv), maxv); }
boolean over() { if(mouseX > xpos && mouseX < xpos+swidth && mouseY > ypos && mouseY < ypos+sheight) { return true; } else { return false; } }
void display() { fill(255); rect(xpos, ypos, swidth, sheight); if(over || locked) { fill(153, 102, 0); } else { fill(102, 102, 102); } rect(spos, ypos, sheight, sheight); }
float getPos() { return spos * ratio; }
void setPos(int value) { spos = value / ratio; }}
15.14 Getting the Time from an Internet Time ServerProblemYou want to get the current time from an Internet time server; for example, to syn-chronize clock software running on Arduino.
SolutionThis sketch gets the time from a Network Time Protocol (NTP) server and prints theresults as seconds since January 1, 1900 (NTP time) and seconds since January 1, 1970:
/* * UdpNtp sketch * * Get the time from an NTP time server
502 | Chapter 15: Ethernet and Networking
www.it-ebooks.info

* Demonstrates use of UDP sendPacket and ReceivePacket */
#if ARDUINO > 18#include <SPI.h> // needed for Arduino versions later than 0018#endif
#include <Ethernet.h>#include <Udp.h>
byte mac[] = { 0xDE, 0xAD, 0xBE, 0xEF, 0xFE, 0xED }; // MAC address to usebyte ip[] = { 192, 168, 1, 44 }; // Arduino's IP address
unsigned int localPort = 8888; // local port to listen for UDP packets
byte time_dot_nist_dot_gov[] = { 192, 43, 244, 18}; // time.nist.gov NTP server
const int NTP_PACKET_SIZE= 48; // NTP time stamp is in the first 48 bytes of themessage
byte packetBuffer[ NTP_PACKET_SIZE]; // buffer to hold incoming/outgoing packets
void setup(){ // start Ethernet and UDP Ethernet.begin(mac,ip); Udp.begin(localPort);
Serial.begin(9600);}
void loop(){ sendNTPpacket(time_dot_nist_dot_gov); // send an NTP packet to a time server // wait to see if a reply is available delay(1000); if ( Udp.available() ) { Udp.readPacket(packetBuffer,NTP_PACKET_SIZE); // read packet into buffer
//the timestamp starts at byte 40, convert four bytes into a long integer unsigned long hi = word(packetBuffer[40], packetBuffer[41]); unsigned long low = word(packetBuffer[42], packetBuffer[43]); unsigned long secsSince1900 = hi << 16 | low; // this is NTP time (secondssince Jan 1 1900)
Serial.print("Seconds since Jan 1 1900 = " ); Serial.println(secsSince1900);
Serial.print("Unix time = "); // Unix time starts on Jan 1 1970 const unsigned long seventyYears = 2208988800UL; unsigned long epoch = secsSince1900 - seventyYears; // subtract 70 years Serial.println(epoch); // print Unix time
15.14 Getting the Time from an Internet Time Server | 503
www.it-ebooks.info

// print the hour, minute and second: // UTC is the time at Greenwich Meridian (GMT) Serial.print("The UTC time is "); // print the hour (86400 equals secs per day) Serial.print((epoch % 86400L) / 3600); Serial.print(':'); // print the minute (3600 equals secs per minute) Serial.print((epoch % 3600) / 60); Serial.print(':'); Serial.println(epoch %60); // print the second } // wait ten seconds before asking for the time again delay(10000);}
// send an NTP request to the time server at the given addressunsigned long sendNTPpacket(byte *address){ memset(packetBuffer, 0, NTP_PACKET_SIZE); // set all bytes in the buffer to 0
// Initialize values needed to form NTP request packetBuffer[0] = B11100011; // LI, Version, Mode packetBuffer[1] = 0; // Stratum packetBuffer[2] = 6; // Max Interval between messages in seconds packetBuffer[3] = 0xEC; // Clock Precision // bytes 4 - 11 are for Root Delay and Dispersion and were set to 0 by memset packetBuffer[12] = 49; // four byte reference ID identifying packetBuffer[13] = 0x4E; packetBuffer[14] = 49; packetBuffer[15] = 52;
// send the packet requesting a timestamp: Udp.sendPacket( packetBuffer,NTP_PACKET_SIZE, address, 123); //NTP requestsare to port 123}
DiscussionNTP is a protocol used to synchronize time through Internet messages. NTP serversprovide time as a value of the number of seconds that have elapsed since January 1,1900. NTP time is UTC (Coordinated Universal Time, similar to Greenwich MeanTime) and does not take time zones or daylight saving time into account.
NTP servers use UDP messages; see Recipe 15.13 for an introduction to UDP. An NTPmessage is constructed in the function named sendNTPpacket and you are unlikely toneed to change the code in that function. The function takes the address of an NTPserver; you can use the IP address in the preceding example or find a list of many moreusing “NTP address” as a search term in Google. If you want more information aboutthe purpose of the NTP fields, see the documentation at http://www.ntp.org/.
The reply from NTP is a message with a fixed format; the time information consists offour bytes starting at byte 40. These four bytes are a 32-bit value (an unsigned long
504 | Chapter 15: Ethernet and Networking
www.it-ebooks.info

integer), which is the number of seconds since January 1, 1900. This value (and thetime converted into Unix time) is printed. If you want to convert the time from an NTPserver to the friendlier format using hours, minutes, and seconds and days, months,and years, you can use the Arduino Time library (see Chapter 12). Here is a variationon the preceding code that prints the time as 14:32:56 Monday 18 Jan 2010:
/* * Time_NTP sketch * Example showing time sync to NTP time source * * This sketch uses the Time library * and the Arduino Ethernet library */
#include <Time.h>#if ARDUINO > 18#include <SPI.h> // needed for Arduino versions later than 0018#endif
#include <Udp.h>#include <Ethernet.h>
byte mac[] = { 0xDE, 0xAD, 0xBE, 0xEF, 0xFE, 0xED };byte ip[] = { 192, 168, 1, 44 };
unsigned int localPort = 8888; // local port to listen for UDP packets
byte time_dot_nist_dot_gov[] = { 192, 43, 244, 18}; // time.nist.gov
const int NTP_PACKET_SIZE= 48; // NTP time stamp is in first 48 bytes of messagebyte packetBuffer[ NTP_PACKET_SIZE]; // buffer to hold incoming/outgoing packets
time_t prevDisplay = 0; // when the digital clock was displayed
void setup(){ Serial.begin(9600); Ethernet.begin(mac,ip); Udp.begin(localPort); Serial.println("waiting for sync"); setSyncProvider(getNtpTime); while(timeStatus()== timeNotSet) ; // wait until the time is set by the sync provider}
void loop(){ if( now() != prevDisplay) //update the display only if the time has changed { prevDisplay = now(); digitalClockDisplay(); }}
15.14 Getting the Time from an Internet Time Server | 505
www.it-ebooks.info

void digitalClockDisplay(){ // digital clock display of the time Serial.print(hour()); printDigits(minute()); printDigits(second()); Serial.print(" "); Serial.print(dayStr(weekday())); Serial.print(" "); Serial.print(day()); Serial.print(" "); Serial.print(monthShortStr(month())); Serial.print(" "); Serial.print(year()); Serial.println();}
void printDigits(int digits){ // utility function for digital clock display: prints preceding colon andleading 0 Serial.print(":"); if(digits < 10) Serial.print('0'); Serial.print(digits);}
/*-------- NTP code ----------*/
unsigned long getNtpTime(){ sendNTPpacket(time_dot_nist_dot_gov); delay(1000); if ( Udp.available() ) { Udp.readPacket(packetBuffer,NTP_PACKET_SIZE); // read packet into the buffer
//the timestamp starts at byte 40, convert four bytes into a long integer unsigned long hi = word(packetBuffer[40], packetBuffer[41]); unsigned long low = word(packetBuffer[42], packetBuffer[43]); // this is NTP time (seconds since Jan 1 1900 unsigned long secsSince1900 = hi << 16 | low; // Unix time starts on Jan 1 1970 const unsigned long seventyYears = 2208988800UL; unsigned long epoch = secsSince1900 - seventyYears; // subtract 70 years return epoch; } return 0; // return 0 if unable to get the time}
// send an NTP request to the time server at the given addressunsigned long sendNTPpacket(byte *address){ memset(packetBuffer, 0, NTP_PACKET_SIZE); // set all bytes in the buffer to 0
// Initialize values needed to form NTP request packetBuffer[0] = B11100011; // LI, Version, Mode
506 | Chapter 15: Ethernet and Networking
www.it-ebooks.info

packetBuffer[1] = 0; // Stratum packetBuffer[2] = 6; // Max Interval between messages in seconds packetBuffer[3] = 0xEC; // Clock Precision // bytes 4 - 11 are for Root Delay and Dispersion and were set to 0 by memset packetBuffer[12] = 49; // four-byte reference ID identifying packetBuffer[13] = 0x4E; packetBuffer[14] = 49; packetBuffer[15] = 52;
// send the packet requesting a timestamp: // NTP requests are to port 123 Udp.sendPacket( packetBuffer,NTP_PACKET_SIZE, address, 123); }
See AlsoChapter 12 provides more information on using the Arduino Time library.
Details on NTP are available at http://www.ntp.org/.
NTP code by Jesse Jaggars that inspired the sketch used in this recipe is available athttp://github.com/cynshard/arduino-ntp.
15.15 Monitoring Pachube FeedsProblemYou want Arduino to respond to information on a web service that offers security anddata backup. Perhaps you want to activate a device or raise an alarm based on the valueof data on Pachube.
SolutionThis sketch gets the first four data fields from feed number 504 and prints the resultson the Serial Monitor:
#if ARDUINO > 18#include <SPI.h> // needed for Arduino versions later than 0018#endif
#include <Ethernet.h>#include <TextFinder.h>
const int feedID = 504; // this is the ID of theremote Pachube feed that you want to connect toconst int streamCount = 4; // Number of data streams to getconst long REFRESH_INTERVAL = 600000; // Update every 10 minutesconst long RETRY_INTERVAL = 10000; // if connection fails/resetswait 10 seconds before trying again - should not be less than 5
#define PACHUBE_API_KEY "your key here . . ." // fill in your API key
15.15 Monitoring Pachube Feeds | 507
www.it-ebooks.info

// mac address, make sure this is unique on your networkbyte mac[] = { 0xCC, 0xAC, 0xBE, 0xEF, 0xFE, 0x91 }; byte remoteServer[] = { 209,40,205,190 }; // pachube.com
byte ip[] = { 192, 168, 1, 144 }; // no DHCP so set IP addressbyte gateway[] ={ 192, 168, 1, 254 };byte subnet[] ={ 255, 255, 255, 0 };
float streamData[streamCount]; // change float to long if needed for your datachar findBuffer [11]; // holds one numeric field - room for 10 charactersand the terminating null
Client client(remoteServer, 80);TextFinder finder( client );
void setup(){ Serial.begin(9600); Ethernet.begin(mac, ip, gateway, subnet);}
void loop(){ if( getFeed(feedID, streamCount) == true) { for(int id = 0; id < streamCount; id++){ Serial.println( streamData[id]); } Serial.println("--"); delay(REFRESH_INTERVAL); } else { Serial.println("Unable to get feed"); delay(RETRY_INTERVAL); }}
// returns true if able to connect and get data for all requested streamsin this feedboolean getFeed(int feedId, int streamCount ){boolean result = false; Serial.print("Connecting feed "); Serial.print(feedId); Serial.print(" ... "); if (client.connect()) { client.print("GET /api/feeds/"); client.print(feedId); // client.print(".csv HTTP/1.1\nHost: pachube.com\nX-PachubeApiKey: "); client.print(".xml HTTP/1.1\nHost: pachube.com\nX-PachubeApiKey: "); client.print(PACHUBE_API_KEY); client.print("\nUser-Agent: Arduino"); client.println("\n"); }
508 | Chapter 15: Ethernet and Networking
www.it-ebooks.info

else { Serial.println("Connection failed"); } if (client.connected()) { Serial.println("Connected"); if( finder.find("HTTP/1.1") && finder.find("200 OK") ) result = processFeed(streamCount); else Serial.println("Dropping connection - no 200 OK"); } else { Serial.println("Disconnected"); } client.stop(); client.flush(); return result;}
int processFeed(int streamCount){ finder.find("<environment updated="); finder.getString("T", "\"",findBuffer, sizeof(findBuffer)); // get the time Serial.print("Values updated at "); Serial.println(findBuffer);
int processed = 0; for(int id = 0; id < streamCount; id++) { if( finder.find( "<data id=" ) ) //find next data field { if(finder.find("<value ") ) { finder.find(">"); // seek to the angle brackets streamData[id] = finder.getValue(); processed++; } } else { Serial.print("unable to find Id field "); Serial.println(id); } } return(processed == streamCount ); // return true iff got all data}
DiscussionTo start using Pachube, you have to sign up for an account, and the Pachube Quickstartpage explains how: http://community.pachube.com/?q=node/4. Once you’re signed up,you will be emailed a username and API key. Add your key to the following line in thesketch:
#define PACHUBE_API_KEY "your key here . . ." // fill in your API key
15.15 Monitoring Pachube Feeds | 509
www.it-ebooks.info

Every Pachube feed (data source) has an identifying ID; this example sketch uses feed504 (environmental data from the Pachube office). Feeds are accessed using the getFeed method with the feed ID and the number of items of data to get passed asarguments. If this is successful, getFeed returns true, and you can process the data usingthe processFeed method. This returns the value for the data item you are interested in(each data item is called a stream in Pachube).
15.16 Sending Information to PachubeProblemYou want Arduino to update feeds on Pachube. For example, you want the values ofsensors connected to Arduino to be published on a Pachube feed.
SolutionThis sketch reads temperature sensors connected to the analog input ports (seeRecipe 6.8) and sends the data to Pachube:
#if ARDUINO > 18#include <SPI.h> // needed for Arduino versions later than 0018#endif
#include <Ethernet.h>#include "Dhcp.h" // uses DHCP code from: http://blog.jordanterrell.com#include <TextFinder.h>
const int feedID = 2955; // this is the ID of my float test feedconst int streamCount = 6; // Number of data streams to sendconst long REFRESH_INTERVAL = 60000; // Update every minute// if connection fails/resets wait 10 seconds before trying again// should not be less than 5const long RETRY_INTERVAL = 10000;
#define PACHUBE_API_KEY "Your key here . . . " // fill in your API key
// make sure this is unique on your networkbyte mac[] = { 0xCC, 0xAC, 0xBE, 0xEF, 0xFE, 0x91 }; byte remoteServer[] = { 209,40,205,190 }; // pachube.com
//used to store csv output and response strings (date is 26 chars)char buffer[32];
Client client(remoteServer, 80);TextFinder finder( client );
void setup(){ Serial.begin(9600); Serial.println("Getting ip address");
510 | Chapter 15: Ethernet and Networking
www.it-ebooks.info

if(Dhcp.beginWithDHCP(mac) == 1) { // begin method returns 1 if successful delay(4000); } else { Serial.println("unable to acquire ip address!"); while(true) ; // do nothing }}
void loop(){
int data[streamCount]; buffer[0] = 0; char * bufPointer = buffer; for(int id = 0; id < streamCount; id++) { float temperature = getTemperature(id) ; formatFloat( temperature, 1, &buffer[strlen(buffer)]); // format as xx.y if( id < streamCount-1) strcat(buffer, ","); // commas between all but last value } if( putFeed(feedID, streamCount) == true) { Serial.print("Feed updated: "); Serial.println(buffer); delay(REFRESH_INTERVAL); } else { Serial.println("Unable to update feed"); delay(RETRY_INTERVAL); }}
// returns true if able to connect and send databoolean putFeed(int feedId, int streamCount ){boolean result = false; Serial.print("Connecting feed "); Serial.print(feedId); Serial.print(" ... "); if (client.connect()) { client.print("PUT /api/feeds/"); client.print(feedId); client.print(".csv HTTP/1.1\nHost: pachube.com\nX-PachubeApiKey: "); //client.print(".xml HTTP/1.1\nHost: pachube.com\nX-PachubeApiKey: "); client.print(PACHUBE_API_KEY); client.print("\nUser-Agent: Arduino"); client.print("\nContent-Type: text/csv\nContent-Length: "); client.print(strlen(buffer)); client.print("\nConnection: close\n\n"); client.print(buffer);
client.println("\n"); }
15.16 Sending Information to Pachube | 511
www.it-ebooks.info

else { Serial.println("Connection failed"); } if (client.connected()) { Serial.println("Connected"); if( finder.find("HTTP/1.1") && finder.find("200 OK") ){ finder.getString("Date: ", "\r",buffer, sizeof(buffer)); // store time result = true; } else Serial.println("Dropping connection - no 200 OK"); } else { Serial.println("Disconnected"); } client.stop(); client.flush(); return result;}
float getTemperature(int pin){ const int nbrSamples = 8; // take the average of 8 samples int samples = 0; for(int i=0; i < nbrSamples; i++) samples = samples + analogRead(pin); float t = samples / nbrSamples; // get the average value t = (t /1024.0) * 500; // each degree C is 10mv return t;}
// returns the number of characters added to the bufferint formatFloat(float number, byte digits, char *buf){ if (!buf ) return 0; char * bufStart = buf; // store the start of the buffer // Handle negative numbers if (number < 0.0) { *buf++ = '-'; number = -number; }
// Round correctly so that print(1.999, 2) prints as "2.00" double rounding = 0.5; for (uint8_t i=0; i<digits; ++i) rounding /= 10.0;
number += rounding;
// Extract the integer part of the number and print it unsigned long int_part = (unsigned long)number; double remainder = number - (double)int_part; ultoa(int_part, buf, 10 );
512 | Chapter 15: Ethernet and Networking
www.it-ebooks.info

buf = &buf[strlen(buf)];
// Print the decimal point, but only if there are digits if (digits > 0 ) *buf++ = '.';
// Extract digits from the remainder one at a time while (digits-- > 0 ) { remainder *= 10.0; int toPrint = int(remainder); *buf++ = toPrint + '0'; remainder -= toPrint; } *buf = 0; return buf-bufStart; // the number of characters added}
DiscussionThis is similar to Recipe 15.15, but here you use the putFeed method to send yourinformation to Pachube. This example sends information from temperature sensors,and almost half the code is used to get and format this information in a form suitablefor display. See the chapter covering the type of sensor you want to use to find codesuitable for your application.
15.16 Sending Information to Pachube | 513
www.it-ebooks.info

CHAPTER 16
Using, Modifying, andCreating Libraries
16.0 IntroductionLibraries add functionality to the Arduino environment. They extend the commandsavailable to provide capabilities not available in the core Arduino language. Librariesprovide a way to add features that can be accessed from any of your sketches once youhave installed the library.
The Arduino software distribution includes built-in libraries that cover common tasks.These libraries are discussed in Recipe 16.1.
Libraries are also a good way for people to share code that may be useful to others.Many third-party libraries provide specialized capabilities; these can be downloadedfrom the Arduino Playground and other sites. Libraries are often written to simplify theuse of a particular piece of hardware. Many of the devices covered in earlier chaptersuse libraries to make it easier to connect to the devices.
Libraries can also provide a friendly wrapper around complex code to make it easier touse. An example is the Wire library distributed with Arduino, which hides much of thecomplexity of low-level hardware communications (see Chapter 13).
This chapter explains how to use and modify libraries. It also gives examples of howto create your own libraries.
16.1 Using the Built-in LibrariesProblemYou want to use the libraries provided with the Arduino distribution in your sketch.
515
www.it-ebooks.info

SolutionThis recipe shows you how to use Arduino library functionality in your sketch.
To see the list of available libraries from the IDE menu, click Sketch→Import Library.A list will drop down showing all the available libraries. The first dozen or so are thelibraries distributed with Arduino. A horizontal line separates that list from the librariesthat you download and install yourself.
Clicking on a library will add that library to the current sketch, by adding the followingline to the top of the sketch:
#include <nameOfTheLibrarySelected.h>
This results in the functions within the library becoming available to use in your sketch.
The Arduino IDE updates its list of available libraries only when the IDEis first started on your computer. If you install a library after the IDE isrunning, you need to close the IDE and restart for that new library to berecognized.
The Arduino libraries are documented in the reference at http://arduino.cc/en/Reference/Libraries and each library includes example sketches demonstrating their use. Chap-ter 1 has details on how to navigate to the examples in the IDE.
The libraries that are included with Arduino as of version 0022 are:
EEPROMUsed to store and read information in memory that is preserved when power isremoved; see Chapter 18
EthernetUsed to communicate with the Arduino Ethernet shield; see Chapter 15
FirmataA protocol used to simplify serial communication and control of the board
LiquidCrystalFor controlling compatible LCD displays; see Chapter 11
MatrixHelps manage a matrix of LEDs; see Chapter 7
SDSupports reading and writing files to an SD card using external hardware
ServoUsed to control servo motors; see Chapter 8
SoftwareSerialEnables additional serial ports
516 | Chapter 16: Using, Modifying, and Creating Libraries
www.it-ebooks.info

SPIUsed for Ethernet and SPI hardware; see Chapter 13
SpriteEnables the use of sprites with an LED matrix
StepperFor working with stepper motors; see Chapter 8
WireWorks with I2C devices attached to the Arduino; see Chapter 13
DiscussionLibraries that work with specific hardware within the Arduino controller chip onlywork on predefined pins. The Wire and SPI libraries are examples of this kind of library.Libraries that allow user selection of pins usually have this specified in setup; Servo,LiquidCrystal, and Stepper are examples of this kind of library. See the library docu-mentation for specific information on how to configure the library.
Including a library adds the library code to your sketch behind the scenes. This meansthe size of your sketch, as reported at the end of the compilation process, will increase,but the Arduino build process is smart enough to only include the code your sketch isactually using from the library, so you don’t have to worry about the memory overheadfor methods that are not being used. Therefore, you also don’t have to worry aboutunused functions reducing the amount of code you can put into your sketch.
See AlsoThe Arduino reference for libraries: http://arduino.cc/en/Reference/Libraries
16.2 Installing Third-Party LibrariesProblemYou want to use a library created for use with Arduino but not in the standarddistribution.
SolutionDownload the library. It will often be a .zip file. Unzip it and you will have a folder thathas the same title as the name of the library. This folder needs to be put inside a foldercalled libraries inside your Arduino document folder. To find the Arduino documentfolder, launch Arduino and choose Sketch→Show Sketch Folder. Go up to the parentdirectory of the folder that appears, and you’ll be in the Arduino document folder. Ifno libraries folder exists, create one and put the library inside it.
16.2 Installing Third-Party Libraries | 517
www.it-ebooks.info

If the Arduino IDE is running, quit the program and restart it. The IDE scans this folderto find libraries only when it is launched. If you now go to the menu Sketch→ImportLibrary, at the bottom, below the gray line and the word Contributed, you should seethe library you have added.
If the libraries provide example sketches, you can view these from the IDE menu; clickFile→Examples, and the libraries examples will be under the libraries name in a sectionbetween the general examples and the Arduino distributed library example listing.
DiscussionA large number of libraries are provided by third parties. Many are of very high quality,are actively maintained, and provide good documentation and example sketches. TheArduino Playground is a good place to look for libraries: http://www.arduino.cc/playground/.
Look for libraries that have clear documentation and examples. Check out the Arduinoforums to see if there are any threads (discussion topics) that discuss the library. Li-braries that were designed to be used with early Arduino releases may have problemswhen used with the latest Arduino version, so you may need to read through a lot ofmaterial (some threads for popular libraries contain hundreds of posts) to find infor-mation on using an older library with the latest Arduino release.
If the library examples do not appear in the Examples menu or you get a message saying“Library not found” when you try to use the library, check that the libraries folderis in the correct place with the name spelled correctly. A library folder named<LibraryName> (where <LibraryName> is the name for the library) must contain afile named <LibraryName>.h with the same spelling and capitalization. Check thatadditional files needed by the library are in the folder.
16.3 Modifying a LibraryProblemYou want to change the behavior of an existing library, perhaps to extend its capability.For example, the TimeAlarms library in Chapter 12 only supports six alarms and youneed more (see Recipe 12.5).
SolutionThe Time and TimeAlarms libraries are described in Chapter 12, so refer to Rec-ipe 12.5 to familiarize yourself with the standard functionality. The libraries canbe downloaded from the website for this book, or from http://www.arduino.cc/playground/uploads/Code/Time.zip (this download includes both libraries).
518 | Chapter 16: Using, Modifying, and Creating Libraries
www.it-ebooks.info

Once you have the Time and TimeAlarms libraries installed, compile and upload thefollowing sketch, which will attempt to create seven alarms—one more than the libra-ries support. Each Alarm task simply prints its task number:
/*multiple_alarms sketch has more timer repeats than the library supports out of the box - you will need to edit the header file to enable more than 6 alarms */
#include <Time.h>#include <TimeAlarms.h>
int currentSeconds = 0;
void setup(){ Serial.begin(9600);
// create 7 alarm tasks Alarm.timerRepeat(1, repeatTask1); Alarm.timerRepeat(2, repeatTask2); Alarm.timerRepeat(3, repeatTask3); Alarm.timerRepeat(4, repeatTask4); Alarm.timerRepeat(5, repeatTask5); Alarm.timerRepeat(6, repeatTask6); Alarm.timerRepeat(7, repeatTask7); //7th timer repeat}
void repeatTask1(){ Serial.print("task 1 ");}
void repeatTask2(){ Serial.print("task 2 ");}void repeatTask3(){ Serial.print("task 3 ");}
void repeatTask4(){ Serial.print("task 4 ");}
void repeatTask5(){ Serial.print("task 5 ");}
void repeatTask6()
16.3 Modifying a Library | 519
www.it-ebooks.info

{ Serial.print("task 6 ");}
void repeatTask7(){ Serial.print("task 7 ");}
void loop(){ if(second() != currentSeconds) { // print the time for each new second // the task numbers will be printed when the alarm for that task is triggered Serial.println(); Serial.print(second()); Serial.print("->"); currentSeconds = second(); Alarm.delay(1); //Alarm.delay must be called to service the alarms }}
Open the Serial Monitor and watch the output being printed. After nine seconds ofoutput, you should see this:
1->task 12->task 1 task 23->task 1 task 34->task 1 task 2 task 45->task 1 task 56->task 1 task 2 task 3 task 67->task 18->task 1 task 2 task 49->task 1 task 3
The task scheduled for seven seconds did not trigger because the library only providessix timer “objects” that you can use.
You can increase this by modifying the library. Go to the libraries folder in your ArduinoDocuments folder.
You can locate the directory containing the sketchbook folder by click-ing on the menu item File→Preferences in the IDE. A dialog box willopen, showing the sketchbook location.
If you have installed the Time and TimeAlarms libraries (both libraries are in thefile you downloaded), navigate to the Libraries\TimeAlarms folder. Open theTimeAlarms.h header file (for more details about header files, see Recipe 16.4). Youcan edit the file with any text editor; for example, Notepad on Windows or TextEditon a Mac.
520 | Chapter 16: Using, Modifying, and Creating Libraries
www.it-ebooks.info

You should see the following at the top of the TimeAlarms.h file:
#ifndef TimeAlarms_h#define TimeAlarms_h
#include <inttypes.h>#include "Time.h"#define dtNBR_ALARMS 6
The maximum number of alarms is specified by the value defined for dtNbr_ALARMS.
Change:
#define dtNBR_ALARMS 6
to:
#define dtNMBR_ALARMS 7
and save the file.
Upload the sketch to your Arduino again, and this time the serial output should read:
1->task 12->task 1 task 23->task 1 task 34->task 1 task 2 task 45->task 1 task 56->task 1 task 2 task 3 task 67->task 1 task 78->task 1 task 2 task 49->task 1 task 3
You can see that task 7 now activates after seven seconds.
DiscussionCapabilities offered by a library are a trade-off between the resources used by the libraryand the resources available to the rest of your sketch, and it is often possible to changethese capabilities if required. For example, you may need to decrease the amount ofmemory used for a serial library so that other code in the sketch has more RAM. Oryou may need to increase the memory usage by a library for your application. The librarywriter generally creates the library to meet typical scenarios, but if your applicationneeds capabilities not catered to by the library writer, you may be able to modify thelibrary to accommodate them.
In this example, the TimeAlarms library allocates room (in RAM) for six alarms. Eachof these consumes around a dozen bytes and the space is reserved even if only a feware used. The number of alarms is set in the library header file (the header is a file namedTimeAlarms.h in the TimeAlarms folder). Here are the first few lines of TimeAlarms.h:
#ifndef TimeAlarms_h#define TimeAlarms_h
#include <inttypes.h>
16.3 Modifying a Library | 521
www.it-ebooks.info

#include "Time.h"
#define dtNBR_ALARMS 6
In the TimeAlarms library, the maximum number of alarms is set using a #define state-ment. Because you changed it and saved the header file when you recompiled the sketchto upload it, it uses the new upper limit.
Sometimes constants are used to define characteristics such as the clock speed of theboard, and when used with a board that runs at a different speed, you will get unex-pected results. Editing this value in the header file to the correct one for the board youare using will fix this problem.
If you edit the header file and the library stops working, you can always download thelibrary again and replace the whole library to return to the original state.
See AlsoRecipe 16.4 has more details on how you can add functionality to libraries.
16.4 Creating Your Own LibraryProblemYou want to create your own library. Libraries are a convenient way to reuse code acrossmultiple sketches and are a good way to share with other users.
SolutionA library is a collection of methods and variables that are combined in a format thatenables users to access functions and variables in a standardized way.
Most Arduino libraries are written as a class. If you are familiar with C++ or Java, youwill be familiar with classes. However, you can create a library without using a class,and this recipe shows you how.
This recipe explains how you can transform the sketch from Recipe 7.1 to move theBlinkLED function into a library.
See Recipe 7.1 for the wiring diagram and an explanation of the circuit. Here is thesketch that will be the starting point for the library:
/* * blinkLibTest */
const int firstLedPin = 3; // choose the pin for each of the LEDsconst int secondLedPin = 5;const int thirdLedPin = 6;
522 | Chapter 16: Using, Modifying, and Creating Libraries
www.it-ebooks.info

void setup(){ pinMode(firstLedPin, OUTPUT); // declare LED pins as output pinMode(secondLedPin, OUTPUT); // declare LED pins as output pinMode(thirdLedPin, OUTPUT); // declare LED pins as output}
void loop(){ // flash each of the LEDs for 1000 milliseconds (1 second) blinkLED(firstLedPin, 1000); blinkLED(secondLedPin, 1000); blinkLED(thirdLedPin, 1000);}
The blinkLED function from Recipe 7.1 should be removed from the sketch and movedinto a separate file named blinkLED.cpp (see the Discussion for more detailsabout .cpp files):
/* blinkLED.cpp * simple library to light an LED for a duration given in milliseconds */#include <WProgram.h> // Arduino includes#include "blinkLED.h"
// blink the LED on the given pin for the duration in millisecondsvoid blinkLED(int pin, int duration){ digitalWrite(pin, HIGH); // turn LED on delay(duration); digitalWrite(pin, LOW); // turn LED off delay(duration);}
Create the blinkLED.h header file as follows:
/* * blinkLED.h * Library header file for BlinkLED library */
void blinkLED(int pin, int duration); // function prototype
DiscussionThe library will be named blinkLED and will be located in the libraries folder (seeRecipe 16.2).
The blinkLED function from Recipe 7.1 is moved out of the sketch and into a libraryfile named blinkLED.cpp (the .cpp extension stands for “C plus plus” and contains theexecutable code).
16.4 Creating Your Own Library | 523
www.it-ebooks.info

The terms functions and methods are used in Arduino library documen-tation to refer to blocks of code such as blinkLED. The term method wasintroduced to refer to the functional blocks in a class. Both terms referto the named functional blocks that are made accessible by a library.
The blinkLED.cpp file contains a blinkLED function that is identical to the code fromRecipe 7.1 with the following two lines added at the top:
#include <WProgram.h> // Arduino includes#include "blinkLED.h"
The #include <WProgram.h> line is needed by a library that uses any Arduino functionsor constants. Without this, the compiler will report errors for all the Arduino functionsused in your sketch.
The next line, #include "blinkLED.h", contains the function definitions (also knownas prototypes) for your library. The Arduino build process creates prototypes for all thefunctions within a sketch automatically when a sketch is compiled—but it does notcreate any prototypes for library code, so if you make a library, you must create a headerwith these prototypes. It is this header file that is added to a sketch when you importa library from the IDE (see Recipe 16.1).
Every library must have a file that declares the names of the functionsto be exposed. This file is called a header file (also known as an in-clude file) and has the form <LibraryName>.h (where <Library-Name> is the name for your library). In this example, the header file isnamed blinkLED.h and is in the same folder as blinkLED.cpp.
The header file for this library is simple. It declares the one function:
void blinkLED(int pin, int duration); // function prototype
This looks similar to the function definition in the blinkLED.cpp file:
void blinkLED(int pin, int duration)
The difference is subtle but vital. The header file prototype contains a trailing semico-lon. This tells the compiler that this is just a declaration of the form for the functionbut not the code. The source file, blinkLED.cpp, does not contain the trailingsemicolon and this informs the compiler that this is the actual source code for thefunction.
Libraries can have more than one header file and more than one imple-mentation file. But there must be at least one header and that mustmatch the library name. It is this file that is included at the top of thesketch when you import a library.
524 | Chapter 16: Using, Modifying, and Creating Libraries
www.it-ebooks.info

A good book on C++ can provide more details on using header and .cpp files to createcode modules. This recipe’s See Also section lists some popular choices.
With the blinkLED.cpp and blinkLED.h files in the correct place within the librariesfolder, close the IDE and reopen it.
The Arduino IDE updates its list of available libraries only when the IDEis first started on your computer. If you create a library after the IDE isrunning, you need to close the IDE and restart for that library to berecognized.
Upload the blinkLibTest sketch and you should see the three LEDs blinking.
It’s easy to add additional functionality to the library. For example, you can add someconstant values for common delays so that users of your libraries can use the descriptiveconstants instead of millisecond values.
Add the three lines with constant values to your header file as follows:
// constants for durationconst int BLINK_SHORT = 250;const int BLINK_MEDIUM = 500;const int BLINK_LONG = 1000;
void blinkLED(int pin, int duration); // function prototype
Change the code in loop as follows and upload the sketch to see the different blink rates:
void loop(){ blinkLED(firstLedPin, BLINK_SHORT); blinkLED(secondLedPin, BLINK_MEDIUM); blinkLED(thirdLedPin, BLINK_LONG);}
You need to close and restart the IDE when you first add the library tothe libraries folder, but not after subsequent changes to the library. Li-braries included in Arduino release 0017 and later are recompiled eachtime the sketch is compiled. Arduino releases earlier than 0017 requiredthe deletion of the library object files to make the library recompile andfor changes to be included.
New functions can be easily added. This example adds a function that continues blink-ing for the number of times given by the sketch. Here is the loop code:
void loop(){ blinkLED(firstLedPin,BLINK_SHORT,5 ); // blink 5 times blinkLED(secondLedPin,BLINK_MEDIUM,3 ); // blink 3 times blinkLED(thirdLedPin, BLINK_LONG); // blink once}
16.4 Creating Your Own Library | 525
www.it-ebooks.info

To add this functionality to the library, add the prototype to blinkLED.h as follows:
/* * BlinkLED.h * Header file for BlinkLED library */
const int BLINK_SHORT = 250;const int BLINK_MEDIUM = 500;const int BLINK_LONG = 1000;
void blinkLED(int pin, int duration);// new function for repeat countvoid blinkLED(int pin, int duration, int repeats);
Add the function into blinkLED.cpp:
/* * BlinkLED.cpp */
#include <WProgram.h> // Arduino includes#include "BlinkLED.h"
// blink the LED on the given pin for the duration in millisecondsvoid blinkLED(int pin, int duration){ digitalWrite(pin, HIGH); // turn LED on delay(duration); digitalWrite(pin, LOW); // turn LED off delay(duration);}
/* function to repeat blinkingvoid blinkLED(int pin, int duration, int repeats){ while(repeats) { blinkLED(pin, duration); repeats = repeats -1; }}
You can create a keywords.txt file if you want to add syntax highlighting (coloring thekeywords used in your library when viewing a sketch in the IDE). This is a text file thatcontains the name of the keyword and the keyword type—each type uses a differentcolor. The keyword and type must be separated by a tab (not a space). For example,save the following file as keywords.txt in the blinkLED folder:
######################################## Methods and Functions (KEYWORD2)#######################################blinkLED KEYWORD2######################################## Constants (LITERAL1)#######################################
526 | Chapter 16: Using, Modifying, and Creating Libraries
www.it-ebooks.info

BLINK_SHORT LITERAL1BLINK_MEDIUM LITERAL1BLINK_LONG LITERAL1
See Also“Writing a Library for Arduino” reference document: http://www.arduino.cc/en/Hacking/LibraryTutorial
Also see the following books on C++:
• Practical C++ Programming by Steve Oualline (O’Reilly)
• C++ Primer Plus by Stephen Prata (Sams)
• C++ Primer by Stanley B. Lippman, Josée Lajoie, and Barbara E. Moo (Addison-Wesley Professional)
16.5 Creating a Library That Uses Other LibrariesProblemYou want to create a library that uses functionality from one or more existing libraries.For example, you want to create a library to aid debugging that sends print output toa second Arduino board using the Wire library.
SolutionThis recipe uses the Wire library discussed in Chapter 13 and the core Arduino printfunctionality to create a new library that sends printed output to another Arduino boardconnected using I2C. The connections and code are covered in Recipe 13.9. This recipedescribes how that code can be converted into a library.
Create a folder named i2cDebug in the libraries directory (see Recipe 16.4 for detailson the file structure for a library). Create a file named i2cDebug.h with the followingcode:
/* * i2cDebug.h */
#include <WProgram.h> #include <Print.h> // the Arduino print class
class I2CDebugClass : public Print{ private: int I2CAddress; byte count; void write(byte c); public: I2CDebugClass();
16 5 Creating a Library That Uses Other Libraries | 527
www.it-ebooks.info

boolean begin(int id);};
extern I2CDebugClass i2cDebug; // the i2c debug object
Create a file named i2cDebug.cpp in the i2cDebug folder as follows:
/* * i2cDebug.cpp */
#include <i2cDebug.h>
#include <Wire.h> // the Arduino I2C library
I2CDebugClass::I2CDebugClass() { }
boolean I2CDebugClass::begin(int id) { I2CAddress = id; // save the slave's address Wire.begin(); // join I2C bus (address optional for master) return true; }
void I2CDebugClass::write(byte c) { if( count == 0) { // here if the first char in the transmission Wire.beginTransmission(I2CAddress); // transmit to device } Wire.send(c); // if the I2C buffer is full or an end of line is reached, send the data // BUFFER_LENGTH is defined in the Wire library if(++count >= BUFFER_LENGTH || c == '\n') { // send data if buffer full or newline character Wire.endTransmission(); count = 0; } }
I2CDebugClass i2cDebug; // Create an I2C debug object
Load this example sketch into the IDE:
/* * i2cDebug * example sketch for i2cDebug library */
#include <Wire.h> // the Arduino I2C library#include <i2cDebug.h>
528 | Chapter 16: Using, Modifying, and Creating Libraries
www.it-ebooks.info

const int address = 4; //the address to be used by the communicating devicesconst int sensorPin = 0; // select the analog input pin for the sensorint val; // variable to store the sensor value
void setup(){ Serial.begin(9600); i2cDebug.begin(address);}
void loop(){ // read the voltage on the pot(val ranges from 0 to 1023) val = analogRead(sensorPin); Serial.println(val); i2cDebug.println(val);}
Remember that you need to restart the IDE after creating the library folder. See Rec-ipe 16.4 for more detail on creating a library.
Upload the slave I2C sketch onto another Arduino board as described in Recipe 13.9,and you should see the output from the Arduino board running your library displayedon the second board.
DiscussionTo include another library, use its include statement in your code as you would in asketch. It is sensible to include information about any additional libraries that yourlibrary needs in documentation if you make it available for others to use, especially ifit requires a library that is not distributed with Arduino.
This recipe provides an example of how to use a class when creating a library. A classis a programming technique for grouping functions and variables together. The fol-lowing references provide an introduction to classes:
• Programming Interactivity by Joshua Noble (O’Reilly)
• C++ Primer by Stanley B. Lippman, Josée Lajoie, and Barbara E. Moo (Addison-Wesley Professional)
16 5 Creating a Library That Uses Other Libraries | 529
www.it-ebooks.info

CHAPTER 17
Advanced Coding andMemory Handling
17.0 IntroductionAs you do more with your Arduino, your sketches need to become more efficient. Thetechniques in this chapter can help you improve the performance and reduce the codesize of your sketches. If you need to make your sketch run faster or use less RAM, therecipes here can help. The recipes here are more technical than most of the other recipesin this book because they cover things that are usually concealed by the friendly Arduinowrapper.
The Arduino build process was designed to hide complex aspects of C and C++ as wellas the tools used to convert a sketch into the bytes that are uploaded and run on anArduino board. But if your project has performance and resource requirements beyondthe capability of the standard Arduino environment, you should find the recipes hereuseful.
The Arduino board uses memory to store information. It has three kinds of memory: program memory, random access memory (RAM), and EEPROM. Each has differentcharacteristics and uses. Many of the techniques in this chapter cover what to do if youdo not have enough of one kind of memory.
Program memory (also known as flash) is where the executable sketch code is stored.The contents of program memory can only be changed by the bootloader in the uploadprocess initiated by the Arduino software running on your computer. After the uploadprocess is completed, the memory cannot be changed until the next upload. There isfar more program memory on an Arduino board than RAM, so it can be beneficial tostore values that don’t change while the code runs (e.g., constants) in program memory.The bootloader takes up some space in program memory. If all other attempts to min-imize the code to fit in program memory have failed, the bootloader can be removedto free up space, but an additional hardware programmer is then needed to get codeonto the board.
531
www.it-ebooks.info

If your code is larger than the program memory space available on the chip, the uploadwill not work and the IDE will warn you that the sketch is too big when you compile.
RAM is used by the code as it runs to store the values for the variables used by yoursketch (including variables in the libraries used by your sketch). RAM is volatile, whichmeans it can be changed by code in your sketch. It also means anything stored in thismemory is lost when power is switched off. Arduino has much less RAM than programmemory. If you run out of RAM while your sketch runs on the board (as variables arecreated and destroyed while the code runs) the board will misbehave (crash).
EEPROM (Electrically Erasable Programmable Read-Only Memory) is memory thatcode running on Arduino can read and write, but it is nonvolatile memory that retainsvalues even when power is switched off. EEPROM access is significantly slower thanfor RAM, so EEPROM is usually used to store configuration or other data that is readat startup to restore information from the previous session.
To understand these issues, it is helpful to understand how the Arduino IDE preparesyour code to go onto the chip and how you can inspect the results it produces.
PreprocessorSome of the recipes here use the preprocessor to achieve the desired result. Preprocessingis a step in the first stage of the build process in which the source code (your sketch) isprepared for compiling. Various find and replace functions can be performed. Prepro-cessor commands are identified by lines that start with #. You have already seen themin sketches that use a library—#include tells the preprocessor to insert the code fromthe named library file. Sometimes the preprocessor is the only way to achieve what isneeded, but its syntax is different from C and C++ code, and it can introduce bugs thatare subtle and hard to track down, so use it with care.
See AlsoAVRfreaks is a website for software engineers that is a good source for technical detailon the controller chips used by Arduino: http://www.avrfreaks.net
Technical details on the C preprocessor are available at http://gcc.gnu.org/onlinedocs/gcc-2.95.3/cpp_1.html.
17.1 Understanding the Arduino Build ProcessProblemYou want to see what is happening under the covers when you compile and upload asketch.
532 | Chapter 17: Advanced Coding and Memory Handling
www.it-ebooks.info

SolutionTo see all the command-line activity that takes place, hold down the Shift key whenyou click on Compile or Upload. The console area at the bottom of the IDE will displaydetails of the compile process.
To have this detail always visible, you can change a value in the Arduino preferen-ces.txt file. This file should be in the following locations:
Mac/Users/<USERNAME>/Library/Arduino/preferences.txt
Windows XPC:\Documents and Settings\<USERNAME>\Application Data\Arduino\preferen-ces.txt
Windows Vistac:\Users\<USERNAME>\AppData\Roaming\Arduino\preferences.txt
Linux~/.arduino/preferences.txt
Make sure the Arduino IDE is not running (changes made to preferences.txt will not besaved if the IDE is running). Open the file and find the line build.verbose=false (it isnear the bottom of the file). Change false to true and save the file.
DiscussionWhen you click on Compile or Upload, a lot of activity happens that is not usuallydisplayed on-screen. The command-line tools that the Arduino IDE was built to hideare used to compile, link, and upload your code to the board.
First your sketch file(s) are transformed into a file suitable for the compiler (AVR-GCC) to process. All source files in the sketch folder that have no file extension arejoined together to make one file. All files that end in .c or .cpp are compiled separately.Header files (with an .h extension) are ignored unless they are explicitly included in thefiles that are being joined.
#include "WProgram.h" is added at the top of the file to include the header file with allthe Arduino-specific code definitions, such as digitalWrite() and analogRead(). If youwant to examine its contents, you can find the file on Windows under the directorywhere Arduino was installed; from there, you can navigate toHardware→Arduino→Cores→Arduino.
On the Mac, Ctrl+click the Arduino application icon and select Show Package Contentsfrom the drop-down menu. A folder will open; from the folder, navigate to Con-tents→Resources→Java→Hardware→Arduino→Cores→Arduino.
17.1 Understanding the Arduino Build Process | 533
www.it-ebooks.info

The Arduino directory structure may change in new releases, so checkthe documentation for the release you are using.
To make the code valid C++, the prototypes of any functions declared in your code aregenerated next and inserted.
Finally, the setting of the board menu is used to insert values (obtained from theboards.txt file) that define various constants used for the controller chips on the selectedboard.
This file is then compiled by AVR-GCC, which is included within the Arduino maindownload (it is in the tools folder).
The compiler produces a number of object files (files with an extension of .o that willbe combined by the link tool). These files are stored in /tmp on Mac and Linux. OnWindows, they are in the applet directory (a folder below the Arduino install directory).
The object files are then linked together to make a HEX file to upload to the board. Avrdude, a utility for transferring files to the Arduino controller, is used to upload tothe board.
The tools used to implement the build process can be found in the hardware\toolsdirectory.
Another useful tool for experienced programmers is avr-objdump, also in the toolsfolder. It lets you see how the compiler turns the sketch into code that the controllerchip runs. This tool produces a disassembly listing of your sketch which shows theobject code intermixed with the source code. It can also display a memory map of allthe variables used in your sketch. To use the tool, compile the sketch and navigate tothe folder containing the Arduino distribution. Then, navigate to the folder with all theintermediate files used in the build process (as explained earlier). The file used byavr-objdump is the one with the extension .elf. For example, if you compile the Blinksketch you could view the compiled output (the machine code) by executing the fol-lowing on the command line:
..\hardware\tools\avr\bin\avr-objdump.exe -S blink.cpp.elf
It is convenient to direct the output to a file that can be read in a text editor. You cando this as follows:
..\hardware\tools\avr\bin\avr-objdump.exe -S blink.cpp.elf > blink.txt
This version adds a list of section headers (helpful for determining memory usage):
..\hardware\tools\avr\bin\avr-objdump.exe -S -h blink.cpp.elf > blink.txt
534 | Chapter 17: Advanced Coding and Memory Handling
www.it-ebooks.info

You can create a batch file to dump the listing into a file. Add the pathof your Arduino installation to the following line and save it to a batchfile:
hardware\tools\avr\bin\avr-objdump.exe -S -h -Tdata %1 > %1%.txt
See AlsoFor information on the Arduino build process, see http://code.google.com/p/arduino/wiki/BuildProcess.
The AVRfreaks website: http://www.avrfreaks.net/wiki/index.php/Documentation:AVR_GCC
17.2 Determining the Amount of Free and Used RAMProblemYou want to be sure you have not run out of RAM. A sketch will not run correctly ifthere is insufficient memory, and this can be difficult to detect.
SolutionThis recipe shows you how you can determine the amount of free memory available toyour sketch. This sketch contains a function called memoryFree that reports the amountof available RAM:
void setup(){ Serial.begin(9600);}
void loop(){ Serial.print(memoryFree()); // print the free memory Serial.print(' '); // print a space delay(1000);}
// variables created by the build process when compiling the sketchextern int __bss_end;extern void *__brkval;
// function to return the amount of free RAMint memoryFree(){ int freeValue;
17.2 Determining the Amount of Free and Used RAM | 535
www.it-ebooks.info

if((int)__brkval == 0) freeValue = ((int)&freeValue) - ((int)&__bss_end); else freeValue = ((int)&freeValue) - ((int)__brkval);
return freeValue;}
DiscussionThe memoryFree function uses system variables to calculate the amount of RAM. Systemvariables are not normally visible (they are created by the compiler to manage internalresources). It is not necessary to understand how the function works to use its output.The function returns the number of bytes of free memory.
The number of bytes your code uses changes as the code runs. The important thing isto ensure that you don’t consume more memory than you have.
Here are the main ways RAM memory is consumed:
• When you initialize constants:
#define ERROR_MESSAGE "an error has occurred"
• When you declare global variables:
char myMessage[] = "Hello World";
• When you make a function call:
void myFunction(int value){ int result; result = value * 2; return result;}
• When you dynamically allocate memory:
String stringOne = "Arduino String";
The Arduino String class uses dynamic memory to allocate space for strings. You cansee this by adding the following line to the very top of the code in the Solution:
String s = "\n";
and the following lines just before the delay in the loop code:
s = s + "Hello I am Arduino \n"; Serial.println(s); // print the string value
You will see the memory value reduce as the size of the string is increased each timethrough the loop. If you run the sketch long enough, the memory will run out—don’tendlessly try to increase the size of a string in anything other than a test application.
Writing code like this that creates a constantly expanding value is a sure way to runout of memory. You should also be careful not to create code that dynamically creates
536 | Chapter 17: Advanced Coding and Memory Handling
www.it-ebooks.info

different numbers of variables based on some parameter while the code runs, as it willbe very difficult to be sure you will not exceed the memory capabilities of the boardwhen the code runs.
Constants and global variables are often declared in libraries as well, so you may notbe aware of them, but they still use up RAM. The Serial library, for example, has a 128-byte global array that it uses for incoming serial data. This alone consumes one-eighthof the total memory of an old Arduino 168 chip.
See AlsoA technical overview of memory usage is available at http://www.gnu.org/savannah-checkouts/non-gnu/avr-libc/user-manual/malloc.html.
17.3 Storing and Retrieving Numeric Values inProgram MemoryProblemYou have a lot of constant numeric data and don’t want to allocate this to RAM.
SolutionStore numeric variables in program memory (the flash memory used to store Arduinoprograms).
This sketch adjusts a fading LED for the nonlinear sensitivity of human vision. It storesthe values to use in a table of 256 values in program memory rather than RAM.
The sketch is based on Recipe 7.2; see Chapter 7 for a wiring diagram and discussionon driving LEDs. Running this sketch results in a smooth change in brightness with theLED on pin 5 compared to the LED on pin 3:
/* ProgmemCurve sketch * uses table in Progmem to convert linear to exponential output * See Recipe 7.2 and Figure 7-2 */
#include <avr/pgmspace.h> // needed for PROGMEM
// table of exponential values// generated for values of i from 0 to 255 -> x=round( pow( 2.0, i/32.0) - 1);
const byte table[]PROGMEM = { 0, 0, 0, 0, 0, 0, 0, 0, 0, 0, 0, 0, 0, 0, 0, 0, 0, 0, 0, 1, 1, 1, 1, 1, 1, 1, 1, 1, 1, 1, 1, 1, 1, 1, 1, 1, 1, 1, 1, 1, 1, 1, 1, 2, 2, 2, 2, 2, 2, 2, 2, 2, 2, 2, 2, 2, 2, 2, 3, 3, 3, 3, 3, 3, 3, 3, 3, 3, 3, 3, 4, 4, 4, 4, 4, 4, 4, 4, 4, 5,
17.3 Storing and Retrieving Numeric Values in Program Memory | 537
www.it-ebooks.info

5, 5, 5, 5, 5, 5, 5, 6, 6, 6, 6, 6, 6, 6, 7, 7, 7, 7, 7, 8, 8, 8, 8, 8, 9, 9, 9, 9, 9, 10, 10, 10, 10, 11, 11, 11, 11, 12, 12, 12, 12, 13, 13, 13, 14, 14, 14, 15, 15, 15, 16, 16, 16, 17, 17, 18, 18, 18, 19, 19, 20, 20, 21, 21, 22, 22, 23, 23, 24, 24, 25, 25, 26, 26, 27, 28, 28, 29, 30, 30, 31, 32, 32, 33, 34, 35, 35, 36, 37, 38, 39, 40, 40, 41, 42, 43, 44, 45, 46, 47, 48, 49, 51, 52, 53, 54, 55, 56, 58, 59, 60, 62, 63, 64, 66, 67, 69, 70, 72, 73, 75, 77, 78, 80, 82, 84, 86, 88, 90, 91, 94, 96, 98, 100, 102, 104, 107, 109, 111, 114, 116, 119, 122, 124, 127, 130, 133, 136, 139, 142, 145, 148, 151, 155, 158, 161, 165, 169, 172, 176, 180, 184, 188, 192, 196, 201, 205, 210, 214, 219, 224, 229, 234, 239, 244, 250};
const int rawLedPin = 3; // this LED is fed with raw valuesconst int adjustedLedPin = 5; // this LED is driven from table
int brightness = 0;int increment = 1;
void setup(){ // pins driven by analogWrite do not need to be declared as outputs}
void loop(){ if(brightness > 255) { increment = -1; // count down after reaching 255 } else if(brightness < 1) { increment = 1; // count up after dropping back down to 0 } brightness = brightness + increment; // increment (or decrement sign is minus)
// write the brightness value to the LEDs analogWrite(rawLedPin, brightness); // this is the raw value int adjustedBrightness = pgm_read_byte(&table[brightness]); // adjusted value analogWrite(adjustedLedPin, adjustedBrightness);
delay(10); // 10ms for each step change means 2.55 secs to fade up or down}
DiscussionWhen you need to use a complex expression to calculate a range of values that regularlyrepeat, it is often better to precalculate the values and include them in a table of values(usually as an array) in the code. This saves the time needed to calculate the valuesrepeatedly when the code runs. The disadvantage concerns the memory needed to placethese values in RAM. RAM is limited on Arduino and the much larger program memoryspace can be used to store constant values. This is particularly helpful for sketches thathave large arrays of numbers.
538 | Chapter 17: Advanced Coding and Memory Handling
www.it-ebooks.info

At the top of the sketch, the table is defined with the following expression:
const byte table[]PROGMEM = { 0, . . .
PROGMEM tells the compiler that the values are to be stored in program memory ratherthan RAM. The remainder of the expression is similar to defining a conventional array(see Chapter 2).
The low-level definitions needed to use PROGMEM are contained in a file namedpgmspace.h and the sketch includes this as follows:
#include <avr/pgmspace.h>
To adjust the brightness to make the fade look uniform, this recipe adds the followinglines to the LED output code used in Recipe 7.2:
int adjustedBrightness = pgm_read_byte(&table[brightness]); analogWrite(adjustedLedPin, adjustedBrightness);
The variable adjustedBrightness is set from a value read from program memory. Theexpression pgm_read_byte(&table[brightness]); means to return the address of theentry in the table array at the index position given by brightness. Each entry in thetable is one byte, so another way to write this expression is:
pgm_read_byte(table + brightness);
If it is not clear why &table[brightness] is equivalent to table + brightness, don’tworry; use whichever expression makes more sense to you.
Another example is from Recipe 6.5, which used a table for converting an infraredsensor reading into distance. Here is the sketch from that recipe converted to use a tablein program memory instead of RAM:
/* ir-distance_Progmem sketch * prints distance & changes LED flash rate depending on distance from IR sensor * uses progmem for table */
#include <avr/pgmspace.h> // needed when using Progmem
// table entries are distances in steps of 250 millivoltsconst int TABLE_ENTRIES = 12;const int firstElement = 250; // first entry is 250 mVconst int interval = 250; // millivolts between each element// the following is the definition of the table in Program Memoryconst int distanceP[TABLE_ENTRIES] PROGMEM = { 150,140,130,100,60,50,40,35,30,25,20,15 };
// This function reads from Program Memory at the given indexint getTableEntry(int index){ int value = pgm_read_word(&distanceP[index]); return value;}
17.3 Storing and Retrieving Numeric Values in Program Memory | 539
www.it-ebooks.info

The remaining code is similar to Recipe 6.5, except that the getTableEntry function isused to get the value from program memory instead of accessing a table in RAM. Hereis the revised getDistance function from that recipe:
int getDistance(int mV){ if( mV > interval * TABLE_ENTRIES ) return getTableEntry(TABLE_ENTRIES-1); // the minimum distance else { int index = mV / interval; float frac = (mV % 250) / (float)interval; return getTableEntry(index) - ((getTableEntry(index) -getTableEntry(index+1)) * frac); }}
17.4 Storing and Retrieving Strings in Program MemoryProblemYou have lots of strings and they are consuming too much RAM. You want to movestring constants, such as menu prompts or debugging statements, out of RAM and intoprogram memory.
SolutionThis sketch creates a string in program memory and prints its value to the Serial Mon-itor. The amount of free RAM is printed using the function described in Recipe 17.2:
#include <avr/pgmspace.h> // for progmem
//create a string of 20 characters in progmemconst prog_uchar myText[] = "arduino duemilanove ";
void setup(){ Serial.begin(9600);}
void loop(){ Serial.print(memoryFree()); // print the free memory Serial.print(' '); // print a space
printP(myText); // print the string delay(1000);}
// function to print a PROGMEM stringvoid printP(const prog_uchar *str)
540 | Chapter 17: Advanced Coding and Memory Handling
www.it-ebooks.info

{char c;
while((c = pgm_read_byte(str++))) Serial.print(c,BYTE);}
// variables created by the build process when compiling the sketchextern int __bss_end;extern void *__brkval;
// function to return the amount of free RAMint memoryFree(){ int freeValue;
if((int)__brkval == 0) freeValue = ((int)&freeValue) - ((int)&__bss_end); else freeValue = ((int)&freeValue) - ((int)__brkval);
return freeValue;}
DiscussionStrings are particularly hungry when it comes to RAM. Each character uses a byte, soit is easy to consume large chunks of RAM if you have lots of words in strings in yoursketch.
The #include at the top is required for the code needed to access program memory:
#include <avr/pgmspace.h> // for progmem
Program memory string declarations begin with const prog_uchar followed by the nameof the string variable and then the string characters:
const prog_uchar myText[] = "arduino duemilanove "; //a string of 20 charactersin progmem
You can use the following expression to create a preprocessor macro that makes yourstring declarations easier to write. Add the following line to the top of the sketch:
#define P(name) const prog_uchar name[] PROGMEM // declare a PROGMEM string
Wherever you use P(name), the expression will be replaced with the full expansion. So,the following code would declare the same string as in the earlier sketch:
P(myTextP) = "arduino duemilanove "; //a string of 20 characters in progmem
(This uses a preprocessing macro, a subject not covered in this book, but you can findlinks to more information on the preprocessor in this chapter’s introduction section.)
17.4 Storing and Retrieving Strings in Program Memory | 541
www.it-ebooks.info

If you change the sketch to use a conventional RAM string, you will see that the freeRAM increases by at least 20 bytes:
char myText[] = "arduino duemilanove "; //a string of 20 characters
void setup(){ Serial.begin(9600);}
void loop(){ Serial.print(memoryFree()); // print the free memory Serial.print(' '); // print a space
Serial.print(myText); // print the string delay(1000);}
17.5 Using #define and const Instead of IntegersProblemYou want to minimize RAM usage by telling the compiler that the value is constant andcan be optimized.
SolutionUse const to declare values that are constant throughout the sketch.
For example, instead of:
int ledPin=13;
use:
const int ledPin=13;
DiscussionWe often want to use a constant value in different areas of code. Just writing the numberis a really bad idea. If you later want to change the value used, it’s difficult to work outwhich numbers scattered throughout the code also need to be changed. It is best to usenamed references.
Here are three different ways to define a value that is a constant:
int ledPin = 13; // a variable, but this wastes RAMconst int ledPin = 13; // a const does not use RAM#define ledPin 13 // using a #define // the preprocessor replaces ledPin with 13
pinMode(ledPin, OUTPUT);
542 | Chapter 17: Advanced Coding and Memory Handling
www.it-ebooks.info

Although the first two expressions look similar, the term const tells the compiler notto treat ledPin as an ordinary variable. Unlike the ordinary int, no RAM is reserved tohold the value for the const, as it is guaranteed not to change. The compiler will produceexactly the same code as if you had written:
pinMode(13, OUTPUT);
You will sometimes see #define used to define constants in older Arduino code, butconst is a better choice than #define. This is because a const variable has a type, whichenables the compiler to verify and report if the variable is being used in ways not ap-propriate for that type. The compiler will also respect C rules for the scope of a constvariable. A #define value will affect all the code in the sketch, which may be more thanyou intended. Another benefit of const is that it uses familiar syntax—#define does notuse the equals sign, and no semicolon is used at the end.
See AlsoSee this chapter’s introduction section for more on the preprocessor.
17.6 Using Conditional CompilationsProblemYou want to have different versions of your code that can be selectively compiled. Forexample, you may need code to work differently when debugging or when runningwith different boards.
SolutionYou can use the conditional statements aimed at the preprocessor to control how yoursketch is built.
This example from sketches in Chapter 15 includes the SPI.h library file that is onlyavailable for and needed with Arduino versions released after 0018:
#if ARDUINO > 18#include <SPI.h> // needed for Arduino versions later than 0018#endif
This example, using the sketch from Recipe 5.6, displays some debug statements onlyif DEBUG is defined:
/* Pot_Debug sketch blink an LED at a rate set by the position of a potentiometer Uses Serial port for debug if DEBUG is defined */
const int potPin = 0; // select the input pin for the potentiometerconst int ledPin = 13; // select the pin for the LED
17.6 Using Conditional Compilations | 543
www.it-ebooks.info

int val = 0; // variable to store the value coming from the sensor
#define DEBUG
void setup(){ Serial.begin(9600); pinMode(ledPin, OUTPUT); // declare the ledPin as an OUTPUT}
void loop() { val = analogRead(potPin); // read the voltage on the pot digitalWrite(ledPin, HIGH); // turn the ledPin on delay(val); // blink rate set by pot value digitalWrite(ledPin, LOW); // turn the ledPin off delay(val); // turn LED off for same period as it was turned on#if defined DEBUG Serial.println(val);#endif}
DiscussionThis recipe uses the preprocessor used at the beginning of the compile process to changewhat code is compiled. The first example tests if the value of the constant ARDUINO isgreater than 18, and if so, the file SPI.h is included. The value of the ARDUINO constantis defined in the build process and corresponds to the Arduino release version. Thesyntax for this expression is not the same as that used for writing a sketch. Expressionsthat begin with the # symbol are processed before the code is compiled—see this chap-ter’s introduction section for more on the preprocessor.
You have already come across #include:
#include <library.h>
The < > brackets tell the compiler to look for the file in the location for standardlibraries:
#include "header.h"
The compiler will also look in the sketch folder.
You can have a conditional compile based on the controller chip selected in the IDE.For example, the following code will produce different code when compiled for a Megaboard that reads the additional analog pins that it has:
/* * ConditionalCompile sketch * This sketch recognizes the controller chip using conditional defines */
int numberOfSensors;int val = 0; // variable to store the value coming from the sensor
544 | Chapter 17: Advanced Coding and Memory Handling
www.it-ebooks.info

void setup(){ Serial.begin(9600);
#if defined(__AVR_ATmega1280__) // defined when selecting Mega in the IDE numberOfSensors = 16; // the number of analog inputs on the Mega#else // if not Mega then assume a standard board numberOfSensors = 6; // analog inputs on a standard Arduino board#endif
Serial.print("The number of sensors is "); Serial.println(numberOfSensors);}
void loop() { for(int sensor = 0; sensor < numberOfSensors; sensor++) { val = analogRead(sensor); // read the sensor value Serial.println(val); // display the value } Serial.println(); delay(1000); // delay a second between readings}
See AlsoTechnical details on the C preprocessor are available at http://gcc.gnu.org/onlinedocs/gcc-2.95.3/cpp_1.html.
17.6 Using Conditional Compilations | 545
www.it-ebooks.info

CHAPTER 18
Using the Controller Chip Hardware
18.0 IntroductionThe Arduino platform simplifies programming by providing easy-to-use function callsto hide complex, low-level hardware functions. But some applications need to bypassthe friendly access functions to get directly at hardware, either because that’s the onlyway to get the needed functionality or because higher performance is required. Thischapter shows how to access and use hardware functions that are not fully exposedthrough the documented Arduino language.
Changing register values can change the behavior of some Arduinofunctions (e.g., millis). The low-level capabilities described in thischapter require care, attention, and testing if you want your code tofunction correctly.
RegistersRegisters are variables that refer to hardware memory locations. They are used by thechip to configure hardware functions or for storing the results of hardware operations.The contents of registers can be read and written by your sketch. Changing registervalues will change the way the hardware operates, or the state of something (such asthe output of a pin). Some registers represent a numerical value (the number a timerwill count to). Registers can control or report on hardware status; for example, the stateof a pin or if an interrupt has occurred. Registers are referenced in code using theirnames—these are documented in the data sheet for the microcontrollers. Setting aregister to a wrong value usually results in a sketch functioning incorrectly, so carefullycheck the documentation to ensure that you are using registers correctly.
547
www.it-ebooks.info

InterruptsInterrupts are signals that enable the controller chip to stop the normal flow of a sketchand handle a task that requires immediate attention before continuing with what it wasdoing. Arduino core software uses interrupts to handle incoming data from the serialport, to maintain the time for the delay and millis functions, and to trigger theattachInterrupt function. Libraries, such as Wire and Servo, use interrupts when anevent occurs, so the code doesn’t have to constantly check to see if the event has hap-pened. This constant checking, called polling, can complicate the logic of your sketch.Interrupts can be a reliable way to detect signals of very short duration. Recipe 18.2explains how to use interrupts to determine if a digital pin has changed state.
Two or more interrupts may occur before the handling of the first interrupt is comple-ted; for example, if two switches are pressed at the same time and each generates adifferent interrupt. The interrupt handler for the first switch must be completed beforethe second interrupt can get started. Interrupts should be brief, because an interruptroutine that takes too much time can cause other interrupt handlers to be delayed orto miss events.
Arduino services one interrupt at a time. It suspends pending interruptswhile it deals with an interrupt that has happened. Code to handle in-terrupts (called the interrupt handler, or interrupt service routine) shouldbe brief to prevent undue delays to pending interrupts. An interruptroutine that takes too much time can cause other interrupt handlers tomiss events. Activities that take a relatively long time, such as blinkingan LED or even serial printing, should be avoided in an interrupthandler.
TimersA standard Arduino board has three hardware timers for managing time-based tasks(the Mega has six). The timers are used in a number of Arduino functions:
Timer0Used for millis and delay; also analogWrite on pins 5 and 6
Timer1analogWrite functions on pins 9 and 10; also driving servos using the Servo library
Timer2analogWrite functions on pins 3 and 11
The Servo library uses the same timer as analogWrite on pins 9 and 10,so you can’t use analogWrite with these pins when using the Servolibrary.
548 | Chapter 18: Using the Controller Chip Hardware
www.it-ebooks.info

The Mega has three additional 16-bit timers and uses different pin numbers withanalogWrite:
Timer0analogWrite functions on pins 4 and 13
Timer1analogWrite functions on pins 11 and 12
Timer2analogWrite functions on pins 9 and 10
Timer3analogWrite functions on pins 2, 3, and 5
Timer4analogWrite functions on pins 6, 7, and 8
Timer5analogWrite functions on pins 45 and 46
Timers are counters that count pulses from a time source, called a timebase. The timerhardware consists of 8-bit or 16-bit digital counters that can be programmed to deter-mine the mode the timer uses to count. The most common mode is to count pulsesfrom the timebase on the Arduino board, usually 16 MHz derived from a crystal; 16MHz pulses repeat every 62.5 nanoseconds, and this is too fast for many timing appli-cations, so the timebase rate is reduced by a divider called a prescaler. Dividing thetimebase by 8, for example, increases the duration of each count to half a microsecond.For applications in which this is still too fast, other prescale values can be used (seeTable 18-1).
Timer operation is controlled by values held in registers that can be read and writtenby Arduino code. The values in these registers set the timer frequency (the number ofsystem timebase pulses between each count) and the method of counting (up, down,up and down, or using an external signal).
Here is an overview of the timer registers (n is the timer number):
Timer Counter Control Register A (TCCRnA)Determines the operating mode
Timer Counter Control Register B (TCCRnB)Determines the prescale value
Timer Counter Register (TCNTn)Contains the timer count
Output Compare Register A (OCRnA)Interrupt can be triggered on this count
Output Compare Register B (OCRnB)Interrupt can be triggered on this count
18.0 Introduction | 549
www.it-ebooks.info

Timer/Counter Interrupt Mask Register (TIMSKn)Sets the conditions for triggering an interrupt
Timer/Counter 0 Interrupt Flag Register (TIFRn)Indicates if the trigger condition has occurred
Table 18-1 is an overview of the bit values used to set the timer precision. Details ofthe functions of the registers are explained in the recipes where they are used.
Table 18-1. Timer prescale values (16 MHz clock)
Prescale factor CSx2, CSx1, CSx0 Precision Time to overflow
8-bit timer 16-bit timer
1 B001 62.5 ns 16 µs 4.096 ms
8 B010 500 ns 128 µs 32.768 ms
64 B011 4 µs 1,024 µs 262.144 ms
256 B100 16 µs 4,096 µs 1048.576 ms
1,024 B101 64 µs 16,384 µs 4194.304 ms
B110 External clock, falling edge
B111 External clock, rising edge
All timers are initialized for a prescale of 64.
Precision in nanoseconds is equal to the CPU period (time for one CPU cycle) multipliedby the prescale.
Analog and Digital PinsChapter 5 described the standard Arduino functions to read and write (to/from) digitaland analog pins. This chapter explains how you can control pins faster than using theArduino read and write functions and make changes to analog methods to improveperformance.
Some of the code in this chapter is more difficult to understand than the other recipesin this book, as it is moving beyond Arduino syntax and closer to the underlying hard-ware. These recipes work directly with the tersely named registers in the chip and usebit shifting and masking to manipulate bits in them. The benefit from this complexityis enhanced performance and functionality.
See AlsoOverview of hardware resources: http://code.google.com/p/arduino/wiki/HardwareResourceMap
Timer1 (and Timer3) library: http://www.arduino.cc/playground/Code/Timer1
Tutorial on timers and PWM: http://arduino.cc/en/Tutorial/SecretsOfArduinoPWM
550 | Chapter 18: Using the Controller Chip Hardware
www.it-ebooks.info

The Atmel ATmega 168/328 data sheets: http://www.atmel.com/dyn/resources/prod_documents/doc8271.pdf
Atmel application note on how to set up and use timers: http://www.atmel.com/dyn/resources/prod_documents/DOC2505.PDF
A thorough summary of information covering 8-bit timers: http://www.cs.mun.ca/~rod/Winter2007/4723/notes/timer0/timer0.html
Diagrams showing register settings for timer modes: http://web.alfredstate.edu/weimandn/miscellaneous/atmega168_subsystem/atmega168_subsystem_index.html
Wikipedia article on interrupts: http://en.wikipedia.org/wiki/Interrupts
18.1 Storing Data in Permanent EEPROM MemoryProblemYou want to store values that will be retained even when power is switched off.
SolutionUse the EEPROM library to read and write values in EEPROM memory. This sketchblinks an LED using values read from EEPROM and allows the values to be changedusing the Serial Monitor:
/* based on Blink without Delay uses EEPROM to store blink values */
#include <EEPROM.h>
// these values are saved in EEPROMconst byte EEPROM_ID = 0x99; // used to identify if valid data in EEPROMbyte ledPin = 13; // the number of the LED pinint interval = 1000; // interval at which to blink (milliseconds)
// variables that do not need to be savedint ledState = LOW; // ledState used to set the LEDlong previousMillis = 0; // will store last time LED was updated
//constants used to identify EEPROM addressesconst int ID_ADDR = 0; // the EEPROM address used to store the IDconst int PIN_ADDR = 1; // the EEPROM address used to store the pinconst int INTERVAL_ADDR = 2; // the EEPROM address used to store the interval
void setup(){ Serial.begin(9600); byte id = EEPROM.read(ID_ADDR); // read the first byte from the EEPROM if( id == EEPROM_ID)
18.1 Storing Data in Permanent EEPROM Memory | 551
www.it-ebooks.info

{ // here if the id value read matches the value saved when writing eeprom Serial.println("Using data from EEPROM"); ledPin = EEPROM.read(PIN_ADDR); byte hiByte = EEPROM.read(INTERVAL_ADDR); byte lowByte = EEPROM.read(INTERVAL_ADDR+1); interval = word(hiByte, lowByte); // see word function in Recipe 3.15 } else { // here if the ID is not found, so write the default data Serial.println("Writing default data to EEPROM"); EEPROM.write(ID_ADDR,EEPROM_ID); // write the ID to indicate valid data EEPROM.write(PIN_ADDR, ledPin); // save the pin in eeprom byte hiByte = highByte(interval); byte loByte = lowByte(interval); EEPROM.write(INTERVAL_ADDR, hiByte); EEPROM.write(INTERVAL_ADDR+1, loByte);
} Serial.print("Setting pin to "); Serial.println(ledPin,DEC); Serial.print("Setting interval to "); Serial.println(interval);
pinMode(ledPin, OUTPUT);}
void loop(){ // this is the same code as the BlinkWithoutDelay example sketch if (millis() - previousMillis > interval) { previousMillis = millis(); // save the last time you blinked the LED // if the LED is off turn it on and vice versa: if (ledState == LOW) ledState = HIGH; else ledState = LOW; digitalWrite(ledPin, ledState); // set LED using value of ledState } processSerial();}
// function to get duration or pin values from Serial Monitor// value followed by i is interval, p is pin numberint value = 0;
void processSerial(){ if( Serial.available()) { char ch = Serial.read(); if(ch >= '0' && ch <= '9') // is this an ascii digit between 0 and 9? {
552 | Chapter 18: Using the Controller Chip Hardware
www.it-ebooks.info

value = (value * 10) + (ch - '0'); // yes, accumulate the value } else if (ch == 'i') // is this the interval { interval = value; Serial.print("Setting interval to "); Serial.println(interval); byte hiByte = highByte(interval); byte loByte = lowByte(interval); EEPROM.write(INTERVAL_ADDR, hiByte); EEPROM.write(INTERVAL_ADDR+1, loByte); value = 0; // reset to 0 ready for the next sequence of digits } else if (ch == 'p') // is this the pin number { ledPin = value; Serial.print("Setting pin to "); Serial.println(ledPin,DEC); pinMode(ledPin, OUTPUT); EEPROM.write(PIN_ADDR, ledPin); // save the pin in eeprom value = 0; // reset to 0 ready for the next sequence of digits } }}
Open the Serial Monitor. As the sketch starts, it tells you whether it is using valuespreviously saved to EEPROM or defaults, if this is the first time the sketch is started.
You can change values by typing a number followed by a letter to indicate the action.A number followed by the letter i changes the blink interval; a number followed by ap changes the pin number for the LED.
DiscussionArduino contains EEPROM memory that will store values even when power is switchedoff. There are 512 bytes of EEPROM in a standard Arduino board, 4K bytes in a Mega.
The sketch uses the EEPROM library to read and write values in EEPROM memory.
Once the library is included in the sketch, an EEPROM object is available that accessesthe memory. The library provides methods to read, write, and clear. EEPROM.clear() is not used in this sketch because it erases all the EEPROM memory.
The EEPROM library requires you to specify the address in memory that you want toread or write. This means you need to keep track of where each value is written so thatwhen you access the value, it is from the correct address.
To write a value, you use EEPROM.write(address, value). The address is from 0 to 511(on a standard Arduino board), and the value is a single byte.
To read, you use EEPROM.read(address). The byte content of that memory address isreturned.
18.1 Storing Data in Permanent EEPROM Memory | 553
www.it-ebooks.info

The sketch stores three values in EEPROM. The first value stored is an ID value that isused only in setup to identify if the EEPROM has been previously written with validdata. If the value stored matches the expected value, the other variables are read fromEEPROM and used in the sketch. If it doesn’t match, this sketch has not been run onthis board (otherwise, the ID would have been written), so the default values are written,including the ID value.
The sketch monitors the serial port and new values received are written to EEPROM.
The sketch stores the ID value in EEPROM address 0, the pin number in address 1, andthe two bytes for the interval start in address 2. The following line writes the pin numberto EEPROM. The variable ledPin is a byte, so it fits into a single EEPROM address:
EEPROM.write(PIN_ADDR, ledPin); // save the pin in eeprom
Because interval is an int, it requires two bytes of memory to store the value:
byte hiByte = highByte(interval);byte loByte = lowByte(interval);EEPROM.write(INTERVAL_ADDR, hiByte);EEPROM.write(INTERVAL_ADDR+1, loByte);
The preceding code splits the value into two bytes that are stored in two consecutiveaddresses. Any additional variables to be added to EEPROM would need to be placedin addresses that follow these two bytes.
Here is the code used to rebuild the int variable from EEPROM:
ledPin = EEPROM.read(PIN_ADDR);byte hiByte = EEPROM.read(INTERVAL_ADDR);byte lowByte = EEPROM.read(INTERVAL_ADDR+1);interval = word(hiByte, lowByte);
See Chapter 3 for more on using the word expression to create an integer from two bytes.
For more complicated use of EEPROM, it is advisable to draw out a map of what isbeing saved where, to ensure that no address is used by more than one value, and thatmultibyte values don’t overwrite other information.
See AlsoRecipe 3.14 provides more information on converting 16- and 32-bit values into bytes.
18.2 Using Hardware InterruptsProblemYou want to perform some action when a digital pin changes value and you don’t wantto have to constantly check the pin state.
554 | Chapter 18: Using the Controller Chip Hardware
www.it-ebooks.info

SolutionThis sketch monitors pulses on pin 2 and stores the duration in an array. When thearray has been filled (64 pulses have been received), the duration of each pulse is dis-played on the Serial Monitor:
/* Interrupts sketch
see Recipe 10.1 for connection diagram */
const int irReceiverPin = 2; //pin the receiver is connected toconst int numberOfEntries = 64;
volatile unsigned long microseconds;volatile byte index = 0;volatile unsigned long results[numberOfEntries];
void setup(){ pinMode(irReceiverPin, INPUT); Serial.begin(9600); attachInterrupt(0, analyze, CHANGE); // encoder pin on interrupt 0 (pin 2); results[0]=0;}
void loop(){ if(index >= numberOfEntries) { Serial.println("Durations in Microseconds are:") ; for( byte i=0; i < numberOfEntries; i++) { Serial.println(results[i]); } while(1) ; } delay(1000);}
void analyze(){ if(index < numberOfEntries ) { if(index > 0) { results[index] = micros() - microseconds; } index = index + 1; } microseconds = micros();}
18.2 Using Hardware Interrupts | 555
www.it-ebooks.info

If you have an infrared receiver module, you can use the wiring in Recipe 10.1 to meas-ure the pulse width from an infrared remote control. You could also use the wiring inRecipe 6.12 to measure pulses from a rotary encoder or connect a switch to pin 2 (seeRecipe 5.1) to test with a pushbutton.
DiscussionIn setup the attachInterrupt(0, analyze, CHANGE); call enables the sketch to handleinterrupts. The first number in the call specifies which interrupt to initialize. On astandard Arduino board, two interrupts are available: number 0, which uses pin 2, andnumber 1 on pin 3. The Mega has four more: number 2, which uses pin 21, number 3on pin 20, number 4 on pin 19, and number 5 on pin 18.
The next parameter specifies what function to call (sometimes called an interrupt han-dler) when the interrupt event happens; analyze in this sketch.
The final parameter specifies what should trigger the interrupt. CHANGE means wheneverthe pin level changes (goes from low to high, or high to low). The other options are:
LOW: when the pin is lowRISING: when the pin goes from low to highFALLING: when the pin goes from high to low
When reading code that uses interrupts, bear in mind that it may not be obvious whenvalues in the sketch change, because the sketch does not directly call the interrupthandler; it’s called when the interrupt conditions occur.
In this sketch, the main loop checks the index variable to see if all the entries have beenset by the interrupt handler. Nothing in loop changes the value of index. index ischanged inside the analyze function when the interrupt condition occurs (pin 2 chang-ing state). The index value is used to store the time since the last state change into thenext slot in the results array. The time is calculated by subtracting the last time thestate changed from the current time in microseconds. The current time is then savedas the last time a change happened. (Chapter 12 describes this method for obtainingelapsed time using the millis function; here micros is used to get elapsed microsecondsinstead of milliseconds.)
The variables that are changed in an interrupt function are declared as volatile; thislets the compiler know that the values could change at any time (by an interrupt han-dler). Without using the volatile keyword, the compiler would think these variablesare not being changed by any code getting called and would replace these variables withconstant values.
Each time an interrupt is triggered, index is incremented and the current time is saved.The time difference is calculated and saved in the array (except for the first time theinterrupt is triggered, when index is 0). When the maximum number of entries hasoccurred, the inner block in loop runs, and it prints out all the values to the serial port.
556 | Chapter 18: Using the Controller Chip Hardware
www.it-ebooks.info

The code stays in the while loop at the end of the inner block, so you need to reset theboard when you want to do another run.
See AlsoRecipe 6.12 has an example of external interrupts used to detect movement in a rotaryencoder.
18.3 Setting Timer DurationProblemYou want to do something at periodic intervals, and you don’t want to have your codeconstantly checking if the interval has elapsed. You would like to have a simple interfacefor setting the period.
SolutionThe easiest way to use a timer is through a library. The following sketch uses theMsTimer2 library (http://www.arduino.cc/playground/Main/MsTimer2) to generate apulse with a period that can be set using the Serial Monitor. This sketch flashes pin 13at a rate that can be set using the Serial Monitor:
/* pulseTimer2 pulse a pin at a rate set from serial input */
#include <MsTimer2.h>
const int pulsePin = 13;
int period = 100; // 10 millisecondsboolean output = HIGH; // the state of the pulse pin
void setup(){ pinMode(pulsePin, OUTPUT); Serial.begin(9600);
MsTimer2::set(period/2, flash); MsTimer2::start();
period= 0; // reset to zero ready for serial input}
void loop(){ if( Serial.available()) { char ch = Serial.read();
18.3 Setting Timer Duration | 557
www.it-ebooks.info

if(ch >= '0' && ch <= '9') // is this an ascii digit between 0 and 9? { period = (period * 10) + (ch - '0'); // yes, accumulate the value } else if (ch == 10) // is the character the newline character { Serial.println(period); MsTimer2::set(period/2, flash); MsTimer2::start(); period = 0; // reset to 0 ready for the next sequence of digits } }
}
void flash(){ digitalWrite(pulsePin, output); output = !output; // invert the output}
DiscussionEnter digits for the desired period in milliseconds using the Serial Monitor. The sketchaccumulates the digits and divides the received value by 2 to calculate the duration ofthe on and off states (the period is the sum of the on time and off time, so the smallestvalue you can use is 2). Bear in mind that an LED flashing very quickly may not appearto be flashing to the human eye.
This library uses Timer2, so it will prevent operation of analogWrite onpins 3 and 11.
This library enables you to use Timer2 by providing the timing interval and the nameof the function to call when the interval has elapsed:
MsTimer2::set(period/2, flash);
This sets up the timer. The first parameter is the time for the timer to run in milliseconds.The second parameter is the function to call when the timer gets to the end of that time(the function is named flash in this recipe):
MsTimer2::start();
As the name implies, start starts the timer running. Another method, named stop,stops the timer.
As in Recipe 18.2, the sketch code does not directly call the function to perform theaction. The LED is turned on and off in the flash function that is called by MsTimer2
558 | Chapter 18: Using the Controller Chip Hardware
www.it-ebooks.info

each time it gets to the end of its time setting. The code in loop deals with any serialmessages and changes the timer settings based on it.
Using a library to control timers is much easier than accessing the registers directly.Here is an overview of the inner workings of this library: Timers work by constantlycounting to a value, signaling that they have reached the value, then starting again.Each timer has a prescaler that determines the counting frequency. The prescaler dividesthe system timebase by a factor such as 1, 8, 64, 256, or 1,024. The lower the prescalefactor, the higher the counting frequency and the quicker the timebase reaches itsmaximum count. The combination of how fast to count, and what value to count to,gives the time for the timer. Timer2 is an 8-bit timer; this means it can count up to 255before starting again from zero. (Timer1 and Timers 3, 4, and 5 on the Mega use 16bits and can count up to 65,535.)
The MsTimer2 library uses a prescale factor of 64. On a 16 MHz Arduino board, eachCPU cycle is 62.5 nanoseconds long, and when this is divided by the prescale factor of64, each count of the timer will be 40,000 nanoseconds (62.5 * 64 = 40,000, which isfour microseconds).
Remember that when you directly use a timer in your sketch, built-infunctions that use that timer, such as analogWrite, may no longer workcorrectly.
See AlsoAn easy-to-use library for interfacing with Timer2: http://www.arduino.cc/playground/Main/MsTimer2
A collection of routines for interfacing with Timer1 (also Timer3 on the Mega): http://www.arduino.cc/playground/Code/Timer1
18.4 Setting Timer Pulse Width and DurationProblemYou want Arduino to generate pulses with a duration and width that you specify.
SolutionThis sketch generates pulses within the frequency range of 1 MHz to 1 Hz using Timer1PWM on pin 9:
#include <TimerOne.h>
#define pwmRegister OCR1A // the logical pin, can be set to OCR1Bconst int outPin = 9; // the physical pin
18.4 Setting Timer Pulse Width and Duration | 559
www.it-ebooks.info

long period = 10000; // the period in microsecondslong pulseWidth = 1000; // width of a pulse in microseconds
int prescale[] = {0,1,8,64,256,1024}; // the range of prescale values
void setup(){ Serial.begin(9600); pinMode(outPin, OUTPUT); Timer1.initialize(period); // initialize timer1, 1000 microseconds setPulseWidth(pulseWidth);}
void loop(){}
bool setPulseWidth(long microseconds){ bool ret = false;
int prescaleValue = prescale[Timer1.clockSelectBits]; // calculate time per counter tick in nanoseconds long precision = (F_CPU / 128000) * prescaleValue ; period = precision * ICR1 / 1000; // period in microseconds if( microseconds < period) { int duty = map(microseconds, 0,period, 0,1024); if( duty < 1) duty = 1; if(microseconds > 0 && duty < RESOLUTION) { Timer1.pwm(outPin, duty); ret = true; } } return ret;}
DiscussionYou set the pulse period to a value from 1 to 1 million microseconds by setting thevalue of the period at the top of the sketch. You can set the pulse width to any value inmicroseconds that is less than the period by setting the value of pulseWidth.
The sketch uses the Timer1 library from http://www.arduino.cc/playground/Code/Timer1.
Timer1 is a 16-bit timer (it counts from zero to 65,535). It’s the same timer used byanalogWrite to control pins 9 and 10 (so you can’t use this library and analogWrite onthose pins at the same time). The sketch generates a pulse on pin 9 with a period and
560 | Chapter 18: Using the Controller Chip Hardware
www.it-ebooks.info

pulse width given by the values of the variables named period and pulseWidth. If youwant to use pin 10 instead of pin 9, you can make the following change:
#define pwmRegister OCR1B // the logical pinconst int outPin = 10; // the physical pin - OCRIB is pin 10
OCR1A and OCR1B are constants that are defined in the code included by the Arduino coresoftware (OCR stands for Output Compare Register). Many different hardware regis-ters in the Arduino hardware are not usually needed by a sketch (the friendly Arduinocommands hide the actual register names). But when you need to access the hardwaredirectly to get at functionality not provided by Arduino commands, these registers needto be accessed. Full details on the registers are in the Atmel data sheet for the chip.
The sketch in this recipe’s Solution uses the following registers:
ICR1 (Input Compare Register for Timer1) determines the period of the pulse. Thisregister contains a 16-bit value which is used as the maximum count for the timer.When the timer count reaches this value it will be reset and start counting again fromzero. In the sketch in this recipe’s Solution, if each count takes one microsecond andthe ICR1 value is set to 1000, the duration of each count cycle is 1,000 microseconds.
OCR1A (or OCR1B depending on which pin you want to use) is the Output CompareRegister for Timer1. When the timer count reaches this value (and the timer is in PWMmode as it is here), the output pin will be set low—this determines the pulse width.For example, if each count takes one microsecond and the ICR1 value is set to 1000 andOCR1A is set to 100, the output pin will be HIGH for 100 microseconds and LOW for 900microseconds (the total period is 1,000 microseconds).
The duration of each count is determined by the Arduino controller timebase frequency(typically 16 MHz) and the prescale value. The prescale is the value that the timebaseis divided by. For example, with a prescale of 64, the timebase will be four microsec-onds.
The Timer1 library has many useful capabilities—see the Playground article for details—but it does not provide for the setting of a specific pulse width. This functionality isadded by the function named setPulseWidth.
This function uses a value of ICR1 to determine the period:
int prescaleValue = prescale[Timer1.clockSelectBits];
The prescale value is set by a variable in the library named clockSelectBits. This var-iable contains a value between 1 and 7—this is used as an index into the prescale arrayto get the current prescale factor.
The duration for each count (precision) is calculated by multiplying the prescale valueby the duration of a timebase cycle:
long precision = (F_CPU / 128000) * prescaleValue ; // time percounter tick in ns
18.4 Setting Timer Pulse Width and Duration | 561
www.it-ebooks.info

The period is the precision times the value of the ICR1 register; it’s divided by 1,000 togive the duration in microseconds:
period = precision * ICR1 / 1000; // period in microseconds
The Timer1 library has a function named pwm that expects the duty cycle to be enteredas a ratio expressed by a value from 1 to 1,023 (where 1 is the shortest pulse and 1,023is the longest). This value is calculated using the Arduino map function to scale themicroseconds given for the period into a proportional value of the period that rangesfrom 1 to 1,023:
int duty = map(microseconds, 0,period, 1,1023);
18.5 Creating a Pulse GeneratorProblemYou want to generate pulses from Arduino and control the characteristics from theSerial Monitor.
SolutionThis is an enhanced version of Recipe 18.4 that enables the frequency, period, pulsewidth, and duty cycle to be set from the serial port:
#include <TimerOne.h>
const char SET_PERIOD_HEADER = 'p';const char SET_FREQUENCY_HEADER = 'f';const char SET_PULSE_WIDTH_HEADER = 'w';const char SET_DUTY_CYCLE_HEADER = 'c';
#define pwmRegister OCR1A // the logical pin, can be set to OCR1Bconst int outPin = 9; // the physical pin
long period = 1000; // the period in microsecondsint duty = 512; // duty as a range from 0 to 1024, 512 is 50% duty cycle
int prescale[] = {0,1,8,64,256,1024}; // the range of prescale values
void setup(){ Serial.begin(9600); pinMode(outPin, OUTPUT); Timer1.initialize(period); // initialize timer1, 1000 microseconds Timer1.pwm(9, duty); // setup pwm on pin 9, 50% duty cycle}
void loop(){
562 | Chapter 18: Using the Controller Chip Hardware
www.it-ebooks.info

processSerial();}
void processSerial(){ static long val = 0;
if ( Serial.available()) { char ch = Serial.read();
if(ch >= '0' && ch <= '9') // is ch a number? { val = val * 10 + ch - '0'; // yes, accumulate the value } else if(ch == SET_PERIOD_HEADER) { period = val; Serial.print("Setting period to "); Serial.println(period); Timer1.setPeriod(period); Timer1.setPwmDuty(outPin, duty); // don't change the duty cycle show(); val = 0; } else if(ch == SET_FREQUENCY_HEADER) { if(val > 0) { Serial.print("Setting frequency to "); Serial.println(val); period = 1000000 / val; Timer1.setPeriod(period); Timer1.setPwmDuty(outPin, duty); // don't change the duty cycle } show(); val = 0; } else if(ch == SET_PULSE_WIDTH_HEADER) { if( setPulseWidth(val) ) { Serial.print("Setting Pulse width to "); Serial.println(val); } else Serial.println("Pulse width too long for current period"); show(); val = 0; } else if(ch == SET_DUTY_CYCLE_HEADER) { if( val >0 && val < 100) { Serial.print("Setting Duty Cycle to "); Serial.println(val);
18.5 Creating a Pulse Generator | 563
www.it-ebooks.info

duty = map(val,1,99, 1, ICR1); pwmRegister = duty; show(); } val = 0; } }}
bool setPulseWidth(long microseconds){ bool ret = false;
int prescaleValue = prescale[Timer1.clockSelectBits]; // calculate time per tick in ns long precision = (F_CPU / 128000) * prescaleValue ; period = precision * ICR1 / 1000; // period in microseconds if( microseconds < period) { duty = map(microseconds, 0,period, 0,1024); if( duty < 1) duty = 1; if(microseconds > 0 && duty < RESOLUTION) { Timer1.pwm(outPin, duty); ret = true; } } return ret;}
void show(){ Serial.print("The period is "); Serial.println(period); Serial.print("Duty cycle is "); // pwmRegister is ICR1A or ICR1B Serial.print( map( pwmRegister, 0,ICR1, 1,99)); Serial.println("%"); Serial.println();}
DiscussionThis sketch is based on Recipe 18.4, with the addition of serial code to interpret com-mands to receive and set the frequency, period, pulse width, and duty cycle percent.Chapter 4 explains the technique used to accumulate the variable val that is then usedfor the desired parameter, based on the command letter.
You can add this function if you want to print instructions to the serial port:
void instructions(){
564 | Chapter 18: Using the Controller Chip Hardware
www.it-ebooks.info

Serial.println("Send values followed by one of the following tags:"); Serial.println(" p - sets period in microseconds"); Serial.println(" f - sets frequency in Hz"); Serial.println(" w - sets pulse width in microseconds"); Serial.println(" c - sets duty cycle in %"); Serial.println("\n(duty cycle can have one decimal place)\n");}
See AlsoRecipe 18.4
18.6 Changing a Timer’s PWM FrequencyProblemYou need to increase or decrease the Pulse Width Modulation (PWM) frequency usedwith analogWrite (see Chapter 7). For example, you are using analogWrite to control amotor speed and there is an audible hum because the PWM frequency is too high, oryou are multiplexing LEDs and the light is uneven because PWM frequency is too low.
SolutionYou can adjust the PWM frequency by changing a register value. The register valuesand associated frequencies are shown in Table 18-2.
Table 18-2. Adjustment values for PWM
Timer0 (pins 5 and 6)
TCCR0B valuePrescale factor(divisor) Frequency
32 (1) 1 62500
33 (2) 8 7812.5
34 64 976.5625
35 256 244.140625
36 1,024 61.03515625
Timer1 (pins 9 and 10)
TCCR1B prescalevalue
Prescale factor(divisor) Frequency
1 1 312500
2 8 3906.25
3 64 488.28125
4 256 122.0703125
5 1,024 30.517578125
18.6 Changing a Timer’s PWM Frequency | 565
www.it-ebooks.info

Timer2 (pins 11 and 3)
TCCR2B valuePrescale factor(divisor) Frequency
1 1 312500
2 8 3906.25
3 64 488.28125
4 256 122.0703125
5 1,024 30.517578125
All frequencies are in hertz and assume a 16 MHz system timebase. The default prescalefactor of 64 is shown in bold.
This sketch enables you to select a timer frequency from the Serial Monitor. Enter adigit from 1 to 7 using the value in the lefthand column of Table 18-2 and follow thiswith character a for Timer0, b for Timer1, and c for Timer2:
const byte mask = B11111000; // mask bits that are not prescale valuesint prescale = 0;
void setup(){ Serial.begin(9600); analogWrite(3,128); analogWrite(5,128); analogWrite(6,128); analogWrite(9,128); analogWrite(10,128); analogWrite(11,128);}
void loop(){ if ( Serial.available()) { char ch = Serial.read(); if(ch >= '0' && ch <= '9') // is ch a number? { prescale = ch - '0'; } else if(ch == 'a') // timer 0; { TCCR0B = (TCCR0B & mask) | prescale; } else if(ch == 'b') // timer 1; { TCCR1B = (TCCR1B & mask) | prescale; }
566 | Chapter 18: Using the Controller Chip Hardware
www.it-ebooks.info

else if(ch == 'c') // timer 2; { TCCR2B = (TCCR2B & mask) | prescale; } }}
Avoid changing the frequency of Timer0 (used for analogWrite pins 5and 6) because it will result in incorrect timing using delay and millis.
DiscussionIf you just have LEDs connected to the analog pins in this sketch, you will not see anynoticeable change to the brightness as you change the PWM speed. You are changingthe speed as they are turning on and off, not the ratio of the on/off time. If this is unclear,see the introduction to Chapter 7 for more on PWM.
You change the PWM frequency of a timer by setting the TCCRnB register where n is theregister number. On a Mega board you also have TCCR3B, TCCR4B, and TCCR5B for timers3 through 5.
All analog output (PWM) pins on a timer use the same frequency, sochanging timer frequency will affect all output pins for that timer.
18.7 Counting PulsesProblemYou want to count the number of pulses occurring on a pin. You want this count to bedone completely in hardware without any software processing time being consumed.
SolutionUse the pulse counter built into the Timer1 hardware:
/* * HardwareCounting sketch * * uses pin 5 on 168/328, pin 47 on Mega */
unsigned int count;
unsigned int getCount()
18.7 Counting Pulses | 567
www.it-ebooks.info

{ TCCR1B= 0 ; // Gate Off / Counter Tn stopped count = TCNT1; TCNT1 = 0;
bitSet(TCCR1B ,CS12); // Counter Clock source is external pin bitSet(TCCR1B ,CS11); // Clock on rising edge bitSet(TCCR1B ,CS10); // you can clear this bit for falling edge
return count;}
void setup(){ Serial.begin(9600); digitalWrite(5, HIGH); // hardware counter setup (see ATmega data sheet for details) TCCR1A=0; // reset timer/counter control register A getCount(); // this will start the clock}
void loop(){ delay(1000); Serial.println(getCount());}
For the Mega, change TCCR1A to TCCR5A and TCCR1B to TCCR5B, and connect input topin 47.
DiscussionYou can test this sketch by connecting the serial receive pin (pin 0) to the input pin (pin5 on a standard Arduino board). Each character sent should show an increase in thecount. If you have two Arduino boards, you can run one of the pulse generator sketchesfrom previous recipes in this chapter and connect the pulse output (pin 9) to the input.
Hardware pulse counting uses a pin that is internally wired within thehardware and cannot be changed. Use pin 5 on a standard Arduinoboard, pin 47 on the Mega.
The line TCCR1A=0; in setup clears the register TCCR1A so that it is ready to start counting.
Calling getCount() returns the current count, resets the count, and starts countingagain.
In loop the current count is printed once per second. If no pulses are detected onpin 5, the values will be 0.
568 | Chapter 18: Using the Controller Chip Hardware
www.it-ebooks.info

See AlsoThe FrequencyCounter library using the method discussed in this recipe: http://interface.khm.de/index.php/lab/experiments/arduino-frequency-counter-library/
18.8 Measuring Pulses More AccuratelyProblemYou want to measure the period between pulses or the duration of the on or off timeof a pulse. You need this as accurate as possible, so you don’t want any delay due tocalling an interrupt handler (as in Recipe 18.2), as this will affect the measurements.
SolutionUse the hardware pulse measuring capability built into the Timer1 hardware:
/* * InputCapture * uses timer hardware to measure pulses on pin 8 */
const int inputCapturePin = 8; // input pin cannot be changed
const int prescale = 8; // prescale factor (each tick 0.5 us @16MHz)const byte prescaleBits = B010; // see Table 18-1 or Datasheet// calculate time per counter tick in nsconst long precision = (1000000/(F_CPU/1000)) * prescale ;
const int numberOfEntries = 64; // the number of pulses to measure
volatile byte index = 0;volatile unsigned int results[numberOfEntries]; // note this is 16 bit value
/* ICR interrupt vector */ISR(TIMER1_CAPT_vect){ TCNT1 = 0; // reset the counter if( index != 0 || bitRead(TCCR1B ,ICES1) == true) // wait for rising edge { // falling edge was detected results[index] = ICR1; // save the input capture value index = index + 1; } TCCR1B ^= _BV(ICES1); // toggle bit to trigger on the other edge}
void setup() { Serial.begin(9600); pinMode(inputCapturePin, INPUT); // ICP pin (digital pin 8 on Arduino) as input
TCCR1A = 0 ; // Normal counting mode TCCR1B = prescaleBits ; // set prescale bits
18.8 Measuring Pulses More Accurately | 569
www.it-ebooks.info

TCCR1B |= _BV(ICES1); // enable input capture
bitSet(TIMSK1,ICIE1); // enable input capture interrupt for timer 1 Serial.println( precision); // report duration of each tick in microseconds}
// this loop prints the number of pulses in the last second, showing min and maxpulse widthsvoid loop() { if(index >= numberOfEntries) { Serial.println("Durations in Microseconds are:") ; for( byte i=0; i < numberOfEntries; i++) { long duration; duration = results[i] * precision; // pulse duration in nanoseconds Serial.println(duration / 1000); // duration in microseconds } while(1) // loop so the print statements are executed once only ; }}
DiscussionThis sketch uses a timer facility called Input Capture to measure the duration of a pulse.Only 16-bit timers support this capability and this only works with pin 8 on a standard Arduino board.
Input Capture uses a pin that is internally wired within the hardwareand cannot be changed. Use pin 8 on a standard Arduino board and pin48 on a Mega (using Timer5).
Because Input Capture is implemented entirely in the controller chip hardware, no timeis wasted in interrupt handling, so this technique is more accurate for very short pulses(less than tens of microseconds).
If the count goes higher than the maximum value for the timer, you can monitor over-flow to increment a variable to extend the counting range. The following code incre-ments a variable named overflow each time the counter overflows:
volatile int overflows = 0;
/* Overflow interrupt vector */ISR(TIMER1_OVF_vect) // here if no input pulse detected{ overflows++; // increment overflow count}
570 | Chapter 18: Using the Controller Chip Hardware
www.it-ebooks.info

Change the code in setup as follows:
TIMSK1 = _BV(ICIE1); // enable input capture interrupt for timer 1 TIMSK1 |= _BV(TOIE1); // Add this line to enable overflow interrupt
18.9 Measuring Analog Values QuicklyProblemYou want to read an analog value as quickly as possible without decreasing theaccuracy.
SolutionYou can increase the analogRead sampling rate by changing register values that deter-mine the sampling frequency:
const int sensorPin = 0; //pin the receiver is connected toconst int numberOfEntries = 100;
unsigned long microseconds;unsigned long duration;
int results[numberOfEntries];
void setup(){ Serial.begin(9600);
// standard analogRead performance (prescale = 128) microseconds = micros(); for(int i = 0; i < numberOfEntries; i++) { results[i] = analogRead(sensorPin); } duration = micros() - microseconds; Serial.print(numberOfEntries); Serial.print(" readings took "); Serial.println(duration);
// running with high speed clock (set prescale to 16) bitClear(ADCSRA,ADPS0) ; bitClear(ADCSRA,ADPS1) ; bitSet(ADCSRA,ADPS2) ; microseconds = micros(); for(int i = 0; i < numberOfEntries; i++) { results[i] = analogRead(sensorPin); } duration = micros() - microseconds; Serial.print(numberOfEntries); Serial.print(" readings took "); Serial.println(duration);
18.9 Measuring Analog Values Quickly | 571
www.it-ebooks.info

}
void loop(){}
Running the sketch on a 16 MHz Arduino will produce output similar to the following:
100 readings took 11308100 readings took 1704
DiscussionanalogRead takes around 110 microseconds to complete a reading. This may not be fastenough for rapidly changing values, such as capturing the higher range of audio fre-quencies. The sketch measures the time in microseconds for the standard analogReadand then adjusts the timebase used by the analog-to-digital converter (ADC) to performthe conversion faster. With a 16 MHz board, the timebase rate is increased from125 KHz to 1 MHz. The actual performance improvement is slightly less than eighttimes because there is some overhead in the Arduino analogRead function that is notimproved by the timebase change. The reduction of time from 113 microseconds to 17microseconds is a significant improvement.
The ADCSRA register is used to configure the ADC, and the bits set in the sketch(ADPS0, ADPS1, and ADPS2) set the ADC clock divisor to 16.
See AlsoAtmel has an application note that provides a detailed explanation of performanceaspects of the ADC: http://www.atmel.com/dyn/resources/prod_documents/DOC2559.PDF
18.10 Reducing Battery DrainProblemYou want to reduce the power used by your application by shutting down Arduinountil a period of time has elapsed or until an external event takes place.
SolutionThis solution uses a library by Arduino guru Peter Knight. You can download the libraryfrom http://code.google.com/p/narcoleptic/:
#include <Narcoleptic.h>
void setup() { pinMode(2,INPUT); digitalWrite(2,HIGH); pinMode(13,OUTPUT);
572 | Chapter 18: Using the Controller Chip Hardware
www.it-ebooks.info

digitalWrite(13,LOW);}
void loop() { int a;
// Merlin the cat is snoozing... Connect digital pin 2 to ground to wake him up. Narcoleptic.delay(500); // During this time power consumption is minimized
while (digitalRead(2) == LOW) { // Wake up CPU. Unfortunately, Merlin does not like waking up.
// Swipe claws left digitalWrite(13,HIGH); delay(50);
// Swipe claws right digitalWrite(13,LOW); delay(50); }
// Merlin the cat goes to sleep...}
DiscussionA standard Arduino board would run down a 9-volt alkaline battery in a few weeks(the Duemilanove typically draws more than 25 milliamperes [mA], excluding any ex-ternal devices that may be connected). You can reduce this consumption by half if youuse a board that does not have a built-in USB interface chip, such as the Arduino Mini,LilyPad, Fio, or one of the Modern Device Bare Bones Boards that require the use ofan external USB interface for uploading sketches. Significantly greater power savingscan be achieved if your application can suspend operation for a period of time—Arduino hardware can be put to sleep for a preset period of time or until a pin changesstate, and this reduces the power consumption of the chip to less than one one-hundredth of 1 percent (from around 15 mA to around 0.001 mA) during sleep.
The library used in this recipe provides easy access to the hardware sleep function. Thesleep time can range from 16 to 8,000 milliseconds (eight seconds). To sleep for longerperiods you can repeat the delay intervals until you get the period you want:
void longDelay(long milliseconds){ while(milliseconds > 0) { if(milliseconds > 8000) { milliseconds -= 8000; Narcoleptic.delay(8000); } else { Narcoleptic.delay(milliseconds);
18.10 Reducing Battery Drain | 573
www.it-ebooks.info

break; }
}}
Sleep mode can reduce the power consumption of the controller chip, but if you arelooking to run for as long as possible on a battery, you should minimize current drainthrough external components such as inefficient voltage regulators, pull-up or pull-down resistors, LEDs, and other components that draw current when the chip is insleep mode.
See AlsoSee the Arduino hardware page for links to information on the LilyPad and Fio boards:http://www.arduino.cc/en/Main/Hardware
For an example of very low power operation, see http://interface.khm.de/index.php/lab/experiments/sleep_watchdog_battery/.
18.11 Setting Digital Pins QuicklyProblemYou need to set or clear digital pins much faster than enabled by the Arduino digitalWrite command.
SolutionArduino digitalWrite provides a safe and easy-to-use method of setting and clearingpins, but it is more than 30 times slower than directly accessing the controller hardware.You can set and clear pins by directly setting bits on the hardware registers that arecontrolling digital pins.
This sketch uses direct hardware I/O to send Morse code (the word arduino) to an AMradio tuned to approximately 1 MHz. The technique used here is 30 times faster thanArduino digitalWrite:
/* * Morse sketch * * Direct port I/O used to send AM radio carrier at 1MHz */
const int sendPin = 2;
const byte WPM = 12; // sending speed in words per minuteconst long repeatCount = 1200000 / WPM; // count used to determinethe duration of dots and dashesconst byte dot = 1;
574 | Chapter 18: Using the Controller Chip Hardware
www.it-ebooks.info

const byte dash = 3;const byte gap = 3;const byte wordGap = 7;
byte letter = 0; // the letter to send
char *arduino = ".- .-. -.. ..- .. -. ---";
void setup(){ pinMode(sendPin, OUTPUT); Serial.begin(9600);}
void loop(){ sendMorse(arduino); delay(2000);}
void sendMorse(char * string){ letter = 0 ; while(string[letter]!= 0) { if(string[letter] == '.') { sendDot(); } else if(string[letter] == '-') { sendDash(); } else if(string[letter] == ' ') { sendGap(); } else if(string[letter] == 0) { sendWordGap(); } letter = letter+1; }}
void sendDot(){ transmitCarrier( dot * repeatCount); sendGap();}
void sendDash(){
18.11 Setting Digital Pins Quickly | 575
www.it-ebooks.info

transmitCarrier( dash * repeatCount); sendGap();}
void sendGap(){ transmitNoCarrier( gap * repeatCount);}
void sendWordGap(){ transmitNoCarrier( wordGap * repeatCount);}
void transmitCarrier(long count){ while(count--) { bitSet(PORTD, sendPin); bitSet(PORTD, sendPin); bitSet(PORTD, sendPin); bitSet(PORTD, sendPin); bitClear(PORTD, sendPin); }}
void transmitNoCarrier(long count){ while(count--) { bitClear(PORTD, sendPin); bitClear(PORTD, sendPin); bitClear(PORTD, sendPin); bitClear(PORTD, sendPin); bitClear(PORTD, sendPin); }}
Connect one end of a piece of wire to pin 2 and place the other end near the antennaof a medium wave AM radio tuned to 1 MHz (1,000 KHz).
DiscussionThe sketch generates a 1 MHz signal to produce dot and dash sounds that can bereceived by an AM radio tuned to this frequency. The frequency is determined by theduration of the bitSet and bitClear commands that set the pin HIGH and LOW to generatethe radio signal. bitSet and bitClear are not functions, they are macros. Macros sub-stitute an expression for executable code—in this case, code that changes a single bitin register PORTD given by the value of sendPin.
Digital pins 0 through 7 are controlled by the register named PORTD. Each bit in PORTDcorresponds to a digital pin. Pins 8 through 13 are on register PORTB, and pins 14 through
576 | Chapter 18: Using the Controller Chip Hardware
www.it-ebooks.info

19 are on PORTA. The sketch uses the bitSet and bitClear commands to set and clearbits on the port (see Recipe 3.12). Each register supports up to eight bits (although notall bits correspond to Arduino pins). If you want to use Arduino pin 13 instead of pin2, you need to set and clear PORTB as follows:
const int sendPin = 13;
bitSet(PORTB, sendPin - 8);bitClear(PORTB, sendPin - 8);
You subtract 8 from the value of the pin because bit 0 of the PORTB register is pin 8, bit1 is pin 9, and so on, to bit 5 controlling pin 13.
Setting and clearing bits using bitSet is done in a single instruction of the Arduinocontroller. On a 16 MHz Arduino, that is 62.5 nanoseconds. This is around 30 timesfaster than using digitalWrite.
The transmit functions in the sketch actually need more time updating and checkingthe count variable than it takes to set and clear the register bits, which is why thetransmitCarrier function has four bitSet commands and only one bitClearcommand—the additional bitClear commands are not needed because of the time ittakes to update and check the count variable.
18.11 Setting Digital Pins Quickly | 577
www.it-ebooks.info

APPENDIX A
Electronic Components
If you are just starting out with electronic components, you may want to purchase abeginner’s starter kit that contains the basic components needed for many of the recipesin this book. These usually include the most common resistors, capacitors, transistors,diodes, LEDs, and switches.
Here are some popular choices:
Maker Shed Arduino starter kithttp://www.makershed.com/ProductDetails.asp?ProductCode=MSGSA
Starter Kit for Arduino-Flex (SKU: DEV-09952)http://www.sparkfun.com/commerce/product_info.php?products_id=9952
Adafruit Starter Pack for Arduino-1.0 (product ID #68)http://www.adafruit.com/index.php?main_page=product_info&products_id=68
Oomlout Starter Kit for Arduino (ARDX)http://oomlout.co.uk/arduino-experimentation-kit-ardx-p-183.html
Seeeduino Catalyst Packhttp://www.seeedstudio.com/depot/super-seeeduino-catalyst-pack-p-257.html
You can also purchase the individual components for your project, as shown in Fig-ure A-1. The following sections provide an overview of common electroniccomponents—part numbers can be found on this book’s website.
CapacitorCapacitors store an electrical charge for a short time and are used in digital circuits tofilter (smooth out) dips and spikes in electrical signals. The most commonly used ca-pacitor is the nonpolarized ceramic capacitor; for example, a 100nF disc capacitor usedfor decoupling (reducing noise spikes). Electrolytic capacitors can generally store morecharge than ceramic caps and are used for higher current circuits, such as powersupplies and motor circuits. Electrolytic capacitors are usually polarized, and the neg-
579
www.it-ebooks.info

ative leg (marked with a minus sign) must be connected to ground (or to a point withlower voltage than the positive leg). Chapter 8 contains examples showing how capac-itors are used in motor circuits.
DiodeDiodes permit current to flow in one direction and block it in the other direction. Mostdiodes have a band (see Figure A-1) to indicate the cathode (negative) end.
Diodes such as the 1N4148 can be used for low-current applications such as the levelsused on Arduino digital pins. The 1N4001 diode is a good choice for higher currents(up to 1 amp).
Figure A-1. Schematic representation of common components
580 | Appendix A: Electronic Components
www.it-ebooks.info

Integrated CircuitIntegrated circuits contain electronic components packaged together in a convenientchip. These can be complex, like the Arduino controller chip that contains thousandsof transistors, or as simple as the optical isolator component used in Chapter 10 thatcontains just two semiconductors. Some integrated circuits (such as the Arduino chip)are sensitive to static electricity and should be handled with care.
KeypadA keypad is a matrix of switches used to provide input for numeric digits. See Chapter 5.
LEDAn LED (light-emitting diode) is a diode that emits light when current flows throughthe device. As they are diodes, LEDs only conduct electricity in one direction. SeeChapter 7.
Motor (DC)Motors convert electrical energy into physical movement. Most small direct current(DC) motors have a speed proportional to the voltage, and you can reverse the directionthey move by reversing the polarity of the voltage across the motor. Most motors needmore current than the Arduino pins provide, and a component such as a transistor isrequired to drive the motor. See Chapter 8.
OptocouplerOptocouplers (also called optoisolators) provide electrical separation between devices.This isolation allows devices that operate with different voltage levels to work safelytogether. See Chapter 10.
Photocell (Photoresistor)Photocells are variable resistors whose resistance changes with light. See Chapter 6.
PiezoA small ceramic transducer that produces sound when pulsed, a Piezo is polarized andmay have a red wire indicating the positive end and a black wire indicating the side tobe connected to ground. See Chapter 9.
Piezo | 581
www.it-ebooks.info

Pot (Potentiometer)A potentiometer (pot for short) is a variable resistor. The two outside terminals act asa fixed resistor. A movable contact called a wiper (or slider) moves across the resistor,producing a variable resistance between the center terminal and the two sides. SeeChapter 5.
RelayA relay is an electronic switch—circuits are opened or closed in response to a voltageon the relay coil, which is electrically isolated from the switch. Most relay coils requiremore current than Arduino pins provide, so they need a transistor to drive them. SeeChapter 8.
ResistorResistors resist the flow of electrical current. A voltage flowing through a resistor willlimit the current proportional to the value of the resistor (see Ohm’s law). The bandson a resistor indicate the resistor’s value. Chapter 7 contains information on selectinga resistor for use with LEDs.
SolenoidA solenoid produces linear movement when powered. Solenoids have a metallic corethat is moved by a magnetic field created when passing current through a coil. SeeChapter 8.
SpeakerA speaker produces sound by moving a diaphragm (the speaker cone) to create soundwaves. The diaphragm is driven by sending an audio frequency electrical signal to acoil of wire attached to the diaphragm. See Chapter 9.
Stepper MotorA stepper motor rotates a specific number of degrees in response to control pulses. SeeChapter 8.
582 | Appendix A: Electronic Components
www.it-ebooks.info

SwitchA switch makes and breaks an electrical circuit. Many of the recipes in this book use atype of pushbutton switch known as a tactile switch. Tactile switches have two pairs ofcontacts that are connected together when the button is pushed. The pairs are wiredtogether, so you can use either one of the pair. Switches that make contact when pressedare called Normally Open (NO) switches. See Chapter 5.
TransistorTransistors are used to switch on high currents or high voltages in digital circuits. Inanalog circuits, transistors are used to amplify signals. A small current through thetransistor base results in a larger current flowing through the collector and emitter.
For currents up to .5 amperes (500 mA) or so, the 2N2222 transistor is a widely availablechoice. For currents up to 5 amperes, you can use the TIP120 transistor.
See Chapters 7 and 8 for examples of transistors used with LEDs and motors.
See AlsoFor more comprehensive coverage of basic electronics, see the following:
• Make: Electronics by Charles Platt (O’Reilly)
• Getting Started in Electronics by Forrest Mims (Master Publishing)
• Physical Computing by Tom Igoe (Cengage)
• Practical Electronics for Inventors by Paul Scherz (McGraw-Hill)
See Also | 583
www.it-ebooks.info

APPENDIX B
Using Schematic Diagrams andData Sheets
A schematic diagram, also called a circuit diagram, is the standard way of describingthe components and connections in an electronic circuit. It uses iconic symbols torepresent components, with lines representing the connections between thecomponents.
A circuit diagram represents the connections of a circuit, but it is not a drawing of theactual physical layout. Although you may initially find that drawings and photos of thephysical wiring can be easier to understand than a schematic, in a complicated circuitit can be difficult to clearly see where each wire gets connected.
Circuit diagrams are like maps. They have conventions that help you to orient yourselfonce you become familiar with their style and symbols. For example, inputs are usuallyto the left, outputs to the right; 0V or ground connections are usually shown at thebottom of simple circuits, the power at the top.
Figure A-1 in Appendix A shows some of the most common components, and thesymbols used for them in circuit diagrams. Figure B-1 is a schematic diagram fromRecipe 8.6 that illustrates the symbols used in a typical diagram.
Components such as the resistor and capacitor used here are not polarized—they canbe connected either way around. Transistors, diodes, and integrated circuits are po-larized, so it is important that you identify each lead and connect it according to thediagram.
Figure B-2 shows how the wiring could look when connected using a breadboard. Thisdrawing was produced using a tool called Fritzing that enables the drawing of electroniccircuits. See http://fritzing.org/.
585
www.it-ebooks.info

Figure B-2. Physical layout of the circuit shown in Figure B-1
Figure B-1. Typical schematic diagram
586 | Appendix B: Using Schematic Diagrams and Data Sheets
www.it-ebooks.info

How to Read a Data SheetData sheets are produced by the manufacturers of components to summarize the tech-nical characteristics of a device. Data sheets contain definitive information about theperformance and usage of the device; for example, the minimum voltage needed forthe device to function and the maximum voltage that it can reliably tolerate. Data sheetscontain information on the function of each pin and advice on how to use the device.
For more complicated devices, such as LCDs, the data sheet covers how to initializeand interact with the device. Very complex devices, such as the Arduino controller chip,require hundreds of pages to explain all the capabilities of the device.
Data sheets are written for design engineers, and they usually contain much more in-formation than you need to get most devices working in an Arduino project. Don’t beintimidated by the volume of technical information; you will typically find the impor-tant information in the first couple of pages. There will usually be a circuit diagramsymbol labeled to show how the connections on the device correspond to the symbols.This page will typically have a general description of the device (or family of devices)and the kinds of uses they are suitable for.
After this, there is usually a table of the electrical characteristics of the device.
Look for information about the maximum voltage and the current the device is designedto handle to check that it is in the range you need. For components to connect directlyto a standard Arduino board, devices need to operate at +5 volts. To be powered directlyfrom the pin of the Arduino, they need to be able to operate with a current of 40 mAor less.
Some components are designed to operate on 3.3 volts and can be dam-aged if connected to a 5V Arduino board. Use these devices with a boarddesigned to run from a 3.3V supply (e.g., the LilyPad, Fio, or 3.3V MiniPro), or use a logic level converter such as the SparkFun BOB-08745.More information on logic level conversion is available at http://ics.nxp.com/support/documents/interface/pdf/an97055.pdf.
Choosing and Using Transistors for SwitchingThe Arduino output pins are designed to handle currents up to 40 mA (milliamperes),which is only 1/25 of an amp. You can use a transistor to switch larger currents. Thissection provides guidance on transistor selection and use.
The most commonly used transistors with Arduino projects are bipolar transistors.These can be of two types (named NPN and PNP) that determine the direction ofcurrent flow. NPN is more common for Arduino projects and is the type that is illus-trated in the recipes in this book. For currents up to .5 amperes (500 mA) or so, the
Choosing and Using Transistors for Switching | 587
www.it-ebooks.info

2N2222 transistor is a widely available choice; the TIP120 transistor is a popular choicefor currents up to 5 amperes.
Figure B-1 shows an example of a transistor connected to an Arduino pin used to drivea motor.
Transistor data sheets are usually packed with information for the design engineer, andmost of this is not relevant for choosing transistors for Arduino applications. Ta-ble B-1 shows the most important parameters you should look for (the values shownare for a typical general-purpose transistor). Manufacturing tolerances result in varyingperformance from different batches of the same part, so data sheets usually indicatethe minimum, typical, and maximum values for parameters that can vary from part topart.
Here’s what to look for:
Collector-emitter voltageMake sure the transistor is rated to operate at a voltage higher than the voltage ofthe power supply for the circuit the transistor is controlling. There is no problemin choosing a transistor with a higher rating.
Collector currentThis is the absolute maximum current the transistor is designed to handle. It is agood practice to choose a transistor that is rated at least 25 percent higher thanwhat you need.
DC current gainThis determines the amount of current needed to flow through the base of thetransistor to switch the output current. Dividing the output current (the maximumcurrent that will flow through the load the transistor is switching) by the gain givesthe amount of current that needs to flow through the base.
Collector-emitter saturation voltageThis is the voltage level on the collector when the transistor is fully conducting.Although this is usually less than 1 volt, it can be significant when calculating aseries resistor for LEDs or for driving high-current devices.
588 | Appendix B: Using Schematic Diagrams and Data Sheets
www.it-ebooks.info

Table B-1. Example of key transistor data sheet specifications
Absolute maximum ratings
Parameter Symbol Rating Units Comment
Collector-emitter voltage Vceo 40 Volts The maximum voltage between the collector andemitter
Collector current Ic 600 mA or A The maximum current that the transistor is designedto handle
Electrical characteristics
DC current gain Ic 90 @ 10 mA Gain with 10 mA current flowing
Ic 50 @ 500mA
Gain with 500 mA current flowing
Collector-emittersaturation voltage
Vce
(sat)
0.3 @ 100mA
1.0 @ 500mA
Volts
Volts
Voltage drop across collector and emitter at variouscurrents
Choosing and Using Transistors for Switching | 589
www.it-ebooks.info

APPENDIX C
Building and Connecting the Circuit
Using a BreadboardA breadboard enables you to prototype circuits quickly, without having to solder theconnections. Figure C-1 shows an example of a breadboard.
Figure C-1. Breadboard for prototyping circuits
Breadboards come in various sizes and configurations. The simplest kind is just a gridof holes in a plastic block. Inside are strips of metal that provide electrical connectionbetween holes in the shorter rows. Pushing the legs of two different components intothe same row joins them together electrically. A deep channel running down the middleindicates that there is a break in connections there, meaning you can push a chip inwith the legs at either side of the channel without connecting them together.
Some breadboards have two strips of holes running along the long edges of the boardthat are separated from the main grid. These have strips running down the length ofthe board inside, and provide a way to connect a common voltage. They are usually inpairs for +5 volts and ground. These strips are referred to as rails and they enable youto connect power to many components or points in the board.
591
www.it-ebooks.info

While breadboards are great for prototyping, they have some limitations. Because theconnections are push-fit and temporary, they are not as reliable as solderedconnections. If you are having intermittent problems with a circuit, it could be due toa poor connection on a breadboard.
Connecting and Using External Power Supplies and BatteriesThe Arduino can be powered from an external power source rather than through theUSB lead. You may need more current than the USB connection can provide (themaximum USB current is 500 mA; some USB hubs only supply 100 mA), or you maywant to run the board without connection to the computer after the sketch is uploaded.
The standard Arduino board has a socket for connecting external power. This can bean AC-powered power supply or a battery pack.
These details relate to the Uno, Duemilanove, and Mega boards. OtherArduino and compatible boards may not protect the board from reverseconnections, or they may automatically switch to use external powerand may not accept higher voltages. If you are using a different board,check before you connect power or you may damage the board.
If you are using an AC power supply, you need one that produces a DC voltage between7 and 12 volts. Choose a power supply that provides at least as much current as youneed (there is no problem in using a power supply with a higher current than you need).Wall wart–style power supplies come in two broad types: regulated and unregulated.A regulated power supply has a circuit that maintains the specified voltage, and this isa good choice to use with Arduino. An unregulated power supply will produce a highervoltage when run at a lower current and can sometimes produce twice the rated voltagewhen driving low-current devices such as Arduino. Voltages higher than 12 volts canoverheat the regulator on the Arduino, and this can cause intermittent operation oreven damage the board.
Battery voltage should also be in the range of 7 to 12 volts. Battery current is rated inmAh (the amount of milliamperes the battery can supply in one hour). A battery witha rating of 500 mAh (a typical alkaline 9V battery) should last around 20 hours withan Arduino board drawing 25 mAh. If your project draws 50 mA, the battery life willbe halved, to around 10 hours. How much current your board uses depends mostly onthe devices (such as LEDs and other external components) that you use. Bear in mindthat the Uno and Duemilanove boards are designed to be easy to use and robust, butthey are not optimized for low power use with a battery. See Recipe 18.10 for adviceon reducing battery drain.
592 | Appendix C: Building and Connecting the Circuit
www.it-ebooks.info

The positive (+) connection from the power supply should be connected to the centerpin of the Arduino power plug. If you connect it the wrong way around on an Uno,Duemilanove, or Mega, the board will not break, but it will not work until the con-nection is reversed. These boards automatically detect that an external power supplyis connected and use that to power the board. You can still have the USB lead pluggedin, so serial communication and code uploading will still work.
Using Capacitors for DecouplingDigital circuits switch signals on and off quickly, and this can cause fluctuations in thepower supply voltage that can disrupt proper operation of the circuit. Properly designeddigital circuits use decoupling capacitors to filter these fluctuations. Decoupling ca-pacitors should be connected across the power pins of each IC in your circuit with thecapacitor leads kept as short as possible. A ceramic capacitor of 0.1 uF is a good choicefor decoupling—that value is not critical (20 percent tolerance is OK).
Using Snubber Diodes with Inductive LoadsInductive loads are devices that have a coil of wire inside. This includes motors, sole-noids, and relays. The interruption of current flow in a coil of wire generates a spike ofelectricity. This voltage can be higher than +5 volts and can damage sensitive electroniccircuits such as Arduino pins. Snubber diodes are used to prevent that by conductingthe voltage spikes to ground. Figure A-1 in Appendix A shows an example of a snubberdiode used to suppress voltage spikes when driving a motor.
Working with AC Line VoltagesWhen working with an AC line voltage from a wall socket, the first thing you shouldconsider is whether you can avoid working with it. Electricity at this voltage isdangerous enough to kill you, not just your circuit, if it is used incorrectly. It is alsodangerous for people using whatever you have made if the AC line voltage is not isolatedproperly.
Hacking controllers for devices that are manufactured to work with mains voltage, orusing devices designed to be used with microcontrollers to control AC line voltages, issafer (and often easier) than working with mains voltage itself. See Chapter 10 forrecipes on controlling external devices for examples of how to do this.
Working with AC Line Voltages | 593
www.it-ebooks.info

APPENDIX D
Tips on TroubleshootingSoftware Problems
As you write and modify code, you will get code that doesn’t work (usually referred toas a bug). There are two broad areas of software problems: code that won’t compileand code that compiles and uploads to the board but doesn’t behave as you want.
Code That Won’t CompileYour code might fail to compile when you click on the “verify” triangle or the “upload”button (see Chapter 1). This is indicated by red error messages in the black consolearea at the bottom of the Arduino software window and a yellow highlight in the codeif there is a specific point where the compilation failed. Often the problem in the codeis in the line immediately before the highlighted line. The error messages in the consolewindow are generated by the command-line programs used to compile and link thecode (see Recipe 17.1 for details on the build process). This message may be difficultto understand when you first start.
One of the most common errors made by people new to Arduino programming isomission of the semicolon at the end of a line. This can produce various different errormessages, depending on the next line. For example, this code fragment:
void loop(){ digitalWrite(ledPin, HIGH) // <- ERROR: missing semicolon delay(1000);}
produces the following error message:
In function 'void loop()': error: expected `;' before 'delay
A less obvious error message is:
expected unqualified-id before numeric constant
595
www.it-ebooks.info

Although the cause is similar, a missing semicolon after a constant results in a differenterror message, as in this fragment:
const int ledPin = 13 // <- ERROR: missing semicolon after constant
The combination of the error message and the line highlighting provides a good startingpoint for closer examination of the area where the error has occurred.
Another common error is misspelled words, resulting in the words not being recog-nized. This includes incorrect capitalization—LedPin is different from ledPin. Thisfragment:
const int ledPin = 13
digitalWrite(LedPin, HIGH); // <- ERROR: the capitalization is different
results in the following error message:
In function 'void loop()': error: 'LedPin' was not declared in this scope
The fix is to use exactly the same spelling and capitalization as the variable declaration.
You must use the correct number and type of parameters for function calls (see Rec-ipe 2.10). The following fragment:
digitalWrite(ledPin); // <- ERROR: this is missing the second parameter
generates this error message:
error: too few arguments to function 'void digitalWrite(uint8_t, uint8_t)' error: at this point in file
The cursor in the IDE will point to the line in the sketch that contains the error.
Functions in sketches that are missing the return type will generate an error.This fragment:
loop() // <- ERROR: loop is missing the return type{}
produces this error:
error: ISO C++ forbids declaration of 'loop' with no type
The error is fixed by adding the missing return type:
void loop() // <- return type precedes function name{}
Incorrectly formed comments, such as this fragment that is missing the second “/”:
digitalWrite(ledPin, HIGH); / set the LED on (ERROR: missing //)
result in this error:
error: expected primary-expression before '/' token
596 | Appendix D: Tips on Troubleshooting Software Problems
www.it-ebooks.info

It is good to work on a small area of code, and regularly verify/compile to check thecode. You don’t need to upload to check that the sketch compiles. The earlier youbecome aware of a problem, the easier it is to fix it, and the less impact it will have onother code. It is much easier to fix code that has one problem than it is to fix a largesection of code that has multiple errors in it.
Code That Compiles but Does Not Work As ExpectedThere is always a feeling of accomplishment when you get your sketch to compilewithout errors, but correct syntax does not mean the code will do what you expect.
This is usually a subtler problem to isolate. You are now in a world where software andhardware are interacting. It is important to try to separate problems in hardware fromthose in software. Carefully check the hardware (see Appendix E) to make sure it isworking correctly.
If you are sure the hardware is wired and working correctly, the first step in debuggingyour sketch is to carefully read through your code to review the logic you used. Pausingto think carefully about what you have written is usually a faster and more productiveway to fix problems than diving in and adding debugging code. It can be difficult tosee faulty reasoning in code you have just written. Walking away from the computernot only helps prevent repetitive strain injury, but it also refreshes your troubleshootingabilities. On your return, you will be looking at the code afresh, and it is very commonfor the cause of the error to jump out at you where you could not see it before.
If this does not work, move on to the next technique: use the Serial Monitor to watchhow the values in your sketch are changed when the program runs and whether con-ditional sections of code run. Chapter 4 explains how to use Arduino serial print state-ments to display values on your computer.
To troubleshoot, you need to find out what is actually happening when the code runs.Serial.print() lines in your sketch can display what part of the code is running andthe values of your variables. These statements are temporary and will be removed onceyou have fixed your problem. The following sketch reads an analog value and is basedon the solution from Recipe 5.6. The sketch should change the blink rate based on thesetting of a variable resistor (see the Discussion for Recipe 5.6 for more details on howthis works). If the sketch does not function as expected, you can see if the software isworking correctly by using a serial.print() statement to display the value read fromthe analog pin:
const int potPin = 0;const int ledPin = 13;int val = 0;
void setup()
Code That Compiles but Does Not Work As Expected | 597
www.it-ebooks.info

{ Serial.begin(9600); // <- add this to initialize Serial pinMode(ledPin, OUTPUT);}
void loop() { val = analogRead(potPin); // read the voltage on the pot Serial.println(val); // <- add this to display the reading digitalWrite(ledPin, HIGH); delay(val); digitalWrite(ledPin, LOW); delay(val);}
If the value displayed on the Serial Monitor does not vary from 0 to 1023 when the pot(variable resistor) is changed, you probably have a hardware problem—the pot may befaulty or not wired correctly. If the value does change but the LED does not blink, theLED may not be wired correctly.
Troubleshooting Interrelated Hardware/Software ProblemsSome problems are not due strictly to software or hardware errors, but to the interplaybetween them.
The most common of these is connecting the circuit to one pin and in software readingor writing a different pin. Hardware and software are both correct in isolation—buttogether they don’t work. You can change either the hardware or the software to fixthis: change the pin in software or move the connection to the pin number declared inyour sketch.
598 | Appendix D: Tips on Troubleshooting Software Problems
www.it-ebooks.info

APPENDIX E
Tips on TroubleshootingHardware Problems
Hardware problems can have more immediate serious ramifications than softwareproblems because incorrect wiring can damage components. The most important tipis always disconnect power when making or changing connections, and double-check yourwork before connecting power.
Unplug Arduino from power while building and modifying circuits.
Applying power is the last thing you do to test a circuit, not the first.
For a complicated circuit, build it a bit at a time. Often a complicated circuit consistsof a number of separate circuit elements, each connected to a pin on the Arduino. Ifthis is the case, build one bit and test it, then the other bits, one at a time. If you can,test each element using a known working sketch such as one of the example sketchessupplied with Arduino or on the Arduino Playground. It usually takes much less timegetting a complex project working if you test each element separately.
For some of the techniques in this appendix, you will need a multimeter (any inexpen-sive digital meter that can read volts, current, and resistance should be suitable).
The most effective test is to carefully inspect the wiring and check that it matches thecircuit you are trying to build. Take particular care that power connections are thecorrect way around and there are no short circuits, +5 volts accidentally connected to0 volts, or legs of components touching where they should not. If you are unsure howmuch current a device connected to an Arduino pin will draw, test it with a multimeterbefore connecting it to a pin. If the circuit draws more than 40 mA, the pin on theArduino can get damaged.
599
www.it-ebooks.info

You can find a video tutorial and PDF explaining how to use a multimeter at http://blog.makezine.com/archive/2007/01/multimeter_tutorial_make_1.html.
You may be able to test output circuits (LEDs or motors) by connecting to the positivepower supply instead of the Arduino pin. If the device does not function, it may befaulty or not wired correctly.
If the device tests OK, but when you connect to the pin and run the code you don’t getthe expected behavior, the pin might be damaged or the problem is in software.
To test a digital output pin, hook up an LED with a resistor (see Chapter 7) or connecta multimeter to read the voltage and run the Blink sketch on that pin. If the LED doesnot flash, or doesn’t jump between 0 volts and 5 volts on the multimeter, the outputpin is probably damaged.
Take care that your wiring does not accidentally connect the power line to ground. Ifthis happens on a board that is powered from USB, all the lights will go out and theboard will become unresponsive. The board has a component, called a polyfuse, whichprotects the computer from excessive current being drawn from the USB port. If youdraw too much current, it will “trip” and switch off power to the board. You can resetit by unplugging the board from the USB hub (you may also need to restart your com-puter). Before reconnecting the power, check your circuits to find and fix the faultywiring; otherwise, the polyfuse will trip again when you plug it back in.
Still Stuck?After trying everything you can think of, you still may not be able to get your projectto work. If you know someone who is using Arduino or similar boards, you could askhim for help. But if you don’t, use the Internet—particularly the Arduino forum site athttp://www.arduino.cc/. This is a place where people of all experience levels can askquestions and share knowledge. Use the forum search box (it’s in the top-right corner)to try to find information relating to your project. A related site is the Arduino Play-ground, a wiki for user-contributed information about Arduino.
If a search doesn’t yield the information you need, you can post a question to theArduino forum. The forum is very active, and if you ask your question clearly, you arelikely to get a quick answer.
To ask your question well, identify which forum section the question should go in andchoose a title for your thread that reflects the specific problem you want to solve. Postin only one place—most people who are likely to answer will check all the sections thathave new posts, and multiple posts will irritate people and make it less likely that youwill get help.
600 | Appendix E: Tips on Troubleshooting Hardware Problems
www.it-ebooks.info

Explain your problem, and the steps you have taken to try to fix it. It’s better to describewhat happens than to explain why you think it is happening. Include all relevant code,but try to produce a concise test sketch that does not contain code that you know isnot related to the problem. If your problem relates to a device or component that isexternal to the Arduino board, post a link to the data sheet. If the wiring is complex,post a diagram or photo showing how you have connected things up.
Still Stuck? | 601
www.it-ebooks.info

APPENDIX F
Digital and Analog Pins
Tables F-1 and F-2 show the digital and analog pins for a standard Arduino board andthe Mega board.
The “Port” column lists the physical port used for the pin—see Recipe 18.11 for in-formation on how to set a pin by writing directly to a port. The introduction to Chap-ter 18 contains more details on timer usage.
Table F-1. Analog and digital pin assignments common to popular Arduino boards
Digital pin
Arduino 168/328 Arduino Mega (pins 0–19)
Port Analog pin Usage Port Analog pin Usage
0 PD 0 USART RX PE 0 USART0 RX, Pin Int 8
1 PD 1 USART TX PE 1 USART0 TX
2 PD 2 Ext Int 0 PE 4 PWM T3B, INT4
3 PD 3 PWM T2B, Ext Int 1 PE 5 PWM T3C, INT5
4 PD 4 PG 5 PWM T0B
5 PD 5 PWM T0B PE 3 PWM T3A
6 PD 6 PWM T0A PH 3 PWM T4A
7 PD 7 PH 4 PWM T4B
8 PB 0 Input capture PH 5 PWM T4C
9 PB 1 PWM T1A PH 6 PWM T2B
10 PB 2 PWM T1B, SS PB 4 PWM T2A, Pin Int 4
11 PB 3 PWM T2A, MOSI PB 5 PWM T1A, Pin Int 5
12 PB 4 SPI MISO PB 6 PWM T1B, Pin Int 6
13 PB 5 SPI SCK PB 7 PWM T0A, Pin Int 7
14 PC 0 0 PJ 1 USART3 TX, Pin Int 10
15 PC 1 1 PJ 0 USART3 RX, Pin Int 9
603
www.it-ebooks.info

Digital pin
Arduino 168/328 Arduino Mega (pins 0–19)
Port Analog pin Usage Port Analog pin Usage
16 PC 2 2 PH 1 USART2 TX
17 PC 3 3 PH 0 USART2 RX
18 PC 4 4 I2C SDA PD 3 USART1 TX, Ext Int 3
19 PC 5 5 I2C SCL PD 2 USART1 RX, Ext Int 2
Table F-2. Assignments for additional Mega pins
Arduino Mega (pins 20–44) Arduino Mega (pins 45–69)
Digital pin Port Usage Digital pin Port Analog pin Usage
20 PD 1 I2C SDA, Ext Int 1 45 PL 4 PWM 5B
21 PD 0 I2C SCL, Ext Int 0 46 PL 3 PWM 5A
22 PA 0 Ext Memory addr bit 0 47 PL 2 T5 external counter
23 PA 1 Ext Memory bit 1 48 PL 1 ICP T5
24 PA 2 Ext Memory bit 2 49 PL 0 ICP T4
25 PA 3 Ext Memory bit 3 50 PB 3 SPI MISO
26 PA 4 Ext Memory bit 4 51 PB 2 SPI MOSI
27 PA 5 Ext Memory bit 5 52 PB 1 SPI SCK
28 PA 6 Ext Memory bit 6 53 PB 0 SPI SS
29 PA 7 Ext Memory bit 7 54 PF 0 0
30 PC 7 Ext Memory bit 15 55 PF 1 1
31 PC 6 Ext Memory bit 14 56 PF 2 2
32 PC 5 Ext Memory bit 13 57 PF 3 3
33 PC 4 Ext Memory bit 12 58 PF 4 4
34 PC 3 Ext Memory bit 11 59 PF 5 5
35 PC 2 Ext Memory bit 10 60 PF 6 6
36 PC 1 Ext Memory bit 9 61 PF 7 7
37 PC 0 Ext Memory bit 8 62 PK 0 8 Pin Int 16
38 PD 7 63 PK 1 9 Pin int 17
39 PG 2 ALE Ext Mem 64 PK 2 10 Pin Int 18
40 PG 1 RD Ext Mem 65 PK 3 11 Pin Int 19
41 PG 0 Wr Ext Mem 66 PK 4 12 Pin Int 20
42 PL 7 67 PK 5 13 Pin Int 21
43 PL 6 68 PK 6 14 Pin Int 22
44 PL 5 PWM 5C 69 PK 7 15 Pin Int 23
604 | Appendix F: Digital and Analog Pins
www.it-ebooks.info

Table F-3 is a summary of timer modes showing the pins used with popular Arduinochips.
Table F-3. Timer modes
Timer Arduino 168/328 Mega
Timer 0 mode (8-bit) Fast PWM Fast PWM
Timer0A analogWrite pin Pin 6 Pin 13
Timer0B analogWrite pin Pin 5 Pin 4
Timer 1 (16-bit) Phase correct PWM Phase correct PWM
Timer1A analogWrite pin Pin 9 Pin 11
Timer1B analogWrite pin Pin 10 Pin 12
Timer 2 (8-bit) Phase correct PWM Phase correct PWM
Timer2A analogWrite pin Pin 11 Pin 10
Timer2B analogWrite pin Pin 3 Pin 9
Timer 3 (16-bit) N/A Phase correct PWM
Timer3A analogWrite pin Pin 5
Timer3B analogWrite pin Pin 2
Timer3C analogWrite pin Pin 3
Timer 4 (16-bit) N/A Phase correct PWM
Timer4A analogWrite pin Pin 6
Timer4A analogWrite pin Pin 7
Timer4A analogWrite pin Pin 8
Timer 5 (16-bit) N/A
Timer5A analogWrite pin Pin 46
Timer5A analogWrite pin Pin 45
Timer5A analogWrite pin Pin 5
Note that the Arduino column is for the ATmega 168/323, and the Mega column is forthe ATmega 1280/2560.
Digital and Analog Pins | 605
www.it-ebooks.info

APPENDIX G
ASCII and Extended Character Sets
ASCII stands for American Standard Code for Information Interchange. It is the mostcommon way of representing letters and numbers on a computer. Each character isrepresented by a number—for example, the letter A has the numeric value 65, and theletter a has the numeric value 97 (lowercase letters have a value that is 32 greater thantheir uppercase versions).
Values below 32 are called control codes—they were defined as nonprinting charactersto control early computer terminal devices. The most common control codes forArduino applications are listed in Table G-1.
Table G-1. Common ASCII control codes
Decimal Hex Escape code Description
0 0x0 '\0' Null character (used to terminate a C string)
9 0x9 '\t' Tab
10 0xA '\n' New line
13 0xD '\r' Carriage return
27 0x1B Escape
Table G-2 shows the decimal and hexadecimal values of the printable ASCII characters.
Table G-2. ASCII table
Dec Hex Dec Hex Dec Hex
Space 32 20 @ 64 40 ` 96 60
! 33 21 A 65 41 a 97 61
" 34 22 B 66 42 b 98 62
# 35 23 C 67 43 c 99 63
$ 36 24 D 68 44 d 100 64
% 37 25 E 69 45 e 101 65
607
www.it-ebooks.info

Dec Hex Dec Hex Dec Hex
& 38 26 F 70 46 f 102 66
' 39 27 G 71 47 g 103 67
( 40 28 H 72 48 h 104 68
) 41 29 I 73 49 i 105 69
* 42 2A J 74 4A j 106 6A
+ 43 2B K 75 4B k 107 6B
, 44 2C L 76 4C l 108 6C
- 45 2D M 77 4D m 109 6D
. 46 2E N 78 4E n 110 6E
/ 47 2F O 79 4F o 111 6F
0 48 30 P 80 50 p 112 70
1 49 31 Q 81 51 q 113 71
2 50 32 R 82 52 r 114 72
3 51 33 S 83 53 s 115 73
4 52 34 T 84 54 t 116 74
5 53 35 U 85 55 u 117 75
6 54 36 V 86 56 v 118 76
7 55 37 W 87 57 w 119 77
8 56 38 X 88 58 x 120 78
9 57 39 Y 89 59 y 121 79
: 58 3A Z 90 5A z 122 7A
; 59 3B [ 91 5B { 123 7B
< 60 3C \ 92 5C | 124 7C
= 61 3D ] 93 5D } 125 7D
> 62 3E ^ 94 5E ~ 126 7E
? 63 3F _ 95 5F
Characters above 128 are non-English characters or special symbols and are displayedin the Serial Monitor using the UTF-8 standard (http://en.wikipedia.org/wiki/UTF-8).Table G-3 lists the UTF-8 extended character set.
608 | Appendix G: ASCII and Extended Character Sets
www.it-ebooks.info

Table G-3. UTF-8 extended characters
Dec Hex Dec Hex Dec Hex
Space 160 A0 À 192 C0 à 224 E0
¡ 161 A1 Á 193 C1 á 225 E1
¢ 162 A2 Â 194 C2 â 226 E2
£ 163 A3 Ã 195 C3 ã 227 E3
¤ 164 A4 Ä 196 C4 ä 228 E4
¥ 165 A5 Å 197 C5 å 229 E5
¦ 166 A6 Æ 198 C6 æ 230 E6
§ 167 A7 Ç 199 C7 ç 231 E7
¨ 168 A8 È 200 C8 è 232 E8
© 169 A9 É 201 C9 é 233 E9
ª 170 AA Ê 202 CA ê 234 EA
« 171 AB Ë 203 CB ë 235 EB
¬ 172 AC Ì 204 CC ì 236 EC
173 AD Í 205 CD í 237 ED
® 174 AE Î 206 CE î 238 EE
¯ 175 AF Ï 207 CF ï 239 EF
° 176 B0 Ð 208 D0 ð 240 F0
± 177 B1 Ñ 209 D1 ñ 241 F1
² 178 B2 Ò 210 D2 ò 242 F2
³ 179 B3 Ó 211 D3 ó 243 F3
´ 180 B4 Ô 212 D4 ô 244 F4
µ 181 B5 Õ 213 D5 õ 245 F5
¶ 182 B6 Ö 214 D6 ö 246 F6
· 183 B7 × 215 D7 ÷ 247 F7
¸ 184 B8 Ø 216 D8 ø 248 F8
¹ 185 B9 Ù 217 D9 ù 249 F9
º 186 BA Ú 218 DA ú 250 FA
» 187 BB Û 219 DB û 251 FB
¼ 188 BC Ü 220 DC ü 252 FC
½ 189 BD Ý 221 DD ý 253 FD
¾ 190 BE Þ 222 DE þ 254 FE
¿ 191 BF ß 223 DF ÿ 255 FF
ASCII and Extended Character Sets | 609
www.it-ebooks.info

You can view the entire character set in the Serial Monitor using this sketch:
/* * display characters from 1 to 255 */
void setup(){ Serial.begin(9600); for(int i=1; i < 256; i++) { Serial.print(i, BYTE); Serial.print(", dec: "); Serial.print(i,DEC); Serial.print(", hex: "); Serial.println(i, HEX); }}
void loop(){}
Note that some devices, such as LCD displays (see Chapter 11), may use differentsymbols for the characters above 128, so check the data sheet for your device to see theactual character supported.
610 | Appendix G: ASCII and Extended Character Sets
www.it-ebooks.info

Index
Symbols! (not) operator, 55!= (not equal to) operator, 52% (modulus) operator, 64, 179& (ampersand), 43& (bitwise AND) operator, 56&& (logical AND) operator, 55&=operator, 58* (multiplication) operator, 61*= operator, 58+ (addition) operator, 61+ string operator, 35+= operator, 58- (subtraction) operator, 61-= operator, 58/ (division) operator, 61, 63/= operator, 58< (less than) operator, 52<<(bit-shift left) operator, 76<<= operator, 58<= (less than or equal to) operator, 52<> (angle brackets), 544= (assignment) operator, 53== (equal to) operator, 52> (greater than) operator, 52>= (greater than or equal to) operator, 52>>(bit-shift right) operator, 76>>= operator, 58^ (bitwise exclusive OR) operator, 56{} (curly brackets), 46| (bitwise OR) operator, 56|= operator, 58|| (logical OR) operator, 55~ (bitwise negation) operator, 56
Aabs function, 64, 65absolute value of numbers, 64AC line voltage
controlling devices, 330–332working with, 593
accel sketch, 215acceleration, reading, 213accelerometer, Wii nunchuck, 214, 397–401actions
based on conditions, 44based on variables, 50–52
actuators, activating, 446–450Adafruit Industries
Boarduino board, 3wave shield, 308–311XBee Adapter, 432, 433
ADC (analog-to-digital converter), 441, 572(see also analogRead function)
ADCSRA register, 572addition (+) operator, 61AdjustClockTime sketch, 377alarms
calling function with, 380–383creating, 519–522
Allen, Charlie, 241ampersand (&), 43amplitude, defined, 183analog panel meters, 259–260analog pins, 550
(see also digitalRead function)about, 134, 550adjusting LED brightness, 223–224changing range of values, 154
We’d like to hear your suggestions for improving our indexes. Send email to [email protected].
611
www.it-ebooks.info

common pin assignments, 603–605detecting input, 135detecting rotation using gyroscope, 206–
207displaying voltages, 158–161increasing number of outputs, 255–259measuring distance, 176measuring temperature, 186measuring values quickly, 571–572measuring voltage, 162–164pin arrangements, 133reading multiple inputs, 155–158reading voltage on, 152responding to voltage changes, 161saving values to logfiles, 121–124sending values of, 109–112sequencing multiple LEDs, 230–232visual output and, 217
analog-to-digital converter (ADC), 441, 572(see also analogRead function)
AnalogMeter sketch, 260analogRead function
additional information, 153changing range of values, 154controlling servos, 267detecting sound, 183displaying voltages, 158–161LED blinking code example, 16measuring distance, 176, 177measuring temperature, 186measuring values quickly, 571–572measuring voltages, 164reading voltages, 152responding to voltage changes, 161sensors and, 165, 181
analogWrite functionadjusting LED brightness, 224analog panel meters, 260controlling brushed motor speed, 282detecting mouse movement, 200timers and, 548visual output and, 217
angle brackets (<>), 544animation effects
beating heart, 236–239smiling face, 348–349
anodescommon, 226, 231defined, 219
Arduino boardsabout, 2additional information, 3communicating between, 421–424interrupts and, 556Linux environment, 5Mac environment, 6memory support, 531pin arrangements, 133–135, 391, 603–605serial communication, 82setting up, 6simultaneous tones and, 303timers and, 548uploading/running Blink sketch, 11–13Windows environment, 6
Arduino build process, 532–535Arduino environment
getting started with projects, 15–18IDE installation, 4–6introduction, 1preparing sketches, 8–11setting up Arduino boards, 6
Arduino Playgroundabout, 1, 518troubleshooting problems, 599, 600
Arduino software, 2(see also sketches)about, 2IDE installation, 4–6version control and, 14
ArduinoMouse.pde (Processing sketch), 114arguments
defined, 38as references, 43
array sketch, 25arrays
defined, 26of LEDs, 253–255in sketches, 25strings and, 28–30, 31
ASCII character setcommon control codes, 607converting to numeric values, 93null value, 28reading RFID tags, 189tables of, 607–610zero value, 28
assignment (=) operator, 53ATCN command, 439
612 | Index
www.it-ebooks.info

ATD02 command, 443ATD13 command, 449ATD14 command, 449ATDH command, 437, 439ATDL command, 437, 439ATIA1234 command, 449ATICFF command, 449ATID command, 437, 443, 449ATIR64 command, 443ATIU1 command, 449Atmel ATmega 168/328 data sheets, 551ATMY command, 437, 439, 449atoi function, 36, 94atol function, 36, 94ATRE command, 443, 449attachInterrupt function, 548, 556ATWR command, 437, 449Audacity utility, 311audio output
about, 297–298controlling MIDI, 311–314detecting sound, 181–185fading an LED, 305–308generating audio tones, 305–308making synthesizers, 314–316multiple simultaneous tones, 303–305playing simple melodies, 301–303playing tones, 299–301playing WAV files, 308–311
Auduino sketch, 314–316AVR-GCC application, 534avr-objdump tool, 534Avrdude utility, 534AVRfreaks website, 532, 535
B<b> tag, 463Babel Fish translation web app, 465background noise, 167backlight (LCD)
defined, 336limiting current to, 355
bar graphs, 229–232, 242–245, 353–355Bargraph sketch, 230, 242Basic_Strings sketch, 28batteries
connecting to/using, 592reducing drain, 572–574
battery eliminator circuit (BEC), 271
baud ratedefined, 87GPS, 204Serial Monitor, 204
BCD (Binary Coded Decimal), 404bcd2dec function, 404BEC (battery eliminator circuit), 271Binary Coded Decimal (BCD), 404binary format
displaying special symbols, 347receiving data in, 105–106sending data in, 89, 101–105sending values from Processing, 107–109
bipolar steppersabout, 263driving, 287–289driving using EasyDriver board, 290–293
bit function, 72bitClear function, 72, 576bitFunctions sketch, 73bitmaps for GLCD displays, 359–361bitRead function
driving 7-segment LED displays, 247functionality, 72reading multiple analog inputs, 158sending multiple pin values, 110
bitssending pin values, 109–112serial communication, 82setting/reading, 72–75shifting, 75
bits sketch, 56bitSet function, 72, 576bitwise operations, 56–58bitWrite function, 72blink function, 37, 341Blink sketch
loading, 8, 11–13running, 11–13turning cursor on/off, 340
blink3 sketch, 39BlinkLED function, 522–527blinkLibTest sketch, 522BlinkM module, 392–397BlinkM sketch, 392BlinkMTester sketch, 395BlinkWithoutDelay sketch, 369, 551BOB-08669 breakout board, 181boolean data type, 22
Index | 613
www.it-ebooks.info

bootloader, 531Bray Terminal program, 88breadboards
about, 591solderless, 135
break statement, 50, 51brushed and brushless motors
about, 262controlling direction with H-Bridge, 277–
279, 280–282controlling direction with sensors, 282–
287controlling speed with H-Bridge, 280–282controlling speed with sensors, 282–287driving using speed controllers, 271driving using transistors, 276
Brushed_H_Ardumoto sketch, 286Brushed_H_Bridge sketch, 281Brushed_H_Bridge_Direction sketch, 283Brushed_H_Bridge_simple sketch, 277Brushed_H_Bridge_simple2 sketch, 279build process (Arduino), 532–535built-in libraries, 515–517byte data type
defined, 22shifting bits, 75
ByteOperators sketch, 77, 79
C.c file extension, 533C language
converting strings to numbers, 36preprocessor, 545strings and, 30
camera sketch, 328Canon Hack Development Kit, 329capacitors
about, 579connecting to sensors, 179decoupling and, 593
carriage return (\r), 97case statement, 51, 228cathodes
common, 226, 231, 252defined, 219schematic symbol for, 221
ceil function, 68Celsius temperature scale, 185, 410char data type, 22
character strings (see strings)characters/character values
comparing to numeric, 52–54converting to numeric, 93creating custom, 347–349data type representing, 22displaying special symbols, 345–347
Charlieplexingabout, 220, 240controlling LED matrix via, 239–245
Charlieplexing sketch, 240chasing lights sequence, 232circuit diagrams, 585classes, libraries as, 522client class (web server)
available method, 471connected method, 471println method, 471read method, 471
clocksdisplaying time of day, 373–380real-time, 384–387synchronizing, 502–507
coding techniques (see programmingtechniques)
color, adjusting for LEDs, 226–229comma-separated text, splitting into groups,
32–34CommaDelimitedInput sketch, 96CommaDelimitedOutput sketch, 95common anode, 226, 231common cathode, 226, 231, 252communication protocols, 84
(see also serial communications; wirelesscommunication; specific protocols)additional information, 451defined, 84
comparison operators, 52–54compasses, detecting direction, 208–211compilation process
conditional compilations, 543defined, 8, 9error messages, 10
compound operators, 58concat function, 35conditions
actions based on, 44breaking out of loops based on, 49compilations based on, 543
614 | Index
www.it-ebooks.info

configureRadio function, 439constant current drivers, 226constants
additional information, 139assigning values to, 54programming techniques, 542–543RAM usage and, 536
constrain function, 65contact bounce, 141continuous rotation servos, 267–269control codes, 607controller chips, 547–551, 547, 574
(see also specific types of controllers)converting
ASCII characters to numeric values, 93numbers to strings, 34–36strings to numbers, 36, 94
Conway, John, 355CoolTerm program, 435Coordinated Universal Time (UTC), 504cos function, 69countdown timers, 144–148counters
pulse, 567repeating statements with, 47–49timers as, 549
.cpp file extension, 533curly brackets {}, 46cursor (LCD), turning on/off, 340cursor (mouse), moving, 112–115cursorHide function, 363customCharPixels sketch, 353customChars sketch, 350custom_char sketch, 348CuteCom program, 88
Ddata sheets, reading, 587data types
Arduino supported, 21binary format considerations, 104
datealarms based on, 381displaying, 376keeping track of, 374
DC motors (see brushed and brushless motors)DC offset, 184debounce function, 142–144Debounce sketch, 142
debouncing process, 141, 144–148debugging
conditional compilations and, 543memory management and, 540sending information to computers, 86–89
decay rate (LED), 231decimal format
BCD and, 404displaying special symbols, 347sending text in, 89
decoding IR signals, 321–324decoupling, capacitors and, 593default (case statement), 52#define preprocessor command, 542–543DEG_TO_RAD constant, 70delay function
creating delays, 367interrupts and, 548playing tones, 301simultaneous tones and, 305timers and, 548
delay sketch, 367delayMicroseconds function, 368delays, time (see time delays)delimiters, 95DHCP (Dynamic Host Configuration Protocol)
DNS and, 460IP addresses and, 452, 455–458third-party library, 456
dial, tracking movement of, 190–192, 195–197
Digi International, 431Digi-Key breadboard, 135digital cameras, controlling, 327–329digital pins, 550
(see also digitalRead function)about, 134, 550additional information, 139common pin assignments, 603–605configuring to read input, 19, 134detecting input, 19, 134detecting switch closing, 141–144determining how long switch is pressed,
144–148determining switch state, 136–139internal pull-up resistors, 139–141LED matrix example, 234measuring pulse duration, 372pin arrangements, 133
Index | 615
www.it-ebooks.info

reading keypads, 149–152saving values to logfiles, 121–124sending values of, 109–112setting quickly, 574–577SPI devices, 391visual output and, 217
digital thermometers, 408–412digitalClockDisplay function, 377digitalRead function
additional information, 139determining switch state, 136functionality, 19, 134monitoring voltage, 137
digitalWrite functionadditional information, 139controlling solenoids and relays, 272digital output and, 217functionality, 19internal pull-up resistors and, 141limitations, 574–577
diodesdefined, 219, 580snubber, 275, 593
directioncontrolling for brushed motors, 277–279,
280–282–287detecting (compass), 208–211tracking (GPS), 190–192
Directory Name System (see DNS)Display5vOrless sketch, 159displayBlink function, 341DisplayMoreThan5V sketch, 163displayNumber function, 252, 415, 421displays (see LCD displays)distance, measuring, 173–179division (/) operator, 61, 63DNS (Directory Name System)
about, 452DHCP and, 460resolving IP addresses, 458–460
DNS libraryfinished function, 460Init function, 460resolve function, 460
do...while loop, 46doEncoder function, 196double data type, 22, 24doubleHeightBars function, 354draw function (Processing), 106
DrawBitmap function, 359drawBox function, 363DS1307 RTC chip, 384DS1307RTC.h library, 384DS1337 RTC chip, 384Dual Tones sketch, 304duration
determining for delays, 368–372measuring for pulses, 372setting for pulses, 559–562setting for timers, 557–559
Dynamic Host Configuration Protocol (seeDHCP)
EEasyDriver board, 290–293EEPROM library
about, 516adding external memory, 404clear function, 553read function, 553storing data, 551–554write function, 553
EEPROM memoryabout, 531adding external, 404–407storing data in, 551–554
802.15.4 standard, 431–437electronics
additional information, 583basic components, 579–583tutorials about, 133
electronics speed controllersdefined, 263driving brushless motors, 271
equal to (==) operator, 52error messages
assigning values to constants, 54compilation process, 11uploading sketches, 12
Ethernet libraryabout, 451, 516begin function, 454security considerations, 471sketches and, 470
Ethernet shieldIP addresses and, 455setting up, 453–455
EZ1Rangefinder Distance Sensor sketch, 175
616 | Index
www.it-ebooks.info

Ffabs function, 24face, animation effect, 348–349Fahrenheit temperature scale, 185, 468Faludi, Robert, 431finder.findUtil method, 486Firmata library, 112, 516flash function, 558flash memory (see program memory)floating-point numbers
data type representing, 22memory consumption, 160precision of, 24rounding up/down, 68in sketches, 23
floor function, 68flow control
additional information, 105binary format considerations, 104defined, 104
for loopchasing lights sequence, 233LED matrix example, 236repeating statements with counters, 47–49
ForLoop sketch, 47formatted text
LCD displays and, 337–340sending, 89–91
formatting web server requests, 479–483forms, creating web pages with, 483–486forward voltage, 2194051 multiplexer, 156–158FrequencyCounter library, 569FrequencyTimer2 library, 244function body, 43function declarations, defined, 43function header, 43function overloading, 103functionReferences sketch, 42functions, 38
(see also specific functions)adding to sketches, 38–41Arduino reference, 41creating, 38creating alarms to call, 380–383naming conventions, 40RAM usage and, 536returning multiple values, 41–43semicolon in, 40, 43
trigonometric, 69Futurlec LEDM88R, 234
Ggame controllers (see PlayStation game
controller)Game of Life simulation, 355GET command, 465, 468getCount function, 568getDistance function, 179, 540getFloat function, 463getkey function, 151getTableEntry function, 540GettingStarted sketch, 131getValue function, 157, 463GLCD (graphical LCD) displays
about, 333connecting, 355–359creating bitmaps for, 359–361pin connections, 355printing output to, 380
GLCD library, 355glcd sketch, 357GLCDdiags test sketch, 359GLCDImage sketch, 360glcdMakeBitmap utility, 359global variables, 42, 147, 536GNU screen program, 88Google Calculator, 462Google Earth
about, 116additional information, 121controlling movement in, 115–121downloading, 120
Google Finance, 464, 466Google Weather, 466–468Google XML API, 466GoogleEarthFS_P sketch, 117, 120GoogleEarthPSX sketch, 116GPS module
creative projects, 205getting location from, 201–206receiving data from, 128–131
granular synthesis, 315graphical LCD displays (see GLCD displays)Gravitech 7-segment display shield, 412–415greater than (>) operator, 52greater than or equal to (>=) operator, 52Greenwich Mean Time, 504
Index | 617
www.it-ebooks.info

gyro sketch, 207gyroscope, detecting rotation with, 206–207
H.h file extension, 359, 533H-Bridge
about, 262controlling brushed motor direction, 277–
279, 280–282controlling brushed motor speed, 280–282driving bipolar stepper motors, 287–289
Hagman, Brett, 301, 303hardware problems, troubleshooting, 599–601hardware sleep function, 573HardwareCounting sketch, 567Hart, Mikal, 125, 128, 201, 206Hello Matrix sketch, 254hexadecimal format
displaying special symbols, 347sending text in, 89
HID (Human Interface Devices), 115highByte function
additional information, 75, 104functionality, 77sending binary data, 102
Hitachi HD44780 chip, 333, 334–337, 347hiWord macro expression, 78HM55bCompass sketch, 208hostnames, resolving to IP addresses, 458–460HTML (HyperText Markup Language)
about, 452<b> tag, 463formatting requests, 479–483GET command, 465, 468POST command, 465, 483–486–493<td> tag, 482<tr> tag, 482
HTTP (Hypertext Transfer Protocol), 452hueToRGB function, 228, 392–397Human Interface Devices (HID), 115HyperText Markup Language (see HTML)Hypertext Transfer Protocol (HTTP), 452
II2C (Inter-Integrated Circuit)
about, 389–391adding EEPROM memory, 404–407
communicating between Arduino boards,421–424
controlling RGB LEDs, 392–397driving 7-segment LEDs, 412–415integrating port expanders, 416–418interfacing to RTCs, 401–404measuring temperature, 408–412RTC chips and, 387Wii nunchuck accelerometer, 397–401
I2C-7Segment sketch, 416I2CDebug object, 423I2C_7Segment sketch, 413I2C_EEPROM sketch, 404I2C_Master sketch, 422, 423I2C_RTC sketch, 401I2C_Slave sketch, 422I2C_Temperature sketch, 408ic2EEPROM_Read function, 407ic2EEPROM_Write function, 407ICR1 (Input Compare Register), 561IDE (integrated development environment)
functionality, 2installing, 4–6preparing sketches with, 8–11
IEEE 802.15.4 standard, 431–437if statement, 44if...else statement, 45images, displaying on LED matrix, 236–239#include preprocessor command, 532, 533,
541indexOf function, 30infrared technology (see IR (infrared)
technology)init function, 21Input Capture timer facility, 570Input Compare Register (ICR1), 561InputCapture sketch, 569int data type
defined, 21extracting high/low bytes, 77–78from high/low bytes, 78–80shifting bits, 75
integrated circuits, 581integrated development environment (see IDE)Inter-Integrated Circuit (see I2C)Internet Protocol (IP), 452Internet time server, 502–507interpolating technique, 178interrupt handlers, 548, 556
618 | Index
www.it-ebooks.info

interrupt service routine, 548interrupts
additional information, 551defined, 548usage examples, 554–557
Interrupts sketch, 555IP (Internet Protocol), 452IP addresses
DNS service and, 452, 458–460hardcoded, 453–455local, 452obtaining automatically, 455–458unique, 470
IR (infrared) technologydecoding signals, 321–324imitating signals, 324–327remote control and, 317, 318–320sensors and, 177–179
IR receiver module, 318–320, 556ir-distance sketch, 177ir-distance_Progmem sketch, 539IRecv object
decode function, 320enableIRIn function, 320resume function, 320
IRremote library, 317, 318–320, 323IRsend object, 326irSend sketch, 324IR_remote_detector sketch, 318itoa function, 35
JJaggars, Jesse, 507Jameco breadboard, 135Java language, 115
(see also Processing open source tool)creating bitmaps, 360Robot class, 115split method, 97
joysticksaccelerometer and, 214controlling Google Earth via, 116–121getting input from, 211–213
.jpg file extension, 492JSON format, 453
KKeypad sketch, 149
keypadsdefined, 581reading, 149–152
Knight, Peter, 314, 572KnightRider sketch, 233knock sensors, 180KS0108 panel, 356
LL293 H-Bridge, 282–287L293D H-Bridge, 277–279Ladyada website, 205, 311LANC, 329lastIndexOf function, 30LCD displays, 355
(see also GLCD displays)about, 333additional information, 337creating custom characters, 347–349displaying special symbols, 345–347formatting text, 337–340pin connections, 334pixels smaller than single character, 352–
355printing output to, 380scrolling text, 342–344symbols larger than single character, 349–
352text-based, 334–337turning cursor on/off, 340turning display on/off, 340
LDR (light dependent resistor), 15, 170leading zeros, 415learnKeyCodes function, 323LED bar graph (decay version) sketch, 231LED matrix
controlling via Charlieplexing, 239–245controlling via multiplexing, 234–236controlling via shift registers, 254displaying images on, 236–239
LEDBrightness sketch, 223LEDs
about, 581adjusting brightness of, 223–224, 537–540adjusting color of, 226–229blinking code example, 13–15–18chasing lights sequence, 232connecting and using, 220–223controlling array of, 253–255
Index | 619
www.it-ebooks.info

controlling with BlinkM module, 392–397creating bar graphs, 229–232, 242–245detecting motion, 172detecting mouse movement, 197–200detecting movement, 167–169digital pins and, 134driving 7-segment displays, 245–248–250–
252, 412–415, 418–421driving high-power, 224–226fading, 305–308imitating IR signals, 324–327increasing number of analog outputs, 255–
259IR remote control and, 318knock sensors and, 181lighting when switch is pressed, 136–139measuring distance, 173multiplexing and, 220printing output to, 380sequencing multiple, 229–232specifications, 219triggering voltage alarms, 162–164wiring XBees to, 447
LEDs sketch, 221LED_intensity sketch, 258LED_state sketch, 244Leone, Alex, 255less than (<) operator, 52less than or equal to (<=) operator, 52libraries, 515
(see also specific libraries)about, 515additional information, 516built-in, 515–517as classes, 522creating, 522–527–529declaring constants, 537declaring global variables, 537installing third-party, 517memory usage and, 521modifying, 518–522sketches and, 517using other libraries, 527–529
lightchasing lights sequence, 232controlling, 218–220detecting changes in, 170
light dependent resistor (LDR), 15, 170Lindsay, Phillip, 115
line feed (\n), 97Linux environment
Arduino IDE installation, 5XBee Series 1 configuration, 435
liquid crystal displays (see LCD displays)LiquidCrystal library
about, 89, 334, 516additional information, 337, 340clear function, 339creating custom characters, 349display function, 341FormatText sketch, 338Hello World sketch, 336noDisplay function, 341print function, 339, 347ScrollDisplayLeft function, 342–344ScrollDisplayRight function, 342–344setCursor function, 339Special Chars sketch, 345
Lite-On LTC-4727JR, 250Lite-On LTD-6440G, 420LM35 heat detection sensor, 185–187lm35 sketch, 185local IP addresses, 452logfiles, saving data to, 121–124logical operators, 55long data type
defined, 21extracting high/low bytes, 77–78from high/low bytes, 78–80shifting bits, 75
lookAround function, 285loop function, 21lowByte function
additional information, 75, 104functionality, 77sending binary data, 102
lowWord macro expression, 78ltoa function, 35
MMAC address
about, 452unique, 454, 470
Mac environmentArduino IDE installation, 5moving mouse cursor, 112–115XBee Series 1 configuration, 435
macro expressions, 78
620 | Index
www.it-ebooks.info

main function, 20makeLong function, 79map function
additional information, 155changing range of values, 154heart beating effect, 239LED blinking code example, 16
Map sketch, 154marquee function, 343Marquee sketch, 343master devices (I2C)
communicating between Arduino boards,421–424
defined, 390master devices (SPI), 391mathematical operators
constraining numbers to range of values,65
determining absolute value, 64extracting high/low bytes, 77–78finding remainder after division, 63incrementing/decrementing values, 62int from high/low bytes, 78–80minimum/maximum of values, 66precedence considerations, 62raising numbers to a power, 67random number generation, 70–72rounding floating-point numbers, 68setting/reading bits, 72–75shifting bits, 75simple math using, 61square roots, 68trigonometric functions, 69
Matrix library, 253, 254, 516matrixMpx sketch, 234matrixMpxAnimation sketch, 237max function, 66, 232Max7221_digits sketch, 250MAX72xx devices
controlling array of LEDs, 253–255driving 7-segment displays, 250–252, 418–
421MaxBotix EZ1 sensor, 175McCauley, Mike, 427Media Access Control address (see MAC
address)Mega boards
EEPROM memory in, 553GLCDs and, 356
I2C and, 390Input Capture timer facility, 570interrupts and, 556pin arrangements, 134, 391, 603–605serial ports, 83, 124–127simultaneous tones and, 303timers and, 549
melodies, playing, 301–303memory management, 531
(see also specific types of memory)adding external, 404–407additional information, 537Arduino boards and, 531bitmaps and, 359constants and, 542–543determining free/used, 535–537floating-point numbers and, 160libraries and, 521storing/retrieving numeric values, 537–540storing/retrieving strings, 540–542web pages and, 486–493
memoryFree function, 535mesh networks, XBee and, 425messages
communications protocol, 84MIDI, 311–314receiving binary data, 105–106receiving multiple text fields, 98–101sending binary data, 101–105sending binary values from Processing, 107–
109sending multiple text fields, 95–98sending via wireless modules, 425–431sending/receiving with UDP, 496–500Twitter, 493–496
Microchip 24LC128 EEPROM, 404, 407microphone sketch, 182microphones, detecting sound, 181–185MIDI (Musical Instrument Digital Interface),
298, 311–314MIDI library, 314midiOut sketch, 312millis function
additional information, 372creating delays, 368duration of delays, 368–372interrupts and, 548managing time, 239simultaneous tones and, 303, 305
Index | 621
www.it-ebooks.info

timers and, 548millisDuration sketch, 369MIME (Multipurpose Internet Mail
Extensions), 492min function, 66Modern Device Bare Bones Boards, 573modulus (%) operator, 64, 179momentary tactile switches, 138MorningAlarm function, 382Morse sketch, 574moserial program, 88motion detection, 171motors, 581
(see also brushed and brushless motors;servo motors; solenoids and relays; steppermotors)
mousedetecting movements of, 197–200moving cursor, 112–115
Mouse sketch, 197mouseBegin function, 199MsTimer2 library, 557multimeters, 135, 333multiplexer sketch, 156multiplexers, reading multiple inputs, 156–
158multiplexing technique
about, 220controlling LED matrix via, 234–236driving 7-segment LED displays, 248–250
multiple_alarms sketch, 519multiplication (*) operator, 61Multipurpose Internet Mail Extensions
(MIME), 492MultiRX sketch, 130Musical Instrument Digital Interface (MIDI),
298, 311–314myDelay function, 370
N\n (line feed), 97naming conventions for functions, 40Narcoleptic library, 572negative numbers, 94neocat, 493Network Time Protocol (NTP), 502NewSoftSerial library
downloading, 205getting location from GPS, 203
receiving data from multiple devices, 128–131
sending data to multiple devices, 125–127NewSoftSerialInput sketch, 128NewSoftSerialOutput sketch, 125NKC Electronics, 255, 286NMEA 0183 protocol, 201–206noBlink function, 341not (!) operator, 55not equal to (!=) operator, 52NTP (Network Time Protocol), 502null value, 28numbers/numeric data
comparing to character, 52–54constraining to range of values, 65converting ASCII characters to, 93converting strings to, 36, 94converting to strings, 34–36determining absolute value, 64LCD displays and, 334–337negative, 94program memory and, 537–540raising to a power, 67sending from Arduino, 89–91square roots, 68
NumberToString sketch, 35nunchuck_accelx function, 401nunchuck_decode_byte function, 401nunchuck_get_data function, 400nunchuck_init function, 400nunchuck_lines sketch, 398nunchuck_setpowerpins function, 399
OOCR (Output Compare Register), 561Ohm’s law, 222onceOnly function, 383optocouplers (optoisolators)
about, 318, 581controlling digital cameras, 329triggering remote controls, 330–332
OptoRemote sketch, 331Output Compare Register (OCR), 561
PPachube feeds
monitoring, 507–510updating, 510–513
622 | Index
www.it-ebooks.info

packing structures, 104, 105panel meters, 259–260Parallax
HM55B compass module, 208–211PING))) ultrasonic distance sensor, 173–
176PIR Sensor, 171RFID reader, 187–190
parametersdefined, 38as references, 43
Passive Infrared (PIR) sensors, 171PC environment (see Windows environment)PCF8574A port expander, 416–418PCM (Pulse-Code Modulation), 308.pde file extension, 14persistence of vision, 220Philips
RC-5 remote, 317RC-6 remote, 317SAA1064 I2C to 7-segment driver, 412–
415photocells, 581physical output (see brushed and brushless
motors; servo motors; solenoids andrelays; stepper motors)
PI constant, 70Piezo devices
defined, 297, 581detecting vibration, 180generating audio tones, 306
piezo sketch, 180Ping))) Sensor sketch, 173pinMode function
additional information, 139digital output and, 217functionality, 19, 134internal pull-up resistors and, 141
pins (see analog pins; digital pins)PIR (Passive Infrared) sensors, 171PIR sketch, 172pixels
defined, 238in GLCD displays, 358smaller than single character, 352–355
PJRC, 3playMidiNote function, 313playNote function, 303PlayStation game controller
controlling Google Earth via, 116–121getting input from, 211–213sensors and, 166
playTone function, 305–308Pocket Piano shield, 308polarity, defined, 220polling, defined, 192, 548Pololu breakout board, 285port expanders, integrating, 416–418port forwarding, 470POSIX time, 374POST command, 465, 483–486–493Pot sketch, 152potentiometers
about, 135, 582changing range of values, 154controlling servos with, 266reading voltage, 152wiper, 152
Pot_Debug sketch, 543pow function, 67power supplies
connecting/using external, 592reducing battery drain, 572–574
precedence of operators, 62preprocessor
about, 532additional information, 545constant values and, 542–543controlling sketch build, 543
preprocessor macros, 541prescaler, defined, 549primitive types, simple, 21printDigits function, 377Processing open source tool
about, 85additional information, 85, 98controlling Google Earth, 115–121createWriter function, 124creating bitmaps, 359DateFormat function, 123draw function, 106moving mouse cursor, 112–115receiving binary data, 105–106saving data to logfiles, 121–124sending binary values, 107–109sending multiple text fields in messages, 95–
98sending pin values, 109–112
Index | 623
www.it-ebooks.info

sending/receiving messages with UDP, 497setting up environment, 131setup function, 106SyncArduinoClock sketch, 376Wii nunchuck sketch, 398
ProgmemCurve sketch, 537program memory
about, 531Arduino boards and, 531storing/retrieving numeric values, 537–540storing/retrieving strings, 540–542web pages and, 486–493
programming techniques, 370(see also specific sketches)Arduino build process, 532–535conditional compilations, 543constants and, 542–543delaying code execution, 370memory usage and, 535–537storing/retrieving numeric values, 537–540storing/retrieving strings, 540–542troubleshooting problems, 595–598
programs (see sketches)projects, getting started with, 15–18prototyping
breadboards and, 592defined, 43
PSX (see PlayStation game controller)PSX sketch, 212pull-down resistors
defined, 134switched connected using, 136
pull-up resistorsdefined, 134enabling internal, 139–141switch connected using, 138
Pullup sketch, 140Pulse Width Modulation (see PWM)Pulse-Code Modulation (PCM), 308pulseIn function, 174, 372PulseIn sketch, 372pulses
counting, 549, 567–569displaying in Serial Monitor, 555–557generating, 562–564measuring accurately, 569–571measuring duration, 372setting width/duration, 559–562
pulseTimer2 sketch, 557
Pushbutton sketch, 44, 45, 136PuTTY program, 88, 435PWM (Pulse Width Modulation)
additional information, 550adjusting LED brightness, 223analog panel meters, 259–260changing frequency for timers, 565–567defined, 217extender chips, 255–259
pwm function, 562
R\r (carriage return), 97RadioShack breadboard, 135RAD_TO_DEG constant, 70RAM (random access memory), 531, 535–537random function, 70–72, 101random number generation, 70–72Random sketch, 71randomSeed function, 70Read a rotary encoder sketch, 190readArduinoInt function, 112readStatus function, 211real-time clock (RTC), 384–387, 401–404RealTerm program, 88ReceiveBinaryData_P sketch, 105ReceiveMultipleFieldsBinaryToFile_P sketch,
122ReceiveMultipleFieldsBinary_P sketch, 111references, parameters as, 43registers, 547
(see also specific types of registers)defined, 547time operations and, 549timer mode settings, 551
relational operators, 52–54RelationalExpressions sketch, 52relays (see solenoids and relays)remainder after division, 63remote control
about, 317controlling AC devices, 330–332controlling digital cameras, 327–329decoding IR signals, 321–324imitating signals, 324–327infrared, 317, 318–320wireless technology and, 317
RemoteDecode sketch, 321repeating
624 | Index
www.it-ebooks.info

sequence of statements, 45statements with counters, 47–49
Repeats function, 382reset function, 211resistive sensors, 171resistors
about, 582calculating value in ohms, 260LDR, 170LED matrix and, 236Ohm’s law, 222pull-down, 134, 136pull-up, 134, 138short circuits and, 219switches without external, 139–141variable, 135, 581
RespondingToChanges sketch, 161reverse EMF, 272RFID sketch, 188RFID tags, reading, 187–190RGB color scale, 226–229, 392–397RGB_LEDs sketch, 227Robertson, Matt, 458Robot class (Java)
additional information, 115mouseMove method, 115
rotary encodersfunctionality, 192measuring pulses from, 556tracking movement of dial, 190–192, 195–
197tracking multiple, 193–195
RotaryEncoderInterrupt sketch, 195RotaryEncoderMultiPoll sketch, 193rotation
detecting with gyroscope, 206–207measuring, 190–192, 193–195
rounding floating-point numbers, 68RS-232 standard, 83, 85RTC (real-time clock), 384–387, 401–404
Sschematic diagrams, 585SCL connection (I2C), 390, 409Scroll sketch, 342scrolling text, 342–344SD library, 516SDA connection (I2C), 390, 409security, Ethernet library and, 471
Seeed Studio Bazaar, 3semicolon in functions, 40, 43sendBinary function, 103, 110SendBinary sketch, 101, 428sendCommand function, 252, 420SendingBinaryFields sketch, 109SendingBinaryToArduino sketch, 107SendInput API function, 115sendMessage function, 107, 495sensors
about, 165additional information, 167connecting capacitors to, 179controlling an LED matrix, 234–236controlling brushed motors, 282–287controlling Google Earth via, 115–121controlling servos with, 266detecting direction, 208–211detecting light level changes, 170detecting motion, 171detecting mouse movements, 197–200detecting movement, 167–169detecting rotation with gyroscope, 206–
207detecting sound, 181–185detecting vibration, 180getting input from game control pad, 211–
213getting location from GPS, 201–206measuring distance, 173–179measuring temperature, 185–187, 510–513reading acceleration, 213reading RFID tags, 187–190reading voltage, 152resistive, 171sending data between XBees, 440–444sending Twitter messages, 493–496sequencing multiple LEDs, 232temperature, 408–412tracking movement of dial, 190–192, 195–
197tracking multiple rotary encoders, 193–195
serial communicationsabout, 81–85additional information, 91controlling Google Earth, 115–121controlling servos, 269–270getting location from GPS, 202moving mouse cursor, 112–115
Index | 625
www.it-ebooks.info

receiving binary data, 105–106receiving data, 92–95receiving data from multiple devices, 128–
131receiving multiple text fields in messages,
98–101saving data to logfiles, 121–124sending binary data, 101–105sending binary values from Processing, 107–
109sending data to multiple devices, 124–127sending debug information, 86–89sending formatted text, 89–91sending multiple text fields in messages, 95–
98sending numeric data, 89–91sending pin values, 109–112serial hardware, 82serial libraries, 84serial message protocol, 84setting up Processing environment, 131TellyMate shield and, 362
Serial libraryavailable function, 401, 471begin function, 868-bit values, 92print function, 86, 88, 90, 102println function, 19, 88, 90, 97read function, 108
Serial Monitorcontrolling brushed motors, 281depicted, 81DHCP server values, 457displaying pulses in, 555–557displaying voltages, 158–161functionality, 17getting location from GPS, 203measuring distance, 173printing sequential numbers, 86–89printing values to computer, 19setting clocks, 376setting pulse period, 557–559starting, 86
Serial Peripheral Interface (see SPI)Serial Terminal window, 437SerialFormatting sketch, 89serialIn function, 211SerialMouse sketch, 113serialOut function, 211
SerialOutput sketch, 86SerialReceive sketch, 92SerialReceiveMultipleFields sketch, 98Servo library
about, 264, 516attach method, 265timers and, 548
servo motorsabout, 261controlling from serial port, 269–270controlling multiple, 266controlling position of, 264–265speed of continuous rotation servos, 267–
269setColor function, 397setPulseWidth function, 561setSpeed function, 285setSyncProvider function, 385setTime function, 374, 383setup function (Arduino), 21setup function (Processing), 106SevenSegment sketch, 245SevenSegmentMpx sketch, 248shaken sketch, 168Sharp GP2Y0A02YK0F sensor, 177–179shift registers
controlling LED arrays, 253–255driving 7-segment displays, 250–252
Shirriff, Ken, 317short circuits, 219show function, 239showDigit function, 247, 250showPrivate function, 478showSymbol function, 347showXY function, 363signed keyword, 22SimpleBrushed sketch, 276SimpleClientGoogleWeatherDHCP sketch,
466SimpleClientwFinder sketch, 462SimpleRead sketch, 85, 105SimpleReceive sketch, 427SimpleSend sketch, 427sine function, 69sizeof function, 231, 428Sketch Editor
functionality, 8opening, 13
sketches, 195
626 | Index
www.it-ebooks.info

(see also specific sketches)actions based on conditions, 44actions based on variables, 50–52Arduino build process and, 533arrays in, 25–28bitwise operations, 56–58breaking out of loops, 49comparing character/numeric values, 52–
54comparing strings, 54compound operators, 58controlling build of, 543converting numbers to strings, 34–36converting strings to numbers, 36creating, 13–15defined, 2, 9error messages, 10, 12floating-point numbers in, 23functional blocks in, 38–41LED blinking code example, 13–15–18libraries and, 517logical comparisons, 55manipulating strings, 28–34preparing with IDE, 8–11repeating sequence of statements, 45repeating statements with counters, 47–49returning multiple values from functions,
41–43saving, 11, 13–15simple primitive types, 21structuring, 20
slave devicesaddress numbers and, 390communicating between Arduino boards,
421–424defined, 390identifying, 391
sleep function, 573SN754410 H-Bridge, 277snubber diodes, 275, 593SoftwareSerial library, 126–127, 203, 516solderless breadboards, 135solenoids and relays
about, 262, 582controlling, 272–273
solid state relay (SSR), 273sound (see audio output)Southern Hemisphere sketch, 202, 203SparkFun
12-button keypad, 149–152accelerometer selection guide, 214Ardumoto shield, 286, 289Audio-Sound Module, 311BOB-00099 data sheet, 387Electret Microphone, 181green LEDs, 255LISY300AL breakout board, 206MIDI breakout shield, 314MP3 breakout board, 311PIR Motion Sensor, 171PRT-00137 breadboard, 135ROB-08449 vibration motor, 274ROB-09402 breakout board, 285WRL-08770, 425WRL-08946, 425XBee Explorer USB, 433
speakers, defined, 582speed
continuous rotation servos and, 267–269controlling for brushed motors, 280–282–
287tracking movement of dial, 190–192
speed controllersdefined, 263driving brushless motors, 271
SPI (Serial Peripheral Interface)about, 389–391driving 7-segment displays, 418–421
SPI library, 391, 517SPI_MAX7221_0019 sketch, 418split method (Java), 97SplitSplit sketch, 32, 33Sprite library, 517sqrt function, 68square roots, 68SREG (interrupt registers), 197SSR (solid state relay), 273startMeasurement function, 211statements
repeating sequence of, 45repeating with counters, 47–49
static variables, 147Stepper library, 287, 517stepper motors
about, 263, 582driving bipolar, 287–289, 290–293driving unipolar, 293–295
Stepper sketch, 294
Index | 627
www.it-ebooks.info

Stepper_bipolar sketch, 287Stepper_Easystepper sketch, 290strcat function, 31strcmp function, 31, 54strcpy function, 31Streaming library, 91String class, 35, 536string data type, 22String library
additional information, 30C language and, 30manipulating strings, 28–30
stringsallocating space for, 536arrays and, 28–30, 31C language and, 30comparing, 31, 54concatenating, 31converting numbers to, 34–36converting to numbers, 36, 94copying, 31data type representing, 22declaring, 31defined, 28determining length of, 31manipulating, 28–30multiple fields in, 95–98null in, 28splitting comma-separated text into groups,
32–34storing/retrieving in program memory, 540–
542strlen function, 31strncmp function, 55strtok_r function, 34structures
binary format considerations, 104packing, 104, 105
substring function, 33subtraction (-) operator, 61swap function, 42, 43swap sketch, 42Sweep sketch, 264–265switch statement, 50–52SwitchCase sketch, 50switches
about, 583detecting closing of, 141–144detecting movement and, 167–169
determining state of, 136–139determining time in current state, 144–148hacking remote control, 330–332interrupts and, 548reading multiple analog inputs, 157–158tactile, 138, 583without external resistors, 139–141
switchTime function, 146–148SwitchTime sketch, 145SwitchTimeMultiple sketch, 147symbols
creating custom, 347–349displaying, 345–347larger than single character, 349–352
SyncArduinoClock sketch, 376synchronization
binary data and, 104clock software, 502–507
synthesizersmaking, 314–316MIDI, 311–314
Ttactile switches, 138, 583takePicture function, 329tan function, 69TCP (Transmission Control Protocol), 452<td> tag, 482TellyBounce sketch, 364TellyMate shield, 361–366TellyMate sketch, 361temperature, measuring, 185–187, 408–412,
510–513Texas Instrument TMP75, 408–412text fields/data
displaying on TV, 361–366formatting for LCD displays, 337–340LCD displays and, 334–337receiving in messages, 98–101scrolling, 342–344sending formatted, 89–91sending in messages, 95–98
TextFinder libraryabout, 99, 452, 463find method, 100findUtil method, 100getFloat method, 100getString method, 100getValue method, 100
628 | Index
www.it-ebooks.info

TextString library, 28theremin, 316thermometers, digital, 408–412tilt sensors, 167–169, 342–344tilt sketch, 167time delays, 239
(see also delay function)animation effects and, 239creating, 367setting delay period, 233
time lapse photography, 327Time library, 373–380, 383, 518time measurement, 239
(see also millis function)alarms to call functions, 380–383displaying time of day, 373–380duration of delays, 368–372duration of pulses, 372for pressed switches, 144–148real-time clocks, 384–387, 401–404reducing battery drain, 572–574synchronizing clock software, 502–507time conversion tools, 380
Time sketch, 373TimeAlarmExample sketch, 381TimeAlarms library, 381–383, 518–522timebase, defined, 549TimedAction library, 371timeout, specifying, 373timer registers, 549Timer1 library, 560timers
additional information, 550changing PWM frequency, 565–567countdown, 144–148defined, 382setting duration, 557–559setting pulse width/duration, 559–562types supported, 548
TimeRTC sketch, 384TimeRTCSet sketch, 386TimeSerial sketch, 375Time_NTP sketch, 505TinyGPS library, 201–206, 205TLC sketch, 255TLC5940 chip, 255–259Tlc5940 library
about, 255additional information, 259
clear method, 257init method, 256NUM_TLCS constant, 259set method, 257setAll method, 257update method, 257
Todbot adapters, 397tone function
about, 297multiple simultaneous tones, 303playing simple melodies, 301–303playing tones, 299–301
Tone library, 301, 303Tone sketch, 299torque, motor, 263Toshiba FB6612FNG, 285<tr> tag, 482transducers, 301Transistor-Transistor Logic (TTL), 82transistors
about, 583choosing for switching, 587controlling solenoids and relays, 272driving brushed motors, 276driving high-power LEDs, 224
Transmission Control Protocol (TCP), 452transmitCarrier function, 577trigonometric functions, 69troubleshooting
device connections, 264hardware problems, 599–601software problems, 595–598XBee modules, 431
TRS connector, 327TTL (Transistor-Transistor Logic), 82TTL level, defined, 82TV, displaying text on, 361–366Twinkle sketch, 301Twitter library
downloading, 493post function, 494wait function, 494
Twitter messages, sending, 493–496
UUARTs, 131UDP (User Datagram Protocol), 496–500, 504UdpNtp sketch, 502UDPSendReceive sketch, 498
Index | 629
www.it-ebooks.info

UDPSendReceiveStrings sketch, 496UDPTest sketch, 500ULN2003A Darlington driver chip, 293–295unipolar steppers
about, 263driving, 293–295
Unix time, 374, 380unsigned keyword, 22USB protocol
boards and, 573digital pins and, 134HID and, 115MIDI devices and, 314serial communications and, 82XBee adapters, 433
User Datagram Protocol (UDP), 496–500, 504USGlobalSat EM-406A GPS module, 203UTC (Coordinated Universal Time), 504
Vvariable resistors, 135, 581variables
actions based on, 50–52defined, 42global, 147, 536simple primitive types, 21static, 147volatile, 196, 556
version control, 14Vibrate sketch, 274Vibrate_Photocell sketch, 275vibration
detecting, 180making objects shake, 273–275
VirtualWire library, 427–431visual output (see LEDs)void data type, 22volatile variables, 196, 556voltage
changing range of values, 154digital monitoring, 137digital output and, 217displaying, 158–161forward, 219knock sensors and, 180LCD displays and, 336LED specifications, 219measuring, 162–164measuring pulse duration, 372
reading on analog pins, 152responding to changes in, 161reverse EMF, 272
voltage divider, 162VW_MAX_MESSAGE_LEN constant, 430
WWAV files, playing, 308–311WaveShieldPlaySelection sketch, 308web pages
creating with forms, 483–486handling requests for, 474–479large amounts of data and, 486–493
web serversformatting requests, 479–483handling requests, 471–474handling requests for specific pages, 474–
479requesting data from, 462–466requesting data in XML, 466–468setting up Arduino, 469–471
WebClientDHCP_DNS sketch, 460WebClientDNS sketch, 458WebClientGoogleFinance sketch, 464WebClient_Babelfish sketch, 465Webduino web server, 493WebServerMultiPage sketch, 475WebServerMultiPageHTML sketch, 479WebServerMultiPageHTMLProgmem sketch,
486WebServerParsing sketch, 472WebServerPost sketch, 483Web_Server sketch, 469while loop, 46Wii nunchuck
accelerometer in, 214, 397–401controlling Google Earth via, 116, 120
WiichuckSerial sketch, 120Windows environment
Arduino IDE installation, 6moving mouse cursor, 112–115XBee Series 1 configuration, 435XBee Series 2 configuration, 433
Wire libraryabout, 391, 517accessing RTCs, 401–404adding, 394additional information, 391available function, 401
630 | Index
www.it-ebooks.info

begin function, 400beginTransmission function, 407creating libraries example, 527endTransmission function, 400receive function, 401, 403, 410requestFrom function, 400, 403, 407send function, 400, 413
wireless communicationactivating actuators, 446–450connecting to 802.15.4 network, 431–437connecting to ZigBee networks, 431–437remote controls and, 317sending messages to XBees, 438–439sending messages via, 425–431sensor data between XBees, 440
word function, 79–80
XX-CTU application
XBee Series 1 configuration, 435XBee Series 2 configuration, 433
XBee Actuate sketch, 447XBee modules
about, 425activating actuators, 446–450connecting to 802.15.4 networks, 431–437connecting to ZigBee networks, 431–437Remote AT Command feature, 446sending messages to, 438–439sending sensor data between, 440–444troubleshooting, 431ZigBee compatibility, 431
XBeeAnalogReceive sketch, 442XBeeAnalogReceiveSeries1 sketch, 444XBeeEcho sketch, 432XBeeMessage sketch, 438XML format, 466–468
ZZambetti, Nicholas, 254zero
ASCII value, 28leading, 415
ZIGBEE COORDINATOR AT function, 434,446
ZIGBEE ROUTER AT function, 434, 441, 446ZigBee standard
about, 431
connecting to networks, 431–437ZTerm program, 88
Index | 631
www.it-ebooks.info