drupal 8 development cookbook - second edition
TRANSCRIPT


Second EditionHarness the power of Drupal 8 with this recipe-based practical guide
Matt Glaman
BIRMINGHAM - MUMBAI
Drupal 8 Development Cookbook
Second Edition
Copyright © 2017 Packt Publishing
All rights reserved. No part of this book may be reproduced, stored in aretrieval system, or transmitted in any form or by any means, without theprior written permission of the publisher, except in the case of briefquotations embedded in critical articles or reviews.
Every effort has been made in the preparation of this book to ensure theaccuracy of the information presented. However, the information contained inthis book is sold without warranty, either express or implied. Neither theauthor, nor Packt Publishing, and its dealers and distributors will be heldliable for any damages caused or alleged to be caused directly or indirectly bythis book.
Packt Publishing has endeavored to provide trademark information about allof the companies and products mentioned in this book by the appropriate useof capitals. However, Packt Publishing cannot guarantee the accuracy of thisinformation.
First published: March 2016
Second edition: September 2017
Production reference: 1210917
Drupal 8 Development Cookbook
Published by Packt Publishing Ltd.Livery Place35 Livery StreetBirminghamB3 2PB, UK.
ISBN 978-1-78829-040-1
www.packtpub.com

Credits
Author
Matt Glaman
Copy Editor
Dhanya Baburaj
Reviewer
Tracy Charles Smith
Project Coordinator
Ritika Manoj
Commissioning Editor
Amarabha Banerjee
Proofreader
Safis Editing
Acquisition Editor
Nigel Fernandes
Indexer
Rekha Nair
Content Development Editor
Mohammed Yusuf Imaratwale
Graphics
Jason Monteiro
Technical Editors
Ankur Ghiye
Murtaza Tinwala
Production Coordinator
Shantanu Zagade
About the AuthorMatt Glaman is a Senior Drupal Consultant at Commerce Guys and co-maintainer of Drupal Commerce. He is an open source developer who hasbeen working with Drupal since 2013. Since then, he has contributed to over60 community project.
I would like to thank, and I am grateful to, my beautiful and loving wife forputting up with the late nights split between work, spending time contributingto the Drupal community, and writing this book. I would also like to thankmy two sons; thank you for giving up your playtime so that Daddy couldwrite this book.Thank you, Andy Giles, for helping me get to my first Drupal camp andkicking off my Drupal career. I would also like to thank my mentors BojanŽivanović, David Snopek, Ryan Szrama, and everyone else in the Drupalcommunity!

About the ReviewerTracy Charles Smith began working with computers at the age of 10. Hisbackground includes network support, web development, customer service,project management, and financial management.
Tracy's entrepreneurial spirit is a key component to his success in interactingwith clients and team members on business and user-experience relatedtechnology solutions. In fact, he used that passion to found his owntechnology-consulting firm called Alpha Geek Tech, LLC. He also served asTechnology Director for Quiddities Dev., Inc., in Santa Cruz, CA, beforemoving back to the DC area to join Phase2 in 2010 as a Senior Programmer.Tracy now works as a Senior Project Manager at Phase2 supporting Growth& Support clients in government and private enterprise. His diversedevelopment background complements his project management skills.
Tracy was also the lead programmer and architect for 12seconds.tv in 2007 (avideo messaging platform), which leveraged Drupal. He also authoredDrupal Intranets with Open Atrium. He earned a BS in ComputerInformation Systems and Business Administration from Wingate University.

www.PacktPub.comFor support files and downloads related to your book, please visitwww.PacktPub.com.
Did you know that Packt offers eBook versions of every book published, withPDF and ePub files available? You can upgrade to the eBook version atwww.PacktPub.com and as a print book customer, you are entitled to adiscount on the eBook copy. Get in touch with us at [email protected] more details.
At www.PacktPub.com, you can also read a collection of free technicalarticles, sign up for a range of free newsletters and receive exclusivediscounts and offers on Packt books and eBooks.
https://www.packtpub.com/mapt
Get the most in-demand software skills with Mapt. Mapt gives you fullaccess to all Packt books and video courses, as well as industry-leading toolsto help you plan your personal development and advance your career.
Why subscribe?Fully searchable across every book published by PacktCopy and paste, print, and bookmark contentOn demand and accessible via a web browser
Customer FeedbackThanks for purchasing this Packt book. At Packt, quality is at the heart of oureditorial process. To help us improve, please leave us an honest review onthis book's Amazon page at https://www.amazon.com/dp/1788290402
If you'd like to join our team of regular reviewers, you can e-mail us [email protected]. We award our regular reviewers with freeeBooks and videos in exchange for their valuable feedback. Help us berelentless in improving our products!
Table of ContentsPreface
What this book coversWhat you need for this bookWho this book is forSections
Getting readyHow to do it…How it works…There's more…See also
ConventionsReader feedbackCustomer support
Downloading the example codeErrataPiracyQuestions
1. Up and Running with Drupal 8IntroductionInstalling Drupal
Getting readyHow to do it...How it works...There's more...
Creating a database user and a databaseDatabase prefixesDownloading and installing with DrushUsing Composer to create a Drupal siteSecurity updates
See alsoUsing a distribution with Drupal
How to do it...How it works...
There's more...MakefilesInstalling with DrushUsing Composer
See also...Installing modules and themes
Getting readyHow to do it...How it works...
Discovering modules and themesModule installationTheme installation
There's more...Installing a module or theme using ComposerInstalling a module with DrushUninstalling a module
See alsoUsing multisites in Drupal 8
Getting readyHow to do it...How it works...There's more...
Security concernsDomain aliases
See also...Tools for setting up an environment
Getting readyHow to do it...How it works...There's more...
Acquia Dev DesktopXAMPP + BitnamiKalabox
See alsoRunning tests - Simpletest and PHPUnit
Getting readyHow to do it...
How it works...There's more...
Is run-tests a shell script?Running tests without Drupal installedRunning specific testsPhpStorm - Drupal Test RunnerDrupalCI
See also...2. The Content Authoring Experience
IntroductionConfiguring the WYSIWYG editor
Getting readyHow to do it...How it works...There's more...
Filter moduleImproved linksCKEditor plugins
See alsoAdding and editing content
Getting readyHow to do it...How it works...There's more...
Save as draftPathautoBulk moderation
See alsoCreating a menu and linking content
Getting readyHow to do it...How it works...There's more...
Managing a contents menu link from its formProviding inline editing
How to do it...How it works...
There's more...The outside-in approach
Creating a custom content typeHow to do it...How it works...
Applying new Drupal 8 core field typesGetting readyHow to do it...
LinkThe Email fieldThe Telephone fieldThe Date fieldThe Entity Reference field
How it works...There's more...
Upcoming updatesViews and Entity Reference
See alsoCustomizing the form display of a node
How to do it...How it works...There's more...
Managing form display modesProgrammatically providing a default to hidden formitems
See alsoCustomizing the display output of a node
How to do it...How it works...
3. Displaying Content through ViewsIntroductionListing content
Getting readyHow to do it...How it works...There's more...
Views in Drupal core initiative
Views and displaysFormat style plugins - style and rowUsing the Embed display
See alsoEditing the default admin interfaces
How to do it...How it works...There's more...
Exposed versus non-exposedFilter identifiersOverriding routes with Views
Creating a block from a ViewGetting readyHow to do it...How it works...There's more...
Exposed forms as blocksSee also
Utilizing dynamic argumentsHow to do it...How it works...There's more...
Previewing with contextual filtersDisplaying as a tab on the user pageAltering the page titleValidationMultiple and exclusion
Adding a relationship in a ViewHow to do it...How it works...There's more...
Relationships provided by entity reference fieldsRelationships provided through custom codeUsing aggregation and views.
Providing an Entity Reference result ViewHow to do it...How it works...
See also4. Extending Drupal
IntroductionCreating a module
How to do it...How it works...There's more...
Module namespacesModule discovery locationsDefining a package groupModule dependenciesSpecifying the module's version
See also...Defining a custom page
Getting readyHow to do it...How it works...There's more...
Parameters in routesValidating parameters in routesRoute requirementsProviding dynamic routesAltering existing routes
See alsoDefining permissions
Getting readyHow to do it...How it works...There's more...
Restrict access flag for permissionsDefining permissions programmaticallyChecking whether a user has permissions
Providing the configuration on the installation or updateGetting readyHow to do it...How it works...There's more...
Configuration subdirectoriesModifying the existing configuration on installation
See alsoCreating an event subscriber
How to do it...How it works...There's more...
Using dependency injectionSee also
Using Features 3.0How to do it...How it works...There's more...
Suggested feature modulesFeatures bundlesManaging the configuration state of Features
See also5. Frontend for the Win
IntroductionCreating a custom theme based on Classy
How to do it...How it works...There's more...
Theme screenshotsThemes, logos, and faviconsBase themes and shared resourcesCKEditor style sheets
See alsoUsing the new asset management system
Getting readyHow to do it...How it works...There's more...
CSS groupsLibrary asset optionsLibrary dependenciesOverriding and extending other libraries
Using a CDN or external resource as a libraryManipulating libraries from hooksPlacing JavaScript in the header
See alsoTwig templating
Getting readyHow to do it...How it works...There's more...
Security firstTheme hook suggestionsDebugging template file selection and hook suggestionsThe Twig logic and operators
See alsoUsing the Breakpoint module
Getting readyHow to do it...How it works...There's more...
Caveat for providing breakpoints from themesAccessing breakpoints programmaticallyMultipliers
See alsoUsing the Responsive Image module
Getting readyHow to do it...How it works...There's more...
Performance first deliveryRemoving picturefill polyfill
See also6. Creating Forms with the Form API
IntroductionCreating a form
Getting readyHow to do it...How it works...
There's more...Form element definitionsThe form stateThe form cache
See alsoUsing new HTML5 elements
Getting readyHow to do it...How it works...There's more...
Specific element propertiesCreating new elements
See alsoValidating form data
Getting readyHow to do it...How it works...There's more...
Multiple validation handlersAccessing multidimensional array valuesElement validation methods
Processing submitted form dataGetting readyHow to do it...How it works...There's more...
Multiple submit handlersSee also
Altering other formsGetting readyHow to do it...How it works...There's more...
Adding additional validate handlersAdding additional submit handlers
7. Plug and Play with PluginsIntroduction
Creating blocks using pluginsGetting readyHow to do it...How it works...There's more...
Altering blocksBlock settings formsDefining access to a block
See alsoCreating a custom field type
Getting readyHow to do it...How it works...There's more...
Altering field typesDefining whether a field is empty
See alsoCreating a custom field widget
Getting readyHow to do it...How it works...There's more...
Field widget settings and summarySee also
Creating a custom field formatterGetting readyHow to do it...How it works...There's more...
Formatter settings and summarySee also
Creating a custom plugin typeGetting readyHow to do it...How it works...There's more...
Specifying an alter hook
Using a cache backendAccessing plugins through the manager
See also8. Multilingual and Internationalization
IntroductionTranslating administrative interfaces
Getting readyHow to do it...How it works...There's more...
Manually installing language filesChecking translation statusExporting translationsInterface translation permissionsUsing interface translation to customize default EnglishstringsInterface text language detectionProviding translations for a custom module
See alsoTranslating configuration
Getting readyHow to do it...How it works...There's more...
Altering configuration translation info definitionsTranslating views
See alsoTranslating content
Getting readyHow to do it...How it worksThere's more...
Flagging translations as outdatedTranslating content linksDefining translation handlers for entities
See alsoCreating multilingual views
Getting readyHow to do it...How it works...There's more...
Translating exposed form items and filtersTranslating display and row format itemsTranslating page display menu items
See also9. Configuration Management - Deploying in Drupal 8
IntroductionImporting and exporting configurations
Getting readyHow to do it...How it works...There's more...
Configuration dependenciesSaving to a YAML file for a module's configurationinstallationConfiguration schemas
See alsoSynchronizing site configurations
Getting readyHow to do it...How it works...There's more...
Universally Unique IdentifierA synchronization folderInstalling a configuration from a new site
Using command-line workflow processesGetting ready...How to do it...How it works...There's more...
Drush config-pullUsing the Drupal ConsoleEditing the configuration from the command lineExporting a single configuration item
Using version control and command-line workflowSee also
Updating and installing new module configurationsHow to do it...How it works...There's more...
The Configuration Development moduleSee also
10. The Entity APIIntroductionCreating a configuration entity type
Getting readyHow to do it...How it works...There's more...
Available data types for schema definitionsSee also
Creating a content entity typeGetting readyHow to do it...How it works...There's more...
Using the AdminHtmlRouteProvider providerMaking the collection route a local task tab
See alsoCreating a bundle for a content entity type
Getting readyHow to do it...How it works...There's more...
Provide action links for adding new bundlesSee also
Implementing custom access control for an entityGetting readyHow to do it...How it works...There's more...
Controlling access to entity fieldsSee also
Providing a custom storage handlerGetting readyHow to do it...How it works...There's more...
Utilizing a different storage backend for an entitySee also
Creating a route providerGetting readyHow to do it...How it works...There's more...
The Entity API module provides additional providersSee also
11. Off the Drupalicon IslandIntroductionImplementing and using a third-party JavaScript library
Getting readyHow to do it...How it works...There's more...
Best practices for handling external librariesSee also
Implementing and using a third-party CSS libraryGetting readyHow to do it...How it works...See also
Implementing and using a third-party PHP libraryGetting readyHow to do it...How it works...See also
12. Web ServicesIntroduction
Enabling RESTful interfacesGetting readyHow to do it...How it works...There's more...
Using _format instead of the Accept headerRestResource plugin to expose data through RESTfulWeb ServicesRate limiting your APIUsing the HAL formatSee also
Using POST to create dataGetting readyHow to do it...How it works...There's more...
Using HAL and understanding _links requirementsWorking with imagesUsing Cross-Site Request Forgery tokens
See alsoUsing PATCH to update data
Getting readyHow to do it...How it works…
Using Views to provide custom data sourcesHow to do it…How it worksThere's more...
Controlling the key name in JSON outputControlling access to RESTful Views
AuthenticationGetting readyHow to do itHow it worksThere's more…
Authentication provider servicesPage cache request policies and authenticated Web

service requestsThe IP Authentication provider
See alsoUsing JSON API
Getting readyHow to do itHow it works...There's more...
Paginating, filtering, and sorting requestsInstalling the JSON API Extras moduleChanging the API path prefixDisabling and enhancing returned entity fieldsContenta CMS
See also13. The Drupal CLI
IntroductionRebuilding cache in Drupal Console or Drush
How to do it…How it works…See also
Using Drush to interact with the databaseGetting readyHow to do it...How it works...There's more…
Using gzip with sql-dumpUsing Console to interact with the database
Using Drush to manage usersHow to do it…How it works…There's more…
Advanced user-login use casesUsing Drupal Console
Scaffolding code through ConsoleGetting readyHow to do it…How it works…
Making a Drush commandGetting readyHow to do it…How it works…There's more…
Specifying the level of Drupal's bootstrapSee also
Making a Console commandGetting readyHow to do it…How it works…There's more…
Using a Console command to create entitiesSee also
PrefaceDrupal is a content management system used to build websites for smallbusinesses, e-commerce, enterprise systems, and much more. Created by over4,500 contributors, Drupal 8 provides many new features to Drupal. Whetheryou are new to Drupal, or an experienced Drupalista, Drupal 8 DevelopmentCookbook contains recipes to dive into what Drupal 8 has to offer.
What this book coversChapter 1, Up and Running with Drupal 8, begins by covering therequirements for running Drupal 8 and going through the installation processand extending Drupal.
Chapter 2, The Content Authoring Experience, dives into the contentmanagement experience in Drupal, including working with the newlybundled CKEditor.
Chapter 3, Displaying Content through Views, explores how to use Views tocreate different ways to list and display your content in Drupal.
Chapter 4, Extending Drupal, introduces how to write a module for Drupal,the building blocks of functionality in Drupal.
Chapter 5, Frontend for the Win, covers how to create a theme, work with thenew templating system Twig, and harness Drupal’s responsive designfeatures.
Chapter 6, Creating Forms with the Form API, explains how to work withDrupal’s Form API to create custom forms for collecting data.
Chapter 7, Plug and Play with Plugins, introduces plugins, one of the newestcomponents in Drupal. This chapter walks through developing the pluginsystem to work with fields.
Chapter 8, Multilingual and Internationalization, introduces the featuresprovided by Drupal 8 to create an internationalized website, supportingmultiple languages for content and administration.
Chapter 9, Configuration Management - Deploying in Drupal 8, explains theconfiguration management system, new to Drupal 8, and how to import andexport site configurations.
Chapter 10, The Entity API, dives into the Entity API in Drupal, allowing you
to create custom configuration and content entities.
Chapter 11, Off the Drupalicon Island, explains how Drupal allowsembracing the mantra of "proudly built elsewhere" and including third-partylibraries with your Drupal site.
Chapter 12, Web Services, shows how to turn your Drupal 8 site into a webservices API provider through a RESTful interface.
Chapter 13, The Drupal CLI, explores working with Drupal 8 through twocommand-line tools created by the Drupal community: Drush and DrupalConsole.
What you need for this bookIn order to work with Drupal 8, and to run the code examples found in thisbook, the following software will be required:
Web server software stack:
Web server: Apache (recommended), Nginx, or Microsoft IISDatabase: MySQL 5.5 or MariaDB 5.5.20 or higherPHP: PHP 5.5.9 or higher
The first chapter details all of these requirements, and includes a recipehighlighting an out-of-the-box development server setup.
You will also need a text editor; the following is a suggestion of populareditors and IDEs:
Atom.io editor, https://atom.io/Visual Code Studio, https://code.visualstudio.com/PHPStorm (specific Drupal integration),https://www.jetbrains.com/phpstorm/Vim with Drupal configuration, https://www.drupal.org/project/vimrcYour operating system’s default text editor or command-line file editors
Who this book is forThis book is for those have been working with Drupal, such as site builders,backend and frontend developers, and who are eager to see what awaits themwhen they start using Drupal 8.
SectionsIn this book, you will find several headings that appear frequently (Gettingready, How to do it, How it works, There's more, and See also).
To give clear instructions on how to complete a recipe, we use these sectionsas follows:

Getting readyThis section tells you what to expect in the recipe, and describes how to setup any software or any preliminary settings required for the recipe.

How to do it…This section contains the steps required to follow the recipe.

How it works…This section usually consists of a detailed explanation of what happened inthe previous section.
There's more…This section consists of additional information about the recipe in order tomake the reader more knowledgeable about the recipe.

See alsoThis section provides helpful links to other useful information for the recipe.
ConventionsIn this book, you will find a number of text styles that distinguish betweendifferent kinds of information. Here are some examples of these styles and anexplanation of their meaning.
Code words in text, database table names, folder names, filenames, fileextensions, pathnames, dummy URLs, user input, and Twitter handles areshown as follows: "You will see drupal-org.make and drupal-org-core.make."
A block of code is set as follows:
public function alterRoutes(RouteCollection $collection) { // Change path of mymodule.mypage to use a hyphen if ($route = $collection->get('mymodule.mypage'))
Any command-line input or output is written as follows:
$ CREATE USER username@localhost IDENTIFIED BY 'password';
New terms and important words are shown in bold. Words that you see onthe screen, for example, in menus or dialog boxes, appear in the text like this:"Check the checkbox and click on Install."
Warnings or important notes appear in a box like this.Tips and tricks appear like this.
Reader feedbackFeedback from our readers is always welcome. Let us know what you thinkabout this book-what you liked or disliked. Reader feedback is important forus as it helps us develop titles that you will really get the most out of.
To send us general feedback, simply e-mail [email protected], andmention the book's title in the subject of your message.
If there is a topic that you have expertise in and you are interested in eitherwriting or contributing to a book, see our author guide atwww.packtpub.com/authors .
Customer supportNow that you are the proud owner of a Packt book, we have a number ofthings to help you to get the most from your purchase.
Downloading the example codeYou can download the example code files for this book from your account athttp://www.packtpub.com. If you purchased this book elsewhere, you canvisit http://www.packtpub.com/support and register to have the files e-maileddirectly to you.
You can download the code files by following these steps:
1. Log in or register to our website using your e-mail address andpassword.
2. Hover the mouse pointer on the SUPPORT tab at the top.3. Click on Code Downloads & Errata.4. Enter the name of the book in the Search box.5. Select the book for which you're looking to download the code files.6. Choose from the drop-down menu where you purchased this book from.7. Click on Code Download.
You can also download the code files by clicking on the Code Files button onthe book's webpage at the Packt Publishing website. This page can beaccessed by entering the book's name in the Search box. Please note that youneed to be logged in to your Packt account.
Once the file is downloaded, please make sure that you unzip or extract thefolder using the latest version of:
WinRAR / 7-Zip for WindowsZipeg / iZip / UnRarX for Mac7-Zip / PeaZip for Linux
The code bundle for the book is also hosted on GitHub athttps://github.com/PacktPublishing/Drupal-8-Development-Cookbook-Second-Edition. We also have other code bundles from our rich catalog ofbooks and videos available at https://github.com/PacktPublishing/. Checkthem out!
ErrataAlthough we have taken every care to ensure the accuracy of our content,mistakes do happen. If you find a mistake in one of our books-maybe amistake in the text or the code-we would be grateful if you could report thisto us. By doing so, you can save other readers from frustration and help usimprove subsequent versions of this book. If you find any errata, pleasereport them by visiting http://www.packtpub.com/submit-errata, selectingyour book, clicking on the Errata Submission Form link, and entering thedetails of your errata. Once your errata are verified, your submission will beaccepted and the errata will be uploaded to our website or added to any list ofexisting errata under the Errata section of that title.
To view the previously submitted errata, go tohttps://www.packtpub.com/books/content/support and enter the name of thebook in the search field. The required information will appear under theErrata section.
PiracyPiracy of copyrighted material on the Internet is an ongoing problem acrossall media. At Packt, we take the protection of our copyright and licenses veryseriously. If you come across any illegal copies of our works in any form onthe Internet, please provide us with the location address or website nameimmediately so that we can pursue a remedy.
Please contact us at [email protected] with a link to the suspectedpirated material.
We appreciate your help in protecting our authors and our ability to bring youvaluable content.
QuestionsIf you have a problem with any aspect of this book, you can contact us [email protected], and we will do our best to address the problem.
Up and Running with Drupal 8In this chapter, we will get introduced to Drupal 8 and cover the followingrecipes:
Installing DrupalUsing a distribution with DrupalInstalling modules and themesUsing multisites in Drupal 8Tools for setting up an environmentRunning tests: Simpletest and PHPUnit
IntroductionThis chapter will kick off with an introduction to installing a Drupal 8 site.We will walk through Drupal's interactive installer. We will cover installingDrupal using a command-line tool called Drush. Drupal provides twoinstallation types: standard and minimal. Throughout this book, we will usethe standard installation.
Once we have installed our Drupal 8 site, we will cover the basics ofextending Drupal. We will discuss using distributions and installingcontributed projects, such as modules and themes. We will also includeuninstalling modules, as the process for uninstalling modules has changed inDrupal 8.
This book will involve a hands-on example for working with Drupal 8, andthis chapter will provide information on setting up a local developmentenvironment. This chapter will also provide recipes on how to set up aMultisite installation in Drupal 8 and run the available test suites.
Before we get started, you should install Composer. Composer is the de factopackage management tool for PHP. In case you are unfamiliar withComposer, it is just like using Gems for Ruby, npm for Node.js, and Bowerfor frontend libraries. Go to the Composer documentation to learn how toinstall Composer globally on your system:
Linux / Unix / macOS: https://getcomposer.org/doc/00-intro.md#installation-linux-unix-osxWindows: https://getcomposer.org/doc/00-intro.md#installation-windows
Installing DrupalThere are many different methods to download Drupal and install it. In thisrecipe, we will focus on downloading Drupal from https://www.drupal.org/and setting it up on a basic Linux, Apache, MySQL, or PHP (LAMP) server.
In this recipe, we will set up the files for Drupal 8 and step through theinstallation process.
Getting readyBefore we start, you will need a development environment that meets the newsystem requirements for Drupal 8:
Apache 2.0 (or higher) or Nginx 1.1 (or higher) web serverPHP 5.5.9 or higher, but PHP 5.6 or PHP 7 is recommended, as PHP 5.5has reached its end-of-life supportMySQL 5.5 or MariaDB 5.5.20 for your database
You will need a user with privileges to create databases or a created databasewith a user who has privileges to make tables in that database.
Access to upload or move files to the serverWhile a default installation of PHP will work with Drupal, it doesrequire certain PHP extensions, such as mbstring. Check outhttps://www.drupal.org/requirements/php for up-to-date requirementinformation.
Drupal 8 ships with Symfony (https://symfony.com/) components. One of thenew dependencies in Drupal 8, to support the Symfony routing system, is theDrupal Clean URL functionality. If the server is using Apache, ensure thatmod_rewrite is enabled. If the server is using Nginx, thengx_http_rewrite_module must be enabled.
We will download Drupal 8 and place its files in your web server's documentroot. This is the /var/www folder. If you used a tool, such as XAMPP,WAMP, or MAPP, consult the proper documentation to know your documentroot.
For full system requirements for Drupal 8, check outhttps://www.drupal.org/docs/8/system-requirements/. The Drupal.orgdocumentation is currently being migrated. Also, review the Drupal 7requirements page on https://www.drupal.org/docs/7/system-requirements/overview, which highlights Drupal 8 items, as well.
How to do it...We need to follow these steps to install Drupal 8:
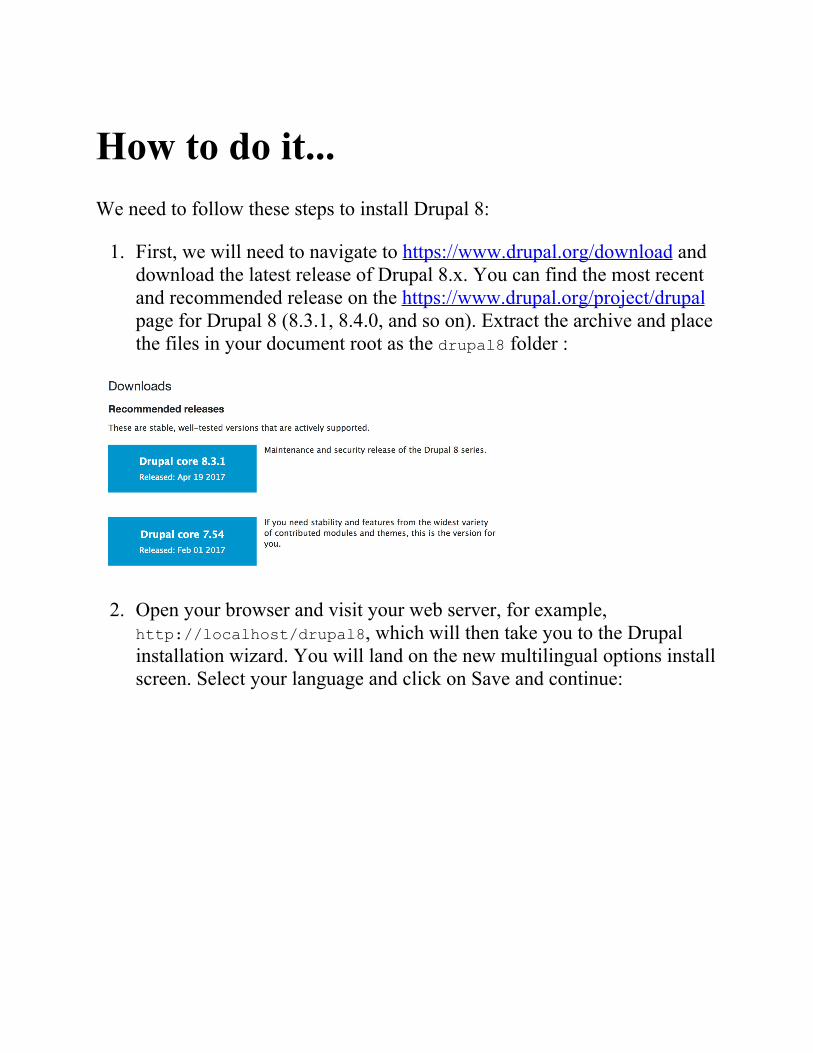
1. First, we will need to navigate to https://www.drupal.org/download anddownload the latest release of Drupal 8.x. You can find the most recentand recommended release on the https://www.drupal.org/project/drupalpage for Drupal 8 (8.3.1, 8.4.0, and so on). Extract the archive and placethe files in your document root as the drupal8 folder :
2. Open your browser and visit your web server, for example,http://localhost/drupal8, which will then take you to the Drupalinstallation wizard. You will land on the new multilingual options installscreen. Select your language and click on Save and continue:
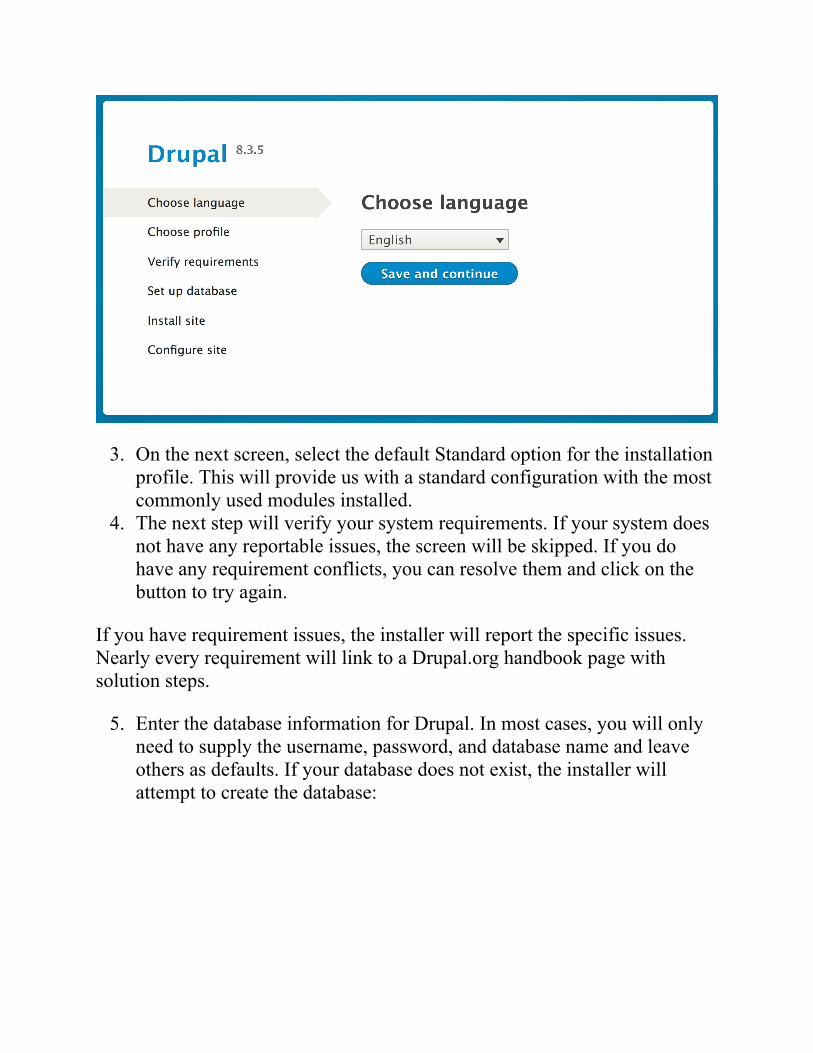
3. On the next screen, select the default Standard option for the installationprofile. This will provide us with a standard configuration with the mostcommonly used modules installed.
4. The next step will verify your system requirements. If your system doesnot have any reportable issues, the screen will be skipped. If you dohave any requirement conflicts, you can resolve them and click on thebutton to try again.
If you have requirement issues, the installer will report the specific issues.Nearly every requirement will link to a Drupal.org handbook page withsolution steps.
5. Enter the database information for Drupal. In most cases, you will onlyneed to supply the username, password, and database name and leaveothers as defaults. If your database does not exist, the installer willattempt to create the database:
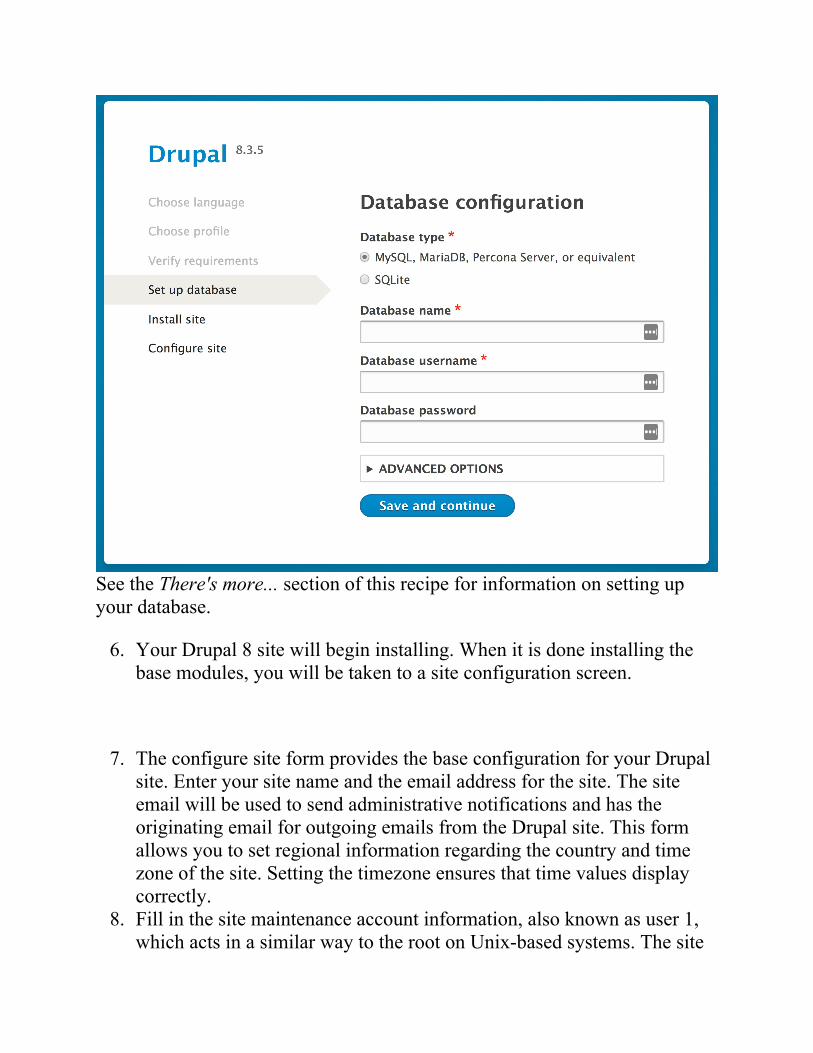
See the There's more... section of this recipe for information on setting upyour database.
6. Your Drupal 8 site will begin installing. When it is done installing thebase modules, you will be taken to a site configuration screen.
7. The configure site form provides the base configuration for your Drupalsite. Enter your site name and the email address for the site. The siteemail will be used to send administrative notifications and has theoriginating email for outgoing emails from the Drupal site. This formallows you to set regional information regarding the country and timezone of the site. Setting the timezone ensures that time values displaycorrectly.
8. Fill in the site maintenance account information, also known as user 1,which acts in a similar way to the root on Unix-based systems. The site
maintenance account is crucial. As stated, this acts as the first user and isgiven the user ID of 1. In Drupal, the user with the user ID of 1 oftencan bypass permission checks automatically and have global access.
9. Enter the site's regional information, and check whether the site shouldcheck for updates available for modules enabled and Drupal itself. Bychecking for updates automatically, your site will report anonymoususage statistics to Drupal along with providing a summary of yourversion status. You have the option to also opt-in for the site to emailyou notifications of new releases, including security releases.
10. When the information is satisfied, click on Save and continue, andcongratulations, you installed Drupal! The next screen will provide youa link to your installed Drupal site.
How it works...The Drupal installation process will provide a Drupal installation for theselected language and install modules and configuration based on theinstallation profile (standard or minimal in this recipe.)
When you visit the installer, it reads the language code from the browser.With this language code, it will then select a supported language. If youchoose a non-English installation, the translation files will be automaticallydownloaded from https://localize.drupal.org/. Previous versions of Drupal didnot support automated multilingual installs. More on multilingual will becovered in Chapter 8, Multilingual and Internationalization.
The installation profile instructs Drupal what modules to install by default.Contributed install profiles are termed distributions; we will discuss this morein the next recipe.
When verifying requirements, Drupal checks application versions and PHPconfigurations. For example, if your server has the PHP Xdebug(https://xdebug.org) extension installed, the minimum max_nesting_levelmust be 256 or else Drupal will not be installed(https://www.drupal.org/node/2393531).

There's more...The Drupal installation process is straightforward, but there are a few thingsworth discussing.
Creating a database user and adatabaseAs mentioned earlier, to install Drupal, you will need to have access to adatabase server (or the ability to create one) and an existing database (or theability to create one). This process will depend on your environment setup.
If you are working with a hosting provider, there is more than likely a web-based control panel. This should allow you to create databases and users.Refer to your hosting provider's documentation for more information on thistopic.
If you are using phpMyAdmin (https://www.phpmyadmin.net/) on yourserver, often installed by MAMP, WAMP, and XAMPP, and have rootaccess, you can create your databases and users by following these steps:
1. Sign in to phpMyAdmin as the root user.2. Click on Add a new User from the bottom of the privileges page.3. Fill in the user's information.4. Select to create a database for the user with all privileges granted.5. You can now use that user's information to connect Drupal to your
database.
If you do not have a user interface but have a command-line access, you canset up your database and user using the MySQL command line. Theseinstructions can be found in the core/INSTALL.mysql.txt file. From thecommand line of your site, perform the following:
1. Log in to MySQL:
$ mysql -u username -p
2. Create the database; you will use the following command to create themy_database database:
$ CREATE DATABASE my_database CHARACTER SET utf8 COLLATE utf8_general_ci;
3. Create a new user to access the database:
$ CREATE USER username@localhost IDENTIFIED BY 'password';
4. Grant the new user permissions on the database, as follows:
$ GRANT SELECT, INSERT, UPDATE, DELETE, CREATE, DROP, INDEX, ALTER, CREATE TEMPORARY TABLES ON databasename.* TO 'username'@'localhost' IDENTIFIED BY 'password';
If you are installing Drupal with a PostgreSQL or SQLite database, check outthe appropriate installation instructions, either INSTALL.pgsql.txt orINSTALL.sqlite.txt.
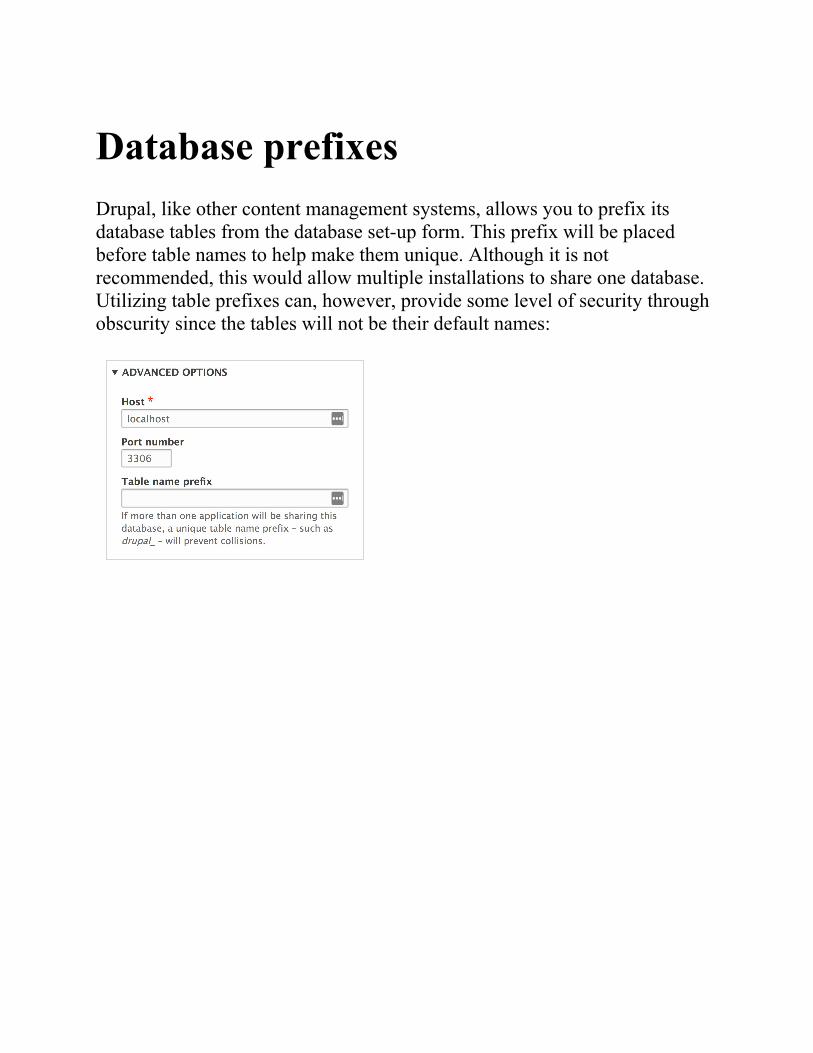
Database prefixesDrupal, like other content management systems, allows you to prefix itsdatabase tables from the database set-up form. This prefix will be placedbefore table names to help make them unique. Although it is notrecommended, this would allow multiple installations to share one database.Utilizing table prefixes can, however, provide some level of security throughobscurity since the tables will not be their default names:
Downloading and installing withDrushYou may also install Drupal using the PHP command-line tool, Drush. Drushis a command-line tool created by the Drupal community and must beinstalled if you wish to use it. Drush is covered in Chapter 13, The DrupalCLI.
As of Drush 9, which supports Drupal 8.3+, this section is deprecated. UsingDrush to download Drupal core or contributed modules will throw a warningto use Composer instead.
The pm-download command will download packages from Drupal.org. Thesite-install command will allow you to specify an installation profile andother options to install a Drupal site. The installation steps in this recipecould be run through Drush, as follows:
$ cd /path/to/web$ drush pm-download drupal-8 drupal8$ cd drupal8$ drush site-install standard -locale=en-US --account-name=admin --account-pass=admin [email protected] -db-url=mysql://user:pass@localhost/database
We used Drush to download the latest Drupal 8 and place it in a folder nameddrupal8. Then, the site-install command instructs Drush to use thestandard install profile, configure the maintenance account, and provide adatabase URI string so that Drupal can connect to its database.
Using Composer to create a DrupalsiteYou can download Drupal using Composer, the de facto PHP packagemanager. The preferred method is to use the Drupal Composer projecttemplate provided by the community.
To build your Drupal 8 site, run the following commands:
$ cd /path/to/document/root$ composer create-project drupal-composer/drupal-project drupal8 --stability dev
Wait for the commands to finish--it may take some time, as it downloads allthe required dependencies. You can feel free to grab a coffee (the first timetakes a while; it primes caches. Have faith, it will be much faster the nexttime.)
When finished, you will find a different directory structure inside yourdrupal8 directory. The vendor directory contains all third-party PHPlibraries, and the web directory contains your Drupal 8 site. You will need tomodify your web server to use the web directory as the new docroot withinyour drupal8 directory.
The project and its details can be found at https://github.com/drupal-composer/drupal-project, along with its full documentation.

Security updatesIf you choose to disable the update options, you will have to check manuallyfor module upgrades. While most upgrades are for bug fixes or features,some are for security updates. It is highly recommended that you subscribe tothe Drupal security team's updates. These updates are available on Twitter at@drupalsecurity (https://twitter.com/drupalsecurity) or the feeds onhttps://www.drupal.org/security.
See alsoFor more on multilingual, check out Chapter 8, Multilingual andInternationalizationFor more on using the command line and Drupal, check out Chapter 13,The Drupal CLICheck out the Drupal.org handbook on installing Drupal athttps://www.drupal.org/documentation/installCheck out the Drupal.org handbook that discusses Drupal 8 andComposer at https://www.drupal.org/docs/develop/using-composer/using-composer-with-drupalCheck out more information on Drush site install athttps://drushcommands.com/drush-8x/core/site-install/

Using a distribution with DrupalWhy would you want to use a distribution? A distribution is a contributedinstallation profile that is not provided by Drupal core. Distributions providea specialized version of Drupal with specific installed modules and themesalong with specific configurations (content types, and blocks.) OnDrupal.org, when you download an installation profile, it not only includesthe profile and its modules but a version of Drupal core, hence the namedistribution. You can find a list of all Drupal distributions athttps://www.drupal.org/project/project_distribution.
How to do it...We will follow these steps to download a distribution to use as a customizedversion of Drupal 8:
1. Download a distribution from Drupal.org. For this recipe, let's use theDemo Framework provided by Acquia athttps://www.drupal.org/project/df.
2. Select the recommended version for the 8.x branch.3. Extract the folder contents to your web server's document root--you'll
note that there is Drupal core; within the profiles folder, there's theinstallation profile's folder--df.
4. Due to current Drupal.org packaging limitations, there is a manual stepthat you will need to run in order to install additional dependencies. Runthe following command using your terminal inside of the extractedcontents:
$ composer require "commerceguys/intl: ~0.7" "commerceguys/addressing: ~1.0" "commerceguys/zone: ~1.0" "embed/embed: ~2.2
5. Install Drupal as you would normally, by navigating to your Drupal sitein your browser.
6. Follow the installation instructions in the site to install the distribution.
How it works...Installation profiles work by including additional modules that are part of thecontributed project realm or custom modules. The profile will then definethem as dependencies to be installed with Drupal. When you select aninstallation profile, you are instructing Drupal to install a set of modules oninstallation.
Demo Framework declares itself as an exclusive installation profile.Distributions that declare this are automatically selected and assumed to bethe default installation option. The exclusive flag was added with Drupal 7.22to improve the experience of using a Drupal distribution(http://drupal.org/node/1961012).

There's more...Distributions provide a specialized version of Drupal with specific featuresets, but there are a few items worth discussing.
MakefilesThe current standard for generating a built distribution is the utilization ofDrush and makefiles. Makefiles allow a user to define a specific version ofDrupal core and other projects (such as themes, modules, and third-partylibraries) that will make up a Drupal code base. It is not a dependencymanagement workflow, like Composer, but is a build tool.
If you take a look at the Demo Framework's profile folder, you will seedrupal-org.make and drupal-org-core.make. These are parsed by theDrupal.org packager to compile the code base and package it as a .zip or.tar.gz, like the one you downloaded.
Installing with DrushAs discussed in the first recipe's There's more... section, you can install aDrupal site through the Drush command-line tool. You can instruct Drush touse a specific installation profile by providing it as the first argument.
As of Drush 9, which supports Drupal 8.3+, this section is deprecated. UsingDrush to download Drupal core or contributed modules will throw a warningto use Composer instead.
The following command would install the Drupal 8 site using the DemoFramework:
$ cd /path/to/drupal8 $ drush pm-download df $ drush site-install df -db-url=mysql://user:pass@localhost/database
Using ComposerCurrently, Drupal.org does not package distributions using Composer, whichis why there was an extra step to add dependencies when installing thedistribution. Many distributions provide project templates to makescaffolding projects simpler.
For example, the following command will set up a Demo Framework sitewith docroot as the directory for the web server document root, whichcontains Drupal 8:
$ composer create-project acquia/df-project df
The project template is available on Acqua's GitHub athttps://github.com/acquia/df-project/.
Another distribution, Open Social, provides a template of its own:
$ composer create-project goalgorilla/social_template
The project template is available athttps://github.com/goalgorilla/social_template.
See also...Refer to Chapter 13, The Drupal CLI, for information on makefiles.Refer to Distribution documentation on Drupal athttps://www.drupal.org/documentation/build/distributions.Refer to Managing Your Drupal Project with Composer athttps://glamanate.com/blog/managing-your-drupal-project-composer.Refer to Managing your Drupal platform with Drush athttps://glamanate.com/blog/managing-your-drupal-platform-drush.
Installing modules and themesDrupal 8 provides more functionality out-of-the-box than previous versionsof Drupal, allowing you to do more with less. However, one of the moreappealing aspects of Drupal is the ability to extend and customize.
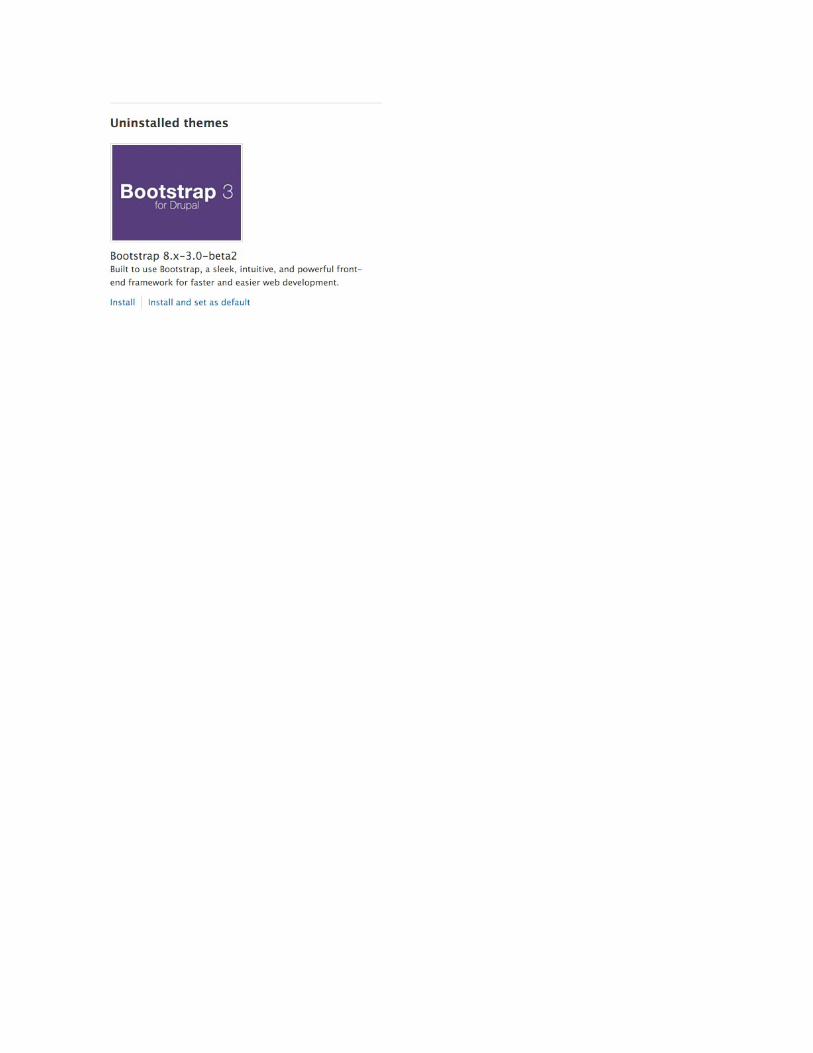
In this recipe, we will download and enable the Honeypot module(https://www.drupal.org/project/honeypot) and tell Drupal to use theBootstrap theme (https://www.drupal.org/project/bootstrap). The Honeypotmodule provides Honeypot and timestamps antispam measures on Drupalsites. This module helps protect forms from spam submissions. The Bootstraptheme implements the Bootstrap frontend framework and supports usingBootswatch styles to theme your Drupal site.
This chapter's recipe will use the standard way of installing modules, bydownloading archives available on Drupal.org. As of Drupal 8.2.0, installingmodules through Composer has been possible and is the required method forsome modules. Installing modules and themes using Composer is covered inthe There's more... section of this recipe and is highly recommended.
Getting readyIf you have used Drupal before, note that the folder structure has changed.Modules, themes, and profiles are now placed in their respective folders inthe root directory and no longer under sites/all. For more informationabout the developer experience change, refer tohttps://www.drupal.org/node/22336.
Downloading the example code: You can download the example code filesfor all Packt books you have purchased from your account athttp://www.packtpub.com. If you have purchased this book from elsewhere,you can go to http://www.packtpub.com/support and register yourself to havethe files emailed directly to you.
How to do it...Let's install modules and themes:
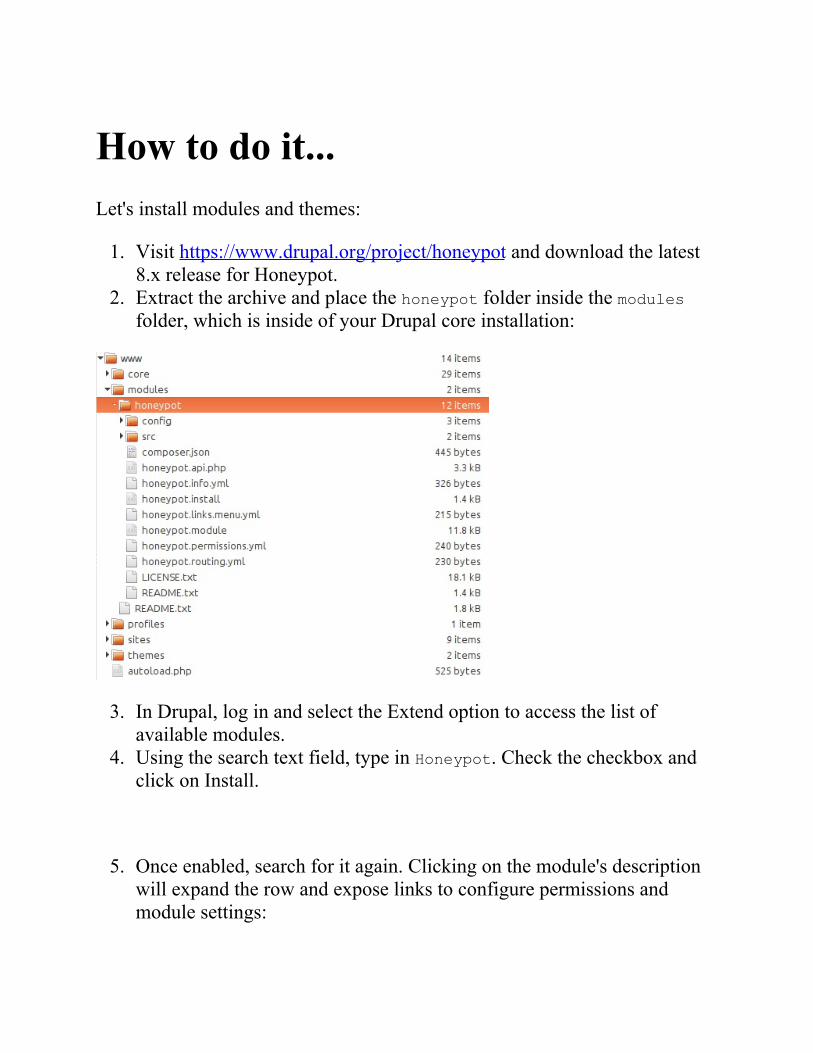
1. Visit https://www.drupal.org/project/honeypot and download the latest8.x release for Honeypot.
2. Extract the archive and place the honeypot folder inside the modulesfolder, which is inside of your Drupal core installation:
3. In Drupal, log in and select the Extend option to access the list ofavailable modules.
4. Using the search text field, type in Honeypot. Check the checkbox andclick on Install.
5. Once enabled, search for it again. Clicking on the module's descriptionwill expand the row and expose links to configure permissions andmodule settings:
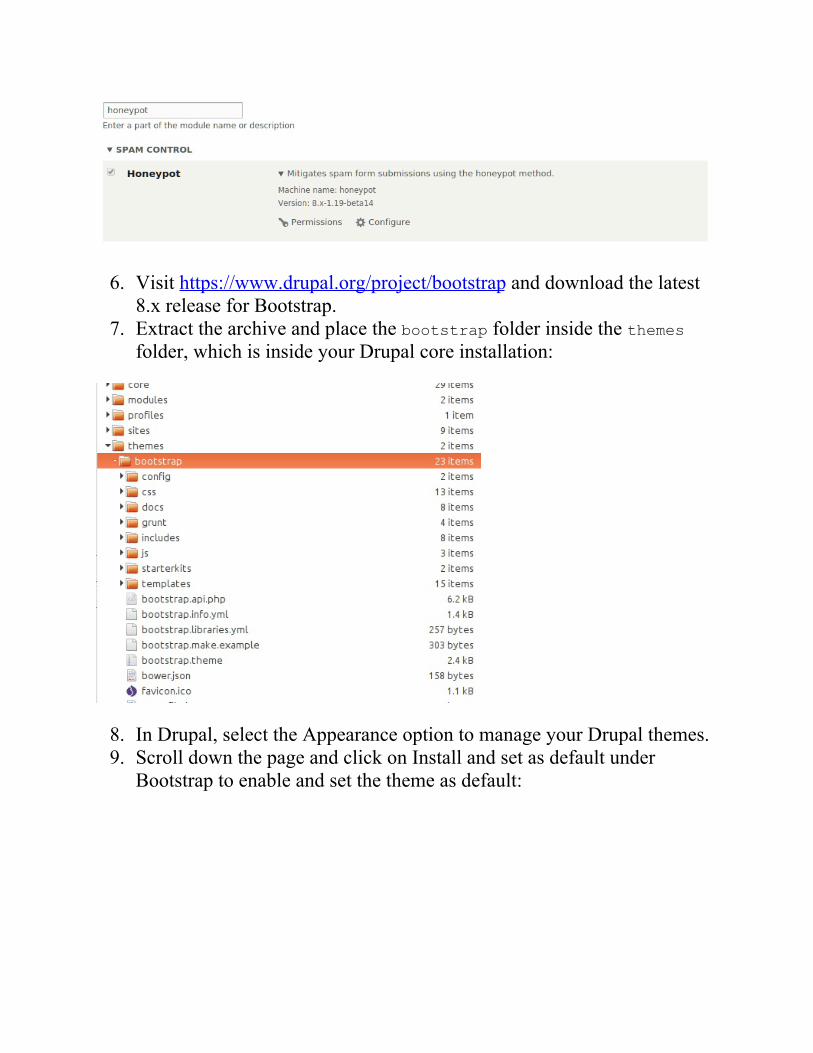
6. Visit https://www.drupal.org/project/bootstrap and download the latest8.x release for Bootstrap.
7. Extract the archive and place the bootstrap folder inside the themesfolder, which is inside your Drupal core installation:
8. In Drupal, select the Appearance option to manage your Drupal themes.9. Scroll down the page and click on Install and set as default under
Bootstrap to enable and set the theme as default:

How it works...The following sections outline the procedure for installing a module or themeand how Drupal discovers these extensions.
Discovering modules and themesDrupal scans specific folder locations to identify modules and themes definedby the .info.yml file in their directory. The following is the order in whichprojects will be discovered:
Their respective core folders (modules, or themes)The currently installed profileThe root modules or themes folderThe current site directory (default or current domain)
Module installationBy placing the module inside the root modules folder, we are allowingDrupal to discover the module and allow it to be installed. When a module isinstalled, Drupal will register its code with the system through themodule_installer service. The service will check for required dependenciesand prompt them to be enabled if required. The configuration system will runany configuration definitions provided by the module on installation. If thereare conflicting configuration items, the module will not be installed.
Theme installationA theme is installed through the theme_installer service and sets anydefault configuration by the theme along with rebuilding the theme registry.Setting a theme to default is a configuration change insystem.theme.default to the theme's machine name (in the recipe, it wouldbe bootstrap).

There's more...The following section outlines the procedure for installing a module or themeand includes some additional information for installing.
Installing a module or theme usingComposerAlthough it is not the required way to install an extension, this shouldbecome your default method. Why? Because each module is a dependency inyour project, and each of those may have its own dependencies. Composercan manage dependencies for you, or you can manage them manually. Yourtime and capabilities probably will not grow to scale as well as Composerwill. Not to mention, it also provides a standard way for PHP projects tointeroperate and load classes.
You can get the Honeypot module and Bootstrap using the following twocommands:
$ cd /path/to/drupal8$ composer require drupal/honeypot$ composer require drupal/bootstrap
Here is an example of contributed projects, which require Composer forinstallation, because they leverage existing libraries in the PHP community atlarge:
Drupal CommerceGeoIPSearch API SolrEntity Print
As more and more modules integrate existing SDK libraries, the requirementto use Composer will increase.
Installing a module with DrushModules can be downloaded and enabled through the command line usingdrush. The command to replicate the recipe would resemble the following:
$ drush pm-download honeypot $ drush pm-enable honeypot
As of Drush 9, which supports Drupal 8.3+, this section is deprecated. UsingDrush to download Drupal core or contributed modules will throw a warningto use Composer instead.
It will prompt you to confirm your action. If there were dependencies for themodule, it would ask whether you will like to enable those, too.
Drush simply downloads the archive available from Drupal.org. If themodule or theme requires third-party PHP library dependencies, these willnot be downloaded or be available in Drupal's class autoloading process.
Uninstalling a moduleOne of the substantial changes in Drupal 8 is the module disable and uninstallprocess. Previously, modules were first disabled and then uninstalled oncedisabled. This created a confusing process, which would disable its features,but not clean up any database schema changes. In Drupal 8, modules cannotjust be disabled but must be uninstalled. This ensures that when a module isuninstalled it can safely be removed from the code base.
A module can only be uninstalled if it is not a dependency of another moduleor does not have a configuration item in use--such as a field type--whichcould disrupt the installation's integrity.
With a standard installation, the Comment module cannot be uninstalled untilyou delete all the Comment fields on the article content type. This is becausethe field type is in use.
See alsoRefer to Chapter 4, Extending Drupal, to learn about setting defaults onenabling a module.Refer to Chapter 9, Configuration Management - Deploying in Drupal8.
Using multisites in Drupal 8Drupal provides the ability to run multiple sites from one single Drupal codebase instance. This feature is referred to as multisite. Each site has a separatedatabase; however, extensions stored in modules, profiles, and themes can beinstalled by all of the sites. Site folders can also contain their own modulesand themes. When provided, these can only be used by that one site.
The default folder is the default folder used if there is no matching domainname.
Getting readyIf you are going to work with multisite functionality, you should have anunderstanding of how to set up virtual host configurations with your webserver. In this recipe, we will use two subdomains under localhost, calleddev1 and dev2.

How to do it...We will use multisites in Drupal 8 by two subdomains under localhost:
1. Copy sites/example.sites.php to sites/sites.php.2. Create a dev1.localhost and dev2.localhost folder inside the sites
folder.3. Copy the sites/default/default.settings.php file into
dev1.localhost and dev2.localhost as settings.php in theirrespective folder:
4. Got to dev1.localhost and run the installation wizard.5. Got to dev2.localhost and verify that you still have the option to
install a site!

How it works...The sites.php must exist for the multisite functionality to work. By default,you do not need to modify its contents. The sites.php file provides a way tomap aliases to specific site folders. The file contains the documentation forusing aliases.
The DrupalKernel class provides findSitePath and getSitePath methodsto discover the site folder path. On Drupal's Bootstrap, this is initiated andreads the incoming HTTP host to load the proper settings.php file from theappropriate folder. The settings.php file is then loaded and parsed into a\Drupal\Core\Site\Settings instance. This allows Drupal to connect to theappropriate database.

There's more...Let's understand the security concerns of using multisite.
Security concernsThere can be cause for concern if you are using multisite. Arbitrary PHP codeexecuted on a Drupal site might be able to affect other sites sharing the samecode base. Drupal 8 marked the removal of the PHP filter(https://www.drupal.org/docs/8/modules/php/overview) module that allowedsite administrators to use PHP code in the administrative interface. Althoughthis mitigates the various ways an administrator had easy access to run PHPthrough an interface, it does not mitigate the risk wholesale. For example, thePHP filter module is now a contributed project and could be installed.
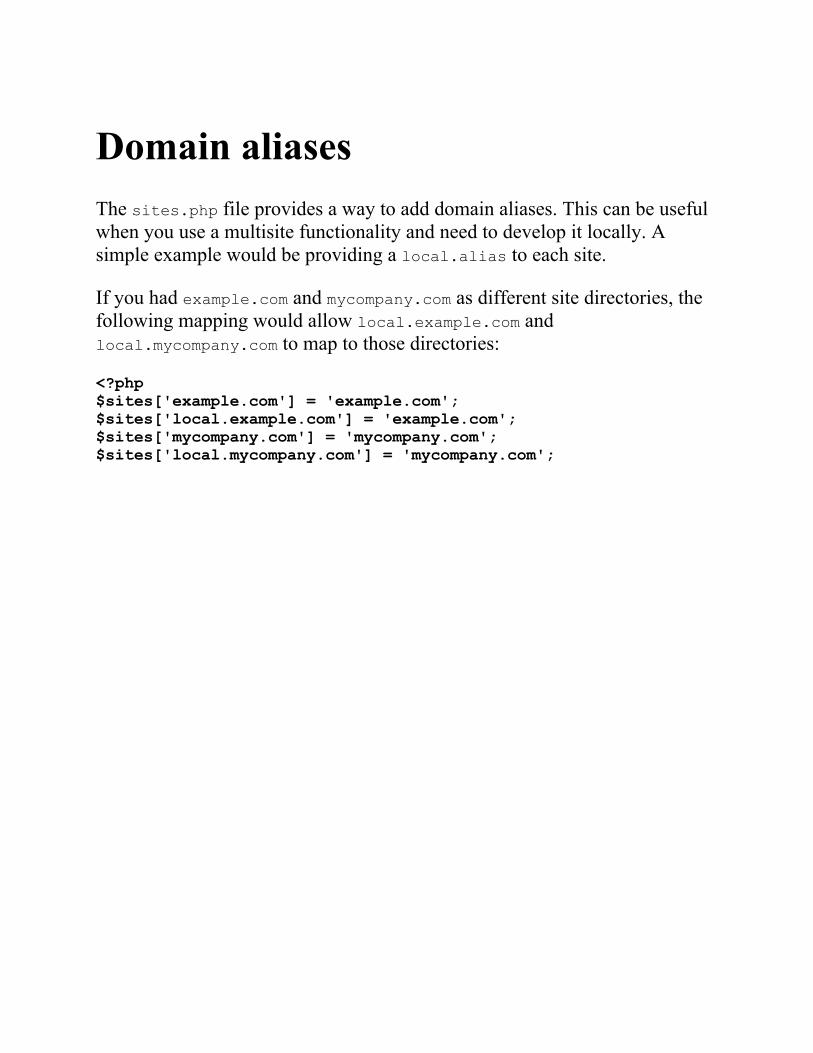
Domain aliasesThe sites.php file provides a way to add domain aliases. This can be usefulwhen you use a multisite functionality and need to develop it locally. Asimple example would be providing a local.alias to each site.
If you had example.com and mycompany.com as different site directories, thefollowing mapping would allow local.example.com andlocal.mycompany.com to map to those directories:
<?php$sites['example.com'] = 'example.com';$sites['local.example.com'] = 'example.com';$sites['mycompany.com'] = 'mycompany.com';$sites['local.mycompany.com'] = 'mycompany.com';

See also...Refer to Multisite documentation on Drupal athttps://www.drupal.org/documentation/install/multi-site.
Tools for setting up an environmentOne of the initial hurdles to getting started with Drupal is a localdevelopment environment. This recipe will cover how to set up theDrupalVM project by Jeff Geerling. DrupalVM is a VirtualBox virtualmachine run through Vagrant, provisioned and configured with Ansible. Itwill set up all of your services and build a Drupal installation for you.
Luckily, you will only need to have VirtualBox and Vagrant installed on yourmachine, and DrupalVM works on Windows, macOS X, and Linux.
Getting readyTo get started, you will need to install the two dependencies required forDrupalVM:
VirtualBox: https://www.virtualbox.org/wiki/DownloadsVagrant: http://www.vagrantup.com/downloads.html
How to do it...Let's set up the DrupalVM project by Jeff Geerling by following these steps:
1. Download the DrupalVM archive fromhttps://github.com/geerlingguy/drupal-vm/archive/master.zip.
2. Extract the archive and place the project in the directory of your choice.3. Copy example.drupal.make.yml to drupal.make.yml.4. Copy default.config.yml to config.yml.
5. Edit config.yml and modify the local_path setting to be the directorywhere you've placed the DrupalVM project. This will be synchronizedinto the virtual machine:
vagrant_synced_folders: local_path: /path/to/drupalvm destination: /var/www type: nfs create: true
6. Open a terminal and navigate to the directory where you have placed theDrupalVM project.
7. Enter the vagrant up command to tell Vagrant to build the virtualmachine and begin the provisioning process.
8. While this process is ongoing, modify your host file to provide easyaccess to the development site. Add the 192.168.88.88 drupalvm.devline to your host file.
9. Open your browser and access http://www.drupalvm.com/.10. Log in to your Drupal site with the username admin and password
admin.
How it works...DrupalVM is a development project that utilizes the Vagrant tool to create aVirtualBox virtual machine. Vagrant is configured through the project'sVagrantfile. Vagrant then uses Ansible--an open source IT automationplatform--to install Apache, PHP, MySQL, and other services on the virtualmachine.
The config.yml file has been set up to provide a simple way to customizevariables for the virtual machine and provisioning process. It also uses Drushto create and install a Drupal 8 site, or whatever components are specified indrupal.make.yml. This file is a Drush make file, which contains a definitionfor Drupal core by default and can be modified to include other contributedprojects.
The vagrant up command tells Vagrant to either launch an existing virtualmachine or create one anew in a headless manner. When Vagrant creates anew virtual machine, it triggers the provisioning process. In this instance,Ansible will read the provisioning/playbook.yml file and follow each stepto create the final virtual machine. The only files that need to be modified,however, are the config.yml and drupal.make.yml files.
There's more...The topic of automating and streamlining a local environment is quitepopular right now with quite a few different options. If you are notcomfortable with using Vagrant, there are a few other options that provide aserver installation and Drupal.
Acquia Dev DesktopAcquia Dev Desktop is developed by Acquia and can be found athttps://docs.acquia.com/dev-desktop2. It is an automated environmentinstaller for Windows and Mac. It is a xAMP stack (or DAMP stack) installerthat provides a full Drupal-specific stack that includes Apache, MySQL, andPHP. The Dev Desktop application allows you to create a regular Drupalinstallation or select from a distribution.
XAMPP + BitnamiXAMPP - Apache + MySQL + PHP + Perl - is a cross-platform environmentinstallation. XAMPP is an open source project from Apache Friends.XAMPP has partnered with Bitnami (https://bitnami.com/) to provide freeall-in-one installations for common applications, including Drupal 8. You candownload XAMPP at https://www.apachefriends.org/download.html.
KalaboxKalabox is developed by the Kalamuna group and intends to be a robustworkflow solution for Drupal development. Kalabox is cross-platformcompatible, allowing you to easily work on Windows machines. It is basedon the command line and provides application binaries for you to install. Youcan learn more about Kalabox athttp://www.kalamuna.com/products/kalabox/.
See alsoRefer to Chapter 13, The Drupal CLI, for information on makefiles.DrupalVM documentation http://docs.drupalvm.com/en/latest/.Refer to Drupal.org community documentation on local environmentsetup at https://www.drupal.org/node/157602.
Running tests - Simpletest andPHPUnitDrupal 8 ships with two testing suites. Previously, Drupal only supportedSimpletest. Now, there are PHPUnit tests as well. In the official changerecord, PHPUnit was added to provide testing without requiring a full DrupalBootstrap, which occurs with each Simpletest test. You can read the changerecord at https://www.drupal.org/node/2012184.
There is currently a PHPUnit initiative active in Drupal core development.The goal is to fully remove the Simpletest framework by Drupal 9. No newSimpletest tests are being written, at least since 8.2. All current tests arecurrently being converted by contributors. More about the initiative can befound in this issue, https://www.drupal.org/node/2807237, where it is beingcoordinated.
We will be running tests using the run-tests.sh test runner. This is a testrunner provided by Drupal that supports concurrency and running all of thevarious test suites. Running tests directly with PHPUnit will be covered in thefollowing There's more... section.
Getting readyDrupal 8.1.0 introduced the ability to perform JavaScript browser tests. Thisis powered using PhantomJS (http://phantomjs.org/), which uses a browseremulator powered by the Mink PHP library (http://mink.behat.org/). In orderto run the FunctionalJavascript test suite, you must have PhantomJS running.
To install PhantomJS, refer to the official installation instructions athttp://phantomjs.org/download.html.
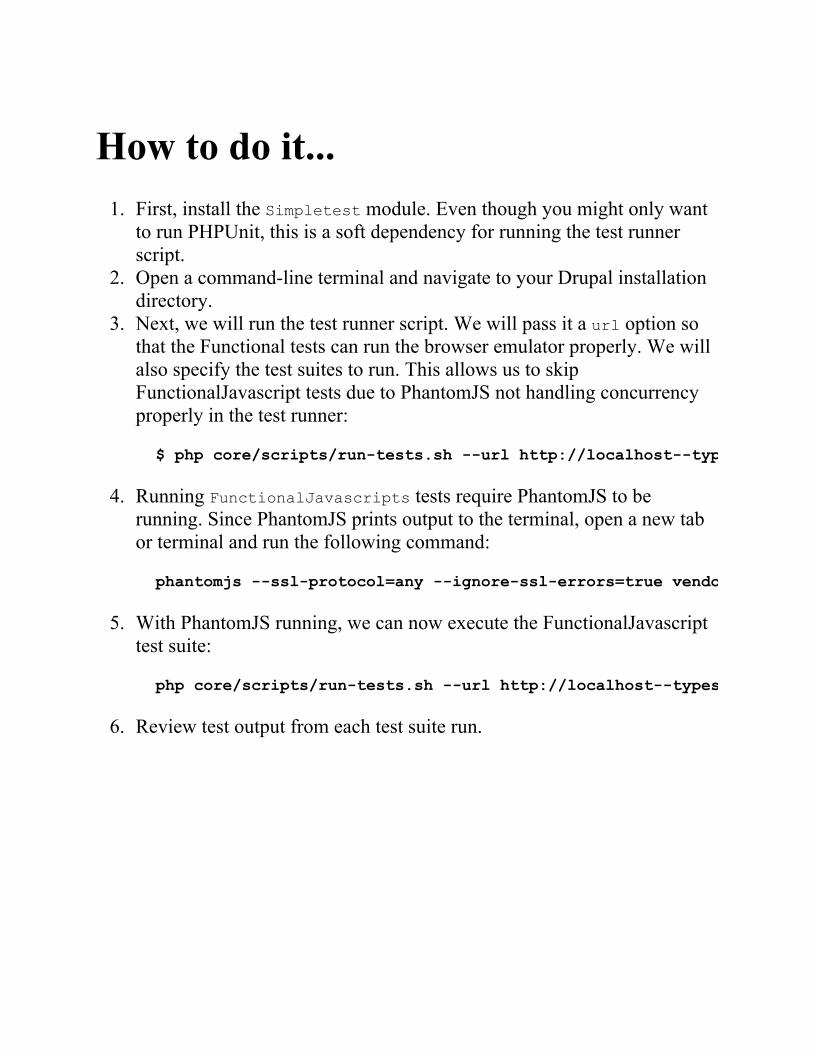
How to do it...1. First, install the Simpletest module. Even though you might only want
to run PHPUnit, this is a soft dependency for running the test runnerscript.
2. Open a command-line terminal and navigate to your Drupal installationdirectory.
3. Next, we will run the test runner script. We will pass it a url option sothat the Functional tests can run the browser emulator properly. We willalso specify the test suites to run. This allows us to skipFunctionalJavascript tests due to PhantomJS not handling concurrencyproperly in the test runner:
$ php core/scripts/run-tests.sh --url http://localhost--types Simpletest,PHPUnit-Unit,PHPUnit-Kernel,PHPUnit-Functional
4. Running FunctionalJavascripts tests require PhantomJS to berunning. Since PhantomJS prints output to the terminal, open a new tabor terminal and run the following command:
phantomjs --ssl-protocol=any --ignore-ssl-errors=true vendor/jcalderonzumba/gastonjs/src/Client/main.js 8510 1024 768
5. With PhantomJS running, we can now execute the FunctionalJavascripttest suite:
php core/scripts/run-tests.sh --url http://localhost--types PHPUnit-FunctionalJavascript --concurrency 1 --all
6. Review test output from each test suite run.
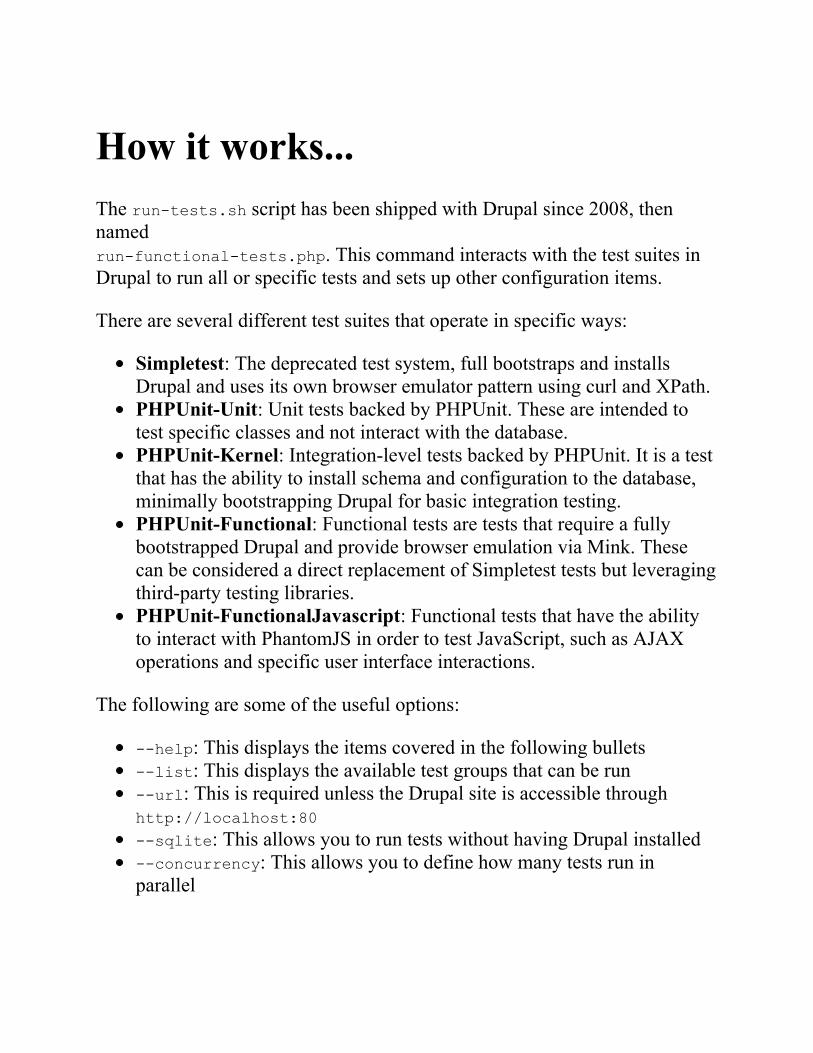
How it works...The run-tests.sh script has been shipped with Drupal since 2008, thennamedrun-functional-tests.php. This command interacts with the test suites inDrupal to run all or specific tests and sets up other configuration items.
There are several different test suites that operate in specific ways:
Simpletest: The deprecated test system, full bootstraps and installsDrupal and uses its own browser emulator pattern using curl and XPath.PHPUnit-Unit: Unit tests backed by PHPUnit. These are intended totest specific classes and not interact with the database.PHPUnit-Kernel: Integration-level tests backed by PHPUnit. It is a testthat has the ability to install schema and configuration to the database,minimally bootstrapping Drupal for basic integration testing.PHPUnit-Functional: Functional tests are tests that require a fullybootstrapped Drupal and provide browser emulation via Mink. Thesecan be considered a direct replacement of Simpletest tests but leveragingthird-party testing libraries.PHPUnit-FunctionalJavascript: Functional tests that have the abilityto interact with PhantomJS in order to test JavaScript, such as AJAXoperations and specific user interface interactions.
The following are some of the useful options:
--help: This displays the items covered in the following bullets--list: This displays the available test groups that can be run--url: This is required unless the Drupal site is accessible throughhttp://localhost:80
--sqlite: This allows you to run tests without having Drupal installed--concurrency: This allows you to define how many tests run inparallel

There's more...We will now discuss more techniques and information for running Drupal'stest suites.

Is run-tests a shell script?The run-tests.sh isn't actually a shell script. It is a PHP script--which iswhy you must execute it with PHP. In fact, within core/scripts, each file isa PHP script file meant to be executed using the command line. These scriptsare not intended to be run through a web server, which is one of the reasonsfor the .sh extension.
There can be issues with PHP across platforms that prevent providing ashebang line to allow executing the file as a normal bash or bat script. Formore information, refer to this Drupal.org issue athttps://www.drupal.org/node/655178.
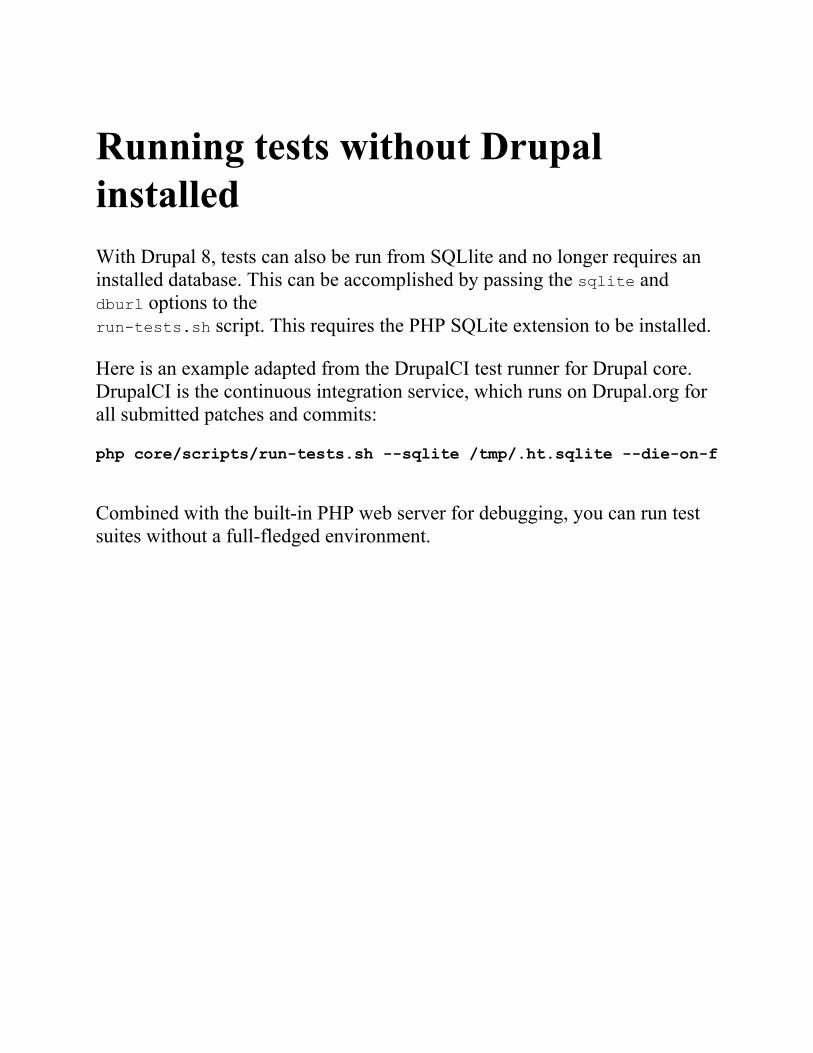
Running tests without DrupalinstalledWith Drupal 8, tests can also be run from SQLlite and no longer requires aninstalled database. This can be accomplished by passing the sqlite anddburl options to therun-tests.sh script. This requires the PHP SQLite extension to be installed.
Here is an example adapted from the DrupalCI test runner for Drupal core.DrupalCI is the continuous integration service, which runs on Drupal.org forall submitted patches and commits:
php core/scripts/run-tests.sh --sqlite /tmp/.ht.sqlite --die-on-fail --dburl sqlite://tmp/.ht.sqlite --all
Combined with the built-in PHP web server for debugging, you can run testsuites without a full-fledged environment.

Running specific testsEach example so far has used the all option to run every Simpletestavailable. There are various ways to run specific tests:
--module: This allows you to run all the tests of a specific module--class: This runs a specific path, identified by a full namespace path--file: This runs tests from a specified file--directory: This run tests within a specified directory
Previously in Drupal, tests were grouped inside the module.test files, whichis where the file option derives from. Drupal 8 utilizes the PSR-4autoloading method and requires one class per file.
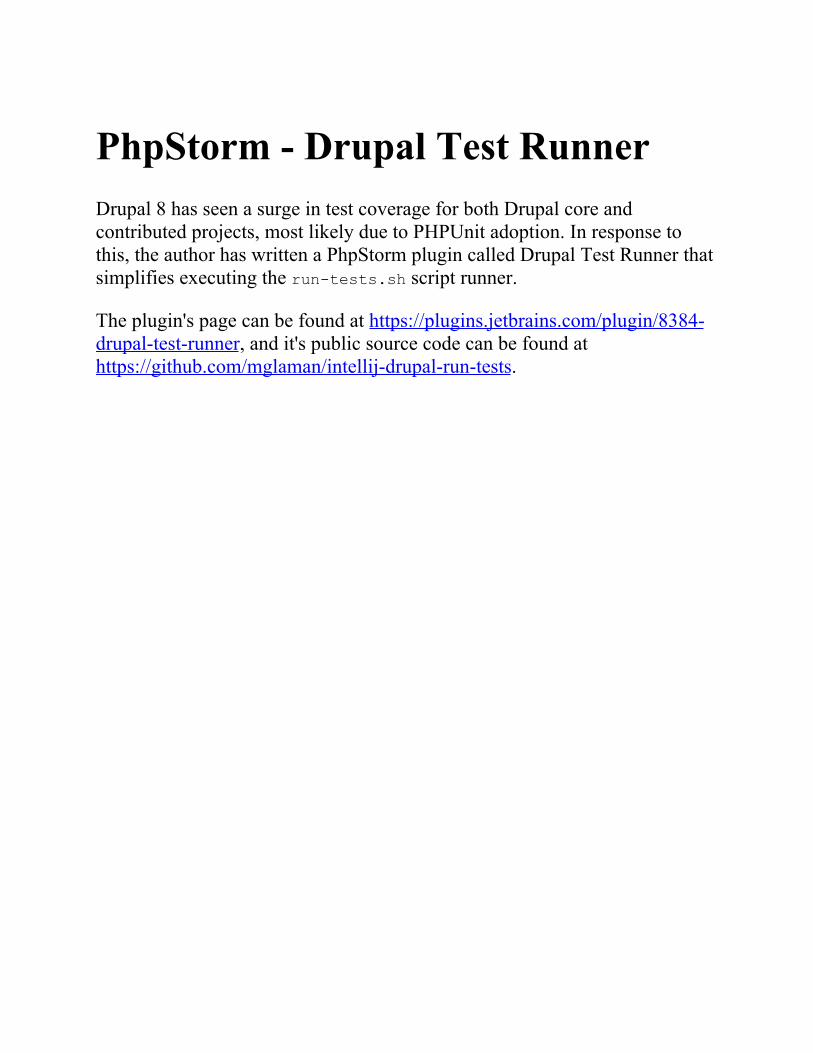
PhpStorm - Drupal Test RunnerDrupal 8 has seen a surge in test coverage for both Drupal core andcontributed projects, most likely due to PHPUnit adoption. In response tothis, the author has written a PhpStorm plugin called Drupal Test Runner thatsimplifies executing the run-tests.sh script runner.
The plugin's page can be found at https://plugins.jetbrains.com/plugin/8384-drupal-test-runner, and it's public source code can be found athttps://github.com/mglaman/intellij-drupal-run-tests.

DrupalCIWith Drupal 8 came a new initiative to upgrade the testing infrastructure onDrupal.org. The outcome was DrupalCI. DrupalCI is open source and can bedownloaded and run locally. The project page for DrupalCI ishttps://www.drupal.org/project/drupalci.
The test bot utilizes Docker and can be downloaded locally to run tests. Theproject ships with a Vagrant file that allows it to be run within a virtualmachine or locally. Learn more on the testbot's project page athttps://www.drupal.org/project/drupalci_testbot.
See also...Refer to the PHPUnit manual athttps://phpunit.de/manual/4.8/en/writing-tests-for-phpunit.html.Refer to the Drupal PHPUnit handbook at https://drupal.org/phpunit.Refer to Running tests from the command line athttps://www.drupal.org/node/645286.
Refer to Commerce 2.x: Unit, Kernel, and Functional Tests Oh My!Authors blog post and tutorial for running tests in Drupal 8 for DrupalCommerce at https://drupalcommerce.org/blog/45322/commerce-2x-unit-kernel-and-functional-tests-oh-my.
The Content Authoring ExperienceIn this chapter, we will explore what Drupal 8 brings to the content authoringexperience:
Configuring the WYSIWYG editorAdding and editing contentCreating a menu and linking contentProviding inline editingCreating a custom content typeApplying new Drupal 8 core field typesCustomizing the form display of a nodeCustomizing the display output of a node
IntroductionIn this chapter, we'll cover the Drupal 8 content authoring experience. Wewill show you how to configure text formats and set up the bundled CKEditorthat ships with Drupal 8. We will take a look at how to add and managecontent and utilize menus to link to content. Drupal 8 ships with inlineediting for per-field modifications from the frontend.
This chapter dives into creating custom content types and harnessingdifferent fields to create advanced content. We'll cover the five new fieldsadded to Drupal 8 core and how to use them, along with configuring newfield types through contributed projects. We will go through customizing thecontent's display and modifying the new form display added in Drupal 8.
Configuring the WYSIWYG editorDrupal 8 saw the collaboration between the Drupal development communityand the CKEditor development community. Because of this, Drupal nowships with CKEditor out of the box as the default What You See Is WhatYou Get (WYSIWYG) editor. The new Editor module provides an API tointegrate WYSIWYG editors. Although CKEditor is provided out of the box,contributed modules can provide integrations with other WYSIWYG editors.
Text formats control the formatting of content and WYSIWYG editorconfiguration for content authors. The standard Drupal installation profileprovides a fully configured text format with the enabled CKEditor. We willwalk through the steps of recreating this text format.
In this recipe, we will create a new text format with a custom CKEditorWYSIWYG configuration.
Getting readyBefore starting, make sure that the CKEditor module is enabled, which alsorequires Editoras a dependency. Editor is the module that provides an API to integrateWYSIWYG editorswith text formats.

How to do it...Let's create a new text format with a custom CKEditor WYSIWYGconfiguration:
1. Visit Configuration from the administrative toolbar and head to Textformats and editors under the CONTENT AUTHORING heading.
2. Click on Add text format to begin creating the new text format:
3. Enter a name for the text format, such as editor format.4. Select which roles have access to this format--this allows you to have
granular control over what users can use when authoring content.5. Select CKEditor from the Text editor select list. The configuration form
for CKEditor will then be loaded.6. You may now use an in-place editor to drag buttons onto the provided
toolbar to configure your CKEditor toolbar:
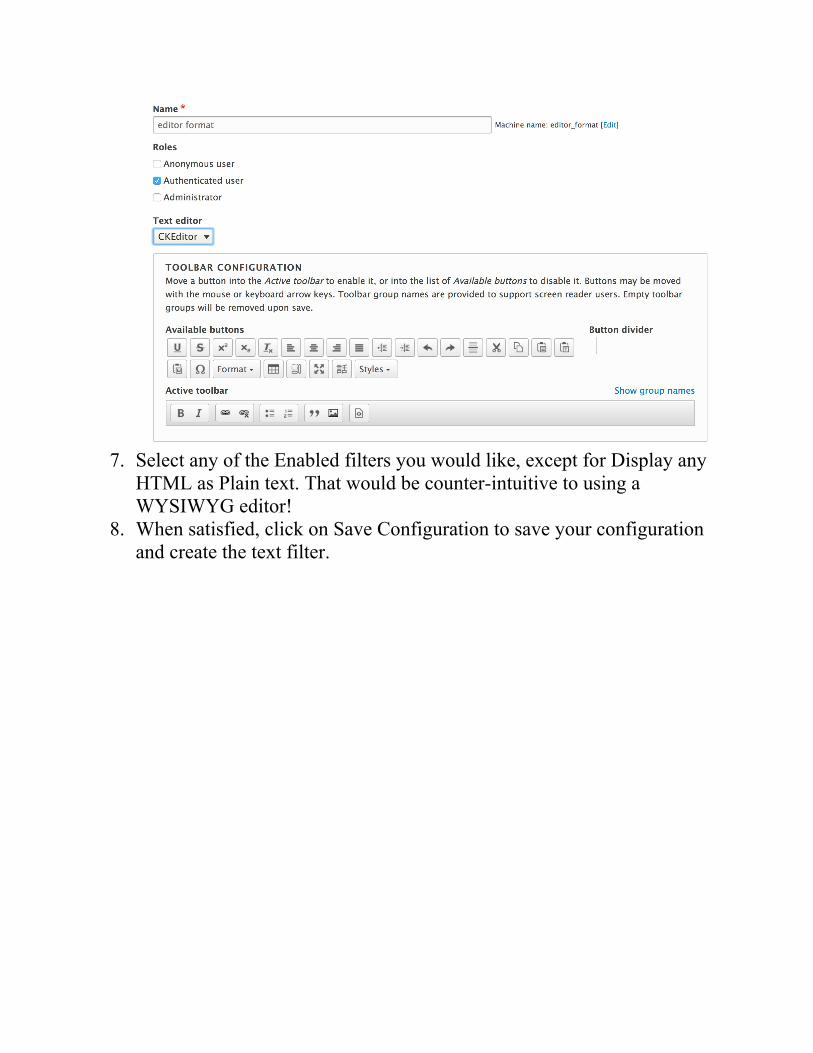
7. Select any of the Enabled filters you would like, except for Display anyHTML as Plain text. That would be counter-intuitive to using aWYSIWYG editor!
8. When satisfied, click on Save Configuration to save your configurationand create the text filter.
How it works...The Filter modules provide text formats that control over how rich text fieldsare presented to the user. Drupal will render rich text saved in a text areabased on the defined text format for the field. Text fields with "formatted" intheir title will respect text format settings; others will render in plain text.
The text formats and editors screen warns of a security risk due to improperconfiguration. This is because you could grant an anonymous user access to atext format that allows full HTML or allows image sources to be from remoteURLs.
The Editor module provides a bridge to WYSIWYG editors and text formats.It alters the text format form and rendering to allow the integration ofWYSIWYG editor libraries. This allows each text format to have its ownconfiguration for its WYSIWYG editor.
Out of the box, the Editor module alone does not provide an editor. TheCKEditor module works with the Editor API to enable the usage of theWYSIWYG editor.
Drupal can support other WYSWIG editors, such as markItUp(http://markitup.jaysalvat.com/home/) or TinyMCE(https://www.tinymce.com/) through contributed modules.

There's more...Drupal provides granular control of how rich text is rendered, and extensibleways, which we will discuss further.
Filter moduleWhen string data is added to a field that supports text formats, the data issaved and preserved as it was originally entered. Enabled filters for a textformat will not be applied until the content is viewed. Drupal works in such away that it saves the original content and only filters on display.
With the Filter module enabled, you gain the ability to specify how text isrendered based on the roles of the user who created the text. It is important tounderstand the filters applied to a text format that uses a WYSIWYG editor.For example, if you selected the Display any HTML as plain text option, theformatting done by the WYSIWYG editor would be stripped out whenviewed.

Improved linksA major component of WYSIWYG editing is the ability to insert links toother pieces of content or external sites. The default link button integratedwith CKEditor allows for basic link embedding. This means that your contenteditors must know their internal content URLs ahead of time to link to them.A solution to this issue is the Linkit module athttps://www.drupal.org/project/linkit.
The module can be installed using Composer by running the followingcommand:
$ cd /path/to/drupal8$ composer require drupal/linkit
The Linkit module provides a drop-in replacement for the default linkfunctionality. It adds auto-complete search for internal content and addsadditional options for displaying the field. Linkit works by creating differentprofiles that allow you to control what content can be referenced, whatattributes can be managed, and which users and roles can use a Linkit profile.
CKEditor pluginsThe CKEditor module provides a plugin type called CKEditorPlugin. Pluginsare small pieces of swappable functionality within Drupal 8. Plugins andplugin development are covered in Chapter 7, Plug and Play with Plugins.This type provides integration between CKEditor and Drupal 8.
The image and link capabilities are plugins defined within the CKEditormodule. Additional plugins can be provided through contributed projects orcustom development.
Refer to the \Drupal\ckeditor\Annotation\CKEditorPlugin class for theplugin definition and the suggested\Drupal\ckeditor\Plugin\CKEditorPlugin\DrupalImage class as aworking example.
See alsoThe official blog post from CKEditor about how Drupal adopted it as theofficial WYSIWYG editor at http://ckeditor.com/blog/CKEditor-Joins-Drupal.Refer to Chapter 7, Plug and Play with Plugins.
Adding and editing contentThe main functionality of a content management system is in the name itself--the ability to manage content; that is, to add, edit, and organize content.Drupal provides a central form that allows you to manage all of the contentwithin your website and allows you to create new content. Additionally, youcan view a piece of content and click on an edit link when viewing it.

Getting readyThis recipe assumes that you have installed the standard installation profileand have the default node content types available for use.
How to do it...Let's manage the content by adding, editing, and organizing the content:
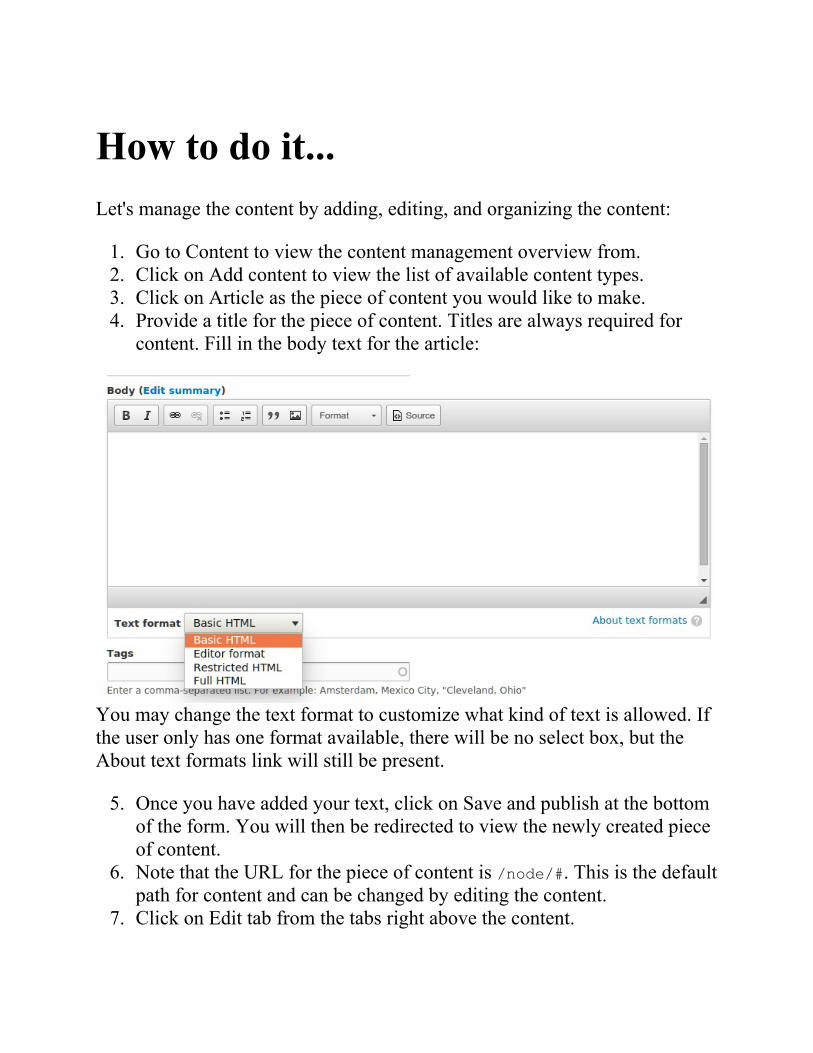
1. Go to Content to view the content management overview from.2. Click on Add content to view the list of available content types.3. Click on Article as the piece of content you would like to make.4. Provide a title for the piece of content. Titles are always required for
content. Fill in the body text for the article:
You may change the text format to customize what kind of text is allowed. Ifthe user only has one format available, there will be no select box, but theAbout text formats link will still be present.
5. Once you have added your text, click on Save and publish at the bottomof the form. You will then be redirected to view the newly created pieceof content.
6. Note that the URL for the piece of content is /node/#. This is the defaultpath for content and can be changed by editing the content.
7. Click on Edit tab from the tabs right above the content.
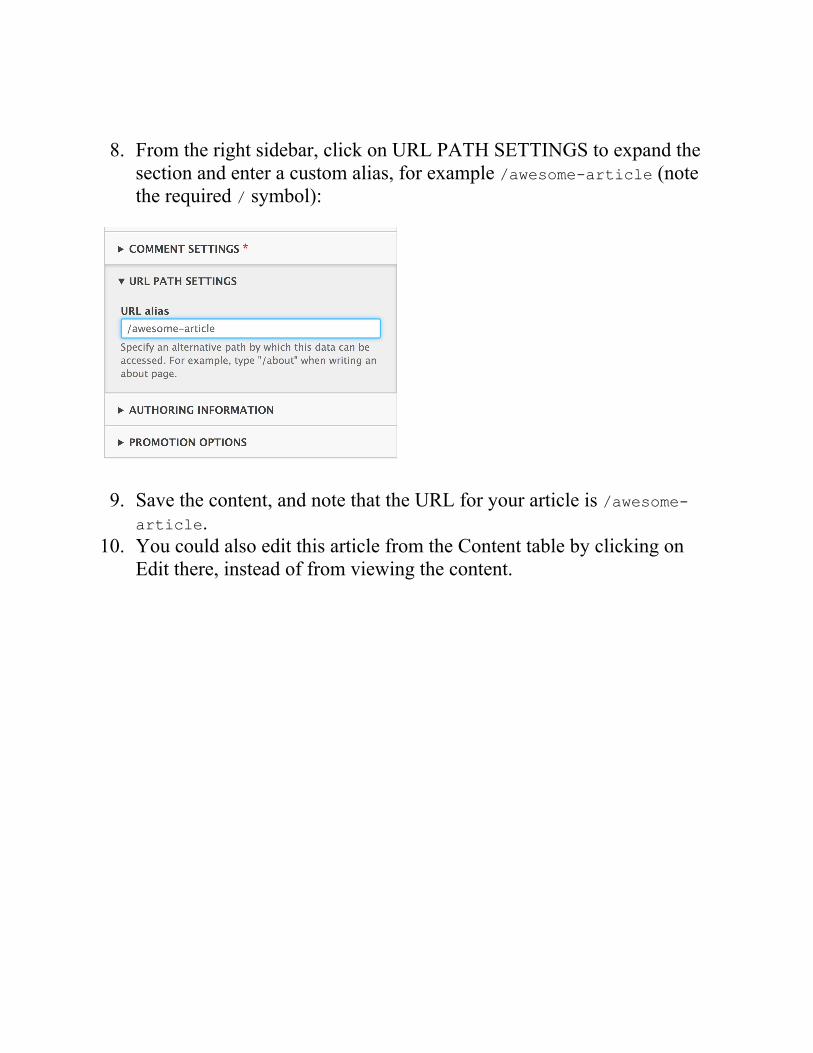
8. From the right sidebar, click on URL PATH SETTINGS to expand thesection and enter a custom alias, for example /awesome-article (notethe required / symbol):
9. Save the content, and note that the URL for your article is /awesome-article.
10. You could also edit this article from the Content table by clicking onEdit there, instead of from viewing the content.
How it works...The Content page is a View, which will be discussed in Chapter 3,Displaying Content Through Views. This creates a table of all the content onyour site that can be searched and filtered. From here, you can view, edit, ordelete any single piece of content.
In Drupal, there are content entities that provide a method of creation,editing, deletion, and viewing. Nodes are a form of a content entity. Whenyou create a node, it will build the proper form that allows you to fill in thepiece of content's data. The same process follows for editing content.
When you save the content, Drupal writes the node's content to the databasealong with all of its respective field data.
There's more...Drupal 8's content management system provides many features; we willcover some extra information.
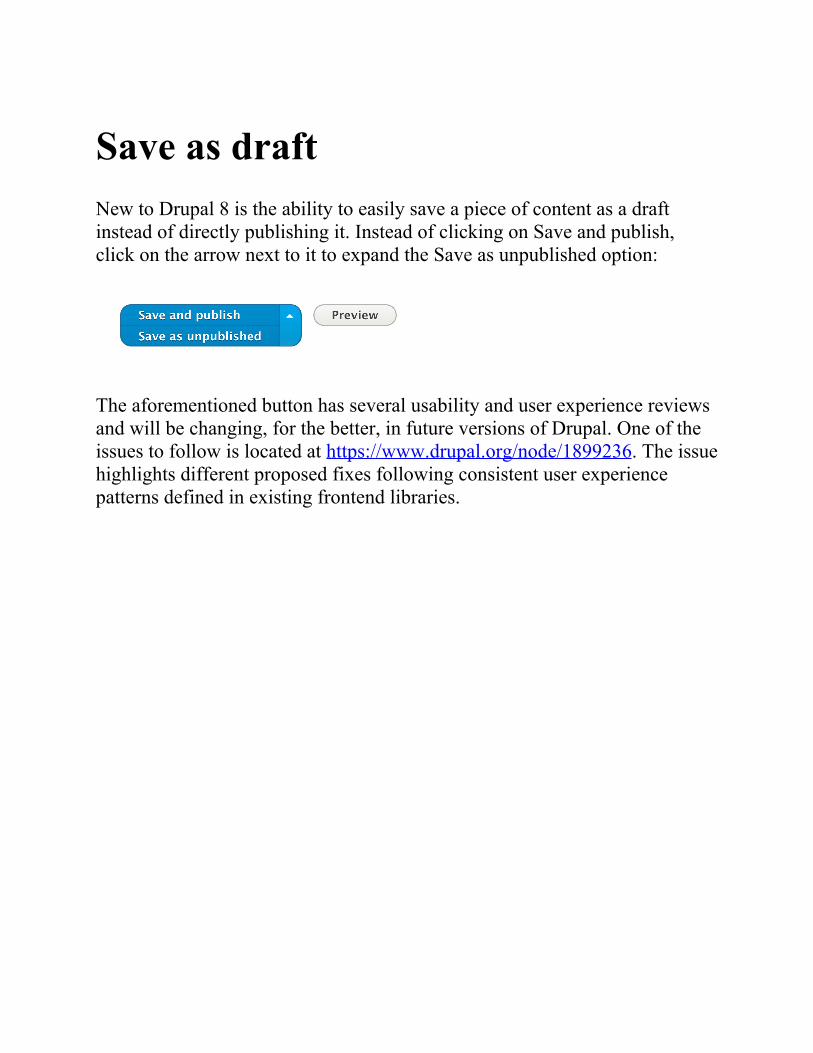
Save as draftNew to Drupal 8 is the ability to easily save a piece of content as a draftinstead of directly publishing it. Instead of clicking on Save and publish,click on the arrow next to it to expand the Save as unpublished option:
The aforementioned button has several usability and user experience reviewsand will be changing, for the better, in future versions of Drupal. One of theissues to follow is located at https://www.drupal.org/node/1899236. The issuehighlights different proposed fixes following consistent user experiencepatterns defined in existing frontend libraries.

PathautoThere is a contributed project called Pathauto that simplifies the process ofproviding URL aliases. It allows you to define patterns that will automaticallycreate URL aliases for content. This module utilizes tokens to allow for veryrobust paths for content.
The Pathauto project can be found athttps://www.drupal.org/project/pathauto.
There is a proposed issue to provide the functionality of Pathauto in Drupalcore, and it can be followed at https://www.drupal.org/node/229568.
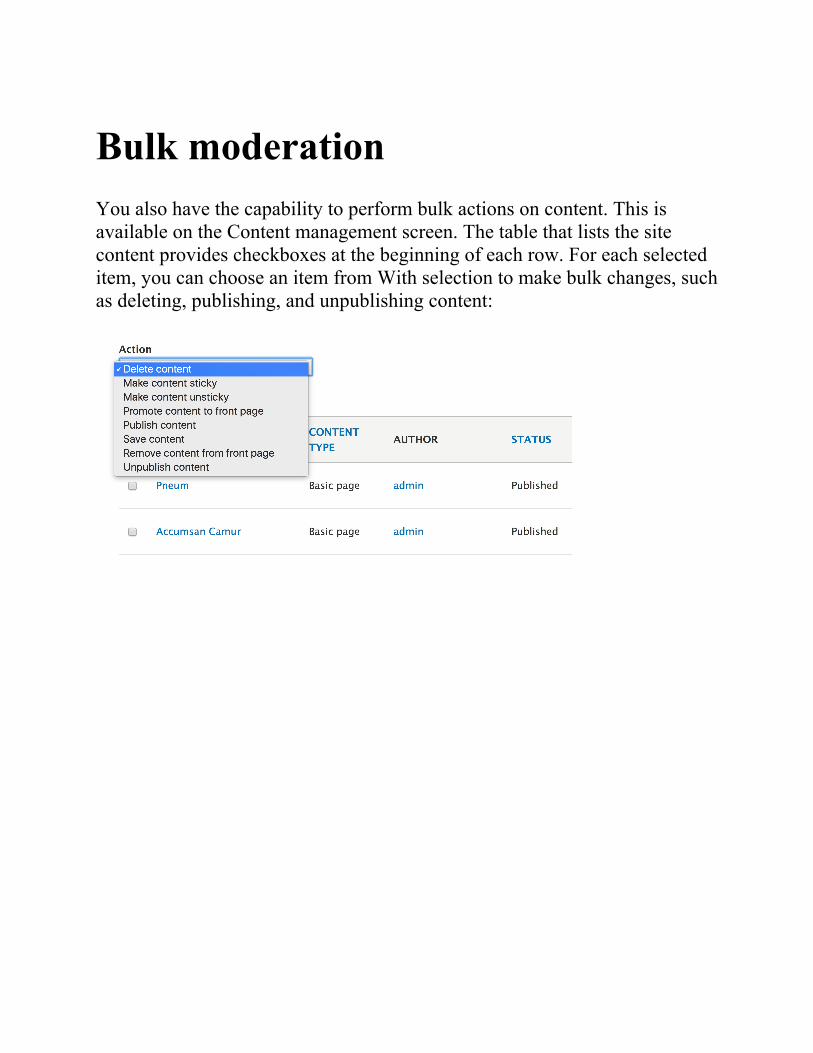
Bulk moderationYou also have the capability to perform bulk actions on content. This isavailable on the Content management screen. The table that lists the sitecontent provides checkboxes at the beginning of each row. For each selecteditem, you can choose an item from With selection to make bulk changes, suchas deleting, publishing, and unpublishing content:

See alsoRefer to the Customizing the form display of a node recipe of thischapter.
Creating a menu and linkingcontentDrupal provides a way to link content being authored to a specified menu onthe website, generally the main menu. You can, however, create a custommenu to provide links to content. In this recipe, we will show you how tocreate a custom menu and link content to it. We will then place the menu as ablock on the page, in the sidebar.

Getting readyThis recipe assumes that you have installed the standard installation profileand have the default node content types available for use. You should havesome content created to create a link.
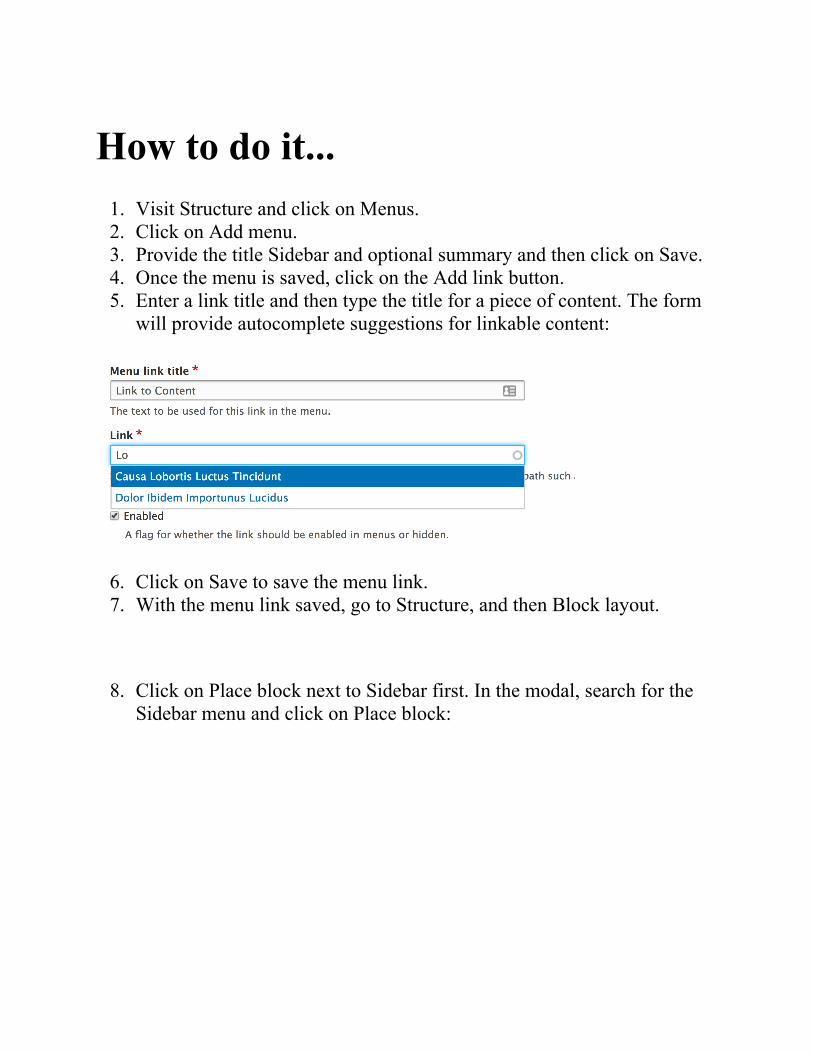
How to do it...1. Visit Structure and click on Menus.2. Click on Add menu.3. Provide the title Sidebar and optional summary and then click on Save.4. Once the menu is saved, click on the Add link button.5. Enter a link title and then type the title for a piece of content. The form
will provide autocomplete suggestions for linkable content:
6. Click on Save to save the menu link.7. With the menu link saved, go to Structure, and then Block layout.
8. Click on Place block next to Sidebar first. In the modal, search for theSidebar menu and click on Place block:
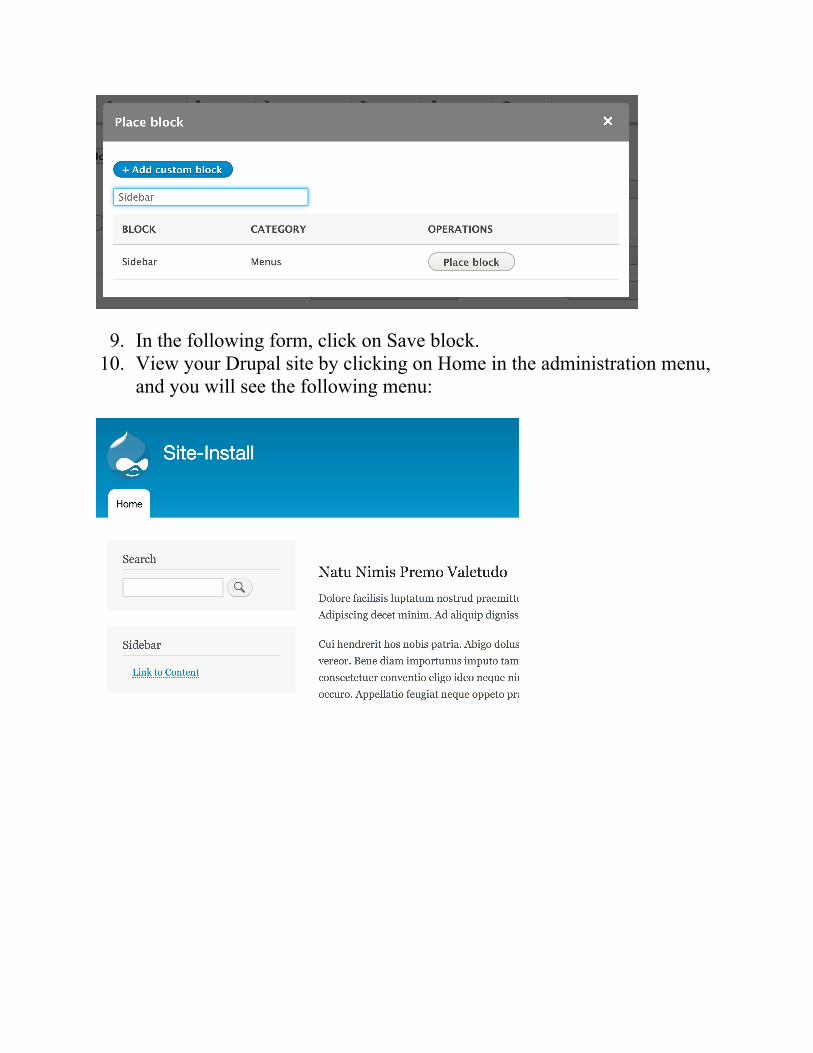
9. In the following form, click on Save block.10. View your Drupal site by clicking on Home in the administration menu,
and you will see the following menu:
How it works...Menus and links are part of Drupal core. The ability to make custom menusand menu links is provided through the Menu UI module. This module isenabled on the standard installation profile, but may not be in others.
The Link input of the menu link form allows you to begin typing node titlesand easily linking them to existing content. This was a piece of functionalitynot available in previous versions of Drupal. It will automatically convert thetitle into the internal path for you. Link input also accepts a regular path, suchas /node/1 or an external path.
You must have a valid path; you cannot add empty links to a menu. There iswork being done to allow adding empty or ID selector link paths--refer tohttps://www.drupal.org/node/1543750.

There's more...Links can be managed through the content edit form itself, which will becovered next.
Managing a contents menu linkfrom its formA piece of content can be linked to a menu from the add or edit form. Themenu settings section allows you to toggle the availability of a menu link.The menu link title will reflect the content's title by default.
The parent item allows you to decide which menu and which item it willappear under. By default, content types only have the main menu allowed.Editing a content type can allow for multiple menus or only choose a custommenu.
This allows you to populate the main menu or complimentary menu withouthaving to visit the menu management screens.
Providing inline editingA touted feature of Drupal 8 is the ability to provide inline editing. Inlineediting is enabled by default with the standard installation profile through theQuick Edit module. The Quick Edit module allows editing individual fieldswhile viewing a piece of content, and integrates it with the Editor module forWYSIWYG editors!
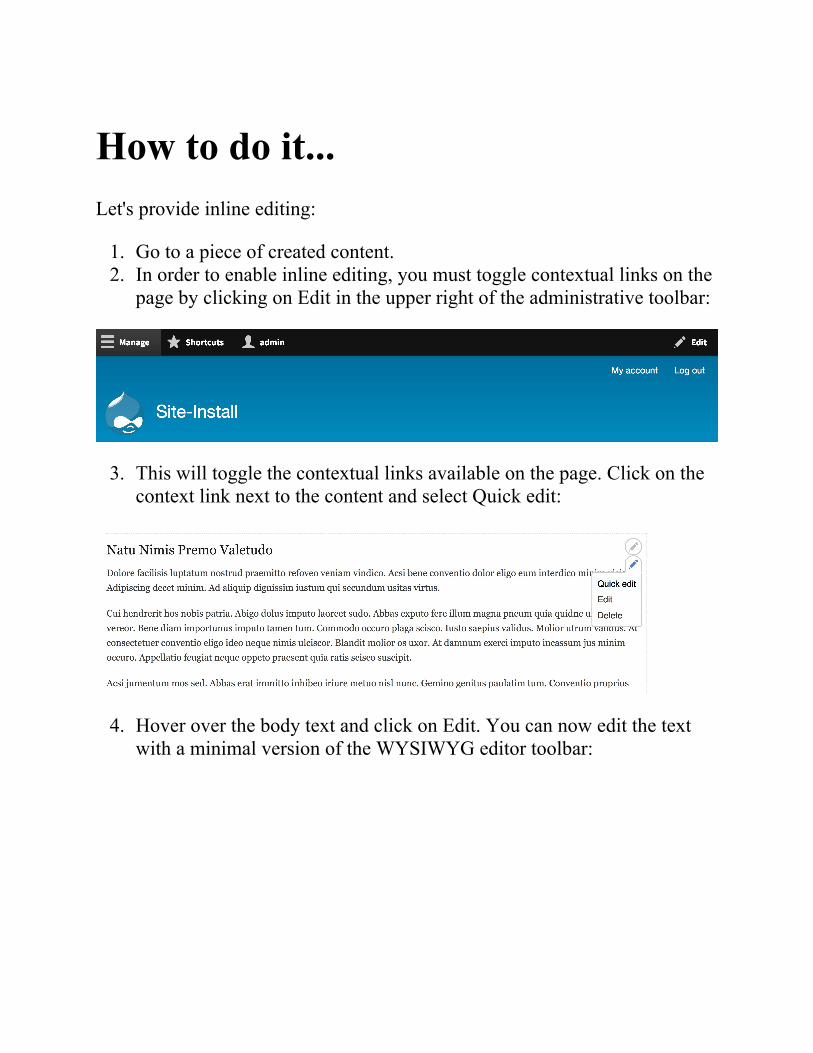
How to do it...Let's provide inline editing:
1. Go to a piece of created content.2. In order to enable inline editing, you must toggle contextual links on the
page by clicking on Edit in the upper right of the administrative toolbar:
3. This will toggle the contextual links available on the page. Click on thecontext link next to the content and select Quick edit:
4. Hover over the body text and click on Edit. You can now edit the textwith a minimal version of the WYSIWYG editor toolbar:
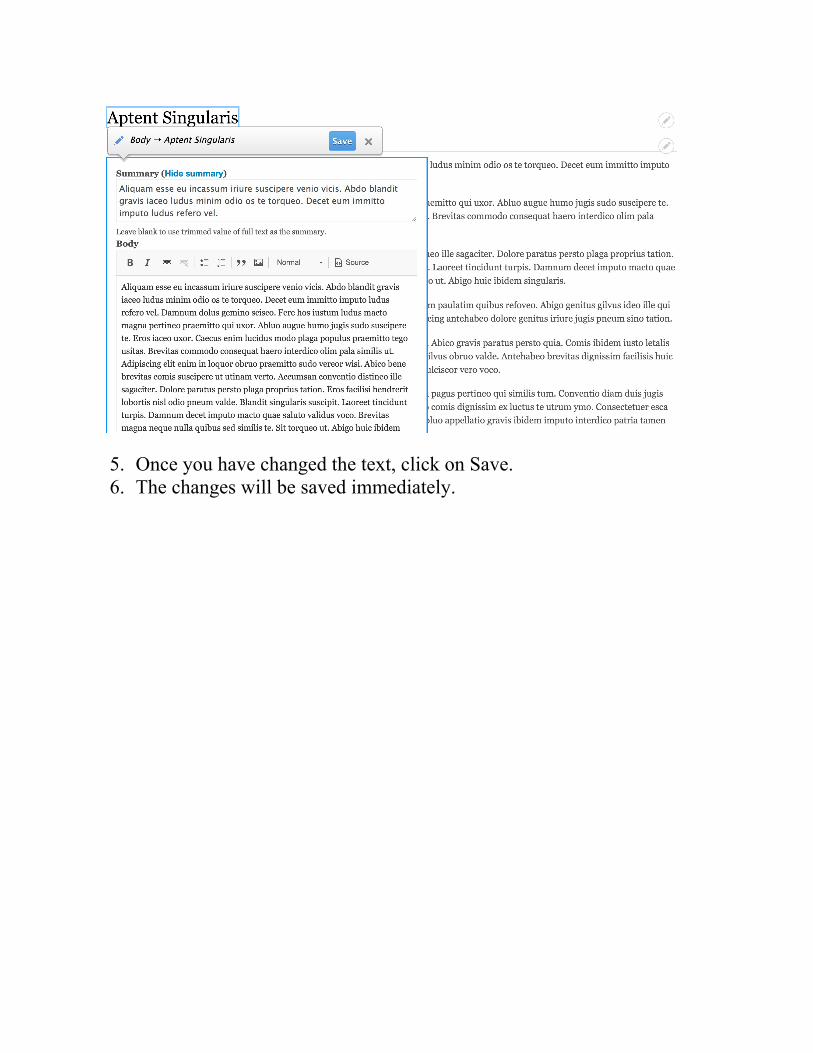
5. Once you have changed the text, click on Save.6. The changes will be saved immediately.
How it works...The Contextual links module provides privileged users with shortcut links tomodify blocks or content. The contextual links are toggled by clicking onEdit in the toolbar. The Edit link toggles the visibility of contextual links onthe page. Previously, in Drupal 7, contextual links appeared as cogs when aspecific region was hovered over.
The Quick Edit module builds on the contextual links features. It allows fieldformatters, which display field data, to describe how they will interact. Bydefault, Quick Edit sets this to a form. Clicking on an element will useJavaScript to load a form and save data via AJAX calls.
Quick Edit will not work on administrative pages.

There's more...With each minor release of Drupal 8, there are more improvements to theinline editing experience.
The outside-in approachThere is an experimental module in Drupal 8.2 that allows you to editingblocks and other site configuration from the frontend of the website, just likeQuick Edit for content. To enable this, install the Settings Tray module.
When you browse the Drupal site, you will note a new Edit button in the leftof the toolbar. Clicking on this will allow you to edit blocks and the siteconfiguration.
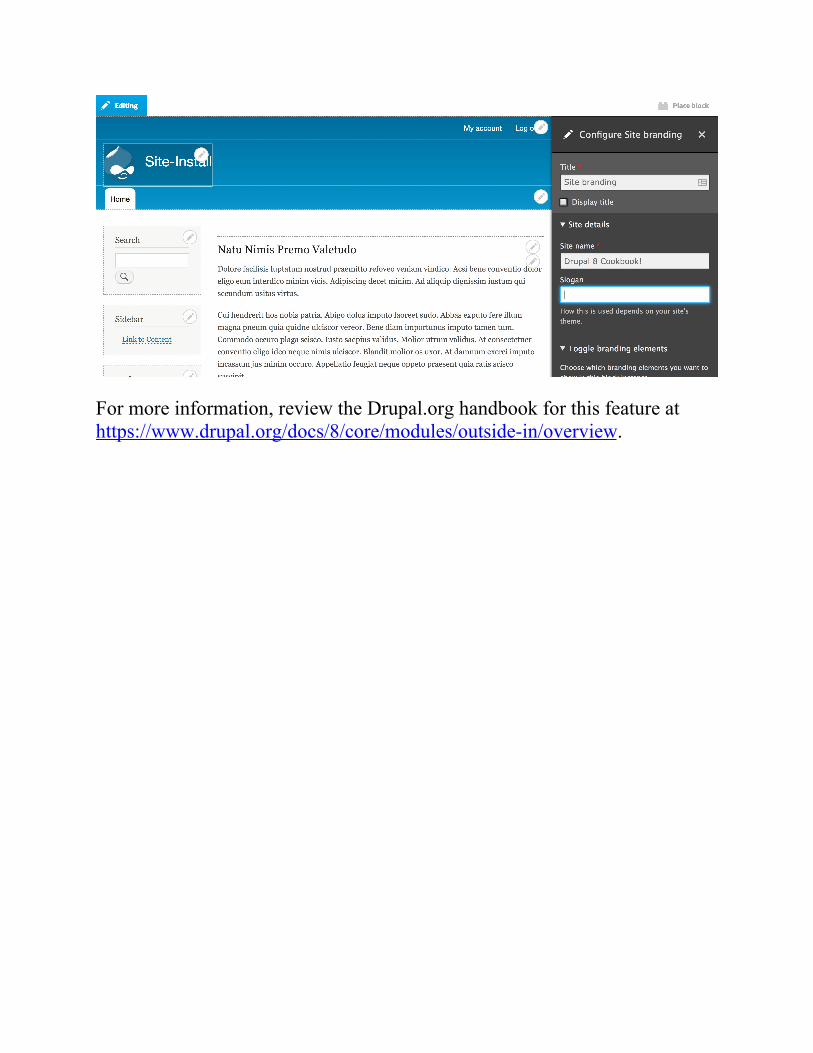
For more information, review the Drupal.org handbook for this feature athttps://www.drupal.org/docs/8/core/modules/outside-in/overview.
Creating a custom content typeDrupal excels in the realm of content management by allowing differenttypes of content. In this recipe, we will walk you through creating a customcontent type. We will create a Services type that has some basic fields andwould be used in a scenario that brings attention to a company's providedservices.
You will also learn how to add fields to a content type in this recipe, whichgenerally goes hand in hand with making a new content type on a Drupal site.
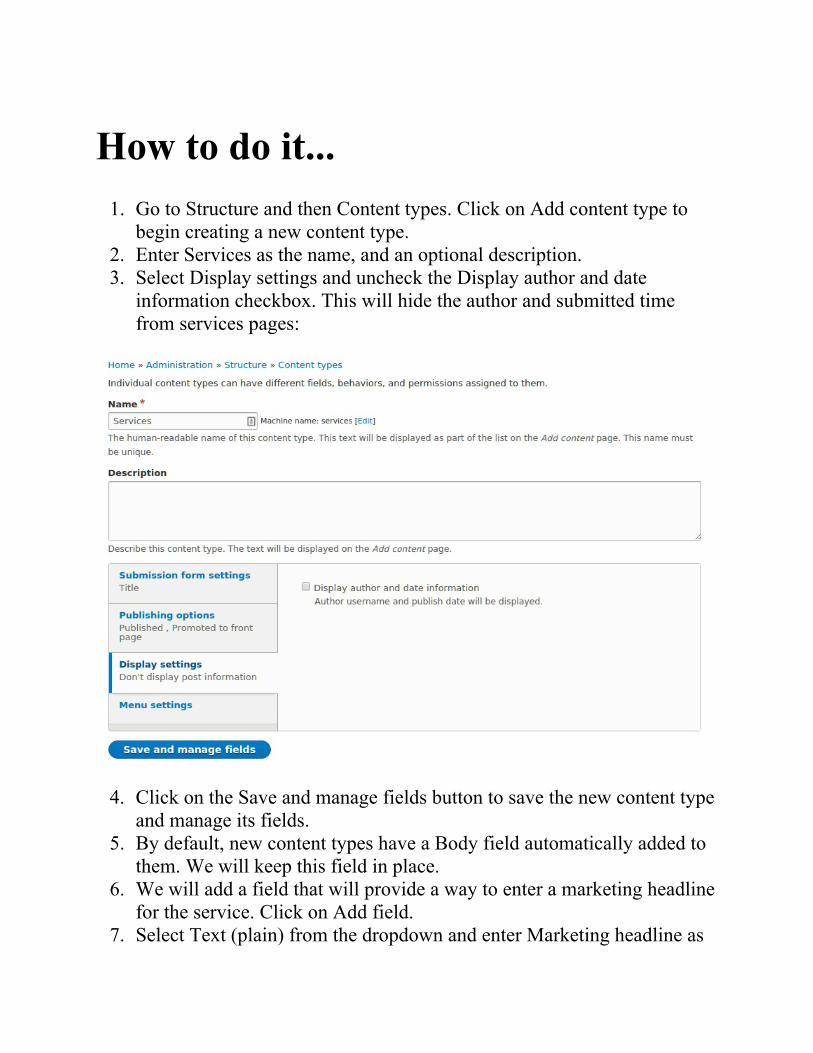
How to do it...1. Go to Structure and then Content types. Click on Add content type to
begin creating a new content type.2. Enter Services as the name, and an optional description.3. Select Display settings and uncheck the Display author and date
information checkbox. This will hide the author and submitted timefrom services pages:
4. Click on the Save and manage fields button to save the new content typeand manage its fields.
5. By default, new content types have a Body field automatically added tothem. We will keep this field in place.
6. We will add a field that will provide a way to enter a marketing headlinefor the service. Click on Add field.
7. Select Text (plain) from the dropdown and enter Marketing headline as
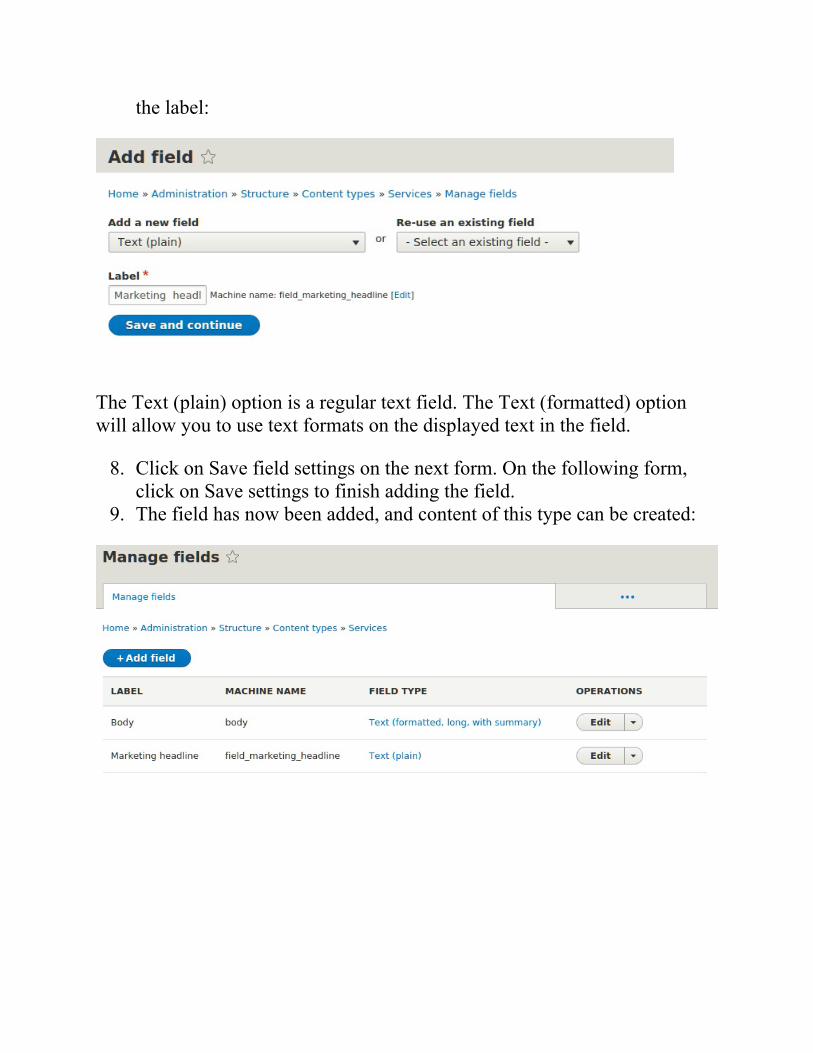
the label:
The Text (plain) option is a regular text field. The Text (formatted) optionwill allow you to use text formats on the displayed text in the field.
8. Click on Save field settings on the next form. On the following form,click on Save settings to finish adding the field.
9. The field has now been added, and content of this type can be created:
How it works...In Drupal, there are entities that have bundles. A bundle is just a type ofentity that can have specific configurations and fields attached. Whenworking with nodes, a bundle is generally referred to as a content type.
Content types can be created as long as the Node module is enabled. When acontent type is created through the user interface, it invokes thenode_add_body_field() function. This function adds the default body fieldfor content types.
Fields can only be managed or added if the Field UI module is enabled. TheField UI module exposes the Manage Fields, Manage Form Display, andManage Display for entities, such as nodes and blocks.
Applying new Drupal 8 core fieldtypesThe field system is what makes creating content in Drupal so robust. WithDrupal 8, some of the most used contributed field types have been mergedinto Drupal core as their own module. In fact, Entity Reference is no longer amodule but part of the main Field API now.
This recipe is actually a collection of mini-recipes to highlight the new fieldsprovided by Drupal 8 core: Link, Email, Telephone, Date, and Entityreference.
Getting readyThe standard installation profile does not enable all of the modules thatprovide these field types by default. For this recipe, you will need tomanually enable select modules so that you can create the field. The modulethat provides the field type and its installation status in the standard profilewill be highlighted.
Each recipe will start off expecting that you have enabled the module, ifneeded, and that you are at the Manage fields form of a content type and haveclicked on Add field and provided a field label. The recipes here cover thesettings for each field.

How to do it...This section contains a series of mini recipes that show how to use each ofthe new core field types.
LinkThe Link field is provided by the Link module. It is installed by default withthe standard installation profile. It is a dependency of the Menu UI, CustomMenu Links, and Shortcut module.
1. The Link field type does not have any additional field level settings thatare used across all bundles.
2. Click on Save field settings to customize the field for this specificbundle.
3. Using the Allowed link type setting, you can control whether providedURLs can be external, internal, or both. Selecting Internal or Both willallow linking to content by autocompleting the title.
4. The Allow link text defines whether a user must provide text to go alongwith the link. If no text is provided, then the URL itself is displayed.
5. The field formatter for a Link field allows you to specifyrel="nofollow" or whether the link should open in a new window.
The Email fieldThe Email field is provided by Drupal core and is available without installingadditional modules:
1. The Email field type does not have any additional field level settingsthat are used across all bundles.
2. Click on Save field settings to customize the field for this specificbundle.
3. There are no further settings for an Email field instance. This field usesthe HTML5 email input, which will leverage browser input validation.
4. The field formatter for an Email field allows you to display the email asa plain text or a mailto: link.
The Telephone fieldThe Telephone field is provided by the Telephone module. It is not installedby default with the standard installation profile, and must be installed throughthe Extend form.
1. The Telephone field type does not have any additional field levelsettings that are used across all bundles.
2. Click on Save field settings to customize the field for this specificbundle.
3. There are no further settings for a Telephone field instance. This fielduses the HTML5 telephone input, which will leverage browser inputvalidation.
4. The field formatter for a Telephone field allows you to display thetelephone number as a plain text item, or use the tel:link with anoptional replacement title for the link.
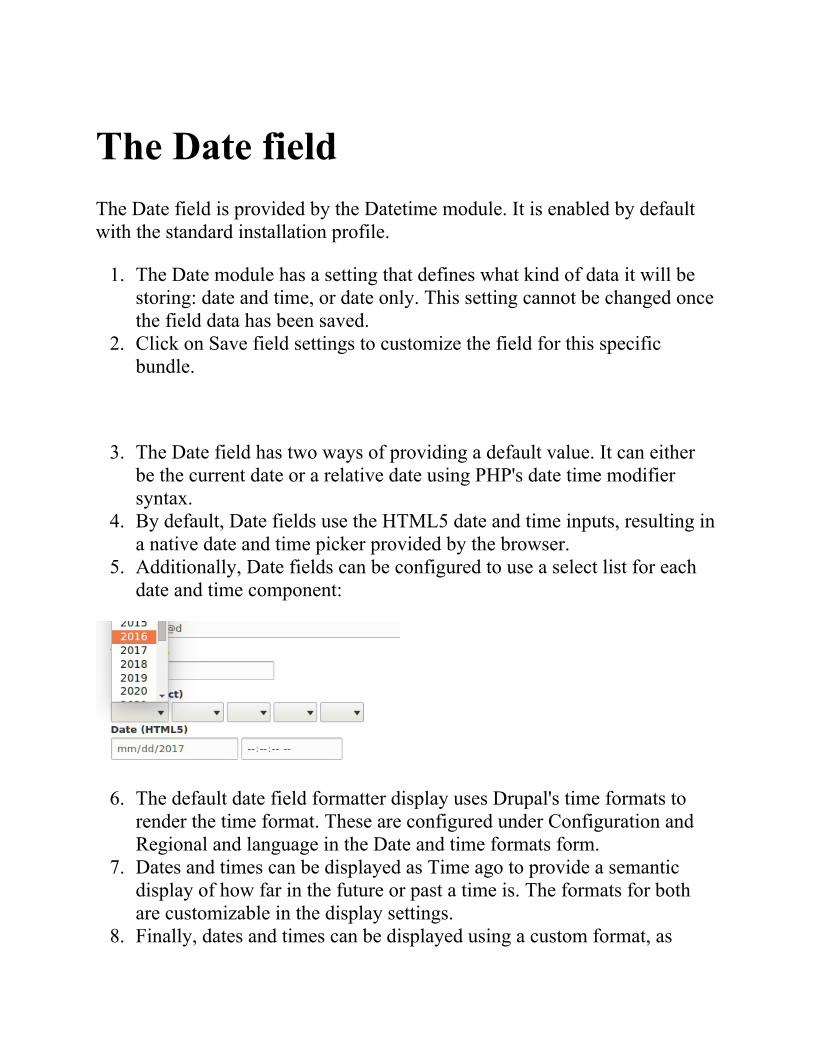
The Date fieldThe Date field is provided by the Datetime module. It is enabled by defaultwith the standard installation profile.
1. The Date module has a setting that defines what kind of data it will bestoring: date and time, or date only. This setting cannot be changed oncethe field data has been saved.
2. Click on Save field settings to customize the field for this specificbundle.
3. The Date field has two ways of providing a default value. It can eitherbe the current date or a relative date using PHP's date time modifiersyntax.
4. By default, Date fields use the HTML5 date and time inputs, resulting ina native date and time picker provided by the browser.
5. Additionally, Date fields can be configured to use a select list for eachdate and time component:
6. The default date field formatter display uses Drupal's time formats torender the time format. These are configured under Configuration andRegional and language in the Date and time formats form.
7. Dates and times can be displayed as Time ago to provide a semanticdisplay of how far in the future or past a time is. The formats for bothare customizable in the display settings.
8. Finally, dates and times can be displayed using a custom format, as

specified by the PHP date formats.
The Entity Reference fieldThe Entity Reference field is part of Drupal core and is available withoutenabling additional modules. Unlike other fields, Entity Reference appears asa grouping of specific items when adding a field. This is because you mustpick a type of entity to reference. Follow these steps:
1. The interface allows you to select a Content, File, Image, Taxonomyterm, User, or Other. Selecting one of the predefined options willpreconfigure the field's target entity type.
2. When creating an Entity Reference field using the Other choice, youmust specify the type of item to reference. This option cannot bechanged once your data is saved.
You will note that there are two groups: content and configuration. Drupaluses configuration entities. Even though configuration is an option, you maynot benefit from referencing those entity types. Only content entities have away to be viewed. Referencing configuration entities would fall under anadvanced use case implementation.
3. Click on Save field settings to customize the field for this specificbundle.
4. The Entity Reference field has two different methods to allow users tosearch for content: using the default autocomplete or a view.
5. Depending on the type of entity you are referencing, there will bedifferent entity properties that you may sort the results based on.
6. The default field widget for an Entity Reference field is autocomplete,however, there is the option to use a select list or checkboxes for theavailable options.
7. The values of an Entity Reference field can display the referencedentity's label or the rendered output. When rendering a label, it can beoptionally linked to the entity itself. When displaying a rendered entity,you may choose a specific view mode.
How it works...When working with fields in Drupal 8, there are two steps that should benoted. When you first create a field, you are defining a base field to be saved.This configuration is a base that specifies how many values a field cansupport and whether any additional settings are defined by the field type.When you attach a field to a bundle, it is considered a field storage andcontains configuration unique to that specific bundle. If you have the sameLink field on the Article and Page content type, the label, link type, and linktext settings are for each instance.
Each field type provides a method for storing and presents a specific type ofdata. The benefit of using these fields comes from validation and datamanipulation. It also allows you to utilize HTML5 form inputs. UsingHTML5 for telephone, email, and date, the authoring experience uses thetools provided by the browser instead of additional third-party libraries. Thisalso provides a more native experience when authoring with mobile devices.
There's more...Having Drupal 8 released with new fields was a significant improvement inintegrating widely used contributed modules into Drupal core. In thefollowing sections, we will cover additional improvements and someadditional topics.
Upcoming updatesEach of the recipes covers a field type that was once part of the contributedproject space. These projects provided more configuration options than thosefound in Drupal core at the time of writing this book. Over time, more andmore features will be brought into Drupal core from their source projects.
For instance, the Datetime module is based on the contributed Date project.However, not all of the contributed project's features have made it to Drupalcore. Each minor release of Drupal 8 sees more features moved to core. Anexample is the Datetime range module, which is an experimental moduleslated to be near stable for Drupal 8.4. This module adds support to start andend dates for Datetime fields. Documentation for the Datetime range modulecan be found at https://www.drupal.org/docs/8/core/modules/datetime-range.
Views and Entity ReferenceUsing a View with an Entity Reference field is covered in Chapter 3,Displaying Content Through Views. Using a View, you can customize theway results are fetched for a reference field.
See alsoRefer to the Providing an entity reference result view recipe in Chapter3, Displaying Content through Views.
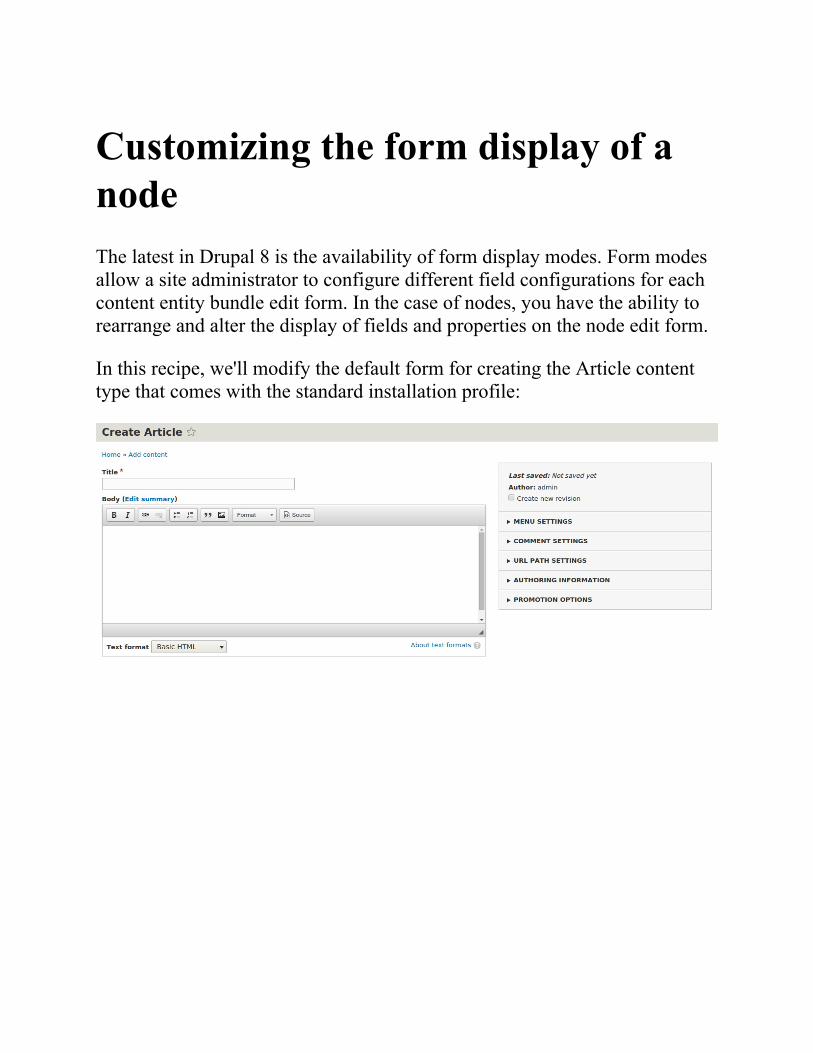
Customizing the form display of anodeThe latest in Drupal 8 is the availability of form display modes. Form modesallow a site administrator to configure different field configurations for eachcontent entity bundle edit form. In the case of nodes, you have the ability torearrange and alter the display of fields and properties on the node edit form.
In this recipe, we'll modify the default form for creating the Article contenttype that comes with the standard installation profile:
How to do it...1. To customize the form display mode, go to Structure and then Content
Types.2. We will modify the Article content type's form. Click on the expand the
OPERATIONS dropdown and select Manage form display.
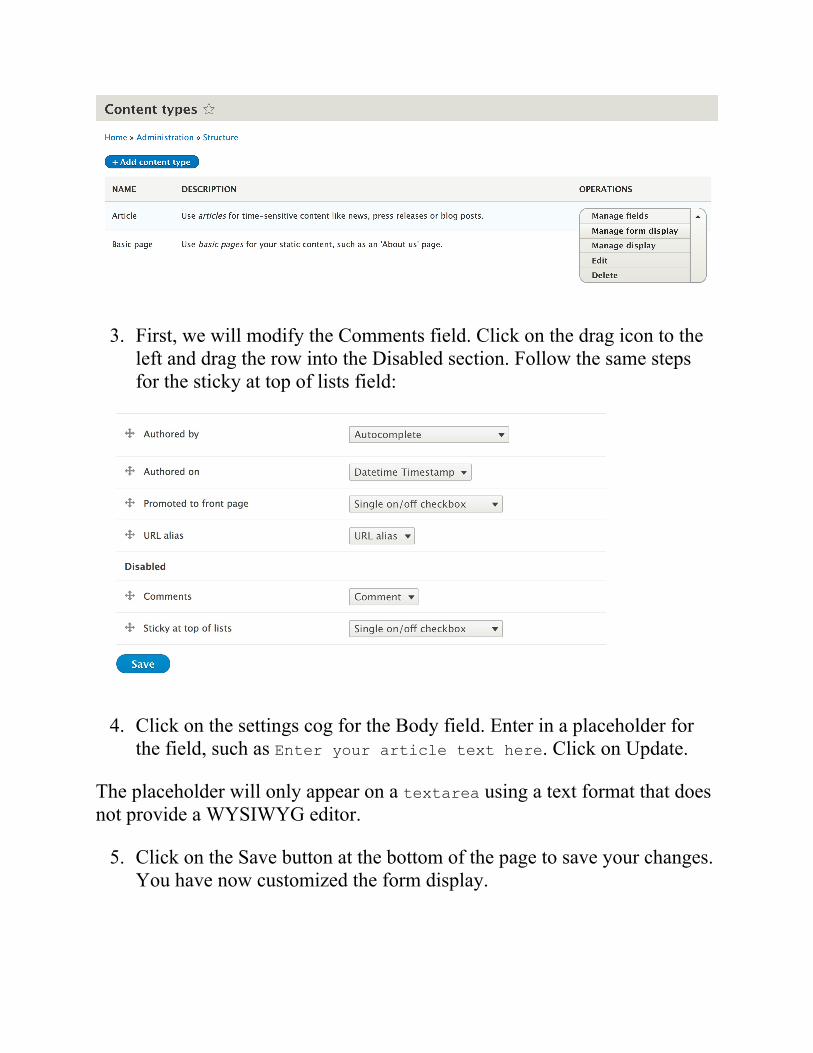
3. First, we will modify the Comments field. Click on the drag icon to theleft and drag the row into the Disabled section. Follow the same stepsfor the sticky at top of lists field:
4. Click on the settings cog for the Body field. Enter in a placeholder forthe field, such as Enter your article text here. Click on Update.
The placeholder will only appear on a textarea using a text format that doesnot provide a WYSIWYG editor.
5. Click on the Save button at the bottom of the page to save your changes.You have now customized the form display.

6. Go to Content | Add Content and then to Article. Note that the commentsettings are no longer displayed nor are the sticky options underpromotion options:
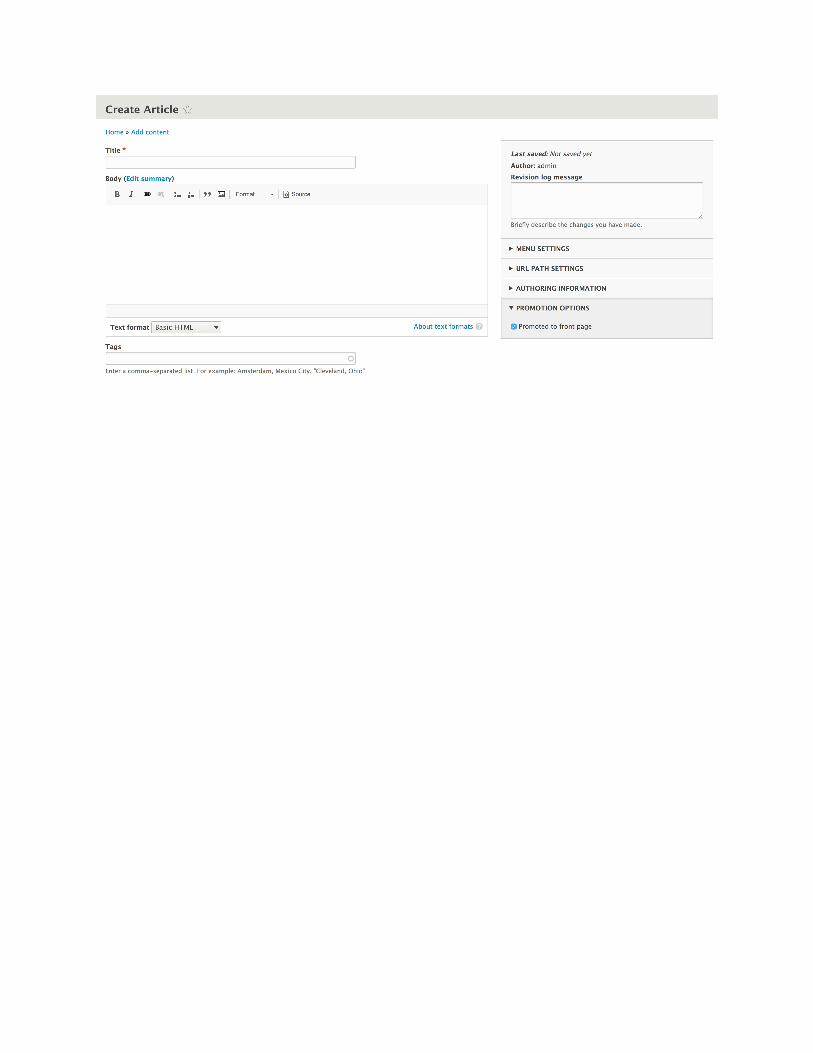
How it works...Entities in Drupal have various view modes for each bundle. In Drupal 7,there were only display view modes, which are covered in the next recipe.Drupal 8 brings in new form modes to allow for more control of how anentity edit form is displayed.
Form display modes are configuration entities. Form display modes dictatehow the \Drupal\Core\EntityContentEntityForm class will build a formwhen an entity is edited. This will always be set to default unless changed orspecified to a different mode programmatically.
Since form display modes are configuration entities, they can be exportedusing configuration management.
Hidden field properties will have no value unless there is a provided defaultvalue. For example, if you hide the authoring information without providingcode to set a default value, the content will be authored by anonymous (nouser).

There's more...We will discuss more items for managing the form of a content entity in thefollowing section.
Managing form display modesForm display modes for all entities are managed under one area and areenabled for each bundle type. You must first create a display mode, and thenit can be configured through the bundle manage interface.
Programmatically providing adefault to hidden form itemsIn Chapter 6, Creating Forms with the Form API, we will have a recipe thatdetails with altering forms. In order to provide a default value for an entityproperty hidden on the form display, you will need to alter the form andprovide a default value. The Field API provides a way to set a default valuewhen fields are created.
See alsoRefer to Chapter 10, The Entity API.Refer to Chapter 6, Creating Forms with the Form API.
Customizing the display output of anodeDrupal provides display view modes that allow for customization of the fieldsand other properties attached to an entity. In this recipe, we will adjust theteaser display mode of an Article. Each field or property has a control fordisplaying the label, the format to display the information in, and additionalsettings for the format.
Harnessing view displays allows you to have full control over how content isviewed on your Drupal site.
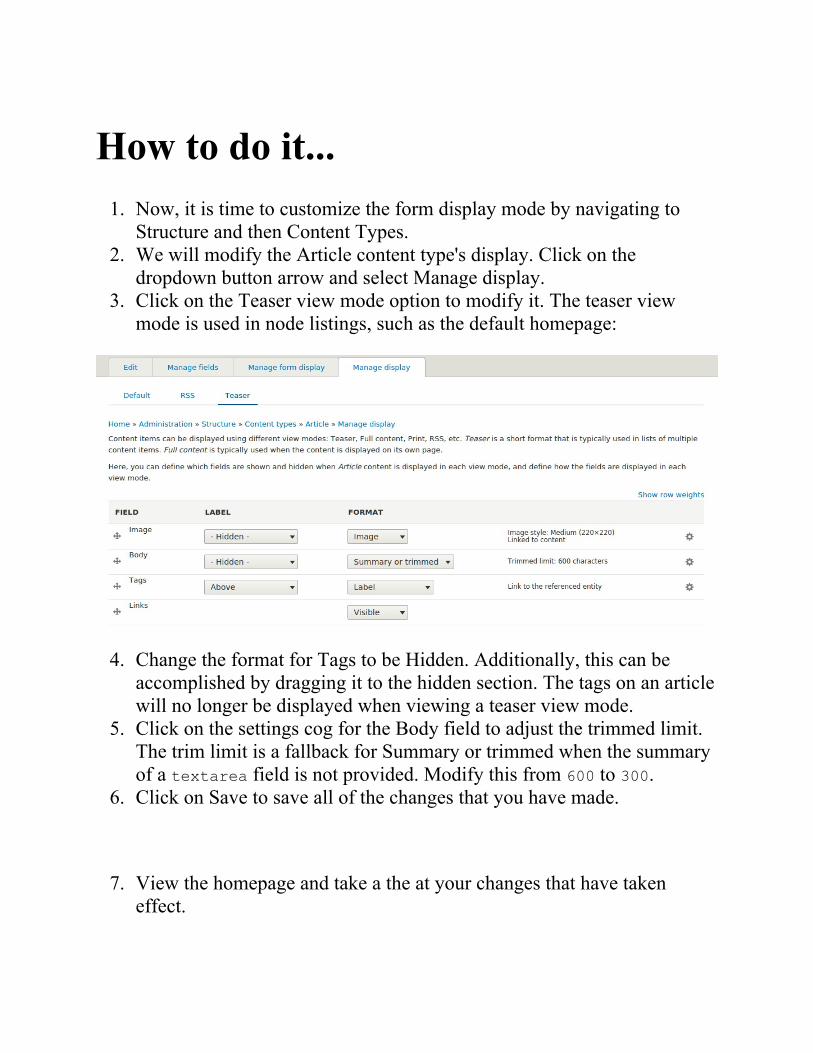
How to do it...1. Now, it is time to customize the form display mode by navigating to
Structure and then Content Types.2. We will modify the Article content type's display. Click on the
dropdown button arrow and select Manage display.3. Click on the Teaser view mode option to modify it. The teaser view
mode is used in node listings, such as the default homepage:
4. Change the format for Tags to be Hidden. Additionally, this can beaccomplished by dragging it to the hidden section. The tags on an articlewill no longer be displayed when viewing a teaser view mode.
5. Click on the settings cog for the Body field to adjust the trimmed limit.The trim limit is a fallback for Summary or trimmed when the summaryof a textarea field is not provided. Modify this from 600 to 300.
6. Click on Save to save all of the changes that you have made.
7. View the homepage and take a the at your changes that have takeneffect.
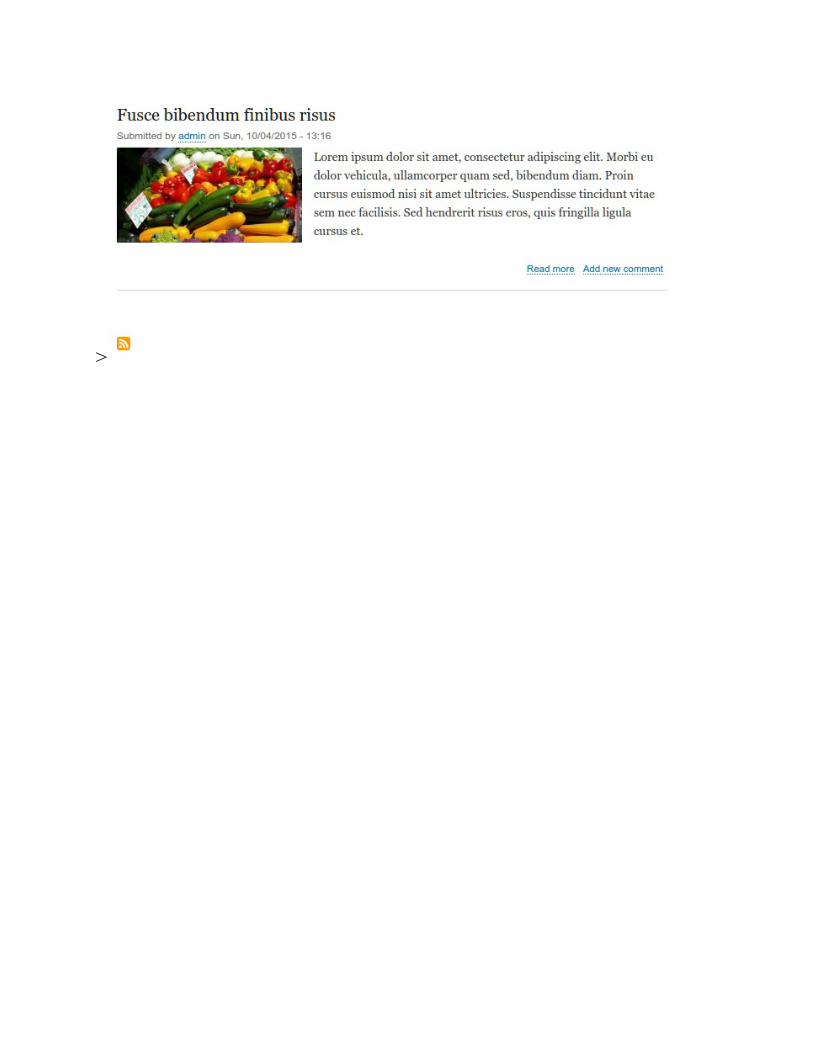
>
How it works...View display modes are configuration entities. View display modes dictatehow the \Drupal\Core\EntityContentEntityForm class will build a viewdisplay when an entity is viewed. This will always be set to default unlesschanged or specified as a different mode programmatically.
Since view display modes are configuration entities, they can be exportedusing configuration management.

Displaying Content through ViewsThis chapter will cover the Views module and how to use a variety of itsmajor features. In this chapter, we will cover the following recipes:
Listing contentEditing the default admin interfacesCreating a block from a ViewUtilizing dynamic argumentsAdding a relationship in a ViewProviding an Entity Reference result View
IntroductionFor those who have used Drupal previously, Views is in core for Drupal 8. Ifyou are new to Drupal, note that Views has been one of the most usedcontributed projects for Drupal 6 and Drupal 7.
Briefly described, Views is a visual query builder that allows you to pullcontent from the database and render it in multiple formats. Selectadministrative areas and content listings provided out of the box by Drupalare all powered by Views. We'll dive into how to use Views to customize theadministrative interface, customize ways to display your content, and interactwith the entity reference field.
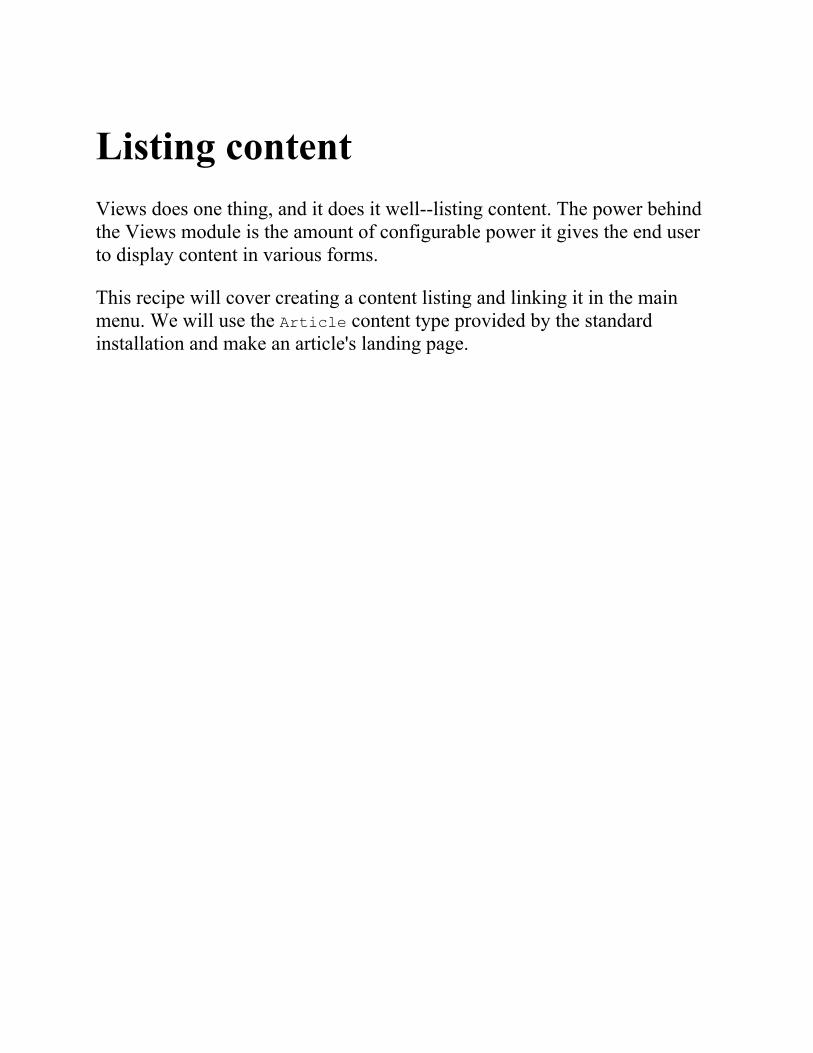
Listing contentViews does one thing, and it does it well--listing content. The power behindthe Views module is the amount of configurable power it gives the end userto display content in various forms.
This recipe will cover creating a content listing and linking it in the mainmenu. We will use the Article content type provided by the standardinstallation and make an article's landing page.

Getting readyThe Views UI module must be installed to manipulate Views from the userinterface. By default, this is enabled with the standard installation profile.
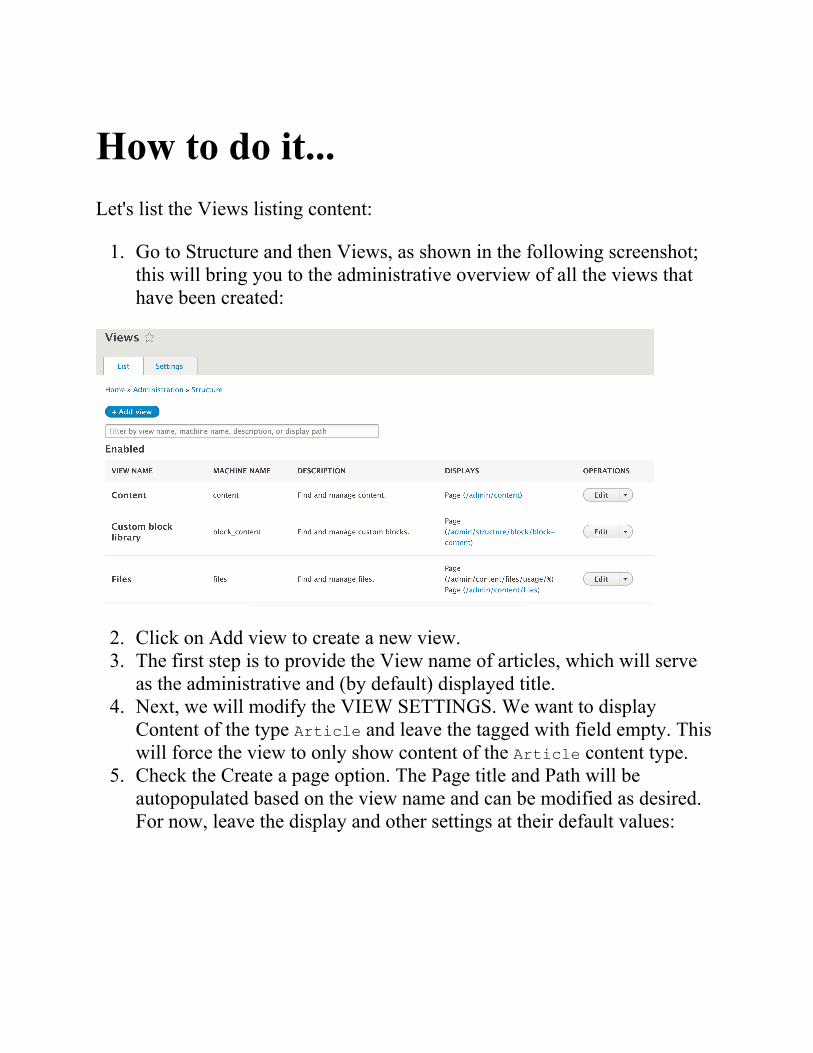
How to do it...Let's list the Views listing content:
1. Go to Structure and then Views, as shown in the following screenshot;this will bring you to the administrative overview of all the views thathave been created:
2. Click on Add view to create a new view.3. The first step is to provide the View name of articles, which will serve
as the administrative and (by default) displayed title.4. Next, we will modify the VIEW SETTINGS. We want to display
Content of the type Article and leave the tagged with field empty. Thiswill force the view to only show content of the Article content type.
5. Check the Create a page option. The Page title and Path will beautopopulated based on the view name and can be modified as desired.For now, leave the display and other settings at their default values:
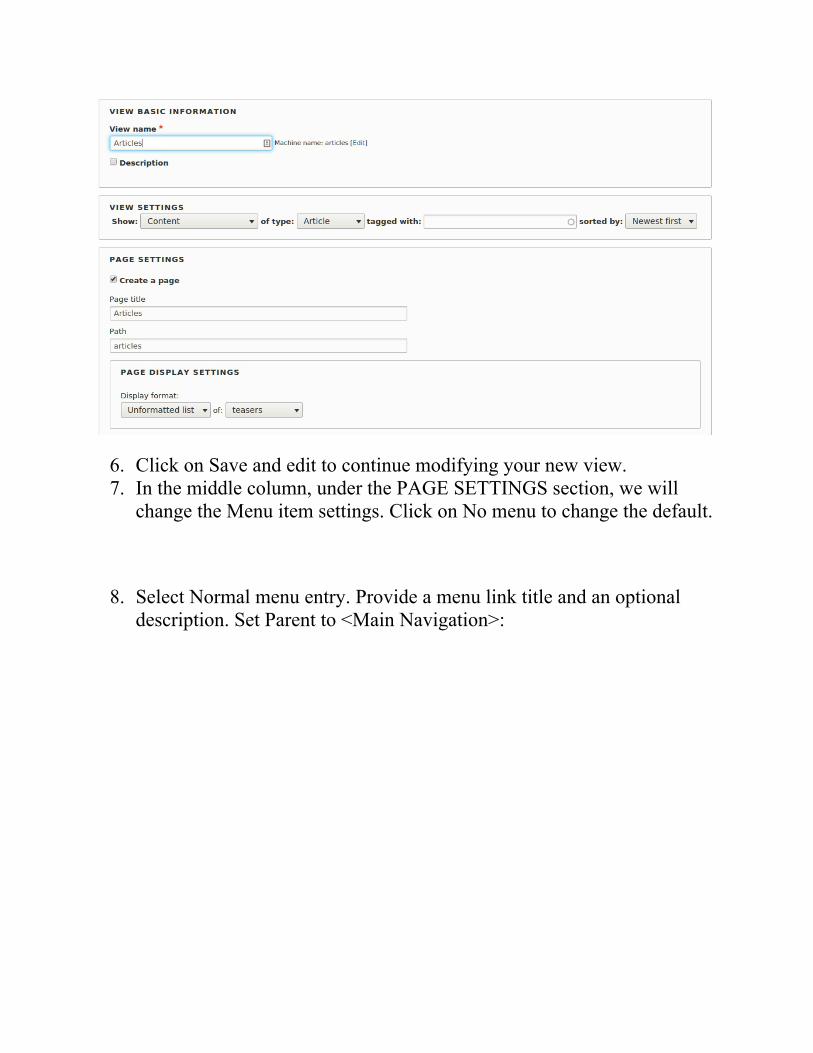
6. Click on Save and edit to continue modifying your new view.7. In the middle column, under the PAGE SETTINGS section, we will
change the Menu item settings. Click on No menu to change the default.
8. Select Normal menu entry. Provide a menu link title and an optionaldescription. Set Parent to <Main Navigation>:
9. Click on Apply at the bottom of the form.10. Click on Save to save your view.11. Once your view is saved, click on Back to site from the administrative
menu. You will now see the link in your Drupal site's main menu.

How it works...The first step to create a view involves selecting the type of data you will bedisplaying. This is referred to as the base table, which can be any type ofentity or data specifically exposed to Views.
Nodes are labeled as Content in Views, and you will find this interchangedterminology throughout Drupal.
When creating a Views page, we add a menu path that can be accessed. Ittells Drupal to invoke Views to render the page, which will load the view youcreate and render it.
There are display style and row plugins that format the data to be rendered.Our recipe used the unformatted list style to wrap each row in a simple divelement. We could have changed this to a table for a formatted list. The rowdisplay controls how each row is outputted.
There's more...The Views module has been one of the must-use modules since it firstdebuted, to the point that almost every Drupal 7 site used this module. In thefollowing section, we will dive further into Views.
Views in Drupal core initiativeThe Views module has been a contributed module up until Drupal 8. In fact,it was one of the most used modules. Although the module is now part ofDrupal core, it still has many improvements that are needed, and are beingcommitted.
Through their 8.1, 8.2, and 8.3 releases, there have been many improvements.We will continue to see this pattern with each future minor release.
Views and displaysWhen working with Views, you will see some different terminologies. One ofthe key items to be grasped is what a display is. A view can contain multipledisplays. Each display is of a certain type. Views comes with the followingdisplay types:
Attachment: This is a display that becomes attached to another displayin the same viewBlock: This allows you to place the view as a blockEmbed: The display is meant to be embedded programmaticallyEntity Reference: This allows Views to provide results for an entityreference fieldFeed: This display returns a XML-based feed and can be attached toanother display to render a feed iconPage: This allows you to display the view from a specific route
Each display can have its own configuration, too. However, each display willshare the same base table (content, files, and so on). This allows you to takethe same data and represent it in different ways.
Format style plugins - style and rowWithin Views, there are two types of style plugins that represent how yourdata is displayed: style and row:
The style plugin represents the overall formatThe row plugin represents each result row's format
For example, the grid style will output multiple div elements with specifiedclasses to create a responsive grid. At the same time, the table style createsa tabular output with labels used as table headings.
Row plugins define how to render the row. The default content will renderthe entity as defined by its selected display mode. If you choose Fields, youcan manually select which fields to include in your view.
Each format style plugin has a corresponding Twig file that the theme layeruses. Refer to the Twig templating recipe of Chapter 5, Frontend for the Winto learn more about Twig in Drupal 8.
You can define new plugins in custom modules or use contributed modules toaccess different options.
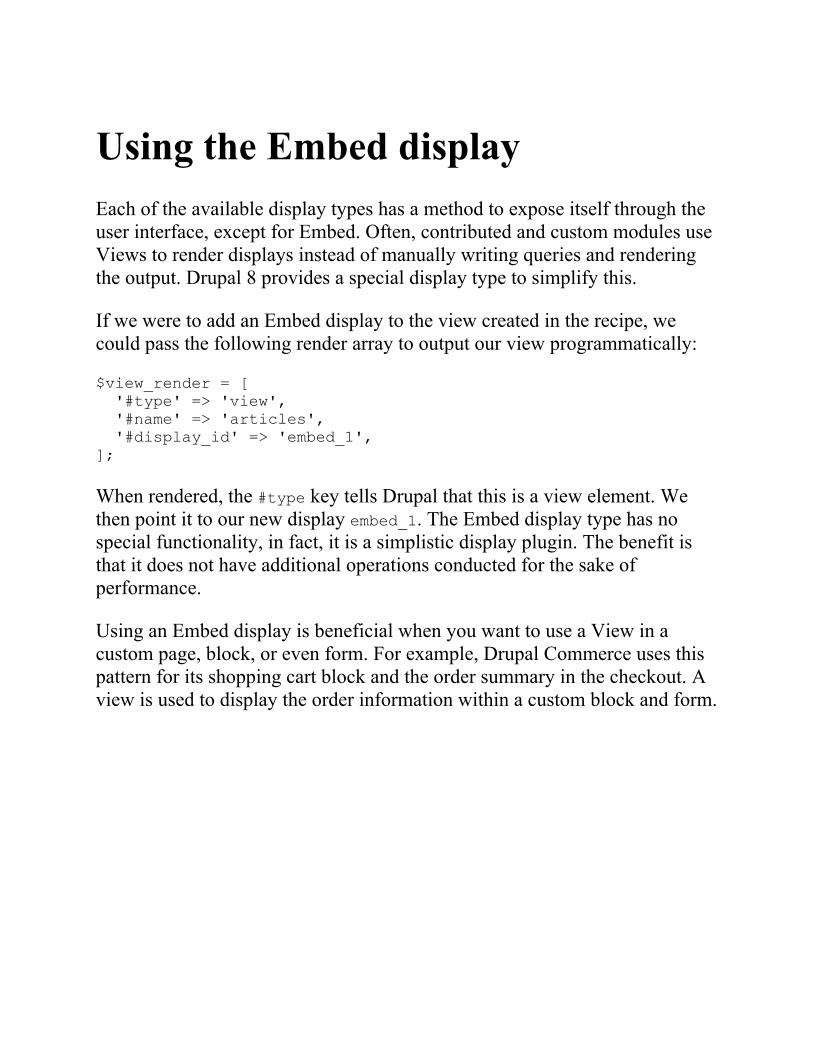
Using the Embed displayEach of the available display types has a method to expose itself through theuser interface, except for Embed. Often, contributed and custom modules useViews to render displays instead of manually writing queries and renderingthe output. Drupal 8 provides a special display type to simplify this.
If we were to add an Embed display to the view created in the recipe, wecould pass the following render array to output our view programmatically:
$view_render = [ '#type' => 'view', '#name' => 'articles', '#display_id' => 'embed_1', ];
When rendered, the #type key tells Drupal that this is a view element. Wethen point it to our new display embed_1. The Embed display type has nospecial functionality, in fact, it is a simplistic display plugin. The benefit isthat it does not have additional operations conducted for the sake ofperformance.
Using an Embed display is beneficial when you want to use a View in acustom page, block, or even form. For example, Drupal Commerce uses thispattern for its shopping cart block and the order summary in the checkout. Aview is used to display the order information within a custom block and form.
See alsoRefer to the VDC initiative at https://www.drupal.org/community-initiatives/drupal-core/vdc.Refer to Chapter 7, Plug and Play with Plugins, to learn more aboutplugins.
Editing the default admin interfacesWith the addition of Views in Drupal core, many of the administrativeinterfaces are powered by Views. This allows customization of default admininterfaces to enhance site management and content authoring experiences.
In Drupal 6 and 7, there was the Administrative Views contributed module,which provided a way to override administrative pages with Views. Thismodule is no longer required, as the functionality comes with Drupal core outof the box.
In this recipe, we will modify the default content overview form that is usedto find and edit content. We will add the ability to filter content by the userwho authored it.
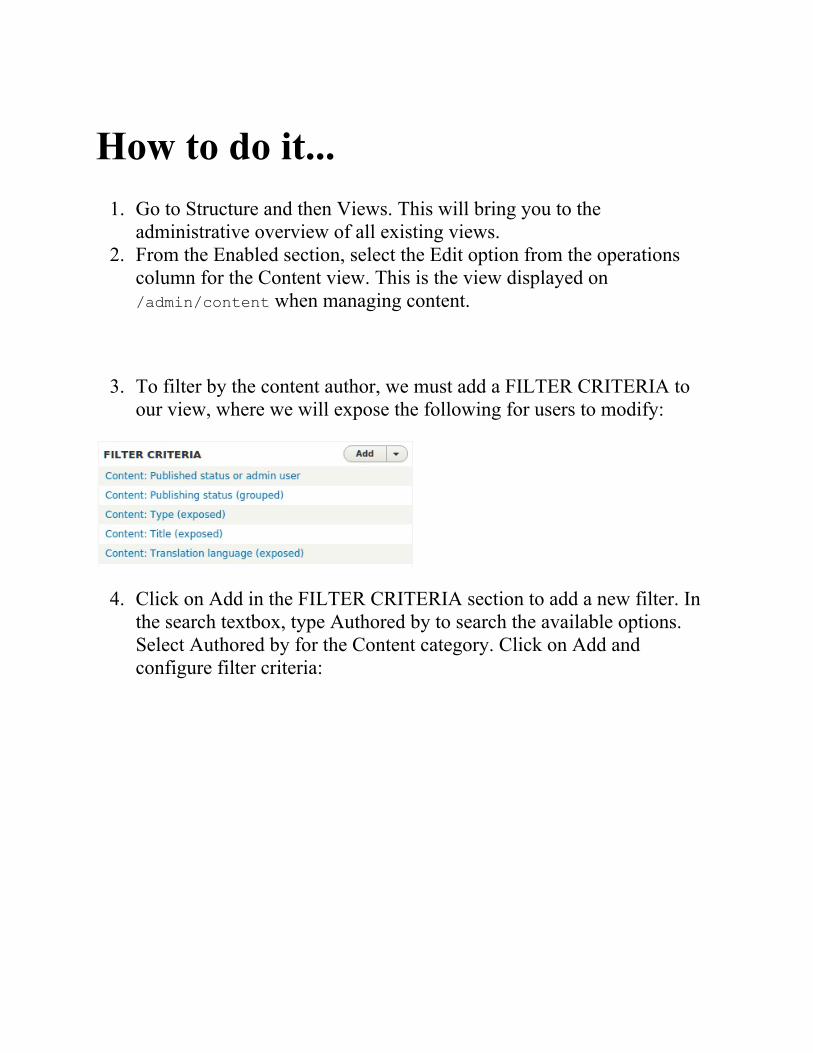
How to do it...1. Go to Structure and then Views. This will bring you to the
administrative overview of all existing views.2. From the Enabled section, select the Edit option from the operations
column for the Content view. This is the view displayed on/admin/content when managing content.
3. To filter by the content author, we must add a FILTER CRITERIA toour view, where we will expose the following for users to modify:
4. Click on Add in the FILTER CRITERIA section to add a new filter. Inthe search textbox, type Authored by to search the available options.Select Authored by for the Content category. Click on Add andconfigure filter criteria:
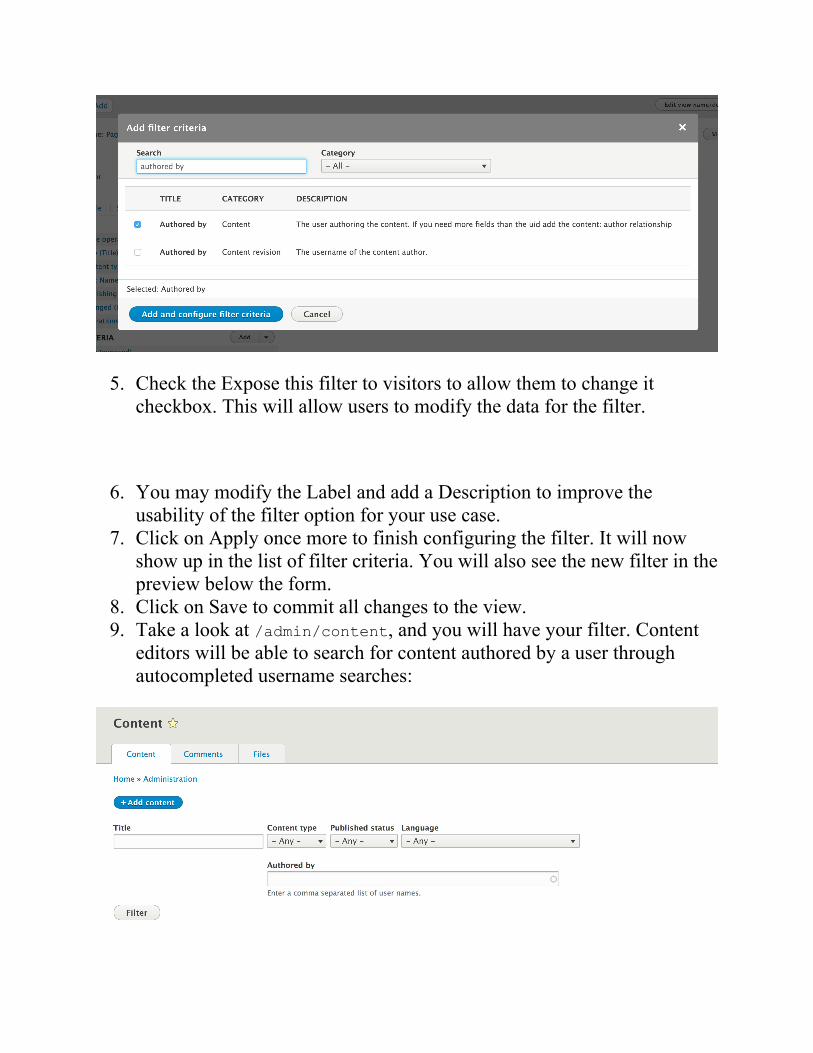
5. Check the Expose this filter to visitors to allow them to change itcheckbox. This will allow users to modify the data for the filter.
6. You may modify the Label and add a Description to improve theusability of the filter option for your use case.
7. Click on Apply once more to finish configuring the filter. It will nowshow up in the list of filter criteria. You will also see the new filter in thepreview below the form.
8. Click on Save to commit all changes to the view.9. Take a look at /admin/content, and you will have your filter. Content
editors will be able to search for content authored by a user throughautocompleted username searches:

How it works...When a view is created that has a path matching an existing route, it willoverride it and present itself. That is how the /admin/content and otheradministrative pages are able to be powered by Views.
If you were to disable the Views module, you can still manage content andusers. The default forms are tables that do not provide filters or other extrafeatures.
Drupal uses the overridden route and uses Views to render the page. Fromthat point on, the page is handled like any other Views page would berendered.

There's more...We will dive into additional features available through Views that canenhance the way you use Views and present them on your Drupal site.
Exposed versus non-exposedFilters allow you to narrow the scope of the data displayed in a view. Filterscan either be exposed or not; by default, a filter is not exposed. An examplewould be using the Content: Publishing status set to Yes (published) toensure that a view always contains published content. This is an item youwould configure to display content to site visitors. However, if it were for anadministrative display, you may want to expose that filter. This way, contenteditors can view, easily, what content has not been published yet or beenunpublished.
All filter and sort criteria can be marked as exposed.
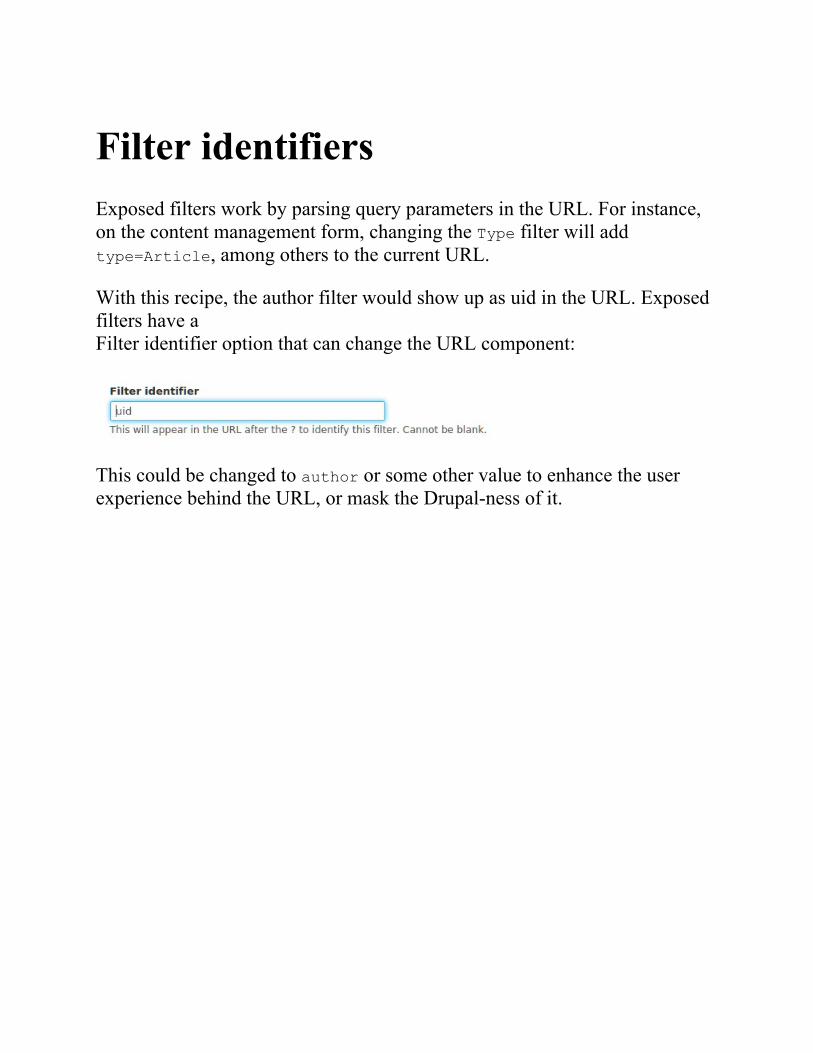
Filter identifiersExposed filters work by parsing query parameters in the URL. For instance,on the content management form, changing the Type filter will addtype=Article, among others to the current URL.
With this recipe, the author filter would show up as uid in the URL. Exposedfilters have aFilter identifier option that can change the URL component:
This could be changed to author or some other value to enhance the userexperience behind the URL, or mask the Drupal-ness of it.
Overriding routes with ViewsViews can replace administrative pages with enhanced versions due to theway the route and module system works in Drupal. Modules are executed inorder of the module's weight or alphabetical order if weights are the same.Naturally, in the English alphabet, the letter V comes toward the end of thealphabet. That means any route that Views provides will be added toward theend of the route discovery cycle.
If a view is created and it provides a route path, it will override any that existon that path. There is no collision checking mechanism (and there was notone present in Views before merging into Drupal core) that prevents this.
This allows you to easily customize most existing routes, but, beware thatyou could easily have conflicting routes, and Views will normally overridethe other.
Creating a block from a ViewPrevious recipes have shown how to create and manipulate a page created bya view. Views provides different display types that can be created, such as ablock. In this recipe, we will create a block powered by Views. The Viewsblock will list all Tag taxonomy terms that have been added to the Articlecontent type.

Getting readyThis recipe assumes that you have installed the standard installation profileand have the default node content types available for use.
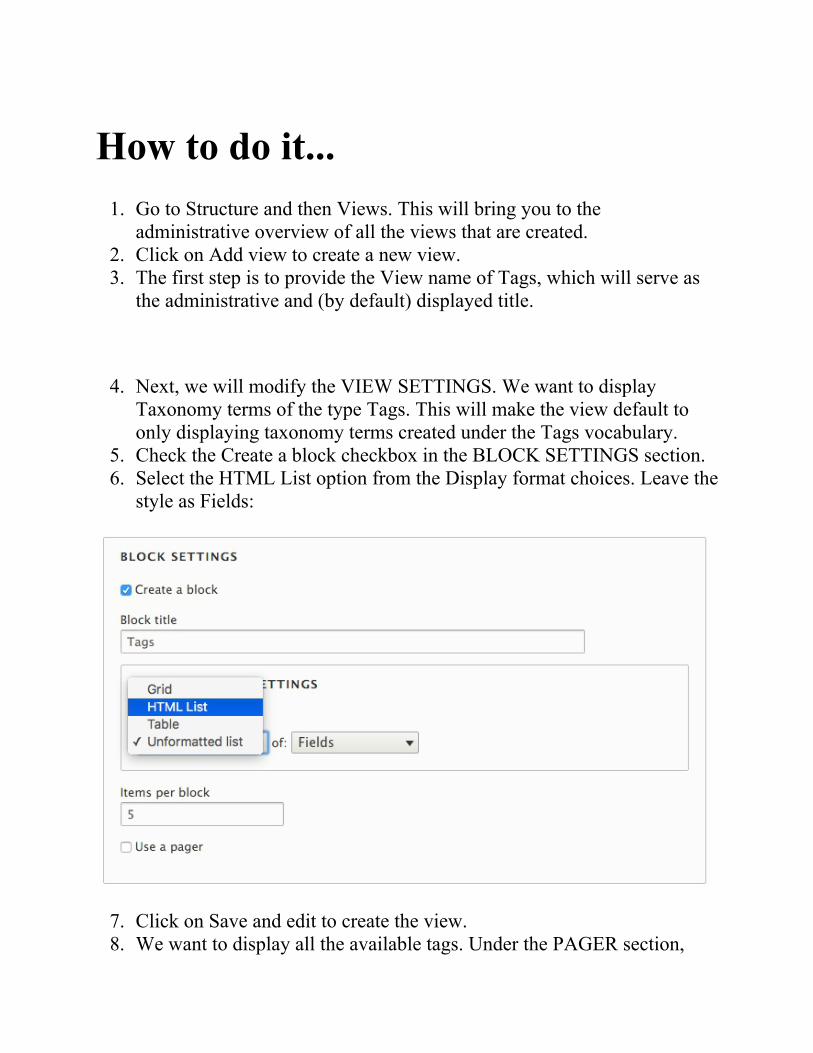
How to do it...1. Go to Structure and then Views. This will bring you to the
administrative overview of all the views that are created.2. Click on Add view to create a new view.3. The first step is to provide the View name of Tags, which will serve as
the administrative and (by default) displayed title.
4. Next, we will modify the VIEW SETTINGS. We want to displayTaxonomy terms of the type Tags. This will make the view default toonly displaying taxonomy terms created under the Tags vocabulary.
5. Check the Create a block checkbox in the BLOCK SETTINGS section.6. Select the HTML List option from the Display format choices. Leave the
style as Fields:
7. Click on Save and edit to create the view.8. We want to display all the available tags. Under the PAGER section,
click on the field next to Use Pager and select Display all items andclick on Apply.
9. Next, we will sort the view by tag name instead of order of creation.Click on Add on the SORT CRITERIA section.Select the checkboxwhere Name : Taxonomy term and click on Add and configure sortcriteria to use the default, that is, ascending. Click on Apply:

10. Click on Save to save the view.11. Go to Structure and Block layout to place the block on your Drupal site.
Click on Place block for the Sidebar first region in the Bartik theme.12. Filter the list by typing your view's name (Tags). Click on Place block to
add your view's block to the block layout.13. Finally, click on Save block to commit your changes.
How it works...In the Drupal 8 plugin system, there is a concept called Derivatives. Pluginsare small pieces of swappable functionality within Drupal 8. Plugins andplugin development are covered in Chapter 7, Plug and Play with Plugins. Aderivative allows a module to present multiple variations of a plugindynamically. In the case of Views, it allows the module to provide variationsof a ViewsBlock plugin for each view that has a block display. Viewsimplements the \Drupal\views\Plugin\Block\ViewsBlock\ViewsBlockclass, providing the base for the dynamic availability of these blocks. Eachderived block is an instance of this class.
When Drupal initiates the block, Views passes the proper configurationrequired. The view is then executed and the display is rendered whenever theblock is displayed.

There's more...We will now explore some of the other ways in which Views interacts withblocks.
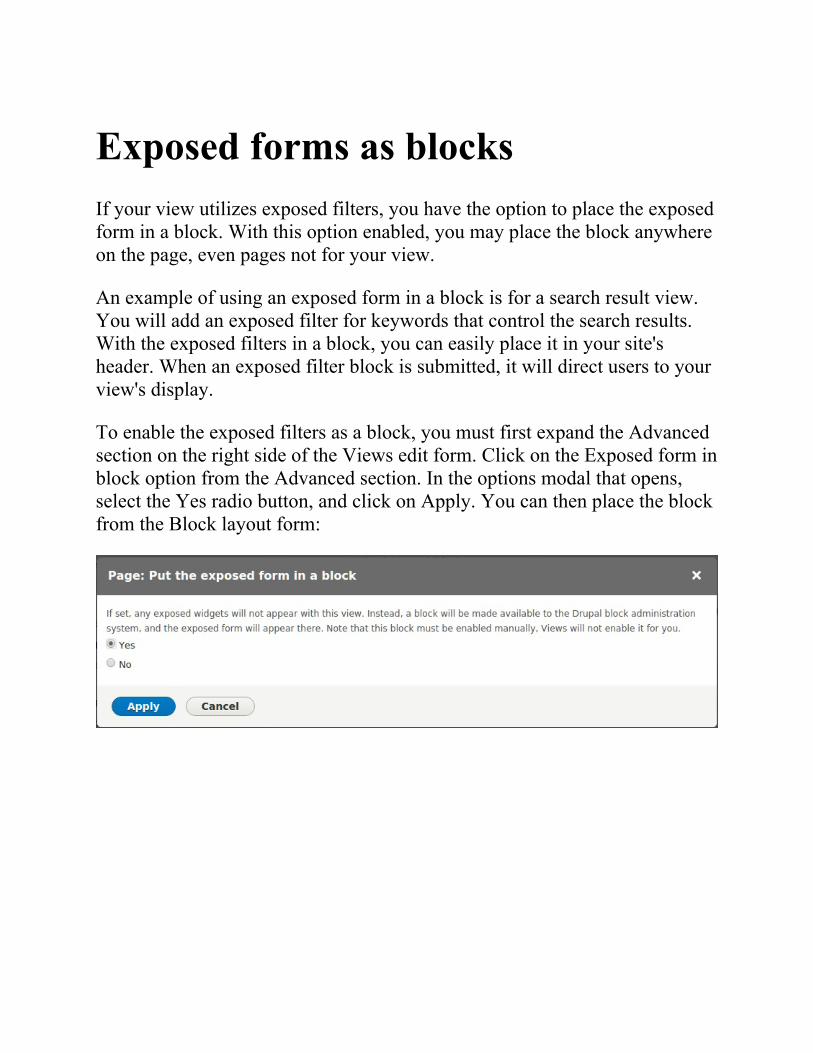
Exposed forms as blocksIf your view utilizes exposed filters, you have the option to place the exposedform in a block. With this option enabled, you may place the block anywhereon the page, even pages not for your view.
An example of using an exposed form in a block is for a search result view.You will add an exposed filter for keywords that control the search results.With the exposed filters in a block, you can easily place it in your site'sheader. When an exposed filter block is submitted, it will direct users to yourview's display.
To enable the exposed filters as a block, you must first expand the Advancedsection on the right side of the Views edit form. Click on the Exposed form inblock option from the Advanced section. In the options modal that opens,select the Yes radio button, and click on Apply. You can then place the blockfrom the Block layout form:
See alsoRefer to Chapter 7, Plug and Play with Plugins, to learn more aboutderivatives
Utilizing dynamic argumentsViews can be configured to accept contextual filters. Contextual filters allowyou to provide a dynamic argument that modifies the view's output. Thevalue is expected to be passed from the URL; however, if it is not present,there are ways to provide a default value.
In this recipe, we will create a new page called My Content, which willdisplay a user's authored content on the /user/%/content route.
How to do it...1. Go to Structure and then Views. This will bring you to the
administrative overview of all the views created. Click on Add view tocreate a new view.
2. Set the View name to My Content.3. Next, we will modify the View settings. We want to display Content of
the type All and leave the Tagged with empty. This will allow allcontent to be displayed.
4. Select Create a page. Keep the page title the same. We will need tochange the path to user/%user/content. Click on Save and edit tomove to the next screen and add the contextual filter.
When building a views page, adding a percent sign to the path identifies aroute variable. By adding an entity type's name, Drupal will match the inputas an identifier to an entity of that type.
5. Toggle the Advanced portion of the form on the right-hand side of thepage. Click on Add in the Contextual filters section.
6. Select Authored by: Content and then click on Add and configurecontextual filters.
7. Change the default value of WHEN THE FILTER VALUE IS NOT INTHE URL to Display "Access Denied" to prevent all content from beingdisplayed with a bad route value:
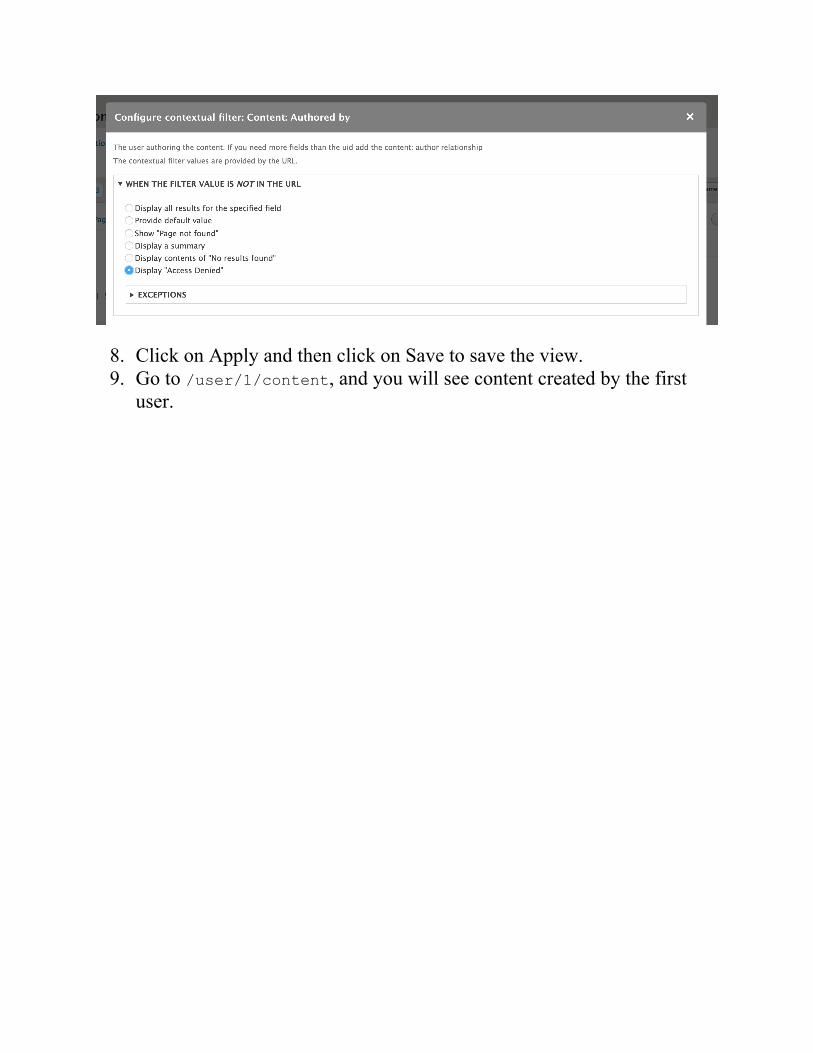
8. Click on Apply and then click on Save to save the view.9. Go to /user/1/content, and you will see content created by the first
user.
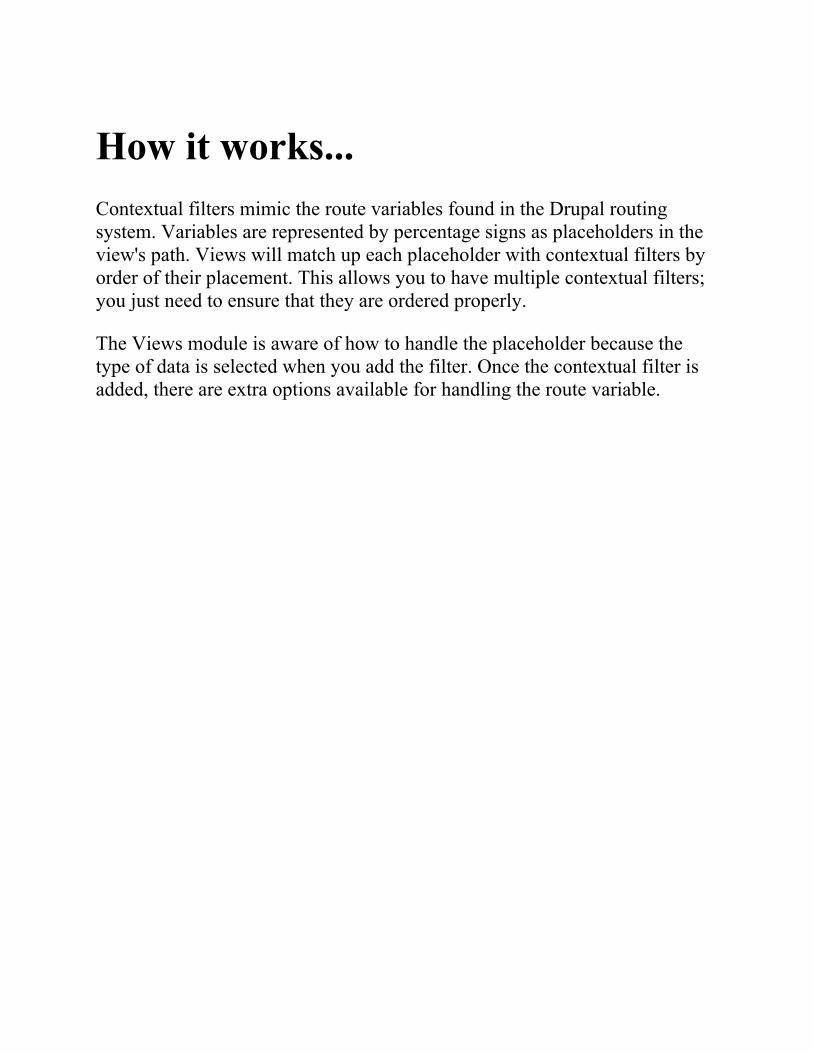
How it works...Contextual filters mimic the route variables found in the Drupal routingsystem. Variables are represented by percentage signs as placeholders in theview's path. Views will match up each placeholder with contextual filters byorder of their placement. This allows you to have multiple contextual filters;you just need to ensure that they are ordered properly.
The Views module is aware of how to handle the placeholder because thetype of data is selected when you add the filter. Once the contextual filter isadded, there are extra options available for handling the route variable.

There's more...We will now explore the extra options available when using contextualfilters.
Previewing with contextual filtersYou are still able to preview a view from the edit form. You simply add thecontextual filter values to the text form concatenated by a forward slash (/).In this recipe, you couldreplace navigating to /user/1/content with simply inputting 1 into thepreview form and updating the preview.
Displaying as a tab on the user pageEven though the view created in the recipe follows a route under /user, itwill not show up as a local task tab until it has a menu entry defined.
Go back and edit the My Content view. From the Page settings section, youwill need to change No menu from the Menu option. Clicking on that linkwill open the menu link settings dialog.
Select Menu tab and provide a Menu link title, such as My Content. Select<User account menu> for the Parent. Click on Apply and save your view.When you go to the /user page again, it will have the My Content pageavailable.
You may need to rebuild Drupal's caches in order for the routing system to berebuilt, making Drupal aware of the menu tab.
Altering the page titleWith contextual filters, you have the ability to manipulate the current page'stitle. When adding or editing a contextual filter, you can modify the pagetitle. You may check the Override title option in When the filter value ispresent in the URL or a default is provided section.
This textbox allows you to enter in a new title that will be displayed.Additionally, you can use the information passed from the route contextusing the format of %#, where # is the argument order.
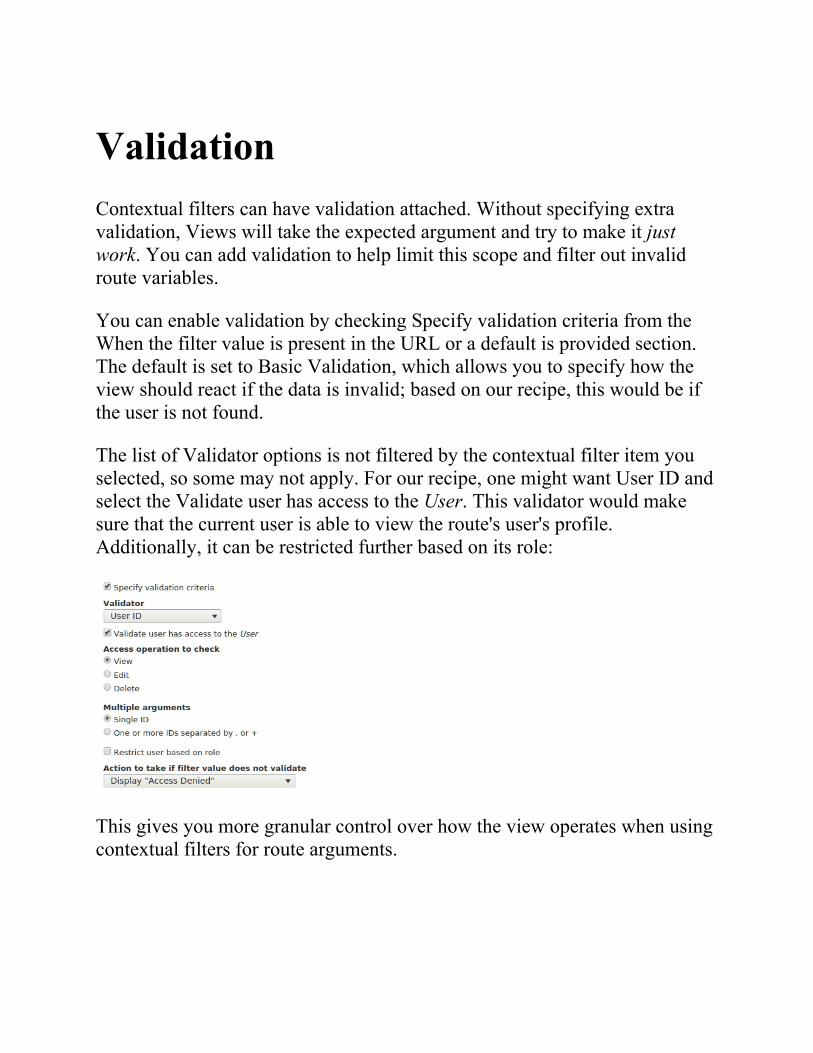
ValidationContextual filters can have validation attached. Without specifying extravalidation, Views will take the expected argument and try to make it justwork. You can add validation to help limit this scope and filter out invalidroute variables.
You can enable validation by checking Specify validation criteria from theWhen the filter value is present in the URL or a default is provided section.The default is set to Basic Validation, which allows you to specify how theview should react if the data is invalid; based on our recipe, this would be ifthe user is not found.
The list of Validator options is not filtered by the contextual filter item youselected, so some may not apply. For our recipe, one might want User ID andselect the Validate user has access to the User. This validator would makesure that the current user is able to view the route's user's profile.Additionally, it can be restricted further based on its role:
This gives you more granular control over how the view operates when usingcontextual filters for route arguments.
Multiple and exclusionYou may also configure the contextual filter to allow AND or OR operationsalong with exclusion. These options are under the More section when addingor editing a contextual filter.
The Allow multiple values option can be checked to enable AND or ORoperations. If the contextual filter argument contains a series of valuesconcatenated by plus (+) signs, it acts as an OR operation. If the values areconcatenated by commas (,) it acts as an AND operation.
When the Exclude option is checked, the value will be excluded from theresults rather than the view being limited by it.
Adding a relationship in a ViewAs stated at the beginning of the chapter, Views is a visual query builder.When you first create a view, a base table is specified from which to pulldata. Views automatically knows how to join tables for field data, such asbody text or custom-attached fields.
When using an entity reference field, you can display the value as the rawidentifier, the referenced entity's label, or the entire rendered entity. However,if you add a relationship based on a reference field, you will have access todisplay any of that entity's available fields.
In this recipe, we will update the Files view, used for administering files, todisplay the username of the user who uploaded the file.
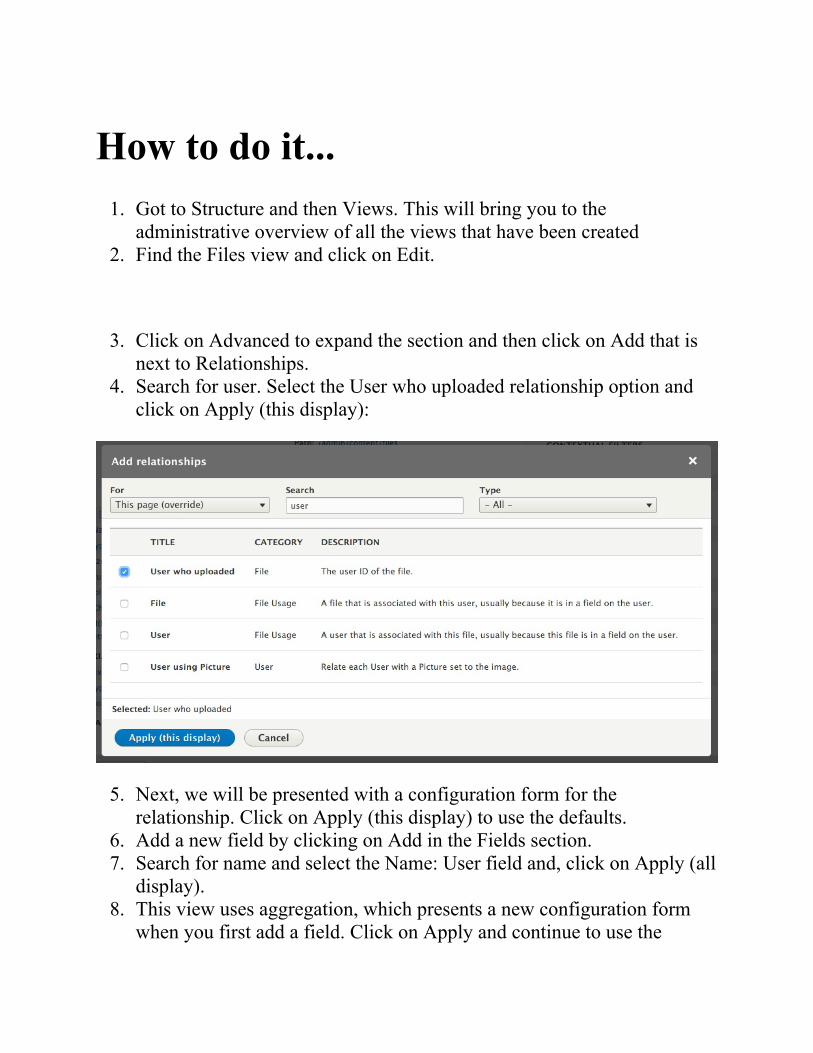
How to do it...1. Got to Structure and then Views. This will bring you to the
administrative overview of all the views that have been created2. Find the Files view and click on Edit.
3. Click on Advanced to expand the section and then click on Add that isnext to Relationships.
4. Search for user. Select the User who uploaded relationship option andclick on Apply (this display):
5. Next, we will be presented with a configuration form for therelationship. Click on Apply (this display) to use the defaults.
6. Add a new field by clicking on Add in the Fields section.7. Search for name and select the Name: User field and, click on Apply (all
display).8. This view uses aggregation, which presents a new configuration form
when you first add a field. Click on Apply and continue to use the
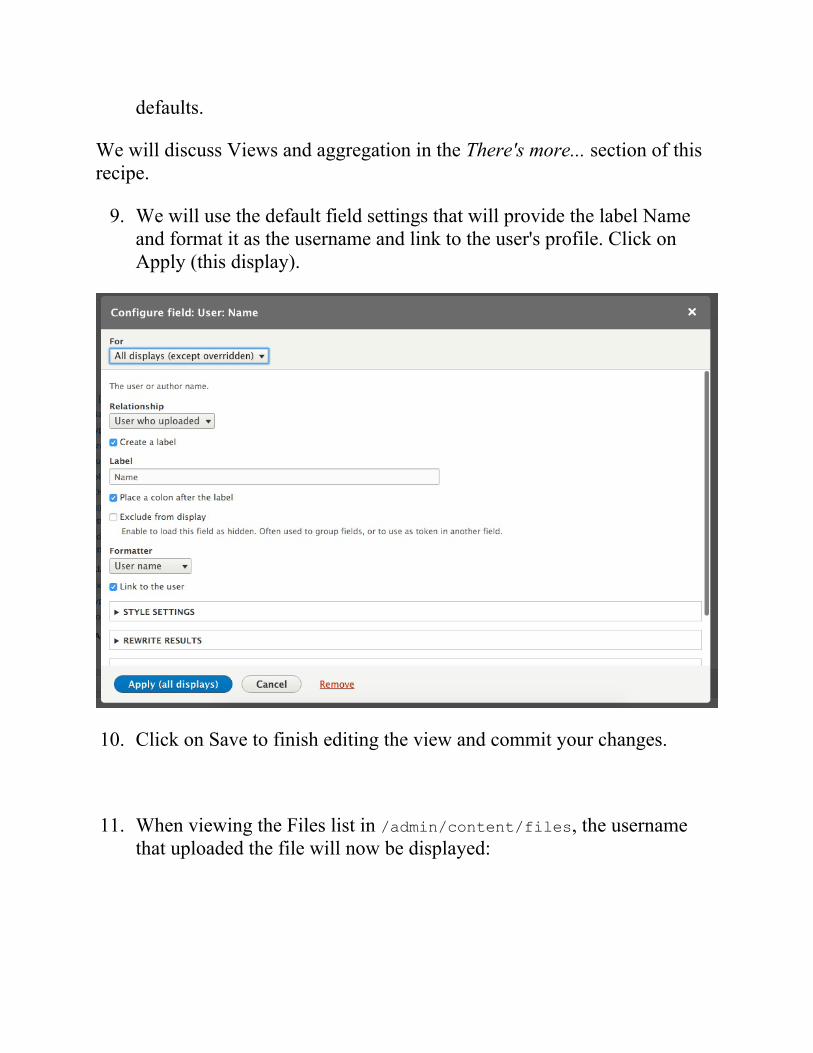
defaults.
We will discuss Views and aggregation in the There's more... section of thisrecipe.
9. We will use the default field settings that will provide the label Nameand format it as the username and link to the user's profile. Click onApply (this display).
10. Click on Save to finish editing the view and commit your changes.
11. When viewing the Files list in /admin/content/files, the usernamethat uploaded the file will now be displayed:
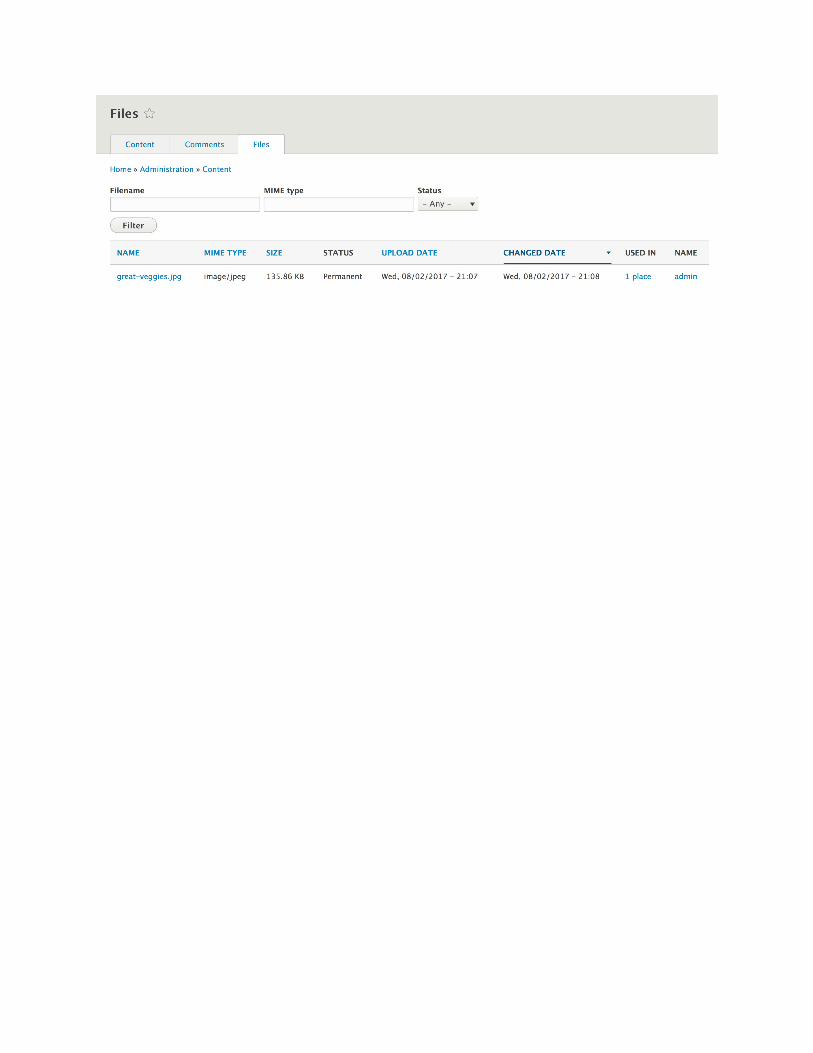
How it works...Drupal stores data in a normalized format. Database normalization, in short,involves the organization of data in specifically related tables. Each entitytype has its own database table, and all fields have their own database table.When you create a view and specify what kind of data will be shown, you arespecifying a base table in the database that Views will query. Views willautomatically associate fields that belong to the entity and it's relationship tothose tables for you.
When an entity has an entity reference field, you can add a relationship to thereferenced entity type's table. This is an explicit definition, whereas fields areimplicit. When the relationship is explicitly defined, all the referenced entitytype's fields come into scope. The fields on the referenced entity type canthen be displayed, filtered, and sorted.

There's more...Using relationships in Views allows you to create some powerful displays.We will discuss aggregation and additional information about relationships.

Relationships provided by entityreference fieldsThe Views module uses a series of hooks to retrieve data that it then uses torepresent ways to interact with the database. One of these is thehook_field_views_data hook, which processes a field storage configurationentity and registers its data with Views. The Views module implements thison behalf of the Drupal core to add relationships and reverse relationship, forEntity reference fields.
Since Entity reference fields have set schema information, Views candynamically generate these relationships by understanding the field's tablename, destination entity's table name, and the destination entity's identifiercolumn.
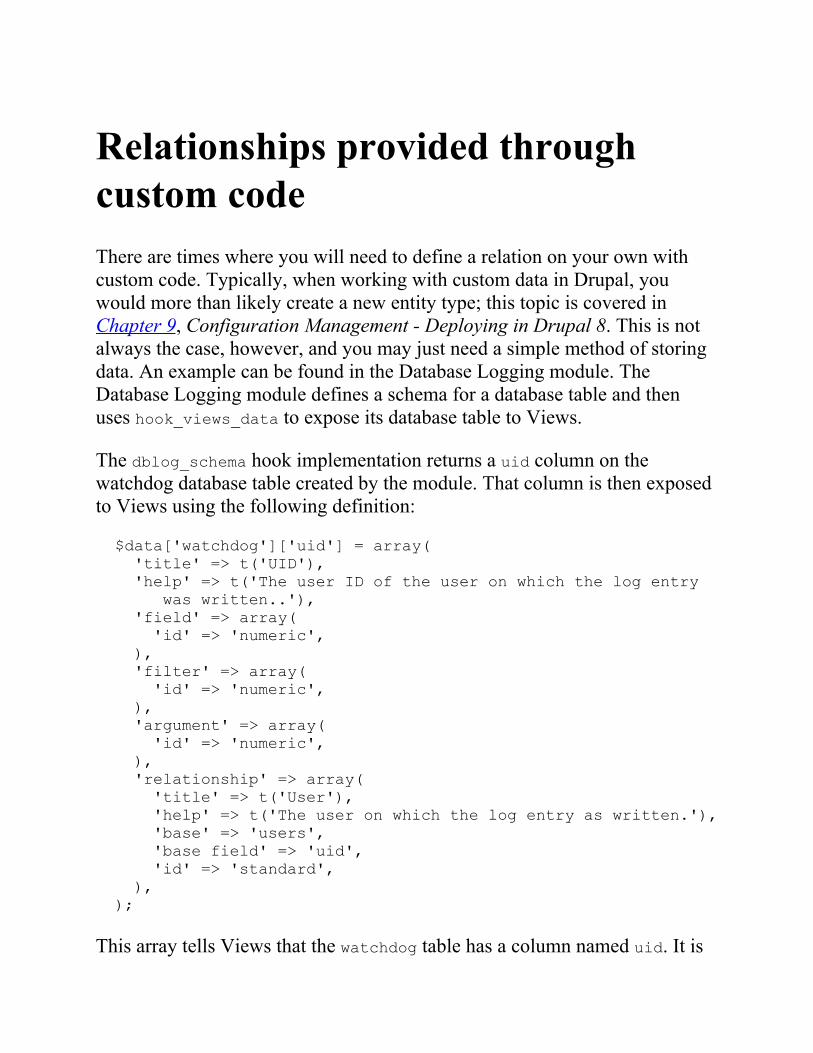
Relationships provided throughcustom codeThere are times where you will need to define a relation on your own withcustom code. Typically, when working with custom data in Drupal, youwould more than likely create a new entity type; this topic is covered inChapter 9, Configuration Management - Deploying in Drupal 8. This is notalways the case, however, and you may just need a simple method of storingdata. An example can be found in the Database Logging module. TheDatabase Logging module defines a schema for a database table and thenuses hook_views_data to expose its database table to Views.
The dblog_schema hook implementation returns a uid column on thewatchdog database table created by the module. That column is then exposedto Views using the following definition:
$data['watchdog']['uid'] = array( 'title' => t('UID'), 'help' => t('The user ID of the user on which the log entry was written..'), 'field' => array( 'id' => 'numeric', ), 'filter' => array( 'id' => 'numeric', ), 'argument' => array( 'id' => 'numeric', ), 'relationship' => array( 'title' => t('User'), 'help' => t('The user on which the log entry as written.'), 'base' => 'users', 'base field' => 'uid', 'id' => 'standard', ), );
This array tells Views that the watchdog table has a column named uid. It is

numeric in nature for its display, filtering capabilities, and sortingcapabilities. The relationshipkey is an array of information that instructs Views how to use this to providea relationship (LEFT JOIN) on the users table. The User entity uses the userstable and has the primary key of uid.
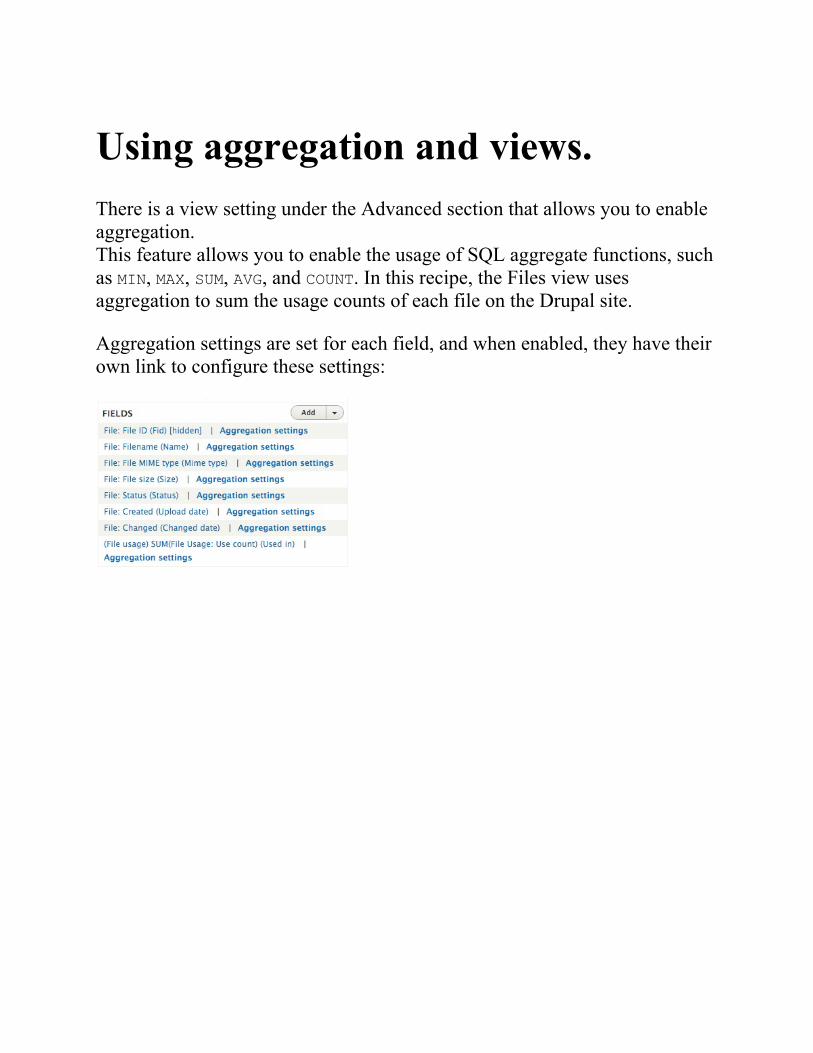
Using aggregation and views.There is a view setting under the Advanced section that allows you to enableaggregation.This feature allows you to enable the usage of SQL aggregate functions, suchas MIN, MAX, SUM, AVG, and COUNT. In this recipe, the Files view usesaggregation to sum the usage counts of each file on the Drupal site.
Aggregation settings are set for each field, and when enabled, they have theirown link to configure these settings:
Providing an Entity Referenceresult ViewThe Entity reference field, covered in Chapter 2, The Content AuthoringExperience, can utilize a custom view for providing the available field values.The default entity reference field will display all available entities of the typeit can reference. The only available filter is based on the entity bundle, suchas only returning Article nodes. Using an entity reference view, you canprovide more filters, such as only returning the content that your user hasauthored.
In this recipe, we will create an entity reference view that filters content bythe author. We will add the field to the user account form, allowing users toselect their favorite contributed content.

How to do it...1. Go to Structure and then Views. This will bring you to the
administrative overview of all the views that have been created. Click onAdd view to create a new view.
2. Set the View name to My Content Reference View, and retain thecurrent View settings configuration.
3. Do not choose to create a page or block. Click on Save and edit tocontinue working on your view.
4. Click on the Add button to create a new display. Select the EntityReference option to create the display:

5. The Format will be automatically set to Entity Reference List, whichutilizes fields. Click on Settings next to it to modify the style format.
6. For Search Fields, check the Content: Title option and then click onApply. This is what the field will perform the autocomplete search on.
7. You will need to modify the Content: Title field to stop it from wrappingthe result as a link. Click on the field label and uncheck Link to theContent. Click on Apply to save the field settings:
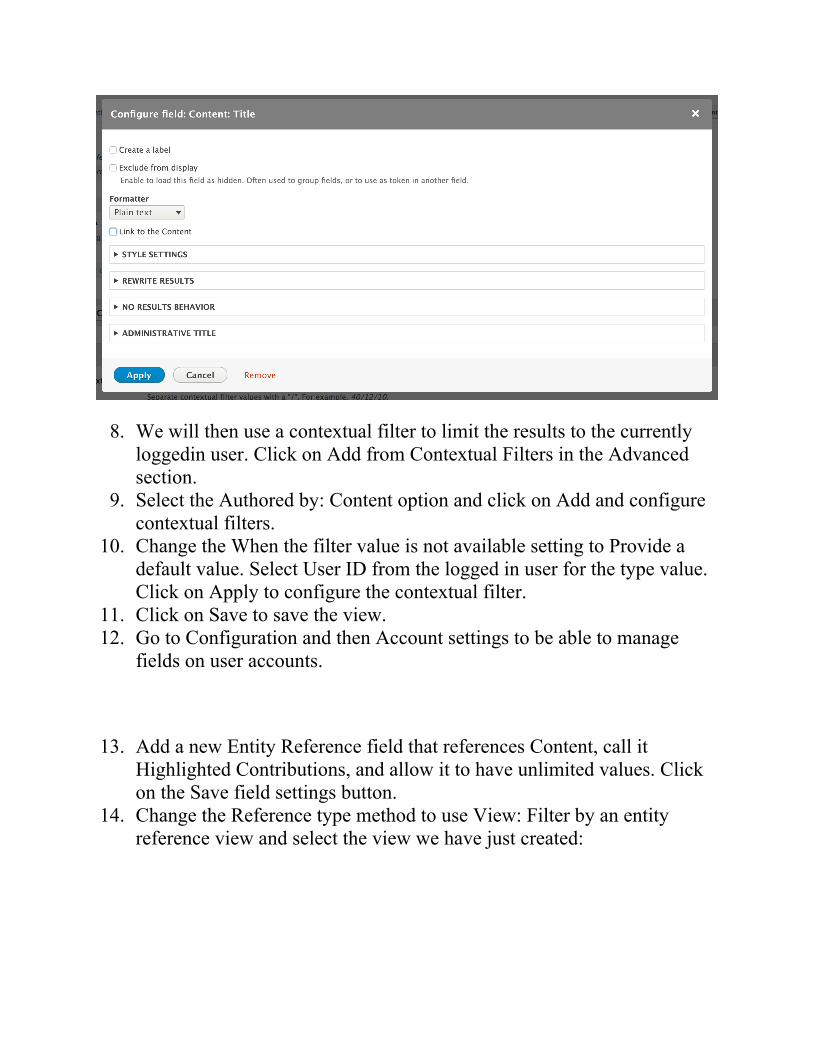
8. We will then use a contextual filter to limit the results to the currentlyloggedin user. Click on Add from Contextual Filters in the Advancedsection.
9. Select the Authored by: Content option and click on Add and configurecontextual filters.
10. Change the When the filter value is not available setting to Provide adefault value. Select User ID from the logged in user for the type value.Click on Apply to configure the contextual filter.
11. Click on Save to save the view.12. Go to Configuration and then Account settings to be able to manage
fields on user accounts.
13. Add a new Entity Reference field that references Content, call itHighlighted Contributions, and allow it to have unlimited values. Clickon the Save field settings button.
14. Change the Reference type method to use View: Filter by an entityreference view and select the view we have just created:
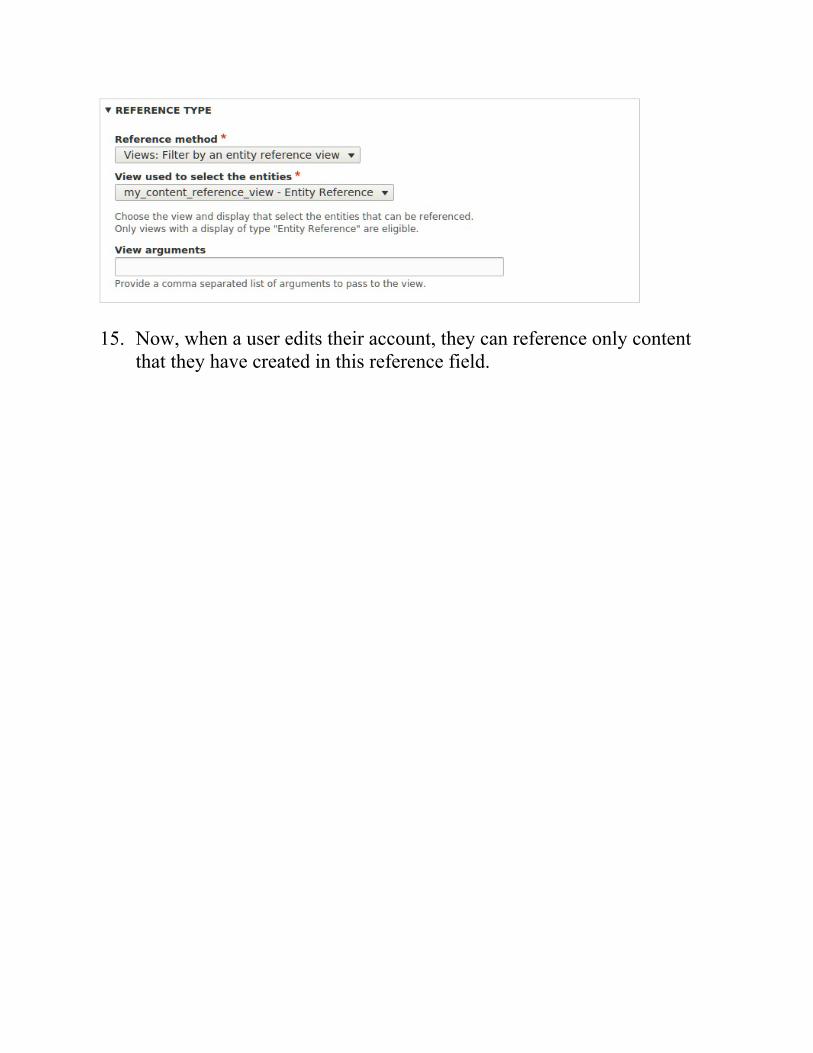
15. Now, when a user edits their account, they can reference only contentthat they have created in this reference field.
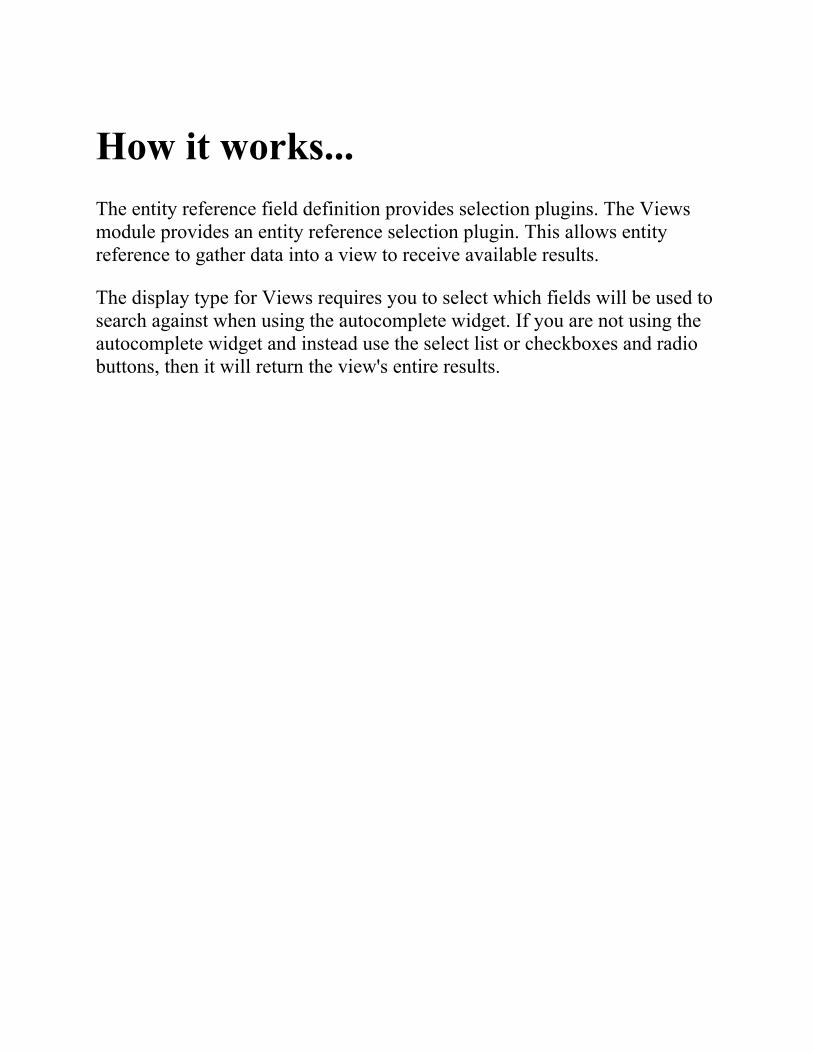
How it works...The entity reference field definition provides selection plugins. The Viewsmodule provides an entity reference selection plugin. This allows entityreference to gather data into a view to receive available results.
The display type for Views requires you to select which fields will be used tosearch against when using the autocomplete widget. If you are not using theautocomplete widget and instead use the select list or checkboxes and radiobuttons, then it will return the view's entire results.
See alsoRefer to Chapter 7, Plug and Play with Plugins, to learn more aboutplugins
Extending DrupalThis chapter dives into extending Drupal using a custom module:
Creating a moduleDefining a custom pageDefining permissionsProviding the configuration on installation or updateCreating an event subscriberUsing Features 3.0
IntroductionA feature of Drupal that makes it desirable is the ability to customize itthrough modules. Whether custom or contributed, modules extend thefunctionalities and capabilities of Drupal. Modules can be used to not onlyextend Drupal, but also to create a way to provide configuration and reusablefeatures.
This chapter will discuss how to create a module and allow Drupal todiscover it, allowing it to be installed from the extend page. Permissions,custom pages, and default configurations all come from modules. We willexplore how to provide these through a custom module.
In addition to creating a module, we will discuss the Features module thatprovides a set of tools to generate a module and export its configuration.

Creating a moduleThe first step to extend Drupal is to create a custom module. Although thetask sounds daunting, it can be accomplished in a few simple steps. Modulescan provide functionalities and customizations to functionalities provided byother modules, or they can be used as a way to contain the configuration anda site's state.
In this recipe, we will create a module by defining an info.yml file, a filecontaining information that Drupal uses to discover extensions, and enablingthe module.
How to do it...1. Create a folder named mymodule in the modules folder in the base
directory of your Drupal site. This will be your module's directory.2. Create a mymodule.info.yml file in your module's directory. This
contains metadata that identifies the module to Drupal.3. Add a line to the name key to provide a name for the module:
name: My Module!
4. We will need to provide the type key to define the type of extension.We provide the module value:
type: module
5. The description key allows you to provide extra information aboutyour module, which will be displayed on the module's list page:
description: This is an example module from the Drupal 8 Cookbook!
6. All modules need to define the core key in order to specify a majorrelease compatibility:
core: 8.x
7. Save the mymodule.info.yml file, which resembles the following code:
name: My Module! type: module description: This is an example module from the Drupal 8 Cookbook! core: 8.x
8. Log in to your Drupal site and go to Extend from the administrativetoolbar.
9. Search for My Module to filter the list of options.10. Check the checkbox and click on Install to enable your module:
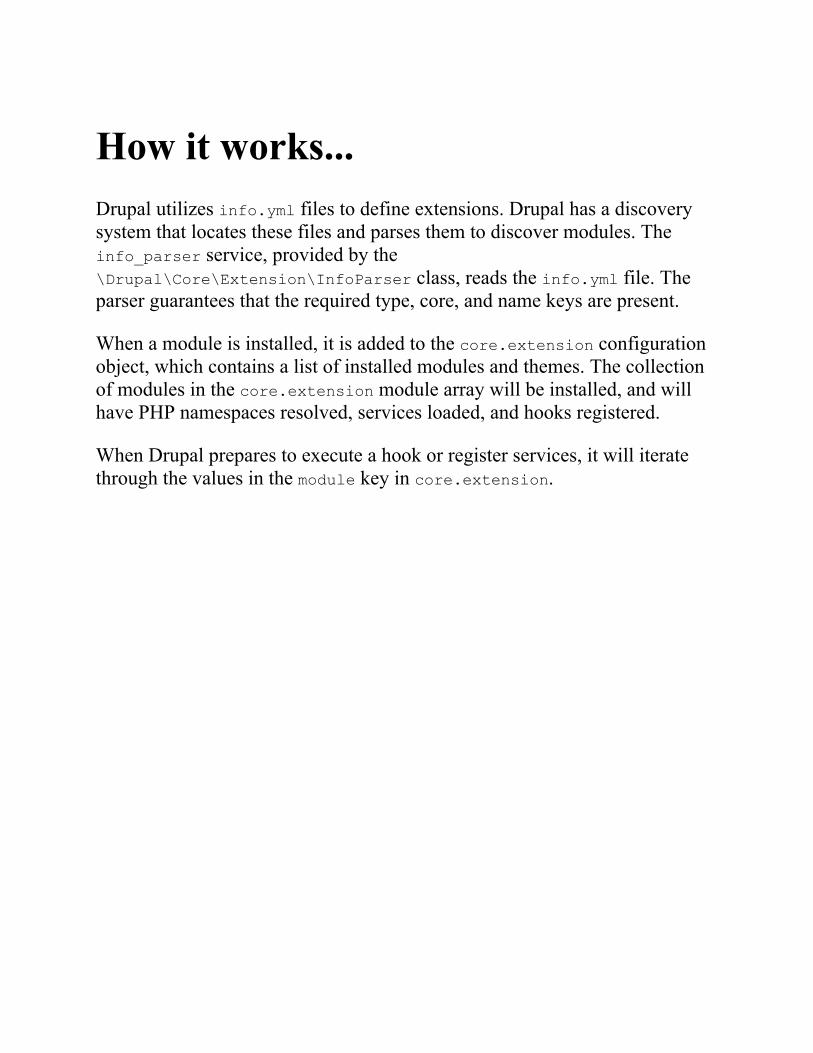
How it works...Drupal utilizes info.yml files to define extensions. Drupal has a discoverysystem that locates these files and parses them to discover modules. Theinfo_parser service, provided by the\Drupal\Core\Extension\InfoParser class, reads the info.yml file. Theparser guarantees that the required type, core, and name keys are present.
When a module is installed, it is added to the core.extension configurationobject, which contains a list of installed modules and themes. The collectionof modules in the core.extension module array will be installed, and willhave PHP namespaces resolved, services loaded, and hooks registered.
When Drupal prepares to execute a hook or register services, it will iteratethrough the values in the module key in core.extension.

There's more...There are more details about Drupal modules and the module info.yml filesthat we can explore.
Module namespacesDrupal 8 uses the PSR-4 standard developed by the PHP FrameworkInteroperability Group (PHP-FIG). The PSR-4 standard is for package-based PHP namespace autoloading. It defines a standard to understand howto automatically include classes based on a namespace and class name.Drupal modules have their own namespaces under the Drupal rootnamespace.
Using the module from the recipe, our PHP namespace will beDrupal\mymodule, which represents the modules/mymodule/src folder.
With PSR-4, files need to contain only one class, interface, or trait. Thesefiles need to have the same filename as the containing class, interface, or traitname. This allows a class loader to resolve a namespace as a directory pathand know the class's filename. The file can then be automatically loadedwhen it is used in a file.
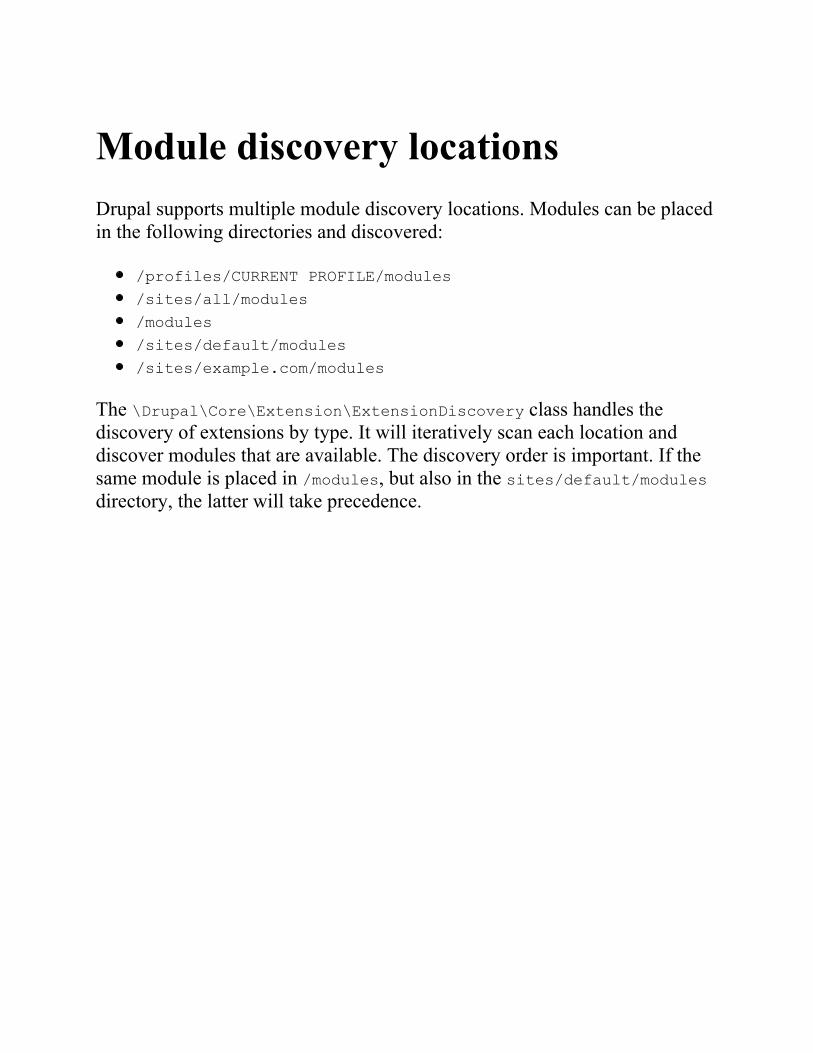
Module discovery locationsDrupal supports multiple module discovery locations. Modules can be placedin the following directories and discovered:
/profiles/CURRENT PROFILE/modules
/sites/all/modules
/modules
/sites/default/modules
/sites/example.com/modules
The \Drupal\Core\Extension\ExtensionDiscovery class handles thediscovery of extensions by type. It will iteratively scan each location anddiscover modules that are available. The discovery order is important. If thesame module is placed in /modules, but also in the sites/default/modulesdirectory, the latter will take precedence.

Defining a package groupModules can define a package key to group modules on the module list page:
Projects that include multiple submodules, such as Drupal Commerce,specify packages to normalize the modules' list form. Contributed modulesfor the Drupal Commerce project utilize a package name, Commerce(contrib), to group them on the module list page.
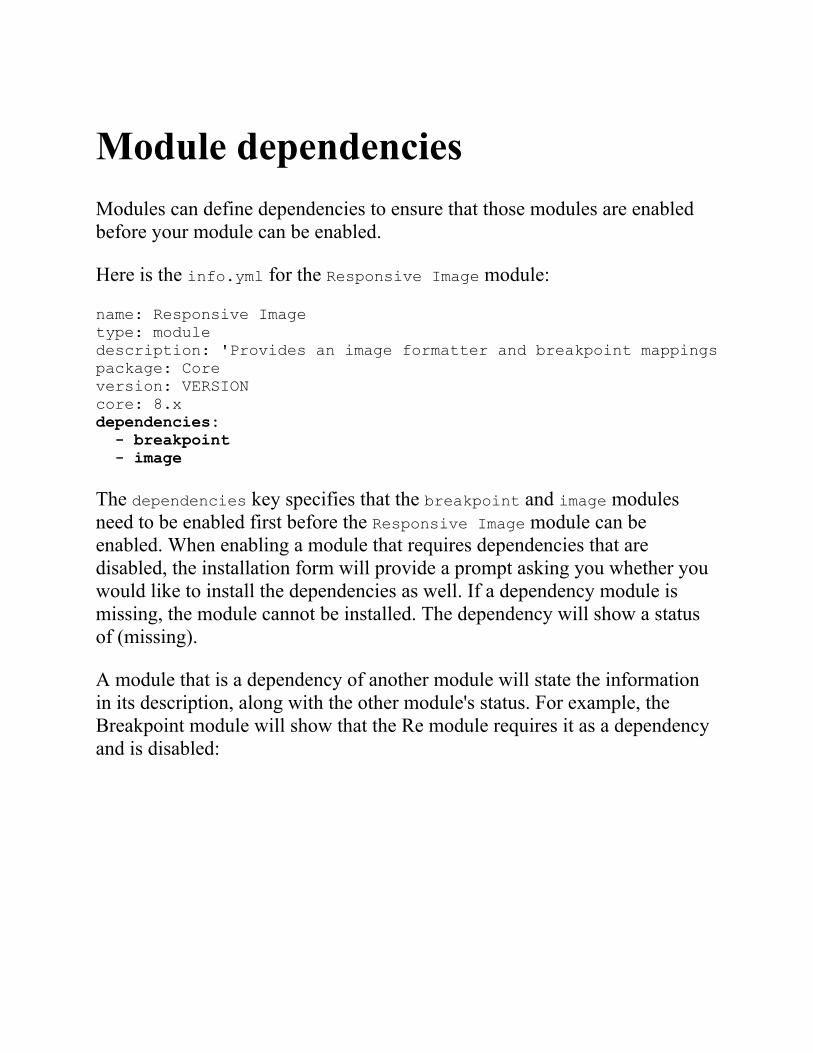
Module dependenciesModules can define dependencies to ensure that those modules are enabledbefore your module can be enabled.
Here is the info.yml for the Responsive Image module:
name: Responsive Image type: module description: 'Provides an image formatter and breakpoint mappings to output responsive images using the HTML5 picture tag.' package: Core version: VERSION core: 8.x dependencies: - breakpoint - image
The dependencies key specifies that the breakpoint and image modulesneed to be enabled first before the Responsive Image module can beenabled. When enabling a module that requires dependencies that aredisabled, the installation form will provide a prompt asking you whether youwould like to install the dependencies as well. If a dependency module ismissing, the module cannot be installed. The dependency will show a statusof (missing).
A module that is a dependency of another module will state the informationin its description, along with the other module's status. For example, theBreakpoint module will show that the Re module requires it as a dependencyand is disabled:
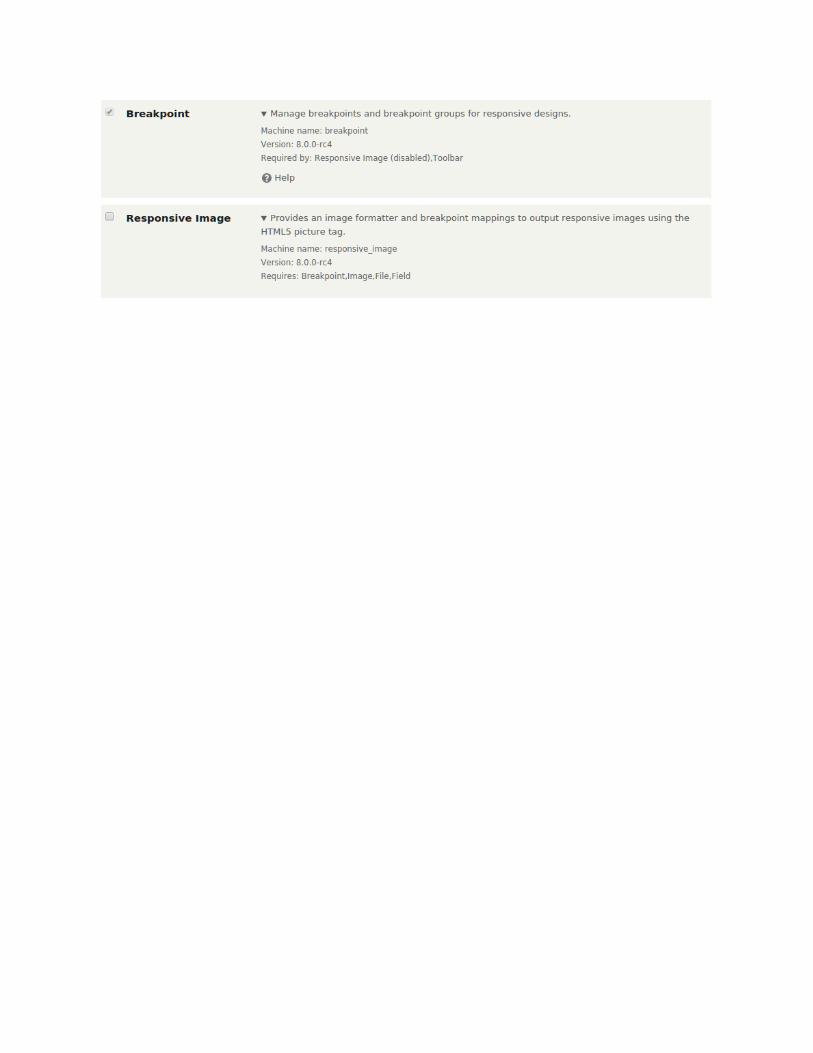
Specifying the module's versionThere is a version key that defines the current module's version. Projects onDrupal.org do not specify this directly, as the Drupal.org extension packageradds it when a release is created. However, this key can be important forprivate modules to track the release information.
Versions are expected to be single strings, such as 1.0-alpha1 and 2.0.1.You can also pass VERSION, which will resolve to the current version ofDrupal core.
Drupal.org does not currently support semantic versioning for contributedprojects. There is a, now postponed, policy discussion in the issue queue,which can be found at https://www.drupal.org/node/1612910.
See also...Refer to the PSR-4: Autoloader specification at http://www.php-fig.org/psr/psr-4/Refer to the Drupal.org documentation for creating a module athttps://www.drupal.org/docs/8/creating-custom-modules
Defining a custom pageIn Drupal, there are routes that represent URL paths that Drupal interprets toreturn content. Modules can define routes and methods that return data to berendered and then displayed to the end user.
In this recipe, we will define a controller that provides an output and a route.The route provides a URL path that Drupal will associate with our controllerto display the output.

Getting readyCreate a new module like the one in the first recipe. We will refer to themodule as mymodule throughout the recipe. Use your module's name asappropriate.
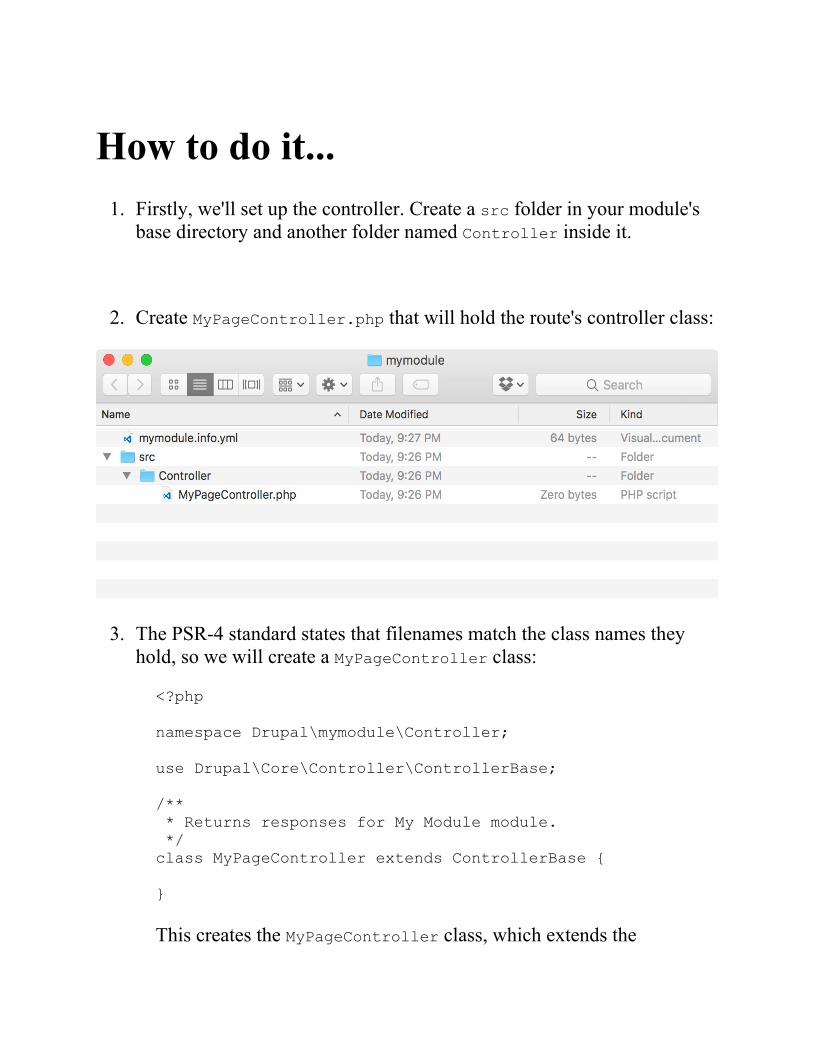
How to do it...1. Firstly, we'll set up the controller. Create a src folder in your module's
base directory and another folder named Controller inside it.
2. Create MyPageController.php that will hold the route's controller class:
3. The PSR-4 standard states that filenames match the class names theyhold, so we will create a MyPageController class:
<?php namespace Drupal\mymodule\Controller; use Drupal\Core\Controller\ControllerBase; /** * Returns responses for My Module module. */ class MyPageController extends ControllerBase { }
This creates the MyPageController class, which extends the
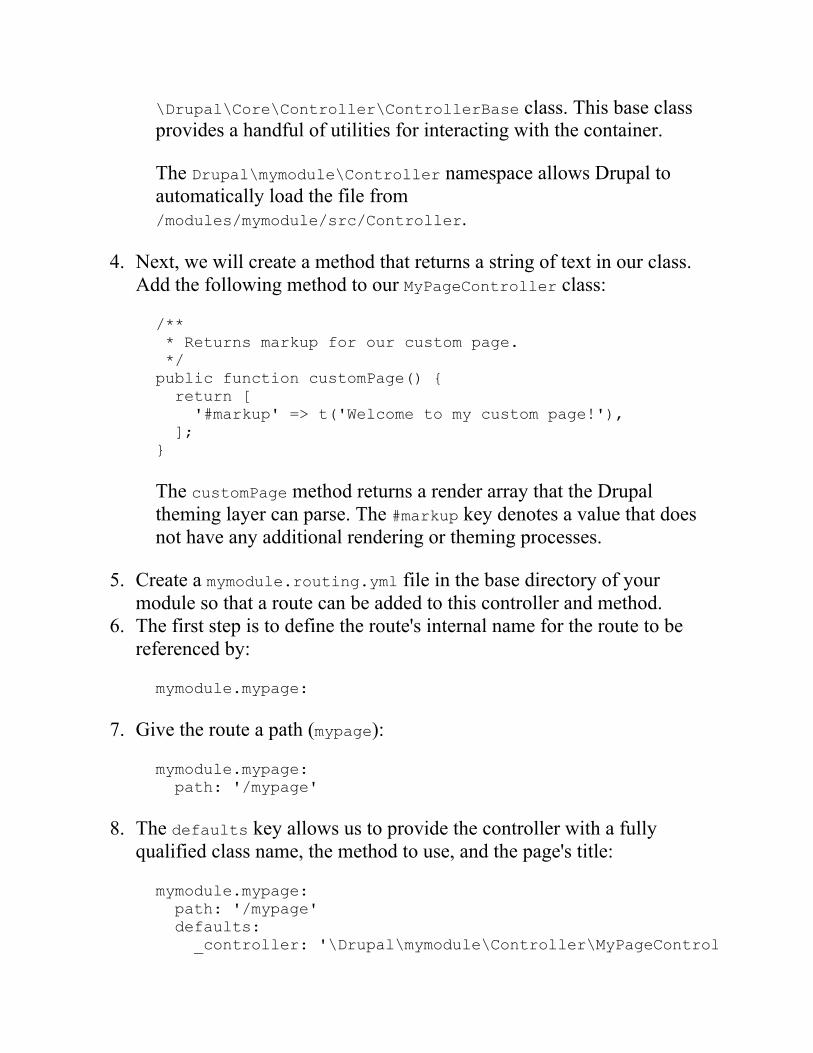
\Drupal\Core\Controller\ControllerBase class. This base classprovides a handful of utilities for interacting with the container.
The Drupal\mymodule\Controller namespace allows Drupal toautomatically load the file from/modules/mymodule/src/Controller.
4. Next, we will create a method that returns a string of text in our class.Add the following method to our MyPageController class:
/** * Returns markup for our custom page. */ public function customPage() { return [ '#markup' => t('Welcome to my custom page!'), ]; }
The customPage method returns a render array that the Drupaltheming layer can parse. The #markup key denotes a value that doesnot have any additional rendering or theming processes.
5. Create a mymodule.routing.yml file in the base directory of yourmodule so that a route can be added to this controller and method.
6. The first step is to define the route's internal name for the route to bereferenced by:
mymodule.mypage:
7. Give the route a path (mypage):
mymodule.mypage: path: '/mypage'
8. The defaults key allows us to provide the controller with a fullyqualified class name, the method to use, and the page's title:
mymodule.mypage: path: '/mypage' defaults: _controller: '\Drupal\mymodule\Controller\MyPageController::customPage'
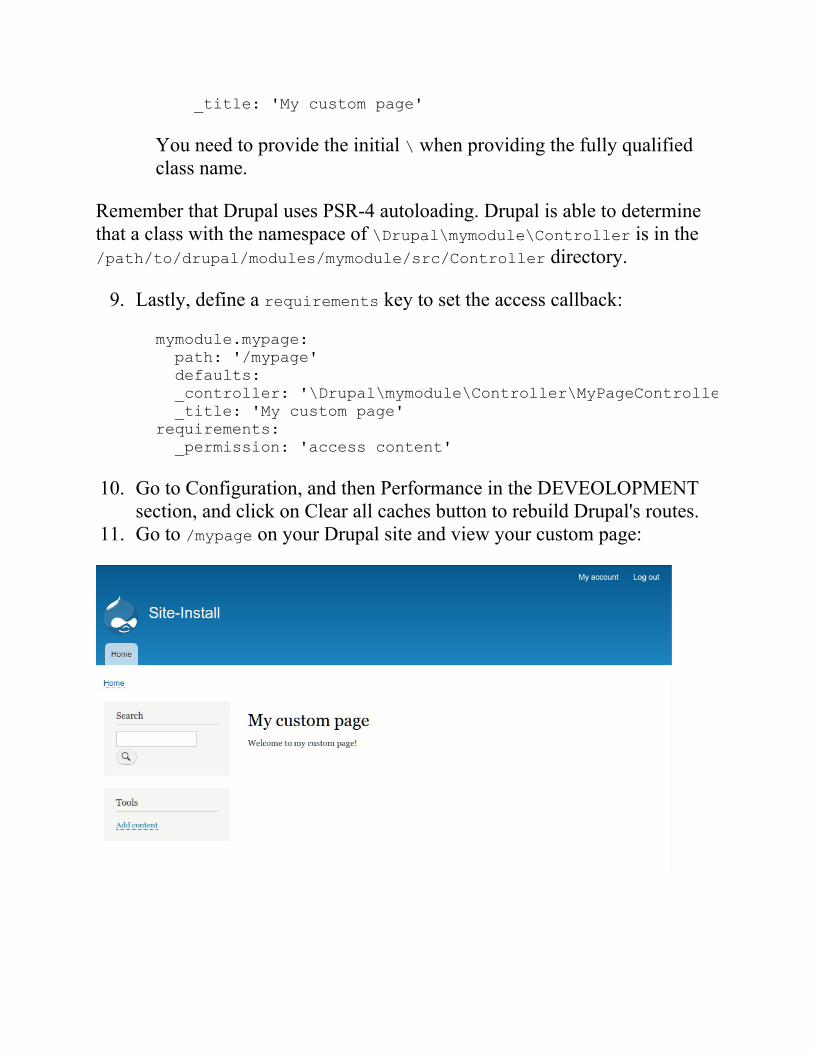
_title: 'My custom page'
You need to provide the initial \ when providing the fully qualifiedclass name.
Remember that Drupal uses PSR-4 autoloading. Drupal is able to determinethat a class with the namespace of \Drupal\mymodule\Controller is in the/path/to/drupal/modules/mymodule/src/Controller directory.
9. Lastly, define a requirements key to set the access callback:
mymodule.mypage: path: '/mypage' defaults: _controller: '\Drupal\mymodule\Controller\MyPageController::customPage' _title: 'My custom page' requirements: _permission: 'access content'
10. Go to Configuration, and then Performance in the DEVEOLOPMENTsection, and click on Clear all caches button to rebuild Drupal's routes.
11. Go to /mypage on your Drupal site and view your custom page:
How it works...Drupal uses routes, which define a path, that returns content. Each route has amethod in a controller class that generates the content, in the form of a renderarray, to be delivered to the user. When a request comes to Drupal, thesystem tries to match the path to known routes. If the route is found, theroute's definition is used to deliver the page. If the route cannot be found, the404 page is displayed.
The HTTP kernel takes the request and loads the route. It will invoke thedefined controller method or procedural function. The result of the invokedmethod or function is then handed to the presentation layer of Drupal to berendered into the content that can be delivered to the user.
Drupal 8 builds on top of the Symfony HTTP kernel to provide theunderlying functionality of its route system. It has added the ability toprovide access requirements, cast placeholders into loaded objects, andprovide partial page responses.

There's more...Routes have extra capabilities that can be configured; we will explore thosein the next section.
Parameters in routesRoutes can accept dynamic arguments that can be passed to the routecontroller's method. Placeholder elements can be defined in the route usingcurly brackets in the URL that denote dynamic values.
The following example code shows what a route might look like:
mymodule.cats: path: '/cat/{name}' defaults: _controller: '\Drupal\mymodule\Controller\MyPageController::cats' requirements: _permission: 'access content'
This route specifies the /cat/{name} path. The {name} placeholder willaccept dynamic values and pass them to the controller's method:
class MyPageController { // ... public function cats($name) { return [ '#markup' => t('My cats name is: @name', [ '@name' => $name, ]), ]; } }
This method accepts the name variable from the route and substitutes it intothe render array to display it as a text.
Drupal's routing system provides a method of upcasting a variable into aloaded object. In Drupal, upcasting is the process of taking a route parameterand converting it into a richer piece of data. This includes taking an entity IDand providing the loaded entity to the system. There are a set of parameterconverter classes under the \Drupal\Core\ParamConverter namespace. TheEntityConverter class will read options defined in the route and replace aplaceholder value with a loaded entity object.
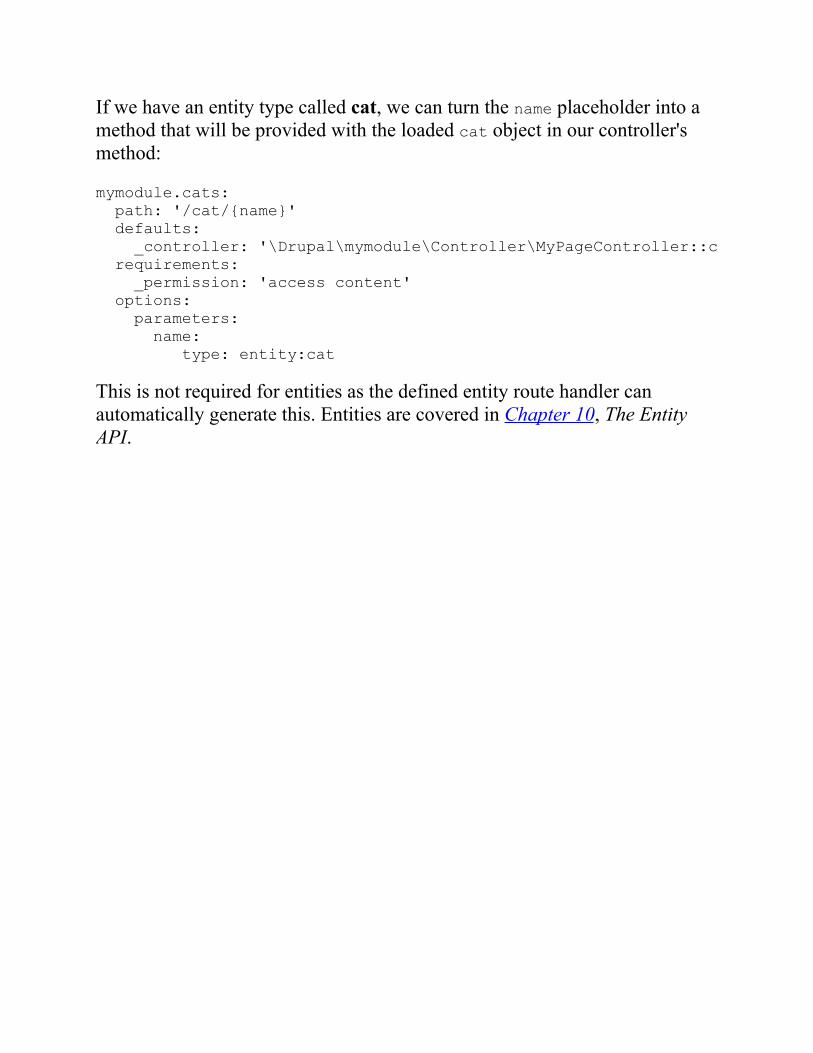
If we have an entity type called cat, we can turn the name placeholder into amethod that will be provided with the loaded cat object in our controller'smethod:
mymodule.cats: path: '/cat/{name}' defaults: _controller: '\Drupal\mymodule\Controller\MyPageController::cats' requirements: _permission: 'access content' options: parameters: name: type: entity:cat
This is not required for entities as the defined entity route handler canautomatically generate this. Entities are covered in Chapter 10, The EntityAPI.
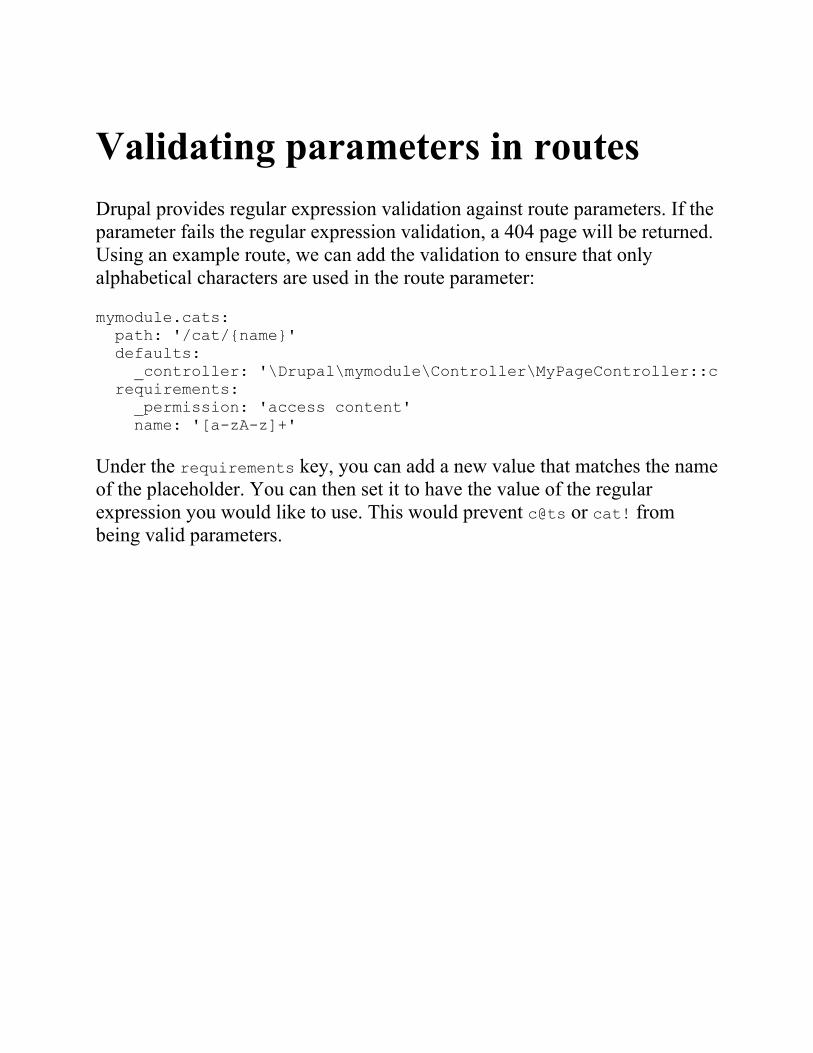
Validating parameters in routesDrupal provides regular expression validation against route parameters. If theparameter fails the regular expression validation, a 404 page will be returned.Using an example route, we can add the validation to ensure that onlyalphabetical characters are used in the route parameter:
mymodule.cats: path: '/cat/{name}' defaults: _controller: '\Drupal\mymodule\Controller\MyPageController::cats' requirements: _permission: 'access content' name: '[a-zA-z]+'
Under the requirements key, you can add a new value that matches the nameof the placeholder. You can then set it to have the value of the regularexpression you would like to use. This would prevent c@ts or cat! frombeing valid parameters.

Route requirementsRoutes can define different access requirements through the requirementskey. Multiple validators can be added. However, there must be one thatprovides a true result, or else the route will return 403, access denied. This istrue if the route defines no requirement validators.
Route requirement validators are defined by implementing\Drupal\Core\Routing\Access\AccessInterface. Here are some of thecommon requirement validators defined throughout Drupal core:
_access: TRUE: Always grants access to the route_entity_access: Validates that the current user has the ability toperformentity_type.operation, such as node.view_permission: Checks whether the current user has the providedpermission_user_is_logged_in: Validates that the current user is logged in, whichis defined with a Boolean value in the routing.yml file
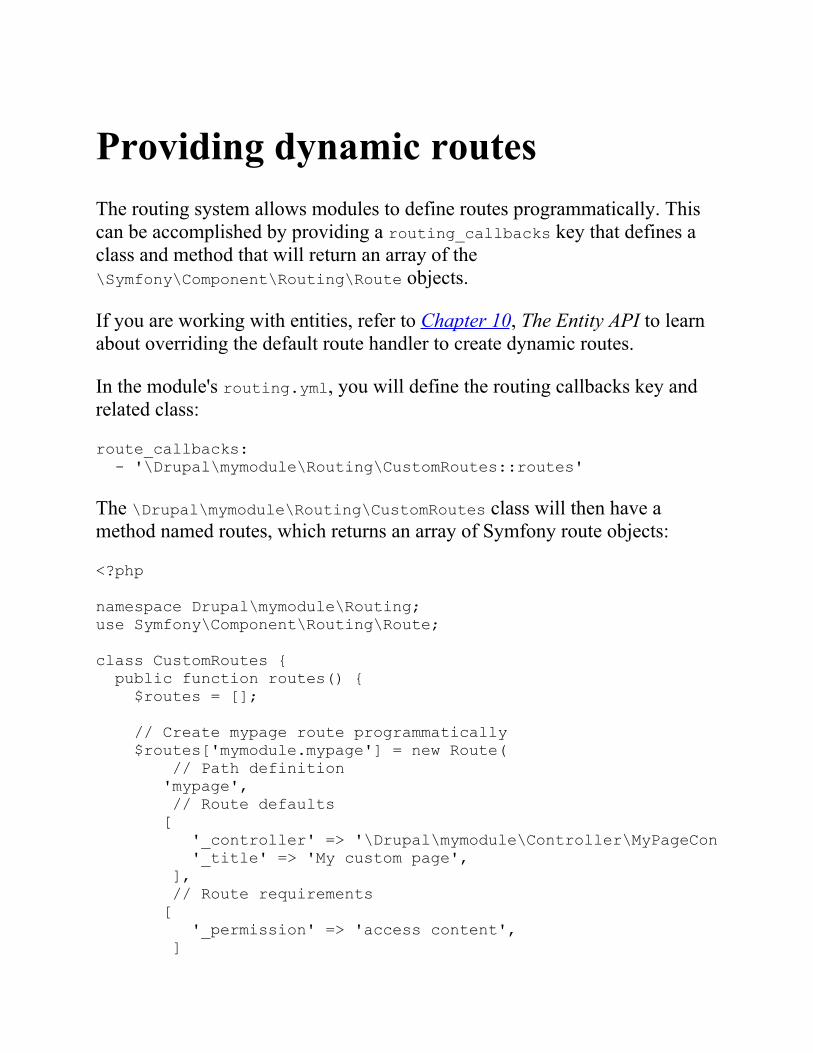
Providing dynamic routesThe routing system allows modules to define routes programmatically. Thiscan be accomplished by providing a routing_callbacks key that defines aclass and method that will return an array of the\Symfony\Component\Routing\Route objects.
If you are working with entities, refer to Chapter 10, The Entity API to learnabout overriding the default route handler to create dynamic routes.
In the module's routing.yml, you will define the routing callbacks key andrelated class:
route_callbacks: - '\Drupal\mymodule\Routing\CustomRoutes::routes'
The \Drupal\mymodule\Routing\CustomRoutes class will then have amethod named routes, which returns an array of Symfony route objects:
<?php namespace Drupal\mymodule\Routing; use Symfony\Component\Routing\Route; class CustomRoutes { public function routes() { $routes = []; // Create mypage route programmatically $routes['mymodule.mypage'] = new Route( // Path definition 'mypage', // Route defaults [ '_controller' => '\Drupal\mymodule\Controller\MyPageController::customPage', '_title' => 'My custom page', ], // Route requirements [ '_permission' => 'access content', ]
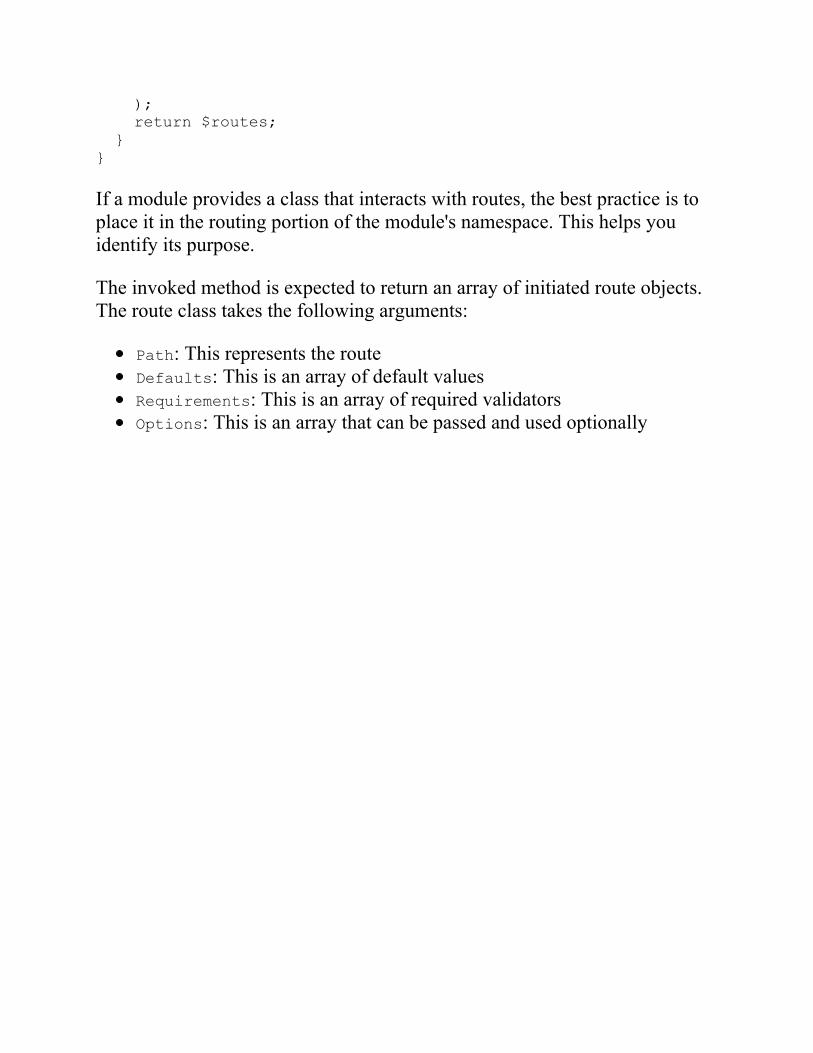
); return $routes; } }
If a module provides a class that interacts with routes, the best practice is toplace it in the routing portion of the module's namespace. This helps youidentify its purpose.
The invoked method is expected to return an array of initiated route objects.The route class takes the following arguments:
Path: This represents the routeDefaults: This is an array of default valuesRequirements: This is an array of required validatorsOptions: This is an array that can be passed and used optionally
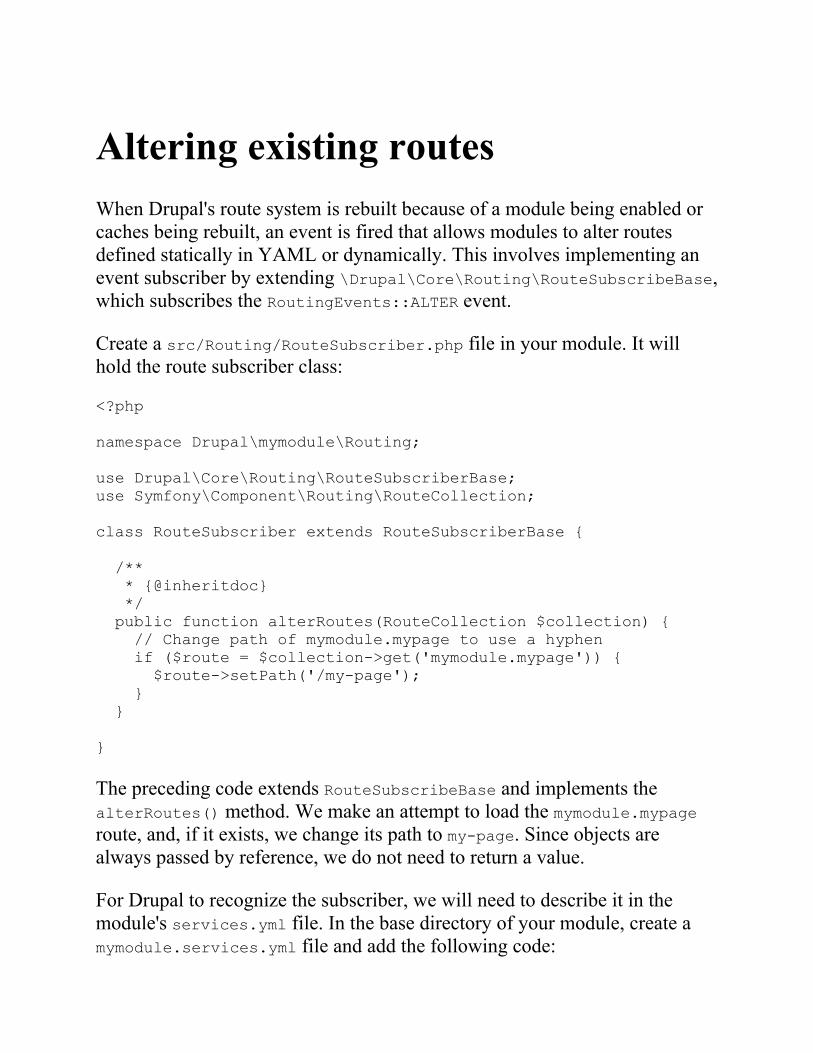
Altering existing routesWhen Drupal's route system is rebuilt because of a module being enabled orcaches being rebuilt, an event is fired that allows modules to alter routesdefined statically in YAML or dynamically. This involves implementing anevent subscriber by extending \Drupal\Core\Routing\RouteSubscribeBase,which subscribes the RoutingEvents::ALTER event.
Create a src/Routing/RouteSubscriber.php file in your module. It willhold the route subscriber class:
<?php namespace Drupal\mymodule\Routing; use Drupal\Core\Routing\RouteSubscriberBase; use Symfony\Component\Routing\RouteCollection; class RouteSubscriber extends RouteSubscriberBase { /** * {@inheritdoc} */ public function alterRoutes(RouteCollection $collection) { // Change path of mymodule.mypage to use a hyphen if ($route = $collection->get('mymodule.mypage')) { $route->setPath('/my-page'); } } }
The preceding code extends RouteSubscribeBase and implements thealterRoutes() method. We make an attempt to load the mymodule.mypageroute, and, if it exists, we change its path to my-page. Since objects arealways passed by reference, we do not need to return a value.
For Drupal to recognize the subscriber, we will need to describe it in themodule's services.yml file. In the base directory of your module, create amymodule.services.yml file and add the following code:
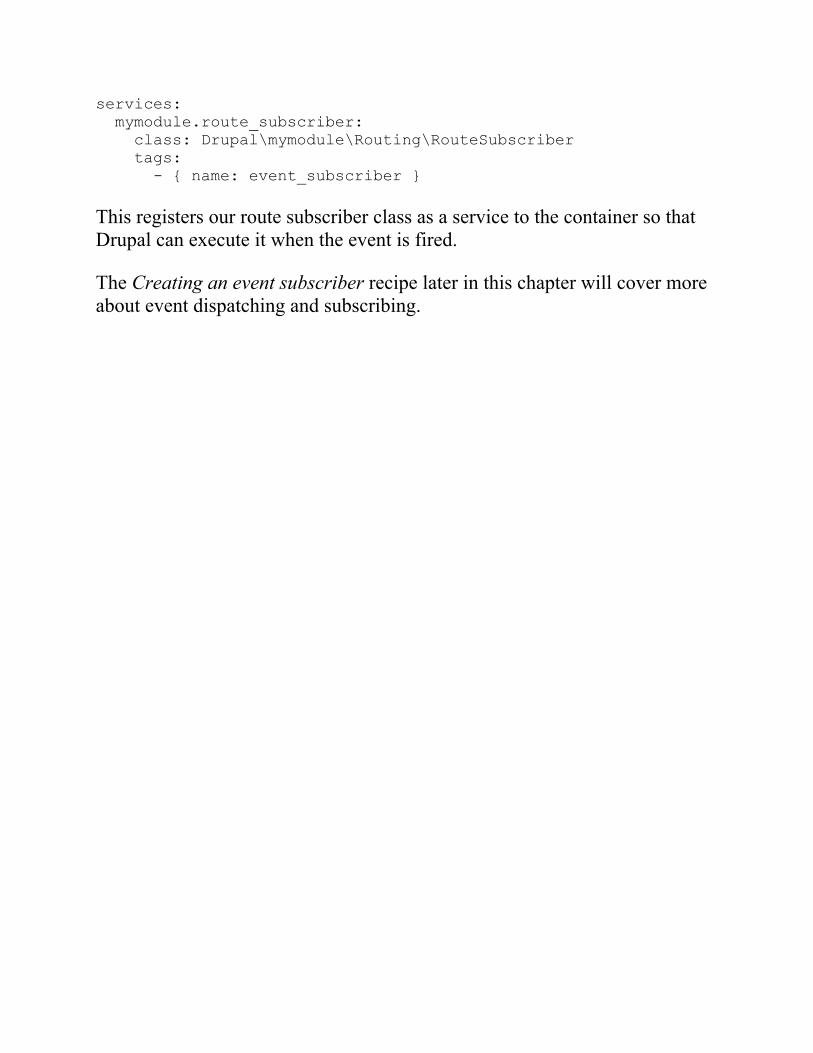
services: mymodule.route_subscriber: class: Drupal\mymodule\Routing\RouteSubscriber tags: - { name: event_subscriber }
This registers our route subscriber class as a service to the container so thatDrupal can execute it when the event is fired.
The Creating an event subscriber recipe later in this chapter will cover moreabout event dispatching and subscribing.

See alsoRefer to the Symfony routing documentation athttp://symfony.com/doc/current/book/routing.htmlRefer to Chapter 10, The Entity APIRefer to the access checking on routes community documentation athttps://www.drupal.org/node/2122195
Defining permissionsIn Drupal, there are roles and permissions used to define robust accesscontrol lists for users. Modules use permissions to check whether the currentuser has access to perform an action, view specific items, or do otheroperations. Modules then define the permissions that are used so that Drupalis aware of them. Developers can then construct roles, which are made up ofenabled permissions.
In this recipe, we will define a new permission to view custom pages definedin a module. The permission will be added to a custom route and will restrictaccess to the route path to users who have a role containing the permission.
Getting readyCreate a new module like the one in the first recipe. We will refer to themodule as mymodule throughout the recipe. Use your module's name in thefollowing recipe as appropriate.
This recipe also modifies a route defined in the module. We will refer to thisroute as mymodule.mypage. Modify the appropriate path in your module'srouting.yml file.
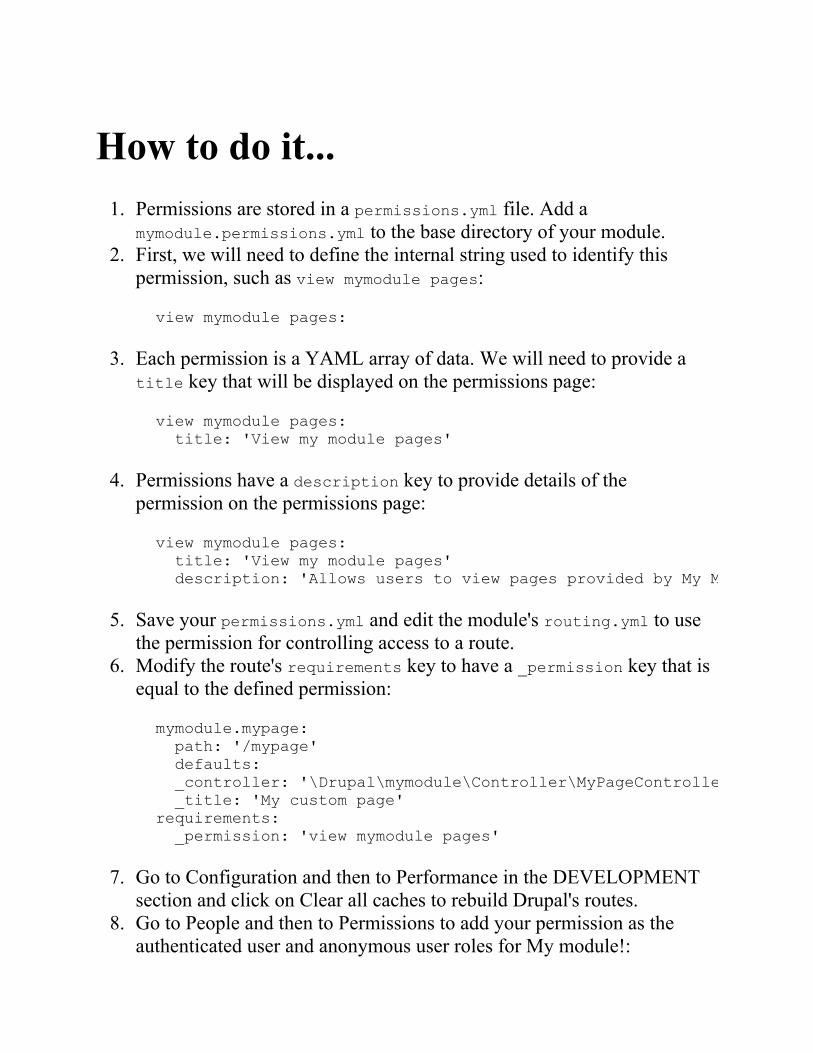
How to do it...1. Permissions are stored in a permissions.yml file. Add a
mymodule.permissions.yml to the base directory of your module.2. First, we will need to define the internal string used to identify this
permission, such as view mymodule pages:
view mymodule pages:
3. Each permission is a YAML array of data. We will need to provide atitle key that will be displayed on the permissions page:
view mymodule pages: title: 'View my module pages'
4. Permissions have a description key to provide details of thepermission on the permissions page:
view mymodule pages: title: 'View my module pages' description: 'Allows users to view pages provided by My Module'
5. Save your permissions.yml and edit the module's routing.yml to usethe permission for controlling access to a route.
6. Modify the route's requirements key to have a _permission key that isequal to the defined permission:
mymodule.mypage: path: '/mypage' defaults: _controller: '\Drupal\mymodule\Controller\MyPageController::customPage' _title: 'My custom page' requirements: _permission: 'view mymodule pages'
7. Go to Configuration and then to Performance in the DEVELOPMENTsection and click on Clear all caches to rebuild Drupal's routes.
8. Go to People and then to Permissions to add your permission as theauthenticated user and anonymous user roles for My module!:
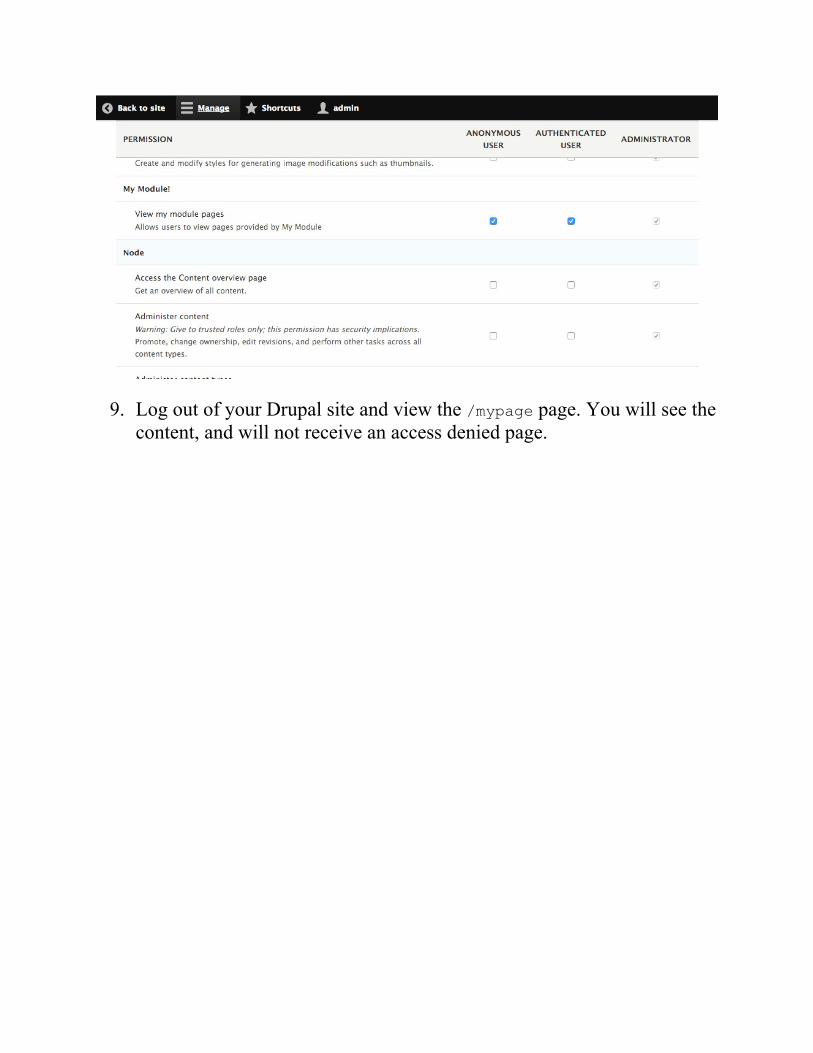
9. Log out of your Drupal site and view the /mypage page. You will see thecontent, and will not receive an access denied page.
How it works...Permissions and roles are provided by the User module. Theuser.permissions service discovers the permissions.yml provided byinstalled modules. By default, the service is defined through the\Drupal\user\PermissionHandler class.
Drupal does not save a list of all permissions that are available. Thepermissions for a system are loaded when the permissions page is loaded.Roles contain an array of permissions.
When checking a user's access for a permission, Drupal checks all the user'sroles to see whether they support that permission.
You can pass an undefined permission to a user access check and not receivean error. The access check will simply fail unless the user is UID 1, whichbypasses access checks.

There's more...We will cover more ways to work with permissions in your modules in theupcoming sections.
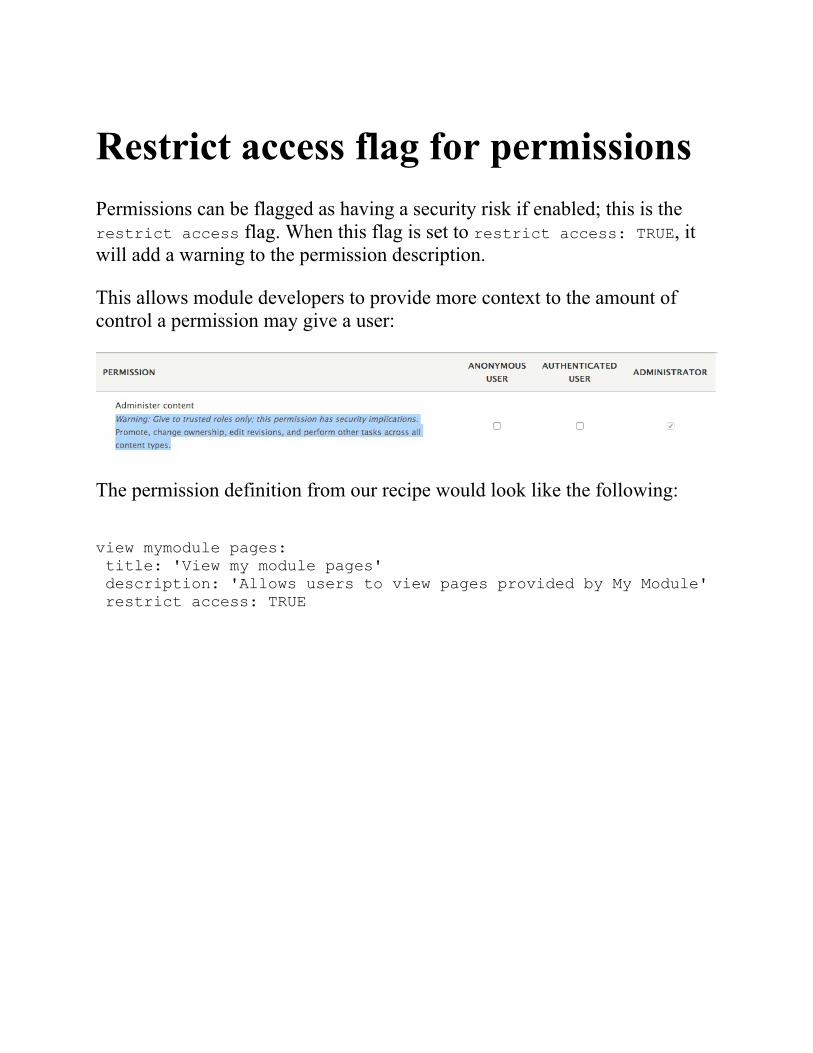
Restrict access flag for permissionsPermissions can be flagged as having a security risk if enabled; this is therestrict access flag. When this flag is set to restrict access: TRUE, itwill add a warning to the permission description.
This allows module developers to provide more context to the amount ofcontrol a permission may give a user:
The permission definition from our recipe would look like the following:
view mymodule pages: title: 'View my module pages' description: 'Allows users to view pages provided by My Module' restrict access: TRUE
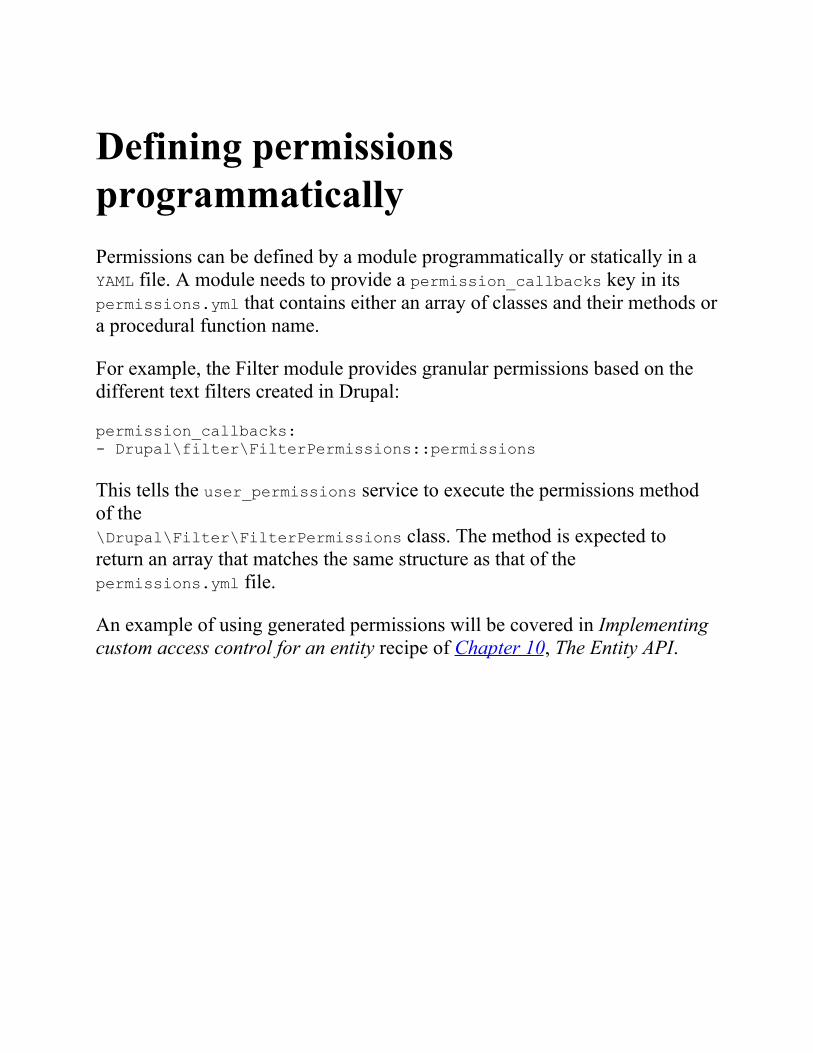
Defining permissionsprogrammaticallyPermissions can be defined by a module programmatically or statically in aYAML file. A module needs to provide a permission_callbacks key in itspermissions.yml that contains either an array of classes and their methods ora procedural function name.
For example, the Filter module provides granular permissions based on thedifferent text filters created in Drupal:
permission_callbacks: - Drupal\filter\FilterPermissions::permissions
This tells the user_permissions service to execute the permissions methodof the\Drupal\Filter\FilterPermissions class. The method is expected toreturn an array that matches the same structure as that of thepermissions.yml file.
An example of using generated permissions will be covered in Implementingcustom access control for an entity recipe of Chapter 10, The Entity API.
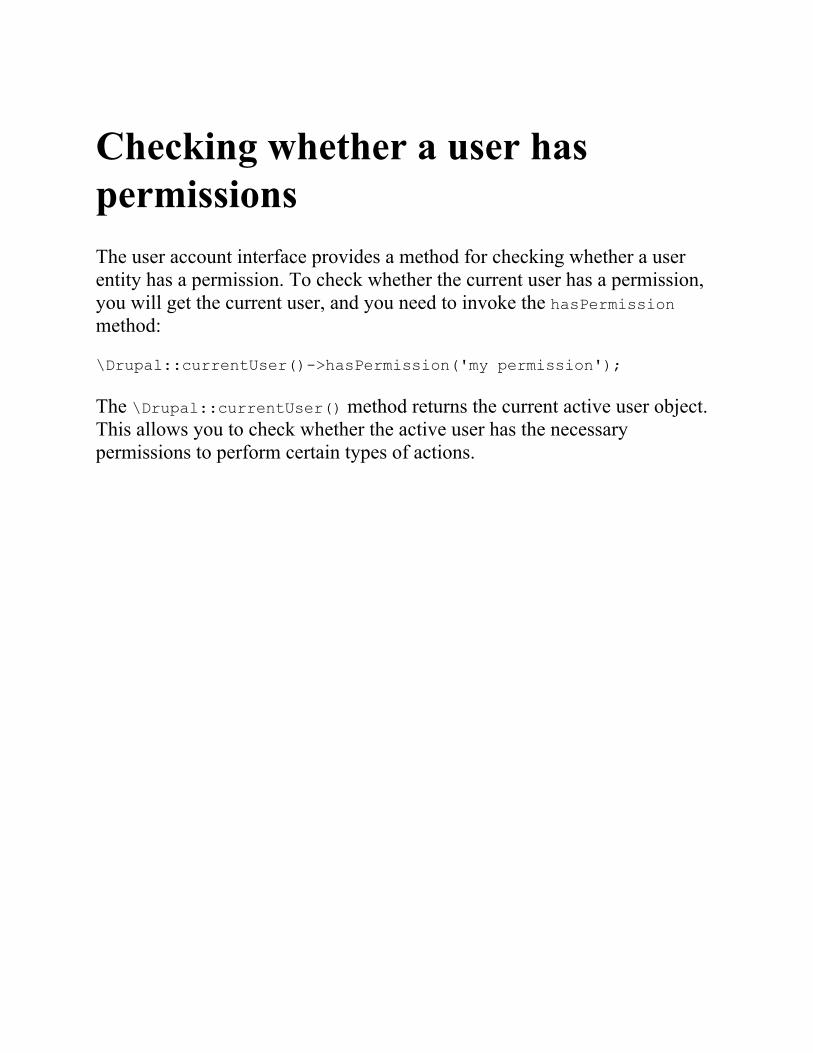
Checking whether a user haspermissionsThe user account interface provides a method for checking whether a userentity has a permission. To check whether the current user has a permission,you will get the current user, and you need to invoke the hasPermissionmethod:
\Drupal::currentUser()->hasPermission('my permission');
The \Drupal::currentUser() method returns the current active user object.This allows you to check whether the active user has the necessarypermissions to perform certain types of actions.
Providing the configuration on theinstallation or updateDrupal provides a configuration management system, which is discussed inChapter 9, Configuration Management - Deploying in Drupal 8, and modulescan provide configuration on an installation or through an update system.Modules provide the configuration through YAML files when they are firstinstalled. Once the module is enabled, the configuration is then placed in theconfiguration management system; however updates can be made to theconfiguration in code through the Drupal update system.
In this recipe, we will provide a configuration YAML that creates a newcontact form and then manipulates it through a schema version change in theupdate system.

Getting readyCreate a new module like the one in the first recipe. We will refer to themodule as mymodule throughout the recipe. Use your module's appropriatename where necessary.
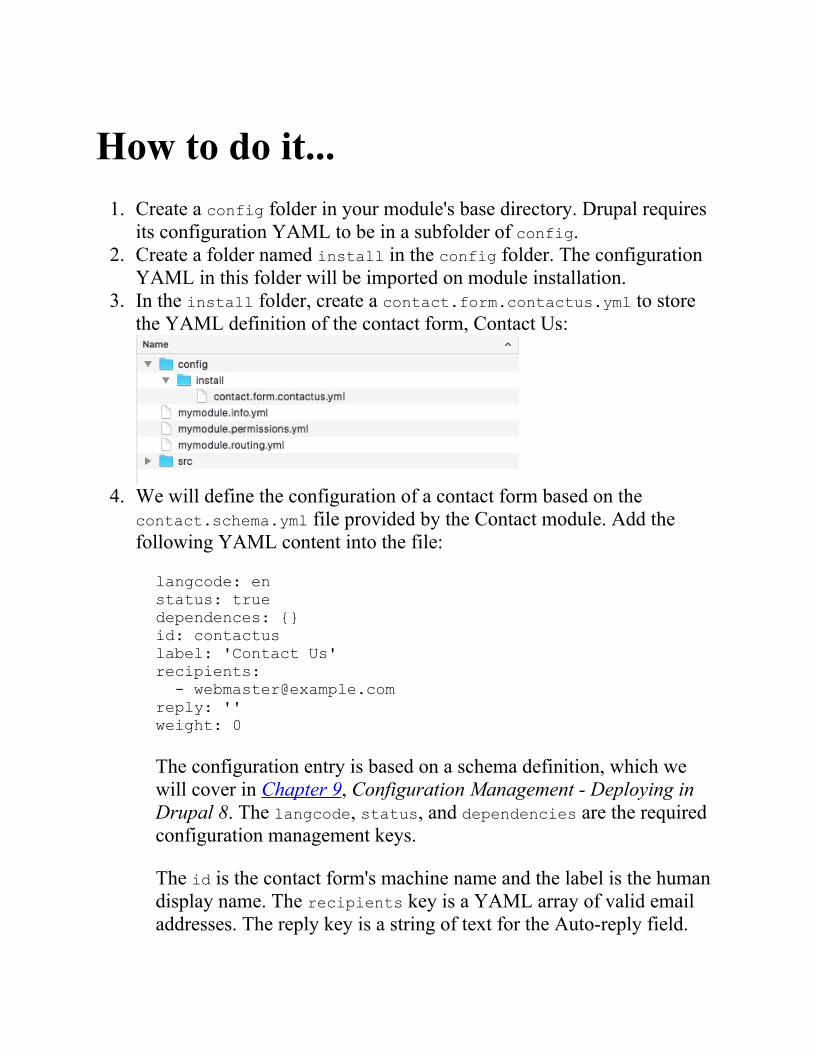
How to do it...1. Create a config folder in your module's base directory. Drupal requires
its configuration YAML to be in a subfolder of config.2. Create a folder named install in the config folder. The configuration
YAML in this folder will be imported on module installation.3. In the install folder, create a contact.form.contactus.yml to store
the YAML definition of the contact form, Contact Us:
4. We will define the configuration of a contact form based on thecontact.schema.yml file provided by the Contact module. Add thefollowing YAML content into the file:
langcode: en status: true dependences: {}id: contactus label: 'Contact Us' recipients: - [email protected] reply: '' weight: 0
The configuration entry is based on a schema definition, which wewill cover in Chapter 9, Configuration Management - Deploying inDrupal 8. The langcode, status, and dependencies are the requiredconfiguration management keys.
The id is the contact form's machine name and the label is the humandisplay name. The recipients key is a YAML array of valid emailaddresses. The reply key is a string of text for the Auto-reply field.
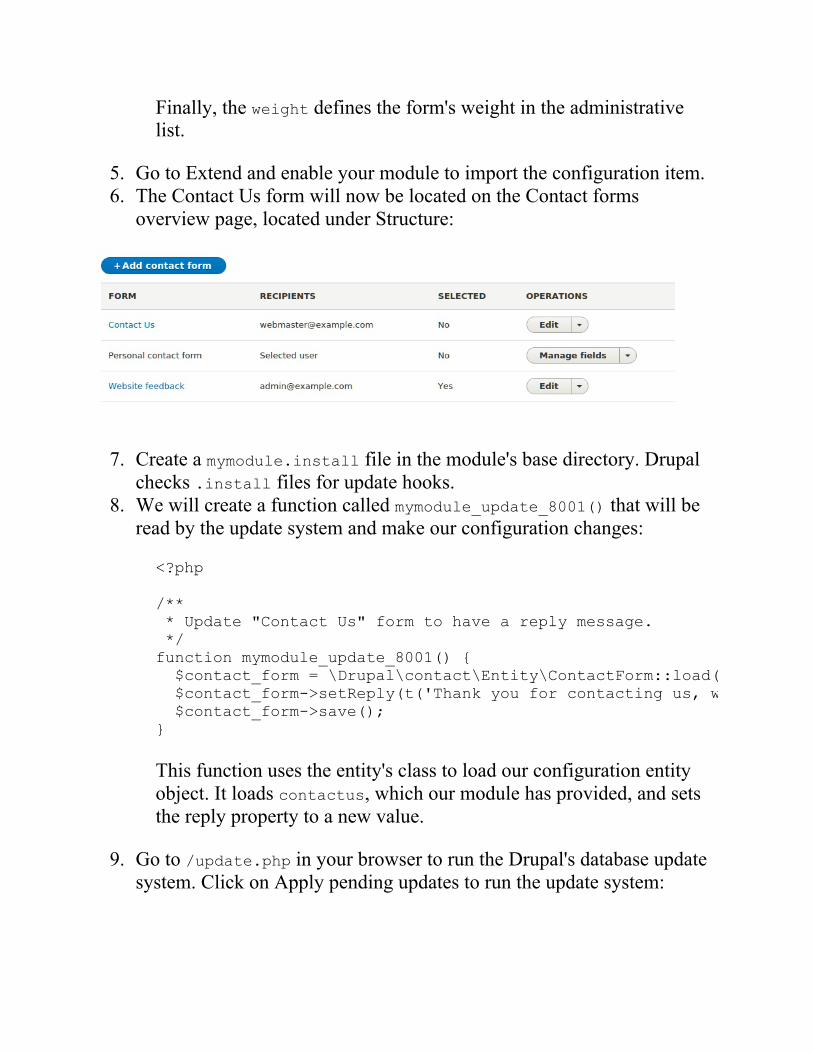
Finally, the weight defines the form's weight in the administrativelist.
5. Go to Extend and enable your module to import the configuration item.6. The Contact Us form will now be located on the Contact forms
overview page, located under Structure:
7. Create a mymodule.install file in the module's base directory. Drupalchecks .install files for update hooks.
8. We will create a function called mymodule_update_8001() that will beread by the update system and make our configuration changes:
<?php /** * Update "Contact Us" form to have a reply message. */ function mymodule_update_8001() { $contact_form = \Drupal\contact\Entity\ContactForm::load('contactus'); $contact_form->setReply(t('Thank you for contacting us, we will reply shortly')); $contact_form->save(); }
This function uses the entity's class to load our configuration entityobject. It loads contactus, which our module has provided, and setsthe reply property to a new value.
9. Go to /update.php in your browser to run the Drupal's database updatesystem. Click on Apply pending updates to run the update system:
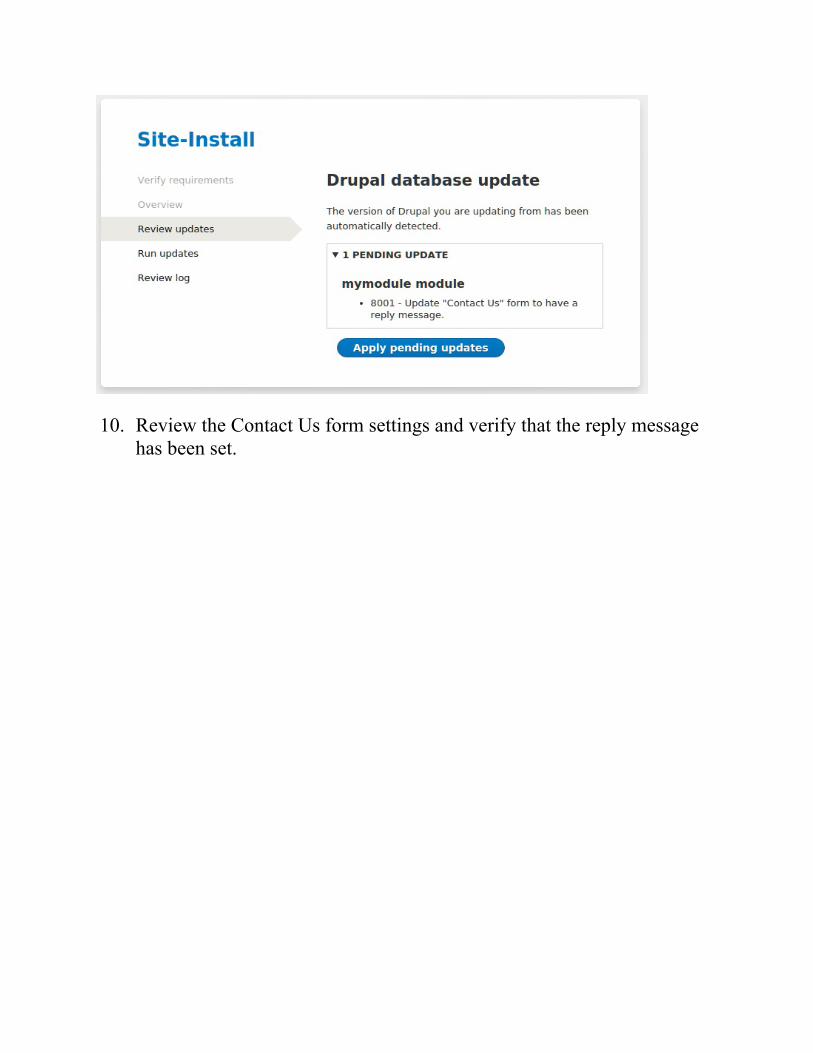
10. Review the Contact Us form settings and verify that the reply messagehas been set.
How it works...Drupal's moduler_installer service, provided through\Drupal\Core\Extension\ModuleInstaller, ensures that configurationitems defined in the module's config folder are processed on installation.When a module is installed, the config.installer service, provided through\Drupal\Core\Config\ConfigInstaller, is called to process the module'sdefault configuration.
In the event, the config.installer service makes an attempt to import theconfiguration from the install folder that already exists, and an exceptionwill be thrown. Modules cannot provide changes made to the existingconfiguration through static YAML definitions.
Since modules cannot adjust configuration objects through static YAMLdefinitions provided to Drupal, they can utilize the database update system tomodify the configuration. Drupal utilizes a schema version for modules. Thebase schema version for a module is 8000. Modules can provide update hooksin the form of hook_update_N, where N represents the next schema version.When Drupal's updates are run, they will execute the proper update hooksand update the module's schema version.
Configuration objects are immutable by default. To edit a configuration, amutable object needs to be loaded through the configuration factory service.
There's more...We will discuss configuration in Chapter 9, Configuration Management -Deploying in Drupal 8; however, we will now dive into some important noteswhen working with modules and configurations.
Configuration subdirectoriesThere are three directories that the configuration management system willinspect in a module's config folder, which are as follows:
install
optional
schema
The install folder specifies the configuration that will be imported. If theconfiguration object exists, the installation will fail. The optional foldercontains the configuration that will be installed if the following conditions aremet:
The configuration does not already existIt is a configuration entityIts dependencies can be met
If any one of the conditions fails, the configuration will not be installed, but itwill not halt the module's installation process.
The schema folder provides configuration object definitions. This usesYAML definitions to structure configuration objects, and is covered in depthin Chapter 9, Configuration Management - Deploying in Drupal 8.
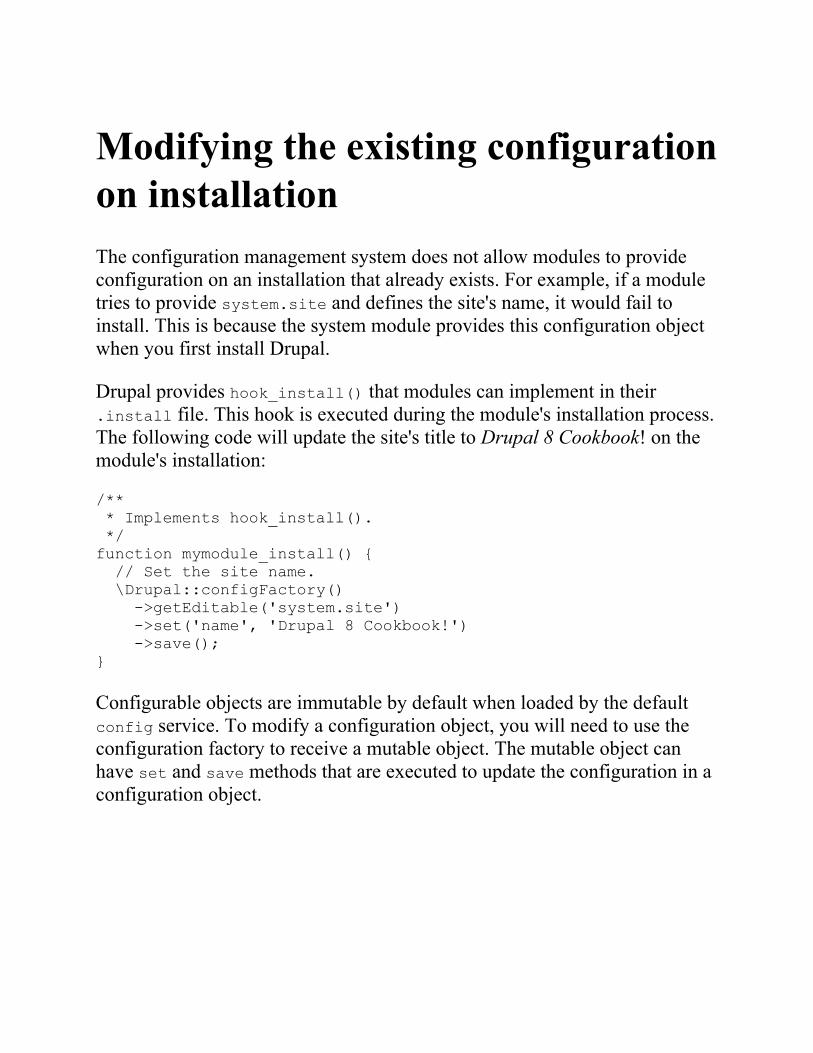
Modifying the existing configurationon installationThe configuration management system does not allow modules to provideconfiguration on an installation that already exists. For example, if a moduletries to provide system.site and defines the site's name, it would fail toinstall. This is because the system module provides this configuration objectwhen you first install Drupal.
Drupal provides hook_install() that modules can implement in their.install file. This hook is executed during the module's installation process.The following code will update the site's title to Drupal 8 Cookbook! on themodule's installation:
/** * Implements hook_install(). */ function mymodule_install() { // Set the site name. \Drupal::configFactory() ->getEditable('system.site') ->set('name', 'Drupal 8 Cookbook!') ->save(); }
Configurable objects are immutable by default when loaded by the defaultconfig service. To modify a configuration object, you will need to use theconfiguration factory to receive a mutable object. The mutable object canhave set and save methods that are executed to update the configuration in aconfiguration object.

See alsoRefer to Chapter 9, Configuration Management - Deploying in Drupal 8
Creating an event subscriberNew to Drupal 8 is the event dispatcher system. One of the many benefits ofDrupal is the ability to react to specific processes and alter or react to them.Unlike the hook system that exists in Drupal 8, and has for many versions ofDrupal, the event dispatch system uses explicit registration to an event.
The events dispatcher system comes from the Symfony framework andallows components to easily interact with one another. Within Drupal, andintegrated Symfony components, events are dispatched, and event subscriberscan listen to the events and react to changes or other processes.
In this recipe, we will subscribe to the REQUEST event, which fires when arequest is first handled. If the user is not logged in, we will navigate them tothe login page.
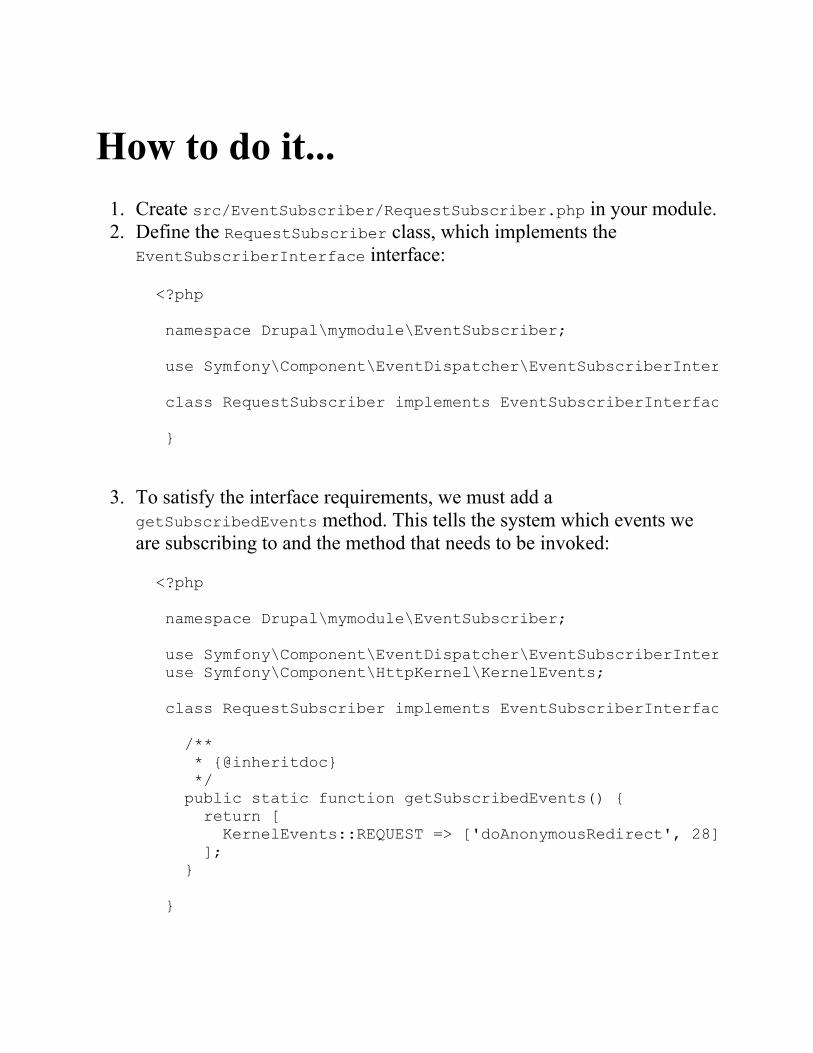
How to do it...1. Create src/EventSubscriber/RequestSubscriber.php in your module.2. Define the RequestSubscriber class, which implements the
EventSubscriberInterface interface:
<?php
namespace Drupal\mymodule\EventSubscriber;
use Symfony\Component\EventDispatcher\EventSubscriberInterface;
class RequestSubscriber implements EventSubscriberInterface {
}
3. To satisfy the interface requirements, we must add agetSubscribedEvents method. This tells the system which events weare subscribing to and the method that needs to be invoked:
<?php
namespace Drupal\mymodule\EventSubscriber;
use Symfony\Component\EventDispatcher\EventSubscriberInterface; use Symfony\Component\HttpKernel\KernelEvents;
class RequestSubscriber implements EventSubscriberInterface {
/** * {@inheritdoc} */ public static function getSubscribedEvents() { return [ KernelEvents::REQUEST => ['doAnonymousRedirect', 28], ]; }
}
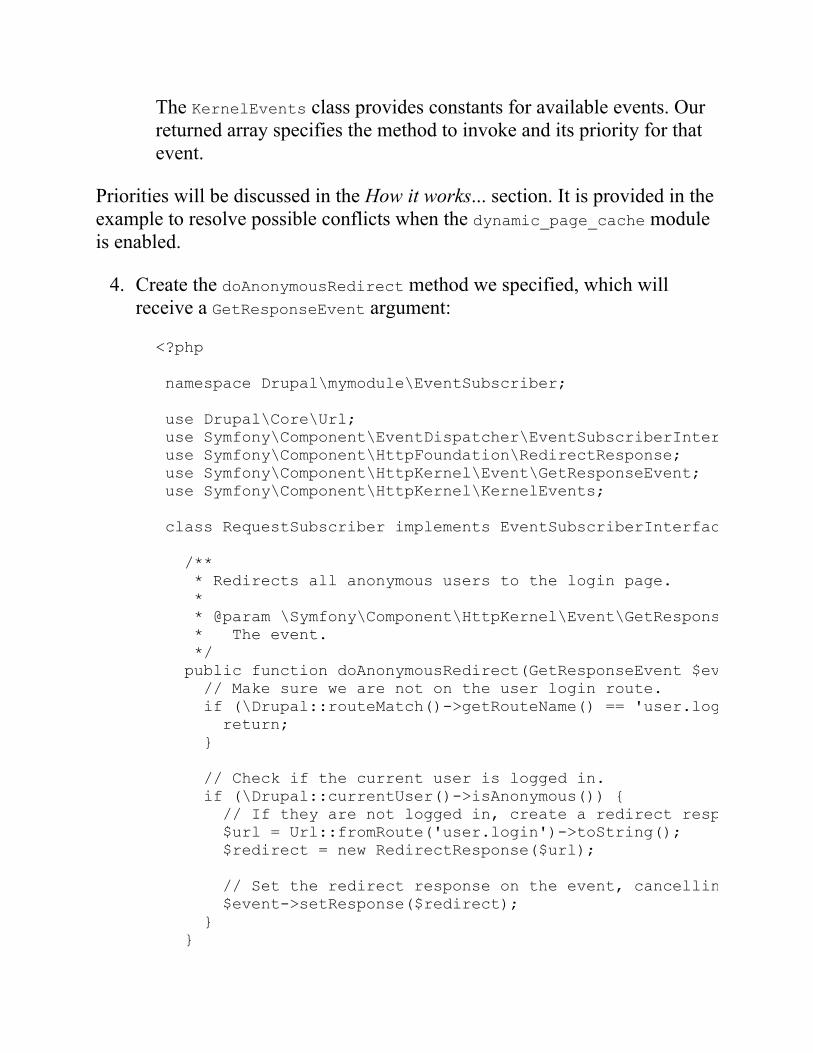
The KernelEvents class provides constants for available events. Ourreturned array specifies the method to invoke and its priority for thatevent.
Priorities will be discussed in the How it works... section. It is provided in theexample to resolve possible conflicts when the dynamic_page_cache moduleis enabled.
4. Create the doAnonymousRedirect method we specified, which willreceive a GetResponseEvent argument:
<?php
namespace Drupal\mymodule\EventSubscriber;
use Drupal\Core\Url; use Symfony\Component\EventDispatcher\EventSubscriberInterface; use Symfony\Component\HttpFoundation\RedirectResponse; use Symfony\Component\HttpKernel\Event\GetResponseEvent; use Symfony\Component\HttpKernel\KernelEvents;
class RequestSubscriber implements EventSubscriberInterface {
/** * Redirects all anonymous users to the login page. * * @param \Symfony\Component\HttpKernel\Event\GetResponseEvent $event * The event. */ public function doAnonymousRedirect(GetResponseEvent $event) { // Make sure we are not on the user login route. if (\Drupal::routeMatch()->getRouteName() == 'user.login') { return; }
// Check if the current user is logged in. if (\Drupal::currentUser()->isAnonymous()) { // If they are not logged in, create a redirect response. $url = Url::fromRoute('user.login')->toString(); $redirect = new RedirectResponse($url);
// Set the redirect response on the event, cancelling default response. $event->setResponse($redirect); } }
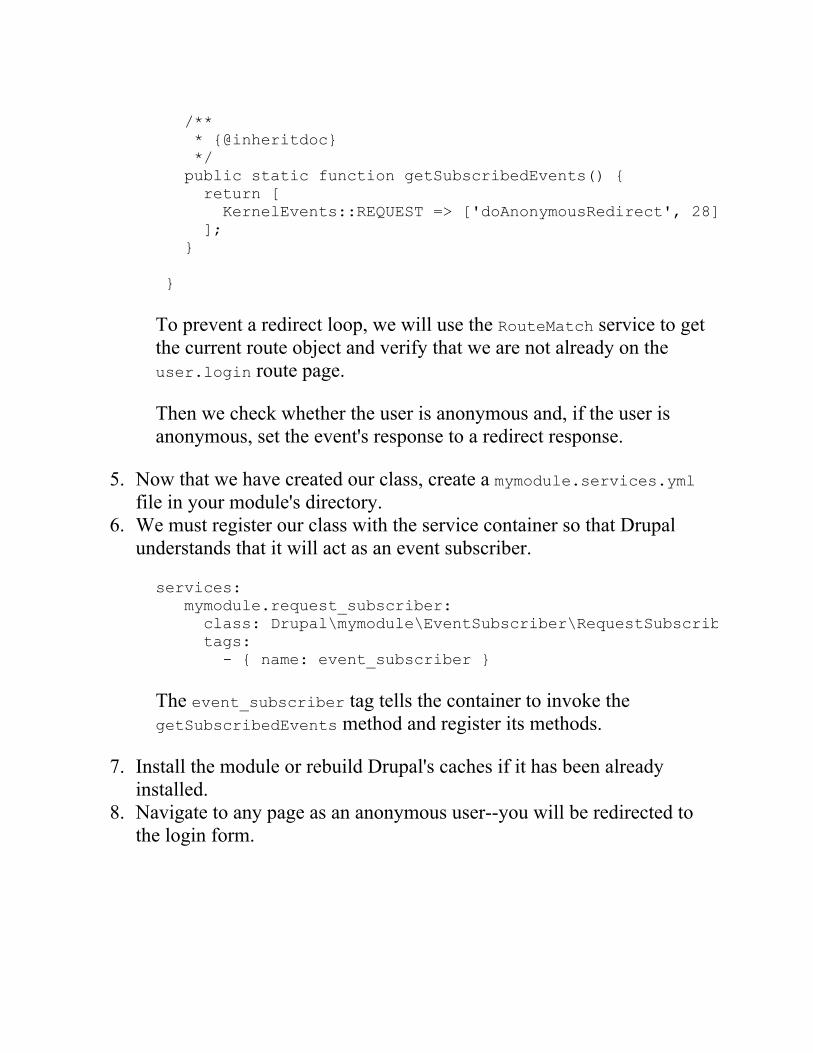
/** * {@inheritdoc} */ public static function getSubscribedEvents() { return [ KernelEvents::REQUEST => ['doAnonymousRedirect', 28], ]; }
}
To prevent a redirect loop, we will use the RouteMatch service to getthe current route object and verify that we are not already on theuser.login route page.
Then we check whether the user is anonymous and, if the user isanonymous, set the event's response to a redirect response.
5. Now that we have created our class, create a mymodule.services.ymlfile in your module's directory.
6. We must register our class with the service container so that Drupalunderstands that it will act as an event subscriber.
services: mymodule.request_subscriber: class: Drupal\mymodule\EventSubscriber\RequestSubscriber tags: - { name: event_subscriber }
The event_subscriber tag tells the container to invoke thegetSubscribedEvents method and register its methods.
7. Install the module or rebuild Drupal's caches if it has been alreadyinstalled.
8. Navigate to any page as an anonymous user--you will be redirected tothe login form.

How it works...Throughout Drupal and Symfony components, and even other third-partyPHP libraries, events can be passed to the event dispatcher. Theevent_dispatcher service in Drupal is an optimized version of the oneprovided by Symfony, but is completely interoperable.
When the container is built, all services tagged as event_subscribers aregathered. They are then registered into the event_dispatcher service, keyedby the events returned in the getSubscribedEvents method.
When the event_dispatcher service is told to dispatch an event, it invokesthe proper methods on all subscribed services. WithKernelEvents::REQUEST, KernelEvents::EXCEPTION andKernelEvents::VIEW, you have the opportunity to provide a response beforethe controller is invoked. Then there are events, such as ConfigEvents::SAVEand ConfigEvents::DELETE, that are dispatched and allow you to react to aconfiguration being saved or deleted but are not actually able to adjust theconfiguration entity directly through the event object.

There's more...Event subscribers require knowledge of creating services, registering them,and even dependency injection. We'll discuss this some more in the nextsection.
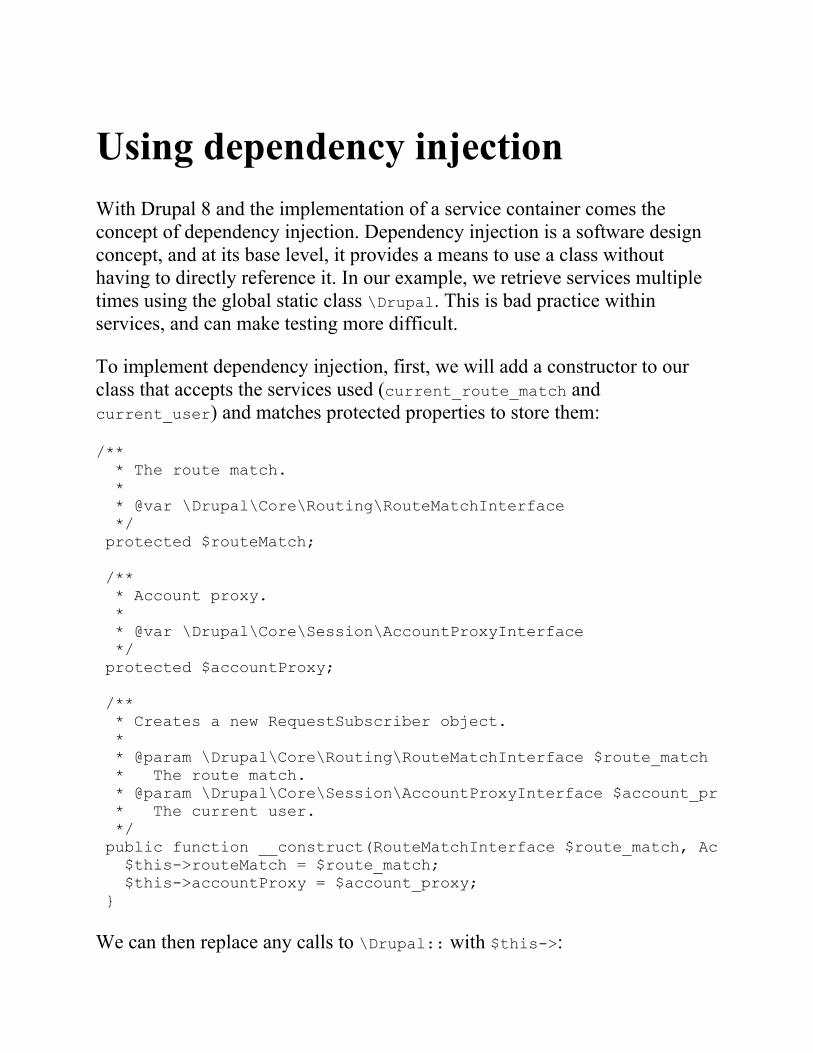
Using dependency injectionWith Drupal 8 and the implementation of a service container comes theconcept of dependency injection. Dependency injection is a software designconcept, and at its base level, it provides a means to use a class withouthaving to directly reference it. In our example, we retrieve services multipletimes using the global static class \Drupal. This is bad practice withinservices, and can make testing more difficult.
To implement dependency injection, first, we will add a constructor to ourclass that accepts the services used (current_route_match andcurrent_user) and matches protected properties to store them:
/** * The route match. * * @var \Drupal\Core\Routing\RouteMatchInterface */ protected $routeMatch;
/** * Account proxy. * * @var \Drupal\Core\Session\AccountProxyInterface */ protected $accountProxy;
/** * Creates a new RequestSubscriber object. * * @param \Drupal\Core\Routing\RouteMatchInterface $route_match * The route match. * @param \Drupal\Core\Session\AccountProxyInterface $account_proxy * The current user. */ public function __construct(RouteMatchInterface $route_match, AccountProxyInterface $account_proxy) { $this->routeMatch = $route_match; $this->accountProxy = $account_proxy; }
We can then replace any calls to \Drupal:: with $this->:
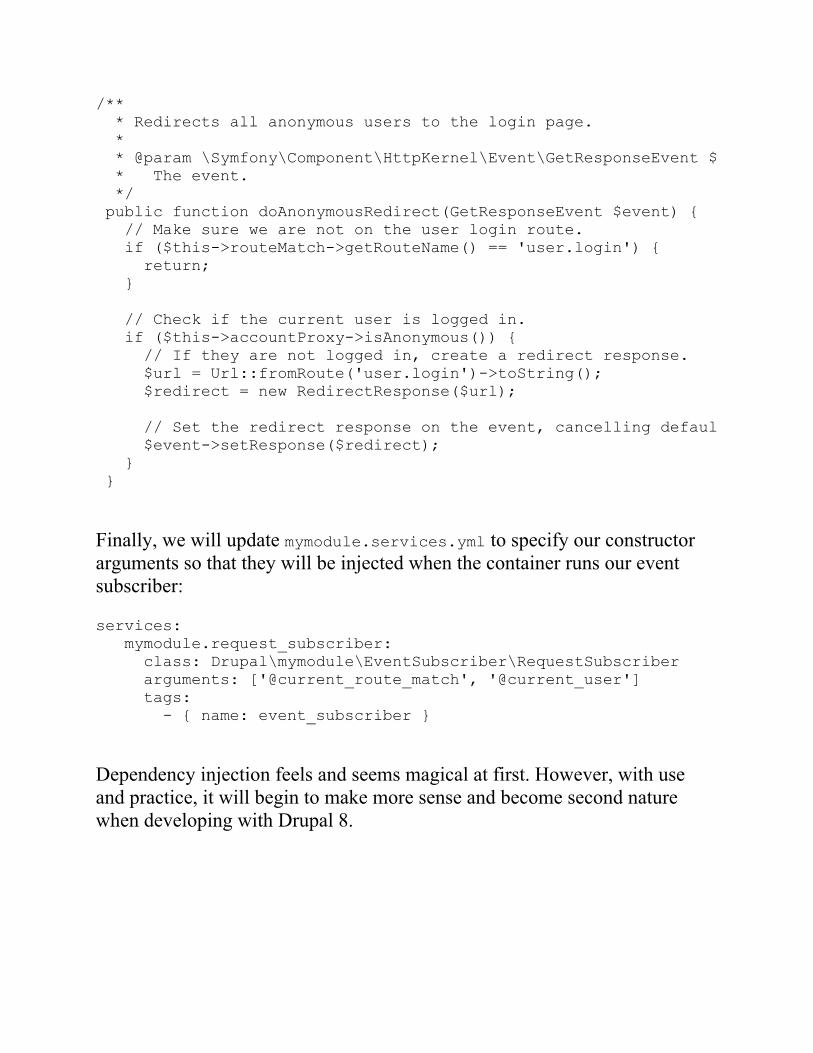
/** * Redirects all anonymous users to the login page. * * @param \Symfony\Component\HttpKernel\Event\GetResponseEvent $event * The event. */ public function doAnonymousRedirect(GetResponseEvent $event) { // Make sure we are not on the user login route. if ($this->routeMatch->getRouteName() == 'user.login') { return; }
// Check if the current user is logged in. if ($this->accountProxy->isAnonymous()) { // If they are not logged in, create a redirect response. $url = Url::fromRoute('user.login')->toString(); $redirect = new RedirectResponse($url);
// Set the redirect response on the event, cancelling default response. $event->setResponse($redirect); } }
Finally, we will update mymodule.services.yml to specify our constructorarguments so that they will be injected when the container runs our eventsubscriber:
services: mymodule.request_subscriber: class: Drupal\mymodule\EventSubscriber\RequestSubscriber arguments: ['@current_route_match', '@current_user'] tags: - { name: event_subscriber }
Dependency injection feels and seems magical at first. However, with useand practice, it will begin to make more sense and become second naturewhen developing with Drupal 8.
See alsoRefer to the Drupal.org API documentation for events and a list ofavailable events athttps://api.drupal.org/api/drupal/core%21core.api.php/group/events/8.3.xRefer to the Drupal.org API documentation on services and dependencyinjection athttps://api.drupal.org/api/drupal/core%21core.api.php/group/container/8.3.x
Using Features 3.0Many Drupal users create custom modules to provide specific sets of featuresthat they can reuse across multiple sites. In fact, there is a module for the solepurpose of providing a means to export configuration and create modules thatprovide features. This is how the Features module received its name, in fact.
The Features module has two submodules. The main Features moduleprovides all the functionalities. The Features UI module provides a userinterface to create and manage features.
We will use Features to export a module with a configuration that containsthe default page and article content types provided by the standardinstallation so that they can be used on other installation profiles.
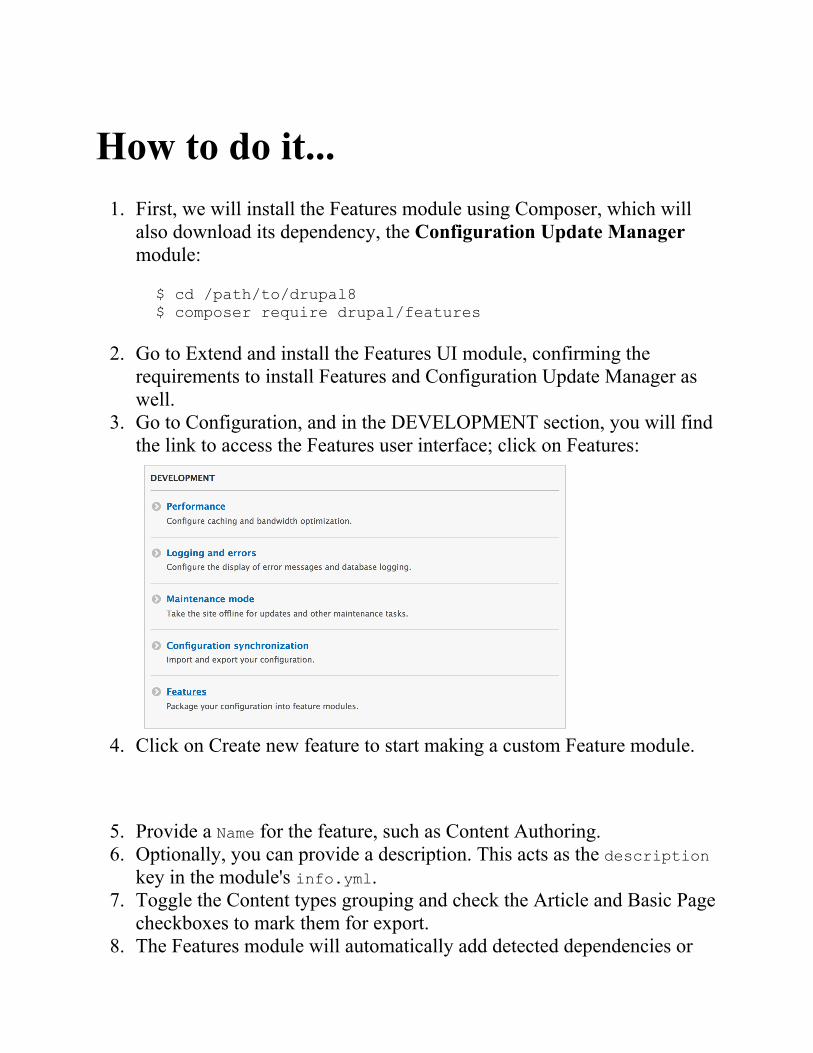
How to do it...1. First, we will install the Features module using Composer, which will
also download its dependency, the Configuration Update Managermodule:
$ cd /path/to/drupal8$ composer require drupal/features
2. Go to Extend and install the Features UI module, confirming therequirements to install Features and Configuration Update Manager aswell.
3. Go to Configuration, and in the DEVELOPMENT section, you will findthe link to access the Features user interface; click on Features:
4. Click on Create new feature to start making a custom Feature module.
5. Provide a Name for the feature, such as Content Authoring.6. Optionally, you can provide a description. This acts as the description
key in the module's info.yml.7. Toggle the Content types grouping and check the Article and Basic Page
checkboxes to mark them for export.8. The Features module will automatically add detected dependencies or
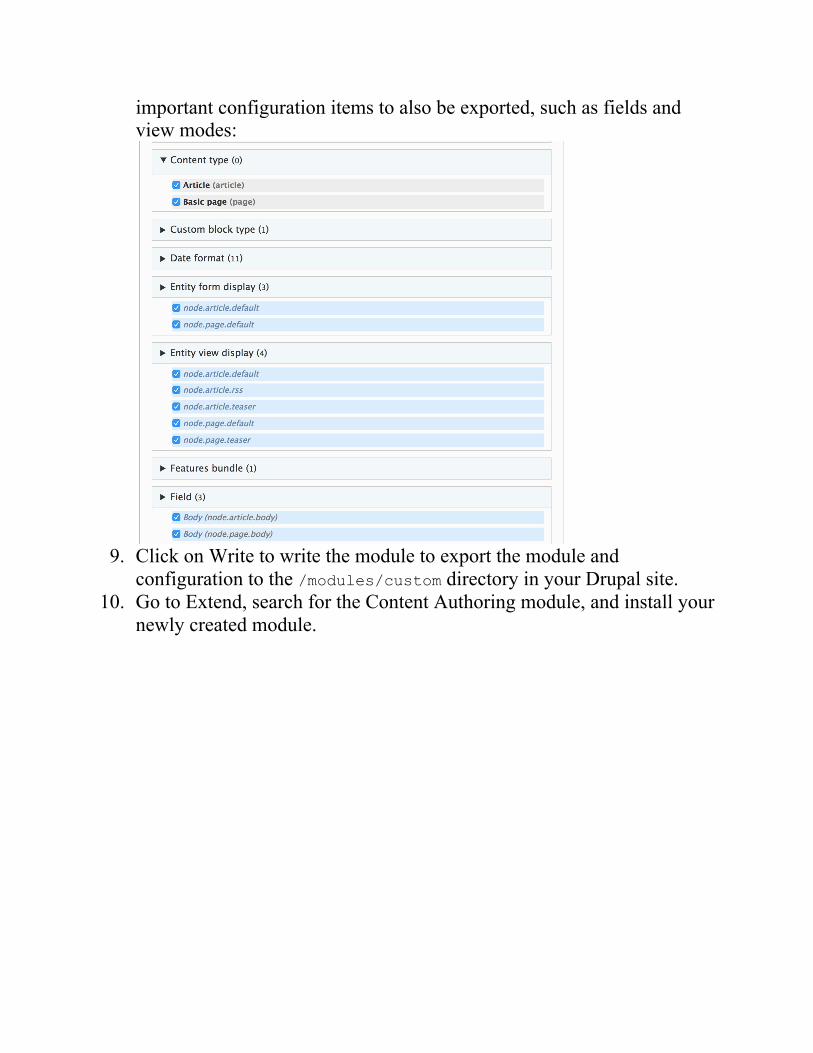
important configuration items to also be exported, such as fields andview modes:
9. Click on Write to write the module to export the module andconfiguration to the /modules/custom directory in your Drupal site.
10. Go to Extend, search for the Content Authoring module, and install yournewly created module.

How it works...Features exports static YAML configuration files into the module'sconfig/install folder. Features modifies the standard configurationmanagement workflow by ensuring that a specific kind of configurationexists. Configuration management does not allow modules to overwriteexisting configuration objects, but Features manages and allows this tohappen.
To accomplish this, Features provides\Drupal\features\FeaturesConfigInstaller, which extends the defaultconfig.install service class. It then alters the services definition to use itsFeaturesConfigInstaller class instead of the default\Drupal\Core\Config\ConfigInstaller class.
Beyond adjusting the config.install service, Features harnesses all thefunctionalities of the configuration management system to provide a simplerway to generate modules.
Any module can be considered a Feature's module by adding the features:true key to its info.yml. This will allow it to be managed through theFeatures UI.

There's more...Features is a robust tool to easily provide bundled configuration; we willdiscuss more ways to use the Features module in the next section.

Suggested feature modulesThe Features module provides an intelligent bundling method that reviewsthe current Drupal site's configuration and suggests feature modules thatshould be created to preserve the configuration. These are provided throughpackage assignment plugins.
These plugins use logic to assign configurations to specific packages:
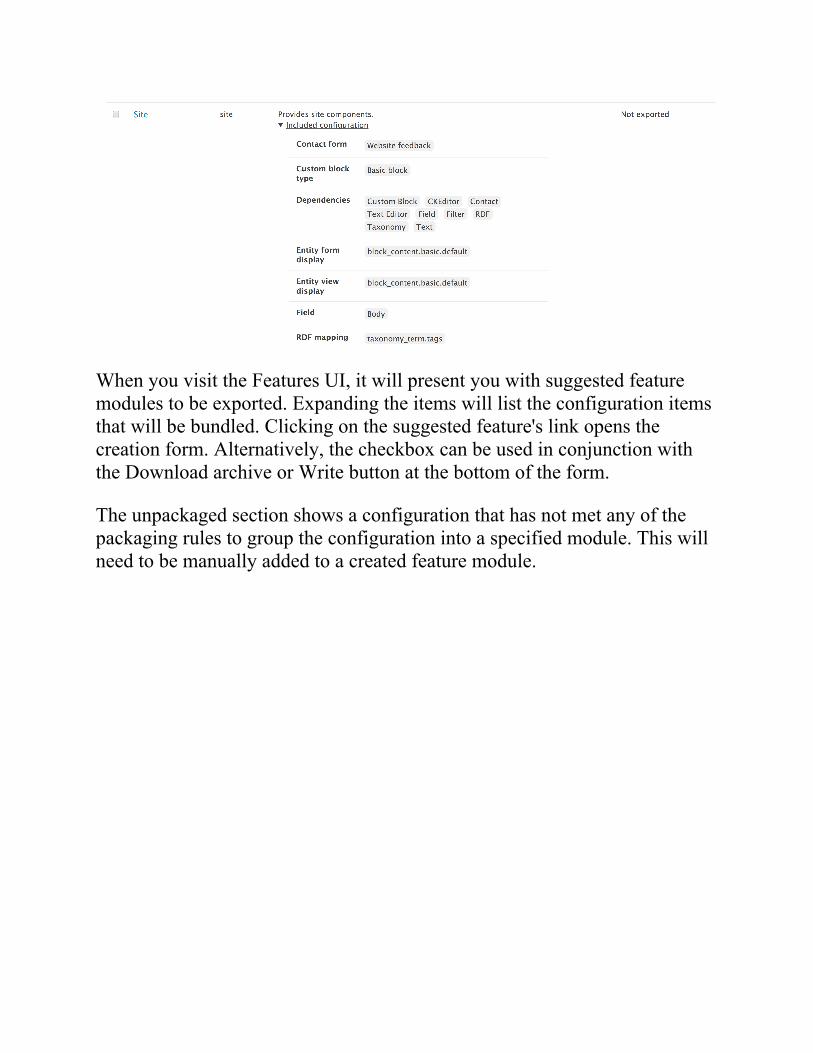
When you visit the Features UI, it will present you with suggested featuremodules to be exported. Expanding the items will list the configuration itemsthat will be bundled. Clicking on the suggested feature's link opens thecreation form. Alternatively, the checkbox can be used in conjunction withthe Download archive or Write button at the bottom of the form.
The unpackaged section shows a configuration that has not met any of thepackaging rules to group the configuration into a specified module. This willneed to be manually added to a created feature module.
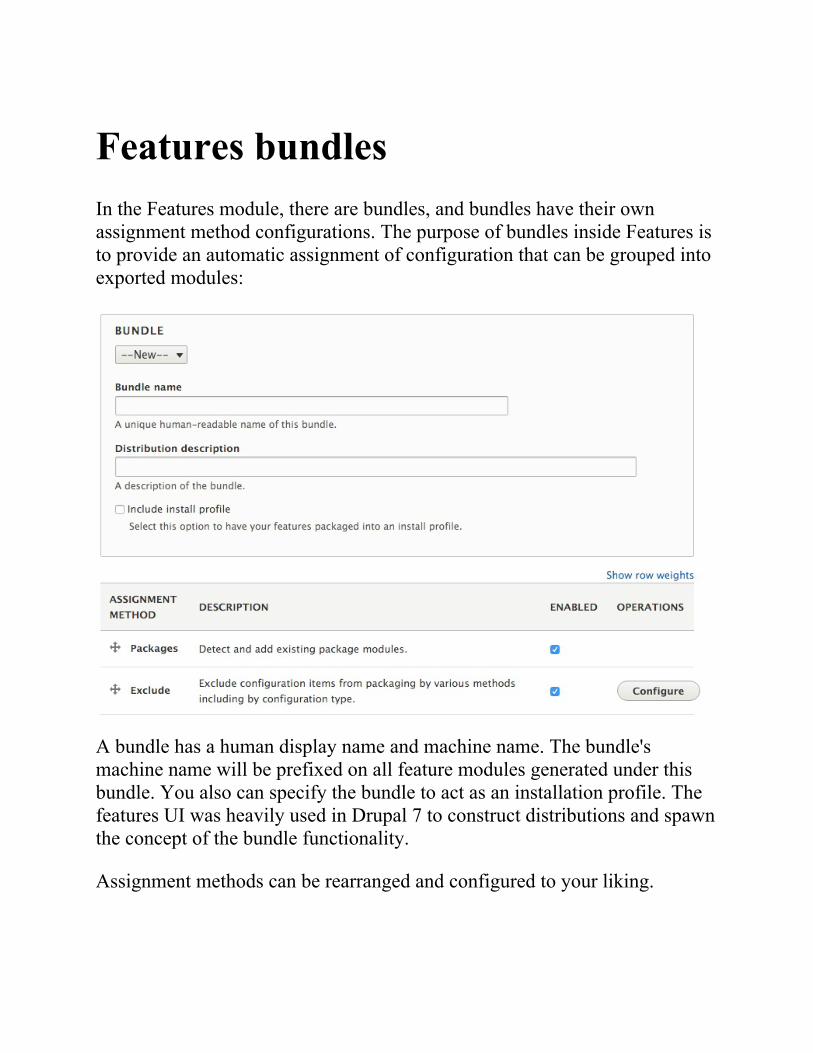
Features bundlesIn the Features module, there are bundles, and bundles have their ownassignment method configurations. The purpose of bundles inside Features isto provide an automatic assignment of configuration that can be grouped intoexported modules:
A bundle has a human display name and machine name. The bundle'smachine name will be prefixed on all feature modules generated under thisbundle. You also can specify the bundle to act as an installation profile. Thefeatures UI was heavily used in Drupal 7 to construct distributions and spawnthe concept of the bundle functionality.
Assignment methods can be rearranged and configured to your liking.
Managing the configuration state ofFeaturesThe Features UI provides a means to review changes to the feature'sconfiguration that may have been made. If a configuration item controlled bya feature module has been modified, it will show up under the differencessection of the Features UI. This will allow you to import or update theFeature module with the change.
The Import option will force the site to use the configuration defined in themodule's configuration YAML files. For example, in the following screenshotwe have an exported content type whose description was modified in the userinterface after being exported:
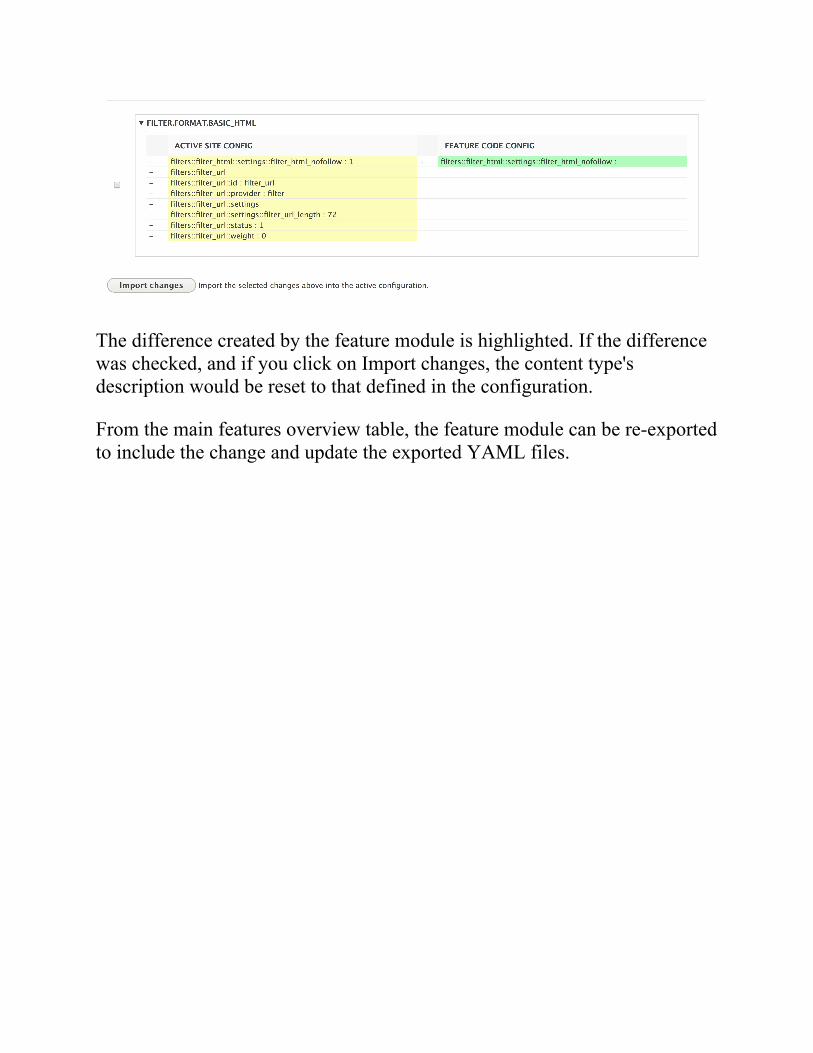
The difference created by the feature module is highlighted. If the differencewas checked, and if you click on Import changes, the content type'sdescription would be reset to that defined in the configuration.
From the main features overview table, the feature module can be re-exportedto include the change and update the exported YAML files.
See alsoRefer to the Drupal.org handbook for the Features module athttps://www.drupal.org/docs/8/modules/features
Frontend for the WinIn this chapter, we will explore the world of frontend development in Drupal8. In this chapter, we will cover the following recipes:
Creating a custom theme based on ClassyUsing the new asset management systemTwig templatingUsing the Breakpoint moduleUsing the Responsive Image module
IntroductionDrupal 8 brought many changes with regard to the frontend. It is now focusedon mobile-first responsive design. Frontend performance has been given ahigh priority, unlike in the previous versions of Drupal. There is a new assetmanagement system based on libraries that will deliver only the minimumrequired assets for a page that comes with Drupal 8.
In Drupal 8, we have a new feature, the Twig templating engine, that replacesthe previously used PHPTemplate engine. Twig is part of the large PHPcommunity and embraces more of Drupal 8's made elsewhere initiative.Drupal 7 supported libraries to define JavaScript and CSS resources.However, it was very rudimentary and did not support the concept of librarydependencies.
There are two modules provided by the Drupal core that implement theresponsive design with server-side components. The Breakpoint moduleprovides a representation of media queries that modules can utilize. TheResponsive Image module implements the HTML5 picture tag for imagefields.
This chapter dives into harnessing Drupal 8's frontend features to get themost out of them.
Creating a custom theme based onClassyDrupal 8 ships with a new base theme that is intended to demonstrate bestpractice and CSS class management. The Classy theme is provided by theDrupal core and is the base theme for the default frontend theme, Bartik, andthe administrative theme, Seven.
Unlike the previous versions of Drupal, Drupal 8 provides two base themes--Classy and Stable--to jump start Drupal theming. Stable provides a leanerapproach to frontend theming with fewer classes and wrapping elements andis guaranteed to not introduce changes that may disrupt your child theme. Inthis recipe, we will create a new theme called mytheme that uses Classy as itsbase.
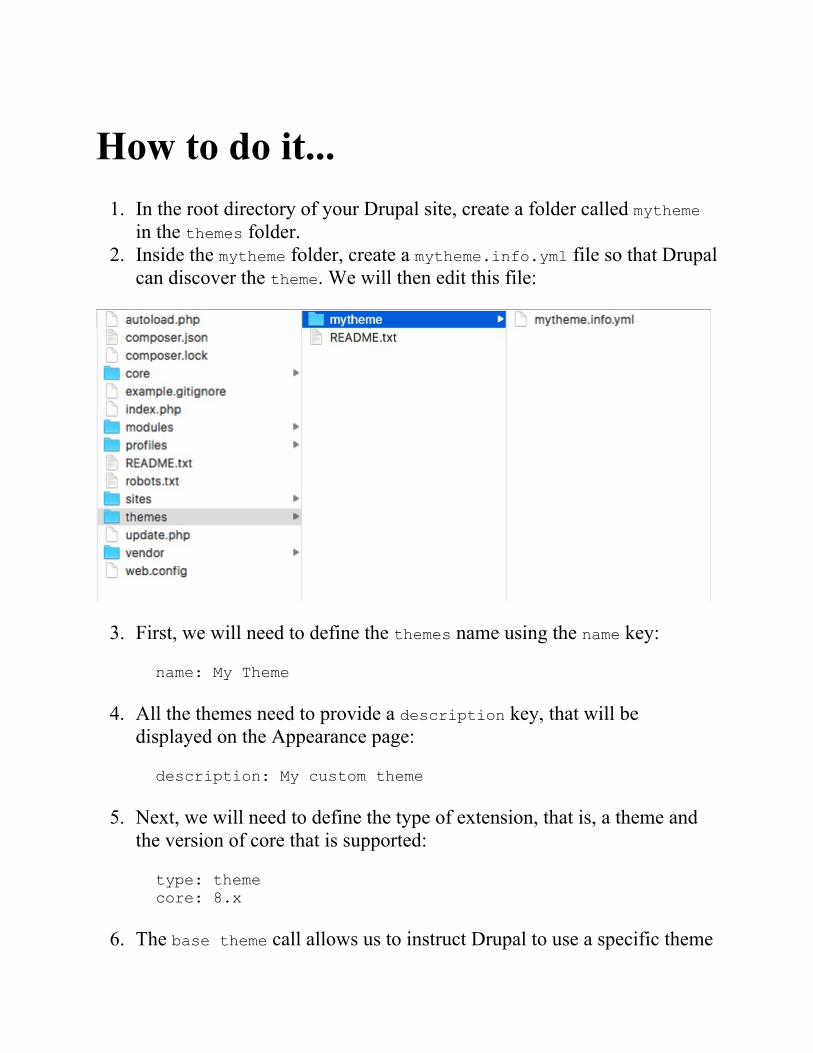
How to do it...1. In the root directory of your Drupal site, create a folder called mytheme
in the themes folder.2. Inside the mytheme folder, create a mytheme.info.yml file so that Drupal
can discover the theme. We will then edit this file:
3. First, we will need to define the themes name using the name key:
name: My Theme
4. All the themes need to provide a description key, that will bedisplayed on the Appearance page:
description: My custom theme
5. Next, we will need to define the type of extension, that is, a theme andthe version of core that is supported:
type: theme core: 8.x
6. The base theme call allows us to instruct Drupal to use a specific theme
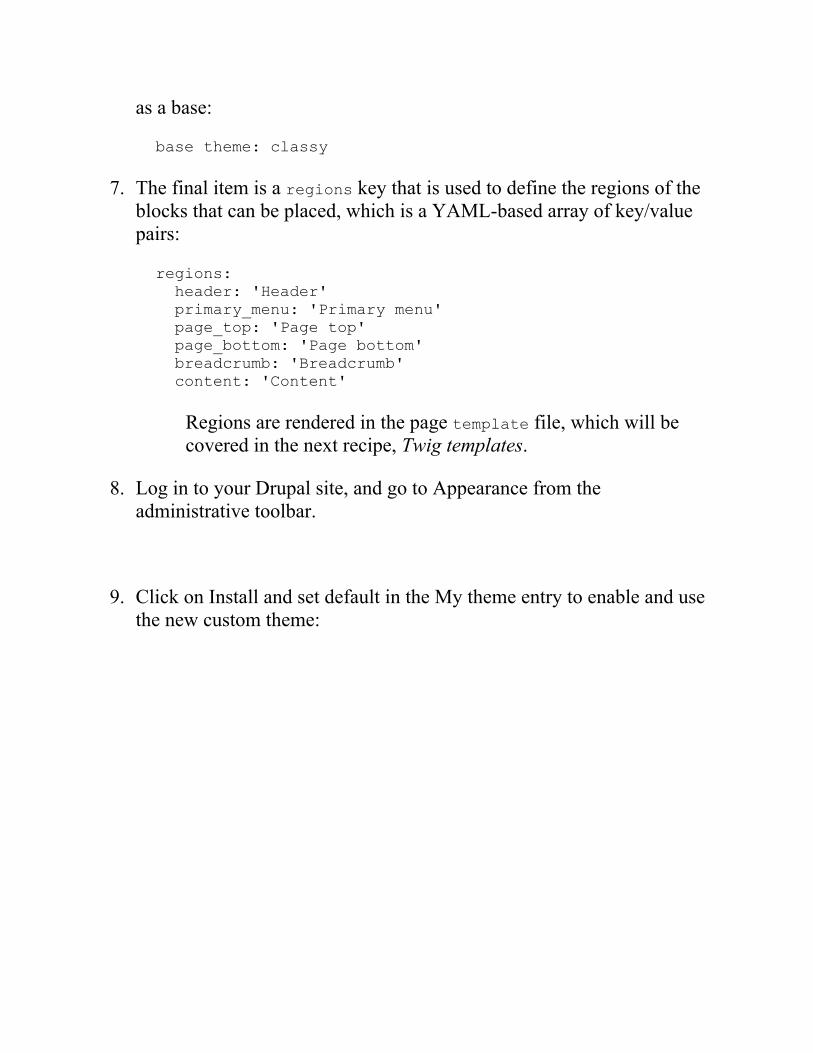
as a base:
base theme: classy
7. The final item is a regions key that is used to define the regions of theblocks that can be placed, which is a YAML-based array of key/valuepairs:
regions: header: 'Header' primary_menu: 'Primary menu' page_top: 'Page top' page_bottom: 'Page bottom' breadcrumb: 'Breadcrumb' content: 'Content'
Regions are rendered in the page template file, which will becovered in the next recipe, Twig templates.
8. Log in to your Drupal site, and go to Appearance from theadministrative toolbar.
9. Click on Install and set default in the My theme entry to enable and usethe new custom theme:
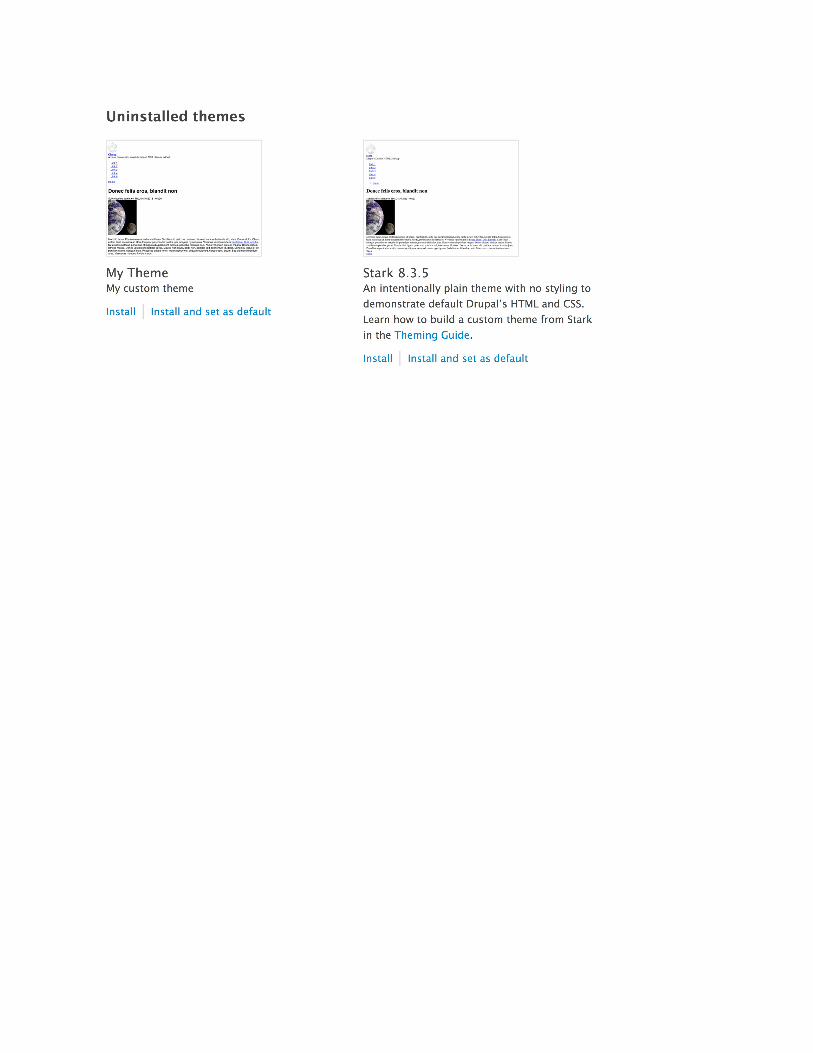
How it works...In Drupal 8, the info.yml files define Drupal themes and modules. The firststep to create a theme is to provide the info.yml file so that the theme can bediscovered. Drupal will parse these values and register the theme.
The following keys are required, as a minimum, when you define a theme:
name
description
type
base theme
core
The name key defines the human-readable name of the theme that will bedisplayed on the Appearance page. The description will be shown under thethemes display name on the Appearance page. All Drupal projects need todefine the type key to indicate the kind of extension that is being defined.For themes, the type must always be theme. You will also need to definewhich version of Drupal the project is compatible with using the core value.All Drupal 8 projects will use the core: 8.x value. When you define atheme, you will also need to provide the base theme key. If your theme doesnot use a base theme, then you need to set the value to false.
The libraries and region keys are optional, but these are keys that mostthemes provide. Drupal's asset management system parses a theme'sinfo.yml and adds those libraries, if required. Regions are defined in aninfo.yml file and provide the areas into which the Block module may placeblocks.

There's more...Next, we will dive into additional information on themes.
Theme screenshotsThemes can provide a screenshot that shows up on the Appearance page. Atheme's screenshot can be provided by placing a screenshot.png image filein the theme folder or a file specified in the info.yml file under thescreenshot key.
If the screenshot is missing, a default is used, as seen with the Classy andStark themes. Generally, a screenshot is a Drupal site with generic contentusing the theme.
Themes, logos, and faviconsDrupal controls the site's favicon and logo settings as a theme setting. Themesettings are active on a theme-by-theme basis and are not global. Themes canprovide a default logo by providing logo.svg in the theme root folder. Afavicon.ico placed in a theme folder will also be the default value of thefavicon for the website.
Currently, there is no way to specify a logo of a different file type for atheme. Previous versions of Drupal looked for logo.png. A feature has beenplanned for Drupal 8.5 to allow the themes to define the logo's filename andextension. Refer to the core issue for more information athttps://www.drupal.org/node/1507896.
You can change the site's logo and favicon by navigating to Appearance andthen clicking on Settings for your current theme. Unchecking the use defaultcheckboxes for the favicon and logo settings allows you to provide customfiles:
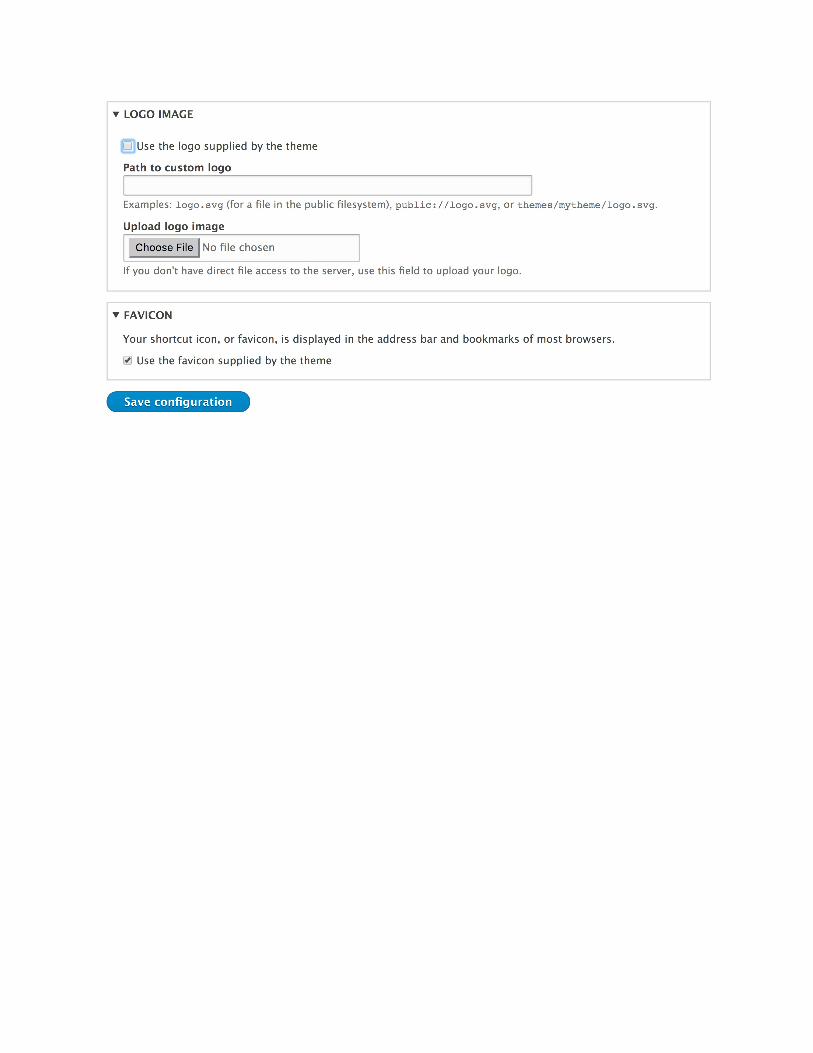
Base themes and shared resourcesMany content management systems that have a theme system which supportsbase (or parent) themes differ mostly in the terminology used. The concept ofa base theme is used to provide established resources that are shared,reducing the amount of work required to create a new theme.
All libraries defined in the base theme will be inherited and used by default,allowing subthemes to reuse existing styles and JavaScript. This allowsfrontend developers to reuse their work and only create specific changes thatare required for the subtheme.
The subthemes will also inherit all Twig template overrides provided by thebase theme. This was one of the initiatives used for the creation of the Classytheme. Drupal 8 makes many fewer assumptions compared to the previousversion as to what class names to provide on elements. Classy overrides allthe core's templates and provides sensible default classes, giving themes theability to use them and accept those class names or be given a blank slate.

CKEditor style sheetsAs discussed in Chapter 2, The Content Authoring Experience, Drupal shipswith the WYSIWYG support and CKEditor as the default editor. TheCKEditor module will inspect the active theme and its base theme, ifprovided, and load any style sheets defined in the ckeditor_stylesheetskey as an array of values.
For example, the following code can be found in bartik.info.yml:
ckeditor_stylesheets: - css/base/elements.css - css/components/captions.css - css/components/table.css
This allows themes to provide style sheets that will style elements within theCKEditor module to enhance the what you see is what you get experience ofthe editor.
See alsoTo define a theme with an info.yml file, refer tohttps://www.drupal.org/node/2349827To use Classy as a base theme, refer to the community documentation athttps://www.drupal.org/theme-guide/8/classyRefer to Core themes documentation athttps://www.drupal.org/docs/8/core/themesTo create a Drupal 8 subtheme, refer to the community documentation athttps://www.drupal.org/node/2165673

Using the new asset managementsystemThe asset management system is the most recent one to Drupal 8. The assetmanagement system allows modules and themes to register libraries.Libraries define CSS style sheets and JavaScript files that need to be loadedwith the page. Drupal 8 takes this approach for the frontend performance.Rather than loading all CSS or JavaScript assets, only those required for thecurrent page in the specified libraries will be loaded.
In this recipe, we will define a libraries.yml file that will define a CSSstyle sheet and JavaScript file provided by a custom theme.

Getting readyThis recipe assumes that you have created a custom theme, such as the oneyou created in the first recipe. When you see mytheme in this recipe, use themachine name of the theme that you created.
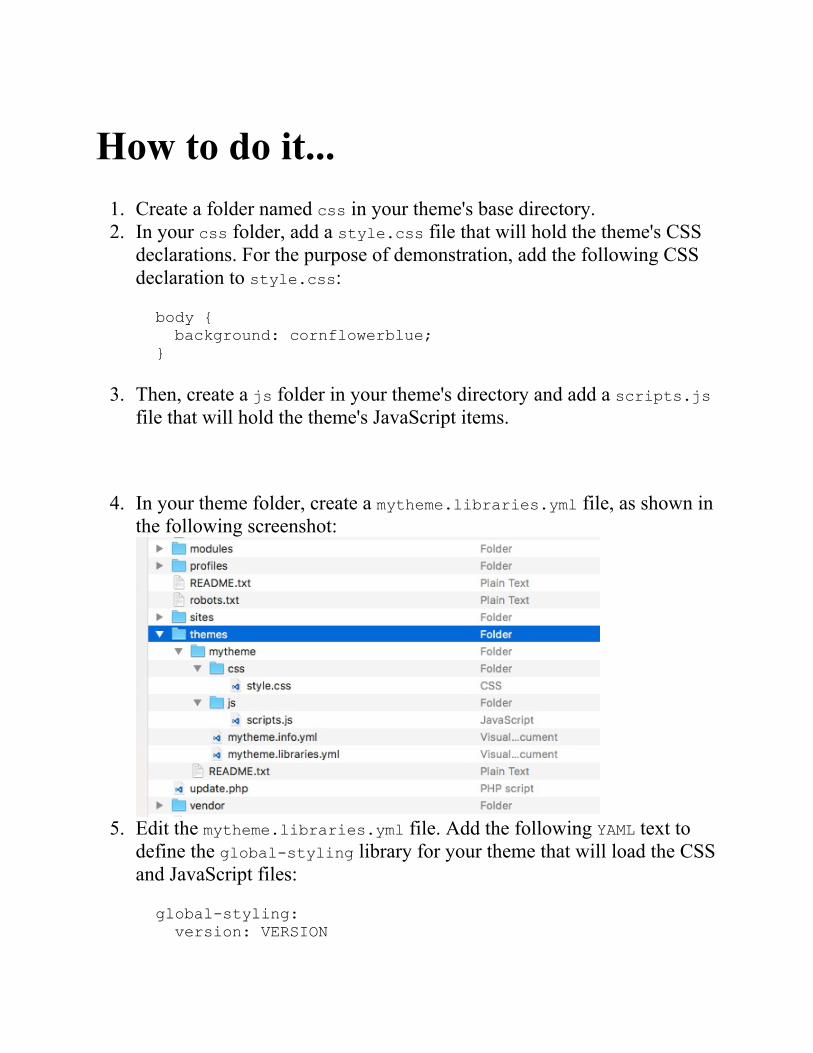
How to do it...1. Create a folder named css in your theme's base directory.2. In your css folder, add a style.css file that will hold the theme's CSS
declarations. For the purpose of demonstration, add the following CSSdeclaration to style.css:
body { background: cornflowerblue;}
3. Then, create a js folder in your theme's directory and add a scripts.jsfile that will hold the theme's JavaScript items.
4. In your theme folder, create a mytheme.libraries.yml file, as shown inthe following screenshot:
5. Edit the mytheme.libraries.yml file. Add the following YAML text todefine the global-styling library for your theme that will load the CSSand JavaScript files:
global-styling: version: VERSION
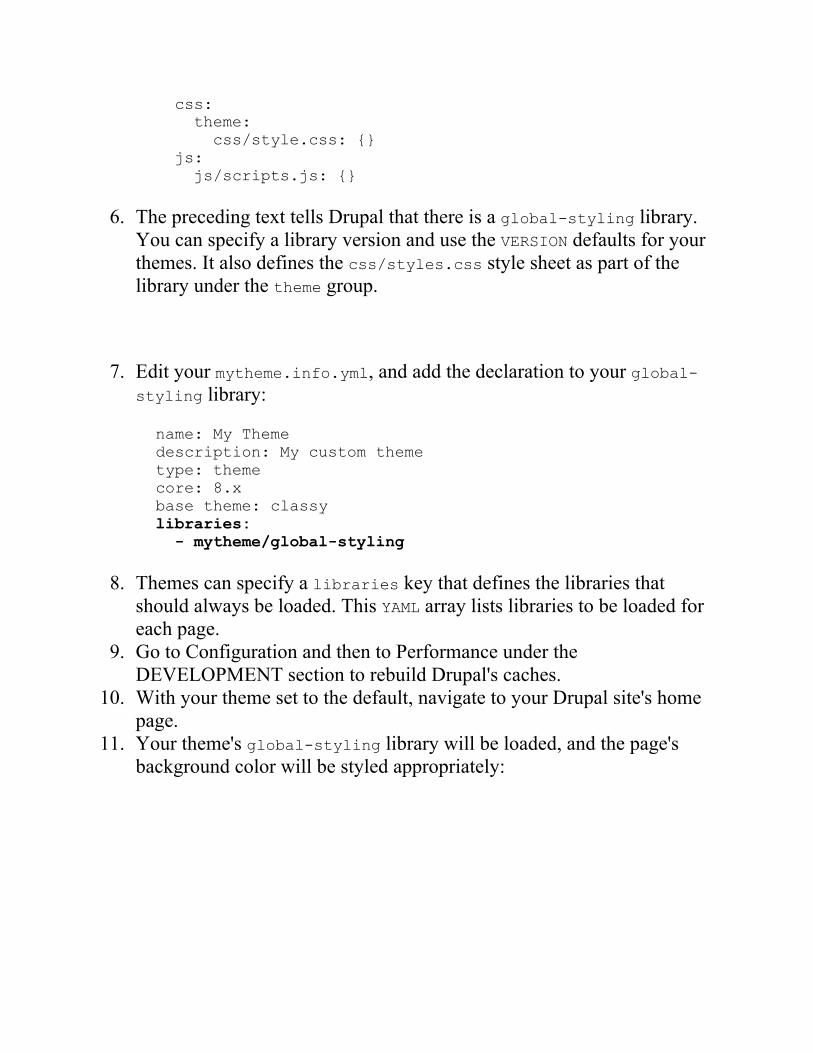
css: theme: css/style.css: {} js: js/scripts.js: {}
6. The preceding text tells Drupal that there is a global-styling library.You can specify a library version and use the VERSION defaults for yourthemes. It also defines the css/styles.css style sheet as part of thelibrary under the theme group.
7. Edit your mytheme.info.yml, and add the declaration to your global-styling library:
name: My Theme description: My custom theme type: themecore: 8.x base theme: classylibraries: - mytheme/global-styling
8. Themes can specify a libraries key that defines the libraries thatshould always be loaded. This YAML array lists libraries to be loaded foreach page.
9. Go to Configuration and then to Performance under theDEVELOPMENT section to rebuild Drupal's caches.
10. With your theme set to the default, navigate to your Drupal site's homepage.
11. Your theme's global-styling library will be loaded, and the page'sbackground color will be styled appropriately:
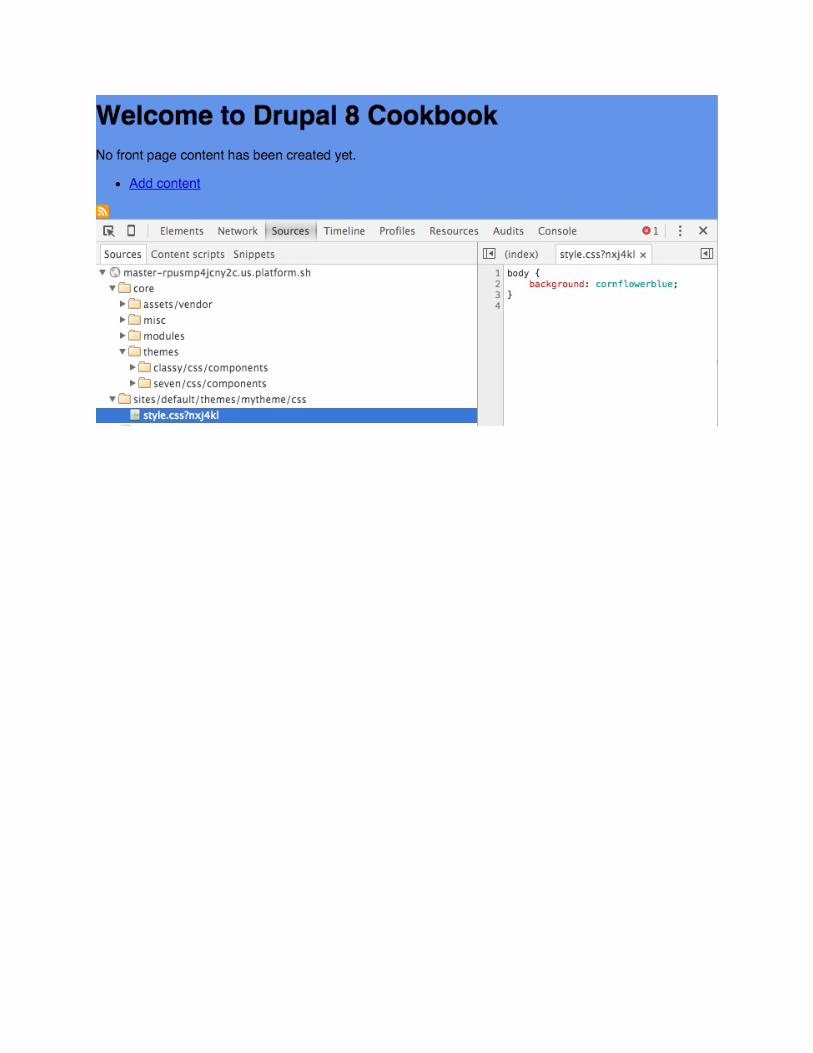
How it works...Drupal aggregates all the available library.yml files and passes them to thelibrary.discovery.parser service. The default class for this serviceprovider is \Drupal\Core\Asset\LibraryDiscoveryParser. This servicereads the library definition from each library.yml and returns its value tothe system. Before parsing the file, the parser allows themes to provideoverrides and extensions to the library.
Libraries are enqueuers, as they are attached to rendered elements. Themescan generically add libraries through their info.yml files via the librarieskey. These libraries will always be loaded on the page when the theme isactive.
CSS style sheets are added to the data that will build the head tag of the page.JavaScript resources, by default, are rendered in the footer of the page forperformance reasons.

There's more...We will explore the options surrounding libraries in Drupal 8 in more detailin the next section.
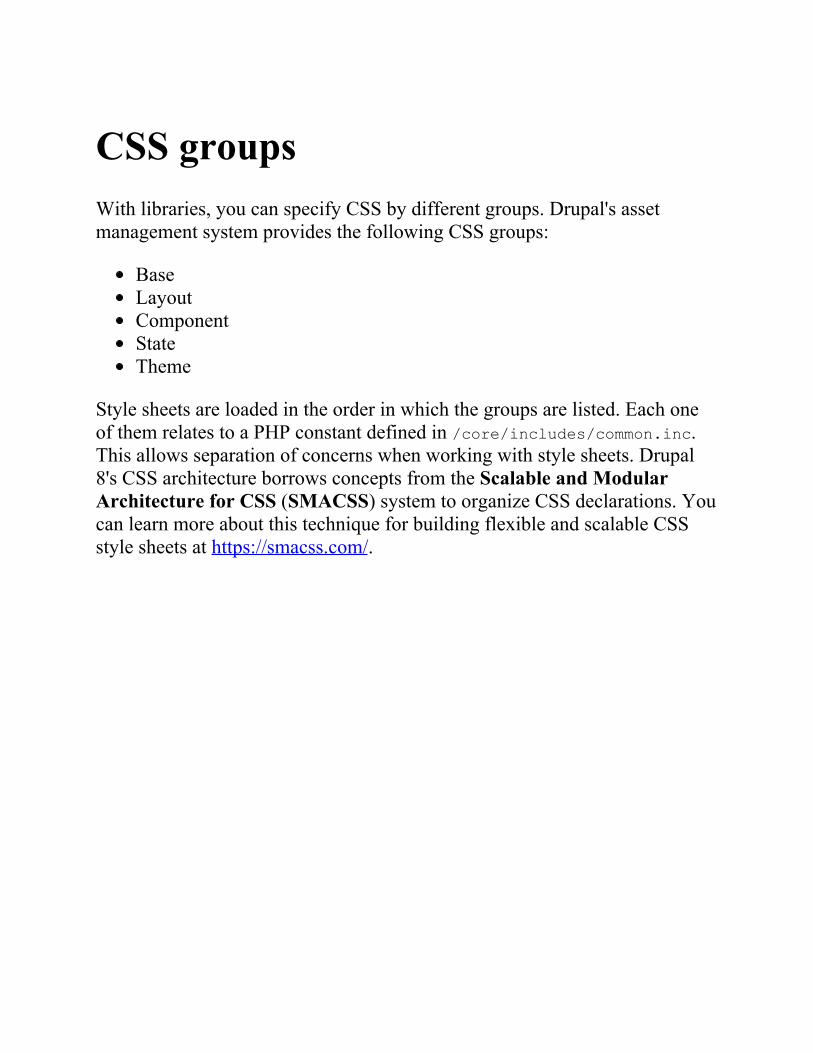
CSS groupsWith libraries, you can specify CSS by different groups. Drupal's assetmanagement system provides the following CSS groups:
BaseLayoutComponentStateTheme
Style sheets are loaded in the order in which the groups are listed. Each oneof them relates to a PHP constant defined in /core/includes/common.inc.This allows separation of concerns when working with style sheets. Drupal8's CSS architecture borrows concepts from the Scalable and ModularArchitecture for CSS (SMACSS) system to organize CSS declarations. Youcan learn more about this technique for building flexible and scalable CSSstyle sheets at https://smacss.com/.
Library asset optionsLibrary assets can have configuration data attached to them. If there are noconfiguration items provided, a simple set of empty brackets is added.Therefore, in each example, lines end with {}.
The following example, taken from core.libraries.yml, adds HTML5shiv:
assets/vendor/html5shiv/html5shiv.min.js: { weight: -22, browsers: { IE: 'lte IE 8', '!IE': false }, minified: true }
Let's take a look at the attributes of html5shiv.min.js:
The weight key ensures that the script is rendered earlier than otherlibrariesThe browser tag allows you to specify conditional rules to load thescriptingYou should always pass minified as true if the asset has already beenminified
For CSS assets, you can pass a media option to specify a media query for theasset. Reviewing classes that implement\Drupal\Core\Asset\AssetCollectionRendererInterface.
Library dependenciesLibraries can specify other libraries as dependencies. This allows Drupal toprovide a minimum footprint on the frontend performance.
jQuery is only loaded if a JavaScript library specifies it as a dependency; formore information on library dependencies, refer tohttps://www.drupal.org/node/1541860.
Here's an example from the Quick Edit module's libraries.yml file:
quickedit: version: VERSION js: ... css: ... dependencies: - core/jquery - core/jquery.once - core/underscore - core/backbone - core/jquery.form - core/jquery.ui.position - core/drupal - core/drupal.displace - core/drupal.form - core/drupal.ajax - core/drupal.debounce - core/drupalSettings - core/drupal.dialog
The Quick Edit module defines jQuery, the jQuery Once plugin, Underscore,and Backbone, and selects other defined libraries as dependencies. Drupalwill ensure that these are present whenever the quickedit/quickedit libraryis attached to a page.
A complete list of the default libraries provided by Drupal core can be foundin core.libraries.yml, which is in core/core.libraries.yml.
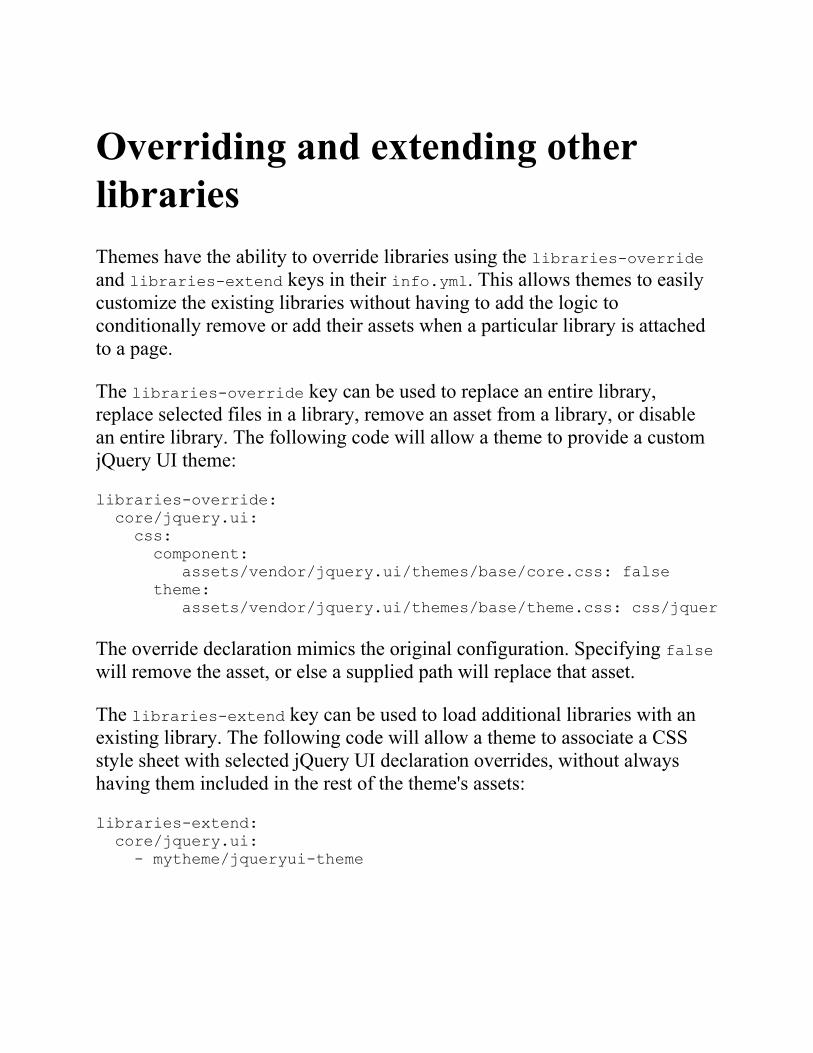
Overriding and extending otherlibrariesThemes have the ability to override libraries using the libraries-overrideand libraries-extend keys in their info.yml. This allows themes to easilycustomize the existing libraries without having to add the logic toconditionally remove or add their assets when a particular library is attachedto a page.
The libraries-override key can be used to replace an entire library,replace selected files in a library, remove an asset from a library, or disablean entire library. The following code will allow a theme to provide a customjQuery UI theme:
libraries-override: core/jquery.ui: css: component: assets/vendor/jquery.ui/themes/base/core.css: false theme: assets/vendor/jquery.ui/themes/base/theme.css: css/jqueryui.css
The override declaration mimics the original configuration. Specifying falsewill remove the asset, or else a supplied path will replace that asset.
The libraries-extend key can be used to load additional libraries with anexisting library. The following code will allow a theme to associate a CSSstyle sheet with selected jQuery UI declaration overrides, without alwayshaving them included in the rest of the theme's assets:
libraries-extend: core/jquery.ui: - mytheme/jqueryui-theme
Using a CDN or external resourceas a libraryLibraries also work with external resources, such as assets loaded over aCDN. This is done by providing a URL for the file location along withselected file parameters.
Here is an example to add the FontAwesome font icon library from theBootstrapCDN provided by MaxCDN:
mytheme.fontawesome: remote: http://fontawesome.io/ version: 4.4.0 license: name: SIL OFL 1.1 url: http://fontawesome.io/license/ gpl-compatible: true css: base: https://maxcdn.bootstrapcdn.com/font-awesome/4.4.0/css/font-awesome.min.css: { type: external, minified: true }
Remote libraries require additional metainformation to work properly:
remote: http://fontawesome.io/
The remote key describes the library as using external resources. While thiskey is not validated beyond its existence, it is best to define it with theexternal resource's primary website:
version: 4.4.0
Like all libraries, a version is required. This should match the version of theexternal resource being added:
license: name: SIL OFL 1.1 url: http://fontawesome.io/license/ gpl-compatible: true
If a library defines the remote key, it also needs to define the license key.This defines the license name, the URL for the license, and checks whether itis GPL-compatible. If this key is not provided, a\Drupal\Core\Asset\Extension\LibraryDefinitionMissingLicenseException
will be thrown:
css: base: https://maxcdn.bootstrapcdn.com/font-awesome/4.4.0/css/font-awesome.min.css: { type: external, minified: true }
Finally, specific external resources are added as normal. Instead of providinga relative file path, the external URL is provided.

Manipulating libraries from hooksModules have the ability to provide dynamic library definitions and alterlibraries. A module can use the hook_library_info() hook to provide alibrary definition. This is not the recommended way to define a library, but itis provided for edge use cases.
Modules do not have the ability to use libraries-override or libraries-extend, and need to rely on the hook_library_info_alter() hook. You cancheck out this hook in core/lib/Drupal/Core/Render/theme.api.php or athttps://api.drupal.org/api/drupal/core!lib!Drupal!Core!Render!theme.api.php/function/hook_library_info_alter/8
Placing JavaScript in the headerBy default, Drupal ensures that JavaScript is placed last on the page. Thisimproves the page's load performance by allowing the critical portions of thepage to load first. Placing JavaScript in the header is now an opt-in option.
In order to render a library in the header, you will need to add the header:true key/value pair:
js-library: header: true js: js/myscripts.js: {}
This will load a custom JavaScript library and its dependencies into theheader of a page.
See alsoRefer to the CSS architecture for Drupal 8: Separate concerns athttps://www.drupal.org/node/1887918#separate-concernsFor more information on SMACSS, refer to http://smacss.com/book/
Twig templatingDrupal 8's theming layer is complemented by Twig, a component of theSymfony framework. Twig is a template language that uses a syntax similarto Django and Jinja templates. The preceding version of Drupal usedPHPTemplate, which required frontend developers to have a rudimentaryunderstanding of PHP.
In this recipe, we will override the Twig template to provide customizationsfor the email form element. We will use the basic Twig syntax to add a newclass and provide a default placeholder.
Getting readyThis recipe assumes that you have already created a custom theme, such asthe one you created in the first recipe. When you see mythemein in thefollowing recipe, use the machine name of the theme you created.
At the time of writing this book, the Classy theme does not provide atemplate suggestion for the email input nor any customization for the inputtemplate that differs from Drupal core.
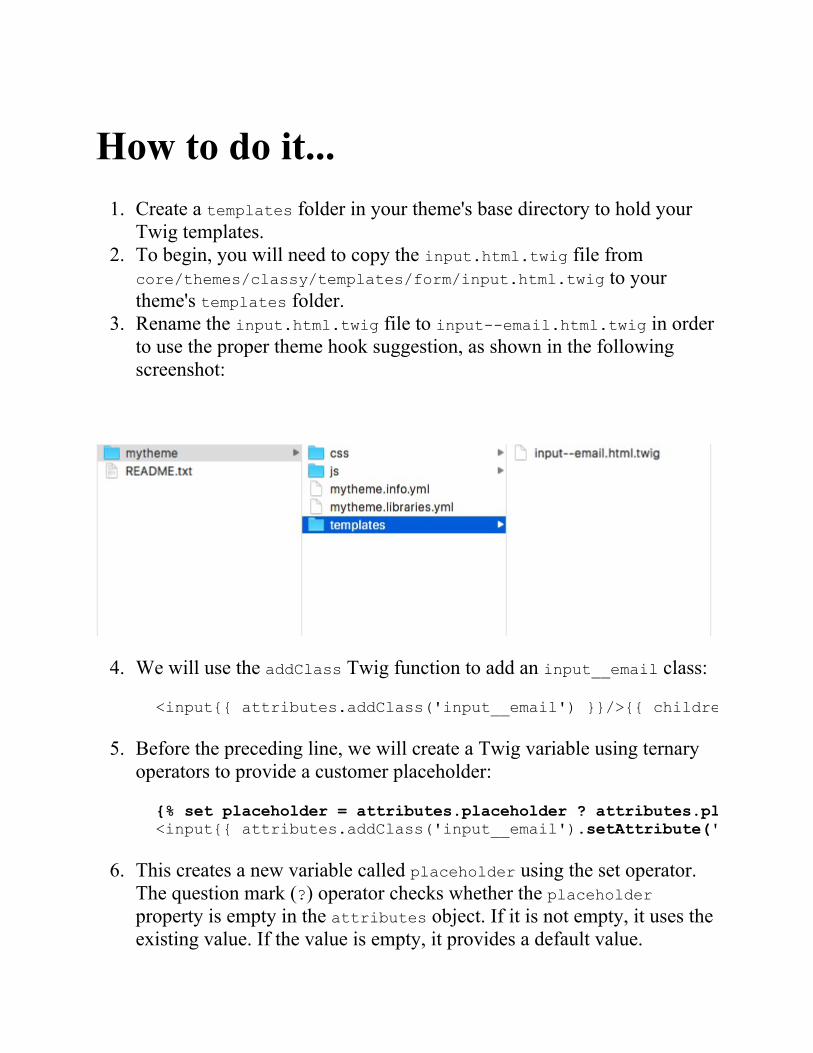
How to do it...1. Create a templates folder in your theme's base directory to hold your
Twig templates.2. To begin, you will need to copy the input.html.twig file from
core/themes/classy/templates/form/input.html.twig to yourtheme's templates folder.
3. Rename the input.html.twig file to input--email.html.twig in orderto use the proper theme hook suggestion, as shown in the followingscreenshot:
4. We will use the addClass Twig function to add an input__email class:
<input{{ attributes.addClass('input__email') }}/>{{ children }}
5. Before the preceding line, we will create a Twig variable using ternaryoperators to provide a customer placeholder:
{% set placeholder = attributes.placeholder ? attributes.placeholder : '[email protected]' %}<input{{ attributes.addClass('input__email').setAttribute('placeholder', placeholder)
6. This creates a new variable called placeholder using the set operator.The question mark (?) operator checks whether the placeholderproperty is empty in the attributes object. If it is not empty, it uses theexisting value. If the value is empty, it provides a default value.
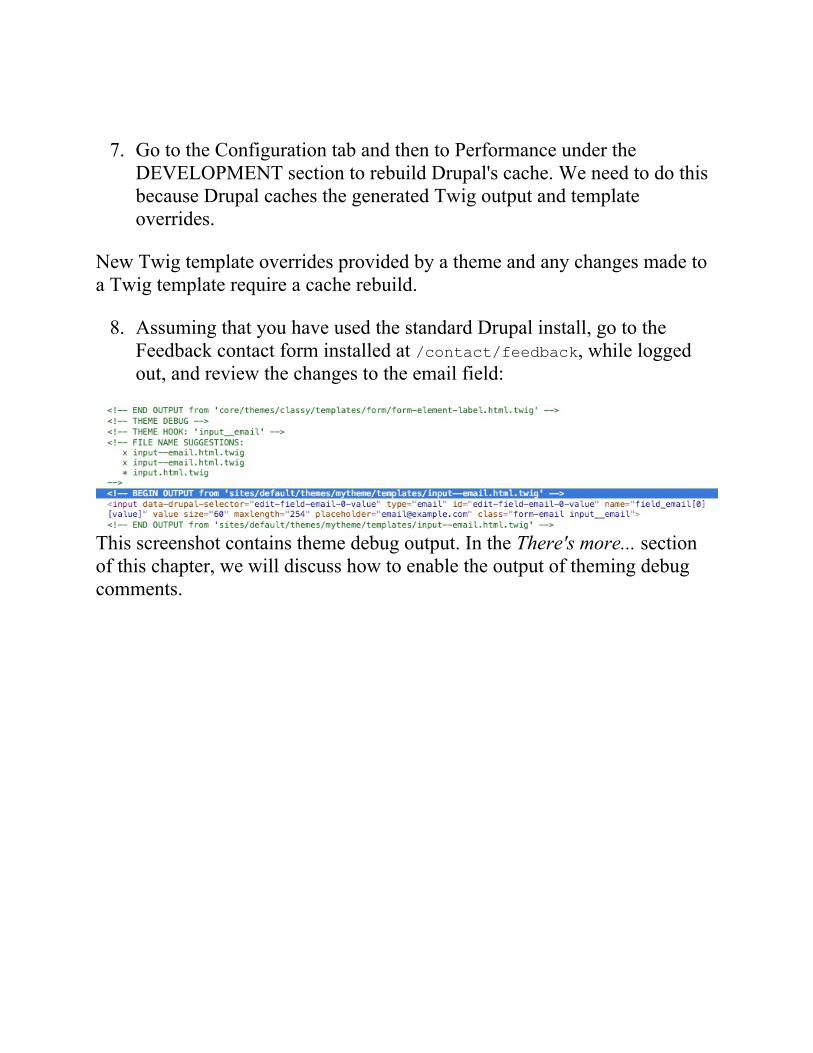
7. Go to the Configuration tab and then to Performance under theDEVELOPMENT section to rebuild Drupal's cache. We need to do thisbecause Drupal caches the generated Twig output and templateoverrides.
New Twig template overrides provided by a theme and any changes made toa Twig template require a cache rebuild.
8. Assuming that you have used the standard Drupal install, go to theFeedback contact form installed at /contact/feedback, while loggedout, and review the changes to the email field:
This screenshot contains theme debug output. In the There's more... sectionof this chapter, we will discuss how to enable the output of theming debugcomments.
How it works...Drupal's theme system is built around hooks and hook suggestions. Theelement definition of the email input element defines the input__emailtheme hook. If there is no input__email hook implemented through a Twigtemplate or PHP function, it will step down to just input.
Drupal theme hooks are defined with underscores (_), but use hyphens (-)when used in Twig template files.
A processor, such as Drupal's theme layer, passes variables to Twig.Variables or properties of objects can be printed by wrapping the variablename with curly brackets. All of Drupal core's default templates provideinformation in the file's document block that details the available Twigvariables.
Twig has a simplistic syntax with basic logic and functions. The addClassmethod will take the attributes variable and add the class provided inaddition to the existing contents.
When providing a theme hook suggestion or altering an existing template,you will need to rebuild Drupal's cache. The compiled Twig template, asPHP, is cached by Drupal so that Twig does not need to compile each timethe template is invoked.

There's more...We will discuss more on using Twig in the following sections.

Security firstTwig automatically escapes the output by default, making Drupal 8 one of themost secure versions yet. For Drupal 7, most security advisors were forcross-site scripting (XSS) vulnerabilities in contributed projects. WithDrupal core, these security advisories should be severely reduced using Twig.
Theme hook suggestionsDrupal utilizes theme hook suggestions for ways to allow output variationsbased on different conditions. It allows site themes to provide a more specifictemplate for certain instances.
When a theme hook has double underscores (__), Drupal's theme systemunderstands this, and it can break apart the theme hook to find a more generictemplate. For instance, the email element definition provides input__emailas its theme hook. Drupal understands this as follows:
Look for a Twig template named input--email.html.twig or a themehook that defines input__emailIf you are not satisfied, look for a Twig template namedinput.html.twig or a theme hook that defines the input
Theme hook suggestions can be provided by the hook_theme_suggestions()hook in a .module or .theme file.
Debugging template file selectionand hook suggestionsDebugging can be enabled to inspect the various template files that make up apage and their theme hook suggestions, and check which are active. This canbe accomplished by editing the sites/default/services.yml file. If aservices.yml file does not exist, copy the default.services.yml to createone.
You need to change debug: false to debug: true under the twig.configsection of the file. This will cause the Drupal theming layer to print out thesource code comments containing the template information. When debug ison, Drupal will not cache the compiled versions of Twig templates and renderthem on the fly.
There is another setting that prevents you from having to rebuild Drupal'scache on each template file change, but do not leave debug enabled. Thetwig.config.auto_reload boolean can be set to true. If this is set to true,the Twig templates will be recompiled if the source code changes.
The Twig logic and operatorsThe Twig has ternary operators for logic. Using a question mark (?), we canperform a basic is true or not empty operation, whereas a question mark andcolon (?:) perform a basic is false or is empty operation.
You may also use the if and else logic to provide different outputs based onvariables.
See alsoRefer to the Twig documentation athttp://twig.sensiolabs.org/documentationRefer to the API documentation for hook_theme_suggestions athttps://api.drupal.org/api/drupal/core%21lib%21Drupal%21Core%21Render%21theme.api.php/function/hook_theme_suggestions_HOOK/8

Using the Breakpoint moduleThe Breakpoint module provides a method to create media query breakpointdefinitions within Drupal. These can be used by other components, such asthe responsive image and toolbar modules, to make Drupal responsive.
Breakpoints are a type of plugin that can be defined in a module's or theme'sbreakpoints.yml in its directory. In this recipe, we will define three differentbreakpoints under a custom group.
Breakpoints are defined solely in YAML files from installed modules andthemes and are not configurable through the user interface.
Getting readyEnsure that the Breakpoint module is enabled--if you have used the standardDrupal installation, the module is enabled.
This recipe assumes that you have already created a custom module. Whenyou see mymodule, use the machine name of the module that you created.

How to do it...1. Create mymodule.breakpoints.yml in your module's base directory.
This file will hold the breakpoint configurations.2. Firstly, we will add a standard mobile breakpoint that does not have a
media query, following mobile first practices:
mymodule.mobile: label: Mobile mediaQuery: '' weight: 0
3. Secondly, we will create a standard breakpoint that will run on a largerviewport:
mymodule.standard: label: Standard mediaQuery: 'only screen and (min-width: 60em)' weight: 1
4. Thirdly, we will create a wide breakpoint for devices that have a largeviewport:
mymodule.wide: label: Wide mediaQuery: 'only screen and (min-width: 70em)' weight: 2
5. Your mymodule.breakpoints.yml should resemble the following:
mymodule.mobile: label: Mobile mediaQuery: '' weight: 0 mymodule.standard: label: Standard mediaQuery: 'only screen and (min-width: 60em)' weight: 1 mymodule.wide: label: Wide mediaQuery: 'only screen and (min-width: 70em)'
weight: 2
6. Go to the Configuration tab and then to Performance to rebuild Drupal'scache and make the system aware of the new breakpoints.
How it works...The Breakpoint module defines the breakpoint configuration entity.Breakpoints do not have any specific form of direct functionalities, beyondproviding a way to save media queries and grouping them.
The Breakpoint module provides a default manager service. This service isused by other modules to discover breakpoint groups and then all of thebreakpoints within a group.

There's more...Additional information on using the Breakpoint module will be covered inthe upcoming sections.

Caveat for providing breakpointsfrom themesThemes have the ability to provide breakpoints; however, they cannot beautomatically discovered if new ones are added once they have beeninstalled. Drupal only reads breakpoints provided by themes when a theme iseither installed or uninstalled.
Inside breakpoint.manager, there are two hooks: one for the themeinstall, and one for the theme uninstall. Each hook retrieves thebreakpoint manager service and rebuilds the breakpoint definitions. Withoutany extra deployment steps, new breakpoints added to a theme will not bediscovered unless these hooks are fired.
Accessing breakpointsprogrammaticallyBreakpoints are utility configurations for other modules. Breakpoints can beloaded using the breakpoint manager service and by specifying a group. Forexample, the following code returns all breakpoints used by the Toolbarmodule:
\Drupal::service('breakpoint.manager')->getBreakpointsByGroup('toolbar');
This code invokes the Drupal container to return the service to managebreakpoints, which, by default, is \Drupal\breakpoint\BreakpointManager.The getBreakpointsByGroup method returns all breakpoints within a group,which are initiated as the \Drupal\breakpoint\BreakpointInterfaceobjects.
The Toolbar element class utilizes this workflow to push the breakpointmedia query values as JavaScript settings for the JavaScript model to interactwith.
MultipliersThe multipliers value is used to support pixel resolution multipliers. Thismultiplier is used in coordination with retina displays. It is a measure of theviewport's device resolution as a ratio of the device's physical size andindependent pixel size. The following is an example of standard multipliers:
1x is normal5x supports Android2x supports Mac retina devices
See alsoTo work with breakpoints in Drupal 8, refer to the communitydocumentation athttps://www.drupal.org/documentation/modules/breakpoint

Using the Responsive Image moduleThe Responsive Image module provides a field formatter for image fields thatuse the HTML5 picture tag and source sets. Utilizing the Breakpoint module,mappings to breakpoints are made to denote an image style to be used at eachbreakpoint.
The responsive image field formatter works with using a defined responsiveimage style. Responsive image styles are configurations that map imageformats to specific breakpoints and modifiers. First, you will need to define aresponsive image style, and then you can apply it to an image field.
In this recipe, we will create a responsive image style set called Articleimage and apply it to the Article content type's image field.

Getting readyYou will need to enable the Responsive Image module, as it is notautomatically enabled with the standard installation.
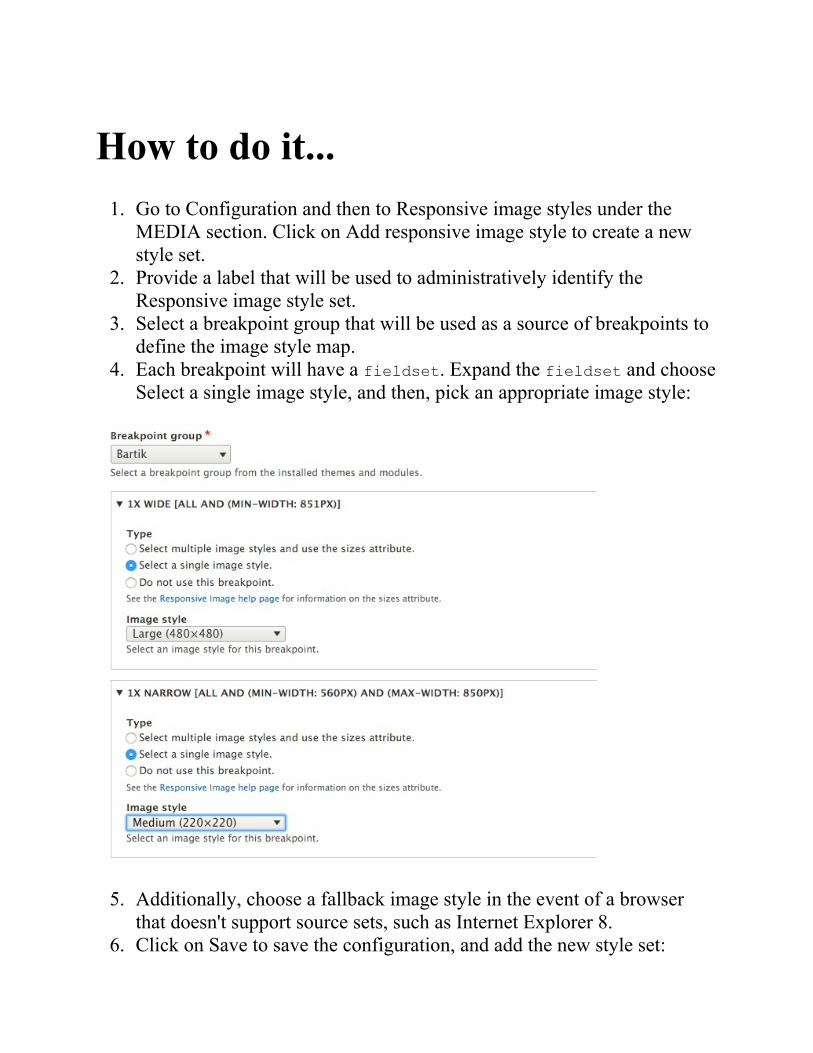
How to do it...1. Go to Configuration and then to Responsive image styles under the
MEDIA section. Click on Add responsive image style to create a newstyle set.
2. Provide a label that will be used to administratively identify theResponsive image style set.
3. Select a breakpoint group that will be used as a source of breakpoints todefine the image style map.
4. Each breakpoint will have a fieldset. Expand the fieldset and chooseSelect a single image style, and then, pick an appropriate image style:
5. Additionally, choose a fallback image style in the event of a browserthat doesn't support source sets, such as Internet Explorer 8.
6. Click on Save to save the configuration, and add the new style set:
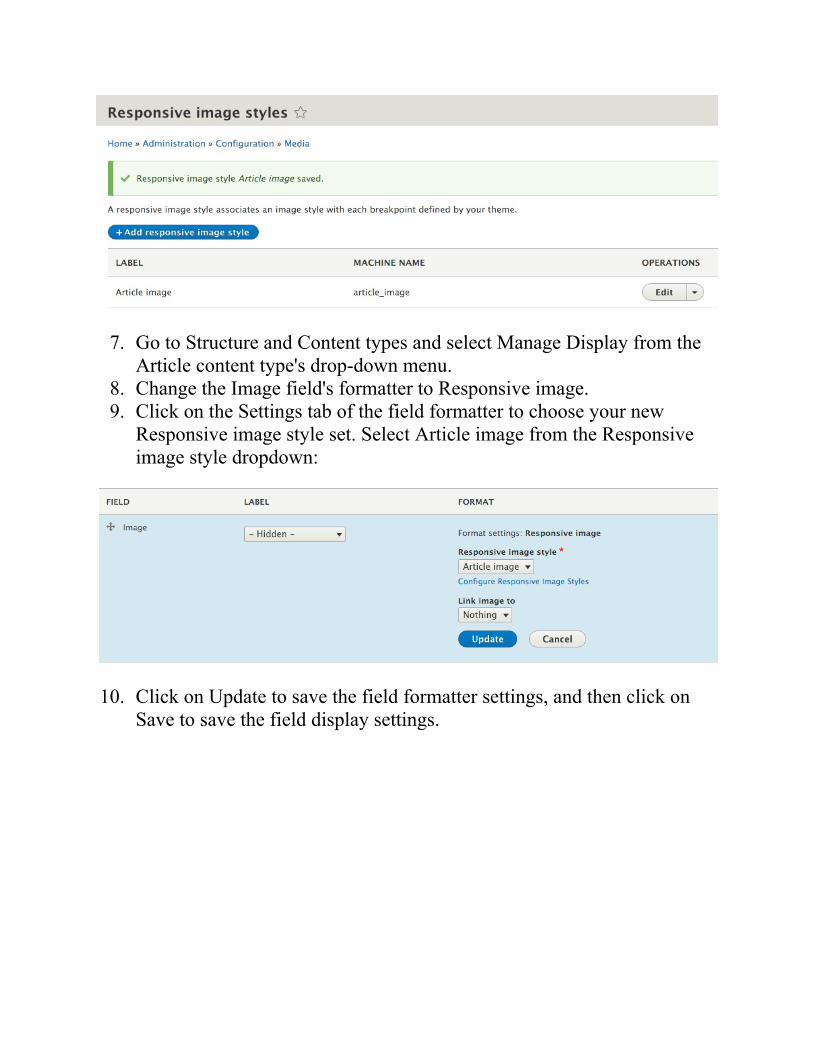
7. Go to Structure and Content types and select Manage Display from theArticle content type's drop-down menu.
8. Change the Image field's formatter to Responsive image.9. Click on the Settings tab of the field formatter to choose your new
Responsive image style set. Select Article image from the Responsiveimage style dropdown:
10. Click on Update to save the field formatter settings, and then click onSave to save the field display settings.
How it works...The Responsive image style provides three components: a responsive imageelement, the responsive image style configuration entity, and the responsiveimage field formatter. The configuration entity is consumed by the fieldformatter and displayed through the responsive image element.
The responsive image style entity contains an array of breakpoints to imagestyle mappings. The available breakpoints are defined by the selectedbreakpoint groups. Breakpoint groups can be changed anytime; however, theprevious mappings will be lost.
The responsive image element prints a picture element with eachbreakpoint, defining a new source element. The breakpoint's media queryvalue is provided as the media attribute for the element.
For Internet Explorer 9, Drupal 8 ships with the picturefill polyfill.Internet Explorer 9 does not recognize source elements wrapped by apicture element. The polyfill wraps the sources around a video elementwithin the picture element.

There's more...In the following sections, we will discuss the responsive image field in moredetail.

Performance first deliveryA benefit of using the responsive image formatter is performance. Browserswill only download the resources defined in the srcset of the appropriatesource tag. This not only allows you to deliver a more appropriate imagesize, but also carries a smaller payload on smaller devices.
Removing picturefill polyfillThe Responsive Image module attaches the picturefill library to theresponsive image element definition. The element's template also providesHTML to implement the polyfill. The polyfill can be removed by overridingthe element's template and overriding the picturefill library to be disabled.
The following snippet, when added to a theme's info.yml, will disable thepicturefill library:
libraries-override: core/picturefill: false
Then, the responsive-image.html.twig must be overridden by the theme toremove the extra HTML generated in the template for the polyfill:
1. Copy responsive-image.html.twig fromcore/modules/responsive_image/templates to the theme templatesfolder.
2. Edit responsive-image.html.twig and delete the Twig comment andIE conditional to output the initial video tag.
3. Remove the last conditional, that provides the closing video tag.
See alsoRefer to the picture element on the Mozilla Developer Network (MDN)at https://developer.mozilla.org/en-US/docs/Web/HTML/Element/pictureRefer to picturefill for IE9 at http://scottjehl.github.io/picturefill/#ie9
Creating Forms with the Form APIIn this chapter, we will explore the various recipes to work with forms inDrupal:
Creating a formUsing new HTML5 elementsValidating form dataProcessing submitted form dataAltering other forms
IntroductionDrupal provides a robust API for creating and managing forms withoutwriting any HTML. Drupal handles form building, validation, andsubmission. Drupal handles the request to either build the form or process theHTTP POST request. This allows developers to simply define the elements ina form, provide any additional validation if needed, and then handle asuccessful submission through specific methods.
This chapter contains various recipes to work with forms in Drupal throughthe Form API. In Drupal 8, forms and form states are objects.
Creating a formIn this recipe, we will create a form, which will be accessible from a menupath. This will involve creating a route that tells Drupal to invoke our formand display it to the end user.
Forms are defined as classes, which implement\Drupal\Core\Form\FormInterface. The \Drupal\Core\Form\FormBaseserves as a utility class that is intended to be extended. We will extend thisclass to create a new form.
Getting readySince we will write the code, you will want to have a custom module.Creating a custom module in Drupal is simple: create a folder and aninfo.yml file. For this recipe, we will create a folder under /modules in yourDrupal folder called drupalform.
In the drupalform folder, create drupalform.info.yml. Drupal will parse theinfo.yml file to discover modules. An example of a module's info.yml fileis as follows:
name: Drupal form example description: Create a basic Drupal form, accessible from a route type: module version: 1.0 core: 8.x
The name will be your module's name, and the description will be listed onthe Extend page. Specifying the core tells Drupal what version of Drupal it isbuilt for. Chapter 4, Extending Drupal, covers how to create a module indepth.
How to do it...1. Create an src folder in your module directory. In this directory, create a
Form directory, which will hold the class that defines your form.2. Next, create a file called ExampleForm.php in your module's src/Form
directory.
Drupal utilizes PSR4 to discover and autoload classes. For brevity, thisdefines that there should be one class per file, with each filename matchingthe class name. The folder structure will also mimic the namespace expected.
3. We will edit the ExampleForm.php file and add the proper PHPnamespace, classes used, and the class itself:
<?php namespace Drupal\drupalform\Form; use Drupal\Core\Form\FormBase; use Drupal\Core\Form\FormStateInterface; class ExampleForm extends FormBase { }
The namespace defines the class in your module's Form directory. Theautoloader will now look at the drupalform module path and loadthe ExampleForm class from the src/Form directory.
The use statement allows us to use just the class name whenreferencing FormBase, and, in the next steps, FormStateInterface.Otherwise, we would be forced to use the fully qualified namespacepath for each class whenever it is used.
4. The \Drupal\Core\Form\FormBase is an abstract class and requires usto implement four remaining interface methods: getFormId, buildForm,validateForm, and submitForm. The latter two will be covered in thefollowing recipes; however, we will need to define the method stubs:
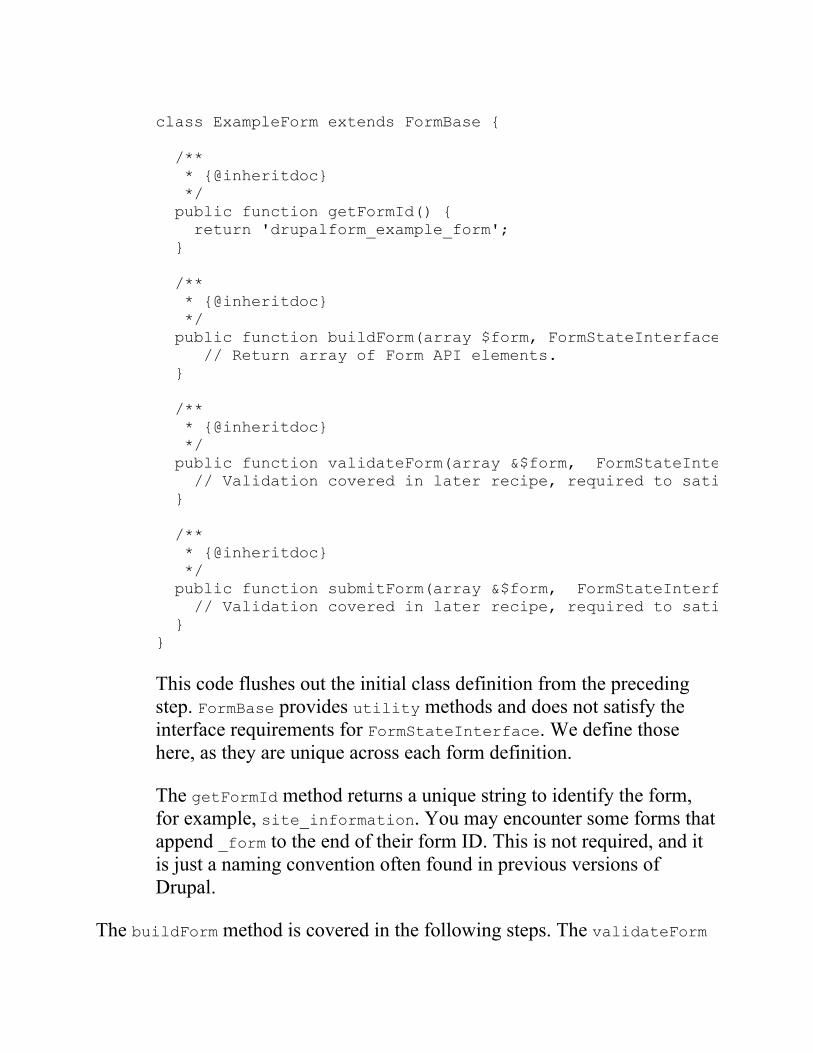
class ExampleForm extends FormBase { /** * {@inheritdoc} */ public function getFormId() { return 'drupalform_example_form'; } /** * {@inheritdoc} */ public function buildForm(array $form, FormStateInterface $form_state) { // Return array of Form API elements. } /** * {@inheritdoc} */ public function validateForm(array &$form, FormStateInterface $form_state) { // Validation covered in later recipe, required to satisfy interface. } /** * {@inheritdoc} */ public function submitForm(array &$form, FormStateInterface $form_state) { // Validation covered in later recipe, required to satisfy interface. } }
This code flushes out the initial class definition from the precedingstep. FormBase provides utility methods and does not satisfy theinterface requirements for FormStateInterface. We define thosehere, as they are unique across each form definition.
The getFormId method returns a unique string to identify the form,for example, site_information. You may encounter some forms thatappend _form to the end of their form ID. This is not required, and itis just a naming convention often found in previous versions ofDrupal.
The buildForm method is covered in the following steps. The validateForm

and submitForm methods are both called during the Form API processes andare covered in later recipes.
5. The buildForm method will be invoked to return Form API elementsthat are rendered to the end user. We will add a simple text field to askfor a company name and a submit button:
/** * {@inheritdoc} */ public function buildForm(array $form, FormStateInterface $form_state) { $form['company_name'] = [ '#type' => 'textfield', '#title' => $this->t('Company name'), ]; $form['submit'] = [ '#type' => 'submit', '#value' => $this->t('Save'), ]; return $form; }
We added a form element definition to the form array. Form elementsare defined with a minimum of a type to specify what the element isand a title to act as the label. The title uses the t method to ensure thatit is translatable.
Adding a submit button is done by providing an element with the typesubmit.
6. To access the form, we will create drupalform.routing.yml in themodule's folder. A route entry will be created to instruct Drupal to use\Drupal\Core\Form\FormBuilder to create and display our form:
drupalform.form: path: '/drupal-example-form' defaults: _title: 'Example form' _form: '\Drupal\drupalform\Form\ExampleForm' requirements: _access: 'TRUE'
In Drupal, all routes have a name, and this example defines it as
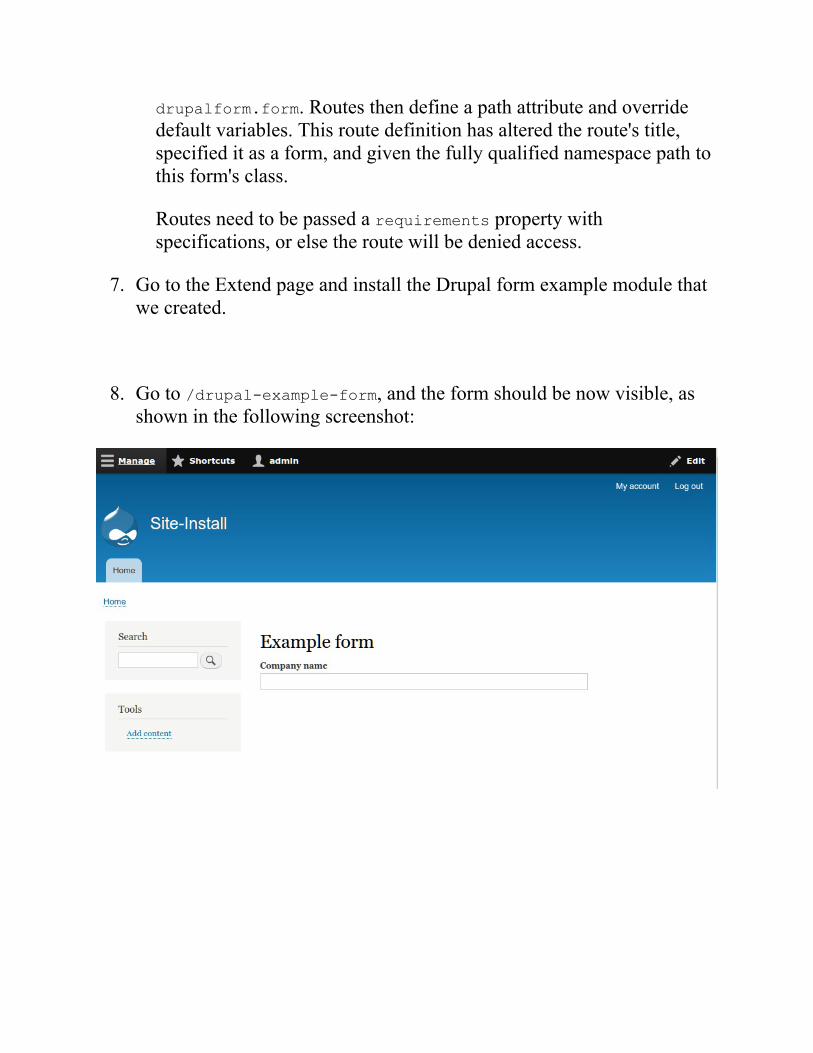
drupalform.form. Routes then define a path attribute and overridedefault variables. This route definition has altered the route's title,specified it as a form, and given the fully qualified namespace path tothis form's class.
Routes need to be passed a requirements property withspecifications, or else the route will be denied access.
7. Go to the Extend page and install the Drupal form example module thatwe created.
8. Go to /drupal-example-form, and the form should be now visible, asshown in the following screenshot:
How it works...This recipe creates a route to display the form. By passing the _form variablein the defaults section of our route entry, we are telling the route controllerhow to render our route's content. The fully qualified class name, whichincludes the namespace, is passed to a method located in the form builder.The route controller will invoke \Drupal::formBuilder()->getForm(\Drupal\drupalform\Form\ExampleForm) based on the recipe. At the sametime, this can be manually called to embed the form elsewhere.
A form builder instance that implements\Drupal\Core\Form\FormBuilderInterface will then process the form bycalling buildForm and initiate the rendering process. The buildForm methodis expected to return an array of form elements and other API options. Thiswill be sent to the render system to output the form as HTML.
There's more...Many components make up a form created through Drupal's Form API. Wewill explore a few of them in depth.
Form element definitionsA form is a collection of form elements, which are types of plugin in Drupal8. Plugins are small pieces of swappable functionalities in Drupal 8. Pluginsand plugin development are covered in Chapter 7, Plug and Play withPlugins.
Here are some of the most common element properties that can be used:
weight: This is used to alter the position of a form element in a form. Bydefault, elements will be displayed in the order in which they wereadded to the form array. Defining a weight allows a developer to controlelement positions.default_value: This gives a developer the ability to prefill the elementwith a value, for example, when building configuration forms that haveexisting data or when editing an entity.placeholder: This is new to Drupal 8. Drupal 8 provides a new HTML5support, and this attribute will set the placeholder attribute on the HTMLinput.
For a complete reference of available form elements and their properties,check out the Drupal.org API documentation page athttps://api.drupal.org/api/drupal/elements/.
The form stateThe \Drupal\Core\Form\FormStateInterface object represents the currentstate of the form and its data. The form state contains user-submitted data forthe form along with build state information. Redirection after the formsubmission is handled through theform state, as well. You will interact more with the form state during thevalidation and submission recipes.

The form cacheDrupal utilizes a cache table for forms. This holds the build table, asidentified by form build identifiers. This allows Drupal to validate formsduring AJAX requests and easily build them when required. It is important tokeep the form cache in persistent storage; otherwise, there may berepercussions, such as loss of form data or invalidating forms.
See alsoForm API in Drupal 8 at https://www.drupal.org/node/2117411The Drupal 8 Form API reference athttps://api.drupal.org/api/drupal/elements/Refer to Chapter 4, Extending DrupalRefer to Chapter 7, Plug and Play with Plugins, to learn more aboutderivatives
Using new HTML5 elementsWith the release of Drupal 8, Drupal has finally entered into the realm ofHTML5. The Form API now allows utilization of HTML5 input elements outof the box. These include the following element types:
tel
number
date
url
search
range
This allows your forms in Drupal to leverage native device input methodsalong with native validation support.
Getting readyThis recipe will walk you through adding elements to a Drupal form. Youwill need to have a custom form implemented through a module, such as theone created in the Creating a form recipe of this chapter.
How to do it...1. To use the telephone input, you will need to add a new form element
definition of the tel type to your buildForm method:
$form['phone'] = [ '#type' => 'tel', '#title' => $this->t('Phone'), ];
2. To use the email input, you will need to add a new form elementdefinition of the email type to your buildForm method. It will validatethe format of email addresses in the Form API:
$form['email'] = [ '#type' => 'email', '#title' => $this->t('Email'), ];
3. To use the number input, you will need to add a new form elementdefinition of the number type to your buildForm method. It will validatethe range and format of the number:
$form['integer'] = [ '#type' => 'number', '#title' => $this->t('Some integer'), // The increment or decrement amount '#step' => 1, // Miminum allowed value '#min' => 0, // Maxmimum allowed value '#max' => 100, ];
4. To use the date input, you will need to add a new form elementdefinition of the date type to your buildForm method. You can also passthe #date_date_format option to alter the format used by the input:
$form['date'] = [ '#type' => 'date',
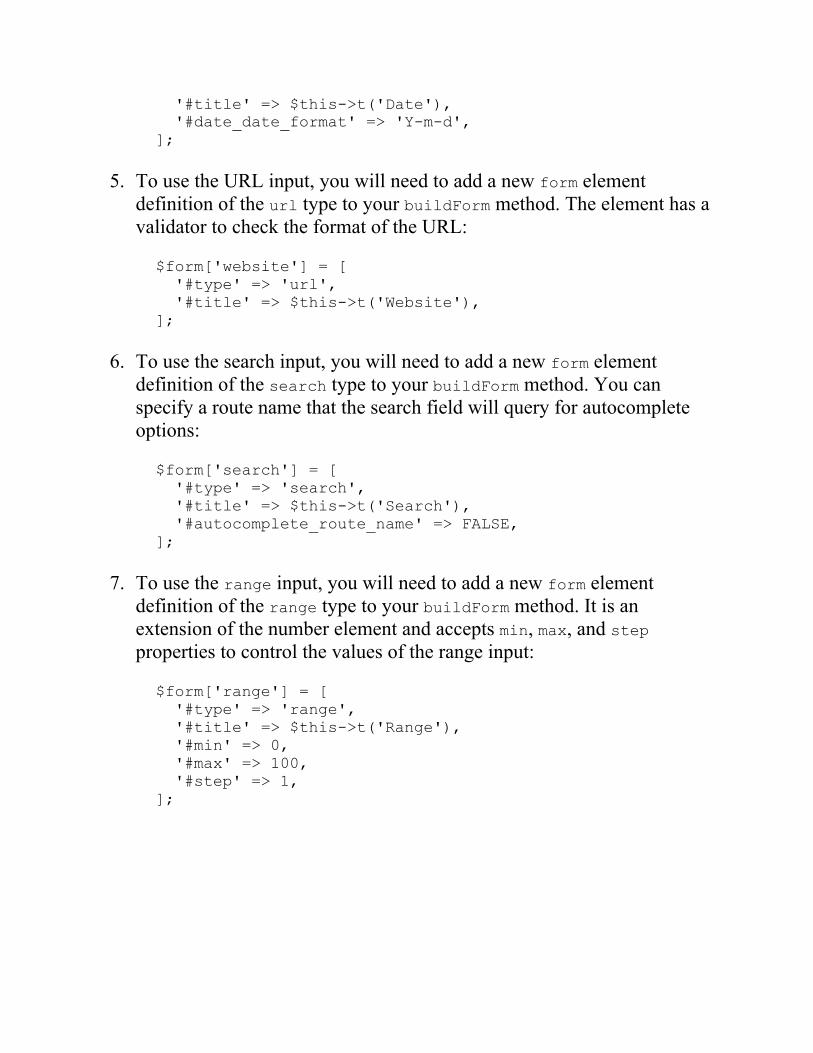
'#title' => $this->t('Date'), '#date_date_format' => 'Y-m-d', ];
5. To use the URL input, you will need to add a new form elementdefinition of the url type to your buildForm method. The element has avalidator to check the format of the URL:
$form['website'] = [ '#type' => 'url', '#title' => $this->t('Website'), ];
6. To use the search input, you will need to add a new form elementdefinition of the search type to your buildForm method. You canspecify a route name that the search field will query for autocompleteoptions:
$form['search'] = [ '#type' => 'search', '#title' => $this->t('Search'), '#autocomplete_route_name' => FALSE, ];
7. To use the range input, you will need to add a new form elementdefinition of the range type to your buildForm method. It is anextension of the number element and accepts min, max, and stepproperties to control the values of the range input:
$form['range'] = [ '#type' => 'range', '#title' => $this->t('Range'), '#min' => 0, '#max' => 100, '#step' => 1, ];
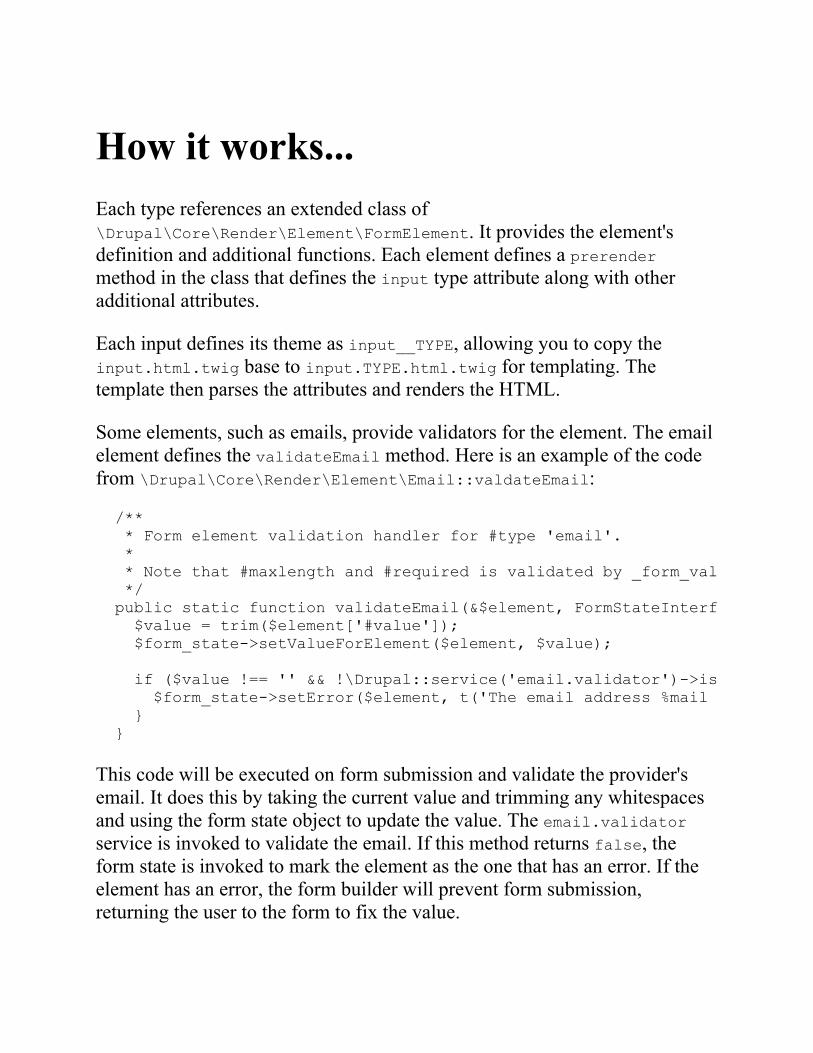
How it works...Each type references an extended class of\Drupal\Core\Render\Element\FormElement. It provides the element'sdefinition and additional functions. Each element defines a prerendermethod in the class that defines the input type attribute along with otheradditional attributes.
Each input defines its theme as input__TYPE, allowing you to copy theinput.html.twig base to input.TYPE.html.twig for templating. Thetemplate then parses the attributes and renders the HTML.
Some elements, such as emails, provide validators for the element. The emailelement defines the validateEmail method. Here is an example of the codefrom \Drupal\Core\Render\Element\Email::valdateEmail:
/** * Form element validation handler for #type 'email'. * * Note that #maxlength and #required is validated by _form_validate() already. */ public static function validateEmail(&$element, FormStateInterface $form_state, &$complete_form) { $value = trim($element['#value']); $form_state->setValueForElement($element, $value); if ($value !== '' && !\Drupal::service('email.validator')->isValid($value)) { $form_state->setError($element, t('The email address %mail is not valid.', array('%mail' => $value))); } }
This code will be executed on form submission and validate the provider'semail. It does this by taking the current value and trimming any whitespacesand using the form state object to update the value. The email.validatorservice is invoked to validate the email. If this method returns false, theform state is invoked to mark the element as the one that has an error. If theelement has an error, the form builder will prevent form submission,returning the user to the form to fix the value.

There's more...Elements are provided through Drupal's plugin system and are explored indetail in the upcoming sections.
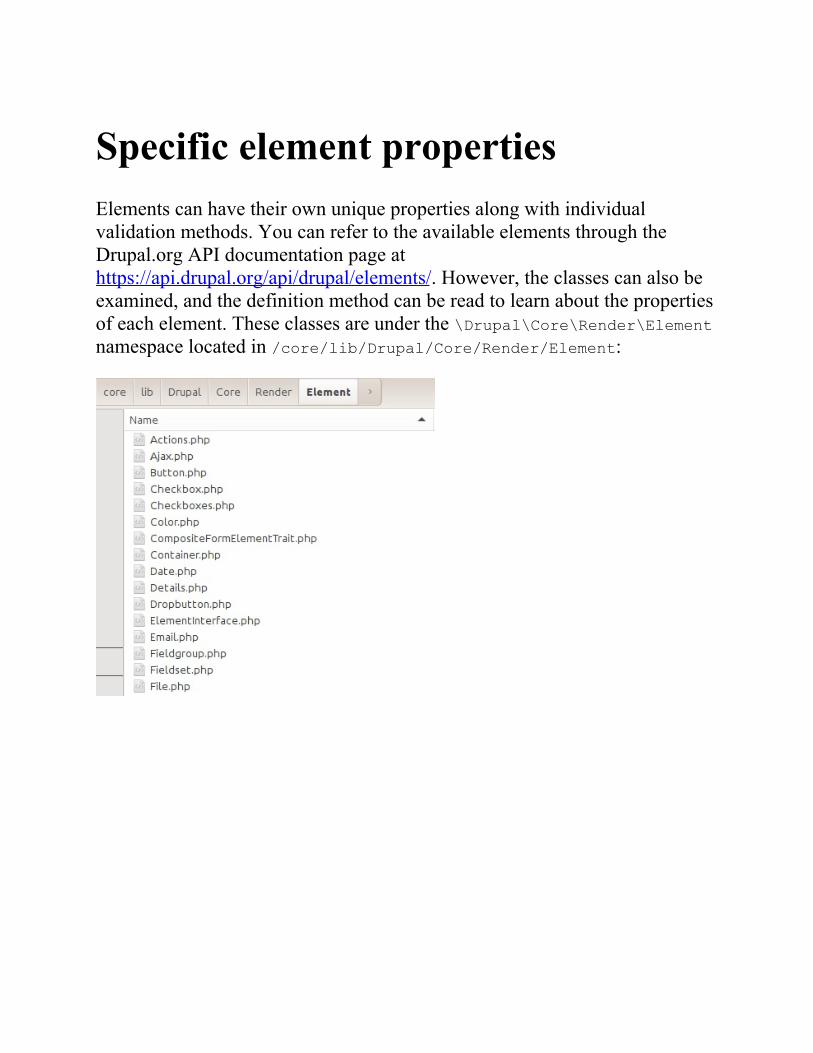
Specific element propertiesElements can have their own unique properties along with individualvalidation methods. You can refer to the available elements through theDrupal.org API documentation page athttps://api.drupal.org/api/drupal/elements/. However, the classes can also beexamined, and the definition method can be read to learn about the propertiesof each element. These classes are under the \Drupal\Core\Render\Elementnamespace located in /core/lib/Drupal/Core/Render/Element:
Creating new elementsEach element used in the Form API extends the\Drupal\Core\Render\Element\FormElement class, which is a plugin.Modules can provide new element types by adding classes to theirPlugins/Element namespace. Refer to Chapter 7, Plug and Play withPlugins, for more information on how to implement a plugin.
See alsoForm API in Drupal 8 at https://www.drupal.org/node/2117411Refer to Chapter 7, Plug and Play with Plugins
Validating form dataAll forms must implement the \Drupal\Core\Form\FormInterface. Theinterface defines a validation method. The validateForm method isinvoked once a form has been submitted and provides a way to validate thedata and halt the processing of the data if required. The form state objectprovides methods for marking specific fields as having the error, providing auser experience tool to alert your users to specify the problem input.
In this recipe, we will be validating the length of the submitted field.

Getting readyThis recipe will use the module and custom form created in the first Creatinga form recipe.

How to do it...1. Open and edit the \Drupal\drupalform\Form\ExampleForm class in the
src/Form directory of the module.
2. Before validating the company_name value, we will need to checkwhether the value is empty using the isValueEmpty() method from the\Drupal\Core\Form\FormStateInterface object:
/** * {@inheritdoc} */ public function validateForm(array &$form, FormStateInterface $form_state) { if (!$form_state->isValueEmpty('company_name')) { // Value is set, perform validation. } }
3. The \Drupal\Form\FormStateInterface::isValueEmpty method takesthe key name of the form element; for example,$form['company_name'] from the buildForm method is referencedthrough company_name in the isValueEmpty method.
4. Next, we will check whether the value's length is greater than five:
/** * {@inheritdoc} */ public function validateForm(array &$form, FormStateInterface $form_state) { if (!$form_state->isValueEmpty('company_name')) { if (strlen($form_state->getValue('company_name')) <= 5) { // Set validation error. } } }
5. The getValue takes a form element's key and returns the value. Since

we have already verified that the value is not empty, we can retrieve thevalue.
If you had any experience with previous versions of Drupal, note that theform state is now an object and not an array.
6. If the logic check finds a value with a length of five or fewer characters,it will throw a form error to prevent submission:
/** * {@inheritdoc} */ public function validateForm(array &$form, FormStateInterface $form_state) { if (!$form_state->isValueEmpty('company_name')) { if (strlen($form_state->getValue('company_name')) <= 5) { $form_state->setErrorByName('company_name', t('Company name is less than 5 characters')); } } }
We can place the setErrorByName method in our strlen logic check.If the string is fewer than five characters, an error is set on theelement. The first parameter is the element's key, and the secondparameter is the message to be presented to the user.
7. When the form is submitted, the Company name text field will havemore than five characters or be empty to be submitted.
How it works...Before the form builder service invokes the form object's submitFormmethod, it invokes the object's validateForm method. In the validationmethod, the form state can be used to check values and perform logic checks.In the event that an item is deemed invalid and an error is set on an element,the form cannot be submitted and will show errors to the user.
When an error is added to an element, an overall counter for the number oferrors on the form is incremented. If the form has any errors, the form builderservice will not execute the submit method.
This process is executed through the \Drupal\Core\Form\FormValidatorclass, which is run through the form builder service.

There's more...Form validation can be done through multiple handlers and at the elementlevel. The following sections will cover those.
Multiple validation handlersA form can have multiple validation handlers. By default, all forms comewith at least one validator, which is its own validateForm method. There ismore that can be added. However, by default, the form will merely execute::validateForm and all element validators. This allows you to invokemethods on other classes or other forms.
If a class provides method1 and method2, which it would like to execute aswell, the following code can be added to the buildForm method:
$form_state->setValidateHandlers([ ['::validateForm'], ['::method1'], [$this, 'method2'], ]);
This sets the validator array to execute the default validateForm method andthe two additional methods. You can reference a method in the current classusing two colons (::) and the method name. Alternatively, you can use anarray that consists of a class instance and the method to be invoked.
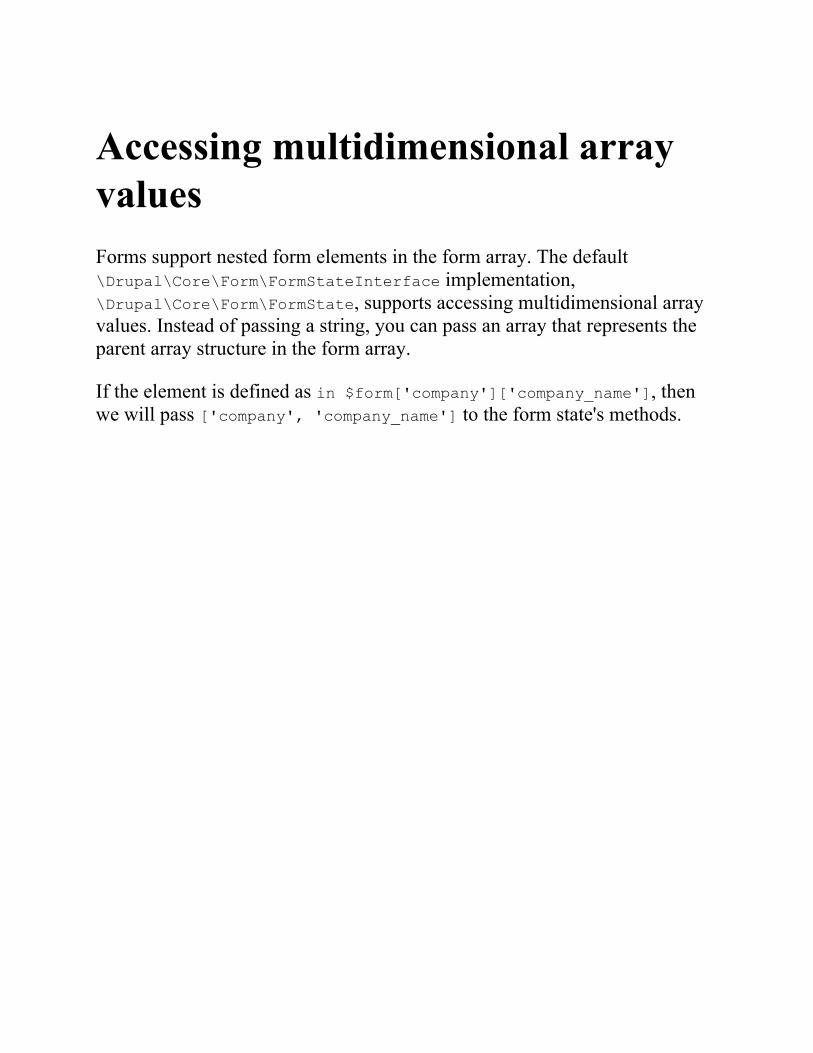
Accessing multidimensional arrayvaluesForms support nested form elements in the form array. The default\Drupal\Core\Form\FormStateInterface implementation,\Drupal\Core\Form\FormState, supports accessing multidimensional arrayvalues. Instead of passing a string, you can pass an array that represents theparent array structure in the form array.
If the element is defined as in $form['company']['company_name'], thenwe will pass ['company', 'company_name'] to the form state's methods.

Element validation methodsForm elements can have their own validators. The form state will aggregateall of the element validation methods and pass them to the form validationservice. This will run with the form's validation.
There is a limit_validation_errors option, which can be set to allowselected invalid errors to be passed. This option allows you to bypassvalidation on specific elements in your form. This is useful if a form has twosubmit buttons and each intends to validate and submit specific data. Thisattribute is defined in the submit button, also known as the triggering elementin the form state. It is an array value consisting of form element keys.
Processing submitted form dataA form's purpose is to collect data and do something with the data that wassubmitted. All forms need to implement the\Drupal\Core\Form\FormInterface interface. The interface defines asubmit method. Once the Form API has invoked the class's validationmethod, the submit method can be run.
This recipe will be based on the custom module and form created in theCreating a form recipe of this chapter. We will convert the form to\Drupal\Core\FormConfigBaseForm, allowing us to save our configurationand reuse code provided by Drupal core.

Getting readyIn this recipe, we will use the module and custom form created in the firstCreating a form recipe.
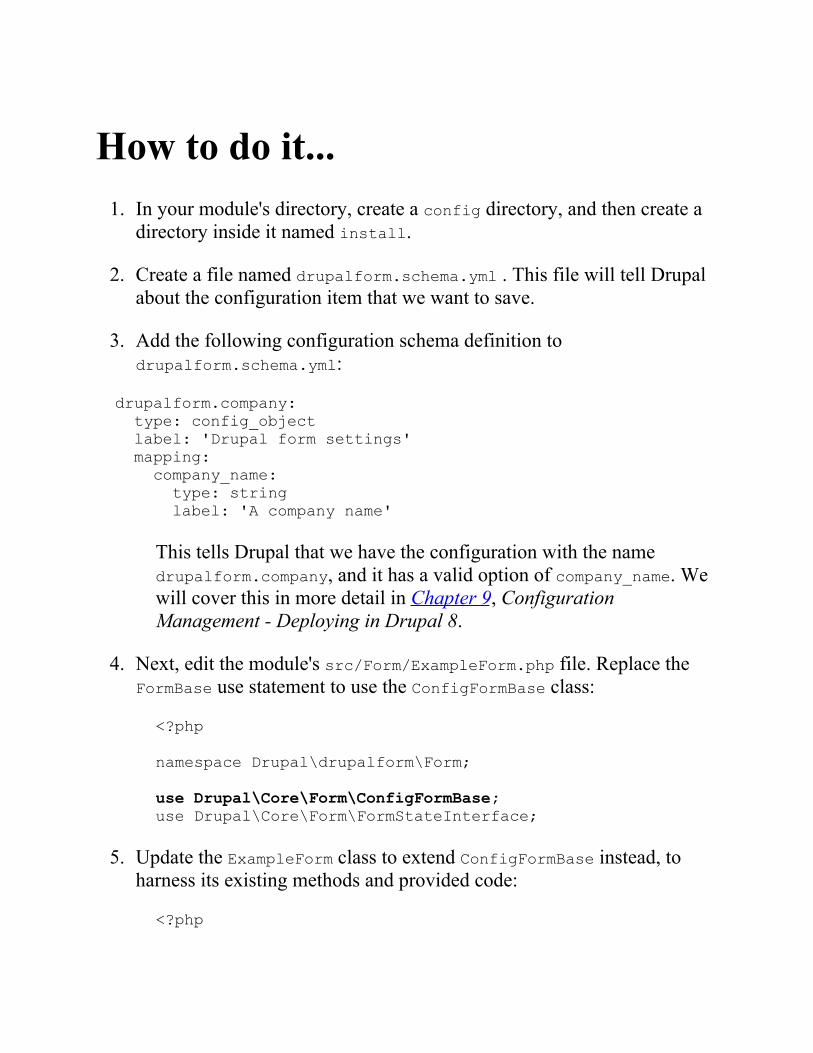
How to do it...1. In your module's directory, create a config directory, and then create a
directory inside it named install.
2. Create a file named drupalform.schema.yml . This file will tell Drupalabout the configuration item that we want to save.
3. Add the following configuration schema definition todrupalform.schema.yml:
drupalform.company: type: config_object label: 'Drupal form settings' mapping: company_name: type: string label: 'A company name'
This tells Drupal that we have the configuration with the namedrupalform.company, and it has a valid option of company_name. Wewill cover this in more detail in Chapter 9, ConfigurationManagement - Deploying in Drupal 8.
4. Next, edit the module's src/Form/ExampleForm.php file. Replace theFormBase use statement to use the ConfigFormBase class:
<?php namespace Drupal\drupalform\Form; use Drupal\Core\Form\ConfigFormBase; use Drupal\Core\Form\FormStateInterface;
5. Update the ExampleForm class to extend ConfigFormBase instead, toharness its existing methods and provided code:
<?php
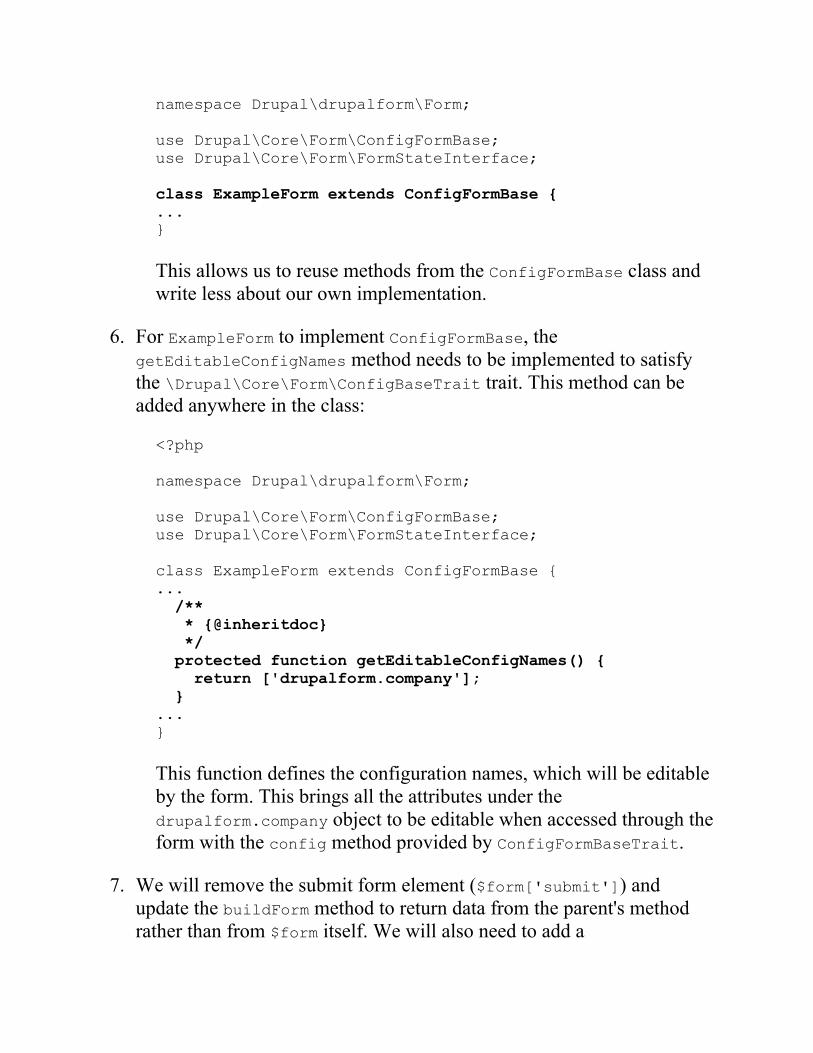
namespace Drupal\drupalform\Form;
use Drupal\Core\Form\ConfigFormBase; use Drupal\Core\Form\FormStateInterface;
class ExampleForm extends ConfigFormBase {...}
This allows us to reuse methods from the ConfigFormBase class andwrite less about our own implementation.
6. For ExampleForm to implement ConfigFormBase, thegetEditableConfigNames method needs to be implemented to satisfythe \Drupal\Core\Form\ConfigBaseTrait trait. This method can beadded anywhere in the class:
<?php
namespace Drupal\drupalform\Form;
use Drupal\Core\Form\ConfigFormBase; use Drupal\Core\Form\FormStateInterface;
class ExampleForm extends ConfigFormBase {... /** * {@inheritdoc} */ protected function getEditableConfigNames() { return ['drupalform.company']; } ...}
This function defines the configuration names, which will be editableby the form. This brings all the attributes under thedrupalform.company object to be editable when accessed through theform with the config method provided by ConfigFormBaseTrait.
7. We will remove the submit form element ($form['submit']) andupdate the buildForm method to return data from the parent's methodrather than from $form itself. We will also need to add a
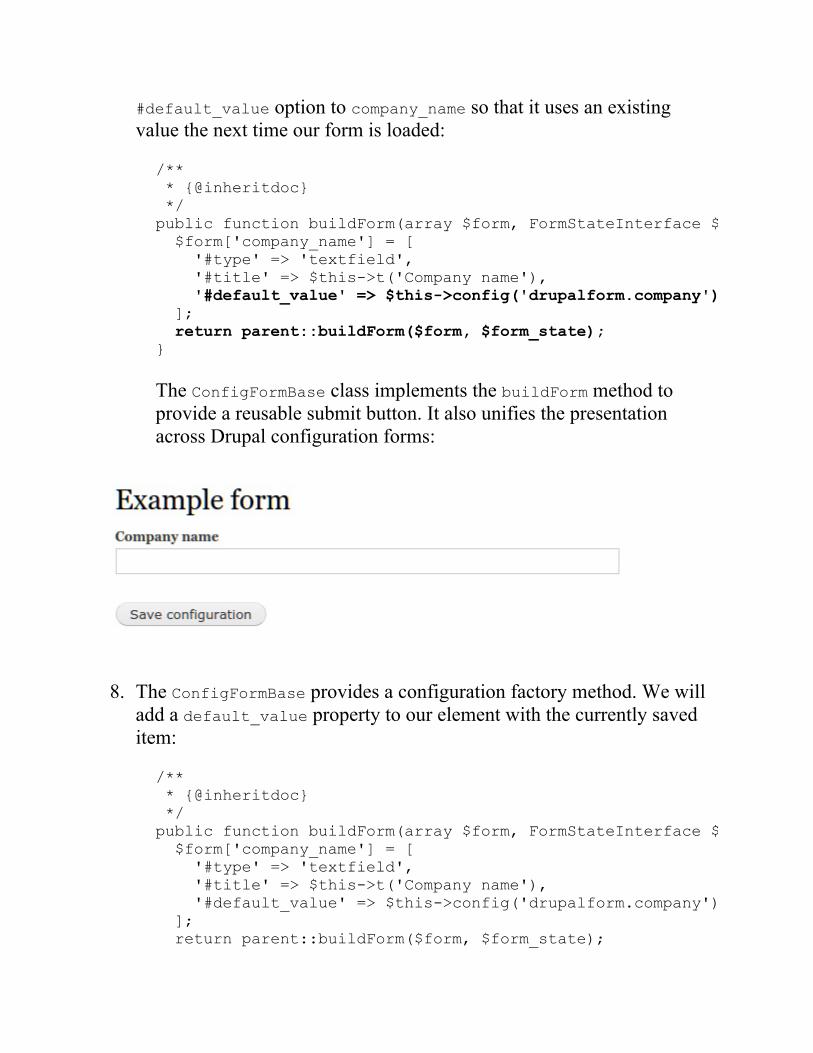
#default_value option to company_name so that it uses an existingvalue the next time our form is loaded:
/** * {@inheritdoc} */ public function buildForm(array $form, FormStateInterface $form_state) { $form['company_name'] = [ '#type' => 'textfield', '#title' => $this->t('Company name'), '#default_value' => $this->config('drupalform.company')->get('company_name'), ]; return parent::buildForm($form, $form_state); }
The ConfigFormBase class implements the buildForm method toprovide a reusable submit button. It also unifies the presentationacross Drupal configuration forms:
8. The ConfigFormBase provides a configuration factory method. We willadd a default_value property to our element with the currently saveditem:
/** * {@inheritdoc} */ public function buildForm(array $form, FormStateInterface $form_state) { $form['company_name'] = [ '#type' => 'textfield', '#title' => $this->t('Company name'), '#default_value' => $this->config('drupalform.company')->get('name'), ]; return parent::buildForm($form, $form_state);
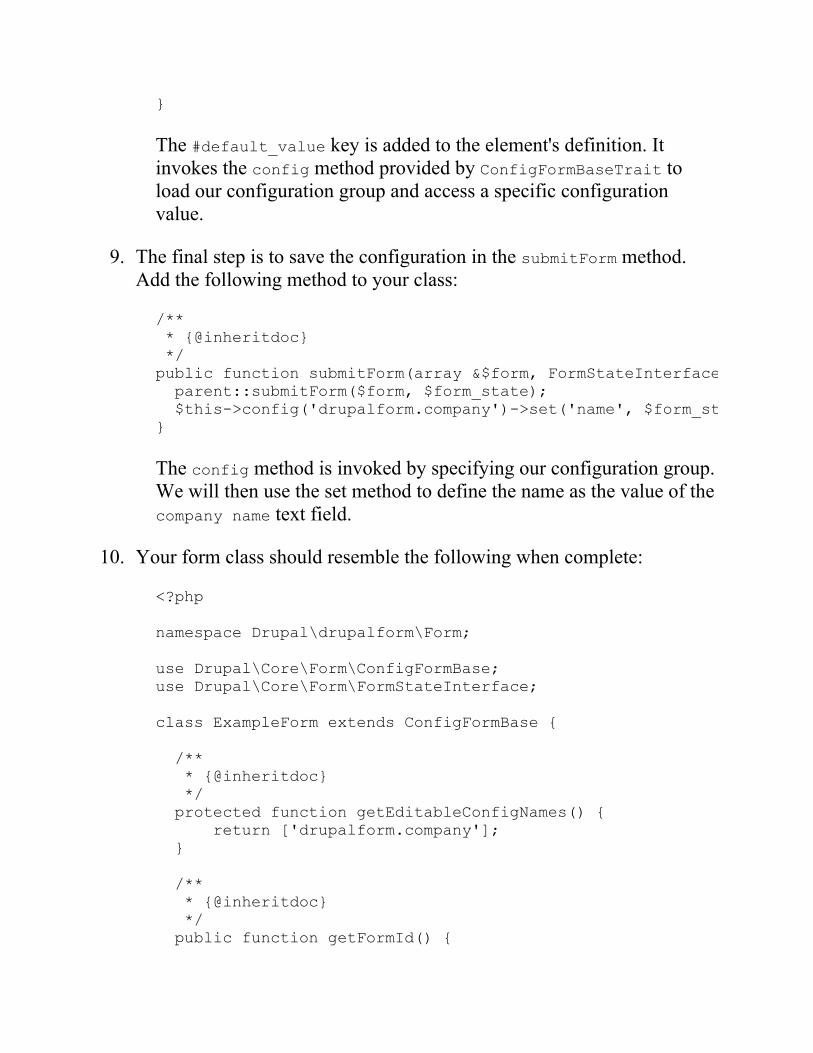
}
The #default_value key is added to the element's definition. Itinvokes the config method provided by ConfigFormBaseTrait toload our configuration group and access a specific configurationvalue.
9. The final step is to save the configuration in the submitForm method.Add the following method to your class:
/** * {@inheritdoc} */ public function submitForm(array &$form, FormStateInterface $form_state) { parent::submitForm($form, $form_state); $this->config('drupalform.company')->set('name', $form_state->getValue('company_name')); }
The config method is invoked by specifying our configuration group.We will then use the set method to define the name as the value of thecompany name text field.
10. Your form class should resemble the following when complete:
<?php
namespace Drupal\drupalform\Form;
use Drupal\Core\Form\ConfigFormBase;use Drupal\Core\Form\FormStateInterface;
class ExampleForm extends ConfigFormBase {
/** * {@inheritdoc} */ protected function getEditableConfigNames() { return ['drupalform.company']; }
/** * {@inheritdoc} */ public function getFormId() {
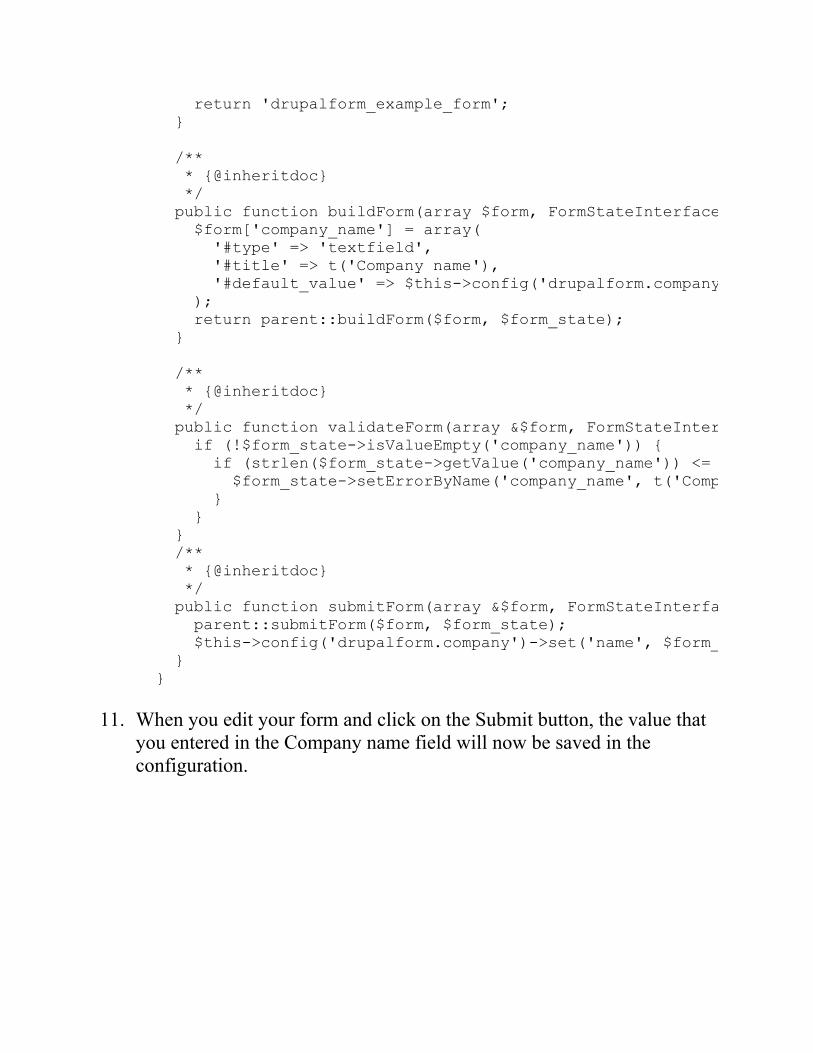
return 'drupalform_example_form'; }
/** * {@inheritdoc} */ public function buildForm(array $form, FormStateInterface $form_state) { $form['company_name'] = array( '#type' => 'textfield', '#title' => t('Company name'), '#default_value' => $this->config('drupalform.company')->get('name'), ); return parent::buildForm($form, $form_state); }
/** * {@inheritdoc} */ public function validateForm(array &$form, FormStateInterface $form_state) { if (!$form_state->isValueEmpty('company_name')) { if (strlen($form_state->getValue('company_name')) <= 5) { $form_state->setErrorByName('company_name', t('Company name is less than 5 characters')); } } } /** * {@inheritdoc} */ public function submitForm(array &$form, FormStateInterface $form_state) { parent::submitForm($form, $form_state); $this->config('drupalform.company')->set('name', $form_state->getValue('company_name')); }}
11. When you edit your form and click on the Submit button, the value thatyou entered in the Company name field will now be saved in theconfiguration.
How it works...The ConfigFormBase utilizes the ConfigFormBaseTrait to provide easyaccess to a configuration factory. The class's implementation of buildFormalso adds a submit button and theme styling to forms. The submit handlerdisplays a configuration saved message, but relies on implementing a moduleto save the configuration.
The form saves its data under the drupalform.company namespace. Thecompany name value is stored as name and can be accessed asdrupalform.company.name. Note that the configuration name does not haveto match the form element's key.

There's more...In the next section, we will cover how to handle multiple submit callbacks.
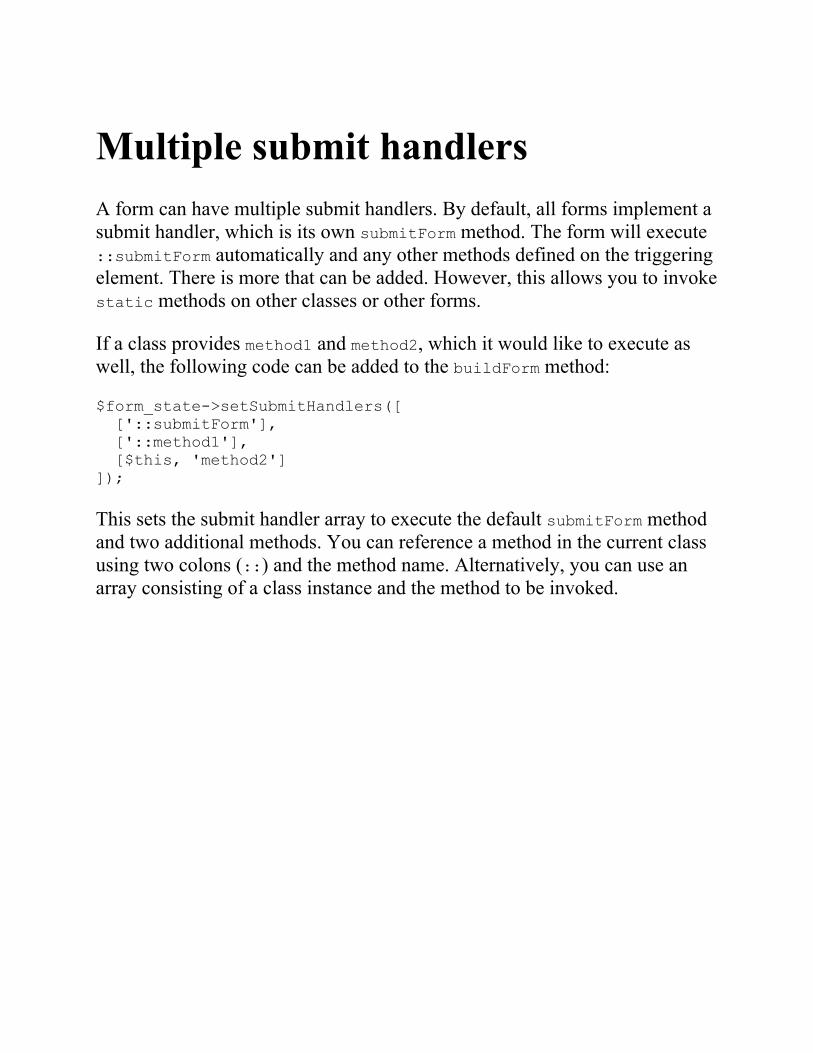
Multiple submit handlersA form can have multiple submit handlers. By default, all forms implement asubmit handler, which is its own submitForm method. The form will execute::submitForm automatically and any other methods defined on the triggeringelement. There is more that can be added. However, this allows you to invokestatic methods on other classes or other forms.
If a class provides method1 and method2, which it would like to execute aswell, the following code can be added to the buildForm method:
$form_state->setSubmitHandlers([ ['::submitForm'], ['::method1'], [$this, 'method2'] ]);
This sets the submit handler array to execute the default submitForm methodand two additional methods. You can reference a method in the current classusing two colons (::) and the method name. Alternatively, you can use anarray consisting of a class instance and the method to be invoked.

See alsoRefer to Chapter 9, Configuration Management- Deploying in Drupal 8
Altering other formsDrupal's Form API does not just provide a way to create forms. There areways to alter forms through a custom module that allows you to manipulatethe core and contributed forms. Using this technique, new elements can beadded, default values can be changed, or elements can even be hidden fromview to simplify the user experience.
The altering of a form does not happen in a custom class; this is a hookdefined in the module file. In this recipe, we will use thehook_form_FORM_ID_alter() hook to add a telephone field to the site'sconfiguration form.
Getting readyThis recipe assumes that you have a custom module to add the code to.
How to do it...1. In the modules folder of your Drupal site, create a folder named
mymodule.
2. In the mymodule folder, create a mymodule.info.yml, containing thefollowing code:
name: My module description: Custom module that uses a form alter type: module core: 8.x
3. Next, create a mymodule.module file in your module's directory:
<?php
/** * @file * Custom module that alters forms. */
4. Add themymodule_form_system_site_information_settings_alter() hook.The form ID can be found by viewing the form's class and reviewing thegetFormId method:
/** * Implements hook_form_FORM_ID_alter(). */ function mymodule_form_system_site_information_settings_alter(&$form, \Drupal\Core\Form\FormStateInterface $form_state) { // Code to alter form or form state here }
Drupal will call this hook and pass the current form array and its formstate object. The form array is passed by reference, allowing our hookto modify the array without returning any values. This is why the
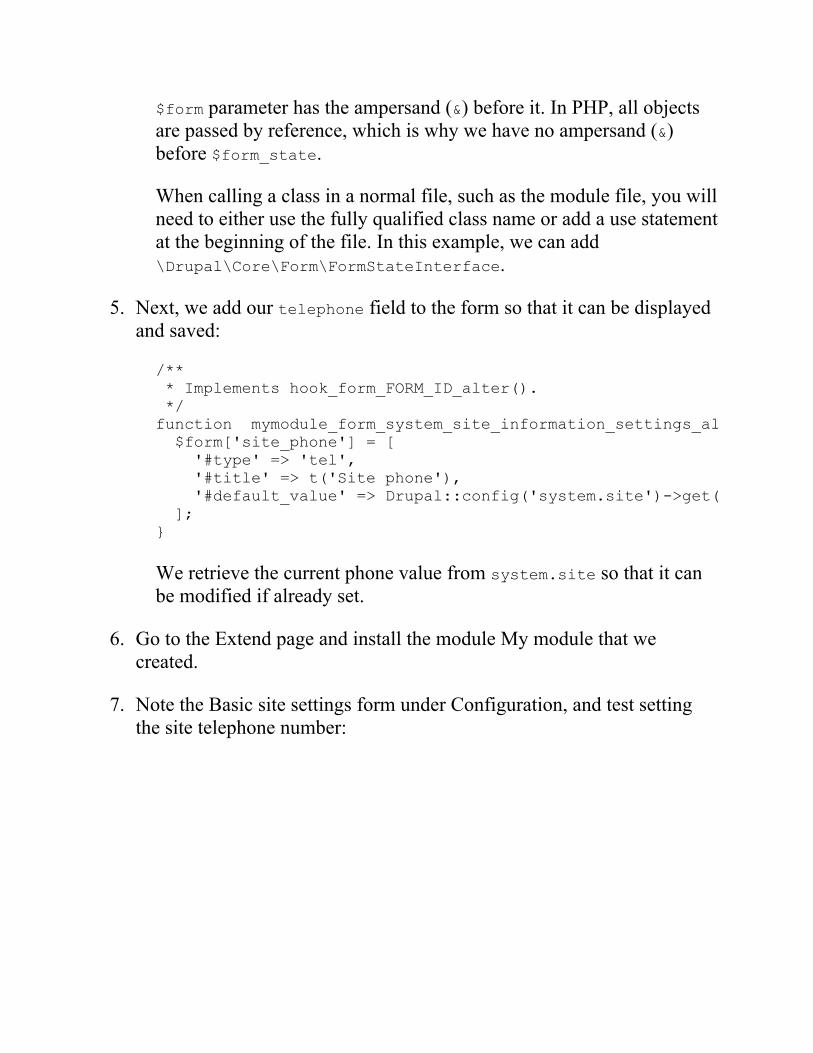
$form parameter has the ampersand (&) before it. In PHP, all objectsare passed by reference, which is why we have no ampersand (&)before $form_state.
When calling a class in a normal file, such as the module file, you willneed to either use the fully qualified class name or add a use statementat the beginning of the file. In this example, we can add\Drupal\Core\Form\FormStateInterface.
5. Next, we add our telephone field to the form so that it can be displayedand saved:
/** * Implements hook_form_FORM_ID_alter(). */ function mymodule_form_system_site_information_settings_alter(&$form, \Drupal\Core\Form\FormStateInterface $form_state) { $form['site_phone'] = [ '#type' => 'tel', '#title' => t('Site phone'), '#default_value' => Drupal::config('system.site')->get('phone'), ]; }
We retrieve the current phone value from system.site so that it canbe modified if already set.
6. Go to the Extend page and install the module My module that wecreated.
7. Note the Basic site settings form under Configuration, and test settingthe site telephone number:
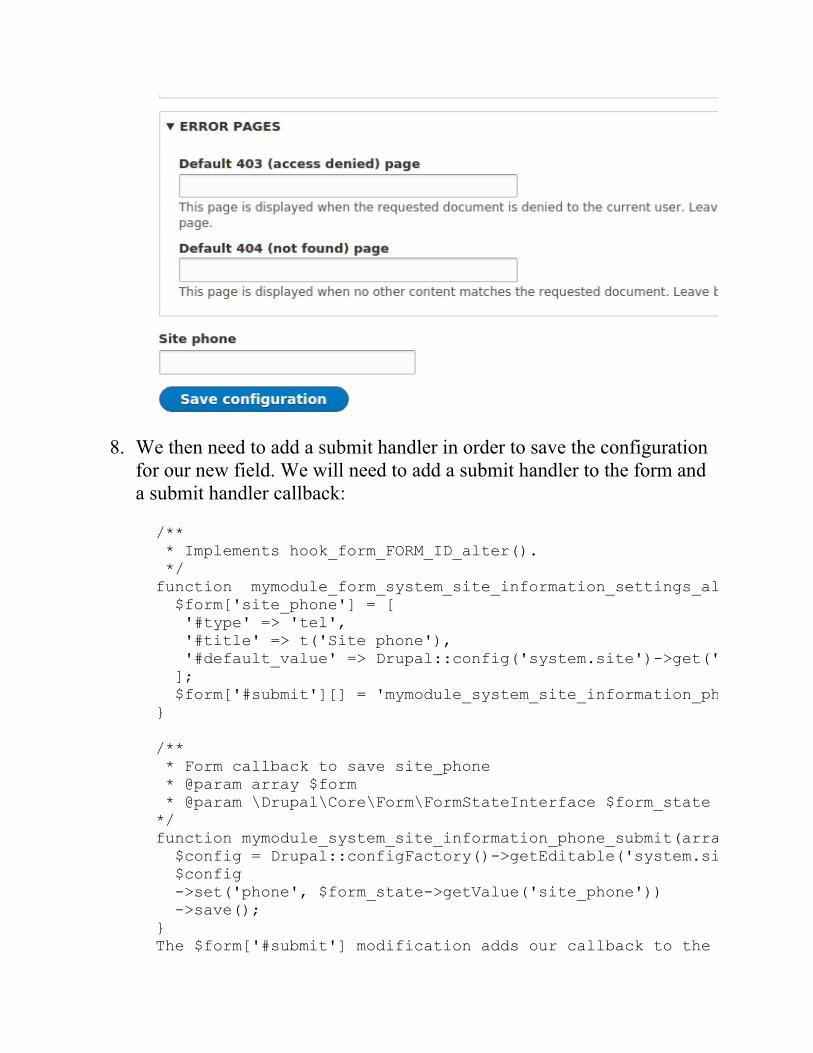
8. We then need to add a submit handler in order to save the configurationfor our new field. We will need to add a submit handler to the form anda submit handler callback:
/** * Implements hook_form_FORM_ID_alter(). */ function mymodule_form_system_site_information_settings_alter(&$form, \Drupal\Core\Form\FormStateInterface $form_state) { $form['site_phone'] = [ '#type' => 'tel', '#title' => t('Site phone'), '#default_value' => Drupal::config('system.site')->get('phone'), ]; $form['#submit'][] = 'mymodule_system_site_information_phone_submit'; } /** * Form callback to save site_phone * @param array $form * @param \Drupal\Core\Form\FormStateInterface $form_state */ function mymodule_system_site_information_phone_submit(array &$form, \Drupal\Core\Form\FormStateInterface $form_state) { $config = Drupal::configFactory()->getEditable('system.site'); $config ->set('phone', $form_state->getValue('site_phone')) ->save(); } The $form['#submit'] modification adds our callback to the form's submit handlers. This allows our module to interact with the form once it has been submitted.
The mymodule_system_site_information_phone_submit callback is passed the form array and form state. We load the current configuration factory to receive the configuration that can be edited. We then load system.site and save phone based on the value from the form state.
9. Submit the form, and verify that the data has been saved.
How it works...The \Drupal\system\Form\SiteInformationForm class extends\Drupal\Core\Form\ConfigFormBase to handle the writing of form elementsas individual configuration values. However, it does not write the valuesautomatically to the form state. In this recipe, we needed to add a submithandler to manually save our added field via a procedural function in ourmymodule.module file.
The form array is passed by reference, allowing modifications to be made inthe hook to alter the original data. This allows us to add an element or evenmodify existing items, such as titles or descriptions.

There's more...We will discuss how to add additional handlers to other forms using formalters.
Adding additional validate handlersUsing a form alter hook, we can add additional validators to a form. Theproper way to do this is to load the current validators and add the new one tothe array and reset the validators in the form state:
$validators = $form_state->getValidateHandlers(); $validators[] = 'mymodule_form_validate'; $form_state->setValidateHandlers($validators);
First, we will receive all of the currently set validators from the form state asthe $validators variable. We then append a new callback to the end of thearray. Once the $validators variable has been modified, we will overridethe form state's validator array by executing the setValidateHandlersmethod.
You can also use PHP array manipulation functions to add your validators indifferent execution orders. For example, array_unshift will place yourvalidator at the beginning of the array so that it can run first.
Adding additional submit handlersUsing a form alter hook, we can add additional submit handlers to a form.The proper way to do this is to load the current submit handlers, add the newone to the array, and reset the validators in the form state:
$submit_handlers = $form_state->getSubmitHandlers(); $submit_handlers[] = 'mymodule_form_submit'; $form_state->setSubmitHandlers($submit_handlers );
First, we will receive all of the currently set submit handlers from the formstate as the $submit_handlers variable. We then append a new callback tothe end of the array.Once the $submit_handlers variable has been modified, we will override theform state's submit handler array by executing the setSubmitHandlersmethod.
You can also use PHP array manipulation functions to add your callback indifferent execution orders. For example, array_unshift will place yourcallback at the beginning of the array so that it can run first.
Plug and Play with PluginsIn this chapter, we will dive into the new Plugin API provided in Drupal 8:
Creating blocks using pluginsCreating a custom field typeCreating a custom field widgetCreating a custom field formatterCreating a custom plugin type
IntroductionDrupal 8 introduces plugins. Plugins power many items in Drupal, such asblocks, field types, and field formatters. Plugins and plugin types areprovided by modules. They provide a swappable and specific functionality.Breakpoints, as discussed in Chapter 5, Front End for the Win, are plugins. Inthis chapter, we will discuss how plugins work in Drupal 8 and show youhow to create blocks, fields, and custom plugin types.
Each version of Drupal has subsystems, which provided pluggablecomponents and contributed modules. However, the implementation andmanagement of these subsystems presented a problem. Blocks, fields, andimage styles each had an entirely different system to be learned andunderstood. The Plugin API exists in Drupal 8 to mitigate this problem andprovide a base API to implement pluggable components. This has greatlyimproved the developer experience when working with Drupal core'ssubsystems. In this chapter, we will implement a block plugin. We will usethe Plugin API to provide a custom field type along with a widget andformatter for the field. The last recipe will show you how to create and use acustom plugin type.

Creating blocks using pluginsIn Drupal, a block is a piece of content that can be placed in a regionprovided by a theme. Blocks are used to present specific kinds of content,such as a user login form, a snippet of text, and many more.
Blocks are annotated plugins. Annotated plugins use documentation blocks toprovide details of the plugin. They are discovered in the module's Pluginclass namespace. Each class in the Plugin/Block namespace will bediscovered by the Block module's plugin manager.
In this recipe, we will define a block that will display a copyright snippet andthe current year and place it in the footer region.
Getting readyCreate a new module like the one shown in this recipe, with a definedinfo.yml so that it can be discovered by Drupal. We will refer to the moduleas mymodule throughout the recipe. Use your module's appropriate name.

How to do it...1. Create a src/Plugin/Block directory in your module. This will translate
the\Drupal\mymodule\Plugin\Block namespace and allow a block plugindiscovery.
2. Create a Copyright.php file in the newly created folder so that we candefine the Copyright class for our block:
3. The Copyright class will extend the \Drupal\Core\Block\BlockBaseclass:
<?php namespace Drupal\mymodule\Plugin\Block; use Drupal\Core\Block\BlockBase; class Copyright extends BlockBase { }
We will extend the BlockBase class, which implements\Drupal\Core\Block\BlockPluginInterface and provides us withan implementation of nearly all of the interface's methods.
4. We will provide the block's identifier, administrative label, andcategory:
<?php
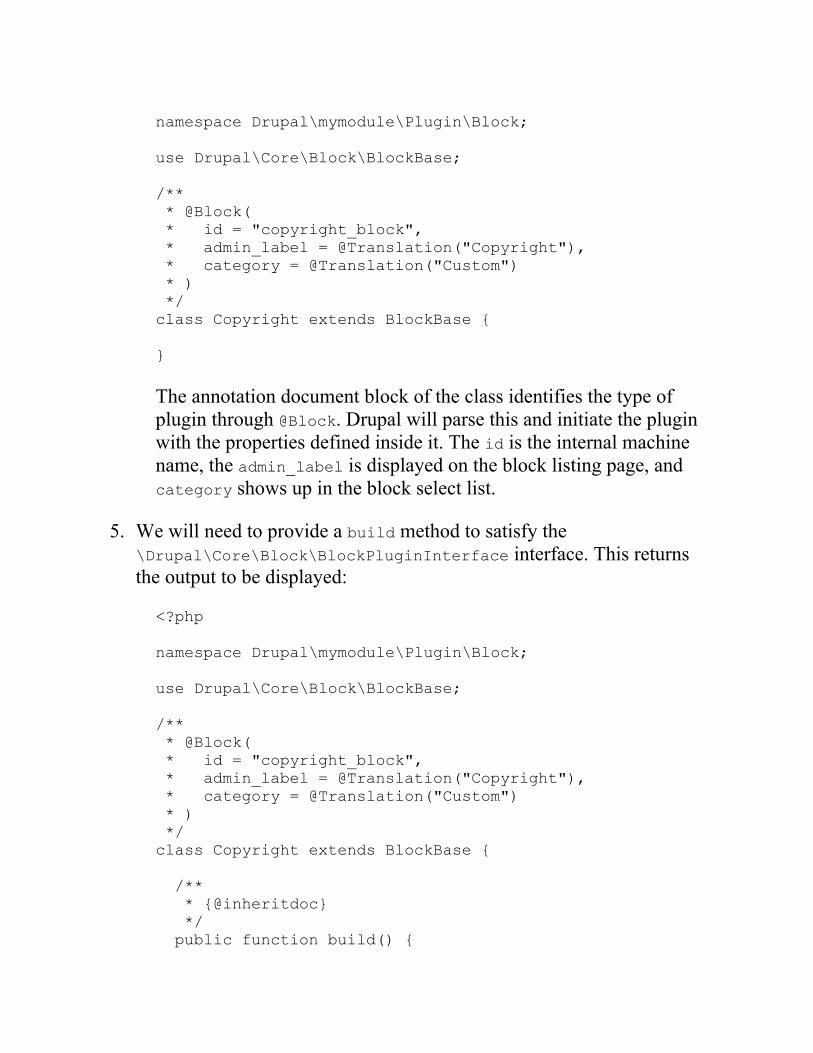
namespace Drupal\mymodule\Plugin\Block; use Drupal\Core\Block\BlockBase; /** * @Block( * id = "copyright_block", * admin_label = @Translation("Copyright"), * category = @Translation("Custom") * ) */ class Copyright extends BlockBase { }
The annotation document block of the class identifies the type ofplugin through @Block. Drupal will parse this and initiate the pluginwith the properties defined inside it. The id is the internal machinename, the admin_label is displayed on the block listing page, andcategory shows up in the block select list.
5. We will need to provide a build method to satisfy the\Drupal\Core\Block\BlockPluginInterface interface. This returnsthe output to be displayed:
<?php namespace Drupal\mymodule\Plugin\Block; use Drupal\Core\Block\BlockBase; /** * @Block( * id = "copyright_block", * admin_label = @Translation("Copyright"), * category = @Translation("Custom") * ) */ class Copyright extends BlockBase { /** * {@inheritdoc} */ public function build() {
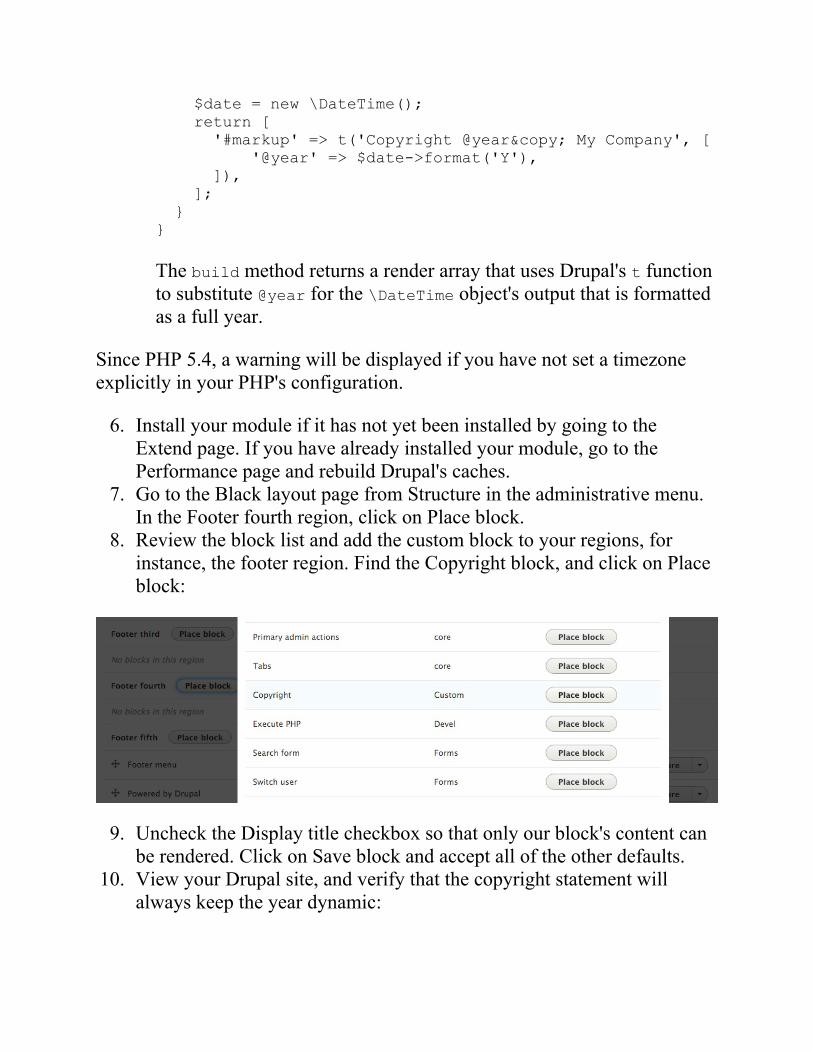
$date = new \DateTime(); return [ '#markup' => t('Copyright @year© My Company', [ '@year' => $date->format('Y'), ]), ]; } }
The build method returns a render array that uses Drupal's t functionto substitute @year for the \DateTime object's output that is formattedas a full year.
Since PHP 5.4, a warning will be displayed if you have not set a timezoneexplicitly in your PHP's configuration.
6. Install your module if it has not yet been installed by going to theExtend page. If you have already installed your module, go to thePerformance page and rebuild Drupal's caches.
7. Go to the Black layout page from Structure in the administrative menu.In the Footer fourth region, click on Place block.
8. Review the block list and add the custom block to your regions, forinstance, the footer region. Find the Copyright block, and click on Placeblock:
9. Uncheck the Display title checkbox so that only our block's content canbe rendered. Click on Save block and accept all of the other defaults.
10. View your Drupal site, and verify that the copyright statement willalways keep the year dynamic:
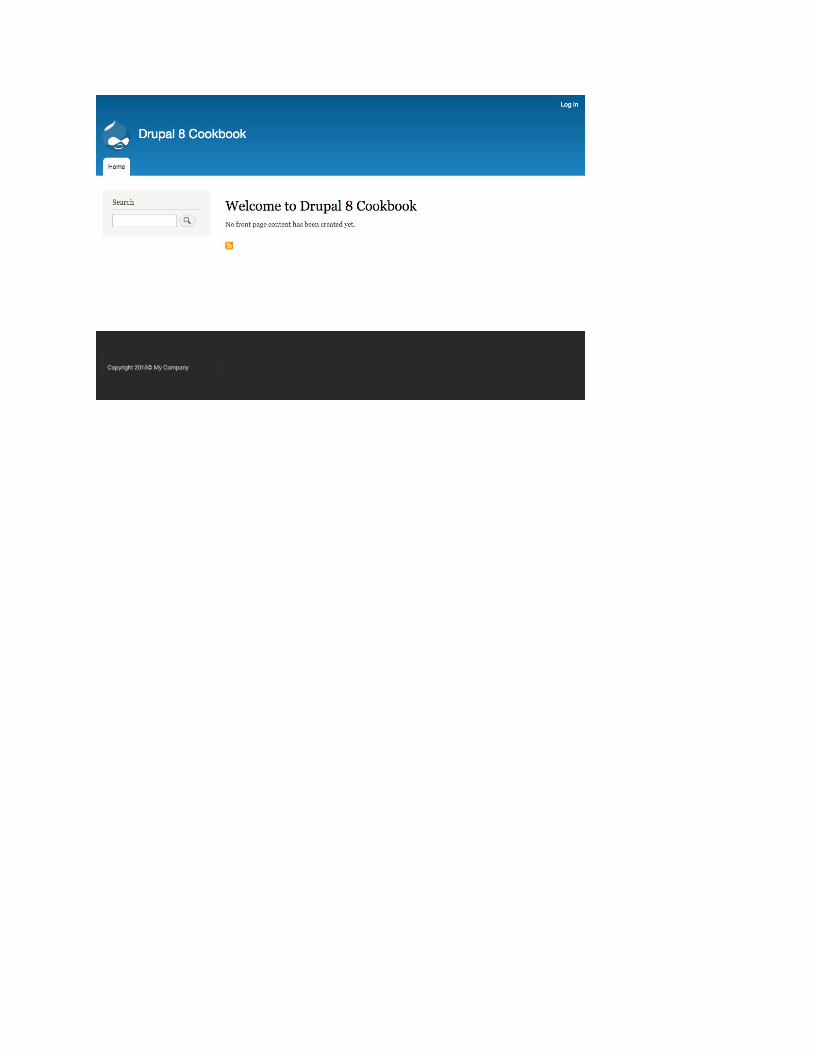
How it works...The plugin system works through plugin definitions and plugin managers forthose definitions. The \Drupal\Core\Block\BlockManager class defines theblock plugins that need be located in the Plugin/Block namespace. It alsodefines the base interface that needs to be implemented along with theAnnotation class, which is to be used when parsing the class's documentblock.
When Drupal's cache is rebuilt, all available namespaces are scanned tocheck whether classes exist in the given plugin namespace. The definitions,via annotation, will be processed, and the information will be cached.
Blocks are then retrieved from the manager, manipulated, and their methodsare invoked. When viewing the Block layout page to manage blocks, the\Drupal\Core\Block\BlockBase class's label method is invoked to displaythe human-readable name. When a block is displayed on a rendered page, thebuild method is invoked and passed to the theming layer to be output.

There's more...There are more in-depth items that can be used when creating a block plugin.We will cover those in the following sections.
Altering blocksBlocks can be altered in three different ways: the plugin definition can bealtered, the build array, or the view array out.
A module can implement hook_block_alter in its .module file and modifythe annotation definitions of all the discovered blocks. This will allow amodule to change the default user_login_block from user login to Login:
/** * Implements hook_block_alter(). */ function mymodule_block_alter(&$definitions) { $definitions['user_login_block']['admin_label'] = t('Login'); }
A module can implement hook_block_build_alter and modify the buildinformation of a block. The hook is passed through the build array and the\Drupal\Core\Block\BlockPluginInterface instance for the current block.Module developers can use this to add cache contexts or alter the cacheability of the metadata:
/** * Implements hook_block_build_alter(). */ function hook_block_build_alter(array &$build, \Drupal\Core\Block\BlockPluginInterface $block) { // Add the 'url' cache the block per URL. if ($block->getBaseId() == 'myblock') { $build['#contexts'][] = 'url'; } }
You can test the modification of the cache metadata by altering the recipe'sblock to output a timestamp. With caching enabled, you will see that thevalue persists on the same URL, but it will be different across each page.
Finally, a module can implement hook_block_view_alter in order to modifythe output to be rendered. A module can add content to be rendered orremoved. This can be used to remove the contextual_links item, which
allows inline editing on the front page of a site:
/** * Implements hook_block_view_alter(). */ function hook_block_view_alter(array &$build, \Drupal\Core\Block\BlockPluginInterface $block) { // Remove the contextual links on all blocks that provide them. if (isset($build['#contextual_links'])) { unset($build['#contextual_links']); } }

Block settings formsBlocks can provide a setting form. This recipe provides the text MyCompany for the copyright text. Instead, this can be defined through a textfield in the block's setting form.
Let's readdress the Copyright.php file that holds our block's class. We willoverride methods provided by our base class. The following methods will beadded to the class written in this recipe.
A block can override the default defaultConfiguration method, whichreturns an array of setting keys and their default values. The blockFormmethod can then override the \Drupal\Core\Block\BlockBase empty arrayimplementation to return a Form API array to represent the settings form:
/** * {@inheritdoc} */ public function defaultConfiguration() { return [ 'company_name' => '', ]; } /** * {@inheritdoc} */ public function blockForm($form, \Drupal\Core\Form\FormStateInterface $form_state) { $form['company_name'] = [ '#type' => 'textfield', '#title' => t('Company name'), '#default_value' => $this->configuration['company_name'], ]; return $form; }
The blockSubmit method must then be implemented, which updates theblock's configuration:
/**
* {@inheritdoc} */ public function blockSubmit($form, \Drupal\Core\Form\FormStateInterface $form_state) { $this->configuration['company_name'] = $form_state->getValue('company_name'); }
Finally, the build method can be updated to use the new configuration item:
/** * {@inheritdoc} */ public function build() { $date = new \DateTime(); return [ '#markup' => t('Copyright @year© @company', [ '@year' => $date->format('Y'), '@company' => $this->configuration['company_name'], ]), ]; }
You can now return to the Block layout form, and click on Configure in theCopyright block. The new setting will be available in the block instance'sconfiguration form.
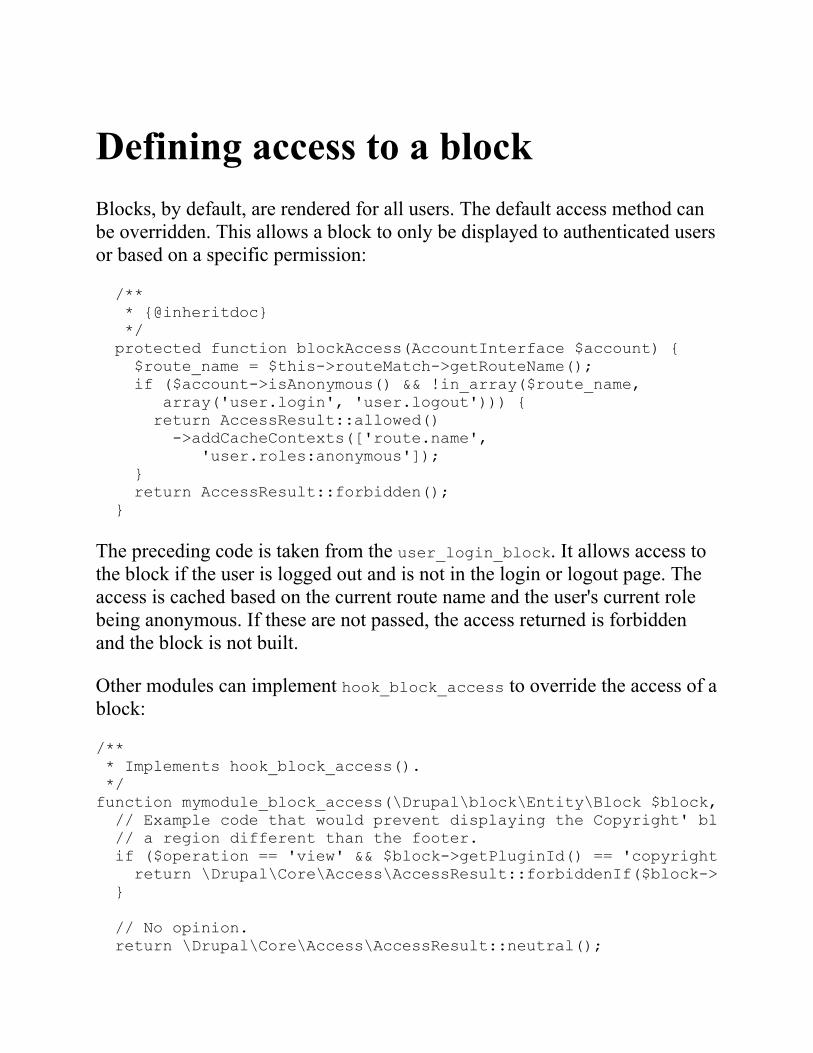
Defining access to a blockBlocks, by default, are rendered for all users. The default access method canbe overridden. This allows a block to only be displayed to authenticated usersor based on a specific permission:
/** * {@inheritdoc} */ protected function blockAccess(AccountInterface $account) { $route_name = $this->routeMatch->getRouteName(); if ($account->isAnonymous() && !in_array($route_name, array('user.login', 'user.logout'))) { return AccessResult::allowed() ->addCacheContexts(['route.name', 'user.roles:anonymous']); } return AccessResult::forbidden(); }
The preceding code is taken from the user_login_block. It allows access tothe block if the user is logged out and is not in the login or logout page. Theaccess is cached based on the current route name and the user's current rolebeing anonymous. If these are not passed, the access returned is forbiddenand the block is not built.
Other modules can implement hook_block_access to override the access of ablock:
/** * Implements hook_block_access(). */ function mymodule_block_access(\Drupal\block\Entity\Block $block, $operation, \Drupal\Core\Session\AccountInterface $account) { // Example code that would prevent displaying the Copyright' block in // a region different than the footer. if ($operation == 'view' && $block->getPluginId() == 'copyright') { return \Drupal\Core\Access\AccessResult::forbiddenIf($block->getRegion() != 'footer'); } // No opinion. return \Drupal\Core\Access\AccessResult::neutral();

}
A module implementing the preceding hook will deny access to ourCopyright block if it is not placed in the footer region.
See alsoRefer to the Creating a custom plugin type recipe of this chapterRefer to annotations-based plugins athttps://www.drupal.org/docs/8/api/plugin-api/annotations-based-pluginsInformation on block.api.php is available athttps://api.drupal.org/api/drupal/core%21modules%21block%21block.api.php/8
Creating a custom field typeField types are defined using the plugin system. Each field type has its ownclass and definition. A new field type can be defined through a custom classthat will provide schema and property information.
In this example, we will create a simple field type called real name to storethe first and last names.
Field types define ways in which data can be stored and handled through theField API. Field widgets provides means for editing a field type in the userinterface. Field formatters provide means for displaying the field data tousers. Both are plugins and will be covered in later recipes.

Getting readyCreate a new module like the one shown in this recipe, with a definedinfo.yml so that it can be discovered by Drupal. We will refer to the moduleas mymodule throughout the recipe. Use your module's appropriate name.
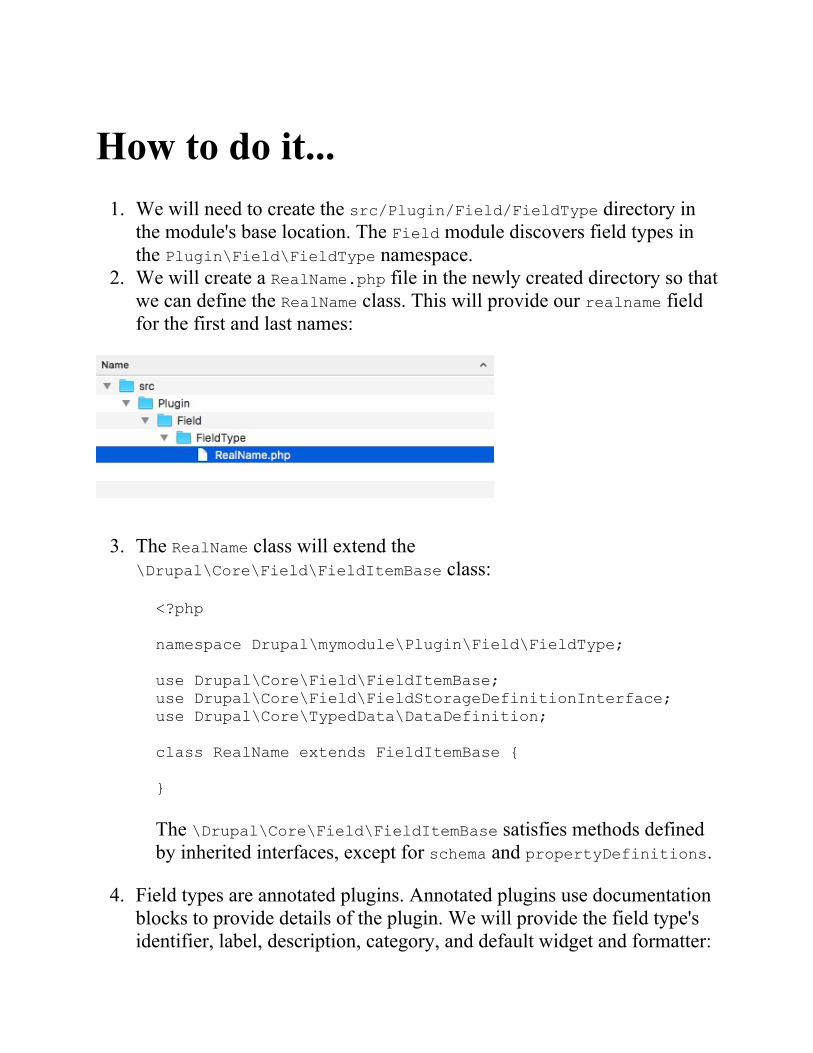
How to do it...1. We will need to create the src/Plugin/Field/FieldType directory in
the module's base location. The Field module discovers field types inthe Plugin\Field\FieldType namespace.
2. We will create a RealName.php file in the newly created directory so thatwe can define the RealName class. This will provide our realname fieldfor the first and last names:
3. The RealName class will extend the\Drupal\Core\Field\FieldItemBase class:
<?php namespace Drupal\mymodule\Plugin\Field\FieldType; use Drupal\Core\Field\FieldItemBase; use Drupal\Core\Field\FieldStorageDefinitionInterface; use Drupal\Core\TypedData\DataDefinition; class RealName extends FieldItemBase { }
The \Drupal\Core\Field\FieldItemBase satisfies methods definedby inherited interfaces, except for schema and propertyDefinitions.
4. Field types are annotated plugins. Annotated plugins use documentationblocks to provide details of the plugin. We will provide the field type'sidentifier, label, description, category, and default widget and formatter:
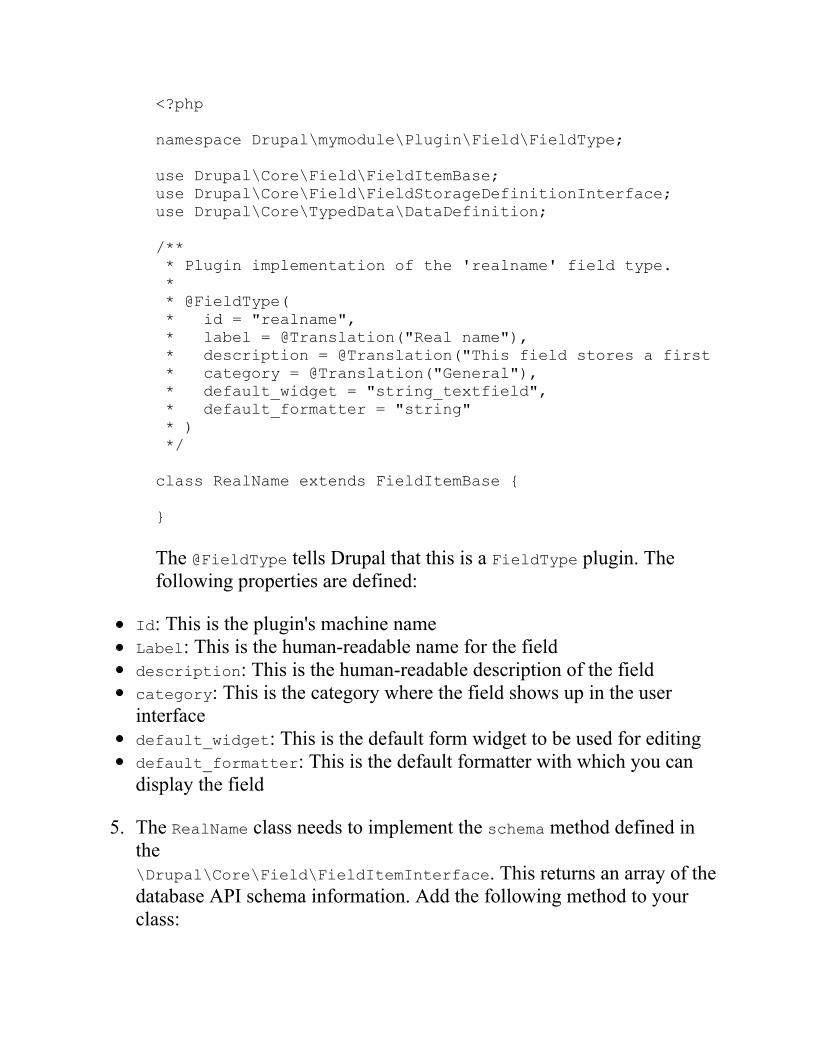
<?php namespace Drupal\mymodule\Plugin\Field\FieldType; use Drupal\Core\Field\FieldItemBase; use Drupal\Core\Field\FieldStorageDefinitionInterface; use Drupal\Core\TypedData\DataDefinition; /** * Plugin implementation of the 'realname' field type. * * @FieldType( * id = "realname", * label = @Translation("Real name"), * description = @Translation("This field stores a first and last name."), * category = @Translation("General"), * default_widget = "string_textfield", * default_formatter = "string" * ) */ class RealName extends FieldItemBase { }
The @FieldType tells Drupal that this is a FieldType plugin. Thefollowing properties are defined:
Id: This is the plugin's machine nameLabel: This is the human-readable name for the fielddescription: This is the human-readable description of the fieldcategory: This is the category where the field shows up in the userinterfacedefault_widget: This is the default form widget to be used for editingdefault_formatter: This is the default formatter with which you candisplay the field
5. The RealName class needs to implement the schema method defined inthe\Drupal\Core\Field\FieldItemInterface. This returns an array of thedatabase API schema information. Add the following method to yourclass:
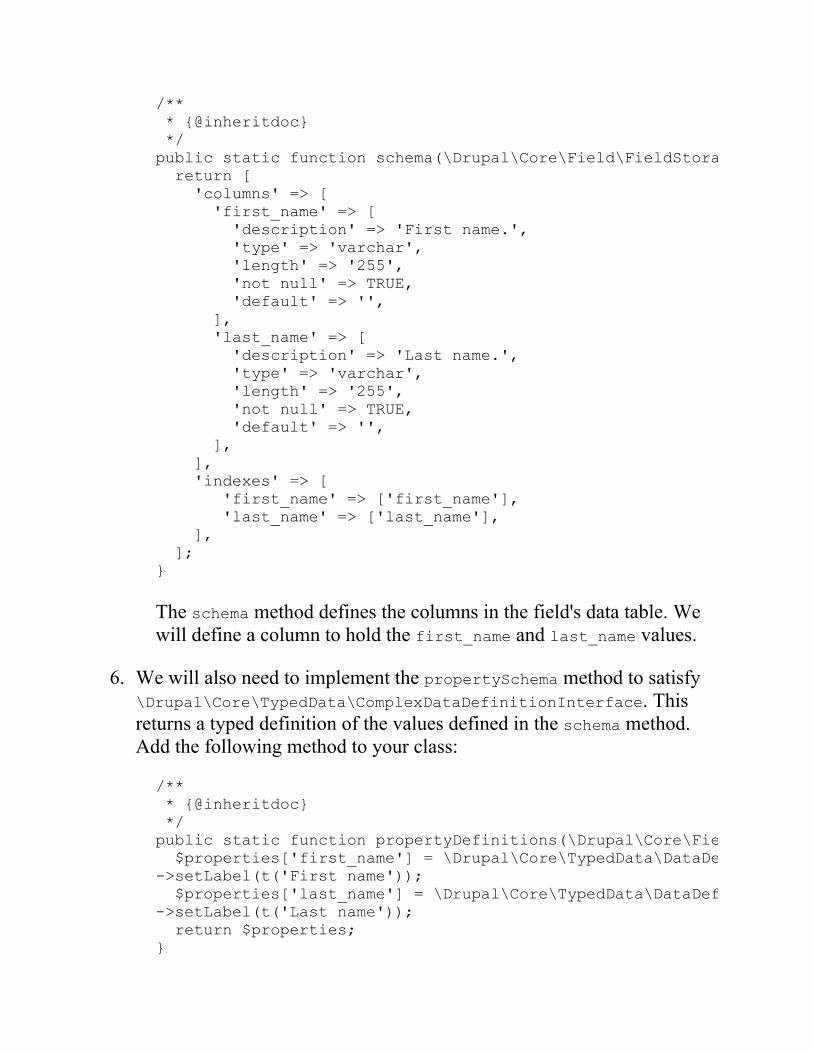
/** * {@inheritdoc} */ public static function schema(\Drupal\Core\Field\FieldStorageDefinitionInterface $field_definition) { return [ 'columns' => [ 'first_name' => [ 'description' => 'First name.', 'type' => 'varchar', 'length' => '255', 'not null' => TRUE, 'default' => '', ], 'last_name' => [ 'description' => 'Last name.', 'type' => 'varchar', 'length' => '255', 'not null' => TRUE, 'default' => '', ], ], 'indexes' => [ 'first_name' => ['first_name'], 'last_name' => ['last_name'], ], ]; }
The schema method defines the columns in the field's data table. Wewill define a column to hold the first_name and last_name values.
6. We will also need to implement the propertySchema method to satisfy\Drupal\Core\TypedData\ComplexDataDefinitionInterface. Thisreturns a typed definition of the values defined in the schema method.Add the following method to your class:
/** * {@inheritdoc} */ public static function propertyDefinitions(\Drupal\Core\Field\FieldStorageDefinitionInterface $field_definition) { $properties['first_name'] = \Drupal\Core\TypedData\DataDefinition::create('string') ->setLabel(t('First name')); $properties['last_name'] = \Drupal\Core\TypedData\DataDefinition::create('string') ->setLabel(t('Last name')); return $properties; }
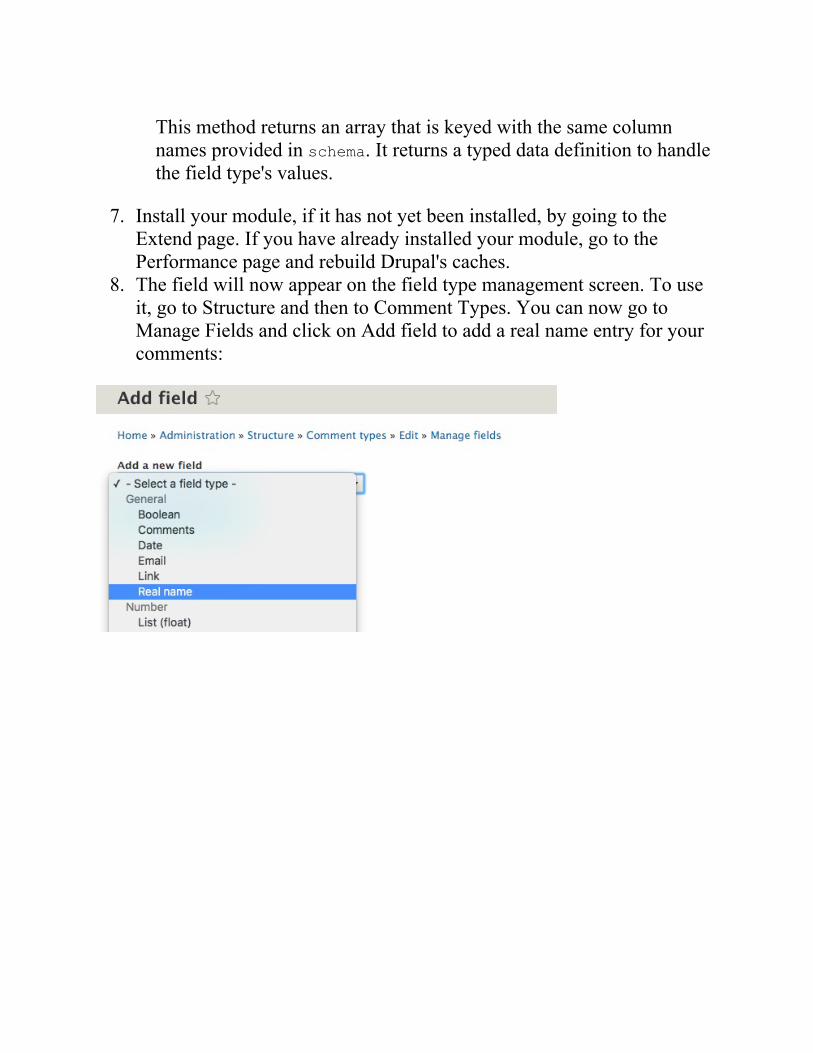
This method returns an array that is keyed with the same columnnames provided in schema. It returns a typed data definition to handlethe field type's values.
7. Install your module, if it has not yet been installed, by going to theExtend page. If you have already installed your module, go to thePerformance page and rebuild Drupal's caches.
8. The field will now appear on the field type management screen. To useit, go to Structure and then to Comment Types. You can now go toManage Fields and click on Add field to add a real name entry for yourcomments:
How it works...Drupal core defines a plugin.manager.field.field_type service. Bydefault, this is handled through the\Drupal\Core\Field\FieldTypePluginManager class. This plugin managerdefines the field type plugins that should be in the Plugin/Field/FieldTypenamespace, and all the classes in this namespace will be loaded and assumedto be field type plugins.
The manager's definition also sets\Drupal\Core\Field\FieldItemInterface as the expected interface that allthe field type plugins will implement. This is why most field types extend\Drupal\Core\Field\FieldItemBase to meet these method requirements.
As field types are annotated plugins, the manager provides\Drupal\Core\Field\Annotation\FieldType as the class that fulfills theannotation definition.
When the user interface defines the available fields, theplugin.manager.field.field_type service is invoked to retrieve a list ofavailable field types.

There's more...Existing field types can be altered to modify their definitions, and customfield types can implement a method to define whether the value is empty ornot. We will cover these in the next sections.
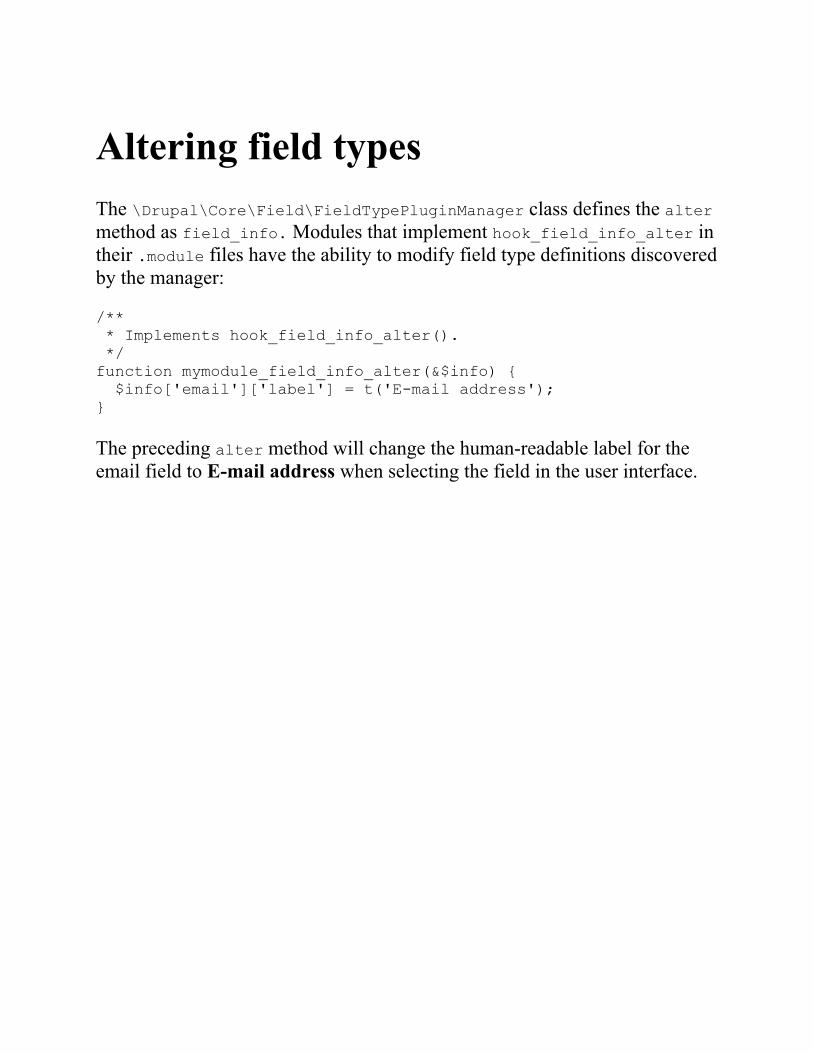
Altering field typesThe \Drupal\Core\Field\FieldTypePluginManager class defines the altermethod as field_info. Modules that implement hook_field_info_alter intheir .module files have the ability to modify field type definitions discoveredby the manager:
/** * Implements hook_field_info_alter(). */ function mymodule_field_info_alter(&$info) { $info['email']['label'] = t('E-mail address'); }
The preceding alter method will change the human-readable label for theemail field to E-mail address when selecting the field in the user interface.
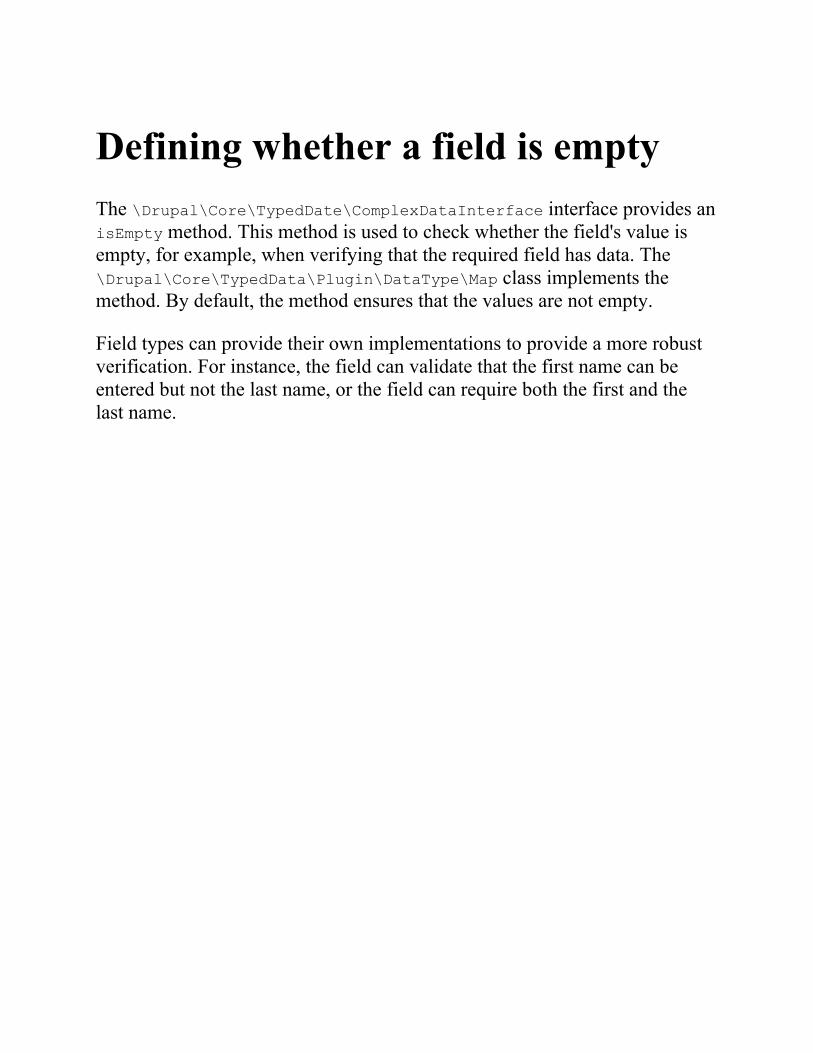
Defining whether a field is emptyThe \Drupal\Core\TypedDate\ComplexDataInterface interface provides anisEmpty method. This method is used to check whether the field's value isempty, for example, when verifying that the required field has data. The\Drupal\Core\TypedData\Plugin\DataType\Map class implements themethod. By default, the method ensures that the values are not empty.
Field types can provide their own implementations to provide a more robustverification. For instance, the field can validate that the first name can beentered but not the last name, or the field can require both the first and thelast name.

See alsoRefer to the Creating blocks using plugins recipe of this chapter
Creating a custom field widgetField widgets provide the form interface to edit a field. These integrate withthe Form API to define how a field can be edited and the way in which thedata can be formatted before it is saved. Field widgets are chosen andcustomized through the form display interface.
In this recipe, we will create a widget for the field created in the Creating acustom field type recipe in this chapter. The field widget will provide two textfields for entering the first and last name items.
Getting readyCreate a new module, such as the one from the Creating a custom field typerecipe. We will refer to the module as mymodule throughout the recipe. Useyour module's appropriate name.
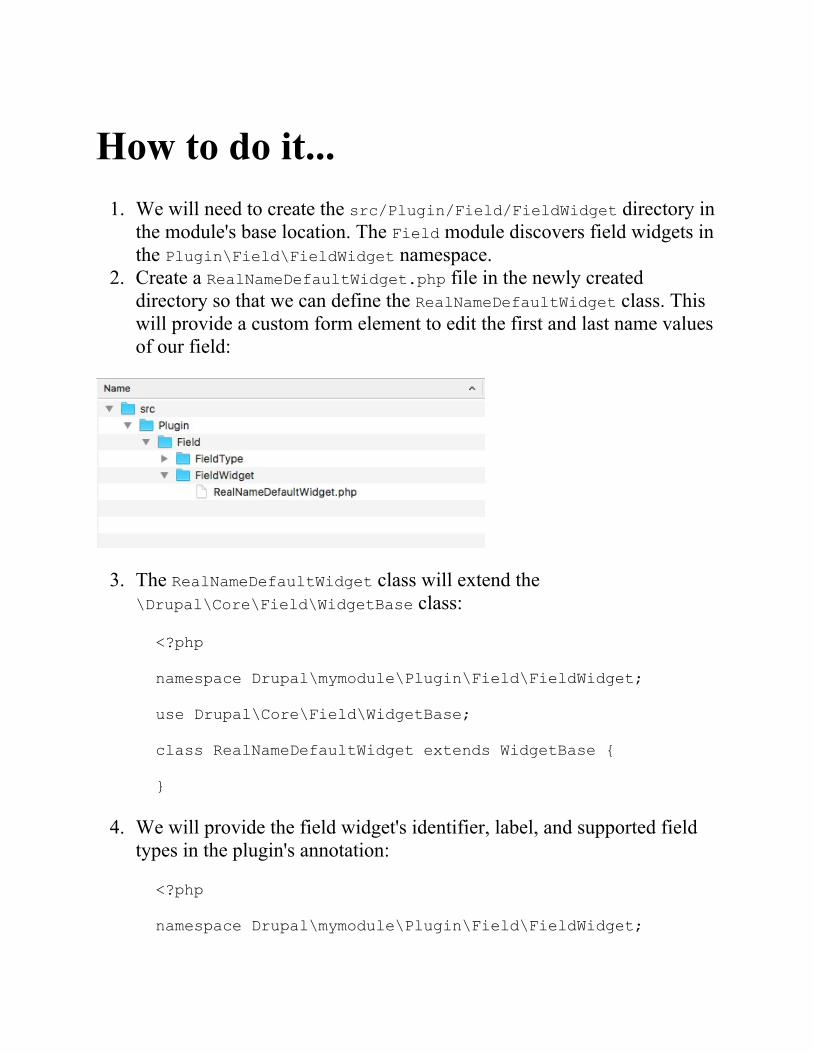
How to do it...1. We will need to create the src/Plugin/Field/FieldWidget directory in
the module's base location. The Field module discovers field widgets inthe Plugin\Field\FieldWidget namespace.
2. Create a RealNameDefaultWidget.php file in the newly createddirectory so that we can define the RealNameDefaultWidget class. Thiswill provide a custom form element to edit the first and last name valuesof our field:
3. The RealNameDefaultWidget class will extend the\Drupal\Core\Field\WidgetBase class:
<?php namespace Drupal\mymodule\Plugin\Field\FieldWidget; use Drupal\Core\Field\WidgetBase; class RealNameDefaultWidget extends WidgetBase { }
4. We will provide the field widget's identifier, label, and supported fieldtypes in the plugin's annotation:
<?php namespace Drupal\mymodule\Plugin\Field\FieldWidget;
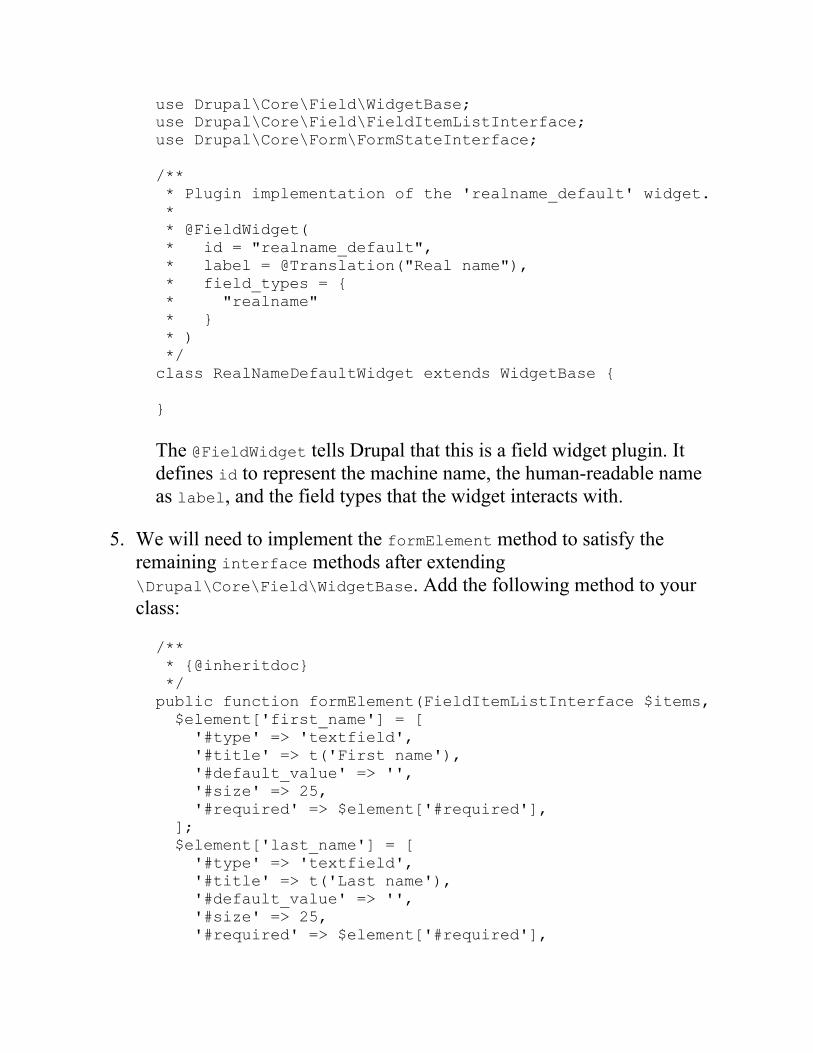
use Drupal\Core\Field\WidgetBase; use Drupal\Core\Field\FieldItemListInterface; use Drupal\Core\Form\FormStateInterface; /** * Plugin implementation of the 'realname_default' widget. * * @FieldWidget( * id = "realname_default", * label = @Translation("Real name"), * field_types = { * "realname" * } * ) */ class RealNameDefaultWidget extends WidgetBase { }
The @FieldWidget tells Drupal that this is a field widget plugin. Itdefines id to represent the machine name, the human-readable nameas label, and the field types that the widget interacts with.
5. We will need to implement the formElement method to satisfy theremaining interface methods after extending\Drupal\Core\Field\WidgetBase. Add the following method to yourclass:
/** * {@inheritdoc} */ public function formElement(FieldItemListInterface $items, $delta, array $element, array &$form, FormStateInterface $form_state) { $element['first_name'] = [ '#type' => 'textfield', '#title' => t('First name'), '#default_value' => '', '#size' => 25, '#required' => $element['#required'], ]; $element['last_name'] = [ '#type' => 'textfield', '#title' => t('Last name'), '#default_value' => '', '#size' => 25, '#required' => $element['#required'],
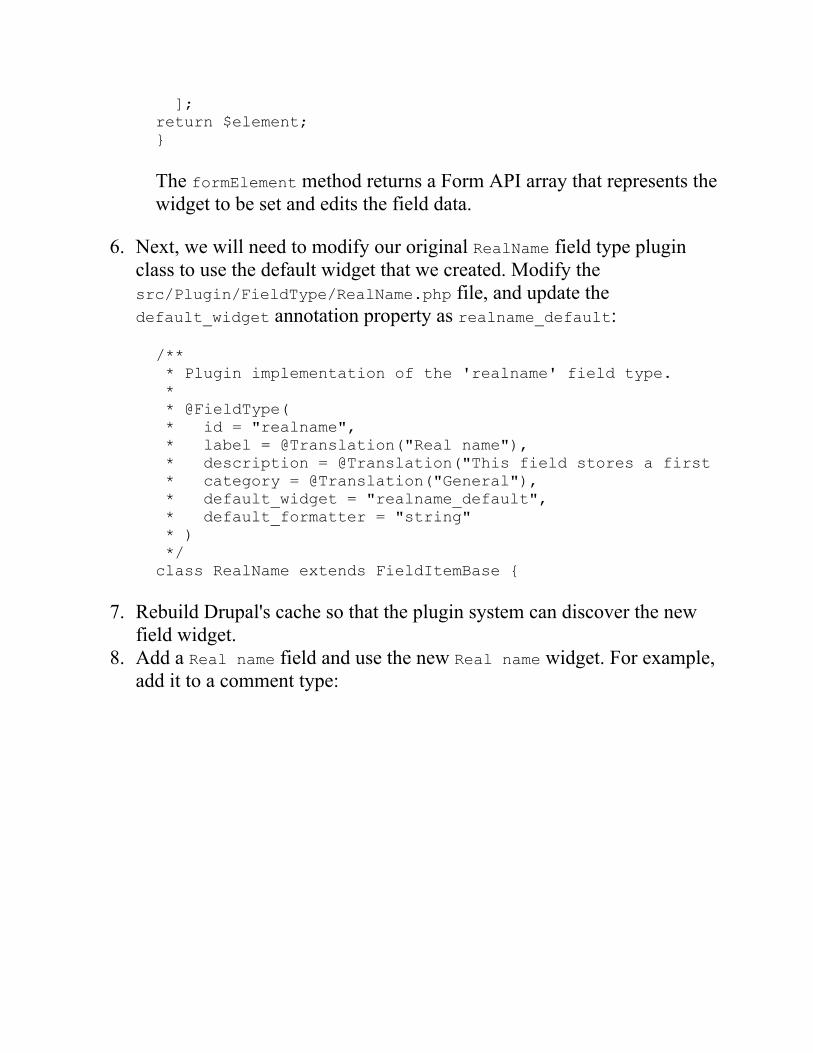
]; return $element; }
The formElement method returns a Form API array that represents thewidget to be set and edits the field data.
6. Next, we will need to modify our original RealName field type pluginclass to use the default widget that we created. Modify thesrc/Plugin/FieldType/RealName.php file, and update thedefault_widget annotation property as realname_default:
/** * Plugin implementation of the 'realname' field type. * * @FieldType( * id = "realname", * label = @Translation("Real name"), * description = @Translation("This field stores a first and last name."), * category = @Translation("General"), * default_widget = "realname_default", * default_formatter = "string" * ) */ class RealName extends FieldItemBase {
7. Rebuild Drupal's cache so that the plugin system can discover the newfield widget.
8. Add a Real name field and use the new Real name widget. For example,add it to a comment type:
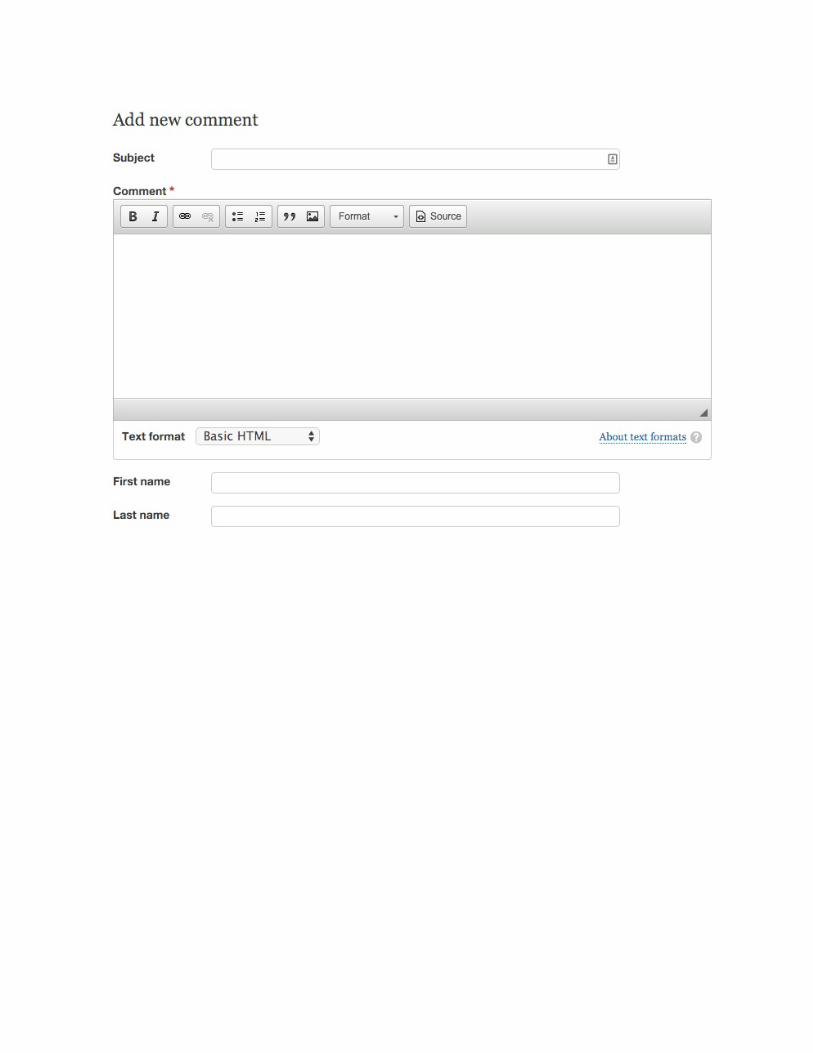
How it works...Drupal core defines a plugin.manager.field.widget service. By default,this is handled through the\Drupal\Core\Field\FieldWidgetPluginManager class. This pluginmanager defines the field widget plugins that should be in thePlugin/Field/FieldWidget namespace, and all the classes in this namespacewill be loaded and assumed to be field widget plugins.
The manager's definition also sets\Drupal\Core\Field\FieldWidgetInterface as the expected interface thatall the field widget plugins will implement. This is why most field typesextend \Drupal\Core\Field\WidgetBase to meet these methodrequirements.
As field widgets are annotated plugins, the manager provides\Drupal\Core\Field\Annotation\FieldWidget as the class that fulfills theannotation definition.
The entity form display system uses the plugin.manager.field.widgetservice to load field definitions and add the field's element returned from theformElement method to the entity form.

There's more...Field widgets have additional methods to provide more information; they arecovered in the next section.
Field widget settings and summaryThe \Drupal\Core\Field\WidgetInterface interface defines three methodsthat can be overridden to provide a settings form and a summary of thecurrent settings:
defaultSettings: This returns an array of the setting keys and defaultvaluessettingsForm: This returns a Form API array that is used for thesettings formsettingsSummary: This allows an array of strings to be returned anddisplayed on the manage display form for the field
Widget settings can be used to alter the form presented to the user. A settingcan be created that allows the field element to be limited to only enter thefirst or last name with one text field.

See alsoThe Creating a custom plugin type recipe of this chapter
Creating a custom field formatterField formatters define the way in which a field type will be presented. Theseformatters return the render array information to be processed by the theminglayer. Field formatters are configured on the display mode interfaces.
In this recipe, we will create a formatter for the field created in the Creating acustom field type recipe in this chapter. The field formatter will display thefirst and last names with some settings.
Getting readyCreate a new module like the one existing in the first recipe. We will refer tothe module as mymodule throughout the recipe. Use your module's appropriatename.
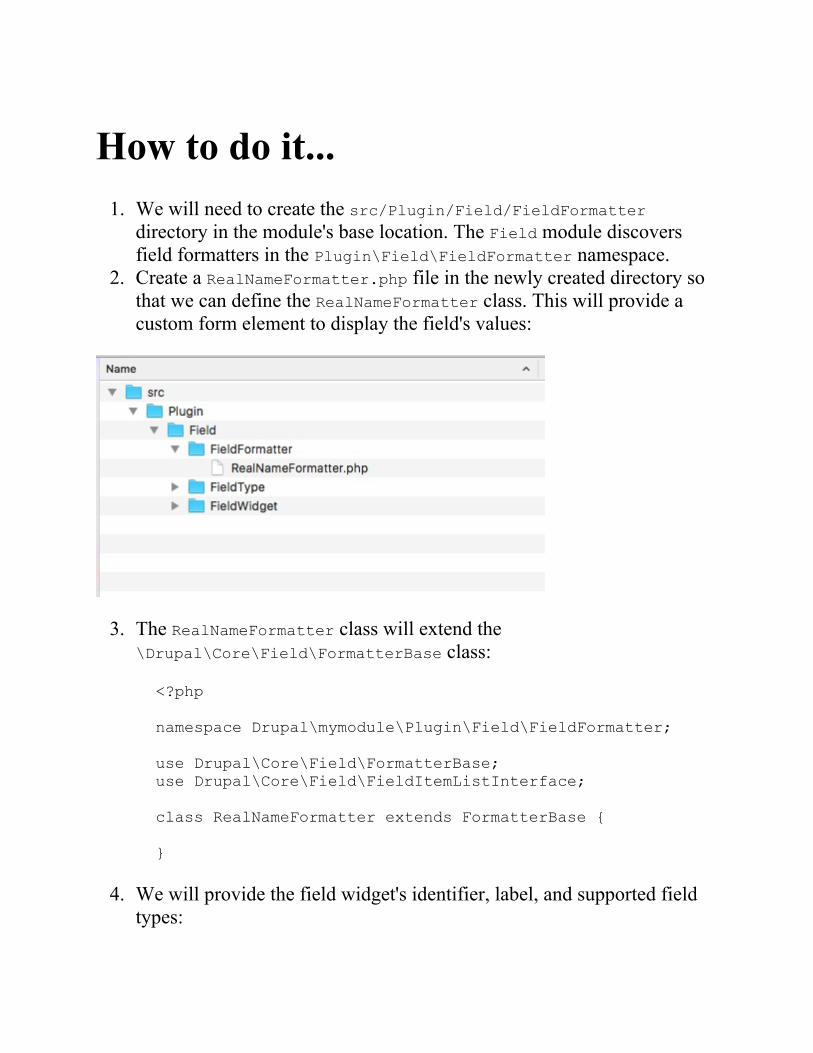
How to do it...1. We will need to create the src/Plugin/Field/FieldFormatter
directory in the module's base location. The Field module discoversfield formatters in the Plugin\Field\FieldFormatter namespace.
2. Create a RealNameFormatter.php file in the newly created directory sothat we can define the RealNameFormatter class. This will provide acustom form element to display the field's values:
3. The RealNameFormatter class will extend the\Drupal\Core\Field\FormatterBase class:
<?php namespace Drupal\mymodule\Plugin\Field\FieldFormatter; use Drupal\Core\Field\FormatterBase; use Drupal\Core\Field\FieldItemListInterface; class RealNameFormatter extends FormatterBase { }
4. We will provide the field widget's identifier, label, and supported fieldtypes:
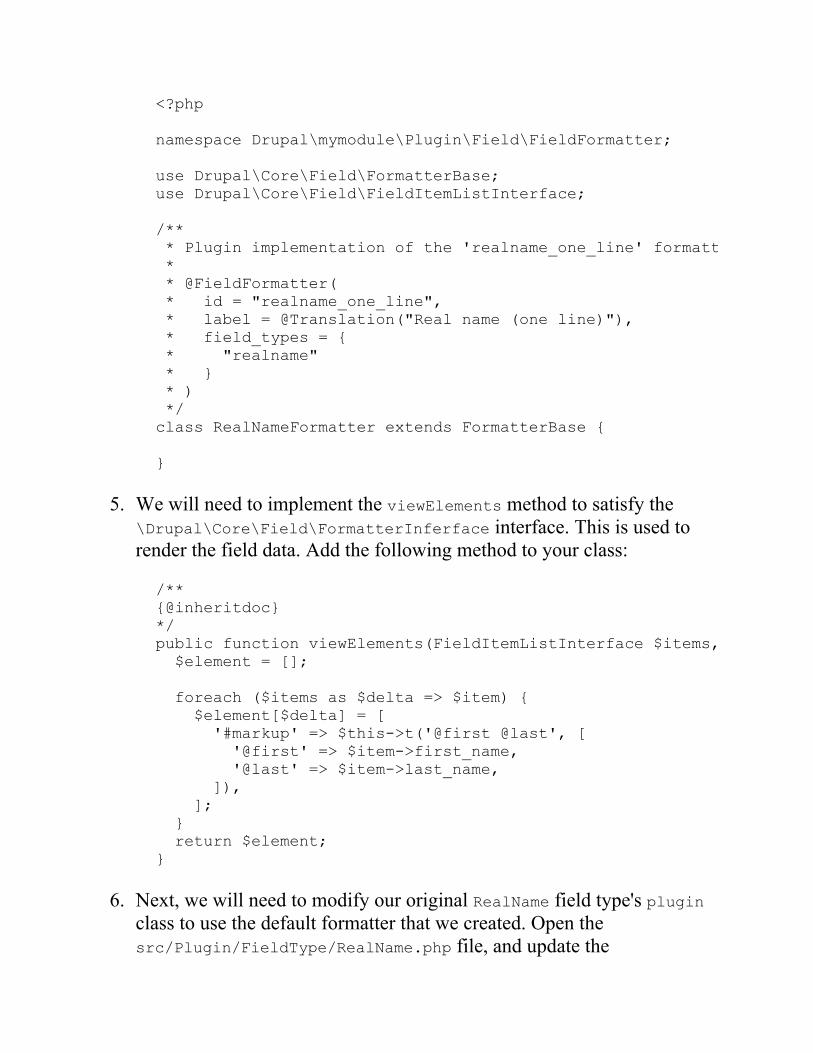
<?php namespace Drupal\mymodule\Plugin\Field\FieldFormatter; use Drupal\Core\Field\FormatterBase; use Drupal\Core\Field\FieldItemListInterface; /** * Plugin implementation of the 'realname_one_line' formatter. * * @FieldFormatter( * id = "realname_one_line", * label = @Translation("Real name (one line)"), * field_types = { * "realname" * } * ) */ class RealNameFormatter extends FormatterBase { }
5. We will need to implement the viewElements method to satisfy the\Drupal\Core\Field\FormatterInferface interface. This is used torender the field data. Add the following method to your class:
/** {@inheritdoc} */ public function viewElements(FieldItemListInterface $items, $langcode) { $element = []; foreach ($items as $delta => $item) { $element[$delta] = [ '#markup' => $this->t('@first @last', [ '@first' => $item->first_name, '@last' => $item->last_name, ]), ]; } return $element; }
6. Next, we will need to modify our original RealName field type's pluginclass to use the default formatter that we created. Open thesrc/Plugin/FieldType/RealName.php file, and update the
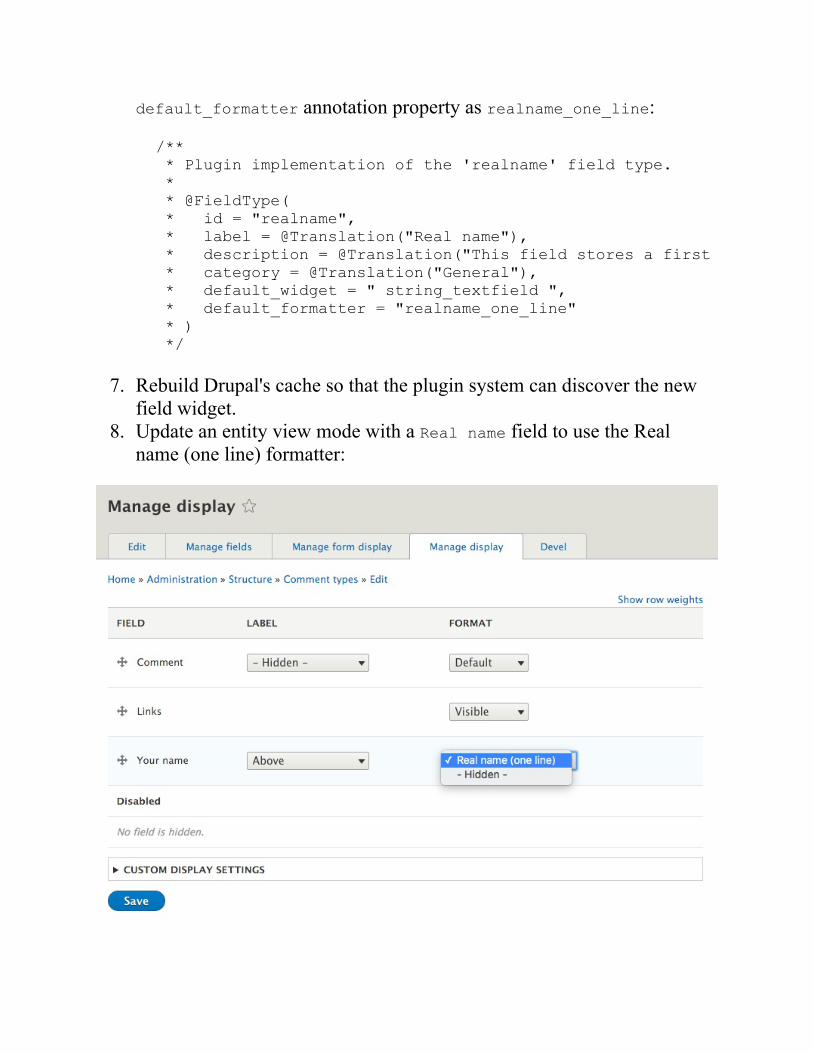
default_formatter annotation property as realname_one_line:
/** * Plugin implementation of the 'realname' field type. * * @FieldType( * id = "realname", * label = @Translation("Real name"), * description = @Translation("This field stores a first and last name."), * category = @Translation("General"), * default_widget = " string_textfield ", * default_formatter = "realname_one_line" * ) */
7. Rebuild Drupal's cache so that the plugin system can discover the newfield widget.
8. Update an entity view mode with a Real name field to use the Realname (one line) formatter:
How it works...Drupal core defines a plugin.manager.field.formatter service. Bydefault, this is handled through the\Drupal\Core\Field\FormatterPluginManager class. This plugin managerdefines the field formatter plugins that should be in thePlugin/Field/FieldFormatter namespace, and all the classes in thisnamespace will be loaded and assumed to be field formatter plugins.
The manager's definition also sets\Drupal\Core\Field\FormatterInterface as the expected interface that allfield formatter plugins will implement. This is why most field formattersextend \Drupal\Core\Field\FormatterBase to meet these methodrequirements.
As field formatters are annotated plugins, the manager provides\Drupal\Core\Field\Annotation\FieldFormatter as the class that fulfillsthe annotation definition.
The entity view display system uses the plugin.manager.field.formatterservice to load field definitions and add the field's render array, returned fromthe viewElements method, to the entity view render array.

There's more...Field formatters have additional methods to provide more information; theyare covered in the next section.
Formatter settings and summaryThe \Drupal\Core\Field\FormatterInterface interface defines threemethods that can be overridden to provide a settings form and a summary ofthe current settings:
defaultSettings: This returns an array of the setting keys and defaultvaluessettingsForm: This returns a Form API array that is used for thesettings formsettingsSummary: This allows an array of strings to be returned anddisplayed on the manage display form for the field
Settings can be used to alter how the formatter displays information. Forexample, these methods can be implemented to provide settings to hide ordisplay the first or last name.

See alsoRefer to the Creating a custom plugin type recipe of this chapter.

Creating a custom plugin typeThe plugin system provides a means to create specialized objects in Drupalthat do not require the data storage features of the entity system.
This recipe is based on the GeoIP API module port to Drupal 8 that wasstarted by the author. The GeoIP API module provides a way to get thecountry from a website visitor's IP address.
In this recipe, we will create a new plugin type called GeoLocator that willreturn the country code for a given IP address. We will create a pluginmanager, a default plugin interface, a plugin annotation definition, andprovide a default plugin to find the country via the website's CDN.

Getting readyWe will use the geoip namespace and module name in this recipe.
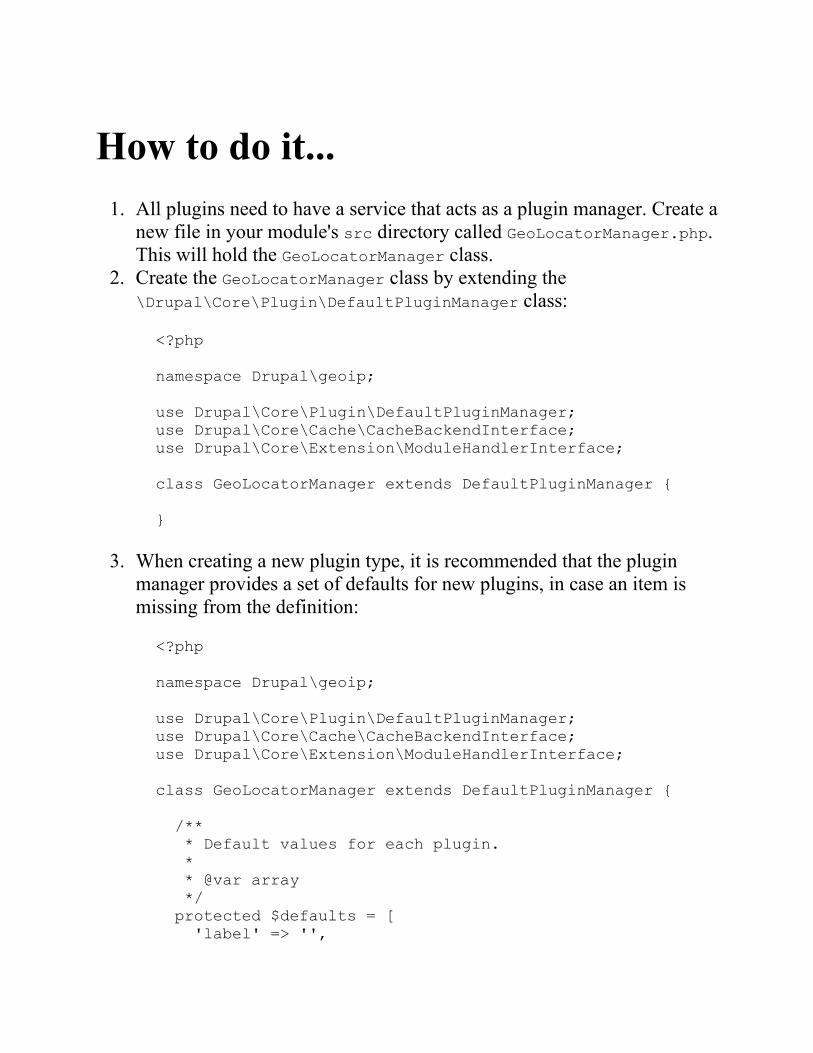
How to do it...1. All plugins need to have a service that acts as a plugin manager. Create a
new file in your module's src directory called GeoLocatorManager.php.This will hold the GeoLocatorManager class.
2. Create the GeoLocatorManager class by extending the\Drupal\Core\Plugin\DefaultPluginManager class:
<?php namespace Drupal\geoip; use Drupal\Core\Plugin\DefaultPluginManager; use Drupal\Core\Cache\CacheBackendInterface; use Drupal\Core\Extension\ModuleHandlerInterface; class GeoLocatorManager extends DefaultPluginManager { }
3. When creating a new plugin type, it is recommended that the pluginmanager provides a set of defaults for new plugins, in case an item ismissing from the definition:
<?php namespace Drupal\geoip; use Drupal\Core\Plugin\DefaultPluginManager; use Drupal\Core\Cache\CacheBackendInterface; use Drupal\Core\Extension\ModuleHandlerInterface; class GeoLocatorManager extends DefaultPluginManager { /** * Default values for each plugin. * * @var array */ protected $defaults = [ 'label' => '',
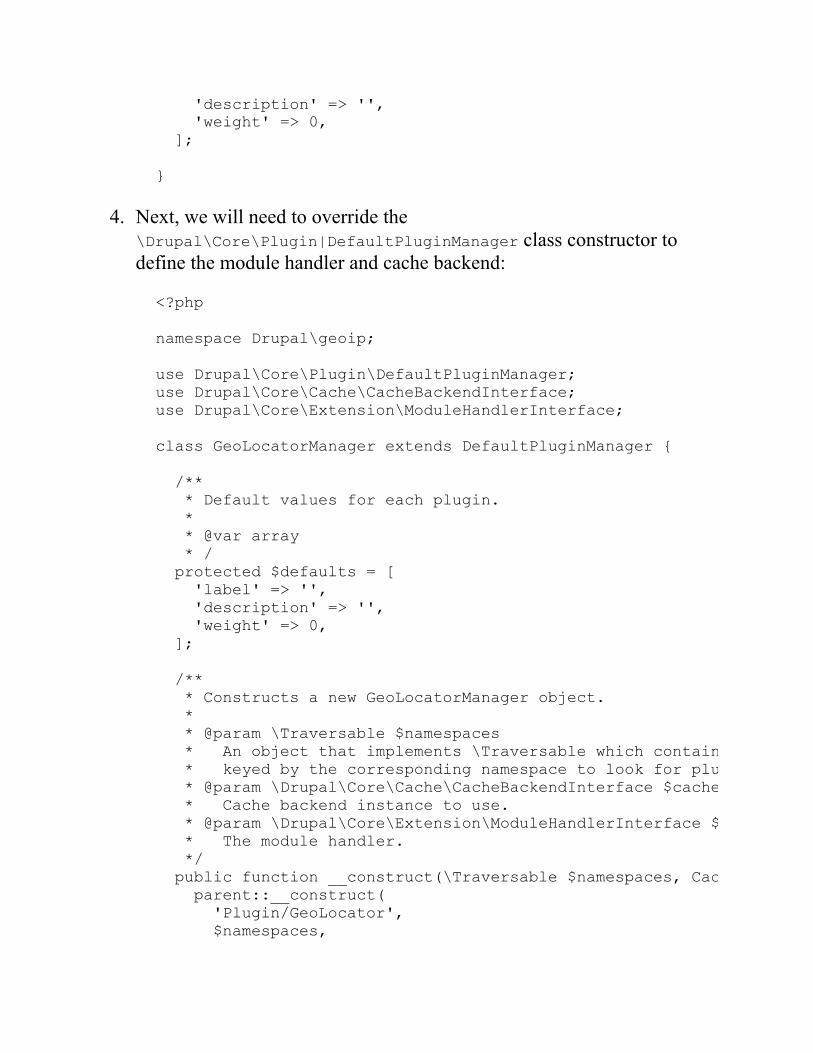
'description' => '', 'weight' => 0, ]; }
4. Next, we will need to override the\Drupal\Core\Plugin|DefaultPluginManager class constructor todefine the module handler and cache backend:
<?php namespace Drupal\geoip; use Drupal\Core\Plugin\DefaultPluginManager; use Drupal\Core\Cache\CacheBackendInterface; use Drupal\Core\Extension\ModuleHandlerInterface; class GeoLocatorManager extends DefaultPluginManager { /** * Default values for each plugin. * * @var array * / protected $defaults = [ 'label' => '', 'description' => '', 'weight' => 0, ]; /** * Constructs a new GeoLocatorManager object. * * @param \Traversable $namespaces * An object that implements \Traversable which contains the root paths * keyed by the corresponding namespace to look for plugin implementations. * @param \Drupal\Core\Cache\CacheBackendInterface $cache_backend * Cache backend instance to use. * @param \Drupal\Core\Extension\ModuleHandlerInterface $module_handler * The module handler. */ public function __construct(\Traversable $namespaces, CacheBackendInterface $cache_backend, ModuleHandlerInterface $module_handler) { parent::__construct( 'Plugin/GeoLocator', $namespaces,
$module_handler, 'Drupal\geoip\Plugin\GeoLocator\GeoLocatorInterface', 'Drupal\geoip\Annotation\GeoLocator' ); $this->setCacheBackend($cache_backend, 'geolocator_plugins'); } }
We override the constructor so that we can specify a specific cachekey. This allows plugin definitions to be cached and cleared properly;otherwise, our plugin manager will continuously read the disk to findplugins.
5. The next step will be to create a geoip.services.yml file in ourmodule's root directory. This will describe our plugin manager toDrupal, allowing a plugin discovery:
services: plugin.manager.geolocator: class: Drupal\geoip\GeoLocatorManager parent: default_plugin_manager
Drupal utilizes services and dependency injection. By defining ourclass as a service, we are telling the application container how toinitiate our class. We can use the parent definition to tell thecontainer to use the same arguments as the default_plugin_managerdefinition.
6. All annotation-based plugins must provide a class, which serves as theannotation definition. Create GeoLocator.php in src/Annotation toprovide the GeoLocator annotation class:
<?php namespace Drupal\geoip\Annotation; use Drupal\Component\Annotation\Plugin; /** * Defines a GeoLocator annotation object. * * @Annotation
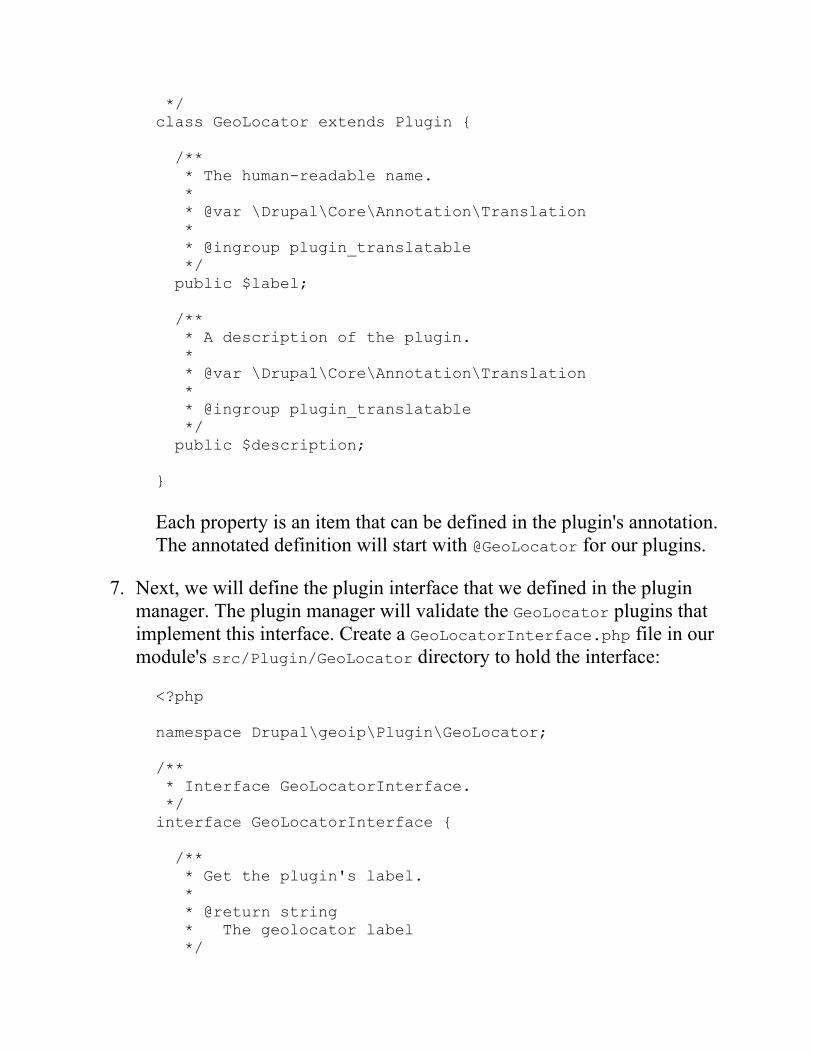
*/ class GeoLocator extends Plugin { /** * The human-readable name. * * @var \Drupal\Core\Annotation\Translation * * @ingroup plugin_translatable */ public $label; /** * A description of the plugin. * * @var \Drupal\Core\Annotation\Translation * * @ingroup plugin_translatable */ public $description; }
Each property is an item that can be defined in the plugin's annotation.The annotated definition will start with @GeoLocator for our plugins.
7. Next, we will define the plugin interface that we defined in the pluginmanager. The plugin manager will validate the GeoLocator plugins thatimplement this interface. Create a GeoLocatorInterface.php file in ourmodule's src/Plugin/GeoLocator directory to hold the interface:
<?php namespace Drupal\geoip\Plugin\GeoLocator; /** * Interface GeoLocatorInterface. */ interface GeoLocatorInterface { /** * Get the plugin's label. * * @return string * The geolocator label */
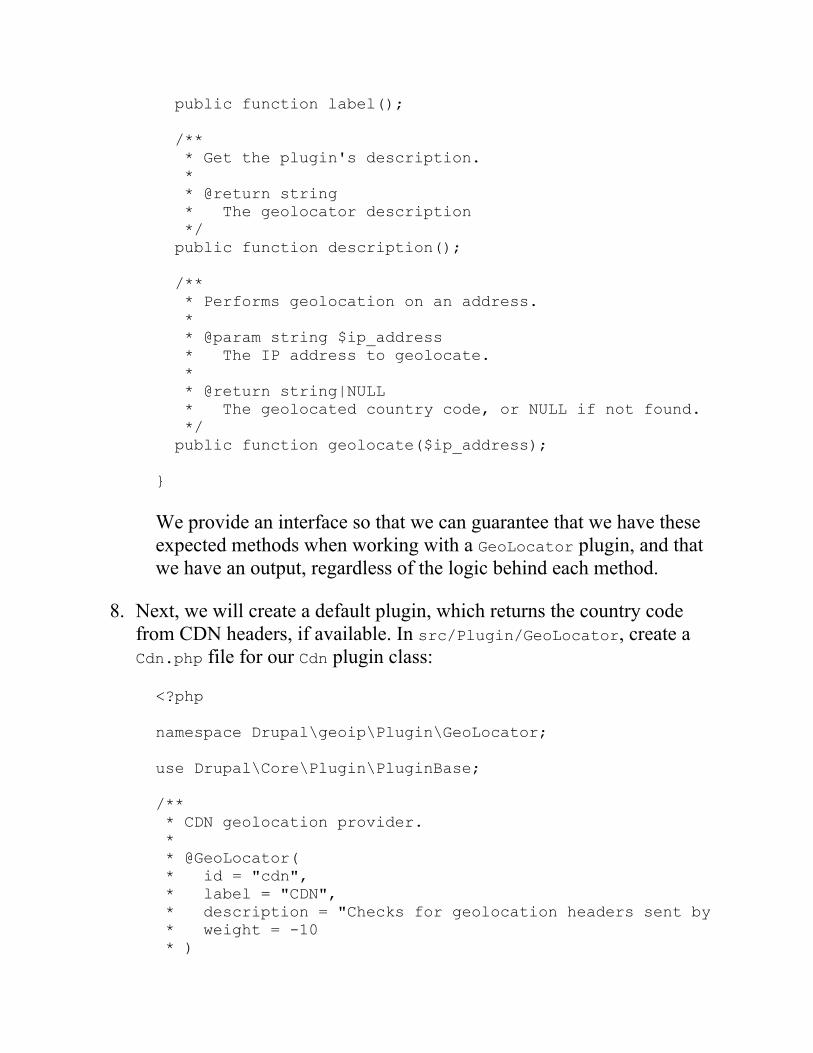
public function label(); /** * Get the plugin's description. * * @return string * The geolocator description */ public function description(); /** * Performs geolocation on an address. * * @param string $ip_address * The IP address to geolocate. * * @return string|NULL * The geolocated country code, or NULL if not found. */ public function geolocate($ip_address); }
We provide an interface so that we can guarantee that we have theseexpected methods when working with a GeoLocator plugin, and thatwe have an output, regardless of the logic behind each method.
8. Next, we will create a default plugin, which returns the country codefrom CDN headers, if available. In src/Plugin/GeoLocator, create aCdn.php file for our Cdn plugin class:
<?php namespace Drupal\geoip\Plugin\GeoLocator; use Drupal\Core\Plugin\PluginBase; /** * CDN geolocation provider. * * @GeoLocator( * id = "cdn", * label = "CDN", * description = "Checks for geolocation headers sent by CDN services", * weight = -10 * )

*/ class Cdn extends PluginBase implements GeoLocatorInterface { /** * {@inheritdoc} */ public function label() { return $this->pluginDefinition['label']; } /** * {@inheritdoc} */ public function description() { return $this->pluginDefinition['description']; } /** * {@inheritdoc} */ public function geolocate($ip_address) { // Check if CloudFlare headers present. if (!empty($_SERVER['HTTP_CF_IPCOUNTRY'])) { $country_code = $_SERVER['HTTP_CF_IPCOUNTRY']; } // Check if CloudFront headers present. elseif (!empty($_SERVER['HTTP_CLOUDFRONT_VIEWER_COUNTRY'])) { $country_code = $_SERVER['HTTP_CLOUDFRONT_VIEWER_COUNTRY']; } else { $country_code = NULL; } return $country_code; } }
9. The GeoLocator plugin type is now set, with a default CDN-basedplugin.
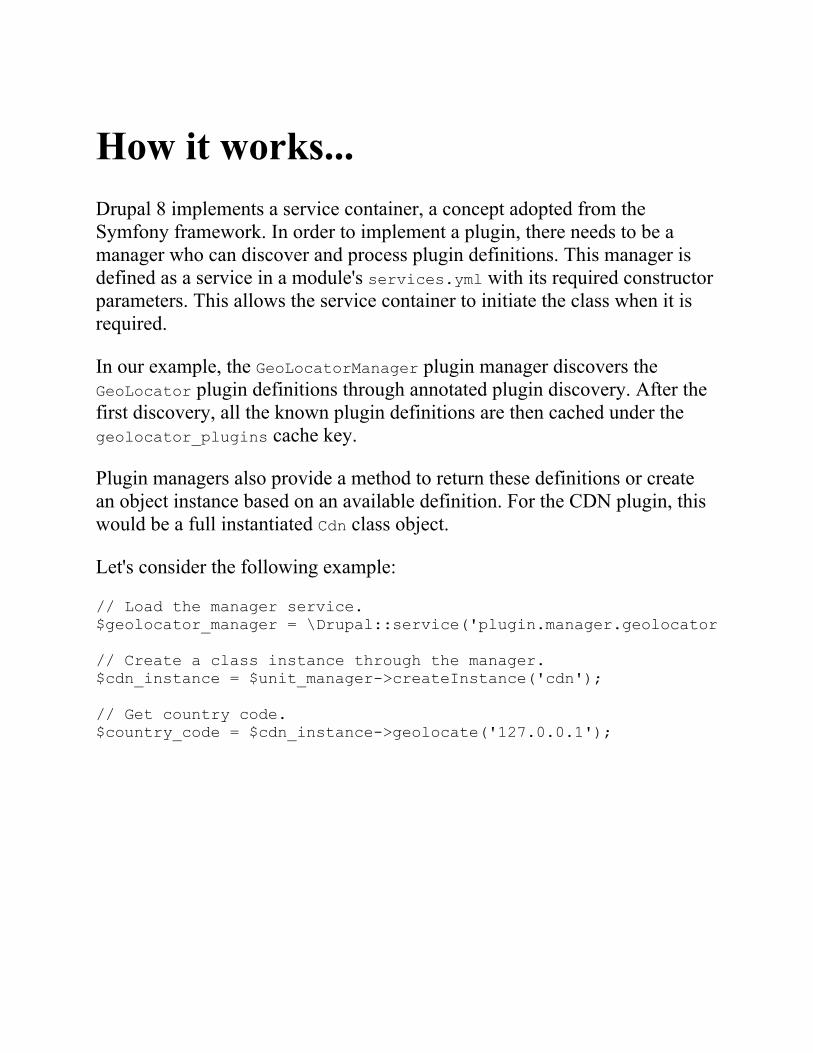
How it works...Drupal 8 implements a service container, a concept adopted from theSymfony framework. In order to implement a plugin, there needs to be amanager who can discover and process plugin definitions. This manager isdefined as a service in a module's services.yml with its required constructorparameters. This allows the service container to initiate the class when it isrequired.
In our example, the GeoLocatorManager plugin manager discovers theGeoLocator plugin definitions through annotated plugin discovery. After thefirst discovery, all the known plugin definitions are then cached under thegeolocator_plugins cache key.
Plugin managers also provide a method to return these definitions or createan object instance based on an available definition. For the CDN plugin, thiswould be a full instantiated Cdn class object.
Let's consider the following example:
// Load the manager service. $geolocator_manager = \Drupal::service('plugin.manager.geolocator'); // Create a class instance through the manager. $cdn_instance = $unit_manager->createInstance('cdn'); // Get country code. $country_code = $cdn_instance->geolocate('127.0.0.1');

There's more...There are many additional items for creating a custom plugin type; we willdiscuss some of them in the following sections.
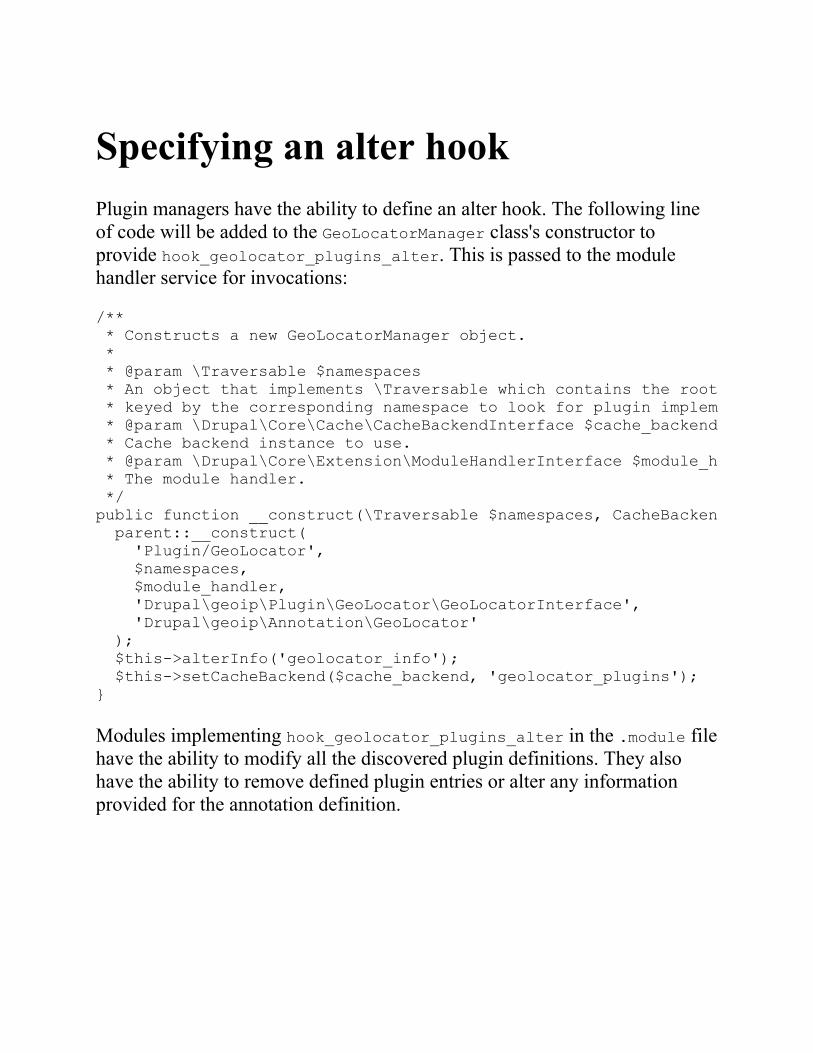
Specifying an alter hookPlugin managers have the ability to define an alter hook. The following lineof code will be added to the GeoLocatorManager class's constructor toprovide hook_geolocator_plugins_alter. This is passed to the modulehandler service for invocations:
/** * Constructs a new GeoLocatorManager object. * * @param \Traversable $namespaces * An object that implements \Traversable which contains the root paths * keyed by the corresponding namespace to look for plugin implementations. * @param \Drupal\Core\Cache\CacheBackendInterface $cache_backend * Cache backend instance to use. * @param \Drupal\Core\Extension\ModuleHandlerInterface $module_handler * The module handler. */public function __construct(\Traversable $namespaces, CacheBackendInterface $cache_backend, ModuleHandlerInterface $module_handler) { parent::__construct( 'Plugin/GeoLocator', $namespaces, $module_handler, 'Drupal\geoip\Plugin\GeoLocator\GeoLocatorInterface', 'Drupal\geoip\Annotation\GeoLocator' ); $this->alterInfo('geolocator_info'); $this->setCacheBackend($cache_backend, 'geolocator_plugins');}
Modules implementing hook_geolocator_plugins_alter in the .module filehave the ability to modify all the discovered plugin definitions. They alsohave the ability to remove defined plugin entries or alter any informationprovided for the annotation definition.
Using a cache backendPlugins can use a cache backend to improve performance. This can be doneby specifying a cache backend with the setCacheBackend method in themanager's constructor. The following line of code will allow the Unit pluginsto be cached and only discovered on a cache rebuild.
The $cache_backend variable is passed to the constructor. The secondparameter provides the cache key. The cache key will have the currentlanguage code added as a suffix.
There is an optional third parameter that takes an array of strings to representcache tags that will cause the plugin definitions to be cleared. This is anadvanced feature, and plugin definitions should normally be cleared throughthe manager's clearCachedDefinitions method. The cache tags allow theplugin definitions to be cleared when a relevant cache is cleared as well.
Accessing plugins through themanagerPlugins are loaded through the manager service, which should always beaccessed through the service container. The following line of code will beused in your module's hooks or classes to access the plugin manager:
$geolocator_manager = \Drupal::service('plugin.manager.geolocator');
Plugin managers have various methods for retrieving plugin definitions,which are as follows:
getDefinitions: This method will return an array of plugin definitions.It first makes an attempt to retrieve cached definitions, if any, and setsthe cache of discovered definitions before returning them.getDefinition: This takes an expected plugin ID and returns itsdefinition.createInstance: This takes an expected plugin ID and returns aninitiated class for the plugin.getInstance: This takes an array that acts as a plugin definition andreturns an initiated class from the definition.
See alsoRefer to services and dependency injection athttps://www.drupal.org/node/2133171
Multilingual andInternationalizationIn this chapter, we will cover the following recipes to make sure that your siteis multilingual and internationalized:
Translating administrative interfacesTranslating configurationsTranslating contentCreating multilingual views
IntroductionThis chapter will cover the multilingual and internationalization features ofDrupal 8, which have been greatly enhanced since Drupal 7. The precedingversion of Drupal required many extra modules to provideinternationalization efforts, but now the majority is provided by Drupal core.
Drupal core provides the following multilingual modules:
Language: This provides you with the ability to detect and supportmultiple languagesInterface translation: This takes installed languages and translatesstrings that are presented through the user interfaceConfiguration translation: This allows you to translate configurationentities, such as date formats and viewsContent translation: This brings the power of providing content indifferent languages and displaying it according to the current languageof the user
Each module serves a specific purpose in creating the multilingual experiencefor your Drupal site. Behind the scenes, Drupal supports the language codefor all entities and cache contexts. These modules expose the interfaces toimplement and deliver internationalized experiences.
Translating administrativeinterfacesThe interface translation module provides a method to translate strings foundin the Drupal user interface. Harnessing the Language module, interfacetranslations are automatically downloaded from the Drupal translation server.By default, the interface language is loaded through the language code as apath prefix. With the default Language configuration, paths will be prefixedwith the default language.
Interface translations are based on strings provided in the code that are passedthrough the internal translation functions.
In this recipe, we will enable Spanish, import the language files, and reviewthe translated interface strings to provide missing or custom translations.

Getting readyDrupal 8 provides an automated installation process of translation files. Forthis to work, your web server must be able to communicate withhttps://localize.drupal.org/. If your web server cannot automatically downloadthe files from the translation server, you can refer to the manual installationinstructions, which will be covered in the There's more... section of thisrecipe.
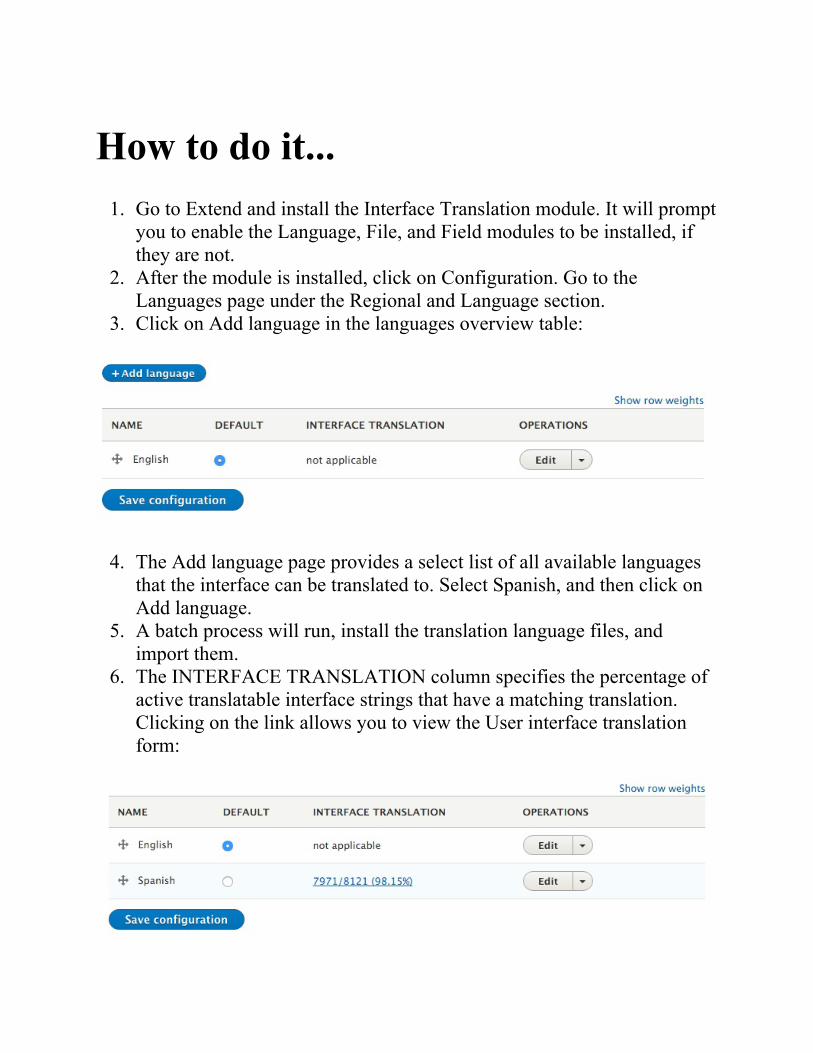
How to do it...1. Go to Extend and install the Interface Translation module. It will prompt
you to enable the Language, File, and Field modules to be installed, ifthey are not.
2. After the module is installed, click on Configuration. Go to theLanguages page under the Regional and Language section.
3. Click on Add language in the languages overview table:
4. The Add language page provides a select list of all available languagesthat the interface can be translated to. Select Spanish, and then click onAdd language.
5. A batch process will run, install the translation language files, andimport them.
6. The INTERFACE TRANSLATION column specifies the percentage ofactive translatable interface strings that have a matching translation.Clicking on the link allows you to view the User interface translationform:
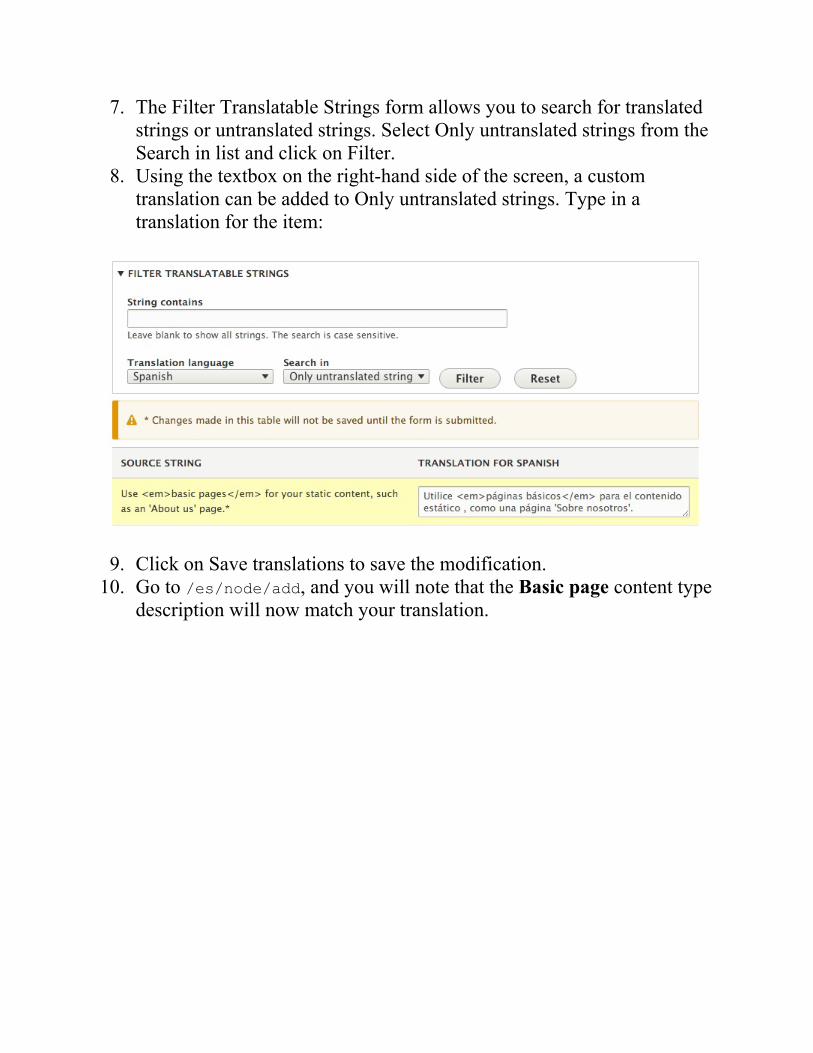
7. The Filter Translatable Strings form allows you to search for translatedstrings or untranslated strings. Select Only untranslated strings from theSearch in list and click on Filter.
8. Using the textbox on the right-hand side of the screen, a customtranslation can be added to Only untranslated strings. Type in atranslation for the item:
9. Click on Save translations to save the modification.10. Go to /es/node/add, and you will note that the Basic page content type
description will now match your translation.
How it works...The interface translation module provides\Drupal\locale\LocaleTranslation, which implements\Drupal\Core\StringTranslation\Translator\TranslatorInterface.This class is registered under the string_translation service as an availablelookup method.
When the t function or the\Drupal\Core\StringTranslation\StringTranslationTrait::t method isinvoked, the string_translation service is called to provide a translatedstring. The string_translation service will iterate through the availabletranslators and return a translated string, if possible.
Developers need to note that this is a key reason to ensure that module stringsare passed through translation functions. It allows you to identify strings thatneed to be translated.
The translator provided in the interface translation will then attempt toresolve the provided string against known translations for the currentlanguage. If a translation has been saved, it will be returned.

There's more...We will explore ways to install other languages, check translation statuses,and do much more in the following sections.
Manually installing language filesTranslation files can be manually installed by downloading them from theDrupal.org translation server and uploading them through the languageinterface. You can also use the import interface to upload custom gettextportable object (.po) files.
Drupal core and most contributed projects have .po files available at theDrupal translations site, https://localize.drupal.org. On the site, click onDownload to download a .po file for Drupal core in all available languages.Additionally, clicking on a language will provide more translations for aspecific language across projects, as follows:
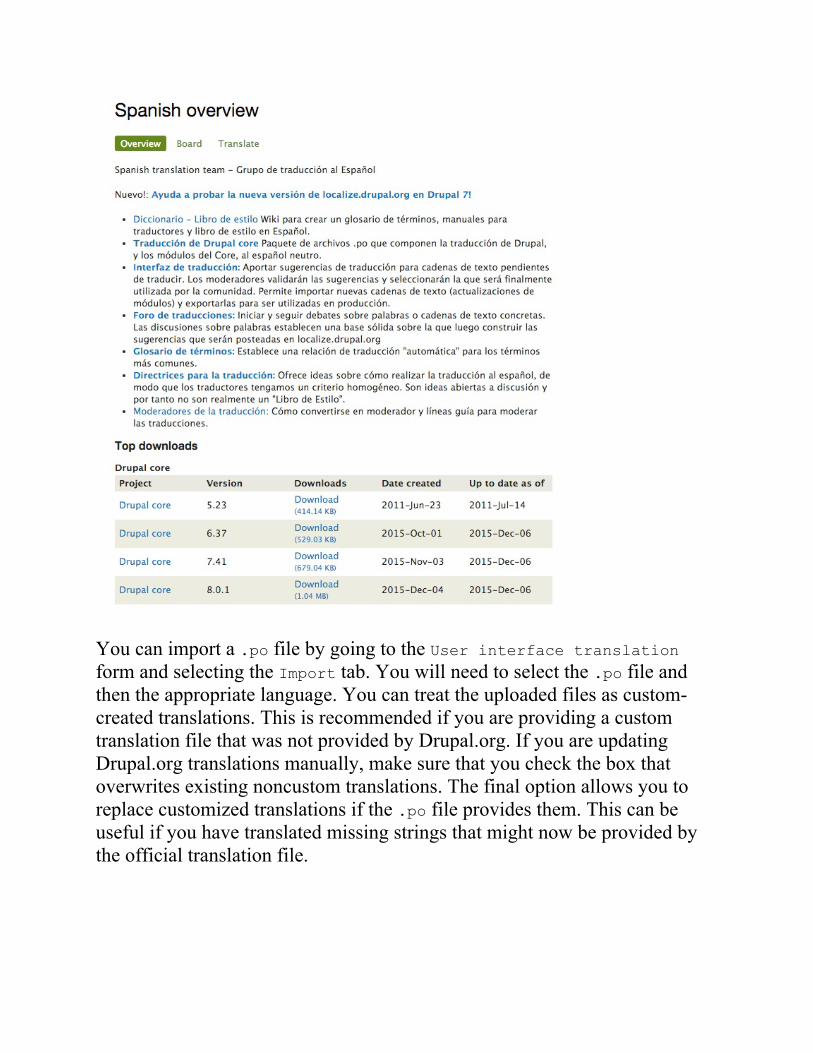
You can import a .po file by going to the User interface translationform and selecting the Import tab. You will need to select the .po file andthen the appropriate language. You can treat the uploaded files as custom-created translations. This is recommended if you are providing a customtranslation file that was not provided by Drupal.org. If you are updatingDrupal.org translations manually, make sure that you check the box thatoverwrites existing noncustom translations. The final option allows you toreplace customized translations if the .po file provides them. This can beuseful if you have translated missing strings that might now be provided bythe official translation file.
Checking translation statusAs you add new modules, the available translations will grow. TheInterface translation module provides a translation status report that isaccessible from the Reports page. This will check the default translationserver for the project and check whether there is a .po available or if it haschanged. In the event of a custom module, you can provide a customtranslation server, which is covered in Providing translations for a custommodule.
If an update is available, you will be alerted. You can then import thetranslation file updates automatically or download and manually import them.
Exporting translationsIn the User interface translation form, there is an Export tab. This formwill provide a Gettext Portable Object (.po) file. You can export all theavailable source text that is discovered in your current Drupal site withouttranslations. This will provide a base .po for translators to work on.
Additionally, you can download a specific language. Specific languagedownloads can include uncustomized translations, customized translations,and missing translations. Downloading customized translations can be usedto help make contributions to the multilingual and internationalization effortsof the Drupal community.

Interface translation permissionsThe interface translation module provides a single permission calledTranslate interface text. This permission grants users the permission tointeract with all the module's capabilities. It is flagged with a securitywarning, as it allows users with this permission to customize all the outputtext presented to them.
However, it does allow you to provide a role for translators and limits theiraccess to just translation interfaces.
Using interface translation tocustomize default English stringsThe interface translation module is useful beyond its typical multilingualpurposes. You can use it to customize strings in the interface that are notavailable to be modified through typical hook methods, or if you are not adeveloper.
Firstly, you will need to edit the English language from the Languagesscreen. Check the checkbox for Enable interface translation for English andclick on Save language. You will now have the ability to customize existinginterface strings.
This is only recommended for areas of the interface that cannot already becustomized through the normal user interface or provided API mechanisms.
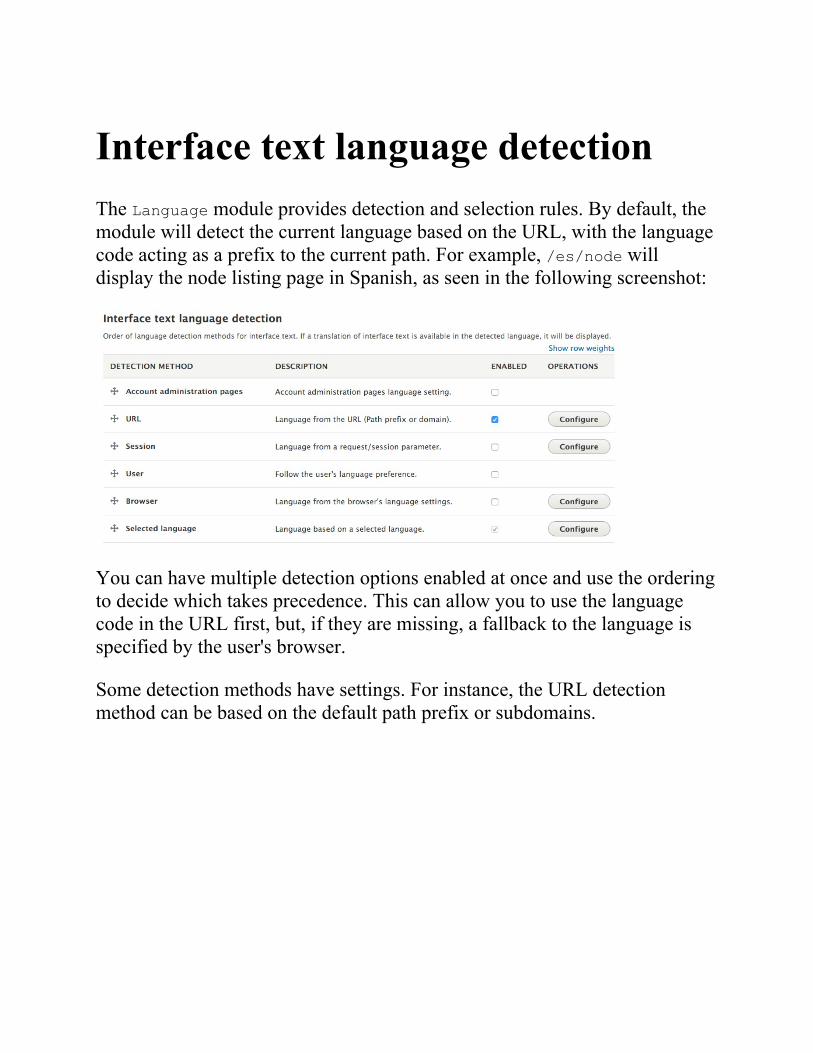
Interface text language detectionThe Language module provides detection and selection rules. By default, themodule will detect the current language based on the URL, with the languagecode acting as a prefix to the current path. For example, /es/node willdisplay the node listing page in Spanish, as seen in the following screenshot:
You can have multiple detection options enabled at once and use the orderingto decide which takes precedence. This can allow you to use the languagecode in the URL first, but, if they are missing, a fallback to the language isspecified by the user's browser.
Some detection methods have settings. For instance, the URL detectionmethod can be based on the default path prefix or subdomains.
Providing translations for a custommoduleModules can provide custom translations in their directories or point to aremote file. These definitions are added to the module's info.yml file. First,you will need to specify the interface translation project key if itdiffers from the project's machine name.
You will then need to specify a server pattern through the interfacetranslation server pattern key. This can be a relative path to Drupal'sroot, such as modules/custom/mymodule/translation.po, or a remote fileURL athttp://example.com/files/translations/mymodule/translation.po.
Distributions (or other modules) can implementhook_locale_translation_projects_alter to provide this information onbehalf of modules or to alter defaults.
The server pattern accepts the following different tokens:
%core: Indicates the version of a course (for example, 8.x)%project: Indicates the project's name%version: Indicates the current version string%language: Indicates the language code
More information on the interface translation keys and variables can be foundin the local.api.php document file located in the interface translationmodule's base folder.

See alsoRefer to the Drupal translation server athttps://localize.drupal.org/translate/drupal8You can contribute using the localization server athttps://www.drupal.org/node/302194Refer to the locale.api.php documentation athttps://api.drupal.org/api/drupal/core%21modules%21locale%21locale.api.php/8Refer to PO and POT files at https://www.drupal.org/node/1814954
Translating configurationThe Configuration translation module provides an interface to translateconfigurations with interface translation and language as dependencies. Thismodule allows us to translate configuration entities. The ability to translateconfiguration entities adds an extra level of internationalization.
Interface translation allows us to translate strings provided in our Drupalsite's code base. Configuration translation allows us to translate importableand exportable configuration items that we created, such as site title or dateformats.
In this recipe, we will translate date format configuration entities. We willprovide localized date formats for Danish to provide a more internationalizedexperience.
Getting readyYour Drupal site needs to have two languages enabled in order to useConfiguration Translation. Install Danish from the Languages interface.
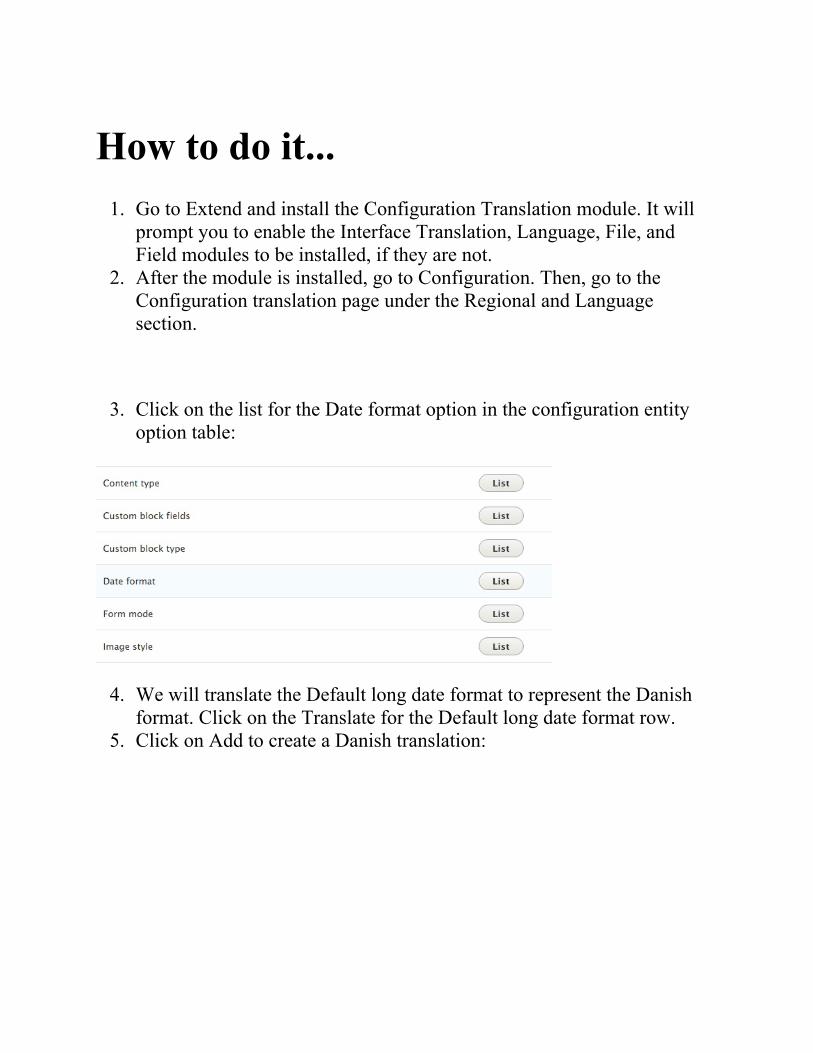
How to do it...1. Go to Extend and install the Configuration Translation module. It will
prompt you to enable the Interface Translation, Language, File, andField modules to be installed, if they are not.
2. After the module is installed, go to Configuration. Then, go to theConfiguration translation page under the Regional and Languagesection.
3. Click on the list for the Date format option in the configuration entityoption table:
4. We will translate the Default long date format to represent the Danishformat. Click on the Translate for the Default long date format row.
5. Click on Add to create a Danish translation:
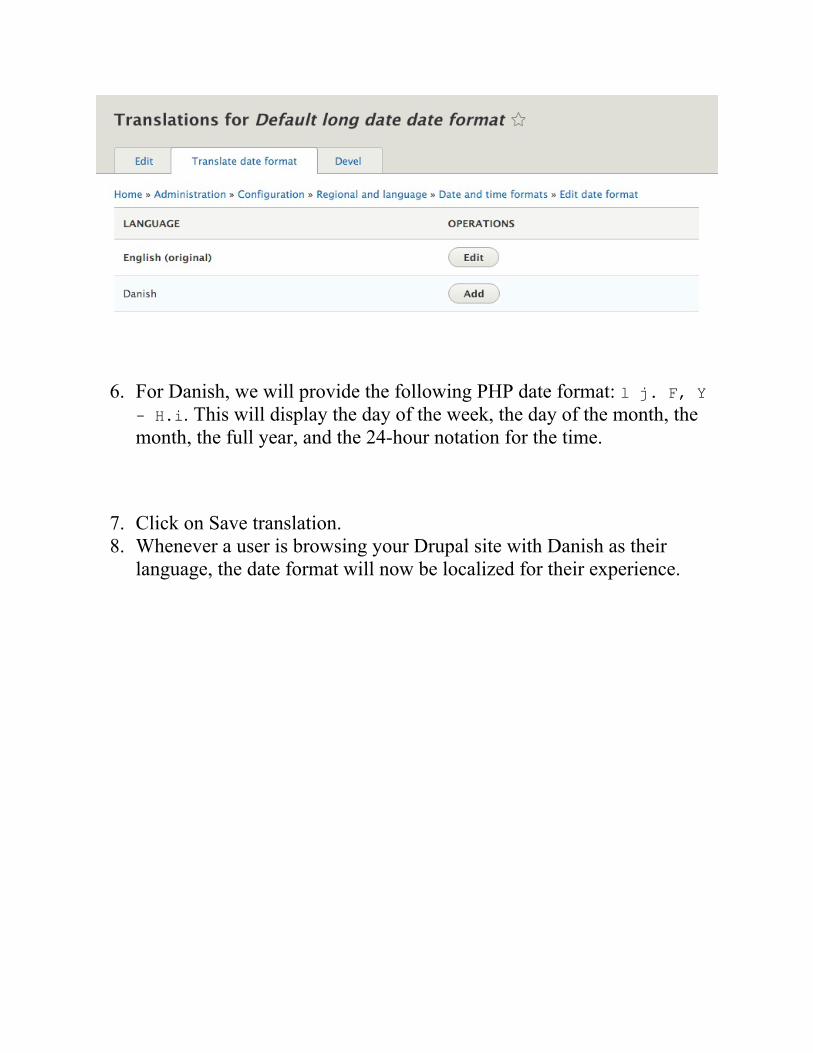
6. For Danish, we will provide the following PHP date format: l j. F, Y- H.i. This will display the day of the week, the day of the month, themonth, the full year, and the 24-hour notation for the time.
7. Click on Save translation.8. Whenever a user is browsing your Drupal site with Danish as their
language, the date format will now be localized for their experience.
How it works...The Configuration Translation module requires Interface Translation;however, it does not work in the same fashion. The module modifies allentity types that extend the\Drupal\Core\Config\Entity\ConfigEntityInterface interface. It adds anew handler under the config_translation_list key. This is used to build alist of available configuration entities and their bundles.
The module alters the configuration schema in Drupal, and updates thedefault configuration element definitions to use a specified class under\Drupal\config_translation\Form. This allows\Drupal\config_translation\Form\ConfigTranslationFormBase and itschild classes to properly save translated configuration data, which can then bemodified through the configuration translation screens.
When the configuration is saved, it is identified as being part of a collection.The collection is identified as language.LANGCODE, and all translatedconfiguration entities are saved and loaded by this identifier. The following isan example of how the configuration items are stored in the database:
When browsing the site in the es language code, the appropriateblock.block.bartik_account_menu configuration entity will be loaded. Ifyou are using the default site, or no language code, the configuration entitywith an empty collection will be used.
There's more...Configuration entities and the ability to translate them are a big part ofDrupal 8's multilingual capabilities. We'll explore them in detail in the nextrecipe.

Altering configuration translationinfo definitionsModules can invoke the hook_config_translation_info_alter hook toalter discovered configuration mappers. For instance, the Node module doesthis to modify the node_type configuration entity:
/** * Implements hook_config_translation_info_alter(). */ function node_config_translation_info_alter(&$info) { $info['node_type']['class'] = 'Drupal\node\ConfigTranslation\NodeTypeMapper'; }
This updates the node_type definition to use the\Drupal\node\ConfigTranslation\NodeTypeMapper custom mapper class.This class adds the node type's title as a configurable translation item.

Translating viewsViews are configuration entities. When the Configuration translation moduleis enabled, it is possible to translate Views. This will allow you to translatedisplay titles, exposed form labels, and other items. Refer to the Creating amultilingual view recipe in this chapter for more information.
See alsoRefer to the Creating a Multilingual View recipe of Chapter 8,Multilingual and Internationalization.
Translating contentThe content translation module provides a method to translate contententities, such as nodes and blocks. Each content entity needs to havetranslation enabled, which allows you to granularly decide what propertiesand fields are translated.
Content translations are duplications of the existing entity, but are flaggedwith a proper language code. When a visitor uses a language code, Drupalattempts to load content entities using that language code. If a translation isnot present, Drupal will render the default untranslated entity.

Getting readyYour Drupal site needs to have two languages enabled to use Contenttranslation. Install Spanish from the Languages interface.
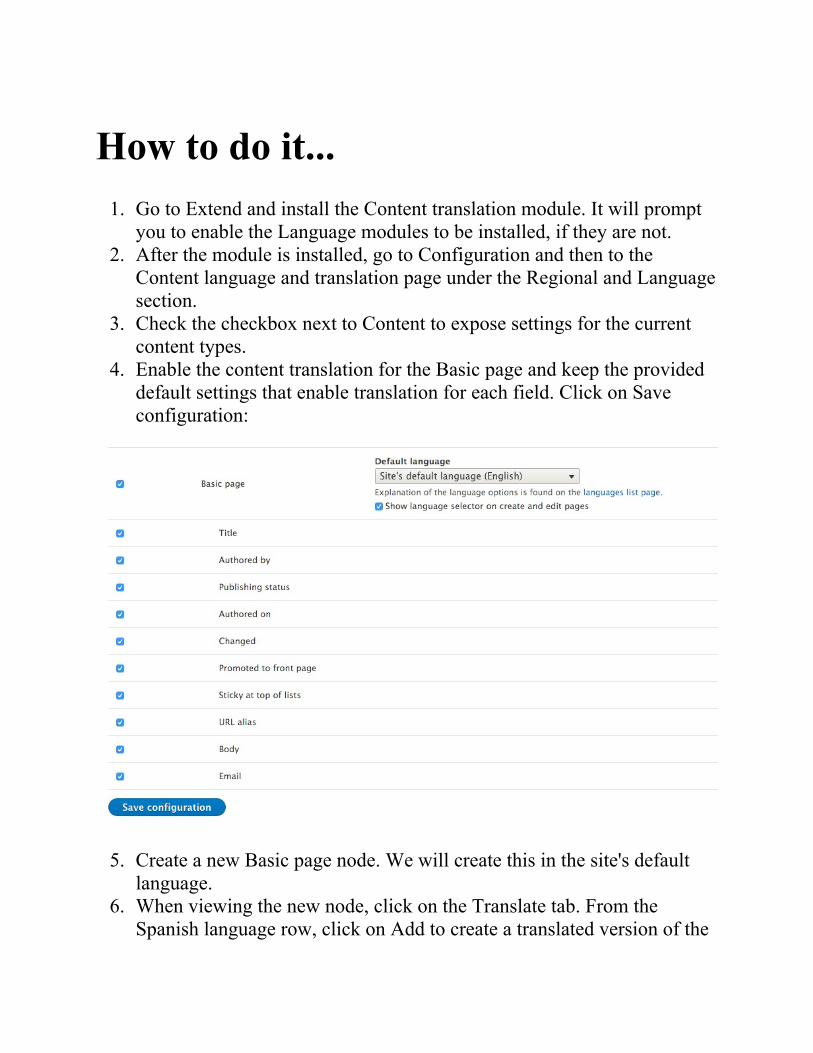
How to do it...1. Go to Extend and install the Content translation module. It will prompt
you to enable the Language modules to be installed, if they are not.2. After the module is installed, go to Configuration and then to the
Content language and translation page under the Regional and Languagesection.
3. Check the checkbox next to Content to expose settings for the currentcontent types.
4. Enable the content translation for the Basic page and keep the provideddefault settings that enable translation for each field. Click on Saveconfiguration:
5. Create a new Basic page node. We will create this in the site's defaultlanguage.
6. When viewing the new node, click on the Translate tab. From theSpanish language row, click on Add to create a translated version of the
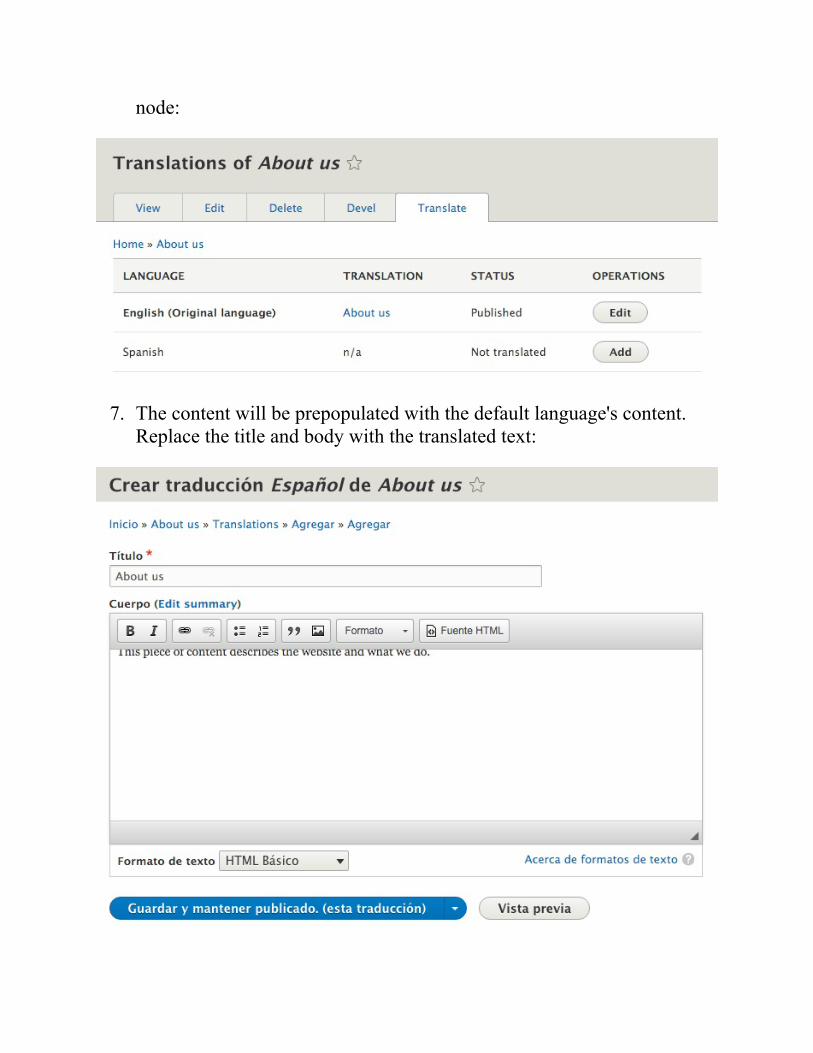
node:
7. The content will be prepopulated with the default language's content.Replace the title and body with the translated text:
8. Click on Save and keep published (this translation) to save the newtranslation.
How it worksThe Content translation module works by utilizing language code flags. Allcontent entities and field definitions have a language code key. A contententity has a language code column, which specifies what language thecontent entity is for. Field definitions also have a language code column,which is used to identify the translation for the content entity. Content entitiescan provide handler definitions to handle translations, or else the Contenttranslation module will provide its own.
Each entity and field record is saved with the proper language code to use.When an entity is loaded, the current language code is taken intoconsideration to ensure that the proper entity is loaded.

There's more...There are additional operations to translate content; we will cover them in thenext sections.
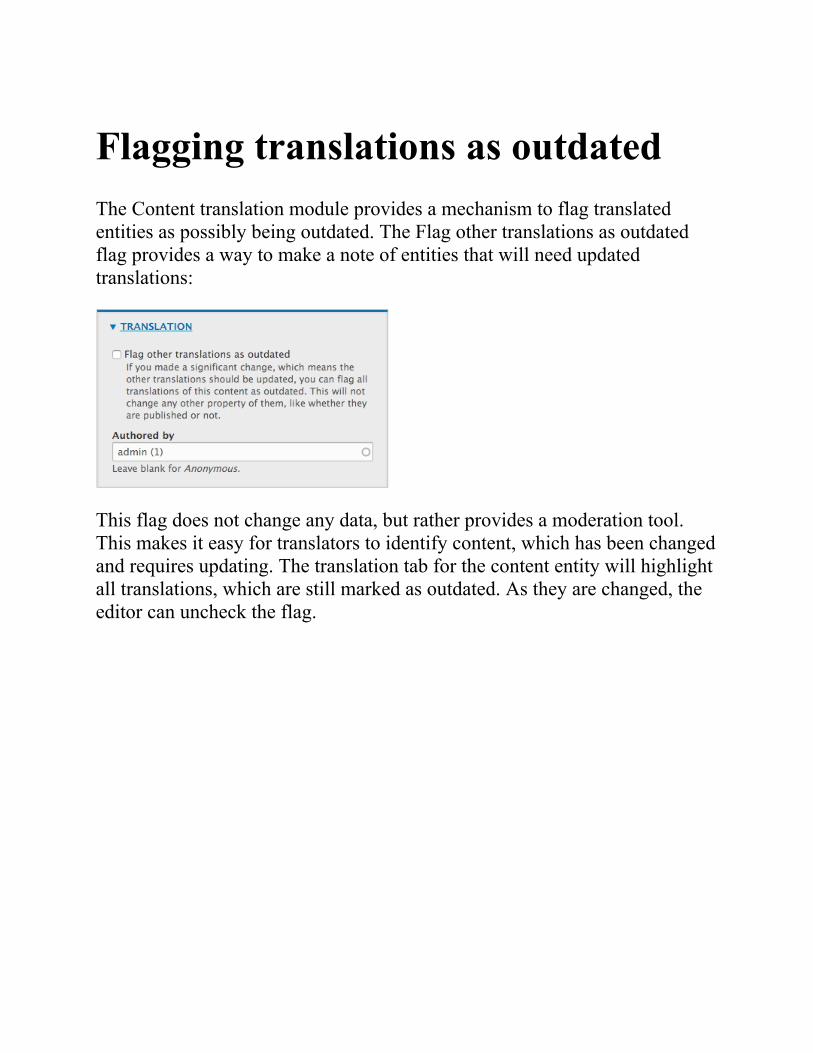
Flagging translations as outdatedThe Content translation module provides a mechanism to flag translatedentities as possibly being outdated. The Flag other translations as outdatedflag provides a way to make a note of entities that will need updatedtranslations:
This flag does not change any data, but rather provides a moderation tool.This makes it easy for translators to identify content, which has been changedand requires updating. The translation tab for the content entity will highlightall translations, which are still marked as outdated. As they are changed, theeditor can uncheck the flag.
Translating content linksMostly, Drupal menus contain links to nodes. Menu links are not translatedby default, and the Custom menu links option must be enabled under Contenttranslation. You will need to translate node links manually from the menuadministration interface.
Enabling a menu link from the node create and edit form will not work withtranslations. If you edit the menu settings from a translation, it will edit theuntranslated menu link.
Defining translation handlers forentitiesThe Content translation module requires entity definitions to provideinformation about translation handlers. If this information is missing, it willprovide its own defaults. The Entity API is covered in Chapter 10, The EntityAPI, but we will quickly discuss how the content translation module interactswith the Entity API.
Content entity definitions can provide a translation handler. If notprovided, it will default to\Drupal\content_translation\ContentTranslationHandler. A nodeprovides this definition and uses it to place the content translationinformation into the vertical tabs.
The content_translation_metadata key defines how to interact withtranslation metadata information, such as flagging other entities as outdated.The content_translation_deletion key provides a form class to handleentity translation deletion.
Currently, as of 8.0.1, no core modules provide implementations that overridethe default content_translation_metadata orcontent_translation_deletion.

See alsoRefer to Chapter 10, The Entity API.
Creating multilingual viewsViews, being configuration entities, are available for translation. However,the power of multilingual views does not lie just in configuration translation.Views allow you to build filters that react to the current language code. Thisensures that the content, which has been translated into the user's language, isdisplayed.
In this recipe, we will create a multilingual view that provides a blockshowing recent articles. If there is no content, we will display a translated noresults message.
Getting readyYour Drupal site needs to have two languages enabled in order to use ContentTranslation. Install Spanish from the Languages interface. Enable contenttranslation for Articles. You will also need to have some translated content.
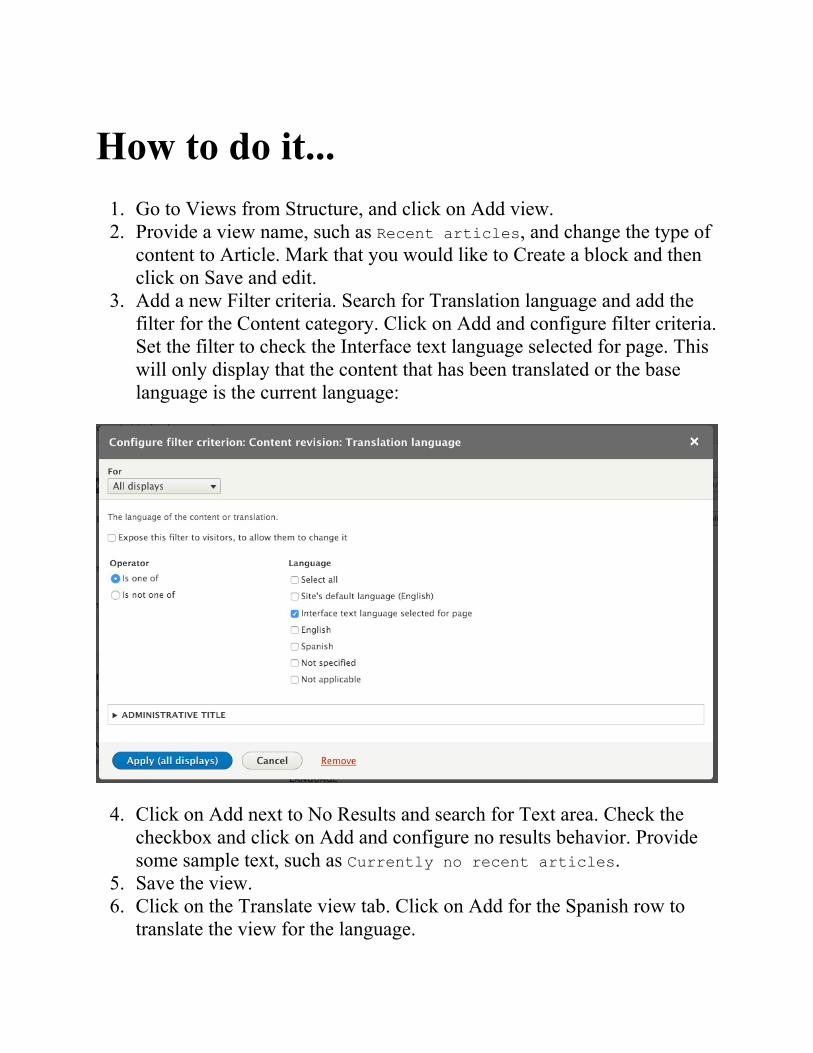
How to do it...1. Go to Views from Structure, and click on Add view.2. Provide a view name, such as Recent articles, and change the type of
content to Article. Mark that you would like to Create a block and thenclick on Save and edit.
3. Add a new Filter criteria. Search for Translation language and add thefilter for the Content category. Click on Add and configure filter criteria.Set the filter to check the Interface text language selected for page. Thiswill only display that the content that has been translated or the baselanguage is the current language:
4. Click on Add next to No Results and search for Text area. Check thecheckbox and click on Add and configure no results behavior. Providesome sample text, such as Currently no recent articles.
5. Save the view.6. Click on the Translate view tab. Click on Add for the Spanish row to
translate the view for the language.
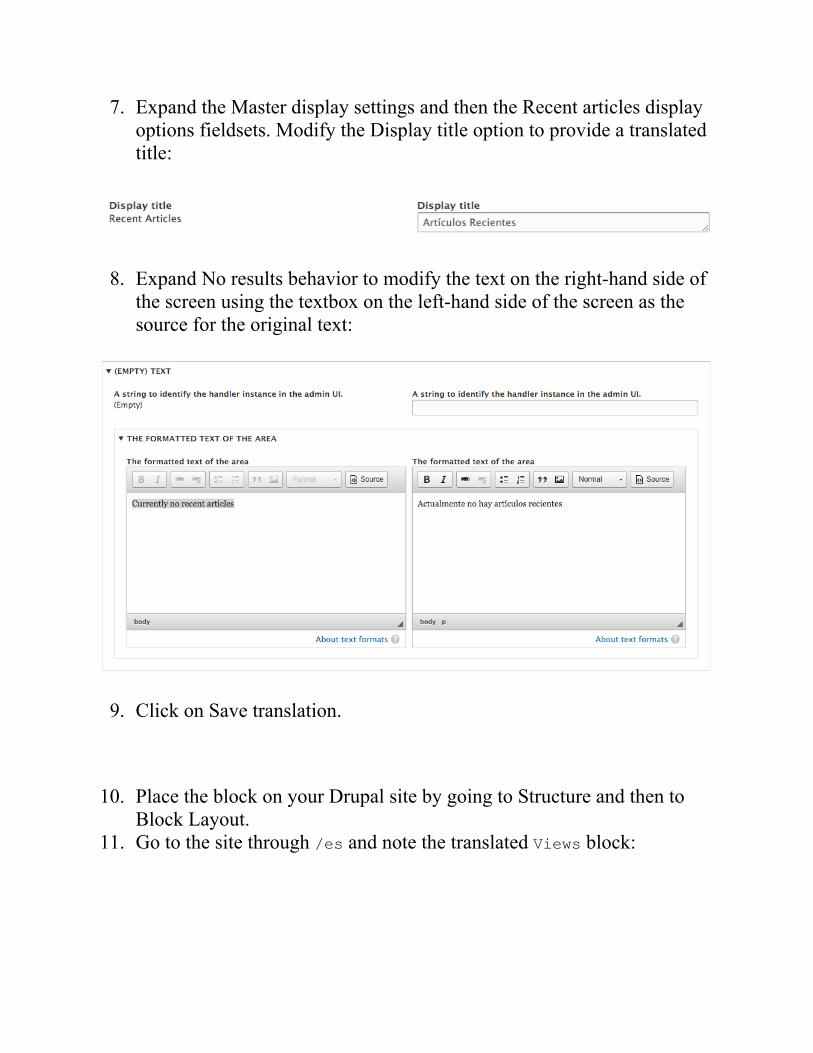
7. Expand the Master display settings and then the Recent articles displayoptions fieldsets. Modify the Display title option to provide a translatedtitle:
8. Expand No results behavior to modify the text on the right-hand side ofthe screen using the textbox on the left-hand side of the screen as thesource for the original text:
9. Click on Save translation.
10. Place the block on your Drupal site by going to Structure and then toBlock Layout.
11. Go to the site through /es and note the translated Views block:
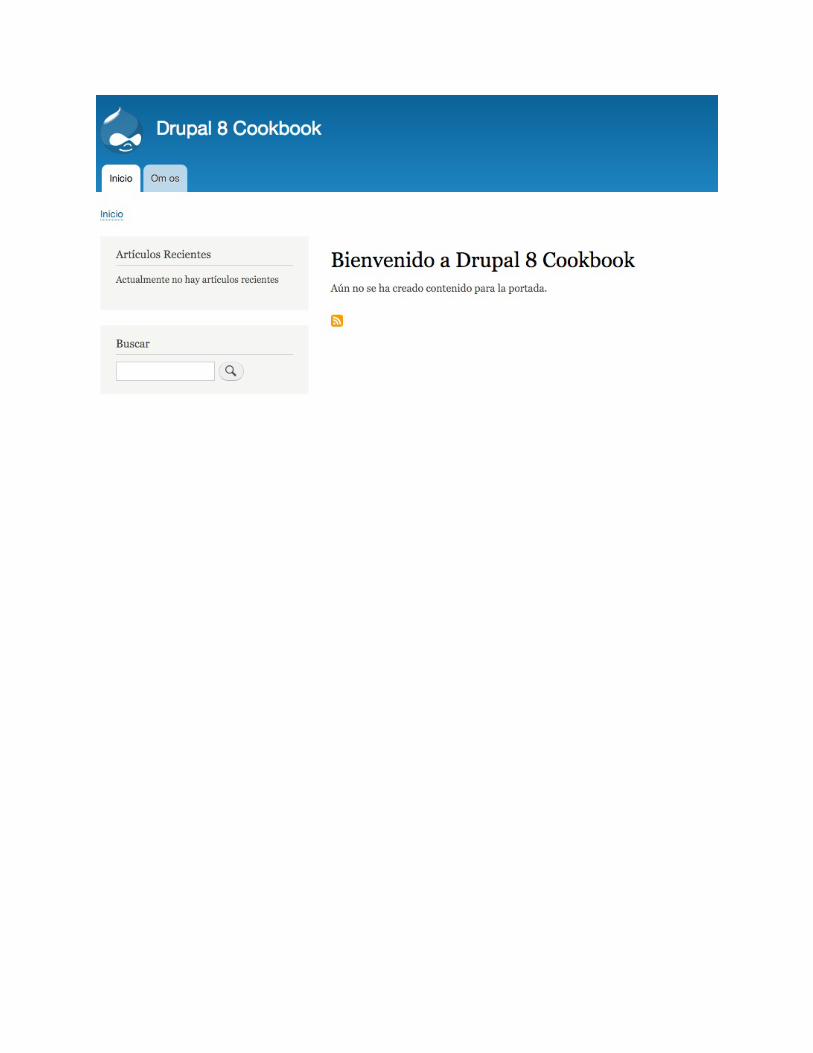
How it works...Views provide the Translation language filter that builds off this element. TheViews plugin systems provide a mechanism to gather and display allavailable languages. These will be saved as a token internally and thensubstituted with the actual language code when the query is executed. If alanguage code is no longer available, the Content language for selectedpage and views will fall back to the current language when viewed.
You will come across this option when editing views provided by Drupalcore or contributed modules. Although this is not an option in the userinterface, it is a default practice to add a language filter defined as***LANGUAGE_language_content***, which will force the view to bemultilingual.
The filter tells Views to query based on the language code of the entity andits fields.
Views are configuration entities. The Configuration translation moduleallows you to translate views. Views can be translated from the mainConfiguration translation screens from the Configuration area or by editingindividual views.
Most translation items will be under the Master display settings tab unlessoverridden in specific displays. Each display type will also have its ownspecific settings.

There's more...Even more can be done to translate your views; we will discuss in thefollowing section.
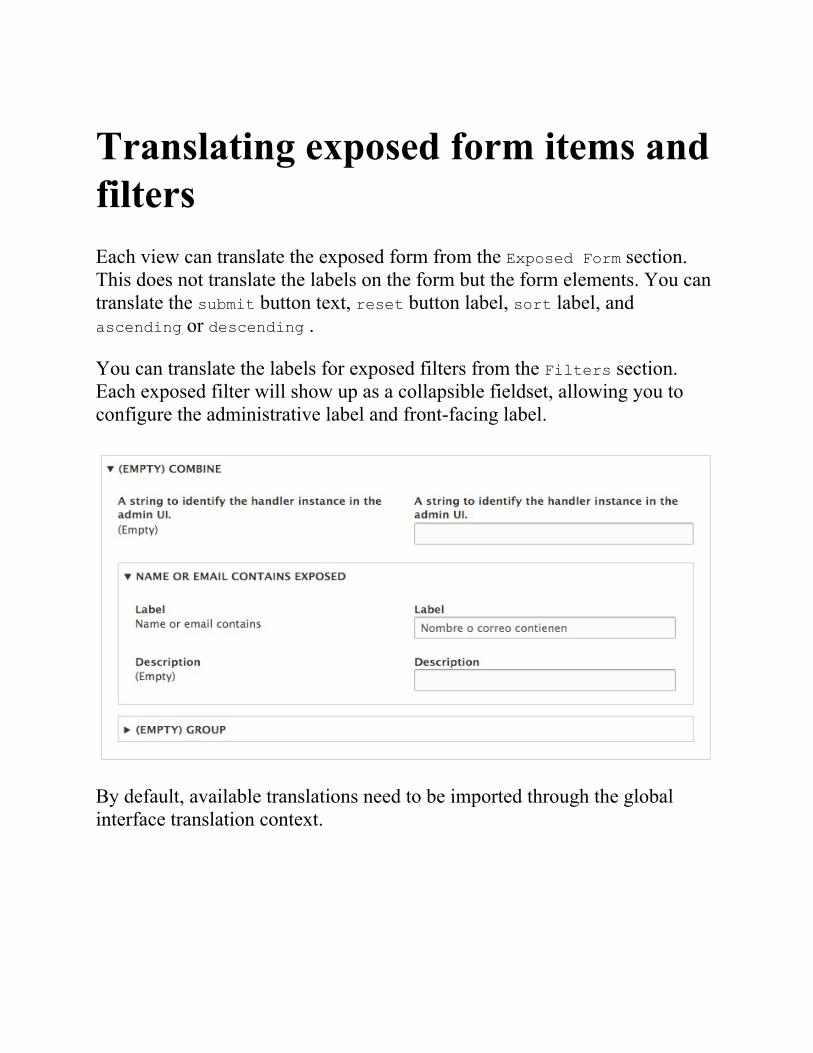
Translating exposed form items andfiltersEach view can translate the exposed form from the Exposed Form section.This does not translate the labels on the form but the form elements. You cantranslate the submit button text, reset button label, sort label, andascending or descending .
You can translate the labels for exposed filters from the Filters section.Each exposed filter will show up as a collapsible fieldset, allowing you toconfigure the administrative label and front-facing label.
By default, available translations need to be imported through the globalinterface translation context.
Translating display and row formatitemsSome display formats have translatable items. These can be translated in eachdisplay mode's section. For example, the following items can be translatedwith their display format:
The Table format allows you to translate the table summaryThe RSS feed format allows you to translate the feed descriptionThe Page format allows you to translate the page's titleThe Block format allows you to translate the block's title

Translating page display menuitemsCustom menu links can be translated through the Content translation module.Views which use a page display do not create custom menu link entities. So itmust be translated through the View itself. The Views module takes all viewswith a page display and registers their paths into the routing system directlyas if defined in a module's routing.yml file:
For example, the People view that lists all users can be translated to have anupdated tab name and link description.

See alsoRefer to Chapter 3, Displaying Content through Views.
Configuration Management -Deploying in Drupal 8In this chapter, we will explore the configuration management system anddeployment of the configuration changes. The following is a list of therecipes covered in this chapter:
Importing and exporting configurationsSynchronizing site configurationsUsing command-line workflow processesUpdating and installing new module configurations
IntroductionDrupal 8 provides a new, unified system to manage configurations. In Drupal8, all configurations are saved in configuration entities that match a definedconfiguration schema. This system provides a standard way of deploying theconfiguration between Drupal site environments and updating the siteconfiguration.
Once the configuration is created, or imported, it goes into an immutablestate. If a module tries to install the configuration that exists, it will throw anexception and be prevented. Outside the typical user interface, theconfiguration can only be modified through the configuration managementsystem.
The configuration management system can be manipulated through a userinterface provided by the Configuration management module or through thecommand-line interface tools. These tools allow you to follow thedevelopment paradigm of utilizing a production site and a development site,where changes are made to the development site and then pushed toproduction.
Instead of creating two different Drupal sites for the recipes in this chapter,you can utilize the Drupal multisite functionality. For more information onthis functionality, refer to the Installing Drupal recipe of Chapter 1, Up andRunning with Drupal 8. Note that if you use a multisite, you will need toclone your development site's database into the site acting as your productionsite to replicate a realistic development and production site workflow.
Importing and exportingconfigurationsConfiguration management in Drupal 8 provides a solution to commonproblems when working with a website across multiple environments. Nomatter what the workflow pattern is, at some point, the configuration needs tomove from one place to another, such as from production to a localenvironment. When pushing the development work to production, you willneed to have some way to put the configuration in place.
Drupal 8's user interface provides a way to import and export configurationentities via the YAML format. In this recipe, we will create a content type,export its configuration, and then import it into another Drupal site. Theconfiguration YAML export will be imported into the production site toupdate its configuration.

Getting readyYou will need a base Drupal site to act as the development site. AnotherDrupal site, which is a clone of the development site, must be available to actas a production Drupal site.
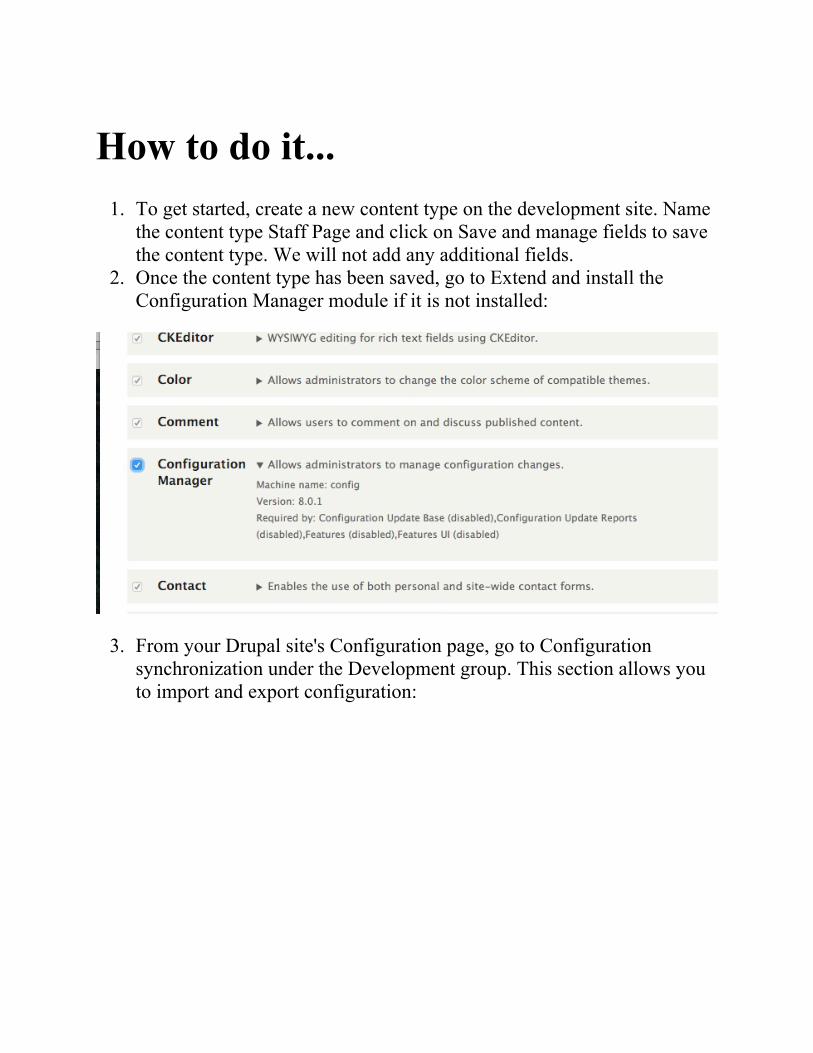
How to do it...1. To get started, create a new content type on the development site. Name
the content type Staff Page and click on Save and manage fields to savethe content type. We will not add any additional fields.
2. Once the content type has been saved, go to Extend and install theConfiguration Manager module if it is not installed:
3. From your Drupal site's Configuration page, go to Configurationsynchronization under the Development group. This section allows youto import and export configuration:
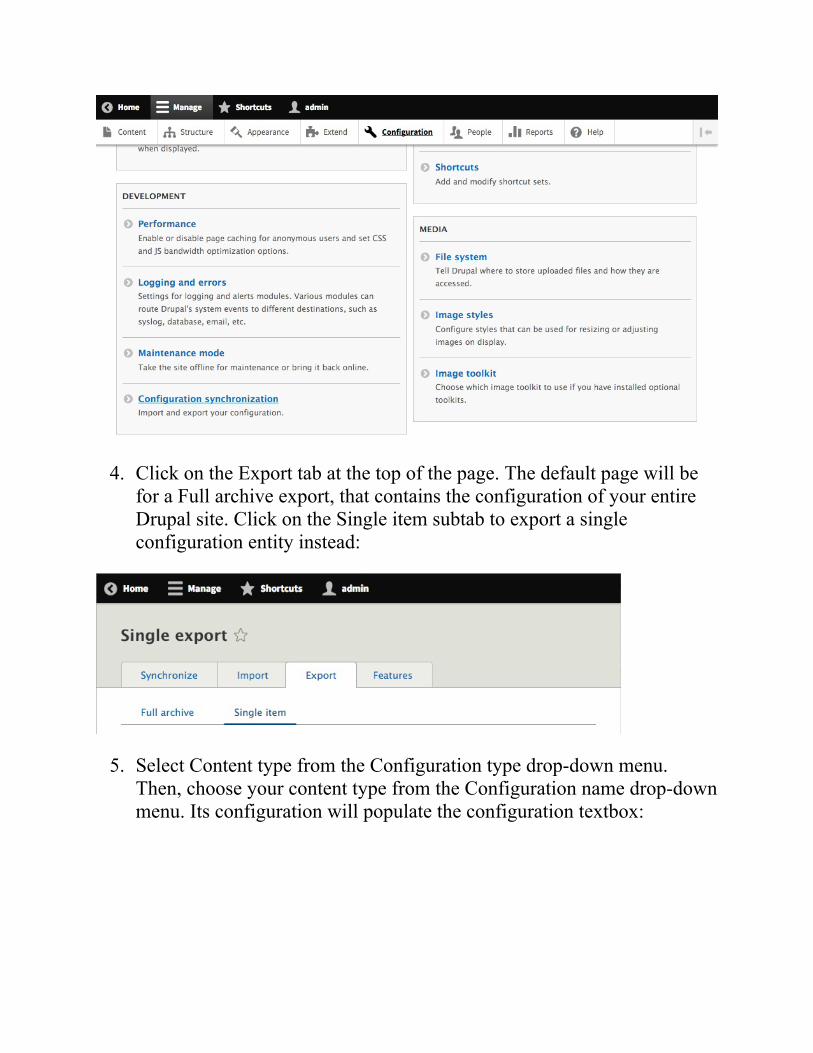
4. Click on the Export tab at the top of the page. The default page will befor a Full archive export, that contains the configuration of your entireDrupal site. Click on the Single item subtab to export a singleconfiguration entity instead:
5. Select Content type from the Configuration type drop-down menu.Then, choose your content type from the Configuration name drop-downmenu. Its configuration will populate the configuration textbox:
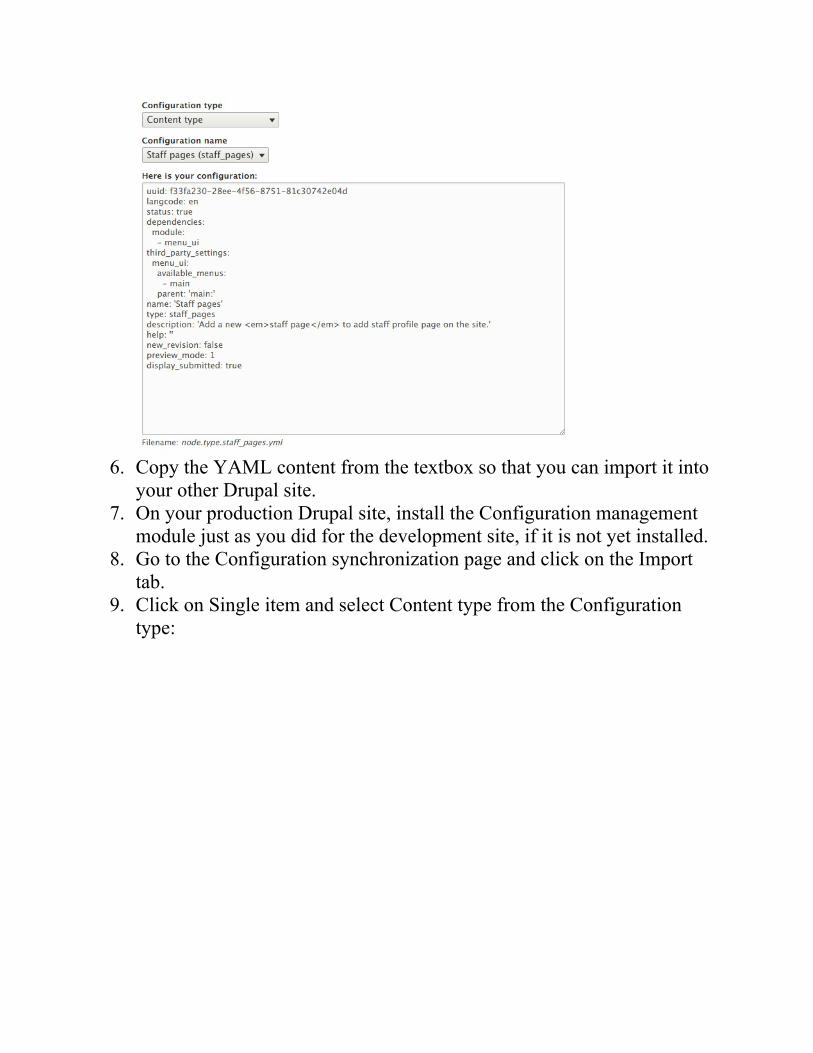
6. Copy the YAML content from the textbox so that you can import it intoyour other Drupal site.
7. On your production Drupal site, install the Configuration managementmodule just as you did for the development site, if it is not yet installed.
8. Go to the Configuration synchronization page and click on the Importtab.
9. Click on Single item and select Content type from the Configurationtype:
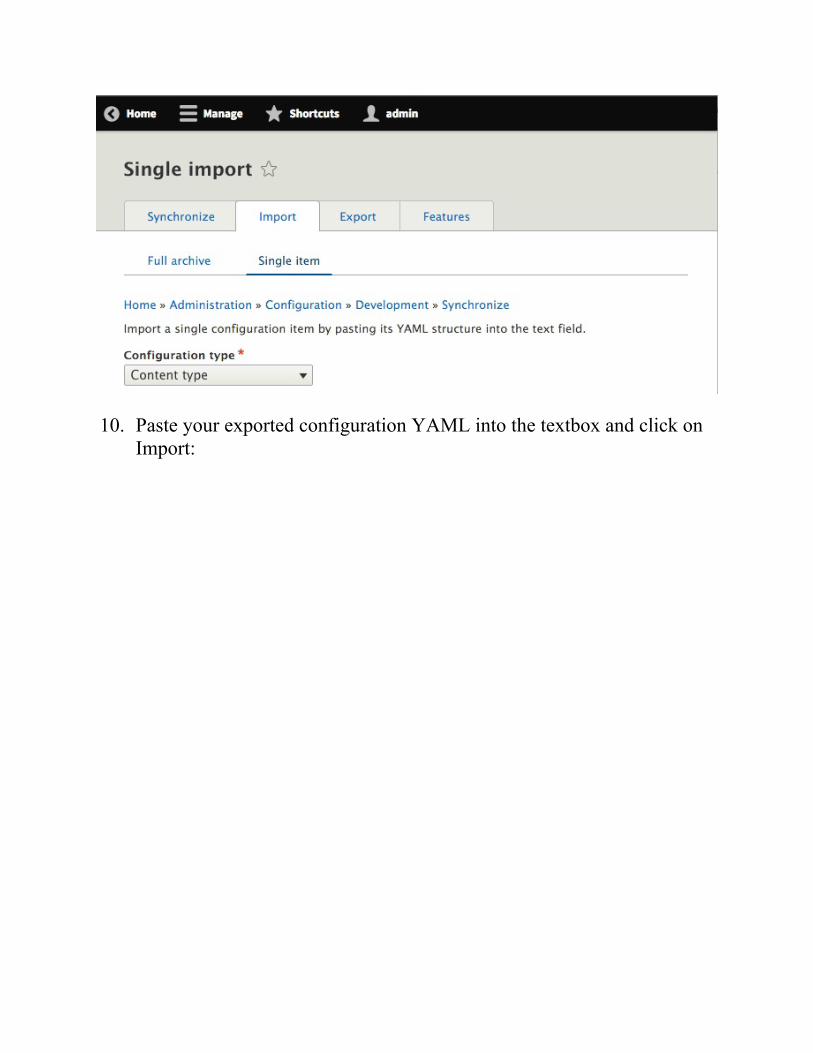
10. Paste your exported configuration YAML into the textbox and click onImport:

11. Click on Confirm on the confirmation form to finalize your import to theproduction Drupal site for your custom content type.
12. Go to the Structure page and then to the Content Types page to verifythat your content type has been imported.

How it works...At the most basic level, configurations are just a mapping of keys and values,which can be represented as a PHP array and translated into the YAMLformat.
Configuration management uses schema definitions for configuration entities.The schema definition provides a configuration namespace and the availablekeys and data types. The schema definition provides a typed data definitionfor each option that allows validation of the individual values andconfiguration.
The export process reads the configuration data and translates it into theYAML format. The configuration manager then receives the configuration inthe form of YAML and converts it back to a PHP array. The data is thenupdated in the database.
When importing the configuration, Drupal checks the value of theconfiguration YAML's uuid key, if present, against any current configurationwith the same Universally Unique Identifier (UUID). A UUID is a patternused in software to provide a method of identifying an object across differentenvironments. This allows Drupal to correlate a piece of data from its UUIDsince the database identifier can differ across environments. If theconfiguration item has a matching machine name, but a mismatching UUID,an error will be thrown.

There's more...We will discuss importing and exporting configuration within your Drupalsite more in depth in a later section.
Configuration dependenciesConfiguration entities define dependencies when they are exported. Thedependency definitions ensure that the configuration entity's schema andother module functionalities are available.
When you review the configuration export forfield.storage.node.body.yml, it defines node and text as dependencies:
dependencies: module: - node - text
If the node or text module is not enabled, the import will fail and throw anerror.
Saving to a YAML file for amodule's configuration installationThe Providing configuration on install or update recipe of Chapter 6,Creating Forms with the Form API, discusses how to use a module toprovide configurations on the module's installation. Instead of manuallywriting configuration YAML files for installation, the Configurationmanagement module can be used to export configurations and save them inyour module's config/install directory.
Any item exported through the user interface can be used. The onlyrequirement is that you will need to remove the uuid key, as it denotes thesite's UUID value and invalidates the configuration when it tries to install it.

Configuration schemasThe configuration management system in Drupal 8 utilizes the configurationschema to describe configurations that can exist. Why is this important? Itallows Drupal to properly implement typed data on stored configurationvalues and validate them, providing a standardized way of handlingconfigurations for translation and configuration items.
When a module uses the configuration system to store data, it needs toprovide a schema for each configuration definition it wishes to store. Theschema definition is used to validate and provide typed data definitions for itsvalues.
The following code defines the configuration schema for the navbar_awesomemodule, which holds two different Boolean configuration values:
navbar_awesome.toolbar: type: config_object label: 'Navbar Awesome toolbar settings' mapping: cdn: type: boolean label: 'Use the FontAwesome CDN library' roboto: type: boolean label: 'Include Roboto from Google Fonts CDN'
This defines the navbar_awesome.toolbar configuration namespace; itbelongs to the navbar_awesome module and has the toolbar configuration.We will then need two cdn and roboto subvalues that represent typed datavalues. A configuration YAML for this schema will be namednavbar_awesome.toolbar.yml after the namespace, and it contains thefollowing code:
cdn: true roboto: true
In turn, this is what the values will look like when represented as a PHP
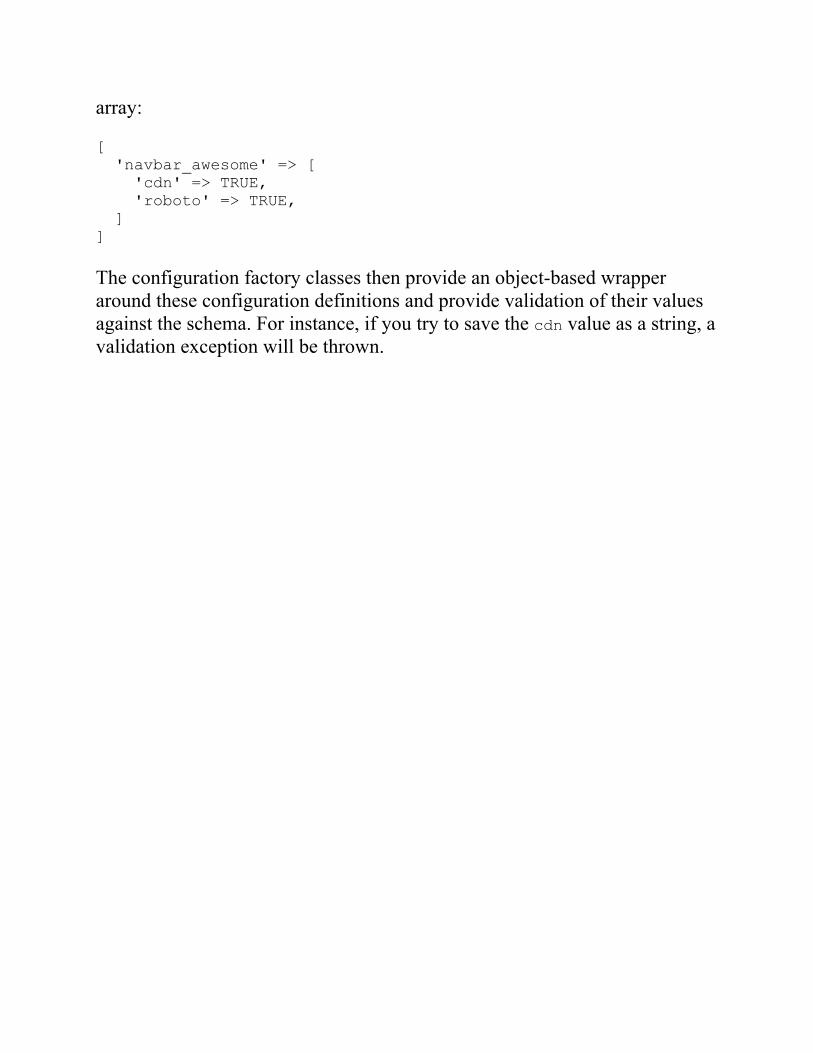
array:
[ 'navbar_awesome' => [ 'cdn' => TRUE, 'roboto' => TRUE, ] ]
The configuration factory classes then provide an object-based wrapperaround these configuration definitions and provide validation of their valuesagainst the schema. For instance, if you try to save the cdn value as a string, avalidation exception will be thrown.
See alsoRefer to Chapter 4, Extending DrupalConfiguration schema/metadata in the Drupal.org community handbookat https://www.drupal.org/node/1905070
Synchronizing site configurationsA key component for managing a Drupal website is configuration integrity. Akey part of maintaining this integrity is ensuring that your configurationchanges made in development are pushed upstream to your productionenvironments. Maintaining configuration changes by manually exporting andimporting through the user interface can be tedious and does not provide away to track what has or has not been exported or imported. At the sametime, manually writing module hooks to manipulate the configuration can betime-consuming. Luckily, the configuration management solution providesyou with the ability to export and import the entire site's configuration.
A site export can only be imported into another copy of itself. Each site musthave the same UUID, which is set during its installation. This allows you toexport your local development environment's configuration and bring it tostaging or production, without modifying the content or the database directly.
In this recipe, we will export the development site's complete configurationentities' definitions. We will then take the exported configuration and importit into the production site. This will simulate a typical deployment of aDrupal site with changes created in development that is ready to be releasedin production.

Getting readyYou will need a base Drupal site to act as the development site. AnotherDrupal site, which is a duplicate of the development site's database, must beavailable to act as the production Drupal site.
You will need to have the Configuration management module installed if itis not already.
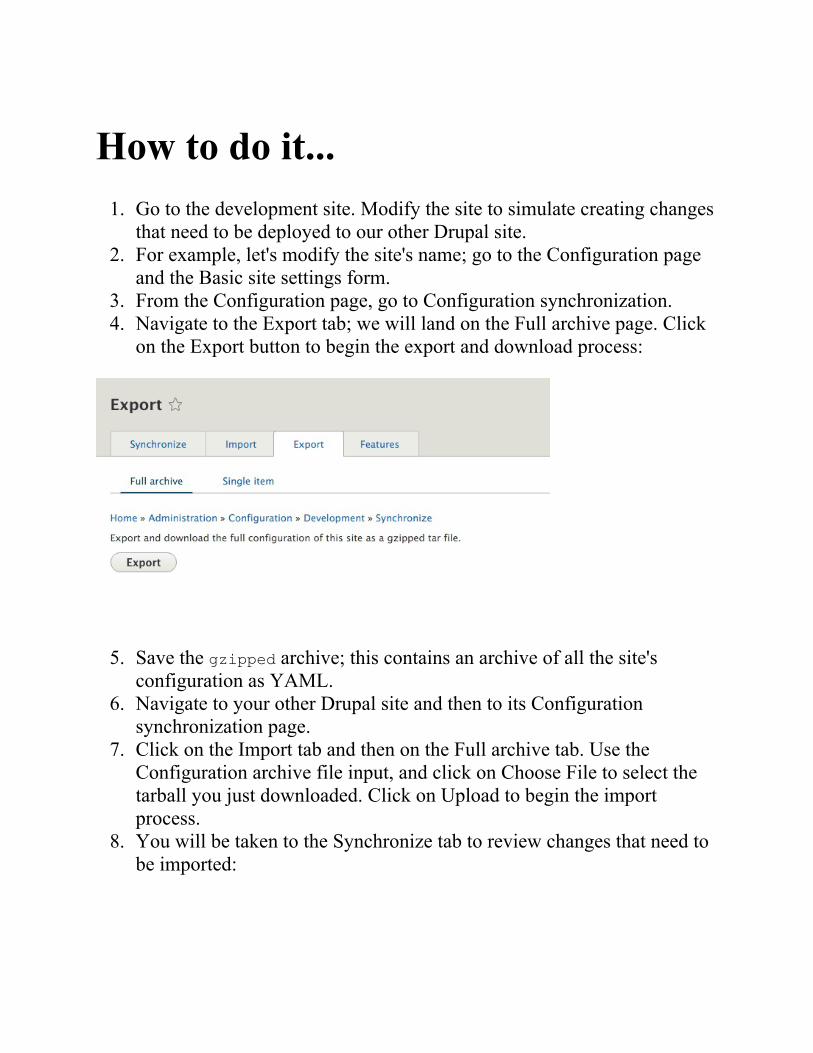
How to do it...1. Go to the development site. Modify the site to simulate creating changes
that need to be deployed to our other Drupal site.2. For example, let's modify the site's name; go to the Configuration page
and the Basic site settings form.3. From the Configuration page, go to Configuration synchronization.4. Navigate to the Export tab; we will land on the Full archive page. Click
on the Export button to begin the export and download process:
5. Save the gzipped archive; this contains an archive of all the site'sconfiguration as YAML.
6. Navigate to your other Drupal site and then to its Configurationsynchronization page.
7. Click on the Import tab and then on the Full archive tab. Use theConfiguration archive file input, and click on Choose File to select thetarball you just downloaded. Click on Upload to begin the importprocess.
8. You will be taken to the Synchronize tab to review changes that need tobe imported:
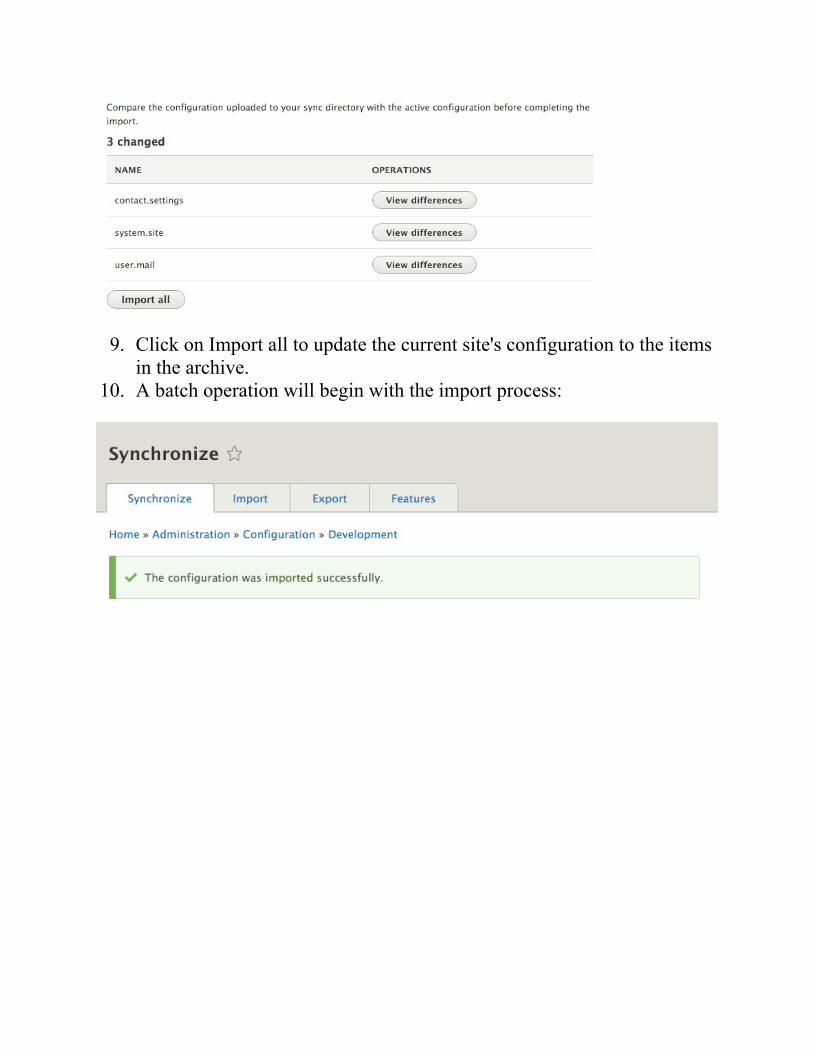
9. Click on Import all to update the current site's configuration to the itemsin the archive.
10. A batch operation will begin with the import process:
How it works...The Configuration synchronization form provides a way to interface with theconfig database table for your Drupal site. When you go to the Export pageand create the tarball, Drupal effectively dumps the contents of the configtable. Each row represents a configuration entity and will become its ownYAML file. The contents of the YAML file represent its database value.
When you import the tarball, Drupal extracts its content. The files are placedin the available CONFIG_SYNC_DIRECTORY directory. The synchronization pageparses the configuration entity YAML and provides a difference checkagainst the current site's configuration. Each configuration item can bereviewed, and then all the items can be imported. You cannot choose toselectively import individual items.
There's more...We will now discuss things that are required for site configurationsynchronization.
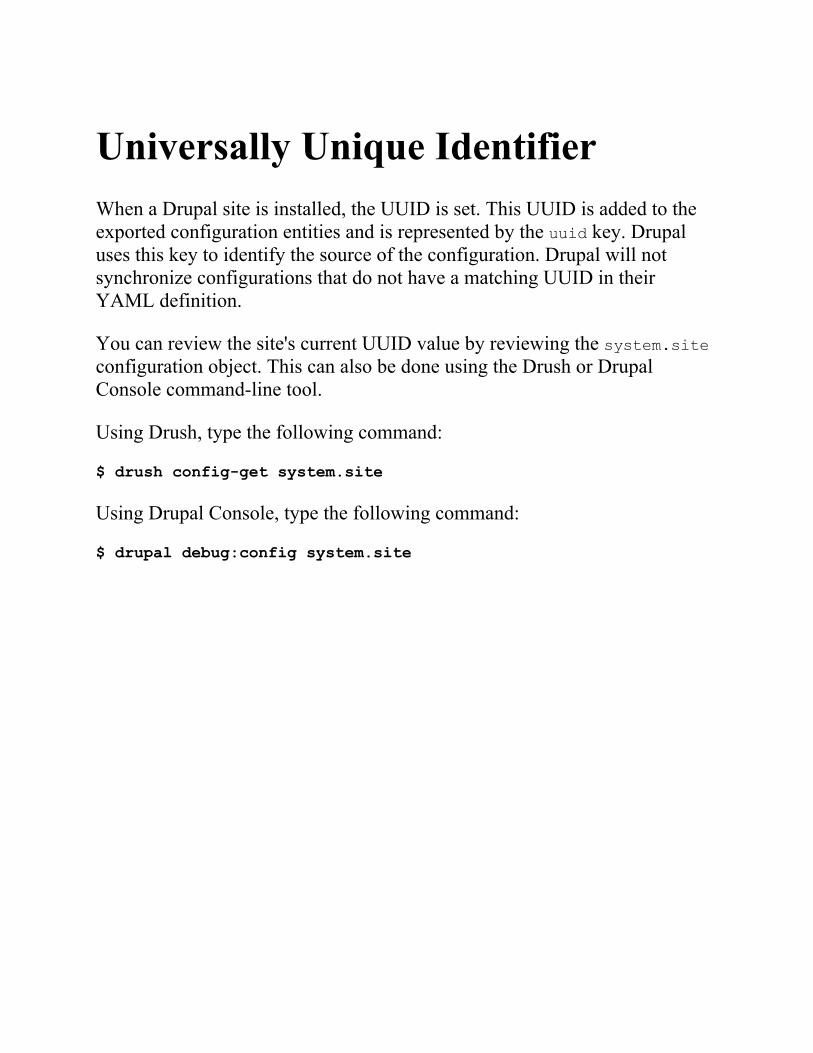
Universally Unique IdentifierWhen a Drupal site is installed, the UUID is set. This UUID is added to theexported configuration entities and is represented by the uuid key. Drupaluses this key to identify the source of the configuration. Drupal will notsynchronize configurations that do not have a matching UUID in theirYAML definition.
You can review the site's current UUID value by reviewing the system.siteconfiguration object. This can also be done using the Drush or DrupalConsole command-line tool.
Using Drush, type the following command:
$ drush config-get system.site
Using Drupal Console, type the following command:
$ drupal debug:config system.site
A synchronization folderDrupal uses a synchronization folder to hold the configuration YAML filesthat are to be imported into the current site. This folder is represented by theCONFIG_SYNC_DIRECTORY constant. If you have not defined this in the global$config_directories variable in your site's settings.php, then it will be arandomly named directory in your site's file directory.
When Drupal 8 entered its beta release cycle, this folder was referenced as astaging folder and referenced by the CONFIG_STAGING_DIRECTORY. This isnow deprecated; however, the internals of the configuration managementsystem support reading CONFIG_STAGING_DIRECTORY asCONFIG_SYNC_DIRECTORY. This will be removed in Drupal 9.
The synchronization form will use the configuration management discoveryservice to look for configuration changes that need to be imported from thisfolder.
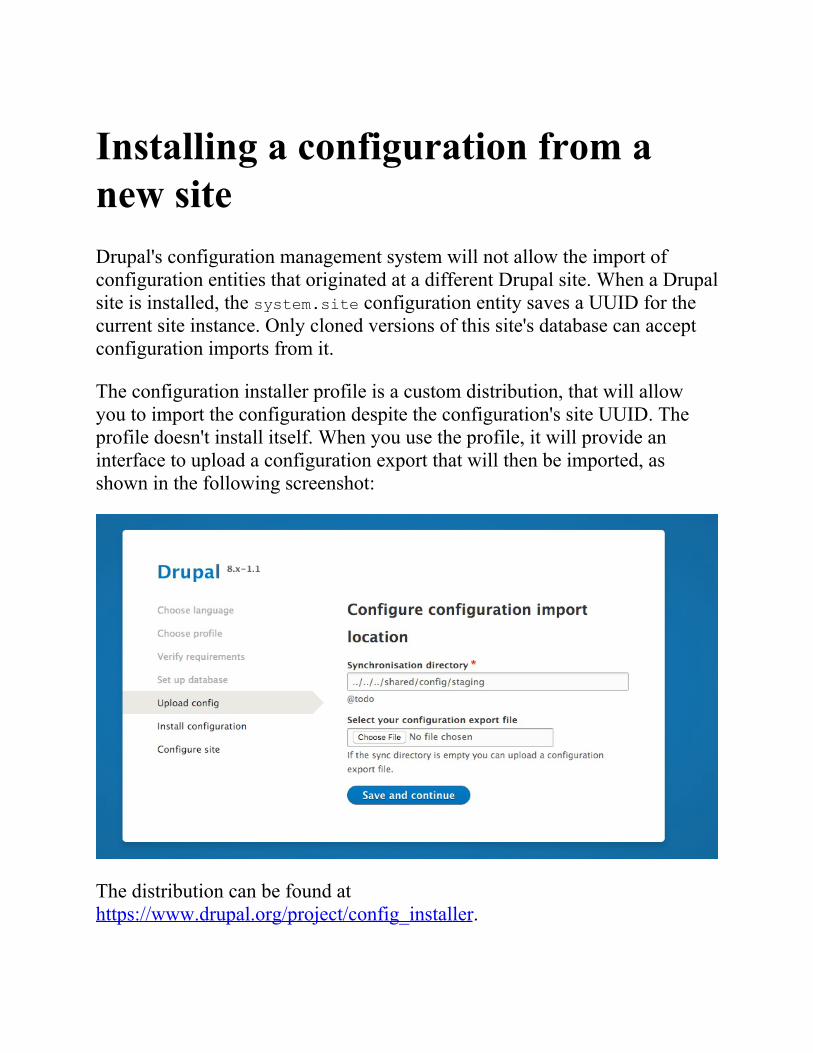
Installing a configuration from anew siteDrupal's configuration management system will not allow the import ofconfiguration entities that originated at a different Drupal site. When a Drupalsite is installed, the system.site configuration entity saves a UUID for thecurrent site instance. Only cloned versions of this site's database can acceptconfiguration imports from it.
The configuration installer profile is a custom distribution, that will allowyou to import the configuration despite the configuration's site UUID. Theprofile doesn't install itself. When you use the profile, it will provide aninterface to upload a configuration export that will then be imported, asshown in the following screenshot:
The distribution can be found athttps://www.drupal.org/project/config_installer.
Using command-line workflowprocessesDrupal 8's configuration systems solve many problems encountered whenexporting and deploying configurations in Drupal 7. However, the task ofsynchronizing the configuration is still a user interface task and requires themanipulation of archive files that contain the configuration exports for aDrupal 8 site.
Configuration management can be done on the command line through Drush,without requiring it to be installed. This mitigates any requirement to log into the production website to import changes. It also opens the ability for moreadvanced workflows that place the configuration in version control.
In this recipe, we will use Drush to export the development site'sconfiguration to the filesystem. The exported configuration files will then becopied to the production site's configuration directory. Using Drush, theconfiguration will be imported into production to complete the deployment.

Getting ready...You will need a base Drupal site to act as the development site. AnotherDrupal site, which is a clone of the development site, must be available to actas the production Drupal site.
This recipe uses Drush. If you have not installed Drush, instructions can befound at http://docs.drush.org/en/master/install/. Drush needs to be installedat the locations of both your Drupal sites.
How to do it...1. For the purpose of demonstration, change your development site's name
to Drush Config Sync Demo!. This way, there is at least oneconfiguration change to be imported to the production Drupal site.
2. Open a command-line terminal and change your directory to theworking directory of your development Drupal site.
3. Use the drush config-export command to export the configuration toa directory. The command will default to the sync configurationdirectory defined in your Drupal 8 site.
If you have not explicitly defined a sync directory, Drupal automaticallycreates a protected folder in the current site's uploaded files' directory, with aunique hash suffix on the directory name.
4. You will receive a message that the configuration has been exported tothe directory.
5. Using a method of your choice, copy the contents of the configurationsync folder to your other Drupal sites that match the configurationsync folder. For example, a default folder generated by Drupal can besites/default/files/config_XYZ/sync.
6. Open a command-line terminal and change your directory to yourproduction Drupal site's working directory.
7. Use the drush config-import command to begin the process ofimporting your configuration.
8. Review the changes made to the configuration entity keys and enter y toconfirm the changes:
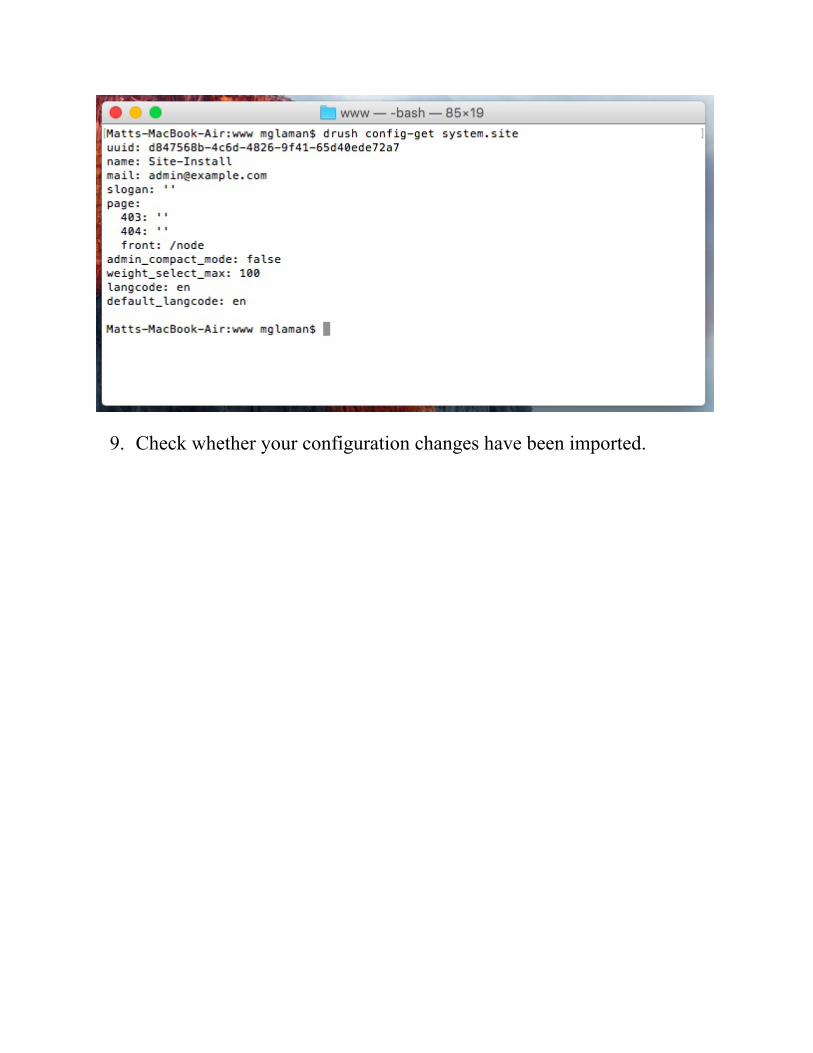
9. Check whether your configuration changes have been imported.
How it works...The Drush command-line tool can utilize the code found in Drupal to interactwith it. The config-export command replicates the functionality providedby the Configuration management module's full site export. However, youdo not need the Configuration management module enabled for the commandto work. The command will extract the available site configuration and writeit to a directory, which is unarchived.
The config-import command parses the files in a directory. It will make anattempt to run a difference check against the YAML files like theConfiguration management module's synchronize overview form does. It willthen import all the changes.
There's more...There are additional ways to work with the configuration managementsystem in Drupal. We will explore those options in the next section.

Drush config-pullDrush provides a way to simplify the transportation of configuration betweensites. The config-pull command allows you to specify two Drupal sites andmove the export configuration between them. You can either specify a nameof a subdirectory under the /sites directory or a Drush alias.
The following command will copy a development site's configuration andimport it into the staging server's site:
drush config-pull @mysite.local @mysite.staging
Additionally, you can specify the --label option. This represents a folderkey in the $config_directories setting. The option defaults to syncautomatically. Alternatively, you can use the --destination parameter tospecify an arbitrary folder that is not specified in the setting of$config_directories.
Using the Drupal ConsoleDrush has been part of the Drupal community since Drupal 4.7 and is acustom-built command-line tool. The Drupal Console is a Symfony Console-based application used to interact with Drupal. The Drupal Console projectprovides a means for configuration management over the command line.
You can learn more about the Drupal Console in Chapter 13, Drupal CLI orat http://www.drupalconsole.com/.
The workflow is the same, except the naming of the command. Theconfiguration export command is config:export, and it is automaticallyexported to your system's temporary folder until a directory is passed. Youcan then import the configuration using the config:import command.
Editing the configuration from thecommand lineBoth Drush and Drupal Console support the ability to edit the configurationthrough the command line in YAML format. Both the tools operate in thesame fashion and have similar command names:
Drush: config-edit [name]Console: config:edit [name]
The difference is that Drush will list all the available options to be edited ifyou do not pass a name, while Console allows you to search.
When you edit a configuration item, your default terminal-based text editorwill open. You will be presented with a YAML file that can be edited. Once yousave your changes, the configuration is then saved on your Drupal site:
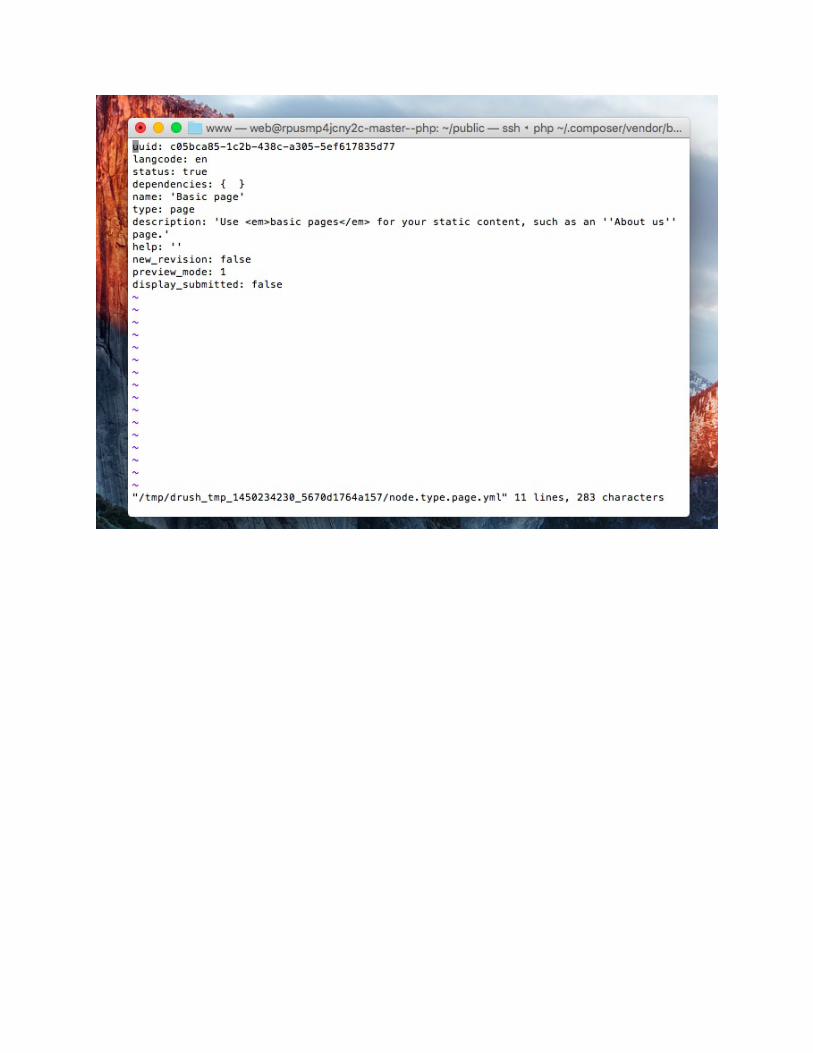
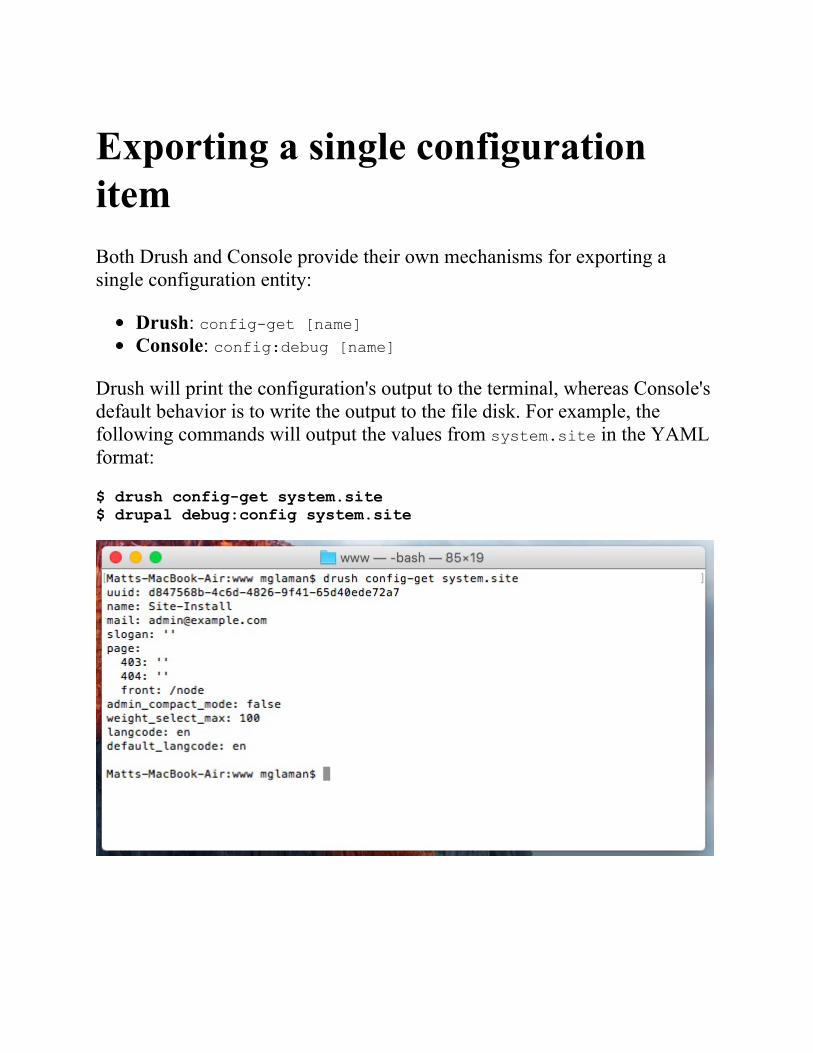
Exporting a single configurationitemBoth Drush and Console provide their own mechanisms for exporting asingle configuration entity:
Drush: config-get [name]Console: config:debug [name]
Drush will print the configuration's output to the terminal, whereas Console'sdefault behavior is to write the output to the file disk. For example, thefollowing commands will output the values from system.site in the YAMLformat:
$ drush config-get system.site $ drupal debug:config system.site

Using version control andcommand-line workflowA benefit of having the configuration exportable to YAML files is the factthat the configuration can be kept in version control. The Drupal site'sCONFIG_SYNC_DIRECTORY directory can be committed to version control toensure that it is transported across environments and properly updated.Deployment tools can then use Drush or Console to automatically importchanges.
The config-export command provided by Drush provides the Gitintegration:
drush config-export --add
Appending the --add option will run git add -p for an interactive staging ofthe changed configuration files:
drush config-export --commit --message="Updating configuration "
The --commit and optional --message options will stage all configuration filechanges and commit them with your message:
drush config-export --push --message="Updating configuration "
Finally, you can also specify --push to make a commit and push it to theremote repository.
See alsoRefer to Chapter 13, The Drupal CLIRefer to Drush at http://docs.drush.org/en/master/Refer to Drupal Console at http://www.drupalconsole.com/
Updating and installing new moduleconfigurationsModules in Drupal 8 provide configuration YAML files inside theirconfig/install directory. A consequence of the site controllingconfiguration is that a new configuration in a module's config/installdirectory is not automatically installed. Module developers must write updatefunctions, which will import the new configuration as it is added. While thisis a practice contributed modules should follow, this process can becumbersome for private projects.
Luckily, the Drupal community has come up with a solution that provides aconfiguration management flow that allows updating of a module's provideddefault configuration. The module Configuration Update Manager allowsyou to import a new configuration from a module or revert it to the originalconfiguration if modified. In fact, the module is a dependency for theFeatures module discussed in Chapter 4, Extending Drupal.
In this recipe, we will use Configuration Update Manager to reviewconfiguration differences to a module and revert the modified configuration.
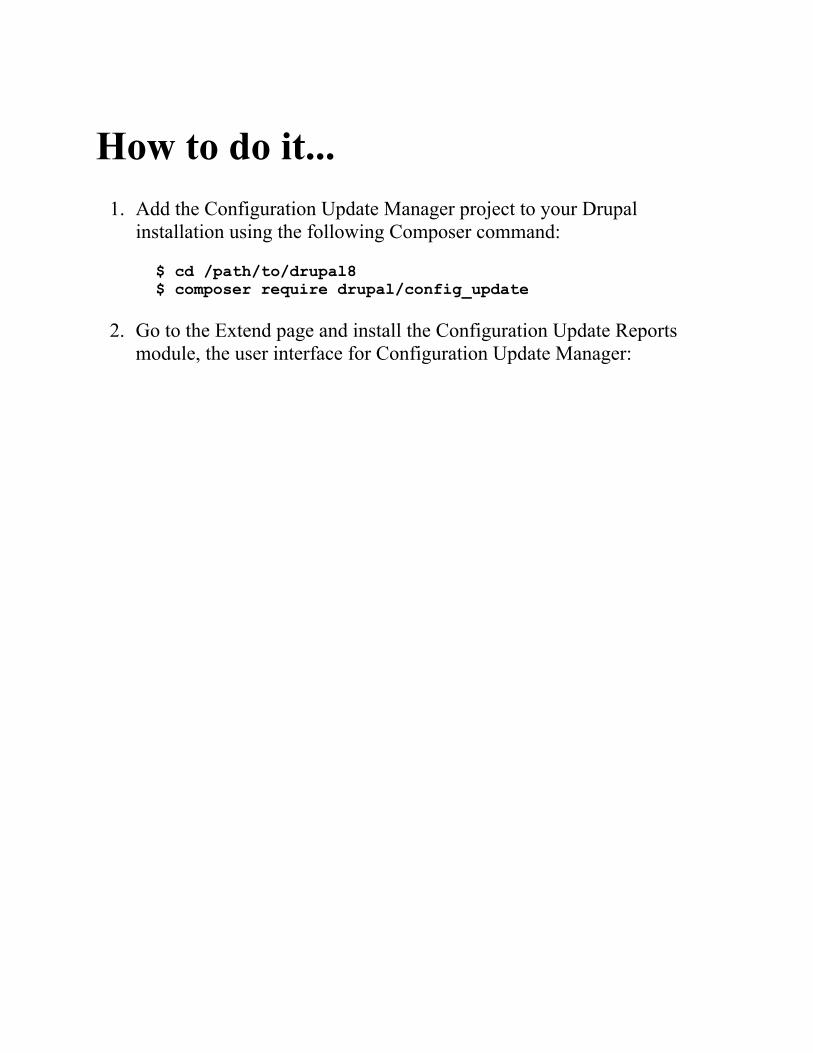
How to do it...1. Add the Configuration Update Manager project to your Drupal
installation using the following Composer command:
$ cd /path/to/drupal8$ composer require drupal/config_update
2. Go to the Extend page and install the Configuration Update Reportsmodule, the user interface for Configuration Update Manager:
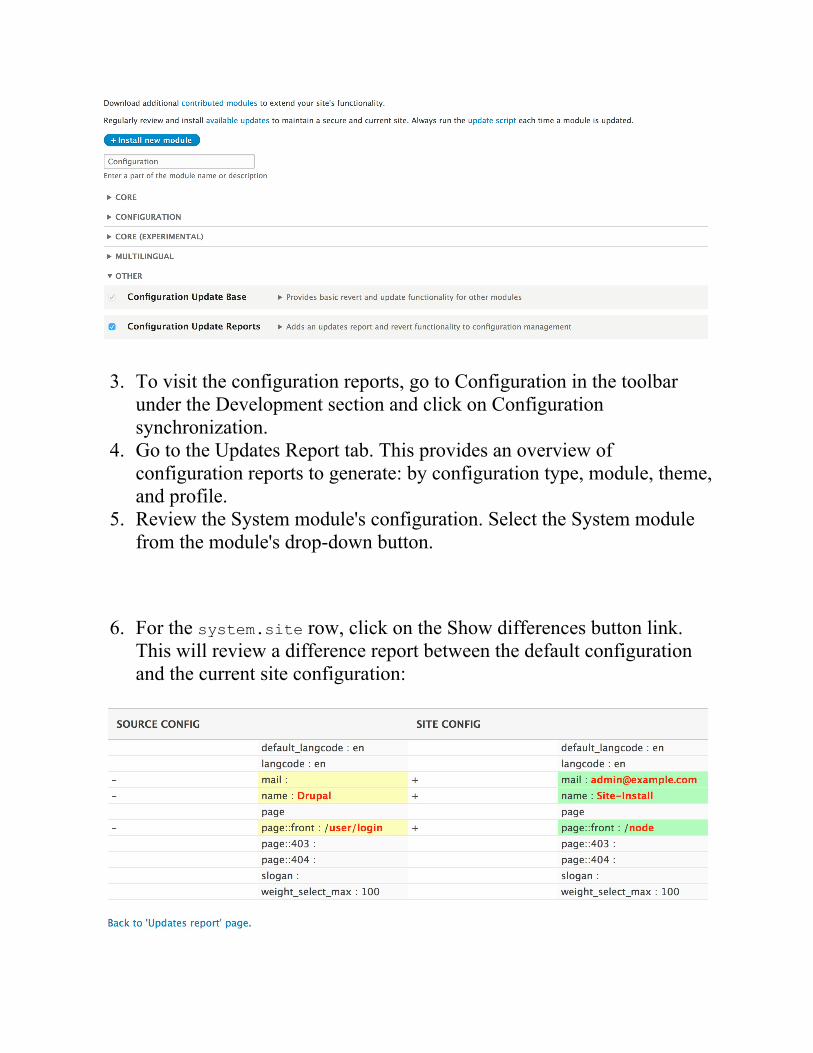
3. To visit the configuration reports, go to Configuration in the toolbarunder the Development section and click on Configurationsynchronization.
4. Go to the Updates Report tab. This provides an overview ofconfiguration reports to generate: by configuration type, module, theme,and profile.
5. Review the System module's configuration. Select the System modulefrom the module's drop-down button.
6. For the system.site row, click on the Show differences button link.This will review a difference report between the default configurationand the current site configuration:

7. Click on the Back to 'Updates report' page to go back to the main reportso that the configuration can be reverted.
8. Expand the drop-down button so that you can click on Revert to source:
9. Click on Revert on the confirmation form to finish the operation.10. The configuration is now reverted to its original installation.
How it works...The Configuration Update Manager provides two modules: ConfigurationUpdate Base and Configuration Update Reports. The base moduleprovides an underlying API for listing a configuration, reverting aconfiguration, and running difference checks with results. It extends Drupalcore's configuration operations. The reports module provides a user interfaceon top of the base module. The Features module uses the base module toprovide difference review and automatic reverting of a configuration.
When reverting a configuration, the raw values are collected and then used tooverwrite what currently exists in the system. The reports also allowimporting a new configuration added to a module.

There's more...There are other contributed projects and methods for handling a configurationwithin modules.
The Configuration DevelopmentmoduleFor module developers, there is the Configuration Development module. TheConfiguration Development module provides a command-line method forimporting and exporting a configuration. This is useful for contributedmodule developers. It eases the exporting and update of a configurationintended for the config/install directory.
The module looks for a config_devel entry in the module's info.yml file.An example is taken from the Commerce Store submodule from DrupalCommerce module:
config_devel: install: - commerce_store.commerce_store_type.online - commerce_store.settings - core.entity_view_display.commerce_store.online.default - views.view.commerce_stores - system.action.commerce_delete_store_action
Using Drush, commands provided by the Configuration Development canthen be used to export and import the data. The following command willexport the listed configuration to the config/install directory:
$ drush config-devel-export commerce_store
See alsoRefer to Configuration Update Manager project page athttps://www.drupal.org/project/config_updateRefer to Configuration development, a command-line based alternativeat https://www.drupal.org/project/config_devel
The Entity APIIn this chapter, we will explore the Entity API to create custom entities andsee how they are handled and cover the following recipes:
Creating a configuration entity typeCreating a content entity typeCreating a bundle for a content entity typeImplementing custom access control for an entityProviding a custom storage handlerCreating a route provider
IntroductionIn Drupal, entities are a representation of data that has a specific structure.There are specific entity types, which have different bundles and fieldsattached to those bundles. Bundles are implementations of entities that canhave fields attached to themselves. In terms of programming, you canconsider an entity that supports bundles as an abstract class and each bundleas a class that extends that abstract class. The fields are added to bundles.This is part of the reasoning for the terminology: an entity type can contain abundle of fields.
An entity is an instance of an entity type defined in Drupal. Drupal 8 providestwo entity types: configuration and content. Configuration entities are notfieldable and represent a configuration within a site. Content entities arefieldable and can have bundles. Bundles are, most commonly, controlledthrough configuration entities.
In Drupal 8, there is an Entity API module. It was created in Drupal 7 toexpand the entity subsystem; most of its functionalities from Drupal 7 arenow in its core. The goal of the module is to develop improvements for thedeveloper experience around entities by merging more functionalities into theDrupal core during each minor release cycle (8.1.x, 8.2.x, and so on). Therewill be a There's more... section in each recipe that relates to how the EntityAPI module can simplify the recipe.
Creating a configuration entity typeDrupal 8 harnesses the entity API for configuration to provide configurationvalidation and extended functionality. Using the underlying entity structure,the configuration has a proper Create, Read, Update, and Delete (CRUD)process that can be managed. Configuration entities are not fieldable. All theattributes of a configuration entity are defined in its configuration schemadefinition.
Most common configuration entities interact with Drupal core'sconfig_object type, as discussed in Chapter 4, Extending Drupal, andChapter 9, Configuration Management - Deploying in Drupal 8, to store andmanage a site's configuration. There are other uses of configuration entities,such as menus, view displays, form displays, and contact forms, which are allconfiguration entities.
In this recipe, we will create a new configuration entity type calledSiteAnnouncement. This will provide a simple configuration entity thatallows you to create, edit, and delete simple messages that can be displayedon the site for important announcements.
Getting readyYou will need a custom module to place code into to implement aconfiguration entity type. Let's create an src directory for your classes. Referto the Creating a module recipe of Chapter 4, Extending Drupal, forinformation on creating a custom module.
Do not use a module that is currently installed, otherwise Drupal will notinstall your new entity type.
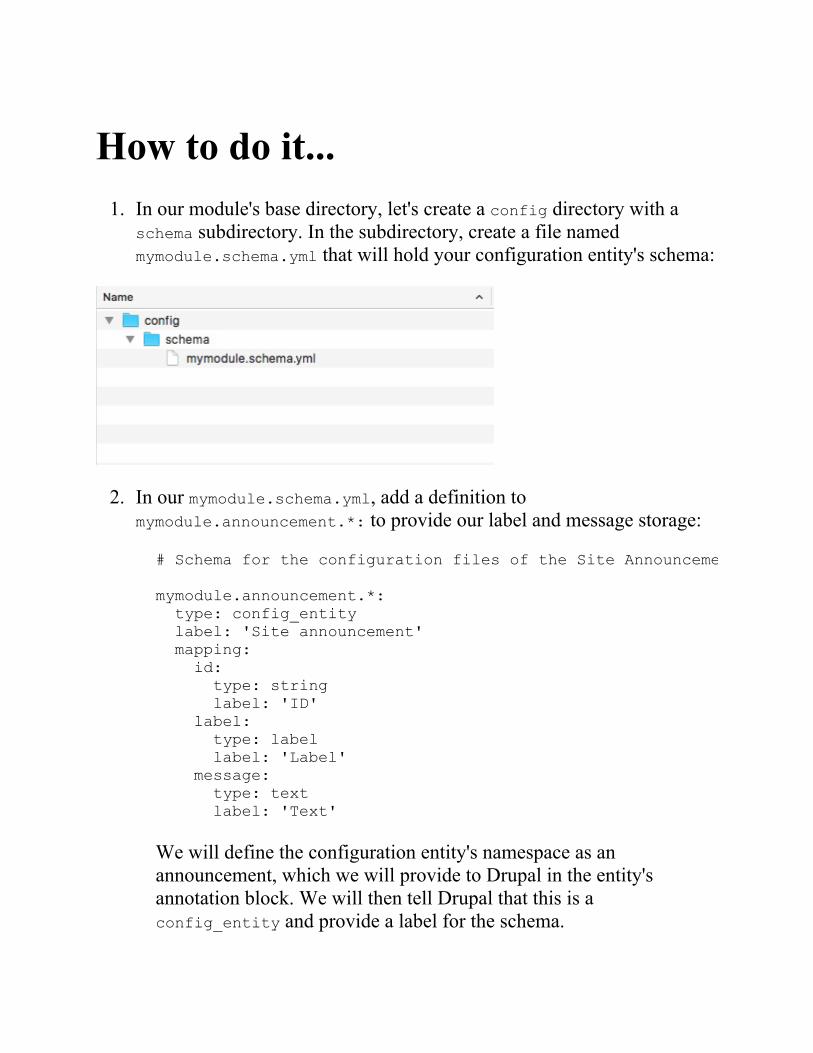
How to do it...1. In our module's base directory, let's create a config directory with a
schema subdirectory. In the subdirectory, create a file namedmymodule.schema.yml that will hold your configuration entity's schema:
2. In our mymodule.schema.yml, add a definition tomymodule.announcement.*: to provide our label and message storage:
# Schema for the configuration files of the Site Announcement. mymodule.announcement.*: type: config_entity label: 'Site announcement' mapping: id: type: string label: 'ID' label: type: label label: 'Label' message: type: text label: 'Text'
We will define the configuration entity's namespace as anannouncement, which we will provide to Drupal in the entity'sannotation block. We will then tell Drupal that this is aconfig_entity and provide a label for the schema.
Using the mapping array, we will provide the attributes that make upour entity and the data that will be stored.
3. Create an Entity directory in our module's src folder. First, we willcreate an interface for our entity by creating aSiteAnnouncementInterface.php file. TheSiteAnnouncementInterface interface will extend the\Drupal\Core\Config\Entity\ConfigEntityInterface:
<?php namespace Drupal\mymodule\Entity; use Drupal\Core\Config\Entity\ConfigEntityInterface; interface SiteAnnouncementInterface extends ConfigEntityInterface { /** * Gets the message value. * * @return string */ public function getMessage(); }
This will be implemented by our entity, and will provide the methodrequirements. It is best practice to provide an interface for entities.This allows you to provide the required methods if another developerextends your entity or if you are doing advanced testing and need tomock an object. We also provide a method to return our customattribute.
4. Let's create SiteAnnouncement.php in our src/Entity directory. Thisfile will contain the SiteAnnouncement class, which extends\Drupal\Core\Config\Entity\ConfigEntityBase and implements ourentity's interface:
<?php namespace Drupal\mymodule\Entity;
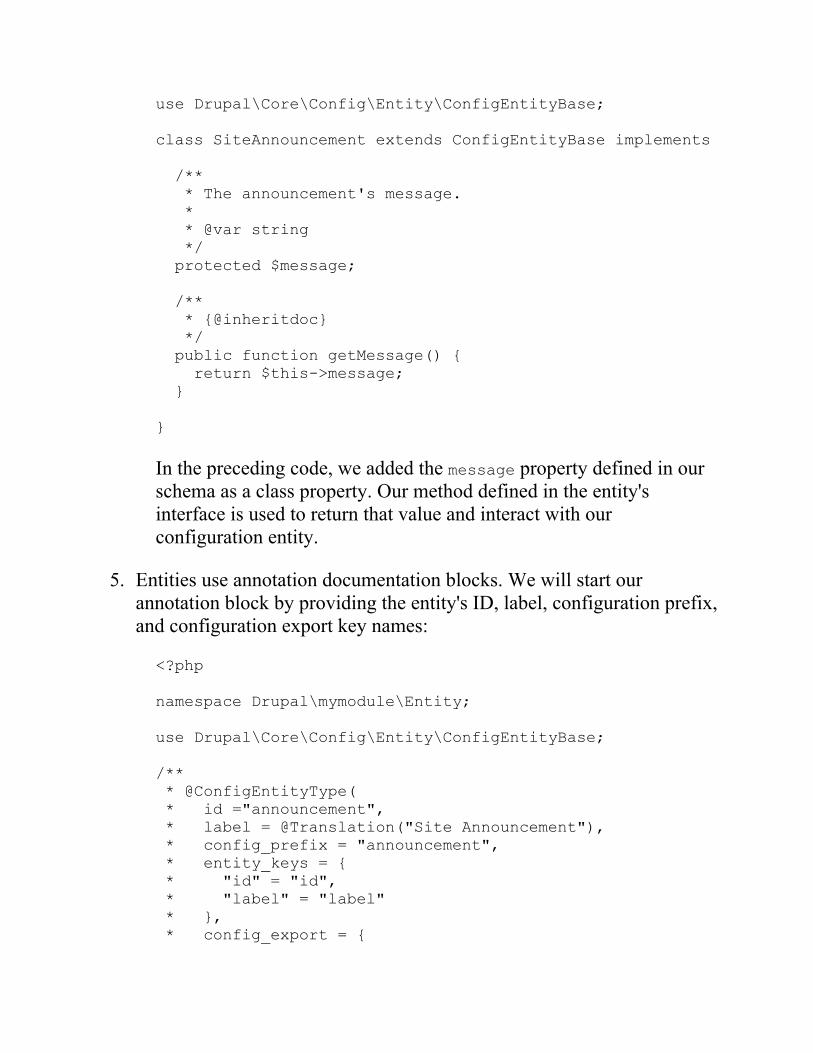
use Drupal\Core\Config\Entity\ConfigEntityBase; class SiteAnnouncement extends ConfigEntityBase implements SiteAnnouncementInterface { /** * The announcement's message. * * @var string */ protected $message; /** * {@inheritdoc} */ public function getMessage() { return $this->message; } }
In the preceding code, we added the message property defined in ourschema as a class property. Our method defined in the entity'sinterface is used to return that value and interact with ourconfiguration entity.
5. Entities use annotation documentation blocks. We will start ourannotation block by providing the entity's ID, label, configuration prefix,and configuration export key names:
<?php namespace Drupal\mymodule\Entity; use Drupal\Core\Config\Entity\ConfigEntityBase; /** * @ConfigEntityType( * id ="announcement", * label = @Translation("Site Announcement"), * config_prefix = "announcement", * entity_keys = { * "id" = "id", * "label" = "label" * }, * config_export = {

* "id", * "label", * "message", * } * ) */ class SiteAnnouncement extends ConfigEntityBase implements SiteAnnouncementInterface { /** * The announcement's message. * * @var string */ protected $message; /** * {@inheritdoc} */ public function getMessage() { return $this->message; } }
The annotation document block tells Drupal that this is an instance ofthe ConfigEntityType plugin. The id is the internal machine nameidentifier for the entity type, and the label is its human-readableversion. The config_prefix matches how we defined our schemawith mymodule.announcement. The entity keys definition tells Drupalthe attributes that represent our identifiers and labels.
When specifying config_export, we are telling the configurationmanagement system what properties are exportable when exportingour entity.
6. Next, we will add handlers to our entity's annotation. We will definethe class that will display the available entity entries and forms to workwith our entity:
/** * @ConfigEntityType( * id ="announcement", * label = @Translation("Site Announcement"), * handlers = {
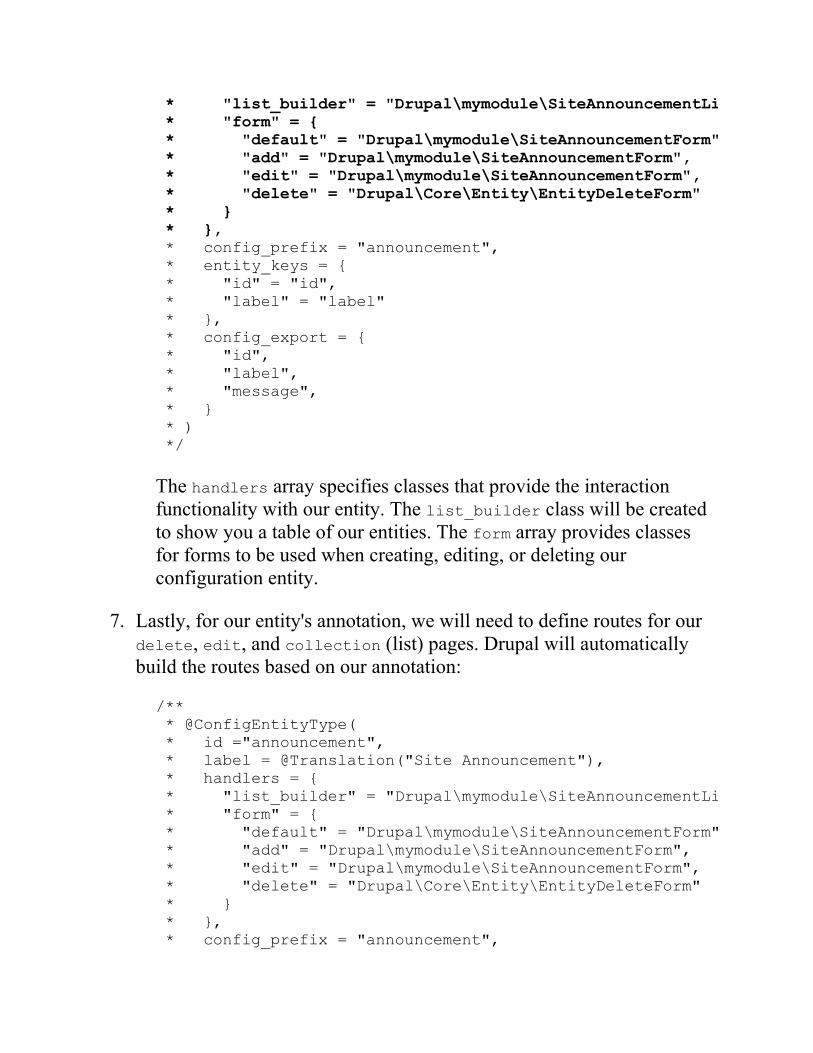
* "list_builder" = "Drupal\mymodule\SiteAnnouncementListBuilder", * "form" = { * "default" = "Drupal\mymodule\SiteAnnouncementForm", * "add" = "Drupal\mymodule\SiteAnnouncementForm", * "edit" = "Drupal\mymodule\SiteAnnouncementForm", * "delete" = "Drupal\Core\Entity\EntityDeleteForm" * } * }, * config_prefix = "announcement", * entity_keys = { * "id" = "id", * "label" = "label" * }, * config_export = { * "id", * "label", * "message", * } * ) */
The handlers array specifies classes that provide the interactionfunctionality with our entity. The list_builder class will be createdto show you a table of our entities. The form array provides classesfor forms to be used when creating, editing, or deleting ourconfiguration entity.
7. Lastly, for our entity's annotation, we will need to define routes for ourdelete, edit, and collection (list) pages. Drupal will automaticallybuild the routes based on our annotation:
/** * @ConfigEntityType( * id ="announcement", * label = @Translation("Site Announcement"), * handlers = { * "list_builder" = "Drupal\mymodule\SiteAnnouncementListBuilder", * "form" = { * "default" = "Drupal\mymodule\SiteAnnouncementForm", * "add" = "Drupal\mymodule\SiteAnnouncementForm", * "edit" = "Drupal\mymodule\SiteAnnouncementForm", * "delete" = "Drupal\Core\Entity\EntityDeleteForm" * } * }, * config_prefix = "announcement",
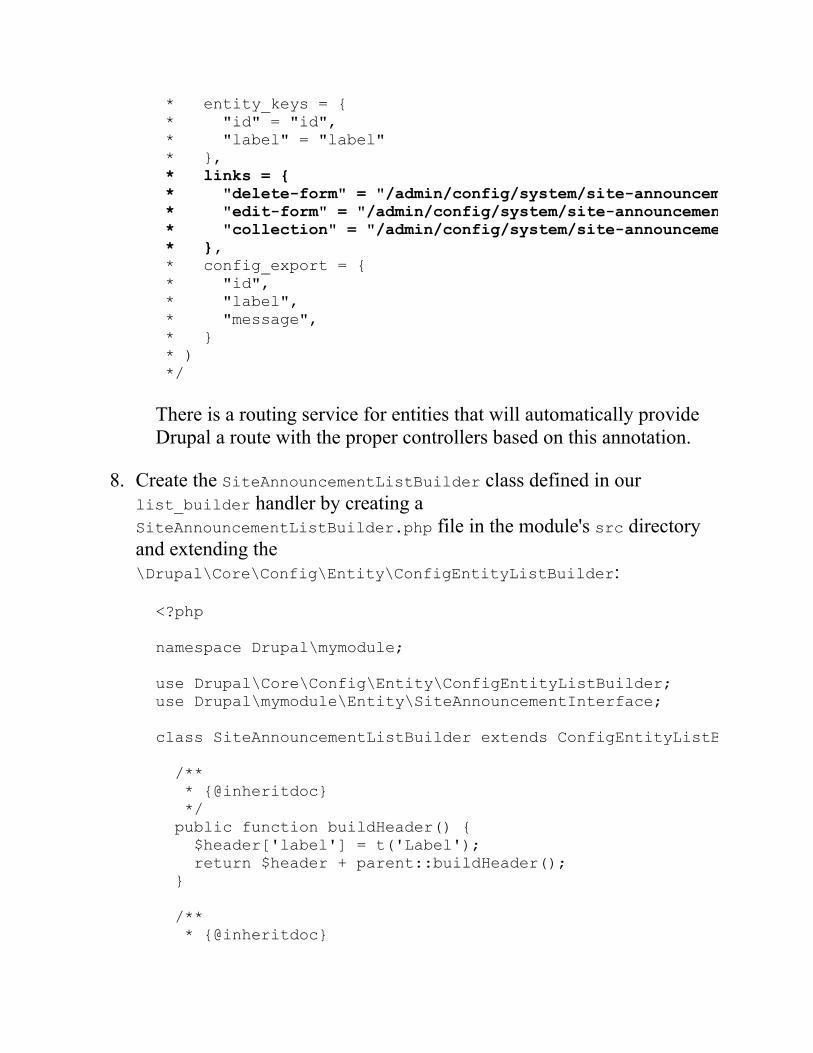
* entity_keys = { * "id" = "id", * "label" = "label" * }, * links = { * "delete-form" = "/admin/config/system/site-announcements/manage/{announcement}/delete", * "edit-form" = "/admin/config/system/site-announcements/manage/{announcement}", * "collection" = "/admin/config/system/site-announcements", * }, * config_export = { * "id", * "label", * "message", * } * ) */
There is a routing service for entities that will automatically provideDrupal a route with the proper controllers based on this annotation.
8. Create the SiteAnnouncementListBuilder class defined in ourlist_builder handler by creating aSiteAnnouncementListBuilder.php file in the module's src directoryand extending the\Drupal\Core\Config\Entity\ConfigEntityListBuilder:
<?php namespace Drupal\mymodule; use Drupal\Core\Config\Entity\ConfigEntityListBuilder; use Drupal\mymodule\Entity\SiteAnnouncementInterface; class SiteAnnouncementListBuilder extends ConfigEntityListBuilder { /** * {@inheritdoc} */ public function buildHeader() { $header['label'] = t('Label'); return $header + parent::buildHeader(); } /** * {@inheritdoc}
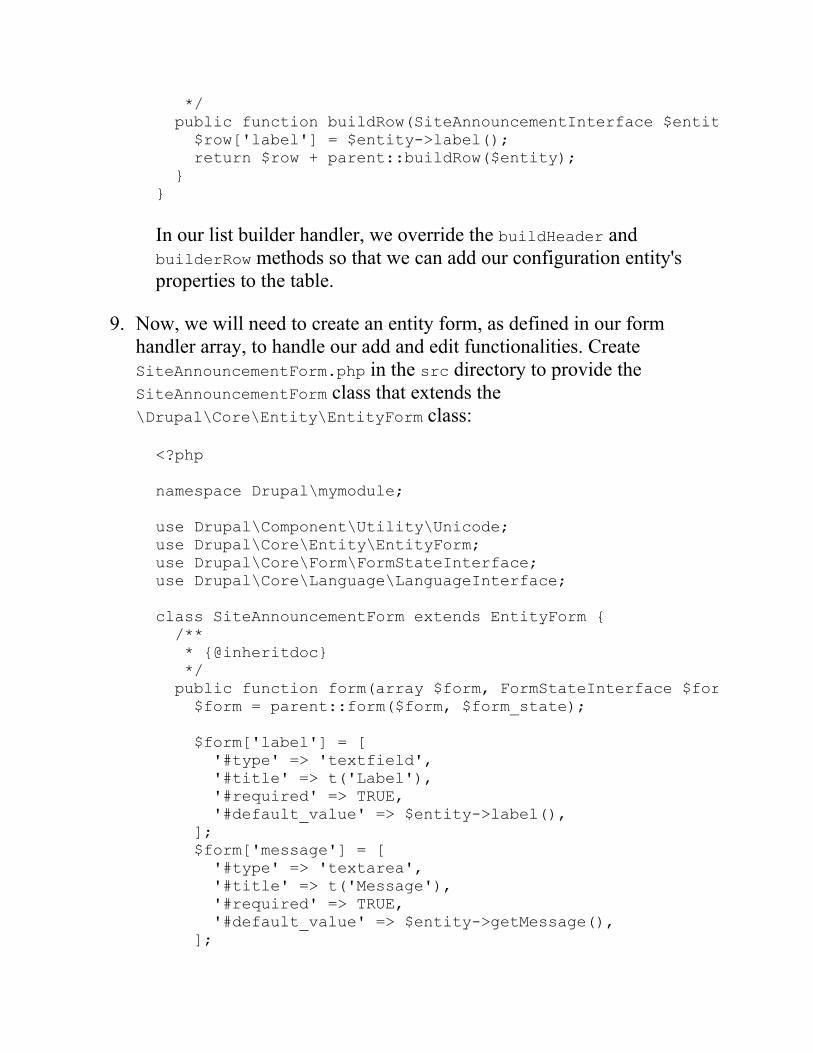
*/ public function buildRow(SiteAnnouncementInterface $entity) { $row['label'] = $entity->label(); return $row + parent::buildRow($entity); } }
In our list builder handler, we override the buildHeader andbuilderRow methods so that we can add our configuration entity'sproperties to the table.
9. Now, we will need to create an entity form, as defined in our formhandler array, to handle our add and edit functionalities. CreateSiteAnnouncementForm.php in the src directory to provide theSiteAnnouncementForm class that extends the\Drupal\Core\Entity\EntityForm class:
<?php namespace Drupal\mymodule; use Drupal\Component\Utility\Unicode; use Drupal\Core\Entity\EntityForm; use Drupal\Core\Form\FormStateInterface; use Drupal\Core\Language\LanguageInterface; class SiteAnnouncementForm extends EntityForm { /** * {@inheritdoc} */ public function form(array $form, FormStateInterface $form_state) { $form = parent::form($form, $form_state); $form['label'] = [ '#type' => 'textfield', '#title' => t('Label'), '#required' => TRUE, '#default_value' => $entity->label(), ]; $form['message'] = [ '#type' => 'textarea', '#title' => t('Message'), '#required' => TRUE, '#default_value' => $entity->getMessage(), ];
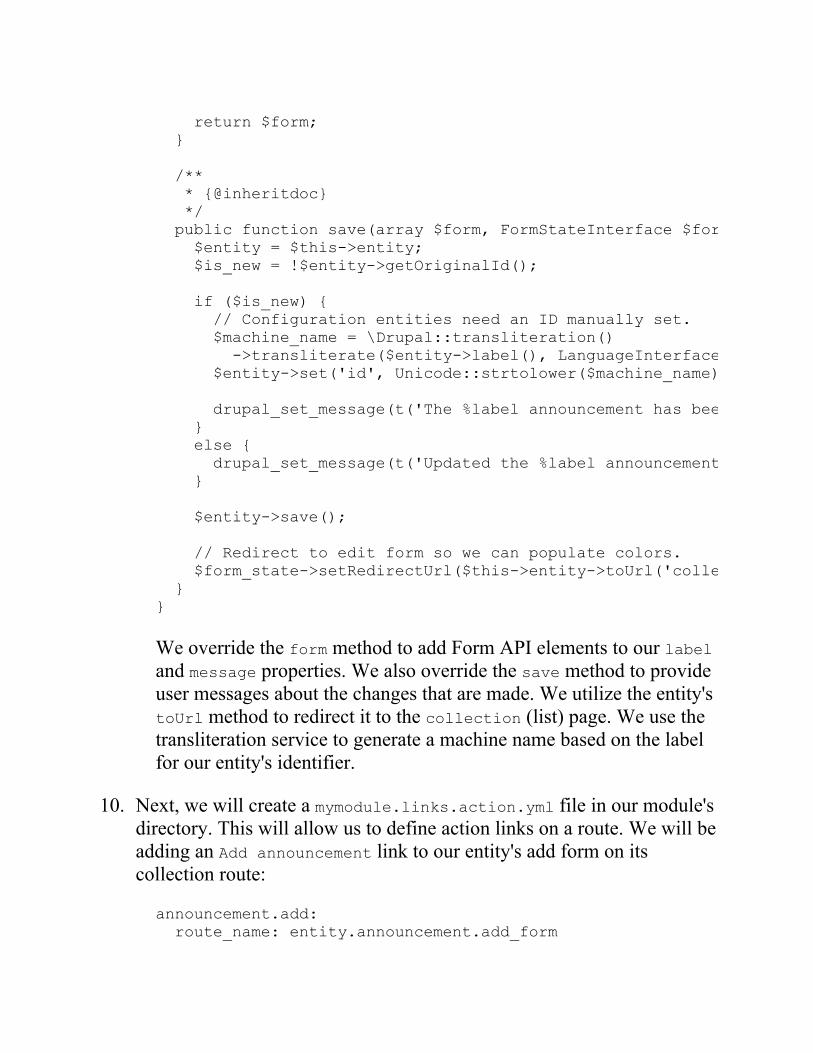
return $form; } /** * {@inheritdoc} */ public function save(array $form, FormStateInterface $form_state) { $entity = $this->entity; $is_new = !$entity->getOriginalId(); if ($is_new) { // Configuration entities need an ID manually set. $machine_name = \Drupal::transliteration() ->transliterate($entity->label(), LanguageInterface::LANGCODE_DEFAULT, '_'); $entity->set('id', Unicode::strtolower($machine_name)); drupal_set_message(t('The %label announcement has been created.', array('%label' => $entity->label()))); } else { drupal_set_message(t('Updated the %label announcement.', array('%label' => $entity->label()))); } $entity->save(); // Redirect to edit form so we can populate colors. $form_state->setRedirectUrl($this->entity->toUrl('collection')); } }
We override the form method to add Form API elements to our labeland message properties. We also override the save method to provideuser messages about the changes that are made. We utilize the entity'stoUrl method to redirect it to the collection (list) page. We use thetransliteration service to generate a machine name based on the labelfor our entity's identifier.
10. Next, we will create a mymodule.links.action.yml file in our module'sdirectory. This will allow us to define action links on a route. We will beadding an Add announcement link to our entity's add form on itscollection route:
announcement.add: route_name: entity.announcement.add_form
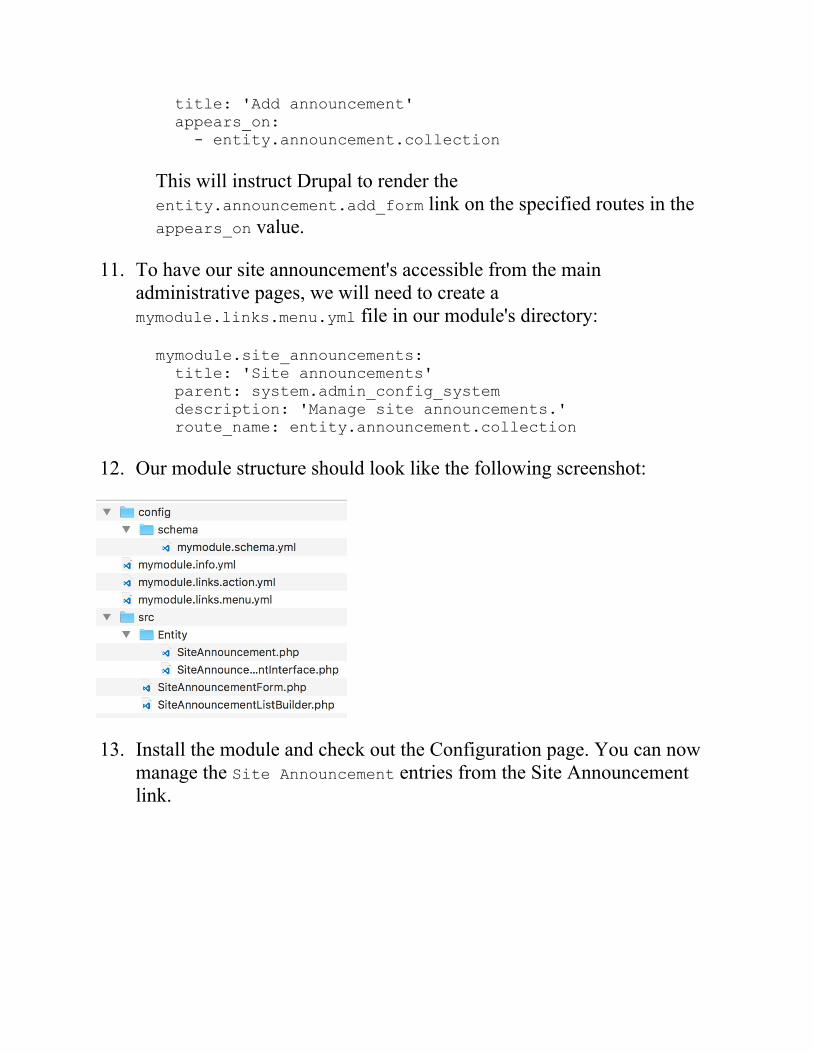
title: 'Add announcement' appears_on: - entity.announcement.collection
This will instruct Drupal to render theentity.announcement.add_form link on the specified routes in theappears_on value.
11. To have our site announcement's accessible from the mainadministrative pages, we will need to create amymodule.links.menu.yml file in our module's directory:
mymodule.site_announcements: title: 'Site announcements' parent: system.admin_config_system description: 'Manage site announcements.' route_name: entity.announcement.collection
12. Our module structure should look like the following screenshot:
13. Install the module and check out the Configuration page. You can nowmanage the Site Announcement entries from the Site Announcementlink.
How it works...When creating a configuration schema definition, one of the first propertiesused for the configuration namespace is type. This value can beconfig_object or config_entity. When the type is config_entity, thedefinition will be used to create a database table rather than to structure theserialized data for the config table.
Entities are powered by the plugin system in Drupal, which means that thereis a plugin manager. The default \Drupal\Core\Entity\EntityTypeManagerprovides discovery and handling of entities. The ConfigEntityType class forthe entity type's plugin class will force the setting of the uuid and langcodein the entity_keys definition. The storage handler for configuration entitiesdefaults to \Drupal\Core\Config\Entity\ConfigEntityStorage. TheConfigEntityStorage class interacts with the configuration managementsystem to load, save, and delete custom configuration entities.

There's more...Drupal 8 introduces a typed data system that configuration entities and fieldsuse.

Available data types for schemadefinitionsDrupal core provides its own configuration information. There is acore.data_types.schema.yml file located at core/config/schema. Theseare the base types of data that the core provides and can be used whenmaking configuration schema. The file contains YAML definitions of datatypes and the class that represents them:
boolean: label: 'Boolean' class: '\Drupal\Core\TypedData\Plugin\DataType\BooleanData' email: label: 'Email' class: '\Drupal\Core\TypedData\Plugin\DataType\Email' string: label: 'String' class: '\Drupal\Core\TypedData\Plugin\DataType\StringData'
When a configuration schema definition specifies an attribute that has anemail for its type, that value is then handled by the\Drupal\Core\TypedData\Plugin\DataType\Email class. Data types are aform of plugins, and each plugin's annotation specifies constraints forvalidation. This is built around the Symfony Validator component.

See alsoRefer to Chapter 6, Creating Forms with the Form APIRefer to Chapter 4, Extending DrupalRefer to Chapter 9, Confiuration Management - Deploying in Drupal 8Refer to configuration schema/metadata athttps://www.drupal.org/node/1905070
Creating a content entity typeContent entities provide base field definitions and configurable fields throughthe Field module. There is also support for revisions and translations withcontent entities. Display modes, both form and view, are available for contententities to control how the fields are edited and displayed. When an entitydoes not specify bundles, there is automatically one bundle instance with thesame name as the entity.
In this recipe, we will create a custom content entity that does not specify abundle. We will create a Message entity that can serve as a content entity forgeneric messages.
Getting readyYou will need a custom module to place code into to implement aconfiguration entity type. Create an src directory for your classes. Refer tothe Creating a module recipe of Chapter 4, Extending Drupal, forinformation on creating a custom module.
Do not use a module which is currently installed, otherwise Drupal will notinstall your new entity type.
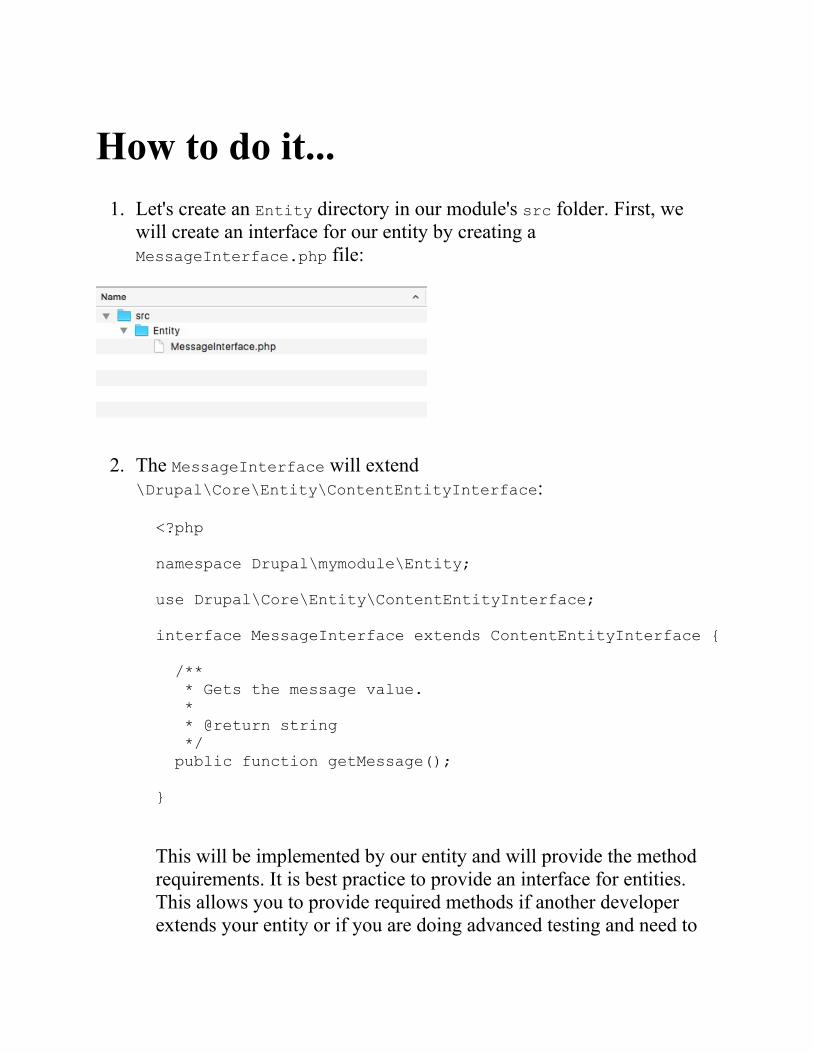
How to do it...1. Let's create an Entity directory in our module's src folder. First, we
will create an interface for our entity by creating aMessageInterface.php file:
2. The MessageInterface will extend\Drupal\Core\Entity\ContentEntityInterface:
<?php namespace Drupal\mymodule\Entity; use Drupal\Core\Entity\ContentEntityInterface; interface MessageInterface extends ContentEntityInterface { /** * Gets the message value. * * @return string */ public function getMessage(); }
This will be implemented by our entity and will provide the methodrequirements. It is best practice to provide an interface for entities.This allows you to provide required methods if another developerextends your entity or if you are doing advanced testing and need to
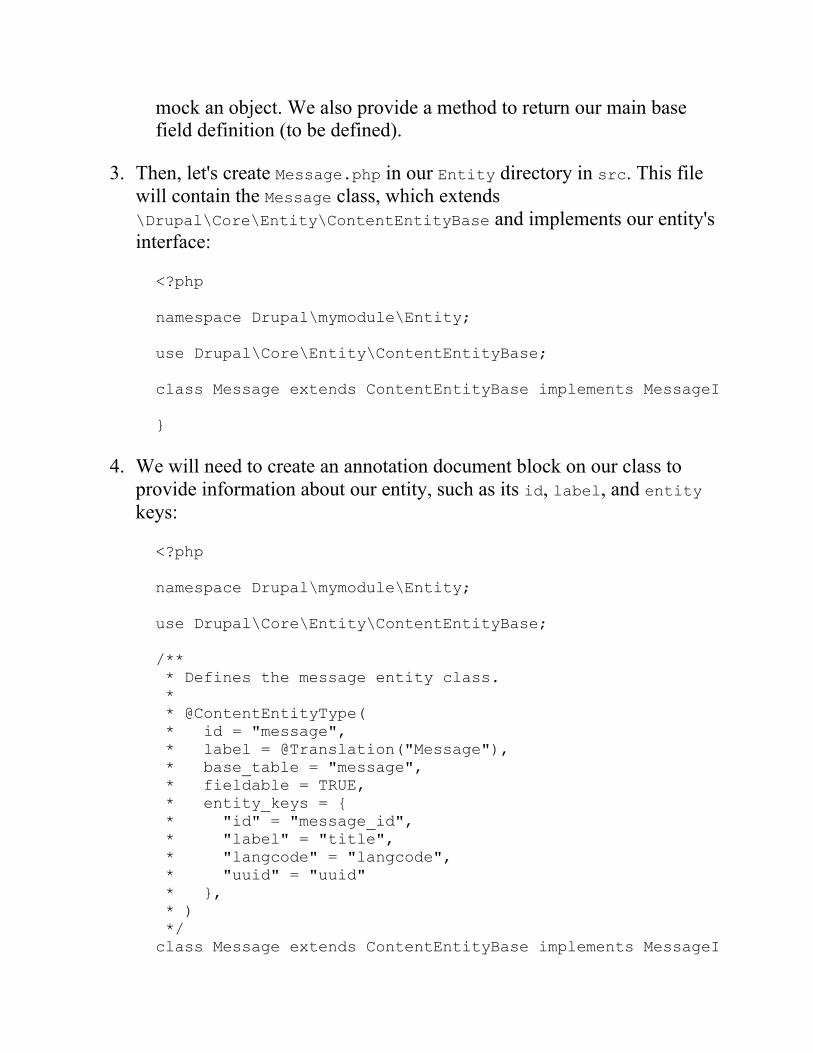
mock an object. We also provide a method to return our main basefield definition (to be defined).
3. Then, let's create Message.php in our Entity directory in src. This filewill contain the Message class, which extends\Drupal\Core\Entity\ContentEntityBase and implements our entity'sinterface:
<?php namespace Drupal\mymodule\Entity; use Drupal\Core\Entity\ContentEntityBase; class Message extends ContentEntityBase implements MessageInterface { }
4. We will need to create an annotation document block on our class toprovide information about our entity, such as its id, label, and entitykeys:
<?php namespace Drupal\mymodule\Entity; use Drupal\Core\Entity\ContentEntityBase; /** * Defines the message entity class. * * @ContentEntityType( * id = "message", * label = @Translation("Message"), * base_table = "message", * fieldable = TRUE, * entity_keys = { * "id" = "message_id", * "label" = "title", * "langcode" = "langcode", * "uuid" = "uuid" * }, * ) */ class Message extends ContentEntityBase implements MessageInterface {
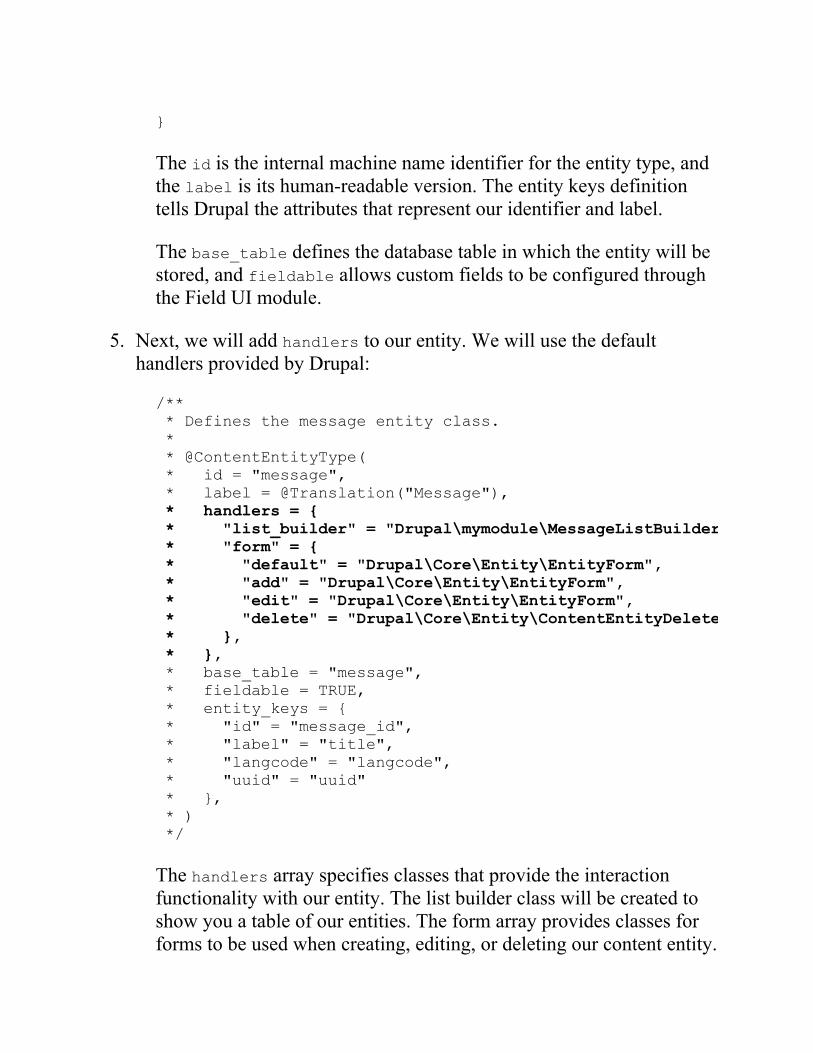
}
The id is the internal machine name identifier for the entity type, andthe label is its human-readable version. The entity keys definitiontells Drupal the attributes that represent our identifier and label.
The base_table defines the database table in which the entity will bestored, and fieldable allows custom fields to be configured throughthe Field UI module.
5. Next, we will add handlers to our entity. We will use the defaulthandlers provided by Drupal:
/** * Defines the message entity class. * * @ContentEntityType( * id = "message", * label = @Translation("Message"), * handlers = { * "list_builder" = "Drupal\mymodule\MessageListBuilder", * "form" = { * "default" = "Drupal\Core\Entity\EntityForm", * "add" = "Drupal\Core\Entity\EntityForm", * "edit" = "Drupal\Core\Entity\EntityForm", * "delete" = "Drupal\Core\Entity\ContentEntityDeleteForm", * }, * }, * base_table = "message", * fieldable = TRUE, * entity_keys = { * "id" = "message_id", * "label" = "title", * "langcode" = "langcode", * "uuid" = "uuid" * }, * ) */
The handlers array specifies classes that provide the interactionfunctionality with our entity. The list builder class will be created toshow you a table of our entities. The form array provides classes forforms to be used when creating, editing, or deleting our content entity.
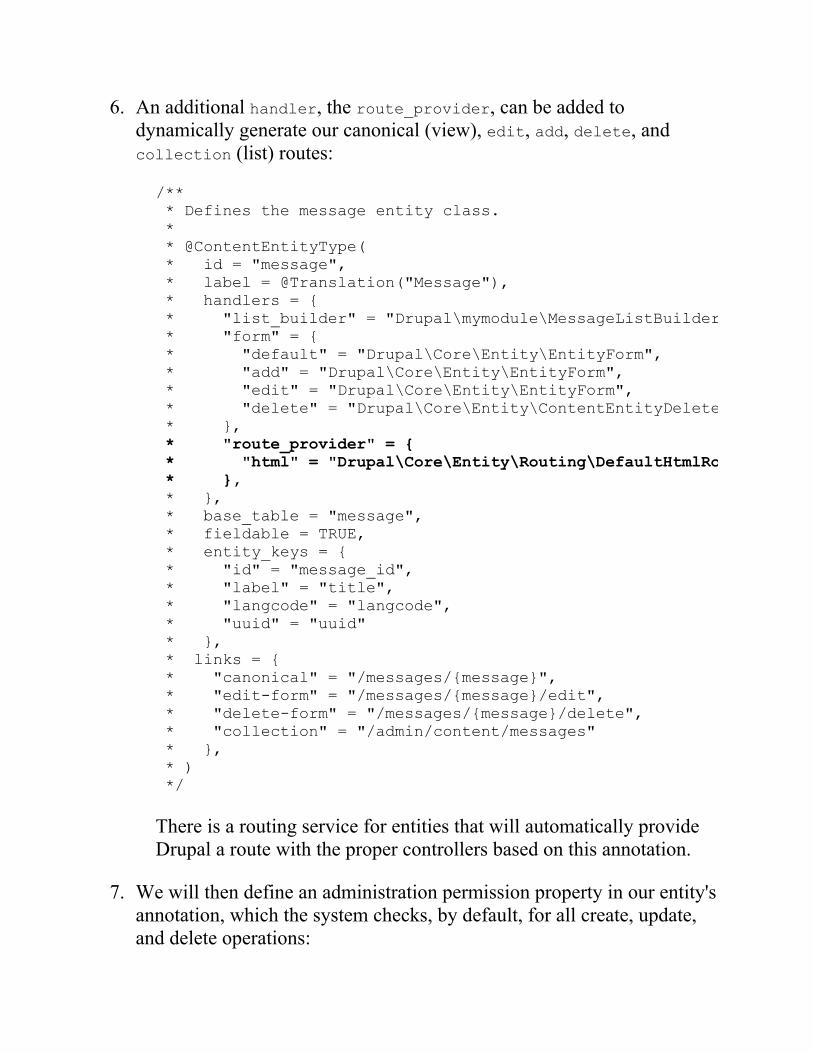
6. An additional handler, the route_provider, can be added todynamically generate our canonical (view), edit, add, delete, andcollection (list) routes:
/** * Defines the message entity class. * * @ContentEntityType( * id = "message", * label = @Translation("Message"), * handlers = { * "list_builder" = "Drupal\mymodule\MessageListBuilder", * "form" = { * "default" = "Drupal\Core\Entity\EntityForm", * "add" = "Drupal\Core\Entity\EntityForm", * "edit" = "Drupal\Core\Entity\EntityForm", * "delete" = "Drupal\Core\Entity\ContentEntityDeleteForm", * }, * "route_provider" = { * "html" = "Drupal\Core\Entity\Routing\DefaultHtmlRouteProvider", * }, * }, * base_table = "message", * fieldable = TRUE, * entity_keys = { * "id" = "message_id", * "label" = "title", * "langcode" = "langcode", * "uuid" = "uuid" * }, * links = { * "canonical" = "/messages/{message}", * "edit-form" = "/messages/{message}/edit", * "delete-form" = "/messages/{message}/delete", * "collection" = "/admin/content/messages" * }, * ) */
There is a routing service for entities that will automatically provideDrupal a route with the proper controllers based on this annotation.
7. We will then define an administration permission property in our entity'sannotation, which the system checks, by default, for all create, update,and delete operations:
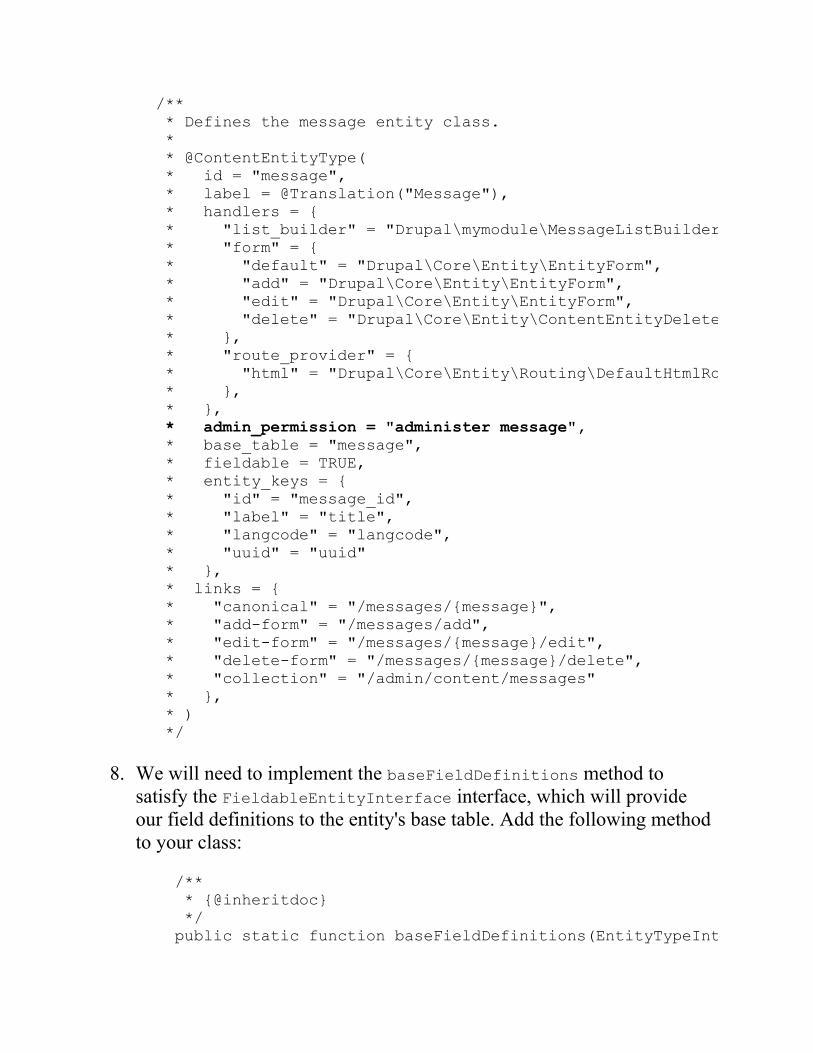
/** * Defines the message entity class. * * @ContentEntityType( * id = "message", * label = @Translation("Message"), * handlers = { * "list_builder" = "Drupal\mymodule\MessageListBuilder", * "form" = { * "default" = "Drupal\Core\Entity\EntityForm", * "add" = "Drupal\Core\Entity\EntityForm", * "edit" = "Drupal\Core\Entity\EntityForm", * "delete" = "Drupal\Core\Entity\ContentEntityDeleteForm", * }, * "route_provider" = { * "html" = "Drupal\Core\Entity\Routing\DefaultHtmlRouteProvider", * }, * }, * admin_permission = "administer message", * base_table = "message", * fieldable = TRUE, * entity_keys = { * "id" = "message_id", * "label" = "title", * "langcode" = "langcode", * "uuid" = "uuid" * }, * links = { * "canonical" = "/messages/{message}", * "add-form" = "/messages/add", * "edit-form" = "/messages/{message}/edit", * "delete-form" = "/messages/{message}/delete", * "collection" = "/admin/content/messages" * }, * ) */
8. We will need to implement the baseFieldDefinitions method tosatisfy the FieldableEntityInterface interface, which will provideour field definitions to the entity's base table. Add the following methodto your class:
/** * {@inheritdoc} */ public static function baseFieldDefinitions(EntityTypeInterface $entity_type) {
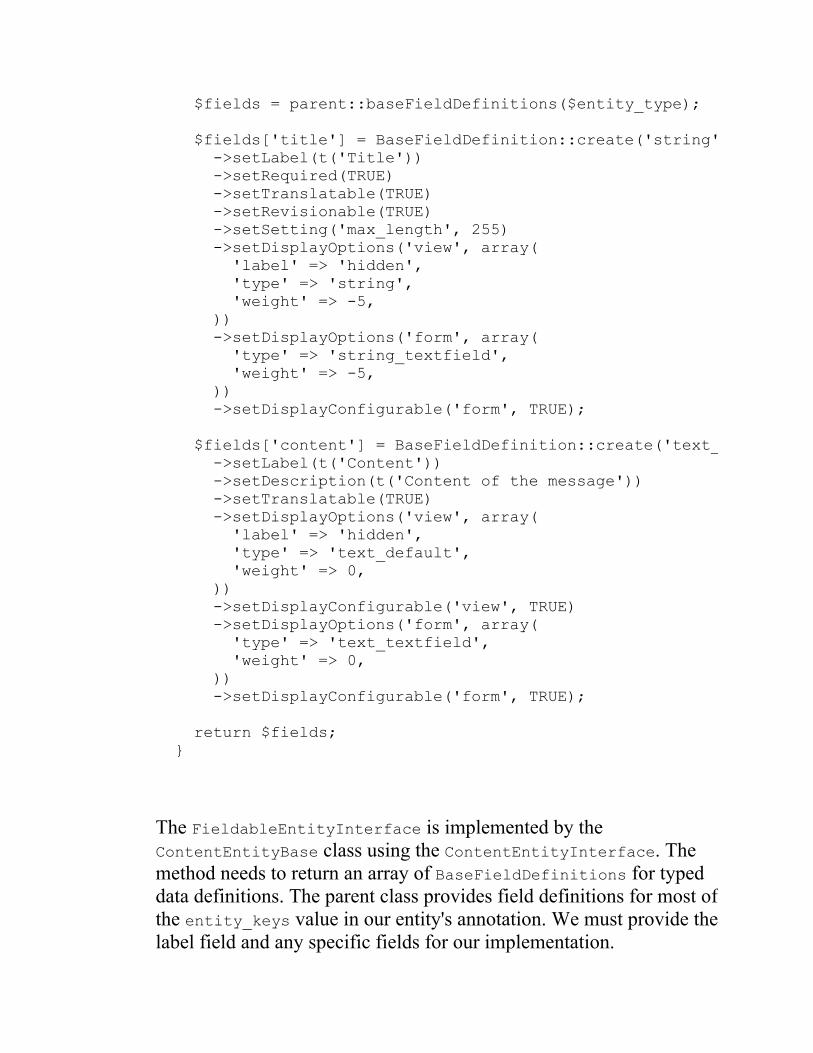
$fields = parent::baseFieldDefinitions($entity_type); $fields['title'] = BaseFieldDefinition::create('string') ->setLabel(t('Title')) ->setRequired(TRUE) ->setTranslatable(TRUE) ->setRevisionable(TRUE) ->setSetting('max_length', 255) ->setDisplayOptions('view', array( 'label' => 'hidden', 'type' => 'string', 'weight' => -5, )) ->setDisplayOptions('form', array( 'type' => 'string_textfield', 'weight' => -5, )) ->setDisplayConfigurable('form', TRUE); $fields['content'] = BaseFieldDefinition::create('text_long') ->setLabel(t('Content')) ->setDescription(t('Content of the message')) ->setTranslatable(TRUE) ->setDisplayOptions('view', array( 'label' => 'hidden', 'type' => 'text_default', 'weight' => 0, )) ->setDisplayConfigurable('view', TRUE) ->setDisplayOptions('form', array( 'type' => 'text_textfield', 'weight' => 0, )) ->setDisplayConfigurable('form', TRUE); return $fields; }
The FieldableEntityInterface is implemented by theContentEntityBase class using the ContentEntityInterface. Themethod needs to return an array of BaseFieldDefinitions for typeddata definitions. The parent class provides field definitions for most ofthe entity_keys value in our entity's annotation. We must provide thelabel field and any specific fields for our implementation.
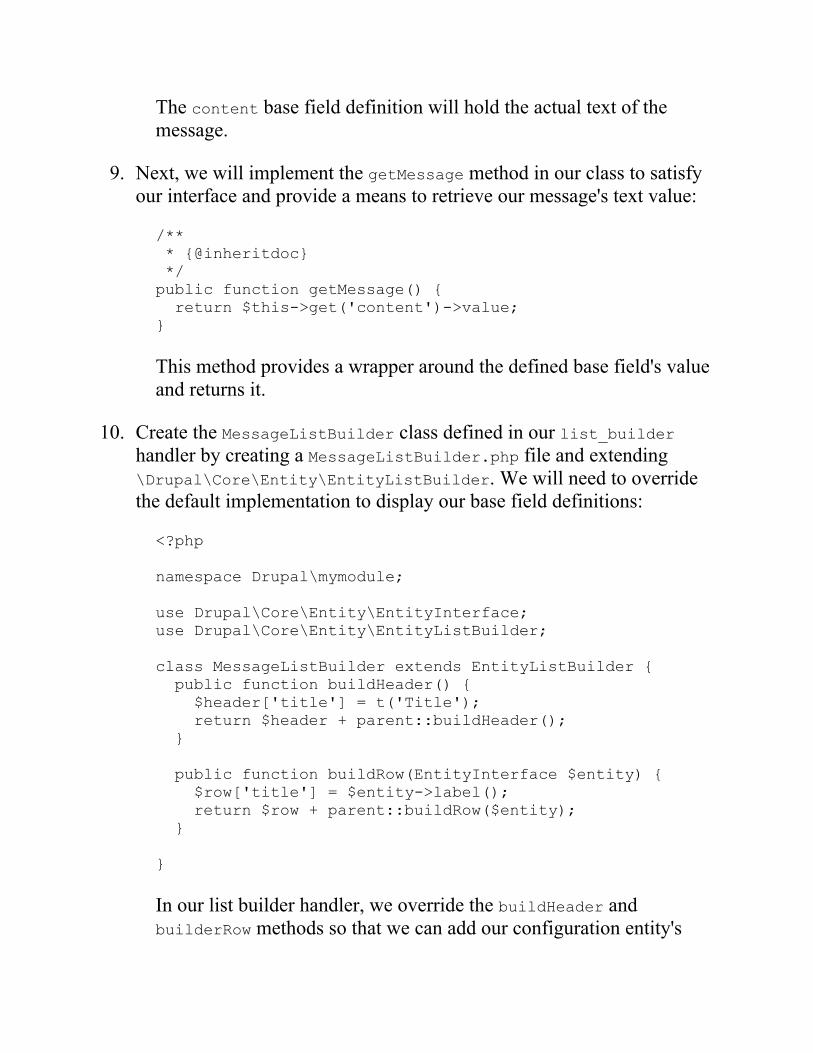
The content base field definition will hold the actual text of themessage.
9. Next, we will implement the getMessage method in our class to satisfyour interface and provide a means to retrieve our message's text value:
/** * {@inheritdoc} */ public function getMessage() { return $this->get('content')->value; }
This method provides a wrapper around the defined base field's valueand returns it.
10. Create the MessageListBuilder class defined in our list_builderhandler by creating a MessageListBuilder.php file and extending\Drupal\Core\Entity\EntityListBuilder. We will need to overridethe default implementation to display our base field definitions:
<?php namespace Drupal\mymodule; use Drupal\Core\Entity\EntityInterface; use Drupal\Core\Entity\EntityListBuilder; class MessageListBuilder extends EntityListBuilder { public function buildHeader() { $header['title'] = t('Title'); return $header + parent::buildHeader(); } public function buildRow(EntityInterface $entity) { $row['title'] = $entity->label(); return $row + parent::buildRow($entity); } }
In our list builder handler, we override the buildHeader andbuilderRow methods so that we can add our configuration entity's
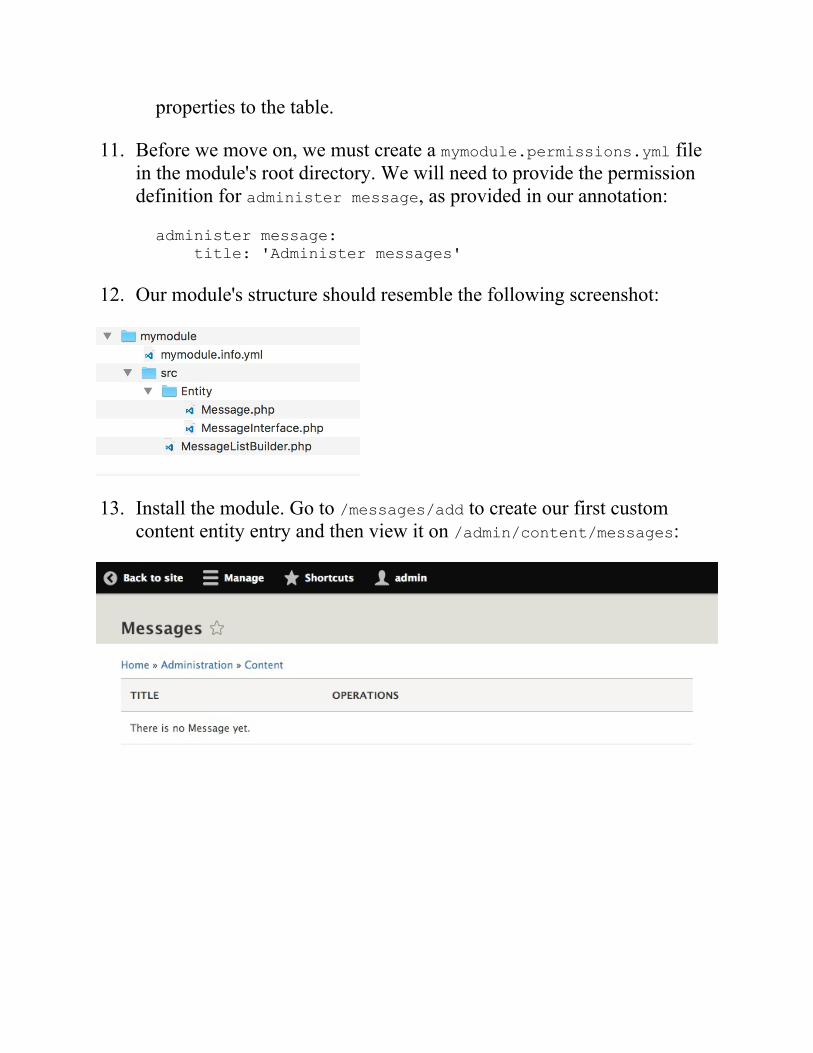
properties to the table.
11. Before we move on, we must create a mymodule.permissions.yml filein the module's root directory. We will need to provide the permissiondefinition for administer message, as provided in our annotation:
administer message: title: 'Administer messages'
12. Our module's structure should resemble the following screenshot:
13. Install the module. Go to /messages/add to create our first customcontent entity entry and then view it on /admin/content/messages:

How it works...Content entities are a version of the EntityType plugin. When you define acontent entity type, the annotation block begins with @ContentEntityType.This declaration and the properties in it represent the definition to initiate aninstance of the \Drupal\Core\Entity\ContentEntityType, class just like allother plugin annotations. The ContentEntityType plugin class implements aconstructor to provide default storage and view_builder handlers, forcingus to implement the list_builder and form handler arrays.
The plugin manager for entity types lives under the entity_type.managerservice name and is provided through\Drupal\Core\Entity\EntityTypeManager by default. However, while theannotation defines the plugin information, our Message class that extendsContentEntityBase provides a means to manipulate the data it represents.
There's more...We will discuss how to add an additional functionality to your entity and usethe Entity module to simplify the developer expedience.
Using theAdminHtmlRouteProvider providerOur Message entity type implements the DefaultHtmlRouteProvider class.There is also the \Drupal\Core\Entity\Routing\AdminHtmlRouteProviderclass. This overrides the getEditFormRoute and getDeleteFormRoute andmarks them with _admin_route. This will cause these forms to be rendered inthe administration theme.
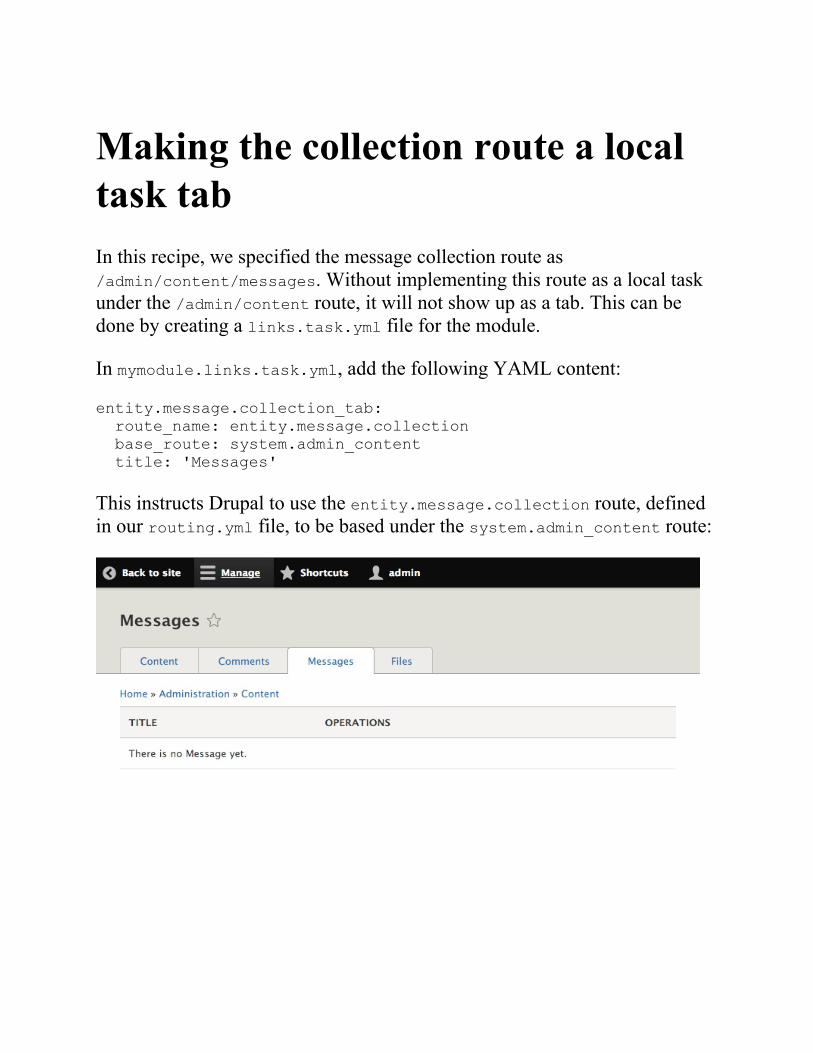
Making the collection route a localtask tabIn this recipe, we specified the message collection route as/admin/content/messages. Without implementing this route as a local taskunder the /admin/content route, it will not show up as a tab. This can bedone by creating a links.task.yml file for the module.
In mymodule.links.task.yml, add the following YAML content:
entity.message.collection_tab: route_name: entity.message.collection base_route: system.admin_content title: 'Messages'
This instructs Drupal to use the entity.message.collection route, definedin our routing.yml file, to be based under the system.admin_content route:

See alsoRefer to Chapter 4, Extending Drupal
Creating a bundle for a contententity typeBundles allow you to have different variations of a content entity. All bundlesshare the same base field definitions but not configured fields. This allowseach bundle to have its own custom fields. Display modes are also dependenton a specific bundle. This allows each bundle to have its own configurationfor the form mode and view mode.
Using the custom entity from the preceding recipe, we will add aconfiguration entity to act as the bundle. This will allow you to have differentmessage types for multiple custom field configurations.
Getting readyWe will need a custom module to place the code into to implement aconfiguration entity type. Create an src directory for your classes. We need acustom content entity type to be implemented, such as the one in the Creatinga content entity type recipe of this chapter.

How to do it...1. Since content entity bundles are configuration entities, we will need to
define our configuration entity schema. Create a config/schemadirectory and mymodule.schema.yml file that will contain theconfiguration entity's schema:
mymodule.message_type.*: type: config_entity label: 'Message type settings' mapping: id: type: string label: 'Machine-readable name' uuid: type: string label: 'UUID' label: type: label label: 'Label' langcode: type: string label: 'Default language'
We will define the configuration entity's config prefix asmessage_type, which we will provide to Drupal in the entity'sannotation block. We will tell Drupal that this is a config_entity andprovide a label for the schema.
With the mapping array, we provide the attributes that make up ourentity and the data that will be stored.
2. In our module's src/Entity directory, let's create an interface for ourbundle by creating a MessageTypeInterface.php file. TheMessageTypeInterface will extend the\Drupal\Core\Config\Entity\ConfigEntityInterface:
<?php
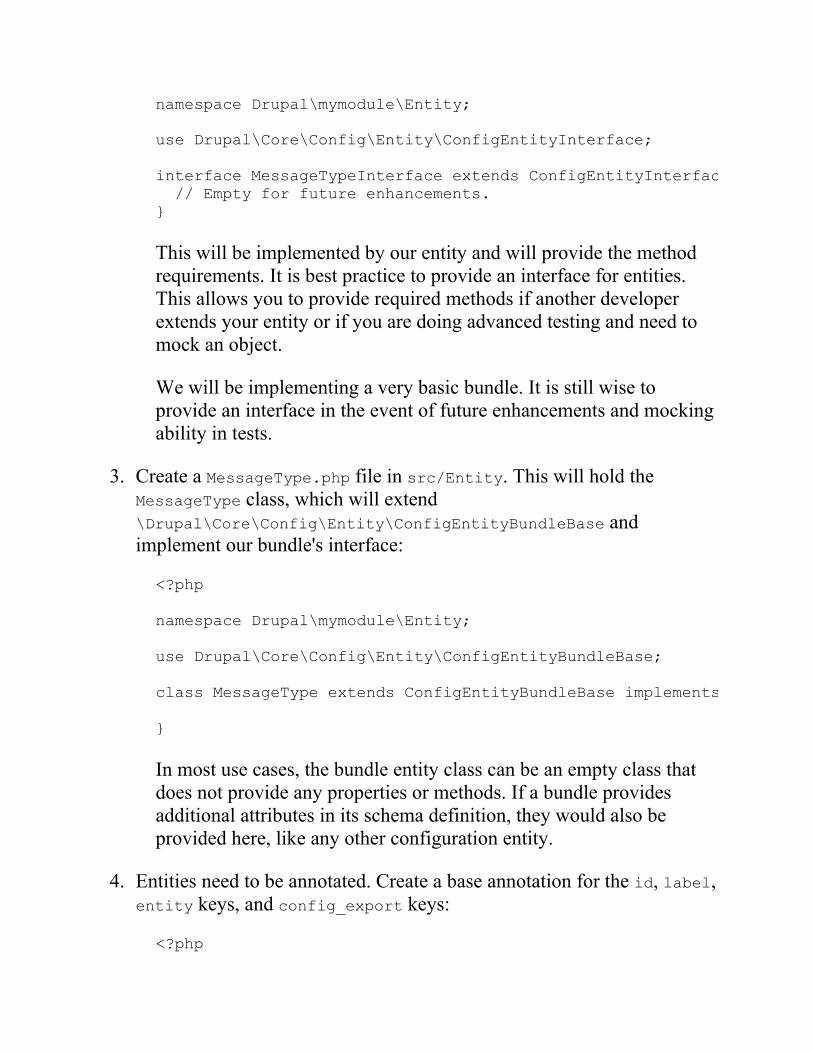
namespace Drupal\mymodule\Entity; use Drupal\Core\Config\Entity\ConfigEntityInterface; interface MessageTypeInterface extends ConfigEntityInterface { // Empty for future enhancements. }
This will be implemented by our entity and will provide the methodrequirements. It is best practice to provide an interface for entities.This allows you to provide required methods if another developerextends your entity or if you are doing advanced testing and need tomock an object.
We will be implementing a very basic bundle. It is still wise toprovide an interface in the event of future enhancements and mockingability in tests.
3. Create a MessageType.php file in src/Entity. This will hold theMessageType class, which will extend\Drupal\Core\Config\Entity\ConfigEntityBundleBase andimplement our bundle's interface:
<?php namespace Drupal\mymodule\Entity; use Drupal\Core\Config\Entity\ConfigEntityBundleBase; class MessageType extends ConfigEntityBundleBase implements MessageTypeInterface { }
In most use cases, the bundle entity class can be an empty class thatdoes not provide any properties or methods. If a bundle providesadditional attributes in its schema definition, they would also beprovided here, like any other configuration entity.
4. Entities need to be annotated. Create a base annotation for the id, label,entity keys, and config_export keys:
<?php
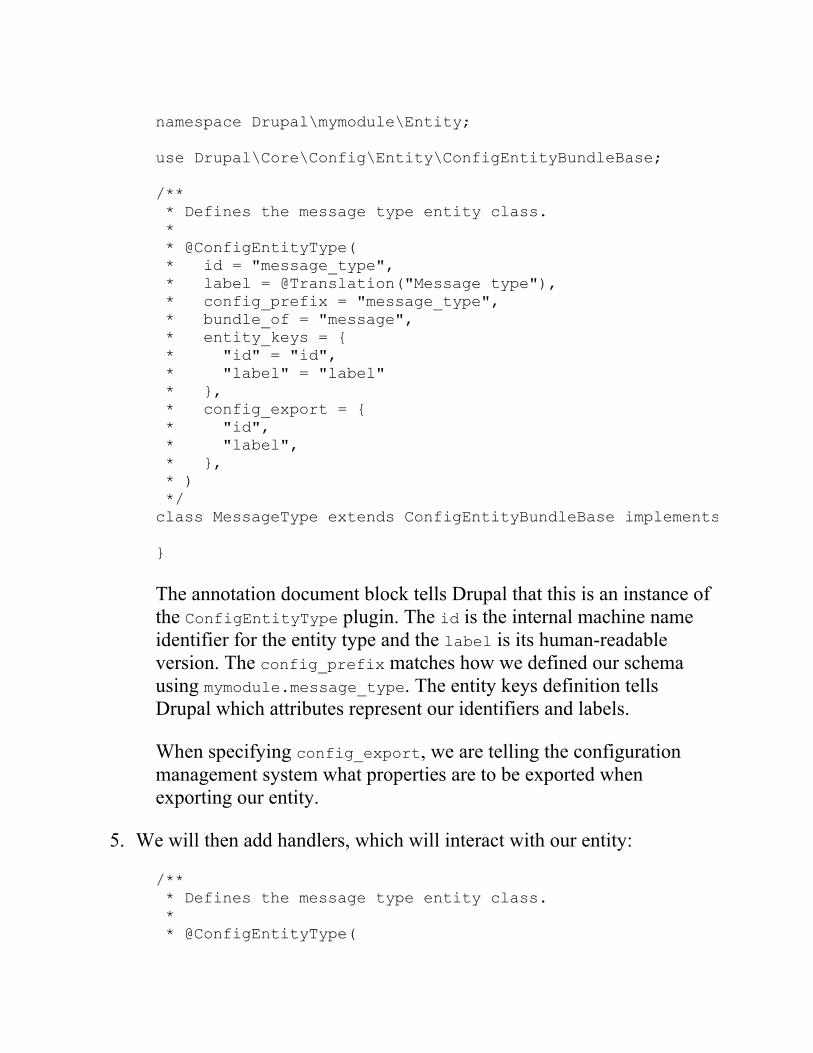
namespace Drupal\mymodule\Entity; use Drupal\Core\Config\Entity\ConfigEntityBundleBase; /** * Defines the message type entity class. * * @ConfigEntityType( * id = "message_type", * label = @Translation("Message type"), * config_prefix = "message_type", * bundle_of = "message", * entity_keys = { * "id" = "id", * "label" = "label" * }, * config_export = { * "id", * "label", * }, * ) */ class MessageType extends ConfigEntityBundleBase implements MessageTypeInterface { }
The annotation document block tells Drupal that this is an instance ofthe ConfigEntityType plugin. The id is the internal machine nameidentifier for the entity type and the label is its human-readableversion. The config_prefix matches how we defined our schemausing mymodule.message_type. The entity keys definition tellsDrupal which attributes represent our identifiers and labels.
When specifying config_export, we are telling the configurationmanagement system what properties are to be exported whenexporting our entity.
5. We will then add handlers, which will interact with our entity:
/** * Defines the message type entity class. * * @ConfigEntityType(
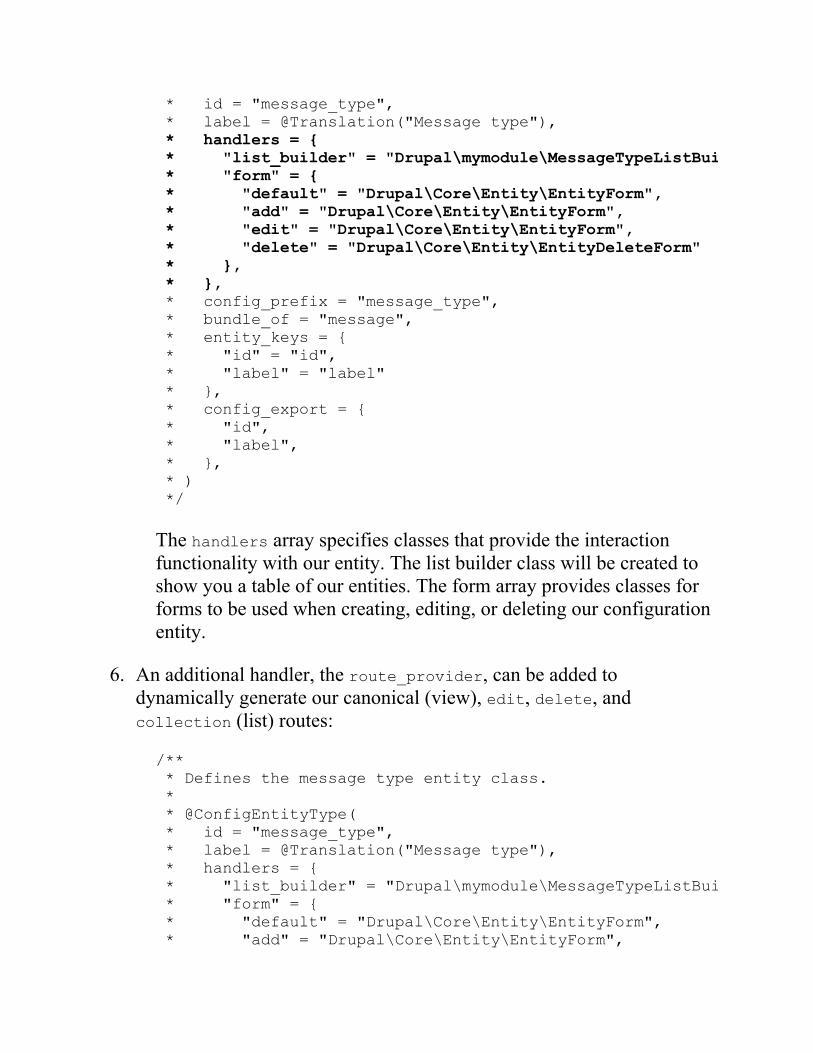
* id = "message_type", * label = @Translation("Message type"), * handlers = { * "list_builder" = "Drupal\mymodule\MessageTypeListBuilder", * "form" = { * "default" = "Drupal\Core\Entity\EntityForm", * "add" = "Drupal\Core\Entity\EntityForm", * "edit" = "Drupal\Core\Entity\EntityForm", * "delete" = "Drupal\Core\Entity\EntityDeleteForm" * }, * }, * config_prefix = "message_type", * bundle_of = "message", * entity_keys = { * "id" = "id", * "label" = "label" * }, * config_export = { * "id", * "label", * }, * ) */
The handlers array specifies classes that provide the interactionfunctionality with our entity. The list builder class will be created toshow you a table of our entities. The form array provides classes forforms to be used when creating, editing, or deleting our configurationentity.
6. An additional handler, the route_provider, can be added todynamically generate our canonical (view), edit, delete, andcollection (list) routes:
/** * Defines the message type entity class. * * @ConfigEntityType( * id = "message_type", * label = @Translation("Message type"), * handlers = { * "list_builder" = "Drupal\mymodule\MessageTypeListBuilder", * "form" = { * "default" = "Drupal\Core\Entity\EntityForm", * "add" = "Drupal\Core\Entity\EntityForm",

* "edit" = "Drupal\Core\Entity\EntityForm", * "delete" = "Drupal\Core\Entity\EntityDeleteForm" * }, * "route_provider" = { * "html" = "Drupal\Core\Entity\Routing\DefaultHtmlRouteProvider", * }, * }, * config_prefix = "message_type", * bundle_of = "message", * entity_keys = { * "id" = "id", * "label" = "label" * }, * config_export = { * "id", * "label", * }, * links = { * "add-form" = "/admin/structure/message-types/add", * "delete-form" = "/admin/structure/message-types/{message_type}/delete", * "edit-form" = "/admin/structure/message-types/{message_type}", * "admin-form" = "/admin/structure/message-types/{message_type}", * "collection" = "/admin/structure/message-types" * } * ) */
There is a routing service for entities that will automatically provideDrupal a route with the proper controllers based on this annotation.The add form route is not yet supported and needs to be manuallyadded.
7. We will need to modify our content entity to use the bundleconfiguration entity that we defined. Edit the src/Entity/Message.phpfile and adjust the entity annotation:
/** * Defines the message entity class. * * @ContentEntityType( * id = "message", * label = @Translation("Message"), * handlers = {...}, * base_table = "message", * fieldable = TRUE,
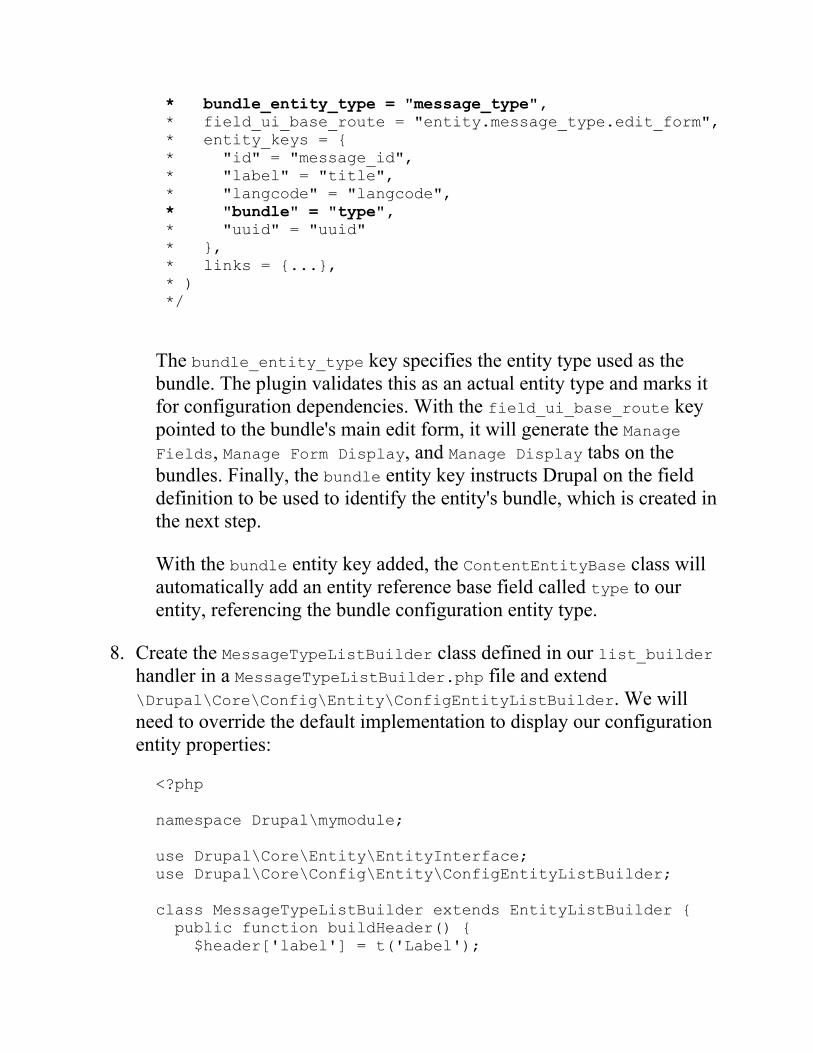
* bundle_entity_type = "message_type", * field_ui_base_route = "entity.message_type.edit_form", * entity_keys = { * "id" = "message_id", * "label" = "title", * "langcode" = "langcode", * "bundle" = "type", * "uuid" = "uuid" * }, * links = {...}, * ) */
The bundle_entity_type key specifies the entity type used as thebundle. The plugin validates this as an actual entity type and marks itfor configuration dependencies. With the field_ui_base_route keypointed to the bundle's main edit form, it will generate the ManageFields, Manage Form Display, and Manage Display tabs on thebundles. Finally, the bundle entity key instructs Drupal on the fielddefinition to be used to identify the entity's bundle, which is created inthe next step.
With the bundle entity key added, the ContentEntityBase class willautomatically add an entity reference base field called type to ourentity, referencing the bundle configuration entity type.
8. Create the MessageTypeListBuilder class defined in our list_builderhandler in a MessageTypeListBuilder.php file and extend\Drupal\Core\Config\Entity\ConfigEntityListBuilder. We willneed to override the default implementation to display our configurationentity properties:
<?php namespace Drupal\mymodule; use Drupal\Core\Entity\EntityInterface; use Drupal\Core\Config\Entity\ConfigEntityListBuilder; class MessageTypeListBuilder extends EntityListBuilder { public function buildHeader() { $header['label'] = t('Label');
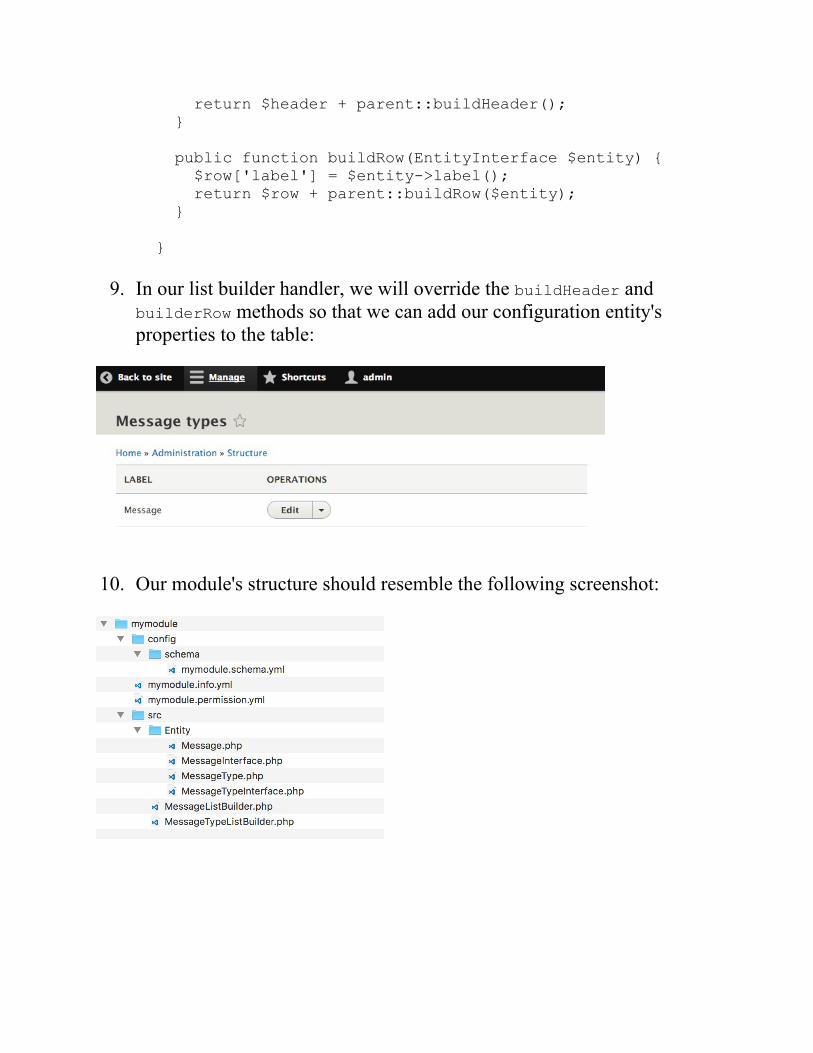
return $header + parent::buildHeader(); } public function buildRow(EntityInterface $entity) { $row['label'] = $entity->label(); return $row + parent::buildRow($entity); } }
9. In our list builder handler, we will override the buildHeader andbuilderRow methods so that we can add our configuration entity'sproperties to the table:
10. Our module's structure should resemble the following screenshot:
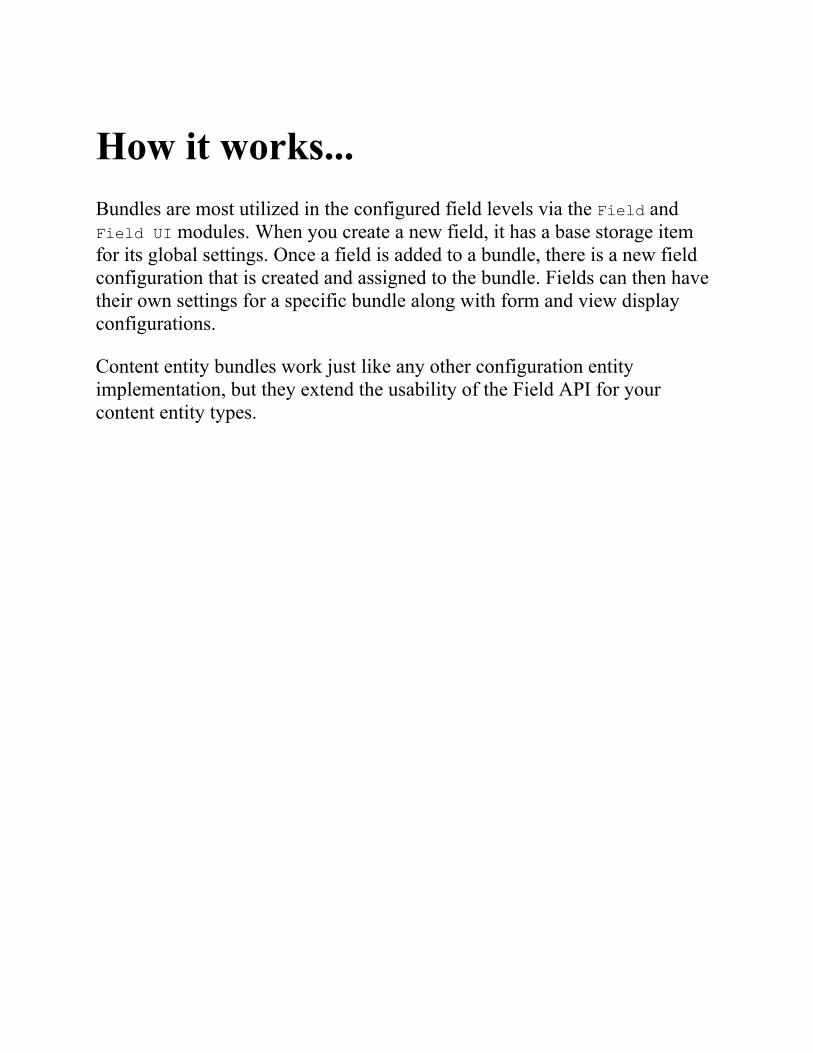
How it works...Bundles are most utilized in the configured field levels via the Field andField UI modules. When you create a new field, it has a base storage itemfor its global settings. Once a field is added to a bundle, there is a new fieldconfiguration that is created and assigned to the bundle. Fields can then havetheir own settings for a specific bundle along with form and view displayconfigurations.
Content entity bundles work just like any other configuration entityimplementation, but they extend the usability of the Field API for yourcontent entity types.

There's more...We will discuss how to add additional functionality to our entity bundle anduse the Entity module to simplify the developer expedience.
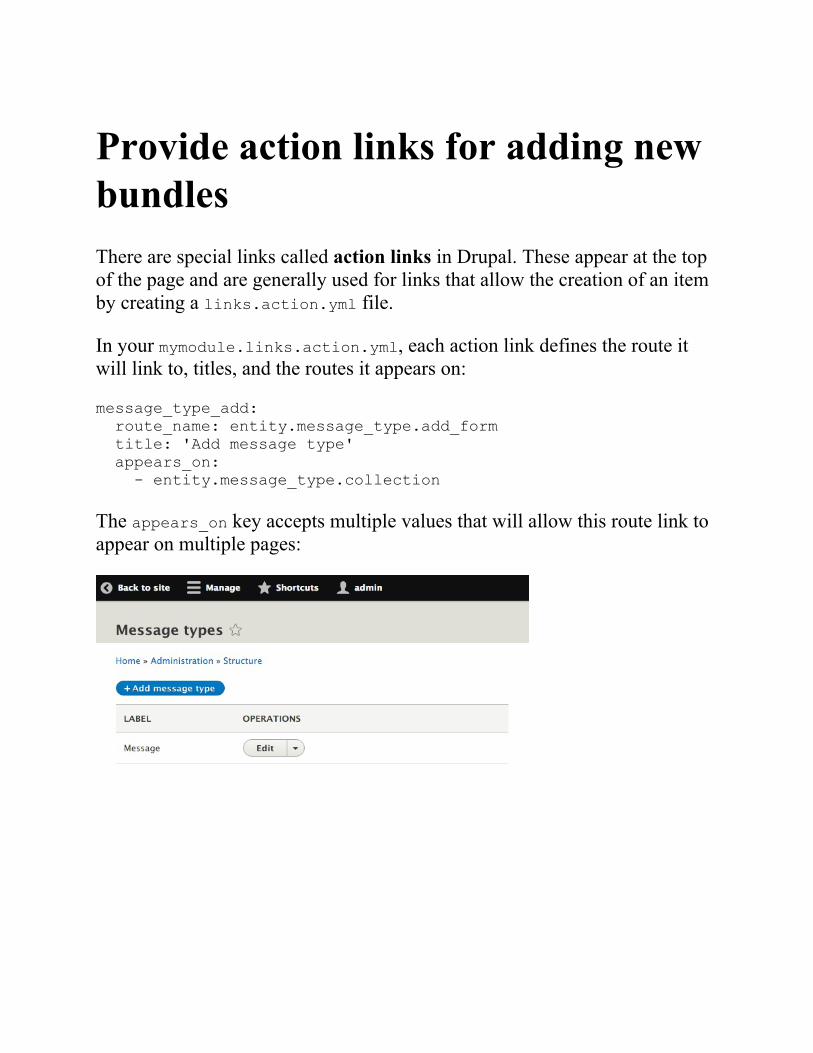
Provide action links for adding newbundlesThere are special links called action links in Drupal. These appear at the topof the page and are generally used for links that allow the creation of an itemby creating a links.action.yml file.
In your mymodule.links.action.yml, each action link defines the route itwill link to, titles, and the routes it appears on:
message_type_add: route_name: entity.message_type.add_form title: 'Add message type' appears_on: - entity.message_type.collection
The appears_on key accepts multiple values that will allow this route link toappear on multiple pages:
See alsoRefer to Chapter 4, Extending DrupalRefer to Chapter 9, Configuration Management - Deploying in Drupal 8Refer to the Creating a Configuration Entity type recipe in Chapter 10,The Entity API
Implementing custom access controlfor an entityAll entities have a set of handlers that control specific pieces offunctionalities. One handler handles access control. When the access handleris not specified, the base \Drupal\Core\Entity\EntityType module willimplement \Drupal\Core\Entity\EntityAccessControlHandler as theaccess handler. By default, this will check whether any modules haveimplemented hook_entity_create_access orhook_entity_type_create_access and use their opinions. Otherwise, itdefaults to the admin permission for the entity type, if implemented.
In this recipe, we will provide an admin permission for our entity andimplement the access handler and permission provider available through theEntity API module. We will base this on an entity called Message.
This recipe specifically uses the functionality from the Entity API modulebecause it has been tested and thoroughly reviewed and reduces boilerplatecode. Ideally, this will be part of an upcoming minor release of Drupal core.

Getting readyWe will need a custom module to place the code into to implement aconfiguration entity type. Let's create an src directory for our PSR-4 styleclasses. We will need to implement a custom content entity type, such as theone in the Creating a content entity type recipe of this chapter.
How to do it...1. First, we will need to define an administration permission for the entity.
This is done by ensuring that the admin_permission key is present inthe entity's annotation document block:
/** * Defines the message entity class. * * @ContentEntityType( * id = "message", * label = @Translation("Message"), * handlers = {...}, * base_table = "message", * fieldable = TRUE, * admin_permission = "administer messages", * entity_keys = { * "id" = "message_id", * "label" = "title", * "langcode" = "langcode", * "uuid" = "uuid" * }, * links = {...}, * ) */
The entity access handler provided by the core will check whetherentities implement this option. If it is provided, it will be used as thebasis for access checks.
2. Next, we will want to specify permissions that are granular per bundle:
/** * Defines the message entity class. * * @ContentEntityType( * id = "message", * label = @Translation("Message"), * handlers = {...}, * base_table = "message", * fieldable = TRUE,

* admin_permission = "administer messages", * permission_granularity = "bundle", * bundle_entity_type = "message_type", * field_ui_base_route = "entity.message_type.edit_form", * entity_keys = { * "id" = "message_id", * "label" = "title", * "langcode" = "langcode", * "bundle" = "type", * "uuid" = "uuid" * }, * links = {...}, * ) */
The permission_granularity key will tell the system whatpermissions should be generated and how the access should bechecked. This way, one user could create Announcement messages butnot Bulletin messages.
3. Then, we define the permission_provider handler, which will generateour permissions:
/** * Defines the message entity class. * * @ContentEntityType( * id = "message", * label = @Translation("Message"), * handlers = { * "list_builder" = "Drupal\mymodule\MessageListBuilder", * "permission_provider" = "\Drupal\entity\EntityPermissionProvider", * "form" = {...}, * "route_provider" = {...}, * }, * base_table = "message", * fieldable = TRUE, * admin_permission = "administer messages", * permission_granularity = "bundle", * bundle_entity_type = "message_type", * field_ui_base_route = "entity.message_type.edit_form", * entity_keys = {...}, * links = {...}, * ) */
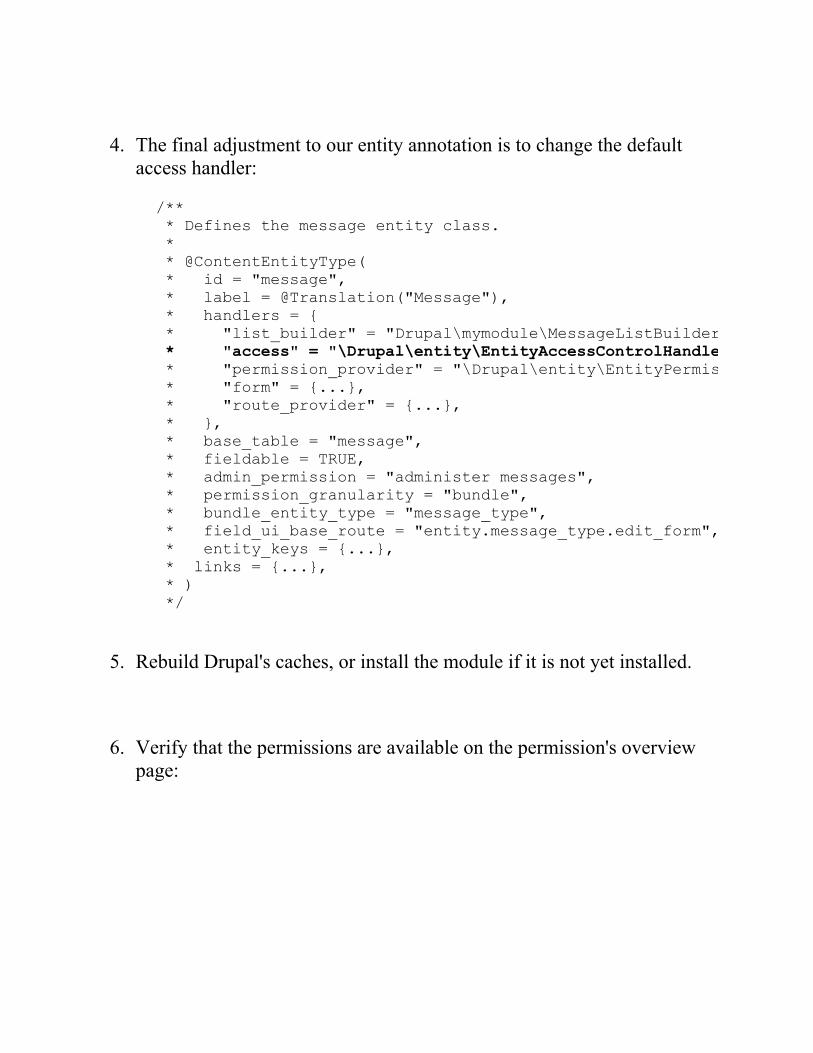
4. The final adjustment to our entity annotation is to change the defaultaccess handler:
/** * Defines the message entity class. * * @ContentEntityType( * id = "message", * label = @Translation("Message"), * handlers = { * "list_builder" = "Drupal\mymodule\MessageListBuilder", * "access" = "\Drupal\entity\EntityAccessControlHandler", * "permission_provider" = "\Drupal\entity\EntityPermissionProvider", * "form" = {...}, * "route_provider" = {...}, * }, * base_table = "message", * fieldable = TRUE, * admin_permission = "administer messages", * permission_granularity = "bundle", * bundle_entity_type = "message_type", * field_ui_base_route = "entity.message_type.edit_form", * entity_keys = {...}, * links = {...}, * ) */
5. Rebuild Drupal's caches, or install the module if it is not yet installed.
6. Verify that the permissions are available on the permission's overviewpage:

How it works...Entities are powered by the plugin system in Drupal, which means that thereis a plugin manager. The default \Drupal\Core\Entity\EntityTypeManagerprovides the discovery and handling of entities. Both the ContentEntityTypeand ConfigEntityType entity types and classes extend the base\Drupal\Core\Entity\EntityType class.
The EntityType class constructor provides a default access handler if it isnot provided through the\Drupal\Core\Entity\EntityAccessControlHandler class. Every coremodule that provides an entity type implements this to override at leastcheckAccess and checkCreateAccess. Meanwhile, the Entity API accesshandler extends this to support bundle granular permissions and owner-basedpermissions if an entity implements EntityOwnerInterface in a reusablefashion.
The \Drupal\Core\Access\AccessibleInterface defines an accessmethod, and all the entities inherit this interface. The default implementationin \Drupal\Core\Entity\Entity will invoke checkCreateAccess if theoperation is create; otherwise, it invokes the generic access method of theaccess controller, which will invoke entity access hooks and the class'checkAccess method.
When Drupal generates available permissions, the Entity API module findsentity definitions that define the permission_provider handler and theninvokes that class to generate permissions.

There's more...We will discuss how to implement custom access control for an entity anduse the Entity to simplify the controlling access.
Controlling access to entity fieldsThe checkFieldAccess method in the core's entity access control handler canbe overridden to control access to specific entity fields when modifying anentity. Without being overridden by a child class, the\Drupal\Core\Entity\EntityAccessControlHandler::checkFieldAccess
will always return an allowed access result. The method receives thefollowing parameters:
The view and edit operationsThe current field's definitionThe user session to check access againstA possible list of field item values
Entity types can implement their own access control handlers and overridethis method to provide granular control over the modification of their basefields. A good example would be the User module and its\Drupal\user\UserAccessControlHandler.
User entities have a pass field that is used for the user's current password.There is also a created field that records when the user was added to the site.
For the pass field, it returns denied if the operation is view, but allows accessif the operation is edit:
case 'pass': // Allow editing the password, but not viewing it. return ($operation == 'edit') ? AccessResult::allowed() : AccessResult::forbidden();
The created field uses the opposite logic. When a user logs in, the site canbe viewed but cannot be edited:
case 'created': // Allow viewing the created date, but not editing it. return ($operation == 'view') ? AccessResult::allowed() : AccessResult::forbidden();

See alsoRefer to Chapter 4, Extending Drupal
Providing a custom storage handlerStorage handlers control the loading, saving, and deleting of an entity. The\Drupal\Core\Entity\ContentEntityType provides the base entity typedefinition for all content entity types. If it is not specified, then the defaultstorage handler is \Drupal\Core\Entity\Sql\SqlContentEntityStorage.This class can be extended to implement alternative load methods oradjustments on saving.
In this recipe, we will implement a method that supports loading an entity bya specific property instead of having to write a specific loadByPropertiesmethod call.
Getting readyYou will need a custom module to place the code into to implement aconfiguration entity type. Create an src directory for your PSR-4 styleclasses. A custom content entity type needs to be implemented, such as theone in the Creating a content entity type recipe of this chapter.

How to do it...1. Create a MessageStorage class in the module's src directory. This class
will extend the default\Drupal\Core\Entity\Sql\SqlContentEntityStorage class:
<?php namespace Drupal\mymodule; use Drupal\Core\Entity\Sql\SqlContentEntityStorage; /** * Defines the entity storage for messages. */ class MessageStorage extends SqlContentEntityStorage { }
By extending the default storage class for our entity type, we cansimply add new methods that are relevant to our requirements ratherthan implementing the extra business logic.
2. Create a loadMultipleByType method; using this method, we willprovide a simple way to load all messages of a specific bundle:
/** * Load multiple messages by bundle type. * * @param string $message_type * The message type. * * @return array|\Drupal\Core\Entity\EntityInterface[] * An array of loaded message entities. */ public function loadMultipleByType($message_type) { return $this->loadByProperties([ 'type' => $message_type, ]); }

We pass the type property so that we can query it based on themessage bundle and return all matching message entities.
3. Update the entity's annotation block to have the new storage handlerdefined:
handlers = { "list_builder" = "Drupal\mymodule\MessageListBuilder", "access" = "\Drupal\entity\EntityAccessControlHandler", "permission_provider" = "\Drupal\entity\EntityPermissionProvider", "storage" = "Drupal\mymodule\MessageStorage", "form" = { "default" = "Drupal\Core\Entity\EntityForm", "add" = "Drupal\Core\Entity\EntityForm", "edit" = "Drupal\Core\Entity\EntityForm", "delete" = "Drupal\Core\Entity\EntityDeleteForm" }, "route_provider" = { "html" = "Drupal\Core\Entity\Routing\DefaultHtmlRouteProvider", }, },
4. You can now programmatically interact with your message entitiesusing the following code:
// Get the entity type manager from the container. \Drupal::entityTypeManager() // Access the storage handler. ->getStorage('message') // Invoke the new method on custom storage class. ->loadMultipleByType('message');
How it works...When defining a content entity type, the annotation block begins with@ContentEntityType. This declaration, and the properties in it represents thedefinition to initiate an instance of the\Drupal\Core\Entity\ContentEntityType class just like all other pluginannotations.
In the class constructor, there is a merge to provide default handlers for thestorage handler if it is not provided. This will always default to\Drupal\Core\Entity\Sql\SqlContentEntityStorage, as it providesmethods and logic to help its parent class, ContentEntityStorageBase,interact with the SQL-based storage.
Configuration entities can have their default\Drupal\Core\Config\Entity\ConfigEntityStorage as well. However, forconfiguration entities, the configuration management utilizes the\Drupal\Core\Config\StorageInterface implementations for storagerather than classes, which extend ConfigEntityStorage. This logic resides inthe configuration factory service.
Extending SqlContentEntityStorage reuses methods required for defaultDrupal implementations and provides an easy method to create custommethods to interact with loading, saving, and so on.

There's more...We will discuss the custom storage handler and utilization of differentstorage backends.
Utilizing a different storagebackend for an entityDrupal provides mechanisms to support different database storage backendsthat are not provided by the Drupal core, such as MongoDB. Although it isnot stable for Drupal 8 at the time of writing this book, there is a MongoDBmodule that provides storage interaction.
The module provides \Drupal\mongodb\Entity\ContentEntityStorage,which extends \Drupal\Core\Entity\ContentEntityStorageBase. Thisclass overrides the methods used to create, save, and delete, to write them to aMongoDB collection.
The project can be found at https://www.drupal.org/project/mongodb.
While there are much more steps to provide a custom storage backend forcontent entities and their fields, this serves as an example for how you canchoose to place a custom entity in different storage backends.
See alsoRefer to Chapter 4, Extending DrupalRefer to Chapter 7, Plug and Play with Plugins
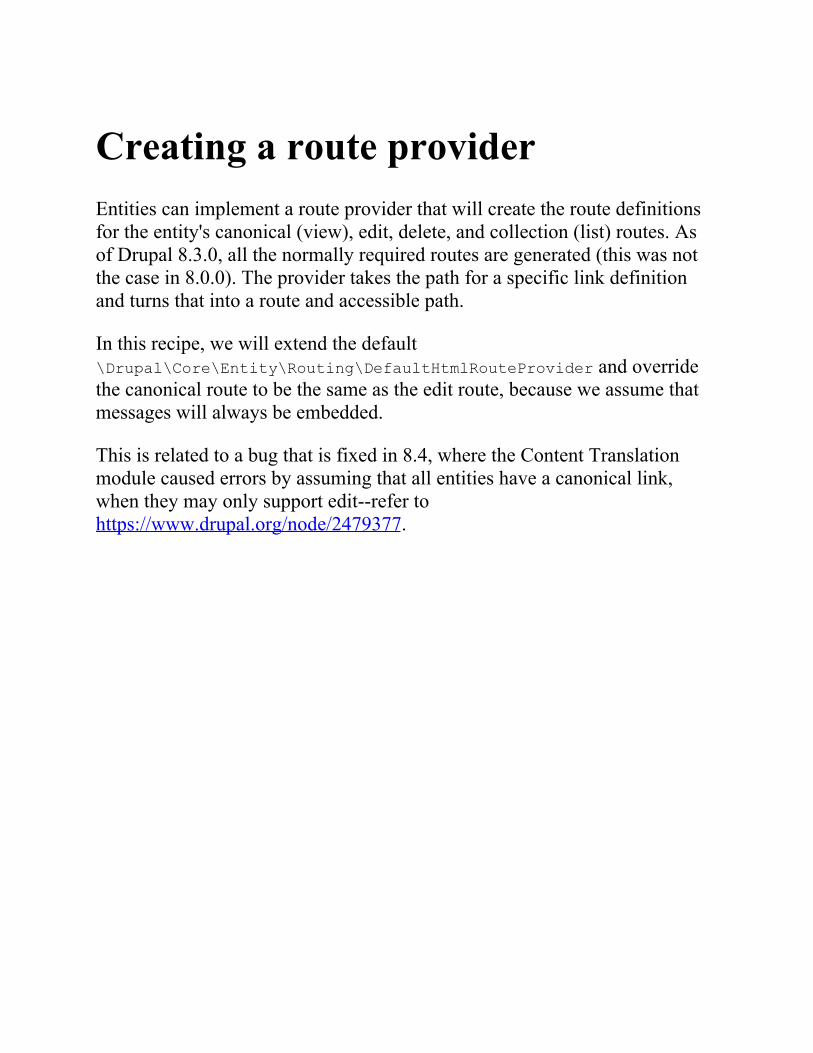
Creating a route providerEntities can implement a route provider that will create the route definitionsfor the entity's canonical (view), edit, delete, and collection (list) routes. Asof Drupal 8.3.0, all the normally required routes are generated (this was notthe case in 8.0.0). The provider takes the path for a specific link definitionand turns that into a route and accessible path.
In this recipe, we will extend the default\Drupal\Core\Entity\Routing\DefaultHtmlRouteProvider and overridethe canonical route to be the same as the edit route, because we assume thatmessages will always be embedded.
This is related to a bug that is fixed in 8.4, where the Content Translationmodule caused errors by assuming that all entities have a canonical link,when they may only support edit--refer tohttps://www.drupal.org/node/2479377.

Getting readyYou will need a custom module to place the code into to implement aconfiguration entity type. Create an src directory for your classes. A customcontent entity type needs to be implemented, such as the one in the Creatinga content entity type recipe of this chapter.
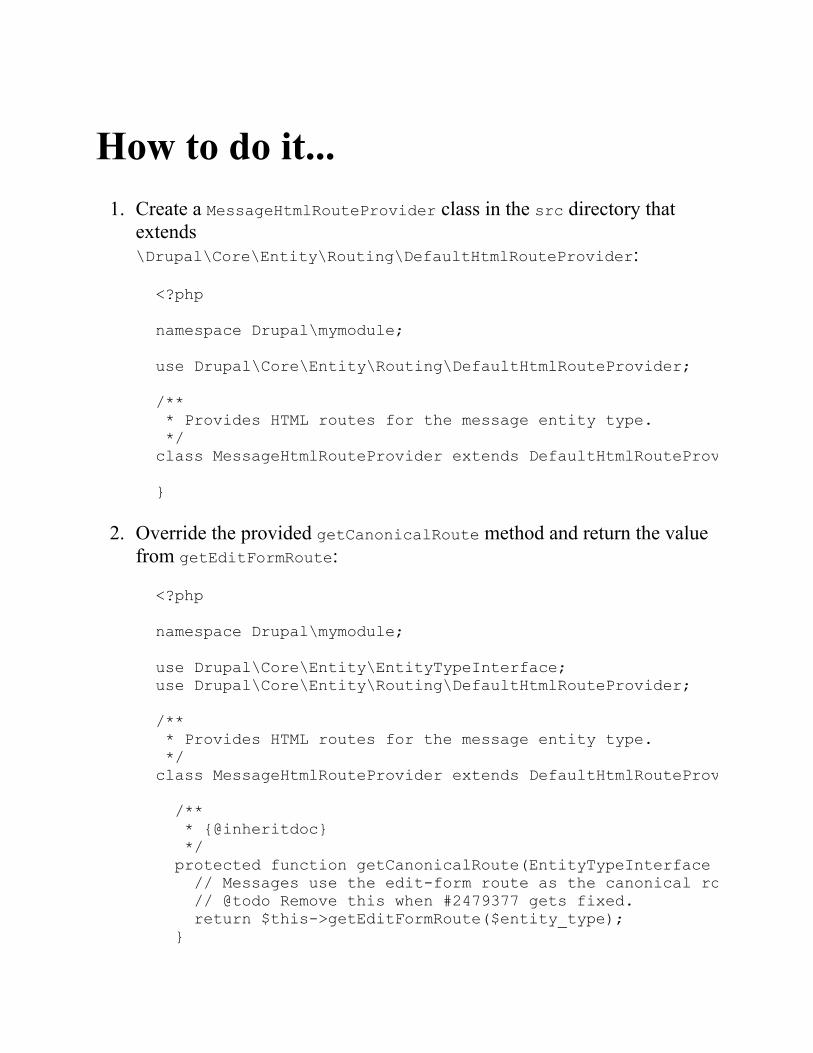
How to do it...1. Create a MessageHtmlRouteProvider class in the src directory that
extends\Drupal\Core\Entity\Routing\DefaultHtmlRouteProvider:
<?php namespace Drupal\mymodule; use Drupal\Core\Entity\Routing\DefaultHtmlRouteProvider; /** * Provides HTML routes for the message entity type. */ class MessageHtmlRouteProvider extends DefaultHtmlRouteProvider { }
2. Override the provided getCanonicalRoute method and return the valuefrom getEditFormRoute:
<?php namespace Drupal\mymodule; use Drupal\Core\Entity\EntityTypeInterface; use Drupal\Core\Entity\Routing\DefaultHtmlRouteProvider; /** * Provides HTML routes for the message entity type. */ class MessageHtmlRouteProvider extends DefaultHtmlRouteProvider { /** * {@inheritdoc} */ protected function getCanonicalRoute(EntityTypeInterface $entity_type) { // Messages use the edit-form route as the canonical route. // @todo Remove this when #2479377 gets fixed. return $this->getEditFormRoute($entity_type); }
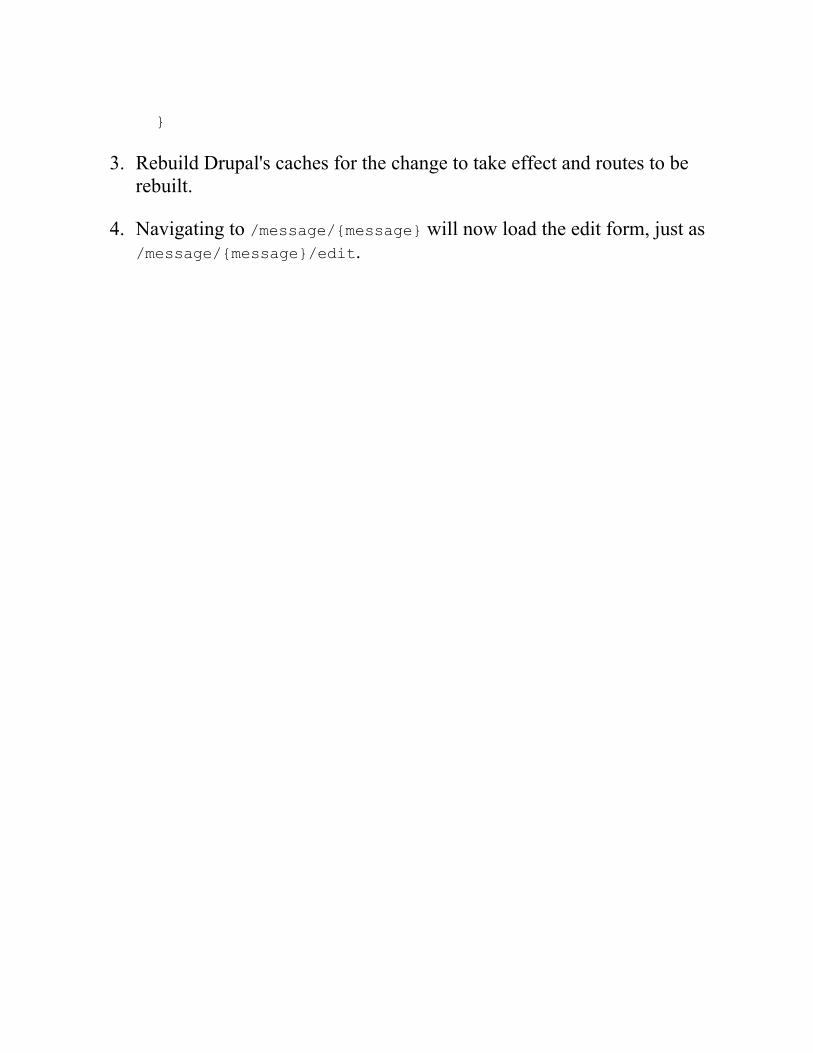
}
3. Rebuild Drupal's caches for the change to take effect and routes to berebuilt.
4. Navigating to /message/{message} will now load the edit form, just as/message/{message}/edit.
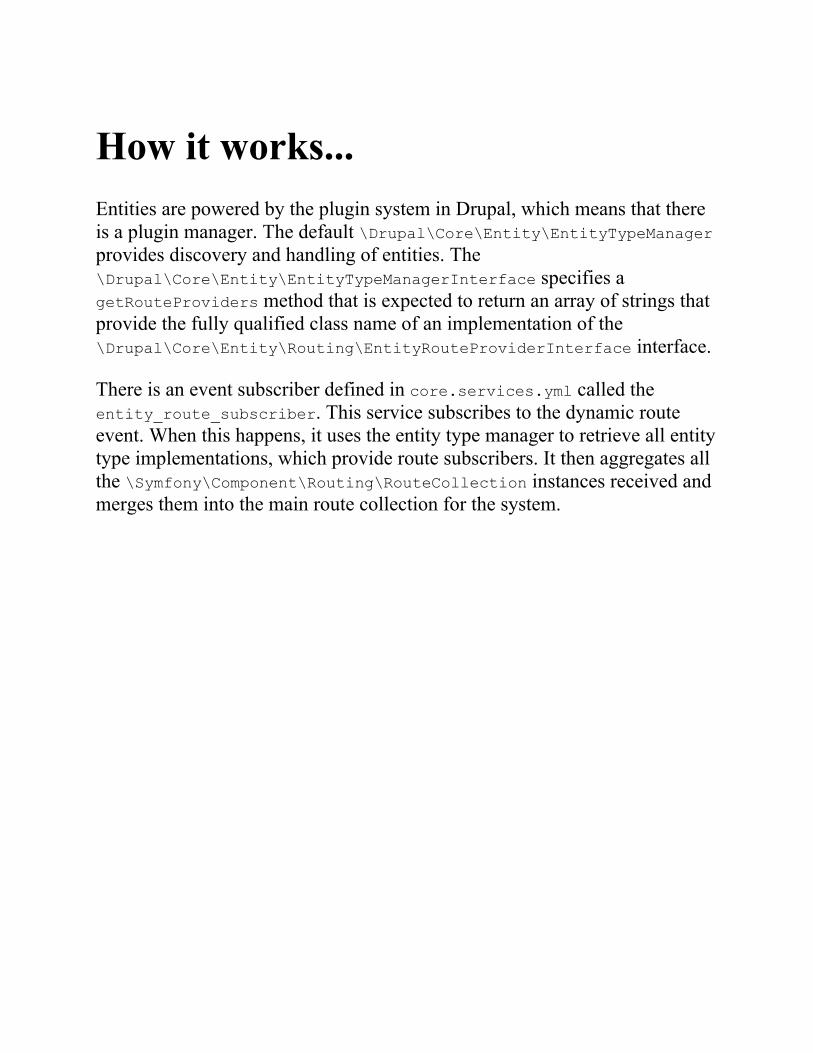
How it works...Entities are powered by the plugin system in Drupal, which means that thereis a plugin manager. The default \Drupal\Core\Entity\EntityTypeManagerprovides discovery and handling of entities. The\Drupal\Core\Entity\EntityTypeManagerInterface specifies agetRouteProviders method that is expected to return an array of strings thatprovide the fully qualified class name of an implementation of the\Drupal\Core\Entity\Routing\EntityRouteProviderInterface interface.
There is an event subscriber defined in core.services.yml called theentity_route_subscriber. This service subscribes to the dynamic routeevent. When this happens, it uses the entity type manager to retrieve all entitytype implementations, which provide route subscribers. It then aggregates allthe \Symfony\Component\Routing\RouteCollection instances received andmerges them into the main route collection for the system.

There's more...Drupal 8 introduces router types and provide the add routes for our entity.

The Entity API module providesadditional providersThe Entity module provides two new route providers aimed specifically forentities that support revisions and a bulk delete form option.
If you have an entity that implements the RevisionLogInterface interface,the revision route provider generates a user interface for managing revisions.You then add a revision entry for the router_providers array pointing tothe new route provider:
* "route_provider" = { * "html" = "Drupal\Core\Entity\Routing\DefaultHtmlRouteProvider", * "revision" = "Drupal\entity\Routing\RevisionRouteProvider", * },
Then, you just need to define additional items in your entity's linksdefinition:
* links = { * "revision" = "/messages/{message}/revisions/{message_revision}/view", * "revision-revert-form" = "/messages/{message_enhanced}/revisions/{message_revision}/revert", * "version-history" = "/messages/{message}/revisions", * "canonical" = "/messages/{message}", * "edit-form" = "/messages/{message}/edit", * "delete-form" = "/messages/{message}/delete", * "collection" = "/admin/content/messages" * }
This reduces the amount of boilerplate code required to implement anEntity. For an implementation example, refer to the EnhancedEntity class inthe Entity API's test module entity_module_test.
See alsoRefer to Chapter 4, Extending DrupalRefer to the routing system in Drupal 8 athttps://www.drupal.org/developing/api/8/routing
Off the Drupalicon IslandIn this chapter, we will see how to use third-party libraries, such asJavaScript, CSS, and PHP in detail:
Implementing and using a third-party JavaScript libraryImplementing and using a third-party CSS libraryImplementing and using a third-party PHP library
IntroductionDrupal 8 comes with a Proudly Built Elsewhere attitude. There has been aneffort made to use more components created by the PHP community at largeand other communities. Drupal 8 is built with Symfony. It includes Twig asits templating system, the provided WYSIWYG editor as its CKEditor, andPHPUnit for testing.
How does Drupal 8 promote using libraries made elsewhere? The new assetmanagement system in Drupal 8 makes it easier to use frontend libraries.Drupal implements PSR-0 and PSR-4 from the PHP FrameworkInteroperability Group (PHP-FIG), and PHP StandardsRecommendations (PSRs) are suggested standards used to increaseinteroperability between PHP applications. This has streamlined integratingthird-party PHP libraries.
Both areas will be constantly improved with each minor release of Drupal 8.These areas will be mentioned throughout the chapter.
Implementing and using a third-party JavaScript libraryIn the past, Drupal has only shipped with jQuery and a few jQuery pluginsused by Drupal core for the JavaScript API. This has changed with Drupal 8.Underscore.js and Backbone.js are now included in Drupal, bringing twopopular JavaScript frameworks to its developers.
However, there are many JavaScript frameworks that can be used. In Chapter5, Frontend for the Win, we covered the asset management system andlibraries. In this recipe, we will create a module that provides Angular.js as alibrary and a custom Angular application; the demo is available on theAngularJS home page.
Getting readyIn this example, we will use Bower to manage our third-party Angular.jslibrary components. If you are not familiar with Bower, it is simply a packagemanager for frontend components. Instead of using Bower, you can justmanually download and place the required files.
If you do not have Bower, you can follow the instructions to install it frombower.io athttp://bower.io/#install-bower. If you do not want to install Bower, we willprovide links to manually download libraries.
Having a background in AngularJS is not required but is beneficial. Thisrecipe implements the example from the home page of the library.
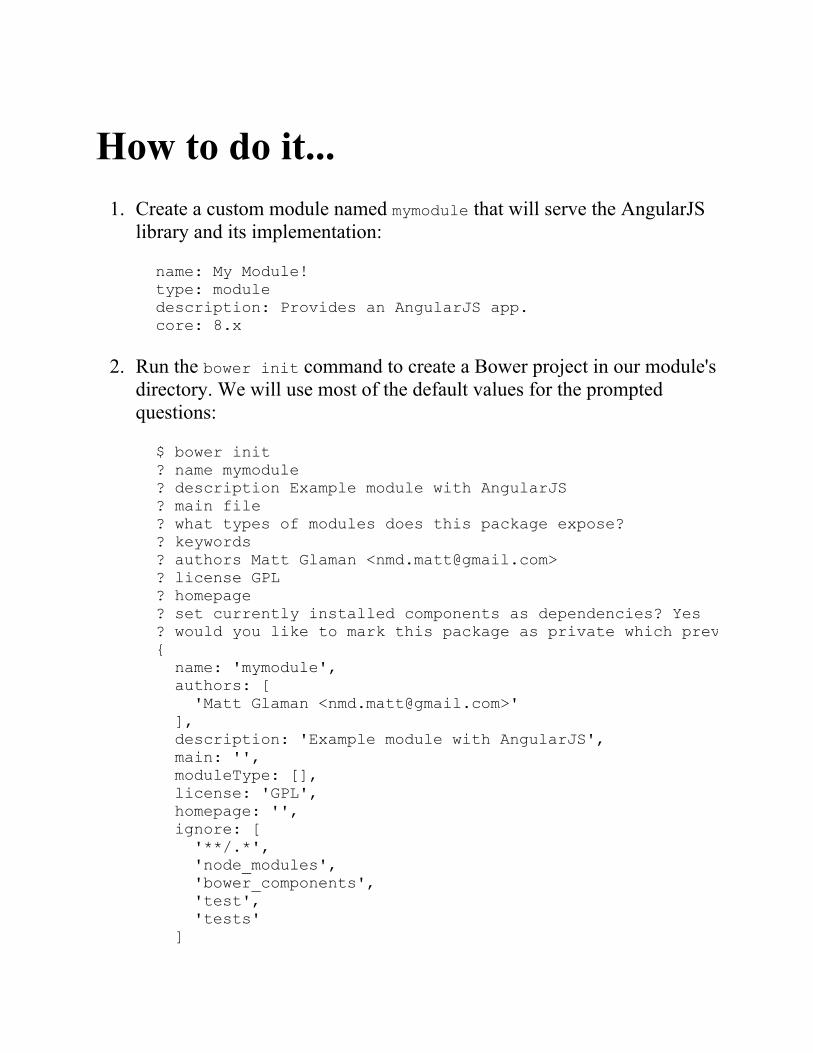
How to do it...1. Create a custom module named mymodule that will serve the AngularJS
library and its implementation:
name: My Module! type: module description: Provides an AngularJS app. core: 8.x
2. Run the bower init command to create a Bower project in our module'sdirectory. We will use most of the default values for the promptedquestions:
$ bower init ? name mymodule ? description Example module with AngularJS ? main file ? what types of modules does this package expose? ? keywords ? authors Matt Glaman <[email protected]> ? license GPL ? homepage ? set currently installed components as dependencies? Yes ? would you like to mark this package as private which prevents it from being accidentally published to the registry? No { name: 'mymodule', authors: [ 'Matt Glaman <[email protected]>' ], description: 'Example module with AngularJS', main: '', moduleType: [], license: 'GPL', homepage: '', ignore: [ '**/.*', 'node_modules', 'bower_components', 'test', 'tests' ]
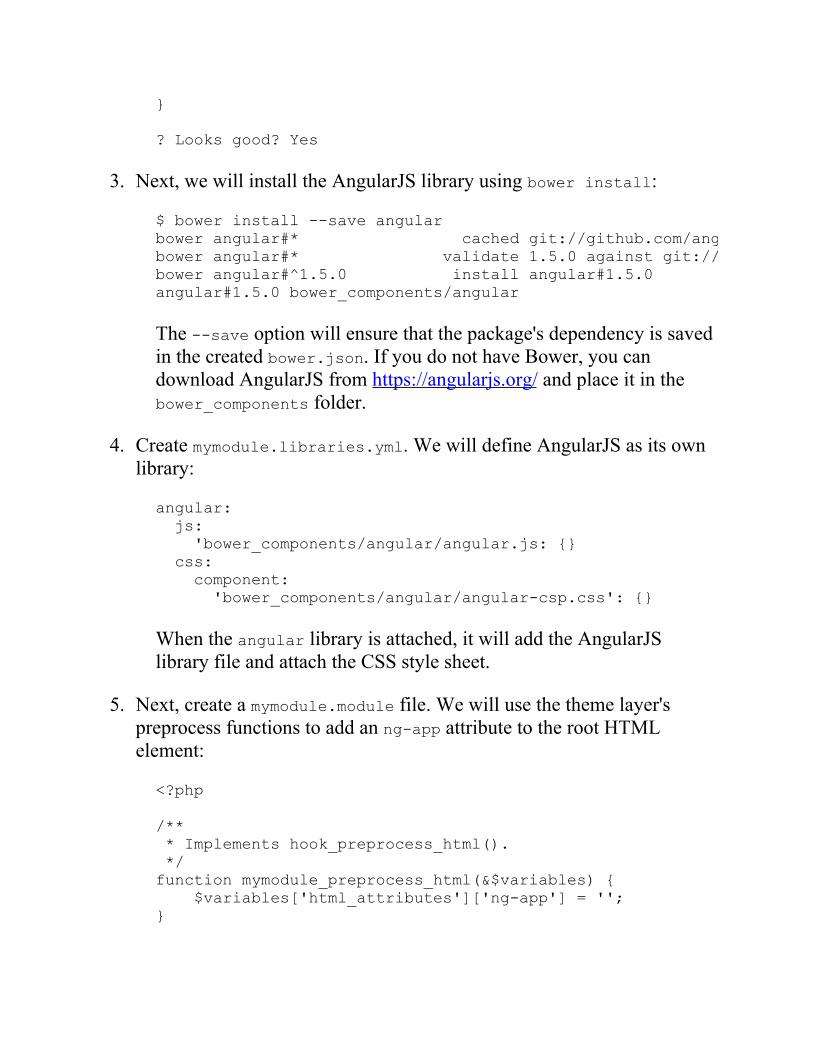
} ? Looks good? Yes
3. Next, we will install the AngularJS library using bower install:
$ bower install --save angular bower angular#* cached git://github.com/angular/bower-angular.git#1.5.0 bower angular#* validate 1.5.0 against git://github.com/angular/bower-angular.git#* bower angular#^1.5.0 install angular#1.5.0 angular#1.5.0 bower_components/angular
The --save option will ensure that the package's dependency is savedin the created bower.json. If you do not have Bower, you candownload AngularJS from https://angularjs.org/ and place it in thebower_components folder.
4. Create mymodule.libraries.yml. We will define AngularJS as its ownlibrary:
angular: js: 'bower_components/angular/angular.js: {} css: component: 'bower_components/angular/angular-csp.css': {}
When the angular library is attached, it will add the AngularJSlibrary file and attach the CSS style sheet.
5. Next, create a mymodule.module file. We will use the theme layer'spreprocess functions to add an ng-app attribute to the root HTMLelement:
<?php /** * Implements hook_preprocess_html(). */ function mymodule_preprocess_html(&$variables) { $variables['html_attributes']['ng-app'] = ''; }
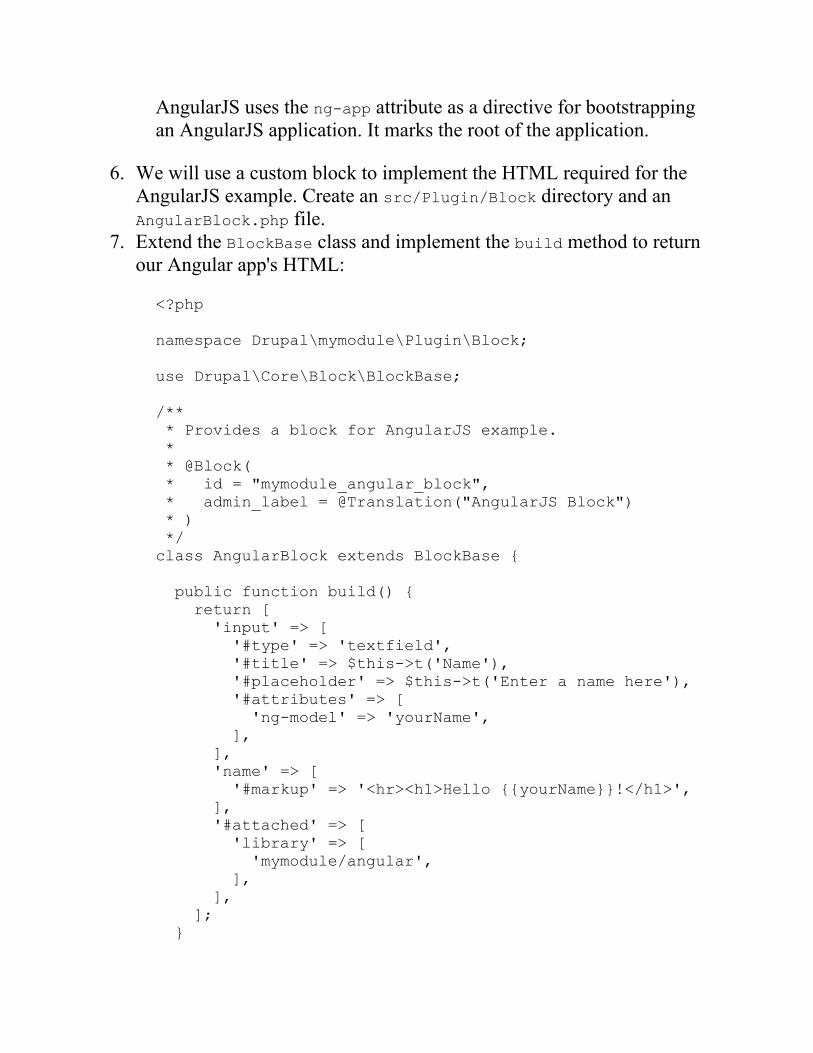
AngularJS uses the ng-app attribute as a directive for bootstrappingan AngularJS application. It marks the root of the application.
6. We will use a custom block to implement the HTML required for theAngularJS example. Create an src/Plugin/Block directory and anAngularBlock.php file.
7. Extend the BlockBase class and implement the build method to returnour Angular app's HTML:
<?php namespace Drupal\mymodule\Plugin\Block; use Drupal\Core\Block\BlockBase; /** * Provides a block for AngularJS example. * * @Block( * id = "mymodule_angular_block", * admin_label = @Translation("AngularJS Block") * ) */ class AngularBlock extends BlockBase { public function build() { return [ 'input' => [ '#type' => 'textfield', '#title' => $this->t('Name'), '#placeholder' => $this->t('Enter a name here'), '#attributes' => [ 'ng-model' => 'yourName', ], ], 'name' => [ '#markup' => '<hr><h1>Hello {{yourName}}!</h1>', ], '#attached' => [ 'library' => [ 'mymodule/angular', ], ], ]; }
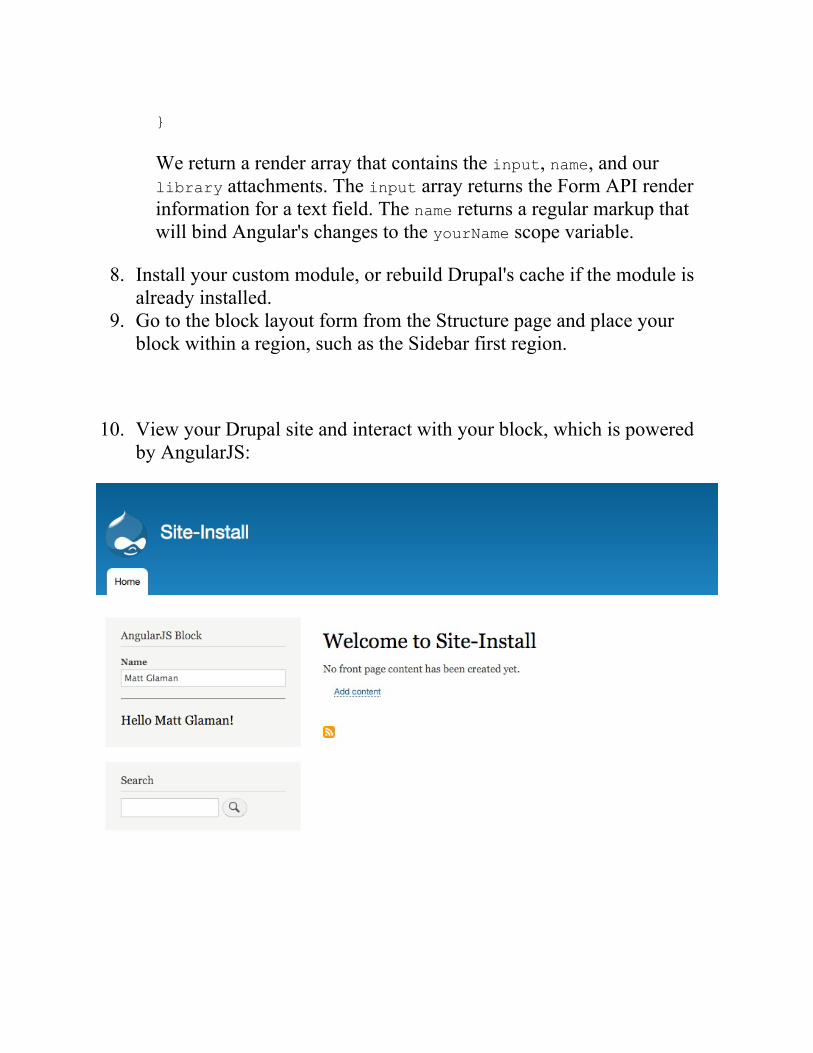
}
We return a render array that contains the input, name, and ourlibrary attachments. The input array returns the Form API renderinformation for a text field. The name returns a regular markup thatwill bind Angular's changes to the yourName scope variable.
8. Install your custom module, or rebuild Drupal's cache if the module isalready installed.
9. Go to the block layout form from the Structure page and place yourblock within a region, such as the Sidebar first region.
10. View your Drupal site and interact with your block, which is poweredby AngularJS:
How it works...The simplicity of integrating with a JavaScript framework is provided by thenew asset management system in Drupal 8. The usage of Bower is optional,but it is usually a preferred method used to manage frontend dependencies.Using Bower, we can place bower_components in an ignore file that can beused to keep third-party libraries out of version control.

There's more...Drupal 8 uses Composer for handling PHP dependencies, but frontendlibraries are still being sorted out for best practices.
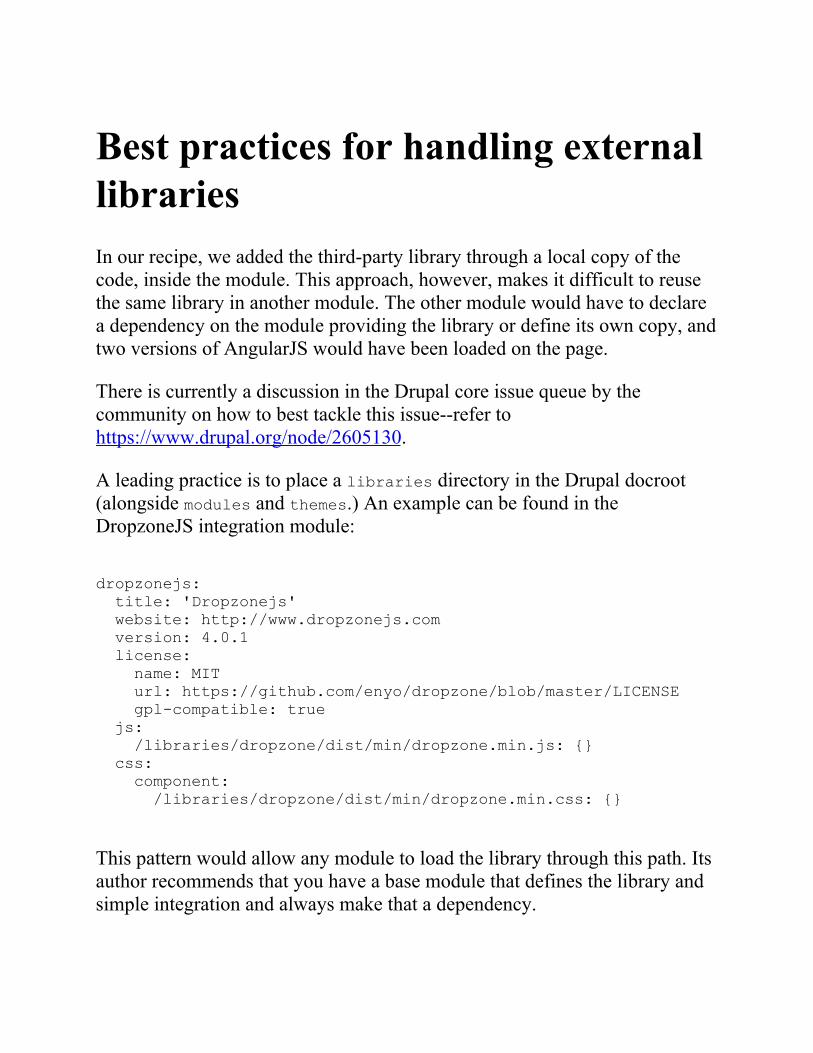
Best practices for handling externallibrariesIn our recipe, we added the third-party library through a local copy of thecode, inside the module. This approach, however, makes it difficult to reusethe same library in another module. The other module would have to declarea dependency on the module providing the library or define its own copy, andtwo versions of AngularJS would have been loaded on the page.
There is currently a discussion in the Drupal core issue queue by thecommunity on how to best tackle this issue--refer tohttps://www.drupal.org/node/2605130.
A leading practice is to place a libraries directory in the Drupal docroot(alongside modules and themes.) An example can be found in theDropzoneJS integration module:
dropzonejs: title: 'Dropzonejs' website: http://www.dropzonejs.com version: 4.0.1 license: name: MIT url: https://github.com/enyo/dropzone/blob/master/LICENSE gpl-compatible: true js: /libraries/dropzone/dist/min/dropzone.min.js: {} css: component: /libraries/dropzone/dist/min/dropzone.min.css: {}
This pattern would allow any module to load the library through this path. Itsauthor recommends that you have a base module that defines the library andsimple integration and always make that a dependency.
See alsoRefer to the core issue to add Backbone.js and Underscore.js athttps://www.drupal.org/node/1149866Refer to the Using the new asset management system recipe of Chapter5, Frontend for the WinRefer to the Creating a Module recipe of Chapter 4, Extending Drupal

Implementing and using a third-party CSS libraryDrupal provides many things. However, one thing that it does not provide isany kind of CSS component library. In the Using the new asset managementsystem recipe of Chapter 5, Frontend for the Win, we added FontAwesome asa library. CSS frameworks implement robust user interface designcomponents, and they can be quite large if you use a compiled version witheverything bundled. The asset management system can be used to define eachcomponent as its own library to only deliver the exact files required for astrong frontend performance.
In this recipe, we will implement the Semantic UI framework, using the CSS-only distribution, which provides each individual component's CSS file. Wewill register the form, button, label, and input components as libraries. Ourcustom theme will then alter the Drupal elements for buttons, labels, andinputs to have the Semantic UI classes and load the proper library.
Getting readyIn this example, we will use Bower to manage our third-party components. Ifyou are not familiar with Bower, it is simply a package manager used forfrontend components. Instead of using Bower, you can just manuallydownload and place the required files.
How to do it...1. For this recipe, create a new custom theme named mytheme using Classy
as a base theme. This way, you can reuse some existing styling. If youare unfamiliar with creating a base theme, refer to the Creating a customtheme based on Classy recipe of Chapter 5, Frontend for the Win.
2. Using your terminal, navigate to your theme's directory. Run bowerinit to create a bower project:
$ bower init ? name mytheme ? description Example theme with Semantic UI ? main file ? what types of modules does this package expose? ? keywords ? authors Matt Glaman <[email protected]> ? license GPL ? homepage ? set currently installed components as dependencies? Yes ? would you like to mark this package as private which prevents it from being accidentally published to the registry? No { name: 'mytheme', authors: [ 'Matt Glaman <[email protected]>' ], description: 'Example theme with Semantic UI, main: '', moduleType: [], license: 'GPL', homepage: '', ignore: [ '**/.*', 'node_modules', 'bower_components', 'test', 'tests' ] } ? Looks good? Yes
3. Next, use bower install to save the Semantic UI library:
$ bower install --save semantic-ui bower semantic-ui#* not-cached git://github.com/Semantic-Org/Semantic-UI.git#* bower semantic-ui#* resolve git://github.com/Semantic-Org/Semantic-UI.git#* bower semantic-ui#* download https://github.com/Semantic-Org/Semantic-UI/archive/2.1.8.tar.gz bower semantic-ui#* extract archive.tar.gz bower semantic-ui#* resolved git://github.com/Semantic-Org/Semantic-UI.git#2.1.8 bower jquery#>=1.8 not-cached git://github.com/jquery/jquery-dist.git#>=1.8 bower jquery#>=1.8 resolve git://github.com/jquery/jquery-dist.git#>=1.8 bower jquery#>=1.8 download https://github.com/jquery/jquery-dist/archive/2.2.0.tar.gz bower jquery#>=1.8 extract archive.tar.gz bower jquery#>=1.8 resolved git://github.com/jquery/jquery-dist.git#2.2.0 bower semantic#^2.1.8 install semantic#2.1.8 bower jquery#>=1.8 install jquery#2.2.0
The --save option will ensure that the package's dependency is savedin the created bower.json. If you do not have Bower, you candownload Semantic UI from https://github.com/semantic-org/semantic-ui/ and place it in a bower_components folder.
4. Create mytheme.libraries.yml in your theme's base directory. Thiswill hold your main Semantic UI definition along with specificcomponent library definitions.
5. You will then add a new library to the form component:
semantic_ui.form: js: bower_components/semantic/dist/components/form.js: {} css: component: bower_components/semantic/dist/components/form.css: {}
The form component for Semantic UI has a style sheet and JavaScriptfile. Your library ensures that both are loaded when the library isattached.
6. The button, input, and label components do not have any JavaScriptfiles. Add a library for each component:
semantic_ui.button: css: component: bower_components/semantic/dist/components/button.css: {} semantic_ui.input:
css: component: bower_components/semantic/dist/components/input.css: {} semantic_ui.label: css: component: bower_components/semantic/dist/components/label.css: {}
7. Now that the libraries are defined, you can use the attach_libraryTwig function to add your libraries to the appropriate templates whenyou add the Semantic UI classes.
8. Copy the form.html.twig file from the Classy theme's templatesfolder and paste it into your theme's templates folder. Then, attachmytheme/semantic_ui.form and add the ui and form classes:
{{ attach_library('mytheme/semantic_ui.form') }} <form{{ attributes.addClass(['ui', 'form']) }}> {{ children }} </form>
The attach_library function will attach the specified library. Usethe addClass method from Twig to add the ui and form classes.Semantic UI requires all elements to have the matching ui class.
9. Next, copy the input.html.twig file from the Classy theme and paste itinto your theme's template folder. Then, attachmytheme/semantic_ui.input and add the ui and input classes:
{{ attach_library('mytheme/semantic_ui.input') }} <input{{ attributes.addClass(['ui', 'input']) }} />{{ children }}
10. Copy the input.html.twig file that you just created and use it to makeinput-submit.html.twig. This template file will be used for submitand other buttons:
{{ attach_library('mytheme/semantic_ui.button') }} <input{{ attributes.addClass(['ui', 'button', 'primary']) }} />{{ children }}
11. Finally, copy the form-element-label.html.twig file from Classy to
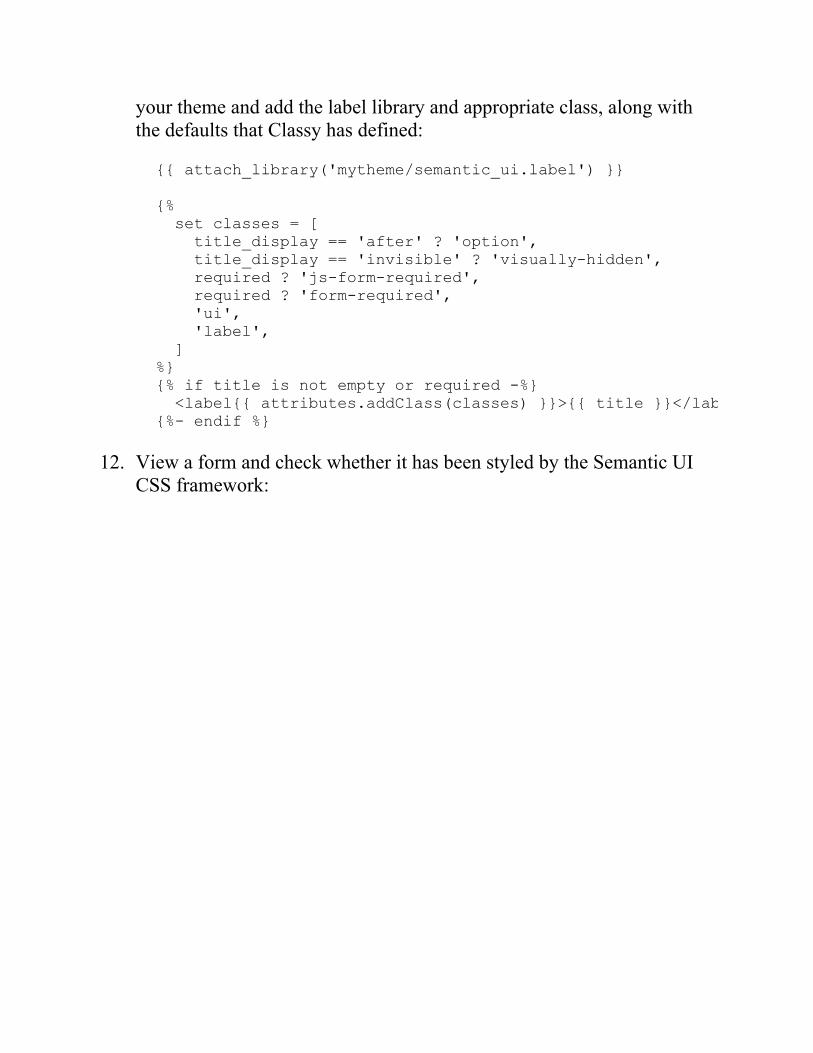
your theme and add the label library and appropriate class, along withthe defaults that Classy has defined:
{{ attach_library('mytheme/semantic_ui.label') }} {% set classes = [ title_display == 'after' ? 'option', title_display == 'invisible' ? 'visually-hidden', required ? 'js-form-required', required ? 'form-required', 'ui', 'label', ] %} {% if title is not empty or required -%} <label{{ attributes.addClass(classes) }}>{{ title }}</label> {%- endif %}
12. View a form and check whether it has been styled by the Semantic UICSS framework:
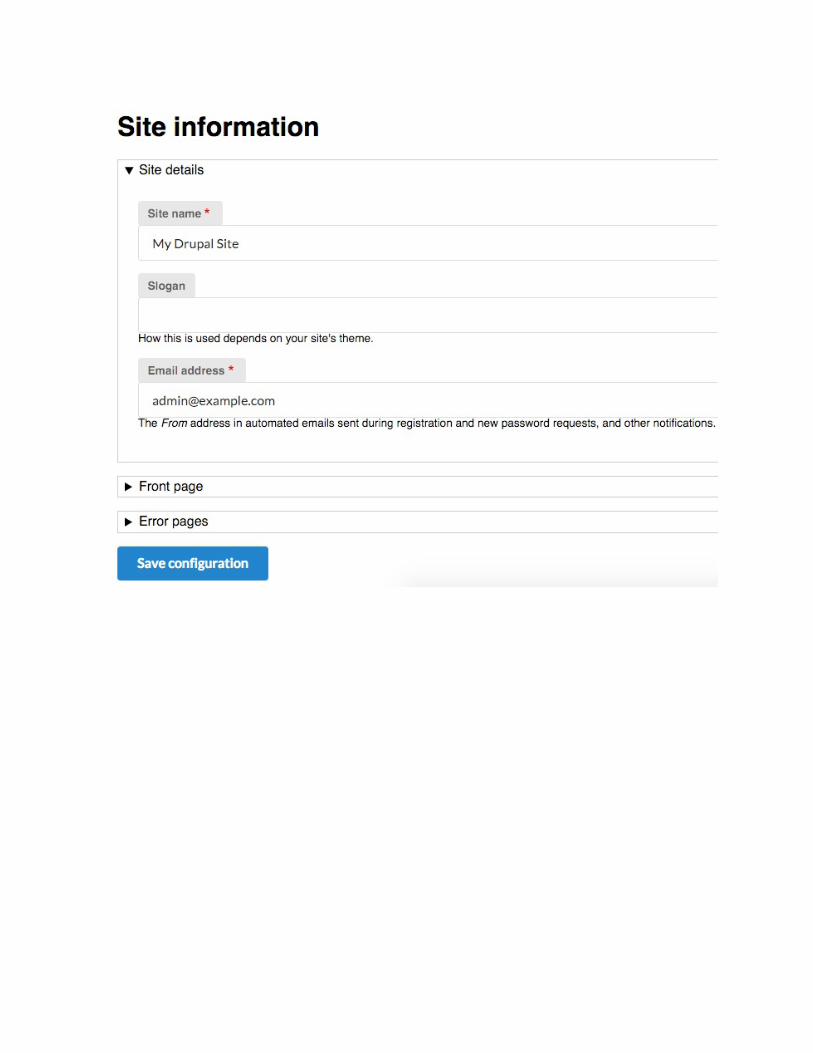
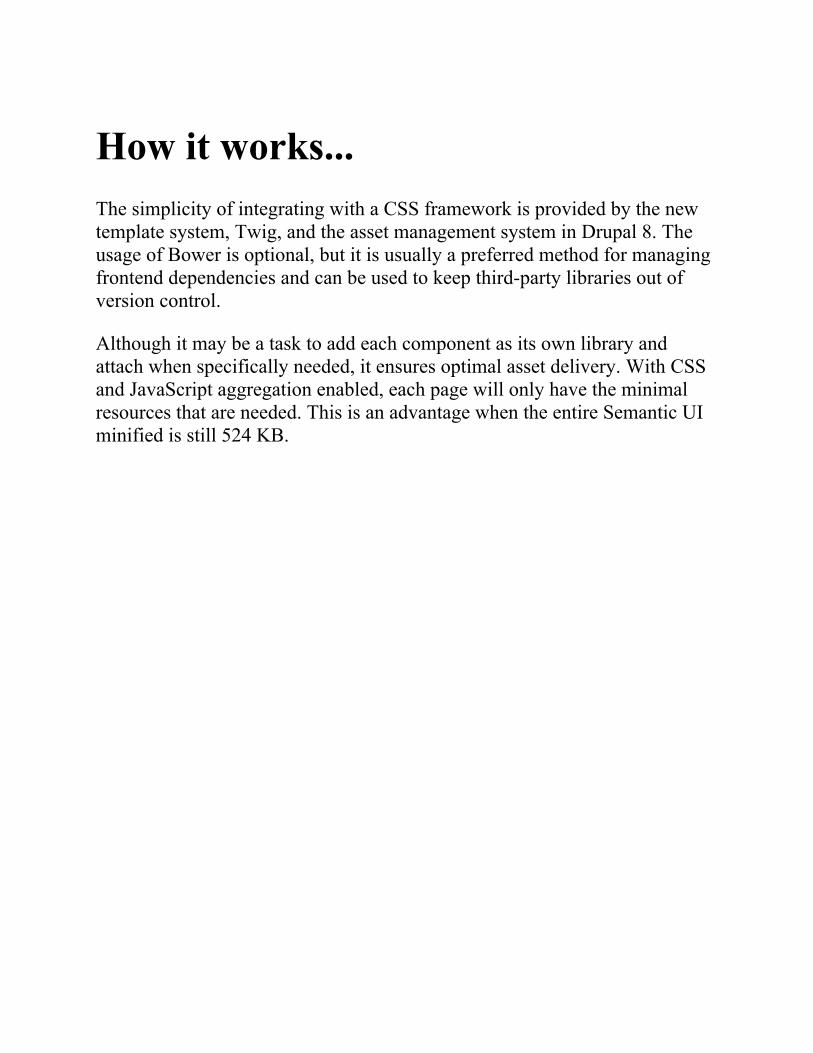
How it works...The simplicity of integrating with a CSS framework is provided by the newtemplate system, Twig, and the asset management system in Drupal 8. Theusage of Bower is optional, but it is usually a preferred method for managingfrontend dependencies and can be used to keep third-party libraries out ofversion control.
Although it may be a task to add each component as its own library andattach when specifically needed, it ensures optimal asset delivery. With CSSand JavaScript aggregation enabled, each page will only have the minimalresources that are needed. This is an advantage when the entire Semantic UIminified is still 524 KB.
See alsoRefer to Semantic UI at http://semantic-ui.com/Refer to the Creating a custom theme based on Classy recipe of Chapter5, Frontend for the WinRefer to the Using the new asset management system recipe of Chapter5, Frontend for the WinRefer to the Twig templating recipe of Chapter 5, Frontend for the Win
Implementing and using a third-party PHP libraryDrupal 8 uses Composer for package dependencies and autoloading classesbased on PSR standards. This allows us to use any available PHP librarymuch more easily than in previous versions of Drupal.
In this recipe, we will add the IpRestrict Stack Middleware library to addthe functionality to whitelist access to the Drupal site based on allowed IPaddresses.

Getting readyYou need to have Composer installed in order to use the Composer managerworkflow. You can follow the Getting Started documentation athttps://getcomposer.org/doc/00-intro.md. We will add the alsar/stack-ip-restrict library as a dependency to our Drupal installation.
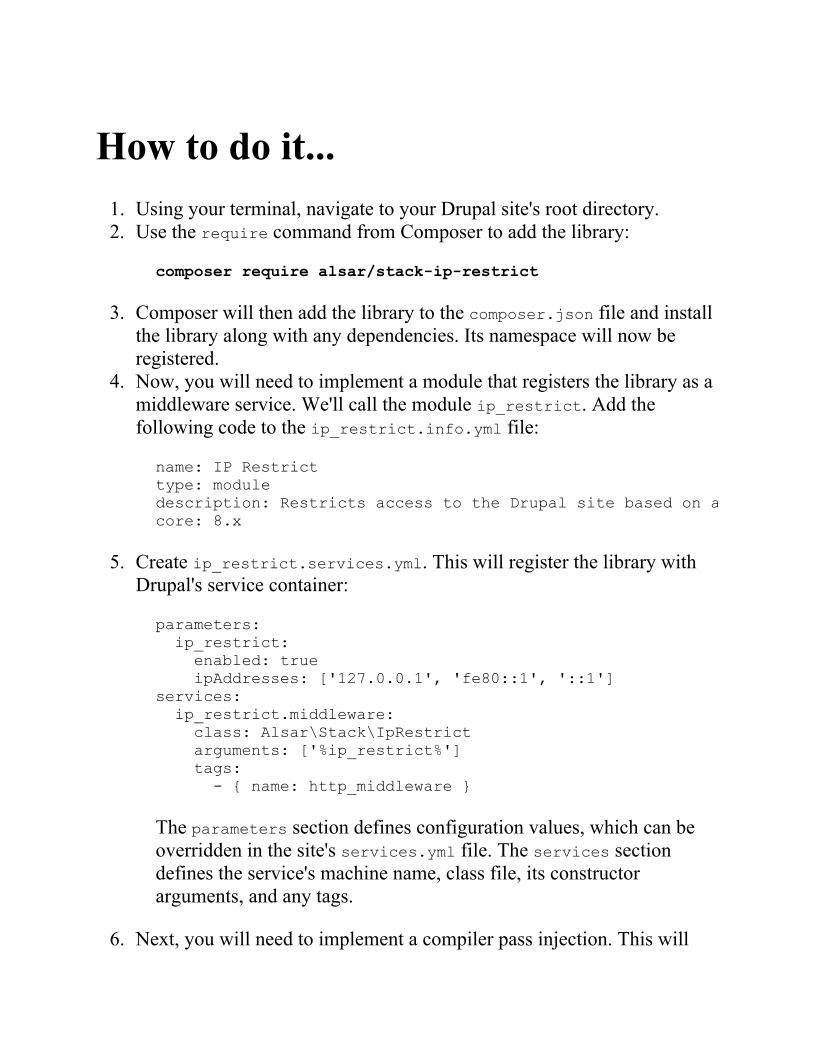
How to do it...1. Using your terminal, navigate to your Drupal site's root directory.2. Use the require command from Composer to add the library:
composer require alsar/stack-ip-restrict
3. Composer will then add the library to the composer.json file and installthe library along with any dependencies. Its namespace will now beregistered.
4. Now, you will need to implement a module that registers the library as amiddleware service. We'll call the module ip_restrict. Add thefollowing code to the ip_restrict.info.yml file:
name: IP Restrict type: module description: Restricts access to the Drupal site based on allowed IP addresses core: 8.x
5. Create ip_restrict.services.yml. This will register the library withDrupal's service container:
parameters: ip_restrict: enabled: true ipAddresses: ['127.0.0.1', 'fe80::1', '::1'] services: ip_restrict.middleware: class: Alsar\Stack\IpRestrict arguments: ['%ip_restrict%'] tags: - { name: http_middleware }
The parameters section defines configuration values, which can beoverridden in the site's services.yml file. The services sectiondefines the service's machine name, class file, its constructorarguments, and any tags.
6. Next, you will need to implement a compiler pass injection. This will
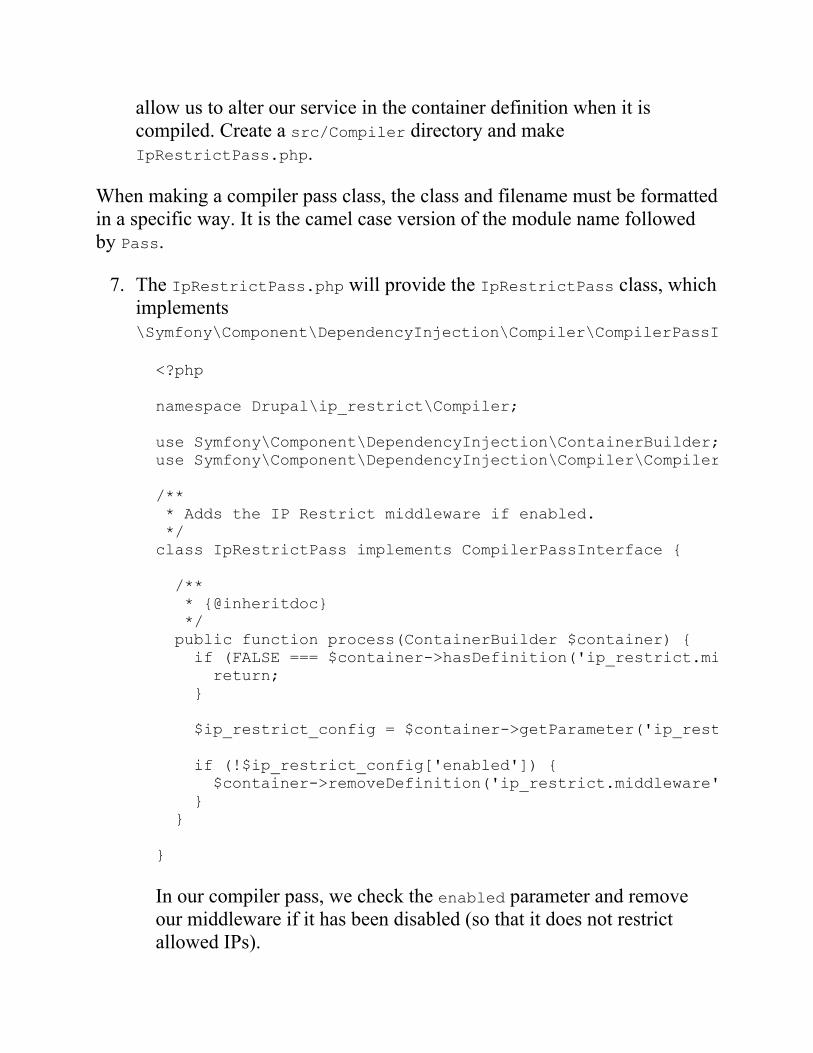
allow us to alter our service in the container definition when it iscompiled. Create a src/Compiler directory and makeIpRestrictPass.php.
When making a compiler pass class, the class and filename must be formattedin a specific way. It is the camel case version of the module name followedby Pass.
7. The IpRestrictPass.php will provide the IpRestrictPass class, whichimplements\Symfony\Component\DependencyInjection\Compiler\CompilerPassInterface
<?php namespace Drupal\ip_restrict\Compiler; use Symfony\Component\DependencyInjection\ContainerBuilder; use Symfony\Component\DependencyInjection\Compiler\CompilerPassInterface; /** * Adds the IP Restrict middleware if enabled. */ class IpRestrictPass implements CompilerPassInterface { /** * {@inheritdoc} */ public function process(ContainerBuilder $container) { if (FALSE === $container->hasDefinition('ip_restrict.middleware')) { return; } $ip_restrict_config = $container->getParameter('ip_restrict'); if (!$ip_restrict_config['enabled']) { $container->removeDefinition('ip_restrict.middleware'); } } }
In our compiler pass, we check the enabled parameter and removeour middleware if it has been disabled (so that it does not restrictallowed IPs).
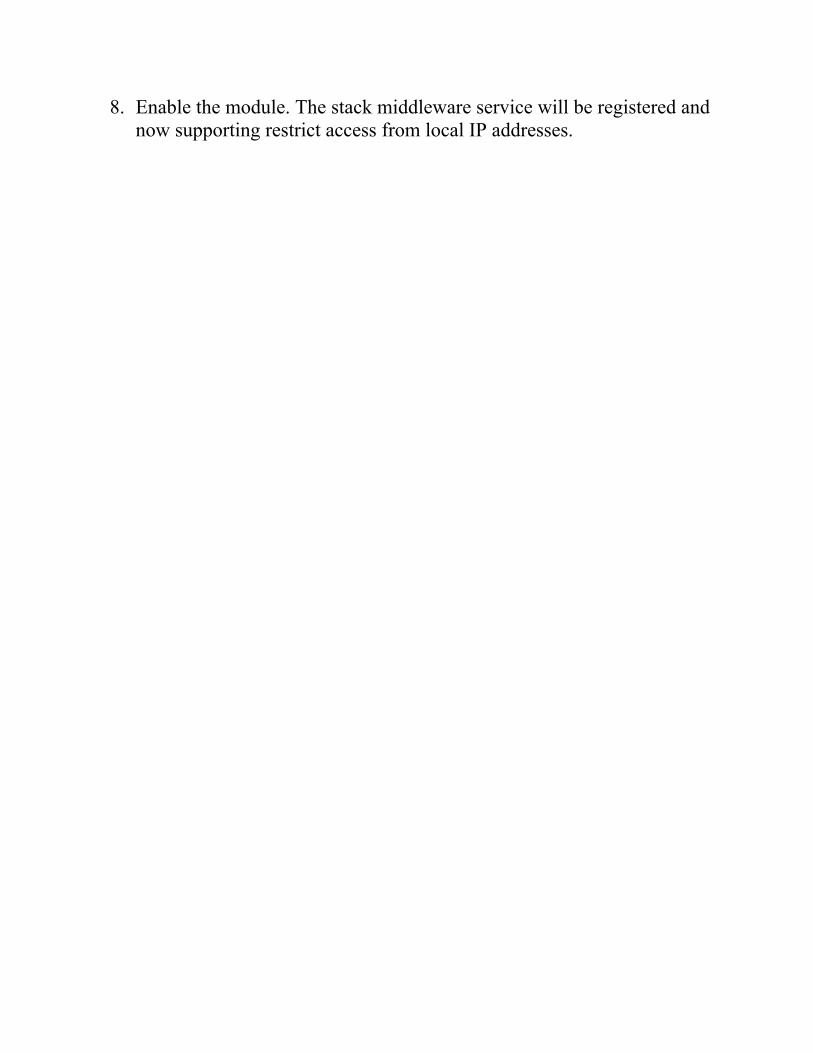
8. Enable the module. The stack middleware service will be registered andnow supporting restrict access from local IP addresses.

How it works...Drupal 8 utilizes Symfony components. One of them is the service containerand the services it has registered. During the building of the container, thereis a compiler pass process that allows alterations of the container's services.
First, we will need to register the service in the module's services.yml file.The \Drupal\Core\DependencyInjection\Compiler\StackedKernelPassclass provided by the core will automatically load all the services tagged withhttp_middleware, such as our ip_restrict.middleware service.
Our arguments definition loads items defined in theparameters.ip_restrict that are used for the class's constructor.
With our provided IpRestrictPass class, we are also tapping into thecontainer's compile cycle. We will take a look at the parameter values for theip_restrict section to check whether they are enabled. If the enabled settingis set to false, we remove our service from the container.
See alsoRefer to Services and dependency injection in the Drupal 8documentation at https://www.drupal.org/docs/8/api/services-and-dependency-injection/services-and-dependency-injection-in-drupal-8Refer to the Symfony service container documentation athttp://symfony.com/doc/current/book/service_container.htmlRefer to the Symfony Dependency Injection component documentationathttp://symfony.com/doc/current/components/dependency_injection/introduction.html
Web ServicesDrupal 8 ships with the RESTful web servers functionality to implement webservices to interact with your application. This chapter shows you how toenable these features and build your API, covering the following topics:
Enabling RESTful interfacesUsing POST to create dataUsing PATCH to update dataUsing Views to provide custom data sourcesAuthenticationUsing JSON API
IntroductionThere are several modules provided by Drupal 8 that enable the ability to turnit into a web service provider. The Serialization module provides a means ofserializing data to or deserializing from formats such as JSON and XML. TheRESTful web services module then exposes entities and other APIs throughWeb APIs. Operations done through RESTful resource endpoints use thesame create, edit, delete, and view permissions that would be used in a non-API format.
The HAL module serializes entities using the Hypertext ApplicationLanguage (HAL) format. HAL is an Internet Draft standard convention usedto hyperlink between resources in an API. HAL+JSON is required whenworking with POST and PATCH methods. For authentication, the HTTPBasic Authentication module provides a simple authentication via HTTPheaders.
There is a community-lead effort to implement the JSON API specificationwith Drupal, using the JSON API module, covered in the Using JSON APIrecipe of this chapter. Like HAL, it provides specifications not only on howdata should be represented, but also on how it should be sorted and filteredvia request parameters.
This chapter covers how to work with the RESTful Web Services module andthe supporting modules around developing a RESTful API powered byDrupal 8. We will cover how to use the GET, POST, and PATCH HTTPmethods to manipulate content on the website. Additionally, we will coverhow to use views to provide custom content that lists endpoints. Finally, wewill cover how to handle custom authentication for our API.
In an article, Putting off PUT, the team behind the Web services initiativechose not to implement PUT and only support PATCH. For moreinformation, refer to the original article athttps://groups.drupal.org/node/284948.

However, the API is open for contributed modules to add the PUT supportfor core resources or their own.
Enabling RESTful interfacesThe RESTful Web Services module provides routes that expose endpoints foryour RESTful API. It utilizes the Serialization module to handle thenormalization to a response and denormalization of data from requests.Endpoints support specific formats and authentication providers. Uponinstallation, the RESTful Web Services module does not provide any defaultconfigured endpoints.
There is one caveat: RESTful Web Services does not provide a user interfaceto configure available endpoints. Enabling resource endpoints can be done bymanually editing configuration or the REST UI module. We will use theREST UI module in this recipe.
In this recipe, we will install RESTful Web Services and enable the properpermissions to allow the retrieval of nodes via REST to receive our formattedJSON.
We will cover using GET, POST, PATCH, and DELETE in later recipes.This recipe covers the installation and configuration of the base modules toenable Web services.
Getting readyThere is a configuration change that might be required if you are runningPHP 5.6: the always_populate_raw_post_data setting. If you try to enablethe RESTful Web Services module without changing the default setting, youwill see the following error message on installation:
The always_populate_raw_post_data PHP setting should be set to -1 inPHP version 5.6. Please check the PHP manual for information on how tocorrect this. (Currently using always_populate_raw_post_data PHP settingversion not set to -1.)
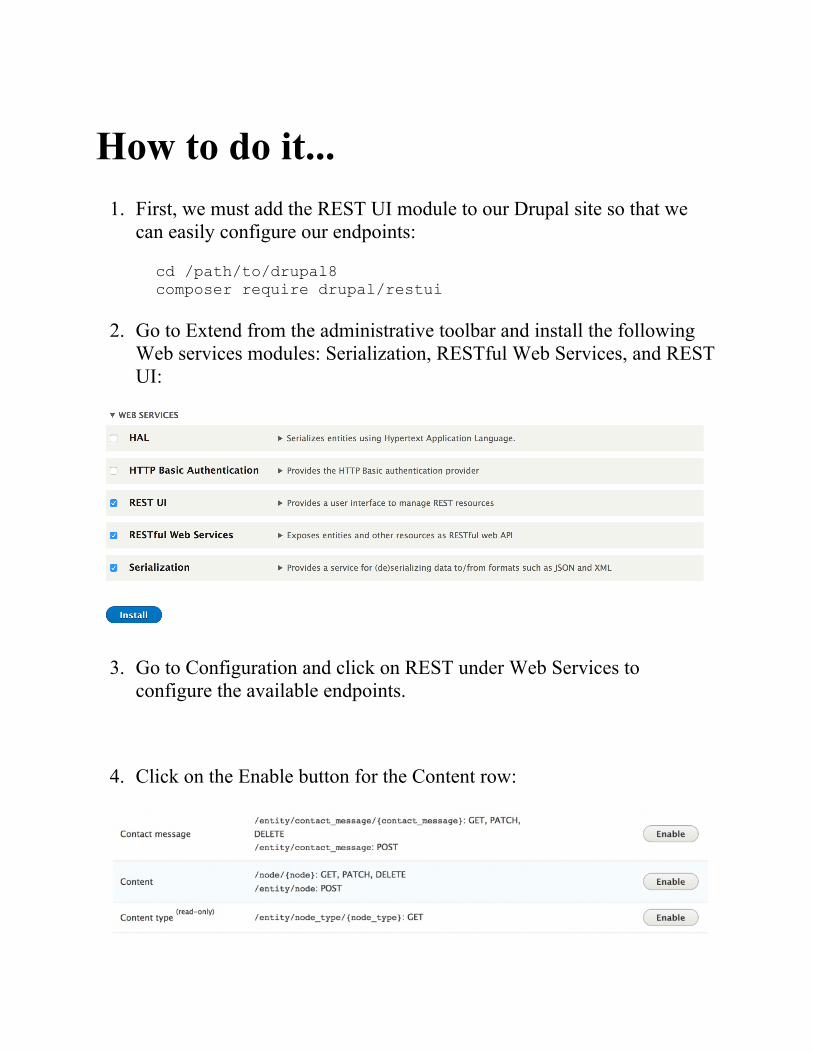
How to do it...1. First, we must add the REST UI module to our Drupal site so that we
can easily configure our endpoints:
cd /path/to/drupal8composer require drupal/restui
2. Go to Extend from the administrative toolbar and install the followingWeb services modules: Serialization, RESTful Web Services, and RESTUI:
3. Go to Configuration and click on REST under Web Services toconfigure the available endpoints.
4. Click on the Enable button for the Content row:
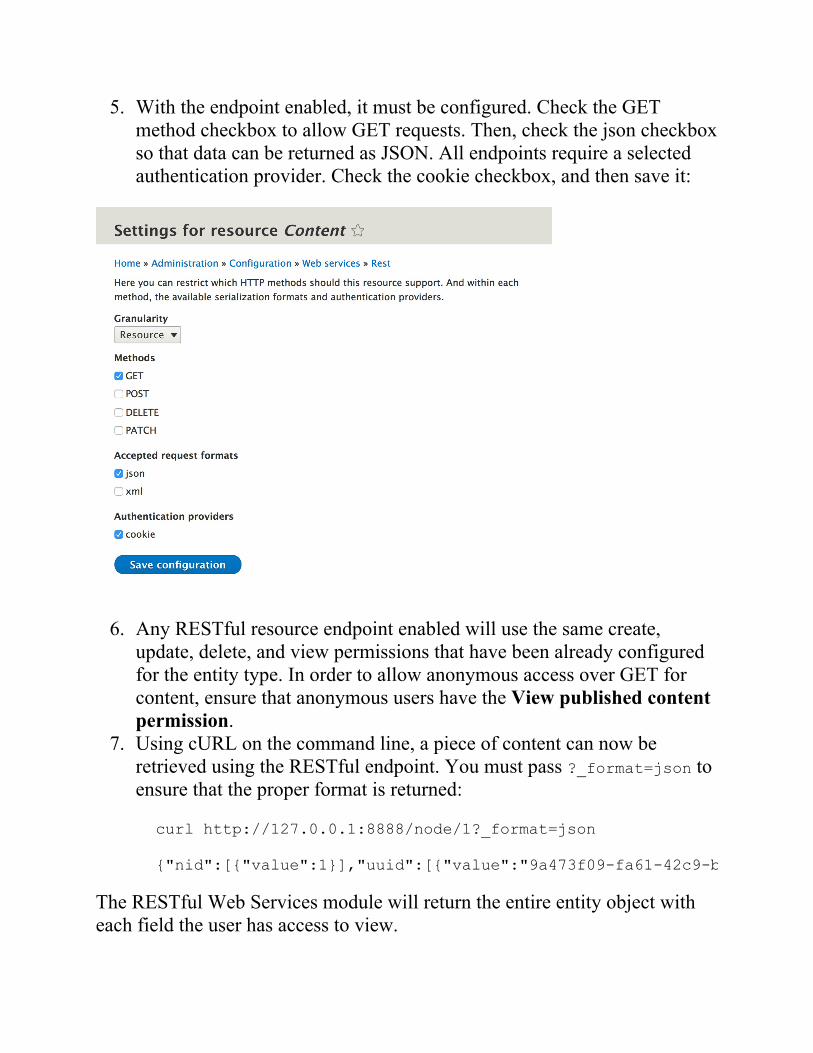
5. With the endpoint enabled, it must be configured. Check the GETmethod checkbox to allow GET requests. Then, check the json checkboxso that data can be returned as JSON. All endpoints require a selectedauthentication provider. Check the cookie checkbox, and then save it:
6. Any RESTful resource endpoint enabled will use the same create,update, delete, and view permissions that have been already configuredfor the entity type. In order to allow anonymous access over GET forcontent, ensure that anonymous users have the View published contentpermission.
7. Using cURL on the command line, a piece of content can now beretrieved using the RESTful endpoint. You must pass ?_format=json toensure that the proper format is returned:
curl http://127.0.0.1:8888/node/1?_format=json
{"nid":[{"value":1}],"uuid":[{"value":"9a473f09-fa61-42c9-b4ad-f24b857d04f6"}],"vid":[{"value":51}],"langcode":[{"value":"en"}],"type":[{"target_id":"page","target_type":"node_type","target_uuid":"8a8ad160-69dc-453f-bc11-86775040465e"}],"status":[{"value":true}],"title":[{"value":"Example node"}],"uid":[{"target_id":0,"target_type":"user","target_uuid":"e31b3de2-2195-48c6-9a5e-ab0553461c93","url":"\/user\/0"}],"created":[{"value":1500650071}],"changed":[{"value":1500650374}],"promote":[{"value":true}],"sticky":[{"value":false}],"revision_timestamp":[{"value":1500650374}],"revision_uid":[{"target_id":1,"target_type":"user","target_uuid":"2d7ee3ef-6f8a-4feb-a99a-4af8cfd24402","url":"\/user\/1"}],"revision_log":[],"revision_translation_affected":[{"value":true}],"default_langcode":[{"value":true}],"path":[],"body":[{"value":"Defui dolor elit jus luptatum. Ad augue causa hos loquor luctus minim singularis sino utinam. ","format":"plain_text","summary":""}]}
The RESTful Web Services module will return the entire entity object witheach field the user has access to view.
How it works...The RESTful Web Services module works by implementing an eventsubscriber service, rest.resource_routes, that adds routes to Drupal basedon implementations of its RestResource plugin. Each plugin returns theavailable routes based on HTTP methods that are enabled for the resource.
When routes are built, the \Drupal\rest\Routing\ResourceRoutes classuses the RestResource plugin manager to retrieve all the availabledefinitions. The endpoint configuration objects are loaded and inspected. Ifthe resource plugin provides an HTTP method that is enabled in theconfiguration definitions, it begins to build a new route. Verification is doneagainst the defined supported formats and supported auth definitions. If thebasic validation passes, the new route is added to the RouteCollection andreturned.
If you provide a supported_formats or supported_auth value that is notavailable, the endpoint will still be created. There will be an error, however,if you attempt to use the route with the invalid plugin. This cannot occurwhen using the REST UI module, but manually providing and managing theconfiguration.
The default routes provided by the base class for resource plugins,\Drupal\rest\Plugin\ResourceBase class, set\Drupal\rest\RequestHandler::handle as the controller and method forthe route. This method checks the passed _format parameter against theconfigured plugin. If the format is valid, the data is passed to the appropriateserializer. The serialized data is then returned in the request with appropriatecontent headers.

There's more...The RESTful Web Services module provides a robust API that has someadditional items to make a note of. We will explore these in the next recipe.
Using _format instead of the AcceptheaderEarlier in the Drupal 8 life cycle, up until 8.0.0-beta12, Drupal supported theuse of the Accept header instead of the _format parameter. Unfortunately,there were issues with external caches. Drupal was serving HTML and otherformats on the same path, only using different Accept headers. CDNs andreverse proxies do not invalidate cache based on this header alone. The onlysolution to prevent cache poisoning on these external caches, such asVarnish, was to ensure the implementation of the Vary: Accept header.There were, however, too many issues regarding CDNs and variance ofimplementation, so the _format parameter was introduced instead ofappending extensions (.json and .xml) to paths.
A detail of the problem can be found on the following core issues:
Refer to external caches mix up response formats on URLs wherecontent negotiation is in use at https://www.drupal.org/node/2364011Check how to implement query parameter-based content negotiation asan alternative to extensions at https://www.drupal.org/node/2481453

RestResource plugin to expose datathrough RESTful Web ServicesThe RESTful Web Services module defines a RestResource plugin. Thisplugin is used to define resource endpoints. They are discovered in amodule's Plugin/rest/resource namespace and need to implement the\Drupal\rest\Plugin\ResourceInterface interface. Drupal 8 provides twoimplementations of the RestResource plugin. The first is theEntityResource class that is provided by the RESTful Web Services module.It implements a driver class that allows it to represent each entity type. Thesecond is the Database Logging module that provides its own RestResourceplugin, as well. It allows you to retrieve logged messages by IDs. The\Drupal\rest\Plugin\ResourceBase class provides an abstract base classthat can be extended for the RestResource plugin implementations. If thechild class provides a method that matches the available HTTP methods, itwill support them. For example, if a class has only a GET method, you canonly interact with that endpoint through HTTP GET requests. On the otherhand, you can provide a trace method that allows an endpoint to supportHTTP TRACE requests.
Drupal 8 provides two implementations of the RestResource plugin. The firstis the EntityResource class that is provided by the RESTful Web Servicesmodule. It implements a deriver class that allows it to represent each entitytype. The second is the Database Logging module that provides its ownRestResource plugin. It allows you to retrieve logged messages by IDs.
Rate limiting your APIMany APIs implement a rate limit to prevent abuse of public APIs. Whenyou have publicly exposed APIs, you will need to control the amount oftraffic hitting the service and prevent abusers from slowing down or stoppingyour service.
The Rate Limiter module implements multiple ways to control access toyour public APIs. There is an option to control the rate limit on specificrequests, IP address-based limiting, and IP whitelisting.
You can find the Rate Limiter module athttps://www.drupal.org/project/rate_limiter.
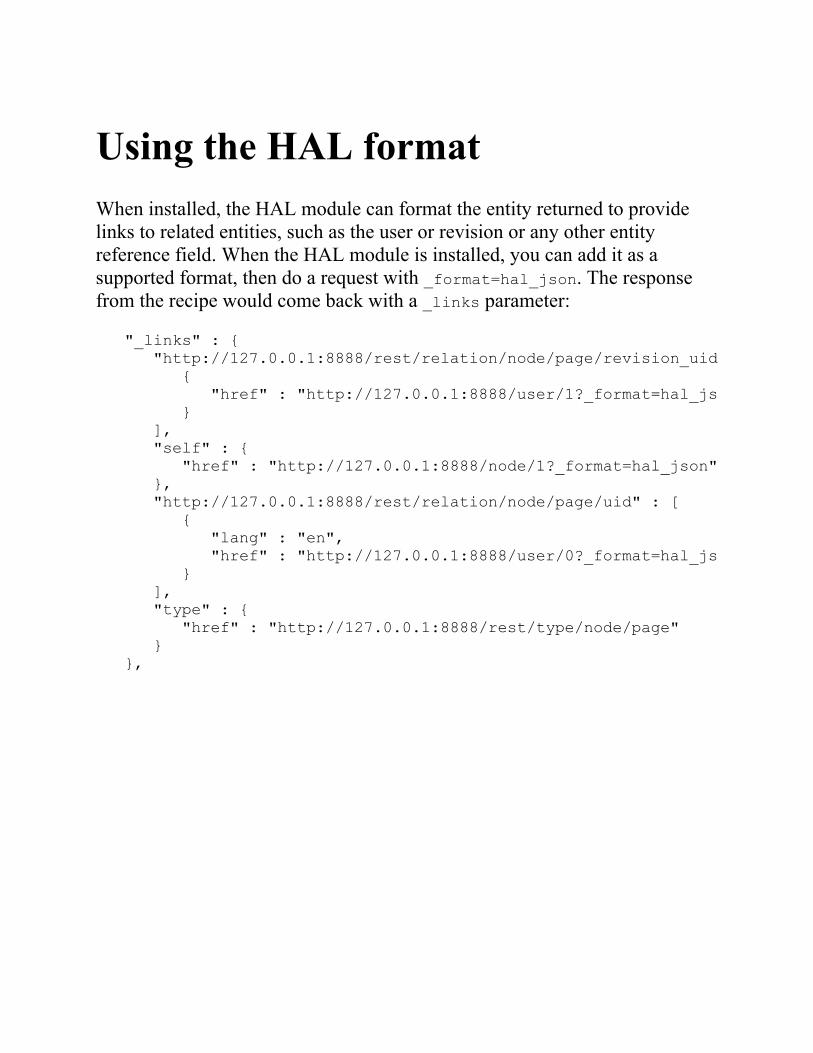
Using the HAL formatWhen installed, the HAL module can format the entity returned to providelinks to related entities, such as the user or revision or any other entityreference field. When the HAL module is installed, you can add it as asupported format, then do a request with _format=hal_json. The responsefrom the recipe would come back with a _links parameter:
"_links" : { "http://127.0.0.1:8888/rest/relation/node/page/revision_uid" : [ { "href" : "http://127.0.0.1:8888/user/1?_format=hal_json" } ], "self" : { "href" : "http://127.0.0.1:8888/node/1?_format=hal_json" }, "http://127.0.0.1:8888/rest/relation/node/page/uid" : [ { "lang" : "en", "href" : "http://127.0.0.1:8888/user/0?_format=hal_json" } ], "type" : { "href" : "http://127.0.0.1:8888/rest/type/node/page" } },
See alsoRefer to the Drupal.org documentation for the RESTful Web Servicesmodule at https://www.drupal.org/documentation/modules/restRefer to Change record: Accept header based routing got replaced by aquery parameter, https://www.drupal.org/node/2501221Refer to Chapter 7, Plug and Play with PluginsRefer to the Rate Limiter module athttps://www.drupal.org/project/rate_limiterRefer to the REST UI module at https://www.drupal.org/project/restui
Using POST to create dataWhen working with RESTful Web Services, the HTTP POST method is usedto create new entities. We will use the HTTP Basic Authentication toauthenticate a user and create a new node.
In this recipe, we will use the exposed node endpoint to create a new piece ofarticle content through the RESTful Web Services module. We will use thejson format. In the There's more... section, we will discuss how to use theHAL module for the hal_json format.
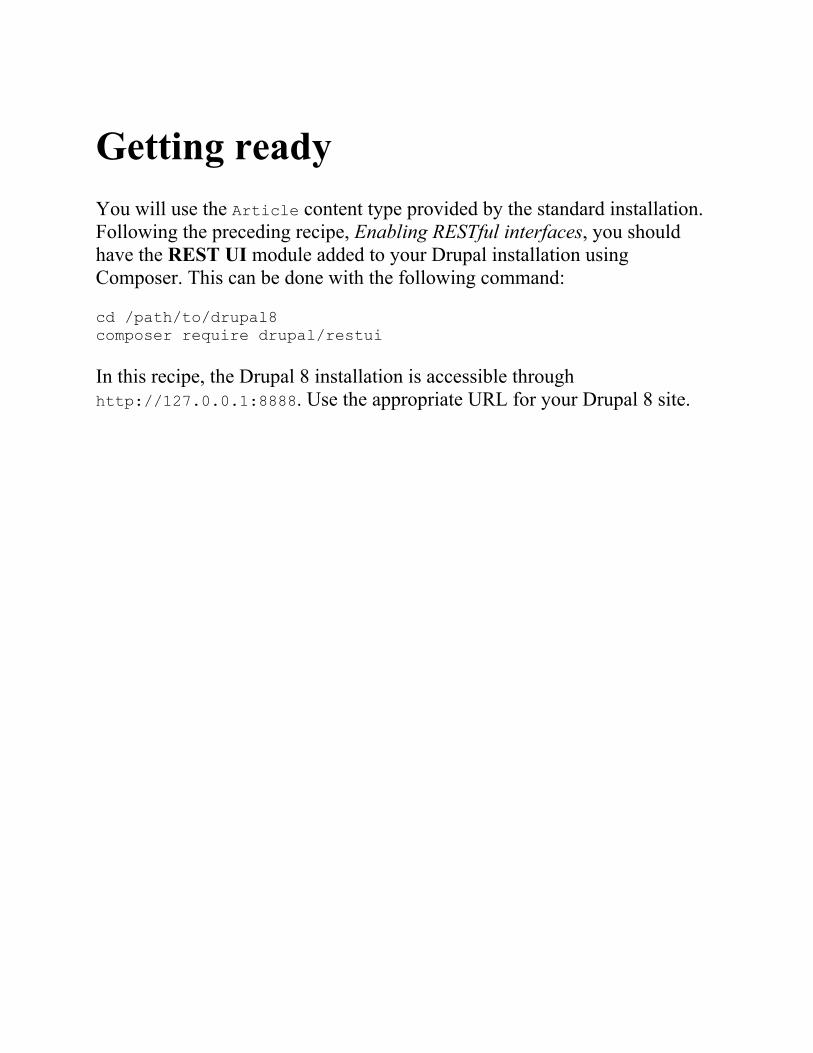
Getting readyYou will use the Article content type provided by the standard installation.Following the preceding recipe, Enabling RESTful interfaces, you shouldhave the REST UI module added to your Drupal installation usingComposer. This can be done with the following command:
cd /path/to/drupal8composer require drupal/restui
In this recipe, the Drupal 8 installation is accessible throughhttp://127.0.0.1:8888. Use the appropriate URL for your Drupal 8 site.
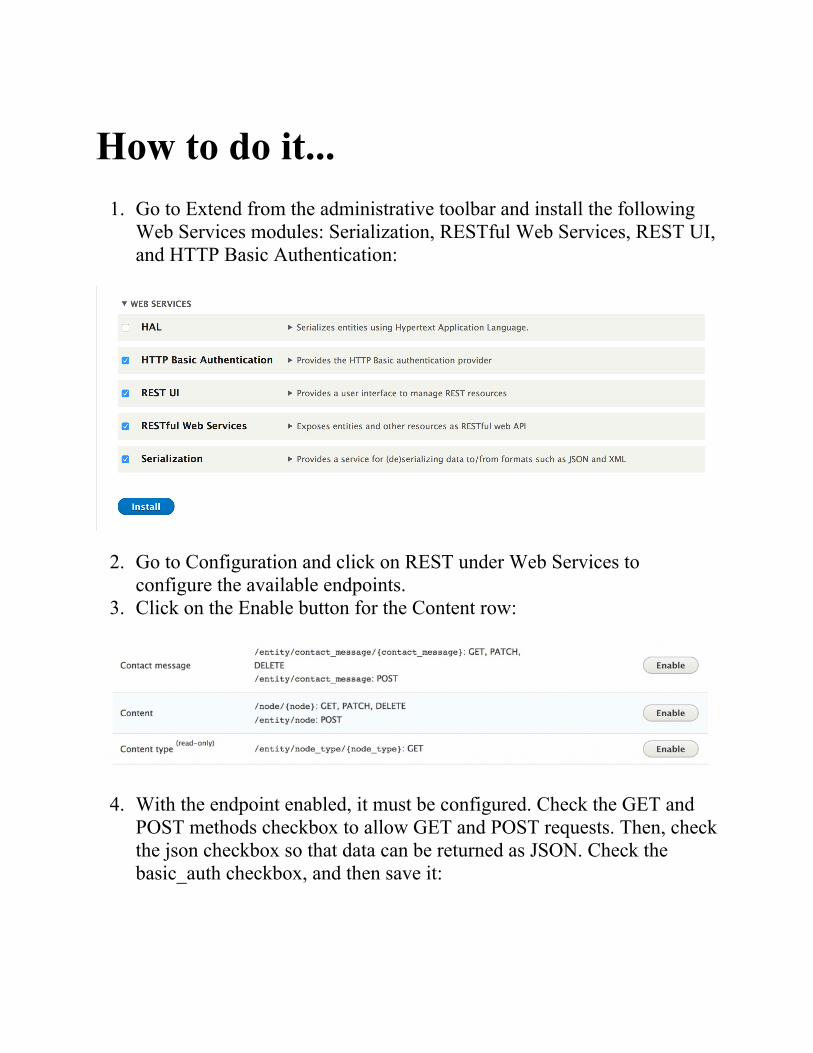
How to do it...1. Go to Extend from the administrative toolbar and install the following
Web Services modules: Serialization, RESTful Web Services, REST UI,and HTTP Basic Authentication:
2. Go to Configuration and click on REST under Web Services toconfigure the available endpoints.
3. Click on the Enable button for the Content row:
4. With the endpoint enabled, it must be configured. Check the GET andPOST methods checkbox to allow GET and POST requests. Then, checkthe json checkbox so that data can be returned as JSON. Check thebasic_auth checkbox, and then save it:
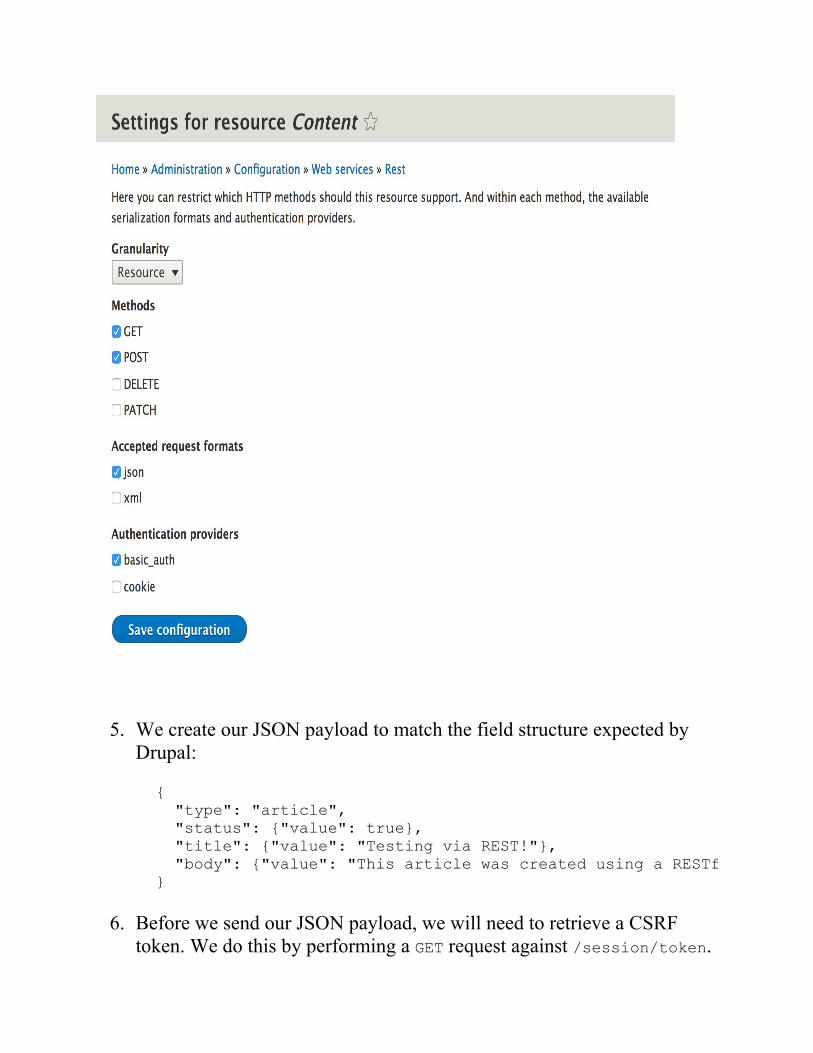
5. We create our JSON payload to match the field structure expected byDrupal:
{ "type": "article", "status": {"value": true}, "title": {"value": "Testing via REST!"}, "body": {"value": "This article was created using a RESTful endpoint"}}
6. Before we send our JSON payload, we will need to retrieve a CSRFtoken. We do this by performing a GET request against /session/token.
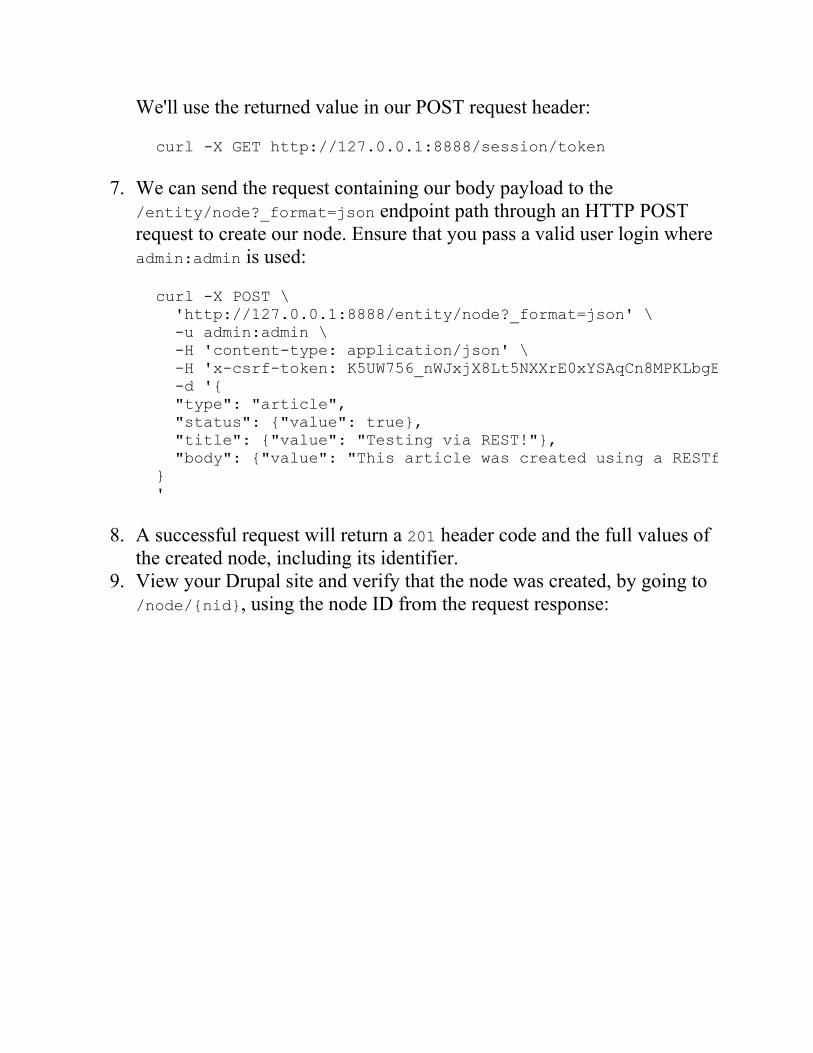
We'll use the returned value in our POST request header:
curl -X GET http://127.0.0.1:8888/session/token
7. We can send the request containing our body payload to the/entity/node?_format=json endpoint path through an HTTP POSTrequest to create our node. Ensure that you pass a valid user login whereadmin:admin is used:
curl -X POST \ 'http://127.0.0.1:8888/entity/node?_format=json' \ -u admin:admin \ -H 'content-type: application/json' \ -H 'x-csrf-token: K5UW756_nWJxjX8Lt5NXXrE0xYSAqCn8MPKLbgE6Gps' \ -d '{ "type": "article", "status": {"value": true}, "title": {"value": "Testing via REST!"}, "body": {"value": "This article was created using a RESTful endpoint"}}'
8. A successful request will return a 201 header code and the full values ofthe created node, including its identifier.
9. View your Drupal site and verify that the node was created, by going to/node/{nid}, using the node ID from the request response:
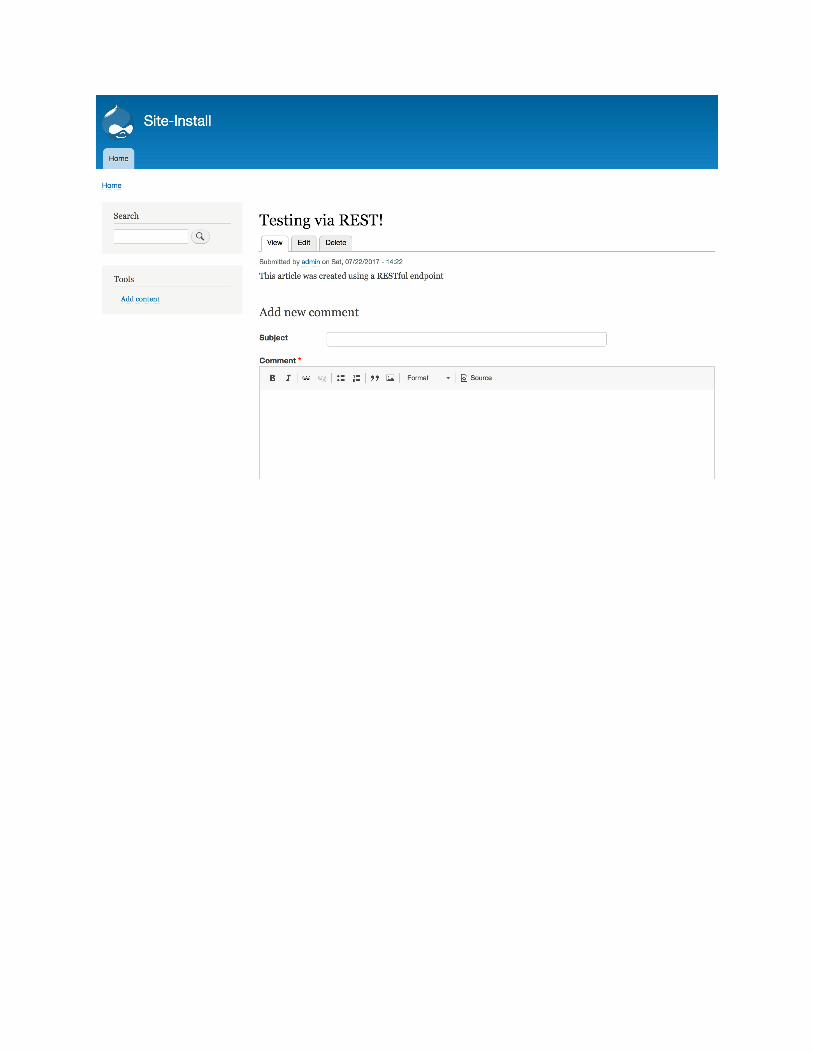
How it works...When working with content entities and the POST method, the endpoint isdifferent to the one used for GET requests. The\Drupal\rest\Plugin\rest\resource\EntityResource class extends the\Drupal\rest\Plugin\ResourceBase base class, which provides a routemethod. If a resource plugin provides an https://www.drupal.org/link-relations/create link template, then that path will be used for the POSTpath.
The EntityResource class defines /entity/{entity_type} as the create linktemplate. It then overrides the getBaseRoute method to ensure that theentity_type parameter is properly populated from the definition.
The EntityResource class will run a set of conditions for the request. First, itwill validate the POST request by checking whether the entity is null. Then,the current user is authorized to create the entity type if the current user alsohas access to edit all fields provided, and finally, it checks whether anidentifier was passed or not. The last condition is important, as updates areonly to be made through a PATCH request.
If the entity is validated, it will be saved. On a successful save, an emptyHTTP 201 response will be returned.
There's more...Working with POST requests requires some specific formatting that will beexplained in the next recipe.
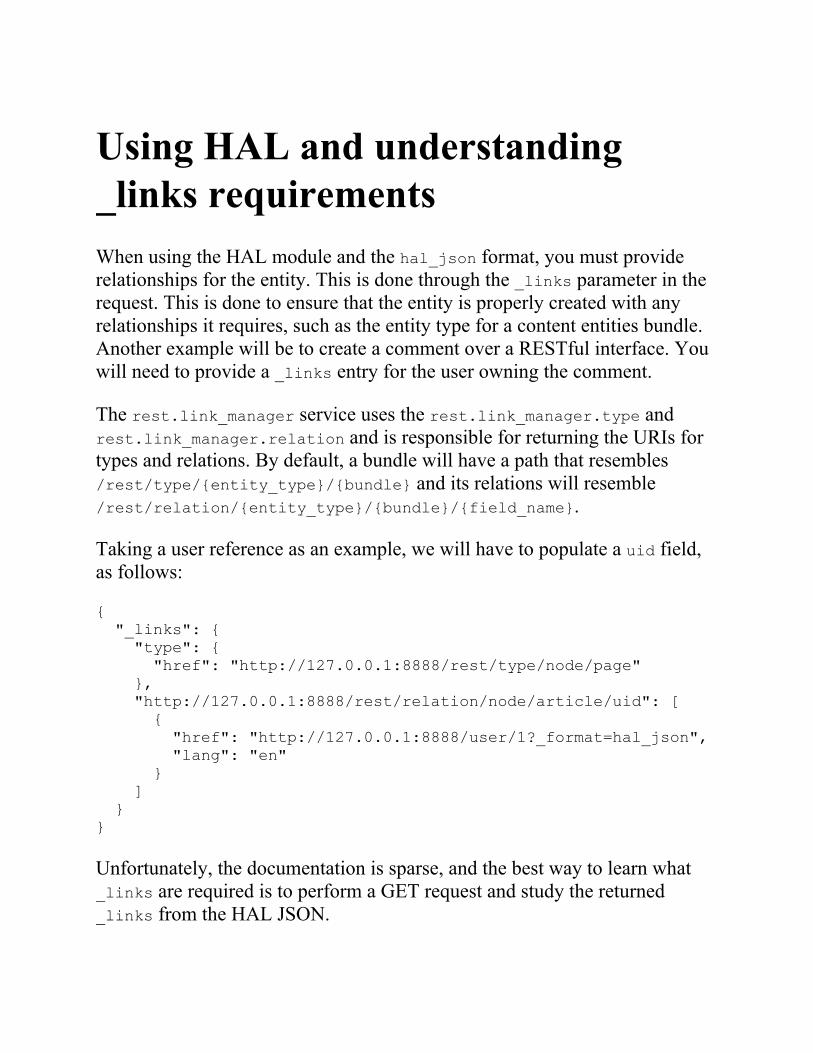
Using HAL and understanding_links requirementsWhen using the HAL module and the hal_json format, you must providerelationships for the entity. This is done through the _links parameter in therequest. This is done to ensure that the entity is properly created with anyrelationships it requires, such as the entity type for a content entities bundle.Another example will be to create a comment over a RESTful interface. Youwill need to provide a _links entry for the user owning the comment.
The rest.link_manager service uses the rest.link_manager.type andrest.link_manager.relation and is responsible for returning the URIs fortypes and relations. By default, a bundle will have a path that resembles/rest/type/{entity_type}/{bundle} and its relations will resemble/rest/relation/{entity_type}/{bundle}/{field_name}.
Taking a user reference as an example, we will have to populate a uid field,as follows:
{ "_links": { "type": { "href": "http://127.0.0.1:8888/rest/type/node/page" }, "http://127.0.0.1:8888/rest/relation/node/article/uid": [ { "href": "http://127.0.0.1:8888/user/1?_format=hal_json", "lang": "en" } ] }}
Unfortunately, the documentation is sparse, and the best way to learn what_links are required is to perform a GET request and study the returned_links from the HAL JSON.
Working with imagesMost RESTful APIs utilize base64 encoding of files to support POSToperations to upload an image. Unfortunately, this is not supported in theDrupal core. Although there is a serializer.normalizer.file_entity.halservice that serializes file entities into HAL JSON, it does not currently workas of 8.3, but is hopefully slated for 8.4.
The \Drupal\hal\Normalizer\FileEntityNormalizer class supportsdenormalization; however, it does not handle base64 and expects binary data.
There is a Drupal core issue for this problem, which is available athttps://www.drupal.org/node/1927648.

Using Cross-Site Request ForgerytokensWhen working with a POST request, you will need to pass a Cross-SiteRequest Forgery (CSRF) token if you are authenticating with a sessioncookie. The X-CSRF-Token header is required when using a session cookieto prevent accidental API requests.
If you are using the cookie provider for authentication, you will need torequest a CSRF token from the /session/token route:
curl -X GET http://127.0.0.1:8888/session/token
See alsoRefer to how to serialize file content (base64) to support RESTGET/POST/PATCHon file entity at https://www.drupal.org/node/1927648
Using PATCH to update dataWhen working with RESTful Web Services, the HTTP PATCH method isused to update entities. We will use the HTTP Basic Authentication toauthenticate our user and update a node.
In this recipe, we will use the exposed node endpoint to create a new piece ofarticle content through the RESTful Web Services module.
Getting readyWe will use the Article content type provided by the standard installation.Following the Enabling RESTful interfaces recipe, you should have the RESTUI module added to your Drupal installation using Composer. This can bedone with the following command:
cd /path/to/drupal8composer require drupal/restui
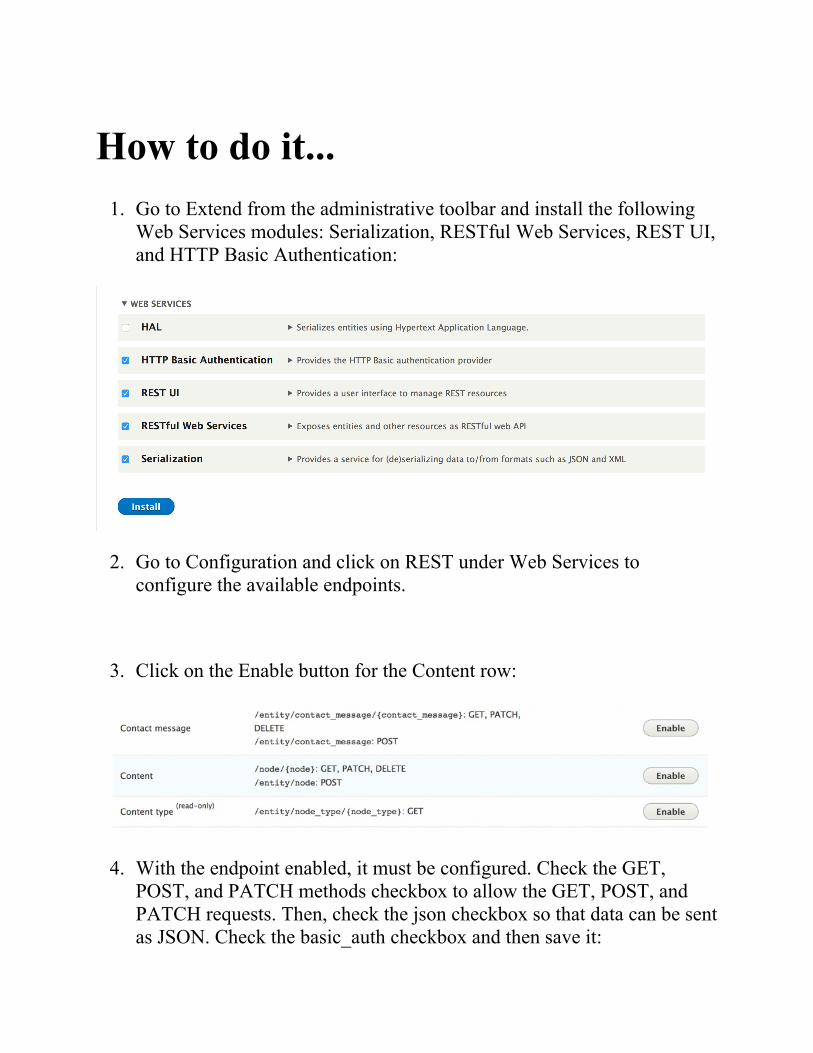
How to do it...1. Go to Extend from the administrative toolbar and install the following
Web Services modules: Serialization, RESTful Web Services, REST UI,and HTTP Basic Authentication:
2. Go to Configuration and click on REST under Web Services toconfigure the available endpoints.
3. Click on the Enable button for the Content row:
4. With the endpoint enabled, it must be configured. Check the GET,POST, and PATCH methods checkbox to allow the GET, POST, andPATCH requests. Then, check the json checkbox so that data can be sentas JSON. Check the basic_auth checkbox and then save it:
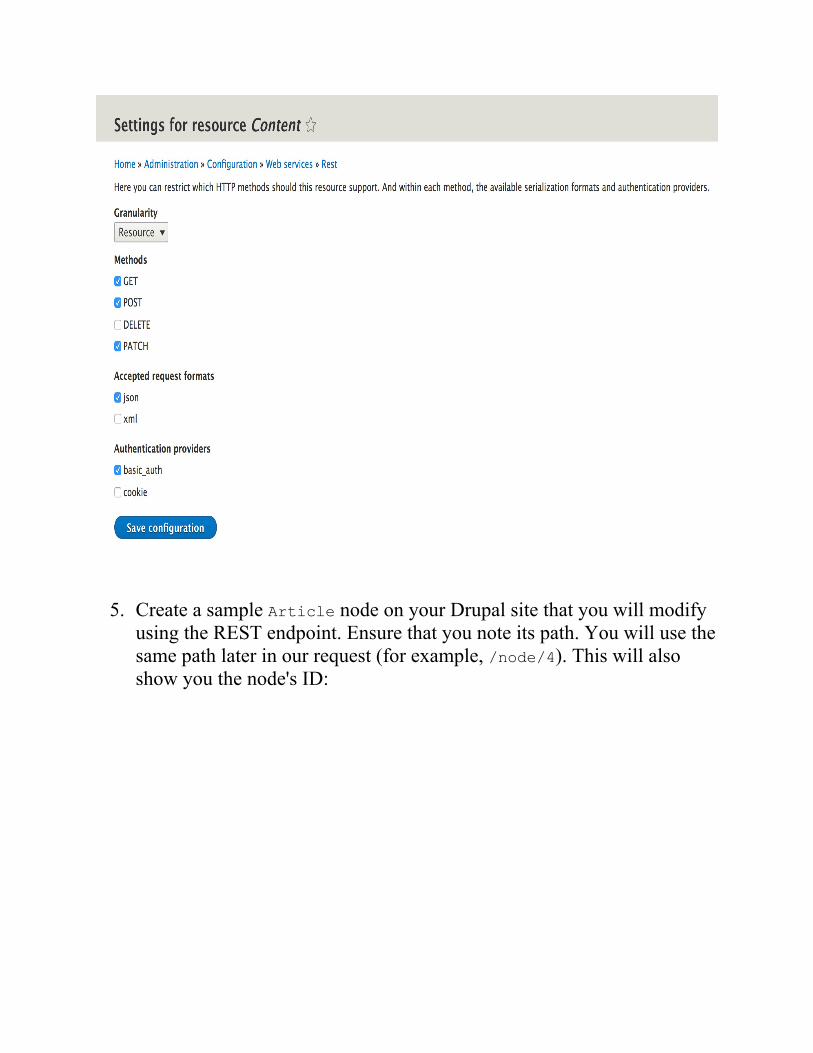
5. Create a sample Article node on your Drupal site that you will modifyusing the REST endpoint. Ensure that you note its path. You will use thesame path later in our request (for example, /node/4). This will alsoshow you the node's ID:
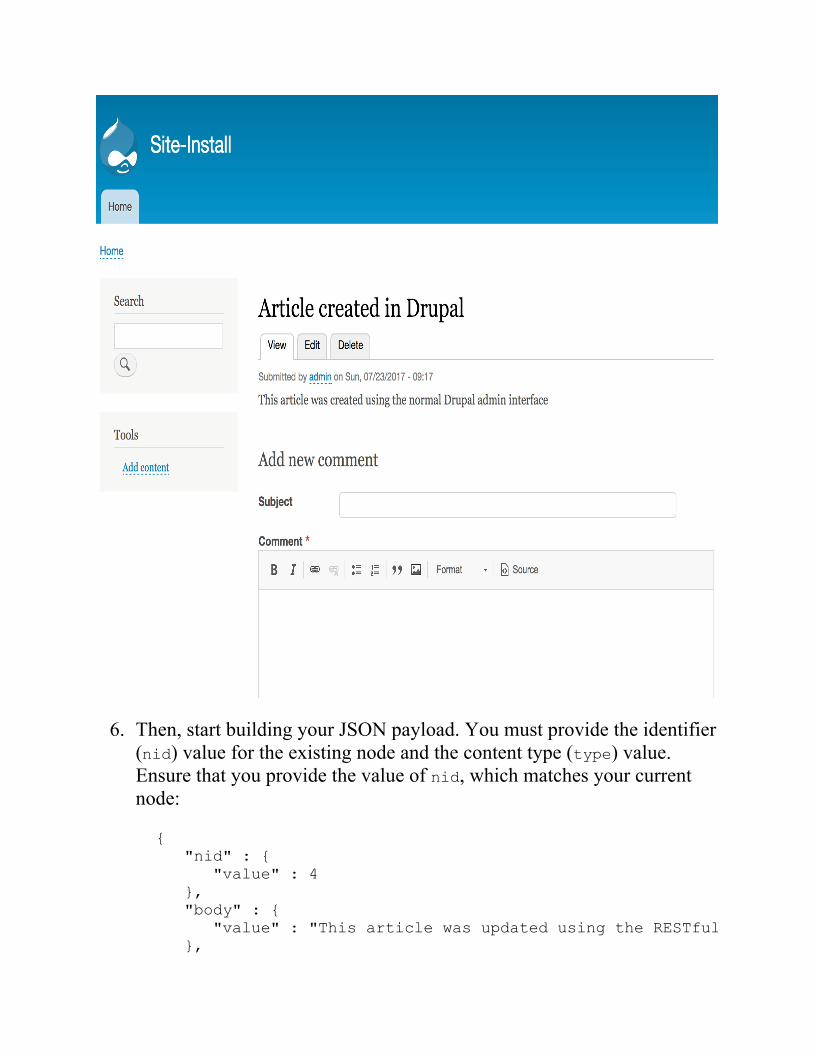
6. Then, start building your JSON payload. You must provide the identifier(nid) value for the existing node and the content type (type) value.Ensure that you provide the value of nid, which matches your currentnode:
{ "nid" : { "value" : 4 }, "body" : { "value" : "This article was updated using the RESTful API endpoint!" },
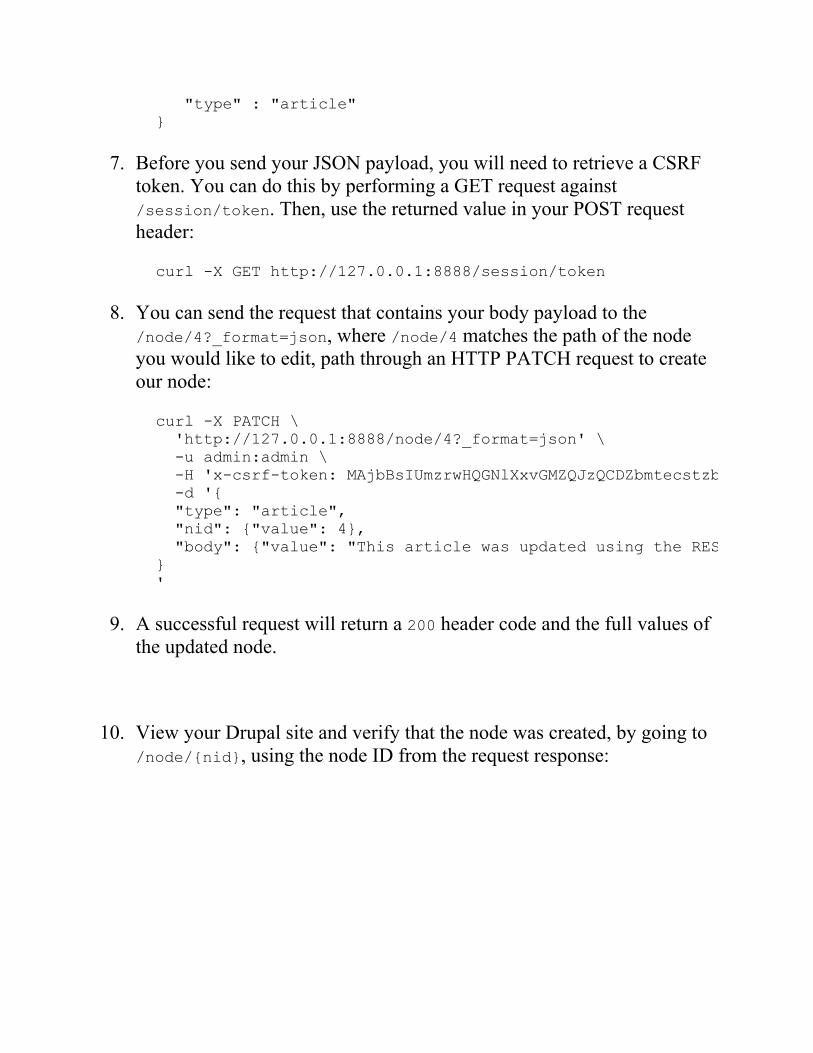
"type" : "article"}
7. Before you send your JSON payload, you will need to retrieve a CSRFtoken. You can do this by performing a GET request against/session/token. Then, use the returned value in your POST requestheader:
curl -X GET http://127.0.0.1:8888/session/token
8. You can send the request that contains your body payload to the/node/4?_format=json, where /node/4 matches the path of the nodeyou would like to edit, path through an HTTP PATCH request to createour node:
curl -X PATCH \ 'http://127.0.0.1:8888/node/4?_format=json' \ -u admin:admin \ -H 'x-csrf-token: MAjbBsIUmzrwHQGNlXxvGMZQJzQCDZbmtecstzbk5UQ' \ -d '{ "type": "article", "nid": {"value": 4}, "body": {"value": "This article was updated using the RESTful API endpoint!!"}}'
9. A successful request will return a 200 header code and the full values ofthe updated node.
10. View your Drupal site and verify that the node was created, by going to/node/{nid}, using the node ID from the request response:
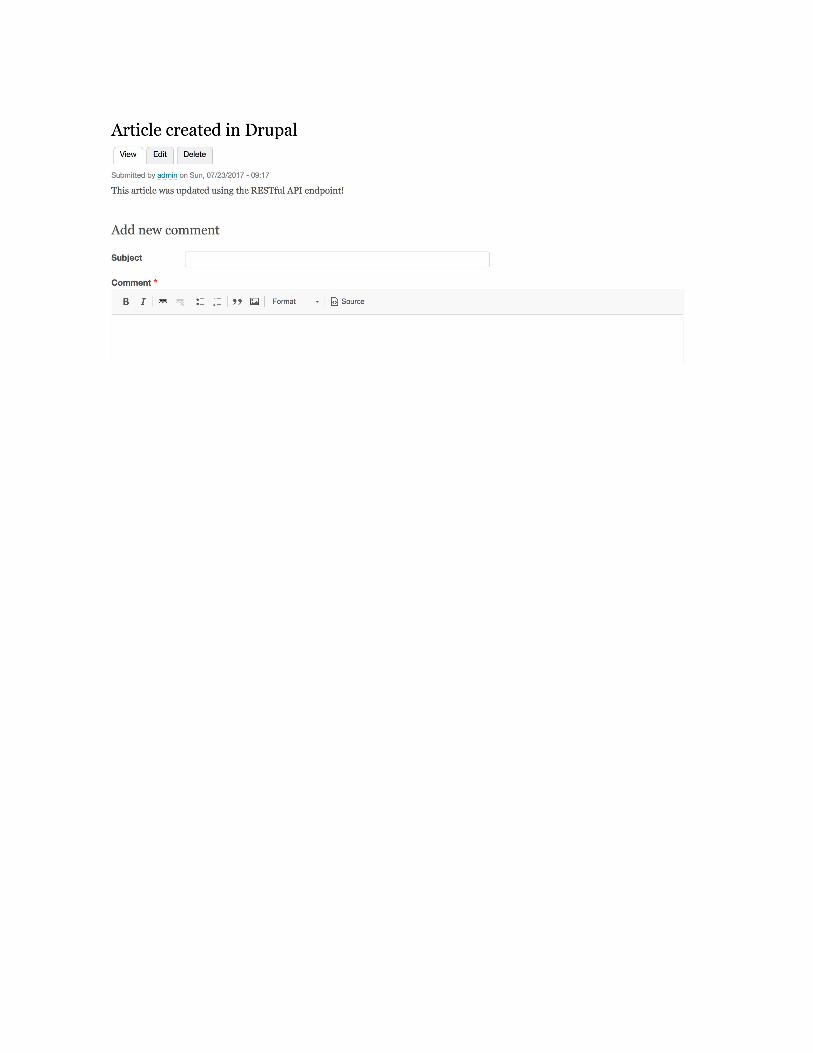
How it works…When working with content entities and the PATCH method, the endpoint isthe same as the GET method path. The current user's access is checked to seewhether they have the permission to update the entity type and each of thesubmitted fields provided in the request body.
Each field provided will be updated on the entity and then validated. If theentity is validated, it will be saved. On a successful save, an HTTP 200response will be returned with the entire updated entity's content.
Using Views to provide custom datasourcesThe RESTful Web Services module provides Views plugins that allow you toexpose data over Views for your RESTful API. This allows you to create aview that has a path and outputs data using a serializer plugin. You can usethis to output entities, such as JSON, HAL JSON, or XML, and it can be sentwith appropriate headers.
In this recipe, we will create a view that outputs the users of the Drupal site,providing their username, email, and picture if provided.
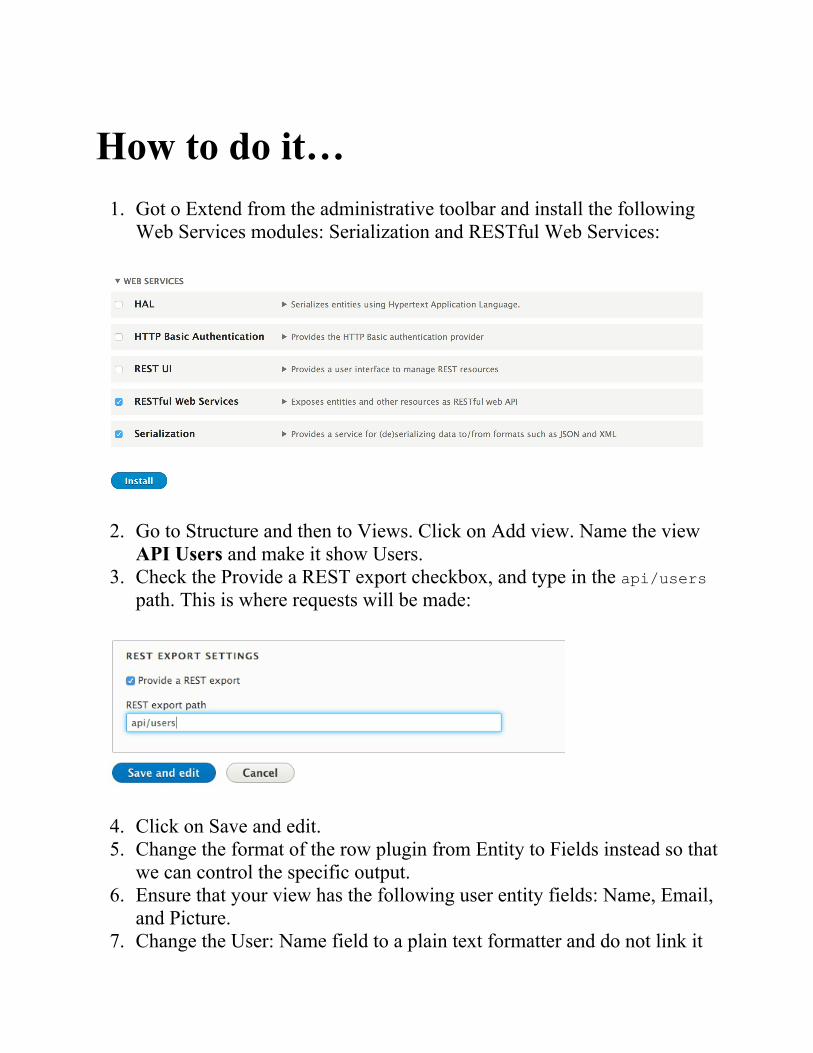
How to do it…1. Got o Extend from the administrative toolbar and install the following
Web Services modules: Serialization and RESTful Web Services:
2. Go to Structure and then to Views. Click on Add view. Name the viewAPI Users and make it show Users.
3. Check the Provide a REST export checkbox, and type in the api/userspath. This is where requests will be made:
4. Click on Save and edit.5. Change the format of the row plugin from Entity to Fields instead so that
we can control the specific output.6. Ensure that your view has the following user entity fields: Name, Email,
and Picture.7. Change the User: Name field to a plain text formatter and do not link it
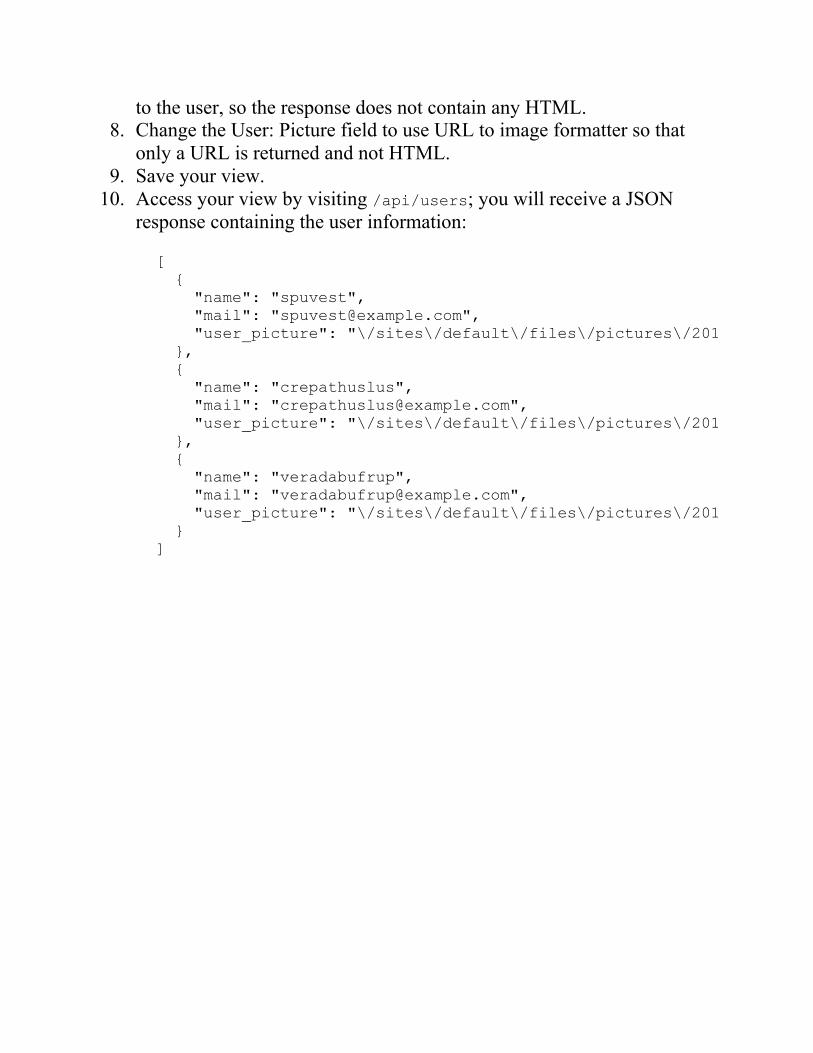
to the user, so the response does not contain any HTML.8. Change the User: Picture field to use URL to image formatter so that
only a URL is returned and not HTML.9. Save your view.
10. Access your view by visiting /api/users; you will receive a JSONresponse containing the user information:
[ { "name": "spuvest", "mail": "[email protected]", "user_picture": "\/sites\/default\/files\/pictures\/2017-07 }, { "name": "crepathuslus", "mail": "[email protected]", "user_picture": "\/sites\/default\/files\/pictures\/2017-07 }, { "name": "veradabufrup", "mail": "[email protected]", "user_picture": "\/sites\/default\/files\/pictures\/2017-07 }]

How it worksThe RESTful Web Services module provides display, row, and formatplugins that allows you to export content entities to a serialized format. TheREST Export display plugin allows you to specify a path to access theRESTful endpoint and properly assigns the Content-Type header for therequested format.
The Serializer style is provided as the only supported style plugin for theREST export display. This style plugin only supports row plugins thatidentify themselves as data display types. It expects data from the row pluginto be raw so that it can be passed to the appropriate serializer.
You then have the option of using the data entity or data field row plugins.Instead of returning a render array from their render method, they return rawdata that will be serialized into the proper format.
With the row plugins returning raw format data and the data serialized by thestyle plugin, the display plugin will then return the response that is convertedinto the proper format via the Serialization module.
There's more...Views provide a way to deliver specific RESTful endpoints. We will exploresome additional features in the next recipe.
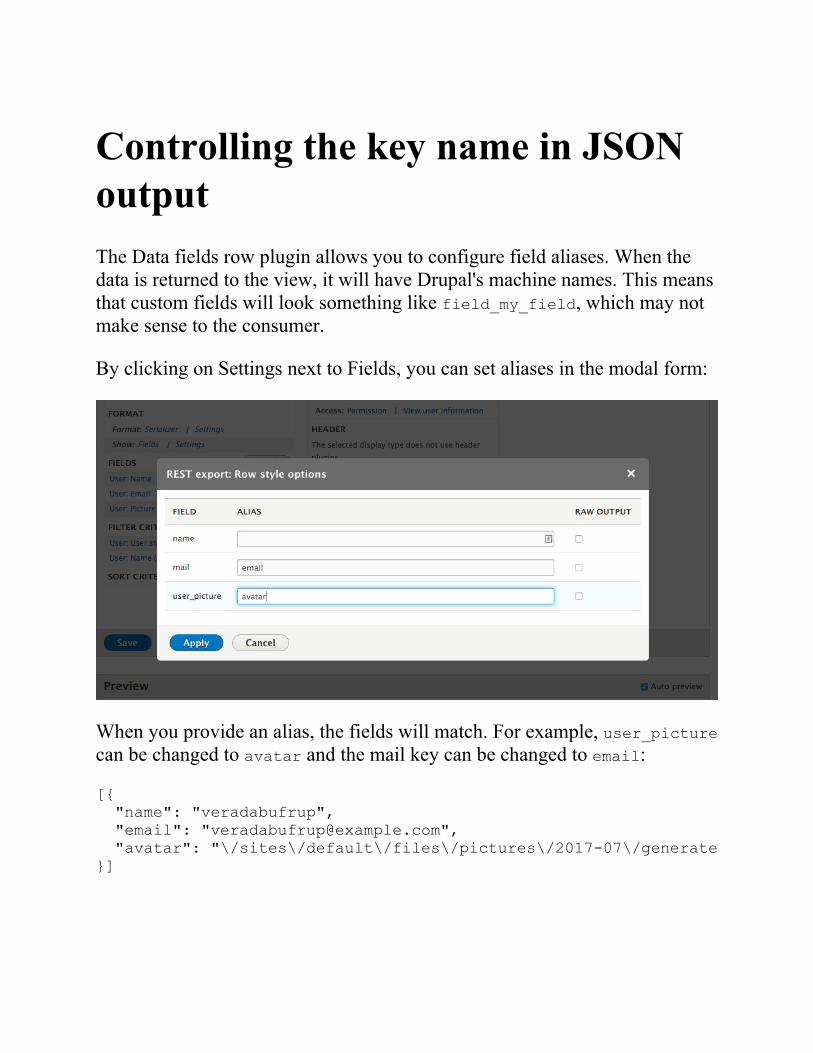
Controlling the key name in JSONoutputThe Data fields row plugin allows you to configure field aliases. When thedata is returned to the view, it will have Drupal's machine names. This meansthat custom fields will look something like field_my_field, which may notmake sense to the consumer.
By clicking on Settings next to Fields, you can set aliases in the modal form:
When you provide an alias, the fields will match. For example, user_picturecan be changed to avatar and the mail key can be changed to email:
[{ "name": "veradabufrup", "email": "[email protected]", "avatar": "\/sites\/default\/files\/pictures\/2017-07\/generateImage_HsEjKW.png"}]
Controlling access to RESTfulViewsWhen you create a RESTful endpoint with Views, you are not using the samepermissions created by the RESTful Web Services module. You will need todefine the route permissions within the view, allowing you to specify specificroles or permissions for the request.
The default GET method provided by the EntityResource plugin does notprovide a way to list entities and allows any entity to be retrieved by an ID.Using Views, you can provide a list of entities, limiting them to specificbundles.
Using Views, you can even provide a new endpoint to retrieve a specificentity. Using Contextual filters, you can add route parameters and filters tolimit and validate entity IDs. For example, you may want to expose the articlecontent over the API, but not pages.
AuthenticationUsing the RESTful Web Services module, we define specific supportedauthentication providers for an endpoint. The Drupal core provides a cookieprovider, which authenticates through a valid cookie, such as your regularlogin experience. Then, there is the HTTP Basic Authentication module tosupport HTTP authentication headers.
There are alternatives that provide more robust authentication methods. Withcookie-based authentication, you will need to use CSRF tokens to preventunrequested page loads by an unauthorized party. When you use the HTTPauthentication, you are sending a password for each request in the requestheader.
OAuth is a popular and open authorization framework. It is a properauthentication method that uses tokens and not passwords. In this recipe, wewill implement the Simple OAuth module to provide OAuth 2.0authentication for GET and POST requests.
Getting readyIf you are not familiar with OAuth or OAuth 2.0, it is a standard forauthorization. The implementation of OAuth revolves around the usage oftokens sent in HTTP headers. Refer to the OAuth home page for moreinformation at http://oauth.net/.
By following the Enabling RESTful interfaces recipe, you should have theREST UI module added to your Drupal installation using Composer. Thiscan be done with the following command:
cd /path/to/drupal8composer require drupal/restui

How to do it1. First, we must add the Simple OAuth module to our Drupal site:
cd /path/to/drupal8composer require drupal/simple_oauth
2. Go to Extend from the administrative toolbar and install the followingWeb Services modules: Serialization, RESTful Web Services, REST UI,and Simple OAuth:
3. Go to Configuration and click on REST under Web Services toconfigure the available endpoints.
4. Click on the Enable button for the Content row:
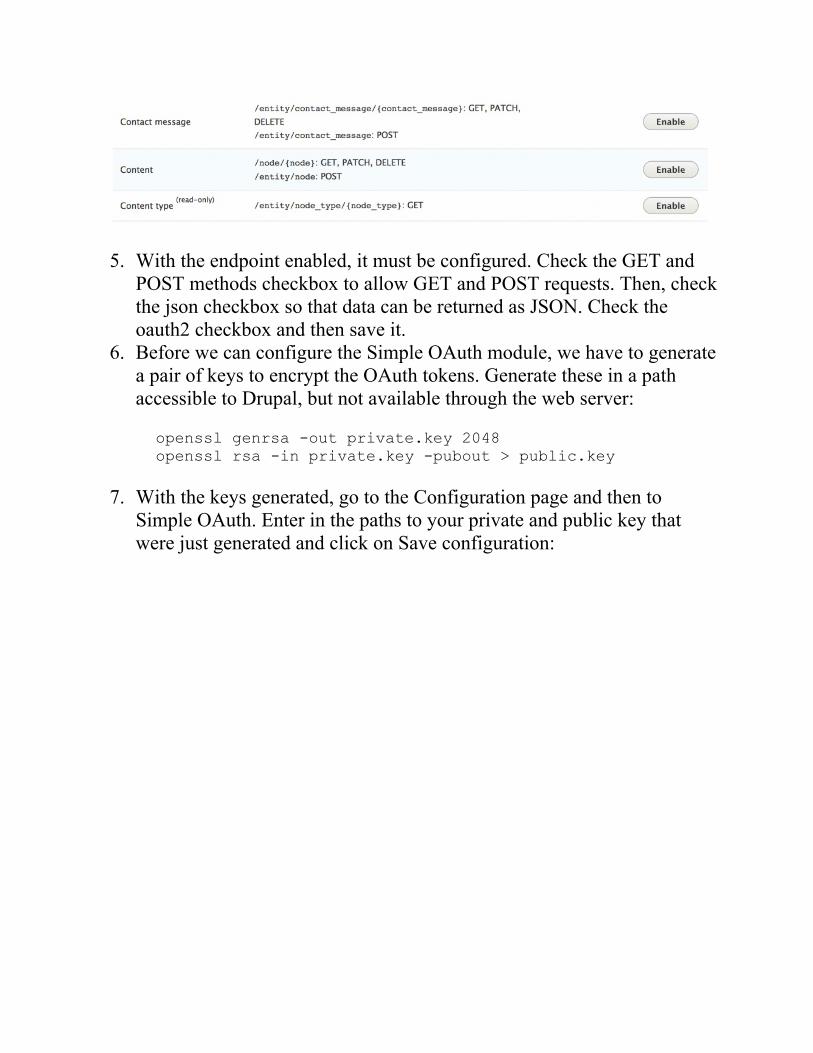
5. With the endpoint enabled, it must be configured. Check the GET andPOST methods checkbox to allow GET and POST requests. Then, checkthe json checkbox so that data can be returned as JSON. Check theoauth2 checkbox and then save it.
6. Before we can configure the Simple OAuth module, we have to generatea pair of keys to encrypt the OAuth tokens. Generate these in a pathaccessible to Drupal, but not available through the web server:
openssl genrsa -out private.key 2048openssl rsa -in private.key -pubout > public.key
7. With the keys generated, go to the Configuration page and then toSimple OAuth. Enter in the paths to your private and public key thatwere just generated and click on Save configuration:
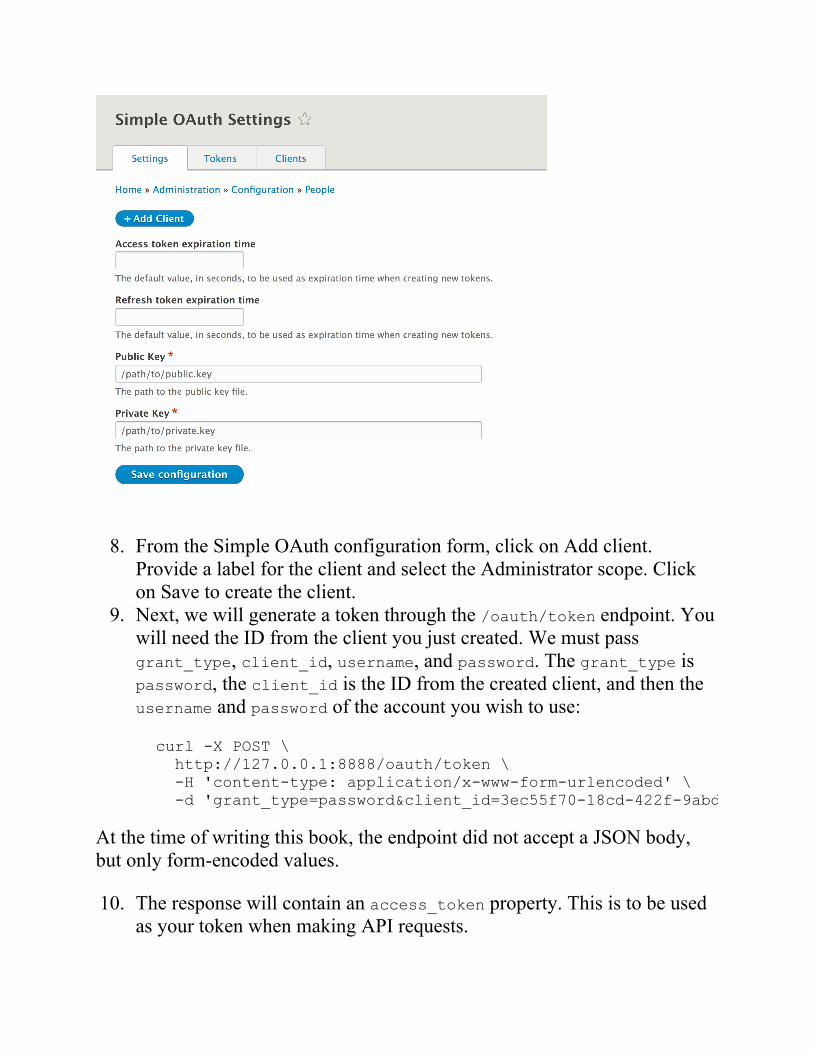
8. From the Simple OAuth configuration form, click on Add client.Provide a label for the client and select the Administrator scope. Clickon Save to create the client.
9. Next, we will generate a token through the /oauth/token endpoint. Youwill need the ID from the client you just created. We must passgrant_type, client_id, username, and password. The grant_type ispassword, the client_id is the ID from the created client, and then theusername and password of the account you wish to use:
curl -X POST \ http://127.0.0.1:8888/oauth/token \ -H 'content-type: application/x-www-form-urlencoded' \ -d 'grant_type=password&client_id=3ec55f70-18cd-422f-9abd-2223f6ca3636&username=admin&password=admin'
At the time of writing this book, the endpoint did not accept a JSON body,but only form-encoded values.
10. The response will contain an access_token property. This is to be usedas your token when making API requests.
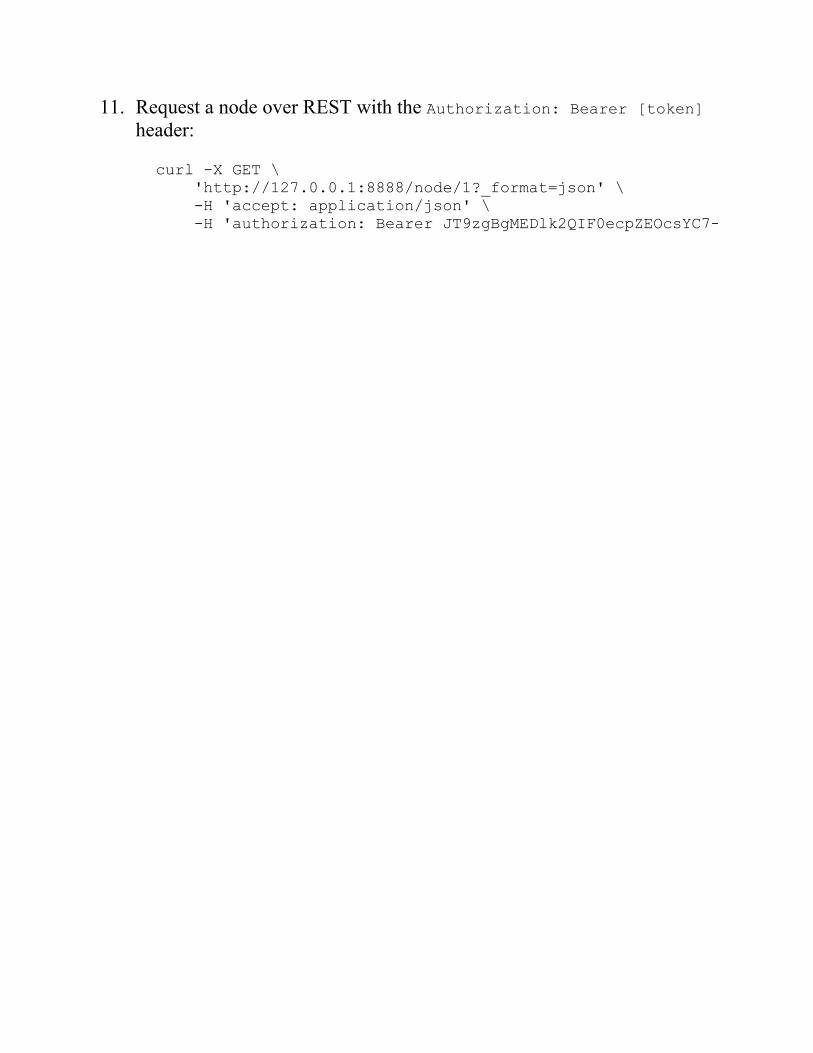
11. Request a node over REST with the Authorization: Bearer [token]header:
curl -X GET \ 'http://127.0.0.1:8888/node/1?_format=json' \ -H 'accept: application/json' \ -H 'authorization: Bearer JT9zgBgMEDlk2QIF0ecpZEOcsYC7-x649Bovo83HXQM'
How it worksThe Simple OAuth module is built using the League\OAuth2 PHP library, acommunity de facto library for OAuth2 implementation.
In a typical authentication request, there is an authentication manager thatuses the authentication_collector service to collect all the taggedauthentication provider servers. Based on the provider's set priority, eachservice is invoked to check whether it applies to the current request. Eachapplied authentication provider then gets invoked to see whether theauthentication is invalid.
For the RESTful Web Services module, the process is more explicit. Theproviders identified in the supported_auth definition for the endpoint are theonly services that run through the applies and authenticates process.

There's more…We will explore more information on working with authentication providersand the RESTful Web Services module in the next section.
Authentication provider servicesWhen working with the RESTful Web Services module endpoints, thesupported_auth values reference services tagged withauthentication_provider. Out of the box, Drupal supports cookieauthentication. The following code is provided by the basic_auth module tosupport the HTTP header authentication:
services: basic_auth.authentication.basic_auth: class: Drupal\basic_auth\Authentication\Provider\BasicAuth arguments: ['@config.factory', '@user.auth', '@flood', '@entity.manager' tags: - { name: authentication_provider, provider_id: 'basic_auth'
An authentication provider can be created by creating a class in yourmodule's Authentication\Provider namespace and implementing the\Drupal\Core\Authentication\AuthenticationProviderInterface
interface. Then, register the class as a service in your module'sservices.yml.
Page cache request policies andauthenticated Web service requestsWhen working with data that expects authenticated users, the authenticationservice provider should also provide a page cache service handler. Servicesthat are tagged with page_cache_request_policy have the ability to checkwhether the content is cached or not. This prevents authorization requestsfrom being cached.
The following code is taken from the basic_auth module:
basic_auth.page_cache_request_policy.disallow_basic_auth_requests: class: Drupal\basic_auth\PageCache\DisallowBasicAuthRequests public: false tags: - { name: page_cache_request_policy }
The \Drupal\basic_auth\PageCache\DisallowBasicAuthRequests classimplements the \Drupal\Core\PageCache\RequestPolicyInterfaceinterface. The check method allows the page cache policy to explicitly denyor remain neutral on a page's ability to be cached. The basic_auth modulechecks whether the default authentication headers are present. For thesimple_oauth module, it checks whether a valid token is present.
This is an important security measure if you are implementing your ownauthentication services.
A page cache policy service can be implemented by creating a class in yourmodule's PageCache namespace and implementing the\Drupal\Core\PageCache\ResponsePolicyInterface interface. Then, weneed to register the class as a service in your module's services.yml.
The IP Authentication providerSome APIs that implement server-to-server communication will authenticateusing IP address whitelists. For this use case, we have the IP Consumer Authmodule. Whitelisted IP addresses are controlled by a form that saves aconfiguration value.
If an IP address is whitelisted, the user is authenticated as an anonymoususer. While this may not be recommended for POST, PATCH, and DELETErequests, it can provide a simple way to control specific GET endpoints in aprivate network.
You can download IP Consumer Auth from its project page athttps://www.drupal.org/project/ip_consumer_auth.
See alsoRefer to the OAuth Community Site at http://oauth.net/Refer to the OAuth module for OAuth 1.0 support athttps://www.drupal.org/project/oauthRefer to the simple OAuth module for OAuth 2.0 support athttps://www.drupal.org/project/simple_oauthRefer to the IP Consumer Auth module athttps://www.drupal.org/project/ip_consumer_auth
Using JSON APIWhen developing a backend API for frontend consumers, there is often muchdebate on naming conventions and returned value structures. In comes{json:api}, an open source specification set to standardize and simplify thebuilding of APIs, which consume and return JSON payloads. Thespecification and documentation can be found at http://jsonapi.org/.
For Drupal, there is a community-lead effort to provide a robust JSON APIspecification implementation to turn Drupal into a streamlined API server.This recipe will install the JSON API module and show how to enableresources.
Just like the RESTful Web Services module provided by Drupal core, theJSON API module does not provide a user interface. It also enables allcontent to be available over the API automatically (given that users havepermissions configured to access the endpoint.) The JSON API Extra modulechanges that, and this will be covered in the There's more... section of thisrecipe.
The JSON API module can be found athttps://www.drupal.org/project/jsonapi
Getting readyCreate sample content using the Article content type provided by thestandard Drupal installation. This will make testing the GET methods mucheasier.
When making requests, all endpoint paths are prefixed with jsonapi.
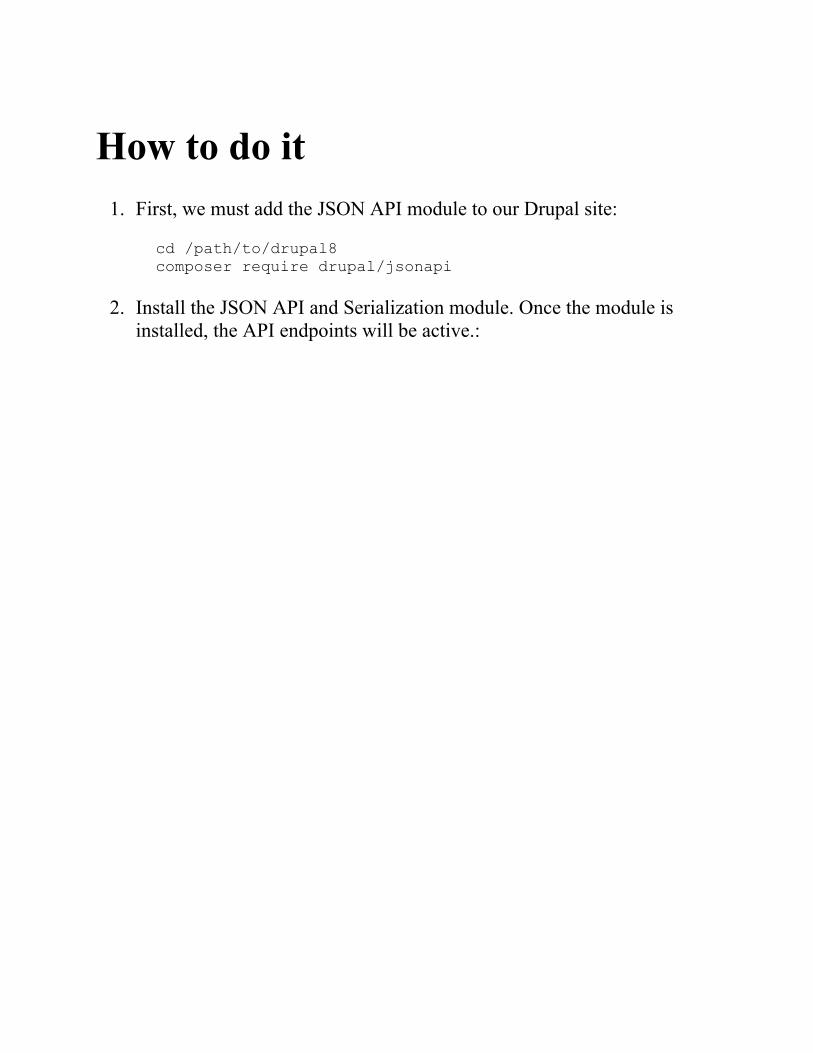
How to do it1. First, we must add the JSON API module to our Drupal site:
cd /path/to/drupal8composer require drupal/jsonapi
2. Install the JSON API and Serialization module. Once the module isinstalled, the API endpoints will be active.:
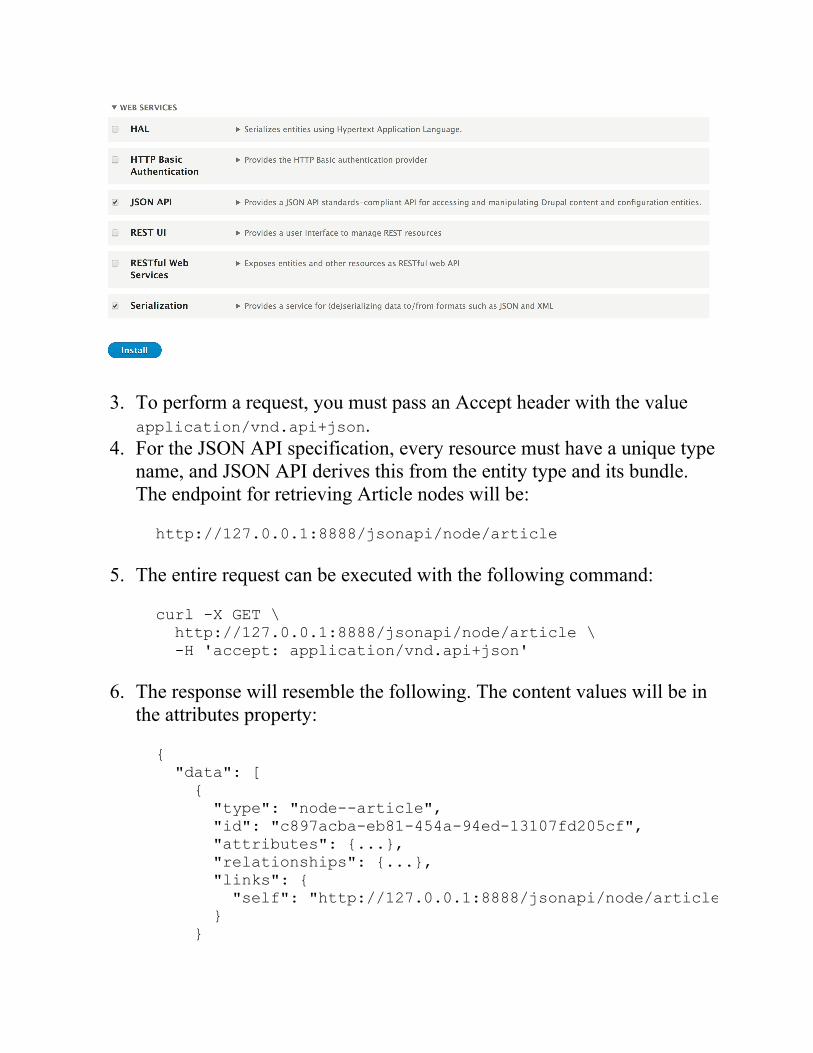
3. To perform a request, you must pass an Accept header with the valueapplication/vnd.api+json.
4. For the JSON API specification, every resource must have a unique typename, and JSON API derives this from the entity type and its bundle.The endpoint for retrieving Article nodes will be:
http://127.0.0.1:8888/jsonapi/node/article
5. The entire request can be executed with the following command:
curl -X GET \ http://127.0.0.1:8888/jsonapi/node/article \ -H 'accept: application/vnd.api+json'
6. The response will resemble the following. The content values will be inthe attributes property:
{ "data": [ { "type": "node--article", "id": "c897acba-eb81-454a-94ed-13107fd205cf", "attributes": {...}, "relationships": {...}, "links": { "self": "http://127.0.0.1:8888/jsonapi/node/article/c897acba-eb81-454a-94ed-13107fd205cf" } }
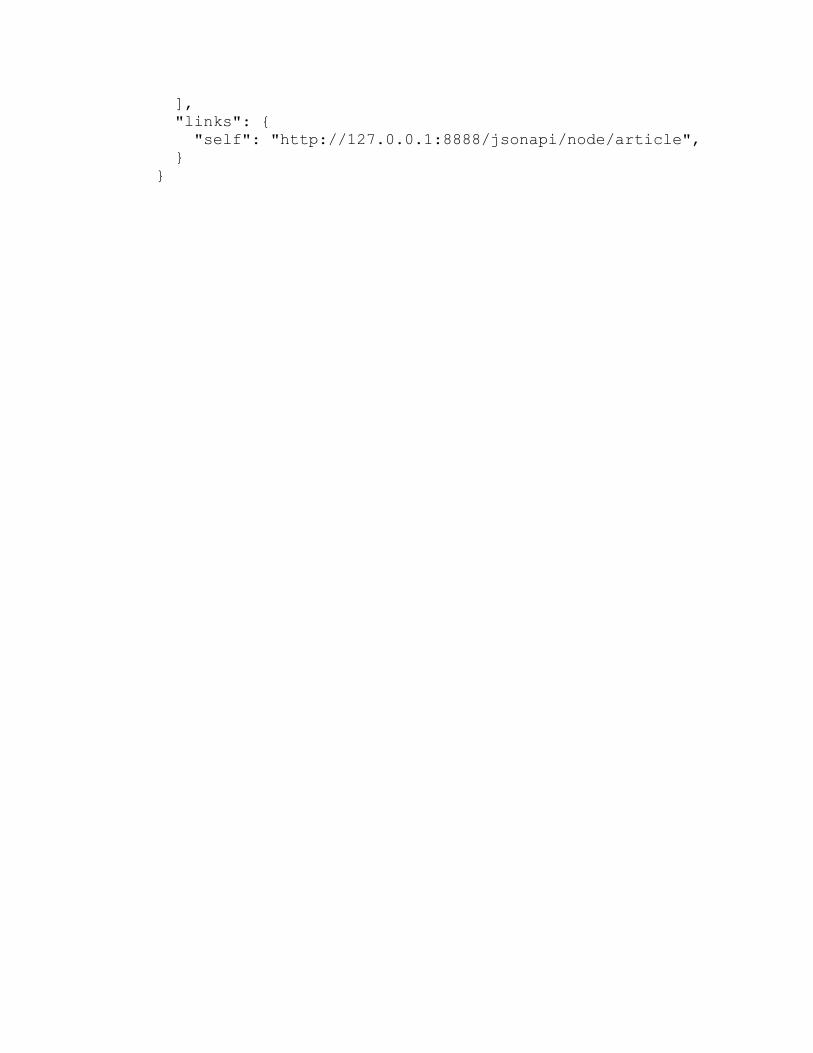
], "links": { "self": "http://127.0.0.1:8888/jsonapi/node/article", }}
How it works...The JSON API module implements the {json:api} specification. Like theRESTful Web Services module provided by Drupal core, it exposes data overvarious endpoints. It builds on top of Drupal's existing routing system towork with non-HTML formats. The major difference is it follows acommunity-driven specification on how the data should be formatted, linked,filtered, sorted, and more.

There's more...Next, we'll cover filtering, paging, sorting, and the JSON API Extras module.
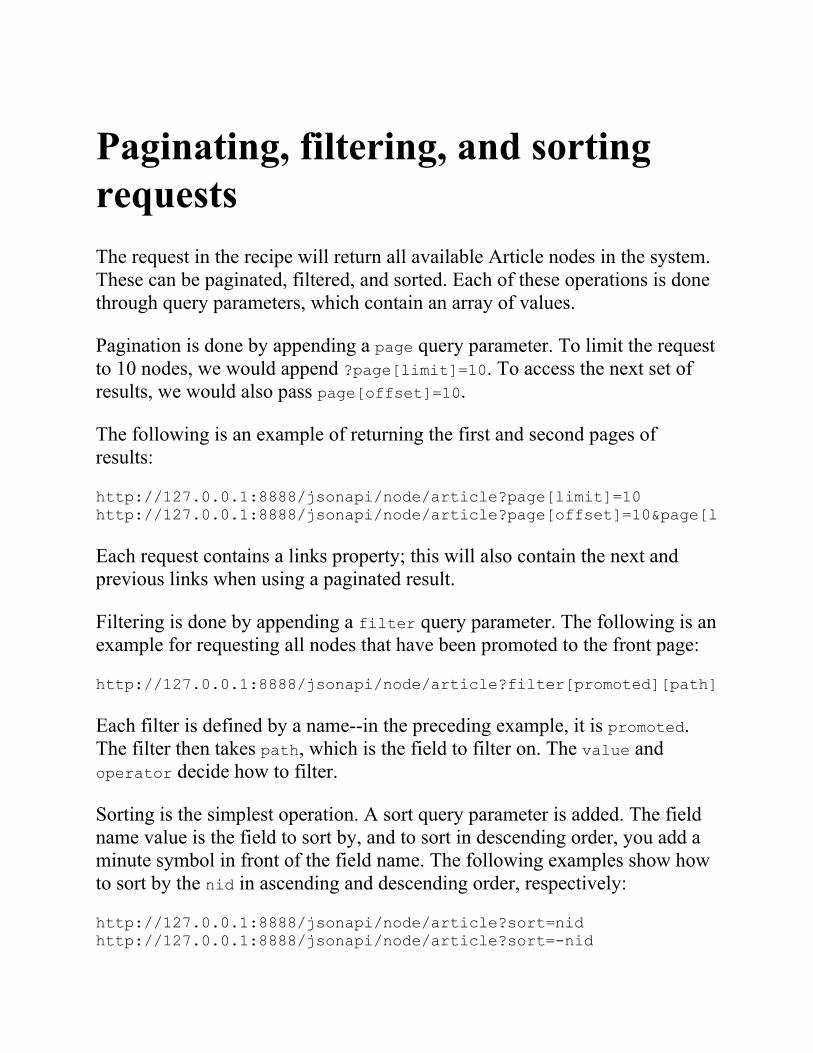
Paginating, filtering, and sortingrequestsThe request in the recipe will return all available Article nodes in the system.These can be paginated, filtered, and sorted. Each of these operations is donethrough query parameters, which contain an array of values.
Pagination is done by appending a page query parameter. To limit the requestto 10 nodes, we would append ?page[limit]=10. To access the next set ofresults, we would also pass page[offset]=10.
The following is an example of returning the first and second pages ofresults:
http://127.0.0.1:8888/jsonapi/node/article?page[limit]=10http://127.0.0.1:8888/jsonapi/node/article?page[offset]=10&page[limit]=10
Each request contains a links property; this will also contain the next andprevious links when using a paginated result.
Filtering is done by appending a filter query parameter. The following is anexample for requesting all nodes that have been promoted to the front page:
http://127.0.0.1:8888/jsonapi/node/article?filter[promoted][path]=promote&filter[promoted][value]=1&filter[promoted][operator]==
Each filter is defined by a name--in the preceding example, it is promoted.The filter then takes path, which is the field to filter on. The value andoperator decide how to filter.
Sorting is the simplest operation. A sort query parameter is added. The fieldname value is the field to sort by, and to sort in descending order, you add aminute symbol in front of the field name. The following examples show howto sort by the nid in ascending and descending order, respectively:
http://127.0.0.1:8888/jsonapi/node/article?sort=nidhttp://127.0.0.1:8888/jsonapi/node/article?sort=-nid

Installing the JSON API ExtrasmoduleThe JSON API Extras module provides a user interface for additionalcustomization. The JSON API Extras module should be added to your Drupalinstallation like all other modules, using Composer:
cd /path/to/drupal8composer require drupal/jsonapi_extras
Once the module is installed in Drupal, you will have the ability to enable ordisable endpoints, change resource names, alter resource paths, disable fields,alias field names, and enhance field outputs.
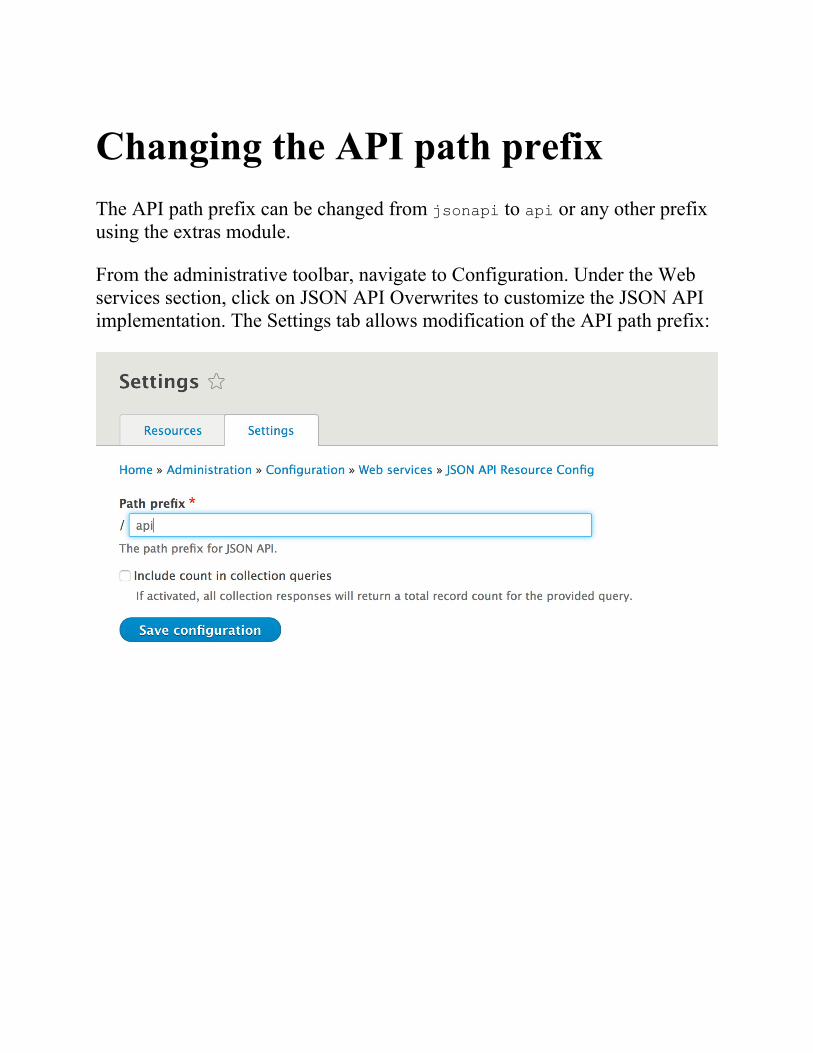
Changing the API path prefixThe API path prefix can be changed from jsonapi to api or any other prefixusing the extras module.
From the administrative toolbar, navigate to Configuration. Under the Webservices section, click on JSON API Overwrites to customize the JSON APIimplementation. The Settings tab allows modification of the API path prefix:
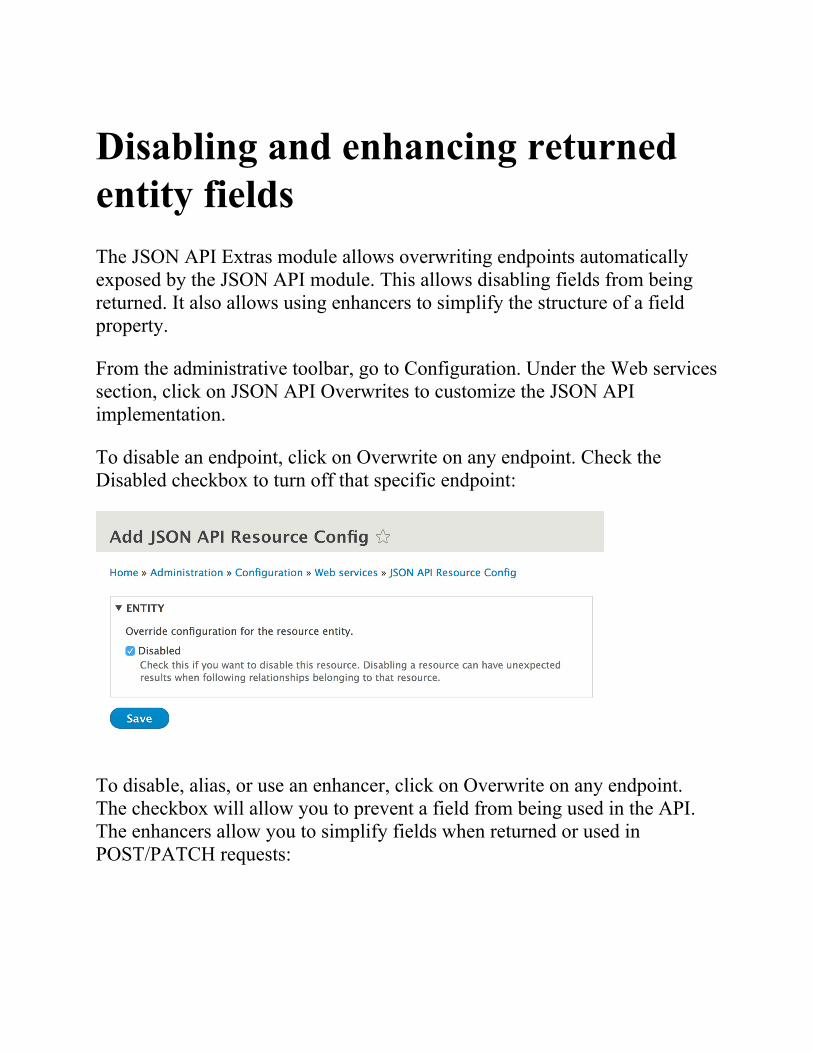
Disabling and enhancing returnedentity fieldsThe JSON API Extras module allows overwriting endpoints automaticallyexposed by the JSON API module. This allows disabling fields from beingreturned. It also allows using enhancers to simplify the structure of a fieldproperty.
From the administrative toolbar, go to Configuration. Under the Web servicessection, click on JSON API Overwrites to customize the JSON APIimplementation.
To disable an endpoint, click on Overwrite on any endpoint. Check theDisabled checkbox to turn off that specific endpoint:
To disable, alias, or use an enhancer, click on Overwrite on any endpoint.The checkbox will allow you to prevent a field from being used in the API.The enhancers allow you to simplify fields when returned or used inPOST/PATCH requests:
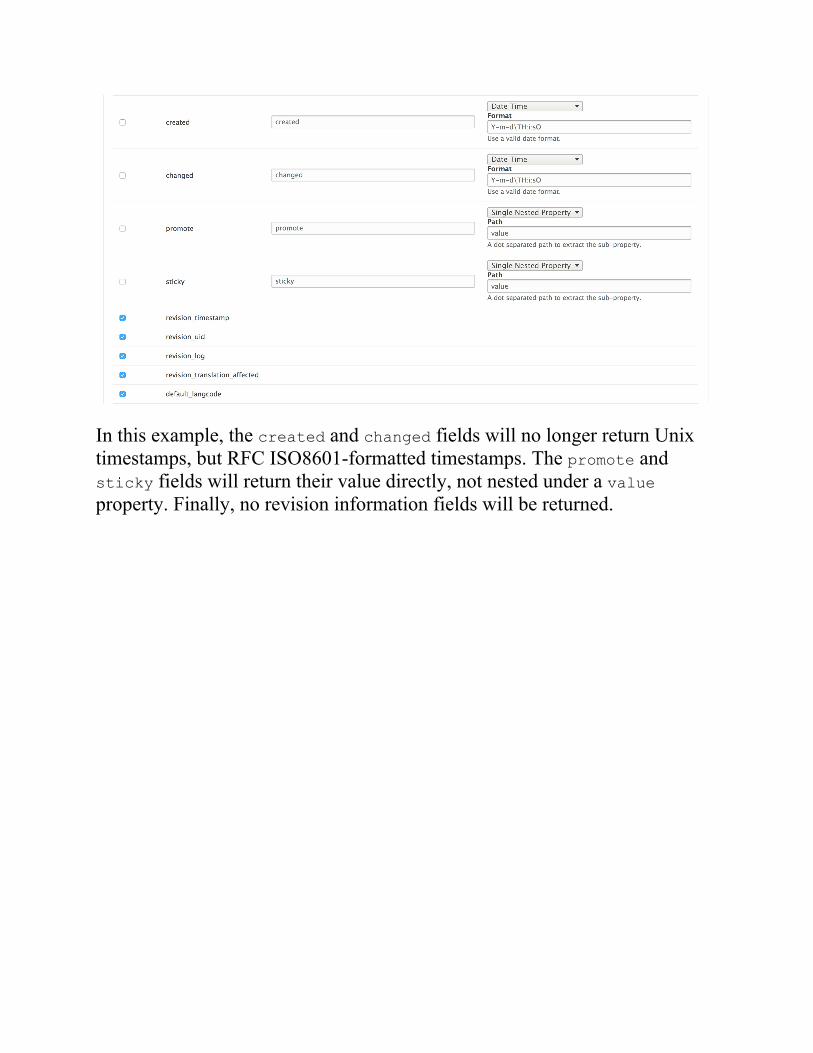
In this example, the created and changed fields will no longer return Unixtimestamps, but RFC ISO8601-formatted timestamps. The promote andsticky fields will return their value directly, not nested under a valueproperty. Finally, no revision information fields will be returned.
Contenta CMSContenta CMS is a decoupled, API-driven Drupal distribution built using theJSON API. It is being built through the same community initiative pushingforward the JSON API module. The project's home page can be found athttp://www.contentacms.org/.
It provides many preconfigured options, including customizations to defaultendpoints. It also provides Simple OAuth to set up decoupled authenticationwith your frontend consumer and the API backend.
On top of delivering a distribution, the community contributors havedeveloped various frontend consumers as examples:
Angular: https://github.com/contentacms/contenta_angularVue/Nuxt: https://github.com/contentacms/contenta_vue_nuxtEmber.js: https://github.com/contentacms/contenta_emberIonic: https://github.com/contentacms/contenta_ionicReact: https://github.com/contentacms/contenta_react
See alsoJSON API project page at https://www.drupal.org/project/jsonapiJSON API Extras page at https://www.drupal.org/project/jsonapi_extrasJSON API module documentation athttps://www.drupal.org/docs/8/modules/json-api/json-apiJSON API module video tutorials at https://www.youtube.com/playlist?list=PLZOQ_ZMpYrZsyO-3IstImK1okrpfAjuMZThe {json:api} specification documentation at http://jsonapi.org/
The Drupal CLIThere are two command-line tools for Drupal 8: Drupal Console and Drush.In this chapter, we will discuss how they make working with Drupal easier bycovering the following recipes:
Rebuilding cache in Drupal Console or DrushUsing Drush to interact with the databaseDebugging Drupal using Drupal ConsoleScaffolding code through Drupal ConsoleMaking a Drush commandMaking a Drupal Console command
IntroductionIn the previous chapters of this book, there have been recipes that provideways of using command-line tools to simplify working with Drupal. Thereare two contributed projects that provide Drupal with a command-lineinterface experience.
First, there is Drush. Drush was first created for Drupal 4.7 and has becomean integral tool used for day-to-day Drupal operations. However, with Drupal8 and its integration with Symfony, there came Drupal Console. DrupalConsole is a Symfony Console-based application that allows it to reuse morecomponents and integrate more easily with contributed modules.
This chapter contains recipes that will highlight operations that can besimplified using Drush or Console. By the end of this chapter, you will beable to work with your Drupal sites through the command line.
At the time of writing this book, Drush was still the primary tool of choicefor Drupal 8; however, Drupal Console is earning more market share. DrupalConsole is rapidly being developed. Due to this rapid development, thecommands will still exist, but the output may differ.
Both Drush and Drupal Console support global installation, but both projectsare migrating to per-project installation using Composer. To get started, referto the following installation guides for each tool for up-to-date installationinformation:
Drush: http://docs.drush.org/en/master/install/Drupal Console: https://docs.drupalconsole.com/en/getting/project.html
Rebuilding cache in Drupal Consoleor DrushDrupal utilizes caching to store plugin definitions, routes, and so on. Whenyou add a new plugin definition or a new route, you need to rebuild Drupal'scache for it to be recognized.
Rebuilding the cache over the command line is also more performant thanusing the user interface since it does not use web server resources to executethe cache rebuild.
In this recipe, we will walk you through using both Drush and DrupalConsole to clear various cache bins in Drupal. It is important to know how toclear specific cache bins so that you do not need to rebuild everything, ifpossible.
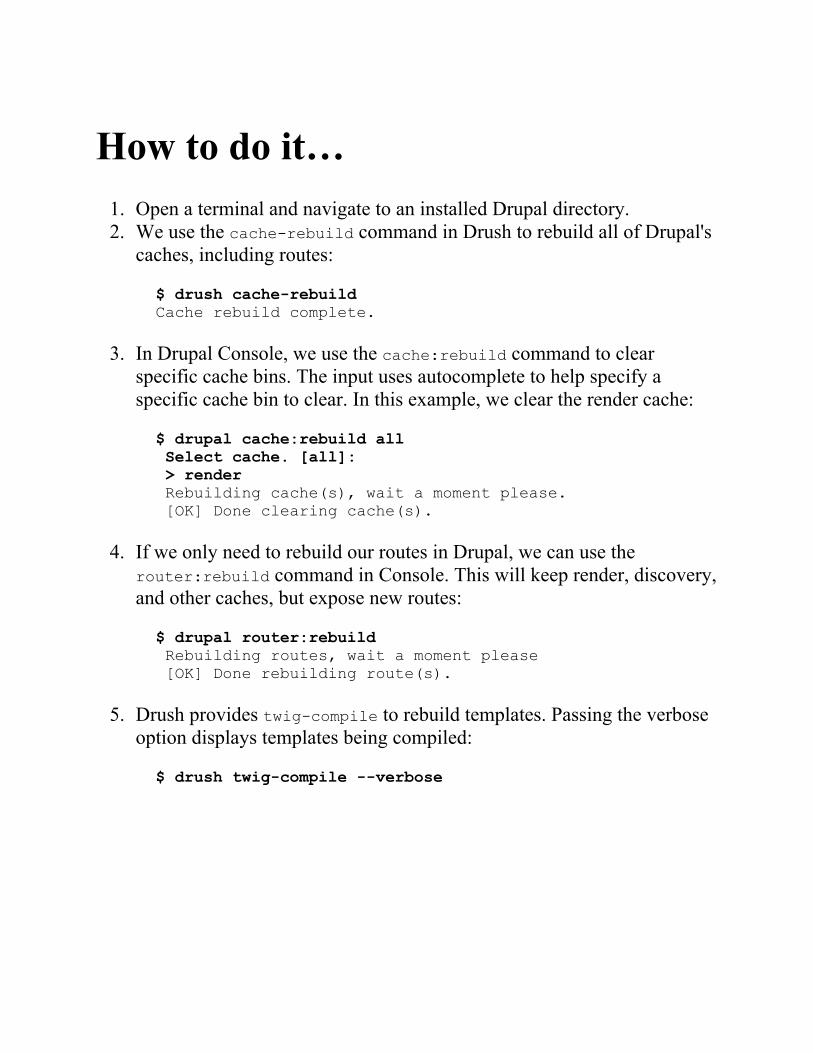
How to do it…1. Open a terminal and navigate to an installed Drupal directory.2. We use the cache-rebuild command in Drush to rebuild all of Drupal's
caches, including routes:
$ drush cache-rebuildCache rebuild complete.
3. In Drupal Console, we use the cache:rebuild command to clearspecific cache bins. The input uses autocomplete to help specify aspecific cache bin to clear. In this example, we clear the render cache:
$ drupal cache:rebuild all Select cache. [all]: > render Rebuilding cache(s), wait a moment please. [OK] Done clearing cache(s).
4. If we only need to rebuild our routes in Drupal, we can use therouter:rebuild command in Console. This will keep render, discovery,and other caches, but expose new routes:
$ drupal router:rebuild Rebuilding routes, wait a moment please [OK] Done rebuilding route(s).
5. Drush provides twig-compile to rebuild templates. Passing the verboseoption displays templates being compiled:
$ drush twig-compile --verbose
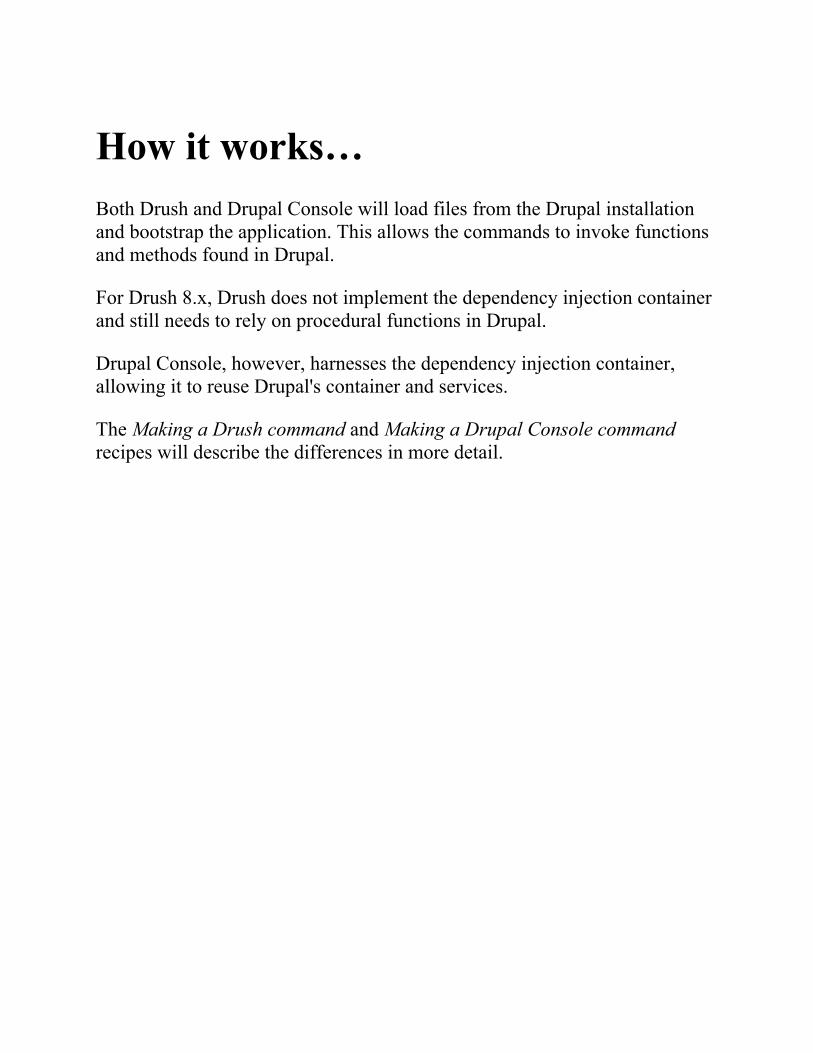
How it works…Both Drush and Drupal Console will load files from the Drupal installationand bootstrap the application. This allows the commands to invoke functionsand methods found in Drupal.
For Drush 8.x, Drush does not implement the dependency injection containerand still needs to rely on procedural functions in Drupal.
Drupal Console, however, harnesses the dependency injection container,allowing it to reuse Drupal's container and services.
The Making a Drush command and Making a Drupal Console commandrecipes will describe the differences in more detail.
See alsoThe Drush documentation at http://docs.drush.org/en/master/The Drupal Console documentation at https://docs.drupalconsole.com/The Drush command cheat sheet at https://drushcommands.com/The Drupal Console command cheat sheet athttp://drupalconsole.com/cheatsheet/
Using Drush to interact with thedatabaseWhen working with any application that utilizes a database, there are timeswhen you will need to export a database and import it elsewhere. Most often,you would do this with a production site to work on it locally. This way, youcan create a new configuration that can be exported and pushed toproduction, as discussed in Chapter 9, Configuration Management –Deploying in Drupal 8.
In this recipe, we will export a database dump from a production site in orderto set up the local development. The database dump will be imported over thecommand line and sanitized. We will then execute an SQL query throughDrush to verify sanitization.
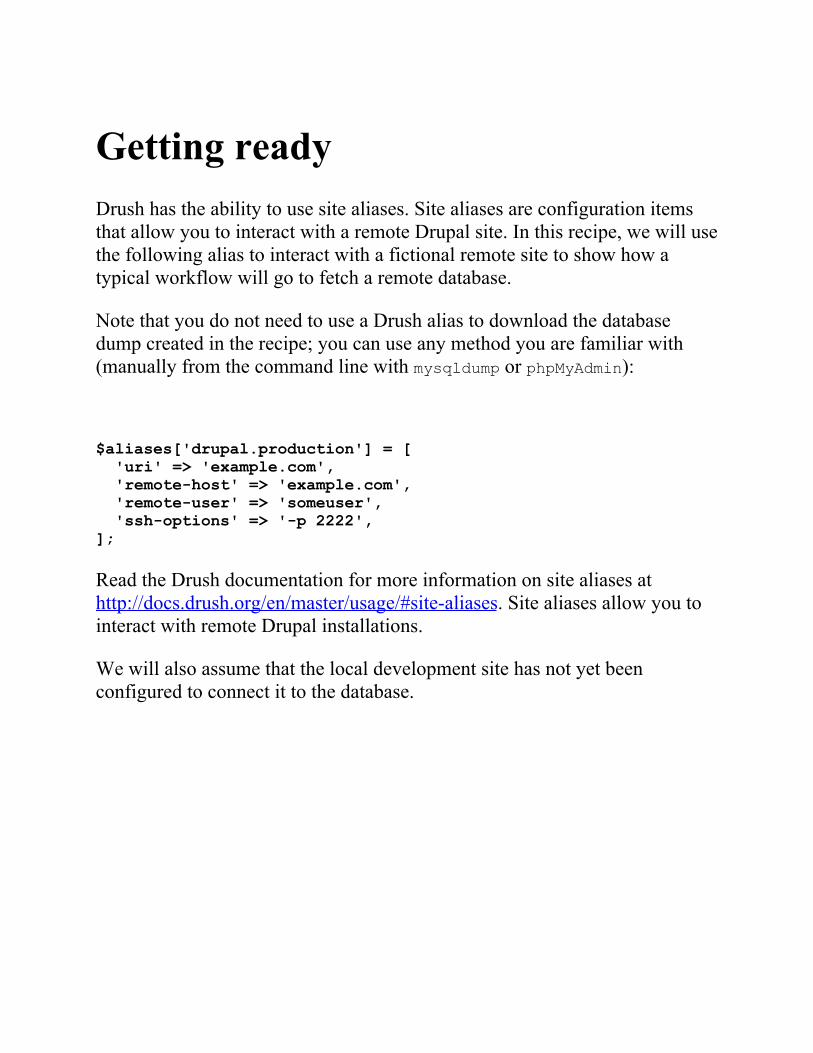
Getting readyDrush has the ability to use site aliases. Site aliases are configuration itemsthat allow you to interact with a remote Drupal site. In this recipe, we will usethe following alias to interact with a fictional remote site to show how atypical workflow will go to fetch a remote database.
Note that you do not need to use a Drush alias to download the databasedump created in the recipe; you can use any method you are familiar with(manually from the command line with mysqldump or phpMyAdmin):
$aliases['drupal.production'] = [ 'uri' => 'example.com', 'remote-host' => 'example.com', 'remote-user' => 'someuser', 'ssh-options' => '-p 2222',];
Read the Drush documentation for more information on site aliases athttp://docs.drush.org/en/master/usage/#site-aliases. Site aliases allow you tointeract with remote Drupal installations.
We will also assume that the local development site has not yet beenconfigured to connect it to the database.
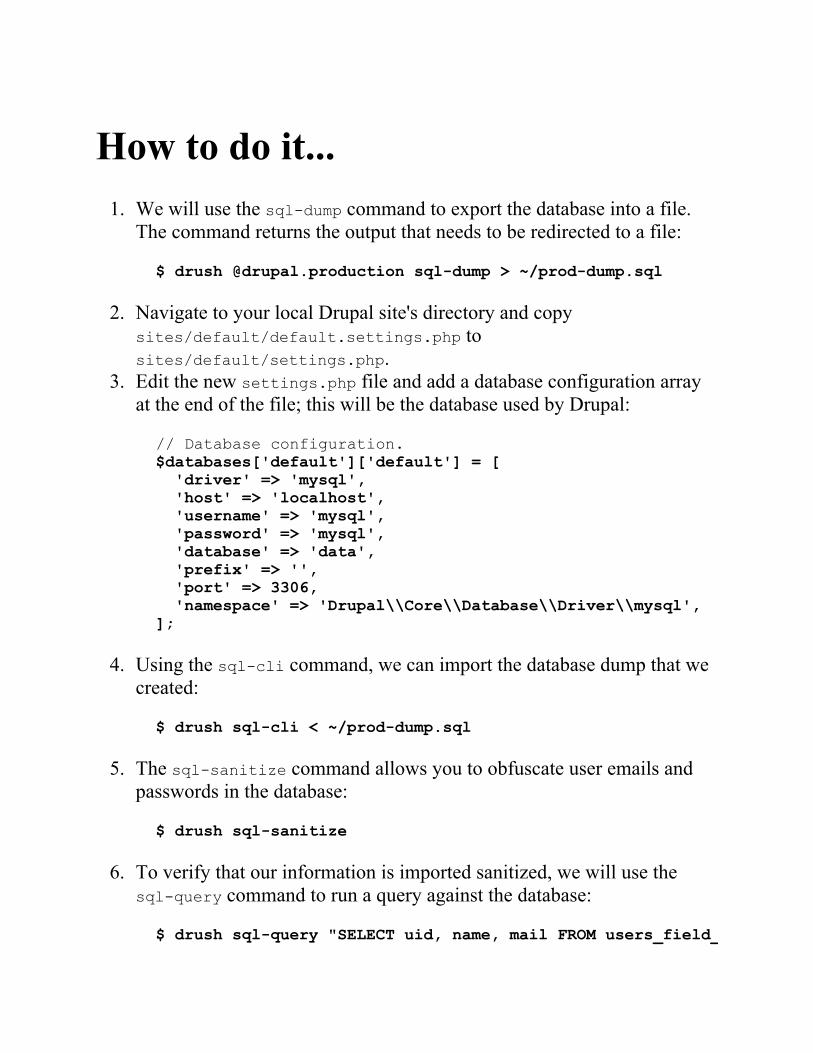
How to do it...1. We will use the sql-dump command to export the database into a file.
The command returns the output that needs to be redirected to a file:
$ drush @drupal.production sql-dump > ~/prod-dump.sql
2. Navigate to your local Drupal site's directory and copysites/default/default.settings.php tosites/default/settings.php.
3. Edit the new settings.php file and add a database configuration arrayat the end of the file; this will be the database used by Drupal:
// Database configuration.$databases['default']['default'] = [ 'driver' => 'mysql', 'host' => 'localhost', 'username' => 'mysql', 'password' => 'mysql', 'database' => 'data', 'prefix' => '', 'port' => 3306, 'namespace' => 'Drupal\\Core\\Database\\Driver\\mysql',];
4. Using the sql-cli command, we can import the database dump that wecreated:
$ drush sql-cli < ~/prod-dump.sql
5. The sql-sanitize command allows you to obfuscate user emails andpasswords in the database:
$ drush sql-sanitize
6. To verify that our information is imported sanitized, we will use thesql-query command to run a query against the database:
$ drush sql-query "SELECT uid, name, mail FROM users_field_data;"
How it works...When working with Drush, we have the ability to use Drush aliases. A Drushalias contains a configuration that allows the tool to connect to a remoteserver and interact with that server's installation of Drush.
You need to have Drush installed on your remote server in order to use a sitealias for it.
The sql-dump command executes the proper dump command for the databasedriver, which is typically MySQL and the mysqldump command. It streams tothe terminal and must be piped to a destination. When piped to a local SQLfile, we can import it and execute the create commands to import ourdatabase schema and data.
The sql-dump command supports a --result-file option; however, thatsaves the file relative to the Drupal installation.
With the sql-cli command, we will be able to execute SQL commands tothe database through Drush. This allows us to redirect the file contents to thesql-cli command and run the set of SQL commands. With the dataimported, the sql-sanitize command replaces usernames and passwords.
Finally, the sql-query command allows us to pass an SQL command directlyto the database and return its results. In our recipe, we will query theusers_field_data to verify that we imported our users and that emails havebeen sanitized.

There's more…Working with Drupal over the command line simplifies working with thedatabase. We will explore this in more detail in the following sections.
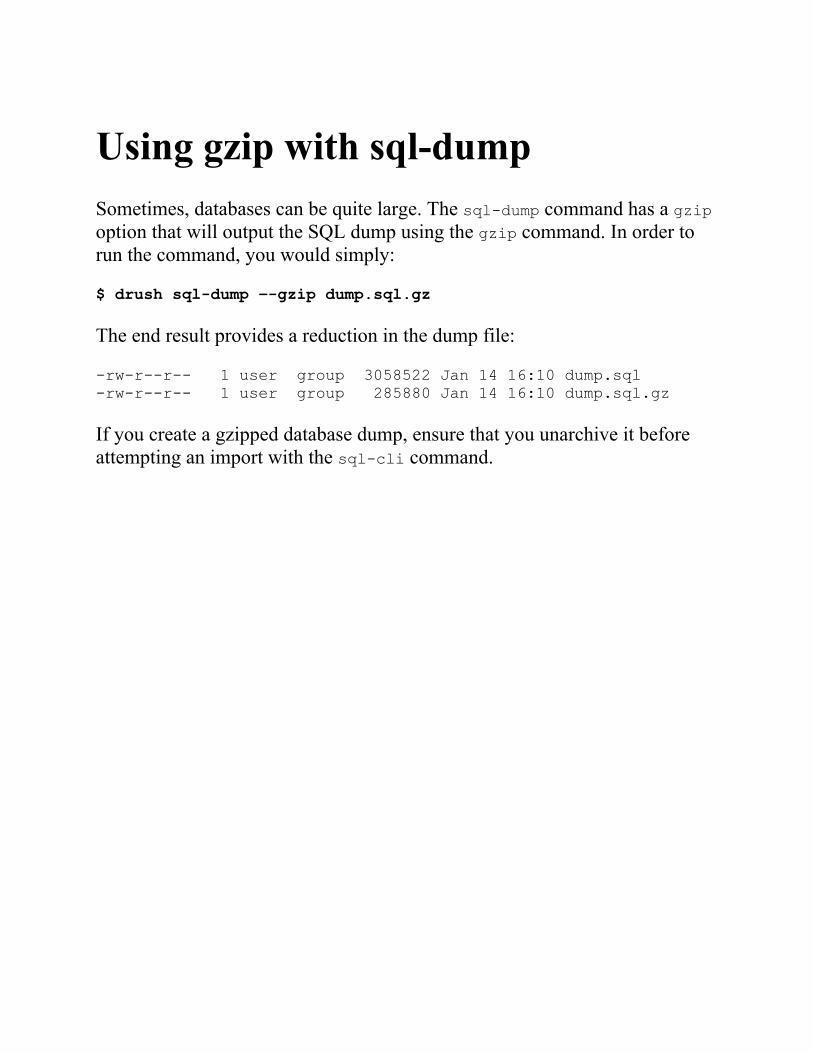
Using gzip with sql-dumpSometimes, databases can be quite large. The sql-dump command has a gzipoption that will output the SQL dump using the gzip command. In order torun the command, you would simply:
$ drush sql-dump –-gzip dump.sql.gz
The end result provides a reduction in the dump file:
-rw-r--r-- 1 user group 3058522 Jan 14 16:10 dump.sql-rw-r--r-- 1 user group 285880 Jan 14 16:10 dump.sql.gz
If you create a gzipped database dump, ensure that you unarchive it beforeattempting an import with the sql-cli command.
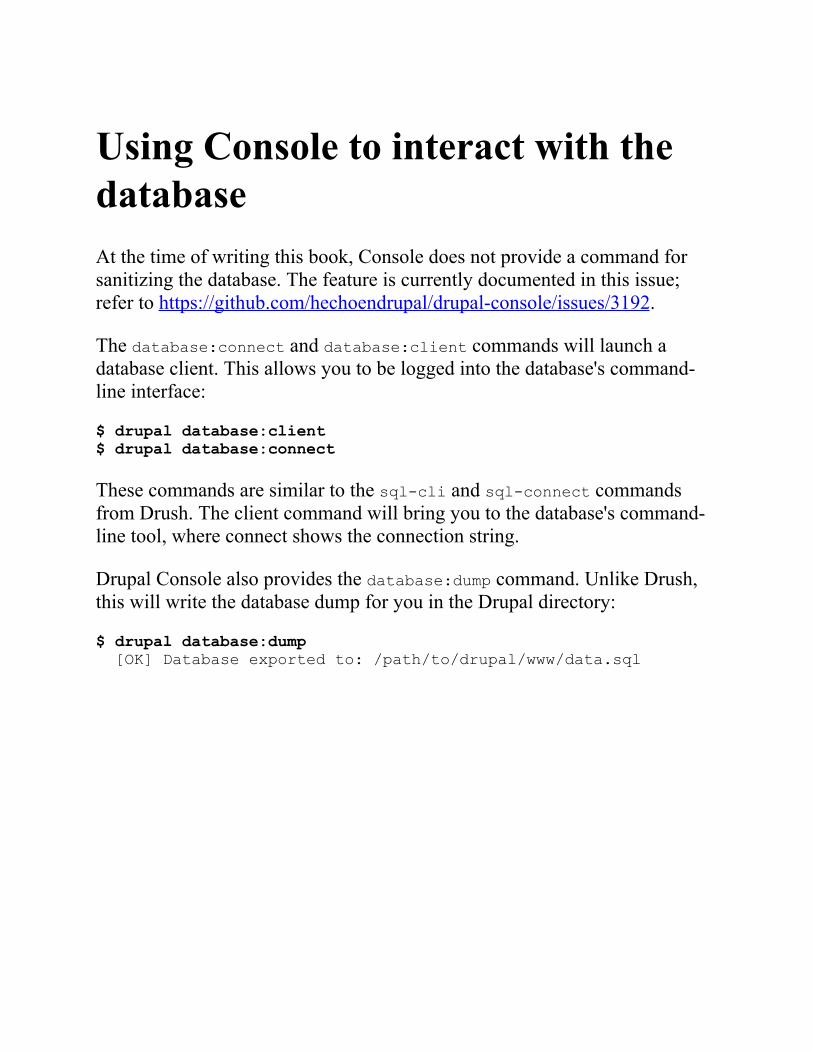
Using Console to interact with thedatabaseAt the time of writing this book, Console does not provide a command forsanitizing the database. The feature is currently documented in this issue;refer to https://github.com/hechoendrupal/drupal-console/issues/3192.
The database:connect and database:client commands will launch adatabase client. This allows you to be logged into the database's command-line interface:
$ drupal database:client$ drupal database:connect
These commands are similar to the sql-cli and sql-connect commandsfrom Drush. The client command will bring you to the database's command-line tool, where connect shows the connection string.
Drupal Console also provides the database:dump command. Unlike Drush,this will write the database dump for you in the Drupal directory:
$ drupal database:dump [OK] Database exported to: /path/to/drupal/www/data.sql
Using Drush to manage usersWhen you need to add an account to Drupal, you will visit the People pageand manually add a new user. Drush provides the complete user managementfor Drupal, from creation to role assignment, password recovery, anddeletion. This workflow allows you to create users easily and provides themwith a login without having to enter your Drupal site.
In this recipe, we will create a staff role with a staffmember user and log inas that user through Drush.

How to do it…1. Use the role-create command to create a new role labeled staff:
$ drush role-create staff Created "staff"
2. Use the role-lists command to verify that the role was created inDrupal:
$ drush role-listID Role Label anonymous Anonymous user authenticated Authenticated user administrator Administrator staff Staff
3. The user-create command will create our user:
$ drush user-create staffmemberUser ID : 2 User name : staffmember User roles : authenticated User status : 1
4. In order to add the role, we will need to use the user-add-rolecommand:
$ drush user-add-role staff staffmemberAdded role staff role to staffmember
5. We will now log in as the staffmember user using the user-logincommand:
$ drush user-login staffmember --uri=http://example.comhttp://example.com/user/reset/2/1452810532/Ia1nJvbr2UQ3Pi_QnmITlVgcCWzDtnKmHxf-I2eAqPE
6. Copy the link and paste it in your browser to log in as that user:
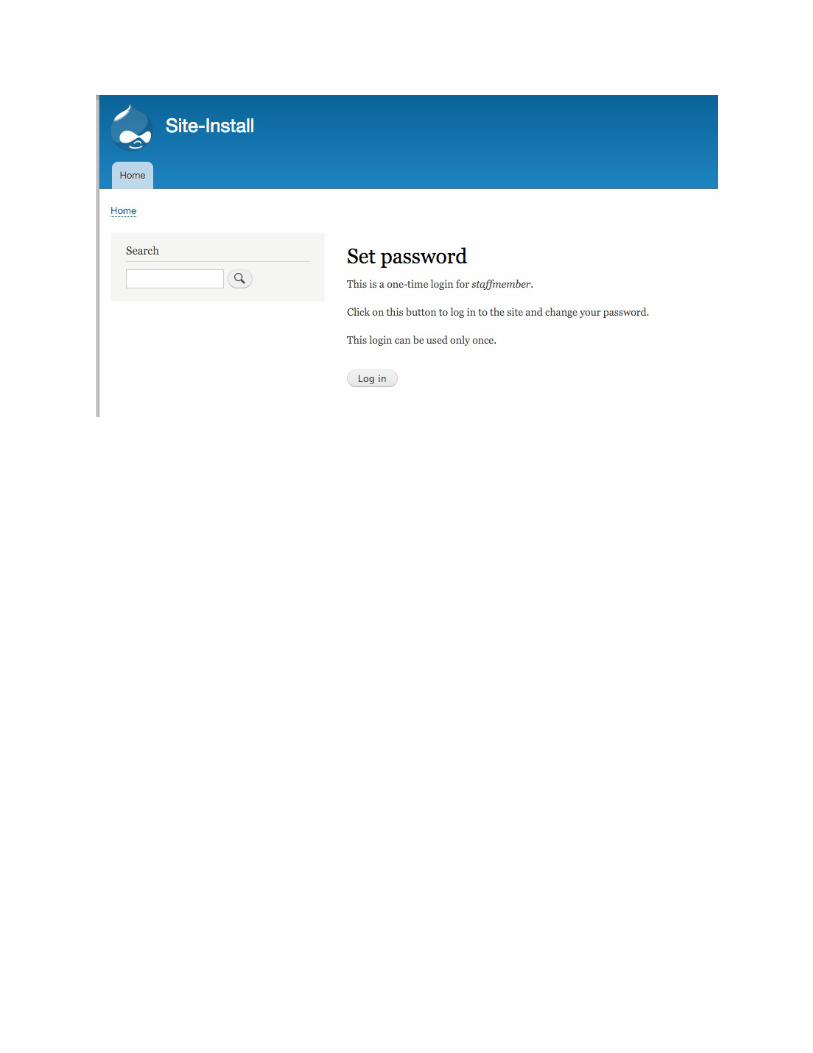
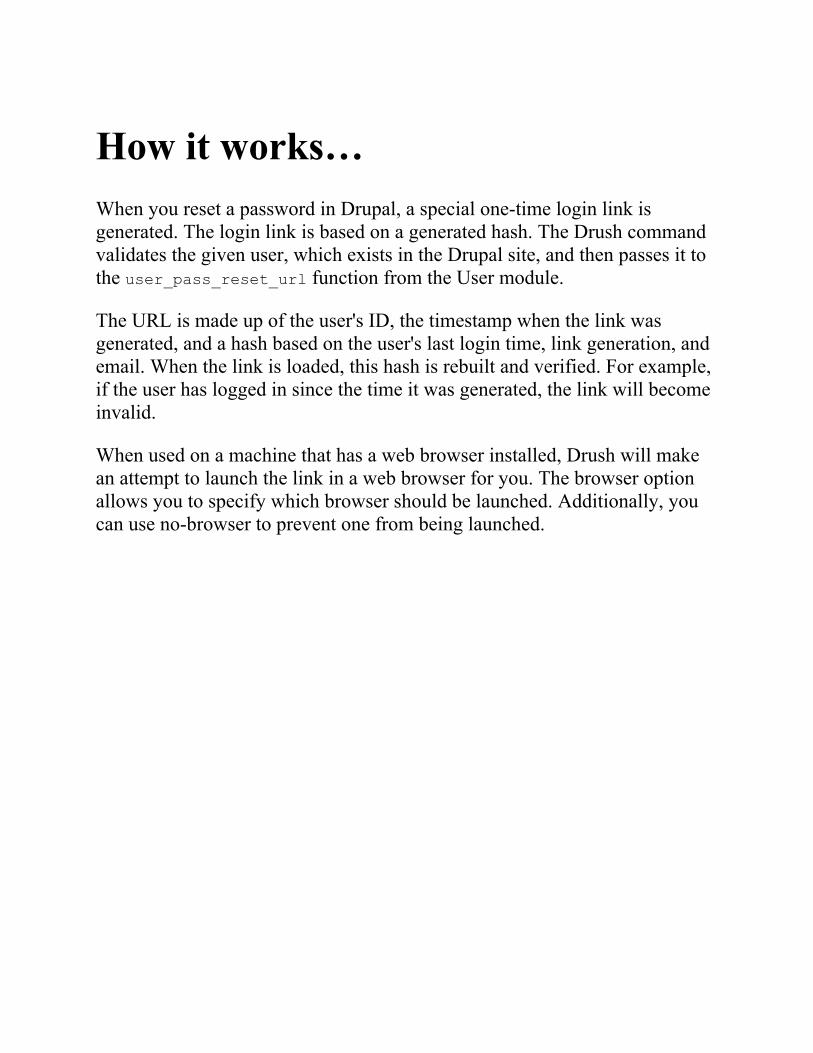
How it works…When you reset a password in Drupal, a special one-time login link isgenerated. The login link is based on a generated hash. The Drush commandvalidates the given user, which exists in the Drupal site, and then passes it tothe user_pass_reset_url function from the User module.
The URL is made up of the user's ID, the timestamp when the link wasgenerated, and a hash based on the user's last login time, link generation, andemail. When the link is loaded, this hash is rebuilt and verified. For example,if the user has logged in since the time it was generated, the link will becomeinvalid.
When used on a machine that has a web browser installed, Drush will makean attempt to launch the link in a web browser for you. The browser optionallows you to specify which browser should be launched. Additionally, youcan use no-browser to prevent one from being launched.

There's more…The command line offers the ability to simplify user management and useradministration. Next, we will explore more on this topic in detail.
Advanced user-login use casesThe user-login command is a useful tool that allows some advanced usecases. For instance, you can append a path after the username and belaunched to that path. You can pass a UID or email instead of a username inorder to log in as a user.
You can use the user-login to secure your admin user account. In Drupal,the user with the identifier of 1 is treated as the root and can bypass allpermissions. Many times, this is the default maintenance account used towork on the Drupal site. Instead of logging in manually, you can set theaccount to a very robust passphrase and use the user-login command whenyou need to access your site. With this, the only users who should be able tolog in as the administrator account are those with access to run the Drushcommands on the website.
Using Drupal ConsoleDrupal Console also provide commands to interact with users. Although theydo not allow the creation of users or roles, they provide a basic usermanagement.
The user:login:url command will generate a one-time login link for thespecified user ID. This uses the same methods as the Drush command:
$ drupal user:login:url 2
The user:password:reset command allows you to reset a user's password tothe new provided password. You can provide the user ID and new passwordas arguments, but if missing, the values will be prompted for interactively:
$ drupal user:password:reset 2 newpassword
The create:users command provides an interactive way to generate bulkusers, which are useful for debugging. However, it cannot create individualusers with specific passwords like Drush.
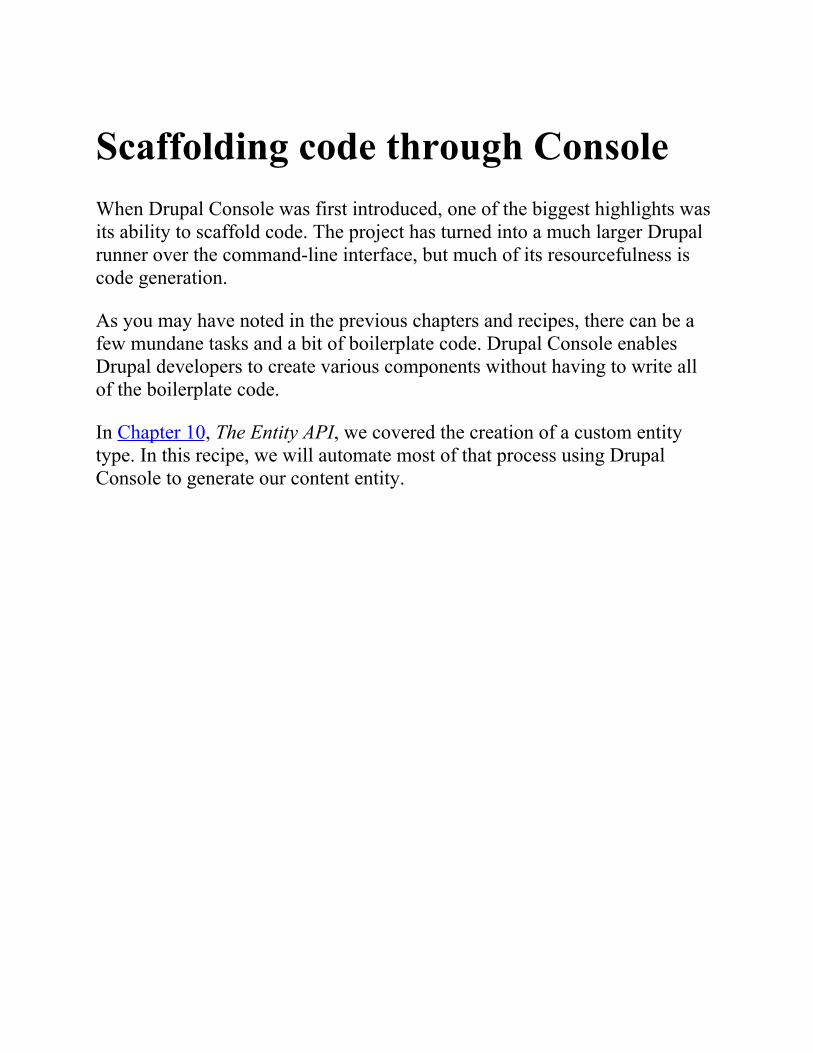
Scaffolding code through ConsoleWhen Drupal Console was first introduced, one of the biggest highlights wasits ability to scaffold code. The project has turned into a much larger Drupalrunner over the command-line interface, but much of its resourcefulness iscode generation.
As you may have noted in the previous chapters and recipes, there can be afew mundane tasks and a bit of boilerplate code. Drupal Console enablesDrupal developers to create various components without having to write allof the boilerplate code.
In Chapter 10, The Entity API, we covered the creation of a custom entitytype. In this recipe, we will automate most of that process using DrupalConsole to generate our content entity.

Getting readyFor this recipe, you will need to have Drupal Console installed. The tool willgenerate everything else for us. You will need to have a Drupal 8 siteinstalled. Many of Console's commands will not work (or be listed) unlessthey can access an installed Drupal site. This is because of the way it interactswith Drupal's service container.
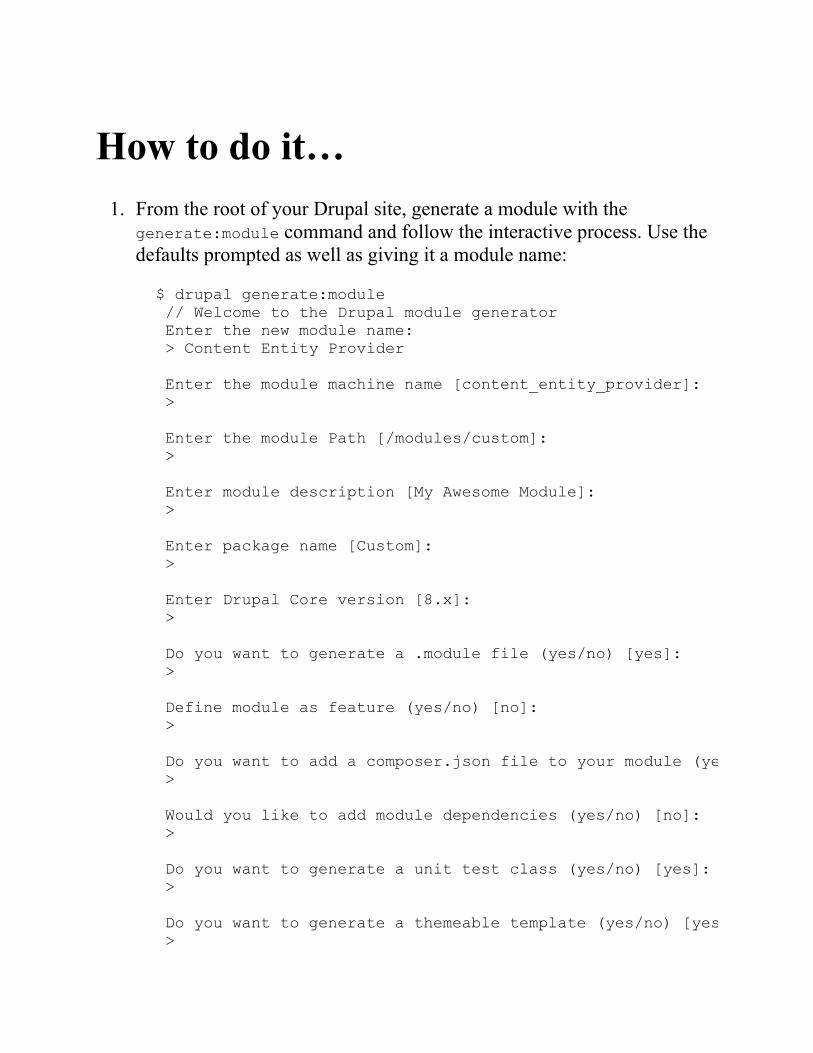
How to do it…1. From the root of your Drupal site, generate a module with the
generate:module command and follow the interactive process. Use thedefaults prompted as well as giving it a module name:
$ drupal generate:module // Welcome to the Drupal module generator Enter the new module name: > Content Entity Provider
Enter the module machine name [content_entity_provider]: >
Enter the module Path [/modules/custom]: >
Enter module description [My Awesome Module]: >
Enter package name [Custom]: >
Enter Drupal Core version [8.x]: >
Do you want to generate a .module file (yes/no) [yes]: >
Define module as feature (yes/no) [no]: >
Do you want to add a composer.json file to your module (yes/no) >
Would you like to add module dependencies (yes/no) [no]: >
Do you want to generate a unit test class (yes/no) [yes]: >
Do you want to generate a themeable template (yes/no) [yes >
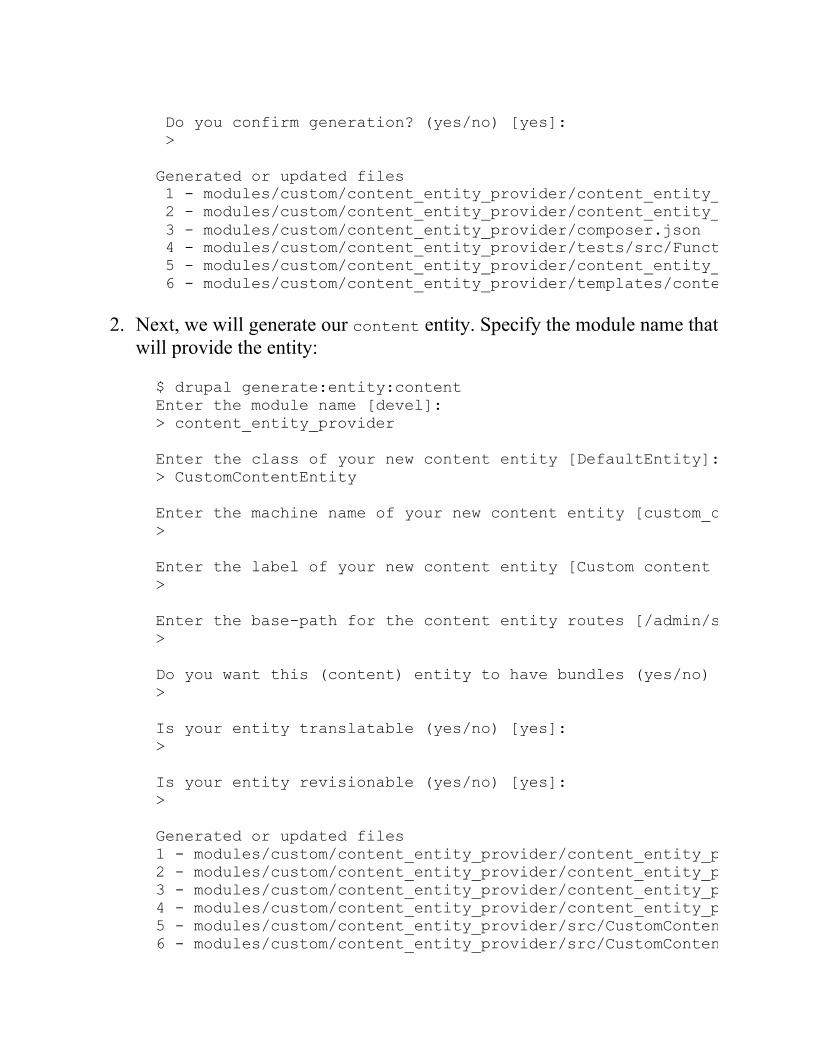
Do you confirm generation? (yes/no) [yes]: >
Generated or updated files 1 - modules/custom/content_entity_provider/content_entity_provider.info.yml 2 - modules/custom/content_entity_provider/content_entity_provider.module 3 - modules/custom/content_entity_provider/composer.json 4 - modules/custom/content_entity_provider/tests/src/Functional/LoadTest.php 5 - modules/custom/content_entity_provider/content_entity_provider.module 6 - modules/custom/content_entity_provider/templates/content-entity-provider.html.twig
2. Next, we will generate our content entity. Specify the module name thatwill provide the entity:
$ drupal generate:entity:contentEnter the module name [devel]:> content_entity_provider
Enter the class of your new content entity [DefaultEntity]:> CustomContentEntity
Enter the machine name of your new content entity [custom_content_entity]:>
Enter the label of your new content entity [Custom content entity]:>
Enter the base-path for the content entity routes [/admin/structure]:>
Do you want this (content) entity to have bundles (yes/no) [no]:>
Is your entity translatable (yes/no) [yes]:>
Is your entity revisionable (yes/no) [yes]:>
Generated or updated files1 - modules/custom/content_entity_provider/content_entity_provider.permissions.yml2 - modules/custom/content_entity_provider/content_entity_provider.links.menu.yml3 - modules/custom/content_entity_provider/content_entity_provider.links.task.yml4 - modules/custom/content_entity_provider/content_entity_provider.links.action.yml5 - modules/custom/content_entity_provider/src/CustomContentEntityAccessControlHandler.php6 - modules/custom/content_entity_provider/src/CustomContentEntityTranslationHandler.php
7 - modules/custom/content_entity_provider/src/Entity/CustomContentEntityInterface.php8 - modules/custom/content_entity_provider/src/Entity/CustomContentEntity.php9 - modules/custom/content_entity_provider/src/CustomContentEntityHtmlRouteProvider.php10 - modules/custom/content_entity_provider/src/Entity/CustomContentEntityViewsData.php11 - modules/custom/content_entity_provider/src/CustomContentEntityListBuilder.php12 - modules/custom/content_entity_provider/src/Form/CustomContentEntitySettingsForm.php13 - modules/custom/content_entity_provider/src/Form/CustomContentEntityForm.php14 - modules/custom/content_entity_provider/src/Form/CustomContentEntityDeleteForm.php15 - modules/custom/content_entity_provider/custom_content_entity.page.inc16 - modules/custom/content_entity_provider/templates/custom_content_entity.html.twig17 - modules/custom/content_entity_provider/src/Form/CustomContentEntityRevisionDeleteForm.php18 - modules/custom/content_entity_provider/src/Form/CustomContentEntityRevisionRevertTranslationForm.php19 - modules/custom/content_entity_provider/src/Form/CustomContentEntityRevisionRevertForm.php20 - modules/custom/content_entity_provider/src/CustomContentEntityStorage.php21 - modules/custom/content_entity_provider/src/CustomContentEntityStorageInterface.php22 - modules/custom/content_entity_provider/src/Controller/CustomContentEntityController.php
3. Install your module using Drupal Console:
$ drupal module:install content_entity_provider Installing module(s) "content_entity_provider"
[OK] The following module(s) were installed successfully: "content_entity_provider" // cache:rebuildRebuilding cache(s), wait a moment please. [OK] Done clearing cache(s).
4. View Structure and find your Custom content entity settings:
How it works…One of the biggest features of Console is its ability to reduce the time spentby developers to create code for Drupal 8. Console utilizes the Twigtemplating engine to provide code generation. These Twig templates containvariables and logic that are compiled into the end result code.
A set of generator classes receives specific parameters, which are receivedthrough the appropriate command, and pass them to Twig for rendering. Thisallows Console to easily stay up to date with changes in Drupal core and stillprovide valuable code generation.

Making a Drush commandDrush provides an API that allows developers to write their own commands.These commands can be part of a module and loaded through a Drupalinstallation, or they can be placed in the local user's Drush folder for generalpurposes.
Often, contributed modules create commands to automate user interfaceoperations. However, creating a custom Drush command can be useful forspecific operations. In this recipe, we will create a command that loads all theusers who have not logged in in the last 10 days and resets their password.

Getting readyFor this recipe, you will need Drush available. We will be creating acommand in a local user directory.
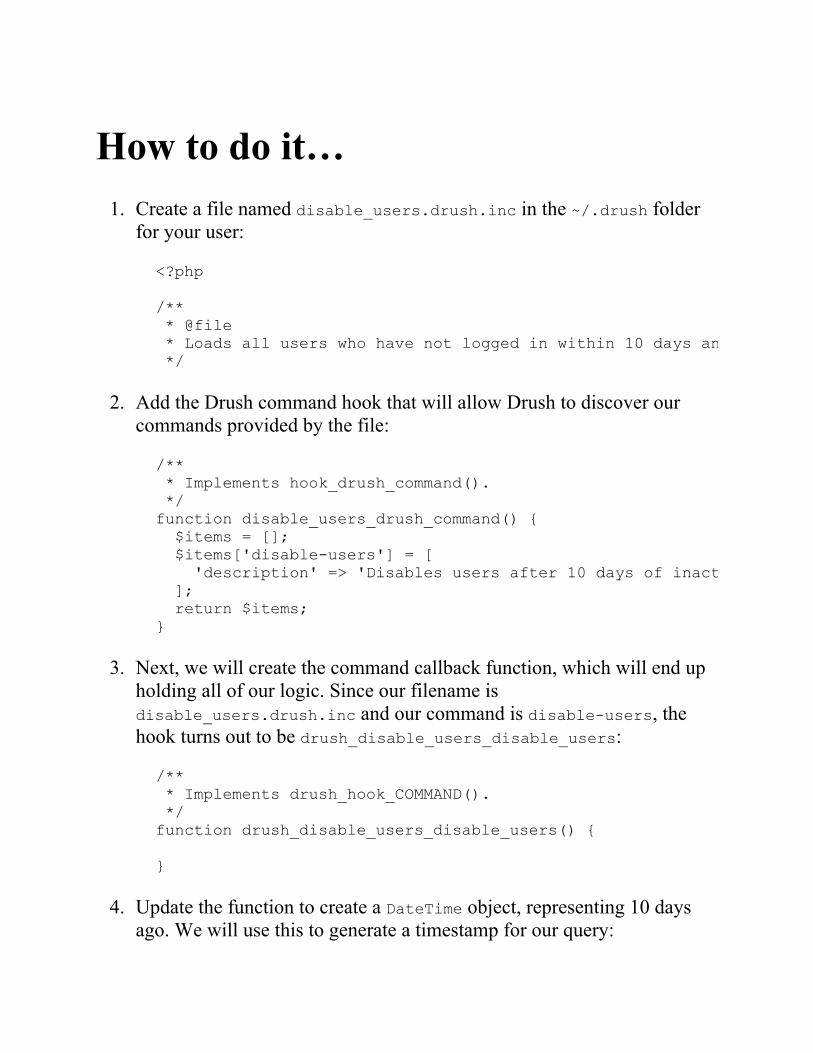
How to do it…1. Create a file named disable_users.drush.inc in the ~/.drush folder
for your user:
<?php
/** * @file * Loads all users who have not logged in within 10 days and disables them. */
2. Add the Drush command hook that will allow Drush to discover ourcommands provided by the file:
/** * Implements hook_drush_command(). */function disable_users_drush_command() { $items = []; $items['disable-users'] = [ 'description' => 'Disables users after 10 days of inactivity' ]; return $items;}
3. Next, we will create the command callback function, which will end upholding all of our logic. Since our filename isdisable_users.drush.inc and our command is disable-users, thehook turns out to be drush_disable_users_disable_users:
/** * Implements drush_hook_COMMAND(). */function drush_disable_users_disable_users() {
}
4. Update the function to create a DateTime object, representing 10 daysago. We will use this to generate a timestamp for our query:
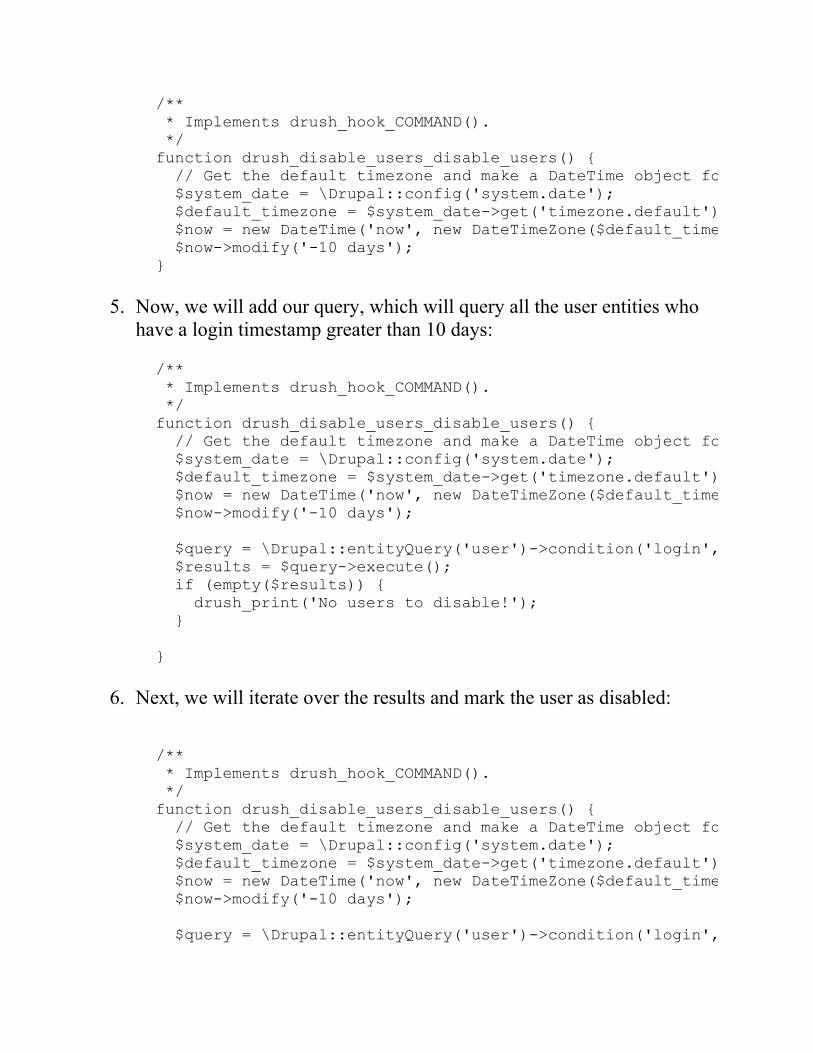
/** * Implements drush_hook_COMMAND(). */function drush_disable_users_disable_users() { // Get the default timezone and make a DateTime object for 10 days ago. $system_date = \Drupal::config('system.date'); $default_timezone = $system_date->get('timezone.default') ?: date_default_timezone_get() $now = new DateTime('now', new DateTimeZone($default_timezone $now->modify('-10 days');}
5. Now, we will add our query, which will query all the user entities whohave a login timestamp greater than 10 days:
/** * Implements drush_hook_COMMAND(). */function drush_disable_users_disable_users() { // Get the default timezone and make a DateTime object for 10 days ago. $system_date = \Drupal::config('system.date'); $default_timezone = $system_date->get('timezone.default') ?: date_default_timezone_get() $now = new DateTime('now', new DateTimeZone($default_timezone $now->modify('-10 days');
$query = \Drupal::entityQuery('user')->condition('login', $results = $query->execute(); if (empty($results)) { drush_print('No users to disable!'); }
}
6. Next, we will iterate over the results and mark the user as disabled:
/** * Implements drush_hook_COMMAND(). */function drush_disable_users_disable_users() { // Get the default timezone and make a DateTime object for 10 days ago. $system_date = \Drupal::config('system.date'); $default_timezone = $system_date->get('timezone.default') ?: date_default_timezone_get() $now = new DateTime('now', new DateTimeZone($default_timezone $now->modify('-10 days');
$query = \Drupal::entityQuery('user')->condition('login',
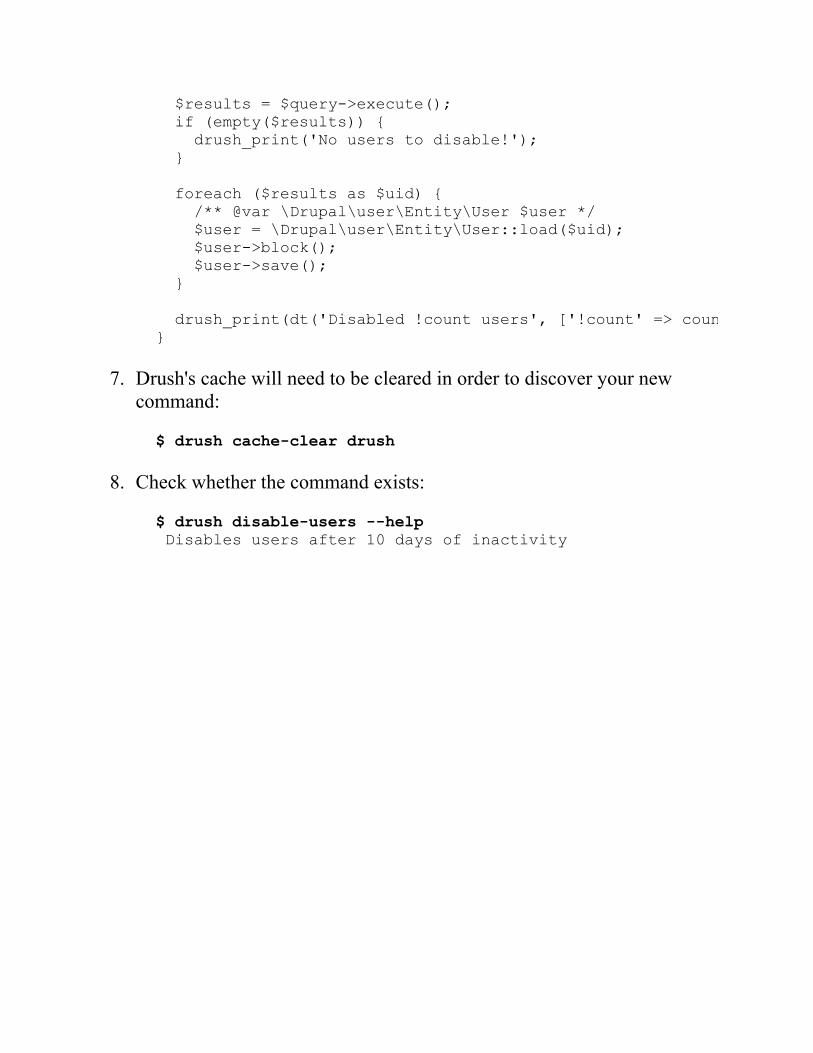
$results = $query->execute(); if (empty($results)) { drush_print('No users to disable!'); }
foreach ($results as $uid) { /** @var \Drupal\user\Entity\User $user */ $user = \Drupal\user\Entity\User::load($uid); $user->block(); $user->save(); }
drush_print(dt('Disabled !count users', ['!count' => count(}
7. Drush's cache will need to be cleared in order to discover your newcommand:
$ drush cache-clear drush
8. Check whether the command exists:
$ drush disable-users --help Disables users after 10 days of inactivity
How it works…Drush works by scanning specific directories for files that follow theCOMMANDFILE.drush.inc pattern. You can think of COMMANDFILE for Drush asa representation of a module name in Drupal's hook system. Whenimplementing a Drush hook, in the HOOK_drush format, you will need toreplace HOOK with your COMMANDFILE name, just as you would do in Drupalwith a module name.
In this recipe, we created a disable_users.drush.inc file. This means thatall hooks and commands in the file need to use disable_users for hookinvocations. Drush uses this to load the hook_drush_command hook thatreturns our command information.
We then provided the functionality of our logic in the drush_hook_commandhook. For this hook, we replaced hook with our COMMANDFILE name, whichwas disable_users, giving us drush_disable_users_command. We replacedcommand with the command that we defined in hook_drush_command, whichwas disable-users. We then had our finaldrush_disable_users_disable_users hook.
There's more…Drush commands have additional options that can be specified in theirdefinitions. We explore their abilities to control the required level of Drupalintegration for a command.
Specifying the level of Drupal'sbootstrapDrush commands have the ability to specify the level of Drupal's bootstrapbefore being executed. Drupal has several bootstrap levels in which onlyspecific parts of the system are loaded. By default, a command's bootstrap isat DRUSH_BOOTSTRAP_DRUPAL_LOGIN, which is at the same level as accessingDrupal over the Web.
Commands, depending on their purpose, can choose to avoid bootstrappingDrupal at all or only until the database system is loaded. Drush commandsthat are utilities, such as the Git release notes module, provide a Drushcommand that does not interact with Drupal. It specifies a bootstrap ofDRUSH_BOOTSTRAP_DRUSH, as it only interacts with repositories to generatechange logs based on Git tags and commits.
See alsoRefer to how to creating custom Drush commands athttp://docs.drush.org/en/master/commands/.Refer to how to install Drush at http://docs.drush.org/en/master/install/.Refer to the Drush Bootstrap process athttp://docs.drush.org/en/master/bootstrap/.
Making a Console commandDrupal Console makes use of the Symfony Console project and other third-party libraries to utilize modern PHP best practices. In doing so, it followsDrupal 8 practices as well. This allows Console to use namespaces for thecommand detection and interaction with Drupal by reading its class loader.
This allows developers to easily create a Console command by implementinga custom class in a module.
In this recipe, we will create a command that loads all the users who have notlogged in in the last 10 days and resets their password. We will generate thebase of our command using the scaffolding commands.

Getting readyFor this recipe, you will need to have Drupal Console installed. The tool willgenerate everything else for us. You will need to have a Drupal 8 siteinstalled.
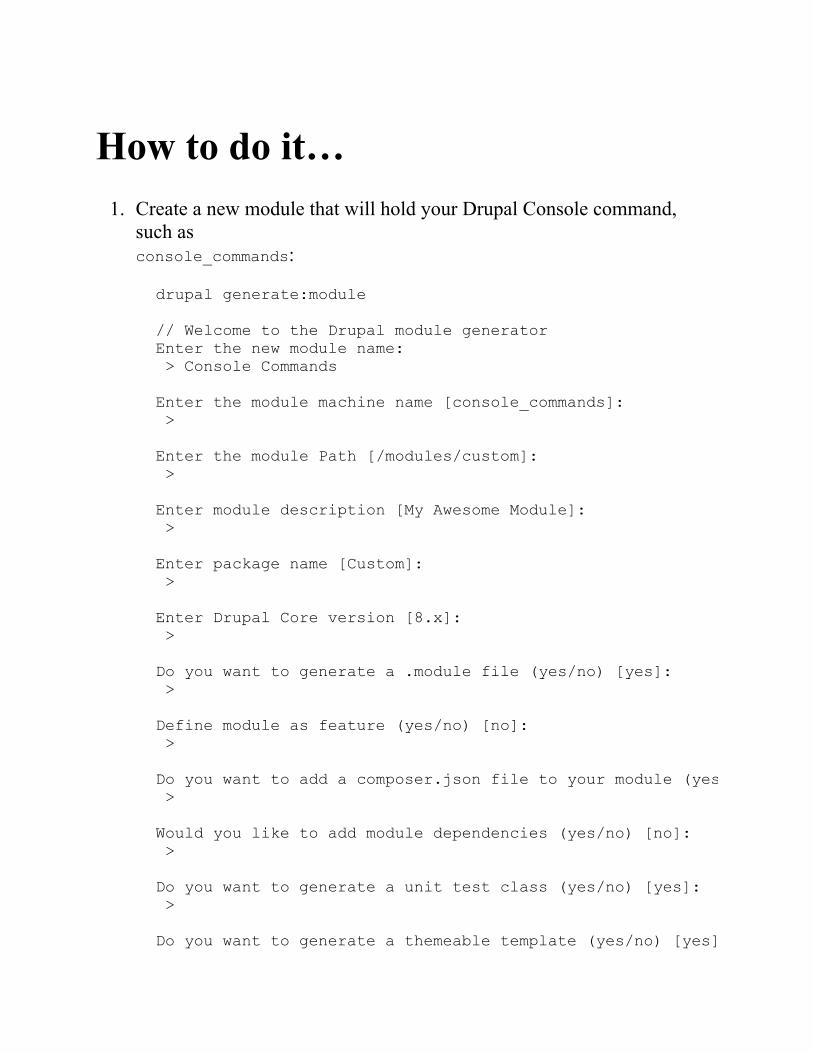
How to do it…1. Create a new module that will hold your Drupal Console command,
such asconsole_commands:
drupal generate:module
// Welcome to the Drupal module generatorEnter the new module name: > Console Commands
Enter the module machine name [console_commands]: >
Enter the module Path [/modules/custom]: >
Enter module description [My Awesome Module]: >
Enter package name [Custom]: >
Enter Drupal Core version [8.x]: >
Do you want to generate a .module file (yes/no) [yes]: >
Define module as feature (yes/no) [no]: >
Do you want to add a composer.json file to your module (yes/no) [yes]: >
Would you like to add module dependencies (yes/no) [no]: >
Do you want to generate a unit test class (yes/no) [yes]: >
Do you want to generate a themeable template (yes/no) [yes]:
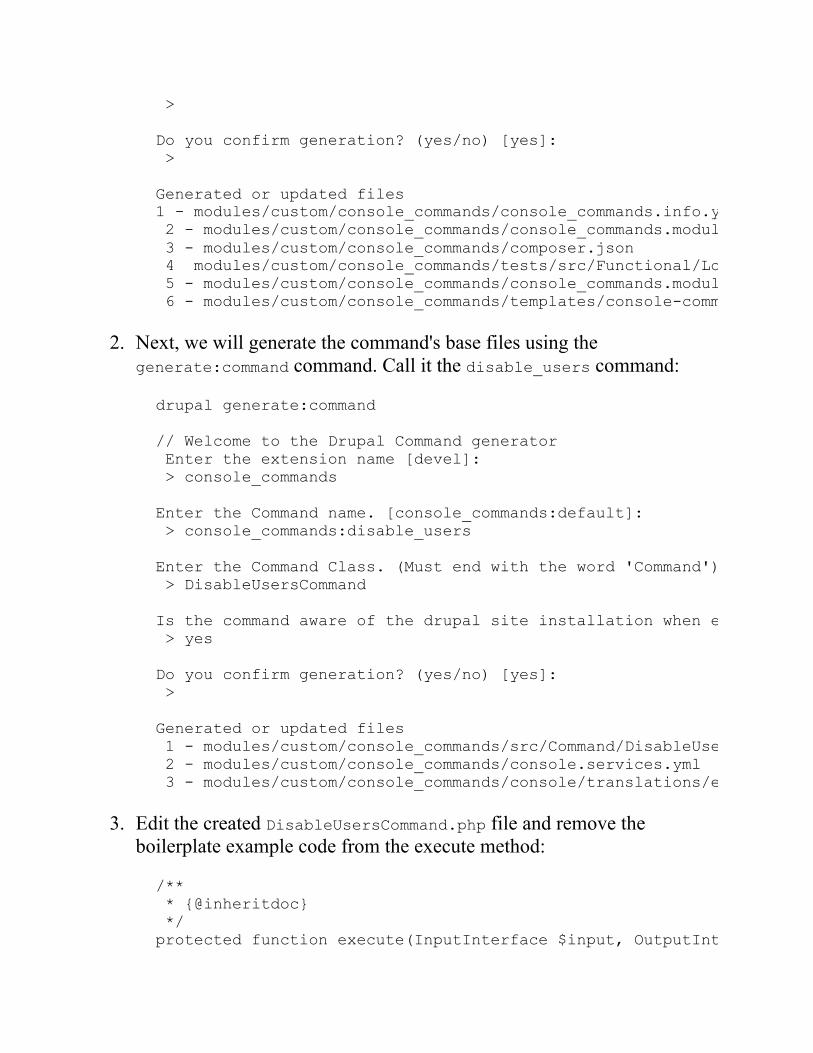
>
Do you confirm generation? (yes/no) [yes]: >
Generated or updated files1 - modules/custom/console_commands/console_commands.info.yml 2 - modules/custom/console_commands/console_commands.module 3 - modules/custom/console_commands/composer.json 4 modules/custom/console_commands/tests/src/Functional/LoadTest.php 5 - modules/custom/console_commands/console_commands.module 6 - modules/custom/console_commands/templates/console-commands.html.twig
2. Next, we will generate the command's base files using thegenerate:command command. Call it the disable_users command:
drupal generate:command
// Welcome to the Drupal Command generator Enter the extension name [devel]: > console_commands
Enter the Command name. [console_commands:default]: > console_commands:disable_users
Enter the Command Class. (Must end with the word 'Command'). [DefaultCommand]: > DisableUsersCommand
Is the command aware of the drupal site installation when executed?. (yes/no) [no]: > yes
Do you confirm generation? (yes/no) [yes]: >
Generated or updated files 1 - modules/custom/console_commands/src/Command/DisableUsersCommand.php 2 - modules/custom/console_commands/console.services.yml 3 - modules/custom/console_commands/console/translations/en/console_commands.disable_users.yml
3. Edit the created DisableUsersCommand.php file and remove theboilerplate example code from the execute method:
/** * {@inheritdoc} */protected function execute(InputInterface $input, OutputInterface

}
4. Update the function to create a DateTime object, representing 10 daysago. We will use this to generate a timestamp for our query:
/** * {@inheritdoc} */protected function execute(InputInterface $input, OutputInterface // Get the default timezone and make a DateTime object for 10 days ago. $system_date = \Drupal::config('system.date'); $default_timezone = $system_date->get('timezone.default') ?: date_default_timezone_get() $now = new \DateTime('now', new \DateTimeZone($default_timezone $now->modify('-10 days');}
5. Now, we will add our query, which will query all the user entities whohave a login timestamp greater than 10 days:
/** * {@inheritdoc} */protected function execute(InputInterface $input, OutputInterface // Get the default timezone and make a DateTime object for 10 days ago. $system_date = \Drupal::config('system.date'); $default_timezone = $system_date->get('timezone.default') ?: date_default_timezone_get() $now = new \DateTime('now', new \DateTimeZone($default_timezone $now->modify('-10 days');
$query = \Drupal::entityQuery('user')->condition('login', $now->getTimestamp(), '>'); $results = $query->execute();
if (empty($results)) { $output->writeln('<info>No users to disable!</info>'); }}
6. Next, we will iterate over the results and mark the user as disabled:
/** * {@inheritdoc} */protected function execute(InputInterface $input, OutputInterface // Get the default timezone and make a DateTime object for 10 days ago. $system_date = \Drupal::config('system.date');
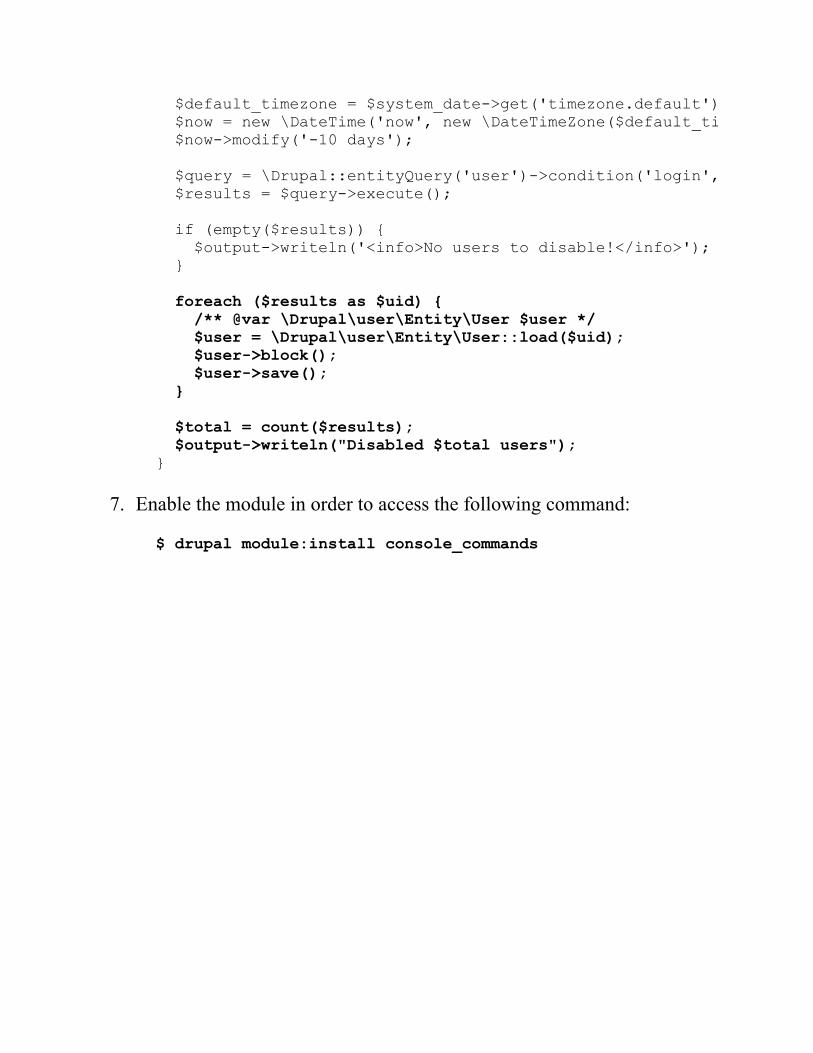
$default_timezone = $system_date->get('timezone.default') ?: date_default_timezone_get() $now = new \DateTime('now', new \DateTimeZone($default_timezone $now->modify('-10 days');
$query = \Drupal::entityQuery('user')->condition('login', $results = $query->execute();
if (empty($results)) { $output->writeln('<info>No users to disable!</info>'); }
foreach ($results as $uid) { /** @var \Drupal\user\Entity\User $user */ $user = \Drupal\user\Entity\User::load($uid); $user->block(); $user->save(); }
$total = count($results); $output->writeln("Disabled $total users");}
7. Enable the module in order to access the following command:
$ drupal module:install console_commands
How it works…Drupal Console provides integration with modules using namespacediscovery methods. When Console is run in a Drupal installation, it willdiscover all the available projects. It then discovers any files in the \Drupal\{ a module }\Command namespace that implements\Drupal\Console\Command\Command.
Drupal Console will rescan the Drupal directory for available commandsevery time it is invoked, as it does not keep a cache of available commands.

There's more…Drupal Console provides a much more intuitive developer experience as itfollows Drupal core's coding formats. We will touch on how Console can beused to create entities.
Using a Console command to createentitiesA benefit of Console is its ability to utilize Symfony Console's questionhelpers for a robust interactive experience. Drupal Commerce utilizesConsole to provide a commerce:create:store command to generate stores.The purpose of the command is to simplify the creation of a specific entity.
The \Drupal\commerce_store\Command\CreateStoreCommand classoverrides the default interact method that is executed to prompt data from theuser. It will prompt users to enter the store's name, email, country, andcurrency.
Developers can implement similar commands to give advanced users asimpler way to work with modules and configuration.
See alsoRefer to how to create custom commands athttps://docs.drupalconsole.com/en/extending/creating-custom-commands.html