multimedia & computer visualization exercise #6 gimp
TRANSCRIPT
Multimedia & Computer Visualization
Wrocław 2011
Multimedia & Computer Visualization
Exercise #6
GIMP - introduction
GIMP is a powerful tool for image processing. By image processing, in this case, we
understood making various operations aimed at transforming images taken by digital cameras or received by other computer graphics methods. GIMP is rather a tool not suitable for creation images from the scratch, although it also offers such possibilities to a limited extent. Although the GIMP is free, it offers a surprisingly large features set, sometimes too big for the needs of even an advanced computer user.
For this reason, it can be generally regarded as a product competitive to expensive professional software Adobe Photoshop. GIMP was originally created for systems based on UNIX operating system and therefore the interface is not too comfortable for Windows users. But after some time and gaining experience navigating across a large number of tools and their options, the problem virtually disappears and the GIMP becomes very useful for anyone who needs a tool for quick and efficient work with digital image.
The aim of this exercise is to familiarize you with the user interface and basic operations useful in the processing of digital images. These operations are useful both for editing of graphic material for the Web as well as the preparation of various types of texts containing images inserted as illustrations.
The following questions will be covered:
§ installation, launching program, § mastering the operation principles of user interface
§ changing the size, resolution and image cropping, § working on layers,
§ making and working with selections.
1. Installation and start-up, program interface
GIMP installation is very simple. You must install the GTK library along with GIMP. Suitable installation files:
§ gtk+ -2.16.6 - GTK library, § gimp-2.6.11 – GIMP program installer,
dr inż. Jacek Jarnicki, dr inż. Marek Woda Institute of Computer Engineering, Control and Robotics Wroclaw University of Technology {jacek.jarnicki, marek.woda}@pwr.wroc.pl
Multimedia & Computer Visualization
Wrocław 2011
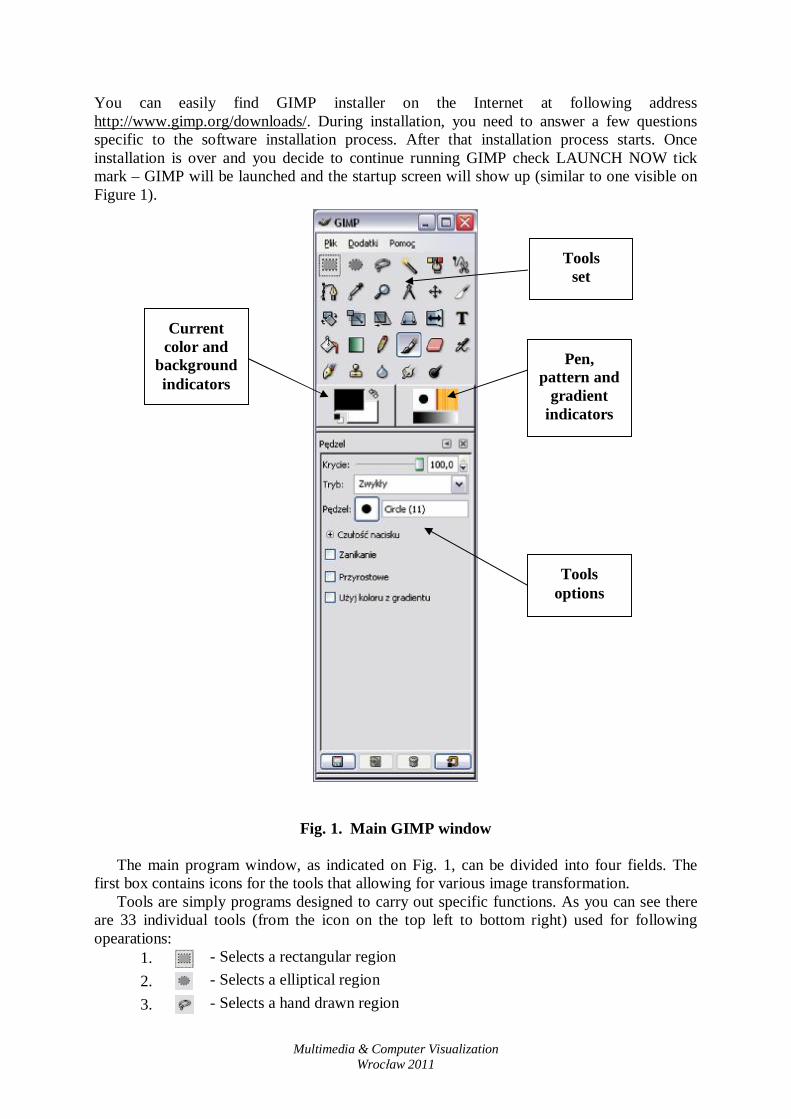
You can easily find GIMP installer on the Internet at following address http://www.gimp.org/downloads/. During installation, you need to answer a few questions specific to the software installation process. After that installation process starts. Once installation is over and you decide to continue running GIMP check LAUNCH NOW tick mark – GIMP will be launched and the startup screen will show up (similar to one visible on Figure 1).
Fig. 1. Main GIMP window
The main program window, as indicated on Fig. 1, can be divided into four fields. The first box contains icons for the tools that allowing for various image transformation.
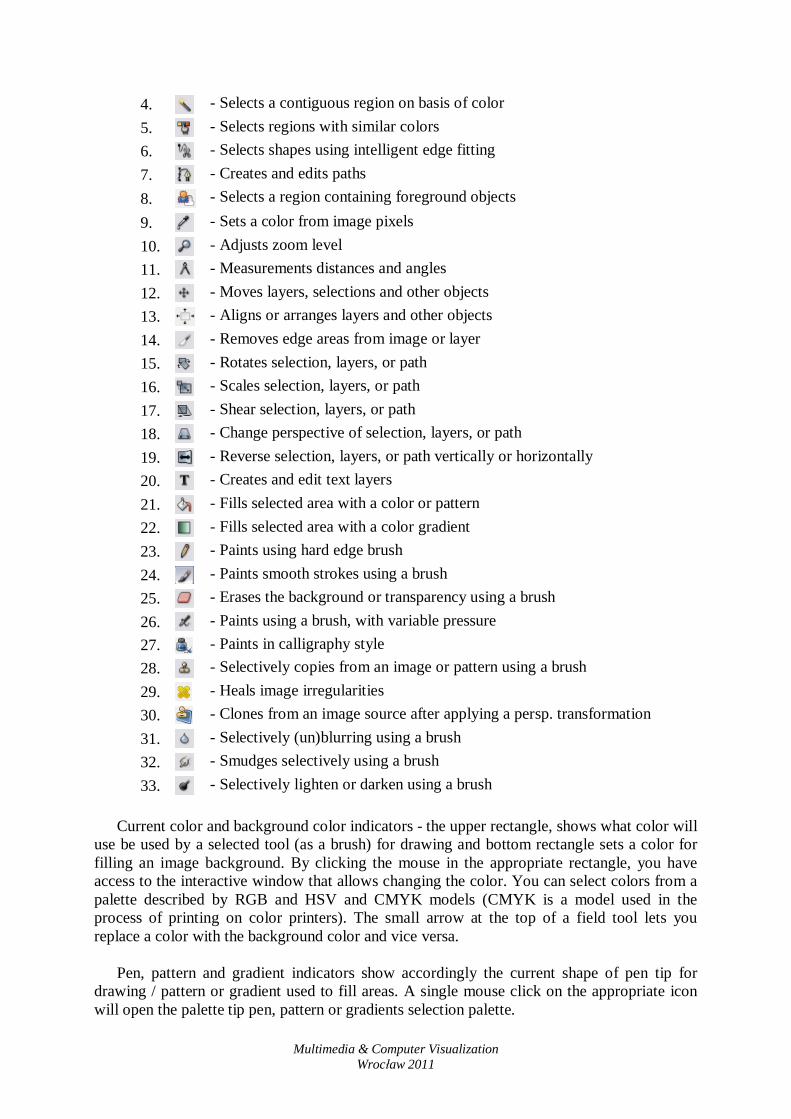
Tools are simply programs designed to carry out specific functions. As you can see there are 33 individual tools (from the icon on the top left to bottom right) used for following opearations:
1. - Selects a rectangular region 2. - Selects a elliptical region 3. - Selects a hand drawn region
Tools set
Tools options
Pen, pattern and
gradient indicators
Current color and
background indicators
Multimedia & Computer Visualization
Wrocław 2011
4. - Selects a contiguous region on basis of color 5. - Selects regions with similar colors 6. - Selects shapes using intelligent edge fitting 7. - Creates and edits paths 8. - Selects a region containing foreground objects 9. - Sets a color from image pixels 10. - Adjusts zoom level 11. - Measurements distances and angles 12. - Moves layers, selections and other objects 13. - Aligns or arranges layers and other objects 14. - Removes edge areas from image or layer 15. - Rotates selection, layers, or path 16. - Scales selection, layers, or path 17. - Shear selection, layers, or path 18. - Change perspective of selection, layers, or path 19. - Reverse selection, layers, or path vertically or horizontally 20. - Creates and edit text layers 21. - Fills selected area with a color or pattern 22. - Fills selected area with a color gradient 23. - Paints using hard edge brush 24. - Paints smooth strokes using a brush 25. - Erases the background or transparency using a brush 26. - Paints using a brush, with variable pressure 27. - Paints in calligraphy style 28. - Selectively copies from an image or pattern using a brush 29. - Heals image irregularities 30. - Clones from an image source after applying a persp. transformation 31. - Selectively (un)blurring using a brush 32. - Smudges selectively using a brush 33. - Selectively lighten or darken using a brush
Current color and background color indicators - the upper rectangle, shows what color will
use be used by a selected tool (as a brush) for drawing and bottom rectangle sets a color for filling an image background. By clicking the mouse in the appropriate rectangle, you have access to the interactive window that allows changing the color. You can select colors from a palette described by RGB and HSV and CMYK models (CMYK is a model used in the process of printing on color printers). The small arrow at the top of a field tool lets you replace a color with the background color and vice versa.
Pen, pattern and gradient indicators show accordingly the current shape of pen tip for
drawing / pattern or gradient used to fill areas. A single mouse click on the appropriate icon will open the palette tip pen, pattern or gradients selection palette.
Multimedia & Computer Visualization
Wrocław 2011
The lower part of the main window is used for options control of currently selected tool. Figure 1 displays also brush options. You can see that you can choose: the coverage type of, brush opacity (measured in percentages), specify how the drawing is combined with the background image (there are 23 different modes), pen pressure sensitivity, etc. The number of options depends on the type of tool and sometimes there is quite a lot options. Knowledge of the various tool options is an important measure of user expertise in this program.
• Orientation in content of the main window
§ Click on the various icon tools to familiarize yourself with the selection of options offered.
§ Use the Current color and background indicators to change both current color and background color.
§ Check the repertoire of available pen tips, patterns and gradients.
• Reading and displaying the image saved as a file
§ Move and extract, to a selected working folder, the contents of the archive attached to this exercise.
§ In main window menu perform sequence of commands: File, Open, set the path to a working folder and select Foto_1.jpg file and press Open button
§ Selected file will be displayed on the screen in a second.
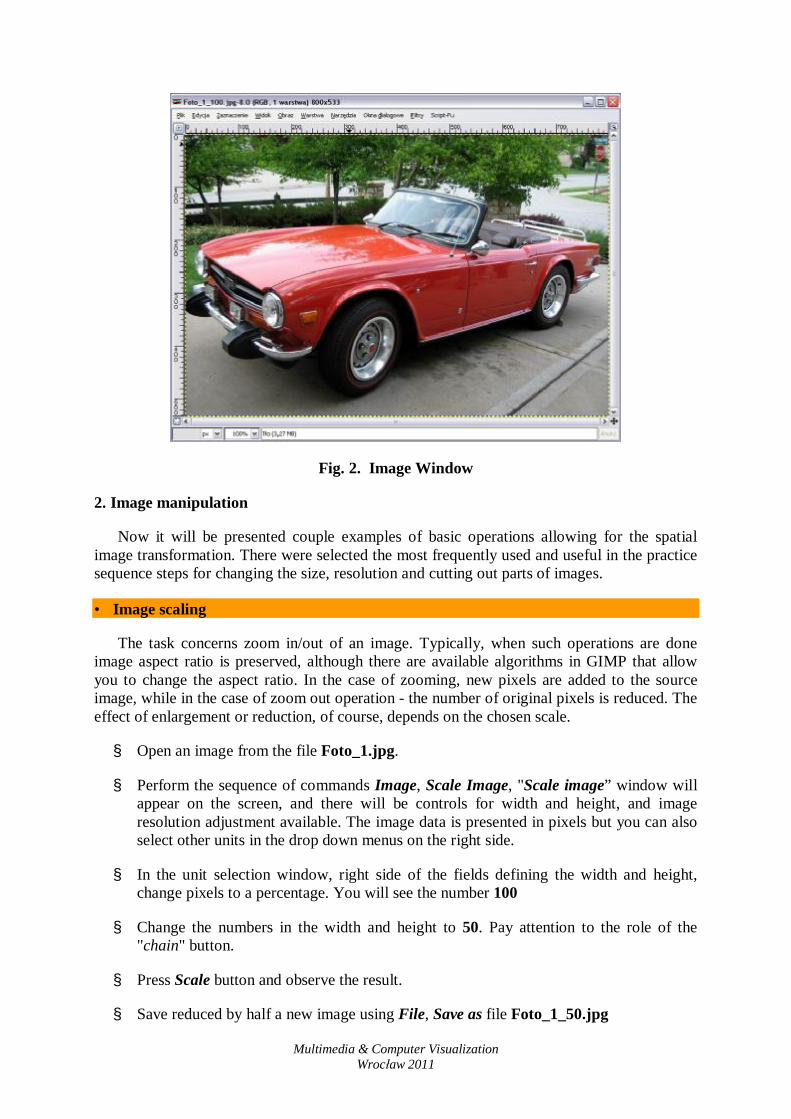
On the window, as shown in Figure 2, there are some more elements besides the image itself:
o on main bar - a basic description of the image containing the name of the file, currently selected color model, the number of layers and the image size in pixels,
o below main bar - drop down menus (very extensive),
o There are rulers, at the image edges, calibrated in current image units (these are pixels on the current figure), there are also two indicators on the rulers showing the position of the cursor.
§ Check what's in the drop-down menus of image window.
Multimedia & Computer Visualization
Wrocław 2011
Fig. 2. Image Window
2. Image manipulation
Now it will be presented couple examples of basic operations allowing for the spatial image transformation. There were selected the most frequently used and useful in the practice sequence steps for changing the size, resolution and cutting out parts of images.
• Image scaling
The task concerns zoom in/out of an image. Typically, when such operations are done image aspect ratio is preserved, although there are available algorithms in GIMP that allow you to change the aspect ratio. In the case of zooming, new pixels are added to the source image, while in the case of zoom out operation - the number of original pixels is reduced. The effect of enlargement or reduction, of course, depends on the chosen scale.
§ Open an image from the file Foto_1.jpg.
§ Perform the sequence of commands Image, Scale Image, "Scale image” window will appear on the screen, and there will be controls for width and height, and image resolution adjustment available. The image data is presented in pixels but you can also select other units in the drop down menus on the right side.
§ In the unit selection window, right side of the fields defining the width and height, change pixels to a percentage. You will see the number 100
§ Change the numbers in the width and height to 50. Pay attention to the role of the "chain" button.
§ Press Scale button and observe the result.
§ Save reduced by half a new image using File, Save as file Foto_1_50.jpg
Multimedia & Computer Visualization
Wrocław 2011
Scaling caused that the linear dimensions of the image has been reduced by half, and number of image pixels is now only ¼ the number of pixels of the original image. When scaling the image the algorithm listed in the dropdown menu of "Scale image" window was used. There are four algorithms: linear interpolation, cubic interpolation, Lanczos3 and scaling without interpolation.
§ Open the image located in the file Foto_1.jpg again and using the command sequence Image, Scale Image, and steps similar to those described above, increase the image twice, and compare effects after different interpolation algorithms application.
You should now be able to perform results comparison after different scaling algorithms were applied.
• Changing the image size and resolution
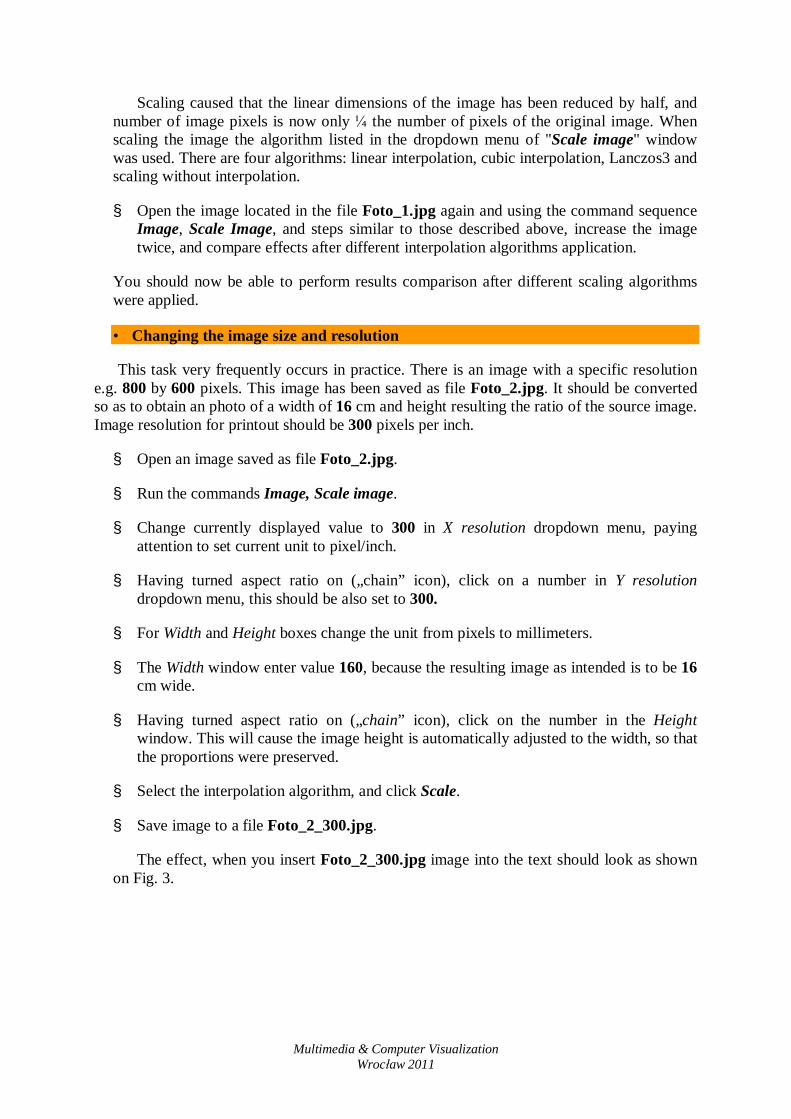
This task very frequently occurs in practice. There is an image with a specific resolution e.g. 800 by 600 pixels. This image has been saved as file Foto_2.jpg. It should be converted so as to obtain an photo of a width of 16 cm and height resulting the ratio of the source image. Image resolution for printout should be 300 pixels per inch.
§ Open an image saved as file Foto_2.jpg.
§ Run the commands Image, Scale image.
§ Change currently displayed value to 300 in X resolution dropdown menu, paying attention to set current unit to pixel/inch.
§ Having turned aspect ratio on („chain” icon), click on a number in Y resolution dropdown menu, this should be also set to 300.
§ For Width and Height boxes change the unit from pixels to millimeters.
§ The Width window enter value 160, because the resulting image as intended is to be 16 cm wide.
§ Having turned aspect ratio on („chain” icon), click on the number in the Height window. This will cause the image height is automatically adjusted to the width, so that the proportions were preserved.
§ Select the interpolation algorithm, and click Scale.
§ Save image to a file Foto_2_300.jpg.
The effect, when you insert Foto_2_300.jpg image into the text should look as shown on Fig. 3.
Multimedia & Computer Visualization
Wrocław 2011
Fig. 3. Image with a width of 16 cm and a resolution of 1890 x 1417 pixels obtained by processing the source image with a resolution of 800 x 600 pixels
Using similar procedures please try to pick a resolution of the image saved in a file
Foto_2.jpg to get in result a thumbnail with a width of 20 mm
• Image cropping
Cropping involves the removal a rectangle from the source image. For convenience, there are assumed different ways of defining the cropped rectangle. It can be any, have a fixed size or fixed sides of their proportions. GIMP offers a relatively convenient mechanism for cropping.
The aim of this section task will consist of cropping the image using abovementioned ways.
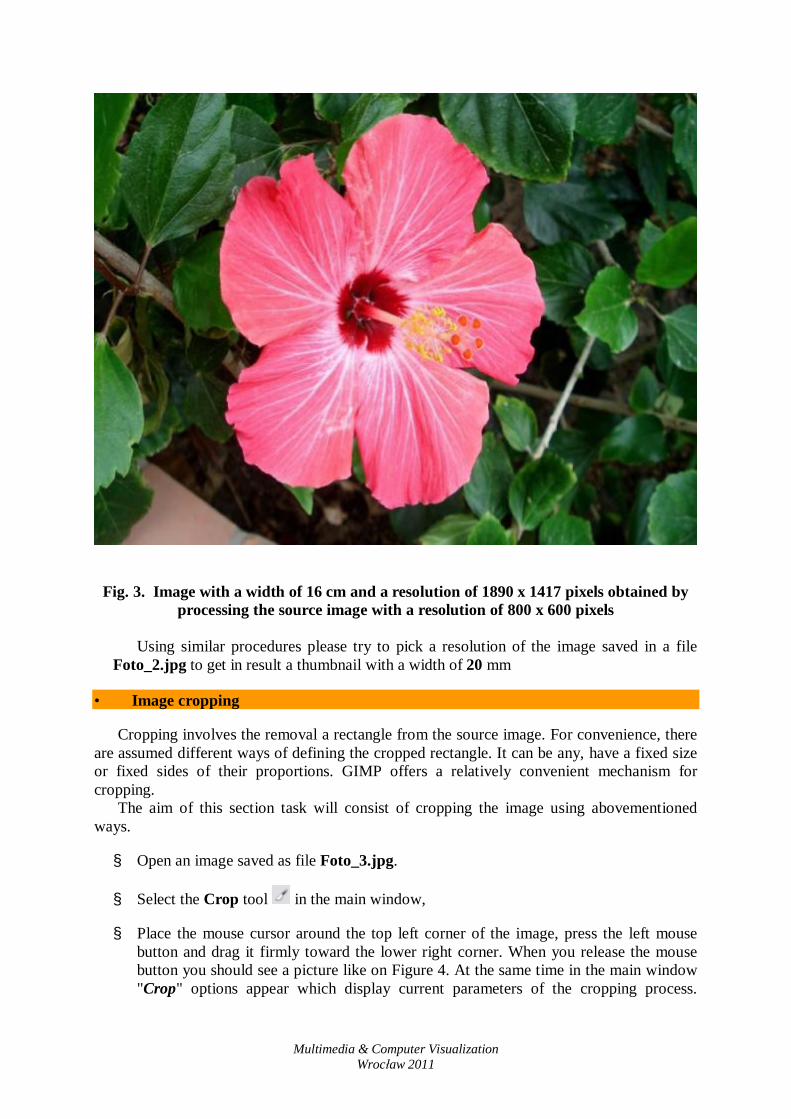
§ Open an image saved as file Foto_3.jpg.
§ Select the Crop tool in the main window,
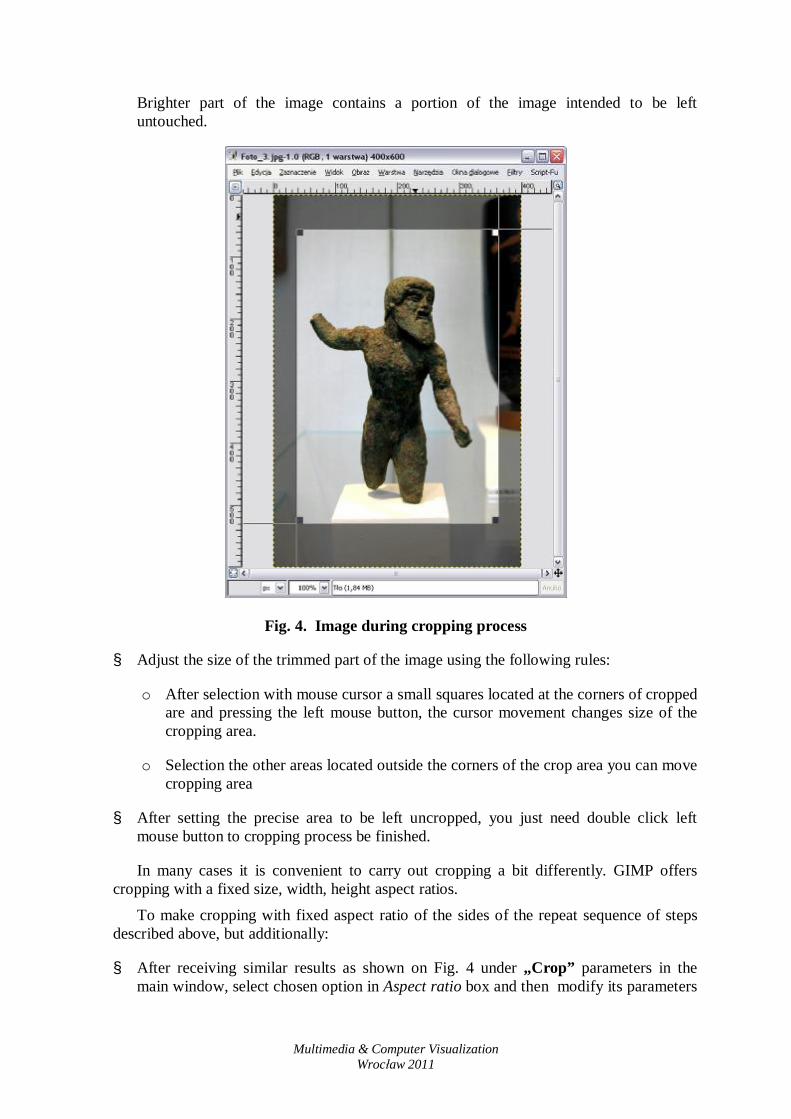
§ Place the mouse cursor around the top left corner of the image, press the left mouse button and drag it firmly toward the lower right corner. When you release the mouse button you should see a picture like on Figure 4. At the same time in the main window "Crop" options appear which display current parameters of the cropping process.
Multimedia & Computer Visualization
Wrocław 2011
Brighter part of the image contains a portion of the image intended to be left untouched.
Fig. 4. Image during cropping process
§ Adjust the size of the trimmed part of the image using the following rules:
o After selection with mouse cursor a small squares located at the corners of cropped are and pressing the left mouse button, the cursor movement changes size of the cropping area.
o Selection the other areas located outside the corners of the crop area you can move cropping area
§ After setting the precise area to be left uncropped, you just need double click left mouse button to cropping process be finished.
In many cases it is convenient to carry out cropping a bit differently. GIMP offers cropping with a fixed size, width, height aspect ratios.
To make cropping with fixed aspect ratio of the sides of the repeat sequence of steps described above, but additionally:
§ After receiving similar results as shown on Fig. 4 under „Crop” parameters in the main window, select chosen option in Aspect ratio box and then modify its parameters
Multimedia & Computer Visualization
Wrocław 2011
accordingly (for best results type them using keyboard) and then double click mouse button on the image.
§ Don’t forget to tick checkbox Fixed in the main window next to Aspect ratio box
After completion of these activities - a crop window will have fixed proportions of the sides, regardless of its size and position. The possibility of cropping with a constant proportion of the sides is extremely useful when trimming photographs before making prints on paper. The prints are made in photo labs in fixed formats such as 9 x 13 cm, 10 x 15 cm, 13 x 18 cm. Therefore it is a must to calculate aspect ratio after selection a size to print and then make a crop with a rectangle of chosen proportions.
You must also remember that the print machines in photo labs can also do automatically cropping and trimming, but these operations are performed according to the lab settings. Typically, the print obtained from a photo lab is a little smaller than the delivered one. So the original image should cropped a bit more than we expect to obtain on the printed one.
To crop the image with a fixed size of the sides you must do the following:
§ After receiving similar results as shown on Fig. 4 under „Crop” parameters in the main window, select Size in Aspect ratio box and then modify output image size by typing in values in the box and then double click mouse button on the image
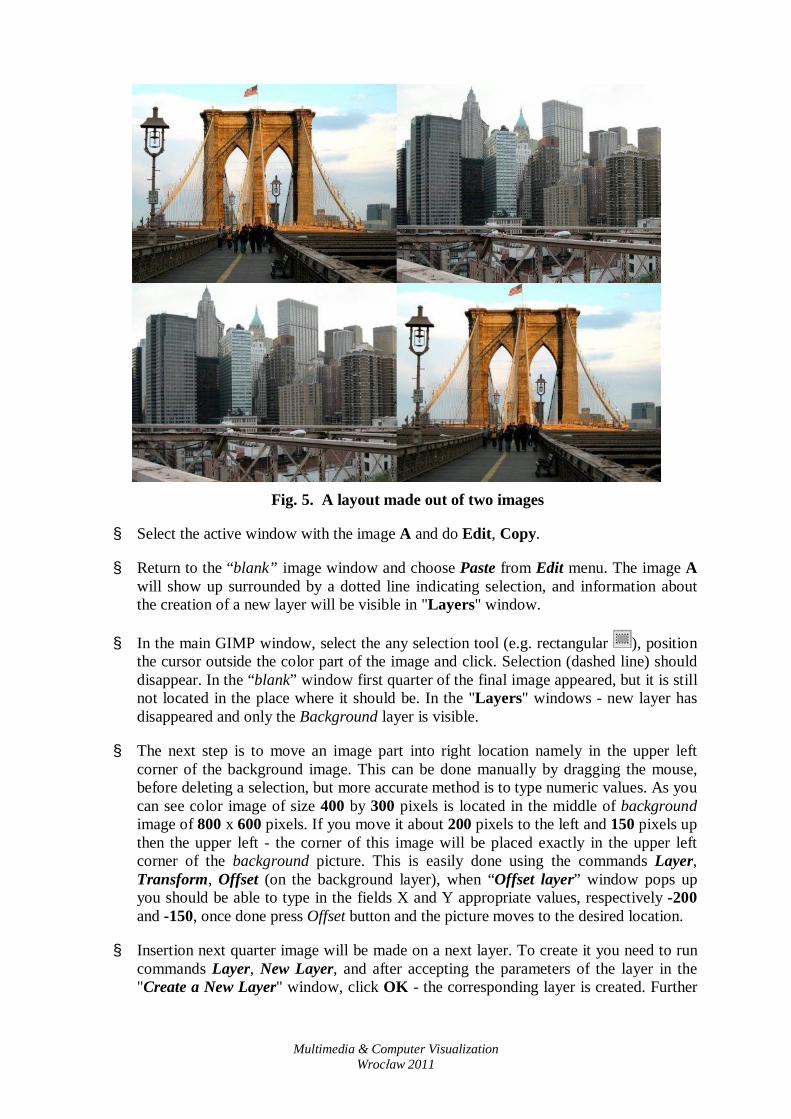
• Combining several images, working with layers
This time the task is somewhat more complicated. You have two source images saved as the files Foto_5.jpg and Foto_4.jpg marge into a layout shown on Fig. 5.
It is assumed that the image from Fig. 5 has a resolution of 800 by 600 pixel and its quarters are 400 by 300 pixels. In addition, the individual image quadrants neither can overlap, nor can be gaps between them.
Implementation the tasks will be divided into two stages. In the first stage will be prepared
two small images resolution 400 x 300 pixels. The second stage will involve deployment of smaller images on canvas size 800 x 600 pixels. Steps to perform are roughly as follows:
§ By means of cropping and scaling operations of the source images Foto_5.jpg and Foto_4.jpg create two new images with a resolution of 400 x 300 pixels and save these images in files named for example A.jpg and B.jpg.
§ Perform a sequence of commands File, New to create a new "blank" image with a resolution of 800 x 600 pixels.
§ Run Open command to open images saved in files A.jpg and B.jpg.
§ Select the window with „blank” image. Now you can already see additional window with layers parameters, which presents so called layers layout that the image is consisted of. Layers can be interpreted as overlapping foils with different image elements. After highlighting a set of such foils we could the image that is being a superposition of images located at each layer. For now, the image resolution of 800 x 600 pixels consists of only one layer filled with the background color.
Multimedia & Computer Visualization
Wrocław 2011
Fig. 5. A layout made out of two images
§ Select the active window with the image A and do Edit, Copy.
§ Return to the “blank” image window and choose Paste from Edit menu. The image A will show up surrounded by a dotted line indicating selection, and information about the creation of a new layer will be visible in "Layers" window.
§ In the main GIMP window, select the any selection tool (e.g. rectangular ), position the cursor outside the color part of the image and click. Selection (dashed line) should disappear. In the “blank” window first quarter of the final image appeared, but it is still not located in the place where it should be. In the "Layers" windows - new layer has disappeared and only the Background layer is visible.
§ The next step is to move an image part into right location namely in the upper left corner of the background image. This can be done manually by dragging the mouse, before deleting a selection, but more accurate method is to type numeric values. As you can see color image of size 400 by 300 pixels is located in the middle of background image of 800 x 600 pixels. If you move it about 200 pixels to the left and 150 pixels up then the upper left - the corner of this image will be placed exactly in the upper left corner of the background picture. This is easily done using the commands Layer, Transform, Offset (on the background layer), when “Offset layer” window pops up you should be able to type in the fields X and Y appropriate values, respectively -200 and -150, once done press Offset button and the picture moves to the desired location.
§ Insertion next quarter image will be made on a next layer. To create it you need to run commands Layer, New Layer, and after accepting the parameters of the layer in the "Create a New Layer" window, click OK - the corresponding layer is created. Further
Multimedia & Computer Visualization
Wrocław 2011
investigation is analogous to the previous one. Please copy and paste the next quarter of the image and then move it into desired location.
§ Repeating the same steps for the other two quarters of the image we can obtain the picture that will look like the one on Fig. 5. However, each quarter will be located still on a separate layer (see "Layers" box). To merge the layers, you must now execute commands Image, Flatten the image and all layers will be merged into the background.
§ The result should be saved to a file in JPEG format.
• Making selection and working with selection
Selection is one of the most important steps in the process of editing digital images. It is aim is to select part of the image. The shape of the selected area can be almost arbitrary. We can name the following basic selection features:
• Selected area is surrounded with dashed line.
• If the selection is done all further operations (e.g. painting with a brush) will cover only a selected part.
• Selection can be removed at any time.
• Selection can be inversed (unchecked part of the image becomes a selection).
• Selections can be transformed (moved, scaled, rotated), copied and pasted.
• The edge of the selection may be blurred GIMP offers several tools to perform selections. You can select areas of rectangular,
elliptical, determined by the color of the area, or mouse stroke. You can also create very carefully almost arbitrarily complex selection mechanism using the so-called paths.
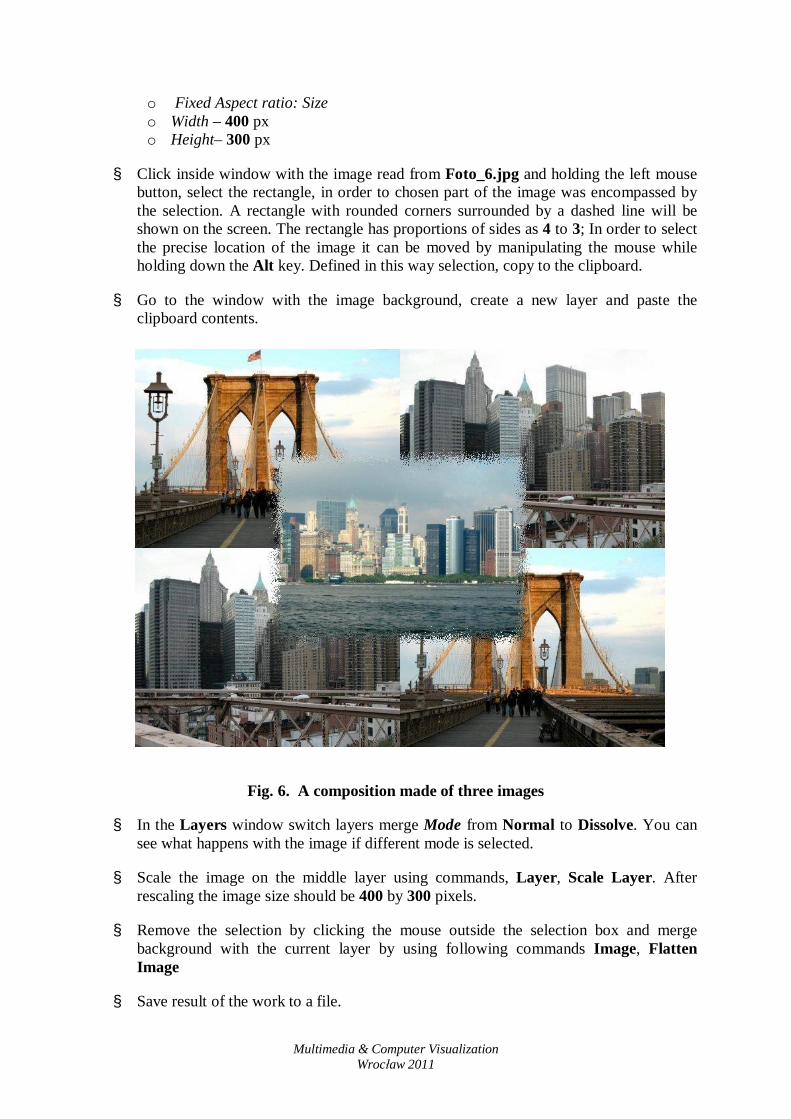
The last task in this exercise involves rectangular areas selection technique and image fragments selection. In view of the fact that almost all the properties of the rectangle selection are alike in other selections types, remaining tools will no longer be discussed in detail hereinafter. The task is to add to the image created and saved in the previous task, treated in this task as a background, a piece "cut" from the next image. Added image fragment should be 400 by 300 pixels, and to be positioned in the center of the image, have rounded corners and fuzzy edges. The result be similar the composition shown on Fig. 6 The task is not too complicated and action items are:
§ Open the image saved as a result of the previous task. It will be used as background image.
§ Open the image saved as file Foto_6.jpg.
§ In the main window, select the rectangle selection tool.
§ In the tool options choose the following parameters:
o Mode: Replace current selection, o Rounded corners, Radius – 30 o Feather edges, Radius – 30
Multimedia & Computer Visualization
Wrocław 2011
o Fixed Aspect ratio: Size o Width – 400 px o Height– 300 px
§ Click inside window with the image read from Foto_6.jpg and holding the left mouse button, select the rectangle, in order to chosen part of the image was encompassed by the selection. A rectangle with rounded corners surrounded by a dashed line will be shown on the screen. The rectangle has proportions of sides as 4 to 3; In order to select the precise location of the image it can be moved by manipulating the mouse while holding down the Alt key. Defined in this way selection, copy to the clipboard.
§ Go to the window with the image background, create a new layer and paste the clipboard contents.
Fig. 6. A composition made of three images
§ In the Layers window switch layers merge Mode from Normal to Dissolve. You can see what happens with the image if different mode is selected.
§ Scale the image on the middle layer using commands, Layer, Scale Layer. After rescaling the image size should be 400 by 300 pixels.
§ Remove the selection by clicking the mouse outside the selection box and merge background with the current layer by using following commands Image, Flatten Image
§ Save result of the work to a file.