mastering python networking - unknown.pdf - chadshare
TRANSCRIPT

Contents
1:ReviewofTCP/IPProtocolSuiteandPythonLanguageb'Chapter1:ReviewofTCP/IPProtocolSuiteandPythonLanguage'b'Theinternetoverview'b'TheOSImodel'b'Clientservermodels'b'Networkprotocolsuites'b'Pythonlanguageoverview'
2:Low-LevelNetworkDeviceInteractionsb'Chapter2:Low-LevelNetworkDeviceInteractions'b'ThechallengesofCLI'b'Constructingavirtuallab\xc3\x82\xc2\xa0'b'PythonPexpectLibrary'b'ThePythonParamikolibrary'b'Lookingahead'b'Summary'
3:APIandIntent-DrivenNetworkingb'Chapter3:APIandIntent-DrivenNetworking'b'InfrastructureasthePythoncode'b'TheCiscoAPIandACI'b'ThePythonAPIforJunipernetworks'b'TheAristaPythonAPI'b'Vendorneutrallibraries'b'Summary'
4:ThePythonAutomationFramework-AnsibleBasicsb'Chapter4:ThePythonAutomationFramework-AnsibleBasics'b'AquickAnsibleexample'b'TheadvantagesofAnsible'b'TheAnsiblearchitecture'b'Ansiblenetworkingmodules'b'TheAnsibleCiscoexample'b'TheAnsibleJuniperexample'b'TheAnsibleAristaexample'

b'Summary'5:ThePythonAutomationFramework-AnsibleAdvanceTopics
b'Chapter 5: The PythonAutomation Framework -AnsibleAdvanceTopics'b'Ansibleconditionals'b'Ansibleloops'b'Templates'b'Groupandhostvariables'b'TheAnsiblevault'b'TheAnsibleincludeandroles'b'Writingyourowncustommodule'b'Summary'
6:NetworkSecuritywithPythonb'Chapter6:NetworkSecuritywithPython'b'Thelabsetup'b'PythonScapy\xc3\x82\xc2\xa0'b'Accesslists'b'Thesyslogsearch'b'Othertools\xc3\x82\xc2\xa0'b'Summary'
7:NetworkMonitoringwithPython-Part1b'Chapter7:NetworkMonitoringwithPython-Part1'b'Labsetup'b'SNMP'b'Pythonvisualization'b'PythonforCacti'b'Summary'
8:NetworkMonitoringwithPython-Part2b'Chapter8:NetworkMonitoringwithPython-Part2'b'Graphviz'b'Flow-basedmonitoring'b'Elasticsearch(ELKstack)'b'Summary'
9:BuildingNetworkWebServiceswithPythonb'Chapter9:BuildingNetworkWebServiceswithPython'b'ComparingPythonwebframeworks\xc3\x82\xc2\xa0'b'Flaskandlabsetup'

b'IntroductiontoFlask'b'NetworkstaticcontentAPI'b'Networkdynamicoperations'b'Security'b'Additionalresources'b'Summary'
10:OpenFlowBasicsb'Chapter10:OpenFlowBasics'b'Labsetup'b'IntroducingOpenFlow'b'Mininet'b'TheRyucontrollerwithPython'b'Layer2OpenFlowswitch'b'ThePOXcontroller'b'Summary'
11:AdvancedOpenFlowTopicsb'Chapter11:AdvancedOpenFlowTopics'b'Setup'b'OpenFlowoperations\xc3\x82\xc2\xa0withRyu'b'Packetinspection'b'Staticrouter'b'RouterwithAPI'b'BGProuterwithOpenFlow'b'FirewallwithOpenFlow'b'Summary'
12:OpenStack,OpenDaylight,andNFVb'Chapter12:OpenStack,OpenDaylight,andNFV'b'OpenStack\xc3\x82\xc2\xa0'b'OpenDaylight'b'Summary'
13:HybridSDNb'Chapter13:HybridSDN'b'Preparingthenetwork\xc3\x82\xc2\xa0'b'Greenfielddeployment'b'Controllerredundancy'b'BGPmigrationexample'b'MoreBGPexample'

b'Monitoringintegration'b'SecureTLSconnection'b'Physicalswitchselection'b'Summary'

Chapter 1. Review of TCP/IP Protocol Suite and PythonLanguage
This book assumes that you have the basic understandings of networkingprotocolsandthePythonlanguage.Inmyexperience,atypicalsystem,networkengineer, or developermight not remember the exactTCP statemachine on adailybasis(IknowIdon't),buthe/shewouldbefamiliarwiththebasicsoftheOSImodel,theTCPandUDPoperations,IPheaders,andmoresuch.
Thischapterwilldoaveryquickrevisionontherelevantnetworkingtopics.Inthesameview,wewillalsodoahigh-levelreviewonthePythonlanguage,justenoughso that readerswhodonotcode inPythononadailybasiscanhaveagroundtowalkonfortherestofthebook.Â
Specifically,wewillcoverthefollowingtopics:
TheinternetoverviewTheOSIandclient-serverModelTCP,UDP,IPprotocolÂSuitesPythonsyntax,types,operators,andloopsExtendingPythonwithfunctions,classes,andpackages
Worrynot ifyoufeelyouneedfurther information,asbynomeansdoI thinkthe information presented in this chapter is exhaustive. Do check out thereferencesectionforthischaptertoreadmoreonyourtopicofinterest.Â

Theinternetoverview
What is the internet? This seemingly easy question might receive differentanswersdependingonyourbackground.The internetmeansdifferent things todifferent people, the young, the older, the student, the teacher, the businessperson,apoet,allcouldhaveadifferentanswertothequestion.Â
To a network engineer and systems engineer by extension, the internet is aglobal computer network providing a variety of information. This globalcomputernetworksystemisactuallyawebofinternetworkconnectinglargeandsmallnetworkstogether.Imagineyourhomenetwork;itwillconsistofahomeswitchÂconnectingyoursmartÂphone,tablet,computers,andTVtogether,sotheycancommunicatewitheachother.Then,whenitneedstocommunicatetotheoutsideworld,itpassestheinformationontothehomerouterthatconnectsyourhomenetworktoalargernetwork,oftenappropriatelycalledtheInternetServiceProvider (ISP).Your ISPoftenconsistsof edgenodes that aggregatethe traffic to theircorenetwork.Thecorenetwork'sfunction is to interconnecttheseedgenetworksviaahigherspeednetwork.Atspecialedgenodes,yourISPisconnectedtootherISPstopassyourtrafficappropriatelytoyourdestination.The returnpath fromyourdestination toyourhomecomputer, tablet,or smartphonemayormaynotfollowthesamepaththroughallofthesenetworksbacktoyourscreen.Â
Let'stakealookatthecomponentsmakingupthiswebofnetworks.Â
Servers,hosts,andnetworkcomponents
Hostsareendnodesonthenetworksthatcommunicatetoothernodes.Intoday'sworld,aÂhostcanbe the traditionalcomputer,or itcanbeyoursmartphone,tablet,orTV.WiththeriseofInternetofThings(IoT),thebroaddefinitionofhost can be expanded to include IP camera, TV set-top boxes, and the ever-increasingtypeofsensorsthatweuseinagriculture,farming,automobiles,andmore.Withtheexplosionofthenumberofhostsconnectedtotheinternet,allofthem need to be addressed, routed, andmanaged, and the demand for propernetworkinghasneverbeengreater.Â

Most of the time when we are on the internet, we request for services. Theservice canbe awebpage, sendingor receiving emails, transferring files, andsuch.Theseservicesareprovidedbyservers.Asthenameimplies,theyprovideservices to multiple nodes and generally have higher levels of hardwarespecification because of it. In a way, servers are special super nodes on thenetworkthatprovideadditionalcapabilitiestoitspeers.Wewilllookatserverslateronintheclient-serversection.Â
Ifonethinksofserversandhostsascitiesandtowns,thenetworkcomponentsare the roads and highways to connect them together. In fact, the term"information superhighway" comes to mind when describing the networkcomponentsthattransmittheeverincreasingbitsandbytesacrosstheglobe.IntheOSImodel thatwewill lookat inabit, thesenetworkcomponentsare theroutersandswitchesthatresideonlayertwoandthreeof themodelaswellasthe layer on fiber optics cable, coaxial cable, twisted copper pairs, and someDWDMequipment,tonameafew.Â
Collectively,thehosts,servers,andnetworkcomponentsmakeuptheinternetasweknowtoday.Â
Theriseofdatacenter
Inthelastsection,welookedatdifferentrolesthatservers,hosts,andnetworkcomponentsplay in the internetwork.Becauseof thehigherhardwarecapacitythattheserversdemand,theyareoftenputtogetherinacentrallocation,sotheycan be managed more efficiently. We will refer to these locations asdatacenters.Â
Enterprisedatacenters
Inatypicalenterprise,thecompanygenerallyhastheneedforinternaltoolssuchase-mails,documentstorage,salestracking,ordering,HRtools,andknowledgesharing intranet. These terms translate into file and mail servers, databaseservers, andweb servers.Unlike user computers, these are generally high-endcomputers that require higher power, cooling, and network connection. Abyproduct of the hardware is also the amount of noise they make. They aregenerally placed in a central location called theMain Distribution Frame(MDF)intheenterprisetoprovidethenecessarypowerfeed,powerredundancy,

cooling,andnetworkspeed.
Toconnect to theMDF, theuser's traffic isgenerallyaggregatedata location,whichissometimescalledtheIntermediateDistributionFrame(IDF)beforethey are connected to theMDF. It is not unusual for the IDF-MDF spread tofollow the physical layout of the enterprise building or campus. For example,eachbuildingfloorcanconsistofanIDFthataggregatestotheMDFonanotherfloor. If theenterpriseconsistsof severalbuildings, furtheraggregationcanbedonebycombiningthebuildingtrafficbeforeconnectingthemtotheenterprisedatacenter.Â
The enterprise datacenters generally follow the three layers of access,distribution, and core. The access layer is analogous to the ports each userconnects to; theIDFcanbe thoughtofas thedistributionlayer,while thecorelayerconsistsoftheconnectiontotheMDFandtheenterprisedatacenters.Thisis,of course, ageneralizationof enterprisenetworksas someof themwillnotfollowthesamemodel.Â
Clouddatacenters
Withtheriseofcloudcomputingandsoftwareorinfrastructureasaservice,wecansaythatthedatacenterscloudprovidersbuildtheclouddatacenters.Becauseof the number of servers they house, they generally demand a much, muchhighercapacityofpower,cooling,networkspeed,andfeedthananyenterprisedatacenter.Infact,theclouddatacentersaresobigtheyaretypicallybuiltcloseto power sources where they can get the cheapest rate for power, withoutlosing toomuchduring transportationof thepower.Theycanalsobe creativewhen it comes to cooling down where the datacenter might be build in agenerallycoldclimate,sotheycanjustopenthedoorsandwindowstokeeptheserver runningata safe temperature.Anysearchenginecangiveyousomeoftheastoundingnumberswhenitcomestothescienceofbuildingandmanagingthese cloud datacenters for the likes of Amazon, Microsoft, Google, andFacebook:Â

ÂUtahDataCenter(source:Âhttps://en.wikipedia.org/wiki/Utah_Data_Center)
Theservicesthattheserversatdatacentersneedtoprovidearegenerallynotcostefficient to be housed in any single server. They are spread among a fleet ofservers, sometimes across many different racks to provide redundancy andflexibility for service owners. The latency and redundancy requirements put atremendousamountofpressureonthenetwork.Thenumberofinterconnectionequates to an explosive growth of network equipment; this translates into thenumberof times thesenetworkequipmentneed tobe racked,provisioned,andmanaged.
ÂCLOSNetwork(source:Âhttps://en.wikipedia.org/wiki/Clos_network)
Inaway,theclouddatacenteriswherenetworkautomationbecomesanecessity.If we follow the traditional way of managing the network devices via aTerminalandcommand-lineinterface,thenumberofengineeringhoursrequired

wouldnotallowtheservicetobeavailableinareasonableamountoftime.Thisisnottomentionthathumanrepetitioniserrorprone,inefficient,andaterriblewasteofengineeringtalent.Â
TheclouddatacenteriswheretheauthorstartedhispathofnetworkautomationwithPythonanumberofyearsago,andneverlookedbacksince.Â
Edgedatacenters
If we have sufficient computing power at the datacenter level, why keepanything anywhere elsebut at thesedatacenters?All the connectionsÂwill berouted back to the server providing the service, andwe can call it a day.Theanswer, of course, depends on the use case. The biggest limitation in routingback the request and session all theway back to the datacenter is the latencyintroducedinthetransport.Inotherwords,networkisthebottleneck.Asfastaslight travels in a vacuum, the latency is still not zero. In the real world, thelatencywould bemuch higherwhen the packet is traversing throughmultiplenetworksandsometimesthroughunderseacable,slowsatellitelinks,3Gor4Gcellularlinks,orWi-Ficonnections.Â
Thesolution?Reducethenumberofnetworkstheenduser traversethroughasmuchaspossiblebyone.Beasdirectlyconnected to theuseraspossible;andtwo:placeenoughresourcesattheedgelocation.Imagineifyouarebuildingthenext generation of video streaming service. In order to increase customersatisfactionwithasmoothstreaming,youwouldwanttoplacethevideoserverasclosetothecustomeraspossible,eitherinsideorveryneartothecustomer'sISP.Also,theupstreamofmyvideoserverfarmwouldnotjustbeconnectedtooneortwoISPs,butalltheISPsthatIcanconnecttowithasmuchbandwidthasneeded.ThisgaverisetothepeeringexchangesedgedatacentersofbigISPandcontentproviders.Evenwhenthenumberofnetworkdevicesarenotashighastheclouddatacenters,theytoocanbenefitfromnetworkautomationintermsofthe increased security andvisibility automationbrings.Wewill cover securityandvisibilityinlaterchaptersofthisbook.Â

TheOSImodel
No network book seems to be complete without first going over the OpenSystemInterconnection(OSI)model.Themodelisaconceptionalmodelthatcomponentizesthetelecommunicationfunctionsintodifferentlayers.Themodeldefinessevenlayers,andeachlayersitsindependentlyontopofanotherone,aslong as they follow defined structures and characteristics. For example, thenetworklayer,suchasIP,cansitontopofdifferenttypeofdatalinklayersuchas the Ethernet or frame relay. The OSI reference model is a good way tonormalizedifferentanddiversetechnologiesintoasetofcommonlanguagethatpeoplecanagreeon.Thisgreatly reduces thescopeforpartiesworkingon theindividual layers and allows them togo indepthon the specific taskswithoutworryingaboutcompatibility:
OSIModel(source:https://en.wikipedia.org/wiki/OSI_model)
TheOSImodelwasinitiallyworkedoninthelate1970'sandlateronpublishedjointlyby theInternationalOrganizationforStandardization (ISO)and thenow calledTelecommunication StandardizationSector of the InternationalTelecommunication Union (ITU-T). It is widely accepted and commonlyreferredtowhenintroducinganewtopicintelecommunication.Â
Around the same timeperiodof theOSImodeldevelopment, the internetwastaking shape.The referencewhichmodel they used is often referred to as theTCP/IPmodel since theTransmissionControlProtocol (TCP) and InternetProtocol(IP),becauseoriginally,thiswaswhattheprotocolsuitescontained.Itissomewhatsimilar to theOSImodel in thesense that theydivide theend-to-

enddatacommunication intoabstraction layers.What isdifferent is themodelcombinedlayers5to7intheOSImodelintotheÂApplicationlayerwhilethePhysicalandDatalinklayersarecombinedintotheLinklayer:
Internet Protocol Suite(source:Âhttps://en.wikipedia.org/wiki/Internet_protocol_suite)
Both the OSI and TCP/IP models are useful in providing a standard forproviding an end-to-end data communication.However, for themost part, wewillrefertotheTCP/IPmodelmoresincethatiswhattheinternetwasbuilton.Wewill specify theOSImodelwhenneeded, suchaswhenwearediscussingthewebframeworkintheupcomingchapters.Â

Clientservermodels
The reference models demonstrated a standard way for data communicationbetweentwonodes.Ofcoursebynow,weallknowthatnotallnodesarecreatedequally.Even in itsDARPA-netdays, therewereworkstationnodes,and therewere nodes with the purpose of serving content to other nodes. These unitstypicallyhavehigherhardwarespecificationandaremanagedmorecloselybytheengineers.Since thesenodesprovide resourcesandservices toothers, theyaretypicallyreferredtoasservers.Theserversaretypicallysittingidle,waitingfor clients to initiate requests for its resources. This model of distributedresources that are "asked for" by the client is referred to as the Client-servermodel.Â
Why is this important? If you think about it for a minute, the importance ofnetworking is really based on this Client-servermodel.Without it, there isreallynotalotofneedfornetworkinterconnections.Itistheneedtotransferbitsandbytesfromclienttoserverthatshinesalightontheimportanceofnetworkengineering.Ofcourse,weareallawareofhowthebiggestnetworkofthemall,theinternet,istransformingthelivesofallofusandcontinuingtodoso.
How, you asked, can each node determine the time, speed, source, anddestination each time they need to talk to each other? This brings us to thenetworkprotocols.Â

Networkprotocolsuites
In the early days of computer networking, the protocolswere proprietary andcloselycontrolledbythecompanywhodesignedtheconnectionmethod.Ifyouare using Novell's IPX/SPX protocol in your hosts, you will not able tocommunicatewithApple'sAppleTalk hosts and vice versa.These proprietaryprotocolsuitesgenerallyhaveanalogouslayerstotheOSIreferencemodelandfollow the client-server communicationmethod. They generallywork great in Local Area Networks (LAN) that are closed without the need tocommunicatewiththeoutsideworld.WhenthetrafficdoneedtomovebeyondlocalLAN,typicallyaninternetworkdevice,suchasarouter,isusedtotranslatefromoneprotocoltoanothersuchasbetweenAppleTalktoIP.Thetranslationisusually not perfect, but since most of the communication happens within theLAN,itisokay.Â
However, as the need for internetwork communication rises, the need forstandardizing the network protocol suites becomes greater. These proprietaryprotocolseventuallygavewaytothestandardizedprotocolsuitesofTCP,UDP,andIPthatgreatlyenhancedtheabilityfromonenetworktotalktoanother.Theinternet, thegreatest networkof themall, relies on theseprotocols to functionproperly. In thenext few sections,wewill take a look at eachof theprotocolsuites.Â
TheTransmissionControlÂProtocol(TCP)
TheTransmissionControlProtocol (TCP) isoneof themainprotocolsusedontheinternettoday.Ifyouhaveopenedawebpageorhavesentane-mail,youhave come across the TCP protocol. The protocol sits at layer 4 of the OSImodel,anditisresponsiblefordeliveringÂthedatasegmentbetweentwonodesin a reliable and error-checkedmanner. TheTCP consists of a 128-bit headerconsists of, among others, source and destination port, sequence number,acknowledgmentnumber,controlflags,andchecksum:Â

 TCP Header(source:https://en.wikipedia.org/wiki/Transmission_Control_Protocol)
FunctionsandCharacteristicsofTCP
TCPusesdatagramsocketsorports toestablishahost-to-hostcommunication.The standard body called Internet Assigned Numbers Authority (IANA)designates well-known ports to indicate certain services, such as port 80 forHTTP(web)andport25forSMTP(mail).Theserverintheclient-servermodeltypically listens on one of these well-known ports in order to receivecommunicationrequestsfromtheclient.TheTCPconnectionismanagedbytheoperating system by the socket that represents the local endpoint forconnection.Â
Theprotocoloperationconsistofastatemachine,where themachineneeds tokeep track of when it is listening for incoming connection, duringcommunication session, as well as releasing resources once the connection isclosed. Each TCP connection goes through a series of states such as Listen,SYN-SENT,SYN-RECEIVED,ESTABLISHED,FIN-WAIT,CLOSE-WAIT,CLOSING,LAST-ACK,TIME-WAIT,andCLOSED.Â
TCPmessagesanddatatransfer
The biggest difference between TCP and User Datagram Protocol (UDP),whichisitsclosecousinatthesamelayer,isthatittransmitsdatainanorderedand reliable fashion. The fact that the operation guarantees delivery oftenreferred to TCP as a connection-oriented protocol. It does this by firstestablishing a three-way handshake to synchronize the sequence numberbetweenthetransmitterandthereceiver,SYN,SYN-ACK,andACK.Â

The acknowledgement is used to keep track of subsequent segments in theconversation.Finallyat theendof theconversation,onesideÂwillsendaFINmessage,theothersidewillACKtheFINmessageaswellassendaFINmessageofitsown.TheFINinitiatorwillthenACKtheFINmessagethatitreceived.Â
As many of us who have troubleshot a TCP connection can tell you, theoperationcangetquitecomplex.Onecancertainlyappreciate thatmostof thetime,theoperationjusthappenssilentlyinthebackground.Â
Awhole book can bewritten about theTCPprotocol; in fact,many excellentbookshavebeenwrittenontheprotocol.
Note
As this section is a quick overview, if interested, The TCP/IPGuide is an excellent free source to dig deeper into thesubject.Â
UserDatagramÂProtocol(UDP)
UDPÂisalsoacorememberof the internetprotocolsuite.LikeTCP, it isonlayer 4 of the OSI model that is responsible for delivering data segmentsbetweentheapplicationandtheIPlayer.UnlikeTCP,theirheaderisonly32-bitthat only consists of source and destination port, length, and checksum. Thelightweight header makes it ideal for the application to prefer a faster datadeliverywithoutsettingupthesessionbetweentwohostsorneedingareliabledelivery of data. Perhaps it is hard to imagine in today's fast internetconnections, but the extra header made a big difference in the speed oftransmission in the early days of X.21 and frame relay links. Although asimportantasthespeedsave,ÂnothavingtomaintainvariousstatessuchasTCPalsosavescomputeresourcesonthetwoendpoints.Â
UDPHeaderÂ(source:https://en.wikipedia.org/wiki/User_Datagram_Protocol)

YoumightÂnowwonderÂwhyUDPwaseverusedatall in themodernage;giventhelackofreliabletransmission,wouldn'twewantalltheconnectionstobe reliable and error free? If one thinks about some of the multimedia videostreaming or Skype call, those applications will benefit from a lighter headerwhen the application just wants to deliver the datagram as fast as possible.YouÂcanalsoconsidertheDNSlookupprocess.Whentheaddressyoutypeinon the browser is translated into a computer understandable address, the userwillbenefitfromthelightweightprocesssincethishastohappen"before"eventhefirstbitofinformationisdeliveredtoyoufromyourfavoritewebsite.Â
Again, this section does not do justice to the topic ofUDP, and the reader isencouragedtoexplorethetopicthroughvariousresourcesifhe/sheisinterestedinlearningmoreaboutUDP.Â
TheInternetÂProtocolÂ(IP)
Asnetworkengineerswould tellyou,networkengineers"live"at the IP layer,which is layer3on theOSImodel.IPÂhas the jobofaddressingand routingbetween end nodes, among others. The addressing of IP is probably its mostimportantjob.Theaddressspaceisdividedintotwoparts:thenetworkandthehostportion.Thesubnetmaskindicatedwhichportionintheaddressconsistofthe network and which is the host. Both IPv4, and later, IPv6 expresses theaddressinthedottednotation,forexample192.168.0.1.Thesubnetmaskcaneitherbeinadottednotation(255.255.255.0)oruseaforwardslashtoexpressthenumberofbitsthatshouldbeconsideredinthenetworkbit(/24).Â
IPv4Header(source:https://en.wikipedia.org/wiki/IPv4)
TheIPv6header,nextgenerationofIPheaderofIPv4,hasafixedportionand

variousextensionheaders.Â
IPv6FixedHeader(source:https://en.wikipedia.org/wiki/IPv6_packet)
TheNext Header field in the fixed header section can indicate an extensionheadertobefollowedthatcarriesadditionalinformation.Theextensionheaderscanincluderoutingandfragmentinformation.Asmuchastheprotocoldesignerwould like tomove from IPv4 to IPv6, the internet today is still prettymuchaddressedwithIPv4.Â
TheIPNATandsecurity
NetworkAddressTranslation (NAT) is typicallyusedfor translatingarangeof private IPv4 addresses to publicly routable IPv4 addresses. But it can alsomeanatranslationbetweenIPv4toIPv6,suchasatacarrieredgewhentheyuseIPv6insideofthenetworkthatneedstobetranslatedtoIPv4,whenthepacketleavesthenetwork.Sometimes,NAT6to6isusedaswellforsecurityreasons.Â
Security is a continuous process that integrates all the aspects of networking,includingautomationandPython.ThisbookaimsatusingPython tohelpyoumanage the network; securitywill be addressed as part of the chapter such asusingSSHv2overtelnet.WewillalsolookathowwecanusePythonandothertoolchainstogainvisibilityinthenetwork.Â
IProutingconcepts
Inmyopinion,IProutingisabouthavingtheintermediatedevicesbetweenthetwoendpointtransmitthepacketsbetweenthembasedtheIPheader.Foreverycommunication on the internet, the packet will traverse through various

intermediatedevices.Asmentioned,theintermediatedevicesconsistofrouters,switches,opticalgears,andvariousothergearsthatdonotexaminebeyondthenetwork and transport layer. In a road trip analogy, you might travel in theUnitedStates fromthecityofSanDiego inCalifornia to thecityofSeattle inWashington. The IP source address is analogous to San Diego and thedestinationIPaddresscanbethoughtofasSeattle.Onyourroadtrip,youwillstopbymanydifferentintermediatespots,suchasLosAngeles,SanFrancisco,andPortland;Âthesecanbethoughtofastheroutersandswitchesbetweenthesourceanddestination.Â
Whywasthisimportant?Inaway,thisbookisaboutmanagingandoptimizingthese intermediatedevices. In the ageofmegadatacenters that span sizesofmultipleAmericanfootballfields,theneedforefficient,agile,costeffectivewayto manage the network becomes a major point of competitive advantage forcompanies. In the future chapters, we will dive into how we can use Pythonprogrammingtoeffectivelymanagethenetwork.Â

Pythonlanguageoverview
Inanutshell,thisbookisaboutmakingourliveseasierwithPython.ButwhatisPythonandwhyisitthelanguageofchoicebymanyDevOpsengineers?Inthewords of the Python Foundation Executive
SummaryÂ(https://www.python.org/doc/essays/blurb/):
"Python is an interpreted, object-oriented, high-level programminglanguage with dynamic semantics. Its high-level, built-in data structure,combined with dynamic typing and dynamic binding, makes it veryattractive for Rapid Application Development, as well as for use as ascripting or glue language to connect existing components together.Python'ssimple,easy-to-learnsyntaxemphasizesreadabilityandthereforereducesthecostofprogrammaintenance."
If you are somewhat new to programming, the object-oriented, dynamicsemanticsprobablydoesnotmeanmuchtoyou.ButIthinkwecanallagreeonRapid applicationdevelopment, simple, and easy-to-learn syntax sounds like agood thing. Python as an interpreted language means there is no compilationprocessrequired,sothespeedofwrite, test,andeditoftheprogramprocessisgreatlyincreased.Forsimplescripts,ifyourscriptfails,afewprintstatementisusually all you need to debug what was going on. Using the interpreter alsomeans that Python is easily ported to different type of operating systems andPythonprogramwrittenonWindowscanbeusedonLinuxandMac.Â
The object-oriented nature encourages code reuse by breaking into simplereusableformsuchmodulesandpackages.Infact,allPythonfilesaremodulesthatcanbereusedorimportedinanotherPythonprogram.Thismakesiteasytoshareprogramsamongengineers andencouragecode reuse.Pythonalsohas abatteries includedmantra, whichmeans that for common tasks, you need notdownloadanyadditional code. Inorder to achieve thiswithout thecodebeingtoobloated, a setof standard libraries is installedwhenyou install thePythoninterpreter. For common tasks such as regular expression, mathematicsfunctions, and JSON decoding, all you need is the import statement, and theinterpreterwillmove those functions intoyour program.This iswhat IwouldconsideroneofthekillerfeaturesofthePythonlanguage.Â

Lastly,thefactthatPythoncodecanstartinarelativelysmall-sizedscriptwithafew lines of code and grow into a fully production system is very handy fornetwork engineers. As many of us know, the network typically growsorganicallywithoutamasterplan.Alanguagethatcangrowwithyournetworkin size is invaluable. You might be surprised to see a language that wasdeemed as scripting language by many, which was being used for fullyproduction systems (Organizations using Python,https://wiki.python.org/moin/OrganizationsUsingPython).
Ifyouhaveeverworkedinanenvironmentwhereyouhavetoswitchbetweenworking on different vendor platforms, such as Cisco IOS and Juniper Junos,youknowhowpainfulitistoswitchbetweensyntaxandusagewhentryingtoachieve the same task.WithPythonbeing flexible enough for large and smallprograms,thereisnosuchcontextswitching,becauseitisjustPython.Â
Fortherestofthechapter,wewilltakeahigh-leveltourofthePythonlanguageforabitofa refresher. Ifyouarealready familiarwith thebasics, feel free toquicklyscanthroughitorskiptherestofthechapter.Â
Pythonversions
At the time of writing this book in early 2017, Python is going through atransition period of moving from Python version 2 to Python version 3.UnfortunatelyPython3isnotbackwardcompatiblewithPython2.WhenIsaytransition,keepinmindthatPython3wasreleasedbackin2008,overnineyearsago with active development with the most recent release of 3.6. The latestPython 2.x release, 2.7, was released over six years ago in mid 2010.Fortunately, both version can coexist on the samemachine. Personally, I usePython 2 as my default interpreter when I type in Python at the CommandPrompt,andIusePython3whenIneed tousePython3.More information isgiven in the next section about invoking Python interpreter, but here is anexampleofinvokingPython2andPython3ontheUbuntuLinuxmachine:Â
echou@pythonicNeteng:~$python
Python2.7.12(default,Nov192016,06:48:10)
[GCC5.4.020160609]onlinux2
Type"help","copyright","credits"or"license"for
moreinformation.
>>>exit()

echou@pythonicNeteng:~$python3
Python3.5.2(default,Nov172016,17:05:23)
[GCC5.4.020160609]onlinux
Type"help","copyright","credits"or"license"for
moreinformation.
>>>exit()
With the 2.7 release being end of life on extended support only for securityupdates,mostPythonframeworksarenowsupportingPython3.Python3alsohaslotsofgoodfeaturessuchasasynchronousI/Othatcanbetakenadvantageofwhenwe need to optimize our code.ÂThis bookwill use Python 3 for itscodeexamples.Â
If the particular library or the framework does not support Python 3, such asAnsible (they are activelyworking on porting to Python 3), itwill be pointedout,soÂyoucanusePython2instead.Â
Operatingsystem
As mentioned, Python is cross platform. Python programs can be run onWindows,Mac,andLinux.Inreality,certaincareneeds tobe takenwhenyouneed to ensure cross-platform compatibility, such as taking care of the subtledifference backslashes inWindows filenames. Since this book is forDevOps,systems,andnetworkengineers,Linuxisthepreferredplatformfortheintendedaudience,especially inproduction.Thecode in thisbookwillbe testedon theLinuxUbuntu16.06LTSmachine.IwillalsotrymybesttomakesurethecoderunsthesameonWindowsandtheMacplatform.Â
IfyouareinterestedintheOSdetails,theyareasfollows:Â
echou@pythonicNeteng:~$uname-a
LinuxpythonicNeteng4.4.0-31-generic#50-UbuntuSMP
WedJul1300:07:12UTC2016x86_64x86_64x86_64
GNU/Linux
echou@pythonicNeteng:~$
RunningaPythonprogram
Python programs are executed by an interpreter,whichmeans the code is fedthroughthisinterpretertobeexecutedbytheunderlyingoperatingsystem,and

results are displayed . There are several different implementation of theinterpreter by the Python development community, such as IronPython andJython. In this book, we will refer to the most common Python interpreter,CPython,whichisinusetoday.Â
One way you can use Python is by taking the advantage of the interactiveprompt.ThisisusefulwhenyouwanttoquicklytestapieceofPythoncodeorconcept without writing a whole program. This is typically done by simplytypinginthePythonÂkeyword:
Python3.5.2(default,Nov172016,17:05:23)
[GCC5.4.020160609]onlinux
Type"help","copyright","credits"or"license"for
moreinformation.
>>>print("helloworld")
helloworld
>>>
Note
Notice the parentheses around the print statement. In Python 3,the print statement is a function; therefore, it requires theparentheses.InPython2,youcanomittheparentheses.Â
The interactive mode is one of the Python's most useful features. In theinteractiveshell,youcantypeanyvalidstatementorsequenceofstatementsandimmediatelygetaresultback.ItypicallyusethistoexplorearoundafeatureorlibrarythatIamnotfamiliarwith.Talkaboutinstantgratification!Â
Note
OnWindows,ifyoudonotgetaPythonshellpromptback,youmightnothavetheprograminyoursystemsearchpath.ThelatestWindows Python installation program provides a check box foraddingPythontoyoursystempath;makesurethatwaschecked.Or you can add the program in the path manually by goingtoÂEnvironmentSettings.Â
A more common way to run the Python program, however, is to save yourPythonfileandrunviatheinterpreterafter.Thiswillsaveyoufromtypingthe

samestatementsoverandoveragainsuchasintheinteractiveshell.Pythonfilesarejustregulartextfilesthataretypicallysavedwiththe.pyextension.Inthe*Nix world, you can also add the shebang (#!) line on top to specify theinterpreter that isused torun thefile.The#Âcharactercanbeused tospecifycomments that will not be executed by the interpreter. The following file,helloworld.py,hasthefollowingstatements:
#Thisisacomment
print("helloworld")
Thiscanbeexecutedasfollows:
echou@pythonicNeteng:~/Master_Python_Networking/
Chapter1$pythonhelloworld.py
helloworld
echou@pythonicNeteng:~/Master_Python_Networking/
Chapter1$
Pythonbuilt-Intypes
Pythonhasseveralstandardtypesbuiltintotheinterpreter:Â
None:TheÂNullobjectNumerics:int,long,float,complex,andÂbool(ThesubclassofintwithTrueorFalsevalue)Sequences:str,list,tuple,andrangeMappings:dictSets:setandÂfrozenset
TheNonetype
TheNonetypedenotesanobjectwithnovalue.Thisisreturnedinfunctionsthatdo not explicitly return anything. The None type is also used in functionargumentstoerroroutifthecallerdoesnotpassinanactualvalue.Â
Numerics
Pythonnumericobjectsarebasicallynumbers.With theexceptionofBoolean,thenumerictypesofint,long,float,andcomplexareallsigned,meaningthey

canbepositiveornegative.Booleanisasubclassoftheintegerthatcanbeoneoftwovalues:Â1 forTrue,and0 forFalse.Therestof thenumerictypesaredifferentiatedbyhowprecisetheycanrepresentthenumber;forexample,intarewhole numbers with a limited range while long are whole numbers withunlimited range. Float are numbers using the double-precision representation(64-bit)onthemachine.Â
Sequences
Sequencesareorderedsetsofobjectswithanindexofnon-negativeintegers.Inthisandthenextfewsections,wewillusetheinteractiveinterpretertoillustratethedifferenttypes.Pleasefeelfreetotypealongonyourowncomputer.Â
Sometimesitsurprisespeoplethatstringisactuallyasequencetype.Butifyoulookclosely,stringsareseriesofcharactersputtogether.Stringsareenclosedbyeither single, double, or triple quotes. Note in the following examples, thequoteshavetomatch,andtriplequotesallowthestringtospandifferentlines:Â
>>>a="networkingisfun"
>>>b='DevOpsisfuntoo'
>>>c="""whataboutcoding?
...superfun!"""
>>>
Theothertwocommonlyusedsequencetypesarelistsandtuples.Listsarethesequence of arbitrary objects. Lists can be created by enclosing the objects insquarebrackets.Justlikestring,listsareindexedbynon-zerointegersthatstartatzero.Thevaluesoflistsareretrievedbyreferencingtheindexnumber:Â
>>>vendors=["Cisco","Arista","Juniper"]
>>>vendors[0]
'Cisco'
>>>vendors[1]
'Arista'
>>>vendors[2]
'Juniper'
Tuplesaresimilar to lists,createdbyenclosingthevalues inparentheses.Likelists,thevaluesinthetupleareretrievedbyreferencingitsindexnumber.Unlikelist,thevaluescannotbemodifiedaftercreation:

>>>datacenters=("SJC1","LAX1","SFO1")
>>>datacenters[0]
'SJC1'
>>>datacenters[1]
'LAX1'
>>>datacenters[2]
'SFO1'
Someoperationsarecommontoallsequencetypes,suchasreturninganelementbyindexaswellasslicing:Â
>>>a
'networkingisfun'
>>>a[1]
'e'
>>>vendors
['Cisco','Arista','Juniper']
>>>vendors[1]
'Arista'
>>>datacenters
('SJC1','LAX1','SFO1')
>>>datacenters[1]
'LAX1'
>>>
>>>a[0:2]
'ne'
>>>vendors[0:2]
['Cisco','Arista']
>>>datacenters[0:2]
('SJC1','LAX1')
>>>
Note
Remember that index starts at 0. Therefore, the index of 1 isactuallythesecondelementinthesequence.
Therearealsocommonfunctionsthatcanbeappliedtosequencetypes,suchascheckingthenumberofelementsandminimumandmaximumvalues:
>>>len(a)
17
>>>len(vendors)
3
>>>len(datacenters)

3
>>>
>>>b=[1,2,3,4,5]
>>>min(b)
1
>>>max(b)
5
Itwouldcomeasnosurprise that therearevariousmethods thatapplyonly tostrings.Itisworthnotingthatthesemethodsdonotmodifytheunderlyingstringdataitselfandalwaysreturnanewstring.Ifyouwanttousethenewvalue,youwouldneedtocatchthereturnvalueandassignittoadifferentvariable:
>>>a
'networkingisfun'
>>>a.capitalize()
'Networkingisfun'
>>>a.upper()
'NETWORKINGISFUN'
>>>a
'networkingisfun'
>>>b=a.upper()
>>>b
'NETWORKINGISFUN'
>>>a.split()
['networking','is','fun']
>>>a
'networkingisfun'
>>>b=a.split()
>>>b
['networking','is','fun']
>>>
Here are some of the common methods for a list. This list is a very usefulstructure in termsof puttingmultiple items in and iterating through them.Forexample,we canmake a list of datacenter spine switches and apply the sameaccess list to all of them by iterating through them one by one. Since a list'svalue can be modified after creation (unlike tuple), we can also expand andcontrasttheexistinglistaswemovealongtheprogram:Â
>>>routers=['r1','r2','r3','r4','r5']
>>>routers.append('r6')
>>>routers
['r1','r2','r3','r4','r5','r6']

>>>routers.insert(2,'r100')
>>>routers
['r1','r2','r100','r3','r4','r5','r6']
>>>routers.pop(1)
'r2'
>>>routers
['r1','r100','r3','r4','r5','r6']
Mapping
Pythonprovidesonemappingtypecalleddictionary.DictionaryiswhatIthinkofasaÂpoorman'sdatabase,becauseitcontainsobjectsthatcanbeindexedbykeys.This isoften referred toas theassociatedarrayorhashing table inotherlanguages.Ifyouhaveusedanyofthedictionary-likeobjectsinotherlanguages,youwillknowthisisapowerfultype,becauseyoucanrefertotheobjectbyareadablekey.Thiskeywillmakemoresenseforthepoorguywhoistryingtomaintainthecode,probablyafewmonthsafteryouwrotethecodeat2aminthemorning.Theobjectcanalsobeanotherdatatype,suchasalist.Youcancreateadictionarywithcurlybraces:Â
>>>datacenter1={'spines':['r1','r2','r3','r4']}
>>>datacenter1['leafs']=['l1','l2','l3','l4']
>>>datacenter1
{'leafs':['l1','l2','l3','l4'],'spines':['r1',
'r2','r3','r4']}
>>>datacenter1['spines']
['r1','r2','r3','r4']
>>>datacenter1['leafs']
['l1','l2','l3','l4']
Sets
A set is used to contain an unordered collection of objects. Unlike lists andtuples, setsareunorderedandcannotbe indexedbynumbers.But there isonecharacter thatmakes sets standout and useful: the elements of a set are neverduplicated.ImagineifyouhavealistofIPsthatyouneedtoputinanaccesslistof.TheonlyprobleminthislistofIPsisthat theyarefullofduplicates.Now,thinkabouthowyouwouldusealooptosortitoutfortheuniqueitems,thesetbuilt-intypewouldallowyoutoeliminatetheduplicateentrieswithjustonelineofcode.Tobehonest,Idonotusesetthatmuch,butwhenIneedit,Iamalways

verythankfulÂthisexists.Oncethesetorsetsarecreated,theycanbecomparedwitheachotheronesusingtheunion,intersection,anddifferences:Â
>>>a="hello"
>>>set(a)
{'h','l','o','e'}
>>>b=set([1,1,2,2,3,3,4,4])
>>>b
{1,2,3,4}
>>>b.add(5)
>>>b
{1,2,3,4,5}
>>>b.update(['a','a','b','b'])
>>>b
{1,2,3,4,5,'b','a'}
>>>a=set([1,2,3,4,5])
>>>b=set([4,5,6,7,8])
>>>a.intersection(b)
{4,5}
>>>a.union(b)
{1,2,3,4,5,6,7,8}
>>>1*
{1,2,3}
>>>
PythonoperatorsÂ
Python has the some numeric operators that you would expect; note thattheÂtruncatingdivision,(//,alsoknownasfloordivision)truncatestheresulttoanintegerandafloatingpointandreturntheintegervalue.Theintegervalueisreturned.Themodulo(%)operatorreturnstheremaindervalueinthedivision:Â
>>>1+2
3
>>>2-1
1
>>>1*5
5
>>>5/1
5.0
>>>5//2
2
>>>5%2

1
Therearealsocomparisonoperators:
>>>a=1
>>>b=2
>>>a==b
False
>>>a>b
False
>>>a<b
True
>>>a<=b
True
Wewill also see twoof thecommonmembershipoperators to seewhether anobjectisinasequencetype:Â
>>>a='helloworld'
>>>'h'ina
True
>>>'z'ina
False
>>>'h'notina
False
>>>'z'notina
True
Pythoncontrolflowtools
Theif,else, andelif statements control conditional code execution.Asonewouldexpect,theformatoftheconditionalstatementisasfollows:Â
ifexpression:
dosomething
elifexpression:
dosomethingiftheexpressionmeets
elifexpression:
dosomethingiftheexpressionmeets
...
else:
statement
Hereisasimpleexample:Â

>>>a=10
>>>ifa>1:
...print("aislargerthan1")
...elifa<1:
...print("aissmallerthan1")
...else:
...print("aisequalto1")
...
aislargerthan1
>>>
Thewhileloopwillcontinuetoexecuteuntiltheconditionisfalse,sobecarefulwiththisoneifyoudon'twanttocontinuetoexecute:Â
whileexpression:
dosomething
>>>a=10
>>>b=1
>>>whileb<a:
...print(b)
...b+=1
...
1
2
3
4
5
6
7
8
9
The for loopworkswith any object that supports iteration; thismeans all thebuilt-insequencetypessuchaslists,tuples,andstringscanbeusedinaforloop.The letter i in the following for loop is an iterating variable, so you cantypicallypicksomethingthatmakesensewithintheÂcontextofyourcode:Â
foriinsequence:
dosomething
>>>a=[100,200,300,400]
>>>fornumberina:
...print(number)
...

100
200
300
400
You can alsomakeyour ownobject that supports the iterator protocol andbeabletousetheforloopforthisobject:
Note
Constructingsuchanobject isoutside the scopeof thischapter,butit isausefulknowledgetohave;youcanreadmoreaboutithttps://docs.python.org/3/c-api/iter.html.
Pythonfunctions
Most of the time when you find yourself reusing some pieces of code, youshouldbreakupthecodeintoaself-containedchunkasfunctions.Thispracticeallows for bettermodularity, is easier tomaintain, and allows for code reuse.Python functions are defined using the def keyword with the function name,followed by the function parameters. The body of the function consists ofPythonstatements thatare tobeexecuted.At theendof the function,youcanchoose to return avalue to the function caller, or bydefault, itwill return theNoneobjectifyoudonotspecifyareturnvalue:Â
defname(parameter1,parameter2):
statements
returnvalue
Wewillseealotmoreexamplesoffunctioninthefollowingchapters,sohereisaquickexample:Â
>>>defsubtract(a,b):
...c=a-b
...returnc
...
>>>result=subtract(10,5)
>>>result
5
>>>

Pythonclasses
PythonisanObject-OrientedProgramming(OOP)language.ThewayPythoncreatesobjectsarewiththeclasskeyword.APythonobjectismostcommonlyacollectionoffunctions(methods),variables,andattributes(properties).Onceaclassisdefined,youcancreateinstancesofsuchaclass.Theclassservesastheblueprintofthesubsequentinstances.Â
Thetopicofobject-orientedprogrammingisoutsidethescopeofthischapter,sohereisasimpleexampleofarouterobjectdefinition:
>>>classrouter(object):
...def__init__(self,name,interface_number,
vendor):
...self.name=name
...self.interface_number=interface_number
...self.vendor=vendor
...
>>>
Once defined, you are able to create asmany instances of that class as you'dlike:Â
>>>r1=router("SFO1-R1",64,"Cisco")
>>>r1.name
'SFO1-R1'
>>>r1.interface_number
64
>>>r1.vendor
'Cisco'
>>>
>>>r2=router("LAX-R2",32,"Juniper")
>>>r2.name
'LAX-R2'
>>>r2.interface_number
32
>>>r2.vendor
'Juniper'
>>>
Of course, there is a lotmore to Python objects andOOP.Wewill seemoreexamplesinthefuturechapters.Â

Pythonmodulesandpackages
AnyPythonsourcefilecanbeusedasamodule,andanyfunctionsandclassesyou define in that source file can be re-used. To load the code, the filereferencing themoduleneeds touse the importkeyword.Three thingshappenwhenthefileisimported:Â
1. The file creates a new namespace for the objects defined in the sourcefile.Â
2. ThecallerÂexecutesallthecodecontainedinthemodule.Â3. The file creates a namewithin the caller that refers to themodule being
imported.Thenamematchesthenameofthemodule.Â
Rememberthesubtract()functionthatyoudefinedusingtheinteractiveshell?Toreusethefunction,wecanputitintoafilenamedsubtract.py:Â
defsubtract(a,b):
c=a-b
returnc
Ina filewithin the samedirectoryofÂsubtract.py, youcan start thePythoninterpreterandimportthisfunction:Â
Python2.7.12(default,Nov192016,06:48:10)
[GCC5.4.020160609]onlinux2
Type"help","copyright","credits"or"license"for
moreinformation.
>>>importsubtract
>>>result=subtract.subtract(10,5)
>>>result
5
Thisworksbecause,bydefault,Pythonwillfirstsearchforthecurrentdirectoryfortheavailablemodules.Ifyouareinadifferentdirectory,youcanmanuallyaddasearchpathlocationusingthesysmodulewithsys.path.Rememberthestandardlibrarythatwementionedawhileback?Youguessedit,thosearejustPythonfilesbeingusedasmodules.Â
Packages allow a collection of modules to be grouped together. This furtherorganizes the Python modules into a more namespace protection to further

reusability.Apackageisdefinedbycreatingadirectorywithanameyouwantto use as the namespace, then yo can place themodule source file under thatdirectory. In order for Python to know it as a Python-package, just create a__init__.py file in this directory. In the same example as the subtract.pyfile, if you were to create a directory called math_stuff and create a__init__.pyfile:Â
echou@pythonicNeteng:~/Master_Python_Networking/
Chapter1$mkdirmath_stuff
echou@pythonicNeteng:~/Master_Python_Networking/
Chapter1$touchmath_stuff/__init__.py
echou@pythonicNeteng:~/Master_Python_Networking/
Chapter1$tree.
.
âââhelloworld.py
âââmath_stuff
âââ__init__.py
âââsubtract.py
1directory,3files
echou@pythonicNeteng:~/Master_Python_Networking/
Chapter1$
The way you will now refer to the module will need to include the packagename:Â
>>>frommath_stuff.subtractimportsubtract
>>>result=subtract(10,5)
>>>result
5
>>>
As you can see,modules and packages are greatways to organize large codefilesandmakesharingPythoncodealoteasier.Â
Summary
In this chapter,wecovered theOSImodel and reviewed thenetworkprotocolsuites, such asTCP,UDP, and IP.We then did a quick reviewof thePythonlanguage, including built-in types, operators, control flows, functions, classes,modules,andpackages.Â

In the next chapter,wewill start to look at usingPython to programmaticallyinteractwiththenetworkequipment.Â

Chapter2.Low-LevelNetworkDeviceInteractions
In Chapter 1, Review of TCP/IP Protocol Suite and Python Language, welooked at the theories and specifications behind network communicationprotocols,andwetookaquicktourofthePythonlanguage.Inthischapter,wewill start to dive deeper into the management of these network devices. Inparticular,wewill examine thedifferentways inwhichwe canusePython toprogrammaticallycommunicatewithlegacyÂnetworkroutersandswitches.
What do Imean by legacy network routers and switches?While it is hard toimagine any networking device coming out today without an ApplicationProgramInterface(API)forautomatingtasks,itisaknownfactthatmanyofthenetworkdevicesdeployedtodaydonothaveAPIs.Theonlywaytomanagethem is throughÂCommandLine Interfaces (CLI) using terminalprograms,whichoriginallyweredevelopedwithahumanengineerinmind.Asthenumberof network devices increases, it becomes increasingly difficult to manuallymanagethemonebyone.Pythonhastwogreatlibrariesthatcanhelpwiththesetasks,sothischapterwillcoverPexpectandParamiko.Inthischapter,wewilltakealookatthefollowingtopics:Â
ThechallengesofCLIConstructingavirtuallabThePythonPexpectlibraryThePythonParamikolibraryThedownsidesofPexpectandParamiko

ThechallengesofCLI
At the Interop expo in Las Vegas 2014, BigSwitch Networks CEO DouglasMurrayÂdisplayed the following slide to illustratewhat has changed inDataCenterNetworking(DCN)in20yearsbetween1993to2013:
Datacenter Networking Changes (source:https://www.bigswitch.com/sites/default/files/presentations/murraydouglasstartuphotseatpanel.pdf)
While he might be negatively biased toward the incumbent vendors whendisplaying this slide, the point is well taken. In his opinion, the only thingin managing routers and switches that has changed in 20 years was theprotocolchanging fromTelnet to themoresecuredSSH. It is rightaround thesame time thatwe start to see the consensus around the industry for the clearneed to move away from manual, human-driven CLI toward an automatic,

computer-centric automation API. Make no mistake, we still need to directlycommunicatewiththedevicewhenmakingnetworkdesigns,bringingupinitialproof of concepts, and deploying the topology for the first time. However,once we have moved beyond the initial deployment, the need becomes toconsistently make the same changes error-free, over and over again withoutbeingdistractedorfeelingtired.Soundslikeanidealjobforcomputersandourfavoritelanguage,Python.Â
Referringback to theslide, thechallenge, is the interactionbetween the routerand the administrator.The router expects the administrator to enter a seriesofmanualinputsthatrequireshumaninterpretation.Forexample,youhavetotypein enable to get into a privileged mode, and upon receiving the returnedpromptwith#sign,youthenneedtotypeinconfigureterminalÂinordertogointotheconfigurationmode.Thesameprocesscanfurtherbeexpandedintointerfaceconfigurationmodeandroutingprotocolconfigurationmode.Thisisina sharp contrast to an computer-driven mindset. When computer wants toaccomplishasingletask,sayputanIPonaninterface,Âitwantstostructurallygivealltheinformationtotherouteratonce,andthenitexpectsasingleyesornoanswerfromtheroutertoindicatesuccessorfailureofthetask.
The solution, as implemented by both Pexpect and Paramiko, is to treat theinteractiveprocessasachildprocessandwatchovertheinteractionbetweentheprocess and the destination device. Based on the returned value, the parentprocesswilldecidethesubsequentaction,ifany.

ConstructingavirtuallabÂ
Beforewediveintothepackages,let'sexaminetheoptionsofputtingtogetheralabforthebenefitoflearning.Astheoldsayinggoes,"PracticeMakesPerfect":weneed an isolated sandbox to safelymakemistakes, try out newways ofdoing things, and repeat someof the steps to reinforce concepts thatwere notclear in the first try. It is easy enough to install Python and the necessarypackages for themanagement host, butwhat about those routers and switchesthatwewanttosimulate?Â
To put together a network lab, we basically have two options, each with itsadvantagesÂanddisadvantages:Â
Physicaldevice:Thisoptionconsistsofphysicaldevicesthatyoucanseeandtouch.Ifyouareluckyenough,youmightbeabletoputtogetheralabthatisanexactreplicationofyourproductionenvironment.Â
Advantages: It isaneasy transitionfromlab toproduction,easier tounderstandbymanagersand fellowengineerswhocan lookat touchthedevices.ÂDisadvantages: It is relatively expensive, requires human capital torackandstack,andisnotveryflexibleonceconstructed.Â
Virtualdevices:These are emulationor simulationof the actualnetworkdevices. They are either provided by the vendors or by the open sourcecommunity.Â
Advantages:Theyare easier to set up, are relatively cheap, and canmakechangesquickly.Disadvantages: They are usually a scaled-down version of theirphysicalcounterpart,andsometimestherearefeaturegapstoo.
Ofcourse,thedecisionofvirtualandphysicallabisapersonaldecisionderivedfromatrade-offbetweenthecost,easeofimplementation,andtheriskofhavingagapbetweenlabandproduction.Â
Inmyopinion,asmoreandmorevendorsdecidestoproducevirtualappliances,thevirtuallabisthewaytoproceedinalearningenvironment.Thefeaturegap

is relatively small and specifically documented when the virtual instance isprovidedbythevendor.Thecostisrelativelysmallcomparedtobuyingphysicaldevices and the time-to-built is quicker because they are usually just softwareprograms.Forthisbook,Iwilluseacombinationofphysicalandvirtualdevicesfordemonstrationwithapreference towardvirtualdevices.For thepurposeofthe book, the differences should be transparent. If there are any knowndifferencesbetweenthevirtualandphysicaldevicespertainingtoourobjectives,Iwillmakesuretolistthemout.
Onthevirtuallabfront,besidesimagesfromvariousvendors,IamalsousingaprogramfromCiscocalledVirtualInternetRoutingLab(VIRL).
Note
Iwanttopointoutthattheuseofthisprogramisentirelyoptionaltothereader.Butitisstronglyrecommendedthatthereaderhavesome lab equipment to follow along with the examples in thisbook.Â
CiscoVirtualInternetRoutingLab(VIRL)
IrememberwhenIfirststartedtostudyformyCiscoCertifiedInternetworkExpert(CCIE)labexam,ÂIpurchasedsomeusedCiscoequipmentfromeBaytostudy.Evenatadiscount,eachrouterandswitcharehundredsofUSdollars,sotosavemoney,IevenpurchasedsomereallyoutdatedCiscoroutersfromthe1980sÂ(searchforCiscoAGSroutersinyourfavoritesearchengineforagoodchuckle) that significantly lacked in feature and horsepower even for labstandards.Asmuchasitmakesaninterestingconversationwithfamilymemberswhen I turned them on (they were really loud), putting the physical devicestogether was not fun. Theywere heavy and clunky, a pain to connect all thecables,andtointroducelinkfailure,Iwouldliterallyunplugacable.Â
Fastforwardafewyears,DynamipwascreatedandIfellinlovewithhoweasyitwasÂtocreatenetworkscenarios.AllyouneedistheiOSimagesfromCisco,afewcarefullyconstructedtopologyfile,andyoucaneasilyconstructavirtualnetworkthatyoucantestyourknowledgeon.Ihadawholefolderofnetwork

topologies, presaved configurations, and different version of images, as calledforby the scenario.The additionof aGNS3 frontendgives thewhole setup abeautifulGUIfacelift.Now,youcanjustclickanddropyourlinksanddevices;youcanevenjustprintoutthenetworktopologyforyourmanagerÂrightoutoftheGNS3designpanel.Â
In2015,theCiscocommunitydecidedtofillÂthisneedbyreleasingtheCiscoVIRL. If you have hardwareÂmachines thatmeet the hardware requirementsandyouarewilling topayfor therequiredannual license, this ismypreferredmethodofdevelopingand tryoutmanyof thePythoncodeboth for thisbookandmyownproductionuse.
Note
AsofJanuary1,2017,onlythepersonaledition20-NodelicenseisavailableforpurchaseforUSD$199.99peryear.Â
Even at a monetary cost, in my opinion, the VIRL platform offers a fewadvantagesoverotheralternatives:Â
Aneaseofuse:All the images for IOSv, IOS-XRv,CSR100v,NX-OSv,ASAvareincludedinthesingledownload.ÂOfficial (kind of): Although the support is community driven, it is aninternallywidelyusedtoolatCisco.It isalsothepopularkidonthebockthatincreasesbugfix,documentation,andtribalknowledge.ÂThecloudmigrationpath:Theprojectofferslogicalmigrationpathwhenyouremulationgrowsoutof thehardwarepoweryouhave,suchasCiscodCloud (https://dcloud.cisco.com/), VIRL onPacket (http://virl.cisco.com/cloud/), and CiscoDevNetÂ(https://developer.cisco.com/).Thelinkandcontrol-planesimulation:Thetoolcansimulatelatencyandjitterandpacket-lossonaper-linkbasisforreal-worldlinkcharacteristics.There is also control-plane traffic generator for the external routeinjection.ÂOthers: The tool also offers some nice features such as VM Maestrotopology design and simulation control, AutoNetkit for automatic configgeneration,andtheuserworkspacemanagementiftheserverisshared.

Wewillnotuseallofthefeaturesinthisbook.Butsincethisisarelativelynewtoolthatisworthyourconsideration,ifyoudodecidethisisthetoolyouwouldliketouseaswell,IwanttooffersomeofthesetupsIused.
Note
Again,Iwanttostresstheimportanceofhavingalab,butitdoesnotneedtobeCiscoVIRL,atleastforthisbook.Â
VIRLtips
TheVIRLwebsiteofferslotsofgreatinstructionanddocumentation.Ialsofindthe community generally offers quick and accurate help. I will not repeat theinformationalreadyofferedinthosetwoplaces;however,herearesomeofthesetupsIuseforthecodeinthisbook:Â
VIRL uses two virtual Ethernet interfaces for connections. The firstinterface issetupasNATfor thehostmachine's Internetconnection,andthe second isused for localmanagement interfaceconnectivity (VMWareFusionVMnet2 in the followingexample). Iuseavirtualmachinewithasimilarnetworksetup inorder to runmyPythoncode,with firstEthernetusedforInternetandthesecondEthernetconnectedtoVmnet2:Â

VMnet2isacustomnetworkcreatedtoconnecttheUbuntuhostwiththeVIRLvirtualmachine:Â

In theTopologyDesign option, I set theManagementNetwork option toSharedFlatNetworkinordertouseVMnet2asthemanagementnetworkonthevirtualrouters:Â

Under the node configuration, you have the option to statically configurethemanagementIP.IalwaysstaticallysettheIPaddressinsteadofwhatisdynamically assigned by the software, so I can easily get to the devicewithoutchecking:

CiscoDevNetanddCloudÂ
Cisco provides two other excellent, at the time of writing free, methods ofpracticeAPIinteractionwithvariousCiscogears.BothofthetoolsrequireCiscoconnectiononlinelogin.Theyarebothreallygood,especiallyforthepricepoint(theyarefree!).It ishardformetoimaginethattheseonlinetoolswillremain

freeforlong,itismybeliefthatatsomepoint,thesetoolsneedtobechargingmoney for usage or be rolled into a bigger initiative that required some fee.howeverÂwecan takeadvantageof themwhile theyareavailable atnoextracharge.Â
The first tool is DevNet (https://developer.cisco.com/), which includesguided learning tracks, complete documentation, and sandbox remote labs,amongotherbenefits.Someofthelabsarealwayson,whilesomeyouneedtoreserveandavailabilitydependsonusage.InmyexperiencewithDevNet,someofthedocumentationsandlinkswereoutdated,buttheycanbeeasilyretrievedfor the most updated version. In a rapidly changing field such as softwaredevelopment, this is somewhat expected. DevNet is certainly a tool that youshouldtakefulladvantageofregardlessofwhetheryouhavealocallyrunVIRLhostornot:Â
AnotheronlinelaboptionforCiscoisCiscodCloud.YoucanthinkofdCloudasrunningVIRLinotherpeople'sserverwithouthavingtomanageorpayforthoseresources.ItseemsthatCiscoistreatingdCloudasbothastandaloneproductaswellasanextensiontoVIRL.Forexample,thecasewhenyouareunabletorunmore than a few IOX-XRorNX-OS instances locally, you canusedCloud toextend your local lab. It is a relatively new tool, but it is definitely worth alook:Â

GNS3
There are a few other virtual labs that I use for this book and other purposesandÂGNS3Âisoneofthem:Â
Asdiscussed,GNS3 iswhat a lotofusused to study for test andpractice for

labs. It has really grown up from the early days into a viable commercialproduct. Cisco-made tools, VIRL, DevNet, and dCloud only contain Ciscotechnologies.Theyprovidewaystocommunicatetotheinterfacesoutsideofthelab; however, they are not as easy as just having other vendor's virtualizedappliances living directly into the simulation environment. GNS3 is vendorneutral and can include other vendor's virtualized platform directly either bymakingancloneoftheimage(suchasAristavEOS),orbydirectlylaunchotherimages via other hypervisors (such as JuniperOlive emulation).ÂGNS3 doesnothavethethebreadthanddepthoftheCiscoVIRLproject,butsincetheycanrundifferentvariationCiscotechnologies,ÂIuseitmanytimeswhenIneedtoincorporate other vendor technologies into the lab along with some Ciscoimages.Â
There are also other vendor virtualized platforms such as AristavEOSÂ (https://eos.arista.com/tag/veos/), JunipervMXÂ(http://www.juniper.net/us/en/products-services/routing/mx-series/vmx/),and vSRXÂ (http://www.juniper.net/us/en/products-services/security/srx-series/vsrx/) that you can use as standalone virtual appliance. They are greatcomplementary tools for testing platform specific features, such as thedifferencesbetweentheAPIversions.Manyofthemareofferedaspaidproductson cloud providermarket places and are offered the identical feature as theirphysicalcounterpart.Â

PythonPexpectLibrary
Pexpect is a pure Python module for spawning child applications,controlling them, and responding to expected patterns in their output.PexpectworkslikeDonLibes'Expect.Pexpctallowsyourscripttospawnachildapplicationandcontrol itas ifahumanweretypingcommands.Â-Pexpect Read theDocs,Âhttps://pexpect.readthedocs.io/en/stable/index.html
Like the original Expect module by Don Libe, Pexpect launches or spawnsanotherprocessandwatchesoveritinordertocontroltheinteraction.Unliketheoriginal Expect, it is entirelywritten in Python that does not quire TCL or Cextensions to be compiled. This allows us to use the familiarÂPython syntaxanditsrichstandardlibraryinourcode.Â
InstallationÂ
TheinstallationofthepipandpexpectÂpackagesÂisstraightforward:Â
sudoapt-getinstallpython-pip
sudoapt-getinstallpython3-pip
sudopip3installpexpect
sudopipinstallpexpect
Note
Iamusingpip3forinstallingPython3packageswhileusingPIPforinstallingpackagestomydefaultPython2interpreter.Â
Doaquicktotesttomakesurethepackageisusable:Â
>>>importpexpect
>>>dir(pexpect)
['EOF','ExceptionPexpect','Expecter','PY3',
'TIMEOUT','__all__','__builtins__','__cached__',
'__doc__','__file__','__loader__','__name__',
'__package__','__path__','__revision__',
'__spec__','__version__','exceptions','expect',
'is_executable_file','pty_spawn','run','runu',

'searcher_re','searcher_string','spawn',
'spawnbase','spawnu','split_command_line','sys',
'utils','which']
>>>
ThePexpectoverview
Let'stakealookathowyouwouldinteractwiththerouterifyouweretoTelnetintothedevice:Â
echou@ubuntu:~$telnet172.16.1.20
Trying172.16.1.20...
Connectedto172.16.1.20.
Escapecharacteris'^]'.
<skip>
UserAccessVerification
Username:cisco
Password:
I used VIRLAutoNetkit to automatically generate initial configuration of therouters, which generated the default username of cisc, and the password ofcisco.Noticetheuserisalreadyintheprivilegedmode:Â
iosv-1#shrun|icisco
enablepasswordcisco
usernameciscoprivilege15secret5$1$Wiwq$7xt2oE0P9ThdxFS02trFw.
passwordcisco
passwordcisco
iosv-1#
AlsonotethattheautoconfiggeneratedvtyaccessforbothtelnetandSSH:Â
linevty04
exec-timeout7200
passwordcisco
loginlocal
transportinputtelnetssh
Let'sseeaPexpectexampleusingthePythoninteractiveshell:Â
Python3.5.2(default,Nov172016,17:05:23)
[GCC5.4.020160609]onlinux
Type"help","copyright","credits"or"license"formoreinformation.

>>>importpexpect
>>>child=pexpect.spawn('telnet172.16.1.20')
>>>child.expect('Username')
0
>>>child.sendline('cisco')
6
>>>child.expect('Password')
0
>>>child.sendline('cisco')
6
>>>child.expect('iosv-1#')
0
>>>child.sendline('showversion|iV')
19
>>>child.expect('iosv-1#')
0
>>>child.before
b'show version | i VrnCisco IOS Software, IOSv Software (VIOS-
ADVENTERPRISEK9-
M),Version15.6(2)T,RELEASESOFTWARE(fc2)rnProcessorboardID9MM4BI7B0DSWK40KV1IIRrn'
>>>child.sendline('exit')
5
>>>exit()
Note
Starting from Pexpect version 4.0, you can run Pexpect on aWindowsplatform.But asnotedon thedocumentation, runningPexpect on Windows should be considered experimental fornow.Â
One thing tonote in theprevious interactiveexample is that asyoucan see,Pexpectspawnsoffachildprocessandwatchesoveritinaninteractivefashion.There are two important methods shown in the example, expect() andsendline(). There is also amethod calledsend() butsendline() includes alinefeed,which is similar toÂpressing theenterkeyat theendofyour line inyour previous telnet session. From the router's perspective, it is just as ifsomeonetypedinthetextfromaTerminal.Inotherwords,wearetrickingtherouter into thinking they are interfacing with a human being when they areactuallycommunicatingwithacomputer.Â
The before and after properties will be set to the text printed by the child

application. The before properties will be set to the text printed by childapplicationuptotheexpectedpattern.Theafterstringwillcontainthetextthatwasmatchedbytheexpectedpattern.Inourcase,thebeforetextwillbesettothe output between the two expected matches (iosv-1#) including the showversioncommand.Theaftertextistherouterhostnameprompt:Â
>>>child.sendline('showversion|iV')
19
>>>child.expect('iosv-1#')
0
>>>child.before
b'show version | i VrnCisco IOS Software, IOSv Software (VIOS-
ADVENTERPRISEK9-
M),Version15.6(2)T,RELEASESOFTWARE(fc2)rnProcessorboardID9MM4BI7B0DSWK40KV1IIRrn'
>>>child.after
b'iosv-1#'
Whatwouldhappenifyouexpectthewrongterm?Forexample,ifyoutypeinthe lowercase username instead of Username after you spawn the childapplication, then thePexpect processwill be looking for a string ofusernamefromthechildprocess.Inthiscase,thePexpectprocesswill justhangbecausetheword usernameÂwould never be returned by the router. The sessionwilleventuallytimeout,oryoucanmanuallyexitoutviaCtrlÂ+ÂC.
Theexpect()methodwaitsforthechildapplicationtoreturnagivenstring,sointhepreviousexample,ifyouwouldliketoaccommodateforbothloweranduppercaseu,youcanusethisterm:Â
>>>child.expect('[Uu]sername')
ThesquarebracketservesasanÂoroperationthattellsthechildapplicationtoexpectaloweroruppercaseufollowedby'sername'asthestring.Whatwearetellingtheprocessisthatwewillaccepteither'Username'or'username'astheexpectedstring.
Note
For more information on Python regular expression, gotoÂhttps://docs.python.org/3.5/library/re.html.Â
Theexpect()methodcanalsocontaina listofoptions insteadof justasingle

string; theseoptions canalsobe regular expression themselves.Goingback tothepreviousexample,youcanusethefollowinglistofoptionstoaccommodatethetwodifferentpossiblestring:Â
>>>child.expect(['Username','username'])
Generally speaking,use the regular expression for a single expect stringwhenyou can fit the different hostname in a regular expression, whereas use thepossible options if you need to catch completely different responses from therouter, such as a password rejection.For example, if youuse several differentpasswords for your login, you want to catch% Login invalid as well as thedeviceprompt.Â
OneimportantdifferencebetweenPexpectREandPythonREisthatthePexpectmatchingisnon-greedy,whichmeanstheywillmatchaslittleaspossiblewhenusing special characters. Because Pexpect performs regular expression on astream,youcannot lookahead,as thechildprocessgenerating thestreammaynotbefinished.ThismeansthespecialcharactercalledÂ$ÂforÂtheendofthelinematch is useless,.+will always return no characters, and.* patternwillmatchaslittleaspossible.Ingeneral,justkeepthisinmindandbeasspecificasyoucanbeontheexpectmatchstrings.Â
Let'sconsiderthefollowingscenario:Â
>>>child.sendline('showrun|ihostname')
22
>>>child.expect('iosv-1')
0
>>>child.before
b'showrun|ihostnamernhostname'
>>>
Hmm..somethingisnotquitrighthere.Comparetotheterminaloutputbefore;theoutputyouexpectwouldbehostnameiosv-1:
iosv-1#showrun|ihostname
hostnameiosv-1
iosv-1#
Acloser lookat theexpected stringwill reveal themistake. In this case,weweremissingthehash(#)signbehindthehostnamecalledÂiosv-1.Therefore,

thechildapplicationtreatedthesecondpartofthereturnstringastheexpectedstring:Â
>>>child.sendline('showrun|ihostname')
22
>>>child.expect('iosv-1#')
0
>>>child.before
b'showrun|ihostnamernhostnameiosv-1rn'
>>>
Prettyquickly,youcanseeapatternemergingfromtheusageofPexpect.Theusermapsout thesequenceof interactionbetweenthePexpectprocessandthechild application. With some Python variables and loops, we can start toconstruct a useful program that will help us gather information and makechangestonetworkdevices.Â
OurfirstExpectprogram
Our first program extends what we have done in the last section with someadditionalcode:Â
#!/usr/bin/python3
importpexpect
devices = {'iosv-1': {'prompt': 'iosv-
1#', 'ip': '172.16.1.20'}, 'iosv-2': {'prompt': 'iosv-
2#','ip':'172.16.1.21'}}
username='cisco'
password='cisco'
fordeviceindevices.keys():
device_prompt=devices[device]['prompt']
child=pexpect.spawn('telnet'+devices[device]['ip'])
child.expect('Username:')
child.sendline(username)
child.expect('Password:')
child.sendline(password)
child.expect(device_prompt)
child.sendline('showversion|iV')
child.expect(device_prompt)
print(child.before)
child.sendline('exit')

Weuseanesteddictionaryinline5:
devices={'iosv-1':{'prompt':'iosv-1#','ip':
'172.16.1.20'},'iosv-2':{'prompt':'iosv-2#',
'ip':'172.16.1.21'}}
The nested dictionary allows us to refer to the same device (such as iosv-1)ÂwiththeappropriateIPaddressandpromptsymbol.Wecanthenusethosevaluesfortheexpect()methodlateronintheloop.Â
Theoutputprintsoutthe'showversion|iV'outputonthescreenforeachofthedevices:Â
$python3chapter2_1.py
b'showversion|iVrnCiscoIOSSoftware,IOSv
Software(VIOS-ADVENTERPRISEK9-M),Version15.6(2)T,
RELEASESOFTWARE(fc2)rnProcessorboardID
9MM4BI7B0DSWK40KV1IIRrn'
b'showversion|iVrnCiscoIOSSoftware,IOSv
Software(VIOS-ADVENTERPRISEK9-M),Version15.6(2)T,
RELEASESOFTWARE(fc2)rn'
MorePexpectfeatures
Inthissection,wewilllookatmorePexpectfeaturesthatmightcomeinhandywhenthesituationarises.Â
If you have a slow link to your remote device, the default expect() methodtimeoutis30seconds,whichyoucanbeincreasedviathetimeoutargument:Â
>>>child.expect('Username',timeout=5)
You can choose to pass the command back to the user using the interact()method.Thisisusefulwhenyoujustwanttoautomatecertainpartsoftheinitialtask:Â
>>>child.sendline('showversion|iV')
19
>>>child.expect('iosv-1#')
0
>>>child.before
b'show version | i VrnCisco IOS Software, IOSv Software (VIOS-
ADVENTERPRISEK9-

M),Version15.6(2)T,RELEASESOFTWARE(fc2)rnProcessorboardID9MM4BI7B0DSWK40KV1IIRrn'
>>>child.interact()
iosv-1#showrun|ihostname
hostnameiosv-1
iosv-1#exit
Connectionclosedbyforeignhost.
>>>
Youcangetalotofinformationaboutthechild.spawnobjectbyprintingitoutinastringformat:
>>>str(child)
"
<pexpect.pty_spawn.spawnobjectat0x7fb01e29dba8>ncommand:/usr/bin/telnetnargs:['/usr/bin/telnet','172.16.1.20']nsearcher:Nonenbuffer(last100chars):b''nbefore(last100chars):b'NTERPRISEK9-
M),Version15.6(2)T,RELEASESOFTWARE(fc2)\r\nProcessorboardID9MM4BI7B0DSWK40KV1IIR\r\n'nafter:b'iosv-
1#'nmatch: <_sre.SRE_Match object; span=(164, 171), match=b'iosv-
1#'>nmatch_index:0nexitstatus:1nflag_eof:Falsenpid:2807nchild_fd:5nclosed:Falsentimeout:30ndelimiter:<class'pexpect.exceptions.EOF'>nlogfile:Nonenlogfile_read:Nonenlogfile_send:Nonenmaxread:2000nignorecase:Falsensearchwindowsize:Nonendelaybeforesend:0.05ndelayafterclose:0.1ndelayafterterminate:0.1"
>>>
ThemostusefuldebugtoolforPexpectistologtheoutputinafile:Â
>>>child=pexpect.spawn('telnet172.16.1.20')
>>>child.logfile=open('debug','wb')
Note
Use child.logfile = open('debug', 'w') for Python 2.Python3usesbytestringbydefault.ÂFormoreinformationonPexpect features,checkÂhttps://pexpect.readthedocs.io/en/stable/api/index.html.Â
PexpectandSSHÂ
Ifyoutrytousetheprevioustelnetexampleandjustplugintoasshsession,youmight find yourself pretty frustrated. You  always have to include theusernameinthesession,sshnewÂkeyquestion,andmoresuch.Therearemanyways to make ssh sessions work, but luckily, Pexpect has a subclass calledpxssh,which specializes setting upSSH connections.The class addsmethodsfor login, logout, and various tricky things to handle many situation in thesshÂloginprocess.Theproceduresaremostly thesamewith theexceptionoflogin()andlogout():

>>>frompexpectimportpxssh
>>>child=pxssh.pxssh()
>>>child.login('172.16.1.20','cisco','cisco',auto_prompt_reset=False)
True
>>>child.sendline('showversion|iV')
19
>>>child.expect('iosv-1#')
0
>>>child.before
b'show version | i VrnCisco IOS Software, IOSv Software (VIOS-
ADVENTERPRISEK9-
M),Version15.6(2)T,RELEASESOFTWARE(fc2)rnProcessorboardID9MM4BI7B0DSWK40KV1IIRrn'
>>>child.logout()
>>>
Notice the'auto_prompt_reset=False' argument in thelogin()method.Bydefault,pxsshusestheshellprompttosynchronizetheoutput.ButsinceitusesthePS1option formost of bashorCsh, theywill error out onCiscoor othernetworkdevices.Â
PuttingthingstogetherforPexpect
As the final step, let's put everything you learned so far for Pexpect into ascript. Putting the code in a script makes it easier to use it in a productionenvironmentaswellassharethecodewithyourcolleagues.Â
Note
You can download the script from the book GitHubrepository, https://github.com/PacktPublishing/Mastering-Python-Networking as well as look at the output generatedfromthescriptasaresultofthecommands.
#!/usr/bin/python3
importgetpass
frompexpectimportpxssh
devices={'iosv-1':{'prompt':'iosv-1#','ip':'172.16.1.20'},
'iosv-2':{'prompt':'iosv-2#','ip':'172.16.1.21'}}
commands=['termlength0','showversion','showrun']
username=input('Username:')

password=getpass.getpass('Password:')
#Startstheloopfordevices
fordeviceindevices.keys():
outputFileName=device+'_output.txt'
device_prompt=devices[device]['prompt']
child=pxssh.pxssh()
child.login(devices[device]
['ip'],username.strip(),password.strip(),auto_prompt_reset=False)
#Startstheloopforcommandsandwritetooutput
withopen(outputFileName,'wb')asf:
forcommandincommands:
child.sendline(command)
child.expect(device_prompt)
f.write(child.before)
child.logout()
The script further expands on our first Pexpect program with the followingadditionalfeatures:Â
ItuseSSHinsteadoftelnetIt supports multiple commands instead of just one by making thecommandsintoalist(line8)andloopthroughthecommands(startingline20)ItpromptstheuserforusernameandpasswordinsteadofhardcodingtheminthescriptItwritestheoutputintoafiletobefurtheranalyzedÂ
Note
For Python 2, use raw_input() instead of input() for theusernameprompt.Alsousewforfilemodeinsteadofwb.Â

ThePythonParamikolibrary
Paramiko is a Python implementation of the SSHv2 protocol. Just liketheÂpxsshsubclassofPexpect,ParamikosimplifiestheSSHv2interactionwiththe remote device. Unlike pxssh, Paramiko is only focused on SSHv2 andprovidesbothclientandserveroperations.Â
Paramiko is the low-level SSH client behind the high-level automationframeworkAnsibleforitsnetworkmodules.WewillcoverAnsibleinthelaterchapters,sofirst,let'stakealookattheParamikolibrary.Â
InstallatingParamikoÂ
Installating Paramiko is pretty straight forward with PIP. However, there is ahard dependency on the Cryptography library. The library provides the low-level,C-basedencryptionalgorithmsfortheSSHprotocol.Â
Note
TheinstallationinstructionforWindows,Mac,andotherflavorsof Linux can befoundÂhttps://cryptography.io/en/latest/installation/
We will show the installation for our Ubuntu 16.04 virtual machine in thefollowing output. The following output shows the installation steps aswell asParamikosuccessfullyimportedinthePythoninteractiveprompt.Â
Python2:Â
sudoapt-getinstallbuild-essentiallibssl-devlibffi-devpython-
dev
sudopipinstallcryptography
sudopipinstallparamiko
$python
Python2.7.12(default,Nov192016,06:48:10)
[GCC5.4.020160609]onlinux2
Type"help","copyright","credits"or"license"formoreinformation.
>>>importparamiko
>>>exit()

Python3:Â
sudoapt-getinstallbuild-essentiallibssl-devlibffi-devpython3-
dev
sudopip3installcryptography
sudopip3installparamiko
$python3
Python3.5.2(default,Nov172016,17:05:23)
[GCC5.4.020160609]onlinux
Type"help","copyright","credits"or"license"formoreinformation.
>>>importparamiko
>>>
TheParamikooverview
Let'slookataquickexampleusingthePython3interactiveshell:Â
>>>importparamiko,time
>>>connection=paramiko.SSHClient()
>>>connection.set_missing_host_key_policy(paramiko.AutoAddPolicy())
>>>connection.connect('172.16.1.20',username='cisco',password='cisco',look_for_keys=False,allow_agent=False)
>>>new_connection=connection.invoke_shell()
>>>output=new_connection.recv(5000)
>>>print(output)
b"rn**************************************************************************rn*IOSvisstrictlylimitedtouseforevaluation,demonstrationandIOS*rn*education.IOSvisprovidedas-
isandisnotsupportedbyCisco's*rn*TechnicalAdvisoryCenter.Anyuseordisclosure,inwholeorinpart,*rn*oftheIOSvSoftwareorDocumentationtoanythirdpartyforany*rn*purposesisexpresslyprohibitedexceptasotherwiseauthorizedby*rn*Ciscoinwriting.*rn**************************************************************************rniosv-
1#"
>>>new_connection.send("showversion|iVn")
19
>>>time.sleep(3)
>>>output=new_connection.recv(5000)
>>>print(output)
b'show version | i VrnCisco IOS Software, IOSv Software (VIOS-
ADVENTERPRISEK9-
M),Version15.6(2)T,RELEASESOFTWARE(fc2)rnProcessorboardID9MM4BI7B0DSWK40KV1IIRrniosv-
1#'
>>>new_connection.close()
>>>
Note
Thetime.sleep() function inserts time delay to ensure that alltheoutputswerecaptured.Thisisparticularlyusefulonaslowernetwork connection or a busy device. This command is not

requiredbutrecommendeddependingonyoursituation.Â
Even ifyouareseeing theParamikooperation for the first time, thebeautyofPython and its clear syntaxmeans that you canmake a pretty good educatedguessatwhattheprogramistryingtodo:
>>>importparamiko
>>>connection=paramiko.SSHClient()
>>>connection.set_missing_host_key_policy(paramiko.AutoAddPolicy())
>>>connection.connect('172.16.1.20',username='cisco',password='cisco',look_for_keys=False,allow_agent=False)
ÂThefirstfourlinescreateaninstanceoftheSSHClientclassfromParamiko.The next line sets the policy that the client should usewhen theSSH server'shostname,inthiscaseiosv-1,isnotpresentineitherthesystemhostkeysortheapplication's keys. In this case, we will just automatically add the key to theapplication'sHostKeysobject.Atthispoint,ifyoulogontotherouter,youwillseetheadditionalloginsessionfromParamiko:
iosv-1#who
LineUserHost(s)IdleLocation
*578vty0ciscoidle00:00:00172.16.1.1
579vty1ciscoidle00:01:30172.16.1.173
InterfaceUserModeIdlePeerAddress
iosv-1#
The next few lines invokes a new interactive shell from the connection and arepeatable pattern of sending a command and retrieves the output. Finallyweclosetheconnection.Â
WhydoweneedtoinvokeaninteractiveshellinsteadofusinganothermethodcalledÂexec_command()?Unfortunately,Âexec_command()onCiscoIOSonlyallowsasinglecommand.Considerthefollowingexamplewithexec_command()fortheconnection:
>>>connection.connect('172.16.1.20',username='cisco',password='cisco',look_for_keys=False,allow_agent=False)
>>>stdin,stdout,stderr=connection.exec_command('showversion|iV')
>>>stdout.read()
b'Cisco IOS Software, IOSv Software (VIOS-ADVENTERPRISEK9-
M),Version15.6(2)T,RELEASESOFTWARE(fc2)rnProcessorboardID9MM4BI7B0DSWK40KV1IIRrn'
>>>
Everythingworksgreat,however, ifyoulookat thenumberofsessionsonthe

Ciscodevice,youwillnoticethattheconnectionisdroppedbytheCiscodevicewithoutyouclosingtheconnection:Â
iosv-1#who
LineUserHost(s)IdleLocation
*578vty0ciscoidle00:00:00172.16.1.1
InterfaceUserModeIdlePeerAddress
iosv-1#
Furthermore,Âexec_command()will return an error of SSH session not beingactive:Â
>>>stdin,stdout,stderr=connection.exec_command('showversion|iV')
Traceback(mostrecentcalllast):
File"<stdin>",line1,in<module>
File "/usr/local/lib/python3.5/dist-
packages/paramiko/client.py",line435,inexec_command
chan=self._transport.open_session(timeout=timeout)
File "/usr/local/lib/python3.5/dist-
packages/paramiko/transport.py",line711,inopen_session
timeout=timeout)
File "/usr/local/lib/python3.5/dist-
packages/paramiko/transport.py",line795,inopen_channel
raiseSSHException('SSHsessionnotactive')
paramiko.ssh_exception.SSHException:SSHsessionnotactive
>>>
Note
The Netmiko library by Kirk Byers is an open source Pythonlibrary that simplifiesSSHmanagement to network devices.Toread about it, check out the article, https://pynet.twb-tech.com/blog/automation/netmiko.html and the source code,https://github.com/ktbyers/netmiko.Â
Whatwouldhappenifyoudonotclearoutthereceivedbuffer?Theoutputwilljustkeeponfillingupthebufferandoverwriteit:Â
>>>new_connection.send("showversion|iVn")
19
>>>new_connection.send("showversion|iVn")
19
>>>new_connection.send("showversion|iVn")

19
>>>new_connection.recv(5000)
b'show version | i VrnCisco IOS Software, IOSv Software (VIOS-
ADVENTERPRISEK9-
M),Version15.6(2)T,RELEASESOFTWARE(fc2)rnProcessorboardID9MM4BI7B0DSWK40KV1IIRrniosv-
1#show version | i VrnCisco IOS Software, IOSv Software (VIOS-
ADVENTERPRISEK9-
M),Version15.6(2)T,RELEASESOFTWARE(fc2)rnProcessorboardID9MM4BI7B0DSWK40KV1IIRrniosv-
1#show version | i VrnCisco IOS Software, IOSv Software (VIOS-
ADVENTERPRISEK9-
M),Version15.6(2)T,RELEASESOFTWARE(fc2)rnProcessorboardID9MM4BI7B0DSWK40KV1IIRrniosv-
1#'
>>>
For the consistency of deterministic output, we will retrieve the output frombuffereachtimeweexecuteacommand.Â
OurfirstParamikoprogram
OurfirstprogramwillusethesamegeneralstructureofthePexpectprogramasfarasloopingoveralistofdevicesandcommands,withtheexceptionofusingParamikoinsteadofPexpect.Thiswillgiveusagoodcompareandcontrastofthedifferencesbetweenthetwoprograms.
You can download the the code from the book Github repository,https://github.com/PacktPublishing/Mastering-Python-Networking.Iwilllistoutthenotabledifferenceshere:Â
devices = {'iosv-1': {'ip': '172.16.1.20'}, 'iosv-
2':{'ip':'172.16.1.21'}}
Weno longerneed tomatch thedevicepromptusingParamiko, therefore, thedevicedictionarycanbesimplified:
commands=['showversionn','showrunn']
ThereisnosendlineequivalentinParamiko,sowearemanuallyincludingthenewlinebreakineachofthecommands:Â
defclear_buffer(connection):
ifconnection.recv_ready():
returnconnection.recv(max_buffer)

Weareincludinganewmethodtoclearthebufferforsendingcommandssuchasterminallength0 orenableÂbecausewe do not need to the output forthose commands.We simplywant to clear thebuffer andget to the executionprompt.ÂThisfunctionwilllateronbeusedintheloopsuchasinline25:
output=clear_buffer(new_connection)
Therestof theprogramshouldbeprettyselfexplanatory,aswehaveseen theusageinthischapter.ThelastthingIwouldliketopointoutisthatsincethisisaninteractiveprogram,weplacedsomebufferandÂwaitÂforthecommandtobefinishedontheremotedevicebeforeretrievingtheoutput:Â
time.sleep(2)
After we clear the buffer, during the time in-between the execution ofcommands,wewillwait twoseconds.Thiswill ensureus toÂgive thedeviceadequatetimeincaseitisbusy.Â
MoreParamikofeatures
WewillworkwithParamikolaterwhenwediscussAnsible,asParamikoistheunderlying transport formanyof thenetworkmodules. In thissection,wewilltakealookatsomeoftheotherfeaturesforParamiko.Â
ParamikoforServers
ParamikocanbeusedtomanageserversthroughSSHv2aswell.Let'slookatanexampleofhowwecanuseParamikotomanageservers.Wewillusekey-basedauthenticationfortheSSHv2session.Â
Note
In this example, I used another virtual machine on the samehypervisorasthedestinationserver.Youcanalsouseaserveronthe VIRL simulator or an instance in one of the public cloudproviders,suchasAmazonAWSEC2.Â
Wewillgenerateapublic-privatekeypairforourParamikohost:Â

ssh-keygen-trsa
Thiscommand,bydefault,willgenerateÂapublickeynamedid_rsa.pub,asthepublickeyundertheuserdirectorycalledÂ~/.sshalongwithaprivatekeynamedid_rsa.Treattheprivatekeyasyourpasswordthatyoudonotwanttoshare, but treat the public key as a business card that identifieswho you are.Together, the message will be encrypted by your private key locally anddecryptedby remotehostusing thepublickey.Therefore,weshouldcopy thepublic key to the remote host. In production, we can do this via out-of-bandusinganUSBdrive;inourlab,wecansimplyjustcopythepublickeyfiletotheremote host's ~/.ssh/authorized_keys file. Open up a Terminal window fortheremoteserver,soyoucanpasteinthepublickey.Â
Copythecontentof~/.ssh/id_rsaonyourmanagementhostwithPramiko:Â
<ManagementHostwithPramiko>$cat~/.ssh/id_rsa.pub
ssh-rsa<yourpublickey>echou@pythonicNeteng
Then, paste it to the remote host under the user directory; in this case I amusingÂechouforboththesides:Â
<RemoteHost>$vim~/.ssh/authorized_keys
ssh-rsa<yourpublickey>echou@pythonicNeteng
YouarenowreadytouseParamikotomanagetheremotehost:Â
Python3.5.2(default,Nov172016,17:05:23)
[GCC5.4.020160609]onlinux
Type"help","copyright","credits"or"license"formoreinformation.
>>>importparamiko
>>>key=paramiko.RSAKey.from_private_key_file('/home/echou/.ssh/id_rsa')
>>>client=paramiko.SSHClient()
>>>client.set_missing_host_key_policy(paramiko.AutoAddPolicy())
>>>client.connect('192.168.199.182',username='echou',pkey=key)
>>>stdin,stdout,stderr=client.exec_command('ls-l')
>>>stdout.read()
b'total44ndrwxr-xr-x2echouechou4096Jan710:14Desktopndrwxr-
xr-x 2 echou echou 4096 Jan 7 10:14 Documentsndrwxr-xr-
x 2 echou echou 4096 Jan 7 10:14 Downloadsn-rw-r--r-
- 1 echou echou 8980 Jan 7 10:03 examples.desktopndrwxr-xr-
x 2 echou echou 4096 Jan 7 10:14 Musicndrwxr-xr-
x 2 echou echou 4096 Jan 7 10:14 Picturesndrwxr-xr-
x 2 echou echou 4096 Jan 7 10:14 Publicndrwxr-xr-
x 2 echou echou 4096 Jan 7 10:14 Templatesndrwxr-xr-
x2echouechou4096Jan710:14Videosn'
>>>stdin,stdout,stderr=client.exec_command('pwd')
>>>stdout.read()
b'/home/echoun'
>>>client.close()
>>>
Noticethatintheserverexample,wedonotneedtocreateaninteractivesessionto execute multiple commands. You can now turn off password-basedauthentication in your remote host's SSHv2 configuration for a more securedkey-basedauthenticationwithautomationenabled.Â
PuttingthingstogetherforParamiko
We are almost at the end of the chapter. In this last section, let's make theParamikoprogrammorereusable.Thereisonedownsideforourexistingscript;we need to open up the script every timewewant to add or delete a host; orwheneverweneedtochangethecommandswehaveÂtoexecuteontheremotehost.Besideshavingahigherchanceformistakes,howaboutwhenyouneedtolet your co-workers or NOC use the script? Theymight not feel comfortableworkinginPython,Paramiko,orLinux.Â
Bymakingboththehostsandcommandsfilesthatwereadinasaparameterforthescript,wecaneliminatesomeoftheseconcerns.Theusers(andafutureyou)can simplymodify these text files when you need tomake host or commandchanges.Â
Thefileisnamedchapter2_4.py.Â
Webreakthecommands intoacommands.txt file.ÂUpto thispoint,wehavebeen using show commands; in this example, we will make configurationchangesfortheloggingbuffersize:Â
$catcommands.txt
configt
loggingbuffered30000
end
copyrunstart
The devices information is written into a devices.json file. We choose

JSONÂ format for the devices information because JSON data types can beeasilytranslatedintoPythondictionarydatatypes:
$catdevices.json
{
"iosv-1":{"ip":"172.16.1.20"},
"iosv-2":{"ip":"172.16.1.21"}
}
Inthescript,wemadethefollowingchanges:Â
withopen('devices.json','r')asf:
devices=json.load(f)
withopen('commands.txt','r')asf:
commands=[lineforlineinf.readlines()]
Hereisanabbreviatedoutputfromthescriptexecution:Â
$python3chapter2_4.py
Username:cisco
Password:
b'terminal length 0rniosv-
2#configtrnEnterconfigurationcommands,oneperline.EndwithCNTL/Z.rniosv-
2(config)#'
b'loggingbuffered30000rniosv-2(config)#'
...
Do a quick check to make sure the change has taken place in both running-configandstartup-config:Â
iosv-1#shrun|ilogging
loggingbuffered30000
iosv-1#shstart|ilogging
loggingbuffered30000
iosv-2#shrun|ilogging
loggingbuffered30000
iosv-2#shstart|ilogging
loggingbuffered30000

Lookingahead
We have taken a pretty huge leap forward as far as automating our networkusing Python in this chapter. However, the method we haveused isÂsomewhatawork-around for theautomation.This ismainlydue tothefactthatthesystemswereoriginallybuiltforhuman.Â
DownsidesofPexpectandParamikocomparedtoothertools
The number one downside for our method so far is that they do not returnstructureddata.TheyreturnthedatathatwefindÂidealtofitonaterminaltobeinterpreted by a human but not by a computer program. The human eye caneasilyinterpretaspacewhilethecomputeronlyseesareturncharacter.This,ofcourse, depends on the network devices to be made that is automationfriendly.Â
Wewilltakealookatabetterwayinthenextchapter.Â
Idempotentnetworkdeviceinteraction
Thetermidempotencyhasdifferentmeanings,dependingonitscontext.Butinthischapter'scontext,thetermmeanswhentheclientmakesthesamecalltothedevice,theresultshouldalwaysbethesame.Ibelievewecanallagreethatthisis necessary. Imagine a timewhen each timeyou execute the script youget adifferent result back. This is a scary thought indeed and would render ourautomationeffortuseless.
SincePexpectandParamikoareblastingoutaseriesofcommandsinteractively,thechanceofhavinganon-idempotentinteractionishigher.Goingbacktothefact that thereturnresultsneededtobescreenscrapedforusefulelements, therisk ismuch higher that somethingmight have changed between the timewewrotethescript to thetimewhenthescript isexecutedfor the100thtime.Forexample,ifthevendormakesascreenoutputchangebetweenreleases,itmightbeokayÂforhumanengineers,butitwillbreakyourscript.
If we need to rely on the script for production, we need the script to beidempotentasmuchaspossible.Â

Badautomationspeedsbadthingsup
Bad automation allows you to poke yourselves in the eye a lot faster; it is assimple as that. Computers are much faster at executing tasks than us humanengineers.Ifwehadthesamesetofoperatingproceduresexecutingbyahumanversus script, the scriptwill finish faster than humans, sometimeswithout thebenefitofhavingasolidfeedbacklookbetweenprocedures.TheInternetisfullofhorrorstorieswhensomeonepressestheEnterkeyandimmediatelyregretsit.
WeneedtomakesurethatÂthechanceofabadautomationscriptcangowrongisassmallaspossible.Â

Summary
In this chapter,wecovered the low-levelways to communicatedirectly to thenetwork devices.Without a way to programmatically communicate andmakechanges to network devices, there is no automation. We looked at twoÂlibrariesinPythonthatallowustomanagethedevicesthatweremeanttobemanaged byCLI.ÂAlthough useful, it is easy to see how the process can besomewhat fragile. This is mostly due to the fact that the network gears inquestionweremeanttobemanagedbyhumanbeingsandnotcomputers.
Inthenextchapter,wewilllookatnetworkdevicessupportingAPIandintent-drivennetworking.Â

Chapter3.APIandIntent-DrivenNetworking
In the previous chapter, we looked at ways to interact with the deviceinteractively using Pexpect and Paramiko.Both of these tools use a persistentsessionthatsimulatesausertypingincommandsasiftheyaresittinginfrontoftheTerminal.Thisworksfineuptoapoint.Itiseasyenoughtosendcommandsover for executionon thedevice and capture theoutput back.However,whentheoutputbecomesmorethanafewlinesofcharacters,itbecomesdifficultforacomputer program to interpret the output. In order for our simple computerprogramtoautomatesomeofwhatÂwedo,weneedtobeabletointerpretthereturnedresultsandmakefollow-upactionsbasedonthereturnedresult.Whenwe cannot accurately and predictably interpret the results back, we cannotexecutethenextcommandwithconfidence.Â
Luckily, this problem was solved by the Internet community. Imagine thedifference between a computer and a human being reading a web page. Thehumanseeswords,pictures,andspacesinterpretedbythebrowser;thecomputerseesrawHTMLcode,Unicodecharacters,andbinaryfiles.Whathappenswhena website needs to become a web service for another computer? Doesn't thisproblemsoundfamiliar totheonethatwepresentedbefore?Theansweris theapplicationprograminterface,orAPIforshort.AnAPIisaconcept;accordingtoWikipedia:
In computer programming , an Application Programming Interface(API)isasetofsubroutineÂdefinitions,protocols,andtoolsforbuildingapplicationsoftware.Ingeneralterms,it'sasetofclearlydefinedmethodsof communication between various software components. A good APImakes it easier to develop a computer program by providing all thebuildingblocks,whicharethenputtogetherbytheprogrammer.
Inourusecase,thesetofclearlydefinedmethodsofcommunicationwouldbebetweenourPythonprogramandthedestinationdevice.
Inthischapter,wewilllookatthefollowingtopics:
Treatinginfrastructureascodeanddatamodeling

CiscoNX-APIandapplication-centricinfrastructureJuniperNETCONFandPyEZAristaeAPIandpyeapi

InfrastructureasthePythoncode
In a perfect world, network engineers and people who design and managenetworksshouldfocusonwhattheywantthenetworktoachieveinsteadofthedevice-levelinteractions.InmyfirstjobasaninternforalocalISP,wide-eyedand excited, I receivedmy first assignment to install a router on a customer'ssiteÂtoturnuptheirfractionalframerelaylink(rememberthose?).HowwouldIdothat?ÂIasked.Iwashandedastandardoperatingprocedurefor turningupframerelaylinks.Iwenttothecustomersite,blindlytypedinthecommandsandlookedatthegreenlightsflash,andthenIÂhappilypackedmybagandpattedmyselfonthebackforajobwelldone.Asexcitingasthatfirstassignmentwas,IdidnotfullyunderstandwhatIwasdoing.Iwassimplyfollowinginstructionswithout thinkingabout the implicationof thecommands Iwas typing in.Howwould I troubleshootsomething if the lightwas red insteadofgreen? I think Iwouldhavecalledbacktotheoffice.
Ofcourse,networkengineeringisnotabouttypingincommandsontoadevice,butitisaboutbuildingawaythatallowsservicestobedeliveredfromonepointtoanotherwithaslittlefrictionaspossible.Thecommandswehavetouseandtheoutputthatwehavetointerpretaremerelyameanstoanend.Iwouldliketohereby argue that we should focus as much on the intent of the network aspossibleforanintent-drivennetworkingandabstractourselvesfromthedevice-levelinteractiononanas-neededbasis.Â
In using anAPI, it ismy opinion that it gets us closer to a state of intent-drivennetworking.Inshort,becauseweabstractthelayerofaspecificcommandexecuted on destination device,we focus on our intent instead of the specificcommandgiventothedevice.Forexample,ifourintendistodenyanIPfromenteringournetwork,wemightuseaccess-listandaccess-grouponaCiscoandfilter-listonaJuniper.However,inusingAPI,ourprogramcanstartaskingtheexecutorfortheirintentwhilemaskingwhatkindofphysicaldeviceitistheyaretalkingto.
ScreenscrapingversusAPIstructuredoutput
Imagineacommonscenariowhereweneedtologintothedeviceandmakesure

all the interfaceson thedevicesare inanup/upstate (bothstatusandprotocolareshowingasup).ForthehumannetworkengineersgettingintoaCiscoNX-OSÂ device, it is simple enough to issue the show IP interface
briefÂcommandtoeasilytellfromtheoutputwhichinterfaceisup:Â
nx-osv-2#showipintbrief
IPInterfaceStatusforVRF"default"(1)
InterfaceIPAddressInterfaceStatus
Lo0192.168.0.2protocol-up/link-up/admin-up
Eth2/110.0.0.6protocol-up/link-up/admin-up
nx-osv-2#
The line break, white spaces, and the first line of the column title are easilydistinguishedfromthehumaneye.Infact,theyaretheretohelpuslineup,say,theIPaddressesofeachinterfacefromline1toline2and3.Ifweweretoputourselvesintothecomputer'sposition,allthesespacesandlinebreaksareonlytakingusawayfromthereallyimportantoutput,whichis:whichinterfacesarein theup/upstate?To illustrate thispoint,wecan lookat theParamikooutputagain:Â
>>>new_connection.send('shipintbriefn')
16
>>>output=new_connection.recv(5000)
>>>print(output)
b'shipintbriefrrnIPInterfaceStatusforVRF
"default"(1)rnInterfaceIPAddressInterface
StatusrnLo0192.168.0.2protocol-up/link-up/admin-up
rnEth2/110.0.0.6protocol-up/link-up/admin-uprnrnx-
osv-2#'
>>>
Ifweweretoparseoutthatdata,thenofcourse,therearemanywaystodoit,buthereiswhatIwoulddoinapseudocodefashion:Â
1. Spliteachlineviathelinebreak.Â2. Imayormaynotneed the first line thatcontains theexecutedcommand;
fornow,Idon'tthinkIneedit.Â3. Takeouteverythingon thesecond lineupuntil theVRF,andsave it ina
variableaswewanttoknowwhichVRFtheoutputisshowing.Â4. Fortherestofthelines,becausewedonotknowhowmanyinterfacesthere
are,wewilldoaregularexpressiontosearchifthelinestartswithpossibleinterfaces,suchasloforloopbackandEth.Â
5. Wewillthensplitthislineintothreesectionsviaspace,eachconsistingofthenameoftheinterface,IPaddress,andthentheinterfaceÂstatus.Â
6. Theinterfacestatuswillthenbesplitfurtherusingtheforwardslash(/)togiveustheprotocol,link,andtheadminstatus.Â
Whew,thatisalotofworkjustforsomethingthatahumanbeingcantellinaglance!Youmightbeabletooptimizethecodeandthenumberoflines,butingeneral,thisiswhatweneedtodowhenweneedtoscreenscrapsomethingthatis somewhat unstructured. There aremany downsides to this method, but thefewÂbiggerproblemsthatIseearehere:
Scalability:Wespentsomuchtimeonpainstakingdetailsforeachoutputthatitishardtoimaginewecandothisforthehundredsofcommandsthatwetypicallyrun.Predicability:Thereisreallynoguaranteethattheoutputstaysthesame.Ifthe output is changed ever so slightly, it might just enter with our hardearnedbattleofinformationgathering.ÂVendorandsoftwarelock-in:Perhapsthebiggestproblemisthatoncewespentallthistimeparsingtheoutputforthisparticularvendorandsoftwareversion, in thiscaseCiscoNX-OS,weneed to repeat thisprocess for thenextvendorthatwepick.Idon'tknowaboutyou,butifIweretoevaluateanewvendor,thenewvendorisatasevereon-boardingdisadvantageifIhadtorewriteallthescreenscrapcodeagain.Â
Let's compare thatwith anoutput fromanNX-API call for the same show IPinterface brief command.Wewill go over the specifics of getting this outputfromthedevicelaterinthischapter,butwhatisimportanthereistocomparethefollowingoutputtothepreviousscreenscrapingsteps:Â
{
"ins_api":{
"outputs":{
"output":{

"body":{
"TABLE_intf":[
{
"ROW_intf":{
"admin-state":"up",
"intf-name":"Lo0",
"iod":84,
"ip-disabled":"FALSE",
"link-state":"up",
"prefix":"192.168.0.2",
"proto-state":"up"
}
},
{
"ROW_intf":{
"admin-state":"up",
"intf-name":"Eth2/1",
"iod":36,
"ip-disabled":"FALSE",
"link-state":"up",
"prefix":"10.0.0.6",
"proto-state":"up"
}
}
],
"TABLE_vrf":[
{
"ROW_vrf":{
"vrf-name-out":"default"
}
},
{
"ROW_vrf":{
"vrf-name-out":"default"
}
}
]
},
"code":"200",
"input":"showipintbrief",
"msg":"Success"
}
},
"sid":"eoc",
"type":"cli_show",
"version":"1.2"
}

}
NX-API can return output in XML or JSON, and this is obviously theJSONÂoutputthatwearelookingat.Rightaway,youcanseetheanswersarestructured and can bemapped directly to thePython dictionary data structure.There isnoparsingrequired,sosimplypick thekeyyouwantandretrieve thevalue associated with this key. There is also an added benefit of a code toindicatecommandsuccessorfailure,withamessagetellingthesenderreasonsbehindthesuccessorfailure.Younolongerneedtokeeptrackofthecommandissued, because it is already returned to you in the input field. There is alsoothermetadatasuchastheNX-APIÂversion.Â
Thistypeofexchangemakeslifeeasierforbothvendorsandoperators.Onthevendorside,theycaneasilytransferconfigurationandstateinformation,aswellasaddandexposeextra fieldswhen theneed rises.On theoperator side, theycan easily ingest the information and build their infrastructure around it. It isgenerally agreed on that automation is much needed and a good thing. Thequestionsareusuallycenteredaroundwhichformatandstructuretheautomationshouldtakeplace.Asyoucanseelaterinthischapter,therearemanycompetingtechnologiesundertheumbrellaofAPI,asonthetransportsidealone,wehaveRESTAPI,NETCONF,andRESTCONF,amongothers.Ultimately,theoverallmarketwill decide about this, but in themeantime,we should all take a stepbackanddecidewhichtechnologybestsuitsourneed.Â
Datamodelingforinfrastructureascode
AccordingtoWikipedia,
"Adatamodel isanabstractmodel thatorganizeselementsofdataÂandstandardizeshowtheyrelate tooneanotherandtopropertiesof thereal-worldentities.Forinstance,adatamodelmayspecifythatthedataelementrepresenting a car be composedof a number of other elementswhich, inturn,representthecolorandsizeofthecaranddefineitsowner."
Thedatamodelingprocesscanbeillustratedinthefollowinggraph:Â

 Data Modeling Process(source:ÂÂhttps://en.wikipedia.org/wiki/Data_model)
Whenappliedtonetworking,wecanapplythisconceptasanabstractmodelthatdescribesournetwork,beitÂdatacenter,campus,orglobalWideAreaNetwork.Ifwetakeacloserlookataphysicaldatacenter,alayer2EthernetswitchcanbethoughtofasadevicecontainingatableofMacaddressesmappedtoeachports.OurswitchdatamodeldescribeshowtheMacaddressshouldbekeptinatable,which includes thekeys,additionalcharacteristics (thinkofVLANandprivateVLAN), and more. Similarly, we can move beyond devices and map thedatacenterinamodel.WecanstartwiththenumberofÂdevicesineachoftheaccess, distribution, core layer, how they are connected, and how they shouldbehave in a production environment. For example, if we have a Fat-Treenetwork, how many links should each of the spine routers have, how manyroutestheyshouldcontain,andhowmanynext-hopsshouldeachoftheprefixeshave.Thesecharacteristicscanbemappedoutinaformatthatcanbereferenced

againsttheidealstatethatweshouldalwayscheckagainst.Â
One of the relatively new network data modeling language that is gainingtraction isYANG.YetAnotherNextGeneration (YANG) (despite commonbelief, some of the IETFwork group do have a sense of humor). It was firstpublished inRFC6020 in2010, andhas sincegained traction amongvendorsandoperators.At the timeofwriting this book, the support forYANGvariedgreatlyfromvendorstoplatforms.Theadaptationrateinproductionisthereforerelativelylow.However,itisatechnologyworthkeepinganeyeoutfor.Â

TheCiscoAPIandACI
Cisco aystems, as the 800 pound gorilla in the networking space, have notmissedon the trendof network automation.Theproblemhas alwaysbeen theconfusionsurroundingCisco'svariousproductlinesandtheleveloftechnologysupport. With product lines spans from routers, switches, firewall, servers(unified computing), wireless, the collaboration software and hardware, andanalyticsoftware,tonameafew,itishardtoknowwheretostart.
SincethisbookfocusesonPythonandnetworking,wewillscopethesectiontothemainnetworkingproducts.Inparticular,wewillcoverthefollowing:Â
NexusproductautomationwithNX-APICiscoNETCONFandYANGexamplesTheCiscoapplication-centricinfrastructureforthedatacenterTheCiscoapplication-centricinfrastructurefortheenterprise
For the NX-API and NETCONF examples here, we can either use the CiscoDevNet always-on lab devices or locally run Cisco VIRL. Since ACI is aseparate product and is licensed on top of the physical switches, for thefollowingACIexamples, Iwould recommendusing theDevNet labs togetanunderstandingofthetools,unless,ofcourse,youareoneoftheluckyoneswhohasÂaprivateACIlabthatyoucanuse.Â
CiscoNX-API
Nexus is Cisco's product line of datacenter switches. NX-APIÂ(http://www.cisco.com/c/en/us/td/docs/switches/datacenter/nexus9000/sw/6-x/programmability/guide/b_Cisco_Nexus_9000_Series_NX-OS_Programmability_Guide/b_Cisco_Nexus_9000_Series_NX-OS_Programmability_Guide_chapter_011.html) allows the engineer to interactwiththeswitchoutsideofthedeviceviaavarietyoftransportsincludingSSH,HTTP,andHTTPS.Â
LabSoftwareInstallationandDevicePreparation

HerearetheUbuntupackagesthatwewillinstall,youmayalreadyhavesomeofthepackagessuchasPythondevelopment,pip,andGit:Â
$ sudo apt-get install -y python3-dev libxml2-dev libxslt1-
dev libffi-dev libssl-dev zlib1g-dev python3-pip git python3-
requests
Note
If you are using Python 2, use the following packagesinstead:sudo apt-get install -y python-dev libxml2-dev
libxslt1-dev libffi-dev libssl-dev zlib1g-dev python-
pipgitÂpython-requests
The ncclient (https://github.com/ncclient/ncclient) library is a Python libraryfor NETCONF clients, so we will install this from the GitHub repository toinstallthelatestversion:
$gitclonehttps://github.com/ncclient/ncclient
$cdncclient/
$sudopython3setup.pyinstall
$sudopythonsetup.pyinstall
NX-APIonNexusdevices isoffbydefault, sowewillneed to turn iton.Wecan either use the user that is already created or create a new user for theNETCONFprocedures:Â
featurenxapi
usernameciscopassword5$1$Nk7ZkwH0$fyiRmMMfIheqE3BqvcL0C1rolenetwork-
opera
tor
usernameciscorolenetwork-admin
usernameciscopassphraselifetime99999warntime14gracetime3
Forourlab,wewillturnonbothHTTPandthesandboxconfiguration,astheyshouldbeturnedoffinproduction:Â
nx-osv-2(config)#nxapihttpport80
nx-osv-2(config)#nxapisandbox
WearenowreadytolookatourfirstNX-APIexample.Â

NX-APIexamples
Sincewehaveturnedonsandbox,wecanlaunchawebbrowserandtakealookat the various message formats, requests, and responses based on the CLIcommandthatwearealreadyfamiliarwith:Â
In the following example, I have selected JSON-RPCandCLI command typeforthecommandcalledÂshowversion:Â

The sandbox comes in handy if you are unsure about the supportability ofmessageformat,orifyouhavequestionsaboutthefieldkeyforwhichthevalueyouwanttoretrieveinyourcode.Â
Inourfirstexample,wearejustgoingtoconnecttotheNexusdeviceandprintoutthecapabilitiesexchangedwhentheconnectionwasfirstmade:Â
#!/usr/bin/envpython3
fromncclientimportmanager
conn=manager.connect(
host='172.16.1.90',
port=22,
username='cisco',
password='cisco',
hostkey_verify=False,
device_params={'name':'nexus'},
look_for_keys=False)
forvalueinconn.server_capabilities:
print(value)
conn.close_session()
Theconnectionparametersofhost,port,username,andpasswordareprettyselfexplanatory. The device parameter specifies the kind of device the client isconnecting to. ÂWewill also see a differentiation in the JuniperNETCONFsections. The hostkey_verify bypass the known_host requirement for SSH,

otherwise the host needs to be listed in the ~/.ssh/known_hosts file.Thelook_for_keysoptiondisablespublic-privatekeyauthenticationbutusesausernameandpasswordforauthentication.
The outputwill show that theXMLandNETCONF supported feature by thisversionofNX-OS:Â
$python3cisco_nxapi_1.py
urn:ietf:params:xml:ns:netconf:base:1.0
urn:ietf:params:netconf:base:1.0
UsingncclientandNETCONFoverSSHisgreatbecauseitgetsusclosertothenative implementation and syntax.Wewill use the librarymore later on. ForNX-API,IpersonallyfeelthatitiseasiertodealwithHTTPSandJSON-RPC.In the earlier screenshot ofNX-APIDeveloperSandbox, if younoticed in theRequestbox,thereisaboxlabeledPython.Ifyouclickonit,youwillbeabletogetanautomaticallyconvertedPythonscriptbasedontherequestlibrary.Â
Note
Requestsisaverypopular,self-proclaimedHTTPforthehumanlibraryusedbycompanieslikeAmazon,Google,NSA,andmore.You can find more information about it on the officialsiteÂ(http://docs.python-requests.org/en/master/).Â
For the show version example, the following Python script is automaticallygeneratedforyou.Iampastingintheoutputwithoutanymodification:Â
"""
NX-API-BOT
"""
importrequests
importjson
"""
Modifytheseplease
"""
url='http://YOURIP/ins'
switchuser='USERID'
switchpassword='PASSWORD'
myheaders={'content-type':'application/json-rpc'}

payload=[
{
"jsonrpc":"2.0",
"method":"cli",
"params":{
"cmd":"showversion",
"version":1.2
},
"id":1
}
]
response=requests.post(url,data=json.dumps(payload),
headers=myheaders,auth=(switchuser,switchpassword)).json()
In cisco_nxapi_2.py file, you will see that I have only modified the URL,username, andpasswordof thepreceding file, and Ihaveparsed theoutput toonlyincludethesoftwareversion.Hereistheoutput:Â
$python3cisco_nxapi_2.py
7.2(0)D1(1)[build7.2(0)ZD(0.120)]
Thebestpartaboutusing thismethod is that thesamesyntaxworkswithbothconfiguration command as well as show commands. This is illustrated inthe cisco_nxapi_3.py file. Formulti-line configuration, you can use the idfield to specify the order of operations. In cisco_nxapi_4.py, the followingpayloadwaslistedforchangingthedescriptionoftheinterfaceEthernet2/12intheinterfaceconfigurationmode:Â
{
"jsonrpc":"2.0",
"method":"cli",
"params":{
"cmd":"interfaceethernet2/12",
"version":1.2
},
"id":1
},
{
"jsonrpc":"2.0",
"method":"cli",
"params":{
"cmd":"descriptionfoo-bar",
"version":1.2
},

"id":2
},
{
"jsonrpc":"2.0",
"method":"cli",
"params":{
"cmd":"end",
"version":1.2
},
"id":3
},
{
"jsonrpc":"2.0",
"method":"cli",
"params":{
"cmd":"copyrunstart",
"version":1.2
},
"id":4
}
]
Inthenextsection,wewill lookat theexamplesforCiscoNETCONFandtheYANGmodel.Â
CiscoandYANGmodel
Earlier in the chapter, we looked at the possibility of expressing the networkusingdatamodelinglanguageYANG.Let'slookÂintoitalittlebit.Â
First off, we should know that YANG only defines the type of data sentoverÂNETCONFprotocol, andNETCONFexists as a standaloneprotocol aswe saw in the NX-API section. YANG, being relatively new, has a spottysupportabilityacrossvendorsandproductlines.Forexample,ifwerunthesamecapabilityexchangescriptthatwehaveusedbeforeÂtoaCisco1000vrunningÂIOS-XE,Âthisiswhatwewillsee:Â
urn:cisco:params:xml:ns:yang:cisco-virtual-service?
module=cisco-
virtual-service&revision=2015-04-09
http://tail-f.com/ns/mibs/SNMP-NOTIFICATION-MIB/200210140000Z?
module=SNMP-NOTIFICATION-MIB&revision=2002-10-14
urn:ietf:params:xml:ns:yang:iana-crypt-hash?module=iana-crypt-
hash&revision=2014-04-04&features=crypt-hash-sha-512,crypt-
hash-
sha-256,crypt-hash-md5
urn:ietf:params:xml:ns:yang:smiv2:TUNNEL-MIB?module=TUNNEL-
MIB&revision=2005-05-16
urn:ietf:params:xml:ns:yang:smiv2:CISCO-IP-URPF-MIB?
module=CISCO-
IP-URPF-MIB&revision=2011-12-29
urn:ietf:params:xml:ns:yang:smiv2:ENTITY-STATE-MIB?
module=ENTITY-
STATE-MIB&revision=2005-11-22
urn:ietf:params:xml:ns:yang:smiv2:IANAifType-MIB?
module=IANAifType-
MIB&revision=2006-03-31
<omitted>
Comparethistotheoutputthatwesaw;clearlyIOS-XEunderstandstheYANGmodelmorethanNX-OS.Industrywidenetworkdatamodelingfornetworkingis clearly something that is beneficial to network automation.However, giventhe uneven support across vendors and products, it is not something that ismatureenough tobeusedacrossyourproductionnetwork, inmyopinion.Forthisbook, Ihave includeda script calledcisco_yang_1.py that showshow toparse out the NETCONF XML output with YANG filterscalledÂurn:ietf:params:xml:ns:yang:ietf-interfacesasastartingpointtoseetheexistingtagoverlay.Â
Note
You can check the latest vendor support on theYANGGitHubproject page:(https://github.com/YangModels/yang/tree/master/vendor).Â
TheCiscoACIÂ
The CiscoApplication Centric Infrastructure (ACI) is meant to provide acentralizedapproachtoallofthenetworkcomponents.Inthedatacentercontext,itmeansthecentralizedcontrollerisawareofandmanagesthespine,leaf,topofrack switches as well as all the network service functions. This can be donethroughGUI,CLI,orAPI.SomemightarguethattheACIisCisco'sanswertothebroadersoftware-definednetworking.
OneofthesomewhatconfusingpointforACIisthedifferencebetweenACIand

ACI-EM.Inshort,ACIfocusesondatacenteroperationswhileACI-EMfocusesonenterprisemodules.Bothofferacentralizedviewandcontrolofthenetworkcomponents,buteachhasitownfocusandshareoftools.Forexample,itisraretoseeanymajordatacenterdeploycustomerfacingwireless infrastructure,butwirelessnetworkisacrucialpartofenterprises today.Anotherexamplewouldbe thedifferent approaches tonetwork security.While security is important inanynetwork,inthedatacenterenvironment,lotsofsecuritypoliciesarepushedto theedgenodeon the server for scalability; in enterprises security,policy issomewhatsharedbetweenthenetworkdevicesandservers.Â
UnlikeNETCONFRPC,ACIAPI follows theRESTmodel to use theHTTPverb(GET,POST,PUT,DELETE)tospecifytheoperationintended.
Note
Wecanlookatthecisco_apic_em_1.pyfile,whichisamodifiedversion of the Cisco sample code on lab2-1-get-network-device-list.py (https://github.com/CiscoDevNet/apicem-1.3-LL-sample-codes/blob/master/basic-labs/lab2-1-get-network-device-list.py).
Theabbreviatedsectionwithoutcommentsandspacesarelistedhere.
The first function called getTicket() uses HTTPS POST on the controllerwith the path called  /api/vi/ticket with a username and passwordembeddedintheheader.Then,parsethereturnedresponseforaticketwithsomelimitedvalidtime:Â
defgetTicket():
url="https://"+controller+"/api/v1/ticket"
payload={"username":"usernae","password":"password"}
header={"content-type":"application/json"}
response=requests.post(url,data=json.dumps(payload),headers=header,verify=False)
r_json=response.json()
ticket=r_json["response"]["serviceTicket"]
returnticket
ThesecondfunctionthencallsanotherpathcalledÂ/api/v1/network-deviceswiththenewlyacquiredticketembeddedintheheader,thenparsetheresults:Â

url="https://"+controller+"/api/v1/network-device"
header = {"content-type": "application/json", "X-Auth-
Token":ticket}
TheoutputdisplaysboththerawJSONresponseoutputaswellasaparsedtable.ApartialoutputwhenexecutedagainstaDevNetlabcontrollerisshownhere:Â
NetworkDevices=
{
"version":"1.0",
"response":[
{
"reachabilityStatus":"Unreachable",
"id":"8dbd8068-1091-4cde-8cf5-d1b58dc5c9c7",
"platformId":"WS-C2960C-8PC-L",
<omitted>
"lineCardId":null,
"family":"WirelessController",
"interfaceCount":"12",
"upTime":"497days,2:27:52.95"
}
]
}
8dbd8068-1091-4cde-8cf5-d1b58dc5c9c7 Cisco Catalyst 2960-
CSeries
Switches
cd6d9b24-839b-4d58-adfe-3fdf781e1782Cisco3500ISeriesUnified
AccessPoints
<omitted>
55450140-de19-47b5-ae80-
bfd741b23fd9Cisco4400SeriesIntegrated
ServicesRouters
ae19cd21-1b26-4f58-8ccd-
d265deabb6c3Cisco5500SeriesWirelessLAN
Controllers
Asonecansee,weonlyqueryasinglecontrollerdevice,butweareabletogetahigh-level viewof all the networkdevices that the controller is awareof.Thedownside is, of course, theACI controller only supportsCisco devices at thistime.Â

ThePythonAPIforJunipernetworks
Juniper networks have always been a fan favorite among the service providercrowd.Ifwetakeastepbackandlookattheserviceprovidervertical,itwouldmake sense that automating network equipments is on the top of their mind.Before the dawn of cloud scale datacenters, service providerswere the oneswith the most network equipment. A typical enterprise might have a fewredundant Internet connection at the corporate headquarter, and have a fewremote sites homing the network connectivities back to the headquarters in ahub-and-spokefashioninordertoaccessheadquarterresources,suchasmailanddatabases. But to a service provider, they are the ones who need to build,provision, manage, and troubleshoot these connections and the underlyingnetworks.Theymake theirmoney by selling the bandwidth alongwith value-addedmanagedservices.Itwouldmakesensefortheserviceproviderstoinvestinautomation touse the leastamountofengineeringhour tokeep thenetworkhummingalong,andautomationisthekey.Â
In my opinion, the difference between a service provider network needs asopposed to their cloud datacenter counterpart is that traditionally, serviceproviders aggregate more into a single device with added services. A goodexamplewouldbetheMultiprotocolLabelSwitching(MPLS)thatalmostallmajorserviceprovidersprovidebutrarelyadaptedintheenterpriseordatacenternetworks.Juniper,astheyhavebeenverysuccessfulat,hasidentifiedthisneedandexcelatfulfillingtheserviceproviderrequirementsofautomating.Let'stakealookatsomeofJuniper'sautomationAPIs.Â
JuniperandNETCONF
The Network Configuration Protocol (NETCONF) is an IETF standard,whichwasfirstpublishedin2006asRFC4741andlaterrevisedinRFC6241.Both the RFC's Juniper contributed heavily to the standards; in fact, in RFC,4741 Juniper was the sole author. It makes sense that Juniper devices fullysupport NETCONF, and it serves as the underlying layer for most of itsautomation tools and frameworks. Some of the main characteristics ofNETCONFinclude:Â

1. ItusesExtensibleMarkupLanguage(XML)fordataencoding.2. ItusesRemoteProcedureCalls(RPC),thereforeinthecaseofHTTP(s)
asthetransport,theURLendpointisidenticalwhiletheoperationintendedisspecifiedinthebodyoftherequest.Â
3. It is conceptually based on layers; from top to bottom, they include thecontent,operations,messages,andtransport:Â
ÂNetConfModel(source:Âhttps://en.wikipedia.org/wiki/NETCONF)
JunipernetworksprovideanextensiveÂNETCONFXMLmanagementprotocoldeveloperguide (https://www.juniper.net/techpubs/en_US/junos13.2/information-products/pathway-pages/netconf-guide/netconf.html#overview) in its technicallibrary.Let'stakealookatitsÂusage.Â
DevicePreparation
InordertostartusingNETCONF,let'screateaseparateuseraswellasturningontheservice:Â
setsystemloginusernetconfuid2001
setsystemloginusernetconfclasssuper-user
setsystemloginusernetconfauthenticationencrypted-password
"$1$0EkA.XVf$cm80A0GC2dgSWJIYWv7Pt1"
setsystemservicesssh

setsystemservicestelnet
setsystemservicesnetconfsshport830
Note
For the Juniper device lab, I am using an older, unsupportedplatform called Juniper Olive. It is solely used for labpurposes. You can use your favorite search engine to find outsomeinterestingfactsandhistoryaboutJuniperOlive.Â
OntheJuniperdevice,youcanalwaystakealookattheconfigurationeitherinaflat fileor in theXMLformat.Theflat filecomes inhandywhenyouneed tospecifyaone-linercommandtomakeconfigurationchanges:Â
netconf@foo>showconfiguration|displayset
setversion12.1R1.9
setsystemhost-namefoo
setsystemdomain-namebar
<omitted>
The XML format comes in handy at times when you need to see the XMLstructureoftheconfiguration:Â
netconf@foo>showconfiguration|displayxml
<rpc-
replyxmlns:junos="http://xml.juniper.net/junos/12.1R1/junos">
<configurationjunos:commit-seconds="1485561328"junos:commit-
localtime="2017-01-27 23:55:28 UTC" junos:commit-
user="netconf">
<version>12.1R1.9</version>
<system>
<host-name>foo</host-name>
<domain-name>bar</domain-name>
Note
Wehave installed thenecessaryLinux librariesand thencclientPythonlibraryintheCiscosection.Ifyouhavenotdoneso,referbacktothesectionandinstallthenecessarypackages.
WearenowreadytolookatourfirstJuniperNETCONFexample.Â

JuniperNETCONFexamples
Wewilluseaprettystraightforwardexample toexecuteÂshowversion.Wewillnamethisfilejunos_netconf_1.py:Â
#!/usr/bin/envpython3
fromncclientimportmanager
conn=manager.connect(
host='192.168.24.252',
port='830',
username='netconf',
password='juniper!',
timeout=10,
device_params={'name':'junos'},
hostkey_verify=False)
result=conn.command('showversion',format='text')
print(result)
conn.close_session()
Allthefieldsinthescriptshouldbeprettyselfexplanatorywiththeexceptionofdevice_params. Starting from ncclient 0.4.1, the device handlerwas added tospecify different vendors or platforms, for example, the name can be juniper,CSR,Nexus,orHuawei.Wealsoaddedhostkey_verify=Falsebecauseweareusingaself-signedcertificatefromtheJuniperdevice.Â
The returned output is an rpc-reply encoded in XML with andoutputÂelement:Â
<rpc-replymessage-id="urn:uuid:7d9280eb-1384-45fe-be48-
b7cd14ccf2b7">
<output>
Hostname:foo
Model:olive
JUNOSBaseOSboot[12.1R1.9]
JUNOSBaseOSSoftwareSuite[12.1R1.9]
<omitted>
JUNOSRuntimeSoftwareSuite[12.1R1.9]
JUNOSRoutingSoftwareSuite[12.1R1.9]
</output>
</rpc-reply>

WecanparsetheXMLoutputtojustincludetheoutputtext:Â
print(result.xpath('output')[0].text)
Injunos_netconf_2.py,wewillmakeconfigurationchangestothedevice.Wewill startwith somenew imports for constructingnewXMLelements and theconnectionmanagerobject:Â
#!/usr/bin/envpython3
fromncclientimportmanager
fromncclient.xml_importnew_ele,sub_ele
conn=manager.connect(host='192.168.24.252',port='830',
username='netconf',password='juniper!',timeout=10,
device_params={'name':'junos'},hostkey_verify=False)
Wewilllocktheconfigurationandmakeconfigurationchanges:
#lockconfigurationandmakeconfigurationchanges
conn.lock()
#buildconfiguration
config=new_ele('system')
sub_ele(config,'host-name').text='master'
sub_ele(config,'domain-name').text='python'
Youcansee from theXMLdisplay that thenodestructurewith'system'Âistheparentof'host-name'and'domain-name':
<system>
<host-name>foo</host-name>
<domain-name>bar</domain-name>
...
</system>
We can then push the configuration and commit the configuration. These arenormalbestpracticestepsforJuniperconfigurationchanges:Â
#send,validate,andcommitconfig
conn.load_configuration(config=config)
conn.validate()
commit_config=conn.commit()
print(commit_config.tostring)

#unlockconfig
conn.unlock()
#closesession
conn.close_session()
Overall, theNETCONFstepsmapprettywelltowhatyouwouldhavedoneinthe CLI steps. Please take a look at the junos_netconf_3.py script for acombinationofthepreviousexamplesandthefunctionalexample.Â
JuniperPyEZfordevelopers
PyEZ is a high-level Python implementation that integrates better with yourexisting Python code. By utilizing Python API, you can perform commonoperationandconfigurationtaskswithouttheextensiveknowledgeoftheJunosCLI.Â
Note
JunipermaintainsacomprehensiveJunosPyEZdeveloperguideat https://www.juniper.net/techpubs/en_US/junos-pyez1.0/information-products/pathway-pages/junos-pyez-developer-guide.html#configuration on their technical library. Ifyouare interested inusingPyEZ, Iwouldhighly recommendatleastaglancethroughthevarioustopicsontheguide.Â
Installationandpreparation
TheinstallationinstructionforeachoftheoperatingsystemcanbefoundontheInstalling Junos PyEZ (https://www.juniper.net/techpubs/en_US/junos-pyez1.0/topics/task/installation/junos-pyez-server-installing.html) page. Next,wewillshowtheinstallationinstructionsforUbuntu16.04.Â
There are somedependent packages,manyofwhich should alreadybe on thedevice:Â
$ sudo apt-get install -y python3-pip python3-dev libxml2-
devlibxslt1-devlibssl-devlibffi-dev

PyEZpackagescanbeinstalledviapip.Here,ÂIhaveinstalledforbothPython3andPython2:Â
$sudopip3installjunos-eznc
$sudopipinstalljunos-eznc
Onthedevice,NETCONFneedstobeconfiguredastheunderlyingXMLAPIforPyEZ:Â
setsystemservicesnetconfsshport830
For user authentication,we can either use password authentication or ssh keypair.Creatingthelocaluserisstraightforward:Â
setsystemloginusernetconfuid2001
setsystemloginusernetconfclasssuper-user
set system login user netconf authentication encrypted-
password"$1$0EkA.XVf$cm80A0GC2dgSWJIYWv7Pt1"
Forthesshkeyauthentication,firstgeneratethekeypair:Â
$ssh-keygen-trsa
Bydefault,thepublickeywillbecalledid_rsa.pubunder~/.ssh/whiletheprivatekeyisnamedid_rsaunderthesamedirectory.Treattheprivatekeylikeapasswordthatyouwouldnevershare.Thepublickeycanbefreelydistributed;however, in this case, we will move it to the /tmp directory and enable thePython3HTTPservermoduletocreateareachableURL:Â
$mv~/.ssh/id_rsa.pub/tmp
$cd/tmp
$python3-mhttp.server
ServingHTTPon0.0.0.0port8000...
Note
ForPython2,usepython-mSimpleHTTPServerÂinstead.Â
Atthispoint,wecancreatetheuserandassociatethepublickey:Â
netconf@foo# set system login user echou class super-
user authentication load-key-

filehttp://192.168.24.164:8000/id_rsa.pub
/var/home/netconf/...transferring.file........100%of394B2482kBps
Now, ifwe trysshwith theprivatekeyfromthemanagementstation, theuserwillbeautomaticallyauthenticated:Â
$ssh-i~/.ssh/id_rsa192.168.24.252
---JUNOS12.1R1.9built2012-03-2412:52:33UTC
echou@foo>
Let's make sure the authentication methods work with PyEZ. Let's try theusernameandpasswordcombination:Â
Python3.5.2(default,Nov172016,17:05:23)
[GCC5.4.020160609]onlinux
Type"help","copyright","credits"or"license"formoreinformation.
>>>fromjnpr.junosimportDevice
>>>dev=Device(host='192.168.24.252',user='netconf',password='juniper!')
>>>dev.open()
Device(192.168.24.252)
>>>dev.facts
{'serialnumber':'','personality':'UNKNOWN','model':'olive','ifd_style':'CLASSIC','2RE':False,'HOME':'/var/home/juniper','version_info':junos.version_info(major=
(12,1),type=R,minor=1,build=9),'switch_style':'NONE','fqdn':'foo.bar','hostname':'foo','version':'12.1R1.9','domain':'bar','vc_capable':False}
>>>dev.close()
Wecanalsotrytousethesshkeyauthentication:Â
>>>fromjnpr.junosimportDevice
>>>dev1=Device(host='192.168.24.252',user='echou',ssh_private_key_file='/home/echou/.ssh/id_rsa')
>>>dev1.open()
Device(192.168.24.252)
>>>dev1.facts
{'HOME':'/var/home/echou','model':'olive','hostname':'foo','switch_style':'NONE','personality':'UNKNOWN','2RE':False,'domain':'bar','vc_capable':False,'version':'12.1R1.9','serialnumber':'','fqdn':'foo.bar','ifd_style':'CLASSIC','version_info':junos.version_info(major=
(12,1),type=R,minor=1,build=9)}
>>>dev1.close()
Great!WearenowreadytolookatsomeexamplesforPyEZ.Â
PyEZexamples
In the previous interactive prompt, we already saw that when the deviceconnects,theobjectalreadyautomaticallyretrievesafewfactsaboutthedevice.In our first example, junos_pyez_1.py, we are connecting to the device andexecutingaRPCcallforshowinterfaceem1:

#!/usr/bin/envpython3
fromjnpr.junosimportDevice
importxml.etree.ElementTreeasET
importpprint
dev=Device(host='192.168.24.252',user='juniper',passwd='juniper!')
try:
dev.open()
exceptExceptionaserr:
print(err)
sys.exit(1)
result=
dev.rpc.get_interface_information(interface_name='em1',terse=True)
pprint.pprint(ET.tostring(result))
dev.close()
ThedeviceclasshasaproperoftheÂrpcÂpropertythatincludesalloperationalcommands.This isprettyawesomebecause there isno slippagebetweenwhatwe can do in CLI vs. API. The catch is that we need to find out the xmlrpcÂelementtag.Inourfirstexample,howdoweknowshowinterfaceem1equates to get_interface_information?We have three ways of finding outabouttheinformation:Â
1. WecanreferencetheJunosXMLAPIOperationalDeveloperReference.Â2. WecanalsousetheCLIanddisplaytheXMLRPCequivalentandreplace
thedash(-)betweenthewordswithunderscore(_).Â3. WecanalsodothisprogrammaticallyusingthePyEZlibrary.Â
ItypicallyusethesecondoptionÂtogettheoutputdirectly:Â
netconf@foo>showinterfacesem1|displayxmlrpc
<rpc-
replyxmlns:junos="http://xml.juniper.net/junos/12.1R1/junos">
<rpc>
<get-interface-information>
<interface-name>em1</interface-name>
</get-interface-information>
</rpc>
<cli>
<banner></banner>
</cli>
</rpc-reply>
However,athirdoptionÂisalsofeasible:Â
>>>dev1.display_xml_rpc('showinterfacesem1',format='text')
'<get-interface-information>n<interface-name>em1</interface-
name>n</get-interface-information>n'
Of course, we will need to make configuration changes as well. Inthe junos_pyez_2.py configuration example, we will import an additionalConfig()methodfromPyEZ:
#!/usr/bin/envpython3
fromjnpr.junosimportDevice
fromjnpr.junos.utils.configimportConfig
Wewillutilizethesameblockforconnectingtoadevice:Â
dev=Device(host='192.168.24.252',user='juniper',
passwd='juniper!')
try:
dev.open()
exceptExceptionaserr:
print(err)
sys.exit(1)
ThenewConfig()methodwillloadtheXMLdataandmaketheconfigurationchanges:Â
config_change="""
<system>
<host-name>master</host-name>
<domain-name>python</domain-name>
</system>
"""
cu=Config(dev)
cu.lock()
cu.load(config_change)
cu.commit()
cu.unlock()

dev.close()
ThePyEZexamplesare simplebydesign,buthopefully, theydemonstrate thewaysyoucanleveragePyEZforyourJunosautomationneeds.Â

TheAristaPythonAPI
AristaNetworkshavealwaysbeenfocusedonlarge-scaledatacenternetworks.In its corporate profile page (https://www.arista.com/en/company/company-overview),itisstatedasfollows:
"AristaNetworkswasfoundedtopioneeranddeliversoftware-drivencloudnetworking solutions for large data center storage and computingenvironments."
Notice that the statement specifically called our large datacenter, which wealreadyknowisexplodedwithservers,databases,andyes,networkequipmenttoo.Therefore,automationhasalwaysbeenon theirmind. Infact, theyhaveaLinux underpin behind their operating system, then EOS has many addedbenefitssuchashavingPythonalreadybuilt-inalongwithLinuxAPIs.Â
Arista'sautomationstoryconsistofthreeapproaches:Â
 EOS Automation (source:https://www.arista.com/en/products/eos/automation)
Like itsnetworkcounterparts,youcan interactwithAristadevicesdirectlyvia

eAPI,oryoucanchoosetoleveragetheirPythonlibraryfortheinteraction.Wewill see examples of both.Wewill look atArista's integration forAnsible inlaterchapters.Â
TheAristaeAPImanagement
Arista'seAPIwasfirst introducedinEOS4.12afewyearsago. It transportsalistofshoworconfigcommandsoverHTTPorHTTPSandresponsesbackinJSON.An important distinction is that it is aRemoteProcedureCall (RPC)andJSON-RPC, insteadof the representationofstate transferandREST,eventhough the transport layer is HTTP(S). For our intents and purposes, thedifferenceisthatwemaketherequesttothesameURLendpointusingthesameHTTP method (POST). Instead of using HTTP verb (GET, Â Â POST, PUT,DELETE)toexpressouraction,wesimplystateourintendedactioninthebodyofthe request. In thecaseofeAPI,wewill specifyamethodkeywitharunCmdsvalueforourintention.
For the followingexamples, I amusingaphysicalArista switch runningEOS4.16.Â
TheeAPIpreparation
TheeAPIagenton theAristadevice isdisabledbydefault,sowewillneedtoenableitonthedevicebeforewecanuseit:Â
arista1(config)#managementapihttp-commands
arista1(config-mgmt-api-http-cmds)#noshut
arista1(config-mgmt-api-http-cmds)#protocolhttpsport443
arista1(config-mgmt-api-http-cmds)#noprotocolhttp
arista1(config-mgmt-api-http-cmds)#vrfmanagement
Asyoucansee,wehaveturnedoffHTTPserveranduseHTTPSasthetransportinstead.StartingfromafewEOSversionago,themanagementinterfacesis,bydefault,residinginaVRFcalledmanagement.Inmytopology,Iamaccessingthe device via themanagement interface; therefore, I have specified the VRFspecifically. You can check that API management is turned on by the showcommand:Â
arista1#shmanagementapihttp-commands
Enabled:Yes

HTTPSserver:running,settouseport443
HTTPserver:shutdown,settouseport80
LocalHTTPserver:shutdown,noauthentication,settouseport8080
UnixSocketserver:shutdown,noauthentication
VRF:management
Hits:64
Lasthit:33secondsago
Bytesin:8250
Bytesout:29862
Requests:23
Commands:42
Duration:7.086seconds
SSLProfile:none
QoSDSCP:0
UserRequestsBytesinBytesoutLasthit
---------------------------------------------------------------
-----
admin2382502986233secondsago
URLs
-----------------------------------------
Management1:https://192.168.199.158:443
arista1#
After enabling the agent, you will be able to access the exploration page foreAPIbygoing to thedevice's IPaddress. Ifyouhavechanged thedefaultportforaccess,justappenditattheend.ÂTheauthenticationistiedintothemethodof authentication on the switch; in this case the username and passwordwereconfiguredlocally.Bydefault,aself-signedcertificatewillbeused.

AristaEOSExplorer
YouwillbetakentoanexplorerpagewhereyoucantypeintheCLIcommandandgetaniceoutputforthebodyofyourrequest.Forexample,ifIwantedtoseehowtomakearequestbodyforshowversion,thisistheoutputIwillseefromtheexplorer:Â

AristaEOSExplorerViewer
The overview link will take you to the sample usage and backgroundinformationwhilethecommanddocumentationwillserveasreferencepointsfortheshowcommands.Eachofthecommandreferenceswillcontainthereturnedvaluefieldname,type,andabriefdescription.TheonlinereferencescriptsfromArista uses jsonrpclib (https://github.com/joshmarshall/jsonrpclib/), which iswhat we will use as well. However, as of this book, it has a dependency ofPython2.6+andnotyetportedtoPython3;therefore,wewillusePython2.7fortheexamples.Â
Note
Bythetimeyoureadthisbook,theremightbeanupdatedstatus.Please read the GitHub pullrequest (https://github.com/joshmarshall/jsonrpclib/issues/38)and theGitHubÂREADMEÂ(https://github.com/joshmarshall/jsonrpclib/forthelateststatus.Â

Installationisstraightforwardusingeasy_installorpip:Â
$sudoeasy_installjsonrpclib
$sudopipinstalljsonrpclib
eAPIexamples
Wecan thenwrite a simpleprogramcalledeapi_1.py to lookat the responsetext:Â
#!/usr/bin/python2
from__future__importprint_function
fromjsonrpclibimportServer
importssl
ssl._create_default_https_context=ssl._create_unverified_context
switch=Server("https://admin:[email protected]/command-
api")
response=switch.runCmds(1,["showversion"])
print('SerialNumber:'+response[0]['serialNumber'])
Note
Note since this is Python 2, in the script I used the from__future__importprint_functionÂtomakefuturemigrationeasier.ThesslrelatedlinesareforPythonversion>2.7.9,Âformore information pleaseseeÂhttps://www.python.org/dev/peps/pep-0476/.Â
ThisistheresponseIreceivedfromthepreviousÂrunCms()method:Â
[{u'memTotal':3978148,u'internalVersion':u'4.16.6M-
3205780.4166M',u'serialNumber':u'<omitted>',u'systemMacAddress':
u'<omitted>',u'bootupTimestamp':1465964219.71,u'memFree':
277832,u'version':u'4.16.6M',u'modelName':u'DCS-7050QX-32-
F',
u'isIntlVersion': False, u'internalBuildId': u'373dbd3c-60a7-
4736-
8d9e-
bf5e7d207689',u'hardwareRevision':u'00.00',u'architecture':

u'i386'}]
Asyoucansee,thisisalistcontainingonedictionaryitem.Ifweneedtograbtheserialnumber,wecansimplyreferencetheitemnumberandthekeyinline12:Â
print('SerialNumber:'+response[0]['serialNumber'])
Theoutputwillcontainonlytheserialnumber:Â
$pythoneapi_1.py
SerialNumber:<omitted>
Tobemorefamiliarwiththecommandreference,IrecommendthatyouclickontheCommandDocumentation link on the eAPI page, and compare your outputwiththeoutputofversioninthedocumentation.Â
Asnotedearlier,unlikeREST,JSON-RPCclientuses thesameURLendpointforcallingtheserverresources.YoucanseefromthepreviousexamplethattherunCmds() method can consume a list of commands. For the execution ofconfigurationcommands,youcan follow the same framework, andplace thelistofcommandsinsidethesecondargument.
Hereisanexampleofconfigurationcommandscalledeapi_2.py:
#!/usr/bin/python2
from__future__importprint_function
fromjsonrpclibimportServer
importssl,pprint
ssl._create_default_https_context=ssl._create_unverified_context
#RunAristacommandsthrueAPI
defrunAristaCommands(switch_object,list_of_commands):
response=switch_object.runCmds(1,list_of_commands)
returnresponse
switch=Server("https://admin:[email protected]/command-
api")
commands=["enable","configure","interfaceethernet1/3",

"switchportaccessvlan100","end","writememory"]
response=runAristaCommands(switch,commands)
pprint.pprint(response)
Hereistheoutputofthecommandexecution:Â
$python2eapi_2.py
[{},{},{},{},{},{u'messages':[u'Copycompletedsuccessfully.']}]
Now,doaquickcheckontheswitchtoverifycommandexecution:
arista1#shruninteth1/3
interfaceEthernet1/3
switchportaccessvlan100
arista1#
Overall, eAPI is fairly straightforward and simple to use.Most programminglanguageshave libraries similar tojsonrpclib that abstracts away JSON-RPCinternals.WithafewcommandsyoucanstartintegratingAristaEOSautomationintoyournetwork.Â
TheAristaPyeapilibrary
The Python client for the eAPI andPyeapiÂ(http://pyeapi.readthedocs.io/en/master/index.html) libraries isanativePythonlibrarywrapperaroundeAPI. Itprovidesasetofbindings toconfigureAristaEOSnodes.WhydoweneedpyeapiwhenwealreadyhaveÂeAPI?Sincewe have used Python to demonstrate eAPI, keep in mind that the onlyrequirementofeAPIisaJSON-RPCcapableclient.Thus,itiscompatiblewithmost programming languages. Personally, I think of eAPI as a commondenominatoramongalldifferentlanguages.WhenIfirststartedoutinthefield,Perlwasthedominantlanguageforscriptingandnetworkautomation.TherearestillmanyenterprisesthatrelyonPerlscriptsastheirprimaryautomationtool.Orinasituationwherethecompanyalreadyhasinvestedatonofresourcesandcodebaseinanotherlanguage,eAPIwithJSON-RPCwouldbethewaytomoveforwardwith.Â
However,forthoseofuswhoprefertocodeinPython,anativePythonlibrarymeansamorenaturalfeelinginwritingourcode.Itcertainlymakesextendinga

PythonprogramtosupporttheEOSnodeeasier.Italsomakeskeepingupwiththe latest change in Python easier. For example, we can use Python 3 withpyeapi!Â
Note
Atthetimeofwriting,Python3(3.4+)supportisofficiallywork-in-progress asstatedÂ(http://pyeapi.readthedocs.io/en/master/requirements.html)onthedocumentation.Pleasecheckthedocumentation.Â
ThePyeapiinstallation
Installationisstraightforwardwithpip:Â
$sudopipinstallpyeapi
$sudopip3installpyeapi
Note
NotethatpipwillalsoinstallthenetaddrlibraryasitispartofthestatedrequirementÂ(http://pyeapi.readthedocs.io/en/master/requirements.htmlforpyeapi.Â
Bydefault,pyapiclientwilllookforanINIstylehidden(withaperiodinfront)filecalledeapi.confinyourhomedirectory.Youcanoverridethisbehaviorbyspecifying theeapi.conf file path, but it is generally a good idea to separateyourconnectioncredentialandlockitdownfromthescriptitself.Youcancheckout the AristapyapiÂdocumentationÂ(http://pyeapi.readthedocs.io/en/master/configfile.html#configfileforthefieldscontainedinthefile;hereisthefileIamusinginthelab:Â
cat~/.eapi.conf
[connection:Arista1]
host:192.168.199.158
username:admin
password:arista
transport:https

ThefirstlinecalledÂ[connection:Arista1]containsthenamethatwewilluseinourpyeapiconnection;therestofthefieldsshouldbeprettyself-explanatory.Youcan lockdown the file tobe read-only for theuser that is going call thisfile:Â
$chmod400~/.eapi.conf
$ls-l~/.eapi.conf
-r--------1echouechou94Jan2718:15/home/echou/.eapi.conf
Pyeapiexamples
Now,wearereadytotakealookaroundtheusage.Let'sstartbyconnectingtotheEOSnodebycreatinganobject:Â
Python3.5.2(default,Nov172016,17:05:23)
[GCC5.4.020160609]onlinux
Type"help","copyright","credits"or"license"formoreinformation.
>>>importpyeapi
>>>arista1=pyeapi.connect_to('Arista1')
Wecanexecuteshowcommandstothenodeandreceivetheoutputback:Â
>>>importpprint
>>>pprint.pprint(arista1.enable('showhostname'))
[{'command':'showhostname',
'encoding':'json',
'result':{'fqdn':'arista1','hostname':'arista1'}}]
Theconfiguration fieldcanbeeithera singlecommandora listofcommandsusingtheconfig()method:Â
>>>arista1.config('hostnamearista1-new')
[{}]
>>>pprint.pprint(arista1.enable('showhostname'))
[{'command':'showhostname',
'encoding':'json',
'result':{'fqdn':'arista1-new','hostname':'arista1-new'}}]
>>>arista1.config(['interfaceethernet1/3','descriptionmy_link'])
[{},{}]
Notethatcommandabbreviation(showrunversusÂshowrunning-config)andsomeextensionswouldnotwork:Â

>>>pprint.pprint(arista1.enable('showrun'))
Traceback(mostrecentcalllast):
...
File "/usr/local/lib/python3.5/dist-
packages/pyeapi/eapilib.py",line396,insend
raiseCommandError(code,msg,command_error=err,output=out)
pyeapi.eapilib.CommandError:Error[1002]:CLIcommand2of2'showrun'failed:invalidcommand[incompletetoken(attoken1:'run')]
>>>
>>> pprint.pprint(arista1.enable('show running-
configinterfaceethernet1/3'))
Traceback(mostrecentcalllast):
...
pyeapi.eapilib.CommandError:Error[1002]:CLIcommand2of2'showrunning-
configinterfaceethernet1/3'failed:invalidcommand[incompletetoken(attoken2:'interface')]
HoweverÂyoucanalwayscatchtheresultsbackandgetthedesiredvalue:Â
>>>result=arista1.enable('showrunning-config')
>>> pprint.pprint(result[0]['result']['cmds']
['interfaceEthernet1/3'])
{'cmds':{'descriptionmy_link':None,'switchportaccessvlan100':None},'comments':[]}
Sofar,wehavebeendoingwhatwehavebeendoingwitheAPIforshowandconfigurationcommands.PyeapioffersvariousAPI tomake life easier. In thefollowingexample,wewillconnecttothenode,calltheVLANAPI,andstarttooperateontheVLANÂparametersofthedevice.Let'stakealook:Â
>>>importpyeapi
>>>node=pyeapi.connect_to('Arista1')
>>>vlans=node.api('vlans')
>>>type(vlans)
<class'pyeapi.api.vlans.Vlans'>
>>>dir(vlans)
[...'command_builder','config','configure','configure_interface','configure_vlan','create','default','delete','error','get','get_block','getall','items','keys','node','remove_trunk_group','set_name','set_state','set_trunk_groups','values']
>>>vlans.getall()
{'1':{'vlan_id':'1','trunk_groups':[],'state':'active','name':'default'}}
>>>vlans.get(1)
{'vlan_id':1,'trunk_groups':[],'state':'active','name':'default'}
>>>vlans.create(10)
True
>>>vlans.getall()
{'1':{'vlan_id':'1','trunk_groups':[],'state':'active','name':'default'},'10':{'vlan_id':'10','trunk_groups':[],'state':'active','name':'VLAN0010'}}
>>>vlans.set_name(10,'my_vlan_10')
True

Let'sverifyVLAN10thatwecreatedviatheVLANAPIonthedevice:Â
arista1#shvlan
VLANNameStatusPorts
----------------------------------------------------------------
-------------
1defaultactive
10my_vlan_10active
Asyou can see, thePython nativeAPI on theEOSobject is reallywhere thepyeapiexcelbeyondeAPIasitabstractsthelowerlevelattributesintothedeviceobject.
Note
Fora full list of ever increasingpyeapiAPIs, check theofficialdocumentationÂ(http://pyeapi.readthedocs.io/en/master/api_modules/_list_of_modules.html
Toroundupthischapter,let'sassumewerepeatthepreviousstepsenoughthatwe would like to write another Python class to save us some work calledpyeapi_1.py:Â
#!/usr/bin/envpython3
importpyeapi
classmy_switch():
def__init__(self,config_file_location,device):
#loadstheconfigfile
pyeapi.client.load_config(config_file_location)
self.node=pyeapi.connect_to(device)
self.hostname=self.node.enable('showhostname')[0]
['result']['hostname']
self.running_config=self.node.enable('showrunning-
config')
defcreate_vlan(self,vlan_number,vlan_name):
vlans=self.node.api('vlans')
vlans.create(vlan_number)
vlans.set_name(vlan_number,vlan_name)
Asyoucansee,weautomaticallyconnecttothenodeandsetthehostnameand

running_config upon connection. We also create a method to the class thatcreatesVLANusingtheVLANAPI.Let'stryitout:Â
Python3.5.2(default,Nov172016,17:05:23)
[GCC5.4.020160609]onlinux
Type"help","copyright","credits"or"license"formoreinformation.
>>>importpyeapi_1
>>>s1=pyeapi_1.my_switch('/tmp/.eapi.conf','Arista1')
>>>s1.hostname
'arista1'
>>>s1.running_config
[{'encoding':'json','result':{'cmds':{'interfaceEthernet27':{'cmds':{},'comments':[]},'iprouting':None,'interfacefaceEthernet29':{'cmds':{},'comments':[]},'interfaceEthernet26':{'cmds':{},'comments':[]},'interfaceEthernet24/4':h.':
<omitted>
'interfaceEthernet3/1':{'cmds':{},'comments':[]}},'comments':[],'header':['!device:arista1(DCS-
7050QX-32,EOS-4.16.6M)n!n']},'command':'showrunning-config'}]
>>>s1.create_vlan(11,'my_vlan_11')
>>>s1.node.api('vlans').getall()
{'11':{'name':'my_vlan_11','vlan_id':'11','trunk_groups':[],'state':'active'},'10':{'name':'my_vlan_10','vlan_id':'10','trunk_groups':[],'state':'active'},'1':{'name':'default','vlan_id':'1','trunk_groups':[],'state':'active'}}
>>>

Vendorneutrallibraries
There are several efforts of vendor neutral libraries such asNetmiko (https://github.com/ktbyers/netmiko) andnapalm (https://github.com/napalm-automation/napalm). Because theselibrariesdonotcomenativelyfromthedevicevendor,theyaresometimesastepslower to support the latest platform or features. They are also communitysupported,whichmeanstheyÂarenotnecessarilytheidealfitifyouneedtorelyon somebody else to fix bugs without any measure of service levelcommitment.Â

Summary
Inthischapter,welookedatvariouswaystocommunicateandmanagenetworkdevices from Cisco, Juniper, and Arista. We looked at both directcommunicationwiththelikesofNETCONFandREST,aswellasusingvendorprovided libraries such as PyEZ and Pyeapi. These are different layers ofabstractionsmeanttoprovideawaytoprogrammaticallymanageyournetworkdeviceswithouthumanintervention.Â
In the next chapter, we will take a look at a higher level of vendor-neutralabstraction tool calledAnsible. Ansible is an open source, general purposeautomation toolwritten inPython. Itcanbeused toautomateservers,networkdevices, load balancers, andmanymore. Of course, for our purpose, we willfocusonusingthisautomationframeworkfornetworkdevices.

Chapter 4. The Python Automation Framework - AnsibleBasics
The previous two chapters incrementally introduced differentways to interactwiththenetworkdevices.InChapter2,LowLevelNetworkDeviceInteractions,we discussed Pexpect and Paramiko that manage an interactive sessionautomatically. InChapter 3,ÂAPIand Intent-DrivenNetworking,we saw thatnetworkingisnotjustaboutindividualdevices,asitisawayforustoconnectindividualpartstogether,butouroverallgoaltypicallyrequiresahigherbusinesslogic.Forexample,imaginethishierarchyofthoughtprocessfromformingourbusiness objective to actually perform an action on a networking device (withthetopbeingclosetothebusinesslogic):welookedatvariousAPIsthatprovidea structured way of feedback from device as well as some well-definedcommandstructure.Bothofthemethodsarefairlylowlevel,meaningtheyarefocusedÂontheindividualdevicethatweareperformingouractionon.
You wake up one morning and think to yourself that you have valuableinformationonyournetwork,soyoushouldputsomesecuremeasurearoundthenetworkdevicestomakethemmoresecure!
Youthenproceedtobreaktheobjectivedownintotwoactionableitemstobeginwith:Â
Upgradingthedevicestothelatestversionofsoftware,whichrequires:Â1. Uploadingtheimagetothedevice.Â2. Tellingthedevicetobootfromthenewimage.Â3. Wewillproceedtorebootthedevice.Â4. Verifythatthedeviceisrunningwiththenewsoftwareimage.
Configuring theappropriateaccesscontrol liston thenetworkingdevices,whichincludesthefollowing:1. Constructingtheaccesslistonthedevice.Â2. Configuring the access list on the interface, which in most cases is
under the interface configuration section to be applied totheÂinterfaces.Â
Beinganautomation-mindedPythonengineer,youproceed towrite thescripts

using Pexpect, Paramiko, or API. But, as you can see, any network taskrepresents apurposewith the actual execution at the tail endof theoperation.For a long time, the engineer will translate the business logic into networkcommands, thenwedocument them into standardoperatingprocedures, sowecanreferbacktotheprocesseitherforourselvesorourcolleagues.Â
Inthischapterandthenext,wewillstarttodiscussanopensourceautomationtool calledAnsible. It is a tool that can simplify the process of going frombusiness logic to network commands. It can configure systems, deploysoftware, and orchestrate a combination of tasks.Ansible iswritten in Pythonandhasemergedasoneof the leadingautomation tools supportedbynetworkequipmentvendors.Â
Inthischapter,wewilltakealookatthefollowingtopics:Â
AquickAnsibleexampleTheadvantagesofAnsibleTheAnsiblearchitectureAnsibleCiscomodulesandexamplesAnsibleJunipermodulesandexamplesAnsibleAristamodulesandexamples
Atthetimeofwritingthisbook,Ansiblerelease2.2wascompatiblewithPython2.6 and 2.7 with a technical review for Python 3 support. However, just likePython,manyoftheusefulfeaturesofAnsiblecomefromthecommunity-drivenextension modules. After the core module is tested stable with Python 3(hopefully in thenear future), itwill take some time tobringall theextensionmodules up fromPython2 toPython3. For the rest of the book,wewill usePython2.7withAnsible.
Note
For the latest information on Ansible Python 3 support, checkoutÂhttp://docs.ansible.com/ansible/python_3_support.html.Â
As one can tell from the previous chapters, I am a believer in learning byexamples. Just like the underlying Python code for Ansible, the syntax for

AnsibleconstructsareeasyenoughtounderstandevenifyouhavenotworkedwithAnsible before. If you have some experiencewithYAMLor Jinja2, youwillquicklydrawthecorrelationbetweenthesyntaxandtheintendedprocedure.Let'stakealookatanexamplefirst.Â

AquickAnsibleexample
Aswith other automation tools, Ansible started out first bymanaging serversbefore expanding tomanage thenetworkingequipment.For themostpart, themodulesandwhatAnsiblereferstoastheplaybookarethesamebetweenservermodulesandnetworkmodules,buttherearestillsomedifferences.Therefore,itishelpfultoseetheserverexamplefirstanddrawcomparisonslateronwhenwestarttolookatnetworkmodules.Â
Thecontrolnodeinstallation
First, let us clarify the terminologywewill use in the context ofAnsible.Wewill refer to thevirtualmachinewithAnsible installedas thecontrolmachine,andthemachineisbeingmanagedas the targetmachinesÂormanagednodes.AnsiblecanbeinstalledonmostoftheUnixsystemswiththeonlydependencyof Python 2.6 or 2.7; the current Windows is not supported as the controlmachine.Windows host can still bemanaged byAnsible, as they are just notsupportedasthecontrolmachine.Â
Note
AsWindows10startstoadaptUbuntuLinux,AnsiblemightsoonbereadytorunonWindowsaswell.Â
Onthemanagednoderequirements,youmaynoticethatPython2.4orlaterisarequirement.ThisistrueformanagingtargetnodeswithoperatingsystemssuchasLinux,butobviously,notallnetworkequipmentsupportPython.Wewillseehowthisrequirementisbypassedfornetworkingmodules.
Note
For Windows machine, the underlying modules are written inPowerShell, Microsoft's automation, and the configurationmanagementframework.Â
We will be installing Ansible on our Ubuntu virtual machine, and for

instructionsoninstallationonotheroperatingsystems,checkouttheinstallationdocument (http://docs.ansible.com/ansible/intro_installation.html).FollowingÂyouwillseethestepstoinstallthesoftwarepackages.
$sudoapt-getinstallsoftware-properties-common
$sudoapt-add-repositoryppa:ansible/ansible
$sudoapt-getupdate
$sudoapt-getinstallansible
Note
You might be tempted to just use pip install ansible forinstallation,but thiswill giveyou someproblemdown the line.Followthe installation instructionon theAnsibledocumentationpageforyouroperatingsystem.Â
Youcannowdoaquickverificationasfollows:Â
$ansible--version
ansible2.2.1.0
configfile=/etc/ansible/ansible.cfg
configuredmodulesearchpath=Defaultw/ooverrides
Now,wearereadytoseeanexample.Â
YourfirstAnsibleplaybook
Ourfirstplaybookwillincludethefollowingsteps:Â
1. Makesurethecontrolnodecanusekey-basedauthorization.Â2. CreateaninventoryFile.3. Createaplaybook.4. Executeandtestit.
ThePublickeyauthorization
ThefirstthingtodoistocopyyourSSHpublickeyfromyourcontrolmachineto the target machine. A full public key Infrastructure tutorial is outside thescopeofthisbook,buthereisaquickwalkthroughÂonthecontrolnode:Â

$ ssh-keygen -t rsa <<<< generates public-
privatekeypaironthehostmachine
$cat~/.ssh/id_rsa.pub<<<<copythecontentoftheoutputandpasteittothe~/.ssh/authorized_keysfileonthetargethost
Note
You can read more about PKIonÂhttps://en.wikipedia.org/wiki/Public_key_infrastructure.Â
Becauseweareusingkey-basedauthentication,wecanturnoffpassword-basedauthenticationontheremotenodeandbemoresecure.Youwillnowbeabletosshfromcontrolnodetoremotenodewithoutusingtheprivatekeyandwithoutbeingpromptedforapassword.Â
Note
Can you automate the initial public key copying? It is possiblebut is highly depended on your use case, regulation, andenvironment. It is comparable to the initial console setup fornetworkgearstoestablishinitialIPreachability.Doyouautomatethis?Whyorwhynot?Â
Theinventoryfile
We do not need Ansible if we have no remote target to manage, correct?Everythingstarts fromthefact thatweneed tomanagesome taskona remotehost.Thewaywespecifythepotentialremotetargetiswithahostfile.Wecaneitherhavethisfilespecifyingtheremotehosteitherin/etc/ansible/hostsorusethe-ioptiontospecifythelocationofthefile.Personally,Iprefertohavethisfileinthesamedirectorywheremyplaybookis.Â
Note
Technically, thisfilecanbenamedanythingaslongasit is inavalid format. However, you can potentially save yourself andyour colleagues some headaches in the future by following thisconvention.Â
Theinventoryfileisasimple,plaintextINI-stylefilethatstatesyourtarget.By

default,thiscaneitherbeaDNSFQDNoranIPaddress:
$cathosts
192.168.199.170
Wecannowusethecommand-lineoptiontotestAnsibleandthehostfile:
$ansible-ihosts192.168.199.170-mping
192.168.199.170|SUCCESS=>{
"changed":false,
"ping":"pong"
}
Note
By default, Ansible assumes that the same user executing theplaybookexistsontheremotehost.Forexample,Iamexecutingthe playbook as echou locally; the same user also exist on myremotehost. Ifyouwant toexecuteasadifferentuser,youcanusethe-uoptionwhenexecuting,thatis-uREMOTE_USER.Â
Theprevious linereads thatwewilluse thehost fileas the inventoryfile,andexecute the ping module on the host called  192.168.199.170.Ping (http://docs.ansible.com/ansible/ping_module.html) is a trivial testmodule that connects to the remote host, verifies a usable Python installation,andreturntheoutputponguponsuccess.
Note
You may take a look at all the ever expanding module list(http://docs.ansible.com/ansible/list_of_all_modules.html) if youhaveanyquestionsabouttheusageofexistingmodulesthatwereshippedwithAnsible.Â
If you get a host key error, it is typically because the host key is not in theknown_hosts file, and is typically under~/.ssh/known_hosts.You can eitherssh to the host and answer yes at adding the host, or you can disable thischeckingon/etc/ansible/ansible.cfgor~/.ansible.cfgwiththefollowingcode:Â

[defaults]
host_key_checking=False
Nowthatwehaveavalidinventoryfile,wecanmakeourfirstplaybook.Â
Ourfirstplaybook
PlaybooksareAnsible'sblueprintÂtodescribewhatyouwouldliketobedonetothehostsusingmodules.ItiswherewewillbespendingthemajorityofourtimeasoperatorswhenworkingwithAnsible.Ifyouarebuildingatreehouse,the playbook will be your manual, the modules will be your tools, while theinventorywillbethecomponentsthatyouwillbeworkingonusingthetools.Â
TheplaybookisdesignedtobehumanreadableintheYAMLformat.Wewilllook at the common syntax and usage in theAnsible architecture section. Fornow,ourfocusistorunanexampletogetthelookandfeelofAnsible.
Note
Originally, YAML was said to mean, Yet Another MarkupLanguage, but now,yaml.org (http://yaml.org/) has repurposedtheacronymtobeYAMLAin'tMarkupLanguageÂforitsdata-drivennature.Â
Let'slookatthissimple6-lineplaybook,df_playbook.yml:Â
---
-hosts:192.168.199.170
tasks:
-name:checkdiskusage
shell:df>df_temp.txt
Inanygivenplaybook,youcancontainmultipleplays.Inthiscase,wehaveoneplay(line2-6).Inthisplay,therecanbemultipletasks,andwealsojusthaveone task (line4 - 6)with thename specifying thepurposeof the task and theshell module taking an argument of df. The shell module takes thecommand in theargumentandexecutes iton the remotehost. In thiscase,weexecute thedf command tocheck thediskusageandcopy theoutput toa filenameddf_temp.txt.

Wecanexecutetheplaybookviathefollowingcode:Â
$ansible-playbook-ihostsdf_playbook.yml
PLAY[192.168.199.170]*********************************************************
TASK[setup]*******************************************************************
ok:[192.168.199.170]
TASK[checkdiskusage]************************************************
changed:[192.168.199.170]
PLAYRECAP*********************************************************************
192.168.199.170:ok=2changed=1unreachable=0failed=0
Ifyou log into themanagedhost (192.168.199.170 forme),youwill see thatthedf_temp.txtfilewillbetherewiththedfcommandoutput.Neat,huh?Â
Noticed that there were actually two tasks executed even though we onlyspecifiedonetaskintheplaybook;thesetupmoduleisautomaticallyaddedbydefault. It is executed byAnsible to gather information about the remote hostthatcanbeusedlateronintheplaybook.Forexample,oneofthefactsthatthesetupmodulegathersistheoperatingsystem.TheplaybookcanlateronspecifytouseaptforDebian-basedhostsandyumforRedHat-basedhoststoinstallnewpackages.Â
Note
If you are curious about the output of a setupmodule, you canfind out what information Ansible gathers via $ ansible -ihosts<host>Â-msetup.Â
Underneaththehood,thereareactuallyafewthingsthathashappenedfortaskssuchascopyoverthePythonscript,copythescriptoutputtoatemporaryfile,thencapturetheoutputanddeletethetemporaryfile.Fornow,wecanprobablysafelyignoretheseunderlyingdetailsuntilweneedthem.Â
Itisimportantthatwefullyunderstandthesimpleprocessthatwehavejustgonethrough,becausewewillbereferringbacktotheseelementslaterinthechapter.Ipurposelychoseaserverexampletobepresentedhere,becausetheywillmakemore sense aswe dive into the networkingmoduleswhenwe need to deviate

fromthem(rememberwementionedPythoninterpreterismostlikelynotonthenetworkgear?).Â
Congratulations on executing your firstAnsible playbook!Wewill lookmoreintotheAnsiblearchitecture,butfornow,let's takea lookatwhyAnsible isagoodfitfornetworkmanagement.RememberthatAnsibleiswritteninPythonsooncewearemorefamiliarwiththeframework,wecanusePythontoextendit.Â

TheadvantagesofAnsible
TherearemanyÂinfrastructureautomationframeworkbesidesAnsible,namelyChef,Puppet,andSaltStack.Eachframeworkoffersitsownuniquefeaturesandmodels,andthereisnorighttoolthatfitsalltheorganizations.Inthissection,IwouldliketolistoutsomeoftheadvantagesofAnsibleandwhyIthinkthisisagoodtoolfornetworkautomation.Â
Fromanetworkengineeringpointofview, rather thananyonepointbelow, Ibelieve it is the combination of all the following reasons that makes Ansibleidealfornetworkautomation.Â
Agentless
Unlikesomeof itspeers,Ansibledoesnotrequireastrictmaster-clientmodel.There is no software or agent to be installed on the client that communicatesbacktotheserver.Asyoucanseefromthepreviousexample,insteadofrelyingonremotehostagents,AnsibleusesSSHtopushitschangestotheremotehost.Thisishugefornetworkdevicemanagement,asnetworkvendorsaretypicallyreluctanttoputthird-partysoftwareontheirplatforms.SSH,ontheotherhand,alreadyexistonthenetworkequipment.ÂThismentalityhaschangedabitinthelast few years, but overall, SSH is the common denominator for all networkequipmentwhileconfigurationmanagementagentsupportisnot.Â
Becausethereisnoagentontheremotehost,Ansibleusesapushmodeltopushthechangestothedevice,asopposedtothepullmodelwheretheagentpullstheinformation from themaster server. The pushmodel, in my opinion, is moredeterministicaseverythingoriginatesfromthecontrolmachine.Â
Again, the importance of being agentless cannot be stressed enough when itcomes toworkingwith theexistingnetworkequipment.This isusuallyoneofthemajorthereasonsnetworkoperatorsandvendorsembraceAnsible.Â
Idempotent
According toWikipedia, Idempotence is the property of certain operations in
mathematics and computer science that can be appliedmultiple timeswithoutchanging the result beyond the initial application(https://en.wikipedia.org/wiki/Idempotence).ÂInmorecommonterms,itmeansrunning the same procedure over and over again does not change the systemafterthefirsttime.ÂAnsibleaimstobeidempotent,whichisgoodfornetworkoperationsthatrequirecertainorderofoperations.Â
The advantage of idempotence is best compared to the Pexpect and Paramikoscripts thatwehavewritten.Remember that thesescriptswerewritten topushoutcommandsasifanengineerissittingattheterminal.Ifyouweretoexecutethe script 10 times, therewill be 10 times that the scriptmakes changes. ThePexpect and Paramiko approach, compare to Ansible playbook thataccomplishesthesamechange,theexistingdeviceconfigurationwillbecheckedfirst,andtheplaybookwillonlyexecuteifthechangesdoesnotexist.Â
Being idempotent means we can repeatedly execute the playbook withoutworrying that there will be unnecessary changes being made. This would beimportant asweneed toautomaticallycheck for state consistencywithout anyextraoverhead.Â
Simpleandextensible
Ansible iswritten in Python and usesYAML for playbook language, both ofwhichareconsideredrelativelyeasytolearn.RememberCiscoIOSsyntax?Thatis a domain-specific language that is only applicablewhen you aremanagingCisco IOS devices or other similarly structured equipment; it is not a generalpurpose language beyond its limited scope. Luckily, unlike some otherautomationtools,thereisnoextradomain-specificlanguageorDSLtolearnforAnsible because YAML and Python are both widely used as general purposelanguages.Â
Asyoucan see from thepreviousexample, even ifyouhavenot seenYAMLbefore,itiseasytoaccuratelyguesswhattheplaybookistryingtodo.AnsiblealsousesJinja2asa templateengine,which isacommontoolusedbyPythonwebframeworkssuchasDjangoandFlask,sotheknowledgeistransferrable.Â
I cannot stress enoughabout the extensibilityofAnsible.As illustratedby theexample,Ansiblestartsoutwithautomatingservers(primarilyLinux)inmind.It

thenbranchesouttomanageWindowsmachineswithPowerShell.AsmoreandmorepeopleintheindustrystarttoadaptAnsible,networkbecameatopicthatstartedtogetmoreattention.TherightpeopleandteamwerehiredandadoptedatAnsible,networkprofessionalsstartstogetinvolved,andcustomersstartedtodemandvendorsforsupport.StartingfromAnsible2.0;networkinghasbecomea first class citizen alongside server management.The ecosystem is alive andwell.
Just like the Python community, the Ansible community is friendly and theattitudeisÂinclusiveofnewmemberandideas.Ihavefirsthandexperienceofbeing anoob and try tomake senseof contributions andwritemodules. I cantestify to the fact that I felt welcomed and respected for my opinion at alltimes.Â
The simplicity and extensibility really speaks well for future proofing. Thetechnologyworld is evolving fast, andwe are constantly trying to adapt to it.Wouldn'titbegreattolearnatechnologyonceandcontinuetouseitregardlessofthelatesttrend?Obviously,nobodyhasacrystalballtoaccuratelypredictthefuture, but Ansible's track record speaks well for the future environmentadaptation.Â
ThevendorSupport
Let'sfaceit,wedon't liveinavacuum.Wewakeupeverydayneedingtodealwith network equipment made by various vendors. We saw the differencebetweenPexpectandAPIinpreviouschapters,andtheAPIintegrationcertainlydid not appear out of thin air. Each vendor needs to invest time,money, andengineering resources tomake the integration happen. Thewillingness for thevendor to support a technology matters greatly in our world. Luckily, all themajor vendors support Ansible as clearly indicated by the ever increasinglyavailable network modules(http://docs.ansible.com/ansible/list_of_network_modules.html).Â
Why do vendors support Ansible more than other automation tools? Beingagentlesscertainlyhelps,havingSSHastheonlydependencygreatlylowersthebarofentry.Engineerswhohavebeenonthevendorsideknowthatthefeature'srequestprocess isusuallymonths longandhasmanyhurdles to jumpthrough.Any time a new feature is added, it means more time spent is on regression

testing,compatibilitychecking, integration reviews,andmanymore.Loweringthebarofentryisusuallythefirststepingettingvendorsupport.Â
ThefactthatAnsibleÂisbasedonPython,alanguagelikedbymanynetworkingprofessionals,isanothergreatpropellerforvendorsupport.ForvendorssuchasJuniperandAristawhoalreadymadeinvestmentsinPyEZandPyeapi,theycaneasily leverage the existing module and quickly integrate their features intoAnsible.As youwill see in the next chapter,we can use our existing Pythonknowledgetoeasilywriteourownmodules.Â
Ansible already has a large number of community-driven modules before itsfocus on networking. The contribution process is somewhat baked andestablished or asmuch an open source project as it can be. The coreAnsibleteam is familiar in working with the community for submission andcontribution.Â
Another reason for the increased network vendor support also has to dowithAnsible'sabilitytogivevendorstheabilitytoexpresstheirownstrengthinthemodulecontext.Wewill see in thenext section thatbesidesSSH, theAnsiblemodule can also be executed locally and communicated to the devices usingAPI.Thisensures thatvendorscanexpress their latest andgreatest featuresassoon as theymake theirAPI available. In termsofnetworkprofessionals, thismeansthatyoucanusethefeaturestoselectthevendorswheneveryouareusingAnsibleasanautomationplatform.Â
We have spent a relatively large portion of space discussing vendor supportbecause I feel this is often an overlooked part in the Ansible story. Havingvendors willing to put their weight behind the tool means you, the networkengineer,cansleepatnightknowingthat thenextbigthinginnetworkingwillhaveahighchanceofAnsiblesupport,andyouarenotlockedintoyourcurrentvendorasyournetworkneedsgrow.Â

TheAnsiblearchitecture
TheAnsiblearchitectureconsistofplaybooks,plays,and tasks.Takea lookatpreviouslyseendf_playbook.yml:
AnsiblePlaybookÂ
Thewhole file is called aplaybook,whichcontainsoneoremoreplays.Eachplaycanconsistofoneormoretasks.Inoursimpleexample,weonlyhaveoneplay, which contains a single task. In this section, wewill take a look at thefollowing:Â
YAML: This format is extensively used inAnsible to express playbooksandvariables.ÂInventory: Inventory is where you can specify and group hosts in yourinfrastructure.Youcanalsooptionallyspecifyhostandgroupvariablesintheinventoryfile.ÂVariables: Each of the network device is different. It has differenthostname,IP,neighborrelations,andsuch.Variablesallowforastandardsetofplayswhilestillaccommodatingthesedifferences.ÂTemplates: Templates are nothing new in networking. In fact, you areprobablyusingonewithoutthinkingitisatemplate.WhatdowetypicallydowhenweneedtoprovisionanewdeviceorreplaceanRMA?Wecopytheoldconfigurationoverandreplacethedifferencessuchasthehostnameand the LoopBack IP addresses. Ansible standardizes the templateformattingwithJinja2,whichwewilldivedeeperinto.Â

In the next chapter, we will cover some more advanced topics such asconditionals, loops, blocks, handlers, playbook roles, and how they can beincludedwithnetworkmanagement.Â
YAML
YAML is the syntax used for Ansible playbooks and other files. The officialYAML documentation contains the full specifications of syntax. Here is acompactversionasitpertainstothemostcommonusageforÂAnsible:Â
YAMLfilestartswiththreedashes(---)Whitespaceindentationisusedtodenotestructurewhentheyarelinedup,justlikePythonCommentsbeginwithhash(#)signListmembers are denoted by a leading hyphen (-)with onemember perlineÂListscanalsobedenotedviasquarebrackets([])withelementsseparatedbycomma(,)ÂDictionariesaredenotedbykey:valuepairwithcolonforseparationÂDictionaries can denoted by curly braces with elements separated bycomma(,)ÂStrings can be unquoted, but can also be enclosed in double or singlequotesÂ
Asyoucansee,YAMLmapswellintoJSONandPythondatatypes.IfIweretorewrite the previous df_playbook.yml into df_playbook.json, this is how itwouldlooklike:Â
[
{
"hosts":"192.168.199.170",
"tasks":[
"name":"checkdiskusage",
"shell":"df>df_temp.txt"
]
}
]
This isobviouslynotavalidplaybookbutanaid inhelping tounderstand the

YAML formats in using JSON format as a comparison. Most of the time,comments (#), lists (-),anddictionaries (key:value)arewhatyouwill see inaplaybook.Â
Inventories
Bydefault,AnsiblelooksattheÂ/etc/ansible/hostsfileforhostsspecifiedinyourplaybook.Asmentioned,Ifinditmorecleartospecifythehostfileviathe-i option aswehavebeendoingup to this point.To expandonour previousexample,wecanwriteÂourinventoryhostfileasfollows:Â
[ubuntu]
192.168.199.170
[nexus]
192.168.199.148
192.168.199.149
[nexus:vars]
username=cisco
password=cisco
[nexus_by_name]
switch1ansible_host=192.168.199.148
switch2ansible_host=192.168.199.149
Asyoumayhaveguessed,thesquarebracketheadingsspecifiesgroupnames,solater on in the playbook, we can point to this group. For example, incisco_1.ymlandcisco_2.yml,Icanactonallhostsspecifiedunderthenexusgroupbypointingtothegroupnameofnexus:Â
---
-name:ConfigureSNMPContact
hosts:"nexus"
gather_facts:false
connection:local
<skip>
A host can exist in more than one groups. The group can also be nested aschildren:Â
[cisco]
router1

router2
[arista]
switch1
switch2
[datacenter:children]
cisco
arista
In the previous example, the datacenter group includes both the cisco andaristamembers.Â
Wewill discuss variables in the next section. But you can optionally specifyvariables belonging to the host and group in the inventory file aswell. In ourfirst inventory file example, [nexus:vars] specifies variables for the wholenexusgroup.Theansible_hostvariabledeclaresvariable foreachof thehostonthesameline.
For more information on inventory file, check out the official documentation(http://docs.ansible.com/ansible/intro_inventory.html).Â
Variables
We discussed variables a bit in the inventory section. Because our managednodes are not exactly alike, we need to accommodate the differences viavariables. Variable names should be letters, numbers, and underscores andalwaysstartwithaletter.Variablesarecommonlydefinedinthreelocations:Â
PlaybookTheinventoryfileSeparatefilestobeincludedinincludedfilesandroles
Let'slookatanexampleofdefiningvariablesinaplaybook,cisco_1.yml:Â
---
-name:ConfigureSNMPContact
hosts:"nexus"
gather_facts:false
connection:local

vars:
cli:
host:"{{inventory_hostname}}"
username:cisco
password:cisco
transport:cli
tasks:
-name:configuresnmpcontact
nxos_snmp_contact:
contact:TEST_1
state:present
provider:"{{cli}}"
register:output
-name:showoutput
debug:
var:output
You can see the cli variable declared under the vars section, which is beingusedinthetaskofnxos_snmp_contact.Â
Note
Formoreinformationonthenxso_snmp_contactmodule,checkout the online documentation(http://docs.ansible.com/ansible/nxos_snmp_contact_module.html
To reference a variable, you use the Jinja2 templating system convention ofdouble curly bracket. You don't need to put quotes around the curly bracketunless you are starting a valuewith it. I typically find it easier to put a quotearoundthevariablevalueregardless.Â
Youmayhavealsonoticedthe{{inventory_hostname}}reference,whichisnot declared in the playbook. It is one of the default variables that Ansibleprovides for you automatically, and it is sometimes referred to as the magicvariable.
Note
Therearenotmanymanymagicvariables,andyoucanfindthe

list on the documentation(http://docs.ansible.com/ansible/playbooks_variables.html#magic-variables-and-how-to-access-information-about-other-hosts).Â
Wehavedeclaredvariablesinaninventoryfileinthepervioussection:Â
[nexus:vars]
username=cisco
password=cisco
[nexus_by_name]
switch1ansible_host=192.168.199.148
switch2ansible_host=192.168.199.149
Tousethevariablesintheinventoryfileinsteadofdeclaringitintheplaybook,let'saddthegroupvariablesfor[nexus_by_name]inthehostfile:
[nexus_by_name]
switch1ansible_host=192.168.199.148
switch2ansible_host=192.168.199.149
[nexus_by_name:vars]
username=cisco
password=cisco
Then,modifytheplaybook,cisco_2.yml,toreferencethevariables:
---
-name:ConfigureSNMPContact
hosts:"nexus_by_name"
gather_facts:false
connection:local
vars:
cli:
host:"{{ansible_host}}"
username:"{{username}}"
password:"{{password}}"
transport:cli
tasks:
-name:configuresnmpcontact
nxos_snmp_contact:
contact:TEST_1
state:present

provider:"{{cli}}"
register:output
-name:showoutput
debug:
var:output
Noticethatinthisexample,wearereferringtothenexus_by_namegroupintheinventoryfile,theansible_hosthostvariable,andtheusernameandpasswordgroupvariable.Thisisagoodwaytohidetheusernameandpasswordinawrite-protected file and publish the playbook without the fear of exposing yoursensitivedata.Â
Note
To see more examples of variables, check out the Ansibledocumentation(http://docs.ansible.com/ansible/playbooks_variables.html).Â
Toaccesscomplexvariabledataprovidedinnesteddatastructure,youcanusetwodifferentnotations.Notedinthenxos_snmp_contacttask,weregisteredtheoutput in a variable and displayed it using the debug module. You will seesomethinglikethefollowing:Â
TASK[showoutput]
*************************************************************
ok:[switch1]=>{
"output":{
"changed":false,
"end_state":{
"contact":"TEST_1"
},
"existing":{
"contact":"TEST_1"
},
"proposed":{
"contact":"TEST_1"
},
"updates":[]
}
}

Inordertoaccessthenesteddata,wecanusethefollowingnotationasspecifiedincisco_3.yml:Â
msg:'{{output["end_state"]["contact"]}}'
msg:'{{output.end_state.contact}}'
Youwillreceivejustthevalueindicated:Â
TASK[showoutputinoutput["end_state"]["contact"]]
***************************
ok:[switch1]=>{
"msg":"TEST_1"
}
ok:[switch2]=>{
"msg":"TEST_1"
}
TASK[showoutputinoutput.end_state.contact]
*********************************
ok:[switch1]=>{
"msg":"TEST_1"
}
ok:[switch2]=>{
"msg":"TEST_1"
}
Lastly,wementionedvariablescanalsobestoredinaseparatefile.Toseehowwe can use variables in a role or included file, we should get a few moreexamples under our belt, because they are a bit complicated to startwith.Wewillseemoreexamplesofrolesinthenextchapter.Â
TemplateswithJinja2
Intheprevioussection,weusedvariableswiththeJinja2syntaxof{{variable}}.While you can do a lot of complex things in Jinja2, luckilywe only needsomeofthebasicthingstogetstarted.Â
Note
Jinja2Â (http://jinja.pocoo.org/) is a full featured, powerfultemplate engine for Python. It is widely used in Python webframeworkssuchasDjangoandFlask.Â

For now, it is enough to just keep in mind that Ansible utilize Jinja2 as thetemplateengine.WewillrevisitthetopicsofJinja2filters,tests,andlookupsasthe situation calls for them.You can findmore information onAnsible Jinja2templatehere(http://docs.ansible.com/ansible/playbooks_templating.html).Â

Ansiblenetworkingmodules
AnsiblewasoriginallymadeformanagingnodesÂwith fulloperatingsystemssuchasLinuxandWindows;then,itextendedtonetworkequipment.Youmayhave alreadynoticed the subtle differences in playbooks thatwehaveused sofar,suchasthelinesofgather_facts:falseandconnection:local;wewilltakealookatcloserlookatthedifferences.
Localconnectionsandfacts
AnsiblemodulesarePythoncodeexecutedonremotehostbydefault.Becausethe fact thatmostnetworkequipmentdoesnot exposePythondirectly,wearealmostalwaysexecuting theplaybooklocally.Thismeans that theplaybookisinterpretedlocallyfirstandcommandsorconfigurationsarepushedoutlateronasneeded.Â
Recallthattheremotehostfactsweregatheredviathesetupmodule,whichwasaddedbydefault.Sinceweareexecutingtheplaybooklocally,thesetupmodulewillgatherthefactsonthelocalhostinsteadofremotehost.Thisiscertainlynotneeded, therefore when the connection is set to local, we can reduce thisunnecessarystepbysettingthefactgatheringtofalse.Â
Providerarguments
AswehaveseenfromChapter2,LowLevelNetworkDeviceInteractions,andchapter 3, API and Intent-Driven Networking, network equipment can beconnectedviabothSSHorAPI,dependingontheplatformandsoftwarerelease.All core networking modules implement a provider argument, which is acollection of arguments used to define how to connect to the network device.Somemodulesonlysupportcliwhilesomesupportothervalues, forexampleAristaEAPIandCiscoNXAPI.This iswhereAnsible's "let thevendor shine"philosophy is demonstrated. The module will have documentation on whichtransportmethodtheysupport.Â
Someofthebasicargumentssupportedbythetransportarehere:Â

host:Thisdefinestheremotehostport:Thisdefinestheporttoconnecttousername:ThisisÂtheusernametobeauthenticatedpassword:ThisÂisÂthepasswordtobeauthenticatedtransport:ThisisÂthetypeoftransportfortheconnectionauthorize:Thisenablesprivilegeescalationfordevicesthatrequiresitauth_pass:Thisdefinestheprivilegeescalationpassword
As you can see, not all arguments need to be specified. For example, for ourprevious playbooks, our user is always at the admin privilege when log in,thereforewedonotneedtospecifytheauthorizeortheÂauth_passarguments.
These arguments are just variables, so they follow the same rules for variableprecedence. For example, if I change the cisco_3.yml to cisco_4.yml andobservethefollowingprecedence:
---
-name:ConfigureSNMPContact
hosts:"nexus_by_name"
gather_facts:false
connection:local
vars:
cli:
host:"{{ansible_host}}"
username:"{{username}}"
password:"{{password}}"
transport:cli
tasks:
-name:configuresnmpcontact
nxos_snmp_contact:
contact:TEST_1
state:present
username:cisco123
password:cisco123
provider:"{{cli}}"
register:output
-name:showoutputinoutput["end_state"]["contact"]
debug:
msg:'{{output["end_state"]["contact"]}}'

-name:showoutputinoutput.end_state.contact
debug:
msg:'{{output.end_state.contact}}'
Theusernameandpassworddefinedonthetasklevelwilloverridetheusernameand password at the playbook level. I will receive the following error whentryingtoconnectbecausetheuserdoesnotexistonthedevice:Â
PLAY[ConfigureSNMPContact]
**************************************************
TASK[configuresnmpcontact]
**************************************************
fatal:[switch2]:FAILED!=>{"changed":false,"failed":true,
"msg":"failedtoconnectto192.168.199.149:22"}
fatal:[switch1]:FAILED!=>{"changed":false,"failed":true,
"msg":"failedtoconnectto192.168.199.148:22"}
toretry,use:--limit
@/home/echou/Master_Python_Networking/Chapter4/cisco_4.retry
PLAYRECAP
*********************************************************************
switch1:ok=0changed=0unreachable=0failed=1
switch2:ok=0changed=0unreachable=0failed=1

TheAnsibleCiscoexample
CiscosupportinAnsibleiscategorizedbytheoperatingsystems:IOS,IOSXR,and NXOS. We have already seen a number of NXOS examples, so in thissection,let'strytomanageIOS-baseddevices.Â
Ourhostfilewillconsistoftwohosts,R1andR2:Â
[ios_devices]
R1ansible_host=192.168.24.250
R2ansible_host=192.168.24.251
[ios_devices:vars]
username=cisco
password=cisco
Our playbook, cisco_5.yml, will use the ios_command module to executearbitraryshowcommands:Â
---
-name:IOSShowCommands
hosts:"ios_devices"
gather_facts:false
connection:local
vars:
cli:
host:"{{ansible_host}}"
username:"{{username}}"
password:"{{password}}"
transport:cli
tasks:
-name:iosshowcommands
ios_command:
commands:
-showversion|iIOS
-showrun|ihostname
provider:"{{cli}}"
register:output
-name:showoutputinoutput["end_state"]["contact"]

debug:
var:output
Theresultiswhatwewouldexpectedastheshowcommandoutput:Â
$ansible-playbook-iios_hostscisco_5.yml
PLAY[IOSShowCommands]
*******************************************************
TASK[iosshowcommands]
*******************************************************
ok:[R1]
ok:[R2]
TASK[showoutputinoutput["end_state"]["contact"]]
***************************
ok:[R1]=>{
"output":{
"changed":false,
"stdout":[
"CiscoIOSSoftware,7200Software(C7200-A3JK9S-M),Version
12.4(25g),RELEASESOFTWARE(fc1)",
"hostnameR1"
],
"stdout_lines":[
[
"CiscoIOSSoftware,7200Software(C7200-A3JK9S-M),Version
12.4(25g),RELEASESOFTWARE(fc1)"
],
[
"hostnameR1"
]
]
}
}
ok:[R2]=>{
"output":{
"changed":false,
"stdout":[
"CiscoIOSSoftware,7200Software(C7200-A3JK9S-M),Version
12.4(25g),RELEASESOFTWARE(fc1)",
"hostnameR2"
],
"stdout_lines":[
[
"CiscoIOSSoftware,7200Software(C7200-A3JK9S-M),Version

12.4(25g),RELEASESOFTWARE(fc1)"
],
[
"hostnameR2"
]
]
}
}
PLAYRECAP
*********************************************************************
R1:ok=2changed=0unreachable=0failed=0
R2:ok=2changed=0unreachable=0failed=0
Iwantedtopointoutafewthingsillustratedbytheexample:Â
TheplaybookbetweenNXOSandIOSislargelyidenticalÂThesyntaxnxos_snmp_contactandios_commandmodulesfollowthesamepatternwiththeonlydifferencebeingtheargumentforthemodulesÂTheIOSversionofthedevicesareprettyoldwithnounderstandingofAPI,butthemodulesstillhavethesamelookandfeelÂ
Asyoucanseefromtheexample,oncewehavethebasicsyntaxdownfortheplaybooks,thesubtledifferencereliesonthemoduleunderneath.Â

TheAnsibleJuniperexample
TheAnsibleJunipermodulerequirestheJuniperPyEZpackageandNETCONF.IfyouhavebeenfollowingtheAPIexampleinChapter3,APIandIntent-DrivenNetworking,youaregoodtogo.Ifnot,referbacktothesectionforinstallationinstructionsaswell as some test script tomake surePyEZworks.ThePythonpackagecalledÂjxmleaseisalsorequired:Â
$sudopipinstalljxmlease
Inthehostfile,wewillspecifythedeviceandconnectionvariables:Â
[junos_devices]
J1ansible_host=192.168.24.252
[junos_devices:vars]
username=juniper
password=juniper!
Inourmoduletest,wewillusethejunos_factsmoduletogatherbasicfactsforthe device. This module is equivalent to the setup module and will come inhandy if we need to take action depending on the returned value. Note thedifferentvalueoftransportandportintheexamplehere:Â
---
-name:GetJuniperDeviceFacts
hosts:"junos_devices"
gather_facts:false
connection:local
vars:
netconf:
host:"{{ansible_host}}"
username:"{{username}}"
password:"{{password}}"
port:830
transport:netconf
tasks:
-name:collectdefaultsetoffacts
junos_facts:
provider:"{{netconf}}"

register:output
-name:showoutput
debug:
var:output
Whenexecuted,youwillreceivethisoutputfromtheJuniperdevice:Â
PLAY[GetJuniperDeviceFacts]
************************************************
TASK[collectdefaultsetoffacts]
********************************************
ok:[J1]
TASK[showoutput]
*************************************************************
ok:[J1]=>{
"output":{
"ansible_facts":{
"HOME":"/var/home/juniper",
"domain":"python",
"fqdn":"master.python",
"has_2RE":false,
"hostname":"master",
"ifd_style":"CLASSIC",
"model":"olive",
"personality":"UNKNOWN",
"serialnumber":"",
"switch_style":"NONE",
"vc_capable":false,
"version":"12.1R1.9",
"version_info":{
"build":9,
"major":[
12,
1
],
"minor":"1",
"type":"R"
}
},
"changed":false
}
}

PLAYRECAP
*********************************************************************
J1:ok=2changed=0unreachable=0failed=0

TheAnsibleAristaexample
ThefinalmoduleexamplewewilllookatwillbetheAristacommandsmodule.Atthispoint,wearequitefamiliarwithourplaybooksyntaxandstructure.TheAristadevicecanbeconfiguredtousetransportusingclioreapi,soÂinthisexample,wewillusecli.Â
Thisisthehostfile:Â
[eos_devices]
A1ansible_host=192.168.199.158
Theplaybookisalsosimilartowhatwehaveseen:Â
---
-name:EOSShowCommands
hosts:"eos_devices"
gather_facts:false
connection:local
vars:
cli:
host:"{{ansible_host}}"
username:"arista"
password:"arista"
authorize:true
transport:cli
tasks:
-name:eosshowcommands
eos_command:
commands:
-showversion|iArista
provider:"{{cli}}"
register:output
-name:showoutput
debug:
var:output
Theoutputwillshowthestandardoutputaswewouldexpectfromthecommandline:Â

PLAY[EOSShowCommands]
*******************************************************
TASK[eosshowcommands]
*******************************************************
ok:[A1]
TASK[showoutput]
*************************************************************
ok:[A1]=>{
"output":{
"changed":false,
"stdout":[
"AristaDCS-7050QX-32-F"
],
"stdout_lines":[
[
"AristaDCS-7050QX-32-F"
]
],
"warnings":[]
}
}
PLAYRECAP
*********************************************************************
A1:ok=2changed=0unreachable=0failed=0

Summary
Inthischapter,wetookagrandtouroftheopensourceautomationframeworkofAnsible. Unlike Pexpect-based andAPI-driven network automation scripts,Ansibleprovidesahigherlayerabstractioncalledtheplaybooktoautomateyournetworkdevices.Â
Ansiblewasoriginallyconstructedtomanageserversandwaslaterextendedtonetwork devices; therefore we took a look at a server example. Then, wecomparedandcontrastedthedifferenceswhenitcametonetworkmanagementplaybooks.ÂLater,welookedattheexampleplaybooksforCiscoIOS,JuniperJUNOS,andAristaEOSdevices.Â
In thenext chapter,wewill leverage theknowledgewegained in this chapterandstarttolookatsomeofthemoreadvancedfeaturesofAnsible.Â

Chapter 5. The Python Automation Framework - AnsibleAdvanceTopics
In the previous chapter, we looked at some of the basic structures to getAnsible running. We worked with Ansible inventory files, variables, andplaybooks. We also looked at the examples of network modules for Cisco,Juniper,andArista.Â
Inthischapter,wewillfurtherbuildontheknowledgethatwegainedanddivedeeperintothemoreadvancedtopicsofAnsible.ManybookshavebeenwrittenaboutAnsible.There isÂmore toAnsible thanwe can cover in two chapters.ThegoalistointroducethemajorityofthefeaturesandfunctionsofAnsiblethatIbelieveyouwouldneedasanetworkengineerandshortenthelearningcurveasmuchaspossible.Â
Itisimportanttopointoutthatifyouwerenotclearonsomeofthepointsmadeinthepreviouschapter,nowisagoodtimetogobackandreviewthemastheyareaprerequisiteforthischapter.
Inthischapter,wewilllookdeeperintothefollowingtopics:
AnsibleconditionalsAnsibleloopsTemplatesGroupandhostvariablesTheAnsiblevaultAnsiblerolesWritingyourownmoduleÂ
Wehavealotofgroundtocover,solet'sgetstarted!Â

Ansibleconditionals
Ansibleconditionalsaresimilartoprogrammingconditionals,astheyareusedtocontrol the flowof your playbooks. InmanyÂcases, the result of a playmaydependonthevalueofafact,variable,ortheprevioustaskresult.Forexample,ifyouhaveaplaybookforupgradingrouterimages,youwanttomakesuretherouter image is presented before you move onto the play of rebooting therouter.Â
Inthissection,wewilldiscussthewhenclausethatissupportedforallmodulesaswellasuniqueconditionalstatessupportedinAnsiblenetworkingcommandmodules,suchasfollows:Â
Equal(eq)Notequal(neq)Greaterthan(gt)Greaterthanorequal(ge)Lessthan(lt)Lessthanorequal(le)ContainsÂ
Thewhenclause
Thewhenclauseisusefulwhenyouneedtochecktheoutputfromtheresultandact accordingly. Let's look at a  simple example of its usage inchapter5_1.yml:Â
---
-name:IOSCommandOutput
hosts:"iosv-devices"
gather_facts:false
connection:local
vars:
cli:
host:"{{ansible_host}}"
username:"{{username}}"
password:"{{password}}"
transport:cli

tasks:
-name:showhostname
ios_command:
commands:
-showrun|ihostname
provider:"{{cli}}"
register:output
-name:showoutput
when:'"iosv-2"in"{{output.stdout}}"'
debug:
msg:'{{output}}'
We have seen all the elements in this playbook before in Chapter 4, PythonAutomationFrameworkâAnsbileBasics;Âtheonlydifferenceisonthesecondtask,asweareusingthewhenclausetocheckiftheoutputcontainsiosv-2.Iftrue,wewillproceedtothetask,whichisusingthedebugmoduletodisplaytheoutput.Whentheplaybookisrun,wewillseethefollowingoutput:Â
<skip>
TASK[showoutput]
*************************************************************
skipping:[ios-r1]
ok:[ios-r2]=>{
"msg":{
"changed":false,
"stdout":[
"hostnameiosv-2"
],
"stdout_lines":[
[
"hostnameiosv-2"
]
],
"warnings":[]
}
}
<skip>
We can see that the iosv-r1 device is skipped from the output because theclausedidnotpass.Wecanfurtherexpandthisexampleinchapter5_2.yml toonlyapplyconfigurationchangeswhentheconditionismet:
<skip>
tasks:
-name:showhostname

ios_command:
commands:
-showrun|ihostname
provider:"{{cli}}"
register:output
-name:configexample
when:'"iosv-2"in"{{output.stdout}}"'
ios_config:
lines:
-loggingbuffered30000
provider:"{{cli}}"
Wecanseetheexecutionoutputhere:Â
TASK[configexample]
**********************************************************
skipping:[ios-r1]
changed:[ios-r2]
PLAYRECAP
***********************************************************
ios-r1:ok=1changed=0unreachable=0failed=0
ios-r2:ok=2changed=1unreachable=0failed=0
Note that the output is showing that only ios-r2 is changedwhile ios-r1 isskipped.Thewhenclauseisalsoveryusefulinsituationssuchaswhenthesetupmodule is supported and you want to act on some facts that were gatheredinitially.Forexample,thefollowingstatementwillensureonlytheUbuntuhostwithmajor release16willbeacteduponbyplacingaconditionalstatement intheclause:Â
when:ansible_os_family=="Debian"andansible_lsb.major_release|int>=16
Note
For more conditionals, check out the Ansible conditionalsdocumentation(http://docs.ansible.com/ansible/playbooks_conditionals.html).Â
Networkmoduleconditional
Let'stakealookatanetworkdeviceexample.Wecantakeadvantageofthefact

thatbothIOSvandAristaEOSprovidetheoutputinJSONformatintheshowcommands.Forexample,wecancheckthestatusoftheinterface:Â
arista1#shinterfacesethernet1/3|json
{
"interfaces":{
"Ethernet1/3":{
"interfaceStatistics":{
<skip>
"outPktsRate":0.0
},
"name":"Ethernet1/3",
"interfaceStatus":"disabled",
"autoNegotiate":"off",
<skip>
}
arista1#
IfwehaveanoperationthatwewanttopreformanditdependsonEthernet1/3being disabled in order to have no user impact, such as when users areactively connected to Ethernet1/3. We can use the following tasksconfigurationinchapter5_3.yml,whichisprovidedintheeos_commandmoduletomakesurethatisthecasebeforeweproceed:Â
<skip>
tasks:
-name:"shintethernet1/3|json"
eos_command:
commands:
-"showinterfaceethernet1/3|json"
provider:"{{cli}}"
waitfor:
-"result[0].interfaces.Ethernet1/3.interfaceStatuseq
disabled"
register:output
-name:showoutput
debug:
msg:"InterfaceDisabled,SafetoProceed"
Uponthemetcondition,thesubsequenttaskwillbeexecuted:Â
TASK[shintethernet1/3|json]
**********************************************
ok:[arista1]

TASK[showoutput]
*************************************************************
ok:[arista1]=>{
"msg":"InterfaceDisabled,SafetoProceed"
}
Otherwise,anerrorwillbegivenasfollows:Â
TASK[shintethernet1/3|json]
**********************************************
fatal:[arista1]:FAILED!=>{"changed":false,"commands":["show
interfaceethernet1/3|json|json"],"failed":true,"msg":
"matchederrorinresponse:showinterfaceethernet1/3|json|
jsonrn%Invalidinput(privilegedmoderequired)rn********1>"}
toretry,use:--limit
@/home/echou/Master_Python_Networking/Chapter5/chapter5_3.retry
PLAYRECAP
******************************************************************
arista1:ok=0changed=0unreachable=0failed=1
Checkout theotherconditionssuchascontains,greater than,andless than,astheyfitinyoursituation.Â

Ansibleloops
Ansible provides a number of loops in the playbook, such as standard loops,loopingoverfiles,subelements,do-until,andmanymore.Inthissection,wewilllookattwoofthemostcommonlyusedloopforms,standardloops,andloopingoverhashvalues.Â
Standardloops
Standard loops in playbook are often used to easily perform similar tasksmultipletimes.Thesyntaxforstandardloopsisveryeasy;thevariable{{item}}Âis theplaceholder loopingover theÂwith_items list.Forexample, takealookatthefollowing:
tasks:
-name:echoloopitems
command:echo{{item}}
with_items:['r1','r2','r3','r4','r5']
Itwillloopoverthefivelistitemswiththesameechocommand:Â
TASK[echoloopitems]*********************************************************
changed:[192.168.199.185]=>(item=r1)
changed:[192.168.199.185]=>(item=r2)
changed:[192.168.199.185]=>(item=r3)
changed:[192.168.199.185]=>(item=r4)
changed:[192.168.199.185]=>(item=r5)
Combiningwithnetworkcommandmodule,thefollowingtaskwilladdmultiplevlanstothedevice:Â
tasks:
-name:addvlans
eos_config:
lines:
-vlan{{item}}
provider:"{{cli}}"
with_items:
-100
-200
-300
The with_items list can also be read from a variable, which gives greaterflexibilitytothestructureofyourplaybook:Â
vars:
vlan_numbers:[100,200,300]
<skip>
tasks:
-name:addvlans
eos_config:
lines:
-vlan{{item}}
provider:"{{cli}}"
with_items:"{{vlan_numbers}}"
Thestandardloopisagreattimesaverwhenitcomestoperformingredundanttasks in a playbook. In the next section, we will take a look at looping overdictionaries.Â
Loopingoverdictionaries
Loopingoverasimplelistisnice.However,weoftenhaveanentitywithmorethanoneattributesassociatewithit.Ifyouthinkofthevlanexampleinthelastsection, each vlanÂwould have several unique attributes to it, such as vlandescription, the IP address, and possibly others. Often times, we can use adictionarytorepresenttheentitytoincorporatemultipleattributestoit.Â
Let'sexpandonthevlanexampleinthelastsectionforadictionaryexampleinchapter5_6.yml.WedefinedthedictionaryvaluesforthreeÂvlans,eachhasanesteddictionaryfordescriptionandtheIPÂaddress:Â
<skip>
vars:
cli:
host:"{{ansible_host}}"
username:"{{username}}"
password:"{{password}}"
transport:cli
vlans:{
"100":{"description":"floor_1","ip":"192.168.10.1"},
"200":{"description":"floor_2","ip":"192.168.20.1"}
"300":{"description":"floor_3","ip":"192.168.30.1"}
}

Wecanconfigurethefirsttask,addvlans,usingthekeyoftheeachoftheitemasthevlannumber:Â
tasks:
-name:addvlans
nxos_config:
lines:
-vlan{{item.key}}
provider:"{{cli}}"
with_dict:"{{vlans}}"
We can proceed with configuring the vlan interface. Notice that we use theparents parameter to uniquely identify the section the commands should becheckedagainst.ThisisduetothefactthatthedescriptionandtheIPaddressarebothconfiguredundertheinterfacevlan<number>subsection:
-name:configurevlans
nxos_config:
lines:
-description{{item.value.name}}
-ipaddress{{item.value.ip}}/24
provider:"{{cli}}"
parents:interfacevlan{{item.key}}
with_dict:"{{vlans}}"
Uponexecution,youwillseethedictionarybeingloopedthrough:Â
TASK[configurevlans]*********************************************************
changed: [nxos-r1] => (item=
{'key':u'300','value':{u'ip':u'192.168.30.1',u'name':u'floor_3'}})
changed: [nxos-r1] => (item=
{'key':u'200','value':{u'ip':u'192.168.20.1',u'name':u'floor_2'}})
changed: [nxos-r1] => (item=
{'key':u'100','value':{u'ip':u'192.168.10.1',u'name':u'floor_1'}})
Letuscheckiftheintendedconfigurationisappliedtothedevice:Â
nx-osv-1#shrun|ivlan
<skip>
vlan1,10,100,200,300
nx-osv-1#
nx-osv-1#shrun|section"interfaceVlan100"
interfaceVlan100

descriptionfloor_1
ipaddress192.168.10.1/24
nx-osv-1#
Note
For more loop types of Ansible, feel free to check out thedocumentation(http://docs.ansible.com/ansible/playbooks_loops.html).Â
Loopingoverdictionariestakessomepracticethefirstfewtimeswhenyouusethem. But just like standard loops, looping over dictionaries will be aninvaluabletoolinyourtoolbelt.Â

Templates
ForaslongasIcanremember,Ihavealwaysusedakindofanetworktemplate.In my experience, many of the network devices have sections of networkconfigurationthatareidentical,especiallyifthesedevicesservethesameroleinthenetwork.ÂMostofthetimewhenweneedtoprovisionanewdevice,weusethe sameconfiguration in the formof a template, replace thenecessary fields,andcopythefileovertothenewdevice.WithAnsible,youcanautomateallthework using the template module(http://docs.ansible.com/ansible/template_module.html).Â
The base template file we are using utilizes the Jinja2 template language(http://jinja.pocoo.org/docs/).WebrieflydiscussedJinja2templatinglanguageinthepreviouschapter, andwewill lookat it abitmorehere. Just likeAnsible,Jinja2 has its own syntax and method of doing loops and conditionals;fortunately,wejustneedtoknowtheverybasicsofitforourpurpose.Youwilllearnthesyntaxbygraduallybuildingupyourplaybook.Â
Thebasicsyntaxfortemplateusageisverysimple;youjustneedtospecifythesource file and the destination location that you want to copy it to. We willcreateanemptyfilenow:Â
$touchfile1
Then, we will use the following playbook to copy file1 to file2, note theplaybookisexecutedonthecontrolmachineonly;now,specifythepathofboththesourceanddestinationfilesasarguments:Â
---
-name:TemplateBasic
hosts:localhost
tasks:
-name:copyonefiletoanother
template:
src=./file1
dest=./file2
Wedonotneedtospecifyahostfilesincelocalhostisavailablebydefault;you

will,however,getawarning:Â
$ansible-playbookchapter5_7.yml
[WARNING]:providedhostslistisempty,onlylocalhostisavailable
<skip>
TASK[copyonefiletoanother]************************************************
changed:[localhost]
<skip>
Thesourcefilecanhaveanyextension,butsincetheyareprocessedthroughtheJinja2templateengine,let'screateafilecallednxos.j2asthetemplatesource.ThetemplatewillfollowtheJinja2conventionofusingdoublecurlybracketstospecifythevariable:Â
hostname{{item.value.hostname}}
featuretelnet
featureospf
featurebgp
featureinterface-vlan
username{{item.value.username}}password{{item.value.password
}}rolenetwork-operator
TheJinja2template
Let'salsomodify theplaybookaccordingly. Inchapter5_8.yml,wewillmakethefollowingchanges:
1. Changethesourcefiletothenxos.j2.Â2. Changethedestinationfiletobeavariable.Â3. Provide the variable values thatwewill substitute in the template that is
indicatedunderthetaskssection.
---
-name:TemplateLooping
hosts:localhost
vars:
nexus_devices:{
"nx-osv-1": {"hostname": "nx-osv-
1","username":"cisco",

"password":"cisco"}
}
tasks:
-name:createrouterconfigurationfiles
template:
src=./nxos.j2
dest=./{{item.key}}.conf
with_dict:"{{nexus_devices}}"
After running theplaybook,youwill find thedestination file calledÂnx-osv-1.confÂwiththevaluesfilledinandreadytobeused:Â
$catnx-osv-1.conf
hostnamenx-osv-1
featuretelnet
featureospf
featurebgp
featureinterface-vlan
usernameciscopasswordciscorolenetwork-operator
Jinja2loops
Wecanalsoloopthroughalistaswellasadictionaryaswehavecompletedinthelastsection;makethefollowingchangesinÂnxos.j2:Â
{%forvlan_numinitem.value.vlans%}
vlan{{vlan_num}}
{%endfor%}
{%forvlan_interfaceinitem.value.vlan_interfaces%}
interface{{vlan_interface.int_num}}
ipaddress{{vlan_interface.ip}}/24
{%endfor%}
Providetheadditionallistanddictionaryvariablesintheplaybook:Â
vars:
nexus_devices:{
"nx-osv-1":{
"hostname":"nx-osv-1",
"username":"cisco",
"password":"cisco",

"vlans":[100,200,300],
"vlan_interfaces":[
{"int_num":"100","ip":"192.168.10.1"},
{"int_num":"200","ip":"192.168.20.1"},
{"int_num":"300","ip":"192.168.30.1"}
]
}
}
Run the playbook, and you will see the configuration for both vlan andvlan_interfacesfilledinontherouterconfig.Â
TheJinja2conditional
Jinja2 also supports and an if conditional checking. Let's add this field in forturningonthenetflowfeatureforcertaindevices.Wewilladdthefollowingtothenxos.j2template:Â
{%ifitem.value.netflow_enable%}
featurenetflow
{%endif%}
Theplaybookishere:Â
vars:
nexus_devices:{
<skip>
"netflow_enable":True
<skip>
}
Thelaststepwewillundertakeistomakethenxos.j2morescalablebyplacingthevlaninterfacesectioninsideofatrue-falseconditionalcheck.Intherealworld,most often,wewill havemultiple deviceswith knowledge of thevlaninformationbutonlyonedeviceasthegatewayforclienthosts:Â
{%ifitem.value.l3_vlan_interfaces%}
{%forvlan_interfaceinitem.value.vlan_interfaces%}
interface{{vlan_interface.int_num}}
ipaddress{{vlan_interface.ip}}/24
{%endfor%}
{%endif%}

Wewillalsoaddaseconddevicecallednx-osv-2intheplaybook:Â
vars:
nexus_devices:{
<skip>
"nx-osv-2":{
"hostname":"nx-osv-2",
"username":"cisco",
"password":"cisco",
"vlans":[100,200,300],
"l3_vlan_interfaces":False,
"netflow_enable":False
}
<skip>
}
Neat,huh?Thiscancertainlysaveusatonoftimeforsomethingthatrequiredrepeatedcopyandpastebefore.Â

Groupandhostvariables
Notice in the previous playbook,we have repeated ourselves in the usernameandpasswordvariablesforthetwodevicesunderthenexus_devicesvariable:Â
vars:
nexus_devices:{
"nx-osv-1":{
"hostname":"nx-osv-1",
"username":"cisco",
"password":"cisco",
"vlans":[100,200,300],
<skip>
"nx-osv-2":{
"hostname":"nx-osv-2",
"username":"cisco",
"password":"cisco",
"vlans":[100,200,300],
<skip>
Thisisnotideal.Ifweeverneedtoupdatetheusernameandpasswordvalues,we will need to remember to update at two locations. This increases themanagementburdenaswellasthechancesofmakingmistakesifweeverforgetto update all the locations. For best practice, Ansible suggests that we usegroup_varsandhost_varsdirectoriestoseparateoutthevariables.Â
Note
For more Ansible best practices, checkoutÂhttp://docs.ansible.com/ansible/playbooks_best_practices.html
Groupvariables
By default,Ansiblewill look for group variables in the same directory as theplaybookcalledgroup_varsforÂvariablesthatcanbeappliedtothegroup.Bydefault,itwilllookforthefilenamethatmatchesthegroupname.Forexample,ifwehaveagroupcalled[nexus-devices]Âintheinventoryfile,wecanhaveafileundergroup_varsnamednexus-devicestohouseallthevariablesappliedtothegroup.Wecanalsouseafilecalledalltoincludevariablesappliedtoall

thegroups.
Wewillutilizethisfeatureforourusernameandpasswordvariables:Â
$mkdirgroup_vars
Then, we can create a YAML file called all to include the username andpassword:
$catgroup_vars/all
---
username:cisco
password:cisco
Wecanthenusevariablesfortheplaybook:
vars:
nexus_devices:{
"nx-osv-1":{
"hostname":"nx-osv-1",
"username":"{{username}}",
"password":"{{password}}",
"vlans":[100,200,300],
<skip>
"nx-osv-2":{
"hostname":"nx-osv-2",
"username":"{{username}}",
"password":"{{password}}",
"vlans":[100,200,300],
<skip>
Hostvariables
Wecanfurtherseparateout thehostvariables in thesameformatas thegroupvariables:Â
$mkdirhost_vars
Inourcase,weexecutethecommandsonthelocalhost,thereforethefileunderhost_vars should be named accordingly, such as  host_vars/localhost.Notethatwekeptthevariablesdeclaredingroup_vars.Â
---

"nexus_devices":
"nx-osv-1":
"hostname":"nx-osv-1"
"username":"{{username}}"
"password":"{{password}}"
<skip>
"netflow_enable":True
"nx-osv-2":
"hostname":"nx-osv-2"
"username":"{{username}}"
"password":"{{password}}"
<skip>
Afterweseparateoutthevariables,theplaybooknowbecomesverylightweightandonlyconsistsofthelogicofouroperation:Â
$catchapter5_9.yml
---
-name:AnsibleGroupandHostVaribles
hosts:localhost
tasks:
-name:createrouterconfigurationfiles
template:
src=./nxos.j2
dest=./{{item.key}}.conf
with_dict:"{{nexus_devices}}"
Thegroup_vars andhost_varsÂdirectories not only decrease our operationsoverhead.Theycanhelpinsecuringthefiles,whichwewillseenext.Â

TheAnsiblevault
Asyou can see from the previous section,many a times, theAnsible variableoftenprovidessensitiveinformationsuchasusernameandpassword.Itwouldbeagoodideatoputsomesecuritymeasuresaroundthevariablessothatwecansafeguardagainst these information.TheAnsiblevaultprovidesencryption forfilesratherthanusingplaintext.Â
AllAnsibleVaultfunctionsstartwiththeÂansible-vaultcommand.Youcanmanuallycreateaencryptedfileviathecreateoption.Youwillbeaskedtoenterapassword.Ifyoutrytoviewthefile,youwillfindthatthefileisnotincleartext:Â
$ansible-vaultcreatesecret.yml
Vaultpassword:
$catsecret.yml
$ANSIBLE_VAULT;1.1;AES256
336564626462373962326635326361323639323635353630646665656430353261383737623<skip>653537333837383863636530356464623032333432386139303335663262
3962
Youcan lateronedit the filevia theeditoptionorviewthefilevia theviewoption:
$ansible-vaulteditsecret.yml
Vaultpassword:
$ansible-vaultviewsecret.yml
Vaultpassword:
Let'sencryptthegroup_vars/allandhost_vars/localhostvariablefiles:Â
$ansible-vaultencryptgroup_vars/allhost_vars/localhost
Vaultpassword:
Encryptionsuccessful
Now, when we run the playbook, we will get a decryption failed errormessage:Â
ERROR!Decryptionfailedon/home/echou/Master_Python_Networking/Chapter5/Vaults/group_vars/all

Wewillneedtousethe--ask-vault-passoptionwhenweruntheplaybook:Â
$ansible-playbookchapter5_10.yml--ask-vault-pass
Vaultpassword:
The decrypt will happen in memory for any vault encrypted files that areaccessed.Â
Note
Currently,thevaultrequiresallthefilestobeencryptedwiththesamepassword.Â
Wecanalsosavethepasswordinafileandmakesurethatthespecificfilehasrestrictedpermission:Â
$chmod400~/.vault_password.txt
$ls-lia~/.vault_password.txt
809496 -r-------
-1echouechou9Feb1812:17/home/echou/.vault_password.txt
Wecanthenexecutetheplaybookwiththe--vault-password-fileoption:
$ ansible-playbook chapter5_10.yml --vault-password-
file~/.vault_password.txt

TheAnsibleincludeandroles
Thebestway tohandlecomplex tasks is tobreak itdown into smallerpieces.ThisapproachiscommoninbothPythonandnetworkengineering,ofcourse.InPython, we break complicated code into functions, classes, modules, andpackages. In Networking, we also break large networks into sections such asracks,rows,clusters,anddatacenters.ÂInAnsible,usesrolesÂandincludestosegmentandorganizealargeplaybookintomultiplefiles.BreakingupalargeAnsible playbook simplifies the structure as each of file focuses on fewertasks.Italsoallowsthesectionsoftheplaybookeasiertobereused.Â
TheAnsibleincludestatement
Astheplaybookgrowsinsize,itwilleventuallybecomeobviousthatmanyofthe tasksandplaybookscanbesharedacrossdifferentplaybooks.TheAnsibleincludestatementissimilartomanyLinuxconfigurationfilesthatjusttellthemachinetoextendthefilethesamewayasifthefilewasdirectlywrittenin.Wecan do an include statement for both playbooks and tasks.Wewill look at asimpleexampleforextendingourtasks.Â
Let'sassumethatwewanttoshowoutputsfortwodifferentplaybooks.WecanmakeaseparateYAMLfilecalledshow_output.ymlasanadditionaltask:
---
-name:showoutput
debug:
var:output
Then, we can reuse this task in multiple playbooks, such as inchapter5_11_1.yml that looked largely identical to the last playbookwith theexceptionofregisteringtheoutputandtheincludestatementattheend:Â
---
-name:AnsibleGroupandHostVaribles
hosts:localhost
tasks:
-name:createrouterconfigurationfiles
template:

src=./nxos.j2
dest=./{{item.key}}.conf
with_dict:"{{nexus_devices}}"
register:output
-include:show_output.yml
Another playbook, chapter5_11_2.yml, can reuse show_output.yml inn thesameway:Â
---
-name:showusers
hosts:localhost
tasks:
-name:showlocalusers
command:who
register:output
-include:show_output.yml
Note that both playbooks use the same variable name, output, as theshow_output.ymlhardcodesthevariablenameforsimplicityindemonstration.Youcanalsopassvariablesintotheincludedfile.Â
Ansibleroles
Ansiblerolesseparatethelogicalfunctionwithphysicalhosttofityournetworkbetter.Forexample,youcanconstructrolessuchasspines,leafs,core,aswellasCisco,Juniper,andArista.Thesamephysicalhostcanbelongtomultipleroles;for example, a device can belong to both Juniper and the core. This makeslogicalsense,aswecanperformoperationsuchasupgradeallJuniperdevicesacrossthenetworkwithouttheirlocationinthelayerofthenetwork.Â
Ansiblerolescanautomaticallyloadcertainvariables,tasks,andhandlersbasedonaknownfileinfrastructure.Thekeyisthatthisisaknownfilestructurethatweautomaticallyinclude;infact,youcanthinkofrolesaspremadeandincludestatementsbyAnsible.Â
The Ansible playbook role documentation(http://docs.ansible.com/ansible/playbooks_roles.html#roles) describes a list of

roledirectories thatyoucanconfigure.Youdonotneed touseallof them; infact,wewillonlymodifythetasksandvarsfolder.However,itisgoodtoknowthattheyexist.
Thefollowingiswhatwewilluseasanexampleforourroles:Â
âââchapter5_12.yml
âââchapter5_13.yml
âââhosts
âââroles
âââcisco_nexus
ââââdefaults
ââââfiles
ââââhandlers
ââââmeta
ââââtasks
âââââmain.yml
ââââtemplates
ââââvars
ââââmain.yml
âââspines
âââdefaults
âââfiles
âââhandlers
âââtasks
ââââmain.yml
âââtemplates
âââvars
âââmain.yml
Youcanseethatatthetoplevel,wehavethehostsfileaswellastheplaybooks.We also have a folder named roles;Â inside it, we have two rolesdefined:Âcisco_nexusandspines.Mostofthesubfoldersundertheroleswereempty, with the exception of tasks and vars folder. There is a file namedmain.ymlinsideeachofthem.Thisisthedefaultbehavior,themain.ymlfileisyourentrypointthatisautomaticallyincludedintheplaybookwhenyouspecifytheroleintheplaybook.Ifyouneedtobreakoutadditionalfiles,youcanusetheincludestatementinthemain.ymlfile.Â
Hereisourscenario:Â
We have two Cisco Nexus devices, nxos-r1 and nxos-r2. We will

configure the logging server as well log link-status for all ofthemÂutilizingthecisco_nexusroleforthem.ÂInaddition,nxos-r1isalsoaspinedevice,wherewewillwanttoconfiguremoreverboselogging,becausetheyareofmorecriticalpositioningwithinournetwork.Â
For our cisco_nexus role, we have the following variables inroles/cisco_nexus/vars/main.yml:
---
cli:
host:"{{ansible_host}}"
username:cisco
password:cisco
transport:cli
We have the following configuration tasks inroles/cisco_nexus/tasks/main.yml:Â
---
-name:configureloggingparameters
nxos_config:
lines:
-loggingserver191.168.1.100
-loggingeventlink-statusdefault
provider:"{{cli}}"
Ourplaybook isextremelysimple,as it justneeds tospecify thehosts thatwewouldliketobeconfiguredaccordingtocisco_nexusrole:Â
---
-name:playbookforcisco_nexusrole
hosts:"cisco_nexus"
gather_facts:false
connection:local
roles:
-cisco_nexus
Whenyouruntheplaybook,theplaybookwill includethetasksandvarirablesdefinedinthecisco_nexusroleandconfigurethedevicesaccordingly.Â
Forourspinerole,wewillhaveanadditionaltaskofmoreverboseloggingin

roles/spines/tasks/mail.yml:
---
-name:changelogginglevel
nxos_config:
lines:
-logginglevellocal77
provider:"{{cli}}"
Inourplaybook,wecanspecifythatitcontainsboththeroleofcisco_nexusaswellasspiens:
---
-name:playbookforspinerole
hosts:"spines"
gather_facts:false
connection:local
roles:
-cisco_nexus
-spines
Note that, when we do this, the cisco_nexus role tasks will be executedfollowedbythespinesÂrole:Â
TASK[cisco_nexus:configureloggingparameters]******************************
changed:[nxos-r1]
TASK[spines:changelogginglevel]*******************************************
ok:[nxos-r1]
Ansible roles are flexible and scalable. Just likePython functions and classes.Onceyourcodegrowsbeyondacertainlevel,itisalmostalwaysagoodideatobreakthemintosmallerpiecesformaintainability.Â
Note
YoucanfindmoreexamplesofrolesintheAnsibleexamplesGitrepositoryatÂhttps://github.com/ansible/ansible-examples.Â

Writingyourowncustommodule
Bynow,youmaygetthefeelingthatnetworkmanagementislargelydependentonfindingtherightmoduleforyourdevice.There iscertainlya lotof truth inthat logic. Modules provide a way to abstract the interaction between themanagedhostandthecontrolmachine,whileitallowsyoutofocusonthelogicofyouroperation.Uptothispoint,wehaveseenthemajorvendorsprovidingawiderangeofmodulesupportforCisco,Juniper,andArista.
Use Cisco Nexus modules as an example, besides specific tasks such asmanaging the BGP neighbor (nxos_bgp) and the aaa server(nxos_aaa_server). Most vendors also provide ways to run arbitrary show(nxos_config) and configuration commands (nxos_config). This generallycoversmostofourusecases.Â
What if thedeviceyouareusingdoesnotcurrentlyhaveany themodules thatyouarelookingfor?Inthissection,wewilllookatseveralÂwaysthatyoucanremedythissituationbywritingyourowncustommodule.
Thefirstcustommodule
Writing a custommodule does not need to be complicated; in fact, it doesn'tevenneed tobe inPython.But sinceweare already familiarwithPython,wewill use Python for our custommodules.We are assuming that themodule iswhat we will be using ourselves and our team without submitting back toAnsible, therefore ignoring some of the documentation and formatting for thetimebeing.Â
Bydefault, ifyoumakea libraryfolder in thesamedirectoryof theplaybook,Ansible will include the directory in the module search path. All the moduleneedsistoreturnaJSONoutputbacktotheplaybook.Â
Recall that in Chapter 3, API and Intent-Driven Networking, we used thefollowingNXAPIPythonscripttocommunicatetotheNX-OSdevice:Â
importrequests
importjson

url='http://172.16.1.142/ins'
switchuser='cisco'
switchpassword='cisco'
myheaders={'content-type':'application/json-rpc'}
payload=[
{
"jsonrpc":"2.0",
"method":"cli",
"params":{
"cmd":"showversion",
"version":1.2
},
"id":1
}
]
response=requests.post(url,data=json.dumps(payload),
headers=myheaders,auth=(switchuser,switchpassword)).json()
print(response['result']['body']['sys_ver_str'])
Whenweexecutedit,wesimplygotthesystemversion.IfwesimplymodifythelastlinetobeaJSONoutput,wewillseethefollowing:Â
version=response['result']['body']['sys_ver_str']
printjson.dumps({"version":version})
We can then use the action plugin(https://docs.ansible.com/ansible/dev_guide/developing_plugins.html) in ourplaybook,chapter5_14.yml,tocallthiscustommodule:Â
---
-name:YourFirstCustomModule
hosts:localhost
gather_facts:false
connection:local
tasks:
-name:ShowVersion
action:custom_module_1
register:output
-debug:
var:output

Note that just like the ssh connection, we are executing themodule locallywiththemodulemakingAPIcallsoutbound.Whenyouexecutethisplaybook,youwillgetthefollowingoutput:Â
$ansible-playbookchapter5_14.yml
[WARNING]:providedhostslistisempty,onlylocalhostisavailable
PLAY[YourFirstCustomModule]************************************************
TASK[ShowVersion]************************************************************
ok:[localhost]
TASK[debug]*******************************************************************
ok:[localhost]=>{
"output":{
"changed":false,
"version":"7.3(0)D1(1)"
}
}
PLAYRECAP*********************************************************************
localhost:ok=2changed=0unreachable=0failed=0
Asyoucansee,youcanwriteanymodulethatissupportedbyAPI,andAnsiblewillhappilytakeanyreturnedJSONoutput.Â
Thesecondcustommodule
Buildinguponthelastmodule,let'sutilizethecommonmoduleBoilerplatefromAnsible as in the module development documentationatÂhttp://docs.ansible.com/ansible/dev_guide/developing_modules_general.htmlWe will modify the last custom module in custom_module_2.py to utilizeingestinginputsfromtheplaybook.Â
First, we will import the boilerplate code fromansible.module_utils.basic:Â
fromansible.module_utils.basicimportAnsibleModule
if__name__=='__main__':
main()
Fromthere,wecanthendefinethemainfunctionwherewewillhouseourcode.

AnsibleModuleprovideslotsofcommoncodeforhandlingreturnsandparsingarguments. In the following example,wewill parse three arguments forhost,username,andpassword,Âandmakethemasarequiredfield:
defmain():
module=AnsibleModule(
argument_spec=dict(
host=dict(required=True),
username=dict(required=True),
password=dict(required=True)
)
)
Thevaluescanthenberetrievedandusedinourcode:Â
device=module.params.get('host')
username=module.params.get('username')
password=module.params.get('password')
url='http://'+host+'/ins'
switchuser=username
switchpassword=password
Finally,wewillfollowtheexitcodeandreturnthevalue:Â
module.exit_json(changed=False,msg=str(data))
Ournewplaybookwilllookidenticaltothelastonewiththeexceptionnowthatwecanpassvaluesfordifferentdevicesintheplaybook:Â
tasks:
-name:ShowVersion
action:custom_module_1host="172.16.1.142"username="cisco"
password="cisco"
register:output
When executed, this playbook will produce the exact same output as the lastplaybook;however,noticethatthisplaybookandmodulecanbepassedaroundforotherpeopletousewithoutthemknowingthedetailsofourmodule.
Ofcourse,thisisafunctionalbutincompletemodule;foronething,wedidnotperform any error checking or documentation. However, it demonstrates howeasyitistobuildacustommodulefromscriptsthatwehavealreadymade.Â

Summary
In this chapter,we covered a lot of ground.Building fromour previous basicknowledge of Ansible, we expanded into more advanced topics such asconditionals, loops, and templates. We looked at how to make our playbookmore scalable with host variables, group variables, include statements, androles. We also looked at how to secure our playbook with the Ansiblevault.ÂFinally,weusedPythontomakeourowncustommodules.Â
Ansible is a very flexible Python framework that can be used for networkautomation.ItprovidesanotherabstractionlayerseparatedfromthelikesofthePexpect and API-based scripts. Depending on your needs and networkenvironment,itmightbetheidealframeworkthatyoucanusetosavetimeandenergy.Â
Inthenextchapter,wewilllookatnetworksecuritywithPython.Â

Chapter6.NetworkSecuritywithPython
Inmyopinion,networksecurityisatrickytopictowriteabout.Thereasonisnotatechnicalone,butratheronewithsettinguptherightscope.TheboundariesofnetworksecurityaresowidethattheytouchÂallsevenlayersoftheOSImodel.From layer 1ofwire tapping, to layer 4of transport protocol vulnerability, tolayer 7 of man-in-the-middle spoofing, network security is everywhere. Theissue is exacerbated by all the newly discovered vulnerabilities, which aresometimes at a daily rate. This does not even include the human socialengineeringaspectofnetworksecurity.Â
Assuch,inthischapter,Iwouldliketosetthescopeforwhatwewilldiscuss.Aswehavebeendoinguptothispoint,wewillbeprimarilyfocusedonusingPythonfornetworkdevicesecurityatOSIlayers3and4.WewilllookatPythontoolsthatwecanusetomanageindividualcomponentsaswellasusingPythonasagluetoconnectdifferentcomponents,sowecantreatnetworksecurityinaholisticview.Inthischapter,wewilltakealookatthefollowing:
ThelabsetupPythonScapyforsecuritytestingÂAccesslistsForensicanalysiswithsyslogandUFWusingPythonÂOther tools such asMac address filter list, privateVLAN, andPython IPtablebindingÂ

Thelabsetup
The devices being used in this chapter are a bit different from the previouschapters. In the previous chapters, we were isolating a particular device byfocusingonthetopicathand.Forthischapter,wewilluseafewmoredevicesinourlabtoillustratethetoolsthatwewillbeusing.Â
WewillbeusingthesameCiscoVIRLtoolwithfournodes, twoserverhosts,andtwonetworkdevices.IfyouneedarefresheronCiscoVIRL,feelfreetogoback to Chapter 2, Low-Level Network Device Interactions where we firstintroducedthetool:
LabTopology

Note
NotethattheIPaddresseslistedwillbedifferentinyourownlab.They are listed here for an easy reference for the rest of thechapter.Â
As illustrated,wewill rename thehoston the topas theclientand thebottomhost as the server. This is analogous to an Internet client trying to access acorporate server within our network. We will again use the Shared flat
networkÂoptionforthemanagementnetworktoaccessthedevicesfortheout-of-bandmanagement:Â
Forthetwoswitches,IamchoosingtouseOpenShortestPathFirst(OSPF)asIGPandputtingboththedevicesinarea0.Bydefault,BGPisturnedonandboththedevices areusingAS1.Fromconfigurationauto-generation, the interfacesconnectedtotheUbuntuhostsareputintoOSPFarea1,sotheywillshowupasinter-area routes. The NX-OSv configurations is shown here and the IOSvconfigurationandoutputaresimilar:Â
interfaceEthernet2/1
descriptiontoiosv-1
noswitchport
mac-addressfa16.3e00.0001
ipaddress10.0.0.6/30
iprouterospf1area0.0.0.0
noshutdown
interfaceEthernet2/2
descriptiontoClient
noswitchport
mac-addressfa16.3e00.0002
ipaddress10.0.0.9/30
iprouterospf1area0.0.0.0
noshutdown

nx-osv-1#shiproute
<skip>
10.0.0.12/30,ubest/mbest:1/0
*via10.0.0.5,Eth2/1,[110/41],04:53:02,ospf-1,intra
192.168.0.2/32,ubest/mbest:1/0
*via10.0.0.5,Eth2/1,[110/41],04:53:02,ospf-1,intra
<skip>
TheOSPFneighborand theBGPoutput forNX-OSvisshownhere; theIOSvoutputissimilar:Â
nx-osv-1#shipospfneighbors
OSPFProcessID1VRFdefault
Totalnumberofneighbors:1
NeighborIDPriStateUpTimeAddressInterface
192.168.0.21FULL/DR04:53:0010.0.0.5Eth2/1
nx-osv-1#shipbgpsummary
BGPsummaryinformationforVRFdefault,addressfamilyIPv4Unicast
BGProuteridentifier192.168.0.1,localASnumber1
BGPtableversionis5,IPv4Unicastconfigpeers1,capablepeers1
2networkentriesand2pathsusing288bytesofmemory
BGPattributeentries[2/288],BGPASpathentries[0/0]
BGPcommunityentries[0/0],BGPclusterlistentries[0/0]
NeighborVASMsgRcvdMsgSentTblVerInQOutQUp/DownState/PfxRcd
192.168.0.24132129750004:52:561
ThehostsinournetworkarerunningUbuntu14.04,similartotheÂUbuntuVM16.04thatwehavebeenusinguptothispoint:
cisco@Server:~$lsb_release-a
NoLSBmodulesareavailable.
DistributorID:Ubuntu
Description:Ubuntu14.04.2LTS
Release:14.04
Codename:trusty
OnbothoftheUbuntuhosts,therearetwonetworkinterfaces,Eth0connectstothemanagementnetworkwhileEth1connectstothenetworkdevices.Theroutesto the device loopback are directly connected to the network block, and theremotehost network is statically routed toEth1with thedefault routegoingtowardthemanagementnetwork:Â

cisco@Client:~$route-n
KernelIProutingtable
DestinationGatewayGenmaskFlagsMetricRefUseIface
0.0.0.0172.16.1.20.0.0.0UG000eth0
10.0.0.410.0.0.9255.255.255.252UG000eth1
10.0.0.80.0.0.0255.255.255.252U000eth1
10.0.0.810.0.0.9255.255.255.248UG000eth1
172.16.1.00.0.0.0255.255.255.0U000eth0
192.168.0.110.0.0.9255.255.255.255UGH000eth1
192.168.0.210.0.0.9255.255.255.255UGH000eth1
Justtomakesure,let'spingandtracetheroutetomakesurethattrafficbetweenourhostsisÂgoingthroughthenetworkdevicesinsteadofthedefaultroute:Â
##OurserverIPis10.0.0.14
cisco@Server:~$ifconfig
<skip>
eth1Linkencap:EthernetHWaddrfa:16:3e:d6:83:02
inetaddr:10.0.0.14Bcast:10.0.0.15Mask:255.255.255.252
##Fromtheclienttowardserver
cisco@Client:~$ping-c110.0.0.14
PING10.0.0.14(10.0.0.14)56(84)bytesofdata.
64bytesfrom10.0.0.14:icmp_seq=1ttl=62time=6.22ms
---10.0.0.14pingstatistics---
1packetstransmitted,1received,0%packetloss,time0ms
rttmin/avg/max/mdev=6.223/6.223/6.223/0.000ms
cisco@Client:~$traceroute10.0.0.14
tracerouteto10.0.0.14(10.0.0.14),30hopsmax,60bytepackets
110.0.0.9(10.0.0.9)11.335ms11.745ms12.113ms
210.0.0.5(10.0.0.5)24.221ms41.635ms41.638ms
310.0.0.14(10.0.0.14)37.916ms38.275ms38.588ms
cisco@Client:~$
Great!We have our lab, andwe are ready to look at some security tools andmeasuresusingPython.Â

PythonScapyÂ
Scapy (http://www.secdev.org/projects/scapy/) is a powerful Python-basedinteractivepacketmanipulationprogram.Outsideofsomecommercialprogram,veryfewtoolscandowhatScapycando,thatIknowof.ThemaindifferenceisScapyallowsyoutocraftyourownpacketfromtheverybasiclevel.Itisabletoforgeordecodenetworkpackets.Let'stakealookatthetool.Â
InstallingScapy
At the timeof thiswriting, Scapy2.3.1 supportedPython2.7.While attemptsandforkshasbeendoneforthePython3support,itisstillaprototype(inPhil'sownwords),sowewillusePython2.7forourusage.TheideaisthatScapy3willbePython3onlyandwillnotbebackwardcompatibletoScapy2.x.
Note
IfyouareinterestedintestingouttheScapy3prototype,hereisthe latest version:Â https://bitbucket.org/secdev/scapy3-prototype2.ÂIfyouwant to learnmoreabout the issueand thefork, here is the issue Bitbucketlink:Âhttps://bitbucket.org/secdev/scapy/issues/5082/compatibility-with-python-3.Â
In our lab, since we are crafting packets going from the client to the server,Scapyneedstobeinstalledontheclient:Â
cisco@Client:~$sudoapt-getupdate
cisco@Client:~$sudoapt-getinstallgit
cisco@Client:~$gitclonehttps://github.com/secdev/scapy
cisco@Client:~$cdscapy/
cisco@Client:~/scapy$sudopythonsetup.pyinstall
Hereisaquicktesttomakesurethepackagesinstalledcorrectly:Â
cisco@Client:~/scapy$python
Python2.7.6(default,Mar222014,22:59:56)
[GCC4.8.2]onlinux2

Type"help","copyright","credits"or"license"formoreinformation.
>>>fromscapy.allimport*
Interactiveexamples
In our first example, we will craft an Internet Control MessageProtocolÂ(ICMP)packetontheclientandsendittotheserver.Ontheserverside,wewillusetcpdumpwithhostfiltertoseethepacketcomingin:Â
##ClientSide
cisco@Client:~/scapy$sudoscapy
<skip>
WelcometoScapy(2.3.3.dev274)
>>>send(IP(dst="10.0.0.14")/ICMP())
.
Sent1packets.
>>>
##ServerSide
cisco@Server:~$sudotcpdump-ieth1host10.0.0.10
tcpdump: verbose output suppressed, use -v or -
vvforfullprotocoldecode
listening on eth1, link-
typeEN10MB(Ethernet),capturesize65535bytes
02:45:16.400162IP10.0.0.10>10.0.0.14:ICMPechorequest,id0,seq0,length8
02:45:16.400192IP10.0.0.14>10.0.0.10:ICMPechoreply,id0,seq0,length8
Asyoucansee,itisverysimpletocraftapacket.Scapyallowsyoutobuildthepacket layer by layer using the slash (/) as the separator. Thesend functionoperatesat thelayer3level,whichtakesÂcareofroutingandlayer2foryou.Thereisalsoasendp()alternativethatoperatesatlayer2,whichmeansyouwillneedtospecifytheinterfaceandlinklayerprotocol.
Let's look at capturing the returned packet by using the send-request (sr)function.Weareusingaspecialvariation,calledsr1,of the function thatonlyreturnsonepacketthatanswersthepacketsent:Â
>>>p=sr1(IP(dst="10.0.0.14")/ICMP())
>>>p
<IPversion=4Lihl=5Ltos=0x0len=28id=26713flags=frag=0Lttl=62proto=icmpchksum=0x71src=10.0.0.14dst=10.0.0.10options=
[]|<ICMPtype=echo-replycode=0chksum=0xffffid=0x0seq=0x0|>>
One thing to note is that the sr() function itself returns a tuple containing

answeredandunansweredlists:
>>>p=sr(IP(dst="10.0.0.14")/ICMP())
>>>type(p)
<type'tuple'>
##unpacking
>>>ans,unans=sr(IP(dst="10.0.0.14")/ICMP())
>>>type(ans)
<class'scapy.plist.SndRcvList'>
>>>type(unans)
<class'scapy.plist.PacketList'>
If we were to only take a look at the answered packet list, we can see it isanother tuple containing the packet that we have sent as well as the returnedpacket:Â
>>>foriinans:
...print(type(i))
...
<type'tuple'>
>>>foriinans:
...printi
...
(<IP frag=0 proto=icmp dst=10.0.0.14 |
<ICMP|>>,<IPversion=4Lihl=5Ltos=0x0len=28id=27062flags=frag=0Lttl=62proto=icmpchksum=0xff13src=10.0.0.14dst=10.0.0.10options=
[]|<ICMPtype=echo-replycode=0chksum=0xffffid=0x0seq=0x0|>>)
Scapy also provides a layer 7 construct aswell, such as aDNS query. In thefollowing example,we are querying anopenDNS server for the resolutionofwww.google.com:Â
>>>p=sr1(IP(dst="8.8.8.8")/UDP()/DNS(rd=1,qd=DNSQR(qname="www.google.com")))
>>>p
<IPversion=4Lihl=5Ltos=0x0len=76id=21743flags=frag=0Lttl=128proto=udpchksum=0x27fasrc=8.8.8.8dst=172.16.1.152options=
[] |<UDP sport=domain dport=domain len=56 chksum=0xc077 |
<DNSid=0qr=1Lopcode=QUERYaa=0Ltc=0Lrd=1Lra=1Lz=0Lad=0Lcd=0Lrcode=okqdcount=1ancount=1nscount=0arcount=0qd=
<DNSQR qname='www.google.com.' qtype=A qclass=IN |> an=
<DNSRRrrname='www.google.com.'type=Arclass=INttl=299rdata='172.217.3.164'|>ns=Nonear=None|>>>
>>>
Sniffing
Scapycanalsobeusedtoeasilycapturepackets:Â

>>>a=sniff(filter="icmpandhost172.217.3.164",count=5)
>>>a.show()
0000Ether/IP/TCP192.168.225.146:ssh>192.168.225.1:50862PA/Raw
0001 Ether / IP / ICMP 192.168.225.146 > 172.217.3.164 echo-
request0/Raw
0002 Ether / IP / ICMP 172.217.3.164 > 192.168.225.146 echo-
reply0/Raw
0003 Ether / IP / ICMP 192.168.225.146 > 172.217.3.164 echo-
request0/Raw
0004 Ether / IP / ICMP 172.217.3.164 > 192.168.225.146 echo-
reply0/Raw
>>>
Wecanlookatthepacketsinsomemoredetail,includingtherawformat:
>>>foriina:
...printi.show()
...
<skip>
###[Ethernet]###
dst=<>
src=<>
type=0x800
###[IP]###
version=4L
ihl=5L
tos=0x0
len=84
id=15714
flags=DF
frag=0L
ttl=64
proto=icmp
chksum=0xaa8e
src=192.168.225.146
dst=172.217.3.164
options
###[ICMP]###
type=echo-request
code=0
chksum=0xe1cf
id=0xaa67
seq=0x1
###[Raw]###
load='xd6xbfxb1Xx00x00x00x00x1axdcnx00x00x00x00x00x10x11x12x13x14x15x16x17x18x19x1ax1bx1cx1dx1ex1f!"#$%&'()*+,-./01234567'
None

Let's continue on and see how we can use Scapy for some of the commonsecuritytesting.Â
TheTCPportscanÂ
The first step for any potential hackers is almost always try to learn whichserviceisopenonthenetwork,sotheycanconcentratetheireffortontheattack.Ofcourse,weneedtoopencertainportsinordertoserviceourcustomer,butweshouldalsocloseanyopenportthatisnotnecessarytodecreasetherisk.WecanuseScapytodoasimpleopenportscan.Â
We can send aSYN packet and seewhether the serverwill returnwithSYN-ACK:Â
>>>p=sr1(IP(dst="10.0.0.14")/TCP(sport=666,dport=23,flags="S"))
>>>p.show()
###[IP]###
version=4L
ihl=5L
tos=0x0
len=40
id=25373
flags=DF
frag=0L
ttl=62
proto=tcp
chksum=0xc59b
src=10.0.0.14
dst=10.0.0.10
options
###[TCP]###
sport=telnet
dport=666
seq=0
ack=1
dataofs=5L
reserved=0L
flags=RA
window=0
chksum=0x9907
urgptr=0
options={}

Noticethatintheoutputhere,theserverisrespondingwithaRESET+ACKforTCPport23.However, TCPport22 (SSH) is open, therefore a SYN-ACK isreturned:Â
>>>p=sr1(IP(dst="10.0.0.14")/TCP(sport=666,dport=22,flags="S"))
>>>p.show()
###[IP]###
version=4L
<skip>
proto=tcp
chksum=0x28b5
src=10.0.0.14
dst=10.0.0.10
options
###[TCP]###
sport=ssh
dport=666
<skip>
flags=SA
<skip>
Wecanalso scana rangeofdestinationports from20 to22;note thatweareusingsr()forsend-receiveinsteadoftheÂsr1()send-receive-one-packet:Â
>>> ans,unans = sr(IP(dst="10.0.0.14")/TCP(sport=666,dport=
(20,22),flags="S"))
>>>foriinans:
...printi
...
(<IP frag=0 proto=tcp dst=10.0.0.14 |
<TCPsport=666dport=ftp_dataflags=S|>>,<IPversion=4Lihl=5Ltos=0x0len=40id=4126flags=DFfrag=0Lttl=62proto=tcpchksum=0x189bsrc=10.0.0.14dst=10.0.0.10options=
[] |
<TCPsport=ftp_datadport=666seq=0ack=1dataofs=5Lreserved=0Lflags=RAwindow=0chksum=0x990aurgptr=0|>>)
(<IP frag=0 proto=tcp dst=10.0.0.14 |
<TCPsport=666dport=ftpflags=S|>>,<IPversion=4Lihl=5Ltos=0x0len=40id=4127flags=DFfrag=0Lttl=62proto=tcpchksum=0x189asrc=10.0.0.14dst=10.0.0.10options=
[] |
<TCPsport=ftpdport=666seq=0ack=1dataofs=5Lreserved=0Lflags=RAwindow=0chksum=0x9909urgptr=0|>>)
(<IP frag=0 proto=tcp dst=10.0.0.14 |
<TCPsport=666dport=sshflags=S|>>,<IPversion=4Lihl=5Ltos=0x0len=44id=0flags=DFfrag=0Lttl=62proto=tcpchksum=0x28b5src=10.0.0.14dst=10.0.0.10options=
[] |
<TCPsport=sshdport=666seq=4187384571ack=1dataofs=6Lreserved=0Lflags=SAwindow=29200chksum=0xaaaburgptr=0options=
[('MSS',1460)]|>>)
>>>
Wecanalsospecifyadestinationnetworkinsteadofasinglehost.Asyoucan

see from the 10.0.0.8/29 block, hosts 10.0.0.9, 10.0.0.13, and 10.0.0.14returnedwithSA,whichcorrespondstothetwonetworkdevicesandthehost:Â
>>> ans,unans = sr(IP(dst="10.0.0.8/29")/TCP(sport=666,dport=
(22),flags="S"))
>>>foriinans:
...print(i)
...
(<IP frag=0 proto=tcp dst=10.0.0.9 |
<TCPsport=666dport=sshflags=S|>>,<IPversion=4Lihl=5Ltos=0x0len=44id=7304flags=frag=0Lttl=64proto=tcpchksum=0x4a32src=10.0.0.9dst=10.0.0.10options=
[] |
<TCPsport=sshdport=666seq=541401209ack=1dataofs=6Lreserved=0Lflags=SAwindow=17292chksum=0xfd18urgptr=0options=
[('MSS',1444)]|>>)
(<IP frag=0 proto=tcp dst=10.0.0.14 |
<TCPsport=666dport=sshflags=S|>>,<IPversion=4Lihl=5Ltos=0x0len=44id=0flags=DFfrag=0Lttl=62proto=tcpchksum=0x28b5src=10.0.0.14dst=10.0.0.10options=
[] |
<TCPsport=sshdport=666seq=4222593330ack=1dataofs=6Lreserved=0Lflags=SAwindow=29200chksum=0x6a5burgptr=0options=
[('MSS',1460)]|>>)
(<IP frag=0 proto=tcp dst=10.0.0.13 |
<TCPsport=666dport=sshflags=S|>>,<IPversion=4Lihl=5Ltos=0x0len=44id=41992flags=frag=0Lttl=254proto=tcpchksum=0x4adsrc=10.0.0.13dst=10.0.0.10options=
[] |
<TCPsport=sshdport=666seq=2167267659ack=1dataofs=6Lreserved=0Lflags=SAwindow=4128chksum=0x1252urgptr=0options=
[('MSS',536)]|>>)
Based on what you have learned so far, you can make a simple script forreusability,Âscapy_tcp_scan_1.py.We startwith the suggested importing ofScapyandthesysmodulefortakinginarguments:Â
#!/usr/bin/envpython2
fromscapy.allimport*
importsys
Thetcp_scan()functionissimilartowhatwehaveseenuptothispoint:Â
deftcp_scan(destination,dport):
ans,unans=sr(IP(dst=destination)/TCP(sport=666,dport=dport,flags="S"))
forsending,returnedinans:
if'SA'instr(returned[TCP].flags):
returndestination+"port"+str(sending[TCP].dport)+"isopen"
else:
returndestination+"port"+str(sending[TCP].dport)+"isnotopen"
We can then acquire the input from arguments, and then call the tcp_scan()

functionÂinmain():
defmain():
destination=sys.argv[1]
port=int(sys.argv[2])
scan_result=tcp_scan(destination,port)
print(scan_result)
if__name__=="__main__":
main()
Remember that Scapy requires root access, therefore our script needs to beexecutedassudo:Â
cisco@Client:~$sudopythonscapy_tcp_scan_1.py"10.0.0.14"23
<skip>
10.0.0.14port23isnotopen
cisco@Client:~$sudopythonscapy_tcp_scan_1.py"10.0.0.14"22
<skip>
10.0.0.14port22isopen
ThiswasarelativelylengthyexampleoftheTCPscan,whichdemonstratedthepower of crafting your own packet with Scapy. It tests out in the interactivemode,andthenfinalizestheusagewithasimplescript.Let'slookatsomemoreexamplesofScapy'susageforsecuritytesting.Â
Thepingcollection
Let's say our network contains amix ofWindows,Unix, andLinuxmachineswithusersaddingtheirownBringYourOwnDeviceÂ(BYOD); theymayormay not support ICMPping.We can now construct a filewith three types ofcommon pings for our network, the ICMP, TCP, and UDP pingsinÂscapy_ping_collection.py:Â
#!/usr/bin/envpython2
fromscapy.allimport*
deficmp_ping(destination):
#regularICMPping
ans,unans=sr(IP(dst=destination)/ICMP())
returnans

deftcp_ping(destination,dport):
#TCPSYNScan
ans,unans=sr(IP(dst=destination)/TCP(dport=dport,flags="S"))
returnans
defudp_ping(destination):
#ICMPPortunreachableerrorfromclosedport
ans,unans=sr(IP(dst=destination)/UDP(dport=0))
returnans
Inthisexample,wewillalsouseÂsummary()andsprintf()fortheoutput:Â
defanswer_summary(answer_list):
#exampleoflambdawithprettyprint
answer_list.summary(lambda(s,r):r.sprintf("%IP.src%isalive"))
Note
If you were wondering what a lambda is from theanswer_summary()functionmentionedpreviously, it isawaytocreate a small anonymous function; it is a function without aname. More information on it can be foundatÂhttps://docs.python.org/3.5/tutorial/controlflow.html#lambda-expressions.Â
Wecanthenexecuteallthethreetypesofpingsonthenetworkinonescript:Â
defmain():
print("**ICMPPing**")
ans=icmp_ping("10.0.0.13-14")
answer_summary(ans)
print("**TCPPing**")
ans=tcp_ping("10.0.0.13",22)
answer_summary(ans)
print("**UDPPing**")
ans=udp_ping("10.0.0.13-14")
answer_summary(ans)
if__name__=="__main__":
main()
At this point, hopefully you will agree with me that by having the ability toconstructyourownpacket,youcanbe inchargeof the typeofoperationsand

teststhatyouwouldliketorun.Â
Commonattacks
In this example for the Scapy usage, let's look at how we can construct ourpacket to conduct some of the class attacks, such as Ping of Death(https://en.wikipedia.org/wiki/Ping_of_death) and LandAttackÂ(https://en.wikipedia.org/wiki/Denial-of-service_attack).Thisisperhapssomething that you previously paid a commercial software for penetrationtesting.WithScapy,youcanconduct the testwhilemaintainingfullcontrolaswellasaddingmoretestsinthefuture.Â
ThefirstattackbasicallysendsthedestinationhostwithabogusIPheader,suchasthelengthof2andtheIPversion3:
defmalformed_packet_attack(host):
send(IP(dst=host,ihl=2,version=3)/ICMP())
ThePingofDeathattackconsistsÂoftheregularICMPpacketwithapayloadbiggerthan65,535bytes:
defping_of_death_attack(host):
#https://en.wikipedia.org/wiki/Ping_of_death
send(fragment(IP(dst=host)/ICMP()/("X"*60000)))
TheLandAttackwantstoredirecttheclientresponsebacktotheclientitselfandexhaustedthehost'sresources:
defland_attack(host):
#https://en.wikipedia.org/wiki/Denial-of-service_attack
send(IP(src=host,dst=host)/TCP(sport=135,dport=135))
These are pretty old vulnerabilities or classic attacks that modern operatingsystem are no longer susceptible to. For our Ubuntu 14.04 host, none of theprecedingattackswillbringitdown.However,asmoresecurityissuesarebeingdiscovered,Scapyisagreattooltostarttestsagainstourownnetworkandhostwithout having towait for the impacted vendor to give you a validation tool.This is especially true for the zero-day (published without prior notification)attacksthatseemtobemoreandmorecommonontheInternet.Â

Scapyresources
WehavespentquiteabitofeffortworkingwithScapyinthischapter,andthisisduetohowhighlyIpersonallythinkofthetool.IhopeyouagreewithmethatScapyisagreattooltokeepinyourtoolsetasanetworkengineer.Thebestpartabout Scapy is that it is constantly being developed with an engagedcommunityofusers.
Note
I would highly recommend at least going through the Scapytutorial athttp://scapy.readthedocs.io/en/latest/usage.html#interactive-tutorial,aswellasanyofthedocumentationthatisofinteresttoyou.Â

Accesslists
The network access lists are usually the first line of defense against outsideintrusionsandattacks.Generallyspeaking,routers,andswitchesprocesspacketsatamuchfasterratethanservers,becausetheyutilizehardwaresuchasTernaryContent-Addressable Memory (TCAM). They do not need to see theapplication layer information, rather just examine the layer 3 and layer 4information, and decide whether the packets can be forwarded on or not.Therefore, we generally utilize network device access lists as the first step insafeguardingournetworkresources.Â
As a rule of thumb, we want to place access lists as close to the source aspossible.Inherently,wealsotrusttheinsidehostanddistrusttheclientsoutsideof our network boundary. The access list is therefore usually placed on theinbound direction on the external facing network interface(s). In our labscenario, thismeanswewillplacean inboundaccess listatEthernet2/2 that isdirectlyconnectedtotheclienthost.Â
Ifyouareunsureofthedirectionandplacementoftheaccesslist,afewpointsmighthelphere:Â
ThinkoftheaccesslistfromtheperspectiveofthenetworkdeviceÂSimplifythepacketintermsofjustsourceanddestinationIPanduseonehostasanexample:Â
Inourlab,trafficÂfromourserverwillhaveasourceIPof10.0.0.14withthedestinationIPof10.0.0.10ThetrafficfromtheclientwillhaveasourceIPof10.10.10.10andthedestinationIPof10.0.0.14
Obviously,everynetworkisdifferentandhowtheaccesslistshouldconstructeddepends on the services provided by your server. But as an inbound borderaccesslist,youmustdothefollowing:
DenyRFC3030special-useaddresssources,thatis127.0.0.0/8ÂDenyRFC1918space,thatis10.0.0.0/8Â

Denyourownspaceassource,inthiscase10.0.0.12/30PermitinboundTCPport22(SSH)and80(HTTP)tohost10.0.0.14ÂDenyeverythingelseÂ
ImplementingaccesslistswithAnsible
TheeasiestwaytoimplementthisaccesslistwouldbetouseAnsible.WehavealreadylookedatAnsible in thelast twochapters,but it isworthrepeatingtheadvantagesofusingAnsibleinthisscenario:
Easier management: For a long access list, we are able to utilize theincludestatementtobreakthelongaccesslistintomoremanageablepieces.The smaller pieces can then be managed by other teams or serviceowners.ÂIdempotency:Wecanscheduletheplaybookataregularintervalandonlythenecessarychangeswillbemade.ÂEachtaskisexplicit:Wecanseparatetheconstructoftheentriesaswellasapplytheaccesslisttotheproperinterface.ÂReusability: In the future, ifweaddadditional external facing interfaces,wejustneedtoaddthedevicetothelistofdevicesfortheaccesslist.ÂExtensible: You will notice that we can use the same playbook forconstructingtheaccesslistandapplyittotherightinterface.Wecanstartsmallandexpandtoseparateplaybooksinthefutureasneeded.Â
Thehostfileisprettystandard:Â
[nxosv-devices]
nx-osv-
1ansible_host=172.16.1.155ansible_username=ciscoansible_password=cisco
Wewilldeclarethevariablesintheplaybookforthetimebeing:Â
---
-name:ConfigureAccessList
hosts:"nxosv-devices"
gather_facts:false
connection:local
vars:
cli:

host:"{{ansible_host}}"
username:"{{ansible_username}}"
password:"{{ansible_password}}"
transport:cli
To save space, we will illustrate denying the RFC 1918 space only.ImplementingthedenyingofRFC3030andourownspacewillbeidenticaltothestepsusedfortheRFP1918space.Notethatwedidnotdeny10.0.0.0/8inour playbook, because our configuration currently uses 10.0.0.0 network foraddressing. Of course, we perform the single host permit first and deny10.0.0.0/8forcompleteness,butinthisexample,wejustchoosetoomitit:Â
tasks:
-nxos_acl:
name:border_inbound
seq:20
action:deny
proto:tcp
src:172.16.0.0/12
dest:any
log:enable
state:present
provider:"{{cli}}"
-nxos_acl:
name:border_inbound
seq:40
action:permit
proto:tcp
src:any
dest:10.0.0.14/32
dest_port_op:eq
dest_port1:22
state:present
log:enable
provider:"{{cli}}"
-nxos_acl:
name:border_inbound
seq:50
action:permit
proto:tcp
src:any
dest:10.0.0.14/32
dest_port_op:eq
dest_port1:80
state:present

log:enable
provider:"{{cli}}"
-nxos_acl:
name:border_inbound
seq:60
action:permit
proto:tcp
src:any
dest:any
state:present
log:enable
established:enable
provider:"{{cli}}"
-nxos_acl:
name:border_inbound
seq:1000
action:deny
proto:ip
src:any
dest:any
state:present
log:enable
provider:"{{cli}}"
Noticethatweareallowingtheestablishedconnectionsourcingfromtheserverinside to be allowed back in. We use the final explicit deny ip any
any statement as a high sequence number (1000), sowe can insert any newentrieslateron.
Wecanthenapplytheaccesslisttotherightinterface:Â
-name:applyingressacltoEthernet2/2
nxos_acl_interface:
name:border_inbound
interface:Ethernet2/2
direction:ingress
state:present
provider:"{{cli}}"
Note
The access list on VIRL NX-OSv is only supported on themanagementinterface.Youwillseethiswarning:Warning:ACLmay not behave as expected since only management

interfaceissupported.IfyouweretoconfigureaclviaCLI.Thisisokayforourlab,asourpurposeisonlytodemonstratetheconfigurationautomationoftheaccesslist.Â
Thismightseemtobealotofworkforasingleaccesslist.Foranexperiencedengineer,usingAnsibletodothistaskwilltakelongerthanjustloggingintothedevice and configuring the access list.However, remember that this playbookcanbereusedmanytimesinthefuture,soitwillsaveyoutimeinthelongrun.
ItisinmyexperiencethatmanytimesÂforalongaccesslist,afewentrieswillbeforoneservice,afewentrieswillbeforanother,andsoon.Theaccessliststendtogroworganicallyovertime,anditbecomesveryhardtokeeptrackoftheoriginandpurposeofeachentry.Thefactthatwecanbreakthemapartmakesmanagementofalongaccesslistmuchsimpler.Â
MACaccesslists
In thecasewhereyouhaveanL2environmentorwhereyouareusingnon-IPprotocolsonEthernetinterfaces,youcanstilluseaMACaddressaccesslisttoallowor deny hosts based onMACaddresses.The steps are similar to the IPaccesslistbutmorespecifictoMACaddresses.RecallthatforMACaddresses,or physical addresses, the first 6 hexadecimal symbols belong to anOrganizationallyUniqueIdentifier(OUI).So,wecanusethesameaccesslistmatchingpatterntodenyacertaingroupofhosts.
Note
Note that we are testing this on IOSv with the ios_configmodule; due to the nature of the module, the change will bepushedouteverysingletimetheplaybookisexecuted.Therefore,weloseoneofthebenefitsof 'nochangemadeunlessnecessaryofAnsible.
Thehost fileand the topportionof theplaybookareÂsimilar to theIPaccesslist; the tasks portion is where the different modules and arguments areconfigured:
<skip>
tasks:

-name:DenyHostswithvendoridfa16.3e00.0000
ios_config:
lines:
-access-list700denyfa16.3e00.00000000.00FF.FFFF
-access-list700permit0000.0000.0000FFFF.FFFF.FFFF
provider:"{{cli}}"
-name:Applyfilteronbridgegroup1
ios_config:
lines:
-bridge-group1
-bridge-group1input-address-list700
parents:
-interfaceGigabitEthernet0/1
provider:"{{cli}}"
As more virtual networks become popular, the L3 information sometimesbecomestransparenttotheunderlyingvirtuallinks.Inthesescenarios,theMACaccesslistbecomesagoodoptionifyouneedtorestrictaccessonthoselinks.Â

Thesyslogsearch
ThereareplentyofÂdocumentednetworksecuritybreachesthattookplaceoveran extended period of time. In these slow breaches, often times evidenceindicatesthatthereweresignsandtracesinboththeserverandnetworklogsthatindicates suspicious activities. The undetected activitieswere not detected notbecause there was a lack of information, but rather there are too muchinformation.ThecriticalinformationthatwewerelookingforareusuallyburieddeepinamountainofinformationthatÂarehardtosortout.Â
Note
Besides syslog, Uncomplicated Firewall (UFW) is anothergreat source of log information for servers. It is a frontend toiptable,whichisaserverfirewall.UFWmakesmanagingfirewallrules very simple and logs good amount of information. SeeOthertoolssectionformoreinformationonUFW.Â
In this section,wewill try to use Python to search through the syslog text inordertodetecttheactivitiesthatwewerelookingfor.Ofcourse,theexacttermsthatwewillsearchfordependsonthedeviceweareusing.Forexample,CiscoprovidesalistofmessagesÂtolookforinsyslogforanytheaccesslistviolationlogging, available at http://www.cisco.com/c/en/us/about/security-center/identify-incidents-via-syslog.html.Â
Note
For more understanding of access control list logging, goto http://www.cisco.com/c/en/us/about/security-center/access-control-list-logging.html.
For our exercise, we will use a Nexus switch anonymized syslog containingabout65,000linesoflogmessages:Â
$wc-lsample_log_anonymized.log
65102sample_log_anonymized.log

We have inserted some syslog messages from the Ciscodocumentation, http://www.cisco.com/c/en/us/support/docs/switches/nexus-7000-series-switches/118907-configure-nx7k-00.html, as the log message thatwewillbelookingfor:Â
2014 Jun 29 19:20:57 Nexus-7000 %VSHD-5-
VSHD_SYSLOG_CONFIG_I:Configuredfromvtyby
adminonconsole0
2014 Jun 29 19:21:18 Nexus-7000 %ACLLOG-5-
ACLLOG_FLOW_INTERVAL:SrcIP:10.10.10.1,
DstIP:172.16.10.10,SrcPort:0,DstPort:0,SrcIntf:Ethernet4/1,Protocol:
"ICMP"(1),Hit-count=2589
2014 Jun 29 19:26:18 Nexus-7000 %ACLLOG-5-
ACLLOG_FLOW_INTERVAL:SrcIP:10.10.10.1,
DstIP:172.16.10.10,SrcPort:0,DstPort:0,SrcIntf:Ethernet4/1,Protocol:
"ICMP"(1),Hit-count=4561
Wewillbeusingsimpleexampleswithregularexpressionsforourexample.IfyouarealreadyfamiliarwiththeregularexpressioninPython,feelfreetoskiptherestofthesection.Â
Searchingwithregularexpressions
Forourfirstsearch,wewillsimplyusetheregularexpressionmoduletolookforthetermswearelookingfor.Wewilluseasimplelooptothefollowing:
#!/usr/bin/envpython3
importre,datetime
startTime=datetime.datetime.now()
withopen('sample_log_anonymized.log','r')asf:
forlineinf.readlines():
ifre.search('ACLLOG-5-ACLLOG_FLOW_INTERVAL',line):
print(line)
endTime=datetime.datetime.now()
elapsedTime=endTime-startTime
print("TimeElapsed:"+str(elapsedTime))
Theresultisabout6/100thofasecondtosearchthroughthelogfile:Â

$python3python_re_search_1.py
2014 Jun 29 19:21:18 Nexus-7000 %ACLLOG-5-
ACLLOG_FLOW_INTERVAL:SrcIP:10.10.10.1,
2014 Jun 29 19:26:18 Nexus-7000 %ACLLOG-5-
ACLLOG_FLOW_INTERVAL:SrcIP:10.10.10.1,
TimeElapsed:0:00:00.065436
Itisrecommendedtocompilethesearchtermforamoreefficientsearch.Itwillnot impact us much since we are already pretty fast. In fact, the Pythoninterpretative nature will actually make it slower. However, it will make adifferencewhenwesearchthroughlargertextbody,solet'smakethechange:Â
searchTerm=re.compile('ACLLOG-5-ACLLOG_FLOW_INTERVAL')
withopen('sample_log_anonymized.log','r')asf:
forlineinf.readlines():
ifre.search(searchTerm,line):
print(line)
Thetimeresultisactuallyslower:Â
TimeElapsed:0:00:00.081541
Let's expand the example a bit. Assumingwe have several files andmultipletermstosearchthrough,wewillcopytheoriginalfiletoanewfile:Â
$cpsample_log_anonymized.logsample_log_anonymized_1.log
Wewillalso includesearching for thePAM:AuthenticationfailureÂterm.Wewilladdanotherlooptosearchboththefiles:
term1=re.compile('ACLLOG-5-ACLLOG_FLOW_INTERVAL')
term2=re.compile('PAM:Authenticationfailure')
fileList=['sample_log_anonymized.log','sample_log_anonymized_1.log']
forloginfileList:
withopen(log,'r')asf:
forlineinf.readlines():
ifre.search(term1,line)orre.search(term2,line):
print(line)

We can now see the difference in performance as well as expand our searchcapabilities:
$python3python_re_search_2.py
2016 Jun 5 16:49:33 NEXUS-A %DAEMON-3-
SYSTEM_MSG:error:PAM:AuthenticationfailureforillegaluserAAAfrom172.16.20.170-sshd[4425]
2016 Sep 14 22:52:26.210 NEXUS-A %DAEMON-3-
SYSTEM_MSG:error:PAM:AuthenticationfailureforillegaluserAAAfrom172.16.20.170-sshd[2811]
<skip>
2014 Jun 29 19:21:18 Nexus-7000 %ACLLOG-5-
ACLLOG_FLOW_INTERVAL:SrcIP:10.10.10.1,
2014 Jun 29 19:26:18 Nexus-7000 %ACLLOG-5-
ACLLOG_FLOW_INTERVAL:SrcIP:10.10.10.1,
<skip>
TimeElapsed:0:00:00.330697
Ofcourse,whenitcomestoperformancetuning,itisaneverendingracetozeroandsometimesdependsonthehardwareyouareusing.ButtheimportantpointistoregularlyperformauditsofyourlogfilesusingPython,soyoucancatchtheearlysignalsofanypotentialbreach.Â

OthertoolsÂ
There are other network security tools that we can use and automate withPython.Let'stakealookatafewofthem.Â
PrivateVLANs
VirtualLocalAreaNetworks(VLANs),hasbeenaroundforalongtime.Theyareessentiallyabroadcastdomainwhereallhostscanbeconnectedtoasingleswitch, but are petitioned out to different domains, so we can separate thehostsÂoutaccordingtowhichhostcanseeothersviabroadcasts.Therealityisthatmostofthetime,VLANsaremappedouttoIPsubnets.Forexample,inanenterprise building, I would likely have one IP subnet per physical floor,192.168.1.0/24forthefirstfloor,192.168.2.0/24forthesecondfloor.Inthispattern,weuse1/24blockforeachfloor.ÂThisgivesacleardelineationofmyphysical network as well as my logical network. All hosts wanting tocommunicate beyond its own subnet will need to traverse through its layer 3gateway,whereIcanuseanaccesslisttoenforcesecurity.Â
What happenswhen different departments resides on the same floor? Perhapsthe finance and sales teams are both on the second floor, and Iwould notwantthesalesteam'shostsinthesamebroadcastdomainasthefinanceteam's.Ican further break the subnet down more, but that might become tedious andbreaks the standard subnet scheme thatwaspreviously setup.This is awhereprivateVLANcanhelp.Â
TheprivateVLANessentiallybreaksup the existingVLAN into sub-VLANs.TherearethreecategorieswithinaprivateVLAN:Â
ThePromiscuous(P)port:Thisportisallowedtosendandreceivelayer2framesfromanyotherportontheVLAN;thisusuallybelongstotheportconnectingtothelayer3routerÂTheIsolated (I)port:Thisport isonlyallowed tocommunicatedwithPports,angtheyaretypicallyconnectedtohostswhenyoudonotwantittocommunicatewithotherhostsinthesameVLAN.Â

TheCommunity(C)port:TheyareallowedtocommunicatewithotherCportsinthesamecommunityandPportsÂ
WecanagainuseAnsibleoranyoftheotherPythonscriptsintroducedsofartoaccomplishthistask.Bynow,weshouldhaveenoughpracticeandconfidencetoimplementthisfeatureifneededusingautomation,soIwillnotrepeatthestepshere.Beingawareof theprivateVLANfeaturewouldcome inhandyat timeswhenyouneedtoisolateportsevenfurtherinaL2VLAN.Â
UFWwithPython
WebrieflymentionedUFWasthefrontendforiptableonUbuntuhosts.Hereisaquickoverview:Â
$sudoapt-getinstallufw
$sudoufwstatus
$sudoufwdefaultoutgoing
$sudoufwallow22/tcp
$sudoufwallowwww
$sudoufwdefaultdenyincoming
WecanseethestatusofUFW:Â
$sudoufwstatusverbose
Status:active
Logging:on(low)
Default:deny(incoming),allow(outgoing),disabled(routed)
Newprofiles:skip
ToActionFrom
------------
22/tcpALLOWINAnywhere
80/tcpALLOWINAnywhere
22/tcp(v6)ALLOWINAnywhere(v6)
80/tcp(v6)ALLOWINAnywhere(v6)
As you can see, the advantage of UFW is a simple interface to constructotherwisecomplicatedIPÂtablerules.ThereareseveralPython-relatedtoolswecanusewithUFWtomakethingsevensimpler:
We can use the Ansible UFW module to streamline our

operations, http://docs.ansible.com/ansible/ufw_module.html. BecauseAnsibleiswritteninPython,wecangofurtherandexaminewhatisinsidethe Python module sourcecode,Âhttps://github.com/ansible/ansible/blob/devel/lib/ansible/modules/system/ufw.pyThere are Python wrapper modules around UFW as anAPI, https://gitlab.com/dhj/easyufw. This canmake integration easier ifyouneedtodynamicallymodifyUFWrulesbasedoncertainevents.ÂUFWitselfiswritteninPython,Âhttps://launchpad.net/ufw.Therefore,youcan use the existing Python knowledge if you ever need to extend thecurrentcommandsets.Â
UFWprovestobeagoodtooltosafeguardyournetworkserver.Â

Summary
Inthischapter,welookedatnetworksecuritywithPython.WeusedtheCiscoVIRLtooltosetupourlabwithbothhostsandnetworkequipmentsofNX-OSvand IOSv. We then took a tour around Scapy, which allows us to constructpacketsfromthegroundup.Scapycanbeusedintheinteractivemodeforquicktesting, once completed in interactivemode, we can put the steps a file formore scalable testing. It can be used to perform various network penetrationtestingforknownvulnerabilities.Â
WealsolookedathowwecanusebothanIPaccesslistaswellasaMAClisttoprotect our network. They are usually the first line of defense in our networkprotection. Using Ansible, we are able to deploy access liss consistently andquicklytomultipledevices.Â
syslogandotherlogfilesÂcontainusefulinformationthatweshouldregularlycomb through to detect any early signs of breach. Using Python regularexpressions,wecansystematicallysearchforknownlogentriesthatcanpointusto security events that requires our attention. Besides the tools we havediscussed,privateVLANandUFWareamongtheotherusefultoolsthatwecanuseformoresecurityprotection.Â
Inthenextchapter,wewilllookathowtousePythonfornetworkmonitoring.Monitoringallowsustoknowwhatishappeninginournetworkandthestateofthenetwork.Â

Chapter7.NetworkMonitoringwithPython-Part1
Imagine you get a call at 2 a.m. in the morning. The person on the otherendÂasks,Hi,wearefacingadifficult issuethat is impactingproduction.Wethink itmight be network-related. Can you check for us?ÂWherewould youcheck first? Of course, you would look at your monitoring tool and confirmwhetheranyofthemetricschangedinthelastfewhours.Throughoutthebook,we have been discussing various ways to programmatically make predictablechanges to our network, with the goal of keeping the network running assmoothlyaspossible.Â
However,networksarenotstatic.Farfromit,theyareprobablyoneofthemostfluent parts of the entire infrastructure. By definition, a network connectsdifferentÂpartstogether,constantlypassingtrafficbackandforth.Therearelotsof moving parts that can cause your network to stop working asexpected:ÂhardwareÂfails,softwarewithbugs,humanmistakes,despitetheirbest intentions, and so on.Weneedways tomake sure our networkworks asexpectedandthatwearehopefullynotifiedwhenthingsarenot.Â
In the next two chapters, we will look at various ways to perform networkmonitoring tasks. Many of the tools we have looked at thus far can be tiedtogetherordirectlymanagedbyPython.Likeeverythingwehavelookedatuptothispoint,networkmonitoringhastodowithtwoparts.First,weneedtoknowwith what information the equipment is capable of transmitting. Second, weneedtoidentifywhatusefulinformationwecaninterpretfromthem.
Wewilllookatafewtoolsthatallowustomonitorthenetworkeffectively:Â
SimpleNetworkManagementProtocol(SNMP)MatplotlibandpygalvisualizationMRTGandCacti
Thislistisnotexhaustive,andthereiscertainlynolackofcommercialvendorsin the space.Thebasicsofnetworkmonitoring thatwewill look at, however,carrywellforbothopensourceandcommercialtools.Â

Labsetup
The lab for thischapter is similar to theone in the lastchapterbutwith thisdifference:boththenetworkdevicesareIOSvdevices.Here'sanillustrationofthis:
ThetwoUbuntuhostswillbeusedtogeneratetrafficacrossthenetworksowecanlookatsomenon-zerocounters.Â

SNMP
SNMPisastandardizedprotocolusedtocollectandmanagedevices.AlthoughthestandardallowsyoutouseSNMPfordevicemanagement,inmyexperience,mostnetworkadministratorsprefertokeepSNMPasaninformationcollectionmechanism only. Since SNMP operates on UDP that is connectionless andconsidering the relatively weak security mechanism in versions 1 and2,Âmaking device changes via SNMP tend to make network operators a bituneasy. SNMPVersion 3 has added cryptographic security and new conceptsand terminologies to the protocol, but the way it's adapted varies amongnetworkdevicevendors.
SNMP iswidely used in networkmonitoring and has been around since 1988and was part of RFC 1065. The operations are straightforward with thenetworkmanager sendingÂGET andSET requests toward the device and thedevicewith theSNMPagent respondingwith the informationper request.ThemostwidelyadaptedstandardisSNMPv2c,whichisdefinedinRFC1901-RFC1908.Itusesasimplecommunity-basedsecurityschemeforsecurity.Ithasalsointroducednewfeatures,suchastheabilitytogetbulkinformation.Thediagrambelowdisplaythehigh-leveloperationforSNMP.Â
SNMP operations (source:https://en.wikipedia.org/wiki/Simple_Network_Management_Protocol)

The information residing in the device is structured in the ManagementInformationBase (MIB).TheMIBuses a hierarchical namespace containinganÂObject Identifier (OID), which represents the information that can bereadand fedback to the requester.Whenwe talkaboutusingSNMP toquerydeviceinformation,wearereallytalkingaboutusingthemanagementstationtoquery the specific OID that represents the information we are after. You'rerequiredtoputsomeeffortsforconsolidatingbasiccommoninformationintoacommonOIDstructure;however,theoutputoftheeffortvariesintermsofhowsuccessfulitis.Atleastinmyexperience,ItypicallyneedtoconsultwithvendordocumentationtofindtheOIDthatIneed.Â
Someofthemainpointstotakeawayfromtheoperationare:
The implementation heavily relies on the amount of information thedevice agent can provide. This, in turn, relies on how the vendor treatsSNMP:asacorefeatureoranaddedfeature.SNMPagentsgenerallyrequireCPUcyclesfromthecontrolplanetoreturnavalue.Notonlyisthisinefficientfordeviceswith,say,largeBGPtables,itisalsonotfeasibletouseSNMPtoconstantlyquerythedata.ÂTheuserneedstoknowtheOIDinordertoquerythedata.Â
SinceSNMPhasbeenaroundforawhile,myassumptionisthatyouhavesomeexperiencewithitalready.Let'sjumpdirectlyintoourfirstexample.Â
Setup
First,let'smakesuretheSNMPmanagingdeviceandagentworksinoursetup.The SNMP bundle can be installed on either the hosts in our lab or themanagingdeviceon themanagement network.As long as themanager has IPreachabilitytothedeviceandthemanageddeviceallowstheconnection,SNMPshouldworkwell.Â
Inmysetup,IhaveinstalledSNMPonboththeUbuntuhostonthemanagementnetworkaswellastheclienthostinthelabtotestsecurity:Â
$sudoapt-getinstallsnmp
Therearemanyoptionalparametersyoucanconfigureon thenetworkdevice,

such as contact, location, chassis ID, and SNMP packet size. The options aredevice-specific and you should check the documentation on your device. ForIOSvdevices,wewillconfigureanaccesslisttolimitonlythedesiredhostforqueryingthedeviceaswellas tyingtheaccesslistwiththeSNMPcommunitystring. In our case,wewill use thewordsecret as the community string andpermit_snmpastheaccesslistname:
!
ipaccess-liststandardpermit_snmp
permit172.16.1.173log
denyanylog
!
!
snmp-servercommunitysecretROpermit_snmp
!
The SNMP community string is acting as a shared password between themanagerand theagent; therefore, itneeds tobe includedanytimeyouwant toquerythedevice.
We can use tools, such as the MIB locater(http://tools.cisco.com/ITDIT/MIBS/servlet/index), for finding specificOIDs toquery.Alternatively,wecanjuststartwalkingthroughtheSNMPtree,startingfromthetopofCisco'senterprisetreeatÂ.1.3.6.1.4.1.9:Â
$snmpwalk-v2c-csecret172.16.1.189.1.3.6.1.4.1.9
iso.3.6.1.4.1.9.2.1.1.0=STRING:"
BootstrapprogramisIOSv
"
iso.3.6.1.4.1.9.2.1.2.0=STRING:"reload"
iso.3.6.1.4.1.9.2.1.3.0=STRING:"iosv-1"
iso.3.6.1.4.1.9.2.1.4.0=STRING:"virl.info"
...
WecanbeveryspecificabouttheOIDweneedtoqueryaswell:Â
$snmpwalk-v2c-csecret172.16.1.189.1.3.6.1.4.1.9.2.1.61.0
iso.3.6.1.4.1.9.2.1.61.0=STRING:"ciscoSystems,Inc.
170WestTasmanDr.
SanJose,CA95134-1706
U.S.A.
Ph+1-408-526-4000
Customerservice1-800-553-6387or+1-408-526-7208

24HREmergency1-800-553-2447or+1-408-526-7209
WorldWideWebhttp://www.cisco.com"
The last thing to check would be to make sure the access list would denyunwantedSNMPqueries.Becausewehadthelogkeywordforbothpermitanddenyentries,only172.16.1.173ispermittedforqueryingthedevice:Â
*Mar 3 20:30:32.179: %SEC-6-
IPACCESSLOGNP: list permit_snmp permitted 0 172.16.1.173 -
>0.0.0.0,1packet
*Mar 3 20:30:33.991: %SEC-6-
IPACCESSLOGNP: list permit_snmp denied 0 172.16.1.187 -
>0.0.0.0,1packet
Asyou can see, the biggest challenge in setting upSNMP is to find the rightOID.SomeoftheOIDsaredefinedinstandardizedMIB-2;othersareundertheenterprise portion of the tree. Vendor documentation is the best bet, though.Thereareanumberoftoolsthatcanhelp,suchastheMIBBrowser;youcanaddMIBs(again,providedbythevendors)tothebrowserandseetheÂdescriptionof the enterprise-basedOIDs.A tool such asCisco's SNMPObjectNavigator(http://snmp.cloudapps.cisco.com/Support/SNMP/do/BrowseOID.do?local=en)provestobeveryvaluablewhenyouneedtofindthecorrectOIDoftheobjectyouarelookingfor.Â
PySNMPÂ
PySNMP is a cross-platform, pure Python SNMP engine implementationdeveloped by Ilya Etingof (https://github.com/etingof). It abstracts a lot ofSNMP details for you, as great libraries do, and supports both Python 2 andPython3.Â
PySNMPrequiresthePyASN1package.AccordingtoWikipedia:
ASN.1 isa standardandnotation thatdescribes rulesandstructuresfor representing, encoding, transmitting, and decoding data intelecommunicationandcomputernetworking.-Âhttps://asn1js.org/
PyASN1 conveniently provides a Pythonwrapper aroundASN.1. Let's installthepackagefirst:Â

cd/tmp
gitclonehttps://github.com/etingof/pyasn1.git
cdpyasn1/
sudopython3setup.pyinstall
Next,installthePySNMPpackage:
gitclonehttps://github.com/etingof/pysnmp
cdpysnmp/
sudopython3setup.pyinstall
Note
Atthetimeofwritingthis,therearesomebugfixesthathavenotbeenpushedtothePyPIrepositoryyet.Thepackagescanalsobeinstalled via pip; sudo pip3 install pysnmp willautomaticallyinstallpyasn1.Â
Let'slookathowtousePySNMPtoquerythesameCiscocontactinformationweusedinthepreviousexample,whichisslightlymodifiedfromthePySNMPexample at http://pysnmp.sourceforge.net/faq/response-values-mib-resolution.html. We will import the necessary module and create aCommandGeneratorobjectfirst:Â
>>>frompysnmp.entity.rfc3413.onelinerimportcmdgen
>>>cmdGen=cmdgen.CommandGenerator()
>>>cisco_contact_info_oid="1.3.6.1.4.1.9.2.1.61.0"
WecanperformSNMPusing thegetCmdmethod.The result is unpacked intovarious variables; of these, we care most about varBinds that contain thequeryresult:Â
>>>errorIndication,errorStatus,errorIndex,varBinds=cmdGen.getCmd(
...cmdgen.CommunityData('secret'),
...cmdgen.UdpTransportTarget(('172.16.1.189',161)),
...cisco_contact_info_oid
...)
>>>forname,valinvarBinds:
...print('%s=%s'%(name.prettyPrint(),str(val)))
...
SNMPv2-SMI::enterprises.9.2.1.61.0=ciscoSystems,Inc.
170WestTasmanDr.
SanJose,CA95134-1706

U.S.A.
Ph+1-408-526-4000
Customerservice1-800-553-6387or+1-408-526-7208
24HREmergency1-800-553-2447or+1-408-526-7209
WorldWideWebhttp://www.cisco.com
>>>
NotethattheresponsevaluesarePyASN1objects.TheprettyPrint()methodwill convert someof thesevalues into a human-readable format, but since theresultinourcasewasnotconverted,wewillconvertitintoastringmanually.Â
Wecanput a scriptusing thepreceding interactiveexample intopysnmp_1.pywiththereferencederrorcheckingifwerunintoproblems.WecanalsoincludemultipleOIDsinthegetCmd()method:Â
system_up_time_oid="1.3.6.1.2.1.1.3.0"
cisco_contact_info_oid="1.3.6.1.4.1.9.2.1.61.0"
errorIndication,errorStatus,errorIndex,varBinds=cmdGen.getCmd(
cmdgen.CommunityData('secret'),
cmdgen.UdpTransportTarget(('172.16.1.189',161)),
system_up_time_oid,
cisco_contact_info_oid
)
Theresultwilljustbeunpackedandlistedoutinourexample:Â
$python3pysnmp_1.py
SNMPv2-MIB::sysUpTime.0=16052379
SNMPv2-SMI::enterprises.9.2.1.61.0=ciscoSystems,Inc.
170WestTasmanDr.
....
Inthenextexample,wewillpersistthevalueswereceivedfromthequeriessowe can perform other functions, such as visualization, with the data. For ourexample,wewillusetheifEntrywithintheMIB-2tree.Youcanfindanumberof resourcesmapping out the ifEntry tree; here is a screenshot of the CiscoSNMPObjectNavigatorsitethatweaccessedbefore:Â

SNMPifEntryOIDTreeÂ

Aquicktestwouldillustratethemappingoftheinterfacesonthedevice:Â
$snmpwalk-v2c-csecret172.16.1.189.1.3.6.1.2.1.2.2.1.2
iso.3.6.1.2.1.2.2.1.2.1=STRING:"GigabitEthernet0/0"
iso.3.6.1.2.1.2.2.1.2.2=STRING:"GigabitEthernet0/1"
iso.3.6.1.2.1.2.2.1.2.3=STRING:"GigabitEthernet0/2"
iso.3.6.1.2.1.2.2.1.2.4=STRING:"Null0"
iso.3.6.1.2.1.2.2.1.2.5=STRING:"Loopback0"
From the documentation, we can map the values of ifInOctets(10),ifInUcastPkts(11), ifOutOctets(16), and ifOutUcastPkts(17). A quickcheck on the value of GigabitEthernet0/0 to the OID1.3.6.1.2.1.2.2.1.17.1Â can be compared to the command line and theSNMP.ÂThe values should be close but not exact since theremight be sometrafficonthewire:
#CommandLineOutput
iosv-1#shintgig0/0|ipackets
5minuteinputrate0bits/sec,0packets/sec
5minuteoutputrate0bits/sec,0packets/sec
38532packetsinput,3635282bytes,0nobuffer
53965packetsoutput,4723884bytes,0underruns
#SNMPOutput
$snmpwalk-v2c-csecret172.16.1.189.1.3.6.1.2.1.2.2.1.17.1
iso.3.6.1.2.1.2.2.1.17.1=Counter32:54070
Atthetimeofproduction,wewillwritethequeryresultsinadatabase.
To simplify our example, we will write the query values to a flat file.InÂpysnmp_3.py,wehavedefinedvariousOIDsthatweneedtoquery:Â
#HostnameOID
system_name='1.3.6.1.2.1.1.5.0'
#InterfaceOID
gig0_0_in_oct='1.3.6.1.2.1.2.2.1.10.1'
gig0_0_in_uPackets='1.3.6.1.2.1.2.2.1.11.1'
gig0_0_out_oct='1.3.6.1.2.1.2.2.1.16.1'
gig0_0_out_uPackets='1.3.6.1.2.1.2.2.1.17.1'
The values were consumed in the snmp_query() function with the host,community,andOIDasinput:Â

defsnmp_query(host,community,oid):
errorIndication,errorStatus,errorIndex,varBinds=cmdGen.getCmd(
cmdgen.CommunityData(community),
cmdgen.UdpTransportTarget((host,161)),
oid
)
All the values are put in a dictionary with various keys and written to a filecalledresults.txt:
result={}
result['Time']=datetime.datetime.utcnow().isoformat()
result['hostname']=snmp_query(host,community,system_name)
result['Gig0-
0_In_Octet']=snmp_query(host,community,gig0_0_in_oct)
result['Gig0-
0_In_uPackets']=snmp_query(host,community,gig0_0_in_uPackets)
result['Gig0-
0_Out_Octet']=snmp_query(host,community,gig0_0_out_oct)
result['Gig0-
0_Out_uPackets']=snmp_query(host,community,gig0_0_out_uPackets)
withopen('/home/echou/Master_Python_Networking/Chapter7/results.txt','a')asf:
f.write(str(result))
f.write('\n')
The outcome will be a file with results showing the number representing thepointoftimeofthequery:
#Sampleoutput
$catresults.txt
{'hostname': 'iosv-1.virl.info', 'Gig0-
0_In_uPackets': '42005', 'Time': '2017-03-
06T02:11:54.989034', 'Gig0-0_Out_uPackets': '59733', 'Gig0-
0_In_Octet':'3969762','Gig0-0_Out_Octet':'5199970'}
Wecanmakethisscriptexecutableandscheduleacronjobforexecutionevery5minutes:Â
$chmod+xpysnmp_3.py
#Crontabconfiguration
*/5****/home/echou/Master_Python_Networking/Chapter7/pysnmp_3.py
Asmentioned,inaproductionenvironment,wewouldputtheinformationina

database.InaNoSQLdatabase,wemightusetimeastheprimaryindex(orkey)becauseitisalwaysunique,followedbyvariouskey-valuepairs.Â
WewillwaitforthescripttobeexecutedafewtimesandmoveontoseehowwecanusePythontovisualizethedata.Â

Pythonvisualization
Wegathernetworkdataforthepurposeofgaininginsightintoournetwork.Oneofthebestwaystoknowwhatthedatameansistovisualizethemwithgraphs.This is true for almost all data, but especially true for time series data in thecontextofnetworkmonitoring.Howmuchdatawastransmittedonthewire inthe last week?What is the percentage of the TCP protocol among all of thetraffic?Thesearevalueswecanglean fromusingdata-gatheringmechanisms,suchasSNMP,andvisualizewithsomeofthepopularPythonlibraries.Â
Inthissection,wewillusethedatawecollectedfromthelastsectiononSNMPandusetwopopularPythonlibraries--MatplotlibandPygal--tographthem.Â
Matplotlib
Matplotlib(http://matplotlib.org/)isaplottinglibraryforthePythonlibraryanditsNumPymathematical extension. It can produce publication-quality figures,suchasplots,histograms,andbargraphswithafewlinesofcode.Â
Note
NumPyisanextensionofthePythonprogramminglanguage.Itisopen source and widely used in various data science projects.You can learn more about itatÂhttps://en.wikipedia.org/wiki/NumPy.Â
Installation
The installation can be done using the Linux package management system,dependingonyourdistribution:Â
$sudoapt-getinstallpython-matplotlib
$sudoapt-getinstallpython3-matplotlib
Matplotlib-thefirstexample
For the following examples, the figures are displayed as standard output by

default;itiseasierifyoutrythemoutwhileonstandardoutput.Ifyouhavebeenfollowingalongthebookviaavirtualmachine,itisrecommendedthatyouusethe VMWindow instead of SSH. If you do not have access to the standardoutput,youcansavethefigureandviewitafteryoudownloadit(asyouwillseesoon). Note that you will need to set the $DISPLAY variable in some of thefollowinggraphs.Â
Alineplotgraphsimplygivestwolistsofnumbersthatcorrespondtothexaxisandyaxisvalues:Â
>>>importmatplotlib.pyplotasplt
>>>plt.plot([0,1,2,3,4],[0,10,20,30,40])
[<matplotlib.lines.Line2Dobjectat0x7f932510df98>]
>>>plt.ylabel('SomethingonY')
<matplotlib.text.Textobjectat0x7f93251546a0>
>>>plt.xlabel('SomethingonX')
<matplotlib.text.Textobjectat0x7f9325fdb9e8>
>>>plt.show()
Thegraphwillshowasalinegraph:Â

MatplotlibLineGraph
Alternatively, if you do not have access to standard output or have saved thefigurefirst,youcanusethesavefig()method:Â
>>>plt.savefig('figure1.png')
or
>>>plt.savefig('figure1.pdf')
Withthisbasicknowledgeofgraphingplots,wecannowgraphtheresultswereceivedfromSNMPqueries.
MatplotlibforSNMPresults
In our first example, namely matplotlib_1.py, we will import the dates

module besides pyplot. We will use the matplotlib.dates module instead ofPythonstandardlibrarydatesmodulebecausethewayweusethemoduleishowMatplotlibwillconvertthedatevalueinternallyintothefloatthatisrequired.Â
importmatplotlib.pyplotasplt
importmatplotlib.datesasdates
Note
Matplotlibprovidessophisticateddateplottingcapabilities;you'llfind more information on thisatÂhttp://matplotlib.org/api/dates_api.html.Â
Wewillcreate twoempty lists,each representing thex axisandy axisvalues.Notethatonline12,weusedthebuilt-inÂeval()Pythontoreadtheinputasadictionaryinsteadofadefaultstring:Â
x_time=[]
y_value=[]
withopen('results.txt','r')asf:
forlineinf.readlines():
line=eval(line)
x_time.append(dates.datestr2num(line['Time']))
y_value.append(line['Gig0-0_Out_uPackets'])
Inordertoreadthexaxisvaluebackinahuman-readabledateformat,wewillneed touse theÂplot_date() function insteadofplot().Wewillalso tweakthesizeofthefigureabitaswellasrotatingthevalueontheÂxaxissowecanreadthevalueinfull:Â
plt.subplots_adjust(bottom=0.3)
plt.xticks(rotation=80)
plt.plot_date(x_time,y_value)
plt.title('Router1G0/0')
plt.xlabel('TimeinUTC')
plt.ylabel('OutputUnicastPackets')
plt.savefig('matplotlib_1_result.png')
plt.show()
ThefinalresultwoulddisplaytheRouter1Gig0/0UnicastOutputPacket,as

follows:Â
Router1MatplotlibGraphÂ
Note that if you prefer a straight line instead of dots, you can use the thirdoptionalparameterintheplot_date()function:Â
plt.plot_date(x_time,y_value,"-")
We can repeat the steps for the rest of the values for output octets, inputunicastpackets,andinputas individualgraphs.However, inournextexample,that isÂmatplotlib_2.py,wewillshowhowtographmultiplevaluesagainstthesametimerange,aswellasadditionalMatplotliboptions.Â
In this case, we will create additional lists and populate the values

accordingly:Â
x_time=[]
out_octets=[]
out_packets=[]
in_octets=[]
in_packets=[]
withopen('results.txt','r')asf:
forlineinf.readlines():
...
out_packets.append(line['Gig0-0_Out_uPackets'])
out_octets.append(line['Gig0-0_Out_Octet'])
in_packets.append(line['Gig0-0_In_uPackets'])
in_octets.append(line['Gig0-0_In_Octet'])
Since we have identical x axis values, we can just add the different y axisvaluestothesamegraph:Â
#Useplot_datetodisplayx-axisbackindateformat
plt.plot_date(x_time,out_packets,'-',label='OutPackets')
plt.plot_date(x_time,out_octets,'-',label='OutOctets')
plt.plot_date(x_time,in_packets,'-',label='InPackets')
plt.plot_date(x_time,in_octets,'-',label='InOctets')
Also,addgridandlegendtothegraph:Â
plt.legend(loc='upperleft')
plt.grid(True)
Thefinalresultwillcombineallthevaluesinasinglegraph.Notethatsomeofthevaluesintheupper-leftcornerisblockedbythelegend.Youcanresizethefigureand/orusethepan/zoomoptiontomovearoundthegraphinordertoseethevalue.Â

Router1-MatplotlibMultilineGraph
TherearemanymoregraphingoptionsavailableinMatplotlib;wearecertainlynotlimitedtoplotgraphs.Forexample,wecanusethefollowingmockdatatographthepercentageofdifferenttraffictypesthatweseeonthewire:Â
#!/usr/bin/envpython3
#Examplefromhttp://matplotlib.org/2.0.0/examples/pie_and_polar_charts/pie_demo_features.html
importmatplotlib.pyplotasplt
#Piechart,wherethesliceswillbeorderedandplottedcounter-
clockwise:
labels='TCP','UDP','ICMP','Others'
sizes=[15,30,45,10]
explode=(0,0.1,0,0)#MakeUDPstandout
fig1,ax1=plt.subplots()
ax1.pie(sizes,explode=explode,labels=labels,autopct='%1.1f%%',

shadow=True,startangle=90)
ax1.axis('equal')#Equalaspectratioensuresthatpieisdrawnasacircle.
plt.show()
Theprecedingcodeleadstothispiediagramfromplt.show():Â
MatplotlibPieGraphÂ
AdditionalMatplotlibresources
MatplotlibisoneofthebestPythonplottinglibrariesthatproducespublication-qualityfigures.LikePython,itsaimistomakecomplextaskssimple.Withover4,800starsonGitHub,itisalsooneofthemostpopularopensourceprojects.Itdirectlytranslatesintobugfixes,usercommunity,andgeneralusability.Ittakes

abitoftimetolearnthepackage,butitiswellworththeeffort.
Note
In this section, we barely scratched the surface of Matplotlib.You'll find additional resources athttp://matplotlib.org/2.0.0/index.html (the Matplotlib projectpage) and https://github.com/matplotlib/matplotlib (MatplotlibGitHubRepository).
Inthenextsection,wewilltakealookatanotherpopularPythongraphlibrary:Pygal.
Pygal
Pygal (http://www.pygal.org/) is a dynamic SVG charting library written inPython. The biggest advantage of Pygal, in my opinion, is it producestheÂScalableVectorGraphicsÂ(SVG)formateasilyandnatively.Therearemany advantages of SVG over other graph formats, but two of the mainadvantagesarethatitiswebbrowserfriendlyanditprovidesscalabilitywithoutsacrificingimagequality.Inotherwords,youcandisplaytheresultingimageinanymodernwebbrowserandzoominandoutof theimagewithoutlosingthedetailsofthegraph.Â
InstallationÂ
Theinstallationisdoneviapip:Â
$sudopipinstallpygal
$sudopip3installpygal
Pygal-thefirstexample
Let's look at the line chart example demonstrated on Pygal's documentation,availableatÂhttp://pygal.org/en/stable/documentation/types/line.html:Â
>>>importpygal
>>>line_chart=pygal.Line()
>>>line_chart.title='Browserusageevolution(in%)'
>>>line_chart.x_labels=map(str,range(2002,2013))

>>>line_chart.add('Firefox',[None,None,0,16.6,25,31,36.4,45.5,46.3,42.8,37.1])
<pygal.graph.line.Lineobjectat0x7fa0bb009c50>
>>>line_chart.add('Chrome',[None,None,None,None,None,None,0,3.9,10.8,23.8,35.3])
<pygal.graph.line.Lineobjectat0x7fa0bb009c50>
>>>line_chart.add('IE',[85.8,84.6,84.7,74.5,66,58.6,54.7,44.8,36.2,26.6,20.1])
<pygal.graph.line.Lineobjectat0x7fa0bb009c50>
>>>line_chart.add('Others',[14.2,15.4,15.3,8.9,9,10.4,8.9,5.8,6.7,6.8,7.5])
<pygal.graph.line.Lineobjectat0x7fa0bb009c50>
>>>line_chart.render_to_file('pygal_example_1.svg')
Note
In the example, we created a line object with the x_labelsautomaticallyrenderedasstringsfor11units.Eachoftheobjectscanbeaddedwiththelabelandthevalueinalistformat,suchasFirefox,Chrome,andIE.Â
Here'stheresultinggraphasviewedinFirefox:Â

PygalSampleGraph
WecanusethesamemethodtographtheSNMPresultswehaveinhand.Wewilldothisinthenextsection.Â
PygalforSNMPresults
For the Pygal line graph, we can largely follow the same pattern as ourMatplotlibexample,wherewecreate listsofvaluesbyreadingthefile.Wenolonger need to convert the x axis value into an internal float, as we did forMatplotlib;however,wedoneed toconvert thenumbers ineachof thevalueswewouldhavereceivedinthefloat:Â
withopen('results.txt','r')asf:
forlineinf.readlines():
line=eval(line)
x_time.append(line['Time'])
out_packets.append(float(line['Gig0-0_Out_uPackets']))
out_octets.append(float(line['Gig0-0_Out_Octet']))
in_packets.append(float(line['Gig0-0_In_uPackets']))
in_octets.append(float(line['Gig0-0_In_Octet']))
WecanusethesamemechanismthatwesawÂtoconstructthelinegraph:Â
line_chart=pygal.Line()
line_chart.title="Router1Gig0/0"
line_chart.x_labels=x_time
line_chart.add('out_octets',out_octets)
line_chart.add('out_packets',out_packets)
line_chart.add('in_octets',in_octets)
line_chart.add('in_packets',in_packets)
line_chart.render_to_file('pygal_example_2.svg')
Theoutcomeissimilartowhatwehavealreadyseen,butthisresultisinSVGformat that is easier for displaying on a web page. It can be viewed from abrowserasfollows:Â

Router1PygalMultilineGraphÂ
JustlikeMatplotlib,Pygalprovidesmanymoreoptionsforgraphs.Forexample,to regraph the pie chartwe sawbefore inPygal,we canuse thepygal.Pie()object:Â
#!/usr/bin/envpython3
importpygal
line_chart=pygal.Pie()
line_chart.title="ProtocolBreakdown"
line_chart.add('TCP',15)
line_chart.add('UDP',30)
line_chart.add('ICMP',45)
line_chart.add('Others',10)
line_chart.render_to_file('pygal_example_3.svg')

TheresultingSVGfilewouldbesimilartothePNGgeneratedbyMatplotlib:Â
PygalPieGraphÂ
AdditionalPygalresources
Pygal providesmanymore customizable features andgraphing capabilities forthedatayoucollectfrommorebasicnetworkmonitoringtoolssuchasSNMP.Wedemonstrateda simple linegraphandpiegraphshere.Youcan findmoreinformationabouttheprojecthere:Â
Pygaldocumentation:http://www.pygal.org/en/stable/index.htmlPygalGitHubprojectpage:https://github.com/Kozea/pygal
In the next section, we will continue with the SNMP theme of networkmonitoringbutwithafullyfeaturednetworkmonitoringsystemcalledCacti.Â

PythonforCacti
Inmyearlydays,whenIwasworkingasanetworkengineer,weusedtheopensource cross-platform Multi Router Traffic Grapher (MRTG,https://en.wikipedia.org/wiki/Multi_Router_Traffic_Grapher) tool to check thetraffic load on network links. It was one of the first open source high-levelnetworkmonitoring system that abstracted thedetailsofSNMP,database, andHTML for network engineers. Then came Round-Robin Database Tool(RRDtool,https://en.wikipedia.org/wiki/RRDtool).Initsfirstreleasein1999,itwasreferredtoas"MRTGdoneright".IthadgreatlyimprovedthedatabaseandpollerÂperformanceinthebackend.Â
Released in 2001, Cacti (https://en.wikipedia.org/wiki/Cacti_(software)) is anopen sourceweb-based networkmonitoring and graphing tool designed as animproved frontend for RRDtool. Because of the heritage of MRTG andRRDtool,youwillnoticeaÂfamiliargraphlayout,templates,andSNMPpoller.As a packaged tool, the installation and usage will need to stay within theboundaryofthetoolitself.However,CactioffersthecustomdataqueryfeaturethatwecanusePythonfor.Inthissection,wewillseehowwecanusePythonasaninputmethodforCacti.Â
Installation
Installation on Ubuntu is straightforward; install Cacti on the UbuntumanagementVM:Â
$sudoapt-getinstallcacti
It will trigger a series of installation and setup steps, including the MySQLdatabase,webserver (Apacheor lighthttpd), andvariousÂconfiguration tasks.Once installed, navigate tohttp://<ip>/cacti to get started. The last step istoÂloginwith thedefaultusernameandpassword(admin/admin);youwillbepromptedtochangethepassword.Â
Onceyouareloggedin,youcanfollowthedocumentationtoaddadeviceandassociate itwitha template.There isaCiscorouterpremadetemplate thatyoucangowith.Cactihasgooddocumentationonhttp://docs.cacti.net/Âforadding

a device and creating your first graph, so we will quickly look at somescreenshotsthatyoucanexpect:Â
AsignindicatingyourSNMPisworkingwouldbethatyoutoseeÂabletoseethedeviceuptime:Â
Youcanaddgraphstothedeviceforinterfacetrafficandotherstatistics:Â

Aftersometime,youwillstartseeingtrafficasshownhere:Â
WearenowreadytolookathowtousePythonscriptstoextendÂCacti'sdata-gatheringfunctionality.Â
Pythonscriptasaninputsource
TherearetwodocumentsthatweshouldreadbeforeweuseourPythonscriptasaninputsource:Â
Data input methods:http://www.cacti.net/downloads/docs/html/data_input_methods.htmlMaking your scripts work with Cacti:http://www.cacti.net/downloads/docs/html/making_scripts_work_with_cacti.html
OnemightwonderwhataretheusecasesforusingPythonscriptasanextensionfor data inputs? One of the use cases would be to provide monitoring toresources that do not have a correspondingOID.Say,wewould like to knowhow many times the access list permit_snmp has allowed thehostÂ172.16.1.173forconductinganSNMPquery.WeknowwecanseethenumberofmatchesviatheCLI:Â
iosv-1#shipaccess-listspermit_snmp|i172.16.1.173
10permit172.16.1.173log(6362matches)
However,chancesare that therearenoOIDsassociatedwith thisvalue(orwecanpretend that there isnone).This iswherewecanuseanexternal script to

produceanoutputthatcanbeconsumedbytheCactihost.Â
WecanreusethePexpectscriptwediscussedinChapter2,Low-LevelNetworkDevice Interactions, chapter1_1.py. We will rename it to cacti_1.py.Everythingshouldbefamiliartotheoriginalscript,exceptthatwewillexecutetheCLIcommandandsavetheoutput:Â
fordeviceindevices.keys():
...
child.sendline('sh ip access-
listspermit_snmp|i172.16.1.173')
child.expect(device_prompt)
output=child.before
...
Theoutputinitsrawformwillappearasbelow:
b'sh ip access-
listspermit_snmp|i172.16.1.173\r\n10permit172.16.1.173log(6428matches)\r\n'
Wewill use the split() function for the string to only leave the number ofmatchesandprintthemoutonstandardoutputinthescript:Â
print(str(output).split('(')[1].split()[0])
Totest,wecanseethenumberofincrementsbyexecutingthescriptanumberoftimes:Â
$./cacti_1.py
6428
$./cacti_1.py
6560
$./cacti_1.py
6758
We can make the script executable and put it into the default Cacti scriptlocation:Â
$chmoda+xcacti_1.py
$sudocpcacti_1.py/usr/share/cacti/site/scripts/
Cacti documentation, availableat http://www.cacti.net/downloads/docs/html/how_to.html, provides detailedsteps on how to add the script result to the output graph. The steps include
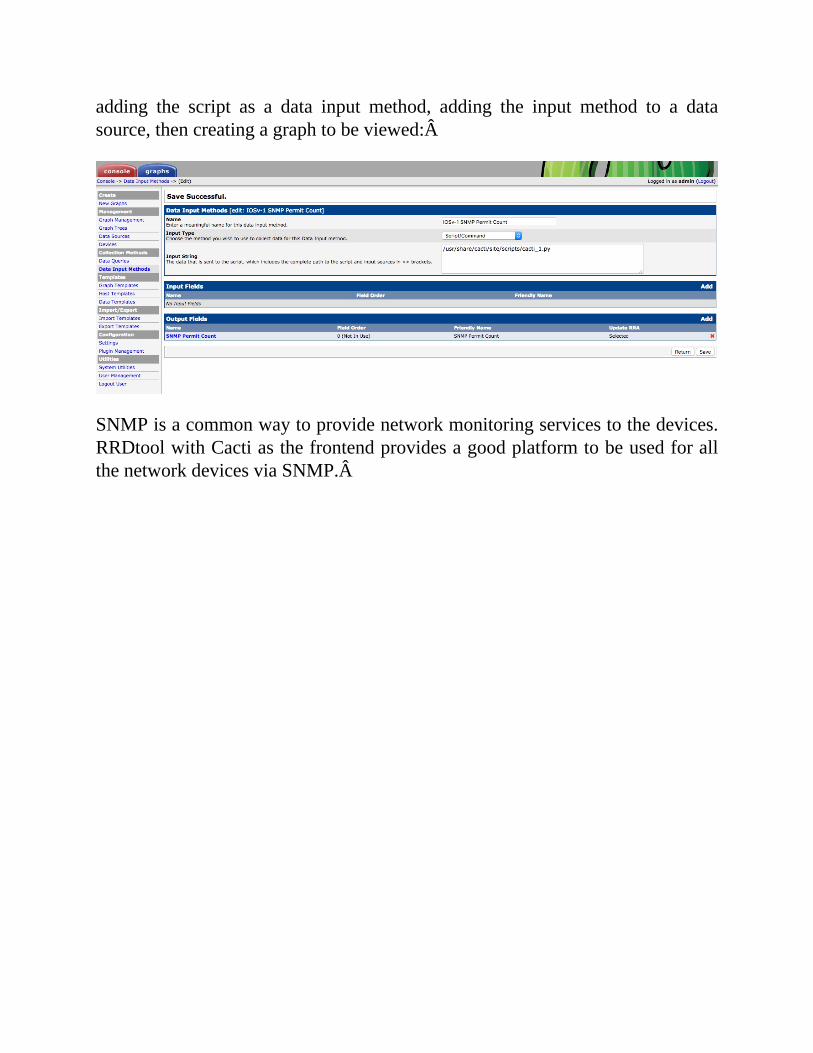
adding the script as a data input method, adding the input method to a datasource,thencreatingagraphtobeviewed:Â
SNMPisacommonwaytoprovidenetworkmonitoringservicestothedevices.RRDtoolwithCactiasthefrontendprovidesagoodplatformtobeusedforallthenetworkdevicesviaSNMP.Â

Summary
Inthischapter,weexploredhowtoperformnetworkmonitoringviaSNMP.Weconfigured SNMP-related commands on the network devices and used ournetworkmanagementVMwithSNMPpollertoquerythedevices.WeusedthePySNMPmoduletosimplifyandautomateourSNMPqueries.Youalsolearnedhowtosavethequeryresultsinaflatfiletobeusedforfutureexamples.Â
Later in the chapter, we used two different Python visualization packages,namely Matplotlib and Pygal, to graph SNMP results. Each package has itsdistinctadvantages.MatplotlibisÂmature,feature-rich,andwidelyusedindatascienceprojects.PygalgeneratesSVGformatgraphs thatare flexibleandwebfriendly.Â
Toward the end of the chapter, we looked at Cacti, an SNMP-based networkmonitoringsystem,andhowtousePythontoextendtheplatform'smonitoringcapabilities.Â
Inthenextchapter,wewillcontinuetodiscussthetoolswecanusetomonitorournetworksandgaininsightintowhetherthenetworkisbehavingasexpected.Wewill lookat flow-basedmonitoringusingNetFlow, sFlow,and IPFIX.WewillalsousetoolssuchasGraphviztovisualizeournetworktopologyanddetectany topological changes. Finally, we will use tools as well as Elasticsearch,Logstash, and Kibana, commonly referred to as the ELK stack, to monitornetworklogdataaswellasothernetwork-relatedinput.Â

Chapter8.NetworkMonitoringwithPython-Part2
In the previous chapter, we used SNMP to query information from networkdevices.WedidthisusinganSNMPmanagertoquerytheSNMPagentresidingon the networkdevicewith specific tree-structuredOIDas theway to specifywhichvalueweintendtoreceive.Mostofthetime,thevaluewecareaboutisanumber,suchasCPUload,memoryusage,andinterface traffic. It'ssomethingwecangraphagainsttimetogiveusasenseofhowthevaluehaschangedovertime.Â
We can typically classify theSNMPapproach as apullmethod, as ifwe areconstantlyaskingthedeviceforaparticularanswer.ThisparticularmethodaddsburdentothedevicebecausenowitneedstospendaCPUcycleonthecontrolplane to find answers from the subsystem and then accordingly answer themanagement station. Over time, if we have multiple SNMP pollers queryingthe same device every 30 seconds (you would be surprised how often thishappens), the management overhead would become substantial. In a human-based example analogous to SNMP, imagine that you have multiple peopleinterruptingyouevery30 seconds toÂaskyouaquestion. I know Iwouldbeannoyedeven if it is a simplequestion (orworse if all of themareasking thesamequestion).Â
Anotherwaywecanprovidenetworkmonitoring is to reverse the relationshipbetween the management station from a pull to a push. In other words, theinformationcanbepushedfromthedevicetowardthemanagementstationinanalready agreed upon format. This concept is what flow-based monitoring isbased on. In a flow-based model, the network device streams the trafficinformation, called flow, to the management station. The format can be theCiscoproprietaryNetFlow(version5orversion9),industrystandardIPFIX,ortheopensourcesFlowformat.Inthischapter,wewillspendsometimelookingintoNetFlow,IPFIX,andsFlowwithPython.Â
Not allmonitoring comes in the formof time-series data. Information such asnetworktopologyandsyslogcanberepresentedinatime-seriesformatbutmostlikely, this is not ideal. Network topology information checks whether thetopology of the network has changed over time. We can use tools, such asGraphviz,withaPythonwrapper to illustrate the topology.Asalreadyseen in

Chapter 6, Network Security with Python, syslog contains securityinformation. In this chapter, we will look at how to use the ELK stack(Elasticsearch,Logstash,Kibana)tocollectnetworkloginformation.
Specifically,wewillcoverthefollowingtopics:
Graphviz, which is an open source graph visualization software that canhelpusquicklyandefficientlygraphournetworkÂFlow-basedmonitoring,suchasNetFlow,IPFIX,andsFlowÂUsingÂntoptovisualizetheflowinformationÂElasticsearchforanalyzingourcollecteddataÂ
Let's start by looking at how to use Graphviz as a tool to monitor networktopologychanges.Â

Graphviz
Graphviz is anopen sourcegraphvisualization software. Imagineyouhave todescribeyournetworktopologytoacolleaguewithout thebenefitofapicture.You might say, "Our network consists of three layers: core, distribution, andaccess. The core layer comprises two routers for redundancy, and both theroutersarefullymeshedtowardthefourdistributionrouters;theyarealsofullymeshed toward the access routers. The internal routing protocol isOSPF, andexternally,weuseBGP forÂourprovider."While thisdescription lacks somedetails,itisprobablyenoughforyourcolleaguetopaintaprettygoodhigh-levelpictureofyournetwork.Â
Graphviz works similarly to the process of describing the graph in text term,then asking theGraphviz program to construct the graph for us.ÂHere, thegraph is described in a text format called DOT(https://en.wikipedia.org/wiki/DOT_(graph_description_language)) andGraphviz renders the graph based on the description. Of course, because thecomputer lacks human imagination, the language has to be precise anddetailed.Â
Note
ForGraphviz-specificDOT grammar definitions, take a look athttp://www.graphviz.org/doc/info/lang.html.Â
In this section,wewill use theLinkLayerDiscoveryProtocol (LLDP) toquery thedeviceneighborsandcreateanetwork topologygraphviaGraphviz.Upon completing this extensive example, we will see how we can takesomethingnew,suchasGraphviz,andcombineitwith thingswehavealreadylearnedtosolveinterestingproblems.Â
Let'sstartbyconstructingthelabwewillbeusing.Â
Labsetup
Inourlab,wewilluseVIRL,asinthepreviouschapters,becauseourgoalisto

illustrateanetworktopology.WewillusefiveIOSvnetworknodesalongwithtwoserverhosts:Â
IfyouarewonderingaboutmyÂchoiceofIOSvasopposedtoNX-OSorIOS-XRandthenumberofdevices,hereareafewpointsforyoutoconsiderwhenyoubuildyourownlab:Â
Nodes virtualized by NX-OS and IOS-XR are much more memoryintensivethanIOSTheVIRLvirtualmanagerÂIamusinghas8GBofRAM,whichseemsenough to sustain nine nodes but could be a bit more unstable (nodeschangingfromreachabletounreachableatrandom)IfyouwishtouseNX-OS,considerusingNX-APIorotherAPIcallsthatwouldreturnstructureddata
Forourexample,IamgoingtouseLLDPastheprotocolforlinklayerneighbordiscovery because it is vendor-neutral. Note that VIRL provides an option to

automatically enable CDP, which can save you some time and is similar toLLDPinfunctionality;however,itisalsoCiscoproprietary:Â
Once the lab is up and running, proceed to installing the necessary softwarepackages.Â
Installation
Graphvizcanbeobtainedviaapt:Â
$sudoapt-getinstallgraphviz
After theinstallationiscomplete,note that thewayforverificationisbyusingthedotcommand:Â
$dot-V
dot-graphvizversion2.38.0(20140413.2041)
WewillusethePythonwrapperforGraphviz,solet'sinstallitnowwhileweareatit:Â
$sudopipinstallgraphviz
$sudopip3installgraphviz
Let'stakealookathowtousethesoftware.Â
Graphvizexamples
Like most popular open source projects, the documentation of Graphviz(http://www.graphviz.org/Documentation.php) is extensive. The challenge isoften where to start. For our purpose, we will focus on dot, which drawsdirectedgraphsashierarchies(nottobeconfusedwiththeDOTlanguage).

Let'sstartwiththebasicsteps:Â
1. Nodes represent our network entities, such as routers, switches, andservers.
2. Theedgerepresentsthelinkbetweenthenetworkentities.3. The graph, nodes, and edges each have attributes
(http://www.graphviz.org/content/attrs)thatcanbetweaked.4. After describing the network, output the network graph
(http://www.graphviz.org/content/output-formats)ineitherthePNG,JPEG,orPDFformat.
Our first example is an undirected dot graph consisting of four nodes (core,distribution, access1, and access2). The edges join the core node to thedistributionnodeaswellasdistributiontoboththeaccessnodes:Â
$catchapter8_gv_1.gv
graphmy_network{
core--distribution;
distribution--access1;
distribution--access2;
}
The graph can be output in the dot -T<format> source -o <output file>commandline:Â
$dot-Tpngchapter8_gv_1.gv-ooutput/chapter8_gv_1.png
Theresultinggraphcanbeviewedfromthefollowingoutputfolder:Â

NotethatwecanuseadirectionalgraphbyspecifyingitasadigraphinsteadofaÂgraphaswellasusingthearrow(->)signtorepresenttheedges.Thereareseveralattributeswecanmodifyinthecaseofnodesandedges,suchasthenodeshape,edgelabels,andsoon.Thesamegraphcanbemodifiedasfollows:Â
$catchapter8_gv_2.gv
digraphmy_network{
node[shape=box];
size="5030";
core->distribution[label="2x10G"];
distribution->access1[label="1G"];
distribution->access2[label="1G"];
}
WewilloutputthefileinPDFthistime:Â
$dot-Tpdfchapter8_gv_2.gv-ooutput/chapter8_gv_2.pdf
Takealookatthedirectionalarrowsinthenewgraph:Â

Nowlet'stakealookatthePythonwrapperaroundGraphviz.Â
PythonwithGraphvizexamples
WecanreproducethesametopologygraphasbeforeusingthePythonGraphvizpackagethatwehaveinstalled:Â

$python3
Python3.5.2(default,Nov172016,17:05:23)
>>>fromgraphvizimportDigraph
>>>my_graph=Digraph(comment="MyNetwork")
>>>my_graph.node("core")
>>>my_graph.node("distribution")
>>>my_graph.node("access1")
>>>my_graph.node("access2")
>>>my_graph.edge("core","distribution")
>>>my_graph.edge("distribution","access1")
>>>my_graph.edge("distribution","access2")
The code basically produces what you would normally write in theDOTÂlanguage.Youcanviewthesource:Â
>>>print(my_graph.source)
//MyNetwork
digraph{
core
distribution
access1
access2
core->distribution
distribution->access1
distribution->access2
}
Thegraphcanberenderedbythe.gvfile;bydefault,theformatisPDF:Â
>>>my_graph.render("output/chapter8_gv_3.gv")
'output/chapter8_gv_3.gv.pdf'
ThePythonpackagewrappercloselymimicsalltheAPIÂoptionsforGraphviz.You can find documentation on this on their website(http://graphviz.readthedocs.io/en/latest/index.html) You can also refer to thesource code on GitHub for moreinformationÂ(https://github.com/xflr6/graphviz).Wecannowusethetoolswehavetomapoutournetwork.Â
LLDPneighborgraphing
In this section, we will use the example of mapping out LLDP neighbors toillustrateaproblem-solvingpatternthathashelpedmeovertheyears:Â

1. Modularize each task into smaller pieces, if possible. Inour example,wecancombineafewsteps,butifwebreakthemintosmallerpieces,wewillbeabletoreuseandimprovethemeasily.Â
2. Useanautomation tool to interactwith thenetworkdevices,butkeep themore complex logic aside at the management station. For example, therouter has provided anLLDPneighbor output that is a bitmessy. In thiscase,wewill stickwith theworking command and the output and use aPythonscriptatthemanagementstationtoparseandreceivetheoutputweneed.Â
3. When presentedwith choices for the same task, pick the one that can bereused. In our example, we can use low-level Pexpect, Paramiko, orAnsibleplaybookstoquerytherouters.Inmyopinion, itwillbeeasier toreuseAnsibleinfuture,sothatiswhatIhavepicked.Â
Togetstarted,sinceLLDPisnotenabledontheroutersbydefault,wewillneedtoconfigurethemonthedevicesfirst.Bynow,weknowwehaveanumberofoptions to choose from; in this case, I chose the Ansible playbook withtheÂios_configmoduleforthetask.Thehostsfileconsistsoffiverouters:Â
$cathosts
[devices]
r1ansible_hostname=172.16.1.218
r2ansible_hostname=172.16.1.219
r3ansible_hostname=172.16.1.220
r5-toransible_hostname=172.16.1.221
r6-edgeansible_hostname=172.16.1.222
The cisco_config_lldp.yml playbook consists of one play with variablesembeddedintheplaybooktoconfiguretheLLDP:Â
<skip>
vars:
cli:
host:"{{ansible_hostname}}"
username:cisco
password:cisco

transport:clitasks:
-name:enableLLDPrun
ios_config:
lines:lldprun
provider:"{{cli}}"
<skip>
After a few seconds, to allow LLDP exchange, we can verify that LLDP isindeedactiveontherouters:Â
r1#showlldpneighbors
Capabilitycodes:(R)Router,(B)Bridge,(T)Telephone,(C)DOCSISCableDevice(W)WLANAccessPoint,(P)Repeater,(S)Station,(O)Other
DeviceIDLocalIntfHold-timeCapabilityPortID
r2.virl.infoGi0/0120RGi0/0
r3.virl.infoGi0/0120RGi0/0
r5-tor.virl.infoGi0/0120RGi0/0
r5-tor.virl.infoGi0/1120RGi0/1
r6-edge.virl.infoGi0/2120RGi0/1
r6-edge.virl.infoGi0/0120RGi0/0
Totalentriesdisplayed:6
In the output, you will see that G0/0 is configured as the MGMT interface;therefore,youwillseeLLDPpeersasiftheyareonaflatmanagementnetwork.Whatwe really care about is theG0/1 andG0/2 interfaces connected to otherpeers.Thisknowledgewillcomeinhandyaswepreparetoparsetheoutputandconstructourtopologygraph.Â
Informationretrieval
We can now use another Ansible playbook,namely cisco_discover_lldp.yml, to execute the LLDP command on thedeviceandcopytheoutputofeachdevicetoatmpdirectory:Â
<skip>
tasks:
-name:QueryforLLDPNeighbors
ios_command:
commands:showlldpneighbors
provider:"{{cli}}"
<skip>

The ./tmp directory now consists of all the routers' output(showingÂLLDPÂneighbors)initsownfile:Â
$ls-ltmp/
total20
-rw-rw-r--1echouechou630Mar1317:12r1_lldp_output.txt
-rw-rw-r--1echouechou630Mar1317:12r2_lldp_output.txt
-rw-rw-r--1echouechou701Mar1212:28r3_lldp_output.txt
-rw-rw-r--1echouechou772Mar1212:28r5-tor_lldp_output.txt
-rw-rw-r--1echouechou630Mar1317:12r6-edge_lldp_output.txt
The r1_lldp_output.txt content is the output.stdout_lines variable fromourAnsibleplaybook:Â
$cattmp/r1_lldp_output.txt
[["Capabilitycodes:","(R)Router,(B)Bridge,(T)Telephone,(C)DOCSISCableDevice","(W)WLANAccessPoint,(P)Repeater,(S)Station,(O)Other","","DeviceIDLocalIntfHold-
timeCapabilityPortID","r2.virl.infoGi0/0120RGi0/0","r3.virl.infoGi0/0120RGi0/0","r5-
tor.virl.info Gi0/0 120 R Gi0/0", "r5-
tor.virl.info Gi0/1 120 R Gi0/1", "r6-
edge.virl.infoGi0/0120RGi0/0","","Totalentriesdisplayed:5",""]]
Pythonparserscript
WecannowuseaPythonscripttoparsetheLLDPneighboroutputfromeachdevice and construct a network topology graph from it. The purpose is toautomaticallycheck thedevice to seewhetheranyof theLLDPneighborshasdisappeared due to link failure or other issues. Let's take a look attheÂcisco_graph_lldp.pyfileandseehowthatisdone.Â
Westartwiththenecessaryimportsofthepackages--anemptylistthatwewillpopulate with tuples of node relationships. We also know that Gi0/0 on thedevices are connected to the management network; therefore, we are onlysearching forGi0/[1234] asour regular expressionpattern in the showLLDPneighborsoutput:Â
importglob,re
fromgraphvizimportDigraph,Source
pattern=re.compile('Gi0/[1234]')
device_lldp_neighbors=[]
WewillusetheÂglob.glob()methodtotraversethroughthe./tmpdirectory

ofallthefiles,parseoutthedevicename,andfindtheneighborsthatthedeviceis connected to. There are some embedded print statements in the script thatwerecommentedout;ifyouuncommentthem,youwillseethatwhatwewantedtoendupwithwastheparsedresults:Â
device:r1
neighbors:r5-tor
neighbors:r6-edge
device:r5-tor
neighbors:r2
neighbors:r3
neighbors:r1
device:r2
neighbors:r5-tor
neighbors:r6-edge
device:r3
neighbors:r5-tor
neighbors:r6-edge
device:r6-edge
neighbors:r2
neighbors:r3
neighbors:r1
The fully populated edge list contains tuples that consist of the device and itsneighbors:Â
Edges: [('r1', 'r5-tor'), ('r1', 'r6-edge'), ('r5-
tor', 'r2'), ('r5-tor', 'r3'), ('r5-tor', 'r1'), ('r2', 'r5-
tor'), ('r2', 'r6-edge'), ('r3', 'r5-tor'), ('r3', 'r6-
edge'),('r6-edge','r2'),('r6-edge','r3'),('r6-edge','r1')]
WecannowconstructthenetworktopologygraphusingtheGraphvizpackage.Themost importantpart is theunpackingof the tuples that represent the edgerelationship:Â
my_graph=Digraph("My_Network")
<skip>
#constructtheedgerelationships
forneighborsindevice_lldp_neighbors:
node1,node2=neighbors
my_graph.edge(node1,node2)
Ifyouwere toprintout the resultingsourcedot file, itwouldbeÂanaccuraterepresentationofyournetwork:Â

digraphMy_Network{
r1->"r5-tor"
r1->"r6-edge"
"r5-tor"->r2
"r5-tor"->r3
"r5-tor"->r1
r2->"r5-tor"
r2->"r6-edge"
r3->"r5-tor"
r3->"r6-edge"
"r6-edge"->r2
"r6-edge"->r3
"r6-edge"->r1
}
However, theplacementof thenodeswillbeabitfunky,as it isautorendered.Thefollowingdiagramillustratestherenderinginadefaultlayoutaswellastheneatolayout,namelydigraph(My_Network,engine='neato'):Â

Theneatolayoutrepresentsanattempttodrawundirectedgraphswithevenlesshierarchy:Â

Sometimesthelayoutpresentedbythetoolisjustfine,especiallyifyourgoalisto detect faults as opposed to making it visually appealing. However, in thiscase,let'sseehowwecaninsertrawDOTÂlanguageknobsintothesourcefile.Fromresearch,weknowthatwecanusetherankcommandtospecifythelevelwhere some nodes can stay. However, there is no option presented in theGraphvizPythonAPI.Luckily,thedotsourcefileisjustastring,whichwecaninsertasrawdotcommentsusingthereplace()methodwith:Â
source=my_graph.source
original_text="digraphMy_Network{"
new_text = 'digraph My_Network {n{rank=same Client "r6-
edge"}n{rank=samer1r2r3}n'
new_source=source.replace(original_text,new_text)
new_graph=Source(new_source)new_graph.render("output/chapter8_lldp_graph.gv")
The end result is a new source that we can render the final topology graphfrom:Â
digraphMy_Network{
{rank=sameClient"r6-edge"}
{rank=samer1r2r3}
Client->"r6-edge"
"r5-tor"->Server
r1->"r5-tor"
r1->"r6-edge"

"r5-tor"->r2
"r5-tor"->r3
"r5-tor"->r1
r2->"r5-tor"
r2->"r6-edge"
r3->"r5-tor"
r3->"r6-edge"
"r6-edge"->r2
"r6-edge"->r3
"r6-edge"->r1
}
Thegraphisnowgoodtogo:Â
Finalplaybook
Wearenowreadytoincorporatethisnewparserscriptbackintoourplaybook.

We can now add the additional task of rendering the output with graphgenerationincisco_discover_lldp.yml:Â
-name:ExecutePythonscripttorenderoutput
command:./cisco_graph_lldp.py
Theplaybookcannowbescheduledtorunregularlyviacronorothermeans.Itwill automatically query the devices for LLDP neighbors and construct thegraph, and the graph will represent the current topology as known by therouters.Â
WecantestthisbyshuttingdowntheÂGi0/1andGo0/2interfacesonr6-edgewhen theLLDPneighborpasses thehold timeanddisappears from theLLDPtable:Â
r6-edge#shlldpneighbors
...
DeviceIDLocalIntfHold-timeCapabilityPortID
r2.virl.infoGi0/0120RGi0/0
r3.virl.infoGi0/3120RGi0/2
r3.virl.infoGi0/0120RGi0/0
r5-tor.virl.infoGi0/0120RGi0/0
r1.virl.infoGi0/0120RGi0/0
Totalentriesdisplayed:5
Thegraphwillautomaticallyshowthatr6-edgeonlyconnectstor3:Â

Thisisarelativelylongexample.Weusedthetoolswehavelearnedsofarinthebook--AnsibleandPython--tomodularizeandbreak tasks into reusablepieces.We thenused thenew tool,namelyGraphviz, tohelpmonitor thenetwork fornon-time-seriesdata,suchasnetworktopologyrelationships.Â

Flow-basedmonitoring
Asmentioned in the chapter introduction, besides polling technology, such asSNMP, we can also use a push strategy, which allows the device to pushnetwork information toward the management station. NetFlow and its closelyassociated cousins--IPFIX and sFlow--are examples of such information pushfromthedirectionofthenetworkdevicetowardthemanagementstation.Â
A flow, as defined by IETF(https://www.ietf.org/proceedings/39/slides/int/ip1394-background/tsld004.htm),isasequenceofpacketsmovingfromanapplicationsendingsomething to theapplication receiving it. If we refer back to the OSI model, a flow is whatconstitutesasingleunitofcommunicationbetweentwoapplications.Eachflowcomprisesanumberofpackets;someflowshavemorepackets(suchasavideostream),while some have few (such as anHTTP request). If you think aboutflows for a minute, you'll notice that routers and switches might care aboutpackets and frames, but the application and user usually care more aboutflows.Â
Flow-basedmonitoringusuallyreferstoNetFlow,IPFIX,andsFlow:Â
NetFlow: NetFlow v5 is a technology where the network device cachesflow entries and aggregate packets bymatching the set of tuples (sourceinterface,sourceIP/port,destinationIP/port,andsuch).Here,onceaÂflowiscompleted,thenetworkdeviceexportstheflowcharacteristics,includingtotalbytesandpacketcountsintheflow,tothemanagementstation.ÂIPFIX: IPFIX is the proposed standard for structured streaming and issimilartoNetFlowv9,alsoknownasFlexibleNetFlow.Essentially,itisadefinableflowexport,whichallowstheusertoexportnearlyanythingthatthenetworkdeviceknowsabout.Theflexibilityoftencomesattheexpenseof simplicity, though; in other words, it is a lot more complex than thetraditional NetFlow. Additional complexity makes it less than ideal forintroductory learning. However, once you are familiar with NetFlow v5,you will be able to parse IPFIX as long as you match the templatedefinition.Â

sFlow: sFlow actually has no notion of a flow or packet aggregation byitself. It performs two types of sampling of packets. It randomly samplesoneoutofnpackets/applicationsandhastime-basedsamplingcounters.Itsendstheinformationtothemanagementstation,andthestationderivesthenetworkflowinformationbyreferringtothetypeofpacketsamplereceivedalong with the counters. As it doesn't perform any aggregation on thenetworkdevice,youcanarguethatsFlowismorescalablethanothers.Â
The best way to learn about each one of these is to probably dive right intoexamples.Â
NetFlowparsingwithPython
WecanusePythontoparsetheNetFlowdatagrambeingtransportedonthewire.This gives us a way to look at the NetFlow packet in detail as well astroubleshootanyNetFlowissuewhentheyarenotworkingasexpected.Â
First,let'sÂgeneratesometrafficbetweentheclientandserveracrosstheVIRLnetwork.Wecanuse thebuilt-inHTTPservermodule fromPython toquicklylaunchasimpleHTTPserverontheVIRLhostactingastheÂserver:Â
cisco@Server:~$python3-mhttp.server
ServingHTTPon0.0.0.0port8000...
Note
For Python 2, the module is named SimpleHTTPServer, forexample,Âpython2-mSimpleHTTPServer.Â
WecancreateashortlooptocontinuouslysendÂHTTPGETtothewebserverontheclient:Â
sudoapt-getinstallpython-pippython3-pip
sudopipinstallrequests
sudopip3installrequests
$cathttp_get.py
importrequests,time
whileTrue:
r=requests.get('http://10.0.0.5:8000')
print(r.text)

time.sleep(5)
TheclientshouldgetaveryplainHTMLpage:Â
cisco@Client:~$python3http_get.py
<!DOCTYPEhtmlPUBLIC"-//W3C//DTDHTML3.2Final//EN"><html>
<title>Directorylistingfor/</title>
<body>
...
</body>
</html>
Weshouldalsoseetherequestscontinuouslycominginfromtheclientevery5seconds:Â
cisco@Server:~$python3-mhttp.server
ServingHTTPon0.0.0.0port8000...
10.0.0.9--[15/Mar/201708:28:29]"GET/HTTP/1.1"200-
10.0.0.9--[15/Mar/201708:28:34]"GET/HTTP/1.1"200-
WecanexportNetFlowfromanyof thedevices,butsincer6-edge is thefirsthopfortheclienthost,wewillhavethishostexportNetFlowtothemanagementhostatport9995.Â
Note
In this example, we use only one device for demonstration,thereforewemanuallyconfigureitwiththenecessarycommands.Inthenextsection,whenweenableNetFlowonall thedevices,wewillusetheÂAnsibleplaybook.Â
!
ipflow-exportversion5
ipflow-exportdestination172.16.1.1739995vrfMgmt-intf
!
interfaceGigabitEthernet0/4
descriptiontoClient
ipaddress10.0.0.10255.255.255.252
ipflowingress
ipflowegress
...
!

Next,let'stakealookatthePythonparserscript.Â
PythonsocketandstructÂ
The script, netFlow_v5_parser.py, wasmodified fromBrian Rak's blog poston http://blog.devicenull.org/2013/09/04/python-netflow-v5-parser.html; thiswasdonemostly forPython3 compatibility aswell as additionalÂNetFlowversion5 fields.Thereasonwechoosev5 insteadofv9 isbecausev9 ismorecomplexasitintroducestemplates;therefore,itwillprovideaverydifficult-to-graspintroductiontoNetFlow.SinceNetFlowversion9isanextendedformatoftheoriginalNetFlowversion5,alltheconceptsweintroducedinthissectionareapplicabletoit.BecauseNetFlowpacketsarerepresentedinbytesoverthewire,wewilluse thestructmodule included in thestandard library toconvertbytesintonativePythondatatypes.
Note
You'll find more information about the two modulesatÂhttps://docs.python.org/3.5/library/socket.htmlÂandÂhttps://docs.python.org/3.5/library/struct.html
We will start by using the socket module to bind and listen for the UDPdatagram. With socket.AF_INET, we intend on listing for the IPv4 address;withÂsocket.SOCK_DGRAM,wespecifythatwe'llseetheUDPdatagram:Â
sock=socket.socket(socket.AF_INET,socket.SOCK_DGRAM)
sock.bind(('0.0.0.0',9995))
Wewillstartaloopandretrieveinformationoffthewire:Â
whileTrue:
buf,addr=sock.recvfrom(1500)
Thefollowinglineiswherewebegintodeconstructorunpackthepacket.Thefirst argument of !HHÂ specifies the network's big-endian byte orderwith theexclamationsign (big-endian)aswellas the formatof theC type (H=2byteunsignedshortinteger):Â
(version,count)=struct.unpack('!HH',buf[0:4])
IfyoudonotremembertheNetFlowversion5headeroffthetopofyourhead

(that was a joke by the way), you can always refertoÂhttp://www.cisco.com/c/en/us/td/docs/net_mgmt/netflow_collection_engine/3-6/user/guide/format.html#wp1006108 for a quick refresher. The rest of theheader can be parsed accordingly, depending on the byte location and datatype:Â
(sys_uptime,unix_secs,unix_nsecs,flow_sequence)=struct.unpack('!IIII',buf[4:20])
(engine_type,engine_id,sampling_interval)=struct.unpack('!BBH',buf[20:24])
ThewhileloopthatfollowswillfillthenfdataÂdictionarywiththeflowrecordthat unpacks the source address and port, destination address and port, packetcount,andbytecount,andprintstheinformationoutonthescreen:Â
foriinrange(0,count):
try:
base=SIZE_OF_HEADER+(i*SIZE_OF_RECORD)
data=struct.unpack('!IIIIHH',buf[base+16:base+36])
input_int,output_int=struct.unpack('!HH',buf[base+12:base+16])
nfdata[i]={}
nfdata[i]['saddr']=inet_ntoa(buf[base+0:base+4])
nfdata[i]['daddr']=inet_ntoa(buf[base+4:base+8])
nfdata[i]['pcount']=data[0]
nfdata[i]['bcount']=data[1]
...
Theoutputof thescriptallowsyou tovisualize theheaderaswellas the flowcontentataglance:Â
Headers:
NetFlowVersion:5
FlowCount:9
SystemUptime:290826756
EpochTimeinseconds:1489636168
EpochTimeinnanoseconds:401224368
Sequencecounteroftotalflow:77616
0192.168.0.1:26828->192.168.0.5:1791packts40bytes
110.0.0.9:52912->10.0.0.5:80006packts487bytes
210.0.0.9:52912->10.0.0.5:80006packts487bytes
310.0.0.5:8000->10.0.0.9:529125packts973bytes
410.0.0.5:8000->10.0.0.9:529125packts973bytes
510.0.0.9:52913->10.0.0.5:80006packts487bytes
610.0.0.9:52913->10.0.0.5:80006packts487bytes
710.0.0.5:8000->10.0.0.9:529135packts973bytes
810.0.0.5:8000->10.0.0.9:529135packts973bytes

Note that in NetFlow version 5, the size of the record is fixed at 48 bytes;therefore,theloopandscriptarerelativelystraightforward.However,inthecaseof NetFlow version 9 or IPFIX, after the header, there is a template FlowSet(http://www.cisco.com/en/US/technologies/tk648/tk362/technologies_white_paper09186a00800a3db9.htmlthat specifies the field count, field type, and field length. This allows thecollectortoparsethedatawithoutknowingthedataformatinadvance.
As you may have guessed, there are other tools that save us the problem ofparsingNetFlowrecordsonebyone.Let'slookatonesuchtool,calledntop,inthenextsection.Â
ntopÂtrafficmonitoringÂ
Just like SNMP in the previous chapter, we can use Python scripts and othertoolstodirectlypollthedevice.However,therearetoolssuchasCacti,whichisan all-in-one open source package, that includes data collection (poller), datastorage(RRD),andawebfrontendforvisualization.ÂÂ
In the case ofNetFlow, there are a number of open source and commercialNetFlowcollectors you can choose from. If youdo a quick search for "topNopensourceNetFlowanalyzer,"Âyouwillseeanumberofcomparisonstudiesfor different tools. Each one of them has their own strong and weak points;which one to use is really a matter of preference, platform, and yourappetite for customization. I would recommend choosing a tool thatwould support both v5 and v9, potentially sFlow as well. A secondaryconsideration would be if the tool is written in a language that you canunderstand;IimaginehavingPythonextensibilitywouldbeanicething.Â
TwooftheopensourceNetFlowtoolsthatIlikeandhaveusedbeforeareNfSen(withNFDUMPasthebackendcollector)andntop(orntopng).Betweenthetwoof them,ntop is abetter-known traffic analyzer; it runsonbothWindowsandLinuxplatformsandintegrateswellwithPython.Therefore,let'susentopasanexampleinthissection.Â
TheinstallationofourUbuntuhostisstraightforward:Â
$sudoapt-getinstallntop

Theinstallationprocesswillpromptforthenecessaryinterfaceforlisteningandthe administrator password. By default, the ntopweb interface listens on port3000,while theprobe listensonUDPport5556.ÂOn thenetworkdevice,weneedtospecifythelocationoftheNetFlowexporter:Â
!
ipflow-exportversion5
ipflow-exportdestination172.16.1.1735556vrfMgmt-intf
!
Note
By default, IOSv creates a VRF called Mgmt-intf and placesGi0/0underVRF.Â
We will also need to specify which the direction of traffic exports, such asingressoregress,undertheinterfaceconfiguration:Â
!
interfaceGigabitEthernet0/0
...
ipflowingress
ipflowegress
...
For your reference, I have included the Ansibleplaybook, cisco_config_netflow.yml, to configure the lab device for theNetFlowexport.Â
Note
Notice that r5-tor and r6-edge have two additional interfacesthanr1,r2,andr3.Â
Once everything is set up, you can check the ntopweb interface for local IPtraffic:Â

Oneofthemostoftenusedfeaturesofntopisusingit tolookat thetoptalkergraph:Â
ThentopreportingengineiswritteninC;itisfastandefficient,buttheneedtohaveadequateknowledgeofCinordertochangethewebfrontenddoesnotfitthe modern agile development mindset. After a few false starts with Perl intheÂmid-2000s,thegoodfolksatntopfinallysettledonembeddingPythonasanextensiblescriptingengine.Let'stakealook.Â
Pythonextensionforntop

WecanusePythontoextendntopÂthroughthentopwebserver.ThentopwebservercanexecutePythonscripts.Atahigh level, the scriptswillperform thefollowing:
MethodstoaccessthestateofntopThePythonCGImoduletoprocessÂformsandURLparametersMakingtemplatesthatgeneratedynamicHTMLpagesÂEachPythonscriptcanreadfromstdinandprintoutstdout/stderrThestdoutscriptisthereturnedHTTPpageÂ
There are several resources that come in handy with the Python integration.Underthewebinterface,youcanclickonAbout|ÂShowConfigurationtoseethePythoninterpreterversionaswellasthedirectoryforyourPythonscript:Â
PythonVersion
You can also check the various directories where the Python script shouldreside:Â
PluginDirectories
UnderAboutÂ|OnlineDocumentationÂ|PythonntopEngine,therearelinksforthePythonAPIaswellasthetutorial:Â

PythonntopDocumentation
Asmentioned, the ntopweb server directly executes the Python script placedunderthedesignateddirectory:Â
$pwd
/usr/share/ntop/python
Wewillplaceour first script,namelyÂchapter8_ntop_1.py, in thedirectory.ThePythonCGImoduleprocessesformsandparsesURLparameters:Â
#ImportmodulesforCGIhandling
importcgi,cgitb
importntop
#ParseURL
cgitb.enable();
ntop implements three Python modules; each one of them has a specificpurposes:Â

ntop:ThisinteractswiththentopengineHost:ThisisusedtodrilldownÂintospecifichostsinformationÂInterfaces:ThisistheinformationonntopinstancesÂ
In our script, we will use the ntop module to retrieve the ntop engineinformationaswellasusetheÂsendString()methodtosendtheHTMLbodytext:Â
form=cgi.FieldStorage();
name=form.getvalue('Name',default="Eric")
version=ntop.version()
os=ntop.os()
uptime=ntop.uptime()
ntop.printHTMLHeader('MasteringPytonNetworking',1,0)
ntop.sendString("Hello,"+name+"<br>")
ntop.sendString("NtopInformation:%s%s%s"%(version,os,uptime))
ntop.printHTMLFooter()
Wewillexecute thePythonscriptusingÂhttp://<ip>:3000/python/<scriptname>.Hereistheresultofourchapter8_ntop_1.pyscript:Â
We can look at another example that interacts with the interfacemodule chapter8_ntop_2.py. We will use the API to iterate through theinterfaces:Â
importntop,interface,json

ifnames=[]
try:
foriinrange(interface.numInterfaces()):
ifnames.append(interface.name(i))
exceptExceptionasinst:
printtype(inst)#theexceptioninstance
printinst.args#argumentsstoredin.args
printinst#__str__allowsargstoprinteddirectly
...
Theresultingpagewilldisplaythentopinterfaces:Â
Besidesthecommunityversion,theyalsooffercommercialproductsifyouneedsupport. With the active open source community, commercial backing, andPython extensibility, ntop is a good choice for your NetFlow monitoringneeds.Â
Next,let'stakealookatNetFlow'scousin:sFlow.Â
sFlow
sFlow, which stands for sampled flow, was originally developed by InMon(http://www.inmon.com)andlaterstandardizedbythewayofRFC.Thecurrentversion is v5. The primary advantage argued for sFlow is scalability. sFlowusesrandomoneinnÂpacketsflowsamplesalongwiththepollingintervalofcounter samples toderive an estimateof the traffic; this is lessCPU-intensive

thanNetFlow. sFlow's statistical sampling is integratedwith the hardware andprovidesreal-time,rawexport.Â
For scalability and competitive reasons, sFlow is generally preferred overNetFlow for newer vendors, such as Arista Networks, Vyatta, and A10Networks.While Cisco supports sFlow on its Nexus 3000 platform, sFlow isgenerallynotÂsupportedonCiscoplatforms.Â
SFlowtoolandsFlow-RTwithPython
Unfortunately, at this point, sFlow is something that ourVIRL labdevices donot support. You can either use a Cisco Nexus 3000 switch or other vendorswitches,suchasArista,thatsupportsFlow.Anothergoodoptionforthelabisto use an Arista vEOS virtual manager. I happen to have Cisco Nexus 3048switchesrunning7.0(3)thatIwillbeusingforthissection.Â
TheconfigurationofCiscoNexus3000forsFlowisstraightforward:
Nexus-2#shrun|isflow
featuresflow
sflowmax-sampled-size256
sflowcounter-poll-interval10
sflowcollector-ip192.168.199.185vrfmanagement
sflowagent-ip192.168.199.148
sflowdata-sourceinterfaceEthernet1/48
The easiest way to utilize sFlow is to use sflowtool. Referto http://blog.sflow.com/2011/12/sflowtool.html, which provides easyinstructionsfortheinstallation:Â
$wgethttp://www.inmon.com/bin/sflowtool-3.22.tar.gz
$tar-xvzfsflowtool-3.22.tar.gz
$cdsflowtool-3.22/
$./configure
$make
$sudomakeinstall
After the installation, you can launch sFlow and look at the datagramNexus3048issending:Â
$sflowtool
startDatagram=================================

datagramSourceIP192.168.199.148
datagramSize88
unixSecondsUTC1489727283
datagramVersion5
agentSubId100
agent192.168.199.148
packetSequenceNo5250248
sysUpTime4017060520
samplesInPacket1
startSample----------------------
sampleType_tag0:4
sampleTypeCOUNTERSSAMPLE
sampleSequenceNo2503508
sourceId2:1
counterBlock_tag0:1001
5s_cpu0.00
1m_cpu21.00
5m_cpu20.80
total_memory_bytes3997478912
free_memory_bytes1083838464
endSample----------------------
endDatagram=================================
There are a number of good usage examples on the sflowtool GitHubrepository(https://github.com/sflow/sflowtool);oneofthemistouseascripttoreceivethesflowtoolinputandparsetheoutput.WecanuseaPythonscriptforthis purpose. In the chapter8_sflowtool_1.py example, we will usesys.stdin.readlinetoreceivetheinputandregularexpressionsearchtoonlyprint out only the lines containing the word agentÂwhen we see the sFlowagent:Â
importsys,re
forlineiniter(sys.stdin.readline,''):
ifre.search('agent',line):
print(line.strip())
Theoutputcanbepipedtothesflowtool:Â
$sflowtool|python3chapter8_sflowtool_1.py
agent192.168.199.148
agent192.168.199.148
Thereareanumberofotherusefuloutputexamples,suchastcpdump,outputasNetFlowversion5records,andacompactline-by-lineoutput.Â

Ntop supports sFlow, which means you can directly export your sFlowdestinationtothentopcollector.IfyourcollectorisNetFlow,youcanusethe-coptionfortheoutputintheNetFlowversion5format:Â
NetFlowoutput:
-chostname_or_IP-(netflowcollectorhost)
-dport-(netflowcollectorUDPport)
-e-(netflowcollectorpeer_as(default=origin_as))
-s-(disablescalingofnetflowoutputbysamplingrate)
-S-spoofsourceofnetflowpacketstoinputagentIP
Alternatively, you can also use InMon's sFlow-RT (http://www.sflow-rt.com/index.php) as your sFlow analytics engine. What sets sFlow-RT apartfrom an operator perspective is its vast RESTAPI that can be customized tosupportyourusecases.Youcanalsoeasily retrieve themetrics from theAPI.You can take a look at its extensive API reference on http://www.sflow-rt.com/reference.php.
NotethatsFlow-RTrequiresJavatorunthefollowing:Â
$sudoapt-getinstalldefault-jre
$java-version
openjdkversion"1.8.0_121"
OpenJDK Runtime Environment (build 1.8.0_121-8u121-b13-
0ubuntu1.16.04.2-b13)
OpenJDK64-BitServerVM(build25.121-b13,mixedmode)
Onceinstalled,downloadingandrunningsFlow-RTisstraightforward:Â
$wgethttp://www.inmon.com/products/sFlow-RT/sflow-rt.tar.gz
$tar-xvzfsflow-rt.tar.gz
$cdsflow-rt/
$./start.sh
2017-03-17T09:35:01-0700INFO:Listening,sFlowport6343
2017-03-17T09:35:02-0700INFO:Listening,HTTPport8008
YoucanpointthewebbrowsertoHTTPport8008andverifytheinstallation:Â

sFlow-RTAbout
AssoonassFlowreceivesthesFlowpackets,theagentsandothermetricswillappear:Â
sFlow-RTAgents
Here are two examples on using requests to retrieve information from sFlow-RT:Â
>>>importrequests
>>>r=requests.get("http://192.168.199.185:8008/version")
>>>r.text
'2.0-r1180'
>>>r=requests.get("http://192.168.199.185:8008/agents/json")
>>>r.text
'{"192.168.199.148":{n"sFlowDatagramsLost":0,n"sFlowDatagramSource":["192.168.199.148"],n"firstSeen":2195541,n"sFlowFlowDuplicateSamples":0,n"sFlowDatagramsReceived":441,n"sFlowCounterDatasources":2,n"sFlowFlowOutOfOrderSamples":0,n"sFlowFlowSamples":0,n"sFlowDatagramsOutOfOrder":0,n"uptime":4060470520,n"sFlowCounterDuplicateSamples":0,n"lastSeen":3631,n"sFlowDatagramsDuplicates":0,n"sFlowFlowDrops":0,n"sFlowFlowLostSamples":0,n"sFlowCounterSamples":438,n"sFlowCounterLostSamples":0,n"sFlowFlowDatasources":0,n"sFlowCounterOutOfOrderSamples":0n}}'
Consult the reference documentation for additional REST endpoints available

foryourneeds.Next,wewilltakealookatanothertool,namelyElasticsearch,that is becoming pretty popular for both syslog index and general networkmonitoring.Â

Elasticsearch(ELKstack)
Aswe have seen so far in this chapter, use just the Python tools aswe havedoneÂwould adequatelymonitor your networkwith enough scalability for alltypesofnetworks, largeandsmallalike.However, Iwould like to introduceone additional open source, general-purpose, distributed, search and analyticsengine calledElasticsearch (https://www.elastic.co/). It is often referred to astheElasticÂorELKstackforcombiningwiththefrontendandinputtools.
Ifyoulookatnetworkmonitoringingeneral,itisreallyaboutanalyzingnetworkdata and making sense out of them. The ELK stack contains Elasticsearch,Logstash,andKibinaasafullstacktoingestinformationwithLogstash,indexandanalyzedatawithElasticsearch,andpresentthegraphicsoutputviaKibana.It is really threeprojects inonewith the flexibility tosubstituteLogstashwithanother input, such as Beats. Alternatively, you can use other tools, such asGrafana,insteadofKibanaforvisualization.TheELKstackbyElasticCo.alsoprovides many add-on tools,referred to as X-Pack, for additional security,alerting,monitoring,andsuch.Â
Asyoucanprobablytellbythedescription,ELK(orevenElasticsearchalone)isadeeptopictocover,andtherearemanyÂbookswrittenonthesubject.Evencovering the basic usagewould take upmore space thanwe can spare in thisbook.Ihaveattimesconsideredleavingthesubjectoutofthebooksimplyforits depth. However, ELK has become a very important tool for many of theprojectsthatIamworkingon,includingnetworkmonitoring.Ifeelleavingitoutwouldbeahugedisservicetoyou.
Therefore,Iamgoingtotakeafewpagestobrieflyintroducethetoolandafewuse cases alongwith information for you to dig deeper if needed.Wewill gothroughtheÂfollowingtopics:Â
SettingupahostedELKserviceTheLogstashformatPython'shelperscriptforLogstashformatting

SettingupahostedELKservice
TheentireELKstackcanbeinstalledasastandaloneserverordistributedacrossmultiple servers. The installation steps are availableat https://www.elastic.co/guide/en/elastic-stack/current/installing-elastic-stack.html. Inmyexperience,evenwithminimalamountofdata,asingleVMrunningELKstackoften stretches the resources.My first attempt at runningELKasa singleVMlastednomore thana fewdayswithbarely twoor threenetwork devices sending log information toward it. After a few moreunsuccessful attempts at running my own cluster as a beginner, I eventuallysettled on running the ELK stack as hosted service, and this is what I wouldrecommendyoustartwith.Â
Asahostedservice,therearetwoprovidersthatyoucanconsider:
Amazon Elasticsearch Service (https://aws.amazon.com/elasticsearch-service/)ElasticCloud(https://cloud.elastic.co/)
Currently,AWSoffersa free tier that is easy toget startedwithand is tightlyintegratedwith thecurrent suiteofAWSsetof tools, suchas identity services(https://aws.amazon.com/iam/) and lambda functions(https://aws.amazon.com/lambda/).However,AWS'sElasticsearchServicedoesnot have the latest features as compared to Elastic Cloud, nor does it haveintegration that is as tight as X-Pack. Because AWS offers a free tier, myrecommendationwouldbethatyoustartwiththeAWSElasticsearchService.IfyoufindoutlaterthatyouneedmorefeaturesthanwhatAWSalreadyprovides,youcanalwaysmovetoElasticCloud.Â
Settinguptheserviceisstraightforward;youjustneedtochooseyourregionandname your first domain. After setting it up, you can use the access policy torestrictinputviaanIPaddress;makesurethisistheIPthatAWSwillseeasthesourceIP(specifyyourcorporatepublicIPifyourhost'sIPaddressistranslatedbehindNATfirewall):

Thelogstashformat
Logstashcanbeinstalledwhereyouarecomfortablesendingyournetworklogto. The installation steps are availableatÂhttps://www.elastic.co/guide/en/logstash/current/installing-logstash.html.Bydefault, you can put the Logstash configuration fileunderÂ/etc/logstash/conf.d/.ThefileÂisintheÂinput-filter-outputformat(https://www.elastic.co/guide/en/logstash/current/advanced-pipeline.html).Inthefollowing example, we specified the input as a network log file, with aplaceholderforfilteringinput,andtheoutputasbothprintingoutmessagetotheconsole aswell as having the output exported toward ourAWSElasticsearchServiceinstance:
input{
file{
type=>"network_log"
path=>"pathtoyournetworklogfile"
}
}
filter{
if[type]=="network_log"{
}
}
output{
stdout{codec=>rubydebug}

elasticsearch{
index=>"logstash_network_log-%{+YYYY.MM.dd}"
hosts=>["http://<instance>.<region>.es.amazonaws.com"]
}
}
Nowlet'slookatwhatmorewecandowithPythonandLogstash.Â
PythonhelperscriptforLogstashformatting
TheprecedingLogstashconfigurationwillallowyoutoingestnetworklogsandcreate the index on Elasticsearch. What would happen if the text format weintendonputtingintoELKisnotastandardlogformat?This iswherePythoncanhelp.Inthenextexample,wewillperformthefollowing:Â
1. Use the Python script to retrieve a list of IPs that the Spamhaus projectconsiderstobeadroplist(https://www.spamhaus.org/drop/drop.txt).Â
2. Use the Python logging module to format the information in a way thatLogstashcaningestit.Â
3. Modify theLogstashconfiguration file soanynew inputcouldbe sent totheAWSElasticsearchService.Â
The chapter8_logstash_1.py script contains the codewewill use. Besidesthemoduleimports,wewilldefinethebasicloggingconfiguration:Â
#loggingconfiguration
logging.basicConfig(filename='/home/echou/Master_Python_Networking/Chapter8/tmp/spamhaus_drop_list.log',level=logging.INFO,format='%
(asctime)s%(message)s',datefmt='%b%d%I:%M:%S')
WewilldefineafewmorevariablesandsavethelistofIPaddressesfromtherequestsinavariable:Â
host='python_networkign'
process='spamhause_drop_list'
r=requests.get('https://www.spamhaus.org/drop/drop.txt')
result=r.text.strip()
timeInUTC=datetime.datetime.utcnow().isoformat()
Item=OrderedDict()
Item["Time"]=timeInUTC

Thefinalsectionofthescriptisaloopmeantforparsingtheoutputandwritingittothelog:
forlineinresult.split('n'):
ifre.match('^;',line)orline=='r':#comments
next
else:
ip,record_number=line.split(";")
logging.warning(host+''+process+':'+'src_ip='+ip.split("/")
[0]+'record_number='+record_number.strip())
Here'sasampleofthelogfileentry:
...
Mar1701:06:08python_networkignspamhause_drop_list:src_ip=5.8.37.0record_number=SBL284078
Mar1701:06:08python_networkignspamhause_drop_list:src_ip=5.34.242.0record_number=SBL194796
...
Wecan thenmodify theLogstash configuration file accordingly, startingwithaddingtheinputfilelocation:Â
input{
file{
type=>"network_log"
path=>"pathtoyournetworklogfile"
}
file{
type=>"spamhaus_drop_list"
path=>"/home/echou/Master_Python_Networking/Chapter8/tmp/spamhaus_drop_list.log"
}
}
Wecanaddmorefilterconfiguration:
filter{
if[type]=="spamhaus_drop_list"{
grok{
match => [ "message", "%{SYSLOGTIMESTAMP:timestamp} %
{SYSLOGHOST:hostname} %{NOTSPACE:process} src_ip=%{IP:src_ip} %
{NOTSPACE:record_number}.*"]
add_tag=>["spamhaus_drop_list"]
}
}
}

We can leave the output section unchanged, as the additional entries will bestored in the same index.Wecannowuse theELKstack toquery, store, andviewthenetworklogaswellastheSpamhausIPinformation.Â

Summary
Inthischapter,welookedatadditionalwaysinwhichwecanutilizePythontoenhanceournetworkmonitoringeffort.WebeganbyusingPython'sGraphvizpackagetocreatenetworktopologygraphs.Thisallowsustoeffortlesslyshowthecurrentnetworktopologyaswellasnoticeanylinkfailures.Â
Next, we used Python to parse NetFlow version 5 packets to enhance ourunderstanding and troubleshooting ofNetFlow.We also looked at how to usentopandPythontoextendntopforNetFlowmonitoring.sFlowisanalternativepacket sampling technology that we looked at where we use sflowtool andsFlow-RTtointerprettheresults.ÂWeendedthechapterwithageneral-purposedataanalyzingtool,namelyElasticsearchorELKstack.
Inthenextchapter,wewillexplorehowtousethePythonwebframeworkFlasktobuildnetworkwebservices.

Chapter9.BuildingNetworkWebServiceswithPython
Inthepreviouschapters,wewereaconsumerof theAPIsprovidedbyvarioustools. In chapter 3,API and Intent-Driven Networking, we sawwe can use aHTTP POST method toÂNX-API at the http://<your router ip>/ins URLwiththeCLIcommandembeddedinthebodytoexecutecommandsremotelyontheCiscoNexusdevice;thedevicethenreturnsthecommandexecutionoutputin return. Inchapter8,NetworkMonitoringwithPython -Part2,weused theGETmethodforoursFlow-RTathttp://<yourhostip>:8008/versionÂwithan empty body to retrieve the version of the sFlow-RT software. TheseexchangesareexamplesofRESTfulwebservices.Â
According to Wikipedia(https://en.wikipedia.org/wiki/Representational_state_transfer),Representationalstate transfer (REST) or RESTful web services are one way of providinginteroperabilitybetweencomputersystemsontheInternet.REST-compliantwebservices allow requesting systems to access and manipulate textualrepresentationofwebresourcesusingauniformandpredefinedsetofstatelessoperations.ÂAsnoted,RESTwebservicesusingtheHTTPprotocolofferÂtheonlymethodof informationexchangeontheweb;otherformsofwebservicesjust exist. But it is the most commonly used web service today, with theassociatedverbsGET,POST,PUT,andDELETEasapredefinedwayofinformationexchange.Â
One of the advantages of usingRESTful services is the ability it provides foryou to hide your internal operations from the user while still providing themwiththeservice.InthecaseofthesFlow-RTexample,ifweweretologintothedevicewhereoursoftwareisinstalled,wewouldn'treallyknowwheretocheckforthesoftwareversion.ByprovidingtheresourcesintheformofaURL,thesoftware abstracts the version-checking operations from the requester. Theabstractionalsoprovidesalayerofsecurity,asitcannowopenuptheendpointsasneeded.Â
As themaster of theÂnetworkuniverse,RESTfulweb servicesprovidemanynotableÂbenefitsthatwecanenjoy,suchas:Â

You can abstract the requester from learning about the internals of thenetwork operations. For example,we can provide aweb service to querythe switch version without the requester having to know the exactcommand.ÂWecanconsolidateandcustomizeoperationsthatuniquelyfitournetwork,suchasaresourcetoupgradeallourtoprackswitches.ÂWecanprovidebettersecuritybyonlyexposingtheoperationsasneeded.Forexample,wecanprovideread-onlyURLs(GET)tocorenetworkdevicesandread-writeURLs(GET/POST/PUT/DELETE)toÂaccessswitches.Â
In this chapter,wewill use one of themost popular Pythonweb frameworks,namely Flask, to create our own REST web service for our network. In thischapter,wewilllearnaboutthefollowing:Â
ComparingPythonwebframeworksÂIntroductiontoFlaskOperationsinvolvingstaticnetworkcontentsOperationsinvolvingdynamicnetworkoperations
Let'sgetstartedbylookingattheavailablePythonwebframeworksandwhywechooseFlask.Â

ComparingPythonwebframeworksÂ
Pythonisknownforitsgreatwebframeworks.ThereisarunningjokeatPyCon,which is that you can never work as a full-time Python developer withoutworkingon anyof thePythonweb frameworks.There are annual conferencesheld for DjangoCon, one of the most popular Python frameworks. It attractshundreds of attendees every year. If you sort the Pythonweb frameworks onhttps://hotframeworks.com/languages/python,youcanseethereisnoshortageofchoiceswhenitcomestoPythonandwebframeworks.Â
PythonWebFrameworksRanking
With so many options to choose from, which one should we pick? Clearly,trying all the frameworks out yourself will be time consuming. ThequestionÂaboutwhichwebframeworkisbetterisalsoapassionatetopicamongwebdevelopers.Ifyouaskthisquestiononanyoftheforums,suchasQuora,or

search on Reddit, get ready for some highly opinionated answers and heateddebates.Â
Note
Both Quora and Reddit were written in Python. Reddit usesPylons(https://www.reddit.com/wiki/faq#wiki_so_what_python_framework_do_you_use.3FwhileQuorastartedwithÂPylonsthenreplacedsomewiththeirin-house code (https://www.quora.com/What-languages-and-frameworks-are-used-to-code-Quora).Â
Ofcourse,Ihavemyownbiastowardlanguageandwebframeworks.Butinthissection, I hope to convey to youmy reasoning behind choosing one over theother. Let's pick the top two frameworks from theHotFrameworks list earlierandcomparethem:
Django: The self-proclaimed web framework for perfectionists withdeadlines is a high-level Python web framework that encourages rapiddevelopment and a clean, pragmatic design(https://www.djangoproject.com/). It is a large framework with prebuiltcode that provides an administrative panel and built-in contentmanagement.ÂFlask: This is a microframework for Python and is based onWerkzeug,Jinja2, and good intentions (http://flask.pocoo.org/). By micro, Flaskintends on keeping the core small and the language easy to extendwhenneeded;itcertainlydoesnotmeanthatFlaskislackinginfunctionality.Â
Personally, I findDjangoabitdifficult toextend,andmostof the time,Ionlyuseafractionoftheprebuiltcode.Theideaofkeepingthecorecodesmallandextending itwhenneeded is very appealing tome.The initial example on thedocumentationtogetFlaskupandrunningconsistsofonlyeight linesofcodeandareeasy tounderstand,even ifyoudon'thaveanypriorexperience.SinceFlask is built with extensions in mind, writing your own extensions, such asdecorator,isprettyeasy.Eventhoughitisamicroframework,theFlaskcorestillincludes the necessary components, such as a development server, debugger,integrationwithunittests,RESTfulrequestdispatching,andsuch,togetstarted

outofthebox.Asyoucansee,besidesDjango,FlaskisthesecondmostpopularPythonframeworkbysomemeasure.Thepopularitythatcomeswithcommunitycontribution,support,andquickdevelopmenthelpsitfurther.Â
Fortheprecedingreasons,IfeelFlaskisanidealchoiceforuswhenitcomestobuildingnetworkwebservices.Â

Flaskandlabsetup
In thischapter,wewillusevirtualenv to isolate theenvironmentwewillworkin.Asthenameindicates,virtualenvisatoolthatcreatesavirtualenvironment.It can keep the dependencies required by different projects in separate placeswhilekeeping theglobal site-packagesclean. Inotherwords,whenyou installFlaskinthevirtualenvironment,itisonlyinstalledinthelocalvirtualenvprojectdirectory,nottheglobalsite-packages.Â
The chances are youmay have already come across virtualenvwhileworkingwithPythonbefore,sowewillrunthroughthisprocessquickly.Ifyouhavenot,feel free to pick up one of many excellent tutorials online, such ashttp://docs.python-guide.org/en/latest/dev/virtualenvs/. We will need to installvirtualenvfirst:Â
#Python3
$sudoapt-getinstallpython3-venv
$python3-mvenvvenv
#Python2
$sudoapt-getinstallpython-virtualenv
$virtualenvvenv-python2
Then,activateanddeactivateitinordertobeinandoutoftheenvironment:Â
$sourcevenv/bin/activate
(venv)$python
Python3.5.2(default,Nov172016,17:05:23)
[GCC5.4.020160609]onlinux
Type"help","copyright","credits"or"license"formoreinformation.
>>>exit()
(venv)$deactivate
Inthischapter,wewillinstallquiteafewPythonpackages.Tomakelifeeasier,I have included arequirements.txt file on thebook'sGitHub repository;wecan use it to install all the necessary packages (remember to activate yourvirtualenv):Â
(venv)$pipinstall-rrequirements.txt

For our network topology,wewill use a simple four-node network, as shownhere:Â
Labtopology
Let'stakealookatFlaskinthenextsection.Â
Note
Pleasenote that fromhereonout, Iwillassume thatyouwouldalways execute from the virtual environment or you haveinstalled the necessary packages in the requirements.txt file,whichisintheglobalsite-packages.Â

IntroductiontoFlask
Like most popular open source projects, Flask has very good documentation,available at http://flask.pocoo.org/docs/0.10/. If any of the examplesareÂunclear,youcanbesuretofindtheanswerontheprojectdocumentation.
Note
I would also highly recommend Miguel Grinberg's(https://blog.miguelgrinberg.com/) work related to Flask. Hisblog,book,andvideotraininghastaughtmealotaboutFlask.Infact,Miguel'sclassBuildingWebAPIswithFlaskÂinspiredmetowritethischapter.YoucantakealookathispublishedcodeonGitHub:Â https://github.com/miguelgrinberg/oreilly-flask-apis-video.Â
Our first Flask application is contained in one single file,namelyÂchapter9_1.py:Â
fromflaskimportFlask
app=Flask(__name__)
@app.route('/')
defhello_networkers():
return'HelloNetworkers!'
if__name__=='__main__':
app.run(host='0.0.0.0',debug=True)
ThiswillalmostalwaysbeyourdesignpatternforFlaskinitially.Wecreateaninstance of the Flask class with the first argument as the name of theapplication'smodulepackage.Inthiscase,weusedasinglemodule;whiledoingthisyourselves,typethenameofyourchoicetoindicatewhetheritisstartedasanapplicationorimportedasamodule.WethenusetheroutedecoratortotellFlaskwhichURL should be handled by thehello_networkers() function; inthis case, we indicated the root path. We end the file with the usualname (https://docs.python.org/3.5/library/__main__.html). We only addedthehostanddebugoptions,whichallowmoreverboseoutputandalsoallowyou

tolistenonalltheinterfacesofthehost(bydefault,itonlylistensonloopback).Wecanrunthisapplicationusingthedevelopmentserver:Â
(venv)$pythonchapter9_1.py
*Runningonhttp://0.0.0.0:5000/
*Restartingwithreloader
Nowthatwehaveaserverrunning,let'stesttheserverresponsewithanHTTPclient.Â
TheHTTPieclient
We have already installed HTTPie (https://httpie.org/) as part of therequirements.txt step. Although it does not show in black and white text,HTTPiehasbettersyntaxhighlighting.Italsohasmoreintuitivecommand-lineinteractionwiththeRESTfulHTTPserver.WecanuseittotestourfirstFlaskapplication(moreexplanationonHTTPietofollow):Â
$httpGEThttp://172.16.1.173:5000/
HTTP/1.0200OK
Content-Length:17
Content-Type:text/html;charset=utf-8
Date:Wed,22Mar201717:37:12GMT
Server:Werkzeug/0.9.6Python/3.5.2
HelloNetworkers!
Note
Alternatively,youcanalsousethe-iswitchwithcurl toseetheHTTPheaders:Âcurl-ihttp://172.16.1.173:5000/.Â
WewilluseHTTPieasourclientforthischapter;itisworthaminuteortwototakealookatitsusage.WewillusetheHTTP-bin(https://httpbin.org/)servicetoshowtheuseofHTTPie.TheusageofHTTPiefollowsthissimplepattern:Â
$http[flags][METHOD]URL[ITEM]
Following the preceding pattern, a GET request is very straightforward, as wehaveseenwithourFlaskdevelopmentserver:Â

$httpGEThttps://httpbin.org/user-agent
...
{
"user-agent":"HTTPie/0.8.0"
}
JSONisthedefaultimplicitcontenttypeforHTTPie.Ifyourbodycontainsjuststrings, no other operation is needed. If you need to apply non-string JSONfields,use:=Âorotherdocumentedspecialcharacters:
$httpPOSThttps://httpbin.org/postname=erictwitter=at_ericchoumarried:=true
HTTP/1.1200OK
...
Content-Type:application/json
...
{
"headers":{
...
"User-Agent":"HTTPie/0.8.0"
},
"json":{
"married":true,
"name":"eric",
"twitter":"at_ericchou"
},
...
"url":"https://httpbin.org/post"
}
Asyoucansee,HTTPieimprovesthetraditionalcurlsyntaxandmakestestingtheRESTAPIabreeze.Â
Note
More usage examples are availableatÂhttps://httpie.org/doc#usage.Â
Getting back to our Flask program, a large part of API building is basedon the flow of URL routing. Let's take a deeper look at the app.route()decorator.Â
URLrouting

We added two additional functions and paired them up with the appropriateapp.route()routeinchapter9_2.py:Â
...
@app.route('/')
defindex():
return'Youareatindex()'
@app.route('/routers/')
defrouters():
return'Youareatrouters()'
...
Theresultisthatdifferentendpointsarepassedtodifferentfunctions:Â
$httpGEThttp://172.16.1.173:5000/
...
Youareatindex()
$httpGEThttp://172.16.1.173:5000/routers/
...
Youareatrouters()
Ofcourse,theroutingwouldbeprettylimitedifwehavetokeepitstaticallthetime.TherearewaystopassvariablesfromtheURLtoÂFlask;wewilllookatanexampleinthenextsection.Â
URLvariables
Asmentioned,wecanalsopassvariables to theURL,asseenin theexamplesdiscussedinchapter9_3.py:Â
...
@app.route('/routers/<hostname>')
defrouter(hostname):
return'Youareat%s'%hostname
@app.route('/routers/<hostname>/interface/<int:interface_number>')
definterface(hostname,interface_number):
return'Youareat%sinterface%d'%(hostname,interface_number)
...

Note that in the/routers/<hostname>URL,wepass the<hostname>variableasastring;<int:interface_number>willspecifythatthevariableshouldonlybeaninteger:Â
$httpGEThttp://172.16.1.173:5000/routers/host1
...
Youareathost1
$httpGEThttp://172.16.1.173:5000/routers/host1/interface/1
...
Youareathost1interface1
#Throwsexception
$httpGEThttp://172.16.1.173:5000/routers/host1/interface/one
HTTP/1.0404NOTFOUND
...
<!DOCTYPEHTMLPUBLIC"-//W3C//DTDHTML3.2Final//EN">
<title>404NotFound</title>
<h1>NotFound</h1>
<p>TherequestedURLwasnotfoundontheserver.IfyouenteredtheURLmanuallypleasecheckyourspellingandtryagain.
</p>
Theconverterincludesintegers,float,andpath(acceptsslashes).Â
Besidesmatching static routes,we can also generateURLson the fly.This isvery useful when we do not know the endpoint variable in advance or if theendpoint is based on other conditions, such as the values queried from adatabase.Let'stakealookatanexampleofit.Â
URLgeneration
In chapter9_4.py, we wanted to dynamically create a URL in the form of'/<hostname>/list_interfaces'incode:Â
fromflaskimportFlask,url_for
...
@app.route('/<hostname>/list_interfaces')
defdevice(hostname):
ifhostnameinrouters:
return'Listinginterfacesfor%s'%hostname
else:
return'Invalidhostname'
routers=['r1','r2','r3']

forrouterinrouters:
withapp.test_request_context():
print(url_for('device',hostname=router))
...
Uponitsexecution,youwillhaveaniceandlogicalURLcreated,asfollows:Â
(venv)$pythonchapter9_4.py
/r1/list_interfaces
/r2/list_interfaces
/r3/list_interfaces
Fornow,youcan thinkofapp.text_request_context() as adummy requestobjectthat isnecessaryfordemonstrationpurposes.Ifyouareinterestedinthelocal context, feel free to take a lookatÂhttp://flask.pocoo.org/docs/0.10/quickstart/#context-locals.
ThejsonifyreturnÂ
AnothertimesaverinFlaskisthejsonify()return,whichwrapsjson.dumps()andturnstheJSONoutputintoaresponseobjectwithapplication/jsonasthecontenttypeintheHTTPheader.WecanÂtweakthelastscriptabitaswewilldoinÂchapter9_5.py:Â
fromflaskimportFlask,jsonify
app=Flask(__name__)
@app.route('/routers/<hostname>/interface/<int:interface_number>')
definterface(hostname,interface_number):
returnjsonify(name=hostname,interface=interface_number)
if__name__=='__main__':
app.run(host='0.0.0.0',debug=True)
WewillÂseetheresultreturnedasaJSONobjectwiththeappropriateheader:Â
$httpGEThttp://172.16.1.173:5000/routers/r1/interface/1
HTTP/1.0200OK
Content-Length:36
Content-Type:application/json
...

{
"interface":1,
"name":"r1"
}
HavinglookedatURLroutingandtheÂjsonify()returninFlask,wearenowreadytobuildanAPIforournetwork.Â

NetworkstaticcontentAPI
Often,yournetworkconsistsofnetworkdevices thatdonotchangea lotonceput into production. For example, you would have core devices, distributiondevices,spine,leaf,topofrackswitches,andsoon.Eachofthedeviceswouldhave certain characteristics and features that you would like to keep in apersistentlocationsoyoucaneasilyretrievethemlateron.Thisisoftendoneintermsofstoringdata inadatabase.However,youwouldnotnormallywant togiveotherusers,whomightwantthisinformation,directaccesstothedatabase;nordotheywanttolearnallthecomplexSQLquerylanguage.Forthiscase,wecanleverageFlaskandtheFlask-SQLAlchemyextensionofÂFlask.Â
Note
You can learn more about Flask-SQLAlchemy at http://flask-sqlalchemy.pocoo.org/2.1/.Â
Flask-SQLAlchemy
Of course, SQLAlchemy and the Flask extension are a database abstractionlayerandobjectrelationalmapper,respectively.It'saÂfancywayofsayingusethe Python object for a database. To make things simple, we will useSQLiteÂas thedatabase,which isa flat file thatactsasa self-containedSQLdatabase.Wewill look at the content ofchapter9_db_1.py as an example ofusingFlask-SQLAlchemytocreateanetworkdatabaseand inserta tableentryintothedatabase.Â
Tobeginwith,wewillcreateaFlaskapplicationandloadtheconfigurationforSQLAlchemy,suchasthedatabasepathandname,thencreatetheSQLAlchemyobjectbypassingtheapplicationtoit:Â
fromflaskimportFlask
fromflask_sqlalchemyimportSQLAlchemy
#CreateFlaskapplication,loadconfiguration,andcreate
#theSQLAlchemyobject
app=Flask(__name__)
app.config['SQLALCHEMY_DATABASE_URI']='sqlite:///network.db'

db=SQLAlchemy(app)
Wecanthencreateadatabaseobjectanditsassociatedprimarykeyandvariouscolumns:Â
classDevice(db.Model):
__tablename__='devices'
id=db.Column(db.Integer,primary_key=True)
hostname=db.Column(db.String(120),index=True)
vendor=db.Column(db.String(40))
def__init__(self,hostname,vendor):
self.hostname=hostname
self.vendor=vendor
def__repr__(self):
return'<Device%r>'%self.hostname
We can invoke the database object, create entries, and insert them into thedatabase table.Keep inmind that anythingwe add to the session needs to becommittedtothedatabaseinordertobepermanent:Â
if__name__=='__main__':
db.create_all()
r1=Device('lax-dc1-core1','Juniper')
r2=Device('sfo-dc1-core1','Cisco')
db.session.add(r1)
db.session.add(r2)
db.session.commit()
Wecanusetheinteractiveprompttocheckthedatabasetableentries:Â
>>>fromflaskimportFlask
>>>fromflask_sqlalchemyimportSQLAlchemy
>>>
>>>app=Flask(__name__)
>>>app.config['SQLALCHEMY_DATABASE_URI']='sqlite:///network.db'
>>>db=SQLAlchemy(app)
>>>fromchapter9_db_1importDevice
>>>Device.query.all()
[<Device'lax-dc1-core1'>,<Device'sfo-dc1-core1'>]
>>>Device.query.filter_by(hostname='sfo-dc1-core1')
<flask_sqlalchemy.BaseQueryobjectat0x7f1b4ae07eb8>
>>>Device.query.filter_by(hostname='sfo-dc1-core1').first()
<Device'sfo-dc1-core1'>

Wecanalsocreatenewentriesinthesamemanner:Â
>>>r3=Device('lax-dc1-core2','Juniper')
>>>db.session.add(r3)
>>>db.session.commit()
>>>Device.query.all()
[<Device 'lax-dc1-core1'>, <Device 'sfo-dc1-core1'>, <Device 'lax-
dc1-core2'>]
NetworkcontentAPI
Beforewediveintocode,let'stakeamomenttothinkabouttheAPIthatwearetrying tocreate.Planning foranAPI isusuallymoreart thanscience; it reallydependsonyoursituationandpreference.WhatIsuggestnextis,bynomeans,therightway,butfornow,staywithmeforthepurposeofgettingstarted.Â
Recall that inourdiagram,wehadfourCiscoIOSvdevices.Let'spretend thattwoofthem,namelyiosv-1andiosv-2,areofthenetworkroleofspine.Theothertwodevices,iosv-3andiosv-4,areinournetworkserviceasleafs.Theseareobviouslyarbitrarychoicesandcanbemodifiedlateron,butthepointisthatwewanttokeepsomedataaboutournetworkdevicesandexposethemviaanAPI.Â
Tomakethingssimple,wewillcreatetwoAPIs,namelydevicesgroupAPIandasingledeviceAPI:
NetworkContentAPI
The first API will be our http://172.16.1.173/devices/ endpoint thatsupportstwomethods:GETandPOST.TheGETrequestwillreturnthecurrentlist

of devices,while thePOST requestwith the proper JSONbodywill create thedevice.Ofcourse,youcanchoose tohavedifferentendpoints forcreationandquery, but in this design, we choose to differentiate the two by the HTTPmethod.Â
The second API will be specific to our device in the form ofhttp://172.16.1.173/devices/<device id>. The API with the GET requestwillshowthedetailofthedevicethatwehaveenteredintothedatabase.ThePUTrequestwillmodifytheentrywiththeupdate.NoticethatweusePUTinsteadofPOST.ThisistypicalofHTTPAPIusage;whenweneedtomodifyanexistingentry,wewillusePUTinsteadofPOST.Â
Atthispoint,youwouldhaveagoodideaabouthowyourAPIwouldlook.Tobettervisualizetheendresult,Iamgoingtojumpaheadandseetheendresultquicklybeforewetakealookatthecode.Â
APOSTÂrequesttothe/devices/APIwillallowyoutocreateanentry.Inthiscase,Iwouldliketocreateournetworkdevicewithattributessuchashostname,loopbackIP,managementIP,role,vendor,andtheoperatingsystemitrunson:
$ http POST http://172.16.1.173:5000/devices/ 'hostname'='iosv-
1''loopback'='192.168.0.1''mgmt_ip'='172.16.1.225''role'='spine''vendor'='Cisco''os'='15.6'
HTTP/1.0201CREATED
Content-Length:2
Content-Type:application/json
Date:Fri,24Mar201701:45:15GMT
Location:http://172.16.1.173:5000/devices/1
Server:Werkzeug/0.9.6Python/3.5.2
{}
IcanrepeatthelaststepÂfortheadditionalthreedevices:Â
$ http POST http://172.16.1.173:5000/devices/ 'hostname'='iosv-
2''loopback'='192.168.0.2''mgmt_ip'='172.16.1.226''role'='spine''vendor'='Cisco''os'='15.6'
...
$ http POST http://172.16.1.173:5000/devices/ 'hostname'='iosv-
3','loopback'='192.168.0.3''mgmt_ip'='172.16.1.227''role'='leaf''vendor'='Cisco''os'='15.6'
...
$ http POST http://172.16.1.173:5000/devices/ 'hostname'='iosv-
4','loopback'='192.168.0.4''mgmt_ip'='172.16.1.228''role'='leaf''vendor'='Cisco''os'='15.6'

IfwecanusethesameAPIwiththeGETrequest,wewillbeabletoseethelistofnetworkdevicesthatwecreated:Â
$httpGEThttp://172.16.1.173:5000/devices/
HTTP/1.0200OK
Content-Length:188
Content-Type:application/json
Date:Fri,24Mar201701:53:15GMT
Server:Werkzeug/0.9.6Python/3.5.2
{
"device":[
"http://172.16.1.173:5000/devices/1",
"http://172.16.1.173:5000/devices/2",
"http://172.16.1.173:5000/devices/3",
"http://172.16.1.173:5000/devices/4"
]
}
Similarly, using the GET request for /devices/<id> will return specificinformationrelatedtoÂthedevice:Â
$httpGEThttp://172.16.1.173:5000/devices/1
HTTP/1.0200OK
Content-Length:188
Content-Type:application/json
...
{
"hostname":"iosv-1",
"loopback":"192.168.0.1",
"mgmt_ip":"172.16.1.225",
"os":"15.6",
"role":"spine",
"self_url":"http://172.16.1.173:5000/devices/1",
"vendor":"Cisco"
}
Let'spretendwehavetodowngradether1operatingsystemfrom15.6to14.6;wecanusethePUTrequesttoupdatethedevicerecord:Â
$ http PUT http://172.16.1.173:5000/devices/1 'hostname'='iosv-
1''loopback'='192.168.0.1''mgmt_ip'='172.16.1.225''role'='spine''vendor'='Cisco''os'='14.6'
HTTP/1.0200OK
#Verification

$httpGEThttp://172.16.1.173:5000/devices/1
...
{
"hostname":"r1",
"loopback":"192.168.0.1",
"mgmt_ip":"172.16.1.225",
"os":"14.6",
"role":"spine",
"self_url":"http://172.16.1.173:5000/devices/1",
"vendor":"Cisco"
}
Now let's take a look at the code in chapter9_6.py that helped create theprecedingAPIs.What'scool,inmyopinion,isthatalloftheseAPIsweredoneina single file, including thedatabase interaction.Lateron,whenweoutgrowtheAPIsathand,wecanalwaysseparatethecomponentsout,suchashavingaseparatefileforthedatabaseclass.Â
DevicesAPI
The chapter9_6.py file starts with the necessary imports. Note that thefollowing request import is the request object from the client and not therequestspackagethatwehavebeenusinginthepreviouschapters:Â
fromflaskimportFlask,url_for,jsonify,request
fromflask_sqlalchemyimportSQLAlchemy
#Thefollowingisdeprecatedbutstillusedinsomeexamples
#fromflask.ext.sqlalchemyimportSQLAlchemy
WedeclaredadatabaseobjectwithitsIDastheprimarykeyandstringfieldsforhostname,loopback,managementIP,role,vendor,andOS:Â
classDevice(db.Model):
__tablename__='devices'
id=db.Column(db.Integer,primary_key=True)
hostname=db.Column(db.String(64),unique=True)
loopback=db.Column(db.String(120),unique=True)
mgmt_ip=db.Column(db.String(120),unique=True)
role=db.Column(db.String(64))
vendor=db.Column(db.String(64))
os=db.Column(db.String(64))
Theget_url()functionreturnsaURLfromtheurl_for()function.Notethat

the get_device() function called is not defined just yet under the'/devices/<int:id>'route:
defget_url(self):
returnurl_for('get_device',id=self.id,_external=True)
Theexport_data() andimport_data()Âfunctions aremirror imagesof eachother. One is used to get the information from the database to the user(export_data()), such as when we use the GET method. The other is to putinformationfromtheusertothedatabase(import_data()),suchaswhenweusethePOSTorPUTmethod:Â
defexport_data(self):
return{
'self_url':self.get_url(),
'hostname':self.hostname,
'loopback':self.loopback,
'mgmt_ip':self.mgmt_ip,
'role':self.role,
'vendor':self.vendor,
'os':self.os
}
defimport_data(self,data):
try:
self.hostname=data['hostname']
self.loopback=data['loopback']
self.mgmt_ip=data['mgmt_ip']
self.role=data['role']
self.vendor=data['vendor']
self.os=data['os']
exceptKeyErrorase:
raiseValidationError('Invaliddevice:missing'+e.args[0])
returnself
Withthedatabaseobjectinplaceaswellasimportandexportfunctionscreated,theURLdispatchisstraightforwardfordevicesoperations.TheGETrequestwillreturna listofdevicesbyqueryingall theentries in thedevices tableandalsoreturn theURLofÂeachentry.ThePOSTmethodwilluse theimport_data()functionwith theglobalrequestobjectas the input. Itwill thenaddthedeviceandÂcommittothedatabase:
@app.route('/devices/',methods=['GET'])

defget_devices():
returnjsonify({'device':[device.get_url()
fordeviceinDevice.query.all()]})
@app.route('/devices/',methods=['POST'])
defnew_device():
device=Device()
device.import_data(request.json)
db.session.add(device)
db.session.commit()
returnjsonify({}),201,{'Location':device.get_url()}
If you look at thePOSTmethod, the returned body is an empty JSONbody,withthestatuscode201(created)aswellasextraheaders:Â
HTTP/1.0201CREATED
Content-Length:2
Content-Type:application/json
Date:...
Location:http://172.16.1.173:5000/devices/4
Server:Werkzeug/0.9.6Python/3.5.2
Let'slookattheAPIthatqueriesandreturnsinformationpertainingtoindividualdevices.Â
ThedeviceIDAPI
TherouteforindividualdevicesspecifiesthattheIDshouldbeaninteger,whichcan act as our first line of defense against a bad request. The two endpointsfollow the same design pattern as our /devices/ endpoint, wherewe use thesameimportandexportfunctions:Â
@app.route('/devices/<int:id>',methods=['GET'])
defget_device(id):
returnjsonify(Device.query.get_or_404(id).export_data())
@app.route('/devices/<int:id>',methods=['PUT'])
defedit_device(id):
device=Device.query.get_or_404(id)
device.import_data(request.json)
db.session.add(device)
db.session.commit()
returnjsonify({})

Noticethequery_or_404()method;itprovidesaconvenientwayforreturning404(notfound) if the database query returns negative for the IDpassed in.Thisisaprettyelegantwayofprovidingaquickcheckonthedatabasequery.Â
Finally,ÂthelastpartofthecodecreatesthedatabasetableandstartstheFlaskdevelopmentserver:Â
if__name__=='__main__':
db.create_all()
app.run(host='0.0.0.0',debug=True)
ThisisoneofthelongerPythonscriptsinthebook;therefore,wewilltakemoretimetoexplainitindetail.ThisprovidesawaytoillustratewayswecanutilizethedatabaseinthebackendtokeeptrackofthenetworkdevicesandonlyexposewhatweneedtotheexternalworldasAPIs,usingFlask.Â
In the next section, we will take a look at how to use API to performasynchronoustaskstoeitherindividualdevicesoragroupofdevices.Â

Networkdynamicoperations
OurAPIcannowprovidestaticinformationaboutthenetwork;anythingthatwecanstoreinthedatabasecanbereturnedtotheuser.Itwouldbegreatifwecaninteractwithournetworkdirectly, suchasquery thedevice for informationorpushconfigurationchangestothedevice.Â
We will start this process by leveraging the script we have already seen inChapter 2, Low-Level Network Device Interactions for interacting with adevice via Pexpect.Wewillmodify the script slightly into a functionwe canrepeatedlyuseinchapter9_pexpect_1.py:Â
#Weneedtoinstallpexpectforourvirtualenv
$pipinstallpexpect
$catchapter9_pexpect_1.py
importpexpect
defshow_version(device,prompt,ip,username,password):
device_prompt=prompt
child=pexpect.spawn('telnet'+ip)
child.expect('Username:')
child.sendline(username)
child.expect('Password:')
child.sendline(password)
child.expect(device_prompt)
child.sendline('showversion|iV')
child.expect(device_prompt)
result=child.before
child.sendline('exit')
returndevice,result
Wecantestthenewfunctionviatheinteractiveprompt:Â
>>>fromchapter9_pexpect_1importshow_version
>>> print(show_version('iosv-1', 'iosv-
1#','172.16.1.225','cisco','cisco'))
('iosv-
1',b'showversion|iV\r\nCiscoIOSSoftware,IOSvSoftware(VIOS-
ADVENTERPRISEK9-M),Version15.6(2)T,RELEASESOFTWARE(fc2)\r\n')
>>>

Note
MakesureyourPexpectscriptworksbeforeyouproceed.Â
WecanaddanewAPIforqueryingthedeviceversioninchapter9_7.py:Â
fromchapter9_pexpect_1importshow_version
...
@app.route('/devices/<int:id>/version',methods=['GET'])
defget_device_version(id):
device=Device.query.get_or_404(id)
hostname=device.hostname
ip=device.mgmt_ip
prompt=hostname+"#"
result=show_version(hostname,prompt,ip,'cisco','cisco')
returnjsonify({"version":str(result)})
Theresultwillbereturnedtotherequester:Â
$httpGEThttp://172.16.1.173:5000/devices/4/version
HTTP/1.0200OK
Content-Length:210
Content-Type:application/json
Date:Fri,24Mar201717:05:13GMT
Server:Werkzeug/0.9.6Python/3.5.2
{
"version": "('iosv-
4',b'showversion|iV\\r\\nCiscoIOSSoftware,IOSvSoftware(VIOS-
ADVENTERPRISEK9-
M),Version15.6(2)T,RELEASESOFTWARE(fc2)\\r\\nProcessorboardID9U96V39A4Z12PCG4O6Y0Q\\r\\n')"
}
Wecanalsoaddanotherendpointthatwouldallowustoperformbulkactiononmultipledevices,basedon their common fields. In the followingexample, theendpointwilltakethedevice_roleattributeintheURLandmatchitupwiththeappropriatedevice(s):Â
@app.route('/devices/<device_role>/version',methods=['GET'])
defget_role_version(device_role):
device_id_list=[device.idfordeviceinDevice.query.all()ifdevice.role==device_role]
result={}
foridindevice_id_list:
device=Device.query.get_or_404(id)

hostname=device.hostname
ip=device.mgmt_ip
prompt=hostname+"#"
device_result=show_version(hostname,prompt,ip,'cisco','cisco')
result[hostname]=str(device_result)
returnjsonify(result)
Note
Of course, looping through all the devices inDevice.query.all()isnotefficient,asintheprecedingcode.Inproduction,wewilluseaSQLquerythatspecificallytargetstheroleofthedevice.Â
When we use the REST API, we can see that all the spine as well asleafÂdevicescanbequeriedatthesametime:Â
$httpGEThttp://172.16.1.173:5000/devices/spine/version
HTTP/1.0200OK
...
{
"iosv-1": "('iosv-
1',b'showversion|iV\\r\\nCiscoIOSSoftware,IOSvSoftware(VIOS-
ADVENTERPRISEK9-
M),Version15.6(2)T,RELEASESOFTWARE(fc2)\\r\\n')",
"iosv-2": "('iosv-
2',b'showversion|iV\\r\\nCiscoIOSSoftware,IOSvSoftware(VIOS-
ADVENTERPRISEK9-
M),Version15.6(2)T,RELEASESOFTWARE(fc2)\\r\\nProcessorboardID9T7CB2J2V6F0DLWK7V48E\\r\\n')"
}
$httpGEThttp://172.16.1.173:5000/devices/leaf/version
HTTP/1.0200OK
...
{
"iosv-3": "('iosv-
3',b'showversion|iV\\r\\nCiscoIOSSoftware,IOSvSoftware(VIOS-
ADVENTERPRISEK9-
M),Version15.6(2)T,RELEASESOFTWARE(fc2)\\r\\nProcessorboardID9MGG8EA1E0V2PE2D8KDD7\\r\\n')",
"iosv-4": "('iosv-
4',b'showversion|iV\\r\\nCiscoIOSSoftware,IOSvSoftware(VIOS-
ADVENTERPRISEK9-
M),Version15.6(2)T,RELEASESOFTWARE(fc2)\\r\\nProcessorboardID9U96V39A4Z12PCG4O6Y0Q\\r\\n')"
}

Asillustrated,thenewAPIendpointsquerythedevice(s)inrealtimeandreturntheresulttotherequester.Thisworksrelativelywellwhenyoucanguaranteearesponse from the operation within the timeout value of the transaction (30secondsbydefault)orifyouareOKÂwiththeHTTPsessiontimingoutbeforethe operation is completed. One way to deal with the timeout issue is toperform the tasks asynchronously. We will look at an example in the nextsection.Â
Asynchronousoperations
Asynchronous operations are, in my opinion, an advanced topic of Flask.Luckily,MiguelGrinberg(https://blog.miguelgrinberg.com/),whoseFlaskworkIamabig fanof,providesmanypostsandexamplesonhisblogandGitHub.Forasynchronousoperations, theexamplecode inchapter9_8.py referencedMiguel's GitHub code on the Raspberry Pi file(https://github.com/miguelgrinberg/oreilly-flask-apis-video/blob/master/camera/camera.py)forthebackgrounddecorator.Westartbyimportingafewmoremodules:Â
fromflaskimportFlask,url_for,jsonify,request,\
make_response,copy_current_request_context
...
importuuid
importfunctools
fromthreadingimportThread
Thebackgrounddecorator takes ina functionandruns itasabackgroundtaskusingThreadandUUIDforthetaskID.Itreturnsthestatuscode202Âacceptedandthelocationofthenewresourcesfortherequestertocheck.WewillmakeanewURLforstatuschecking:Â
@app.route('/status/<id>',methods=['GET'])
defget_task_status(id):
globalbackground_tasks
rv=background_tasks.get(id)
ifrvisNone:
returnnot_found(None)
ifisinstance(rv,Thread):
returnjsonify({}),202,{'Location':url_for('get_task_status',id=id)}

ifapp.config['AUTO_DELETE_BG_TASKS']:
delbackground_tasks[id]
returnrv
Once we retrieve the resource, it is deleted. This was done via settingapp.config['AUTO_DELETE_BG_TASKS'] to true at the top of the app.Wewilladdthisdecoratortoourversionendpointswithoutchangingtheotherpartofthecode because all of the complexity is hidden in the decorator (how cool isthat!):Â
@app.route('/devices/<int:id>/version',methods=['GET'])
@background
defget_device_version(id):
device=Device.query.get_or_404(id)
...
@app.route('/devices/<device_role>/version',methods=['GET'])
@background
defget_role_version(device_role):
device_id_list=[device.idfordeviceinDevice.query.all()ifdevice.role==device_role]
...
The end result is a two-part process.Wewill perform theGET request for theendpointandreceivethelocationheader:Â
$httpGEThttp://172.16.1.173:5000/devices/spine/version
HTTP/1.0202ACCEPTED
Content-Length:2
Content-Type:application/json
Date:<skip>
Location:http://172.16.1.173:5000/status/d02c3f58f4014e96a5dca075e1bb65d4
Server:Werkzeug/0.9.6Python/3.5.2
{}
Wecanthenmakeasecondrequesttothelocationtoretrievetheresult:Â
$httpGEThttp://172.16.1.173:5000/status/d02c3f58f4014e96a5dca075e1bb65d4
HTTP/1.0200OK
Content-Length:370
Content-Type:application/json
Date:<skip>
Server:Werkzeug/0.9.6Python/3.5.2

{
"iosv-1": "('iosv-
1',b'showversion|iV\\r\\nCiscoIOSSoftware,IOSvSoftware(VIOS-
ADVENTERPRISEK9-
M),Version15.6(2)T,RELEASESOFTWARE(fc2)\\r\\n')",
"iosv-2": "('iosv-
2',b'showversion|iV\\r\\nCiscoIOSSoftware,IOSvSoftware(VIOS-
ADVENTERPRISEK9-
M),Version15.6(2)T,RELEASESOFTWARE(fc2)\\r\\nProcessorboardID9T7CB2J2V6F0DLWK7V48E\\r\\n')"
}
Toverifythatthestatuscode202isreturnedwhentheresourceisnotready,wewill use the following script to immediately make a request to the newresource:Â
importrequests,time
server='http://172.16.1.173:5000'
endpoint='/devices/1/version'
#Firstrequesttogetthenewresource
r=requests.get(server+endpoint)
resource=r.headers['location']
print("Status:{}Resource:{}".format(r.status_code,resource))
#Secondrequesttogettheresourcestatus
r=requests.get(resource)
print("ImmediateStatusQuerytoResource:"+str(r.status_code))
print("Sleepfor2seconds")
time.sleep(2)
#Thirdrequesttogettheresourcestatus
r=requests.get(resource)
print("Statusafter2seconds:"+str(r.status_code))
Asyoucanseeintheresult,thestatuscodeisreturnedwhiletheresourceisstillbeingruninthebackgroundas202:Â
$pythonchapter9_request_1.py
Status:202Resource:http://172.16.1.173:5000/status/1de21f5235c94236a38abd5606680b92
ImmediateStatusQuerytoResource:202
Sleepfor2seconds
Statusafter2seconds:200
OurAPIsarecomingalongnicely.Becauseournetworkresourceisvaluableto

us,weshouldsecureAPIaccesstoonlyauthorizedpersonnel.WewilladdbasicsecuritymeasurestoourAPIinthenextsection.Â
Security
Foruserauthenticationsecurity,wewilluseFlask'sextensionhttpauth,writtenby Miguel Grinberg, as well as the password functions in Werkzeug. Thehttpauthextensionshouldhavebeeninstalledaspartof therequirements.txtinstallation in thebeginningof the chapter.The file is namedchapter9_9.py;wewillstartwithafewmoremoduleimports:Â
...
fromwerkzeug.securityimportgenerate_password_hash,check_password_hash
fromflask.ext.httpauthimportHTTPBasicAuth
...
Wewill create an HTTPBasicAuth object as well as the user database object.Note that during the user creation process, we will pass the password value;however,weareonlystoringpassword_hashinsteadofthepassworditself:Â
auth=HTTPBasicAuth()
classUser(db.Model):
__tablename__='users'
id=db.Column(db.Integer,primary_key=True)
username=db.Column(db.String(64),index=True)
password_hash=db.Column(db.String(128))
defset_password(self,password):
self.password_hash=generate_password_hash(password)
defverify_password(self,password):
returncheck_password_hash(self.password_hash,password)
Theauthobjecthasaverify_passworddecorator thatwecanuse,alongwithFlash's g global context object that was created when the request started forpasswordverification.Becausegisglobal,ifwesavetheusertothegvariable,itwilllivethroughtheentiretransaction:Â
@auth.verify_password
defverify_password(username,password):
g.user=User.query.filter_by(username=username).first()
ifg.userisNone:
returnFalse

returng.user.verify_password(password)
There is a handy before_request handler that can be used before any APIendpoint is called.Wewill combine theauth.login_required decoratorwiththebefore_requesthandlerthatwillbeappliedtoalltheAPIroutes:Â
@app.before_request
@auth.login_required
defbefore_request():
pass
Lastly,wewillusetheunauthorizederrorhandlertoreturnaresponseobjectforthe401unauthorizederror:Â
@auth.error_handler
defunathorized():
response=jsonify({'status':401,'error':'unahtorized',
'message':'pleaseauthenticate'})
response.status_code=401
returnresponse
Before we can test user authentication, we will need to create users in ourdatabase:Â
>>>fromchapter9_9importdb,User
>>>db.create_all()
>>>u=User(username='eric')
>>>u.set_password('secret')
>>>db.session.add(u)
>>>db.session.commit()
>>>exit()
OnceyoustartyourFlaskdevelopmentserver,trytomakearequestasbefore;however, this time itwill be rejected andpresentedwithÂa401 unauthorizederror:Â
$httpGEThttp://172.16.1.173:5000/devices/
HTTP/1.0401UNAUTHORIZED
Content-Length:81
Content-Type:application/json
Date:<skip>
Server:Werkzeug/0.9.6Python/3.5.2
WWW-Authenticate:Basicrealm="AuthenticationRequired"

{
"error":"unauthorized",
"message":"pleaseauthenticate",
"status":401
}
Wewillnowneedtoprovidetheauthenticationheaderforourrequests:Â
$http--autheric:secretGEThttp://172.16.1.173:5000/devices/
HTTP/1.0200OK
Content-Length:188
Content-Type:application/json
Date:<skip>
Server:Werkzeug/0.9.6Python/3.5.2
{
"device":[
"http://172.16.1.173:5000/devices/1",
"http://172.16.1.173:5000/devices/2",
"http://172.16.1.173:5000/devices/3",
"http://172.16.1.173:5000/devices/4"
]
}
WenowhaveadecentRESTfulAPIsetupforournetwork.TheuserwillbeabletointeractwiththeAPIsnowinsteadofthenetworkdevices.TheycanqueryforstaticcontentsoftheÂnetworkaswellasperformtasksforÂindividualdevicesoragroupofdevices.WealsoaddedbasicsecuritymeasurestoensureonlytheuserswecreatedareabletoretrievetheinformationfromourAPI.Â
WehaveÂnowabstracted theunderlyingvendorAPI away fromour networkand replaced them with our own RESTful API. We are free to use what isrequired, such as Pexpect, while still providing a uniform frontend to ourrequester.Â
Let'stakealookatadditionalresourcesforFlasksowecancontinuetobuildonourAPIframework.Â

Additionalresources
Flask is no doubt a feature-rich framework that is growing in features andcommunity.Wehavecovereda lotof topics in thischapterbutstillhaveonlyscrapedthesurfaceoftheframework.BesidesAPIs,youcanuseFlaskforwebapplicationsaswellasyourwebsites.ThereareafewimprovementsthatIthinkwecanstillmaketoournetworkAPIframework:Â
Separateout thedatabaseandeachendpoint in itsownfileso thecode iscleanandeasiertotroubleshoot.ÂMigratefromSQLitetootherproduction-readydatabases.Use token-based authentication instead of passing the username andpassword for every transaction. In essence, wewill receive a tokenwithfinite expiration time upon initial authentication and use the token forfurthertransactionsuntiltheexpiration.ÂDeployyourFlaskAPIappbehindawebserver,suchasNginx,alongwiththePythonWSGIserverforproductionuse.Â
Obviously, the preceding improvements will vary greatly from company tocompany. For example, the choice of database and web server may haveimplicationsfromthecompany'stechnicalpreferenceaswellastheotherteam'sinput.Theuseoftoken-basedauthenticationmightnotbenecessaryiftheAPIisonlyused internally andother formsof security havebeenput intoplace.Forthese reasons, I would like to provide you with additional links as extraresources should you choose to move forward with any of theprecedingÂitems.Â
Here are some of the links I find usefulwhen thinking about design patterns,databaseoptions,andgeneralFlaskfeatures:Â
Best practices on Flask designpatterns,Âhttp://flask.pocoo.org/docs/0.10/patterns/FlaskAPI,Âhttp://flask.pocoo.org/docs/0.12/api/Deploymentoptions,Âhttp://flask.pocoo.org/docs/0.12/deploying/

DuetothenatureofFlaskandthefactthatitreliesontheextensionoutsideofits small core, sometimes you might find yourself jumping from onedocumentationtoanother.Thiscanbefrustrating,buttheupsideisthatyouonlyneed toknow theextensionyouareusing,which I feel saves time in the longrun.Â

Summary
Inthischapter,westartedmovingdownthepathofbuildingRESTAPIsforournetwork. We looked at different popular Python web frameworks, namelyDjangoandFlask,andcomparedandcontrastedbetweenthetwo.BychoosingFlask, we are able to start small and expand on features by adding Flaskextensions.Â
Inourlab,weusedthevirtualenvironmenttoseparatetheFlaskinstallationbasefrom our global site-packages. The lab network consist of four nodes, two ofwhichwehavedesignatedasspinerouterswhiletheothertwoasleafs.Wetooka tourof thebasicsofFlaskandused thesimpleHTTPieclientfor testingourAPIsetup.Â
Among the different setups of Flask, we placed special emphasis on URLdispatchaswellastheURLvariablesbecausetheyaretheinitiallogicbetweentherequestersandourAPIsystem.WetookalookatusingFlask-SQLAlchemyand sqlite to store and return network elements that are static in nature. Foroperation tasks, we also created API endpoints while calling other programs,such as Pexpect, to accomplish our tasks. We improved the setup by addingasynchronoushandlingaswelluserauthenticationtoourAPI.Towardtheendofthechapter,we lookat someof theadditional resource linkswecan follow toaddevenmoresecurityandotherfeatures.Â
In thenext chapter,wewill shiftourgear to takea lookatSoftware-DefinedNetworking (SDN), starting with the original technology that someconsideredstartedtheSDNmovement:OpenFlow.Â

Chapter10.OpenFlowBasics
Upto thispoint in thebook,wehavebeenworkingwithanexistingnetworksandautomatingvarioustasksusingPython.Westartedwithbasicpseudo-humanautomation using SSH, interactionwith theAPI, higher-level abstractionwithAnsible, network security, and networkmonitoring. In the previous chapter,wealsolookedathowtobuildourownnetworkAPIwiththeFlaskframework.Thebookisstructuredthiswaybydesigntofocusonworkingwiththenetworkengineering field as it is today with the dominating vendors such as Cisco,Juniper,andArista.Theskillsintroducedsofarinthebookwillhelpyoufillinthegapasyouscaleandgrowyournetwork.Â
Onepointof thisconsistent theme ishowweareworkingwithin the realmofvendor walls. For example, if a Cisco IOS device does not provide an APIinterface, we have to use pexpect and paramiko for SSH. If the device onlysupports Simple Network Management Protocol (SNMP) for networkmonitoring,we have toworkwith SNMP.There arewayswe can get aroundtheselimitations,but,forthemostpart,theyfeeladhocandsometimeshardtoimplementwithoutfeelinglikeyouarevoidingyourdevicewarranty.
Perhaps sparked by these frustrations and the need to rapidly develop newnetwork features, the Software Defined Networking (SDN) movement wasborn.Ifyouworkintheindustryandhavenotlivedunderarockforthelastfewyears, no doubt you have heard of terms such as SDN, OpenFlow,OpenDaylight,andNetworkFunctionVirtualization(NFV).Perhapsyouevenpicked up this book because you have heard about software eating thenetworkingworldÂandwantedtoprepareyourselfforthefuture.SDNnodoubtoffersrealvalueandclearlydrivesinnovationatapacethathasnothappenedinthenetwork-engineeringworldforalongtime.Â
Note
AsanexampleofSDN-driveninnovation,oneofthehottestareasof networking, is software-defined WAN(https://en.wikipedia.org/wiki/Software-defined_networking),whichmanypredictwillcompletelyreplaceroutersintheedgeoftheWANinamulti-billionUSdollarindustry.Â

UnderstandingSDN,however, isnotasstraightforwardasitmayseem.Inanynew technology such as SDN, there is much marketing and hype in thebeginning. When there is no common standard, the technology is open forinterpretation, especially when the incumbent feels the need to maintain theirleadinthespacebyinjectingtheirownflavorÂtothemix.Ifyouwerelookingforanexample,looknofurtherthanCisco'sinitialsupportforOpenFlowintheNexus5500and6000lineofswitches, thentheintroductionoftheOpenFlow-competingOpFlex aswell as theCiscoOpenNetworkEnvironment (ONE)software controller and Cisco One Platform Kit (onePK). I get tired justbyÂkeepingtrackalltheCiscoSDN-relatedacronyms.Â
Note
IlayemphasisonCiscosinceIfollowthemmorecloselybecausetheyarethelong-termmarketleaders.Â
In this chapter, I would like to focus on the technology that many considerstartedtheSDNevolution,OpenFlow.Inanutshell,OpenFlowisatechnologythat's layered on top of the Transmission Control Protocol (TCP) thatseparatesthecontrolandforwardingpathsbetweenthephysicaldeviceandthecontroller. By separating the two functions and communication methods,OpenFlowallowsthedeterminationofthenetworkpathoutsideofthephysicaldevice. This enables the controller to use the software on the centralizedcontrollertohaveaholisticviewandsimplifytheamountofintelligenceneededontheindividualnetworkequipment.
Inthischapter,wewillcoverthefollowingtopics:
SettingupanOpenFlowlabusingvirtualmachinesÂIntroducingÂtheOpenFlowprotocolUsingMininetfornetworksimulationTakingalookataPython-basedOpenFlowcontroller,Ryu,toconstructaLayer2OpenFlowswitchUsingthesameRyucontrollertobuildaLayer3firewallapplicationIntroducingÂanalternativePythonOpenFlowcontroller,POX
Let'sgetstarted.Â

Labsetup
We will be using a number of tools, namely Mininet, Open vSwitch, theOpenFlowRyucontroller,andWiresharkwiththeOpenFlowdissector.Wecaninstalleachofthesetoolsseparately;however,itwilltakeawhilebeforewegeteverything installed and configured correctly. Luckily, SDN Hub(http://sdnhub.org) provides an all-in-one SDN app development starter VM(http://sdnhub.org/tutorials/sdn-tutorial-vm/) that includes all of the toolsmentionedÂhereandmore.ThebaseoperatingsystemisUbuntu14.04,whichissimilartotheVMthatwehavebeenusinguptothispoint,anditalsocontainsall the popular SDN controllers in one setting, such asOpenDaylight,ONOS,Ryu,Floodlight,POX,andTrema.Â
Note
SDN Hub also provides several useful tutorials under theTutorials header, including another Python-based OpenFlowcontroller,POX(http://sdnhub.org/tutorials/pox/).Â
For thischapterand thenext,wewillbeusing thisall-in-one image tohaveaself-contained OpenFlow network as a starting point to experiment and learnaboutOpenFlowandSDN.Itisaprettybigimagetobedownloaded,atabout3GB,but for theamountofwork it saves, I feel it isworth theeffort.Start thedownload,grabacupofcoffee,andoffwego!Â

SDNHuball-in-oneimagedownloadÂ
After the OVA image download, you can run the image on a number ofhypervisors,includingVirtualBoxandVMWare.IwouldrecommendusingthesamehypervisorasyourVIRLsetup,sinceinthefollowingÂchapters,wewilltry touse theOpenFlowenvironment to interactwith theVIRLVM.YoucanalsouseadifferentÂhypervisor,suchasHyper-VorVirtualBox,aslongasyoubridge the interfaces to the same virtual network as the VIRLVM for futurechapters.Â
Inmypersonalsetup,IimportedtheimagetoVMwareFusion:Â

VMWareFusionimportÂ
Therecommendedresourceallocationis2vCPUand2GBofmemory:

Imageresourceallocation
Forconsistency,IhavealsoaddedadditionalnetworkinterfacestotheVMNet,similartothesetupforthevirtualmachinewehavebeenusing:Â

VMNetsetupÂ
WewilladdtheIPaddressto/etc/network/interfaces/Âinordertopreservesettingsafterreboot:Â
Note
The default username and password combination isubuntu/ubuntu.Â
ubuntu@sdnhubvm:~[06:56]$cat/etc/network/interfaces
...
autoeth1
ifaceeth1inetstatic
address172.16.1.174
netmask255.255.255.0
WearenowreadytoworkwithOpenFlow,solet'stakeaquickoverviewoftheOpenFlowprotocol.Â

IntroducingOpenFlow
Let's start with an honest statement: OpenFlow is not SDN, and SDN is notOpenFlow.Peopleofteninterchangedthetwotermsintheearlydays,but theyare certainly not the same. OpenFlow is a very important building block ofSDN, andmany credit it to be the origin of theSDNmovement.OpenFloworiginallystartedatStanfordUniversityasaresearchproject,whicheventuallyjump-started the startups of Nicira and Big Switch Networks. Nicira wasacquiredbyVMWareand isnowpartof the company'snetwork-virtualizationproductline.ÂBigSwitchNetworksleadsanumberofOpenFlowopensourceprojectssuchasFloodlightController,SwitchLightOSforbar-metalEthernetswitches,andSwitchLightvSwitchforvirtualswitches.
TheoriginalversionofOpenFlow1.1wasreleasedinFebruary2011,andsoonafter the release, the OpenFlow effort was overseen by the Open NetworkFoundation, which retains control for the 1.2 release and beyond. In 2012,Googlemadeabigwavebydescribinghowthecompany'sinternalnetworkhadbeenredesigned torununderOpenFlowat theOpenNetworkingSummit.Thecurrent version of OpenFlow is 1.4, with most switches supporting version1.3.Â
Note
You can refer to the OpenFlow 1.4specificationÂatÂhttps://www.opennetworking.org/images/stories/downloads/sdn-resources/onf-specifications/openflow/openflow-spec-v1.4.0.pdf.You can refer to the OpenFlow 1.3 specificationhereÂhttps://www.opennetworking.org/images/stories/downloads/sdn-resources/onf-specifications/openflow/openflow-spec-v1.3.1.pdf.Â
Inmostcases,thecontrollerisasoftware-basedpackagethatsupportsarangeofOpenFlow versions from 1.1 and up. The switches, however, vary in theirsupportfor theversionofOpenFlowspecification.Tohelpwith theadaptationand increase confidence, the Open Network Foundation provides certificationlabs for switches (https://www.opennetworking.org/openflow-conformance-

certification) and publishes the list of certified switches. In addition, thecontroller manufacturer, such as Ryu, might also perform their owncompatibility tests (https://osrg.github.io/ryu/certification.html) and publish theresults.Â
Let'slookatthebasicOpenFlowoperationsinthenextsection.Â
Basicoperations
At itscore, theOpenFlowprotocolspecifieshowtheswitchand thecontrollershould communicateÂwith each other.When the switch initially boots up, itregistersitselfwiththecontroller.Inmostcases,thecontrollerIPisspecifiedtotheswitcheitherduringthebootupprocessÂorconfiguredontheswitchoutofbandviamanagement.Theswitchwilltheninitiatethechanneltocommunicatewiththecontroller:
 OpenFlow switch to controller communication(source:Âhttp://archive.openflow.org/documents/openflow-spec-v1.1.0.pdf)

Following the bootup, the switch will communicate with the controller viaseveraltypesofmessages;Âthemainmessagesareasfollows:Â
Symmetric: Symmetric messages are initiated by either the switch orcontroller. Typical symmetric messages are hello messages, echorequest/reply messages, and other experimental messages for futurefeatures.ÂController-to-switch: Controller-to-switch messages are initiated by thecontroller to manage the switch or query the switch for its state. Theyinclude feature and configuration queries from controller to switch,statistics collection, and barrier messages for operation-completionnotifications. Also, the controller can initiate modify-state messages tochangeflowsandgroupsontheswitchaswellaspacket-outinresponsetoswitchPacketInmessagedtoforwardapacketoutofaswitchport.ÂAsynchronous: The switches send the controller asynchronousmessagesforpacketarrival, statechange,orerror.When thepacketarrivesand theswitchdoesnothaveanexistingmatchingflowentry,theeventwillbesentto the controller for action as a PacketIn message. The controller willrespondwithapacket-outmessage.Theswitchwillalsosendanyerrorandport-statuschangeaswellasflowremovalasasynchronousmessagestothecontroller.Â
Obviously, there is no need tomemorize the differentmessages: the commonmessageswillbecomenaturaltoyouthemoreyouuseandseethem.Themoreobscuremessagescanalwaysbeenlookedupwhenneeded.Whatisimportantisthe fact that the switchand thecontrollerareboth inconstantcommunication,and they need to synchronize to a certain degree in order for the network tofunctionproperly.Â
The point of the channel establishment and all the messages exchanged is toallow the network device to take proper forwarding action based onwhat itknowsabout thepacket.Wewill lookat theavailablematchingfields inabit,but the forwarding decisions are generally done by matching with the flowentries.Manyflowentriescanexistinaflowtable,andeachOpenFlowswitchcontainsmultiple flow tables at differentpriorities.Whenapacket arrives atthe device, it is matched against the highest-priority flow table and the flowentriesinthetable.Whenamatchisfound,anactionsuchasforwardingoutan

interfaceorgoingtoanothertableisexecuted.Ifthereisnomatch,forexampleatablemiss,youcanconfiguretheactiontobeasfollows:
DropthepacketPassthepackettoanothertableSend the packet to the controller via a PacketInmessage andwait forfurtherinstructions
The OpenFlow packet processing pipeline(source:Â https://www.opennetworking.org/images/stories/downloads/sdn-resources/onf-specifications/openflow/openflow-spec-v1.3.1.pdf)
Asyoucansee,theOpenFlowoperationisrelativelysimpleandstraightforward.Besidestheseparationofcontrolanddataplanes,theuniquenessofOpenFlowisthatitallowspacketstobegranularlymatched,thusenablingafinercontroloveryourpacketflow.Â
AsofOpenFlow1.3,thefollowingsetofmatchfieldsarespecified:Â

OpenFlow 1.3 flow match fields(source:Â https://www.opennetworking.org/images/stories/downloads/sdn-resources/onf-specifications/openflow/openflow-spec-v1.3.1.pdf)
Fromtheprecedingchart,manyofthefieldsOpenFlowcanmatchagainstarenodifferentthanthantheexistinglayer2to4headers.Sowhatisthebigdeal?Ifwelookbackat traditionalnetworkdevices,aswitchthat isexaminingVLAN

information might not be looking at IP headers, a router making forwardingdecisions based on IP headers is not digging into TCP ports, and anMPLS-capable device might only be dealing with label headers. OpenFlow allowsnetworkdevicestobecontrolledbyasoftwarecontrollerthatlooksatalloftheavailable information; thus, it can make a so-called white box to be anynetwork function as it desires. It also allows the software controller to have atotal view of the network instead of each device making forwardingdecisionsÂtothebestofitsknowledge.ThismakesOpenFloworothersoftwarecontrollers that provide the same function very desirable for networkoperators.Â
OpenFlow1.0vs1.3
Youmight bewondering about the difference betweenOpenFlow 1.0 vs. 1.3,and what happened to OpenFlow 1.2. OpenFlow 1.0 represents the very firstefforttointroducetheconceptofprogrammableflowinswitchestotheworld.Itincludesa limitedsubsetofswitch-matchingandactionfunctions,butmanyinthe industry do not consider OpenFlow 1.0 to include sufficient features forproduction networks. It is really about the introduction of the concept andshowing thepotential of the technology to the industry.Theconceptwaswellreceivedbytheindustry,andthestandardmakerswerequicktostartworkingoniterationsof thespecification, suchasversion1.1and1.2.However,hardwareimplementationofa technologytakesmuchlongerthanthespeedatwhichthespecificationsarewritten.Manyofthevendorscannotkeepupwiththespeedofspecification releases. It became obvious that the specification needs to slowdownabitandworkwithequipmentmakerssotherecanbeactualhardwaretorunournetworkswhenthespecificationcomesout.OpenFlow1.3waswritteninconjunctionwithequipmentmakers'timingtohavehardwareswitchsupport.ItisthefirstversionofOpenFlowconsideredbymanytobeproductionready.ÂNowthatwehavelearnedaboutthebasicsofOpenFlow,wearereadytotakealookattheprotocolinaction.Butbeforewecandothat,wewillneedaswitchthat understands OpenFlow as well as a few hosts connected to that switch.Luckily,Mininetprovidesboth. In thenextsection,wewill lookatMininet,anetworkemulationtoolthatwecanusetoexperimentwithOpenFlow.Â

Mininet
Mininet, fromÂhttp://mininet.org/, creates a virtual networkworkingwith theOpenFlowcontrolleronasingleLinuxkernel.Ituseslightweightvirtualizationtomakeasinglesystemlooklikeacompletenetwork,consistingofend-hosts,switches,routers,andlinks.ThisissimilartoVIRL,orperhapsGNS3,whichwehavebeenusing,exceptitismuchlighterinweightthaneither,soyoucanrunmorenodesmuchfaster.
AllMininet commands startswithmn, andyou canget a helpmenuwith the-hÂoption.Among the options, pay special attention to the switch, controller,andtopologyoptions,whichwewilluseoften.Theyareusedtospecifythetypeof switch, controller type, location, and the topology. The MAC optionautomaticallysetsthehostMACaddresstoeasilyidentifythehostswhenlayer2isinvolved,suchaswhenthehostissendingARPrequests:
$sudomn-h
...
Options:
...
--
switch=SWITCHdefault|ivs|lxbr|ovs|ovsbr|ovsk|user[,param=value...]
--controller=CONTROLLER
--topo=TOPOlinear|minimal|reversed|single|torus|tree[,param=value
--macautomaticallysethostMACs
...
Mininet provides several defaults; to launch the basic topology with defaultsettings,youcansimplytypeinthesudomncommand:Â
$sudomn
***NodefaultOpenFlowcontrollerfoundfordefaultswitch!
***FallingbacktoOVSBridge
***Creatingnetwork
***Addingcontroller
***Addinghosts:
h1h2
***Addingswitches:
s1
***Addinglinks:
(h1,s1)(h2,s1)

***Configuringhosts
h1h2
***Startingcontroller
c0
***Starting1switches
s1...
***StartingCLI:
mininet>
Asyou can see, the command creates two hosts and one switch hostwith abasicÂOpenFlowcontroller,andthendropstheuserintotheMininetCLI.Fromthe CLI, you can interact with the host and gather information about thenetwork,muchliketheGNS3console:Â
mininet>nodes
availablenodesare:
h1h2s1
mininet>net
h1h1-eth0:s1-eth1
h2h2-eth0:s1-eth2
s1lo:s1-eth1:h1-eth0s1-eth2:h2-eth0
mininet>links
h1-eth0<->s1-eth1(OKOK)
h2-eth0<->s1-eth2(OKOK)
mininet>help
Documentedcommands(typehelp<topic>):
...
AveryusefulfeatureoftheMininetCLIisthatyoucaninteractwiththehostsdirectly,asifyouwereattheirconsoleprompts:Â
mininet>h1ifconfig
h1-eth0Linkencap:EthernetHWaddr16:e5:72:7b:53:f8
inetaddr:10.0.0.1Bcast:10.255.255.255Mask:255.0.0.0
...
loLinkencap:LocalLoopback
inetaddr:127.0.0.1Mask:255.0.0.0
...
mininet>h2ps
PIDTTYTIMECMD
9492pts/700:00:00bash
10012pts/700:00:00ps

mininet>
There are many more useful options in Mininet, such as changing topology,running iperf tests, introduce delay and bandwidth limitation on links, andrunningcustomtopologies.Inthischapter,wewillmostlyuseMininetwiththefollowingoptions:Â
$sudomn--toposingle,3--mac--controllerremote--switchovsk
TheprecedingÂcommandwillstartanetworkemulationwithoneswitch,threehosts,automaticallyassignedMACaddressesforthehosts,aremotecontroller,andanOpenvSwitchastheswitchtype.Â
Note
The Mininet walk-through provides an excellent tutorial ofMininetatÂhttp://mininet.org/walkthrough/.Â
WearenowreadytolookattheOpenFlowcontrollerthatwewillbeusing,Ryu.

TheRyucontrollerwithPython
Ryuisacomponent-basedSDNcontrollerfullywritteninPython.Itisaprojectbacked byNippon Telegraph and Telephone (NTT) Labs. The project hasJapaneseroots;Ryumeans"flow"inJapaneseandispronounced"ree-yooh"inEnglish,whichmatcheswellwiththeOpenFlowobjectiveofprogrammingflowinnetworkdevices.ÂBybeingcomponentbased,theRyuframeworkbreaksthesoftwareitusesintoindividualportionsthatcanbetakeninpartorasawhole.For example, onyour virtualmachine, under/home/ubuntu/ryu/ryu, you canseeseveralfolders,includingapp,base,andofproto:Â
ubuntu@sdnhubvm:~/ryu/ryu[00:04](master)$pwd
/home/ubuntu/ryu/ryu
ubuntu@sdnhubvm:~/ryu/ryu[00:05](master)$ls
app/cmd/exception.pyc__init__.pylog.pyctopology/
base/contrib/flags.py__init__.pycofproto/utils.py
cfg.pycontroller/flags.pyclib/services/utils.pyc
cfg.pycexception.pyhooks.pylog.pytests/
Each of these folders contains different software components.The base foldercontains the app_manager.py file, which loads the Ryu applications, providescontexts, and routes messages among Ryu applications. The app foldercontainsvariousapplicationsthatyoucanloadusingtheapp_manager,suchaslayer 2 switches, routers, and firewalls. The ofproto folder containsencoders/decodersasperOpenFlowstandards:version1.0,version1.3,andsoon.By focusing on the components, it is easy to only pick the portion of thepackagethatyouneed.Let'slookatanexample.First,let'sfireupourMininetnetwork:Â
$sudomn--toposingle,3--mac--controllerremote--switchovsk
...
***StartingCLI:
mininet>
Then, in a separate terminalwindow,we can run the simple_switch_13.pyapplication by placing it as the first argument after ryu-manager.RyuÂapplicationsaresimplyPythonscripts:Â
$cdryu/

$./bin/ryu-managerryu/app/simple_switch_13.py
loadingappryu/app/simple_switch_13.py
loadingappryu.controller.ofp_handler
instantiatingappryu/app/simple_switch_13.pyofSimpleSwitch13
instantiatingappryu.controller.ofp_handlerofOFPHandler
You can run a quick check between the two hosts in Mininet to verifyreachability:Â
mininet>h1ping-c2h2
PING10.0.0.2(10.0.0.2)56(84)bytesofdata.
64bytesfrom10.0.0.2:icmp_seq=1ttl=64time=8.64ms
64bytesfrom10.0.0.2:icmp_seq=2ttl=64time=0.218ms
---10.0.0.2pingstatistics---
2packetstransmitted,2received,0%packetloss,time1003ms
rttmin/avg/max/mdev=0.218/4.430/8.643/4.213ms
mininet>
Youcanalsoseeafeweventshappeningonyourscreenwhereyoulaunchedtheswitchapplication:
packetin100:00:00:00:00:01ff:ff:ff:ff:ff:ff1
packetin100:00:00:00:00:0200:00:00:00:00:012
packetin100:00:00:00:00:0100:00:00:00:00:021
Asyouwould expect, host 1 broadcasts the request, towhich host 2 answers.Thenhost1willproceedwithsendingthepingpacketouttohost2.NoticethatwehavesuccessfullysenttwoICMPpacketsfromhost1tohost2;however,thecontroller is only seeing 1 packet being sent across. Also notice that the firstpingpackettookabout8.64ms,whilethesecondpingpackettookabout0.218ms,almosta40ximprovement!Whyis that?Whatwasthecauseof thespeedimprovement?Â
YoumayhavealreadyguesseditifyouhavereadtheOpenFlowspecificationorhaveprogrammedaswitchbefore.Ifyouputyourselfintheswitch'sposition--be the switch, if you will--when you received the first broadcast packet, youwouldn't know what to do with the packet. This is considered a table missbecausethereisnoflowinanyofthetables.Ifyourecall,wehavethreeoptionsfortablemisses;thetwoobviousoptionswouldbetoeitherdropthepacketortosend it to the controller and wait for further instructions. As it turns out,simple_switch_l3.py installeda flowaction for flowmisses tobesent to the

controller,sothecontrollerwouldseeanytablemissasaPacketInevent:Â
actions=[parser.OFPActionOutput(ofproto.OFPP_CONTROLLER,
ofproto.OFPCML_NO_BUFFER)]
self.add_flow(datapath,0,match,actions)
Thatexplainsthefirstthreepackets,sincetheywereunknowntotheswitch.Thesecond questionwe hadwaswhy did the controller not see the second ICMPpacketfromh1toh2?Asyouwouldhavealreadyguessed,bythetimewesawtheMACÂaddress fromh2 toh1,wewould have had enough information toinstalltheflowentries.Therefore,whenthesecondICMPfromh1toh2arrivesattheswitch,theswitchalreadyhasaflowmatchandnolongerneedstosendthepacket to thecontroller.This iswhythesecondICMPhadadramatic timeimprovement:mostofthedelayinthefirstpacketwascausedbythecontrollerprocessingandcommunication. Thisbringsus toagoodpoint to todiscusssomeoftheOpenvSwitchcommandsthatwecanusetointeractwiththeswitchdirectly.Â
OpenvSwitchcommands
There are several command-line options forOpenvSwitch as it has become averypopularsoftware-basedswitchforprojectssuchasOpenStacknetworkingandOpenFlow.Thereare threepopular command-line tools forOpenvSwitchadministration:
1. ovs-vsctl:ThisconfiguresOpenvSwitchparameterssuchasports,addingordeletingbridges,andVLANtagging
2. ovs-dpctl: This configures the data path of Open vSwitch, such asshowingthecurrentlyinstalledflowsÂ
3. ovs-ofctl:Â This combines the functions of ovs-vsctl as well asovs-dpctlbutismeantforOpenFlowswitches,thustheofÂinthename
Let's continue to use the Layer 2 switch example as before and look at someexamplesofthecommand-linetools.Firstup,let'slookatÂovs-vsctlandovs-dpctlforconfiguringandqueryingOpenvSwitch:
$ovs-vsctl-V
ovs-vsctl(OpenvSwitch)2.3.90

CompiledJan8201511:52:49
DBSchema7.11.1
$sudoovs-vsctlshow
873c293e-912d-4067-82ad-d1116d2ad39f
Bridge"s1"
Controller"ptcp:6634"
Controller"tcp:127.0.0.1:6633"
is_connected:true
fail_mode:secure
Port"s1"
Interface"s1"
type:internal
...
Youcanalsoqueryaspecificswitchformoreinformation:
ubuntu@sdnhubvm:~[12:43]$sudoovs-vsctllist-br
s1
ubuntu@sdnhubvm:~[12:43]$sudoovs-vsctllist-portss1
s1-eth1
s1-eth2
s1-eth3
ubuntu@sdnhubvm:~[12:43]$sudoovs-vsctllistinterface
_uuid:399a3edc-8f93-4984-a646-b54cb35cdc4c
admin_state:up
bfd:{}
bfd_status:{}
cfm_fault:[]
cfm_fault_status:[]
...
ubuntu@sdnhubvm:~[12:44]$sudoovs-dpctldump-flows
flow-dumpfrompmdoncpucore:32767
recirc_id(0),in_port(2),eth(dst=00:00:00:00:00:02),eth_type(0x0800),ipv4(frag=no),packets:0,bytes:0,used:never,actions:1
recirc_id(0),in_port(1),eth(dst=00:00:00:00:00:01),eth_type(0x0800),ipv4(frag=no),packets:1,bytes:98,used:2.316s,actions:2
Bydefault,OVSsupportsOpenFlow1.0and1.3.Oneoftheuseful thingsyoucan use ovs-vsctl to do, for example, is to force Open vSwitch to supportOpenFlow1.3only(wewilllookatovs-ofctlinabit;herewearejustusingittoverifytheOpenFlowversion):Â
$sudoovs-ofctlshows1

OFPT_FEATURES_REPLY(xid=0x2):dpid:0000000000000001
$sudoovs-vsctlsetbridges1protocols=OpenFlow13
$sudoovs-ofctlshows1
2017-03-
30T21:55:20Z|00001|vconn|WARN|unix:/var/run/openvswitch/s1.mgmt:versionnegotiationfailed(wesupportversion0x01,peersupportsversion0x04)
As an alternative, you can also use the ovs-ofctl command-line tools forOpenFlowswitches:Â
$sudoovs-ofctlshows1
OFPT_FEATURES_REPLY(xid=0x2):dpid:0000000000000001
n_tables:254,n_buffers:256
capabilities:FLOW_STATSTABLE_STATSPORT_STATSQUEUE_STATSARP_MATCH_IP
actions:outputenqueueset_vlan_vidset_vlan_pcpstrip_vlanmod_dl_srcmod_dl_dstmod_nw_srcmod_nw_dstmod_nw_tosmod_tp_src
...
$sudoovs-ofctldump-flowss1
NXST_FLOWreply(xid=0x4):
cookie=0x0,duration=790.374s,table=0,n_packets=4,n_bytes=280,idle_age=785,priority=1,in_port=2,dl_dst=00:00:00:00:00:01actions=output:1
cookie=0x0,duration=790.372s,table=0,n_packets=3,n_bytes=238,idle_age=785,priority=1,in_port=1,dl_dst=00:00:00:00:00:02actions=output:2
cookie=0x0,duration=1037.897s,table=0,n_packets=3,n_bytes=182,idle_age=790,priority=0actions=CONTROLLER:65535
Asyoucan see from theoutput, the flowsareunidirectional.Even though thecommunicationhappens bidirectionally (h1 toh2Âand fromÂh2 back toh1),theflowsareinstalledindividually.Thereisoneflowfromh1toh2,andanotherflow from h2 to h1; together, they form a bidirectional communication. Asnetworkengineers,whosometimestakeforgrantedthataforwardpathfromasourcetodestinationdoesnotnecessarilyguaranteeareturnpathinthecaseofOpenFloworanyothernetworkapplication,bidirectionalcommunicationneedstobekeptinmind.Â
Twootherpointstonoteabouttheflowoutputareasfollows:
 dpid represents the identification of the switch. If we have multipleswitches,theywillbedifferentiatedbydpid.Alsonotethemacaddressofthehosts.Becauseweusethe--macÂoption,host1hasmacaddressÂ00:00:00:00:00:01Âandhost2hasmacaddressof00:00:00:00:00:02,whichmakesitveryeasytoidentifythehostsatthelayer2level:Â
OFPT_FEATURES_REPLY(xid=0x2):dpid:0000000000000001

recirc_id(0),in_port(2),eth(dst=00:00:00:00:00:02),eth_type(0x0800),ipv4(frag=no),packets:0,bytes:0,used:never,actions:1
recirc_id(0),in_port(1),eth(dst=00:00:00:00:00:01),eth_type(0x0800),ipv4(frag=no),packets:1,bytes:98,used:2.316s,actions:2
Thecommand-linetoolsareveryusefulwhenyouneedtoconfiguretheswitchmanuallyforbothswitchparametersaswellasdatapath,say,addingordeletingaflowmanually.TheanalogyIwouldliketomakeistheyaresimilartoout-of-bandmanagementofaphysicalswitch.Theyarehelpfulwhenyouneedtoeitherisolate the controller or the switch for troubleshooting. They are also usefulwhenyouarewritingyourownnetworkapplication,aswewilldolaterinthischapter, toverify that thecontroller is instructing theswitch to install flowsasexpected. Wehaveseen theprocessof launchinga typicalMininetnetworkwithaLayer2 learningswitchaswell ascommand-line tools toverify switchoperations. Now let's take a look at launching different applications via ryu-manager.Â
TheRyufirewallapplication
Asdiscussedearlierinthechapter,partoftheattractionofOpenFlowisthatthetechnologyallows thecontroller todecide the functionsof theswitch. Inotherwords,whiletheswitchitselfhousesÂtheflow,thecontrollerdecidesthelogicofmatchingfieldsandtheflowstoprogramtheswitchwith.Let'sseeexamplesofhowwecanusethesameMininettopology,butnowmaketheswitchbehavelikea firewall.Wewill useoneof the ready-made sample applications, calledrest_firewall.py,asanexample.ÂFirst,wewilllaunchtheMininetnetworkandsettheswitchversiontoOpenFlow1.3:
$sudomn--toposingle,3--mac--controllerremote--switchovsk
$sudoovs-vsctlsetbridges1protocols=OpenFlow13
Then under the /home/ubuntu/ryu directory, we will launch the firewallapplicationwith theverbose option.Therest_firewall.pyÂfilewaspartoftheexampleapplications thatcamewith theRyusourcecode.Wewill see theswitchregistertothecontroller:Â
$./bin/ryu-manager--verboseryu/app/rest_firewall.py
...
creatingcontextdpset
creatingcontextwsgi
instantiatingappryu/app/rest_firewall.pyofRestFirewallAPI
...

(3829)wsgistartinguponhttp://0.0.0.0:8080/
...
EVENTdpset->RestFirewallAPIEventDP
[FW][INFO]dpid=0000000000000001:Joinasfirewall.
Bydefault,theswitchisdisabled.Sowewillenabletheswitchfirst:Â
$curl-XGEThttp://localhost:8080/firewall/module/status
[{"status":"disable","switch_id":"0000000000000001"}]
$ curl -
XPUThttp://localhost:8080/firewall/module/enable/0000000000000001
[{"switch_id":"0000000000000001","command_result":{"result":"success","details":"firewallrunning."}}]
Bydefault,whenyoutrytopingfromh1toh2,thepacketisblocked:
mininet>h1ping-c2h2
PING10.0.0.2(10.0.0.2)56(84)bytesofdata.
---10.0.0.2pingstatistics---
2packetstransmitted,0received,100%packetloss,time1004ms
WecanseethisintheverboseoutputoftheRyuterminalwindow:Â
[FW]
[INFO]dpid=0000000000000001:Blockedpacket=ethernet(dst='00:00:00:00:00:02',ethertype=2048,src='00:00:00:00:00:01'),ipv4(csum=56630,dst='10.0.0.2',flags=2,header_length=5,identification=18800,offset=0,option=None,proto=1,src='10.0.0.1',tos=0,total_length=84,ttl=64,version=4),icmp(code=0,csum=58805,data=echo(data='xddx84xddXx00x00x00x00x84xc6x02x00x00x00x00x00x10x11x12x13x14x15x16x17x18x19x1ax1bx1cx1dx1ex1f!"#$%&'()*+,-./01234567',id=4562,seq=1),type=8)
WecannowaddaruletopermitICMPpackets:Â
$ curl -X POST -
d'{"nw_src":"10.0.0.1","nw_proto":"ICMP"}'http://localhost:8080/firewall/rules/0000000000000001
[{"switch_id":"0000000000000001","command_result":[{"result":"success","details":"Ruleadded.:rule_id=1"}]}]
$ curl -X POST -
d'{"nw_src":"10.0.0.2","nw_proto":"ICMP"}'http://localhost:8080/firewall/rules/0000000000000001
[{"switch_id":"0000000000000001","command_result":[{"result":"success","details":"Ruleadded.:rule_id=2"}]}]
WecanverifytherulesetviatheAPI:Â
$curl-XGEThttp://localhost:8080/firewall/rules/0000000000000001
[{"access_control_list":[{"rules":[{"priority":1,"dl_type":"IPv4","nw_proto":"ICMP","nw_src":"10.0.0.1","rule_id":1,"actions":"ALLOW"},{"priority":1,"dl_type":"IPv4","nw_proto":"ICMP","nw_src":"10.0.0.2","rule_id":2,"actions":"ALLOW"}]}],"switch_id":"0000000000000001"}]
NowtheMinineth1Âhostcanpingh2:Â

mininet>h1ping-c2h2
PING10.0.0.2(10.0.0.2)56(84)bytesofdata.
64bytesfrom10.0.0.2:icmp_seq=1ttl=64time=0.561ms
64bytesfrom10.0.0.2:icmp_seq=2ttl=64time=0.319ms
---10.0.0.2pingstatistics---
2packetstransmitted,2received,0%packetloss,time1000ms
rttmin/avg/max/mdev=0.319/0.440/0.561/0.121ms
mininet>
Note
FormoreRyufirewallapplicationAPIs,consulttheRyumanualatÂhttps://github.com/osrg/ryu-book.
I don't know about you, but the first time I saw this reference application, itreally blewme away! Â The reason it is impressive to me is because of theagilityitprovides.Notethatinourexample,wedidnotchangethetopologyorthevirtualswitch.Wewereabletoalterthevirtualswitchfunctionfromlayer3switching to a firewall simply by changing the Ryu application. Imagine theamountofworkitwill takeonvendor-basedequipment: itwouldhavetakenalotlongerthanwejustdid.Ifwehavesomebrandnewideaaboutafirewall,thisis would be a great way to shorten the develop-test-trial cycle. To me, thisexampleillustratestheflexibilityandthepowerofOpenFlowandSDN.Â
WehaveseenhowOpenFlowandSDNenablequickprototypingof ideasandfeaturesviasoftware.Inthenextsection,wewillstarttolearnhowwecanwriteour own network application for the Ryu controller.Wewill start by lookingcloselyattheLayer2switchapplicationthatweusedbefore.Â

Layer2OpenFlowswitch
Whilewe have lots of choiceswhen it comes to learning and dissecting RyuOpenFlowapplications,wewanttopicksomethingsimplethatwehavealreadyworkedwith.Bysimple,Imeanwewanttopicksomethinginwhichweknowhowthetechnologyworkssowecanfocusonjustthenewinformation,suchashowRyu uses Python to implementOpenFlow technologies. To that end, theLayer 2 OpenFlow switch application that we saw earlier would be a goodcandidate.Mostofusnetworkengineersknowhowswitchingworks,especiallyinasingle-switchsetup(withoutspanningtree,whichisnotsosimple).
Asareminder,ifyouareusingtheSDNHubvirtualmachineandareloggedinas the default user Ubuntu, the application file is located under/home/ubuntu/ryu/ryu/app/simple_switch_13.py:Â
ubuntu@sdnhubvm:~[21:28]$lsryu/ryu/app/simple_switch_13.py
ryu/ryu/app/simple_switch_13.py
Thefileissurprisinglyshort:fewerthan100linesofcodeminusthecommentsandimportstatements.Thisismainlyduetothefactthatweareabletoabstractand reuse common Python codes such as packet decode, controller, andofprotocol.Let'sstartbythinkingaboutwhatacontrollerandswitchshoulddointhisscenario.
Planningyourapplication
Before you canwrite your application, you should at least have an outline ofwhat a successful application would look like. It does not need to be verydetailed; infact,mostpeopledon'thaveall thedetails.Butyoushouldhaveatleastahigh-leveloutlineofwhatyouenvisionittobe.Itislikewritinganessay:youwould need to knowwhere to start, then illustrate your points, and knowwhattheendingwouldbelike.Inourscenario,weknowourapplicationshouldperformthesameasaswitch,sowewouldenvisionittodothefollowing:Â
1. Upon initialization, the switch will negotiate its capabilities with thecontroller so that the controller will know which version of OpenFlow

operationstheswitchcanperform.Â
2. Thecontrollerwill install a tablemiss flowaction so that the switchwillsendanytablemissflowstothecontrollerandaPacketIneventforfurtherinstructionsfromthecontroller.Â
3. Upon receiving the PacketIn event, the controller will perform thefollowing:1. Learn the MAC address connected to the port. Record the MAC
addressandportinformation.Â2. Look at the destination MAC address and see whether the host is
alreadyknown. If it is aknownhost, use thePacketOut functionontheportandinstalltheflowforfuturepackets.Ifthehostisunknown,usethePacketOutfunctiontofloodtoallports.Â
4. This step is optional during initial application construction, but when inproduction,youwanttosetatimeoutvalueassociatedwithboththeMACaddresstableaswellastheflow.Thisistoconserveyourresourcesaswellastoavoidstaleentries.

OpenFlowpacket-processingpipeline
Nowthatwehaveagoodideaofwhatisrequiredofus, let's lookat thestockapplicationanditsdifferentcomponents.Â

Applicationcomponents
Inatypicaldevelopmentcycle,wewillstarttodeveloptheapplicationafterwehaveplannedouttherequirements.However,sinceweareinlearningmodeandalreadyknowofareferenceapplication,itwouldbesmartofustoexaminethesimple_switch_13.pyapplicationasastartingpoint.Basedonwhatwe'veseen,we can also tweak ormake our own code based on this reference to help usunderstand the Ryu framework better. Let's make a separate folder calledmastering_python_networkingÂunder/home/ubuntu/ryuÂandstoreour fileinthere:
$mkdirmastering_python_networking
In the folder, you can copy and paste the following code, fromchapter10_1.py:Â
fromryu.baseimportapp_manager
fromryu.controllerimportofp_event
fromryu.controller.handlerimportCONFIG_DISPATCHER,MAIN_DISPATCHER
fromryu.controller.handlerimportset_ev_cls
fromryu.ofprotoimportofproto_v1_3,ofproto_v1_0
classSimpleSwitch(app_manager.RyuApp):
OFP_VERSIONS=[ofproto_v1_0.OFP_VERSION]
def__init__(self,*args,**kwargs):
super(SimpleSwitch,self).__init__(*args,**kwargs)
self.mac_to_port={}
@set_ev_cls(ofp_event.EventOFPSwitchFeatures,CONFIG_DISPATCHER)
defswitch_features_handler(self,ev):
print("evmessage:",ev.msg)
datapath=ev.msg.datapath
print("datapath:",datapath)
ofproto=datapath.ofproto
print("ofprotocol:",ofproto)
parser=datapath.ofproto_parser
print("parser:",parser)
Thisfileisverysimilartothetopportionofthereferenceapplication,withafewexceptions:Â

Since Open vSwitch supports both OpenFlow 1.0 and 1.3, we purposelywanttoregistertheswitchwithOpenFlow1.0We are using the print function to get the output of ev, datapath,ofprotocol,andparser
We can see from theRyuAPI document, http://ryu.readthedocs.io/en/latest/,that a Ryu application is a Python module that defines a subclass ofryu.base.app_manager.RyuApp. Our switch class is a subclass of this baseclass. We also see the decorator of ryu.controller.handler.set_ev_cls,which is a decorator for theRyu application to declare an event handler. Thedecorator takes twoarguments: the firstone indicateswhicheventwill invokethe function, and the secondargument indicates the stateof the switch. Inourscenario, we are calling the function when there is an OpenFlow SwitchFeaturesevent;CONFI_DISPATCHERmeanstheswitchisinthenegotiationphaseofversionisnegotiatedandthefeatures-requestmessagehasbeenÂsent.Ifyouare curious about the different switch states, you can check out thedocumentation at http://ryu.readthedocs.io/en/latest/ryu_app_api.html#ryu-base-app-manager-ryuapp. Although our application does not domuch at thistime,itisnonethelessacompleteapplicationthatwecanrun:Â
$ bin/ryu-manager --
verbosemastering_python_networking/chapter10_1.py
Whenyouruntheapplication,youwillnoticethattheswitchversionisnow1.0(0x1)insteadofversion1.3(0x4)aswellasthedifferentobjectsthatweprintedout.ThisishelpfulbecauseitgivesusthefullpathtotheobjectifwewanttolookuptheAPIdocumentation:Â
...
switchfeaturesevversion:0x1
...
('ev:',OFPSwitchFeatures(actions=4095,capabilities=199,datapath_id=1,n_buffers=256,n_tables=254,ports=
{1: OFPPhyPort(port_no=1,hw_addr='92:27:5b:6f:97:88',name='s1-
eth1',config=0,state=0,curr=192,advertised=0,supported=0,peer=0),2:OFPPhyPort(port_no=2,hw_addr='f2:8d:a9:8d:49:be',name='s1-
eth2',config=0,state=0,curr=192,advertised=0,supported=0,peer=0),3:OFPPhyPort(port_no=3,hw_addr='ce:34:9a:7d:90:7f',name='s1-
eth3',config=0,state=0,curr=192,advertised=0,supported=0,peer=0),65534:OFPPhyPort(port_no=65534,hw_addr='ea:99:57:fc:56:4f',name='s1',config=1,state=1,curr=0,advertised=0,supported=0,peer=0)}))
('datapath:',<ryu.controller.controller.Datapathobjectat0x7feebca5e290>)
('ofprotocol:',<module'ryu.ofproto.ofproto_v1_0'from'/home/ubuntu/ryu/ryu/ofproto/ofproto_v1_0.pyc'>)
('parser:',<module'ryu.ofproto.ofproto_v1_0_parser'from'/home/ubuntu/ryu/ryu/ofproto/ofproto_v1_0_parser.pyc'>)

Note
Refertohttp://ryu.readthedocs.io/en/latest/formoreRyuAPIs.Â
WecannowtakealookathandlingPacketIneventstomakeasimplehub.Thefilecanbecopiedfromchapter10_2.pytothesamedirectory.Thetopportionofthefileisidenticaltothepreviousversionwithouttheprintstatementsoutsideoftheeventmessage:Â
classSimpleHub(app_manager.RyuApp):
OFP_VERSIONS=[ofproto_v1_0.OFP_VERSION]
#OFP_VERSIONS=[ofproto_v1_3.OFP_VERSION]
def__init__(self,*args,**kwargs):
super(SimpleHub,self).__init__(*args,**kwargs)
@set_ev_cls(ofp_event.EventOFPSwitchFeatures,CONFIG_DISPATCHER)
defswitch_features_handler(self,ev):
message=ev.msg
print("message:",message)
WhatisnowdifferentisthenewfunctionthatiscalledwhenthereisaPacketInevent:Â
@set_ev_cls(ofp_event.EventOFPPacketIn,MAIN_DISPATCHER)
defpacket_in_handler(self,ev):
msg=ev.msg
print("evmessage:",ev.msg)
datapath=msg.datapath
ofproto=datapath.ofproto
ofp_parser=datapath.ofproto_parser
actions=[ofp_parser.OFPActionOutput(ofproto.OFPP_FLOOD)]
out=ofp_parser.OFPPacketOut(
datapath=datapath,buffer_id=msg.buffer_id,in_port=msg.in_port,
actions=actions)
datapath.send_msg(out)
We use the same set_ev_cls, but to specify by calling the function foraÂPacketIn event.We also specified the state of the switch after the featurenegotiationiscompletedviaMAIN_DISPATCHER.Aswecanseefromthepreviousexample, the event message typically contains the information that we areinterestedin;therefore,weareprintingitoutinthisfunctionaswell.Whatwe

added is an OpenFlow version 1.0parser,ÂOFPActionOutputÂ(http://ryu.readthedocs.io/en/latest/ofproto_v1_0_ref.html#action-structures), for flooding all the ports as well as a PacketOut specifying thefloodingaction.Â
Ifwelaunchtheapplication,wewillseethesameswitchfeaturemessage.Wecanalsopingfromh1toh2:Â
mininet>h1ping-c2h2
PING10.0.0.2(10.0.0.2)56(84)bytesofdata.
64bytesfrom10.0.0.2:icmp_seq=1ttl=64time=4.89ms
64bytesfrom10.0.0.2:icmp_seq=2ttl=64time=3.84ms
---10.0.0.2pingstatistics---
2packetstransmitted,2received,0%packetloss,time1001ms
rttmin/avg/max/mdev=3.842/4.366/4.891/0.528ms
mininet>
Inthiscase,wewillseethebroadcastpacketcominginonport1:Â
EVENTofp_event->SimpleHubEventOFPPacketIn
('evmessage:',OFPPacketIn(buffer_id=256,data='xffxffxffxffxffxffx00x00x00x00x00x01x08x06x00x01x08x00x06x04x00x01x00x00x00x00x00x01nx00x00x01x00x00x00x00x00x00nx00x00x02',in_port=1,reason=0,total_len=42))
Thebroadcastpacketwill reachh2,andh2will respond to thebroadcast fromport2:Â
EVENTofp_event->SimpleHubEventOFPPacketIn
('evmessage:',OFPPacketIn(buffer_id=257,data='x00x00x00x00x00x01x00x00x00x00x00x02x08x06x00x01x08x00x06x04x00x02x00x00x00x00x00x02nx00x00x02x00x00x00x00x00x01nx00x00x01',in_port=2,reason=0,total_len=42))
Notethatunlikethesimpleswitchapplication,wedidnotinstallanyflowsintothe switch, so all thepackets are floodedout to all ports, just like ahub.Youmay have also noticed a difference between our application and thesimple_switch_13.pyreferencemodule.Inthereferencemodule,uponfeaturenegotiation,theapplicationinstalledaflow-missÂflowtosendallpacketstothecontroller:
match=parser.OFPMatch()
actions=[parser.OFPActionOutput(ofproto.OFPP_CONTROLLER,
ofproto.OFPCML_NO_BUFFER)]
self.add_flow(datapath,0,match,actions)
However, we did not have to do that in our module in order to see future

PacketInevents.ThisisduetothedefaultbehaviorchangebetweenOpenFlow1.0toOpenFlow1.3.In1.0,thedefaulttable-missactionistosendthepackettothecontroller,whereasin1.3,thedefaultactionistodropthepacket.Feelfreeto uncomment the OFP_VERSIONS variable form 1.0 to 1.3 and relaunch theapplication; you will see that the PacketIn event will not be sent to thecontroller:Â
classSimpleHub(app_manager.RyuApp):
OFP_VERSIONS=[ofproto_v1_0.OFP_VERSION]
#OFP_VERSIONS=[ofproto_v1_3.OFP_VERSION]
Let'slookattheadd_flow()functionofthereferencemodule:Â
defadd_flow(self,datapath,priority,match,actions,buffer_id=None):
ofproto=datapath.ofproto
parser=datapath.ofproto_parser
inst=[parser.OFPInstructionActions(ofproto.OFPIT_APPLY_ACTIONS,
actions)]
ifbuffer_id:
mod=parser.OFPFlowMod(datapath=datapath,buffer_id=buffer_id,
priority=priority,match=match,
instructions=inst)
else:
mod=parser.OFPFlowMod(datapath=datapath,priority=priority,
match=match,instructions=inst)
datapath.send_msg(mod)
We have seen most of these fields; the only thing we have not seen is thebuffer_id.This ispartof theOpenFlowstandard, inwhichtheswitchhastheoption of sending thewhole packet including payload or choosing to park thepacketatabufferandonlysendafractionofthepacketheadertothecontroller.In this case, the controller will send the flow insertion, including the bufferID. The reference module contains a more sophisticated PacketIn handlerthanourhubinordertomakeitaswitch.Thereweretwoextraimportsinordertodecodethepacket:Â
fromryu.lib.packetimportpacket
fromryu.lib.packetimportethernet
Withinthe_packet_in_hander(),wetookstockofthein_port,andpopulatedthe mac_to_port dictionary by using the dpid of the switch and the MACaddress:Â

in_port=msg.match['in_port']
pkt=packet.Packet(msg.data)
eth=pkt.get_protocols(ethernet.ethernet)[0]
dst=eth.dst
src=eth.src
Therestof thecode takescareof thePacketOuteventaswellas inserting theflowusingtheÂadd_flow()function.Â
#learnamacaddresstoavoidFLOODnexttime.
self.mac_to_port[dpid][src]=in_port
ifdstinself.mac_to_port[dpid]:
out_port=self.mac_to_port[dpid][dst]
else:
out_port=ofproto.OFPP_FLOOD
actions=[parser.OFPActionOutput(out_port)]
#installaflowtoavoidpacket_innexttime
ifout_port!=ofproto.OFPP_FLOOD:
match=parser.OFPMatch(in_port=in_port,eth_dst=dst)
#verifyifwehaveavalidbuffer_id,ifyesavoidtosendboth
#flow_mod&packet_out
ifmsg.buffer_id!=ofproto.OFP_NO_BUFFER:
self.add_flow(datapath,1,match,actions,msg.buffer_id)
return
else:
self.add_flow(datapath,1,match,actions)
data=None
ifmsg.buffer_id==ofproto.OFP_NO_BUFFER:
data=msg.data
out=parser.OFPPacketOut(datapath=datapath,buffer_id=msg.buffer_id,
in_port=in_port,actions=actions,data=data)
datapath.send_msg(out)
Youmight be thinking at this point, "Wow, that is a lot ofwork just to get asimpleswitchtowork!"andyouwouldbecorrectinthatregard.Ifyoujustwanta switch, using OpenFlow and Ryu is absolutely overkill. You are better offspending a few bucks at the local electronics store than studying all the APIdocuments and code. However, keep in mind that the modules and designpatterns we have learned in this section are reused in almost any Ryu

application.Bylearningthesetechniques,youaresettingyourselfupforbiggerand better OpenFlow applications using the Ryu controller to enable rapiddevelopment and prototyping. I would love to hear about your next million-dollarnetworkfeatureusingOpenFlowandRyu!

ThePOXcontroller
The final section of Chapter 1,Review of TCP/IP Protocol Suite and PythonLanguage, introduce to you another Python-basedOpenFlow controller, POX.WhenOpenFlowwas originally developed at Stanford, the original controllerwasNOX,writteninJava.Asaneasier-to-learnalternativetoNOX,POXwascreated.IpersonallyusedPOXtolearnOpenFlowafewyearsagoandthoughtitwasanexcellentlearningtool.However,astimehaspassed,thedevelopmentof POX seems to have slowed down a bit. For example, currently there is noactiveeffortforPython3.Moreimportantly,officially,POXsupportsOpenFlow1.0andanumberofNiciraextensionsandhaspartialsupportforOpenFlow1.1.Therefore, I have pickedRyu as theOpenFlow controller for this book. POXremains a viable alternative, however, for Python-based controllers if you areonlyworkingwithOpenFlow1.0.Â
Note
You can learn more about POX onhttps://openflow.stanford.edu/display/ONL/POX+Wiki.
Launchinganyof the applications inPOX is similar toRyu.On theSDNHubVM,POXisalreadyinstalledunder/home/ubuntu/pox.Thepox.pymoduleisequivalent to Ryu-manager. The controller will automatically look undertheÂpox/folderforapplications.ÂChangetothe/home/ubuntu/poxdirectory,andlaunchtheapplicationunderpox/forwarding/tutorial_l2_hub.Itisreallyeasy:
$./pox.pylog.level--DEBUGforwarding.tutorial_l2_hub
POX0.5.0(eel)/Copyright2011-2014JamesMcCauley,etal.
DEBUG:core:POX0.5.0(eel)goingup...
DEBUG:core:RunningonCPython(2.7.6/Oct26201620:30:19)
DEBUG:core:PlatformisLinux-3.13.0-24-generic-x86_64-with-Ubuntu-
14.04-trusty
INFO:core:POX0.5.0(eel)isup.
DEBUG:openflow.of_01:Listeningon0.0.0.0:6633
INFO:openflow.of_01:[00-00-00-00-00-011]connected
TestingwithMininetofcoursedoesnotchangeit:

mininet>h1ping-c2h2
PING10.0.0.2(10.0.0.2)56(84)bytesofdata.
64bytesfrom10.0.0.2:icmp_seq=1ttl=64time=39.9ms
64bytesfrom10.0.0.2:icmp_seq=2ttl=64time=24.5ms
---10.0.0.2pingstatistics---
2packetstransmitted,2received,0%packetloss,time1002ms
rttmin/avg/max/mdev=24.503/32.231/39.960/7.730ms
WewillnotspendalotoftimelearningaboutPOXsinceourfocusisonRyu.POX has similar structures in regard to listening for OpenFlow events andlaunchingcallbackfunctionsaswellasapacketparsinglibrary.Â

Summary
In this chapter, we covered a lot of topics related to OpenFlow.We learnedaboutthebasicsandthehistoryoftheOpenFlowprotocol.Wewereabletosetup a labwithMininet,which is a lightweight network-emulation tool that cancreate a full network with virtual Open vSwitch and Linux hosts. We alsolearned about the command-line tools that can interact directly with OpenvSwitch for informationgathering and troubleshooting. We continuedon tolook at two Python-based OpenFlow controllers, Ryu and POX. The POXcontrollerÂwasacloneoftheoriginalNOXcontrollerreferencedesignwrittenin Python. Due to its academic nature, among other reasons, the project haslaggedbehindonthelatestOpenFlowfeatures,suchasOpenFlow1.3.Ryu,ontheotherhand,wassponsoredbyNTTandbenefitedfromtheproductionusageand experience of the service provider. We focused on the Ryu controllercomponentsandlookedathowwecaneasilyswitchbetweenRyuapplicationsbypointingRyu-managertodifferentPythonfiles,suchasL2switchesandL3firewalls. We looked at a full-featured firewall, written as a Ryu-basedOpenFlow application. The firewall application is able to implement firewallrules viaRESTAPI using theHTTP protocol,making itmore automation-friendlythantraditionalvendor-basedfirewallsbecauseweareabletomakethechangeprogrammaticallywithoutthehuman-basedcommand-lineinterface.Theswitch application is a simple yet valuable application that we dissected andlookedatindetailinordertounderstandtheRyuframeworkanddesignpatterns.In thenext chapter,wewill buildon theknowledgewegained in this chapterandlookatmoreadvancedtopicsofOpenFlow.

Chapter11.AdvancedOpenFlowTopics
Inthepreviouschapter,welookedatsomeofthebasicconceptsofOpenFlow,Mininet, and the Ryu controller. We proceeded to dissect and construct anOpenFlowswitchinordertounderstandRyu'sframeworkaswellaslookingatoneofRyu's firewall applicationsasa reference for theAPI interface.For thesameMininetnetwork,wewereable to switchbetweena simpleswitchandafirewall by just replacingone software applicationwith another.RyuprovidesPythonmodulestoabstractbasicoperationssuchasswitchfeaturenegotiation,packetparsing,OpenFlowmessageconstructs,andmanymore.Thisallowsustofocus on the networking logic of our application. Since Ryu was written inPython, theapplicationcodecanbewritten inourfamiliarPython languageaswell.Â
Ofcourse,ourgoalistowriteourownapplications.Inthischapter,wewilltakewhatwehave learnedsofarandbuildon topof thatknowledge. Inparticular,wewilllookathowwecanbuildseveralnetworkapplications,suchasaBorderGatewayProtocol (BGP) router.Wewill start by examininghowwe candecode OpenFlow events and packets via the Ryu framework. Then we willbuildthefollowingnetworkapplicationsgraduallyfromonetothenext:Â
OpenFlowoperationswithRyuPacketinspectionStaticflowrouterRouterwithRESTAPIBGProuterFirewall
Let'sgetstarted!

Setup
Inthischapter,wewillcontinuetousethesamehttp://sdnhub.org/Âall-in-onevirtualmachine from the last chapter. The Ryu install on the VMwas a fewreleasesbehindthecurrentone,soitwasfineforastart,butwewanttousethelatestBGPspeakerlibraryandexamplesforthischapter.ThelatestversionalsosupportsOpenFlow1.5ifyouwouldliketoexperimentwithit.Therefore,let'sdownloadthelatestversionandinstallfromsource:Â
$mkdirryu_latest
$cdryu_latest/
$gitclonehttps://github.com/osrg/ryu.git
$cdryu/
$sudopythonsetup.pyinstall
#Verification:
$ls/usr/local/bin/ryu*
/usr/local/bin/ryu*/usr/local/bin/ryu-manager*
$ryu-manager--version
ryu-manager4.13
Note
Officially,RyusupportsPython3.4andbeyond.Itismyopinionthatmostof theexistingapplicationsandusercommunities stillhave been using Python 2.7. This directly translates tosupportability and knowledge base; therefore, I have decided tostickwithPython2.7whenitcomestoRyuapplications.Â
Aswehave seen so far, theRyu frameworkbasicallybreaksdownOpenFloweventsanddispatchesthemtotherightfunctions.Theframeworktakescareofthe basic operations, such as handling the communicationwith the switch anddecodingtherightOpenFlowprotocolbasedontheversionaswellasprovidingthe libraries tobuild andparsevariousprotocolpackets (suchasBGP). In thenextsection,wewillseehowwecanlookatthespecificeventmessagecontentssothatwecanfurtherprocessthem.

OpenFlowoperationsÂwithRyu
Tobeginwith,let'slookattwobasiccomponentsofRyucodethatwehaveseenintheswitchapplication:Â
ryu.base.app_manager: The component that centrally manages Ryuapplications.ryu.base.app_manager.RyuApp is thebaseclassthatallRyuapplications inherit. It provides contexts to Ryu applications and routesmessages among Ryu applications (contexts are ordinary Python objectsshared among Ryu applications). It also contains methods such assend_eventorsend_event_to_observerstoraiseOpenFlowevents.Âryu.controller: The ryu.controller.controller handles connectionsfromswitchesandrouteseventstoappropriateentities:Â
ryu.controller.ofp_event:ThisistheOpenFloweventdefinition.Âryu.controller.ofp_handler: This is the handler of an OpenFlowevent. A Ryu application registers itself to listen for specific eventsusingryu.controller.handler.set_ev_clsdecorator.Wehaveseenthe decorator set_ev_cls as well as CONFIG_DISPATCHER
andÂMAIN_DISPATCHERfromthehandler.Â
EachRyuapplicationhasanevent-receivedqueuethat isfirst-in,first-outwiththeeventorderpreserved.Ryuapplicationsare single-threaded,and the threadkeeps draining the received queue by dequeueing and calling the appropriateeventhandlerfordifferenteventtypes.Wehaveseentwoexamplesofitsofarin the simple_switch_13.py application. The first was the handling ofryu.controller.ofp_event.EventOFSwitchFeatures for switch featurenegotiationfromtheswitch:Â
@set_ev_cls(ofp_event.EventOFPSwitchFeatures,CONFIG_DISPATCHER)
defswitch_features_handler(self,ev):
datapath=ev.msg.datapath
ofproto=datapath.ofproto
parser=datapath.ofproto_parser
...
The second example was ryu.controller.ofp_event.EventOFPacketIn.AÂPacketIn event iswhat the switch sends to the controllerwhen there is a

flowmiss:Â
@set_ev_cls(ofp_event.EventOFPPacketIn,MAIN_DISPATCHER)
def_packet_in_handler(self,ev):
ifev.msg.msg_len<ev.msg.total_len:
self.logger.debug("packettruncated:only%sof%sbytes",
ev.msg.msg_len,ev.msg.total_len)
...
ThetwoexamplesshowtheconventionsusedinRyuforOpenFlowevents;theyare named ryu.controller.ofp_event.EventOF<name>, where <name> is theOpenFlowmessage.TheRyucontrollerautomaticallydecodesthemessageandsends it to the registered function. There are two common attributes for theryu.controller.opf_event.EVentOFMsgBaseclass:Â
OpenFlow event message base (source: http://ryu-ippouzumi.readthedocs.io/en/latest/ryu_app_api.html#openflow-event-classes)
Thefunctionoftheeventwilltaketheeventobjectasinputandexaminethemsgandmsg.datapathattributes.Forexample,inchapter11_1.py,westrippedoutall the code for ryu.controller.ofp_event.EventOFPSwitchFeatures anddecodeditfromtheeventobject:Â
fromryu.baseimportapp_manager
fromryu.controllerimportofp_event
fromryu.controller.handlerimportCONFIG_DISPATCHER,MAIN_DISPATCHER
fromryu.controller.handlerimportset_ev_cls
fromryu.ofprotoimportofproto_v1_3
classSimpleSwitch13(app_manager.RyuApp):
OFP_VERSIONS=[ofproto_v1_3.OFP_VERSION]

def__init__(self,*args,**kwargs):
super(SimpleSwitch13,self).__init__(*args,**kwargs)
self.mac_to_port={}
#CatchingSwitchFeaturesEvents
@set_ev_cls(ofp_event.EventOFPSwitchFeatures,CONFIG_DISPATCHER)
defswitch_features_handler(self,ev):
print("EventOFPSwitchFeatures:datapath_id{},n_buffers{}capabilities{}".format(ev.msg.datapath_id,
ev.msg.n_buffers,
ev.msg.capabilities))
Thiswillprintoutthefollowingmessagefortheswitchfeaturereceived:Â
EventOFPSwitchFeatures:datapath_id1,n_buffers256capabilities79
AsyoubecomemorefamiliarwiththeRyuframework,theAPIdocumentwillbecome a much-read reference:Â http://ryu-ippouzumi.readthedocs.io/en/latest/ofproto_ref.html#ofproto-ref.
Because switch registration is such as common operation, the Ryu controllertypicallytakescareofthehandshakeoffeaturerequestandreply.ItisprobablymorerelevantforustotakealookattheparsingpacketinaPacketInevent.Thisiswhatwewillbedoinginthenextsection.Â

Packetinspection
Inthissection,wewilltakeacloserlookatthePacketInmessageandparsethepacket so we can further process the event and determine the correspondingaction.Inchapter11_2.py,wecanusetheryu.lib.packet.packetmethodtodecodethepacket:Â
fromryu.lib.packetimportpacket
importarray
...
@set_ev_cls(ofp_event.EventOFPPacketIn,MAIN_DISPATCHER)
def_packet_in_handler(self,ev):
print("msg.data:{}".format(array.array('B',ev.msg.data)))
pkt=packet.Packet(ev.msg.data)
forpinpkt.protocols:
print(p.protocol_name,p)
Note that ev.msg.data is in bytearray format, which is why use thearray.array()functiontoprintitout.Wecantheninitiateaping,h1ping-c2h2,andobserveintheoutputthearpfromh1toh2:Â
EVENTofp_event->SimpleSwitch13EventOFPPacketIn
msg.data:array('B',[255,255,255,255,255,255,0,0,0,0,0,1,8,6,0,1,8,0,6,4,0,1,0,0,0,0,0,1,10,0,0,1,0,0,0,0,0,0,10,0,0,2])
('ethernet',ethernet(dst='ff:ff:ff:ff:ff:ff',ethertype=2054,src='00:00:00:00:00:01'))
('arp',arp(dst_ip='10.0.0.2',dst_mac='00:00:00:00:00:00',hlen=6,hwtype=1,opcode=1,plen=4,proto=2048,src_ip='10.0.0.1',src_mac='00:00:00:00:00:01'))
Ifweaddintherestoftheswitchcode,youcanseetherestoftheARPresponsefromh2andthesubsequentsuccessfulpingsfromÂh1toh2:Â
EVENTofp_event->SimpleSwitch13EventOFPPacketIn
msg.data:array('B',[0,0,0,0,0,1,0,0,0,0,0,2,8,6,0,1,8,0,6,4,0,2,0,0,0,0,0,2,10,0,0,2,0,0,0,0,0,1,10,0,0,1])
('ethernet',ethernet(dst='00:00:00:00:00:01',ethertype=2054,src='00:00:00:00:00:02'))
('arp',arp(dst_ip='10.0.0.1',dst_mac='00:00:00:00:00:01',hlen=6,hwtype=1,opcode=2,plen=4,proto=2048,src_ip='10.0.0.2',src_mac='00:00:00:00:00:02'))
('ethernet',ethernet(dst='00:00:00:00:00:02',ethertype=2048,src='00:00:00:00:00:01'))
('ipv4',ipv4(csum=56624,dst='10.0.0.2',flags=2,header_length=5,identification=18806,offset=0,option=None,proto=1,src='10.0.0.1',tos=0,total_length=84,ttl=64,version=4))
('icmp',icmp(code=0,csum=21806,data=echo(data=array('B',[30,216,230,88,0,0,0,0,125,173,9,0,0,0,0,0,16,17,18,19,20,21,22,23,24,25,26,27,28,29,30,31,32,33,34,35,36,37,38,39,40,41,42,43,44,45,46,47,48,49,50,51,52,53,54,55]),id=22559,seq=1),type=8))
IfweweretorestartMininet(orsimplydeletetheinstalledflows),wecouldtestoutanHTTPflowwithaPythonHTTPserverfromthestandardlibrary.Simplystart theHTTPserveronh2,andusecurl toget thewebpage.Bydefault, thePythonHTTPserverlistensonport8000:Â

mininet>h2python-mSimpleHTTPServer&
mininet>h1curlhttp://10.0.0.2:8000
Theobservedresultisasexpected:Â
('ipv4',ipv4(csum=48411,dst='10.0.0.2',flags=2,header_length=5,identification=27038,offset=0,option=None,proto=6,src='10.0.0.1',tos=0,total_length=60,ttl=64,version=4))
('tcp',tcp(ack=0,bits=2,csum=19098,dst_port=8000,offset=10,option=
[TCPOptionMaximumSegmentSize(kind=2,length=4,max_seg_size=1460),TCPOptionSACKPermitted(kind=4,length=2),TCPOptionTimestamps(kind=8,length=10,ts_ecr=0,ts_val=8596478),TCPOptionNoOperation(kind=1,length=1),TCPOptionWindowScale(kind=3,length=3,shift_cnt=9)],seq=1316962912,src_port=39600,urgent=0,window_size=29200))
You could further decode the packet, for example, the IPv4 source anddestinationaddresses:Â
@set_ev_cls(ofp_event.EventOFPPacketIn,MAIN_DISPATCHER)
def_packet_in_handler(self,ev):
print("msg.data:{}".format(array.array('B',ev.msg.data)))
pkt=packet.Packet(ev.msg.data)
forpinpkt.protocols:
print(p.protocol_name,p)
ifp.protocol_name=='ipv4':
print('IP:src{}dst{}'.format(p.src,p.dst))
Youwillseetheprint-outoftheHTTPcurlfromh1toh2asfollows:Â
('ethernet',ethernet(dst='00:00:00:00:00:02',ethertype=2048,src='00:00:00:00:00:01'))
('ipv4',ipv4(csum=56064,dst='10.0.0.2',flags=2,header_length=5,identification=19385,offset=0,option=None,proto=6,src='10.0.0.1',tos=0,total_length=60,ttl=64,version=4))
IP:src10.0.0.1dst10.0.0.2
By looking closely at how the Ryu framework decodes/encodes OpenFlowmessagesandevents,weareclosertobuildingourownapplications.Â

Staticrouter
Letusstartbybuildingamulti-devicenetworkstatically.Bystatic,Imeanwewill program static flows in the routers tomake our topologywork,which issimilar toa statically routeddevice.Obviously,buildingsomethingbyhand isnot very scalable, just like we do not use static routes in a productionenvironment, but it is a great way to learn how to program a Ryu-basedOpenFlow router. Note that I will use the terms switch and routerinterchangeably.InMininet,thedevicesarebydefaultswitcheswiths1,s2,andso on; however, since we are performing routing functions via software andflow,theyarealsoroutersinmyopinion.ÂHereisthesimpletopologythatwewillbuild:Â

StaticroutertopologyÂ
Let'sseehowwecanbuildthistopologywithMininet.
Mininettopology
Mininet provides a convenientway for buildingmulti-device linear topologieswiththeÂ--topolinearÂoption:Â
$sudomn--topolinear,2--mac--controllerremote--switchovsk
...
mininet>links
h1-eth0<->s1-eth1(OKOK)
h2-eth0<->s2-eth1(OKOK)
s2-eth2<->s1-eth2(OKOK)

Bydefault, thehostswereassignedthesameIPaddressessequentially,similartoÂasingle-switchtopology:Â
mininet>dump
<Hosth1:h1-eth0:10.0.0.1pid=29367>
<Hosth2:h2-eth0:10.0.0.2pid=29375>
<OVSSwitchs1:lo:127.0.0.1,s1-eth1:None,s1-eth2:Nonepid=29383>
<OVSSwitchs2:lo:127.0.0.1,s2-eth1:None,s2-eth2:Nonepid=29386>
<RemoteControllerc0:127.0.0.1:6633pid=29361>
WecaneasilychangetheIPaddressesofthehostsaccordingtoourdiagram:Â
mininet>h1ipaddrdel10.0.0.1/8devh1-eth0
mininet>h1ipaddradd192.168.1.10/24devh1-eth0
mininet>h2ipaddrdel10.0.0.2/8devh2-eth0
mininet>h2ipaddradd192.168.2.10/24devh2-eth0
mininet>h1iprouteadddefaultvia192.168.1.1
mininet>h2iprouteadddefaultvia192.168.2.1
Wecanverifytheconfigurationasfollows:Â
mininet>h1ifconfig|grepinet
inetaddr:192.168.1.10Bcast:0.0.0.0Mask:255.255.255.0
inet6addr:fe80::200:ff:fe00:1/64Scope:Link
inetaddr:127.0.0.1Mask:255.0.0.0
inet6addr:::1/128Scope:Host
...
mininet>h2ifconfig|grepinet
inetaddr:192.168.2.10Bcast:0.0.0.0Mask:255.255.255.0
inet6addr:fe80::200:ff:fe00:2/64Scope:Link
inetaddr:127.0.0.1Mask:255.0.0.0
inet6addr:::1/128Scope:Host
...
mininet>h1route-n
KernelIProutingtable
DestinationGatewayGenmaskFlagsMetricRefUseIface
0.0.0.0192.168.1.10.0.0.0UG000h1-eth0
192.168.1.00.0.0.0255.255.255.0U000h1-eth0
...
mininet>h2route-n
KernelIProutingtable
DestinationGatewayGenmaskFlagsMetricRefUseIface
0.0.0.0192.168.2.10.0.0.0UG000h2-eth0
192.168.2.00.0.0.0255.255.255.0U000h2-eth0
mininet>

Great!We'vebuilt the topologyweneeded in less than5minutes.Keep thesestepshandy,aswewill start and restartMininet a few timesduringourbuild.Let'stakealookatthecodethatwewillbeusing.Â
Ryucontrollercode
Mostofusnetworkengineerstakeroutingforgrantedafterawhile.Afterall,itiseasytojustassignthedefaultgatewayfordevices,turnontheroutingprotocolonrouters,advertiseIPblocks,andcall itaday.However,aswehaveseen inthe switch configuration, OpenFlow gives you very granular control overnetworkoperations.With this control, youhave to tell the deviceswhat to dowithyourcode:verylittleishandledonyourbehalf.Solet'stakeastepbackandthinkaboutthenetworkoperationsinourtwo-routertopologywhenh1istryingtopingh2,suchaswhenissuingthecommandh1ping-c2h2:Â
The h1 host with IP address 192.168.1.10/24 knows that thedestination192.168.2.10 isnotonitsownsubnet.Therefore, itwillneedtosendthepackettoitsdefaultgateway,Â192.168.1.1.ÂThe h1 host initially does not know how to reach 192.168.1.1 on thesamesubnet,soitwillsendoutanARPrequestfor192.168.1.1.ÂAfterreceivingtheARPresponse,h1willencapsulatetheICMPpacketwithIPv4source192.168.1.10,ÂIPv4destination192.168.2.10,sourcemac00:00:00:00:00:01,andthedestinationmacfromtheARPresponse.ÂIfrouter1doesnothaveaflowforthereceivingpacket,assumingwehaveinstalledaflowmissentryforthecontroller,thepacketwillbesenttothecontrollerforfurtheraction.The controllerwill instruct router 1 to send the packet out to the correctport, inthiscaseport2,andoptionallyinstallaflowentryforfutureflowtablematch.The steps are repeated until the packet reaches h2, and then theprocessisreversed,thatis,Âh2willARPforitsdefaultgateway,thensendoutthepacket,andsoon.
ThecodeisprovidedforyouinChapter11_3.py.Aswiththerestofthecodeinthe book, the code is written to demonstrate concepts and features, so someimplementation might not make sense in real-world production. This isespecially truewhenitcomestoOpenFlowandRyubecauseof thefreedomit

offers you. Â First, let's take a look at the static flow installs from thecontroller.Â
Ryuflowinstallation
Atthetopofthecode,youwillnoticewehaveafewmoreimportsthatweneedfurtherdownthefile:Â
fromryu.baseimportapp_manager
fromryu.controllerimportofp_event
fromryu.controller.handlerimportCONFIG_DISPATCHER,MAIN_DISPATCHER
fromryu.controller.handlerimportset_ev_cls
fromryu.ofprotoimportofproto_v1_3
fromryu.lib.packetimportpacket
fromryu.lib.packetimportethernet
fromryu.lib.packetimportether_types
#newimport
fromryu.ofprotoimportether
fromryu.lib.packetimportipv4,arp
Duringtheclassinitialization,wewilldeterminewhatMACaddresseswewillusefors1ands2:
classMySimpleStaticRouter(app_manager.RyuApp):
OFP_VERSIONS=[ofproto_v1_3.OFP_VERSION]
def__init__(self,*args,**kwargs):
super(MySimpleStaticRouter,self).__init__(*args,**kwargs)
self.s1_gateway_mac='00:00:00:00:00:02'
self.s2_gateway_mac='00:00:00:00:00:01'
Wecanpickanyvalid formattedMACaddresswewant for theARP,butyouwillnotice thatwehaveused thesameMACaddressfor thegatewaytospoofthehostmac.Inotherwords,theÂs1gatewayhastheh2host'sMACaddress,while the s2 gateway has the h1 host's MAC address. This is doneintentionally;wewilllookatthereasonlateron.Inthenextsection,weseethesame EventOFPSwitchFeatures event for the decorator and the correspondingfunction.
After installing the flow miss table entry, we see that we have pushed out anumberofstaticflowstothetwodevices:

ifdatapath.id==1:
#flowfromh1toh2
match=parser.OFPMatch(in_port=1,
eth_type=ether.ETH_TYPE_IP,
ipv4_src=
('192.168.1.0','255.255.255.0'),
ipv4_dst=
('192.168.2.0','255.255.255.0'))
out_port=2
actions=[parser.OFPActionOutput(out_port)]
self.add_flow(datapath,1,match,actions)
...
Afewpointstonoteinthissection:Â
Weneedtomatchthedevicefortheflowtobepushedoutbyidentifyingthedatapath.id,whichcorrespondstotheDPIDofeachswitch.Weuseseveralmatchtypes,suchasin_port,ether_type,ipv4_src,andipv4_dst, to make the flow unique. You can match as many fields asmakes sense. Each OpenFlow specification adds more and more matchfields.Themoduleryu.lib.packet.ether_typesoffersaconvenientwaytomatchEthernettypes,suchasLinkLayerDiscoveryProtocol(LLDP),ARP,Dot1Qtrunks,IP,andmuchmore.ÂThe flow priority is pushed out as priority 1.Recall that the flowmissentryispriority0:sincetheseentrieswillbepushedoutaftertheflowmissentry,weneedtoputthematahigherprioritytobematched.Otherwise,atthesamepriority,theflowentriesarejustmatchedsequentially.ÂOptionally,youcancommentout theadd_flowentries inorder tosee thepacket at the controller level. For example, you can comment out thedatapath.id1ÂfortheÂh1toh2ÂflowinordertoseetheARPentryaswellasthefirstICMPpacketfromh1toh2atthecontroller.Notethatsincethese flows are installed upon switch feature handshake, if you commentoutanyflowinstall,youwillneedtorestartMininetandrepeattheprocessintheMininetsection.Â
We have installed four flows; each corresponds to when the packet arrivesfromÂthehoststotheswitchesandbetweentheswitches.Rememberthatflowsareunidirectional,soaflowisneededforbothforwardandreturnpaths.Intheadd_flow() function, we also added the idle_timeout and hard_timeout

options. These are commonly used options to avoid stale flow entries in theswitch. The values are in seconds, so after 600 seconds, if the switch has notseen any flowmiss or matching flow entries, the entries will be removed. Amore realistic option would be to keep the flow miss entry permanent anddynamicallyinstalltheotherentriesuponthecorrespondingPacketInevent.Butagain,wearemakingthingssimplefornow:
defadd_flow(self,datapath,priority,match,actions,buffer_id=None):
ofproto=datapath.ofproto
parser=datapath.ofproto_parser
...
ifbuffer_id:
mod=parser.OFPFlowMod(datapath=datapath,buffer_id=buffer_id,
priority=priority,match=match,
instructions=inst,idle_timeout=600,
hard_timeout=600)
else:
mod=parser.OFPFlowMod(datapath=datapath,priority=priority,
match=match,instructions=inst,
idle_timeout=600,hard_timeout=600)
datapath.send_msg(mod)
Wecanverifytheflowsinstalledons1ands2usingovs-ofctl:Â
ubuntu@sdnhubvm:~[08:35]$sudoovs-ofctldump-flowss1
NXST_FLOWreply(xid=0x4):
cookie=0x0,duration=1.694s,table=0,n_packets=0,n_bytes=0,idle_timeout=600,hard_timeout=600,idle_age=20,priority=1,ip,in_port=1,nw_src=192.168.1.0/24,nw_dst=192.168.2.0/24actions=output:2
cookie=0x0,duration=1.694s,table=0,n_packets=0,n_bytes=0,idle_timeout=600,hard_timeout=600,idle_age=20,priority=1,ip,in_port=2,nw_src=192.168.2.0/24,nw_dst=192.168.1.0/24actions=output:1
cookie=0x0,duration=1.694s,table=0,n_packets=13,n_bytes=1026,idle_timeout=600,hard_timeout=600,idle_age=10,priority=0actions=CONTROLLER:65535
...
ubuntu@sdnhubvm:~[08:36]$sudoovs-ofctldump-flowss2
NXST_FLOWreply(xid=0x4):
cookie=0x0,duration=5.770s,table=0,n_packets=0,n_bytes=0,idle_timeout=600,hard_timeout=600,idle_age=24,priority=1,ip,in_port=2,nw_src=192.168.1.0/24,nw_dst=192.168.2.0/24actions=output:1
cookie=0x0,duration=5.770s,table=0,n_packets=0,n_bytes=0,idle_timeout=600,hard_timeout=600,idle_age=24,priority=1,ip,in_port=1,nw_src=192.168.2.0/24,nw_dst=192.168.1.0/24actions=output:2
cookie=0x0,duration=5.770s,table=0,n_packets=13,n_bytes=1038,idle_timeout=600,hard_timeout=600,idle_age=14,priority=0actions=CONTROLLER:65535
Nowthatwehavetakencareofthestaticflows,weneedtorespondtotheARPrequestsÂfromthehosts.Wewillcomplete thatprocess in thenextsectionofthecode.Â
Ryupacketgeneration
InordertorespondtotheARPrequests,weneedtodothefollowing:Â

CatchtheARPrequestbasedontherightswitch,ordatapath,andknowtheIPitissendinganARPforÂBuildtheARPresponsepacketÂSendtheresponsebackouttheportitwasoriginallyreceivedfrom
In initial part of the PacketIn function, most of the code is identical to theswitchfunction,whichcorrespondstodecodingtheOpenFloweventaswellasthe packet itself. For our purposes, we do not need ofproto and parser forOpenFlowevents,butforconsistency,weareleavingthemin:Â
@set_ev_cls(ofp_event.EventOFPPacketIn,MAIN_DISPATCHER)
def_packet_in_handler(self,ev):
msg=ev.msg
datapath=msg.datapath
ofproto=datapath.ofproto
parser=datapath.ofproto_parser
in_port=msg.match['in_port']
pkt=packet.Packet(msg.data)
eth=pkt.get_protocols(ethernet.ethernet)[0]
ThenextsectioncatchesARPpacketsbyidentifyingtherightether_type:Â
ifeth.ethertype==ether_types.ETH_TYPE_ARP:
arp_packet=pkt.get_protocols(arp.arp)[0]
ethernet_src=eth.src
WecanthenidentifythedeviceandtheIPitissendinganARPforandcontinueon to build the packet. The packet-building process is similar to the toolswehave seenbefore, suchasScapy, in that it tooka layeredapproachwhereyoucanbuildtheEthernetheaderandthentheARPpacketitself.Wewillconstructapacket via ryu.lib.packet.Packet(), add the contents in, and serialize thepacket:Â
ifarp_packet.dst_ip=='192.168.2.1'anddatapath.id==2:
print('ReceivedARPfor192.168.2.1')
e=ethernet.ethernet(dst=eth.src,src=self.s2_gateway_mac,ethertype=ether.ETH_TYPE_ARP)
a=arp.arp(hwtype=1,proto=0x0800,hlen=6,plen=4,opcode=2,
src_mac=self.s2_gateway_mac,src_ip='192.168.2.1',

dst_mac=ethernet_src,dst_ip=arp_packet.src_ip)
p=packet.Packet()
p.add_protocol(e)
p.add_protocol(a)
p.serialize()
...
Thelaststepwouldbetosendthepacketouttotheportitwasreceivedfrom:Â
outPort=in_port
actions=[datapath.ofproto_parser.OFPActionOutput(outPort,0)]
out=datapath.ofproto_parser.OFPPacketOut(
datapath=datapath,
buffer_id=0xffffffff,
in_port=datapath.ofproto.OFPP_CONTROLLER,
actions=actions,
data=p.data)
datapath.send_msg(out)
Noticethatforthein_port,weusethespecialOFPP_CONTROLLERsincewedon'ttechnically have an inbound port. We will repeat the ARP process for bothgateways.Theonlyadditionalcodewehaveistoverboselyprintoutthepacketwehavereceivedanditsmetainformation:
#verboseiterationofpackets
try:
forpinpkt.protocols:
print(p.protocol_name,p)
print("datapath:{}in_port:{}".format(datapath.id,in_port))
except:
pass
Wearenowreadytocheckonthefinalresultofourcode.Â
Finalresult
Toverify,wewilllaunchMininetonthevirtualmachinedesktopsowecanusexterm on h1 and launchWiresharkwithin the host to see the arp reply.AfterlaunchingMininet,simplytypeinxtermh1Âtolaunchaterminalwindowforh1, and type in wireshark at the h1 terminal window to launchWireshark.Chooseh1-eth0astheinterfacetocapturepacketson:

Mininetandh1Wireshark
Wecantrytopingfromh1toh2withtwopackets:Â
mininet>h1ping-c2h2
PING192.168.2.10(192.168.2.10)56(84)bytesofdata.
From192.168.1.10icmp_seq=1DestinationHostUnreachable
From192.168.1.10icmp_seq=2DestinationHostUnreachable
---192.168.2.10pingstatistics---
2packetstransmitted,0received,+2errors,100%packetloss,time1004ms
pipe2
mininet>
On the controller screen, we can see the two ARP entries, one from h1 for192.168.1.1andtheotherforh2Âfromthegateways:Â
EVENTofp_event->MySimpleStaticRouterEventOFPPacketIn
ReceivedARPfor192.168.1.1
('ethernet',ethernet(dst='ff:ff:ff:ff:ff:ff',ethertype=2054,src='00:00:00:00:00:01'))

('arp',arp(dst_ip='192.168.1.1',dst_mac='00:00:00:00:00:00',hlen=6,hwtype=1,opcode=1,plen=4,proto=2048,src_ip='192.168.1.10',src_mac='00:00:00:00:00:01'))
datapath:1in_port:1
EVENTofp_event->MySimpleStaticRouterEventOFPPacketIn
ReceivedARPfor192.168.2.1
('ethernet',ethernet(dst='ff:ff:ff:ff:ff:ff',ethertype=2054,src='00:00:00:00:00:02'))
('arp',arp(dst_ip='192.168.2.1',dst_mac='00:00:00:00:00:00',hlen=6,hwtype=1,opcode=1,plen=4,proto=2048,src_ip='192.168.2.10',src_mac='00:00:00:00:00:02'))
datapath:2in_port:1
Intheh1-eth0packetcapture,wecanseethearpreply:Â
S1GatewayARPReply
WecanalsoseetheICMPrequestandreplyfromh1toh2:Â

ICMPRequestandResponseÂ
The final piecewewill touch on for this section is the spoofing of theMACaddress of the gateway. Of course, in accordance with the Ethernet standard,whenwetransferfromporttoport,weneedtorewritethesourceanddestinationMACs. For example, had we kept everything the same but usedthe 00:00:00:00:00:10 MAC address for 192.168.1.1 on s1, h2 wouldhavereceivedthefollowingICMPpacketfromh1:

H1toH2ICMPwithoutMACspoofing
Since theMAC address was not modified, h2 would not know the packet isdestinedfor itandwouldsimplydrop it.Ofcourse,wecanuse theOpenFlowactionOFPactionSetFieldÂtorewritethedestinationMACaddress,butIhavechosen to use spoofing to illustrate an important point. The point is that in asoftware-defined scenario, we have total control of our network. We cannotbypass certain restrictions, such as host ARP, but once the packet enters thenetwork,wearefreetorouteandmodifybasedonourneeds.Â
Inthenextsection,wewill takealookathowtoaddRESTAPIstoourstaticroutersowecanchangeflowsdynamically.Â

RouterwithAPI
WehavebeenmanuallyÂenteringtheflowinthelastexample;inparticular,theflowswereinserteduponthecompletionofswitchfeaturenegotiation.Itwouldbegreatifwecoulddynamicallyinsertandremoveflows.Luckily,RyualreadyshipswithmanyreferenceapplicationswiththeRESTAPIundertheÂryu/appdirectory, suchasrest_router.py.TheRESTAPIportionof thecode isalsoseparatedintoitsownexamplefilename,Âofctl_rest.py:
ubuntu@sdnhubvm:~/ryu_latest[15:40](master)$lsryu/app/rest*
ryu/app/rest_conf_switch.pyryu/app/rest_qos.pyryu/app/rest_topology.py
ryu/app/rest_firewall.pyryu/app/rest_router.pyryu/app/rest_vtep.py
...
ubuntu@sdnhubvm:~/ryu_latest[12:34](master)$lsryu/app/ofctl_rest.py
ryu/app/ofctl_rest.py
The rest_router.py application usage is covered in detail in the Ryubook, https://osrg.github.io/ryu-book/en/html/rest_router.html, with a three-switch,three-hostlineartopology.TheexamplemainlyconsistsofAPIusagefordealingwithflowandVLAN,whichwouldbeagreatreferencetoseewhat ispossiblewiththeRyuframework.However,ifyoudivedirectlyintothecode,itisabittoocomplexforstartingout.ÂInthissection,wewillfocusonÂaddingafewAPIforourroutercontrollerfromtheprevioussection.Wewilldothisbyleveraging the methods and classes already created in ofctl_rest.py. Bylimiting the scope aswell as leveraging our existing example, we are able tofocus on adding just theAPI. In the following example,wewill useHTTPie,whichwehaveseenbeforeforHTTPGET:
$sudoapt-getinstallhttpie
IfindtheHTTPieÂcolor-highlightingandoutputpretty-printeasierforviewing,but using HTTPie is of course optional. I personally find the HTTP POST
operationwithacomplexbodyabiteasierwithcurl.Inthissection,IwillusecurlforHTTPPOSToperationsthatincludecomplexJSONbodies,andHTTPieforHTTPGEToperations.Â
RyucontrollerwithAPI

Theexamplecode is included inChapter11_4.py.Wewilldelete all the lineswithmanuallyaddedflows.Thesewillbereplacedbythefollowing:Â
HTTPGET/network/switchestoshowÂtheDPIDforalltheswitchesÂHTTP GET /network/desc/<dpid> to query the individual switchdescriptionÂHTTP GET /network/flow/<dpid>Â to query the flow on the particularswitchHTTPPOST/network/flowentry/addtoaddaflowentrytoaswitchÂHTTP POST /network/flowentry/delete to delete a flow entry on aswitchÂ
To begin with, we will import the functions and classes in theryu.app.ofctl_restÂmodule:Â
fromryu.app.ofctl_restimport*
Theimportwill include theWSGImodules includedwith theRyuapplication.WealreadyworkedwithWSGIintheFlaskAPIsection,andtheURLdispatchandmappingÂwillbesimilar:Â
fromryu.app.wsgiimportControllerBase
fromryu.app.wsgiimportResponse
fromryu.app.wsgiimportWSGIApplication
Contexts are ordinary Python objects shared amongRyu applications.We areusingthesecontextobjectsinourcode:Â
_CONTEXTS={
'dpset':dpset.DPSet,
'wsgi':WSGIApplication
}
The init method includes the datastore and attributes required for theStatsController class, inherited from ryu.app.wsgi.ControllerBase andimportedwithÂofctl_rest.py.Â
def__init__(self,*args,**kwargs):
super(MySimpleRestRouter,self).__init__(*args,**kwargs)
self.s1_gateway_mac='00:00:00:00:00:02'

self.s2_gateway_mac='00:00:00:00:00:01'
self.dpset=kwargs['dpset']
wsgi=kwargs['wsgi']
self.waiters={}
self.data={}
self.data['dpset']=self.dpset
self.data['waiters']=self.waiters
mapper=wsgi.mapper
wsgi.registory['StatsController']=self.data
WewilldeclareaURLpathforaccessingresources.Wehavedeclaredtheroottobe/network,alongwiththenecessaryactionmethodstoobtaintheresources.Luckily for us, these methods were already created underthe StatsController class in ofctl_rest.py, which abstracted the actualOpenFlowactionsforus:Â
path='/network'
uri=path+'/switches'
mapper.connect('stats',uri,
controller=StatsController,action='get_dpids',
conditions=dict(method=['GET']))
uri=path+'/desc/{dpid}'
mapper.connect('stats',uri,
controller=StatsController,action='get_desc_stats',
conditions=dict(method=['GET']))
uri=path+'/flow/{dpid}'
mapper.connect('stats',uri,
controller=StatsController,action='get_flow_stats',
conditions=dict(method=['GET']))
uri=path+'/flowentry/{cmd}'
mapper.connect('stats',uri,
controller=StatsController,action='mod_flow_entry',
conditions=dict(method=['POST']))
Asyoucansee,threeoftheURLswereGETwithdpidasthevariable.ThelastPOSTmethodincludesthecmdvariable,wherewecanuseeitheraddordelete,whichwillresultinanÂOFPFlowModcalltotherightrouter.Thelastportionistoinclude the function to handle different OpenFlow events, such as

EventOFPStatsReplyÂandÂEventOFPDescStatsReply:
#handlingOpenFlowevents
@set_ev_cls([ofp_event.EventOFPStatsReply,
ofp_event.EventOFPDescStatsReply,
...
ofp_event.EventOFPGroupDescStatsReply,
ofp_event.EventOFPPortDescStatsReply
],MAIN_DISPATCHER)
defstats_reply_handler(self,ev):
msg=ev.msg
dp=msg.datapath
...
WearenowreadytoseethenewAPIsinaction.Â
APIusageexamples
WeareonlyaddingAPIsforthequeryandflowmodificationwiththerestÂofthecodenotchanged,sothestepsforlaunchingMininetandRyuareÂidentical.WhathaschangedisthatnowweseetheWSGIserverstartedonport8080andthetwoswitchesregisteredasdatapath:Â
(4568)wsgistartinguponhttp://0.0.0.0:8080
...
DPSET:registerdatapath<ryu.controller.controller.Datapathobjectat0x7f83556866d0>
DPSET:registerdatapath<ryu.controller.controller.Datapathobjectat0x7f8355686b10>
WecannowusetheAPItoqueryforexistingswitches:Â
$httpGEThttp://localhost:8080/network/switches
HTTP/1.1200OK
Content-Length:6
Content-Type:application/json;charset=UTF-8
Date:<skip>
[
1,
2
]
ThenwecanusethemorespecificURLtoqueryswitchdescriptions:Â
$httpGEThttp://localhost:8080/network/desc/1
...

{
"1":{
"dp_desc":"None",
"hw_desc":"OpenvSwitch",
"mfr_desc":"Nicira,Inc.",
"serial_num":"None",
"sw_desc":"2.3.90"
}
}
$httpGEThttp://localhost:8080/network/desc/2
...
{
"2":{
"dp_desc":"None",
"hw_desc":"OpenvSwitch",
"mfr_desc":"Nicira,Inc.",
"serial_num":"None",
"sw_desc":"2.3.90"
}
}
Atthispoint, theswitchshouldonlyhaveoneflowforsendingflowmissestothecontroller,whichwecanverifyusingtheAPIaswell:Â
$httpGEThttp://localhost:8080/network/flow/1
HTTP/1.1200OK
Content-Length:251
Content-Type:application/json;charset=UTF-8
Date:<skip>
{
"1":[
{
"actions":[
"OUTPUT:CONTROLLER"
],
"byte_count":1026,
"cookie":0,
"duration_nsec":703000000,
"duration_sec":48,
"flags":0,
"hard_timeout":0,
"idle_timeout":0,
"length":80,
"match":{},

"packet_count":13,
"priority":0,
"table_id":0
}
]
}
Wewillthenbeabletoaddtheflowtos1withtheAPI:Â
curl-H"Content-Type:application/json"
-X POST -
d'{"dpid":"1","priority":"1","match":{"in_port":"1","dl_type":"2048","priority":"2","nw_src":"192.168.1.0/24","nw_dst":"192.168.2.0/24"},"actions":
[{"type":"OUTPUT","port":"2"}]}'http://localhost:8080/network/flowentry/add
curl-H"Content-Type:application/json"
-X POST -
d'{"dpid":"1","priority":"1","match":{"in_port":"2","dl_type":"2048","nw_src":"192.168.2.0/24","nw_dst":"192.168.1.0/24"},"actions":
[{"type":"OUTPUT","port":"1"}]}'http://localhost:8080/network/flowentry/add
Wecanrepeattheprocessfors2:Â
curl-H"Content-Type:application/json"
-X POST -
d'{"dpid":"2","priority":"1","match":{"in_port":"2","dl_type":"2048","nw_src":"192.168.1.0/24","nw_dst":"192.168.2.0/24"},"actions":
[{"type":"OUTPUT","port":"1"}]}'http://localhost:8080/network/flowentry/add
curl-H"Content-Type:application/json"
-X POST -
d'{"dpid":"2","priority":"1","match":{"in_port":"1","dl_type":"2048","nw_src":"192.168.2.0/24","nw_dst":"192.168.1.0/24"},"actions":
[{"type":"OUTPUT","port":"2"}]}'http://localhost:8080/network/flowentry/add
WecanusethesameAPIforverifyingflowentries.Ifyoueverneedtodeleteflows,youcansimplychangeaddtodelete,asfollows:Â
curl-H"Content-Type:application/json"
-X POST -
d'{"dpid":"1","priority":"1","match":{"in_port":"1","dl_type":"2048","priority":"2","nw_src":"192.168.1.0/24","nw_dst":"192.168.2.0/24"},"actions":
[{"type":"OUTPUT","port":"2"}]}'http://localhost:8080/network/flowentry/delete
Thelaststepistoonceagainverifythatthepingpacketswork:Â
mininet>h1ping-c2h2
PING192.168.2.10(192.168.2.10)56(84)bytesofdata.
64bytesfrom192.168.2.10:icmp_seq=1ttl=64time=9.25ms
64bytesfrom192.168.2.10:icmp_seq=2ttl=64time=0.079ms

---192.168.2.10pingstatistics---
2packetstransmitted,2received,0%packetloss,time1002ms
rttmin/avg/max/mdev=0.079/4.664/9.250/4.586ms
#RyuapplicationconsoleoutputforARPonlywiththeflowmatchfor
#ICMPpackets.
ReceivedARPfor192.168.1.1
('ethernet',ethernet(dst='ff:ff:ff:ff:ff:ff',ethertype=2054,src='00:00:00:00:00:01'))
('arp',arp(dst_ip='192.168.1.1',dst_mac='00:00:00:00:00:00',hlen=6,hwtype=1,opcode=1,plen=4,proto=2048,src_ip='192.168.1.10',src_mac='00:00:00:00:00:01'))
datapath:1in_port:1
EVENTofp_event->MySimpleRestRouterEventOFPPacketIn
ReceivedARPfor192.168.2.1
('ethernet',ethernet(dst='ff:ff:ff:ff:ff:ff',ethertype=2054,src='00:00:00:00:00:02'))
('arp',arp(dst_ip='192.168.2.1',dst_mac='00:00:00:00:00:00',hlen=6,hwtype=1,opcode=1,plen=4,proto=2048,src_ip='192.168.2.10',src_mac='00:00:00:00:00:02'))
datapath:2in_port:1
The OpenFlow REST API is one of the most useful features in the Ryuframework. It is widely used in many of the Ryu application examples andproductionsoftware. In thenextsection,wewill takea lookatusing theBGPlibraryfortheRyucontroller.Â

BGProuterwithOpenFlow
BGPhaslongbeenusedastheexternalroutingprotocol,sincethebeginningofinternet. It is meant for exchanging routing information between differentautonomous systemswithout having a centralizedmanagement system.As thenetworkstartstogrowexponentially,traditionalIGPs,suchasIS-ISandOSPF,arenotabletokeepupwiththeresourcesrequiredtokeepupwiththegrowth.ThenatureofBGPisalsousefulwhendifferentinternalentitiesneedstooperateoveracommonnetworkinfrastructure.Anexamplewouldbetohaveacommoncore for inter-site networks in one autonomous system, a different distributionautonomoussystemineachdatacenter,andadifferentautonomoussystemforeachdivisionbehind thedistribution fabric. Inmany largenetworks,BGPhasbecometheroutingprotocolofchoiceinbothinternalandexternalnetworks.Â
The Ryu framework includes a BGP speaker library(http://ryu.readthedocs.io/en/latest/library_bgp_speaker.html#) that greatlysimplifiesthetaskifyourSDNcontrollerneedstocommunicateexternallyusingBGP. We will look at using the Ryu SDN controller with BGP in detail inChapter13,HybridSDN,butthissectionwillserveasagoodintroduction.Â
TherearetwowaystousetheRyucontrollerwithBGP:Â
DirectlyusingPythonandtheBGPspeakerlibraryAs a Ryu application, usingryu/services/protocols/bgp/application.pyÂ
WecanusetheVIRLroutertoverifyourRyuBGPconfiguration.Let's takealookatsettinguptheiosvrouters.Â
Labroutersetup
In this section,wewillusea simple two-iosv router inourVIRL lab to test aBGPneighborconnection.Wewillusethedefaultauto-configforthetopologysothetworoutersestablishaBGPneighborrelationship,whileusingiosv-1toestablish aBGP neighbor relationshipwith ourRyu controller.By default, aniosvrouterplacesthefirstinterfaceintheMgmt-intfVRF:Â

!
vrfdefinitionMgmt-intf
!
address-familyipv4
exit-address-family
!
address-familyipv6
exit-address-family
!
interfaceGigabitEthernet0/0
descriptionOOBManagement
vrfforwardingMgmt-intf
ipaddress172.16.1.237255.255.255.0
duplexfull
speedauto
media-typerj45
!
WewillTelnettotheconsoleinterfaceandtakeitoutofthemanagementVRFsothattheroutingtablesconverge.Notethatwhenwedothis,theIPaddressisremoved from the interface, so we need to assign a new IP address to theinterface:Â
iosv-1#confit
Enterconfigurationcommands,oneperline.EndwithCNTL/Z.
iosv-1(config)#intgig0/0
iosv-1(config-if)#descriptionToRyuBGPNeighbor
iosv-1(config-if)#novrfforwardingMgmt-intf
%InterfaceGigabitEthernet0/0IPv4disabledandaddress(es)removedduetoenablingVRFMgmt-
intf
iosv-1(config-if)#ipadd172.16.1.175255.255.255.0
iosv-1(config-if)#end
iosv-1#
Wewill configure the router asASN65001peeringwith aneighbor at the IPaddress of our Ryu virtualmachine.We can also see that the iBGP neighborwithiosv-2isestablished,buttheeBGPneighborwithRyucontrollerisidle:Â
iosv-1(config-if)#routerbgp1
iosv-1(config-router)#neighbor172.16.1.174remote-as65000
iosv-1(config-router)#neighbor172.16.1.174activate
iosv-1(config-router)#end
iosv-1#
iosv-1#shipbgpsummary
BGProuteridentifier192.168.0.1,localASnumber1
...
NeighborVASMsgRcvdMsgSentTblVerInQOutQUp/DownState/PfxRcd
172.16.1.17446500000100neverActive
192.168.0.2416630000:02:341
iosv-1#
Weareall setupwithourBGPneighbor,so let's takea lookatour firstBGPspeakerexample.Â
PythonwiththeBGPspeakerlibrary
The first BGP speaker code in Chapter11_5.py is very similar to the BGPspeaker example on the Ryu readthedocs documentation, http://ryu.readthedocs.io/en/latest/library_bgp_speaker.html#example, with afewexceptions,aswewillsee.Sinceweare launchingtheapplicationdirectlyfromPython,weneedtoimporttheRyueventqueueintheformofeventletaswellastheBGPspeakerlibrary:
importeventlet
...
fromryu.services.protocols.bgp.bgpspeakerimportBGPSpeaker
Wewill define twocallback functions for theBGP speaker forBGPneighbordetectionandbest-pathchange:Â
defdump_remote_best_path_change(event):
print'thebestpathchanged:',event.remote_as,event.prefix,
event.nexthop,event.is_withdraw
defdetect_peer_down(remote_ip,remote_as):
print'Peerdown:',remote_ip,remote_as
WewilldefinetheBGPspeakerwiththenecessaryparametersandaddiosv-1asourneighbor.Every30seconds,wewillannounceaprefixaswellasprintingoutourcurrentneighborsandRoutingInformationBase(RIB):Â
if__name__=="__main__":
speaker=BGPSpeaker(as_number=65000,router_id='172.16.1.174',
best_path_change_handler=dump_remote_best_path_change,
peer_down_handler=detect_peer_down)
speaker.neighbor_add('172.16.1.175',1)
count=0

whileTrue:
eventlet.sleep(30)
prefix='10.20.'+str(count)+'.0/24'
print"addanewprefix",prefix
speaker.prefix_add(prefix)
count+=1
print("Neighbors:",speaker.neighbors_get())
print("Routes:",speaker.rib_get())
TheapplicationneedstospawnachildprocessfortheBGPspeaker,soweneedtolaunchitasroot:Â
$pythonmastering_python_networking/Chapter11_5.py
Wecanseethattheiosv-1routernowshowstheneighborasupandestablished:
*Apr915:57:11.272:%BGP-5-ADJCHANGE:neighbor172.16.1.174Up
Every30seconds,therouterwillreceiveBGProutesfromtheRyucontroller:Â
0iosv-1#shipbgpsummary
BGProuteridentifier192.168.0.1,localASnumber1
...
NeighborVASMsgRcvdMsgSentTblVerInQOutQUp/DownState/PfxRcd
172.16.1.174465000911310000:01:072
192.168.0.2414049310000:33:301
#ShowingBGProutesfromRyuController
iosv-1#shiproutebgp
...
10.0.0.0/8isvariablysubnetted,4subnets,3masks
B10.20.0.0/24[20/0]via172.16.1.174,0:00:56
B10.20.1.0/24[20/0]via172.16.1.174,00:00:27
Onthecontrollerconsole,youcanseetheBGPkeepaliveexchangemessages:
PeerPeer(ip:172.16.1.175,asn:1)askedtocommunicatepath
...
Sentmsgto('172.16.1.175','179')>>BGPKeepAlive(len=19,type=4)
Receivedmsgfrom('172.16.1.175','179')<<BGPKeepAlive(len=19,type=4)
Note that we can see the neighbors as well as routes from iosv-2 propagatedfromBGP:Â
('Neighbors:','[{"bgp_state":"Established","ip_addr":"172.16.1.175","as_num":"1"}]')

...
APImethodoperator.showcalledwithargs:{'params':['rib','all'],'format':'json'}
('Routes:','{"vpnv6":[],"ipv4fs":[],"vpnv4":[],"vpnv4fs":[],"ipv4":[{"paths":[{"origin":"i","aspath":[1],"prefix":"192.168.0.1/32","bpr":"OnlyPath","localpref":"","nexthop":..."prefix":"192.168.0.2/32"},...
UsingPythonandtheBGPspeakerlibrarygivesyouverygranularcontrol,butittakes away the operations Ryu-manager does for you, such as managing theevent queue and the OpenFlow event manager. It also requires you to haveextensive knowledge of the BGP speaker library API, which can get prettycomplicated when it comes to more advanced features such as MPLS orFlowSpec.Let'slookathowtorunBGPasaRyuapplication,whichsimplifiestheprocessquiteabit.Â
RyuBGPapplication
RyucanrunaBGPapplicationwiththe--bgp-app-config-fileoption,whichcan be taken in as input by theryu/serivces/protocols/bgp/applications.pymodule:Â
$ sudo ryu-manager --verbose --bgp-app-config-
file<config_file>ryu/services/protocols/bgp/application.py
There is a sample configuration file located in the same directory forreference:Â
$lessryu/services/protocols/bgp/bgp_sample_conf.py
In our configuration file, Chapter11_6.py, we will start with a simpleconfigurationfilethatestablishestheBGPneighborrelationshipandprovidesanSSHconsole:Â
BGP={
'local_as':65000,
'router_id':'172.16.1.174',
'neighbors':[
{
'address':'172.16.1.175',
'remote_as':1,
'enable_ipv4':True,
'enable_ipv6':True,
'enable_vpnv4':True,
'enable_vpnv6':True
},

]
}
SSH={
'ssh_port':4990,
'ssh_host':'localhost',
#'ssh_host_key':'/etc/ssh_host_rsa_key',
#'ssh_username':'ryu',
#'ssh_password':'ryu',
}
Youcanlaunchtheapplicationusingthe--bgp-app-config-fileÂoption:Â
$ sudo ryu-manager --verbose --bgp-app-config-
filemastering_python_networking/Chapter11_6.pyryu/services/protocols/bgp/application.py
YoucanSSHÂ to the localhost and takea lookat theneighbors,RIB, and soon:Â
$sshlocalhost-p4990
Hello,thisisRyuBGPspeaker(version4.13).
bgpd>
bgpd>showneighbor
IPAddressASNumberBGPState
172.16.1.1751Established
bgpd>showriball
Statuscodes:*valid,>best
Origincodes:i-IGP,e-EGP,?-incomplete
NetworkLabelsNextHopReasonMetricLocPrfPath
Family:vpnv6
Family:ipv4fs
Family:vpnv4
Family:vpnv4fs
Family:ipv4
*>192.168.0.1/32None172.16.1.175OnlyPath01i
*>192.168.0.2/32None172.16.1.175OnlyPath1i
Family:ipv6
Family:rtfilter
Family:evpn
bgpd>quit
bgpd>bye.
Connectiontolocalhostclosed.

IntheÂChapter11_7.pyconfigurationfile,I'vealsoincludedasectionforrouteadvertisement:Â
'routes':[
#ExampleofIPv4prefix
{
'prefix':'10.20.0.0/24',
'next_hop':'172.16.1.1'
},
{
'prefix':'10.20.1.0/24',
'next_hop':'172.16.1.174'
},
]
Init,wecanseetheRyucontrolleradvertisedtoiosv-1:Â
iosv-1#shiproutebgp
...
Gatewayoflastresortisnotset
10.0.0.0/8isvariablysubnetted,4subnets,3masks
B10.20.0.0/24[20/0]via172.16.1.1,00:01:16
B10.20.1.0/24[20/0]via172.16.1.174,00:01:16
Notethatthenext_hopattributefortheIPv4prefixispointedto172.16.1.1forthe prefix 10.20.0.0/24. This is a great example of being able to flexiblycontrol the BGP attributes that youwish tomake (if you knowwhat you aredoing). The ryu/services/protocols/bgp/bgp_sample_config.py fileprovides lotsofgreat examples and features; Iwould encourageyou to take acloserlookatwhatisavailableintheconfigurationfile.Inthenextsection,wewilltakealookathowtousetheRyucontrollertosimulateafirewalloraccess-listfunction.Â

FirewallwithOpenFlow
For the firewall function demonstration, we will use the existingryu/app/rest_firewall.pyapplicationandcombinetheknowledgewegainedinthischapterabouttheRESTAPIandflowmodification.Thisisasimplifiedversion of the Ryu book firewall example, https://osrg.github.io/ryu-book/en/html/rest_firewall.html. Besides firewall operations, the Ryu firewallexampleinthelinkprovidedillustratestheusageofmulti-tenancywithVLAN.The example covered in this sectionwill focus on the correlationbetween thefirewall application andOpenFlow for learningpurposes.This section and thelinked exampleÂwould be good complements of each other. If you take alook at the rest_firewall.py code, youwill notice a lot of similarities withofctl_rest.py.Infact,mostoftherest_*applicationshavesimilarfunctionswhenitcomestocallbackfunctionsandURLdispatch.Thisisgreatnewsforus,since we only have to learn the pattern once and can apply it to multipleapplications.ÂTobeginwith,wewilllaunchatwo-host,single-switchtopologyinMininet:Â
$sudomn--toposingle,2--mac--switchovsk--controllerremote
Wecanlaunchthefirewallapplication:Â
$ryu-manager--verboseryu/app/rest_firewall.py
We can perform a quick flow dump and see that the initial state of the flowincludesadropactionatthetop:Â
$sudoovs-ofctldump-flowss1
NXST_FLOWreply(xid=0x4):
cookie=0x0,duration=5.849s,table=0,n_packets=0,n_bytes=0,idle_age=5,priority=65535actions=drop
cookie=0x0,duration=5.848s,table=0,n_packets=0,n_bytes=0,idle_age=5,priority=0actions=CONTROLLER:128
cookie=0x0,duration=5.848s,table=0,n_packets=0,n_bytes=0,idle_age=5,priority=65534,arpactions=NORMAL
We can enable the firewall via the API under/firewall/module/enable/<dpid>,whichwewilldonow:Â
$ curl -
XPUThttp://localhost:8080/firewall/module/enable/0000000000000001
[{"switch_id":"0000000000000001","command_result":{"result":"success","details":"firewallrunning."}}]

Ifweperformtheflowdumpagain,wewillseethedropactionisgone:Â
$sudoovs-ofctldump-flowss1
NXST_FLOWreply(xid=0x4):
cookie=0x0,duration=964.894s,table=0,n_packets=0,n_bytes=0,idle_age=964,priority=65534,arpactions=NORMAL
cookie=0x0,duration=964.894s,table=0,n_packets=0,n_bytes=0,idle_age=964,priority=0actions=CONTROLLER:128adfa
ButthereisstillnoflowfromÂh1toh2,sothepingpacketwillbeblockedanddropped:Â
mininet>h1ping-c1h2
PING10.0.0.2(10.0.0.2)56(84)bytesofdata.
---10.0.0.2pingstatistics---
1packetstransmitted,0received,100%packetloss,time0ms
#OnRyuconsole
EVENTofp_event->RestFirewallAPIEventOFPPacketIn
[FW]
[INFO]dpid=0000000000000001:Blockedpacket=ethernet(dst='00:00:00:00:00:02',ethertype=2048,src='00:00:00:00:00:01'),ipv4(csum=56630,dst='10.0.0.2',flags=2,header_length=5,identification=18800,offset=0,option=None,proto=1,src='10.0.0.1',tos=0,total_length=84,ttl=64,version=4),icmp(code=0,csum=37249,data=echo(data='Vjxe8Xx00x00x00x00xfe8tx00x00x00x00x00x10x11x12x13x14x15x16x17x18x19x1ax1bx1cx1dx1ex1f!"#$%&'()*+,-./01234567',id=25006,seq=1),type=8)
Solet'saddtherulesforallowingICMPpackets--rememberthatthisneedstobedonebidirectionally,soweneedtoaddtworules:Â
$ curl -X POST -
d'{"nw_src":"10.0.0.1/32","nw_dst":"10.0.0.2/32","nw_proto":"ICMP"}'http://localhost:8080/firewall/rules/0000000000000001
$ curl -X POST -
d'{"nw_src":"10.0.0.2/32","nw_dst":"10.0.0.1/32","nw_proto":"ICMP"}'http://localhost:8080/firewall/rules/0000000000000001
Ifweperformaflowdumpagain,wewillseetheflowinstalled:Â
$sudoovs-ofctldump-flowss1
NXST_FLOWreply(xid=0x4):
cookie=0x0,duration=1143.144s,table=0,n_packets=2,n_bytes=84,idle_age=101,priority=65534,arpactions=NORMAL
cookie=0x1,duration=16.060s,table=0,n_packets=0,n_bytes=0,idle_age=16,priority=1,icmp,nw_src=10.0.0.1,nw_dst=10.0.0.2actions=NORMAL
cookie=0x2,duration=3.662s,table=0,n_packets=0,n_bytes=0,idle_age=3,priority=1,icmp,nw_src=10.0.0.2,nw_dst=10.0.0.1actions=NORMAL
cookie=0x0,duration=1143.144s,table=0,n_packets=1,n_bytes=98,idle_age=101,priority=0actions=CONTROLLER:128
Asexpected,thepingpacketfromh1toh2nowsucceeds:Â
mininet>h1ping-c1h2
PING10.0.0.2(10.0.0.2)56(84)bytesofdata.
64bytesfrom10.0.0.2:icmp_seq=1ttl=64time=0.423ms
---10.0.0.2pingstatistics---

1packetstransmitted,1received,0%packetloss,time0ms
rttmin/avg/max/mdev=0.423/0.423/0.423/0.000ms
ButsincetheflowisimplementedspecificallyforICMP,othertrafficwillstillbeblocked:Â
mininet>h2python-mSimpleHTTPServer&
mininet>h1curlhttp://10.0.0.2:8000
#Ryuconsole
[FW]
[INFO]dpid=0000000000000001:Blockedpacket=ethernet(dst='00:00:00:00:00:02',ethertype=2048,src='00:00:00:00:00:01'),ipv4(csum=49315,dst='10.0.0.2',flags=2,header_length=5,identification=26134,offset=0,option=None,proto=6,src='10.0.0.1',tos=0,total_length=60,ttl=64,version=4),tcp(ack=0,bits=2,csum=6514,dst_port=8000,offset=10,option=
[TCPOptionMaximumSegmentSize(kind=2,length=4,max_seg_size=1460),TCPOptionSACKPermitted(kind=4,length=2),TCPOptionTimestamps(kind=8,length=10,ts_ecr=0,ts_val=34384732),TCPOptionNoOperation(kind=1,length=1),TCPOptionWindowScale(kind=3,length=3,shift_cnt=9)],seq=677247676,src_port=47286,urgent=0,window_size=29200)
Asyoucansee, thefirewallapplicationisawaytouseSDNÂtoimplementatraditionalnetworkfunctionbasedonpacketcharacteristicsandimplementitasflows to the network device. In this example, we implemented what istraditionallyalayer4firewallruleintermsofSDN,Ryu,andOpenFlow.Â

Summary
Inthischapter,webuiltonthepreviouschapter'sknowledgeonOpenFlowandRyuforadvancedfunctions.WestartedwithparsingoutthedifferentOpenFlowfunctions and decoding packets with the Ryu packet library. We thenimplemented our own static router between two routers, each with a hostconnectedtoa/24subnet.TherouterisresponsibleforansweringARPpacketsand installing static flows between the two hosts. After the static routersuccessfully transported traffic between the two hosts, we implemented theRESTAPIandremoved thestatic flow in thecode.Thisgaveus flexibility todynamicallyinsertflowsintherouterwecoded.Â
Inthesectionthatfollowed,welookedattwowaystoimplementaBGProuterwithRyu.ThefirstmethodrequiresmorePythonknowledgebydirectlycallingtheBGPlibraryoftheRyuframework.Thesecondmethodusesthe--bgp-app-config-fileÂoptionwiththeRyuBGPapplication.Thefirstmethodgaveusmoregranularcontrolofourappbutthatcanbecometedious,whilethesecondoptionabstractsthelower-levelcodebutattheexpenseofcontrol.Bothmethodshavetheiradvantagesanddisadvantages.Â
In the last section of the chapter, we looked at the firewall application Ryuprovides as an example of howwe can simulate a traditional layer 4 firewallfunctioninanetworkdevicewithOpenFlow.Â
In the next chapter,wewill look atmoreSDNÂoptionswithOpenStack andOpenDaylight. Both of the projects carry great industrymomentumwith bothcommercialvendorsandopensourcecommunitysupport.Â

Chapter12.OpenStack,OpenDaylight,andNFV
It seems there is no shortage of network engineering projects named after thetermOpenthesedays.BesidestheOpenvSwitchandÂOpenFlowprojects,thatwe have already studied in the last two chapters, there are community drivenprojects such as Open Network Operating System(ONOS, http://onosproject.org/), OpenDaylight(https://www.opendaylight.org/), and OpenStack (https://www.openstack.org/).Furthermore,thereareotherprojectsthatareopeninnaturebutarguablyheavilybackedorbootstrappedbycommercialcompanies(suchasRyuwithNTT);forexampleOpenContrail (http://www.opencontrail.org/) with Juniper Networksand Open Compute Project (http://www.opencompute.org/) bootstrappedby Facebook. There is also the Open Networking User Group(ONUG, https://opennetworkingusergroup.com/) that, according to theirmissionstatement,enablegreaterchoicesandoptionsforITbusinessleadersbyadvocatingforopeninteroperablehardwareandsoftware-definedinfrastructuresolutions.Â
Note
For more open and community driven initiatives, there is agrowing list on the Wikipedia pagehttps://en.wikipedia.org/wiki/List_of_SDN_controller_software.Â
On one hand, it is terrific to see so much innovation and communityinvolvement in thenetworkengineering field.On theotherhand, it feels abitoverwhelmingifonetriesÂtounderstandandlearnaboutallof thesedifferentprojects.Many,ifnotallofthem,usethetermSoftwareDefinedNetworking(SDN)andNetworkFunctionVirtualization(NFV)Âtodescribetheirmissionandfeatureswhen itcomes to the technology theybringforward.Manyof theprojects utilize the same technology, such as OpenFlow, but add differentorchestrationenginesorAPIsontoptotargetslightlydifferentaudience.
We have already discussed in detail about OpenFlow in the previous twochapters.Inthischapter,wewilltakealookatthetwootherÂprojectsthathavegeneralindustrysupportamongstthecommunityandvendors:

OpenStack: It is an open source Infrastructure-as-a- Service cloudplatform with integrated components for the datacenter environment.Therearemanydifferentcomponentswithintheproject,suchascompute,storage, and networking resources. We will focus on the networkingportion,codenameNeutron,withinOpenStack.ÂOpenDaylight: It isacommunity-ledand industry-supportedopensourceprojectwith aims to accelerate the adoptionofSDNandNFVwithmoretransparency.TheprojectwasadministratedbytheLinuxFoundationfromdayoneandthefoundingmembersincludeindustryleaderssuchasCisco,Juniper,Arista,Brocade,Microsoft,VMware,RedHat,andmanymore.Â
When discussing the two projects, we will look at how each projectimplements NFV. NFV is a concept where we can use software andvirtualization technologies to simulate traditional network functions, such asrouting,switching,loadbalancing,firewalls,caching,andmore.Inthepreviouschapter, we saw how we can use OpenFlow and Ryu controller to simulatefunctionssuchasrouting,switching,andtraditionalfirewall,allusingthesameMininet Open vSwitch. Many full size books have been written on bothOpenStackandOpenDaylight. Itwouldsimplybea falsehope trying tocoverthe two topics in depthwithin the constrains of a chapter.Both these subjectsrepresent important steps forward in the network engineering world, that areworth spending time understanding. In this chapter, wewill try to establish asolid basic understanding of both projects from network engineeringperspective,sothereadercandiveintoeachtopicdeeperinthefuture.Â
Additionally,wewillcoverthefollowingtopics:Â
NetworkinginOpenStackTryingoutOpenStackÂOpenDaylightProgrammingoverviewÂOpenDaylightexample

OpenStackÂ
OpenStacktriestosolveaverycomplexÂproblem,whichistocreateanopensource, flexible, extensible Infrastructure-as-a- Service (IaaS) datacenter.Imagine if you are creating an Amazon AWS or Microsoft Azure publiccloudÂfromyourownbaremetalserverandoff-the-shelfnetworkequipment,andyoucanbegintoseethecomplicationthattheprocessinvolves.Inordertobescalable, the requiredcomponentsneed tobebrokenoff into self-containedcomponents. Each of the component consists of sub-components and pluginsthatallowformoreextensionandcommunityinvolvement.ÂLet'stakealookatthecoreandassociatedcomponentsatahighlevelinthenextsection.Â
OpenStackoverview
InOpenStack, theoverallcomponentscanbeseparatedintothefollowingcoreservices:
Compute, code named nova: It is the computing fabric controller formanaging and controlling computing resources. It workswith baremetalservers aswell as hypervisor technologies, such asKVM,Xen,Hyper-V,andmanymore.NovaiswritteninPython.ÂNetworking, code name Neutron: This is the system that managesnetworksandassociatedservices.Thephysicalnetworkcanbeflat,VLAN,orVXLANthatseparatescontrolanduser trafficwiththevirtualnetworkwork in conjunction with the underlying physical network. Networkservices such as IP addressing (DHCPor static), floating IP fromcontrolnode to user network, L2 and L3 services reside within the networkingservices. This is where the network plugin can be installed to provideadditional services such as intrusion detection system, load balancing,firewall,andVPN.Thisisthefocusofourchapter.ÂBlock Storage, code named Cinder: The block storage is used withcompute instances toprovideblock-level storage, similar toavirtualharddrive.ÂIdentify, code named keystone: Keystone provides central directory ofuserrightsmanagement.Â

Image service, code named glance: This is service that providesdiscovery,registration,anddeliveryfordiskandserverimages.ÂObject Storage, code named Swift: Swift is the backend redundantstoragesystemfordatareplicationandintegrityacrossmultiplediskdrivesandservers.ÂDashboard, code name Horizon: This is the dashboard for access,provision, and automate deployment. Technically this is classified as anoptionalserviceforenhancement.However,Ipersonallyfeelthisisacoreservicethatisrequiredfordeployment.
HereisavisualizationofthecoreservicesofOpenStack:Â
OpenStackCoreServices(source:Âhttps://www.openstack.org/software/)
There are many more optional services that enhance the services, such asdatabase, telemetry, messaging service, DNS, orchestration, and many more.Hereisabriefoverviewofsomeoftheoptionalservices:Â

OpenStack Optional Services  (source:https://www.openstack.org/software/project-navigator)
As you can tell by the size of the components, OpenStack is a very big andcomplexproject. In the latestOcatarelease(less thanÂ6monthsreleasecyclebetween Newton in October 2016 to Ocata in February 2017), thereareÂhundredsof contributorswith tensof thousandsof codeandassociatedcodereviewsineachmonthtohelpbringthelatestreleasetofruition.

OpenStack Ocata Release Contribution (source: http://stackalytics.com/?release=ocata)
The point I am trying tomake is thatmoving over toOpenStack onlymakessenseifyoudeploytheprojectasawhole,withallthecomponentsintact.Youcould choose to deploy any individual component, such as OpenStackNetworking(neutron),butthebenefitwouldbenodifferentthanfromdeployinga number of other network abstraction technologies. The true benefit ofOpenStackcomesfromthedirectandseamlessintegrationandorchestrationofallthecomponentsworkingtogether.Â
The decision to deployOpenStack generally is not a network engineer drivenone.Itisgenerallyahigh-levelbusinessdecision,jointlymadebybothbusinessand technicalpersonnels ina company. Inmyopinion, as anetworkengineer,

we should exercise due diligence in investigating if our physical network andtechnologyin-usetodaycanaccommodateÂtheOpenStackvirtualizednetwork;forexample,ifweshoulduseflat,VLAN,orVXLANformanagementandusernetworkoverlay.WeshouldstartwithhownetworkvirtualizationisdonewithinOpenStack,whichwewillexamineinthenextsection.Â
NetworkinginOpenStack
The OpenStack NetworkingGuide, https://docs.openstack.org/ocata/networking-guide/index.html, is adetailed and authoritative source for networking in OpenStack. The guideprovidesahighleveloverviewofthetechnology,dependencies,anddeploymentexamples.HereisanoverviewandsummaryofnetworkinginOpenStack:Â
OpenStack networking handles the creation andmanagement of a virtualnetwork infrastructure, including networks, switches, subnets, and routersfordevicesmanagedbyOpenStackservices.ÂAdditionalservices,suchasfirewallsorVPN,canalsobeusedintheformofaplugins.ÂOpenStacknetworkingconsistsoftheneutron-server,databasefornetworkinformationstorage,andpluginagents.Theagentsare responsible for theinteractionbetweentheLinuxnetworkingmechanism,externaldevices,andSDNcontrollers.ÂThe networking service leverages Keystone identify services for userauthentication,ÂNovacomputeservicesforconnectanddisconnectvirtualNICon theVMtoacustomernetwork,Âandhorizondashboard servicesforadministratorandtenantuserstocreatenetworkservices.The main virtualization underpin is the Linux namespace. A Linuxnamespace is a way of scoping a particular set of identifiers, whichare provided for networking and processes. If a process or a networkdevice is running within a process namespace, it can only see andcommunicate with other processes and network devices in the samenamespace.Eachnetworknamespacehas itsown routing table, IPaddress space,andIPÂtables.ÂModularlayer2(ml2)neutronpluginisaframeworkallowingOpenStacknetworkingtosimultaneouslyusethevarietyoflayer2networkingsuchas

VXLAN and Open vSwitch. They can be used simultaneously to accessdifferentportsofthesamevirtualnetwork.ÂAnL2agentserveslayer2networkconnectivitytoOpenStackresources.Itis typically run on each network node and compute node (please seediagram below for the L2 agents). Available agents are Open vSwitchagent, Linux bridge agent, SRIOV NIC switch agent, and MacVTapagent.Â
L2Agents (source:Â https://docs.openstack.org/ocata/networking-guide/config-ml2.html)
AnL3agentoffers advanced layer3 services, suchasvirtual routers andfFloatingIPs.ItrequiresanL2agentrunninginparallel.Â
OpenStackNetworkingserviceneutronincludesthefollowingcomponents:Â
APIserver:Thiscomponent includes support for layer2networkingandIPaddressspacemanagement,aswellasanextensionforalayer3routerconstruct thatenables routingbetweena layer2networkandgateways toexternalnetworks.ÂPlugIn and agents: This component creates subnets, provides IPaddressing,connectanddisconnectports.ÂMessaging queue: This queue accepts RPC requests between agents tocompleteAPIoperations.ÂThenetworkservicecanresideinthecontrolnodeorinitsownnode:Â

Compute and NetworkNode(source:Â https://docs.openstack.org/ocata/networking-guide/intro-os-networking.html)
An importantdifference inOpenStacknetworking is thedifference inproviderandtenantnetworks:Â
OpenStack compute is a consumer of OpenStack networking to provideconnectivity for its instances. This is done through the combination ofproviderandtenantnetworks.ÂTheprovidernetworkofferslayer2connectivitytoinstanceswithoptionalsupportforDHCPandmetadataservices.Theprovidernetworkconnectstotheexistinglayer2networkinthedatacenter,typicallyusingVLAN.Onlyanadministratorcanmanagetheprovidernetwork.ÂThe tenant networks are self-service networks that use tunnelingmechanism, such asVXLANorGRE.They are entirely virtual and self-contained. In order for the tenant network to connect to the providernetworkorexternalnetwork,avirtualrouterisused.ÂFrom tenant network to provider network, source network addresstranslationisusedonthevirtualrouter.ÂFrom provider to tenant network, destination network address translation

withafloatingIPisusedonthevirtualrouter.Â
Using the Linux bridge as an example, let's take a look at how the providernetworkismappedtothephysicalnetwork:Â

Linux Bridge Tenant Network (source:Â https://docs.openstack.org/ocata/networking-guide/deploy-lb-selfservice.html)

Thefollowinggraphincludesaremoredetailedlinktopologyforinterface2:Â
Linux Bridge Provider Network (source:https://docs.openstack.org/ocata/networking-guide/deploy-lb-provider.html)
LetustakeacloserlookattheprecedingÂtopology:Â
Interface 1 is a physical interface with an IP address dedicated formanagementpurposes.This is typicallyan isolatedVLANin thephysicalinfrastructure.The controller node receives thenetworkmanagementAPIcall, and through the management interface on the compute node,configures the DHCP agent and metadata agent for the tenant networkinstance.Â

Interface2onthecomputenodeisdedicatedasaL2trunkinterfacetothephysical network infrastructure. Each instance has its dedicated Linuxbridge instance with separate IP table and virtual Ethernet ports. Eachinstance is taggedwith a particularVLAN ID for separation and trunkedthrough interface 2 to the provider network. In this deployment, theinstancetraffictraversesthroughthesameVLANastheprovidernetworkinthesameVLAN.ÂInterface3providesanadditionaloverlayoptionfortenantnetworks,ifthephysicalnetworksupportsVXLAN.Inthecomputenode,insteadofhavingtheLinuxbridgetagwithVLANID, theLinuxbridgeusesVXLANVNIforidentification.ItthentraversesthroughthephysicalnetworktoreachtheNetwork node with the same VXLAN that connects to the routernamespace.Therouternamespacehasaseparatevirtualconnection to theLinuxbridgetointerface2fortheprovidernetwork.Â
Hereisanexampleofhowalayer3agentcaninteractwiththeBGProuter intheprovidernetwork,whichinturnpeerswiththeexternalnetwork:Â

BGP Dynamic Routing (source: https://docs.openstack.org/ocata/networking-guide/config-bgp-dynamic-routing.html)
InthecaseofaLinuxbridgewithBGProuting,theL3gatewaywouldbeonthenetworknode that candirectlyor indirectlypeerwith theexternalnetwork. Inthe next section, we will take a look at some of the command syntax ofOpenStackconfiguration.Â
TryingoutOpenStackÂ
TherearetwowaystotryoutOpenStackwithminimalfootprint.Thefirstoptionis an all-in-one installation calledDevStack, https://docs.openstack.org/developer/devstack/#all-in-one-single-vm.ItconsistsofcloningtheDevStackGitrepositoryandinstallingaseriesoftoolsandscriptstoenableaOpenStackinanall-in-oneenvironment.

Note
DevStackwillrunasrootandsubstantiallymakechangestoyoursystem. Therefore, it is best to run it on a server or a virtualmachinethatyoucandedicatetothispurpose.Â
The second option is to use a cloud-based sandbox calledTryStack,Âhttp://trystack.org/.Theaccountisfreebuttheprocessissomewhatmanual at this time. Also, the project is made possible by the generosity ofcompaniessuchasDell,NetApp,Cisco,andRedHat,soÂyourmileagemightvarybythetimeyoureadthis.ButTryStackÂisatrulyeasywaytogetalookandfeelofthedashboardandlaunchyourfirstOpenStackinstance.ÂTheyhaveagreatquickstartvideothatIwillnotrepeathere,hereisthescreenshotofthehorizondashboardoftheinternalnetwork:Â
TryStackInternalNetwork
Aswellasthevirtualroutercreated:Â
TryStackVirtualRouter

Thenetwork topologyshows if the internalnetwork is connected to the router(ornot)andtheexternalnetwork:Â

TryStackNetworkTopologyÂ
Aspreviouslydiscussed,moving fromprovidernetwork to internalnetwork, afloatingIPisrequired.TryStackwillallocateanIPfromitspublicpool:Â
TryStackFloatingIPÂ
WecanthenlaunchaninstanceassociatedwithboththeinternalnetworkaswellasthepublicfloatingIP:Â

TryStackComputeInstanceÂ
Duringtheinstancelaunchprocess,youwillneedtoeithercreateorimportyourpublickeyforsecurity,aswellascreatinginboundsecurityrulesforthesecuritygroup.Intheprecedingexample,IcreatedaninboundruleforallowingICMP,SSH,aswellasTCPport8000 to testwithPython'sHTTPservermodule.WecannowtestthehostwithICMPandSSH.Notethatthefollowinghostisabletopingbutunabletossh:Â
echou@ubuntu:~$ping8.43.87.101
PING8.43.87.101(8.43.87.101)56(84)bytesofdata.
64bytesfrom8.43.87.101:icmp_seq=1ttl=128time=106ms
64bytesfrom8.43.87.101:icmp_seq=2ttl=128time=100ms
^C
---8.43.87.101pingstatistics---
2packetstransmitted,2received,0%packetloss,time1002ms
rttmin/avg/max/mdev=100.802/103.765/106.728/2.963ms
#Hostcanpingbutcannotsshduetokeyauthenticationerror
echou@ubuntu:[email protected]
Permissiondenied(publickey).
Wecanaccess theVMwith thehostusing thecorrectkey, installPython(didnot come standardwith the image), and launch thePythonSimpleHTTPServermodule.YouanseenextthatÂ
#Hostwithcorrectpublickey
Theauthenticityofhost'8.43.87.101(8.43.87.101)'can'tbeestablished.
ECDSAkeyfingerprintis
WelcometoUbuntu16.04LTS(GNU/Linux4.4.0-21-genericx86_64)

...
ubuntu@echou-u01:~$
ubuntu@echou-u01:~$python2.7-mSimpleHTTPServer
ServingHTTPon0.0.0.0port8000...
[ip]--[13/Apr/201714:42:25]"GET/HTTP/1.1"200-
[ip]--[13/Apr/201714:42:26]code404,messageFilenotfound
[ip]--[13/Apr/201714:42:26]"GET/favicon.icoHTTP/1.1"404-
YoucanalsoinstallDevStackonacleanmachine.IfyouareopenfortheLinuxflavor,Ubuntu16.04isrecommended.Theinstallationshouldbeinstalledwithauserstackwithrootaccess,withoutpromptingpassword:Â
$sudouseradd-s/bin/bash-d/opt/stack-mstack
$ echo "stack ALL=
(ALL)NOPASSWD:ALL"|sudotee/etc/sudoers.d/stack
$sudosu-stack
$gitclonehttps://git.openstack.org/openstack-dev/devstack
Cloninginto'devstack'...
..
$cddevstack/
Createthelocal.conffileattherootofGitrepo,andstarttheprocess:
$catlocal.conf
[[local|localrc]]
ADMIN_PASSWORD=secret
DATABASE_PASSWORD=$ADMIN_PASSWORD
RABBIT_PASSWORD=$ADMIN_PASSWORD
SERVICE_PASSWORD=$ADMIN_PASSWORD
Youcanthenstarttheinstall:Â
#startinstall
$./stack.sh
After installation, you can start tinkering with the different project andconfigurationfiles:Â
echou@ubuntu:~$ls/opt/stack/
cinderdevstack.subunithorizonneutronrequirements
dataexamples.desktopkeystonenovastatus
devstackglancelogsnoVNCtempest
echou@ubuntu:~$

OpenStackisacoolprojectthattriestosolveabigproblem.Inthissection,welookedattheoverallarchitectureoftheprojectandusedtwolowfootprintwaystotryouttheproject,usingTryStackandDevStack.Inthenextsection,wewilltakealookattheOpenDaylightproject.Â

OpenDaylight
TheOpenDaylight(ODL)projectisanopensourceprojectfoundedin2013topromotesoftware-definednetworkingandNFV.ThesoftwareiswritteninJava.OpenDaylightsupportstechnologysuchasOpenFlow,ismodularinnature,andtries to enable network services across environments. In the middle of theOpenDaylight architecture is a service abstraction layer with standardizedsouthbound API and protocol plugins, which allows operation with hardwaredevicessuchasOpenFlowandvariousvendor-centric:
An Operational View of OpenDaylight(source:Âhttps://www.opendaylight.org/platform-overview/)
AlsoshownintheprecedingdiagramisthenorthboundOpenDaylightAPI.Thisis normally aREST-based orNetConfig-basedAPI byway of plugins. In thenext section, let's takea lookat theODLprojectcomponentsand theproject'sprogrammingapproach.
OpenDaylightprogrammingoverviewÂ

Theplatformconsistsofthefollowingessentialcomponents:Â
Java:TheJavalanguageisthelanguageODLiswrittenin.Javainterfacesareusedforeventlistening,specifications,andformingpatterns.ÂMaven:ThisisthebuildsystemforJava.ÂOpenServiceGateway Initiative (OSGi): This is a Java framework fordevelopinganddeployingmodularsoftwareprogramsand libraries. Ithastwo parts: the first part is the bundled plug-in and the second part isthe JavaVirtualMachine (JVM)-level service registry for bundles topublish,discover,andbindservices.ÂKaraf: This is a light-weight OSGi runtime for loading modules andbundles.ÂConfig subsystem: . This is done with an XML file that is read atruntime.ÂModel-Driven SAL: Model-driven Service Adaptation Layer (MD-SAL)isthekernelofthecontrollerplatform.Thisiswheredifferentlayersandmodulesareinterconnectedthroughpre-definedAPI.
Takes in theYANGdatamodelat runtimeandThedata is sorted intwobuckets:firstisconfigdatastorethatisalwayskeptpersistent,andsecond is operational data store that is ephemeral and typically notchangedbyRESTCONF.ÂIt manages the contracts and state exchange between everyapplication.Â
ODLtakesthemodelviewcontrolapproachfor itsapplicationdevelopment inmodular fashion.Wesaw theMVCapproach inwebAPIdevelopment,wherethemodel is the database, the control is the Python code, and the view is theHTML page or the API output. In ODL, the MCV are broken down asfollows:Â
Model:ThemodelinODLusesÂtheYANGmodelinglanguage,whichisalso the preferred configuration language for NETCONF that we saw inChapter3,APIandIntent-DrivenNetworking,wesawhowYANGcanbeusedtodescribedata,inODL,itisusednotonlytodescribedatabutalsonotification to registered listeners and Remote Procedure Call (RPC)betweendifferentmodules.ÂÂ

View:TheviewistheRESTCONFviewthatisgeneratedautomatically.Â
LetustakealookatanODLapplicationexample.Â
OpenDaylightexample
OpenDaylightisanimportantmovementinsoftwaredefinednetworkingthatweshouldatleasthaveabasicunderstandingof,whichiswhythetopicisincludedin this book. However, as stated in the overview section, OpenDaylightapplications are written in Java, which is outside the scope of this book.Therefore, as with OpenStack examples, we will with the OpenDaylightexamples.Â
The contains two OpenDaylight developer applications under/home/ubuntu/SDNHub_Opendaylight_Tutorial, which correspond to thetutorial page on http://sdnhub.org/tutorials/opendaylight/. The tutorial does agood job explaining the fundamentals ofODL programming and the differentcomponentsinvolved.ÂWewillcombinesomeoftheSDN_Hubtutorialpageandthetutorialonslideshare,https://www.slideshare.net/sdnhub/opendaylight-app-development-tutorial/45,forthefollowingsteps.Â
Note
IfinditeasierifIincreasethememoryallocationfortheVMtoavoid running intomemory error later. I increased thememoryfrom2Gto4Gforthissection.Â
To begin with, let's change to the OpenDaylight directory andmake sure wehavethelatesttutorialcodeasamatterofgoodpractice:Â
$cdSDNHub_Opendaylight_Tutorial/
$gitpull--rebase
LetusdownloadtheLithiumreleaseandstartthecontroller.Wewillbedroppedintothecontrollershell:Â
$wgethttps://nexus.opendaylight.org/content/groups/public/org/opendaylight/integration/distribution-
karaf/0.3.0-Lithium/distribution-karaf-0.3.0-Lithium.zip
$unzipdistribution-karaf-0.3.0-Lithium.zip
$cddistribution-karaf-0.3.0-Lithium/

$./bin/karaf
karaf: Enabling Java debug options: -Xdebug -Xnoagent -
Djava.compiler=NONE -
Xrunjdwp:transport=dt_socket,server=y,suspend=n,address=5005
Java HotSpot(TM) 64-
BitServerVMwarning:ignoringoptionMaxPermSize=512m;supportwasremovedin8.0
Listeningfortransportdt_socketataddress:5005
________________.__.__.____
\_____\______________\______\________.__.|||__|____||___/|_
/|\\____\_/__\/\||\\__\<||||||/___\||\__\
/|\|_>>___/||\|`\/__\\___|||_|//_/>Y\|
\_______/__/\___>___|/_______(____/____||____/__\___/|___|/__|
\/|__|\/\/\/\/\//_____/\/
Hit'<tab>'foralistofavailablecommands
and'[cmd]--help'forhelponaspecificcommand.
Hit '<ctrl-
d>'ortype'system:shutdown'or'logout'toshutdownOpenDaylight.
opendaylight-user@root>
Wecanusehelpand<tab>forhelpontheavailablecommands.
opendaylight-user@root>feature:list
Name|Version|Installed|Repository|Description
-------------------------------------------------------------------
-------------------------------------------------------------------
---------------------------------------
framework-security | 3.0.3 | | standard-
3.0.3|OSGiSecurityforKaraf
standard|3.0.3|x|standard-3.0.3|Karafstandardfeature
aries-annotation|3.0.3||standard-3.0.3|AriesAnnotations
wrapper|3.0.3||standard-3.0.3|ProvideOSintegration
...
WecaninstalltheUI,OpenFlowsouthboundplugin,andL2switch:Â
opendaylight-user@root>feature:installodl-dlux-core
opendaylight-user@root>feature:installodl-openflowplugin-all
opendaylight-user@root>feature:installodl-l2switch-all
WiththeUIinstalled,wecanconnect to theUIathttp://<ip>:8181/index.html.Thedefaultusernameandpasswordisadmin/admin:Â

OpenDaylightUIÂ
Thedefaultdashboardisprettyboringatthispoint:
opendaylight-user@root>feature:installodl-restconf
opendaylight-user@root>feature:installodl-mdsal-apidocs
The API doc can be accessed viahttp://<ip>:8181/apidoc/explorer/index.html:Â

ODLAPIExplorerÂ
EachoftheAPIscanbedrilleddownfurther:Â

ODLAPIDrilldownÂ
Let'sshutdownthecontroller:Â
opendaylight-user@root>system:shutdown
We will now switch to the tutorial directory/home/ubuntu/SDNHub_Opendaylight_Tutorial/distribution/opendaylight-
karaf/target/assembly and restart the controller. Note the banner ofSDNHub:Â
ubuntu@sdnhubvm:~/SDNHub_Opendaylight_Tutorial/distribution/opendaylight-
karaf/target/assembly[18:26](master)$./bin/karaf
karaf: Enabling Java debug options: -Xdebug -Xnoagent -
Djava.compiler=NONE -
Xrunjdwp:transport=dt_socket,server=y,suspend=n,address=5005
Java HotSpot(TM) 64-
BitServerVMwarning:ignoringoptionMaxPermSize=512m;supportwasremovedin8.0
Listeningfortransportdt_socketataddress:5005
_______________

/____|__\|\||||||||
|(___||||\||||__||__||__
\___\||||.`||__||||'_\
____)||__|||\||||||_|||_)|
|_____/|_____/|_|\_||_||_|\__,_|_.__/
Hit'<tab>'foralistofavailablecommands
and'[cmd]--help'forhelponaspecificcommand.
Hit '<ctrl-
d>'ortype'system:shutdown'or'logout'toshutdownOpenDaylight.
opendaylight-user@root>
Wewillinstallthelearning-switch,OpenFlowplugin,andRESTCONF:Â
opendaylight-user@root>feature:install sdnhub-tutorial-learning-
switch
opendaylight-user@root>feature:installodl-openflowplugin-all
opendaylight-user@root>feature:installodl-restconf
In a separate window, let's start the Mininet single switch with three hoststopology:Â
$sudomn--toposingle,3--mac--switchovsk--controllerremote
Ofcourse,h1isunabletopingh2:Â
mininet>h1ping-c2h2
PING10.0.0.2(10.0.0.2)56(84)bytesofdata.
From10.0.0.1icmp_seq=1DestinationHostUnreachable
From10.0.0.1icmp_seq=2DestinationHostUnreachable
---10.0.0.2pingstatistics---
2packetstransmitted,0received,+2errors,100%packetloss,time999ms
pipe2
It is because althoughwehave installed theSDNHub's switch application,wehavenotinstalledtheflow-missentryforthecontroller.Let'sdothat:Â
$sudoovs-ofctldump-flowss1
NXST_FLOWreply(xid=0x4):
$ ovs-ofctl add-flow tcp:127.0.0.1:6634 -
OOpenFlow13priority=1,action=output:controller
$sudoovs-ofctldump-flowss1
NXST_FLOWreply(xid=0x4):

cookie=0x0,duration=21.407s,table=0,n_packets=8,n_bytes=560,idle_age=2,priority=1actions=CONTROLLER:65535
NowwecanseethepingpacketsgosuccessfullyÂfromh1toh2:Â
mininet>h1ping-c2h2
PING10.0.0.2(10.0.0.2)56(84)bytesofdata.
64bytesfrom10.0.0.2:icmp_seq=1ttl=64time=21.5ms
64bytesfrom10.0.0.2:icmp_seq=2ttl=64time=3.49ms
---10.0.0.2pingstatistics---
2packetstransmitted,2received,0%packetloss,time1002ms
rttmin/avg/max/mdev=3.493/12.523/21.554/9.031ms
SimilartowhatwedidÂearlierwiththeRyucontroller, tomoveforwardwiththe programming,we need to startmodifying theTutorialL2Fowarding.javafile under /home/ubuntu/SDNHub_Opendaylight_Tutorial/learning-
switch/implementation/src/main/java/org/sdnhub/odl/tutorial/learningswitch/impl
Asmentionedearlier,goingoverJavaconstructisoutofscopeforthisbook:Â
$pwd
/home/ubuntu/SDNHub_Opendaylight_Tutorial/learning-
switch/implementation/src/main/java/org/sdnhub/odl/tutorial/learningswitch/impl
$ls
TutorialL2Forwarding.java*
TutorialL2Forwarding.single_switch.solution*
TutorialLearningSwitchModuleFactory.java*
TutorialLearningSwitchModule.java*
OpenDaylightisaimportantprojectintheSDNcommunity.AsPython-focusednetwork engineers, even ifwe do notwrite Java-based controller applications,wecanstillfamiliarizeourselveswiththebasicunderstandingofOpenDaylightandhowthepiecesfitinatthehighlevel.Asaconsumeroftheservice,wecanalwaysusethenorthboundRESTAPItointeractwithaready-madeapplicationviaPython,likewehavedoneanumberoftimesinthepreviouschapters.Â

Summary
In this chapter, we learnt about the different components of OpenStack andOpenDaylight. We started with an overview of OpenStack and its differentcomponents,suchasÂnetworking,identity,storage,andothercorecomponents.
OpenStack is a broad, complex project, aimed at for a virtualized datacenter.Therefore, we kept our focus on Networking in OpenStack and the differentPluginsthatinteractwiththephysicalnetwork.Inthesectionthatfollowed,weused DevStack and TryStack to look at examples of OpenStack. TheOpenDaylight project is an open source project founded in 2013 to promotesoftware-defined networking and network functions virtualization. The projectprovides an abstraction layer that provides both northbound and southboundinterfaces,whichallowsmulti-vendorcompatibility.Wetookahighlevelviewof the components of OpenDaylight, as well as using the VirtualMachine toconstruct a Hub application using the OpenDaylight controller. In the nextchapter, we will combine all our knowledge from the previous chapters andexamineSDNintherealworld;we'llexplorehowwecanmovefromalegacy-based network into perhaps an SDN-based, flexible, and programmablenetwork.Â

Chapter13.HybridSDN
ItseemsthatsoftwaredefinednetworkingÂisoneverynetworkengineer'smindthesedays,andrightfullyso.EversincetheintroductionofOpenFlowin2010,we have seen steady news on traditional networks transition to a software-defined network. The news typically focuses on the infrastructure agility ascompetitiveadvantage that thechangebrings.ManyhighprofileSDNstartupswere formed offering new network services, such as SD-WAN. In the slowerpaced standards bodies,ÂSDN standardswere gradually being ratified. In themarketplace,vendorssuchasQuantaandPica8startedtojoinforcesinmakingcarrier-gradehardware thatwasde-coupledfromsoftware.Thecombinationofresults is a seemingly new SDNworld, just waiting around the corner for allnetworksto transitionto.However, thereality isabitdifferent.Despiteall theprogress SDN have made, the technology deployment seems to bebiased toward the very large, somemight callHyperscale, networks.Highereducation researchnetworks such as Internet2 and companies such asGoogle,Facebook, andMicrosoft, all publicly release their SDN-driven projects, withmanyofthemindetailandopensource.Butinthemid-tierserviceproviderandenterprisespace,therestillremainstobeaholdingpattern.Â
Whatarethereasonscausingthisdisparity?Everynetworkisdifferent,butlet'stake a look at some of the generalized reasons for not adapting SDN, andperhaps some counter arguments. First let's look at the argument of MynetworkistoosmalltoutilizethebenefitsofSDN.
It does not take amathematician to figure out that larger networks havemorenetworkgears,andthereforecanreapmorebenefits if theycansavemoneyorincreaseflexibilitybymovingtoSDN.Eachnetworkisdifferentandthedegreeof competitive advantage SDN can bring varies. However, if we believe thatSDNÂisthecorrectpathforthefuture,itisnevertooearlytostartplanning.
Inthischapter,Iwilloffersomestepsforthemigration.Thesestepsdonotneedtobeexecutedatonce;infact,manyofthemneedtobeexecutedsequentially.But the steps, such as standardizing your network, will help you gain somebenefits today. The second argument against SDN migration might be: Thetechnologyisnotmatureenoughforproductionuse.Â

ItistruethattheSDNtechnologyismovingatafasterpacethanitsmorematurecounterparts, and being on the cutting edge can sometimes put you on thebleedingedge.Itisnofuntocommittoatechnologyonlytoreplaceitlater.Inthischapter,Iwishtoofferyousomethoughtsaboutsegmentingpartsofyournetwork, so you can safely evaluate the technology without putting yourproduction network at risk. We see that both small and large networks canbenefitfromSDN,andsegmentinglargenetworksintosmallernetworkswouldbebeneficial.ApossiblethirdargumentagainstSDNmigrationmightbe:ÂIdonothaveenoughengineeringresourcestoinvestinSDN.
TheSDNprojects,suchasOpenFlow,havecomealongwaysincetheirhumblebeginningasStanfordUniversityresearchprojects.Thefactthatyouarereadingthischaptermightindicatethateventhoughthereareonlylimitedresources,youdobelievethatthereissomevalueininvestingthetimetolearnthetechnology.Eachtechnologyismoreorlessanevolutionratherthanrevolutionprocess;theknowledge you invest time in learning today, will serve as a foundation fornewertechnologytomorrow,evenifyoudonotuseittoday.Finally,onemightarguethatIdonothaveatransitionplantomovetoSDN.Â
In this chapter, I wish to address the transition path by calling the network ahybridSDNnetwork.Wemighthaveanaspirationtomovefroma traditional,vendordrivennetworktoanautomatedsoftwaredefinednetwork,butthetruthof the matter is that the migration will take time, effort, and monetaryinvestment.Duringthattransitiontime,thenetworkstillneedstobefunctionalandthelightstillneedstobeon.Inthischapter,IwilluseOpenFlowandRyucontrollerasanexampleofanSDNnetworkthatweeventuallywanttomigrateto. We will look at some of the planning steps, technology, and points ofdiscussion for a successful migration. I wish to offer some generalizedsuggestions and examples thatmight come inhandy for your ownnetwork. Ifyou are wondering about a successfulmigration, you need to look no furtherthanGoogle.At theOpenNetworking Summit of 2017, the typically secretiveGoogle detailed their migration from traditional network to OpenFlow-basedWAN at G-Scale (http://opennetsummit.org/archives/apr12/hoelzle-tue-openflow.pdf).Bysomeestimatein2010,ifGooglewasanISP,itwouldbethesecond largest in the world. Very few of us operate at that scale, but it iscomforting to know that migration is possible without disruption even for anetworkaslargeasGoogle's.Â

Note
I picked OpenFlow and Ryu controller because of thecombination of industry support, Python subject matter for thisbook,andpersonalpreference.Â
Inparticular,thischapterwillfocusonthefollowing:Â
PreparingthenetworkforSDNandOpenFlowGreenfielddeploymentconsiderationsControllerredundancyBGPinteroperationÂMonitoringintegrationControllertoswitchsecureTLSconnectionÂPhysicalswitchselectionconsiderationsÂ
Bytheendofthechapter,youshouldbereadytotakethenextstepsinbringingyourtraditionalnetworkintoasoftwareÂdefinednetwork.Â

PreparingthenetworkÂ
BeforewediveintotheSDNnetwork,weshouldtakeamomenttoprepareournetwork.Forexample,aswehaveseenwiththevariousexamplesinthebook,network automation works because it offloads redundant, boring tasks withcomputerprograms(Pythoninourcase).Acomputercancompletethetasksfastandwithoutmistakes,andissuperiortoitshumancounterpart.Whatacomputerprogramdoesnotdowell,amongstotherthings,isanalyticsandinterpretationofsituation.Automation ismost effectivewhenournetwork is standardizedwithsimilarfunctions.ThesamegoesforSDNmigration.Ifwehavemanypartsofthe network that are dissimilar that requires constant thinking when makingmodifications, simply placing a controllerwithin the networkwill not help usmuch.Â
ThefollowingarewhatIdeemtobenecessarystepsthatshouldbetakenpriortoSDN andOpenFlowmigration. The points listed next are subjective in naturewithno rightorwronganswer,butonlyacontinuumscale that showsrelativestrength in each area. For the engineer in me, I understand that we are allanxioustogettopracticalexamples.However,Ibelievethemindsetandpracticewill serveyouwellonyour journey formigration.Theyareworth the time tothinkthroughandincorporateÂintoyourstrategy.
Familiarizeyourselfwiththeexistingframeworkandtools
Beingfamiliarwithexistingtoolsisoneofthefirststepswecantaketoprepareour network.As the old saying goes,we don't knowwhatwe don't know. Bystudyingtheexistingframeworkandtools,wecanstarttoevaluatethemagainstourownnetworkneeds.Forexample,ifyourcompanyalreadyhaslotsofJavadevelopers, you might want to take a look at Floodlight controller, which iswritten in Java. If you prefer to have strong vendor support, OpenDaylightprojects might have an edge over OpenFlow. Of course, understanding atechnology does notmean agreement, but it does give you a solid ground forevaluation of the pros and cons of each. A healthy debate between teammembers holding different points of view will usually result in betterdecisions.Â

Ofcourse,with thespeedof technologicaldevelopment, there ispracticallynowaywecanbeexpertsineveryframeworkandtool.Moreimportantly,wecan'tfallintothetrapsof'paralysisbyanalysis',whereweoveranalyseatechnology,somuch so that we end up notmaking a decision at all. Personally, I wouldrecommendgoingrelativelydeepintosomethingthatinterestsyouwhilehavingatleastapassinginterestinsimilartechnologies.Forme,IchoosetogodeeperintoRyuandPOXcontrollerforOpenFlow.Fromthere,Iamable tocompareand contrast the two controllers with other controllers and technologies thatperform similar functions.Thisway,we can evaluatewith confidence andyetnotspend100percentofourtimeanalyzing.
Networkstandardization
Iamsurestandardizationisnothingnewtonetworkengineers.Afterall,werelyontheTCP,UDP,ICMP,IP,andmanyotherstandardsforournetworknodestocommunicate with each other. Standards give us a way to stand on commongroundwhencomparingdifferentelements.Thinkofatimeyoutalkedtoyourcolleague about an OSI layer 3 technology to start the conversation, so yourcolleaguecoulddrawtherightcomparisoninhisorhermind.Whenwedesignnetworks, we know that a standardized topology using similar vendors andprotocols helps us troubleshoot, maintain, and grow our network. What isinteresting is that as the network grows in size, so does non-standardconfigurationandone-offwork.Asingleswitchinawiringclosetwillstarttobedaisy-chainedwhenwerunoutofports,ouroncestandardizedborderaccess-listondevicesnolongerfollowsournumberschemaorpreferredwayofdescriptionwhentheystarts togrow.Haveyouseenasnowflakeundermicroscope?Theyarebeautifultolookat,buteachofthemisdifferent.Anon-standard'snowflake'networkisprobablyonerouting-loopawayfromÂcausinganoutage.Â
What is a good standardizing strategy? The truth always stands between acompletelyorganicnetworkandasinglestandardization.Onlyyoucananswerthatquestion.However,overtheyearsIhaveseengoodresultsforhavingtwoorthree standardized topologies separated by function, say, core, datacenter, andaccess. There are probably several non-flexible requirements dependingon network functions, for example, the size of routing table in the corenetwork.Therefore,startingwiththenetworkfunctionandlimitthestandardasfarasequipment,protocol,andtopologygenerallyyieldsgoodbalancebetween

theneedforlocalizationwithstandardization,inmyopinion.
Createminimumviableproducts
According to Wikipedia,https://en.wikipedia.org/wiki/Minimum_viable_product, the minimum viableproduct, or MVP, is a product with just enough features to satisfy earlycustomers,andtoprovidefeedbackfor futuredevelopment.ÂThis issimilar tothe proof of concept that we are all familiar with. Before we deploy a newtechnology, we put it in the lab and run tests against it. There is no way toreplicate production, but the second best option is to use minimum viableproductforproductionsimulation.Â
Inthisbook,wehavebeenusingVIRLandvirtualmachinestocreateourownminimum viable network for practice. The beauty of virtual machine andsimulation tools, such as VIRL andGNS3, cannot be overstated. Perhaps thebest thing about software defined networking is that there are plenty ofMVPtools we can use, many of them with very little footprint, such as a virtualmachine. We have seen SDNHub's all-in-one VM bundled with Mininet andvariouscontrollers. It iseasier thaneverbeforeforus toproperlysimulateourfuturenetwork.Â
Relentlesslyexperiment
Wealllearnbetterwhenwecansafelydeployandbreakthings.Timeandtimeagain,weknowthatthingsusuallydonotworkrightoutofthebox,andweneedto spend timeandenergy to learnandexperiment.This is especially truewithnewertechnologysuchasSDN.Byexperimentingoverandoverwiththesametechnology, you also gain muscle memories from repeated tasks. Do youremember the first timeyou logged in to theCisco IOSorNX-OS shell?Didthatfeelstrange?Howaboutnowafteryouhaveloggedinperhapshundredsoftimes?Oftenwelearnbestbydoing.Â
ThepointsIhavemadeinthissectionmightseembasicorcommonsense,butthese are points I hold true throughout the years. I have seen projects notsucceedingbecausesomeofthepointsmentionedpreviouslywerenotfollowedthrough.

Perhaps a minimum viable product was not built that would have uncoveredsome detectable fault, or therewas toomuch variation in the network for thenew technology to adapt to. Hopefully, by preparing your network withfamiliarization of tools and frameworks, standardization, building minimumviableproduct,andrelentlesslyexperimenting,youcandecreasethefrictionofSDNmigration foryourownnetwork. In thenext section,wewill lookat theconsiderationpointsforagreenfieldSDNdeployment.Â

Greenfielddeployment
A greenfield deployment, or building a network from scratch, is perhaps theeasiestintermsofco-existanSDNOpenFlownetworkwithtraditionalnetwork.The only interaction between your SDN network to traditional networkequipment will almost only be at the edge, which in today's world, almostalwaysusesBGPas the exchangeprotocol.Your external facingnodewill beusing BGP, such as what we have seen with the Ryu BGP library, whileinternallyyouarefreetouseanytypeofconnectivityandtopologyyouwish.ÂIfyoualreadyhaveawaytoisolateyourdatacenternetworkwiththisapproach,inthecaseofagreenfielddeploymentyoucanusethesamemethod.Ifyouuseabottom up approach, you can start by calculating the amount of computeresourceyouneed,tallyituptothenumberofracks,anddeterminethenumberof top of rack switches as a starting point.Then calculate the number of oversubscription,ifany,ateachoftheaggregationlayers,leaves,spines,cores,andsuch.Inaway,thisisnodifferentthanplanningoutatraditionalnetwork.Theonly variables in this casewould be controller placement and orchestration.ÂFor the controller placement, there have been many studies and use casespublished.Butthefinalanswertypicallyresidesattheanswertothequestions,"Howmanynodesdoyouwanteachcontroller tomanage?"and"Howdoyouwanteachcontrollertocommunicatewitheachother?"Thefirstquestiondealswith the SLA-level of how big of a failure domain do you feel comfortablewith (we will look at controller redundancy later on). The second questiontypically deals with the type of coordination between the controllers. ThecoordinationcanhappenexternallyorsimplytiedinastatisticsÂfeedbackloop.Forexample,theleafcontrollercansimplyknowthatforcertaindestinationxinandECMPformat,itÂcanbereachedthroughports1-4ofswitch1aslongtheutilization on those 4 ports are below 70 percent. Using the OpenFlow portstatistics, the controller can easily be alerted if those ports are above theutilization threshold and take the port out of load balance rotation if needed.TherearealsocommercialvendorswhocanprovidethisorchestrationforopensourceOpenFlowcontrollersaswell.Â

Controllerredundancy
In the centralized controlled environment, such as OpenFlow, we need to bepreparedforfaulttoleranceonthecontroller.Thisisgenerallythefirstthingweneedtoconsiderinourdeployment.Inproductionnetwork,weneedtoplanforcontroller failure or any communication failure between controller and theswitch.PriortoOpenFlow1.3,theorchestrationofcontrollersneededtobedoneviaathirdpartysoftwareorbetweencontrollersthemselvesfornegotiatingtheprimary controller. Starting in OpenFlow 1.3, this can be done via theÂOFPT_ROLEmessagesbetweenthecontrollerandtheswitch.InOpenFlow1.3,the switch can connect tomultiple controllers and the controller's role can beequal,master,orslave.Inequalrole,itisjustasiftheswitchhastwomasters,eachhavingfullaccesstotheswitch.Inaslaverole,thecontrollerhasonlyreadaccesstotheswitch,doesnotreceiveasynchronousmessages,andisdeniedanyflow-mod, packet-out, or other state change messages. In a master role, thecontroller has full access to the switch; the switchwill only have onemastercontroller. In the case of two controllers trying to become themaster, the tie-breaker will be on the 64-bit generation ID that is included in theOFPT_ROLE_REQUESTmessages; the largervaluewins. Tohaveequal roleofcontrollers that a switch connects to, is pretty tricky for coordination. Thecontrollersmust be in synchronizationwith each other to avoid any duplicateflows. So I would recommend having master-slave relationship in yourdeployment. The number of controllers in a cluster differs from network tonetwork,but it is safe tosay thatyoushouldhaveat leastonemasterandoneslave.Let'slookatanexample.Â
Multiplecontrollerexample
WecanlaunchmultipleinstancesofRyuOpenFlow1.3controllerslisteningondifferentports:Â
$ryu-manager--verboseryu/app/simple_switch_13.py
$ ryu-manager --verbose --ofp-tcp-listen-
port5555ryu/app/simple_switch_13.py
IhaveconstructedaMininetPythontopologyfile,Âchapter13_mininet_1.py,that specifies two controllers with two switches connected to both the

controllers.EachswitchhasÂtwohostsconnectedto:Â
...
net=Mininet(controller=RemoteController,switch=OVSKernelSwitch)
c1=net.addController('c1',controller=RemoteController,ip='127.0.0.1',port=6633)
c2=net.addController('c2',controller=RemoteController,ip='127.0.0.1',port=5555)
...
s1=net.addSwitch('s1')
s2=net.addSwitch('s2')
...
c1.start()
c2.start()
s1.start([c1,c2])
s2.start([c1,c2])
...
Wecanlaunchthetopology:Â
$sudopythonmastering_python_networking/Chapter13/chapter13_mininet_1.py
...
mininet>net
h1h1-eth0:s1-eth1
h2h2-eth0:s1-eth2
h3h3-eth0:s2-eth2
h4h4-eth0:s2-eth3
s1lo:s1-eth1:h1-eth0s1-eth2:h2-eth0s1-eth3:s2-eth1
s2lo:s2-eth1:s1-eth3s2-eth2:h3-eth0s2-eth3:h4-eth0
c1
c2
Weseethatthereareactuallysomeduplicatedpacketsontheinitialflood:Â
mininet>h1ping-c3h4
PING10.0.0.4(10.0.0.4)56(84)bytesofdata.
64bytesfrom10.0.0.4:icmp_seq=1ttl=64time=34.6ms
64bytesfrom10.0.0.4:icmp_seq=1ttl=64time=38.4ms(DUP!)
64bytesfrom10.0.0.4:icmp_seq=1ttl=64time=38.4ms(DUP!)
64bytesfrom10.0.0.4:icmp_seq=2ttl=64time=0.197ms
64bytesfrom10.0.0.4:icmp_seq=3ttl=64time=0.067ms
---10.0.0.4pingstatistics---
3packetstransmitted,3received,+2duplicates,0%packetloss,time2005ms
rttmin/avg/max/mdev=0.067/22.375/38.480/18.213ms
mininet>
Let'sstoptheMininettopologyandcleanupthelinks(youshouldalwaysdothis

afteryoustopyourMininettopologywhenusingAPI):Â
$sudomn--clean
I have included two Ryu applications, chapter13_switch_1.py andchapter_switch_2.py, each based on simple_switch_13.py that we haveseen.However,wemadesomechanges.Weaddedafewmorenewimportsthatwewilluselateron:Â
fromryu.controllerimportdpset
fromryu.controller.handlerimportHANDSHAKE_DISPATCHER
importrandom
Intheinitialization,weincludedtherolelistaswellasagenerationID:Â
def__init__(self,*args,**kwargs):
super(SimpleSwitch13,self).__init__(*args,**kwargs)
self.mac_to_port={}
self.gen_id=0
self.role_string_list=['nochange','equal','master','slave','unknown']
WehaveaddedadditionalmethodstocatchOpenFlowerrorswithdecorator:Â
@set_ev_cls(ofp_event.EventOFPErrorMsg,
[HANDSHAKE_DISPATCHER,CONFIG_DISPATCHER,MAIN_DISPATCHER])
defon_error_msg(self,ev):
msg=ev.msg
print'receiveaerrormessage:%s'%(msg)
Thefollowingsectioniswherewecreateafunctiontosendrolerequestsfromthecontrollertotheswitch:Â
defsend_role_request(self,datapath,role,gen_id):
ofp_parser=datapath.ofproto_parser
print'sendarolechangerequest'
print'role:%s,gen_id:%d'%(self.role_string_list[role],gen_id)
msg=ofp_parser.OFPRoleRequest(datapath,role,gen_id)
datapath.send_msg(msg)
Note that in chapter13_switch_1.py, we assign the controller to MASTER,whileinchapter13_switch_2.py,weassignittoÂSLAVE:Â
@set_ev_cls(dpset.EventDP,MAIN_DISPATCHER)

defon_dp_change(self,ev):
ifev.enter:
dp=ev.dp
dpid=dp.id
ofp=dp.ofproto
ofp_parser=dp.ofproto_parser
print'dpentered,idis%s'%(dpid)
self.send_role_request(dp,ofp.OFPCR_ROLE_MASTER,self.gen_id)
WealsowanttocatchtheRoleReplymessagesfromtheswitchtoconfirmthatthecontrollerisnoweitherinmasterorslaverole:Â
@set_ev_cls(ofp_event.EventOFPRoleReply,MAIN_DISPATCHER)
defon_role_reply(self,ev):
msg=ev.msg
dp=msg.datapath
ofp=dp.ofproto
role=msg.role
#unknownrole
ifrole<0orrole>3:
role=4
print''
print'getarolereply:%s,generation:%d'%(self.role_string_list[role],msg.generation_id)
WhenwerelaunchtheMininettopology,wewillbeabletoseethemasterandslaveassignmentandconfirmation:Â
#Formaster
dpentered,idis1
sendarolechangerequest
role:master,gen_id:0
...
dpentered,idis2
sendarolechangerequest
role:master,gen_id:0
#Forslave
dpentered,idis1
sendarolechangerequest
role:slave,gen_id:0
...
dpentered,idis2
sendarolechangerequest
role:slave,gen_id:0

TheswitchwillnowonlysendthePacket-Inmessagetowardthemaster,withnoduplicatedflood:Â
mininet>h1ping-c3h4
PING10.0.0.4(10.0.0.4)56(84)bytesofdata.
64bytesfrom10.0.0.4:icmp_seq=1ttl=64time=23.8ms
64bytesfrom10.0.0.4:icmp_seq=2ttl=64time=0.311ms
64bytesfrom10.0.0.4:icmp_seq=3ttl=64time=0.059ms
---10.0.0.4pingstatistics---
3packetstransmitted,3received,0%packetloss,time2004ms
rttmin/avg/max/mdev=0.059/8.070/23.840/11.151ms
Again, in strategizing for our deployment, the first thing to consider is thenumberofcontrollersandtheirroles.Unfortunately,forbothquestions,Âthereisnoone-size-fits-allformula.YoutypicallymakeÂaneducatedguessinyourdeploymentdesign,andmodifyasyougraduallyimprovethework.Forgeneralguidance,insomeliteraturesforOpenDaylightandCiscoACI,theyrecommendhavingonemasterandtwoslavecontrollers.Ifyoudonothaveanypreference,thatmightbeagoodstartingpointforcontrollerredundancy.Â

BGPmigrationexample
BGP isbecoming theprotocolof choice in intra and inter autonomous systemnetworking,essentiallyusingthesameprotocolforbothIGPandborder.Therearemanyreasonsforthis.Thefactthatitisarobustandself-sustainingprotocolmakes it an ideal candidate for building scaled out network.Not surprisingly,BGP has themaximum support amongst SDN technologies.We have alreadyseenthatRyuhasasolidBGPspeakerlibrary.Letususeamockscenariotoseehowwecanconstructamigrationplanoruseitinahybridmode.Â
Note
RyuBGPDriver is also used as the plugin for BGP Speaker inOpenStack, https://docs.openstack.org/developer/neutron-dynamic-routing/functionality/bgp-speaker.html. UnderstandingRyu BGP usage can possibly help you with OpenStack BGPspeakerinthefuture.Â
Tobegin,let'slookatourscenario.Â
Migrationsegmentation
Letusassume thatBGP isusedbetweenall the followingscaleddownnodes.Thespine-1 isusedasanaggregationrouterfor leaf-1and leaf-2.Eachof theleaf router is top of rack switch that advertises a/24; in this case, leaf-2 isadvertising 10.20.1.0/24. We would like to migrate leaf-2 from traditionalIOS-baseddevicetoOpenFlowdevicewithRyucontroller.Â

OriginalTopologyÂ
Of course, your network might look different than this. This topology waspickedbecause:Â
Itisaneasysegmentationinyourmind.Youcaneasilypointtotheleaf-2rackandthinkofitasanOpenFlowrack.ÂItisacleanswapandiseasytorollback.Inotherwords,youarereplacinga physical hardware for the same function. In the event of a rollback, atworst,youcanalwaysjusttakeoutthenewrouterandputtheoldonebackin.ÂThe logical addressing is clean. You can be on high alert for any serverreportingerrorinthe10.20.1.0/24blockuponmigration.Â
Regardlessofyourscenario,thesethreepointswouldbemyrecommendationfor

pickingaspotinyournetworkasastartingpointformigration.Inthenextstep,let's see howwe canmimic this scenariowithMininet,VIRL, andour virtualmachine.Â
VIRLandMininetsetup
In our VIRL machine, we will utilize the two flat networks presented bydefault. We have been using the flat network connected to VMNet2 on172.16.1.0/24 as themanagement network.Wewill connect a third virtualEthernetinterfacetoVMnet3on172.16.2.0/24:
NetworkAdapterÂ
In our scenario, we will leave the management network as private projectnetwork(whichwecanstillusetosshto),andflatÂnetworkasourlinktotheMininettopologytosimulateleaf-2whileusingflat-1asthecontrolplaneBGPpeertoourRyuBGPspeaker.
Â

SimulatedTopology
Itmayseemlikeanoverkilltohavetwoseparatecontrollerapplications,oneforBGPpeerandtheotherforrouter.Thereasonforperformingthemigrationthisway is because I believe it is useful to see that the two functions can be de-coupled, which is many times not the case for vendor-purchased equipment.Havingtwoseparateapplicationscanalsobemorescalabledowntheline,ifyouwanttokeepaddingToRrouterswithoutneedingtospinupanewBGPspeaker.Finally,wehavealreadyworkedwiththeBGPspeakerapplicationaswellastherouter application in Chapter 11,OpenFlow Advance Topics. By using thesametool,wecanbuildonwhatwealreadyknow.Â
Now thatwe have the lab ready, let's take a look at the configurationwe arestartedwith.Â
Ciscodeviceconfiguration
OneofthebenefitsofusingVIRListheauto-configurationgenerationfunction.IassumeweareallfamiliarwiththebasicsofBGPsyntax;Iwillnotspendtoomuch time on it. Following are short descriptions that will help us inunderstandingthescenario.Âspine-1andleaf-1areEBGPpeers;Âspine-1in

ASN1whileleaf-1inASN2:Â
spine-1#shipbgpsummary
BGProuteridentifier192.168.0.1,localASnumber1
...
NeighborVASMsgRcvdMsgSentTblVerInQOutQUp/DownState/PfxRcd
10.0.128.242262264300003:54:182
The linkbetweenspine-1andleaf-1 is inÂ10.0.128.0/17,while theserverrack behind leaf-1 is in the 10.0.0.0/17 network. Spine-1's loopback IP is192.168.0.1/32 and leaf-1's loopback IP is 192.168.0.5/32. The mostimportant point is that we can use 192.168.0.1 or 192.168.0.5 to testreachability betweenour newOpenFlow rack and the two routers.Ultimately,our newOpenFlow rack andMininet host need to be able to ping the host in10.0.0.0/17 range, specifically gateway IP 10.0.0.1 on leaf-1 andIPÂ10.0.0.2Âontheserver:Â
spine-1#shiproutebgp
...
10.0.0.0/8isvariablysubnetted,4subnets,3masks
B10.0.0.0/17[20/0]via10.0.128.2,03:56:53
B10.20.1.0/24[200/0]via172.16.1.174,01:35:14
192.168.0.0/32issubnetted,2subnets
B192.168.0.5[20/0]via10.0.128.2,03:56:53
Before we move forward with any Ryu and Mininet connections, we shouldalways test reachability first. A simple ping sourcing from spine-1 loopbacktowardtheloopbackofleaf-1andservershouldbesufficient:Â
spine-1#pingip192.168.0.5source192.168.0.1
Typeescapesequencetoabort.
Sending 5, 100-
byteICMPEchosto192.168.0.5,timeoutis2seconds:
Packetsentwithasourceaddressof192.168.0.1
!!!!!
Success rate is 100 percent (5/5), round-
tripmin/avg/max=2/6/13ms
spine-1#
spine-1#pingip10.0.0.2source192.168.0.1
Typeescapesequencetoabort.
Sending5,100-byteICMPEchosto10.0.0.2,timeoutis2seconds:
Packetsentwithasourceaddressof192.168.0.1
!!!!!

Success rate is 100 percent (5/5), round-
tripmin/avg/max=3/4/9ms
ThelaststepwouldbetochecktheIPaddressthatwereceivedfromDHCPinVMNet2 andVMnet3. For production, thesewill obviously be static, but inour lab, I left itasDHCPIP. In thefollowingoutput,wecansee that theRyuBGP speaker should communicate to 172.16.2.51, while the Mininet switchwouldhaveanupstreamneighborof172.16.1.250:Â
spine-1#shipintbrief
InterfaceIP-AddressOK?MethodStatusProtocol
GigabitEthernet0/010.255.0.68YESNVRAMupup
GigabitEthernet0/110.0.128.1YESNVRAMupup
GigabitEthernet0/2172.16.2.51YESmanualupup
GigabitEthernet0/3172.16.1.250YESNVRAMupup
Loopback0192.168.0.1YESNVRAMupup[placeholder]
Great!Let'sgetourRyuBGPspeakerready!Â
RyuBGPspeaker
Since this is a pretty involved process, I would recommend opening fourdifferentSSHsessions to theOpenFlowvirtualmachine:one forRyuspeaker,oneforMininet,onefortherouterapplication,andoneforexecutingtheÂovs-vsctl commands. The IP to ssh to should NOT be the VMnet2 IP in the172.16.1.0/24 range, because we are using that as the data path betweenspine-1andourrouter,andwewilladdthatinterfacetos1OVSbridgelateron.ÂInordertocommunicatewiththeflat1VMnet3network,weneedtoaddthevirtual Ethernet interface on the virtual machine as well. For me, this isEthernet3,andIaddedtheIPof172.16.2.52fortheinterface:Â
ubuntu@sdnhubvm:~/ryu_latest[02:44](master)$ifconfigeth3
eth3Linkencap:EthernetHWaddr00:0c:29:87:67:c9
inetaddr:172.16.2.52Bcast:172.16.2.255Mask:255.255.255.0
Wewill use the BGP configuration, chapter13_bgp_1.py, as illustrated next,wherewehavedefinedtheBGPneighborfirst:Â
BGP={
'local_as':1,
'router_id':'172.16.2.52',
'neighbors':[

{
'address':'172.16.2.51',
'remote_as':1,
'enable_ipv4':True,
'enable_ipv6':True,
'enable_vpnv4':True,
'enable_vpnv6':True
},
],
Wewillalsoconfiguretheadvertisedroutes:
'routes':[
#ExampleofIPv4prefix
{
'prefix':'10.20.1.0/24',
'next_hop':'172.16.1.174'
},
{
'prefix':'172.16.1.0/24'
},
{
'prefix':'172.16.2.0/24'
}
]
}
NotethattheBGPspeakerisadvertisingonbehalfoftheToRrouterinMininetthat we will see later in this section; therefore, the next hop is the IP of theMininetOVSsegmentIP.WeareusingiBGPpeertoallowustheflexibilitytospecifynon-localnexthopwithouttheCiscodevicerejectingit.Also,notethatbecause we are usingmultiple applications on the same host, listening on allports will be very confusing. Therefore, we have restricted the applicationinterfaceviatheofp-listen-hostoptioninRyu-manager.ÂWewillstart theRyu BGP speaker using the BGP application that we saw in Chapter 11,OpenFlowAdvanceTopics:Â
$ sudo ryu-manager --verbose --ofp-listen-host 172.16.1.52 --bgp-
app-config-
filemastering_python_networking/Chapter13/chapter13_bgp_1.pyryu/services/protocols/bgp/application.py
Followingare someusefuloutputs fromRyu,spine-1, andleaf-1 routers forBGPneighborrelationshipestablishmentthatyoucanlookforinyourlab:Â

#Ryu
Loadingconfigfilemastering_python_networking/Chapter13/chapter13_bgp_1.py...
LoadingBGPsettings...
StartingBGPSpeaker...
...
Addingroutesettings:{'prefix':'10.20.1.0/24','next_hop':'172.16.1.174'}
...
Peer172.16.2.51BGPFSMwentfromIdletoConnect
Peer172.16.2.51BGPFSMwentfromConnecttoOpenSent
Connectiontopeer:172.16.2.51established
#spine-1
*<date>22:56:39.322:%BGP-5-ADJCHANGE:neighbor172.16.2.52Up
spine-1#shiproute10.20.1.0
Routingentryfor10.20.1.0/24
Knownvia"bgp1",distance200,metric0,typeinternal
Lastupdatefrom172.16.1.17400:05:16ago
RoutingDescriptorBlocks:
*172.16.1.174,from172.16.2.52,00:05:16ago
Routemetricis0,trafficsharecountis1
ASHops0
MPLSlabel:none
#leaf-1
leaf-1#shiproute10.20.1.0
Routingentryfor10.20.1.0/24
Knownvia"bgp2",distance20,metric0
Tag1,typeexternal
Lastupdatefrom10.0.128.100:08:27ago
RoutingDescriptorBlocks:
*10.0.128.1,from10.0.128.1,00:08:27ago
Routemetricis0,trafficsharecountis1
ASHops1
Routetag1
MPLSlabel:none
leaf-1#
We can see that the BGP routes are being advertised correctly across thenetwork.Let'sbuildtheMininetnetwork.Â
MininetandRESTRouter
TheMininetsetupisprettysimpleandstraightforward,whichisthebeautyofOpenFlowandSDN.The intelligence is in thecontrollerapplication.WehavealreadyseenmostofthesetupstepsinChapter11,OpenFlowAdvanceTopics.I

willjustquicklyshowthestepsthatweretaken.Â
Forgoodmeasure,wewillcleanuptheMininettopology:Â
$sudomn--clean
The Mininet topology is located under chapter13_mininet_2.py, where webuild the networkwith one controller and twohosts.Note thatwe change thedefaultportofthecontrollertoport5555:Â
...
net=Mininet(controller=RemoteController,switch=OVSKernelSwitch)
c1=net.addController('c2',controller=RemoteController,ip='127.0.0.1',port=5555)
h1=net.addHost('h1',ip='10.20.1.10/24')
h2=net.addHost('h2',ip='10.20.1.11/24')
s1=net.addSwitch('s1')
...
WecanstarttheMininetnetwork:Â
$sudopythonmastering_python_networking/Chapter13/chapter13_mininet_2.py
Thehostsneedtohaveadefaultgatewaypointtoourrouter:Â
mininet>h1iprouteadddefaultvia10.20.1.1
mininet>h2iprouteadddefaultvia10.20.1.1
WecanusethesameREST_Routerreferenceapplicationforourlab:Â
$ ryu-manager --verbose --ofp-tcp-listen-
port5555ryu/app/rest_router.py
Wewilladdtheaddressestheroutershouldlistenforandrespondto:Â
$ curl -X POST -
d'{"address":"10.20.1.1/24"}'http://localhost:8080/router/0000000000000001
$ curl -X POST -
d'{"address":"172.16.1.174/24"}'http://localhost:8080/router/0000000000000001
Wecanaddtheroutestotheloopbacksandtheserverrackconnectedtoleaf-1:Â

$ curl -X POST -
d'{"destination":"192.168.0.1/32","gateway":"172.16.1.250"}'http://localhost:8080/router/0000000000000001
$ curl -X POST -
d'{"destination":"192.168.0.5/32","gateway":"172.16.1.250"}'http://localhost:8080/router/0000000000000001
$ curl -X POST -
d'{"destination":"10.0.0.0/17","gateway":"172.16.1.250"}'http://localhost:8080/router/0000000000000001
$ curl -X POST -
d'{"destination":"10.0.128.0/17","gateway":"172.16.1.250"}'http://localhost:8080/router/0000000000000001
The last step regarding our Mininet topology involves putting the interfaceconnectingVMnet2toOVSbridge,sospine-1hasvisibilitytoit:Â
$sudoovs-vsctladd-ports1eth1
WecanverifytheMininettopologyviaovs-vsctl:Â
$sudoovs-vsctlshow
873c293e-912d-4067-82ad-d1116d2ad39f
Bridge"s1"
Controller"tcp:127.0.0.1:5555"
fail_mode:secure
Port"eth1"
Interface"eth1"
Port"s1-eth2"
Interface"s1-eth2"
Port"s1"
Interface"s1"
type:internal
Port"s1-eth1"
Interface"s1-eth1"
ovs_version:"2.3.90"
WecanalsoverifytheroutesandaddressesofourREST_Router:Â
$ curl http://localhost:8080/router/0000000000000001 | python -
mjson.tool
...
"internal_network":[
{
"address":[
{
"address":"172.16.1.174/24",
"address_id":2

},
{
"address":"10.20.1.1/24",
"address_id":1
}
],
...
"route":[
{
"destination":"10.0.128.0/17",
"gateway":"172.16.1.250",
"route_id":4
},
...
Afterall thatwork,wearenowreadytotest theconnectivityfromourshiningnewOpenFlowracktotherestofthenetwork!Â
Resultandverification
We can now test for connectivity to spine-1 and leaf-1, as well as to thegatewayoftheleaf-1block:Â
#connectivitytospine-1loopback
mininet>h1ping-c3192.168.0.1
PING192.168.0.1(192.168.0.1)56(84)bytesofdata.
64bytesfrom192.168.0.1:icmp_seq=1ttl=254time=11.0ms
64bytesfrom192.168.0.1:icmp_seq=2ttl=254time=2.39ms
#connectivitytoleaf-1loopback
mininet>h1ping-c3192.168.0.5
PING192.168.0.5(192.168.0.5)56(84)bytesofdata.
64bytesfrom192.168.0.5:icmp_seq=1ttl=253time=9.91ms
64bytesfrom192.168.0.5:icmp_seq=2ttl=253time=5.28ms
#connectivitytoleaf-1serverblock
mininet>h1ping-c310.0.0.1
PING10.0.0.1(10.0.0.1)56(84)bytesofdata.
64bytesfrom10.0.0.1:icmp_seq=1ttl=253time=5.49ms
64bytesfrom10.0.0.1:icmp_seq=2ttl=253time=5.23ms
Success!Inordertoestablishreachabilitytotheserver,weneedtoaddaroutefromtheservertoournewrack.ThisisstrictlyaVIRLauto-configsetting.

Thehostwasconfiguredwithadefaultroutetothemanagementnetworkwhilestatic routeswereadded toeachof thenetworks. In the realworld,youwouldnotneedtodothis:Â
cisco@server-1:~$sudobash
[sudo]passwordforcisco:
root@server-1:~# route add -
net10.20.1.0netmask255.255.255.0gw10.0.0.1
root@server-1:~#route-n
KernelIProutingtable
DestinationGatewayGenmaskFlagsMetricRefUseIface
0.0.0.010.255.0.10.0.0.0UG000eth0
...
10.20.1.010.0.0.1255.255.255.0UG000eth1
...
Nowwecanreachserver-1fromh1inMininet:Â
mininet>h1ping-c310.0.0.2
PING10.0.0.2(10.0.0.2)56(84)bytesofdata.
64bytesfrom10.0.0.2:icmp_seq=1ttl=61time=13.3ms
64bytesfrom10.0.0.2:icmp_seq=2ttl=61time=3.48ms
...
mininet>[email protected]
[email protected]'spassword:
WelcometoUbuntu14.04.2LTS(GNU/Linux3.13.0-52-genericx86_64)
Lastlogin:ThuApr2021:18:132017from10.20.1.10
cisco@server-1:~$exit
logout
Connectionto10.0.0.2closed.
mininet>
Howcoolisthat!WenowhaveanOpenFlowSDNrackÂreplacingatraditionalgear with all the flexibility and modularity that we could not have achievedotherwise.Weareonaroll,solet'slookatmoreBGPexamples.Â

MoreBGPexample
YoucanseethatBGPisagoodprotocolofchoicetosegmentyournetworkatalogical location and start your migration process. What if you have a morecomplicatedBGPsetup, suchasMP-BGP,MPLS,orVxLAN?WouldRyuorotherOpenFlow-basedBGPspeakerbeabletoprovideenoughbasecodesoyoudonotneedtore-writelotsofcode?ÂWeÂmentionedthatRyuBGPisoneofOpenStack'sNeutronnetworkingBGPplugins.Itspeakstothefeature,maturity,andcommunitysupportfortheRyuproject.AtthetimeofwritinginSpringof2017,youcanseetheBGPspeakercomparisonoftheNeutronproject.TheRyuBGPspeakersupportsMP-BGP,IPv4andIPv6peeringandVPN.Â
NeutronBGPSpeakerComparisonÂ
The proceeding picture demonstrated the BGP speaker and dynamic routingcomparison.NeutronprojectusesJSONRPCoverWebSockettocommunicatewithRyuBGPspeaker.LetustakealookatanÂexample.Inoursetup,letusplacethespeakeratthespinelevelthistime,withtheToRswitchesbeingNX-OSvandIOSvdevices,asshownhere:

Â
RyuSPINEBGPSpeakerÂ
NotethateventhoughtheflatnetworkisseparatedasRyu-flatandRyu-flat-1,they are both connected to VMnet2 on 172.16.1.0/24. The differentiation innaming is a limitation on VIRL. On the NX-OS, we will add the BGPneighbor:Â
nx-osv-1#shrun|sectionbgp
featurebgp
routerbgp1
router-id192.168.0.3
address-familyipv4unicast
network192.168.0.3/32
neighbor172.16.1.174remote-as1
descriptioniBGPpeerRyu
address-familyipv4unicast
neighbor192.168.0.1remote-as1
descriptioniBGPpeeriosv-1
update-sourceloopback0
address-familyipv4unicast
TheIOSvneighborhassimilarconfigurationwithslightlydifferentsyntax:Â
iosv-1#shrun|sectionbgp

routerbgp1
bgprouter-id192.168.0.1
bgplog-neighbor-changes
neighbor172.16.1.174remote-as1
neighbor192.168.0.3remote-as1
neighbor192.168.0.3descriptioniBGPpeernx-osv-1
neighbor192.168.0.3update-sourceLoopback0
!
address-familyipv4
network192.168.0.1mask255.255.255.255
neighbor172.16.1.174activate
neighbor192.168.0.3activate
exit-address-family
Forourexample,wewillinstallthewebsocket-clientpackageontheSNDHubvirtualmachine:Â
$sudopipinstallwebsocket-client
Wecanre-usethesameMininettopologyandrouterexampleaswell;however,let'sfocusontheBGPspeakerforthisexercise.Remember,wearede-couplingthetwofunctions.Â
We can use the sample code provided with the Ryu packageryu/services/protocols/bgp/api/jsonrpc.py, written by Fujita Tomonori(https://sourceforge.net/p/ryu/mailman/message/32391914/). On a separatewindow,launchtheBGPÂapplicationwiththeÂjsonrpc.pycomponent:Â
$ sudo ryu-
managerryu/services/protocols/bgp/api/jsonrpc.pyryu/services/protocols/bgp/application.py
Bydefault,thewebsocket-clientpackagewillinstallorputalinkforwsdump.yunder/usr/local/bin.
$wsdump.pyws://127.0.0.1:8080/bgp/ws
PressCtrl+Ctoquit
WecanlaunchitforourspeakerviatheÂwebsocketcall:Â
>{"jsonrpc":"2.0","id":1,"method":"core.start","params":{"as_number":1,"router_id":"172.16.1.174"}}
WewillbeabletoaddthetwoBGPneighbors,where172.16.1.109istheNX-OSvneighborIPÂand172.16.1.110istheIOSvneighborIP:Â

>{"jsonrpc":"2.0","id":1,"method":"neighbor.create","params":{"ip_address":"172.16.1.109","remote_as":1}}
>{"jsonrpc":"2.0","id":1,"method":"neighbor.create","params":{"ip_address":"172.16.1.110","remote_as":1}}
WecanverifythetwoBGPneighborrelationship:Â
#NX-OSv
nx-osv-1#shipbgpsummary
NeighborVASMsgRcvdMsgSentTblVerInQOutQUp/DownState/PfxRcd
172.16.1.174419641005630000:00:141
192.168.0.141518500000:44:13Active
#IOSv
iosv-1#shipbgpsummary
NeighborVASMsgRcvdMsgSentTblVerInQOutQUp/DownState/PfxRcd
172.16.1.1744157300000:00:351
192.168.0.3410010000:43:28Idle
Cool! We have used the JSON RPC over WebSocket to configure our BGPspeaker.Notethatbydefault,theauto-configurationtriestohavethetworoutersbecomeBGPspeakersover the loopback interface.This isnormallydoneoverOSPFastheIGPthatadvertisestheloopback.However,inourscenario,OSPFisnotenabledonourconnectiontowardtheflatÂnetwork.Thisoffersusagreatopportunitytolookunderneaththehoodofthejsonrpc.pyfile.Â
ExaminetheJSONRPCoverWebSocket
Ifwe takea lookat theÂryu/services/protocols/bgp/api/jsonrpc.py file,weseethatthemethodsarePythondecorators,itcallsthevariousfunctionsfromryu/services/protocols/bgp. Let us make a new file underÂmastering_python_networkingnamedchapter13_jsonrpc_1.py,bymakinganewfile,wecanmakeourchangessafelyindependentoftheoriginalfile.Thisiswherewewillexperimentandmakeourchanges.Weseethatthefileimportstheneighborsmodulefromrtconf:Â
fromryu.services.protocols.bgp.rtconfimportneighbors
Fromthatmodule,weretrievetheIP_ADDRESSandREMOTE_ASattributethatweuse when creating the neighbor. We can see in the neighbors section of theconfigurationthatwereisalsoaroutereflectorclientoption:Â

IS_ROUTE_REFLECTOR_CLIENT='is_route_reflector_client'
Aha, from the BGP API documentation(http://ryu.readthedocs.io/en/latest/library_bgp_speaker_ref.html#), we can tellthat this is where we can specify our route reflector client for the neighbors.Therefore,wecanaddtheadditionalattributewhenweaddourneighbors.WeneedtocastthevalueasBoolean,asthisiseithertrueorfalse:Â
@rpc_public('neighbor.create')
def_neighbor_create(self,ip_address='192.168.177.32',
remote_as=64513,is_route_reflector_client=False):
bgp_neighbor={}
bgp_neighbor[neighbors.IP_ADDRESS]=str(ip_address)
bgp_neighbor[neighbors.REMOTE_AS]=remote_as
bgp_neighbor[neighbors.IS_ROUTE_REFLECTOR_CLIENT]=bool(is_route_reflector_client)
call('neighbor.create',**bgp_neighbor)
return{}
WecannowrelaunchourBGPspeakerwithourownRPCfile:Â
$ sudo ryu-
managermastering_python_networking/Chapter13/chapter13_jsonrpc_1.pyryu/services/protocols/bgp/application.py
Proceedtorepeat theinitializationprocessandaddthenewneighborswiththeroute-reflector-clientoption:Â
$wsdump.pyws://127.0.0.1:8080/bgp/ws
PressCtrl+Ctoquit
>{"jsonrpc":"2.0","id":1,"method":"core.start","params":{"as_number":1,"router_id":"172.16.1.174"}}
<{"jsonrpc":"2.0","id":1,"result":{}}
>{"jsonrpc":"2.0","id":1,"method":"neighbor.create","params":{"ip_address":"172.16.1.109","remote_as":1,"is_route_reflector_client":"True"}}
<{"jsonrpc":"2.0","id":1,"result":{}}
>{"jsonrpc":"2.0","id":1,"method":"neighbor.create","params":{"ip_address":"172.16.1.110","remote_as":1,"is_route_reflector_client":"True"}}
<{"jsonrpc":"2.0","id":1,"result":{}}
WecanseethetwoleafroutershaveestablishedtheBGPrelationshipovertheloopbackinterface:Â
iosv-1#shipbgpsummary
NeighborVASMsgRcvdMsgSentTblVerInQOutQUp/DownState/PfxRcd
172.16.1.17441911320000:01:181
192.168.0.34154320000:00:481

iosv-1#shipbgpsummary
NeighborVASMsgRcvdMsgSentTblVerInQOutQUp/DownState/PfxRcd
172.16.1.17441911320000:01:181
192.168.0.34154320000:00:481
This example demonstrates how we can take an example code and makeadjustmentsbyreading into thecodeand theRyudocumentationfor theAPIs.For more advanced BGP speaker examples, you can check ToshikiTsuboi's SimpleRouter for Raspberry Pi 2(https://github.com/ttsubo/simpleRouter),whereheusesRaspberryPi2devicesandRyucontrollertoestablishMP-BGPforVPNv4overexternalBGPdevices.You can also refer to the Ryu-SDN-IP project by Takeshi Tseng(https://github.com/sdnds-tw/Ryu-SDN-IP), where he makes a Ryu version oftheSDN-IPprojectfromONOS.Â

Monitoringintegration
AsyoustarttomigratemoredevicestowardOpenFlow,itbecomesincreasinglyimportanttomonitorthelinks.WediscussedvariousmonitoringtooloptionsinChapter7,ÂNetworkMonitoringwithPythonâPart1andChapter8,NetworkMonitoringwithPythonâPart2.Nextwecaneasily integratemonitoring forthemigrateddevices.Wewillshowthebuilt-intopologyviewerthatcamewithRyu (http://ryu.readthedocs.io/en/latest/gui.html). For easier demonstration, Ihave used the sameMininet topologywe saw earlier in the chapter, but havechangedthecontrollerportbackto6633inÂchapter13_mininet_3.py:Â
net=Mininet(controller=RemoteController,switch=OVSKernelSwitch)
c1=net.addController('c2',controller=RemoteController,
ip='127.0.0.1',port=6633)
LaunchtheMininettopologyandtheGuiÂTopologyapplication:Â
#MininetTopology
$sudopythonmastering_python_networking/Chapter13/chapter13_mininet_3.py
#RyuApplication
$ PYTHONPATH=. ./bin/ryu run --observe-
linksryu/app/gui_topology/gui_topology.py
Point your browser to http://<ip>:8080 and you will be able to see theswitchÂalongwithflowstatistics,asshownhere:Â

GuiTopologyViewer1Â
For multi-device topology testing, you can launch the 8-switch referencetopologyinthereferenceexample:Â
$sudomn--controllerremote--topotree,depth=3
...
***Creatingnetwork
***Addingcontroller
***Addinghosts:
h1h2h3h4h5h6h7h8
***Addingswitches:
s1s2s3s4s5s6s7
...
Youwillbeabletopointtodifferentdevices,anddraganddroptomovethemaround:Â

GuiTopologyViewer2Â
The graph can be placed side-by-side with your existing monitoring tool orintegrated into your existing monitoring tool. Let's talk about encrypting themessagebetweenthecontrollerandtheswitchinthenextsection.Â

SecureTLSconnection
Atthispoint,youhaveaprettygoodmigrationstory,havingalreadydevelopedyour application toworkwith existing infrastructure, and on yourway to flipmore devices. You might be wondering if you should encrypt the messagesbetweenthecontrollerandthenetworkdevices.Infact,youmightbewonderingwhywewaitedthislongtodiscussthistopic.
Thereareseveralreasons:Â
Duringdevelopmentandinitialmigration,youwanttohaveaslittlemovingvariableaspossible.Itisdifficultenoughtodosomethingnew;youdonotneedtoworryaboutencryptionifyoudon'thaveto.ÂSometimes for troubleshooting, you might not have a switch that cancapturepacketsnativelyortheswitchnothavingenoughbuffertoperformverbose captures. Youwould be required to do tcpdump outside of yourtwoendpoints.ÂYoumay already have your own PKI infrastructure, if that is the case,pleasefollowyourowncertgenerationandstepsforsigningbyyourowncertificateauthority.Â
Havingsaidthat,wearehere,solet'sgooverthestepstohavetheOpenvSwitchcommunicatingwithRyucontrolleroverSSL.Â
Note
YoucanconsulttheRyudocumentonsettingupTLSconnection(http://ryu.readthedocs.io/en/latest/tls.html) and the article onconfigure Open vSwitch for SSL(http://openvswitch.org/support/dist-docs-2.5/INSTALL.SSL.md.html). I combined the steps from thosetwoarticlestobemorespecifictoourSDNHubvirtualmachine.For example, we do not need to initialize the PKI script andcacert.pem isunderÂ/var/lib/openvswitch/pki/controllerca/insteadof

/usr/local/var/lib/openvswitch/pki/controllerca.Â
Let's change to the Open vSwitch directory on our VM and create a switchprivatekeyandcertificate:Â
$cd/etc/openvswitch
$sudoovs-pkireq+signscswitch
Let's also create the controller private key and certificate in the samedirectory:Â
$sudoovs-pkireq+signctlcontroller
IhavecreatedtheMininettopologythatissimilartotheothertopology,withtheexceptionofthefollowinglinetospecifySSLconnectionforthecontroller:Â
c1=net.addController('c0')
...
s1=net.addSwitch('s1')
...
s1.cmd('ovs-vsctlset-controllers1ssl:127.0.0.1:6633')
WecanlaunchtheMininettopology:Â
$sudopythonmastering_python_networking/Chapter13/chapter13_mininet_4.py
Wewilllaunchthecontrollerwiththeprivatekeyandcertoptions:Â
$sudoryu-manager--ctl-privkey/etc/openvswitch/ctl-privkey.pem-
-ctl-cert /etc/openvswitch/ctl-cert.pem --ca-
certs /var/lib/openvswitch/pki/switchca/cacert.pem --
verboseryu/app/simple_switch_13.py
Youshouldbeable tosee theSSLmessageon theRyuconsole.YoucanalsoverifyusingtheÂovs-vsctlshowcommand:Â
#Ryuconsole
connected socket:
<eventlet.green.ssl.GreenSSLSocketobjectat0x7f603f8b0c08>address:
('127.0.0.1',59430)
#ovs-vsctl
$sudoovs-vsctlshow

873c293e-912d-4067-82ad-d1116d2ad39f
Bridge"s1"
Controller"ssl:127.0.0.1:6633"
is_connected:true
fail_mode:secure
Great! Now we can avoid any casual snooping of our OpenFlow messagesbetween Ryu and the switch (yes, I realize our setup is in a single virtualmachine).Inthenextsection,let'sexamineafewofthemarketplaceÂswitchesimplementationofOpenFlowtohelpuspickthebestswitchforournetwork.Â
Physicalswitchselection
Physicalswitchselectionisalwaysaninterestingquestiontoaskwhenbuildingyournetwork.Theterm'switch'inthiscontextshouldbebroadlyinterpretedasbothL2andL3devices.In theSDNworld,whereweseparate thecontrolanddata plane, any network function, such as routing, switching, firewall,monitoring, or firewall function, are software function while we reduce thephysical packet transport into flows. The line between software-based versushardware switch is almost non-existent when it comes to management andcontrolplaneconstructs.However,westillneedtobeconcernedwithhardwarecapacitywhenitcomestobuildingournetworkinfrastructure.
Ifyoudrawacomparisonbetweennetworkengineeringandsystemsengineeringwhen purchasing servers, a system engineer would consider hardwarespecifications,suchasCPU,memory,andstorage,whileseparatingthesoftwareaspectsofoperatingsystemandsoftwarepackages.The twosidesofhardwareandsoftwarestillneedtoworktogether,thoughtheindustryhasmaturedenoughthatforthemostparttheinteroperabilityisnotabigissue.Â
NetworkengineeringwithSDNandOpenFlowismovingtowardthatdirection,butisnotasmatured.Whenchoosingaphysicalswitch,besidesconsideringthesize,portcount,andnumberofprogrammableflows,itisalwaysagoodideatochooseswitchesthathavegonethroughsometestingwithÂtheSDNtechnologyinmind.Inourusecase,weÂshoudtakeacloser lookatswitcheswithstatedOpenFlow specification support, and perhaps consulting vendor-neutral labtesting results, such as InCNTRE from Indiana University(http://incntre.iu.edu/SDNlab).Morespecifically,controllerprojectssuchasRyuandcommercialcontrollerssuchasBigSwitchandCiscoONE,allprovidetheirown testing results. In the years since the first introduction ofOpenFlow, themarket for physical switch selection has grown tremendously. I have pickedthreecategoriesandrepresentativedevicestohelpyouinyourownevaluation.
Note
NotethatIamnotpromotingtheswitcheswhenpointingoutthemodel number or vendor. I simply want to include them to be

morepreciseandallowyoutohavelessfrictionwhendoingyourownresearch.Â
LabOpenFlowswitches
The first category ismy favorite,whichwecancall thehacker category.Thistypically consists of hardware specifications that pale in comparison todatacenterswitches,butareeasytoobtainanddonotbreakyourwallet.IntheSimpleRouterproject(https://github.com/ttsubo/simpleRouter),youcanseehowToshiki Tsuboi uses a USD 35 Raspberry Pi 2 device(https://www.raspberrypi.org/) with 3 USB-Ethernet interfaces to run OpenvSwitch and Ryu and demonstrate MP-BGP and VPN to external BGPdevices.Â
Small,budget-friendlyswitchesarealsoavailableinthiscategory.Homeroutersandswitches,suchasTP-LINKTL-WR1043NDorCisco-LinksysWRT54GL,have OpenWRT images that enable them to be quick OpenFlow 1.0 or 1.3switches. For roughly USD 35 (at the time of writing), you can install anOpenFlowswitch inyourhomeand run live trafficcontrolbyyourcontroller.Imagineasmallswitch thatcosts less thanafewcupsofcoffee, runningBGPprotocol.Howcoolisthat!
The following picture shows my first physical OpenFlow switch at home in2011,whichisaLinksysWRT54GLrunningOpenFlow1.0withaRaspberryPi1actingasacontroller:Â

MyFirstOpenFlowSwitchÂ
The small consumer-based switches typically contain a small Linuximplementation,suchasBusyBox:Â
BusyBoxv1.15.3(2010-05-2812:28:17PDT)built-inshell(ash)
Enter'help'foralistofbuilt-incommands.
_________________
||.-----.-----.-----.||||.----.||_
|-||_|-__|||||||_||_|
|_______||__|_____|__|__||________||__||____|
|__|WIRELESSFREEDOM
Backfire(10.03,r23206)--------------------------
*1/3shotKahluaInashotglass,layerKahlua
*1/3shotBailey'sonthebottom,thenBailey's,
*1/3shotVodkathenVodka.
---------------------------------------------------
root@OpenWrt:~#
TheOpenFlowconfiguration canbemanually examinedormanipulatedunderpre-definedcategory:Â
root@OpenWrt:/etc/config#catopenflow

config'ofswitch'
option'dp''dp0'
option'ofports''eth0.0eth0.1eth0.2eth0.3'
option'ofctl''tcp:192.168.1.7:6633'
option'mode''outofband'
Theswitchcanassociatewiththecontrollernormally:Â
ubuntu@sdnhubvm:~/ryu[10:24] (master)$ bin/ryu-manager --
verboseryu/app/simple_switch.py
loadingappryu/app/simple_switch.py
loadingappryu.controller.ofp_handler
...
switchfeaturesevversion:0x1msg_type0x6xid0x4498ae12OFPSwitchFeatures(actions=3839,capabilities=199,datapath_id=150863439593,n_buffers=256,n_tables=2,ports=
{1:OFPPhyPort(port_no=1,hw_addr='c0:c1:c0:0d:36:63',name='eth0.0',config=0,state=0,curr=648,advertised=3599,supported=527,peer=0),2:OFPPhyPort(port_no=2,hw_addr='c0:c1:c0:0d:36:63',name='eth0.1',config=0,state=0,curr=648,advertised=3599,supported=527,peer=0),3:OFPPhyPort(port_no=3,hw_addr='c0:c1:c0:0d:36:63',name='eth0.2',config=0,state=0,curr=648,advertised=3599,supported=527,peer=0),4:OFPPhyPort(port_no=4,hw_addr='c0:c1:c0:0d:36:63',name='eth0.3',config=0,state=0,curr=648,advertised=3599,supported=527,peer=0)})
moveontomainmode
Ihaveputthisswitchinmyworklabafewtimesforquicktests.Itisaverylowcost, low friction way to get started when you are ready to step outside ofsoftwareswitches.Â
Incumbentvendorswitches
If youhave existingvendor equipments that supportOpenFlow, itwouldbe agreat way to start your migration path. Vendors such as Cisco, Juniper, andArista,allhaveequipmentsthatsupportOpenFlow.Thedepthofsupportandthedegreeofdifficultyvariesfromvendortovendorandinsomecases,fromdevicetodevice.Givensomeofthelimitationaswewillseelateron,usingincumbentvendorswitchwouldbeagreatwaytomigratetoOpenFlowifyoualreadyhavematchedgearsinyourpossession.Inthissection,IwilluseAristagearsrunningEOS 4.17 as an example. For more details, you can consult the EOS 4.17OpenFlow configuration manualat https://www.arista.com/assets/data/docs/Manuals/EOS-4.17.0F-Manual.pdf.Â
InEOS4.17,AristasupportsOpenFlowin7050and7050Xseriesofswitches.However,thereareanumberoflimitationsstatedinthemanual,soreadthroughthem to save yourself from some troubleshooting headache in future. Forexample, it is stated that for switch to controller interaction, TLS is notsupported.IfyouhadnotreadthatbeforeyoutriedtoimplementTLS,youcouldhave spent hours troubleshooting fruitlessly. Arista also recommends using

OpenFlowfortheswitch,eventhoughinconfigurationyoucanbindtocertainVLANs.Â
switch(config)#openflow
switch(config-openflow)#controllertcp:1.2.3.4:6633
switch(config-openflow)#bindmodevlan
switch(config-openflow)#bindvlan1
switch(config-OpenFlow)#noshutdown
YoucanexaminethestateofOpenFlow:Â
switch(config)#showopenflow
OpenFlowconfiguration:Enabled
DPID:0x0000001c73111a92
Description:sw3-Arista
Controllers:
configured:tcp:172.22.28.228:6633
connected:tcp:172.22.28.228:6633
connectioncount:3
keepaliveperiod:10sec
Flowtablestate:Enabled
Flowtableprofile:full-match
Bindmode:VLAN
VLANs:1-2
nativeVLAN:1
IProutingstate:Disabled
Shellcommandexecution:Disabled
Totalmatched:7977645packets
AristaalsosupportsanOpenFlow-likefeaturecalledDirectFlow.ItsupportsallOpenFlow 1.0 match criteria and actions. The big difference betweenDirectFlowandOpenFlowisthatthereisnodefaultmatchaction,sotable-missentries are to follow the normal L2/L3 pipeline. DirectFlow is mutuallyexclusivewithOpenFlow.Configurationisstraightforward:Â
switch(config)#directflow
switch(config-directflow)#
switch(config-directflow)#noshutdown
switch(config-directflow)#flowTest1
switch(config-directflow-Test1)#matchethertypeip
switch(config-directflow-Test1)#matchsourceip10.10.10.10
switch(config-directflow-Test1)#actionegressmirrorethernet7
switch(config-directflow-
Test1)#actionsetdestinationmac0000.aaaa.bbbb

The Arista example demonstrates the limitation we have discussed. Thesupportability of OpenFlow from incumbent vendor varies from device tosoftware.The vendors typically add their own flavor as they see fit.WehaveseenanexampleofArista,buttheyarenotaloneinthateachvendorhavetheirownlimitationfromyearsofbuildingnon-OpenFlowdevices.However, ifyoualreadyhavesomevendorequipmentthatmatchesthecriteria,whichisabigif,itisagreatwaytogetstarted.Â
WhiteboxSwitches
Whitebox switches represent a new category of switches thatwere brought tomass market by the SDNmovement. They represent a class of switches thattypicallymadebyvendorswhomadenetworkhardwareasoutsourcers for thetypical commercial vendors such as Cisco. Since the SDN movement allowsnetwork engineers to only care about 'raw' forwarding plane, the whiteboxswitch vendors can now sell directly to the network engineers. They are justblankswitchesuponwhichyoucan loadseparatesoftwarefor themtooperateon. The hardware vendors include Accton, Celestica, and Quanta, amongstothers. The software you can load on the switch varies from just an agentinteractingwith controller, such asBig SwitchNetworks SwitchLightOS, tostandalonefull-featureoperatingsystem,suchasPica8andCumulusLinux.Thisis an area that is quickly evolving and offers no shortage of innovation. ThefollowingoutputsshowarelativelyoldQuantaLB9switchrunningPica8PicOS2.8.1.Thesoftwareoffersdifferentmodes,suchasOpenFlownativeorhybridmode,wheretheportfollowsthenormalL2/L3pipelineforflow-miss.Â
XorPluslogin:admin
Password:
admin@XorPlus$
admin@XorPlus$cli
Synchronizingconfiguration...OK.Pica8PicOSVersion2.8.1
WelcometoPicOSonXorPlus
admin@XorPlus>
admin@XorPlus>showversion
Copyright(C)2009-2017Pica8,Inc.
===================================
BaseethernetMACAddress:<skip>
HardwareModel:P3295

LinuxSystemVersion/Revision:2.8.1/f2806cd
LinuxSystemReleasedDate:01/04/2017
L2/L3Version/Revision:2.8.1/f2806cd
L2/L3ReleasedDate:01/04/2017
admin@XorPlus>
CanyoutellitwasaQuantaLB9switch?No,whichisthepoint.Pica8softwareorothersoftwarewill run thesameonallwhiteboxswitches.ThiscategoryofswitchesrepresentsthetruepotentialofSDNandtheclosestthatwehaveseenofÂadecoupledfutureofnetworkhardwareandsoftware.Â

Summary
In this chapter, we discussed the migration steps of implementing SoftwareDefinedNetworkingintoyournetwork.UsingOpenFlowandtheRyucontroller,thatwehavediscussed inprevious chapters,weput theknowledgewegainedinto practical use.We began with possible reasons for why you would NOTwanttoimplementSDNandOpenFlow,anddebunkedthem.Thenwelaidoutthe steps and strategies to prepare your network for SDN migration. Wediscussedgreenfielddeploymentandcontrollerredundancy.Inthenextsection,we also gave two extensive BGP examples that would assist in the hybridmode. We then discussed monitoring of your SDNOpenFlow network, aswellassecuringthecommunicationfromswitchtocontrollercommunicationbyusing TLS encryption. The last section listed out three categories of physicalOpenFlowswitchesthatyoucanpurchasetoday,fromlabtocommercialvendorequipment. Each of the categories has its own pros and cons.We also brieflysawexamplesofeachcategory.ÂItisnodoubtanexcitingtimetobeanetworkengineer,orhowever the termwillevolvein thefuture.Youmightbecalledanetwork programmer, network developer, or simply 'TheNetworkGuy' in theeverchangingfield.Whatdoesnotchangeischangeitself,aswellasthedesireto have better, faster, more flexible network that will assist the business inachieving its goals. From one network engineer to another, I thank you forallowingmetotakepartinthisjourneywithyou.IhopeIhaveprovidedsomeassistancetoyouwiththisbookandthetopicswehavecovered,andIhumblyask for your feedback, if any, to helpme improve the future contents.Happyengineering!Â

TableofContents
Chapter 1. Review of TCP/IP Protocol Suite and Python LanguageThis bookassumes thatyouhave thebasicunderstandingsofnetworkingprotocolsandthePythonlanguage.Inmyexperience,atypicalsystem,networkengineer,ordevelopermightnotremembertheexactTCPstatemachineonadailybasis(IknowIdon't),buthe/shewouldbefamiliarwiththebasicsoftheOSImodel,theTCPandUDPoperations,IPheaders,andmoresuch.Thischapterwilldoaveryquickrevisionontherelevantnetworkingtopics.Inthesameview,wewillalsodoahigh-level reviewonthePythonlanguage, justenoughso thatreaderswhodonotcodeinPythononadailybasiscanhaveagroundtowalkon for the rest of the book. Specifically, we will cover the followingtopics:The internet overviewTheOSI and client-serverModelTCP,UDP, IPprotocolÂSuitesPythonsyntax, types,operators,and loopsExtendingPythonwith functions, classes, andpackagesWorrynot if you feel youneed furtherinformation,asby
Chapter1.ReviewofTCP/IPProtocolSuiteandPythonLanguageChapter 2. Low-Level Network Device InteractionsIn Chapter 1, Review ofTCP/IPProtocolSuiteandPythonLanguage,Âwelookedatthetheoriesandspecificationsbehindnetworkcommunicationprotocols,andwetookaquicktourofthePythonlanguage.Inthischapter,wewillstarttodivedeeperintothemanagementofthesenetworkdevices.Inparticular,wewillexaminethedifferentwaysinwhichwecanusePythontoprogrammaticallycommunicatewith legacy network routers and switches.What do I mean by legacynetwork routers and switches?While it is hard to imagine any networkingdevicecomingouttodaywithoutanApplicationProgramInterface(API)forautomating tasks, it is a known fact that many of the network devicesdeployed today do not have APIs. The only way to manage them isthrough Command Line Interfaces (CLI) using terminal programs, whichoriginallyweredevelopedwithahumanengineerinmind.Asthenumberofnetworkdevicesincreases,itbecomesincreasinglydiffi
Chapter2.Low-LevelNetworkDeviceInteractionsChapter 3. API and Intent-Driven NetworkingIn the previous chapter, welooked at ways to interact with the device interactively using Pexpect andParamiko. Both of these tools use a persistent session that simulates a usertypingincommandsasiftheyaresittinginfrontoftheTerminal.Thisworks

fineuptoapoint.Itiseasyenoughtosendcommandsoverforexecutiononthedevice and capture theoutputback.However,when theoutput becomesmore than a few lines of characters, it becomes difficult for a computerprogramtointerprettheoutput.InorderforoursimplecomputerprogramtoautomatesomeofwhatÂwedo,weneedtobeabletointerpret thereturnedresults and make follow-up actions based on the returned result.When wecannotaccuratelyandpredictablyinterprettheresultsback,wecannotexecutethenextcommandwithconfidence.ÂLuckily,thisproblemwassolvedbytheInternetcommunity.Imaginethedifferencebetweenacomputerandahumanbeingreadingaweb
Chapter3.APIandIntent-DrivenNetworkingChapter 4. The Python Automation Framework - Ansible BasicsThe previoustwo chapters incrementally introduced different ways to interact with thenetworkdevices. InChapter 2,LowLevelNetworkDevice Interactions,wediscussed Pexpect and Paramiko that manage an interactive sessionautomatically.InChapter3,ÂAPIandIntent-DrivenNetworking,wesawthatnetworkingisnotjustaboutindividualdevices,asitisawayforustoconnectindividual parts together, but our overall goal typically requires a higherbusiness logic.Forexample, imagine thishierarchyof thoughtprocess fromformingourbusinessobjectivetoactuallyperformanactiononanetworkingdevice(with the topbeingclose to thebusiness logic):we lookedatvariousAPIsthatprovideastructuredwayoffeedbackfromdeviceaswellassomewell-defined command structure. Both of the methods are fairly low level,meaning they are focusedÂon the individual device thatwe areperformingouractionon.Youwakeupo
Chapter4.ThePythonAutomationFramework-AnsibleBasicsChapter 5. The Python Automation Framework - Ansible Advance TopicsInthe previous chapter, we looked at some of the basic structures to getAnsible running. We worked with Ansible inventory files, variables, andplaybooks.We also looked at the examples of networkmodules for Cisco,Juniper,andArista.ÂInthischapter,wewillfurtherbuildontheknowledgethat we gained and dive deeper into the more advanced topics of Ansible.ManybookshavebeenwrittenaboutAnsible.ThereisÂmoretoAnsiblethanwe can cover in two chapters. The goal is to introduce themajority of thefeaturesandfunctionsofAnsiblethatIbelieveyouwouldneedasanetworkengineerandshortenthelearningcurveasmuchaspossible.ÂItisimportantto point out that if you were not clear on some of the points made in the

previouschapter,nowisagoodtimetogobackandreviewthemastheyareaprerequisite for this chapter.In this chapter, we will look deeper into thefollowingtopics:Ansiblecondi
Chapter5.ThePythonAutomationFramework-AnsibleAdvanceTopicsChapter 6.NetworkSecuritywithPythonInmyopinion, network security is atricky topic towriteabout.The reason isnota technicalone,but ratheronewith setting up the right scope. The boundaries of network security are sowidethattheytouchÂallsevenlayersoftheOSImodel.Fromlayer1ofwiretapping,tolayer4oftransportprotocolvulnerability,tolayer7ofman-in-the-middlespoofing,networksecurityiseverywhere.Theissueisexacerbatedbyall thenewlydiscoveredvulnerabilities,whicharesometimesatadailyrate.This does not even include the human social engineering aspect of networksecurity.ÂAssuch,inthischapter,Iwouldliketosetthescopeforwhatwewill discuss. Aswe have been doing up to this point, wewill be primarilyfocusedonusingPython fornetworkdevice security atOSI layers3 and4.We will look at Python tools that we can use to manage individualcomponents as well as using Python as a glue to connect differentcomponents,sowe
Chapter6.NetworkSecuritywithPythonChapter7.NetworkMonitoringwithPython-Part1Imagineyougetacallat2a.m.inthemorning.ThepersonontheotherendÂasks,Hi,wearefacingadifficult issue that is impacting production.We think it might be network-related.Canyoucheckforus?ÂWherewouldyoucheckfirst?Ofcourse,youwould look at yourmonitoring tool and confirmwhether anyof themetricschangedinthelastfewhours.Throughoutthebook,wehavebeendiscussingvariousways toprogrammaticallymakepredictablechanges toournetwork,with the goal of keeping the network running as smoothly aspossible.ÂHowever, networks are not static. Far from it, they are probablyone of the most fluent parts of the entire infrastructure. By definition,aÂnetworkconnectsdifferentÂpartstogether,constantlypassingtrafficbackandforth.Therearelotsofmovingpartsthatcancauseyournetworktostopworkingasexpected:ÂhardwareÂfails,softwarewithbugs,humanmistakes,despitetheirbestintentions
Chapter7.NetworkMonitoringwithPython-Part1Chapter8.NetworkMonitoringwithPython-Part2Inthepreviouschapter,weusedSNMPtoqueryinformationfromnetworkdevices.WedidthisusinganSNMPmanagertoquerytheSNMPagentresidingonthenetworkdevicewith

specific tree-structuredOIDas theway to specifywhichvaluewe intend toreceive.Mostofthetime,thevaluewecareaboutisanumber,suchasCPUload,memoryusage,andinterfacetraffic.It'ssomethingwecangraphagainsttime to give us a sense of how the value has changed over time.ÂWe cantypicallyclassifytheSNMPapproachasapullmethod,asifweareconstantlyaskingthedeviceforaparticularanswer.ThisparticularmethodaddsburdentothedevicebecausenowitneedstospendaCPUcycleonthecontrolplaneto find answers from the subsystem and then accordingly answer themanagementstation.Over time, ifwehavemultipleSNMPpollersqueryingtheÂsamedevice every30 seconds (youwouldbe surprisedhowoften thishappens),themanagement
Chapter8.NetworkMonitoringwithPython-Part2Chapter9.BuildingNetworkWebServiceswithPythonInthepreviouschapters,wewereaconsumeroftheAPIsprovidedbyvarioustools.Inchapter3,APIand Intent-Driven Networking, we saw we can use a HTTP POSTmethodtoÂNX-API at the http://<your router ip>/insURLwith theCLI commandembedded in the body to execute commands remotely on the Cisco Nexusdevice; the device then returns the command execution output in return. Inchapter8,NetworkMonitoringwithPython-Part2,weusedtheGETmethodforoursFlow-RTathttp://<yourhostip>:8008/versionÂwithanemptybodyto retrieve the version of the sFlow-RT software. These exchanges areexamples of RESTful web services. According to Wikipedia(https://en.wikipedia.org/wiki/Representational_state_transfer),Representationalstatetransfer(REST)orRESTfulwebservicesareonewayof providing interoperability between computer systems on the Internet.REST-compliantwebservicesallowrequestingsystemstoaccessandmanipul
Chapter9.BuildingNetworkWebServiceswithPythonChapter 10. OpenFlow BasicsUp to this point in the book, we have beenworkingwithanexistingnetworksandautomatingvarioustasksusingPython.Westartedwithbasicpseudo-humanautomationusingSSH,interactionwiththeAPI,higher-levelabstractionwithAnsible,networksecurity,andnetworkmonitoring.InthepreviousÂchapter,wealsolookedathowtobuildourownnetworkAPIwith theFlask framework.The book is structured thiswaybydesign to focusonworkingwith thenetworkengineeringfieldas it is todaywith the dominating vendors such as Cisco, Juniper, and Arista. The skillsintroduced so far in the bookwill help you fill in the gap as you scale andgrow your network. One point of this consistent theme is how we are

working within the realm of vendor walls. For example, if a Cisco IOSdevice does not provide an API interface, we have to use pexpect andparamikoforSSH.IfthedeviceonlysupportsSimpleNetworkManagementProtocol(SNMP)fornetworkmonitoring,w
Chapter10.OpenFlowBasicsChapter 11.AdvancedOpenFlowTopicsIn the previous chapter,we looked atsomeofthebasicconceptsofOpenFlow,Mininet,andtheRyucontroller.WeproceededtodissectandconstructanOpenFlowswitchinordertounderstandRyu'sframeworkaswellaslookingatoneofRyu'sfirewallapplicationsasareferencefortheAPIinterface.ForthesameMininetnetwork,wewereableto switch between a simple switch and a firewall by just replacing onesoftware applicationwith another.Ryu providesPythonmodules to abstractbasicoperationssuchasswitchfeaturenegotiation,packetparsing,OpenFlowmessage constructs, and many more. This allows us to focus on thenetworking logic of our application. Since Ryu was written in Python, theapplicationcodecanbewritteninourfamiliarPythonlanguageaswell.ÂOfcourse,ourgoalistowriteourownapplications.Inthischapter,wewilltakewhatwehavelearnedsofarandbuildontopofthatknowledge.Inparticular,wewilllookatho
Chapter11.AdvancedOpenFlowTopicsChapter12.OpenStack,OpenDaylight,andNFVItseemsthereisnoshortageofnetworkengineeringprojectsnamedafter the termOpenthesedays.BesidestheOpenvSwitchandÂOpenFlowprojects, thatwehavealreadystudied inthe last two chapters, there are community driven projects such as OpenNetworkOperating System (ONOS, http://onosproject.org/),OpenDaylight(https://www.opendaylight.org/), and OpenStack(https://www.openstack.org/). Furthermore, there are other projects that areopen in nature but arguably heavily backed or bootstrapped by commercialcompanies (such as Ryu with NTT); for example OpenContrail(http://www.opencontrail.org/) with Juniper Networks and Open ComputeProject(http://www.opencompute.org/)bootstrappedbyÂFacebook.Thereisalso the Open Networking User Group(ONUG, https://opennetworkingusergroup.com/) that, according to theirmissionstatement,enablegreaterchoicesandoptionsforITbusinessleadersbyadvocatingforopeninteroperablehardware
Chapter12.OpenStack,OpenDaylight,andNFVChapter13.HybridSDNItseemsthatsoftwaredefinednetworkingÂisonevery

network engineer's mind these days, and rightfully so. Ever since theintroductionofOpenFlow in2010,wehave seen steadynewson traditionalnetworkstransitiontoasoftware-definednetwork.Thenewstypicallyfocuseson the infrastructureagilityascompetitiveadvantage that thechangebrings.ManyhighprofileSDNstartupswereformedofferingnewnetworkservices,such as SD-WAN. In the slower paced standards bodies, SDN standardsweregraduallybeingratified.Inthemarketplace,vendorssuchasQuantaandPica8 started to join forces in making carrier-grade hardware that was de-coupled fromsoftware.Thecombinationof results isaseeminglynewSDNworld, just waiting around the corner for all networks to transition to.However, the reality is a bit different.Despite all the progress SDN havemade, the technology deployment seems to be biased toward the verylarge,somemightcallHyperscale,n
Chapter13.HybridSDN