leomig mark· 6070, mark 6050 mark 6100, 610 ° lux
TRANSCRIPT

leomig MARK· 6070, MARK 6050
MARK 6100, 610 ° LUX 'DUAL B SILENT PROJECTOR
- Focusing knob
How to operate your projector in a nutshell o Plug in the projector. But first check
the li,ne (mains) voltage and frequency.
8 Swing up the reel arm. Place the full reel (with super8 or single 8 film) on the reel spindle and flip over the reel guard. (For regular 8 film, turn to page 5.) Place the universal film reel suppl ied on the fakeup-reel spindle.
8 Move the function switch to the auto threading position.
S Feed the film end into the threading slot until it is caught by the threading mechanism. The threading meohanism will do the rest.
o Move the function switch to the forward with lamp position .

CongratulationS! You have made a wise choice. The projector which you just bought is the product of the accumulated engineering and manufacturin€l know-how of a company that has been making movie projectors for over forty years: Eumig.
You will find that your modern projector combines outstanding performance with operating simplicity and dependability.
Your projector, from the 600 series, is . a dual 8 projector featuring still and multiple slow-motion projection. You can vary the projection speed from single-frame through a choice of slow-motion speeds (all flickerless) to 18 fps, both forward and reverse. The projector is equipped with a low-heat halogen lamp with dichroic mirror land takes reels holding up to 400 ft. of acetat film.
The Vario Eupronet zoom lens provides crisp, brilliant pictures. The built-in film cutter, the pilot light and the automatic film threader make it easy to set up for a show.
The Eumig Mark 610 D has provision for starting a yassette recorder in step with the projector. That means you can screen your silent movies with sound accompaniment (background music, etc.).
The MARK 610D ~Uk is designed for those who require the utmost optical performance and light output in a movie projector.
The high class exceptionally fast f/1.2 "Supmgon" zoom lens with its 12.5- 25 mm focal length range plus the ideal design of the lighting system yields about 35% more light flux on a 44% large1r screen area than models with the standard 15 - 30 mm f/1.3 lens at the same projection distance.
We do hope that you will get a lot of enjoyment out of the Eumig projector. There should be nothing to mar your pleasure if you will first get acquainted with it and be guided by the operating instructions which follow.
Putting on a show with the Eumig projector at a glance
4 Thumbnail description 8
5 Before you plug it in
5 Selecting the film format 9
5 Getting ready to show a movie 10
7 Slow-motion and still projection 11
7 Fast rewind through film channel 11
7 Direct reel-to-reel rewind 12
7 Instant replay
Movie sound from a cassette recorder With the use of a sync cable (Mark 610 D)
Caring for your projector
Replacing the projection lamp
Replacing the pilot-light bulb (Mark 610 D)
Replacing the drive belt
Accessories you'll find helpfull
3

~---------------------------------------------------------- --------~
4
Thumbnail description
o Reel spindle
e Slow-motion knob
8 Carrying handle
o Framing lever
9 Reel arm
9 Lens
G Mounting holes for daylight viewer (an accessory)
8 Focusing knob
f) Reel-spindle adapter
4I!> Tilt control
CD Film outter
f) Function switch
o Film-format selector
~ Pilot light (Mark 610 D)
m Power cord (mains lead)
~ Sync cable outlet
G Voltage selector
~ Cover mounting screws
Accessories supplied:
Power cord (mains lead)
Operating instructions
Warranty card
Universal film reel (for use as automatic. takeup and storage reel) 790.0320/5
Reel-sp indle adapter 704.5710/4
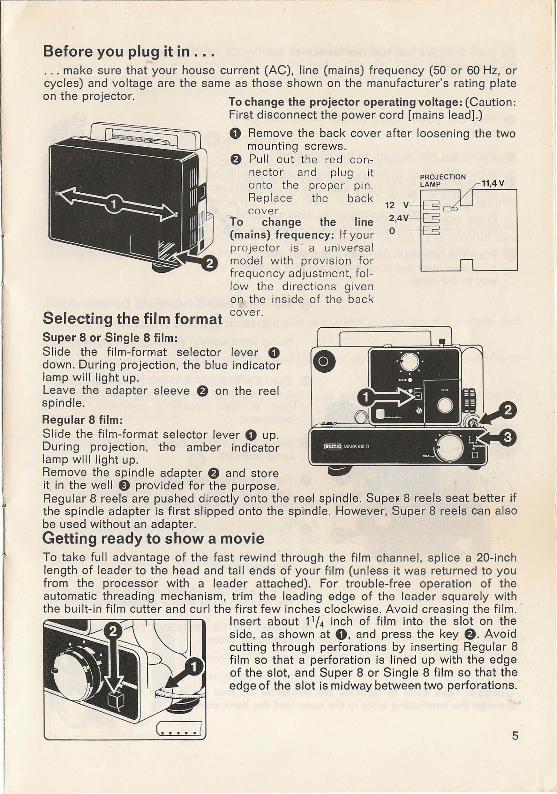
Before you plug it in ... . . . make sure that your house current (Ae), line (mains) frequency (50 or 60 Hz, or cycles) and voltage are the same as those shown on the manufacturer's rating plate on the projector. To change the projector operating voltage: (Caution:
First disconnect the power cord [mains lead) .)
o Remove the back cover after loosening the two mounting screws .
6 Pull out the I'ed co n-nector and pl ug it on to the prope r pin . 11,4V
Replace the back 12 v
Selecting the film format Super 8 or Single 8 film:
cover . To change the line (mains) frequency: If your projector is- a unive rsal model wi th provision for fre quency adjustme nt, fol low the directions given on the inside of .the back cove r.
S lide the film-format selector lever 0 down. During projection, the blue indicator lamp will light up. Leave the adapter sleeve 6 on the reel spindle.
Regular 8 film: Slide the f ilm-format selector lever 0 up. During projection, the amber indicator lamp will li.g.ht up. Remove the spindle adapter 6 and store it. in the well e provided for the purpose.
2,4V
o
Regular 8 reels are pushed directly onto the ree l spind le. SupeF 8 reels seat better if the spind le adapter i's first sHpped onto the spind le. Howeve,r, Super 8 reels can also be used without an adapter. Getting ready to show a movie To take full advantage of the fast rewind through the film chan nel , splice a 20- inch length of leader to the head and tail ends of your film (unless it was returned to you from the processor with a leader attached). For trouble-free operation of t he automatic threading mechanism, trim the leading edge of the leader squ arely with the built-in film cutter and curl the first few inches c lockwise. Avoid creasing the fi lm . .
Insert about 11/4 inch of film into the slot on the side , as shown at 0, and press the key 6 . Avoid cutting through perforations by inserting Regular 8 film so that a perforati·on is lined up with the edge of the slot, and Super 8 or Single 8 film so that the edge of the slot is midway between two perforations.
5

Be sure to move the function switch to the" 0" (off) position befo.re plugging the projector in.
o Plug the power cord (mains lead) into an outlet.
S Swing the reel arm up to the click stop.
f) Place the full reel on the reel arm (with the perforations facing you) and flip over the reel guard. Films wound the wrong way (not as shown here) must be rewound twice for projection.
o Push the universal film reel supplied with the projector onto the takeup-reel spindle all the way to the stop.
o Move the function switch to the auto thread
ing pos ition () (The projection lamp is now
being preheated. Pi lot goes on with the
Mark 610 D.)
o Feed the film end into the threading slot until it is caught by the threading mechanism. The rest of the threading operation is fully automatic.
0 , Move the function switch to the forward with lamp position 0
o For reverse projection, move the function switch past the" 0" (off) position to the reve·rse with lamp position 0
o Turn the zoom ring to HII the screen.
~ Bring the picture into focus by turning the focusing knob.
tD If a frame line shows on the screen, move the framing lever until it disappears.
Ii) Adjust the tilt control to rais'e or lower the projected p icture.
Caution: Take care to operate the projector so that air is able to circulate freely through the ventilating slots in the case and the back cover ..
6

If the projector is very cold, let it run for a few minutes with the projection lamp on to warm it up b e for e loa.ding it. Should the motor stop for some reason, such as a momentary power failure, move the function switch to the " 0" (off) position, then back to the deSired operating mode.
Slow-motion and still projection If you wish to show a given sequence of scenes in slow motion, move the slow-motion switch to the deSired slowmotion speed - 12, 9, 6 or 3 fps (frames per second) -(9 or 6 fps on the Mark 605 D) or to 0 for still projection during either forward or reverse projection. To make it easier for you to locate the sWitch position for the normal projection speed of 18 fps, it is marked by a green indicator lamp during projection (not fitted on the Mark 605 D).
Fast rewind through film channel As soon as the leader attached to the tail end of the film moves into the picture, and
before the film comes off the feed ree l:
Move the function switch past the " 0 " (off) and reverse with lamp positions to
the fast rewind (instant replay) position OJ . The lens gate swings up, the projection lamp goe,s out, and the film rewinds rapidly
through the film channel.
Direct reel-to-reel rewind Of course the film can also be rewound onto
the feed reel externally, from reel to reel. This is
done by moving the function switch to the fast
rewind (instant replay) position OJ
Instant replay If you want to show a given sequence of scenes once
more, you can interrupt the fast rewind at any time by
moving the function switch clockwi,se to the forward with
lamp position 0
7

Movie sound from a cassette recorder by using a sync cable (Mark 610 D)
The tripping contact incorporated in the Eumig Mark 610 D makes it possible to start and stop a cassette recorder simultaneously with the projector.
However, it can be used only with recorders havi'ng a remote-control jack.
The recorder will start when the projector's function switch is moved into
the 0 forward with lamp and start position 0 which oloses the tripping contact.
In all other function-switch positions the trippfng contact is open and the recorder
turned off.
Sync cable (Mark 610 D) :,
A connecting cable that fits most makes of cassette recorders is avai,lable from your dealer as an accessory (Eumig Ordering No. 790.0267/5). It terminates in a subminiature plug and comes with an adapter for Philips-type DIN jacks.
Instructions for its use accompany the cable.
8

Caring for your projector
All moving parts of the Mark 610 0 are permanently lubricated and require no attention.
The film guides and film channel should be cleaned from time to time. With a soft cloth ora camel's hair brush, carefully remove dust and emulsion particles. To gain access to the film channel, pressure pad and film guides, take off the lamp housing and swing up the lens gate. But first move the function sWitch to the top" 0 " (off) position and pull out the line (mains) plug.
o Use a coin to turn the screw, then take off the lamp housing.
e Push the lens-gate latch toward the left. The lens gate wi ll swing up.
e To olean the lens (with a soft, lint-free cloth or a camel's hair brush), pullout the focusing knob a little.
e Uft the lens out of the lens gate.
o Before replacing, check that the engagement groove of the lens faces you (see illustration). Now pull out the focusing knob aga in , push the lens into the carrier tube and let it engage.
Now swing the lens gate back in place and replace the lamp housing .
Proper film care is important. Clean your films occasionally with a commercial film cleaner. Store them in dust-tight cans in a cool, not-too-dry place.
9

Replacing the projection lamp (only with mains lead disconnected)
Nothing lasts forever. Projection lamps are no exception. When yours burns out, replace it with a halogen lampwith cold-light mirror. Type of lamp for: 12 V, 100 W halogen lamp with dichroic mirror No. 931.005/8
1. Remove the lamp cover.
e Swing up and forward heat protection plate.
8 Push down the lamp spring and turn it counterclockwise to disengage it. Lift the lamp out of the lamp holder.
o Pullout the lamp plug. When inserting the new lamp, take care not to touch the bulb or the inside of the reflector with your bare hands . If you accidentally do, wipe them with alcohol.
o Plug in the lamp plug.
6. Raise the lamp spring and push the lamp fn contact with the lamp holder into the centering hole in the socket, taking care to locate the centering key in the centering notch.
8 Push down the lamp spring and turn it clockwise to engage it. Subsequent centering of the lamp unit is not necessary.
8. Swing heat protection plate back into original position.
9. Replace the lamp cover.
Momentary line-voltage surges in some localities may cause the projection lamp to burn out faster. Where this is observed, it is recommended that the projector's voltage selector be set for the next-higher voltage level (230 volts instead of 220, for example). This will extend the life of the lamp at the expense of slightly reduced light output.
The life expectancy of the lamp can be increased alsQ by letting it cool off at the end of the show before putting the projector away. The hot lamp filament is brittle and susceptible to shock.
10

Replacing th~ pilot-light bulb - Mark 610 D (only with mains lead disconnected)
'-------~~.~------~
1. Replace lamp cover.
Turn cap counterclockwise to disengage it, then
take it off.
3. Turn bulb to remove it and replace in with a 12-volt,
3-watt bulb of the same bayonet-base type.
4. Replace cap, turning it clockwise to engage it.
5. Rep lace the lamp cover.
Replacing the drive belt (Eum ig Ordering No. 731 .5629/2)
60HlI: 50Hz ••
Jt.... 60Hz 50Hz
First set the slow-motion knob for 18 fps, move the function sWitch to the " 0 " (off) position, and unplug the powe,r cord (mains lead).
Remove back cover and lamp housing.
Remove the worn drive belt and place in new belt in
the pulley groove corresponding to your line (mains) frequency.
Replace lamp housing and back cover.
11

Accessories you'll find he~pful
~"'~"~C:'~
.,_ .... , .
.~
Sync Cable (Mark 610 D)
( Eumig Ordering No. 790.0267/5)
This accessory will enable you to litart your cassette recorder in step with your projector. Ask your dealer for it.
Folding case No, 7900396/5
These durable covers not only protect your projector against dust during storage , but also hold various accessories such as the main lead , spare reels etc,
Daylight Viewer (Eumig Ordering No. 790.0290/0)
The Daylight Viewer displays even in broad daylight a bright, high-contrast picture on a small ground-glass screen, Just snap it on for a p,review of your film or a screening under daylight conditions before a small audience. You will find it extremely helpful in soundtrack building (Mark 610 D) and film editing too.
Subject to design changes without notice. Printed in Austria by Eumig . 732,9239/4