hardening linux
TRANSCRIPT
Hardening Linux
JAMES TURNBULL
4444_FM_final.qxd 1/5/05 12:39 AM Page i

Hardening Linux
Copyright © 2005 by James Turnbull
All rights reserved. No part of this work may be reproduced or transmitted in any form or by any means,electronic or mechanical, including photocopying, recording, or by any information storage or retrievalsystem, without the prior written permission of the copyright owner and the publisher.
ISBN (pbk): 1-59059-444-4
Printed and bound in the United States of America 9 8 7 6 5 4 3 2 1
Trademarked names may appear in this book. Rather than use a trademark symbol with every occurrenceof a trademarked name, we use the names only in an editorial fashion and to the benefit of the trademarkowner, with no intention of infringement of the trademark.
Lead Editor: Jim Sumser
Technical Reviewer: Judith Myerson
Editorial Board: Steve Anglin, Dan Appleman, Ewan Buckingham, Gary Cornell, Tony Davis, JasonGilmore, Chris Mills, Dominic Shakeshaft, Jim Sumser
Project Manager: Kylie Johnston
Copy Edit Manager: Nicole LeClerc
Copy Editor: Kim Wimpsett
Production Manager: Kari Brooks-Copony
Production Editor: Kelly Winquist
Compositor: Linda Weidemann
Proofreader: Lori Bring
Indexer: Kevin Broccoli
Artist: Kinetic Publishing Services, LLC
Cover Designer: Kurt Krames
Manufacturing Manager: Tom Debolski
Distributed to the book trade in the United States by Springer-Verlag New York, Inc., 233 Spring Street, 6th Floor, New York, NY 10013, and outside the United States by Springer-Verlag GmbH & Co. KG,Tiergartenstr. 17, 69112 Heidelberg, Germany.
In the United States: phone 1-800-SPRINGER, fax 201-348-4505, e-mail [email protected], or visithttp://www.springer-ny.com. Outside the United States: fax +49 6221 345229, e-mail [email protected],or visit http://www.springer.de.
For information on translations, please contact Apress directly at 2560 Ninth Street, Suite 219, Berkeley,CA 94710. Phone 510-549-5930, fax 510-549-5939, e-mail [email protected], or visit http://www.apress.com.
The information in this book is distributed on an “as is” basis, without warranty. Although every precau-tion has been taken in the preparation of this work, neither the author(s) nor Apress shall have any liabil-ity to any person or entity with respect to any loss or damage caused or alleged to be caused directly orindirectly by the information contained in this work.
The source code for this book is available to readers at http://www.apress.com in the Downloads section.
4444_FM_final.qxd 1/5/05 12:39 AM Page ii
Contents at a Glance
About the Author . . . . . . . . . . . . . . . . . . . . . . . . . . . . . . . . . . . . . . . . . . . . . . . . . . . . . . . . . . . . . . . . . . xv
About the Technical Reviewer. . . . . . . . . . . . . . . . . . . . . . . . . . . . . . . . . . . . . . . . . . . . . . . . . . . . . . xvii
Acknowledgments . . . . . . . . . . . . . . . . . . . . . . . . . . . . . . . . . . . . . . . . . . . . . . . . . . . . . . . . . . . . . . . . xix
Introduction. . . . . . . . . . . . . . . . . . . . . . . . . . . . . . . . . . . . . . . . . . . . . . . . . . . . . . . . . . . . . . . . . . . . . . xxi
CHAPTER 1 Hardening the Basics . . . . . . . . . . . . . . . . . . . . . . . . . . . . . . . . . . . . . . . . . . . 1
CHAPTER 2 Firewalling Your Hosts . . . . . . . . . . . . . . . . . . . . . . . . . . . . . . . . . . . . . . . . . 79
CHAPTER 3 Securing Connections and Remote Administration . . . . . . . . . . . . . 137
CHAPTER 4 Securing Files and File Systems . . . . . . . . . . . . . . . . . . . . . . . . . . . . . . 187
CHAPTER 5 Understanding Logging and Log Monitoring . . . . . . . . . . . . . . . . . . . 233
CHAPTER 6 Using Tools for Security Testing . . . . . . . . . . . . . . . . . . . . . . . . . . . . . . . 281
CHAPTER 7 Securing Your Mail Server . . . . . . . . . . . . . . . . . . . . . . . . . . . . . . . . . . . . 321
CHAPTER 8 Authenticating and Securing Your Mail . . . . . . . . . . . . . . . . . . . . . . . . 373
CHAPTER 9 Hardening Remote Access to E-mail. . . . . . . . . . . . . . . . . . . . . . . . . . . 403
CHAPTER 10 Securing an FTP Server . . . . . . . . . . . . . . . . . . . . . . . . . . . . . . . . . . . . . . . 443
CHAPTER 11 Hardening DNS and BIND . . . . . . . . . . . . . . . . . . . . . . . . . . . . . . . . . . . . . 463
APPENDIX A The Bastion Host Firewall Script . . . . . . . . . . . . . . . . . . . . . . . . . . . . . . 511
APPENDIX B BIND Configuration Files . . . . . . . . . . . . . . . . . . . . . . . . . . . . . . . . . . . . . . 517
APPENDIX C Checkpoints . . . . . . . . . . . . . . . . . . . . . . . . . . . . . . . . . . . . . . . . . . . . . . . . . . 525
INDEX . . . . . . . . . . . . . . . . . . . . . . . . . . . . . . . . . . . . . . . . . . . . . . . . . . . . . . . . . . . . . . . . . . . . . . . . . 533
v
4444_FM_final.qxd 1/5/05 12:39 AM Page v
Contents
About the Author . . . . . . . . . . . . . . . . . . . . . . . . . . . . . . . . . . . . . . . . . . . . . . . . . . . . . . . . . . . . . . . . . . xv
About the Technical Reviewer. . . . . . . . . . . . . . . . . . . . . . . . . . . . . . . . . . . . . . . . . . . . . . . . . . . . . . xvii
Acknowledgments . . . . . . . . . . . . . . . . . . . . . . . . . . . . . . . . . . . . . . . . . . . . . . . . . . . . . . . . . . . . . . . . xix
Introduction. . . . . . . . . . . . . . . . . . . . . . . . . . . . . . . . . . . . . . . . . . . . . . . . . . . . . . . . . . . . . . . . . . . . . . xxi
■CHAPTER 1 Hardening the Basics . . . . . . . . . . . . . . . . . . . . . . . . . . . . . . . . . . . . . . . . 1
Installing Your Distribution Securely. . . . . . . . . . . . . . . . . . . . . . . . . . . . . . . . . 2
Some Answers to Common Installation Questions. . . . . . . . . . . . . . . . 2
Install Only What You Need. . . . . . . . . . . . . . . . . . . . . . . . . . . . . . . . . . . . 2
Secure Booting, Boot Loaders, and Boot-Time Services . . . . . . . . . . . . . . . 4
Securing Your Boat Loader . . . . . . . . . . . . . . . . . . . . . . . . . . . . . . . . . . . . 5
Init, Starting Services, and Boot Sequencing . . . . . . . . . . . . . . . . . . . . 8
Consoles, Virtual Terminals, and Login Screens. . . . . . . . . . . . . . . . . . . . . . 15
Securing the Console . . . . . . . . . . . . . . . . . . . . . . . . . . . . . . . . . . . . . . . 16
The Red Hat Console . . . . . . . . . . . . . . . . . . . . . . . . . . . . . . . . . . . . . . . . 16
Securing Virtual Terminals . . . . . . . . . . . . . . . . . . . . . . . . . . . . . . . . . . . 17
Securing Login Screens . . . . . . . . . . . . . . . . . . . . . . . . . . . . . . . . . . . . . 18
Users and Groups . . . . . . . . . . . . . . . . . . . . . . . . . . . . . . . . . . . . . . . . . . . . . . . 19
Shadow Passwording . . . . . . . . . . . . . . . . . . . . . . . . . . . . . . . . . . . . . . . 22
Groups . . . . . . . . . . . . . . . . . . . . . . . . . . . . . . . . . . . . . . . . . . . . . . . . . . . . 23
Adding Users. . . . . . . . . . . . . . . . . . . . . . . . . . . . . . . . . . . . . . . . . . . . . . . 24
Adding Groups . . . . . . . . . . . . . . . . . . . . . . . . . . . . . . . . . . . . . . . . . . . . . 26
Deleting Unnecessary Users and Groups. . . . . . . . . . . . . . . . . . . . . . . 28
Passwords. . . . . . . . . . . . . . . . . . . . . . . . . . . . . . . . . . . . . . . . . . . . . . . . . 31
Password Aging . . . . . . . . . . . . . . . . . . . . . . . . . . . . . . . . . . . . . . . . . . . . 35
sudo . . . . . . . . . . . . . . . . . . . . . . . . . . . . . . . . . . . . . . . . . . . . . . . . . . . . . . 37
User Accounting . . . . . . . . . . . . . . . . . . . . . . . . . . . . . . . . . . . . . . . . . . . . 42
Process Accounting. . . . . . . . . . . . . . . . . . . . . . . . . . . . . . . . . . . . . . . . . . . . . . 44
Pluggable Authentication Modules (PAM) . . . . . . . . . . . . . . . . . . . . . . . . . . . 46
PAM Module Stacking . . . . . . . . . . . . . . . . . . . . . . . . . . . . . . . . . . . . . . . 48
The PAM “Other” Service . . . . . . . . . . . . . . . . . . . . . . . . . . . . . . . . . . . . 49
Restricting su Using PAM . . . . . . . . . . . . . . . . . . . . . . . . . . . . . . . . . . . . 50
vii
4444_FM_final.qxd 1/5/05 12:39 AM Page vii
Setting Limits with PAM . . . . . . . . . . . . . . . . . . . . . . . . . . . . . . . . . . . . . 51
Restricting Users to Specific Login Times with PAM . . . . . . . . . . . . . 53
Package Management, File Integrity, and Updating . . . . . . . . . . . . . . . . . . 56
Ensuring File Integrity . . . . . . . . . . . . . . . . . . . . . . . . . . . . . . . . . . . . . . . 57
Downloading Updates and Patches . . . . . . . . . . . . . . . . . . . . . . . . . . . 61
Compilers and Development Tools . . . . . . . . . . . . . . . . . . . . . . . . . . . . . . . . . 64
Removing the Compilers and Development Tools . . . . . . . . . . . . . . . 64
Restricting the Compilers and Development Tools. . . . . . . . . . . . . . . 65
Hardening and Securing Your Kernel . . . . . . . . . . . . . . . . . . . . . . . . . . . . . . . 66
Getting Your Kernel Source. . . . . . . . . . . . . . . . . . . . . . . . . . . . . . . . . . . 66
The Openwall Project . . . . . . . . . . . . . . . . . . . . . . . . . . . . . . . . . . . . . . . 68
Other Kernel-Hardening Options . . . . . . . . . . . . . . . . . . . . . . . . . . . . . . 74
Keeping Informed About Security . . . . . . . . . . . . . . . . . . . . . . . . . . . . . . . . . . 75
Security Sites and Mailing Lists . . . . . . . . . . . . . . . . . . . . . . . . . . . . . . 75
Vendor and Distribution Security Sites . . . . . . . . . . . . . . . . . . . . . . . . . 76
Resources . . . . . . . . . . . . . . . . . . . . . . . . . . . . . . . . . . . . . . . . . . . . . . . . . . . . . . 76
Mailing Lists . . . . . . . . . . . . . . . . . . . . . . . . . . . . . . . . . . . . . . . . . . . . . . . 76
Sites . . . . . . . . . . . . . . . . . . . . . . . . . . . . . . . . . . . . . . . . . . . . . . . . . . . . . . 77
■CHAPTER 2 Firewalling Your Hosts . . . . . . . . . . . . . . . . . . . . . . . . . . . . . . . . . . . . . . 79
So, How Does a Linux Firewall Work? . . . . . . . . . . . . . . . . . . . . . . . . . . . . . . 80
Tables. . . . . . . . . . . . . . . . . . . . . . . . . . . . . . . . . . . . . . . . . . . . . . . . . . . . . 82
Chains . . . . . . . . . . . . . . . . . . . . . . . . . . . . . . . . . . . . . . . . . . . . . . . . . . . . 82
Policies. . . . . . . . . . . . . . . . . . . . . . . . . . . . . . . . . . . . . . . . . . . . . . . . . . . . 82
Adding Your First Rules. . . . . . . . . . . . . . . . . . . . . . . . . . . . . . . . . . . . . . . . . . . 83
Choosing Filtering Criteria . . . . . . . . . . . . . . . . . . . . . . . . . . . . . . . . . . . . . . . . 86
The iptables Command . . . . . . . . . . . . . . . . . . . . . . . . . . . . . . . . . . . . . . . . . . 87
Creating a Basic Firewall . . . . . . . . . . . . . . . . . . . . . . . . . . . . . . . . . . . . . . . . . 91
Creating a Firewall for a Bastion Host . . . . . . . . . . . . . . . . . . . . . . . . . . . . . . 97
Securing the Bastion Services. . . . . . . . . . . . . . . . . . . . . . . . . . . . . . . . 98
Firewall Logging. . . . . . . . . . . . . . . . . . . . . . . . . . . . . . . . . . . . . . . . . . . 101
Handling ICMP Traffic . . . . . . . . . . . . . . . . . . . . . . . . . . . . . . . . . . . . . . 105
Spoofing, Hijacking, and Denial of Service Attacks . . . . . . . . . . . . . 108
iptables and TCP Flags . . . . . . . . . . . . . . . . . . . . . . . . . . . . . . . . . . . . . 111
Some Final Bastion Host Rules . . . . . . . . . . . . . . . . . . . . . . . . . . . . . . 116
Kernel Modules and Parameters. . . . . . . . . . . . . . . . . . . . . . . . . . . . . . . . . . 117
Patch-o-Matic. . . . . . . . . . . . . . . . . . . . . . . . . . . . . . . . . . . . . . . . . . . . . 117
Kernel Parameters . . . . . . . . . . . . . . . . . . . . . . . . . . . . . . . . . . . . . . . . . 124
Managing iptables and Your Rules . . . . . . . . . . . . . . . . . . . . . . . . . . . . . . . . 129
iptables-save and iptables-restore . . . . . . . . . . . . . . . . . . . . . . . . . . . 130
■CONTENTSviii
4444_FM_final.qxd 1/5/05 12:39 AM Page viii
iptables init Scripts . . . . . . . . . . . . . . . . . . . . . . . . . . . . . . . . . . . . . . . . 131
Testing and Troubleshooting . . . . . . . . . . . . . . . . . . . . . . . . . . . . . . . . 132
Resources . . . . . . . . . . . . . . . . . . . . . . . . . . . . . . . . . . . . . . . . . . . . . . . . . . . . . 136
Mailing Lists . . . . . . . . . . . . . . . . . . . . . . . . . . . . . . . . . . . . . . . . . . . . . . 136
Sites . . . . . . . . . . . . . . . . . . . . . . . . . . . . . . . . . . . . . . . . . . . . . . . . . . . . . 136
Books . . . . . . . . . . . . . . . . . . . . . . . . . . . . . . . . . . . . . . . . . . . . . . . . . . . . 136
■CHAPTER 3 Securing Connections and Remote Administration. . . . . . 137
Public-Key Encryption. . . . . . . . . . . . . . . . . . . . . . . . . . . . . . . . . . . . . . . . . . . 137
SSL, TLS, and OpenSSL . . . . . . . . . . . . . . . . . . . . . . . . . . . . . . . . . . . . 140
Stunnel. . . . . . . . . . . . . . . . . . . . . . . . . . . . . . . . . . . . . . . . . . . . . . . . . . . 152
IPSec, VPNs, and Openswan . . . . . . . . . . . . . . . . . . . . . . . . . . . . . . . . 159
inetd and xinetd-Based Connections . . . . . . . . . . . . . . . . . . . . . . . . . 167
Remote Administration . . . . . . . . . . . . . . . . . . . . . . . . . . . . . . . . . . . . . . . . . . 169
ssh . . . . . . . . . . . . . . . . . . . . . . . . . . . . . . . . . . . . . . . . . . . . . . . . . . . . . . 171
scp and sftp . . . . . . . . . . . . . . . . . . . . . . . . . . . . . . . . . . . . . . . . . . . . . . 175
ssh-agent and Agent Forwarding . . . . . . . . . . . . . . . . . . . . . . . . . . . . 177
The sshd Daemon . . . . . . . . . . . . . . . . . . . . . . . . . . . . . . . . . . . . . . . . . 179
Configuring ssh and sshd . . . . . . . . . . . . . . . . . . . . . . . . . . . . . . . . . . . 180
Port Forwarding with OpenSSH . . . . . . . . . . . . . . . . . . . . . . . . . . . . . . 183
Forwarding X with OpenSSH . . . . . . . . . . . . . . . . . . . . . . . . . . . . . . . . 184
Resources . . . . . . . . . . . . . . . . . . . . . . . . . . . . . . . . . . . . . . . . . . . . . . . . . . . . . 185
Mailing Lists . . . . . . . . . . . . . . . . . . . . . . . . . . . . . . . . . . . . . . . . . . . . . . 185
Sites . . . . . . . . . . . . . . . . . . . . . . . . . . . . . . . . . . . . . . . . . . . . . . . . . . . . . 185
■CHAPTER 4 Securing Files and File Systems . . . . . . . . . . . . . . . . . . . . . . . . . . 187
Basic File Permissions and File Attributes. . . . . . . . . . . . . . . . . . . . . . . . . . 188
Access Permissions. . . . . . . . . . . . . . . . . . . . . . . . . . . . . . . . . . . . . . . . 188
Ownership . . . . . . . . . . . . . . . . . . . . . . . . . . . . . . . . . . . . . . . . . . . . . . . . 198
Immutable Files . . . . . . . . . . . . . . . . . . . . . . . . . . . . . . . . . . . . . . . . . . . . . . . . 198
Capabilities and lcap. . . . . . . . . . . . . . . . . . . . . . . . . . . . . . . . . . . . . . . . . . . . 200
Encrypting Files . . . . . . . . . . . . . . . . . . . . . . . . . . . . . . . . . . . . . . . . . . . . . . . . 202
Securely Mounting File Systems. . . . . . . . . . . . . . . . . . . . . . . . . . . . . . . . . . 204
Securing Removable Devices . . . . . . . . . . . . . . . . . . . . . . . . . . . . . . . . . . . . 207
Creating an Encrypted File System . . . . . . . . . . . . . . . . . . . . . . . . . . . . . . . 208
Installing the Userland Tools . . . . . . . . . . . . . . . . . . . . . . . . . . . . . . . . 209
Enabling the Functionality . . . . . . . . . . . . . . . . . . . . . . . . . . . . . . . . . . 209
Encrypting a Loop File System . . . . . . . . . . . . . . . . . . . . . . . . . . . . . . 210
Unmounting Your Encrypted File System . . . . . . . . . . . . . . . . . . . . . . 214
Remounting. . . . . . . . . . . . . . . . . . . . . . . . . . . . . . . . . . . . . . . . . . . . . . . 215
■CONTENTS ix
4444_FM_final.qxd 1/5/05 12:39 AM Page ix
Maintaining File Integrity with Tripwire . . . . . . . . . . . . . . . . . . . . . . . . . . . . 215
Configuring Tripwire . . . . . . . . . . . . . . . . . . . . . . . . . . . . . . . . . . . . . . . 216
Explaining Tripwire Policy . . . . . . . . . . . . . . . . . . . . . . . . . . . . . . . . . . . 218
Network File System (NFS) . . . . . . . . . . . . . . . . . . . . . . . . . . . . . . . . . . . . . . 229
Resources . . . . . . . . . . . . . . . . . . . . . . . . . . . . . . . . . . . . . . . . . . . . . . . . . . . . . 231
Mailing Lists . . . . . . . . . . . . . . . . . . . . . . . . . . . . . . . . . . . . . . . . . . . . . . 231
Sites . . . . . . . . . . . . . . . . . . . . . . . . . . . . . . . . . . . . . . . . . . . . . . . . . . . . . 231
Sites About ACLs . . . . . . . . . . . . . . . . . . . . . . . . . . . . . . . . . . . . . . . . . . 231
■CHAPTER 5 Understanding Logging and Log Monitoring . . . . . . . . . . . . . 233
Syslog . . . . . . . . . . . . . . . . . . . . . . . . . . . . . . . . . . . . . . . . . . . . . . . . . . . . . . . . 233
Configuring Syslog. . . . . . . . . . . . . . . . . . . . . . . . . . . . . . . . . . . . . . . . . 235
Starting syslogd and Its Options . . . . . . . . . . . . . . . . . . . . . . . . . . . . . 239
syslog-NG . . . . . . . . . . . . . . . . . . . . . . . . . . . . . . . . . . . . . . . . . . . . . . . . . . . . . 241
Installing and Configuring syslog-NG . . . . . . . . . . . . . . . . . . . . . . . . . 241
The contrib Directory. . . . . . . . . . . . . . . . . . . . . . . . . . . . . . . . . . . . . . . 242
Running and Configuring syslog-NG. . . . . . . . . . . . . . . . . . . . . . . . . . 242
Sample syslog-ng.conf File . . . . . . . . . . . . . . . . . . . . . . . . . . . . . . . . . 254
Logging to a Database with syslog-NG . . . . . . . . . . . . . . . . . . . . . . . 256
Secure Logging with syslog-NG . . . . . . . . . . . . . . . . . . . . . . . . . . . . . 259
Testing Logging with logger . . . . . . . . . . . . . . . . . . . . . . . . . . . . . . . . . 263
Log Analysis and Correlation . . . . . . . . . . . . . . . . . . . . . . . . . . . . . . . . . . . . . 264
Installing and Running SEC . . . . . . . . . . . . . . . . . . . . . . . . . . . . . . . . . 267
Inputting Messages to SEC . . . . . . . . . . . . . . . . . . . . . . . . . . . . . . . . . 269
Building Your SEC Rules . . . . . . . . . . . . . . . . . . . . . . . . . . . . . . . . . . . . 270
Log Management and Rotation. . . . . . . . . . . . . . . . . . . . . . . . . . . . . . . . . . . 277
Resources . . . . . . . . . . . . . . . . . . . . . . . . . . . . . . . . . . . . . . . . . . . . . . . . . . . . . 280
Mailing Lists . . . . . . . . . . . . . . . . . . . . . . . . . . . . . . . . . . . . . . . . . . . . . . 280
Sites . . . . . . . . . . . . . . . . . . . . . . . . . . . . . . . . . . . . . . . . . . . . . . . . . . . . . 280
Books . . . . . . . . . . . . . . . . . . . . . . . . . . . . . . . . . . . . . . . . . . . . . . . . . . . . 280
■CHAPTER 6 Using Tools for Security Testing . . . . . . . . . . . . . . . . . . . . . . . . . . 281
Inner Layer . . . . . . . . . . . . . . . . . . . . . . . . . . . . . . . . . . . . . . . . . . . . . . . . . . . . 282
Scanning for Exploits and Root Kits . . . . . . . . . . . . . . . . . . . . . . . . . . 282
Testing Your Password Security. . . . . . . . . . . . . . . . . . . . . . . . . . . . . . 287
Automated Security Hardening with Bastille Linux . . . . . . . . . . . . . 290
Outer Layer. . . . . . . . . . . . . . . . . . . . . . . . . . . . . . . . . . . . . . . . . . . . . . . . . . . . 295
NMAP . . . . . . . . . . . . . . . . . . . . . . . . . . . . . . . . . . . . . . . . . . . . . . . . . . . . 296
Nessus . . . . . . . . . . . . . . . . . . . . . . . . . . . . . . . . . . . . . . . . . . . . . . . . . . . 302
■CONTENTSx
4444_FM_final.qxd 1/5/05 12:39 AM Page x
Other Methods of Detecting a Penetration . . . . . . . . . . . . . . . . . . . . . . . . . 313
Recovering from a Penetration . . . . . . . . . . . . . . . . . . . . . . . . . . . . . . . . . . . 315
Additional Security Tools . . . . . . . . . . . . . . . . . . . . . . . . . . . . . . . . . . . . . . . . 318
dsniff . . . . . . . . . . . . . . . . . . . . . . . . . . . . . . . . . . . . . . . . . . . . . . . . . . . . 318
Ethereal . . . . . . . . . . . . . . . . . . . . . . . . . . . . . . . . . . . . . . . . . . . . . . . . . . 318
Ettercap . . . . . . . . . . . . . . . . . . . . . . . . . . . . . . . . . . . . . . . . . . . . . . . . . . 318
LIDS . . . . . . . . . . . . . . . . . . . . . . . . . . . . . . . . . . . . . . . . . . . . . . . . . . . . . 318
Netcat. . . . . . . . . . . . . . . . . . . . . . . . . . . . . . . . . . . . . . . . . . . . . . . . . . . . 319
SARA . . . . . . . . . . . . . . . . . . . . . . . . . . . . . . . . . . . . . . . . . . . . . . . . . . . . 319
Snort. . . . . . . . . . . . . . . . . . . . . . . . . . . . . . . . . . . . . . . . . . . . . . . . . . . . . 319
tcpdump . . . . . . . . . . . . . . . . . . . . . . . . . . . . . . . . . . . . . . . . . . . . . . . . . 319
Titan . . . . . . . . . . . . . . . . . . . . . . . . . . . . . . . . . . . . . . . . . . . . . . . . . . . . . 319
Resources . . . . . . . . . . . . . . . . . . . . . . . . . . . . . . . . . . . . . . . . . . . . . . . . . . . . . 319
Sites . . . . . . . . . . . . . . . . . . . . . . . . . . . . . . . . . . . . . . . . . . . . . . . . . . . . . 320
■CHAPTER 7 Securing Your Mail Server . . . . . . . . . . . . . . . . . . . . . . . . . . . . . . . . . 321
Which Mail Server to Choose? . . . . . . . . . . . . . . . . . . . . . . . . . . . . . . . . . . . 321
How Is Your Mail Server at Risk? . . . . . . . . . . . . . . . . . . . . . . . . . . . . . . . . . 323
Protecting Your Mail Server . . . . . . . . . . . . . . . . . . . . . . . . . . . . . . . . . . . . . . 323
Chrooting a Sendmail SMTP Gateway or Relay . . . . . . . . . . . . . . . . 324
Chrooting Postfix . . . . . . . . . . . . . . . . . . . . . . . . . . . . . . . . . . . . . . . . . . 330
Securing Your SMTP Server . . . . . . . . . . . . . . . . . . . . . . . . . . . . . . . . . . . . . . 333
Obfuscating the MTA Banner and Version . . . . . . . . . . . . . . . . . . . . . 333
Disabling Dangerous and Legacy SMTP Commands. . . . . . . . . . . . 336
Some Additional Sendmail Privacy Flags . . . . . . . . . . . . . . . . . . . . . . 339
Sendmail and smrsh . . . . . . . . . . . . . . . . . . . . . . . . . . . . . . . . . . . . . . . 339
Writing to Files Safely . . . . . . . . . . . . . . . . . . . . . . . . . . . . . . . . . . . . . . 340
Limiting the Risk of (Distributed) DoS Attacks . . . . . . . . . . . . . . . . . 341
Relaying, Spam, and Viruses . . . . . . . . . . . . . . . . . . . . . . . . . . . . . . . . . . . . . 346
Relaying. . . . . . . . . . . . . . . . . . . . . . . . . . . . . . . . . . . . . . . . . . . . . . . . . . 346
Antispam . . . . . . . . . . . . . . . . . . . . . . . . . . . . . . . . . . . . . . . . . . . . . . . . . 351
Antivirus Scanning Your E-mail Server. . . . . . . . . . . . . . . . . . . . . . . . 364
Resources . . . . . . . . . . . . . . . . . . . . . . . . . . . . . . . . . . . . . . . . . . . . . . . . . . . . . 372
Mailing Lists . . . . . . . . . . . . . . . . . . . . . . . . . . . . . . . . . . . . . . . . . . . . . . 372
Sites . . . . . . . . . . . . . . . . . . . . . . . . . . . . . . . . . . . . . . . . . . . . . . . . . . . . . 372
■CHAPTER 8 Authenticating and Securing Your Mail . . . . . . . . . . . . . . . . . . 373
TLS. . . . . . . . . . . . . . . . . . . . . . . . . . . . . . . . . . . . . . . . . . . . . . . . . . . . . . . . . . . 373
Creating Certificates for TLS . . . . . . . . . . . . . . . . . . . . . . . . . . . . . . . . 374
■CONTENTS xi
4444_FM_final.qxd 1/5/05 12:39 AM Page xi

■CONTENTSxii
TLS with Sendmail. . . . . . . . . . . . . . . . . . . . . . . . . . . . . . . . . . . . . . . . . 377
TLS with Postfix . . . . . . . . . . . . . . . . . . . . . . . . . . . . . . . . . . . . . . . . . . . 381
SMTP AUTH Using Cyrus SASL . . . . . . . . . . . . . . . . . . . . . . . . . . . . . . . . . . . 387
Compiling Cyrus SASL. . . . . . . . . . . . . . . . . . . . . . . . . . . . . . . . . . . . . . 388
Configuring SASL saslauthd. . . . . . . . . . . . . . . . . . . . . . . . . . . . . . . . . 389
SMTP AUTH Using Cyrus SASL for Sendmail . . . . . . . . . . . . . . . . . . . . . . . 389
Compiling Cyrus SASL into Sendmail . . . . . . . . . . . . . . . . . . . . . . . . . 390
Configuring Cyrus SASL for Sendmail . . . . . . . . . . . . . . . . . . . . . . . . 391
Using SMTP Server Authentication with Sendmail. . . . . . . . . . . . . . 392
Using SMTP Client Authentication with Sendmail . . . . . . . . . . . . . . 394
SMTP AUTH Using Cyrus SASL for Postfix. . . . . . . . . . . . . . . . . . . . . . . . . . 395
Compiling Cyrus SASL into Postfix . . . . . . . . . . . . . . . . . . . . . . . . . . . 395
Configuring Cyrus SASL for Postfix . . . . . . . . . . . . . . . . . . . . . . . . . . . 396
Using SMTP Server Authentication with Postfix . . . . . . . . . . . . . . . . 398
Using SMTP Client Authentication with Postfix . . . . . . . . . . . . . . . . . 400
Testing SMTP AUTH with Outlook Express . . . . . . . . . . . . . . . . . . . . . . . . . 400
Resources . . . . . . . . . . . . . . . . . . . . . . . . . . . . . . . . . . . . . . . . . . . . . . . . . . . . . 402
Mailing Lists . . . . . . . . . . . . . . . . . . . . . . . . . . . . . . . . . . . . . . . . . . . . . . 402
Sites . . . . . . . . . . . . . . . . . . . . . . . . . . . . . . . . . . . . . . . . . . . . . . . . . . . . . 402
■CHAPTER 9 Hardening Remote Access to E-mail . . . . . . . . . . . . . . . . . . . . . 403
IMAP . . . . . . . . . . . . . . . . . . . . . . . . . . . . . . . . . . . . . . . . . . . . . . . . . . . . . . . . . 404
POP . . . . . . . . . . . . . . . . . . . . . . . . . . . . . . . . . . . . . . . . . . . . . . . . . . . . . . . . . . 404
Choosing IMAP or POP Servers . . . . . . . . . . . . . . . . . . . . . . . . . . . . . . . . . . . 405
How Is Your IMAP or POP Server at Risk? . . . . . . . . . . . . . . . . . . . . . . . . . . 406
Cyrus IMAP . . . . . . . . . . . . . . . . . . . . . . . . . . . . . . . . . . . . . . . . . . . . . . . . . . . . 407
Installing and Compiling Cyrus IMAP . . . . . . . . . . . . . . . . . . . . . . . . . 409
Installing Cyrus IMAP into a chroot Jail . . . . . . . . . . . . . . . . . . . . . . . 411
Configuring Cyrus IMAP . . . . . . . . . . . . . . . . . . . . . . . . . . . . . . . . . . . . 417
Cyrus IMAP Authentication with SASL . . . . . . . . . . . . . . . . . . . . . . . . 422
Cyrus IMAP Access Control and Authorization . . . . . . . . . . . . . . . . . 425
Testing Cyrus IMAP with imtest/pop3test . . . . . . . . . . . . . . . . . . . . . 428
Fetchmail . . . . . . . . . . . . . . . . . . . . . . . . . . . . . . . . . . . . . . . . . . . . . . . . . . . . . 430
Installing Fetchmail . . . . . . . . . . . . . . . . . . . . . . . . . . . . . . . . . . . . . . . . 431
Configuring and Running Fetchmail . . . . . . . . . . . . . . . . . . . . . . . . . . 434
Resources . . . . . . . . . . . . . . . . . . . . . . . . . . . . . . . . . . . . . . . . . . . . . . . . . . . . . 441
Mailing Lists . . . . . . . . . . . . . . . . . . . . . . . . . . . . . . . . . . . . . . . . . . . . . . 441
Sites . . . . . . . . . . . . . . . . . . . . . . . . . . . . . . . . . . . . . . . . . . . . . . . . . . . . . 441
4444_FM_final.qxd 1/5/05 12:39 AM Page xii
■CHAPTER 10 Securing an FTP Server. . . . . . . . . . . . . . . . . . . . . . . . . . . . . . . . . . . . 443
How Does FTP Work? . . . . . . . . . . . . . . . . . . . . . . . . . . . . . . . . . . . . . . . . . . . 444
Firewalling Your FTP Server . . . . . . . . . . . . . . . . . . . . . . . . . . . . . . . . . . . . . . 446
What FTP Server to Use? . . . . . . . . . . . . . . . . . . . . . . . . . . . . . . . . . . . . . . . . 448
Installing vsftpd . . . . . . . . . . . . . . . . . . . . . . . . . . . . . . . . . . . . . . . . . . . . . . . . 448
Configuring vsftpd for Anonymous FTP . . . . . . . . . . . . . . . . . . . . . . . . . . . . 450
General Configuration . . . . . . . . . . . . . . . . . . . . . . . . . . . . . . . . . . . . . . 451
Mode and Access Rights. . . . . . . . . . . . . . . . . . . . . . . . . . . . . . . . . . . . 452
General Security. . . . . . . . . . . . . . . . . . . . . . . . . . . . . . . . . . . . . . . . . . . 454
Preventing Denial of Service Attacks . . . . . . . . . . . . . . . . . . . . . . . . . 455
Configuring vsftpd with Local Users. . . . . . . . . . . . . . . . . . . . . . . . . . . . . . . 456
Adding SSL/TLS Support . . . . . . . . . . . . . . . . . . . . . . . . . . . . . . . . . . . . . . . . 459
Starting and Stopping vsftpd. . . . . . . . . . . . . . . . . . . . . . . . . . . . . . . . . . . . . 461
Resources . . . . . . . . . . . . . . . . . . . . . . . . . . . . . . . . . . . . . . . . . . . . . . . . . . . . . 461
Sites . . . . . . . . . . . . . . . . . . . . . . . . . . . . . . . . . . . . . . . . . . . . . . . . . . . . . 461
■CHAPTER 11 Hardening DNS and BIND . . . . . . . . . . . . . . . . . . . . . . . . . . . . . . . . . . 463
Your DNS Server at Risk. . . . . . . . . . . . . . . . . . . . . . . . . . . . . . . . . . . . . . . . . 464
Man-in-the-Middle Attacks . . . . . . . . . . . . . . . . . . . . . . . . . . . . . . . . . 464
Cache Poisoning. . . . . . . . . . . . . . . . . . . . . . . . . . . . . . . . . . . . . . . . . . . 465
Denial of Service Attacks . . . . . . . . . . . . . . . . . . . . . . . . . . . . . . . . . . . 465
Data Corruption and Alteration . . . . . . . . . . . . . . . . . . . . . . . . . . . . . . 466
Other Risks . . . . . . . . . . . . . . . . . . . . . . . . . . . . . . . . . . . . . . . . . . . . . . . 466
What DNS Server Should You Choose? . . . . . . . . . . . . . . . . . . . . . . . . . . . . 466
Secure BIND Design . . . . . . . . . . . . . . . . . . . . . . . . . . . . . . . . . . . . . . . . . . . . 467
Installing BIND . . . . . . . . . . . . . . . . . . . . . . . . . . . . . . . . . . . . . . . . . . . . . . . . . 470
Chrooting BIND . . . . . . . . . . . . . . . . . . . . . . . . . . . . . . . . . . . . . . . . . . . . . . . . 472
Permissions in the chroot Jail . . . . . . . . . . . . . . . . . . . . . . . . . . . . . . . . . . . . 473
Starting and Running named. . . . . . . . . . . . . . . . . . . . . . . . . . . . . . . . . . . . . 474
Configuring BIND . . . . . . . . . . . . . . . . . . . . . . . . . . . . . . . . . . . . . . . . . . . . . . . 476
Access Control Lists . . . . . . . . . . . . . . . . . . . . . . . . . . . . . . . . . . . . . . . 479
Logging . . . . . . . . . . . . . . . . . . . . . . . . . . . . . . . . . . . . . . . . . . . . . . . . . . 480
Options. . . . . . . . . . . . . . . . . . . . . . . . . . . . . . . . . . . . . . . . . . . . . . . . . . . 484
Views and Zones . . . . . . . . . . . . . . . . . . . . . . . . . . . . . . . . . . . . . . . . . . 493
Zones . . . . . . . . . . . . . . . . . . . . . . . . . . . . . . . . . . . . . . . . . . . . . . . . . . . . 497
TSIG . . . . . . . . . . . . . . . . . . . . . . . . . . . . . . . . . . . . . . . . . . . . . . . . . . . . . . . . . . 500
■CONTENTS xiii
4444_FM_final.qxd 1/5/05 12:39 AM Page xiii
The rndc Command . . . . . . . . . . . . . . . . . . . . . . . . . . . . . . . . . . . . . . . . . . . . 504
rndc.conf . . . . . . . . . . . . . . . . . . . . . . . . . . . . . . . . . . . . . . . . . . . . . . . . . 505
Adding rndc Support to named.conf. . . . . . . . . . . . . . . . . . . . . . . . . . 507
Using rndc . . . . . . . . . . . . . . . . . . . . . . . . . . . . . . . . . . . . . . . . . . . . . . . . 508
Resources . . . . . . . . . . . . . . . . . . . . . . . . . . . . . . . . . . . . . . . . . . . . . . . . . . . . . 510
Mailing Lists . . . . . . . . . . . . . . . . . . . . . . . . . . . . . . . . . . . . . . . . . . . . . . 510
Sites . . . . . . . . . . . . . . . . . . . . . . . . . . . . . . . . . . . . . . . . . . . . . . . . . . . . . 510
Information About Zone Files . . . . . . . . . . . . . . . . . . . . . . . . . . . . . . . . 510
Books . . . . . . . . . . . . . . . . . . . . . . . . . . . . . . . . . . . . . . . . . . . . . . . . . . . . 510
■APPENDIX A The Bastion Host Firewall Script . . . . . . . . . . . . . . . . . . . . . . . . . . 511
■APPENDIX B BIND Configuration Files . . . . . . . . . . . . . . . . . . . . . . . . . . . . . . . . . . 517
A Caching Server. . . . . . . . . . . . . . . . . . . . . . . . . . . . . . . . . . . . . . . . . . . . . . . 517
An Authoritative Master Name Server . . . . . . . . . . . . . . . . . . . . . . . . . . . . . 519
A Split DNS Name Server. . . . . . . . . . . . . . . . . . . . . . . . . . . . . . . . . . . . . . . . 520
A Sample Named init Script. . . . . . . . . . . . . . . . . . . . . . . . . . . . . . . . . . . . . . 523
■APPENDIX C Checkpoints . . . . . . . . . . . . . . . . . . . . . . . . . . . . . . . . . . . . . . . . . . . . . . . . 525
Chapter 1 . . . . . . . . . . . . . . . . . . . . . . . . . . . . . . . . . . . . . . . . . . . . . . . . . . . . . 525
Chapter 2 . . . . . . . . . . . . . . . . . . . . . . . . . . . . . . . . . . . . . . . . . . . . . . . . . . . . . 526
Chapter 3 . . . . . . . . . . . . . . . . . . . . . . . . . . . . . . . . . . . . . . . . . . . . . . . . . . . . . 527
Chapter 4 . . . . . . . . . . . . . . . . . . . . . . . . . . . . . . . . . . . . . . . . . . . . . . . . . . . . . 527
Chapter 5 . . . . . . . . . . . . . . . . . . . . . . . . . . . . . . . . . . . . . . . . . . . . . . . . . . . . . 528
Chapter 6 . . . . . . . . . . . . . . . . . . . . . . . . . . . . . . . . . . . . . . . . . . . . . . . . . . . . . 529
Chapter 7 . . . . . . . . . . . . . . . . . . . . . . . . . . . . . . . . . . . . . . . . . . . . . . . . . . . . . 529
Chapter 8 . . . . . . . . . . . . . . . . . . . . . . . . . . . . . . . . . . . . . . . . . . . . . . . . . . . . . 530
Chapter 9 . . . . . . . . . . . . . . . . . . . . . . . . . . . . . . . . . . . . . . . . . . . . . . . . . . . . . 530
Chapter 10 . . . . . . . . . . . . . . . . . . . . . . . . . . . . . . . . . . . . . . . . . . . . . . . . . . . . 531
Chapter 11 . . . . . . . . . . . . . . . . . . . . . . . . . . . . . . . . . . . . . . . . . . . . . . . . . . . . 531
■INDEX . . . . . . . . . . . . . . . . . . . . . . . . . . . . . . . . . . . . . . . . . . . . . . . . . . . . . . . . . . . . . . . . . . . . . . . 533
■CONTENTSxiv
4444_FM_final.qxd 1/5/05 12:39 AM Page xiv

About the Author
■JAMES TURNBULL is an IT&T security consultant at the Commonwealth Bank of Australia.He is an experienced infrastructure architect with a background in Linux/Unix, AS/400,Windows, and storage systems. He has been involved in security consulting, infrastructuresecurity design, SLA and support services design, and business application support.
xv
4444_FM_final.qxd 1/5/05 12:39 AM Page xv

About the Technical Reviewer
■JUDITH MYERSON is a systems architect and engineer. Areas of interest include middlewaretechnologies, enterprise-wide systems, database technologies, application development,server/network management, security, firewall technologies, and project management.
xvii
4444_FM_final.qxd 1/5/05 12:39 AM Page xvii

Acknowledgments
Mark Chandler, for his friendship and technical assistance during the writing of this book.Nate Campi, for providing syslog-NG, SEC, and logging information.
xix
4444_FM_final.qxd 1/5/05 12:39 AM Page xix
Introduction
This book is a technical guide to hardening and securing Linux hosts and some of the com-mon applications used on Linux hosts. It provides information on how to harden the baseLinux operating system, including firewalling and securing connections to your hosts. It alsolooks at hardening and securing some of the applications commonly run on Linux hosts, suchas e-mail, IMAP/POP, FTP, and DNS.
No single book on security, even a book on the security of a single operating system, willever answer all the security questions or address all the possible threats. This book is aboutproviding risk mitigation and minimization. I have set out to identify risks associated withrunning Linux and some of the applications that run on Linux hosts. I have then providedtechnical solutions—backed by frequent examples, code, and commands—that minimize,mitigate, or in some circumstances negate those risks. The configurations and examples Iprovide are designed to ensure your Linux hosts are hardened against attack while not limit-ing the functionality available to your users.
So why should you care about security? The answer to this is simple—because a significantportion of businesses today rely heavily on the security of their IT assets. To use a metaphor:running a computer host is like owning a house. When Unix-flavored operating systems andTCP/IP networking were in their infancy, it was like owning a house in a small country town.The emphasis was on making it easy for people to cooperate and communicate. People left theirdoors open and did not mind other people exploring their houses or borrowing a cup of sugar.You probably did not really keep anything too valuable in your house, and if you did, peoplerespected it. Your neighborhood was friendly, everyone knew everyone else, and you trustedyour neighbors. Your local neighborhood “hacker” was someone who showed expertise withprogramming, systems, or telecommunications. Security was a secondary consideration, ifit was considered at all.
Times have changed. Now the little country town has a big interstate running rightthrough it. You need to lock up your house, install a burglar alarm, and put up a big fence.Your neighbors have become considerably unfriendlier, and instead of borrowing a cup ofsugar, they are more interested in stealing your DVD player or burning your house down.Additionally, the items you store in your house now have considerably more value to you,in terms of both their financial cost and their importance to you. Worse, your local neighbor-hood “hacker” has morphed into a variety of bad guys with skills ranging from the base tothe brilliant.
■Note I do not like the term hacker to describe the people who attack your hosts. The term still has ambi-guities associated with it, and its usage to describe attackers is not 100 percent accurate. Throughout thisbook I use the term attacker to describe the people who threaten your hosts and applications.
xxi
4444_FM_final.qxd 1/5/05 12:39 AM Page xxi
■INTRODUCTIONxxii
Many people scoff at IT security. They claim IT security professionals are paranoid andare overstating the threat. Are we paranoid? Yes, probably we are. Is this paranoia justified? Webelieve so; in fact, a common refrain in the IT security industry is “Are we being paranoidenough?” IT assets have become absolutely critical to the functioning of most businesses,both large and small. They have also become the repositories of highly valuable commercial,research, customer, and financial information. The guys in the white hats are not the onlyones who have noticed the increase in importance of IT assets and the increase in value of theinformation they contain. The guys in the black hats know exactly how important IT assetsare. They know how much damage they can do and how much they can gain from attacking,penetrating, and compromising those assets.
The IT security skeptics claim that the threat of these attackers is overstated. They statethat the vast majority of attackers are unskilled, use collections of prepackaged tools thatexploit known vulnerabilities, and are no threat to most of your assets. That these make upa significant portion of attacks is indeed true. Take a look at your Internet-facing firewall orIDS logs, and you will see a considerable volume of attacks on your hosts with the patterns orsignatures of automated attack tools. Does this lessen the threat to your hosts? Yes, some-times. It can be easier to defend against the less-skilled attacker using a prepackaged tool. Thevulnerabilities exploited by these tools and how to fix them are usually well-documented orcan be easily patched. But if you do not know about the vulnerability or have not applied thepatch, then an attacker using an automated or prepackaged attack tool becomes the samelevel of threat as a brilliant attacker with a hand-coded attack tool.
The danger posed by these unskilled attackers has also increased. New vulnerabilities arediscovered daily. Exploits are frequently built on these vulnerabilities within hours of thembeing discovered. Some vulnerabilities are not even discovered until someone uses them toexploit a host. This means pre-packaged attack tools are often available to exploit a vulnera-bility before the application developer or vendor has even released a patch. The combinationof the speed with which new methods of attack spread and the diminishing gap between thediscovery of a vulnerability and the development of an exploit means the risk that one of theseattacks gets through is significantly increased if you are not being vigilant. You must take seri-ous, consistent, and systematic precautions to secure your hosts.
In addition to the vast majority of unskilled attackers, a smaller group of skilled attackersexists. These are either intelligent and cunning outsiders or internal staff with in-house knowl-edge. These attackers also pose a serious threat to your hosts, and you need to ensure thatyour hosts are protected from them, too. This requires that your hosts be hardened and lockeddown to ensure that only activities that you have authorized using functionality you haveapproved and installed are conducted.
To return to the metaphor of an IT asset as a house, securing your host is a bit like havinghome insurance. You hope you do not need it, but you would be foolish not to have it. Do notunderestimate the potential damage an attacker can cause or envisage these threats as beingsomehow hypothetical. For example, imagine the response if you asked the staff of yourorganization to go without e-mail for a week? This happened to many organizations duringthe Netsky, Sobig, and Mimail virus attacks. Or imagine if your customers were denied accessto your e-commerce site as happened to Amazon, eBay, and Yahoo as the result of DistributedDenial of Service (DDoS) attacks in 1999, 2000, and 2001. Or imagine if an attacker penetrated
4444_FM_final.qxd 1/5/05 12:39 AM Page xxii
■INTRODUCTION xxiii
your hosts and stole your organization’s bank account detail, the numbers of its corporatecredit cards, or, worse, the credit card numbers of your customers.
You can see that the potential cost of attacks on IT assets is high. There is a potentialmonetary cost to your organization from theft, loss of revenue, or productivity. There is alsoa potential public relations cost through loss of customer or industry confidence. You needto understand how to simply, consistently, and practically secure your IT environment. Foryour Linux hosts and applications, this book provides this practical understanding.
■Note In a later section of this introduction, “Basic Security Tenets,” I talk broadly about some basic secu-rity tenets and theory. This should provide a basic understanding of IT security theory. I recommend you readmore widely in this area.
Who Should Read This Book?This book is aimed at people who are new to security but who are not entirely new to Linux.This includes system administrators and engineers, security administrators, and IT managers.This is not a book for absolute beginners. I provide real-world examples of configurations,commands, and scenarios that will help you harden and secure your Linux hosts. While doingthis, I try to explain in as much detail as possible to accommodate systems administrators ofvarying skills. But I do expect that readers are at least familiar with basic to intermediate Linuxoperations and systems administration.
I recommend you understand the following:
• Basic file manipulation (editors, grep, and so on)
• Basic file permissions and ownership
• Basic user administration
• Package management including some knowledge of compiling source packages
• Basic understanding of init and init scripts
• Basic networking including IP addressing, subnets, and administering networkresources using the command line
• Basic storage management: partitions, mounting and unmounting, and devices
The book is also designed to be used by those setting up new hosts in addition to peopleseeking to harden and existing hosts. Thus, it covers addressing security vulnerabilities fromscratch, but you can also take the instructions and examples provided in this book and applythem selectively to harden portions of your existing hosts and applications.
4444_FM_final.qxd 1/5/05 12:39 AM Page xxiii
■INTRODUCTIONxxiv
■Note One of the topics I do not cover in this book is Web serving, specifically Apache. For this I recom-mend another book in this series, Hardening Apache (Apress, 2004) by Tony Mobily, for the complete pictureon installing, configuring, and running secure Apache servers.1 In the limited space available in this book,I could not do this complicated and extensive topic justice.
How This Book Is StructuredThis book covers the following topics:
Chapter 1, “Hardening the Basics,” covers the basics of hardening your Linux hosts. Itintroduces the core security features of the Linux operating system and kernel and pro-vides information and examples on how to harden them. It also covers patching andupdating your hosts and how to keep up-to-date with the latest security-related infor-mation for Linux.
Chapter 2, “Firewalling Your Hosts,” addresses securing your Linux hosts with theiptables firewall. It covers setting up a basic firewall and configuring and managingiptables and then moves onto advanced topics such as firewall logging, protecting fromDenial of Service (DoS) attacks and other network-based attacks. (Appendix A containsfirewall scripts for securing a bastion host based on the contents of this chapter.)
Chapter 3, “Securing Connections and Remote Administration,” examines securing con-nections on your hosts. This includes providing secure connections for the administra-tion of your systems using tools such as OpenSSH. I address using OpenSSL and Stunnelto encapsulate connections, and I show how to set up VPN connections.
Chapter 4, “Securing Files and File Systems,” looks at securing your files and file sys-tems. I cover file permissions, file attributes, and symmetric file encryption. I alsoexplain securely mounting your disks and removable file systems, encrypting entirefile systems, and using the Tripwire tool to monitor the integrity and status of yourfiles and directories.
Chapter 5, “Understanding Logging and Log Monitoring,” covers logging and monitoringand filtering your logs. I cover the syslog and syslog-ng tools for gathering your log mes-sages. I also show you how to use the SEC tool to correlate log messages and demonstratehow to manage and rotate your log files.
Chapter 6, “Using Tools for Security Testing,” provides information on the tools availableto you for testing the security of your hosts. I address testing the security of your pass-words and scanning for root kits. I cover scanning your hosts for vulnerabilities and openports with tools such as nmap and Nessus. I also demonstrate how to use the Bastille hard-ening script to harden your host.
1. http://www.apress.com/book/bookDisplay.html?bID=320
4444_FM_final.qxd 1/5/05 12:39 AM Page xxiv
■INTRODUCTION xxv
Chapter 7, “Securing Your Mail Server,” looks at securing and hardening two of the mostcommonly used e-mail servers, Sendmail and Postfix. I examine running these e-mailservers in a chroot jail as well as other methods of limiting their exposure to attack. I alsoexplain how to protect your users from spam and viruses.
Chapter 8, “Authenticating and Securing Your Mail,” addresses securing the transmissionof your e-mail and the authentication of your clients to your e-mail servers. I examineusing Cyrus SASL and SMTP AUTH to ensure only authenticated clients can use youre-mail servers and demonstrate how to use TLS to provide encryption of the transmis-sion of your e-mail.
Chapter 9, “Hardening Remote Access to E-mail,” addresses securing your user’s remoteaccess to their e-mail via IMAP and POP and using tools such as Fetchmail. I cover pro-viding secure IMAP and POP using SSL and how to build a “black box” secure IMAPserver using Cyrus IMAP.
Chapter 10, “Securing an FTP Server,” covers the FTP server and file transfers. I demon-strate how to run secure local and anonymous FTP servers, including how to integrate itwith SSL/TLS and authenticate your users with PAM.
Chapter 11, “Hardening DNS and BIND,” looks at running DNS services. I cover DNS-related threats and attacks, how to choose your DNS server, and the basics of secure DNSdesign. I also cover installing and hardening a BIND DNS server and take you through thesecurity-related configurations options of BIND. Finally, I cover some BIND security fea-tures such as TSIG. (Appendix B contains a number of secure BIND configuration filesbased on the contents of this chapter.)
Basic Security TenetsThe practical examples I demonstrate in this book are built on some underlying tenets thatare crucial to maintaining your security.
• Be minimalist and minimize the risk.
• Defense in depth
• Vigilance
An understanding of these tenets, in combination with the examples and a little commonsense, can help you mitigate the risk of an attack on your hosts. In the following sectionsI briefly articulate the IT security tenets on which I have based this book.
Be Minimalist, and Minimize the RiskThe first principle, that of minimalism, can also be expressed with the acronym KISS, or KeepIt Simple Stupid. The safest way to reduce the risks to your hosts is to not introduce risks inthe first place. For example, many distributions install services, tools, applications, and func-tionality that could pose risks to your host. In some cases, they even start services. They alsocreate users for these services and applications that are often not needed or could be used by
4444_FM_final.qxd 1/5/05 12:39 AM Page xxv
■INTRODUCTIONxxvi
an attacker to compromise your host. The first step in minimizing the risk to your hosts is toremove this excess and unnecessary material. The second step is ensuring that you tightlycontrol what is installed on your hosts. Do not install more than you need to, do not run serv-ices or functionality you do not need, and do not have users you do not need.
This is something you need to do from scratch with the installation of a new hardenedhost or if hardening an existing host. Obviously, minimizing the functionality of an existinghost is harder. You need to make sure you are fully aware of all the functions that host per-forms and ensure you do not switch off or remove something that is required for that hostto provide the required functionality. Hardening a production host requires extensive test-ing, and I recommend you proceed only if you have the ability to back out any changes andrevert to your original configuration in the event a security change has an adverse effect.
■Tip I recommend you use a change control system to ensure all changes are managed and plannedrather than simply implemented. At the least you should keep a journal of the activities you conduct ona particular host. Every time you make a configuration change, you should detail the old and new settingsand the change performed in a logbook.
Defense in DepthThe second tenet of good security is defense in depth. At its most basic, defense in depthmeans taking a layered approach to defending your hosts. The defense in depth concept pro-poses using layers of technology, policies, and processes to protect your systems. This meansthat, wherever possible in your environment, you do not rely on a single layer for defense ofyour hosts.
As an example you can look at your connectivity to the Internet. Just installing a firewallbetween your internal network and the Internet is not enough. In addition to a firewall betweenyour network and the Internet, you should firewall your individual internal hosts, install an IDSsystem of some kind, and conduct regular penetration testing and vulnerability scanning of yourhosts. You should apply this principle to all the components of your host security.
VigilanceOne of the biggest threats to your security is simply doing nothing. No matter how secure yourhosts are at this point in time, they will, at varying rates, become less secure as time goes by.This is a consequence of simple entropy, as changes to your applications, environment, andrequirements alter the configuration and potentially purpose of your systems. It is also a con-sequence of the changing nature of the threats against you. What you have protected yourselfagainst now may not be what you need to protect yourself against in the future. This is mostobviously manifested as new vulnerabilities and exploits of those vulnerabilities are discov-ered in the operating systems, applications, and tools you have running.
You need to ensure you include security administration and monitoring as part of yourregular system administration activities. Check your logs, audit your users and groups, andmonitor your files and objects for suspicious activity. Know the routines and configuration of
4444_FM_final.qxd 1/5/05 12:39 AM Page xxvi
■INTRODUCTION xxvii
your hosts; the more you understand about the normal rhythms of your hosts, the easier it isto spot anomalies that could indicate you are under attack or have been penetrated.
You also need to ensure you keep up-to-date with vulnerabilities, threats, and exploits. InChapter 1 I talk about some of the sources of information you can utilize to do this. You shouldsubscribe to or review the security-related information your vendors distribute as well as thoseavailable from third-party sources such as SANS or CIS.
Finally, the truly vigilant test. And test again. Perform regular security assessments of yourhosts and environment. Scan for vulnerabilities using tools such as Nessus or commercial toolssuch as ISS Security Scanner. Consider using independent third parties to perform penetrationtesting of your environment and hosts. Ongoing security assurance is vital to make sure youstay protected and hardened from attack.
Downloading the Code and ExamplesSome of the lengthier configurations and examples from this book are also available in a zip filefrom the Downloads section of the Apress Web site (http://www.apress.com). These include theiptables firewall script from Chapter 2, the BIND named.conf configuration files from Chapter 11,and a variety of other configuration files and scripts.
Contacting the AuthorYou can reach James Turnbull at [email protected].
4444_FM_final.qxd 1/5/05 12:39 AM Page xxvii
Hardening the Basics
At the heart of your Linux system is the Linux kernel and operating system. Combined, theseform the base level of your system on which all your applications run. Comparatively speak-ing, the Linux operating system and kernel are actually reasonably secure. A large number ofsecurity features are built in the kernel, and a variety of security-related tools and features comewith most distributions or are available in open-source form. Additionally, Linux offers excep-tional control over whom, how, and what resources and applications users can access. So,where are the risks?
Well, as the old saying goes, “The devil is in the details.” The security of your systemdepends on a wide variety of configuration elements both at the operating system level andthe application level. Additionally, the Linux operating system and kernel are complex andnot always easy to configure. In fact, Linux systems are nearly infinitely configurable, andsubtle configuration changes can have significant security implications. Thus, some securityexposures and vulnerabilities are not always immediately obvious, and a lack of understand-ing about the global impact of changing configuration elements can lead to inadvertentexposures.
Furthermore, security on Linux systems never stays static. Once secured, your system doesnot perpetually stay secure. Indeed, the longer you use your system, the less secure it becomes.This can happen through operational or functional changes exposing you to threats or throughnew exploits being discovered in packages and applications. Securing your system is an ongo-ing and living process. Many of the steps and concepts in this chapter you will apply morethan once (for example, after you make an operational change to reaffirm the required levelof security), or you will apply on a regular basis to keep your security level consistent.
Finally, many distributions come prepackaged or preconfigured for you with a recom-mended default set of packages, applications, and settings. Usually this configuration is basedon the author or vendor understanding what their end user requires of the distribution. Gen-erally speaking, a lot of this preconfiguration is useful and enhances the potential security ofyour system; for example, Red Hat comes preconfigured to use Pluggable Authentication Mod-ules (or PAM) for a variety of authentication processes. But sometimes this preconfigurationopens security holes or is poorly designed from a security perspective. For example, as a resultof the vendor’s desire to make it easy for you to set your system up, they may install, configure,and start applications or services for you. Red Hat automatically configures and starts Send-mail when you take the default installation options, for example.
To be able to address these issues, you need to have a solid understanding of the underly-ing basic security requirements of your system—those of your operating system and kernel.This chapter is entitled “Hardening the Basics” because it is aimed at exploring and explaining
1
C H A P T E R 1
■ ■ ■
4444c01_final.qxd 1/5/05 12:42 AM Page 1

CHAPTER 1 ■ HARDENING THE BASICS2
the key areas of security and security configuration at that operating system and kernel level.Additionally, I try to address some of the key weaknesses of a freshly installed Linux distribu-tion or an existing unhardened Linux system and provide quick and practical fixes to them.I will start with some guidelines for installing a Linux distribution and then address bootsecurity, user and password security, PAM, updates and package upgrades, and your kernel,and I will finish up with some information that should help you keep up-to-date with thelatest vulnerabilities and security exposures.
Installing Your Distribution SecurelyThis book does not specifically cover a single distribution but rather tries to offer practicalexamples that you can use on the majority of Linux distributions (though I most keenly focuson Red Hat and Debian when offering examples of commands and application configuration).As a result, I am not going to take you through the process of installing a particular distributionbut rather offer some recommendations about how you should install your Linux distribution.As I articulated in the chapter’s introduction, one of the key tenets of information technology(IT) security is minimizing your risks. The default installation process for most Linux distribu-tions does the opposite. Extraneous and inappropriate applications are installed, unnecessaryusers are created, and some potentially highly insecure configuration decisions are made.
Let’s look at some ways to reduce the risks and the issues created during your distribu-tion’s installation process.
Some Answers to Common Installation QuestionsAlmost all Linux distributions installations ask you a series of questions about your system’s pro-posed configuration during the installation process. They are usually some important security-related questions that you should take care answering. Obviously, whilst I cannot run throughwhat every distribution is going to ask, some questions remain similar across many distributions.
If prompted, enable MD5 and shadow passwording. This will make your passwords sig-nificantly more secure.
When prompted to input a root password, always chose a secure password. I will brieflytalk about choosing suitable passwords in the “Users and Groups” section of this chapter.
Create a user other than root if prompted, ensuring you choose a suitable password forthis user also, so you have a user other than root to log onto the system.
If prompted during installation, enable any proposed firewall. If options to control theconfiguration of the firewall are offered, select the bare minimum of allowed connections.Only explicitly enable connections when you absolutely require them. Remember anyfirewall you configure during installation will generally not be suitable for productionpurposes, and you should see Chapter 2 for further information on firewalls.
Install Only What You NeedAs I have stated, minimalism is important. If your distribution offers a Minimal or Customoption when selecting packages that will allow you install a minimal numbers of packages orallow you to deselect packages for installation, then you should use that option. In fact, on
4444c01_final.qxd 1/5/05 12:42 AM Page 2
CHAPTER 1 ■ HARDENING THE BASICS 3
a Red Hat system I recommend you deselect every possible package option and then installthe base system.
I cannot provide you with a definitive list of packages not to install. But a lot of this is com-mon sense. Do you really need NetHack on your production Apache server? I can identify someof the types of packages that are installed by default that you should be able to remove. This alsoapplies to hardening existing systems. You should review all installed packages and removethose not required or those that present significant risks.
Some of the areas I recommend you remove packages from are as follows:
• Games
• Network servers
• Daemons and services
• Databases
• Web tools
• Editors
• Media-related (CD and MP3 players, CD burners)
• Development tools and compilers
• Printing and printing tools
• Office-style applications and tools
• Document management and manipulation
• X-Windows (including Gnome and KDE)
One of my most important recommendations when choosing not to install packagesinvolves X-Windows. Most, if not all, production Linux systems do not need X-Windows to per-form their functions. An e-mail server, for example, should have no requirement for X-Windows.So do not install it. X-Windows is a huge package with numerous components and a history ofnumerous security vulnerabilities that make it a potentially dangerous package to install. Addi-tionally, on a Linux system, unlike Windows systems, nothing requires the use of a graphical userinterface (GUI) to configure that you cannot configure from the command line.
■Caution Do not install your distribution whilst connected to the Internet or to a network that is connectedto the Internet.
It may seem like a good idea to be connected to the Internet when you install your distribu-tion to get patches and updates or register your system. But is it? Often the media used to installa distribution could be quite old. A number of vulnerabilities could and probably will have beendiscovered since the media was constructed. This means your system could be vulnerable to anynumber of potential attacks. Until you have downloaded the updates that fix these vulnerabilities,
4444c01_final.qxd 1/5/05 12:42 AM Page 3
CHAPTER 1 ■ HARDENING THE BASICS4
then your system is vulnerable. While you are busy waiting to download the required patches,then an attacker has the potential to identify your unprotected system and penetrate it usingan as yet unfixed vulnerability.
To mitigate the risks of connecting an unpatched system to the Internet, I recommend youstay offline until you have updated your system with all the required patches. To do this, I rec-ommend you download all the updates and patches required for your system onto another sys-tem first and check the MD5 checksums of the updates against those published by the vendorand their GNU Privacy Guard (GPG) public key. For Red Hat updates the checksums and publickey are published on the Red Hat Network site, and for Debian they are contained in the .dscfile, which describes each dpkg package. I go into more detail about how to do this in the “Pack-age Management, File Integrity, and Updating” section later in this chapter.
I recommend setting up a central “updates and patches” machine and download and ver-ify all updates and patches on that system. You can also use this system to perform testing ofnew releases or updates before migrating them to your production systems. For a new instal-lation you can package and burn the updates onto a CD and load them from the media directlyonto the system to be patched.
Secure Booting, Boot Loaders,and Boot-Time ServicesAn attacker who has physical access to your system can easily bypass a great deal of your sys-tem’s inherent security (especially controls such as users and passwords) and can reboot it orchange the configuration of your boot loader or your init process—including what servicesare run at boot and what sequence they are run in. You need to secure the boot process andensure you fully understand what happens during your boot process so that your system issecure from this sort of attack.
Attackers who are able to reboot your system can create two major problems. The first isthat Linux systems allow a great deal of access to someone who can control how they bootinto your system. The second is that taking your system offline is an excellent Denial of Ser-vice attack. Thus, control over who is allowed to reboot your system, how they interact withyour boot loader, and what kernel they boot into is something you need to tightly restrict.
Additionally, what services you start and the order you start them in can expose your sys-tem to further risks. Indeed, after a default installation or on an unhardened system, manyservices that are started at boot are not required. Some of the running services even exposeyou to vulnerabilities because of their particular functionality. In the next section, I will coversome good rules you should follow for securing and organizing your boot process andsequence, including what you allow to start up when your system boots.
■Note I have described the items that start at boot time as services, but of course not all of them are.Some are daemons, one-off commands, or configuration tools. I will use the generic term services forsimplicity’s sake.
4444c01_final.qxd 1/5/05 12:42 AM Page 4
CHAPTER 1 ■ HARDENING THE BASICS 5
Securing Your Boat LoaderMost Linux systems use one of two boot loaders, the Linux Loader (LILO) or Grub. These bootloaders control your boot images and determine what kernel is booted when the system is startedor rebooted. They are loaded after your Basic Input/Output System (BIOS) has initialized yoursystem and generally wait a set period of time (generally between 10 and 30 seconds, but you canoverride this) for you to select a kernel to boot into; if you have not intervened, then they defaultto a specified kernel and boot into that.
I recommend you do not have too many kernel versions available to boot into, especiallyolder versions of kernels. Many people leave older kernels on their systems and in their bootloader menus. The risk exists that you, or an attacker, could boot into an older kernel witha security vulnerability that could allow an attacker to compromise your system. Clean upwhen you perform kernel upgrades. I recommend leaving the current and previous versionsof the kernel on the system (unless, of course, you have upgraded from the previous kernelto correct a security vulnerability).
Both boot loaders, LILO and Grub, are inherently insecure if your attacker has physicalaccess to your system. For example, by default both LILO and Grub will allow you to boot intosingle-user mode. In single-user mode you have root privileges without having to enter the rootpassword. Additionally, you can enter a variety of other parameters on both the boot loader’scommand lines that can provide an attacker with opportunities to compromise your system.
But both LILO and Grub have the option of being secured with passwords to prevent this,and I will show how to address this for both boat loaders.
■Tip You should do this in addition to securing your BIOS. Set a BIOS password for your system, and dis-able booting from a floppy drive or CD/DVD drive.
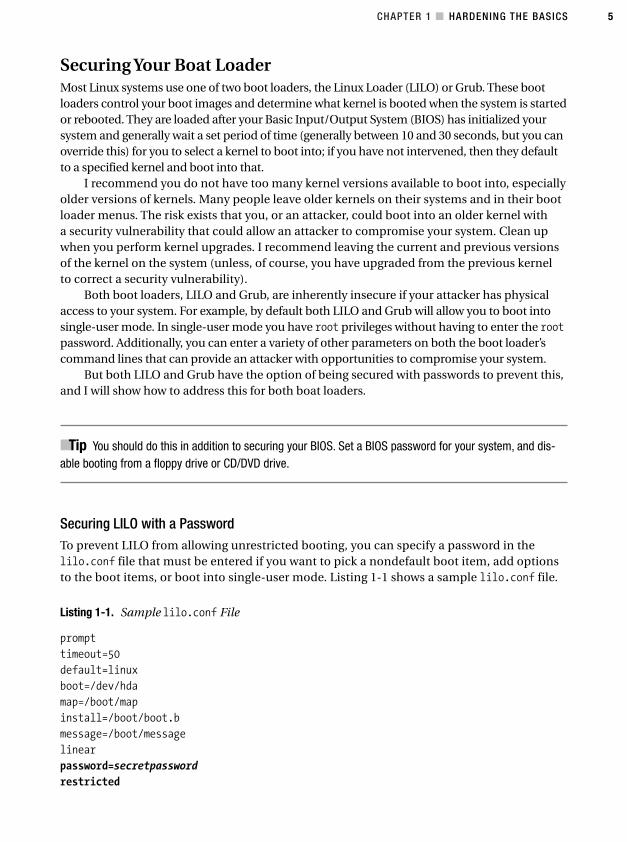
Securing LILO with a PasswordTo prevent LILO from allowing unrestricted booting, you can specify a password in thelilo.conf file that must be entered if you want to pick a nondefault boot item, add optionsto the boot items, or boot into single-user mode. Listing 1-1 shows a sample lilo.conf file.
Listing 1-1. Sample lilo.conf File
prompt
timeout=50
default=linux
boot=/dev/hda
map=/boot/map
install=/boot/boot.b
message=/boot/message
linear
password=secretpassword
restricted
4444c01_final.qxd 1/5/05 12:42 AM Page 5
CHAPTER 1 ■ HARDENING THE BASICS6
1. See the “Passwords” section for a definition of a suitably secure password.
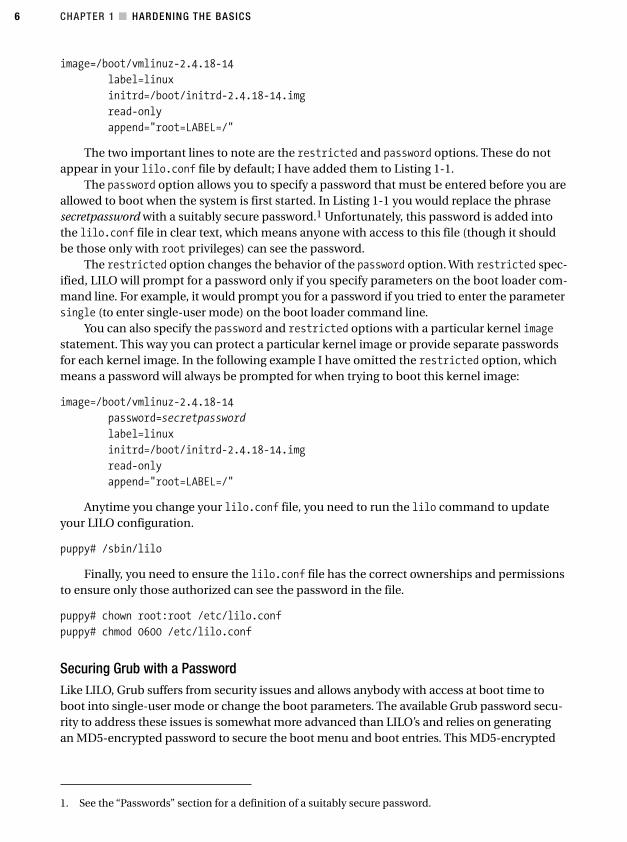
image=/boot/vmlinuz-2.4.18-14
label=linux
initrd=/boot/initrd-2.4.18-14.img
read-only
append="root=LABEL=/"
The two important lines to note are the restricted and password options. These do notappear in your lilo.conf file by default; I have added them to Listing 1-1.
The password option allows you to specify a password that must be entered before you areallowed to boot when the system is first started. In Listing 1-1 you would replace the phrasesecretpassword with a suitably secure password.1 Unfortunately, this password is added intothe lilo.conf file in clear text, which means anyone with access to this file (though it shouldbe those only with root privileges) can see the password.
The restricted option changes the behavior of the password option. With restricted spec-ified, LILO will prompt for a password only if you specify parameters on the boot loader com-mand line. For example, it would prompt you for a password if you tried to enter the parametersingle (to enter single-user mode) on the boot loader command line.
You can also specify the password and restricted options with a particular kernel imagestatement. This way you can protect a particular kernel image or provide separate passwordsfor each kernel image. In the following example I have omitted the restricted option, whichmeans a password will always be prompted for when trying to boot this kernel image:
image=/boot/vmlinuz-2.4.18-14
password=secretpassword
label=linux
initrd=/boot/initrd-2.4.18-14.img
read-only
append="root=LABEL=/"
Anytime you change your lilo.conf file, you need to run the lilo command to updateyour LILO configuration.
puppy# /sbin/lilo
Finally, you need to ensure the lilo.conf file has the correct ownerships and permissionsto ensure only those authorized can see the password in the file.
puppy# chown root:root /etc/lilo.conf
puppy# chmod 0600 /etc/lilo.conf
Securing Grub with a PasswordLike LILO, Grub suffers from security issues and allows anybody with access at boot time toboot into single-user mode or change the boot parameters. The available Grub password secu-rity to address these issues is somewhat more advanced than LILO’s and relies on generatingan MD5-encrypted password to secure the boot menu and boot entries. This MD5-encrypted
4444c01_final.qxd 1/5/05 12:42 AM Page 6
CHAPTER 1 ■ HARDENING THE BASICS 7
password means that the password cannot be extracted by simply reading the Grubconfiguration file, /etc/grub.conf.
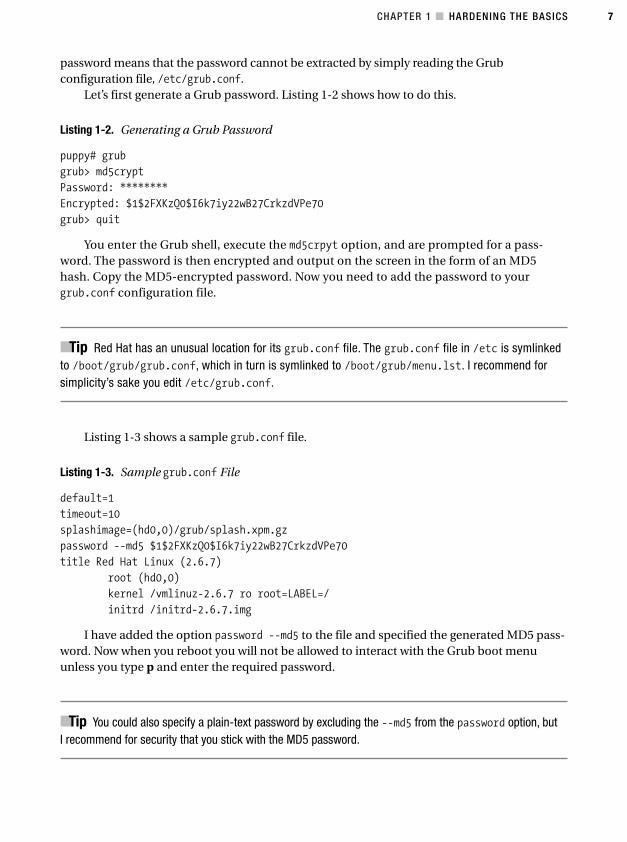
Let’s first generate a Grub password. Listing 1-2 shows how to do this.
Listing 1-2. Generating a Grub Password
puppy# grub
grub> md5crypt
Password: ********
Encrypted: $1$2FXKzQ0$I6k7iy22wB27CrkzdVPe70
grub> quit
You enter the Grub shell, execute the md5crpyt option, and are prompted for a pass-word. The password is then encrypted and output on the screen in the form of an MD5hash. Copy the MD5-encrypted password. Now you need to add the password to yourgrub.conf configuration file.
■Tip Red Hat has an unusual location for its grub.conf file. The grub.conf file in /etc is symlinkedto /boot/grub/grub.conf, which in turn is symlinked to /boot/grub/menu.lst. I recommend forsimplicity’s sake you edit /etc/grub.conf.
Listing 1-3 shows a sample grub.conf file.
Listing 1-3. Sample grub.conf File
default=1
timeout=10
splashimage=(hd0,0)/grub/splash.xpm.gz
password --md5 $1$2FXKzQ0$I6k7iy22wB27CrkzdVPe70
title Red Hat Linux (2.6.7)
root (hd0,0)
kernel /vmlinuz-2.6.7 ro root=LABEL=/
initrd /initrd-2.6.7.img
I have added the option password --md5 to the file and specified the generated MD5 pass-word. Now when you reboot you will not be allowed to interact with the Grub boot menuunless you type p and enter the required password.
■Tip You could also specify a plain-text password by excluding the --md5 from the password option, butI recommend for security that you stick with the MD5 password.
4444c01_final.qxd 1/5/05 12:42 AM Page 7
CHAPTER 1 ■ HARDENING THE BASICS8
You can also add another parameter to the password option to launch a particular menu filewhen you have entered the password. To do this, change your password option to the following:
password --md5 $1$2FXKzQ0$I6k7iy22wB27CrkzdVPe70 /boot/grub/administrator-menu.lst
When you enter the correct password, Grub will launch the specified menu file. This allowsyou, for example, to create an additional menu of other kernels or boot options available onlyto those users who provide the required password.
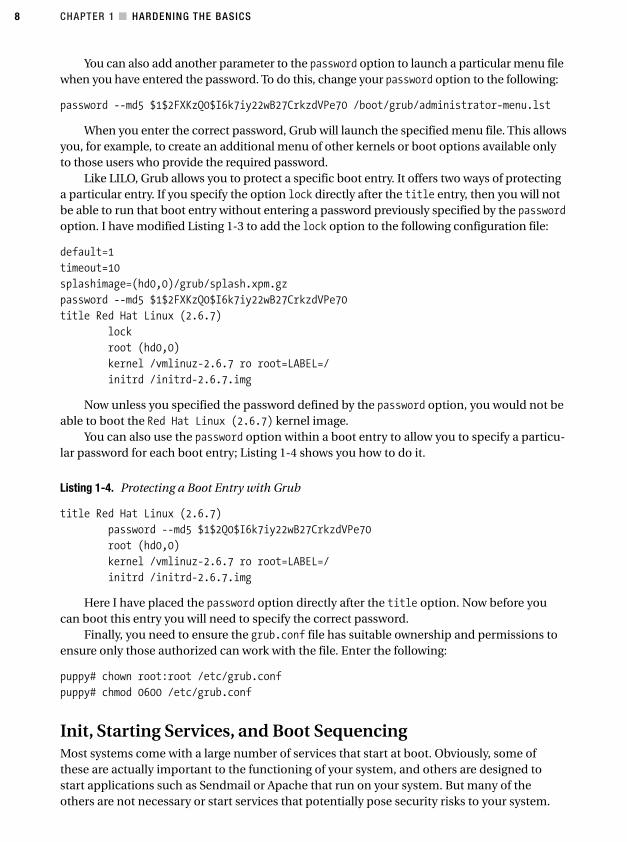
Like LILO, Grub allows you to protect a specific boot entry. It offers two ways of protectinga particular entry. If you specify the option lock directly after the title entry, then you will notbe able to run that boot entry without entering a password previously specified by the passwordoption. I have modified Listing 1-3 to add the lock option to the following configuration file:
default=1
timeout=10
splashimage=(hd0,0)/grub/splash.xpm.gz
password --md5 $1$2FXKzQ0$I6k7iy22wB27CrkzdVPe70
title Red Hat Linux (2.6.7)
lock
root (hd0,0)
kernel /vmlinuz-2.6.7 ro root=LABEL=/
initrd /initrd-2.6.7.img
Now unless you specified the password defined by the password option, you would not beable to boot the Red Hat Linux (2.6.7) kernel image.
You can also use the password option within a boot entry to allow you to specify a particu-lar password for each boot entry; Listing 1-4 shows you how to do it.
Listing 1-4. Protecting a Boot Entry with Grub
title Red Hat Linux (2.6.7)
password --md5 $1$2Q0$I6k7iy22wB27CrkzdVPe70
root (hd0,0)
kernel /vmlinuz-2.6.7 ro root=LABEL=/
initrd /initrd-2.6.7.img
Here I have placed the password option directly after the title option. Now before youcan boot this entry you will need to specify the correct password.
Finally, you need to ensure the grub.conf file has suitable ownership and permissions toensure only those authorized can work with the file. Enter the following:
puppy# chown root:root /etc/grub.conf
puppy# chmod 0600 /etc/grub.conf
Init, Starting Services, and Boot SequencingMost systems come with a large number of services that start at boot. Obviously, some ofthese are actually important to the functioning of your system, and others are designed tostart applications such as Sendmail or Apache that run on your system. But many of theothers are not necessary or start services that potentially pose security risks to your system.
4444c01_final.qxd 1/5/05 12:42 AM Page 8
CHAPTER 1 ■ HARDENING THE BASICS 9
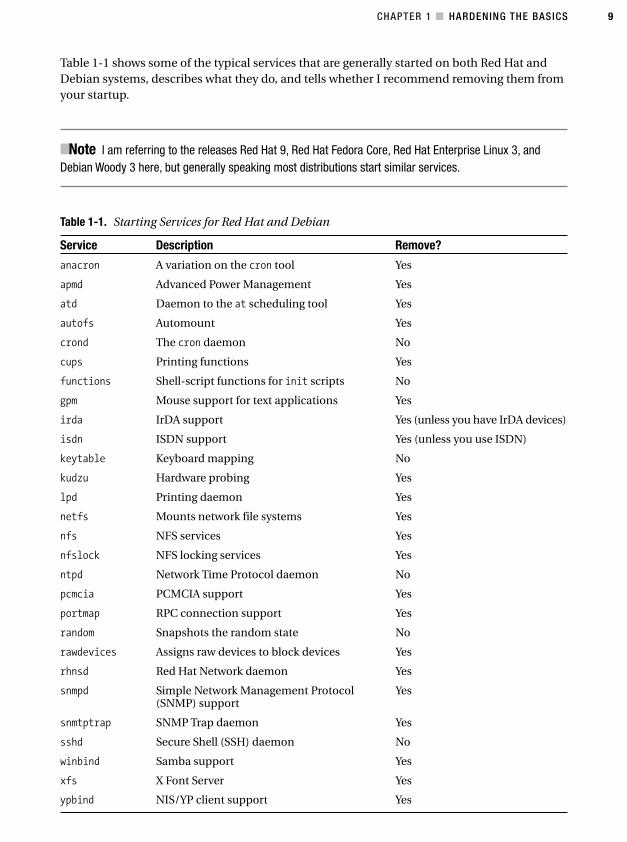
Table 1-1 shows some of the typical services that are generally started on both Red Hat andDebian systems, describes what they do, and tells whether I recommend removing them fromyour startup.
■Note I am referring to the releases Red Hat 9, Red Hat Fedora Core, Red Hat Enterprise Linux 3, andDebian Woody 3 here, but generally speaking most distributions start similar services.
Table 1-1. Starting Services for Red Hat and Debian
Service Description Remove?
anacron A variation on the cron tool Yes
apmd Advanced Power Management Yes
atd Daemon to the at scheduling tool Yes
autofs Automount Yes
crond The cron daemon No
cups Printing functions Yes
functions Shell-script functions for init scripts No
gpm Mouse support for text applications Yes
irda IrDA support Yes (unless you have IrDA devices)
isdn ISDN support Yes (unless you use ISDN)
keytable Keyboard mapping No
kudzu Hardware probing Yes
lpd Printing daemon Yes
netfs Mounts network file systems Yes
nfs NFS services Yes
nfslock NFS locking services Yes
ntpd Network Time Protocol daemon No
pcmcia PCMCIA support Yes
portmap RPC connection support Yes
random Snapshots the random state No
rawdevices Assigns raw devices to block devices Yes
rhnsd Red Hat Network daemon Yes
snmpd Simple Network Management Protocol Yes(SNMP) support
snmtptrap SNMP Trap daemon Yes
sshd Secure Shell (SSH) daemon No
winbind Samba support Yes
xfs X Font Server Yes
ypbind NIS/YP client support Yes
4444c01_final.qxd 1/5/05 12:42 AM Page 9
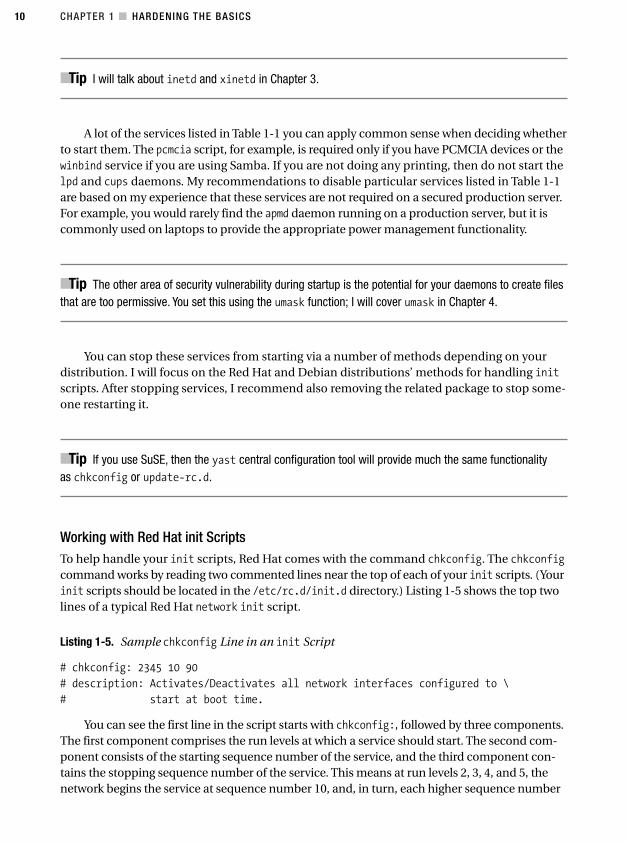
CHAPTER 1 ■ HARDENING THE BASICS10
■Tip I will talk about inetd and xinetd in Chapter 3.
A lot of the services listed in Table 1-1 you can apply common sense when deciding whetherto start them. The pcmcia script, for example, is required only if you have PCMCIA devices or thewinbind service if you are using Samba. If you are not doing any printing, then do not start thelpd and cups daemons. My recommendations to disable particular services listed in Table 1-1are based on my experience that these services are not required on a secured production server.For example, you would rarely find the apmd daemon running on a production server, but it iscommonly used on laptops to provide the appropriate power management functionality.
■Tip The other area of security vulnerability during startup is the potential for your daemons to create filesthat are too permissive. You set this using the umask function; I will cover umask in Chapter 4.
You can stop these services from starting via a number of methods depending on yourdistribution. I will focus on the Red Hat and Debian distributions’ methods for handling initscripts. After stopping services, I recommend also removing the related package to stop some-one restarting it.
■Tip If you use SuSE, then the yast central configuration tool will provide much the same functionalityas chkconfig or update-rc.d.
Working with Red Hat init ScriptsTo help handle your init scripts, Red Hat comes with the command chkconfig. The chkconfigcommand works by reading two commented lines near the top of each of your init scripts. (Yourinit scripts should be located in the /etc/rc.d/init.d directory.) Listing 1-5 shows the top twolines of a typical Red Hat network init script.
Listing 1-5. Sample chkconfig Line in an init Script
# chkconfig: 2345 10 90
# description: Activates/Deactivates all network interfaces configured to \
# start at boot time.
You can see the first line in the script starts with chkconfig:, followed by three components.The first component comprises the run levels at which a service should start. The second com-ponent consists of the starting sequence number of the service, and the third component con-tains the stopping sequence number of the service. This means at run levels 2, 3, 4, and 5, thenetwork begins the service at sequence number 10, and, in turn, each higher sequence number
4444c01_final.qxd 1/5/05 12:42 AM Page 10
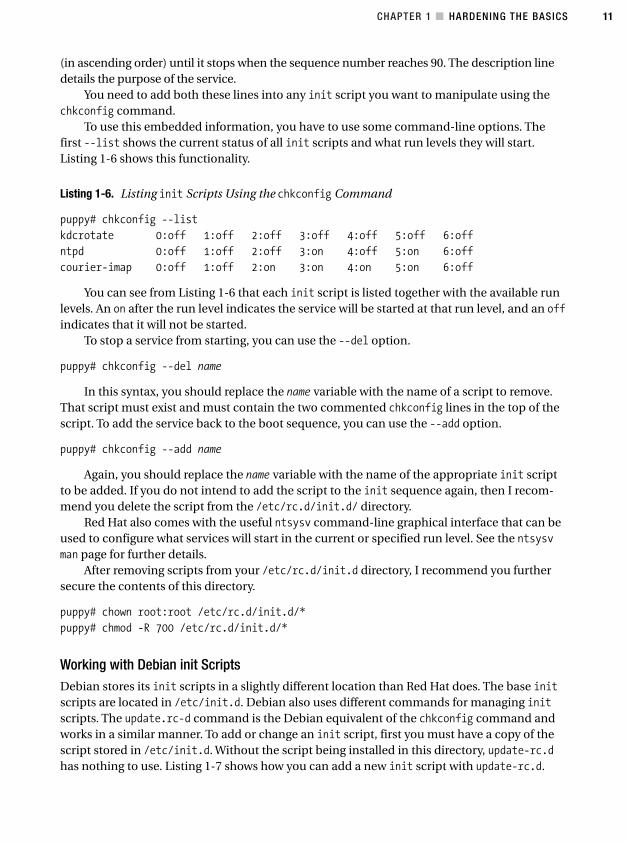
CHAPTER 1 ■ HARDENING THE BASICS 11
(in ascending order) until it stops when the sequence number reaches 90. The description linedetails the purpose of the service.
You need to add both these lines into any init script you want to manipulate using thechkconfig command.
To use this embedded information, you have to use some command-line options. Thefirst --list shows the current status of all init scripts and what run levels they will start.Listing 1-6 shows this functionality.
Listing 1-6. Listing init Scripts Using the chkconfig Command
puppy# chkconfig --list
kdcrotate 0:off 1:off 2:off 3:off 4:off 5:off 6:off
ntpd 0:off 1:off 2:off 3:on 4:off 5:on 6:off
courier-imap 0:off 1:off 2:on 3:on 4:on 5:on 6:off
You can see from Listing 1-6 that each init script is listed together with the available runlevels. An on after the run level indicates the service will be started at that run level, and an offindicates that it will not be started.
To stop a service from starting, you can use the --del option.
puppy# chkconfig --del name
In this syntax, you should replace the name variable with the name of a script to remove.That script must exist and must contain the two commented chkconfig lines in the top of thescript. To add the service back to the boot sequence, you can use the --add option.
puppy# chkconfig --add name
Again, you should replace the name variable with the name of the appropriate init scriptto be added. If you do not intend to add the script to the init sequence again, then I recom-mend you delete the script from the /etc/rc.d/init.d/ directory.
Red Hat also comes with the useful ntsysv command-line graphical interface that can beused to configure what services will start in the current or specified run level. See the ntsysvman page for further details.
After removing scripts from your /etc/rc.d/init.d directory, I recommend you furthersecure the contents of this directory.
puppy# chown root:root /etc/rc.d/init.d/*
puppy# chmod -R 700 /etc/rc.d/init.d/*
Working with Debian init ScriptsDebian stores its init scripts in a slightly different location than Red Hat does. The base initscripts are located in /etc/init.d. Debian also uses different commands for managing initscripts. The update.rc-d command is the Debian equivalent of the chkconfig command andworks in a similar manner. To add or change an init script, first you must have a copy of thescript stored in /etc/init.d. Without the script being installed in this directory, update-rc.dhas nothing to use. Listing 1-7 shows how you can add a new init script with update-rc.d.
4444c01_final.qxd 1/5/05 12:42 AM Page 11
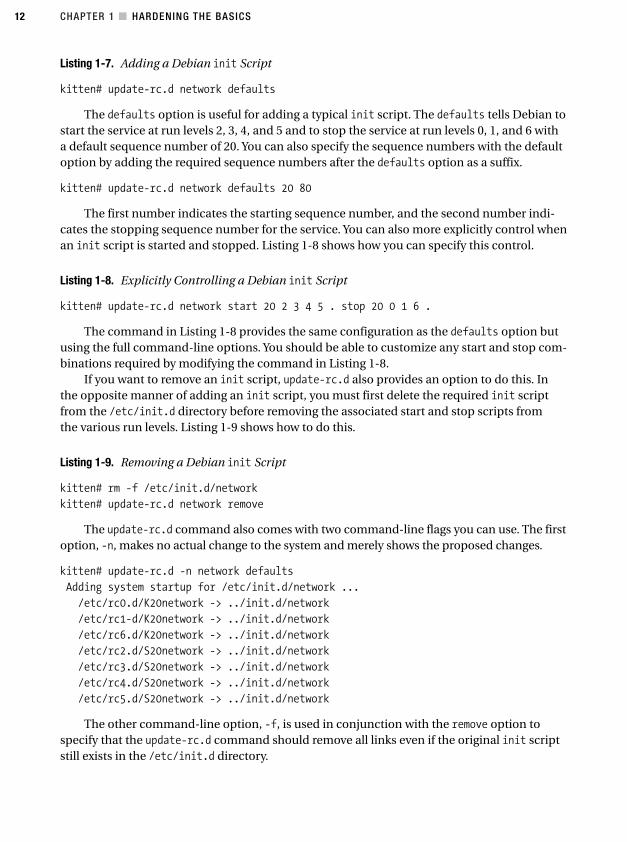
CHAPTER 1 ■ HARDENING THE BASICS12
Listing 1-7. Adding a Debian init Script
kitten# update-rc.d network defaults
The defaults option is useful for adding a typical init script. The defaults tells Debian tostart the service at run levels 2, 3, 4, and 5 and to stop the service at run levels 0, 1, and 6 witha default sequence number of 20. You can also specify the sequence numbers with the defaultoption by adding the required sequence numbers after the defaults option as a suffix.
kitten# update-rc.d network defaults 20 80
The first number indicates the starting sequence number, and the second number indi-cates the stopping sequence number for the service. You can also more explicitly control whenan init script is started and stopped. Listing 1-8 shows how you can specify this control.
Listing 1-8. Explicitly Controlling a Debian init Script
kitten# update-rc.d network start 20 2 3 4 5 . stop 20 0 1 6 .
The command in Listing 1-8 provides the same configuration as the defaults option butusing the full command-line options. You should be able to customize any start and stop com-binations required by modifying the command in Listing 1-8.
If you want to remove an init script, update-rc.d also provides an option to do this. Inthe opposite manner of adding an init script, you must first delete the required init scriptfrom the /etc/init.d directory before removing the associated start and stop scripts fromthe various run levels. Listing 1-9 shows how to do this.
Listing 1-9. Removing a Debian init Script
kitten# rm -f /etc/init.d/network
kitten# update-rc.d network remove
The update-rc.d command also comes with two command-line flags you can use. The firstoption, -n, makes no actual change to the system and merely shows the proposed changes.
kitten# update-rc.d -n network defaults
Adding system startup for /etc/init.d/network ...
/etc/rc0.d/K20network -> ../init.d/network
/etc/rc1-d/K20network -> ../init.d/network
/etc/rc6.d/K20network -> ../init.d/network
/etc/rc2.d/S20network -> ../init.d/network
/etc/rc3.d/S20network -> ../init.d/network
/etc/rc4.d/S20network -> ../init.d/network
/etc/rc5.d/S20network -> ../init.d/network
The other command-line option, -f, is used in conjunction with the remove option tospecify that the update-rc.d command should remove all links even if the original init scriptstill exists in the /etc/init.d directory.
4444c01_final.qxd 1/5/05 12:42 AM Page 12
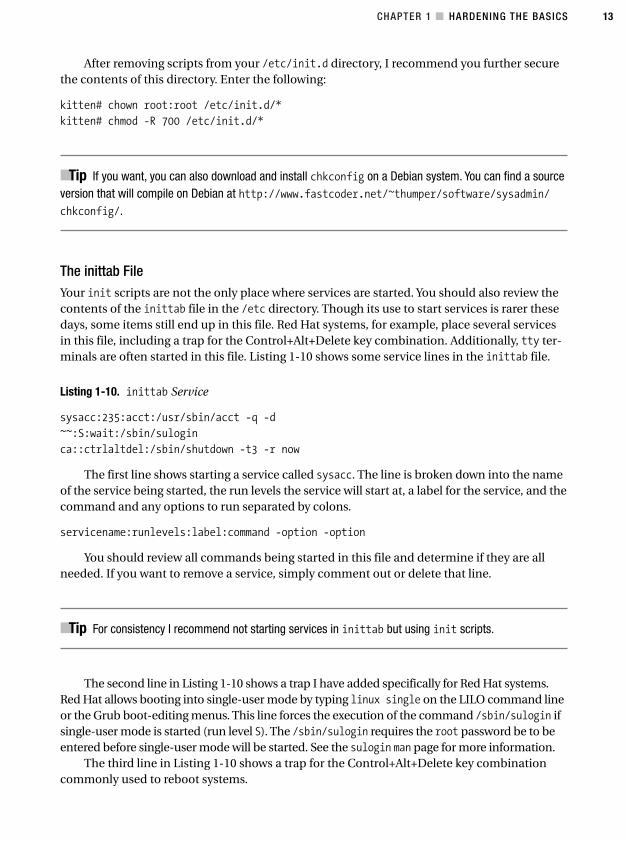
CHAPTER 1 ■ HARDENING THE BASICS 13
After removing scripts from your /etc/init.d directory, I recommend you further securethe contents of this directory. Enter the following:
kitten# chown root:root /etc/init.d/*
kitten# chmod -R 700 /etc/init.d/*
■Tip If you want, you can also download and install chkconfig on a Debian system. You can find a sourceversion that will compile on Debian at http://www.fastcoder.net/~thumper/software/sysadmin/chkconfig/.
The inittab FileYour init scripts are not the only place where services are started. You should also review thecontents of the inittab file in the /etc directory. Though its use to start services is rarer thesedays, some items still end up in this file. Red Hat systems, for example, place several servicesin this file, including a trap for the Control+Alt+Delete key combination. Additionally, tty ter-minals are often started in this file. Listing 1-10 shows some service lines in the inittab file.
Listing 1-10. inittab Service
sysacc:235:acct:/usr/sbin/acct -q -d
~~:S:wait:/sbin/sulogin
ca::ctrlaltdel:/sbin/shutdown -t3 -r now
The first line shows starting a service called sysacc. The line is broken down into the nameof the service being started, the run levels the service will start at, a label for the service, and thecommand and any options to run separated by colons.
servicename:runlevels:label:command -option -option
You should review all commands being started in this file and determine if they are allneeded. If you want to remove a service, simply comment out or delete that line.
■Tip For consistency I recommend not starting services in inittab but using init scripts.
The second line in Listing 1-10 shows a trap I have added specifically for Red Hat systems.Red Hat allows booting into single-user mode by typing linux single on the LILO command lineor the Grub boot-editing menus. This line forces the execution of the command /sbin/sulogin ifsingle-user mode is started (run level S). The /sbin/sulogin requires the root password be to beentered before single-user mode will be started. See the sulogin man page for more information.
The third line in Listing 1-10 shows a trap for the Control+Alt+Delete key combinationcommonly used to reboot systems.
4444c01_final.qxd 1/5/05 12:42 AM Page 13
CHAPTER 1 ■ HARDENING THE BASICS14
■Tip Linux pays attention only to the Control+Alt+Delete key combination when used from the consoleor virtual consoles. For users who are logged into the system via other means—for example, a terminalsession—pressing these keys will do nothing.
By default most Linux kernels trap this key combination when pressed and pass it to the initsystem for processing. This allows you to specify the action taken when the Control+Alt+Deletekey combination is pressed. The default action is usually to run the shutdown command. I recom-mend securing this a bit further by adding the -a option to the trap in Listing 1-10.
ca::ctrlaltdel:/sbin/shutdown -a -t3 -r now
The -a option enables the use of the shutdown.allowed file. Create a file calledshutdown.allowed in the /etc directory. Add the users you want to be authorized to use theshutdown command to the file, one username per line. You can also have comments andempty lines in this file. Listing 1-11 shows what is inside the sample shutdown.allowed file.
Listing 1-11. Sample shutdown.allowed File
root
bob
sarah
If someone other than these users tries to issue a Control+Alt+Delete from the console,they will get an error message.
shutdown: no authorized users logged in
On some systems you may not want anybody to be able to use Control+Alt+Delete. To dothis, change the trap line to the following:
ca::ctrlaltdel:
Your /etc/inittab file also contains the definitions for the virtual terminals available toyou on the console using the Alt+number key combination. You can define them using thefollowing lines in inittab:
1:2345:respawn:/sbin/mingetty tty1
2:2345:respawn:/sbin/mingetty tty2
Generally most distributions define six or so virtual terminals. You can reduce the num-ber of virtual terminals started by commenting out some of the ttys in the /etc/inittab file.
After making any changes to the inittab file, you need to tell the init process to reviewthe file. Use the following command:
puppy# telinit q
Then you need to ensure the inittab file has the correct ownerships and permissions toensure only those authorized can work with the file.
puppy# chown root:root /etc/inittab
4444c01_final.qxd 1/5/05 12:42 AM Page 14
CHAPTER 1 ■ HARDENING THE BASICS 15
Boot SequencingThe order in which you start and stop services on your system is also important. This is mainlyfor controlling when your firewall and logging services start and stop. Ensure you start yourfirewall, (iptables, for example) and your syslog daemon before you bring up your network.This ensures your system will not be connected to any external systems or networks withoutthe protection of your firewall or without any logging of your system occurring. Then duringthe shutdown of your system, ensure you stop your networking services before you stop yourfirewall and syslog services.
On most systems init scripts are started and stopped according to the sequence numbergiven to them; sequence 20 will start before 30, and so on. I briefly covered sequence numbers inthe previous “Working with Debian init Scripts” and “Working with Red Hat init Scripts” sec-tions. You should ensure the start sequence numbers for your firewall and your syslog daemonsare lower than the sequence number for your system’s networking service, in other words, thedaemons start before your network. Your networking services are usually started by an initscript called network on a Red Hat system and a script called networking on a Debian system.Then confirm that your system’s networking service stops before your firewall and logging.
■Tip I will talk further about booting and some additional security features related to securing file systemsin Chapter 4.
Consoles, Virtual Terminals, and Login ScreensThe next area I will cover is the security of your console, your terminals, and the login screenspresented to your users when they log into the system. The console of your system is usuallyphysically attached to your system. (It is usually from the console you will have installed yourdistribution.) In the Linux world, logging onto the console often allows you to perform activities,commands, or functions that you would not be able to do from other locations, such as via asecure shell (SSH) login. You need to understand what the capabilities of a user logged into theconsole are and how to secure them further. Additionally, your console also has a number of vir-tual terminals defined that you can access. I talked about defining these virtual terminals in theearlier “The inittab File” section. These also need to be secured, and I will cover in the “SecuringVirtual Terminals” section a method of locking these virtual terminals from unauthorized use.
Lastly, when users connect to your systems, they are presented with a login screen. Theinformation presented on most default login screens can offer attackers information aboutyour system you do not want to share. Additionally, these login screens are a good method ofcommunicating warnings and notices to the user logging into your system.
■Tip In addition to securing your console and terminals, do not neglect your physical security. Ensure yoursystems are stored somewhere that makes access to the console difficult to all those bar authorized people.Ensure the access is logged of any authorized people who can enter the area in which the console and sys-tem are stored. Additionally, if you have a case lock or similar physical security devices on your system, thenuse it to secure access to the interior of your system.
4444c01_final.qxd 1/5/05 12:42 AM Page 15
CHAPTER 1 ■ HARDENING THE BASICS16
2. Red Hat 8, Red Hat 9, and Red Hat Enterprise Linux 3
Securing the ConsoleI will first talk about where root can log on. In Chapter 3 I will talk about restricting root logonsover SSH to your system. You can further limit where root can log on by restricting it to a specificset of terminals. To do this, edit the contents of the /etc/securetty file. The login program refersto this file to determine whether the root user can log into a particular device. Listing 1-12 showsa sample of a typical securetty file.
Listing 1-12. A Sample securetty File
tty1
#tty2
#tty3
#tty4
All devices you want to allow root to log in from should be listed in the file (without the/dev/ prefix). I recommend allowing root login only on one terminal and forcing all other loginsto be a non-root user and if required use su to gain root privileges. In Listing 1-12 you can seethat only device tty1 allows a root login. All other devices have been commented out of the file,disabling root login on those devices. You also need to secure the securetty file to ensure it ismodifiable only by root. Enter the following:
puppy# chown root:root /etc/securetty
puppy# chmod 0600 /etc/securetty
■Tip You can also achieve similar results using the PAM module, pam_access.so. See its configurationfile in /etc/security/access.conf.
The Red Hat ConsoleOn Red Hat systems2 when non-root users log into the console, they are granted access tosome additional programs that they would otherwise not be able to run. Additionally, they aregiven permissions to certain files they would not have as normal users solely because they arelogged onto the console. To achieve this, Red Hat uses a PAM module called pam_console.so,which is defined in the PAM login service. See the “Pluggable Authentication Modules (PAM)”section.
■Tip If more than one non-root user is logged onto console, the first user to log in gets the right to runthese programs and the additional permissions.
4444c01_final.qxd 1/5/05 12:42 AM Page 16
CHAPTER 1 ■ HARDENING THE BASICS 17
The configuration files contained in the /etc/security/console.apps/ directory definethe additional programs that users logged onto the console can run. This directory containsa collection of files, and each file corresponds to a command that users, after logging ontothe console, can run as if they were root.
puppy# ls -l /etc/security/console.apps/
-rw-r--r-- 1 root root 10 Aug 22 2003 authconfig
-rw-r--r-- 1 root root 87 Aug 22 2003 authconfig-gtk
-rw-r--r-- 1 root root 83 Sep 20 2003 dateconfig
-rw-r--r-- 1 root root 64 May 29 01:31 ethereal
-rw-r--r-- 1 root root 66 Apr 15 00:33 gdmsetup
-rw-r--r-- 1 root root 14 Sep 26 2003 halt
Whilst perhaps this model of granting extra privileges to console users makes administra-tion for your system easier, I do not think this is a good idea from a security perspective. Most,if not all of these programs, should be run only by root, and the risk posed by this access beinggranted to a non-root user just because the user is able to login to the console is not accept-able on a production system. So, I recommend you disable this functionality. You can do thisby removing the contents of the /etc/security/console.apps directory. Enter the following:
puppy# rm -f /etc/security/console.apps/*
The file /etc/security/console.perms contains the additional permissions provided.I also recommend you go through the permissions granted to users in the console.perms fileand confirm you are comfortable granting all of them to non-root users who are logged intothe console.
■Tip You will also find sample configuration files for other PAM modules in the /etc/security directory.I will talk about some of them in the Pluggable Authentication Modules (PAM)” section later in this chapter.
Securing Virtual TerminalsYour virtual terminals are useful to allow you to log into multiple sessions on your console.But they can be dangerous if you leave sessions logged on unattended. I will show you a wayto lock them against unauthorized use with a password. This is especially useful when youneed to leave a process running interactively on the console. You start your process, change toanother virtual terminal, and lock all the other virtual terminals. Then, unless someone hasthe root password, they cannot unlock the terminals and interfere with your running process.
You will learn how to do this using a tool called Vlock. The Vlock tool comes with someLinux distributions but may need to be installed on others. Checking for the presence of thevlock binary on your system will tell you if you have it installed. Otherwise you can install pack-ages for Red Hat, Mandrake, Debian, and other distributions at http://linux.maruhn.com/sec/vlock.html. If not already installed, then add Vlock to your system, such as a Red Hat system.
puppy# rpm -Uvh vlock-1-3-13.i386.rpm
4444c01_final.qxd 1/5/05 12:42 AM Page 17
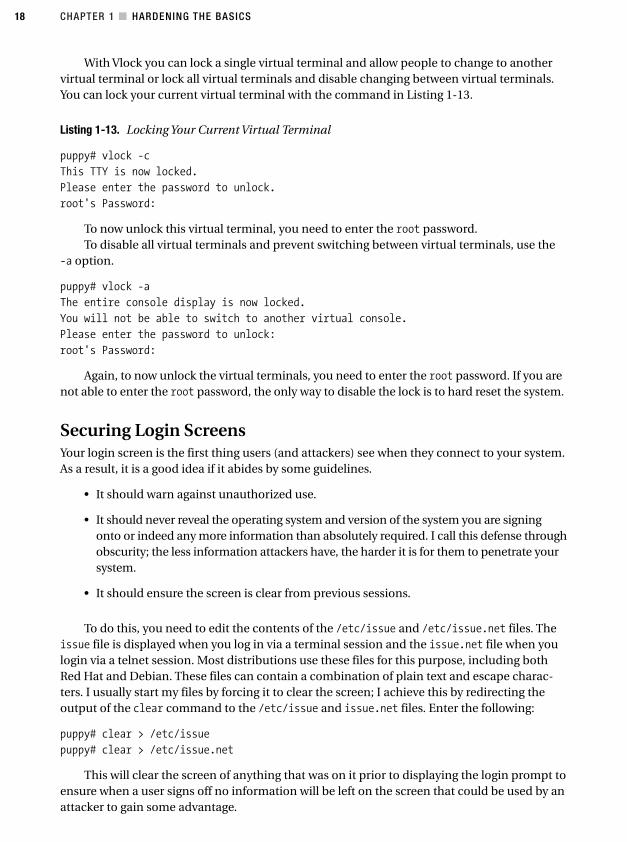
CHAPTER 1 ■ HARDENING THE BASICS18
With Vlock you can lock a single virtual terminal and allow people to change to anothervirtual terminal or lock all virtual terminals and disable changing between virtual terminals.You can lock your current virtual terminal with the command in Listing 1-13.
Listing 1-13. Locking Your Current Virtual Terminal
puppy# vlock -c
This TTY is now locked.
Please enter the password to unlock.
root's Password:
To now unlock this virtual terminal, you need to enter the root password.To disable all virtual terminals and prevent switching between virtual terminals, use the
-a option.
puppy# vlock -a
The entire console display is now locked.
You will not be able to switch to another virtual console.
Please enter the password to unlock:
root's Password:
Again, to now unlock the virtual terminals, you need to enter the root password. If you arenot able to enter the root password, the only way to disable the lock is to hard reset the system.
Securing Login ScreensYour login screen is the first thing users (and attackers) see when they connect to your system.As a result, it is a good idea if it abides by some guidelines.
• It should warn against unauthorized use.
• It should never reveal the operating system and version of the system you are signingonto or indeed any more information than absolutely required. I call this defense throughobscurity; the less information attackers have, the harder it is for them to penetrate yoursystem.
• It should ensure the screen is clear from previous sessions.
To do this, you need to edit the contents of the /etc/issue and /etc/issue.net files. Theissue file is displayed when you log in via a terminal session and the issue.net file when youlogin via a telnet session. Most distributions use these files for this purpose, including bothRed Hat and Debian. These files can contain a combination of plain text and escape charac-ters. I usually start my files by forcing it to clear the screen; I achieve this by redirecting theoutput of the clear command to the /etc/issue and issue.net files. Enter the following:
puppy# clear > /etc/issue
puppy# clear > /etc/issue.net
This will clear the screen of anything that was on it prior to displaying the login prompt toensure when a user signs off no information will be left on the screen that could be used by anattacker to gain some advantage.
4444c01_final.qxd 1/5/05 12:42 AM Page 18
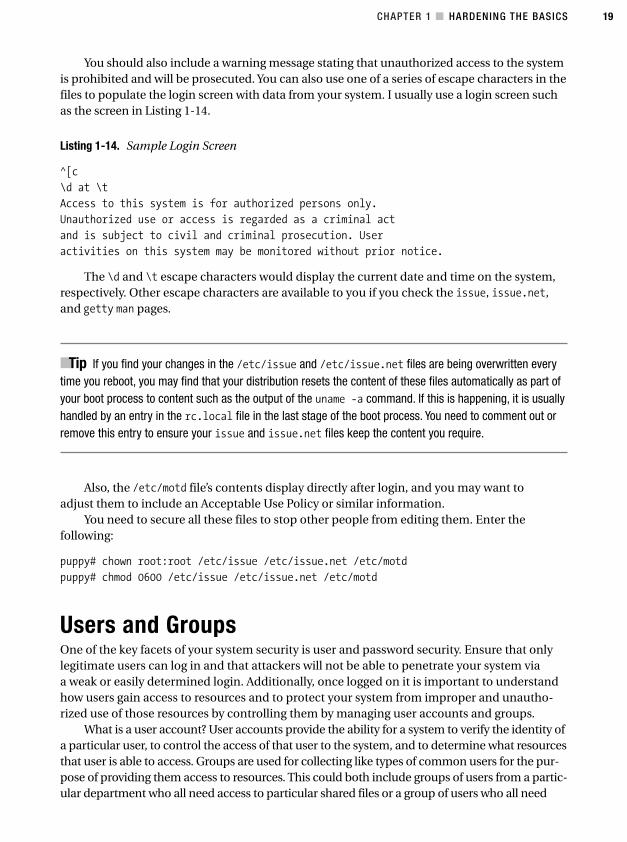
CHAPTER 1 ■ HARDENING THE BASICS 19
You should also include a warning message stating that unauthorized access to the systemis prohibited and will be prosecuted. You can also use one of a series of escape characters in thefiles to populate the login screen with data from your system. I usually use a login screen suchas the screen in Listing 1-14.
Listing 1-14. Sample Login Screen
^[c
\d at \t
Access to this system is for authorized persons only.
Unauthorized use or access is regarded as a criminal act
and is subject to civil and criminal prosecution. User
activities on this system may be monitored without prior notice.
The \d and \t escape characters would display the current date and time on the system,respectively. Other escape characters are available to you if you check the issue, issue.net,and getty man pages.
■Tip If you find your changes in the /etc/issue and /etc/issue.net files are being overwritten everytime you reboot, you may find that your distribution resets the content of these files automatically as part ofyour boot process to content such as the output of the uname -a command. If this is happening, it is usuallyhandled by an entry in the rc.local file in the last stage of the boot process. You need to comment out orremove this entry to ensure your issue and issue.net files keep the content you require.
Also, the /etc/motd file’s contents display directly after login, and you may want toadjust them to include an Acceptable Use Policy or similar information.
You need to secure all these files to stop other people from editing them. Enter thefollowing:
puppy# chown root:root /etc/issue /etc/issue.net /etc/motd
puppy# chmod 0600 /etc/issue /etc/issue.net /etc/motd
Users and GroupsOne of the key facets of your system security is user and password security. Ensure that onlylegitimate users can log in and that attackers will not be able to penetrate your system viaa weak or easily determined login. Additionally, once logged on it is important to understandhow users gain access to resources and to protect your system from improper and unautho-rized use of those resources by controlling them by managing user accounts and groups.
What is a user account? User accounts provide the ability for a system to verify the identity ofa particular user, to control the access of that user to the system, and to determine what resourcesthat user is able to access. Groups are used for collecting like types of common users for the pur-pose of providing them access to resources. This could both include groups of users from a partic-ular department who all need access to particular shared files or a group of users who all need
4444c01_final.qxd 1/5/05 12:42 AM Page 19

CHAPTER 1 ■ HARDENING THE BASICS20
access to a particular resource such as a connection, piece of hardware such as a scanner orprinter, or an application.
Linux stores details of users, groups, and other information in three files: /etc/passwd,/etc/shadow, and /etc/group. The first file, /etc/passwd, contains a list of all users and theirdetails. Listing 1-15 shows an example of some passwd entries.
Listing 1-15. Some Sample passwd Entries
root:x:0:0:root:/root:/bin/bash
daemon:x:2:2:daemon:/sbin:/sbin/nologin
The entries can be broken into their component pieces, each separated by a colon.
username:password:UID:GID:GECOS:Home Directory:Shell
The username is up to eight characters long and is case sensitive (though usually all inlowercase). As you can see in Listing 1-15, the x in the next field is a marker for the password.The actual password is stored in the /etc/shadow file, which I will discuss in the “ShadowPasswording” section.
■Tip Systems often have usernames that are constructed from a combination of a user’s first and lastnames. Introducing random usernames instead is often a good idea. Random usernames do not link usersto personal information. Even if a user has a password that is related to personal information, an attackerwill be less likely to be able to make the connection to a random username.
Next is the User ID (or UID) and the Group ID (GID). On a Linux system each user accountand group is assigned a numeric ID. Users are assigned a UID and groups a GID. Depending onthe distribution, lower-numbered UIDs and GIDs indicate system accounts and groups such asroot or daemon. On Red Hat systems UIDs and GIDs are those IDs lower than 500, and on Debianthose IDs are lower than 100.
■Note The root user has a UID and GID of 0. This should be the only user on the system with a UID andGID of 0.
In many cases the UID and GID for a user will be identical.
■Tip You can specify the range of the UIDs and GIDs for users in the /etc/login.defs file using theUID_MIN and UID_MAX range for UIDs and the GID_MIN and GID_MAX range for GIDs.
4444c01_final.qxd 1/5/05 12:42 AM Page 20
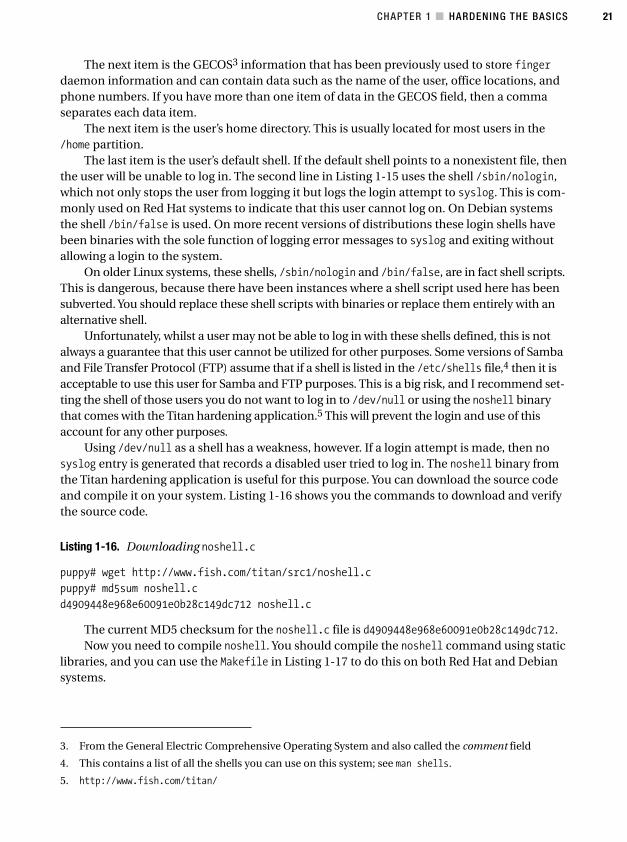
CHAPTER 1 ■ HARDENING THE BASICS 21
3. From the General Electric Comprehensive Operating System and also called the comment field
4. This contains a list of all the shells you can use on this system; see man shells.
5. http://www.fish.com/titan/
The next item is the GECOS3 information that has been previously used to store fingerdaemon information and can contain data such as the name of the user, office locations, andphone numbers. If you have more than one item of data in the GECOS field, then a commaseparates each data item.
The next item is the user’s home directory. This is usually located for most users in the/home partition.
The last item is the user’s default shell. If the default shell points to a nonexistent file, thenthe user will be unable to log in. The second line in Listing 1-15 uses the shell /sbin/nologin,which not only stops the user from logging it but logs the login attempt to syslog. This is com-monly used on Red Hat systems to indicate that this user cannot log on. On Debian systemsthe shell /bin/false is used. On more recent versions of distributions these login shells havebeen binaries with the sole function of logging error messages to syslog and exiting withoutallowing a login to the system.
On older Linux systems, these shells, /sbin/nologin and /bin/false, are in fact shell scripts.This is dangerous, because there have been instances where a shell script used here has beensubverted. You should replace these shell scripts with binaries or replace them entirely with analternative shell.
Unfortunately, whilst a user may not be able to log in with these shells defined, this is notalways a guarantee that this user cannot be utilized for other purposes. Some versions of Sambaand File Transfer Protocol (FTP) assume that if a shell is listed in the /etc/shells file,4 then it isacceptable to use this user for Samba and FTP purposes. This is a big risk, and I recommend set-ting the shell of those users you do not want to log in to /dev/null or using the noshell binarythat comes with the Titan hardening application.5 This will prevent the login and use of thisaccount for any other purposes.
Using /dev/null as a shell has a weakness, however. If a login attempt is made, then nosyslog entry is generated that records a disabled user tried to log in. The noshell binary fromthe Titan hardening application is useful for this purpose. You can download the source codeand compile it on your system. Listing 1-16 shows you the commands to download and verifythe source code.
Listing 1-16. Downloading noshell.c
puppy# wget http://www.fish.com/titan/src1/noshell.c
puppy# md5sum noshell.c
d4909448e968e60091e0b28c149dc712 noshell.c
The current MD5 checksum for the noshell.c file is d4909448e968e60091e0b28c149dc712.Now you need to compile noshell. You should compile the noshell command using static
libraries, and you can use the Makefile in Listing 1-17 to do this on both Red Hat and Debiansystems.
4444c01_final.qxd 1/5/05 12:42 AM Page 21
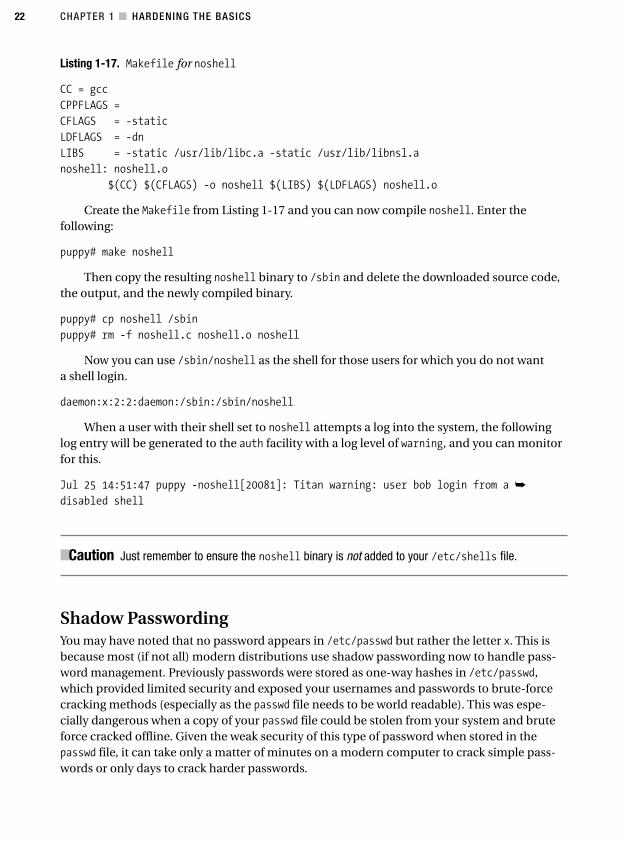
CHAPTER 1 ■ HARDENING THE BASICS22
Listing 1-17. Makefile for noshell
CC = gcc
CPPFLAGS =
CFLAGS = -static
LDFLAGS = -dn
LIBS = -static /usr/lib/libc.a -static /usr/lib/libnsl.a
noshell: noshell.o
$(CC) $(CFLAGS) -o noshell $(LIBS) $(LDFLAGS) noshell.o
Create the Makefile from Listing 1-17 and you can now compile noshell. Enter thefollowing:
puppy# make noshell
Then copy the resulting noshell binary to /sbin and delete the downloaded source code,the output, and the newly compiled binary.
puppy# cp noshell /sbin
puppy# rm -f noshell.c noshell.o noshell
Now you can use /sbin/noshell as the shell for those users for which you do not wanta shell login.
daemon:x:2:2:daemon:/sbin:/sbin/noshell
When a user with their shell set to noshell attempts a log into the system, the followinglog entry will be generated to the auth facility with a log level of warning, and you can monitorfor this.
Jul 25 14:51:47 puppy -noshell[20081]: Titan warning: user bob login from a ➥
disabled shell
■Caution Just remember to ensure the noshell binary is not added to your /etc/shells file.
Shadow PasswordingYou may have noted that no password appears in /etc/passwd but rather the letter x. This isbecause most (if not all) modern distributions use shadow passwording now to handle pass-word management. Previously passwords were stored as one-way hashes in /etc/passwd,which provided limited security and exposed your usernames and passwords to brute-forcecracking methods (especially as the passwd file needs to be world readable). This was espe-cially dangerous when a copy of your passwd file could be stolen from your system and bruteforce cracked offline. Given the weak security of this type of password when stored in thepasswd file, it can take only a matter of minutes on a modern computer to crack simple pass-words or only days to crack harder passwords.
4444c01_final.qxd 1/5/05 12:42 AM Page 22
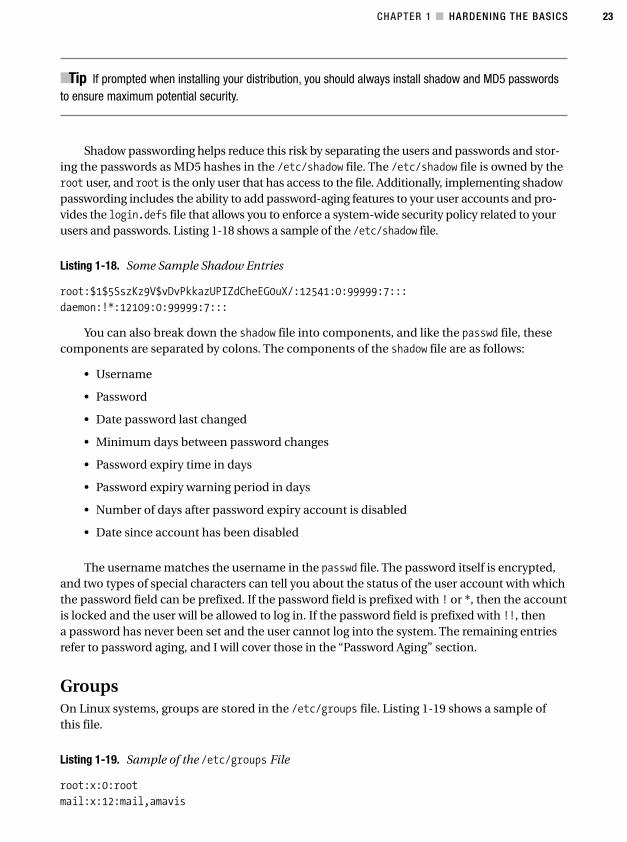
CHAPTER 1 ■ HARDENING THE BASICS 23
■Tip If prompted when installing your distribution, you should always install shadow and MD5 passwordsto ensure maximum potential security.
Shadow passwording helps reduce this risk by separating the users and passwords and stor-ing the passwords as MD5 hashes in the /etc/shadow file. The /etc/shadow file is owned by theroot user, and root is the only user that has access to the file. Additionally, implementing shadowpasswording includes the ability to add password-aging features to your user accounts and pro-vides the login.defs file that allows you to enforce a system-wide security policy related to yourusers and passwords. Listing 1-18 shows a sample of the /etc/shadow file.
Listing 1-18. Some Sample Shadow Entries
root:$1$5SszKz9V$vDvPkkazUPIZdCheEG0uX/:12541:0:99999:7:::
daemon:!*:12109:0:99999:7:::
You can also break down the shadow file into components, and like the passwd file, thesecomponents are separated by colons. The components of the shadow file are as follows:
• Username
• Password
• Date password last changed
• Minimum days between password changes
• Password expiry time in days
• Password expiry warning period in days
• Number of days after password expiry account is disabled
• Date since account has been disabled
The username matches the username in the passwd file. The password itself is encrypted,and two types of special characters can tell you about the status of the user account with whichthe password field can be prefixed. If the password field is prefixed with ! or *, then the accountis locked and the user will be allowed to log in. If the password field is prefixed with !!, thena password has never been set and the user cannot log into the system. The remaining entriesrefer to password aging, and I will cover those in the “Password Aging” section.
GroupsOn Linux systems, groups are stored in the /etc/groups file. Listing 1-19 shows a sample ofthis file.
Listing 1-19. Sample of the /etc/groups File
root:x:0:root
mail:x:12:mail,amavis
4444c01_final.qxd 1/5/05 12:42 AM Page 23
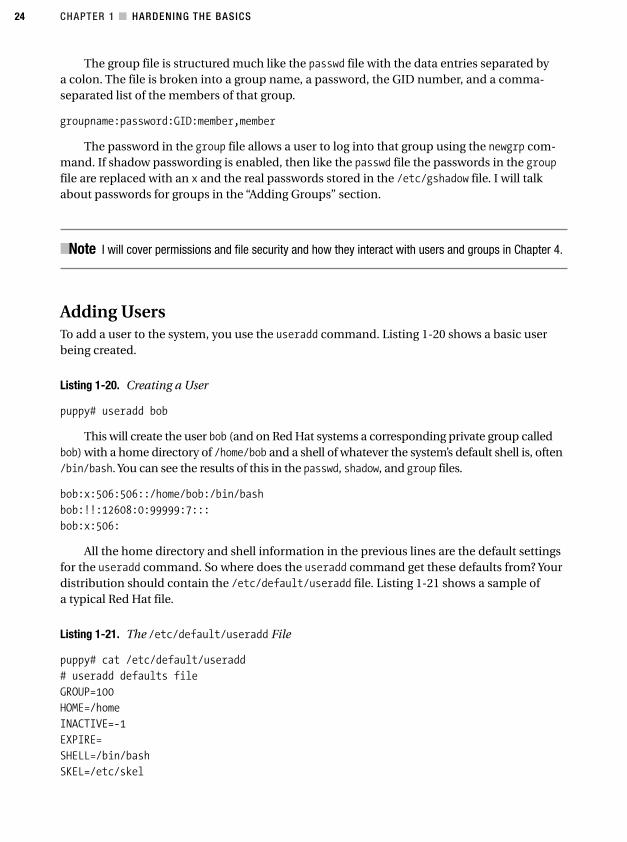
CHAPTER 1 ■ HARDENING THE BASICS24
The group file is structured much like the passwd file with the data entries separated bya colon. The file is broken into a group name, a password, the GID number, and a comma-separated list of the members of that group.
groupname:password:GID:member,member
The password in the group file allows a user to log into that group using the newgrp com-mand. If shadow passwording is enabled, then like the passwd file the passwords in the groupfile are replaced with an x and the real passwords stored in the /etc/gshadow file. I will talkabout passwords for groups in the “Adding Groups” section.
■Note I will cover permissions and file security and how they interact with users and groups in Chapter 4.
Adding UsersTo add a user to the system, you use the useradd command. Listing 1-20 shows a basic userbeing created.
Listing 1-20. Creating a User
puppy# useradd bob
This will create the user bob (and on Red Hat systems a corresponding private group calledbob) with a home directory of /home/bob and a shell of whatever the system’s default shell is, often/bin/bash. You can see the results of this in the passwd, shadow, and group files.
bob:x:506:506::/home/bob:/bin/bash
bob:!!:12608:0:99999:7:::
bob:x:506:
All the home directory and shell information in the previous lines are the default settingsfor the useradd command. So where does the useradd command get these defaults from? Yourdistribution should contain the /etc/default/useradd file. Listing 1-21 shows a sample ofa typical Red Hat file.
Listing 1-21. The /etc/default/useradd File
puppy# cat /etc/default/useradd
# useradd defaults file
GROUP=100
HOME=/home
INACTIVE=-1
EXPIRE=
SHELL=/bin/bash
SKEL=/etc/skel
4444c01_final.qxd 1/5/05 12:42 AM Page 24
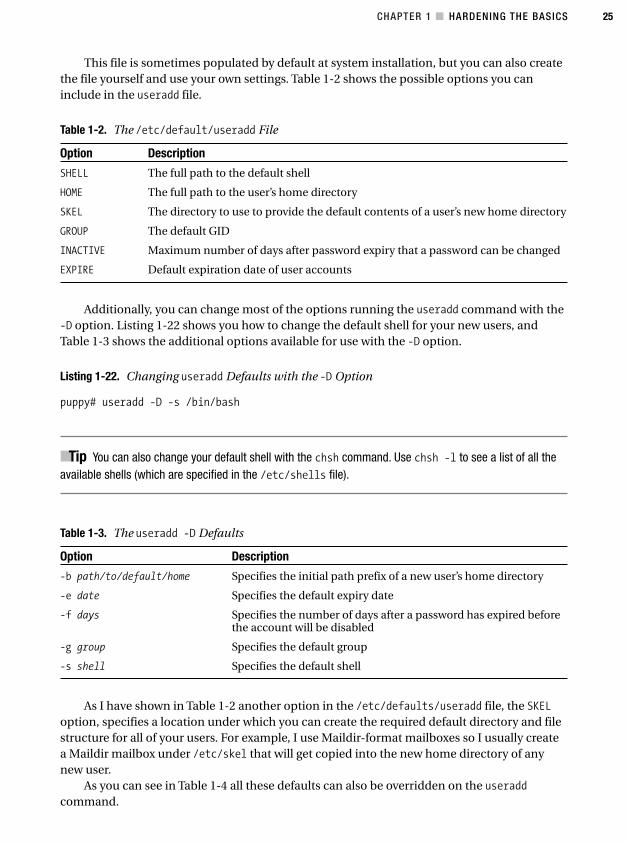
CHAPTER 1 ■ HARDENING THE BASICS 25
This file is sometimes populated by default at system installation, but you can also createthe file yourself and use your own settings. Table 1-2 shows the possible options you caninclude in the useradd file.
Table 1-2. The /etc/default/useradd File
Option Description
SHELL The full path to the default shell
HOME The full path to the user’s home directory
SKEL The directory to use to provide the default contents of a user’s new home directory
GROUP The default GID
INACTIVE Maximum number of days after password expiry that a password can be changed
EXPIRE Default expiration date of user accounts
Additionally, you can change most of the options running the useradd command with the-D option. Listing 1-22 shows you how to change the default shell for your new users, andTable 1-3 shows the additional options available for use with the -D option.
Listing 1-22. Changing useradd Defaults with the -D Option
puppy# useradd -D -s /bin/bash
■Tip You can also change your default shell with the chsh command. Use chsh -l to see a list of all theavailable shells (which are specified in the /etc/shells file).
Table 1-3. The useradd -D Defaults
Option Description
-b path/to/default/home Specifies the initial path prefix of a new user’s home directory
-e date Specifies the default expiry date
-f days Specifies the number of days after a password has expired beforethe account will be disabled
-g group Specifies the default group
-s shell Specifies the default shell
As I have shown in Table 1-2 another option in the /etc/defaults/useradd file, the SKELoption, specifies a location under which you can create the required default directory and filestructure for all of your users. For example, I use Maildir-format mailboxes so I usually createa Maildir mailbox under /etc/skel that will get copied into the new home directory of anynew user.
As you can see in Table 1-4 all these defaults can also be overridden on the useraddcommand.
4444c01_final.qxd 1/5/05 12:42 AM Page 25
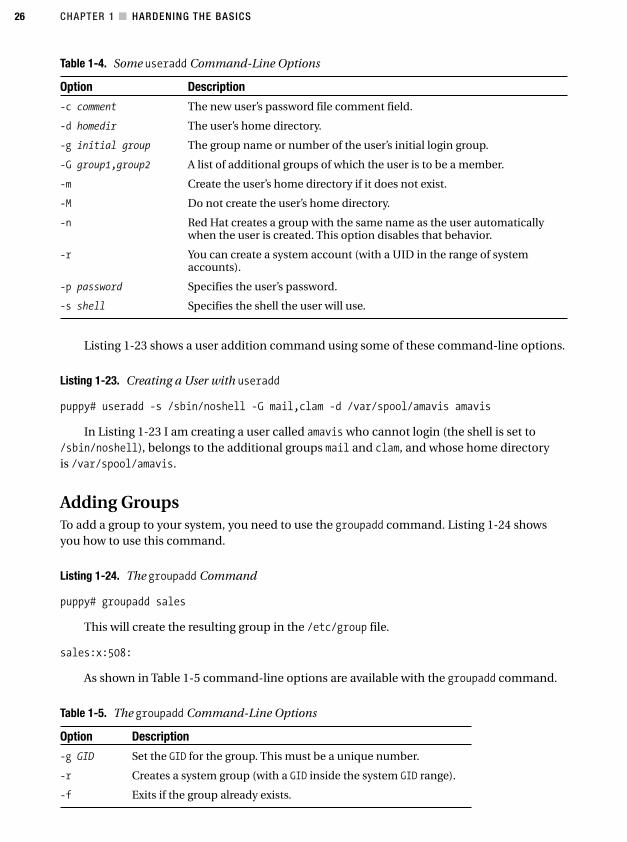
CHAPTER 1 ■ HARDENING THE BASICS26
Table 1-4. Some useradd Command-Line Options
Option Description
-c comment The new user’s password file comment field.
-d homedir The user’s home directory.
-g initial group The group name or number of the user’s initial login group.
-G group1,group2 A list of additional groups of which the user is to be a member.
-m Create the user’s home directory if it does not exist.
-M Do not create the user’s home directory.
-n Red Hat creates a group with the same name as the user automaticallywhen the user is created. This option disables that behavior.
-r You can create a system account (with a UID in the range of systemaccounts).
-p password Specifies the user’s password.
-s shell Specifies the shell the user will use.
Listing 1-23 shows a user addition command using some of these command-line options.
Listing 1-23. Creating a User with useradd
puppy# useradd -s /sbin/noshell -G mail,clam -d /var/spool/amavis amavis
In Listing 1-23 I am creating a user called amavis who cannot login (the shell is set to/sbin/noshell), belongs to the additional groups mail and clam, and whose home directoryis /var/spool/amavis.
Adding GroupsTo add a group to your system, you need to use the groupadd command. Listing 1-24 showsyou how to use this command.
Listing 1-24. The groupadd Command
puppy# groupadd sales
This will create the resulting group in the /etc/group file.
sales:x:508:
As shown in Table 1-5 command-line options are available with the groupadd command.
Table 1-5. The groupadd Command-Line Options
Option Description
-g GID Set the GID for the group. This must be a unique number.
-r Creates a system group (with a GID inside the system GID range).
-f Exits if the group already exists.
4444c01_final.qxd 1/5/05 12:42 AM Page 26

CHAPTER 1 ■ HARDENING THE BASICS 27
Once you have created groups, you need to assign users to these groups. You can do thisone of two ways. First, you can edit the /etc/groups file itself and add the specific user to agroup; second, you can use the gpasswd command. The gpasswd command provides a way toadd users to groups via the command line and can also assign passwords to a particular group(storing these in the /etc/gshadow file).
To add users to a group, you would use the gpasswd command with the -a option.
puppy$ gpasswd -a bob sales
In the previous command the user bob is added to the group sales. To remove a user froma group, you would use the -d option.
puppy$ gpasswd -d jane sales
In the previous command the user jane is removed from the group sales using the -d option.You can also define one or more users as administrators of a particular group and allow
them to use the -a and the -d options to add and remove users to that particular group. To adda group administrator to a group, use the following command:
puppy# gpasswd -A bob sales
This adds the user bob as an administrator of the group sales. Now bob can use the gpasswdcommand to add users (jane, chris, and david) to the sales group. Or you can add both anadministrator and users at the same time to a group using this command:
puppy# gpasswd -A bob -M jane chris david sales
The -A option adds the group administer, bob, and the -M option specifies a list of users.You can also add a password to a group. The password will be stored in the /etc/gshadow
file.
puppy# gpasswd sales
Changing the password for group sales
New Password:
Re-enter new password:
This password will allow users to use the newgrp command to temporarily add themselvesto the sales group if they know the required password.
puppy# newgrp sales
Password:
This gives them the access rights of the users of this group. The group access is removedwhen the user logs off. You can use gpasswd -r to remove the password from a particular group.
Another option you can use with the gpasswd command is the -R option, which stops fromanyone adding themselves to the group using the newgrp command.
puppy# gpasswd -R sales
■Tip You can use another command, grpck, to check the integrity of your /etc/group and/etc/gshadow files. See its man page for further information.
4444c01_final.qxd 1/5/05 12:42 AM Page 27
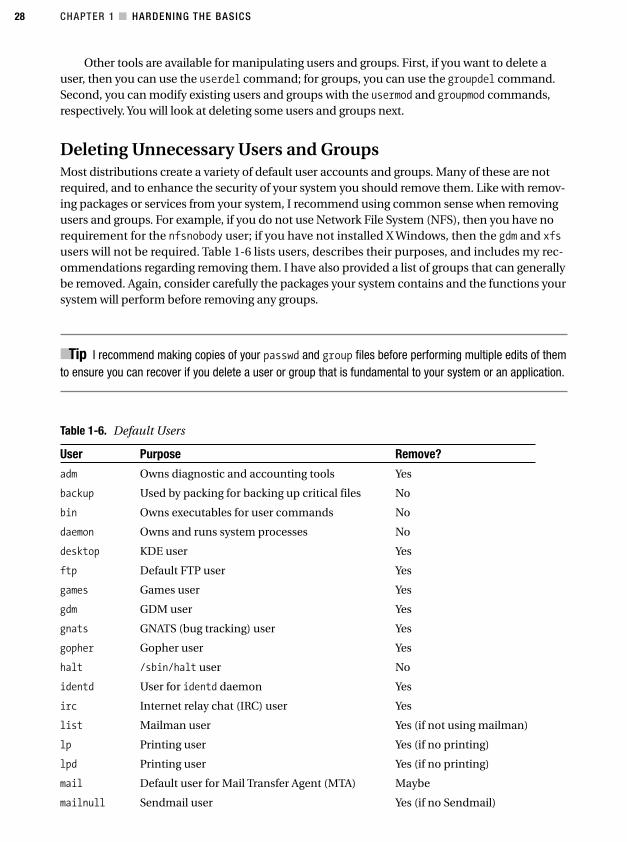
CHAPTER 1 ■ HARDENING THE BASICS28
Other tools are available for manipulating users and groups. First, if you want to delete auser, then you can use the userdel command; for groups, you can use the groupdel command.Second, you can modify existing users and groups with the usermod and groupmod commands,respectively. You will look at deleting some users and groups next.
Deleting Unnecessary Users and GroupsMost distributions create a variety of default user accounts and groups. Many of these are notrequired, and to enhance the security of your system you should remove them. Like with remov-ing packages or services from your system, I recommend using common sense when removingusers and groups. For example, if you do not use Network File System (NFS), then you have norequirement for the nfsnobody user; if you have not installed X Windows, then the gdm and xfsusers will not be required. Table 1-6 lists users, describes their purposes, and includes my rec-ommendations regarding removing them. I have also provided a list of groups that can generallybe removed. Again, consider carefully the packages your system contains and the functions yoursystem will perform before removing any groups.
■Tip I recommend making copies of your passwd and group files before performing multiple edits of themto ensure you can recover if you delete a user or group that is fundamental to your system or an application.
Table 1-6. Default Users
User Purpose Remove?
adm Owns diagnostic and accounting tools Yes
backup Used by packing for backing up critical files No
bin Owns executables for user commands No
daemon Owns and runs system processes No
desktop KDE user Yes
ftp Default FTP user Yes
games Games user Yes
gdm GDM user Yes
gnats GNATS (bug tracking) user Yes
gopher Gopher user Yes
halt /sbin/halt user No
identd User for identd daemon Yes
irc Internet relay chat (IRC) user Yes
list Mailman user Yes (if not using mailman)
lp Printing user Yes (if no printing)
lpd Printing user Yes (if no printing)
mail Default user for Mail Transfer Agent (MTA) Maybe
mailnull Sendmail user Yes (if no Sendmail)
4444c01_final.qxd 1/5/05 12:42 AM Page 28
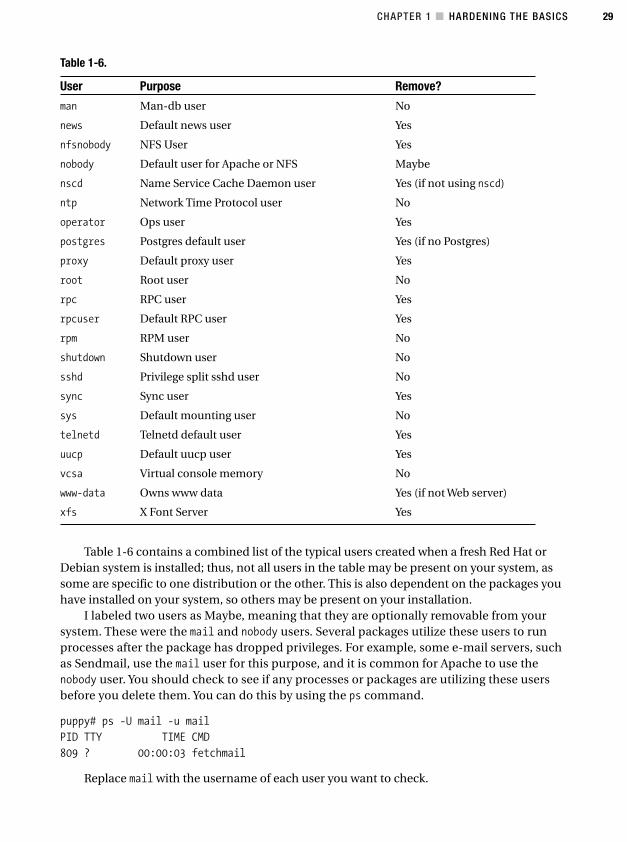
CHAPTER 1 ■ HARDENING THE BASICS 29
Table 1-6.
User Purpose Remove?
man Man-db user No
news Default news user Yes
nfsnobody NFS User Yes
nobody Default user for Apache or NFS Maybe
nscd Name Service Cache Daemon user Yes (if not using nscd)
ntp Network Time Protocol user No
operator Ops user Yes
postgres Postgres default user Yes (if no Postgres)
proxy Default proxy user Yes
root Root user No
rpc RPC user Yes
rpcuser Default RPC user Yes
rpm RPM user No
shutdown Shutdown user No
sshd Privilege split sshd user No
sync Sync user Yes
sys Default mounting user No
telnetd Telnetd default user Yes
uucp Default uucp user Yes
vcsa Virtual console memory No
www-data Owns www data Yes (if not Web server)
xfs X Font Server Yes
Table 1-6 contains a combined list of the typical users created when a fresh Red Hat orDebian system is installed; thus, not all users in the table may be present on your system, assome are specific to one distribution or the other. This is also dependent on the packages youhave installed on your system, so others may be present on your installation.
I labeled two users as Maybe, meaning that they are optionally removable from yoursystem. These were the mail and nobody users. Several packages utilize these users to runprocesses after the package has dropped privileges. For example, some e-mail servers, suchas Sendmail, use the mail user for this purpose, and it is common for Apache to use thenobody user. You should check to see if any processes or packages are utilizing these usersbefore you delete them. You can do this by using the ps command.
puppy# ps -U mail -u mail
PID TTY TIME CMD
809 ? 00:00:03 fetchmail
Replace mail with the username of each user you want to check.
4444c01_final.qxd 1/5/05 12:42 AM Page 29
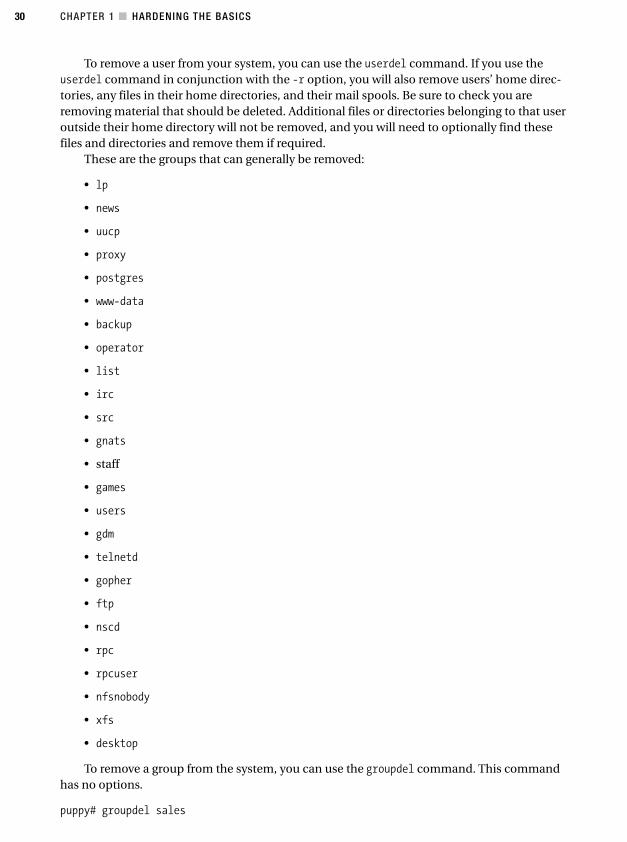
CHAPTER 1 ■ HARDENING THE BASICS30
To remove a user from your system, you can use the userdel command. If you use theuserdel command in conjunction with the -r option, you will also remove users’ home direc-tories, any files in their home directories, and their mail spools. Be sure to check you areremoving material that should be deleted. Additional files or directories belonging to that useroutside their home directory will not be removed, and you will need to optionally find thesefiles and directories and remove them if required.
These are the groups that can generally be removed:
• lp
• news
• uucp
• proxy
• postgres
• www-data
• backup
• operator
• list
• irc
• src
• gnats
• staff
• games
• users
• gdm
• telnetd
• gopher
• ftp
• nscd
• rpc
• rpcuser
• nfsnobody
• xfs
• desktop
To remove a group from the system, you can use the groupdel command. This commandhas no options.
puppy# groupdel sales
4444c01_final.qxd 1/5/05 12:42 AM Page 30
CHAPTER 1 ■ HARDENING THE BASICS 31
PasswordsAs part of the user and group creation process, you need to ensure your users choose suitableand secure passwords for their accounts and that those passwords are managed and changed ona regular basis. I mentioned earlier in this chapter shadow passwords and using the /etc/shadowfile. Additionally, most distributions also come with support for MD5 passwords. Without MD5your passwords are encrypted via DES (the Data Encryption Standard), which is significantlymore vulnerable to cracking attempts than MD5 passwords. You should enable both shadowpasswording and MD5 passwords as part of your install process.
Your users’ ability to choose their own passwords is one of the most frustrating and dan-gerous parts of user administration. Almost all your users have one objective when choosinga password: choosing one that is easy for them to remember. Security is simply not a consid-eration. Changing their password on a regular basis for them is an inconvenience and achore. But it is an essential activity for the ongoing security of your system. A lot of people inthe security world believe this sort of attitude is able to be changed with education about therisks of poor password security. I believe this is only partially true. To an extent no matterhow often most of your users are told to treat their password like the personal identificationnumber (PIN) to their cash card, they simply do not attach the same importance to it as theywould something valuable to them personally. This is not to say you should not attempt toeducate them, but do not count on it changing their attitudes. I recommend taking a consul-tative but ultimately dictatorial approach to determining the characteristics of your pass-word variables and regime. Explain the security requirements of your environment to yourend users, but do not compromise that security by making exceptions to your overall pass-word rules.
I recommend you set your password rules, taking into consideration the following points:
• Do not allow passwords with dictionary words, such as dog, cat, or elephant. The sameapplies for non-English-language words.
• Do not allow passwords with only letters or numbers, such as 12345678 or abcdefghi.
• Ensure users do not use personal information such as dates of birth, pet names, namesof family members, phone numbers, or post and zip codes.
• Set a minimum password length of ten. Longer is better.
• Force users to mix case; in other words, use both uppercase and lowercase letters in thepassword.
• Force users to mix letters, numbers, and punctuation in the password.
• Ensure your users change their passwords regularly; and if the password expires withoutbeing changed, then set a time limit after which that user account should be disabled.
• Ensure the new password is not the same as a number of previous passwords.
You can control the characteristics of your users’ passwords in Linux via PAM. I talk aboutPAM in more detail in the “Pluggable Authentication Modules (PAM)” section later in this chap-ter, but I will cover the PAM modules specifically designed to handle the passwd application here.
The PAM modules are defined in individual files located in the /etc/pam.d directory. Thefile you want to look at in this directory is passwd and contains all the relevant PAM modules
4444c01_final.qxd 1/5/05 12:42 AM Page 31
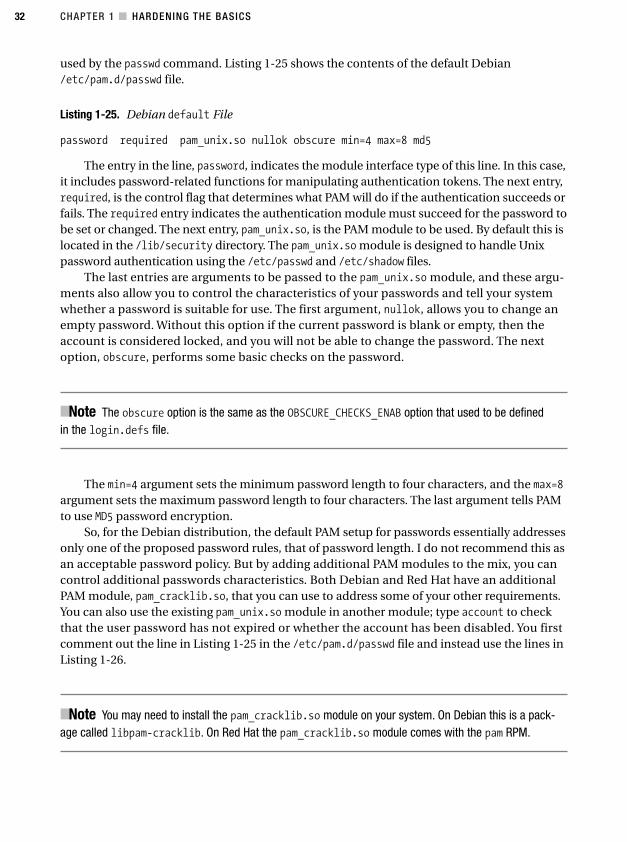
CHAPTER 1 ■ HARDENING THE BASICS32
used by the passwd command. Listing 1-25 shows the contents of the default Debian/etc/pam.d/passwd file.
Listing 1-25. Debian default File
password required pam_unix.so nullok obscure min=4 max=8 md5
The entry in the line, password, indicates the module interface type of this line. In this case,it includes password-related functions for manipulating authentication tokens. The next entry,required, is the control flag that determines what PAM will do if the authentication succeeds orfails. The required entry indicates the authentication module must succeed for the password tobe set or changed. The next entry, pam_unix.so, is the PAM module to be used. By default this islocated in the /lib/security directory. The pam_unix.so module is designed to handle Unixpassword authentication using the /etc/passwd and /etc/shadow files.
The last entries are arguments to be passed to the pam_unix.so module, and these argu-ments also allow you to control the characteristics of your passwords and tell your systemwhether a password is suitable for use. The first argument, nullok, allows you to change anempty password. Without this option if the current password is blank or empty, then theaccount is considered locked, and you will not be able to change the password. The nextoption, obscure, performs some basic checks on the password.
■Note The obscure option is the same as the OBSCURE_CHECKS_ENAB option that used to be definedin the login.defs file.
The min=4 argument sets the minimum password length to four characters, and the max=8argument sets the maximum password length to four characters. The last argument tells PAMto use MD5 password encryption.
So, for the Debian distribution, the default PAM setup for passwords essentially addressesonly one of the proposed password rules, that of password length. I do not recommend this asan acceptable password policy. But by adding additional PAM modules to the mix, you cancontrol additional passwords characteristics. Both Debian and Red Hat have an additionalPAM module, pam_cracklib.so, that you can use to address some of your other requirements.You can also use the existing pam_unix.so module in another module; type account to checkthat the user password has not expired or whether the account has been disabled. You firstcomment out the line in Listing 1-25 in the /etc/pam.d/passwd file and instead use the lines inListing 1-26.
■Note You may need to install the pam_cracklib.so module on your system. On Debian this is a pack-age called libpam-cracklib. On Red Hat the pam_cracklib.so module comes with the pam RPM.
4444c01_final.qxd 1/5/05 12:42 AM Page 32
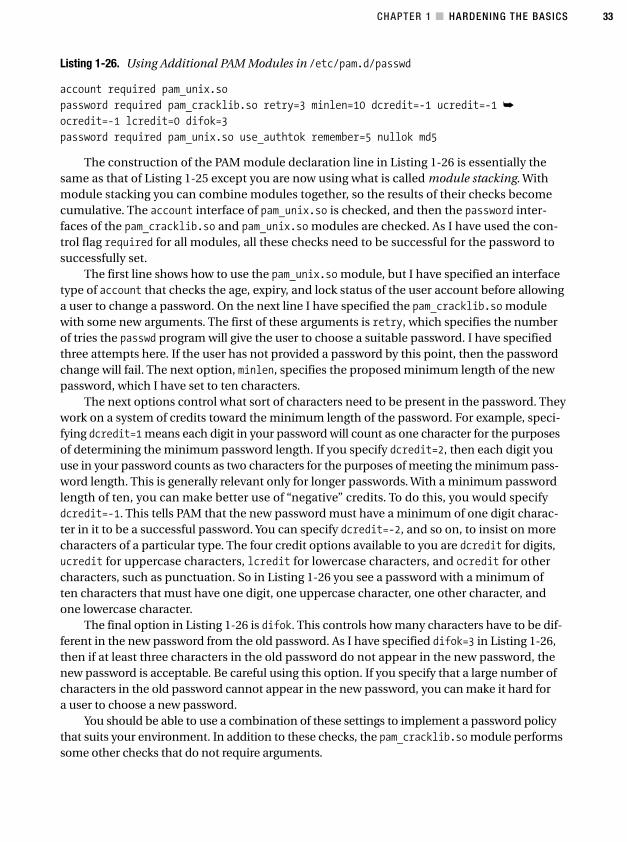
CHAPTER 1 ■ HARDENING THE BASICS 33
Listing 1-26. Using Additional PAM Modules in /etc/pam.d/passwd
account required pam_unix.so
password required pam_cracklib.so retry=3 minlen=10 dcredit=-1 ucredit=-1 ➥
ocredit=-1 lcredit=0 difok=3
password required pam_unix.so use_authtok remember=5 nullok md5
The construction of the PAM module declaration line in Listing 1-26 is essentially thesame as that of Listing 1-25 except you are now using what is called module stacking. Withmodule stacking you can combine modules together, so the results of their checks becomecumulative. The account interface of pam_unix.so is checked, and then the password inter-faces of the pam_cracklib.so and pam_unix.so modules are checked. As I have used the con-trol flag required for all modules, all these checks need to be successful for the password tosuccessfully set.
The first line shows how to use the pam_unix.so module, but I have specified an interfacetype of account that checks the age, expiry, and lock status of the user account before allowinga user to change a password. On the next line I have specified the pam_cracklib.so modulewith some new arguments. The first of these arguments is retry, which specifies the numberof tries the passwd program will give the user to choose a suitable password. I have specifiedthree attempts here. If the user has not provided a password by this point, then the passwordchange will fail. The next option, minlen, specifies the proposed minimum length of the newpassword, which I have set to ten characters.
The next options control what sort of characters need to be present in the password. Theywork on a system of credits toward the minimum length of the password. For example, speci-fying dcredit=1 means each digit in your password will count as one character for the purposesof determining the minimum password length. If you specify dcredit=2, then each digit youuse in your password counts as two characters for the purposes of meeting the minimum pass-word length. This is generally relevant only for longer passwords. With a minimum passwordlength of ten, you can make better use of “negative” credits. To do this, you would specifydcredit=-1. This tells PAM that the new password must have a minimum of one digit charac-ter in it to be a successful password. You can specify dcredit=-2, and so on, to insist on morecharacters of a particular type. The four credit options available to you are dcredit for digits,ucredit for uppercase characters, lcredit for lowercase characters, and ocredit for othercharacters, such as punctuation. So in Listing 1-26 you see a password with a minimum often characters that must have one digit, one uppercase character, one other character, andone lowercase character.
The final option in Listing 1-26 is difok. This controls how many characters have to be dif-ferent in the new password from the old password. As I have specified difok=3 in Listing 1-26,then if at least three characters in the old password do not appear in the new password, thenew password is acceptable. Be careful using this option. If you specify that a large number ofcharacters in the old password cannot appear in the new password, you can make it hard fora user to choose a new password.
You should be able to use a combination of these settings to implement a password policythat suits your environment. In addition to these checks, the pam_cracklib.so module performssome other checks that do not require arguments.
4444c01_final.qxd 1/5/05 12:42 AM Page 33
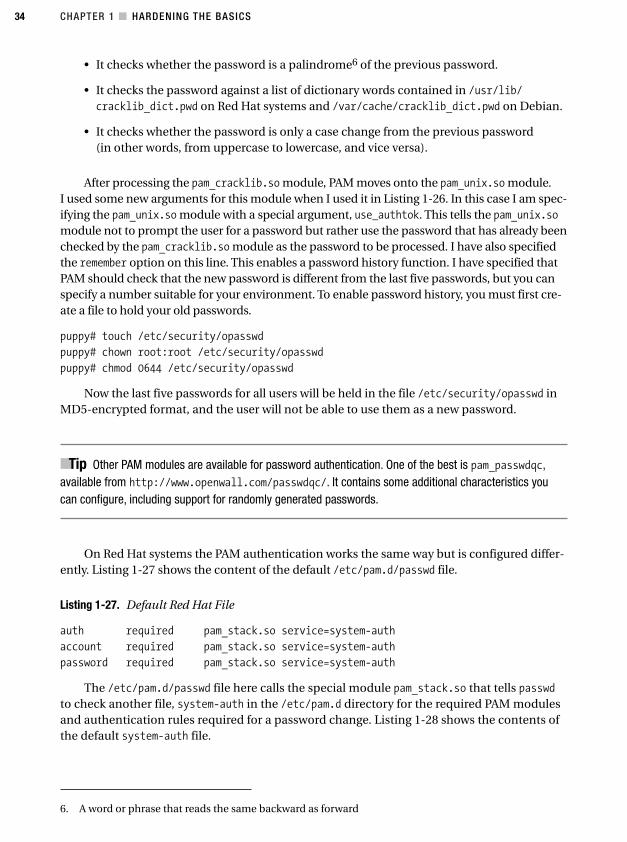
CHAPTER 1 ■ HARDENING THE BASICS34
6. A word or phrase that reads the same backward as forward
• It checks whether the password is a palindrome6 of the previous password.
• It checks the password against a list of dictionary words contained in /usr/lib/cracklib_dict.pwd on Red Hat systems and /var/cache/cracklib_dict.pwd on Debian.
• It checks whether the password is only a case change from the previous password(in other words, from uppercase to lowercase, and vice versa).
After processing the pam_cracklib.so module, PAM moves onto the pam_unix.so module.I used some new arguments for this module when I used it in Listing 1-26. In this case I am spec-ifying the pam_unix.so module with a special argument, use_authtok. This tells the pam_unix.somodule not to prompt the user for a password but rather use the password that has already beenchecked by the pam_cracklib.so module as the password to be processed. I have also specifiedthe remember option on this line. This enables a password history function. I have specified thatPAM should check that the new password is different from the last five passwords, but you canspecify a number suitable for your environment. To enable password history, you must first cre-ate a file to hold your old passwords.
puppy# touch /etc/security/opasswd
puppy# chown root:root /etc/security/opasswd
puppy# chmod 0644 /etc/security/opasswd
Now the last five passwords for all users will be held in the file /etc/security/opasswd inMD5-encrypted format, and the user will not be able to use them as a new password.
■Tip Other PAM modules are available for password authentication. One of the best is pam_passwdqc,available from http://www.openwall.com/passwdqc/. It contains some additional characteristics youcan configure, including support for randomly generated passwords.
On Red Hat systems the PAM authentication works the same way but is configured differ-ently. Listing 1-27 shows the content of the default /etc/pam.d/passwd file.
Listing 1-27. Default Red Hat File
auth required pam_stack.so service=system-auth
account required pam_stack.so service=system-auth
password required pam_stack.so service=system-auth
The /etc/pam.d/passwd file here calls the special module pam_stack.so that tells passwdto check another file, system-auth in the /etc/pam.d directory for the required PAM modulesand authentication rules required for a password change. Listing 1-28 shows the contents ofthe default system-auth file.
4444c01_final.qxd 1/5/05 12:42 AM Page 34
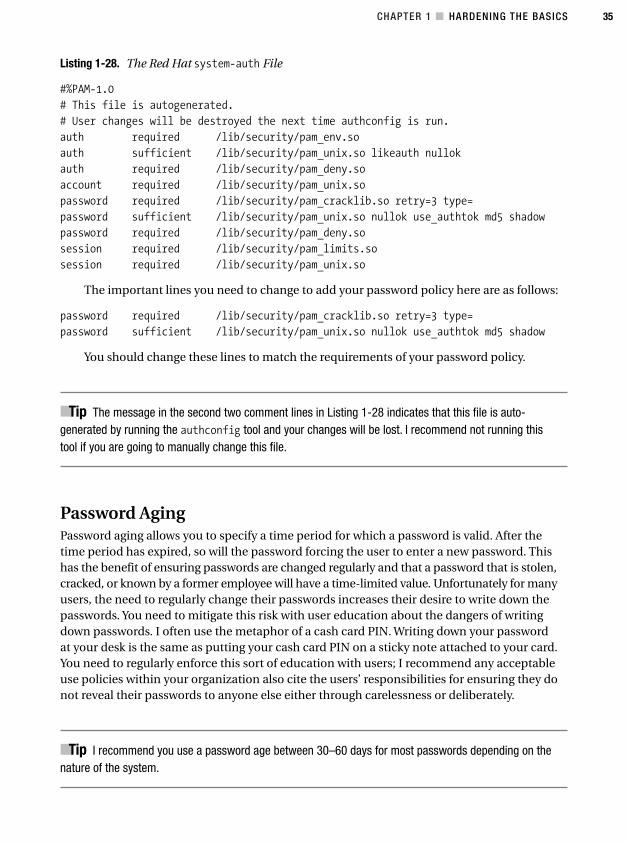
CHAPTER 1 ■ HARDENING THE BASICS 35
Listing 1-28. The Red Hat system-auth File
#%PAM-1.0
# This file is autogenerated.
# User changes will be destroyed the next time authconfig is run.
auth required /lib/security/pam_env.so
auth sufficient /lib/security/pam_unix.so likeauth nullok
auth required /lib/security/pam_deny.so
account required /lib/security/pam_unix.so
password required /lib/security/pam_cracklib.so retry=3 type=
password sufficient /lib/security/pam_unix.so nullok use_authtok md5 shadow
password required /lib/security/pam_deny.so
session required /lib/security/pam_limits.so
session required /lib/security/pam_unix.so
The important lines you need to change to add your password policy here are as follows:
password required /lib/security/pam_cracklib.so retry=3 type=
password sufficient /lib/security/pam_unix.so nullok use_authtok md5 shadow
You should change these lines to match the requirements of your password policy.
■Tip The message in the second two comment lines in Listing 1-28 indicates that this file is auto-generated by running the authconfig tool and your changes will be lost. I recommend not running this tool if you are going to manually change this file.
Password AgingPassword aging allows you to specify a time period for which a password is valid. After thetime period has expired, so will the password forcing the user to enter a new password. Thishas the benefit of ensuring passwords are changed regularly and that a password that is stolen,cracked, or known by a former employee will have a time-limited value. Unfortunately for manyusers, the need to regularly change their passwords increases their desire to write down thepasswords. You need to mitigate this risk with user education about the dangers of writingdown passwords. I often use the metaphor of a cash card PIN. Writing down your passwordat your desk is the same as putting your cash card PIN on a sticky note attached to your card.You need to regularly enforce this sort of education with users; I recommend any acceptableuse policies within your organization also cite the users’ responsibilities for ensuring they donot reveal their passwords to anyone else either through carelessness or deliberately.
■Tip I recommend you use a password age between 30–60 days for most passwords depending on thenature of the system.
4444c01_final.qxd 1/5/05 12:42 AM Page 35
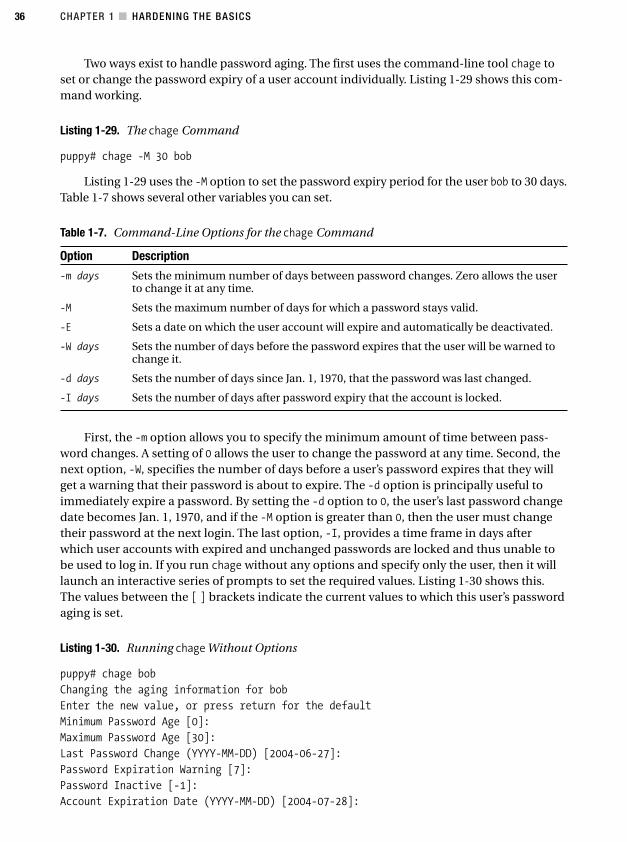
CHAPTER 1 ■ HARDENING THE BASICS36
Two ways exist to handle password aging. The first uses the command-line tool chage toset or change the password expiry of a user account individually. Listing 1-29 shows this com-mand working.
Listing 1-29. The chage Command
puppy# chage -M 30 bob
Listing 1-29 uses the -M option to set the password expiry period for the user bob to 30 days.Table 1-7 shows several other variables you can set.
Table 1-7. Command-Line Options for the chage Command
Option Description
-m days Sets the minimum number of days between password changes. Zero allows the userto change it at any time.
-M Sets the maximum number of days for which a password stays valid.
-E Sets a date on which the user account will expire and automatically be deactivated.
-W days Sets the number of days before the password expires that the user will be warned tochange it.
-d days Sets the number of days since Jan. 1, 1970, that the password was last changed.
-I days Sets the number of days after password expiry that the account is locked.
First, the -m option allows you to specify the minimum amount of time between pass-word changes. A setting of 0 allows the user to change the password at any time. Second, thenext option, -W, specifies the number of days before a user’s password expires that they willget a warning that their password is about to expire. The -d option is principally useful toimmediately expire a password. By setting the -d option to 0, the user’s last password changedate becomes Jan. 1, 1970, and if the -M option is greater than 0, then the user must changetheir password at the next login. The last option, -I, provides a time frame in days afterwhich user accounts with expired and unchanged passwords are locked and thus unable tobe used to log in. If you run chage without any options and specify only the user, then it willlaunch an interactive series of prompts to set the required values. Listing 1-30 shows this.The values between the [ ] brackets indicate the current values to which this user’s passwordaging is set.
Listing 1-30. Running chageWithout Options
puppy# chage bob
Changing the aging information for bob
Enter the new value, or press return for the default
Minimum Password Age [0]:
Maximum Password Age [30]:
Last Password Change (YYYY-MM-DD) [2004-06-27]:
Password Expiration Warning [7]:
Password Inactive [-1]:
Account Expiration Date (YYYY-MM-DD) [2004-07-28]:
4444c01_final.qxd 1/5/05 12:42 AM Page 36
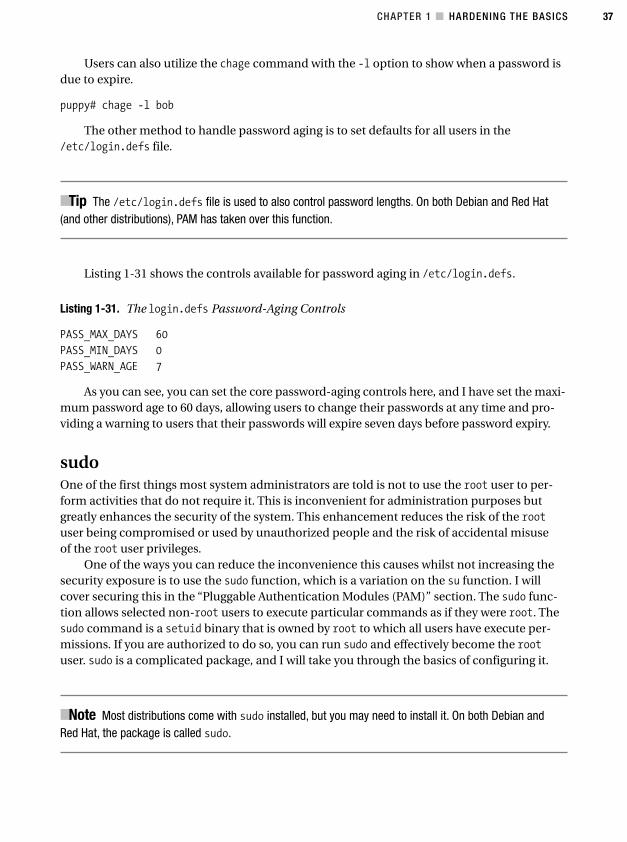
CHAPTER 1 ■ HARDENING THE BASICS 37
Users can also utilize the chage command with the -l option to show when a password isdue to expire.
puppy# chage -l bob
The other method to handle password aging is to set defaults for all users in the/etc/login.defs file.
■Tip The /etc/login.defs file is used to also control password lengths. On both Debian and Red Hat(and other distributions), PAM has taken over this function.
Listing 1-31 shows the controls available for password aging in /etc/login.defs.
Listing 1-31. The login.defs Password-Aging Controls
PASS_MAX_DAYS 60
PASS_MIN_DAYS 0
PASS_WARN_AGE 7
As you can see, you can set the core password-aging controls here, and I have set the maxi-mum password age to 60 days, allowing users to change their passwords at any time and pro-viding a warning to users that their passwords will expire seven days before password expiry.
sudoOne of the first things most system administrators are told is not to use the root user to per-form activities that do not require it. This is inconvenient for administration purposes butgreatly enhances the security of the system. This enhancement reduces the risk of the rootuser being compromised or used by unauthorized people and the risk of accidental misuseof the root user privileges.
One of the ways you can reduce the inconvenience this causes whilst not increasing thesecurity exposure is to use the sudo function, which is a variation on the su function. I willcover securing this in the “Pluggable Authentication Modules (PAM)” section. The sudo func-tion allows selected non-root users to execute particular commands as if they were root. Thesudo command is a setuid binary that is owned by root to which all users have execute per-missions. If you are authorized to do so, you can run sudo and effectively become the rootuser. sudo is a complicated package, and I will take you through the basics of configuring it.
■Note Most distributions come with sudo installed, but you may need to install it. On both Debian andRed Hat, the package is called sudo.
4444c01_final.qxd 1/5/05 12:42 AM Page 37
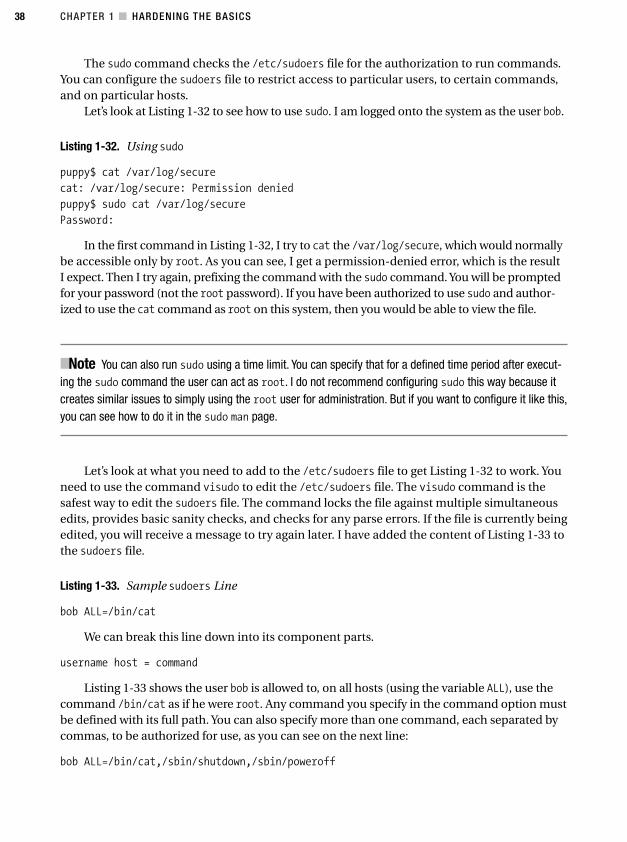
CHAPTER 1 ■ HARDENING THE BASICS38
The sudo command checks the /etc/sudoers file for the authorization to run commands.You can configure the sudoers file to restrict access to particular users, to certain commands,and on particular hosts.
Let’s look at Listing 1-32 to see how to use sudo. I am logged onto the system as the user bob.
Listing 1-32. Using sudo
puppy$ cat /var/log/secure
cat: /var/log/secure: Permission denied
puppy$ sudo cat /var/log/secure
Password:
In the first command in Listing 1-32, I try to cat the /var/log/secure, which would normallybe accessible only by root. As you can see, I get a permission-denied error, which is the resultI expect. Then I try again, prefixing the command with the sudo command. You will be promptedfor your password (not the root password). If you have been authorized to use sudo and author-ized to use the cat command as root on this system, then you would be able to view the file.
■Note You can also run sudo using a time limit. You can specify that for a defined time period after execut-ing the sudo command the user can act as root. I do not recommend configuring sudo this way because itcreates similar issues to simply using the root user for administration. But if you want to configure it like this,you can see how to do it in the sudo man page.
Let’s look at what you need to add to the /etc/sudoers file to get Listing 1-32 to work. Youneed to use the command visudo to edit the /etc/sudoers file. The visudo command is thesafest way to edit the sudoers file. The command locks the file against multiple simultaneousedits, provides basic sanity checks, and checks for any parse errors. If the file is currently beingedited, you will receive a message to try again later. I have added the content of Listing 1-33 tothe sudoers file.
Listing 1-33. Sample sudoers Line
bob ALL=/bin/cat
We can break this line down into its component parts.
username host = command
Listing 1-33 shows the user bob is allowed to, on all hosts (using the variable ALL), use thecommand /bin/cat as if he were root. Any command you specify in the command option mustbe defined with its full path. You can also specify more than one command, each separated bycommas, to be authorized for use, as you can see on the next line:
bob ALL=/bin/cat,/sbin/shutdown,/sbin/poweroff
4444c01_final.qxd 1/5/05 12:42 AM Page 38
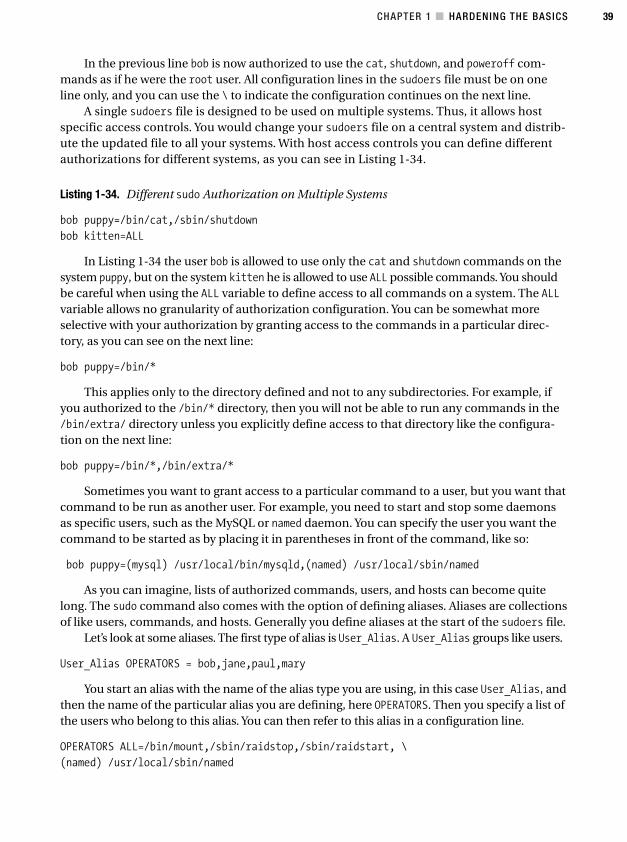
CHAPTER 1 ■ HARDENING THE BASICS 39
In the previous line bob is now authorized to use the cat, shutdown, and poweroff com-mands as if he were the root user. All configuration lines in the sudoers file must be on oneline only, and you can use the \ to indicate the configuration continues on the next line.
A single sudoers file is designed to be used on multiple systems. Thus, it allows hostspecific access controls. You would change your sudoers file on a central system and distrib-ute the updated file to all your systems. With host access controls you can define differentauthorizations for different systems, as you can see in Listing 1-34.
Listing 1-34. Different sudo Authorization on Multiple Systems
bob puppy=/bin/cat,/sbin/shutdown
bob kitten=ALL
In Listing 1-34 the user bob is allowed to use only the cat and shutdown commands on thesystem puppy, but on the system kitten he is allowed to use ALL possible commands. You shouldbe careful when using the ALL variable to define access to all commands on a system. The ALLvariable allows no granularity of authorization configuration. You can be somewhat moreselective with your authorization by granting access to the commands in a particular direc-tory, as you can see on the next line:
bob puppy=/bin/*
This applies only to the directory defined and not to any subdirectories. For example, ifyou authorized to the /bin/* directory, then you will not be able to run any commands in the/bin/extra/ directory unless you explicitly define access to that directory like the configura-tion on the next line:
bob puppy=/bin/*,/bin/extra/*
Sometimes you want to grant access to a particular command to a user, but you want thatcommand to be run as another user. For example, you need to start and stop some daemonsas specific users, such as the MySQL or named daemon. You can specify the user you want thecommand to be started as by placing it in parentheses in front of the command, like so:
bob puppy=(mysql) /usr/local/bin/mysqld,(named) /usr/local/sbin/named
As you can imagine, lists of authorized commands, users, and hosts can become quitelong. The sudo command also comes with the option of defining aliases. Aliases are collectionsof like users, commands, and hosts. Generally you define aliases at the start of the sudoers file.
Let’s look at some aliases. The first type of alias is User_Alias. A User_Alias groups like users.
User_Alias OPERATORS = bob,jane,paul,mary
You start an alias with the name of the alias type you are using, in this case User_Alias, andthen the name of the particular alias you are defining, here OPERATORS. Then you specify a list ofthe users who belong to this alias. You can then refer to this alias in a configuration line.
OPERATORS ALL=/bin/mount,/sbin/raidstop,/sbin/raidstart, \
(named) /usr/local/sbin/named
4444c01_final.qxd 1/5/05 12:42 AM Page 39
CHAPTER 1 ■ HARDENING THE BASICS40
In the previous line I have specified that the users in User_Alias OPERATORS (bob, jane,paul, and mary) are able to use the mount, raidstart, and raidstop commands and the namedcommand.
The next type of alias you can define is a command alias, Cmnd_Alias, which groupscollections of commands.
Cmnd_Alias DNS_COMMANDS = /usr/local/sbin/rndc,(named) /usr/local/sbin/named
You can use this alias in conjunction with the previous alias.
OPERATORS ALL=/bin/mount,DNS_COMMANDS
Now all users defined in the alias OPERATORS can use the commands /bin/mount and allthose commands defined in the command alias DNS_COMMANDS on ALL hosts.
You can also specify an alias that groups a collection of hosts. The Host_Alias alias canspecify lists of host names, IP addresses, and networks.
Host_Alias DNS_SERVERS = elephant,tiger,bear
You can combine this alias with the preceding ones you have defined.
OPERATORS DNS_SERVERS=DNS_COMMANDS
Now all users specified in the OPERATORS alias can run the commands specified inDNS_COMMANDS on the hosts defined in the DNS_SERVERS alias group.
You can also negate aliases by placing an exclamation (!) mark in front of them. Let’s lookat an example of this. First you define a command alias with some commands you do not wantusers to use, and then you can use that alias in conjunction with a sudo configuration line.
Cmnd_Alias DENIED_COMMANDS = /bin/su,/bin/mount,/bin/umount
bob puppy=/bin/*,!DENIED_COMMANDS
Here the user bob can use all the commands in the /bin directory on the puppy host exceptthose defined in the DENIED_COMMANDS command alias.
■Caution This looks like a great method of securing commands via sudo, but unfortunately it is relativelyeasy to get around negating commands simply by copying or moving the denied command from the direc-tory you have denied it in to another location. You should be aware of this risk when using negated aliases.
Let’s look at one of the other ways you can authorize users to sudo. Inside the sudoers fileyou can define another type of alias based on the group information in your system by prefix-ing the group name with %.
%groupname ALL=(ALL) ALL
Replace groupname with the name of a group defined on your system. This means all mem-bers of the defined group are able to execute whatever commands you authorize for them, inthis case ALL commands on ALL hosts. On Red Hat a group called wheel already exists for this
4444c01_final.qxd 1/5/05 12:42 AM Page 40
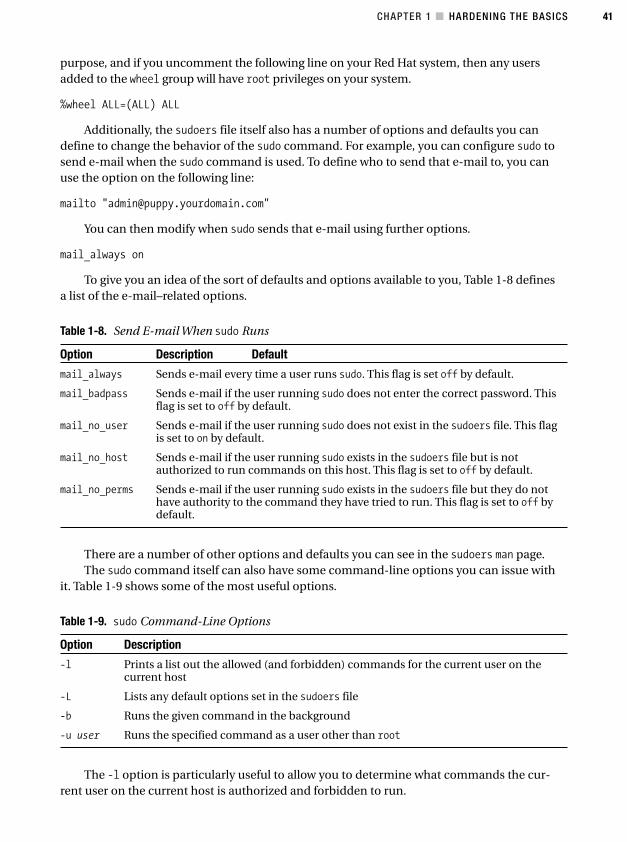
CHAPTER 1 ■ HARDENING THE BASICS 41
purpose, and if you uncomment the following line on your Red Hat system, then any usersadded to the wheel group will have root privileges on your system.
%wheel ALL=(ALL) ALL
Additionally, the sudoers file itself also has a number of options and defaults you candefine to change the behavior of the sudo command. For example, you can configure sudo tosend e-mail when the sudo command is used. To define who to send that e-mail to, you canuse the option on the following line:
mailto "[email protected]"
You can then modify when sudo sends that e-mail using further options.
mail_always on
To give you an idea of the sort of defaults and options available to you, Table 1-8 definesa list of the e-mail–related options.
Table 1-8. Send E-mail When sudo Runs
Option Description Default
mail_always Sends e-mail every time a user runs sudo. This flag is set off by default.
mail_badpass Sends e-mail if the user running sudo does not enter the correct password. Thisflag is set to off by default.
mail_no_user Sends e-mail if the user running sudo does not exist in the sudoers file. This flagis set to on by default.
mail_no_host Sends e-mail if the user running sudo exists in the sudoers file but is notauthorized to run commands on this host. This flag is set to off by default.
mail_no_perms Sends e-mail if the user running sudo exists in the sudoers file but they do nothave authority to the command they have tried to run. This flag is set to off bydefault.
There are a number of other options and defaults you can see in the sudoers man page.The sudo command itself can also have some command-line options you can issue with
it. Table 1-9 shows some of the most useful options.
Table 1-9. sudo Command-Line Options
Option Description
-l Prints a list out the allowed (and forbidden) commands for the current user on thecurrent host
-L Lists any default options set in the sudoers file
-b Runs the given command in the background
-u user Runs the specified command as a user other than root
The -l option is particularly useful to allow you to determine what commands the cur-rent user on the current host is authorized and forbidden to run.
4444c01_final.qxd 1/5/05 12:42 AM Page 41

CHAPTER 1 ■ HARDENING THE BASICS42
puppy# sudo -l
Password:
User bob may run the following commands on this host:
(root) ALL
The sudo command is complicated and if improperly implemented can open your systemto security exposures. I recommend you carefully test any sudo configuration before you imple-ment it and you thoroughly explore the contents of the sudo and sudoers man pages.
User AccountingKeeping track of what your users are doing is an important part of user management. In Chapter 5I will talk about logging onto your system, and indeed one of the first resources you will use tokeep track of the actions of your users is the content of your syslog log files. But also othercommands and sources are useful for keeping track of your users and their activities.
■Caution The data used to populate the output of these commands is often one of the first targets ofan attacker. You should secure the integrity of this data by ensuring only root can read the log files.
The first command I will cover is the who command. This command displays all those userslogged onto the system currently, together with the terminal they are logged on to and if theyhave connected remotely then the IP address or hostname from which they have connected.Listing 1-35 shows the default output of the who command.
Listing 1-35. The Output of the who Command
puppy# who
root tty1 Jul 3 12:32
bob pts/0 Jul 8 11:39 (host002.yourdomain.com)
You can also modify the output of the who command. Table 1-10 shows the command-lineoptions available to modify its output.
Table 1-10. The who Command-Line Options
Option Description
-a Displays all options in verbose mode
-b Displays the time of the last system boot
-d Displays any dead processes
-H Prints a line of column headings
--login Prints the system login processes
-p Prints all active processes spawned by init
-q Generates a count of all login names and number of users logged on
-r Prints the current run level
-t Prints the last system clock change
4444c01_final.qxd 1/5/05 12:42 AM Page 42
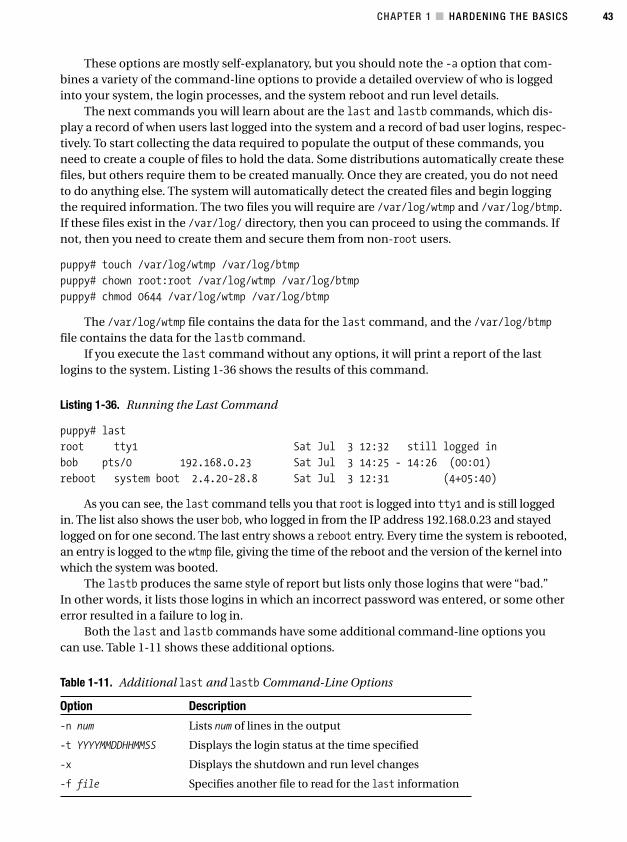
CHAPTER 1 ■ HARDENING THE BASICS 43
These options are mostly self-explanatory, but you should note the -a option that com-bines a variety of the command-line options to provide a detailed overview of who is loggedinto your system, the login processes, and the system reboot and run level details.
The next commands you will learn about are the last and lastb commands, which dis-play a record of when users last logged into the system and a record of bad user logins, respec-tively. To start collecting the data required to populate the output of these commands, youneed to create a couple of files to hold the data. Some distributions automatically create thesefiles, but others require them to be created manually. Once they are created, you do not needto do anything else. The system will automatically detect the created files and begin loggingthe required information. The two files you will require are /var/log/wtmp and /var/log/btmp.If these files exist in the /var/log/ directory, then you can proceed to using the commands. Ifnot, then you need to create them and secure them from non-root users.
puppy# touch /var/log/wtmp /var/log/btmp
puppy# chown root:root /var/log/wtmp /var/log/btmp
puppy# chmod 0644 /var/log/wtmp /var/log/btmp
The /var/log/wtmp file contains the data for the last command, and the /var/log/btmpfile contains the data for the lastb command.
If you execute the last command without any options, it will print a report of the lastlogins to the system. Listing 1-36 shows the results of this command.
Listing 1-36. Running the Last Command
puppy# last
root tty1 Sat Jul 3 12:32 still logged in
bob pts/0 192.168.0.23 Sat Jul 3 14:25 - 14:26 (00:01)
reboot system boot 2.4.20-28.8 Sat Jul 3 12:31 (4+05:40)
As you can see, the last command tells you that root is logged into tty1 and is still loggedin. The list also shows the user bob, who logged in from the IP address 192.168.0.23 and stayedlogged on for one second. The last entry shows a reboot entry. Every time the system is rebooted,an entry is logged to the wtmp file, giving the time of the reboot and the version of the kernel intowhich the system was booted.
The lastb produces the same style of report but lists only those logins that were “bad.”In other words, it lists those logins in which an incorrect password was entered, or some othererror resulted in a failure to log in.
Both the last and lastb commands have some additional command-line options youcan use. Table 1-11 shows these additional options.
Table 1-11. Additional last and lastb Command-Line Options
Option Description
-n num Lists num of lines in the output
-t YYYYMMDDHHMMSS Displays the login status at the time specified
-x Displays the shutdown and run level changes
-f file Specifies another file to read for the last information
4444c01_final.qxd 1/5/05 12:42 AM Page 43
CHAPTER 1 ■ HARDENING THE BASICS44
Related to the last and lastb commands is the lastlog command. The lastlog commanddisplays a report that is based on information in the /var/log/lastlog file that shows the loginstatus of all users on your system including those users who have never logged in. Like the wtmpand btmp files, you may need to create the lastlog file.
puppy# touch /var/log/lastlog
puppy# chown root:root /var/log/lastlog
puppy# chmod 0644 /var/log/lastlog
This displays a list of all users and their last login date and time. Or it displays a messageindicating **Never Logged In** if that user has never logged in. You can also specify only thelastlog record for a particular user by using the -u command-line option. Or you can use the-t days option to specify only those logins more recent than days be displayed. Using the -tflag overrides the use of the -u flag.
puppy# lastlog -u bob
puppy# lastlog -t 30
■Tip Many systems also come with the ac command that provides statistics about the amount of time usershave been connected to your system, which can often provide useful information. The ac command uses thecontents of the /var/log/wtmp file to produce these reports; you can see its options in the sa man page.
Process AccountingAnother useful tool in tracking the activities on your system is process accounting. Processaccounting is a method of tracking every command issued on your system, the process oruser initiating that command, and the amount of processing time used, amongst other infor-mation. All modern distributions have process accounting enabled in their kernels, and yousimply need to add some utilities for turning on and manipulating that data on your system.
If you have Red Hat, you can install the package psacct, which contains the required tools.For Debian systems you can use the acct package. If you cannot find a suitable process account-ing package for your distribution, then you can also download and compile the Acct utilities fromhttp://www.ibiblio.org/pub/linux/system/admin/accounts/acct-1-3.73.tar.gz. This is an oldrelease of the tools and, although stable, does not have the full functionality of the utilities avail-able in the Red Hat and Debian packages, so some of the functions I will describe may not work.
If you installed a package, then skip down until you reach the section on the discussion ofstarting process accounting. If you downloaded the utilities, then unpack the archive and changeinto the resulting directory. This directory contains some kernel patches (which you will not allneed, as all modern kernels include process accounting code) and two directories, utils andscripts. Change into the utils directory, and compile the programs in this directory. Enter thefollowing:
puppy# make
Then copy the compiled binaries to a program directory in your path; the recommendeddefault path is /usr/local/sbin.
4444c01_final.qxd 1/5/05 12:42 AM Page 44
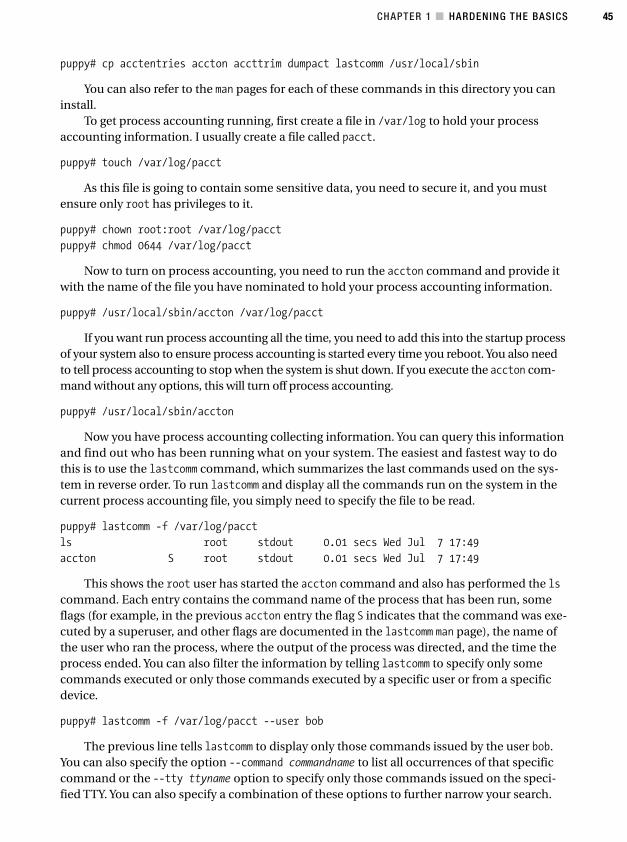
CHAPTER 1 ■ HARDENING THE BASICS 45
puppy# cp acctentries accton accttrim dumpact lastcomm /usr/local/sbin
You can also refer to the man pages for each of these commands in this directory you caninstall.
To get process accounting running, first create a file in /var/log to hold your processaccounting information. I usually create a file called pacct.
puppy# touch /var/log/pacct
As this file is going to contain some sensitive data, you need to secure it, and you mustensure only root has privileges to it.
puppy# chown root:root /var/log/pacct
puppy# chmod 0644 /var/log/pacct
Now to turn on process accounting, you need to run the accton command and provide itwith the name of the file you have nominated to hold your process accounting information.
puppy# /usr/local/sbin/accton /var/log/pacct
If you want run process accounting all the time, you need to add this into the startup processof your system also to ensure process accounting is started every time you reboot. You also needto tell process accounting to stop when the system is shut down. If you execute the accton com-mand without any options, this will turn off process accounting.
puppy# /usr/local/sbin/accton
Now you have process accounting collecting information. You can query this informationand find out who has been running what on your system. The easiest and fastest way to dothis is to use the lastcomm command, which summarizes the last commands used on the sys-tem in reverse order. To run lastcomm and display all the commands run on the system in thecurrent process accounting file, you simply need to specify the file to be read.
puppy# lastcomm -f /var/log/pacct
ls root stdout 0.01 secs Wed Jul 7 17:49
accton S root stdout 0.01 secs Wed Jul 7 17:49
This shows the root user has started the accton command and also has performed the lscommand. Each entry contains the command name of the process that has been run, someflags (for example, in the previous accton entry the flag S indicates that the command was exe-cuted by a superuser, and other flags are documented in the lastcomm man page), the name ofthe user who ran the process, where the output of the process was directed, and the time theprocess ended. You can also filter the information by telling lastcomm to specify only somecommands executed or only those commands executed by a specific user or from a specificdevice.
puppy# lastcomm -f /var/log/pacct --user bob
The previous line tells lastcomm to display only those commands issued by the user bob.You can also specify the option --command commandname to list all occurrences of that specificcommand or the --tty ttyname option to specify only those commands issued on the speci-fied TTY. You can also specify a combination of these options to further narrow your search.
4444c01_final.qxd 1/5/05 12:42 AM Page 45
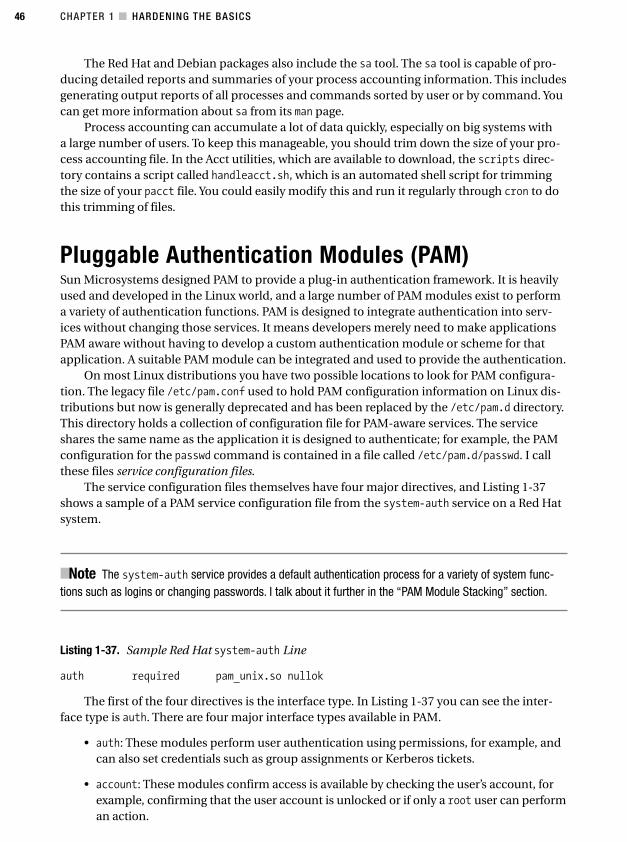
CHAPTER 1 ■ HARDENING THE BASICS46
The Red Hat and Debian packages also include the sa tool. The sa tool is capable of pro-ducing detailed reports and summaries of your process accounting information. This includesgenerating output reports of all processes and commands sorted by user or by command. Youcan get more information about sa from its man page.
Process accounting can accumulate a lot of data quickly, especially on big systems witha large number of users. To keep this manageable, you should trim down the size of your pro-cess accounting file. In the Acct utilities, which are available to download, the scripts direc-tory contains a script called handleacct.sh, which is an automated shell script for trimmingthe size of your pacct file. You could easily modify this and run it regularly through cron to dothis trimming of files.
Pluggable Authentication Modules (PAM)Sun Microsystems designed PAM to provide a plug-in authentication framework. It is heavilyused and developed in the Linux world, and a large number of PAM modules exist to performa variety of authentication functions. PAM is designed to integrate authentication into serv-ices without changing those services. It means developers merely need to make applicationsPAM aware without having to develop a custom authentication module or scheme for thatapplication. A suitable PAM module can be integrated and used to provide the authentication.
On most Linux distributions you have two possible locations to look for PAM configura-tion. The legacy file /etc/pam.conf used to hold PAM configuration information on Linux dis-tributions but now is generally deprecated and has been replaced by the /etc/pam.d directory.This directory holds a collection of configuration file for PAM-aware services. The serviceshares the same name as the application it is designed to authenticate; for example, the PAMconfiguration for the passwd command is contained in a file called /etc/pam.d/passwd. I callthese files service configuration files.
The service configuration files themselves have four major directives, and Listing 1-37shows a sample of a PAM service configuration file from the system-auth service on a Red Hatsystem.
■Note The system-auth service provides a default authentication process for a variety of system func-tions such as logins or changing passwords. I talk about it further in the “PAM Module Stacking” section.
Listing 1-37. Sample Red Hat system-auth Line
auth required pam_unix.so nullok
The first of the four directives is the interface type. In Listing 1-37 you can see the inter-face type is auth. There are four major interface types available in PAM.
• auth: These modules perform user authentication using permissions, for example, andcan also set credentials such as group assignments or Kerberos tickets.
• account: These modules confirm access is available by checking the user’s account, forexample, confirming that the user account is unlocked or if only a root user can performan action.
4444c01_final.qxd 1/5/05 12:42 AM Page 46
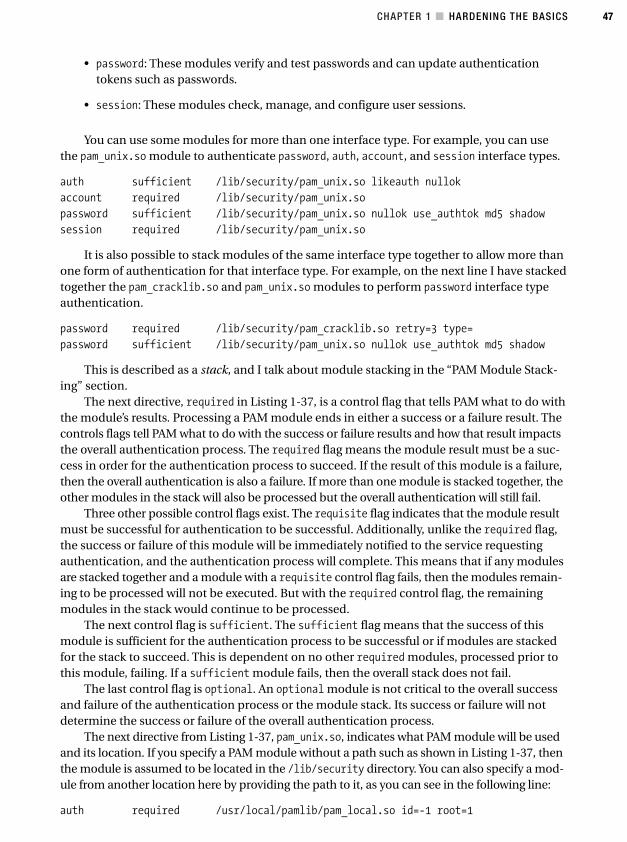
CHAPTER 1 ■ HARDENING THE BASICS 47
• password: These modules verify and test passwords and can update authenticationtokens such as passwords.
• session: These modules check, manage, and configure user sessions.
You can use some modules for more than one interface type. For example, you can usethe pam_unix.so module to authenticate password, auth, account, and session interface types.
auth sufficient /lib/security/pam_unix.so likeauth nullok
account required /lib/security/pam_unix.so
password sufficient /lib/security/pam_unix.so nullok use_authtok md5 shadow
session required /lib/security/pam_unix.so
It is also possible to stack modules of the same interface type together to allow more thanone form of authentication for that interface type. For example, on the next line I have stackedtogether the pam_cracklib.so and pam_unix.so modules to perform password interface typeauthentication.
password required /lib/security/pam_cracklib.so retry=3 type=
password sufficient /lib/security/pam_unix.so nullok use_authtok md5 shadow
This is described as a stack, and I talk about module stacking in the “PAM Module Stack-ing” section.
The next directive, required in Listing 1-37, is a control flag that tells PAM what to do withthe module’s results. Processing a PAM module ends in either a success or a failure result. Thecontrols flags tell PAM what to do with the success or failure results and how that result impactsthe overall authentication process. The required flag means the module result must be a suc-cess in order for the authentication process to succeed. If the result of this module is a failure,then the overall authentication is also a failure. If more than one module is stacked together, theother modules in the stack will also be processed but the overall authentication will still fail.
Three other possible control flags exist. The requisite flag indicates that the module resultmust be successful for authentication to be successful. Additionally, unlike the required flag,the success or failure of this module will be immediately notified to the service requestingauthentication, and the authentication process will complete. This means that if any modulesare stacked together and a module with a requisite control flag fails, then the modules remain-ing to be processed will not be executed. But with the required control flag, the remainingmodules in the stack would continue to be processed.
The next control flag is sufficient. The sufficient flag means that the success of thismodule is sufficient for the authentication process to be successful or if modules are stackedfor the stack to succeed. This is dependent on no other required modules, processed prior tothis module, failing. If a sufficient module fails, then the overall stack does not fail.
The last control flag is optional. An optional module is not critical to the overall successand failure of the authentication process or the module stack. Its success or failure will notdetermine the success or failure of the overall authentication process.
The next directive from Listing 1-37, pam_unix.so, indicates what PAM module will be usedand its location. If you specify a PAM module without a path such as shown in Listing 1-37, thenthe module is assumed to be located in the /lib/security directory. You can also specify a mod-ule from another location here by providing the path to it, as you can see in the following line:
auth required /usr/local/pamlib/pam_local.so id=-1 root=1
4444c01_final.qxd 1/5/05 12:42 AM Page 47
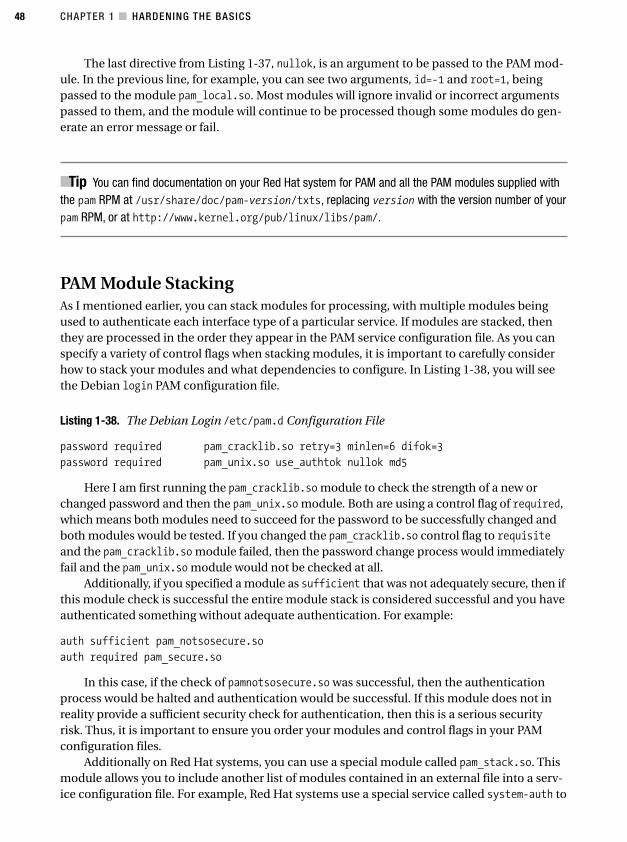
CHAPTER 1 ■ HARDENING THE BASICS48
The last directive from Listing 1-37, nullok, is an argument to be passed to the PAM mod-ule. In the previous line, for example, you can see two arguments, id=-1 and root=1, beingpassed to the module pam_local.so. Most modules will ignore invalid or incorrect argumentspassed to them, and the module will continue to be processed though some modules do gen-erate an error message or fail.
■Tip You can find documentation on your Red Hat system for PAM and all the PAM modules supplied withthe pam RPM at /usr/share/doc/pam-version/txts, replacing version with the version number of yourpam RPM, or at http://www.kernel.org/pub/linux/libs/pam/.
PAM Module StackingAs I mentioned earlier, you can stack modules for processing, with multiple modules beingused to authenticate each interface type of a particular service. If modules are stacked, thenthey are processed in the order they appear in the PAM service configuration file. As you canspecify a variety of control flags when stacking modules, it is important to carefully considerhow to stack your modules and what dependencies to configure. In Listing 1-38, you will seethe Debian login PAM configuration file.
Listing 1-38. The Debian Login /etc/pam.d Configuration File
password required pam_cracklib.so retry=3 minlen=6 difok=3
password required pam_unix.so use_authtok nullok md5
Here I am first running the pam_cracklib.so module to check the strength of a new orchanged password and then the pam_unix.so module. Both are using a control flag of required,which means both modules need to succeed for the password to be successfully changed andboth modules would be tested. If you changed the pam_cracklib.so control flag to requisiteand the pam_cracklib.so module failed, then the password change process would immediatelyfail and the pam_unix.so module would not be checked at all.
Additionally, if you specified a module as sufficient that was not adequately secure, then ifthis module check is successful the entire module stack is considered successful and you haveauthenticated something without adequate authentication. For example:
auth sufficient pam_notsosecure.so
auth required pam_secure.so
In this case, if the check of pamnotsosecure.so was successful, then the authenticationprocess would be halted and authentication would be successful. If this module does not inreality provide a sufficient security check for authentication, then this is a serious securityrisk. Thus, it is important to ensure you order your modules and control flags in your PAMconfiguration files.
Additionally on Red Hat systems, you can use a special module called pam_stack.so. Thismodule allows you to include another list of modules contained in an external file into a serv-ice configuration file. For example, Red Hat systems use a special service called system-auth to
4444c01_final.qxd 1/5/05 12:42 AM Page 48

CHAPTER 1 ■ HARDENING THE BASICS 49
perform the default authentication for most services. In Listing 1-39 you will see the Red Hatservice configuration file for the passwd function.
Listing 1-39. The Red Hat passwd Function Service Configuration File
auth required /lib/security/pam_stack.so service=system-auth
account required /lib/security/pam_stack.so service=system-auth
password required /lib/security/pam_warn.so
password required /lib/security/pam_stack.so service=system-auth
Instead of defining the particular PAM modules to be used for authentication, the serviceconfiguration file defines the pam_stack.so module with an option of service=system-auth.This tells PAM to use the service configuration file called system-auth and the modules definedin it for the authentication process. This is especially useful for maintaining a single, central-ized authentication method that you refer to in a number of services. If you want to change theauthentication process, you have to change it in only one place—not in all the service configu-ration files.
Finally, you should check the contents of all your PAM module stacks and configurationto ensure you fully understand the sequence in which authentication occurs. Additionally, youshould check for the presence of the pam_rhosts_auth.so module. This module is designed toallow access using .rhosts files, which are used by the so-called r-tools, rlogin, rsh, and so on.These tools and this authentication model are not secure, and I strongly recommend you removeall references to this module from your PAM configuration. I will talk about the r-tools andtheir security weaknesses further in Chapter 3.
The PAM “Other” ServiceOne of the advantages of implementing PAM on your system is that it comes with a catchallauthentication service that handles the authentication for any PAM-aware service that doesnot have a specific service configuration file. The PAM configuration for this is located in the/etc/pam.d/other file, and in Listing 1-40 you can see the default Red Hat other file.
Listing 1-40. Default Red Hat /etc/pam.d/other File
#%PAM-1-0
auth required /lib/security/pam_deny.so
account required /lib/security/pam_deny.so
password required /lib/security/pam_deny.so
session required /lib/security/pam_deny.so
Listing 1-40 shows a very strong other file. Each of the possible interface types is repre-sented here with a control flag of required, which means each authentication request mustsucceed for the service to authenticate and that all interface types will be checked. The speci-fied module, pam_deny.so, does exactly what the name suggests and denies any request madeto it. So this is a good configuration for security purposes because the authentication in List-ing 1-40 will never succeed, thus stopping any PAM-aware service from being inadvertentlyauthenticated.
This configuration does pose a risk, though, if you or someone else accidentally deletesone of the service configuration files from the /etc/pam.d directory, for example, the login file.
4444c01_final.qxd 1/5/05 12:42 AM Page 49
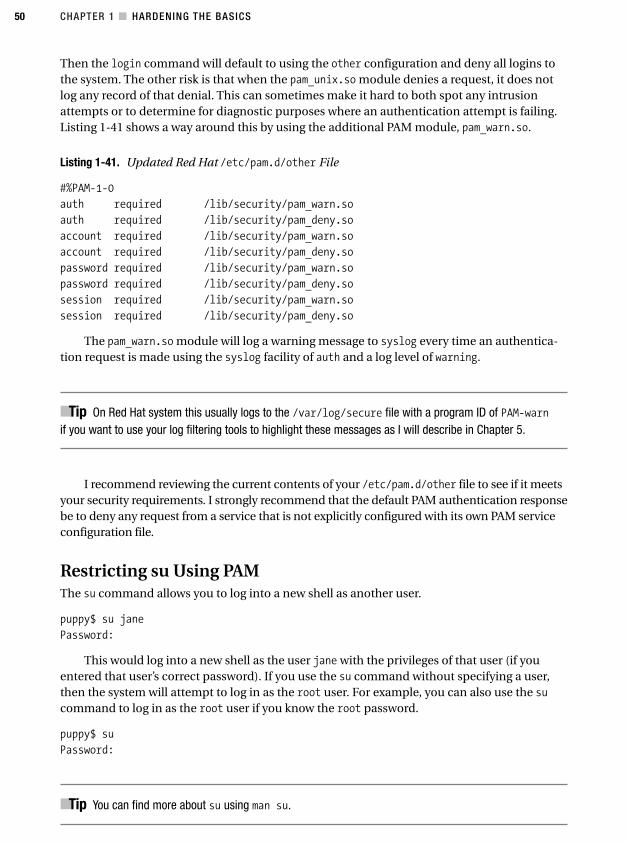
CHAPTER 1 ■ HARDENING THE BASICS50
Then the login command will default to using the other configuration and deny all logins tothe system. The other risk is that when the pam_unix.so module denies a request, it does notlog any record of that denial. This can sometimes make it hard to both spot any intrusionattempts or to determine for diagnostic purposes where an authentication attempt is failing.Listing 1-41 shows a way around this by using the additional PAM module, pam_warn.so.
Listing 1-41. Updated Red Hat /etc/pam.d/other File
#%PAM-1-0
auth required /lib/security/pam_warn.so
auth required /lib/security/pam_deny.so
account required /lib/security/pam_warn.so
account required /lib/security/pam_deny.so
password required /lib/security/pam_warn.so
password required /lib/security/pam_deny.so
session required /lib/security/pam_warn.so
session required /lib/security/pam_deny.so
The pam_warn.so module will log a warning message to syslog every time an authentica-tion request is made using the syslog facility of auth and a log level of warning.
■Tip On Red Hat system this usually logs to the /var/log/secure file with a program ID of PAM-warnif you want to use your log filtering tools to highlight these messages as I will describe in Chapter 5.
I recommend reviewing the current contents of your /etc/pam.d/other file to see if it meetsyour security requirements. I strongly recommend that the default PAM authentication responsebe to deny any request from a service that is not explicitly configured with its own PAM serviceconfiguration file.
Restricting su Using PAMThe su command allows you to log into a new shell as another user.
puppy$ su jane
Password:
This would log into a new shell as the user jane with the privileges of that user (if youentered that user’s correct password). If you use the su command without specifying a user,then the system will attempt to log in as the root user. For example, you can also use the sucommand to log in as the root user if you know the root password.
puppy$ su
Password:
■Tip You can find more about su using man su.
4444c01_final.qxd 1/5/05 12:42 AM Page 50
CHAPTER 1 ■ HARDENING THE BASICS 51
As you can imagine, this is a powerful tool but also a dangerous one to which you shouldrestrict access. PAM offers a way to easily secure access to this tool to only those users you want.To configure for access restriction, review the contents of the su PAM service configurationfiles inside your /etc/pam.d directory. On both Debian and Red Hat systems, you should findthe following line:
auth required /lib/security/pam_wheel.so use_uid
Uncomment this line, so PAM will allow su to be used only by members of the wheel group.
■Note The wheel group may exist on your system already, or you may need to create it and add therequired members to it.
The use_uid option tells PAM to check the UID of the current user trying to use su to log in.You can also specify the group= option to indicate that a group other than wheel is allowed touse su to log in. See the following line:
auth required /lib/security/pam_wheel.so use_uid group=allowsu
Now only those users belonging to the allowsu group will be able to use the su command.
■Tip Some other useful configuration models for su are documented in the /etc/pam.d/su service andare worth examining. These may also give you ideas for some other uses of PAM.
Setting Limits with PAMThe PAM module pam_limits.so is designed to prevent internal- and some external-style Denialof Service attacks. An internal Denial of Service attack can occur when internal users either delib-erately or inadvertently cause a system or application outage by consuming too many resourcessuch as memory, disk space, or CPU. External Denial of Service attacks occur in the same mannerbut originate from outside the host.
To enable limits on functionality, you need to add or enable the pam_limits.so module inthe services for which you require limiting to operate. On a Debian system, for example, an entryexists for the pam_limits.so functionality in the login service configuration file in /etc/pam.d.
session required pam_limits.so
By default on Debian, this entry is commented out. Uncomment it to enable limits. Asyou can see, the pam_limits.so module is used for the session interface type.
■Note On the Red Hat system the default system-auth service contains an entry for the pam_limits.somodule.
4444c01_final.qxd 1/5/05 12:42 AM Page 51

CHAPTER 1 ■ HARDENING THE BASICS52
You can also add it to other services, for example, adding it to the imap service to providelimits to users accessing IMAP resources.
The pam_limits.so module is controlled by a configuration file called limits.conf that islocated in /etc/security. Listing 1-42 shows an example of this file.
Listing 1-42. Sample limits.conf File
# domain type item value
* soft core 0
* hard core 0
Here the limits.conf file is controlling the size of any core dumps generated. This is oneof the most common uses of the pam_limits.so module. Let’s examine the structure of the file.It is broken into four elements: domain, type, item, and value.
The domain is the scope of the limit and who it effects, for example, a particular user, groupof users, or a wildcard entry (*), which indicates all users. The type is either soft or hard. A soft
limit is a warning point and can be exceeded but will trigger a warning syslog entry. A hard limitis the maximum possible limit. A resource cannot exceed this hard limit. Thus, you should setyour soft limits as a smaller size or number than your hard limits.
The type of limit describes what is being limited, and the value is the size of that limit.Table 1-12 lists all the possible types of resources you can limit with the pam_limits.so module.
Table 1-12. Limits You Can Impose
Limit Description Value
core Limits the core file size Kilobytes
data Limits the maximum data size Kilobytes
fsize Limits the maximum file size Kilobytes
memlock Defines the maximum locked-in-memory address space Kilobytes
nofile Limits the number of open files Number
rss Limits the maximum resident set size Kilobytes
stack Limits the maximum stack size Kilobytes
cpu Limits the maximum CPU time Minutes
nproc Limits the maximum number of processes Number
as Specifies the address space limit Number
maxlogins Limits the maximum number of logins for a user Number
priority Limits the priority with which to run a user’s process Number
I also show the type of value you can use for a resource limit. For example, the maxloginslimit type is expressed as number that indicates the maximum number of times a user or userscan simultaneously log in. cpu is expressed as the maximum number of minutes of CPU timethat a user can consume.
Where the value is set to 0, this indicates the specified user or users (or all users) are unableto use any of that resource. For example, setting the core limit to 0 will result in no core dumpfiles being created.
4444c01_final.qxd 1/5/05 12:42 AM Page 52
CHAPTER 1 ■ HARDENING THE BASICS 53
bob soft core 0
bob hard core 0
So, in the previous two lines, the user bob is prevented from creating any core dump files.
■Tip Even if you do not use any other type of limit, you should set the core dump size limit to 0 to prevent thecreation of core dump files. Core dump files often contain valuable or dangerous information, and unless youhave a requirement for them (for example developers need them), then I recommend you limit their creation.
You can also restrict this to a particular group by prefixing the group name with an at (@)character
@sales soft core 0
@sales hard core 0
or to everyone on the system using the * wildcard, as you saw in Listing 1-42.
■Note You can also control the limits being set with the ulimit command.
Restricting Users to Specific Login Times with PAMMost distributions come with the pam_time.so module. This allows you to control when andwhere from users can log onto the system. It is defined as an account interface type. You canadd it to the login service in the so file like this:
account required /lib/security/pam_time.so
If you have more than one module stacked, then you should add the pam_time.so modulebefore all the other account interface type modules. In the previous line, I added it as a required
module, which means the check must be successful for authentication to succeed.The pam_time.so module is configured using the file time.conf, which is stored in the
/etc/security directory. Listing 1-43 shows a line from this file.
Listing 1-43. The time.conf File
login;*;bob|jane;!Al2100-0600
I will break this rather confusing piece of configuration down and explain its componentelements. Each element is separated by a semicolon. Each of these elements is a logic list, andyou can use logical operators and tokens to control it further.
service;terminal;users;times
So the first element is service. In Listing 1-43 you can see that login is the service. If youspecify a line in this file that refers to a service, you must also define the pam_time.so module
4444c01_final.qxd 1/5/05 12:42 AM Page 53
CHAPTER 1 ■ HARDENING THE BASICS54
in that service’s configuration file in /etc/pam.d. You can add the pam_time.so module toalmost any one of the services defined in the /etc/pam.d directory.
The next element is the terminal to which this time restriction applies. Here I have speci-fied the wildcard operator * for all terminals. You can use a wildcard in any element exceptservice but only once per element. You could also specify a list of terminals separated by a|, tty1|tty2|tty3, or a type of terminal suffixed with a * wildcard such as ttyp*.
In the next element I specify which users this time restriction applies to, and I have useda logical operator here. The first user is bob. I have then used the logical or separator, |, to spec-ify a second user, jane. In this example this means the time restrictions apply to either bob orjane. You could also use the logical operator & here to represent and. For example, time restric-tions apply to both bob and jane as in bob&jane.
The last element is the time restriction itself. The time here is prefixed with !. This means“anything but.” The next two letters Al is short for “all,” which indicates all days of the week.The next eight digits are start and finish times in 24-hour time format separated by a hyphen(-). In Listing 1-43, you saw that the start and finish times are 21:00 (or 9 p.m.) and 06:00 (or6 a.m.), respectively. If the finish time is lower than the start time (as is the case in Listing 1-43),then the finish time is deemed to be during the next day. So, putting this all together meansthat bob and jane can log onto any terminal at any time except between 9 p.m. and 6 a.m.
Let’s look at another example.
login;ttyp*;!root;!Wd0000-2400
Here I block logins from all pseudo-terminals on the weekends for all users except root.In the time element I have used the Wd entry, which indicates weekends. You can also use Wk,which stands for weekdays, or the entries for the individual days of the week, which are Mo, Tu,We, Th, Fr, Sa, Su.
Logging an Alert on User Login with PAMThe next PAM module is called pam_login_alert.so and alerts via e-mail or syslog when a particular user (or users) logs onto the system. You can download the module at http://www.kernel.org/pub/linux/libs/pam/pre/modules/pam_login_alert-0.10.tar.gz.
■Tip A variety of other PAM modules are also available at this site that you may find useful.
Create a temporary directory, and unpack the tar file into it. The package contains a num-ber of files, including the source for the module. To create the module, you need to make andinstall it.
puppy$ make
puppy# make install
This will results in a file called pam_login_alert.so, which is installed by default to the/lib/security directory. Also, two configuration files are created and copied to /etc. They arelogin_alert.conf and login.alert.users.
4444c01_final.qxd 1/5/05 12:42 AM Page 54
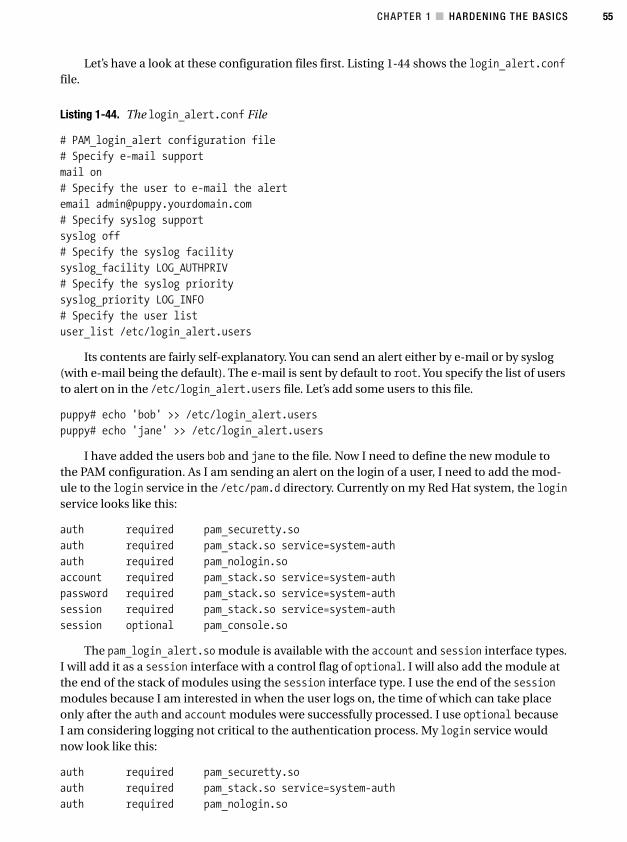
CHAPTER 1 ■ HARDENING THE BASICS 55
Let’s have a look at these configuration files first. Listing 1-44 shows the login_alert.conffile.
Listing 1-44. The login_alert.conf File
# PAM_login_alert configuration file
# Specify e-mail support
mail on
# Specify the user to e-mail the alert
email [email protected]
# Specify syslog support
syslog off
# Specify the syslog facility
syslog_facility LOG_AUTHPRIV
# Specify the syslog priority
syslog_priority LOG_INFO
# Specify the user list
user_list /etc/login_alert.users
Its contents are fairly self-explanatory. You can send an alert either by e-mail or by syslog(with e-mail being the default). The e-mail is sent by default to root. You specify the list of usersto alert on in the /etc/login_alert.users file. Let’s add some users to this file.
puppy# echo 'bob' >> /etc/login_alert.users
puppy# echo 'jane' >> /etc/login_alert.users
I have added the users bob and jane to the file. Now I need to define the new module tothe PAM configuration. As I am sending an alert on the login of a user, I need to add the mod-ule to the login service in the /etc/pam.d directory. Currently on my Red Hat system, the loginservice looks like this:
auth required pam_securetty.so
auth required pam_stack.so service=system-auth
auth required pam_nologin.so
account required pam_stack.so service=system-auth
password required pam_stack.so service=system-auth
session required pam_stack.so service=system-auth
session optional pam_console.so
The pam_login_alert.so module is available with the account and session interface types.I will add it as a session interface with a control flag of optional. I will also add the module atthe end of the stack of modules using the session interface type. I use the end of the sessionmodules because I am interested in when the user logs on, the time of which can take placeonly after the auth and account modules were successfully processed. I use optional becauseI am considering logging not critical to the authentication process. My login service wouldnow look like this:
auth required pam_securetty.so
auth required pam_stack.so service=system-auth
auth required pam_nologin.so
4444c01_final.qxd 1/5/05 12:42 AM Page 55

CHAPTER 1 ■ HARDENING THE BASICS56
account required pam_stack.so service=system-auth
password required pam_stack.so service=system-auth
session required pam_stack.so service=system-auth
session optional pam_console.so
session optional pam_login_alert.so
Now when bob or jane logs in, an e-mail will be generated and a message will be sent toroot notifying of the new login. You could also enable the syslog function to send a log entrywhen either of these users log in.
Some Other Pam ModulesI recommend you investigate some other PAM modules and potentially configure them to aidin securing your system.
pam_access.so: The pam_access.so module controls login access and is configured usingthe /etc/security/access.conf file. For example, it controls who can log in and wherethey can log in from. It can include restrictions based on group membership as well.
pam_group.so: The pam_group.so module works with group membership and PAM. This isa slightly more dangerous module, as it is able to grant temporary group membership tousers; you should use it with caution. See the /etc/security/group.conf file for configu-ration details.
pam_env.so: This module allows you to set your environment variables using PAM. See the/etc/security/pam_env.conf file for configuration details.
Package Management, File Integrity, and UpdatingOne of the great advantages attackers have when attempting to penetrate systems is some sys-tem administrators’ inertia about updating software packages and applications. A large num-ber of systems have software installed that is one or more versions behind the current release.Or the software is the original version installed when the system was installed. These olderversions of software frequently have exploits and vulnerabilities that expose your system toattack. It is critical you update your software on a regular basis to ensure your system has themost recent and secure version of packages and applications.
■Note I talk about how to find out when a security vulnerability is discovered in the “Keeping InformedAbout Security” section.
The package management and update tools on the various distributions are powerful andperform a variety of functions that do not have any security implications. I will focus on thoseaspects of updating and package management on your system that do have security implica-tions, such as verifying the integrity of a package or securely downloading an update.
4444c01_final.qxd 1/5/05 12:42 AM Page 56
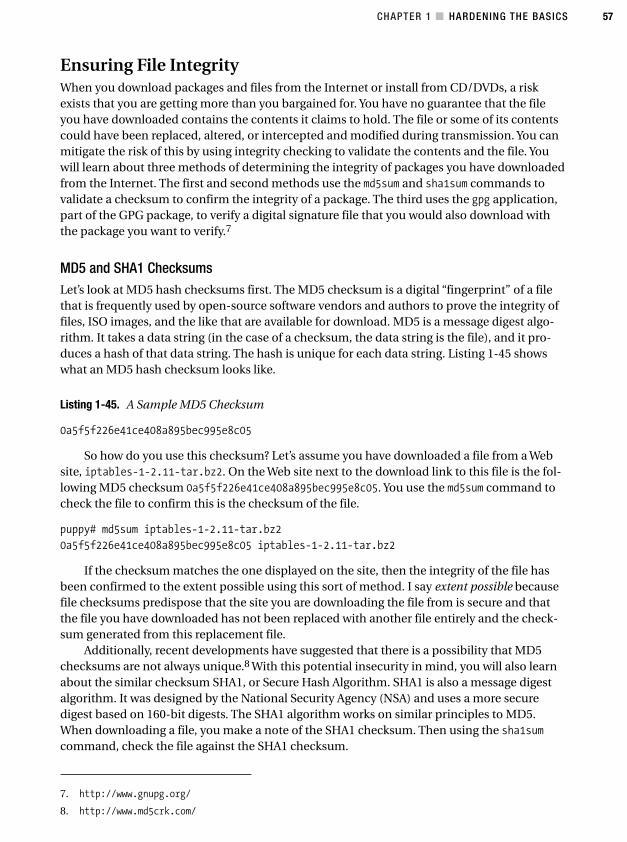
CHAPTER 1 ■ HARDENING THE BASICS 57
7. http://www.gnupg.org/
8. http://www.md5crk.com/
Ensuring File IntegrityWhen you download packages and files from the Internet or install from CD/DVDs, a riskexists that you are getting more than you bargained for. You have no guarantee that the fileyou have downloaded contains the contents it claims to hold. The file or some of its contentscould have been replaced, altered, or intercepted and modified during transmission. You canmitigate the risk of this by using integrity checking to validate the contents and the file. Youwill learn about three methods of determining the integrity of packages you have downloadedfrom the Internet. The first and second methods use the md5sum and sha1sum commands tovalidate a checksum to confirm the integrity of a package. The third uses the gpg application,part of the GPG package, to verify a digital signature file that you would also download withthe package you want to verify.7
MD5 and SHA1 ChecksumsLet’s look at MD5 hash checksums first. The MD5 checksum is a digital “fingerprint” of a filethat is frequently used by open-source software vendors and authors to prove the integrity offiles, ISO images, and the like that are available for download. MD5 is a message digest algo-rithm. It takes a data string (in the case of a checksum, the data string is the file), and it pro-duces a hash of that data string. The hash is unique for each data string. Listing 1-45 showswhat an MD5 hash checksum looks like.
Listing 1-45. A Sample MD5 Checksum
0a5f5f226e41ce408a895bec995e8c05
So how do you use this checksum? Let’s assume you have downloaded a file from a Website, iptables-1-2.11-tar.bz2. On the Web site next to the download link to this file is the fol-lowing MD5 checksum 0a5f5f226e41ce408a895bec995e8c05. You use the md5sum command tocheck the file to confirm this is the checksum of the file.
puppy# md5sum iptables-1-2.11-tar.bz2
0a5f5f226e41ce408a895bec995e8c05 iptables-1-2.11-tar.bz2
If the checksum matches the one displayed on the site, then the integrity of the file hasbeen confirmed to the extent possible using this sort of method. I say extent possible becausefile checksums predispose that the site you are downloading the file from is secure and thatthe file you have downloaded has not been replaced with another file entirely and the check-sum generated from this replacement file.
Additionally, recent developments have suggested that there is a possibility that MD5checksums are not always unique.8 With this potential insecurity in mind, you will also learnabout the similar checksum SHA1, or Secure Hash Algorithm. SHA1 is also a message digestalgorithm. It was designed by the National Security Agency (NSA) and uses a more securedigest based on 160-bit digests. The SHA1 algorithm works on similar principles to MD5.When downloading a file, you make a note of the SHA1 checksum. Then using the sha1sumcommand, check the file against the SHA1 checksum.
4444c01_final.qxd 1/5/05 12:42 AM Page 57

CHAPTER 1 ■ HARDENING THE BASICS58
puppy# sha1sum image.iso
1929b791088db2338c535e4850d49f491b3c7b53 image.iso
So where you have the option of using a SHA1 checksum, I recommend using these overMD5 checksums.
The SHA1 checksums of course still does not address the issue of a total replacement ofthe file and substitution of a new checksum based on the substituted file. The only way toaddress this is via using a digital signature.
Digital Signatures and GNU Privacy GuardDigital signatures rely on the principles of public-key encryption, which I will discuss in moredetail in Chapter 3. Public-key encryption depends on two keys: a public key and a private key.You publish your public key to anyone who wants to exchange encrypted information with youand keep your private key secret. You encrypt the information with the recipient’s public key,and the recipient of that information uses their private key to decrypt the information. You canalso do this encryption in reverse and encrypt the information with your private key and haveyour public key able to decrypt it. It is this second model that digital signatures use to ensurefile integrity.
Digital signatures are created by combining hashes and public-key encryption. A hash isgenerated of the information (in this case, a package or file) that an author wants to confirmas valid. Like the checksum hashes I have just discussed, this hash is unique to the file; if thecontents of the file change, then so does the hash. This hash is then encrypted, or signed, withthe package author’s private key. This creates the digital signature.
Now the author of the package distributes the file with its digital signature and also makesavailable their public key. When you download the package, you also download the signatureand the author’s public key. You import this public key into your keyring. Your keyring is a col-lection of the public keys that your system knows about, which is managed by whatever toolyou are using for public-key encryption, in this case gpg. You can then verify the file with thedigital signature by using the author’s public key to decrypt the checksum hash and then ver-ify that the hash matches the hash of the downloaded file. You now know the file is valid becauseyou know the author must have used their private key to encrypt the digital signature; other-wise you would not have been able to use their public key to decrypt it.
Let’s look at an example of this at work. Download the GPG package, its digital signature,and the public key of the author and use them to verify the integrity of the package. First, down-load the package and its signature.
puppy# wget ftp://ftp.gnupg.org/gcrypt/gnupg/gnupg-1.2.4.tar.bz2
puppy# wget ftp://ftp.gnupg.org/gcrypt/gnupg/gnupg-1.2.4.tar.bz2.sig
Second, download and import the GPG group’s public key into your public keyring.
puppy# wget ftp://ftp.gnupg.org/gcrypt/gnupg/gnupg.asc
puppy# gpg --import gnupg.asc
gpg: key 57548DCD: public key imported
gpg: Total number processed: 1
gpg: imported: 1
To do the import, you use the gpg --import option.
4444c01_final.qxd 1/5/05 12:42 AM Page 58
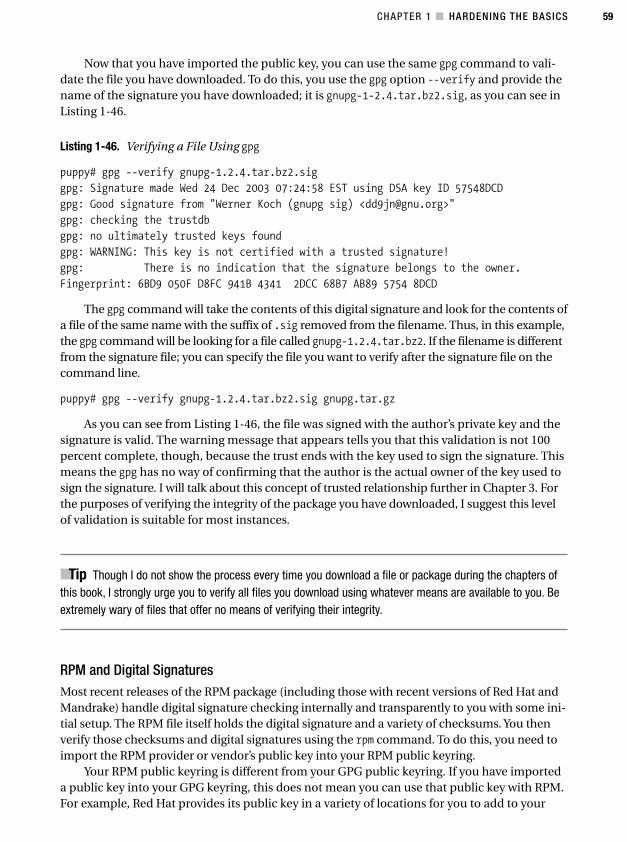
CHAPTER 1 ■ HARDENING THE BASICS 59
Now that you have imported the public key, you can use the same gpg command to vali-date the file you have downloaded. To do this, you use the gpg option --verify and provide thename of the signature you have downloaded; it is gnupg-1-2.4.tar.bz2.sig, as you can see inListing 1-46.
Listing 1-46. Verifying a File Using gpg
puppy# gpg --verify gnupg-1.2.4.tar.bz2.sig
gpg: Signature made Wed 24 Dec 2003 07:24:58 EST using DSA key ID 57548DCD
gpg: Good signature from "Werner Koch (gnupg sig) <[email protected]>"
gpg: checking the trustdb
gpg: no ultimately trusted keys found
gpg: WARNING: This key is not certified with a trusted signature!
gpg: There is no indication that the signature belongs to the owner.
Fingerprint: 6BD9 050F D8FC 941B 4341 2DCC 68B7 AB89 5754 8DCD
The gpg command will take the contents of this digital signature and look for the contents ofa file of the same name with the suffix of .sig removed from the filename. Thus, in this example,the gpg command will be looking for a file called gnupg-1.2.4.tar.bz2. If the filename is differentfrom the signature file; you can specify the file you want to verify after the signature file on thecommand line.
puppy# gpg --verify gnupg-1.2.4.tar.bz2.sig gnupg.tar.gz
As you can see from Listing 1-46, the file was signed with the author’s private key and thesignature is valid. The warning message that appears tells you that this validation is not 100percent complete, though, because the trust ends with the key used to sign the signature. Thismeans the gpg has no way of confirming that the author is the actual owner of the key used tosign the signature. I will talk about this concept of trusted relationship further in Chapter 3. Forthe purposes of verifying the integrity of the package you have downloaded, I suggest this levelof validation is suitable for most instances.
■Tip Though I do not show the process every time you download a file or package during the chapters ofthis book, I strongly urge you to verify all files you download using whatever means are available to you. Beextremely wary of files that offer no means of verifying their integrity.
RPM and Digital SignaturesMost recent releases of the RPM package (including those with recent versions of Red Hat andMandrake) handle digital signature checking internally and transparently to you with some ini-tial setup. The RPM file itself holds the digital signature and a variety of checksums. You thenverify those checksums and digital signatures using the rpm command. To do this, you need toimport the RPM provider or vendor’s public key into your RPM public keyring.
Your RPM public keyring is different from your GPG public keyring. If you have importeda public key into your GPG keyring, this does not mean you can use that public key with RPM.For example, Red Hat provides its public key in a variety of locations for you to add to your
4444c01_final.qxd 1/5/05 12:42 AM Page 59
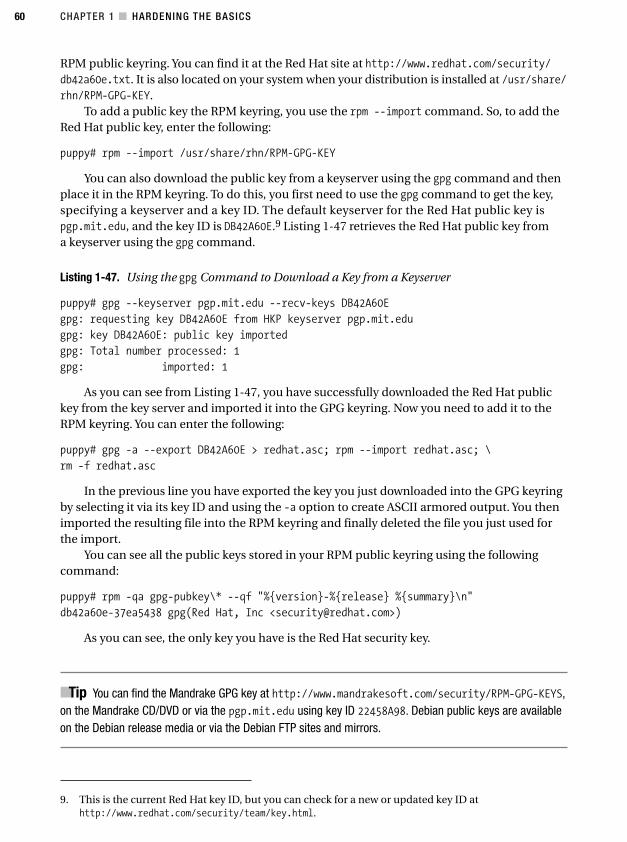
CHAPTER 1 ■ HARDENING THE BASICS60
9. This is the current Red Hat key ID, but you can check for a new or updated key ID athttp://www.redhat.com/security/team/key.html.
RPM public keyring. You can find it at the Red Hat site at http://www.redhat.com/security/db42a60e.txt. It is also located on your system when your distribution is installed at /usr/share/rhn/RPM-GPG-KEY.
To add a public key the RPM keyring, you use the rpm --import command. So, to add theRed Hat public key, enter the following:
puppy# rpm --import /usr/share/rhn/RPM-GPG-KEY
You can also download the public key from a keyserver using the gpg command and thenplace it in the RPM keyring. To do this, you first need to use the gpg command to get the key,specifying a keyserver and a key ID. The default keyserver for the Red Hat public key ispgp.mit.edu, and the key ID is DB42A60E.9 Listing 1-47 retrieves the Red Hat public key froma keyserver using the gpg command.
Listing 1-47. Using the gpg Command to Download a Key from a Keyserver
puppy# gpg --keyserver pgp.mit.edu --recv-keys DB42A60E
gpg: requesting key DB42A60E from HKP keyserver pgp.mit.edu
gpg: key DB42A60E: public key imported
gpg: Total number processed: 1
gpg: imported: 1
As you can see from Listing 1-47, you have successfully downloaded the Red Hat publickey from the key server and imported it into the GPG keyring. Now you need to add it to theRPM keyring. You can enter the following:
puppy# gpg -a --export DB42A60E > redhat.asc; rpm --import redhat.asc; \
rm -f redhat.asc
In the previous line you have exported the key you just downloaded into the GPG keyringby selecting it via its key ID and using the -a option to create ASCII armored output. You thenimported the resulting file into the RPM keyring and finally deleted the file you just used forthe import.
You can see all the public keys stored in your RPM public keyring using the followingcommand:
puppy# rpm -qa gpg-pubkey\* --qf "%{version}-%{release} %{summary}\n"
db42a60e-37ea5438 gpg(Red Hat, Inc <[email protected]>)
As you can see, the only key you have is the Red Hat security key.
■Tip You can find the Mandrake GPG key at http://www.mandrakesoft.com/security/RPM-GPG-KEYS,on the Mandrake CD/DVD or via the pgp.mit.edu using key ID 22458A98. Debian public keys are availableon the Debian release media or via the Debian FTP sites and mirrors.
4444c01_final.qxd 1/5/05 12:42 AM Page 60
CHAPTER 1 ■ HARDENING THE BASICS 61
With the rpm command and the public key, you can now validate the digital signature.Now if you download an RPM produced by Red Hat, you are now able to verify it. To do this,you use the rpm command with the --checksig option (or the -K option, which performs thesame function).
puppy# rpm --checksig kernel-2.4.21-15.0.2.EL.src.rpm
kernel-2.4.21-15.0.2.EL.src.rpm: (sha1) dsa sha1 md5 gpg OK
You can see the results of the --checksig option on the previous line. First the name of theRPM being checked is displayed, and then the successful checks are displayed. The line beforethe results shows that the RPM has valid dsa, sha1, and md5 checksums and is signed with avalid gpg signature. The final OK confirms the validity of the RPM file. If you want to displaymore detail of the validation, you can add the -v option to the rpm command.
puppy# rpm --checksig -v kernel-2.4.21-15.0.2.EL.src.rpm
kernel-2.4.21-15.0.2.EL.src.rpm:
Header V3 DSA signature: OK, key ID db42a60e
Header SHA1 digest: OK (a0c3ab5a36016f398e0882a54164796f2ae9044f)
MD5 digest: OK (ef590ee95255210aca8e2631ebaaa019)
V3 DSA signature: OK, key ID db42a60e
You can display even more information by using the -vv option.If the RPM fails to validate, then the rpm --checksig command will return different results.
Any checks that have failed will be displayed in uppercase, and the results will end with NOT OK.
puppy# rpm --checksig kernel-2.4.21-15.0.2.EL.src.rpm
kernel-2.4.21-15.0.2.EL.src.rpm: size gpg MD5 NOT OK
You can see in the previous line that the size check has validated, but the MD5 checksumhas failed and the results display NOT OK. If the GPG digital signature fails to validate, then youwill see output similar to the following line. In this instance the GPG key is missing.
puppy# rpm --checksig kernel-2.4.21-15.0.2.EL.src.rpm
kernel-2.4.21-15.0.2.EL.src.rpm: (SHA1) DSA sha1 md5 (GPG) NOT OK ➥
(MISSING KEYS: GPG#db42a60e)
You should verify all RPMs using the --checksig option before installing them, and do notinstall an RPM package if any of these checks fail.
Downloading Updates and PatchesYou can use a variety of automated tools for updating your system via the Internet. I willbriefly cover three of them: up2date, apt-get, and yum. Of the three, the only one that offersreal security is the up2date command, which uses SSL certificates to confirm you are down-loading from a valid and verifiable update source in addition to verifying the file integrity ofthe files downloaded. Unfortunately, up2date is a Red Hat–only solution. The remaining tools,apt-get and yum, are capable only of verifying the file integrity of downloads using MD5,SHA1, and GPG checks.
4444c01_final.qxd 1/5/05 12:42 AM Page 61
CHAPTER 1 ■ HARDENING THE BASICS62
10. http://freshrpms.net/apt/
up2dateThe up2date tool comes with Red Hat systems and allows you to retrieve updates from the Red HatNetwork. As mentioned, it uses SSL to verify it is connecting to a valid update source. The up2datecommand does this SSL authentication transparently for you. For any Red Hat releases with a pur-chase price (for example, Red Hat Enterprise Linux), you need to pay for an entitlement to down-load updated patches. For the Fedora Core releases, you can download the updates for free. Theup2date client is a propriety Red Hat tool and does not work with any other distributions.
■Tip An open-source variation of up2date, called NRH-up2date, is available at http://www.nrh-up2date.org/. This tool also allows you to run a centralized Red Hat update server.
The up2date tool downloads RPMs from the Red Hat network and then passes them to therpm command to be processed and installed transparently to the user. As part of this transferto the rpm command, the standard rpm --checksig processing is performed on the RPM(s) tobe installed. This means the size, MD5, and SHA1 checksums as well as the GPG key are allchecked before installing the RPM(s). If any of these fail to validate, then the respective RPMwill not be installed.
You would usually configure up2date and the Red Hat Network when you first install yourRed Hat distribution. But you can reregister your system to the Red Hat Network using the fol-lowing command:
puppy# rhn_register
If your system is registered, you can use the up2date command to retrieve RPMs from RedHat. To list all the available packages, enter the following:
puppy# up2date -l
Fetching package list for channel: rhel-i386-as-3...
And if you want to fetch and download the available updates, you can enter the following:
puppy# up2date -u
Finally, the up2date man page contains further information on how to use the up2datecommand.
apt-getThe APT package-handling application is a front-end interface for the Debian dpkg command.A version also exists that can act as a front-end to RPM.10 It fetches deb or RPM files from remoterepositories and uses either dpkg or rpm to install them. It is extremely easy to use. Each commandconsists of the apt-get command followed by the required function to be performed and poten-tially a package name.
puppy# apt-get update
4444c01_final.qxd 1/5/05 12:42 AM Page 62
CHAPTER 1 ■ HARDENING THE BASICS 63
For example, the command on the previous line updates the list of packages that areavailable for download. The configuration for the apt-get command is held in the /etc/aptdirectory. For Debian, review the contents of the apt.conf.d directory in /etc/apt; for the RedHat variation, review the apt.conf file to see how apt-get is configured to function. Both ver-sions use a file called sources.list in the /etc/apt directory to store the list of repositories.The repositories are generally HTTP or FTP sites that store the available updates.
To install a particular package using apt-get, use the install option, as follows, replacingthe packagename variable with the name of the particular package to be installed:
puppy# apt-get install packagename
To install all available updates, use the upgrade option. Enter the following:
puppy# apt-get upgrade
■Caution Some older versions of apt-get continue to install packages even if the checksums or keyshave failed. I recommend upgrading to the latest version of apt-get.
YumYum (Yellow dog Updater, Modified) is another update and patch tool that works with RPM pack-ages. It functions much like the apt-get and up2date tools. Like these tools, Yum fetches RPMsfrom remote repositories and uses the rpm command to check checksums and to perform theinstallation. You can download Yum from http://linux.duke.edu/projects/yum/download.ptml.It comes in different versions depending on the version of RPM you have installed. Check yourRPM version before you choose a version of Yum to install. Enter the following:
puppy# rpm --version
RPM version 4.2.2
Yum performs much the same functions as the other tools you have seen in this chapter.For example, to view a list of all the packages available to download, you would use the listoption, as follows:
puppy# yum list
You can configure Yum using the file yum.conf located in the /etc directory. In Listing 1-48you can see a sample of this file.
Listing 1-48. Sample yum.conf File
[main]
cachedir=/var/cache/yum
logfile=/var/log/yum.log
distroverpkg=redhat-release
4444c01_final.qxd 1/5/05 12:42 AM Page 63
CHAPTER 1 ■ HARDENING THE BASICS64
[base]
name=Red Hat Linux $releasever - $basearch - Base
baseurl=
http://mirror.dulug.duke.edu/pub/yum-repository/redhat/$releasever/$basearch/
gpgcheck=1
The [main] configuration block shown in Listing 1-48 contains the global variables usedby Yum. You can read about those in the yum.conf man page. The [base] configuration definesa repository to check for updated packages. I have added the option gpgcheck=1 to this reposi-tory to make Yum check for valid GPG signatures. You need to add this option to the definitionsof all repositories defined to Yum if you want them to use GPG signature checking.
To install a package with Yum, use the install option, as follows, replacing the package-name variable with the name of the particular package to be installed:
puppy# yum install packagename
To upgrade all available packages with Yum, use the upgrade option.
puppy# yum upgrade
You can see the additional options available with Yum in its man page.
Compilers and Development ToolsCompilers and associated development tools are incredibly useful to have on your system—thatis, they are handy for you and any potential attackers. If an attacker has access to developmenttools, it makes the process of penetrating your system easier. An attacker can write their ownpenetration programs on your system and then use your compilers and development tools tocompile them. Additionally, some root kits require the attacker compile them on your system.Removing the compilers and development tools makes it that much harder for an attacker.
I recommend that on your production systems you remove the compiler packages andassociated development tools or at least restrict access to them to selected users or groups.The easiest way to restrict access to them is to create a new group and restrict execute accesson all the compiler and development tool binaries to this group.
Removing the Compilers and Development ToolsLet’s now take you through an example of removing the compilers and development tools ona Red Hat system. Listing 1-49 shows you how you can identify the packages you shouldremove or restrict on Red Hat system using the rpm command.
Listing 1-49. Identifying the Compilers and Development Tools
puppy# rpm -qg Development/Languages Development/Tools
cpp-3.2-7
dev86-0.16.3-4
gcc-3.2-7
gcc-g77-3.2-7
...
4444c01_final.qxd 1/5/05 12:42 AM Page 64
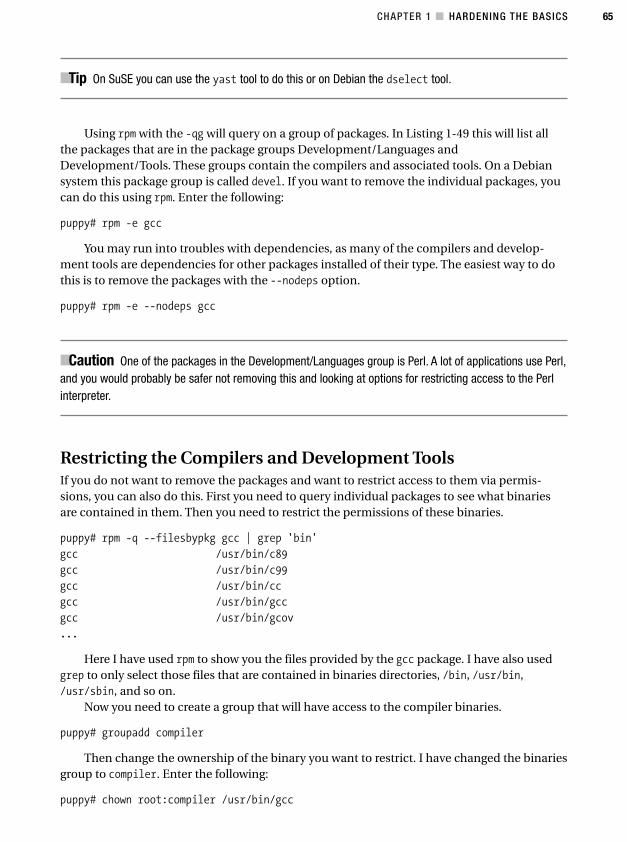
CHAPTER 1 ■ HARDENING THE BASICS 65
■Tip On SuSE you can use the yast tool to do this or on Debian the dselect tool.
Using rpm with the -qg will query on a group of packages. In Listing 1-49 this will list allthe packages that are in the package groups Development/Languages andDevelopment/Tools. These groups contain the compilers and associated tools. On a Debiansystem this package group is called devel. If you want to remove the individual packages, youcan do this using rpm. Enter the following:
puppy# rpm -e gcc
You may run into troubles with dependencies, as many of the compilers and develop-ment tools are dependencies for other packages installed of their type. The easiest way to dothis is to remove the packages with the --nodeps option.
puppy# rpm -e --nodeps gcc
■Caution One of the packages in the Development/Languages group is Perl. A lot of applications use Perl,and you would probably be safer not removing this and looking at options for restricting access to the Perlinterpreter.
Restricting the Compilers and Development ToolsIf you do not want to remove the packages and want to restrict access to them via permis-sions, you can also do this. First you need to query individual packages to see what binariesare contained in them. Then you need to restrict the permissions of these binaries.
puppy# rpm -q --filesbypkg gcc | grep 'bin'
gcc /usr/bin/c89
gcc /usr/bin/c99
gcc /usr/bin/cc
gcc /usr/bin/gcc
gcc /usr/bin/gcov
...
Here I have used rpm to show you the files provided by the gcc package. I have also usedgrep to only select those files that are contained in binaries directories, /bin, /usr/bin,/usr/sbin, and so on.
Now you need to create a group that will have access to the compiler binaries.
puppy# groupadd compiler
Then change the ownership of the binary you want to restrict. I have changed the binariesgroup to compiler. Enter the following:
puppy# chown root:compiler /usr/bin/gcc
4444c01_final.qxd 1/5/05 12:42 AM Page 65
CHAPTER 1 ■ HARDENING THE BASICS66
And finally you change its permissions to be executable only by the root user and mem-bers of the compiler group. Enter the following:
puppy# chmod 0750 /usr/bin/gcc
Now unless the user running the gcc command belongs to the group compiler, they willget a permission-denied message when they try to run the gcc compiler.
puppy$ gcc
bash: /usr/bin/gcc: Permission denied
Hardening and Securing Your KernelThe Linux kernel is the core of your operating system. It provides the coordinating enginefor the rest of the operating system and organizes and manages the processes of your sys-tem. It is unfortunately also subject to some weaknesses through which attackers can gaincontrol of system resources or your system itself. These weaknesses can allow attackers torun attack tools such as root kits.
■Note See Chapter 6 for more details on root kits and detecting them.
To combat these weaknesses and prevent their exploitation, you need to harden the ker-nel. You do this by applying one or more of a series of available patches that address some ofthese weaknesses. These patches are not perfect, though, but they will significantly reduce therisk to your system from these exploits. I will cover one of the major kernel hardening patches:Openwall. I will show you how you can apply this patch to your system, and I will explain thevarious benefits, risks, and limitations created by using the patch. I will discuss the particularfeatures and fixes the Openwall patch offers in the section “The Openwall Project.”
Securing your kernel and hardening using available patches is not an easy process. Fun-damentally perhaps one of the hardest Linux operating system activities that a system admin-istrator can undertake is patching and rebuilding a kernel. This is not a reason not to do this!I will take you through the steps you need to follow and the outputs you should expect to seewhen doing this. At the end of this, you should be comfortable with doing this whenever youneed.
Getting Your Kernel SourceIf you patch and harden your kernel for security purposes, then you need to work from a freshcopy of the kernel, not the kernel that came with your distribution. You can download the lat-est version of the Linux kernel from http://www.kernel.org. Most distributions currentlycome with a version 2.4 kernel; for example, the currently supported kernel for Red Hat 3AS is2.4.26. Run the uname -a command to find out what kernel is running on your system.
puppy# uname -a
Linux puppy.yourdomain.com 2.4.26-EL #2 Mon Jul 19 18:00:36 EST 2004 i686 i686 ➥
i386 GNU/Linux
4444c01_final.qxd 1/5/05 12:42 AM Page 66
CHAPTER 1 ■ HARDENING THE BASICS 67
You can see in the previous line the current kernel is version 2.4.26-EL. (The EL indicatesa Red Hat–specific designation meaning Enterprise Linux.)
At the time of writing, the most recently released version of the kernel was 2.6.7. But atthis stage most distributions are supporting 2.4 release kernels, so I will base my explanationof how to install them on this release of the kernel. Nothing, though, should fundamentallydiffer between the installation process for version 2.4.x kernels and version 2.6.x kernels.
Download kernel version 2.4.26. You should download the most up-to-date version at thetime you are reading this. Replace the 2.4.26 version in the next few examples with the ver-sion of the kernel you are downloading. So Listing 1-50 shows how to download the kernel.
Listing 1-50. Downloading the Kernel Source
puppy$ cd /usr/src
puppy$ wget ftp://ftp.kernel.org/pub/linux/kernel/v2.4/linux-2.4.26.tar.gz
puppy$ wget ftp://ftp.kernel.org/pub/linux/kernel/v2.4/linux-2.4.26.tar.gz.sign
puppy$ gpg --keyserver wwwkeys.pgp.net --recv-keys 0x517D0F0E
gpg: key 517D0F0E: public key "Linux Kernel Archives Verification Key ➥
<[email protected]>" imported
gpg: Total number processed: 1
gpg: imported: 1
Let’s look at Listing 1-50. The Linux kernel sources are generally stored in the /usr/srcdirectory on your system. You have downloaded the most recent version of kernel source andthe signature file for this release of the kernel source to this directory. You have also down-loaded from the pgp.net key server the gpg public key for http://www.kernel.org andimported it into your gpg keyring.
■Note You should check for the current key at http://www.kernel.org/signature.html.
Listing 1-51 shows how to use this public key and the signature file to verify the integrityof the kernel source.
Listing 1-51. Verifying the Kernel Source
puppy$ gpg --verify linux-2.4.26.tar.gz.sign linux-2.4.26.tar.gz
gpg: Signature made Wed 14 Apr 2004 23:23:32 EST using DSA key ID 517D0F0E
gpg: Good signature from "Linux Kernel Archives Verification Key ➥
gpg: aka "Linux Kernel Archives Verification Key ➥
gpg: checking the trustdb
gpg: no ultimately trusted keys found
gpg: WARNING: This key is not certified with a trusted signature!
gpg: There is no indication that the signature belongs to the owner.
Primary key fingerprint: C75D C40A 11D7 AF88 9981 ED5B C86B A06A 517D 0F0E
4444c01_final.qxd 1/5/05 12:42 AM Page 67
CHAPTER 1 ■ HARDENING THE BASICS68
You have used the gpg command to verify the signature of the file and the downloaded filetogether with the PGP public key downloaded in Listing 1-50. The response in Listing 1-51shows this is a good signature. Do not worry about the last lines claiming the key is not certi-fied with a trusted signature. This merely means you do not have the full trust chain for thissignature.
Now that you have verified the integrity of the file, you can unpack it. A lot of patches andother related items look for the source in the directory /usr/src/linux, so you will create a sym-bolic link to this directory using the unpacked source directory as the source of the link. You cansee this Listing 1-52.
Listing 1-52. Unpacking and Creating the Linux Symbolic Link
puppy$ tar -zxf linux-2.4.26.tar.gz
puppy$ ln -s linux-2.4.26.tar.gz linux
You now have a fresh copy of kernel source available to work with and on which to applythe hardening patches.
The Openwall ProjectThe Openwall Project is a collection of security features, patches, and fixes designed to hardenand secure your kernel. You can configure the individual security features during the kernelcomplication process after patching your kernel source; I will take you through doing that inthe following sections. So, what security features does Openwall introduce?
Provides a nonexecutable user stack area: The nonexecutable user stack area isdesigned to reduce the risk of buffer overflows. Most buffer overflows are based on over-writing a function’s return address on the stack to point to some malicious code. Thiscode is put on the stack and executed. By making the stack nonexecutable, the code isprevented from functioning and your system is protected. This is not a perfect solutionto the threat of buffer overflows, but it does reduce the risk that a major group of exploitsthat function in this way can take advantage of the weaknesses in your system.
Restrict links in /tmp: The /tmp directory (or other +t directories) are popular spots forexploits to be executed in and from because of the openness of the directory. Several ofthese types of exploit methods involve using hard links. For example, one form of hardlink attack is based on hard linking setuid or setgid binaries to a directory such as /tmp.An exploit is discovered in one of these binaries. You update or patch the binary, but ahard linked version still exists in another directory that the attacker can use to compro-mise your system. Other forms of hard link attack include using hard links to cause Denialof Service attacks by overwriting critical files or by overflowing disk space or quotas usinghard links of temporary files.
The Openwall patch stops hard links being created by users to files they do not ownunless they have read or write permissions to the file (usually permissions providedthrough group membership). This may potentially impact some poorly designed applica-tions and stop them from functioning. I recommend you test this option after implemen-tation with any applications that utilize hard links in temporary directories.
4444c01_final.qxd 1/5/05 12:42 AM Page 68
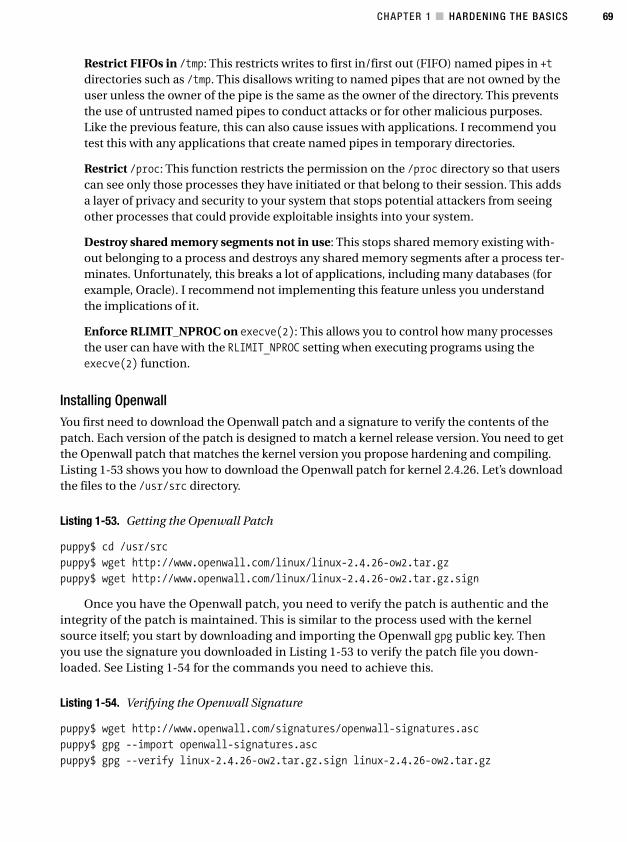
CHAPTER 1 ■ HARDENING THE BASICS 69
Restrict FIFOs in /tmp: This restricts writes to first in/first out (FIFO) named pipes in +tdirectories such as /tmp. This disallows writing to named pipes that are not owned by theuser unless the owner of the pipe is the same as the owner of the directory. This preventsthe use of untrusted named pipes to conduct attacks or for other malicious purposes.Like the previous feature, this can also cause issues with applications. I recommend youtest this with any applications that create named pipes in temporary directories.
Restrict /proc: This function restricts the permission on the /proc directory so that userscan see only those processes they have initiated or that belong to their session. This addsa layer of privacy and security to your system that stops potential attackers from seeingother processes that could provide exploitable insights into your system.
Destroy shared memory segments not in use: This stops shared memory existing with-out belonging to a process and destroys any shared memory segments after a process ter-minates. Unfortunately, this breaks a lot of applications, including many databases (forexample, Oracle). I recommend not implementing this feature unless you understandthe implications of it.
Enforce RLIMIT_NPROC on execve(2): This allows you to control how many processesthe user can have with the RLIMIT_NPROC setting when executing programs using theexecve(2) function.
Installing OpenwallYou first need to download the Openwall patch and a signature to verify the contents of thepatch. Each version of the patch is designed to match a kernel release version. You need to getthe Openwall patch that matches the kernel version you propose hardening and compiling.Listing 1-53 shows you how to download the Openwall patch for kernel 2.4.26. Let’s downloadthe files to the /usr/src directory.
Listing 1-53. Getting the Openwall Patch
puppy$ cd /usr/src
puppy$ wget http://www.openwall.com/linux/linux-2.4.26-ow2.tar.gz
puppy$ wget http://www.openwall.com/linux/linux-2.4.26-ow2.tar.gz.sign
Once you have the Openwall patch, you need to verify the patch is authentic and theintegrity of the patch is maintained. This is similar to the process used with the kernelsource itself; you start by downloading and importing the Openwall gpg public key. Thenyou use the signature you downloaded in Listing 1-53 to verify the patch file you down-loaded. See Listing 1-54 for the commands you need to achieve this.
Listing 1-54. Verifying the Openwall Signature
puppy$ wget http://www.openwall.com/signatures/openwall-signatures.asc
puppy$ gpg --import openwall-signatures.asc
puppy$ gpg --verify linux-2.4.26-ow2.tar.gz.sign linux-2.4.26-ow2.tar.gz
4444c01_final.qxd 1/5/05 12:42 AM Page 69
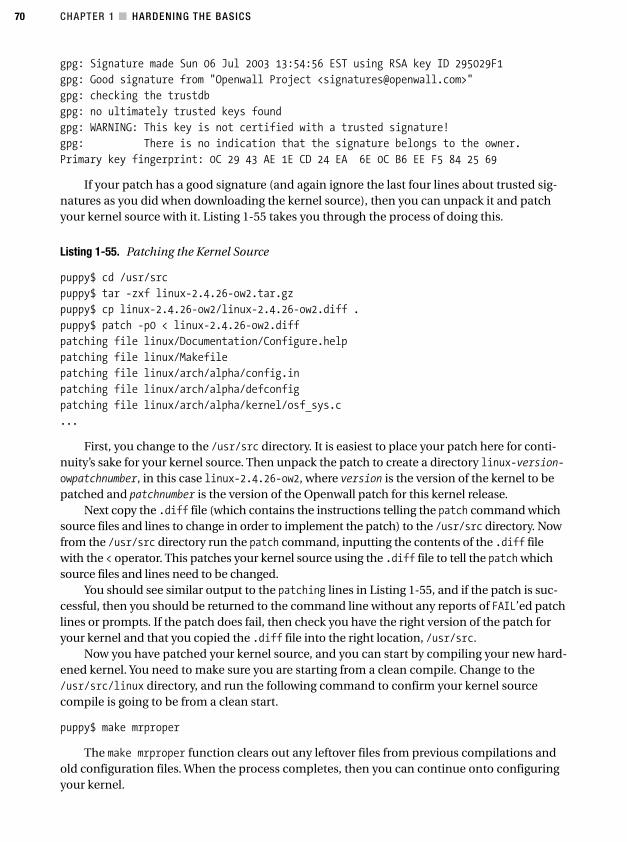
CHAPTER 1 ■ HARDENING THE BASICS70
gpg: Signature made Sun 06 Jul 2003 13:54:56 EST using RSA key ID 295029F1
gpg: Good signature from "Openwall Project <[email protected]>"
gpg: checking the trustdb
gpg: no ultimately trusted keys found
gpg: WARNING: This key is not certified with a trusted signature!
gpg: There is no indication that the signature belongs to the owner.
Primary key fingerprint: 0C 29 43 AE 1E CD 24 EA 6E 0C B6 EE F5 84 25 69
If your patch has a good signature (and again ignore the last four lines about trusted sig-natures as you did when downloading the kernel source), then you can unpack it and patchyour kernel source with it. Listing 1-55 takes you through the process of doing this.
Listing 1-55. Patching the Kernel Source
puppy$ cd /usr/src
puppy$ tar -zxf linux-2.4.26-ow2.tar.gz
puppy$ cp linux-2.4.26-ow2/linux-2.4.26-ow2.diff .
puppy$ patch -p0 < linux-2.4.26-ow2.diff
patching file linux/Documentation/Configure.help
patching file linux/Makefile
patching file linux/arch/alpha/config.in
patching file linux/arch/alpha/defconfig
patching file linux/arch/alpha/kernel/osf_sys.c
...
First, you change to the /usr/src directory. It is easiest to place your patch here for conti-nuity’s sake for your kernel source. Then unpack the patch to create a directory linux-version-owpatchnumber, in this case linux-2.4.26-ow2, where version is the version of the kernel to bepatched and patchnumber is the version of the Openwall patch for this kernel release.
Next copy the .diff file (which contains the instructions telling the patch command whichsource files and lines to change in order to implement the patch) to the /usr/src directory. Nowfrom the /usr/src directory run the patch command, inputting the contents of the .diff filewith the < operator. This patches your kernel source using the .diff file to tell the patch whichsource files and lines need to be changed.
You should see similar output to the patching lines in Listing 1-55, and if the patch is suc-cessful, then you should be returned to the command line without any reports of FAIL’ed patchlines or prompts. If the patch does fail, then check you have the right version of the patch foryour kernel and that you copied the .diff file into the right location, /usr/src.
Now you have patched your kernel source, and you can start by compiling your new hard-ened kernel. You need to make sure you are starting from a clean compile. Change to the/usr/src/linux directory, and run the following command to confirm your kernel sourcecompile is going to be from a clean start.
puppy$ make mrproper
The make mrproper function clears out any leftover files from previous compilations andold configuration files. When the process completes, then you can continue onto configuringyour kernel.
4444c01_final.qxd 1/5/05 12:42 AM Page 70
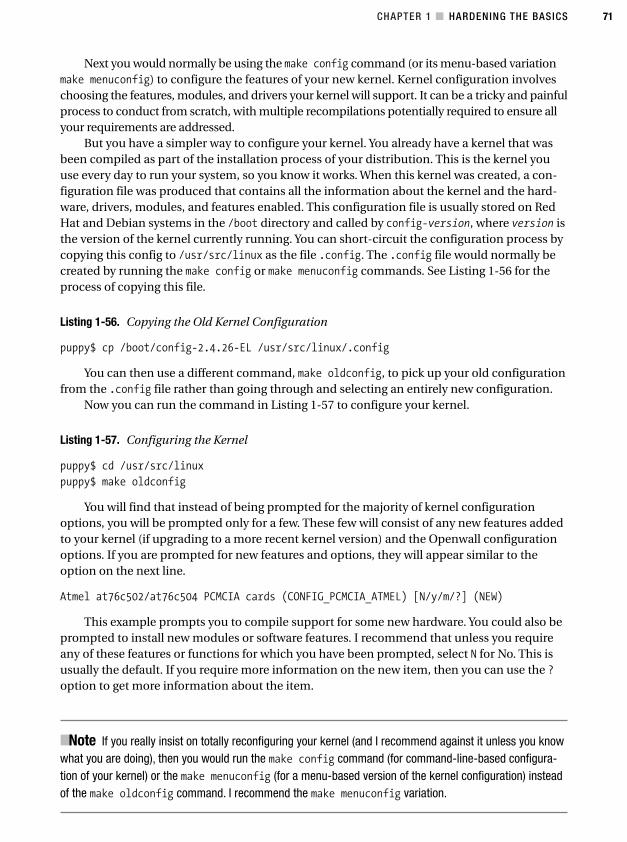
CHAPTER 1 ■ HARDENING THE BASICS 71
Next you would normally be using the make config command (or its menu-based variationmake menuconfig) to configure the features of your new kernel. Kernel configuration involveschoosing the features, modules, and drivers your kernel will support. It can be a tricky and painfulprocess to conduct from scratch, with multiple recompilations potentially required to ensure allyour requirements are addressed.
But you have a simpler way to configure your kernel. You already have a kernel that wasbeen compiled as part of the installation process of your distribution. This is the kernel youuse every day to run your system, so you know it works. When this kernel was created, a con-figuration file was produced that contains all the information about the kernel and the hard-ware, drivers, modules, and features enabled. This configuration file is usually stored on RedHat and Debian systems in the /boot directory and called by config-version, where version isthe version of the kernel currently running. You can short-circuit the configuration process bycopying this config to /usr/src/linux as the file .config. The .config file would normally becreated by running the make config or make menuconfig commands. See Listing 1-56 for theprocess of copying this file.
Listing 1-56. Copying the Old Kernel Configuration
puppy$ cp /boot/config-2.4.26-EL /usr/src/linux/.config
You can then use a different command, make oldconfig, to pick up your old configurationfrom the .config file rather than going through and selecting an entirely new configuration.
Now you can run the command in Listing 1-57 to configure your kernel.
Listing 1-57. Configuring the Kernel
puppy$ cd /usr/src/linux
puppy$ make oldconfig
You will find that instead of being prompted for the majority of kernel configurationoptions, you will be prompted only for a few. These few will consist of any new features addedto your kernel (if upgrading to a more recent kernel version) and the Openwall configurationoptions. If you are prompted for new features and options, they will appear similar to theoption on the next line.
Atmel at76c502/at76c504 PCMCIA cards (CONFIG_PCMCIA_ATMEL) [N/y/m/?] (NEW)
This example prompts you to compile support for some new hardware. You could also beprompted to install new modules or software features. I recommend that unless you requireany of these features or functions for which you have been prompted, select N for No. This isusually the default. If you require more information on the new item, then you can use the ?option to get more information about the item.
■Note If you really insist on totally reconfiguring your kernel (and I recommend against it unless you knowwhat you are doing), then you would run the make config command (for command-line-based configura-tion of your kernel) or the make menuconfig (for a menu-based version of the kernel configuration) insteadof the make oldconfig command. I recommend the make menuconfig variation.
4444c01_final.qxd 1/5/05 12:42 AM Page 71
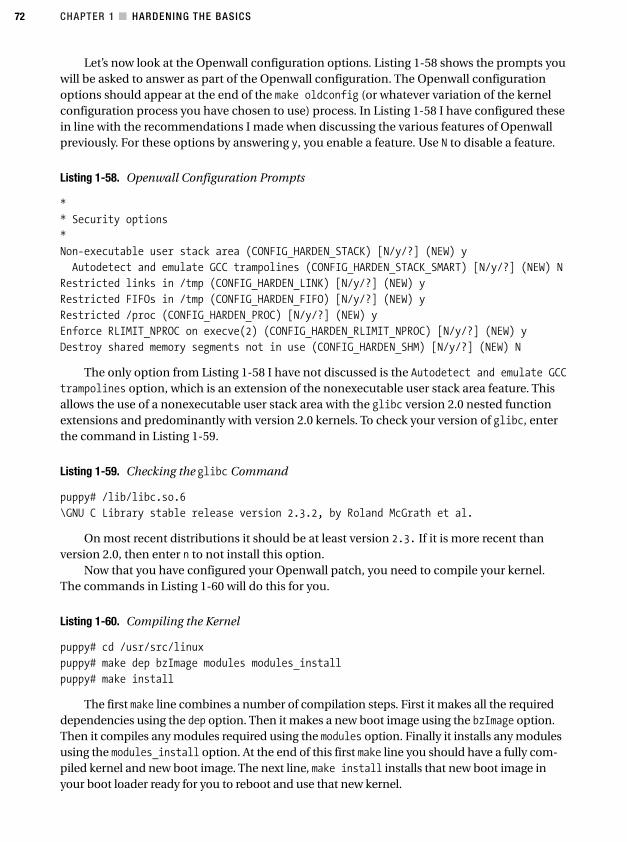
CHAPTER 1 ■ HARDENING THE BASICS72
Let’s now look at the Openwall configuration options. Listing 1-58 shows the prompts youwill be asked to answer as part of the Openwall configuration. The Openwall configurationoptions should appear at the end of the make oldconfig (or whatever variation of the kernelconfiguration process you have chosen to use) process. In Listing 1-58 I have configured thesein line with the recommendations I made when discussing the various features of Openwallpreviously. For these options by answering y, you enable a feature. Use N to disable a feature.
Listing 1-58. Openwall Configuration Prompts
*
* Security options
*
Non-executable user stack area (CONFIG_HARDEN_STACK) [N/y/?] (NEW) y
Autodetect and emulate GCC trampolines (CONFIG_HARDEN_STACK_SMART) [N/y/?] (NEW) N
Restricted links in /tmp (CONFIG_HARDEN_LINK) [N/y/?] (NEW) y
Restricted FIFOs in /tmp (CONFIG_HARDEN_FIFO) [N/y/?] (NEW) y
Restricted /proc (CONFIG_HARDEN_PROC) [N/y/?] (NEW) y
Enforce RLIMIT_NPROC on execve(2) (CONFIG_HARDEN_RLIMIT_NPROC) [N/y/?] (NEW) y
Destroy shared memory segments not in use (CONFIG_HARDEN_SHM) [N/y/?] (NEW) N
The only option from Listing 1-58 I have not discussed is the Autodetect and emulate GCCtrampolines option, which is an extension of the nonexecutable user stack area feature. Thisallows the use of a nonexecutable user stack area with the glibc version 2.0 nested functionextensions and predominantly with version 2.0 kernels. To check your version of glibc, enterthe command in Listing 1-59.
Listing 1-59. Checking the glibc Command
puppy# /lib/libc.so.6
\GNU C Library stable release version 2.3.2, by Roland McGrath et al.
On most recent distributions it should be at least version 2.3. If it is more recent thanversion 2.0, then enter n to not install this option.
Now that you have configured your Openwall patch, you need to compile your kernel.The commands in Listing 1-60 will do this for you.
Listing 1-60. Compiling the Kernel
puppy# cd /usr/src/linux
puppy# make dep bzImage modules modules_install
puppy# make install
The first make line combines a number of compilation steps. First it makes all the requireddependencies using the dep option. Then it makes a new boot image using the bzImage option.Then it compiles any modules required using the modules option. Finally it installs any modulesusing the modules_install option. At the end of this first make line you should have a fully com-piled kernel and new boot image. The next line, make install installs that new boot image inyour boot loader ready for you to reboot and use that new kernel.
4444c01_final.qxd 1/5/05 12:42 AM Page 72
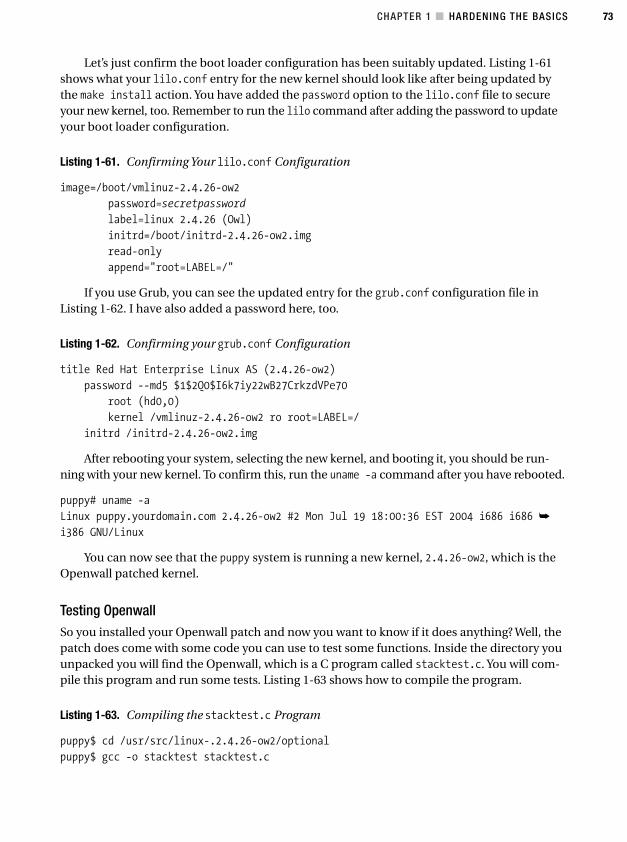
CHAPTER 1 ■ HARDENING THE BASICS 73
Let’s just confirm the boot loader configuration has been suitably updated. Listing 1-61shows what your lilo.conf entry for the new kernel should look like after being updated bythe make install action. You have added the password option to the lilo.conf file to secureyour new kernel, too. Remember to run the lilo command after adding the password to updateyour boot loader configuration.
Listing 1-61. Confirming Your lilo.conf Configuration
image=/boot/vmlinuz-2.4.26-ow2
password=secretpassword
label=linux 2.4.26 (Owl)
initrd=/boot/initrd-2.4.26-ow2.img
read-only
append="root=LABEL=/"
If you use Grub, you can see the updated entry for the grub.conf configuration file inListing 1-62. I have also added a password here, too.
Listing 1-62. Confirming your grub.conf Configuration
title Red Hat Enterprise Linux AS (2.4.26-ow2)
password --md5 $1$2Q0$I6k7iy22wB27CrkzdVPe70
root (hd0,0)
kernel /vmlinuz-2.4.26-ow2 ro root=LABEL=/
initrd /initrd-2.4.26-ow2.img
After rebooting your system, selecting the new kernel, and booting it, you should be run-ning with your new kernel. To confirm this, run the uname -a command after you have rebooted.
puppy# uname -a
Linux puppy.yourdomain.com 2.4.26-ow2 #2 Mon Jul 19 18:00:36 EST 2004 i686 i686 ➥
i386 GNU/Linux
You can now see that the puppy system is running a new kernel, 2.4.26-ow2, which is theOpenwall patched kernel.
Testing OpenwallSo you installed your Openwall patch and now you want to know if it does anything? Well, thepatch does come with some code you can use to test some functions. Inside the directory youunpacked you will find the Openwall, which is a C program called stacktest.c. You will com-pile this program and run some tests. Listing 1-63 shows how to compile the program.
Listing 1-63. Compiling the stacktest.c Program
puppy$ cd /usr/src/linux-.2.4.26-ow2/optional
puppy$ gcc -o stacktest stacktest.c
4444c01_final.qxd 1/5/05 12:42 AM Page 73
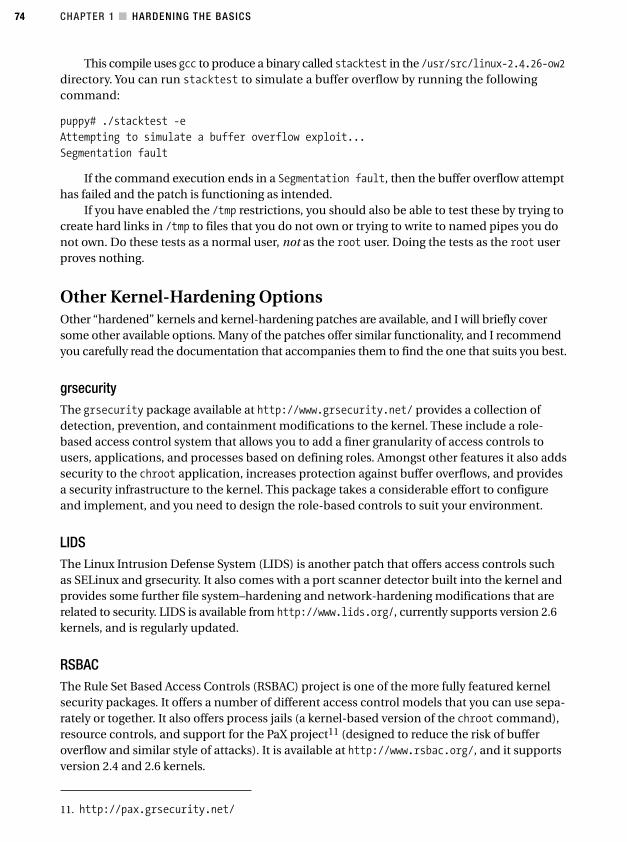
CHAPTER 1 ■ HARDENING THE BASICS74
This compile uses gcc to produce a binary called stacktest in the /usr/src/linux-2.4.26-ow2directory. You can run stacktest to simulate a buffer overflow by running the followingcommand:
puppy# ./stacktest -e
Attempting to simulate a buffer overflow exploit...
Segmentation fault
If the command execution ends in a Segmentation fault, then the buffer overflow attempthas failed and the patch is functioning as intended.
If you have enabled the /tmp restrictions, you should also be able to test these by trying tocreate hard links in /tmp to files that you do not own or trying to write to named pipes you donot own. Do these tests as a normal user, not as the root user. Doing the tests as the root userproves nothing.
Other Kernel-Hardening OptionsOther “hardened” kernels and kernel-hardening patches are available, and I will briefly coversome other available options. Many of the patches offer similar functionality, and I recommendyou carefully read the documentation that accompanies them to find the one that suits you best.
grsecurityThe grsecurity package available at http://www.grsecurity.net/ provides a collection ofdetection, prevention, and containment modifications to the kernel. These include a role-based access control system that allows you to add a finer granularity of access controls tousers, applications, and processes based on defining roles. Amongst other features it also addssecurity to the chroot application, increases protection against buffer overflows, and providesa security infrastructure to the kernel. This package takes a considerable effort to configureand implement, and you need to design the role-based controls to suit your environment.
LIDSThe Linux Intrusion Defense System (LIDS) is another patch that offers access controls suchas SELinux and grsecurity. It also comes with a port scanner detector built into the kernel andprovides some further file system–hardening and network-hardening modifications that arerelated to security. LIDS is available from http://www.lids.org/, currently supports version 2.6kernels, and is regularly updated.
RSBACThe Rule Set Based Access Controls (RSBAC) project is one of the more fully featured kernelsecurity packages. It offers a number of different access control models that you can use sepa-rately or together. It also offers process jails (a kernel-based version of the chroot command),resource controls, and support for the PaX project11 (designed to reduce the risk of bufferoverflow and similar style of attacks). It is available at http://www.rsbac.org/, and it supportsversion 2.4 and 2.6 kernels.
11. http://pax.grsecurity.net/
4444c01_final.qxd 1/5/05 12:42 AM Page 74
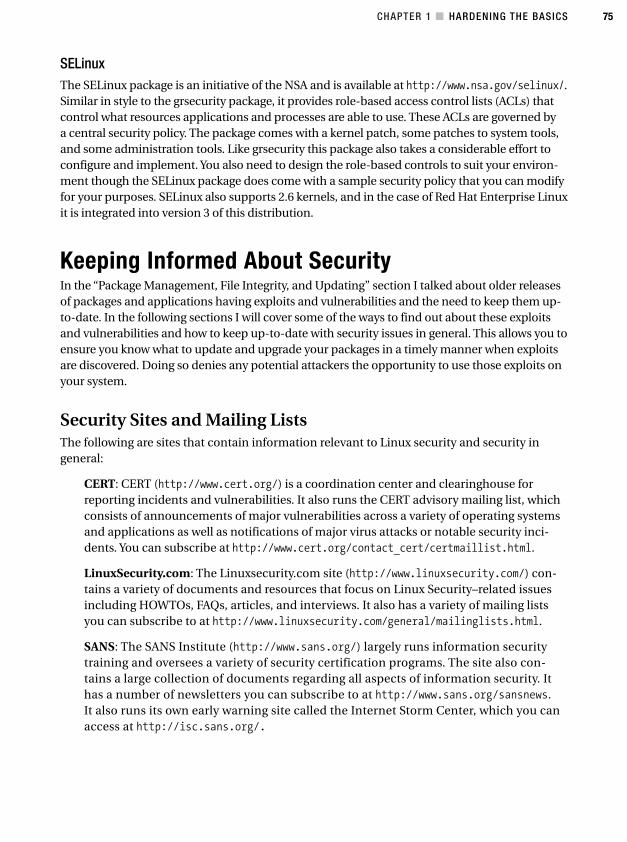
CHAPTER 1 ■ HARDENING THE BASICS 75
SELinuxThe SELinux package is an initiative of the NSA and is available at http://www.nsa.gov/selinux/.Similar in style to the grsecurity package, it provides role-based access control lists (ACLs) thatcontrol what resources applications and processes are able to use. These ACLs are governed bya central security policy. The package comes with a kernel patch, some patches to system tools,and some administration tools. Like grsecurity this package also takes a considerable effort toconfigure and implement. You also need to design the role-based controls to suit your environ-ment though the SELinux package does come with a sample security policy that you can modifyfor your purposes. SELinux also supports 2.6 kernels, and in the case of Red Hat Enterprise Linuxit is integrated into version 3 of this distribution.
Keeping Informed About SecurityIn the “Package Management, File Integrity, and Updating” section I talked about older releasesof packages and applications having exploits and vulnerabilities and the need to keep them up-to-date. In the following sections I will cover some of the ways to find out about these exploitsand vulnerabilities and how to keep up-to-date with security issues in general. This allows you toensure you know what to update and upgrade your packages in a timely manner when exploitsare discovered. Doing so denies any potential attackers the opportunity to use those exploits onyour system.
Security Sites and Mailing ListsThe following are sites that contain information relevant to Linux security and security ingeneral:
CERT: CERT (http://www.cert.org/) is a coordination center and clearinghouse forreporting incidents and vulnerabilities. It also runs the CERT advisory mailing list, whichconsists of announcements of major vulnerabilities across a variety of operating systemsand applications as well as notifications of major virus attacks or notable security inci-dents. You can subscribe at http://www.cert.org/contact_cert/certmaillist.html.
LinuxSecurity.com: The Linuxsecurity.com site (http://www.linuxsecurity.com/) con-tains a variety of documents and resources that focus on Linux Security–related issuesincluding HOWTOs, FAQs, articles, and interviews. It also has a variety of mailing listsyou can subscribe to at http://www.linuxsecurity.com/general/mailinglists.html.
SANS: The SANS Institute (http://www.sans.org/) largely runs information securitytraining and oversees a variety of security certification programs. The site also con-tains a large collection of documents regarding all aspects of information security. Ithas a number of newsletters you can subscribe to at http://www.sans.org/sansnews.It also runs its own early warning site called the Internet Storm Center, which you canaccess at http://isc.sans.org/.
4444c01_final.qxd 1/5/05 12:42 AM Page 75
CHAPTER 1 ■ HARDENING THE BASICS76
Security Focus: The Security Focus site12 (http://www.securityfocus.com) is a vendor-neutral site containing a collection of security resources. These include the BugTraq mail-ing list, which is probably the most comprehensive mailing list of security vulnerabilities.You can subscribe to the mailing list at http://www.securityfocus.com/archive. The sitealso contains the Security Focus Vulnerability Database. The database should be one ofyour first ports of call when checking for vulnerabilities in an application, distribution, ortool. You can find it at http://www.securityfocus.com/bid.
Vendor and Distribution Security SitesThese are sites maintained by the authors and vendors of a variety of Linux distributions thatfocus on security and security-related announcements specific to that distribution. Many ofthem also contain links to distribution specific mailing lists, such as Red Hat’s Watch-ListAdvisories, which provide notifications of security-related material.
• Debian: http://www.debian.org/security/
• Gentoo: http://www.gentoo.org/security/en/glsa/
• Mandrake: http://www.mandrakesoft.com/security/
• Red Hat: http://www.redhat.com/support/errata/
• SuSE: http://www.suse.com/us/support/security/index.html
• Yellow Dog: http://www.yellowdoglinux.com/resources/updates.shtml
ResourcesThe following are some resources for you to use.
Mailing Lists
• PAM mailing list: https://listman.redhat.com/mailman/listinfo/pam-list
• Kernel traffic mailing list: http://zork.net/mailman/listinfo/ktdistrib
• grsecurity mailing list: http://grsecurity.net/cgi-bin/mailman/listinfo/grsecurity
• LIDS mailing list: http://www.lids.org/maillist.html
• RSBAC mailing list: http://www.rsbac.org/mailman/listinfo/rsbac/
• SELinux mailing list: http://www.nsa.gov/selinux/info/subscribe.cfm
• GNU Privacy Guard mailing list: http://lists.gnupg.org/pipermail/gnupg-users/
12. Symantec acquired the Security Focus site in 2002, but part of the sale agreement states the site mustremain vendor neutral.
4444c01_final.qxd 1/5/05 12:42 AM Page 76
CHAPTER 1 ■ HARDENING THE BASICS 77
Sites
• Chkconfig: http://www.fastcoder.net/~thumper/software/sysadmin/chkconfig/
• Vlock: http://linux.maruhn.com/sec/vlock.html orhttp://freshmeat.net/projects/vlock/
• Titan hardening script: http://www.fish.com/titan/
• PAM_passwdqc: http://www.openwall.com/passwdqc/
• Acct tools: http://www.ibiblio.org/pub/linux/system/admin/accounts/acct-1.3.73.tar.gz
• General PAM: http://www.kernel.org/pub/linux/libs/pam/
• PAM modules: http://www.kernel.org/pub/linux/libs/pam/pre/modules/
• Openwall: http://www.openwall.com/linux/
• Grsecurity: http://www.grsecurity.net/
• LIDS: http://www.lids.org/
• RSBAC: http://www.rsbac.org/
• SELinux: http://www.nsa.gov/selinux/
• PaX: http://pax.grsecurity.net/
• MD5 Crack: http://www.md5crk.com/
• GPG: http://www.gnupg.org/
• NRH-up2date: http://www.nrh-up2date.org/
• APT for RPM: http://freshrpms.net/apt/
• Yum: http://linux.duke.edu/projects/yum/
4444c01_final.qxd 1/5/05 12:42 AM Page 77
Firewalling Your Hosts
Perhaps the most important element of your host’s defenses against attack is the firewall. Inmany cases, the firewall is the first line of defense against attacks on your hosts. A firewall canhelp you defend your hosts in three principal ways: dealing with unwanted incoming traffic,dealing with unwanted outgoing traffic, and handling the logging of suspicious traffic or traf-fic known to be of malicious intent. A firewall functions as both a defensive measure and anearly warning system.
So what is this firewall thing I am talking about? Well, a variety of firewalls are designedto be deployed in different locations on your network. For example, most networks have a fire-wall installed at the perimeter of the network to protect your entire network. These are oftenhardware-based firewalls such as Cisco PIX devices, software-based firewalls such as CheckPoint Firewall-1,1 or Linux-based solutions such as SmoothWall.2 Other firewalls, such asiptables or Zone Alarm, are designed to protect individual hosts.
In this chapter, I focus on protecting individual hosts with Netfilter through its user spaceinterface iptables. I thus will not cover Netfilter’s capabilities as a dedicated firewall-router,which includes functions such as packet forwarding and Network Address Translation (NAT).The emphasis in this chapter is on building secure firewalls for stand-alone and bastion hostswhile not limiting the capabilities of your applications and services. This means I will not coverevery single feature of iptables and Netfilter; instead, I recommend some books and sites inthe “Resources” section that offer further information on the areas I have not covered in thischapter.
The doctrine for setting up the securest possible host-based firewall reflects some of theconcepts I discussed in the book’s introduction: minimalism and vigilance. Your firewall shouldbe minimalist in design and managed by exception. The simplest, securest, and most minimallyconfigured possible firewall is one that denies everything: from everywhere and to everywhere.I recommend this should be your default firewall design. Any access to your host should be theexception, not the rule—you create a wall and then carefully remove only those bricks that arerequired for access.
This applies to network traffic in two ways: when you assess what a single host is expectedto receive and transmit on your local network and when you decide what traffic you want toenter your bastion host from foreign networks. In the second case, I am deliberately not say-ing the “Internet,” because the principle applies to all internetworking. You should be think-ing about protecting and monitoring all your network borders whether they are shared with
79
C H A P T E R 2
■ ■ ■
1. http://www.checkpoint.com/products/firewall-1/
2. http://www.smoothwall.org/
4444c02_final.qxd 1/5/05 12:50 AM Page 79
CHAPTER 2 ■ FIREWALLING YOUR HOSTS80
subsidiaries, clients, service providers, and so on. This makes sense because you may not beable to control the security policies of those connected networks, and therefore you may notbe able to trust them.
Vigilance also comes into your firewall design and management as it is going to be a keyaspect of firewall construction. They allow you to both see where you are going wrong and whenyour rules are being effective in addition to providing information on what traffic is being gener-ated on a host and who is generating it. I recommend getting a laptop and small hub that you canuse to connect to any host on your network to see what traffic it creates and consumes. Using thiscombination, you can quickly see over which ports and to what networks a host communicatesand then adjust your firewall rules accordingly. Tools such as Ethereal and tcpdump are great forsnooping on network conversations (and I will show you how to use tcpdump in the “Testing andTroubleshooting” section). Do not forget the ethical implications this has. You may need sign-offfrom your organization’s management before you can legitimately monitor traffic on some or allof your network.
I will show you how iptables-based firewalls work on a Linux host, how to constructa firewalls for stand-alone and bastion hosts, and cover additional Netfilter modules andkernel-tuning parameters, testing and troubleshooting your firewalling, and some tools youcan use with your firewalls and firewalling. In Appendix A, I provide you with a script fora bastion host–based on the information in this chapter; you can edit and configure it toprovide a suitable firewall for your own hosts.
I will not explain basic networking to you. To understand this chapter, you should havean understanding of IP addressing, subnetting, and the basic operation of TCP/IP traffic. Youshould also be able to control the networking configuration of your host using the basic con-figuration tools available such as ifconfig. Also, I will not cover network design in any greatdetail because this book is aimed at host-level security, not network security in a broader con-text. I will not examine NAT and routing using iptables. Books are available that better coverthose issues aimed at using Linux and iptables for firewalling and routing, and I list some ofthem in the “Resources” section at the end of this chapter.
■Note This chapter focuses on IPv4 networking. At this point, industry-spread acceptance of IPv6 net-working is not sufficient to merit its coverage.
So, How Does a Linux Firewall Work?The tools I will be using to provide firewall functions are built on the Netfilter frameworkthat exists in the Linux kernel. Netfilter was written by Rusty Russell3 and has been in Linuxsince version 1.0 although at that stage it was a rewrite of pf from NetBSD. It allows theoperating system to perform packet filtering and shaping at a kernel level, and this allowsit to be under fewer restrictions than user space programs. This is especially useful for dedi-cated firewall and router hosts.
3. http://ozlabs.org/~rusty/
4444c02_final.qxd 1/5/05 12:50 AM Page 80
CHAPTER 2 ■ FIREWALLING YOUR HOSTS 81
Netfilter is a stateful packet-filtering firewall. Two types of packet-filtering firewalls exist:stateful and stateless. A stateless packet-filtering firewall examines only the header of a packetfor filtering information. It sees each packet in isolation and thus has no way to determine ifa packet is part of an existing connection or an isolated malicious packet. A stateful firewallmaintains information about the status of the connections passing through it. This allows thefirewall to filter on the state of the connection, which offers considerably finer-grained controlover your traffic.
Netfilter is controlled and configured in user space by the iptables command. In previ-ous versions of the Linux kernel, other commands provided this functionality. In kernel ver-sion 2.2 it was ipchains, and in version 2.0 it was ipfwadm. I cover the iptables command inthis chapter, and I will frequently use this name to refer to the firewall technology in general.Most Linux-based distributions will have an iptables package, but they may also have theirown tool for configuring the rules. Some of these may be worth looking into, but they may notbe easy to use for more complicated configurations or may make dangerous configurationassumptions.
■Note This chapter was written using iptables version 1.2.11, which was the most recent at the time ofwriting. You can use the command, iptables -V, to find the version of the iptables command on your host.
Netfilter works by referring to a set of tables. These tables contain chains, which in turncontain individual rules. Chains hold groups of like rules; for example, a group of rules govern-ing incoming traffic could be held in a chain. Rules are the basic Netfilter configuration itemsthat contain criteria to match particular traffic and perform an action on the matched traffic.
Traffic that is currently being processed by the host is compared against these rules, and ifthe current packet being processed satisfies the selection criteria of a rule, then the action speci-fied by that rule is carried out. These actions, amongst others, can be to ignore the packet, acceptthe packet, reject the packet, or pass the packet onto other rules for more refined processing. Let’slook at an example; say the Ethernet interface on your Web server has just received a packet fromthe Internet. This packet is checked against your rules and compared to their selection criteria.The selection criteria include such items as the destination IP address and the destination port.For example, you want incoming Web traffic on the HTTP port 80 to go to the IP address of yourWeb server. If your incoming traffic matches these criteria, then you specify and action to let itthrough. This is a simple example that shows how an iptables rule could work.
Each iptables rule relies on specifying a set of network parameters as selection criteriato select the packets and traffic for each rule. You can use a number of network parameters tobuild each iptables rule. For example, a network connection between two hosts is referredto as a socket. This is the combination of a source IP address, source port, destination IP address,and destination port. All four of these parameters must exist for the connection to be estab-lished, and iptables can use these values to filter traffic coming in and out of hosts. Addition-ally, if you look at how communication is performed on a TCP/IP-based network, you will seethat three protocols are used frequently: Internet Control Message Protocol (ICMP), Transmis-sion Control Protocol (TCP), and User Datagram Protocol (UDP). The iptables firewall caneasily distinguish between these different types of protocols and others.
4444c02_final.qxd 1/5/05 12:50 AM Page 81
CHAPTER 2 ■ FIREWALLING YOUR HOSTS82
With just these five parameters (the source and destination IP addresses, the source anddestination ports and the protocol type), you can now start building some useful filteringrules. But before you start building these rules, you need to understand how iptables rulesare structured and interact. And to gain this understanding, you need to understand furthersome initial iptables concepts such as tables, chains, and policies.
TablesI talked about Netfilter having tables of rules that traffic can be compared against and someaction taken. Netfilter has three built-in tables that can hold rules for processing traffic. Thefirst is the filter table, which is the default table used for all rules related to the filtering ofyour traffic. The second is nat, which handles NAT rules, and the last is the mangle table, whichcovers a variety of packet alteration functions. When constructing the iptables rules in thischapter, I will focus on the filter table.
ChainsThe iptables rules are broken down within the tables I have described into groupings calledchains. Each table contains default chains that are built into the table. You can also create chainsof your own in each table to hold additional rules. Let’s focus on the built-in chains in the filtertable. These are FORWARD, INPUT, and OUTPUT. Each chain correlates to the basic paths that packetscan take through a host. When the Netfilter logic encounters a packet, the first evaluation itmakes is to which chain the packet is destined. If a packet is coming into the host through a net-work interface, it needs to be evaluated by the rules in the INPUT chain. If the packet is generatedby this host and going out onto the network via a network interface, then it needs to be evalu-ated by the rules in the OUTPUT chain. The FORWARD chain is used for packets that have entered thehost but are destined for some other host (for example, on hosts that act as routers or software-based firewalls at the perimeter of your network or between your network and the Internet).
PoliciesEach chain defined in the filter table also can have a policy. A policy is the default action a chaintakes on a packet to determine if a packet makes it all the way through the rules in a chain with-out matching any of them. The policies you can use for packets are DROP, REJECT, and ACCEPT.When the iptables commands is first run, it sets some default policies for built-in chains. TheINPUT and OUTPUT chains will have a policy of ACCEPT, and the FORWARD chain will have a policyof DROP.
The DROP policy discards a packet without notifying the sender. The REJECT policy also dis-cards the packet, but it sends an ICMP packet to the sender to tell it the rejection has occurred.The REJECT policy means that a device will know that its packets are not getting to their destina-tion and will report the error quickly instead of waiting to be timed out, as is the case with theDROP policy. The DROP policy is contrary to TCP RFCs and can be a little harsh on network devices;specifically, they can sit waiting for a response from their dropped packet(s) for a long time. Butfor security purposes it is generally considered better to use the DROP policy rather than theREJECT policy, as it provides less information to the outside world.
The ACCEPT policy accepts the traffic and allows it to pass through the firewall. Naturallyfrom a security perspective this renders your firewall ineffective if it is used as the default policy.By default iptables configures all chains with a policy of ACCEPT, but changing this to a policy of
4444c02_final.qxd 1/5/05 12:50 AM Page 82
CHAPTER 2 ■ FIREWALLING YOUR HOSTS 83
DROP for all chains is recommended. This falls in line with the basic doctrine of a default stanceof denial for the firewall. You should deny all traffic by default and open the host to only the traf-fic to which you have explicitly granted access. This denial can be problematic, because settinga default policy of DROP for the INPUT and OUTPUT chains means incoming and outgoing traffic arenot allowed unless you explicitly add rules to allow traffic to come into and out of the host. Thiswill cause all services and tools that connect from your host that are not explicitly allowed toenter or leave that host to fail.
Adding Your First RulesThe majority of our work will be on the INPUT and OUTPUT chains of the filter table, as I will bedefending hosts from the outside world by attempting to narrow down the incoming traffic toonly the bare minimum required for the host to perform its designated function. So I will cre-ate some rules for the INPUT and the OUTPUT chains to demonstrate how iptables works. To createa new rule, you can simply add one to a chain with the iptables command. Let’s add the ruleto deal with HTTP traffic on port 80 that I described earlier.
puppy# iptables -A INPUT -i eth0 -p tcp --dport 80 -d 192.168.0.1 -j ACCEPT
■Note The iptables function is interactive. The rule will take effect immediately upon being added.All rules exist in memory and will be lost when the system is rebooted. I will cover methods of saving rulesets and starting and stopping iptables in the “Managing iptables and Your Rules” section.
So what does this command do? Well, in the next few paragraphs let’s break it down intoits component pieces. The first flag, -A, tells iptables that this is an addition and specifies towhich chain the new rule should be added.
■Note By default, unless overridden, all new rules are added to the filter table, so you do not needto define to which table you are adding it.
The -i flag specifies which device the traffic will use to enter the host. I have indicatedeth0, which would be the first Ethernet device on your host. If you do not specify a device then iptables assumes the rule applies to all incoming network traffic from all devices.
The next flag, -p, specifies the protocol of the packets you are filtering, in this case tcp. As HTTP is a TCP protocol, I have told iptables to select only TCP packets. If you were selectinga protocol that used UDP or ICMP traffic, you would specify udp here for UDP traffic or icmp forICMP traffic, respectively. You could also select a particular protocol by number; for example,you could use -p 50, which is the Authentication Header that is used for IPSec connections.4
4. You can see a list of all the protocol numbers at http://www.iana.org/assignments/protocol-numbers.
4444c02_final.qxd 1/5/05 12:50 AM Page 83
CHAPTER 2 ■ FIREWALLING YOUR HOSTS84
The following flags are related to the destination of the packets that iptables is filtering. The--dport flag tells iptables to select only packets destined for port 80, the standard port for HTTPtraffic. The -d selects only those packets destined for the specified IP address, 192.168.0.1. If youdo not specify a destination IP address, then iptables would apply this rule to all incoming HTTPtraffic on eth0.
The last flag in the rule, -j, specifies the ultimate action or target of the rule. In this caseI am using the ACCEPT target, which accepts the packets. The ACCEPT target also indicates thatif the packet being filtered matches this rule, then no other rule matches are performed andthe packet can pass through the firewall. Several other targets exist. For example, you couldchange the proposed target to DROP, as shown in the next line:
puppy# iptables -A INPUT -i eth0 -p tcp --dport 80 -d 192.168.0.1 -j DROP
Then if the incoming packet matched this rule, it would be dropped and no other ruleswould be checked. Targets offer similar functionality to the policies I have described. Indeed,ACCEPT, DROP, and REJECT targets perform the same function as their policy namesakes. Butthere are also more targets available to you than their policy counterparts, and I will describesome of these targets in the coming sections.
Let’s say this is the first rule for a Web server. The example Web server also runs a securesite using HTTPS, so you decide to add a rule to handle this traffic, too.
puppy# iptables -A INPUT -i eth0 -p tcp --dport 443 -d 192.168.0.1 -j ACCEPT
Here I have created an almost identical rule to the previous one except I have specifiedthat the rule will filter on the destination HTTPS port 443.
So now both HTTP and HTTPS traffic are allowed into the host and will be passed to theWeb server. But what happens if you want HTTP and HTTPS traffic to get back out of the host,which would be required to allow the Web server to correctly function? All outgoing traffic ishandled by rules defined in the OUTPUT chain. So you need to add rules to handle the outgoingtraffic from the Web server to the OUTPUT chain.
puppy# iptables -A OUTPUT -o eth0 -p tcp --sport http -j ACCEPT
puppy# iptables -A OUTPUT -o eth0 -p tcp --sport https -j ACCEPT
While these new rules are similar to the rules you have already defined, they have someimportant differences. The first is that the -A flag is now adding these rules to the OUTPUT chainrather than the INPUT chain. I have also specified the device eth0 again, but I have specified itusing the -o flag. The -o flag indicates traffic outgoing on the specified device as opposed tothe -i flag, which indicates incoming traffic on the specified device.
Like the previous rules, you are still specifying the TCP protocol using the -p flag butinstead of the destination port as indicated by the --dport flag, you are now using the --sportflag, which defines the source port from which the HTTP or HTTPS traffic comes. You can alsospecify both the --sport and --dport options in a rule to allow you dictate the ports at bothend of the connection, as you can see in the next line. Enter the following:
puppy# iptables -A INPUT -i eth0 -p tcp --sport imap --dport imaps -j ACCEPT
In the rule on the previous line all incoming TCP traffic from the imap port is allowed to gothrough to the imaps port.5
5. Ports 143 and 993, respectively
4444c02_final.qxd 1/5/05 12:50 AM Page 84
CHAPTER 2 ■ FIREWALLING YOUR HOSTS 85
In the last three rules you have also replaced the references to the numeric port numberswith the name of the services being filtered, http and https and imap and imaps. These servicesare defined in the file /etc/services. Listing 2-1 shows the service definitions for these proto-cols from this file.
Listing 2-1. Service Definitions in the /etc/services File
http 80/tcp www www-http # WorldWideWeb HTTP
imap 143/tcp imap # IMAP
https 443/tcp # MCom
imaps 993/tcp imaps # IMAPS
I recommend using the service name rather than the port for your source and destinationports, as it makes your rules easier to read and understand.
Finally, you have again used the target of ACCEPT as defined by the -j flag to indicate thatthis traffic is allowed to leave the host.
In combination, the four rules you have defined allow a Web server to receive and sendHTTP and HTTPS traffic from a host. While not an ideal (or complete) configuration, this rep-resents a limited-functioning iptables firewall. From this you will build more complicatedfirewall configurations, but first you will examine how to identify what to filter on and lookat the iptables command and some of its options.
THE /etc/services FILE
It is important to secure the /etc/services file. It contains a list of network services and matching ports.Listing 2-2 shows a sample of this file.
Listing 2-2. Sample /etc/services File
ftp 21/tcp
ftp 21/udp fsp fspd
ssh 22/tcp # SSH Remote Login Protocol
ssh 22/udp # SSH Remote Login Protocol
telnet 23/tcp
telnet 23/udp
Although actually disabling services you do not use in this file can inconvenience attackers, it will not activelystop them using the service you have disabled. But I recommend not allowing anyone to edit this file andpotentially add any services to your host. Use the following commands to secure the file:
puppy# chown root:root /etc/services
puppy# chmod 0644 /etc/services
puppy# chattr +i /etc/services
The chattr +i command makes the /etc/services immutable: it cannot be deleted, it cannot berenamed, and no link can be created to this file.
4444c02_final.qxd 1/5/05 12:50 AM Page 85
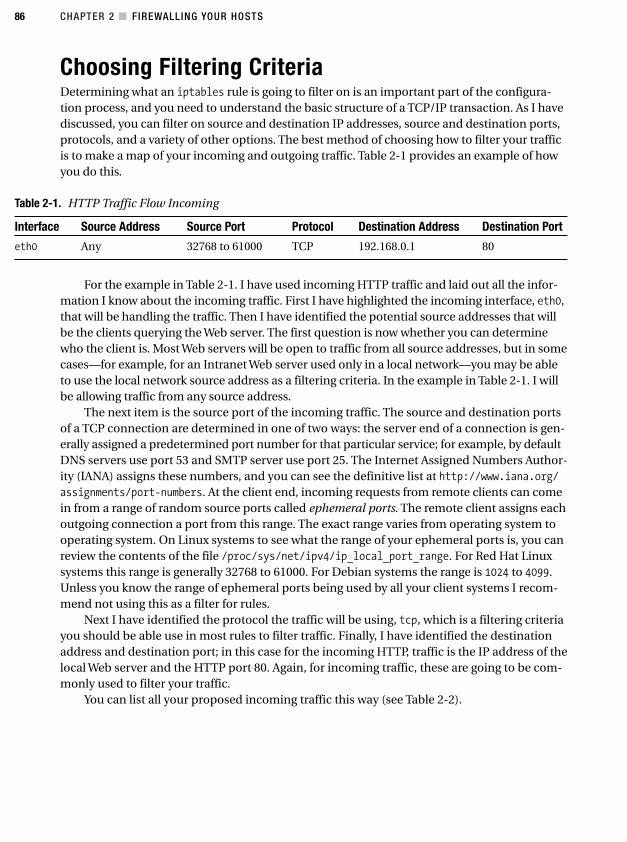
CHAPTER 2 ■ FIREWALLING YOUR HOSTS86
Choosing Filtering CriteriaDetermining what an iptables rule is going to filter on is an important part of the configura-tion process, and you need to understand the basic structure of a TCP/IP transaction. As I havediscussed, you can filter on source and destination IP addresses, source and destination ports,protocols, and a variety of other options. The best method of choosing how to filter your trafficis to make a map of your incoming and outgoing traffic. Table 2-1 provides an example of howyou do this.
Table 2-1. HTTP Traffic Flow Incoming
Interface Source Address Source Port Protocol Destination Address Destination Port
eth0 Any 32768 to 61000 TCP 192.168.0.1 80
For the example in Table 2-1. I have used incoming HTTP traffic and laid out all the infor-mation I know about the incoming traffic. First I have highlighted the incoming interface, eth0,that will be handling the traffic. Then I have identified the potential source addresses that willbe the clients querying the Web server. The first question is now whether you can determinewho the client is. Most Web servers will be open to traffic from all source addresses, but in somecases—for example, for an Intranet Web server used only in a local network—you may be ableto use the local network source address as a filtering criteria. In the example in Table 2-1. I willbe allowing traffic from any source address.
The next item is the source port of the incoming traffic. The source and destination portsof a TCP connection are determined in one of two ways: the server end of a connection is gen-erally assigned a predetermined port number for that particular service; for example, by defaultDNS servers use port 53 and SMTP server use port 25. The Internet Assigned Numbers Author-ity (IANA) assigns these numbers, and you can see the definitive list at http://www.iana.org/assignments/port-numbers. At the client end, incoming requests from remote clients can comein from a range of random source ports called ephemeral ports. The remote client assigns eachoutgoing connection a port from this range. The exact range varies from operating system tooperating system. On Linux systems to see what the range of your ephemeral ports is, you canreview the contents of the file /proc/sys/net/ipv4/ip_local_port_range. For Red Hat Linuxsystems this range is generally 32768 to 61000. For Debian systems the range is 1024 to 4099.Unless you know the range of ephemeral ports being used by all your client systems I recom-mend not using this as a filter for rules.
Next I have identified the protocol the traffic will be using, tcp, which is a filtering criteriayou should be able use in most rules to filter traffic. Finally, I have identified the destinationaddress and destination port; in this case for the incoming HTTP, traffic is the IP address of thelocal Web server and the HTTP port 80. Again, for incoming traffic, these are going to be com-monly used to filter your traffic.
You can list all your proposed incoming traffic this way (see Table 2-2).
4444c02_final.qxd 1/5/05 12:50 AM Page 86
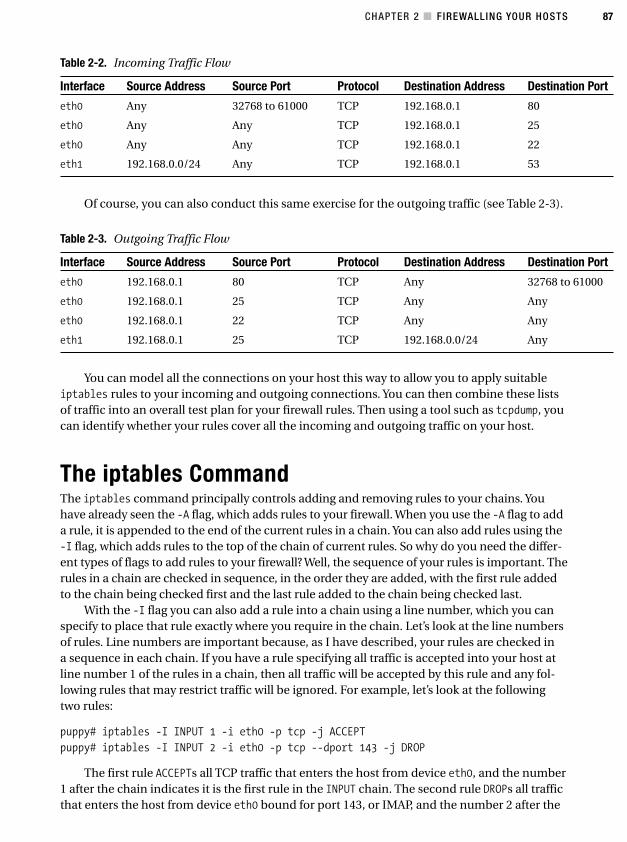
CHAPTER 2 ■ FIREWALLING YOUR HOSTS 87
Table 2-2. Incoming Traffic Flow
Interface Source Address Source Port Protocol Destination Address Destination Port
eth0 Any 32768 to 61000 TCP 192.168.0.1 80
eth0 Any Any TCP 192.168.0.1 25
eth0 Any Any TCP 192.168.0.1 22
eth1 192.168.0.0/24 Any TCP 192.168.0.1 53
Of course, you can also conduct this same exercise for the outgoing traffic (see Table 2-3).
Table 2-3. Outgoing Traffic Flow
Interface Source Address Source Port Protocol Destination Address Destination Port
eth0 192.168.0.1 80 TCP Any 32768 to 61000
eth0 192.168.0.1 25 TCP Any Any
eth0 192.168.0.1 22 TCP Any Any
eth1 192.168.0.1 25 TCP 192.168.0.0/24 Any
You can model all the connections on your host this way to allow you to apply suitableiptables rules to your incoming and outgoing connections. You can then combine these listsof traffic into an overall test plan for your firewall rules. Then using a tool such as tcpdump, youcan identify whether your rules cover all the incoming and outgoing traffic on your host.
The iptables CommandThe iptables command principally controls adding and removing rules to your chains. Youhave already seen the -A flag, which adds rules to your firewall. When you use the -A flag to adda rule, it is appended to the end of the current rules in a chain. You can also add rules using the-I flag, which adds rules to the top of the chain of current rules. So why do you need the differ-ent types of flags to add rules to your firewall? Well, the sequence of your rules is important. Therules in a chain are checked in sequence, in the order they are added, with the first rule addedto the chain being checked first and the last rule added to the chain being checked last.
With the -I flag you can also add a rule into a chain using a line number, which you canspecify to place that rule exactly where you require in the chain. Let’s look at the line numbersof rules. Line numbers are important because, as I have described, your rules are checked ina sequence in each chain. If you have a rule specifying all traffic is accepted into your host atline number 1 of the rules in a chain, then all traffic will be accepted by this rule and any fol-lowing rules that may restrict traffic will be ignored. For example, let’s look at the followingtwo rules:
puppy# iptables -I INPUT 1 -i eth0 -p tcp -j ACCEPT
puppy# iptables -I INPUT 2 -i eth0 -p tcp --dport 143 -j DROP
The first rule ACCEPTs all TCP traffic that enters the host from device eth0, and the number1 after the chain indicates it is the first rule in the INPUT chain. The second rule DROPs all trafficthat enters the host from device eth0 bound for port 143, or IMAP, and the number 2 after the
4444c02_final.qxd 1/5/05 12:50 AM Page 87
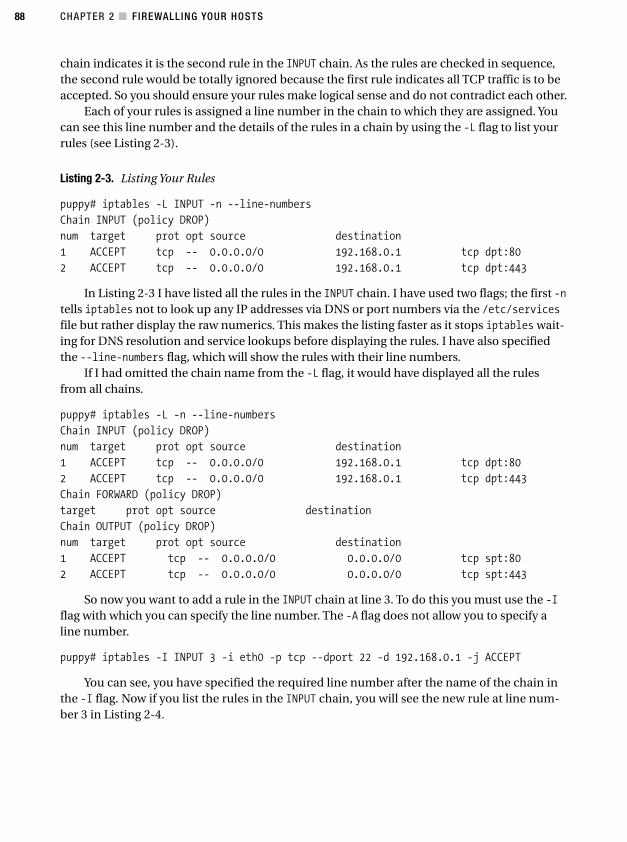
CHAPTER 2 ■ FIREWALLING YOUR HOSTS88
chain indicates it is the second rule in the INPUT chain. As the rules are checked in sequence,the second rule would be totally ignored because the first rule indicates all TCP traffic is to beaccepted. So you should ensure your rules make logical sense and do not contradict each other.
Each of your rules is assigned a line number in the chain to which they are assigned. Youcan see this line number and the details of the rules in a chain by using the -L flag to list yourrules (see Listing 2-3).
Listing 2-3. Listing Your Rules
puppy# iptables -L INPUT -n --line-numbers
Chain INPUT (policy DROP)
num target prot opt source destination
1 ACCEPT tcp -- 0.0.0.0/0 192.168.0.1 tcp dpt:80
2 ACCEPT tcp -- 0.0.0.0/0 192.168.0.1 tcp dpt:443
In Listing 2-3 I have listed all the rules in the INPUT chain. I have used two flags; the first -ntells iptables not to look up any IP addresses via DNS or port numbers via the /etc/servicesfile but rather display the raw numerics. This makes the listing faster as it stops iptables wait-ing for DNS resolution and service lookups before displaying the rules. I have also specifiedthe --line-numbers flag, which will show the rules with their line numbers.
If I had omitted the chain name from the -L flag, it would have displayed all the rulesfrom all chains.
puppy# iptables -L -n --line-numbers
Chain INPUT (policy DROP)
num target prot opt source destination
1 ACCEPT tcp -- 0.0.0.0/0 192.168.0.1 tcp dpt:80
2 ACCEPT tcp -- 0.0.0.0/0 192.168.0.1 tcp dpt:443
Chain FORWARD (policy DROP)
target prot opt source destination
Chain OUTPUT (policy DROP)
num target prot opt source destination
1 ACCEPT tcp -- 0.0.0.0/0 0.0.0.0/0 tcp spt:80
2 ACCEPT tcp -- 0.0.0.0/0 0.0.0.0/0 tcp spt:443
So now you want to add a rule in the INPUT chain at line 3. To do this you must use the -Iflag with which you can specify the line number. The -A flag does not allow you to specify aline number.
puppy# iptables -I INPUT 3 -i eth0 -p tcp --dport 22 -d 192.168.0.1 -j ACCEPT
You can see, you have specified the required line number after the name of the chain inthe -I flag. Now if you list the rules in the INPUT chain, you will see the new rule at line num-ber 3 in Listing 2-4.
4444c02_final.qxd 1/5/05 12:50 AM Page 88
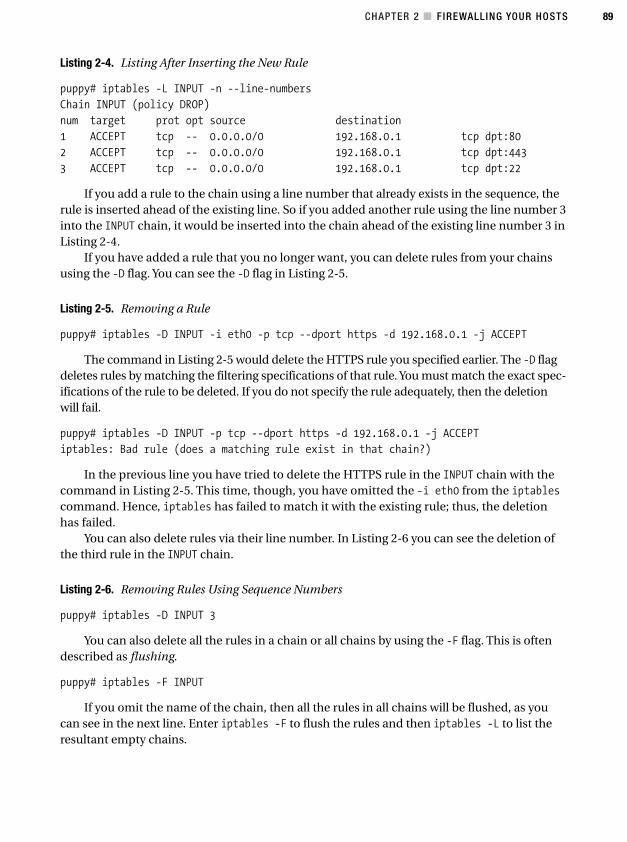
CHAPTER 2 ■ FIREWALLING YOUR HOSTS 89
Listing 2-4. Listing After Inserting the New Rule
puppy# iptables -L INPUT -n --line-numbers
Chain INPUT (policy DROP)
num target prot opt source destination
1 ACCEPT tcp -- 0.0.0.0/0 192.168.0.1 tcp dpt:80
2 ACCEPT tcp -- 0.0.0.0/0 192.168.0.1 tcp dpt:443
3 ACCEPT tcp -- 0.0.0.0/0 192.168.0.1 tcp dpt:22
If you add a rule to the chain using a line number that already exists in the sequence, therule is inserted ahead of the existing line. So if you added another rule using the line number 3into the INPUT chain, it would be inserted into the chain ahead of the existing line number 3 inListing 2-4.
If you have added a rule that you no longer want, you can delete rules from your chainsusing the -D flag. You can see the -D flag in Listing 2-5.
Listing 2-5. Removing a Rule
puppy# iptables -D INPUT -i eth0 -p tcp --dport https -d 192.168.0.1 -j ACCEPT
The command in Listing 2-5 would delete the HTTPS rule you specified earlier. The -D flagdeletes rules by matching the filtering specifications of that rule. You must match the exact spec-ifications of the rule to be deleted. If you do not specify the rule adequately, then the deletionwill fail.
puppy# iptables -D INPUT -p tcp --dport https -d 192.168.0.1 -j ACCEPT
iptables: Bad rule (does a matching rule exist in that chain?)
In the previous line you have tried to delete the HTTPS rule in the INPUT chain with thecommand in Listing 2-5. This time, though, you have omitted the -i eth0 from the iptablescommand. Hence, iptables has failed to match it with the existing rule; thus, the deletionhas failed.
You can also delete rules via their line number. In Listing 2-6 you can see the deletion ofthe third rule in the INPUT chain.
Listing 2-6. Removing Rules Using Sequence Numbers
puppy# iptables -D INPUT 3
You can also delete all the rules in a chain or all chains by using the -F flag. This is oftendescribed as flushing.
puppy# iptables -F INPUT
If you omit the name of the chain, then all the rules in all chains will be flushed, as youcan see in the next line. Enter iptables -F to flush the rules and then iptables -L to list theresultant empty chains.
4444c02_final.qxd 1/5/05 12:50 AM Page 89
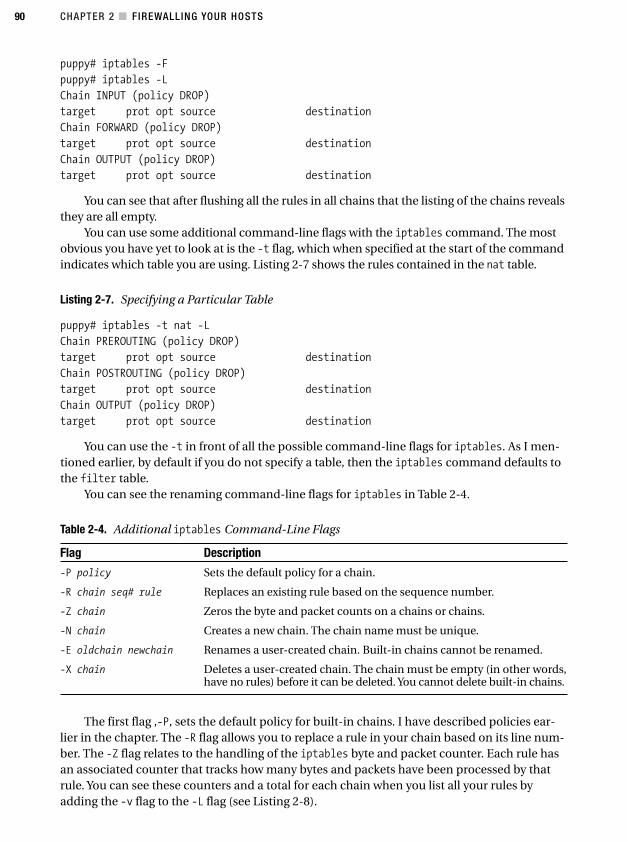
CHAPTER 2 ■ FIREWALLING YOUR HOSTS90
puppy# iptables -F
puppy# iptables -L
Chain INPUT (policy DROP)
target prot opt source destination
Chain FORWARD (policy DROP)
target prot opt source destination
Chain OUTPUT (policy DROP)
target prot opt source destination
You can see that after flushing all the rules in all chains that the listing of the chains revealsthey are all empty.
You can use some additional command-line flags with the iptables command. The mostobvious you have yet to look at is the -t flag, which when specified at the start of the commandindicates which table you are using. Listing 2-7 shows the rules contained in the nat table.
Listing 2-7. Specifying a Particular Table
puppy# iptables -t nat -L
Chain PREROUTING (policy DROP)
target prot opt source destination
Chain POSTROUTING (policy DROP)
target prot opt source destination
Chain OUTPUT (policy DROP)
target prot opt source destination
You can use the -t in front of all the possible command-line flags for iptables. As I men-tioned earlier, by default if you do not specify a table, then the iptables command defaults tothe filter table.
You can see the renaming command-line flags for iptables in Table 2-4.
Table 2-4. Additional iptables Command-Line Flags
Flag Description
-P policy Sets the default policy for a chain.
-R chain seq# rule Replaces an existing rule based on the sequence number.
-Z chain Zeros the byte and packet counts on a chains or chains.
-N chain Creates a new chain. The chain name must be unique.
-E oldchain newchain Renames a user-created chain. Built-in chains cannot be renamed.
-X chain Deletes a user-created chain. The chain must be empty (in other words,have no rules) before it can be deleted. You cannot delete built-in chains.
The first flag ,-P, sets the default policy for built-in chains. I have described policies ear-lier in the chapter. The -R flag allows you to replace a rule in your chain based on its line num-ber. The -Z flag relates to the handling of the iptables byte and packet counter. Each rule hasan associated counter that tracks how many bytes and packets have been processed by thatrule. You can see these counters and a total for each chain when you list all your rules byadding the -v flag to the -L flag (see Listing 2-8).
4444c02_final.qxd 1/5/05 12:50 AM Page 90

CHAPTER 2 ■ FIREWALLING YOUR HOSTS 91
Listing 2-8. Displaying Rules and Their Counters
puppy# iptables -L -v
Chain INPUT (policy ACCEPT 25897 packets, 2300K bytes)
pkts bytes target prot opt in out source destination
The -Z flag sets all counters back to zero.The last flags from Table 2-4 relate to the creation of user chains. You can utilize user-
created chains to better structure your rules. For example, creating a new chain to hold all therules related to incoming ICMP traffic. You can then direct traffic to your user-created chainsby using them as a target with the -j flag (see Listing 2-9).
Listing 2-9. Redirecting Packets to a User-Created Chain
puppy# iptables -A INPUT -p icmp -j NEW_CHAIN
In Listing 2-9 all incoming ICMP traffic is redirected to the user-created chain NEW_CHAIN.You can create this new chain using the -N flag (see Listing 2-10).
Listing 2-10. Creating a User Chain
puppy# iptables -N NEW_CHAIN
You can also rename your user-created chain using the -E flag.
puppy# iptables -E NEW_CHAIN OLD_CHAIN
And finally, you can delete a user-created chain (if it contains no rules and is not refer-enced as a target by any other rules) using the -X flag.
puppy# iptables -X OLD_CHAIN
If you do not specify a particular chain to be deleted, then the -X flag will delete all user-created chains. You cannot delete the built-in chains such as INPUT or OUTPUT.
Creating a Basic FirewallOne of the best ways to learn how to use iptables is to construct a basic firewall. I will do that fora stand-alone host, puppy. This is a host that is not directly connected to the Internet and lives ina local network. Then I will expand on this basic configuration to include securing a bastion host,which is frequently located in DMZs6 and is directly connected to the Internet, to explain some ofthe more advanced features and functions of iptables. I will start by describing the stand-alonehost I intend to firewall.
6. A demilitarized zone (DMZ) is an isolated segment of your network designed to hold hosts and serv-ices that are at greater risk than others, for example, bastion hosts. The DMZ is generally more securethan the other segments of your network.
4444c02_final.qxd 1/5/05 12:50 AM Page 91
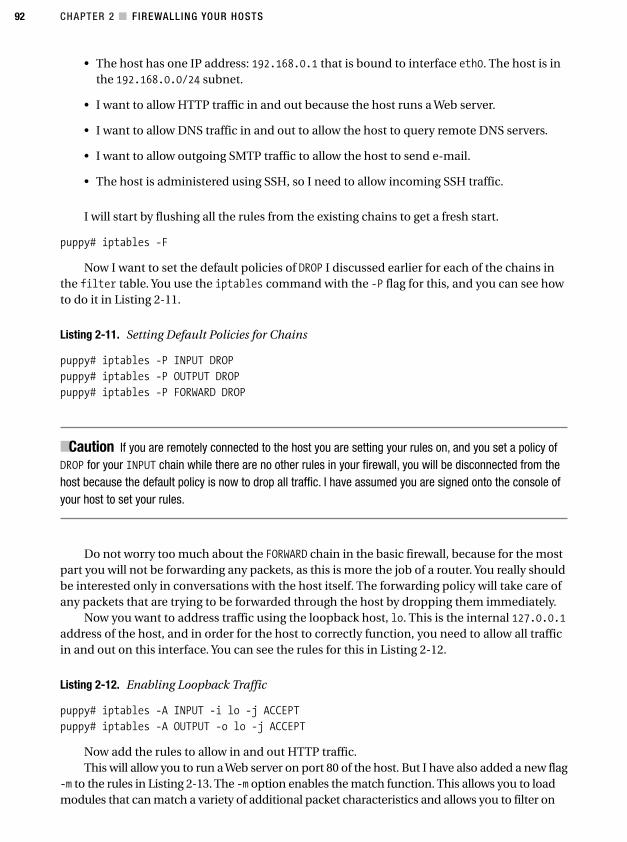
CHAPTER 2 ■ FIREWALLING YOUR HOSTS92
• The host has one IP address: 192.168.0.1 that is bound to interface eth0. The host is inthe 192.168.0.0/24 subnet.
• I want to allow HTTP traffic in and out because the host runs a Web server.
• I want to allow DNS traffic in and out to allow the host to query remote DNS servers.
• I want to allow outgoing SMTP traffic to allow the host to send e-mail.
• The host is administered using SSH, so I need to allow incoming SSH traffic.
I will start by flushing all the rules from the existing chains to get a fresh start.
puppy# iptables -F
Now I want to set the default policies of DROP I discussed earlier for each of the chains inthe filter table. You use the iptables command with the -P flag for this, and you can see howto do it in Listing 2-11.
Listing 2-11. Setting Default Policies for Chains
puppy# iptables -P INPUT DROP
puppy# iptables -P OUTPUT DROP
puppy# iptables -P FORWARD DROP
■Caution If you are remotely connected to the host you are setting your rules on, and you set a policy ofDROP for your INPUT chain while there are no other rules in your firewall, you will be disconnected from thehost because the default policy is now to drop all traffic. I have assumed you are signed onto the console ofyour host to set your rules.
Do not worry too much about the FORWARD chain in the basic firewall, because for the mostpart you will not be forwarding any packets, as this is more the job of a router. You really shouldbe interested only in conversations with the host itself. The forwarding policy will take care ofany packets that are trying to be forwarded through the host by dropping them immediately.
Now you want to address traffic using the loopback host, lo. This is the internal 127.0.0.1address of the host, and in order for the host to correctly function, you need to allow all trafficin and out on this interface. You can see the rules for this in Listing 2-12.
Listing 2-12. Enabling Loopback Traffic
puppy# iptables -A INPUT -i lo -j ACCEPT
puppy# iptables -A OUTPUT -o lo -j ACCEPT
Now add the rules to allow in and out HTTP traffic.This will allow you to run a Web server on port 80 of the host. But I have also added a new flag
-m to the rules in Listing 2-13. The -m option enables the match function. This allows you to loadmodules that can match a variety of additional packet characteristics and allows you to filter on
4444c02_final.qxd 1/5/05 12:50 AM Page 92
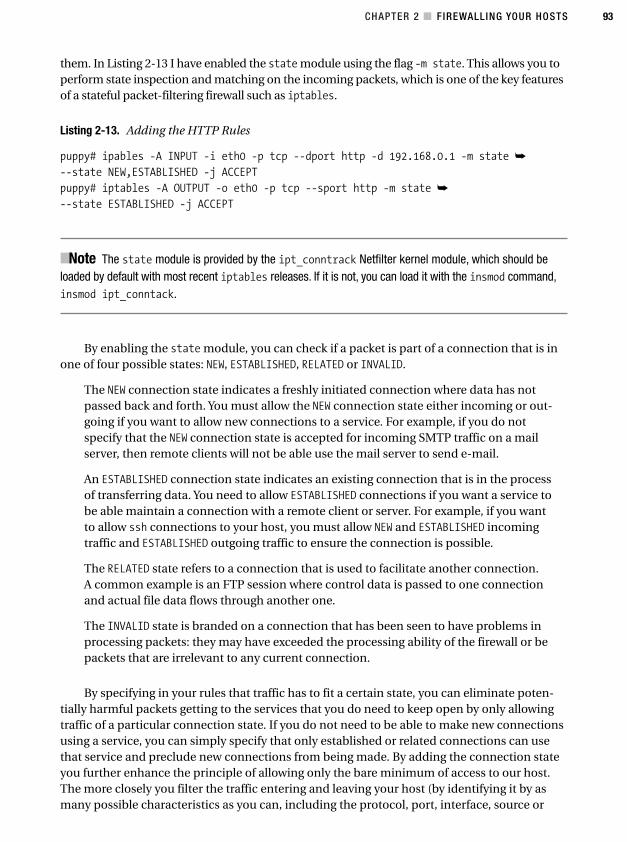
CHAPTER 2 ■ FIREWALLING YOUR HOSTS 93
them. In Listing 2-13 I have enabled the state module using the flag -m state. This allows you toperform state inspection and matching on the incoming packets, which is one of the key featuresof a stateful packet-filtering firewall such as iptables.
Listing 2-13. Adding the HTTP Rules
puppy# ipables -A INPUT -i eth0 -p tcp --dport http -d 192.168.0.1 -m state ➥
--state NEW,ESTABLISHED -j ACCEPT
puppy# iptables -A OUTPUT -o eth0 -p tcp --sport http -m state ➥
--state ESTABLISHED -j ACCEPT
■Note The state module is provided by the ipt_conntrack Netfilter kernel module, which should beloaded by default with most recent iptables releases. If it is not, you can load it with the insmod command,insmod ipt_conntack.
By enabling the state module, you can check if a packet is part of a connection that is inone of four possible states: NEW, ESTABLISHED, RELATED or INVALID.
The NEW connection state indicates a freshly initiated connection where data has notpassed back and forth. You must allow the NEW connection state either incoming or out-going if you want to allow new connections to a service. For example, if you do notspecify that the NEW connection state is accepted for incoming SMTP traffic on a mailserver, then remote clients will not be able use the mail server to send e-mail.
An ESTABLISHED connection state indicates an existing connection that is in the processof transferring data. You need to allow ESTABLISHED connections if you want a service tobe able maintain a connection with a remote client or server. For example, if you wantto allow ssh connections to your host, you must allow NEW and ESTABLISHED incomingtraffic and ESTABLISHED outgoing traffic to ensure the connection is possible.
The RELATED state refers to a connection that is used to facilitate another connection.A common example is an FTP session where control data is passed to one connectionand actual file data flows through another one.
The INVALID state is branded on a connection that has been seen to have problems inprocessing packets: they may have exceeded the processing ability of the firewall or bepackets that are irrelevant to any current connection.
By specifying in your rules that traffic has to fit a certain state, you can eliminate poten-tially harmful packets getting to the services that you do need to keep open by only allowingtraffic of a particular connection state. If you do not need to be able to make new connectionsusing a service, you can simply specify that only established or related connections can usethat service and preclude new connections from being made. By adding the connection stateyou further enhance the principle of allowing only the bare minimum of access to our host.The more closely you filter the traffic entering and leaving your host (by identifying it by asmany possible characteristics as you can, including the protocol, port, interface, source or
4444c02_final.qxd 1/5/05 12:50 AM Page 93
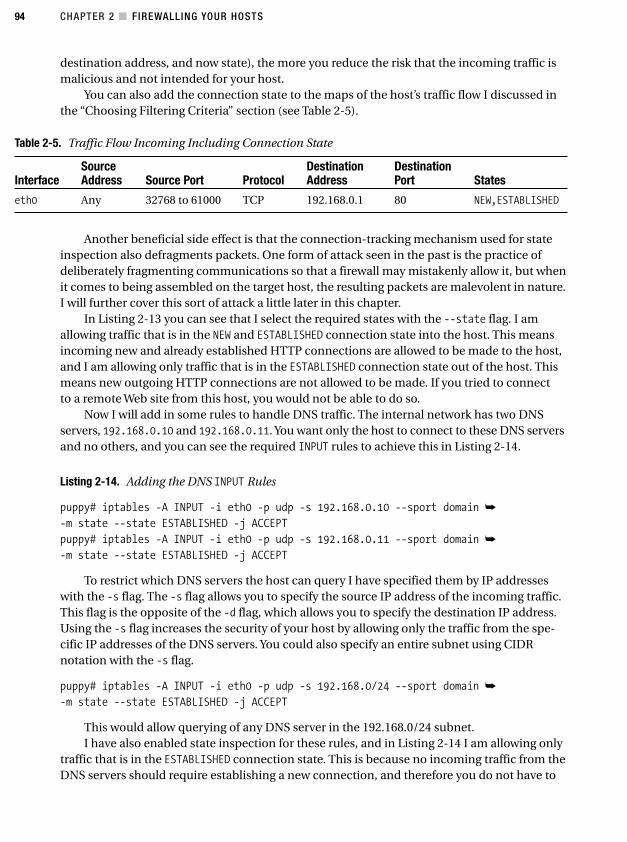
CHAPTER 2 ■ FIREWALLING YOUR HOSTS94
destination address, and now state), the more you reduce the risk that the incoming traffic ismalicious and not intended for your host.
You can also add the connection state to the maps of the host’s traffic flow I discussed inthe “Choosing Filtering Criteria” section (see Table 2-5).
Table 2-5. Traffic Flow Incoming Including Connection State
Source Destination DestinationInterface Address Source Port Protocol Address Port States
eth0 Any 32768 to 61000 TCP 192.168.0.1 80 NEW,ESTABLISHED
Another beneficial side effect is that the connection-tracking mechanism used for stateinspection also defragments packets. One form of attack seen in the past is the practice ofdeliberately fragmenting communications so that a firewall may mistakenly allow it, but whenit comes to being assembled on the target host, the resulting packets are malevolent in nature.I will further cover this sort of attack a little later in this chapter.
In Listing 2-13 you can see that I select the required states with the --state flag. I amallowing traffic that is in the NEW and ESTABLISHED connection state into the host. This meansincoming new and already established HTTP connections are allowed to be made to the host,and I am allowing only traffic that is in the ESTABLISHED connection state out of the host. Thismeans new outgoing HTTP connections are not allowed to be made. If you tried to connectto a remote Web site from this host, you would not be able to do so.
Now I will add in some rules to handle DNS traffic. The internal network has two DNSservers, 192.168.0.10 and 192.168.0.11. You want only the host to connect to these DNS serversand no others, and you can see the required INPUT rules to achieve this in Listing 2-14.
Listing 2-14. Adding the DNS INPUT Rules
puppy# iptables -A INPUT -i eth0 -p udp -s 192.168.0.10 --sport domain ➥
-m state --state ESTABLISHED -j ACCEPT
puppy# iptables -A INPUT -i eth0 -p udp -s 192.168.0.11 --sport domain ➥
-m state --state ESTABLISHED -j ACCEPT
To restrict which DNS servers the host can query I have specified them by IP addresseswith the -s flag. The -s flag allows you to specify the source IP address of the incoming traffic.This flag is the opposite of the -d flag, which allows you to specify the destination IP address.Using the -s flag increases the security of your host by allowing only the traffic from the spe-cific IP addresses of the DNS servers. You could also specify an entire subnet using CIDRnotation with the -s flag.
puppy# iptables -A INPUT -i eth0 -p udp -s 192.168.0/24 --sport domain ➥
-m state --state ESTABLISHED -j ACCEPT
This would allow querying of any DNS server in the 192.168.0/24 subnet.I have also enabled state inspection for these rules, and in Listing 2-14 I am allowing only
traffic that is in the ESTABLISHED connection state. This is because no incoming traffic from theDNS servers should require establishing a new connection, and therefore you do not have to
4444c02_final.qxd 1/5/05 12:50 AM Page 94
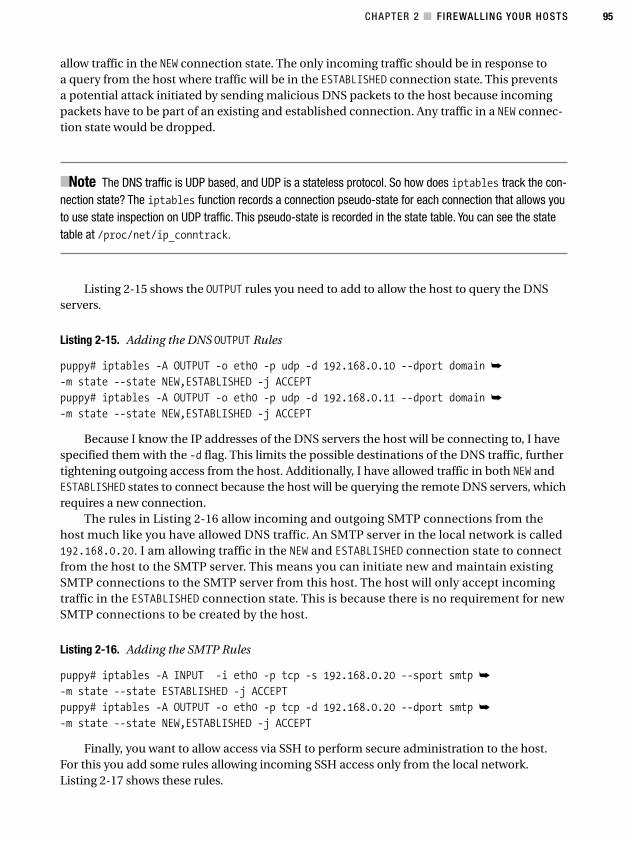
CHAPTER 2 ■ FIREWALLING YOUR HOSTS 95
allow traffic in the NEW connection state. The only incoming traffic should be in response toa query from the host where traffic will be in the ESTABLISHED connection state. This preventsa potential attack initiated by sending malicious DNS packets to the host because incomingpackets have to be part of an existing and established connection. Any traffic in a NEW connec-tion state would be dropped.
■Note The DNS traffic is UDP based, and UDP is a stateless protocol. So how does iptables track the con-nection state? The iptables function records a connection pseudo-state for each connection that allows youto use state inspection on UDP traffic. This pseudo-state is recorded in the state table. You can see the statetable at /proc/net/ip_conntrack.
Listing 2-15 shows the OUTPUT rules you need to add to allow the host to query the DNSservers.
Listing 2-15. Adding the DNS OUTPUT Rules
puppy# iptables -A OUTPUT -o eth0 -p udp -d 192.168.0.10 --dport domain ➥
-m state --state NEW,ESTABLISHED -j ACCEPT
puppy# iptables -A OUTPUT -o eth0 -p udp -d 192.168.0.11 --dport domain ➥
-m state --state NEW,ESTABLISHED -j ACCEPT
Because I know the IP addresses of the DNS servers the host will be connecting to, I havespecified them with the -d flag. This limits the possible destinations of the DNS traffic, furthertightening outgoing access from the host. Additionally, I have allowed traffic in both NEW andESTABLISHED states to connect because the host will be querying the remote DNS servers, whichrequires a new connection.
The rules in Listing 2-16 allow incoming and outgoing SMTP connections from thehost much like you have allowed DNS traffic. An SMTP server in the local network is called192.168.0.20. I am allowing traffic in the NEW and ESTABLISHED connection state to connectfrom the host to the SMTP server. This means you can initiate new and maintain existingSMTP connections to the SMTP server from this host. The host will only accept incomingtraffic in the ESTABLISHED connection state. This is because there is no requirement for newSMTP connections to be created by the host.
Listing 2-16. Adding the SMTP Rules
puppy# iptables -A INPUT -i eth0 -p tcp -s 192.168.0.20 --sport smtp ➥
-m state --state ESTABLISHED -j ACCEPT
puppy# iptables -A OUTPUT -o eth0 -p tcp -d 192.168.0.20 --dport smtp ➥
-m state --state NEW,ESTABLISHED -j ACCEPT
Finally, you want to allow access via SSH to perform secure administration to the host.For this you add some rules allowing incoming SSH access only from the local network.Listing 2-17 shows these rules.
4444c02_final.qxd 1/5/05 12:50 AM Page 95
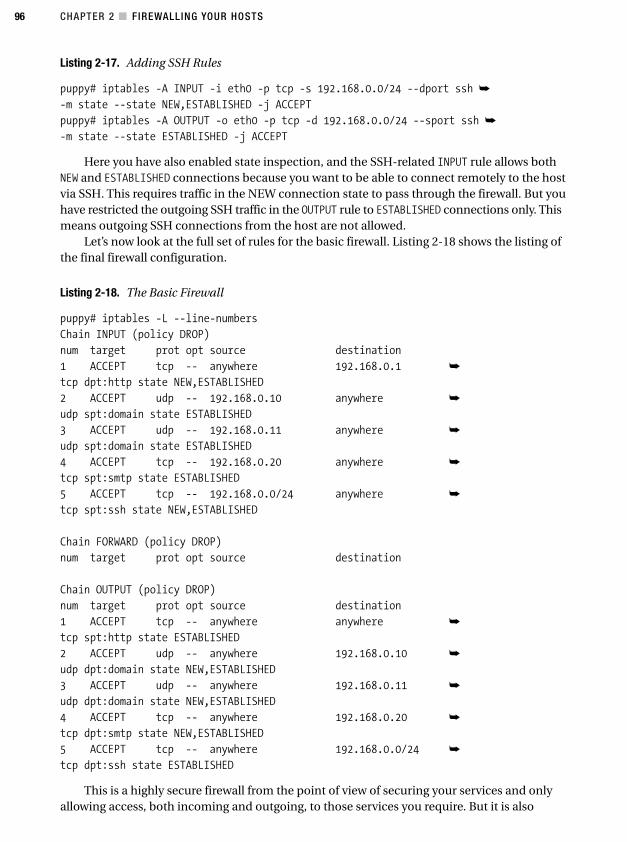
CHAPTER 2 ■ FIREWALLING YOUR HOSTS96
Listing 2-17. Adding SSH Rules
puppy# iptables -A INPUT -i eth0 -p tcp -s 192.168.0.0/24 --dport ssh ➥
-m state --state NEW,ESTABLISHED -j ACCEPT
puppy# iptables -A OUTPUT -o eth0 -p tcp -d 192.168.0.0/24 --sport ssh ➥
-m state --state ESTABLISHED -j ACCEPT
Here you have also enabled state inspection, and the SSH-related INPUT rule allows bothNEW and ESTABLISHED connections because you want to be able to connect remotely to the hostvia SSH. This requires traffic in the NEW connection state to pass through the firewall. But youhave restricted the outgoing SSH traffic in the OUTPUT rule to ESTABLISHED connections only. Thismeans outgoing SSH connections from the host are not allowed.
Let’s now look at the full set of rules for the basic firewall. Listing 2-18 shows the listing ofthe final firewall configuration.
Listing 2-18. The Basic Firewall
puppy# iptables -L --line-numbers
Chain INPUT (policy DROP)
num target prot opt source destination
1 ACCEPT tcp -- anywhere 192.168.0.1 ➥
tcp dpt:http state NEW,ESTABLISHED
2 ACCEPT udp -- 192.168.0.10 anywhere ➥
udp spt:domain state ESTABLISHED
3 ACCEPT udp -- 192.168.0.11 anywhere ➥
udp spt:domain state ESTABLISHED
4 ACCEPT tcp -- 192.168.0.20 anywhere ➥
tcp spt:smtp state ESTABLISHED
5 ACCEPT tcp -- 192.168.0.0/24 anywhere ➥
tcp spt:ssh state NEW,ESTABLISHED
Chain FORWARD (policy DROP)
num target prot opt source destination
Chain OUTPUT (policy DROP)
num target prot opt source destination
1 ACCEPT tcp -- anywhere anywhere ➥
tcp spt:http state ESTABLISHED
2 ACCEPT udp -- anywhere 192.168.0.10 ➥
udp dpt:domain state NEW,ESTABLISHED
3 ACCEPT udp -- anywhere 192.168.0.11 ➥
udp dpt:domain state NEW,ESTABLISHED
4 ACCEPT tcp -- anywhere 192.168.0.20 ➥
tcp dpt:smtp state NEW,ESTABLISHED
5 ACCEPT tcp -- anywhere 192.168.0.0/24 ➥
tcp dpt:ssh state ESTABLISHED
This is a highly secure firewall from the point of view of securing your services and onlyallowing access, both incoming and outgoing, to those services you require. But it is also
4444c02_final.qxd 1/5/05 12:50 AM Page 96
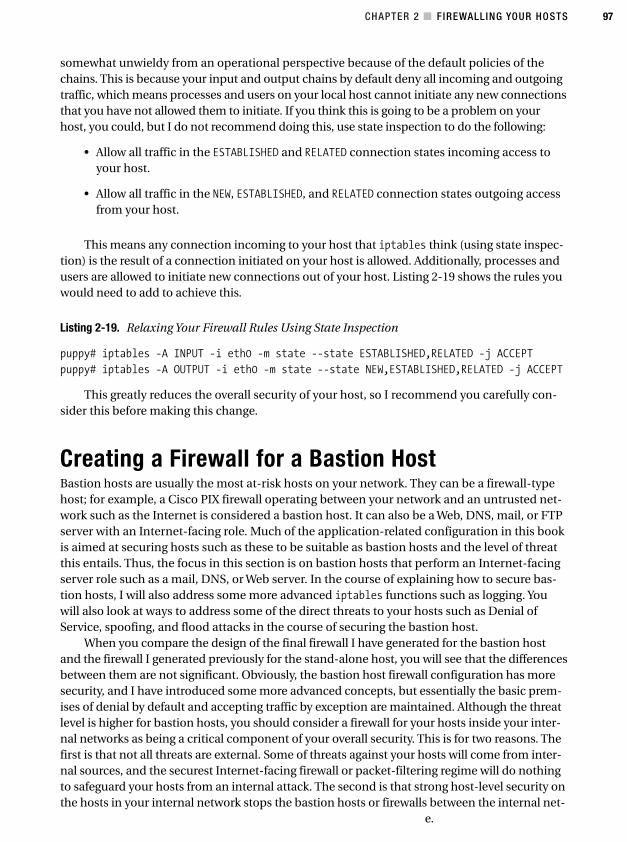
CHAPTER 2 ■ FIREWALLING YOUR HOSTS 97
somewhat unwieldy from an operational perspective because of the default policies of thechains. This is because your input and output chains by default deny all incoming and outgoingtraffic, which means processes and users on your local host cannot initiate any new connectionsthat you have not allowed them to initiate. If you think this is going to be a problem on yourhost, you could, but I do not recommend doing this, use state inspection to do the following:
• Allow all traffic in the ESTABLISHED and RELATED connection states incoming access toyour host.
• Allow all traffic in the NEW, ESTABLISHED, and RELATED connection states outgoing accessfrom your host.
This means any connection incoming to your host that iptables think (using state inspec-tion) is the result of a connection initiated on your host is allowed. Additionally, processes andusers are allowed to initiate new connections out of your host. Listing 2-19 shows the rules youwould need to add to achieve this.
Listing 2-19. Relaxing Your Firewall Rules Using State Inspection
puppy# iptables -A INPUT -i eth0 -m state --state ESTABLISHED,RELATED -j ACCEPT
puppy# iptables -A OUTPUT -i eth0 -m state --state NEW,ESTABLISHED,RELATED -j ACCEPT
This greatly reduces the overall security of your host, so I recommend you carefully con-sider this before making this change.
Creating a Firewall for a Bastion HostBastion hosts are usually the most at-risk hosts on your network. They can be a firewall-typehost; for example, a Cisco PIX firewall operating between your network and an untrusted net-work such as the Internet is considered a bastion host. It can also be a Web, DNS, mail, or FTPserver with an Internet-facing role. Much of the application-related configuration in this bookis aimed at securing hosts such as these to be suitable as bastion hosts and the level of threatthis entails. Thus, the focus in this section is on bastion hosts that perform an Internet-facingserver role such as a mail, DNS, or Web server. In the course of explaining how to secure bas-tion hosts, I will also address some more advanced iptables functions such as logging. Youwill also look at ways to address some of the direct threats to your hosts such as Denial ofService, spoofing, and flood attacks in the course of securing the bastion host.
When you compare the design of the final firewall I have generated for the bastion hostand the firewall I generated previously for the stand-alone host, you will see that the differencesbetween them are not significant. Obviously, the bastion host firewall configuration has moresecurity, and I have introduced some more advanced concepts, but essentially the basic prem-ises of denial by default and accepting traffic by exception are maintained. Although the threatlevel is higher for bastion hosts, you should consider a firewall for your hosts inside your inter-nal networks as being a critical component of your overall security. This is for two reasons. Thefirst is that not all threats are external. Some of threats against your hosts will come from inter-nal sources, and the securest Internet-facing firewall or packet-filtering regime will do nothingto safeguard your hosts from an internal attack. The second is that strong host-level security onthe hosts in your internal network stops the bastion hosts or firewalls between the internal net-
e.
4444c02_final.qxd 1/5/05 12:50 AM Page 97
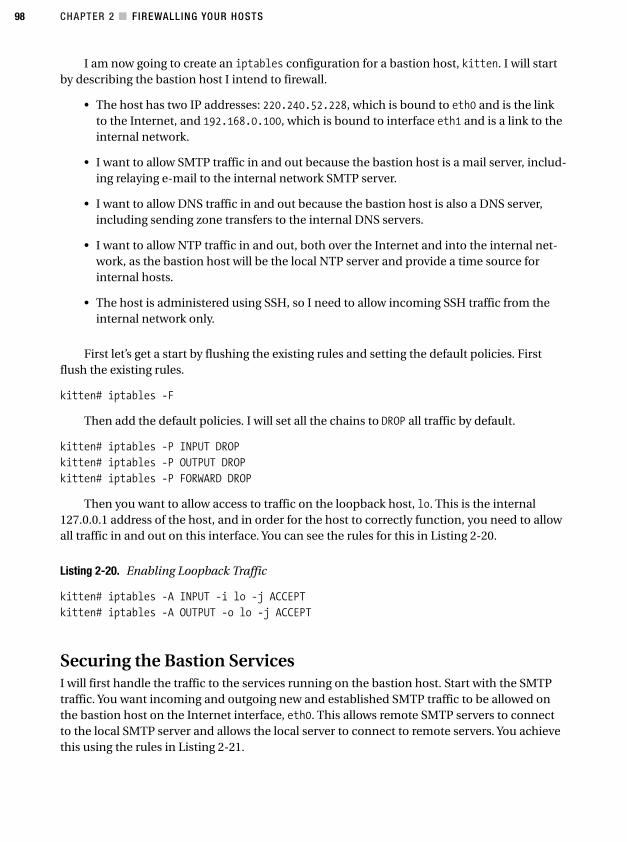
CHAPTER 2 ■ FIREWALLING YOUR HOSTS98
I am now going to create an iptables configuration for a bastion host, kitten. I will startby describing the bastion host I intend to firewall.
• The host has two IP addresses: 220.240.52.228, which is bound to eth0 and is the linkto the Internet, and 192.168.0.100, which is bound to interface eth1 and is a link to theinternal network.
• I want to allow SMTP traffic in and out because the bastion host is a mail server, includ-ing relaying e-mail to the internal network SMTP server.
• I want to allow DNS traffic in and out because the bastion host is also a DNS server,including sending zone transfers to the internal DNS servers.
• I want to allow NTP traffic in and out, both over the Internet and into the internal net-work, as the bastion host will be the local NTP server and provide a time source forinternal hosts.
• The host is administered using SSH, so I need to allow incoming SSH traffic from theinternal network only.
First let’s get a start by flushing the existing rules and setting the default policies. Firstflush the existing rules.
kitten# iptables -F
Then add the default policies. I will set all the chains to DROP all traffic by default.
kitten# iptables -P INPUT DROP
kitten# iptables -P OUTPUT DROP
kitten# iptables -P FORWARD DROP
Then you want to allow access to traffic on the loopback host, lo. This is the internal127.0.0.1 address of the host, and in order for the host to correctly function, you need to allowall traffic in and out on this interface. You can see the rules for this in Listing 2-20.
Listing 2-20. Enabling Loopback Traffic
kitten# iptables -A INPUT -i lo -j ACCEPT
kitten# iptables -A OUTPUT -o lo -j ACCEPT
Securing the Bastion ServicesI will first handle the traffic to the services running on the bastion host. Start with the SMTPtraffic. You want incoming and outgoing new and established SMTP traffic to be allowed onthe bastion host on the Internet interface, eth0. This allows remote SMTP servers to connectto the local SMTP server and allows the local server to connect to remote servers. You achievethis using the rules in Listing 2-21.
4444c02_final.qxd 1/5/05 12:50 AM Page 98
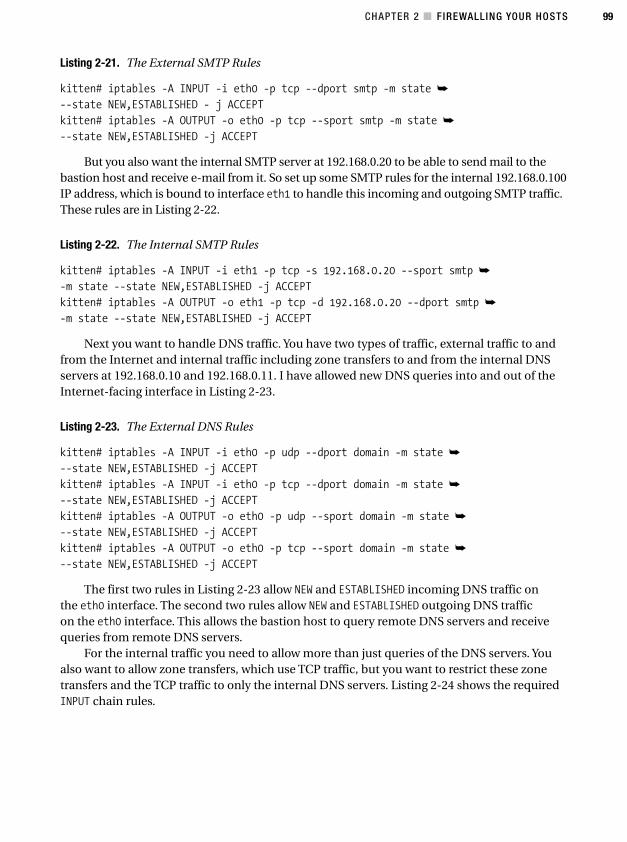
CHAPTER 2 ■ FIREWALLING YOUR HOSTS 99
Listing 2-21. The External SMTP Rules
kitten# iptables -A INPUT -i eth0 -p tcp --dport smtp -m state ➥
--state NEW,ESTABLISHED - j ACCEPT
kitten# iptables -A OUTPUT -o eth0 -p tcp --sport smtp -m state ➥
--state NEW,ESTABLISHED -j ACCEPT
But you also want the internal SMTP server at 192.168.0.20 to be able to send mail to thebastion host and receive e-mail from it. So set up some SMTP rules for the internal 192.168.0.100IP address, which is bound to interface eth1 to handle this incoming and outgoing SMTP traffic.These rules are in Listing 2-22.
Listing 2-22. The Internal SMTP Rules
kitten# iptables -A INPUT -i eth1 -p tcp -s 192.168.0.20 --sport smtp ➥
-m state --state NEW,ESTABLISHED -j ACCEPT
kitten# iptables -A OUTPUT -o eth1 -p tcp -d 192.168.0.20 --dport smtp ➥
-m state --state NEW,ESTABLISHED -j ACCEPT
Next you want to handle DNS traffic. You have two types of traffic, external traffic to andfrom the Internet and internal traffic including zone transfers to and from the internal DNSservers at 192.168.0.10 and 192.168.0.11. I have allowed new DNS queries into and out of theInternet-facing interface in Listing 2-23.
Listing 2-23. The External DNS Rules
kitten# iptables -A INPUT -i eth0 -p udp --dport domain -m state ➥
--state NEW,ESTABLISHED -j ACCEPT
kitten# iptables -A INPUT -i eth0 -p tcp --dport domain -m state ➥
--state NEW,ESTABLISHED -j ACCEPT
kitten# iptables -A OUTPUT -o eth0 -p udp --sport domain -m state ➥
--state NEW,ESTABLISHED -j ACCEPT
kitten# iptables -A OUTPUT -o eth0 -p tcp --sport domain -m state ➥
--state NEW,ESTABLISHED -j ACCEPT
The first two rules in Listing 2-23 allow NEW and ESTABLISHED incoming DNS traffic onthe eth0 interface. The second two rules allow NEW and ESTABLISHED outgoing DNS trafficon the eth0 interface. This allows the bastion host to query remote DNS servers and receivequeries from remote DNS servers.
For the internal traffic you need to allow more than just queries of the DNS servers. Youalso want to allow zone transfers, which use TCP traffic, but you want to restrict these zonetransfers and the TCP traffic to only the internal DNS servers. Listing 2-24 shows the requiredINPUT chain rules.
4444c02_final.qxd 1/5/05 12:50 AM Page 99
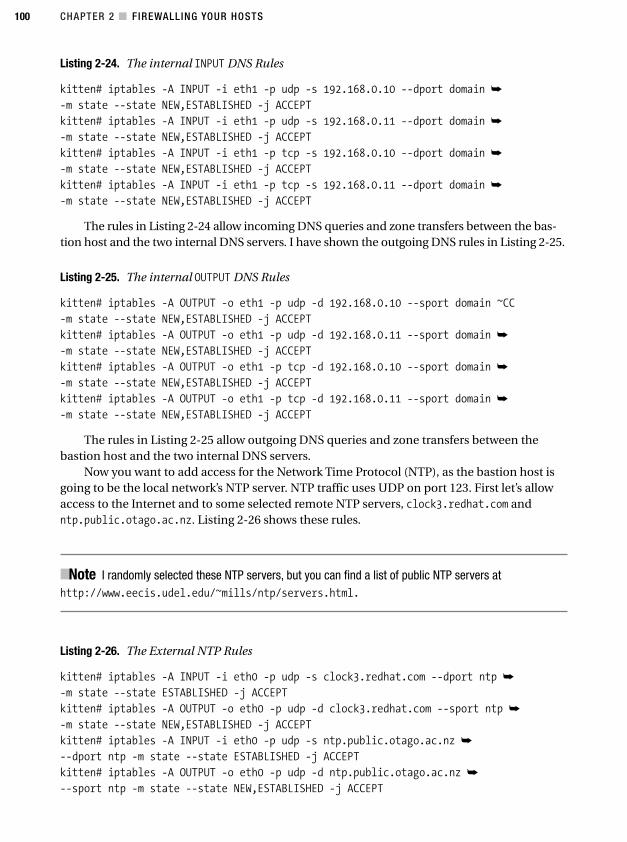
CHAPTER 2 ■ FIREWALLING YOUR HOSTS100
Listing 2-24. The internal INPUT DNS Rules
kitten# iptables -A INPUT -i eth1 -p udp -s 192.168.0.10 --dport domain ➥
-m state --state NEW,ESTABLISHED -j ACCEPT
kitten# iptables -A INPUT -i eth1 -p udp -s 192.168.0.11 --dport domain ➥
-m state --state NEW,ESTABLISHED -j ACCEPT
kitten# iptables -A INPUT -i eth1 -p tcp -s 192.168.0.10 --dport domain ➥
-m state --state NEW,ESTABLISHED -j ACCEPT
kitten# iptables -A INPUT -i eth1 -p tcp -s 192.168.0.11 --dport domain ➥
-m state --state NEW,ESTABLISHED -j ACCEPT
The rules in Listing 2-24 allow incoming DNS queries and zone transfers between the bas-tion host and the two internal DNS servers. I have shown the outgoing DNS rules in Listing 2-25.
Listing 2-25. The internal OUTPUT DNS Rules
kitten# iptables -A OUTPUT -o eth1 -p udp -d 192.168.0.10 --sport domain ~CC
-m state --state NEW,ESTABLISHED -j ACCEPT
kitten# iptables -A OUTPUT -o eth1 -p udp -d 192.168.0.11 --sport domain ➥
-m state --state NEW,ESTABLISHED -j ACCEPT
kitten# iptables -A OUTPUT -o eth1 -p tcp -d 192.168.0.10 --sport domain ➥
-m state --state NEW,ESTABLISHED -j ACCEPT
kitten# iptables -A OUTPUT -o eth1 -p tcp -d 192.168.0.11 --sport domain ➥
-m state --state NEW,ESTABLISHED -j ACCEPT
The rules in Listing 2-25 allow outgoing DNS queries and zone transfers between thebastion host and the two internal DNS servers.
Now you want to add access for the Network Time Protocol (NTP), as the bastion host isgoing to be the local network’s NTP server. NTP traffic uses UDP on port 123. First let’s allowaccess to the Internet and to some selected remote NTP servers, clock3.redhat.com andntp.public.otago.ac.nz. Listing 2-26 shows these rules.
■Note I randomly selected these NTP servers, but you can find a list of public NTP servers athttp://www.eecis.udel.edu/~mills/ntp/servers.html.
Listing 2-26. The External NTP Rules
kitten# iptables -A INPUT -i eth0 -p udp -s clock3.redhat.com --dport ntp ➥
-m state --state ESTABLISHED -j ACCEPT
kitten# iptables -A OUTPUT -o eth0 -p udp -d clock3.redhat.com --sport ntp ➥
-m state --state NEW,ESTABLISHED -j ACCEPT
kitten# iptables -A INPUT -i eth0 -p udp -s ntp.public.otago.ac.nz ➥
--dport ntp -m state --state ESTABLISHED -j ACCEPT
kitten# iptables -A OUTPUT -o eth0 -p udp -d ntp.public.otago.ac.nz ➥
--sport ntp -m state --state NEW,ESTABLISHED -j ACCEPT
4444c02_final.qxd 1/5/05 12:50 AM Page 100
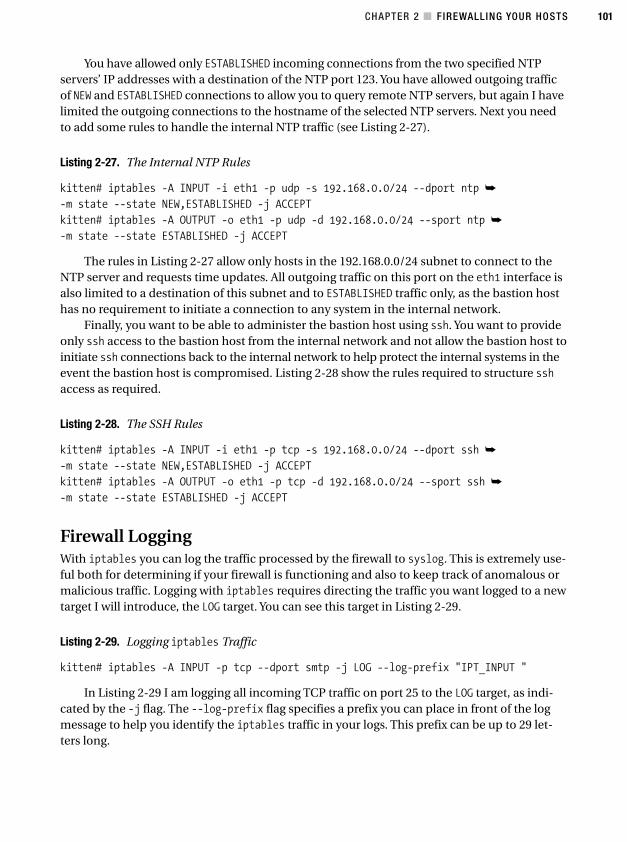
CHAPTER 2 ■ FIREWALLING YOUR HOSTS 101
You have allowed only ESTABLISHED incoming connections from the two specified NTPservers’ IP addresses with a destination of the NTP port 123. You have allowed outgoing trafficof NEW and ESTABLISHED connections to allow you to query remote NTP servers, but again I havelimited the outgoing connections to the hostname of the selected NTP servers. Next you needto add some rules to handle the internal NTP traffic (see Listing 2-27).
Listing 2-27. The Internal NTP Rules
kitten# iptables -A INPUT -i eth1 -p udp -s 192.168.0.0/24 --dport ntp ➥
-m state --state NEW,ESTABLISHED -j ACCEPT
kitten# iptables -A OUTPUT -o eth1 -p udp -d 192.168.0.0/24 --sport ntp ➥
-m state --state ESTABLISHED -j ACCEPT
The rules in Listing 2-27 allow only hosts in the 192.168.0.0/24 subnet to connect to theNTP server and requests time updates. All outgoing traffic on this port on the eth1 interface isalso limited to a destination of this subnet and to ESTABLISHED traffic only, as the bastion hosthas no requirement to initiate a connection to any system in the internal network.
Finally, you want to be able to administer the bastion host using ssh. You want to provideonly ssh access to the bastion host from the internal network and not allow the bastion host toinitiate ssh connections back to the internal network to help protect the internal systems in theevent the bastion host is compromised. Listing 2-28 show the rules required to structure sshaccess as required.
Listing 2-28. The SSH Rules
kitten# iptables -A INPUT -i eth1 -p tcp -s 192.168.0.0/24 --dport ssh ➥
-m state --state NEW,ESTABLISHED -j ACCEPT
kitten# iptables -A OUTPUT -o eth1 -p tcp -d 192.168.0.0/24 --sport ssh ➥
-m state --state ESTABLISHED -j ACCEPT
Firewall LoggingWith iptables you can log the traffic processed by the firewall to syslog. This is extremely use-ful both for determining if your firewall is functioning and also to keep track of anomalous ormalicious traffic. Logging with iptables requires directing the traffic you want logged to a newtarget I will introduce, the LOG target. You can see this target in Listing 2-29.
Listing 2-29. Logging iptables Traffic
kitten# iptables -A INPUT -p tcp --dport smtp -j LOG --log-prefix "IPT_INPUT "
In Listing 2-29 I am logging all incoming TCP traffic on port 25 to the LOG target, as indi-cated by the -j flag. The --log-prefix flag specifies a prefix you can place in front of the logmessage to help you identify the iptables traffic in your logs. This prefix can be up to 29 let-ters long.
4444c02_final.qxd 1/5/05 12:50 AM Page 101
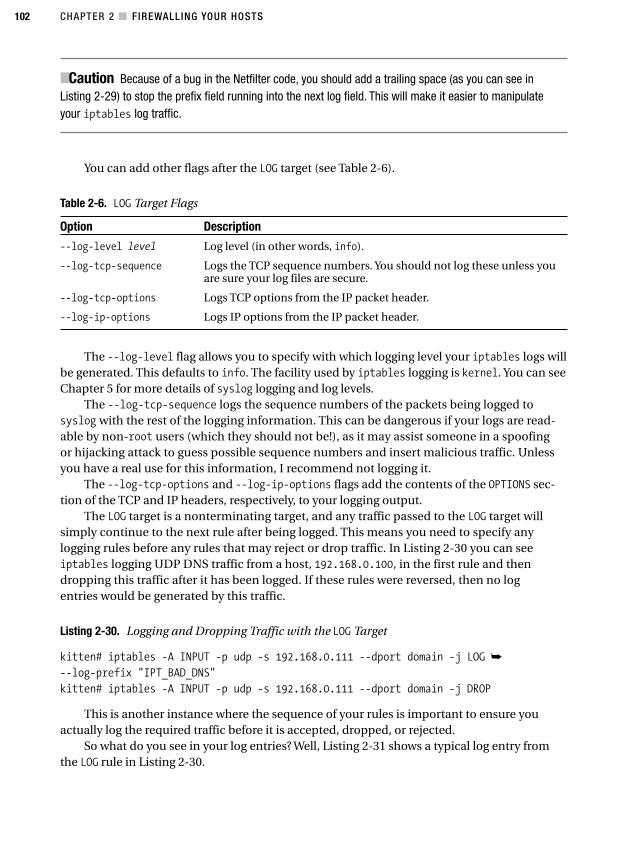
CHAPTER 2 ■ FIREWALLING YOUR HOSTS102
■Caution Because of a bug in the Netfilter code, you should add a trailing space (as you can see inListing 2-29) to stop the prefix field running into the next log field. This will make it easier to manipulate your iptables log traffic.
You can add other flags after the LOG target (see Table 2-6).
Table 2-6. LOG Target Flags
Option Description
--log-level level Log level (in other words, info).
--log-tcp-sequence Logs the TCP sequence numbers. You should not log these unless youare sure your log files are secure.
--log-tcp-options Logs TCP options from the IP packet header.
--log-ip-options Logs IP options from the IP packet header.
The --log-level flag allows you to specify with which logging level your iptables logs willbe generated. This defaults to info. The facility used by iptables logging is kernel. You can seeChapter 5 for more details of syslog logging and log levels.
The --log-tcp-sequence logs the sequence numbers of the packets being logged tosyslog with the rest of the logging information. This can be dangerous if your logs are read-able by non-root users (which they should not be!), as it may assist someone in a spoofingor hijacking attack to guess possible sequence numbers and insert malicious traffic. Unlessyou have a real use for this information, I recommend not logging it.
The --log-tcp-options and --log-ip-options flags add the contents of the OPTIONS sec-tion of the TCP and IP headers, respectively, to your logging output.
The LOG target is a nonterminating target, and any traffic passed to the LOG target willsimply continue to the next rule after being logged. This means you need to specify anylogging rules before any rules that may reject or drop traffic. In Listing 2-30 you can seeiptables logging UDP DNS traffic from a host, 192.168.0.100, in the first rule and thendropping this traffic after it has been logged. If these rules were reversed, then no logentries would be generated by this traffic.
Listing 2-30. Logging and Dropping Traffic with the LOG Target
kitten# iptables -A INPUT -p udp -s 192.168.0.111 --dport domain -j LOG ➥
--log-prefix "IPT_BAD_DNS"
kitten# iptables -A INPUT -p udp -s 192.168.0.111 --dport domain -j DROP
This is another instance where the sequence of your rules is important to ensure youactually log the required traffic before it is accepted, dropped, or rejected.
So what do you see in your log entries? Well, Listing 2-31 shows a typical log entry fromthe LOG rule in Listing 2-30.
4444c02_final.qxd 1/5/05 12:50 AM Page 102
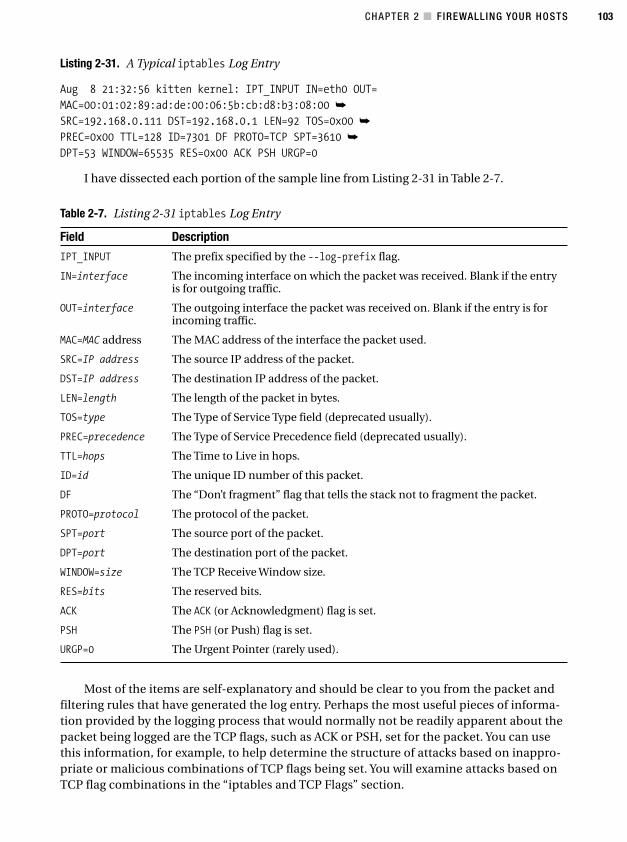
CHAPTER 2 ■ FIREWALLING YOUR HOSTS 103
Listing 2-31. A Typical iptables Log Entry
Aug 8 21:32:56 kitten kernel: IPT_INPUT IN=eth0 OUT=
MAC=00:01:02:89:ad:de:00:06:5b:cb:d8:b3:08:00 ➥
SRC=192.168.0.111 DST=192.168.0.1 LEN=92 TOS=0x00 ➥
PREC=0x00 TTL=128 ID=7301 DF PROTO=TCP SPT=3610 ➥
DPT=53 WINDOW=65535 RES=0x00 ACK PSH URGP=0
I have dissected each portion of the sample line from Listing 2-31 in Table 2-7.
Table 2-7. Listing 2-31 iptables Log Entry
Field Description
IPT_INPUT The prefix specified by the --log-prefix flag.
IN=interface The incoming interface on which the packet was received. Blank if the entryis for outgoing traffic.
OUT=interface The outgoing interface the packet was received on. Blank if the entry is forincoming traffic.
MAC=MAC address The MAC address of the interface the packet used.
SRC=IP address The source IP address of the packet.
DST=IP address The destination IP address of the packet.
LEN=length The length of the packet in bytes.
TOS=type The Type of Service Type field (deprecated usually).
PREC=precedence The Type of Service Precedence field (deprecated usually).
TTL=hops The Time to Live in hops.
ID=id The unique ID number of this packet.
DF The “Don’t fragment” flag that tells the stack not to fragment the packet.
PROTO=protocol The protocol of the packet.
SPT=port The source port of the packet.
DPT=port The destination port of the packet.
WINDOW=size The TCP Receive Window size.
RES=bits The reserved bits.
ACK The ACK (or Acknowledgment) flag is set.
PSH The PSH (or Push) flag is set.
URGP=0 The Urgent Pointer (rarely used).
Most of the items are self-explanatory and should be clear to you from the packet andfiltering rules that have generated the log entry. Perhaps the most useful pieces of informa-tion provided by the logging process that would normally not be readily apparent about thepacket being logged are the TCP flags, such as ACK or PSH, set for the packet. You can usethis information, for example, to help determine the structure of attacks based on inappro-priate or malicious combinations of TCP flags being set. You will examine attacks based onTCP flag combinations in the “iptables and TCP Flags” section.
4444c02_final.qxd 1/5/05 12:50 AM Page 103

CHAPTER 2 ■ FIREWALLING YOUR HOSTS104
The log entries generated by using the LOG target can be separated from your other logentries by controlling your syslog or syslog-ng configuration. Listing 2-32 shows two samplelogging rules that would log all incoming and outgoing traffic.
Listing 2-32. Sample Logging Rules
kitten# iptables -A INPUT -i eth0 -j LOG --log-prefix "IPT_INPUT " ➥
--log-level warning
kitten# iptables -A OUTPUT -o eth0 -j LOG --log-prefix "IPT_OUTPUT " ➥
--log-level warning
Listing 2-33 shows the syslog.conf entry to trap these log entries into a separate file. Thisis not precise and you may end up with entries not related to your iptables traffic, as the basicsyslog daemon does not have the full functionality to allow you to sort the iptables entries fromother kernel facility messages.
Listing 2-33. syslog.conf Entries for the Listing 2-32 Logging Entries
kern.warn /var/log/ipt_log
In Listing 2-34 I have provided the same configuration but for the syslog-NG daemon,which allows considerably greater flexibility in selecting only those log entries from yourfirewall logging.
Listing 2-34. Syslog-NG Configuration for Logging iptables Traffic
destination d_ipti { file("/var/log/ipt_input"); };
destination d_ipto { file("/var/log/ipt_output"); };
filter f_filter_in { facility(kernel) and level(warning) ➥
and match(IPT_INPUT ); };
filter f_filter_out { facility(kernel) and level(warning) ➥
and match(IPT_OUTPUT ); };
log { source(s_sys); filter(f_filter_in); destination(d_ipti); };
log { source(s_sys); filter(f_filter_out); destination(d_ipto); };
In Listing 2-34 I have separated the incoming log entries from the outgoing log entriesand written them to two different files.
■Tip You can find further information on logging and using other tools such as SEC to process your firewalllog files in Chapter 5.
I have not explicitly added any new rules to the bastion host firewall as a result of theinformation described in this section but I will incorporate rules with the LOG target into theoverall bastion host firewall in the next few sections.
4444c02_final.qxd 1/5/05 12:50 AM Page 104
CHAPTER 2 ■ FIREWALLING YOUR HOSTS 105
■Caution You should be aware that firewall logging on a busy system can generate a lot of data, andyou should ensure you have sufficient disk space and a suitable log rotation regime to accommodate yourrequired level of logging.
Handling ICMP TrafficTogether with TCP and UDP, one of the most commonly used protocols is ICMP.7 ICMPprovides error, control, and informational messages such as the messages used by the pingcommand. In the past, ICMP messages have formed an important component of networktroubleshooting and diagnostics. Unfortunately in recent years, the widespread use andaccess granted to ICMP traffic has meant a variety of vulnerabilities and exploits, includingsome serious Denial of Service attacks related to ICMP traffic, have emerged. Bastion hostsare particular targets of these types of attacks. In the last five years more than 40 ICMP-related vulnerabilities and potential attacks have been discovered.8 These have includedattacks such as the following:
• ICMP flood attacks where a storm of pings overwhelm a system and consume availablebandwidth resulting in a Denial of Service.
• ICMP “smurf” attacks where an attacker sends forged ICMP echo packets to networkbroadcast addresses allegedly from a particular targeted host. The broadcast addressesreply with ICMP echo reply packets, which are sent to the targeted host, consuming allavailable bandwidth and killing the host with a Denial of Service attack.
• The “ping of death” in which an attacker sends an ICMP echo packet larger than themaximum IP packet size. The packet is fragmented and because of bugs in the IP stackattempts to reassemble the packets crash the system.
• ICMP “nuke” attack in which the ICMP packet contains information that the receivingsystem cannot handle, which results in a system crash.
You can prevent all these attacks or mitigate the risk of attack using iptables by tightlycontrolling how your hosts handle ICMP traffic. But this traffic is also used by some importantnetwork diagnostic tools such as ping.
If you look at ICMP, you can see it consists of a whole series of message types with relatedmessage codes. For example, the ping command generates an echo-request or an ICMP Type 8message. The response to a ping is an echo reply or an ICMP Type 0 message. Table 2-8 pres-ents all the ICMP message types.
7. The RFC for ICMP is RFC 792; you can review it at http://www.ietf.org/rfc/rfc0792.txt?number=792.
8. http://icat.nist.gov/icat.cfm
4444c02_final.qxd 1/5/05 12:50 AM Page 105
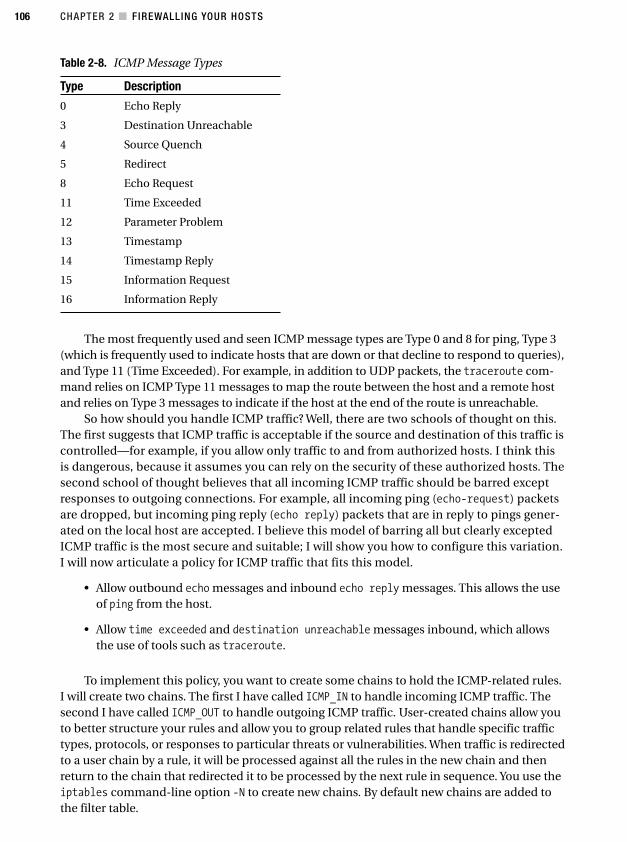
CHAPTER 2 ■ FIREWALLING YOUR HOSTS106
Table 2-8. ICMP Message Types
Type Description
0 Echo Reply
3 Destination Unreachable
4 Source Quench
5 Redirect
8 Echo Request
11 Time Exceeded
12 Parameter Problem
13 Timestamp
14 Timestamp Reply
15 Information Request
16 Information Reply
The most frequently used and seen ICMP message types are Type 0 and 8 for ping, Type 3(which is frequently used to indicate hosts that are down or that decline to respond to queries),and Type 11 (Time Exceeded). For example, in addition to UDP packets, the traceroute com-mand relies on ICMP Type 11 messages to map the route between the host and a remote hostand relies on Type 3 messages to indicate if the host at the end of the route is unreachable.
So how should you handle ICMP traffic? Well, there are two schools of thought on this.The first suggests that ICMP traffic is acceptable if the source and destination of this traffic iscontrolled—for example, if you allow only traffic to and from authorized hosts. I think thisis dangerous, because it assumes you can rely on the security of these authorized hosts. Thesecond school of thought believes that all incoming ICMP traffic should be barred exceptresponses to outgoing connections. For example, all incoming ping (echo-request) packetsare dropped, but incoming ping reply (echo reply) packets that are in reply to pings gener-ated on the local host are accepted. I believe this model of barring all but clearly exceptedICMP traffic is the most secure and suitable; I will show you how to configure this variation.I will now articulate a policy for ICMP traffic that fits this model.
• Allow outbound echo messages and inbound echo reply messages. This allows the useof ping from the host.
• Allow time exceeded and destination unreachable messages inbound, which allowsthe use of tools such as traceroute.
To implement this policy, you want to create some chains to hold the ICMP-related rules.I will create two chains. The first I have called ICMP_IN to handle incoming ICMP traffic. Thesecond I have called ICMP_OUT to handle outgoing ICMP traffic. User-created chains allow youto better structure your rules and allow you to group related rules that handle specific traffictypes, protocols, or responses to particular threats or vulnerabilities. When traffic is redirectedto a user chain by a rule, it will be processed against all the rules in the new chain and thenreturn to the chain that redirected it to be processed by the next rule in sequence. You use theiptables command-line option -N to create new chains. By default new chains are added tothe filter table.
4444c02_final.qxd 1/5/05 12:50 AM Page 106
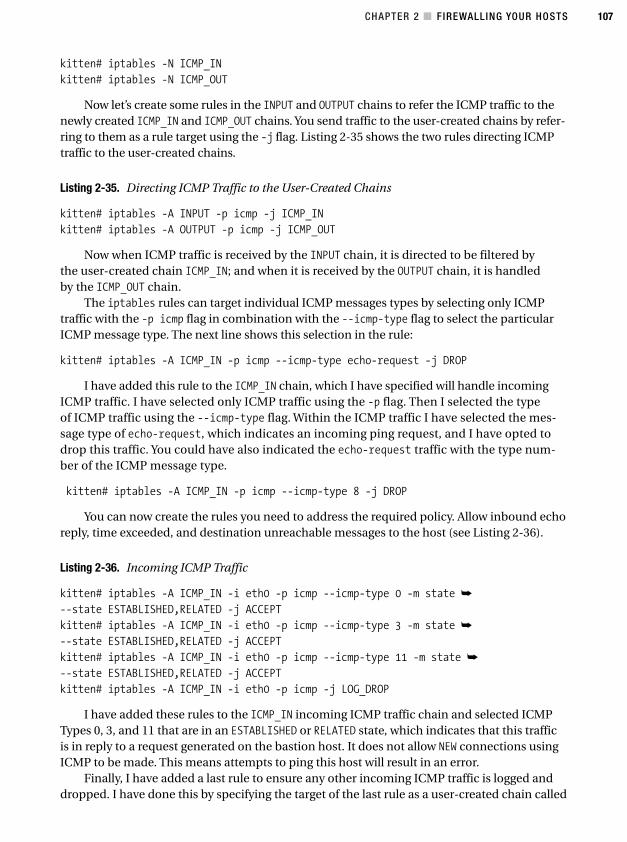
CHAPTER 2 ■ FIREWALLING YOUR HOSTS 107
kitten# iptables -N ICMP_IN
kitten# iptables -N ICMP_OUT
Now let’s create some rules in the INPUT and OUTPUT chains to refer the ICMP traffic to thenewly created ICMP_IN and ICMP_OUT chains. You send traffic to the user-created chains by refer-ring to them as a rule target using the -j flag. Listing 2-35 shows the two rules directing ICMPtraffic to the user-created chains.
Listing 2-35. Directing ICMP Traffic to the User-Created Chains
kitten# iptables -A INPUT -p icmp -j ICMP_IN
kitten# iptables -A OUTPUT -p icmp -j ICMP_OUT
Now when ICMP traffic is received by the INPUT chain, it is directed to be filtered by the user-created chain ICMP_IN; and when it is received by the OUTPUT chain, it is handled by the ICMP_OUT chain.
The iptables rules can target individual ICMP messages types by selecting only ICMPtraffic with the -p icmp flag in combination with the --icmp-type flag to select the particularICMP message type. The next line shows this selection in the rule:
kitten# iptables -A ICMP_IN -p icmp --icmp-type echo-request -j DROP
I have added this rule to the ICMP_IN chain, which I have specified will handle incomingICMP traffic. I have selected only ICMP traffic using the -p flag. Then I selected the typeof ICMP traffic using the --icmp-type flag. Within the ICMP traffic I have selected the mes-sage type of echo-request, which indicates an incoming ping request, and I have opted todrop this traffic. You could have also indicated the echo-request traffic with the type num-ber of the ICMP message type.
kitten# iptables -A ICMP_IN -p icmp --icmp-type 8 -j DROP
You can now create the rules you need to address the required policy. Allow inbound echoreply, time exceeded, and destination unreachable messages to the host (see Listing 2-36).
Listing 2-36. Incoming ICMP Traffic
kitten# iptables -A ICMP_IN -i eth0 -p icmp --icmp-type 0 -m state ➥
--state ESTABLISHED,RELATED -j ACCEPT
kitten# iptables -A ICMP_IN -i eth0 -p icmp --icmp-type 3 -m state ➥
--state ESTABLISHED,RELATED -j ACCEPT
kitten# iptables -A ICMP_IN -i eth0 -p icmp --icmp-type 11 -m state ➥
--state ESTABLISHED,RELATED -j ACCEPT
kitten# iptables -A ICMP_IN -i eth0 -p icmp -j LOG_DROP
I have added these rules to the ICMP_IN incoming ICMP traffic chain and selected ICMPTypes 0, 3, and 11 that are in an ESTABLISHED or RELATED state, which indicates that this trafficis in reply to a request generated on the bastion host. It does not allow NEW connections usingICMP to be made. This means attempts to ping this host will result in an error.
Finally, I have added a last rule to ensure any other incoming ICMP traffic is logged anddropped. I have done this by specifying the target of the last rule as a user-created chain called
4444c02_final.qxd 1/5/05 12:50 AM Page 107
CHAPTER 2 ■ FIREWALLING YOUR HOSTS108
LOG_DROP. This chain is going to direct the ICMP traffic to a set of iptables rules that will logthe packets to be dropped and then drop the packets. First, create the LOG_DROP chain.
kitten# iptables -N LOG_DROP
Second, create a rule to log the incoming ICMP traffic. You will log the ICMP traffic tosyslog adding a prefix of IPT_ICMP_IN (with a trailing space) to the log entries to allow youto identify them.
kitten# iptables -A LOG_DROP -i eth0 -p icmp -j LOG --log-prefix "IPT_ICMP_IN "
kitten# iptables -A LOG_DROP -i eth0 -p icmp -j DROP
The last rule drops the traffic after it has been logged. This takes care of all the incomingICMP traffic.
■Caution Be careful about logging your ICMP traffic. Large amounts of logging traffic can be generatedby ICMP traffic. You should ensure you have sufficient disk space and a suitable log rotation regime.
Now you add the rules to take care of the outbound ICMP traffic. You can see these ruleson the following lines:
kitten# iptables -A ICMP_OUT -o eth0 -p icmp --icmp-type 8 -m state ➥
--state NEW -j ACCEPT
kitten# iptables -A ICMP_OUT -o eth0 -p icmp -j LOG_DROP
I have allowed outgoing echo messages so that I can ping remote hosts; then you addeda rule to log and drop all other outgoing ICMP traffic.
I will also add two more rules to the user-created chain LOG_DROP to handle logging anddropping the outgoing ICMP traffic.
kitten# iptables -A LOG_DROP -o eth0 -p icmp -j LOG --log-prefix "IPT_ICMP_OUT "
kitten# iptables -A LOG_DROP -o eth0 -p icmp -j DROP
From this information and these rules, you should now be able to design and implementsome rules to handle incoming and outgoing ICMP traffic in your environment.
■Note Some kernel parameters relate to ICMP traffic; I will cover them in the “Kernel Modules andParameters” section.
Spoofing, Hijacking, and Denial of Service AttacksAttacks based on incoming traffic are not limited to ICMP-based traffic. Some of the othercommon forms of attack on hosts are spoofing, hijacking, and Denial of Service attacks. Inthis section I will provide some rules for defending against these types of attacks.
4444c02_final.qxd 1/5/05 12:50 AM Page 108
CHAPTER 2 ■ FIREWALLING YOUR HOSTS 109
These sorts of attacks can take three major forms (though all these forms can be com-bined and used in conjunction with each other). In the first form, an attacker tries to subvertthe traffic between two hosts from a third host by trying to fool one of the hosts into believingit is actually the other host in the conversation. The attacker can then connect to the targetedhost or insert some malicious information into packets sent to the targeted system to compro-mise or penetrate it. This form of attack includes so-called man-in-the-middle attacks andblind spoofing attacks.
In the second form, an attacker redirects routing information by using methods suchas ICMP redirect or by manipulating the host’s ARP table. The routing changes redirecttraffic from the original host to the attacker’s host. This allows the attacker to receive allthe traffic from the original host and potentially use this information to exploit the originalhost or another host with which the original host communicates.
■Caution Attacks based on manipulating or poisoning ARP tables are hard to defend against and hard to detect. I recommend looking at a tool such as ARPWatch to monitor incoming ARP traffic. You can findARPWatch at ftp://ftp.ee.lbl.gov/arpwatch.tar.gz.
The third form of attack is similar in nature to the ICMP flood attack. An attacker spoofsthe target’s address and utilizes mechanisms such as network broadcasts to flood the targetwith incoming connections and consume all available connection resources. This results ina Denial of Service on the targeted host. This last form is often called smurfing or fraggling.
It can be hard to both detect and stop some of these sorts of attacks, but it is not impossi-ble. One of the best ways to prevent these types of attacks is to explicitly deny traffic from hosts,networks, and sources you know traffic should not or cannot be coming from. This includessources such as the following:
• Incoming traffic that has a source address of an IP address assigned to a local interface;for example, if eth0 is bound to 192.168.0.1, then incoming traffic cannot have a sourceaddress of 192.168.0.1, as the IP address should be unique in the subnet.
• Outgoing traffic that does not have a source address of an interface on your local host; forexample, this includes a process trying to send traffic with a source address of 10.0.0.1when you do not have this address bound to a local interface.
• Traffic coming from the Internet on RFC 1918’s private IP address ranges. These are pri-vate address ranges and should not be routable on the Internet.
• The Zeroconf IP address range, 169.254.0.0/16.
• The TEST-NET address range of 192.0.2.0/24.
• The reserved IP address Class D and E (Broadcast) addresses 224.0.0.0/4 and240.0.0.0/5 and the unallocated address range 248.0.0.0/5.
• Loopback addresses in the range 127.0.0.0/8 should also be nonroutable on the Inter-net and finally broadcast address range 255.255.255.255/32 and the older broadcastaddress range, 0.0.0.0/8.
4444c02_final.qxd 1/5/05 12:50 AM Page 109
CHAPTER 2 ■ FIREWALLING YOUR HOSTS110
So, I will show how to set some rules to reduce the risk that incoming traffic to your host ismalicious, and then later in the “Kernel Parameters section” I will introduce some kernel param-eters that will also help further reduce the risk of these sorts of attacks.
The first set of rules you will add handle traffic that allegedly comes from your ownhost. Incoming traffic with the source addresses of your system is going to be spoofed trafficbecause you know it cannot be generated by the host or it would be outgoing rather thanincoming. You add a rule to handle packets allegedly from the internal LAN IP address andthen a rule to handle packets allegedly to the external IP address.
kitten# iptables -A INPUT -i eth1 -s 192.168.0.100 -j DROP
kitten# iptables -A INPUT -i eth0 -s 220.240.52.228 -j DROP
You can also add a rule saying that any outgoing traffic that is not from your source IPaddress is incorrect. This is both useful to stop your host sending bad packets and also politeas your host should not be generating packets that do not come from your IP address.
kitten# iptables -A OUTPUT -o eth1 -s ! 192.168.0.100 -j DROP
kitten# iptables -A OUTPUT -o eth0 -s ! 220.240.52.228 -j DROP
These rule uses the negate symbol (!) together with the source address to indicate all out-going traffic not from the specified IP address. For example, in the first rule, all traffic that isnot from IP address192.168.0.100 is dropped. This is because only traffic from the IP address192.168.0.100 should be outgoing from this interface.
You can also use the negate symbol on most other iptables flags; for example, to select alltraffic except ICMP, you could use the following rule:
kitten# iptables -A INPUT -p ! imcp -J ACCEPT
As you were using iptables on a bastion host between your network and the Internet,you will block the RFC 1918 private address space ranges.9 These address ranges, 10.0.0.0/8,172.16.0.0/12, and 192.168.0.0/16, are reserved for private IP networks and should be usedonly as internal IP addresses ranges. These addresses are not routable on the Internet. Youshould block these address ranges on any Internet-facing interfaces.
kitten# iptables -A INPUT -i eth0 -s 10.0.0.0/8 -j DROP
kitten# iptables -A INPUT -i eth0 -s 172.16.0.0/12 -j DROP
kitten# iptables -A INPUT -i eth0 -s 192.168.0.0/16 -j DROP
You do not need to block this traffic on the internal network because these address ranges arefrequently used, including by the internal network you have specified, as internal address ranges.
Next you want to block incoming traffic from the Internet that is from the Zeroconf addressrange.10 The Zeroconf address range is used primarily by hosts that use DHCP to acquire theirIP address. An address from this range is assigned when these hosts are unable to find a DHCPserver to provide them with an address. It is also being proposed to use this address range toprovide addressing when connecting two devices together with a crossover cable. Add a ruleto prevent any traffic on the Internet and the internal LAN interfaces.
kitten# iptables -A INPUT -s 168.254.0.0/16 -j DROP
9. http://www.faqs.org/rfcs/rfc1918.html
10. http://www.zeroconf.org/
4444c02_final.qxd 1/5/05 12:50 AM Page 110
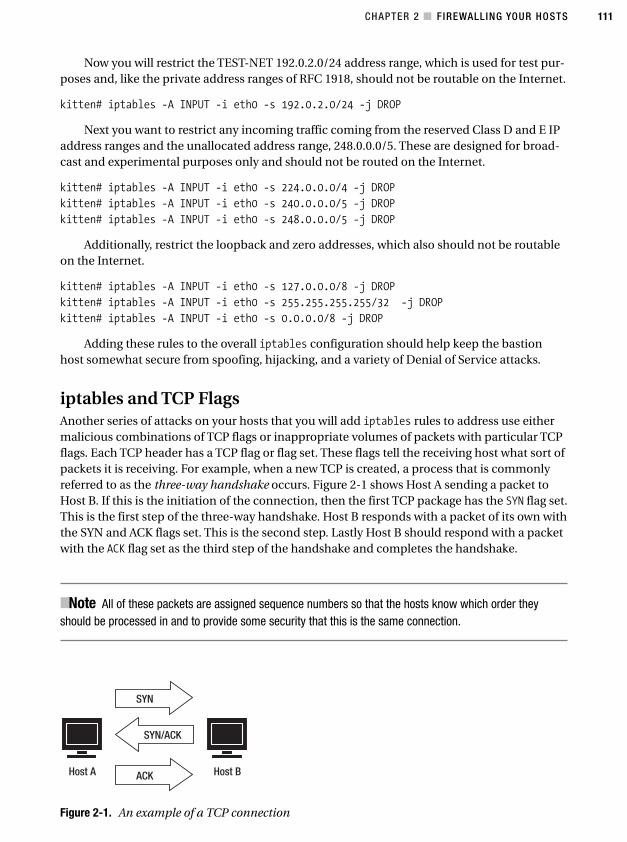
CHAPTER 2 ■ FIREWALLING YOUR HOSTS 111
Now you will restrict the TEST-NET 192.0.2.0/24 address range, which is used for test pur-poses and, like the private address ranges of RFC 1918, should not be routable on the Internet.
kitten# iptables -A INPUT -i eth0 -s 192.0.2.0/24 -j DROP
Next you want to restrict any incoming traffic coming from the reserved Class D and E IPaddress ranges and the unallocated address range, 248.0.0.0/5. These are designed for broad-cast and experimental purposes only and should not be routed on the Internet.
kitten# iptables -A INPUT -i eth0 -s 224.0.0.0/4 -j DROP
kitten# iptables -A INPUT -i eth0 -s 240.0.0.0/5 -j DROP
kitten# iptables -A INPUT -i eth0 -s 248.0.0.0/5 -j DROP
Additionally, restrict the loopback and zero addresses, which also should not be routableon the Internet.
kitten# iptables -A INPUT -i eth0 -s 127.0.0.0/8 -j DROP
kitten# iptables -A INPUT -i eth0 -s 255.255.255.255/32 -j DROP
kitten# iptables -A INPUT -i eth0 -s 0.0.0.0/8 -j DROP
Adding these rules to the overall iptables configuration should help keep the bastionhost somewhat secure from spoofing, hijacking, and a variety of Denial of Service attacks.
iptables and TCP FlagsAnother series of attacks on your hosts that you will add iptables rules to address use eithermalicious combinations of TCP flags or inappropriate volumes of packets with particular TCPflags. Each TCP header has a TCP flag or flag set. These flags tell the receiving host what sort ofpackets it is receiving. For example, when a new TCP is created, a process that is commonlyreferred to as the three-way handshake occurs. Figure 2-1 shows Host A sending a packet toHost B. If this is the initiation of the connection, then the first TCP package has the SYN flag set.This is the first step of the three-way handshake. Host B responds with a packet of its own withthe SYN and ACK flags set. This is the second step. Lastly Host B should respond with a packetwith the ACK flag set as the third step of the handshake and completes the handshake.
■Note All of these packets are assigned sequence numbers so that the hosts know which order theyshould be processed in and to provide some security that this is the same connection.
Figure 2-1. An example of a TCP connection
4444c02_final.qxd 1/5/05 12:50 AM Page 111
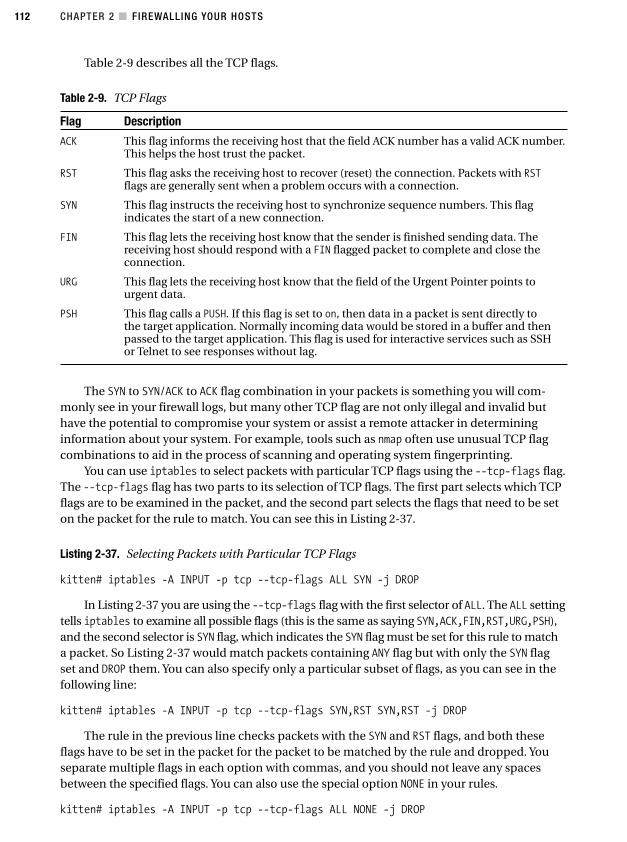
CHAPTER 2 ■ FIREWALLING YOUR HOSTS112
Table 2-9 describes all the TCP flags.
Table 2-9. TCP Flags
Flag Description
ACK This flag informs the receiving host that the field ACK number has a valid ACK number.This helps the host trust the packet.
RST This flag asks the receiving host to recover (reset) the connection. Packets with RSTflags are generally sent when a problem occurs with a connection.
SYN This flag instructs the receiving host to synchronize sequence numbers. This flagindicates the start of a new connection.
FIN This flag lets the receiving host know that the sender is finished sending data. Thereceiving host should respond with a FIN flagged packet to complete and close theconnection.
URG This flag lets the receiving host know that the field of the Urgent Pointer points tourgent data.
PSH This flag calls a PUSH. If this flag is set to on, then data in a packet is sent directly tothe target application. Normally incoming data would be stored in a buffer and thenpassed to the target application. This flag is used for interactive services such as SSHor Telnet to see responses without lag.
The SYN to SYN/ACK to ACK flag combination in your packets is something you will com-monly see in your firewall logs, but many other TCP flag are not only illegal and invalid buthave the potential to compromise your system or assist a remote attacker in determininginformation about your system. For example, tools such as nmap often use unusual TCP flagcombinations to aid in the process of scanning and operating system fingerprinting.
You can use iptables to select packets with particular TCP flags using the --tcp-flags flag.The --tcp-flags flag has two parts to its selection of TCP flags. The first part selects which TCPflags are to be examined in the packet, and the second part selects the flags that need to be seton the packet for the rule to match. You can see this in Listing 2-37.
Listing 2-37. Selecting Packets with Particular TCP Flags
kitten# iptables -A INPUT -p tcp --tcp-flags ALL SYN -j DROP
In Listing 2-37 you are using the --tcp-flags flag with the first selector of ALL. The ALL settingtells iptables to examine all possible flags (this is the same as saying SYN,ACK,FIN,RST,URG,PSH),and the second selector is SYN flag, which indicates the SYN flag must be set for this rule to matcha packet. So Listing 2-37 would match packets containing ANY flag but with only the SYN flagset and DROP them. You can also specify only a particular subset of flags, as you can see in thefollowing line:
kitten# iptables -A INPUT -p tcp --tcp-flags SYN,RST SYN,RST -j DROP
The rule in the previous line checks packets with the SYN and RST flags, and both theseflags have to be set in the packet for the packet to be matched by the rule and dropped. Youseparate multiple flags in each option with commas, and you should not leave any spacesbetween the specified flags. You can also use the special option NONE in your rules.
kitten# iptables -A INPUT -p tcp --tcp-flags ALL NONE -j DROP
4444c02_final.qxd 1/5/05 12:50 AM Page 112
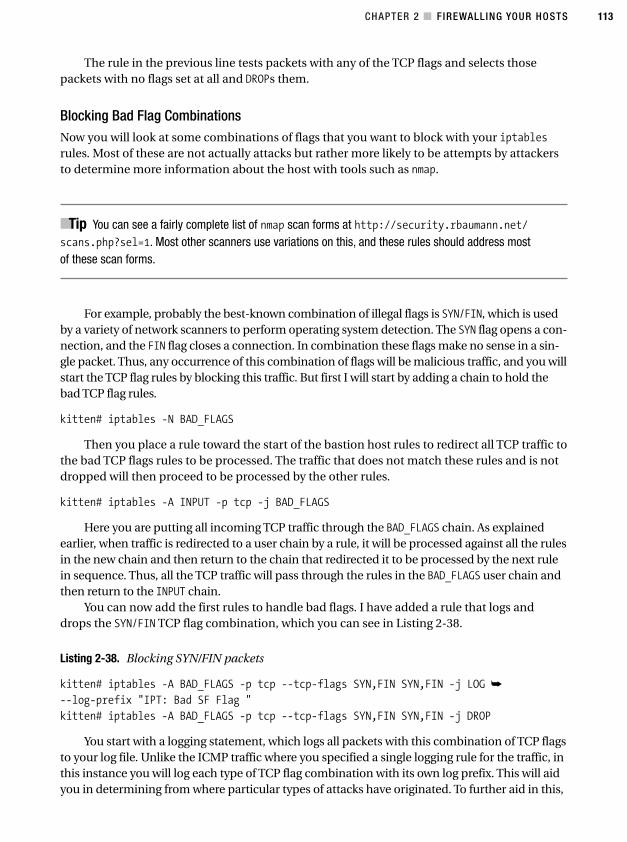
CHAPTER 2 ■ FIREWALLING YOUR HOSTS 113
The rule in the previous line tests packets with any of the TCP flags and selects thosepackets with no flags set at all and DROPs them.
Blocking Bad Flag CombinationsNow you will look at some combinations of flags that you want to block with your iptablesrules. Most of these are not actually attacks but rather more likely to be attempts by attackersto determine more information about the host with tools such as nmap.
■Tip You can see a fairly complete list of nmap scan forms at http://security.rbaumann.net/scans.php?sel=1. Most other scanners use variations on this, and these rules should address mostof these scan forms.
For example, probably the best-known combination of illegal flags is SYN/FIN, which is usedby a variety of network scanners to perform operating system detection. The SYN flag opens a con-nection, and the FIN flag closes a connection. In combination these flags make no sense in a sin-gle packet. Thus, any occurrence of this combination of flags will be malicious traffic, and you willstart the TCP flag rules by blocking this traffic. But first I will start by adding a chain to hold thebad TCP flag rules.
kitten# iptables -N BAD_FLAGS
Then you place a rule toward the start of the bastion host rules to redirect all TCP traffic tothe bad TCP flags rules to be processed. The traffic that does not match these rules and is notdropped will then proceed to be processed by the other rules.
kitten# iptables -A INPUT -p tcp -j BAD_FLAGS
Here you are putting all incoming TCP traffic through the BAD_FLAGS chain. As explainedearlier, when traffic is redirected to a user chain by a rule, it will be processed against all the rulesin the new chain and then return to the chain that redirected it to be processed by the next rulein sequence. Thus, all the TCP traffic will pass through the rules in the BAD_FLAGS user chain andthen return to the INPUT chain.
You can now add the first rules to handle bad flags. I have added a rule that logs anddrops the SYN/FIN TCP flag combination, which you can see in Listing 2-38.
Listing 2-38. Blocking SYN/FIN packets
kitten# iptables -A BAD_FLAGS -p tcp --tcp-flags SYN,FIN SYN,FIN -j LOG ➥
--log-prefix "IPT: Bad SF Flag "
kitten# iptables -A BAD_FLAGS -p tcp --tcp-flags SYN,FIN SYN,FIN -j DROP
You start with a logging statement, which logs all packets with this combination of TCP flagsto your log file. Unlike the ICMP traffic where you specified a single logging rule for the traffic, inthis instance you will log each type of TCP flag combination with its own log prefix. This will aidyou in determining from where particular types of attacks have originated. To further aid in this,
4444c02_final.qxd 1/5/05 12:50 AM Page 113
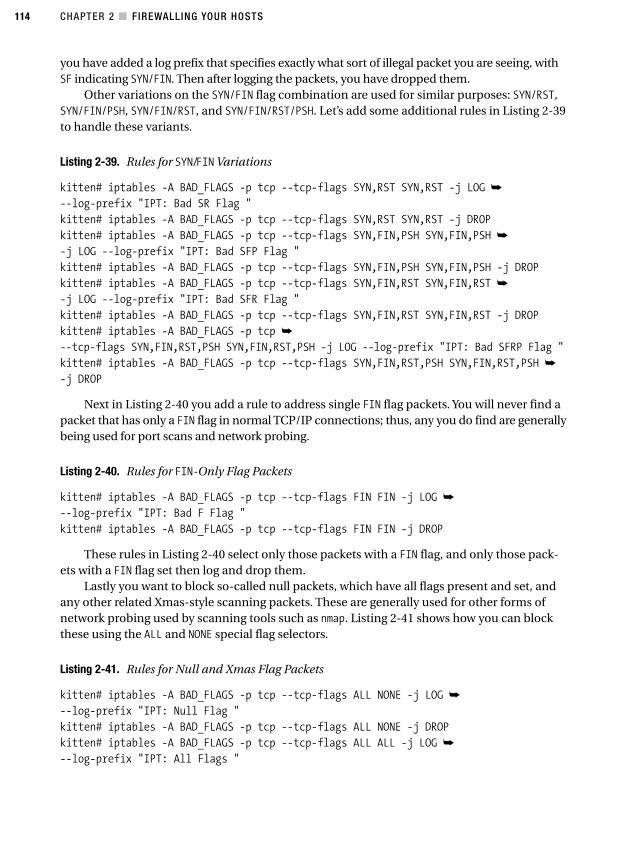
CHAPTER 2 ■ FIREWALLING YOUR HOSTS114
you have added a log prefix that specifies exactly what sort of illegal packet you are seeing, withSF indicating SYN/FIN. Then after logging the packets, you have dropped them.
Other variations on the SYN/FIN flag combination are used for similar purposes: SYN/RST,SYN/FIN/PSH, SYN/FIN/RST, and SYN/FIN/RST/PSH. Let’s add some additional rules in Listing 2-39to handle these variants.
Listing 2-39. Rules for SYN/FINVariations
kitten# iptables -A BAD_FLAGS -p tcp --tcp-flags SYN,RST SYN,RST -j LOG ➥
--log-prefix "IPT: Bad SR Flag "
kitten# iptables -A BAD_FLAGS -p tcp --tcp-flags SYN,RST SYN,RST -j DROP
kitten# iptables -A BAD_FLAGS -p tcp --tcp-flags SYN,FIN,PSH SYN,FIN,PSH ➥
-j LOG --log-prefix "IPT: Bad SFP Flag "
kitten# iptables -A BAD_FLAGS -p tcp --tcp-flags SYN,FIN,PSH SYN,FIN,PSH -j DROP
kitten# iptables -A BAD_FLAGS -p tcp --tcp-flags SYN,FIN,RST SYN,FIN,RST ➥
-j LOG --log-prefix "IPT: Bad SFR Flag "
kitten# iptables -A BAD_FLAGS -p tcp --tcp-flags SYN,FIN,RST SYN,FIN,RST -j DROP
kitten# iptables -A BAD_FLAGS -p tcp ➥
--tcp-flags SYN,FIN,RST,PSH SYN,FIN,RST,PSH -j LOG --log-prefix "IPT: Bad SFRP Flag "
kitten# iptables -A BAD_FLAGS -p tcp --tcp-flags SYN,FIN,RST,PSH SYN,FIN,RST,PSH ➥
-j DROP
Next in Listing 2-40 you add a rule to address single FIN flag packets. You will never find apacket that has only a FIN flag in normal TCP/IP connections; thus, any you do find are generallybeing used for port scans and network probing.
Listing 2-40. Rules for FIN-Only Flag Packets
kitten# iptables -A BAD_FLAGS -p tcp --tcp-flags FIN FIN -j LOG ➥
--log-prefix "IPT: Bad F Flag "
kitten# iptables -A BAD_FLAGS -p tcp --tcp-flags FIN FIN -j DROP
These rules in Listing 2-40 select only those packets with a FIN flag, and only those pack-ets with a FIN flag set then log and drop them.
Lastly you want to block so-called null packets, which have all flags present and set, andany other related Xmas-style scanning packets. These are generally used for other forms ofnetwork probing used by scanning tools such as nmap. Listing 2-41 shows how you can blockthese using the ALL and NONE special flag selectors.
Listing 2-41. Rules for Null and Xmas Flag Packets
kitten# iptables -A BAD_FLAGS -p tcp --tcp-flags ALL NONE -j LOG ➥
--log-prefix "IPT: Null Flag "
kitten# iptables -A BAD_FLAGS -p tcp --tcp-flags ALL NONE -j DROP
kitten# iptables -A BAD_FLAGS -p tcp --tcp-flags ALL ALL -j LOG ➥
--log-prefix "IPT: All Flags "
4444c02_final.qxd 1/5/05 12:50 AM Page 114
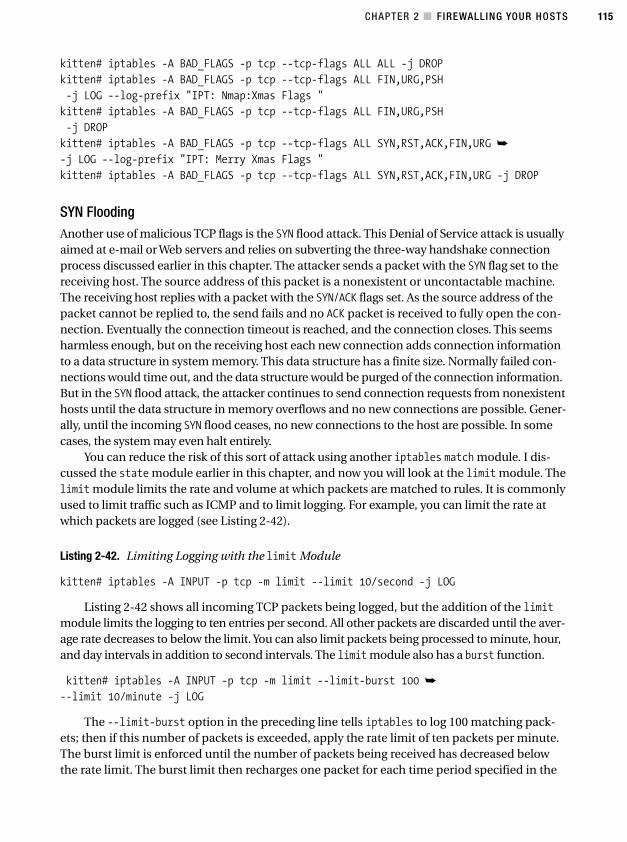
CHAPTER 2 ■ FIREWALLING YOUR HOSTS 115
kitten# iptables -A BAD_FLAGS -p tcp --tcp-flags ALL ALL -j DROP
kitten# iptables -A BAD_FLAGS -p tcp --tcp-flags ALL FIN,URG,PSH
-j LOG --log-prefix "IPT: Nmap:Xmas Flags "
kitten# iptables -A BAD_FLAGS -p tcp --tcp-flags ALL FIN,URG,PSH
-j DROP
kitten# iptables -A BAD_FLAGS -p tcp --tcp-flags ALL SYN,RST,ACK,FIN,URG ➥
-j LOG --log-prefix "IPT: Merry Xmas Flags "
kitten# iptables -A BAD_FLAGS -p tcp --tcp-flags ALL SYN,RST,ACK,FIN,URG -j DROP
SYN FloodingAnother use of malicious TCP flags is the SYN flood attack. This Denial of Service attack is usuallyaimed at e-mail or Web servers and relies on subverting the three-way handshake connectionprocess discussed earlier in this chapter. The attacker sends a packet with the SYN flag set to thereceiving host. The source address of this packet is a nonexistent or uncontactable machine.The receiving host replies with a packet with the SYN/ACK flags set. As the source address of thepacket cannot be replied to, the send fails and no ACK packet is received to fully open the con-nection. Eventually the connection timeout is reached, and the connection closes. This seemsharmless enough, but on the receiving host each new connection adds connection informationto a data structure in system memory. This data structure has a finite size. Normally failed con-nections would time out, and the data structure would be purged of the connection information.But in the SYN flood attack, the attacker continues to send connection requests from nonexistenthosts until the data structure in memory overflows and no new connections are possible. Gener-ally, until the incoming SYN flood ceases, no new connections to the host are possible. In somecases, the system may even halt entirely.
You can reduce the risk of this sort of attack using another iptables match module. I dis-cussed the state module earlier in this chapter, and now you will look at the limit module. Thelimit module limits the rate and volume at which packets are matched to rules. It is commonlyused to limit traffic such as ICMP and to limit logging. For example, you can limit the rate atwhich packets are logged (see Listing 2-42).
Listing 2-42. Limiting Logging with the limit Module
kitten# iptables -A INPUT -p tcp -m limit --limit 10/second -j LOG
Listing 2-42 shows all incoming TCP packets being logged, but the addition of the limitmodule limits the logging to ten entries per second. All other packets are discarded until the aver-age rate decreases to below the limit. You can also limit packets being processed to minute, hour,and day intervals in addition to second intervals. The limit module also has a burst function.
kitten# iptables -A INPUT -p tcp -m limit --limit-burst 100 ➥
--limit 10/minute -j LOG
The --limit-burst option in the preceding line tells iptables to log 100 matching pack-ets; then if this number of packets is exceeded, apply the rate limit of ten packets per minute.The burst limit is enforced until the number of packets being received has decreased belowthe rate limit. The burst limit then recharges one packet for each time period specified in the
4444c02_final.qxd 1/5/05 12:50 AM Page 115
CHAPTER 2 ■ FIREWALLING YOUR HOSTS116
limit option where the packet rate is maintained below the limit. So, in the preceding example,the burst limit is recharged one packet for every minute where the rate of received packets isless than ten per minute.
Let’s look at restricting SYN flooding now. You can use the rule in Listing 2-43 to limit thenumber of incoming SYN packets on your Internet-facing port.
Listing 2-43. Limiting Incoming SYN Packets
kitten# iptables -A INPUT -i eth0 -p tcp --syn -m limit --limit 5/second -j ACCEPT
In Listing 2-43 you have used the special TCP option --syn, which matches all packets withthe ACK and RST bits cleared and SYN flag set. It is the equivalent of setting the TCP flags option to--tcp-flags SYN,RST,ACK SYN. You have limited the number of incoming SYN packets to five persecond. This would limit the number of incoming connections to five per second and should(you hope) prevent an attacker from using a SYN flood attack on the bastion host. I recommendyou test a suitable connection rate for your system taking into consideration the volume ofincoming connections to your host and its size and performance when setting the limit.
Limiting the number of SYN packets connections to your host is not, however, an idealsolution to SYN flood attacks because it does limit the number of potential incoming connec-tions and does not do any checking of the connections it is dropping to ensure they are actu-ally malicious connections. On a busy system this can cause bottlenecking and the droppingof legitimate connections. A possible solution to this is the introduction of SYN cookies; I willcover them in the “Kernel Parameters” section.
Some Final Bastion Host RulesNow you will look at some final rules to catch some remaining potentially bad packets. Thefirst rule goes back to the state module introduced earlier. You will remember that one of thepotential states that is tracked by Netfilter is the INVALID state. Packets in the INVALID state arenot associated with any known connection. This means any incoming packets in the INVALIDstate are not from connections on the host and should be dropped. On the bastion host youwill log and discard all incoming packets in this state (see Listing 2-44).
Listing 2-44. Logging and Discarding Packets in the INVALID State
kitten# iptables -A INPUT -m state --state INVALID -j LOG ➥
--log-prefix "IPT INV_STATE "
kitten# iptables -A INPUT -m state --state INVALID -j DROP
Like you did with the BAD_FLAGS chain, you specify this rule to cover all incoming packetson all interfaces and log and drop them.
Lastly, you have added a rule to deal with packet fragments. Packet fragments occur whena packet is too large to be sent in one piece. The packet is broken up into fragments that arethen reassembled on the receiving host. Fragments have some issues, though. Only the firstfragment contains the full header fields of the packet. The subsequent packets have only a sub-set of the packet headers and contain only the IP information without any protocol informa-tion. This means most packet filtering based on this information fails. Not only this, but packetfragments have not only been responsible for a number of bugs in network servers and servicesbut can also be used in attacks designed to crash servers and services.
4444c02_final.qxd 1/5/05 12:50 AM Page 116
CHAPTER 2 ■ FIREWALLING YOUR HOSTS 117
This is mitigated if you are using connection tracking (using -m state), or NAT, as thepackets are reassembled before being received by the filtering rules. Most modern Netfilterimplementations should have connection tracking enabled by default, so fragments shouldnot appear. But you should add rules that log and block fragments in Listing 2-45 both asa precaution and for completeness sake.
Listing 2-45. Fragmented Packets
kitten# iptables -A INPUT -f -j LOG --log-prefix "IPT Frag "
kitten# iptables -A INPUT -f -j DROP
The -f flag in Listing 2-45 tells iptables to select all fragments, and you have then loggedand dropped them.
With these rules you have completed the iptables rules section of the bastion hosts fire-wall. You can see all these rules together with additional features such as kernel parametersin a script in Appendix A that you can modify for your own purposes.
Kernel Modules and ParametersNetfilter is constructed of two components: the Netfilter kernel code and the userland tools, ofwhich iptables is the principal tool. In addition to providing the standard packet-filtering rules,Netfilter also has a series of patches you can apply to the kernel code, as well as additional mod-ules that you can load to provide additional functionality. Furthermore, you can set a variety ofkernel parameters that allow you to tune and further configure iptables.
Patch-o-MaticIn the more recent releases of Netfilter, all the available patches and modules for Netfilterhave been bundled into a tool called Patch-o-Matic (Next Gen), or POM. POM is designed tosimplify the occasionally complicated process of applying patches to your kernel. The POMtool is available to download from the Netfilter site; Listing 2-46 goes through the downloadand verification process.
Listing 2-46. Downloading and Verifying the POM Archive
kitten# wget http://www.netfilter.org/files/patch-o-matic-ng-20040621.tar.bz2
kitten# wget http://www.netfilter.org/files/coreteam-gpg-key.txt
kitten# gpg --import coreteam-gpg-key.txt
gpg: key CA9A8D5B: public key "Netfilter Core Team <[email protected]>"
imported
gpg: Total number processed: 1
gpg: imported: 1
kitten# wget http://www.netfilter.org/files/patch-o-matic-ng-20040621.tar.bz2.sig
kitten# gpg --verify patch-o-matic-ng-20040621.tar.bz2.sig
gpg: Signature made Tue 22 Jun 2004 08:06:15 EST using DSA key ID CA9A8D5B
gpg: Good signature from "Netfilter Core Team <[email protected]>"
gpg: checking the trustdb
gpg: no ultimately trusted keys found
4444c02_final.qxd 1/5/05 12:50 AM Page 117
CHAPTER 2 ■ FIREWALLING YOUR HOSTS118
gpg: WARNING: This key is not certified with a trusted signature!
gpg: There is no indication that the signature belongs to the owner.
Primary key fingerprint: 02AC E2A4 74DD 09D7 FD45 2E2E 35FA 89CC CA9A 8D5B
In Listing 2-46 I have downloaded the POM source, the GPG key of the Netfilter team, andthe signature of the POM source. I downloaded the version of POM (20040621) at the time ofwriting, but you should check the Netfilter site for the most recent version. I then imported theNetfilter GPG key and verified the source archive against it with the signature I downloaded.
You will also need a copy of your current kernel source and the source of the iptablestool. See Chapter 1 for instructions on how to get the source of your current kernel. I willassume you have followed the instructions in Chapter 1 and stored your kernel source in/usr/src/linux. To get the source of iptables, you can download it from Netfilter. To checkthe current version of iptables on your system, use the following command:
kitten# iptables -V
iptables v1.2.11
If you have not got the latest version of the iptables userland tools, I recommend upgrad-ing to the latest version. Download the source for your version of iptables or the latest versionif you have chosen to upgrade. You can see this process in Listing 2-47.
Listing 2-47. Downloading and Verifying the POM Archive
kitten# wget http://www.netfilter.org/files/iptables-1.2.11.tar.bz2
kitten# wget http://www.netfilter.org/files/iptables-1.2.11.tar.bz2.sig
kitten# gpg --verify iptables-1.2.11.tar.bz2.sig gpg: ➥
Signature made Tue 22 Jun 2004 07:48:54 EST using DSA key ID CA9A8D5B
gpg: Good signature from "Netfilter Core Team <[email protected]>"
gpg: WARNING: This key is not certified with a trusted signature!
gpg: There is no indication that the signature belongs to the owner.
Primary key fingerprint: 02AC E2A4 74DD 09D7 FD45 2E2E 35FA 89CC CA9A 8D5B
In Listing 2-47 I have downloaded the iptables userland source archive and verified it withits signature. As I have already downloaded the Netfilter GPG key, I do not need to download itagain and import it. Unpack the iptables source archive, and make a note of the location, asyou will need it later when you use the POM tool.
■Tip I recommend installing your iptables source in the /usr/src directory.
Now that you have the POM, the kernel source, and the iptables source code, the prerequi-sites for POM are complete. Unpack the POM archive, and change into the resulting directory.
The POM tool contains two types of patches are. The first are patches fixing or adjustingiptables functionality. The second are patches and modules adding functionality to iptables.In both cases, you will generally need to recompile your kernel and the userland tools. With
4444c02_final.qxd 1/5/05 12:50 AM Page 118
CHAPTER 2 ■ FIREWALLING YOUR HOSTS 119
both types of patch or functionality, you are required to choose from a list of possible patchesand modules to install. This is much like the process of kernel configuration. The POM toolhas some built-in checking and does not let you install patches or modules that are alreadycompiled into your kernel.
■Caution The patches and modules contained within the Patch-o-Matic tool are new features that couldpotentially seriously impact how Netfilter and iptables function. The Netfilter team considers many of thepatches and modules not stable enough to be included in the core Netfilter release. Install them with caution,and test the functionality carefully.
If you want to just see the first type of patches for Netfilter, you can run POM using thecommands in Listing 2-48.
Listing 2-48. Applying the Latest patches for Netfilter with POM
kitten# cd patch-o-matic-ng-20040621
kitten# export KERNEL_DIR=/path/to/kernel/source
kitten# export IPTABLES_DIR=/path/to/iptables/source
kitten# ./runme
In Listing 2-48 replace the KERNEL_DIR path with the path to your kernel source and theIPTABLES_DIR path with the path to your iptables source. The runme script calls the POMconfiguration script in the patching mode.
In you want to see the second type of patches and additional functionality for Netfilter,you can access them by adding the extra variable to the runme script (see Listing 2-49).
Listing 2-49. Applying the Extra Functionality for Netfilter with POM
kitten# cd patch-o-matic-ng-20040621
kitten# export KERNEL_DIR=/path/to/kernel/source
kitten# export IPTABLES_DIR=/path/to/iptables/source
kitten# ./runme extra
Again in Listing 2-49, replace the KERNEL_DIR path with the path to your kernel source andthe IPTABLES_DIR path with the path to your iptables source.
When you run the runme script, it displays a list of the available patches and/or modulesfor Netfilter. Figure 2-2 shows the POM patching script.
As you can see in Figure 2-2, the patch script screen has four sections. The first at the top ofthe screen displays your kernel and iptables versions and the location of your source files. Thesecond section displays all the patches and modules that have either been already installed inthe kernel or are not appropriate to your kernel version.
In the third section, the proposed patch or module to apply to your kernel appears witha description, and in the last section you can select a series of actions to perform on the patchthat is being displayed. Table 2-10 describes the most useful actions available to you.
4444c02_final.qxd 1/5/05 12:50 AM Page 119
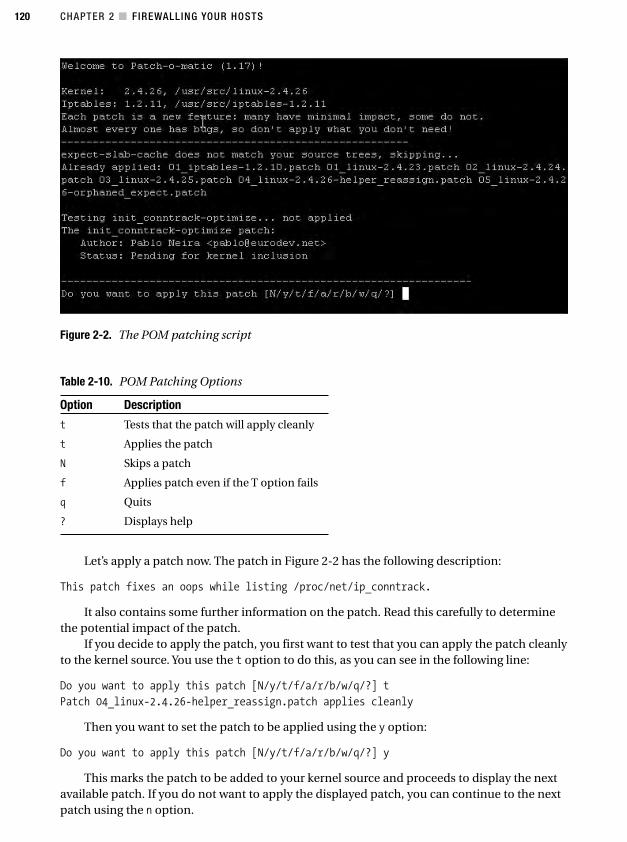
CHAPTER 2 ■ FIREWALLING YOUR HOSTS120
Figure 2-2. The POM patching script
Table 2-10. POM Patching Options
Option Description
t Tests that the patch will apply cleanly
t Applies the patch
N Skips a patch
f Applies patch even if the T option fails
q Quits
? Displays help
Let’s apply a patch now. The patch in Figure 2-2 has the following description:
This patch fixes an oops while listing /proc/net/ip_conntrack.
It also contains some further information on the patch. Read this carefully to determinethe potential impact of the patch.
If you decide to apply the patch, you first want to test that you can apply the patch cleanlyto the kernel source. You use the t option to do this, as you can see in the following line:
Do you want to apply this patch [N/y/t/f/a/r/b/w/q/?] t
Patch 04_linux-2.4.26-helper_reassign.patch applies cleanly
Then you want to set the patch to be applied using the y option:
Do you want to apply this patch [N/y/t/f/a/r/b/w/q/?] y
This marks the patch to be added to your kernel source and proceeds to display the nextavailable patch. If you do not want to apply the displayed patch, you can continue to the nextpatch using the n option.
4444c02_final.qxd 1/5/05 12:50 AM Page 120
CHAPTER 2 ■ FIREWALLING YOUR HOSTS 121
Do you want to apply this patch [N/y/t/f/a/r/b/w/q/?] N
The POM tool will proceed to the next patch to be applied and display its description.When you have selected all patches and modules you want, you can quit the POM tool usingthe q option.
After you have quit from the POM tool, you should see lines similar to Listing 2-50.
Listing 2-50. Patching the Kernel with POM
Do you want to apply this patch [N/y/t/f/a/r/b/w/q/?] q
Excellent! Source trees are ready for compilation.
Recompile the kernel image.
Recompile the netfilter kernel modules.
Recompile the iptables binaries.
The list in Listing 2-50 may be different pending on the compilation requirements of thepatches or modules you have selected. You may not need to recompile all the items listed inListing 2-50 in all circumstances.
Now you need to recompile the kernel and the Netfilter kernel modules. The commands inListing 2-51 will do this for you. I have assumed you have followed the instructions in Chapter 1and stored your kernel source in /usr/src/linux. I have also assumed you have copied and usedyour old .config file to run the make oldconfig process also as described in Chapter 1.
Listing 2-51. Compiling the Kernel
puppy# cd /usr/src/linux
puppy# make dep bzImage modules modules_install
puppy# make install
The first make line combines a number of compilation steps. First, it makes all therequired dependencies, dep. Second, it makes a new boot image, bzImage. Then it compilesany modules required, modules, and finally it installs those modules, modules_install. Themodules and modules_install commands will recompile all your Netfilter modules. At the endof this first make line you should have a fully compiled kernel and a new boot image. The nextline, make install, installs that new boot image in your boot loader ready for you to rebootand use that new kernel together with the new patches or modules.
Next make the iptables binaries; to do this, use the commands in Listing 2-52.
Listing 2-52. Recompiling the iptables Binaries
kitten# cd /usr/src/iptables-1.2.11
kitten# make KERNEL_DIR=/path/to/kernel/source
kitten# make install KERNEL_DIR=/path/to/kernel/source
Replace the /path/to/kernel/source part with the location of your kernel source.When you have recompiled your kernel and the iptables userland tools, you need to
reboot your system into the new kernel.Now let’s look at some of the additional modules available in the POM tool. You will look
at three modules: the iprange module, the mport module, and the comment module.
4444c02_final.qxd 1/5/05 12:50 AM Page 121
CHAPTER 2 ■ FIREWALLING YOUR HOSTS122
The iprange ModuleThe iprange module allows you to specify inclusive source and destination IP address ranges.This means instead of only being able to specify a particular host or subnet as a source or des-tination address, you can now specify a range of hosts inside a subnet or a range of subnets.
Before you can use the module, you need to load it using the insmod command exactly asyou would load any other kernel module. The names of Netfilter modules are usually prefixedwith ipt_ so that iprange becomes ipt_range. To load the module, enter the following:
kitten# insmod ipt_iprange
Using /lib/modules/2.4.26/kernel/net/ipv4/netfilter/ipt_iprange.o
Now that you have loaded the module, you can add the module to rules using the -m flag.Let’s start with a rule that allows you to use a range of hosts like the rule in Listing 2-53.
Listing 2-53. Using a Range of Source Hosts with the iprange Module
kitten# iptables -A INPUT -p tcp -m iprange ➥
--src-range 192.168.0.1-192.168.0.20 -j ACCEPT
The rule in Listing 2-53 accepts all incoming TCP traffic from the source IP address range192.168.0.1 to 192.168.0.20. You can also specify a destination range of IP addresses or subnetsas I have done in Listing 2-54.
Listing 2-54. Using a Range of Destination Subnets with the iprange Module
kitten# iptables -A FORWARD -p tcp -m iprange ➥
--dst-range 192.168.0.0-192.168.255.255 -j ACCEPT
■Tip You can also negate the --dst-range or --src-range flag using the ! option.
You can see the help text for the iprange module using the command in Listing 2-55.
Listing 2-55. iptables Module Help
kitten# iptables -m iprange -h
irange match v1.2.11 options:
[!] --src-range ip-ip Match source IP in the specified range
[!] --dst-range ip-ip Match destination IP in the specified range
You can also substitute the iprange module in Listing 2-55 for the name of any othermodules for which you want to see help text or syntax.
4444c02_final.qxd 1/5/05 12:50 AM Page 122
CHAPTER 2 ■ FIREWALLING YOUR HOSTS 123
The mport ModuleThe mport module provides an enhancement of the multiport module, which allows you tospecify multiple ports using the --sport and --dport flags. The multiport module allows onlycomma-separated lists of individual ports and no ranges. The rule on the next line, for exam-ple, shows the use of the multiport module:
kitten# iptables -A INPUT -i eth0 -p tcp -m multiport --dport 80,443 -j ACCEPT
The rule in the previous line selects all incoming TCP traffic on both port 80 and port 443.This is pretty much the extent of the module’s functionality. The mport module takes this fur-ther by allowing byte ranges as well as lists of single ports. To use the module, you first needto load it using the insmod command, as shown on the next line:
kitten# insmod ipt_mport
Using /lib/modules/2.4.26/kernel/net/ipv4/netfilter/ipt_mport.o
Once you have the module loaded, you can add it to rules. You can see an example rule onthe next line that uses the module:
kitten# iptables -A INPUT -p tcp -m mport --dport 80:85,8080 -j ACCEPT
This rule allows incoming TCP traffic and invokes the mport module using the -m flag to allowtraffic into the destination port range 80 to 85 and the individual port 8080. You can specify up to15 ports or port ranges. A port range takes up two port slots.
The comment ModulePOM also has a comment module that provides the ability to add comments to individual rulesexplaining their purpose. You can add comments of up to 256 characters in length to a rule. Likethe other modules, first you need to confirm it is loaded; you use the insmod command again todo this (see Listing 2-56).
Listing 2-56. Loading the comment Module
kitten# insmod ipt_comment
Using /lib/modules/2.4.26/kernel/net/ipv4/netfilter/ipt_comment.o
insmod: a module named ipt_comment already exists
In Listing 2-56 I have shown the result that would occur if the comment module werealready loaded.
Now you want to add comments to your rules. Listing 2-57 shows a comment added toone of the bastion host rules.
Listing 2-57. Using the comment Module
kitten# iptables -A INPUT -i eth1 -p udp -s 192.168.0.10 --dport domain ➥
-m state --state NEW,ESTABLISHED -m comment --comment "Allows incoming DNS ➥
traffic" -j ACCEPT
4444c02_final.qxd 1/5/05 12:50 AM Page 123
CHAPTER 2 ■ FIREWALLING YOUR HOSTS124
Using the -m flag you add the comment module to the rule; then using the only argumentfor the comment module, --comment, you provide a comment for the rule. Let’s take a look athow the comment appears in the rule when you display your rules. Enter the following:
kitten# iptables -L INPUT
Chain INPUT (policy DROP)
target prot opt source destination
ACCEPT udp -- 192.168.0.10 anywhere ➥
udp dpt:domain state NEW,ESTABLISHED /* Allows incoming DNS traffic */
Kernel ParametersNetfilter comes with a variety of kernel parameters that can be used to change its behavior, per-formance, and other features. You will examine some of these parameters to further enhancethe security of your iptables firewall.
■Note All changes you make to your kernel parameters are lost when you reboot your system. To miti-gate this, most distributions have a file located in /etc, called sysctl.conf, in which you can set thosekernel parameters that you want automatically set at the bootup of the system. I recommend setting anyiptables-related kernel parameters in this file to ensure they are set at system startup.
The parameters you will be manipulating are stored in the /proc directory structure. The/proc directory is a virtual file system that exists in memory and is created when the systemboots (and is why the settings are reset when you reboot). It contains a variety of data struc-tures and files that contain information gathered from the kernel and other sources. Generallyeach parameter correlates to a file in the /proc directory structure. These data structures andfiles can be changed and manipulated like any other file on your system. I will focus on theparameters contained in /proc/sys/net, which contains all the Netfilter-related settings.
■Tip The /proc/net directory contains a variety of files that include information about your iptablesenvironment, including information such as the current connections and connection states being tracked.
You will use the sysctl command to manipulate these kernel parameters. The sysctlcommand comes with all distributions. Let’s use it to view all your kernel parameters.Listing 2-58 shows an abbreviated listing of all the available kernel parameters.
4444c02_final.qxd 1/5/05 12:50 AM Page 124

CHAPTER 2 ■ FIREWALLING YOUR HOSTS 125
Listing 2-58. Display All Parameters
kitten# sysctl -a
abi/fake_utsname = 0
abi/trace = 0
abi/defhandler_libcso = 68157441
abi/defhandler_lcall7 = 68157441
...
You can also selectively list the setting of a particular parameter by specifying that param-eter on the sysctl command line, as in Listing 2-59.
Listing 2-59. Display an Individual Parameter
kitten# sysctl net/ipv4/ip_forward
As mentioned, each parameter correlates to a file in the /proc directory structure. Thisnet.ipv4.ip_forward parameter correlates to a file called /proc/sys/net/ipv4/ip_forward.The sysctl command automatically prefixes /proc/sys/ to the parameter location, so youneed to specify only its location from the net directory onward.
You can see all the sysctl command-line options in Table 2-11.
Table 2-11. The sysctl Command-Line Options
Option Description
-a Displays all kernel parameters.
-p file Loads the parameters from a file. If no file is specified, it defaults to/etc/sysctl.conf.
-n Disables printing the parameter name when displaying the parametervalue.
-w parameter=value Sets a parameter to the specified value.
If you want to change a kernel parameter using sysctl, you can do it using the -w option.Most kernel parameters are either numeric or Boolean values: with 0 indicating off and 1 indi-cating on. Let’s change the ip_forward option you looked at in Listing 2-59 to demonstrate thisparameter change. Listing 2-60 demonstrates this change.
■Note You need to be root or equivalent to change these parameters.
Listing 2-60. Changing a Kernel Parameters Using -w
kitten# sysctl -w net/ipv4/ip_forward="1"
4444c02_final.qxd 1/5/05 12:50 AM Page 125
CHAPTER 2 ■ FIREWALLING YOUR HOSTS126
By default the ip_forward option is set off, or 0. In Listing 2-60 I have set it to on, or 1. Youcan also change parameters by echoing values to them. For example, to change the ip_forwardvalue back to off, you would use the following command:
kitten# /bin/echo "0" > /proc/sys/net/ipv4/ip_forward
Let’s now look at some of the relevant kernel parameters for iptables that can enhancethe security of your host.
■Caution Be sure you totally understand what each parameter does before you change it. Changinga parameter without a full understanding of its purpose can have unexpected results.
/proc/sys/net/ipv4/conf/all/accept_redirectsThe accept_redirects parameter determines whether your system accepts ICMP redirects.ICMP redirects are used to tell routers or hosts that there is a faster or less congested way tosend the packets to specific hosts or networks. Generally your hosts will not require this,especially stand-alone and bastion hosts. Even firewalls using iptables should only rarelyhave a use for redirects. Accepting redirects is also a security risk, because ICMP redirectscan be easily forged and can potentially redirect your traffic somewhere malicious. I recom-mend you turn accept_redirects off, as in Listing 2-61.
Listing 2-61. Turning Off the accept_redirects Parameter
kitten# sysctl -w net/ipv4/conf/all/accept_redirects="0"
/proc/sys/net/ipv4/conf/all/accept_source_routeThis parameter tells Netfilter if it should allow source-routed packets. Source-routed packetshave their paths between two hosts exactly defined, including through which interfaces thosepackets are routed. In some instances this source routing can be subverted, which can allowattackers to route packets through an untrusted or insecure interface. I recommend you turnthis parameter off, as in Listing 2-62.
Listing 2-62. Turning Off the accept_source_route Parameter
kitten# sysctl -w net/ipv4/conf/all/accept_source_route="0"
/proc/sys/net/ipv4/conf/all/log_martiansThe log_martians parameter logs all packets from “impossible” addresses to the kernel. Thisincludes bad IP addresses (similar to what I described when I discussed IP spoofing attacks),bad source routing, and the like. Many of these types of packets could indicate an IP addressspoofing attack on your host. With this enabled, you will have entries appear in your logs simi-lar to Listing 2-63.
4444c02_final.qxd 1/5/05 12:50 AM Page 126

CHAPTER 2 ■ FIREWALLING YOUR HOSTS 127
Listing 2-63. log_martians syslog Entry
Aug 3 00:11:41 kitten kernel: martian source 255.255.255.255 from ➥
192.168.0.150, on dev eth0
I recommend you turn this on to keep track of these packets, which could potentiallyindicate an attack on your host. You can see the log_martians parameter turned on inListing 2-64.
Listing 2-64. Turning On the log_martians Parameter
kitten# sysctl -w net/ipv4/conf/all/log_martians="1"
/proc/sys/net/ipv4/conf/all/rp_filterThis parameter controls reverse path filtering, which tries to ensure packets use legitimatesource addresses. When it is turned on, then incoming packets whose routing table entry fortheir source address does not match the interface they are coming in on are rejected. This canprevent some IP spoofing attacks. If you have some unusual routing arrangements, such asasymmetric routing where packets take a different route from your host to another host thanthey take from that host to you, or if you have interfaces bound to more than one IP addresses,then you should test this parameter carefully to ensure you are not going to reject legitimatetraffic.
You can set this parameter for each interface on your host individually. Each of your inter-faces has a file called rp_filter that controls this parameter in the /proc/sys/net/ipv4/conf/directory, as you can see in Listing 2-65.
Listing 2-65. Listing of the /proc/sys/net/ipv4/conf Directory
kitten# ls -l
total 0
dr-xr-xr-x 2 root root 0 Aug 23 01:39 all
dr-xr-xr-x 2 root root 0 Aug 23 01:39 default
dr-xr-xr-x 2 root root 0 Aug 23 01:39 eth0
dr-xr-xr-x 2 root root 0 Aug 23 01:39 eth1
dr-xr-xr-x 2 root root 0 Aug 23 01:39 lo
An rp_filter file exists in each of the directories in Listing 2-65, and you can change eachof them to enable this function for individual interfaces. Or you could change all of them witha simple script like Listing 2-66.
Listing 2-66. Enabling rp_filter for All Interfaces
kitten# for interface in /proc/sys/net/ipv4/conf/*/rp_filter; do
/bin/echo "1" > ${interface}
done
4444c02_final.qxd 1/5/05 12:50 AM Page 127
CHAPTER 2 ■ FIREWALLING YOUR HOSTS128
11. You can find requirements for Internet Hosts—Communication Layers athttp://www.faqs.org/rfcs/rfc1122.html.
You can also set this parameter for all interfaces by changing the setting of the rp_filterfile in the /proc/sys/net/ipv4/conf/all directory. This file controls this setting for all yourinterfaces.
■Tip This is true of all the parameters that are interface specific. Changing the file located in the/proc/sys/net/ipv4/conf/all directory will change that setting for all interfaces.
/proc/sys/net/ipv4/icmp_echo_ignore_allIf this parameter is turned on, then Netfilter will ignore all ICMP echo requests. This willignore all rules set to handle ICMP echo traffic. This is another method of handling ICMPecho traffic. I personally prefer to have a finer granularity of control over the handling ofICMP echo traffic and set up particular rules to address a variety of potential situations, forexample, denying ICMP echo traffic incoming on an Internet-facing interface whilst allowingit on an internal network interface. You should consider what option best suits your environ-ment. In Listing 2-67 I turn the parameter off.
Listing 2-67. Setting icmp_echo_ignore_all Off
kitten# sysctl -w net/ipv4/icmp_echo_ignore_all="0"
/proc/sys/net/ipv4/icmp_echo_ignore_broadcastsThis parameter works in the same manner as the icmp_echo_ignore_all parameter except thatit ignores only ICMP messages sent to broadcast or multicast addresses. This significantlyreduces the risk of a host being targeted by a smurf attack; I recommend you set it on, as inListing 2-68.
Listing 2-68. Setting icmp_echo_ignore_broadcasts On
kitten# sysctl -w net/ipv4/icmp_echo_ignore_broadcasts ="1"
/proc/sys/net/ipv4/icmp_ignore_bogus_error_responsesSome routers, switches, and firewalls do not behave in accordance with the standards set outin RFC 112211 and send out incorrect responses to broadcasts. These incorrect responses arelogged via the kern logging facility. If you do not want to see these log entries, you can set thisparameter on. I recommend leaving this option on (as in Listing 2-69), because what mayappear to be a bogus error response may in fact be a sign of an attack or probe of your system.
Listing 2-69. Setting icmp_ignore_bogus_error_responses Off
kitten# sysctl -w net/ipv4/icmp_ignore_bogus_error_responses="0"
4444c02_final.qxd 1/5/05 12:50 AM Page 128
CHAPTER 2 ■ FIREWALLING YOUR HOSTS 129
12. http://firestarter.sourceforge.net/
13. http://monmotha.mplug.org/firewall/index.php
14. http://www.simonzone.com/software/guarddog/
/proc/sys/net/ipv4/ip_forwardThe ip_forward parameter turns IP forwarding on or off. With this off (which it generally is bydefault), then packets will not be forwarded between interfaces. The ip_forward parameter isgenerally needed only if iptables is being used for routing, for NAT, as a network firewall, orfor masquerading. For a bastion or stand-alone host, this should be set off, as you can see inListing 2-70.
Listing 2-70. Setting ip_forward Off
kitten# sysctl -w net/ipv4/ip_forward="0"
/proc/sys/net/ipv4/tcp_syncookiesIn response to the SYN flooding attacks described earlier, a kernel method was developed tomitigate the risk. When a host has SYN cookies enabled, it sends back encoded SYN/ACK pack-ets. These encoded SYN/ACK packets have information about the connection state encodedinto the sequence number of the reply to the initial SYN packet. If a reply is received to one ofthese packets, then its acknowledgement number will be one more than the sequence num-ber sent. Netfilter then subtracts one from this number and decodes it to return and verify theoriginal connection information. Any nonencoded or packets without do not verify are dis-carded. This process is conducted without consuming memory or connection resources. Thekernel is now insulated from a Denial of Service attack using a SYN flood. I recommend turningit on, as I have in Listing 2-71.
Listing 2-71. Setting tcp_syncookies On
kitten# sysctl -w net/ipv4/tcp_syncookies="1"
Managing iptables and Your RulesMany distributions come with tools to help you create your firewall. Gnome Lokkit on Red Hator Debian and third-party tools such as Firestarter,12 MonMotha,13 and GuardDog14 are allexamples of these. These tools allow you to input configuration settings and variables, andthey output iptables rules. I will not cover any of these tools because they are dangerous andencourage poor security. Gnome Lokkit is a good example of this. Its default policy is to ACCEPTtraffic by default and not by exception. This violates what I think is good firewall design andleaves your system exposed whilst giving you the impression it is secure because you haveused Red Hat’s recommended tool.
Additionally, these tools often set extra configuration and firewall settings without con-sulting you. This assumption that this default configuration will suit your host and environ-ment is a dangerous risk. It is a much better approach to configure your own rules and havea full understanding of how the various rules interact than to assume that a third-party tool
4444c02_final.qxd 1/5/05 12:50 AM Page 129
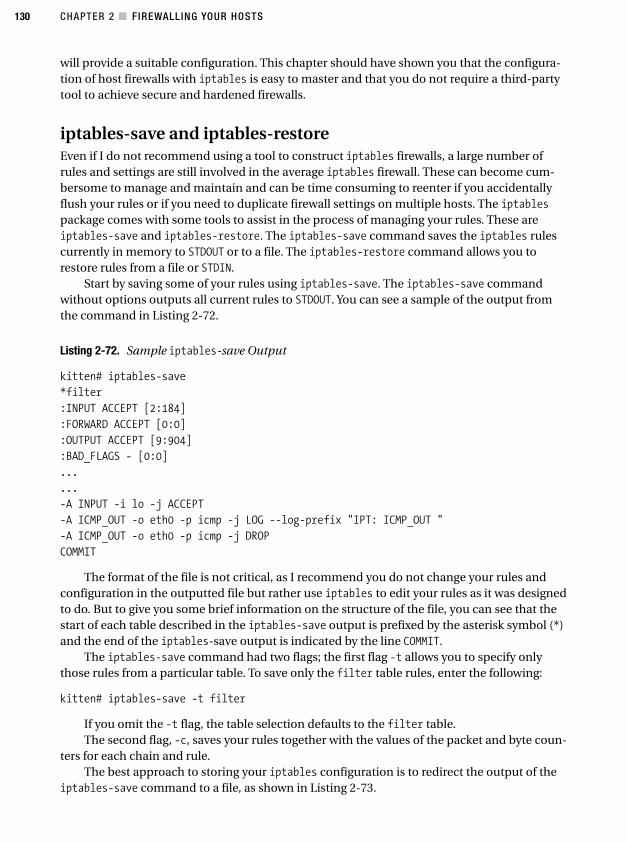
CHAPTER 2 ■ FIREWALLING YOUR HOSTS130
will provide a suitable configuration. This chapter should have shown you that the configura-tion of host firewalls with iptables is easy to master and that you do not require a third-partytool to achieve secure and hardened firewalls.
iptables-save and iptables-restoreEven if I do not recommend using a tool to construct iptables firewalls, a large number ofrules and settings are still involved in the average iptables firewall. These can become cum-bersome to manage and maintain and can be time consuming to reenter if you accidentallyflush your rules or if you need to duplicate firewall settings on multiple hosts. The iptablespackage comes with some tools to assist in the process of managing your rules. These areiptables-save and iptables-restore. The iptables-save command saves the iptables rulescurrently in memory to STDOUT or to a file. The iptables-restore command allows you torestore rules from a file or STDIN.
Start by saving some of your rules using iptables-save. The iptables-save commandwithout options outputs all current rules to STDOUT. You can see a sample of the output fromthe command in Listing 2-72.
Listing 2-72. Sample iptables-save Output
kitten# iptables-save
*filter
:INPUT ACCEPT [2:184]
:FORWARD ACCEPT [0:0]
:OUTPUT ACCEPT [9:904]
:BAD_FLAGS - [0:0]
...
...
-A INPUT -i lo -j ACCEPT
-A ICMP_OUT -o eth0 -p icmp -j LOG --log-prefix "IPT: ICMP_OUT "
-A ICMP_OUT -o eth0 -p icmp -j DROP
COMMIT
The format of the file is not critical, as I recommend you do not change your rules andconfiguration in the outputted file but rather use iptables to edit your rules as it was designedto do. But to give you some brief information on the structure of the file, you can see that thestart of each table described in the iptables-save output is prefixed by the asterisk symbol (*)and the end of the iptables-save output is indicated by the line COMMIT.
The iptables-save command had two flags; the first flag -t allows you to specify onlythose rules from a particular table. To save only the filter table rules, enter the following:
kitten# iptables-save -t filter
If you omit the -t flag, the table selection defaults to the filter table.The second flag, -c, saves your rules together with the values of the packet and byte coun-
ters for each chain and rule.The best approach to storing your iptables configuration is to redirect the output of the
iptables-save command to a file, as shown in Listing 2-73.
4444c02_final.qxd 1/5/05 12:50 AM Page 130
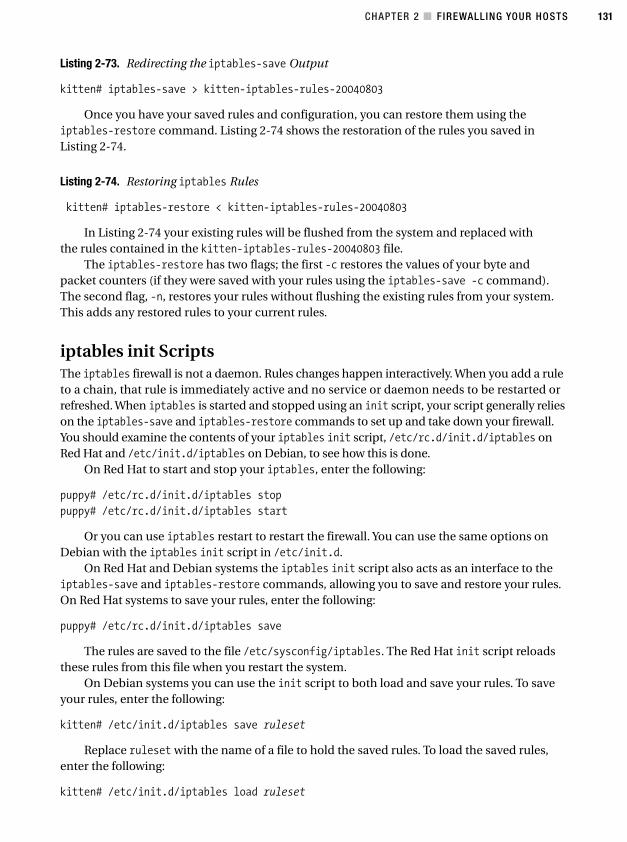
CHAPTER 2 ■ FIREWALLING YOUR HOSTS 131
Listing 2-73. Redirecting the iptables-save Output
kitten# iptables-save > kitten-iptables-rules-20040803
Once you have your saved rules and configuration, you can restore them using theiptables-restore command. Listing 2-74 shows the restoration of the rules you saved inListing 2-74.
Listing 2-74. Restoring iptables Rules
kitten# iptables-restore < kitten-iptables-rules-20040803
In Listing 2-74 your existing rules will be flushed from the system and replaced withthe rules contained in the kitten-iptables-rules-20040803 file.
The iptables-restore has two flags; the first -c restores the values of your byte andpacket counters (if they were saved with your rules using the iptables-save -c command).The second flag, -n, restores your rules without flushing the existing rules from your system.This adds any restored rules to your current rules.
iptables init ScriptsThe iptables firewall is not a daemon. Rules changes happen interactively. When you add a ruleto a chain, that rule is immediately active and no service or daemon needs to be restarted orrefreshed. When iptables is started and stopped using an init script, your script generally relieson the iptables-save and iptables-restore commands to set up and take down your firewall.You should examine the contents of your iptables init script, /etc/rc.d/init.d/iptables onRed Hat and /etc/init.d/iptables on Debian, to see how this is done.
On Red Hat to start and stop your iptables, enter the following:
puppy# /etc/rc.d/init.d/iptables stop
puppy# /etc/rc.d/init.d/iptables start
Or you can use iptables restart to restart the firewall. You can use the same options onDebian with the iptables init script in /etc/init.d.
On Red Hat and Debian systems the iptables init script also acts as an interface to theiptables-save and iptables-restore commands, allowing you to save and restore your rules.On Red Hat systems to save your rules, enter the following:
puppy# /etc/rc.d/init.d/iptables save
The rules are saved to the file /etc/sysconfig/iptables. The Red Hat init script reloadsthese rules from this file when you restart the system.
On Debian systems you can use the init script to both load and save your rules. To saveyour rules, enter the following:
kitten# /etc/init.d/iptables save ruleset
Replace ruleset with the name of a file to hold the saved rules. To load the saved rules,enter the following:
kitten# /etc/init.d/iptables load ruleset
4444c02_final.qxd 1/5/05 12:50 AM Page 131
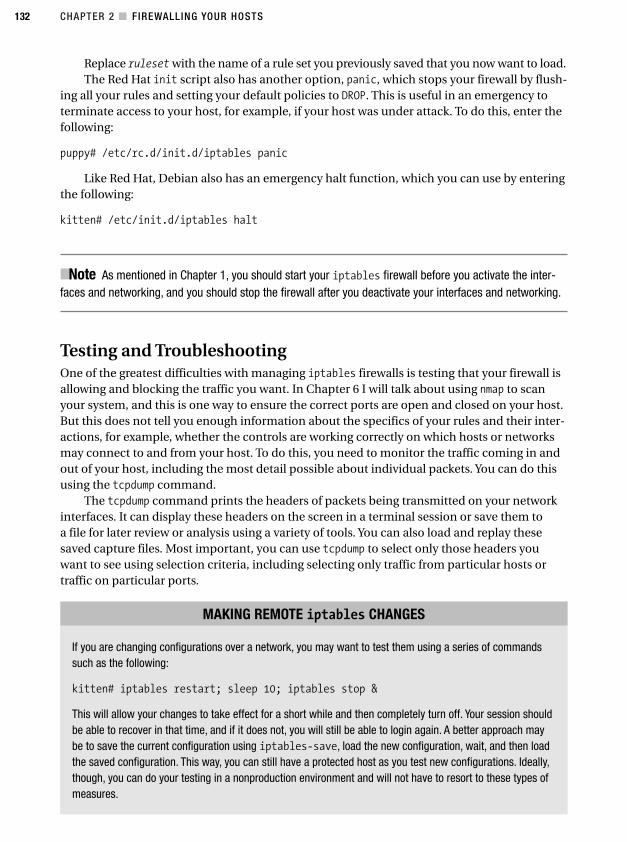
CHAPTER 2 ■ FIREWALLING YOUR HOSTS132
Replace ruleset with the name of a rule set you previously saved that you now want to load.The Red Hat init script also has another option, panic, which stops your firewall by flush-
ing all your rules and setting your default policies to DROP. This is useful in an emergency toterminate access to your host, for example, if your host was under attack. To do this, enter thefollowing:
puppy# /etc/rc.d/init.d/iptables panic
Like Red Hat, Debian also has an emergency halt function, which you can use by enteringthe following:
kitten# /etc/init.d/iptables halt
■Note As mentioned in Chapter 1, you should start your iptables firewall before you activate the inter-faces and networking, and you should stop the firewall after you deactivate your interfaces and networking.
Testing and TroubleshootingOne of the greatest difficulties with managing iptables firewalls is testing that your firewall isallowing and blocking the traffic you want. In Chapter 6 I will talk about using nmap to scanyour system, and this is one way to ensure the correct ports are open and closed on your host.But this does not tell you enough information about the specifics of your rules and their inter-actions, for example, whether the controls are working correctly on which hosts or networksmay connect to and from your host. To do this, you need to monitor the traffic coming in andout of your host, including the most detail possible about individual packets. You can do thisusing the tcpdump command.
The tcpdump command prints the headers of packets being transmitted on your networkinterfaces. It can display these headers on the screen in a terminal session or save them toa file for later review or analysis using a variety of tools. You can also load and replay thesesaved capture files. Most important, you can use tcpdump to select only those headers youwant to see using selection criteria, including selecting only traffic from particular hosts ortraffic on particular ports.
MAKING REMOTE iptables CHANGES
If you are changing configurations over a network, you may want to test them using a series of commandssuch as the following:
kitten# iptables restart; sleep 10; iptables stop &
This will allow your changes to take effect for a short while and then completely turn off. Your session shouldbe able to recover in that time, and if it does not, you will still be able to login again. A better approach maybe to save the current configuration using iptables-save, load the new configuration, wait, and then loadthe saved configuration. This way, you can still have a protected host as you test new configurations. Ideally,though, you can do your testing in a nonproduction environment and will not have to resort to these types ofmeasures.
4444c02_final.qxd 1/5/05 12:50 AM Page 132
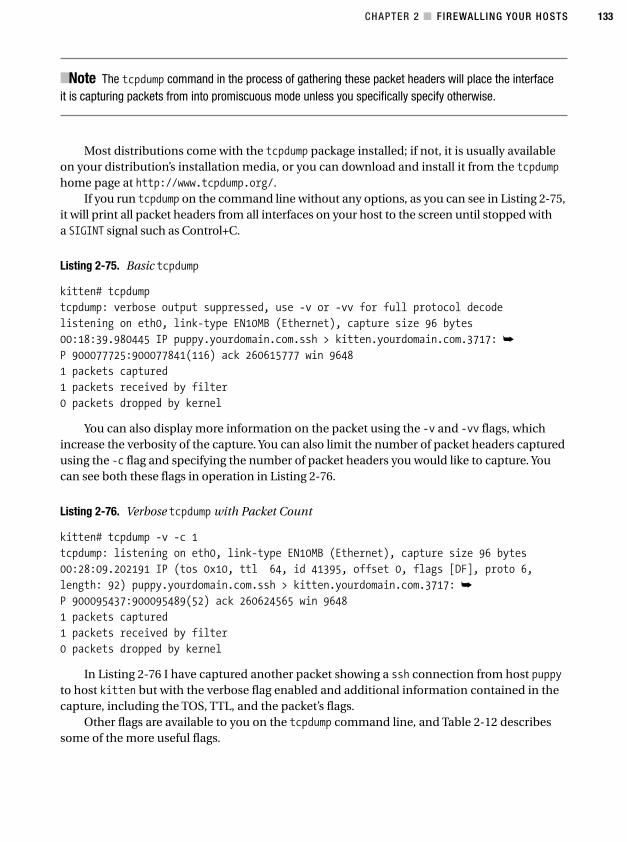
CHAPTER 2 ■ FIREWALLING YOUR HOSTS 133
■Note The tcpdump command in the process of gathering these packet headers will place the interfaceit is capturing packets from into promiscuous mode unless you specifically specify otherwise.
Most distributions come with the tcpdump package installed; if not, it is usually availableon your distribution’s installation media, or you can download and install it from the tcpdumphome page at http://www.tcpdump.org/.
If you run tcpdump on the command line without any options, as you can see in Listing 2-75,it will print all packet headers from all interfaces on your host to the screen until stopped witha SIGINT signal such as Control+C.
Listing 2-75. Basic tcpdump
kitten# tcpdump
tcpdump: verbose output suppressed, use -v or -vv for full protocol decode
listening on eth0, link-type EN10MB (Ethernet), capture size 96 bytes
00:18:39.980445 IP puppy.yourdomain.com.ssh > kitten.yourdomain.com.3717: ➥
P 900077725:900077841(116) ack 260615777 win 9648
1 packets captured
1 packets received by filter
0 packets dropped by kernel
You can also display more information on the packet using the -v and -vv flags, whichincrease the verbosity of the capture. You can also limit the number of packet headers capturedusing the -c flag and specifying the number of packet headers you would like to capture. Youcan see both these flags in operation in Listing 2-76.
Listing 2-76. Verbose tcpdump with Packet Count
kitten# tcpdump -v -c 1
tcpdump: listening on eth0, link-type EN10MB (Ethernet), capture size 96 bytes
00:28:09.202191 IP (tos 0x10, ttl 64, id 41395, offset 0, flags [DF], proto 6,
length: 92) puppy.yourdomain.com.ssh > kitten.yourdomain.com.3717: ➥
P 900095437:900095489(52) ack 260624565 win 9648
1 packets captured
1 packets received by filter
0 packets dropped by kernel
In Listing 2-76 I have captured another packet showing a ssh connection from host puppyto host kitten but with the verbose flag enabled and additional information contained in thecapture, including the TOS, TTL, and the packet’s flags.
Other flags are available to you on the tcpdump command line, and Table 2-12 describessome of the more useful flags.
4444c02_final.qxd 1/5/05 12:50 AM Page 133
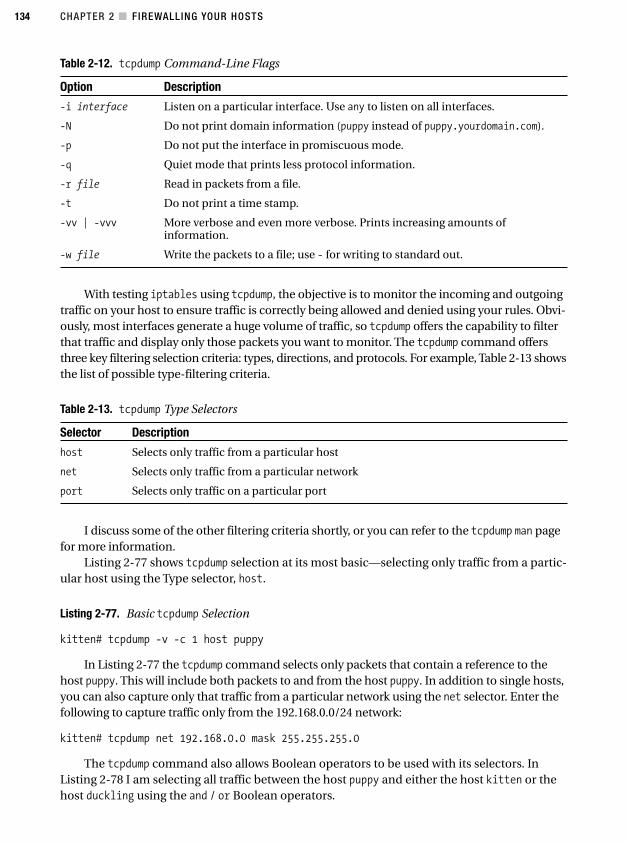
CHAPTER 2 ■ FIREWALLING YOUR HOSTS134
Table 2-12. tcpdump Command-Line Flags
Option Description
-i interface Listen on a particular interface. Use any to listen on all interfaces.
-N Do not print domain information (puppy instead of puppy.yourdomain.com).
-p Do not put the interface in promiscuous mode.
-q Quiet mode that prints less protocol information.
-r file Read in packets from a file.
-t Do not print a time stamp.
-vv | -vvv More verbose and even more verbose. Prints increasing amounts ofinformation.
-w file Write the packets to a file; use - for writing to standard out.
With testing iptables using tcpdump, the objective is to monitor the incoming and outgoingtraffic on your host to ensure traffic is correctly being allowed and denied using your rules. Obvi-ously, most interfaces generate a huge volume of traffic, so tcpdump offers the capability to filterthat traffic and display only those packets you want to monitor. The tcpdump command offersthree key filtering selection criteria: types, directions, and protocols. For example, Table 2-13 showsthe list of possible type-filtering criteria.
Table 2-13. tcpdump Type Selectors
Selector Description
host Selects only traffic from a particular host
net Selects only traffic from a particular network
port Selects only traffic on a particular port
I discuss some of the other filtering criteria shortly, or you can refer to the tcpdump man pagefor more information.
Listing 2-77 shows tcpdump selection at its most basic—selecting only traffic from a partic-ular host using the Type selector, host.
Listing 2-77. Basic tcpdump Selection
kitten# tcpdump -v -c 1 host puppy
In Listing 2-77 the tcpdump command selects only packets that contain a reference to thehost puppy. This will include both packets to and from the host puppy. In addition to single hosts,you can also capture only that traffic from a particular network using the net selector. Enter thefollowing to capture traffic only from the 192.168.0.0/24 network:
kitten# tcpdump net 192.168.0.0 mask 255.255.255.0
The tcpdump command also allows Boolean operators to be used with its selectors. InListing 2-78 I am selecting all traffic between the host puppy and either the host kitten or thehost duckling using the and / or Boolean operators.
4444c02_final.qxd 1/5/05 12:50 AM Page 134
CHAPTER 2 ■ FIREWALLING YOUR HOSTS 135
Listing 2-78. Boolean Selectors
kitten# tcpdump host puppy and kitten or duckling
Notice that I have not prefixed the kitten or duckling hosts with the host selector. If youomit the selector, the tcpdump command will assume you meant to use the last selector utilized.This means Listing 2-78 is equivalent to the filter on the next line:
kitten# tcpdump host puppy and host kitten or host duckling
In addition to and/or Boolean operators, you can also use the not operator. Enter thefollowing, which captures traffic from any host except puppy:
kitten# tcpdump not host puppy
With the tcpdump filtering selectors, you can also restrict the filtering to specific ports.To select all ssh traffic from host puppy, enter the following:
kitten# tcpdump host puppy and port ssh
You can also further restrict Listing 2-78 to a traffic direction using the src and dstdirection selectors, as you can see in Listing 2-79.
Listing 2-79. Specifying Traffic Direction
kitten# tcpdump src host puppy and dst host kitten or duckling
In Listing 2-79 you are now selecting only traffic outgoing from the host puppy with adestination of the hosts kitten or duckling.
In Listing 2-80 you can use the protocol selectors to select only that traffic from aparticular protocol type.
Listing 2-80. Selecting Traffic via Protocol
kitten# tcpdump tcp host puppy and port domain
In Listing 2-80 tcpdump selects only TCP traffic to and from the host puppy on port 53. Youcan also use the ip selector to capture IP traffic, udp to select UDP traffic, and icmp to captureICMP traffic.
This was a brief introduction to tcpdump; you can do a lot more with the command. I rec-ommend you read the tcpdump man page, which contains detailed and useful documentationfor the command.
■Tip You should also look at some of the tools discussed at the end of Chapter 6, which should also proveuseful in troubleshooting, testing, and dissecting your network traffic.
4444c02_final.qxd 1/5/05 12:50 AM Page 135
CHAPTER 2 ■ FIREWALLING YOUR HOSTS136
ResourcesThe following are some resources for you to use.
Mailing Lists• Netfilter mailing lists: http://lists.netfilter.org/mailman/listinfo
• tcpdump mailing list: http://www.tcpdump.org/#lists
Sites• Netfilter: http://www.netfilter.org/
• Netfilter Packet Filtering HOWTO:http://www.netfilter.org/documentation/HOWTO//packet-filtering-HOWTO.html
• Netfilter NAT HOWTO: http://www.netfilter.org/documentation/HOWTO//NAT-HOWTO.html
• Shorewall: http://www.shorewall.net/
• Firestarter: http://firestarter.sourceforge.net/
• MonMotha: http://monmotha.mplug.org/firewall/index.php
• GuardDog: http://www.simonzone.com/software/guarddog/
• tcpdump: http://www.tcpdump.org
Books• McCarty, Bill. Red Hat Linux Firewalls. Indianapolis, IN: Red Hat, 2002.
• Zeigler, Robert. Linux Firewalls, Second Edition. Indianapolis, IN: Sams, 2001.
4444c02_final.qxd 1/5/05 12:50 AM Page 136
Securing Connections andRemote Administration
In Chapter 2 I talked about using firewalls, specifically iptables, to secure your system fromnetwork threats. This principally allows you to block all connections to the system except thoseyou explicitly want to allow through your firewall. But what about those allowed connections?Can you be sure they are going to be secure? They need to be secure from the perspective ofpreventing penetrations of your system using those connections, and they also need to be securefrom the traffic itself running over those connections from attackers using tools such as sniffersthat try to obtain information from your systems, including passwords and other potentiallyvaluable data.
Additionally, many of the nonapplication connections to your system are going to beadministration related. It is unfortunate that securing your system from intrusion often makesthe job of administering your system more difficult. While it is not only harder for an attackerto penetrate your system, it is also harder for you or another systems administrator to accessthe system for legitimate purposes—especially if those administrative purposes require a higherlevel of access (for example, root access) to the system than a normal user.
In this chapter, I will cover some methods of securing the incoming and outgoing connec-tions to and from your systems, including both the connection and the traffic running acrossthat connection. I will also cover the basics of virtual private networks (VPNs) using IPSec andprovide you with a practical example of joining two subnets via a VPN tunnel over the Internet.In addition, I will cover some methods of securely administering your system. My aim is to showsome practical examples of using particular applications securely and effectively while ensur-ing they do not put your system at risk of attack. Some of the tools and applications I will coverin this chapter you will put to further practical use elsewhere in this book. As a result of thepractical focus on this chapter, I will not delve into a great deal of the theory behind some of thetools covered, with the exception of a brief discussion on public-key encryption that is impor-tant for everyone to understand because of its widespread use in the Unix and networkingsecurity arena.
Public-Key EncryptionAny connections using TCP/IP you have open from your system are at risk from a variety ofattacks. Often, your connections pass through many different networking devices and systemsbefore reaching their final destination, which further increases the risk that someone may be
137
C H A P T E R 3
■ ■ ■
4444c03_final.qxd 1/5/05 12:44 AM Page 137
CHAPTER 3 ■ SECURING CONNECTIONS AND REMOTE ADMINISTRATION138
1. The entire components of a public-key encryption system (including CAs, policies, procedures, andprotocols) are often referred to as public-key infrastructure (PKI).
2. http://developer.netscape.com/docs/manuals/security/pkin/index.html
able to use the connection to gain access to or disrupt your systems or use the informationflowing over that connection for nefarious purposes, such as acquiring credit card details froman e-commerce site or banking details from an e-mail. The risks associated with running thesetypes of connections are as follows:
• Eavesdropping: Your information is monitored or intercepted.
• Tampering: Your information is changed or replaced.
• Spoofing or impersonation: Someone pretends to be the recipient of your informationor sends false or substituted information back to you.
However, a well-established methodology exists for securing connections against the risksI have articulated; it is called public-key cryptography.1 Public-key cryptography (in conjunctionwith the use of digital signatures) provides a variety of functions, including the encryption anddecryption of information being transmitted, authentication of the information’s sender, detec-tion of tampering, and an audit trail that allows both parties to see the information has beensent. In combination, these can mitigate the risks I detailed previously. What follows is ahighly simplified description of public-key cryptography. I aim to give you a clear understandingof the concepts involved without covering a great deal of theoretical information. For example,I will not discuss widely the various ciphers you could use but instead focus on the well-knownand default RSA cipher, which should provide more than adequate security for most purposes.My focus is on getting you running secured connections quickly. If you want more information,I recommend Netscape’s “Introduction to Public-Key Cryptography.”2
In public-key cryptography you have two keys: a public key and a private key. The publickey is published (often in conjunction with a certificate), and the private key is kept secret. Thepublic key can be as widely distributed as you like without comprising security, but your pri-vate key must be kept secure. The sender will encrypt the information they want to send withthe recipient’s public key. They then send the information. The recipient receives the informa-tion and uses their private key to decrypt the information. This ensures your information isprotected from monitoring or eavesdropping.
Added to the public-key encryption is a digital signature that addresses the issues of tam-pering and spoofing. The signature itself is called a one-way hash or message digest. A one-wayhash is a mathematical function that creates a number that is a unique representation of theinformation to be sent. If the information is changed in any way, then the hash is no longer avalid representation of the new information. When sent with the information, this allows thesigning mechanism at the receiving end to ensure the information has not been changed dur-ing its transmission from the sender to the recipient. The one-way indicates that it is not pos-sible to extrapolate the information being sent from the hash, thus preventing someone fromusing the hash to determine the information.
To generate a digital signature, the encryption approach is reversed from the originalpublic-key encryption process. The signing mechanism generates the one-way hash, andyou use your private key to encrypt it. The encrypted hash together with some additional
4444c03_final.qxd 1/5/05 12:44 AM Page 138
CHAPTER 3 ■ SECURING CONNECTIONS AND REMOTE ADMINISTRATION 139
3. http://www.itu.int/rec/recommendation.asp?type=items&lang=e&parent=T-REC-X.509-200003-I
4. You’ll find links to these products in the “Resources” section.
5. Arguably, some risks are associated with PKI overall. An excellent document that details some of theserisks is available at http://www.schneier.com/paper-pki.html.
information, most notably the hashing algorithm, is sent with the information to the recipientas the digital signature. The signing mechanism at the recipient end then uses your public keyto decrypt the hash and uses it to verify the integrity of the information sent.
The final layer in the public-key encryption infrastructure I will cover is a certificate. A cer-tificate is just like a passport. It binds certain identifying information, such as your name andlocation or the name of a server or Web site to a particular public key. It also usually has anexpiry period and is valid only for that period. Most public certificates are valid for one year.Most of the certificates you will deal with follow the X.509 standard, which is an ITU recom-mendation3 adopted by a variety of developers.
Certificates are generally issued by a certificate authority (CA). A CA is usually a privatelyrun organization that guarantees to its customers and users it has verified the identity of theowner or purchaser of a certificate. Some organizations run their own internal CAs usingproducts, such as Netscape Certificate Management System and Microsoft Certificate Server,or using open-source products such as EJBCA.4
So how does this work? Well, let’s say you wanted to use public-key encryption using certifi-cates to secure a Web site. You first create a signing request and a private key. A signing request isa type of certificate. The signing request is then sent to a CA to be signed and therefore becomea fully fledged certificate. Your private key remains with you. The CA sends you a public certifi-cate (which, as discussed previously, combines a public key and some associated identifyinginformation, in this case probably the hostname of the Web site to be secured) and a copy of itspublic certificate, called a CA certificate. The CA certificate it has sent to you is like a receipt fromthe CA. Every time the authenticity and validity of your public certificate is checked, the signingmechanism checks your CA certificate to ensure your public certificate was signed by someonevalid and trusted. Sometimes you may have a chain of CA certificates. For example, it could bethat the CA certificate that signed your public certificate was in turn signed by another CA cer-tificate. Each of these associated CA certificates would need to be verified in sequence to ensureyour public certificate is valid. You then install your new public certificate into your Web site andserver, and when users connect to your site, they will do so over an authenticated and encryptedconnection.5
■Tip Of course, one of the great benefits of the open-source world is that you do not need to use com-mercial CAs to sign all your certificates. This can considerably save on costs because commercial CAs cansometimes charge steep fees for certificate signing. In the previous example, you are securing a Web site.So you would almost certainly need a commercial CA involved to sign your certificate to ensure third partieswere comfortable and trusted your site. But for other sorts of connections (for example, a secure connectionbetween two syslog systems), you could use a CA you have created locally. You will look at this in the “SSL,TLS, and OpenSSL” section.
4444c03_final.qxd 1/5/05 12:44 AM Page 139
CHAPTER 3 ■ SECURING CONNECTIONS AND REMOTE ADMINISTRATION140
6. http://www.ietf.org/rfc/rfc2246.txt
7. md5 is the Message Digest algorithm developed by Prof. Ronald Rivest, and gpg is the GNU PrivacyGuard utility that you can see at http:// www.gnupg.org.
SSL, TLS, and OpenSSLOne of the most well-known examples of the use of public-key encryption and digital signa-tures for securing connections are the Secure Sockets Layer (SSL) protocol and the TransportLayer Security (TLS) protocol. In the example in the previous section, in which I talked aboutsecuring a Web site using public-key encryption and certificates, the protocol securing yourWeb site would be SSL, and you would have connected to the site by using the https prefixinstead of the standard http prefix.
Developed by Netscape, SSL is a protocol for handling the security of message transmis-sion over networks and most specifically the Internet. SSL operates between the TCP/IP net-work layer and the application layer. When you connect to a device or service running SSL,a handshake takes places in which the device or service presents its public certificate to theconnecting party to authenticate its identity. This is called server authentication. If the serverand the connecting party authenticate, then all transmissions between the parties are nowauthenticated and encrypted using whatever encryption method you have selected, for exam-ple, RSA or DSA encryption. You can also configure SSL so that the connecting party must alsoprove their bona fides to the device or service; this is called client authentication.
Similar in operation to SSL is TLS. TLS was also developed by Netscape and was based onSSL version 3.0. It is detailed in RFC 2246.6 It offers significant advantages over SSL version 2.0,and it is slightly more secure than SSL version 3.0. Thus, I recommend using it over either ver-sion of SSL if your application or service supports using TLS. In Chapters 8 and 9, when I dis-cuss using SSL/TLS to secure SMTP and IMAP/POP, I focus on TLS. Unfortunately, few Webbrowsers support TLS; most of them still use SSL rather than TLS.
To use SSL/TLS (hereafter just referred to as TLS) on your Linux system, I will show howto implement the OpenSSL package. OpenSSL is an attempt to develop a secure and robustopen-source implementation of SSL (versions 2.0 and 3.0) and TLS (version 1.0). You can findOpenSSL at http://www.openssl.org/. The implementation is well maintained and updatedfrequently, and I recommend you look at it before considering an investment in a commercialpackage that offers similar capabilities.
You can download OpenSSL from http://www.openssl.org/source/, and I will show youhow to install it.
■Tip You should check the authenticity of the download using md5 or gpg7 to ensure you have an authenticpackage. See Chapters 1 and 4 for details of how to do this.
Before you install OpenSSL, you should check whether you already have it installed andwhat version it is. More so than other applications, you need to keep applications such asOpenSSL up-to-date. It is a vital component of a large number of security-related solutions onLinux systems. Vulnerabilities in OpenSSL could have spillover effects on multiple other appli-cations and create a series of vulnerabilities and exploitable weaknesses in those applications
4444c03_final.qxd 1/5/05 12:44 AM Page 140
CHAPTER 3 ■ SECURING CONNECTIONS AND REMOTE ADMINISTRATION 141
that rely on the functionality of OpenSSL to secure them. To check what version of OpenSSLyou have, run the following:
puppy$ openssl version
You will get these results:
OpenSSL 0.9.7a Feb 19 2003
Then check the OpenSSL site to confirm the current version. If the version you have hasbeen superseded, I strongly recommend you download and install the latest version eitherfrom the source package or via your package management tool if your vendor has a more up-to-date package.
If you have downloaded OpenSSL in the form of a source package, then unpack it andchange into the resulting directory. OpenSSL relies on the config script to configure the basicsettings for OpenSSL. The major option of the config script is the specification of the locationin which to install OpenSSL. By default when installed from the source package, OpenSSL isinstalled with a prefix of /usr/local and an OpenSSL directory of /usr/local/ssl. If you arereplacing an existing OpenSSL installation, you need to confirm where your current version isinstalled and make sure you specify that location to the config script. Listing 3-1 shows how toreplace the existing OpenSSL installation on a Red Hat system.
Listing 3-1. Replacing OpenSSL on a Red Hat System
puppy$ ./config --prefix=/usr --openssldir=/usr/share/ssl shared
■Tip The last option shared tells OpenSSL to create shared libraries as well as the static libraries. This isnot strictly necessary, and the shared libraries function is considered experimental until the version 1 releaseof OpenSSL. However, on most Linux systems it is stable enough and may offer some performance enhance-ments and better use of memory.
Then you need to make, make test to ensure all of OpenSSL’s cryptographical functions areworking, and then finally make install to install OpenSSL onto your system.
puppy$ make && make test
puppy# make install
You saw the openssl command previously when you used it to check the version of yourOpenSSL installation. It also has a number of other functions that are useful to you such ascreating keys and certificates, testing SSL connections, and encrypting and decrypting items.Table 3-1 details the features and functions you are most likely to use. These functions arespecified directly after the openssl command, as you can see in Listing 3-2 in which I generatea new RSA private key.
4444c03_final.qxd 1/5/05 12:44 AM Page 141
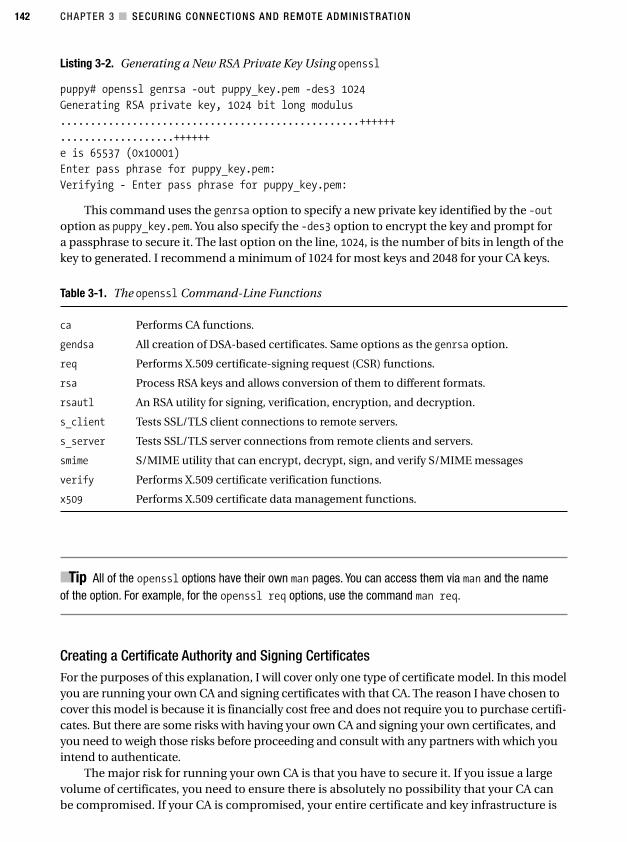
CHAPTER 3 ■ SECURING CONNECTIONS AND REMOTE ADMINISTRATION142
Listing 3-2. Generating a New RSA Private Key Using openssl
puppy# openssl genrsa -out puppy_key.pem -des3 1024
Generating RSA private key, 1024 bit long modulus
..................................................++++++
...................++++++
e is 65537 (0x10001)
Enter pass phrase for puppy_key.pem:
Verifying - Enter pass phrase for puppy_key.pem:
This command uses the genrsa option to specify a new private key identified by the -outoption as puppy_key.pem. You also specify the -des3 option to encrypt the key and prompt fora passphrase to secure it. The last option on the line, 1024, is the number of bits in length of thekey to generated. I recommend a minimum of 1024 for most keys and 2048 for your CA keys.
Table 3-1. The openssl Command-Line Functions
ca Performs CA functions.
gendsa All creation of DSA-based certificates. Same options as the genrsa option.
req Performs X.509 certificate-signing request (CSR) functions.
rsa Process RSA keys and allows conversion of them to different formats.
rsautl An RSA utility for signing, verification, encryption, and decryption.
s_client Tests SSL/TLS client connections to remote servers.
s_server Tests SSL/TLS server connections from remote clients and servers.
smime S/MIME utility that can encrypt, decrypt, sign, and verify S/MIME messages
verify Performs X.509 certificate verification functions.
x509 Performs X.509 certificate data management functions.
■Tip All of the openssl options have their own man pages. You can access them via man and the nameof the option. For example, for the openssl req options, use the command man req.
Creating a Certificate Authority and Signing CertificatesFor the purposes of this explanation, I will cover only one type of certificate model. In this modelyou are running your own CA and signing certificates with that CA. The reason I have chosen tocover this model is because it is financially cost free and does not require you to purchase certifi-cates. But there are some risks with having your own CA and signing your own certificates, andyou need to weigh those risks before proceeding and consult with any partners with which youintend to authenticate.
The major risk for running your own CA is that you have to secure it. If you issue a largevolume of certificates, you need to ensure there is absolutely no possibility that your CA canbe compromised. If your CA is compromised, your entire certificate and key infrastructure is
4444c03_final.qxd 1/5/05 12:44 AM Page 142

CHAPTER 3 ■ SECURING CONNECTIONS AND REMOTE ADMINISTRATION 143
8. If you are interested in the mathematics involved, see the RSA Laboratories site athttp://www.rsasecurity.com/rsalabs/node.asp?id=2214.
9. http://www.rsasecurity.com/rsalabs/node.asp?id=2099
10. http://www.rsasecurity.com/rsalabs/node.asp?id=2096
CIPHERS, KEYS, AND KEY LENGTH
As I mentioned, I will not cover a lot of detail on cipher systems, as I recommend you use the default RSAcryptosystem. To use RSA, though, it is important to have at least a limited understanding of the mechanicsof the cryptosystem. RSA is a public-key encryption system that provides encryption, decryption, and digitalsignature functionality for authentication purposes. Ronald Rivest, Adi Shamir, and Leonard Adleman devel-oped it in 1977, and the RSA acronym was taken from the first letters of the last names of its developers. TheRSA algorithm relies on prime-number factoring to provide security. Two large primes are taken, and theirproduct computed to produce a third number, the modulus. Two more numbers are chosen that are less thanthe modulus and relatively prime to the original large primes. The combination of the modulus and one of therelative primes make up the private and public keys, respectively.8 The two biggest threats to the RSA crypto-system and to your PKI environment are if someone discovers a way to shortcut factoring or, far more likely, ifyour PKI environment is not secure and an attacker manages to acquire your private key.Your public-key encryption system is only as secure as your private keys. You must ensure that your privatekeys are protected at all costs. Some basic rules should help with this.
• Ensure you set suitable ownership and set your permissions on the keys as tightly as possible.
• Use only secure mediums to transmit your private keys, especially any CA keys.
• I recommend you consider expiring your keys after a suitable period of use. This gives you the oppor-tunity to also review your key length, as I talk about shortly.
Five years ago RSA Laboratories issued a challenge to crack a 140-bit RSA encryption key. It took one monthfor someone to crack the key.9 More recently in December 2003, a team in Germany successfully crackeda 576-bit RSA encryption key in three months.10 Admittedly, the team used a significant amount of process-ing power (more than 100 workstations), but this emphasizes that any keys you create need to be of a suit-able length. Additionally, as hardware performance increases, the time needed to crack short key lengths willobviously decrease. So at this stage I recommend you use keys 1024 bits in length or longer as a minimum.The RSA Laboratories claim these keys will be secure up until at least 2010. As you can see in Listing 3-2,I have specified a minimum key length using the openssl command of 1024-bits, and you can also specifya default in your openssl.cnf file.
But having longer key lengths has issues also. The major issue with having longer keys is the risk thatperformance will suffer and that the time taken to encrypt and decrypt information will make encryptiondetrimental to productive operations. Of course, the risk that increased hardware performance will allow keysto be cracked faster also means improved performance for your cryptosystem, which means longer keylengths are more feasible and will have less impact on the speed of operations. You will need to assess andtest the performance of your applications using the required key sizes.
4444c03_final.qxd 1/5/05 12:44 AM Page 143
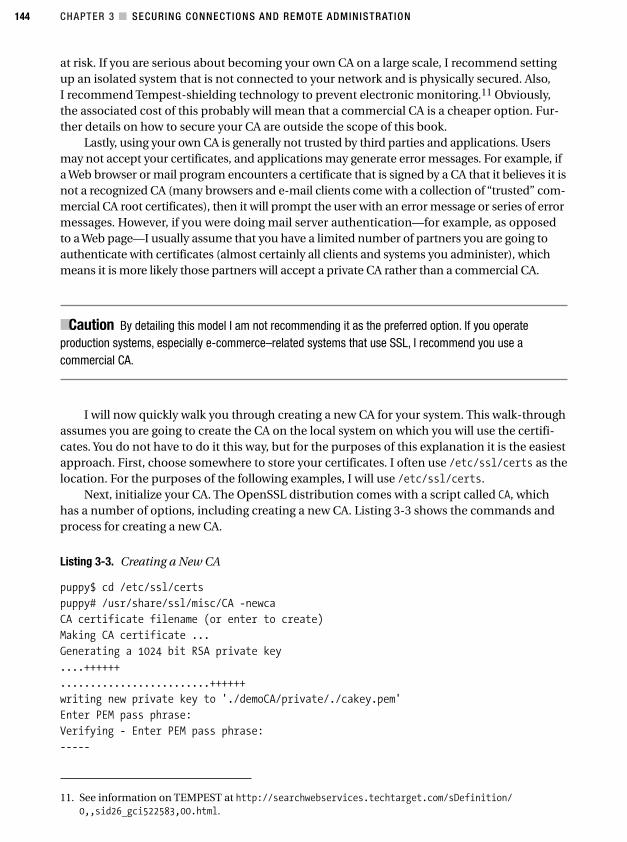
CHAPTER 3 ■ SECURING CONNECTIONS AND REMOTE ADMINISTRATION144
11. See information on TEMPEST at http://searchwebservices.techtarget.com/sDefinition/0,,sid26_gci522583,00.html.
at risk. If you are serious about becoming your own CA on a large scale, I recommend settingup an isolated system that is not connected to your network and is physically secured. Also,I recommend Tempest-shielding technology to prevent electronic monitoring.11 Obviously,the associated cost of this probably will mean that a commercial CA is a cheaper option. Fur-ther details on how to secure your CA are outside the scope of this book.
Lastly, using your own CA is generally not trusted by third parties and applications. Usersmay not accept your certificates, and applications may generate error messages. For example, ifa Web browser or mail program encounters a certificate that is signed by a CA that it believes it isnot a recognized CA (many browsers and e-mail clients come with a collection of “trusted” com-mercial CA root certificates), then it will prompt the user with an error message or series of errormessages. However, if you were doing mail server authentication—for example, as opposedto a Web page—I usually assume that you have a limited number of partners you are going toauthenticate with certificates (almost certainly all clients and systems you administer), whichmeans it is more likely those partners will accept a private CA rather than a commercial CA.
■Caution By detailing this model I am not recommending it as the preferred option. If you operateproduction systems, especially e-commerce–related systems that use SSL, I recommend you use acommercial CA.
I will now quickly walk you through creating a new CA for your system. This walk-throughassumes you are going to create the CA on the local system on which you will use the certifi-cates. You do not have to do it this way, but for the purposes of this explanation it is the easiestapproach. First, choose somewhere to store your certificates. I often use /etc/ssl/certs as thelocation. For the purposes of the following examples, I will use /etc/ssl/certs.
Next, initialize your CA. The OpenSSL distribution comes with a script called CA, whichhas a number of options, including creating a new CA. Listing 3-3 shows the commands andprocess for creating a new CA.
Listing 3-3. Creating a New CA
puppy$ cd /etc/ssl/certs
puppy# /usr/share/ssl/misc/CA -newca
CA certificate filename (or enter to create)
Making CA certificate ...
Generating a 1024 bit RSA private key
....++++++
.........................++++++
writing new private key to './demoCA/private/./cakey.pem'
Enter PEM pass phrase:
Verifying - Enter PEM pass phrase:
-----
4444c03_final.qxd 1/5/05 12:44 AM Page 144
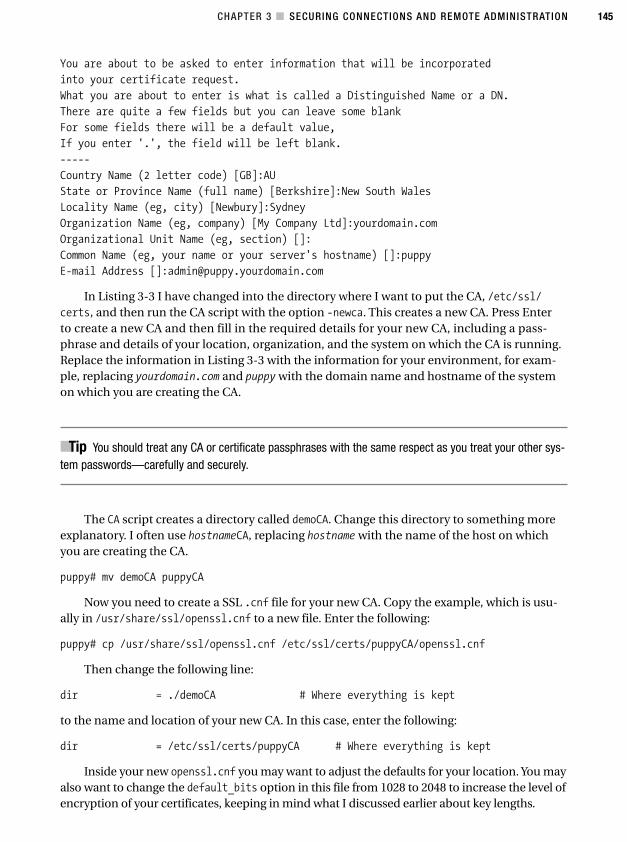
CHAPTER 3 ■ SECURING CONNECTIONS AND REMOTE ADMINISTRATION 145
You are about to be asked to enter information that will be incorporated
into your certificate request.
What you are about to enter is what is called a Distinguished Name or a DN.
There are quite a few fields but you can leave some blank
For some fields there will be a default value,
If you enter '.', the field will be left blank.
-----
Country Name (2 letter code) [GB]:AU
State or Province Name (full name) [Berkshire]:New South Wales
Locality Name (eg, city) [Newbury]:Sydney
Organization Name (eg, company) [My Company Ltd]:yourdomain.com
Organizational Unit Name (eg, section) []:
Common Name (eg, your name or your server's hostname) []:puppy
E-mail Address []:[email protected]
In Listing 3-3 I have changed into the directory where I want to put the CA, /etc/ssl/certs, and then run the CA script with the option -newca. This creates a new CA. Press Enterto create a new CA and then fill in the required details for your new CA, including a pass-phrase and details of your location, organization, and the system on which the CA is running.Replace the information in Listing 3-3 with the information for your environment, for exam-ple, replacing yourdomain.com and puppy with the domain name and hostname of the systemon which you are creating the CA.
■Tip You should treat any CA or certificate passphrases with the same respect as you treat your other sys-tem passwords—carefully and securely.
The CA script creates a directory called demoCA. Change this directory to something moreexplanatory. I often use hostnameCA, replacing hostname with the name of the host on whichyou are creating the CA.
puppy# mv demoCA puppyCA
Now you need to create a SSL .cnf file for your new CA. Copy the example, which is usu-ally in /usr/share/ssl/openssl.cnf to a new file. Enter the following:
puppy# cp /usr/share/ssl/openssl.cnf /etc/ssl/certs/puppyCA/openssl.cnf
Then change the following line:
dir = ./demoCA # Where everything is kept
to the name and location of your new CA. In this case, enter the following:
dir = /etc/ssl/certs/puppyCA # Where everything is kept
Inside your new openssl.cnf you may want to adjust the defaults for your location. You mayalso want to change the default_bits option in this file from 1028 to 2048 to increase the level ofencryption of your certificates, keeping in mind what I discussed earlier about key lengths.
4444c03_final.qxd 1/5/05 12:44 AM Page 145
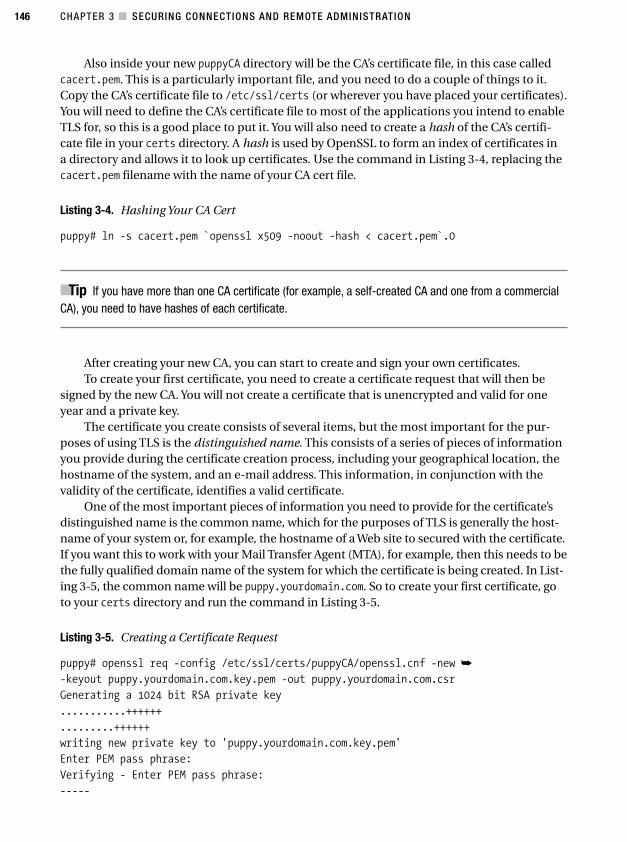
CHAPTER 3 ■ SECURING CONNECTIONS AND REMOTE ADMINISTRATION146
Also inside your new puppyCA directory will be the CA’s certificate file, in this case calledcacert.pem. This is a particularly important file, and you need to do a couple of things to it.Copy the CA’s certificate file to /etc/ssl/certs (or wherever you have placed your certificates).You will need to define the CA’s certificate file to most of the applications you intend to enableTLS for, so this is a good place to put it. You will also need to create a hash of the CA’s certifi-cate file in your certs directory. A hash is used by OpenSSL to form an index of certificates ina directory and allows it to look up certificates. Use the command in Listing 3-4, replacing thecacert.pem filename with the name of your CA cert file.
Listing 3-4. Hashing Your CA Cert
puppy# ln -s cacert.pem `openssl x509 -noout -hash < cacert.pem`.0
■Tip If you have more than one CA certificate (for example, a self-created CA and one from a commercialCA), you need to have hashes of each certificate.
After creating your new CA, you can start to create and sign your own certificates.To create your first certificate, you need to create a certificate request that will then be
signed by the new CA. You will not create a certificate that is unencrypted and valid for oneyear and a private key.
The certificate you create consists of several items, but the most important for the pur-poses of using TLS is the distinguished name. This consists of a series of pieces of informationyou provide during the certificate creation process, including your geographical location, thehostname of the system, and an e-mail address. This information, in conjunction with thevalidity of the certificate, identifies a valid certificate.
One of the most important pieces of information you need to provide for the certificate’sdistinguished name is the common name, which for the purposes of TLS is generally the host-name of your system or, for example, the hostname of a Web site to secured with the certificate.If you want this to work with your Mail Transfer Agent (MTA), for example, then this needs to bethe fully qualified domain name of the system for which the certificate is being created. In List-ing 3-5, the common name will be puppy.yourdomain.com. So to create your first certificate, goto your certs directory and run the command in Listing 3-5.
Listing 3-5. Creating a Certificate Request
puppy# openssl req -config /etc/ssl/certs/puppyCA/openssl.cnf -new ➥
-keyout puppy.yourdomain.com.key.pem -out puppy.yourdomain.com.csr
Generating a 1024 bit RSA private key
...........++++++
.........++++++
writing new private key to 'puppy.yourdomain.com.key.pem'
Enter PEM pass phrase:
Verifying - Enter PEM pass phrase:
-----
4444c03_final.qxd 1/5/05 12:44 AM Page 146
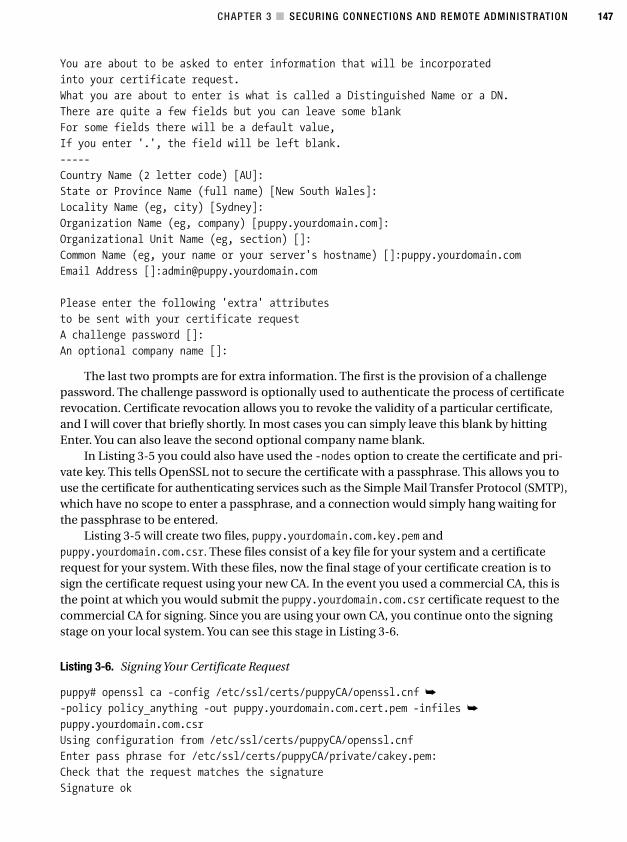
CHAPTER 3 ■ SECURING CONNECTIONS AND REMOTE ADMINISTRATION 147
You are about to be asked to enter information that will be incorporated
into your certificate request.
What you are about to enter is what is called a Distinguished Name or a DN.
There are quite a few fields but you can leave some blank
For some fields there will be a default value,
If you enter '.', the field will be left blank.
-----
Country Name (2 letter code) [AU]:
State or Province Name (full name) [New South Wales]:
Locality Name (eg, city) [Sydney]:
Organization Name (eg, company) [puppy.yourdomain.com]:
Organizational Unit Name (eg, section) []:
Common Name (eg, your name or your server's hostname) []:puppy.yourdomain.com
Email Address []:[email protected]
Please enter the following 'extra' attributes
to be sent with your certificate request
A challenge password []:
An optional company name []:
The last two prompts are for extra information. The first is the provision of a challengepassword. The challenge password is optionally used to authenticate the process of certificaterevocation. Certificate revocation allows you to revoke the validity of a particular certificate,and I will cover that briefly shortly. In most cases you can simply leave this blank by hittingEnter. You can also leave the second optional company name blank.
In Listing 3-5 you could also have used the -nodes option to create the certificate and pri-vate key. This tells OpenSSL not to secure the certificate with a passphrase. This allows you touse the certificate for authenticating services such as the Simple Mail Transfer Protocol (SMTP),which have no scope to enter a passphrase, and a connection would simply hang waiting forthe passphrase to be entered.
Listing 3-5 will create two files, puppy.yourdomain.com.key.pem andpuppy.yourdomain.com.csr. These files consist of a key file for your system and a certificaterequest for your system. With these files, now the final stage of your certificate creation is tosign the certificate request using your new CA. In the event you used a commercial CA, this isthe point at which you would submit the puppy.yourdomain.com.csr certificate request to thecommercial CA for signing. Since you are using your own CA, you continue onto the signingstage on your local system. You can see this stage in Listing 3-6.
Listing 3-6. Signing Your Certificate Request
puppy# openssl ca -config /etc/ssl/certs/puppyCA/openssl.cnf ➥
-policy policy_anything -out puppy.yourdomain.com.cert.pem -infiles ➥
puppy.yourdomain.com.csr
Using configuration from /etc/ssl/certs/puppyCA/openssl.cnf
Enter pass phrase for /etc/ssl/certs/puppyCA/private/cakey.pem:
Check that the request matches the signature
Signature ok
4444c03_final.qxd 1/5/05 12:44 AM Page 147
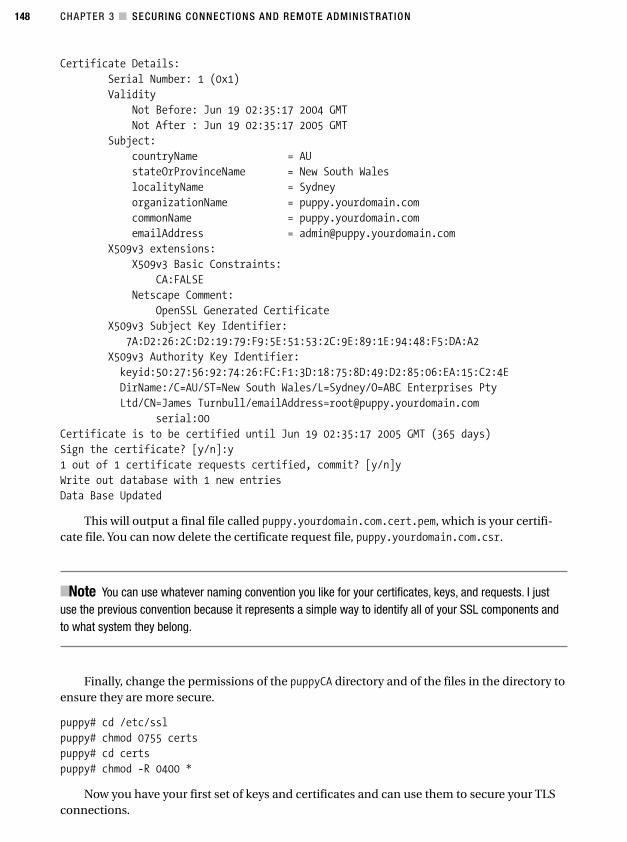
CHAPTER 3 ■ SECURING CONNECTIONS AND REMOTE ADMINISTRATION148
Certificate Details:
Serial Number: 1 (0x1)
Validity
Not Before: Jun 19 02:35:17 2004 GMT
Not After : Jun 19 02:35:17 2005 GMT
Subject:
countryName = AU
stateOrProvinceName = New South Wales
localityName = Sydney
organizationName = puppy.yourdomain.com
commonName = puppy.yourdomain.com
emailAddress = [email protected]
X509v3 extensions:
X509v3 Basic Constraints:
CA:FALSE
Netscape Comment:
OpenSSL Generated Certificate
X509v3 Subject Key Identifier:
7A:D2:26:2C:D2:19:79:F9:5E:51:53:2C:9E:89:1E:94:48:F5:DA:A2
X509v3 Authority Key Identifier:
keyid:50:27:56:92:74:26:FC:F1:3D:18:75:8D:49:D2:85:06:EA:15:C2:4E
DirName:/C=AU/ST=New South Wales/L=Sydney/O=ABC Enterprises Pty
Ltd/CN=James Turnbull/[email protected]
serial:00
Certificate is to be certified until Jun 19 02:35:17 2005 GMT (365 days)
Sign the certificate? [y/n]:y
1 out of 1 certificate requests certified, commit? [y/n]y
Write out database with 1 new entries
Data Base Updated
This will output a final file called puppy.yourdomain.com.cert.pem, which is your certifi-cate file. You can now delete the certificate request file, puppy.yourdomain.com.csr.
■Note You can use whatever naming convention you like for your certificates, keys, and requests. I justuse the previous convention because it represents a simple way to identify all of your SSL components andto what system they belong.
Finally, change the permissions of the puppyCA directory and of the files in the directory toensure they are more secure.
puppy# cd /etc/ssl
puppy# chmod 0755 certs
puppy# cd certs
puppy# chmod -R 0400 *
Now you have your first set of keys and certificates and can use them to secure your TLSconnections.
4444c03_final.qxd 1/5/05 12:44 AM Page 148
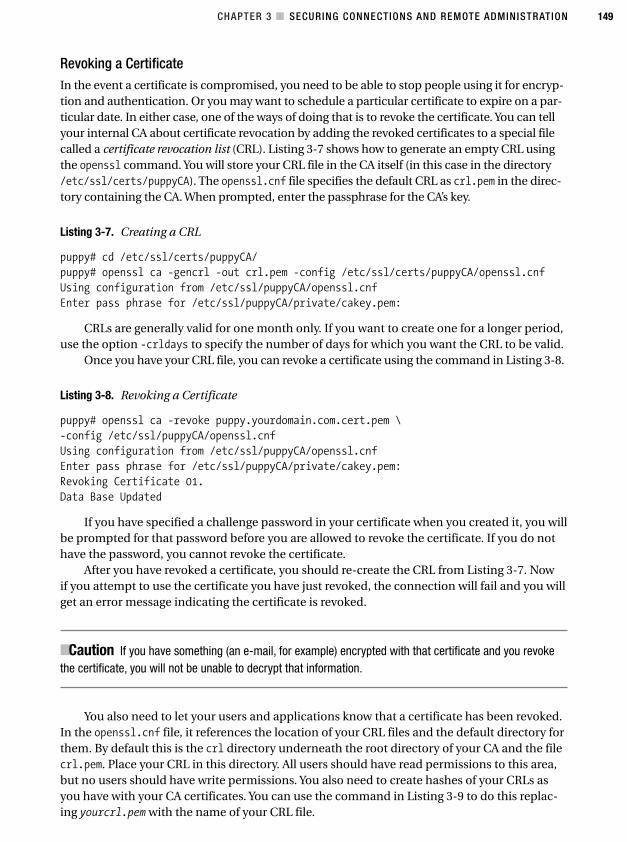
CHAPTER 3 ■ SECURING CONNECTIONS AND REMOTE ADMINISTRATION 149
Revoking a CertificateIn the event a certificate is compromised, you need to be able to stop people using it for encryp-tion and authentication. Or you may want to schedule a particular certificate to expire on a par-ticular date. In either case, one of the ways of doing that is to revoke the certificate. You can tellyour internal CA about certificate revocation by adding the revoked certificates to a special filecalled a certificate revocation list (CRL). Listing 3-7 shows how to generate an empty CRL usingthe openssl command. You will store your CRL file in the CA itself (in this case in the directory/etc/ssl/certs/puppyCA). The openssl.cnf file specifies the default CRL as crl.pem in the direc-tory containing the CA. When prompted, enter the passphrase for the CA’s key.
Listing 3-7. Creating a CRL
puppy# cd /etc/ssl/certs/puppyCA/
puppy# openssl ca -gencrl -out crl.pem -config /etc/ssl/certs/puppyCA/openssl.cnf
Using configuration from /etc/ssl/puppyCA/openssl.cnf
Enter pass phrase for /etc/ssl/puppyCA/private/cakey.pem:
CRLs are generally valid for one month only. If you want to create one for a longer period,use the option -crldays to specify the number of days for which you want the CRL to be valid.
Once you have your CRL file, you can revoke a certificate using the command in Listing 3-8.
Listing 3-8. Revoking a Certificate
puppy# openssl ca -revoke puppy.yourdomain.com.cert.pem \
-config /etc/ssl/puppyCA/openssl.cnf
Using configuration from /etc/ssl/puppyCA/openssl.cnf
Enter pass phrase for /etc/ssl/puppyCA/private/cakey.pem:
Revoking Certificate 01.
Data Base Updated
If you have specified a challenge password in your certificate when you created it, you willbe prompted for that password before you are allowed to revoke the certificate. If you do nothave the password, you cannot revoke the certificate.
After you have revoked a certificate, you should re-create the CRL from Listing 3-7. Nowif you attempt to use the certificate you have just revoked, the connection will fail and you willget an error message indicating the certificate is revoked.
■Caution If you have something (an e-mail, for example) encrypted with that certificate and you revokethe certificate, you will not be unable to decrypt that information.
You also need to let your users and applications know that a certificate has been revoked.In the openssl.cnf file, it references the location of your CRL files and the default directory forthem. By default this is the crl directory underneath the root directory of your CA and the filecrl.pem. Place your CRL in this directory. All users should have read permissions to this area,but no users should have write permissions. You also need to create hashes of your CRLs asyou have with your CA certificates. You can use the command in Listing 3-9 to do this replac-ing yourcrl.pem with the name of your CRL file.
4444c03_final.qxd 1/5/05 12:44 AM Page 149
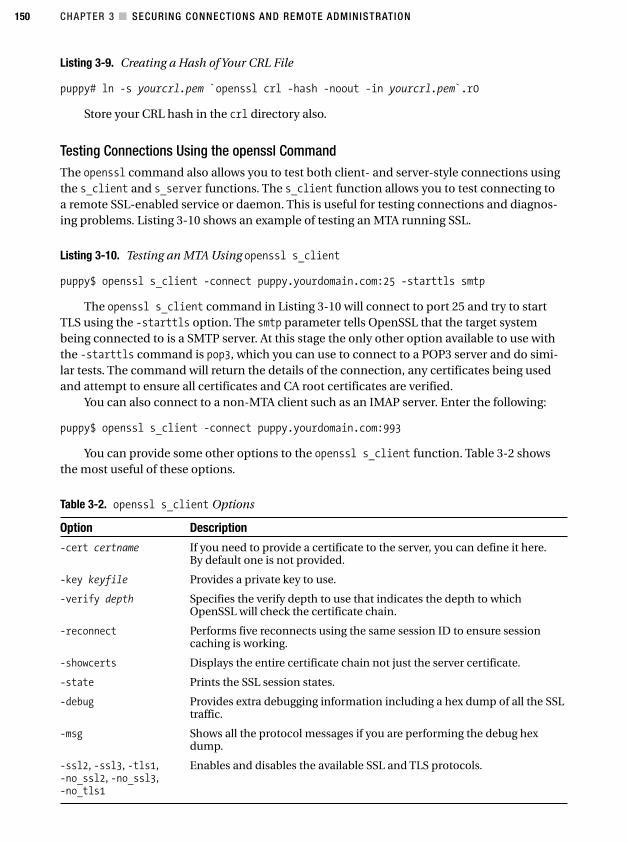
CHAPTER 3 ■ SECURING CONNECTIONS AND REMOTE ADMINISTRATION150
Listing 3-9. Creating a Hash of Your CRL File
puppy# ln -s yourcrl.pem `openssl crl -hash -noout -in yourcrl.pem`.r0
Store your CRL hash in the crl directory also.
Testing Connections Using the openssl CommandThe openssl command also allows you to test both client- and server-style connections usingthe s_client and s_server functions. The s_client function allows you to test connecting toa remote SSL-enabled service or daemon. This is useful for testing connections and diagnos-ing problems. Listing 3-10 shows an example of testing an MTA running SSL.
Listing 3-10. Testing an MTA Using openssl s_client
puppy$ openssl s_client -connect puppy.yourdomain.com:25 -starttls smtp
The openssl s_client command in Listing 3-10 will connect to port 25 and try to startTLS using the -starttls option. The smtp parameter tells OpenSSL that the target systembeing connected to is a SMTP server. At this stage the only other option available to use withthe -starttls command is pop3, which you can use to connect to a POP3 server and do simi-lar tests. The command will return the details of the connection, any certificates being usedand attempt to ensure all certificates and CA root certificates are verified.
You can also connect to a non-MTA client such as an IMAP server. Enter the following:
puppy$ openssl s_client -connect puppy.yourdomain.com:993
You can provide some other options to the openssl s_client function. Table 3-2 showsthe most useful of these options.
Table 3-2. openssl s_client Options
Option Description
-cert certname If you need to provide a certificate to the server, you can define it here.By default one is not provided.
-key keyfile Provides a private key to use.
-verify depth Specifies the verify depth to use that indicates the depth to whichOpenSSL will check the certificate chain.
-reconnect Performs five reconnects using the same session ID to ensure sessioncaching is working.
-showcerts Displays the entire certificate chain not just the server certificate.
-state Prints the SSL session states.
-debug Provides extra debugging information including a hex dump of all the SSLtraffic.
-msg Shows all the protocol messages if you are performing the debug hexdump.
-ssl2, -ssl3, -tls1, Enables and disables the available SSL and TLS protocols.-no_ssl2, -no_ssl3, -no_tls1
4444c03_final.qxd 1/5/05 12:44 AM Page 150
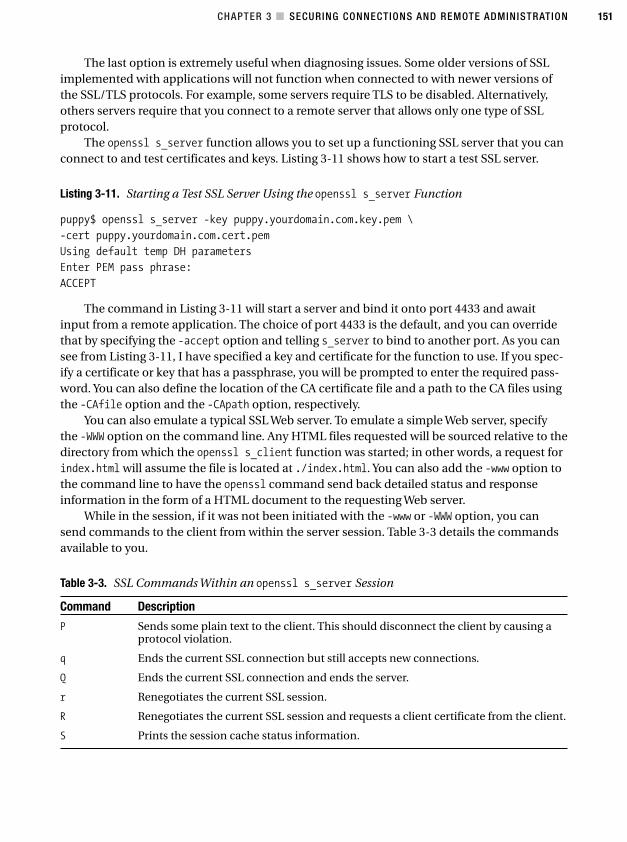
CHAPTER 3 ■ SECURING CONNECTIONS AND REMOTE ADMINISTRATION 151
The last option is extremely useful when diagnosing issues. Some older versions of SSLimplemented with applications will not function when connected to with newer versions ofthe SSL/TLS protocols. For example, some servers require TLS to be disabled. Alternatively,others servers require that you connect to a remote server that allows only one type of SSLprotocol.
The openssl s_server function allows you to set up a functioning SSL server that you canconnect to and test certificates and keys. Listing 3-11 shows how to start a test SSL server.
Listing 3-11. Starting a Test SSL Server Using the openssl s_server Function
puppy$ openssl s_server -key puppy.yourdomain.com.key.pem \
-cert puppy.yourdomain.com.cert.pem
Using default temp DH parameters
Enter PEM pass phrase:
ACCEPT
The command in Listing 3-11 will start a server and bind it onto port 4433 and awaitinput from a remote application. The choice of port 4433 is the default, and you can overridethat by specifying the -accept option and telling s_server to bind to another port. As you cansee from Listing 3-11, I have specified a key and certificate for the function to use. If you spec-ify a certificate or key that has a passphrase, you will be prompted to enter the required pass-word. You can also define the location of the CA certificate file and a path to the CA files usingthe -CAfile option and the -CApath option, respectively.
You can also emulate a typical SSL Web server. To emulate a simple Web server, specifythe -WWW option on the command line. Any HTML files requested will be sourced relative to thedirectory from which the openssl s_client function was started; in other words, a request forindex.html will assume the file is located at ./index.html. You can also add the -www option tothe command line to have the openssl command send back detailed status and responseinformation in the form of a HTML document to the requesting Web server.
While in the session, if it was not been initiated with the -www or -WWW option, you cansend commands to the client from within the server session. Table 3-3 details the commandsavailable to you.
Table 3-3. SSL Commands Within an openssl s_server Session
Command Description
P Sends some plain text to the client. This should disconnect the client by causing aprotocol violation.
q Ends the current SSL connection but still accepts new connections.
Q Ends the current SSL connection and ends the server.
r Renegotiates the current SSL session.
R Renegotiates the current SSL session and requests a client certificate from the client.
S Prints the session cache status information.
4444c03_final.qxd 1/5/05 12:44 AM Page 151
CHAPTER 3 ■ SECURING CONNECTIONS AND REMOTE ADMINISTRATION152
■Tip A useful tool called SSLdump is available from http://www.rtfm.com/ssldump/ and is designedto function like tcpdump except it focuses on SSL/TLS traffic. This is a good tool for diagnosing connectionwith SSL/TLS. If provided with keys and passwords, it can also decrypt the monitored traffic.
StunnelStunnel provides an excellent example of how you can use OpenSSL to secure connections.Many daemons that rely on connections for their functionality, such as a sendmail daemon orthe Apache Web server, either have built-in access controls and have encryption mechanismssuch as OpenSSL or have the ability to be integrated with an access control or encryption mech-anism. Using Sendmail as an example, I will show in Chapter 8 how to incorporate OpenSSL andCyrus SASL to provide authenticated and encrypted message transfer using TLS and a variety ofpotential authentication mechanisms. These types of connections generally do not require anyspecial additional security other than what is incorporated or integrated with them. The connec-tions from applications and daemons do not offer any or not enough access controls or encryp-tion that you need to consider securing them further. These types of connections (for example,a network-enabled syslog daemon like in Chapter 5) require some kind of wrapper to providethat access control and encryption. The ideal wrapper for those connections is provided withthe combination of OpenSSL and Stunnel.
■Note Stunnel tunnels only TCP packets, not UDP packets. It also works only on connections that use singleconnections. A service such as FTP requires two connections (a control channel and a data connection) andtherefore cannot be tunneled with Stunnel. If you do need to secure FTP, I will talk about that in Chapter 10.Otherwise, if you want to transfer files, you can use secure tools such as sftp or scp, which I talk about inthe “scp and sftp” section later in this chapter.
Obviously, Stunnel relies on OpenSSL, and it needs to be installed before you installStunnel. You may also have an existing installation of Stunnel of your system. Run the Stunnelcommand to check for its presence and version.
puppy# stunnel -version
stunnel 4.04 on i386-redhat-linux-gnu PTHREAD+LIBWRAP with ➥
OpenSSL 0.9.7a Feb 19 2003
If installed by your distribution, the Stunnel binary is usually located in /usr/sbin with itsconfiguration located in the /etc/stunnel directory. Like OpenSSL, Stunnel is a package youshould ensure is kept as up-to-date as possible either through your distribution’s packagemanagement system or via upgrading a source package.
■Tip If you install Stunnel on Debian using apt-get, you should check the README.Debian file in thedirectory /usr/share/doc/stunnel/ for further instructions on configuring Stunnel on Debian.
4444c03_final.qxd 1/5/05 12:44 AM Page 152
CHAPTER 3 ■ SECURING CONNECTIONS AND REMOTE ADMINISTRATION 153
You can download Stunnel from http://www.stunnel.org/download/stunnel/src/. Unpackthe source package, and change into the resulting directory. You need to configure Stunnel.Listing 3-12 shows a basic configure.
Listing 3-12. Using the configure Script for Stunnel
puppy$ ./configure --with-tcp-wrappers --prefix=/usr \
--sysconfdir=/etc --localstatedir=/
This configure script specifies Stunnel should enable support for TCP Wrappers and usean installation prefix of /usr, which would generally overwrite an existing installation of Stun-nel if it has been installed as part of your base distribution. I have also specified the locationsof the Stunnel configuration files as /etc/ using the --sysconfdir option (with the install pro-cess creating a subdirectory called stunnel) and the state files to be located in /var using the --localstatedir option. Some other configuration options are available. Probably the mostcommonly used is the --with-ssl option, which allows you to specify the exact location ofyour SSL libraries if they are installed in a nonstandard location.
puppy$ ./configure --with-tcp-wrappers --prefix=/usr \
--sysconfdir=/etc --localstatedir=/ --with-ssl=/usr/local/ssl
You can see any additional options available by running the configure script with the --help option.
Once you have configured Stunnel, you need to make and make install it. When you makeStunnel, you will be prompted to create a server certificate for the system on which you areinstalling it. Stunnel uses the standard OpenSSL openssl command to do this, and you shouldbe able to easily follow the prompts to create the certificate.
The stunnel binary is designed to start Stunnel and by default looks for a file calledstunnel.conf in /etc/stunnel to find its configuration information. Enter the following:
puppy# stunnel
You can override this by specifying a different filename on the command line. This canallow you to launch a number of individual Stunnel sessions using different configuration files(for example, if you want to use different certificates and keys for different connections), oryou can place all your connections in one configuration file using the same certificate and keyfor all of them. Enter the following:
puppy# stunnel /etc/stunnel/another_config.conf
You can also use a couple of other options; -sockets prints the socket option defaults and-help prints the Stunnel help screen. By default running the stunnel binary will start Stunnelin daemon mode. Generally I recommend starting Stunnel via an init script. Stunnel includesa sample init script in the tools subdirectory in the source package. You can modify and copyit to use it for your system. I recommend at least adjusting the location of the default processidentifier (PID) file in the top of the script, which generally points to an unsuitable location.
■Tip Stunnel used to have command-line options available to it. This was changed in version 4 of Stunnel,and now all configuration is handled via the configuration file. Command-line options will no longer work!
4444c03_final.qxd 1/5/05 12:44 AM Page 153
CHAPTER 3 ■ SECURING CONNECTIONS AND REMOTE ADMINISTRATION154
The stunnel.conf file controls Stunnel. The source package comes with a sample configura-tion file called stunnel-sample.conf, which provides examples of a few options. It is installed intothe directory you have specified as the configuration directory using the --sysconfdir option.The configuration file is divided into two types of options: global options and service options. Theglobal options specify settings and parameters that affect how Stunnel runs. The service optionsallow you to define particular services, tunnels, and connections to Stunnel, which are the corefunctionality of the application. Listing 3-13 shows a simple stunnel.conf file.
Listing 3-13. Sample stunnel.conf File
cert = /etc/stunnel/stunnel.pem
pid = /var/run/stunnel/stunnel.pid
setuid = stunnel
setgid = stunnel
[imaps]
accept = 993
connect = 143
The first two options specify the location of the default server certificate to use and thePID file for the Stunnel process. By default Stunnel starts in server mode and requires youspecify a certificate to be used. You have already specified the certificate that was created bydefault when you installed Stunnel (as shown in Listing 3-13). The next two options specifythe user and group that Stunnel will run as.
I recommend creating a user and group specifically for Stunnel. Enter the following:
puppy# groupadd stunnel
puppy# useradd -g stunnel -s /sbin/nologin -d /dev/null stunnel
You should also create the directory for the PID file and change its ownership and per-missions to accommodate the new user and group. Enter the following:
puppy# mkdir /var/run/stunnel
puppy# chown stunnel:stunnel /var/run/stunnel
puppy# chmod 0755 /var/run/stunnel
In Listing 3-13 the third line shows a service option defined to Stunnel. This is a simplewrapper for IMAPS. First, you see the name of the service defined in brackets, [ ], in this caseimaps. This is useful because Stunnel logs to syslog each service by this name, so you shoulddefine it here. Also, if you are using TCP Wrappers, this identifies the service for it.
Second, the next two lines specify what Stunnel is listening for and where it is going tosend that connection. In this case, it is listening on port 993 (the accept statement) for anSSL-enabled client to try to connect to the IMAP server. It then diverts all traffic from that portto port 143 (the connect statement). As you have not included a hostname, Stunnel assumesyou are listening on the local host and connecting to the local host. This is the simplest formof tunnel you can create, and now all traffic between port 993 and port 143 will be encryptedusing SSL/TLS.
4444c03_final.qxd 1/5/05 12:44 AM Page 154
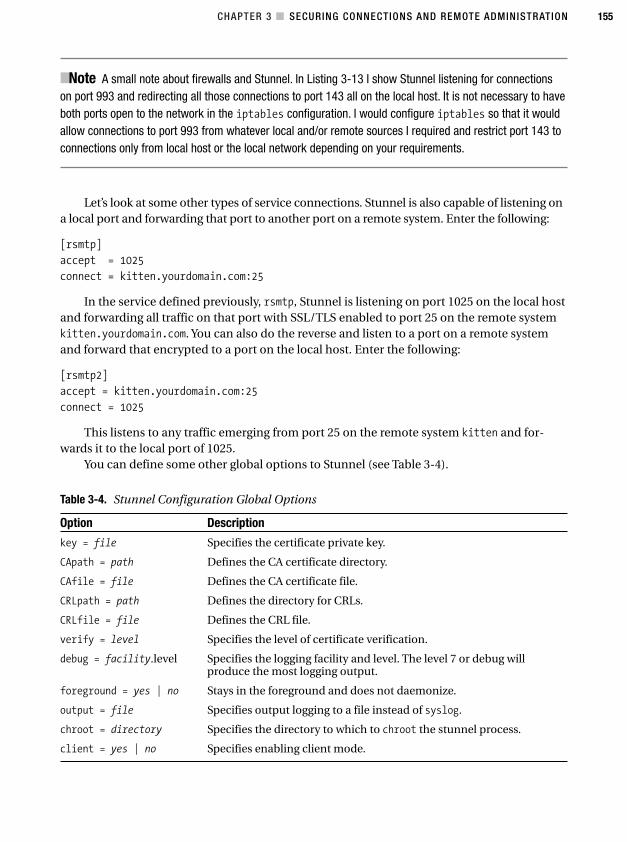
CHAPTER 3 ■ SECURING CONNECTIONS AND REMOTE ADMINISTRATION 155
■Note A small note about firewalls and Stunnel. In Listing 3-13 I show Stunnel listening for connectionson port 993 and redirecting all those connections to port 143 all on the local host. It is not necessary to haveboth ports open to the network in the iptables configuration. I would configure iptables so that it wouldallow connections to port 993 from whatever local and/or remote sources I required and restrict port 143 toconnections only from local host or the local network depending on your requirements.
Let’s look at some other types of service connections. Stunnel is also capable of listening ona local port and forwarding that port to another port on a remote system. Enter the following:
[rsmtp]
accept = 1025
connect = kitten.yourdomain.com:25
In the service defined previously, rsmtp, Stunnel is listening on port 1025 on the local hostand forwarding all traffic on that port with SSL/TLS enabled to port 25 on the remote systemkitten.yourdomain.com. You can also do the reverse and listen to a port on a remote systemand forward that encrypted to a port on the local host. Enter the following:
[rsmtp2]
accept = kitten.yourdomain.com:25
connect = 1025
This listens to any traffic emerging from port 25 on the remote system kitten and for-wards it to the local port of 1025.
You can define some other global options to Stunnel (see Table 3-4).
Table 3-4. Stunnel Configuration Global Options
Option Description
key = file Specifies the certificate private key.
CApath = path Defines the CA certificate directory.
CAfile = file Defines the CA certificate file.
CRLpath = path Defines the directory for CRLs.
CRLfile = file Defines the CRL file.
verify = level Specifies the level of certificate verification.
debug = facility.level Specifies the logging facility and level. The level 7 or debug willproduce the most logging output.
foreground = yes | no Stays in the foreground and does not daemonize.
output = file Specifies output logging to a file instead of syslog.
chroot = directory Specifies the directory to which to chroot the stunnel process.
client = yes | no Specifies enabling client mode.
4444c03_final.qxd 1/5/05 12:44 AM Page 155
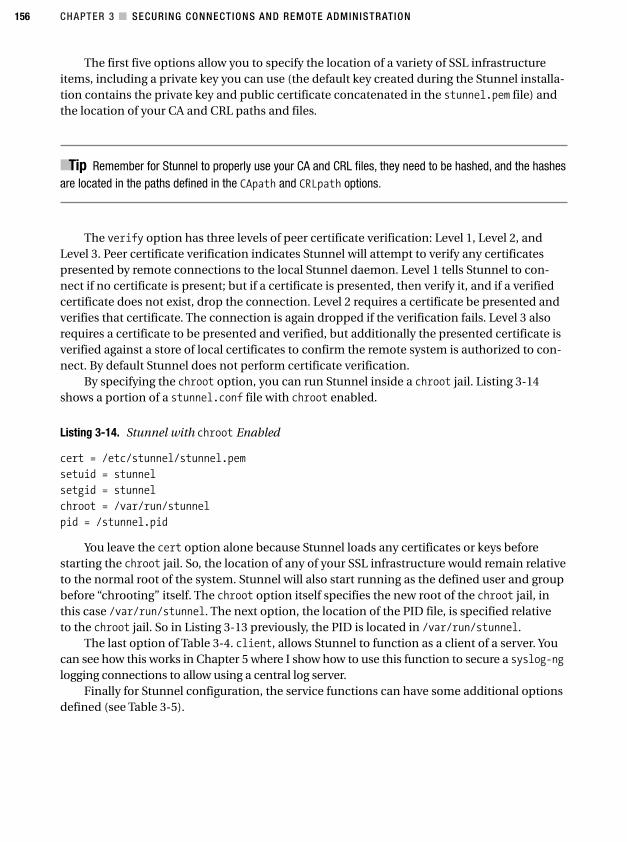
CHAPTER 3 ■ SECURING CONNECTIONS AND REMOTE ADMINISTRATION156
The first five options allow you to specify the location of a variety of SSL infrastructureitems, including a private key you can use (the default key created during the Stunnel installa-tion contains the private key and public certificate concatenated in the stunnel.pem file) andthe location of your CA and CRL paths and files.
■Tip Remember for Stunnel to properly use your CA and CRL files, they need to be hashed, and the hashesare located in the paths defined in the CApath and CRLpath options.
The verify option has three levels of peer certificate verification: Level 1, Level 2, andLevel 3. Peer certificate verification indicates Stunnel will attempt to verify any certificatespresented by remote connections to the local Stunnel daemon. Level 1 tells Stunnel to con-nect if no certificate is present; but if a certificate is presented, then verify it, and if a verifiedcertificate does not exist, drop the connection. Level 2 requires a certificate be presented andverifies that certificate. The connection is again dropped if the verification fails. Level 3 alsorequires a certificate to be presented and verified, but additionally the presented certificate isverified against a store of local certificates to confirm the remote system is authorized to con-nect. By default Stunnel does not perform certificate verification.
By specifying the chroot option, you can run Stunnel inside a chroot jail. Listing 3-14shows a portion of a stunnel.conf file with chroot enabled.
Listing 3-14. Stunnel with chroot Enabled
cert = /etc/stunnel/stunnel.pem
setuid = stunnel
setgid = stunnel
chroot = /var/run/stunnel
pid = /stunnel.pid
You leave the cert option alone because Stunnel loads any certificates or keys beforestarting the chroot jail. So, the location of any of your SSL infrastructure would remain relativeto the normal root of the system. Stunnel will also start running as the defined user and groupbefore “chrooting” itself. The chroot option itself specifies the new root of the chroot jail, inthis case /var/run/stunnel. The next option, the location of the PID file, is specified relativeto the chroot jail. So in Listing 3-13 previously, the PID is located in /var/run/stunnel.
The last option of Table 3-4. client, allows Stunnel to function as a client of a server. Youcan see how this works in Chapter 5 where I show how to use this function to secure a syslog-ng
logging connections to allow using a central log server.Finally for Stunnel configuration, the service functions can have some additional options
defined (see Table 3-5).
4444c03_final.qxd 1/5/05 12:44 AM Page 156

CHAPTER 3 ■ SECURING CONNECTIONS AND REMOTE ADMINISTRATION 157
Table 3-5. Service-Level Options
Option Description
delay = yes | no Delays the DNS lookup for connects.
local = IP Address IP address to be used as source for remote connections.
protocol = protocol A protocol to negotiate before SSL initialization, which includes cifs,nntp, pop3, and smtp.
TIMEOUTbusy = seconds Number of seconds to wait for expected data.
TIMEOUTclose = seconds Number of seconds to wait for close_notify.
TIMEOUTidle = seconds Number of seconds to keep idle connection open.
The delay option tells Stunnel to delay any DNS lookups until a connection is made if it isset to yes. The protocol option allows Stunnel to negotiate a particular protocol before the SSLsession is initialized. This is particularly useful with SMTP services where they are expectingsome negotiation before initializing SSL. To provide negotiation for an SMTP service, set theprotocol option to smtp like this:
protocol = smtp
The last options offer timeout values to help manage your connections. The TIMEOUTbusyoption provides a timeout for a response from a remote connection, the TIMEOUTclose waitsfor a busy connection close notification, and the TIMEOUTidle provides a length in seconds forStunnel to keep alive an idle connection. You will need to experiment with these values todetermine what best suits the type and purpose of your connections.
Let’s look at an example of how to use Stunnel. I will encapsulate a virtual network comput-ing (VNC) session in a secure tunnel. VNC is remote-access software incorporating remote con-trol, a screen viewer, and a Java-based viewer that can allow remote control from within a browserwindow. It is a popular tool for systems administrators and remote user access. Unfortunately, itis not very secure. Most of the information transmitted via VNC can be sniffed from the network,including usernames and passwords. It is especially dangerous to use VNC across an Internetconnection. You will now look at securing VNC using Stunnel.
VNC comes in two portions: a client and a server. The server portion runs on the machineyou want to connect to and the client portion on your local machine. For the purposes of thisexplanation, I will assume your server system is a Linux system and you are connecting to itusing a desktop system running Linux. So, set up the server end of Stunnel and VNC.Listing 3-15 shows the server-side stunnel.conf file.
Listing 3-15. Server-Side stunnel.conf Configuration for the VNC Tunnel
cert = /etc/stunnel/stunnel.pem
chroot = /var/run/stunnel
pid = /stunnel.pid
setuid = stunnel
setgid = stunnel
[vnc]
accept = puppy.yourdomain.net:5999
connect = 5901
4444c03_final.qxd 1/5/05 12:44 AM Page 157

CHAPTER 3 ■ SECURING CONNECTIONS AND REMOTE ADMINISTRATION158
I have already explained the first five options in Listing 3-15 in the previous section, butnote that I have enabled the chroot function so that any connections to the system will be tothe chroot jail. This may not be ideal if you are using the VNC connection for remote adminis-tration. The service function defines a service called vnc, which accepts connections on hostpuppy.yourdomain.com on port 5999 and then forwards those connections to the port 5901 onthe local host. Now start Stunnel to continue. Enter the following:
puppy# stunnel
The port 5901 is where the VNC is going to be listening for connections. Let’s start it now.Enter the following:
puppy# vncserver :1
If this is the first time you have started the VNC server, you will be prompted for a pass-word that will be required by any clients to be able to connect to your system. The :1 partindicates the VNC server should start allocating displays to incoming clients from Display #1.Display #1 equates to port 5901, Display #2 equates to port 5902, and so on.
On the client the configuration is similar, as you can see from Listing 3-16.
Listing 3-16. Client-Side stunnel.conf Configuration for the VNC Tunnel
cert = /etc/stunnel/stunnel.pem
chroot = /var/run/stunnel
pid = /stunnel.pid
setuid = stunnel
setgid = stunnel
[vnc]
accept = 5901
connect = puppy:yourdomain.com:5999
In this case, the defined service vnc is listening on the local host port 5901 for any connec-tions and is configured to forward those connections onto the host puppy.yourdomain.com onport 5999. You also need to start Stunnel on your client system.
With Stunnel and VNC running on the server system, and Stunnel running on the clientsystem, you can now try to connect to the server system securely using VNC over Stunnel.Enter the following:
kitten# vncviewer localhost:1
On the sample client system, kitten, you launch the vncviewer binary and request a connec-tion to localhost:1, which means Display #1 on the local system. This display equates to the port5901, which Stunnel is listening on and forwarding to port 5999 on the puppy.yourdomain.com sys-tem. From there the Stunnel daemon forwards the connection to port 5901 on puppy where theVNC server is waiting for connections. You will be prompted for a password, and then, if authenti-cated, you will then be connected to the puppy system via VNC.
You could also update this configuration as I will do with the syslog-ng secure connectiondemonstrated in Chapter 5. This allows connections from specific systems and from systemswith valid certificates when you use the verify option in your stunnel.conf configuration file.
4444c03_final.qxd 1/5/05 12:44 AM Page 158
CHAPTER 3 ■ SECURING CONNECTIONS AND REMOTE ADMINISTRATION 159
12. http://www.faqs.org/rfcs/rfc2401.html
13. Pronounced “swan”
14. You can also use shared secrets and X.509 certificate authentication with Openswan.
15. http://wiki.openswan.org/
IPSec,VPNs, and OpenswanIPSec is short for IP security and represents a collection of extension standards and protocolsfor the original Internet protocol related to the secure exchange of IP packets. It was firstdeveloped for IPv6 and then made backward compatible for IPv4. At the core of this collectionof standards is RFC2401.12 A variety of products and tools use IPSec to secure connectionsbetween systems. IPSec works at a lower level than the SSL/TLS protocols. Whereas SSL oper-ates between the network and application layers, IPSec encrypts traffic at the IP level and iscapable of encapsulating the entire IP datagram (tunnel mode) or just the data portion of theIP datagram (transport mode). The tunnel mode allows the encapsulation of the entire origi-nal IP datagram with a new encrypted datagram. While the transport mode encrypts only thepayload of the IP datagram, leaving the IP header unencrypted. With IPSec you could evenlayer a protocol like SSL/TLS over the top of a connection, further enhancing your security.
You will now look at the S/WAN13 implementation of IPSec. S/WAN can be best describedas a virtual private network (VPN) solution. S/WAN stands for secure wide area network andwas an initiative by RSA Security both to develop a standard for the use of IPSec to build VPNsand to promote the deployment of Internet-based VPNs using IPSec. While S/WAN is nolonger being actively developed, a number of open-source packages have developed out ofthe S/WAN project. One example of this is Openswan. Openswan is an open-source S/WANIPSec implementation principally for Linux and other *nix operating systems (though it alsosupports Windows to some degree). It is available at http://www.openswan.org/. I will showyou how to install Openswan and create a VPN tunnel between two subnets over the Internetusing RSA encryption.14 You can perform other tasks with Openswan, including a variety offunctions aimed at providing remote VPN connectivity for roving users. See the Openswanwiki for further details.15
■Tip Additionally, you do not have to only connect two systems. You could also connect a system to afirewall or router. For example, instructions are available at http://www.johnleach.co.uk/documents/freeswan-pix/freeswan-pix.html that should provide a starting point for connections between asystem and a Cisco PIX firewall using Openswan.
Openswan has a couple of prerequisites for installation. These are the GMP (GNU Multi-Precision) libraries from http://swox.com/gmp/. These should probably be installed by defaulton your distribution, but an up-to-date version is the safest. Openswan itself is available intwo branches of code, which you can download from http://www.openswan.org/code/. Thefirst, version 2, supports all current kernels up to version 2.6 and is the current path of devel-opment of the Openswan package. The second, version 1, supports only kernel versions 2.0,2.2, and 2.4. It contains a fixed feature set that is somewhat limited compared to the version 2
4444c03_final.qxd 1/5/05 12:44 AM Page 159

CHAPTER 3 ■ SECURING CONNECTIONS AND REMOTE ADMINISTRATION160
branch. Openswan version 1 is well tested and stable, but given the lack of support for 2.6 ker-nels it may have a limited life span as more people upgrade to more recent kernel versions.I recommend going with the version 2 branch for this reason to avoid a potentially compli-cated upgrade path as more distributions default to a version 2.6 kernel. For the purposes ofthis explanation, I will assume you are going to download the version 2 branch of Openswan.
■Caution Openswan works best with 2.4.x and 2.6.x kernels, and I recommend that all your systems runat least version 2.4. Indeed, not only is support unpredictable for older versions of 2.0 and 2.2 kernels (2.0earlier than release 2.0.39 and 2.2 earlier than release 2.2.20), but these versions of the kernel also sufferfrom a variety of security issues.
Installing Openswan on kernel version 2.4 is not an easy task for a beginner because itinvolves working with your kernel. If this worries you or you are not comfortable with activi-ties such as working with your kernel or recompiling your kernel, I recommend you avoidOpenswan.
■Tip Red Hat Enterprise Linux 3-0 (AS, WS, and ES) and Red Hat Fedora Core 2 do not require a kernelrecompilation; although they have version 2.4 kernels, they also have the IPSec modules from the version2.6 kernel that is backward compatible.
Download Openswan from the Web site. If you are running Red Hat Enterprise 3 or FedoraCore 2–based systems, you are able to install Openswan via RPM. If you have downloaded theRPM, then install it using the following command and move onto the section talking aboutOpenswan configuration. Enter the following:
puppy# rpm -Uvh openswan-version.as3.i386.rpm
If you have downloaded the source package, then unpack the package and change to theresulting directory.
For kernel version 2.4 systems, you need a clean copy of your kernel source either fromyour distribution or downloaded via http://www.kernel.org. The best method to ensure yourinstallation goes smoothly is to compile your kernel from source prior to installing Openswan.Once you have done this, make a note of the location of your kernel source package and youcan begin to install Openswan. If you require Network Address Translation Traversal (NAT-T)support, you need to patch the kernel source. NAT-T allows IPSec traffic to work with NATdevices such as routers and firewalls. From inside the Openswan source directory, run the fol-lowing command replacing the /path/to/kernel/source with the location of your kernel source,as follows. The last command make bzImage will make a new boot image for your system. Youwill need to install this new boot image; I recommend you reboot after this to test the newboot image.
puppy$ make nattpatch | (cd /path/to/kernel/source && patch -p1 && make bzImage)
4444c03_final.qxd 1/5/05 12:44 AM Page 160
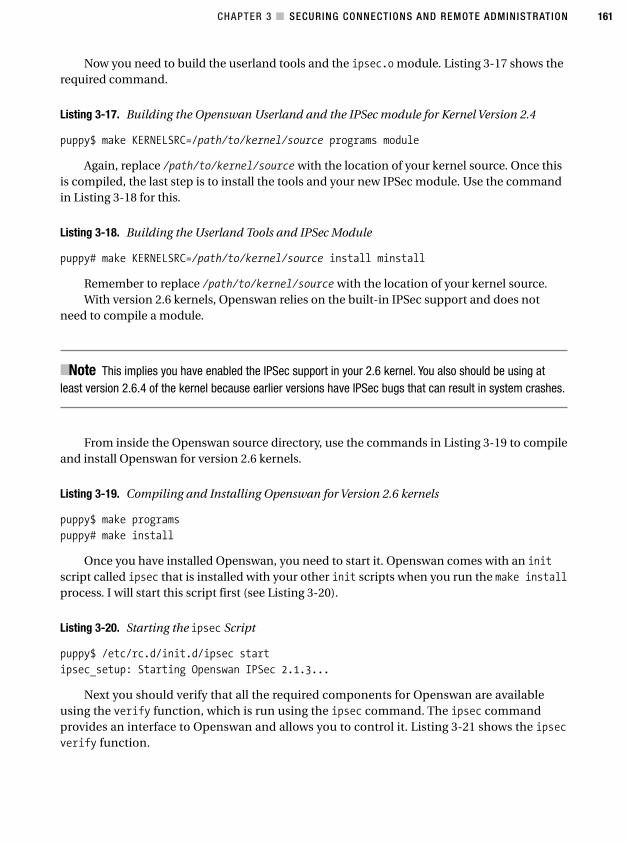
CHAPTER 3 ■ SECURING CONNECTIONS AND REMOTE ADMINISTRATION 161
Now you need to build the userland tools and the ipsec.o module. Listing 3-17 shows therequired command.
Listing 3-17. Building the Openswan Userland and the IPSec module for Kernel Version 2.4
puppy$ make KERNELSRC=/path/to/kernel/source programs module
Again, replace /path/to/kernel/source with the location of your kernel source. Once thisis compiled, the last step is to install the tools and your new IPSec module. Use the commandin Listing 3-18 for this.
Listing 3-18. Building the Userland Tools and IPSec Module
puppy# make KERNELSRC=/path/to/kernel/source install minstall
Remember to replace /path/to/kernel/source with the location of your kernel source.With version 2.6 kernels, Openswan relies on the built-in IPSec support and does not
need to compile a module.
■Note This implies you have enabled the IPSec support in your 2.6 kernel. You also should be using atleast version 2.6.4 of the kernel because earlier versions have IPSec bugs that can result in system crashes.
From inside the Openswan source directory, use the commands in Listing 3-19 to compileand install Openswan for version 2.6 kernels.
Listing 3-19. Compiling and Installing Openswan for Version 2.6 kernels
puppy$ make programs
puppy# make install
Once you have installed Openswan, you need to start it. Openswan comes with an initscript called ipsec that is installed with your other init scripts when you run the make installprocess. I will start this script first (see Listing 3-20).
Listing 3-20. Starting the ipsec Script
puppy$ /etc/rc.d/init.d/ipsec start
ipsec_setup: Starting Openswan IPSec 2.1.3...
Next you should verify that all the required components for Openswan are availableusing the verify function, which is run using the ipsec command. The ipsec commandprovides an interface to Openswan and allows you to control it. Listing 3-21 shows the ipsecverify function.
4444c03_final.qxd 1/5/05 12:44 AM Page 161
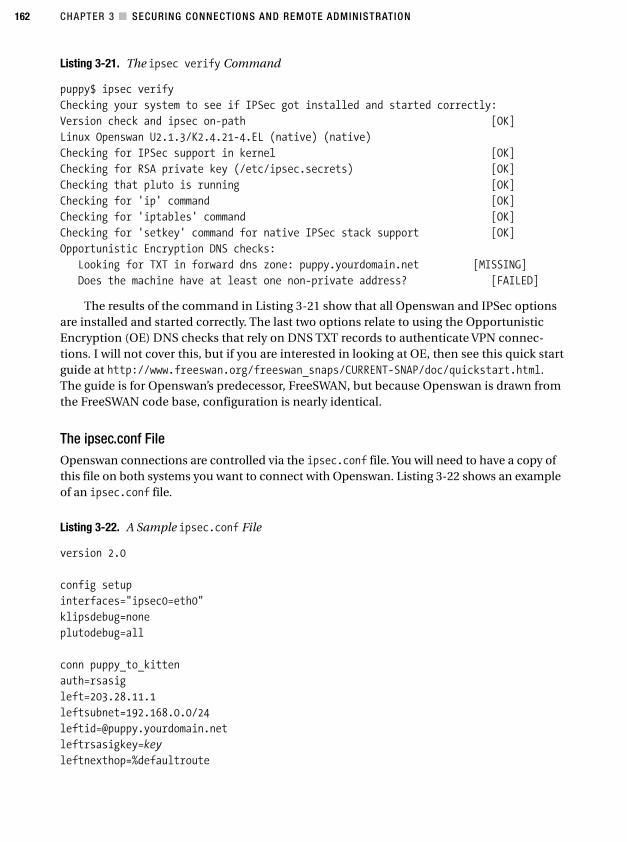
CHAPTER 3 ■ SECURING CONNECTIONS AND REMOTE ADMINISTRATION162
Listing 3-21. The ipsec verify Command
puppy$ ipsec verify
Checking your system to see if IPSec got installed and started correctly:
Version check and ipsec on-path [OK]
Linux Openswan U2.1.3/K2.4.21-4.EL (native) (native)
Checking for IPSec support in kernel [OK]
Checking for RSA private key (/etc/ipsec.secrets) [OK]
Checking that pluto is running [OK]
Checking for 'ip' command [OK]
Checking for 'iptables' command [OK]
Checking for 'setkey' command for native IPSec stack support [OK]
Opportunistic Encryption DNS checks:
Looking for TXT in forward dns zone: puppy.yourdomain.net [MISSING]
Does the machine have at least one non-private address? [FAILED]
The results of the command in Listing 3-21 show that all Openswan and IPSec optionsare installed and started correctly. The last two options relate to using the OpportunisticEncryption (OE) DNS checks that rely on DNS TXT records to authenticate VPN connec-tions. I will not cover this, but if you are interested in looking at OE, then see this quick startguide at http://www.freeswan.org/freeswan_snaps/CURRENT-SNAP/doc/quickstart.html.The guide is for Openswan’s predecessor, FreeSWAN, but because Openswan is drawn fromthe FreeSWAN code base, configuration is nearly identical.
The ipsec.conf FileOpenswan connections are controlled via the ipsec.conf file. You will need to have a copy ofthis file on both systems you want to connect with Openswan. Listing 3-22 shows an exampleof an ipsec.conf file.
Listing 3-22. A Sample ipsec.conf File
version 2.0
config setup
interfaces="ipsec0=eth0"
klipsdebug=none
plutodebug=all
conn puppy_to_kitten
auth=rsasig
left=203.28.11.1
leftsubnet=192.168.0.0/24
leftrsasigkey=key
leftnexthop=%defaultroute
4444c03_final.qxd 1/5/05 12:44 AM Page 162
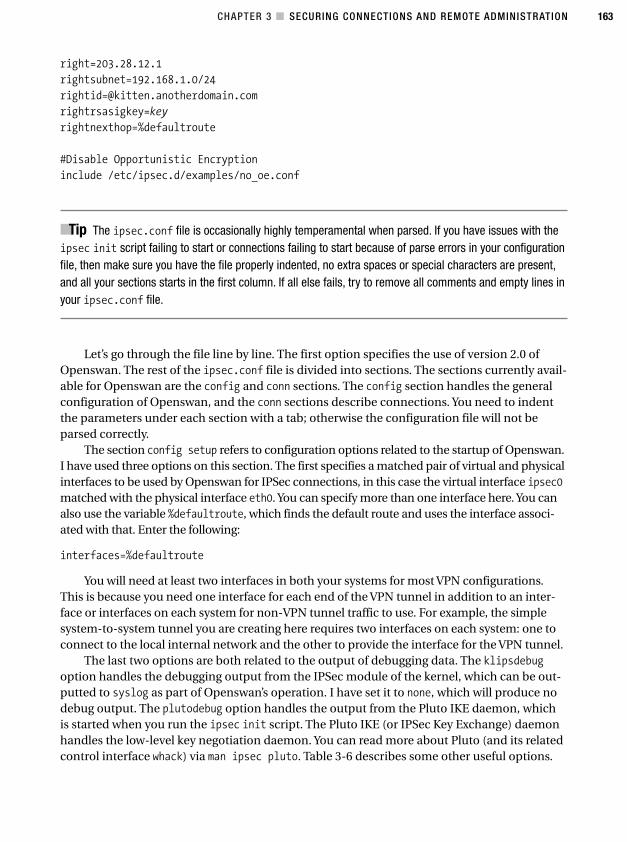
CHAPTER 3 ■ SECURING CONNECTIONS AND REMOTE ADMINISTRATION 163
right=203.28.12.1
rightsubnet=192.168.1.0/24
rightrsasigkey=key
rightnexthop=%defaultroute
#Disable Opportunistic Encryption
include /etc/ipsec.d/examples/no_oe.conf
■Tip The ipsec.conf file is occasionally highly temperamental when parsed. If you have issues with theipsec init script failing to start or connections failing to start because of parse errors in your configurationfile, then make sure you have the file properly indented, no extra spaces or special characters are present,and all your sections starts in the first column. If all else fails, try to remove all comments and empty lines inyour ipsec.conf file.
Let’s go through the file line by line. The first option specifies the use of version 2.0 ofOpenswan. The rest of the ipsec.conf file is divided into sections. The sections currently avail-able for Openswan are the config and conn sections. The config section handles the generalconfiguration of Openswan, and the conn sections describe connections. You need to indentthe parameters under each section with a tab; otherwise the configuration file will not beparsed correctly.
The section config setup refers to configuration options related to the startup of Openswan.I have used three options on this section. The first specifies a matched pair of virtual and physicalinterfaces to be used by Openswan for IPSec connections, in this case the virtual interface ipsec0matched with the physical interface eth0. You can specify more than one interface here. You canalso use the variable %defaultroute, which finds the default route and uses the interface associ-ated with that. Enter the following:
interfaces=%defaultroute
You will need at least two interfaces in both your systems for most VPN configurations.This is because you need one interface for each end of the VPN tunnel in addition to an inter-face or interfaces on each system for non-VPN tunnel traffic to use. For example, the simplesystem-to-system tunnel you are creating here requires two interfaces on each system: one toconnect to the local internal network and the other to provide the interface for the VPN tunnel.
The last two options are both related to the output of debugging data. The klipsdebugoption handles the debugging output from the IPSec module of the kernel, which can be out-putted to syslog as part of Openswan’s operation. I have set it to none, which will produce nodebug output. The plutodebug option handles the output from the Pluto IKE daemon, whichis started when you run the ipsec init script. The Pluto IKE (or IPSec Key Exchange) daemonhandles the low-level key negotiation daemon. You can read more about Pluto (and its relatedcontrol interface whack) via man ipsec pluto. Table 3-6 describes some other useful options.
4444c03_final.qxd 1/5/05 12:44 AM Page 163
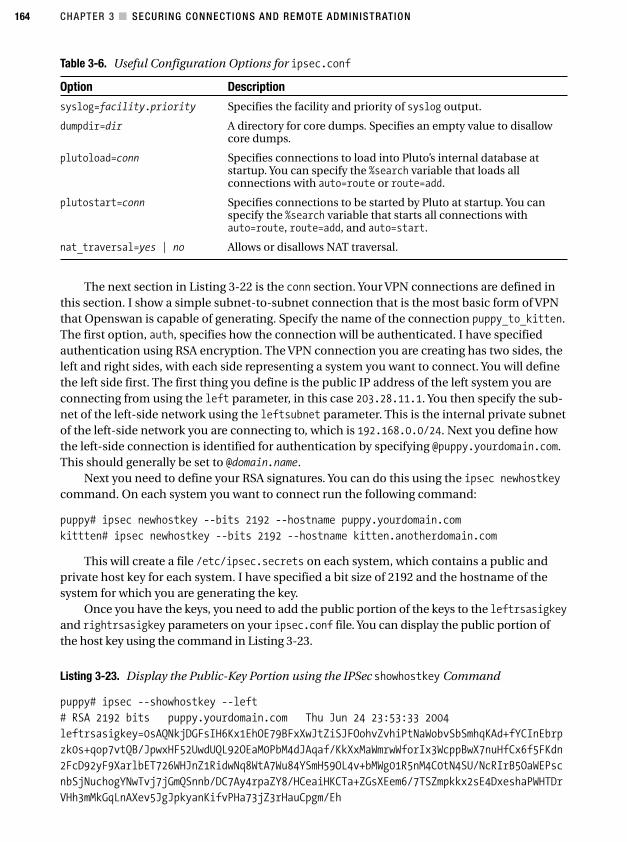
CHAPTER 3 ■ SECURING CONNECTIONS AND REMOTE ADMINISTRATION164
Table 3-6. Useful Configuration Options for ipsec.conf
Option Description
syslog=facility.priority Specifies the facility and priority of syslog output.
dumpdir=dir A directory for core dumps. Specifies an empty value to disallowcore dumps.
plutoload=conn Specifies connections to load into Pluto’s internal database atstartup. You can specify the %search variable that loads allconnections with auto=route or route=add.
plutostart=conn Specifies connections to be started by Pluto at startup. You canspecify the %search variable that starts all connections withauto=route, route=add, and auto=start.
nat_traversal=yes | no Allows or disallows NAT traversal.
The next section in Listing 3-22 is the conn section. Your VPN connections are defined inthis section. I show a simple subnet-to-subnet connection that is the most basic form of VPNthat Openswan is capable of generating. Specify the name of the connection puppy_to_kitten.The first option, auth, specifies how the connection will be authenticated. I have specifiedauthentication using RSA encryption. The VPN connection you are creating has two sides, theleft and right sides, with each side representing a system you want to connect. You will definethe left side first. The first thing you define is the public IP address of the left system you areconnecting from using the left parameter, in this case 203.28.11.1. You then specify the sub-net of the left-side network using the leftsubnet parameter. This is the internal private subnetof the left-side network you are connecting to, which is 192.168.0.0/24. Next you define howthe left-side connection is identified for authentication by specifying @puppy.yourdomain.com.This should generally be set to @domain.name.
Next you need to define your RSA signatures. You can do this using the ipsec newhostkeycommand. On each system you want to connect run the following command:
puppy# ipsec newhostkey --bits 2192 --hostname puppy.yourdomain.com
kittten# ipsec newhostkey --bits 2192 --hostname kitten.anotherdomain.com
This will create a file /etc/ipsec.secrets on each system, which contains a public andprivate host key for each system. I have specified a bit size of 2192 and the hostname of thesystem for which you are generating the key.
Once you have the keys, you need to add the public portion of the keys to the leftrsasigkeyand rightrsasigkey parameters on your ipsec.conf file. You can display the public portion ofthe host key using the command in Listing 3-23.
Listing 3-23. Display the Public-Key Portion using the IPSec showhostkey Command
puppy# ipsec --showhostkey --left
# RSA 2192 bits puppy.yourdomain.com Thu Jun 24 23:53:33 2004
leftrsasigkey=0sAQNkjDGFsIH6Kx1EhOE79BFxXwJtZiSJFOohvZvhiPtNaWobvSbSmhqKAd+fYCInEbrp
zk0s+qop7vtQB/JpwxHF52UwdUQL92OEaM0PbM4dJAqaf/KkXxMaWmrwWforIx3WcppBwX7nuHfCx6f5FKdn
2FcD92yF9XarlbET726WHJnZ1RidwNq8WtA7Wu84YSmH59OL4v+bMWg01R5nM4C0tN4SU/NcRIrB5OaWEPsc
nbSjNuchogYNwTvj7jGmQSnnb/DC7Ay4rpaZY8/HCeaiHKCTa+ZGsXEem6/7TSZmpkkx2sE4DxeshaPWHTDr
VHh3mMkGqLnAXev5JgJpkyanKifvPHa73jZ3rHauCpgm/Eh
4444c03_final.qxd 1/5/05 12:44 AM Page 164
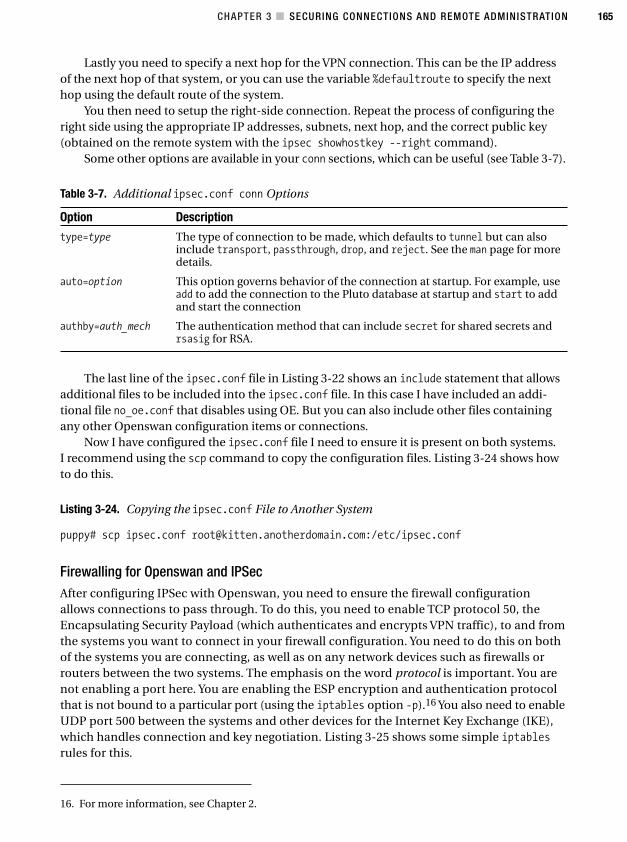
CHAPTER 3 ■ SECURING CONNECTIONS AND REMOTE ADMINISTRATION 165
Lastly you need to specify a next hop for the VPN connection. This can be the IP addressof the next hop of that system, or you can use the variable %defaultroute to specify the nexthop using the default route of the system.
You then need to setup the right-side connection. Repeat the process of configuring theright side using the appropriate IP addresses, subnets, next hop, and the correct public key(obtained on the remote system with the ipsec showhostkey --right command).
Some other options are available in your conn sections, which can be useful (see Table 3-7).
Table 3-7. Additional ipsec.conf conn Options
Option Description
type=type The type of connection to be made, which defaults to tunnel but can alsoinclude transport, passthrough, drop, and reject. See the man page for moredetails.
auto=option This option governs behavior of the connection at startup. For example, useadd to add the connection to the Pluto database at startup and start to addand start the connection
authby=auth_mech The authentication method that can include secret for shared secrets andrsasig for RSA.
The last line of the ipsec.conf file in Listing 3-22 shows an include statement that allowsadditional files to be included into the ipsec.conf file. In this case I have included an addi-tional file no_oe.conf that disables using OE. But you can also include other files containingany other Openswan configuration items or connections.
Now I have configured the ipsec.conf file I need to ensure it is present on both systems.I recommend using the scp command to copy the configuration files. Listing 3-24 shows howto do this.
Listing 3-24. Copying the ipsec.conf File to Another System
puppy# scp ipsec.conf [email protected]:/etc/ipsec.conf
Firewalling for Openswan and IPSecAfter configuring IPSec with Openswan, you need to ensure the firewall configurationallows connections to pass through. To do this, you need to enable TCP protocol 50, theEncapsulating Security Payload (which authenticates and encrypts VPN traffic), to and fromthe systems you want to connect in your firewall configuration. You need to do this on bothof the systems you are connecting, as well as on any network devices such as firewalls orrouters between the two systems. The emphasis on the word protocol is important. You arenot enabling a port here. You are enabling the ESP encryption and authentication protocolthat is not bound to a particular port (using the iptables option -p).16 You also need to enableUDP port 500 between the systems and other devices for the Internet Key Exchange (IKE),which handles connection and key negotiation. Listing 3-25 shows some simple iptablesrules for this.
16. For more information, see Chapter 2.
4444c03_final.qxd 1/5/05 12:44 AM Page 165
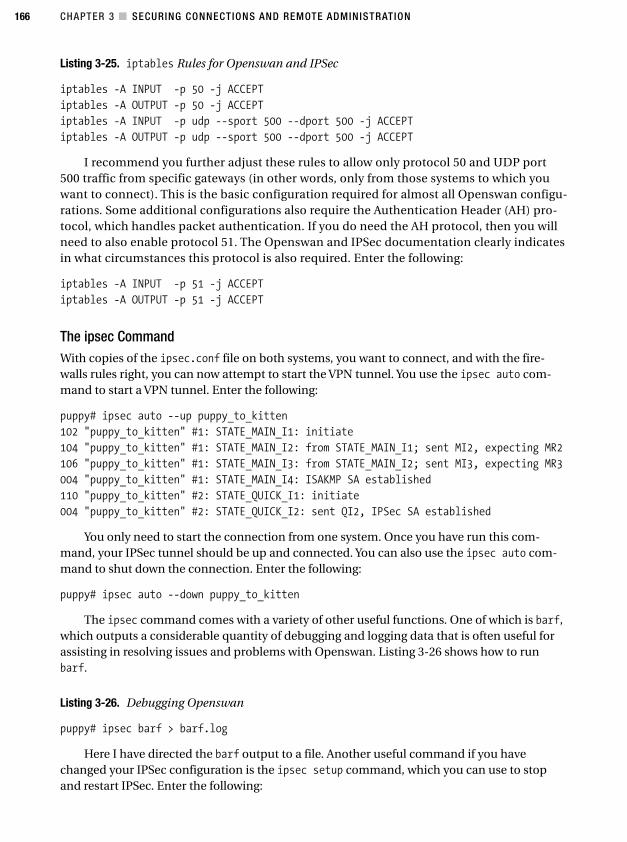
CHAPTER 3 ■ SECURING CONNECTIONS AND REMOTE ADMINISTRATION166
Listing 3-25. iptables Rules for Openswan and IPSec
iptables -A INPUT -p 50 -j ACCEPT
iptables -A OUTPUT -p 50 -j ACCEPT
iptables -A INPUT -p udp --sport 500 --dport 500 -j ACCEPT
iptables -A OUTPUT -p udp --sport 500 --dport 500 -j ACCEPT
I recommend you further adjust these rules to allow only protocol 50 and UDP port500 traffic from specific gateways (in other words, only from those systems to which youwant to connect). This is the basic configuration required for almost all Openswan configu-rations. Some additional configurations also require the Authentication Header (AH) pro-tocol, which handles packet authentication. If you do need the AH protocol, then you willneed to also enable protocol 51. The Openswan and IPSec documentation clearly indicatesin what circumstances this protocol is also required. Enter the following:
iptables -A INPUT -p 51 -j ACCEPT
iptables -A OUTPUT -p 51 -j ACCEPT
The ipsec CommandWith copies of the ipsec.conf file on both systems, you want to connect, and with the fire-walls rules right, you can now attempt to start the VPN tunnel. You use the ipsec auto com-mand to start a VPN tunnel. Enter the following:
puppy# ipsec auto --up puppy_to_kitten
102 "puppy_to_kitten" #1: STATE_MAIN_I1: initiate
104 "puppy_to_kitten" #1: STATE_MAIN_I2: from STATE_MAIN_I1; sent MI2, expecting MR2
106 "puppy_to_kitten" #1: STATE_MAIN_I3: from STATE_MAIN_I2; sent MI3, expecting MR3
004 "puppy_to_kitten" #1: STATE_MAIN_I4: ISAKMP SA established
110 "puppy_to_kitten" #2: STATE_QUICK_I1: initiate
004 "puppy_to_kitten" #2: STATE_QUICK_I2: sent QI2, IPSec SA established
You only need to start the connection from one system. Once you have run this com-mand, your IPSec tunnel should be up and connected. You can also use the ipsec auto com-mand to shut down the connection. Enter the following:
puppy# ipsec auto --down puppy_to_kitten
The ipsec command comes with a variety of other useful functions. One of which is barf,which outputs a considerable quantity of debugging and logging data that is often useful forassisting in resolving issues and problems with Openswan. Listing 3-26 shows how to runbarf.
Listing 3-26. Debugging Openswan
puppy# ipsec barf > barf.log
Here I have directed the barf output to a file. Another useful command if you havechanged your IPSec configuration is the ipsec setup command, which you can use to stopand restart IPSec. Enter the following:
4444c03_final.qxd 1/5/05 12:44 AM Page 166
CHAPTER 3 ■ SECURING CONNECTIONS AND REMOTE ADMINISTRATION 167
17. http://www.xinetd.org/
puppy# ipsec setup --stop
puppy# ipsec setup --start
You can see details of the other ipsec commands by entering the following:
puppy$ ipsec --help
inetd and xinetd-Based ConnectionsIn the previous section you looked at securing persistent connections in the form of alwaysactive applications such as a mail server or a network-enabled syslog daemon. But othertypes of connections exist also, most notably on-demand connections such as those initiatedand controlled by the inetd or xinetd daemons (sometimes called master daemons). As aresult of the number of systems that use inetd and xinetd, it is worth taking a brief look atthese daemons and decide whether you need to run them. These daemons monitor the portsdefined to them, and if they receive a connection on that port, then the daemons start therequired application. The inetd/xinetd daemons can also provide access control (includingusing TCP Wrappers) and additional logging while they manage the applications and connec-tions. In contrast, most persistent connections are started using init scripts and consist ofrunning a program and placing it in the background or in daemon mode. The daemon han-dles binding itself to required ports and generally handles its own access controls and log-ging. The Sendmail daemon, for example, binds itself to port 25, has the ability to controlwho connects to it, and logs to the maillog log file.
The original daemon used on a lot of Linux systems was called inetd. These days manyLinux distributions—Red Hat, for example—use a more secure and advanced version calledxinetd17 that added better access controls, some protection from Denial of Service attacks,and considerable further sophistication of potential configuration. Debian, though, still usesinetd. The origin of inetd/xinetd-style functionality comes from a requirement to have a cen-tral server to manage and control a variety of independent networked services. Some of theservices that inetd/xinetd traditionally handle are functions such as echo, chargen, and finger.Debian also uses inetd by default to start telnet, smtp, and ftp. I recommend you disablewhichever of these your system uses and instead rely on individual init scripts to start thoseservices, daemons, and applications you require.
I recommend you do this for two reasons. The first is that most of the services thatinetd/xinetd controls are often unnecessary for many systems and can even pose a securityrisk to your system. Review all the services started by inetd/xinetd carefully, but I suggest thatmost of them are either not required or could be started equally securely using an init script.One of the elements of good security is operating with the principle of minimalism in mind.So stop and disable any service or application that is not 100 percent required for the functionof your secured system.
The second reason I recommend you disable inetd/xinetd is because both of thesedaemons pose a security risk to your system in their own rights. This risk is both in the manysecurity vulnerabilities discovered in both daemons but also because it adds another potentialpoint of security failure. Indeed, many attackers can often use your inetd/xinetd daemon toinstall or prime a backdoor on your system by penetrating the daemon. Any potential security
4444c03_final.qxd 1/5/05 12:44 AM Page 167
CHAPTER 3 ■ SECURING CONNECTIONS AND REMOTE ADMINISTRATION168
value-add or enhancement offered by either inetd or xinetd is outweighed by the additionalexposure created by using these daemons on your system.
To remove initd or xinetd, you need to first check whether init or xinetd is running onyour system and, if so, which of the daemons you are using. Listing 3-27 shows an easy way ofdoing this.
Listing 3-27. Finding Out if Either inetd or xinetd Are Running
puppy$ ps -A | grep 'xinetd\|inetd'
2106 ? 00:00:00 xinetd
The inetd/xinetd daemon is usually started by an init script when your system starts.The inetd daemon is controlled by the inetd.conf file and xinetd by the xinetd.conf file, bothlocated in /etc. With the inetd daemon, all the services and the programs initiated by it aredefined solely in the inetd.conf file, and the xinetd.conf file references a further directory,xinetd.d, which contains a collection of files, each of which contains configuration control-ling a particular service or application.
■Tip Make sure you have added a means of starting any applications that inetd or xinetd currently han-dle that you continue to want to run on your system before proceeding.
Once you know which daemon is running, then stop that daemon. To stop either inetd orxinetd, the easiest way is to run the init script that starts the daemon and instruct it to stopthe daemon instead. You could also simply kill the process. Remember that this will generallyalso kill any services that the daemons are running. Enter the following:
puppy$ /etc/rc.d/init.d/xinetd stop
On a Debian system you can use the invoke-rc.d command. Enter the following:
kitten$ invoke-rc.d inetd stop
Now you need to stop inetd/xinetd from starting when your system runs. On a Red Hatsystem, simply use the chkconfig command.
puppy$ chkconfig --del xinetd
And on a Debian system, use the update-rc.d command. Enter the following:
kitten$ update-rc.d -f inetd remove
With the service stopped, you should neaten your system by deleting the associatedinetd/xinetd files. Listing 3-28 shows the files you need to remove for inetd, assuming aDebian-style system.
Listing 3-28. Removing the inetd Files
kitten# rm -f /etc/init.d/inetd
kitten# rm -f /etc/inetd.conf
4444c03_final.qxd 1/5/05 12:44 AM Page 168
CHAPTER 3 ■ SECURING CONNECTIONS AND REMOTE ADMINISTRATION 169
And for xinetd, Listing 3-29 shows the files you need to remove assuming a Red Hat–styleor Mandrake-style system.
Listing 3-29. Removing the xinetd Files
puppy# rm -f /etc/rc.d/init.d/xinetd
puppy# rm -f /etc/xinetd/conf
puppy# rm -fr /etc/xinetd.d
It is probably a good idea at this point to restart your system and test what connectionsare open using the ps -A and netstat -a commands to confirm all the services have beenstopped.
You can also remove the inetd and xinetd packages from your system using your chosenpackage management tool. This will guarantee the daemons cannot be used to penetrate orcompromise your system.
■Note As I have recommended removing inet.d and xinet.d from your system, this chapter will notcover the use of TCP Wrappers.
Remote AdministrationMost system administrators manage systems to which they need to remotely connect. Some-times these connections are made over the Internet to a remote location. In the past, the onlytools available to administer your systems were telnet, ftp and the so-called r-tools, rcp, rlogin,and rsh. These tools are highly insecure. If you are still using any of these tools to administeryour systems—STOP NOW. These tools transmit all their information, including any passwordsyou input, in clear text with no encryption. Anybody sniffing on your network or monitoringdevices your traffic passes through on the Internet can grab this information and use it topenetrate your systems. The r-tools would appear to offer marginal improvement on straighttelnet by using the rhosts file to check that the user and source machine for the connection isvalid and able to sign on. In reality this provides little or no comfort these days because it isincredibly simple to “spoof” a system to believe a connection is coming from a valid system.
I will cover SSH, as implemented in the OpenSSH package, to replace these clear-text toolsand additionally secure some of the other tools you can use for remote administration such asremote X-Windows, Webmin, and VNC. SSH stands for Secure Shell and is a command interfaceand protocol for establishing secure connections between systems. I will cover the free imple-mentation called OpenSSH.
■Tip If you want to purchase a solution or feel more comfortable with a commercial product, I recommendSSH Tectia from http://www.ssh.com/.
4444c03_final.qxd 1/5/05 12:44 AM Page 169
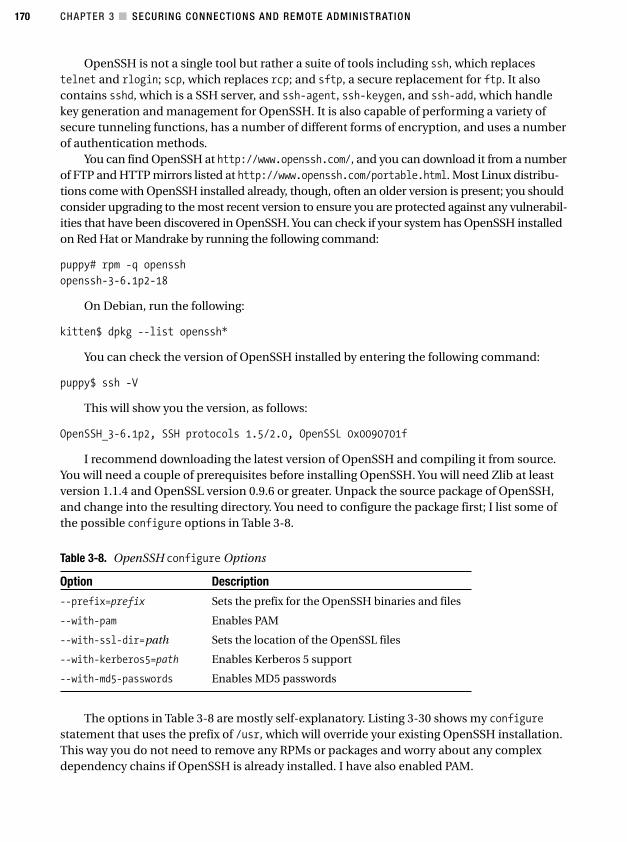
CHAPTER 3 ■ SECURING CONNECTIONS AND REMOTE ADMINISTRATION170
OpenSSH is not a single tool but rather a suite of tools including ssh, which replacestelnet and rlogin; scp, which replaces rcp; and sftp, a secure replacement for ftp. It alsocontains sshd, which is a SSH server, and ssh-agent, ssh-keygen, and ssh-add, which handlekey generation and management for OpenSSH. It is also capable of performing a variety ofsecure tunneling functions, has a number of different forms of encryption, and uses a numberof authentication methods.
You can find OpenSSH at http://www.openssh.com/, and you can download it from a numberof FTP and HTTP mirrors listed at http://www.openssh.com/portable.html. Most Linux distribu-tions come with OpenSSH installed already, though, often an older version is present; you shouldconsider upgrading to the most recent version to ensure you are protected against any vulnerabil-ities that have been discovered in OpenSSH. You can check if your system has OpenSSH installedon Red Hat or Mandrake by running the following command:
puppy# rpm -q openssh
openssh-3-6.1p2-18
On Debian, run the following:
kitten$ dpkg --list openssh*
You can check the version of OpenSSH installed by entering the following command:
puppy$ ssh -V
This will show you the version, as follows:
OpenSSH_3-6.1p2, SSH protocols 1.5/2.0, OpenSSL 0x0090701f
I recommend downloading the latest version of OpenSSH and compiling it from source.You will need a couple of prerequisites before installing OpenSSH. You will need Zlib at leastversion 1.1.4 and OpenSSL version 0.9.6 or greater. Unpack the source package of OpenSSH,and change into the resulting directory. You need to configure the package first; I list some ofthe possible configure options in Table 3-8.
Table 3-8. OpenSSH configure Options
Option Description
--prefix=prefix Sets the prefix for the OpenSSH binaries and files
--with-pam Enables PAM
--with-ssl-dir=path Sets the location of the OpenSSL files
--with-kerberos5=path Enables Kerberos 5 support
--with-md5-passwords Enables MD5 passwords
The options in Table 3-8 are mostly self-explanatory. Listing 3-30 shows my configurestatement that uses the prefix of /usr, which will override your existing OpenSSH installation.This way you do not need to remove any RPMs or packages and worry about any complexdependency chains if OpenSSH is already installed. I have also enabled PAM.
4444c03_final.qxd 1/5/05 12:44 AM Page 170
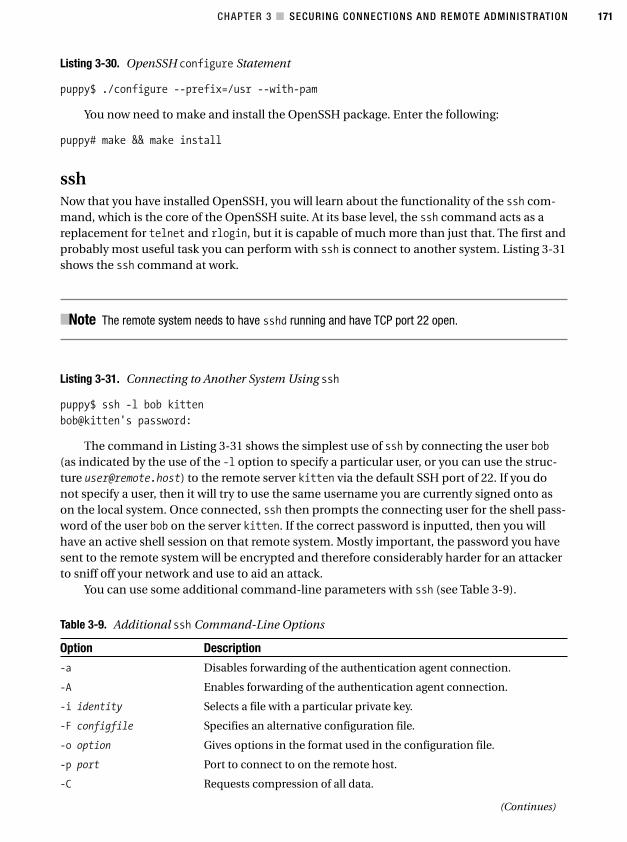
CHAPTER 3 ■ SECURING CONNECTIONS AND REMOTE ADMINISTRATION 171
Listing 3-30. OpenSSH configure Statement
puppy$ ./configure --prefix=/usr --with-pam
You now need to make and install the OpenSSH package. Enter the following:
puppy# make && make install
sshNow that you have installed OpenSSH, you will learn about the functionality of the ssh com-mand, which is the core of the OpenSSH suite. At its base level, the ssh command acts as areplacement for telnet and rlogin, but it is capable of much more than just that. The first andprobably most useful task you can perform with ssh is connect to another system. Listing 3-31shows the ssh command at work.
■Note The remote system needs to have sshd running and have TCP port 22 open.
Listing 3-31. Connecting to Another System Using ssh
puppy$ ssh -l bob kitten
bob@kitten's password:
The command in Listing 3-31 shows the simplest use of ssh by connecting the user bob(as indicated by the use of the -l option to specify a particular user, or you can use the struc-ture [email protected]) to the remote server kitten via the default SSH port of 22. If you donot specify a user, then it will try to use the same username you are currently signed onto ason the local system. Once connected, ssh then prompts the connecting user for the shell pass-word of the user bob on the server kitten. If the correct password is inputted, then you willhave an active shell session on that remote system. Mostly important, the password you havesent to the remote system will be encrypted and therefore considerably harder for an attackerto sniff off your network and use to aid an attack.
You can use some additional command-line parameters with ssh (see Table 3-9).
Table 3-9. Additional ssh Command-Line Options
Option Description
-a Disables forwarding of the authentication agent connection.
-A Enables forwarding of the authentication agent connection.
-i identity Selects a file with a particular private key.
-F configfile Specifies an alternative configuration file.
-o option Gives options in the format used in the configuration file.
-p port Port to connect to on the remote host.
-C Requests compression of all data.
(Continues)
4444c03_final.qxd 1/5/05 12:44 AM Page 171
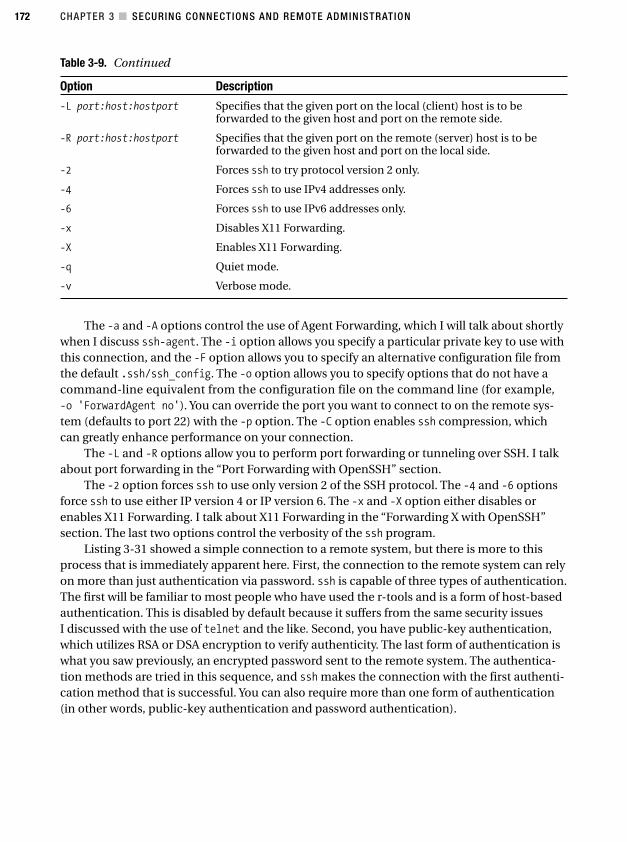
CHAPTER 3 ■ SECURING CONNECTIONS AND REMOTE ADMINISTRATION172
Table 3-9. Continued
Option Description
-L port:host:hostport Specifies that the given port on the local (client) host is to beforwarded to the given host and port on the remote side.
-R port:host:hostport Specifies that the given port on the remote (server) host is to beforwarded to the given host and port on the local side.
-2 Forces ssh to try protocol version 2 only.
-4 Forces ssh to use IPv4 addresses only.
-6 Forces ssh to use IPv6 addresses only.
-x Disables X11 Forwarding.
-X Enables X11 Forwarding.
-q Quiet mode.
-v Verbose mode.
The -a and -A options control the use of Agent Forwarding, which I will talk about shortlywhen I discuss ssh-agent. The -i option allows you specify a particular private key to use withthis connection, and the -F option allows you to specify an alternative configuration file fromthe default .ssh/ssh_config. The -o option allows you to specify options that do not have acommand-line equivalent from the configuration file on the command line (for example,-o 'ForwardAgent no'). You can override the port you want to connect to on the remote sys-tem (defaults to port 22) with the -p option. The -C option enables ssh compression, whichcan greatly enhance performance on your connection.
The -L and -R options allow you to perform port forwarding or tunneling over SSH. I talkabout port forwarding in the “Port Forwarding with OpenSSH” section.
The -2 option forces ssh to use only version 2 of the SSH protocol. The -4 and -6 optionsforce ssh to use either IP version 4 or IP version 6. The -x and -X option either disables orenables X11 Forwarding. I talk about X11 Forwarding in the “Forwarding X with OpenSSH”section. The last two options control the verbosity of the ssh program.
Listing 3-31 showed a simple connection to a remote system, but there is more to thisprocess that is immediately apparent here. First, the connection to the remote system can relyon more than just authentication via password. ssh is capable of three types of authentication.The first will be familiar to most people who have used the r-tools and is a form of host-basedauthentication. This is disabled by default because it suffers from the same security issuesI discussed with the use of telnet and the like. Second, you have public-key authentication,which utilizes RSA or DSA encryption to verify authenticity. The last form of authentication iswhat you saw previously, an encrypted password sent to the remote system. The authentica-tion methods are tried in this sequence, and ssh makes the connection with the first authenti-cation method that is successful. You can also require more than one form of authentication(in other words, public-key authentication and password authentication).
4444c03_final.qxd 1/5/05 12:44 AM Page 172
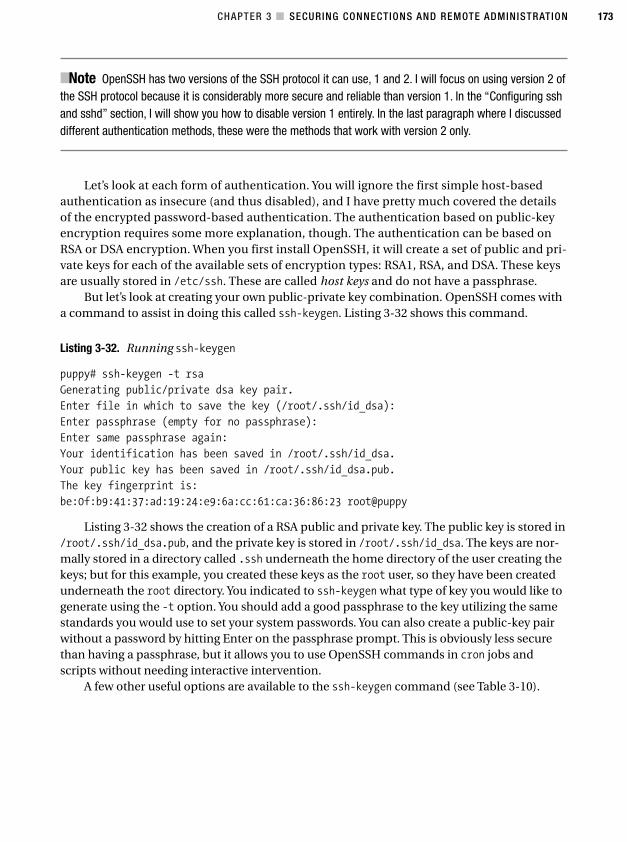
CHAPTER 3 ■ SECURING CONNECTIONS AND REMOTE ADMINISTRATION 173
■Note OpenSSH has two versions of the SSH protocol it can use, 1 and 2. I will focus on using version 2 ofthe SSH protocol because it is considerably more secure and reliable than version 1. In the “Configuring sshand sshd” section, I will show you how to disable version 1 entirely. In the last paragraph where I discusseddifferent authentication methods, these were the methods that work with version 2 only.
Let’s look at each form of authentication. You will ignore the first simple host-basedauthentication as insecure (and thus disabled), and I have pretty much covered the detailsof the encrypted password-based authentication. The authentication based on public-keyencryption requires some more explanation, though. The authentication can be based onRSA or DSA encryption. When you first install OpenSSH, it will create a set of public and pri-vate keys for each of the available sets of encryption types: RSA1, RSA, and DSA. These keysare usually stored in /etc/ssh. These are called host keys and do not have a passphrase.
But let’s look at creating your own public-private key combination. OpenSSH comes witha command to assist in doing this called ssh-keygen. Listing 3-32 shows this command.
Listing 3-32. Running ssh-keygen
puppy# ssh-keygen -t rsa
Generating public/private dsa key pair.
Enter file in which to save the key (/root/.ssh/id_dsa):
Enter passphrase (empty for no passphrase):
Enter same passphrase again:
Your identification has been saved in /root/.ssh/id_dsa.
Your public key has been saved in /root/.ssh/id_dsa.pub.
The key fingerprint is:
be:0f:b9:41:37:ad:19:24:e9:6a:cc:61:ca:36:86:23 root@puppy
Listing 3-32 shows the creation of a RSA public and private key. The public key is stored in/root/.ssh/id_dsa.pub, and the private key is stored in /root/.ssh/id_dsa. The keys are nor-mally stored in a directory called .ssh underneath the home directory of the user creating thekeys; but for this example, you created these keys as the root user, so they have been createdunderneath the root directory. You indicated to ssh-keygen what type of key you would like togenerate using the -t option. You should add a good passphrase to the key utilizing the samestandards you would use to set your system passwords. You can also create a public-key pairwithout a password by hitting Enter on the passphrase prompt. This is obviously less securethan having a passphrase, but it allows you to use OpenSSH commands in cron jobs andscripts without needing interactive intervention.
A few other useful options are available to the ssh-keygen command (see Table 3-10).
4444c03_final.qxd 1/5/05 12:44 AM Page 173
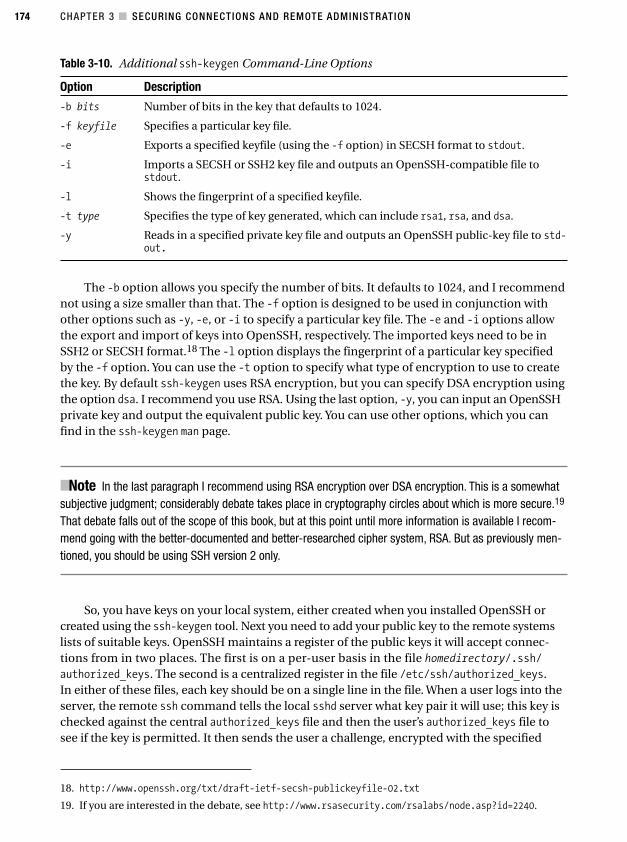
CHAPTER 3 ■ SECURING CONNECTIONS AND REMOTE ADMINISTRATION174
18. http://www.openssh.org/txt/draft-ietf-secsh-publickeyfile-02.txt
19. If you are interested in the debate, see http://www.rsasecurity.com/rsalabs/node.asp?id=2240.
Table 3-10. Additional ssh-keygen Command-Line Options
Option Description
-b bits Number of bits in the key that defaults to 1024.
-f keyfile Specifies a particular key file.
-e Exports a specified keyfile (using the -f option) in SECSH format to stdout.
-i Imports a SECSH or SSH2 key file and outputs an OpenSSH-compatible file tostdout.
-l Shows the fingerprint of a specified keyfile.
-t type Specifies the type of key generated, which can include rsa1, rsa, and dsa.
-y Reads in a specified private key file and outputs an OpenSSH public-key file to std-out.
The -b option allows you specify the number of bits. It defaults to 1024, and I recommendnot using a size smaller than that. The -f option is designed to be used in conjunction withother options such as -y, -e, or -i to specify a particular key file. The -e and -i options allowthe export and import of keys into OpenSSH, respectively. The imported keys need to be inSSH2 or SECSH format.18 The -l option displays the fingerprint of a particular key specifiedby the -f option. You can use the -t option to specify what type of encryption to use to createthe key. By default ssh-keygen uses RSA encryption, but you can specify DSA encryption usingthe option dsa. I recommend you use RSA. Using the last option, -y, you can input an OpenSSHprivate key and output the equivalent public key. You can use other options, which you canfind in the ssh-keygen man page.
■Note In the last paragraph I recommend using RSA encryption over DSA encryption. This is a somewhatsubjective judgment; considerably debate takes place in cryptography circles about which is more secure.19
That debate falls out of the scope of this book, but at this point until more information is available I recom-mend going with the better-documented and better-researched cipher system, RSA. But as previously men-tioned, you should be using SSH version 2 only.
So, you have keys on your local system, either created when you installed OpenSSH orcreated using the ssh-keygen tool. Next you need to add your public key to the remote systemslists of suitable keys. OpenSSH maintains a register of the public keys it will accept connec-tions from in two places. The first is on a per-user basis in the file homedirectory/.ssh/authorized_keys. The second is a centralized register in the file /etc/ssh/authorized_keys.In either of these files, each key should be on a single line in the file. When a user logs into theserver, the remote ssh command tells the local sshd server what key pair it will use; this key ischecked against the central authorized_keys file and then the user’s authorized_keys file tosee if the key is permitted. It then sends the user a challenge, encrypted with the specified
4444c03_final.qxd 1/5/05 12:44 AM Page 174
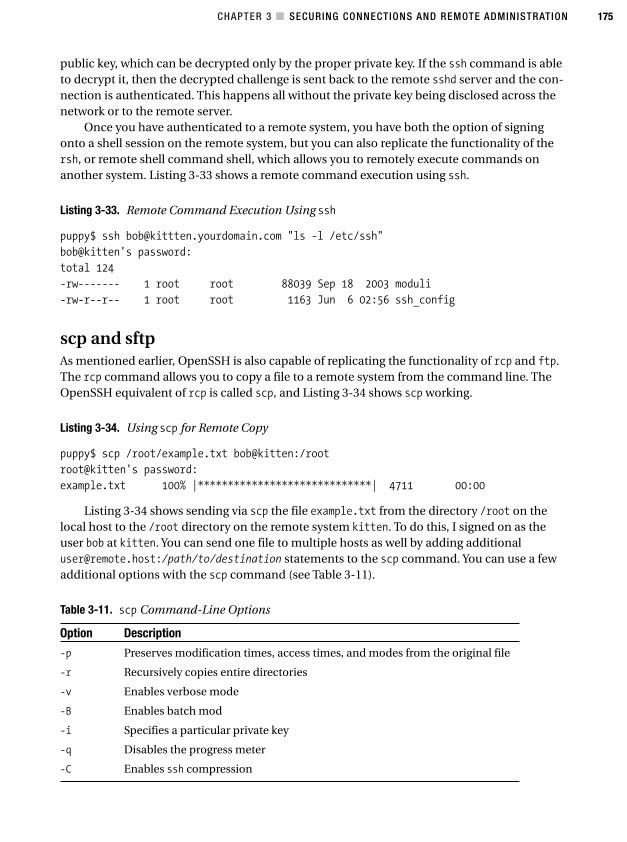
CHAPTER 3 ■ SECURING CONNECTIONS AND REMOTE ADMINISTRATION 175
public key, which can be decrypted only by the proper private key. If the ssh command is ableto decrypt it, then the decrypted challenge is sent back to the remote sshd server and the con-nection is authenticated. This happens all without the private key being disclosed across thenetwork or to the remote server.
Once you have authenticated to a remote system, you have both the option of signingonto a shell session on the remote system, but you can also replicate the functionality of thersh, or remote shell command shell, which allows you to remotely execute commands onanother system. Listing 3-33 shows a remote command execution using ssh.
Listing 3-33. Remote Command Execution Using ssh
puppy$ ssh [email protected] "ls -l /etc/ssh"
bob@kitten's password:
total 124
-rw------- 1 root root 88039 Sep 18 2003 moduli
-rw-r--r-- 1 root root 1163 Jun 6 02:56 ssh_config
scp and sftpAs mentioned earlier, OpenSSH is also capable of replicating the functionality of rcp and ftp.The rcp command allows you to copy a file to a remote system from the command line. TheOpenSSH equivalent of rcp is called scp, and Listing 3-34 shows scp working.
Listing 3-34. Using scp for Remote Copy
puppy$ scp /root/example.txt bob@kitten:/root
root@kitten's password:
example.txt 100% |*****************************| 4711 00:00
Listing 3-34 shows sending via scp the file example.txt from the directory /root on thelocal host to the /root directory on the remote system kitten. To do this, I signed on as theuser bob at kitten. You can send one file to multiple hosts as well by adding [email protected]:/path/to/destination statements to the scp command. You can use a fewadditional options with the scp command (see Table 3-11).
Table 3-11. scp Command-Line Options
Option Description
-p Preserves modification times, access times, and modes from the original file
-r Recursively copies entire directories
-v Enables verbose mode
-B Enables batch mod
-i Specifies a particular private key
-q Disables the progress meter
-C Enables ssh compression
4444c03_final.qxd 1/5/05 12:44 AM Page 175
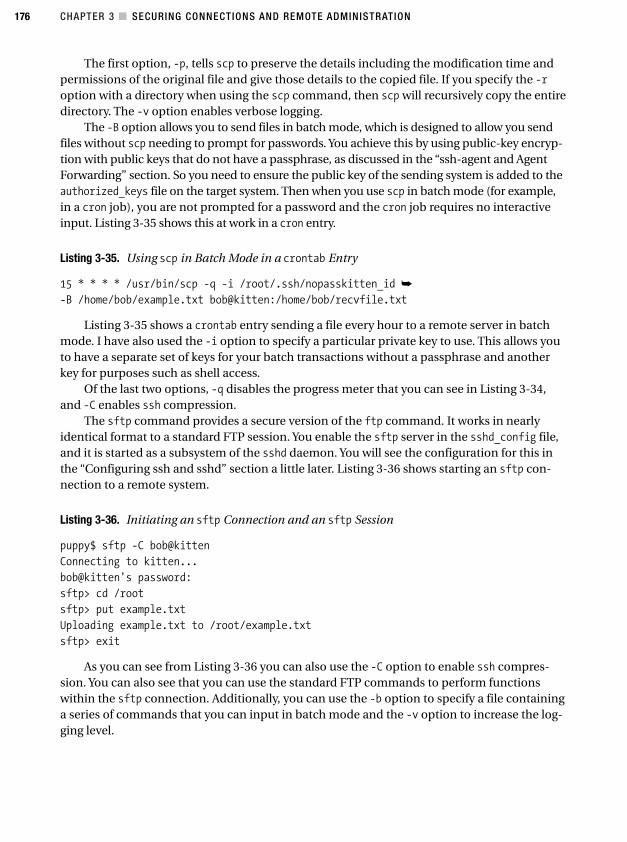
CHAPTER 3 ■ SECURING CONNECTIONS AND REMOTE ADMINISTRATION176
The first option, -p, tells scp to preserve the details including the modification time andpermissions of the original file and give those details to the copied file. If you specify the -roption with a directory when using the scp command, then scp will recursively copy the entiredirectory. The -v option enables verbose logging.
The -B option allows you to send files in batch mode, which is designed to allow you sendfiles without scp needing to prompt for passwords. You achieve this by using public-key encryp-tion with public keys that do not have a passphrase, as discussed in the “ssh-agent and AgentForwarding” section. So you need to ensure the public key of the sending system is added to theauthorized_keys file on the target system. Then when you use scp in batch mode (for example,in a cron job), you are not prompted for a password and the cron job requires no interactiveinput. Listing 3-35 shows this at work in a cron entry.
Listing 3-35. Using scp in Batch Mode in a crontab Entry
15 * * * * /usr/bin/scp -q -i /root/.ssh/nopasskitten_id ➥
-B /home/bob/example.txt bob@kitten:/home/bob/recvfile.txt
Listing 3-35 shows a crontab entry sending a file every hour to a remote server in batchmode. I have also used the -i option to specify a particular private key to use. This allows youto have a separate set of keys for your batch transactions without a passphrase and anotherkey for purposes such as shell access.
Of the last two options, -q disables the progress meter that you can see in Listing 3-34,and -C enables ssh compression.
The sftp command provides a secure version of the ftp command. It works in nearlyidentical format to a standard FTP session. You enable the sftp server in the sshd_config file,and it is started as a subsystem of the sshd daemon. You will see the configuration for this inthe “Configuring ssh and sshd” section a little later. Listing 3-36 shows starting an sftp con-nection to a remote system.
Listing 3-36. Initiating an sftp Connection and an sftp Session
puppy$ sftp -C bob@kitten
Connecting to kitten...
bob@kitten's password:
sftp> cd /root
sftp> put example.txt
Uploading example.txt to /root/example.txt
sftp> exit
As you can see from Listing 3-36 you can also use the -C option to enable ssh compres-sion. You can also see that you can use the standard FTP commands to perform functionswithin the sftp connection. Additionally, you can use the -b option to specify a file containinga series of commands that you can input in batch mode and the -v option to increase the log-ging level.
4444c03_final.qxd 1/5/05 12:44 AM Page 176
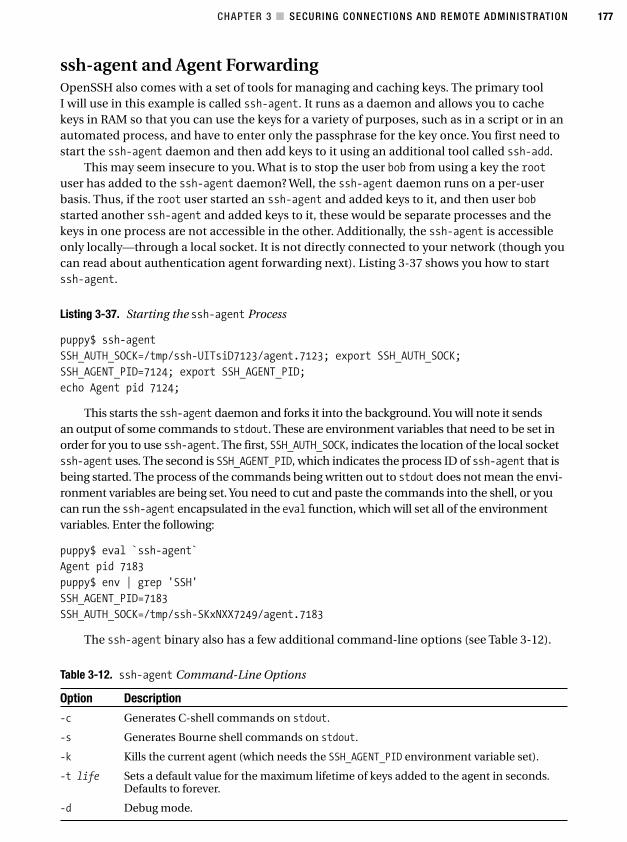
CHAPTER 3 ■ SECURING CONNECTIONS AND REMOTE ADMINISTRATION 177
ssh-agent and Agent ForwardingOpenSSH also comes with a set of tools for managing and caching keys. The primary toolI will use in this example is called ssh-agent. It runs as a daemon and allows you to cachekeys in RAM so that you can use the keys for a variety of purposes, such as in a script or in anautomated process, and have to enter only the passphrase for the key once. You first need tostart the ssh-agent daemon and then add keys to it using an additional tool called ssh-add.
This may seem insecure to you. What is to stop the user bob from using a key the rootuser has added to the ssh-agent daemon? Well, the ssh-agent daemon runs on a per-userbasis. Thus, if the root user started an ssh-agent and added keys to it, and then user bobstarted another ssh-agent and added keys to it, these would be separate processes and thekeys in one process are not accessible in the other. Additionally, the ssh-agent is accessibleonly locally—through a local socket. It is not directly connected to your network (though youcan read about authentication agent forwarding next). Listing 3-37 shows you how to startssh-agent.
Listing 3-37. Starting the ssh-agent Process
puppy$ ssh-agent
SSH_AUTH_SOCK=/tmp/ssh-UITsiD7123/agent.7123; export SSH_AUTH_SOCK;
SSH_AGENT_PID=7124; export SSH_AGENT_PID;
echo Agent pid 7124;
This starts the ssh-agent daemon and forks it into the background. You will note it sendsan output of some commands to stdout. These are environment variables that need to be set inorder for you to use ssh-agent. The first, SSH_AUTH_SOCK, indicates the location of the local socketssh-agent uses. The second is SSH_AGENT_PID, which indicates the process ID of ssh-agent that isbeing started. The process of the commands being written out to stdout does not mean the envi-ronment variables are being set. You need to cut and paste the commands into the shell, or youcan run the ssh-agent encapsulated in the eval function, which will set all of the environmentvariables. Enter the following:
puppy$ eval `ssh-agent`
Agent pid 7183
puppy$ env | grep 'SSH'
SSH_AGENT_PID=7183
SSH_AUTH_SOCK=/tmp/ssh-SKxNXX7249/agent.7183
The ssh-agent binary also has a few additional command-line options (see Table 3-12).
Table 3-12. ssh-agent Command-Line Options
Option Description
-c Generates C-shell commands on stdout.
-s Generates Bourne shell commands on stdout.
-k Kills the current agent (which needs the SSH_AGENT_PID environment variable set).
-t life Sets a default value for the maximum lifetime of keys added to the agent in seconds.Defaults to forever.
-d Debug mode.
4444c03_final.qxd 1/5/05 12:44 AM Page 177
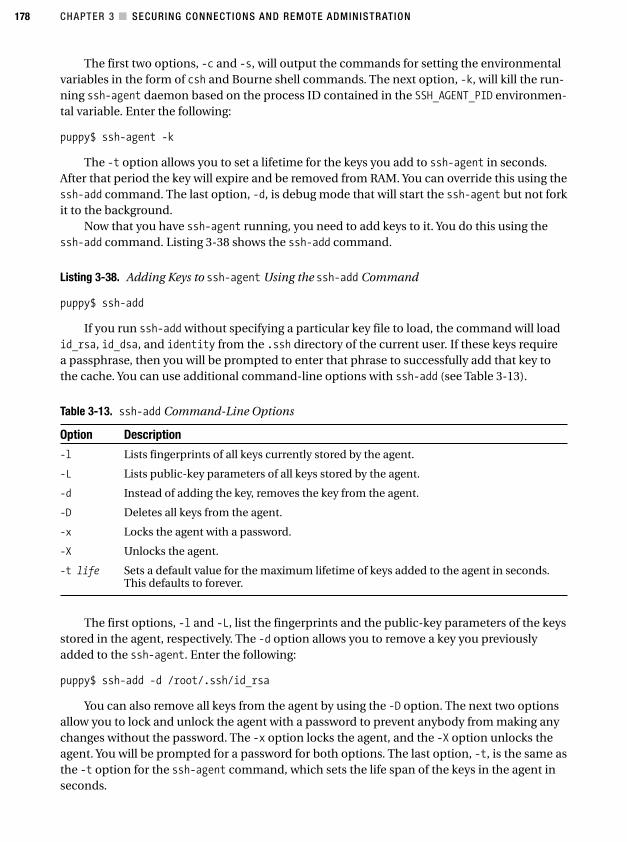
CHAPTER 3 ■ SECURING CONNECTIONS AND REMOTE ADMINISTRATION178
The first two options, -c and -s, will output the commands for setting the environmentalvariables in the form of csh and Bourne shell commands. The next option, -k, will kill the run-ning ssh-agent daemon based on the process ID contained in the SSH_AGENT_PID environmen-tal variable. Enter the following:
puppy$ ssh-agent -k
The -t option allows you to set a lifetime for the keys you add to ssh-agent in seconds.After that period the key will expire and be removed from RAM. You can override this using thessh-add command. The last option, -d, is debug mode that will start the ssh-agent but not forkit to the background.
Now that you have ssh-agent running, you need to add keys to it. You do this using thessh-add command. Listing 3-38 shows the ssh-add command.
Listing 3-38. Adding Keys to ssh-agent Using the ssh-add Command
puppy$ ssh-add
If you run ssh-add without specifying a particular key file to load, the command will loadid_rsa, id_dsa, and identity from the .ssh directory of the current user. If these keys requirea passphrase, then you will be prompted to enter that phrase to successfully add that key tothe cache. You can use additional command-line options with ssh-add (see Table 3-13).
Table 3-13. ssh-add Command-Line Options
Option Description
-l Lists fingerprints of all keys currently stored by the agent.
-L Lists public-key parameters of all keys stored by the agent.
-d Instead of adding the key, removes the key from the agent.
-D Deletes all keys from the agent.
-x Locks the agent with a password.
-X Unlocks the agent.
-t life Sets a default value for the maximum lifetime of keys added to the agent in seconds.This defaults to forever.
The first options, -l and -L, list the fingerprints and the public-key parameters of the keysstored in the agent, respectively. The -d option allows you to remove a key you previouslyadded to the ssh-agent. Enter the following:
puppy$ ssh-add -d /root/.ssh/id_rsa
You can also remove all keys from the agent by using the -D option. The next two optionsallow you to lock and unlock the agent with a password to prevent anybody from making anychanges without the password. The -x option locks the agent, and the -X option unlocks theagent. You will be prompted for a password for both options. The last option, -t, is the same asthe -t option for the ssh-agent command, which sets the life span of the keys in the agent inseconds.
4444c03_final.qxd 1/5/05 12:44 AM Page 178
CHAPTER 3 ■ SECURING CONNECTIONS AND REMOTE ADMINISTRATION 179
The ssh-agent also allows authentication-agent forwarding. Authentication-agent for-warding means that remote systems can use a local trusted ssh-agent daemon to performauthentication. To do this, you need to ensure either the -A command line option is issued orthe ForwardAgent option in the ssh_config configuration file is set to yes. Let’s see an example.
1. You have a trusted secure system running ssh-agent on it called puppy.
2. You have two other systems, kitten and duckling. Both kitten and duckling have yourpublic key in their authorized_keys file.
3. You have a terminal session on puppy, and you ssh to kitten. The ssh-agent takes careof the authentication, and you sign on. You do what you need to on the kitten system.
4. Now you want to do something on duckling, so you need to ssh over there. But yourprivate key is stored on the ssh-agent on puppy, and the kitten system does not havea copy of your private key.
5. But you have AgentForward enabled on the kitten and duckling systems. Your ssh session has recognized this, and when you connect to duckling it connects to thessh-agent on puppy and passes your private key through to the duckling system. Thus,you are able to be authenticated to the duckling system.
■Caution This has risks, though. Never enable agent forwarding on a system where you do not controlroot or do not trust the system. This is because your private key and passphrase are now in memory of thesystems you have agent forwarded to, and the root user can pluck them from the memory of the system.
The sshd DaemonThe last area of OpenSSH you will look at in this section is the sshd daemon itself. To allowremote connections via ssh to your system, you need to have the sshd daemon running and bydefault the TCP port 22 open (you can override this port in the sshd_config file, which I willdiscuss shortly). The sshd daemon is usually started when your system is started through aninit script.
■Tip You can find examples of init scripts for Red Hat (which will work for Mandrake, Yellow Dog, andsimilar) and SuSE in the contrib directory of the OpenSSH source package.
You can also start it from the command line; Listing 3-39 shows this.
Listing 3-39. Starting the sshd Daemon
puppy$ sshd -p 22
4444c03_final.qxd 1/5/05 12:44 AM Page 179

CHAPTER 3 ■ SECURING CONNECTIONS AND REMOTE ADMINISTRATION180
Listing 3-39 starts the sshd daemon, and the -p option tells the daemon to bind itself onTCP port 22. You can also specify multiple ports after the -p option to have sshd listen on morethan one port. Table 3-14 describes some of the other command-line options available forsshd.
Table 3-14. sshd Command-Line Options
Option Description
-d Debug mode. Can be used more than once to increase verbosity.
-D Do not detach and become a daemon.
-t Test mode.
-e When this option is specified, sshd will send the output to the standarderror instead of the system log.
-f configuration_file Specifies the name of the configuration file. The default is/etc/ssh/sshd_config.
-g grace time Gives the grace time for clients to authenticate themselves. Defaults to120 seconds.
-h key file Specifies a file from which a host key is read.
-o option Can be used to give options in the format used in the configuration file.This is useful for specifying options for which there is no separatecommand-line flag.
-q Quiet mode.
The first four options are useful for testing. The first -d enables debug output. You canspecify it up to three times in the command line to get more verbosity. The second -D tells sshdnot to detach and become a daemon, and the last, -t, tells sshd to test its configuration andreturn any errors without starting. The -e option redirects output from sshd to standard errorand not to the syslog.
You can specify the location of a configuration file using the -f option; if this option is notspecified, then sshd defaults to using /etc/ssh/sshd_config. You can also specify the grace timeallowed for clients to authenticate themselves using the -g option. A setting of 0 means sshd willwait forever. You can also specify a particular host key for the sshd daemon using the -h option.The next option allows you to specify any of the configuration file options from the sshd_configfile that do not have a command-line equivalent. Enter the following:
puppy# sshd -p 22 -o 'PasswordAuthentication no'
The last option, -q, suppresses all sshd output and runs the daemon in quiet mode.
Configuring ssh and sshdYou can customize all the commands you have seen so far by configuring the OpenSSH envi-ronment. The majority of this client-side configuration is controlled by the ssh_config file,and the server-side configuration of the daemon is controlled by the sshd_config file. You willlook at the ssh_config file first. Usually two versions of this file exist: a local version that islocated in the .ssh directories of local users and a global version that is overridden by the con-tents of the local ssh_config. The local ssh_config file is in turn overridden by any command-line option with which you start ssh. Listing 3-40 shows a sample ssh_config file.
4444c03_final.qxd 1/5/05 12:44 AM Page 180
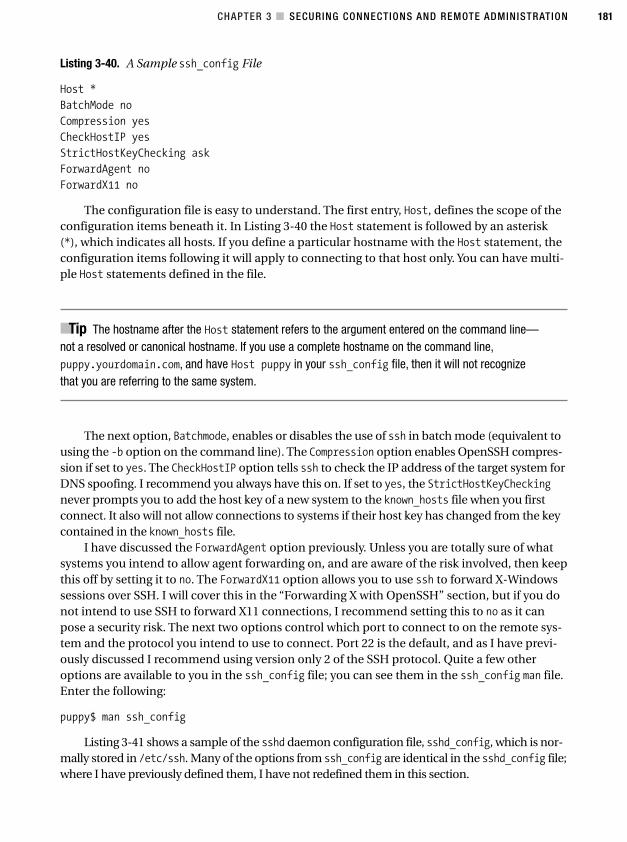
CHAPTER 3 ■ SECURING CONNECTIONS AND REMOTE ADMINISTRATION 181
Listing 3-40. A Sample ssh_config File
Host *
BatchMode no
Compression yes
CheckHostIP yes
StrictHostKeyChecking ask
ForwardAgent no
ForwardX11 no
The configuration file is easy to understand. The first entry, Host, defines the scope of theconfiguration items beneath it. In Listing 3-40 the Host statement is followed by an asterisk(*), which indicates all hosts. If you define a particular hostname with the Host statement, theconfiguration items following it will apply to connecting to that host only. You can have multi-ple Host statements defined in the file.
■Tip The hostname after the Host statement refers to the argument entered on the command line—not a resolved or canonical hostname. If you use a complete hostname on the command line,puppy.yourdomain.com, and have Host puppy in your ssh_config file, then it will not recognize that you are referring to the same system.
The next option, Batchmode, enables or disables the use of ssh in batch mode (equivalent tousing the -b option on the command line). The Compression option enables OpenSSH compres-sion if set to yes. The CheckHostIP option tells ssh to check the IP address of the target system forDNS spoofing. I recommend you always have this on. If set to yes, the StrictHostKeyCheckingnever prompts you to add the host key of a new system to the known_hosts file when you firstconnect. It also will not allow connections to systems if their host key has changed from the keycontained in the known_hosts file.
I have discussed the ForwardAgent option previously. Unless you are totally sure of whatsystems you intend to allow agent forwarding on, and are aware of the risk involved, then keepthis off by setting it to no. The ForwardX11 option allows you to use ssh to forward X-Windowssessions over SSH. I will cover this in the “Forwarding X with OpenSSH” section, but if you donot intend to use SSH to forward X11 connections, I recommend setting this to no as it canpose a security risk. The next two options control which port to connect to on the remote sys-tem and the protocol you intend to use to connect. Port 22 is the default, and as I have previ-ously discussed I recommend using version only 2 of the SSH protocol. Quite a few otheroptions are available to you in the ssh_config file; you can see them in the ssh_config man file.Enter the following:
puppy$ man ssh_config
Listing 3-41 shows a sample of the sshd daemon configuration file, sshd_config, which is nor-mally stored in /etc/ssh. Many of the options from ssh_config are identical in the sshd_config file;where I have previously defined them, I have not redefined them in this section.
4444c03_final.qxd 1/5/05 12:44 AM Page 181
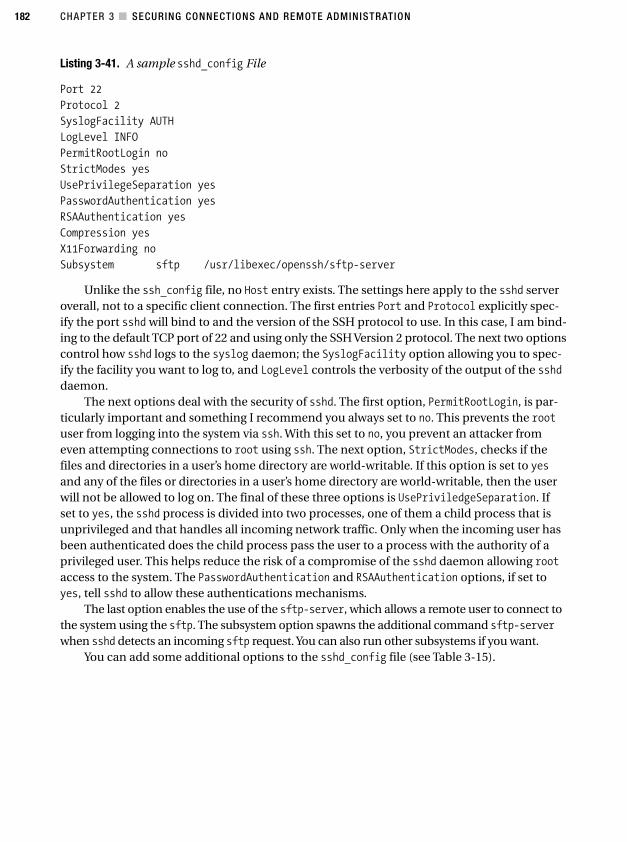
CHAPTER 3 ■ SECURING CONNECTIONS AND REMOTE ADMINISTRATION182
Listing 3-41. A sample sshd_config File
Port 22
Protocol 2
SyslogFacility AUTH
LogLevel INFO
PermitRootLogin no
StrictModes yes
UsePrivilegeSeparation yes
PasswordAuthentication yes
RSAAuthentication yes
Compression yes
X11Forwarding no
Subsystem sftp /usr/libexec/openssh/sftp-server
Unlike the ssh_config file, no Host entry exists. The settings here apply to the sshd serveroverall, not to a specific client connection. The first entries Port and Protocol explicitly spec-ify the port sshd will bind to and the version of the SSH protocol to use. In this case, I am bind-ing to the default TCP port of 22 and using only the SSH Version 2 protocol. The next two optionscontrol how sshd logs to the syslog daemon; the SyslogFacility option allowing you to spec-ify the facility you want to log to, and LogLevel controls the verbosity of the output of the sshddaemon.
The next options deal with the security of sshd. The first option, PermitRootLogin, is par-ticularly important and something I recommend you always set to no. This prevents the rootuser from logging into the system via ssh. With this set to no, you prevent an attacker fromeven attempting connections to root using ssh. The next option, StrictModes, checks if thefiles and directories in a user’s home directory are world-writable. If this option is set to yesand any of the files or directories in a user’s home directory are world-writable, then the userwill not be allowed to log on. The final of these three options is UsePriviledgeSeparation. Ifset to yes, the sshd process is divided into two processes, one of them a child process that isunprivileged and that handles all incoming network traffic. Only when the incoming user hasbeen authenticated does the child process pass the user to a process with the authority of aprivileged user. This helps reduce the risk of a compromise of the sshd daemon allowing rootaccess to the system. The PasswordAuthentication and RSAAuthentication options, if set toyes, tell sshd to allow these authentications mechanisms.
The last option enables the use of the sftp-server, which allows a remote user to connect tothe system using the sftp. The subsystem option spawns the additional command sftp-serverwhen sshd detects an incoming sftp request. You can also run other subsystems if you want.
You can add some additional options to the sshd_config file (see Table 3-15).
4444c03_final.qxd 1/5/05 12:44 AM Page 182
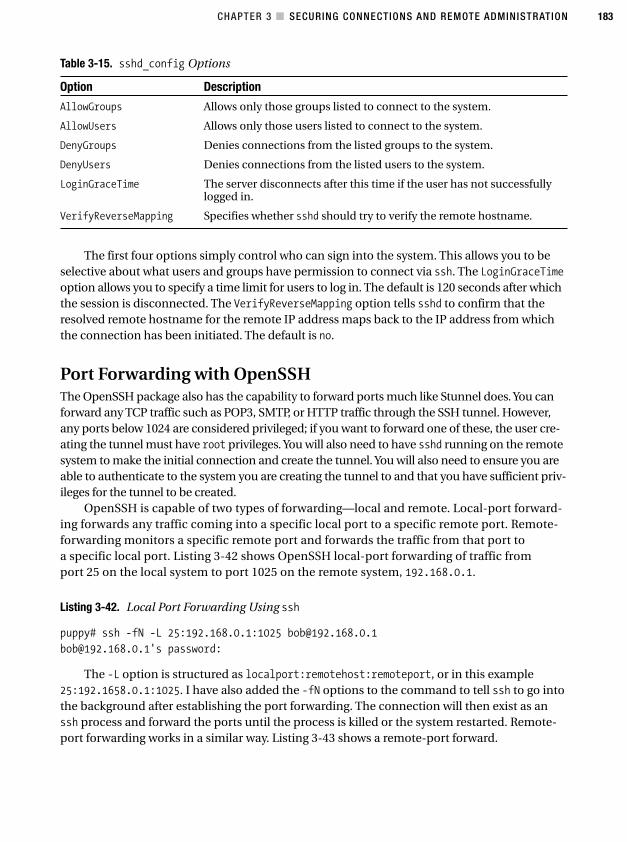
CHAPTER 3 ■ SECURING CONNECTIONS AND REMOTE ADMINISTRATION 183
Table 3-15. sshd_config Options
Option Description
AllowGroups Allows only those groups listed to connect to the system.
AllowUsers Allows only those users listed to connect to the system.
DenyGroups Denies connections from the listed groups to the system.
DenyUsers Denies connections from the listed users to the system.
LoginGraceTime The server disconnects after this time if the user has not successfullylogged in.
VerifyReverseMapping Specifies whether sshd should try to verify the remote hostname.
The first four options simply control who can sign into the system. This allows you to beselective about what users and groups have permission to connect via ssh. The LoginGraceTimeoption allows you to specify a time limit for users to log in. The default is 120 seconds after whichthe session is disconnected. The VerifyReverseMapping option tells sshd to confirm that theresolved remote hostname for the remote IP address maps back to the IP address from whichthe connection has been initiated. The default is no.
Port Forwarding with OpenSSHThe OpenSSH package also has the capability to forward ports much like Stunnel does. You canforward any TCP traffic such as POP3, SMTP, or HTTP traffic through the SSH tunnel. However,any ports below 1024 are considered privileged; if you want to forward one of these, the user cre-ating the tunnel must have root privileges. You will also need to have sshd running on the remotesystem to make the initial connection and create the tunnel. You will also need to ensure you areable to authenticate to the system you are creating the tunnel to and that you have sufficient priv-ileges for the tunnel to be created.
OpenSSH is capable of two types of forwarding—local and remote. Local-port forward-ing forwards any traffic coming into a specific local port to a specific remote port. Remote-forwarding monitors a specific remote port and forwards the traffic from that port toa specific local port. Listing 3-42 shows OpenSSH local-port forwarding of traffic fromport 25 on the local system to port 1025 on the remote system, 192.168.0.1.
Listing 3-42. Local Port Forwarding Using ssh
puppy# ssh -fN -L 25:192.168.0.1:1025 [email protected]
[email protected]'s password:
The -L option is structured as localport:remotehost:remoteport, or in this example25:192.1658.0.1:1025. I have also added the -fN options to the command to tell ssh to go intothe background after establishing the port forwarding. The connection will then exist as anssh process and forward the ports until the process is killed or the system restarted. Remote-port forwarding works in a similar way. Listing 3-43 shows a remote-port forward.
4444c03_final.qxd 1/5/05 12:44 AM Page 183

CHAPTER 3 ■ SECURING CONNECTIONS AND REMOTE ADMINISTRATION184
Listing 3-43. Remote Port Forwarding Using ssh
puppy# ssh -fN -R 995:localhost:110 [email protected]
jim@localhost's password:
The -R option is structured as remoteport:localhost:localport, so in Listing 3-43 you are lis-tening to remote port 995 on kitten.yourdomain.com and forwarding it to port 110 on localhost.You have also added the -fN options again to have the ssh command go into the background.
With the port forwarding I have demonstrated here, the user is prompted for a passwordbased on the user specified on the command line. You could also use a system that has beenauthenticated via RSA key exchange or generate a key specifically for this connection. You canspecify the use of a particular private key using the -i option. The matching public key obvi-ously needs to be in the authorized_keys file on the remote system. Enter the following:
puppy# ssh -fN -i /home/jim/.ssh/kitten_key -R 995:localhost:110
This could potentially also allow you to incorporate the command into a script because itdoes not require prompting for a password.
Another option you can add to the ssh port-forwarding command is the -g option. By defaultOpenSSH does not allow remote hosts to connect to local forwarded ports. When you add the -goption, remote hosts are able to connect to those local forwarded ports.
Forwarding X with OpenSSHThe last use of OpenSSH you will look at is the forwarding of X11 traffic over SSH. This allowsyou to execute X applications on a remote system via a secure SSH tunnel. Normal X traffic isunencrypted and easily sniffed across a network. But there are still risks with doing this, andyou should never enable X11 Forwarding on systems where you do not explicitly trust theremote system. Also, X offers too many potential threats, even with an SSH tunnel, to forwardX11 traffic over the Internet. In fact, as I have mentioned elsewhere in this book, I recommendnot running X on a system that provides a server function because of the risks that X poses.
But if you do want to use remote X sessions, I will show you how to tunnel those X ses-sions through an SSH tunnel. First, you need sshd running on the remote machine on whichyou want to run X applications. Your sshd_config file on that remote machine needs to havethe option on the next line enabled:
X11Forwarding yes
Second, change your ssh_config file to add the option on the following line:
ForwardX11 yes
You could also enable X11 Forwarding on your ssh command by using the -X command-line option.
4444c03_final.qxd 1/5/05 12:44 AM Page 184
CHAPTER 3 ■ SECURING CONNECTIONS AND REMOTE ADMINISTRATION 185
■Caution From OpenSSH version 3.8 onward, ssh will use untrusted X11 Forwarding by default. This moresecure untrusted forwarding will limit what you can change and control using a remote X11 connection. Thiswill be the default behavior when using the X11Forward, ForwardX11, and-X options with OpenSSH. If youwant to revert to the previous X11 Forwarding behavior, you can set the option ForwardX11Trusted to yesin your ssh_config file or use the command-line option -Y.
Once you have configured this, then you can connect to the remote system and run an Xapplication; in this case, I have chosen to run xterm. Enter the following:
puppy# ssh -X bob@kitten
bob@kitten's password:
kitten# xterm
The X11 Forwarding option of OpenSSH will automatically define and assign a $DISPLAY
variable to your forwarded X connection.
ResourcesThe following are some resources for you to use.
Mailing Lists
• Openswan mailing lists: http://lists.openswan.org/mailman/listinfo/
• OpenSSH mailing lists: http://www.openssh.org/list.html
• Stunnel mailing lists: http://www.stunnel.org/support/
Sites
• Certificate Service Provider: http://devel.it.su.se/projects/CSP/
• EJBCA: http://ejbca.sourceforge.net/
• IPSec HOWTO for Linux: http://www.ipsec-howto.org/
• Netscape Certificate Management System: http://wp.netscape.com/cms/v4.0/index.html
• Openswan: http://www.openswan.org/
• Openswan wiki: http://wiki.openswan.org/
• OpenSSH: http://www.openssh.org/
• RSA Laboratories: http://www.rsasecurity.com/
• Stunnel: http://www.stunnel.org/
• VNC: http://www.realvnc.com/
4444c03_final.qxd 1/5/05 12:44 AM Page 185
Securing Files and File Systems
In the past few chapters I have covered basic operating system security, firewalls, and the secu-rity of your connections. In this chapter I will cover the security of your data itself—the files andfile systems that hold both user data and the files and objects used by the kernel, your operatingsystems, and your applications. Your file systems and the files and objects stored on them areyour system’s assets. The data contained on these assets is often the ultimate target of attackerswho have the intention of stealing, tampering with, or destroying them.
Attacks on your files and file systems come in a number of forms. They can take the formof vulnerabilities and exploits of applications, tools, or the kernel. These vulnerabilities andexploits take advantage of security weaknesses or idiosyncrasies in Linux’s implementation offiles and file systems. Or they can take advantage of the functionality of your file attributes, forexample, through the malicious exploitation of setuid or setgid binaries. They can also occurbecause attackers are able to circumvent your system security through inappropriately setpermissions or poorly managed or administered files and file systems.
I will take you through a series of explanations of various facets of file and file systemsecurity. First, I will run through some basic permission and file attributes concepts. This willinclude looking at some file attributes such as object ownership, setuid, and world-writablepermissions that could potentially offer attackers opportunities or leverage on your system.Second, I will cover setting a secure umask for your system. Additionally, I will cover some waysof protecting the files on your system, including making them immutable and encrypting them.I take the same approach to addressing file systems by covering individual security-relateditems such as securely mounting file systems, encrypting file systems, and using tools suchas Tripwire.
This chapter is not a detailed examination of how Linux and other Unix dialects files andfile systems work but rather covers security-related features, highlights areas of potential secu-rity risk that result from certain types of file attributes, and covers some file and file-specificsecurity enhancements, tools, and functions that can assist you in securing your files.
187
C H A P T E R 4
■ ■ ■
4444c04_final.qxd 1/5/05 12:46 AM Page 187
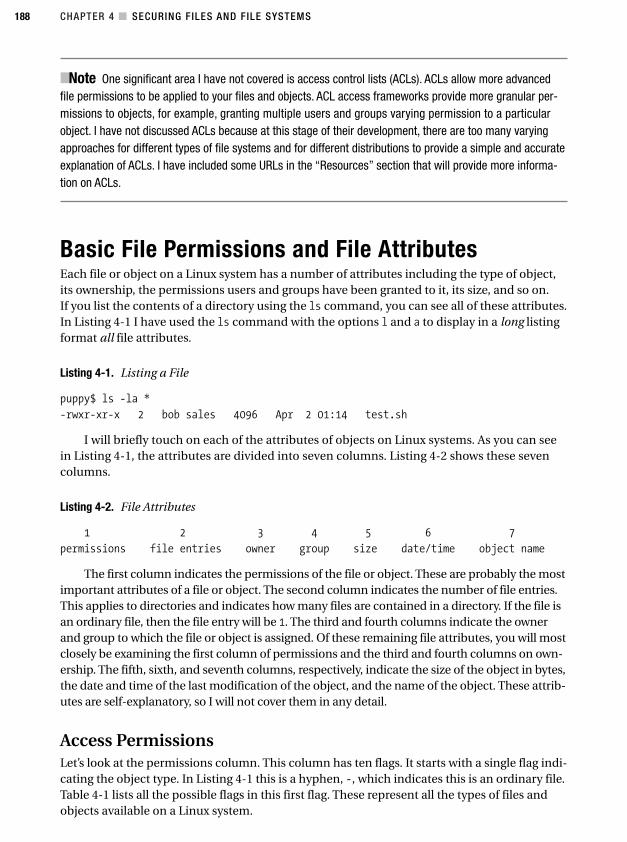
CHAPTER 4 ■ SECURING FILES AND FILE SYSTEMS188
■Note One significant area I have not covered is access control lists (ACLs). ACLs allow more advancedfile permissions to be applied to your files and objects. ACL access frameworks provide more granular per-missions to objects, for example, granting multiple users and groups varying permission to a particularobject. I have not discussed ACLs because at this stage of their development, there are too many varyingapproaches for different types of file systems and for different distributions to provide a simple and accurateexplanation of ACLs. I have included some URLs in the “Resources” section that will provide more informa-tion on ACLs.
Basic File Permissions and File AttributesEach file or object on a Linux system has a number of attributes including the type of object,its ownership, the permissions users and groups have been granted to it, its size, and so on.If you list the contents of a directory using the ls command, you can see all of these attributes.In Listing 4-1 I have used the ls command with the options l and a to display in a long listingformat all file attributes.
Listing 4-1. Listing a File
puppy$ ls -la *
-rwxr-xr-x 2 bob sales 4096 Apr 2 01:14 test.sh
I will briefly touch on each of the attributes of objects on Linux systems. As you can seein Listing 4-1, the attributes are divided into seven columns. Listing 4-2 shows these sevencolumns.
Listing 4-2. File Attributes
1 2 3 4 5 6 7
permissions file entries owner group size date/time object name
The first column indicates the permissions of the file or object. These are probably the mostimportant attributes of a file or object. The second column indicates the number of file entries.This applies to directories and indicates how many files are contained in a directory. If the file isan ordinary file, then the file entry will be 1. The third and fourth columns indicate the ownerand group to which the file or object is assigned. Of these remaining file attributes, you will mostclosely be examining the first column of permissions and the third and fourth columns on own-ership. The fifth, sixth, and seventh columns, respectively, indicate the size of the object in bytes,the date and time of the last modification of the object, and the name of the object. These attrib-utes are self-explanatory, so I will not cover them in any detail.
Access PermissionsLet’s look at the permissions column. This column has ten flags. It starts with a single flag indi-cating the object type. In Listing 4-1 this is a hyphen, -, which indicates this is an ordinary file.Table 4-1 lists all the possible flags in this first flag. These represent all the types of files andobjects available on a Linux system.
4444c04_final.qxd 1/5/05 12:46 AM Page 188

CHAPTER 4 ■ SECURING FILES AND FILE SYSTEMS 189
1. Also known as world or other permissions. I will use the term world permissions throughout thischapter.
Table 4-1. File and Object Types
Flag Description
- Regular file
d Directory
l Link
c Special file
s Socket
p Named pipe
The next nine flags indicate what the permissions of the object are. They are divided intothree groups, or triplets, of three flags each. Each triplet of flags is the permission settings fora particular class of user. These classes of users are the owner of the object, the group assignedto the object, and everyone.1 The individual flags within each triplet represent the three basicpermissions used on Linux systems: read, write and execute. Let’s look at what access eachpermission grants.
• Read: Allows you to read, view, and print a file
• Write: Allows you to write, edit, and delete a file
• Execute: Allows you to execute a file, such as a binary or script, and search a directory
So, if you look back at Listing 4-1, you can see the first triplet of flags is rwx. This indi-cates that the owner of the object has the read, write, and execute permissions to the test.shobject. The next group of flags indicates the permissions that the group the object is assignedto have been granted to the object. In this case, it is r-x or read and execute. The - indicatesthat write permissions have not been granted to the group of the object. The last group offlags indicates the permissions that everyone on the system has to this object, in this case r-xor read and execute. Again, the - indicates that the write permission is not granted to theworld.
These groups of permissions can also be indicated numerically, and I have used this formof notation throughout this book. Listing 4-3 shows an example of this notation in conjunctionwith the chmod command.
Listing 4-3. Numerical Permissions Notation
puppy# chmod 0755 test.sh
The notation 0755 is a number in octal mode. This number is the same as setting the ninepermission flags to rwxr-x-r-x. Or explained further, the owner has all three permissions tothis object, and both the members of the group that this object belongs to and everyone onthe system have been granted read and execute permissions for this same object. So where dothese octal-mode numbers come from?
4444c04_final.qxd 1/5/05 12:46 AM Page 189
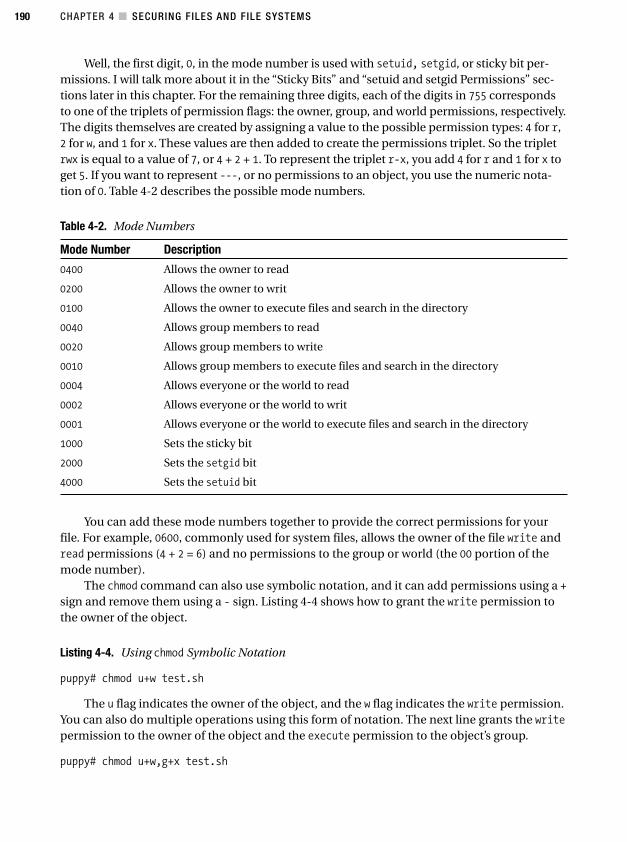
CHAPTER 4 ■ SECURING FILES AND FILE SYSTEMS190
Well, the first digit, 0, in the mode number is used with setuid, setgid, or sticky bit per-missions. I will talk more about it in the “Sticky Bits” and “setuid and setgid Permissions” sec-tions later in this chapter. For the remaining three digits, each of the digits in 755 correspondsto one of the triplets of permission flags: the owner, group, and world permissions, respectively.The digits themselves are created by assigning a value to the possible permission types: 4 for r,2 for w, and 1 for x. These values are then added to create the permissions triplet. So the tripletrwx is equal to a value of 7, or 4 + 2 + 1. To represent the triplet r-x, you add 4 for r and 1 for x toget 5. If you want to represent ---, or no permissions to an object, you use the numeric nota-tion of 0. Table 4-2 describes the possible mode numbers.
Table 4-2. Mode Numbers
Mode Number Description
0400 Allows the owner to read
0200 Allows the owner to writ
0100 Allows the owner to execute files and search in the directory
0040 Allows group members to read
0020 Allows group members to write
0010 Allows group members to execute files and search in the directory
0004 Allows everyone or the world to read
0002 Allows everyone or the world to writ
0001 Allows everyone or the world to execute files and search in the directory
1000 Sets the sticky bit
2000 Sets the setgid bit
4000 Sets the setuid bit
You can add these mode numbers together to provide the correct permissions for yourfile. For example, 0600, commonly used for system files, allows the owner of the file write andread permissions (4 + 2 = 6) and no permissions to the group or world (the 00 portion of themode number).
The chmod command can also use symbolic notation, and it can add permissions using a +
sign and remove them using a - sign. Listing 4-4 shows how to grant the write permission tothe owner of the object.
Listing 4-4. Using chmod Symbolic Notation
puppy# chmod u+w test.sh
The u flag indicates the owner of the object, and the w flag indicates the write permission.You can also do multiple operations using this form of notation. The next line grants the writepermission to the owner of the object and the execute permission to the object’s group.
puppy# chmod u+w,g+x test.sh
4444c04_final.qxd 1/5/05 12:46 AM Page 190

CHAPTER 4 ■ SECURING FILES AND FILE SYSTEMS 191
To grant world read permissions to the test.sh file, you would use the following:
puppy# chmod o+r test.sh
where o indicates world or everyone permissions and r indicates read.You can get more information on this style of notation in the chmod man page.
umaskBy default on Linux systems, each file or object is created with default file permissions. Youneed to ensure these default permissions are not overly generous and users and applica-tions are granted an appropriate level of permissions to files and objects. To achieve thisLinux comes with the umask command. This command adjusts how the file and object per-missions will be set when a file or object is created and is intended to ensure any new filescreated by users, applications, or the system itself are not inadvertently granted excessivepermissions. Listing 4-5 shows a typical umask setting.
Listing 4-5. umask Settings
puppy# umask 022
The umask command works by applying a umask value to a series of default permissions fordifferent types of objects on your system. For example, the default file permissions for a newdirectory or binary executable file are 777, and for an ordinary file they are 666. In Listing 4-5the umask is set to 022. If you create a new binary file, you take the default file permissions of777 and subtract the 022 from them (777 – 022) to get the permissions of the new file, 755. Ifyou were to create an ordinary file and umask was set to 022, you would subtract the 022 from666 to get the new default permissions of 644.
You can set the umask on the command line, as demonstrated in Listing 4-5. The umask com-mand also has a couple of command-line options. You can see the -S option on the next line:
puppy# umask -S
u=rwx,g=rx,o=rx
The -S option prints the current umask in symbolic notation. On the previous line you cansee the symbolic notation for the octal-mode number, 755. The second option, -p, prints thecurrent umask in a form that can be reused as an input in a script or the like. Entering the com-mand umask without any options will print the umask of the current user.
The umask command can be set by default at a few different points on your system. Thefirst, and most commonly utilized, is via the boot process in init scripts. For example, on RedHat systems the umask is set in the /etc/rc.d/init.d/functions init script, which is referencedin most Red Hat init scripts. On Debian systems it is set in the /etc/rcS init script. Addition-ally, each user on your system generally has the umask command set for them in their profile.For example, if you use the bash shell, it is set in the .bash_profile file in the user’s home direc-tory or globally for all user profiles in the /etc/bashrc file. On some other distributions the umaskis set in the /etc/profile file.
Typical umask settings include 022, 027, and the most restrictive setting 077. I recommenda default umask of at least 022, but you should look at increasing this to a setting such as 077 onsystems that will not have users creating large numbers of files (such as a bastion host) and
4444c04_final.qxd 1/5/05 12:46 AM Page 191
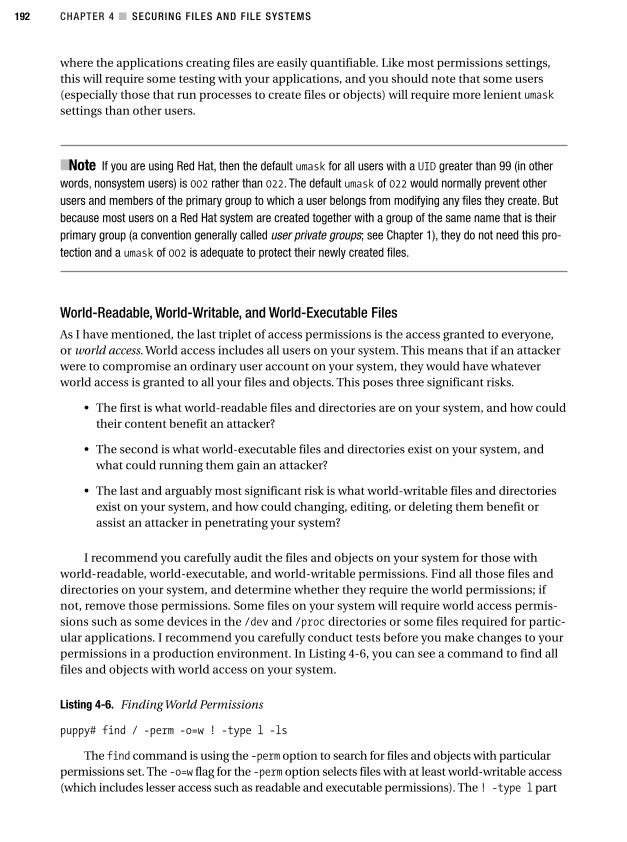
CHAPTER 4 ■ SECURING FILES AND FILE SYSTEMS192
where the applications creating files are easily quantifiable. Like most permissions settings,this will require some testing with your applications, and you should note that some users(especially those that run processes to create files or objects) will require more lenient umasksettings than other users.
■Note If you are using Red Hat, then the default umask for all users with a UID greater than 99 (in otherwords, nonsystem users) is 002 rather than 022. The default umask of 022 would normally prevent otherusers and members of the primary group to which a user belongs from modifying any files they create. Butbecause most users on a Red Hat system are created together with a group of the same name that is theirprimary group (a convention generally called user private groups; see Chapter 1), they do not need this pro-tection and a umask of 002 is adequate to protect their newly created files.
World-Readable, World-Writable, and World-Executable FilesAs I have mentioned, the last triplet of access permissions is the access granted to everyone,or world access. World access includes all users on your system. This means that if an attackerwere to compromise an ordinary user account on your system, they would have whateverworld access is granted to all your files and objects. This poses three significant risks.
• The first is what world-readable files and directories are on your system, and how couldtheir content benefit an attacker?
• The second is what world-executable files and directories exist on your system, andwhat could running them gain an attacker?
• The last and arguably most significant risk is what world-writable files and directoriesexist on your system, and how could changing, editing, or deleting them benefit orassist an attacker in penetrating your system?
I recommend you carefully audit the files and objects on your system for those withworld-readable, world-executable, and world-writable permissions. Find all those files anddirectories on your system, and determine whether they require the world permissions; ifnot, remove those permissions. Some files on your system will require world access permis-sions such as some devices in the /dev and /proc directories or some files required for partic-ular applications. I recommend you carefully conduct tests before you make changes to yourpermissions in a production environment. In Listing 4-6, you can see a command to find allfiles and objects with world access on your system.
Listing 4-6. Finding World Permissions
puppy# find / -perm -o=w ! -type l -ls
The find command is using the -perm option to search for files and objects with particularpermissions set. The -o=w flag for the -perm option selects files with at least world-writable access(which includes lesser access such as readable and executable permissions). The ! -type l part
4444c04_final.qxd 1/5/05 12:46 AM Page 192
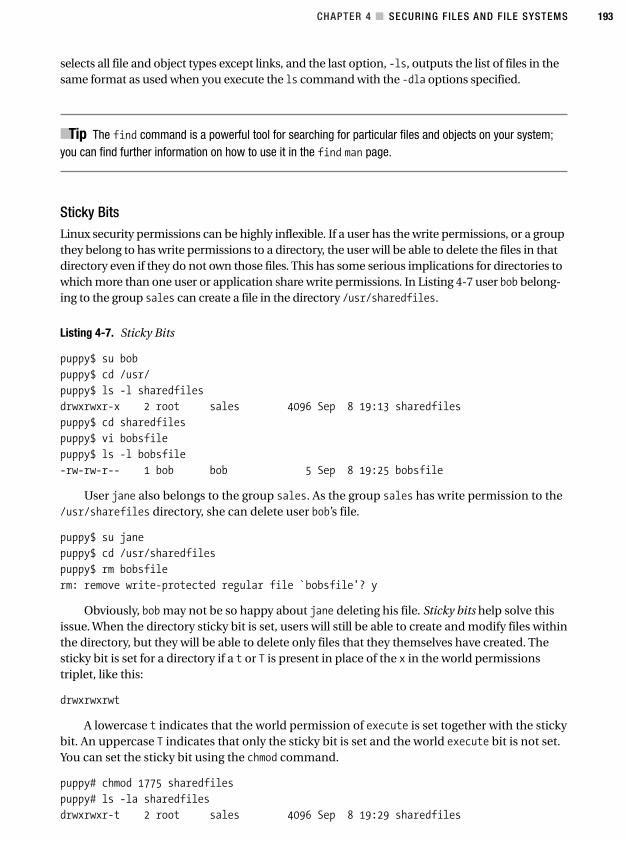
CHAPTER 4 ■ SECURING FILES AND FILE SYSTEMS 193
selects all file and object types except links, and the last option, -ls, outputs the list of files in thesame format as used when you execute the ls command with the -dla options specified.
■Tip The find command is a powerful tool for searching for particular files and objects on your system;you can find further information on how to use it in the find man page.
Sticky BitsLinux security permissions can be highly inflexible. If a user has the write permissions, or a groupthey belong to has write permissions to a directory, the user will be able to delete the files in thatdirectory even if they do not own those files. This has some serious implications for directories towhich more than one user or application share write permissions. In Listing 4-7 user bob belong-ing to the group sales can create a file in the directory /usr/sharedfiles.
Listing 4-7. Sticky Bits
puppy$ su bob
puppy$ cd /usr/
puppy$ ls -l sharedfiles
drwxrwxr-x 2 root sales 4096 Sep 8 19:13 sharedfiles
puppy$ cd sharedfiles
puppy$ vi bobsfile
puppy$ ls -l bobsfile
-rw-rw-r-- 1 bob bob 5 Sep 8 19:25 bobsfile
User jane also belongs to the group sales. As the group sales has write permission to the/usr/sharefiles directory, she can delete user bob’s file.
puppy$ su jane
puppy$ cd /usr/sharedfiles
puppy$ rm bobsfile
rm: remove write-protected regular file `bobsfile'? y
Obviously, bob may not be so happy about jane deleting his file. Sticky bits help solve thisissue. When the directory sticky bit is set, users will still be able to create and modify files withinthe directory, but they will be able to delete only files that they themselves have created. Thesticky bit is set for a directory if a t or T is present in place of the x in the world permissionstriplet, like this:
drwxrwxrwt
A lowercase t indicates that the world permission of execute is set together with the stickybit. An uppercase T indicates that only the sticky bit is set and the world execute bit is not set.You can set the sticky bit using the chmod command.
puppy# chmod 1775 sharedfiles
puppy# ls -la sharedfiles
drwxrwxr-t 2 root sales 4096 Sep 8 19:29 sharedfiles
4444c04_final.qxd 1/5/05 12:46 AM Page 193
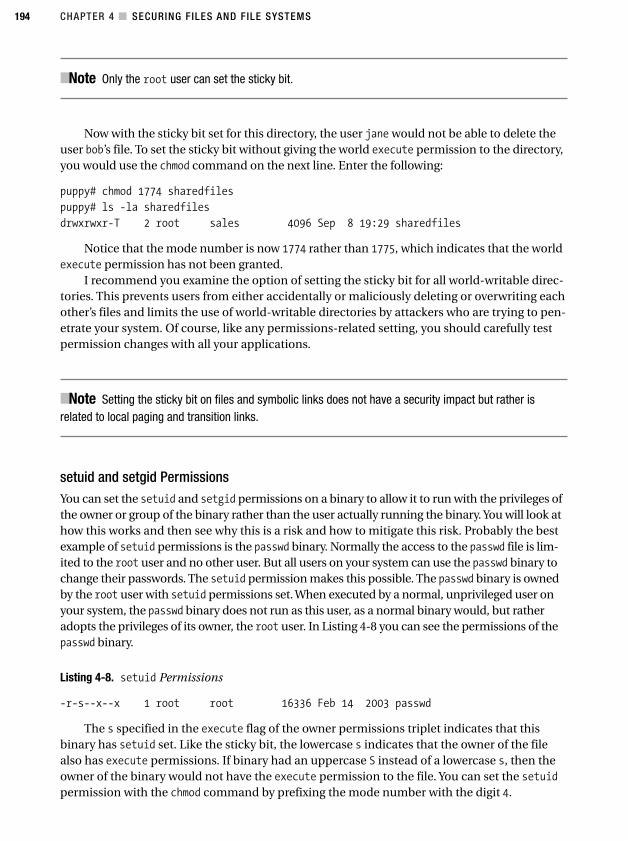
CHAPTER 4 ■ SECURING FILES AND FILE SYSTEMS194
■Note Only the root user can set the sticky bit.
Now with the sticky bit set for this directory, the user jane would not be able to delete theuser bob’s file. To set the sticky bit without giving the world execute permission to the directory,you would use the chmod command on the next line. Enter the following:
puppy# chmod 1774 sharedfiles
puppy# ls -la sharedfiles
drwxrwxr-T 2 root sales 4096 Sep 8 19:29 sharedfiles
Notice that the mode number is now 1774 rather than 1775, which indicates that the worldexecute permission has not been granted.
I recommend you examine the option of setting the sticky bit for all world-writable direc-tories. This prevents users from either accidentally or maliciously deleting or overwriting eachother’s files and limits the use of world-writable directories by attackers who are trying to pen-etrate your system. Of course, like any permissions-related setting, you should carefully testpermission changes with all your applications.
■Note Setting the sticky bit on files and symbolic links does not have a security impact but rather isrelated to local paging and transition links.
setuid and setgid PermissionsYou can set the setuid and setgid permissions on a binary to allow it to run with the privileges ofthe owner or group of the binary rather than the user actually running the binary. You will look athow this works and then see why this is a risk and how to mitigate this risk. Probably the bestexample of setuid permissions is the passwd binary. Normally the access to the passwd file is lim-ited to the root user and no other user. But all users on your system can use the passwd binary tochange their passwords. The setuid permission makes this possible. The passwd binary is ownedby the root user with setuid permissions set. When executed by a normal, unprivileged user onyour system, the passwd binary does not run as this user, as a normal binary would, but ratheradopts the privileges of its owner, the root user. In Listing 4-8 you can see the permissions of thepasswd binary.
Listing 4-8. setuid Permissions
-r-s--x--x 1 root root 16336 Feb 14 2003 passwd
The s specified in the execute flag of the owner permissions triplet indicates that thisbinary has setuid set. Like the sticky bit, the lowercase s indicates that the owner of the filealso has execute permissions. If binary had an uppercase S instead of a lowercase s, then theowner of the binary would not have the execute permission to the file. You can set the setuidpermission with the chmod command by prefixing the mode number with the digit 4.
4444c04_final.qxd 1/5/05 12:46 AM Page 194

CHAPTER 4 ■ SECURING FILES AND FILE SYSTEMS 195
puppy# chmod 4755 test.sh
puppy# ls -l test.sh
-rwsr-xr-x 1 root root 992 Aug 4 15:49 test.sh
Thus, the digit 4 in the 4755 sets the lowercase s in the execute flag of the owner permis-sion triplet. To set the S setuid permission, you enter the following:
puppy# chmod 4655 test.sh
puppy# ls -l test.sh
-rwSr-xr-x 1 root root 992 Aug 4 15:50 test.sh
The setgid permission operates in a similar way to the setuid permission. But instead ofallowing the binary to run with the permissions of the owner, it allows the binary to run withthe permissions of the owning group. You can tell if the setgid permission is set if an s or S isset in the execute flag of the group permissions triplet. Like the setuid permissions, you setthe setgid permissions with the chmod command. Instead of prefixing the mode number witha 4, you prefix it with a 2. In Listing 4-9 you can see how setgid is set.
Listing 4-9. setgid Permissions
puppy# chmod 2755 test.sh
puppy# ls -l test.sh
-rwxr-sr-x 1 root root 992 Aug 4 15:50 test.sh
So why are setuid and setgid binaries a potential security risk on your system? Well, theyhave two problems. The first problem is that a user can use an existing setuid binary’s greaterprivileges to perform actions that could be malicious on your system. Of course, some setuidand setgid files on your system actually require this functionality to operate, with the previ-ously cited passwd command being one of these. The sendmail binary is another example.
The second problem is that setuid or setgid commands or binaries owned by privilegedusers such as the root user can be easily created on your system by an attacker. This binarycan be used to run an attack or compromise your system. Indeed, many root kits (seeChapter 6) use setuid or setgid binaries to compromise systems. So, the two aspects ofsetuid and setgid permissions you need to monitor and manage are as follows:
• Limit the number of setuid and setgid binaries on your system to only those binariesthat require it.
• Regular checks for new and existing binaries that may have had setuid and/or setgidpermissions set without your approval or knowledge.
To do this, the first thing you need to do is identify all the setuid and setgid binaries onyour system. Listing 4-10 provides a find command designed to locate setuid binaries.
Listing 4-10. Finding setuid Files
puppy# find / -perm -4000 -ls
And Listing 4-11 provides a variation of this command for locating setgid binaries.
4444c04_final.qxd 1/5/05 12:46 AM Page 195
CHAPTER 4 ■ SECURING FILES AND FILE SYSTEMS196
Listing 4-11. Finding setgid Files
puppy# find / -perm -2000 -ls
■Tip You can also use a tool such as sXid (available from http://linux.cudeso.be/linuxdoc/sxid.php) to automatically find setuid/setgid binaries. You could also look at the Debian commandchecksecurity.
After using the commands in Listings 4-10 and 4-11 you need to review all the files foundand determine whether they all require setuid or setgid. If they can have the permissionsremoved, then use the chmod command to remove them.
■Note For a scanning tool that can scan for a variety of different file types, see the “Scanning for Files withAdeos” sidebar.
SCANNING FOR FILES WITH ADEOS
The Adeos2 tool is designed to automatically scan your system for files and objects in a variety of potentialstates, such as world-writable or setuid files, and output a report that you can review. You can downloadAdeos from http://linux.wku.edu/~lamonml/software/adeos/. The tool has not been updated forsome time, but its basic functionality remains suitable to use. Download the archive file containing the Adeosscanner, and unpack it.
puppy$ wget http://linux.wku.edu/~lamonml/software/adeos/adeos-1.0.tar.gz
puppy$ tar -zxf adeos-1.0.tar.gz
Change into the adeos-1.0 directory created when you unpack the archive. The configuration and installa-tion process for Adeos is a simple configure and make process.
puppy$ ./configure && make
The compilation process will create a binary called adeos. You can copy the binary to a location of yourchoice or run it from the adeos-1.0 directory. The binary can be run from the command line or via a cronjob. Table 4-3 lists the options it can use.
(Continues)
2. Adeos is the Roman goddess of modesty.
4444c04_final.qxd 1/5/05 12:46 AM Page 196
CHAPTER 4 ■ SECURING FILES AND FILE SYSTEMS 197
SCANNING FOR FILES WITH ADEOS (Continued)
Table 4-3. Adeos Command-Line Options
Option Description-d Includes dynamic directories such as /tmp or /proc in the scan
-h Outputs the scan as a HTML file called results.html in the current working directory
-r Formats the output as a collated report
--help Displays the Adeos help and usage information
Adeos supports three scan modes: normal, verbose, and paranoid. The normal mode scans for setuidand setgid files, world-writable files, and directories. This is the default mode that Adeos will run in if youdo not provide a mode on the command line. The next mode is verbose mode, which looks for all the filetypes in the normal scan mode plus files with the sticky bit set, unreadable directories, and inaccessible files.The last mode, paranoid, is the most detailed and scans for all the types in the normal and verbose modesand adds world-readable and world-executable objects.
Let’s first run Adeos in the normal mode. Enter the following:
puppy$ ./adeos
World-writeable file: /var/lib/mysql/mysql.sock
World-writeable directory: /var/tmp
World-writeable directory: /var/spool/vbox
World-writeable directory: /var/spool/samba
World-writeable directory: /tmp
SUID file: /usr/X11R6/bin/XFree86
SUID file: /usr/sbin/usernetctl
...
The adeos command will output a list of files will be outputted. This list may be quite long, and I recommendyou redirect the output of the command to a file. This will allow you to better use the results. You can also runAdeos with the -r option to output the results in a report format suitable for printing. Listing 4-12 runs Adeosin verbose mode with the report option enabled.
Listing 4-12. Adeos in verbose Report Mode
puppy$ ./adeos -r verbose
You can also output the results of the Adeos scan as a HTML document using the -h option. Listing 4-13 runsAdeos in paranoid mode with the HTML output option.
Listing 4-13. Adeos in paranoid Mode
puppy$ ./adeos -h paranoid
The -h option will create a HTML file called results.html in the current working directory.
■Caution Occasionally when running in paranoid mode with the -r option set, Adeos can consumelarge quantities of memory and significantly slow your system. You should be careful when runningAdeos in this mode with this option.
4444c04_final.qxd 1/5/05 12:46 AM Page 197
CHAPTER 4 ■ SECURING FILES AND FILE SYSTEMS198
OwnershipNow I will go back to Listing 4-2 and the seven columns of attributes for the objects. The thirdand fourth columns are the owner of the object and the group of the object, respectively. InListing 4-1 the test.sh object is owned by the user bob and belongs to the group sales. Theuser bob, as the owner, is entitled to the first triplet of access permissions, rwx, as I have describedin the previous section, and the group sales is entitled to the second triplet of permissions, r-x. As I stated earlier, everyone on the system has been granted the world permissions, r-x,to the test.sh object.
One of the important characteristics of ownership is that all files and objects on your sys-tem should have an owner. Unowned objects can often indicate that an attacker has penetratedyour system. Listing 4-14 provides a find command that will return all files that do not have anowner or a group.
Listing 4-14. Find Unowned Files and Objects
puppy# find / -nouser -o -nogroup -ls
You should review any files and objects that are unowned by a user or do not belong toa group and either remove them or assign them to the appropriate owner or group.
Immutable FilesImmutable files are one of the most powerful security and system administration featuresavailable on Linux systems. Immutable files cannot be written to by any user, even by the rootuser, regardless of their file permissions. They cannot be deleted or renamed, and no hard linkcan be created from them. They are ideal for securing configuration files or other files towhich you want to prevent changes and which you know will not or should not be changed.
■Note Immutable file functionality is available for ext2 and ext3 type file systems in kernel versions 2.4and onward on most distributions. The chattr commands and associated functionality is provided by thee2fsprogs package, which is usually installed by default on most Linux systems.
You can add or remove the immutable attribute using the chattr command. Only theroot user can use the chattr command to make files immutable. Listing 4-15 makes the/etc/passwd file immutable. This would prevent any new users being created on the system,because new users could not be written to the /etc/passwd file.
Listing 4-15. Setting the Immutable Attribute
puppy# chattr -V +i /etc/passwd
chattr 1.34 (25-Jul-2003)
Flags of /etc/passwd set as ----i--------
The chattr command is similar in function to the chmod command. Like the chmod com-mand, you specify either a plus (+) sign or minus (-) sign and the required attribute. The plus
4444c04_final.qxd 1/5/05 12:46 AM Page 198
CHAPTER 4 ■ SECURING FILES AND FILE SYSTEMS 199
sign adds the specified attribute, and the minus sign removes it. So, to make a file immutable,you use the option +i. To remove the immutable attribute, you use the -i option. Listing 4-15also specifies the -V option to run the chattr command in the verbose mode and displaysmore information about the attribute change. If you run the chattr command without the -Voption, it will complete without output, unless an error occurs.
■Tip The chattr command has another attribute you can potentially use: a. If this attribute is set, thena file can be opened only for append or update operations and cannot be deleted. This is useful for log filesor for files you want to be able to write to but not to delete. Like the i attribute, it can be set or removed bythe root user only.
Now the /etc/passwd file is immutable, you will not be able to delete or change it.Listing 4-16 tries to delete the file.
Listing 4-16. Deleting an Immutable File
puppy# rm /etc/passwd
rm: remove write-protected regular file `/etc/passwd'? y
rm: cannot remove `/etc/passwd': Operation not permitted
As you can see from the error message in Listing 4-16, the file cannot be deleted withoutremoving the immutable attribute. In Listing 4-17 you can also see that you are unable to cre-ate a hard link to the file.
Listing 4-17. Linking Immutable Files
puppy# ln /etc/passwd /root/test
ln: creating hard link `/root/test' to `/etc/passwd': Operation not permitted
■Tip You can still create symbolic links to immutable files.
Immutable files are also useful for securing more than just individual configuration files.On many hardened systems, a number of binaries that are not likely to change can be madeimmutable. For example, the contents of the /sbin, /bin, /usr/sbin, and /usr/lib directoriescan be made immutable to prevent an attacker from replacing a critical binary or library filewith an altered malicious version.
■Caution Obviously, upgrading applications and tools is not possible while the binaries or libraries youneed to update are marked immutable. You need to remove the immutable attribute to perform updates orupgrades, such as installing a new version of Sendmail.
4444c04_final.qxd 1/5/05 12:46 AM Page 199
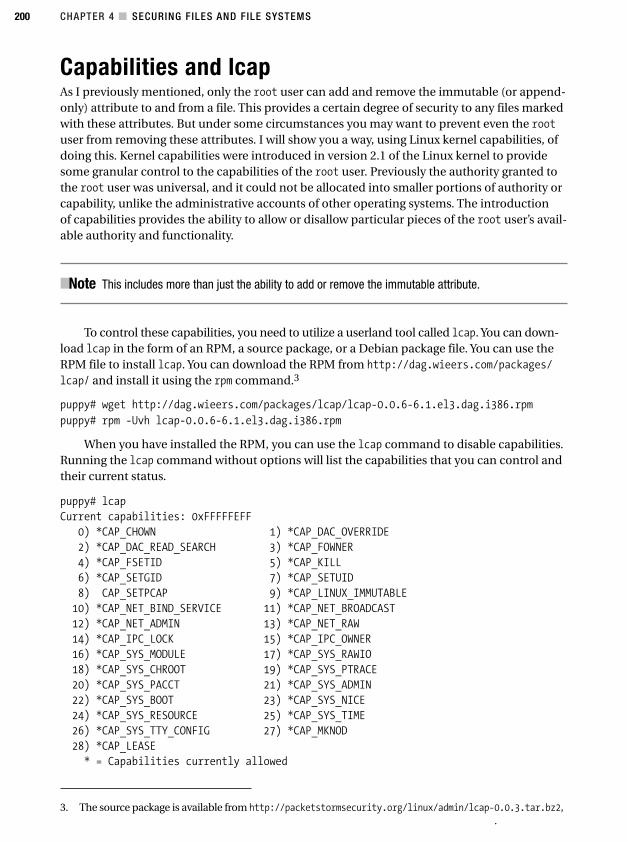
CHAPTER 4 ■ SECURING FILES AND FILE SYSTEMS200
3. The source package is available from http://packetstormsecurity.org/linux/admin/lcap-0.0.3.tar.bz2,.
Capabilities and lcapAs I previously mentioned, only the root user can add and remove the immutable (or append-only) attribute to and from a file. This provides a certain degree of security to any files markedwith these attributes. But under some circumstances you may want to prevent even the rootuser from removing these attributes. I will show you a way, using Linux kernel capabilities, ofdoing this. Kernel capabilities were introduced in version 2.1 of the Linux kernel to providesome granular control to the capabilities of the root user. Previously the authority granted tothe root user was universal, and it could not be allocated into smaller portions of authority orcapability, unlike the administrative accounts of other operating systems. The introductionof capabilities provides the ability to allow or disallow particular pieces of the root user’s avail-able authority and functionality.
■Note This includes more than just the ability to add or remove the immutable attribute.
To control these capabilities, you need to utilize a userland tool called lcap. You can down-load lcap in the form of an RPM, a source package, or a Debian package file. You can use theRPM file to install lcap. You can download the RPM from http://dag.wieers.com/packages/lcap/ and install it using the rpm command.3
puppy# wget http://dag.wieers.com/packages/lcap/lcap-0.0.6-6.1.el3.dag.i386.rpm
puppy# rpm -Uvh lcap-0.0.6-6.1.el3.dag.i386.rpm
When you have installed the RPM, you can use the lcap command to disable capabilities.Running the lcap command without options will list the capabilities that you can control andtheir current status.
puppy# lcap
Current capabilities: 0xFFFFFEFF
0) *CAP_CHOWN 1) *CAP_DAC_OVERRIDE
2) *CAP_DAC_READ_SEARCH 3) *CAP_FOWNER
4) *CAP_FSETID 5) *CAP_KILL
6) *CAP_SETGID 7) *CAP_SETUID
8) CAP_SETPCAP 9) *CAP_LINUX_IMMUTABLE
10) *CAP_NET_BIND_SERVICE 11) *CAP_NET_BROADCAST
12) *CAP_NET_ADMIN 13) *CAP_NET_RAW
14) *CAP_IPC_LOCK 15) *CAP_IPC_OWNER
16) *CAP_SYS_MODULE 17) *CAP_SYS_RAWIO
18) *CAP_SYS_CHROOT 19) *CAP_SYS_PTRACE
20) *CAP_SYS_PACCT 21) *CAP_SYS_ADMIN
22) *CAP_SYS_BOOT 23) *CAP_SYS_NICE
24) *CAP_SYS_RESOURCE 25) *CAP_SYS_TIME
26) *CAP_SYS_TTY_CONFIG 27) *CAP_MKNOD
28) *CAP_LEASE
* = Capabilities currently allowed
4444c04_final.qxd 1/5/05 12:46 AM Page 200
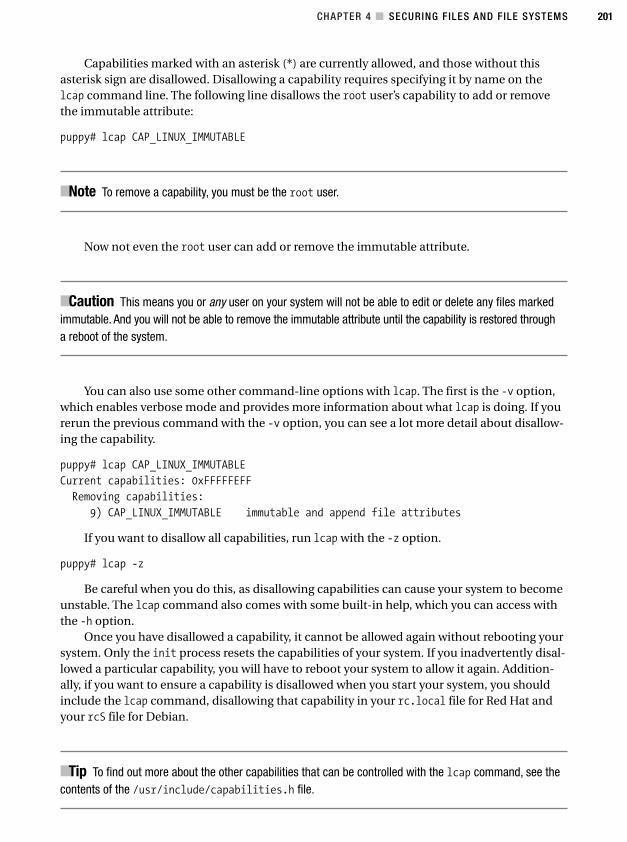
CHAPTER 4 ■ SECURING FILES AND FILE SYSTEMS 201
Capabilities marked with an asterisk (*) are currently allowed, and those without thisasterisk sign are disallowed. Disallowing a capability requires specifying it by name on thelcap command line. The following line disallows the root user’s capability to add or removethe immutable attribute:
puppy# lcap CAP_LINUX_IMMUTABLE
■Note To remove a capability, you must be the root user.
Now not even the root user can add or remove the immutable attribute.
■Caution This means you or any user on your system will not be able to edit or delete any files markedimmutable. And you will not be able to remove the immutable attribute until the capability is restored througha reboot of the system.
You can also use some other command-line options with lcap. The first is the -v option,which enables verbose mode and provides more information about what lcap is doing. If yourerun the previous command with the -v option, you can see a lot more detail about disallow-ing the capability.
puppy# lcap CAP_LINUX_IMMUTABLE
Current capabilities: 0xFFFFFEFF
Removing capabilities:
9) CAP_LINUX_IMMUTABLE immutable and append file attributes
If you want to disallow all capabilities, run lcap with the -z option.
puppy# lcap -z
Be careful when you do this, as disallowing capabilities can cause your system to becomeunstable. The lcap command also comes with some built-in help, which you can access withthe -h option.
Once you have disallowed a capability, it cannot be allowed again without rebooting yoursystem. Only the init process resets the capabilities of your system. If you inadvertently disal-lowed a particular capability, you will have to reboot your system to allow it again. Addition-ally, if you want to ensure a capability is disallowed when you start your system, you shouldinclude the lcap command, disallowing that capability in your rc.local file for Red Hat andyour rcS file for Debian.
■Tip To find out more about the other capabilities that can be controlled with the lcap command, see thecontents of the /usr/include/capabilities.h file.
4444c04_final.qxd 1/5/05 12:46 AM Page 201
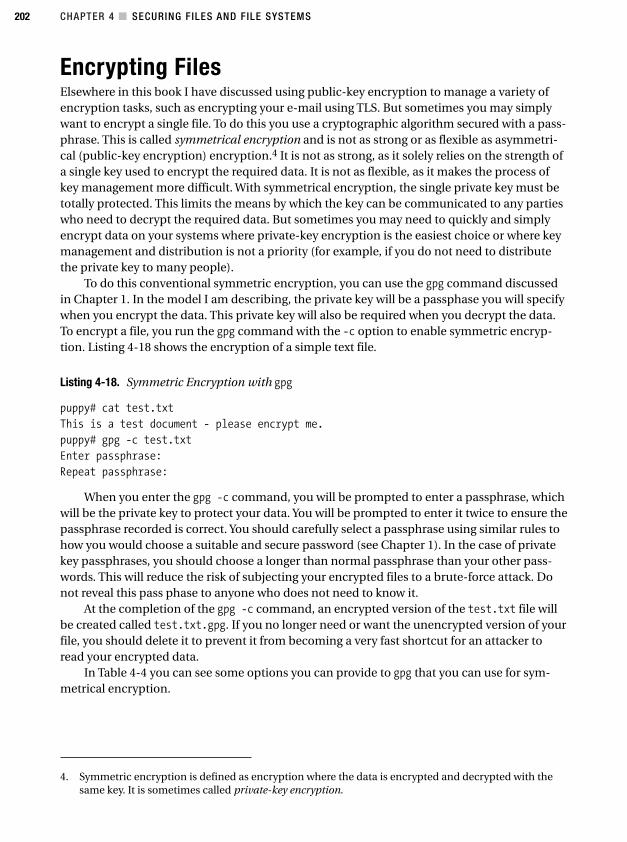
CHAPTER 4 ■ SECURING FILES AND FILE SYSTEMS202
4. Symmetric encryption is defined as encryption where the data is encrypted and decrypted with thesame key. It is sometimes called private-key encryption.
Encrypting FilesElsewhere in this book I have discussed using public-key encryption to manage a variety ofencryption tasks, such as encrypting your e-mail using TLS. But sometimes you may simplywant to encrypt a single file. To do this you use a cryptographic algorithm secured with a pass-phrase. This is called symmetrical encryption and is not as strong or as flexible as asymmetri-cal (public-key encryption) encryption.4 It is not as strong, as it solely relies on the strength ofa single key used to encrypt the required data. It is not as flexible, as it makes the process ofkey management more difficult. With symmetrical encryption, the single private key must betotally protected. This limits the means by which the key can be communicated to any partieswho need to decrypt the required data. But sometimes you may need to quickly and simplyencrypt data on your systems where private-key encryption is the easiest choice or where keymanagement and distribution is not a priority (for example, if you do not need to distributethe private key to many people).
To do this conventional symmetric encryption, you can use the gpg command discussedin Chapter 1. In the model I am describing, the private key will be a passphase you will specifywhen you encrypt the data. This private key will also be required when you decrypt the data.To encrypt a file, you run the gpg command with the -c option to enable symmetric encryp-tion. Listing 4-18 shows the encryption of a simple text file.
Listing 4-18. Symmetric Encryption with gpg
puppy# cat test.txt
This is a test document - please encrypt me.
puppy# gpg -c test.txt
Enter passphrase:
Repeat passphrase:
When you enter the gpg -c command, you will be prompted to enter a passphrase, whichwill be the private key to protect your data. You will be prompted to enter it twice to ensure thepassphrase recorded is correct. You should carefully select a passphrase using similar rules tohow you would choose a suitable and secure password (see Chapter 1). In the case of privatekey passphrases, you should choose a longer than normal passphrase than your other pass-words. This will reduce the risk of subjecting your encrypted files to a brute-force attack. Donot reveal this pass phase to anyone who does not need to know it.
At the completion of the gpg -c command, an encrypted version of the test.txt file willbe created called test.txt.gpg. If you no longer need or want the unencrypted version of yourfile, you should delete it to prevent it from becoming a very fast shortcut for an attacker toread your encrypted data.
In Table 4-4 you can see some options you can provide to gpg that you can use for sym-metrical encryption.
4444c04_final.qxd 1/5/05 12:46 AM Page 202
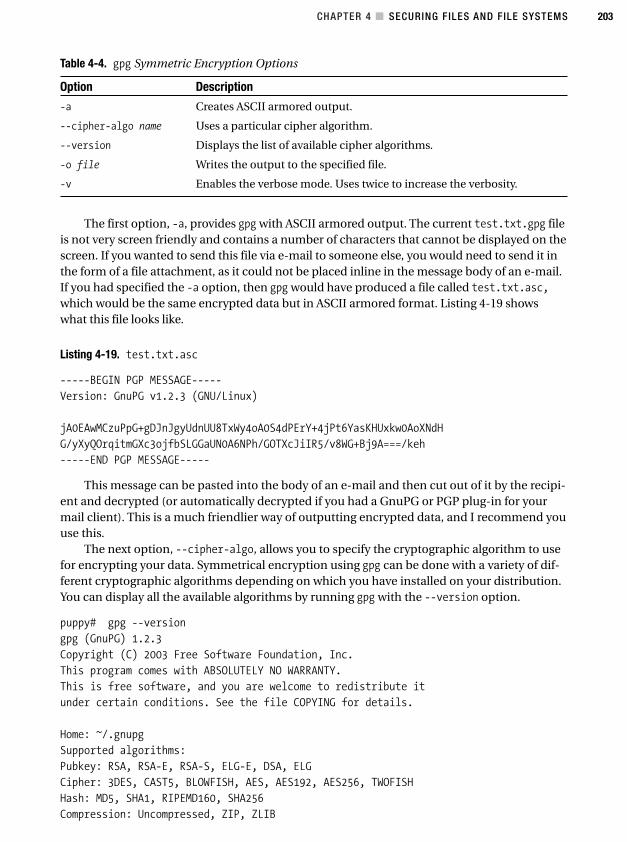
CHAPTER 4 ■ SECURING FILES AND FILE SYSTEMS 203
Table 4-4. gpg Symmetric Encryption Options
Option Description
-a Creates ASCII armored output.
--cipher-algo name Uses a particular cipher algorithm.
--version Displays the list of available cipher algorithms.
-o file Writes the output to the specified file.
-v Enables the verbose mode. Uses twice to increase the verbosity.
The first option, -a, provides gpg with ASCII armored output. The current test.txt.gpg fileis not very screen friendly and contains a number of characters that cannot be displayed on thescreen. If you wanted to send this file via e-mail to someone else, you would need to send it inthe form of a file attachment, as it could not be placed inline in the message body of an e-mail.If you had specified the -a option, then gpg would have produced a file called test.txt.asc,which would be the same encrypted data but in ASCII armored format. Listing 4-19 showswhat this file looks like.
Listing 4-19. test.txt.asc
-----BEGIN PGP MESSAGE-----
Version: GnuPG v1.2.3 (GNU/Linux)
jA0EAwMCzuPpG+gDJnJgyUdnUU8TxWy4oA0S4dPErY+4jPt6YasKHUxkw0AoXNdH
G/yXyQOrqitmGXc3ojfbSLGGaUN0A6NPh/GOTXcJiIR5/v8WG+Bj9A===/keh
-----END PGP MESSAGE-----
This message can be pasted into the body of an e-mail and then cut out of it by the recipi-ent and decrypted (or automatically decrypted if you had a GnuPG or PGP plug-in for yourmail client). This is a much friendlier way of outputting encrypted data, and I recommend youuse this.
The next option, --cipher-algo, allows you to specify the cryptographic algorithm to usefor encrypting your data. Symmetrical encryption using gpg can be done with a variety of dif-ferent cryptographic algorithms depending on which you have installed on your distribution.You can display all the available algorithms by running gpg with the --version option.
puppy# gpg --version
gpg (GnuPG) 1.2.3
Copyright (C) 2003 Free Software Foundation, Inc.
This program comes with ABSOLUTELY NO WARRANTY.
This is free software, and you are welcome to redistribute it
under certain conditions. See the file COPYING for details.
Home: ~/.gnupg
Supported algorithms:
Pubkey: RSA, RSA-E, RSA-S, ELG-E, DSA, ELG
Cipher: 3DES, CAST5, BLOWFISH, AES, AES192, AES256, TWOFISH
Hash: MD5, SHA1, RIPEMD160, SHA256
Compression: Uncompressed, ZIP, ZLIB
4444c04_final.qxd 1/5/05 12:46 AM Page 203
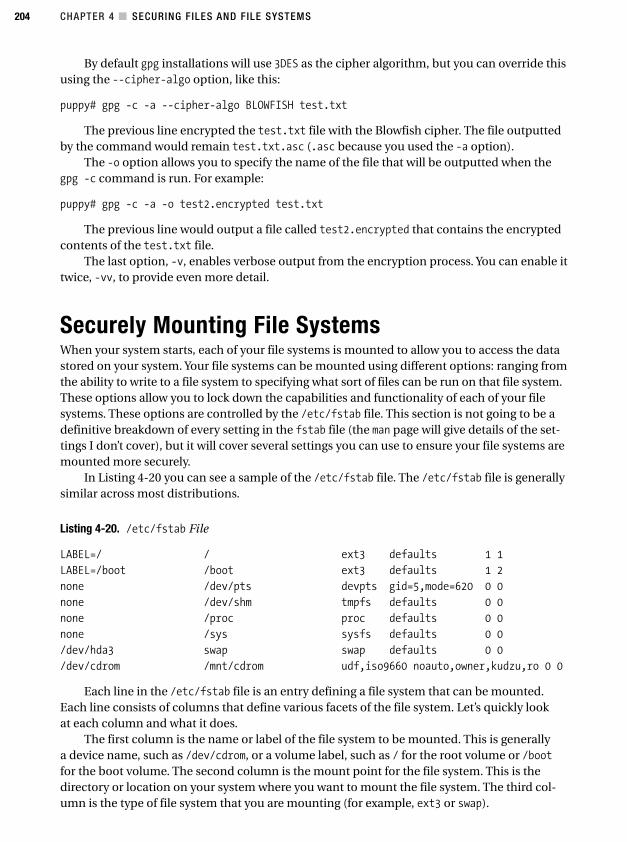
CHAPTER 4 ■ SECURING FILES AND FILE SYSTEMS204
By default gpg installations will use 3DES as the cipher algorithm, but you can override thisusing the --cipher-algo option, like this:
puppy# gpg -c -a --cipher-algo BLOWFISH test.txt
The previous line encrypted the test.txt file with the Blowfish cipher. The file outputtedby the command would remain test.txt.asc (.asc because you used the -a option).
The -o option allows you to specify the name of the file that will be outputted when thegpg -c command is run. For example:
puppy# gpg -c -a -o test2.encrypted test.txt
The previous line would output a file called test2.encrypted that contains the encryptedcontents of the test.txt file.
The last option, -v, enables verbose output from the encryption process. You can enable ittwice, -vv, to provide even more detail.
Securely Mounting File SystemsWhen your system starts, each of your file systems is mounted to allow you to access the datastored on your system. Your file systems can be mounted using different options: ranging fromthe ability to write to a file system to specifying what sort of files can be run on that file system.These options allow you to lock down the capabilities and functionality of each of your filesystems. These options are controlled by the /etc/fstab file. This section is not going to be adefinitive breakdown of every setting in the fstab file (the man page will give details of the set-tings I don’t cover), but it will cover several settings you can use to ensure your file systems aremounted more securely.
In Listing 4-20 you can see a sample of the /etc/fstab file. The /etc/fstab file is generallysimilar across most distributions.
Listing 4-20. /etc/fstab File
LABEL=/ / ext3 defaults 1 1
LABEL=/boot /boot ext3 defaults 1 2
none /dev/pts devpts gid=5,mode=620 0 0
none /dev/shm tmpfs defaults 0 0
none /proc proc defaults 0 0
none /sys sysfs defaults 0 0
/dev/hda3 swap swap defaults 0 0
/dev/cdrom /mnt/cdrom udf,iso9660 noauto,owner,kudzu,ro 0 0
Each line in the /etc/fstab file is an entry defining a file system that can be mounted.Each line consists of columns that define various facets of the file system. Let’s quickly lookat each column and what it does.
The first column is the name or label of the file system to be mounted. This is generallya device name, such as /dev/cdrom, or a volume label, such as / for the root volume or /bootfor the boot volume. The second column is the mount point for the file system. This is thedirectory or location on your system where you want to mount the file system. The third col-umn is the type of file system that you are mounting (for example, ext3 or swap).
4444c04_final.qxd 1/5/05 12:46 AM Page 204
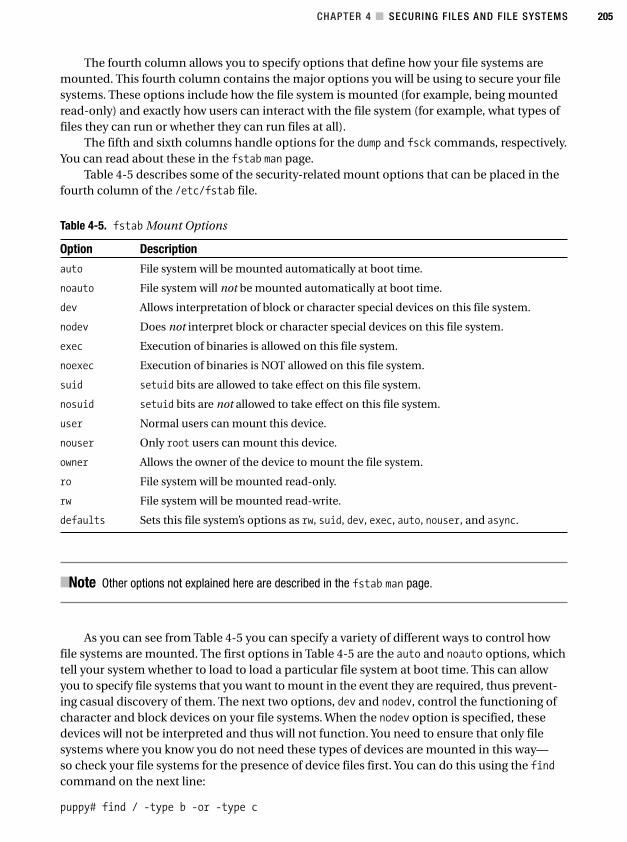
CHAPTER 4 ■ SECURING FILES AND FILE SYSTEMS 205
The fourth column allows you to specify options that define how your file systems aremounted. This fourth column contains the major options you will be using to secure your filesystems. These options include how the file system is mounted (for example, being mountedread-only) and exactly how users can interact with the file system (for example, what types offiles they can run or whether they can run files at all).
The fifth and sixth columns handle options for the dump and fsck commands, respectively.You can read about these in the fstab man page.
Table 4-5 describes some of the security-related mount options that can be placed in thefourth column of the /etc/fstab file.
Table 4-5. fstab Mount Options
Option Description
auto File system will be mounted automatically at boot time.
noauto File system will not be mounted automatically at boot time.
dev Allows interpretation of block or character special devices on this file system.
nodev Does not interpret block or character special devices on this file system.
exec Execution of binaries is allowed on this file system.
noexec Execution of binaries is NOT allowed on this file system.
suid setuid bits are allowed to take effect on this file system.
nosuid setuid bits are not allowed to take effect on this file system.
user Normal users can mount this device.
nouser Only root users can mount this device.
owner Allows the owner of the device to mount the file system.
ro File system will be mounted read-only.
rw File system will be mounted read-write.
defaults Sets this file system’s options as rw, suid, dev, exec, auto, nouser, and async.
■Note Other options not explained here are described in the fstab man page.
As you can see from Table 4-5 you can specify a variety of different ways to control howfile systems are mounted. The first options in Table 4-5 are the auto and noauto options, whichtell your system whether to load to load a particular file system at boot time. This can allowyou to specify file systems that you want to mount in the event they are required, thus prevent-ing casual discovery of them. The next two options, dev and nodev, control the functioning ofcharacter and block devices on your file systems. When the nodev option is specified, thesedevices will not be interpreted and thus will not function. You need to ensure that only filesystems where you know you do not need these types of devices are mounted in this way—so check your file systems for the presence of device files first. You can do this using the findcommand on the next line:
puppy# find / -type b -or -type c
4444c04_final.qxd 1/5/05 12:46 AM Page 205
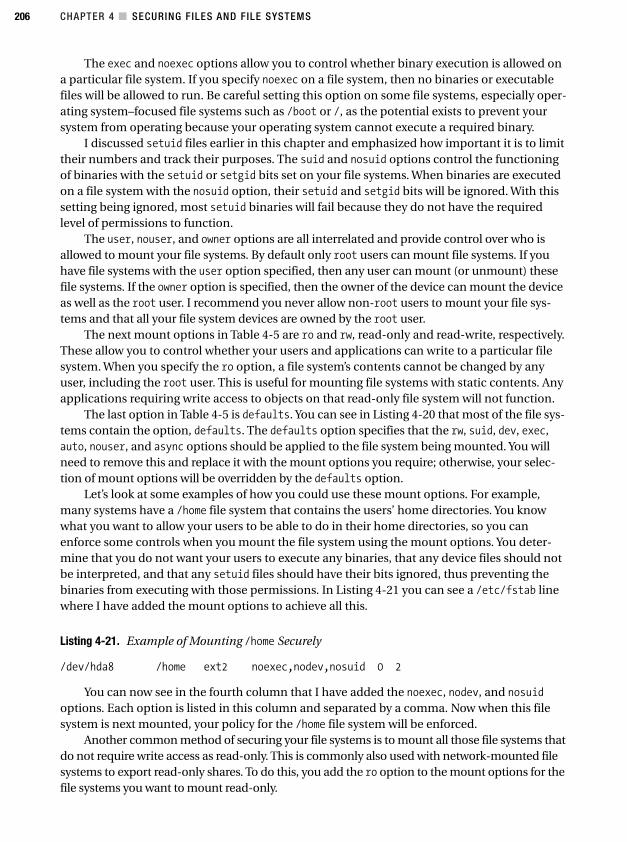
CHAPTER 4 ■ SECURING FILES AND FILE SYSTEMS206
The exec and noexec options allow you to control whether binary execution is allowed ona particular file system. If you specify noexec on a file system, then no binaries or executablefiles will be allowed to run. Be careful setting this option on some file systems, especially oper-ating system–focused file systems such as /boot or /, as the potential exists to prevent yoursystem from operating because your operating system cannot execute a required binary.
I discussed setuid files earlier in this chapter and emphasized how important it is to limittheir numbers and track their purposes. The suid and nosuid options control the functioningof binaries with the setuid or setgid bits set on your file systems. When binaries are executedon a file system with the nosuid option, their setuid and setgid bits will be ignored. With thissetting being ignored, most setuid binaries will fail because they do not have the requiredlevel of permissions to function.
The user, nouser, and owner options are all interrelated and provide control over who isallowed to mount your file systems. By default only root users can mount file systems. If youhave file systems with the user option specified, then any user can mount (or unmount) thesefile systems. If the owner option is specified, then the owner of the device can mount the deviceas well as the root user. I recommend you never allow non-root users to mount your file sys-tems and that all your file system devices are owned by the root user.
The next mount options in Table 4-5 are ro and rw, read-only and read-write, respectively.These allow you to control whether your users and applications can write to a particular filesystem. When you specify the ro option, a file system’s contents cannot be changed by anyuser, including the root user. This is useful for mounting file systems with static contents. Anyapplications requiring write access to objects on that read-only file system will not function.
The last option in Table 4-5 is defaults. You can see in Listing 4-20 that most of the file sys-tems contain the option, defaults. The defaults option specifies that the rw, suid, dev, exec,auto, nouser, and async options should be applied to the file system being mounted. You willneed to remove this and replace it with the mount options you require; otherwise, your selec-tion of mount options will be overridden by the defaults option.
Let’s look at some examples of how you could use these mount options. For example,many systems have a /home file system that contains the users’ home directories. You knowwhat you want to allow your users to be able to do in their home directories, so you canenforce some controls when you mount the file system using the mount options. You deter-mine that you do not want your users to execute any binaries, that any device files should notbe interpreted, and that any setuid files should have their bits ignored, thus preventing thebinaries from executing with those permissions. In Listing 4-21 you can see a /etc/fstab linewhere I have added the mount options to achieve all this.
Listing 4-21. Example of Mounting /home Securely
/dev/hda8 /home ext2 noexec,nodev,nosuid 0 2
You can now see in the fourth column that I have added the noexec, nodev, and nosuidoptions. Each option is listed in this column and separated by a comma. Now when this filesystem is next mounted, your policy for the /home file system will be enforced.
Another common method of securing your file systems is to mount all those file systems thatdo not require write access as read-only. This is commonly also used with network-mounted filesystems to export read-only shares. To do this, you add the ro option to the mount options for thefile systems you want to mount read-only.
4444c04_final.qxd 1/5/05 12:46 AM Page 206
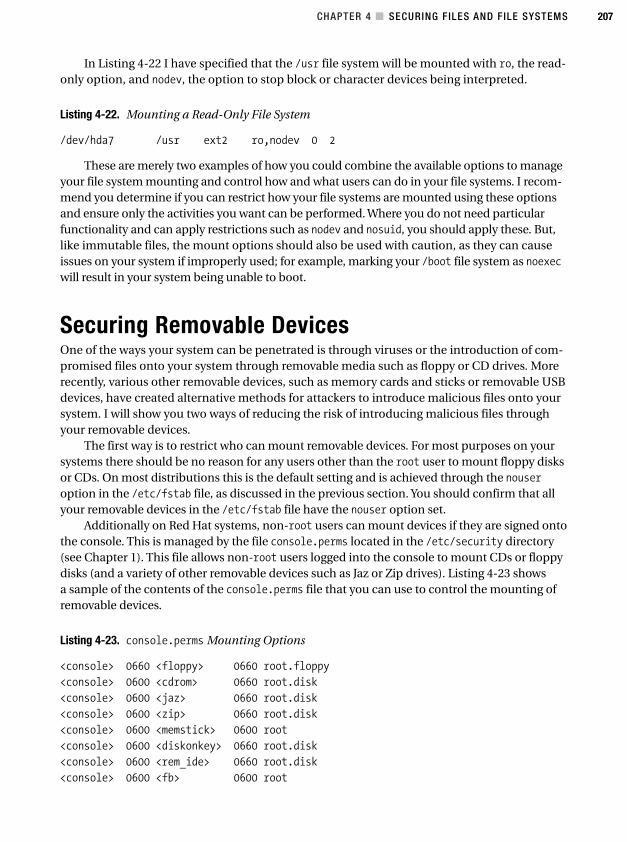
CHAPTER 4 ■ SECURING FILES AND FILE SYSTEMS 207
In Listing 4-22 I have specified that the /usr file system will be mounted with ro, the read-only option, and nodev, the option to stop block or character devices being interpreted.
Listing 4-22. Mounting a Read-Only File System
/dev/hda7 /usr ext2 ro,nodev 0 2
These are merely two examples of how you could combine the available options to manageyour file system mounting and control how and what users can do in your file systems. I recom-mend you determine if you can restrict how your file systems are mounted using these optionsand ensure only the activities you want can be performed. Where you do not need particularfunctionality and can apply restrictions such as nodev and nosuid, you should apply these. But,like immutable files, the mount options should also be used with caution, as they can causeissues on your system if improperly used; for example, marking your /boot file system as noexecwill result in your system being unable to boot.
Securing Removable DevicesOne of the ways your system can be penetrated is through viruses or the introduction of com-promised files onto your system through removable media such as floppy or CD drives. Morerecently, various other removable devices, such as memory cards and sticks or removable USBdevices, have created alternative methods for attackers to introduce malicious files onto yoursystem. I will show you two ways of reducing the risk of introducing malicious files throughyour removable devices.
The first way is to restrict who can mount removable devices. For most purposes on yoursystems there should be no reason for any users other than the root user to mount floppy disksor CDs. On most distributions this is the default setting and is achieved through the nouseroption in the /etc/fstab file, as discussed in the previous section. You should confirm that allyour removable devices in the /etc/fstab file have the nouser option set.
Additionally on Red Hat systems, non-root users can mount devices if they are signed ontothe console. This is managed by the file console.perms located in the /etc/security directory(see Chapter 1). This file allows non-root users logged into the console to mount CDs or floppydisks (and a variety of other removable devices such as Jaz or Zip drives). Listing 4-23 showsa sample of the contents of the console.perms file that you can use to control the mounting ofremovable devices.
Listing 4-23. console.perms Mounting Options
<console> 0660 <floppy> 0660 root.floppy
<console> 0600 <cdrom> 0660 root.disk
<console> 0600 <jaz> 0660 root.disk
<console> 0600 <zip> 0660 root.disk
<console> 0600 <memstick> 0600 root
<console> 0600 <diskonkey> 0660 root.disk
<console> 0600 <rem_ide> 0660 root.disk
<console> 0600 <fb> 0600 root
4444c04_final.qxd 1/5/05 12:46 AM Page 207
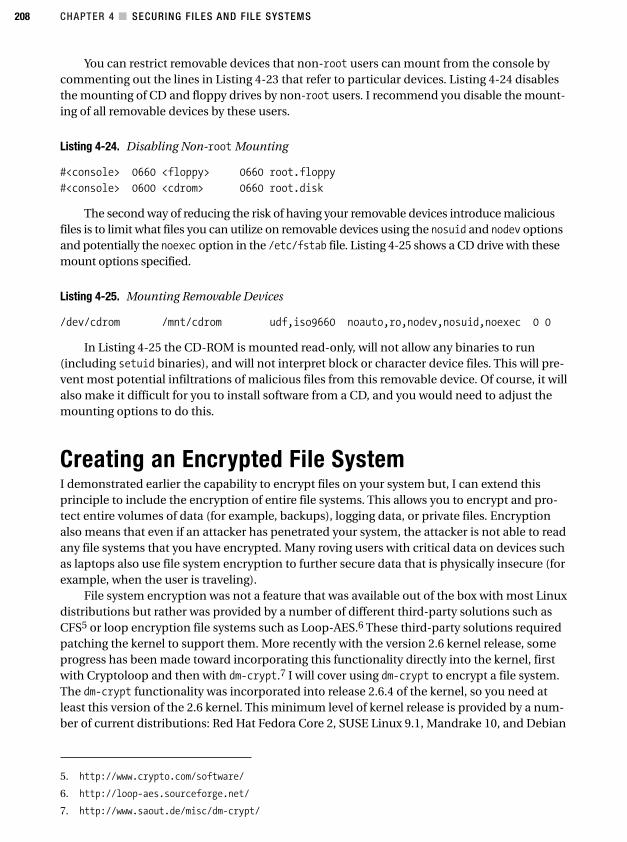
CHAPTER 4 ■ SECURING FILES AND FILE SYSTEMS208
You can restrict removable devices that non-root users can mount from the console bycommenting out the lines in Listing 4-23 that refer to particular devices. Listing 4-24 disablesthe mounting of CD and floppy drives by non-root users. I recommend you disable the mount-ing of all removable devices by these users.
Listing 4-24. Disabling Non-root Mounting
#<console> 0660 <floppy> 0660 root.floppy
#<console> 0600 <cdrom> 0660 root.disk
The second way of reducing the risk of having your removable devices introduce maliciousfiles is to limit what files you can utilize on removable devices using the nosuid and nodev optionsand potentially the noexec option in the /etc/fstab file. Listing 4-25 shows a CD drive with thesemount options specified.
Listing 4-25. Mounting Removable Devices
/dev/cdrom /mnt/cdrom udf,iso9660 noauto,ro,nodev,nosuid,noexec 0 0
In Listing 4-25 the CD-ROM is mounted read-only, will not allow any binaries to run(including setuid binaries), and will not interpret block or character device files. This will pre-vent most potential infiltrations of malicious files from this removable device. Of course, it willalso make it difficult for you to install software from a CD, and you would need to adjust themounting options to do this.
Creating an Encrypted File SystemI demonstrated earlier the capability to encrypt files on your system but, I can extend thisprinciple to include the encryption of entire file systems. This allows you to encrypt and pro-tect entire volumes of data (for example, backups), logging data, or private files. Encryptionalso means that even if an attacker has penetrated your system, the attacker is not able to readany file systems that you have encrypted. Many roving users with critical data on devices suchas laptops also use file system encryption to further secure data that is physically insecure (forexample, when the user is traveling).
File system encryption was not a feature that was available out of the box with most Linuxdistributions but rather was provided by a number of different third-party solutions such asCFS5 or loop encryption file systems such as Loop-AES.6 These third-party solutions requiredpatching the kernel to support them. More recently with the version 2.6 kernel release, someprogress has been made toward incorporating this functionality directly into the kernel, firstwith Cryptoloop and then with dm-crypt.7 I will cover using dm-crypt to encrypt a file system.The dm-crypt functionality was incorporated into release 2.6.4 of the kernel, so you need atleast this version of the 2.6 kernel. This minimum level of kernel release is provided by a num-ber of current distributions: Red Hat Fedora Core 2, SUSE Linux 9.1, Mandrake 10, and Debian
5. http://www.crypto.com/software/
6. http://loop-aes.sourceforge.net/
7. http://www.saout.de/misc/dm-crypt/
4444c04_final.qxd 1/5/05 12:46 AM Page 208

CHAPTER 4 ■ SECURING FILES AND FILE SYSTEMS 209
Sarge. Most other distributions are also moving toward providing this level of kernel release.Or if you need this functionality, you can upgrade your kernel to the required version yourself.To do this, you can start with the instructions provided in Chapter 1.
I will cover using dm_crypt to create a loop encryption file system. A loop encryption file sys-tem allows you to create an encrypted file system from an image file. This allows you to store pri-vate files in a single encrypted file system rather than encrypting all the individual files. This isthe simplest use of dm_crypt, and you can extend the principles demonstrated next to encryptentire partitions or disks.
Installing the Userland ToolsFirst, though, you need to ensure you have all the tools required to perform the encryption.If you have confirmed you have the required kernel version, you need to install the userlandtools that allow you to manipulate the dm_crypt functionality. These are provided by a packagecalled cryptsetup, which is available for Red Hat and Debian via those distribution’s updatetools. In Listing 4-26 you use yum to install it.
Listing 4-26. Installing cryptsetup
puppy# yum install cryptsetup
This will also prompt you to install the additional required packages: libgcrypt andlibgpg-error. Install all three packages.
■Tip These packages should also be on the distribution media for your distribution, but it is a good idea toensure you have the latest versions.
Enabling the FunctionalityMost distributions have provided the dm_crypt functionality in the form of loadable kernelmodules. You will need to load these modules before being able to use dm_crypt. You can usethe modprobe command to load the required modules like this:
puppy# modprobe aes dm_crypt dm_mod
The first module, aes, enables support for AES encryption, which is the default cipherused by dm_crypt.8 I will show you how to use dm_crypt with this cipher, but you can alsoenable alternative ciphers, such as Blowfish, by ensuring they have been compiled into yourkernel and then load them via modules.
You can check the contents of your kernel configuration file in /boot for which ciphers areavailable by using the following command:
puppy# cat /boot/config-version | grep 'CRYPT'
8. Read about AES at http://csrc.nist.gov/publications/fips/fips197/fips-197.pdf.
4444c04_final.qxd 1/5/05 12:46 AM Page 209
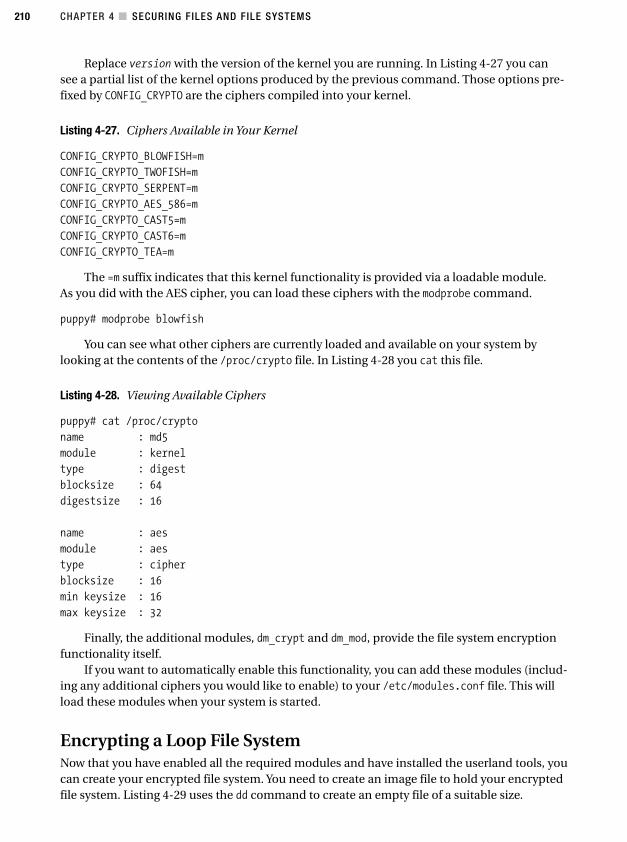
CHAPTER 4 ■ SECURING FILES AND FILE SYSTEMS210
Replace version with the version of the kernel you are running. In Listing 4-27 you cansee a partial list of the kernel options produced by the previous command. Those options pre-fixed by CONFIG_CRYPTO are the ciphers compiled into your kernel.
Listing 4-27. Ciphers Available in Your Kernel
CONFIG_CRYPTO_BLOWFISH=m
CONFIG_CRYPTO_TWOFISH=m
CONFIG_CRYPTO_SERPENT=m
CONFIG_CRYPTO_AES_586=m
CONFIG_CRYPTO_CAST5=m
CONFIG_CRYPTO_CAST6=m
CONFIG_CRYPTO_TEA=m
The =m suffix indicates that this kernel functionality is provided via a loadable module. As you did with the AES cipher, you can load these ciphers with the modprobe command.
puppy# modprobe blowfish
You can see what other ciphers are currently loaded and available on your system bylooking at the contents of the /proc/crypto file. In Listing 4-28 you cat this file.
Listing 4-28. Viewing Available Ciphers
puppy# cat /proc/crypto
name : md5
module : kernel
type : digest
blocksize : 64
digestsize : 16
name : aes
module : aes
type : cipher
blocksize : 16
min keysize : 16
max keysize : 32
Finally, the additional modules, dm_crypt and dm_mod, provide the file system encryptionfunctionality itself.
If you want to automatically enable this functionality, you can add these modules (includ-ing any additional ciphers you would like to enable) to your /etc/modules.conf file. This willload these modules when your system is started.
Encrypting a Loop File SystemNow that you have enabled all the required modules and have installed the userland tools, youcan create your encrypted file system. You need to create an image file to hold your encryptedfile system. Listing 4-29 uses the dd command to create an empty file of a suitable size.
4444c04_final.qxd 1/5/05 12:46 AM Page 210
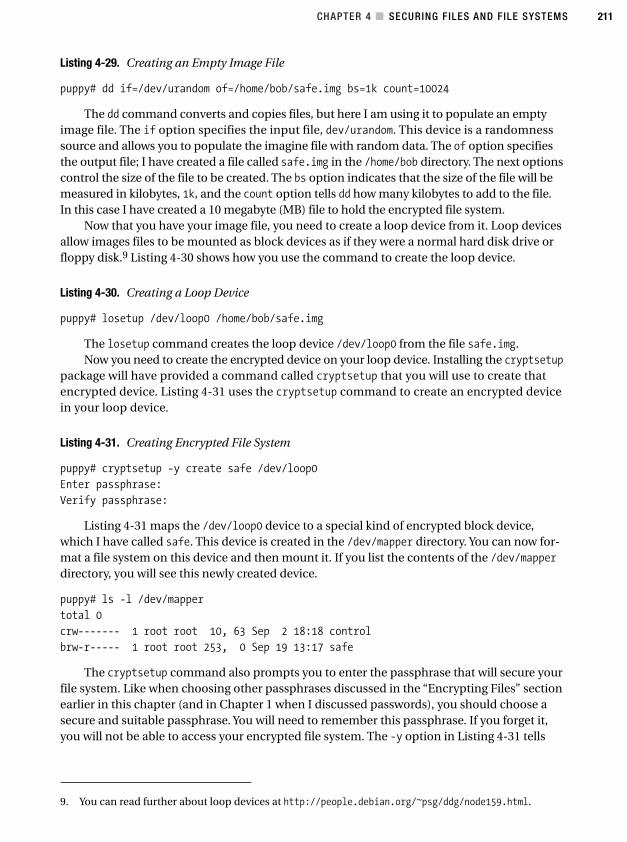
CHAPTER 4 ■ SECURING FILES AND FILE SYSTEMS 211
9. You can read further about loop devices at http://people.debian.org/~psg/ddg/node159.html.
Listing 4-29. Creating an Empty Image File
puppy# dd if=/dev/urandom of=/home/bob/safe.img bs=1k count=10024
The dd command converts and copies files, but here I am using it to populate an emptyimage file. The if option specifies the input file, dev/urandom. This device is a randomnesssource and allows you to populate the imagine file with random data. The of option specifiesthe output file; I have created a file called safe.img in the /home/bob directory. The next optionscontrol the size of the file to be created. The bs option indicates that the size of the file will bemeasured in kilobytes, 1k, and the count option tells dd how many kilobytes to add to the file.In this case I have created a 10 megabyte (MB) file to hold the encrypted file system.
Now that you have your image file, you need to create a loop device from it. Loop devicesallow images files to be mounted as block devices as if they were a normal hard disk drive orfloppy disk.9 Listing 4-30 shows how you use the command to create the loop device.
Listing 4-30. Creating a Loop Device
puppy# losetup /dev/loop0 /home/bob/safe.img
The losetup command creates the loop device /dev/loop0 from the file safe.img.Now you need to create the encrypted device on your loop device. Installing the cryptsetup
package will have provided a command called cryptsetup that you will use to create thatencrypted device. Listing 4-31 uses the cryptsetup command to create an encrypted devicein your loop device.
Listing 4-31. Creating Encrypted File System
puppy# cryptsetup -y create safe /dev/loop0
Enter passphrase:
Verify passphrase:
Listing 4-31 maps the /dev/loop0 device to a special kind of encrypted block device,which I have called safe. This device is created in the /dev/mapper directory. You can now for-mat a file system on this device and then mount it. If you list the contents of the /dev/mapperdirectory, you will see this newly created device.
puppy# ls -l /dev/mapper
total 0
crw------- 1 root root 10, 63 Sep 2 18:18 control
brw-r----- 1 root root 253, 0 Sep 19 13:17 safe
The cryptsetup command also prompts you to enter the passphrase that will secure yourfile system. Like when choosing other passphrases discussed in the “Encrypting Files” sectionearlier in this chapter (and in Chapter 1 when I discussed passwords), you should choose asecure and suitable passphrase. You will need to remember this passphrase. If you forget it,you will not be able to access your encrypted file system. The -y option in Listing 4-31 tells
4444c04_final.qxd 1/5/05 12:46 AM Page 211
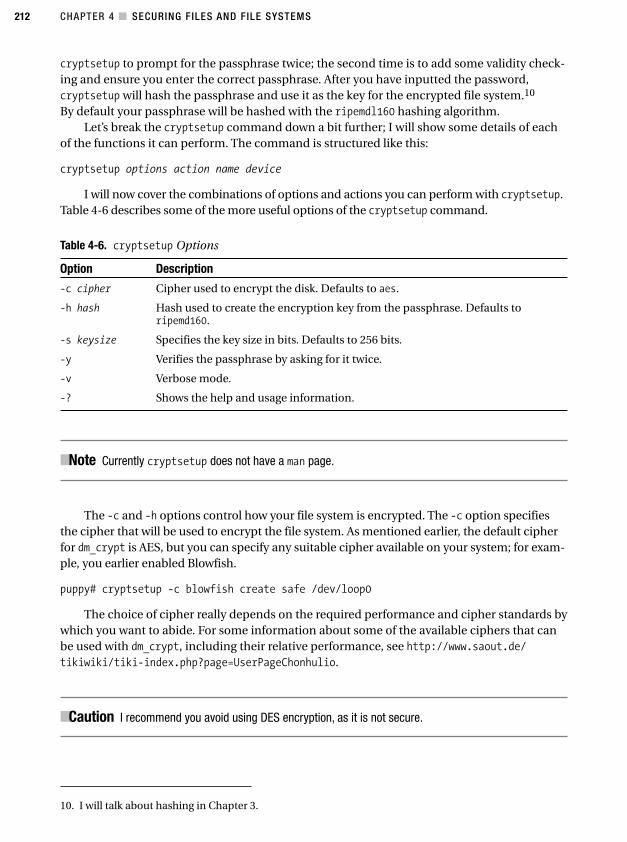
CHAPTER 4 ■ SECURING FILES AND FILE SYSTEMS212
10. I will talk about hashing in Chapter 3.
cryptsetup to prompt for the passphrase twice; the second time is to add some validity check-ing and ensure you enter the correct passphrase. After you have inputted the password,cryptsetup will hash the passphrase and use it as the key for the encrypted file system.10
By default your passphrase will be hashed with the ripemdl160 hashing algorithm.Let’s break the cryptsetup command down a bit further; I will show some details of each
of the functions it can perform. The command is structured like this:
cryptsetup options action name device
I will now cover the combinations of options and actions you can perform with cryptsetup.Table 4-6 describes some of the more useful options of the cryptsetup command.
Table 4-6. cryptsetup Options
Option Description
-c cipher Cipher used to encrypt the disk. Defaults to aes.
-h hash Hash used to create the encryption key from the passphrase. Defaults toripemd160.
-s keysize Specifies the key size in bits. Defaults to 256 bits.
-y Verifies the passphrase by asking for it twice.
-v Verbose mode.
-? Shows the help and usage information.
■Note Currently cryptsetup does not have a man page.
The -c and -h options control how your file system is encrypted. The -c option specifiesthe cipher that will be used to encrypt the file system. As mentioned earlier, the default cipherfor dm_crypt is AES, but you can specify any suitable cipher available on your system; for exam-ple, you earlier enabled Blowfish.
puppy# cryptsetup -c blowfish create safe /dev/loop0
The choice of cipher really depends on the required performance and cipher standards bywhich you want to abide. For some information about some of the available ciphers that canbe used with dm_crypt, including their relative performance, see http://www.saout.de/tikiwiki/tiki-index.php?page=UserPageChonhulio.
■Caution I recommend you avoid using DES encryption, as it is not secure.
4444c04_final.qxd 1/5/05 12:46 AM Page 212
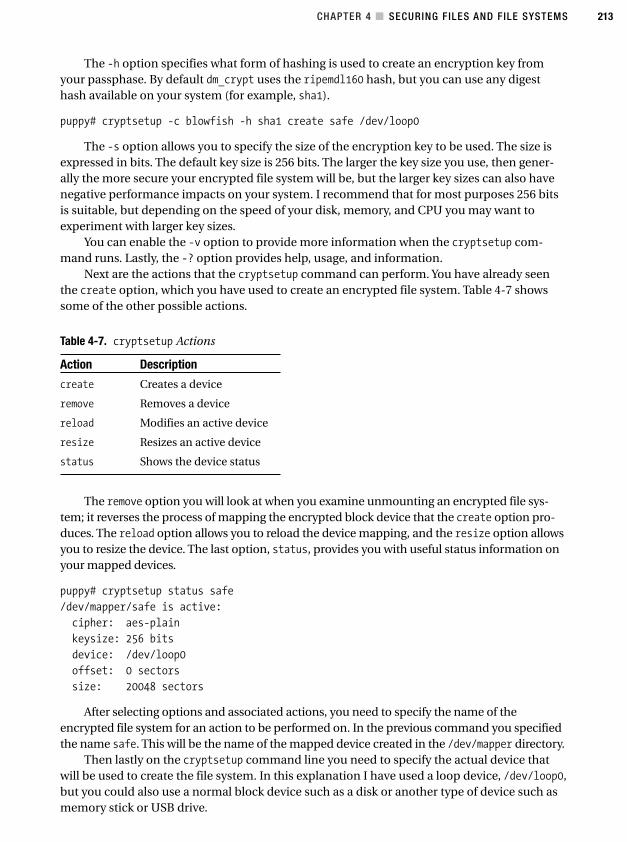
CHAPTER 4 ■ SECURING FILES AND FILE SYSTEMS 213
The -h option specifies what form of hashing is used to create an encryption key fromyour passphase. By default dm_crypt uses the ripemdl160 hash, but you can use any digesthash available on your system (for example, sha1).
puppy# cryptsetup -c blowfish -h sha1 create safe /dev/loop0
The -s option allows you to specify the size of the encryption key to be used. The size isexpressed in bits. The default key size is 256 bits. The larger the key size you use, then gener-ally the more secure your encrypted file system will be, but the larger key sizes can also havenegative performance impacts on your system. I recommend that for most purposes 256 bitsis suitable, but depending on the speed of your disk, memory, and CPU you may want toexperiment with larger key sizes.
You can enable the -v option to provide more information when the cryptsetup com-mand runs. Lastly, the -? option provides help, usage, and information.
Next are the actions that the cryptsetup command can perform. You have already seenthe create option, which you have used to create an encrypted file system. Table 4-7 showssome of the other possible actions.
Table 4-7. cryptsetup Actions
Action Description
create Creates a device
remove Removes a device
reload Modifies an active device
resize Resizes an active device
status Shows the device status
The remove option you will look at when you examine unmounting an encrypted file sys-tem; it reverses the process of mapping the encrypted block device that the create option pro-duces. The reload option allows you to reload the device mapping, and the resize option allowsyou to resize the device. The last option, status, provides you with useful status information onyour mapped devices.
puppy# cryptsetup status safe
/dev/mapper/safe is active:
cipher: aes-plain
keysize: 256 bits
device: /dev/loop0
offset: 0 sectors
size: 20048 sectors
After selecting options and associated actions, you need to specify the name of theencrypted file system for an action to be performed on. In the previous command you specifiedthe name safe. This will be the name of the mapped device created in the /dev/mapper directory.
Then lastly on the cryptsetup command line you need to specify the actual device thatwill be used to create the file system. In this explanation I have used a loop device, /dev/loop0,but you could also use a normal block device such as a disk or another type of device such asmemory stick or USB drive.
4444c04_final.qxd 1/5/05 12:46 AM Page 213
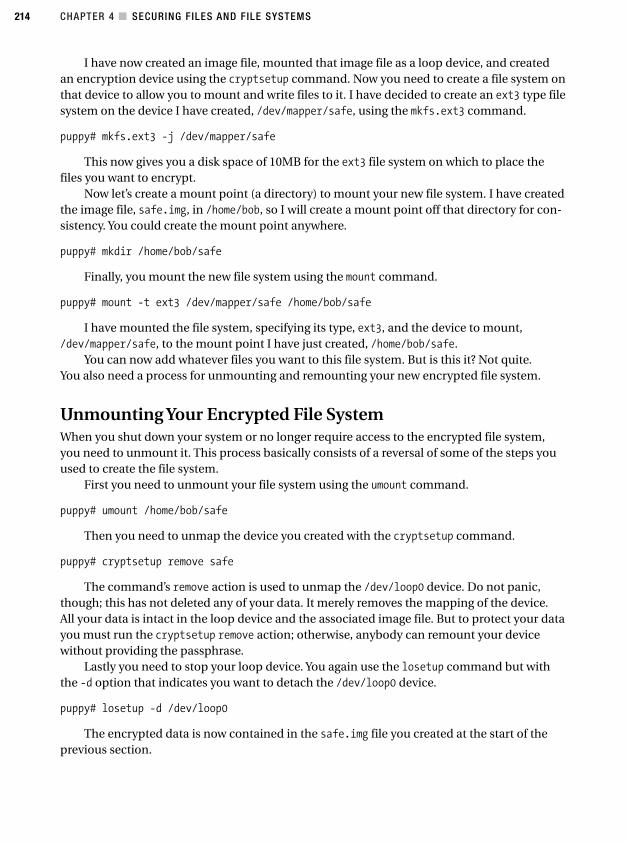
CHAPTER 4 ■ SECURING FILES AND FILE SYSTEMS214
I have now created an image file, mounted that image file as a loop device, and createdan encryption device using the cryptsetup command. Now you need to create a file system onthat device to allow you to mount and write files to it. I have decided to create an ext3 type filesystem on the device I have created, /dev/mapper/safe, using the mkfs.ext3 command.
puppy# mkfs.ext3 -j /dev/mapper/safe
This now gives you a disk space of 10MB for the ext3 file system on which to place thefiles you want to encrypt.
Now let’s create a mount point (a directory) to mount your new file system. I have createdthe image file, safe.img, in /home/bob, so I will create a mount point off that directory for con-sistency. You could create the mount point anywhere.
puppy# mkdir /home/bob/safe
Finally, you mount the new file system using the mount command.
puppy# mount -t ext3 /dev/mapper/safe /home/bob/safe
I have mounted the file system, specifying its type, ext3, and the device to mount,/dev/mapper/safe, to the mount point I have just created, /home/bob/safe.
You can now add whatever files you want to this file system. But is this it? Not quite.You also need a process for unmounting and remounting your new encrypted file system.
Unmounting Your Encrypted File SystemWhen you shut down your system or no longer require access to the encrypted file system,you need to unmount it. This process basically consists of a reversal of some of the steps youused to create the file system.
First you need to unmount your file system using the umount command.
puppy# umount /home/bob/safe
Then you need to unmap the device you created with the cryptsetup command.
puppy# cryptsetup remove safe
The command’s remove action is used to unmap the /dev/loop0 device. Do not panic,though; this has not deleted any of your data. It merely removes the mapping of the device.All your data is intact in the loop device and the associated image file. But to protect your datayou must run the cryptsetup remove action; otherwise, anybody can remount your devicewithout providing the passphrase.
Lastly you need to stop your loop device. You again use the losetup command but withthe -d option that indicates you want to detach the /dev/loop0 device.
puppy# losetup -d /dev/loop0
The encrypted data is now contained in the safe.img file you created at the start of theprevious section.
4444c04_final.qxd 1/5/05 12:46 AM Page 214
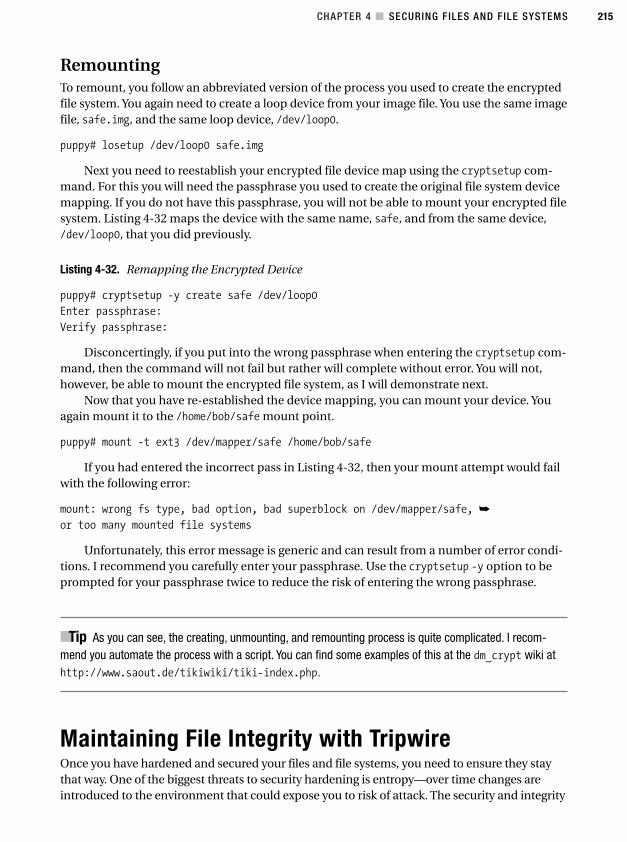
CHAPTER 4 ■ SECURING FILES AND FILE SYSTEMS 215
RemountingTo remount, you follow an abbreviated version of the process you used to create the encryptedfile system. You again need to create a loop device from your image file. You use the same imagefile, safe.img, and the same loop device, /dev/loop0.
puppy# losetup /dev/loop0 safe.img
Next you need to reestablish your encrypted file device map using the cryptsetup com-mand. For this you will need the passphrase you used to create the original file system devicemapping. If you do not have this passphrase, you will not be able to mount your encrypted filesystem. Listing 4-32 maps the device with the same name, safe, and from the same device,/dev/loop0, that you did previously.
Listing 4-32. Remapping the Encrypted Device
puppy# cryptsetup -y create safe /dev/loop0
Enter passphrase:
Verify passphrase:
Disconcertingly, if you put into the wrong passphrase when entering the cryptsetup com-mand, then the command will not fail but rather will complete without error. You will not,however, be able to mount the encrypted file system, as I will demonstrate next.
Now that you have re-established the device mapping, you can mount your device. Youagain mount it to the /home/bob/safe mount point.
puppy# mount -t ext3 /dev/mapper/safe /home/bob/safe
If you had entered the incorrect pass in Listing 4-32, then your mount attempt would failwith the following error:
mount: wrong fs type, bad option, bad superblock on /dev/mapper/safe, ➥
or too many mounted file systems
Unfortunately, this error message is generic and can result from a number of error condi-tions. I recommend you carefully enter your passphrase. Use the cryptsetup -y option to beprompted for your passphrase twice to reduce the risk of entering the wrong passphrase.
■Tip As you can see, the creating, unmounting, and remounting process is quite complicated. I recom-mend you automate the process with a script. You can find some examples of this at the dm_crypt wiki athttp://www.saout.de/tikiwiki/tiki-index.php.
Maintaining File Integrity with TripwireOnce you have hardened and secured your files and file systems, you need to ensure they staythat way. One of the biggest threats to security hardening is entropy—over time changes areintroduced to the environment that could expose you to risk of attack. The security and integrity
4444c04_final.qxd 1/5/05 12:46 AM Page 215
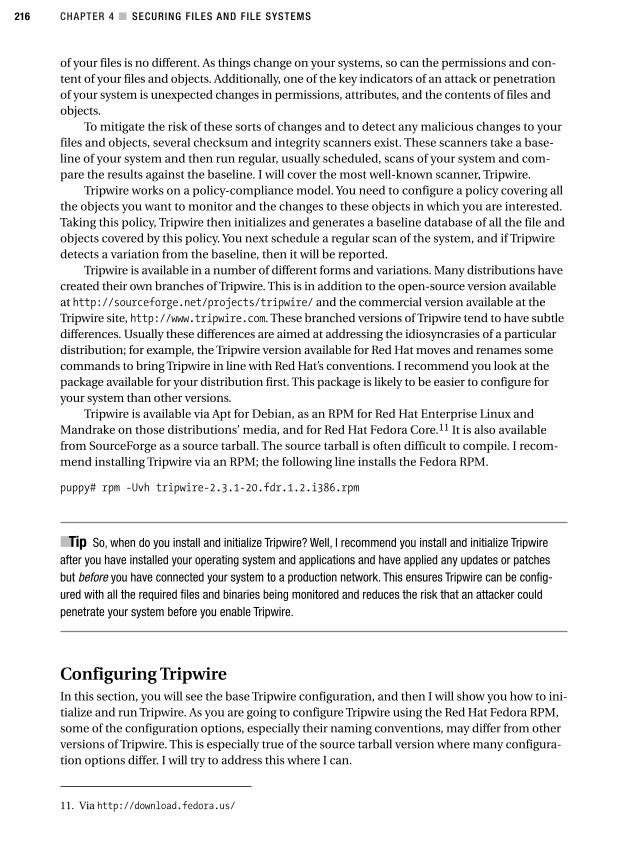
CHAPTER 4 ■ SECURING FILES AND FILE SYSTEMS216
11. Via http://download.fedora.us/
of your files is no different. As things change on your systems, so can the permissions and con-tent of your files and objects. Additionally, one of the key indicators of an attack or penetrationof your system is unexpected changes in permissions, attributes, and the contents of files andobjects.
To mitigate the risk of these sorts of changes and to detect any malicious changes to yourfiles and objects, several checksum and integrity scanners exist. These scanners take a base-line of your system and then run regular, usually scheduled, scans of your system and com-pare the results against the baseline. I will cover the most well-known scanner, Tripwire.
Tripwire works on a policy-compliance model. You need to configure a policy covering allthe objects you want to monitor and the changes to these objects in which you are interested.Taking this policy, Tripwire then initializes and generates a baseline database of all the file andobjects covered by this policy. You next schedule a regular scan of the system, and if Tripwiredetects a variation from the baseline, then it will be reported.
Tripwire is available in a number of different forms and variations. Many distributions havecreated their own branches of Tripwire. This is in addition to the open-source version availableat http://sourceforge.net/projects/tripwire/ and the commercial version available at theTripwire site, http://www.tripwire.com. These branched versions of Tripwire tend to have subtledifferences. Usually these differences are aimed at addressing the idiosyncrasies of a particulardistribution; for example, the Tripwire version available for Red Hat moves and renames somecommands to bring Tripwire in line with Red Hat’s conventions. I recommend you look at thepackage available for your distribution first. This package is likely to be easier to configure foryour system than other versions.
Tripwire is available via Apt for Debian, as an RPM for Red Hat Enterprise Linux andMandrake on those distributions’ media, and for Red Hat Fedora Core.11 It is also availablefrom SourceForge as a source tarball. The source tarball is often difficult to compile. I recom-mend installing Tripwire via an RPM; the following line installs the Fedora RPM.
puppy# rpm -Uvh tripwire-2.3.1-20.fdr.1.2.i386.rpm
■Tip So, when do you install and initialize Tripwire? Well, I recommend you install and initialize Tripwireafter you have installed your operating system and applications and have applied any updates or patchesbut before you have connected your system to a production network. This ensures Tripwire can be config-ured with all the required files and binaries being monitored and reduces the risk that an attacker couldpenetrate your system before you enable Tripwire.
Configuring TripwireIn this section, you will see the base Tripwire configuration, and then I will show you how to ini-tialize and run Tripwire. As you are going to configure Tripwire using the Red Hat Fedora RPM,some of the configuration options, especially their naming conventions, may differ from otherversions of Tripwire. This is especially true of the source tarball version where many configura-tion options differ. I will try to address this where I can.
4444c04_final.qxd 1/5/05 12:46 AM Page 216

CHAPTER 4 ■ SECURING FILES AND FILE SYSTEMS 217
After installing Tripwire, the configuration for the tool will be installed into the/etc/tripwire directory in the form of two files: twcfg.txt and twpol.txt. The twcfg.txt filecontains the default configuration for Tripwire, including the location of the Tripwire binariesand policies. The twpol.txt file contains the Tripwire policy that tells Tripwire what to moni-tor. I will talk about it in the “Explaining Tripwire Policy” section.
Listing 4-33 shows a sample of the twcfg.txt file.
Listing 4-33. Tripwire twcfg.txt
ROOT =/usr/sbin
POLFILE =/etc/tripwire/tw.pol
DBFILE =/var/lib/tripwire/$(HOSTNAME).twd
REPORTFILE =/var/lib/tripwire/report/$(HOSTNAME)-$(DATE).twr
SITEKEYFILE =/etc/tripwire/site.key
The file consists of directives and answers (for example, ROOT=/usr/sbin), which indicateswhere the Tripwire binaries are located. Most of the directives in twcfg.txt are self-explanatory.Table 4-8 describes some of the other directives and their functions.
Table 4-8. Tripwire twcfg.txt Directives
Directive Description
LATEPROMPTING=true | false Limits the time the Tripwire password is in memory bydelaying prompting for it. Defaults to false.
LOOSEDIRECTORYCHECKING=true | false If true, then report if files in a watched directory changebut do not report on the directory itself. Defaults tofalse.
SYSLOGREPORTING=true | false Specifies whether Tripwire logs to syslog.
EMAILREPORTLEVEL=number Specifies the verbosity of Tripwire e-mail reports.Defaults to 3.
REPORTLEVEL=number Specifies the verbosity of Tripwire printed reports.Defaults to 3.
MAILMETHOD=SENDMAIL | SMTP Specifies how Tripwire sends e-mail. Defaults toSENDMAIL.
MAILPROGRAM=program Specifies the Sendmail binary for Tripwire. Defaults to/usr/lib/sendmail -oi -t. Valid only if the mail methodis SENDMAIL.
SMTPHOST=SMTP Host Specifies the SMTP host to use. Valid only if the mailmethod is SMTP.
SMTPPORT=port Specifies the SMTP port to use. Valid only if the mailmethod is SMTP.
MAILNOVIOLATIONS=true | false Sends a notification when a Tripwire report is run even ifno violations were found.
■Note Most of these variables are present in all versions of Tripwire, but in some versions, most notably thesource tarball, these options are prefixed with the letters TW. So, MAILPRORAM becomes TWMAILPROGRAM.
4444c04_final.qxd 1/5/05 12:46 AM Page 217
CHAPTER 4 ■ SECURING FILES AND FILE SYSTEMS218
The defaults in twcfg.txt should be suitable for most Tripwire installations, but some ofthe options in Table 4-8 may be useful to tweak. If the first option, LATEPROMPTING, is set to true,then Tripwire delays the prompting of the user for passwords as long as possible to limit thetime the password spends in memory. If the second option, LOOSEDIRECTORYCHECKING, is set totrue, then it reports on changed files and objects in a watched directory but does not report thedirectory change itself. This stops Tripwire from reporting two changes, one for file and one forthe directory, which reduces redundant reporting. It defaults to false.
If you want Tripwire to log violations to syslog, then set the SYSLOGREPORTING directive totrue. You can control the verbosity of Tripwire’s reporting with the two report-level options,REPORTLEVEL and EMAILREPORTLEVEL. The verbosity ranges from 0 to 4, with 0 as minimal detailand 4 as the most verbose.
The last five options relate to how Tripwire notifies you via e-mail if it detects a violation.The first is the MAILMETHOD, which determines how Tripwire will send e-mails. Tripwire cansend e-mail directly via the Sendmail binary or can connect to an SMTP host. Specify SENDMAILto send via the binary and SMTP to send to an SMTP host. If you specified SENDMAIL as the mailmethod, then the location and options of the Sendmail binary are set with the MAILPROGRAMdirective. If you specified SMTP, then you can designate the SMTP host and port you want tosend e-mails to using the SMTPHOST and SMTPPORT directives, respectively.
If the last of these options, MAILNOVIOLATIONS, is set to true, then Tripwire generates ane-mail report when it is run, even if no violations are found. If you do not want to receivea report when Tripwire is run and does not find any violations, then set this option to false.The default is true.
Additionally, some variables are available to you in the twcfg.txt file, such as $(HOSTNAME)for hostname and $(DATE) for the current date.
Explaining Tripwire PolicyThe twpol.txt file is the input file for the Tripwire policy for your host. This file will be used tocreate a proprietary file called a policy file. The policy determines what files and objects Trip-wire will monitor for changes. It also specifies exactly what changes to those files and objectsit will monitor. The RPM you have installed comes with a default policy. This policy is designedto monitor Red Hat Fedora systems. If you are running Tripwire on a different distribution, itmay have come with a sample policy of its own. Either way you will need to change the policyto reflect exactly what objects you want to monitor on your system. I recommend you at leastmonitor important operating system files and directories, logging files, and the configurationfiles and binaries of your applications.
Let’s look at the twpol.txt file. The file contains two types of items. It contains the direc-tives and the rules that identify the individual files, and it contains the objects Tripwire ismonitoring. I will break the sample twpol.txt file into these items to demonstrate its contentand then show how to structure your Tripwire policy file.
Tripwire Policy Global VariablesThe global Tripwire variables define the location of Tripwire-specific objects and directoriesand the hostname of the system on which Tripwire is running. These variables are containedin a special section of the policy file called a directive. This directive is entitled @@sectionGLOBAL and is located toward the start of the policy file. Listing 4-34 shows a sample of theglobal variables section of the default twpol.txt file created when I installed Tripwire.
4444c04_final.qxd 1/5/05 12:46 AM Page 218
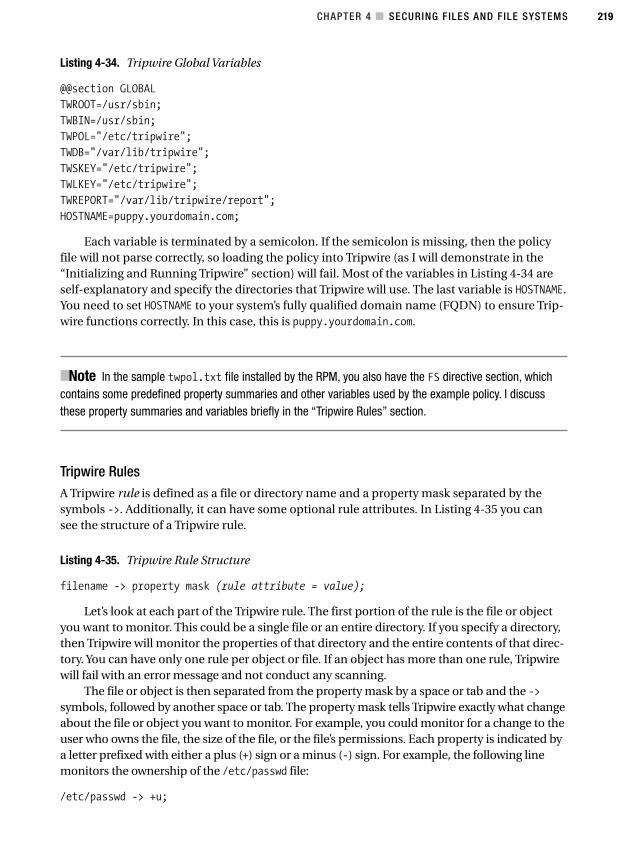
CHAPTER 4 ■ SECURING FILES AND FILE SYSTEMS 219
Listing 4-34. Tripwire Global Variables
@@section GLOBAL
TWROOT=/usr/sbin;
TWBIN=/usr/sbin;
TWPOL="/etc/tripwire";
TWDB="/var/lib/tripwire";
TWSKEY="/etc/tripwire";
TWLKEY="/etc/tripwire";
TWREPORT="/var/lib/tripwire/report";
HOSTNAME=puppy.yourdomain.com;
Each variable is terminated by a semicolon. If the semicolon is missing, then the policyfile will not parse correctly, so loading the policy into Tripwire (as I will demonstrate in the“Initializing and Running Tripwire” section) will fail. Most of the variables in Listing 4-34 areself-explanatory and specify the directories that Tripwire will use. The last variable is HOSTNAME.You need to set HOSTNAME to your system’s fully qualified domain name (FQDN) to ensure Trip-wire functions correctly. In this case, this is puppy.yourdomain.com.
■Note In the sample twpol.txt file installed by the RPM, you also have the FS directive section, whichcontains some predefined property summaries and other variables used by the example policy. I discussthese property summaries and variables briefly in the “Tripwire Rules” section.
Tripwire RulesA Tripwire rule is defined as a file or directory name and a property mask separated by thesymbols ->. Additionally, it can have some optional rule attributes. In Listing 4-35 you cansee the structure of a Tripwire rule.
Listing 4-35. Tripwire Rule Structure
filename -> property mask (rule attribute = value);
Let’s look at each part of the Tripwire rule. The first portion of the rule is the file or objectyou want to monitor. This could be a single file or an entire directory. If you specify a directory,then Tripwire will monitor the properties of that directory and the entire contents of that direc-tory. You can have only one rule per object or file. If an object has more than one rule, Tripwirewill fail with an error message and not conduct any scanning.
The file or object is then separated from the property mask by a space or tab and the ->symbols, followed by another space or tab. The property mask tells Tripwire exactly what changeabout the file or object you want to monitor. For example, you could monitor for a change to theuser who owns the file, the size of the file, or the file’s permissions. Each property is indicated bya letter prefixed with either a plus (+) sign or a minus (-) sign. For example, the following linemonitors the ownership of the /etc/passwd file:
/etc/passwd -> +u;
4444c04_final.qxd 1/5/05 12:46 AM Page 219

CHAPTER 4 ■ SECURING FILES AND FILE SYSTEMS220
The u is the Tripwire property for object ownership, and the plus (+) sign indicates you wantto monitor this property. You can add further properties to be monitored by adding property let-ters to your Tripwire rule. On the next line you add the property, s, which indicates file size:
/etc/passwd -> +su;
Now Tripwire will monitor for any changes to the /etc/passwd file’s ownership and its size.
■Note You must terminate all rules with a semicolon (;).
Table 4-9 lists all the properties you can monitor for in Tripwire.
Table 4-9. Tripwire Property Masks
Property Description
a Access time stamp.
b Number of blocks.
c Inode time stamp.
d ID of the device on which the inode resides.
g Owning group.
i Inode number.
l File increases in size.
m Modification time stamp.
n Number of links to the object.
p Permissions.
r ID of the device pointed to by inode. Valid only for device type objects.
s File size.
t File type.
u Object owner.
C CRC-32 hash value.
H Haval hash value.
M MD5 hash value.
S SHA hash value.
These properties are generally fairly self-explanatory file system attributes. The only prop-erty that needs further explanation is l. The l property is designed for files that will only grow.Tripwire thus monitors to see if the file shrinks in size but ignores the file if it grows in size.
The minus (-) sign prefixing a property indicates that you do not want to monitor for thatproperty. In the next line I am monitoring the /etc/passwd file for its ownership and size, butI have explicitly told Tripwire that I do not care about its last modification time stamp.
/etc/passwd -> +su-m;
4444c04_final.qxd 1/5/05 12:46 AM Page 220
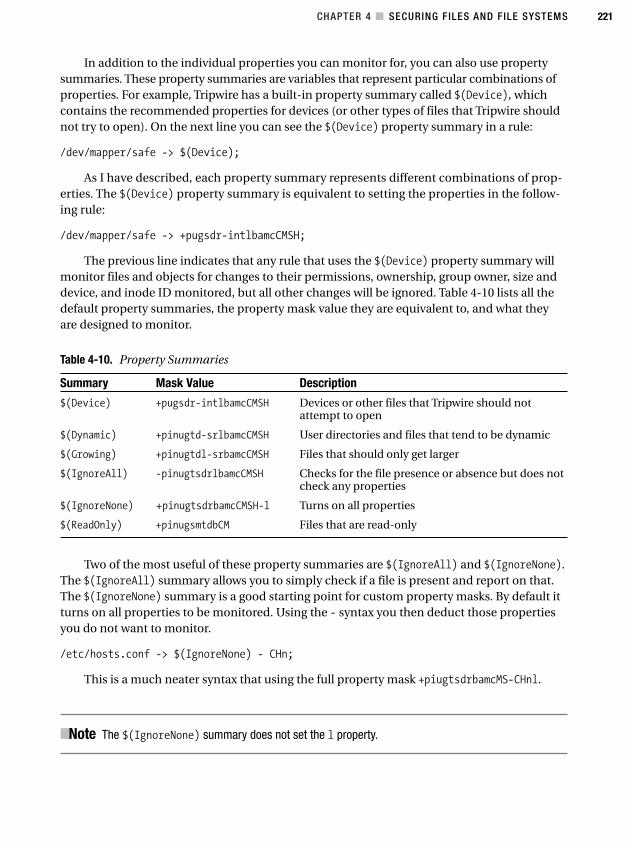
CHAPTER 4 ■ SECURING FILES AND FILE SYSTEMS 221
In addition to the individual properties you can monitor for, you can also use propertysummaries. These property summaries are variables that represent particular combinations ofproperties. For example, Tripwire has a built-in property summary called $(Device), whichcontains the recommended properties for devices (or other types of files that Tripwire shouldnot try to open). On the next line you can see the $(Device) property summary in a rule:
/dev/mapper/safe -> $(Device);
As I have described, each property summary represents different combinations of prop-erties. The $(Device) property summary is equivalent to setting the properties in the follow-ing rule:
/dev/mapper/safe -> +pugsdr-intlbamcCMSH;
The previous line indicates that any rule that uses the $(Device) property summary willmonitor files and objects for changes to their permissions, ownership, group owner, size anddevice, and inode ID monitored, but all other changes will be ignored. Table 4-10 lists all thedefault property summaries, the property mask value they are equivalent to, and what theyare designed to monitor.
Table 4-10. Property Summaries
Summary Mask Value Description
$(Device) +pugsdr-intlbamcCMSH Devices or other files that Tripwire should notattempt to open
$(Dynamic) +pinugtd-srlbamcCMSH User directories and files that tend to be dynamic
$(Growing) +pinugtdl-srbamcCMSH Files that should only get larger
$(IgnoreAll) -pinugtsdrlbamcCMSH Checks for the file presence or absence but does notcheck any properties
$(IgnoreNone) +pinugtsdrbamcCMSH-l Turns on all properties
$(ReadOnly) +pinugsmtdbCM Files that are read-only
Two of the most useful of these property summaries are $(IgnoreAll) and $(IgnoreNone).The $(IgnoreAll) summary allows you to simply check if a file is present and report on that.The $(IgnoreNone) summary is a good starting point for custom property masks. By default itturns on all properties to be monitored. Using the - syntax you then deduct those propertiesyou do not want to monitor.
/etc/hosts.conf -> $(IgnoreNone) - CHn;
This is a much neater syntax that using the full property mask +piugtsdrbamcMS-CHnl.
■Note The $(IgnoreNone) summary does not set the l property.
4444c04_final.qxd 1/5/05 12:46 AM Page 221
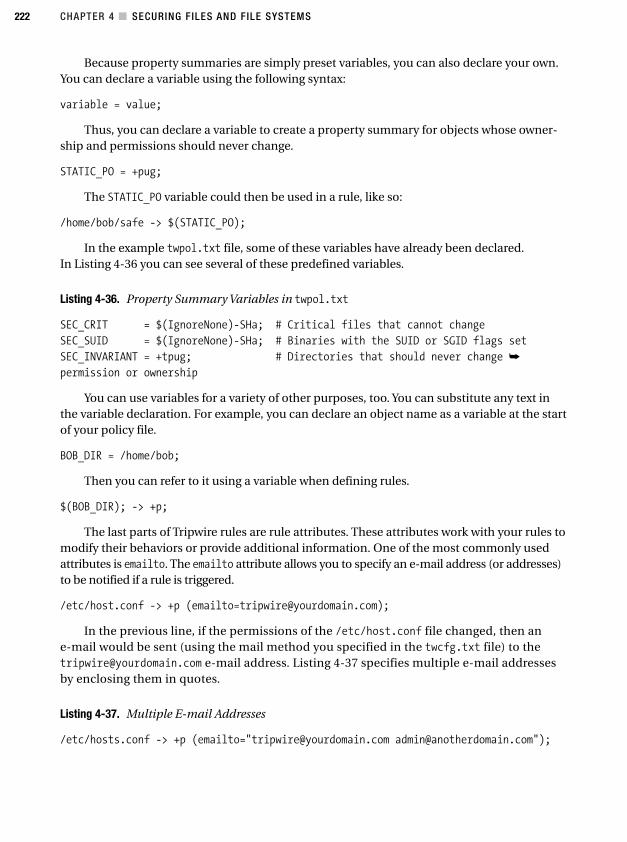
CHAPTER 4 ■ SECURING FILES AND FILE SYSTEMS222
Because property summaries are simply preset variables, you can also declare your own.You can declare a variable using the following syntax:
variable = value;
Thus, you can declare a variable to create a property summary for objects whose owner-ship and permissions should never change.
STATIC_PO = +pug;
The STATIC_PO variable could then be used in a rule, like so:
/home/bob/safe -> $(STATIC_PO);
In the example twpol.txt file, some of these variables have already been declared. In Listing 4-36 you can see several of these predefined variables.
Listing 4-36. Property Summary Variables in twpol.txt
SEC_CRIT = $(IgnoreNone)-SHa; # Critical files that cannot change
SEC_SUID = $(IgnoreNone)-SHa; # Binaries with the SUID or SGID flags set
SEC_INVARIANT = +tpug; # Directories that should never change ➥
permission or ownership
You can use variables for a variety of other purposes, too. You can substitute any text inthe variable declaration. For example, you can declare an object name as a variable at the startof your policy file.
BOB_DIR = /home/bob;
Then you can refer to it using a variable when defining rules.
$(BOB_DIR); -> +p;
The last parts of Tripwire rules are rule attributes. These attributes work with your rules tomodify their behaviors or provide additional information. One of the most commonly usedattributes is emailto. The emailto attribute allows you to specify an e-mail address (or addresses)to be notified if a rule is triggered.
/etc/host.conf -> +p ([email protected]);
In the previous line, if the permissions of the /etc/host.conf file changed, then ane-mail would be sent (using the mail method you specified in the twcfg.txt file) to [email protected] e-mail address. Listing 4-37 specifies multiple e-mail addressesby enclosing them in quotes.
Listing 4-37. Multiple E-mail Addresses
/etc/hosts.conf -> +p (emailto="[email protected] [email protected]");
4444c04_final.qxd 1/5/05 12:46 AM Page 222

CHAPTER 4 ■ SECURING FILES AND FILE SYSTEMS 223
■Tip You can test your e-mail settings using the command /usr/sbin/tripwire --test [email protected], replacing the [email protected] with the e-mail address to which youwant the test message sent.
The other attributes available to Tripwire are recurse, severity, and rulename. The recurseattribute is specified for directories and specifies whether Tripwire should recursively scan adirectory and its contents.
/etc -> +p (recurse=false);
Using the rule in the previous line Tripwire normally would scan the /etc directory andall its contents. With the recurse attribute set to false, Tripwire will now scan only the /etcdirectory itself for changes. You can also use the recurse setting to specify the depth to whichTripwire will recurse. A setting of recurse=0 will scan only the contents of the directory andnot recurse to any lower directories. On the other hand, a setting of recurse=1 will scan thecontents of the specified directory and recurse one directory level lower, and so on.
The severity and rulename attributes allow you to group files in the Tripwire reportaccording to classification. The severity attribute allows you to define a severity to the filebeing monitored.
/etc/host.conf -> +p (severity=99);
In your Tripwire report, all the results from rules, which have been specified as severity 99using this attribute, will be grouped, which allows you to better sort your results. The rulenameattribute provides similar functionality by allowing you to describe a particular rule.
/etc/host.conf -> +p (rulename="Network Files");
You can also assign multiple attributes to a rule. Listing 4-38 adds both severity andrulename attributes to a rule.
Listing 4-38. Multiple Attributes
/etc/host.conf -> +p (severity=99, rulename="Network Files");
You can also specify rule attributes for a group of rules. Listing 4-39 demonstrates this.
Listing 4-39. Attributes for Groups of Rules
(rulename="Network files", severity=99, [email protected])
{
/etc/host.conf -> +p;
/etc/hosts -> +p;
/etc/nsswitch.conf -> +p;
/etc/resolv.conf -> +p;
}
4444c04_final.qxd 1/5/05 12:46 AM Page 223
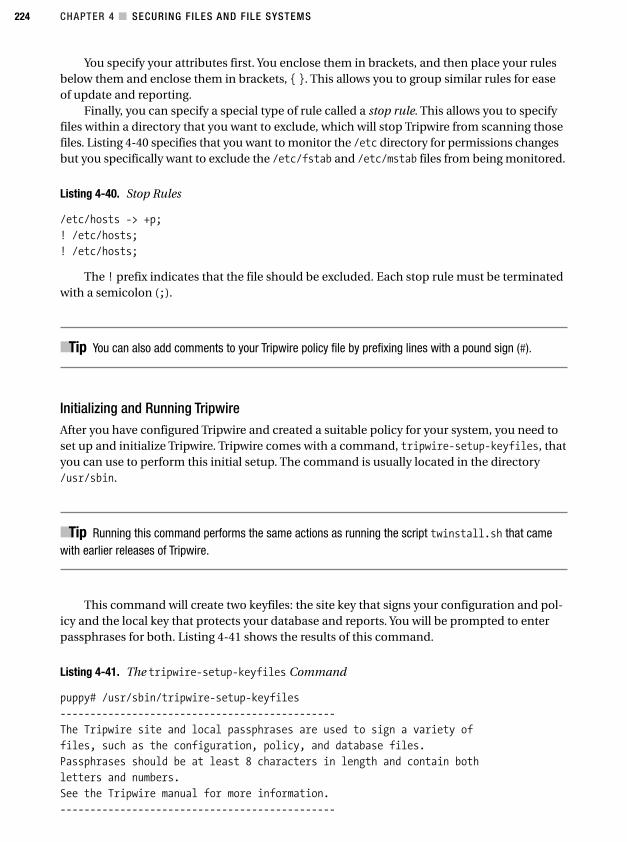
CHAPTER 4 ■ SECURING FILES AND FILE SYSTEMS224
You specify your attributes first. You enclose them in brackets, and then place your rulesbelow them and enclose them in brackets, { }. This allows you to group similar rules for easeof update and reporting.
Finally, you can specify a special type of rule called a stop rule. This allows you to specifyfiles within a directory that you want to exclude, which will stop Tripwire from scanning thosefiles. Listing 4-40 specifies that you want to monitor the /etc directory for permissions changesbut you specifically want to exclude the /etc/fstab and /etc/mstab files from being monitored.
Listing 4-40. Stop Rules
/etc/hosts -> +p;
! /etc/hosts;
! /etc/hosts;
The ! prefix indicates that the file should be excluded. Each stop rule must be terminatedwith a semicolon (;).
■Tip You can also add comments to your Tripwire policy file by prefixing lines with a pound sign (#).
Initializing and Running TripwireAfter you have configured Tripwire and created a suitable policy for your system, you need toset up and initialize Tripwire. Tripwire comes with a command, tripwire-setup-keyfiles, thatyou can use to perform this initial setup. The command is usually located in the directory/usr/sbin.
■Tip Running this command performs the same actions as running the script twinstall.sh that camewith earlier releases of Tripwire.
This command will create two keyfiles: the site key that signs your configuration and pol-icy and the local key that protects your database and reports. You will be prompted to enterpassphrases for both. Listing 4-41 shows the results of this command.
Listing 4-41. The tripwire-setup-keyfiles Command
puppy# /usr/sbin/tripwire-setup-keyfiles
----------------------------------------------
The Tripwire site and local passphrases are used to sign a variety of
files, such as the configuration, policy, and database files.
Passphrases should be at least 8 characters in length and contain both
letters and numbers.
See the Tripwire manual for more information.
----------------------------------------------
4444c04_final.qxd 1/5/05 12:46 AM Page 224
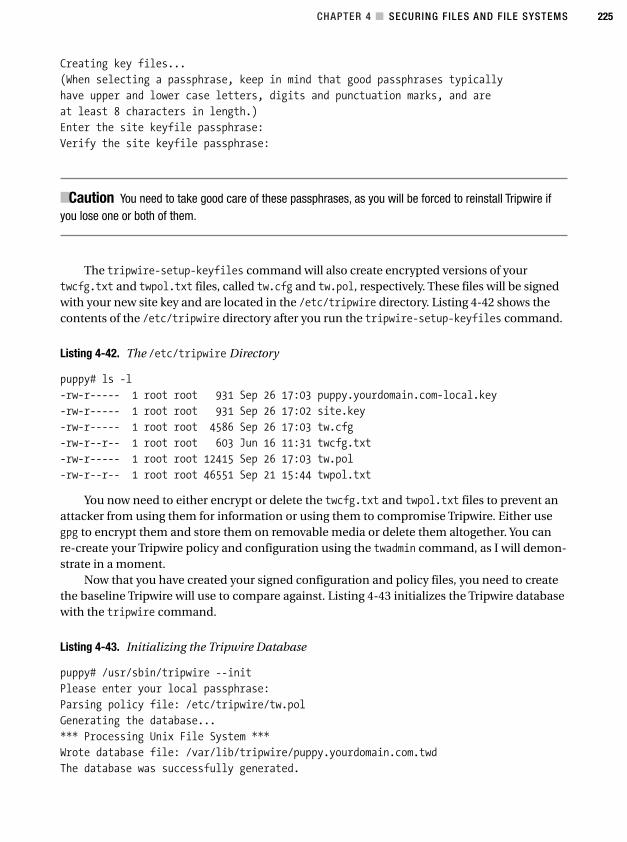
CHAPTER 4 ■ SECURING FILES AND FILE SYSTEMS 225
Creating key files...
(When selecting a passphrase, keep in mind that good passphrases typically
have upper and lower case letters, digits and punctuation marks, and are
at least 8 characters in length.)
Enter the site keyfile passphrase:
Verify the site keyfile passphrase:
■Caution You need to take good care of these passphrases, as you will be forced to reinstall Tripwire ifyou lose one or both of them.
The tripwire-setup-keyfiles command will also create encrypted versions of yourtwcfg.txt and twpol.txt files, called tw.cfg and tw.pol, respectively. These files will be signedwith your new site key and are located in the /etc/tripwire directory. Listing 4-42 shows thecontents of the /etc/tripwire directory after you run the tripwire-setup-keyfiles command.
Listing 4-42. The /etc/tripwire Directory
puppy# ls -l
-rw-r----- 1 root root 931 Sep 26 17:03 puppy.yourdomain.com-local.key
-rw-r----- 1 root root 931 Sep 26 17:02 site.key
-rw-r----- 1 root root 4586 Sep 26 17:03 tw.cfg
-rw-r--r-- 1 root root 603 Jun 16 11:31 twcfg.txt
-rw-r----- 1 root root 12415 Sep 26 17:03 tw.pol
-rw-r--r-- 1 root root 46551 Sep 21 15:44 twpol.txt
You now need to either encrypt or delete the twcfg.txt and twpol.txt files to prevent anattacker from using them for information or using them to compromise Tripwire. Either usegpg to encrypt them and store them on removable media or delete them altogether. You canre-create your Tripwire policy and configuration using the twadmin command, as I will demon-strate in a moment.
Now that you have created your signed configuration and policy files, you need to createthe baseline Tripwire will use to compare against. Listing 4-43 initializes the Tripwire databasewith the tripwire command.
Listing 4-43. Initializing the Tripwire Database
puppy# /usr/sbin/tripwire --init
Please enter your local passphrase:
Parsing policy file: /etc/tripwire/tw.pol
Generating the database...
*** Processing Unix File System ***
Wrote database file: /var/lib/tripwire/puppy.yourdomain.com.twd
The database was successfully generated.
4444c04_final.qxd 1/5/05 12:46 AM Page 225
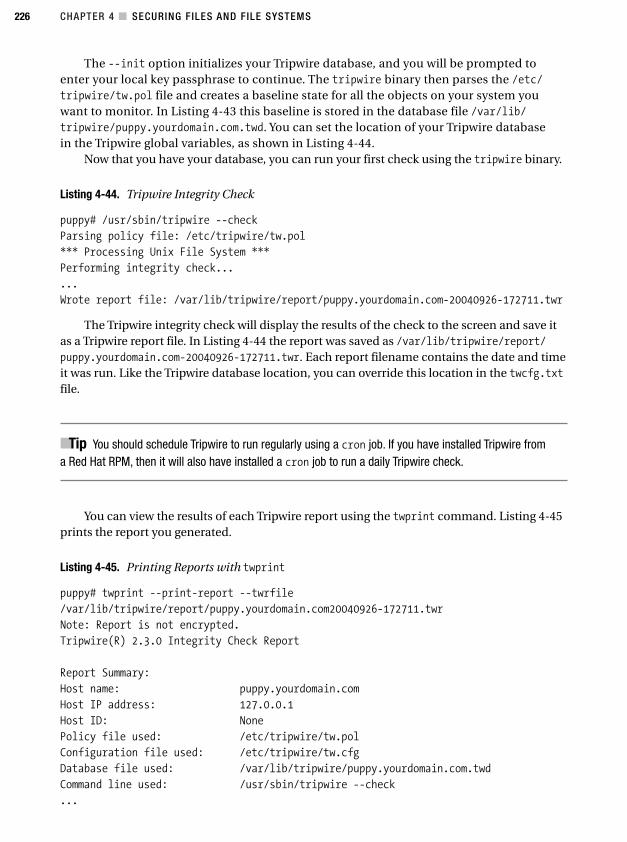
CHAPTER 4 ■ SECURING FILES AND FILE SYSTEMS226
The --init option initializes your Tripwire database, and you will be prompted toenter your local key passphrase to continue. The tripwire binary then parses the /etc/tripwire/tw.pol file and creates a baseline state for all the objects on your system youwant to monitor. In Listing 4-43 this baseline is stored in the database file /var/lib/tripwire/puppy.yourdomain.com.twd. You can set the location of your Tripwire databasein the Tripwire global variables, as shown in Listing 4-44.
Now that you have your database, you can run your first check using the tripwire binary.
Listing 4-44. Tripwire Integrity Check
puppy# /usr/sbin/tripwire --check
Parsing policy file: /etc/tripwire/tw.pol
*** Processing Unix File System ***
Performing integrity check...
...
Wrote report file: /var/lib/tripwire/report/puppy.yourdomain.com-20040926-172711.twr
The Tripwire integrity check will display the results of the check to the screen and save itas a Tripwire report file. In Listing 4-44 the report was saved as /var/lib/tripwire/report/puppy.yourdomain.com-20040926-172711.twr. Each report filename contains the date and timeit was run. Like the Tripwire database location, you can override this location in the twcfg.txtfile.
■Tip You should schedule Tripwire to run regularly using a cron job. If you have installed Tripwire froma Red Hat RPM, then it will also have installed a cron job to run a daily Tripwire check.
You can view the results of each Tripwire report using the twprint command. Listing 4-45prints the report you generated.
Listing 4-45. Printing Reports with twprint
puppy# twprint --print-report --twrfile
/var/lib/tripwire/report/puppy.yourdomain.com20040926-172711.twr
Note: Report is not encrypted.
Tripwire(R) 2.3.0 Integrity Check Report
Report Summary:
Host name: puppy.yourdomain.com
Host IP address: 127.0.0.1
Host ID: None
Policy file used: /etc/tripwire/tw.pol
Configuration file used: /etc/tripwire/tw.cfg
Database file used: /var/lib/tripwire/puppy.yourdomain.com.twd
Command line used: /usr/sbin/tripwire --check
...
4444c04_final.qxd 1/5/05 12:46 AM Page 226

CHAPTER 4 ■ SECURING FILES AND FILE SYSTEMS 227
Total objects scanned: 45606
Total violations found: 1
...
Rule Name: Tripwire Data Files (/var/lib/tripwire)
Severity Level: 100
...
Modified Objects: 1
Modified object name: /var/lib/tripwire/puppy.yourdomain.com.twd
Property: Expected Observed
* Mode -rw-r--r-- -rwxr-xr-x
■Tip You may want to run the twprint command through the more or less commands to display it moreeffectively.
The --print-report option prints the report specified by the --twrfile option. InListing 4-45 you can also see an abbreviated extract of the Tripwire report. I have removedsome of the output of the Tripwire report but have kept the key sections: the summary of theparameters used, the total objects scanned, and the violations recorded. Only one violationis recorded, a modification of the puppy.yourdomain.com.twd file located in the /var/lib/tripwire directory. You can see that the permissions of this file have been modified from -rw-r--r-- to -rwxr-xr-x. The report displays the rule name, Tripwire Data Files, for therule covering the /var/lib/tripwire directory and the severity level of 100.
You can also use the twprint command to display a Tripwire database entry for a file orobject on your system. Listing 4-46 demonstrates this.
Listing 4-46. Printing Tripwire Database Entry
puppy# twprint --print-dbfile /etc/passwd
Object name: /etc/passwd
Property: Value:
------------- -----------
Object Type Regular File
Device Number 770
Inode Number 607017
Mode -rw-r--r--
Num Links 1
UID root (0)
GID root (0)
I have displayed the database entry for the file /etc/passwd using the --print-dbfileoption. If you use twprint --print-dbfile without an individual file specified, it will outputthe entire contents of the Tripwire database.
If you find violations in your report, you should first check if these are normal occur-rences. During normal operations some files may change, be added to, or be removed from
4444c04_final.qxd 1/5/05 12:46 AM Page 227
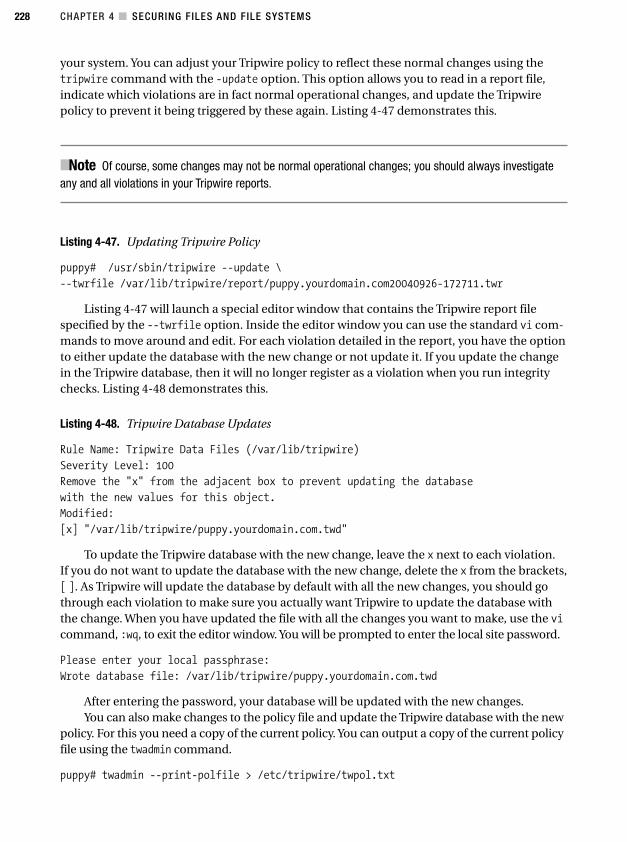
CHAPTER 4 ■ SECURING FILES AND FILE SYSTEMS228
your system. You can adjust your Tripwire policy to reflect these normal changes using thetripwire command with the -update option. This option allows you to read in a report file,indicate which violations are in fact normal operational changes, and update the Tripwirepolicy to prevent it being triggered by these again. Listing 4-47 demonstrates this.
■Note Of course, some changes may not be normal operational changes; you should always investigateany and all violations in your Tripwire reports.
Listing 4-47. Updating Tripwire Policy
puppy# /usr/sbin/tripwire --update \
--twrfile /var/lib/tripwire/report/puppy.yourdomain.com20040926-172711.twr
Listing 4-47 will launch a special editor window that contains the Tripwire report filespecified by the --twrfile option. Inside the editor window you can use the standard vi com-mands to move around and edit. For each violation detailed in the report, you have the optionto either update the database with the new change or not update it. If you update the changein the Tripwire database, then it will no longer register as a violation when you run integritychecks. Listing 4-48 demonstrates this.
Listing 4-48. Tripwire Database Updates
Rule Name: Tripwire Data Files (/var/lib/tripwire)
Severity Level: 100
Remove the "x" from the adjacent box to prevent updating the database
with the new values for this object.
Modified:
[x] "/var/lib/tripwire/puppy.yourdomain.com.twd"
To update the Tripwire database with the new change, leave the x next to each violation. If you do not want to update the database with the new change, delete the x from the brackets,[ ]. As Tripwire will update the database by default with all the new changes, you should gothrough each violation to make sure you actually want Tripwire to update the database withthe change. When you have updated the file with all the changes you want to make, use the vicommand, :wq, to exit the editor window. You will be prompted to enter the local site password.
Please enter your local passphrase:
Wrote database file: /var/lib/tripwire/puppy.yourdomain.com.twd
After entering the password, your database will be updated with the new changes.You can also make changes to the policy file and update the Tripwire database with the new
policy. For this you need a copy of the current policy. You can output a copy of the current policyfile using the twadmin command.
puppy# twadmin --print-polfile > /etc/tripwire/twpol.txt
4444c04_final.qxd 1/5/05 12:46 AM Page 228
CHAPTER 4 ■ SECURING FILES AND FILE SYSTEMS 229
■Tip The twadmin command also has other options that can help you administer Tripwire. See thetwadmin man file.
You can then edit your policy file to add or remove rules. Once you have finished yourediting, you need to use the tripwire command with the --update-policy option to updateyour policy file.
puppy# /usr/sbin/tripwire --update-policy /etc/tripwire/twpol.txt
Please enter your local passphrase:
Please enter your site passphrase:
======== Policy Update: Processing section Unix File System.
======== Step 1: Gathering information for the new policy.
======== Step 2: Updating the database with new objects.
======== Step 3: Pruning unneeded objects from the database.
Wrote policy file: /etc/tripwire/tw.pol
Wrote database file: /var/lib/tripwire/puppy.yourdomain.com.twd
You will be prompted for your local and site passphrases; when the process is completed,your Tripwire database will be updated with your new policy. You then need to either encryptor delete your plain-text twpol.txt file to protect it.
Network File System (NFS)Sun designed the Network File System (NFS) protocol in the mid-1980s to provide remote net-work share functionality to Unix systems. Much like Microsoft Windows’ file system sharing, ituses a client-server model, with a system hosting the shared data and “sharing” it with a seriesof clients who can connect to the shared file system. NFS describes this process as “exporting”a file system, and the remote clients connecting to the exported file system are “importing.”The NFS protocol runs over either TCP or UDP and uses Sun’s Remote Procedure Call (RPC)protocol to communicate with and authenticate clients.
NFS is vulnerable to three major forms of attack: eavesdropping, penetration, and substitu-tion. The eavesdropping vulnerability appears because NFS broadcasts its information across thenetwork, potentially allowing an attacker to listen in or sniff that data as it crosses the network.The penetration vulnerability appears because of the potential for an attacker to compromise andpenetrate the NFS file system and thus gain unauthorized access to the data. A substitution attackoccurs when an attacker intervenes in the NFS data transmission process to change or deleteinformation traveling across the network.
My recommendation with NFS is simply to not use it. In the past, NFS has proven vulner-able to a variety of types of attack, its vulnerabilities are common, it is technically and opera-tionally complicated to secure (or encrypt) NFS data, and the authentication of remote usersto NFS file systems lacks the resiliency required to share files in a production environment.
4444c04_final.qxd 1/5/05 12:46 AM Page 229
CHAPTER 4 ■ SECURING FILES AND FILE SYSTEMS230
■Note A new version of NFS has been proposed. NFS 4 proposes considerably stronger security, includingstrong authentication and encryption. You can read about it at http://www.nfsv4.org/. At this stage,though, it is still in RFC form and not ready for deployment.
If you decide to use NFS (and I really think you should not!), I recommend you mitigatethe risk as much as possible by following these guidelines:
• Keep your version of NFS and its associated applications such as portmap or rpcbindup-to-date and ensure you install any NFS-related security patches.
• Export file systems only to those hosts you need. Restrict your file systems to onlythose hosts and users who need them. Do not publicly export file systems.
• Install NFS file systems on different hard disks or partitions other than your other filesystems.
• If possible, export your file systems as read-only to help reduce the risk attackerscould manipulate or delete your data.
• Disable setuid files on your NFS file systems using the nosuid option in the/etc/fstab file.
• If possible, use SSH to tunnel NFS traffic.
• Block the NFS TCP and UDP ports 2049 and 111 from any of your Internet-facinghosts or any hosts or networks that you do not trust or are unsure whether they aresecure.
■Tip A couple of tools are available to you that can help monitor and secure NFS. The first is nfsbug,12
which checks NFS installations for bugs and security holes. It is a little dated these days but still offerssome insights. Also available is the nfswatch13 command, which can be used to monitor NFS traffic onyour network.
12. Available from http://ftp.nluug.nl/security/coast/sysutils/nfsbug/
13. Available from http://ftp.rge.com/pub/networking/nfswatch/
4444c04_final.qxd 1/5/05 12:46 AM Page 230
CHAPTER 4 ■ SECURING FILES AND FILE SYSTEMS 231
ResourcesThe following are some resources for you to use.
Mailing Lists• dm_crypt: Send empty e-mail to: [email protected]
• Tripwire: http://sourceforge.net/mail/?group_id=3130
Sites• Adeos: http://linux.wku.edu/~lamonml/software/adeos/
• dm_crypt: http://www.saout.de/misc/dm-crypt/
• dm_crypt wiki: http://www.saout.de/tikiwiki/tiki-index.php
• NFS: http://nfs.sourceforge.net/
• NFS 4: http://www.nfsv4.org/
• sXid: http://linux.cudeso.be/linuxdoc/sxid.php
• Tripwire: http://www.tripwire.org/
Sites About ACLs• Red Hat Enterprise Linux and ACLs: http://www.redhat.com/docs/manuals/
enterprise/RHEL-3-Manual/sysadmin-guide/ch-acls.html
• Linux ACLs: http://www.vanemery.com/Linux/ACL/linux-acl.html
• Debian ACLs: http://acl.bestbits.at/
4444c04_final.qxd 1/5/05 12:46 AM Page 231
233
C H A P T E R 5
■ ■ ■
Understanding Logging and Log Monitoring
One of the key facets of maintaining a secure and hardened environment is knowing whatis going on in that environment. You can achieve this through your careful and systematic useof logs. Most systems and most applications, such as Apache or Postfix, come with default log-ging options. This is usually enough for you to diagnose problems or determine the ongoingoperational status of your system and applications. When it comes to security, you need todelve a bit deeper into the logging world to gain a fuller and clearer understanding of what isgoing on with your systems and applications and thus identify potential threats and attacks.
Logs are also key targets for someone who wants to penetrate your system—for two rea-sons. The first reason is that your logs often contain vital clues about your systems and theirsecurity. Attackers often target your logs in an attempt to discover more about your systems.As a result, you need to ensure your log files and /var/log directory are secure from intrudersand that log files are available only to authorized users. Additionally, if you transmit your logsover your network to a centralized log server, you need to ensure no one can intercept or divertyour logs.
The second reason is that if attackers do penetrate your systems, the last thing they wantto happen is that you detect them and shut them out of your system. One of the easiest waysto prevent you from seeing their activities is to whitewash your logs so that you see only whatyou expect to see. Early detection of intrusion using log monitoring and analysis allows you tospot them before they blind you.
I will cover a few topics in this chapter, including the basic syslog daemon and one of itssuccessors, the considerably more powerful and more secure syslog-NG. I will also cover theSimple Event Correlation (SEC) tool, which can assist you in highlighting events in your logs.I will also discuss logging to databases and secure ways to deliver your logs to a centralizedlocation for review and analysis.
SyslogSyslog is the ubiquitous Unix tool for logging. It is present on all flavors of Linux and indeedon almost all flavors of Unix. You can add it using third-party tools to Windows systems, andmost network devices such as firewalls, routers, and switches are capable of generating Syslogmessages. This results in the Syslog format being the closest thing to a universal logging stan-dard that exists.
4444c05_final.qxd 1/5/05 12:52 AM Page 233
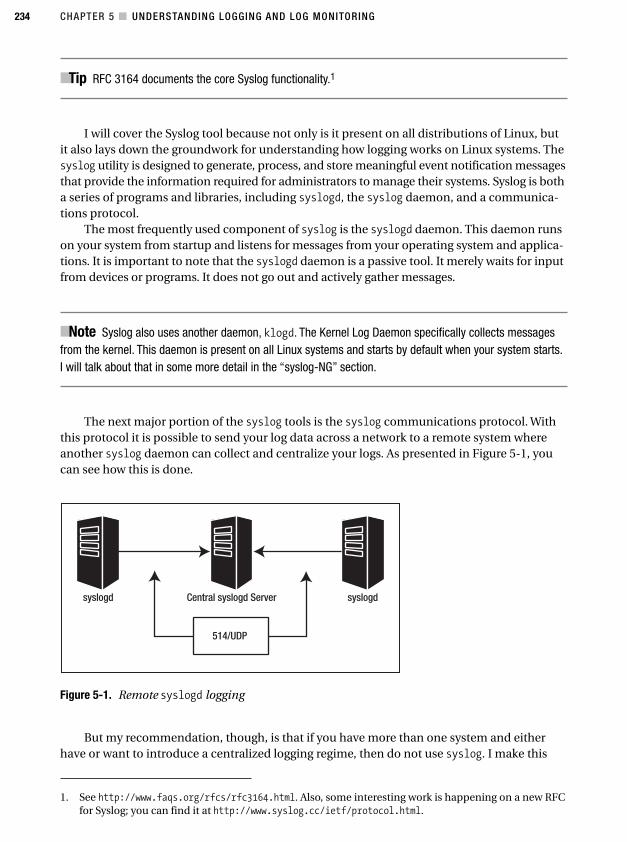
CHAPTER 5 ■ UNDERSTANDING LOGGING AND LOG MONITORING234
Figure 5-1. Remote syslogd logging
■Tip RFC 3164 documents the core Syslog functionality.1
I will cover the Syslog tool because not only is it present on all distributions of Linux, butit also lays down the groundwork for understanding how logging works on Linux systems. Thesyslog utility is designed to generate, process, and store meaningful event notification messagesthat provide the information required for administrators to manage their systems. Syslog is botha series of programs and libraries, including syslogd, the syslog daemon, and a communica-tions protocol.
The most frequently used component of syslog is the syslogd daemon. This daemon runson your system from startup and listens for messages from your operating system and applica-tions. It is important to note that the syslogd daemon is a passive tool. It merely waits for inputfrom devices or programs. It does not go out and actively gather messages.
■Note Syslog also uses another daemon, klogd. The Kernel Log Daemon specifically collects messagesfrom the kernel. This daemon is present on all Linux systems and starts by default when your system starts.I will talk about that in some more detail in the “syslog-NG” section.
The next major portion of the syslog tools is the syslog communications protocol. Withthis protocol it is possible to send your log data across a network to a remote system whereanother syslog daemon can collect and centralize your logs. As presented in Figure 5-1, youcan see how this is done.
1. See http://www.faqs.org/rfcs/rfc3164.html. Also, some interesting work is happening on a new RFCfor Syslog; you can find it at http://www.syslog.cc/ietf/protocol.html.
But my recommendation, though, is that if you have more than one system and eitherhave or want to introduce a centralized logging regime, then do not use syslog. I make this
4444c05_final.qxd 1/5/05 12:52 AM Page 234
CHAPTER 5 ■ UNDERSTANDING LOGGING AND LOG MONITORING 235
recommendation as a result of syslog’s reliance on the User Datagram Protocol (UDP) totransmit information. UDP has three major limitations.
• On a congested network, packets are frequently lost.
• The protocol is not fully secure.
• You are open to replay and Denial of Service (DoS) attacks.
If you are serious about secure logging, I recommend the syslog-NG package, which I willdiscuss later in the “syslog-NG” section.
The syslog communications protocol allows you to send syslog messages across yournetwork via UDP to a centralized log server running syslogd. The syslogd daemon usuallystarts by default when your system boots. It is configured to collect a great deal of informationabout the ongoing activities of your system “out of the box.”
■Tip Syslog traffic is usually transmitted via UDP on port 514.
Configuring SyslogThe syslog daemon is controlled by a configuration file located in /etc called syslog.conf.This file contains the information about what devices and programs syslogd is listening for(filtered by facility and priority), where that information is to be stored, or what actions areto be taken when that information is received. You can see in Listing 5-1 that each line isstructured into two fields, a selector field and an action field, which are separated by spacesor a tab.
Listing 5-1. syslog.conf Syntax
mail.info /var/log/maillog
This example shows a facility and priority selector, mail.info, together with the action/var/log/maillog. The facility represented here is mail, and the priority is info. Overall theline in Listing 5-1 indicates that all messages generated by the mail facility with a priority ofinfo or higher will be logged to the file /var/log/maillog. Let’s examine now what facilities,priorities, and actions are available to you on a Linux system.
FacilitiesThe facility identifies the source of the syslog message. Some operating-system functions anddaemons and other common application daemons have standard facilities attached to them.The mail and kern facilities are two good examples. The first example is the facility for all mail-related event notification messages. The second example is the facility for all kernel-relatedmessages. Other processes and daemons that do not have a prespecified facility are able to logto the local facilities, ranging from local0 to local7. For example, I use local4 as the facilityfor all messages on my Cisco devices. Table 5-1 lists all Syslog facilities.
4444c05_final.qxd 1/5/05 12:52 AM Page 235
CHAPTER 5 ■ UNDERSTANDING LOGGING AND LOG MONITORING236
Table 5-1. Syslog Facilities on Linux
Facility Purpose
auth Security-related messages
auth-priv Access control messages
cron cron-related messages
daemon System daemons and process messages
kern Kernel messages
local0–local7 Reserved for locally defined messages
lpr Spooling subsystem messages
mail Mail-related messages
mark Time-stamped messages generated by syslogd
news Network News–related messages (for example, Usenet)
syslog Syslog-related messages
user The default facility when no facility is specified
uucp UUCP-related messages
■Tip On Mandrake and Red Hat systems local7 points at /var/log/boot.log, which contains all themessages generated during the boot of your system.
The mark facility is a special case. It is used by the time-stamped messages that syslogd gen-erates when you use the -m (minutes) flag. You can find more on this in the “Starting syslogd andIts Options” section.
You have two special facilities: *, which indicates all facilities, and none, which negatesa facility selection. As shown in the following example, you can use these two facilities aswildcard selectors. See Listing 5-2.
Listing 5-2. syslog.conf *Wildcard Selector
*.emerg /dev/console
This will send all messages of the emerg priority, regardless of facility, to the console. Youcan also use the none wildcard selector to not select messages from a particular facility.
kern.none /var/log/messages
This will tell syslog to not log any kernel messages to the file /var/log/messages.
PrioritiesPriorities are organized in an escalating scale of importance. They are debug, info, notice,warning, err, crit, alert, and emerg. Each priority selector applies to the priority stated and allhigher priorities, so uucp.err indicates all uucp facility messages of err, crit, alert, and emergpriorities.
4444c05_final.qxd 1/5/05 12:52 AM Page 236
CHAPTER 5 ■ UNDERSTANDING LOGGING AND LOG MONITORING 237
As with facilities, you can use the wildcard selectors * and none. Additionally, you can usetwo other modifiers: = and !. The = modifier indicates that only one priority is selected; forexample, cron.=crit indicates that only cron facility messages of crit priority are to be selected.The ! modifier has a negative effect; for example, cron.!crit selects all cron facility messagesexcept those of crit or higher priority. You can also combine the two modifiers to create theopposite effect of the = modifier so that cron.!=crit selects all cron facility messages exceptthose of crit priority. Only one priority and one priority wildcard can be listed per selector.
ActionsActions tell the syslogd what to do with the event notification messages it receives. Listing 5-3lists the four actions syslogd can take, including logging to a file, device file, named pipes (fifos)and the console or a user’s screen. In Listing 5-2 you saw device logging at work with all theemerg messages on the system being sent to the console.
Listing 5-3. File, Device, and Named Pipe Actions
cron.err /var/log/cron
auth.!=emerg /dev/lpr3
auth-priv root,bob
news.=notice |/var/log/newspipe
In the first line all cron messages of err priority and higher are logged to the file/var/log/cron. The second line has all auth messages except those of emerg priority beingsent to a local printer lpr3. The third line sends all auth-priv messages to the users rootand bob if they are logged in. The fourth sends all news messages of notice or greater prior-ity to a named pipe called /var/log/newspipe (you would need to create this pipe yourselfwith the mkfifo command).
■Caution When logging to files, syslogd allows you to add a hyphen (-) to the front of the filename likethis: -/var/log/auth. This tells syslog to not sync the file after writing to it. This is designed to speed upthe process of writing to the log. But it can also mean that if your system crashes between write attempts,you will lose data. Unless your logging system is suffering from performance issues, I recommend you donot use this option.
You can also log to a remote system (see Listing 5-4).
Listing 5-4. Logging to a Remote System
mail @puppy.yourdomain.com
In this example all mail messages are sent to the host puppy.yourdomain.com on UDP port514. This requires that the syslogd daemon on puppy is started with the -r option; otherwise,the syslogd port will not be open.
4444c05_final.qxd 1/5/05 12:52 AM Page 237
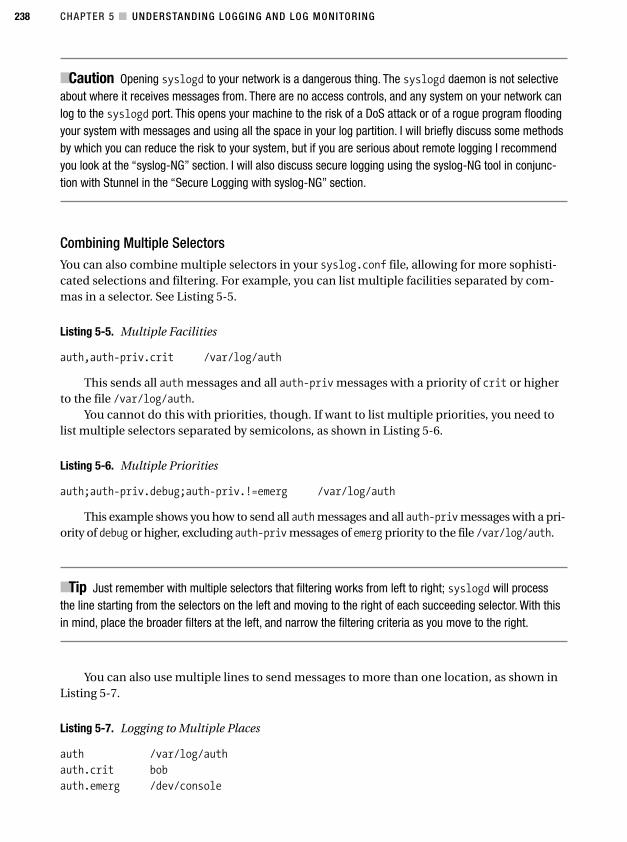
CHAPTER 5 ■ UNDERSTANDING LOGGING AND LOG MONITORING238
■Caution Opening syslogd to your network is a dangerous thing. The syslogd daemon is not selectiveabout where it receives messages from. There are no access controls, and any system on your network canlog to the syslogd port. This opens your machine to the risk of a DoS attack or of a rogue program floodingyour system with messages and using all the space in your log partition. I will briefly discuss some methodsby which you can reduce the risk to your system, but if you are serious about remote logging I recommendyou look at the “syslog-NG” section. I will also discuss secure logging using the syslog-NG tool in conjunc-tion with Stunnel in the “Secure Logging with syslog-NG” section.
Combining Multiple SelectorsYou can also combine multiple selectors in your syslog.conf file, allowing for more sophisti-cated selections and filtering. For example, you can list multiple facilities separated by com-mas in a selector. See Listing 5-5.
Listing 5-5. Multiple Facilities
auth,auth-priv.crit /var/log/auth
This sends all auth messages and all auth-priv messages with a priority of crit or higherto the file /var/log/auth.
You cannot do this with priorities, though. If want to list multiple priorities, you need tolist multiple selectors separated by semicolons, as shown in Listing 5-6.
Listing 5-6. Multiple Priorities
auth;auth-priv.debug;auth-priv.!=emerg /var/log/auth
This example shows you how to send all auth messages and all auth-priv messages with a pri-ority of debug or higher, excluding auth-priv messages of emerg priority to the file /var/log/auth.
■Tip Just remember with multiple selectors that filtering works from left to right; syslogd will processthe line starting from the selectors on the left and moving to the right of each succeeding selector. With thisin mind, place the broader filters at the left, and narrow the filtering criteria as you move to the right.
You can also use multiple lines to send messages to more than one location, as shown inListing 5-7.
Listing 5-7. Logging to Multiple Places
auth /var/log/auth
auth.crit bob
auth.emerg /dev/console
4444c05_final.qxd 1/5/05 12:52 AM Page 238
CHAPTER 5 ■ UNDERSTANDING LOGGING AND LOG MONITORING 239
Here all auth messages are logged to /var/log/auth as previously, but auth messages ofcrit or higher priority are also sent to user bob, if he is logged in. Those of emerg priority arealso sent to the console.
Starting syslogd and Its OptionsThe syslogd daemon and its sister process, the klogd daemon, are both started when your sys-tem boots up. This is usually in the form of an init script; for example, on Red Hat the syslogscript in /etc/rc.d/init.d/ starts syslogd and klogd. You can pass a number of options to thesyslogd program when it starts.
■Tip On most Red Hat and Mandrake systems the syslog file in /etc/sysconfig/ is referenced by thesyslog init script and contains the options to be passed to syslogd and klogd when it starts.
The first option you will look at is the debug option (see Listing 5-8).
Listing 5-8. Running syslogd with Debug
puppy# syslogd -d
This will start syslogd and prevent it from forking to the background. It will display a largeamount of debugging information to the current screen (you will probably want to pipe it intomore to make it easier to read). A lot of the information the debug option displays is not usefulto the everyday user, but it will tell you if your syslog.conf file has any syntax errors, which issomething that becomes useful if your file grows considerably.
The next option you will look at tells syslogd where to find the syslog.conf file. By defaultsyslogd will look for /etc/syslog.conf, but you can override this (see Listing 5-9).
Listing 5-9. Starting syslogd with a Different Config File
puppy# syslogd -f /etc/puppylog.conf
In this example syslogd would look for /etc/puppylog.conf. If this file does not exist, thensyslogd will terminate. This is useful for testing a new syslog.conf file without overwriting theold one.
I discussed earlier mark facility messages. These are time stamps that are generated atspecified intervals in your logs that look something like this:
Feb 24 21:46:05 puppy -- MARK -
They are useful, amongst other reasons, for acting as markers for programs parsing yourlog files. These time stamps are generated using the -m mins option when you start syslogd. Togenerate a mark message every ten minutes, you would start syslogd as shown in Listing 5-10.
Listing 5-10. Generating mark Messages
puppy# syslogd -m 10
4444c05_final.qxd 1/5/05 12:52 AM Page 239
CHAPTER 5 ■ UNDERSTANDING LOGGING AND LOG MONITORING240
Remember that mark is a facility in its own right, and you can direct its output to a partic-ular file or destination (see Listing 5-11).
Listing 5-11. Using the mark Facility
mark /var/log/messages
In Listing 5-11 all mark facility messages will be directed to /var/log/messages. By defaultmost syslogd daemons start with the -m option set to 0.
Often when you set up a chroot environment, the application in the jail is unable to log tosyslog because of the restrictive nature of the chroot jail. In this instance, you can create an addi-tional log socket inside the chroot jail and use the -a option when you start syslogd to allow sys-log to listen to it. You will see how this works in more detail in Chapter 11 when I show how to setup a BIND daemon in a chroot jail. See Listing 5-12.
Listing 5-12. Listening to Additional Sockets
puppy# syslogd -a /chroot/named/dev/log -a /chroot/apache/dev/log
Here the syslogd daemon is listening to two additional sockets: one in /chroot/named/dev/log and the other in /chroot/apache/dev/log.
Lastly you will look at the -r option, which allows syslogd to receive messages fromexternal sources on UDP port 514. See Listing 5-13.
Listing 5-13. Enabling Remote Logging
puppy# syslogd -r
By default most syslogd daemons start without -r enabled, and you will have to specifi-cally enable this option to get syslogd to listen.
■Tip If you enable the -r option, you will need to punch a hole in your firewall to allow remote syslogddaemons to connect to your system.
If you are going to use syslogd for remote logging, then you have a couple of ways to makeyour installation more secure. The most obvious threat to syslogd daemons are DoS attacks inwhich your system is flooded with messages that could completely fill your disks. If your logs arelocated in the root partition, your system can potentially crash. To reduce the risk of this poten-tial crash, I recommend you store your logs on a nonroot partition. This means that even if allthe space on your disk is consumed, the system will not crash. The second way to secure yoursyslogd for remote logging is to ensure your firewall rules allow connections only from thosesystems that will be sending their logging data to you. Do not open your syslog daemon to allincoming traffic!
4444c05_final.qxd 1/5/05 12:52 AM Page 240
CHAPTER 5 ■ UNDERSTANDING LOGGING AND LOG MONITORING 241
syslog-NGSyslog and syslogd are useful tools; however, not only are they dated, but they also have limi-tations in the areas of reliability and security that do not make them the ideal tools to use ina hardened environment. A worthy successor to syslog is syslog-NG. Developed to overcomethe limitations of syslog, it represents a “new-generation” look at logging with an emphasis onavailability and flexibility and considerably more regard for security.
Additionally, syslog-NG allows for more sophisticated message filtering, manipulation,and interaction. syslog-NG is freeware developed by Balazs Scheidler and is available fromhttp://www.balabit.com/products/syslog_ng/.
■Note syslog-NG goes through a lot of active development, and new features are added all the time. Withthe active development cycle of the product, sometimes the documentation becomes out-of-date. If you wantto keep up with all the activity and need help for something that is not explained in the documentation, thenI recommend you subscribe to the syslog-NG mailing list at https://lists.balabit.hu/mailman/listinfo/syslog-ng. syslog-NG’s author, Balazs Scheidler, is a regular and helpful participant on the list.As a result of this busy development cycle, I also recommend you use the most recent stable release oflibol and syslog-NG to get the most out of the package.
The following sections cover installing and compiling syslog-NG and then configuring itas a replacement for syslog. I will also cover configuring syslog-NG to allow you to store andquery log messages in a database. Finally, I will cover secure syslog-NG logging in a distrib-uted environment.
Installing and Configuring syslog-NGDownload syslog-NG and libol (an additional library required for installing syslog-NG) fromhttp://www.balabit.com/products/syslog_ng/upgrades.bbq. You will need to build libol first.So unpack the tar file, and compile the libol package.
puppy# ./configure && make && make install
■Tip If you do not want to install libol, you can omit the make install command, and when you configuresyslog-NG, you need to tell it where to find libol using ./configure --with-libol=/path/to/libol.
Now unpack syslog-NG, enter the syslog-NG directory, and configure the package.
puppy# ./configure
4444c05_final.qxd 1/5/05 12:52 AM Page 241
CHAPTER 5 ■ UNDERSTANDING LOGGING AND LOG MONITORING242
2. I tested it on Mandrake 9.2, SuSE 9, and Debian 3, in addition to Red Hat Enterprise 3, Red Hat 8.0,Red Hat 9.0, and Fedora Core 1, and it logged without issues.
By default syslog-NG is installed to /usr/local/sbin, but you can override this by enteringthe following:
puppy# ./configure --prefix=/new/directory/here
Also by default syslog-NG looks for its conf file in /usr/local/etc/syslog-ng.conf. Youcan override this also. I recommend using /etc/syslog-ng.
puppy# ./configure --sysconfdir=/etc/syslog-ng
Then make and install syslog-NG.
puppy# make && make install
This will create a binary called syslog-ng and install it either to the /usr/local/sbin/directory or to whatever directory you have specified if you have overridden it with the prefixoption.
The contrib DirectoryWithin the syslog-NG package comes a few other useful items. In the contrib directory isa collection of init scripts for a variety of systems including Red Hat and SuSE. These can beeasily adapted to suit your particular distribution. Also in the contrib directory is an awk scriptcalled syslog2ng, which converts syslog.conf files to syslog-ng.conf files. See Listing 5-14.
Listing 5-14. Using the syslog2ng Script
puppy# ./syslog2ng < /etc/syslog.conf > syslog-ng.conf
This will convert the contents of your syslog.conf file into the file called syslog-ng.conf.This is especially useful if you have done a lot of work customizing your syslog.conf file.
Lastly, in the contrib directory are several sample syslog-ng.conf files, including syslog-ng.conf.RedHat, which provides a syslog-NG configuration that replicates the default syslog.conffile on a Red Hat system. (Note that it assumes you have disabled the klogd daemon and are usingsyslog-ng for kernel logging as well.) This file should also work on most Linux distributions.2
Also, among the sample syslog-ng.conf files is syslog-ng.conf.doc, which is an annotatedconfiguration file with the manual entries for each option and function embedded next tothat option or function.
Running and Configuring syslog-NGAs mentioned previously, syslog-NG comes with a number of sample init scripts that youshould be able to adapt for your system. Use one of these scripts, and set syslog-NG to startwhen you boot up. As shown in Table 5-2. the syslog-ng daemon has some command-lineoptions.
4444c05_final.qxd 1/5/05 12:52 AM Page 242
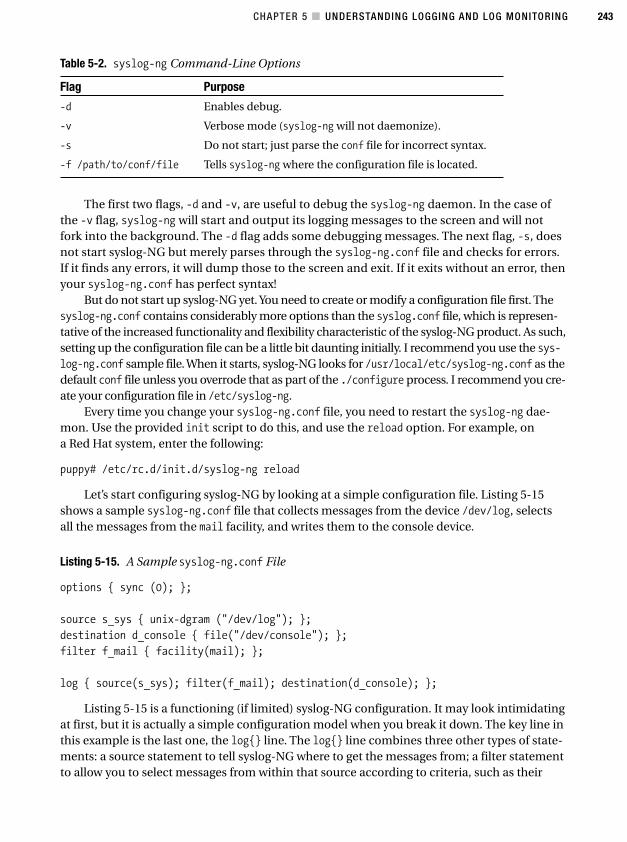
CHAPTER 5 ■ UNDERSTANDING LOGGING AND LOG MONITORING 243
Table 5-2. syslog-ng Command-Line Options
Flag Purpose
-d Enables debug.
-v Verbose mode (syslog-ng will not daemonize).
-s Do not start; just parse the conf file for incorrect syntax.
-f /path/to/conf/file Tells syslog-ng where the configuration file is located.
The first two flags, -d and -v, are useful to debug the syslog-ng daemon. In the case ofthe -v flag, syslog-ng will start and output its logging messages to the screen and will notfork into the background. The -d flag adds some debugging messages. The next flag, -s, doesnot start syslog-NG but merely parses through the syslog-ng.conf file and checks for errors.If it finds any errors, it will dump those to the screen and exit. If it exits without an error, thenyour syslog-ng.conf has perfect syntax!
But do not start up syslog-NG yet. You need to create or modify a configuration file first. Thesyslog-ng.conf contains considerably more options than the syslog.conf file, which is represen-tative of the increased functionality and flexibility characteristic of the syslog-NG product. As such,setting up the configuration file can be a little bit daunting initially. I recommend you use the sys-log-ng.conf sample file. When it starts, syslog-NG looks for /usr/local/etc/syslog-ng.conf as thedefault conf file unless you overrode that as part of the ./configure process. I recommend you cre-ate your configuration file in /etc/syslog-ng.
Every time you change your syslog-ng.conf file, you need to restart the syslog-ng dae-mon. Use the provided init script to do this, and use the reload option. For example, ona Red Hat system, enter the following:
puppy# /etc/rc.d/init.d/syslog-ng reload
Let’s start configuring syslog-NG by looking at a simple configuration file. Listing 5-15shows a sample syslog-ng.conf file that collects messages from the device /dev/log, selectsall the messages from the mail facility, and writes them to the console device.
Listing 5-15. A Sample syslog-ng.conf File
options { sync (0); };
source s_sys { unix-dgram ("/dev/log"); };
destination d_console { file("/dev/console"); };
filter f_mail { facility(mail); };
log { source(s_sys); filter(f_mail); destination(d_console); };
Listing 5-15 is a functioning (if limited) syslog-NG configuration. It may look intimidatingat first, but it is actually a simple configuration model when you break it down. The key line inthis example is the last one, the log{} line. The log{} line combines three other types of state-ments: a source statement to tell syslog-NG where to get the messages from; a filter statementto allow you to select messages from within that source according to criteria, such as their
4444c05_final.qxd 1/5/05 12:52 AM Page 243
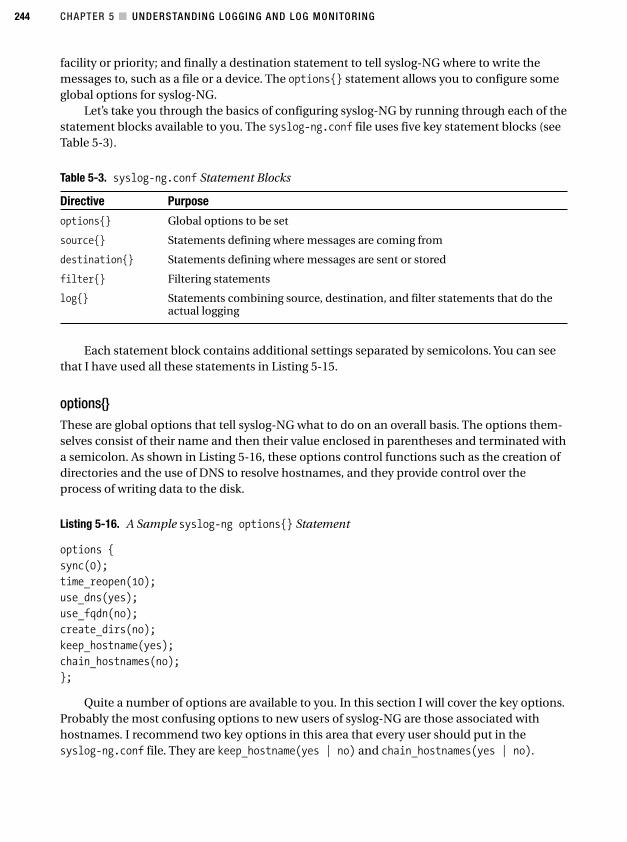
CHAPTER 5 ■ UNDERSTANDING LOGGING AND LOG MONITORING244
facility or priority; and finally a destination statement to tell syslog-NG where to write themessages to, such as a file or a device. The options{} statement allows you to configure someglobal options for syslog-NG.
Let’s take you through the basics of configuring syslog-NG by running through each of thestatement blocks available to you. The syslog-ng.conf file uses five key statement blocks (seeTable 5-3).
Table 5-3. syslog-ng.conf Statement Blocks
Directive Purpose
options{} Global options to be set
source{} Statements defining where messages are coming from
destination{} Statements defining where messages are sent or stored
filter{} Filtering statements
log{} Statements combining source, destination, and filter statements that do theactual logging
Each statement block contains additional settings separated by semicolons. You can seethat I have used all these statements in Listing 5-15.
options{}These are global options that tell syslog-NG what to do on an overall basis. The options them-selves consist of their name and then their value enclosed in parentheses and terminated witha semicolon. As shown in Listing 5-16, these options control functions such as the creation ofdirectories and the use of DNS to resolve hostnames, and they provide control over theprocess of writing data to the disk.
Listing 5-16. A Sample syslog-ng options{} Statement
options {
sync(0);
time_reopen(10);
use_dns(yes);
use_fqdn(no);
create_dirs(no);
keep_hostname(yes);
chain_hostnames(no);
};
Quite a number of options are available to you. In this section I will cover the key options.Probably the most confusing options to new users of syslog-NG are those associated withhostnames. I recommend two key options in this area that every user should put in thesyslog-ng.conf file. They are keep_hostname(yes | no) and chain_hostnames(yes | no).
4444c05_final.qxd 1/5/05 12:52 AM Page 244
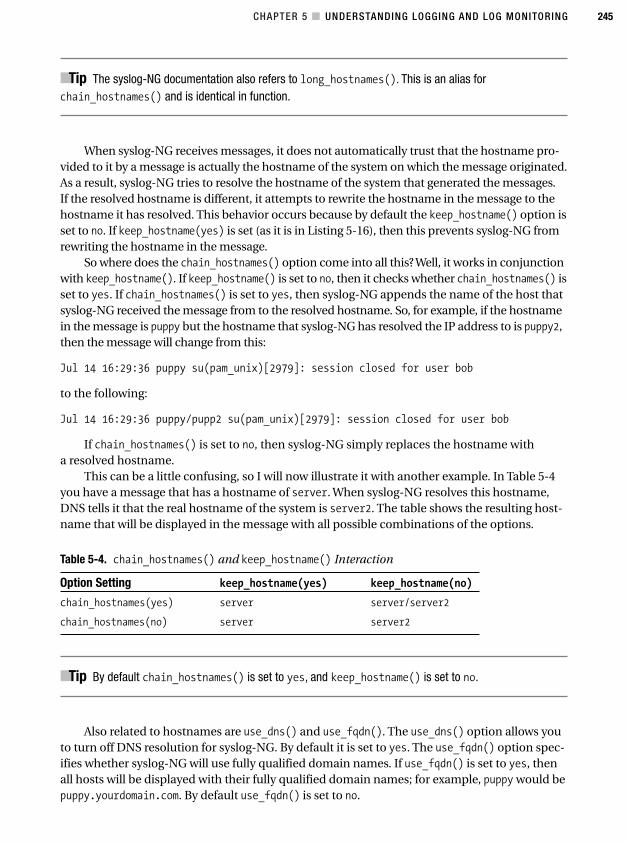
CHAPTER 5 ■ UNDERSTANDING LOGGING AND LOG MONITORING 245
■Tip The syslog-NG documentation also refers to long_hostnames(). This is an alias forchain_hostnames() and is identical in function.
When syslog-NG receives messages, it does not automatically trust that the hostname pro-vided to it by a message is actually the hostname of the system on which the message originated.As a result, syslog-NG tries to resolve the hostname of the system that generated the messages.If the resolved hostname is different, it attempts to rewrite the hostname in the message to thehostname it has resolved. This behavior occurs because by default the keep_hostname() option isset to no. If keep_hostname(yes) is set (as it is in Listing 5-16), then this prevents syslog-NG fromrewriting the hostname in the message.
So where does the chain_hostnames() option come into all this? Well, it works in conjunctionwith keep_hostname(). If keep_hostname() is set to no, then it checks whether chain_hostnames() isset to yes. If chain_hostnames() is set to yes, then syslog-NG appends the name of the host thatsyslog-NG received the message from to the resolved hostname. So, for example, if the hostnamein the message is puppy but the hostname that syslog-NG has resolved the IP address to is puppy2,then the message will change from this:
Jul 14 16:29:36 puppy su(pam_unix)[2979]: session closed for user bob
to the following:
Jul 14 16:29:36 puppy/pupp2 su(pam_unix)[2979]: session closed for user bob
If chain_hostnames() is set to no, then syslog-NG simply replaces the hostname witha resolved hostname.
This can be a little confusing, so I will now illustrate it with another example. In Table 5-4you have a message that has a hostname of server. When syslog-NG resolves this hostname,DNS tells it that the real hostname of the system is server2. The table shows the resulting host-name that will be displayed in the message with all possible combinations of the options.
Table 5-4. chain_hostnames() and keep_hostname() Interaction
Option Setting keep_hostname(yes) keep_hostname(no)
chain_hostnames(yes) server server/server2
chain_hostnames(no) server server2
■Tip By default chain_hostnames() is set to yes, and keep_hostname() is set to no.
Also related to hostnames are use_dns() and use_fqdn(). The use_dns() option allows youto turn off DNS resolution for syslog-NG. By default it is set to yes. The use_fqdn() option spec-ifies whether syslog-NG will use fully qualified domain names. If use_fqdn() is set to yes, thenall hosts will be displayed with their fully qualified domain names; for example, puppy would bepuppy.yourdomain.com. By default use_fqdn() is set to no.
4444c05_final.qxd 1/5/05 12:52 AM Page 245
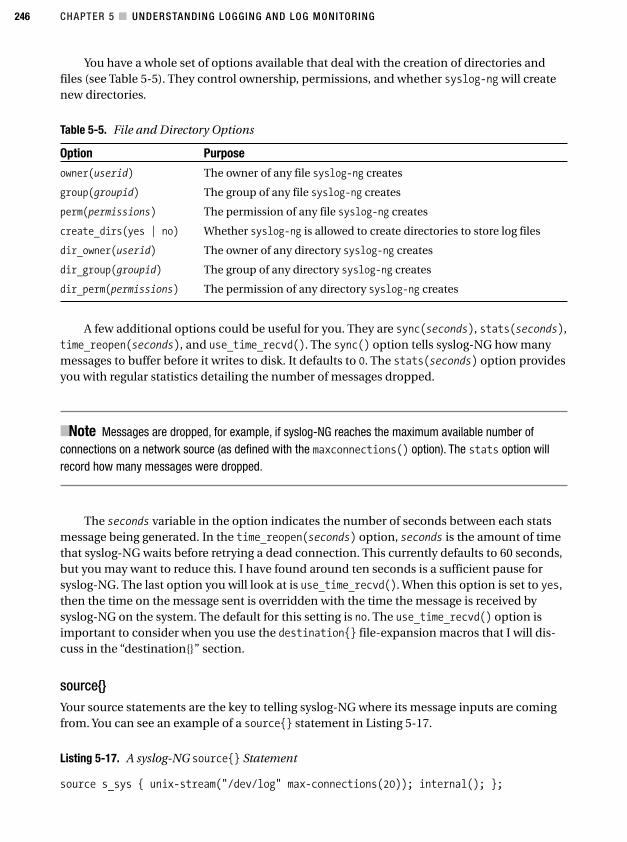
CHAPTER 5 ■ UNDERSTANDING LOGGING AND LOG MONITORING246
You have a whole set of options available that deal with the creation of directories andfiles (see Table 5-5). They control ownership, permissions, and whether syslog-ng will createnew directories.
Table 5-5. File and Directory Options
Option Purpose
owner(userid) The owner of any file syslog-ng creates
group(groupid) The group of any file syslog-ng creates
perm(permissions) The permission of any file syslog-ng creates
create_dirs(yes | no) Whether syslog-ng is allowed to create directories to store log files
dir_owner(userid) The owner of any directory syslog-ng creates
dir_group(groupid) The group of any directory syslog-ng creates
dir_perm(permissions) The permission of any directory syslog-ng creates
A few additional options could be useful for you. They are sync(seconds), stats(seconds),time_reopen(seconds), and use_time_recvd(). The sync() option tells syslog-NG how manymessages to buffer before it writes to disk. It defaults to 0. The stats(seconds) option providesyou with regular statistics detailing the number of messages dropped.
■Note Messages are dropped, for example, if syslog-NG reaches the maximum available number ofconnections on a network source (as defined with the maxconnections() option). The stats option willrecord how many messages were dropped.
The seconds variable in the option indicates the number of seconds between each statsmessage being generated. In the time_reopen(seconds) option, seconds is the amount of timethat syslog-NG waits before retrying a dead connection. This currently defaults to 60 seconds,but you may want to reduce this. I have found around ten seconds is a sufficient pause forsyslog-NG. The last option you will look at is use_time_recvd(). When this option is set to yes,then the time on the message sent is overridden with the time the message is received bysyslog-NG on the system. The default for this setting is no. The use_time_recvd() option isimportant to consider when you use the destination{} file-expansion macros that I will dis-cuss in the “destination{}” section.
source{}Your source statements are the key to telling syslog-NG where its message inputs are comingfrom. You can see an example of a source{} statement in Listing 5-17.
Listing 5-17. A syslog-NG source{} Statement
source s_sys { unix-stream("/dev/log" max-connections(20)); internal(); };
4444c05_final.qxd 1/5/05 12:52 AM Page 246
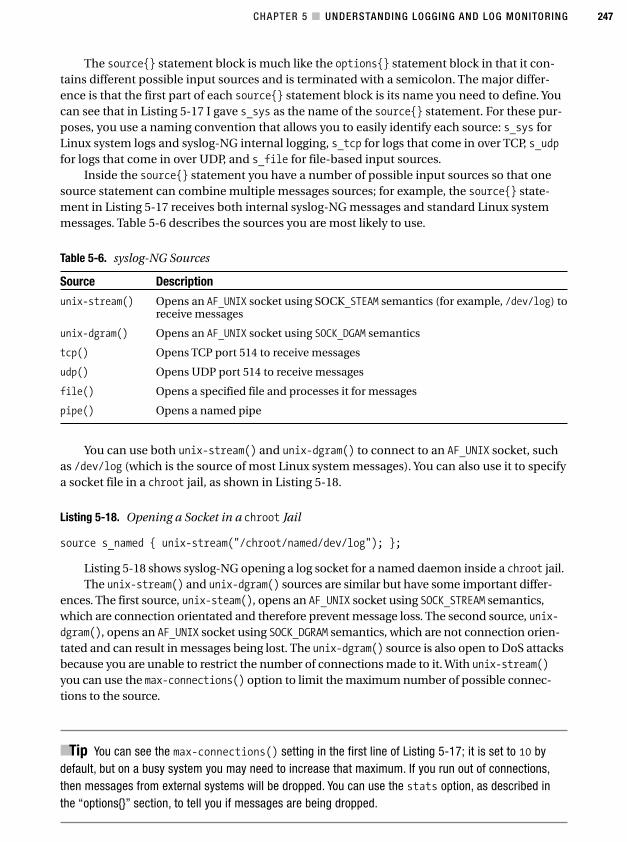
CHAPTER 5 ■ UNDERSTANDING LOGGING AND LOG MONITORING 247
The source{} statement block is much like the options{} statement block in that it con-tains different possible input sources and is terminated with a semicolon. The major differ-ence is that the first part of each source{} statement block is its name you need to define. Youcan see that in Listing 5-17 I gave s_sys as the name of the source{} statement. For these pur-poses, you use a naming convention that allows you to easily identify each source: s_sys forLinux system logs and syslog-NG internal logging, s_tcp for logs that come in over TCP, s_udpfor logs that come in over UDP, and s_file for file-based input sources.
Inside the source{} statement you have a number of possible input sources so that onesource statement can combine multiple messages sources; for example, the source{} state-ment in Listing 5-17 receives both internal syslog-NG messages and standard Linux systemmessages. Table 5-6 describes the sources you are most likely to use.
Table 5-6. syslog-NG Sources
Source Description
unix-stream() Opens an AF_UNIX socket using SOCK_STEAM semantics (for example, /dev/log) toreceive messages
unix-dgram() Opens an AF_UNIX socket using SOCK_DGAM semantics
tcp() Opens TCP port 514 to receive messages
udp() Opens UDP port 514 to receive messages
file() Opens a specified file and processes it for messages
pipe() Opens a named pipe
You can use both unix-stream() and unix-dgram() to connect to an AF_UNIX socket, suchas /dev/log (which is the source of most Linux system messages). You can also use it to specifya socket file in a chroot jail, as shown in Listing 5-18.
Listing 5-18. Opening a Socket in a chroot Jail
source s_named { unix-stream("/chroot/named/dev/log"); };
Listing 5-18 shows syslog-NG opening a log socket for a named daemon inside a chroot jail.The unix-stream() and unix-dgram() sources are similar but have some important differ-
ences. The first source, unix-steam(), opens an AF_UNIX socket using SOCK_STREAM semantics,which are connection orientated and therefore prevent message loss. The second source, unix-dgram(), opens an AF_UNIX socket using SOCK_DGRAM semantics, which are not connection orien-tated and can result in messages being lost. The unix-dgram() source is also open to DoS attacksbecause you are unable to restrict the number of connections made to it. With unix-stream()you can use the max-connections() option to limit the maximum number of possible connec-tions to the source.
■Tip You can see the max-connections() setting in the first line of Listing 5-17; it is set to 10 bydefault, but on a busy system you may need to increase that maximum. If you run out of connections,then messages from external systems will be dropped. You can use the stats option, as described inthe “options{}” section, to tell you if messages are being dropped.
4444c05_final.qxd 1/5/05 12:52 AM Page 247
CHAPTER 5 ■ UNDERSTANDING LOGGING AND LOG MONITORING248
As such, I recommend you use the unix-stream() source, not the unix-dgram() source.The next types are tcp() and udp() sources.
source s_tcp { tcp(ip(192.168.0.1) port(514) max-connections(15)); };
source s_udp { udp(); };
These sources both allow syslog-NG to collect messages from external systems. As dis-cussed during the “Syslog” section of this chapter, I do not recommend you use udp() for thispurpose. Unlike syslog, however, syslog-NG also supports message send via Transmission Con-trol Protocol (TCP) using the tcp() source. This delivers the same functionality as UDP connec-tions but with the benefit of TCP acknowledgments, which greatly raise the level of reliability.The tcp() connections are also able to be secured by introducing a tool such as Stunnel. Stun-nel encapsulates TCP traffic inside a Secure Sockets Layer (SSL) wrapper and secures the con-nection with public-key encryption. This means attackers are not able to read your log trafficand that you are considerably more protected from any potential DoS attacks because syslog-NG is configured to receive only from those hosts you specify. I will discuss this capability inthe “Secure Logging with syslog-NG” section later in the chapter.
The previous tcp() source statements specify 192.168.0.1 as the IP address to which syslog-NG should bind. This IP address is the address of a local interface, not that of the sending system.It also specifies 514 as the port number to run on and 15 as the maximum number of simultane-ous connections. If the max-connections() option is not set, then it defaults to 10. This is a safe-guard against DoS attacks by preventing an unlimited number of systems from simultaneouslyconnecting to your syslog-NG server and overloading it. I will show how to further secure yourTCP connections in the “Secure Logging with syslog-NG” section.
The next type of source is a file() source statement. The file() is used to process specialfiles such as those in /proc.
source s_file { file("/proc/kmsg" log_prefix("kernel: ")); };
It is also commonly used to collect kernel messages on systems where you have replacedklogd as well as syslogd.
■Tip This will not follow a file like the tail -f command. In the “Testing Logging with logger” sectionI will explain how you can use logger to feed a growing file to the syslog-NG daemon.
It is easy to replace klogd with syslog-NG. To add kernel logging to syslog-NG, adjust yoursource{} statement to include file("/proc/kmsg"). A source{} statement used to log most ofthe default system messages would now look something like this:
source s_sys { file("/proc/kmsg" log_prefix("kernel: ")); ➥
unix-stream("/dev/log"); internal(); };
The log prefix option ensures all kernel messages are prefixed with "kernel: ". You needto ensure you have stopped the klogd daemon before you enable and start syslog-NG withkernel logging. Otherwise syslog-NG may stop, and all local logging will be disabled.
4444c05_final.qxd 1/5/05 12:52 AM Page 248
CHAPTER 5 ■ UNDERSTANDING LOGGING AND LOG MONITORING 249
The last source is the pipe() source. This is used to open a named pipe as an input source.
source s_pipe { pipe("/var/programa"); };
This allows programs that use named pipes for their logging to be read by syslog-NG. Thissource can be also used to collect system messages from /proc/kmsg.
source s_kern { pipe("/proc/kmsg"); };
destination{}The destination{} statement block contains all the statements to tell syslog-NG where to putits output. This output could be written to a log file, output to a program, or output to a data-base. Listing 5-19 contains an example of a destination{} statement.
Listing 5-19. A syslog-NG destination{} Statement
destination d_mult { file("/var/log/messages"); usertty("bob"); };
The destination{} statement block is constructed like that of the source{} statement block.I have continued in the vein of the naming convention I started in the “source{}” section and pre-fixed the name of the destination blocks with d_ (for example, d_console).
As with source{} statements, you can combine more than one destination in a single sourcestatement. As you can see in Listing 5-19, the destination d_mult logs both to a file and to a ses-sion signed on as the user bob. Various possible destinations for your messages are available.
Probably the most commonly used destination is file(), which logs message data toa file on the system. The next line shows a file destination of /var/log/messages, which will beowned by the root user and group and have its file permissions set to 0644.
destination d_mesg { file("/var/log/messages" owner(root) group(root) perm(0644)); };
So as you can see, the file() destination statement consists of the name of the file youare logging to and a variety of options that control the ownership and permission of the fileitself. These are identical to the file-related permissions you can set at the global options{}level, and the options for each individual destination override any global options specified.
In the next line, you can also see the use of the file-expansion macros:
destination d_host { file("/var/log/hosts/$HOST/$FACILITY$YEAR$MONTH$DAY"); };
File-expansion macros are useful for including data such as the hostname, facility, anddate and time in the filenames of your log files to make them easier to identify and manipu-late. Each is placed exactly like a shell script parameter, prefixed with $. Using this example,a cron message on the puppy system on March 1, 2005, would result in the following directoryand file structure:
/var/log/puppy/cron20050301
You can see a list of all possible file-expansion macros in Table 5-7.
4444c05_final.qxd 1/5/05 12:52 AM Page 249
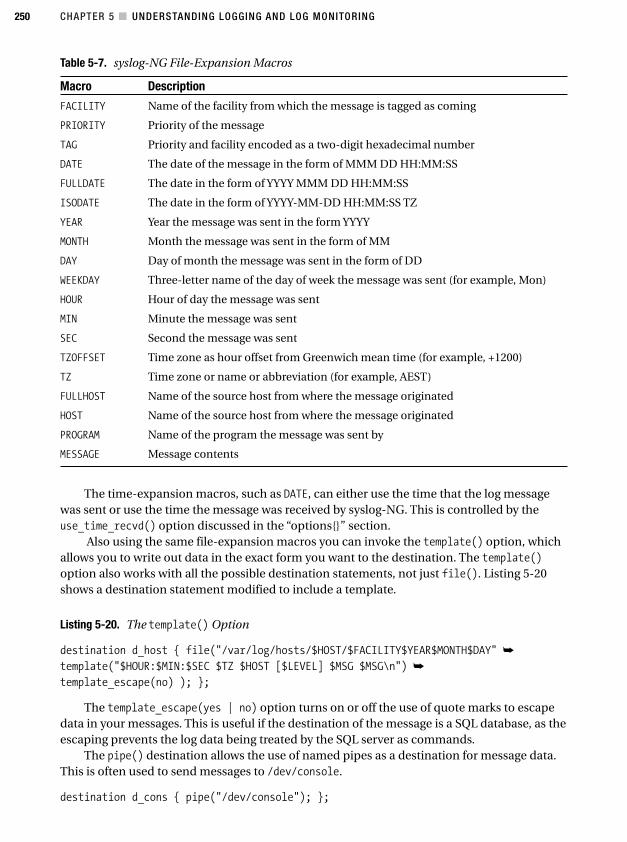
CHAPTER 5 ■ UNDERSTANDING LOGGING AND LOG MONITORING250
Table 5-7. syslog-NG File-Expansion Macros
Macro Description
FACILITY Name of the facility from which the message is tagged as coming
PRIORITY Priority of the message
TAG Priority and facility encoded as a two-digit hexadecimal number
DATE The date of the message in the form of MMM DD HH:MM:SS
FULLDATE The date in the form of YYYY MMM DD HH:MM:SS
ISODATE The date in the form of YYYY-MM-DD HH:MM:SS TZ
YEAR Year the message was sent in the form YYYY
MONTH Month the message was sent in the form of MM
DAY Day of month the message was sent in the form of DD
WEEKDAY Three-letter name of the day of week the message was sent (for example, Mon)
HOUR Hour of day the message was sent
MIN Minute the message was sent
SEC Second the message was sent
TZOFFSET Time zone as hour offset from Greenwich mean time (for example, +1200)
TZ Time zone or name or abbreviation (for example, AEST)
FULLHOST Name of the source host from where the message originated
HOST Name of the source host from where the message originated
PROGRAM Name of the program the message was sent by
MESSAGE Message contents
The time-expansion macros, such as DATE, can either use the time that the log messagewas sent or use the time the message was received by syslog-NG. This is controlled by theuse_time_recvd() option discussed in the “options{}” section.
Also using the same file-expansion macros you can invoke the template() option, whichallows you to write out data in the exact form you want to the destination. The template()option also works with all the possible destination statements, not just file(). Listing 5-20shows a destination statement modified to include a template.
Listing 5-20. The template() Option
destination d_host { file("/var/log/hosts/$HOST/$FACILITY$YEAR$MONTH$DAY" ➥
template("$HOUR:$MIN:$SEC $TZ $HOST [$LEVEL] $MSG $MSG\n") ➥
template_escape(no) ); };
The template_escape(yes | no) option turns on or off the use of quote marks to escapedata in your messages. This is useful if the destination of the message is a SQL database, as theescaping prevents the log data being treated by the SQL server as commands.
The pipe() destination allows the use of named pipes as a destination for message data.This is often used to send messages to /dev/console.
destination d_cons { pipe("/dev/console"); };
4444c05_final.qxd 1/5/05 12:52 AM Page 250

CHAPTER 5 ■ UNDERSTANDING LOGGING AND LOG MONITORING 251
Here the destination d_cons sends all messages to the /dev/console device. You will alsouse the pipe() destination to send messages to the SEC log correlation tool and to a database.
Importantly for a distributed monitoring environment, it is also possible to forward messagesto another system using either TCP or UDP with the tcp() and udp() destination{} statements.
destination d_monitor { tcp("192.168.1.10" port(514)); };
You can see for the third statement of Listing 5-18 where the destination d_monitor isa syslog server located at IP address 192.168.1.10 that listens to TCP traffic on the standardsyslog port of 514. As stated elsewhere, I do not recommend using UDP connections for yourlogging traffic. You will see more of how this is used for secure logging in the “Secure Loggingwith syslog-NG” section.
The usertty() destination allows you to send messages to the terminal of a specificlogged user or all logged users. In the next line, the destination d_root sends messages toterminals logged in as the root user:
destination d_root { usertty("root"); };
You can also use the wildcard option (*) to send messages to all users.Finally, the program() destination invokes a program as the destination. You have quite a
variety of possible uses for this, including mailing out certain messages or as an alternative methodof integrating syslog-NG with log analysis tools such as SEC or Swatch. See Listing 5-21.
Listing 5-21. Sample program() Destination
destination d_mailout { program("/root/scripts/mailout" ➥
template("$HOUR:$MIN:$SEC $HOST $FACILITY $LEVEL $PROGRAM $MSG\n")); };
In Listing 5-21 the d_mailout destination sends a message to the script /root/scripts/mailout using a template. Note the \n at the end of the template() line. Because of the use ofa template, you have to tell the script that it has reached the end of the line and that the loopmust end. With a normal message, syslog-NG includes its own line break.
The mailout script itself is simple (see Listing 5-22).
Listing 5-22. mailout Script
#!/bin/bash
# Script to mail out logs
while read line; do
echo $line | /bin/mail -s "log entry from mail out" [email protected]
done
■Caution Always remember that any time you designate a message to be mailed out, you should askyourself if you are making yourself vulnerable to a self-inflicted DoS attack if thousands of messages weregenerated and your mail server was flooded. Either choose only those most critical messages to be mailedout or look at modifying the script you are using to mail out messages to throttle the number of messagesbeing sent out in a particular time period.
4444c05_final.qxd 1/5/05 12:52 AM Page 251
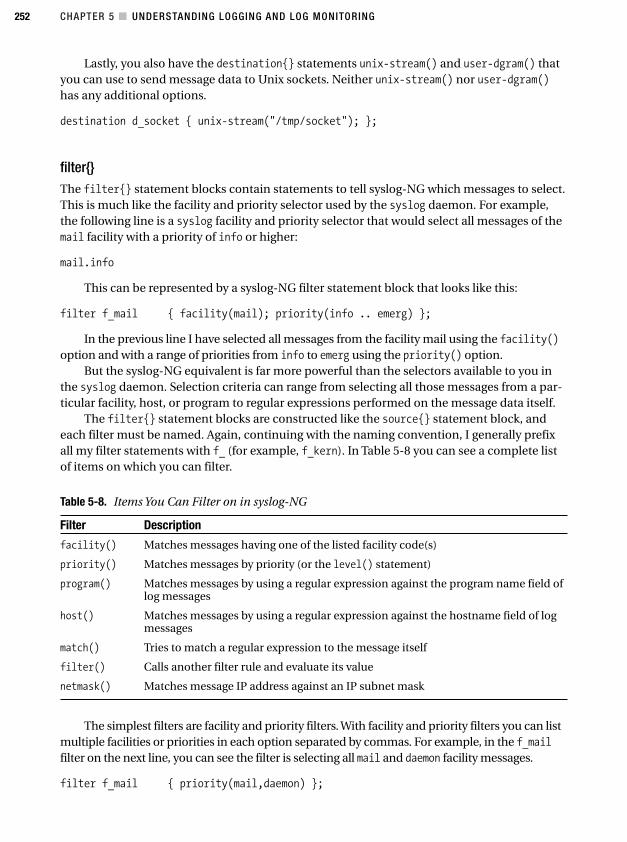
CHAPTER 5 ■ UNDERSTANDING LOGGING AND LOG MONITORING252
Lastly, you also have the destination{} statements unix-stream() and user-dgram() thatyou can use to send message data to Unix sockets. Neither unix-stream() nor user-dgram()has any additional options.
destination d_socket { unix-stream("/tmp/socket"); };
filter{}The filter{} statement blocks contain statements to tell syslog-NG which messages to select.This is much like the facility and priority selector used by the syslog daemon. For example,the following line is a syslog facility and priority selector that would select all messages of themail facility with a priority of info or higher:
mail.info
This can be represented by a syslog-NG filter statement block that looks like this:
filter f_mail { facility(mail); priority(info .. emerg) };
In the previous line I have selected all messages from the facility mail using the facility()option and with a range of priorities from info to emerg using the priority() option.
But the syslog-NG equivalent is far more powerful than the selectors available to you inthe syslog daemon. Selection criteria can range from selecting all those messages from a par-ticular facility, host, or program to regular expressions performed on the message data itself.
The filter{} statement blocks are constructed like the source{} statement block, andeach filter must be named. Again, continuing with the naming convention, I generally prefixall my filter statements with f_ (for example, f_kern). In Table 5-8 you can see a complete listof items on which you can filter.
Table 5-8. Items You Can Filter on in syslog-NG
Filter Description
facility() Matches messages having one of the listed facility code(s)
priority() Matches messages by priority (or the level() statement)
program() Matches messages by using a regular expression against the program name field oflog messages
host() Matches messages by using a regular expression against the hostname field of logmessages
match() Tries to match a regular expression to the message itself
filter() Calls another filter rule and evaluate its value
netmask() Matches message IP address against an IP subnet mask
The simplest filters are facility and priority filters. With facility and priority filters you can listmultiple facilities or priorities in each option separated by commas. For example, in the f_mailfilter on the next line, you can see the filter is selecting all mail and daemon facility messages.
filter f_mail { priority(mail,daemon) };
4444c05_final.qxd 1/5/05 12:52 AM Page 252
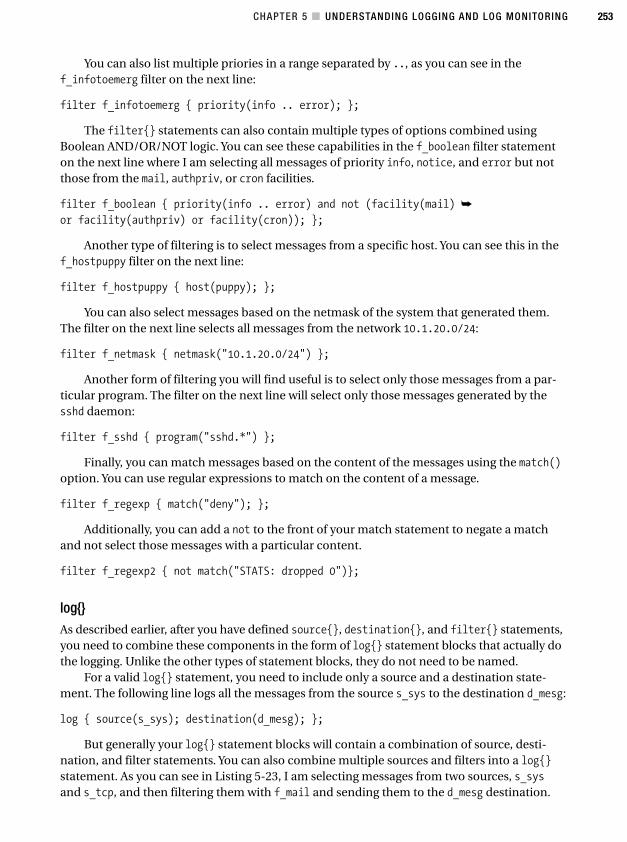
CHAPTER 5 ■ UNDERSTANDING LOGGING AND LOG MONITORING 253
You can also list multiple priories in a range separated by .., as you can see in thef_infotoemerg filter on the next line:
filter f_infotoemerg { priority(info .. error); };
The filter{} statements can also contain multiple types of options combined usingBoolean AND/OR/NOT logic. You can see these capabilities in the f_boolean filter statementon the next line where I am selecting all messages of priority info, notice, and error but notthose from the mail, authpriv, or cron facilities.
filter f_boolean { priority(info .. error) and not (facility(mail) ➥
or facility(authpriv) or facility(cron)); };
Another type of filtering is to select messages from a specific host. You can see this in thef_hostpuppy filter on the next line:
filter f_hostpuppy { host(puppy); };
You can also select messages based on the netmask of the system that generated them.The filter on the next line selects all messages from the network 10.1.20.0/24:
filter f_netmask { netmask("10.1.20.0/24") };
Another form of filtering you will find useful is to select only those messages from a par-ticular program. The filter on the next line will select only those messages generated by thesshd daemon:
filter f_sshd { program("sshd.*") };
Finally, you can match messages based on the content of the messages using the match()option. You can use regular expressions to match on the content of a message.
filter f_regexp { match("deny"); };
Additionally, you can add a not to the front of your match statement to negate a matchand not select those messages with a particular content.
filter f_regexp2 { not match("STATS: dropped 0")};
log{}As described earlier, after you have defined source{}, destination{}, and filter{} statements,you need to combine these components in the form of log{} statement blocks that actually dothe logging. Unlike the other types of statement blocks, they do not need to be named.
For a valid log{} statement, you need to include only a source and a destination state-ment. The following line logs all the messages from the source s_sys to the destination d_mesg:
log { source(s_sys); destination(d_mesg); };
But generally your log{} statement blocks will contain a combination of source, desti-nation, and filter statements. You can also combine multiple sources and filters into a log{}
statement. As you can see in Listing 5-23, I am selecting messages from two sources, s_sysand s_tcp, and then filtering them with f_mail and sending them to the d_mesg destination.
4444c05_final.qxd 1/5/05 12:52 AM Page 253
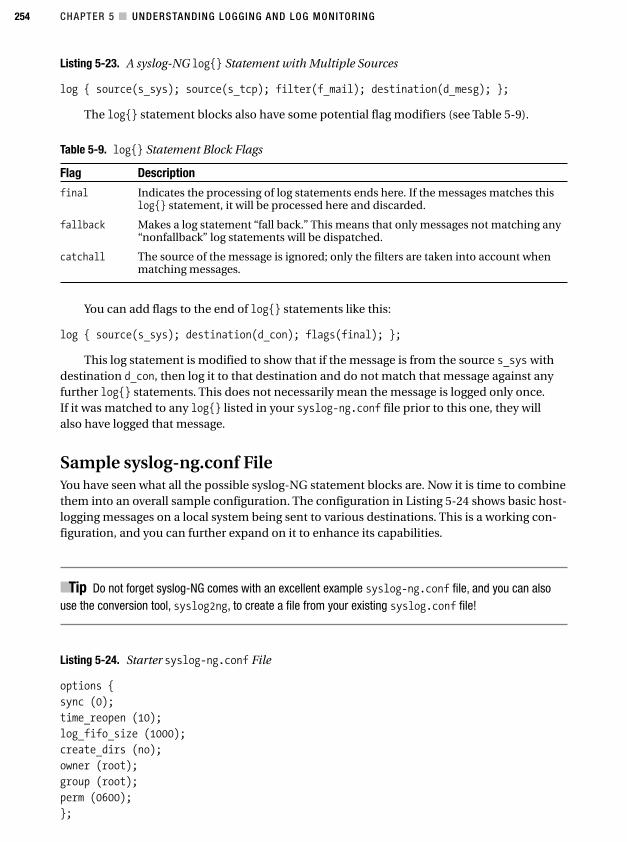
CHAPTER 5 ■ UNDERSTANDING LOGGING AND LOG MONITORING254
Listing 5-23. A syslog-NG log{} Statement with Multiple Sources
log { source(s_sys); source(s_tcp); filter(f_mail); destination(d_mesg); };
The log{} statement blocks also have some potential flag modifiers (see Table 5-9).
Table 5-9. log{} Statement Block Flags
Flag Description
final Indicates the processing of log statements ends here. If the messages matches thislog{} statement, it will be processed here and discarded.
fallback Makes a log statement “fall back.” This means that only messages not matching any“nonfallback” log statements will be dispatched.
catchall The source of the message is ignored; only the filters are taken into account whenmatching messages.
You can add flags to the end of log{} statements like this:
log { source(s_sys); destination(d_con); flags(final); };
This log statement is modified to show that if the message is from the source s_sys withdestination d_con, then log it to that destination and do not match that message against anyfurther log{} statements. This does not necessarily mean the message is logged only once. If it was matched to any log{} listed in your syslog-ng.conf file prior to this one, they willalso have logged that message.
Sample syslog-ng.conf FileYou have seen what all the possible syslog-NG statement blocks are. Now it is time to combinethem into an overall sample configuration. The configuration in Listing 5-24 shows basic host-logging messages on a local system being sent to various destinations. This is a working con-figuration, and you can further expand on it to enhance its capabilities.
■Tip Do not forget syslog-NG comes with an excellent example syslog-ng.conf file, and you can alsouse the conversion tool, syslog2ng, to create a file from your existing syslog.conf file!
Listing 5-24. Starter syslog-ng.conf File
options {
sync (0);
time_reopen (10);
log_fifo_size (1000);
create_dirs (no);
owner (root);
group (root);
perm (0600);
};
4444c05_final.qxd 1/5/05 12:52 AM Page 254
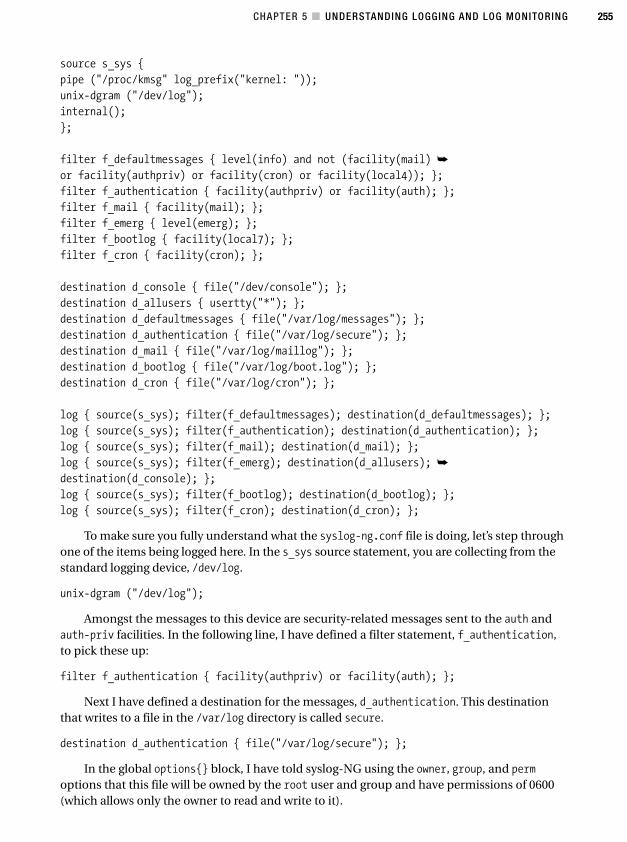
CHAPTER 5 ■ UNDERSTANDING LOGGING AND LOG MONITORING 255
source s_sys {
pipe ("/proc/kmsg" log_prefix("kernel: "));
unix-dgram ("/dev/log");
internal();
};
filter f_defaultmessages { level(info) and not (facility(mail) ➥
or facility(authpriv) or facility(cron) or facility(local4)); };
filter f_authentication { facility(authpriv) or facility(auth); };
filter f_mail { facility(mail); };
filter f_emerg { level(emerg); };
filter f_bootlog { facility(local7); };
filter f_cron { facility(cron); };
destination d_console { file("/dev/console"); };
destination d_allusers { usertty("*"); };
destination d_defaultmessages { file("/var/log/messages"); };
destination d_authentication { file("/var/log/secure"); };
destination d_mail { file("/var/log/maillog"); };
destination d_bootlog { file("/var/log/boot.log"); };
destination d_cron { file("/var/log/cron"); };
log { source(s_sys); filter(f_defaultmessages); destination(d_defaultmessages); };
log { source(s_sys); filter(f_authentication); destination(d_authentication); };
log { source(s_sys); filter(f_mail); destination(d_mail); };
log { source(s_sys); filter(f_emerg); destination(d_allusers); ➥
destination(d_console); };
log { source(s_sys); filter(f_bootlog); destination(d_bootlog); };
log { source(s_sys); filter(f_cron); destination(d_cron); };
To make sure you fully understand what the syslog-ng.conf file is doing, let’s step throughone of the items being logged here. In the s_sys source statement, you are collecting from thestandard logging device, /dev/log.
unix-dgram ("/dev/log");
Amongst the messages to this device are security-related messages sent to the auth andauth-priv facilities. In the following line, I have defined a filter statement, f_authentication,to pick these up:
filter f_authentication { facility(authpriv) or facility(auth); };
Next I have defined a destination for the messages, d_authentication. This destinationthat writes to a file in the /var/log directory is called secure.
destination d_authentication { file("/var/log/secure"); };
In the global options{} block, I have told syslog-NG using the owner, group, and permoptions that this file will be owned by the root user and group and have permissions of 0600(which allows only the owner to read and write to it).
4444c05_final.qxd 1/5/05 12:52 AM Page 255
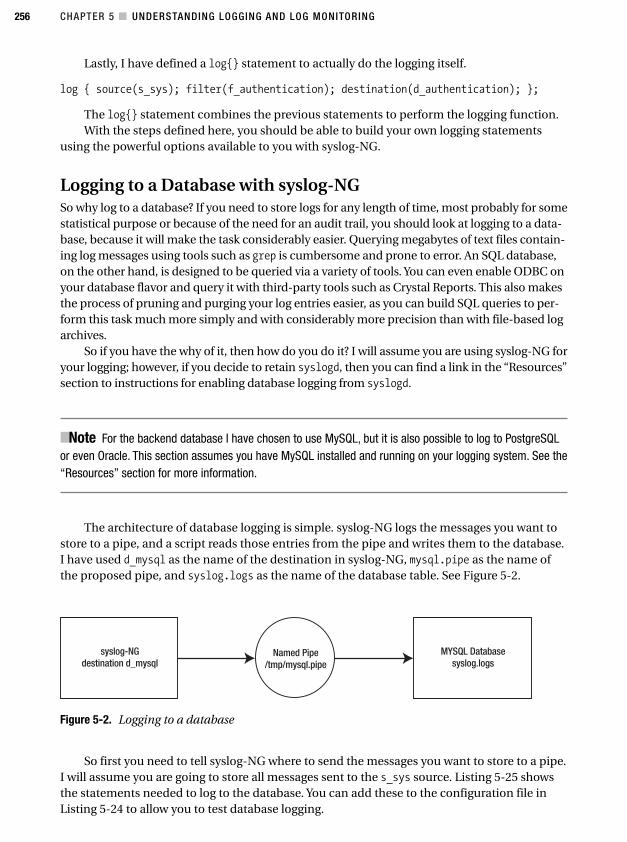
CHAPTER 5 ■ UNDERSTANDING LOGGING AND LOG MONITORING256
Figure 5-2. Logging to a database
Lastly, I have defined a log{} statement to actually do the logging itself.
log { source(s_sys); filter(f_authentication); destination(d_authentication); };
The log{} statement combines the previous statements to perform the logging function.With the steps defined here, you should be able to build your own logging statements
using the powerful options available to you with syslog-NG.
Logging to a Database with syslog-NGSo why log to a database? If you need to store logs for any length of time, most probably for somestatistical purpose or because of the need for an audit trail, you should look at logging to a data-base, because it will make the task considerably easier. Querying megabytes of text files contain-ing log messages using tools such as grep is cumbersome and prone to error. An SQL database,on the other hand, is designed to be queried via a variety of tools. You can even enable ODBC onyour database flavor and query it with third-party tools such as Crystal Reports. This also makesthe process of pruning and purging your log entries easier, as you can build SQL queries to per-form this task much more simply and with considerably more precision than with file-based logarchives.
So if you have the why of it, then how do you do it? I will assume you are using syslog-NG foryour logging; however, if you decide to retain syslogd, then you can find a link in the “Resources”section to instructions for enabling database logging from syslogd.
■Note For the backend database I have chosen to use MySQL, but it is also possible to log to PostgreSQLor even Oracle. This section assumes you have MySQL installed and running on your logging system. See the“Resources” section for more information.
The architecture of database logging is simple. syslog-NG logs the messages you want tostore to a pipe, and a script reads those entries from the pipe and writes them to the database.I have used d_mysql as the name of the destination in syslog-NG, mysql.pipe as the name ofthe proposed pipe, and syslog.logs as the name of the database table. See Figure 5-2.
So first you need to tell syslog-NG where to send the messages you want to store to a pipe.I will assume you are going to store all messages sent to the s_sys source. Listing 5-25 showsthe statements needed to log to the database. You can add these to the configuration file inListing 5-24 to allow you to test database logging.
4444c05_final.qxd 1/5/05 12:52 AM Page 256
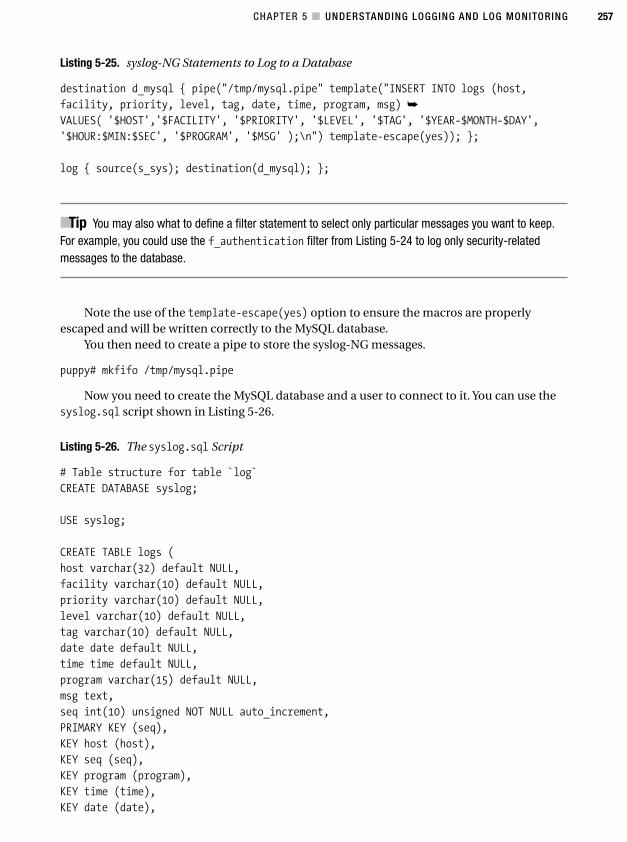
CHAPTER 5 ■ UNDERSTANDING LOGGING AND LOG MONITORING 257
Listing 5-25. syslog-NG Statements to Log to a Database
destination d_mysql { pipe("/tmp/mysql.pipe" template("INSERT INTO logs (host,
facility, priority, level, tag, date, time, program, msg) ➥
VALUES( '$HOST','$FACILITY', '$PRIORITY', '$LEVEL', '$TAG', '$YEAR-$MONTH-$DAY',
'$HOUR:$MIN:$SEC', '$PROGRAM', '$MSG' );\n") template-escape(yes)); };
log { source(s_sys); destination(d_mysql); };
■Tip You may also what to define a filter statement to select only particular messages you want to keep.For example, you could use the f_authentication filter from Listing 5-24 to log only security-relatedmessages to the database.
Note the use of the template-escape(yes) option to ensure the macros are properlyescaped and will be written correctly to the MySQL database.
You then need to create a pipe to store the syslog-NG messages.
puppy# mkfifo /tmp/mysql.pipe
Now you need to create the MySQL database and a user to connect to it. You can use thesyslog.sql script shown in Listing 5-26.
Listing 5-26. The syslog.sql Script
# Table structure for table `log`
CREATE DATABASE syslog;
USE syslog;
CREATE TABLE logs (
host varchar(32) default NULL,
facility varchar(10) default NULL,
priority varchar(10) default NULL,
level varchar(10) default NULL,
tag varchar(10) default NULL,
date date default NULL,
time time default NULL,
program varchar(15) default NULL,
msg text,
seq int(10) unsigned NOT NULL auto_increment,
PRIMARY KEY (seq),
KEY host (host),
KEY seq (seq),
KEY program (program),
KEY time (time),
KEY date (date),
4444c05_final.qxd 1/5/05 12:52 AM Page 257

CHAPTER 5 ■ UNDERSTANDING LOGGING AND LOG MONITORING258
KEY priority (priority),
KEY facility (facility)
) TYPE=MyISAM;
GRANT ALL PRIVILEGES ON syslog.* TO syslog@localhost identified by 'syslog' ➥
with grant option;
This script will create a database called syslog with a table called log accessible by a usercalled syslog with a password of syslog. You should change the grant privileges, user, and pass-word to suit your environment—the syslog user needs only INSERT privileges to the table.
To run this script, you use the following command:
puppy# mysql -u user -p < /path/to/syslog.sql
Enter password:
Replace user with a MySQL user with the authority to create tables and grant privileges,and replace /path/to/syslog.sql with the location of the script shown in Listing 5-26. You willbe prompted to enter the required password for the user specified with the -u option.
You can check whether the creation of the database is successful by first connecting to theMySQL server as the syslog user and then connecting to the syslog database and querying itstables.
puppy# mysql -u syslog -p
Enter password:
mysql> connect syslog;
Current database: syslog
mysql> show tables;
Tables_in_syslog
logs
1 row in set (0.00 sec)
If the shows tables command returns a table called logs, then the script has been successful.You then need a script to read the contents of the mysql.pipe pipe and send them to the data-
base. I provide a suitable script in Listing 5-27.
Listing 5-27. Script to Read mysql.pipe
# syslog2mysql script#
#!/bin/bash
if [ -e /tmp/mysql.pipe ]; then
while [ -e /tmp/mysql.pipe ]
do
mysql -u syslog --password=syslog syslog < /tmp/mysql.pipe
done
else
mkfifo /tmp/mysql.pipe
fi
4444c05_final.qxd 1/5/05 12:52 AM Page 258
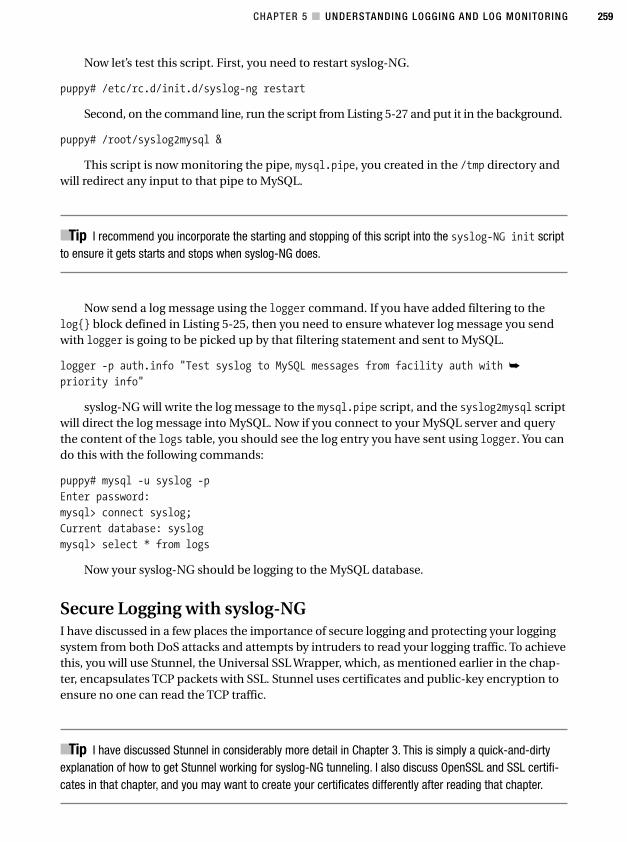
CHAPTER 5 ■ UNDERSTANDING LOGGING AND LOG MONITORING 259
Now let’s test this script. First, you need to restart syslog-NG.
puppy# /etc/rc.d/init.d/syslog-ng restart
Second, on the command line, run the script from Listing 5-27 and put it in the background.
puppy# /root/syslog2mysql &
This script is now monitoring the pipe, mysql.pipe, you created in the /tmp directory andwill redirect any input to that pipe to MySQL.
■Tip I recommend you incorporate the starting and stopping of this script into the syslog-NG init scriptto ensure it gets starts and stops when syslog-NG does.
Now send a log message using the logger command. If you have added filtering to thelog{} block defined in Listing 5-25, then you need to ensure whatever log message you sendwith logger is going to be picked up by that filtering statement and sent to MySQL.
logger -p auth.info "Test syslog to MySQL messages from facility auth with ➥
priority info"
syslog-NG will write the log message to the mysql.pipe script, and the syslog2mysql scriptwill direct the log message into MySQL. Now if you connect to your MySQL server and querythe content of the logs table, you should see the log entry you have sent using logger. You cando this with the following commands:
puppy# mysql -u syslog -p
Enter password:
mysql> connect syslog;
Current database: syslog
mysql> select * from logs
Now your syslog-NG should be logging to the MySQL database.
Secure Logging with syslog-NGI have discussed in a few places the importance of secure logging and protecting your loggingsystem from both DoS attacks and attempts by intruders to read your logging traffic. To achievethis, you will use Stunnel, the Universal SSL Wrapper, which, as mentioned earlier in the chap-ter, encapsulates TCP packets with SSL. Stunnel uses certificates and public-key encryption toensure no one can read the TCP traffic.
■Tip I have discussed Stunnel in considerably more detail in Chapter 3. This is simply a quick-and-dirtyexplanation of how to get Stunnel working for syslog-NG tunneling. I also discuss OpenSSL and SSL certifi-cates in that chapter, and you may want to create your certificates differently after reading that chapter.
4444c05_final.qxd 1/5/05 12:52 AM Page 259
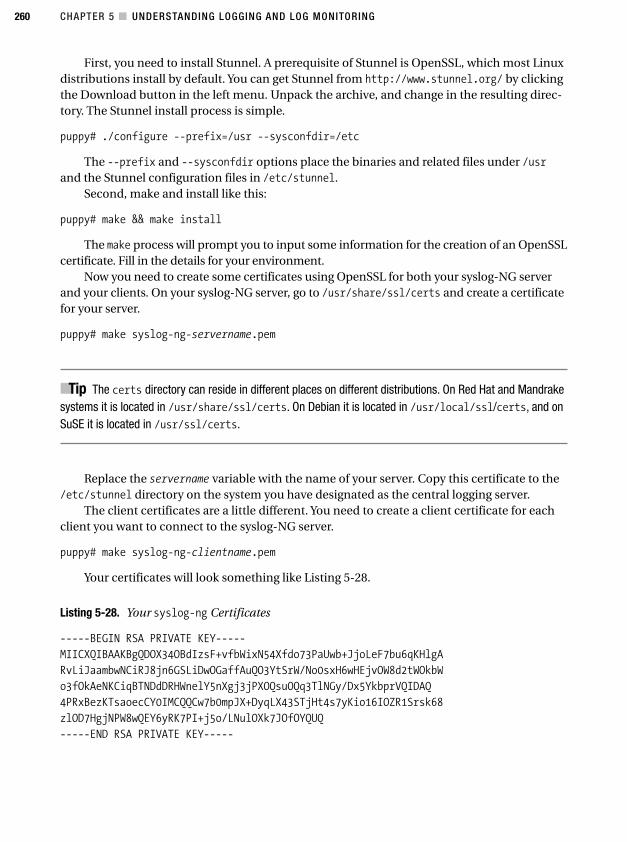
CHAPTER 5 ■ UNDERSTANDING LOGGING AND LOG MONITORING260
First, you need to install Stunnel. A prerequisite of Stunnel is OpenSSL, which most Linuxdistributions install by default. You can get Stunnel from http://www.stunnel.org/ by clickingthe Download button in the left menu. Unpack the archive, and change in the resulting direc-tory. The Stunnel install process is simple.
puppy# ./configure --prefix=/usr --sysconfdir=/etc
The --prefix and --sysconfdir options place the binaries and related files under /usrand the Stunnel configuration files in /etc/stunnel.
Second, make and install like this:
puppy# make && make install
The make process will prompt you to input some information for the creation of an OpenSSLcertificate. Fill in the details for your environment.
Now you need to create some certificates using OpenSSL for both your syslog-NG serverand your clients. On your syslog-NG server, go to /usr/share/ssl/certs and create a certificatefor your server.
puppy# make syslog-ng-servername.pem
■Tip The certs directory can reside in different places on different distributions. On Red Hat and Mandrakesystems it is located in /usr/share/ssl/certs. On Debian it is located in /usr/local/ssl/certs, and onSuSE it is located in /usr/ssl/certs.
Replace the servername variable with the name of your server. Copy this certificate to the/etc/stunnel directory on the system you have designated as the central logging server.
The client certificates are a little different. You need to create a client certificate for eachclient you want to connect to the syslog-NG server.
puppy# make syslog-ng-clientname.pem
Your certificates will look something like Listing 5-28.
Listing 5-28. Your syslog-ng Certificates
-----BEGIN RSA PRIVATE KEY-----
MIICXQIBAAKBgQDOX34OBdIzsF+vfbWixN54Xfdo73PaUwb+JjoLeF7bu6qKHlgA
RvLiJaambwNCiRJ8jn6GSLiDwOGaffAuQO3YtSrW/No0sxH6wHEjvOW8d2tWOkbW
o3fOkAeNKCiqBTNDdDRHWnelY5nXgj3jPXOQsuOQq3TlNGy/Dx5YkbprVQIDAQ
4PRxBezKTsaoecCY0IMCQQCw7b0mpJX+DyqLX43STjHt4s7yKio16IOZR1Srsk68
zlOD7HgjNPW8wQEY6yRK7PI+j5o/LNulOXk7JOfOYQUQ
-----END RSA PRIVATE KEY-----
4444c05_final.qxd 1/5/05 12:52 AM Page 260
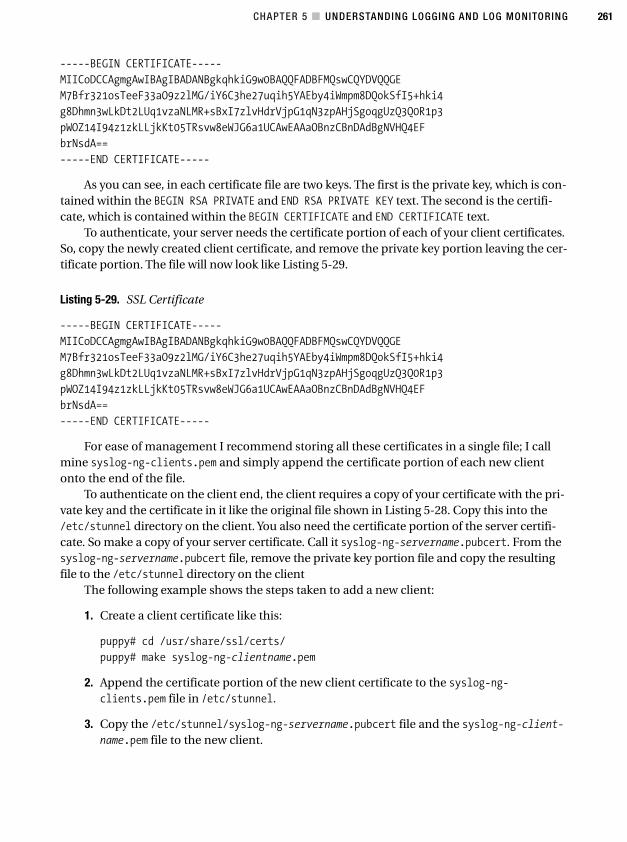
CHAPTER 5 ■ UNDERSTANDING LOGGING AND LOG MONITORING 261
-----BEGIN CERTIFICATE-----
MIICoDCCAgmgAwIBAgIBADANBgkqhkiG9w0BAQQFADBFMQswCQYDVQQGE
M7Bfr321osTeeF33aO9z2lMG/iY6C3he27uqih5YAEby4iWmpm8DQokSfI5+hki4
g8Dhmn3wLkDt2LUq1vzaNLMR+sBxI7zlvHdrVjpG1qN3zpAHjSgoqgUzQ3Q0R1p3
pWOZ14I94z1zkLLjkKt05TRsvw8eWJG6a1UCAwEAAaOBnzCBnDAdBgNVHQ4EF
brNsdA==
-----END CERTIFICATE-----
As you can see, in each certificate file are two keys. The first is the private key, which is con-tained within the BEGIN RSA PRIVATE and END RSA PRIVATE KEY text. The second is the certifi-cate, which is contained within the BEGIN CERTIFICATE and END CERTIFICATE text.
To authenticate, your server needs the certificate portion of each of your client certificates.So, copy the newly created client certificate, and remove the private key portion leaving the cer-tificate portion. The file will now look like Listing 5-29.
Listing 5-29. SSL Certificate
-----BEGIN CERTIFICATE-----
MIICoDCCAgmgAwIBAgIBADANBgkqhkiG9w0BAQQFADBFMQswCQYDVQQGE
M7Bfr321osTeeF33aO9z2lMG/iY6C3he27uqih5YAEby4iWmpm8DQokSfI5+hki4
g8Dhmn3wLkDt2LUq1vzaNLMR+sBxI7zlvHdrVjpG1qN3zpAHjSgoqgUzQ3Q0R1p3
pWOZ14I94z1zkLLjkKt05TRsvw8eWJG6a1UCAwEAAaOBnzCBnDAdBgNVHQ4EF
brNsdA==
-----END CERTIFICATE-----
For ease of management I recommend storing all these certificates in a single file; I callmine syslog-ng-clients.pem and simply append the certificate portion of each new clientonto the end of the file.
To authenticate on the client end, the client requires a copy of your certificate with the pri-vate key and the certificate in it like the original file shown in Listing 5-28. Copy this into the/etc/stunnel directory on the client. You also need the certificate portion of the server certifi-cate. So make a copy of your server certificate. Call it syslog-ng-servername.pubcert. From thesyslog-ng-servername.pubcert file, remove the private key portion file and copy the resultingfile to the /etc/stunnel directory on the client
The following example shows the steps taken to add a new client:
1. Create a client certificate like this:
puppy# cd /usr/share/ssl/certs/
puppy# make syslog-ng-clientname.pem
2. Append the certificate portion of the new client certificate to the syslog-ng-clients.pem file in /etc/stunnel.
3. Copy the /etc/stunnel/syslog-ng-servername.pubcert file and the syslog-ng-client-name.pem file to the new client.
4444c05_final.qxd 1/5/05 12:52 AM Page 261
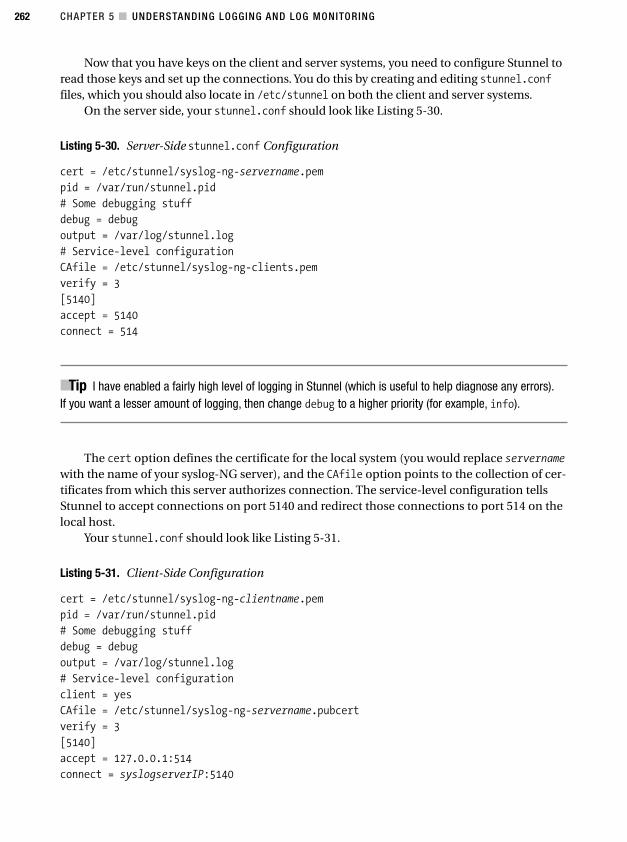
CHAPTER 5 ■ UNDERSTANDING LOGGING AND LOG MONITORING262
Now that you have keys on the client and server systems, you need to configure Stunnel toread those keys and set up the connections. You do this by creating and editing stunnel.conffiles, which you should also locate in /etc/stunnel on both the client and server systems.
On the server side, your stunnel.conf should look like Listing 5-30.
Listing 5-30. Server-Side stunnel.conf Configuration
cert = /etc/stunnel/syslog-ng-servername.pem
pid = /var/run/stunnel.pid
# Some debugging stuff
debug = debug
output = /var/log/stunnel.log
# Service-level configuration
CAfile = /etc/stunnel/syslog-ng-clients.pem
verify = 3
[5140]
accept = 5140
connect = 514
■Tip I have enabled a fairly high level of logging in Stunnel (which is useful to help diagnose any errors).If you want a lesser amount of logging, then change debug to a higher priority (for example, info).
The cert option defines the certificate for the local system (you would replace servernamewith the name of your syslog-NG server), and the CAfile option points to the collection of cer-tificates from which this server authorizes connection. The service-level configuration tellsStunnel to accept connections on port 5140 and redirect those connections to port 514 on thelocal host.
Your stunnel.conf should look like Listing 5-31.
Listing 5-31. Client-Side Configuration
cert = /etc/stunnel/syslog-ng-clientname.pem
pid = /var/run/stunnel.pid
# Some debugging stuff
debug = debug
output = /var/log/stunnel.log
# Service-level configuration
client = yes
CAfile = /etc/stunnel/syslog-ng-servername.pubcert
verify = 3
[5140]
accept = 127.0.0.1:514
connect = syslogserverIP:5140
4444c05_final.qxd 1/5/05 12:52 AM Page 262
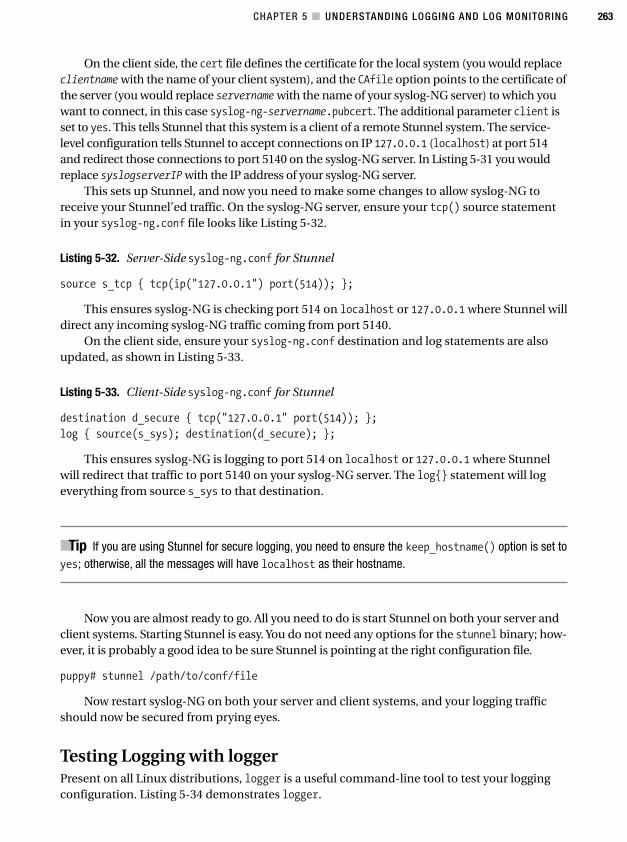
CHAPTER 5 ■ UNDERSTANDING LOGGING AND LOG MONITORING 263
On the client side, the cert file defines the certificate for the local system (you would replaceclientname with the name of your client system), and the CAfile option points to the certificate ofthe server (you would replace servername with the name of your syslog-NG server) to which youwant to connect, in this case syslog-ng-servername.pubcert. The additional parameter client isset to yes. This tells Stunnel that this system is a client of a remote Stunnel system. The service-level configuration tells Stunnel to accept connections on IP 127.0.0.1 (localhost) at port 514and redirect those connections to port 5140 on the syslog-NG server. In Listing 5-31 you wouldreplace syslogserverIP with the IP address of your syslog-NG server.
This sets up Stunnel, and now you need to make some changes to allow syslog-NG toreceive your Stunnel’ed traffic. On the syslog-NG server, ensure your tcp() source statementin your syslog-ng.conf file looks like Listing 5-32.
Listing 5-32. Server-Side syslog-ng.conf for Stunnel
source s_tcp { tcp(ip("127.0.0.1") port(514)); };
This ensures syslog-NG is checking port 514 on localhost or 127.0.0.1 where Stunnel willdirect any incoming syslog-NG traffic coming from port 5140.
On the client side, ensure your syslog-ng.conf destination and log statements are alsoupdated, as shown in Listing 5-33.
Listing 5-33. Client-Side syslog-ng.conf for Stunnel
destination d_secure { tcp("127.0.0.1" port(514)); };
log { source(s_sys); destination(d_secure); };
This ensures syslog-NG is logging to port 514 on localhost or 127.0.0.1 where Stunnelwill redirect that traffic to port 5140 on your syslog-NG server. The log{} statement will logeverything from source s_sys to that destination.
■Tip If you are using Stunnel for secure logging, you need to ensure the keep_hostname() option is set toyes; otherwise, all the messages will have localhost as their hostname.
Now you are almost ready to go. All you need to do is start Stunnel on both your server andclient systems. Starting Stunnel is easy. You do not need any options for the stunnel binary; how-ever, it is probably a good idea to be sure Stunnel is pointing at the right configuration file.
puppy# stunnel /path/to/conf/file
Now restart syslog-NG on both your server and client systems, and your logging trafficshould now be secured from prying eyes.
Testing Logging with loggerPresent on all Linux distributions, logger is a useful command-line tool to test your loggingconfiguration. Listing 5-34 demonstrates logger.
4444c05_final.qxd 1/5/05 12:52 AM Page 263
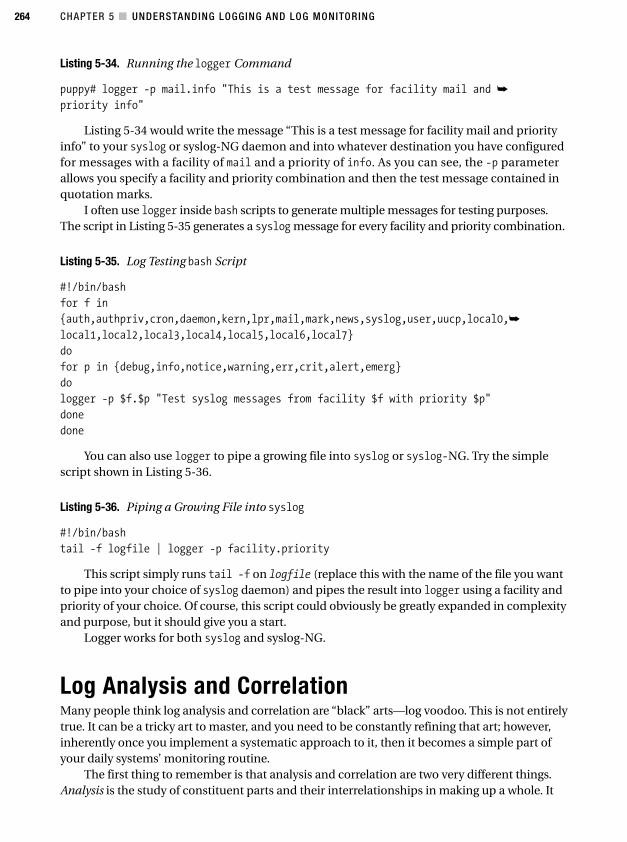
CHAPTER 5 ■ UNDERSTANDING LOGGING AND LOG MONITORING264
Listing 5-34. Running the logger Command
puppy# logger -p mail.info "This is a test message for facility mail and ➥
priority info"
Listing 5-34 would write the message “This is a test message for facility mail and priorityinfo” to your syslog or syslog-NG daemon and into whatever destination you have configuredfor messages with a facility of mail and a priority of info. As you can see, the -p parameterallows you specify a facility and priority combination and then the test message contained inquotation marks.
I often use logger inside bash scripts to generate multiple messages for testing purposes.The script in Listing 5-35 generates a syslog message for every facility and priority combination.
Listing 5-35. Log Testing bash Script
#!/bin/bash
for f in
{auth,authpriv,cron,daemon,kern,lpr,mail,mark,news,syslog,user,uucp,local0,➥
local1,local2,local3,local4,local5,local6,local7}
do
for p in {debug,info,notice,warning,err,crit,alert,emerg}
do
logger -p $f.$p "Test syslog messages from facility $f with priority $p"
done
done
You can also use logger to pipe a growing file into syslog or syslog-NG. Try the simplescript shown in Listing 5-36.
Listing 5-36. Piping a Growing File into syslog
#!/bin/bash
tail -f logfile | logger -p facility.priority
This script simply runs tail -f on logfile (replace this with the name of the file you wantto pipe into your choice of syslog daemon) and pipes the result into logger using a facility andpriority of your choice. Of course, this script could obviously be greatly expanded in complexityand purpose, but it should give you a start.
Logger works for both syslog and syslog-NG.
Log Analysis and CorrelationMany people think log analysis and correlation are “black” arts—log voodoo. This is not entirelytrue. It can be a tricky art to master, and you need to be constantly refining that art; however,inherently once you implement a systematic approach to it, then it becomes a simple part ofyour daily systems’ monitoring routine.
The first thing to remember is that analysis and correlation are two very different things.Analysis is the study of constituent parts and their interrelationships in making up a whole. It
4444c05_final.qxd 1/5/05 12:52 AM Page 264
CHAPTER 5 ■ UNDERSTANDING LOGGING AND LOG MONITORING 265
must be said that the best analysis tool available is yourself. System administrators learn thepatterns of their machines’ operations and can often detect a problem far sooner than auto-mated monitoring or alerting systems have done on the same problem. I have two problemswith this model. The first problem is that you cannot be everywhere at once. The second prob-lem is that the growing volume of the data collected by the systems can become overwhelming.
This is where correlation comes in. Correlation is best defined as the act of detecting rela-tionships between data. You set up tools to collect your data, filter the “wheat from the chaff,”and then correlate that remaining data to put the right pieces of information in front of you soyou can provide an accurate analysis. Properly setup and managed tools can sort through theconstant stream of data that the daily operations of your systems and any attacks on those sys-tems generate. They can detect the relationships between that data and either put those piecestogether into a coherent whole or provide you with the right pieces to allow you to put thatanalysis together for yourself.
But you have to ensure those tools are the right tools and are configured to look for the rightthings so you can rely on them to tell you that something is wrong and that you need to inter-vene. As a result of the importance of those tools to your environment, building and implement-ing them should be a carefully staged process. I will now cover those stages in brief.
The first stage of building such an automated log monitoring system is to make sureyou are collecting the right things and putting them in the right place. Make lists of all yourapplications, devices, and systems and where they log to. Read carefully through the sec-tions in this chapter discussing syslog and syslog-NG, and make sure whatever you set upcovers your entire environment. Make sure your logging infrastructure encompasses everypiece of data generated that may be vital to protecting your systems.
The second stage is bringing together all that information and working out what youreally want to know. Make lists of the critical messages that are important to you and yoursystems. Throw test attacks and systems failures at your test systems, and record the result-ing message traffic; also, port scan your systems and firewalls, even unplugging hardware ordeliberately breaking applications in a test environment to record the results. Group thoselists into priority listings; some messages you may want to be paged for, others can go viae-mail, and some may trigger automated processes or generate attempts at self-recoverysuch as restarting a process.
The third stage is implementing your log correlation and analysis, including configur-ing your correlation tools and designing the required responses. Make sure you carefullydocument each message, the response to the message, and any special information thatrelates to this message. Then test them. And test them again. And keep testing them. Yourlogging environment should not be and almost certainly will never be static. You will alwaysdiscover something new you want to watch for and respond to. Attackers are constantlyfinding new ways to penetrate systems that generate different data for your logging systems.Attacks are much like viruses—you need to constantly update your definitions to keep upwith them.
So where do you go from here? I will now introduce you to a powerful tool that will helpyou achieve your logging goals. That tool is called SEC.
4444c05_final.qxd 1/5/05 12:52 AM Page 265

CHAPTER 5 ■ UNDERSTANDING LOGGING AND LOG MONITORING266
3. SEC is written by Risto Vaarandi and supported by Vaarandi’s employer, The Union Bank of Estonia. Itis free to download and uses the GNU General Public License.
SEC is the most powerful open-source log correlation tool available.3 SEC utilizes Perlregular expressions to find the messages that are important to running your system out of thehuge volume of log traffic most Linux systems generate. It can find a single message or matchpairs of related messages; for example, it can find matching messages that indicate when auser has logged on and off a system. SEC can also keep count of messages it receives and actonly if it receives a number of messages exceeding a threshold that you can define. SEC canalso react to the messages it receives by performing actions such as running a shell script.These actions can include the content of the messages. For example, it is possible to run ashell script as a SEC action and use some or all of the message content as a variable to beinputted into that shell script.
■Note As a result of SEC’s reliance on Perl regular expressions, you need to be reasonably comfortable withusing them. The Perl documentation on regular expressions is excellent. Try http://www.perldoc.com/perl5.6.1/pod/perlre.html and http://www.perldoc.com/perl5.8.0/pod/perlretut.html. Also,I have listed several excellent books on regular expressions in this chapter’s “Resources” section.
Seeing all this functionality you may think SEC is overkill for your requirements, but theability to expand your event correlation capabilities far outweighs the cost of implementation.It is my experience that it is critical in your logging environment to avoid having to make com-promises in your monitoring that could cause you to be exposed to vulnerabilities or a poten-tially missing vital messages. The functionality richness of SEC should be able to cover all yourcurrent and future event correlation needs.
Because of SEC’s complexity, it is impossible to completely cover all its features within thischapter, so I will avoid discussing some of the more advanced features of SEC, most notably con-texts. SEC’s full implementation and variables could easily occupy a book in their own right. I willget you started with SEC by showing you how to install it, how to get it running, how to point yourlogs to SEC, and how set up some basic message-matching rules; then I will point you to theresources you will need to fully enable SEC within your own environment.
■Tip A good place to start learning more about SEC is the mailing list maintained at the SourceForge sitefor SEC. You can subscribe to the mailing list and read its archives at http://lists.sourceforge.net/lists/listinfo/simple-evcorr-users. SEC’s author Risto Vaarandi is a regular, active, and helpful par-ticipant to this list, and the archives of the list contain many useful examples of SEC rules to help you.
4444c05_final.qxd 1/5/05 12:52 AM Page 266
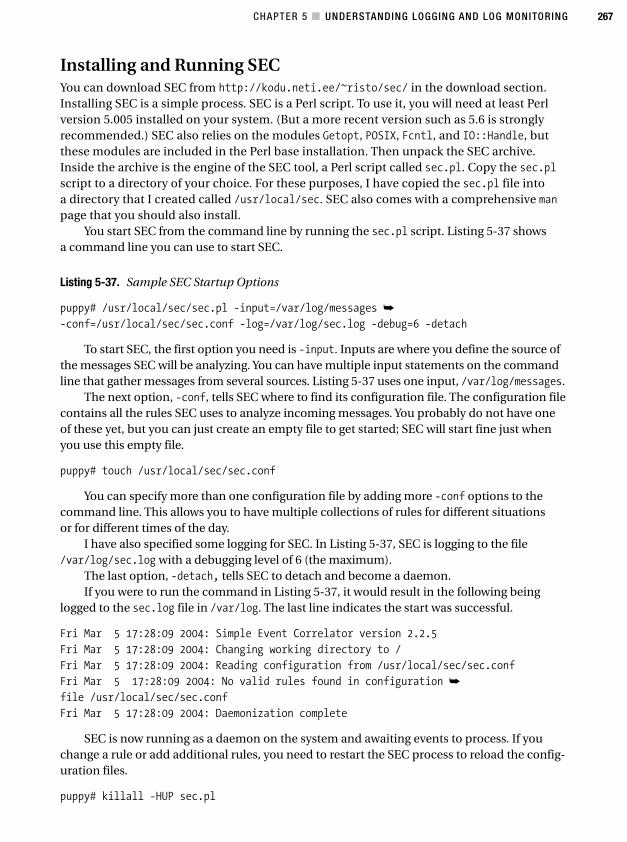
CHAPTER 5 ■ UNDERSTANDING LOGGING AND LOG MONITORING 267
Installing and Running SECYou can download SEC from http://kodu.neti.ee/~risto/sec/ in the download section.Installing SEC is a simple process. SEC is a Perl script. To use it, you will need at least Perlversion 5.005 installed on your system. (But a more recent version such as 5.6 is stronglyrecommended.) SEC also relies on the modules Getopt, POSIX, Fcntl, and IO::Handle, butthese modules are included in the Perl base installation. Then unpack the SEC archive.Inside the archive is the engine of the SEC tool, a Perl script called sec.pl. Copy the sec.plscript to a directory of your choice. For these purposes, I have copied the sec.pl file intoa directory that I created called /usr/local/sec. SEC also comes with a comprehensive manpage that you should also install.
You start SEC from the command line by running the sec.pl script. Listing 5-37 showsa command line you can use to start SEC.
Listing 5-37. Sample SEC Startup Options
puppy# /usr/local/sec/sec.pl -input=/var/log/messages ➥
-conf=/usr/local/sec/sec.conf -log=/var/log/sec.log -debug=6 -detach
To start SEC, the first option you need is -input. Inputs are where you define the source ofthe messages SEC will be analyzing. You can have multiple input statements on the commandline that gather messages from several sources. Listing 5-37 uses one input, /var/log/messages.
The next option, -conf, tells SEC where to find its configuration file. The configuration filecontains all the rules SEC uses to analyze incoming messages. You probably do not have oneof these yet, but you can just create an empty file to get started; SEC will start fine just whenyou use this empty file.
puppy# touch /usr/local/sec/sec.conf
You can specify more than one configuration file by adding more -conf options to thecommand line. This allows you to have multiple collections of rules for different situationsor for different times of the day.
I have also specified some logging for SEC. In Listing 5-37, SEC is logging to the file/var/log/sec.log with a debugging level of 6 (the maximum).
The last option, -detach, tells SEC to detach and become a daemon.If you were to run the command in Listing 5-37, it would result in the following being
logged to the sec.log file in /var/log. The last line indicates the start was successful.
Fri Mar 5 17:28:09 2004: Simple Event Correlator version 2.2.5
Fri Mar 5 17:28:09 2004: Changing working directory to /
Fri Mar 5 17:28:09 2004: Reading configuration from /usr/local/sec/sec.conf
Fri Mar 5 17:28:09 2004: No valid rules found in configuration ➥
file /usr/local/sec/sec.conf
Fri Mar 5 17:28:09 2004: Daemonization complete
SEC is now running as a daemon on the system and awaiting events to process. If youchange a rule or add additional rules, you need to restart the SEC process to reload the config-uration files.
puppy# killall -HUP sec.pl
4444c05_final.qxd 1/5/05 12:52 AM Page 267
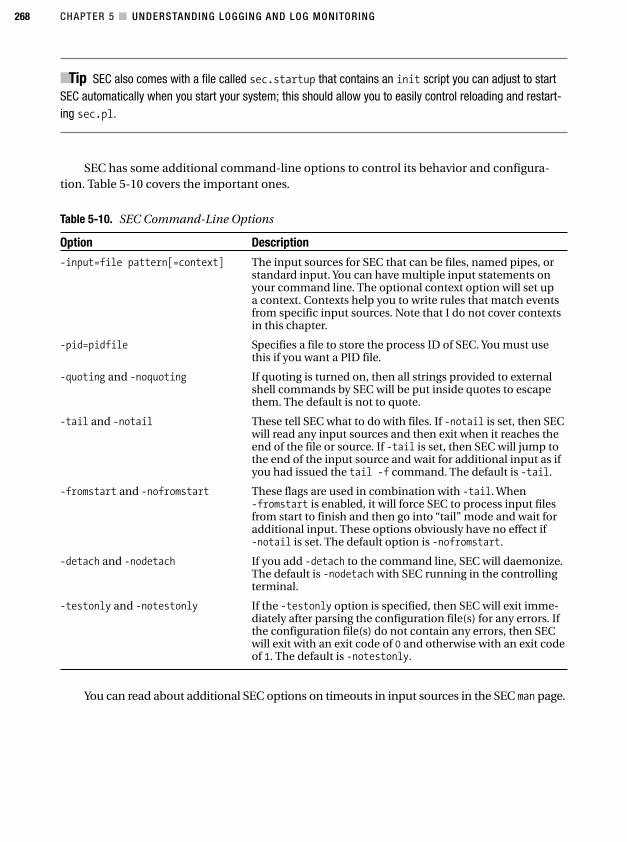
CHAPTER 5 ■ UNDERSTANDING LOGGING AND LOG MONITORING268
■Tip SEC also comes with a file called sec.startup that contains an init script you can adjust to startSEC automatically when you start your system; this should allow you to easily control reloading and restart-ing sec.pl.
SEC has some additional command-line options to control its behavior and configura-tion. Table 5-10 covers the important ones.
Table 5-10. SEC Command-Line Options
Option Description
-input=file pattern[=context] The input sources for SEC that can be files, named pipes, orstandard input. You can have multiple input statements onyour command line. The optional context option will set upa context. Contexts help you to write rules that match eventsfrom specific input sources. Note that I do not cover contextsin this chapter.
-pid=pidfile Specifies a file to store the process ID of SEC. You must usethis if you want a PID file.
-quoting and -noquoting If quoting is turned on, then all strings provided to externalshell commands by SEC will be put inside quotes to escapethem. The default is not to quote.
-tail and -notail These tell SEC what to do with files. If -notail is set, then SECwill read any input sources and then exit when it reaches theend of the file or source. If -tail is set, then SEC will jump tothe end of the input source and wait for additional input as ifyou had issued the tail -f command. The default is -tail.
-fromstart and -nofromstart These flags are used in combination with -tail. When-fromstart is enabled, it will force SEC to process input filesfrom start to finish and then go into “tail” mode and wait foradditional input. These options obviously have no effect if-notail is set. The default option is -nofromstart.
-detach and -nodetach If you add -detach to the command line, SEC will daemonize.The default is -nodetach with SEC running in the controllingterminal.
-testonly and -notestonly If the -testonly option is specified, then SEC will exit imme-diately after parsing the configuration file(s) for any errors. Ifthe configuration file(s) do not contain any errors, then SECwill exit with an exit code of 0 and otherwise with an exit codeof 1. The default is -notestonly.
You can read about additional SEC options on timeouts in input sources in the SEC man page.
4444c05_final.qxd 1/5/05 12:52 AM Page 268
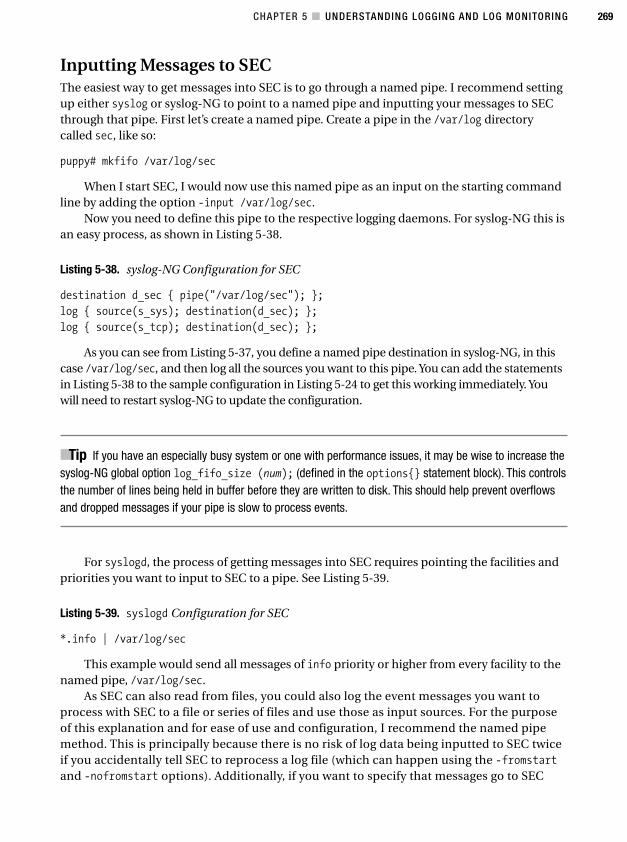
CHAPTER 5 ■ UNDERSTANDING LOGGING AND LOG MONITORING 269
Inputting Messages to SECThe easiest way to get messages into SEC is to go through a named pipe. I recommend settingup either syslog or syslog-NG to point to a named pipe and inputting your messages to SECthrough that pipe. First let’s create a named pipe. Create a pipe in the /var/log directorycalled sec, like so:
puppy# mkfifo /var/log/sec
When I start SEC, I would now use this named pipe as an input on the starting commandline by adding the option -input /var/log/sec.
Now you need to define this pipe to the respective logging daemons. For syslog-NG this isan easy process, as shown in Listing 5-38.
Listing 5-38. syslog-NG Configuration for SEC
destination d_sec { pipe("/var/log/sec"); };
log { source(s_sys); destination(d_sec); };
log { source(s_tcp); destination(d_sec); };
As you can see from Listing 5-37, you define a named pipe destination in syslog-NG, in thiscase /var/log/sec, and then log all the sources you want to this pipe. You can add the statementsin Listing 5-38 to the sample configuration in Listing 5-24 to get this working immediately. Youwill need to restart syslog-NG to update the configuration.
■Tip If you have an especially busy system or one with performance issues, it may be wise to increase thesyslog-NG global option log_fifo_size (num); (defined in the options{} statement block). This controlsthe number of lines being held in buffer before they are written to disk. This should help prevent overflowsand dropped messages if your pipe is slow to process events.
For syslogd, the process of getting messages into SEC requires pointing the facilities andpriorities you want to input to SEC to a pipe. See Listing 5-39.
Listing 5-39. syslogd Configuration for SEC
*.info | /var/log/sec
This example would send all messages of info priority or higher from every facility to thenamed pipe, /var/log/sec.
As SEC can also read from files, you could also log the event messages you want toprocess with SEC to a file or series of files and use those as input sources. For the purposeof this explanation and for ease of use and configuration, I recommend the named pipemethod. This is principally because there is no risk of log data being inputted to SEC twiceif you accidentally tell SEC to reprocess a log file (which can happen using the -fromstartand -nofromstart options). Additionally, if you want to specify that messages go to SEC
4444c05_final.qxd 1/5/05 12:52 AM Page 269
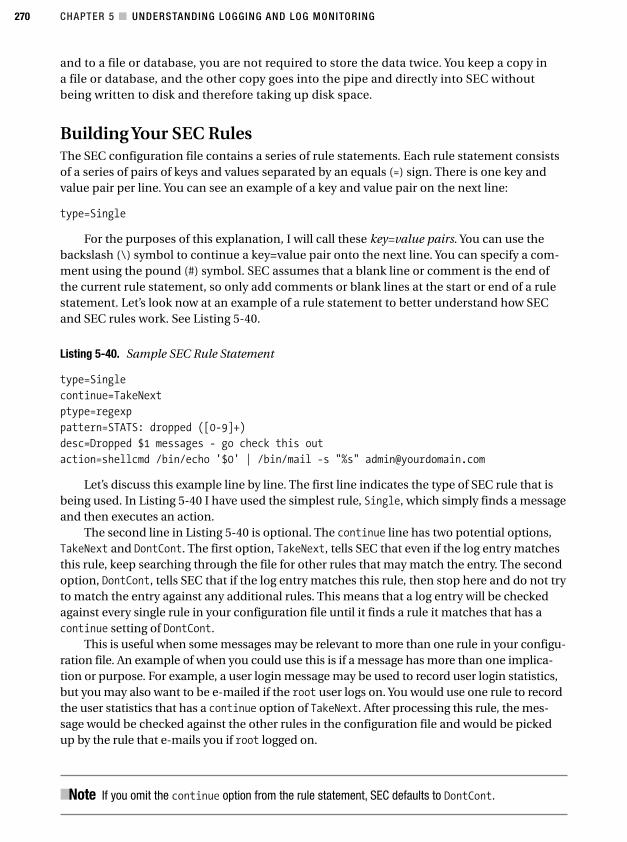
CHAPTER 5 ■ UNDERSTANDING LOGGING AND LOG MONITORING270
and to a file or database, you are not required to store the data twice. You keep a copy ina file or database, and the other copy goes into the pipe and directly into SEC withoutbeing written to disk and therefore taking up disk space.
Building Your SEC RulesThe SEC configuration file contains a series of rule statements. Each rule statement consistsof a series of pairs of keys and values separated by an equals (=) sign. There is one key andvalue pair per line. You can see an example of a key and value pair on the next line:
type=Single
For the purposes of this explanation, I will call these key=value pairs. You can use thebackslash (\) symbol to continue a key=value pair onto the next line. You can specify a com-ment using the pound (#) symbol. SEC assumes that a blank line or comment is the end ofthe current rule statement, so only add comments or blank lines at the start or end of a rulestatement. Let’s look now at an example of a rule statement to better understand how SECand SEC rules work. See Listing 5-40.
Listing 5-40. Sample SEC Rule Statement
type=Single
continue=TakeNext
ptype=regexp
pattern=STATS: dropped ([0-9]+)
desc=Dropped $1 messages - go check this out
action=shellcmd /bin/echo '$0' | /bin/mail -s "%s" [email protected]
Let’s discuss this example line by line. The first line indicates the type of SEC rule that isbeing used. In Listing 5-40 I have used the simplest rule, Single, which simply finds a messageand then executes an action.
The second line in Listing 5-40 is optional. The continue line has two potential options,TakeNext and DontCont. The first option, TakeNext, tells SEC that even if the log entry matchesthis rule, keep searching through the file for other rules that may match the entry. The secondoption, DontCont, tells SEC that if the log entry matches this rule, then stop here and do not tryto match the entry against any additional rules. This means that a log entry will be checkedagainst every single rule in your configuration file until it finds a rule it matches that has acontinue setting of DontCont.
This is useful when some messages may be relevant to more than one rule in your configu-ration file. An example of when you could use this is if a message has more than one implica-tion or purpose. For example, a user login message may be used to record user login statistics,but you may also want to be e-mailed if the root user logs on. You would use one rule to recordthe user statistics that has a continue option of TakeNext. After processing this rule, the mes-sage would be checked against the other rules in the configuration file and would be pickedup by the rule that e-mails you if root logged on.
■Note If you omit the continue option from the rule statement, SEC defaults to DontCont.
4444c05_final.qxd 1/5/05 12:52 AM Page 270
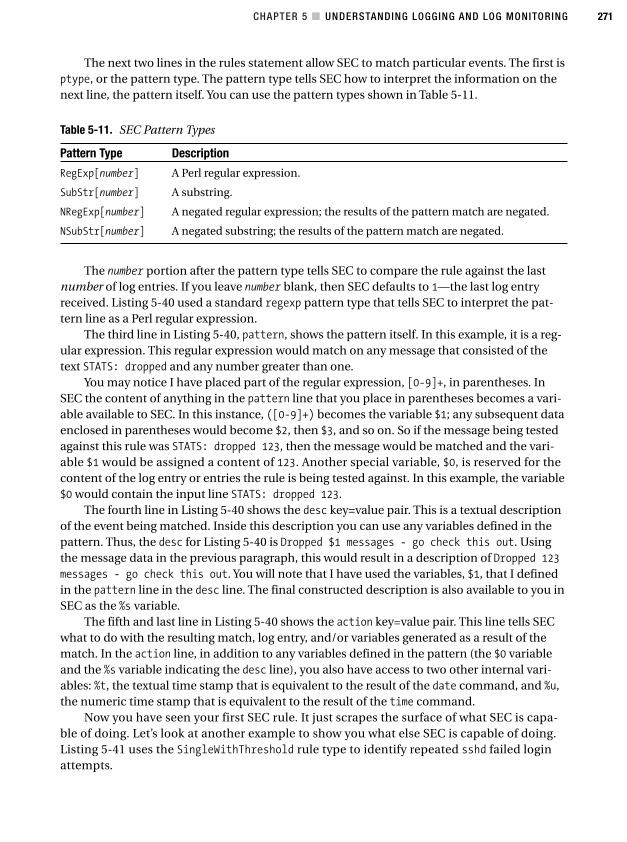
CHAPTER 5 ■ UNDERSTANDING LOGGING AND LOG MONITORING 271
The next two lines in the rules statement allow SEC to match particular events. The first isptype, or the pattern type. The pattern type tells SEC how to interpret the information on thenext line, the pattern itself. You can use the pattern types shown in Table 5-11.
Table 5-11. SEC Pattern Types
Pattern Type Description
RegExp[number] A Perl regular expression.
SubStr[number] A substring.
NRegExp[number] A negated regular expression; the results of the pattern match are negated.
NSubStr[number] A negated substring; the results of the pattern match are negated.
The number portion after the pattern type tells SEC to compare the rule against the lastnumber of log entries. If you leave number blank, then SEC defaults to 1—the last log entryreceived. Listing 5-40 used a standard regexp pattern type that tells SEC to interpret the pat-tern line as a Perl regular expression.
The third line in Listing 5-40, pattern, shows the pattern itself. In this example, it is a reg-ular expression. This regular expression would match on any message that consisted of thetext STATS: dropped and any number greater than one.
You may notice I have placed part of the regular expression, [0-9]+, in parentheses. InSEC the content of anything in the pattern line that you place in parentheses becomes a vari-able available to SEC. In this instance, ([0-9]+) becomes the variable $1; any subsequent dataenclosed in parentheses would become $2, then $3, and so on. So if the message being testedagainst this rule was STATS: dropped 123, then the message would be matched and the vari-able $1 would be assigned a content of 123. Another special variable, $0, is reserved for thecontent of the log entry or entries the rule is being tested against. In this example, the variable$0 would contain the input line STATS: dropped 123.
The fourth line in Listing 5-40 shows the desc key=value pair. This is a textual descriptionof the event being matched. Inside this description you can use any variables defined in thepattern. Thus, the desc for Listing 5-40 is Dropped $1 messages - go check this out. Usingthe message data in the previous paragraph, this would result in a description of Dropped 123messages - go check this out. You will note that I have used the variables, $1, that I definedin the pattern line in the desc line. The final constructed description is also available to you inSEC as the %s variable.
The fifth and last line in Listing 5-40 shows the action key=value pair. This line tells SECwhat to do with the resulting match, log entry, and/or variables generated as a result of thematch. In the action line, in addition to any variables defined in the pattern (the $0 variableand the %s variable indicating the desc line), you also have access to two other internal vari-ables: %t, the textual time stamp that is equivalent to the result of the date command, and %u,the numeric time stamp that is equivalent to the result of the time command.
Now you have seen your first SEC rule. It just scrapes the surface of what SEC is capa-ble of doing. Let’s look at another example to show you what else SEC is capable of doing.Listing 5-41 uses the SingleWithThreshold rule type to identify repeated sshd failed loginattempts.
4444c05_final.qxd 1/5/05 12:52 AM Page 271
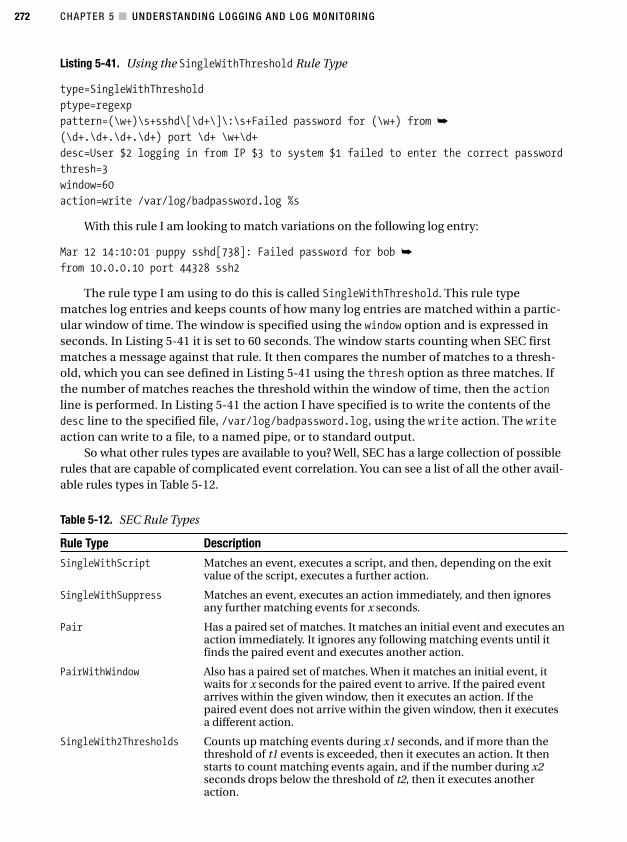
CHAPTER 5 ■ UNDERSTANDING LOGGING AND LOG MONITORING272
Listing 5-41. Using the SingleWithThreshold Rule Type
type=SingleWithThreshold
ptype=regexp
pattern=(\w+)\s+sshd\[\d+\]\:\s+Failed password for (\w+) from ➥
(\d+.\d+.\d+.\d+) port \d+ \w+\d+
desc=User $2 logging in from IP $3 to system $1 failed to enter the correct password
thresh=3
window=60
action=write /var/log/badpassword.log %s
With this rule I am looking to match variations on the following log entry:
Mar 12 14:10:01 puppy sshd[738]: Failed password for bob ➥
from 10.0.0.10 port 44328 ssh2
The rule type I am using to do this is called SingleWithThreshold. This rule typematches log entries and keeps counts of how many log entries are matched within a partic-ular window of time. The window is specified using the window option and is expressed inseconds. In Listing 5-41 it is set to 60 seconds. The window starts counting when SEC firstmatches a message against that rule. It then compares the number of matches to a thresh-old, which you can see defined in Listing 5-41 using the thresh option as three matches. Ifthe number of matches reaches the threshold within the window of time, then the actionline is performed. In Listing 5-41 the action I have specified is to write the contents of thedesc line to the specified file, /var/log/badpassword.log, using the write action. The writeaction can write to a file, to a named pipe, or to standard output.
So what other rules types are available to you? Well, SEC has a large collection of possiblerules that are capable of complicated event correlation. You can see a list of all the other avail-able rules types in Table 5-12.
Table 5-12. SEC Rule Types
Rule Type Description
SingleWithScript Matches an event, executes a script, and then, depending on the exitvalue of the script, executes a further action.
SingleWithSuppress Matches an event, executes an action immediately, and then ignoresany further matching events for x seconds.
Pair Has a paired set of matches. It matches an initial event and executes anaction immediately. It ignores any following matching events until itfinds the paired event and executes another action.
PairWithWindow Also has a paired set of matches. When it matches an initial event, itwaits for x seconds for the paired event to arrive. If the paired eventarrives within the given window, then it executes an action. If thepaired event does not arrive within the given window, then it executesa different action.
SingleWith2Thresholds Counts up matching events during x1 seconds, and if more than thethreshold of t1 events is exceeded, then it executes an action. It thenstarts to count matching events again, and if the number during x2seconds drops below the threshold of t2, then it executes anotheraction.
(Continues)
4444c05_final.qxd 1/5/05 12:52 AM Page 272
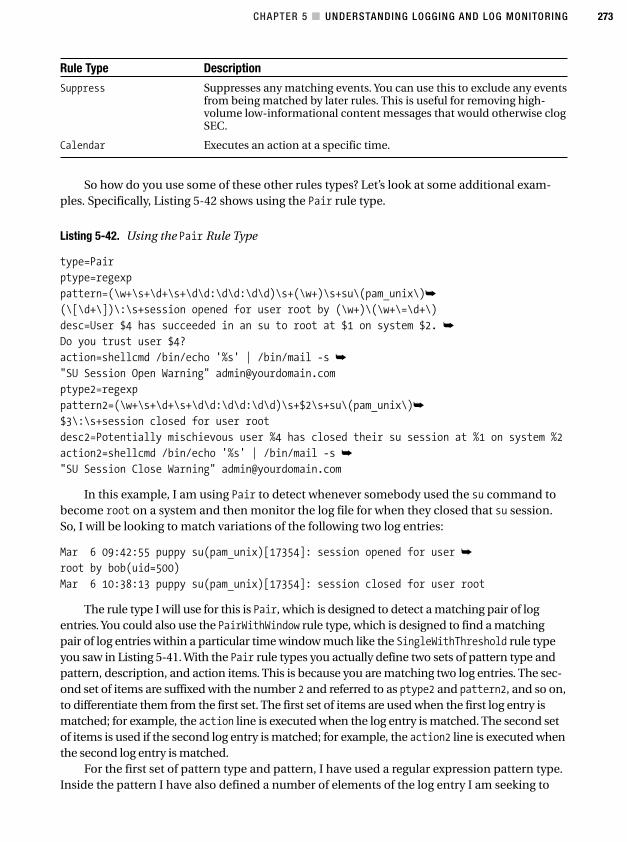
CHAPTER 5 ■ UNDERSTANDING LOGGING AND LOG MONITORING 273
Rule Type Description
Suppress Suppresses any matching events. You can use this to exclude any eventsfrom being matched by later rules. This is useful for removing high-volume low-informational content messages that would otherwise clogSEC.
Calendar Executes an action at a specific time.
So how do you use some of these other rules types? Let’s look at some additional exam-ples. Specifically, Listing 5-42 shows using the Pair rule type.
Listing 5-42. Using the Pair Rule Type
type=Pair
ptype=regexp
pattern=(\w+\s+\d+\s+\d\d:\d\d:\d\d)\s+(\w+)\s+su\(pam_unix\)➥
(\[\d+\])\:\s+session opened for user root by (\w+)\(\w+\=\d+\)
desc=User $4 has succeeded in an su to root at $1 on system $2. ➥
Do you trust user $4?
action=shellcmd /bin/echo '%s' | /bin/mail -s ➥
"SU Session Open Warning" [email protected]
ptype2=regexp
pattern2=(\w+\s+\d+\s+\d\d:\d\d:\d\d)\s+$2\s+su\(pam_unix\)➥
$3\:\s+session closed for user root
desc2=Potentially mischievous user %4 has closed their su session at %1 on system %2
action2=shellcmd /bin/echo '%s' | /bin/mail -s ➥
"SU Session Close Warning" [email protected]
In this example, I am using Pair to detect whenever somebody used the su command tobecome root on a system and then monitor the log file for when they closed that su session.So, I will be looking to match variations of the following two log entries:
Mar 6 09:42:55 puppy su(pam_unix)[17354]: session opened for user ➥
root by bob(uid=500)
Mar 6 10:38:13 puppy su(pam_unix)[17354]: session closed for user root
The rule type I will use for this is Pair, which is designed to detect a matching pair of logentries. You could also use the PairWithWindow rule type, which is designed to find a matchingpair of log entries within a particular time window much like the SingleWithThreshold rule typeyou saw in Listing 5-41. With the Pair rule types you actually define two sets of pattern type andpattern, description, and action items. This is because you are matching two log entries. The sec-ond set of items are suffixed with the number 2 and referred to as ptype2 and pattern2, and so on,to differentiate them from the first set. The first set of items are used when the first log entry ismatched; for example, the action line is executed when the log entry is matched. The second setof items is used if the second log entry is matched; for example, the action2 line is executed whenthe second log entry is matched.
For the first set of pattern type and pattern, I have used a regular expression pattern type.Inside the pattern I have also defined a number of elements of the log entry I am seeking to
4444c05_final.qxd 1/5/05 12:52 AM Page 273
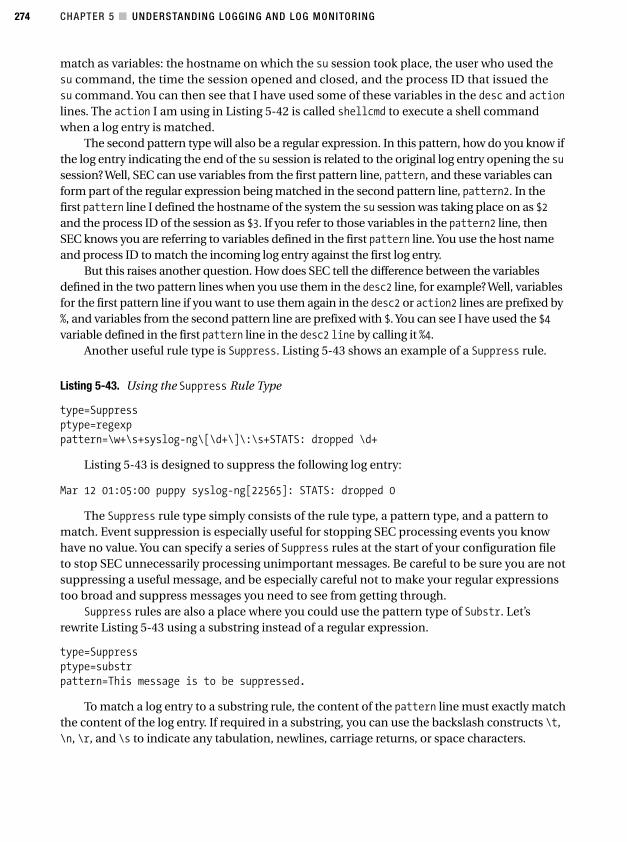
CHAPTER 5 ■ UNDERSTANDING LOGGING AND LOG MONITORING274
match as variables: the hostname on which the su session took place, the user who used thesu command, the time the session opened and closed, and the process ID that issued thesu command. You can then see that I have used some of these variables in the desc and actionlines. The action I am using in Listing 5-42 is called shellcmd to execute a shell commandwhen a log entry is matched.
The second pattern type will also be a regular expression. In this pattern, how do you know ifthe log entry indicating the end of the su session is related to the original log entry opening the susession? Well, SEC can use variables from the first pattern line, pattern, and these variables canform part of the regular expression being matched in the second pattern line, pattern2. In thefirst pattern line I defined the hostname of the system the su session was taking place on as $2and the process ID of the session as $3. If you refer to those variables in the pattern2 line, thenSEC knows you are referring to variables defined in the first pattern line. You use the host nameand process ID to match the incoming log entry against the first log entry.
But this raises another question. How does SEC tell the difference between the variablesdefined in the two pattern lines when you use them in the desc2 line, for example? Well, variablesfor the first pattern line if you want to use them again in the desc2 or action2 lines are prefixed by%, and variables from the second pattern line are prefixed with $. You can see I have used the $4variable defined in the first pattern line in the desc2 line by calling it %4.
Another useful rule type is Suppress. Listing 5-43 shows an example of a Suppress rule.
Listing 5-43. Using the Suppress Rule Type
type=Suppress
ptype=regexp
pattern=\w+\s+syslog-ng\[\d+\]\:\s+STATS: dropped \d+
Listing 5-43 is designed to suppress the following log entry:
Mar 12 01:05:00 puppy syslog-ng[22565]: STATS: dropped 0
The Suppress rule type simply consists of the rule type, a pattern type, and a pattern tomatch. Event suppression is especially useful for stopping SEC processing events you knowhave no value. You can specify a series of Suppress rules at the start of your configuration fileto stop SEC unnecessarily processing unimportant messages. Be careful to be sure you are notsuppressing a useful message, and be especially careful not to make your regular expressionstoo broad and suppress messages you need to see from getting through.
Suppress rules are also a place where you could use the pattern type of Substr. Let’srewrite Listing 5-43 using a substring instead of a regular expression.
type=Suppress
ptype=substr
pattern=This message is to be suppressed.
To match a log entry to a substring rule, the content of the pattern line must exactly matchthe content of the log entry. If required in a substring, you can use the backslash constructs \t,\n, \r, and \s to indicate any tabulation, newlines, carriage returns, or space characters.
4444c05_final.qxd 1/5/05 12:52 AM Page 274
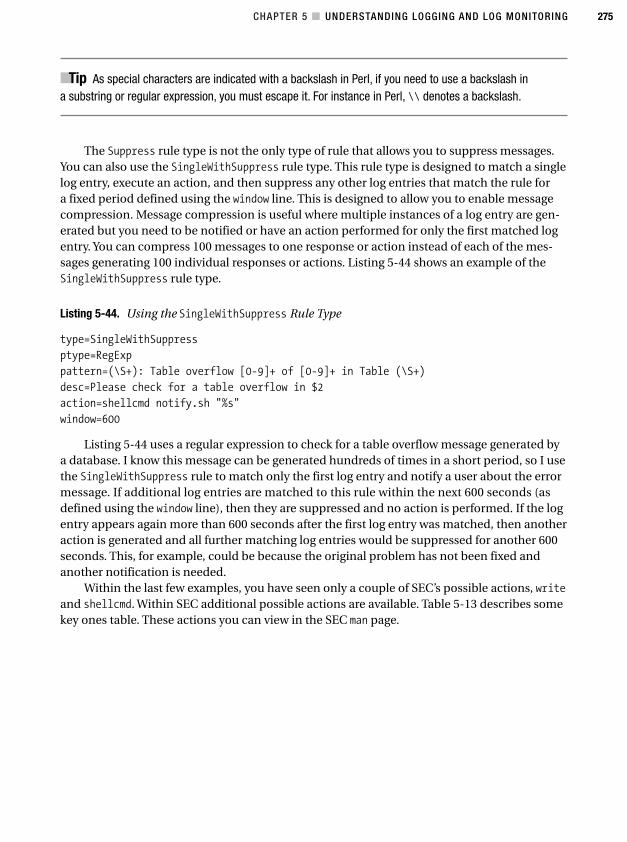
CHAPTER 5 ■ UNDERSTANDING LOGGING AND LOG MONITORING 275
■Tip As special characters are indicated with a backslash in Perl, if you need to use a backslash in a substring or regular expression, you must escape it. For instance in Perl, \\ denotes a backslash.
The Suppress rule type is not the only type of rule that allows you to suppress messages.You can also use the SingleWithSuppress rule type. This rule type is designed to match a singlelog entry, execute an action, and then suppress any other log entries that match the rule fora fixed period defined using the window line. This is designed to allow you to enable messagecompression. Message compression is useful where multiple instances of a log entry are gen-erated but you need to be notified or have an action performed for only the first matched logentry. You can compress 100 messages to one response or action instead of each of the mes-sages generating 100 individual responses or actions. Listing 5-44 shows an example of theSingleWithSuppress rule type.
Listing 5-44. Using the SingleWithSuppress Rule Type
type=SingleWithSuppress
ptype=RegExp
pattern=(\S+): Table overflow [0-9]+ of [0-9]+ in Table (\S+)
desc=Please check for a table overflow in $2
action=shellcmd notify.sh "%s"
window=600
Listing 5-44 uses a regular expression to check for a table overflow message generated bya database. I know this message can be generated hundreds of times in a short period, so I usethe SingleWithSuppress rule to match only the first log entry and notify a user about the errormessage. If additional log entries are matched to this rule within the next 600 seconds (asdefined using the window line), then they are suppressed and no action is performed. If the logentry appears again more than 600 seconds after the first log entry was matched, then anotheraction is generated and all further matching log entries would be suppressed for another 600seconds. This, for example, could be because the original problem has not been fixed andanother notification is needed.
Within the last few examples, you have seen only a couple of SEC’s possible actions, writeand shellcmd. Within SEC additional possible actions are available. Table 5-13 describes somekey ones table. These actions you can view in the SEC man page.
4444c05_final.qxd 1/5/05 12:52 AM Page 275
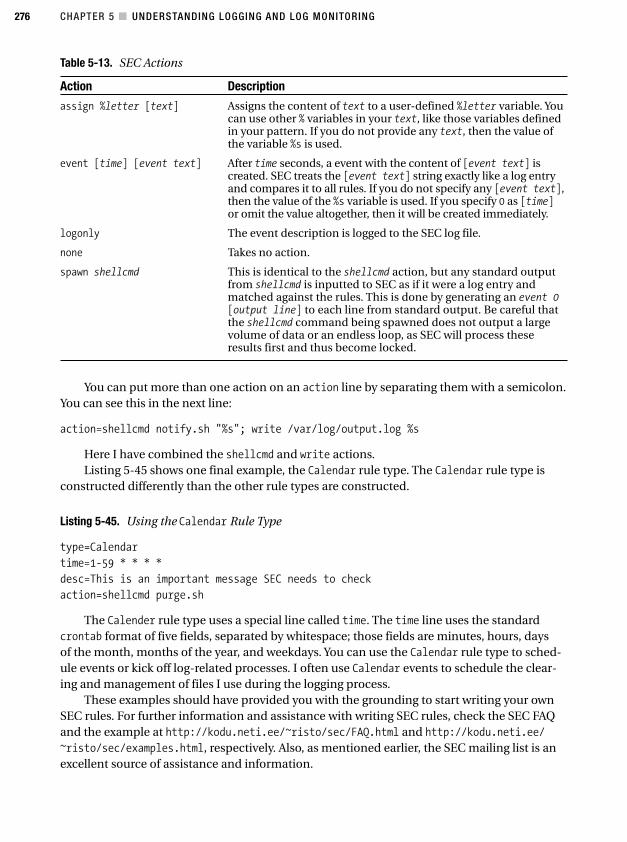
CHAPTER 5 ■ UNDERSTANDING LOGGING AND LOG MONITORING276
Table 5-13. SEC Actions
Action Description
assign %letter [text] Assigns the content of text to a user-defined %letter variable. Youcan use other % variables in your text, like those variables definedin your pattern. If you do not provide any text, then the value ofthe variable %s is used.
event [time] [event text] After time seconds, a event with the content of [event text] iscreated. SEC treats the [event text] string exactly like a log entryand compares it to all rules. If you do not specify any [event text],then the value of the %s variable is used. If you specify 0 as [time]or omit the value altogether, then it will be created immediately.
logonly The event description is logged to the SEC log file.
none Takes no action.
spawn shellcmd This is identical to the shellcmd action, but any standard outputfrom shellcmd is inputted to SEC as if it were a log entry andmatched against the rules. This is done by generating an event 0[output line] to each line from standard output. Be careful thatthe shellcmd command being spawned does not output a largevolume of data or an endless loop, as SEC will process theseresults first and thus become locked.
You can put more than one action on an action line by separating them with a semicolon.You can see this in the next line:
action=shellcmd notify.sh "%s"; write /var/log/output.log %s
Here I have combined the shellcmd and write actions.Listing 5-45 shows one final example, the Calendar rule type. The Calendar rule type is
constructed differently than the other rule types are constructed.
Listing 5-45. Using the Calendar Rule Type
type=Calendar
time=1-59 * * * *
desc=This is an important message SEC needs to check
action=shellcmd purge.sh
The Calender rule type uses a special line called time. The time line uses the standardcrontab format of five fields, separated by whitespace; those fields are minutes, hours, daysof the month, months of the year, and weekdays. You can use the Calendar rule type to sched-ule events or kick off log-related processes. I often use Calendar events to schedule the clear-ing and management of files I use during the logging process.
These examples should have provided you with the grounding to start writing your ownSEC rules. For further information and assistance with writing SEC rules, check the SEC FAQand the example at http://kodu.neti.ee/~risto/sec/FAQ.html and http://kodu.neti.ee/~risto/sec/examples.html, respectively. Also, as mentioned earlier, the SEC mailing list is anexcellent source of assistance and information.
4444c05_final.qxd 1/5/05 12:52 AM Page 276
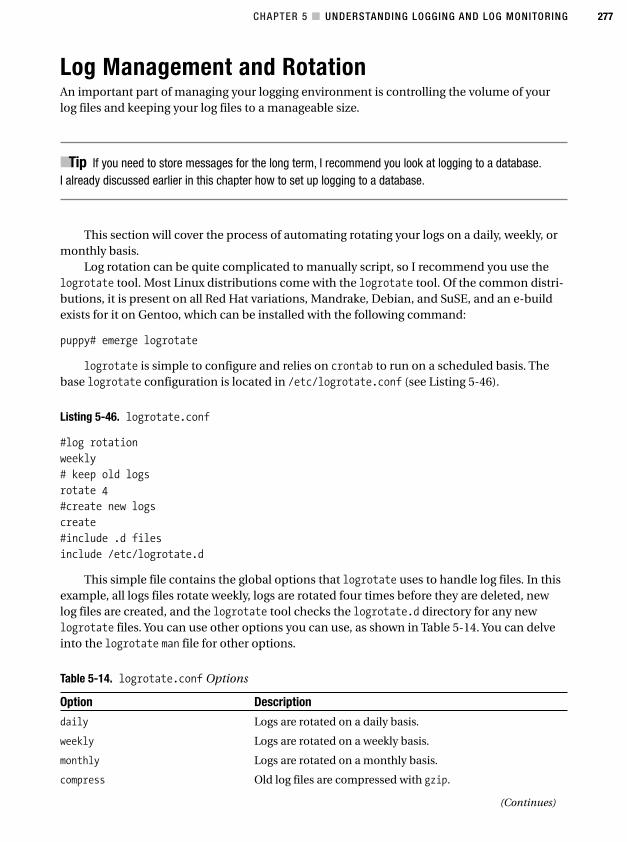
CHAPTER 5 ■ UNDERSTANDING LOGGING AND LOG MONITORING 277
Log Management and RotationAn important part of managing your logging environment is controlling the volume of yourlog files and keeping your log files to a manageable size.
■Tip If you need to store messages for the long term, I recommend you look at logging to a database.I already discussed earlier in this chapter how to set up logging to a database.
This section will cover the process of automating rotating your logs on a daily, weekly, ormonthly basis.
Log rotation can be quite complicated to manually script, so I recommend you use thelogrotate tool. Most Linux distributions come with the logrotate tool. Of the common distri-butions, it is present on all Red Hat variations, Mandrake, Debian, and SuSE, and an e-buildexists for it on Gentoo, which can be installed with the following command:
puppy# emerge logrotate
logrotate is simple to configure and relies on crontab to run on a scheduled basis. Thebase logrotate configuration is located in /etc/logrotate.conf (see Listing 5-46).
Listing 5-46. logrotate.conf
#log rotation
weekly
# keep old logs
rotate 4
#create new logs
create
#include .d files
include /etc/logrotate.d
This simple file contains the global options that logrotate uses to handle log files. In thisexample, all logs files rotate weekly, logs are rotated four times before they are deleted, newlog files are created, and the logrotate tool checks the logrotate.d directory for any newlogrotate files. You can use other options you can use, as shown in Table 5-14. You can delveinto the logrotate man file for other options.
Table 5-14. logrotate.conf Options
Option Description
daily Logs are rotated on a daily basis.
weekly Logs are rotated on a weekly basis.
monthly Logs are rotated on a monthly basis.
compress Old log files are compressed with gzip.
(Continues)
4444c05_final.qxd 1/5/05 12:52 AM Page 277
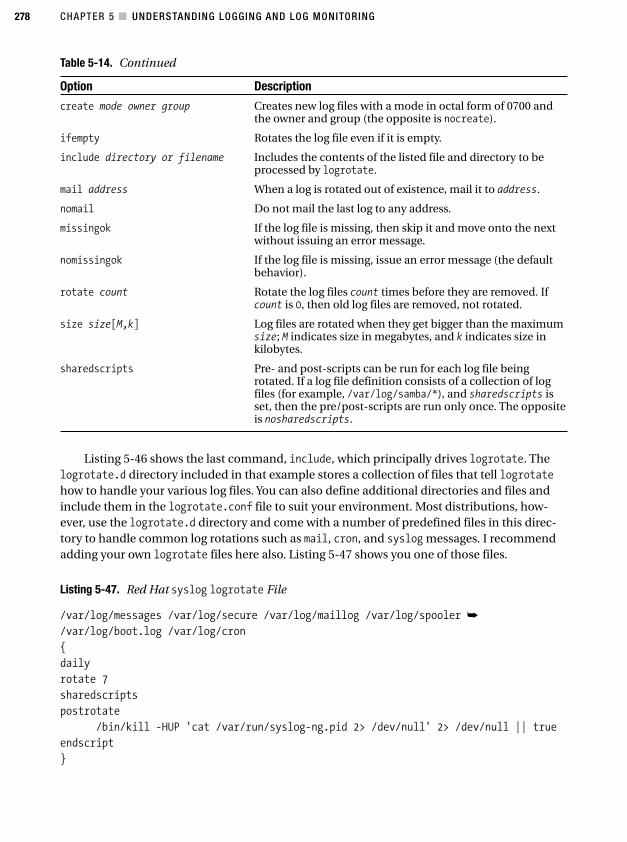
CHAPTER 5 ■ UNDERSTANDING LOGGING AND LOG MONITORING278
Table 5-14. Continued
Option Description
create mode owner group Creates new log files with a mode in octal form of 0700 andthe owner and group (the opposite is nocreate).
ifempty Rotates the log file even if it is empty.
include directory or filename Includes the contents of the listed file and directory to beprocessed by logrotate.
mail address When a log is rotated out of existence, mail it to address.
nomail Do not mail the last log to any address.
missingok If the log file is missing, then skip it and move onto the nextwithout issuing an error message.
nomissingok If the log file is missing, issue an error message (the defaultbehavior).
rotate count Rotate the log files count times before they are removed. Ifcount is 0, then old log files are removed, not rotated.
size size[M,k] Log files are rotated when they get bigger than the maximumsize; M indicates size in megabytes, and k indicates size inkilobytes.
sharedscripts Pre- and post-scripts can be run for each log file beingrotated. If a log file definition consists of a collection of logfiles (for example, /var/log/samba/*), and sharedscripts isset, then the pre/post-scripts are run only once. The oppositeis nosharedscripts.
Listing 5-46 shows the last command, include, which principally drives logrotate. Thelogrotate.d directory included in that example stores a collection of files that tell logrotatehow to handle your various log files. You can also define additional directories and files andinclude them in the logrotate.conf file to suit your environment. Most distributions, how-ever, use the logrotate.d directory and come with a number of predefined files in this direc-tory to handle common log rotations such as mail, cron, and syslog messages. I recommendadding your own logrotate files here also. Listing 5-47 shows you one of those files.
Listing 5-47. Red Hat syslog logrotate File
/var/log/messages /var/log/secure /var/log/maillog /var/log/spooler ➥
/var/log/boot.log /var/log/cron
{
daily
rotate 7
sharedscripts
postrotate
/bin/kill -HUP 'cat /var/run/syslog-ng.pid 2> /dev/null' 2> /dev/null || true
endscript
}
4444c05_final.qxd 1/5/05 12:52 AM Page 278
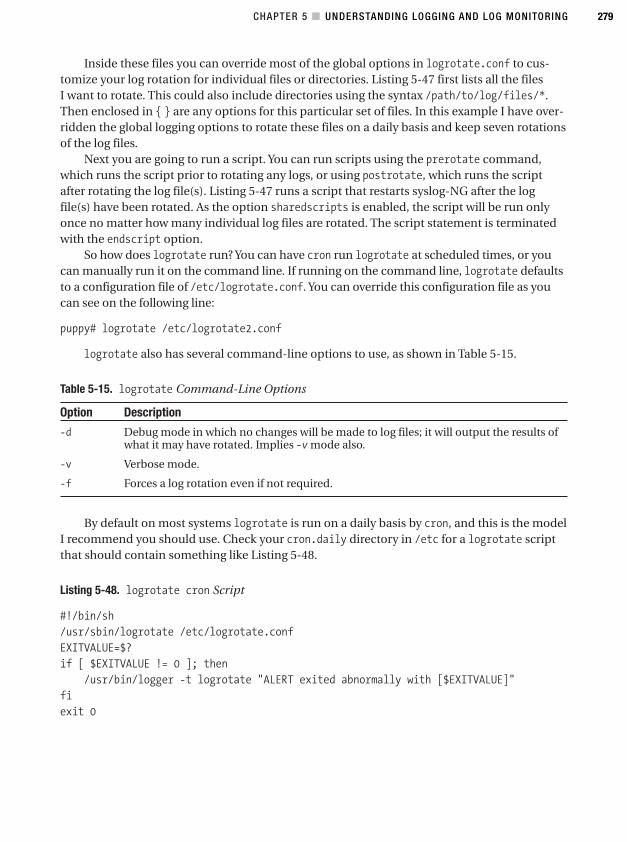
Inside these files you can override most of the global options in logrotate.conf to cus-tomize your log rotation for individual files or directories. Listing 5-47 first lists all the filesI want to rotate. This could also include directories using the syntax /path/to/log/files/*.Then enclosed in { } are any options for this particular set of files. In this example I have over-ridden the global logging options to rotate these files on a daily basis and keep seven rotationsof the log files.
Next you are going to run a script. You can run scripts using the prerotate command,which runs the script prior to rotating any logs, or using postrotate, which runs the scriptafter rotating the log file(s). Listing 5-47 runs a script that restarts syslog-NG after the logfile(s) have been rotated. As the option sharedscripts is enabled, the script will be run onlyonce no matter how many individual log files are rotated. The script statement is terminatedwith the endscript option.
So how does logrotate run? You can have cron run logrotate at scheduled times, or youcan manually run it on the command line. If running on the command line, logrotate defaultsto a configuration file of /etc/logrotate.conf. You can override this configuration file as youcan see on the following line:
puppy# logrotate /etc/logrotate2.conf
logrotate also has several command-line options to use, as shown in Table 5-15.
Table 5-15. logrotate Command-Line Options
Option Description
-d Debug mode in which no changes will be made to log files; it will output the results ofwhat it may have rotated. Implies -v mode also.
-v Verbose mode.
-f Forces a log rotation even if not required.
By default on most systems logrotate is run on a daily basis by cron, and this is the modelI recommend you should use. Check your cron.daily directory in /etc for a logrotate scriptthat should contain something like Listing 5-48.
Listing 5-48. logrotate cron Script
#!/bin/sh
/usr/sbin/logrotate /etc/logrotate.conf
EXITVALUE=$?
if [ $EXITVALUE != 0 ]; then
/usr/bin/logger -t logrotate "ALERT exited abnormally with [$EXITVALUE]"
fi
exit 0
CHAPTER 5 ■ UNDERSTANDING LOGGING AND LOG MONITORING 279
4444c05_final.qxd 1/5/05 12:52 AM Page 279
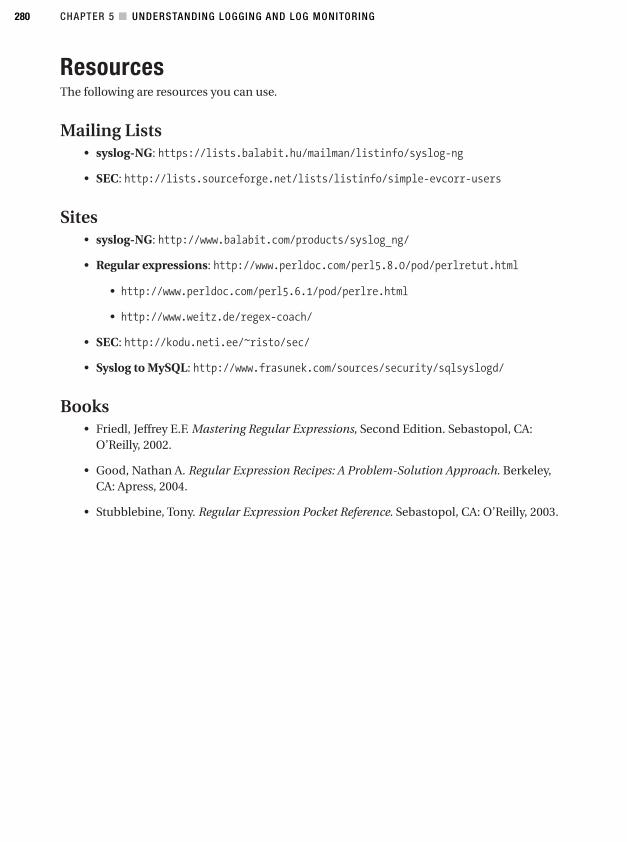
ResourcesThe following are resources you can use.
Mailing Lists• syslog-NG: https://lists.balabit.hu/mailman/listinfo/syslog-ng
• SEC: http://lists.sourceforge.net/lists/listinfo/simple-evcorr-users
Sites• syslog-NG: http://www.balabit.com/products/syslog_ng/
• Regular expressions: http://www.perldoc.com/perl5.8.0/pod/perlretut.html
• http://www.perldoc.com/perl5.6.1/pod/perlre.html
• http://www.weitz.de/regex-coach/
• SEC: http://kodu.neti.ee/~risto/sec/
• Syslog to MySQL: http://www.frasunek.com/sources/security/sqlsyslogd/
Books• Friedl, Jeffrey E.F. Mastering Regular Expressions, Second Edition. Sebastopol, CA:
O’Reilly, 2002.
• Good, Nathan A. Regular Expression Recipes: A Problem-Solution Approach. Berkeley,CA: Apress, 2004.
• Stubblebine, Tony. Regular Expression Pocket Reference. Sebastopol, CA: O’Reilly, 2003.
CHAPTER 5 ■ UNDERSTANDING LOGGING AND LOG MONITORING280
4444c05_final.qxd 1/5/05 12:52 AM Page 280
281
C H A P T E R 6
■ ■ ■
Using Tools for Security Testing
So you think you have got world-class security and a hardened site and systems? But do youreally? Just because no one has penetrated your systems yet does not mean they are secure ordoes it mean you should rest on your laurels. If you are serious about security, you need to beconstantly updating, refining, and, most important, testing your security and hardened sys-tems. However, this by no means guarantees your security, as new exploits and vulnerabilitiesare discovered on a daily basis, but it is the best way to become as confident as possible thatyour systems are secure.
This chapter covers three layers of security testing: the inner security layer, the outersecurity layer, and the application security layer. I define the inner layer as consisting of theoperating system of your systems, including such elements as your kernel security, file secu-rity, and user and password security. Outer layer security consists of what is best described asthe “crust” of your system. These are your system’s network connections, ports, or anythingelse that connects your systems to an intranet, the Internet, or other systems. The applicationsecurity layer consists of the security of the applications running on your system. In each chap-ter where I discuss hardening a particular application, I will provide methods and tools to helpyou test that particular application for any security holes or vulnerabilities. Additionally, oneof the outer layer security tools, Nessus, acts as a security scanner that often highlights poten-tial issues with the applications or versions of applications you have running.
This chapter covers a variety of tools for testing the different layers of your security. Someof these tools need to be installed on your local system (and some should be removed whenyou are finished with them to prevent them from providing aid to an intruder), and some canbe run across your network or from another host. I will take you through installing and run-ning those tools and how to interpret the results of those tools. These tools are by no meansthe only tools available to you. Also, a variety of other security tools are useful. I will describesome of those in the “Additional Security Tools” section.
Do not take the results of any of these tools as “security gospel.” They are fallible. Whena particular security tool tells you your systems are secure, it simply means they are secureagainst all the exploits or vulnerabilities the author of that tool has envisaged or addressed.You need to keep up-to-date with new vulnerabilities, bugs, and exploits and ensure yoursystems and applications are up-to-date, as discussed in Chapter 1.
4444c06_final.qxd 1/5/05 12:53 AM Page 281
CHAPTER 6 ■ USING TOOLS FOR SECURITY TESTING282
■Tip As previously mentioned, two good places to start if you want to keep track of vulnerabilities andexploits are the Bugtraq mailing list (http://www.securityfocus.com/subscribe?listname=1), theVulnwatch site (http://vulnwatch.org/), and associated mailing lists.
This chapter also covers some methods of detecting a penetration that do not require anytools. Lastly I will cover the worst-case scenario: someone has penetrated your system, and nowyou need to know how to respond and recover. I will cover some general ideas about how torespond and offer some advice on recovering your systems.
Inner LayerYour inner layer security consists of the operating-system level of your system, including thevarious programs, configurations, and settings that make up a well-secured and administeredsystem. The following sections cover three types of applications to assist with your inner layersecurity. The first type is security-scanning software that can check for operating-system exploits,root kits, weaknesses, and vulnerabilities. The second type is a password cracker that allowsyou to test the security and strength of your system and users’ passwords. The third type ofsoftware checks the security-related settings of your system.
Scanning for Exploits and Root KitsA root kit is one variety of hacker tool kit. It can perform a number of functions dependingon the flavor of the root kit. The original core of most root kit applications was some kind ofnetwork-sniffing tool designed to allow the attacker to find additional usernames and pass-words. More recently, these functions have expanded to include capturing passwords usingTrojan programs, providing back doors into your system, and masking that your system hasbeen penetrated by purging or filtering logs. Root kits can also contain functionality designedto hide the attacker’s logins and any processes they are running.
To install and run a root kit successfully, attackers need root access to your system. Thus,they have totally compromised your system and are now looking to expand their hold on it.Think about a root kit like a crowbar. Your attacker has penetrated your system, probably usinga username and password of a low-level user. They seize root access through an exploit anduse the root kit to pry open your system further, to grab other usernames and passwords, andto provide themselves with a jumping-off point to attack other systems in your environment.
■Note I discuss reducing the risk of an attacker seizing root access in Chapter 1.
Recovery is going to be a long process. Your system has been seriously penetrated by thetime your attacker has installed a root kit. Even if he has only cracked open the door slightly,there is still significant risk that he has subverted a variety of your resources. The first thing
4444c06_final.qxd 1/5/05 12:53 AM Page 282
CHAPTER 6 ■ USING TOOLS FOR SECURITY TESTING 283
1. RPM sometimes is incorrectly referred to as the Red Hat Package Manager. It is actually the abbrevia-tion for RPM Package Manager, a command line–driven package management system that you canuse to install, uninstall, verify, query, and update software packages. It is not just limited to packagesdeveloped by just Red Hat but is commonly used to distribute a variety of software packages.
most attackers do when they penetrate your systems is to secure their foothold, so it will beharder for you to get rid of them. I recommend that if you spot a root kit, then you should pullthe plug on that system immediately and isolate it from your network. Then look at the rec-ommendations later in the chapter in the “Detecting and Recovering from a Penetration orAttack” section.
I will cover two tools that are capable of detecting a variety of root kits. These tools are byno means infallible. They are generally not going to pick up root kits that are new or have changedsince the tools were released (depending on how they identify root kits). And they are not sub-stitutes for actually knowing what is running on your systems, including activities such as on-going log analysis and comprehensive systems monitoring. They are after-the-fact tools. Theyare useful only for telling you what has happened after an attack. Finally, they are capable ofgenerating false positives. Some applications can appear to be acting like a root kit. So, inves-tigate all results carefully before taking drastic action.
Rootkit HunterRootkit Hunter helps you scan your system for signs of a root kit installed and to perform a variety of other checks on related logs, commands, processes, and some configuration settings. You can download Rootkit Hunter at http://www.rootkit.nl/projects/rootkit_hunter.html. It is available in the form of a source download or an RPM.1 Down-load it in the form that best suits you.
If you have downloaded it Rootkit Hunter in source form, unpack your source archive,change into the created rkhunter directory, and install it using the command in Listing 6-1.
Listing 6-1. Installing via Source
puppy# ./installer.sh
If you have downloaded the RPM, you can install it using the command in Listing 6-2.
Listing 6-2. Installing via RPM
puppy# rpm -Uvh rkhunter-version.rpm
Rootkit Hunter installs a shell script, rkhunter, into /usr/local/bin and the rest of its files,including Perl scripts and databases, into the directory /usr/local/rkhunter.
■Note You need Perl installed to run Rootkit Hunter correctly.
4444c06_final.qxd 1/5/05 12:53 AM Page 283
CHAPTER 6 ■ USING TOOLS FOR SECURITY TESTING284
You can run Rootkit Hunter from the command line or via cron. Listing 6-3 shows a sam-ple run of Rootkit Hunter.
Listing 6-3. Running rkhunter
puppy# rkhunter --checkall --createlogfile
Listing 6-3 is running rkhunter with --checkall, which runs all the Rootkit Hunter testsand, with the option --createlogfile, creates a log file called rkhunter.log in /var/log. Youcan use a variety of other useful command-lines options (see Table 6-1); I will discuss eachof them.
Table 6-1. Rootkit Hunter Command-Line Options
Option Description
--cronjob Runs as a cron job
--help Shows help
--nocolors Does not use colors in rkhunter output
--report-mode Cuts down report and is useful when running for crontab
--skip-keypress Runs in batch mode
--versioncheck Checks for the latest version of Rootkit Hunter
The first option, --cronjob, adjusts the output of Rootkit Hunter to be suitable to run asa cron job. It is usually run in conjunction with the --report-mode option, which cuts downthe report to the essentials. The --cronjob option does not actually install the rkhunter asa cron job. You need to add a crontab entry, such as in Listing 6-4, which runs the rkhuntervia cron and mails the results of the scan to the user or alias admin once a month at 9 p.m.
Listing 6-4. Rkhunter crontab Entry
0 21 1 * * /usr/local/bin/rkhunter --cronjob --report-mode 2>&1 ➥
|/bin/mail -s "Rootkit Hunter report" admin
The next option, --help, lists all the possible command-line options. You can use the --nocolors option for those terminals that do not have color support. I discussed --report-modepreviously. The next option, --skip-keypress, runs Rootkit Hunter in batch mode and removesprompts for key presses. The last option, --versioncheck, checks the Rootkit Hunter Web sitefor a new version and reports if there is a new version and its version number.
So what does Rootkit Hunter report? Well, after some initial self-checks, it checks a list ofcommonly penetrated binary commands for any sign they have been subverted. Listing 6-5shows some of the results from this check.
4444c06_final.qxd 1/5/05 12:53 AM Page 284
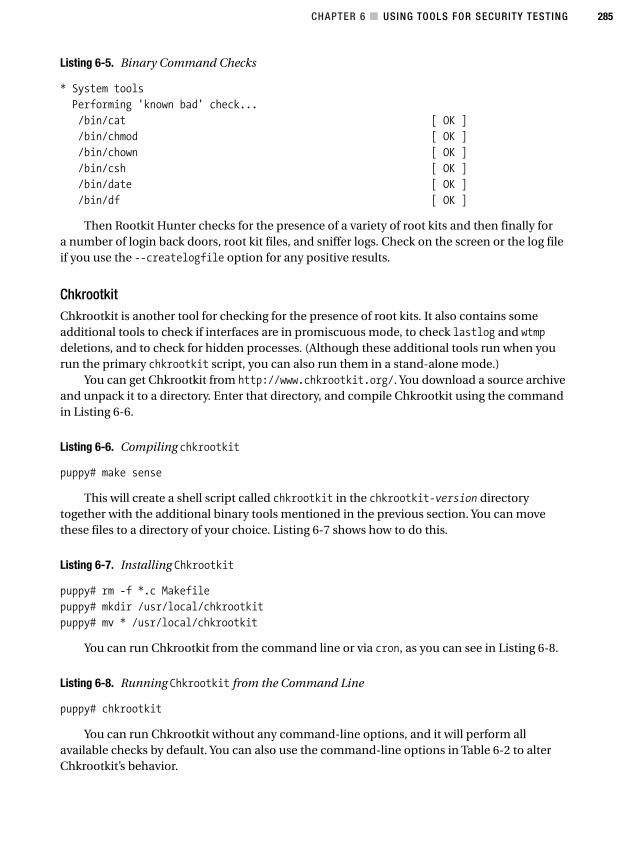
CHAPTER 6 ■ USING TOOLS FOR SECURITY TESTING 285
Listing 6-5. Binary Command Checks
* System tools
Performing 'known bad' check...
/bin/cat [ OK ]
/bin/chmod [ OK ]
/bin/chown [ OK ]
/bin/csh [ OK ]
/bin/date [ OK ]
/bin/df [ OK ]
Then Rootkit Hunter checks for the presence of a variety of root kits and then finally fora number of login back doors, root kit files, and sniffer logs. Check on the screen or the log fileif you use the --createlogfile option for any positive results.
ChkrootkitChkrootkit is another tool for checking for the presence of root kits. It also contains someadditional tools to check if interfaces are in promiscuous mode, to check lastlog and wtmpdeletions, and to check for hidden processes. (Although these additional tools run when yourun the primary chkrootkit script, you can also run them in a stand-alone mode.)
You can get Chkrootkit from http://www.chkrootkit.org/. You download a source archiveand unpack it to a directory. Enter that directory, and compile Chkrootkit using the commandin Listing 6-6.
Listing 6-6. Compiling chkrootkit
puppy# make sense
This will create a shell script called chkrootkit in the chkrootkit-version directorytogether with the additional binary tools mentioned in the previous section. You can movethese files to a directory of your choice. Listing 6-7 shows how to do this.
Listing 6-7. Installing Chkrootkit
puppy# rm -f *.c Makefile
puppy# mkdir /usr/local/chkrootkit
puppy# mv * /usr/local/chkrootkit
You can run Chkrootkit from the command line or via cron, as you can see in Listing 6-8.
Listing 6-8. Running Chkrootkit from the Command Line
puppy# chkrootkit
You can run Chkrootkit without any command-line options, and it will perform allavailable checks by default. You can also use the command-line options in Table 6-2 to alterChkrootkit’s behavior.
4444c06_final.qxd 1/5/05 12:53 AM Page 285
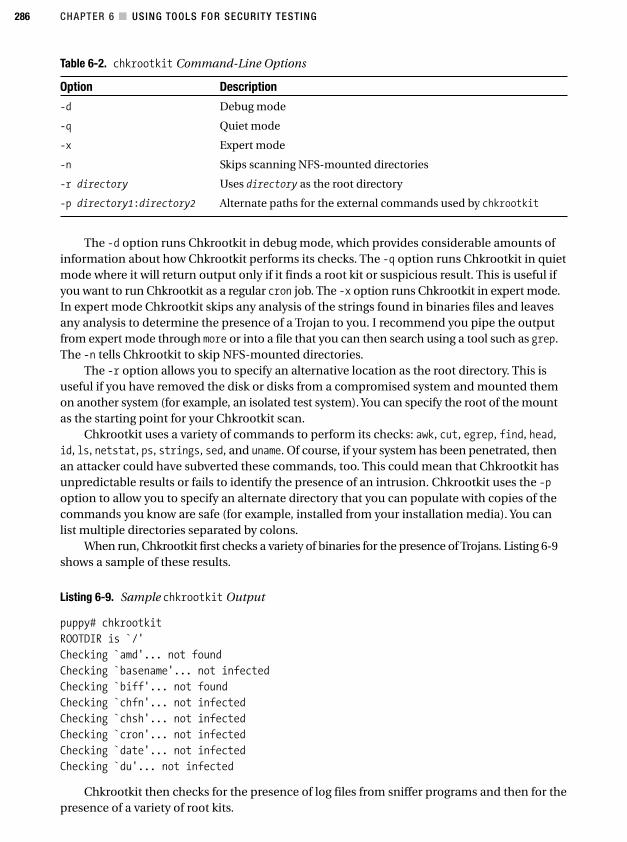
CHAPTER 6 ■ USING TOOLS FOR SECURITY TESTING286
Table 6-2. chkrootkit Command-Line Options
Option Description
-d Debug mode
-q Quiet mode
-x Expert mode
-n Skips scanning NFS-mounted directories
-r directory Uses directory as the root directory
-p directory1:directory2 Alternate paths for the external commands used by chkrootkit
The -d option runs Chkrootkit in debug mode, which provides considerable amounts ofinformation about how Chkrootkit performs its checks. The -q option runs Chkrootkit in quietmode where it will return output only if it finds a root kit or suspicious result. This is useful ifyou want to run Chkrootkit as a regular cron job. The -x option runs Chkrootkit in expert mode.In expert mode Chkrootkit skips any analysis of the strings found in binaries files and leavesany analysis to determine the presence of a Trojan to you. I recommend you pipe the outputfrom expert mode through more or into a file that you can then search using a tool such as grep.The -n tells Chkrootkit to skip NFS-mounted directories.
The -r option allows you to specify an alternative location as the root directory. This isuseful if you have removed the disk or disks from a compromised system and mounted themon another system (for example, an isolated test system). You can specify the root of the mountas the starting point for your Chkrootkit scan.
Chkrootkit uses a variety of commands to perform its checks: awk, cut, egrep, find, head,id, ls, netstat, ps, strings, sed, and uname. Of course, if your system has been penetrated, thenan attacker could have subverted these commands, too. This could mean that Chkrootkit hasunpredictable results or fails to identify the presence of an intrusion. Chkrootkit uses the -poption to allow you to specify an alternate directory that you can populate with copies of thecommands you know are safe (for example, installed from your installation media). You canlist multiple directories separated by colons.
When run, Chkrootkit first checks a variety of binaries for the presence of Trojans. Listing 6-9shows a sample of these results.
Listing 6-9. Sample chkrootkit Output
puppy# chkrootkit
ROOTDIR is `/'
Checking `amd'... not found
Checking `basename'... not infected
Checking `biff'... not found
Checking `chfn'... not infected
Checking `chsh'... not infected
Checking `cron'... not infected
Checking `date'... not infected
Checking `du'... not infected
Chkrootkit then checks for the presence of log files from sniffer programs and then for thepresence of a variety of root kits.
4444c06_final.qxd 1/5/05 12:53 AM Page 286
CHAPTER 6 ■ USING TOOLS FOR SECURITY TESTING 287
2. http://geodsoft.com/howto/password/cracking_passwords.htm#howlong
3. http://zdnet.com.com/2100-11-530187.html?legacy=zdnn
4. http://www.crypticide.com/users/alecm/
Testing Your Password SecurityChapter 1 talked about controlling the variables associated with your passwords to ensurethat your users must use the most secure passwords possible. It also talked about ensuringyou use modern password-encryption techniques such as MD5 and shadow passwording.Although this greatly enhances the security of your password, it is not always a guarantee thatyour passwords are totally impenetrable. Further testing is a good idea to add further reassur-ance that your passwords are strong and secure. I will show you how to use the passwordcracker John the Ripper to test the strength of your passwords.
■Caution Password cracking can be construed as a serious attack on a system. Do not run password crack-ing on a system that you do not control or do not explicitly have permission to run password cracking on.
The two most common forms of password cracking are brute-force and dictionary-basedcracking. Brute-force cracking requires throwing computing resources at a password you want tocrack. Usually a brute-force password-cracking program generates character sequences startingwith one character and then incrementing from there and testing those character sequencesagainst the password. This often requires considerable time and resources, and if your passwordsare secure, then an attacker is unlikely to break them unless they are prepared to very patient. Forexample, a random password of eight characters in length and created from the 94 displayableASCII characters would take a cracker approximately 1,930 years to crack using a typical desktopPC.2 Of course, the more computing power you can throw at problem, the shorter you can makethis time. Thus, password cracking highly lends itself to using parallel processing and using multi-ple systems to work on cracking passwords simultaneously.
The second form of password cracking relies on inputting a dictionary of potential pass-words, encrypting them using the algorithm used by your password encryption, and then test-ing them against the encrypted password. This sort of cracking assumes users have choseneveryday words or combinations of everyday words as their passwords. This is quite commonunless you force your users not to use this style of password. The system administrator’s cliché ofeasily hacked systems with passwords such as sex, god, and love is still alive and well out there.Given the choice, your users will want to use a password they can easily remember, often con-taining personal information such as birthdays or pets’ names rather than a complex string ofcharacters and symbols.3 This is simply the most dangerous form of password, and I stronglyurge you not to let your users use any word that is a dictionary word for a password.
Running a password cracker over your password files on a regular basis is a good way toensure your users are not choosing weak or easy-to-guess passwords.
Introducing John the RipperI use a password cracker called John the Ripper (JTR). A few password crackers are available,including the now venerable Crack.4 I have chosen to cover JTR because it is regularly
4444c06_final.qxd 1/5/05 12:53 AM Page 287
CHAPTER 6 ■ USING TOOLS FOR SECURITY TESTING288
updated, fast, and fairly simple to use. The other consideration I am making is that it is a knownquantity. Consider this scenario: You decide you would like to test your passwords and go to asearch engine and type in password cracking my Linux root password. You are directed to a pagewith a useful-looking piece of software that you then download and install. It turns out to bea Trojan horse program, which at the very least does something malicious with any passwordfiles it tests or passwords it cracks if not actually root kits on your system. So you want to makesure you download a safe password cracker.
Download JTR from http://www.openwall.com/john/, preferably verifying it using its MD5signature.
■Note I used JTR version 1.6.37 for this explanation.
Unpack the archive, and change to the src directory. You have to tell JTR what sort ofsystem you are running. Type make to see a list of potential systems. Listing 6-10 shows thepossible Linux-based builds you can compile.
Listing 6-10. Compiling John the Ripper
puppy# make
To build John the Ripper, type:
make SYSTEM
where SYSTEM can be one of the following:
linux-x86-any-elf Linux, x86, ELF binaries
linux-x86-mmx-elf Linux, x86 with MMX, ELF binaries
linux-x86-k6-elf Linux, AMD K6, ELF binaries
linux-x86-any-a.out Linux, x86, a.out binaries
linux-alpha Linux, Alpha
linux-sparc Linux, SPARC
If you have an Intel system, then your best choice is to compile JTR by entering thefollowing:
puppy# make linux-x86-any-elf
This will create a binary called john in the directory john-version/run.You run JTR from the command line, and Listing 6-11 shows a basic run of JTR.
Listing 6-11. JTR on the Command Line
puppy# john --wordlist=password.lst passwd
Listing 6-11 shows JTR performing a dictionary-based attack using a list of words con-tained in the file password.lst against passwords contained in a file called passwd. JTR comeswith a simple file, password.lst, which is a collection of popular passwords. You will needto need find some additional dictionaries and word lists, including word lists in other lan-guages, especially if you have users who speak English as a second language and may use
4444c06_final.qxd 1/5/05 12:53 AM Page 288
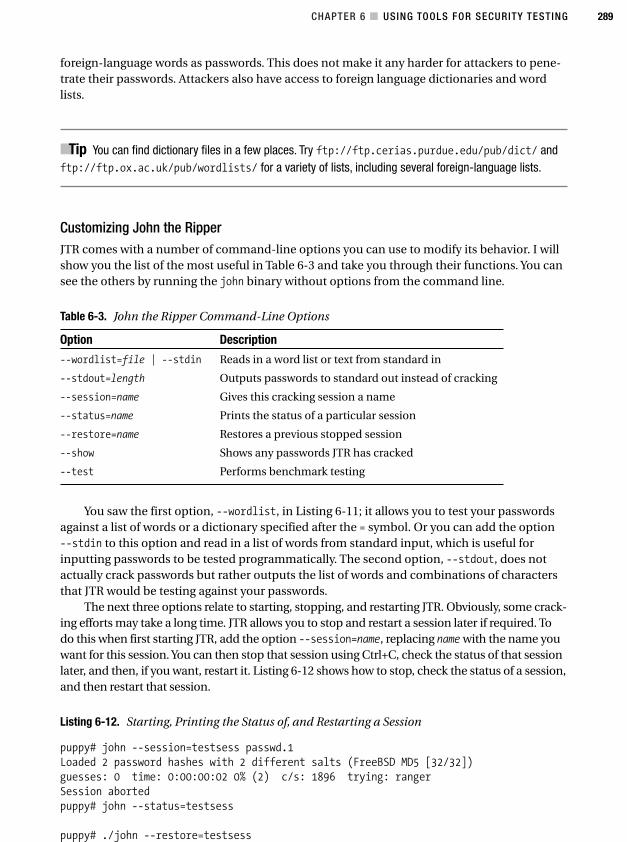
CHAPTER 6 ■ USING TOOLS FOR SECURITY TESTING 289
foreign-language words as passwords. This does not make it any harder for attackers to pene-trate their passwords. Attackers also have access to foreign language dictionaries and wordlists.
■Tip You can find dictionary files in a few places. Try ftp://ftp.cerias.purdue.edu/pub/dict/ andftp://ftp.ox.ac.uk/pub/wordlists/ for a variety of lists, including several foreign-language lists.
Customizing John the Ripper JTR comes with a number of command-line options you can use to modify its behavior. I willshow you the list of the most useful in Table 6-3 and take you through their functions. You cansee the others by running the john binary without options from the command line.
Table 6-3. John the Ripper Command-Line Options
Option Description
--wordlist=file | --stdin Reads in a word list or text from standard in
--stdout=length Outputs passwords to standard out instead of cracking
--session=name Gives this cracking session a name
--status=name Prints the status of a particular session
--restore=name Restores a previous stopped session
--show Shows any passwords JTR has cracked
--test Performs benchmark testing
You saw the first option, --wordlist, in Listing 6-11; it allows you to test your passwordsagainst a list of words or a dictionary specified after the = symbol. Or you can add the option--stdin to this option and read in a list of words from standard input, which is useful forinputting passwords to be tested programmatically. The second option, --stdout, does notactually crack passwords but rather outputs the list of words and combinations of charactersthat JTR would be testing against your passwords.
The next three options relate to starting, stopping, and restarting JTR. Obviously, some crack-ing efforts may take a long time. JTR allows you to stop and restart a session later if required. Todo this when first starting JTR, add the option --session=name, replacing name with the name youwant for this session. You can then stop that session using Ctrl+C, check the status of that sessionlater, and then, if you want, restart it. Listing 6-12 shows how to stop, check the status of a session,and then restart that session.
Listing 6-12. Starting, Printing the Status of, and Restarting a Session
puppy# john --session=testsess passwd.1
Loaded 2 password hashes with 2 different salts (FreeBSD MD5 [32/32])
guesses: 0 time: 0:00:00:02 0% (2) c/s: 1896 trying: ranger
Session aborted
puppy# john --status=testsess
puppy# ./john --restore=testsess
4444c06_final.qxd 1/5/05 12:53 AM Page 289
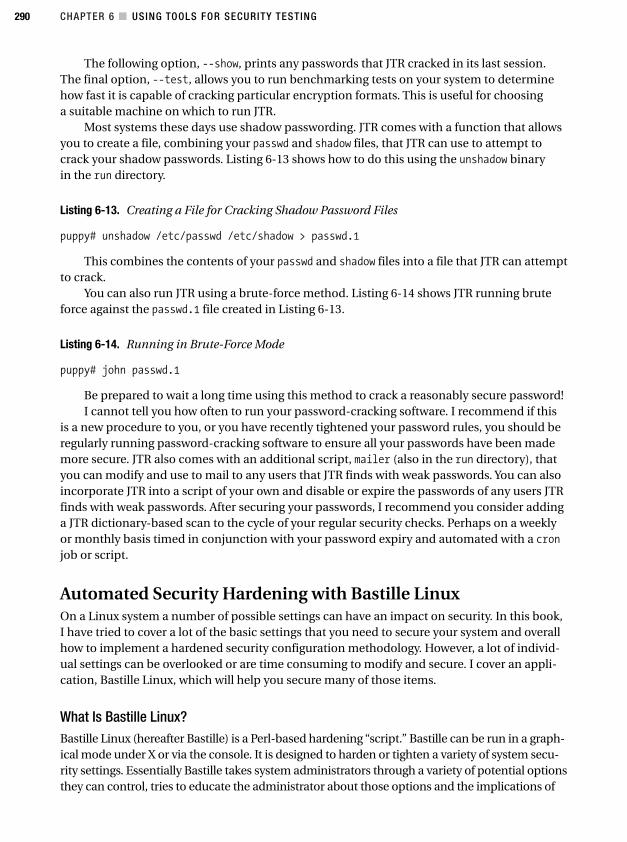
CHAPTER 6 ■ USING TOOLS FOR SECURITY TESTING290
The following option, --show, prints any passwords that JTR cracked in its last session.The final option, --test, allows you to run benchmarking tests on your system to determinehow fast it is capable of cracking particular encryption formats. This is useful for choosinga suitable machine on which to run JTR.
Most systems these days use shadow passwording. JTR comes with a function that allowsyou to create a file, combining your passwd and shadow files, that JTR can use to attempt tocrack your shadow passwords. Listing 6-13 shows how to do this using the unshadow binaryin the run directory.
Listing 6-13. Creating a File for Cracking Shadow Password Files
puppy# unshadow /etc/passwd /etc/shadow > passwd.1
This combines the contents of your passwd and shadow files into a file that JTR can attemptto crack.
You can also run JTR using a brute-force method. Listing 6-14 shows JTR running bruteforce against the passwd.1 file created in Listing 6-13.
Listing 6-14. Running in Brute-Force Mode
puppy# john passwd.1
Be prepared to wait a long time using this method to crack a reasonably secure password!I cannot tell you how often to run your password-cracking software. I recommend if this
is a new procedure to you, or you have recently tightened your password rules, you should beregularly running password-cracking software to ensure all your passwords have been mademore secure. JTR also comes with an additional script, mailer (also in the run directory), thatyou can modify and use to mail to any users that JTR finds with weak passwords. You can alsoincorporate JTR into a script of your own and disable or expire the passwords of any users JTRfinds with weak passwords. After securing your passwords, I recommend you consider addinga JTR dictionary-based scan to the cycle of your regular security checks. Perhaps on a weeklyor monthly basis timed in conjunction with your password expiry and automated with a cron
job or script.
Automated Security Hardening with Bastille LinuxOn a Linux system a number of possible settings can have an impact on security. In this book,I have tried to cover a lot of the basic settings that you need to secure your system and overallhow to implement a hardened security configuration methodology. However, a lot of individ-ual settings can be overlooked or are time consuming to modify and secure. I cover an appli-cation, Bastille Linux, which will help you secure many of those items.
What Is Bastille Linux?Bastille Linux (hereafter Bastille) is a Perl-based hardening “script.” Bastille can be run in a graph-ical mode under X or via the console. It is designed to harden or tighten a variety of system secu-rity settings. Essentially Bastille takes system administrators through a variety of potential optionsthey can control, tries to educate the administrator about those options and the implications of
4444c06_final.qxd 1/5/05 12:53 AM Page 290
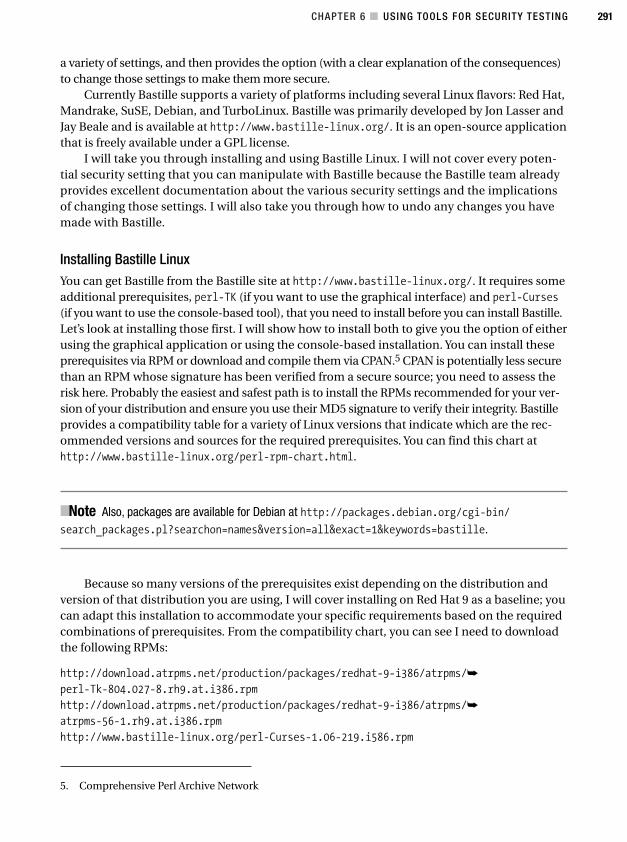
CHAPTER 6 ■ USING TOOLS FOR SECURITY TESTING 291
5. Comprehensive Perl Archive Network
a variety of settings, and then provides the option (with a clear explanation of the consequences)to change those settings to make them more secure.
Currently Bastille supports a variety of platforms including several Linux flavors: Red Hat,Mandrake, SuSE, Debian, and TurboLinux. Bastille was primarily developed by Jon Lasser andJay Beale and is available at http://www.bastille-linux.org/. It is an open-source applicationthat is freely available under a GPL license.
I will take you through installing and using Bastille Linux. I will not cover every poten-tial security setting that you can manipulate with Bastille because the Bastille team alreadyprovides excellent documentation about the various security settings and the implicationsof changing those settings. I will also take you through how to undo any changes you havemade with Bastille.
Installing Bastille LinuxYou can get Bastille from the Bastille site at http://www.bastille-linux.org/. It requires someadditional prerequisites, perl-TK (if you want to use the graphical interface) and perl-Curses(if you want to use the console-based tool), that you need to install before you can install Bastille.Let’s look at installing those first. I will show how to install both to give you the option of eitherusing the graphical application or using the console-based installation. You can install theseprerequisites via RPM or download and compile them via CPAN.5 CPAN is potentially less securethan an RPM whose signature has been verified from a secure source; you need to assess therisk here. Probably the easiest and safest path is to install the RPMs recommended for your ver-sion of your distribution and ensure you use their MD5 signature to verify their integrity. Bastilleprovides a compatibility table for a variety of Linux versions that indicate which are the rec-ommended versions and sources for the required prerequisites. You can find this chart athttp://www.bastille-linux.org/perl-rpm-chart.html.
■Note Also, packages are available for Debian at http://packages.debian.org/cgi-bin/search_packages.pl?searchon=names&version=all&exact=1&keywords=bastille.
Because so many versions of the prerequisites exist depending on the distribution andversion of that distribution you are using, I will cover installing on Red Hat 9 as a baseline; youcan adapt this installation to accommodate your specific requirements based on the requiredcombinations of prerequisites. From the compatibility chart, you can see I need to downloadthe following RPMs:
http://download.atrpms.net/production/packages/redhat-9-i386/atrpms/➥
perl-Tk-804.027-8.rh9.at.i386.rpm
http://download.atrpms.net/production/packages/redhat-9-i386/atrpms/➥
atrpms-56-1.rh9.at.i386.rpm
http://www.bastille-linux.org/perl-Curses-1.06-219.i586.rpm
4444c06_final.qxd 1/5/05 12:53 AM Page 291
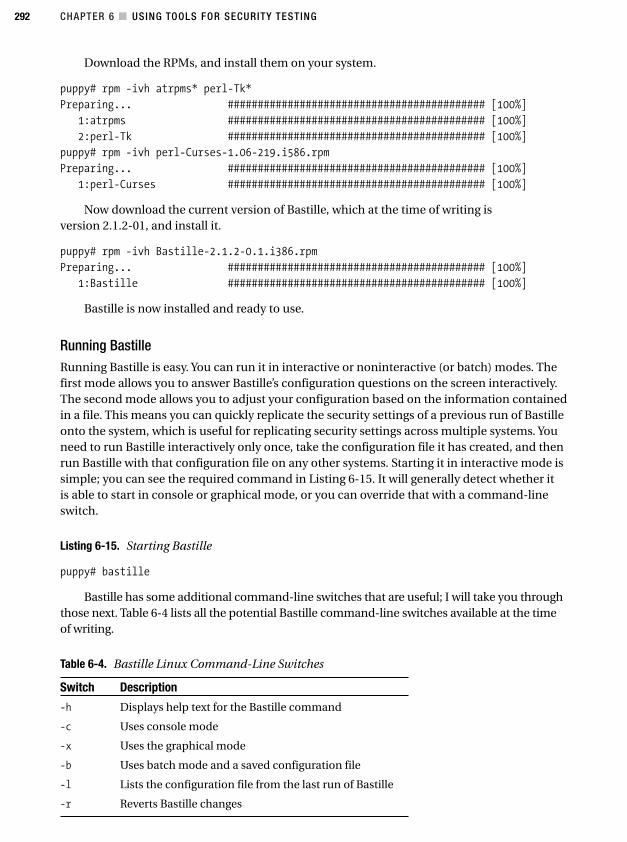
CHAPTER 6 ■ USING TOOLS FOR SECURITY TESTING292
Download the RPMs, and install them on your system.
puppy# rpm -ivh atrpms* perl-Tk*
Preparing... ########################################### [100%]
1:atrpms ########################################### [100%]
2:perl-Tk ########################################### [100%]
puppy# rpm -ivh perl-Curses-1.06-219.i586.rpm
Preparing... ########################################### [100%]
1:perl-Curses ########################################### [100%]
Now download the current version of Bastille, which at the time of writing is version 2.1.2-01, and install it.
puppy# rpm -ivh Bastille-2.1.2-0.1.i386.rpm
Preparing... ########################################### [100%]
1:Bastille ########################################### [100%]
Bastille is now installed and ready to use.
Running BastilleRunning Bastille is easy. You can run it in interactive or noninteractive (or batch) modes. Thefirst mode allows you to answer Bastille’s configuration questions on the screen interactively.The second mode allows you to adjust your configuration based on the information containedin a file. This means you can quickly replicate the security settings of a previous run of Bastilleonto the system, which is useful for replicating security settings across multiple systems. Youneed to run Bastille interactively only once, take the configuration file it has created, and thenrun Bastille with that configuration file on any other systems. Starting it in interactive mode issimple; you can see the required command in Listing 6-15. It will generally detect whether itis able to start in console or graphical mode, or you can override that with a command-lineswitch.
Listing 6-15. Starting Bastille
puppy# bastille
Bastille has some additional command-line switches that are useful; I will take you throughthose next. Table 6-4 lists all the potential Bastille command-line switches available at the timeof writing.
Table 6-4. Bastille Linux Command-Line Switches
Switch Description
-h Displays help text for the Bastille command
-c Uses console mode
-x Uses the graphical mode
-b Uses batch mode and a saved configuration file
-l Lists the configuration file from the last run of Bastille
-r Reverts Bastille changes
4444c06_final.qxd 1/5/05 12:53 AM Page 292
CHAPTER 6 ■ USING TOOLS FOR SECURITY TESTING 293
The first option, -h, displays some help text for Bastille’s command-line operation. Thenext two options allow you to specify what mode you would like Bastille to run in: -c for con-sole mode and -x for X-Windows. The next option, -b, tells Bastille to run in batch mode andapply the configuration contained in the /etc/Bastille/config file to the system. As discussedpreviously, this is useful for ensuring multiple systems have the same security settings.
If you run Bastille using the -b switch, then you need to have a configuration file contain-ing the Bastille run you would like to duplicate in the /etc/Bastille/ directory in a file calledconfig. Listing 6-16 shows the start of a Bastille run using an already existing configuration.
Listing 6-16. Running Bastille Linux in Batch Mode
puppy# bastille -b
NOTE: Entering Critical Code Execution.
Bastille has disabled keyboard interrupts.
NOTE: Bastille is scanning the system configuration...
Bastille is now locking down your system in accordance with your
answers in the "config" file. Please be patient as some modules
may take a number of minutes, depending on the speed of your machine.
The next option, -l, requests the location of the file containing details of the last inter-active run of Bastille performed. Finally, the -r option allows you to revert to your previousconfiguration. I will cover that option a little further on in this section.
I will show you how to use Bastille running in console mode. To launch Bastille, run thefollowing:
puppy# bastille -c
If this is the first time you have run Bastille, it will show you its license and disclaimer. Toacknowledge the license and disclaimer, type accept when prompted, and Bastille will showyou a screen explaining how to use the console-based text interface. Bastille uses a simple setof controls. You can use the Tab key to move between menu items and options and Enter toselect the required option. Thus, from the explanation screen, you can select the < Next >option using the Tab key and hit Enter to continue through and launch the first of the configu-ration screens.
Figure 6-1 shows you the first configuration screen.So what does Bastille do? Well, it runs a variety of modules that allow you to configure
system-level security. These modules include such features as the following:
• Securing administration utilities
• Removing setuid from a variety of tools
• Setting password aging
• Setting a default umask
• Protecting GRUB and single-user mode
• Restricting root logons
4444c06_final.qxd 1/5/05 12:53 AM Page 293
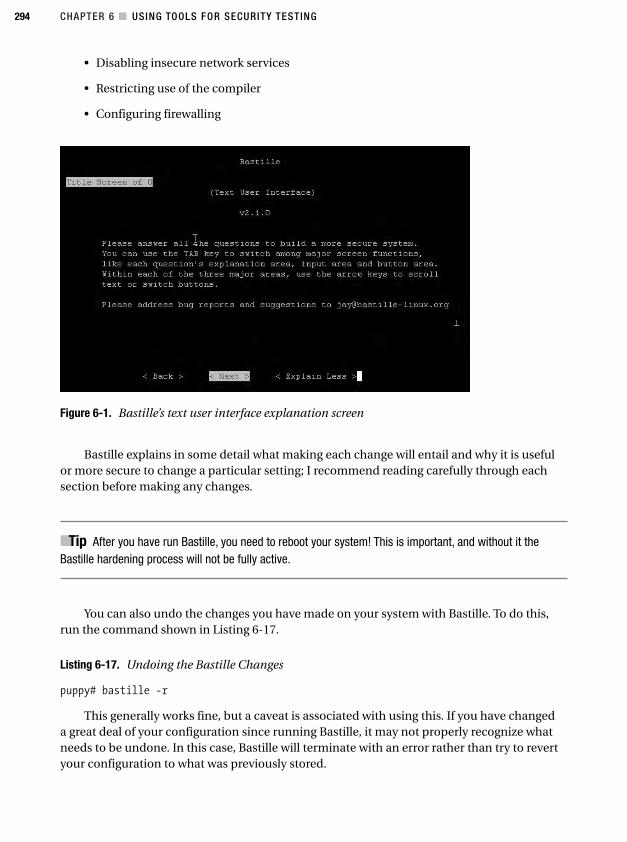
CHAPTER 6 ■ USING TOOLS FOR SECURITY TESTING294
Bastille explains in some detail what making each change will entail and why it is usefulor more secure to change a particular setting; I recommend reading carefully through eachsection before making any changes.
■Tip After you have run Bastille, you need to reboot your system! This is important, and without it theBastille hardening process will not be fully active.
You can also undo the changes you have made on your system with Bastille. To do this,run the command shown in Listing 6-17.
Listing 6-17. Undoing the Bastille Changes
puppy# bastille -r
This generally works fine, but a caveat is associated with using this. If you have changeda great deal of your configuration since running Bastille, it may not properly recognize whatneeds to be undone. In this case, Bastille will terminate with an error rather than try to revertyour configuration to what was previously stored.
Figure 6-1. Bastille’s text user interface explanation screen
• Disabling insecure network services
• Restricting use of the compiler
• Configuring firewalling
4444c06_final.qxd 1/5/05 12:54 AM Page 294
CHAPTER 6 ■ USING TOOLS FOR SECURITY TESTING 295
6. K Desktop Environment
Bastille LoggingFinally, you can see a log of what Bastille has done. These logs are located in /var/log/Bastille.Two principal logs are generated: action-log and error-log. You should check them both to con-firm the actions Bastille has taken and any potential errors generated during the Bastille process.Listing 6-18 shows a sample of the contents of the error-log file.
Listing 6-18. Bastille Linux error-log File
{Mon May 24 10:55:34 2004} ERROR: open /etc/pam.d/kde failed.
{Mon May 24 10:55:34 2004} # Couldn't prepend line to /etc/pam.d/kde, ➥
since open failed.
{Mon May 24 10:55:34 2004} ERROR: Unable to open /etc/pam.d/kde as ➥
the swap file etc/pam.d/kde.bastille already exists. Rename the swap ➥
file to allow Bastille to make desired file modifications.
{Mon May 24 10:55:34 2004} ERROR: open /etc/pam.d/kde.bastille failed...
{Mon May 24 10:55:34 2004} ERROR: open /etc/pam.d/kde failed.
{Mon May 24 10:55:34 2004} # Couldn't append line to /etc/pam.d/kde, ➥
since open failed.
These are mostly harmless errors indicating that KDE6 is not installed. But you shouldreview the file for other potential errors that could indicate that part of the hardening processhas failed. This has the potential to leave your system exposed without your knowledge.
Outer LayerYour outer layer security is critical; not only is it the first line of defense for your system, but itis also the layer most commonly targeted by people seeking information about your system.An attacker can tell a lot about your system and the applications running on it from examiningthat outer “crust,” including what ports are open and applications you have running. Indeed,many common applications and daemons routinely respond to queries with their name andversion that greatly assists attackers in tailoring exploits and picking the vulnerabilities of yoursystem.
The following sections cover two useful tools, NMAP and Nessus, that will allow you tosee what potential attackers see when they scan your system. Both tools perform differentfunctions. The NMAP tool is a powerful network scanner/mapper, and Nessus is a securityand vulnerability scanner that will help you find potential exposures in your systems andapplications and will offer suggestions for resolving them.
■Caution Scanning a system you do not own is not only rude but could readily be construed as an attackin its own right. If you are going to scan hosts and devices across a network or over the Internet, ensure youhave carefully selected only those hosts that you either control or have permission to scan. The safest courseof action when dealing with hosts you do not personally administer is to get permission in writing from theowner or administrator of those hosts or devices to scan them.
4444c06_final.qxd 1/5/05 12:54 AM Page 295
CHAPTER 6 ■ USING TOOLS FOR SECURITY TESTING296
NMAPOne of the easiest to use and most powerful tools available to you is NMAP, the NetworkMapper. NMAP is designed for network exploration and security auditing. It can scan a hostor series of hosts using IP packets looking for hosts and devices and the ports, services, andapplications running on those hosts and devices. It also uses sophisticated fingerprinting todetermine what sort of host or device it is scanning and to detect operating systems andfirewalls. NMAP also allows you to save the results of your scan in a variety of forms that areuseful for system and security administrators to manipulate. NMAP is a complicated tool;I will cover the key elements that make it so useful. If you want more detailed informationon some of NMAP’s more sophisticated functions, please use the man pages and resourcesavailable on the NMAP Web site. NMAP is open source and comes by default with most dis-tributions of Linux.
■Tip If you actually have access to the system you are scanning, it is often much easier to use thenetstat -a command to find out what ports are open on that system.
If NMAP is not on your system, you can get it in a number of ways. The easiest way is tocheck the usual methods you use to update your distributions: apt-get, yum, up2date, emerge,and so on, for an NMAP package in the form used by your distribution. If you cannot find oneusing this method or want to get the latest version of NMAP, it is available in source form, RPMs,and binaries on the NMAP Web site at http://www.insecure.org/nmap.
If you get the source archive, then compiling NMAP is a simple process. Unpack the archive,and change into the resulting directory. When compiling, you may want to specify some config-ure variables, such as the location of your OpenSSL installation that is used by NMAP. You can dothat by specifying configure flags, as follows:
puppy# ./configure --openssl=/path/to/openssl
Then make and install NMAP by entering the following:
puppy# make && make install
By default NMAP will be installed to /usr/local/bin, but you can also override this duringthe ./configure process using the -prefix option.
NMAP is a command-line tool and comes with a front end that works in X. I will showrunning NMAP from the command line. You can run NMAP by typing the command inListing 6-19.
Listing 6-19. Basic NMAP Scan
puppy# nmap 192.168.0.1
This will scan the host 192.168.0.1 (or any other IP address you specify) using a TCPSYN scan. (The example assumes you are logged in as root.) It would return something likeListing 6-20.
4444c06_final.qxd 1/5/05 12:54 AM Page 296
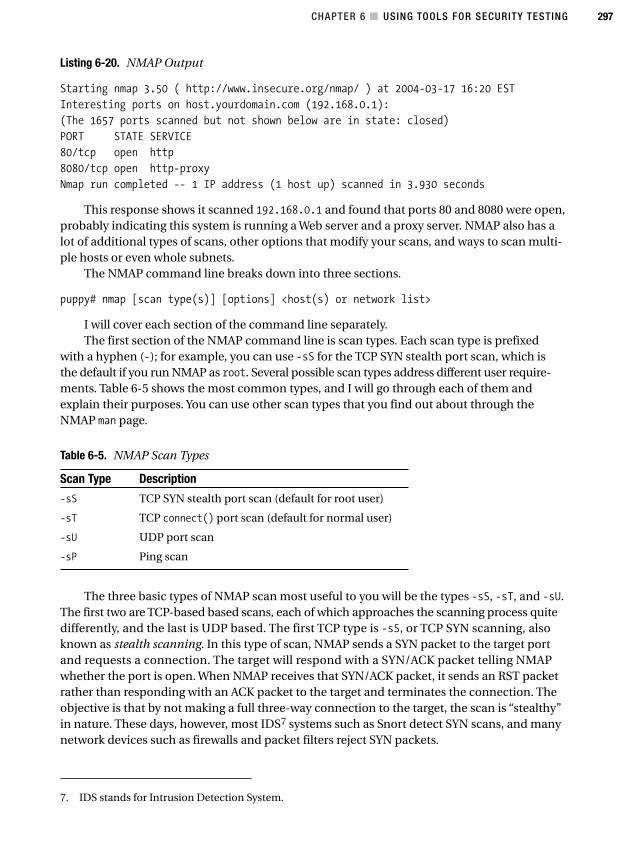
CHAPTER 6 ■ USING TOOLS FOR SECURITY TESTING 297
7. IDS stands for Intrusion Detection System.
Listing 6-20. NMAP Output
Starting nmap 3.50 ( http://www.insecure.org/nmap/ ) at 2004-03-17 16:20 EST
Interesting ports on host.yourdomain.com (192.168.0.1):
(The 1657 ports scanned but not shown below are in state: closed)
PORT STATE SERVICE
80/tcp open http
8080/tcp open http-proxy
Nmap run completed -- 1 IP address (1 host up) scanned in 3.930 seconds
This response shows it scanned 192.168.0.1 and found that ports 80 and 8080 were open,probably indicating this system is running a Web server and a proxy server. NMAP also has alot of additional types of scans, other options that modify your scans, and ways to scan multi-ple hosts or even whole subnets.
The NMAP command line breaks down into three sections.
puppy# nmap [scan type(s)] [options] <host(s) or network list>
I will cover each section of the command line separately.The first section of the NMAP command line is scan types. Each scan type is prefixed
with a hyphen (-); for example, you can use -sS for the TCP SYN stealth port scan, which isthe default if you run NMAP as root. Several possible scan types address different user require-ments. Table 6-5 shows the most common types, and I will go through each of them andexplain their purposes. You can use other scan types that you find out about through theNMAP man page.
Table 6-5. NMAP Scan Types
Scan Type Description
-sS TCP SYN stealth port scan (default for root user)
-sT TCP connect() port scan (default for normal user)
-sU UDP port scan
-sP Ping scan
The three basic types of NMAP scan most useful to you will be the types -sS, -sT, and -sU.The first two are TCP-based based scans, each of which approaches the scanning process quitedifferently, and the last is UDP based. The first TCP type is -sS, or TCP SYN scanning, alsoknown as stealth scanning. In this type of scan, NMAP sends a SYN packet to the target portand requests a connection. The target will respond with a SYN/ACK packet telling NMAPwhether the port is open. When NMAP receives that SYN/ACK packet, it sends an RST packetrather than responding with an ACK packet to the target and terminates the connection. Theobjective is that by not making a full three-way connection to the target, the scan is “stealthy”in nature. These days, however, most IDS7 systems such as Snort detect SYN scans, and manynetwork devices such as firewalls and packet filters reject SYN packets.
4444c06_final.qxd 1/5/05 12:54 AM Page 297
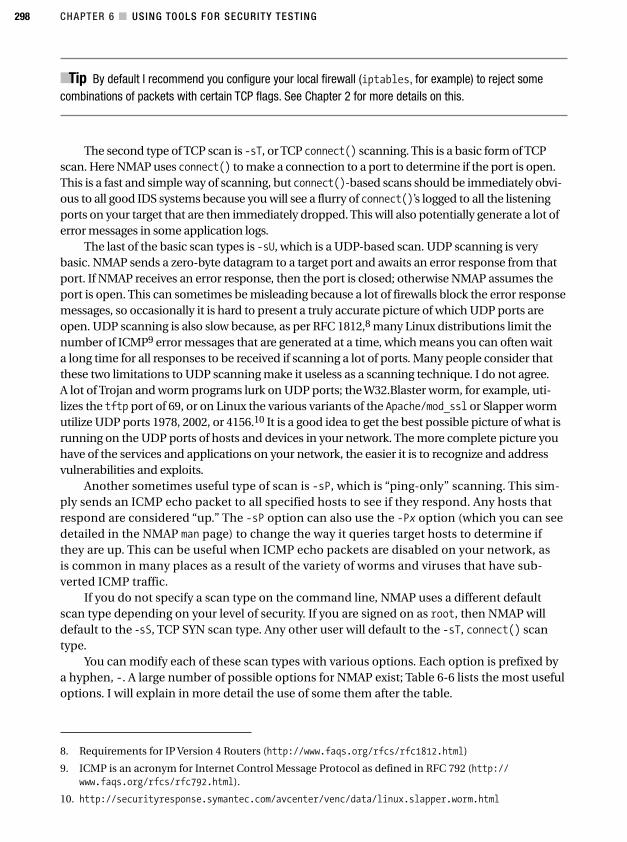
CHAPTER 6 ■ USING TOOLS FOR SECURITY TESTING298
8. Requirements for IP Version 4 Routers (http://www.faqs.org/rfcs/rfc1812.html)
9. ICMP is an acronym for Internet Control Message Protocol as defined in RFC 792 (http://www.faqs.org/rfcs/rfc792.html).
10. http://securityresponse.symantec.com/avcenter/venc/data/linux.slapper.worm.html
■Tip By default I recommend you configure your local firewall (iptables, for example) to reject somecombinations of packets with certain TCP flags. See Chapter 2 for more details on this.
The second type of TCP scan is -sT, or TCP connect() scanning. This is a basic form of TCPscan. Here NMAP uses connect() to make a connection to a port to determine if the port is open.This is a fast and simple way of scanning, but connect()-based scans should be immediately obvi-ous to all good IDS systems because you will see a flurry of connect()’s logged to all the listeningports on your target that are then immediately dropped. This will also potentially generate a lot oferror messages in some application logs.
The last of the basic scan types is -sU, which is a UDP-based scan. UDP scanning is verybasic. NMAP sends a zero-byte datagram to a target port and awaits an error response from thatport. If NMAP receives an error response, then the port is closed; otherwise NMAP assumes theport is open. This can sometimes be misleading because a lot of firewalls block the error responsemessages, so occasionally it is hard to present a truly accurate picture of which UDP ports areopen. UDP scanning is also slow because, as per RFC 1812,8 many Linux distributions limit thenumber of ICMP9 error messages that are generated at a time, which means you can often waita long time for all responses to be received if scanning a lot of ports. Many people consider thatthese two limitations to UDP scanning make it useless as a scanning technique. I do not agree.A lot of Trojan and worm programs lurk on UDP ports; the W32.Blaster worm, for example, uti-lizes the tftp port of 69, or on Linux the various variants of the Apache/mod_ssl or Slapper wormutilize UDP ports 1978, 2002, or 4156.10 It is a good idea to get the best possible picture of what isrunning on the UDP ports of hosts and devices in your network. The more complete picture youhave of the services and applications on your network, the easier it is to recognize and addressvulnerabilities and exploits.
Another sometimes useful type of scan is -sP, which is “ping-only” scanning. This sim-ply sends an ICMP echo packet to all specified hosts to see if they respond. Any hosts thatrespond are considered “up.” The -sP option can also use the -Px option (which you can seedetailed in the NMAP man page) to change the way it queries target hosts to determine ifthey are up. This can be useful when ICMP echo packets are disabled on your network, asis common in many places as a result of the variety of worms and viruses that have sub-verted ICMP traffic.
If you do not specify a scan type on the command line, NMAP uses a different defaultscan type depending on your level of security. If you are signed on as root, then NMAP willdefault to the -sS, TCP SYN scan type. Any other user will default to the -sT, connect() scantype.
You can modify each of these scan types with various options. Each option is prefixed bya hyphen, -. A large number of possible options for NMAP exist; Table 6-6 lists the most usefuloptions. I will explain in more detail the use of some them after the table.
4444c06_final.qxd 1/5/05 12:54 AM Page 298
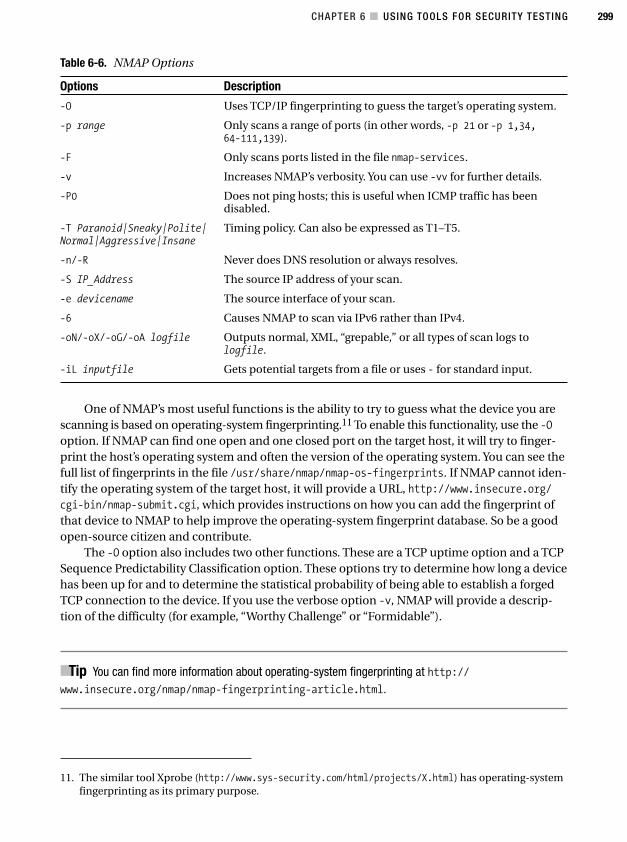
CHAPTER 6 ■ USING TOOLS FOR SECURITY TESTING 299
11. The similar tool Xprobe (http://www.sys-security.com/html/projects/X.html) has operating-systemfingerprinting as its primary purpose.
Table 6-6. NMAP Options
Options Description
-O Uses TCP/IP fingerprinting to guess the target’s operating system.
-p range Only scans a range of ports (in other words, -p 21 or -p 1,34,64-111,139).
-F Only scans ports listed in the file nmap-services.
-v Increases NMAP’s verbosity. You can use -vv for further details.
-P0 Does not ping hosts; this is useful when ICMP traffic has beendisabled.
-T Paranoid|Sneaky|Polite| Timing policy. Can also be expressed as T1–T5.Normal|Aggressive|Insane
-n/-R Never does DNS resolution or always resolves.
-S IP_Address The source IP address of your scan.
-e devicename The source interface of your scan.
-6 Causes NMAP to scan via IPv6 rather than IPv4.
-oN/-oX/-oG/-oA logfile Outputs normal, XML, “grepable,” or all types of scan logs tologfile.
-iL inputfile Gets potential targets from a file or uses - for standard input.
One of NMAP’s most useful functions is the ability to try to guess what the device you arescanning is based on operating-system fingerprinting.11 To enable this functionality, use the -Ooption. If NMAP can find one open and one closed port on the target host, it will try to finger-print the host’s operating system and often the version of the operating system. You can see thefull list of fingerprints in the file /usr/share/nmap/nmap-os-fingerprints. If NMAP cannot iden-tify the operating system of the target host, it will provide a URL, http://www.insecure.org/cgi-bin/nmap-submit.cgi, which provides instructions on how you can add the fingerprint ofthat device to NMAP to help improve the operating-system fingerprint database. So be a goodopen-source citizen and contribute.
The -O option also includes two other functions. These are a TCP uptime option and a TCPSequence Predictability Classification option. These options try to determine how long a devicehas been up for and to determine the statistical probability of being able to establish a forgedTCP connection to the device. If you use the verbose option -v, NMAP will provide a descrip-tion of the difficulty (for example, “Worthy Challenge” or “Formidable”).
■Tip You can find more information about operating-system fingerprinting at http://www.insecure.org/nmap/nmap-fingerprinting-article.html.
4444c06_final.qxd 1/5/05 12:54 AM Page 299
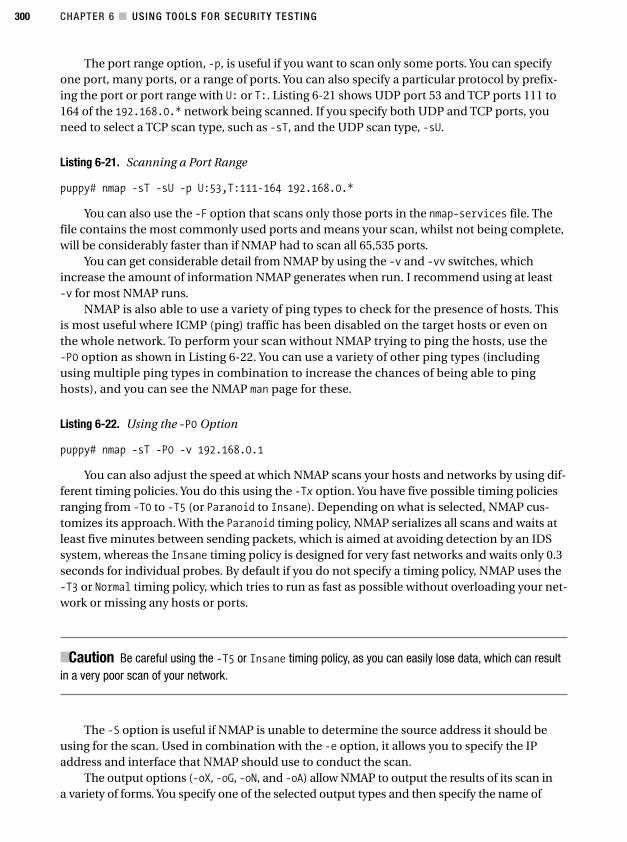
CHAPTER 6 ■ USING TOOLS FOR SECURITY TESTING300
The port range option, -p, is useful if you want to scan only some ports. You can specifyone port, many ports, or a range of ports. You can also specify a particular protocol by prefix-ing the port or port range with U: or T:. Listing 6-21 shows UDP port 53 and TCP ports 111 to164 of the 192.168.0.* network being scanned. If you specify both UDP and TCP ports, youneed to select a TCP scan type, such as -sT, and the UDP scan type, -sU.
Listing 6-21. Scanning a Port Range
puppy# nmap -sT -sU -p U:53,T:111-164 192.168.0.*
You can also use the -F option that scans only those ports in the nmap-services file. Thefile contains the most commonly used ports and means your scan, whilst not being complete,will be considerably faster than if NMAP had to scan all 65,535 ports.
You can get considerable detail from NMAP by using the -v and -vv switches, whichincrease the amount of information NMAP generates when run. I recommend using at least -v for most NMAP runs.
NMAP is also able to use a variety of ping types to check for the presence of hosts. Thisis most useful where ICMP (ping) traffic has been disabled on the target hosts or even onthe whole network. To perform your scan without NMAP trying to ping the hosts, use the-P0 option as shown in Listing 6-22. You can use a variety of other ping types (includingusing multiple ping types in combination to increase the chances of being able to pinghosts), and you can see the NMAP man page for these.
Listing 6-22. Using the -P0 Option
puppy# nmap -sT -P0 -v 192.168.0.1
You can also adjust the speed at which NMAP scans your hosts and networks by using dif-ferent timing policies. You do this using the -Tx option. You have five possible timing policiesranging from -T0 to -T5 (or Paranoid to Insane). Depending on what is selected, NMAP cus-tomizes its approach. With the Paranoid timing policy, NMAP serializes all scans and waits atleast five minutes between sending packets, which is aimed at avoiding detection by an IDSsystem, whereas the Insane timing policy is designed for very fast networks and waits only 0.3seconds for individual probes. By default if you do not specify a timing policy, NMAP uses the-T3 or Normal timing policy, which tries to run as fast as possible without overloading your net-work or missing any hosts or ports.
■Caution Be careful using the -T5 or Insane timing policy, as you can easily lose data, which can resultin a very poor scan of your network.
The -S option is useful if NMAP is unable to determine the source address it should beusing for the scan. Used in combination with the -e option, it allows you to specify the IPaddress and interface that NMAP should use to conduct the scan.
The output options (-oX, -oG, -oN, and -oA) allow NMAP to output the results of its scan ina variety of forms. You specify one of the selected output types and then specify the name of
4444c06_final.qxd 1/5/05 12:54 AM Page 300
CHAPTER 6 ■ USING TOOLS FOR SECURITY TESTING 301
a file to store that output. NMAP will automatically create the file; or, if you already have anexisting file you want to add to, you can use the -append_output option. The first output type,-oX, will present the results of the NMAP scan in XML format. This is useful for populating moni-toring tools such as Nagios or to provide an input source for a script. The second, -oG, presentsthe scan results in a single line to make it easier to grep the resulting file for the results you want.The -oN option will present the results of a scan in a human-readable form much the same as theresults that are displayed on the screen when you run NMAP interactively. The last option, -oA,tells NMAP to output to all three forms. If you specify a filename, then NMAP will create outputfiles: yourfilename.grep, yourfilename.normal, and yourfilename.xml. Listing 6-23 shows anNMAP scan outputting in all output forms.
Listing 6-23. Outputting a Scan in All Output Types
puppy# nmap -sT -P0 -vv -oA yourfilename 192.168.0.1
The last option, -iL, allows you to input target hosts and networks from a file. Specifya filename with a collection of target specifications (which I will describe next) all separatedby spaces, tabs, or newlines. You can also specify the hyphen, -, for standard input to allowyou to pipe in a target from the command line or a script.
This leads me into the last section of the NMAP command line: target selection. You canspecify targets in the form of single IP addresses or hostnames (for example, 192.168.0.1). Youcan specify a list of IP addresses and hostnames by separating each with a space. If you wantto specify an entire network, you can do that in a number of ways. The first is by adding thenetmask in the form of /mask; for example, 192.168.0.0/24 will scan the entire 192.168.0.0Class C network. The second method is to use asterisks (*) to indicate an entire network; forexample, 192.168.0.* will scan all the hosts of the 192.168.0.0 network from 1 to 254. Youcan also specify ranges, with the upper and lower ranges separated by a hyphen (for example,192.168.0.100-150).
Listing 6-24 shows some typical NMAP scans; I will break down their functionality.
Listing 6-24. NMAP Scans
puppy# nmap -sT -P0 -v -F 192.168.0.1-64
puppy# nmap -sT -P0 -p 1-1024 -v 192.168.0.*
puppy# nmap -sU -vv -oX xmlscan 192.168.0.1
The first scan uses TCP SYN scanning (-sT), does not use ICMP (-P0) to scan the portscontained in the nmap-services (-F) of the target hosts 192.168.0.1 to 192.168.0.64(192.168.0.1-64), and outputs the data in a verbose form (-v) to standard output.
The second scan shows a port-ranged scan also using a TCP SYN scan with no ICMPpings. The scan will scan the port range of 1–1024 of every host in the 192.168.0.0 networkand outputs in a verbose form to standard output.
The last scan is a UDP scan of one host, 192.168.0.1, which will produce very verboseoutput (-vv) in the form of an XML file called xmlscan (using the -oX output option).
These examples and the preceding explanation should indicate how to use NMAP to findout about open ports on your hosts, on your devices, and across entire networks. NMAP comeswith a lot of additional options and capabilities that I recommend you explore using the NMAPman page.
4444c06_final.qxd 1/5/05 12:54 AM Page 301
CHAPTER 6 ■ USING TOOLS FOR SECURITY TESTING302
NessusNessus is a security and vulnerability-scanning tool that attempts to scan and determine fromthe ports open on your hosts if any of your running applications are exploitable. You can run itacross remote networks or on a local system. It consists of a client-server model with two com-ponents: the server daemon nessusd and the client nessus. The server uses a collection of exter-nal plug-ins separate from the core Nessus daemon that allows you to also update or createyour own plug-ins without changing the core code of the Nessus package.
■Tip You can create plug-ins in C or using the built-in Nessus Attack Scripting Language (NASL). You canread about NASL at http://www.nessus.org/doc/nasl2_reference.pdf.
Nessus plug-ins are regularly updated by the development and support team, and youcan update your collection of plug-ins using a single command.
The scans that Nessus conducts are quick and take place on multiple hosts as simultane-ously as possible. Nessus can also output reports in a variety of forms, including HTML, PDF,LaTeX, and plain text. Overall, Nessus is a powerful and extremely useful tool that, if kept up-to-date, will help you determine if any of your systems suffer from vulnerabilities or could besubject to exploits. I will show you how to install and run Nessus in your environment andhow to use the results to get the best possible information from Nessus.
■Caution Nessus is a powerful tool, and some of its scans can be dangerous to your systems. Whilsttesting for certain exploits, it is possible that some applications or even entire systems can crash. Unlessyou know precisely what you are testing for, do not run Nessus on a production system without consideringthe possibility that it could result in a system crash or application outage.
Installing Nessus is actually quite easy. This is because the team behind Nessus providesan automated installation script you can download from a variety of FTP and HTTP servers.But before you do that, you need a couple of prerequisites. The first is the Gimp Toolkit (GTK)version 1.2, and the second is OpenSSL. OpenSSL is not absolutely required, but I stronglyurge you to install it—though I hope you would already have it installed. Nessus uses OpenSSLfor both securing client-server communications and for testing OpenSSL related services.
Many distributions have GTK installed by default, and a good way of finding out whetherit is installed is to try the following command:
puppy# gtk-config --version
The command should return the version of GTK; for example, on the puppy system, it is1.2.10. If you have GTK version 1.2 or later, then you can continue with your install of Nessus.If not, you can get GTK from ftp://ftp.gimp.org/pub/gtk/v1.2. You will also need the latestversion of the glib libraries, which are also available at the same FTP site. Unpack the archiveof the latest version of glib, and configure it by entering the following:
puppy# ./configure
4444c06_final.qxd 1/5/05 12:54 AM Page 302
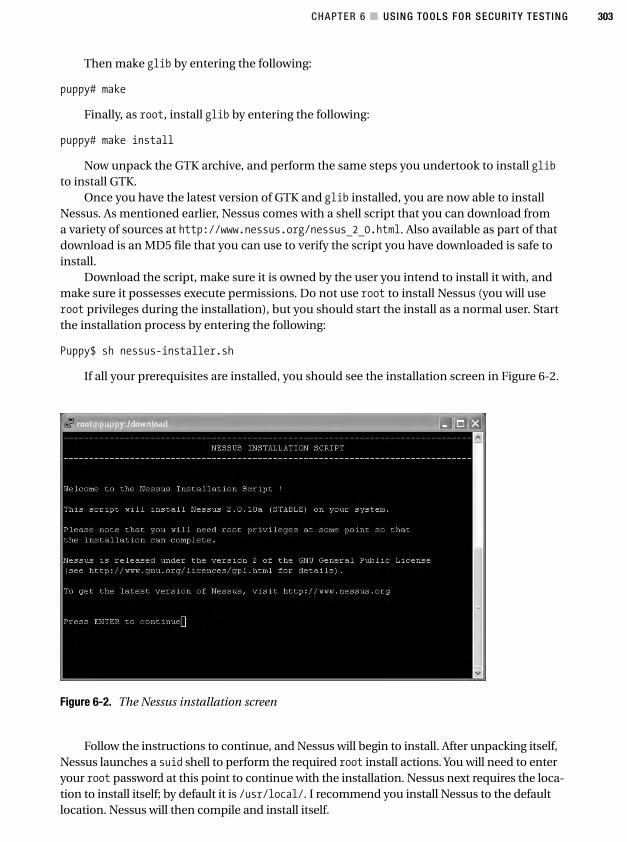
CHAPTER 6 ■ USING TOOLS FOR SECURITY TESTING 303
Then make glib by entering the following:
puppy# make
Finally, as root, install glib by entering the following:
puppy# make install
Now unpack the GTK archive, and perform the same steps you undertook to install glibto install GTK.
Once you have the latest version of GTK and glib installed, you are now able to installNessus. As mentioned earlier, Nessus comes with a shell script that you can download froma variety of sources at http://www.nessus.org/nessus_2_0.html. Also available as part of thatdownload is an MD5 file that you can use to verify the script you have downloaded is safe toinstall.
Download the script, make sure it is owned by the user you intend to install it with, andmake sure it possesses execute permissions. Do not use root to install Nessus (you will useroot privileges during the installation), but you should start the install as a normal user. Startthe installation process by entering the following:
Puppy$ sh nessus-installer.sh
If all your prerequisites are installed, you should see the installation screen in Figure 6-2.
Follow the instructions to continue, and Nessus will begin to install. After unpacking itself,Nessus launches a suid shell to perform the required root install actions. You will need to enteryour root password at this point to continue with the installation. Nessus next requires the loca-tion to install itself; by default it is /usr/local/. I recommend you install Nessus to the defaultlocation. Nessus will then compile and install itself.
Figure 6-2. The Nessus installation screen
4444c06_final.qxd 1/5/05 12:54 AM Page 303
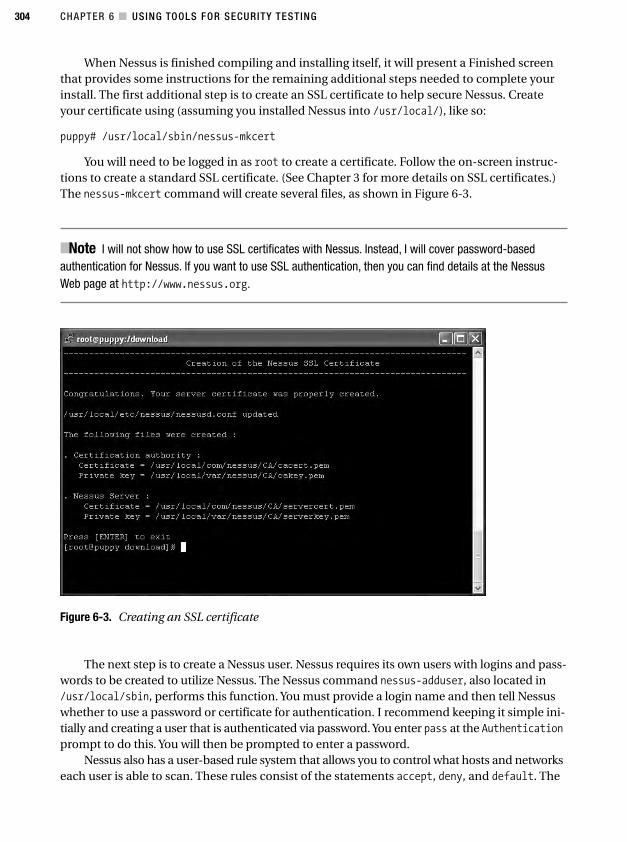
CHAPTER 6 ■ USING TOOLS FOR SECURITY TESTING304
Figure 6-3. Creating an SSL certificate
When Nessus is finished compiling and installing itself, it will present a Finished screenthat provides some instructions for the remaining additional steps needed to complete yourinstall. The first additional step is to create an SSL certificate to help secure Nessus. Createyour certificate using (assuming you installed Nessus into /usr/local/), like so:
puppy# /usr/local/sbin/nessus-mkcert
You will need to be logged in as root to create a certificate. Follow the on-screen instruc-tions to create a standard SSL certificate. (See Chapter 3 for more details on SSL certificates.)The nessus-mkcert command will create several files, as shown in Figure 6-3.
■Note I will not show how to use SSL certificates with Nessus. Instead, I will cover password-basedauthentication for Nessus. If you want to use SSL authentication, then you can find details at the NessusWeb page at http://www.nessus.org.
The next step is to create a Nessus user. Nessus requires its own users with logins and pass-words to be created to utilize Nessus. The Nessus command nessus-adduser, also located in/usr/local/sbin, performs this function. You must provide a login name and then tell Nessuswhether to use a password or certificate for authentication. I recommend keeping it simple ini-tially and creating a user that is authenticated via password. You enter pass at the Authenticationprompt to do this. You will then be prompted to enter a password.
Nessus also has a user-based rule system that allows you to control what hosts and networkseach user is able to scan. These rules consist of the statements accept, deny, and default. The
4444c06_final.qxd 1/5/05 12:54 AM Page 304
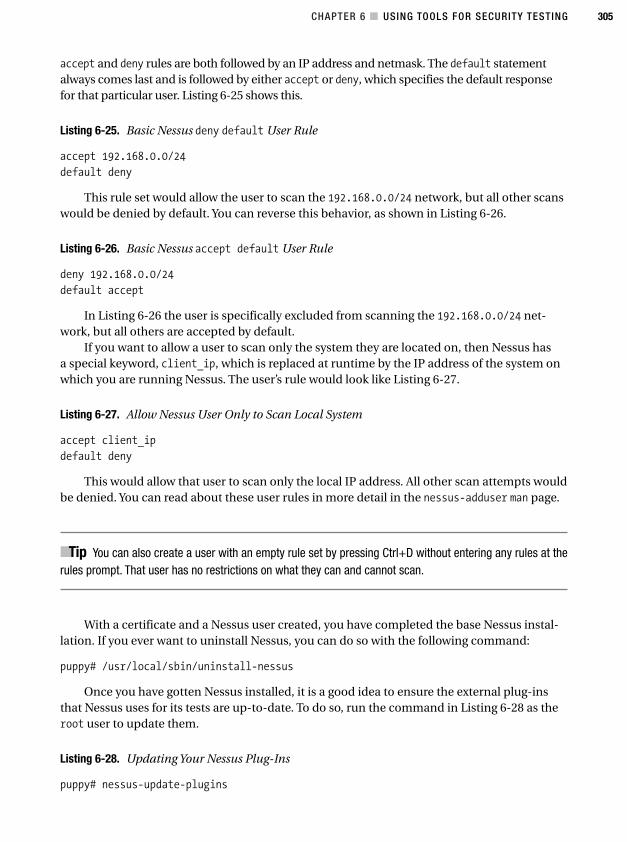
CHAPTER 6 ■ USING TOOLS FOR SECURITY TESTING 305
accept and deny rules are both followed by an IP address and netmask. The default statementalways comes last and is followed by either accept or deny, which specifies the default responsefor that particular user. Listing 6-25 shows this.
Listing 6-25. Basic Nessus deny default User Rule
accept 192.168.0.0/24
default deny
This rule set would allow the user to scan the 192.168.0.0/24 network, but all other scanswould be denied by default. You can reverse this behavior, as shown in Listing 6-26.
Listing 6-26. Basic Nessus accept default User Rule
deny 192.168.0.0/24
default accept
In Listing 6-26 the user is specifically excluded from scanning the 192.168.0.0/24 net-work, but all others are accepted by default.
If you want to allow a user to scan only the system they are located on, then Nessus hasa special keyword, client_ip, which is replaced at runtime by the IP address of the system onwhich you are running Nessus. The user’s rule would look like Listing 6-27.
Listing 6-27. Allow Nessus User Only to Scan Local System
accept client_ip
default deny
This would allow that user to scan only the local IP address. All other scan attempts wouldbe denied. You can read about these user rules in more detail in the nessus-adduser man page.
■Tip You can also create a user with an empty rule set by pressing Ctrl+D without entering any rules at therules prompt. That user has no restrictions on what they can and cannot scan.
With a certificate and a Nessus user created, you have completed the base Nessus instal-lation. If you ever want to uninstall Nessus, you can do so with the following command:
puppy# /usr/local/sbin/uninstall-nessus
Once you have gotten Nessus installed, it is a good idea to ensure the external plug-insthat Nessus uses for its tests are up-to-date. To do so, run the command in Listing 6-28 as theroot user to update them.
Listing 6-28. Updating Your Nessus Plug-Ins
puppy# nessus-update-plugins
4444c06_final.qxd 1/5/05 12:54 AM Page 305
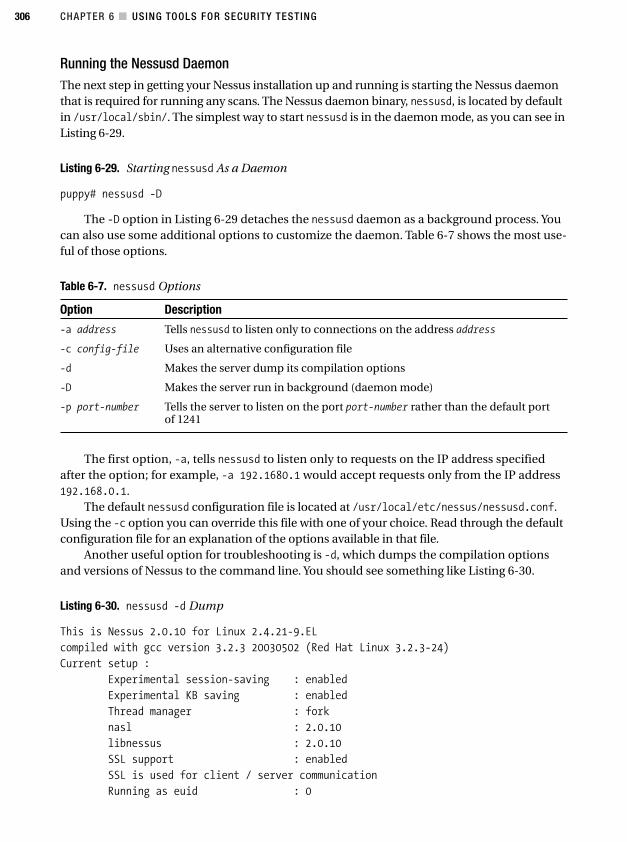
CHAPTER 6 ■ USING TOOLS FOR SECURITY TESTING306
Running the Nessusd DaemonThe next step in getting your Nessus installation up and running is starting the Nessus daemonthat is required for running any scans. The Nessus daemon binary, nessusd, is located by defaultin /usr/local/sbin/. The simplest way to start nessusd is in the daemon mode, as you can see inListing 6-29.
Listing 6-29. Starting nessusd As a Daemon
puppy# nessusd -D
The -D option in Listing 6-29 detaches the nessusd daemon as a background process. Youcan also use some additional options to customize the daemon. Table 6-7 shows the most use-ful of those options.
Table 6-7. nessusd Options
Option Description
-a address Tells nessusd to listen only to connections on the address address
-c config-file Uses an alternative configuration file
-d Makes the server dump its compilation options
-D Makes the server run in background (daemon mode)
-p port-number Tells the server to listen on the port port-number rather than the default portof 1241
The first option, -a, tells nessusd to listen only to requests on the IP address specifiedafter the option; for example, -a 192.1680.1 would accept requests only from the IP address192.168.0.1.
The default nessusd configuration file is located at /usr/local/etc/nessus/nessusd.conf.Using the -c option you can override this file with one of your choice. Read through the defaultconfiguration file for an explanation of the options available in that file.
Another useful option for troubleshooting is -d, which dumps the compilation optionsand versions of Nessus to the command line. You should see something like Listing 6-30.
Listing 6-30. nessusd -d Dump
This is Nessus 2.0.10 for Linux 2.4.21-9.EL
compiled with gcc version 3.2.3 20030502 (Red Hat Linux 3.2.3-24)
Current setup :
Experimental session-saving : enabled
Experimental KB saving : enabled
Thread manager : fork
nasl : 2.0.10
libnessus : 2.0.10
SSL support : enabled
SSL is used for client / server communication
Running as euid : 0
4444c06_final.qxd 1/5/05 12:54 AM Page 306
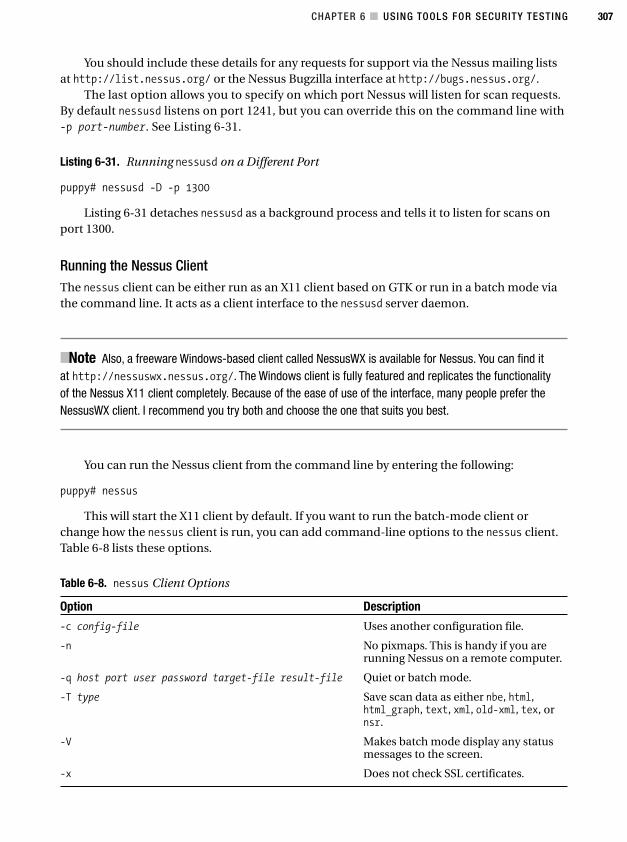
CHAPTER 6 ■ USING TOOLS FOR SECURITY TESTING 307
You should include these details for any requests for support via the Nessus mailing listsat http://list.nessus.org/ or the Nessus Bugzilla interface at http://bugs.nessus.org/.
The last option allows you to specify on which port Nessus will listen for scan requests.By default nessusd listens on port 1241, but you can override this on the command line with-p port-number. See Listing 6-31.
Listing 6-31. Running nessusd on a Different Port
puppy# nessusd -D -p 1300
Listing 6-31 detaches nessusd as a background process and tells it to listen for scans onport 1300.
Running the Nessus ClientThe nessus client can be either run as an X11 client based on GTK or run in a batch mode viathe command line. It acts as a client interface to the nessusd server daemon.
■Note Also, a freeware Windows-based client called NessusWX is available for Nessus. You can find itat http://nessuswx.nessus.org/. The Windows client is fully featured and replicates the functionalityof the Nessus X11 client completely. Because of the ease of use of the interface, many people prefer theNessusWX client. I recommend you try both and choose the one that suits you best.
You can run the Nessus client from the command line by entering the following:
puppy# nessus
This will start the X11 client by default. If you want to run the batch-mode client orchange how the nessus client is run, you can add command-line options to the nessus client.Table 6-8 lists these options.
Table 6-8. nessus Client Options
Option Description
-c config-file Uses another configuration file.
-n No pixmaps. This is handy if you arerunning Nessus on a remote computer.
-q host port user password target-file result-file Quiet or batch mode.
-T type Save scan data as either nbe, html,html_graph, text, xml, old-xml, tex, ornsr.
-V Makes batch mode display any statusmessages to the screen.
-x Does not check SSL certificates.
4444c06_final.qxd 1/5/05 12:54 AM Page 307
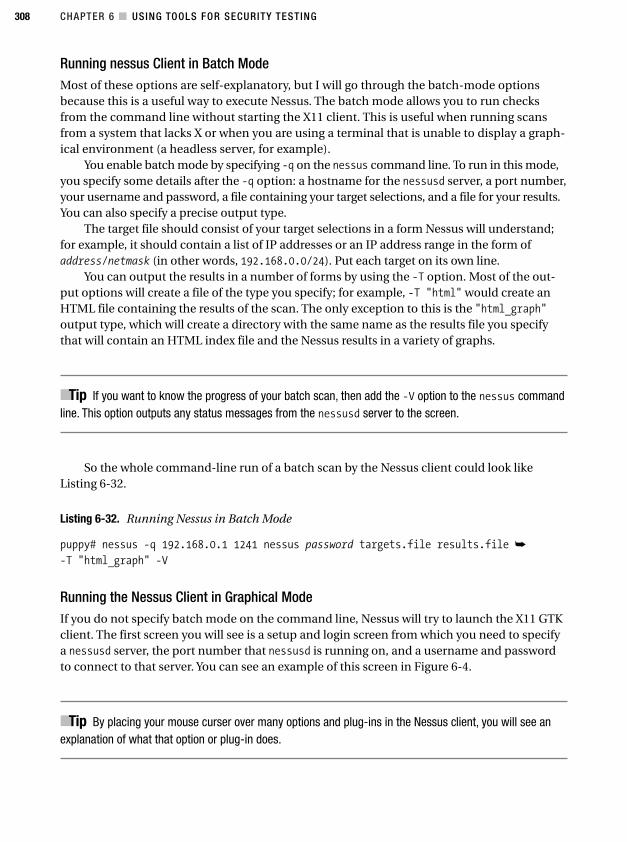
CHAPTER 6 ■ USING TOOLS FOR SECURITY TESTING308
Running nessus Client in Batch ModeMost of these options are self-explanatory, but I will go through the batch-mode optionsbecause this is a useful way to execute Nessus. The batch mode allows you to run checksfrom the command line without starting the X11 client. This is useful when running scansfrom a system that lacks X or when you are using a terminal that is unable to display a graph-ical environment (a headless server, for example).
You enable batch mode by specifying -q on the nessus command line. To run in this mode,you specify some details after the -q option: a hostname for the nessusd server, a port number,your username and password, a file containing your target selections, and a file for your results.You can also specify a precise output type.
The target file should consist of your target selections in a form Nessus will understand;for example, it should contain a list of IP addresses or an IP address range in the form ofaddress/netmask (in other words, 192.168.0.0/24). Put each target on its own line.
You can output the results in a number of forms by using the -T option. Most of the out-put options will create a file of the type you specify; for example, -T "html" would create anHTML file containing the results of the scan. The only exception to this is the "html_graph"output type, which will create a directory with the same name as the results file you specifythat will contain an HTML index file and the Nessus results in a variety of graphs.
■Tip If you want to know the progress of your batch scan, then add the -V option to the nessus commandline. This option outputs any status messages from the nessusd server to the screen.
So the whole command-line run of a batch scan by the Nessus client could look likeListing 6-32.
Listing 6-32. Running Nessus in Batch Mode
puppy# nessus -q 192.168.0.1 1241 nessus password targets.file results.file ➥
-T "html_graph" -V
Running the Nessus Client in Graphical ModeIf you do not specify batch mode on the command line, Nessus will try to launch the X11 GTKclient. The first screen you will see is a setup and login screen from which you need to specifya nessusd server, the port number that nessusd is running on, and a username and passwordto connect to that server. You can see an example of this screen in Figure 6-4.
■Tip By placing your mouse curser over many options and plug-ins in the Nessus client, you will see anexplanation of what that option or plug-in does.
4444c06_final.qxd 1/5/05 12:54 AM Page 308
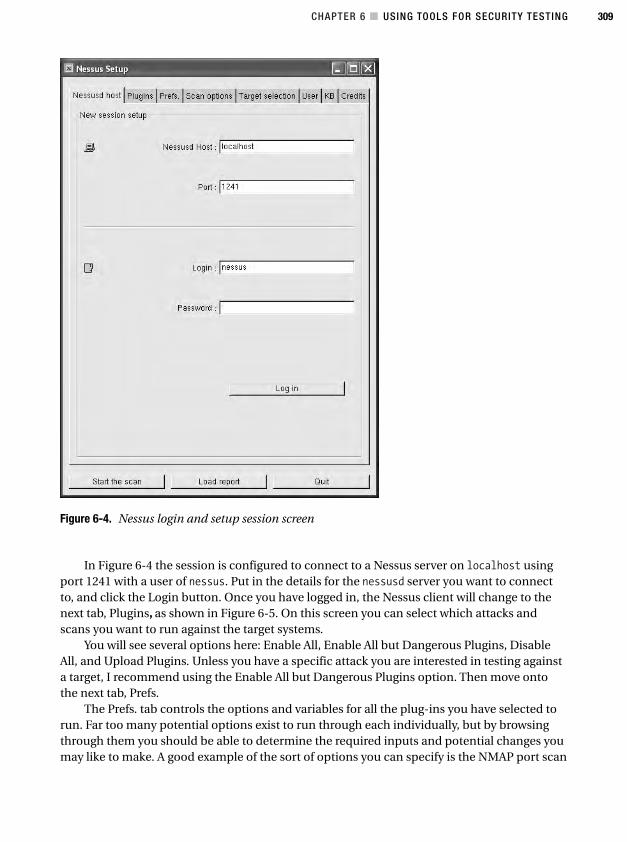
CHAPTER 6 ■ USING TOOLS FOR SECURITY TESTING 309
In Figure 6-4 the session is configured to connect to a Nessus server on localhost usingport 1241 with a user of nessus. Put in the details for the nessusd server you want to connectto, and click the Login button. Once you have logged in, the Nessus client will change to thenext tab, Plugins, as shown in Figure 6-5. On this screen you can select which attacks andscans you want to run against the target systems.
You will see several options here: Enable All, Enable All but Dangerous Plugins, DisableAll, and Upload Plugins. Unless you have a specific attack you are interested in testing againsta target, I recommend using the Enable All but Dangerous Plugins option. Then move ontothe next tab, Prefs.
The Prefs. tab controls the options and variables for all the plug-ins you have selected torun. Far too many potential options exist to run through each individually, but by browsingthrough them you should be able to determine the required inputs and potential changes youmay like to make. A good example of the sort of options you can specify is the NMAP port scan
Figure 6-4. Nessus login and setup session screen
4444c06_final.qxd 1/5/05 12:54 AM Page 309
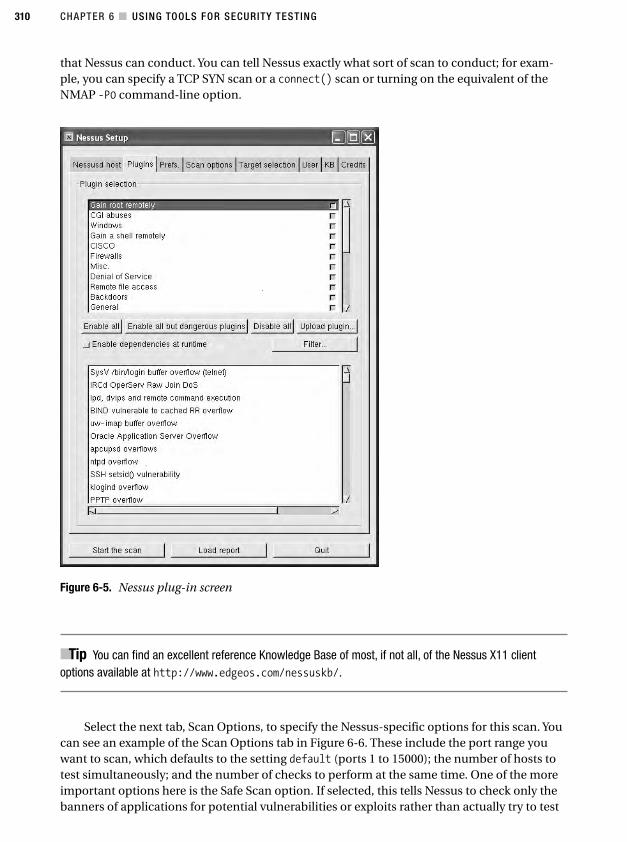
CHAPTER 6 ■ USING TOOLS FOR SECURITY TESTING310
Figure 6-5. Nessus plug-in screen
■Tip You can find an excellent reference Knowledge Base of most, if not all, of the Nessus X11 clientoptions available at http://www.edgeos.com/nessuskb/.
Select the next tab, Scan Options, to specify the Nessus-specific options for this scan. Youcan see an example of the Scan Options tab in Figure 6-6. These include the port range youwant to scan, which defaults to the setting default (ports 1 to 15000); the number of hosts totest simultaneously; and the number of checks to perform at the same time. One of the moreimportant options here is the Safe Scan option. If selected, this tells Nessus to check only thebanners of applications for potential vulnerabilities or exploits rather than actually try to test
that Nessus can conduct. You can tell Nessus exactly what sort of scan to conduct; for exam-ple, you can specify a TCP SYN scan or a connect() scan or turning on the equivalent of theNMAP -P0 command-line option.
4444c06_final.qxd 1/5/05 12:54 AM Page 310
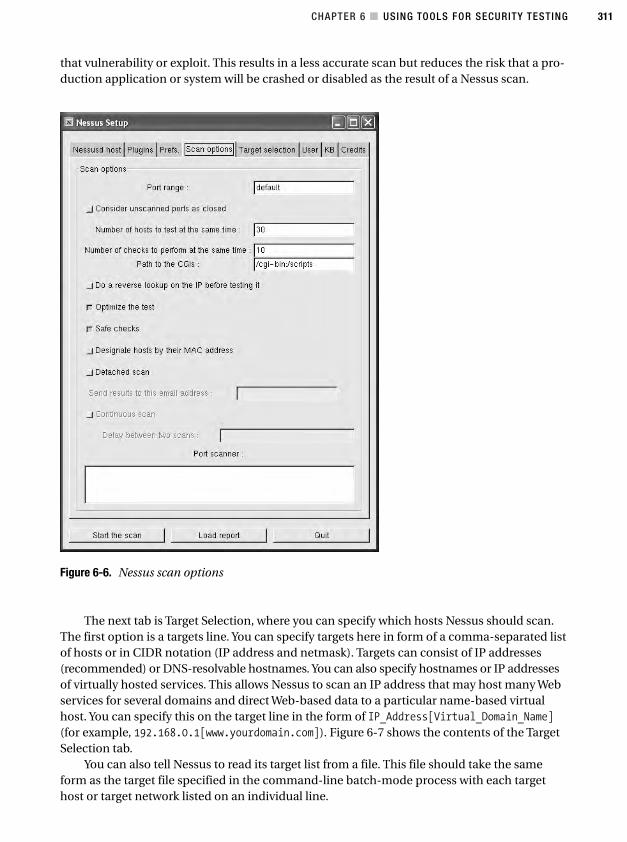
CHAPTER 6 ■ USING TOOLS FOR SECURITY TESTING 311
that vulnerability or exploit. This results in a less accurate scan but reduces the risk that a pro-duction application or system will be crashed or disabled as the result of a Nessus scan.
The next tab is Target Selection, where you can specify which hosts Nessus should scan.The first option is a targets line. You can specify targets here in form of a comma-separated listof hosts or in CIDR notation (IP address and netmask). Targets can consist of IP addresses(recommended) or DNS-resolvable hostnames. You can also specify hostnames or IP addressesof virtually hosted services. This allows Nessus to scan an IP address that may host many Webservices for several domains and direct Web-based data to a particular name-based virtualhost. You can specify this on the target line in the form of IP_Address[Virtual_Domain_Name](for example, 192.168.0.1[www.yourdomain.com]). Figure 6-7 shows the contents of the TargetSelection tab.
You can also tell Nessus to read its target list from a file. This file should take the sameform as the target file specified in the command-line batch-mode process with each targethost or target network listed on an individual line.
Figure 6-6. Nessus scan options
4444c06_final.qxd 1/5/05 12:54 AM Page 311
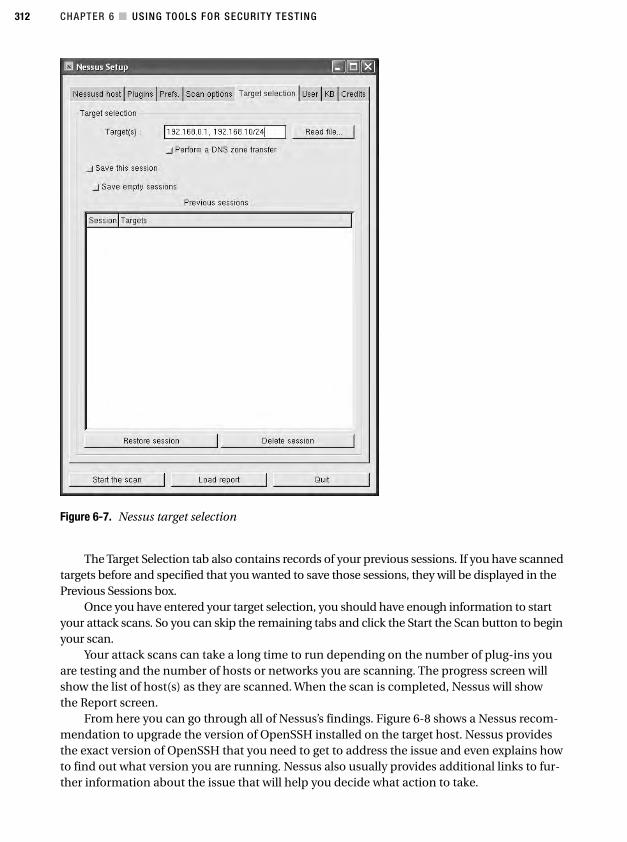
CHAPTER 6 ■ USING TOOLS FOR SECURITY TESTING312
Figure 6-7. Nessus target selection
The Target Selection tab also contains records of your previous sessions. If you have scannedtargets before and specified that you wanted to save those sessions, they will be displayed in thePrevious Sessions box.
Once you have entered your target selection, you should have enough information to startyour attack scans. So you can skip the remaining tabs and click the Start the Scan button to beginyour scan.
Your attack scans can take a long time to run depending on the number of plug-ins youare testing and the number of hosts or networks you are scanning. The progress screen willshow the list of host(s) as they are scanned. When the scan is completed, Nessus will showthe Report screen.
From here you can go through all of Nessus’s findings. Figure 6-8 shows a Nessus recom-mendation to upgrade the version of OpenSSH installed on the target host. Nessus providesthe exact version of OpenSSH that you need to get to address the issue and even explains howto find out what version you are running. Nessus also usually provides additional links to fur-ther information about the issue that will help you decide what action to take.
4444c06_final.qxd 1/5/05 12:54 AM Page 312

CHAPTER 6 ■ USING TOOLS FOR SECURITY TESTING 313
You can save this report in a variety of forms, as discussed earlier, including an HTMLpage and a collection of graphs that detail the results of the scan.
It is important to remember that Nessus is not always perfect. Not everything that Nessusfinds will be an exploit or vulnerability that applies to your system. But all the findings are worthat least investigating. Nessus provides quite detailed explanations of the exploits and vulnerabil-ities it finds on your systems. They often include potential changes and solutions. To get the fullbenefit from Nessus and to be able to ensure that all the potential issues Nessus finds are eitheraddressed or determined not relevant, I recommend you study these findings carefully.
Other Methods of Detecting a PenetrationYou can look for some additional things that indicate a possible penetration of your system ora compromised system. The following items are all things you should perform regular checksof (in addition to any automated tools such as Chkrootkit that I discussed earlier):
Figure 6-8. Nessus report screen
4444c06_final.qxd 1/5/05 12:54 AM Page 313
CHAPTER 6 ■ USING TOOLS FOR SECURITY TESTING314
• Log files
• Files, directories, and binaries
• cron and at jobs
• The contents of the /etc/passwd and /etc/group files
The first step, as discussed in Chapter 5, is to make sure you know what is happening onyour system by examining your logs. Check the following items especially:
• Base log files including messages, secure, cron, and related operating-system logs forunusual activity or entries. Potentially examine them using a tool such as SEC or Swatchto help filter your logs.
• Any firewall logs you are collecting. See Chapter 2 for further details.
• The wtmp file, which is usually contained in /var/log. This file contains records of thedate and time of the last successful login of all users on the system. You can access thisinformation via the last command.
• The utmp file that is contained in /var/run. This file contains information on each usercurrently logged on. It is what is accessed when you use the w or who command.
Unfortunately, I cannot tell you exactly what to look for, as every system is different; how-ever, I emphasis that as part of securing your system, you should know exactly who and whatshould be running on your system. It is impossible to secure a system if you do not have aprecise picture of what is occurring on your system.
Next you should check for a variety of file-related items. This is mostly based around set-ting a baseline of what you know is on the system (for example, what setuid files exist on thesystem and checking against that baseline on a regular basis). The addition of new setuid fileswithout your knowledge, for example, would almost certainly imply something is amiss.
So, you should start with checking for new or changed setuid or setgid root files on yoursystem. These types of files are often not only points of entry and exploited by attackers, butfiles with these permissions are regularly added by attackers during penetration. The com-mand in Listing 6-33 should show all executable files with setuid and setgid permissions.
■Note I provide much more information about this in Chapter 4.
Listing 6-33. Finding setuid and setgid Files
puppy# find / -type f -perm +6000 -ls
You should review all the files on your system with these permissions and confirm if theyare actually required by setuid or setgid root files. If they are not required, you can removethe permissions with the following command:
puppy# chmod -s filename
4444c06_final.qxd 1/5/05 12:54 AM Page 314
CHAPTER 6 ■ USING TOOLS FOR SECURITY TESTING 315
Listing 6-34 shows a command to find all the world-writable files and directories on thesystem.
Listing 6-34. Find World-Writable Files and Directories
puppy# find / -perm -2 ! -type l -ls
You should also check for any unusually named files. For example, files preceded by aperiod (.) do not show up when you use the ls command and are a simple way for an attackerto hide a file from a casual inspection. You can use the find command to locate a combinationof unusually named files. Listing 6-35 shows find commands that will show all files on yoursystem prefixed by . and ... You can construct other variations of these to find other files.
Listing 6-35. Finding Unusually Named Files
puppy# find / -name ".*" -print -xdev
puppy# find / -name "..*" -print -xdev
Lastly, unowned12 files and directories may also be an indication of a penetration on yoursystem. Listing 6-36 shows a command to find all the unowned files and directories.
Listing 6-36. Finding Unowned Files and Directories
puppy# find / -nouser -o -nogroup -ls
You should also look at ensuring the integrity of your binaries using a tool such as Tripwire orMD5 or similar checksums. I talk about cryptographic checksums in Chapter 1 and the Tripwireapplication in Chapter 4.
You should check the contents of the root crontab and at files for any scheduled commandsor processes that an attacker may have left behind. You can use the commands in Listing 6-37 todo this.
Listing 6-37. Checking the Contents of cron and at
puppy# crontab -l
puppy# at -l
Lastly, you need to check your /etc/passwd and /etc/group files for any new users youhave not created, changes to existing accounts, UID changes (especially those related to UID 0or root), or accounts without passwords.
Recovering from a PenetrationThe first thing you need to come to terms with is that a penetrated system, from a recoverypoint of view, is generally a lost cause. You can never guarantee you have removed and purged
12. Unowned files are those files that are not owned by any user or group.
4444c06_final.qxd 1/5/05 12:54 AM Page 315
CHAPTER 6 ■ USING TOOLS FOR SECURITY TESTING316
all the potential malicious exploits left on your system, and you cannot guarantee that youhave spotted any potential time bombs or booby traps left by your attacker. You will need torebuild this system either from a safe set of backups or from safe media. I recommend doingthis from safe media and restoring your data carefully from safe backups.
The word safe is important here. You may not find out exactly when an attacker penetratedyour system. Data and files you have backed up could contain tools, exploits, or other hiddenand nasty surprises that come back to haunt your rebuilt system. The worst-case scenario isthat you rebuild your system, reinstall your applications, and then restore from your backups,but your attacker has left a binary or a script behind that is now present in your backed-up datathat allows them to easily repenetrate your system or has some delayed malicious intent suchas damage to your system or deletion of your data.
The following recommendations apply to system recovery after an attack or penetration:
• Isolate the system; remove it from the network, and do not plug it back into your net-work or any other network that contains production or at-risk systems. If you mustplug it back into the network, do so in an isolated, preferably stand-alone networkwith no connections to the Internet or your local network.
• Check your other systems immediately for signs of attack. Check logs, check logins,and run your collection of scanning tools.
• Change all your secure passwords, including your root passwords and passwords fornetwork devices immediately. Do not use electronic means to disseminate these newpasswords.
• Examine your system for the source of the attack, and, if required, involve any relevantlaw-enforcement agencies.
• Attempt to determine the how the attack was achieved, and ensure you can addressthe exploit(s) or penetration methods before you rebuild your system.
• If you rebuild your system, then confirm you are building from safe and up-to-datemedia.
• If you rebuild your system, then check that any data you restore to your system is safeand not corrupted, infected, or booby-trapped by your attacker.
But before you rebuild your system, you need to look at that the potential forensic value ofthat system. If you intend to investigate the nature of the penetration on your system, then youshould keep a detailed record of what you do and what you find. This record is useful for yourown purposes in tracking the path of the attacker, and it also provides input for any auditorswho may become involved in reviewing the attack from a wider security perspective. Addition-ally, if your organization chooses to involve law enforcement in the aftermath of an attack, thisrecord could eventually form some kind of evidence. The following are a few steps you shouldtake to gather this information:
• Maintain a journal of your actions on the penetrated system.
• Take copies of all major configuration files, including your network configuration,passwd and group files, and so on.
4444c06_final.qxd 1/5/05 12:54 AM Page 316
CHAPTER 6 ■ USING TOOLS FOR SECURITY TESTING 317
• Take copies of your log files including any relevant log entries.
• Take snapshots of your running processes, network status, memory states, /proc direc-tory, and disks. Store these securely.
You can use a few basic tools to help you keep a journal of your activities. The first thingto ensure is that you mark all your entries with the system name, the type, and the correct dateand time. Prefix all journal entries with the following command:
puppy# (date; uname -a)
Another useful tool is the script command, which records the contents of an interactivesession. You can start script with the following command:
puppy# script -a penetration_log.txt
The -a option appends data to a previously connected file so you do not overwrite thecontents of an existing file. The collection of data will stop when you issue an exit command,log out, or issue Ctrl+D. The script command really works only with commands that write tostdout. If you execute a tool such as ed or vi that clears the screen and opens another screen,this tends to write junk to the script log file.
You should take snapshots of a variety of system configuration files in both hard and softcopy. This includes all the major configuration operating-system files as well as the configura-tion files of any applications you think may have been penetrated or used to achieve the pene-tration. You should also take hard and soft copies of any relevant log entries and log files.
Additionally, you need to capture the running state of the system. Start with the runningprocesses on the system. Enter the following:
puppy# (ps -aux; ps -auxeww; lsof) > current_procs.txt
Then grab the contents of the /proc directory. Enter the following:
puppy# tar -cvpf proc_directory.tar /proc/[0-9]*
Next, take a snapshot of the network state of the system. Enter the following:
puppy# (date; uname -a; netstat -p; netstat -rn; arp -v) > network_status.txt
■Note I have included the current date and time and the uname information to the start of the recordsI have generated.
Finally, take a snapshot of the currently active and kernel memory. Listing 6-38 shows thecommands to do this.
Listing 6-38. Snapshot of Currently Active Memory
puppy# dd bs=1024 < /dev/mem > mem
puppy# dd bs=1024 < /dev/kmem > kmem
4444c06_final.qxd 1/5/05 12:54 AM Page 317
CHAPTER 6 ■ USING TOOLS FOR SECURITY TESTING318
I also recommend taking snapshots of the disk of the suspect system, so you can use themfor further forensic work later. You can use the command in Listing 6-39 to take the snapshot.In this example, I am taking a snapshot of the hda1 partition. You need to take snapshots of anyadditional partitions on the system.
Listing 6-39. Taking a Disk Snapshot
puppy# dd if=/dev/hda1 bs=1024 > hda1
Additional Security ToolsThe following sections list (by no means comprehensively) some additional security tools thatmay be useful to you. These include network scanners and sniffers, traffic-capture tools, net-work intrusion detection systems, secure kernels, and security-auditing tools.
dsniffThis suite of packet-sniffing tools allows you to monitor traffic on your network for sensitivedata. It comes with a number of tools, including its namesake, dsniff, which allows you to sniffnetwork traffic that could potentially contain items such as passwords. It comes with the addi-tional tools filesnarf, mailsnarf, and urlsnarf that specialize in sniffing for filenames, mailpasswords, and traffic and HTTP traffic. dsniff requires libnet (http://www.packetfactory.net/projects/libnet/) and libnids (http://www.packetfactory.net/projects/libnids/) for opera-tion. You can find dsniff at http://monkey.org/~dugsong/dsniff/.
EtherealEthereal is a network data-capture tool that can grab data off your network and read in the con-tents of tcpdump files or read in data from a variety of other sources. You can dissect and analyzea variety of data from a wide selection of protocols and can even edit the contents of capturedtraffic. Ethereal also comes with an X-based GUI tool that you can use to display data being cap-tured in real time. You can find Ethereal at http://www.ethereal.com/.
EttercapThe Ettercap suite simulates and sniffs for man-in-the-middle attacks on your network. It is capa-ble of sniffing live connections and performing content filtering on the fly. It can support activeand passive dissection of a number of protocols and has built-in fingerprinting capabilities witha large library of fingerprints. You can find Ettercap at http://ettercap.sourceforge.net/.
LIDSLIDS is a secured kernel designed to replace your existing kernel. It provides file-system protec-tion, provides protection of processes (including hiding processes), introduces access controllists (ACLs) that allow you control access to applications, and contains some network securityfeatures and a port scanner detector. LIDS also has a built-in secured alerting system. You canfind LIDS at http://www.lids.org/.
4444c06_final.qxd 1/5/05 12:54 AM Page 318
CHAPTER 6 ■ USING TOOLS FOR SECURITY TESTING 319
NetcatNetcat is similar in function to nmap but has some useful additional functionality. It is capableof the same network and port scanning as nmap but also allows you to send TCP/IP data. Youcan use it to open TCP connections, listen on arbitrary TCP and UDP ports, and send TCP andUDP packets. You can find Netcat at http://netcat.sourceforge.net/.
SARASecurity Auditor’s Research Assistant (SARA) is a security-analysis tool. It is an inheritor ofSATAN, the original security analysis tool. SATAN has become outdated and obsolete in recenttimes, and SARA has overtaken its core functionality. It is able to perform a series of built-inscans or can scan using third-party plug-ins. You can run it in stand-alone and daemon mode.You can find SARA at http://www-arc.com/sara/.
SnortSnort is a packet-sniffing tool and intrusion-detection tool. It is a complex, powerful, andhighly configurable tool. It can run in three modes: as a network sniffer reading packets offthe network and displaying them, in packet logging mode logging those packets to disk, andin the last mode as a network intrusion detection tool. This allows you to match the packetsagainst a series of rules. Some rules are provided by default, and you can also define yourown; for example, as a new virus or worm is discovered, you can define a rule to detect thatworm and identify any computers that may be infected. Snort can also perform actions, trig-ger events, or conduct alerting if it detects packets matching its or your rules. You can findSnort at http://www.snort.org/.
tcpdumpOne of the more useful tools in your security arsenal, the tcpdump command allows you to dumpnetwork traffic in the form of the headers of packets. You can select headers using Boolean expres-sions, collect packets from a particular interface, and use a variety of other options. You can displaythe packet headers on the console or log them to a file for later review. Most Linux systems comewith the tcpdump command, or you can find it at http://www.tcpdump.org/.
TitanSimilar to Bastille Linux in functionality, the Titan package also provides operating-systemhardening. Titan runs a series of tests, provides analysis, and corrects deficiencies it detectson your system. It is written in the form of Bourne script and is easily able to be added to andcustomized. Titan is available at http://www.fish.com/titan/.
ResourcesThe following are some resources you can use.
• Bastille Linux mailing lists: http://www.bastille-linux.org/mail.html
• NMAP hacker list: http://seclists.org/about/nmap-hackers.txt
• Nessus mailing lists: http://list.nessus.org/
4444c06_final.qxd 1/5/05 12:54 AM Page 319

CHAPTER 6 ■ USING TOOLS FOR SECURITY TESTING320
Sites• Chkrootkit: http://www.chkrootkit.org/
• Rootkit Hunter: http://www.rootkit.nl/
• John the Ripper: http://www.openwall.com/john/
• Bastille Linux: http://www.bastille-linux.org/
• NMAP: http://insecure.org/nmap/
• Xprobe: http://sys-security.com/html/projects/X.html
• Nessus: http://www.nessus.org
• Nessus Knowledge Base: http://www.edgeos.com/nessuskb/
4444c06_final.qxd 1/5/05 12:54 AM Page 320
321
C H A P T E R 7
■ ■ ■
Securing Your Mail Server
One of the most vital components in any modern business is e-mail. It has become commonfor commercial organizations to do a significant part of their communication via e-mail, andend users and management now generally consider an outage of a corporate e-mail system tobe a major, if not critical, issue. With the rise of the importance of e-mail, several serious issueshave emerged with respect to the stability, functionality, and security of e-mail communica-tion. These include the security of transmitted information, the prevalence of spam, the useof e-mail to disseminate viruses, and the potential for penetrating your Simple Mail TransferProtocol (SMTP) services either to cause a Denial of Service (DoS) attack or to use as a poten-tial route into your system.
This has not been helped by the fact that (both before and after the rise of popularity ofe-mail as a service) the security, integrity, and stability of many of the available mail serverapplications have had major issues. This is especially true of Unix-based and Linux-basedenvironments where e-mail servers have been frequent targets of attackers; several majorvulnerabilities and exploits have been discovered for mail servers running on these platforms.Additionally, many Linux distributions offer pre-installed mail servers and services that arepoorly configured and secured or not secured at all.
With the combination of heavy reliance on e-mail functionality and the relatively poor secu-rity track record of e-mail servers, system administrators and security officers need to take partic-ular care in selecting, maintaining, and securing their e-mail infrastructures. In this chapter, I willaddress each of the major threats facing your e-mail server. I will provide practical working con-figurations that will provide you with some methods of securing the transmission of e-mail, helpyou reduce spam, and protect your e-mail system and users from viruses. To provide real-worldexamples of how you can go about doing all this, I will cover principally two mail server applica-tions: Sendmail and Postfix.
More important, what won’t I cover? Well, I will not tell you how to configure the base func-tionality of your e-mail server unless it has some security implications. I will also not explain howto set up and configure complex mail server environments such as virtual addressing or the like.You can get this sort of information from the man pages, FAQs, and associated documentation ofthe mail server application of your choice.
Which Mail Server to Choose?An important question is which mail server to choose; unfortunately, not a lot of independentguidance is available to you from a functionality or security standpoint. I will make any recom-mendations based on the core functionality of a mail server. Whether you choose Sendmail,
4444c07_final.qxd 1/5/05 12:55 AM Page 321
CHAPTER 7 ■ SECURING YOUR MAIL SERVER322
Postfix, Qmail, Courier, or one of a number of other variants, the essential function of thosemail servers remains similar. I also have no intention of buying into the “my e-mail server isbetter than your e-mail server” wars that occasionally spring up on Usenet and mailing listswhen discussing the relative merits of a particular mail server.
From a security standpoint, however, I do have some opinions and advice that is valuablewhen selecting a mail server. My recommendation for a mail server is Postfix. Postfix was writtenby Dr. Wietse Venema, who is one of the authors of the Security Administrator Tool for AnalyzingSystems (SATAN); he has a considerable pedigree in the TCP/IP and Unix security worlds.
Postfix was designed with security in mind and contains a variety of security safeguards.
• It has a distributed architecture with smaller programs performing individual functionsinstead of one monolithic program.
• Almost all these smaller programs can be chrooted.
• Those chrooted functions all run at low privilege.
• You have to penetrate these smaller programs before you have access to local delivery.
• Memory for buffers is allocated dynamically to restrict the risk of buffer overflow attacks.
• No Postfix program uses set-uid.
• Postfix does not trust the content of its own queues.
• Postfix integrates relatively easily with antivirus and antispam tools.
All these in combination mean that Postfix addresses some of the key areas in which MailTransfer Agents (MTAs) are vulnerable to attack. I recommend you at least look at Postfix as analternative to your current mail server.
■Note On the functionality front (not as an exercise in one-upmanship but more to articulate that Postfixmeets the same functionality standards as alternatives such as Sendmail), Postfix also offers excellent per-formance in terms of throughput and capacity and is easy to configure.
From a security advice perspective for existing systems, this is not to say I recommendabsolutely getting rid of your existing mail server. Obviously, if you have a significant invest-ment in that system or have a technical preference for another variety of MTA, then I recom-mend you stay with that package and secure it. This is especially true of Sendmail servers. Ifyou ensure you have an up-to-date version of Sendmail (and most of the releases from version8.11 and beyond have proven to be reasonably secure) and follow some basic steps to secureit, then you should be reasonably confident of a secure MTA.
I believe, though, that the vast numbers of mail servers attached to the Internet mean thatattackers have a huge pool of potential targets and thus perceive mail servers as an excellentchoice of application to probe and dismember in order to look for exploits and vulnerabilities.So, update your software. Regularly. You should try not to fall too many versions behind thecurrent release of your MTA. Subscribe to the announce mailing list for your MTA. Subscribe
4444c07_final.qxd 1/5/05 12:55 AM Page 322
CHAPTER 7 ■ SECURING YOUR MAIL SERVER 323
to vulnerabilities mailing lists, and watch for posts related to your MTA. Join Usenet newsgroups. Protect your system with your antivirus and antispam protection. Keep your users up-to-date and informed about potential virus and spam threats.
How Is Your Mail Server at Risk?So what does security for a mail server mean? Well, in order for your mail server to be consid-ered at least partially secure, you need to address the following issues:
• Reduce the risk of penetration of your system and/or an attacker gaining root via yourmail server.
• Reduce the risk of DoS attacks.
• Reduce spam.
• Inhibit the spread of viruses, and protect users from virus infections via e-mail.
• Secure your mail and its transmission.
• Prevent the unauthorized use of relaying whilst allowing authorized users to relay.
• Reduce the risk of forgery of mail messages.
The MTAs I will cover both have some inherent security, but you need to do more to reallyensure the security of your MTA. In this chapter, I will take you through addressing the first fourissues I listed previously: reducing the risk of penetration of your system, reducing the risk ofDoS attacks, providing antispam protection, and providing antivirus protection. In Chapter 8I will take you through the remaining three issues: securing your mail transmission, preventingrelaying, and reducing the risk of mail forgery.
Protecting Your Mail ServerThis section covers some ways to protect your MTA from penetration and reduce the risk ofan attacker gaining root through your MTA. I will cover a bit about chrooting your MTA, hid-ing your MTA’s identity, disabling some dangerous SMTP commands, protecting your MTAfrom DoS attacks, and providing some general security.
One of the biggest issues with MTA security is the need for many MTAs to utilize root,utilize setuid, or require quite high privileges to correctly function. Older Sendmail versionsare particular culprits of this. Both Postfix and more recent versions of Sendmail, from version8.12 onward, run without setuid root, which reduces the potential risk of an attacker usingyour MTA as a conduit to root privileges on your system. This is another reason, if you are run-ning Sendmail, to update to a more recent version.
So how does Sendmail achieve this? Sendmail is split into two operational modes: an MTAfunction and a Mail Submission Program (MSP) function. How you start Sendmail depends onwhich function is called. So, effectively now you have two running Sendmail modes: one is anSMTP daemon that performs your MTA functions, and the other is an MSP daemon that han-dles the submission and queuing of e-mail. To accommodate for this, an additional configura-tion file has been created, submit.cf, which controls the mail submission functions.
4444c07_final.qxd 1/5/05 12:55 AM Page 323

CHAPTER 7 ■ SECURING YOUR MAIL SERVER324
In version 8.12, Sendmail still needs root privileges to perform a few actions, such as bindingto port 25, reading .forward files, performing local delivery of mail, and writing e-mail submittedvia the command line to the queue directory. The last option is what Sendmail principally hadused a setuid root binary for. The new version downgrades the requirements for root privilegesby changing the sendmail binary to a setgid binary and writing to a group-writable queue direc-tory. Sendmail still needs to be started as root, but then it drops privileges once it has performedthe required root tasks.
This is a fairly simplistic explanation, and I recommend you carefully read the changesarticulated in the Sendmail README and SECURITY documents that come with the sourcedistribution to fully understand how the structure and running of Sendmail has changed. Youneed to consider a few caveats and warnings, though. You can also find these documents onthe Sendmail Web site.
■Note Both Sendmail and Postfix still use the less dangerous setgid for several functions. Postfix usessetgid as part of the postdrop program for mail submission whilst Sendmail uses it to setgid to a differ-ent user and group, called smmsp, as part of the new separate mail submission process.
So how do you further limit the risk to your system from a penetration of your MTA’sdaemons? Well, one of the possible methods is chrooting. I will cover how both MTAs I amdiscussing can be chrooted and under what circumstances you may choose to do this.
Sendmail can be highly complicated to completely chroot, and because of its monolithicnature, the benefits derived from chrooting are potentially much more limited. Postfix consistsof many small daemons, so you can therefore be selective about which you chroot; however,Sendmail is one binary, which means you have to attempt to chroot all its functions. Since Send-mail requires write access to objects that are almost certainly going to be outside your chrootjail, the value of the jail is negated.
The security changes that have been made to the way Sendmail runs in version 8.12reduce the risk of a root penetration. This does not mean you should not look at chroot forSendmail. I still think, though, you may want to run Sendmail chrooted in some importantinstances, such as if you are running an SMTP gateway, so I will take you through chrootingthat type of Sendmail installation in the next section.
Postfix by default is designed to have most of its daemons running chrooted with fixedlow privileges. Additionally, adjusting its configuration to enable chroot is simple and quickto achieve. I will cover the configuration of Postfix as a chrooted system in the “ChrootingPostfix” section.
Chrooting a Sendmail SMTP Gateway or RelayMany enterprises run an SMTP gateway or relay on the “border” of their network, usuallyhoused in a DMZ with a firewall protecting it, to provide front-line mail services on the Inter-net. The SMTP gateway sends and receives all mail for the enterprise but does no local deliv-ery of mail; rather, it relays it onto other mail servers that handle internal mail. This frontendmail server provides another layer of security for your network and often also performs spamfiltering or antivirus functions. See Figure 7-1.
4444c07_final.qxd 1/5/05 12:55 AM Page 324
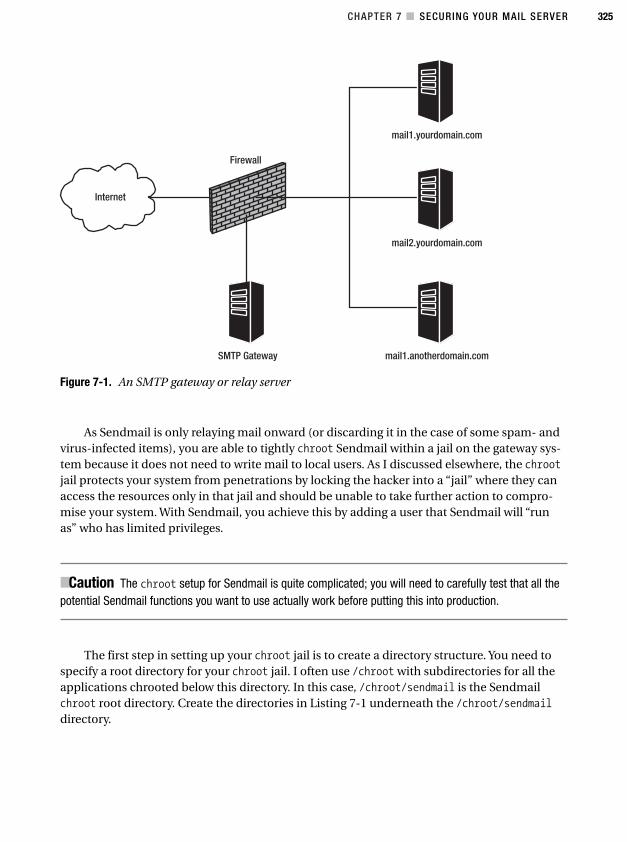
CHAPTER 7 ■ SECURING YOUR MAIL SERVER 325
Figure 7-1. An SMTP gateway or relay server
As Sendmail is only relaying mail onward (or discarding it in the case of some spam- andvirus-infected items), you are able to tightly chroot Sendmail within a jail on the gateway sys-tem because it does not need to write mail to local users. As I discussed elsewhere, the chrootjail protects your system from penetrations by locking the hacker into a “jail” where they canaccess the resources only in that jail and should be unable to take further action to compro-mise your system. With Sendmail, you achieve this by adding a user that Sendmail will “runas” who has limited privileges.
■Caution The chroot setup for Sendmail is quite complicated; you will need to carefully test that all thepotential Sendmail functions you want to use actually work before putting this into production.
The first step in setting up your chroot jail is to create a directory structure. You need tospecify a root directory for your chroot jail. I often use /chroot with subdirectories for all theapplications chrooted below this directory. In this case, /chroot/sendmail is the Sendmailchroot root directory. Create the directories in Listing 7-1 underneath the /chroot/sendmaildirectory.
4444c07_final.qxd 1/5/05 12:55 AM Page 325

CHAPTER 7 ■ SECURING YOUR MAIL SERVER326
Listing 7-1. chroot Directory Structure
/dev
/etc
/etc/mail
/lib
/lib/tls
/tmp
/usr
/usr/bin
/usr/sbin
/usr/lib
/usr/lib/sasl2
/var
/var/run
/var/spool
/var/spool/mqueue
Next you will want to add a user for Sendmail to run as. I usually call this user sendmailand add it to the mail group. Enter the following:
puppy# useradd -u 501 -g mail -s /sbin/nologin -d /dev/null sendmail
Then enable the RunAsUser setting in sendmail.mc, and change it to the user you havecreated to run the Sendmail daemon. The following shows this:
define(`confRUN_AS_USER',`sendmail')
Re-create your sendmail.cf file to enable this.
Populating the /chroot/sendmail/etc DirectoryNow you need to populate these directories with some of the files you will need. You can startwith the /chroot/sendmail/etc directory. You need to copy the following:
aliases
aliases.db
passwd
group
resolv.conf
host.conf
nsswitch.conf
services
hosts
localtime
Once you have copied in your passwd and group files, you should edit these down to justthe users and groups you need to run Sendmail. My passwd file contains the following:
4444c07_final.qxd 1/5/05 12:55 AM Page 326
CHAPTER 7 ■ SECURING YOUR MAIL SERVER 327
root:x:0:0:root:/root:/bin/bash
bin:x:1:1:bin:/bin:/sbin/nologin
daemon:x:2:2:daemon:/sbin:/sbin/nologin
mail:x:8:12:mail:/var/spool/mail:/sbin/nologin
mailnull:x:47:47::/var/spool/mqueue:/sbin/nologin
sendmail:x:501:501::/dev/null:/sbin/nologin
The group file contains the following:
root:x:0:root
bin:x:1:root,bin,daemon
daemon:x:2:root,bin,daemon
mail:x:12:mail,sendmail
mailnull:x:47:
Finally, you need to put in your Sendmail configuration files. Simply copy the entire contentsof your /etc/mail directory and all subdirectories into the /chroot/sendmail/etc/ directory. Asmuch as I would like to say there is an easier way to do this—mount or links, for example—there isnot, and both these methods punch a hole in your chroot jail that could allow an attacker to getout. So you need copy these files from the source directory to the target directory. When you areupdating databases and files, ensure that you update the files in the chroot jail.
Populating the /chroot/sendmail/dev DirectoryThe next directory you will populate is your /chroot/sendmail/dev directory. You need to cre-ate some devices in this directory to allow Sendmail to correctly function. These devices, nulland random, should duplicate the devices of the same name in the /dev directory. You can dothis using the mknod commands shown in Listing 7-2.
Listing 7-2. Making Devices for Sendmail
puppy# mknod /chroot/sendmail/dev/null c 1 3
puppy# mknod /chroot/sendmail/dev/random c 1 8
Now secure your newly created devices. They should both be owned by the root user, withtheir permissions changed using chmod: null to 0666 and random to 0644.
Also in your /dev directory you need to create a log device to allow the chrooted Sendmailto log to syslog. If you are using syslog, then you need to add the -a switch to the commandthat starts syslog. For the sample configuration, you would add the following:
-a /chroot/sendmail/dev/log
If you are using syslog-NG, then add a line similar to the following one to yoursyslog-ng.conf file in one of your source block statements:
unix-stream("/chroot/sendmail/dev/log");
■Tip See Chapter 5 for more details on how to do this.
4444c07_final.qxd 1/5/05 12:55 AM Page 327

CHAPTER 7 ■ SECURING YOUR MAIL SERVER328
Then restart syslog or syslog-NG, a new log device in the dev directory will allow Sendmailto log to your syslog daemon.
Adding the Sendmail Binary and Libraries to the chroot JailNext put a copy of your sendmail binary into /chroot/sendmail/usr/sbin. This is the copy ofSendmail that will run when you start your chroot. You should also create symbolic links tothis binary for your mailq and newaliases commands. Enter the following:
puppy# ln -s /chroot/sendmail/usr/sbin/sendmail /chroot/sendmail/usr/bin/mailq
puppy# ln -s /chroot/sendmail/usr/sbin/sendmail /chroot/sendmail/usr/bin/newaliases
Sendmail will also require a variety of libraries to run correctly in the chroot jail. The best wayto work this out is to run ldd on the sendmail binary and record the list of libraries shown and tocopy them into their respective locations in the chroot jail. Listing 7-3 shows the partial results ofthe ldd command and the copy of the libraries in their correct locations in the chroot jail.
Listing 7-3. Adding the Sendmail Libraries
puppy# ldd /usr/sbin/sendmail
libssl.so.4 => /lib/libssl.so.4 (0xb75ab000)
libcrypto.so.4 => /lib/libcrypto.so.4 (0xb74ba000)
libsasl2.so.2 => /usr/lib/libsasl2.so.2 (0xb74a4000)
libdb-4.1.so => /lib/libdb-4.1.so (0xb73e2000)
libpthread.so.0 => /lib/tls/libpthread.so.0 (0xb71b1000)
puppy# cp /lib/libssl.so.4 /chroot/sendmail/lib
puppy# cp /usr/lib/libsasl2.so.2 /chroot/sendmail/usr/lib
puppy# cp /lib/tls/libpthread.so.0 /chroot/sendmail/lib/tls
■Caution If you see any libraries located in /usr/kerberos/lib in your list of Sendmail libraries, do notcopy them into a similar location under the Sendmail chroot; instead, copy them into /chroot/sendmail/usr/lib. Sendmail seems unable to find them otherwise.
You will also need some other libraries. Listing 7-4 lists these libraries, which are usuallycontained in /lib.
Listing 7-4. Additional Libraries Required by Sendmail
libnss_dns.so.2
libresolv.so.2
libnss_files.so.2
Copy the libraries from Listing 7-4 to /chroot/sendmail/lib to proceed.Finally, if you will be using Simple Authentication and Security Layer (SASL), then you
need to copy the Sendmail.conf file and all the required SASL mechanisms and plug-ins youintend to support. You do this simply by copying all the files in the /usr/lib/sasl2 directory to/chroot/sendmail/usr/lib/sasl2. If you are using saslauthd, you also need to adjust the loca-tion of your saslauthd mux file to within your chroot jail. See Chapter 8 for how to do this.
4444c07_final.qxd 1/5/05 12:55 AM Page 328
CHAPTER 7 ■ SECURING YOUR MAIL SERVER 329
Permissions and OwnershipBefore you can start your Sendmail daemon in the chroot jail, you need to ensure some permis-sions and ownerships are set up correctly. First, the /chroot/sendmail/var/spool/mqueue direc-tory needs to be owned by the user you have specified in the RunAsUser option and chmoded to0700 (in this case the user sendmail).
puppy# chown sendmail /chroot/sendmail/var/spool/mqueue
puppy# chmod 0700 /chroot/sendmail/var/spool/mqueue
USING CHROOT
In this and other chapters I have discussed chroot jails. A chroot jail uses the chroot() function to locka process into its own directory structure. Essentially the chroot() function redefines what the root, or /,directory is for a process. For example, the chroot() function is frequently used for FTP servers to lock localusers into their home directories. This way, if user bob signs onto the FTP server, he is placed in his homedirectory, /home/bob. If he issues the following command:
puppy# cd /
he will not go to the / directory; rather, he will return to the /home/bob directory, as this has been definedas his root directory. This allows you to control the access your processes have to your file systems.
Because you have no access to resources outside the chroot jail, you need to provide all the resourcesrequired by the jailed process or daemon inside the jail. You do this by copying the required files and objects.These include devices, libraries, commands, or files. Hence, an important step in building a chroot jail is cre-ating and populating the directory structure and content of the jail. Throughout this book I have constructedthe chroot jails with the bare minimum of resources required for the various processes to function.
Many daemons, such as Postfix or BIND, come with the ability to create their own built-in chroot jails.These processes can be jailed by setting a configuration or command-line option. Other processes require thatyou build your own custom jail and then execute the chroot command. The chroot command provides auserland interface to the chroot() function. It works by specifying the new root directory of the proposed jailand then executing the required command like so:
puppy# chroot /chroot/newroot /usr/sbin/jailed
On the previous line, the chroot command changes to the directory /chroot/newroot and thenexecutes the command /usr/sbin/jailed. The jailed daemon will now be able to access only the filesand objects in the directory /chroot/newroot and any subdirectories. It will have no other access to therest of the host’s file systems.
It is possible, albeit technically challenging, to break out of a chroot jail. A number of methods exist:buffer overflows, open directory handles in file systems outside the chroot jail, or the injection of code intothe kernel. All these methods are made more difficult if the process or daemon inside the chroot jail hasdropped privileges. The ideal model for running a chroot jail is with a process that has normal user privi-leges. For example, this is how the BIND named daemon can be run.
4444c07_final.qxd 1/5/05 12:55 AM Page 329
CHAPTER 7 ■ SECURING YOUR MAIL SERVER330
All files and databases (including alias files, :include: files, statistics files, and databases)must also be readable by that user. Next ensure there are no group-writable files in the chrootjail and that your cf files are secure using the following:
puppy# chmod -R go-w /chroot/sendmail
puppy# chmod 0400 /chroot/sendmail/etc/mail/*.cf
Finally, because you have chrooted Sendmail and you are running it on an SMTP gateway,you do not need to do local delivery; therefore, your sendmail binary does not need to setgidsmmsp or belong to the smmsp group. Change it by entering the following:
puppy# chmod g-s /chroot/sendmail/usr/sbin/sendmail
puppy# chgrp root /chroot/sendmail/usr/sbin/sendmail
Change any other ownerships and permissions according to the instructions in the Send-mail op.ps file. When you start Sendmail, it should identify any other potential permissionsproblems—the more recent versions of Sendmail are especially strict about this—and you cancorrect these as you go.
Starting and Troubleshooting Your Sendmail chroot JailObviously you will also need to configure your Sendmail to relay your mail to its final destina-tion; I recommend setting up some fairly stringent antispam and antivirus rules on any SMTPgateway system. Once this is complete, you can start your chrooted Sendmail. Listing 7-5shows the required command.
Listing 7-5. Starting your Chrooted Sendmail
puppy# chroot /chroot/sendmail /usr/sbin/sendmail -bd -q15m
This command first specifies the location of the chroot root directory, /chroot/sendmail,and then executes the sendmail binary. The binary it executes is the sendmail you have locatedin the chroot jail, because /usr/sbin is now relative to the new root directory, not to your exist-ing / root directory.
During your testing phase, I recommend you change your Sendmail logging level insendmail.cf to the highest level to pick up all the possible error messages whilst you are testingyour chroot jail. You need to change the logging setting, LogLevel, to 15. You should change thisback to your choice of logging level after you have finished testing. The most common prob-lems with this setup are usually related to permissions. Carefully read your mail logs to deter-mine exactly where the problem is.
Chrooting PostfixPostfix is remarkably easy to chroot. Or perhaps, better said, most of the Postfix daemons areeasy to chroot. Almost all the Postfix daemons can be run in a chroot jail using fixed low privi-leges with access only to the Postfix queue at /var/spool/postfix. The only daemons that can-not be chrooted are the daemons associated with the local delivery of e-mail.
■Note This assumes you have already installed and configured Postfix and it is running on your system.
4444c07_final.qxd 1/5/05 12:55 AM Page 330
CHAPTER 7 ■ SECURING YOUR MAIL SERVER 331
You first need to create your chroot jail and populate it with all the files Postfix requires torun. The default place to create your Postfix chroot jail is in /var/spool/postfix.
■Caution Always remember any chrooted daemon resolves filenames and directories relative to the rootof the chroot jail. In this case, that is /var/spool/postfix. So if it is looking for the file /etc/localtime,then it expects to find it in /var/spool/postfix/etc/localtime.
Create the following subdirectories under this directory:
/dev
/etc
/lib
/usr
/usr/lib
/usr/lib/zoneinfo
/var
/var/run
You will need some files from elsewhere in the system to allow Postfix to function. Copythe following files into /var/spool/postfix/etc from /etc:
/etc/localtime
/etc/host.conf
/etc/resolv.conf
/etc/nsswitch.conf
/etc/services
/etc/hosts
/etc/passwd
You also need to add the Postfix required libraries to the /var/spool/postfix/lib direc-tory. You can do this by copying all of the following:
puppy# cp /lib/libnss_*.so* /var/spool/postfix/lib
puppy# cp /lib/libresolv.so* /var/spool/postfix/lib
puppy# cp /lib/libdb.so* /var/spool/postfix/lib
You also need to copy the file /etc/localtime to /var/spool/postfix/usr/lib/zoneinfo/localtime. You can use the following command for this:
puppy# cp /etc/localtime /var/spool/postfix/usr/lib/zoneinfo
■Tip If you downloaded the Postfix source and installed it that way, then the source package contains somescripts to automate the creation of the required directories and to copy the required files for you. These scriptsare located in postfix-version/examples/chroot-setup/. An example script called LINUX2 is specificallyfor Linux. You just need to make the script executable and then run it. It also automatically reloads Postfix.
4444c07_final.qxd 1/5/05 12:55 AM Page 331
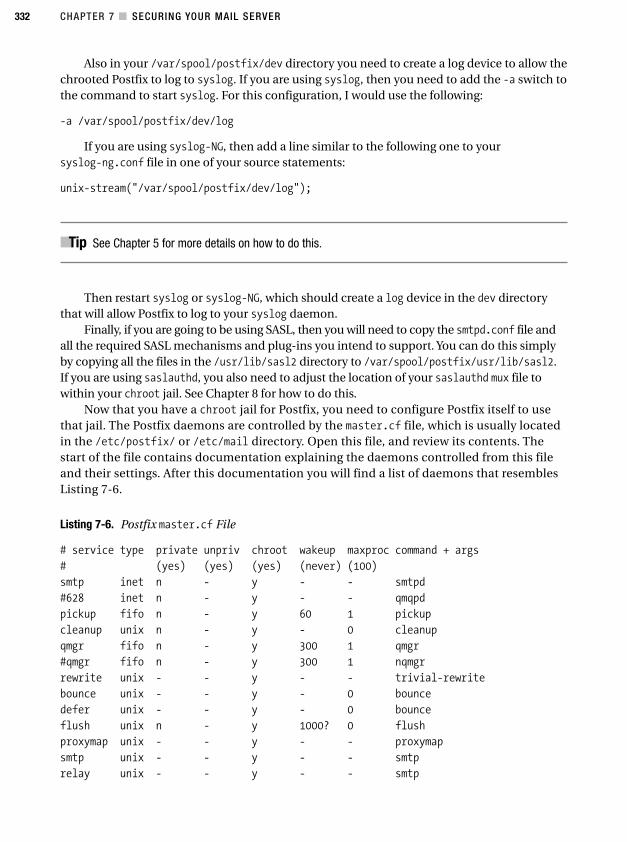
CHAPTER 7 ■ SECURING YOUR MAIL SERVER332
Also in your /var/spool/postfix/dev directory you need to create a log device to allow thechrooted Postfix to log to syslog. If you are using syslog, then you need to add the -a switch tothe command to start syslog. For this configuration, I would use the following:
-a /var/spool/postfix/dev/log
If you are using syslog-NG, then add a line similar to the following one to yoursyslog-ng.conf file in one of your source statements:
unix-stream("/var/spool/postfix/dev/log");
■Tip See Chapter 5 for more details on how to do this.
Then restart syslog or syslog-NG, which should create a log device in the dev directorythat will allow Postfix to log to your syslog daemon.
Finally, if you are going to be using SASL, then you will need to copy the smtpd.conf file andall the required SASL mechanisms and plug-ins you intend to support. You can do this simplyby copying all the files in the /usr/lib/sasl2 directory to /var/spool/postfix/usr/lib/sasl2.If you are using saslauthd, you also need to adjust the location of your saslauthd mux file towithin your chroot jail. See Chapter 8 for how to do this.
Now that you have a chroot jail for Postfix, you need to configure Postfix itself to usethat jail. The Postfix daemons are controlled by the master.cf file, which is usually locatedin the /etc/postfix/ or /etc/mail directory. Open this file, and review its contents. Thestart of the file contains documentation explaining the daemons controlled from this fileand their settings. After this documentation you will find a list of daemons that resemblesListing 7-6.
Listing 7-6. Postfix master.cf File
# service type private unpriv chroot wakeup maxproc command + args
# (yes) (yes) (yes) (never) (100)
smtp inet n - y - - smtpd
#628 inet n - y - - qmqpd
pickup fifo n - y 60 1 pickup
cleanup unix n - y - 0 cleanup
qmgr fifo n - y 300 1 qmgr
#qmgr fifo n - y 300 1 nqmgr
rewrite unix - - y - - trivial-rewrite
bounce unix - - y - 0 bounce
defer unix - - y - 0 bounce
flush unix n - y 1000? 0 flush
proxymap unix - - y - - proxymap
smtp unix - - y - - smtp
relay unix - - y - - smtp
4444c07_final.qxd 1/5/05 12:55 AM Page 332
CHAPTER 7 ■ SECURING YOUR MAIL SERVER 333
# -o smtp_helo_timeout=5 -o smtp_connect_timeout=5
showq unix n - y - - showq
error unix - - y - - error
local unix - n n - - local
virtual unix - n n - - virtual
lmtp unix - - y - - lmtp
You should see that each daemon is followed by several columns of configuration switches.A hyphen (-) in a column indicates that Postfix will use the default setting for that setting, whichis specified in the second commented line beneath the description of what each column does.For example, the default for unpriv is y (for yes).
The most important columns are unpriv and chroot. In the chroot column, make sure all thedaemons except those that use local or virtual services (check the last column under command toconfirm this) are set to y. Then check that all the entries underneath unpriv are set to either - or yagain with the same exceptions: the local and virtual services.
Now reload Postfix by entering the following:
puppy# postfix reload
Check your mail log file (usually /var/log/maillog) for the results of the reload; if itreports that Postfix reloaded without incident, your system is now running Postfix chrooted!
Securing Your SMTP ServerI will now show you some options for securing Sendmail and Postfix, including hiding your ban-ner, disabling some SMTP commands, setting the privacy flags for Sendmail, and using smrshwith Sendmail, amongst other issues. A large portion of the following sections focus on Send-mail rather than Postfix because Postfix provides built-in protection or turns on or off somesecurity-related options by default and does not require you to manually do this. I will identifywhere any manual intervention for Postfix is required.
Obfuscating the MTA Banner and VersionYour MTA’s banner is one of the few occasions when it does not pay to advertise. One of theeasiest ways for attackers to customize their assaults on your MTA is by Telneting to port 25on your system and watching your MTA’s banner tell the attackers what application it is andits version. So I will take you through the steps required to change Sendmail and Postfix’s ban-ner to something that does not broadcast these details.
SendmailSendmail controls its banner by settings in the sendmail.cf file. If you know Sendmail, you willbe aware it is recommended you do not directly edit the sendmail.cf file; rather, you should up-date the m4 macro file, sendmail.mc, and then re-create the sendmail.cf file. In Listing 7-7 youcan see the default Sendmail banner.
Listing 7-7. Default Sendmail Banner
220 puppy.yourdomain.com ESMTP Sendmail 8.12.11/8.12.10; ➥
Fri, 26 Mar 2004 20:45:50 +1100
4444c07_final.qxd 1/5/05 12:55 AM Page 333
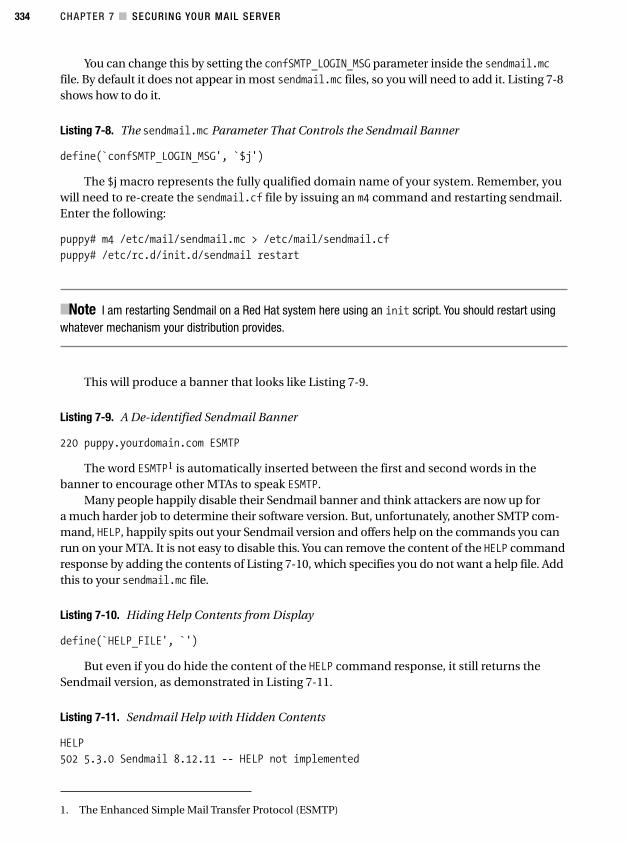
CHAPTER 7 ■ SECURING YOUR MAIL SERVER334
You can change this by setting the confSMTP_LOGIN_MSG parameter inside the sendmail.mcfile. By default it does not appear in most sendmail.mc files, so you will need to add it. Listing 7-8shows how to do it.
Listing 7-8. The sendmail.mc Parameter That Controls the Sendmail Banner
define(`confSMTP_LOGIN_MSG', `$j')
The $j macro represents the fully qualified domain name of your system. Remember, youwill need to re-create the sendmail.cf file by issuing an m4 command and restarting sendmail.Enter the following:
puppy# m4 /etc/mail/sendmail.mc > /etc/mail/sendmail.cf
puppy# /etc/rc.d/init.d/sendmail restart
■Note I am restarting Sendmail on a Red Hat system here using an init script. You should restart usingwhatever mechanism your distribution provides.
This will produce a banner that looks like Listing 7-9.
Listing 7-9. A De-identified Sendmail Banner
220 puppy.yourdomain.com ESMTP
The word ESMTP1 is automatically inserted between the first and second words in thebanner to encourage other MTAs to speak ESMTP.
Many people happily disable their Sendmail banner and think attackers are now up fora much harder job to determine their software version. But, unfortunately, another SMTP com-mand, HELP, happily spits out your Sendmail version and offers help on the commands you canrun on your MTA. It is not easy to disable this. You can remove the content of the HELP commandresponse by adding the contents of Listing 7-10, which specifies you do not want a help file. Addthis to your sendmail.mc file.
Listing 7-10. Hiding Help Contents from Display
define(`HELP_FILE', `')
But even if you do hide the content of the HELP command response, it still returns theSendmail version, as demonstrated in Listing 7-11.
Listing 7-11. Sendmail Help with Hidden Contents
HELP
502 5.3.0 Sendmail 8.12.11 -- HELP not implemented
1. The Enhanced Simple Mail Transfer Protocol (ESMTP)
4444c07_final.qxd 1/5/05 12:55 AM Page 334

CHAPTER 7 ■ SECURING YOUR MAIL SERVER 335
At the time of this writing, the only way for the paranoid (and I fall into this categorybecause I believe every trick or edge you can get on potential attackers is good) to disable thisbehavior is to edit the source code of Sendmail itself. If you really want to do this, then youwill find the relevant code in the sendmail subdirectory of your Sendmail source distributionin the file srvrsmtp.c. In this file find the line in Listing 7-12.
Listing 7-12. HELP Command in srvrsmtp.c
message("502 5.3.0 Sendmail %s -- HELP not implemented",
Version);
Remove Sendmail %s from the line in Listing 7-12 and recompile. The Sendmail server willnow not display the application name or version in the HELP command response. Of course, youwould need to repeat this every time you upgrade Sendmail.
■Caution If you do not know what you are doing, do not mess with the Sendmail source code, becausethere is every chance you will break something! Security is good, but your users also need a working MTA.
PostfixThe banner presented by Postfix is easy to configure. It is controlled by the smtpd_bannerparameter in the main.cf file. The main.cf file is normally located in /etc/postfix or/etc/mail. Listing 7-13 shows the default banner.
Listing 7-13. Default Postfix Banner
220 puppy.yourdomain.com ESMTP Postfix
You can create this by setting the smtpd_banner parameter in the main.cf file to the following:
smtpd_banner = $myhostname ESMTP $mail_name
The $myhostname variable expands to the hostname and domain of the system, and the$mail_name variable expands to Postfix. To hide the Postfix server identification from view,change the banner parameter to the following:
smtpd_banner = $myhostname ESMTP
■Caution You must include the $hostname variable. It is a requirement of the RFC. You should also leaveESMTP in the banner, as by default Postfix sends only an EHLO at the start of a connection if ESMTP appears inthe banner. You can override this behavior by adding smtp_always_send_ehlo = yes to the main.cf file.
The Postfix MTA does not implement the HELP command.
4444c07_final.qxd 1/5/05 12:55 AM Page 335
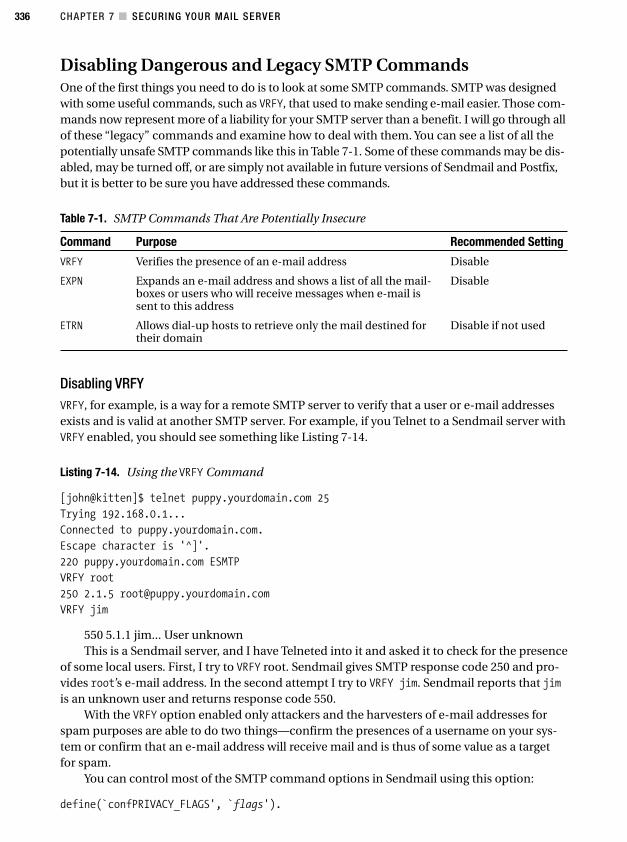
CHAPTER 7 ■ SECURING YOUR MAIL SERVER336
Disabling Dangerous and Legacy SMTP CommandsOne of the first things you need to do is to look at some SMTP commands. SMTP was designedwith some useful commands, such as VRFY, that used to make sending e-mail easier. Those com-mands now represent more of a liability for your SMTP server than a benefit. I will go through allof these “legacy” commands and examine how to deal with them. You can see a list of all thepotentially unsafe SMTP commands like this in Table 7-1. Some of these commands may be dis-abled, may be turned off, or are simply not available in future versions of Sendmail and Postfix,but it is better to be sure you have addressed these commands.
Table 7-1. SMTP Commands That Are Potentially Insecure
Command Purpose Recommended Setting
VRFY Verifies the presence of an e-mail address Disable
EXPN Expands an e-mail address and shows a list of all the mail- Disableboxes or users who will receive messages when e-mail is sent to this address
ETRN Allows dial-up hosts to retrieve only the mail destined for Disable if not usedtheir domain
Disabling VRFYVRFY, for example, is a way for a remote SMTP server to verify that a user or e-mail addressesexists and is valid at another SMTP server. For example, if you Telnet to a Sendmail server withVRFY enabled, you should see something like Listing 7-14.
Listing 7-14. Using the VRFY Command
[john@kitten]$ telnet puppy.yourdomain.com 25
Trying 192.168.0.1...
Connected to puppy.yourdomain.com.
Escape character is '^]'.
220 puppy.yourdomain.com ESMTP
VRFY root
250 2.1.5 [email protected]
VRFY jim
550 5.1.1 jim... User unknownThis is a Sendmail server, and I have Telneted into it and asked it to check for the presence
of some local users. First, I try to VRFY root. Sendmail gives SMTP response code 250 and pro-vides root’s e-mail address. In the second attempt I try to VRFY jim. Sendmail reports that jimis an unknown user and returns response code 550.
With the VRFY option enabled only attackers and the harvesters of e-mail addresses forspam purposes are able to do two things—confirm the presences of a username on your sys-tem or confirm that an e-mail address will receive mail and is thus of some value as a targetfor spam.
You can control most of the SMTP command options in Sendmail using this option:
define(`confPRIVACY_FLAGS', `flags').
4444c07_final.qxd 1/5/05 12:55 AM Page 336
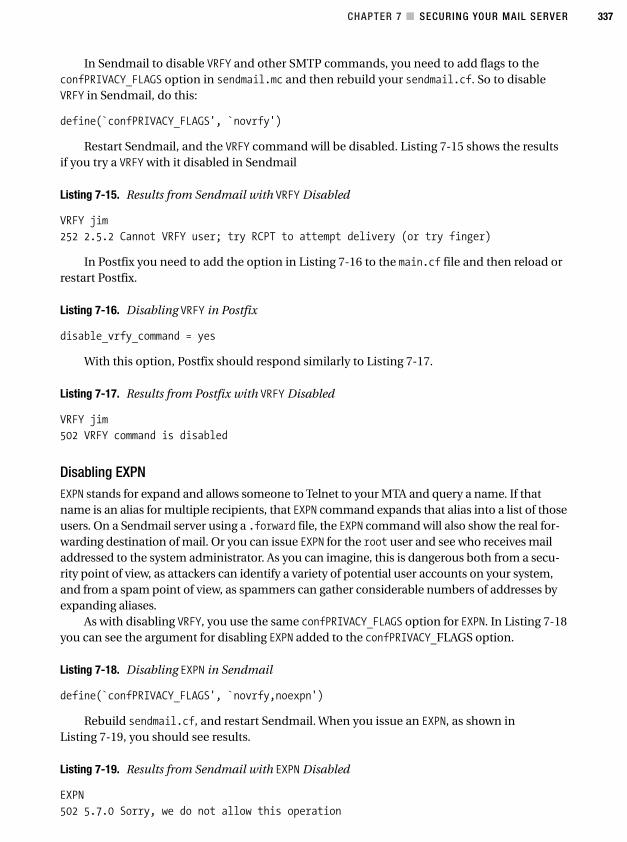
CHAPTER 7 ■ SECURING YOUR MAIL SERVER 337
In Sendmail to disable VRFY and other SMTP commands, you need to add flags to theconfPRIVACY_FLAGS option in sendmail.mc and then rebuild your sendmail.cf. So to disableVRFY in Sendmail, do this:
define(`confPRIVACY_FLAGS', `novrfy')
Restart Sendmail, and the VRFY command will be disabled. Listing 7-15 shows the resultsif you try a VRFY with it disabled in Sendmail
Listing 7-15. Results from Sendmail with VRFY Disabled
VRFY jim
252 2.5.2 Cannot VRFY user; try RCPT to attempt delivery (or try finger)
In Postfix you need to add the option in Listing 7-16 to the main.cf file and then reload orrestart Postfix.
Listing 7-16. Disabling VRFY in Postfix
disable_vrfy_command = yes
With this option, Postfix should respond similarly to Listing 7-17.
Listing 7-17. Results from Postfix with VRFY Disabled
VRFY jim
502 VRFY command is disabled
Disabling EXPNEXPN stands for expand and allows someone to Telnet to your MTA and query a name. If thatname is an alias for multiple recipients, that EXPN command expands that alias into a list of thoseusers. On a Sendmail server using a .forward file, the EXPN command will also show the real for-warding destination of mail. Or you can issue EXPN for the root user and see who receives mailaddressed to the system administrator. As you can imagine, this is dangerous both from a secu-rity point of view, as attackers can identify a variety of potential user accounts on your system,and from a spam point of view, as spammers can gather considerable numbers of addresses byexpanding aliases.
As with disabling VRFY, you use the same confPRIVACY_FLAGS option for EXPN. In Listing 7-18you can see the argument for disabling EXPN added to the confPRIVACY_FLAGS option.
Listing 7-18. Disabling EXPN in Sendmail
define(`confPRIVACY_FLAGS', `novrfy,noexpn')
Rebuild sendmail.cf, and restart Sendmail. When you issue an EXPN, as shown inListing 7-19, you should see results.
Listing 7-19. Results from Sendmail with EXPN Disabled
EXPN
502 5.7.0 Sorry, we do not allow this operation
4444c07_final.qxd 1/5/05 12:55 AM Page 337
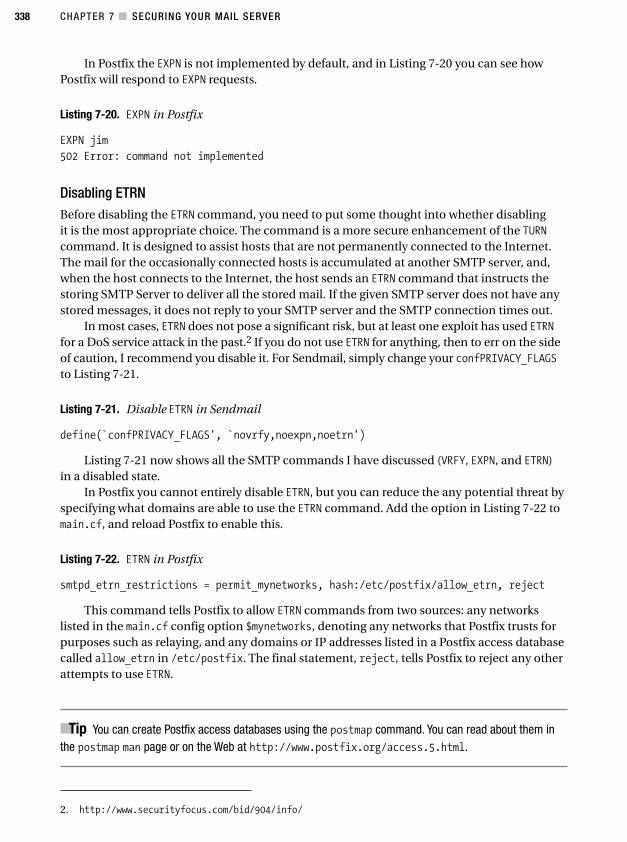
CHAPTER 7 ■ SECURING YOUR MAIL SERVER338
In Postfix the EXPN is not implemented by default, and in Listing 7-20 you can see howPostfix will respond to EXPN requests.
Listing 7-20. EXPN in Postfix
EXPN jim
502 Error: command not implemented
Disabling ETRNBefore disabling the ETRN command, you need to put some thought into whether disablingit is the most appropriate choice. The command is a more secure enhancement of the TURNcommand. It is designed to assist hosts that are not permanently connected to the Internet.The mail for the occasionally connected hosts is accumulated at another SMTP server, and,when the host connects to the Internet, the host sends an ETRN command that instructs thestoring SMTP Server to deliver all the stored mail. If the given SMTP server does not have anystored messages, it does not reply to your SMTP server and the SMTP connection times out.
In most cases, ETRN does not pose a significant risk, but at least one exploit has used ETRNfor a DoS service attack in the past.2 If you do not use ETRN for anything, then to err on the sideof caution, I recommend you disable it. For Sendmail, simply change your confPRIVACY_FLAGSto Listing 7-21.
Listing 7-21. Disable ETRN in Sendmail
define(`confPRIVACY_FLAGS', `novrfy,noexpn,noetrn')
Listing 7-21 now shows all the SMTP commands I have discussed (VRFY, EXPN, and ETRN)in a disabled state.
In Postfix you cannot entirely disable ETRN, but you can reduce the any potential threat byspecifying what domains are able to use the ETRN command. Add the option in Listing 7-22 tomain.cf, and reload Postfix to enable this.
Listing 7-22. ETRN in Postfix
smtpd_etrn_restrictions = permit_mynetworks, hash:/etc/postfix/allow_etrn, reject
This command tells Postfix to allow ETRN commands from two sources: any networkslisted in the main.cf config option $mynetworks, denoting any networks that Postfix trusts forpurposes such as relaying, and any domains or IP addresses listed in a Postfix access databasecalled allow_etrn in /etc/postfix. The final statement, reject, tells Postfix to reject any otherattempts to use ETRN.
■Tip You can create Postfix access databases using the postmap command. You can read about them inthe postmap man page or on the Web at http://www.postfix.org/access.5.html.
2. http://www.securityfocus.com/bid/904/info/
4444c07_final.qxd 1/5/05 12:55 AM Page 338
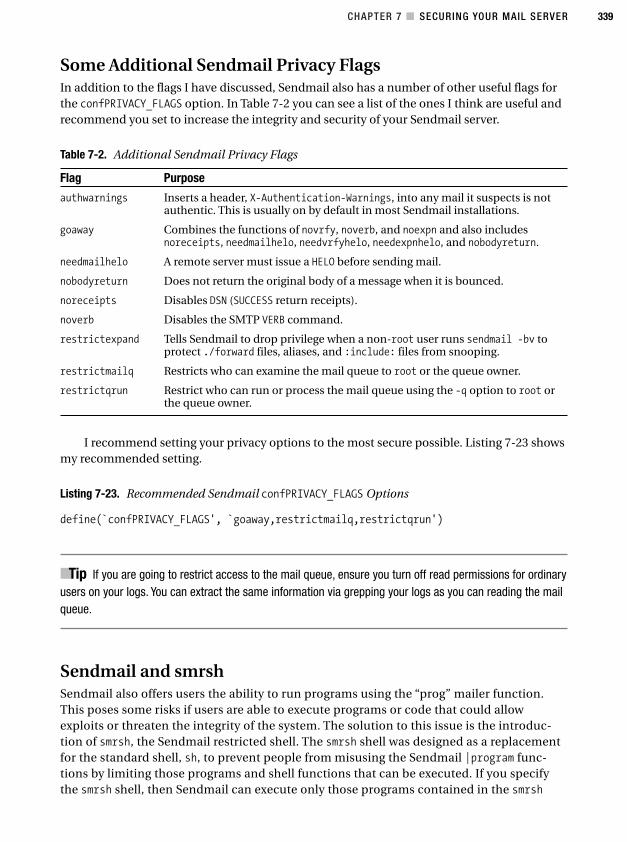
CHAPTER 7 ■ SECURING YOUR MAIL SERVER 339
Some Additional Sendmail Privacy FlagsIn addition to the flags I have discussed, Sendmail also has a number of other useful flags forthe confPRIVACY_FLAGS option. In Table 7-2 you can see a list of the ones I think are useful andrecommend you set to increase the integrity and security of your Sendmail server.
Table 7-2. Additional Sendmail Privacy Flags
Flag Purpose
authwarnings Inserts a header, X-Authentication-Warnings, into any mail it suspects is notauthentic. This is usually on by default in most Sendmail installations.
goaway Combines the functions of novrfy, noverb, and noexpn and also includesnoreceipts, needmailhelo, needvrfyhelo, needexpnhelo, and nobodyreturn.
needmailhelo A remote server must issue a HELO before sending mail.
nobodyreturn Does not return the original body of a message when it is bounced.
noreceipts Disables DSN (SUCCESS return receipts).
noverb Disables the SMTP VERB command.
restrictexpand Tells Sendmail to drop privilege when a non-root user runs sendmail -bv toprotect ./forward files, aliases, and :include: files from snooping.
restrictmailq Restricts who can examine the mail queue to root or the queue owner.
restrictqrun Restrict who can run or process the mail queue using the -q option to root orthe queue owner.
I recommend setting your privacy options to the most secure possible. Listing 7-23 showsmy recommended setting.
Listing 7-23. Recommended Sendmail confPRIVACY_FLAGS Options
define(`confPRIVACY_FLAGS', `goaway,restrictmailq,restrictqrun')
■Tip If you are going to restrict access to the mail queue, ensure you turn off read permissions for ordinaryusers on your logs. You can extract the same information via grepping your logs as you can reading the mailqueue.
Sendmail and smrshSendmail also offers users the ability to run programs using the “prog” mailer function.This poses some risks if users are able to execute programs or code that could allowexploits or threaten the integrity of the system. The solution to this issue is the introduc-tion of smrsh, the Sendmail restricted shell. The smrsh shell was designed as a replacementfor the standard shell, sh, to prevent people from misusing the Sendmail |program func-tions by limiting those programs and shell functions that can be executed. If you specifythe smrsh shell, then Sendmail can execute only those programs contained in the smrsh
4444c07_final.qxd 1/5/05 12:55 AM Page 339
CHAPTER 7 ■ SECURING YOUR MAIL SERVER340
directory (by default /usr/adm/sm.bin). It limits the use of shell commands to exec, exit,and echo. The smrsh shell also disables the use of the following characters when executingprograms:
' < > ; $ ( ) \r \n
You can enable smrsh by adding the feature in Listing 7-24 to your sendmail.mc file.
Listing 7-24. Enabling SMRSH in Sendmail
FEATURE(`smrsh',`/usr/sbin/smrsh')
Ensure the second option /usr/sbin/smrsh is the location of your smrsh binary. Thencreate your /usr/adm/sm.bin directory to hold your “safe” programs.
■Tip Some distributions change the default location for the smrsh programs directory. Use the commandstrings /path/to/smrsh | grep '^/' to find the directory. One of the directories returned should bethe smrsh directory.
You should populate your smrsh “safe” programs directory with only those programs youbelieve cannot be compromised or used for hacking purposes. So, do not include the perlinterpreter, sed, awk, or the like. And do not include shells such as sh or csh, as this defeats thepurpose of having a secure shell. I usually include programs such as mail and vacation and, ifyou use them, programs such as maildrop and procmail. When populating your “safe” pro-grams directory, the easiest method is to simply symbolically link in the required programs.
Writing to Files SafelyStarting with version 8.7, Sendmail also has the ability to control how delivery is made to files,including defining a “safe” directory environment in the form of a limited chroot jail. Ordinarily,Sendmail will write to any file or object it has permission to write to, including ordinary files, direc-tories, and devices. This poses a serious risk if Sendmail were to write over something crucial or ifan attacker was able to overwrite something that created a vulnerability or hole in your security.
The SafeFileEnvironment option handles the ability to control how delivery is made to files.Enabling it can achieve two possible outcomes. The first is to restrict delivery to ordinary filesonly, and the second to create an area to which Sendmail must write its files. Listing 7-25 simplydeclares the option in sendmail.mc, which restricts delivery to ordinary files only.
Listing 7-25. Setting SafeFileEnvironment
define(`confSAFE_FILE_ENV', `/')
With the SafeFileEnvironment declared as / or root, Sendmail will now to refuse to writeto anything except a normal file. This includes banning writes to directory, devices, and,importantly for some systems, symbolic links. The only exception to this is that it is still possi-ble for Sendmail to write to /dev/null. Turning this option on is a good idea as a bare mini-mum to prevent an inadvertent or malicious write by Sendmail to some critical location.
4444c07_final.qxd 1/5/05 12:55 AM Page 340
CHAPTER 7 ■ SECURING YOUR MAIL SERVER 341
The second way to use the SafeFileEnvironment option is to define a directory or direc-tory tree in which all files that Sendmail wants to write to must be contained. This applies onlyto delivery to files. This does not include things such as your aliases, include files, maps, or any-thing written by a delivery agent such as procmail. Listing 7-26 shows how you can define adirectory.
Listing 7-26. Setting SafeFileEnvironment
define(`confSAFE_FILE_ENV', `/safe')
Sendmail will chroot into the /safe directory before making any writes. But Sendmail alsois careful to check that you are not referencing the “safe” directory twice. For example, if youralias file contains the following:
jim: \jim, /safe/home/jim/jim.old
and your SafeFileEnvironment option is set like Listing 7-26, then Sendmail will strip off theextra /safe in your aliases file before writing.
■Note The \ in front of jim tells Sendmail to write immediately ignoring any other aliasing, including.forward files.
This means rather than incorrectly writing to /safe/safe/home/jim/jim.old, Sendmailchecks for the extra directory and sees that you have included it in both the alias file and thesendmail.cf file, removes the extra reference, and actually writes to /safe/home/jim/jim.old.
The last thing to consider with the SafeFileEnvironment is if you use it in conjunction withthe RunAsUser option. Turning on the RunAsUser option will make all deliveries to files or programsunsafe and thus conflicts with the SafeFileEnvironment option. If you use the RunAsUser option,then do not enable the SafeFileEnvironment.
Limiting the Risk of (Distributed) DoS AttacksDoS and Distributed Denial of Service (DDoS) attacks are designed to overwhelm your mailserver by using multiple, simultaneous requests, e-mails, or commands. Eventually youre-mail server uses too much memory, runs out of disk, or spawns too many processes, oryour network is overloaded and your system either becomes ineffective or crashes. There issome good news here. You can prevent some of this behavior with some relatively simple-to-implement changes.
But (and there are a couple of big buts), you must also be careful when setting thisup depending on the volume and throughput of your e-mail server. First, you could riskseverely crippling the performance of your e-mail server if you restrict it to a certain num-ber of processes/daemons or a certain volume of e-mail. You should watch your systemclosely, collect performance data and statistics, and set any thresholds at least 50 percentto 100 percent higher than the peak for that service, rate, or process. This reduces the riskof you artificially denying service to your own e-mail server by setting any limits too low.
4444c07_final.qxd 1/5/05 12:55 AM Page 341
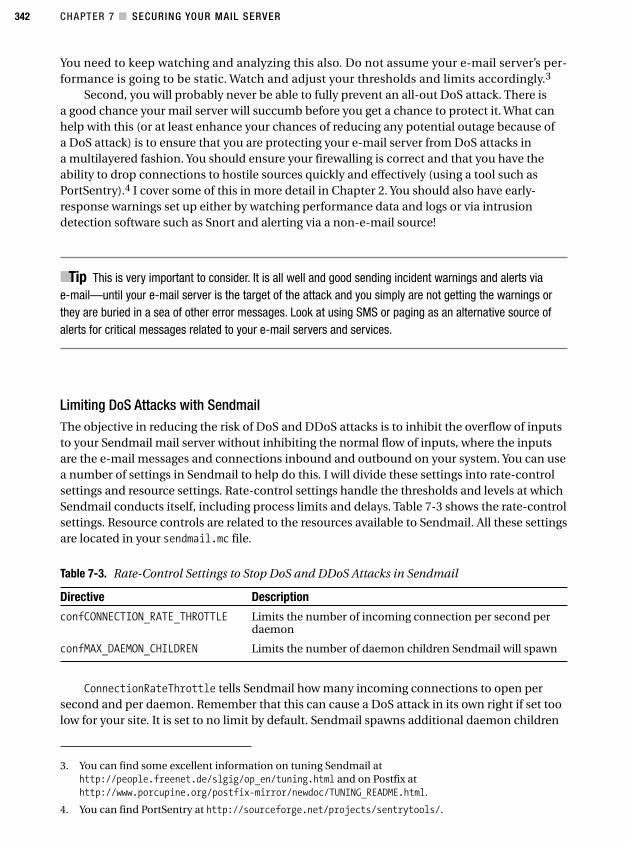
CHAPTER 7 ■ SECURING YOUR MAIL SERVER342
3. You can find some excellent information on tuning Sendmail athttp://people.freenet.de/slgig/op_en/tuning.html and on Postfix athttp://www.porcupine.org/postfix-mirror/newdoc/TUNING_README.html.
4. You can find PortSentry at http://sourceforge.net/projects/sentrytools/.
You need to keep watching and analyzing this also. Do not assume your e-mail server’s per-formance is going to be static. Watch and adjust your thresholds and limits accordingly.3
Second, you will probably never be able to fully prevent an all-out DoS attack. There isa good chance your mail server will succumb before you get a chance to protect it. What canhelp with this (or at least enhance your chances of reducing any potential outage because ofa DoS attack) is to ensure that you are protecting your e-mail server from DoS attacks ina multilayered fashion. You should ensure your firewalling is correct and that you have theability to drop connections to hostile sources quickly and effectively (using a tool such asPortSentry).4 I cover some of this in more detail in Chapter 2. You should also have early-response warnings set up either by watching performance data and logs or via intrusiondetection software such as Snort and alerting via a non-e-mail source!
■Tip This is very important to consider. It is all well and good sending incident warnings and alerts viae-mail—until your e-mail server is the target of the attack and you simply are not getting the warnings orthey are buried in a sea of other error messages. Look at using SMS or paging as an alternative source ofalerts for critical messages related to your e-mail servers and services.
Limiting DoS Attacks with SendmailThe objective in reducing the risk of DoS and DDoS attacks is to inhibit the overflow of inputsto your Sendmail mail server without inhibiting the normal flow of inputs, where the inputsare the e-mail messages and connections inbound and outbound on your system. You can usea number of settings in Sendmail to help do this. I will divide these settings into rate-controlsettings and resource settings. Rate-control settings handle the thresholds and levels at whichSendmail conducts itself, including process limits and delays. Table 7-3 shows the rate-controlsettings. Resource controls are related to the resources available to Sendmail. All these settingsare located in your sendmail.mc file.
Table 7-3. Rate-Control Settings to Stop DoS and DDoS Attacks in Sendmail
Directive Description
confCONNECTION_RATE_THROTTLE Limits the number of incoming connection per second perdaemon
confMAX_DAEMON_CHILDREN Limits the number of daemon children Sendmail will spawn
ConnectionRateThrottle tells Sendmail how many incoming connections to open persecond and per daemon. Remember that this can cause a DoS attack in its own right if set toolow for your site. It is set to no limit by default. Sendmail spawns additional daemon children
4444c07_final.qxd 1/5/05 12:55 AM Page 342
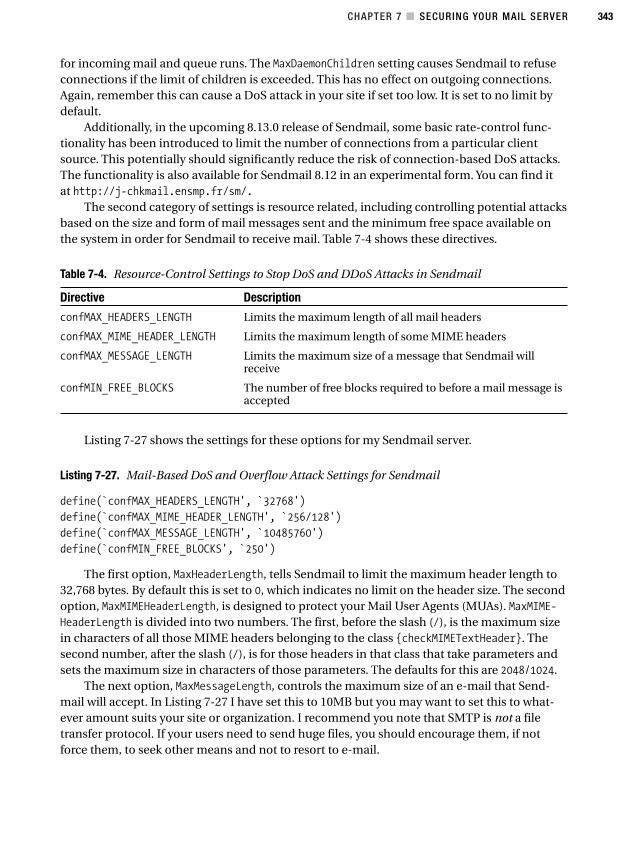
CHAPTER 7 ■ SECURING YOUR MAIL SERVER 343
for incoming mail and queue runs. The MaxDaemonChildren setting causes Sendmail to refuseconnections if the limit of children is exceeded. This has no effect on outgoing connections.Again, remember this can cause a DoS attack in your site if set too low. It is set to no limit bydefault.
Additionally, in the upcoming 8.13.0 release of Sendmail, some basic rate-control func-tionality has been introduced to limit the number of connections from a particular clientsource. This potentially should significantly reduce the risk of connection-based DoS attacks.The functionality is also available for Sendmail 8.12 in an experimental form. You can find itat http://j-chkmail.ensmp.fr/sm/.
The second category of settings is resource related, including controlling potential attacksbased on the size and form of mail messages sent and the minimum free space available onthe system in order for Sendmail to receive mail. Table 7-4 shows these directives.
Table 7-4. Resource-Control Settings to Stop DoS and DDoS Attacks in Sendmail
Directive Description
confMAX_HEADERS_LENGTH Limits the maximum length of all mail headers
confMAX_MIME_HEADER_LENGTH Limits the maximum length of some MIME headers
confMAX_MESSAGE_LENGTH Limits the maximum size of a message that Sendmail willreceive
confMIN_FREE_BLOCKS The number of free blocks required to before a mail message isaccepted
Listing 7-27 shows the settings for these options for my Sendmail server.
Listing 7-27. Mail-Based DoS and Overflow Attack Settings for Sendmail
define(`confMAX_HEADERS_LENGTH', `32768')
define(`confMAX_MIME_HEADER_LENGTH', `256/128')
define(`confMAX_MESSAGE_LENGTH', `10485760')
define(`confMIN_FREE_BLOCKS', `250')
The first option, MaxHeaderLength, tells Sendmail to limit the maximum header length to32,768 bytes. By default this is set to 0, which indicates no limit on the header size. The secondoption, MaxMIMEHeaderLength, is designed to protect your Mail User Agents (MUAs). MaxMIME-HeaderLength is divided into two numbers. The first, before the slash (/), is the maximum sizein characters of all those MIME headers belonging to the class {checkMIMETextHeader}. Thesecond number, after the slash (/), is for those headers in that class that take parameters andsets the maximum size in characters of those parameters. The defaults for this are 2048/1024.
The next option, MaxMessageLength, controls the maximum size of an e-mail that Send-mail will accept. In Listing 7-27 I have set this to 10MB but you may want to set this to what-ever amount suits your site or organization. I recommend you note that SMTP is not a filetransfer protocol. If your users need to send huge files, you should encourage them, if notforce them, to seek other means and not to resort to e-mail.
4444c07_final.qxd 1/5/05 12:55 AM Page 343
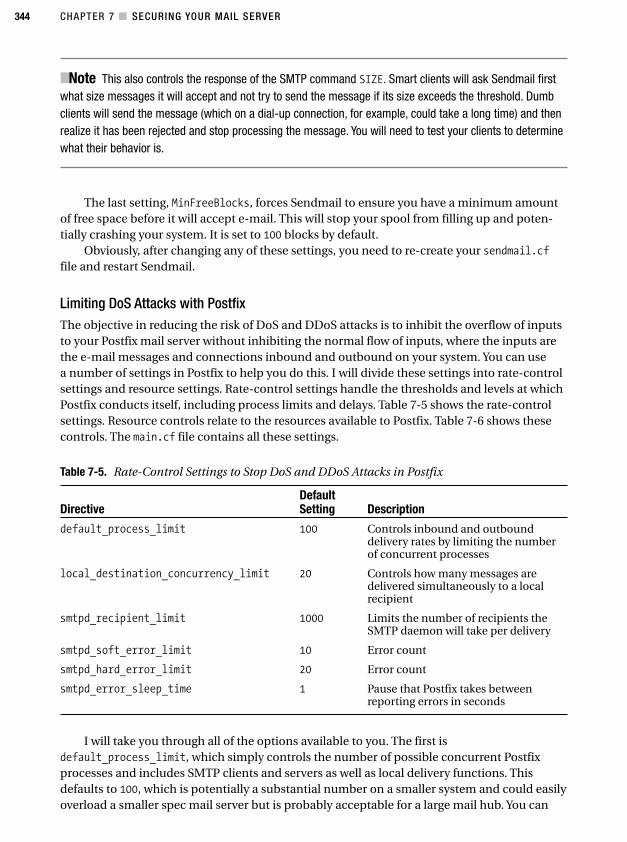
CHAPTER 7 ■ SECURING YOUR MAIL SERVER344
■Note This also controls the response of the SMTP command SIZE. Smart clients will ask Sendmail firstwhat size messages it will accept and not try to send the message if its size exceeds the threshold. Dumbclients will send the message (which on a dial-up connection, for example, could take a long time) and thenrealize it has been rejected and stop processing the message. You will need to test your clients to determinewhat their behavior is.
The last setting, MinFreeBlocks, forces Sendmail to ensure you have a minimum amountof free space before it will accept e-mail. This will stop your spool from filling up and poten-tially crashing your system. It is set to 100 blocks by default.
Obviously, after changing any of these settings, you need to re-create your sendmail.cffile and restart Sendmail.
Limiting DoS Attacks with PostfixThe objective in reducing the risk of DoS and DDoS attacks is to inhibit the overflow of inputsto your Postfix mail server without inhibiting the normal flow of inputs, where the inputs arethe e-mail messages and connections inbound and outbound on your system. You can usea number of settings in Postfix to help you do this. I will divide these settings into rate-controlsettings and resource settings. Rate-control settings handle the thresholds and levels at whichPostfix conducts itself, including process limits and delays. Table 7-5 shows the rate-controlsettings. Resource controls relate to the resources available to Postfix. Table 7-6 shows thesecontrols. The main.cf file contains all these settings.
Table 7-5. Rate-Control Settings to Stop DoS and DDoS Attacks in Postfix
Default Directive Setting Description
default_process_limit 100 Controls inbound and outbounddelivery rates by limiting the numberof concurrent processes
local_destination_concurrency_limit 20 Controls how many messages aredelivered simultaneously to a localrecipient
smtpd_recipient_limit 1000 Limits the number of recipients theSMTP daemon will take per delivery
smtpd_soft_error_limit 10 Error count
smtpd_hard_error_limit 20 Error count
smtpd_error_sleep_time 1 Pause that Postfix takes betweenreporting errors in seconds
I will take you through all of the options available to you. The first isdefault_process_limit, which simply controls the number of possible concurrent Postfixprocesses and includes SMTP clients and servers as well as local delivery functions. Thisdefaults to 100, which is potentially a substantial number on a smaller system and could easilyoverload a smaller spec mail server but is probably acceptable for a large mail hub. You can
4444c07_final.qxd 1/5/05 12:55 AM Page 344
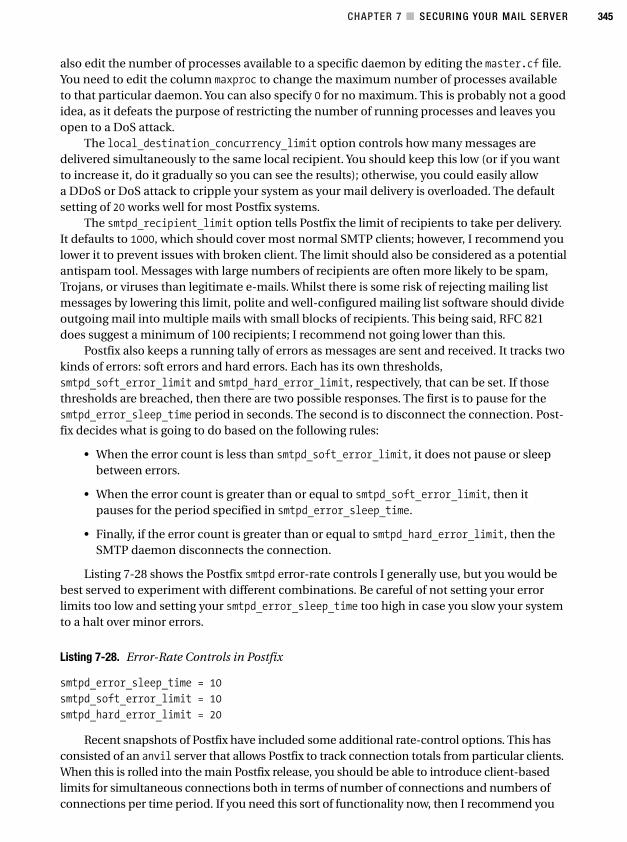
CHAPTER 7 ■ SECURING YOUR MAIL SERVER 345
also edit the number of processes available to a specific daemon by editing the master.cf file.You need to edit the column maxproc to change the maximum number of processes availableto that particular daemon. You can also specify 0 for no maximum. This is probably not a goodidea, as it defeats the purpose of restricting the number of running processes and leaves youopen to a DoS attack.
The local_destination_concurrency_limit option controls how many messages aredelivered simultaneously to the same local recipient. You should keep this low (or if you wantto increase it, do it gradually so you can see the results); otherwise, you could easily allowa DDoS or DoS attack to cripple your system as your mail delivery is overloaded. The defaultsetting of 20 works well for most Postfix systems.
The smtpd_recipient_limit option tells Postfix the limit of recipients to take per delivery.It defaults to 1000, which should cover most normal SMTP clients; however, I recommend youlower it to prevent issues with broken client. The limit should also be considered as a potentialantispam tool. Messages with large numbers of recipients are often more likely to be spam,Trojans, or viruses than legitimate e-mails. Whilst there is some risk of rejecting mailing listmessages by lowering this limit, polite and well-configured mailing list software should divideoutgoing mail into multiple mails with small blocks of recipients. This being said, RFC 821does suggest a minimum of 100 recipients; I recommend not going lower than this.
Postfix also keeps a running tally of errors as messages are sent and received. It tracks twokinds of errors: soft errors and hard errors. Each has its own thresholds,smtpd_soft_error_limit and smtpd_hard_error_limit, respectively, that can be set. If thosethresholds are breached, then there are two possible responses. The first is to pause for thesmtpd_error_sleep_time period in seconds. The second is to disconnect the connection. Post-fix decides what is going to do based on the following rules:
• When the error count is less than smtpd_soft_error_limit, it does not pause or sleepbetween errors.
• When the error count is greater than or equal to smtpd_soft_error_limit, then itpauses for the period specified in smtpd_error_sleep_time.
• Finally, if the error count is greater than or equal to smtpd_hard_error_limit, then theSMTP daemon disconnects the connection.
Listing 7-28 shows the Postfix smtpd error-rate controls I generally use, but you would bebest served to experiment with different combinations. Be careful of not setting your errorlimits too low and setting your smtpd_error_sleep_time too high in case you slow your systemto a halt over minor errors.
Listing 7-28. Error-Rate Controls in Postfix
smtpd_error_sleep_time = 10
smtpd_soft_error_limit = 10
smtpd_hard_error_limit = 20
Recent snapshots of Postfix have included some additional rate-control options. This hasconsisted of an anvil server that allows Postfix to track connection totals from particular clients.When this is rolled into the main Postfix release, you should be able to introduce client-basedlimits for simultaneous connections both in terms of number of connections and numbers ofconnections per time period. If you need this sort of functionality now, then I recommend you
4444c07_final.qxd 1/5/05 12:55 AM Page 345
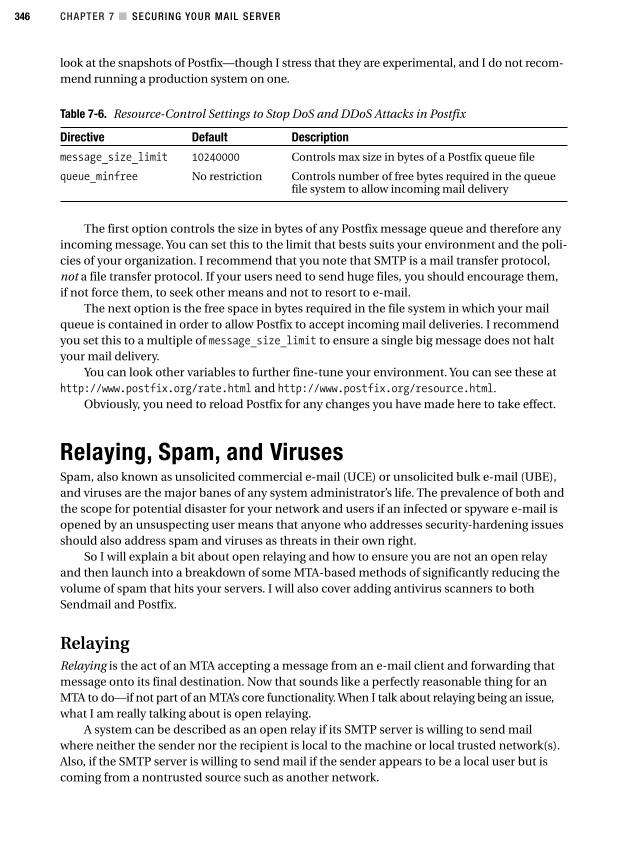
CHAPTER 7 ■ SECURING YOUR MAIL SERVER346
look at the snapshots of Postfix—though I stress that they are experimental, and I do not recom-mend running a production system on one.
Table 7-6. Resource-Control Settings to Stop DoS and DDoS Attacks in Postfix
Directive Default Description
message_size_limit 10240000 Controls max size in bytes of a Postfix queue file
queue_minfree No restriction Controls number of free bytes required in the queuefile system to allow incoming mail delivery
The first option controls the size in bytes of any Postfix message queue and therefore anyincoming message. You can set this to the limit that bests suits your environment and the poli-cies of your organization. I recommend that you note that SMTP is a mail transfer protocol,not a file transfer protocol. If your users need to send huge files, you should encourage them,if not force them, to seek other means and not to resort to e-mail.
The next option is the free space in bytes required in the file system in which your mailqueue is contained in order to allow Postfix to accept incoming mail deliveries. I recommendyou set this to a multiple of message_size_limit to ensure a single big message does not haltyour mail delivery.
You can look other variables to further fine-tune your environment. You can see these athttp://www.postfix.org/rate.html and http://www.postfix.org/resource.html.
Obviously, you need to reload Postfix for any changes you have made here to take effect.
Relaying, Spam, and VirusesSpam, also known as unsolicited commercial e-mail (UCE) or unsolicited bulk e-mail (UBE),and viruses are the major banes of any system administrator’s life. The prevalence of both andthe scope for potential disaster for your network and users if an infected or spyware e-mail isopened by an unsuspecting user means that anyone who addresses security-hardening issuesshould also address spam and viruses as threats in their own right.
So I will explain a bit about open relaying and how to ensure you are not an open relayand then launch into a breakdown of some MTA-based methods of significantly reducing thevolume of spam that hits your servers. I will also cover adding antivirus scanners to bothSendmail and Postfix.
RelayingRelaying is the act of an MTA accepting a message from an e-mail client and forwarding thatmessage onto its final destination. Now that sounds like a perfectly reasonable thing for anMTA to do—if not part of an MTA’s core functionality. When I talk about relaying being an issue,what I am really talking about is open relaying.
A system can be described as an open relay if its SMTP server is willing to send mailwhere neither the sender nor the recipient is local to the machine or local trusted network(s).Also, if the SMTP server is willing to send mail if the sender appears to be a local user but iscoming from a nontrusted source such as another network.
4444c07_final.qxd 1/5/05 12:55 AM Page 346
CHAPTER 7 ■ SECURING YOUR MAIL SERVER 347
■Caution You may think that if an e-mail is coming from [email protected], then the servermail.yourdomain.com should relay that message because jim is a local user. Unfortunately, “from” e-mailaddresses are ludicrously easy to forge, and thus just because a message says it has come from jim doesnot guarantee it actually has.
Spammers use open relays to transmit mail to recipients who have blocked mail fromknown spammers and also as a means to send e-mail when their ISP blocks mass e-mail. Theyare also used by spam bots and mail-based viruses to transmit spam or spread themselves tonew systems. Open relaying is bad. You will not make yourself or your systems popular if youmaintain an open relay, and indeed you may end up blacklisted by a variety of third-partyblocking lists or spam prevention systems, which means your user’s ability to send e-mail willbe seriously compromised.
So why not just not use relaying? Well, unfortunately, if you have remote users, whetherthey are roaming users or users who work from home, then they are often on networks yoursystem does not recognize as local. They still need to send mail, but you also need some wayof authenticating who they actually are. In Chapter 8 I will explain authentication using SMTPAUTH, SASL, and TLS to allow you to do this.
But I have some good news. Most recent releases of all major MTAs (including MicrosoftExchange 2000/2003) come with relaying disabled by default. Both Postfix (pretty much sinceits first release) and Sendmail (from version 8.9 onward) also both have open relaying disabledby default. This is yet another good reason to keep your software up-to-date. So, you have toexplicitly go out of your way to enable open relaying! But, unfortunately, mail servers exist thathave open relaying been turned on by accident or as the result of incorrect configuration.I will show you in the next section how to make sure you are not one of those sites.
Testing If You Are an Open RelaySo, you want to find out if you are an open relay? Well, you have a couple of ways to do this.One is to test your own mail server by trying to relay a message through it to another addressfrom an untrusted network, such as a dial-up connection. If the message is sent, then youre-mail server is almost certainly acting as an open relay. If it is not sent and your MTAresponds with a message saying relaying is denied, then your MTA is probably not relaying.This is, however, not a 100 percent foolproof method of detecting an open relay, though.Spammers use a lot of tricks to defeat your MTA’s relaying restrictions.
The other method you can use to test for an open relay is to use one of the several freeopen relay test tools. Several are available.
• http://www.abuse.net/relay.html
• http://www.ordb.org/submit/
• http://www.rbl.jp/svcheck.php
If you are not able to use a Web-based test, several Telnet tests are available:
4444c07_final.qxd 1/5/05 12:55 AM Page 347

CHAPTER 7 ■ SECURING YOUR MAIL SERVER348
• relay-test.mail-abuse.org
• www.relaycheck.com
• rt.njabl.org 2500
You can access these via Telnet from your command line. Finally, you can downloada variety of scripts to do your testing.
• http://www.cymru.com/Tools/mtaprobe.exp (Expect)
• http://www.monkeys.com/mrt/ (Perl)
• http://sorbs.sourceforge.net (Checks incoming servers for open relaying)
Try to test your MTA against a few different test tools. I recommend scheduling periodictesting of your system or including a test of relaying after making configuration changesrelated to relaying on your MTA.
Relaying in SendmailBy default, from version 8.9 Sendmail does not allow the relaying of SMTP messages. To con-firm this, you can check your sendmail.cf file for the contents of Listing 7-29.
Listing 7-29. Restricting Relaying in Sendmail
FR-o /etc/mail/relay-domains
This forces Sendmail to accept relaying only from the domains listed in the relay-domainsfile. You can add hosts, domains, IP addresses, and subnets to this file. Listing 7-30 shows youthe content of my relay-domains file.
Listing 7-30. Sendmail relay-domains File
yourdomain.com
192.168.0
kitten.anotherdomain.com
Listing 7-30 allows relaying from the domain yourdomain.com, the network 192.168.0.0/28,and the host kitten.anotherdomain.com. I recommend you use the relay-domains file for thenetworks and domains that are local to your system. This is because you need to restart Send-mail to update this file, so you want to make sure it is relatively static. If you want to frequentlychange your relaying settings, then I recommend you use the access database file. I will discusshow to handle relaying with the access database a little later.
You can further modify the behavior of the relay-domains file (and any RELAY options youspecify in your access database also) by adding some options to the sendmail.mc file. Table 7-7lists those options. I will take you through all these features.
4444c07_final.qxd 1/5/05 12:55 AM Page 348
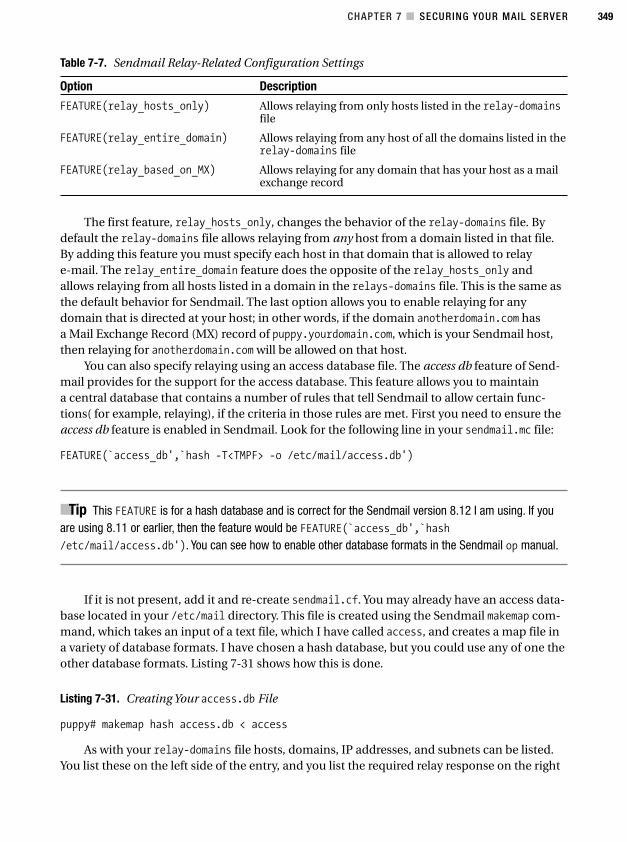
CHAPTER 7 ■ SECURING YOUR MAIL SERVER 349
Table 7-7. Sendmail Relay-Related Configuration Settings
Option Description
FEATURE(relay_hosts_only) Allows relaying from only hosts listed in the relay-domainsfile
FEATURE(relay_entire_domain) Allows relaying from any host of all the domains listed in therelay-domains file
FEATURE(relay_based_on_MX) Allows relaying for any domain that has your host as a mailexchange record
The first feature, relay_hosts_only, changes the behavior of the relay-domains file. Bydefault the relay-domains file allows relaying from any host from a domain listed in that file.By adding this feature you must specify each host in that domain that is allowed to relaye-mail. The relay_entire_domain feature does the opposite of the relay_hosts_only andallows relaying from all hosts listed in a domain in the relays-domains file. This is the same asthe default behavior for Sendmail. The last option allows you to enable relaying for anydomain that is directed at your host; in other words, if the domain anotherdomain.com hasa Mail Exchange Record (MX) record of puppy.yourdomain.com, which is your Sendmail host,then relaying for anotherdomain.com will be allowed on that host.
You can also specify relaying using an access database file. The access db feature of Send-mail provides for the support for the access database. This feature allows you to maintaina central database that contains a number of rules that tell Sendmail to allow certain func-tions( for example, relaying), if the criteria in those rules are met. First you need to ensure theaccess db feature is enabled in Sendmail. Look for the following line in your sendmail.mc file:
FEATURE(`access_db',`hash -T<TMPF> -o /etc/mail/access.db')
■Tip This FEATURE is for a hash database and is correct for the Sendmail version 8.12 I am using. If youare using 8.11 or earlier, then the feature would be FEATURE(`access_db',`hash/etc/mail/access.db'). You can see how to enable other database formats in the Sendmail op manual.
If it is not present, add it and re-create sendmail.cf. You may already have an access data-base located in your /etc/mail directory. This file is created using the Sendmail makemap com-mand, which takes an input of a text file, which I have called access, and creates a map file ina variety of database formats. I have chosen a hash database, but you could use any of one theother database formats. Listing 7-31 shows how this is done.
Listing 7-31. Creating Your access.db File
puppy# makemap hash access.db < access
As with your relay-domains file hosts, domains, IP addresses, and subnets can be listed.You list these on the left side of the entry, and you list the required relay response on the right
4444c07_final.qxd 1/5/05 12:55 AM Page 349
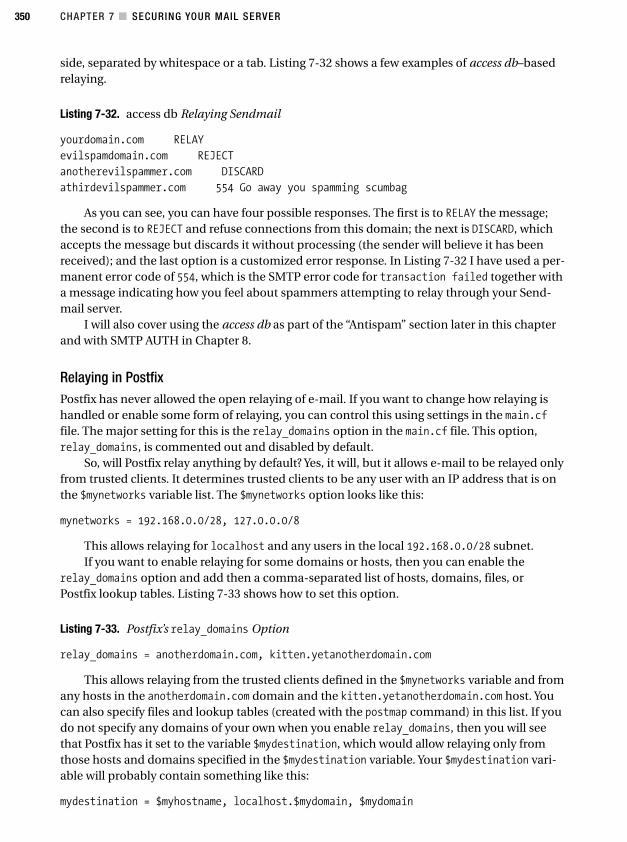
CHAPTER 7 ■ SECURING YOUR MAIL SERVER350
side, separated by whitespace or a tab. Listing 7-32 shows a few examples of access db–basedrelaying.
Listing 7-32. access db Relaying Sendmail
yourdomain.com RELAY
evilspamdomain.com REJECT
anotherevilspammer.com DISCARD
athirdevilspammer.com 554 Go away you spamming scumbag
As you can see, you can have four possible responses. The first is to RELAY the message;the second is to REJECT and refuse connections from this domain; the next is DISCARD, whichaccepts the message but discards it without processing (the sender will believe it has beenreceived); and the last option is a customized error response. In Listing 7-32 I have used a per-manent error code of 554, which is the SMTP error code for transaction failed together witha message indicating how you feel about spammers attempting to relay through your Send-mail server.
I will also cover using the access db as part of the “Antispam” section later in this chapterand with SMTP AUTH in Chapter 8.
Relaying in PostfixPostfix has never allowed the open relaying of e-mail. If you want to change how relaying ishandled or enable some form of relaying, you can control this using settings in the main.cffile. The major setting for this is the relay_domains option in the main.cf file. This option,relay_domains, is commented out and disabled by default.
So, will Postfix relay anything by default? Yes, it will, but it allows e-mail to be relayed onlyfrom trusted clients. It determines trusted clients to be any user with an IP address that is onthe $mynetworks variable list. The $mynetworks option looks like this:
mynetworks = 192.168.0.0/28, 127.0.0.0/8
This allows relaying for localhost and any users in the local 192.168.0.0/28 subnet.If you want to enable relaying for some domains or hosts, then you can enable the
relay_domains option and add then a comma-separated list of hosts, domains, files, or Postfix lookup tables. Listing 7-33 shows how to set this option.
Listing 7-33. Postfix’s relay_domains Option
relay_domains = anotherdomain.com, kitten.yetanotherdomain.com
This allows relaying from the trusted clients defined in the $mynetworks variable and fromany hosts in the anotherdomain.com domain and the kitten.yetanotherdomain.com host. Youcan also specify files and lookup tables (created with the postmap command) in this list. If youdo not specify any domains of your own when you enable relay_domains, then you will seethat Postfix has it set to the variable $mydestination, which would allow relaying only fromthose hosts and domains specified in the $mydestination variable. Your $mydestination vari-able will probably contain something like this:
mydestination = $myhostname, localhost.$mydomain, $mydomain
4444c07_final.qxd 1/5/05 12:55 AM Page 350
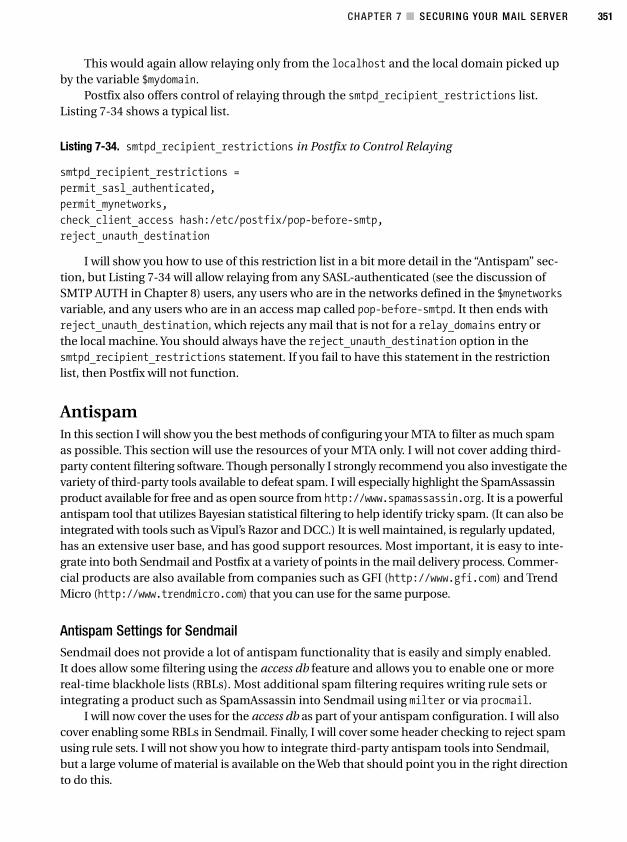
CHAPTER 7 ■ SECURING YOUR MAIL SERVER 351
This would again allow relaying only from the localhost and the local domain picked upby the variable $mydomain.
Postfix also offers control of relaying through the smtpd_recipient_restrictions list.Listing 7-34 shows a typical list.
Listing 7-34. smtpd_recipient_restrictions in Postfix to Control Relaying
smtpd_recipient_restrictions =
permit_sasl_authenticated,
permit_mynetworks,
check_client_access hash:/etc/postfix/pop-before-smtp,
reject_unauth_destination
I will show you how to use of this restriction list in a bit more detail in the “Antispam” sec-tion, but Listing 7-34 will allow relaying from any SASL-authenticated (see the discussion ofSMTP AUTH in Chapter 8) users, any users who are in the networks defined in the $mynetworksvariable, and any users who are in an access map called pop-before-smtpd. It then ends withreject_unauth_destination, which rejects any mail that is not for a relay_domains entry orthe local machine. You should always have the reject_unauth_destination option in thesmtpd_recipient_restrictions statement. If you fail to have this statement in the restrictionlist, then Postfix will not function.
AntispamIn this section I will show you the best methods of configuring your MTA to filter as much spamas possible. This section will use the resources of your MTA only. I will not cover adding third-party content filtering software. Though personally I strongly recommend you also investigate thevariety of third-party tools available to defeat spam. I will especially highlight the SpamAssassinproduct available for free and as open source from http://www.spamassassin.org. It is a powerfulantispam tool that utilizes Bayesian statistical filtering to help identify tricky spam. (It can also beintegrated with tools such as Vipul’s Razor and DCC.) It is well maintained, is regularly updated,has an extensive user base, and has good support resources. Most important, it is easy to inte-grate into both Sendmail and Postfix at a variety of points in the mail delivery process. Commer-cial products are also available from companies such as GFI (http://www.gfi.com) and TrendMicro (http://www.trendmicro.com) that you can use for the same purpose.
Antispam Settings for SendmailSendmail does not provide a lot of antispam functionality that is easily and simply enabled.It does allow some filtering using the access db feature and allows you to enable one or morereal-time blackhole lists (RBLs). Most additional spam filtering requires writing rule sets orintegrating a product such as SpamAssassin into Sendmail using milter or via procmail.
I will now cover the uses for the access db as part of your antispam configuration. I will alsocover enabling some RBLs in Sendmail. Finally, I will cover some header checking to reject spamusing rule sets. I will not show you how to integrate third-party antispam tools into Sendmail,but a large volume of material is available on the Web that should point you in the right directionto do this.
4444c07_final.qxd 1/5/05 12:55 AM Page 351
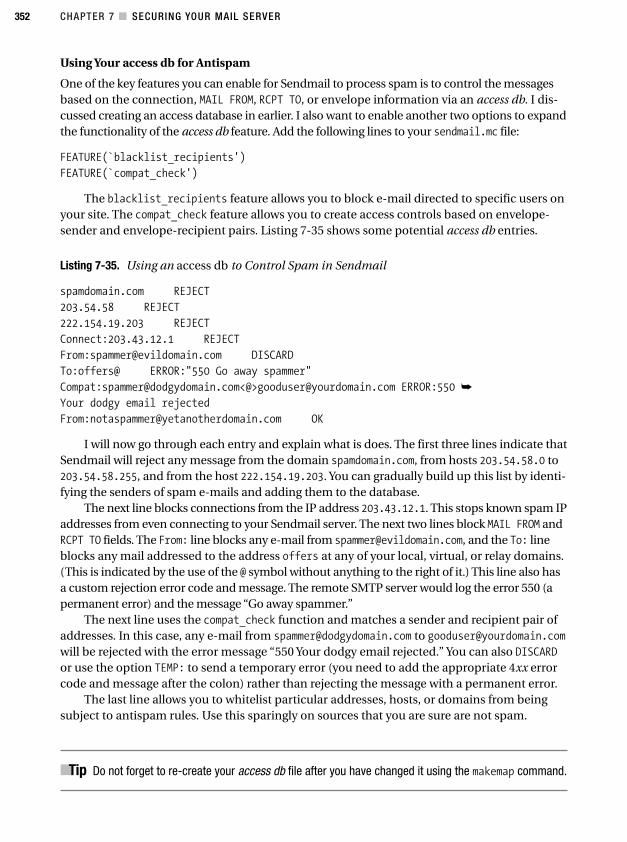
CHAPTER 7 ■ SECURING YOUR MAIL SERVER352
Using Your access db for Antispam
One of the key features you can enable for Sendmail to process spam is to control the messagesbased on the connection, MAIL FROM, RCPT TO, or envelope information via an access db. I dis-cussed creating an access database in earlier. I also want to enable another two options to expandthe functionality of the access db feature. Add the following lines to your sendmail.mc file:
FEATURE(`blacklist_recipients')
FEATURE(`compat_check')
The blacklist_recipients feature allows you to block e-mail directed to specific users onyour site. The compat_check feature allows you to create access controls based on envelope-sender and envelope-recipient pairs. Listing 7-35 shows some potential access db entries.
Listing 7-35. Using an access db to Control Spam in Sendmail
spamdomain.com REJECT
203.54.58 REJECT
222.154.19.203 REJECT
Connect:203.43.12.1 REJECT
From:[email protected] DISCARD
To:offers@ ERROR:"550 Go away spammer"
Compat:[email protected]<@>[email protected] ERROR:550 ➥
Your dodgy email rejected
From:[email protected] OK
I will now go through each entry and explain what is does. The first three lines indicate thatSendmail will reject any message from the domain spamdomain.com, from hosts 203.54.58.0 to203.54.58.255, and from the host 222.154.19.203. You can gradually build up this list by identi-fying the senders of spam e-mails and adding them to the database.
The next line blocks connections from the IP address 203.43.12.1. This stops known spam IPaddresses from even connecting to your Sendmail server. The next two lines block MAIL FROM andRCPT TO fields. The From: line blocks any e-mail from [email protected], and the To: lineblocks any mail addressed to the address offers at any of your local, virtual, or relay domains.(This is indicated by the use of the @ symbol without anything to the right of it.) This line also hasa custom rejection error code and message. The remote SMTP server would log the error 550 (apermanent error) and the message “Go away spammer.”
The next line uses the compat_check function and matches a sender and recipient pair ofaddresses. In this case, any e-mail from [email protected] to [email protected] be rejected with the error message “550 Your dodgy email rejected.” You can also DISCARDor use the option TEMP: to send a temporary error (you need to add the appropriate 4xx errorcode and message after the colon) rather than rejecting the message with a permanent error.
The last line allows you to whitelist particular addresses, hosts, or domains from beingsubject to antispam rules. Use this sparingly on sources that you are sure are not spam.
■Tip Do not forget to re-create your access db file after you have changed it using the makemap command.
4444c07_final.qxd 1/5/05 12:55 AM Page 352
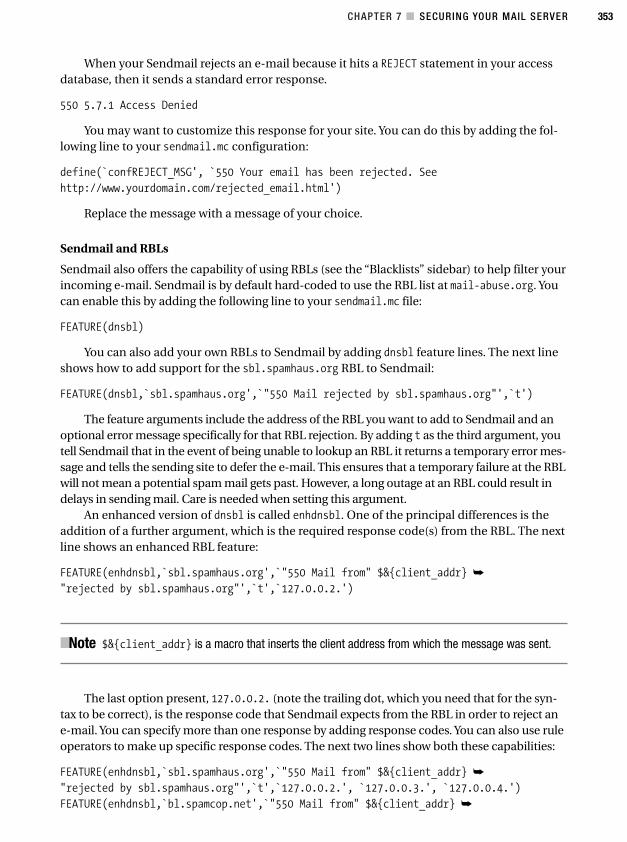
CHAPTER 7 ■ SECURING YOUR MAIL SERVER 353
When your Sendmail rejects an e-mail because it hits a REJECT statement in your accessdatabase, then it sends a standard error response.
550 5.7.1 Access Denied
You may want to customize this response for your site. You can do this by adding the fol-lowing line to your sendmail.mc configuration:
define(`confREJECT_MSG', `550 Your email has been rejected. See
http://www.yourdomain.com/rejected_email.html')
Replace the message with a message of your choice.
Sendmail and RBLs
Sendmail also offers the capability of using RBLs (see the “Blacklists” sidebar) to help filter yourincoming e-mail. Sendmail is by default hard-coded to use the RBL list at mail-abuse.org. Youcan enable this by adding the following line to your sendmail.mc file:
FEATURE(dnsbl)
You can also add your own RBLs to Sendmail by adding dnsbl feature lines. The next lineshows how to add support for the sbl.spamhaus.org RBL to Sendmail:
FEATURE(dnsbl,`sbl.spamhaus.org',`"550 Mail rejected by sbl.spamhaus.org"',`t')
The feature arguments include the address of the RBL you want to add to Sendmail and anoptional error message specifically for that RBL rejection. By adding t as the third argument, youtell Sendmail that in the event of being unable to lookup an RBL it returns a temporary error mes-sage and tells the sending site to defer the e-mail. This ensures that a temporary failure at the RBLwill not mean a potential spam mail gets past. However, a long outage at an RBL could result indelays in sending mail. Care is needed when setting this argument.
An enhanced version of dnsbl is called enhdnsbl. One of the principal differences is theaddition of a further argument, which is the required response code(s) from the RBL. The nextline shows an enhanced RBL feature:
FEATURE(enhdnsbl,`sbl.spamhaus.org',`"550 Mail from" $&{client_addr} ➥
"rejected by sbl.spamhaus.org"',`t',`127.0.0.2.')
■Note $&{client_addr} is a macro that inserts the client address from which the message was sent.
The last option present, 127.0.0.2. (note the trailing dot, which you need that for the syn-tax to be correct), is the response code that Sendmail expects from the RBL in order to reject ane-mail. You can specify more than one response by adding response codes. You can also use ruleoperators to make up specific response codes. The next two lines show both these capabilities:
FEATURE(enhdnsbl,`sbl.spamhaus.org',`"550 Mail from" $&{client_addr} ➥
"rejected by sbl.spamhaus.org"',`t',`127.0.0.2.', `127.0.0.3.', `127.0.0.4.')
FEATURE(enhdnsbl,`bl.spamcop.net',`"550 Mail from" $&{client_addr} ➥
4444c07_final.qxd 1/5/05 12:55 AM Page 353
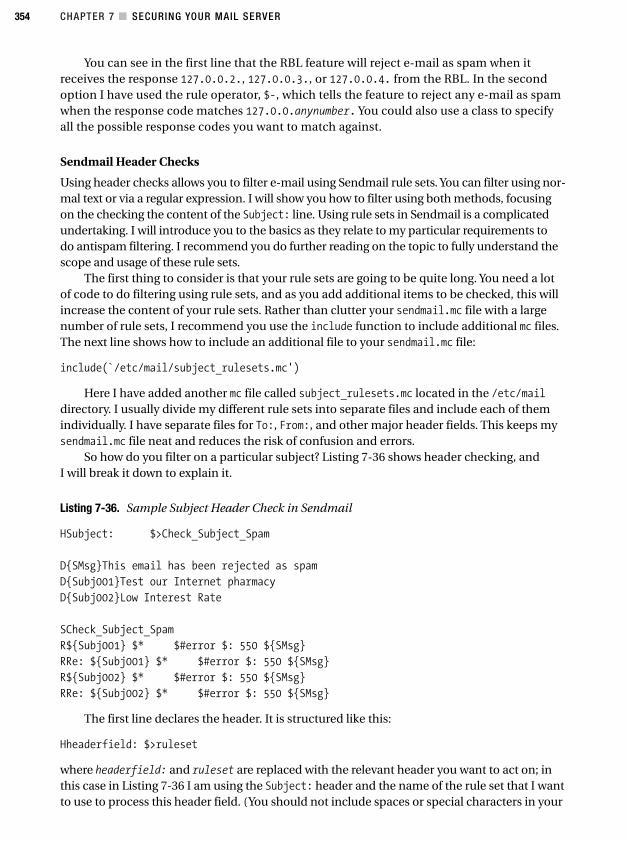
CHAPTER 7 ■ SECURING YOUR MAIL SERVER354
You can see in the first line that the RBL feature will reject e-mail as spam when itreceives the response 127.0.0.2., 127.0.0.3., or 127.0.0.4. from the RBL. In the secondoption I have used the rule operator, $-, which tells the feature to reject any e-mail as spamwhen the response code matches 127.0.0.anynumber. You could also use a class to specifyall the possible response codes you want to match against.
Sendmail Header Checks
Using header checks allows you to filter e-mail using Sendmail rule sets. You can filter using nor-mal text or via a regular expression. I will show you how to filter using both methods, focusingon the checking the content of the Subject: line. Using rule sets in Sendmail is a complicatedundertaking. I will introduce you to the basics as they relate to my particular requirements todo antispam filtering. I recommend you do further reading on the topic to fully understand thescope and usage of these rule sets.
The first thing to consider is that your rule sets are going to be quite long. You need a lotof code to do filtering using rule sets, and as you add additional items to be checked, this willincrease the content of your rule sets. Rather than clutter your sendmail.mc file with a largenumber of rule sets, I recommend you use the include function to include additional mc files.The next line shows how to include an additional file to your sendmail.mc file:
include(`/etc/mail/subject_rulesets.mc')
Here I have added another mc file called subject_rulesets.mc located in the /etc/maildirectory. I usually divide my different rule sets into separate files and include each of themindividually. I have separate files for To:, From:, and other major header fields. This keeps mysendmail.mc file neat and reduces the risk of confusion and errors.
So how do you filter on a particular subject? Listing 7-36 shows header checking, andI will break it down to explain it.
Listing 7-36. Sample Subject Header Check in Sendmail
HSubject: $>Check_Subject_Spam
D{SMsg}This email has been rejected as spam
D{Subj001}Test our Internet pharmacy
D{Subj002}Low Interest Rate
SCheck_Subject_Spam
R${Subj001} $* $#error $: 550 ${SMsg}
RRe: ${Subj001} $* $#error $: 550 ${SMsg}
R${Subj002} $* $#error $: 550 ${SMsg}
RRe: ${Subj002} $* $#error $: 550 ${SMsg}
The first line declares the header. It is structured like this:
Hheaderfield: $>ruleset
where headerfield: and ruleset are replaced with the relevant header you want to act on; inthis case in Listing 7-36 I am using the Subject: header and the name of the rule set that I wantto use to process this header field. (You should not include spaces or special characters in your
4444c07_final.qxd 1/5/05 12:55 AM Page 354

CHAPTER 7 ■ SECURING YOUR MAIL SERVER 355
rule set name.) Overall, the line sends the content of the header field, Subject:, into the rule setCheck_Subject_Spam to be processed for matches.
■Tip If you want to include any RFC 2822 comments in the data outputted from the Subject: field, thenreplace the $> with $>+ in the H line.
The next lines declare configuration file macros. The macros are structured like this:
D{macroname}macro content
The first line declares a macro called SMsg with the content of “This email has been rejectedas spam.” I will use this macro to provide a message that Sendmail will send to the sending SMTPserver if the e-mail is rejected because of the Subject: content. The next two lines are subjectlines that I am testing for in my incoming mail. I have named the first macro Subj001 and the sec-ond Subj002. It is important to note that when you test against the subject that it is not a regularexpression. The test will try to match the exact content of the Subj001 macro. So the subject “Testour Internet Pharmacy” will be picked up by the rule set, but the subject “Test our Internet Phar-macy!!!” will not be matched. This limits the functionality of this sort of rule set.
The next line declares the start of the particular rule set. The name after the S must matchthe rule set you specified in the H line. Following this S line are R lines that are the actual rulesbeing used. The R lines are divided into three sections.
RLHS RHS comment
The R line starts the rule. Then you will see the left-and side (LHS) of the rule, the right-handside (RHS) of the rule, and an optional comment. The LHS of the rule does not need to be sepa-rated from the R line. But the LHS, RHS, and comments should all be separated by a tab character;otherwise, Sendmail will fail to parse the rule. (You cannot use space characters—the separatormust be a tab).
In the case of the Subject: checking antispam rule, the LHS content is going to be themacro ${subj001}. I tell the rule set that it is a macro by prefixing $ to the front of the macroname (which is still enclosed in brackets). It is then followed by the rule operator $*, which isa wildcard operator that tries to match zero or more tokens (in the case the tokens being thecontent of the Subject: header field).
R${Subj001} $* $#error $: 550 ${SMsg}
The RHS side starts with the operator $#, which indicates an action. When you are testing fora match on your headers, these rule sets can return two possible values: $#error and $#discard.The first response tells Sendmail to reject the message, and the second tells Sendmail to silentlydiscard it. Following the action returned by the rule is the operator $:, which defines the defaultvalue to return. So if the Subject: field matches the ${subj001} macro, then Sendmail generatesan $#error and specifies the value to return to Sendmail, which in this case is: “550 This email hasbeen rejected as spam,” which is the content of the first macro I defined as ${SMsg}.
The second line that matches against the macro ${subj001} adds Re: in front of the macroto match any case where this subject appears with a reply appended to the subject. This patternis repeated for the next macro ${subj002} in Listing 7-36.
4444c07_final.qxd 1/5/05 12:55 AM Page 355
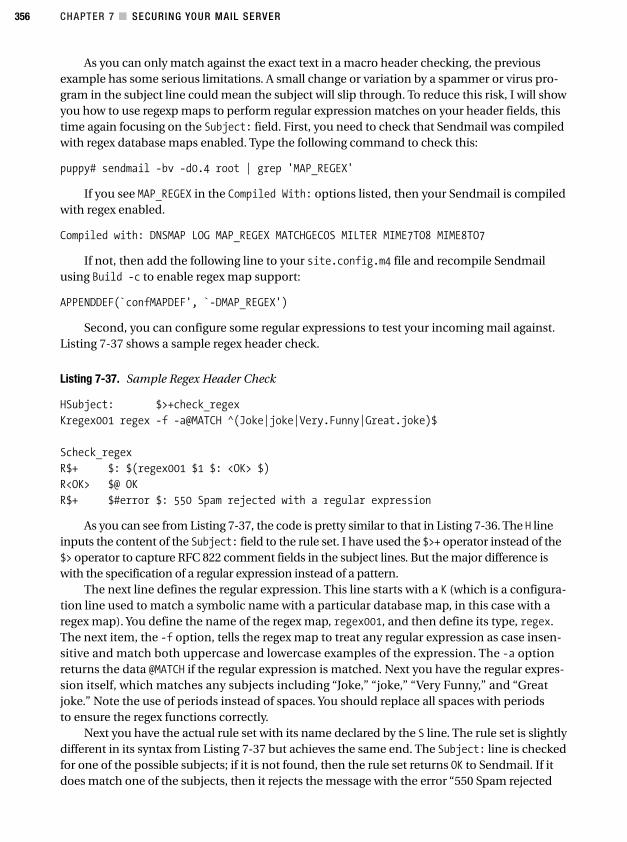
CHAPTER 7 ■ SECURING YOUR MAIL SERVER356
As you can only match against the exact text in a macro header checking, the previousexample has some serious limitations. A small change or variation by a spammer or virus pro-gram in the subject line could mean the subject will slip through. To reduce this risk, I will showyou how to use regexp maps to perform regular expression matches on your header fields, thistime again focusing on the Subject: field. First, you need to check that Sendmail was compiledwith regex database maps enabled. Type the following command to check this:
puppy# sendmail -bv -d0.4 root | grep 'MAP_REGEX'
If you see MAP_REGEX in the Compiled With: options listed, then your Sendmail is compiledwith regex enabled.
Compiled with: DNSMAP LOG MAP_REGEX MATCHGECOS MILTER MIME7TO8 MIME8TO7
If not, then add the following line to your site.config.m4 file and recompile Sendmailusing Build -c to enable regex map support:
APPENDDEF(`confMAPDEF', `-DMAP_REGEX')
Second, you can configure some regular expressions to test your incoming mail against.Listing 7-37 shows a sample regex header check.
Listing 7-37. Sample Regex Header Check
HSubject: $>+check_regex
Kregex001 regex -f -a@MATCH ^(Joke|joke|Very.Funny|Great.joke)$
Scheck_regex
R$+ $: $(regex001 $1 $: <OK> $)
R<OK> $@ OK
R$+ $#error $: 550 Spam rejected with a regular expression
As you can see from Listing 7-37, the code is pretty similar to that in Listing 7-36. The H lineinputs the content of the Subject: field to the rule set. I have used the $>+ operator instead of the$> operator to capture RFC 822 comment fields in the subject lines. But the major difference iswith the specification of a regular expression instead of a pattern.
The next line defines the regular expression. This line starts with a K (which is a configura-tion line used to match a symbolic name with a particular database map, in this case with aregex map). You define the name of the regex map, regex001, and then define its type, regex.The next item, the -f option, tells the regex map to treat any regular expression as case insen-sitive and match both uppercase and lowercase examples of the expression. The -a optionreturns the data @MATCH if the regular expression is matched. Next you have the regular expres-sion itself, which matches any subjects including “Joke,” “joke,” “Very Funny,” and “Greatjoke.” Note the use of periods instead of spaces. You should replace all spaces with periodsto ensure the regex functions correctly.
Next you have the actual rule set with its name declared by the S line. The rule set is slightlydifferent in its syntax from Listing 7-37 but achieves the same end. The Subject: line is checkedfor one of the possible subjects; if it is not found, then the rule set returns OK to Sendmail. If itdoes match one of the subjects, then it rejects the message with the error “550 Spam rejected
4444c07_final.qxd 1/5/05 12:55 AM Page 356
CHAPTER 7 ■ SECURING YOUR MAIL SERVER 357
with a regular expression.” You can create a variety of your own rules to address the require-ments of your antispam configuration.
Finally, it is easy to test your new rules. Using the command in Listing 7-38, start Send-mail in Address Test Mode.
Listing 7-38. Starting Sendmail in Address Test Mode
puppy# sendmail -d21.4 -bt
■Tip If you want to test your regular expression rule sets, it is basically the same process; start sendmailas sendmail -d38.2 -bt, and your regex maps will be automatically initiated.
You will see > on the command line. Enter the name of your rule (for example,Check_Subject_Spam) and then the text you are checking for (for example, Low Interest Rate).Sendmail will test the rule using the text provided. If you are using Listing 7-36, you should seea response like this one:
> Check_Subject_Spam Low Interest Rate
Check_Subject_Sp input: Low Interest Rate
rewritten as: $# error $: 550 This e-mail has been rejected as spam
Check_Subject_Sp returns: $# error $: 550 This e-mail has been rejected as spam
This indicates that the test has been successful; Sendmail has matched the subject andresponded with the correct error response.
Antispam Settings for PostfixThe basic idea behind stopping spam with Postfix is to test the message against a variety ofrestrictions, checks, and filters. If a message successfully navigates through these, then there isa good chance it is not spam. These checks start with a collection of restrictions lists that allowyou to block e-mail based on the content of HELO, MAIL FROM, RCPT TO, and other fields. Then youhave the ability to specify header and body checks that use regular expressions to filter mailbased on their subject or content. Finally, you can integrate tools such as SpamAssassin to pro-vide external content filtering to Postfix. I will show you how to use restriction lists and headerand body checks and then provide you with a configuration that should be a good starting pointto block spam using Postfix. I will not cover integrating Postfix with third-party content-filteringtools. Quite a few HOWTOs and resources are available on the Postfix site and elsewhere thatcan explain this.
Postfix processes antispam restrictions, checks, and filters in a particular order. It is impor-tant to understand what that order is so as to both design the most efficient antispam structureand ensure you are correctly permitting and restricting the right things. It is no good placinga permit statement in a restriction if Postfix is already going to reject a message because of anearlier processed restriction. So Postfix first processes any restriction lists, then any header orbody checks, and then in turn any content filters such as SpamAssassin or ClamAV.
4444c07_final.qxd 1/5/05 12:55 AM Page 357
CHAPTER 7 ■ SECURING YOUR MAIL SERVER358
Postfix Restriction List
This section will cover the restriction lists available in Postfix. Postfix also checks these restric-tion lists in a particular order. Table 7-8 lists all the possible restriction lists, what they do, anddisplays them in the order in which they are processed.
Table 7-8. Processing Order of Postfix Restriction Lists
Restriction Description
smtpd_client_restrictions Restrictions on sending e-mail based on the client
smtpd_helo_restrictions Restrictions on sending e-mail based on the HELO identificationstring
smtpd_sender_restrictions Restrictions in sending e-mail based on the sender
smtpd_recipient_restrictions Restrictions in sending e-mail based on the recipient
smtpd_data_restrictions Restrictions in sending e-mail based on the content of theSMTP DATA command
Listing 7-39 shows what a restriction list looks like.
Listing 7-39. Sample Postfix Restriction List
smtpd_recipient_restrictions =
reject_unknown_recipient_domain,
permit_mynetworks,
reject_unauth_destination,
check_sender_access hash:/etc/postfix/access,
permit
As you can see from Listing 7-39, each type of restriction is listed in a line after the optionand should be separated by either a comma or whitespace. Listing 7-39 is checking the RCPTTO field against recipient data. It first uses reject_unknown_recipient_domain (which rejects ifthe domain does not have a valid A or MX record). Then it permits all e-mail if the client IPaddress is listed in $mynetworks. Then it rejects any mail not for the local machine or a domaincontained in the relay_domains option using the reject_unauth_destination. (This restrictionis mandatory in this restriction list to prevent open relaying.) Finally, it checks the contents ofan access map and finally ends with a generic permit statement.
The last permit statement is one of several generic restrictions you can use to specify thedefault policy in a restriction option. The two simplest options are reject and permit. You alsohave the options to defer, which informs the client to try again later, and warn_if_reject, whichlogs a warning instead of rejecting. warn_if_reject is useful for testing new configurations with-out risking rejecting legitimate mail. You should end each restriction option with either a permit
statement or a reject statement. It is not strictly necessary, but it is a neat way of making it clearwhat the default behavior of the restriction list is.
As you can also see from Listing 7-39, you can specify an access list in the form of apostmap-created map file (in this case, hash:/etc/postfix/access). All the restriction lists areable to check access maps. Listing 7-39 uses the check_sender_access restriction to check theMAIL FROM field. There are also client, HELO, and recipient access checks (check_client_access,check_helo_access, and so on). Listing 7-40 shows the contents of a typical map.
4444c07_final.qxd 1/5/05 12:55 AM Page 358
CHAPTER 7 ■ SECURING YOUR MAIL SERVER 359
Listing 7-40. Access Maps for Postfix Restriction Lists
[email protected] REJECT
anotherdomain.com OK
morespam.com DISCARD
confused.uncertain.com DUNNO
uncertain.com REJECT
The first line shows all e-mail from address [email protected] will be rejected. Thesecond line says that domain anotherdomain.com is OK and should be permitted. The third linetells Postfix that all e-mail from domain morespam.com is to be discarded silently. (The senderwill think the message is received.) The fourth line tells Postfix to ignore any messages fromthe host confused.uncertain.com and thus stop processing that restriction and skip to the nextrestriction if any. The DUNNO option is useful to provide exceptions to restriction. You can see inListing 7-40 that messages from confused.uncertain.com would be ignored because they arespecified as DUNNO but any other messages from the domain uncertain.com will be rejected.
■Tip You can also provide customized error code responses to rejections. Postfix allows you to specify theexact error code response to a remote system. For example, by using the relay_domains_reject_codeoption (which defaults to error code 554), you can override the error code response Postfix sends whena rejected request is processed. A variety of reject code options exist; you can see them at http://www.postfix.org/uce.html.
Postfix Header and Body Checks
I will now briefly discuss Postfix’s header and body checks. These checks occur after yourrestrictions list checks and before any content filtering. These checks consist of map files thatcontain entries that are matched against either the headers or the body of e-mail messages.I recommend using the regular expression type of map file to do this, as it allows you do somepowerful pattern matching. Listing 7-41 shows a portion of my header checks map.
■Tip Regular expression map files are not created with postmap. They are simply ASCII files. I use theextension .regexp to identify my files.
Listing 7-41. Sample Postfix Header Checks Map
/^Subject: Make Money Fast/ REJECT
/^Subject: Need a Home Loan? We Can Help!!/ REJECT
/^Subject: .*Important News On Aging/ REJECT This is a spam message
As you can see, I have used the regular expressions (enclosed in / and /) to match a fewspam subjects and reject them. In the header checks file, you can test any header that is con-tained in the e-mail (in Listing 7-41 I have used Subject:), but you could any header field. Forbody checks it is any text that appears in the body of the message.
4444c07_final.qxd 1/5/05 12:55 AM Page 359
CHAPTER 7 ■ SECURING YOUR MAIL SERVER360
If a match occurs, Postfix performs the action specified next to that regular expression.This includes rejecting the message (and optionally adding some text with the rejection as youcan in the last line of Listing 7-41); ignoring the message using the IGNORE option, which deletesthe matched header from the message; and discarding the message using the DISCARD option.For simplicities sake, I recommend you use header and body checks to REJECT messages only.
You can define both header and body checks to Postfix. Listing 7-42 shows how to definethem in your main.cf file.
Listing 7-42. Defining Header and Body Checks in Postfix
header_checks = regexp:/etc/postfix/header_checks.regexp
body_checks = regexp:/etc/postfix/header_checks.regexp
■Tip The site at http://www.hispalinux.es/~data/postfix/ contains a good collection of sampleheader and body checks you can use with Postfix.
A Postfix Antispam Configuration
Now I will try to provide you with a solid basic configuration to defeat spam. I will initiallystart with some basic options that set the scene for your antispam configuration. Table 7-9lists these base options and explains their use. I will describe their recommended settingsafter the table.
■Note Many of the options in Table 7-9 complement and interact with the options detailed in the earlier “Lim-iting DoS Attacks with Postfix” section, and you should implement them in conjunction with those options. Addi-tionally, you should be at least also disabling the VRFY command, as mentioned earlier in this chapter.
Then I will move onto sender, recipient, and data-specific restrictions. I will not the use ofheader or body checks and content filters such as SpamAssassin.
■Tip All the settings I am working with here are located in the main.cf file. You will also need to issuea postfix reload in order for any changes you make to take effect.
4444c07_final.qxd 1/5/05 12:55 AM Page 360
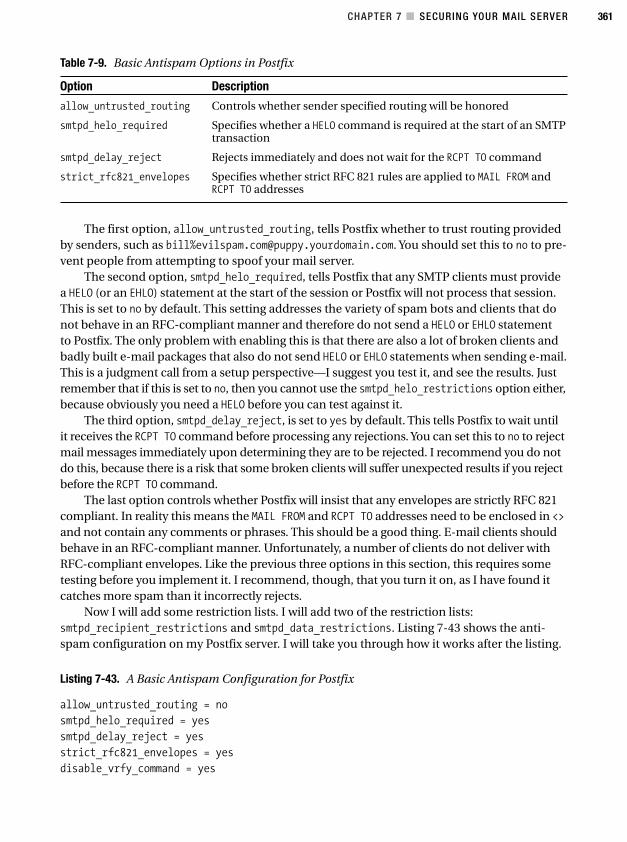
CHAPTER 7 ■ SECURING YOUR MAIL SERVER 361
Table 7-9. Basic Antispam Options in Postfix
Option Description
allow_untrusted_routing Controls whether sender specified routing will be honored
smtpd_helo_required Specifies whether a HELO command is required at the start of an SMTPtransaction
smtpd_delay_reject Rejects immediately and does not wait for the RCPT TO command
strict_rfc821_envelopes Specifies whether strict RFC 821 rules are applied to MAIL FROM andRCPT TO addresses
The first option, allow_untrusted_routing, tells Postfix whether to trust routing providedby senders, such as bill%[email protected]. You should set this to no to pre-vent people from attempting to spoof your mail server.
The second option, smtpd_helo_required, tells Postfix that any SMTP clients must providea HELO (or an EHLO) statement at the start of the session or Postfix will not process that session.This is set to no by default. This setting addresses the variety of spam bots and clients that donot behave in an RFC-compliant manner and therefore do not send a HELO or EHLO statementto Postfix. The only problem with enabling this is that there are also a lot of broken clients andbadly built e-mail packages that also do not send HELO or EHLO statements when sending e-mail.This is a judgment call from a setup perspective—I suggest you test it, and see the results. Justremember that if this is set to no, then you cannot use the smtpd_helo_restrictions option either,because obviously you need a HELO before you can test against it.
The third option, smtpd_delay_reject, is set to yes by default. This tells Postfix to wait untilit receives the RCPT TO command before processing any rejections. You can set this to no to rejectmail messages immediately upon determining they are to be rejected. I recommend you do notdo this, because there is a risk that some broken clients will suffer unexpected results if you rejectbefore the RCPT TO command.
The last option controls whether Postfix will insist that any envelopes are strictly RFC 821compliant. In reality this means the MAIL FROM and RCPT TO addresses need to be enclosed in <>and not contain any comments or phrases. This should be a good thing. E-mail clients shouldbehave in an RFC-compliant manner. Unfortunately, a number of clients do not deliver withRFC-compliant envelopes. Like the previous three options in this section, this requires sometesting before you implement it. I recommend, though, that you turn it on, as I have found itcatches more spam than it incorrectly rejects.
Now I will add some restriction lists. I will add two of the restriction lists:smtpd_recipient_restrictions and smtpd_data_restrictions. Listing 7-43 shows the anti-spam configuration on my Postfix server. I will take you through how it works after the listing.
Listing 7-43. A Basic Antispam Configuration for Postfix
allow_untrusted_routing = no
smtpd_helo_required = yes
smtpd_delay_reject = yes
strict_rfc821_envelopes = yes
disable_vrfy_command = yes
4444c07_final.qxd 1/5/05 12:55 AM Page 361
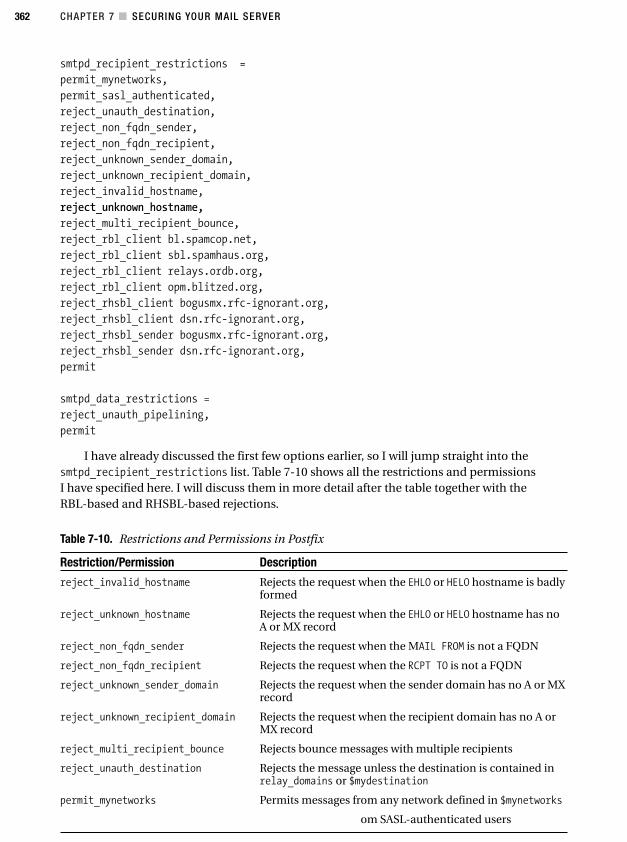
CHAPTER 7 ■ SECURING YOUR MAIL SERVER362
smtpd_recipient_restrictions =
permit_mynetworks,
permit_sasl_authenticated,
reject_unauth_destination,
reject_non_fqdn_sender,
reject_non_fqdn_recipient,
reject_unknown_sender_domain,
reject_unknown_recipient_domain,
reject_invalid_hostname,
reject_unknown_hostname,
reject_multi_recipient_bounce,
reject_rbl_client bl.spamcop.net,
reject_rbl_client sbl.spamhaus.org,
reject_rbl_client relays.ordb.org,
reject_rbl_client opm.blitzed.org,
reject_rhsbl_client bogusmx.rfc-ignorant.org,
reject_rhsbl_client dsn.rfc-ignorant.org,
reject_rhsbl_sender bogusmx.rfc-ignorant.org,
reject_rhsbl_sender dsn.rfc-ignorant.org,
permit
smtpd_data_restrictions =
reject_unauth_pipelining,
permit
I have already discussed the first few options earlier, so I will jump straight into thesmtpd_recipient_restrictions list. Table 7-10 shows all the restrictions and permissionsI have specified here. I will discuss them in more detail after the table together with the RBL-based and RHSBL-based rejections.
Table 7-10. Restrictions and Permissions in Postfix
Restriction/Permission Description
reject_invalid_hostname Rejects the request when the EHLO or HELO hostname is badlyformed
reject_unknown_hostname Rejects the request when the EHLO or HELO hostname has noA or MX record
reject_non_fqdn_sender Rejects the request when the MAIL FROM is not a FQDN
reject_non_fqdn_recipient Rejects the request when the RCPT TO is not a FQDN
reject_unknown_sender_domain Rejects the request when the sender domain has no A or MXrecord
reject_unknown_recipient_domain Rejects the request when the recipient domain has no A orMX record
reject_multi_recipient_bounce Rejects bounce messages with multiple recipients
reject_unauth_destination Rejects the message unless the destination is contained inrelay_domains or $mydestination
permit_mynetworks Permits messages from any network defined in $mynetworks
om SASL-authenticated users
4444c07_final.qxd 1/5/05 12:55 AM Page 362
CHAPTER 7 ■ SECURING YOUR MAIL SERVER 363
In Listing 7-43 you can see a variety of restriction and permission options. Some ofthem reject based on information in the HELO/EHLO identification string; others check MAILFROM or RCPT TO. You may think the HELO/EHLO and MAIL FROM restrictions would have to bechecked in the smtpd_helo_restrictions and the smtpd_sender_restrictions lists. Butbecause smtpd_delay_reject is set to yes, Postfix delays until the RCPT TO command beforerejecting, which means you can combine a variety of restrictions or permissions from otherrestriction lists in the smtpd_recipient_restrictions list. This is a much cleaner and moreefficient way of doing this and means your antispam configuration is easy to understandand simple to manage.
The first step in the smtpd_recipient_restrictions list is to allow through anything in$mynetworks. It is a waste of processor cycles to test mail from your local network. Then youpermit through mail from SASL authenticated users. Next and very importantly you add thereject_unath_destination statement. This statement means that e-mail is rejected fromunauthorized locations and ensures your Postfix server is not an open relay.
Next is a series of rejections based on the contents of a variety of fields, including theHELO/EHLO, MAIL FROM, and RCPT TO fields and queries based on the DNS status of senders,recipients, domains, and hosts. Table 7-10 explains all these rejections. Then you have a listof RBLs and RHSBLs, which Postfix checks (see the “Blacklists” sidebar). Finally, you end therestriction list with a permit statement.
Finally, the smtpd_data_restrictions list contains the statement reject_unauth_pipelining.This final restriction list rejects requests from clients that send SMTP commands in a pipelinebefore knowing whether Postfix supports pipelining. The main offenders in this sort of behavior
BLACKLISTS
RBLs and right-hand side blacklist (RHSBLs) are lists of IP addresses (for RBLs) and domain names (for RHS-BLs) that have been marked as being used by spammers, open relays, or systems that are nonconformant toRFC. They could also include other IP addresses or domains that have been marked according to additionalcriteria or submitted by users, ISPs, or system administrators.
This is the key weakness of blacklists—the data they contain is not always accurate, and you could havee-mail rejected on the basis on incorrect blacklisting. This is especially common with dynamically assigned IPaddresses that are often assigned to residential ADSL and cable customers. A spammer uses an address, andit is added to a blacklist and then assigned to someone else. But the address is not removed from the blacklist,and any e-mail sent from the address that is checked against that blacklist is marked as spam.
Another issue with blacklists is that you need to trust the people running the blacklist. You are trustingthat a third party is being both dutiful and accurate about the IP addresses and domains being collecting. Asanyone who has tried to remove an IP address or domain from a blacklist can tell you, that trust can some-times be misplaced. Some blacklists do not operate in a professional or, what can be worse, a prompt man-ner. This can seriously inconvenience to you and your users if a large volume of false positives are generatedbecause of blacklisting.
If you choose to enable RBLs and RHSBLs, then you should carefully review the blacklists you are select-ing. Check out the blacklist’s home page for the frequency of updates and determine its responsiveness by ask-ing questions and investigating it. Many of the MTA mailing lists, such as the Sendmail and Postfix user mailinglists, have people asking about the functionality and stability of various blacklists, so the archives should revealsome further information.
4444c07_final.qxd 1/5/05 12:55 AM Page 363
CHAPTER 7 ■ SECURING YOUR MAIL SERVER364
5. Examples of this sort of virus include the W32.Beagle, W32.Netsky, W32.Chir worms, as well as a num-ber of others.
The contents of Listing 7-43 should provide you with a good basis for your antispam con-figuration. You can further add access maps customized to your own environment, build a col-lection of header and body checks, and add the functionality of a SpamAssassin-type product.Also, your antispam configuration should never stay static. Spammers are always adapting andadvancing their techniques for defeating antispam measures, so you need to keep updatingyour own configuration.
Antivirus Scanning Your E-mail ServerA virus is loosely defined as a piece of programming or code that is installed on your computerwithout your knowledge and that has some effect, usually malicious, on your system or data.Viruses are usually coded to replicate themselves via a variety of means. Recently a large spateof virus attacks has occurred via e-mail. An e-mail is sent to the user with an alluring messageand an attachment that contains the virus. After a user has executed the script, piece of code,or executable attached to an e-mail, then their system has been infected and the virus spawnsan SMTP server and e-mails itself to all the addresses it can find on that system.5
This is just one example of virus infection via e-mail. So, protecting your users againste-mail-borne viruses has become absolutely critical. I will take you through installing andconfiguring an antivirus scanner for your Linux system and integrating it with your MTA.I will cover integration with both Sendmail and Postfix.
Installing ClamAVI will cover integrating Sendmail and Postfix with an open-source virus-scanning engine. I havechosen to cover ClamAV as that virus-scanning engine. I have chosen ClamAV for a couple ofreasons. The first is that it is freely available and well maintained. The second is that its virusdefinitions are updated as frequently as the commercially available packages.
You can get ClamAV from http://prdownloads.sourceforge.net/clamav. Download the lat-est stable version, and unpack the archive (I used version 0.70 for this explanation). The first stepyou need is to create a clamav user and group. Enter the following:
puppy# groupadd clamav
puppy# useradd -g clamav -s /sbin/nologin -M clamav
I have created a group clamav and a user clamav who cannot login, has no home directory,and belongs to the clamav group. I will also create a directory to hold some ClamAV files. I usu-ally create this under /var/run. I have used clamav as the directory name and set it to be ownedby the user clamav and the group clamav. Enter the following:
puppy# mkdir /var/run/clamav
puppy# chown clamav:clamav /var/run/clamav
Now you need to configure ClamAV. A number of potentially useful configure options areavailable, but I will cover only a couple. The first is --prefix; by default ClamAV is installedunder /usr/local. If you want to move it elsewhere, specify an alternative prefix. A little laterI will show how to integrate ClamAV with Sendmail using milter, so if you are using Sendmail,then you want to enable milter support. For this, use the option --enable-milter.
4444c07_final.qxd 1/5/05 12:55 AM Page 364
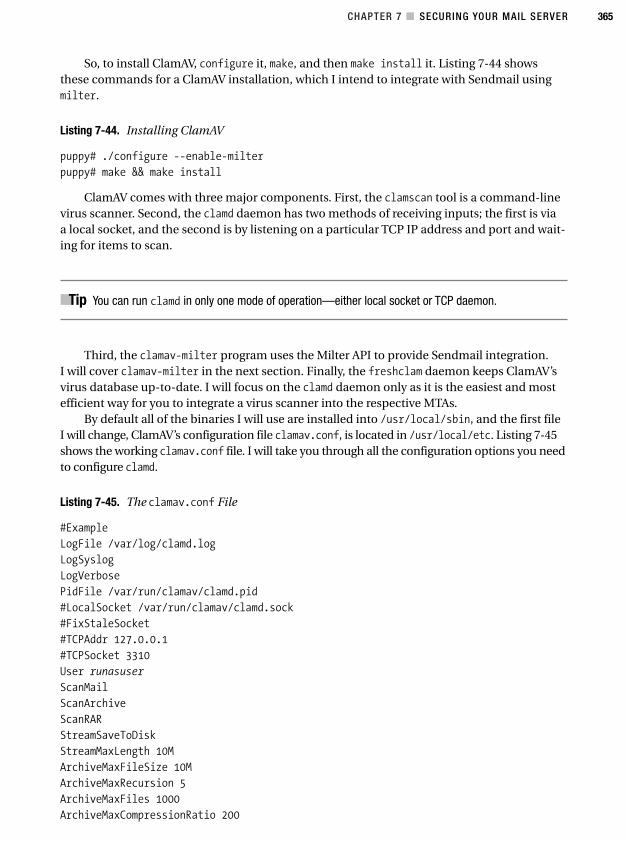
CHAPTER 7 ■ SECURING YOUR MAIL SERVER 365
So, to install ClamAV, configure it, make, and then make install it. Listing 7-44 showsthese commands for a ClamAV installation, which I intend to integrate with Sendmail usingmilter.
Listing 7-44. Installing ClamAV
puppy# ./configure --enable-milter
puppy# make && make install
ClamAV comes with three major components. First, the clamscan tool is a command-linevirus scanner. Second, the clamd daemon has two methods of receiving inputs; the first is viaa local socket, and the second is by listening on a particular TCP IP address and port and wait-ing for items to scan.
■Tip You can run clamd in only one mode of operation—either local socket or TCP daemon.
Third, the clamav-milter program uses the Milter API to provide Sendmail integration.I will cover clamav-milter in the next section. Finally, the freshclam daemon keeps ClamAV’svirus database up-to-date. I will focus on the clamd daemon only as it is the easiest and mostefficient way for you to integrate a virus scanner into the respective MTAs.
By default all of the binaries I will use are installed into /usr/local/sbin, and the first fileI will change, ClamAV’s configuration file clamav.conf, is located in /usr/local/etc. Listing 7-45shows the working clamav.conf file. I will take you through all the configuration options you needto configure clamd.
Listing 7-45. The clamav.conf File
#Example
LogFile /var/log/clamd.log
LogSyslog
LogVerbose
PidFile /var/run/clamav/clamd.pid
#LocalSocket /var/run/clamav/clamd.sock
#FixStaleSocket
#TCPAddr 127.0.0.1
#TCPSocket 3310
User runasuser
ScanMail
ScanArchive
ScanRAR
StreamSaveToDisk
StreamMaxLength 10M
ArchiveMaxFileSize 10M
ArchiveMaxRecursion 5
ArchiveMaxFiles 1000
ArchiveMaxCompressionRatio 200
4444c07_final.qxd 1/5/05 12:55 AM Page 365
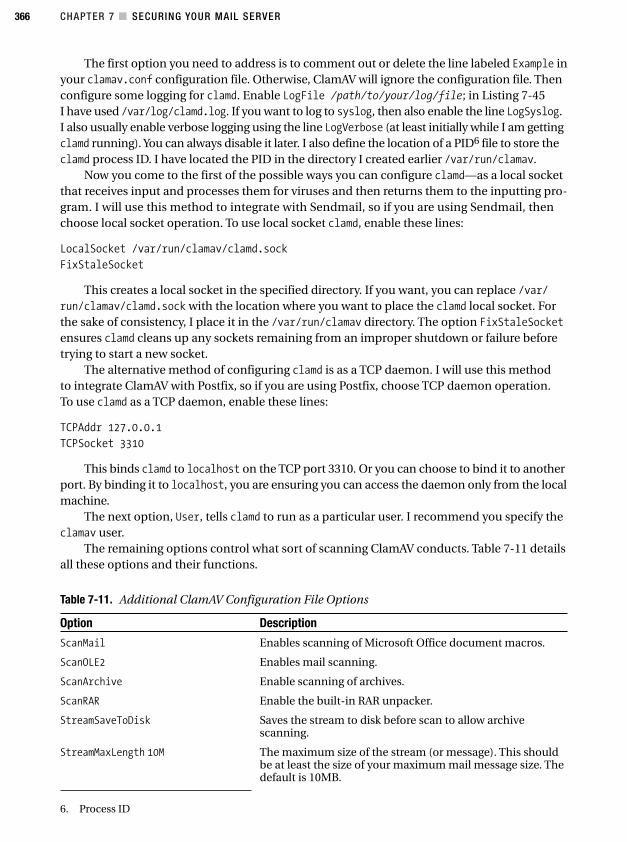
CHAPTER 7 ■ SECURING YOUR MAIL SERVER366
6. Process ID
The first option you need to address is to comment out or delete the line labeled Example inyour clamav.conf configuration file. Otherwise, ClamAV will ignore the configuration file. Thenconfigure some logging for clamd. Enable LogFile /path/to/your/log/file; in Listing 7-45I have used /var/log/clamd.log. If you want to log to syslog, then also enable the line LogSyslog.I also usually enable verbose logging using the line LogVerbose (at least initially while I am gettingclamd running). You can always disable it later. I also define the location of a PID6 file to store theclamd process ID. I have located the PID in the directory I created earlier /var/run/clamav.
Now you come to the first of the possible ways you can configure clamd—as a local socketthat receives input and processes them for viruses and then returns them to the inputting pro-gram. I will use this method to integrate with Sendmail, so if you are using Sendmail, thenchoose local socket operation. To use local socket clamd, enable these lines:
LocalSocket /var/run/clamav/clamd.sock
FixStaleSocket
This creates a local socket in the specified directory. If you want, you can replace /var/run/clamav/clamd.sock with the location where you want to place the clamd local socket. Forthe sake of consistency, I place it in the /var/run/clamav directory. The option FixStaleSocketensures clamd cleans up any sockets remaining from an improper shutdown or failure beforetrying to start a new socket.
The alternative method of configuring clamd is as a TCP daemon. I will use this methodto integrate ClamAV with Postfix, so if you are using Postfix, choose TCP daemon operation.To use clamd as a TCP daemon, enable these lines:
TCPAddr 127.0.0.1
TCPSocket 3310
This binds clamd to localhost on the TCP port 3310. Or you can choose to bind it to anotherport. By binding it to localhost, you are ensuring you can access the daemon only from the localmachine.
The next option, User, tells clamd to run as a particular user. I recommend you specify theclamav user.
The remaining options control what sort of scanning ClamAV conducts. Table 7-11 detailsall these options and their functions.
Table 7-11. Additional ClamAV Configuration File Options
Option Description
ScanMail Enables scanning of Microsoft Office document macros.
ScanOLE2 Enables mail scanning.
ScanArchive Enable scanning of archives.
ScanRAR Enable the built-in RAR unpacker.
StreamSaveToDisk Saves the stream to disk before scan to allow archivescanning.
StreamMaxLength 10M The maximum size of the stream (or message). This shouldbe at least the size of your maximum mail message size. Thedefault is 10MB.
4444c07_final.qxd 1/5/05 12:55 AM Page 366
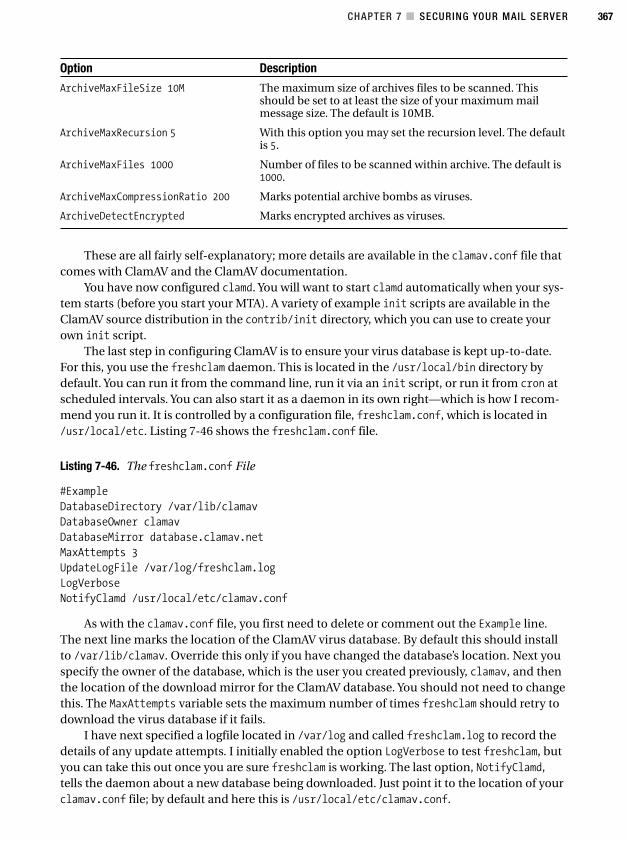
CHAPTER 7 ■ SECURING YOUR MAIL SERVER 367
Option Description
ArchiveMaxFileSize 10M The maximum size of archives files to be scanned. Thisshould be set to at least the size of your maximum mailmessage size. The default is 10MB.
ArchiveMaxRecursion 5 With this option you may set the recursion level. The defaultis 5.
ArchiveMaxFiles 1000 Number of files to be scanned within archive. The default is1000.
ArchiveMaxCompressionRatio 200 Marks potential archive bombs as viruses.
ArchiveDetectEncrypted Marks encrypted archives as viruses.
These are all fairly self-explanatory; more details are available in the clamav.conf file thatcomes with ClamAV and the ClamAV documentation.
You have now configured clamd. You will want to start clamd automatically when your sys-tem starts (before you start your MTA). A variety of example init scripts are available in theClamAV source distribution in the contrib/init directory, which you can use to create yourown init script.
The last step in configuring ClamAV is to ensure your virus database is kept up-to-date.For this, you use the freshclam daemon. This is located in the /usr/local/bin directory bydefault. You can run it from the command line, run it via an init script, or run it from cron atscheduled intervals. You can also start it as a daemon in its own right—which is how I recom-mend you run it. It is controlled by a configuration file, freshclam.conf, which is located in/usr/local/etc. Listing 7-46 shows the freshclam.conf file.
Listing 7-46. The freshclam.conf File
#Example
DatabaseDirectory /var/lib/clamav
DatabaseOwner clamav
DatabaseMirror database.clamav.net
MaxAttempts 3
UpdateLogFile /var/log/freshclam.log
LogVerbose
NotifyClamd /usr/local/etc/clamav.conf
As with the clamav.conf file, you first need to delete or comment out the Example line.The next line marks the location of the ClamAV virus database. By default this should installto /var/lib/clamav. Override this only if you have changed the database’s location. Next youspecify the owner of the database, which is the user you created previously, clamav, and thenthe location of the download mirror for the ClamAV database. You should not need to changethis. The MaxAttempts variable sets the maximum number of times freshclam should retry todownload the virus database if it fails.
I have next specified a logfile located in /var/log and called freshclam.log to record thedetails of any update attempts. I initially enabled the option LogVerbose to test freshclam, butyou can take this out once you are sure freshclam is working. The last option, NotifyClamd,tells the daemon about a new database being downloaded. Just point it to the location of yourclamav.conf file; by default and here this is /usr/local/etc/clamav.conf.
4444c07_final.qxd 1/5/05 12:55 AM Page 367
CHAPTER 7 ■ SECURING YOUR MAIL SERVER368
I recommend you run freshclam as a daemon. Listing 7-47 shows the command line youuse to start freshclam as a daemon.
Listing 7-47. Starting freshclam As a Daemon
puppy# /usr/local/bin/freshclam -d -c 24
The first option, -d, tells freshclam to go into daemon mode. The second option, -c, tellsfreshclam the frequency of its checks. In this case you have 24 times a day or once an hour. Thisis probably the most frequently you will need to update your virus database. Any more frequentupdates could put an undue load on the database site.
If you want to start freshclam when your system boots, then sample init scripts are avail-able in the ClamAV source distribution in the contrib/init directory.
Your ClamAV setup is now complete, and you can now proceed to integrate your antivirusscanner with your MTA.
Integrating ClamAV with SendmailI will use milter, which is the Mail Filtering API that has supported by Sendmail since version8.10, to integrate ClamAV with Sendmail. This API communicates with Sendmail using socketsand is enabled by defining filters in your sendmail.mc file. The milter functionality comes withSendmail by default but may not have been compiled into your version of Sendmail. A quickway to check this is to run the following:
puppy# sendmail -d0 < /dev/null | grep MILTER
If your Sendmail binary supports milter, it should return something like this:
Compiled with: DNSMAP LOG MATCHGECOS MILTER MIME7TO8 MIME8TO7
If it does not return MILTER in the Compiled with options, you need to enable milter sup-port by adding the following line to your site.config.m4 file. APPENDDEF enables the mail filterinterface. Enter the following:
APPENDDEF(`confENVDEF', `-DMILTER')
Now rebuild Sendmail with the Build -c option.You also need the libmilter library that comes with Sendmail. In your Sendmail source
distribution, change into the libmilter directory and run the following:
puppy# ./Build install
■Tip If you are using a Red Hat or Mandrake distribution, then you can use the RPM packagesendmail-devel. On Debian the package is libmilter-dev.
You should already have clamd configured and running according to the instructionsin the “Installing ClamAV” section. You want it to be creating a local socket, which is thefirst method of setting it up that was described in that section. Now you need to start the
4444c07_final.qxd 1/5/05 12:55 AM Page 368
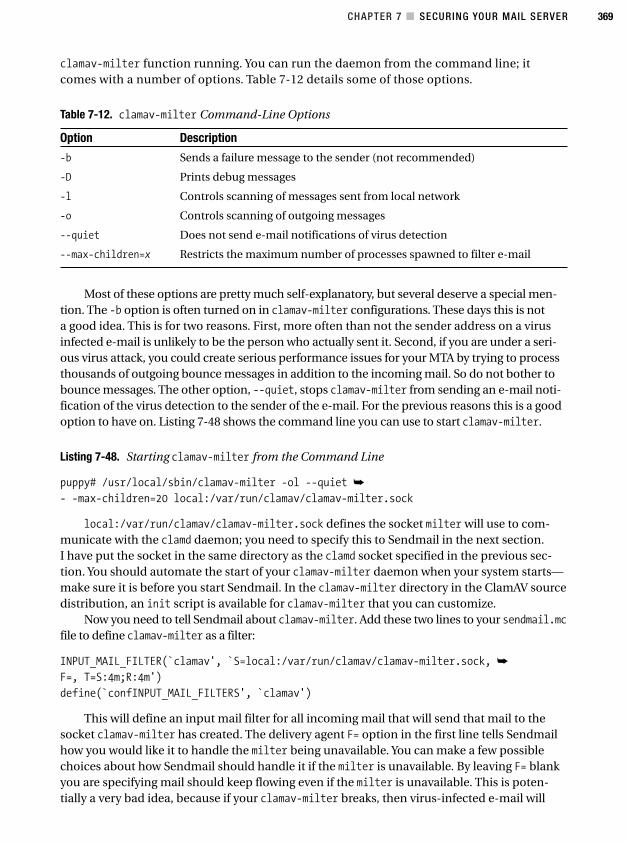
CHAPTER 7 ■ SECURING YOUR MAIL SERVER 369
clamav-milter function running. You can run the daemon from the command line; itcomes with a number of options. Table 7-12 details some of those options.
Table 7-12. clamav-milter Command-Line Options
Option Description
-b Sends a failure message to the sender (not recommended)
-D Prints debug messages
-l Controls scanning of messages sent from local network
-o Controls scanning of outgoing messages
--quiet Does not send e-mail notifications of virus detection
--max-children=x Restricts the maximum number of processes spawned to filter e-mail
Most of these options are pretty much self-explanatory, but several deserve a special men-tion. The -b option is often turned on in clamav-milter configurations. These days this is nota good idea. This is for two reasons. First, more often than not the sender address on a virusinfected e-mail is unlikely to be the person who actually sent it. Second, if you are under a seri-ous virus attack, you could create serious performance issues for your MTA by trying to processthousands of outgoing bounce messages in addition to the incoming mail. So do not bother tobounce messages. The other option, --quiet, stops clamav-milter from sending an e-mail noti-fication of the virus detection to the sender of the e-mail. For the previous reasons this is a goodoption to have on. Listing 7-48 shows the command line you can use to start clamav-milter.
Listing 7-48. Starting clamav-milter from the Command Line
puppy# /usr/local/sbin/clamav-milter -ol --quiet ➥
- -max-children=20 local:/var/run/clamav/clamav-milter.sock
local:/var/run/clamav/clamav-milter.sock defines the socket milter will use to com-municate with the clamd daemon; you need to specify this to Sendmail in the next section.I have put the socket in the same directory as the clamd socket specified in the previous sec-tion. You should automate the start of your clamav-milter daemon when your system starts—make sure it is before you start Sendmail. In the clamav-milter directory in the ClamAV sourcedistribution, an init script is available for clamav-milter that you can customize.
Now you need to tell Sendmail about clamav-milter. Add these two lines to your sendmail.mcfile to define clamav-milter as a filter:
INPUT_MAIL_FILTER(`clamav', `S=local:/var/run/clamav/clamav-milter.sock, ➥
F=, T=S:4m;R:4m')
define(`confINPUT_MAIL_FILTERS', `clamav')
This will define an input mail filter for all incoming mail that will send that mail to thesocket clamav-milter has created. The delivery agent F= option in the first line tells Sendmailhow you would like it to handle the milter being unavailable. You can make a few possiblechoices about how Sendmail should handle it if the milter is unavailable. By leaving F= blankyou are specifying mail should keep flowing even if the milter is unavailable. This is poten-tially a very bad idea, because if your clamav-milter breaks, then virus-infected e-mail will
4444c07_final.qxd 1/5/05 12:56 AM Page 369
CHAPTER 7 ■ SECURING YOUR MAIL SERVER370
simply pass straight through Sendmail. You could also set it to F=T, which would temporarilyreject the message. Or you could even set it to F=R, which would reject the message as undeliv-erable. I recommend you read about the delivery agent options before making a definitive choiceas to your response. The T= options are all timeouts. For most systems, these defaults shouldbe fine.
Now if you rebuild sendmail.cf and restart Sendmail, all your mail will now be filteredthrough ClamAV. If you initially set the -D option in clamav-milter, you should be able to trackthe submission and scanning of all your e-mail via milter and ClamAV in your mail logs.
■Tip If you do not want to integrate ClamAV and Sendmail using milter, you could also look at AMaVis(http://www.amavis.org/) or MailScanner. You could also do filtering during the local delivery processusing procmail or maildrop, but I recommend that the earlier you address any virus and spam filtering inthe mail process is best.
Integrating ClamAV with PostfixIntegrating ClamAV with Postfix is slightly more complicated than integrating it with Sendmail.You will require an extra component, AMaViS.
■Caution Older versions of AMaViS have had security issues. Ensure you are using an up-to-date versionof the script and that you add it to your list of products to monitor for security exploits.
AMaViS is a Perl script that processes the mail using your specified antivirus engine (in thiscase, ClamAV) and then re-injecting it back into Postfix. It is relatively simple to set up, and youcan download it at http://www.amavis.org/download.php3.
■Note You may need some additional Perl CPAN modules to run AMaViS. Check the AMaViS documenta-tion, and use perl -MCPAN -e shell to retrieve any modules you require.
Unpack the source archive, and configure it. As you are going to integrate it with Postfix,use the next line as your configure statement:
puppy# ./configure --enable-postfix --with-mailto=virusadmin --with-syslog
replacing virusadmin with the user you want to have admin notifications of virus detectionssent to. Then run make and make install.
The install process will create an amavis user and group. It also creates two directories:/var/amavis and /var/virusmails. The /var/virusmails is the default location for AMaViS toquarantine virus e-mails. By default the AMaViS script itself will be installed into /usr/sbin.
4444c07_final.qxd 1/5/05 12:56 AM Page 370
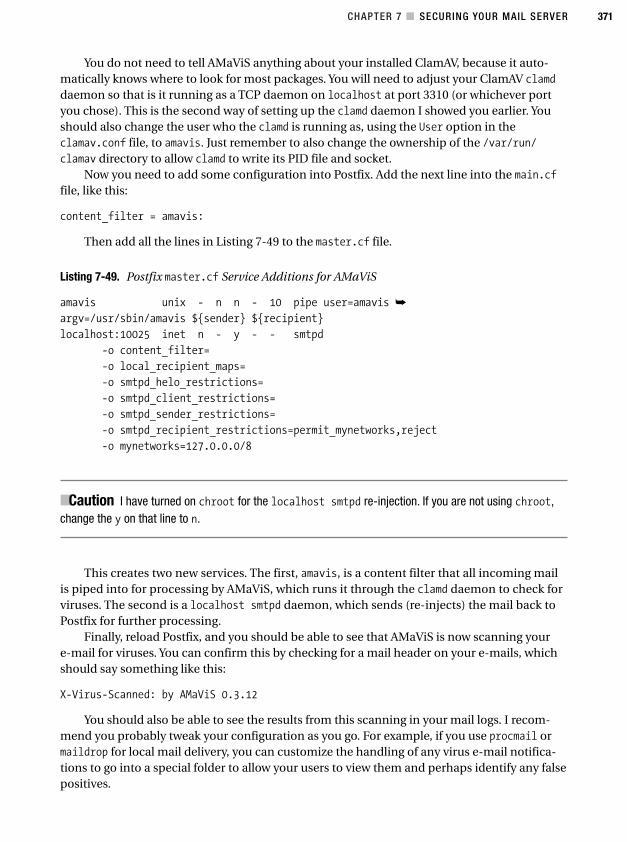
CHAPTER 7 ■ SECURING YOUR MAIL SERVER 371
You do not need to tell AMaViS anything about your installed ClamAV, because it auto-matically knows where to look for most packages. You will need to adjust your ClamAV clamddaemon so that is it running as a TCP daemon on localhost at port 3310 (or whichever portyou chose). This is the second way of setting up the clamd daemon I showed you earlier. Youshould also change the user who the clamd is running as, using the User option in theclamav.conf file, to amavis. Just remember to also change the ownership of the /var/run/clamav directory to allow clamd to write its PID file and socket.
Now you need to add some configuration into Postfix. Add the next line into the main.cffile, like this:
content_filter = amavis:
Then add all the lines in Listing 7-49 to the master.cf file.
Listing 7-49. Postfix master.cf Service Additions for AMaViS
amavis unix - n n - 10 pipe user=amavis ➥
argv=/usr/sbin/amavis ${sender} ${recipient}
localhost:10025 inet n - y - - smtpd
-o content_filter=
-o local_recipient_maps=
-o smtpd_helo_restrictions=
-o smtpd_client_restrictions=
-o smtpd_sender_restrictions=
-o smtpd_recipient_restrictions=permit_mynetworks,reject
-o mynetworks=127.0.0.0/8
■Caution I have turned on chroot for the localhost smtpd re-injection. If you are not using chroot,change the y on that line to n.
This creates two new services. The first, amavis, is a content filter that all incoming mailis piped into for processing by AMaViS, which runs it through the clamd daemon to check forviruses. The second is a localhost smtpd daemon, which sends (re-injects) the mail back toPostfix for further processing.
Finally, reload Postfix, and you should be able to see that AMaViS is now scanning youre-mail for viruses. You can confirm this by checking for a mail header on your e-mails, whichshould say something like this:
X-Virus-Scanned: by AMaViS 0.3.12
You should also be able to see the results from this scanning in your mail logs. I recom-mend you probably tweak your configuration as you go. For example, if you use procmail ormaildrop for local mail delivery, you can customize the handling of any virus e-mail notifica-tions to go into a special folder to allow your users to view them and perhaps identify any falsepositives.
4444c07_final.qxd 1/5/05 12:56 AM Page 371
CHAPTER 7 ■ SECURING YOUR MAIL SERVER372
■Tip You could also do this filtering during the local delivery process using procmail or maildrop, butI recommend that the earlier in your mail process that you address any virus and spam filtering is best.
ResourcesThe following are resources you can use.
Mailing Lists• Sendmail Usenet and mailing list: http://www.sendmail.org/usenet.html
• Postfix mailing lists: http://www.postfix.org/lists.html
• ClamAV mailing lists: http://www.clamav.net/ml.html#pagestart
• AMaViS mailing lists: http://sourceforge.net/mail/?group_id=6006
Sites• Sendmail: http://www.sendmail.org/
• Postfix: http://www.postfix.org
• ClamAV: http://www.clamav.net/
• Milter: http://www.milter.org/
• AMaViS: http://www.amavis.org/
4444c07_final.qxd 1/5/05 12:56 AM Page 372
373
C H A P T E R 8
■ ■ ■
Authenticating and Securing Your Mail
In this chapter, I will cover Transport Layer Security (TLS), Simple Authentication and Secu-rity Layer (SASL), and SMTP AUTH as tools to further secure and harden your mail server.These tools allow you to secure and encrypt the transmission (though not the content) of youre-mails. They also help ensure that the mail servers and clients that you communicate withare authentic. Probably most important for mail administrators, they provide the ability forroaming and remote users to have an encrypted authenticated connection to their mail serverthat allows functionality such as relaying. You saw in Chapter 7 how relaying is locked downand the inconvenience this can cause your users. SMTP AUTH using SASL and TLS can allowyour users to relay e-mails via your server using authentication whilst you continue to main-tain your antispam and antirelaying controls.
I will first take you through setting up TLS and some examples of how to use TLS (thoughmost people will probably use TLS as an encryption layer in conjunction with SASL and SMTPAUTH). Then I will cover Cyrus SASL and SMTP AUTH and how to use them. Finally, I willcover how to implement these tools on both Sendmail and Postfix.
TLSBy default the vast majority of communication on the Internet is both unauthenticated andunencrypted. This means anyone in the right place at the right time with the correct toolscan read any of your traffic, including your e-mail traffic. Even potentially more dangerousis the possibility that anyone could alter or delete portions or all of your traffic. With this inmind, Netscape came up with a new protocol called Secure Sockets Layer (SSL), which pro-vides a twofold solution to this. The first part of that solution is to hide your traffic fromeavesdropping by encrypting it, and the second part is to provide an authentication mecha-nism by which the sender and recipient of traffic can be assured that both ends of the trans-action are the people they claim to be and that the data being sent has not been altered.
TLS1 is an extension of the SSL protocol and requires you have OpenSSL installed. TLSuses public-key encryption to encrypt mail transactions. Public-key encryption works with twokeys; the public key, often called a certificate, is available publicly, and the private key is storedon the server and kept secret. So anything that is encrypted using the public key can bedecrypted only with the corresponding private key, and vice versa.
1. See RFC 2246 (http://www.ietf.org/rfc/rfc2246.txt) for the details of TLS.
4444c08_final.qxd 1/5/05 12:58 AM Page 373
CHAPTER 8 ■ AUTHENTICATING AND SECURING YOUR MAIL 374
2. See the “Sites” section for some links.
■Note It is possible to use TLS for encryption without a certificate at all, but I do not recommend thisapproach. Using a certificate authority (CA) and certificates further enhances the level of security available toyou because it adds a layer of authentication in addition to the layer of encryption.
Your Mail Transfer Agent (MTA) can use TLS as part of its initial connection negotiationwith a remote client or server. A server or client connecting to your server sends an EHLO request,which your MTA responds to by advertising it has support for the STARTTLS command. Theserver or client then requests that the server uses TLS by issuing the STARTTLS command.
So what could you use TLS for? Well, TLS is probably most often used in conjunctionwith SASL and SMTP AUTH to provide encryption for SASL plain-text authentication.Many enterprises also use TLS to encrypt and authenticate the transfer of e-mail trafficfrom two TLS-enabled hosts each at a different site across the Internet. Or, at the mostbasic level, many people use a TLS-capable client such as Outlook Express or Eudora toprovide encryption and authentication when sending mail directly to a remote server.
TLS has some significant limitations that are especially important to note. What TLS doesis to encrypt and authenticate the transfer of e-mail from server to server and from client toserver, and vice versa. If your e-mail passes through a mail hub that does not have STARTTLSenabled, then it will not be secured. It is also not an end-to-end encryption tool. The contentof your e-mail messages will remain unencrypted on both the sender and receiver systems—only the transfer is encrypted. If you want to encrypt your e-mail, you need to look at solutionssuch as S/MIME or PGP-MIME. I will not cover S/MIME or PGP-MIME in any detail, though,because I perceive these as client-based encryption and not therefore directly related to hard-ening the server end of your e-mail infrastructure. Quite a few resources are available that dodiscuss e-mail content encryption.2
In the next sections, I will take you through creating certificates for using with TLS andyour MTA. Then I will show you how to enable TLS in both Sendmail and Postfix and provideexamples of how you can use TLS.
Creating Certificates for TLSTLS uses SSL certificates to authenticate servers and clients for a variety of functions. I discussSSL in more depth in Chapter 3, but for the purposes of this explanation, I will cover only onetype of certificate model. In this model, you are running your own CA and creating X.509 cer-tificates from that CA. The reason I have chosen to look at this model is because it is financiallyfree and does not require you to purchase certificates.
But as I detailed in Chapter 3, some risks come with being your own CA and signing yourown certificates; you need to weigh those risks before proceeding, and you need to consult withany partners you intend to authenticate with certificates. However, with mail server authenti-cation, unlike an SSL certificate for a Web page, I usually assume you have only a limited num-ber of partners you are going to authenticate with certificates (almost certainly all clients andsystems that you administer); this means it is more likely those partners will accept a privateCA rather than a commercial CA.
4444c08_final.qxd 1/5/05 12:58 AM Page 374
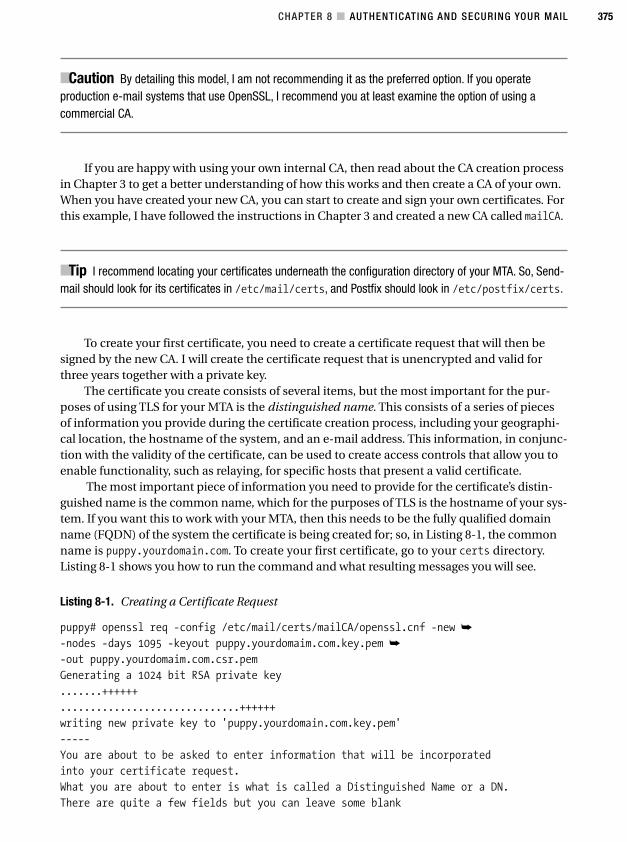
CHAPTER 8 ■ AUTHENTICATING AND SECURING YOUR MAIL 375
■Caution By detailing this model, I am not recommending it as the preferred option. If you operateproduction e-mail systems that use OpenSSL, I recommend you at least examine the option of using acommercial CA.
If you are happy with using your own internal CA, then read about the CA creation processin Chapter 3 to get a better understanding of how this works and then create a CA of your own.When you have created your new CA, you can start to create and sign your own certificates. Forthis example, I have followed the instructions in Chapter 3 and created a new CA called mailCA.
■Tip I recommend locating your certificates underneath the configuration directory of your MTA. So, Send-mail should look for its certificates in /etc/mail/certs, and Postfix should look in /etc/postfix/certs.
To create your first certificate, you need to create a certificate request that will then besigned by the new CA. I will create the certificate request that is unencrypted and valid forthree years together with a private key.
The certificate you create consists of several items, but the most important for the pur-poses of using TLS for your MTA is the distinguished name. This consists of a series of piecesof information you provide during the certificate creation process, including your geographi-cal location, the hostname of the system, and an e-mail address. This information, in conjunc-tion with the validity of the certificate, can be used to create access controls that allow you toenable functionality, such as relaying, for specific hosts that present a valid certificate.
The most important piece of information you need to provide for the certificate’s distin-guished name is the common name, which for the purposes of TLS is the hostname of your sys-tem. If you want this to work with your MTA, then this needs to be the fully qualified domainname (FQDN) of the system the certificate is being created for; so, in Listing 8-1, the commonname is puppy.yourdomain.com. To create your first certificate, go to your certs directory.Listing 8-1 shows you how to run the command and what resulting messages you will see.
Listing 8-1. Creating a Certificate Request
puppy# openssl req -config /etc/mail/certs/mailCA/openssl.cnf -new ➥
-nodes -days 1095 -keyout puppy.yourdomaim.com.key.pem ➥
-out puppy.yourdomaim.com.csr.pem
Generating a 1024 bit RSA private key
.......++++++
..............................++++++
writing new private key to 'puppy.yourdomain.com.key.pem'
-----
You are about to be asked to enter information that will be incorporated
into your certificate request.
What you are about to enter is what is called a Distinguished Name or a DN.
There are quite a few fields but you can leave some blank
4444c08_final.qxd 1/5/05 12:58 AM Page 375
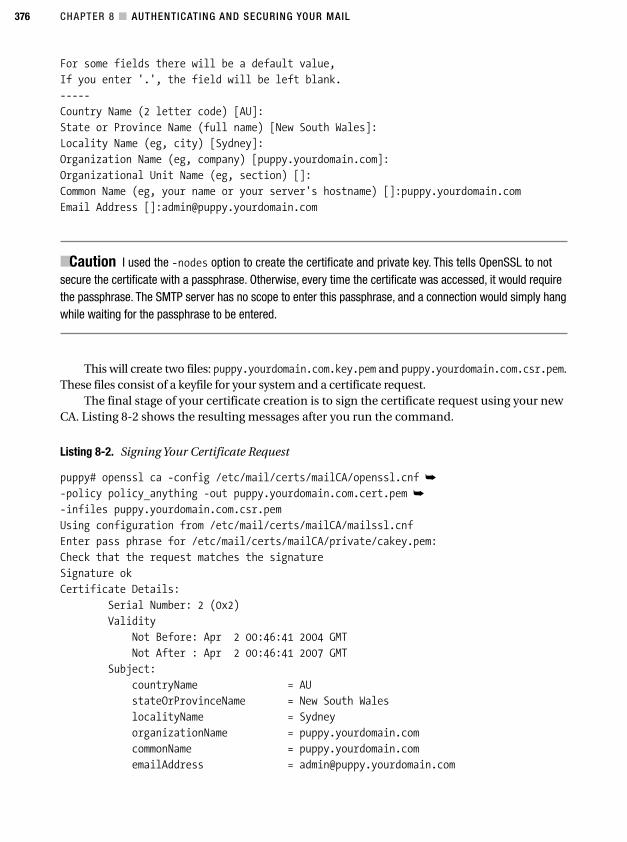
CHAPTER 8 ■ AUTHENTICATING AND SECURING YOUR MAIL 376
For some fields there will be a default value,
If you enter '.', the field will be left blank.
-----
Country Name (2 letter code) [AU]:
State or Province Name (full name) [New South Wales]:
Locality Name (eg, city) [Sydney]:
Organization Name (eg, company) [puppy.yourdomain.com]:
Organizational Unit Name (eg, section) []:
Common Name (eg, your name or your server's hostname) []:puppy.yourdomain.com
Email Address []:[email protected]
■Caution I used the -nodes option to create the certificate and private key. This tells OpenSSL to notsecure the certificate with a passphrase. Otherwise, every time the certificate was accessed, it would requirethe passphrase. The SMTP server has no scope to enter this passphrase, and a connection would simply hangwhile waiting for the passphrase to be entered.
This will create two files: puppy.yourdomain.com.key.pem and puppy.yourdomain.com.csr.pem.These files consist of a keyfile for your system and a certificate request.
The final stage of your certificate creation is to sign the certificate request using your newCA. Listing 8-2 shows the resulting messages after you run the command.
Listing 8-2. Signing Your Certificate Request
puppy# openssl ca -config /etc/mail/certs/mailCA/openssl.cnf ➥
-policy policy_anything -out puppy.yourdomain.com.cert.pem ➥
-infiles puppy.yourdomain.com.csr.pem
Using configuration from /etc/mail/certs/mailCA/mailssl.cnf
Enter pass phrase for /etc/mail/certs/mailCA/private/cakey.pem:
Check that the request matches the signature
Signature ok
Certificate Details:
Serial Number: 2 (0x2)
Validity
Not Before: Apr 2 00:46:41 2004 GMT
Not After : Apr 2 00:46:41 2007 GMT
Subject:
countryName = AU
stateOrProvinceName = New South Wales
localityName = Sydney
organizationName = puppy.yourdomain.com
commonName = puppy.yourdomain.com
emailAddress = [email protected]
4444c08_final.qxd 1/5/05 12:58 AM Page 376

CHAPTER 8 ■ AUTHENTICATING AND SECURING YOUR MAIL 377
X509v3 extensions:
X509v3 Basic Constraints:
CA:FALSE
Netscape Comment:
OpenSSL Generated Certificate
X509v3 Subject Key Identifier:
EB:62:9D:27:65:3E:AB:55:44:67:8D:A7:09:E5:08:B3:FC:FF:0B:38
X509v3 Authority Key Identifier:
keyid:09:6A:E4:42:E8:DD:53:93:9C:49:01:49:D4:B3:BD:20:5F:82:2A:20
DirName:/C=AU/ST=New South Wales/L=Sydney/O=puppy.yourdomain.com/➥
CN=puppy/[email protected]
serial:00
Certificate is to be certified until Apr 2 00:46:41 2007 GMT (1095 days)
Sign the certificate? [y/n]:y
1 out of 1 certificate requests certified, commit? [y/n]y
Write out database with 1 new entries
Data Base Updated
This will output a final file called puppy.yourdomain.com.cert.pem, which is your certifi-cate file. You can now delete the certificate request file, which ispuppy.yourdomain.com.csr.pem.
■Note You can use whatever naming convention you like for your certificates, keys, and requests. I justuse the previous convention because it represents a simple way to identify all your SSL components andto which system they belong.
Finally, as you can see in Listing 8-3, you should change the permissions of the files inyour certs directory to ensure they are more secure.
Listing 8-3. Certificate Permissions
puppy# cd /etc/mail
puppy# chmod 0755 certs
puppy# cd certs
puppy# chmod -R 0400 *
Now you have your first set of certificates and can use them to secure your TLSconnections.
TLS with SendmailThe first thing Sendmail needs to run TLS is OpenSSL. You need to ensure the latest versionof OpenSSL is installed and that Sendmail has been compiled with SSL support. Listing 8-4shows the fastest way to check the options with which Sendmail has been compiled.
4444c08_final.qxd 1/5/05 12:58 AM Page 377
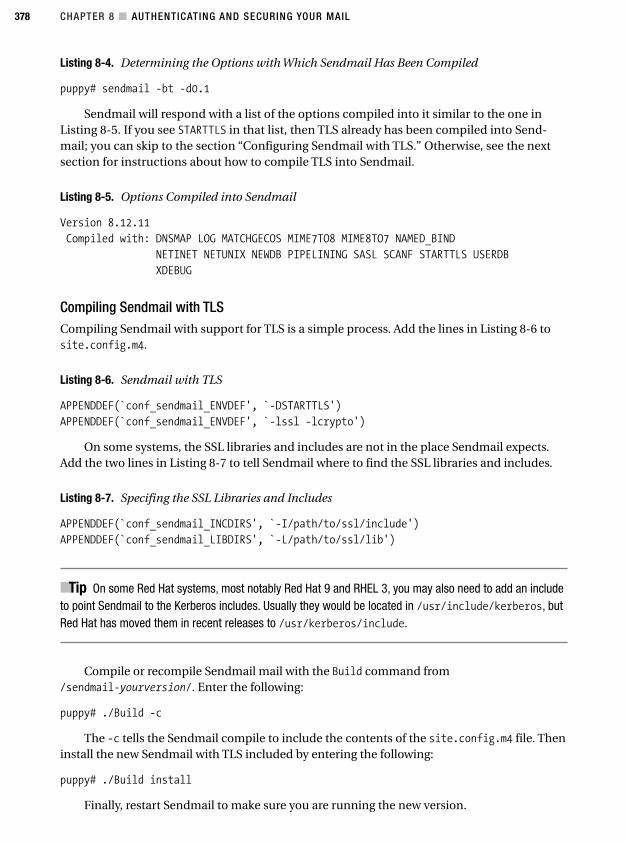
CHAPTER 8 ■ AUTHENTICATING AND SECURING YOUR MAIL 378
Listing 8-4. Determining the Options with Which Sendmail Has Been Compiled
puppy# sendmail -bt -d0.1
Sendmail will respond with a list of the options compiled into it similar to the one inListing 8-5. If you see STARTTLS in that list, then TLS already has been compiled into Send-mail; you can skip to the section “Configuring Sendmail with TLS.” Otherwise, see the nextsection for instructions about how to compile TLS into Sendmail.
Listing 8-5. Options Compiled into Sendmail
Version 8.12.11
Compiled with: DNSMAP LOG MATCHGECOS MIME7TO8 MIME8TO7 NAMED_BIND
NETINET NETUNIX NEWDB PIPELINING SASL SCANF STARTTLS USERDB
XDEBUG
Compiling Sendmail with TLSCompiling Sendmail with support for TLS is a simple process. Add the lines in Listing 8-6 tosite.config.m4.
Listing 8-6. Sendmail with TLS
APPENDDEF(`conf_sendmail_ENVDEF', `-DSTARTTLS')
APPENDDEF(`conf_sendmail_ENVDEF', `-lssl -lcrypto')
On some systems, the SSL libraries and includes are not in the place Sendmail expects.Add the two lines in Listing 8-7 to tell Sendmail where to find the SSL libraries and includes.
Listing 8-7. Specifing the SSL Libraries and Includes
APPENDDEF(`conf_sendmail_INCDIRS', `-I/path/to/ssl/include')
APPENDDEF(`conf_sendmail_LIBDIRS', `-L/path/to/ssl/lib')
■Tip On some Red Hat systems, most notably Red Hat 9 and RHEL 3, you may also need to add an includeto point Sendmail to the Kerberos includes. Usually they would be located in /usr/include/kerberos, butRed Hat has moved them in recent releases to /usr/kerberos/include.
Compile or recompile Sendmail mail with the Build command from /sendmail-yourversion/. Enter the following:
puppy# ./Build -c
The -c tells the Sendmail compile to include the contents of the site.config.m4 file. Theninstall the new Sendmail with TLS included by entering the following:
puppy# ./Build install
Finally, restart Sendmail to make sure you are running the new version.
4444c08_final.qxd 1/5/05 12:58 AM Page 378
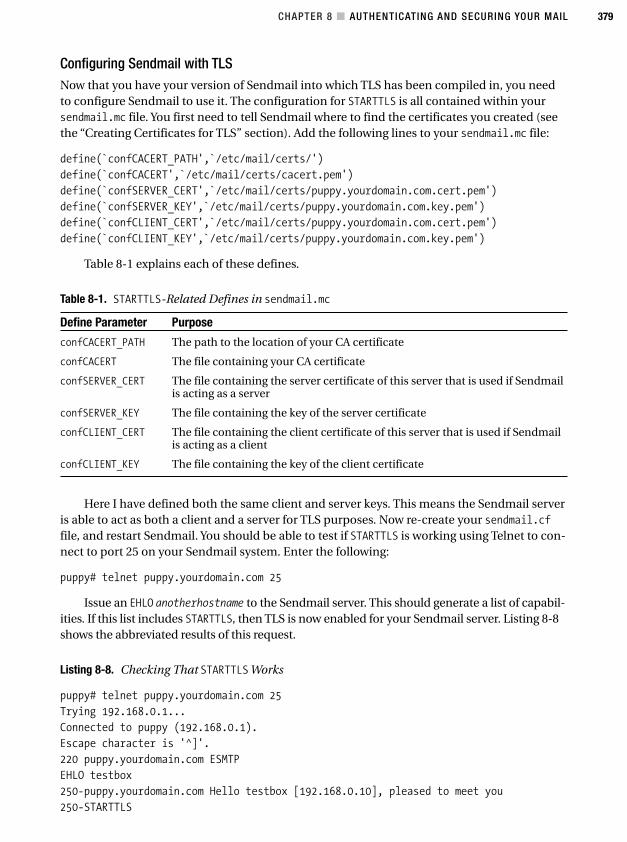
CHAPTER 8 ■ AUTHENTICATING AND SECURING YOUR MAIL 379
Configuring Sendmail with TLSNow that you have your version of Sendmail into which TLS has been compiled in, you needto configure Sendmail to use it. The configuration for STARTTLS is all contained within yoursendmail.mc file. You first need to tell Sendmail where to find the certificates you created (seethe “Creating Certificates for TLS” section). Add the following lines to your sendmail.mc file:
define(`confCACERT_PATH',`/etc/mail/certs/')
define(`confCACERT',`/etc/mail/certs/cacert.pem')
define(`confSERVER_CERT',`/etc/mail/certs/puppy.yourdomain.com.cert.pem')
define(`confSERVER_KEY',`/etc/mail/certs/puppy.yourdomain.com.key.pem')
define(`confCLIENT_CERT',`/etc/mail/certs/puppy.yourdomain.com.cert.pem')
define(`confCLIENT_KEY',`/etc/mail/certs/puppy.yourdomain.com.key.pem')
Table 8-1 explains each of these defines.
Table 8-1. STARTTLS-Related Defines in sendmail.mc
Define Parameter Purpose
confCACERT_PATH The path to the location of your CA certificate
confCACERT The file containing your CA certificate
confSERVER_CERT The file containing the server certificate of this server that is used if Sendmailis acting as a server
confSERVER_KEY The file containing the key of the server certificate
confCLIENT_CERT The file containing the client certificate of this server that is used if Sendmailis acting as a client
confCLIENT_KEY The file containing the key of the client certificate
Here I have defined both the same client and server keys. This means the Sendmail serveris able to act as both a client and a server for TLS purposes. Now re-create your sendmail.cffile, and restart Sendmail. You should be able to test if STARTTLS is working using Telnet to con-nect to port 25 on your Sendmail system. Enter the following:
puppy# telnet puppy.yourdomain.com 25
Issue an EHLO anotherhostname to the Sendmail server. This should generate a list of capabil-ities. If this list includes STARTTLS, then TLS is now enabled for your Sendmail server. Listing 8-8shows the abbreviated results of this request.
Listing 8-8. Checking That STARTTLSWorks
puppy# telnet puppy.yourdomain.com 25
Trying 192.168.0.1...
Connected to puppy (192.168.0.1).
Escape character is '^]'.
220 puppy.yourdomain.com ESMTP
EHLO testbox
250-puppy.yourdomain.com Hello testbox [192.168.0.10], pleased to meet you
250-STARTTLS
4444c08_final.qxd 1/5/05 12:58 AM Page 379
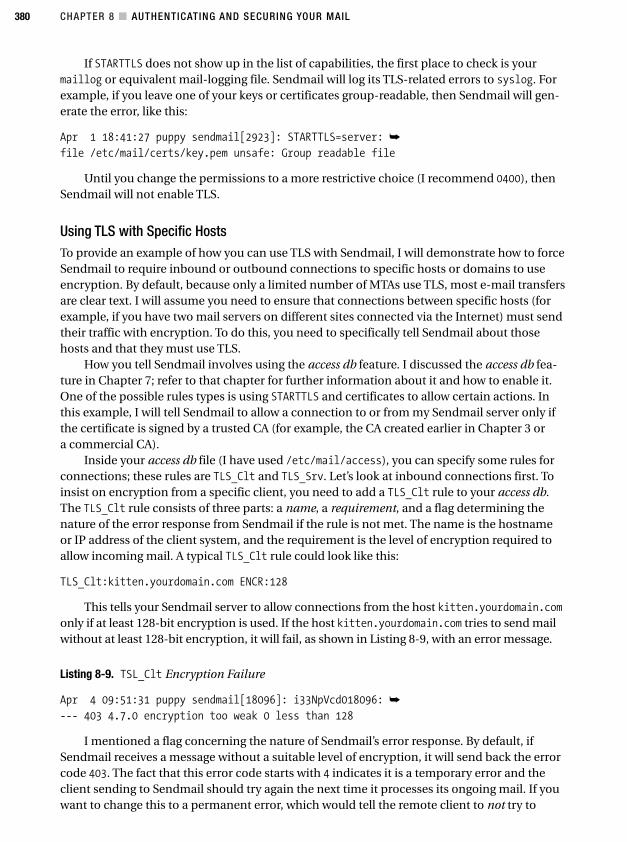
CHAPTER 8 ■ AUTHENTICATING AND SECURING YOUR MAIL 380
If STARTTLS does not show up in the list of capabilities, the first place to check is yourmaillog or equivalent mail-logging file. Sendmail will log its TLS-related errors to syslog. Forexample, if you leave one of your keys or certificates group-readable, then Sendmail will gen-erate the error, like this:
Apr 1 18:41:27 puppy sendmail[2923]: STARTTLS=server: ➥
file /etc/mail/certs/key.pem unsafe: Group readable file
Until you change the permissions to a more restrictive choice (I recommend 0400), thenSendmail will not enable TLS.
Using TLS with Specific HostsTo provide an example of how you can use TLS with Sendmail, I will demonstrate how to forceSendmail to require inbound or outbound connections to specific hosts or domains to useencryption. By default, because only a limited number of MTAs use TLS, most e-mail transfersare clear text. I will assume you need to ensure that connections between specific hosts (forexample, if you have two mail servers on different sites connected via the Internet) must sendtheir traffic with encryption. To do this, you need to specifically tell Sendmail about thosehosts and that they must use TLS.
How you tell Sendmail involves using the access db feature. I discussed the access db fea-ture in Chapter 7; refer to that chapter for further information about it and how to enable it.One of the possible rules types is using STARTTLS and certificates to allow certain actions. Inthis example, I will tell Sendmail to allow a connection to or from my Sendmail server only ifthe certificate is signed by a trusted CA (for example, the CA created earlier in Chapter 3 ora commercial CA).
Inside your access db file (I have used /etc/mail/access), you can specify some rules forconnections; these rules are TLS_Clt and TLS_Srv. Let’s look at inbound connections first. Toinsist on encryption from a specific client, you need to add a TLS_Clt rule to your access db.The TLS_Clt rule consists of three parts: a name, a requirement, and a flag determining thenature of the error response from Sendmail if the rule is not met. The name is the hostnameor IP address of the client system, and the requirement is the level of encryption required toallow incoming mail. A typical TLS_Clt rule could look like this:
TLS_Clt:kitten.yourdomain.com ENCR:128
This tells your Sendmail server to allow connections from the host kitten.yourdomain.comonly if at least 128-bit encryption is used. If the host kitten.yourdomain.com tries to send mailwithout at least 128-bit encryption, it will fail, as shown in Listing 8-9, with an error message.
Listing 8-9. TSL_Clt Encryption Failure
Apr 4 09:51:31 puppy sendmail[18096]: i33NpVcd018096: ➥
--- 403 4.7.0 encryption too weak 0 less than 128
I mentioned a flag concerning the nature of Sendmail’s error response. By default, ifSendmail receives a message without a suitable level of encryption, it will send back the errorcode 403. The fact that this error code starts with 4 indicates it is a temporary error and theclient sending to Sendmail should try again the next time it processes its ongoing mail. If youwant to change this to a permanent error, which would tell the remote client to not try to
4444c08_final.qxd 1/5/05 12:58 AM Page 380
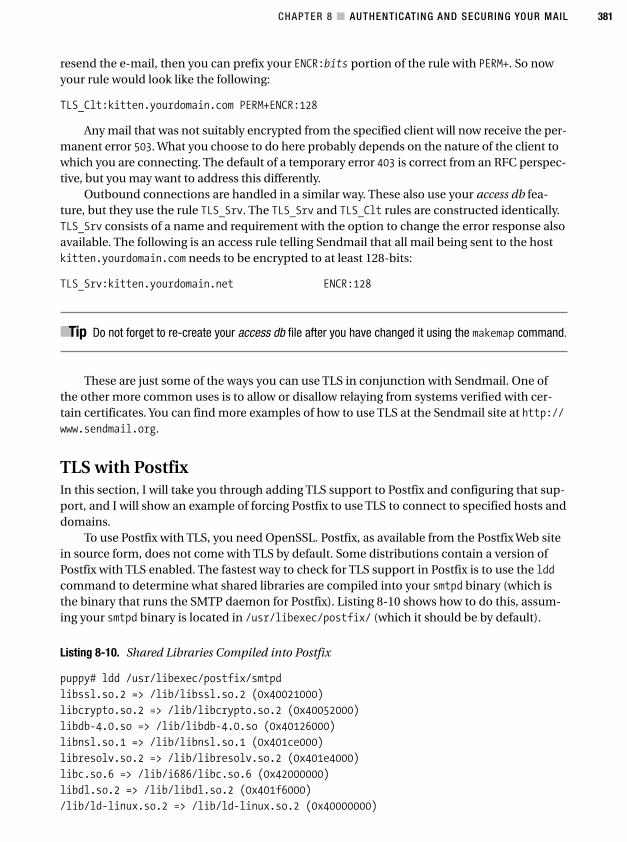
CHAPTER 8 ■ AUTHENTICATING AND SECURING YOUR MAIL 381
resend the e-mail, then you can prefix your ENCR:bits portion of the rule with PERM+. So nowyour rule would look like the following:
TLS_Clt:kitten.yourdomain.com PERM+ENCR:128
Any mail that was not suitably encrypted from the specified client will now receive the per-manent error 503. What you choose to do here probably depends on the nature of the client towhich you are connecting. The default of a temporary error 403 is correct from an RFC perspec-tive, but you may want to address this differently.
Outbound connections are handled in a similar way. These also use your access db fea-ture, but they use the rule TLS_Srv. The TLS_Srv and TLS_Clt rules are constructed identically.TLS_Srv consists of a name and requirement with the option to change the error response alsoavailable. The following is an access rule telling Sendmail that all mail being sent to the hostkitten.yourdomain.com needs to be encrypted to at least 128-bits:
TLS_Srv:kitten.yourdomain.net ENCR:128
■Tip Do not forget to re-create your access db file after you have changed it using the makemap command.
These are just some of the ways you can use TLS in conjunction with Sendmail. One ofthe other more common uses is to allow or disallow relaying from systems verified with cer-tain certificates. You can find more examples of how to use TLS at the Sendmail site at http://www.sendmail.org.
TLS with PostfixIn this section, I will take you through adding TLS support to Postfix and configuring that sup-port, and I will show an example of forcing Postfix to use TLS to connect to specified hosts anddomains.
To use Postfix with TLS, you need OpenSSL. Postfix, as available from the Postfix Web sitein source form, does not come with TLS by default. Some distributions contain a version ofPostfix with TLS enabled. The fastest way to check for TLS support in Postfix is to use the lddcommand to determine what shared libraries are compiled into your smtpd binary (which isthe binary that runs the SMTP daemon for Postfix). Listing 8-10 shows how to do this, assum-ing your smtpd binary is located in /usr/libexec/postfix/ (which it should be by default).
Listing 8-10. Shared Libraries Compiled into Postfix
puppy# ldd /usr/libexec/postfix/smtpd
libssl.so.2 => /lib/libssl.so.2 (0x40021000)
libcrypto.so.2 => /lib/libcrypto.so.2 (0x40052000)
libdb-4.0.so => /lib/libdb-4.0.so (0x40126000)
libnsl.so.1 => /lib/libnsl.so.1 (0x401ce000)
libresolv.so.2 => /lib/libresolv.so.2 (0x401e4000)
libc.so.6 => /lib/i686/libc.so.6 (0x42000000)
libdl.so.2 => /lib/libdl.so.2 (0x401f6000)
/lib/ld-linux.so.2 => /lib/ld-linux.so.2 (0x40000000)
4444c08_final.qxd 1/5/05 12:58 AM Page 381
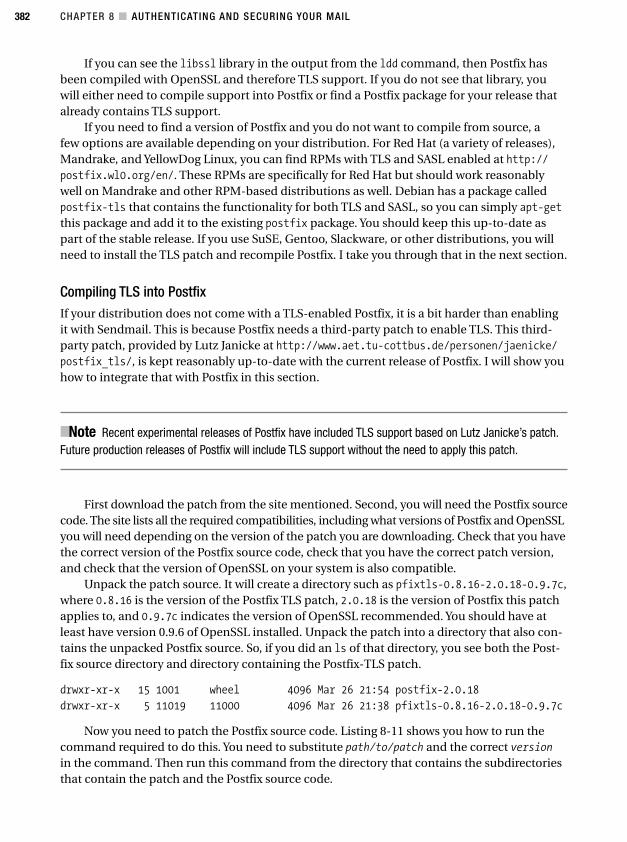
CHAPTER 8 ■ AUTHENTICATING AND SECURING YOUR MAIL 382
If you can see the libssl library in the output from the ldd command, then Postfix hasbeen compiled with OpenSSL and therefore TLS support. If you do not see that library, youwill either need to compile support into Postfix or find a Postfix package for your release thatalready contains TLS support.
If you need to find a version of Postfix and you do not want to compile from source, a few options are available depending on your distribution. For Red Hat (a variety of releases),Mandrake, and YellowDog Linux, you can find RPMs with TLS and SASL enabled at http://postfix.wl0.org/en/. These RPMs are specifically for Red Hat but should work reasonablywell on Mandrake and other RPM-based distributions as well. Debian has a package calledpostfix-tls that contains the functionality for both TLS and SASL, so you can simply apt-getthis package and add it to the existing postfix package. You should keep this up-to-date aspart of the stable release. If you use SuSE, Gentoo, Slackware, or other distributions, you willneed to install the TLS patch and recompile Postfix. I take you through that in the next section.
Compiling TLS into PostfixIf your distribution does not come with a TLS-enabled Postfix, it is a bit harder than enablingit with Sendmail. This is because Postfix needs a third-party patch to enable TLS. This third-party patch, provided by Lutz Janicke at http://www.aet.tu-cottbus.de/personen/jaenicke/postfix_tls/, is kept reasonably up-to-date with the current release of Postfix. I will show youhow to integrate that with Postfix in this section.
■Note Recent experimental releases of Postfix have included TLS support based on Lutz Janicke’s patch.Future production releases of Postfix will include TLS support without the need to apply this patch.
First download the patch from the site mentioned. Second, you will need the Postfix sourcecode. The site lists all the required compatibilities, including what versions of Postfix and OpenSSLyou will need depending on the version of the patch you are downloading. Check that you havethe correct version of the Postfix source code, check that you have the correct patch version,and check that the version of OpenSSL on your system is also compatible.
Unpack the patch source. It will create a directory such as pfixtls-0.8.16-2.0.18-0.9.7c,where 0.8.16 is the version of the Postfix TLS patch, 2.0.18 is the version of Postfix this patchapplies to, and 0.9.7c indicates the version of OpenSSL recommended. You should have atleast have version 0.9.6 of OpenSSL installed. Unpack the patch into a directory that also con-tains the unpacked Postfix source. So, if you did an ls of that directory, you see both the Post-fix source directory and directory containing the Postfix-TLS patch.
drwxr-xr-x 15 1001 wheel 4096 Mar 26 21:54 postfix-2.0.18
drwxr-xr-x 5 11019 11000 4096 Mar 26 21:38 pfixtls-0.8.16-2.0.18-0.9.7c
Now you need to patch the Postfix source code. Listing 8-11 shows you how to run thecommand required to do this. You need to substitute path/to/patch and the correct versionin the command. Then run this command from the directory that contains the subdirectoriesthat contain the patch and the Postfix source code.
4444c08_final.qxd 1/5/05 12:58 AM Page 382
CHAPTER 8 ■ AUTHENTICATING AND SECURING YOUR MAIL 383
Listing 8-11. Patching the Postfix Code
patch -p0 < /path/to/patch/pfixtls-version/pfixtls.diff
This should generate a list of the files being patched and then return you to the commandline.
Once the patch is complete, then you need to adjust Postfix’s Makefiles to add the OpenSSLheader files. Move to the Postfix source directory, and run the command in Listing 8-12, changingthe -I to the location of your OpenSSL include files and the -L to the location of your OpenSSLlibraries. The locations listed in Listing 8-12 represent the general defaults for an OpenSSL instal-lation. This may differ on your distribution.
Listing 8-12. Adding OpenSSL to the Postfix Makefiles
make makefiles CCARGS="-DUSE_SSL -I/usr/local/ssl/include" ➥
AUXLIBS="-L/usr/local/ssl/lib -lssl -lcrypto"
Then run make and make upgrade if you already have Postfix installed, or run make installfor a new install of the Postfix source. Now if you run ldd on the smtpd binary, you should seethat libssl is included in the list of libraries. If Postfix is already running, then you will alsoneed to restart it.
Configuring TLS in PostfixNow that you have TLS compiled into Postfix, you need to enable it. You do this in the main.cfPostfix configuration file, which is usually located in /etc/postfix. You should already havea key, a public certificate, and the CA cert that was generated at the start of the “Creating Cer-tificates for TLS” section. You need to define these and their locations to Postfix.
■Tip Do not forget to hash your CA certificate!
You need to define two sets of options: one set for Postfix to act as a TLS server and oneset for Postfix to act as a TLS client. For a TLS server, add the following lines in your main.cffile, replacing /path/to/certs with the path to the location of your certificates (including yourCA cert file) and replacing cert, key, and CAcert with the names of your certificate, key, and CAcert files in PEM format, respectively.
smtpd_tls_cert_file = /path/to/certs/cert.pem
smtpd_tls_key_file = /path/to/certs/key.pem
smtpd_tls_CAfile = /path/to/certs/CAcert.pem
■Caution If you are running Postfix chrooted and you have more than one CA certificate, then you needto combine them into one file. Before chrooting itself, the smtpd daemon will read the contents of the filedefined by the smtpd_tls_CAfile option and then chroot. This means if all the CA certs are combined inone file, they are available in the chroot jail for Postfix. The same also applies to the smtp_tls_CAfileoption in the unusual event you have different CAs for clients.
4444c08_final.qxd 1/5/05 12:58 AM Page 383
CHAPTER 8 ■ AUTHENTICATING AND SECURING YOUR MAIL 384
For a TLS client, add the following lines in your main.cf file, again replacing /path/to/certswith the path to the location of your certificates (including your CA cert file) and replacingcert, key, and CAcert with the names of your certificate, key, and CA cert files in PEM format,respectively.
smtp_tls_cert_file = /path/to/certs/cert.pem
smtp_tls_key_file = /path/to/certs/key.pem
smtp_tls_CAfile = /path/to/certs/CAcert.pem
You can also add some other options that are useful. The first is logging. Add the followingline to main.cf to enable logging for Postfix as a TSL server:
smtpd_tls_loglevel = 1
You can also add the following for Postfix TLS client logging:
smtp_tls_loglevel = 1
Five logging levels exist and are identical for both the server and client logging options.Table 8-2 details them.
Table 8-2. TLS Logging levels for Postfix
Level Description
0 No logging
1 Startup and certificate information
2 Level 1 plus display levels during negotiation
3 Level 2 plus a HEX and ASCII dump of the negotiation process
4 Level 3 plus a HEX and ASCII dump of the complete STARTTLS transaction
I recommend during normal operations a logging level of 1 or 2. I recommend not usingLevel 4 unless you absolutely need this information for Postfix TLS client logging, as this willgenerate a huge volume of data and could considerably slow down your server.
A useful option for server TLS is smtpd_tls_auth_only. This stops Postfix from sendingAUTH data over an unencrypted channel. This is useful when you are also using SMTP AUTH.If this option is set to yes, then Postfix will send AUTH data only once TLS has been activatedvia the STARTTLS command. To enable this option, add the following to the main.cf file:
smtpd_tls_auth_only = yes
Finally, you need to add a line explicitly starting TLS to your main.cf file. For a Postfixacting as a TLS server, add the following:
smtpd_use_tls = yes
For Postfix acting as a TLS client, add the following:
smtp_use_tls = yes
After adding one or both options, you need to reload Postfix.
4444c08_final.qxd 1/5/05 12:58 AM Page 384
CHAPTER 8 ■ AUTHENTICATING AND SECURING YOUR MAIL 385
Now when you Telnet to your Postfix server and issue the EHLO command, you should seeSTARTTLS as one of the available capabilities of your Postfix server.
puppy# telnet puppy.yourdomain.com 25
Trying 192.168.0.1...
Connected to puppy.
Escape character is '^]'.
220 puppy.yourdomain.com
EHLO kitten.yourdomain.com
250-puppy.yourdomain.com
250-STARTTLS
You are now ready to use TLS with Postfix!
■Note With Postfix-TLS you may want to investigate a few other options. The Postfix-TLS patch alsocomes with a sample configuration file that details all the options available. This usually located in/etc/postfix/sample-tls.cf.
Using TLS for a Specific HostAs an example of how to use TLS with Postfix, I will take you through the process of enforcing theuse of TLS for specific hosts or domains. I will do this by defining a new option, smtp_tls_per_site,in the main.cf file. This option will reference a list of hosts and domains and contain specificinstructions that tell Postfix whether to use TLS with that host or domain. Remember to becareful. The host or domain you are sending to must be capable of TLS, and if you specify itmust use TLS, then you need to be sure it has TLS capabilities; otherwise, you will not be ableto send mail to that host or domain. As most systems on the Internet are not TLS capable, youshould reserve this sort of enforcement for hosts and domains with which you were sure youare able to initiate TLS.
To get started, add the following line to your main.cf file:
smtp_tls_per_site = hash:/etc/postfix/tls_per_site
The hash:/etc/postfix/tls_per_site entry refers to a Postfix hash map created with thepostmap command that you will create shortly.
Now you need to specify the hosts and domains that will or will not use TLS. Create a newfile called tls_per_site, and add entries for all the hosts and systems you want to define. Eachentry should consist of a hostname or domain name followed by a space or tab with each newhost or domain on a new line. Listing 8-13 shows you how to do it.
Listing 8-13. A Sample tls_per_site File
puppy.yourdomain.com MUST
yourdomain.com MAY
otherdomain.com NONE
anotherdomain.com MUST_NOPEERMATCH
4444c08_final.qxd 1/5/05 12:58 AM Page 385
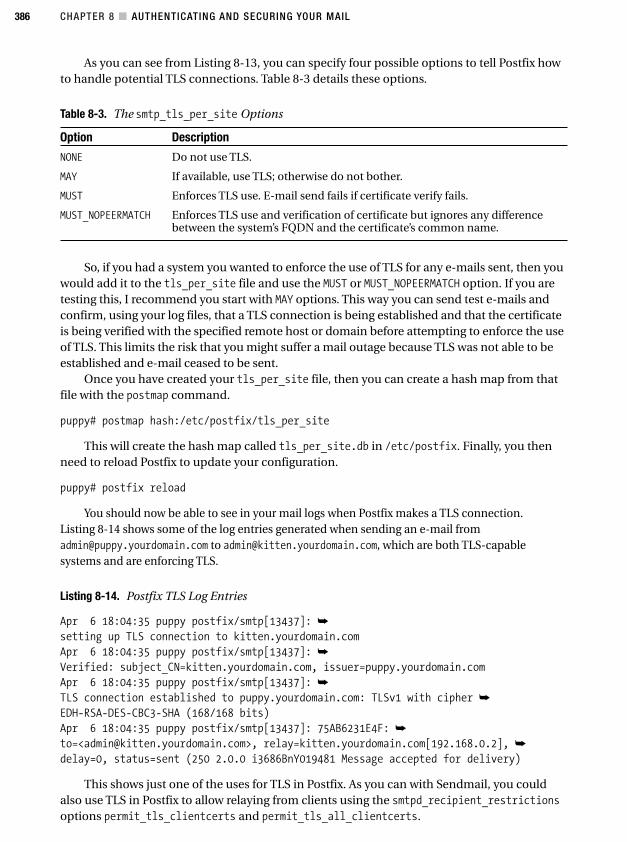
CHAPTER 8 ■ AUTHENTICATING AND SECURING YOUR MAIL 386
As you can see from Listing 8-13, you can specify four possible options to tell Postfix howto handle potential TLS connections. Table 8-3 details these options.
Table 8-3. The smtp_tls_per_site Options
Option Description
NONE Do not use TLS.
MAY If available, use TLS; otherwise do not bother.
MUST Enforces TLS use. E-mail send fails if certificate verify fails.
MUST_NOPEERMATCH Enforces TLS use and verification of certificate but ignores any differencebetween the system’s FQDN and the certificate’s common name.
So, if you had a system you wanted to enforce the use of TLS for any e-mails sent, then youwould add it to the tls_per_site file and use the MUST or MUST_NOPEERMATCH option. If you aretesting this, I recommend you start with MAY options. This way you can send test e-mails andconfirm, using your log files, that a TLS connection is being established and that the certificateis being verified with the specified remote host or domain before attempting to enforce the useof TLS. This limits the risk that you might suffer a mail outage because TLS was not able to beestablished and e-mail ceased to be sent.
Once you have created your tls_per_site file, then you can create a hash map from thatfile with the postmap command.
puppy# postmap hash:/etc/postfix/tls_per_site
This will create the hash map called tls_per_site.db in /etc/postfix. Finally, you thenneed to reload Postfix to update your configuration.
puppy# postfix reload
You should now be able to see in your mail logs when Postfix makes a TLS connection.Listing 8-14 shows some of the log entries generated when sending an e-mail [email protected] to [email protected], which are both TLS-capablesystems and are enforcing TLS.
Listing 8-14. Postfix TLS Log Entries
Apr 6 18:04:35 puppy postfix/smtp[13437]: ➥
setting up TLS connection to kitten.yourdomain.com
Apr 6 18:04:35 puppy postfix/smtp[13437]: ➥
Verified: subject_CN=kitten.yourdomain.com, issuer=puppy.yourdomain.com
Apr 6 18:04:35 puppy postfix/smtp[13437]: ➥
TLS connection established to puppy.yourdomain.com: TLSv1 with cipher ➥
EDH-RSA-DES-CBC3-SHA (168/168 bits)
Apr 6 18:04:35 puppy postfix/smtp[13437]: 75AB6231E4F: ➥
to=<[email protected]>, relay=kitten.yourdomain.com[192.168.0.2], ➥
delay=0, status=sent (250 2.0.0 i3686BnY019481 Message accepted for delivery)
This shows just one of the uses for TLS in Postfix. As you can with Sendmail, you couldalso use TLS in Postfix to allow relaying from clients using the smtpd_recipient_restrictionsoptions permit_tls_clientcerts and permit_tls_all_clientcerts.
4444c08_final.qxd 1/5/05 12:58 AM Page 386
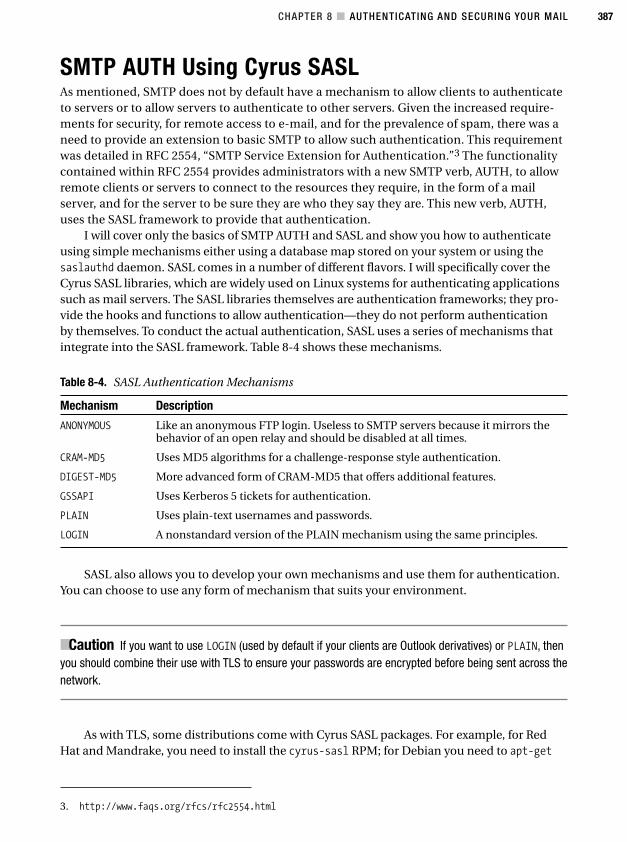
CHAPTER 8 ■ AUTHENTICATING AND SECURING YOUR MAIL 387
3. http://www.faqs.org/rfcs/rfc2554.html
SMTP AUTH Using Cyrus SASLAs mentioned, SMTP does not by default have a mechanism to allow clients to authenticateto servers or to allow servers to authenticate to other servers. Given the increased require-ments for security, for remote access to e-mail, and for the prevalence of spam, there was aneed to provide an extension to basic SMTP to allow such authentication. This requirementwas detailed in RFC 2554, “SMTP Service Extension for Authentication.”3 The functionalitycontained within RFC 2554 provides administrators with a new SMTP verb, AUTH, to allowremote clients or servers to connect to the resources they require, in the form of a mailserver, and for the server to be sure they are who they say they are. This new verb, AUTH,uses the SASL framework to provide that authentication.
I will cover only the basics of SMTP AUTH and SASL and show you how to authenticateusing simple mechanisms either using a database map stored on your system or using thesaslauthd daemon. SASL comes in a number of different flavors. I will specifically cover theCyrus SASL libraries, which are widely used on Linux systems for authenticating applicationssuch as mail servers. The SASL libraries themselves are authentication frameworks; they pro-vide the hooks and functions to allow authentication—they do not perform authenticationby themselves. To conduct the actual authentication, SASL uses a series of mechanisms thatintegrate into the SASL framework. Table 8-4 shows these mechanisms.
Table 8-4. SASL Authentication Mechanisms
Mechanism Description
ANONYMOUS Like an anonymous FTP login. Useless to SMTP servers because it mirrors thebehavior of an open relay and should be disabled at all times.
CRAM-MD5 Uses MD5 algorithms for a challenge-response style authentication.
DIGEST-MD5 More advanced form of CRAM-MD5 that offers additional features.
GSSAPI Uses Kerberos 5 tickets for authentication.
PLAIN Uses plain-text usernames and passwords.
LOGIN A nonstandard version of the PLAIN mechanism using the same principles.
SASL also allows you to develop your own mechanisms and use them for authentication.You can choose to use any form of mechanism that suits your environment.
■Caution If you want to use LOGIN (used by default if your clients are Outlook derivatives) or PLAIN, thenyou should combine their use with TLS to ensure your passwords are encrypted before being sent across thenetwork.
As with TLS, some distributions come with Cyrus SASL packages. For example, for RedHat and Mandrake, you need to install the cyrus-sasl RPM; for Debian you need to apt-get
4444c08_final.qxd 1/5/05 12:58 AM Page 387
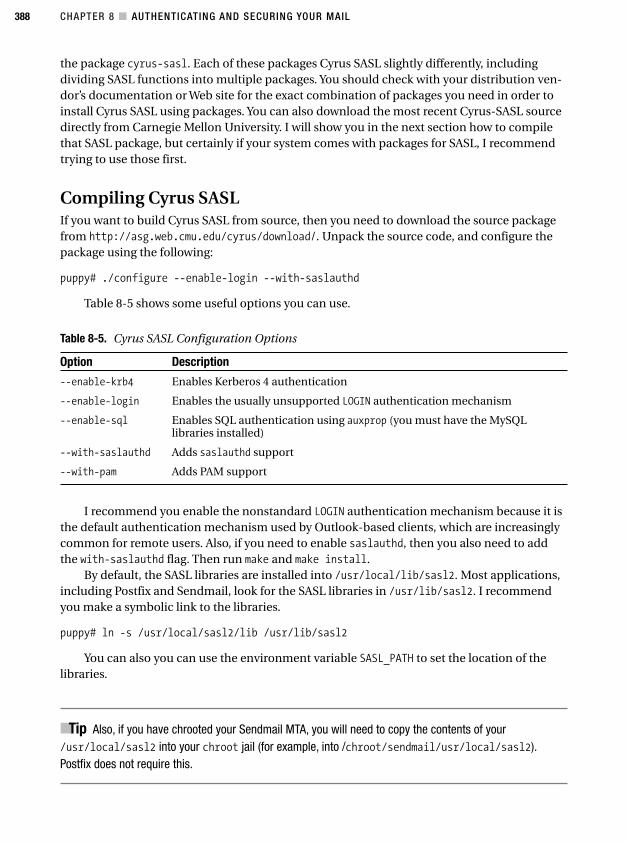
CHAPTER 8 ■ AUTHENTICATING AND SECURING YOUR MAIL 388
the package cyrus-sasl. Each of these packages Cyrus SASL slightly differently, includingdividing SASL functions into multiple packages. You should check with your distribution ven-dor’s documentation or Web site for the exact combination of packages you need in order toinstall Cyrus SASL using packages. You can also download the most recent Cyrus-SASL sourcedirectly from Carnegie Mellon University. I will show you in the next section how to compilethat SASL package, but certainly if your system comes with packages for SASL, I recommendtrying to use those first.
Compiling Cyrus SASLIf you want to build Cyrus SASL from source, then you need to download the source packagefrom http://asg.web.cmu.edu/cyrus/download/. Unpack the source code, and configure thepackage using the following:
puppy# ./configure --enable-login --with-saslauthd
Table 8-5 shows some useful options you can use.
Table 8-5. Cyrus SASL Configuration Options
Option Description
--enable-krb4 Enables Kerberos 4 authentication
--enable-login Enables the usually unsupported LOGIN authentication mechanism
--enable-sql Enables SQL authentication using auxprop (you must have the MySQLlibraries installed)
--with-saslauthd Adds saslauthd support
--with-pam Adds PAM support
I recommend you enable the nonstandard LOGIN authentication mechanism because it isthe default authentication mechanism used by Outlook-based clients, which are increasinglycommon for remote users. Also, if you need to enable saslauthd, then you also need to addthe with-saslauthd flag. Then run make and make install.
By default, the SASL libraries are installed into /usr/local/lib/sasl2. Most applications,including Postfix and Sendmail, look for the SASL libraries in /usr/lib/sasl2. I recommendyou make a symbolic link to the libraries.
puppy# ln -s /usr/local/sasl2/lib /usr/lib/sasl2
You can also you can use the environment variable SASL_PATH to set the location of thelibraries.
■Tip Also, if you have chrooted your Sendmail MTA, you will need to copy the contents of your/usr/local/sasl2 into your chroot jail (for example, into /chroot/sendmail/usr/local/sasl2).Postfix does not require this.
4444c08_final.qxd 1/5/05 12:58 AM Page 388
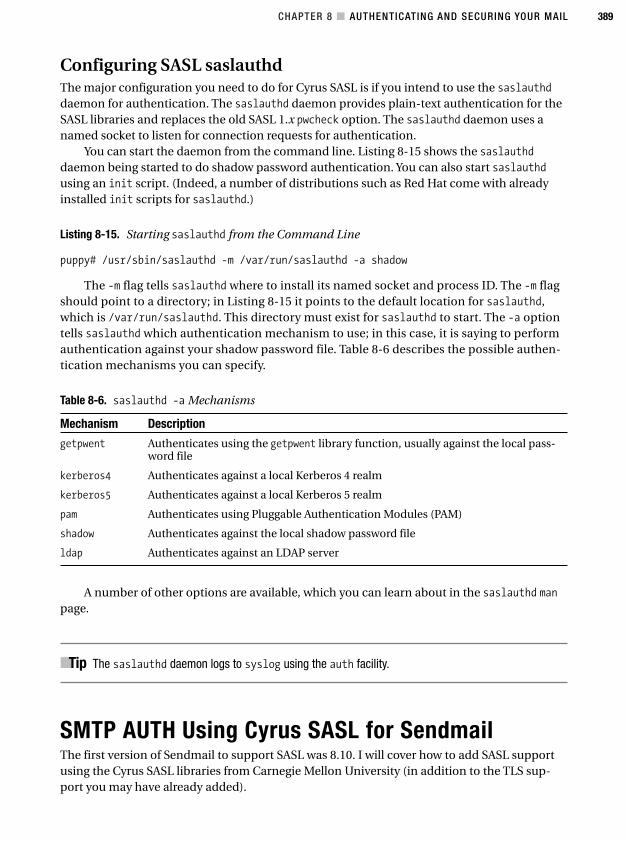
CHAPTER 8 ■ AUTHENTICATING AND SECURING YOUR MAIL 389
Configuring SASL saslauthdThe major configuration you need to do for Cyrus SASL is if you intend to use the saslauthddaemon for authentication. The saslauthd daemon provides plain-text authentication for theSASL libraries and replaces the old SASL 1.x pwcheck option. The saslauthd daemon uses anamed socket to listen for connection requests for authentication.
You can start the daemon from the command line. Listing 8-15 shows the saslauthddaemon being started to do shadow password authentication. You can also start saslauthdusing an init script. (Indeed, a number of distributions such as Red Hat come with alreadyinstalled init scripts for saslauthd.)
Listing 8-15. Starting saslauthd from the Command Line
puppy# /usr/sbin/saslauthd -m /var/run/saslauthd -a shadow
The -m flag tells saslauthd where to install its named socket and process ID. The -m flagshould point to a directory; in Listing 8-15 it points to the default location for saslauthd,which is /var/run/saslauthd. This directory must exist for saslauthd to start. The -a optiontells saslauthd which authentication mechanism to use; in this case, it is saying to performauthentication against your shadow password file. Table 8-6 describes the possible authen-tication mechanisms you can specify.
Table 8-6. saslauthd -a Mechanisms
Mechanism Description
getpwent Authenticates using the getpwent library function, usually against the local pass-word file
kerberos4 Authenticates against a local Kerberos 4 realm
kerberos5 Authenticates against a local Kerberos 5 realm
pam Authenticates using Pluggable Authentication Modules (PAM)
shadow Authenticates against the local shadow password file
ldap Authenticates against an LDAP server
A number of other options are available, which you can learn about in the saslauthd manpage.
■Tip The saslauthd daemon logs to syslog using the auth facility.
SMTP AUTH Using Cyrus SASL for SendmailThe first version of Sendmail to support SASL was 8.10. I will cover how to add SASL supportusing the Cyrus SASL libraries from Carnegie Mellon University (in addition to the TLS sup-port you may have already added).
4444c08_final.qxd 1/5/05 12:58 AM Page 389
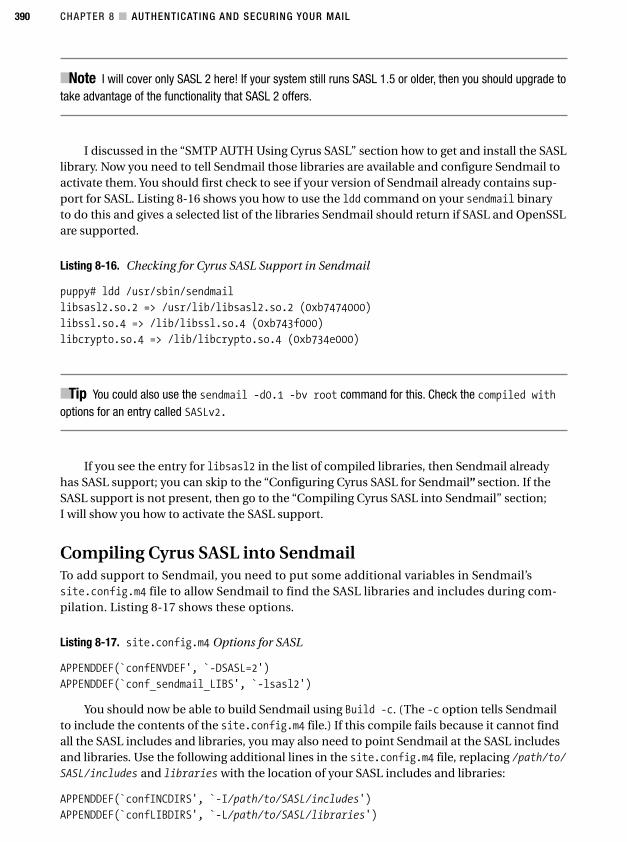
CHAPTER 8 ■ AUTHENTICATING AND SECURING YOUR MAIL 390
■Note I will cover only SASL 2 here! If your system still runs SASL 1.5 or older, then you should upgrade totake advantage of the functionality that SASL 2 offers.
I discussed in the “SMTP AUTH Using Cyrus SASL” section how to get and install the SASLlibrary. Now you need to tell Sendmail those libraries are available and configure Sendmail toactivate them. You should first check to see if your version of Sendmail already contains sup-port for SASL. Listing 8-16 shows you how to use the ldd command on your sendmail binaryto do this and gives a selected list of the libraries Sendmail should return if SASL and OpenSSLare supported.
Listing 8-16. Checking for Cyrus SASL Support in Sendmail
puppy# ldd /usr/sbin/sendmail
libsasl2.so.2 => /usr/lib/libsasl2.so.2 (0xb7474000)
libssl.so.4 => /lib/libssl.so.4 (0xb743f000)
libcrypto.so.4 => /lib/libcrypto.so.4 (0xb734e000)
■Tip You could also use the sendmail -d0.1 -bv root command for this. Check the compiled withoptions for an entry called SASLv2.
If you see the entry for libsasl2 in the list of compiled libraries, then Sendmail alreadyhas SASL support; you can skip to the “Configuring Cyrus SASL for Sendmail” section. If theSASL support is not present, then go to the “Compiling Cyrus SASL into Sendmail” section;I will show you how to activate the SASL support.
Compiling Cyrus SASL into SendmailTo add support to Sendmail, you need to put some additional variables in Sendmail’ssite.config.m4 file to allow Sendmail to find the SASL libraries and includes during com-pilation. Listing 8-17 shows these options.
Listing 8-17. site.config.m4 Options for SASL
APPENDDEF(`confENVDEF', `-DSASL=2')
APPENDDEF(`conf_sendmail_LIBS', `-lsasl2')
You should now be able to build Sendmail using Build -c. (The -c option tells Sendmailto include the contents of the site.config.m4 file.) If this compile fails because it cannot findall the SASL includes and libraries, you may also need to point Sendmail at the SASL includesand libraries. Use the following additional lines in the site.config.m4 file, replacing /path/to/SASL/includes and libraries with the location of your SASL includes and libraries:
APPENDDEF(`confINCDIRS', `-I/path/to/SASL/includes')
APPENDDEF(`confLIBDIRS', `-L/path/to/SASL/libraries')
4444c08_final.qxd 1/5/05 12:58 AM Page 390
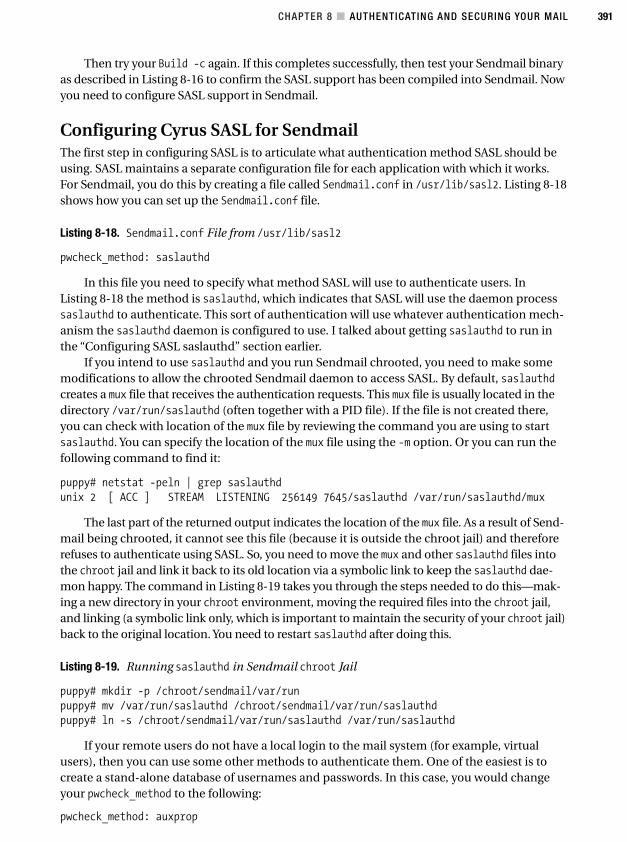
CHAPTER 8 ■ AUTHENTICATING AND SECURING YOUR MAIL 391
Then try your Build -c again. If this completes successfully, then test your Sendmail binaryas described in Listing 8-16 to confirm the SASL support has been compiled into Sendmail. Nowyou need to configure SASL support in Sendmail.
Configuring Cyrus SASL for SendmailThe first step in configuring SASL is to articulate what authentication method SASL should beusing. SASL maintains a separate configuration file for each application with which it works.For Sendmail, you do this by creating a file called Sendmail.conf in /usr/lib/sasl2. Listing 8-18shows how you can set up the Sendmail.conf file.
Listing 8-18. Sendmail.conf File from /usr/lib/sasl2
pwcheck_method: saslauthd
In this file you need to specify what method SASL will use to authenticate users. InListing 8-18 the method is saslauthd, which indicates that SASL will use the daemon processsaslauthd to authenticate. This sort of authentication will use whatever authentication mech-anism the saslauthd daemon is configured to use. I talked about getting saslauthd to run inthe “Configuring SASL saslauthd” section earlier.
If you intend to use saslauthd and you run Sendmail chrooted, you need to make somemodifications to allow the chrooted Sendmail daemon to access SASL. By default, saslauthdcreates a mux file that receives the authentication requests. This mux file is usually located in thedirectory /var/run/saslauthd (often together with a PID file). If the file is not created there,you can check with location of the mux file by reviewing the command you are using to startsaslauthd. You can specify the location of the mux file using the -m option. Or you can run thefollowing command to find it:
puppy# netstat -peln | grep saslauthd
unix 2 [ ACC ] STREAM LISTENING 256149 7645/saslauthd /var/run/saslauthd/mux
The last part of the returned output indicates the location of the mux file. As a result of Send-mail being chrooted, it cannot see this file (because it is outside the chroot jail) and thereforerefuses to authenticate using SASL. So, you need to move the mux and other saslauthd files intothe chroot jail and link it back to its old location via a symbolic link to keep the saslauthd dae-mon happy. The command in Listing 8-19 takes you through the steps needed to do this—mak-ing a new directory in your chroot environment, moving the required files into the chroot jail,and linking (a symbolic link only, which is important to maintain the security of your chroot jail)back to the original location. You need to restart saslauthd after doing this.
Listing 8-19. Running saslauthd in Sendmail chroot Jail
puppy# mkdir -p /chroot/sendmail/var/run
puppy# mv /var/run/saslauthd /chroot/sendmail/var/run/saslauthd
puppy# ln -s /chroot/sendmail/var/run/saslauthd /var/run/saslauthd
If your remote users do not have a local login to the mail system (for example, virtualusers), then you can use some other methods to authenticate them. One of the easiest is tocreate a stand-alone database of usernames and passwords. In this case, you would changeyour pwcheck_method to the following:
pwcheck_method: auxprop
4444c08_final.qxd 1/5/05 12:58 AM Page 391
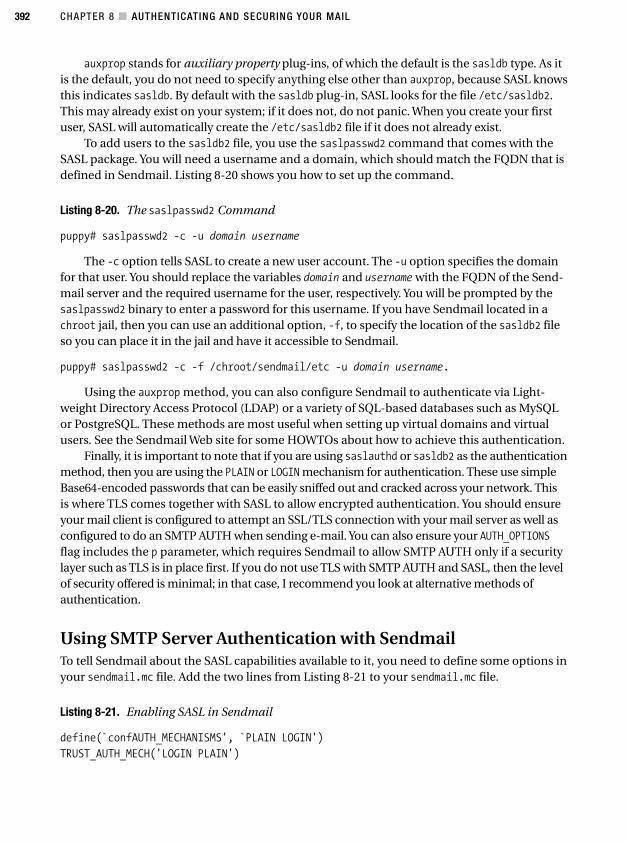
CHAPTER 8 ■ AUTHENTICATING AND SECURING YOUR MAIL 392
auxprop stands for auxiliary property plug-ins, of which the default is the sasldb type. As itis the default, you do not need to specify anything else other than auxprop, because SASL knowsthis indicates sasldb. By default with the sasldb plug-in, SASL looks for the file /etc/sasldb2.This may already exist on your system; if it does not, do not panic. When you create your firstuser, SASL will automatically create the /etc/sasldb2 file if it does not already exist.
To add users to the sasldb2 file, you use the saslpasswd2 command that comes with theSASL package. You will need a username and a domain, which should match the FQDN that isdefined in Sendmail. Listing 8-20 shows you how to set up the command.
Listing 8-20. The saslpasswd2 Command
puppy# saslpasswd2 -c -u domain username
The -c option tells SASL to create a new user account. The -u option specifies the domainfor that user. You should replace the variables domain and username with the FQDN of the Send-mail server and the required username for the user, respectively. You will be prompted by thesaslpasswd2 binary to enter a password for this username. If you have Sendmail located in achroot jail, then you can use an additional option, -f, to specify the location of the sasldb2 fileso you can place it in the jail and have it accessible to Sendmail.
puppy# saslpasswd2 -c -f /chroot/sendmail/etc -u domain username.
Using the auxprop method, you can also configure Sendmail to authenticate via Light-weight Directory Access Protocol (LDAP) or a variety of SQL-based databases such as MySQLor PostgreSQL. These methods are most useful when setting up virtual domains and virtualusers. See the Sendmail Web site for some HOWTOs about how to achieve this authentication.
Finally, it is important to note that if you are using saslauthd or sasldb2 as the authenticationmethod, then you are using the PLAIN or LOGIN mechanism for authentication. These use simpleBase64-encoded passwords that can be easily sniffed out and cracked across your network. Thisis where TLS comes together with SASL to allow encrypted authentication. You should ensureyour mail client is configured to attempt an SSL/TLS connection with your mail server as well asconfigured to do an SMTP AUTH when sending e-mail. You can also ensure your AUTH_OPTIONSflag includes the p parameter, which requires Sendmail to allow SMTP AUTH only if a securitylayer such as TLS is in place first. If you do not use TLS with SMTP AUTH and SASL, then the levelof security offered is minimal; in that case, I recommend you look at alternative methods ofauthentication.
Using SMTP Server Authentication with SendmailTo tell Sendmail about the SASL capabilities available to it, you need to define some options inyour sendmail.mc file. Add the two lines from Listing 8-21 to your sendmail.mc file.
Listing 8-21. Enabling SASL in Sendmail
define(`confAUTH_MECHANISMS', `PLAIN LOGIN')
TRUST_AUTH_MECH('LOGIN PLAIN')
4444c08_final.qxd 1/5/05 12:58 AM Page 392
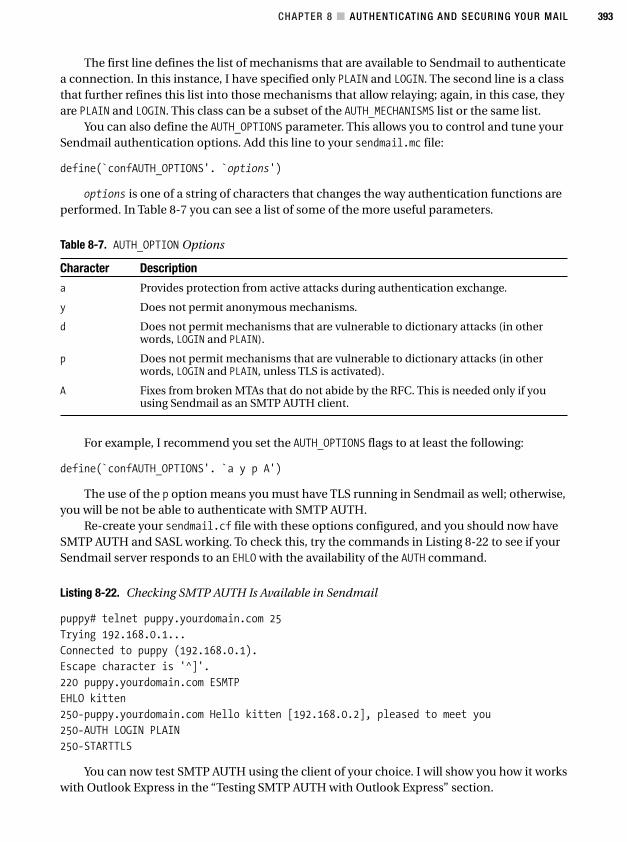
CHAPTER 8 ■ AUTHENTICATING AND SECURING YOUR MAIL 393
The first line defines the list of mechanisms that are available to Sendmail to authenticatea connection. In this instance, I have specified only PLAIN and LOGIN. The second line is a classthat further refines this list into those mechanisms that allow relaying; again, in this case, theyare PLAIN and LOGIN. This class can be a subset of the AUTH_MECHANISMS list or the same list.
You can also define the AUTH_OPTIONS parameter. This allows you to control and tune yourSendmail authentication options. Add this line to your sendmail.mc file:
define(`confAUTH_OPTIONS'. `options')
options is one of a string of characters that changes the way authentication functions areperformed. In Table 8-7 you can see a list of some of the more useful parameters.
Table 8-7. AUTH_OPTION Options
Character Description
a Provides protection from active attacks during authentication exchange.
y Does not permit anonymous mechanisms.
d Does not permit mechanisms that are vulnerable to dictionary attacks (in otherwords, LOGIN and PLAIN).
p Does not permit mechanisms that are vulnerable to dictionary attacks (in otherwords, LOGIN and PLAIN, unless TLS is activated).
A Fixes from broken MTAs that do not abide by the RFC. This is needed only if youusing Sendmail as an SMTP AUTH client.
For example, I recommend you set the AUTH_OPTIONS flags to at least the following:
define(`confAUTH_OPTIONS'. `a y p A')
The use of the p option means you must have TLS running in Sendmail as well; otherwise,you will be not be able to authenticate with SMTP AUTH.
Re-create your sendmail.cf file with these options configured, and you should now haveSMTP AUTH and SASL working. To check this, try the commands in Listing 8-22 to see if yourSendmail server responds to an EHLO with the availability of the AUTH command.
Listing 8-22. Checking SMTP AUTH Is Available in Sendmail
puppy# telnet puppy.yourdomain.com 25
Trying 192.168.0.1...
Connected to puppy (192.168.0.1).
Escape character is '^]'.
220 puppy.yourdomain.com ESMTP
EHLO kitten
250-puppy.yourdomain.com Hello kitten [192.168.0.2], pleased to meet you
250-AUTH LOGIN PLAIN
250-STARTTLS
You can now test SMTP AUTH using the client of your choice. I will show you how it workswith Outlook Express in the “Testing SMTP AUTH with Outlook Express” section.
4444c08_final.qxd 1/5/05 12:58 AM Page 393
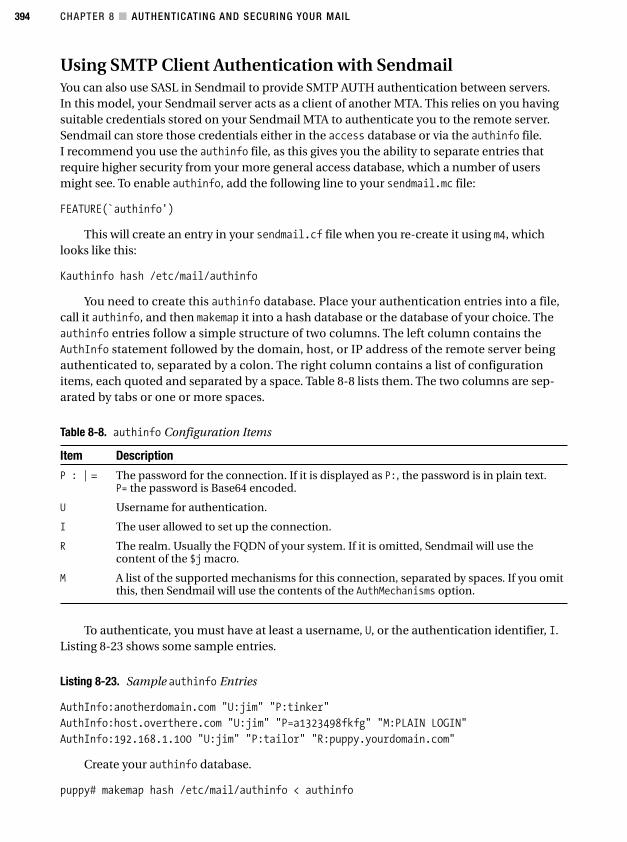
CHAPTER 8 ■ AUTHENTICATING AND SECURING YOUR MAIL 394
Using SMTP Client Authentication with SendmailYou can also use SASL in Sendmail to provide SMTP AUTH authentication between servers.In this model, your Sendmail server acts as a client of another MTA. This relies on you havingsuitable credentials stored on your Sendmail MTA to authenticate you to the remote server.Sendmail can store those credentials either in the access database or via the authinfo file.I recommend you use the authinfo file, as this gives you the ability to separate entries thatrequire higher security from your more general access database, which a number of usersmight see. To enable authinfo, add the following line to your sendmail.mc file:
FEATURE(`authinfo')
This will create an entry in your sendmail.cf file when you re-create it using m4, whichlooks like this:
Kauthinfo hash /etc/mail/authinfo
You need to create this authinfo database. Place your authentication entries into a file,call it authinfo, and then makemap it into a hash database or the database of your choice. Theauthinfo entries follow a simple structure of two columns. The left column contains theAuthInfo statement followed by the domain, host, or IP address of the remote server beingauthenticated to, separated by a colon. The right column contains a list of configurationitems, each quoted and separated by a space. Table 8-8 lists them. The two columns are sep-arated by tabs or one or more spaces.
Table 8-8. authinfo Configuration Items
Item Description
P : | = The password for the connection. If it is displayed as P:, the password is in plain text. P= the password is Base64 encoded.
U Username for authentication.
I The user allowed to set up the connection.
R The realm. Usually the FQDN of your system. If it is omitted, Sendmail will use thecontent of the $j macro.
M A list of the supported mechanisms for this connection, separated by spaces. If you omitthis, then Sendmail will use the contents of the AuthMechanisms option.
To authenticate, you must have at least a username, U, or the authentication identifier, I.Listing 8-23 shows some sample entries.
Listing 8-23. Sample authinfo Entries
AuthInfo:anotherdomain.com "U:jim" "P:tinker"
AuthInfo:host.overthere.com "U:jim" "P=a1323498fkfg" "M:PLAIN LOGIN"
AuthInfo:192.168.1.100 "U:jim" "P:tailor" "R:puppy.yourdomain.com"
Create your authinfo database.
puppy# makemap hash /etc/mail/authinfo < authinfo
4444c08_final.qxd 1/5/05 12:58 AM Page 394
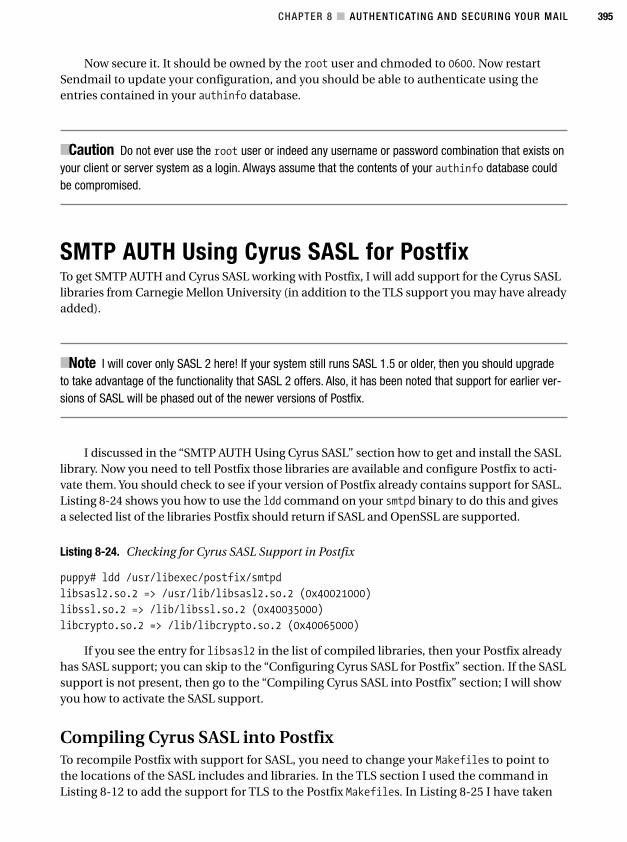
CHAPTER 8 ■ AUTHENTICATING AND SECURING YOUR MAIL 395
Now secure it. It should be owned by the root user and chmoded to 0600. Now restartSendmail to update your configuration, and you should be able to authenticate using theentries contained in your authinfo database.
■Caution Do not ever use the root user or indeed any username or password combination that exists onyour client or server system as a login. Always assume that the contents of your authinfo database couldbe compromised.
SMTP AUTH Using Cyrus SASL for PostfixTo get SMTP AUTH and Cyrus SASL working with Postfix, I will add support for the Cyrus SASLlibraries from Carnegie Mellon University (in addition to the TLS support you may have alreadyadded).
■Note I will cover only SASL 2 here! If your system still runs SASL 1.5 or older, then you should upgradeto take advantage of the functionality that SASL 2 offers. Also, it has been noted that support for earlier ver-sions of SASL will be phased out of the newer versions of Postfix.
I discussed in the “SMTP AUTH Using Cyrus SASL” section how to get and install the SASLlibrary. Now you need to tell Postfix those libraries are available and configure Postfix to acti-vate them. You should check to see if your version of Postfix already contains support for SASL.Listing 8-24 shows you how to use the ldd command on your smtpd binary to do this and givesa selected list of the libraries Postfix should return if SASL and OpenSSL are supported.
Listing 8-24. Checking for Cyrus SASL Support in Postfix
puppy# ldd /usr/libexec/postfix/smtpd
libsasl2.so.2 => /usr/lib/libsasl2.so.2 (0x40021000)
libssl.so.2 => /lib/libssl.so.2 (0x40035000)
libcrypto.so.2 => /lib/libcrypto.so.2 (0x40065000)
If you see the entry for libsasl2 in the list of compiled libraries, then your Postfix alreadyhas SASL support; you can skip to the “Configuring Cyrus SASL for Postfix” section. If the SASLsupport is not present, then go to the “Compiling Cyrus SASL into Postfix” section; I will showyou how to activate the SASL support.
Compiling Cyrus SASL into PostfixTo recompile Postfix with support for SASL, you need to change your Makefiles to point tothe locations of the SASL includes and libraries. In the TLS section I used the command inListing 8-12 to add the support for TLS to the Postfix Makefiles. In Listing 8-25 I have taken
4444c08_final.qxd 1/5/05 12:58 AM Page 395

CHAPTER 8 ■ AUTHENTICATING AND SECURING YOUR MAIL 396
that Makefile update and added support for SASL as well. As with Listing 8-12, the exact loca-tion of the OpenSSL and Cyrus SASL includes and libraries may be different, so you will needto adjust Listing 8-25 to match your environment.
Listing 8-25. Adding SASL and OpenSSL to the Postfix Makefiles
make makefiles CCARGS="-DUSE_SASL_AUTH -I/usr/include/sasl ➥
-DHAS_SSL -I/usr/include/openssl" AUXLIBS="-lsasl2 -lssl -lcrypto"
Then run make and make upgrade if you already have Postfix installed, or run make installfor a new install of the Postfix source. Now if you run ldd on the smtpd binary, you should seethat libsasl2 is included in the list of libraries. If Postfix is already running, then you will alsoneed to restart it.
Configuring Cyrus SASL for PostfixThe first step in configuring SASL is to articulate what authentication method SASL should beusing. SASL maintains a separate configuration file for each application with which it works.For Postfix you do this by creating a file called smtpd.conf in /usr/lib/sasl2. Listing 8-26shows a typical file.
Listing 8-26. smtpd.conf File from /usr/lib/sasl2
pwcheck_method: saslauthd
In this file you need to specify what method SASL will use to authenticate users. InListing 8-26 the method is saslauthd, which indicates that SASL will use the daemon processsaslauthd to authenticate against your passwd file (which is rare these days, as most systemsuse shadow passwords), against shadow passwords, or via PAM. This sort of authenticationuses your existing user and password system to verify users. This implies that the remoteusers have a login to the mail system that Postfix and SASL are able to authenticate. I earlierdiscussed in the “Configuring SASL saslauthd” section how to get saslauthd running
If you intend to use saslauthd and you run Postfix chrooted, you need to make somemodifications to allow the chrooted Postfix daemon to access SASL. By default saslauthdcreates a mux file that receives the authentication requests. This mux file is usually located inthe directory /var/run/saslauthd (often with a PID file). If the file is not created there, youcan check the location of the mux file by reviewing the command you are using to startsaslauthd. You can specify the location of the mux file by using the -m option. Or you canrun this command to find it:
puppy# netstat -peln | grep saslauthd
unix 2 [ ACC ] STREAM LISTENING 256149 7645/saslauthd /var/run/saslauthd/mux
The last part of the returned output indicates the location of the mux file. As a result ofPostfix being chrooted, it cannot see this file (because it is outside the chroot jail) and there-fore refuses to authenticate using SASL. So, you need to move the mux file and other saslauthdfiles into the chroot jail and link it back to its old location via a symbolic link to keep thesaslauthd daemon happy. The command in Listing 8-27 takes you through the steps neededto do this—making a new directory in your chroot environment (I have assumed you haveinstalled Postfix in the default chroot location, but you can change this to your Postfix chroot
4444c08_final.qxd 1/5/05 12:58 AM Page 396
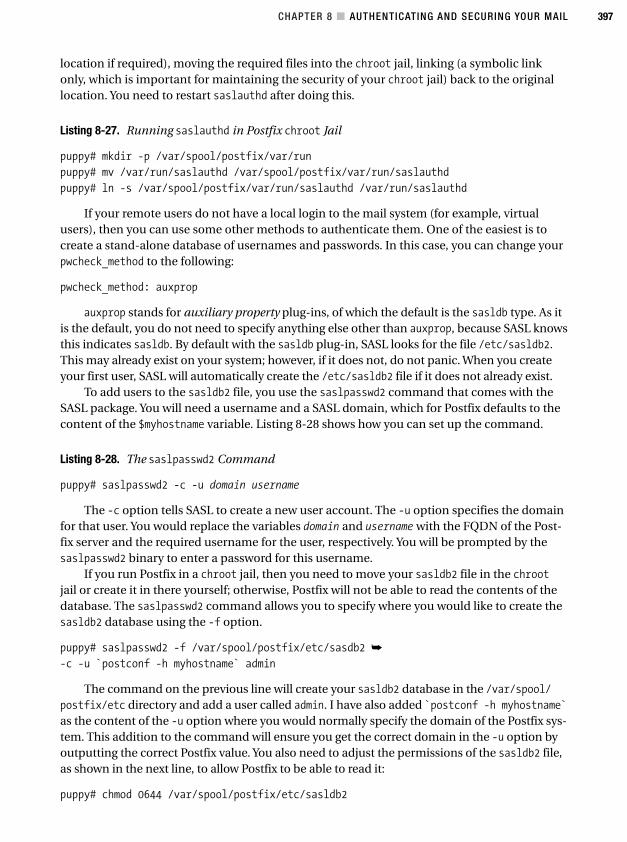
CHAPTER 8 ■ AUTHENTICATING AND SECURING YOUR MAIL 397
location if required), moving the required files into the chroot jail, linking (a symbolic linkonly, which is important for maintaining the security of your chroot jail) back to the originallocation. You need to restart saslauthd after doing this.
Listing 8-27. Running saslauthd in Postfix chroot Jail
puppy# mkdir -p /var/spool/postfix/var/run
puppy# mv /var/run/saslauthd /var/spool/postfix/var/run/saslauthd
puppy# ln -s /var/spool/postfix/var/run/saslauthd /var/run/saslauthd
If your remote users do not have a local login to the mail system (for example, virtualusers), then you can use some other methods to authenticate them. One of the easiest is tocreate a stand-alone database of usernames and passwords. In this case, you can change yourpwcheck_method to the following:
pwcheck_method: auxprop
auxprop stands for auxiliary property plug-ins, of which the default is the sasldb type. As itis the default, you do not need to specify anything else other than auxprop, because SASL knowsthis indicates sasldb. By default with the sasldb plug-in, SASL looks for the file /etc/sasldb2.This may already exist on your system; however, if it does not, do not panic. When you createyour first user, SASL will automatically create the /etc/sasldb2 file if it does not already exist.
To add users to the sasldb2 file, you use the saslpasswd2 command that comes with theSASL package. You will need a username and a SASL domain, which for Postfix defaults to thecontent of the $myhostname variable. Listing 8-28 shows how you can set up the command.
Listing 8-28. The saslpasswd2 Command
puppy# saslpasswd2 -c -u domain username
The -c option tells SASL to create a new user account. The -u option specifies the domainfor that user. You would replace the variables domain and username with the FQDN of the Post-fix server and the required username for the user, respectively. You will be prompted by thesaslpasswd2 binary to enter a password for this username.
If you run Postfix in a chroot jail, then you need to move your sasldb2 file in the chrootjail or create it in there yourself; otherwise, Postfix will not be able to read the contents of thedatabase. The saslpasswd2 command allows you to specify where you would like to create thesasldb2 database using the -f option.
puppy# saslpasswd2 -f /var/spool/postfix/etc/sasdb2 ➥
-c -u `postconf -h myhostname` admin
The command on the previous line will create your sasldb2 database in the /var/spool/postfix/etc directory and add a user called admin. I have also added `postconf -h myhostname`as the content of the -u option where you would normally specify the domain of the Postfix sys-tem. This addition to the command will ensure you get the correct domain in the -u option byoutputting the correct Postfix value. You also need to adjust the permissions of the sasldb2 file,as shown in the next line, to allow Postfix to be able to read it:
puppy# chmod 0644 /var/spool/postfix/etc/sasldb2
4444c08_final.qxd 1/5/05 12:58 AM Page 397
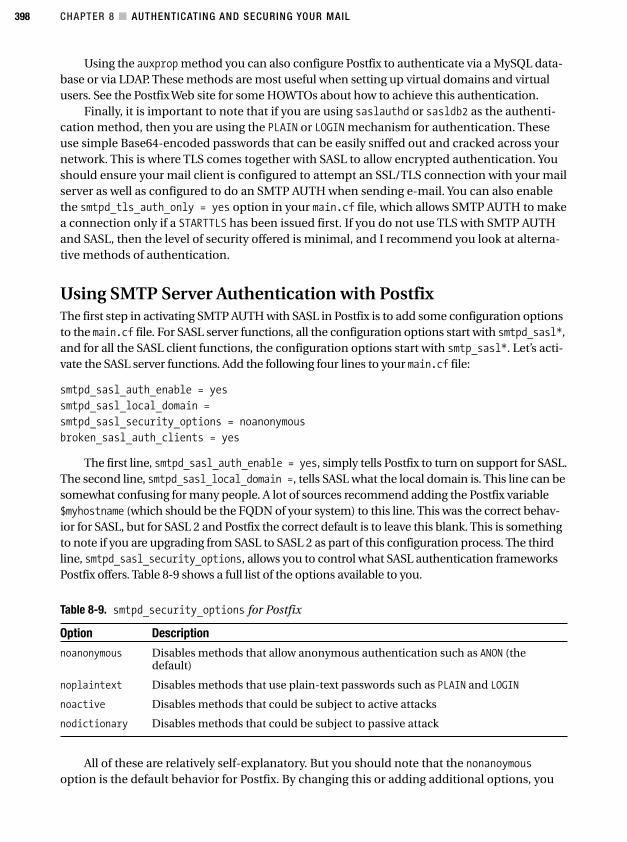
CHAPTER 8 ■ AUTHENTICATING AND SECURING YOUR MAIL 398
Using the auxprop method you can also configure Postfix to authenticate via a MySQL data-base or via LDAP. These methods are most useful when setting up virtual domains and virtualusers. See the Postfix Web site for some HOWTOs about how to achieve this authentication.
Finally, it is important to note that if you are using saslauthd or sasldb2 as the authenti-cation method, then you are using the PLAIN or LOGIN mechanism for authentication. Theseuse simple Base64-encoded passwords that can be easily sniffed out and cracked across yournetwork. This is where TLS comes together with SASL to allow encrypted authentication. Youshould ensure your mail client is configured to attempt an SSL/TLS connection with your mailserver as well as configured to do an SMTP AUTH when sending e-mail. You can also enablethe smtpd_tls_auth_only = yes option in your main.cf file, which allows SMTP AUTH to makea connection only if a STARTTLS has been issued first. If you do not use TLS with SMTP AUTHand SASL, then the level of security offered is minimal, and I recommend you look at alterna-tive methods of authentication.
Using SMTP Server Authentication with PostfixThe first step in activating SMTP AUTH with SASL in Postfix is to add some configuration optionsto the main.cf file. For SASL server functions, all the configuration options start with smtpd_sasl*,and for all the SASL client functions, the configuration options start with smtp_sasl*. Let’s acti-vate the SASL server functions. Add the following four lines to your main.cf file:
smtpd_sasl_auth_enable = yes
smtpd_sasl_local_domain =
smtpd_sasl_security_options = noanonymous
broken_sasl_auth_clients = yes
The first line, smtpd_sasl_auth_enable = yes, simply tells Postfix to turn on support for SASL.The second line, smtpd_sasl_local_domain =, tells SASL what the local domain is. This line can besomewhat confusing for many people. A lot of sources recommend adding the Postfix variable$myhostname (which should be the FQDN of your system) to this line. This was the correct behav-ior for SASL, but for SASL 2 and Postfix the correct default is to leave this blank. This is somethingto note if you are upgrading from SASL to SASL 2 as part of this configuration process. The thirdline, smtpd_sasl_security_options, allows you to control what SASL authentication frameworksPostfix offers. Table 8-9 shows a full list of the options available to you.
Table 8-9. smtpd_security_options for Postfix
Option Description
noanonymous Disables methods that allow anonymous authentication such as ANON (thedefault)
noplaintext Disables methods that use plain-text passwords such as PLAIN and LOGIN
noactive Disables methods that could be subject to active attacks
nodictionary Disables methods that could be subject to passive attack
All of these are relatively self-explanatory. But you should note that the nonanoymousoption is the default behavior for Postfix. By changing this or adding additional options, you
4444c08_final.qxd 1/5/05 12:58 AM Page 398
CHAPTER 8 ■ AUTHENTICATING AND SECURING YOUR MAIL 399
are overriding that default. Thus, I recommend you always leave noanonymous at the end of thelist, as shown in the next line:
smtpd_sasl_security_options = noactive, noanonymous
The previous line is useful if you have users with older e-mail clients. By default, Postfixpresents the AUTH command as per the RFC. Some older broken clients (for example, Outlookversions prior to 5 suffer from this problem) expect the command to look like AUTH=. Settingthis option to yes tells Postfix to present AUTH both ways and enables these older clients touse SMTP AUTH correctly. I recommend you use it because it has no ill effects for Postfix, andit means if there are any older clients out in your network, SMTP AUTH will work for them.
Now if you restart Postfix, you will be able to Telnet your mail server and see the AUTHstatement and any SASL authentication frameworks that are supported.
puppy# telnet puppy.yourdomain.com 25
Trying 192.168.0.1...
Connected to puppy.
Escape character is '^]'.
220 puppy.yourdomain.com
EHLO kitten
250-puppy.yourdomain.com
250-STARTTLS
250-AUTH PLAIN LOGIN GSSAPI DIGEST-MD5 CRAM-MD5
■Caution If you have smtpd_tls_auth_only = yes set in your main.cf file, you will not see theAUTH message presented, because you have not initiated STARTTLS. If you intend to use thesmtpd_tls_auth_only option, then I recommend you turn it off during your initial testing.
As you can see, AUTH is available and is advertising the PLAIN, LOGIN, GSSAPI, DIGEST-MD5,and CRAM-MD5 authentication methods.
Now to actually use SASL and SMTP AUTH to authenticate relaying, you need to adjustyour smtpd_recipient_restrictions so Postfix uses the results of SMTP AUTH to authenticateusers. Find the smtpd_recipient_restrictions option in Postfix. By adding the optionpermit_sasl_authenticated, you allow any client authenticated with SASL to relay using yourmail server. Listing 8-29 shows the restrictions option with SASL authentication permitted.
Listing 8-29. smtpd_recipient_restrictions in Postfix
smtpd_recipient_restrictions =
permit_mynetworks,
permit_sasl_authenticated,
reject_unauth_destination
4444c08_final.qxd 1/5/05 12:58 AM Page 399
CHAPTER 8 ■ AUTHENTICATING AND SECURING YOUR MAIL 400
■Tip Always remember to end your restrictions with a rejection, here reject_unauth_destination,to ensure that the default behavior is to reject relaying.
Finally, restart Postfix.
Using SMTP Client Authentication with PostfixYou may want to enable server-to-server relaying using SMTP AUTH and SASL. This is handleda bit differently than authorizing client-to-server relaying, because your Postfix server needs toprovide a username and password to the remote server to allow it to authenticate your mailserver. I provide these usernames and passwords to Postfix in the form of a postmap-createdpassword file.
First, enable client-based SMTP AUTH and SASL in Postfix and use thesmtp_sasl_password_maps option to tell Postfix where to find your password file. Listing 8-30shows the required commands.
Listing 8-30. Enabling Client SMTP AUTH
smtp_sasl_auth_enable = yes
smtp_sasl_password_maps = hash:/etc/postfix/sasl_client_passwd
Second, create your password file. You will need to specify a domain and username:passwordcombination. The next line shows a username and password for the anotherdomain.com domainto be used when trying to relay through to that domain.
anotherdomain.com admin:secretpassword
Then run postmap on the file, like so:
puppy# postmap /etc/postfix/sasl_client_passwd
and reload Postfix. Now if you were to send a message to a user at anotherdomain.com, yourPostfix system would offer the credentials of admin with a password of secretpassword.
Testing SMTP AUTH with Outlook ExpressTo show how to test SMTP AUTH, I will set up an Outlook Express client to use SMTP AUTH tolog in with a login name and password and perform a relay. If you do not have Outlook Express,you can use any e-mail client that is capable of authenticating outbound connections. OpenOutlook Express, and select Tools ➤ Accounts... to edit the properties of an e-mail account. Clickthe Servers tab. At the bottom of this tab is an entry under Outgoing Mail Server. Highlight theoption for My Server Requires Authentication, and click the Settings... button (see Figure 8-1).
4444c08_final.qxd 1/5/05 12:58 AM Page 400
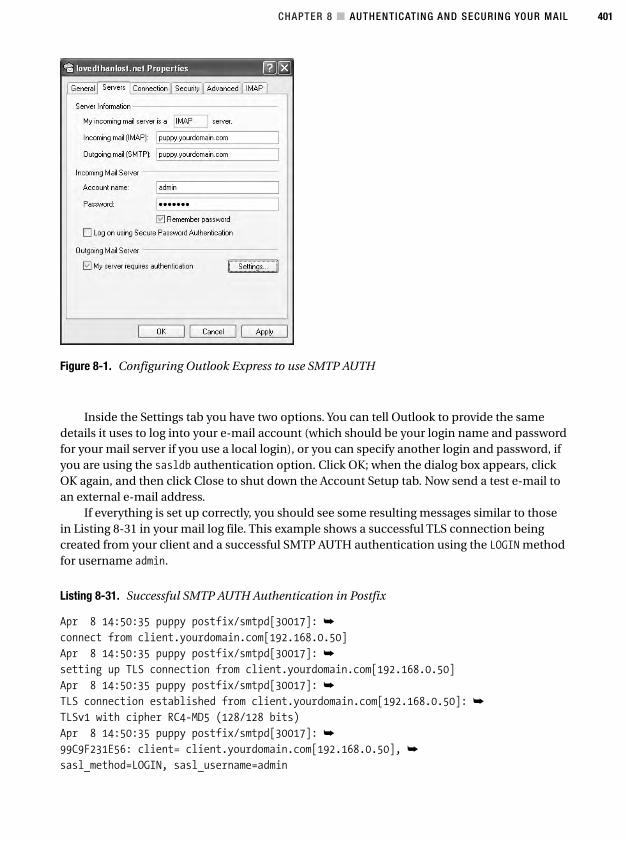
CHAPTER 8 ■ AUTHENTICATING AND SECURING YOUR MAIL 401
Inside the Settings tab you have two options. You can tell Outlook to provide the samedetails it uses to log into your e-mail account (which should be your login name and passwordfor your mail server if you use a local login), or you can specify another login and password, ifyou are using the sasldb authentication option. Click OK; when the dialog box appears, clickOK again, and then click Close to shut down the Account Setup tab. Now send a test e-mail toan external e-mail address.
If everything is set up correctly, you should see some resulting messages similar to thosein Listing 8-31 in your mail log file. This example shows a successful TLS connection beingcreated from your client and a successful SMTP AUTH authentication using the LOGIN methodfor username admin.
Listing 8-31. Successful SMTP AUTH Authentication in Postfix
Apr 8 14:50:35 puppy postfix/smtpd[30017]: ➥
connect from client.yourdomain.com[192.168.0.50]
Apr 8 14:50:35 puppy postfix/smtpd[30017]: ➥
setting up TLS connection from client.yourdomain.com[192.168.0.50]
Apr 8 14:50:35 puppy postfix/smtpd[30017]: ➥
TLS connection established from client.yourdomain.com[192.168.0.50]: ➥
TLSv1 with cipher RC4-MD5 (128/128 bits)
Apr 8 14:50:35 puppy postfix/smtpd[30017]: ➥
99C9F231E56: client= client.yourdomain.com[192.168.0.50], ➥
sasl_method=LOGIN, sasl_username=admin
Figure 8-1. Configuring Outlook Express to use SMTP AUTH
4444c08_final.qxd 1/5/05 12:58 AM Page 401
CHAPTER 8 ■ AUTHENTICATING AND SECURING YOUR MAIL 402
ResourcesThe following are resources you can use.
Mailing Lists• Sendmail Usenet and mailing list: http://www.sendmail.org/usenet.html
• Postfix mailing lists: http://www.postfix.org/lists.html
• Postfix TLS mailing list: http://www.aet.tu-cottbus.de/mailman/listinfo/postfix_tls
Sites• Sendmail: http://www.sendmail.org/
• Postfix: http://www.postfix.org
• Postfix TLS patch: http://www.aet.tu-cottbus.de/personen/jaenicke/postfix_tls/
• Postfix TLS RPMs: http://postfix.wl0.org/en/
• Cyrus SASL: http://asg.web.cmu.edu/sasl/
• S/MIME and PGP-MIME: http://www.imc.org/smime-pgpmime.html andhttp://www.ietf.org/html.charters/smime-charter.html
4444c08_final.qxd 1/5/05 12:58 AM Page 402
403
C H A P T E R 9
■ ■ ■
Hardening Remote Access to E-mail
More and more users expect to be able to access their e-mail remotely, including from homeand while traveling. Even more users are best classified as “roving” users who do not regularlyreturn to a home base and need to be able to access their e-mail resources remotely. These usersare forced by the nature of their movements to rely on remote access to provide access to vitalcorporate resources such as e-mail.
To address the requirement for remote access, several protocols were developed to provideremote-access functionality to a variety of resources. This chapter focuses on the protocols thatgive you remote access to your e-mail resources in the form of messages and message stores.The two key protocols I will cover are the Internet Message Access Protocol (IMAP) and the PostOffice Protocol (POP); I will also cover a variety of related offshoots of these protocols. Theseprotocols basically perform the same core function, providing remote access to your e-mail,but they perform that function using different methods.
Naturally, the farther your users are from your internal network (especially as the mediumof the Internet is interposed between your remote users and the resources they require), thehigher the risk that your data (usernames, passwords, valuable commercial data) could be inter-cepted, diverted, or altered. Earlier implementations of remote-access protocols and systemsassumed that the fabrics and networks those protocols were traveling across were much nicerand friendlier places than the current environment has proven to be. Additionally, opening con-nections to the Internet for these protocols to operate also puts your system at risk and addspoints through which an attacker could attempt to penetrate your system.
I will explain a bit about IMAP and POP. Then I will make some recommendations aboutparticular servers I think are the most secure applications to provide this functionality. I will takeyou through the risks and potential exploits that running IMAP and POP exposes you to andthen take you through installing, configuring, and securing an IMAP server and a POP server.I will also cover the commonly used Fetchmail tool and the security risks associated with usingit, as well as how to mitigate some of the risks and harden your Fetchmail installation.
I will not go into a lot of detail about non-security-related configuration and managementissues such as performance.
4444c09_final.qxd 1/5/05 12:59 AM Page 403
CHAPTER 9 ■ HARDENING REMOTE ACCESS TO E-MAIL404
1. http://www.faqs.org/rfcs/rfc3501.html
2. Refer to http://www.faqs.org/rfcs/rfc1939.html. You should probably also look at the “POP Exten-sions” RFC at http://www.faqs.org/rfcs/rfc2449.html.
IMAPIMAP is a protocol for retrieving e-mail messages. The latest version is called IMAP4 anddescribed in RFC 3501.1 Essentially, it allows a client (such as Pine, mutt, or Outlook) to accessmessages stores on a remote server as if they were stored locally. This allows users to manipu-late messages on that remote server without having to send those messages back and forth.
It is similar in functionality to the other protocol I will cover in this chapter, POP, but hassome important differences. IMAP and POP both aim to achieve the same basic objective—allowing remote access to message stores. POP is much more focused on retrieving those mes-sages from the remote message store from a single client, storing those messages on theclient, and then deleting the messages from the remote message store. IMAP generallyassumes users will retrieve their mail from multiple different systems and thus leaves the mes-sages in place on the remote message store. The following list covers most of the key function-ality of IMAP:
• Checking for new messages
• Deleting and permanently removing messages
• Creating, deleting, and renaming mailboxes
• Creating, deleting, and renaming folders in a mailbox
• Searching and selectively retrieving messages and message attributes
• RFC-822 and MIME parsing on the remote server
■Note IMAP does not in itself send e-mail. You still need an SMTP server for that. IMAP merely retrievesthe messages from your remote message store.
POPPOP is similar to IMAP in nature, designed for the retrieval of messages from remote messagestores. It is currently in its third version, POP3, which is described in RFC 1939.2
■Note When I refer to POP, I am talking about POP3.
POP uses a client (for example, a mail client such as Pine or mutt or a mail retrieval toolsuch as Fetchmail) to connect to a remote server running POP. The client usually retrieves themessages from the remote message store, stores them locally, and (unlike IMAP) generally
4444c09_final.qxd 1/5/05 12:59 AM Page 404

CHAPTER 9 ■ HARDENING REMOTE ACCESS TO E-MAIL 405
deletes the remote messages. It was principally designed to allow remote computers withoutpermanent connections to the Internet to use another system as a “post office” and to hold allmail until that remote client could connect and receive its mail. ISPs commonly utilize thissystem.
■Note In fact, most individual ISP users employ POP to retrieve their e-mail. IMAP is considerably lessfrequently used by ISPs for this function.
POP is also often used to collect e-mail from multiple remote messages stores and toconsolidate it to a single central location when a user has multiple e-mail accounts.
■Note Like IMAP, POP also does not allow you to send e-mail and instead relies on a SMTP server toperform this function.
Choosing IMAP or POP ServersShould you choose IMAP or POP? There are really two parts to this question. The first is, shouldyou use IMAP or POP (or should you use both)? Well, that depends on your requirements. AsI have talked about previously, POP is a good choice if you have users who are retrieving e-mailfrom a single location and deleting that e-mail from the remote message store in the process.They maintain local messages stores containing the e-mail they retrieve. For other sites, IMAPis a good choice because it allows you to maintain a central message store where users holdand manipulate their messages. This means they log into that message store from a variety oflocations or clients and always have access to their messages. Or you could run both protocolsand provide users with the option of having the solution that suits their requirements best. Sodecide what model suits your organization and then choose a suitable server.
Indeed, a lot of IMAP and POP servers are available from which to choose. IMAP serversinclude Courier-IMAP, Cyrus IMAP, and UW-IMAP, among others. Also, several open-sourcePOP servers are currently available. Courier-IMAP includes a POP server, as does Cyrus IMAPand UW-IMAP; Qmail includes a POP server; and others include Qpopper, vm-pop3d, GNUpop3d, POPular, and TeaPOP.
■Note I provide a list of all the home pages of these IMAP and POP servers in the “Sites” section.
I will choose a package that allows you to use both IMAP and POP, and I will assume youwant to enable both IMAP and POP functionality. You can, of course, disable one or more ofthe protocols if you do not want to use it. This also makes configuring your IMAP and POP
4444c09_final.qxd 1/5/05 12:59 AM Page 405
CHAPTER 9 ■ HARDENING REMOTE ACCESS TO E-MAIL406
3. http://www.securityfocus.com/archive/1
4. I discuss the best approach to this in Chapter 1.
server easier because you need to learn how to use only one package. The package I have cho-sen to cover is Cyrus IMAP. Cyrus IMAP is produced by the same team that developed CyrusSASL and thus comes with good integration to SASL; it is also easy to integrate with TSL/SSL.It even has a number of additional features that make it an ideal choice for a secure IMAP orPOP server. I will discuss those features in the “Cyrus IMAP” section.
This is not to say that whatever you use as your existing IMAP or POP server is not a goodsolution. But there have been some serious issues with some of the servers available. Of obviousnote are the continuing security issues with UW-IMAP and Qpopper, which are both commonlyand popularly used packages. If you are running one of these, I recommend at the least youupgrade to the latest version but perhaps also consider looking at alternatives such as CyrusIMAP. The best idea is to examine the Security Focus Bugtraq mailing list3 and review any IMAP-or POP-related security exploits and vulnerabilities and the packages they affect. In combinationwith a careful analysis of your requirements, the functionality offered by particular packages andby examining how they address security-related functionality and issues should give you a goodpicture of whether a package is secure and suitable for your environment.
How Is Your IMAP or POP Server at Risk?So in what ways is your IMAP or POP server at risk of attack? Well, there are two major threatshere. The first is the risk posed by placing an IMAP and/or POP server on the Internet and theopportunities this offers for an attacker to use that daemon to stage an attack on your system.The second is the privacy and security of your e-mail, passwords, and users as they send andreceive data from the remote message store to their clients, especially across the Internet.I will cover both these threats individually and later in this chapter; I will also discuss someways to mitigate these risks, provide some practical configurations using Cyrus IMAP, andshow this risk mitigation in action.
The first area of threat is generally an attacker scanning for an open port, discoveringyour IMAP or POP server, and attempting to exploit that server and penetrate your system.This is further exacerbated by the large number of exploits that can and have affected IMAPand POP servers. This is a key reason to keep your IMAP or POP server up-to-date with thelatest stable version and any available and relevant security patches. You should ensure youare using the most recent stable version of the server and that you regularly check that no newsecurity exposures, exploits, or issues have been discovered.4
Additionally, in some cases with some types of services, you can mitigate the risk ofhaving open ports on the Internet by placing that server inside a chroot jail, such as BINDor SMTP. Unfortunately, many IMAP and POP servers are not good candidates for chrootingbecause of their need to read all users’ mbox or Maildir files. Additionally, some IMAP serversinsist on running as the root user and not dropping their privileges. The server I have cho-sen, though, Cyrus IMAP, is able to be chrooted because it stores messages in a central pri-vate message store, not in users’ home directories. Cyrus IMAP also requires only root tobind to its required IP addresses and ports, and then it drops privileges and by default runsas the cyrus user. I will take you through chrooting Cyrus IMAP in the next section.
4444c09_final.qxd 1/5/05 12:59 AM Page 406
CHAPTER 9 ■ HARDENING REMOTE ACCESS TO E-MAIL 407
The second area of threat is the threat to your users’ data, usernames, and passwords. Whenrun out of the box, many IMAP and POP installations perform simple plain-text authentication,usually against a local user in your /etc/passwd file. They also conduct the transmission of thosepasswords unencrypted between the client and the server. This means that via some fairly simplenetwork-sniffing techniques, attackers can read both the username and password of a user. Thisresults in their ability to access that user’s message store or, if the user has a shell login, to log intothe system and continue their attack from within your system. You can reduce this threat greatlyby using encryption on your IMAP and POP connections using OpenSSL and/or using moresophisticated authentication methods through a framework such as SASL. It is also good to con-sider whether you would like to create a “sealed” system where no IMAP or POP user has anaccount with shell access to the system. I will now take you through configuring and runningCyrus IMAP with OpenSSL, cover some authentication methods, and show the best way to createa “sealed“ system.
Cyrus IMAPThe Andrews System Group at Carnegie Mellon University produces Cyrus IMAP, which is partof the broader Cyrus Electronic Mail Project that includes close links to its sister project, theCyrus SASL project. It is designed to be part of a scalable electronic mail infrastructure that canbe used by small organizations right up to enterprise-sized deployments. The main home ofthe Cyrus IMAP project is at http://asg.web.cmu.edu/cyrus/; also, a Cyrus IMAP wiki is avail-able at http://acs-wiki.andrew.cmu.edu/twiki/bin/view/Cyrus/WebHome and is more frequentlyupdated than the project home page.
Several features make Cyrus IMAP an attractive choice as a secure solution for an IMAPand/or POP server. The following list details each of those features; I will go through them toexplain why and how they offer security benefits for your IMAP and POP server:
• You do not need to create local user accounts for IMAP/POP users; thus, you can “seal”your system and not allow local logins.
• You can tightly control access to your user’s mail using customizable access control lists(ACLs) that utilize the IMAP ACL command.
• You can chroot your Cyrus IMAP server.
• Cyrus IMAP integrates easily with Cyrus SASL for a variety of user authentication meth-ods using the IMAP AUTH command.
• Cyrus IMAP integrates easily with TLS/SSL to allow encrypted communication betweenyour clients and server.
• The package has a limited number of security-related flaws or issues. At the time ofpublication, Security Focus did not have any Cyrus IMAP vulnerabilities listed.
One of the key factors behind choosing a Cyrus IMAP server is that it overcomes one ofthe major security flaws I have highlighted—the use of usernames and passwords to authenti-cate to the message store that can also be used to log into the IMAP/POP server. Whilst undersome circumstances, this is not an issue; for example, when you have small volumes of users,or when your IMAP server supports hundreds of users or a large volume of virtual users, it is
4444c09_final.qxd 1/5/05 12:59 AM Page 407
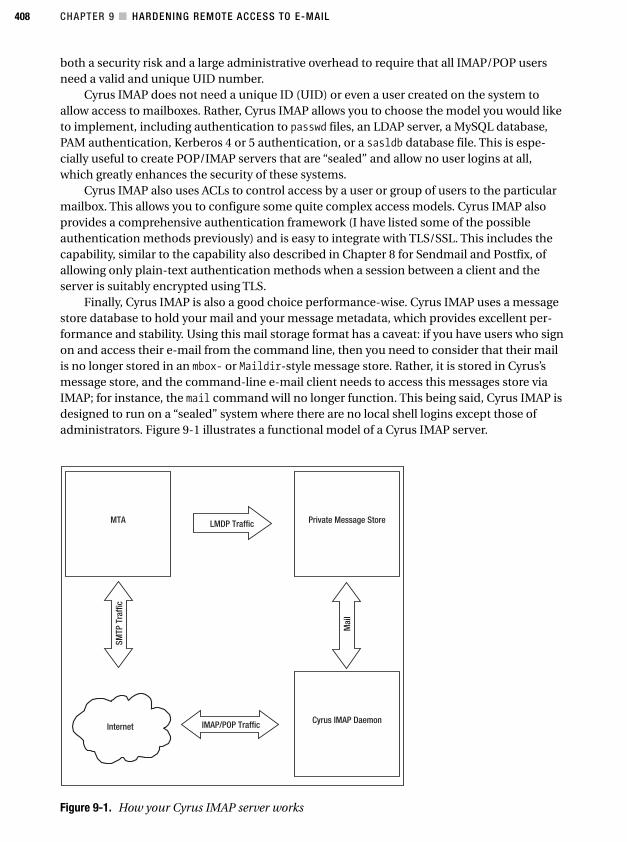
CHAPTER 9 ■ HARDENING REMOTE ACCESS TO E-MAIL408
Figure 9-1. How your Cyrus IMAP server works
both a security risk and a large administrative overhead to require that all IMAP/POP usersneed a valid and unique UID number.
Cyrus IMAP does not need a unique ID (UID) or even a user created on the system toallow access to mailboxes. Rather, Cyrus IMAP allows you to choose the model you would liketo implement, including authentication to passwd files, an LDAP server, a MySQL database,PAM authentication, Kerberos 4 or 5 authentication, or a sasldb database file. This is espe-cially useful to create POP/IMAP servers that are “sealed” and allow no user logins at all,which greatly enhances the security of these systems.
Cyrus IMAP also uses ACLs to control access by a user or group of users to the particularmailbox. This allows you to configure some quite complex access models. Cyrus IMAP alsoprovides a comprehensive authentication framework (I have listed some of the possibleauthentication methods previously) and is easy to integrate with TLS/SSL. This includes thecapability, similar to the capability also described in Chapter 8 for Sendmail and Postfix, ofallowing only plain-text authentication methods when a session between a client and theserver is suitably encrypted using TLS.
Finally, Cyrus IMAP is also a good choice performance-wise. Cyrus IMAP uses a messagestore database to hold your mail and your message metadata, which provides excellent per-formance and stability. Using this mail storage format has a caveat: if you have users who signon and access their e-mail from the command line, then you need to consider that their mailis no longer stored in an mbox- or Maildir-style message store. Rather, it is stored in Cyrus’smessage store, and the command-line e-mail client needs to access this messages store viaIMAP; for instance, the mail command will no longer function. This being said, Cyrus IMAP isdesigned to run on a “sealed” system where there are no local shell logins except those ofadministrators. Figure 9-1 illustrates a functional model of a Cyrus IMAP server.
4444c09_final.qxd 1/5/05 12:59 AM Page 408
CHAPTER 9 ■ HARDENING REMOTE ACCESS TO E-MAIL 409
5. http://www.ietf.org/rfc/rfc2033.txt
So how does Cyrus IMAP actually work? It is usually integrated with your MTA. You con-figure your MTA to deliver mail to Cyrus IMAP. (I will show you how to integrate it with bothSendmail and Postfix.) I will be using the Local Mail Transfer Protocol (LMTP)5 to put e-mailfrom your MTA into the private message store. In the model, I will show you that the privatemessage store will reside within a chroot jail. When an e-mail client connects to the IMAP orPOP daemon, it accesses the Cyrus IMAP message store and retrieves the required message ormessages. Figure 9-1 also shows this process.
Installing and Compiling Cyrus IMAPInstalling and compiling Cyrus IMAP can occasionally be a temperamental process, as CyrusIMAP has a few quirks that I will help you address and that should make your Cyrus IMAPinstall as smooth as possible.
■Note You will also need Cyrus SASL. See Chapter 8 for instructions on how to install and configure CyrusSASL. You should install Cyrus SASL before you install Cyrus IMAP!
First, you need to download the latest version of Cyrus IMAP from ftp://ftp.andrew.cmu.edu/pub/cyrus-mail/.
■Tip I used Cyrus IMAP 2.2.3 for this installation.
Second, you need to create a user for Cyrus IMAP and assign the user to a group. Enterthe following:
puppy# useradd -g mail -s /sbin/nologin -d /dev/null cyrus
I have created a user called cyrus who belongs the group mail, who cannot log on, andwho has a home directory of /dev/null. You could also create your own cyrus group, butI have chosen to use the mail group rather than clutter the system with additional groups.
Now unpack the source package, and change into the resulting created directory. Youneed to check whether you have the makedepend command. Use find or locate to check for it;if it does not exist on your system, then you can create it using source from within the CyrusIMAP source package. Change into the makedepend directory, compile the command, andinstall it. Listing 9-1 shows the process I undertook to do this.
Listing 9-1. Installing makedepend for Cyrus IMAP
puppy# cd path/to/Cyrus/source/makedepend
puppy# ./configure && make
puppy# cp makedepend /usr/local/bin
4444c09_final.qxd 1/5/05 12:59 AM Page 409
CHAPTER 9 ■ HARDENING REMOTE ACCESS TO E-MAIL410
Now to compile Cyrus IMAP, you first need to configure it. Listing 9-2 shows the configurestatement I used for Cyrus IMAP. I will take you through that statement and, in Table 9-1.some of the other potential configure options.
Listing 9-2. Cyrus IMAP configure Statement
puppy# ./configure --with-sasl=/usr/lib/sasl2 --with-openssl=/usr/lib/ssl \
--with-auth=unix --disable-sieve
The configure statement in Listing 9-2 configures Cyrus IMAP and enables SASL supportand OpenSSL support. It also specifies the unix authorization module, which tells Cyrus IMAPto use Unix-based authorization. I have also disabled sieve, which is Cyrus IMAP’s mail-filteringlanguage (such as procmail for IMAP). Table 9-1 shows some additional configuration optionsavailable for Cyrus IMAP.
Table 9-1. Cyrus IMAP configure Options
Option Description
--with-cyrus-user=user Uses user as Cyrus IMAP user
--with-cyrus-group=group Uses group as Cyrus IMAP group
--with-auth=method Uses authorization method (including unix, krb, krb5, or pts)
--with-openssl=/path/to/ssl Uses OpenSSL at /path/to/ssl
--with-sasl=/path/to/sasl Uses SASL 2 at /path/to/sasl
--with-krb=/path/to/krb Uses Kerberos at path/to/krb
--with-com_err=/path/to/com_err Specifies path to com_err files
The first two options allow you to specify a particular user and group for Cyrus IMAP touse. By default, Cyrus IMAP uses the cyrus user and the mail group.
The next option controls the authorization module used by Cyrus IMAP. It is important tonote I am talking about authorization here, not authentication. Authentication proves you arewho you say you are and allows you to connect to Cyrus IMAP. Once connected, authorizationdetermines what rights you have to access the Cyrus IMAP message stores and mailboxes. WithCyrus IMAP, authorization refers to controls over permissions and the ACLs. Authentication refersto the different ways you can log into Cyrus IMAP. You could also use Kerberos, Kerberos 5, or anexternal authorization process to perform authorization (using the configure option krb, krb5, orpts, respectively). We have specified unix here, which is the most commonly used authorizationmodel. I will cover how to control authorization in the “Cyrus IMAP Access Control and Authori-zation” section. We cover authentication in the "Cyrus IMAP Authentication with SASL" section.
The next three options all allow you to specify the location of OpenSSL, SASL, and Kerberos,respectively.
■Note On Red Hat 8, Red Hat 9, and Enterprise 3 systems, the standard location of the Kerberos includeshas been moved, and this causes the Cyrus IMAP compilation to fail. Use the command CPPFLAGS="-I/usr/kerberos/include" && export CPPFLAGS to add the CPPFLAG environment flag on these systemsto allow Cyrus IMAP to find these additional includes. Add this flag before you make Cyrus IMAP.
4444c09_final.qxd 1/5/05 12:59 AM Page 410
CHAPTER 9 ■ HARDENING REMOTE ACCESS TO E-MAIL 411
The final option allows you to overcome issues with the location of com_err.h duringcompilation. If your make fails with an error indicating that it cannot find com_err.h, then youcan overcome these issues by installing com_err.h into the include directory of your choice.
Listing 9-3. Overcoming com_err.h Compile Errors in Cyrus IMAP
puppy# cd path/to/Cyrus/source/et
puppy# cp com_err.h /usr/local/include
If you do not want to install the com_err.h include file, then you can also point Cyrus IMAPto the file using a configure option. Listing 9-4 shows the previous configure statement withthe option added.
Listing 9-4. Specifying the Location of the com_err.h File Using configure
puppy# ./configure --with-sasl=/usr/lib/sasl2 --with-openssl=/usr/lib/ssl \
--with-auth=unix -with-com_err=/path/to/Cyrus/source/et
After you have configured Cyrus IMAP, you need to make and install it. Listing 9-5 showsthe relevant commands.
Listing 9-5. Making and Installing Cyrus IMAP
puppy# make && make install
By default Cyrus IMAP installs the Cyrus binaries into /usr/cyrus. (You can override thiswith the --with-cyrus-prefix configure option.)
Installing Cyrus IMAP into a chroot JailI will take you through the basics of configuring Cyrus IMAP in a chroot jail. First, you shouldcreate a directory structure to hold the chroot jail. I have created a directory called/chroot/cyrus in the root directory by entering the following:
puppy# mkdir -R /chroot/cyrus
Second, you need to create some additional directories under /chroot/cyrus. Listing 9-6shows the directories and directory you need to create.
Listing 9-6. Cyrus IMAP chroot Directory Structure
/dev
/etc
/lib
/lib/tls
/tmp
/usr
/usr/cyrus
/usr/cyrus/bin
/usr/lib
/usr/lib/sasl2
4444c09_final.qxd 1/5/05 12:59 AM Page 411
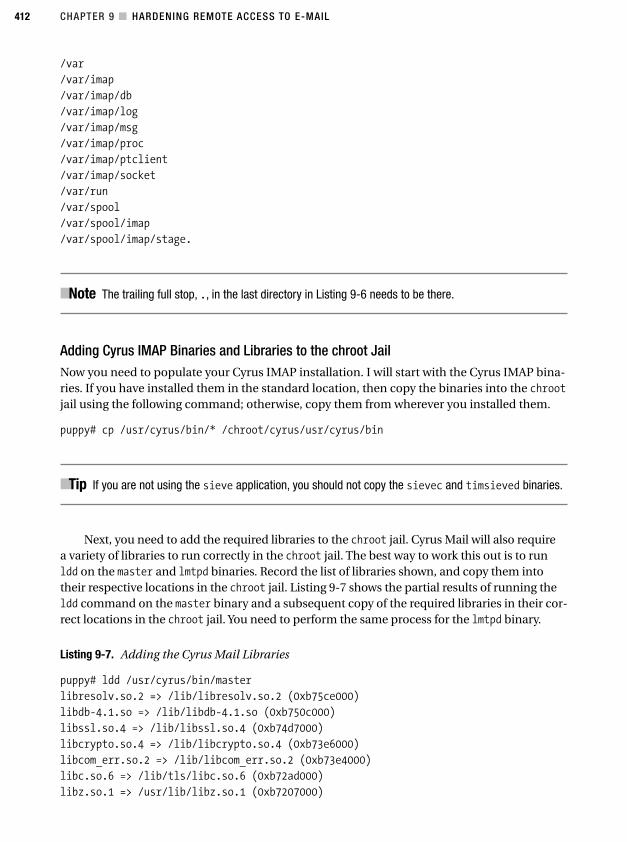
CHAPTER 9 ■ HARDENING REMOTE ACCESS TO E-MAIL412
/var
/var/imap
/var/imap/db
/var/imap/log
/var/imap/msg
/var/imap/proc
/var/imap/ptclient
/var/imap/socket
/var/run
/var/spool
/var/spool/imap
/var/spool/imap/stage.
■Note The trailing full stop, ., in the last directory in Listing 9-6 needs to be there.
Adding Cyrus IMAP Binaries and Libraries to the chroot JailNow you need to populate your Cyrus IMAP installation. I will start with the Cyrus IMAP bina-ries. If you have installed them in the standard location, then copy the binaries into the chrootjail using the following command; otherwise, copy them from wherever you installed them.
puppy# cp /usr/cyrus/bin/* /chroot/cyrus/usr/cyrus/bin
■Tip If you are not using the sieve application, you should not copy the sievec and timsieved binaries.
Next, you need to add the required libraries to the chroot jail. Cyrus Mail will also requirea variety of libraries to run correctly in the chroot jail. The best way to work this out is to runldd on the master and lmtpd binaries. Record the list of libraries shown, and copy them intotheir respective locations in the chroot jail. Listing 9-7 shows the partial results of running theldd command on the master binary and a subsequent copy of the required libraries in their cor-rect locations in the chroot jail. You need to perform the same process for the lmtpd binary.
Listing 9-7. Adding the Cyrus Mail Libraries
puppy# ldd /usr/cyrus/bin/master
libresolv.so.2 => /lib/libresolv.so.2 (0xb75ce000)
libdb-4.1.so => /lib/libdb-4.1.so (0xb750c000)
libssl.so.4 => /lib/libssl.so.4 (0xb74d7000)
libcrypto.so.4 => /lib/libcrypto.so.4 (0xb73e6000)
libcom_err.so.2 => /lib/libcom_err.so.2 (0xb73e4000)
libc.so.6 => /lib/tls/libc.so.6 (0xb72ad000)
libz.so.1 => /usr/lib/libz.so.1 (0xb7207000)
4444c09_final.qxd 1/5/05 12:59 AM Page 412

CHAPTER 9 ■ HARDENING REMOTE ACCESS TO E-MAIL 413
libpthread.so.0 => /lib/tls/libpthread.so.0 (0xb729c000)
libgssapi_krb5.so.2 => /usr/kerberos/lib/libgssapi_krb5.so.2 (0xb7289000)
puppy# cp /lib/libssl.so.4 /chroot/cyrus/lib
puppy# cp /usr/lib/libz.o.1/chroot/cyrus/usr/lib
puppy# cp /lib/tls/libpthread.so.0 /chroot/cyrus/lib/tls
■Caution If you see any libraries located in /usr/kerberos/lib in your list of Cyrus Mail libraries,do not copy them into a similar location under the Cyrus Mail chroot; instead, copy them into /chroot/cyrus/usr/lib. Cyrus Mail seems unable to find them otherwise.
You will also need some other libraries. Listing 9-8 lists these libraries, which are usuallycontained in /lib.
Listing 9-8. Additional Libraries Required by Cyrus Mail
libnss_files.so.2
libnss_dns.so.2
Copy the libraries from Listing 9-8 into /chroot/cyrus/lib to proceed.If you are using Cyrus SASL (which you almost certainly are), then you should copy the
contents of /usr/lib/sasl2 (or /usr/local/lib/sasl2 depending where you have installed theCyrus SASL libraries) to chroot/cyrus/lib/sasl2.
Populating the /chroot/cyrus/dev DirectoryThe next directory you will populate is your /chroot/cyrus/dev directory. You need to createsome devices in this directory to allow Cyrus IMAP to correctly function. These devices, nulland random, should duplicate the devices of the same name in the /dev directory. You can dothis using the mknod command. Enter the following:
puppy# mknod /chroot/cyrus/dev/null c 1 3
puppy# mknod /chroot/cyrus/dev/random c 1 8
Now secure your newly created devices. They should both be owned by root with nullbeing chmoded to 0666 and random to 0644.
Also in your /dev directory, you need to define a log device to allow the chrooted CyrusIMAP to log to syslog. If you are using syslog, then you need to add an -a switch to the com-mand that starts syslog. For my configuration, I add the following:
-a /chroot/cyrus/dev/log
If you are using syslog-NG, then add a line similar to the following one to yoursyslog-ng.conf file in one of your source statements:
unix-stream("/chroot/cyrus/dev/log");
4444c09_final.qxd 1/5/05 12:59 AM Page 413
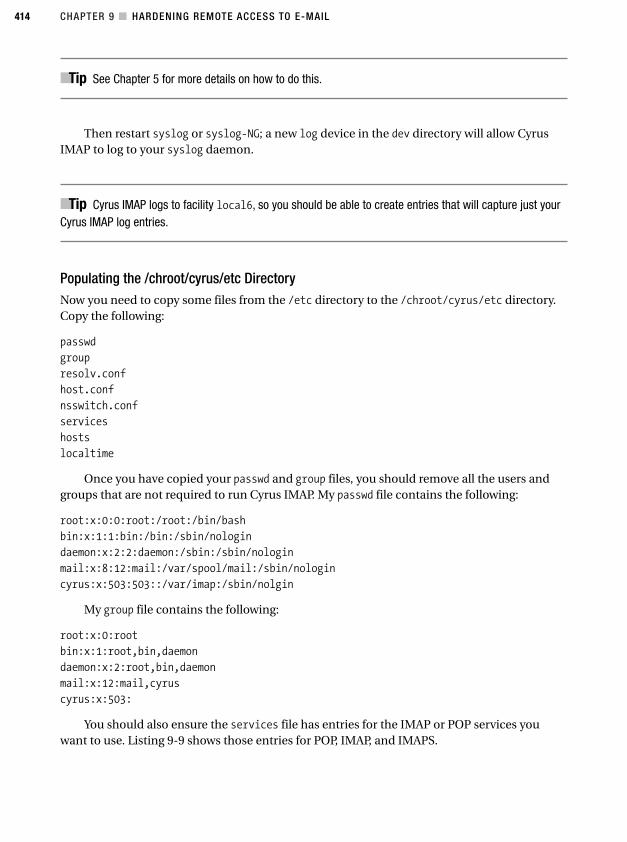
CHAPTER 9 ■ HARDENING REMOTE ACCESS TO E-MAIL414
■Tip See Chapter 5 for more details on how to do this.
Then restart syslog or syslog-NG; a new log device in the dev directory will allow CyrusIMAP to log to your syslog daemon.
■Tip Cyrus IMAP logs to facility local6, so you should be able to create entries that will capture just yourCyrus IMAP log entries.
Populating the /chroot/cyrus/etc DirectoryNow you need to copy some files from the /etc directory to the /chroot/cyrus/etc directory.Copy the following:
passwd
group
resolv.conf
host.conf
nsswitch.conf
services
hosts
localtime
Once you have copied your passwd and group files, you should remove all the users andgroups that are not required to run Cyrus IMAP. My passwd file contains the following:
root:x:0:0:root:/root:/bin/bash
bin:x:1:1:bin:/bin:/sbin/nologin
daemon:x:2:2:daemon:/sbin:/sbin/nologin
mail:x:8:12:mail:/var/spool/mail:/sbin/nologin
cyrus:x:503:503::/var/imap:/sbin/nolgin
My group file contains the following:
root:x:0:root
bin:x:1:root,bin,daemon
daemon:x:2:root,bin,daemon
mail:x:12:mail,cyrus
cyrus:x:503:
You should also ensure the services file has entries for the IMAP or POP services youwant to use. Listing 9-9 shows those entries for POP, IMAP, and IMAPS.
4444c09_final.qxd 1/5/05 12:59 AM Page 414
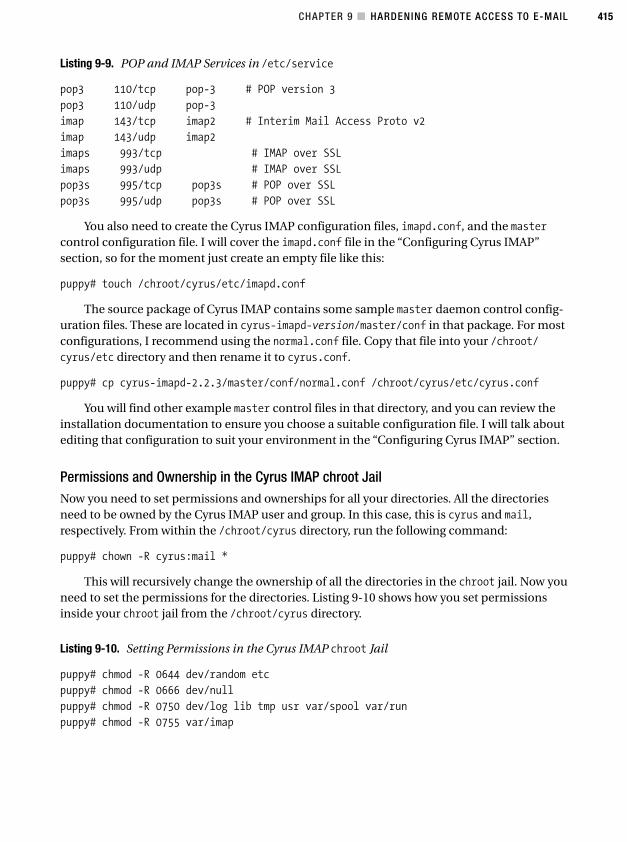
CHAPTER 9 ■ HARDENING REMOTE ACCESS TO E-MAIL 415
Listing 9-9. POP and IMAP Services in /etc/service
pop3 110/tcp pop-3 # POP version 3
pop3 110/udp pop-3
imap 143/tcp imap2 # Interim Mail Access Proto v2
imap 143/udp imap2
imaps 993/tcp # IMAP over SSL
imaps 993/udp # IMAP over SSL
pop3s 995/tcp pop3s # POP over SSL
pop3s 995/udp pop3s # POP over SSL
You also need to create the Cyrus IMAP configuration files, imapd.conf, and the mastercontrol configuration file. I will cover the imapd.conf file in the “Configuring Cyrus IMAP”section, so for the moment just create an empty file like this:
puppy# touch /chroot/cyrus/etc/imapd.conf
The source package of Cyrus IMAP contains some sample master daemon control config-uration files. These are located in cyrus-imapd-version/master/conf in that package. For mostconfigurations, I recommend using the normal.conf file. Copy that file into your /chroot/cyrus/etc directory and then rename it to cyrus.conf.
puppy# cp cyrus-imapd-2.2.3/master/conf/normal.conf /chroot/cyrus/etc/cyrus.conf
You will find other example master control files in that directory, and you can review theinstallation documentation to ensure you choose a suitable configuration file. I will talk aboutediting that configuration to suit your environment in the “Configuring Cyrus IMAP” section.
Permissions and Ownership in the Cyrus IMAP chroot JailNow you need to set permissions and ownerships for all your directories. All the directoriesneed to be owned by the Cyrus IMAP user and group. In this case, this is cyrus and mail,respectively. From within the /chroot/cyrus directory, run the following command:
puppy# chown -R cyrus:mail *
This will recursively change the ownership of all the directories in the chroot jail. Now youneed to set the permissions for the directories. Listing 9-10 shows how you set permissionsinside your chroot jail from the /chroot/cyrus directory.
Listing 9-10. Setting Permissions in the Cyrus IMAP chroot Jail
puppy# chmod -R 0644 dev/random etc
puppy# chmod -R 0666 dev/null
puppy# chmod -R 0750 dev/log lib tmp usr var/spool var/run
puppy# chmod -R 0755 var/imap
4444c09_final.qxd 1/5/05 12:59 AM Page 415
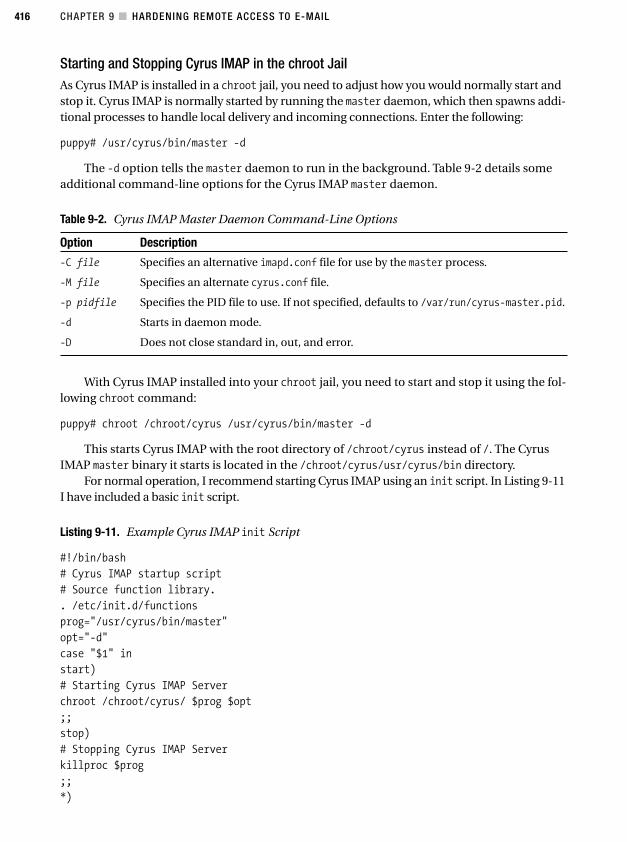
CHAPTER 9 ■ HARDENING REMOTE ACCESS TO E-MAIL416
Starting and Stopping Cyrus IMAP in the chroot JailAs Cyrus IMAP is installed in a chroot jail, you need to adjust how you would normally start andstop it. Cyrus IMAP is normally started by running the master daemon, which then spawns addi-tional processes to handle local delivery and incoming connections. Enter the following:
puppy# /usr/cyrus/bin/master -d
The -d option tells the master daemon to run in the background. Table 9-2 details someadditional command-line options for the Cyrus IMAP master daemon.
Table 9-2. Cyrus IMAP Master Daemon Command-Line Options
Option Description
-C file Specifies an alternative imapd.conf file for use by the master process.
-M file Specifies an alternate cyrus.conf file.
-p pidfile Specifies the PID file to use. If not specified, defaults to /var/run/cyrus-master.pid.
-d Starts in daemon mode.
-D Does not close standard in, out, and error.
With Cyrus IMAP installed into your chroot jail, you need to start and stop it using the fol-lowing chroot command:
puppy# chroot /chroot/cyrus /usr/cyrus/bin/master -d
This starts Cyrus IMAP with the root directory of /chroot/cyrus instead of /. The CyrusIMAP master binary it starts is located in the /chroot/cyrus/usr/cyrus/bin directory.
For normal operation, I recommend starting Cyrus IMAP using an init script. In Listing 9-11I have included a basic init script.
Listing 9-11. Example Cyrus IMAP init Script
#!/bin/bash
# Cyrus IMAP startup script
# Source function library.
. /etc/init.d/functions
prog="/usr/cyrus/bin/master"
opt="-d"
case "$1" in
start)
# Starting Cyrus IMAP Server
chroot /chroot/cyrus/ $prog $opt
;;
stop)
# Stopping Cyrus IMAP Server
killproc $prog
;;
*)
4444c09_final.qxd 1/5/05 12:59 AM Page 416
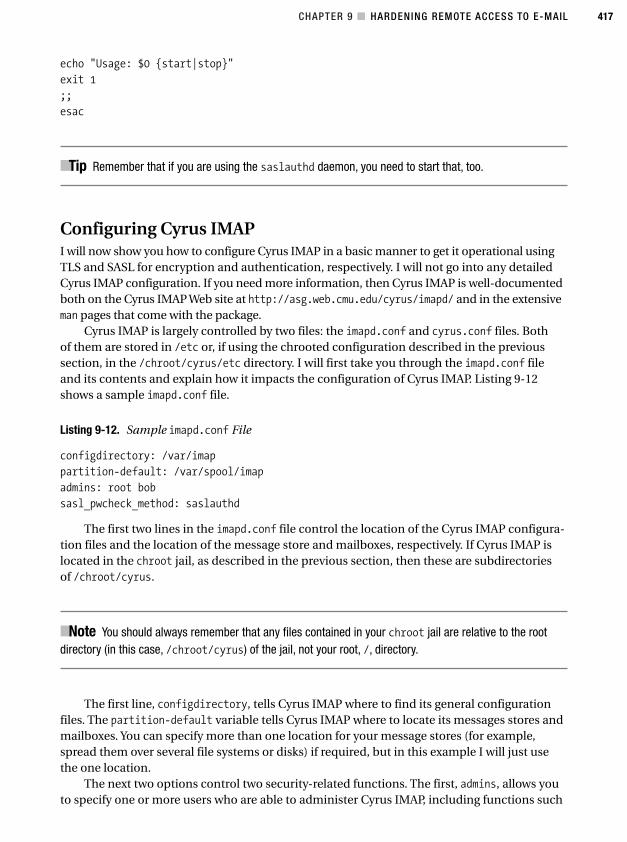
CHAPTER 9 ■ HARDENING REMOTE ACCESS TO E-MAIL 417
echo "Usage: $0 {start|stop}"
exit 1
;;
esac
■Tip Remember that if you are using the saslauthd daemon, you need to start that, too.
Configuring Cyrus IMAPI will now show you how to configure Cyrus IMAP in a basic manner to get it operational usingTLS and SASL for encryption and authentication, respectively. I will not go into any detailedCyrus IMAP configuration. If you need more information, then Cyrus IMAP is well-documentedboth on the Cyrus IMAP Web site at http://asg.web.cmu.edu/cyrus/imapd/ and in the extensiveman pages that come with the package.
Cyrus IMAP is largely controlled by two files: the imapd.conf and cyrus.conf files. Bothof them are stored in /etc or, if using the chrooted configuration described in the previoussection, in the /chroot/cyrus/etc directory. I will first take you through the imapd.conf fileand its contents and explain how it impacts the configuration of Cyrus IMAP. Listing 9-12shows a sample imapd.conf file.
Listing 9-12. Sample imapd.conf File
configdirectory: /var/imap
partition-default: /var/spool/imap
admins: root bob
sasl_pwcheck_method: saslauthd
The first two lines in the imapd.conf file control the location of the Cyrus IMAP configura-tion files and the location of the message store and mailboxes, respectively. If Cyrus IMAP islocated in the chroot jail, as described in the previous section, then these are subdirectoriesof /chroot/cyrus.
■Note You should always remember that any files contained in your chroot jail are relative to the rootdirectory (in this case, /chroot/cyrus) of the jail, not your root, /, directory.
The first line, configdirectory, tells Cyrus IMAP where to find its general configurationfiles. The partition-default variable tells Cyrus IMAP where to locate its messages stores andmailboxes. You can specify more than one location for your message stores (for example,spread them over several file systems or disks) if required, but in this example I will just usethe one location.
The next two options control two security-related functions. The first, admins, allows youto specify one or more users who are able to administer Cyrus IMAP, including functions such
4444c09_final.qxd 1/5/05 12:59 AM Page 417
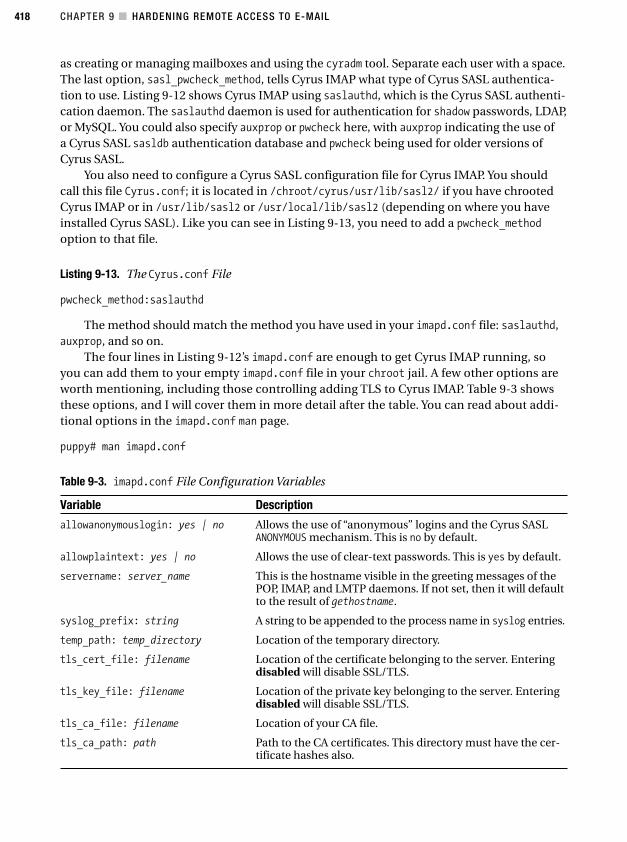
CHAPTER 9 ■ HARDENING REMOTE ACCESS TO E-MAIL418
as creating or managing mailboxes and using the cyradm tool. Separate each user with a space.The last option, sasl_pwcheck_method, tells Cyrus IMAP what type of Cyrus SASL authentica-tion to use. Listing 9-12 shows Cyrus IMAP using saslauthd, which is the Cyrus SASL authenti-cation daemon. The saslauthd daemon is used for authentication for shadow passwords, LDAP,or MySQL. You could also specify auxprop or pwcheck here, with auxprop indicating the use ofa Cyrus SASL sasldb authentication database and pwcheck being used for older versions ofCyrus SASL.
You also need to configure a Cyrus SASL configuration file for Cyrus IMAP. You shouldcall this file Cyrus.conf; it is located in /chroot/cyrus/usr/lib/sasl2/ if you have chrootedCyrus IMAP or in /usr/lib/sasl2 or /usr/local/lib/sasl2 (depending on where you haveinstalled Cyrus SASL). Like you can see in Listing 9-13, you need to add a pwcheck_method
option to that file.
Listing 9-13. The Cyrus.conf File
pwcheck_method:saslauthd
The method should match the method you have used in your imapd.conf file: saslauthd,auxprop, and so on.
The four lines in Listing 9-12’s imapd.conf are enough to get Cyrus IMAP running, soyou can add them to your empty imapd.conf file in your chroot jail. A few other options areworth mentioning, including those controlling adding TLS to Cyrus IMAP. Table 9-3 showsthese options, and I will cover them in more detail after the table. You can read about addi-tional options in the imapd.conf man page.
puppy# man imapd.conf
Table 9-3. imapd.conf File Configuration Variables
Variable Description
allowanonymouslogin: yes | no Allows the use of “anonymous” logins and the Cyrus SASLANONYMOUS mechanism. This is no by default.
allowplaintext: yes | no Allows the use of clear-text passwords. This is yes by default.
servername: server_name This is the hostname visible in the greeting messages of thePOP, IMAP, and LMTP daemons. If not set, then it will defaultto the result of gethostname.
syslog_prefix: string A string to be appended to the process name in syslog entries.
temp_path: temp_directory Location of the temporary directory.
tls_cert_file: filename Location of the certificate belonging to the server. Enteringdisabled will disable SSL/TLS.
tls_key_file: filename Location of the private key belonging to the server. Enteringdisabled will disable SSL/TLS.
tls_ca_file: filename Location of your CA file.
tls_ca_path: path Path to the CA certificates. This directory must have the cer-tificate hashes also.
4444c09_final.qxd 1/5/05 12:59 AM Page 418
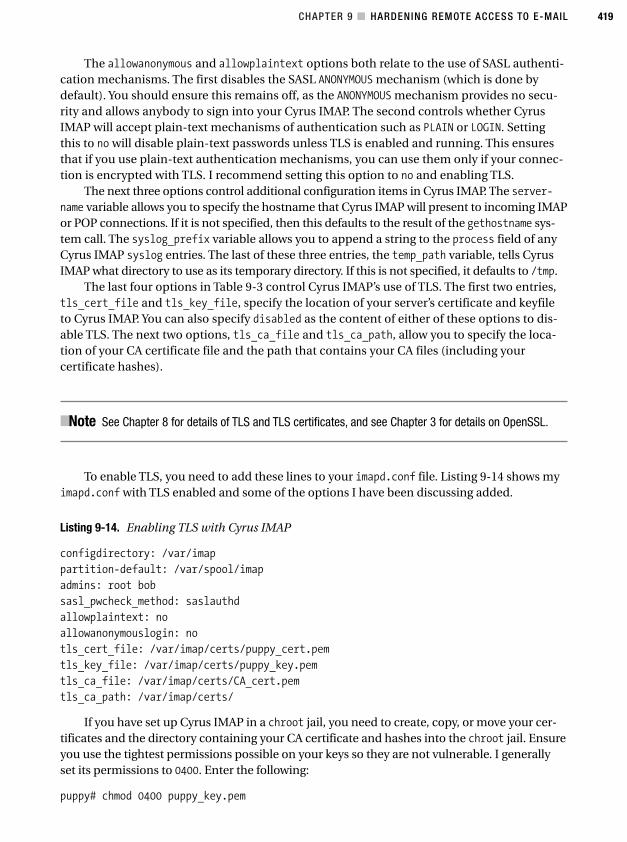
CHAPTER 9 ■ HARDENING REMOTE ACCESS TO E-MAIL 419
The allowanonymous and allowplaintext options both relate to the use of SASL authenti-cation mechanisms. The first disables the SASL ANONYMOUS mechanism (which is done bydefault). You should ensure this remains off, as the ANONYMOUS mechanism provides no secu-rity and allows anybody to sign into your Cyrus IMAP. The second controls whether CyrusIMAP will accept plain-text mechanisms of authentication such as PLAIN or LOGIN. Settingthis to no will disable plain-text passwords unless TLS is enabled and running. This ensuresthat if you use plain-text authentication mechanisms, you can use them only if your connec-tion is encrypted with TLS. I recommend setting this option to no and enabling TLS.
The next three options control additional configuration items in Cyrus IMAP. The server-name variable allows you to specify the hostname that Cyrus IMAP will present to incoming IMAPor POP connections. If it is not specified, then this defaults to the result of the gethostname sys-tem call. The syslog_prefix variable allows you to append a string to the process field of anyCyrus IMAP syslog entries. The last of these three entries, the temp_path variable, tells CyrusIMAP what directory to use as its temporary directory. If this is not specified, it defaults to /tmp.
The last four options in Table 9-3 control Cyrus IMAP’s use of TLS. The first two entries,tls_cert_file and tls_key_file, specify the location of your server’s certificate and keyfileto Cyrus IMAP. You can also specify disabled as the content of either of these options to dis-able TLS. The next two options, tls_ca_file and tls_ca_path, allow you to specify the loca-tion of your CA certificate file and the path that contains your CA files (including yourcertificate hashes).
■Note See Chapter 8 for details of TLS and TLS certificates, and see Chapter 3 for details on OpenSSL.
To enable TLS, you need to add these lines to your imapd.conf file. Listing 9-14 shows myimapd.conf with TLS enabled and some of the options I have been discussing added.
Listing 9-14. Enabling TLS with Cyrus IMAP
configdirectory: /var/imap
partition-default: /var/spool/imap
admins: root bob
sasl_pwcheck_method: saslauthd
allowplaintext: no
allowanonymouslogin: no
tls_cert_file: /var/imap/certs/puppy_cert.pem
tls_key_file: /var/imap/certs/puppy_key.pem
tls_ca_file: /var/imap/certs/CA_cert.pem
tls_ca_path: /var/imap/certs/
If you have set up Cyrus IMAP in a chroot jail, you need to create, copy, or move your cer-tificates and the directory containing your CA certificate and hashes into the chroot jail. Ensureyou use the tightest permissions possible on your keys so they are not vulnerable. I generallyset its permissions to 0400. Enter the following:
puppy# chmod 0400 puppy_key.pem
4444c09_final.qxd 1/5/05 12:59 AM Page 419
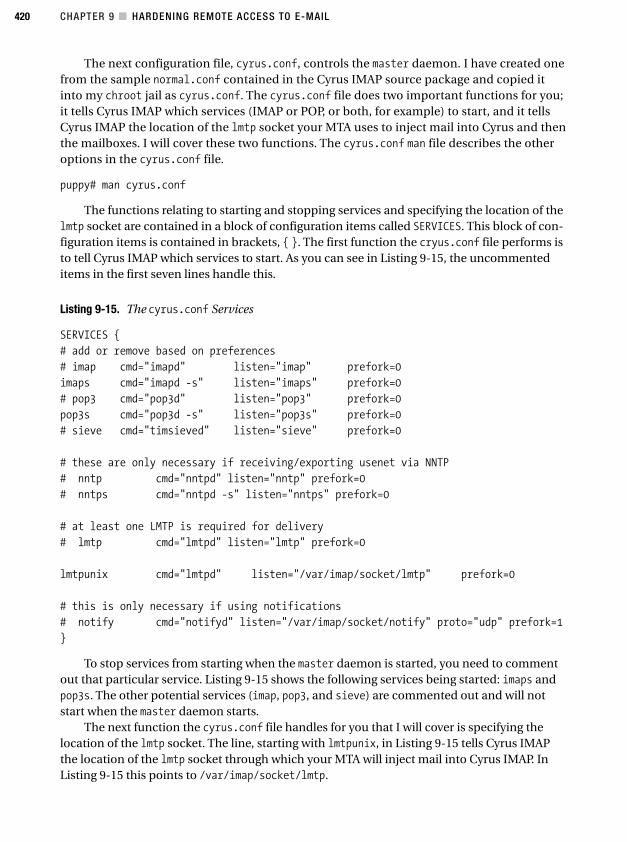
CHAPTER 9 ■ HARDENING REMOTE ACCESS TO E-MAIL420
The next configuration file, cyrus.conf, controls the master daemon. I have created onefrom the sample normal.conf contained in the Cyrus IMAP source package and copied itinto my chroot jail as cyrus.conf. The cyrus.conf file does two important functions for you;it tells Cyrus IMAP which services (IMAP or POP, or both, for example) to start, and it tellsCyrus IMAP the location of the lmtp socket your MTA uses to inject mail into Cyrus and thenthe mailboxes. I will cover these two functions. The cyrus.conf man file describes the otheroptions in the cyrus.conf file.
puppy# man cyrus.conf
The functions relating to starting and stopping services and specifying the location of thelmtp socket are contained in a block of configuration items called SERVICES. This block of con-figuration items is contained in brackets, { }. The first function the cryus.conf file performs isto tell Cyrus IMAP which services to start. As you can see in Listing 9-15, the uncommenteditems in the first seven lines handle this.
Listing 9-15. The cyrus.conf Services
SERVICES {
# add or remove based on preferences
# imap cmd="imapd" listen="imap" prefork=0
imaps cmd="imapd -s" listen="imaps" prefork=0
# pop3 cmd="pop3d" listen="pop3" prefork=0
pop3s cmd="pop3d -s" listen="pop3s" prefork=0
# sieve cmd="timsieved" listen="sieve" prefork=0
# these are only necessary if receiving/exporting usenet via NNTP
# nntp cmd="nntpd" listen="nntp" prefork=0
# nntps cmd="nntpd -s" listen="nntps" prefork=0
# at least one LMTP is required for delivery
# lmtp cmd="lmtpd" listen="lmtp" prefork=0
lmtpunix cmd="lmtpd" listen="/var/imap/socket/lmtp" prefork=0
# this is only necessary if using notifications
# notify cmd="notifyd" listen="/var/imap/socket/notify" proto="udp" prefork=1
}
To stop services from starting when the master daemon is started, you need to commentout that particular service. Listing 9-15 shows the following services being started: imaps andpop3s. The other potential services (imap, pop3, and sieve) are commented out and will notstart when the master daemon starts.
The next function the cyrus.conf file handles for you that I will cover is specifying thelocation of the lmtp socket. The line, starting with lmtpunix, in Listing 9-15 tells Cyrus IMAPthe location of the lmtp socket through which your MTA will inject mail into Cyrus IMAP. InListing 9-15 this points to /var/imap/socket/lmtp.
4444c09_final.qxd 1/5/05 12:59 AM Page 420
CHAPTER 9 ■ HARDENING REMOTE ACCESS TO E-MAIL 421
6. http://www.faqs.org/rfcs/rfc2033.html
7. http://www.sendmail.org/m4/mailers.html
Integrating Cyrus IMAP with Sendmail and PostfixAs discussed earlier in the chapter, I will integrate Cyrus IMAP into your MTA using LMTP. LMTP isa fast and efficient method of delivering mail from your MTA to Cyrus IMAP. LMTP is described inRFC 2033.6 Mail is delivered from your MTA to a local or remote lmtp socket on which your CyrusIMAP server is listening. The mail is received and added to the user’s mailbox.
Sendmail
You can start integration with Sendmail by adding some configuration lines to your sendmail.mcfile. These lines tell Sendmail about Cyrus and specify the location of the lmtp socket to yourSendmail configuration. This is made easier by the fact that Sendmail has a custom Mailerdesigned specifically for Cyrus IMAP; I will show how to configure that Mailer with a specificlocation for the lmtp socket.
■Tip You can read more about Mailers at the Sendmail site.7
Listing 9-16 shows the lines you need to add to your sendmail.mc file.
Listing 9-16. Cyrus IMAP Sendmail Integration
define(`confLOCAL_MAILER', `cyrusv2')dnl
define(`CYRUSV2_MAILER_ARGS', `FILE /chroot/cyrus/var/imap/socket/lmtp')dnl
MAILER(`cyrusv2')dnl
You will notice I have defined the location of the lmtp socket from the perspective of theroot directory of the system, as opposed to inside the chroot jail, because Sendmail is runningoutside the jail and not inside it. After adding these lines, then re-create your sendmail.cf fileand restart Sendmail. This completes your Cyrus IMAP integration with Sendmail; now Send-mail should be delivering mail into your Cyrus IMAP mailboxes.
Postfix
If instead you use Postfix, you go about the integration a little differently. First, you need toidentify the user who Postfix is running as, usually postfix. Second, you need to add this userto the mail group or to whichever group Cyrus IMAP is running as if you have overridden thedefault group during the configure process. This gives Postfix permission to write to the lmtpsocket that Cyrus IMAP creates. Listing 9-17 shows the entry I have for the mail group.
Listing 9-17. /etc/group Entry for Postfix and Cyrus IMAP Integration
mail:x:12:mail,cyrus,postfix
4444c09_final.qxd 1/5/05 12:59 AM Page 421
CHAPTER 9 ■ HARDENING REMOTE ACCESS TO E-MAIL422
Next you need to add a mailbox_transport entry to Postfix’s main.cf file to tell Postfix to writeand deliver to Cyrus IMAP the location of the socket. As I did with Sendmail, I will use LMTPbecause of its excellent performance. You can define the lmtp socket created by Cyrus IMAP andindicated in the cyrus.conf file to Postfix. In Listing 9.18, you can see the mailbox_transport.
Listing 9-18. main.cf mailbox_transport Entry
mailbox_transport = lmtp:unix:/chroot/cyrus/var/imap/socket/lmtp
As Postfix is delivering from outside the Cyrus IMAP chroot jail, you need to reference thefull directory of the socket, not just the directory from the point of view of the root of the chrootjail. After you have added this line to the main.cf file, then you need to reload Postfix. After this,Postfix should be delivering mail to the indicated socket.
■Tip With both Sendmail and Postfix, you can use other methods of integrating with Cyrus IMAP, includingusing the deliver binary that comes with Cyrus IMAP. If you do not want to use LMTP, then see the CyrusIMAP documentation for other methods.
Cyrus IMAP Authentication with SASLSo, you have compiled, installed, and integrated Cyrus IMAP with your MTA (and installedCyrus SASL!).
■Note I talk about Cyrus SASL in further detail in Chapter 8.
Now you want to use it to connect a client securely over an encrypted connection andretrieve e-mail. I will briefly cover authentication via some simple methods and provide youwith the basis for other forms of authentication.
So how does this work? With Cyrus IMAP running, the master daemon is bound to yourchosen interface and has opened the required ports. The master daemon then advertises itscapabilities to any clients connecting to it. Amongst those capabilities is the IMAP AUTH com-mand. This lists any authentication mechanisms that Cyrus IMAP is capable of using. Theseare the authentication mechanisms that Cyrus SASL has provided to Cyrus IMAP; for example,this could be the PLAIN, LOGIN, or GSSAPI mechanism (plain-text login, the Outlook-style LOGINfunction, and the Generic Security Services Application Programming Interface that is inte-grated into Kerberos 5 and allows Kerberos 5 authentication, respectively). The login clientprovides credentials for one of these authentication mechanisms, and Cyrus IMAP queries therequired mechanisms to verify the authenticity of the credentials. For example, a client usingKerberos 5 authentication connects to Cyrus IMAP using the GSSAPI mechanism. Cyrus IMAPqueries the Cyrus SASL authentication mechanism and using that configuration queries therequired Kerberos 5 server. Figure 9-2 shows this process at work.
4444c09_final.qxd 1/5/05 12:59 AM Page 422
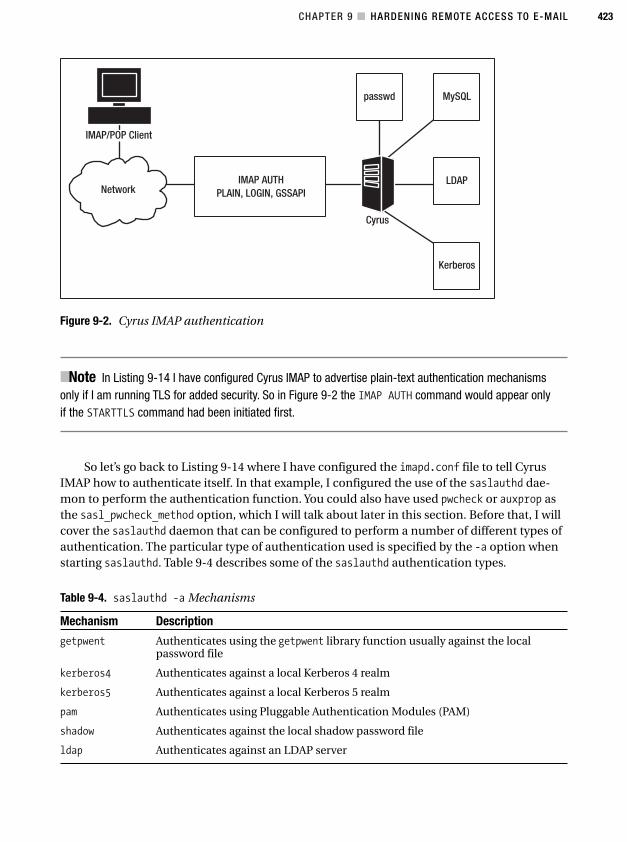
CHAPTER 9 ■ HARDENING REMOTE ACCESS TO E-MAIL 423
■Note In Listing 9-14 I have configured Cyrus IMAP to advertise plain-text authentication mechanismsonly if I am running TLS for added security. So in Figure 9-2 the IMAP AUTH command would appear onlyif the STARTTLS command had been initiated first.
So let’s go back to Listing 9-14 where I have configured the imapd.conf file to tell CyrusIMAP how to authenticate itself. In that example, I configured the use of the saslauthd dae-mon to perform the authentication function. You could also have used pwcheck or auxprop asthe sasl_pwcheck_method option, which I will talk about later in this section. Before that, I willcover the saslauthd daemon that can be configured to perform a number of different types ofauthentication. The particular type of authentication used is specified by the -a option whenstarting saslauthd. Table 9-4 describes some of the saslauthd authentication types.
Table 9-4. saslauthd -a Mechanisms
Mechanism Description
getpwent Authenticates using the getpwent library function usually against the localpassword file
kerberos4 Authenticates against a local Kerberos 4 realm
kerberos5 Authenticates against a local Kerberos 5 realm
pam Authenticates using Pluggable Authentication Modules (PAM)
shadow Authenticates against the local shadow password file
ldap Authenticates against an LDAP server
Figure 9-2. Cyrus IMAP authentication
4444c09_final.qxd 1/5/05 12:59 AM Page 423
CHAPTER 9 ■ HARDENING REMOTE ACCESS TO E-MAIL424
I will cover one of the most commonly used types of authentication: shadow. The shadowauthentication mechanisms are designed to allow you to authenticate against a local pass-word file that uses shadow passwording. In Listing 9-19, you can see how to start saslauthdwith the shadow authentication mechanism enabled.
Listing 9-19. Cyrus SASL saslauthd with shadow Authentication
puppy# /usr/sbin/saslauthd -m /var/run/saslauthd -a shadow
The -m option allows you to specify the location of a PID file. The saslauthd daemon willnow check the contents of your /etc/shadow file for usernames and passwords passed to CyrusSASL from Cyrus IMAP.
If you intend to use saslauthd and you have chrooted Cyrus IMAP, you need to makesome modifications to allow the chrooted Cyrus IMAP daemon to access saslauthd. Bydefault saslauthd creates a mux file to receive the authentication requests. This mux file isusually located in the directory /var/run/saslauthd (often together with a PID file). If thefile is not created there, you can check with location of the mux file by reviewing the com-mand you are using to start saslauthd. You specific the location of the mux file using the -moption. Or you can run the following command to find it:
puppy# netstat -peln | grep saslauthd
unix 2 [ ACC ] STREAM LISTENING 256149 7645/saslauthd /var/run/saslauthd/mux
The last part of the returned output, /var/run/saslauthd/mux, indicates the location of themux file. As a result of Cyrus IMAP being chrooted, it cannot see this file (because it is outside thechroot jail) and therefore refuses to authenticate using SASL. So you need to move the mux file andother saslauthd files into the chroot jail and link it back to its old location via a symbolic link tokeep the saslauthd daemon happy. The command in Listing 9-20 takes you through the stepsneeded to do this—making a new directory in your chroot environment, moving the requiredfiles into the chroot jail, linking (a symbolic link only, which is important to maintain the securityof your chroot jail) back to the original location, and changing the ownership of the saslauthddirectory.
Listing 9-20. Running saslauthd in Cyrus IMAP chroot Jail
puppy# mv /var/run/saslauthd /chroot/cyrus/var/run/saslauthd
puppy# ln -s /chroot/cyrus/var/run/saslauthd /var/run/saslauthd
puppy# chown cyrus:mail /chroot/cyrus/var/run/saslauthd
You need to restart saslauthd after doing this.I have covered using the saslauthd daemon for Cyrus IMAP authentication. You can also
use some other mechanisms. I will cover how to use the sasldb mechanism. This is best usedfor “sealed” systems, as I discussed earlier where the users signing onto the Cyrus IMAP serverdo not have shell logins. The sasldb file contains usernames and passwords. In this case, changeyour sasl_pwcheck_method in the imapd.conf to the following:
sasl_pwcheck_method: auxprop
■Note You also need to change the pwcheck_method option in the Cyrus.conf file.
4444c09_final.qxd 1/5/05 12:59 AM Page 424
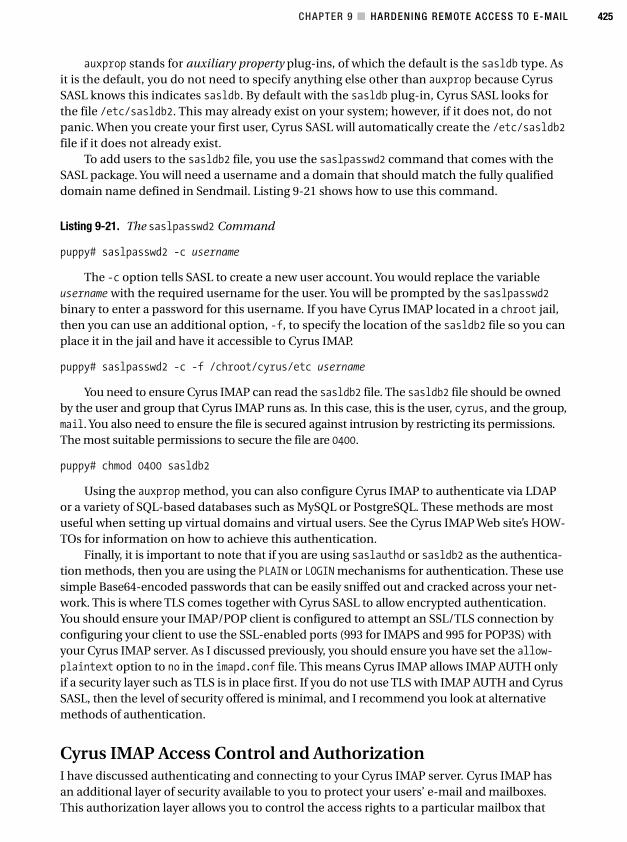
CHAPTER 9 ■ HARDENING REMOTE ACCESS TO E-MAIL 425
auxprop stands for auxiliary property plug-ins, of which the default is the sasldb type. Asit is the default, you do not need to specify anything else other than auxprop because CyrusSASL knows this indicates sasldb. By default with the sasldb plug-in, Cyrus SASL looks forthe file /etc/sasldb2. This may already exist on your system; however, if it does not, do notpanic. When you create your first user, Cyrus SASL will automatically create the /etc/sasldb2file if it does not already exist.
To add users to the sasldb2 file, you use the saslpasswd2 command that comes with theSASL package. You will need a username and a domain that should match the fully qualifieddomain name defined in Sendmail. Listing 9-21 shows how to use this command.
Listing 9-21. The saslpasswd2 Command
puppy# saslpasswd2 -c username
The -c option tells SASL to create a new user account. You would replace the variableusername with the required username for the user. You will be prompted by the saslpasswd2binary to enter a password for this username. If you have Cyrus IMAP located in a chroot jail,then you can use an additional option, -f, to specify the location of the sasldb2 file so you canplace it in the jail and have it accessible to Cyrus IMAP.
puppy# saslpasswd2 -c -f /chroot/cyrus/etc username
You need to ensure Cyrus IMAP can read the sasldb2 file. The sasldb2 file should be ownedby the user and group that Cyrus IMAP runs as. In this case, this is the user, cyrus, and the group,mail. You also need to ensure the file is secured against intrusion by restricting its permissions.The most suitable permissions to secure the file are 0400.
puppy# chmod 0400 sasldb2
Using the auxprop method, you can also configure Cyrus IMAP to authenticate via LDAPor a variety of SQL-based databases such as MySQL or PostgreSQL. These methods are mostuseful when setting up virtual domains and virtual users. See the Cyrus IMAP Web site’s HOW-TOs for information on how to achieve this authentication.
Finally, it is important to note that if you are using saslauthd or sasldb2 as the authentica-tion methods, then you are using the PLAIN or LOGIN mechanisms for authentication. These usesimple Base64-encoded passwords that can be easily sniffed out and cracked across your net-work. This is where TLS comes together with Cyrus SASL to allow encrypted authentication.You should ensure your IMAP/POP client is configured to attempt an SSL/TLS connection byconfiguring your client to use the SSL-enabled ports (993 for IMAPS and 995 for POP3S) withyour Cyrus IMAP server. As I discussed previously, you should ensure you have set the allow-plaintext option to no in the imapd.conf file. This means Cyrus IMAP allows IMAP AUTH onlyif a security layer such as TLS is in place first. If you do not use TLS with IMAP AUTH and CyrusSASL, then the level of security offered is minimal, and I recommend you look at alternativemethods of authentication.
Cyrus IMAP Access Control and AuthorizationI have discussed authenticating and connecting to your Cyrus IMAP server. Cyrus IMAP hasan additional layer of security available to you to protect your users’ e-mail and mailboxes.This authorization layer allows you to control the access rights to a particular mailbox that
4444c09_final.qxd 1/5/05 12:59 AM Page 425
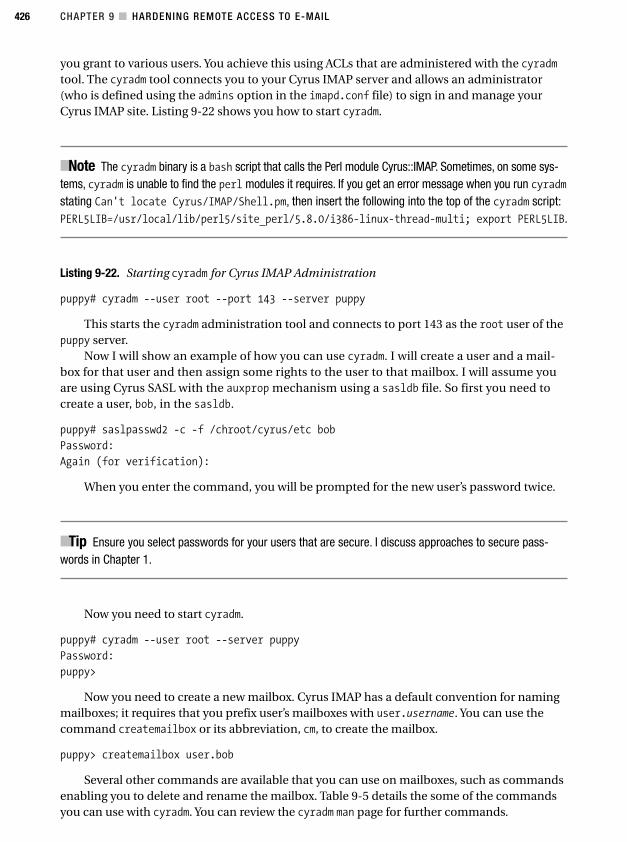
CHAPTER 9 ■ HARDENING REMOTE ACCESS TO E-MAIL426
you grant to various users. You achieve this using ACLs that are administered with the cyradmtool. The cyradm tool connects you to your Cyrus IMAP server and allows an administrator(who is defined using the admins option in the imapd.conf file) to sign in and manage yourCyrus IMAP site. Listing 9-22 shows you how to start cyradm.
■Note The cyradm binary is a bash script that calls the Perl module Cyrus::IMAP. Sometimes, on some sys-tems, cyradm is unable to find the perl modules it requires. If you get an error message when you run cyradmstating Can't locate Cyrus/IMAP/Shell.pm, then insert the following into the top of the cyradm script:PERL5LIB=/usr/local/lib/perl5/site_perl/5.8.0/i386-linux-thread-multi; export PERL5LIB.
Listing 9-22. Starting cyradm for Cyrus IMAP Administration
puppy# cyradm --user root --port 143 --server puppy
This starts the cyradm administration tool and connects to port 143 as the root user of thepuppy server.
Now I will show an example of how you can use cyradm. I will create a user and a mail-box for that user and then assign some rights to the user to that mailbox. I will assume youare using Cyrus SASL with the auxprop mechanism using a sasldb file. So first you need tocreate a user, bob, in the sasldb.
puppy# saslpasswd2 -c -f /chroot/cyrus/etc bob
Password:
Again (for verification):
When you enter the command, you will be prompted for the new user’s password twice.
■Tip Ensure you select passwords for your users that are secure. I discuss approaches to secure pass-words in Chapter 1.
Now you need to start cyradm.
puppy# cyradm --user root --server puppy
Password:
puppy>
Now you need to create a new mailbox. Cyrus IMAP has a default convention for namingmailboxes; it requires that you prefix user’s mailboxes with user.username. You can use thecommand createmailbox or its abbreviation, cm, to create the mailbox.
puppy> createmailbox user.bob
Several other commands are available that you can use on mailboxes, such as commandsenabling you to delete and rename the mailbox. Table 9-5 details the some of the commandsyou can use with cyradm. You can review the cyradm man page for further commands.
4444c09_final.qxd 1/5/05 12:59 AM Page 426

CHAPTER 9 ■ HARDENING REMOTE ACCESS TO E-MAIL 427
Table 9-5. cyradm Commands
Command Abbreviation Description
createmailbox cm Creates a mailbox
listmailbox lm Lists mailboxes
renamemailbox renm Renames a mailbox
deletemailbox dm Deletes a mailbox
setaclmailbox sam Sets an ACL on a mailbox
listaclmailbox lam Lists the ACL on a mailbox
deleteaclmailbox dam Deletes an ACL on a mailbox
setquota sq Sets quota limits
listquota lq Lists quota on root
help Gets help on commands
quit Exits cyradm
The new mailbox I have created has some default access rights assigned to it. You candisplay these default access rights by using the listaclmailbox command or its abbreviation,lam.
puppy> listaclmailbox user.bob
bob lrswipcda
You can see that bob has a variety of access rights to his mailbox. In fact, as the owner ofthat mailbox, bob has all rights to that mailbox. Now I will explain what those rights means.Table 9-6 lists all the rights and provides an explanation of what each does.
■Note The users listed in the admins option in the imapd.conf file automatically have l and a rights tothe mailbox.
Table 9-6. Cyrus IMAP ACL Rights
Letter Access Right Description
l lookup Sees that the mailbox exists
r read Reads the mailbox
s seen Modifies the Seen and Recent flags
w write Modifies flags and keywords other than Seen and Deleted
i insert Inserts new messages into the mailbox
p post Sends mail to the submission address for the mailbox
c create Creates new submailboxes of the mailbox, or deletes or renames thecurrent mailbox
d delete Uses the Deleted flag and expunges deleted mail
a administer Changes the ACL on the mailbox
4444c09_final.qxd 1/5/05 12:59 AM Page 427
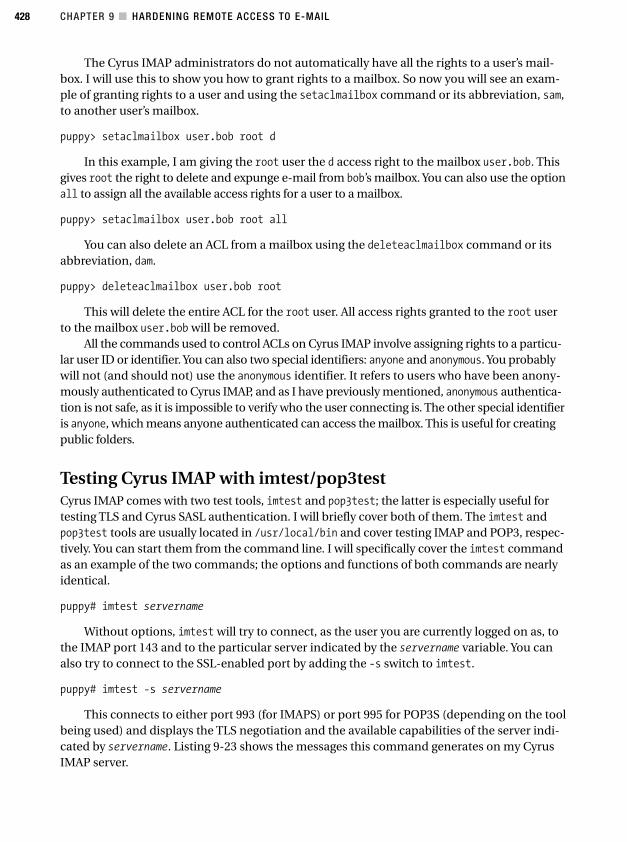
CHAPTER 9 ■ HARDENING REMOTE ACCESS TO E-MAIL428
The Cyrus IMAP administrators do not automatically have all the rights to a user’s mail-box. I will use this to show you how to grant rights to a mailbox. So now you will see an exam-ple of granting rights to a user and using the setaclmailbox command or its abbreviation, sam,to another user’s mailbox.
puppy> setaclmailbox user.bob root d
In this example, I am giving the root user the d access right to the mailbox user.bob. Thisgives root the right to delete and expunge e-mail from bob’s mailbox. You can also use the optionall to assign all the available access rights for a user to a mailbox.
puppy> setaclmailbox user.bob root all
You can also delete an ACL from a mailbox using the deleteaclmailbox command or itsabbreviation, dam.
puppy> deleteaclmailbox user.bob root
This will delete the entire ACL for the root user. All access rights granted to the root userto the mailbox user.bob will be removed.
All the commands used to control ACLs on Cyrus IMAP involve assigning rights to a particu-lar user ID or identifier. You can also two special identifiers: anyone and anonymous. You probablywill not (and should not) use the anonymous identifier. It refers to users who have been anony-mously authenticated to Cyrus IMAP, and as I have previously mentioned, anonymous authentica-tion is not safe, as it is impossible to verify who the user connecting is. The other special identifieris anyone, which means anyone authenticated can access the mailbox. This is useful for creatingpublic folders.
Testing Cyrus IMAP with imtest/pop3testCyrus IMAP comes with two test tools, imtest and pop3test; the latter is especially useful fortesting TLS and Cyrus SASL authentication. I will briefly cover both of them. The imtest andpop3test tools are usually located in /usr/local/bin and cover testing IMAP and POP3, respec-tively. You can start them from the command line. I will specifically cover the imtest commandas an example of the two commands; the options and functions of both commands are nearlyidentical.
puppy# imtest servername
Without options, imtest will try to connect, as the user you are currently logged on as, tothe IMAP port 143 and to the particular server indicated by the servername variable. You canalso try to connect to the SSL-enabled port by adding the -s switch to imtest.
puppy# imtest -s servername
This connects to either port 993 (for IMAPS) or port 995 for POP3S (depending on the toolbeing used) and displays the TLS negotiation and the available capabilities of the server indi-cated by servername. Listing 9-23 shows the messages this command generates on my CyrusIMAP server.
4444c09_final.qxd 1/5/05 12:59 AM Page 428
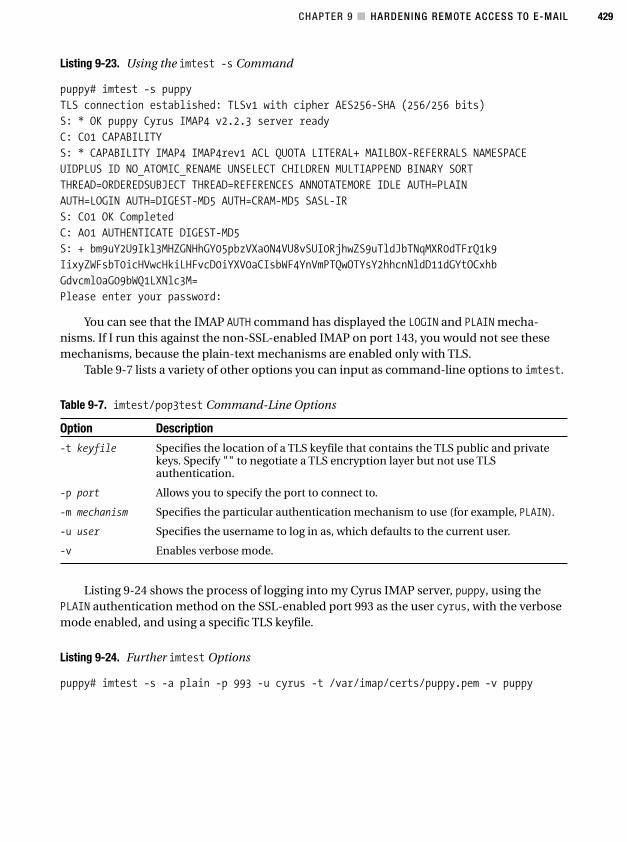
CHAPTER 9 ■ HARDENING REMOTE ACCESS TO E-MAIL 429
Listing 9-23. Using the imtest -s Command
puppy# imtest -s puppy
TLS connection established: TLSv1 with cipher AES256-SHA (256/256 bits)
S: * OK puppy Cyrus IMAP4 v2.2.3 server ready
C: C01 CAPABILITY
S: * CAPABILITY IMAP4 IMAP4rev1 ACL QUOTA LITERAL+ MAILBOX-REFERRALS NAMESPACE
UIDPLUS ID NO_ATOMIC_RENAME UNSELECT CHILDREN MULTIAPPEND BINARY SORT
THREAD=ORDEREDSUBJECT THREAD=REFERENCES ANNOTATEMORE IDLE AUTH=PLAIN
AUTH=LOGIN AUTH=DIGEST-MD5 AUTH=CRAM-MD5 SASL-IR
S: C01 OK Completed
C: A01 AUTHENTICATE DIGEST-MD5
S: + bm9uY2U9Ikl3MHZGNHhGY05pbzVXa0N4VU8vSUI0RjhwZS9uTldJbTNqMXR0dTFrQ1k9
IixyZWFsbT0icHVwcHkiLHFvcD0iYXV0aCIsbWF4YnVmPTQwOTYsY2hhcnNldD11dGYtOCxhb
Gdvcml0aG09bWQ1LXNlc3M=
Please enter your password:
You can see that the IMAP AUTH command has displayed the LOGIN and PLAIN mecha-nisms. If I run this against the non-SSL-enabled IMAP on port 143, you would not see thesemechanisms, because the plain-text mechanisms are enabled only with TLS.
Table 9-7 lists a variety of other options you can input as command-line options to imtest.
Table 9-7. imtest/pop3test Command-Line Options
Option Description
-t keyfile Specifies the location of a TLS keyfile that contains the TLS public and privatekeys. Specify "" to negotiate a TLS encryption layer but not use TLSauthentication.
-p port Allows you to specify the port to connect to.
-m mechanism Specifies the particular authentication mechanism to use (for example, PLAIN).
-u user Specifies the username to log in as, which defaults to the current user.
-v Enables verbose mode.
Listing 9-24 shows the process of logging into my Cyrus IMAP server, puppy, using thePLAIN authentication method on the SSL-enabled port 993 as the user cyrus, with the verbosemode enabled, and using a specific TLS keyfile.
Listing 9-24. Further imtest Options
puppy# imtest -s -a plain -p 993 -u cyrus -t /var/imap/certs/puppy.pem -v puppy
4444c09_final.qxd 1/5/05 12:59 AM Page 429
CHAPTER 9 ■ HARDENING REMOTE ACCESS TO E-MAIL430
8. http://www.catb.org/~esr/who-is-ESR.html and http://www.opensource.org/
9. http://www.faqs.org/rfcs/rfc2645.html
10. I recommend if you want to investigate these other protocol and configuration options that you startwith the Fetchmail home page, which is referenced in the “Resources” section, and specifically its FAQsection.
FetchmailFetchmail is a popular tool authored by Eric S. Raymond (of open-source fame8) to provideremote e-mail retrieval and forwarding functionality using a variety of protocols, includingPOP3 (and related protocols such as APOP, RPOP, and KPOP) and most flavors of IMAP, ETRN,and ODMR.
■Note I briefly discuss ETRN in Chapter 7. ODMR is On-Demand Mail Relay, also known as ATRN, whichis best defined as an authenticated version of the SMTP TURN command. It allows SMTP functionality usingdynamic IP addresses instead of static IP addresses. See RFC 26459 for more details.
As previously mentioned, Fetchmail is a remote mail retrieval and forwarding tool thatuses a variety of protocols to retrieve e-mail via TCP/IP links. Fetchmail retrieves mail fromremote MTAs and forwards it via SMTP or local delivery such as LMTP to your mailbox ormessage store. This allows you to gather e-mail from a variety of remote mailboxes and serversand centralize that e-mail at your local server. This also allows the spam filtering, antivirus, oraliasing functionality capabilities of your MTA to be used on these remote messages as theycome in. Figure 9-3 shows how this process works.
So why is Fetchmail potentially insecure? Some of the insecurities are related to its use ofparticular protocols, such as IMAP and POP, to retrieve e-mail. For example, Fetchmail bydefault runs POP and IMAP unencrypted and transmits your password to the remote systemin the clear. This exposes you to the potential risk, which also exists with regular unencryptedIMAP or POP, that with relatively simple network-sniffing tools an attacker could sniff out theusername and password you are using to connect. Additionally, if you are using .fetchmailrc,your password is often hard-coded into that file to allow Fetchmail to act as a daemon withoutrequiring you to input your password for each session. Finally, as with any other similar tool,I see the possibility of Fetchmail being used as a conduit for Denial of Service (DoS) attacks.
I will cover installing Fetchmail and then cover some examples of common uses, such assecurely retrieving e-mail from a POP and IMAP server using SSL authentication with Fetch-mail, encapsulating Fetchmail transactions using ssh, and demonstrating the most secureways to configure and use Fetchmail. I will also address how to secure your .fetchmailrc fileand limit the potential of Fetchmail being used for a DoS attack.
In doing this, I will focus on Fetchmail’s use as a mail retrieval tool for POP and IMAPaccounts and not cover its use with other protocols such as ETRN or look at using more spe-cialized authenticated protocols such as APOP and KPOP. I am taking this approach becauseI am attempting to address the practical issues facing most users rather than the more special-ized approaches.10 I will not cover any complex Fetchmail configurations or any of the meth-ods of integrating Fetchmail with your MTA. (I will assume you are injecting the mail into anSMTP server located on your local host.)
4444c09_final.qxd 1/5/05 12:59 AM Page 430
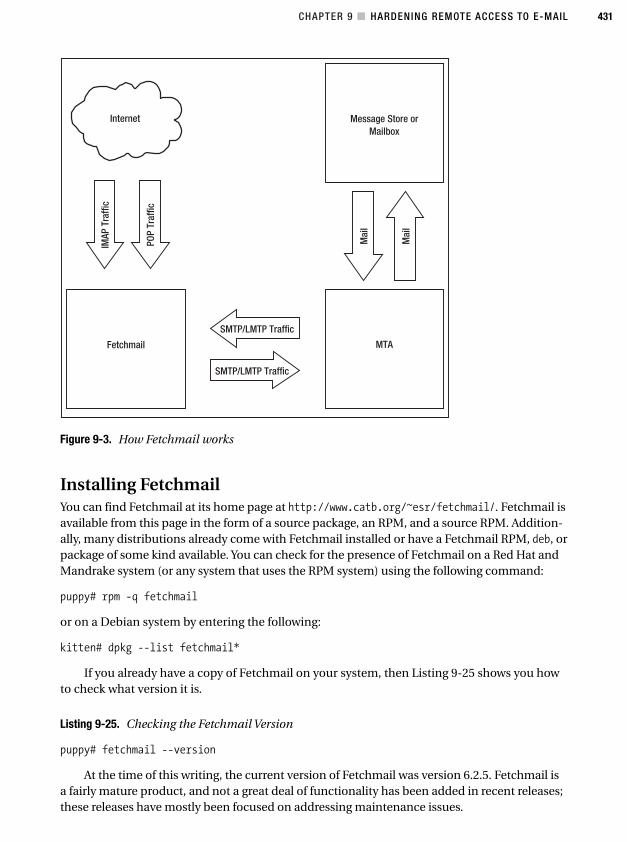
CHAPTER 9 ■ HARDENING REMOTE ACCESS TO E-MAIL 431
Figure 9-3. How Fetchmail works
Installing FetchmailYou can find Fetchmail at its home page at http://www.catb.org/~esr/fetchmail/. Fetchmail isavailable from this page in the form of a source package, an RPM, and a source RPM. Addition-ally, many distributions already come with Fetchmail installed or have a Fetchmail RPM, deb, orpackage of some kind available. You can check for the presence of Fetchmail on a Red Hat andMandrake system (or any system that uses the RPM system) using the following command:
puppy# rpm -q fetchmail
or on a Debian system by entering the following:
kitten# dpkg --list fetchmail*
If you already have a copy of Fetchmail on your system, then Listing 9-25 shows you howto check what version it is.
Listing 9-25. Checking the Fetchmail Version
puppy# fetchmail --version
At the time of this writing, the current version of Fetchmail was version 6.2.5. Fetchmail isa fairly mature product, and not a great deal of functionality has been added in recent releases;these releases have mostly been focused on addressing maintenance issues.
4444c09_final.qxd 1/5/05 12:59 AM Page 431
CHAPTER 9 ■ HARDENING REMOTE ACCESS TO E-MAIL432
11. http://www.securityfocus.com/bid/8843
You can either run the Fetchmail that comes with your distribution or download and installthe Fetchmail available from the Fetchmail home page. However, a recent version, Fetchmail6.2.4, has at least one vulnerability.11 (However, there have been no known exploits of that vul-nerability.) So I recommend you install Fetchmail from the source package and compile it your-self to ensure you have the most secure and up-to-date version of the application. I will showyou how to do that next. If you want to use the Fetchmail that comes with your distribution, youcan skip to the next section.
If you download Fetchmail from its site, then I recommend you check its GNU PrivacyGuard (GPG) signature and checksums to ensure you have an unadulterated copy before youinstall it (see Listing 9-26).
■Note I talk about GPG and MD5 checksums in more detail in Chapter 1.
Listing 9-26. Checking the GPG Signature of Fetchmail
puppy# gpg --verify fetchmail-version.tar.gz.asc fetchmail-version.tar.gz
You can find the Fetchmail checksums at http://www.catb.org/~esr/fetchmail/checksums.You can use the command in Listing 9-27 to verify those checksums.
Listing 9-27. Checking the Fetchmail Checksums
puppy# gpg --verify checksums
If you have downloaded Fetchmail in the form of an RPM, it is easy to install. Use thecommand in Listing 9-28 to install the RPM.
Listing 9-28. Installing Fetchmail via RPM
puppy# rpm -Uvh fetchmail-version.rpm
If you want to compile Fetchmail from source, then download the source package andunpack it. Change into the fetchmail-version directory, and configure Fetchmail. You cansimply configure Fetchmail using the command in Listing 9-29. Replace the /path/to/sslwith the location of your OpenSSL installation to enable SSL support for Fetchmail. Thisconfiguration should cover most purposes for which you want to use Fetchmail.
Listing 9-29. Configuring Fetchmail
puppy# ./configure --with-ssl=/path/to/ssl
4444c09_final.qxd 1/5/05 12:59 AM Page 432
CHAPTER 9 ■ HARDENING REMOTE ACCESS TO E-MAIL 433
■Tip If you are compiling OpenSSL support into Fetchmail, you should note that an issue exists with findingthe Kerberos includes on Red Hat systems. Red Hat has relocated the Kerberos includes to /usr/kerberos/include. Thus, on these systems, you need to add the following environment variable to the system beforeyou configure Fetchmail: CFLAGS=-I/usr/kerberos/include; export CFLAG.
As shown in Table 9-8. Fetchmail also has some additional configuration options that youcan use.
Table 9-8. Fetchmail Configuration Options
Option Description
--prefix=prefix Installs Fetchmail using the directory prefix of prefix
--enable-fallback=procmail | Enables Procmail, Sendmail, Maildrop, or no fallback transportmaildrop | sendmail | no
--enable-RPA Compiles support for the RPA protocol
--enable-NTLM Compiles support for NTLM authentication support
--enable-SDPS Compiles support for the SDPS protocol
--enable-opie Supports OTP with the OPIE library
--enable-inet6 Supports IPv6 (Requires the inet6-apps library)
--with-kerberos5=dir Compiles Fetchmail with Kerberos 5 support
--with-kerberos=dir Compiles Fetchmail with Kerberos 4 support
--with-socks=dir Adds SOCKS firewall support
--with-socks5=dir Adds SOCKS5 firewall support
--with-gssapi=dir Adds GSSAPI support to Fetchmail
The first option allows you to change the location prefix of Fetchmail. The second optionallows you specify a fallback transport in the event that SMTP is not available. Fetchmail firsttries to submit e-mail via SMTP to port 25; then, if a fallback transport is specified, it tries tosubmit the e-mail using that. You can specify sendmail, procmail, or maildrop as the fallbacktransport.
The next few options allow you to enable support for other protocols and tools. Theseinclude the Remote Passphrase Authentication (RPA) protocol (used by CompuServe), NTML(the Microsoft standard authentication protocol), and Demon Internet’s SDPS protocol. The-enable-opie option allows you to enable the one-time passwords using the One Time Pass-words in Everything library.12 You can enable IPv6 support (for which you need the inet6-appslibrary) by using the --enable-inet6 option.
You can enable Kerberos or Kerberos 5 by using the -enable-kerberos and -enable-kerberos5 options. Support for SOCKS and SOCKS5 is also available by using the
12. http://inner.net/opie
4444c09_final.qxd 1/5/05 12:59 AM Page 433
CHAPTER 9 ■ HARDENING REMOTE ACCESS TO E-MAIL434
--enable-socks and --enable-socks5 options, respectively. Finally, you can enable the Generic Security Services Application Programming Interface (GSSAPI) by using the option --enable-gssapi.
Once you have configured Fetchmail to your requirements, you need to make and installit by entering the following:
puppy# make && make install
By default, the Fetchmail binary is installed into /usr/local/bin (unless you have over-ridden that location using the --prefix configure option).
Configuring and Running FetchmailFetchmail can be run both from the command line and as a daemon. On the command line, youcan specify a particular account or system you would like to retrieve mail from via POP or IMAPwhilst running in daemon mode. Fetchmail can process multiple accounts for multiple users.Fetchmail draws its configuration from either command-line options or the .fetchmailrc file.Any command-line options override duplicate options specified in the .fetchmailrc file. Youcan have many .fetchmailrc files (one for each user, for example), each of which can containmultiple potential accounts using different protocols from which to retrieve e-mail. I will prima-rily cover the basic command-line options and show you some examples of .fetchmailrc con-figurations that are relevant to using Fetchmail in a secure manner. I will not go into a lot ofdetail about .fetchmailrc files.
■Tip Also, a GUI Fetchmail configuration client called fetchmailconf runs under X-Windows. Itrequires TCL/TK to operate. It comes with the current releases of Fetchmail, or you can find a Debian ver-sion at http://packages.debian.org/stable/mail/fetchmailconf and RPM packages for a varietyof distributions at http://rpmfind.net.
I will start by looking at running Fetchmail from the command line. This is often a use-ful way to test your connection before you commit your configuration to a .fetchmailrc file.Listing 9-30 shows the start of a typical Fetchmail session. I will cover the makeup of thatcommand and explain how to use the options. Then I will cover exactly what the commandhas done and any potential risks that exist.
Listing 9-30. Sample Fetchmail Command
puppy# fetchmail -v -p IMAP -u bob kitten.yourdomain.com
Enter password for [email protected]:
fetchmail: 6.2.1 querying yourdomain.com (protocol IMAP) at ➥
Thu 27 May 2004 19:45:37 EST: poll started
I have executed the fetchmail binary with a few basic options. The first option, -v, enablesthe verbose mode, which increases the logging level. All logging is done to stdout as Fetchmailruns. The next option, -p, selects the protocol with which you want to connect to the remotesystem. Table 9-9 shows the list of available protocols.
4444c09_final.qxd 1/5/05 12:59 AM Page 434
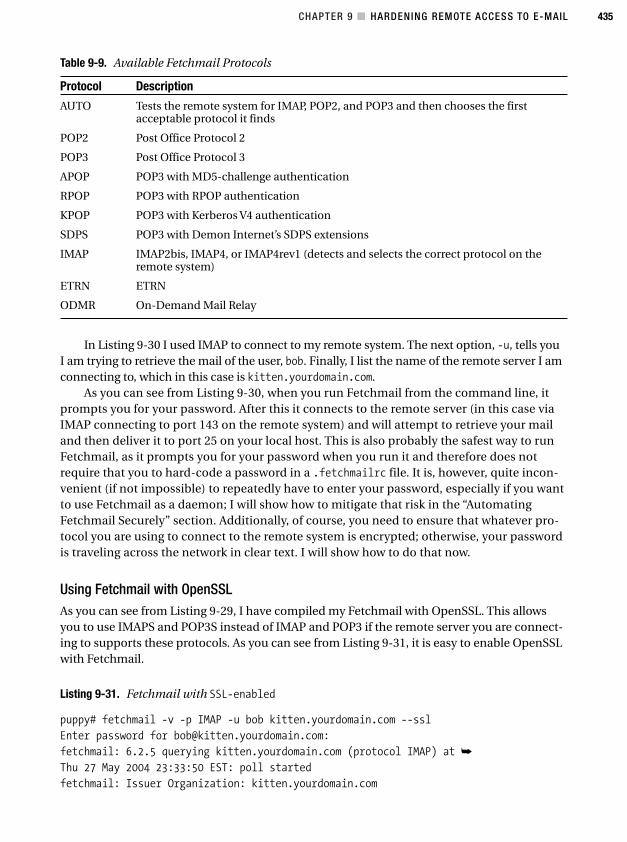
CHAPTER 9 ■ HARDENING REMOTE ACCESS TO E-MAIL 435
Table 9-9. Available Fetchmail Protocols
Protocol Description
AUTO Tests the remote system for IMAP, POP2, and POP3 and then chooses the firstacceptable protocol it finds
POP2 Post Office Protocol 2
POP3 Post Office Protocol 3
APOP POP3 with MD5-challenge authentication
RPOP POP3 with RPOP authentication
KPOP POP3 with Kerberos V4 authentication
SDPS POP3 with Demon Internet’s SDPS extensions
IMAP IMAP2bis, IMAP4, or IMAP4rev1 (detects and selects the correct protocol on theremote system)
ETRN ETRN
ODMR On-Demand Mail Relay
In Listing 9-30 I used IMAP to connect to my remote system. The next option, -u, tells youI am trying to retrieve the mail of the user, bob. Finally, I list the name of the remote server I amconnecting to, which in this case is kitten.yourdomain.com.
As you can see from Listing 9-30, when you run Fetchmail from the command line, itprompts you for your password. After this it connects to the remote server (in this case viaIMAP connecting to port 143 on the remote system) and will attempt to retrieve your mailand then deliver it to port 25 on your local host. This is also probably the safest way to runFetchmail, as it prompts you for your password when you run it and therefore does notrequire that you to hard-code a password in a .fetchmailrc file. It is, however, quite incon-venient (if not impossible) to repeatedly have to enter your password, especially if you wantto use Fetchmail as a daemon; I will show how to mitigate that risk in the “AutomatingFetchmail Securely” section. Additionally, of course, you need to ensure that whatever pro-tocol you are using to connect to the remote system is encrypted; otherwise, your passwordis traveling across the network in clear text. I will show how to do that now.
Using Fetchmail with OpenSSLAs you can see from Listing 9-29, I have compiled my Fetchmail with OpenSSL. This allowsyou to use IMAPS and POP3S instead of IMAP and POP3 if the remote server you are connect-ing to supports these protocols. As you can see from Listing 9-31, it is easy to enable OpenSSLwith Fetchmail.
Listing 9-31. Fetchmail with SSL-enabled
puppy# fetchmail -v -p IMAP -u bob kitten.yourdomain.com --ssl
Enter password for [email protected]:
fetchmail: 6.2.5 querying kitten.yourdomain.com (protocol IMAP) at ➥
Thu 27 May 2004 23:33:50 EST: poll started
fetchmail: Issuer Organization: kitten.yourdomain.com
4444c09_final.qxd 1/5/05 12:59 AM Page 435
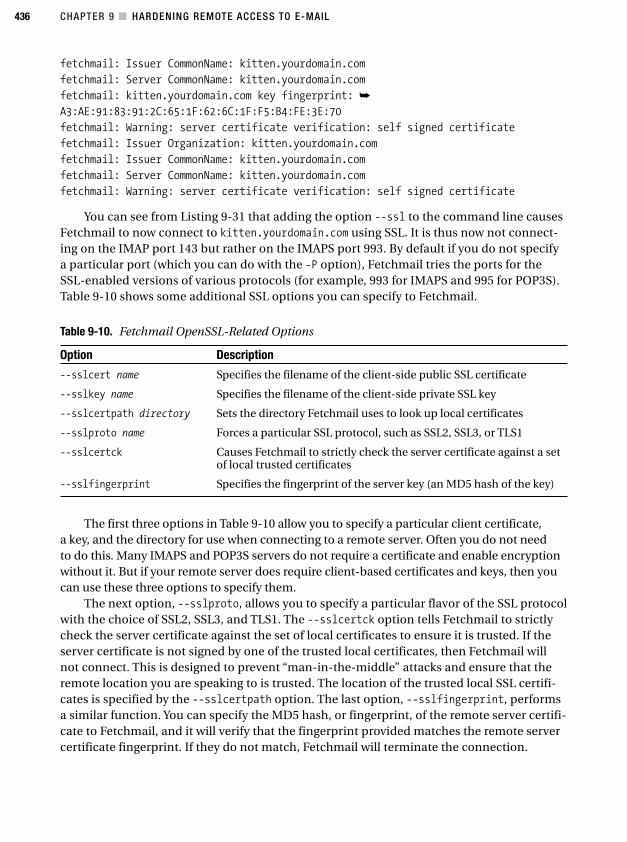
CHAPTER 9 ■ HARDENING REMOTE ACCESS TO E-MAIL436
fetchmail: Issuer CommonName: kitten.yourdomain.com
fetchmail: Server CommonName: kitten.yourdomain.com
fetchmail: kitten.yourdomain.com key fingerprint: ➥
A3:AE:91:83:91:2C:65:1F:62:6C:1F:F5:B4:FE:3E:70
fetchmail: Warning: server certificate verification: self signed certificate
fetchmail: Issuer Organization: kitten.yourdomain.com
fetchmail: Issuer CommonName: kitten.yourdomain.com
fetchmail: Server CommonName: kitten.yourdomain.com
fetchmail: Warning: server certificate verification: self signed certificate
You can see from Listing 9-31 that adding the option --ssl to the command line causesFetchmail to now connect to kitten.yourdomain.com using SSL. It is thus now not connect-ing on the IMAP port 143 but rather on the IMAPS port 993. By default if you do not specifya particular port (which you can do with the -P option), Fetchmail tries the ports for theSSL-enabled versions of various protocols (for example, 993 for IMAPS and 995 for POP3S).Table 9-10 shows some additional SSL options you can specify to Fetchmail.
Table 9-10. Fetchmail OpenSSL-Related Options
Option Description
--sslcert name Specifies the filename of the client-side public SSL certificate
--sslkey name Specifies the filename of the client-side private SSL key
--sslcertpath directory Sets the directory Fetchmail uses to look up local certificates
--sslproto name Forces a particular SSL protocol, such as SSL2, SSL3, or TLS1
--sslcertck Causes Fetchmail to strictly check the server certificate against a setof local trusted certificates
--sslfingerprint Specifies the fingerprint of the server key (an MD5 hash of the key)
The first three options in Table 9-10 allow you to specify a particular client certificate,a key, and the directory for use when connecting to a remote server. Often you do not needto do this. Many IMAPS and POP3S servers do not require a certificate and enable encryptionwithout it. But if your remote server does require client-based certificates and keys, then youcan use these three options to specify them.
The next option, --sslproto, allows you to specify a particular flavor of the SSL protocolwith the choice of SSL2, SSL3, and TLS1. The --sslcertck option tells Fetchmail to strictlycheck the server certificate against the set of local certificates to ensure it is trusted. If theserver certificate is not signed by one of the trusted local certificates, then Fetchmail willnot connect. This is designed to prevent “man-in-the-middle” attacks and ensure that theremote location you are speaking to is trusted. The location of the trusted local SSL certifi-cates is specified by the --sslcertpath option. The last option, --sslfingerprint, performsa similar function. You can specify the MD5 hash, or fingerprint, of the remote server certifi-cate to Fetchmail, and it will verify that the fingerprint provided matches the remote servercertificate fingerprint. If they do not match, Fetchmail will terminate the connection.
4444c09_final.qxd 1/5/05 12:59 AM Page 436
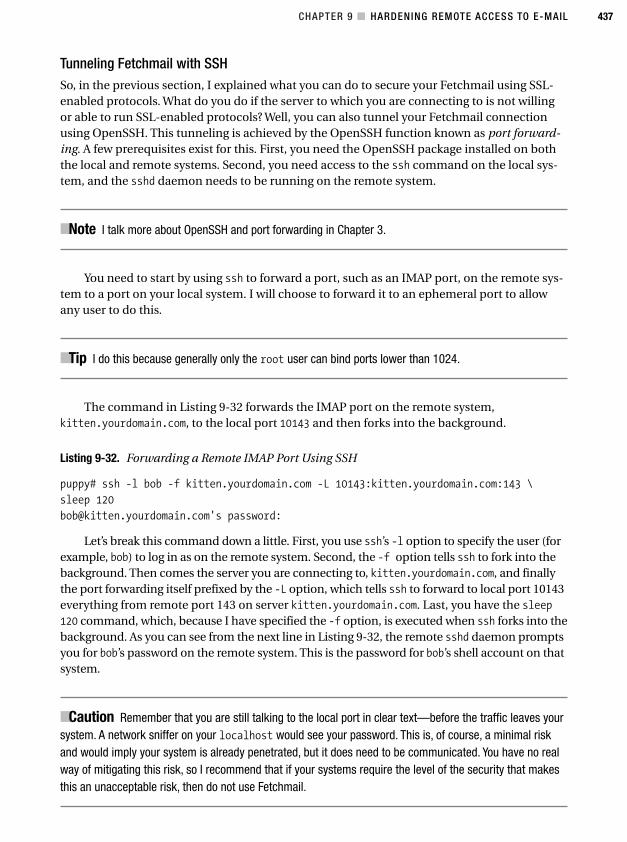
CHAPTER 9 ■ HARDENING REMOTE ACCESS TO E-MAIL 437
Tunneling Fetchmail with SSHSo, in the previous section, I explained what you can do to secure your Fetchmail using SSL-enabled protocols. What do you do if the server to which you are connecting to is not willingor able to run SSL-enabled protocols? Well, you can also tunnel your Fetchmail connectionusing OpenSSH. This tunneling is achieved by the OpenSSH function known as port forward-ing. A few prerequisites exist for this. First, you need the OpenSSH package installed on boththe local and remote systems. Second, you need access to the ssh command on the local sys-tem, and the sshd daemon needs to be running on the remote system.
■Note I talk more about OpenSSH and port forwarding in Chapter 3.
You need to start by using ssh to forward a port, such as an IMAP port, on the remote sys-tem to a port on your local system. I will choose to forward it to an ephemeral port to allowany user to do this.
■Tip I do this because generally only the root user can bind ports lower than 1024.
The command in Listing 9-32 forwards the IMAP port on the remote system,kitten.yourdomain.com, to the local port 10143 and then forks into the background.
Listing 9-32. Forwarding a Remote IMAP Port Using SSH
puppy# ssh -l bob -f kitten.yourdomain.com -L 10143:kitten.yourdomain.com:143 \
sleep 120
[email protected]'s password:
Let’s break this command down a little. First, you use ssh’s -l option to specify the user (forexample, bob) to log in as on the remote system. Second, the -f option tells ssh to fork into thebackground. Then comes the server you are connecting to, kitten.yourdomain.com, and finallythe port forwarding itself prefixed by the -L option, which tells ssh to forward to local port 10143everything from remote port 143 on server kitten.yourdomain.com. Last, you have the sleep120 command, which, because I have specified the -f option, is executed when ssh forks into thebackground. As you can see from the next line in Listing 9-32, the remote sshd daemon promptsyou for bob’s password on the remote system. This is the password for bob’s shell account on thatsystem.
■Caution Remember that you are still talking to the local port in clear text—before the traffic leaves yoursystem. A network sniffer on your localhost would see your password. This is, of course, a minimal riskand would imply your system is already penetrated, but it does need to be communicated. You have no realway of mitigating this risk, so I recommend that if your systems require the level of the security that makesthis an unacceptable risk, then do not use Fetchmail.
4444c09_final.qxd 1/5/05 12:59 AM Page 437
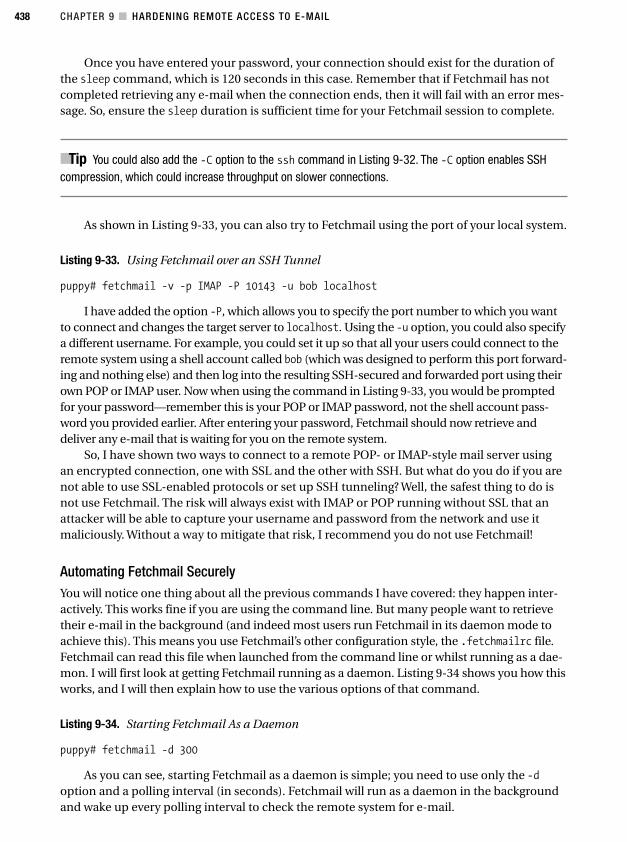
CHAPTER 9 ■ HARDENING REMOTE ACCESS TO E-MAIL438
Once you have entered your password, your connection should exist for the duration ofthe sleep command, which is 120 seconds in this case. Remember that if Fetchmail has notcompleted retrieving any e-mail when the connection ends, then it will fail with an error mes-sage. So, ensure the sleep duration is sufficient time for your Fetchmail session to complete.
■Tip You could also add the -C option to the ssh command in Listing 9-32. The -C option enables SSHcompression, which could increase throughput on slower connections.
As shown in Listing 9-33, you can also try to Fetchmail using the port of your local system.
Listing 9-33. Using Fetchmail over an SSH Tunnel
puppy# fetchmail -v -p IMAP -P 10143 -u bob localhost
I have added the option -P, which allows you to specify the port number to which you wantto connect and changes the target server to localhost. Using the -u option, you could also specifya different username. For example, you could set it up so that all your users could connect to theremote system using a shell account called bob (which was designed to perform this port forward-ing and nothing else) and then log into the resulting SSH-secured and forwarded port using theirown POP or IMAP user. Now when using the command in Listing 9-33, you would be promptedfor your password—remember this is your POP or IMAP password, not the shell account pass-word you provided earlier. After entering your password, Fetchmail should now retrieve anddeliver any e-mail that is waiting for you on the remote system.
So, I have shown two ways to connect to a remote POP- or IMAP-style mail server usingan encrypted connection, one with SSL and the other with SSH. But what do you do if you arenot able to use SSL-enabled protocols or set up SSH tunneling? Well, the safest thing to do isnot use Fetchmail. The risk will always exist with IMAP or POP running without SSL that anattacker will be able to capture your username and password from the network and use itmaliciously. Without a way to mitigate that risk, I recommend you do not use Fetchmail!
Automating Fetchmail SecurelyYou will notice one thing about all the previous commands I have covered: they happen inter-actively. This works fine if you are using the command line. But many people want to retrievetheir e-mail in the background (and indeed most users run Fetchmail in its daemon mode toachieve this). This means you use Fetchmail’s other configuration style, the .fetchmailrc file.Fetchmail can read this file when launched from the command line or whilst running as a dae-mon. I will first look at getting Fetchmail running as a daemon. Listing 9-34 shows you how thisworks, and I will then explain how to use the various options of that command.
Listing 9-34. Starting Fetchmail As a Daemon
puppy# fetchmail -d 300
As you can see, starting Fetchmail as a daemon is simple; you need to use only the -doption and a polling interval (in seconds). Fetchmail will run as a daemon in the backgroundand wake up every polling interval to check the remote system for e-mail.
4444c09_final.qxd 1/5/05 12:59 AM Page 438
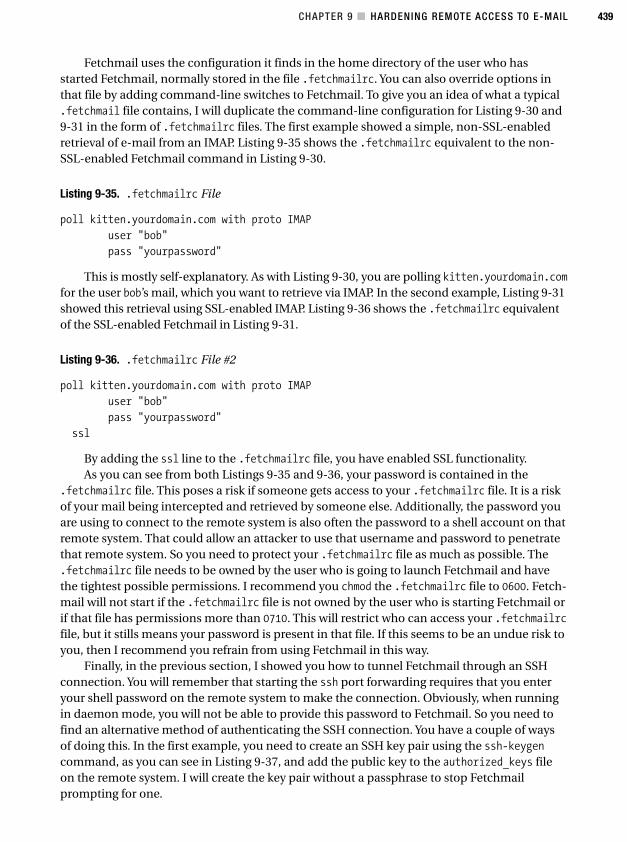
CHAPTER 9 ■ HARDENING REMOTE ACCESS TO E-MAIL 439
Fetchmail uses the configuration it finds in the home directory of the user who hasstarted Fetchmail, normally stored in the file .fetchmailrc. You can also override options inthat file by adding command-line switches to Fetchmail. To give you an idea of what a typical.fetchmail file contains, I will duplicate the command-line configuration for Listing 9-30 and9-31 in the form of .fetchmailrc files. The first example showed a simple, non-SSL-enabledretrieval of e-mail from an IMAP. Listing 9-35 shows the .fetchmailrc equivalent to the non-SSL-enabled Fetchmail command in Listing 9-30.
Listing 9-35. .fetchmailrc File
poll kitten.yourdomain.com with proto IMAP
user "bob"
pass "yourpassword"
This is mostly self-explanatory. As with Listing 9-30, you are polling kitten.yourdomain.comfor the user bob’s mail, which you want to retrieve via IMAP. In the second example, Listing 9-31showed this retrieval using SSL-enabled IMAP. Listing 9-36 shows the .fetchmailrc equivalentof the SSL-enabled Fetchmail in Listing 9-31.
Listing 9-36. .fetchmailrc File #2
poll kitten.yourdomain.com with proto IMAP
user "bob"
pass "yourpassword"
ssl
By adding the ssl line to the .fetchmailrc file, you have enabled SSL functionality.As you can see from both Listings 9-35 and 9-36, your password is contained in the
.fetchmailrc file. This poses a risk if someone gets access to your .fetchmailrc file. It is a riskof your mail being intercepted and retrieved by someone else. Additionally, the password youare using to connect to the remote system is also often the password to a shell account on thatremote system. That could allow an attacker to use that username and password to penetratethat remote system. So you need to protect your .fetchmailrc file as much as possible. The.fetchmailrc file needs to be owned by the user who is going to launch Fetchmail and havethe tightest possible permissions. I recommend you chmod the .fetchmailrc file to 0600. Fetch-mail will not start if the .fetchmailrc file is not owned by the user who is starting Fetchmail orif that file has permissions more than 0710. This will restrict who can access your .fetchmailrcfile, but it stills means your password is present in that file. If this seems to be an undue risk toyou, then I recommend you refrain from using Fetchmail in this way.
Finally, in the previous section, I showed you how to tunnel Fetchmail through an SSHconnection. You will remember that starting the ssh port forwarding requires that you enteryour shell password on the remote system to make the connection. Obviously, when runningin daemon mode, you will not be able to provide this password to Fetchmail. So you need tofind an alternative method of authenticating the SSH connection. You have a couple of waysof doing this. In the first example, you need to create an SSH key pair using the ssh-keygencommand, as you can see in Listing 9-37, and add the public key to the authorized_keys fileon the remote system. I will create the key pair without a passphrase to stop Fetchmailprompting for one.
4444c09_final.qxd 1/5/05 12:59 AM Page 439
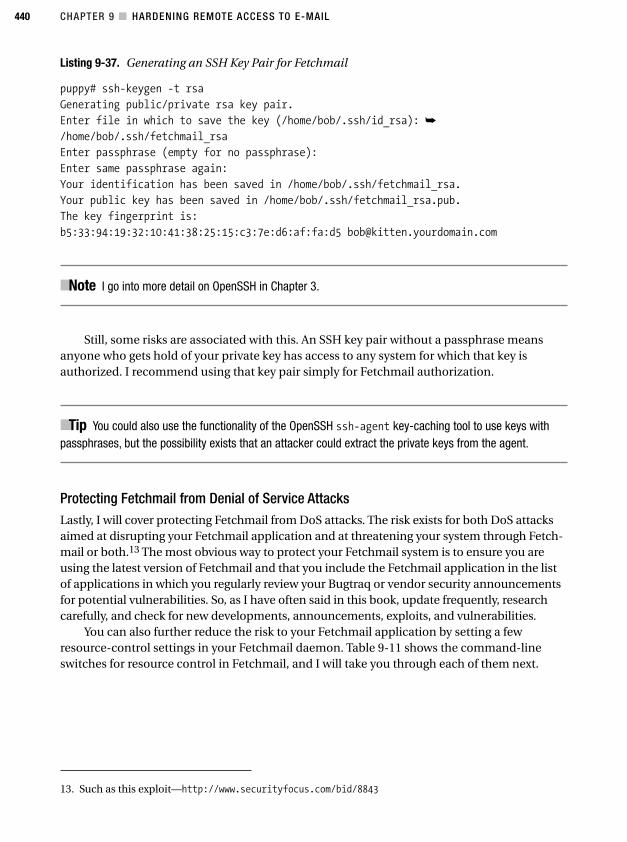
CHAPTER 9 ■ HARDENING REMOTE ACCESS TO E-MAIL440
Listing 9-37. Generating an SSH Key Pair for Fetchmail
puppy# ssh-keygen -t rsa
Generating public/private rsa key pair.
Enter file in which to save the key (/home/bob/.ssh/id_rsa): ➥
/home/bob/.ssh/fetchmail_rsa
Enter passphrase (empty for no passphrase):
Enter same passphrase again:
Your identification has been saved in /home/bob/.ssh/fetchmail_rsa.
Your public key has been saved in /home/bob/.ssh/fetchmail_rsa.pub.
The key fingerprint is:
b5:33:94:19:32:10:41:38:25:15:c3:7e:d6:af:fa:d5 [email protected]
■Note I go into more detail on OpenSSH in Chapter 3.
Still, some risks are associated with this. An SSH key pair without a passphrase meansanyone who gets hold of your private key has access to any system for which that key isauthorized. I recommend using that key pair simply for Fetchmail authorization.
■Tip You could also use the functionality of the OpenSSH ssh-agent key-caching tool to use keys withpassphrases, but the possibility exists that an attacker could extract the private keys from the agent.
Protecting Fetchmail from Denial of Service AttacksLastly, I will cover protecting Fetchmail from DoS attacks. The risk exists for both DoS attacksaimed at disrupting your Fetchmail application and at threatening your system through Fetch-mail or both.13 The most obvious way to protect your Fetchmail system is to ensure you areusing the latest version of Fetchmail and that you include the Fetchmail application in the listof applications in which you regularly review your Bugtraq or vendor security announcementsfor potential vulnerabilities. So, as I have often said in this book, update frequently, researchcarefully, and check for new developments, announcements, exploits, and vulnerabilities.
You can also further reduce the risk to your Fetchmail application by setting a fewresource-control settings in your Fetchmail daemon. Table 9-11 shows the command-lineswitches for resource control in Fetchmail, and I will take you through each of them next.
13. Such as this exploit—http://www.securityfocus.com/bid/8843
4444c09_final.qxd 1/5/05 12:59 AM Page 440
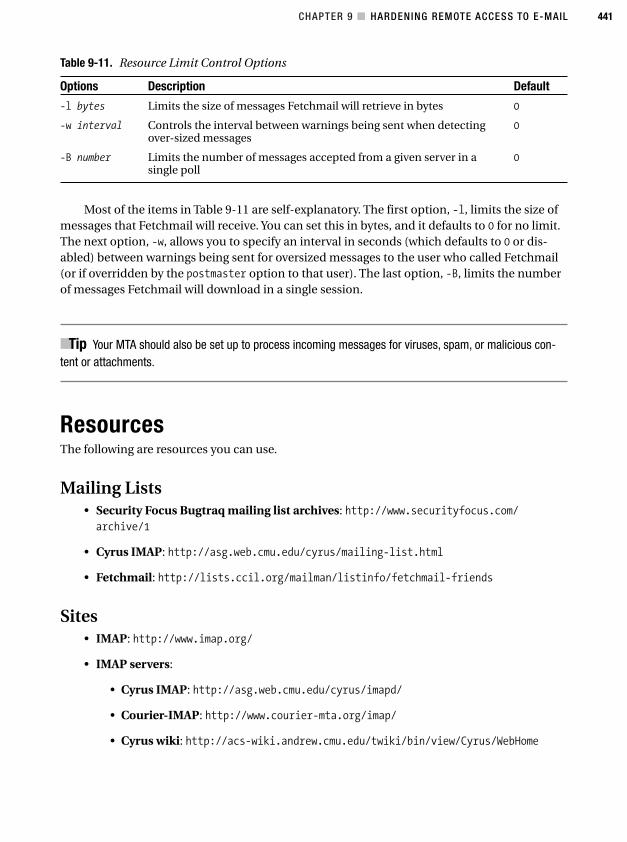
CHAPTER 9 ■ HARDENING REMOTE ACCESS TO E-MAIL 441
Table 9-11. Resource Limit Control Options
Options Description Default
-l bytes Limits the size of messages Fetchmail will retrieve in bytes 0
-w interval Controls the interval between warnings being sent when detecting 0over-sized messages
-B number Limits the number of messages accepted from a given server in a 0single poll
Most of the items in Table 9-11 are self-explanatory. The first option, -l, limits the size ofmessages that Fetchmail will receive. You can set this in bytes, and it defaults to 0 for no limit.The next option, -w, allows you to specify an interval in seconds (which defaults to 0 or dis-abled) between warnings being sent for oversized messages to the user who called Fetchmail(or if overridden by the postmaster option to that user). The last option, -B, limits the numberof messages Fetchmail will download in a single session.
■Tip Your MTA should also be set up to process incoming messages for viruses, spam, or malicious con-tent or attachments.
ResourcesThe following are resources you can use.
Mailing Lists• Security Focus Bugtraq mailing list archives: http://www.securityfocus.com/
archive/1
• Cyrus IMAP: http://asg.web.cmu.edu/cyrus/mailing-list.html
• Fetchmail: http://lists.ccil.org/mailman/listinfo/fetchmail-friends
Sites• IMAP: http://www.imap.org/
• IMAP servers:
• Cyrus IMAP: http://asg.web.cmu.edu/cyrus/imapd/
• Courier-IMAP: http://www.courier-mta.org/imap/
• Cyrus wiki: http://acs-wiki.andrew.cmu.edu/twiki/bin/view/Cyrus/WebHome
4444c09_final.qxd 1/5/05 12:59 AM Page 441
• POP servers:
• GNU pop3d: http://freshmeat.net/projects/gnupop3d
• POPular: http://www.remote.org/jochen/mail/popular/
• Qpopper: http://www.eudora.com/products/unsupported/qpopper/index.html
• TeaPOP: http://www.toontown.org/teapop/
• vm-pop3d: http://www.reedmedia.net/software/virtualmail-pop3d/
• Fetchmail: http://www.catb.org/~esr/fetchmail/
• One Time Passwords in Everything: http://inner.net/opie
CHAPTER 9 ■ HARDENING REMOTE ACCESS TO E-MAIL442
4444c09_final.qxd 1/5/05 12:59 AM Page 442
443
C H A P T E R 1 0
■ ■ ■
Securing an FTP Server
File Transfer Protocol (FTP) is one of the original core protocols of the Internet and was firstdocumented in 1971. It was designed to provide the functionality to exchanges files over theInternet and is specified in RFC 959.1 It is still currently used for a number of purposes,including running user-authenticated and anonymously authenticated FTP servers to down-load files and applications. For example, software vendors utilize it to provide updates orpatches to clients. It is also used to transfer files between disparate systems; for example,many non-Unix systems also support FTP. One of the most common uses of FTP is by ISPsto provide customers with the ability to upload files to their Web sites.
At first look FTP would seem to fulfill a useful and practical function. Unfortunately, FTPis also inherently insecure. The only security available to most FTP sessions is a username andpassword combination. By default, FTP transactions are unencrypted, and all traffic is sent inclear text across your network. One example is the transmission of usernames and passwords.This exposes you to a considerable level of risk that is difficult to mitigate with available tools.
Because of the inner workings of FTP, it is not possible to use tools such as Stunnel tosecure FTP traffic; I will explain why this is so in the next section. Additionally, many of theavailable open-source and commercial FTP servers have proven to be highly vulnerable toattack. Many FTP servers are easily compromised and thus can provide a point of access foran attacker to enter your system. Or they have vulnerabilities that could allow Denial of Service(DoS) attacks on your systems. In addition to these potential insecurities, FTP is also vulner-able to so-called man-in-the-middle attacks where your data is intercepted and then eitherstolen or altered and sent on. For example, this is one of the primary methods hackers use topenetrate and hack Web servers. New material is uploaded to a Web server via FTP. The hackerfinds the IP address of the Web server and sets up a sniffer to watch FTP’s TCP port 21. Thenext time you update the site, the attacker grabs your username and password, which are usedto upload material of the hacker’s choice to the system or to steal any valuable information, suchas credit card details, from your site.
Given the weaknesses of FTP, I recommend you not run it at all as a production server onany systems, unless you absolutely require the functionality. Some commercial secure FTPservers are available. But these usually require a client that is compatible with the secure server.If you have a proprietary commercial FTP server running with encryption or enhanced authen-tication, then generally clients other than the proprietary client designed for that server will notbe able to connect or will be able to connect to the server using only standard FTP without anyadditional security.
1. http://www.ietf.org/rfc/rfc0959.txt?number=959
4444c10_final.qxd 1/5/05 1:02 AM Page 443
CHAPTER 10 ■ SECURING AN FTP SERVER444
You do have some alternatives to FTP. Indeed, for the process of transferring files betweensystems, other mechanisms are considerably more secure. These include sftp or scp from theOpenSSH toolkit (as discussed in Chapter 3). If the remote systems are configured correctly,then you can use SSH to upload files to remote systems such as Web servers without requiringan FTP port to be open on them. I recommend you look at these options rather than use FTP.
If you must use FTP, then in this chapter I will try to provide a secure as possible imple-mentation of an FTP server. I will show you how FTP works and how best to firewall it. Addi-tionally, I will take you through installing a secure anonymous FTP server, show you a localuser–authenticated FTP server, and cover support for FTP over SSL/TLS. As part of this, I willalso demonstrate how to chroot your FTP server and mitigate the risk of DoS attacks.
How Does FTP Work?FTP has two key components: a client and a server. This chapter will focus on the servercomponent of FTP. FTP is a stateful protocol, meaning that connections between clients andservers are created and kept open during an FTP session. Commands that are issued to theFTP server (for example, to upload a file or list files in a directory) are executed consecutively.If a command arrives while another command is being executed, then the new command isqueued and will execute when the current command has been completed.
■Note FTP is a TCP-only protocol. FTP does not have any UDP elements.
When making an FTP connection, two types of connections are initiated. They are a con-trol connection, also called a command, and a data connection. When you connect an FTPclient to an FTP server, a single control connection is established by default using the TCPport 21. This connection is used for the authentication process, for sending commands, andfor receiving response messages from the remote server. It does not do the actual sending andreceiving of information or files. The data connection handles sending and receiving files.A data connection is established only when a file needs to be transferred and is closed at theend of the transfer.
Two types of data connection exist: active mode and passive mode. Active connectionsuse the PORT command and are initiated by the remote server, and the client listens for theconnection. Passive connections use the PASV command; the client initiates the connectionto the remote server, and the server listens for the data connections. When the client startsa transfer, it tells the server what type of connection it wants to make. In modern FTP clientsand servers, the most common connection type is passive connections.
In active mode, the client connects from a random source port in the ephemeral portrange (see Chapter 2) to the FTP control port 21. All commands and response codes are senton this control connection. When you actually want to transfer a file, the remote FTP serverwill initiate a connection from the FTP data port 20 on the server system back to a destinationport in the ephemeral port range on the client. This destination port is negotiated by the port21 control connection. Often, the destination port used is one port number higher than thesource port on the client. Figure 10-1 shows an active mode connection.
4444c10_final.qxd 1/5/05 1:02 AM Page 444
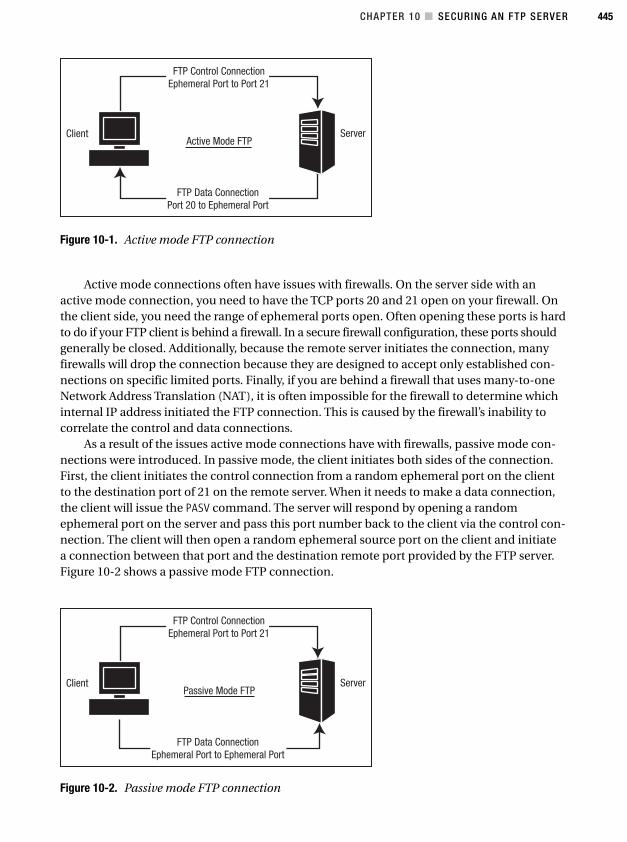
CHAPTER 10 ■ SECURING AN FTP SERVER 445
Figure 10-1. Active mode FTP connection
Active mode connections often have issues with firewalls. On the server side with anactive mode connection, you need to have the TCP ports 20 and 21 open on your firewall. Onthe client side, you need the range of ephemeral ports open. Often opening these ports is hardto do if your FTP client is behind a firewall. In a secure firewall configuration, these ports shouldgenerally be closed. Additionally, because the remote server initiates the connection, manyfirewalls will drop the connection because they are designed to accept only established con-nections on specific limited ports. Finally, if you are behind a firewall that uses many-to-oneNetwork Address Translation (NAT), it is often impossible for the firewall to determine whichinternal IP address initiated the FTP connection. This is caused by the firewall’s inability tocorrelate the control and data connections.
As a result of the issues active mode connections have with firewalls, passive mode con-nections were introduced. In passive mode, the client initiates both sides of the connection.First, the client initiates the control connection from a random ephemeral port on the clientto the destination port of 21 on the remote server. When it needs to make a data connection,the client will issue the PASV command. The server will respond by opening a randomephemeral port on the server and pass this port number back to the client via the control con-nection. The client will then open a random ephemeral source port on the client and initiatea connection between that port and the destination remote port provided by the FTP server.Figure 10-2 shows a passive mode FTP connection.
Figure 10-2. Passive mode FTP connection
4444c10_final.qxd 1/5/05 1:02 AM Page 445

CHAPTER 10 ■ SECURING AN FTP SERVER446
Passive mode connections mitigate the risk of the remote server initiating the connectionto the client and being blocked by a firewall. This is because the client initiates both the con-trol and data connections. Thus, firewalls see the outgoing FTP data connection as part of anestablished connection. You still need to have ephemeral ports open on the server and clientside of the connection. But this too can be partially mitigated because many FTP servers allowyou to specify the range of ephemeral ports rather than using the entire ephemeral port range.But you still need to open a suitable range to allow your FTP server to function.
Overall, the random ephemeral port selection, for both active and passive connec-tions, is one of the reasons why securing FTP is difficult. To achieve a secure connection,the securing application needs to know which ports to secure. As this port choice is ran-dom, the securing application has no means of determining what port needs to be secured.
Firewalling Your FTP ServerAnother method exists for further locking down your FTP connections. To do this, you can useiptables with a module called ip_conntrack_ftp. The ip_conntrack_ftp module uses connec-tion state tracking to correlate and track FTP transactions. I first introduced connection statetracking in Chapter 2. Let’s look at creating some iptables rules for your FTP server.
I discussed earlier that in order for the FTP server to function, you will need a combina-tion of the port 20, the port 21, and the range of ephemeral ports open on both the client andserver. This combination is partially dependant on the connection mode you are running onyour FTP server. I will assume you are creating firewall rules for an FTP server running on inter-face eth0 and bound to IP address 192.168.0.1. I will also assume you want FTP connectionsonly into the system and you do not want to allow outgoing FTP connections.
The first rules you will create are for the FTP server’s control connection, which uses TCPport 21. They are identical for active and passive mode FTP, as the control connection isrequired for both modes.
puppy# iptables -A INPUT -i eth0 -p tcp --dport 21 -d 192.168.0.1 -m state \
--state NEW,ESTABLISHED,RELATED -j ACCEPT
puppy# iptables -A OUTPUT -o eth0 -p tcp --sport 21 -s 192.168.0.1 -m state \
--state ESTABLISHED,RELATED -j ACCEPT
In the two rules you have just specified, incoming traffic on interface eth0 to IP address192.168.0.1 and TCP port 21 in the connection state NEW, ESTABLISHED, or RELATED is allowedto enter the host. Outgoing traffic on the same interface, IP address, and port in the connec-tion states ESTABLISHED and RELATED is allowed to exit the host.
The control connection is not the whole story, though. The FTP server also needs the dataconnection opened in your firewall for the server to correctly function. As I have discussed,this data connection can run in two modes: active and passive. For example, the active modeconnection requires a substantial port range to be open. To function correctly, the activemode requires port 20 to be open on the FTP server. Additionally, on the server you need toaccept incoming connections from the ephemeral port range on the client host. The passivemode connection requires ports in the ephemeral port range to be open on both the clientand the server. Both of these models pose security risks.
To help mitigate this security risk, I will show how to utilize the ip_conntrack_ftp module.This module is an iptables kernel module that extends the functionality of the connection
4444c10_final.qxd 1/5/05 1:02 AM Page 446
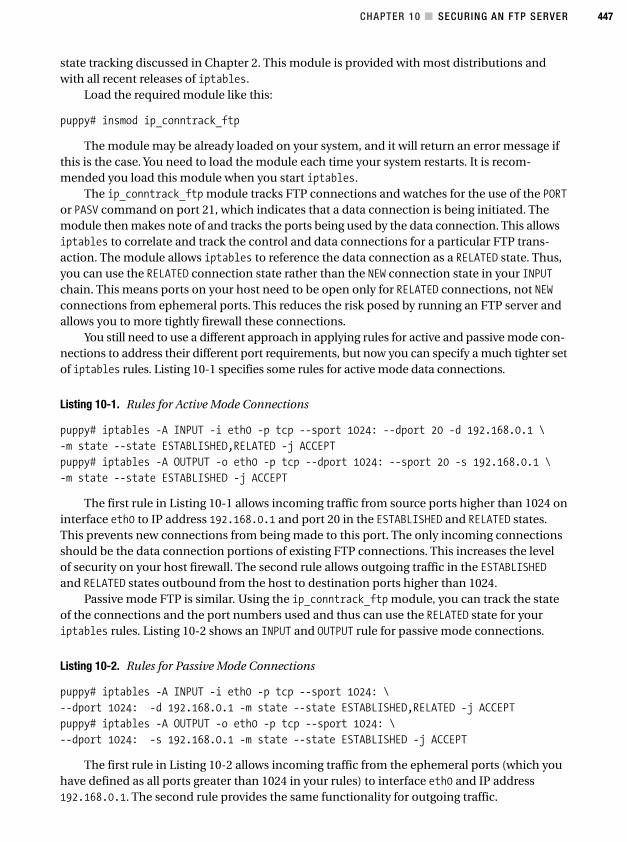
CHAPTER 10 ■ SECURING AN FTP SERVER 447
state tracking discussed in Chapter 2. This module is provided with most distributions andwith all recent releases of iptables.
Load the required module like this:
puppy# insmod ip_conntrack_ftp
The module may be already loaded on your system, and it will return an error message ifthis is the case. You need to load the module each time your system restarts. It is recom-mended you load this module when you start iptables.
The ip_conntrack_ftp module tracks FTP connections and watches for the use of the PORTor PASV command on port 21, which indicates that a data connection is being initiated. Themodule then makes note of and tracks the ports being used by the data connection. This allowsiptables to correlate and track the control and data connections for a particular FTP trans-action. The module allows iptables to reference the data connection as a RELATED state. Thus,you can use the RELATED connection state rather than the NEW connection state in your INPUTchain. This means ports on your host need to be open only for RELATED connections, not NEWconnections from ephemeral ports. This reduces the risk posed by running an FTP server andallows you to more tightly firewall these connections.
You still need to use a different approach in applying rules for active and passive mode con-nections to address their different port requirements, but now you can specify a much tighter setof iptables rules. Listing 10-1 specifies some rules for active mode data connections.
Listing 10-1. Rules for Active Mode Connections
puppy# iptables -A INPUT -i eth0 -p tcp --sport 1024: --dport 20 -d 192.168.0.1 \
-m state --state ESTABLISHED,RELATED -j ACCEPT
puppy# iptables -A OUTPUT -o eth0 -p tcp --dport 1024: --sport 20 -s 192.168.0.1 \
-m state --state ESTABLISHED -j ACCEPT
The first rule in Listing 10-1 allows incoming traffic from source ports higher than 1024 oninterface eth0 to IP address 192.168.0.1 and port 20 in the ESTABLISHED and RELATED states.This prevents new connections from being made to this port. The only incoming connectionsshould be the data connection portions of existing FTP connections. This increases the levelof security on your host firewall. The second rule allows outgoing traffic in the ESTABLISHEDand RELATED states outbound from the host to destination ports higher than 1024.
Passive mode FTP is similar. Using the ip_conntrack_ftp module, you can track the stateof the connections and the port numbers used and thus can use the RELATED state for youriptables rules. Listing 10-2 shows an INPUT and OUTPUT rule for passive mode connections.
Listing 10-2. Rules for Passive Mode Connections
puppy# iptables -A INPUT -i eth0 -p tcp --sport 1024: \
--dport 1024: -d 192.168.0.1 -m state --state ESTABLISHED,RELATED -j ACCEPT
puppy# iptables -A OUTPUT -o eth0 -p tcp --sport 1024: \
--dport 1024: -s 192.168.0.1 -m state --state ESTABLISHED -j ACCEPT
The first rule in Listing 10-2 allows incoming traffic from the ephemeral ports (which youhave defined as all ports greater than 1024 in your rules) to interface eth0 and IP address192.168.0.1. The second rule provides the same functionality for outgoing traffic.
4444c10_final.qxd 1/5/05 1:02 AM Page 447
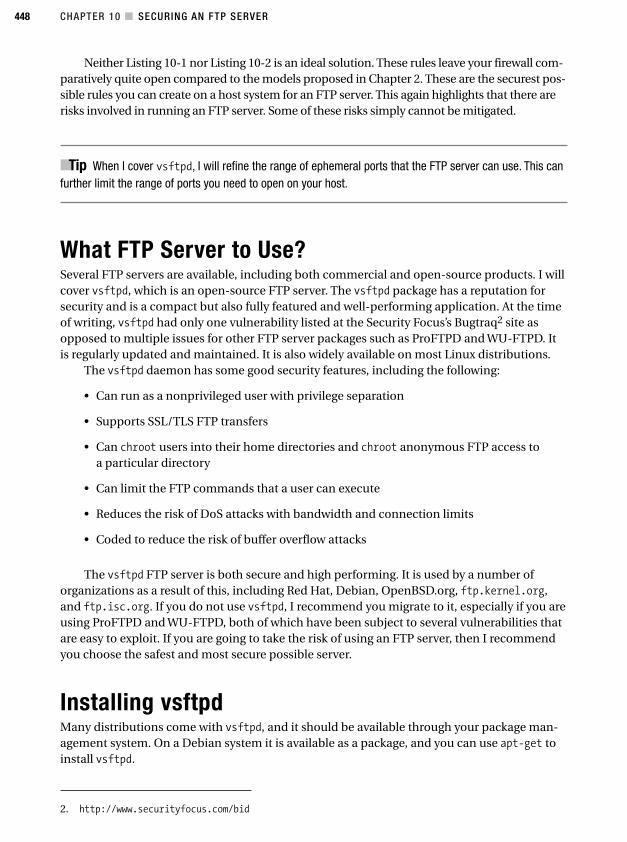
CHAPTER 10 ■ SECURING AN FTP SERVER448
2. http://www.securityfocus.com/bid
Neither Listing 10-1 nor Listing 10-2 is an ideal solution. These rules leave your firewall com-paratively quite open compared to the models proposed in Chapter 2. These are the securest pos-sible rules you can create on a host system for an FTP server. This again highlights that there arerisks involved in running an FTP server. Some of these risks simply cannot be mitigated.
■Tip When I cover vsftpd, I will refine the range of ephemeral ports that the FTP server can use. This canfurther limit the range of ports you need to open on your host.
What FTP Server to Use?Several FTP servers are available, including both commercial and open-source products. I willcover vsftpd, which is an open-source FTP server. The vsftpd package has a reputation forsecurity and is a compact but also fully featured and well-performing application. At the timeof writing, vsftpd had only one vulnerability listed at the Security Focus’s Bugtraq2 site asopposed to multiple issues for other FTP server packages such as ProFTPD and WU-FTPD. Itis regularly updated and maintained. It is also widely available on most Linux distributions.
The vsftpd daemon has some good security features, including the following:
• Can run as a nonprivileged user with privilege separation
• Supports SSL/TLS FTP transfers
• Can chroot users into their home directories and chroot anonymous FTP access toa particular directory
• Can limit the FTP commands that a user can execute
• Reduces the risk of DoS attacks with bandwidth and connection limits
• Coded to reduce the risk of buffer overflow attacks
The vsftpd FTP server is both secure and high performing. It is used by a number oforganizations as a result of this, including Red Hat, Debian, OpenBSD.org, ftp.kernel.org,and ftp.isc.org. If you do not use vsftpd, I recommend you migrate to it, especially if you areusing ProFTPD and WU-FTPD, both of which have been subject to several vulnerabilities thatare easy to exploit. If you are going to take the risk of using an FTP server, then I recommendyou choose the safest and most secure possible server.
Installing vsftpdMany distributions come with vsftpd, and it should be available through your package man-agement system. On a Debian system it is available as a package, and you can use apt-get toinstall vsftpd.
4444c10_final.qxd 1/5/05 1:02 AM Page 448
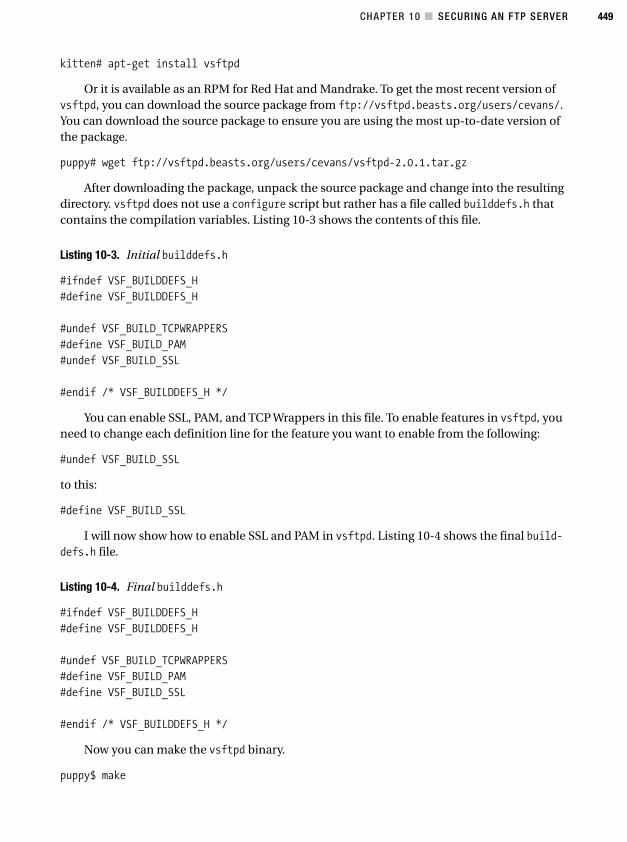
CHAPTER 10 ■ SECURING AN FTP SERVER 449
kitten# apt-get install vsftpd
Or it is available as an RPM for Red Hat and Mandrake. To get the most recent version ofvsftpd, you can download the source package from ftp://vsftpd.beasts.org/users/cevans/.You can download the source package to ensure you are using the most up-to-date version ofthe package.
puppy# wget ftp://vsftpd.beasts.org/users/cevans/vsftpd-2.0.1.tar.gz
After downloading the package, unpack the source package and change into the resultingdirectory. vsftpd does not use a configure script but rather has a file called builddefs.h thatcontains the compilation variables. Listing 10-3 shows the contents of this file.
Listing 10-3. Initial builddefs.h
#ifndef VSF_BUILDDEFS_H
#define VSF_BUILDDEFS_H
#undef VSF_BUILD_TCPWRAPPERS
#define VSF_BUILD_PAM
#undef VSF_BUILD_SSL
#endif /* VSF_BUILDDEFS_H */
You can enable SSL, PAM, and TCP Wrappers in this file. To enable features in vsftpd, youneed to change each definition line for the feature you want to enable from the following:
#undef VSF_BUILD_SSL
to this:
#define VSF_BUILD_SSL
I will now show how to enable SSL and PAM in vsftpd. Listing 10-4 shows the final build-defs.h file.
Listing 10-4. Final builddefs.h
#ifndef VSF_BUILDDEFS_H
#define VSF_BUILDDEFS_H
#undef VSF_BUILD_TCPWRAPPERS
#define VSF_BUILD_PAM
#define VSF_BUILD_SSL
#endif /* VSF_BUILDDEFS_H */
Now you can make the vsftpd binary.
puppy$ make
4444c10_final.qxd 1/5/05 1:02 AM Page 449
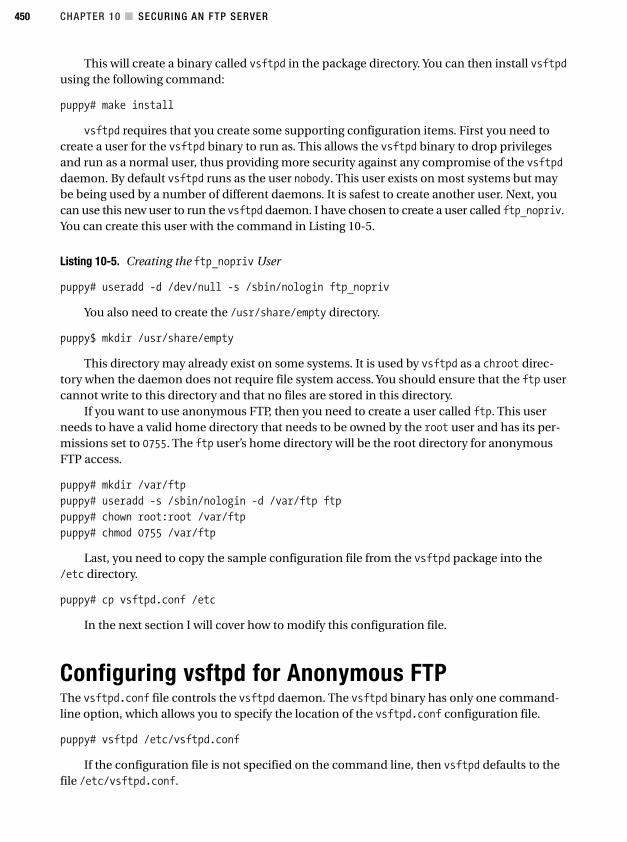
CHAPTER 10 ■ SECURING AN FTP SERVER450
This will create a binary called vsftpd in the package directory. You can then install vsftpdusing the following command:
puppy# make install
vsftpd requires that you create some supporting configuration items. First you need tocreate a user for the vsftpd binary to run as. This allows the vsftpd binary to drop privilegesand run as a normal user, thus providing more security against any compromise of the vsftpddaemon. By default vsftpd runs as the user nobody. This user exists on most systems but maybe being used by a number of different daemons. It is safest to create another user. Next, youcan use this new user to run the vsftpd daemon. I have chosen to create a user called ftp_nopriv.You can create this user with the command in Listing 10-5.
Listing 10-5. Creating the ftp_nopriv User
puppy# useradd -d /dev/null -s /sbin/nologin ftp_nopriv
You also need to create the /usr/share/empty directory.
puppy$ mkdir /usr/share/empty
This directory may already exist on some systems. It is used by vsftpd as a chroot direc-tory when the daemon does not require file system access. You should ensure that the ftp usercannot write to this directory and that no files are stored in this directory.
If you want to use anonymous FTP, then you need to create a user called ftp. This userneeds to have a valid home directory that needs to be owned by the root user and has its per-missions set to 0755. The ftp user’s home directory will be the root directory for anonymousFTP access.
puppy# mkdir /var/ftp
puppy# useradd -s /sbin/nologin -d /var/ftp ftp
puppy# chown root:root /var/ftp
puppy# chmod 0755 /var/ftp
Last, you need to copy the sample configuration file from the vsftpd package into the/etc directory.
puppy# cp vsftpd.conf /etc
In the next section I will cover how to modify this configuration file.
Configuring vsftpd for Anonymous FTPThe vsftpd.conf file controls the vsftpd daemon. The vsftpd binary has only one command-line option, which allows you to specify the location of the vsftpd.conf configuration file.
puppy# vsftpd /etc/vsftpd.conf
If the configuration file is not specified on the command line, then vsftpd defaults to thefile /etc/vsftpd.conf.
4444c10_final.qxd 1/5/05 1:02 AM Page 450
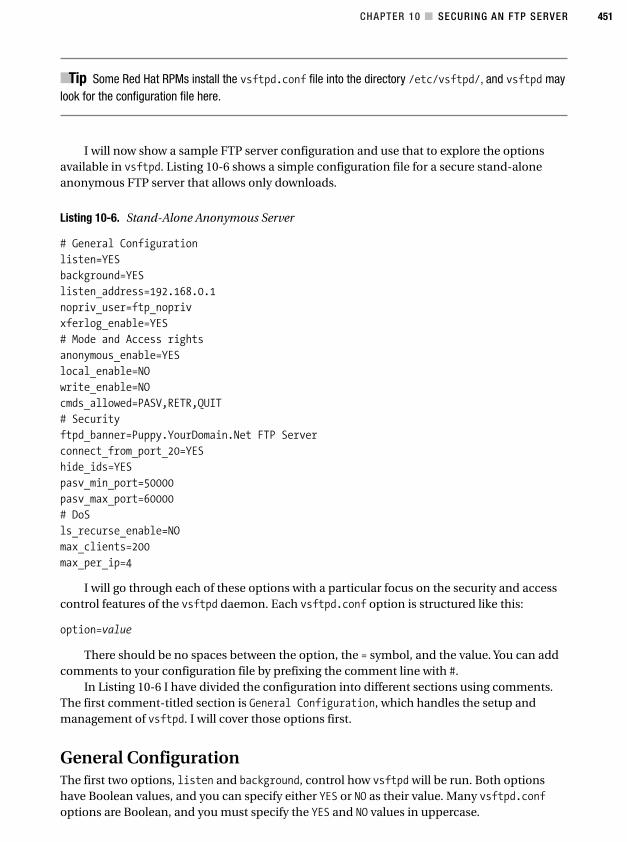
CHAPTER 10 ■ SECURING AN FTP SERVER 451
■Tip Some Red Hat RPMs install the vsftpd.conf file into the directory /etc/vsftpd/, and vsftpd maylook for the configuration file here.
I will now show a sample FTP server configuration and use that to explore the optionsavailable in vsftpd. Listing 10-6 shows a simple configuration file for a secure stand-aloneanonymous FTP server that allows only downloads.
Listing 10-6. Stand-Alone Anonymous Server
# General Configuration
listen=YES
background=YES
listen_address=192.168.0.1
nopriv_user=ftp_nopriv
xferlog_enable=YES
# Mode and Access rights
anonymous_enable=YES
local_enable=NO
write_enable=NO
cmds_allowed=PASV,RETR,QUIT
# Security
ftpd_banner=Puppy.YourDomain.Net FTP Server
connect_from_port_20=YES
hide_ids=YES
pasv_min_port=50000
pasv_max_port=60000
# DoS
ls_recurse_enable=NO
max_clients=200
max_per_ip=4
I will go through each of these options with a particular focus on the security and accesscontrol features of the vsftpd daemon. Each vsftpd.conf option is structured like this:
option=value
There should be no spaces between the option, the = symbol, and the value. You can addcomments to your configuration file by prefixing the comment line with #.
In Listing 10-6 I have divided the configuration into different sections using comments.The first comment-titled section is General Configuration, which handles the setup andmanagement of vsftpd. I will cover those options first.
General ConfigurationThe first two options, listen and background, control how vsftpd will be run. Both optionshave Boolean values, and you can specify either YES or NO as their value. Many vsftpd.confoptions are Boolean, and you must specify the YES and NO values in uppercase.
4444c10_final.qxd 1/5/05 1:02 AM Page 451
CHAPTER 10 ■ SECURING AN FTP SERVER452
The listen option runs vsftpd in stand-alone mode. This means vsftpd is run as a nor-mal daemon rather than through the inetd or xinetd daemon. It defaults to NO. I have enabledvsftpd to run in stand-alone mode by changing this option to YES. The background option tellsthe vsftpd to fork to the background. It also defaults to NO. I have changed it to YES to have thevsftpd daemon run in the background.
The listen_address option allows you to bind vsftpd to a particular IP address, thus con-trolling on which interface your FTP server runs. I have specified the IP address of the puppyhost, 192.168.0.1.
The nopriv_user option allows you to specify which user the vsftpd daemon will run as.I have specified the ftp_nopriv user that I created as part of the installation process. This causesvsftpd to run as a nonprivileged user and enhances the security of the daemon. This mitigatesthe risk of an attacker gaining root privileges through the daemon.
The xferlog_enable option enables a log file that records all file uploads and downloads.The log file defaults to /var/log/vsftpd.log, but you can override this with thevsftpd_log_file option.
vsftpd_log_file=/var/log/transfer_log.log
Also available is the xferlog_std_format option, which allows you to specify that loggingshould be in the xferlog format. This is the default log format used by WU-FTPD and allows youto also use a variety of statistical tools developed for this application for reporting on vsftpd.You can enable this option like this:
xferlog_std_format=YES
Alternatively, you can enable the option syslog_enable to log to syslog instead.
syslog_enable=YES
The syslog_enable option overrides all the other logging options, and if set to YES, thenvsftpd will not log to any other specified log files.
Mode and Access RightsThe mode options control what type of FTP server vsftpd will run; for example, it could spec-ify an anonymous FTP server or an FTP server that accepts local user logins. The access rightsoptions control what capabilities are offered to anonymous or local users signed into the FTPserver (for example, whether uploads are enabled). In Listing 10-6 I have specified an anony-mous FTP server that you can only download files from the server. This is the only type ofserver I recommend you run.
■Note I will demonstrate how to build a local user FTP server with SSL/TLS in the next section.
You can enable anonymous FTP by setting the anonymous_enable option to YES. The anony-mous FTP mode is vsftpd’s default mode; thus, YES is the default setting for this option. Inanonymous FTP mode only the users anonymous and ftp can log onto the FTP server. Wheneither of these users log in, they will be prompted for a password. vsftpd will accept any text
4444c10_final.qxd 1/5/05 1:02 AM Page 452
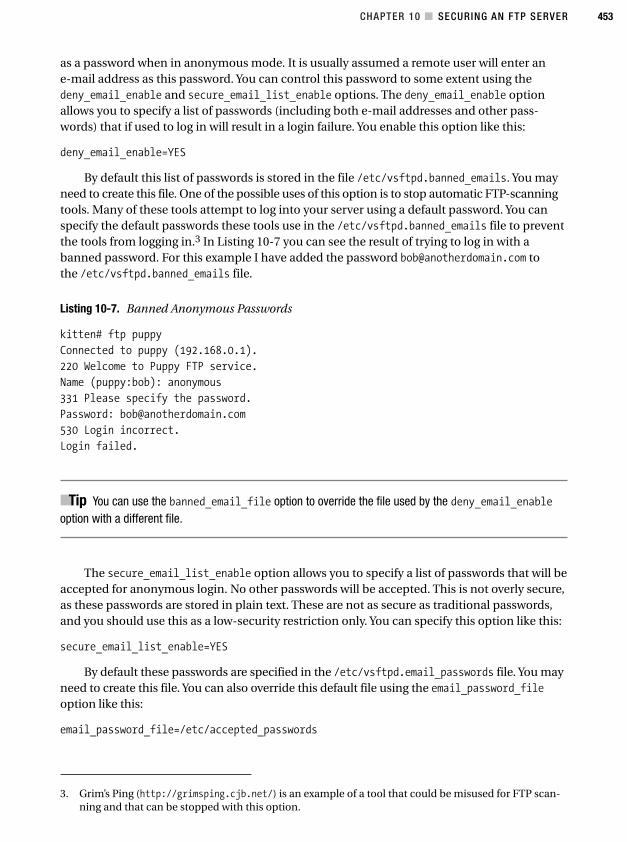
CHAPTER 10 ■ SECURING AN FTP SERVER 453
3. Grim’s Ping (http://grimsping.cjb.net/) is an example of a tool that could be misused for FTP scan-ning and that can be stopped with this option.
as a password when in anonymous mode. It is usually assumed a remote user will enter ane-mail address as this password. You can control this password to some extent using thedeny_email_enable and secure_email_list_enable options. The deny_email_enable optionallows you to specify a list of passwords (including both e-mail addresses and other pass-words) that if used to log in will result in a login failure. You enable this option like this:
deny_email_enable=YES
By default this list of passwords is stored in the file /etc/vsftpd.banned_emails. You mayneed to create this file. One of the possible uses of this option is to stop automatic FTP-scanningtools. Many of these tools attempt to log into your server using a default password. You canspecify the default passwords these tools use in the /etc/vsftpd.banned_emails file to preventthe tools from logging in.3 In Listing 10-7 you can see the result of trying to log in with abanned password. For this example I have added the password [email protected] tothe /etc/vsftpd.banned_emails file.
Listing 10-7. Banned Anonymous Passwords
kitten# ftp puppy
Connected to puppy (192.168.0.1).
220 Welcome to Puppy FTP service.
Name (puppy:bob): anonymous
331 Please specify the password.
Password: [email protected]
530 Login incorrect.
Login failed.
■Tip You can use the banned_email_file option to override the file used by the deny_email_enableoption with a different file.
The secure_email_list_enable option allows you to specify a list of passwords that will beaccepted for anonymous login. No other passwords will be accepted. This is not overly secure,as these passwords are stored in plain text. These are not as secure as traditional passwords,and you should use this as a low-security restriction only. You can specify this option like this:
secure_email_list_enable=YES
By default these passwords are specified in the /etc/vsftpd.email_passwords file. You mayneed to create this file. You can also override this default file using the email_password_fileoption like this:
email_password_file=/etc/accepted_passwords
4444c10_final.qxd 1/5/05 1:02 AM Page 453
CHAPTER 10 ■ SECURING AN FTP SERVER454
4. You can see a list of most FTP commands at http://www.nsftools.com/tips/RawFTP.htm.
Once the ftp or anonymous user is logged into your anonymous FTP server, the user willhave access only to the contents of the home directory of the ftp user. I showed how to createthis user and specify their home directory as part of the vsftpd installation process in the“Installing vsftpd” section. In that section I used the /var/ftp directory.
If you want to enable local user mode, which allows local users contained in the /etc/passwdfile to log into the FTP server, you should set the local_enable option to YES. I will talk about thatoption in the “Configuring vsftpd with Local Users” section.
The first of the access rights options, the write_enable option, specifies whether FTPcommands that are capable of writing to the file system are enabled. This includes FTP com-mands such as STOR or DELE.4 By default this option is set to NO. This means no files can bewritten to, renamed, or deleted from your system. The vsftpd.conf man file contains a full listof the commands this option disables.
The second access right I have specified, cmds_allowed, controls the FTP commands thatyou are able to run on your FTP server. This is a powerful tool for locking down your FTPserver to a limited number of FTP commands. Listing 10-6 specifies that only the commandsPASV, RETR, and QUIT are allowed to run on the server. This means users can only downloadfiles and exit the server. With a limited number of FTP commands enabled, you can quitetightly secure your FTP server.
General SecurityThe general security options control a variety of security-related settings for your FTP server.The first option deals with the use of a banner for your FTP server. Like many services, whenyou connect to an FTP server, it displays a banner advertising details about the server towhich you are connecting. Generally, the default vsftpd banner reveals little informationabout the server to which you are connecting. You should confirm your banner does notreveal the package or version of your FTP server.
The banner is controlled by two options: the ftpd_banner option and the banner_fileoption. The ftpd_banner option specifies a line that will be displayed when you connect tothe FTP server.
ftpd_banner=Welcome to Puppy FTP service.
The banner_file option overrides this and allows you to specify a file containing your banner.
banner_name=/etc/vsftpd_banner
Confirm the details contained in your ftpd_banner. The banner_file option should suitablyobfuscate your FTP server package and version or any details that may provide an attacker withinformation that could aid in an attack.
The next option, connect_from_port_20, tells PORT or active mode connections to use port20. This is required for some FTP clients. Do not disable this without testing that all your remoteclients still function correctly.
The hide_ids option hides the actual owner and group of the objects stored on your FTPserver. With this option set to YES, the files will all appear to be owned by the user and groupftp. You can see this in the example in Listing 10-8.
4444c10_final.qxd 1/5/05 1:02 AM Page 454

CHAPTER 10 ■ SECURING AN FTP SERVER 455
Listing 10-8. Hiding Owners and Groups
ftp> ls
227 Entering Passive Mode (192,168,0,1,63,131)
150 Here comes the directory listing.
drwxr-xr-x 2 ftp ftp 4096 Oct 04 06:36 pub
-rw-r--r-- 1 ftp ftp 51 Oct 05 15:05 tmp
226 Directory send OK.
The next two options, pasv_min_port and pasv_max_port, control the range of the ephemeralports used by vsftpd. I have specified a lower range of 50000 and an upper range of 60000. Thismeans all passive mode connections will have an ephemeral port assigned from within this portrange. This should allow you to tighten your firewall rules down to only this port range ratherthan the entire ephemeral port range. Listing 10-9 specifies iptables rules, restricting vsftpdto this ephemeral port range.
Listing 10-9. Rules for Passive Mode Connections
puppy# iptables -A INPUT -i eth0 -p tcp --sport 50000:60000 --dport 50000:60000 \
-d 192.168.0.1 -m state --state ESTABLISHED,RELATED -j ACCEPT
puppy# iptables -A OUTPUT -o eth0 -p tcp --sport 50000:60000 --dport 50000:60000 \
-s 192.168.0.1 -m state --state ESTABLISHED -j ACCEPT
You may ask, “Why don’t I simply restrict the ephemeral port range to only one or a hand-ful of ports?” The limitation here is that each FTP data connection requires an individual port.You can create a bottleneck on your system by limiting the ephemeral port range to a rangethat is too small.
Preventing Denial of Service AttacksThe last options from the example anonymous FTP server allow you to specify some limita-tions to the resources used by the FTP server. These limitations assist in mitigating the risk ofDoS attacks against your FTP server. Setting the ls_recurse_enable option to YES allows theuse of the ls -R directory-listing command. This can potentially consume a large volume ofresources if run from the root directory of a large site. I recommend that if you have a largenumber of files in multiple directories that you set this option to NO.
The next two options, max_clients and max_per_ip, specify the maximum number ofclients and the maximum number of connections from a single IP address, respectively. Themax_clients option specifies the maximum number of clients that can be connected simulta-neously to your FTP server. Any additional clients that try to connect to the server will get thefollowing error message:
Connected to puppy.yourdomain.com
421 There are too many connected users, please try later.
The max_per_ip option specifies the maximum number of clients that can connect froma single IP address. Any additional clients will get the following error message:
Connected to puppy.yourdomain.com
421 There are too many connections from your internet address.
4444c10_final.qxd 1/5/05 1:02 AM Page 455
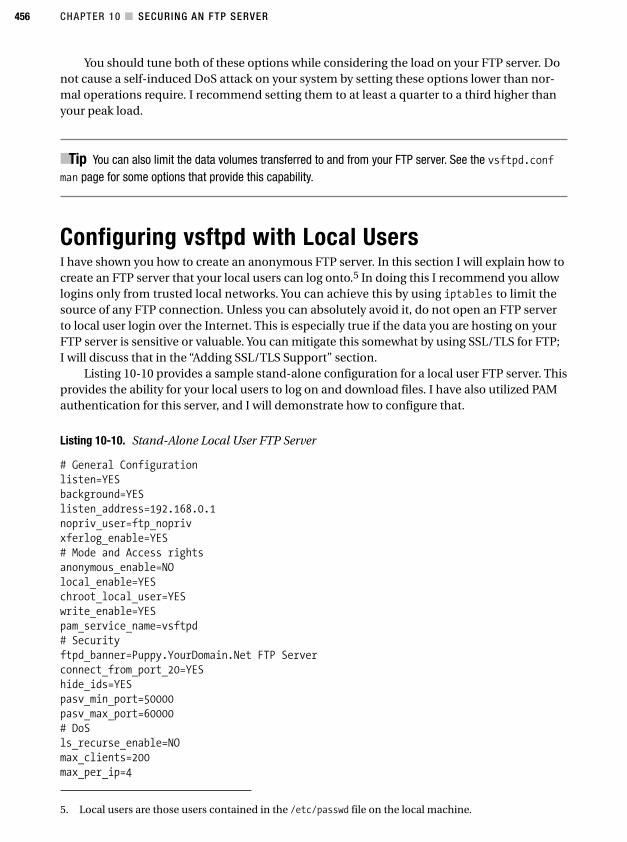
CHAPTER 10 ■ SECURING AN FTP SERVER456
5. Local users are those users contained in the /etc/passwd file on the local machine.
You should tune both of these options while considering the load on your FTP server. Donot cause a self-induced DoS attack on your system by setting these options lower than nor-mal operations require. I recommend setting them to at least a quarter to a third higher thanyour peak load.
■Tip You can also limit the data volumes transferred to and from your FTP server. See the vsftpd.confman page for some options that provide this capability.
Configuring vsftpd with Local UsersI have shown you how to create an anonymous FTP server. In this section I will explain how tocreate an FTP server that your local users can log onto.5 In doing this I recommend you allowlogins only from trusted local networks. You can achieve this by using iptables to limit thesource of any FTP connection. Unless you can absolutely avoid it, do not open an FTP serverto local user login over the Internet. This is especially true if the data you are hosting on yourFTP server is sensitive or valuable. You can mitigate this somewhat by using SSL/TLS for FTP;I will discuss that in the “Adding SSL/TLS Support” section.
Listing 10-10 provides a sample stand-alone configuration for a local user FTP server. Thisprovides the ability for your local users to log on and download files. I have also utilized PAMauthentication for this server, and I will demonstrate how to configure that.
Listing 10-10. Stand-Alone Local User FTP Server
# General Configuration
listen=YES
background=YES
listen_address=192.168.0.1
nopriv_user=ftp_nopriv
xferlog_enable=YES
# Mode and Access rights
anonymous_enable=NO
local_enable=YES
chroot_local_user=YES
write_enable=YES
pam_service_name=vsftpd
# Security
ftpd_banner=Puppy.YourDomain.Net FTP Server
connect_from_port_20=YES
hide_ids=YES
pasv_min_port=50000
pasv_max_port=60000
# DoS
ls_recurse_enable=NO
max_clients=200
max_per_ip=4
4444c10_final.qxd 1/5/05 1:02 AM Page 456
CHAPTER 10 ■ SECURING AN FTP SERVER 457
Many of the options in Listing 10-10 are identical to those in Listing 10-6. I will identifythe changes in this section and explain how they impact the server configuration. The mostobvious modification is in the mode and access rights configuration. Here I have disabled anyanonymous access to the server by setting the anonymous_enable option to NO. I have alsoenabled the option local_enable by setting it to YES. This allows any local user to log into theFTP server.
■Tip You can enable anonymous and local user access on the same FTP server if required. You would setthe anonymous_enable and local_enable options both to YES.
When local users are signed into the FTP server, they will be placed in their home directory bydefault. They have access to any files or directories that are available to them as a result of theirownership, permissions, and group membership. For FTP purposes this is quite often a greaterlevel of access than they really require. To reduce this access, I have enabled the chroot_local_useroption. This option creates a mini-chroot jail for each of your users. Local users are jailed intotheir home directories. This prevents them from changing the directory out of their homedirectory and allows them access only to their home directory and any subdirectories beneath.This prevents them from downloading or uploading files to or from any other directory.
■Caution Some small risk is associated with using chroot jails for local users if those local usershave upload privileges. See the vsftpd FAQ at ftp://vsftpd.beasts.org/users/cevans/untar/vsftpd-2.0.1/FAQ. If you are restricting access to local users in a trusted network, I think the risk isoutweighed by the overall added security of the chroot jail.
If the chroot_local_user option is set to YES, then vsftpd also allows you to not chrootspecific users with the chroot_list_enable option, like so:
chroot_list_enable=YES
chroot_list_file=/etc/vsftpd.chroot_list
You specify the list of users in the file /etc/vsftpd.chroot_list that vsftpd should notchroot. When these non-chroot users log in, they will have access to all file and directoriesgranted to them via their permissions and groups.
■Note If chroot_local_user is set to NO and chroot_list_enable is set to YES, then the file specifiedin the chroot_list_file becomes a list of local users to chroot. All other local users would log on andnot be confined to a chroot jail.
I also enabled the write_enable option, setting it to YES. This allows any users logged ontoyour FTP server to upload files. As the users have been placed in chroot jails in their homedirectories, they will only be able to upload files to this directory and subdirectories of theirhome directory.
4444c10_final.qxd 1/5/05 1:02 AM Page 457
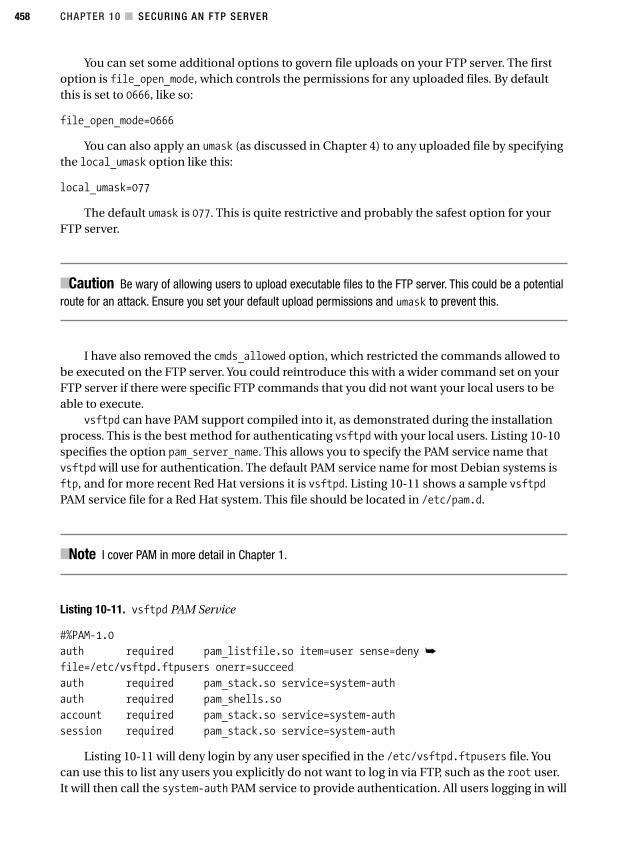
CHAPTER 10 ■ SECURING AN FTP SERVER458
You can set some additional options to govern file uploads on your FTP server. The firstoption is file_open_mode, which controls the permissions for any uploaded files. By defaultthis is set to 0666, like so:
file_open_mode=0666
You can also apply an umask (as discussed in Chapter 4) to any uploaded file by specifyingthe local_umask option like this:
local_umask=077
The default umask is 077. This is quite restrictive and probably the safest option for yourFTP server.
■Caution Be wary of allowing users to upload executable files to the FTP server. This could be a potentialroute for an attack. Ensure you set your default upload permissions and umask to prevent this.
I have also removed the cmds_allowed option, which restricted the commands allowed tobe executed on the FTP server. You could reintroduce this with a wider command set on yourFTP server if there were specific FTP commands that you did not want your local users to beable to execute.
vsftpd can have PAM support compiled into it, as demonstrated during the installationprocess. This is the best method for authenticating vsftpd with your local users. Listing 10-10specifies the option pam_server_name. This allows you to specify the PAM service name thatvsftpd will use for authentication. The default PAM service name for most Debian systems isftp, and for more recent Red Hat versions it is vsftpd. Listing 10-11 shows a sample vsftpdPAM service file for a Red Hat system. This file should be located in /etc/pam.d.
■Note I cover PAM in more detail in Chapter 1.
Listing 10-11. vsftpd PAM Service
#%PAM-1.0
auth required pam_listfile.so item=user sense=deny ➥
file=/etc/vsftpd.ftpusers onerr=succeed
auth required pam_stack.so service=system-auth
auth required pam_shells.so
account required pam_stack.so service=system-auth
session required pam_stack.so service=system-auth
Listing 10-11 will deny login by any user specified in the /etc/vsftpd.ftpusers file. Youcan use this to list any users you explicitly do not want to log in via FTP, such as the root user.It will then call the system-auth PAM service to provide authentication. All users logging in will
4444c10_final.qxd 1/5/05 1:02 AM Page 458
CHAPTER 10 ■ SECURING AN FTP SERVER 459
thus ultimately be authenticated against the /etc/passwd file, in addition to any furtherauthentication or access control checks the system-auth service is configured to perform.
All other options in Listing 10-10 are the same as those for the anonymous FTP server.
Adding SSL/TLS SupportThe more recent versions of vsftpd come with support for SSL/TLS. The first version to doso was vsftpd version 2.0.0. In some cases this support has been backported to the packagesavailable in various distributions. If this support has not been backported, you may be able tocompile vsftpd from source or adapt a package that already supports SSL/TLS for your distri-bution. For example, Red Hat has introduced support to the vsftpd RPM provided with FedoraCore 3. You should be able to use this RPM on some other, earlier versions of Red Hat orpotentially on Mandrake systems. So to quickly add SSL/TLS support to vsftpd, you need toensure vsftpd has support for SSL/TLS, create a certificate, update your vsftpd.conf file withyour SSL/TLS configuration, and restart the vsftpd daemon. I will take you through all thesesteps in this section.
To enable SSL/TLS, you first need to compile it into vsftpd as you did in the “Installingvsftpd” section. You can check if your version of vsftpd is compiled with SSL/TLS using theldd command.
puppy# ldd vsftpd
libssl.so.4 => /lib/libssl.so.4 (0x4000d000)
libcrypto.so.4 => /lib/libcrypto.so.4 (0x401ab000)
libgssapi_krb5.so.2 => /usr/kerberos/lib/libgssapi_krb5.so.2 (0x4029d000)
libk5crypto.so.3 => /usr/kerberos/lib/libk5crypto.so.3 (0x40311000)
...
If your vsftpd binary contains the library libssl.so.x, then it has been compiled withSSL/TLS.
You will also need to create a certificate for vsftpd to use. I talk about creating certificates inChapter 3. Follow the process described in this chapter to create your certificate. Sign it againstan existing certificate authority (CA) if you have created a local CA or against a commercial CA ifyou prefer to do so. If you intend to use this server for customers via the Internet, I recommendyou purchase a commercial SSL certificate.
You can also quickly create a certificate using the OpenSSL make process that is providedwith the OpenSSL package. This may be a simple option for FTP servers that are accessed onlyfrom internal networks. These require SSL encryption, but you may not be overly concernedabout needing to prove the authenticity of the FTP server certificate. Listing 10-12 shows howto create such a certificate.
Listing 10-12. Creating an SSL Certificate
puppy# cd /usr/share/ssl/certs
puppy# make vsftpd.pem
umask 77 ; \
PEM1=`/bin/mktemp /tmp/openssl.XXXXXX` ; \
PEM2=`/bin/mktemp /tmp/openssl.XXXXXX` ; \
4444c10_final.qxd 1/5/05 1:02 AM Page 459
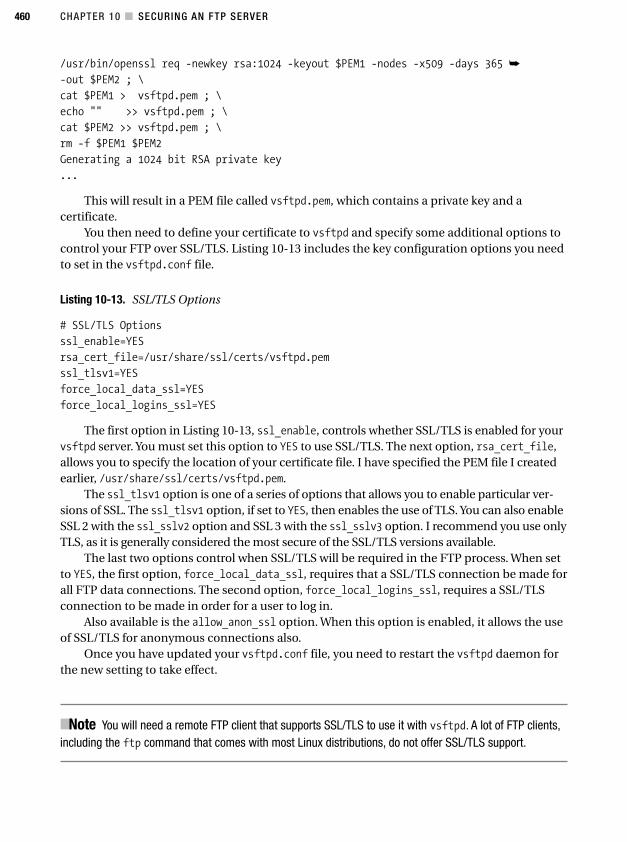
CHAPTER 10 ■ SECURING AN FTP SERVER460
/usr/bin/openssl req -newkey rsa:1024 -keyout $PEM1 -nodes -x509 -days 365 ➥
-out $PEM2 ; \
cat $PEM1 > vsftpd.pem ; \
echo "" >> vsftpd.pem ; \
cat $PEM2 >> vsftpd.pem ; \
rm -f $PEM1 $PEM2
Generating a 1024 bit RSA private key
...
This will result in a PEM file called vsftpd.pem, which contains a private key and acertificate.
You then need to define your certificate to vsftpd and specify some additional options tocontrol your FTP over SSL/TLS. Listing 10-13 includes the key configuration options you needto set in the vsftpd.conf file.
Listing 10-13. SSL/TLS Options
# SSL/TLS Options
ssl_enable=YES
rsa_cert_file=/usr/share/ssl/certs/vsftpd.pem
ssl_tlsv1=YES
force_local_data_ssl=YES
force_local_logins_ssl=YES
The first option in Listing 10-13, ssl_enable, controls whether SSL/TLS is enabled for yourvsftpd server. You must set this option to YES to use SSL/TLS. The next option, rsa_cert_file,allows you to specify the location of your certificate file. I have specified the PEM file I createdearlier, /usr/share/ssl/certs/vsftpd.pem.
The ssl_tlsv1 option is one of a series of options that allows you to enable particular ver-sions of SSL. The ssl_tlsv1 option, if set to YES, then enables the use of TLS. You can also enableSSL 2 with the ssl_sslv2 option and SSL 3 with the ssl_sslv3 option. I recommend you use onlyTLS, as it is generally considered the most secure of the SSL/TLS versions available.
The last two options control when SSL/TLS will be required in the FTP process. When setto YES, the first option, force_local_data_ssl, requires that a SSL/TLS connection be made forall FTP data connections. The second option, force_local_logins_ssl, requires a SSL/TLSconnection to be made in order for a user to log in.
Also available is the allow_anon_ssl option. When this option is enabled, it allows the useof SSL/TLS for anonymous connections also.
Once you have updated your vsftpd.conf file, you need to restart the vsftpd daemon forthe new setting to take effect.
■Note You will need a remote FTP client that supports SSL/TLS to use it with vsftpd. A lot of FTP clients,including the ftp command that comes with most Linux distributions, do not offer SSL/TLS support.
4444c10_final.qxd 1/5/05 1:02 AM Page 460
CHAPTER 10 ■ SECURING AN FTP SERVER 461
6. A Red Hat init script, available at http://freshrpms.net/packages/builds/vsftpd/vsftpd.init,should be easy to adapt to other distributions.
Starting and Stopping vsftpdYou can start and stop vsftpd using the vsftpd binary. The daemon will first check the validityof vsftpd.conf and then, depending on the configuration, will either run in the foreground orfork the process into the background.
puppy# vsftpd &
To stop vsftpd, simply kill the daemon.You could also start and stop vsftpd from an init script.6 I recommend using this
approach for ease of operation.
ResourcesThe following are resources you can use.
Sites• vsftpd: http://vsftpd.beasts.org/
• vsftpd HOWTO: http://www.vsftpd.org/
4444c10_final.qxd 1/5/05 1:02 AM Page 461
463
C H A P T E R 1 1
■ ■ ■
Hardening DNS and BIND
Domain Name Services1 (DNS) is the phone directory of the Internet and private networks.DNS maps the IP addresses of hosts to their names, and vice versa. It provides the ability forapplications, tools, and hosts to find and resolve the IP addresses or names of hosts with whichthey want to communicate. It is one of the most critical Internet and network services utilizedby ISPs and organizations. Without DNS, the Internet and your internal network would beunable to function.
A DNS server is, in its simplest form, a database of names and addresses. This DNS data-base performs two core roles: it tracks the names and addresses of your hosts and providesthese names and addresses in response to queries. These names and addresses can describehosts and networks inside your internal network, on the Internet, or on another network. Itcan also describe the same host in two different contexts, depending on who asks the question.For example, the host kitten.yourdomain.com could have the IP address of 192.168.0.100 onyour internal network. Clients of your internal network need to use this address to communi-cate with this host. On the Internet, however, kitten.yourdomain.com may be known by IPaddress 220.240.52.228, and clients there need this address instead. Your DNS server deter-mines which IP address for the kitten.yourdomain.com host it can provide to a client, depend-ing on whether the query comes from your internal network or the Internet.
This name and address resolution role is critical to how almost all network services andapplications function. It is also an extremely useful resource for attackers to control on yournetwork because they can see the contents of your entire network and also use that informa-tion to subvert your hosts, stage “man-in-the-middle” attacks, or inflict crippling Denial ofService (DoS) attacks on your environment. In this chapter, I aim to mitigate and minimizethe risk of these sorts of compromises and attacks from occurring and prevent an attackerfrom turning your DNS assets into dangerous liabilities.
In this chapter I will briefly cover some of the potential threats and risks to your DNSservers. Then I will address choosing a suitable DNS server and creating a secure DNS design.I will take you through installing, configuring, and hardening a DNS server and use the BINDDNS server as a model. I will provide an overview of the basic configuration of BIND, whichshould allow you to set up some simple DNS server configurations. I will also cover TSIG,which allows you to secure transactions between the BIND server and the rndc command,which provides an administration interface to your BIND server.
I will not go into a large amount of detail about how DNS functions, unless it relatesto securing DNS or DNS servers. To fully appreciate this chapter, you need to have a basic
1. Also known as Domain Name Service, Domain Name Server, or Domain Name System
4444c11_final.qxd 1/5/05 1:04 AM Page 463
CHAPTER 11 ■ HARDENING DNS AND BIND464
2. See RFC 2535 at http://www.faqs.org/rfcs/rfc2535.html.
3. http://www.isc.org/index.pl?/sw/bind/bind-security.php
4. See a recent survey of DNS server software at http://mydns.bboy.net/survey/.
understanding of how DNS works. Additionally, you should understand the relationshipsbetween the various DNS infrastructure components, including primary and secondary DNSservers, how record types are used in DNS, and how zone files are constructed. Some excellentinformation is available, as I have cited in the “Resources” section, that describes the innerworkings and design of DNS in much greater depth than is possible here.
■Note I will not cover DNSSEC (as described in RFC 2535).2 This is principally because I do not believeDNSSEC is mature enough or the RFC itself is final enough. Both the RFC and the current implementation ofDNSSEC need a considerable amount of development before they can be readily implemented in a produc-tion environment.
Your DNS Server at RiskYour DNS server is subject to a similar range and type of attacks as most of your other Internet-facing daemons: the exploitation of software vulnerabilities and bugs, DoS attacks, poor con-figuration, and poor server and infrastructure hardening. Several DNS servers, especially thecommonly implemented BIND server, have been subject to a variety of vulnerabilities andcompromises in recent years.3 These have included vulnerabilities such as buffer overflows andother code exposures that could potentially allow attacks or penetrations.
Additionally, DNS server software is often installed but then not regularly updated or prop-erly managed. Many DNS servers operating on the Web are older versions of software or versionswith known compromises.4 Other than configuration changes to add additional zones or hosts,many DNS servers and their configuration are not updated to take advantage of new features orto address security exposures. This has left many DNS systems seriously exposed to potentialattacks.
The DNS protocol itself can also be subject to compromises such as improper DNS dataupdates and to attacks aimed at compromising your DNS data. Many of these attacks are sim-ilar in nature or are only subtlety different from each other. Additionally, attacks against yourDNS infrastructure are frequently combinations of multiple attack types. For example, manyDNS protocol attacks require an attacker to stage a DoS attack against your DNS server priorto another form of attack. Let’s look at some of the common types of DNS-specific attacks.
Man-in-the-Middle AttacksMan-in-the-middle attacks allow an attacker to intercept your DNS traffic or impersonate yourDNS server for the purpose of spoofing its input or output or assuming the entire identity ofyour DNS server. To do this, attackers sniff traffic on your network, detect your DNS packets,and use the information in them to replicate these packets and interpose themselves into the
4444c11_final.qxd 1/5/05 1:04 AM Page 464
CHAPTER 11 ■ HARDENING DNS AND BIND 465
5. http://www.securityfocus.com/guest/17905
DNS packet flow. This interposition is easier than it sounds because DNS traffic is generallyunsigned, unencrypted UDP packets whose only control is a sequence number. Although thesequence number generally starts from a random point, it is generally simply incremented,which makes it easy to guess the next sequence number. Questions have also been raisedabout the true randomness of the sequence numbers.5
To perform this interposition, the attacker generally initiates a DoS attack against one ofthe components in your DNS infrastructure; for example, the attackers launch a DoS attack ona secondary DNS server in order to silence it and interpose themselves between the primaryand secondary server. An attacker can also simply be in a right position, figuratively “closer”to your DNS server than another component in the DNS traffic flow. For example, an attackercan install a new DNS server on your network and respond to DNS queries before the real DNSserver is able to do so. This is often possible if the DNS server being impersonated is on a dif-ferent network or accessed via the Internet.
Once in this position, the attacker has considerable scope to both gain critical informa-tion about the structure and contents of your networks or to insert malicious or bogus infor-mation into your environment. For example, by interposing themselves between a primaryand secondary DNS server, attackers can acquire details of all the zones for which the DNSservers are responsible. This gives attackers a very detailed picture of your network withoutrequiring them to perform any high-profile activities. These activities, such as scanning orprobing your network, potentially have a much higher detection profile than the compro-mise of your DNS server.
Cache PoisoningProbably the most dangerous form of DNS-based attack is cache poisoning. Cache poisoningoccurs when an attacker introduces or substitutes malicious data into the cache of a DNS server.For example, the attacker monitors queries from a DNS server, intercepts the query, and providesa false answer. This could be a bogus IP address for a particular domain, such as providing a newIP address for the domain name of an Internet banking site. This bogus data is now stored in thecache of the DNS server. This bogus data can be used to direct clients that use this poisoned DNSserver to the new IP address for that Internet banking site. The attacker situates a forged site,designed to resemble the real Internet banking site, at this new IP address. The user will assumethis forged site is the legitimate Internet banking site and provide banking information. Theattacker now has this information and can defraud the user.
Denial of Service AttacksAttackers generally have two reasons why they want to stage a DoS attack on your DNS infra-structure. The first reason is the normal purpose of a DoS attack: to deny service to your organiza-tion and users. The second reason is as an adjunct or precursor to another attack and to preventyour DNS server functioning whilst an attacker substitutes bogus information or a bogus nameserver for the domains and clients for which your DNS server provides services.
Traffic-based DoS attacks are also possible with DNS data. This is because the size of aninitial DNS query is quite small but usually results in a reply of a larger size. For example, a DNS
4444c11_final.qxd 1/5/05 1:04 AM Page 465

CHAPTER 11 ■ HARDENING DNS AND BIND466
6. Berkeley Internet Name Domain (http://www.isc.org/index.pl?/sw/bind/)7. http://cr.yp.to/djbdns.html8. http://www.isc.org/index.pl?/ops/ds/
query asking for the name servers for a domain will require a small volume of data but gener-ally will result in a larger volume of data being generated. An attacker can thus use a DNS serveras a traffic multiplier to either deny service to the DNS server itself or target other hosts bydirecting a large volume of DNS replies toward them.
Data Corruption and AlterationThe contents of your configuration and zone files contain the information that controls yourDNS server, in addition to the information it provides to clients in response to queries. One ofthe ways an attacker can subvert your DNS server is to penetrate your host and change or cor-rupt this data. This can cause your DNS server to fail, if the data has been corrupted, or it maydeliver data that is incorrect or malicious, if the data has been altered.
Other RisksFinally, I hear you ask, “My DNS server is hardened, is secured, and runs the latest version ofDNS software. Am I still at risk?” Unfortunately, one of the reasons DNS is such a vulnerableservice is that you are reliant on the security and stability of any DNS servers that are poten-tially more authoritative than your DNS server or that provide DNS resolution for you. Thismeans if a DNS server that you rely on to provide information for your DNS is compromised,you could receive bogus data from that server. Unfortunately, you cannot do anything to pro-tect yourself from this risk. I hope future developments in RFCs such as DNSSEC can help tosomewhat mitigate this risk. In the meantime, you should ensure your own DNS environmentis secure and up-to-date.
What DNS Server Should You Choose?Many DNS servers are available to provide DNS capabilities. But only three major players occupythis space. They are BIND, djbdns, and Microsoft DNS. Obviously, I will not cover Microsoft DNS,as it runs on Windows hosts only. In the Linux (and other *nix and BSD dialects) space, this leavesBIND,6 provided by Internet Systems Consortium (ISC), and djbdns,7 written by Daniel. J. Bern-stein. The debate between which of these is the better DNS server, both operationally and withrespect to security, is both vitriolic and controversial.
The BIND server has the larger market share. Depending on whose figures you believe, it isused by approximately 80 percent of the DNS servers on the Internet.8 It has also had a difficultpast history with a large number of both operational-related and security-related bugs beingdiscovered in various versions of the server software. Some versions of BIND are fundamentallyflawed, and running them exposes your organization to an extreme level of risk. More recentversions (from BIND 9 onward) have been somewhat more stable, and the incidence of majorsecurity vulnerabilities has decreased. But still a lot of older, easily exploitable versions of BINDare running on the Internet.
4444c11_final.qxd 1/5/05 1:04 AM Page 466
CHAPTER 11 ■ HARDENING DNS AND BIND 467
9. http://cr.yp.to/djbdns/run-cache.html
Alternatively, djbdns has not had a major security problem. Indeed, Bernstein offersa challenge for anyone to discover one in his code.
■Note The djbdns package does have some functional issues. They are described athttp://homepages.tesco.net/~J.deBoynePollard/FGA/djbdns-problems.html.
But it can also be argued that Bernstein has not fully implemented the total scope of theDNS RFCs and that occasionally djbdns does not have the correct RFC behavior. For example,djbdns does not support TSIG or DNSSEC. These variations result because Bernstein’s develop-ment approach tends to be based on his interpretation of the RFCs. To his credit, his softwaredoes address issues and flaws with the RFCs. Overall, though, this arbitrary and interpretationalapproach to standards compliance is problematic. Indeed, it has created some problems fordjbdns’ interoperability with BIND and other DNS servers. Finally, it could also be stated thatthe djbdns package is limited because it has a single author who controls the code base. Thefuture development of the package depends on that author.
So where does this leave you with regard to choosing a DNS server? Well, it is very much anindividual choice. With regard to the core functionality required to run DNS services, both BINDand djbdns offer a full feature set. For many purposes, djbdns is a good choice, such as when run-ning a personal caching server on an individual system with the dnscache application.9 Froma security perspective, you may see some benefits in running djbdns because of its lack of dis-covered vulnerabilities. For interoperability purposes with other BIND servers, or if you want touse features such as TSIG, you may want to go with a BIND infrastructure.
For the purposes of this chapter, I have chosen to cover securing and hardening the BINDpackage. I have chosen BIND as a result of its extensive installation base. BIND is the DNS serveryou are most likely to encounter or to have as a standard for your organization. This is not to saythat potentially djbdns is not a better solution. But BIND is distinctly more pervasive. Addition-ally, in defense of BIND’s security, the more recent releases of BIND have been more stable andsecure. Finally, the support available for BIND from ISC and other sources also contributed tothe decision to cover BIND.
Secure BIND DesignOne of the factors in securing your DNS services is designing a secure BIND infrastructure.As with designing a secure network, where you place your BIND servers and what functionsthose servers will perform is as important as how you build and secure them. I will brieflyexplain the major concepts in good DNS/BIND design and provide some simple rules thatI recommend you follow.
• Do not use a single DNS host as an authoritative name server and a caching server.
• Ensure each DNS host provides only the functionality required. For example, do notprovide resolution and caching services on a host that does not require it.
4444c11_final.qxd 1/5/05 1:04 AM Page 467
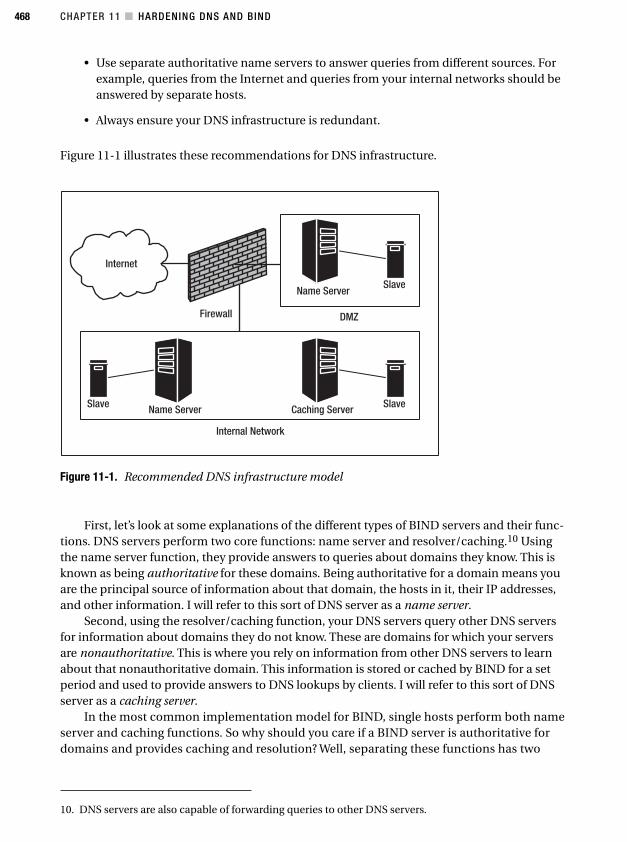
CHAPTER 11 ■ HARDENING DNS AND BIND468
Figure 11-1. Recommended DNS infrastructure model
• Use separate authoritative name servers to answer queries from different sources. Forexample, queries from the Internet and queries from your internal networks should beanswered by separate hosts.
• Always ensure your DNS infrastructure is redundant.
Figure 11-1 illustrates these recommendations for DNS infrastructure.
10. DNS servers are also capable of forwarding queries to other DNS servers.
First, let’s look at some explanations of the different types of BIND servers and their func-tions. DNS servers perform two core functions: name server and resolver/caching.10 Usingthe name server function, they provide answers to queries about domains they know. This isknown as being authoritative for these domains. Being authoritative for a domain means youare the principal source of information about that domain, the hosts in it, their IP addresses,and other information. I will refer to this sort of DNS server as a name server.
Second, using the resolver/caching function, your DNS servers query other DNS serversfor information about domains they do not know. These are domains for which your serversare nonauthoritative. This is where you rely on information from other DNS servers to learnabout that nonauthoritative domain. This information is stored or cached by BIND for a setperiod and used to provide answers to DNS lookups by clients. I will refer to this sort of DNSserver as a caching server.
In the most common implementation model for BIND, single hosts perform both nameserver and caching functions. So why should you care if a BIND server is authoritative fordomains and provides caching and resolution? Well, separating these functions has two
4444c11_final.qxd 1/5/05 1:04 AM Page 468
CHAPTER 11 ■ HARDENING DNS AND BIND 469
principal advantages. The first is that you make your DNS services more resilient from anavailability perspective. With a combined name and caching server, you create a single pointof failure. For example, if a DoS attack results in the failure of your BIND server, then youwill lose both your name server and caching functions. This would stop you from beingauthoritative for your domains as well as stop you from resolving DNS queries for yourclients. With functional separation onto separate hosts, the impact of such a DoS attackis more limited, and you would potentially lose only one function.
The second advantage is that a compromise of your BIND server will allow attackers totake advantage of only one function. If attackers compromise a BIND server that combinesboth functions, then they now control responses to queries about the domains for which thatserver is authoritative, and they can influence the results of any DNS queries your clients makeor poison the cache of that server. Separating these functions limits the risk of attackers con-trolling your entire DNS infrastructure with a single attack. So, if you have the resources toprovide multiple servers to perform these separate functions, you should look into doing so.
Where you position your BIND servers and what role they play in your DNS infrastructureis also often critical. For example, you only need to place caching servers within your internalnetwork. This is because you will not be providing DNS resolution to external clients. In fact,you should ensure your BIND servers are not providing resolution and caching to externalclients to protect them, both from attacks and to prevent external clients using your valuablebandwidth and resources. I recommend you never place a caching DNS server on a bastionhost or in a DMZ.
Alternatively, your name servers, which provide resolution for domains you control, gen-erally need to be placed facing both your internal and external networks. This is because youneed to provide different DNS answers for external clients and internal clients. You can do thison single name servers using split DNS with view statements (which I will demonstrate in the“Views and Zones” section), or you can implement separate name servers, some located inyour internal network and some located in a DMZ or in a bastion host protected by a firewall.I recommend you take the separate name server approach and provide different name serversto respond to queries from different clients. This again enhances the availability of your DNSinfrastructure and also limits unnecessary connectivity between your higher risk areas, suchas a DMZ, and your internal network.
The final element to any secure DNS infrastructure design is redundancy. You should havemore than one host providing resolution and caching services to your internal clients. If a cachingserver fails without a backup, then your clients will not be able to resolve IP addresses and host-names. This will render most software that requires communication with the network inoperable.
For name servers you also need redundancy. With name servers you should have both pri-mary and secondary name servers (also known as masters and slaves) configured. What doesthis mean? Domains (referred to in BIND as zones) defined to a BIND name server can be oftwo major types, masters and slaves. A master zone is the authoritative and primary source ofinformation about that domain. The name server where that master zone is defined is the pri-mary, or master, server for that zone. A slave zone is an exact copy of the master zone, and it isdefined on a secondary, or slave, name server. On a regular basis the master zone is transferredfrom the master server to the slave server. This transfer generally occurs either when the masterzone is changed or when a fixed period expires. In your DNS infrastructure you define bothyour master and slaves as potential name servers for particular domains to your clients. If themaster server fails, then the client can use the slave server or servers to answer queries aboutthat domain.
4444c11_final.qxd 1/5/05 1:04 AM Page 469
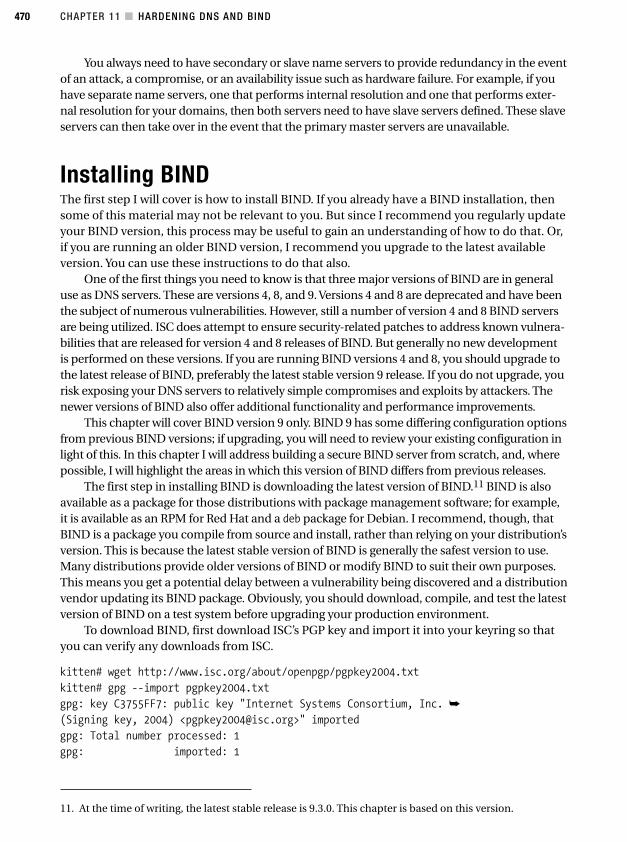
CHAPTER 11 ■ HARDENING DNS AND BIND470
11. At the time of writing, the latest stable release is 9.3.0. This chapter is based on this version.
You always need to have secondary or slave name servers to provide redundancy in the eventof an attack, a compromise, or an availability issue such as hardware failure. For example, if youhave separate name servers, one that performs internal resolution and one that performs exter-nal resolution for your domains, then both servers need to have slave servers defined. These slaveservers can then take over in the event that the primary master servers are unavailable.
Installing BINDThe first step I will cover is how to install BIND. If you already have a BIND installation, thensome of this material may not be relevant to you. But since I recommend you regularly updateyour BIND version, this process may be useful to gain an understanding of how to do that. Or,if you are running an older BIND version, I recommend you upgrade to the latest availableversion. You can use these instructions to do that also.
One of the first things you need to know is that three major versions of BIND are in generaluse as DNS servers. These are versions 4, 8, and 9. Versions 4 and 8 are deprecated and have beenthe subject of numerous vulnerabilities. However, still a number of version 4 and 8 BIND serversare being utilized. ISC does attempt to ensure security-related patches to address known vulnera-bilities that are released for version 4 and 8 releases of BIND. But generally no new developmentis performed on these versions. If you are running BIND versions 4 and 8, you should upgrade tothe latest release of BIND, preferably the latest stable version 9 release. If you do not upgrade, yourisk exposing your DNS servers to relatively simple compromises and exploits by attackers. Thenewer versions of BIND also offer additional functionality and performance improvements.
This chapter will cover BIND version 9 only. BIND 9 has some differing configuration optionsfrom previous BIND versions; if upgrading, you will need to review your existing configuration inlight of this. In this chapter I will address building a secure BIND server from scratch, and, wherepossible, I will highlight the areas in which this version of BIND differs from previous releases.
The first step in installing BIND is downloading the latest version of BIND.11 BIND is alsoavailable as a package for those distributions with package management software; for example,it is available as an RPM for Red Hat and a deb package for Debian. I recommend, though, thatBIND is a package you compile from source and install, rather than relying on your distribution’sversion. This is because the latest stable version of BIND is generally the safest version to use.Many distributions provide older versions of BIND or modify BIND to suit their own purposes.This means you get a potential delay between a vulnerability being discovered and a distributionvendor updating its BIND package. Obviously, you should download, compile, and test the latestversion of BIND on a test system before upgrading your production environment.
To download BIND, first download ISC’s PGP key and import it into your keyring so thatyou can verify any downloads from ISC.
kitten# wget http://www.isc.org/about/openpgp/pgpkey2004.txt
kitten# gpg --import pgpkey2004.txt
gpg: key C3755FF7: public key "Internet Systems Consortium, Inc. ➥
(Signing key, 2004) <[email protected]>" imported
gpg: Total number processed: 1
gpg: imported: 1
4444c11_final.qxd 1/5/05 1:04 AM Page 470
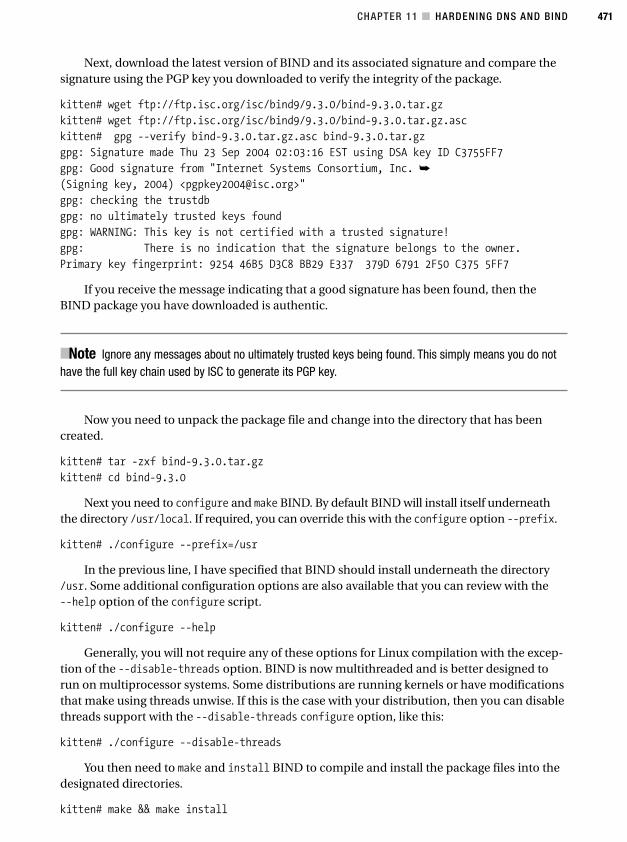
CHAPTER 11 ■ HARDENING DNS AND BIND 471
Next, download the latest version of BIND and its associated signature and compare thesignature using the PGP key you downloaded to verify the integrity of the package.
kitten# wget ftp://ftp.isc.org/isc/bind9/9.3.0/bind-9.3.0.tar.gz
kitten# wget ftp://ftp.isc.org/isc/bind9/9.3.0/bind-9.3.0.tar.gz.asc
kitten# gpg --verify bind-9.3.0.tar.gz.asc bind-9.3.0.tar.gz
gpg: Signature made Thu 23 Sep 2004 02:03:16 EST using DSA key ID C3755FF7
gpg: Good signature from "Internet Systems Consortium, Inc. ➥
(Signing key, 2004) <[email protected]>"
gpg: checking the trustdb
gpg: no ultimately trusted keys found
gpg: WARNING: This key is not certified with a trusted signature!
gpg: There is no indication that the signature belongs to the owner.
Primary key fingerprint: 9254 46B5 D3C8 BB29 E337 379D 6791 2F50 C375 5FF7
If you receive the message indicating that a good signature has been found, then theBIND package you have downloaded is authentic.
■Note Ignore any messages about no ultimately trusted keys being found. This simply means you do nothave the full key chain used by ISC to generate its PGP key.
Now you need to unpack the package file and change into the directory that has beencreated.
kitten# tar -zxf bind-9.3.0.tar.gz
kitten# cd bind-9.3.0
Next you need to configure and make BIND. By default BIND will install itself underneaththe directory /usr/local. If required, you can override this with the configure option --prefix.
kitten# ./configure --prefix=/usr
In the previous line, I have specified that BIND should install underneath the directory/usr. Some additional configuration options are also available that you can review with the --help option of the configure script.
kitten# ./configure --help
Generally, you will not require any of these options for Linux compilation with the excep-tion of the --disable-threads option. BIND is now multithreaded and is better designed torun on multiprocessor systems. Some distributions are running kernels or have modificationsthat make using threads unwise. If this is the case with your distribution, then you can disablethreads support with the --disable-threads configure option, like this:
kitten# ./configure --disable-threads
You then need to make and install BIND to compile and install the package files into thedesignated directories.
kitten# make && make install
4444c11_final.qxd 1/5/05 1:04 AM Page 471
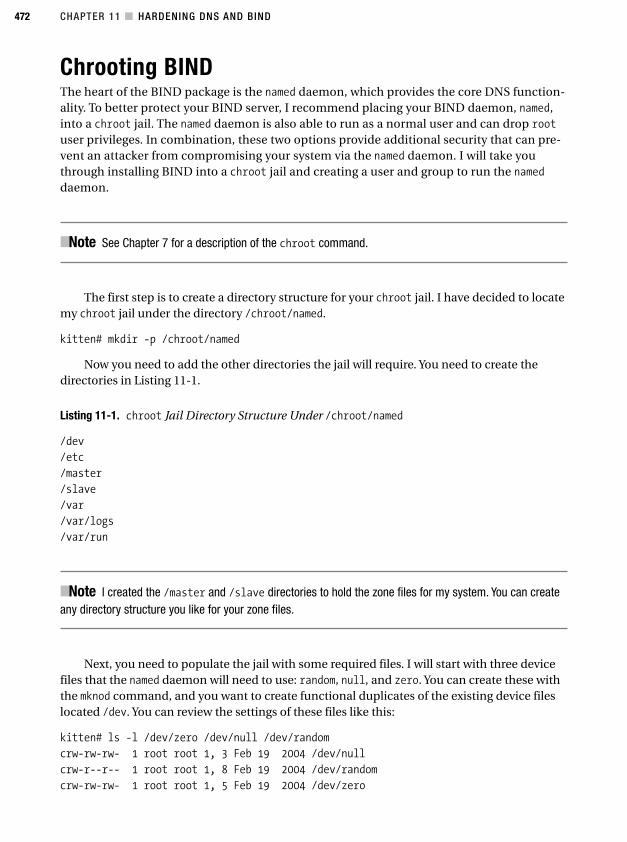
CHAPTER 11 ■ HARDENING DNS AND BIND472
Chrooting BINDThe heart of the BIND package is the named daemon, which provides the core DNS function-ality. To better protect your BIND server, I recommend placing your BIND daemon, named,into a chroot jail. The named daemon is also able to run as a normal user and can drop rootuser privileges. In combination, these two options provide additional security that can pre-vent an attacker from compromising your system via the named daemon. I will take youthrough installing BIND into a chroot jail and creating a user and group to run the nameddaemon.
■Note See Chapter 7 for a description of the chroot command.
The first step is to create a directory structure for your chroot jail. I have decided to locatemy chroot jail under the directory /chroot/named.
kitten# mkdir -p /chroot/named
Now you need to add the other directories the jail will require. You need to create thedirectories in Listing 11-1.
Listing 11-1. chroot Jail Directory Structure Under /chroot/named
/dev
/etc
/master
/slave
/var
/var/logs
/var/run
■Note I created the /master and /slave directories to hold the zone files for my system. You can createany directory structure you like for your zone files.
Next, you need to populate the jail with some required files. I will start with three devicefiles that the named daemon will need to use: random, null, and zero. You can create these withthe mknod command, and you want to create functional duplicates of the existing device fileslocated /dev. You can review the settings of these files like this:
kitten# ls -l /dev/zero /dev/null /dev/random
crw-rw-rw- 1 root root 1, 3 Feb 19 2004 /dev/null
crw-r--r-- 1 root root 1, 8 Feb 19 2004 /dev/random
crw-rw-rw- 1 root root 1, 5 Feb 19 2004 /dev/zero
4444c11_final.qxd 1/5/05 1:04 AM Page 472
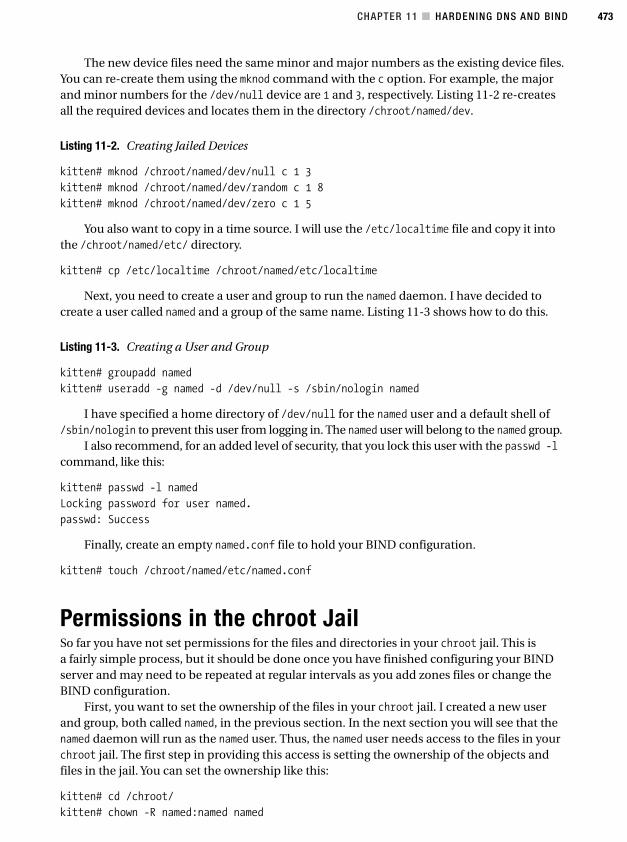
CHAPTER 11 ■ HARDENING DNS AND BIND 473
The new device files need the same minor and major numbers as the existing device files.You can re-create them using the mknod command with the c option. For example, the majorand minor numbers for the /dev/null device are 1 and 3, respectively. Listing 11-2 re-createsall the required devices and locates them in the directory /chroot/named/dev.
Listing 11-2. Creating Jailed Devices
kitten# mknod /chroot/named/dev/null c 1 3
kitten# mknod /chroot/named/dev/random c 1 8
kitten# mknod /chroot/named/dev/zero c 1 5
You also want to copy in a time source. I will use the /etc/localtime file and copy it intothe /chroot/named/etc/ directory.
kitten# cp /etc/localtime /chroot/named/etc/localtime
Next, you need to create a user and group to run the named daemon. I have decided tocreate a user called named and a group of the same name. Listing 11-3 shows how to do this.
Listing 11-3. Creating a User and Group
kitten# groupadd named
kitten# useradd -g named -d /dev/null -s /sbin/nologin named
I have specified a home directory of /dev/null for the named user and a default shell of/sbin/nologin to prevent this user from logging in. The named user will belong to the named group.
I also recommend, for an added level of security, that you lock this user with the passwd -lcommand, like this:
kitten# passwd -l named
Locking password for user named.
passwd: Success
Finally, create an empty named.conf file to hold your BIND configuration.
kitten# touch /chroot/named/etc/named.conf
Permissions in the chroot JailSo far you have not set permissions for the files and directories in your chroot jail. This isa fairly simple process, but it should be done once you have finished configuring your BINDserver and may need to be repeated at regular intervals as you add zones files or change theBIND configuration.
First, you want to set the ownership of the files in your chroot jail. I created a new userand group, both called named, in the previous section. In the next section you will see that thenamed daemon will run as the named user. Thus, the named user needs access to the files in yourchroot jail. The first step in providing this access is setting the ownership of the objects andfiles in the jail. You can set the ownership like this:
kitten# cd /chroot/
kitten# chown -R named:named named
4444c11_final.qxd 1/5/05 1:04 AM Page 473
CHAPTER 11 ■ HARDENING DNS AND BIND474
Second, you need to change the permissions on the directories. You want the named user tohave all permissions to the directory and give the named group read and execute permissions tothe directories. You can use the following commands to do this:
kitten# cd /chroot/named
kitten# find . -type d -print | xargs chmod 0750
The second command finds all directories below the /chroot/named directory and changestheir permissions to 0750.
Next, you want to secure your files. Only the named user and group should have permissionsto the files in your chroot jail. Everyone else on the system should have no permissions to the filesand objects. So, the files need to be readable and writable by the named user, need to be readableby the named group, and need to have no world permissions granted. You can do this using the fol-lowing commands:
kitten# cd /chroot/named
kitten# find . -type f -print | xargs chmod 0640
■Caution As the named group has read permissions to the files in your chroot jail, you should ensureyou do not add users to that group, unless absolutely required.
Finally, change the attributes on the localtime file to make it immutable to prevent thetime from being changed.
kitten# chattr +i /chroot/named/etc/localtime
It is especially important to ensure that you carefully secure your configuration and zonefiles. I recommend using a tool such as Tripwire (see Chapter 4) to monitor these files. Addition-ally, another potential file to consider making immutable is your named.conf file, which containsyour BIND configuration. This can inconvenience the process of administering your BIND serverbut adds a greater level of assurance that your configuration file cannot be changed for maliciouspurposes.
kitten# chattr +i /chroot/named/etc/named.conf
■Tip You should also update your permissions on a regular basis to ensure they remain correct and that anynew files—for example, new zone files—receive the correct ownership and permissions. I generally do thiswhen the named daemon is started and stopped by adding a section resetting permissions to the defaults inmy init script.
Starting and Running namedTo use BIND, you need to start the named daemon. You can do this by running the named binary.When the named binary is executed without options, it will bind the ports it requires, read in
4444c11_final.qxd 1/5/05 1:04 AM Page 474
CHAPTER 11 ■ HARDENING DNS AND BIND 475
12. For a quick reference for Red Hat systems, see http://www.vsl.gifu-u.ac.jp/freeman/misc/initscripts-6.51/sysvinitfiles. For Debian, see http://www.debianhelp.org/modules.php?op=modload&name=News&file=article&sid=3306.
the configuration from the configuration file (which it expects to find in /etc/named.conf),and then daemonize.
■Tip By default the named daemon binary is installed into /usr/local/sbin.
You can start the named binary on the command line or via an init script. Most of thepackages available for BIND on various distributions come with an init script. If you haveinstalled from source, you can extract one of these init scripts from a package and customizeit for your own environment. You could also write your own script or get an init script fromthe Web.12
■Tip I have included a sample init script in Appendix B.
Listing 11-4 shows how to start the named daemon by running the named binary.
Listing 11-4. Starting named
kitten# named -t /chroot/named -u named
In Listing 11-4 the -t option specifies the root directory of the chroot jail I am using,/chroot/named. This is the directory that named will change to when it is chrooted. This thenbecomes the root directory for the named daemon. All directories you reference will be relativeto this directory rather than the system’s normal root directory. For example, the named dae-mon looks for the random device in /dev. In Listing 11-4, as the daemon is chrooted, the actualdirectory it will look for the device in is /chroot/named/dev.
The -u option specifies the user you want to run the named daemon; I have specified theuser named. In this example, the named daemon will start with root user privileges and thendrop these privileges to run as the named user.
■Note I show how to create both the chroot jail directories and the named user in the “Chrooting BIND”section.
Other options are available for the named daemon (see Table 11-1).
4444c11_final.qxd 1/5/05 1:04 AM Page 475
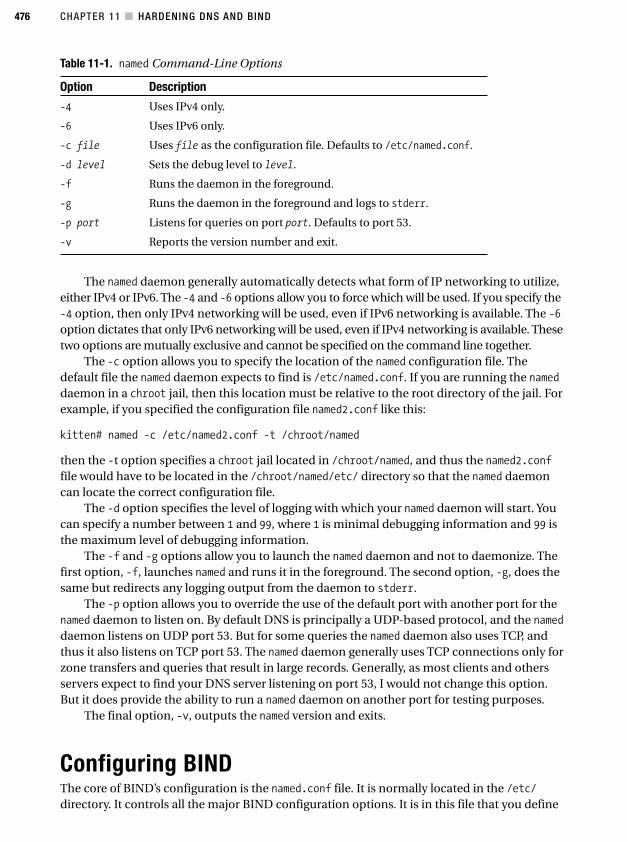
CHAPTER 11 ■ HARDENING DNS AND BIND476
Table 11-1. named Command-Line Options
Option Description
-4 Uses IPv4 only.
-6 Uses IPv6 only.
-c file Uses file as the configuration file. Defaults to /etc/named.conf.
-d level Sets the debug level to level.
-f Runs the daemon in the foreground.
-g Runs the daemon in the foreground and logs to stderr.
-p port Listens for queries on port port. Defaults to port 53.
-v Reports the version number and exit.
The named daemon generally automatically detects what form of IP networking to utilize,either IPv4 or IPv6. The -4 and -6 options allow you to force which will be used. If you specify the-4 option, then only IPv4 networking will be used, even if IPv6 networking is available. The -6option dictates that only IPv6 networking will be used, even if IPv4 networking is available. Thesetwo options are mutually exclusive and cannot be specified on the command line together.
The -c option allows you to specify the location of the named configuration file. Thedefault file the named daemon expects to find is /etc/named.conf. If you are running the nameddaemon in a chroot jail, then this location must be relative to the root directory of the jail. Forexample, if you specified the configuration file named2.conf like this:
kitten# named -c /etc/named2.conf -t /chroot/named
then the -t option specifies a chroot jail located in /chroot/named, and thus the named2.conffile would have to be located in the /chroot/named/etc/ directory so that the named daemoncan locate the correct configuration file.
The -d option specifies the level of logging with which your named daemon will start. Youcan specify a number between 1 and 99, where 1 is minimal debugging information and 99 isthe maximum level of debugging information.
The -f and -g options allow you to launch the named daemon and not to daemonize. Thefirst option, -f, launches named and runs it in the foreground. The second option, -g, does thesame but redirects any logging output from the daemon to stderr.
The -p option allows you to override the use of the default port with another port for thenamed daemon to listen on. By default DNS is principally a UDP-based protocol, and the nameddaemon listens on UDP port 53. But for some queries the named daemon also uses TCP, andthus it also listens on TCP port 53. The named daemon generally uses TCP connections only forzone transfers and queries that result in large records. Generally, as most clients and othersservers expect to find your DNS server listening on port 53, I would not change this option.But it does provide the ability to run a named daemon on another port for testing purposes.
The final option, -v, outputs the named version and exits.
Configuring BINDThe core of BIND’s configuration is the named.conf file. It is normally located in the /etc/directory. It controls all the major BIND configuration options. It is in this file that you define
4444c11_final.qxd 1/5/05 1:04 AM Page 476
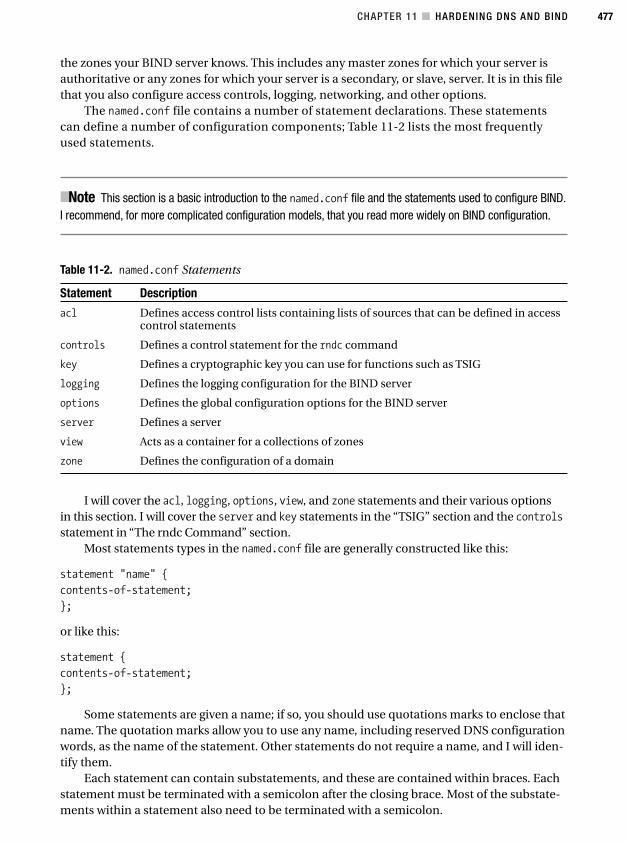
CHAPTER 11 ■ HARDENING DNS AND BIND 477
the zones your BIND server knows. This includes any master zones for which your server isauthoritative or any zones for which your server is a secondary, or slave, server. It is in this filethat you also configure access controls, logging, networking, and other options.
The named.conf file contains a number of statement declarations. These statementscan define a number of configuration components; Table 11-2 lists the most frequentlyused statements.
■Note This section is a basic introduction to the named.conf file and the statements used to configure BIND.I recommend, for more complicated configuration models, that you read more widely on BIND configuration.
Table 11-2. named.conf Statements
Statement Description
acl Defines access control lists containing lists of sources that can be defined in accesscontrol statements
controls Defines a control statement for the rndc command
key Defines a cryptographic key you can use for functions such as TSIG
logging Defines the logging configuration for the BIND server
options Defines the global configuration options for the BIND server
server Defines a server
view Acts as a container for a collections of zones
zone Defines the configuration of a domain
I will cover the acl, logging, options, view, and zone statements and their various optionsin this section. I will cover the server and key statements in the “TSIG” section and the controlsstatement in “The rndc Command” section.
Most statements types in the named.conf file are generally constructed like this:
statement "name" {
contents-of-statement;
};
or like this:
statement {
contents-of-statement;
};
Some statements are given a name; if so, you should use quotations marks to enclose thatname. The quotation marks allow you to use any name, including reserved DNS configurationwords, as the name of the statement. Other statements do not require a name, and I will iden-tify them.
Each statement can contain substatements, and these are contained within braces. Eachstatement must be terminated with a semicolon after the closing brace. Most of the substate-ments within a statement also need to be terminated with a semicolon.
4444c11_final.qxd 1/5/05 1:04 AM Page 477
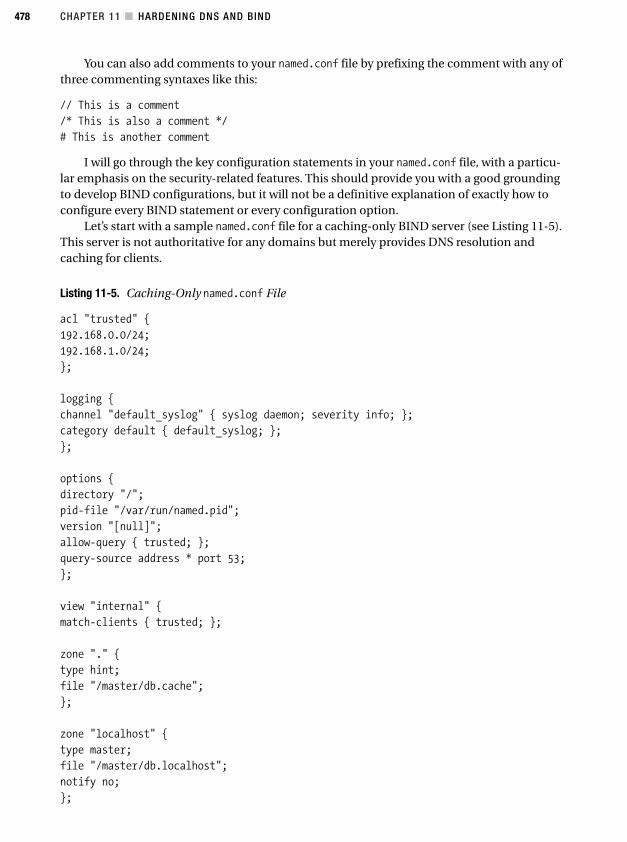
CHAPTER 11 ■ HARDENING DNS AND BIND478
You can also add comments to your named.conf file by prefixing the comment with any ofthree commenting syntaxes like this:
// This is a comment
/* This is also a comment */
# This is another comment
I will go through the key configuration statements in your named.conf file, with a particu-lar emphasis on the security-related features. This should provide you with a good groundingto develop BIND configurations, but it will not be a definitive explanation of exactly how toconfigure every BIND statement or every configuration option.
Let’s start with a sample named.conf file for a caching-only BIND server (see Listing 11-5).This server is not authoritative for any domains but merely provides DNS resolution andcaching for clients.
Listing 11-5. Caching-Only named.conf File
acl "trusted" {
192.168.0.0/24;
192.168.1.0/24;
};
logging {
channel "default_syslog" { syslog daemon; severity info; };
category default { default_syslog; };
};
options {
directory "/";
pid-file "/var/run/named.pid";
version "[null]";
allow-query { trusted; };
query-source address * port 53;
};
view "internal" {
match-clients { trusted; };
zone "." {
type hint;
file "/master/db.cache";
};
zone "localhost" {
type master;
file "/master/db.localhost";
notify no;
};
4444c11_final.qxd 1/5/05 1:04 AM Page 478
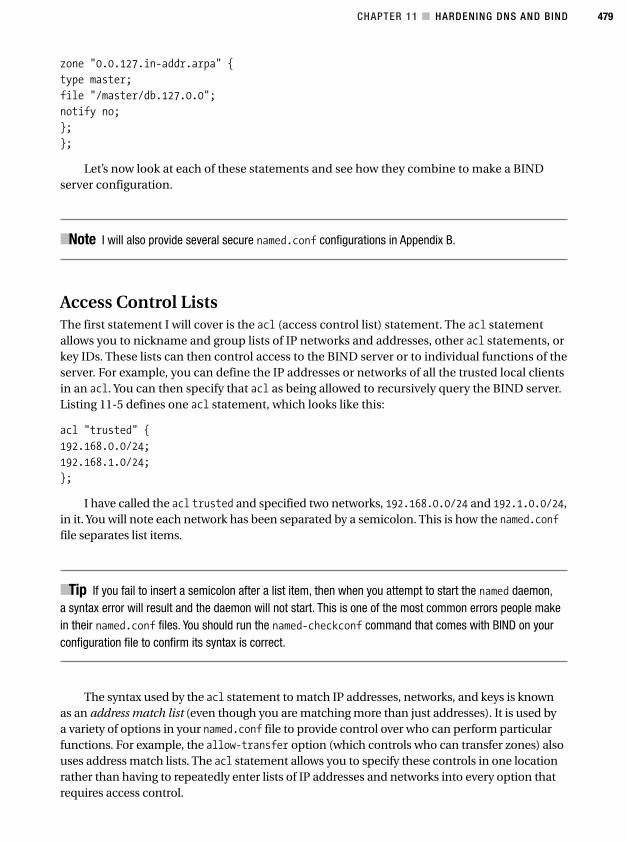
CHAPTER 11 ■ HARDENING DNS AND BIND 479
zone "0.0.127.in-addr.arpa" {
type master;
file "/master/db.127.0.0";
notify no;
};
};
Let’s now look at each of these statements and see how they combine to make a BINDserver configuration.
■Note I will also provide several secure named.conf configurations in Appendix B.
Access Control ListsThe first statement I will cover is the acl (access control list) statement. The acl statementallows you to nickname and group lists of IP networks and addresses, other acl statements, orkey IDs. These lists can then control access to the BIND server or to individual functions of theserver. For example, you can define the IP addresses or networks of all the trusted local clientsin an acl. You can then specify that acl as being allowed to recursively query the BIND server.Listing 11-5 defines one acl statement, which looks like this:
acl "trusted" {
192.168.0.0/24;
192.168.1.0/24;
};
I have called the acl trusted and specified two networks, 192.168.0.0/24 and 192.1.0.0/24,in it. You will note each network has been separated by a semicolon. This is how the named.conffile separates list items.
■Tip If you fail to insert a semicolon after a list item, then when you attempt to start the named daemon,a syntax error will result and the daemon will not start. This is one of the most common errors people makein their named.conf files. You should run the named-checkconf command that comes with BIND on yourconfiguration file to confirm its syntax is correct.
The syntax used by the acl statement to match IP addresses, networks, and keys is knownas an address match list (even though you are matching more than just addresses). It is used bya variety of options in your named.conf file to provide control over who can perform particularfunctions. For example, the allow-transfer option (which controls who can transfer zones) alsouses address match lists. The acl statement allows you to specify these controls in one locationrather than having to repeatedly enter lists of IP addresses and networks into every option thatrequires access control.
4444c11_final.qxd 1/5/05 1:04 AM Page 479
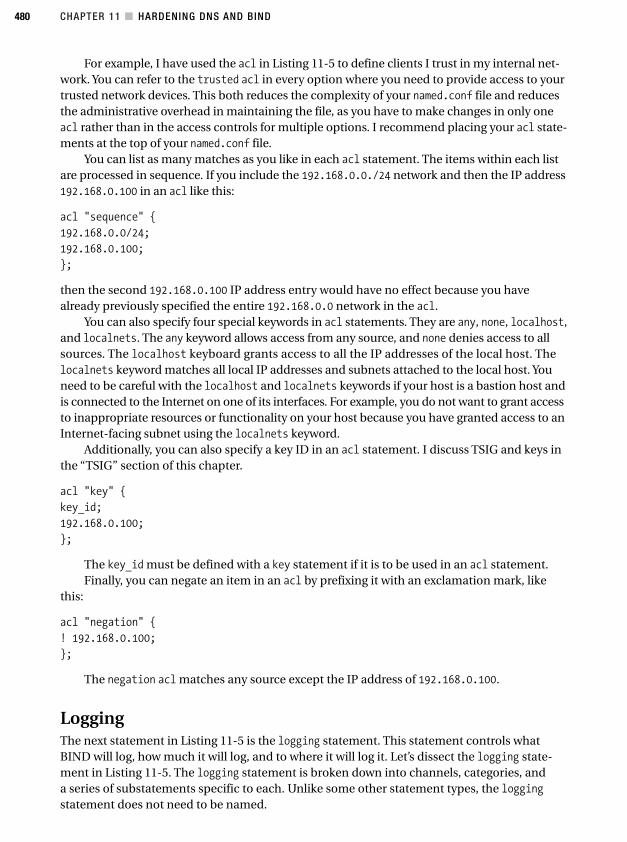
CHAPTER 11 ■ HARDENING DNS AND BIND480
For example, I have used the acl in Listing 11-5 to define clients I trust in my internal net-work. You can refer to the trusted acl in every option where you need to provide access to yourtrusted network devices. This both reduces the complexity of your named.conf file and reducesthe administrative overhead in maintaining the file, as you have to make changes in only oneacl rather than in the access controls for multiple options. I recommend placing your acl state-ments at the top of your named.conf file.
You can list as many matches as you like in each acl statement. The items within each listare processed in sequence. If you include the 192.168.0.0./24 network and then the IP address192.168.0.100 in an acl like this:
acl "sequence" {
192.168.0.0/24;
192.168.0.100;
};
then the second 192.168.0.100 IP address entry would have no effect because you havealready previously specified the entire 192.168.0.0 network in the acl.
You can also specify four special keywords in acl statements. They are any, none, localhost,and localnets. The any keyword allows access from any source, and none denies access to allsources. The localhost keyboard grants access to all the IP addresses of the local host. Thelocalnets keyword matches all local IP addresses and subnets attached to the local host. Youneed to be careful with the localhost and localnets keywords if your host is a bastion host andis connected to the Internet on one of its interfaces. For example, you do not want to grant accessto inappropriate resources or functionality on your host because you have granted access to anInternet-facing subnet using the localnets keyword.
Additionally, you can also specify a key ID in an acl statement. I discuss TSIG and keys inthe “TSIG” section of this chapter.
acl "key" {
key_id;
192.168.0.100;
};
The key_id must be defined with a key statement if it is to be used in an acl statement.Finally, you can negate an item in an acl by prefixing it with an exclamation mark, like
this:
acl "negation" {
! 192.168.0.100;
};
The negation acl matches any source except the IP address of 192.168.0.100.
LoggingThe next statement in Listing 11-5 is the logging statement. This statement controls whatBIND will log, how much it will log, and to where it will log it. Let’s dissect the logging state-ment in Listing 11-5. The logging statement is broken down into channels, categories, anda series of substatements specific to each. Unlike some other statement types, the loggingstatement does not need to be named.
4444c11_final.qxd 1/5/05 1:04 AM Page 480
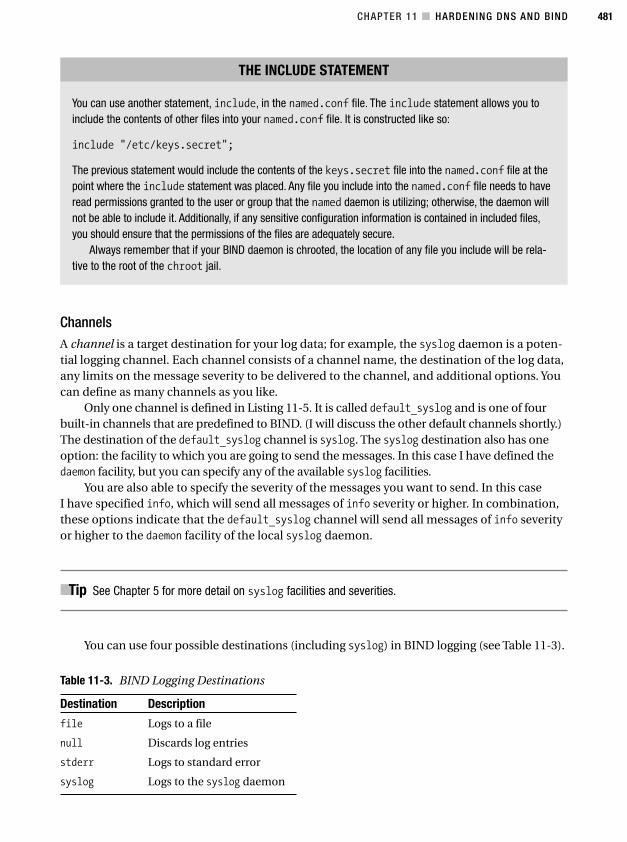
CHAPTER 11 ■ HARDENING DNS AND BIND 481
ChannelsA channel is a target destination for your log data; for example, the syslog daemon is a poten-tial logging channel. Each channel consists of a channel name, the destination of the log data,any limits on the message severity to be delivered to the channel, and additional options. Youcan define as many channels as you like.
Only one channel is defined in Listing 11-5. It is called default_syslog and is one of fourbuilt-in channels that are predefined to BIND. (I will discuss the other default channels shortly.)The destination of the default_syslog channel is syslog. The syslog destination also has oneoption: the facility to which you are going to send the messages. In this case I have defined thedaemon facility, but you can specify any of the available syslog facilities.
You are also able to specify the severity of the messages you want to send. In this caseI have specified info, which will send all messages of info severity or higher. In combination,these options indicate that the default_syslog channel will send all messages of info severityor higher to the daemon facility of the local syslog daemon.
■Tip See Chapter 5 for more detail on syslog facilities and severities.
You can use four possible destinations (including syslog) in BIND logging (see Table 11-3).
Table 11-3. BIND Logging Destinations
Destination Description
file Logs to a file
null Discards log entries
stderr Logs to standard error
syslog Logs to the syslog daemon
THE INCLUDE STATEMENT
You can use another statement, include, in the named.conf file. The include statement allows you toinclude the contents of other files into your named.conf file. It is constructed like so:
include "/etc/keys.secret";
The previous statement would include the contents of the keys.secret file into the named.conf file at thepoint where the include statement was placed. Any file you include into the named.conf file needs to haveread permissions granted to the user or group that the named daemon is utilizing; otherwise, the daemon willnot be able to include it. Additionally, if any sensitive configuration information is contained in included files,you should ensure that the permissions of the files are adequately secure.
Always remember that if your BIND daemon is chrooted, the location of any file you include will be rela-tive to the root of the chroot jail.
4444c11_final.qxd 1/5/05 1:04 AM Page 481
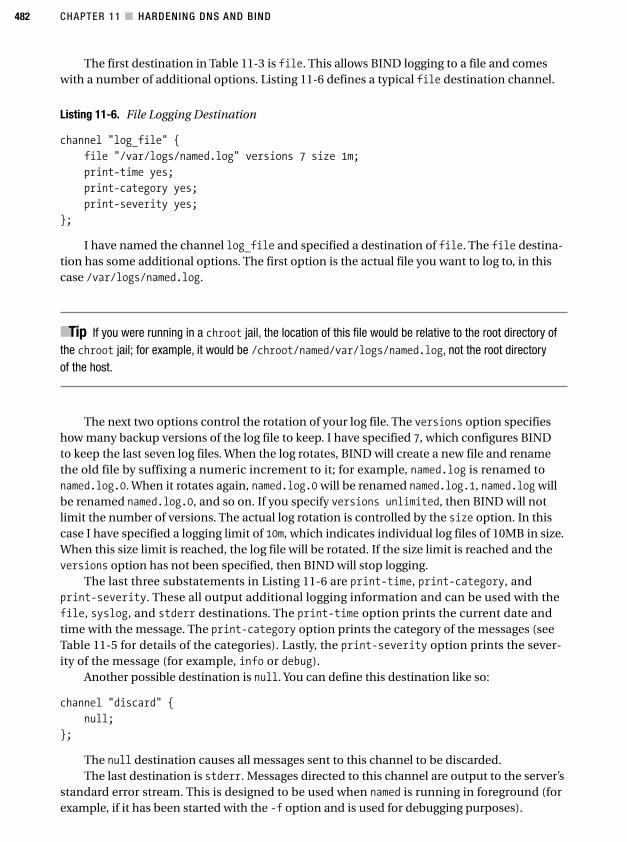
CHAPTER 11 ■ HARDENING DNS AND BIND482
The first destination in Table 11-3 is file. This allows BIND logging to a file and comeswith a number of additional options. Listing 11-6 defines a typical file destination channel.
Listing 11-6. File Logging Destination
channel "log_file" {
file "/var/logs/named.log" versions 7 size 1m;
print-time yes;
print-category yes;
print-severity yes;
};
I have named the channel log_file and specified a destination of file. The file destina-tion has some additional options. The first option is the actual file you want to log to, in thiscase /var/logs/named.log.
■Tip If you were running in a chroot jail, the location of this file would be relative to the root directory ofthe chroot jail; for example, it would be /chroot/named/var/logs/named.log, not the root directoryof the host.
The next two options control the rotation of your log file. The versions option specifieshow many backup versions of the log file to keep. I have specified 7, which configures BINDto keep the last seven log files. When the log rotates, BIND will create a new file and renamethe old file by suffixing a numeric increment to it; for example, named.log is renamed tonamed.log.0. When it rotates again, named.log.0 will be renamed named.log.1, named.log willbe renamed named.log.0, and so on. If you specify versions unlimited, then BIND will notlimit the number of versions. The actual log rotation is controlled by the size option. In thiscase I have specified a logging limit of 10m, which indicates individual log files of 10MB in size.When this size limit is reached, the log file will be rotated. If the size limit is reached and theversions option has not been specified, then BIND will stop logging.
The last three substatements in Listing 11-6 are print-time, print-category, andprint-severity. These all output additional logging information and can be used with thefile, syslog, and stderr destinations. The print-time option prints the current date andtime with the message. The print-category option prints the category of the messages (seeTable 11-5 for details of the categories). Lastly, the print-severity option prints the sever-ity of the message (for example, info or debug).
Another possible destination is null. You can define this destination like so:
channel "discard" {
null;
};
The null destination causes all messages sent to this channel to be discarded.The last destination is stderr. Messages directed to this channel are output to the server’s
standard error stream. This is designed to be used when named is running in foreground (forexample, if it has been started with the -f option and is used for debugging purposes).
4444c11_final.qxd 1/5/05 1:04 AM Page 482
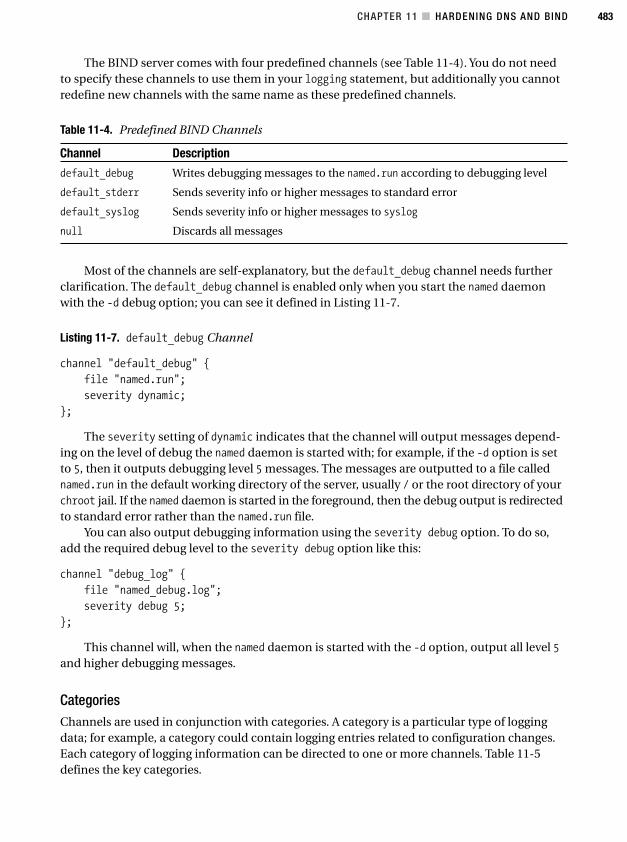
CHAPTER 11 ■ HARDENING DNS AND BIND 483
The BIND server comes with four predefined channels (see Table 11-4). You do not needto specify these channels to use them in your logging statement, but additionally you cannotredefine new channels with the same name as these predefined channels.
Table 11-4. Predefined BIND Channels
Channel Description
default_debug Writes debugging messages to the named.run according to debugging level
default_stderr Sends severity info or higher messages to standard error
default_syslog Sends severity info or higher messages to syslog
null Discards all messages
Most of the channels are self-explanatory, but the default_debug channel needs furtherclarification. The default_debug channel is enabled only when you start the named daemonwith the -d debug option; you can see it defined in Listing 11-7.
Listing 11-7. default_debug Channel
channel "default_debug" {
file "named.run";
severity dynamic;
};
The severity setting of dynamic indicates that the channel will output messages depend-ing on the level of debug the named daemon is started with; for example, if the -d option is setto 5, then it outputs debugging level 5 messages. The messages are outputted to a file callednamed.run in the default working directory of the server, usually / or the root directory of yourchroot jail. If the named daemon is started in the foreground, then the debug output is redirectedto standard error rather than the named.run file.
You can also output debugging information using the severity debug option. To do so,add the required debug level to the severity debug option like this:
channel "debug_log" {
file "named_debug.log";
severity debug 5;
};
This channel will, when the named daemon is started with the -d option, output all level 5and higher debugging messages.
CategoriesChannels are used in conjunction with categories. A category is a particular type of loggingdata; for example, a category could contain logging entries related to configuration changes.Each category of logging information can be directed to one or more channels. Table 11-5defines the key categories.
4444c11_final.qxd 1/5/05 1:04 AM Page 483
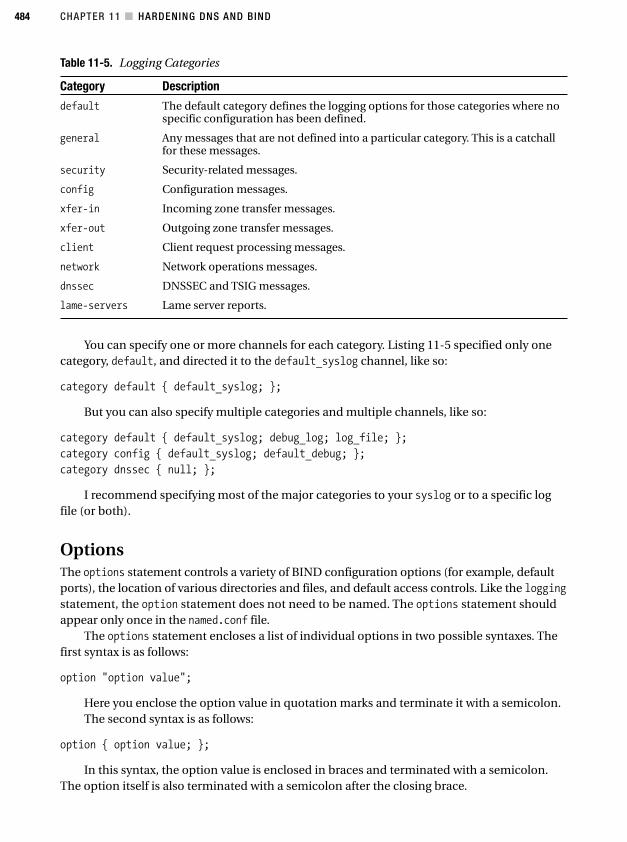
CHAPTER 11 ■ HARDENING DNS AND BIND484
Table 11-5. Logging Categories
Category Description
default The default category defines the logging options for those categories where nospecific configuration has been defined.
general Any messages that are not defined into a particular category. This is a catchallfor these messages.
security Security-related messages.
config Configuration messages.
xfer-in Incoming zone transfer messages.
xfer-out Outgoing zone transfer messages.
client Client request processing messages.
network Network operations messages.
dnssec DNSSEC and TSIG messages.
lame-servers Lame server reports.
You can specify one or more channels for each category. Listing 11-5 specified only onecategory, default, and directed it to the default_syslog channel, like so:
category default { default_syslog; };
But you can also specify multiple categories and multiple channels, like so:
category default { default_syslog; debug_log; log_file; };
category config { default_syslog; default_debug; };
category dnssec { null; };
I recommend specifying most of the major categories to your syslog or to a specific logfile (or both).
OptionsThe options statement controls a variety of BIND configuration options (for example, defaultports), the location of various directories and files, and default access controls. Like the loggingstatement, the option statement does not need to be named. The options statement shouldappear only once in the named.conf file.
The options statement encloses a list of individual options in two possible syntaxes. Thefirst syntax is as follows:
option "option value";
Here you enclose the option value in quotation marks and terminate it with a semicolon.The second syntax is as follows:
option { option value; };
In this syntax, the option value is enclosed in braces and terminated with a semicolon.The option itself is also terminated with a semicolon after the closing brace.
4444c11_final.qxd 1/5/05 1:04 AM Page 484
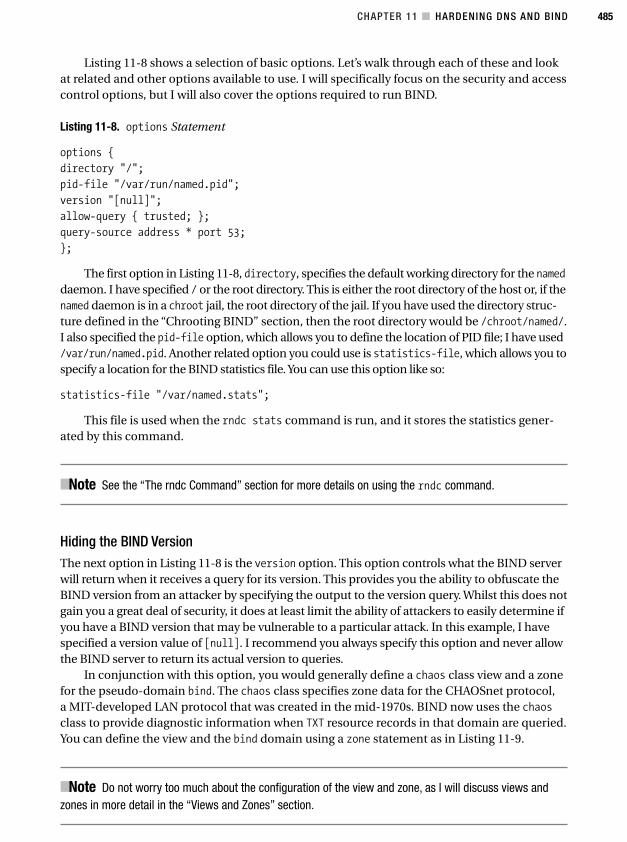
CHAPTER 11 ■ HARDENING DNS AND BIND 485
Listing 11-8 shows a selection of basic options. Let’s walk through each of these and lookat related and other options available to use. I will specifically focus on the security and accesscontrol options, but I will also cover the options required to run BIND.
Listing 11-8. options Statement
options {
directory "/";
pid-file "/var/run/named.pid";
version "[null]";
allow-query { trusted; };
query-source address * port 53;
};
The first option in Listing 11-8, directory, specifies the default working directory for the nameddaemon. I have specified / or the root directory. This is either the root directory of the host or, if thenamed daemon is in a chroot jail, the root directory of the jail. If you have used the directory struc-ture defined in the “Chrooting BIND” section, then the root directory would be /chroot/named/.I also specified the pid-file option, which allows you to define the location of PID file; I have used/var/run/named.pid. Another related option you could use is statistics-file, which allows you tospecify a location for the BIND statistics file. You can use this option like so:
statistics-file "/var/named.stats";
This file is used when the rndc stats command is run, and it stores the statistics gener-ated by this command.
■Note See the “The rndc Command” section for more details on using the rndc command.
Hiding the BIND VersionThe next option in Listing 11-8 is the version option. This option controls what the BIND serverwill return when it receives a query for its version. This provides you the ability to obfuscate theBIND version from an attacker by specifying the output to the version query. Whilst this does notgain you a great deal of security, it does at least limit the ability of attackers to easily determine ifyou have a BIND version that may be vulnerable to a particular attack. In this example, I havespecified a version value of [null]. I recommend you always specify this option and never allowthe BIND server to return its actual version to queries.
In conjunction with this option, you would generally define a chaos class view and a zonefor the pseudo-domain bind. The chaos class specifies zone data for the CHAOSnet protocol,a MIT-developed LAN protocol that was created in the mid-1970s. BIND now uses the chaosclass to provide diagnostic information when TXT resource records in that domain are queried.You can define the view and the bind domain using a zone statement as in Listing 11-9.
■Note Do not worry too much about the configuration of the view and zone, as I will discuss views andzones in more detail in the “Views and Zones” section.
4444c11_final.qxd 1/5/05 1:04 AM Page 485
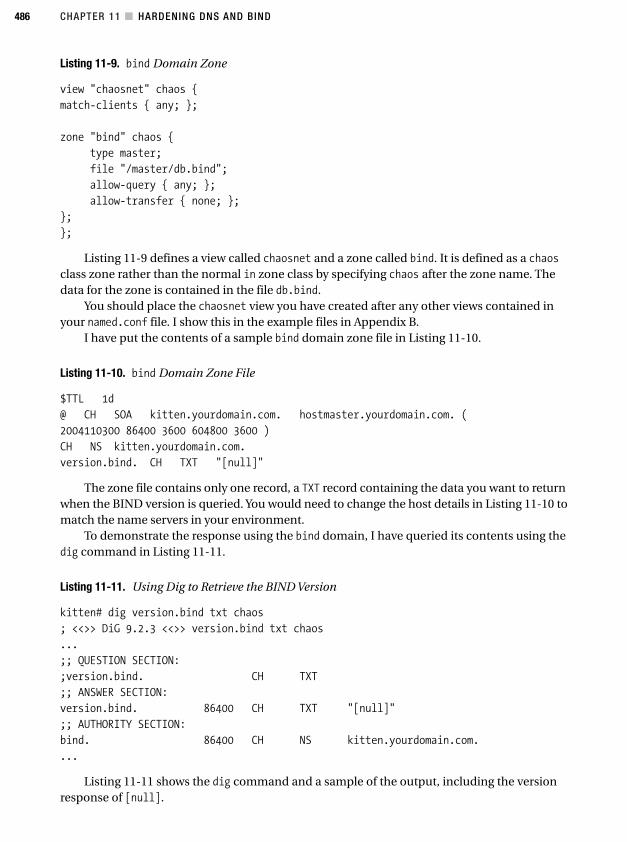
CHAPTER 11 ■ HARDENING DNS AND BIND486
Listing 11-9. bind Domain Zone
view "chaosnet" chaos {
match-clients { any; };
zone "bind" chaos {
type master;
file "/master/db.bind";
allow-query { any; };
allow-transfer { none; };
};
};
Listing 11-9 defines a view called chaosnet and a zone called bind. It is defined as a chaos
class zone rather than the normal in zone class by specifying chaos after the zone name. Thedata for the zone is contained in the file db.bind.
You should place the chaosnet view you have created after any other views contained inyour named.conf file. I show this in the example files in Appendix B.
I have put the contents of a sample bind domain zone file in Listing 11-10.
Listing 11-10. bind Domain Zone File
$TTL 1d
@ CH SOA kitten.yourdomain.com. hostmaster.yourdomain.com. (
2004110300 86400 3600 604800 3600 )
CH NS kitten.yourdomain.com.
version.bind. CH TXT "[null]"
The zone file contains only one record, a TXT record containing the data you want to returnwhen the BIND version is queried. You would need to change the host details in Listing 11-10 tomatch the name servers in your environment.
To demonstrate the response using the bind domain, I have queried its contents using thedig command in Listing 11-11.
Listing 11-11. Using Dig to Retrieve the BIND Version
kitten# dig version.bind txt chaos
; <<>> DiG 9.2.3 <<>> version.bind txt chaos
...
;; QUESTION SECTION:
;version.bind. CH TXT
;; ANSWER SECTION:
version.bind. 86400 CH TXT "[null]"
;; AUTHORITY SECTION:
bind. 86400 CH NS kitten.yourdomain.com.
...
Listing 11-11 shows the dig command and a sample of the output, including the versionresponse of [null].
4444c11_final.qxd 1/5/05 1:04 AM Page 486
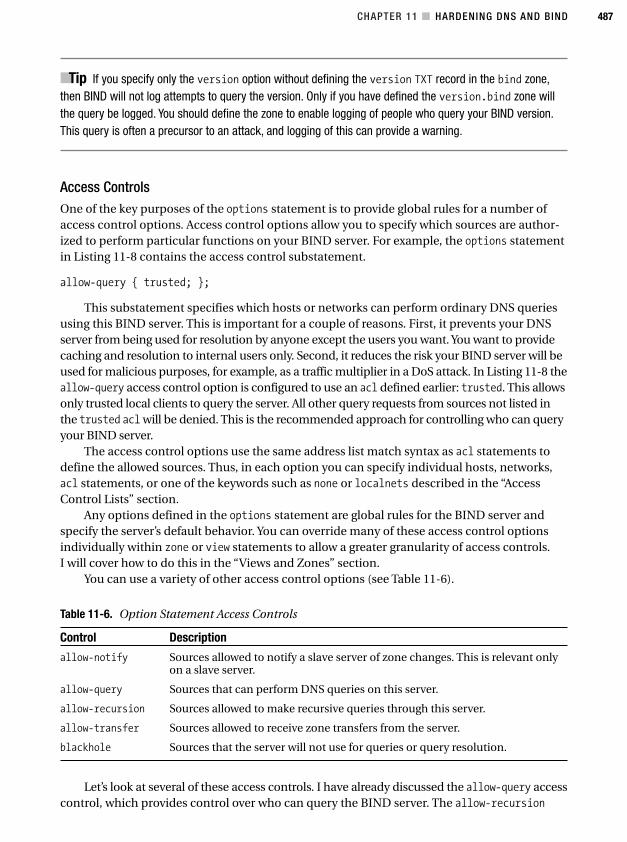
CHAPTER 11 ■ HARDENING DNS AND BIND 487
■Tip If you specify only the version option without defining the version TXT record in the bind zone,then BIND will not log attempts to query the version. Only if you have defined the version.bind zone willthe query be logged. You should define the zone to enable logging of people who query your BIND version.This query is often a precursor to an attack, and logging of this can provide a warning.
Access ControlsOne of the key purposes of the options statement is to provide global rules for a number ofaccess control options. Access control options allow you to specify which sources are author-ized to perform particular functions on your BIND server. For example, the options statementin Listing 11-8 contains the access control substatement.
allow-query { trusted; };
This substatement specifies which hosts or networks can perform ordinary DNS queriesusing this BIND server. This is important for a couple of reasons. First, it prevents your DNSserver from being used for resolution by anyone except the users you want. You want to providecaching and resolution to internal users only. Second, it reduces the risk your BIND server will beused for malicious purposes, for example, as a traffic multiplier in a DoS attack. In Listing 11-8 theallow-query access control option is configured to use an acl defined earlier: trusted. This allowsonly trusted local clients to query the server. All other query requests from sources not listed inthe trusted acl will be denied. This is the recommended approach for controlling who can queryyour BIND server.
The access control options use the same address list match syntax as acl statements todefine the allowed sources. Thus, in each option you can specify individual hosts, networks,acl statements, or one of the keywords such as none or localnets described in the “AccessControl Lists” section.
Any options defined in the options statement are global rules for the BIND server andspecify the server’s default behavior. You can override many of these access control optionsindividually within zone or view statements to allow a greater granularity of access controls.I will cover how to do this in the “Views and Zones” section.
You can use a variety of other access control options (see Table 11-6).
Table 11-6. Option Statement Access Controls
Control Description
allow-notify Sources allowed to notify a slave server of zone changes. This is relevant onlyon a slave server.
allow-query Sources that can perform DNS queries on this server.
allow-recursion Sources allowed to make recursive queries through this server.
allow-transfer Sources allowed to receive zone transfers from the server.
blackhole Sources that the server will not use for queries or query resolution.
Let’s look at several of these access controls. I have already discussed the allow-query accesscontrol, which provides control over who can query the BIND server. The allow-recursion
4444c11_final.qxd 1/5/05 1:04 AM Page 487
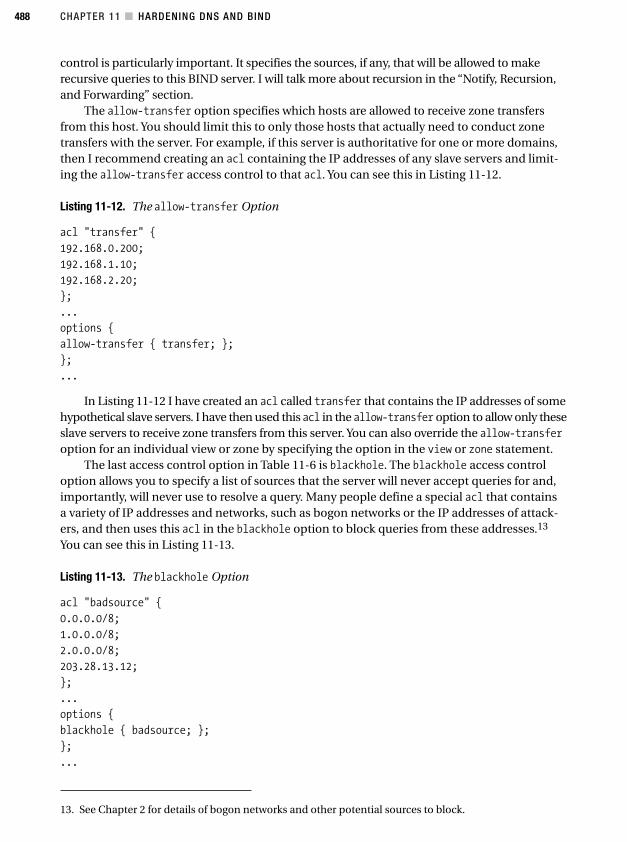
CHAPTER 11 ■ HARDENING DNS AND BIND488
control is particularly important. It specifies the sources, if any, that will be allowed to makerecursive queries to this BIND server. I will talk more about recursion in the “Notify, Recursion,and Forwarding” section.
The allow-transfer option specifies which hosts are allowed to receive zone transfersfrom this host. You should limit this to only those hosts that actually need to conduct zonetransfers with the server. For example, if this server is authoritative for one or more domains,then I recommend creating an acl containing the IP addresses of any slave servers and limit-ing the allow-transfer access control to that acl. You can see this in Listing 11-12.
Listing 11-12. The allow-transfer Option
acl "transfer" {
192.168.0.200;
192.168.1.10;
192.168.2.20;
};
...
options {
allow-transfer { transfer; };
};
...
In Listing 11-12 I have created an acl called transfer that contains the IP addresses of somehypothetical slave servers. I have then used this acl in the allow-transfer option to allow only theseslave servers to receive zone transfers from this server. You can also override the allow-transferoption for an individual view or zone by specifying the option in the view or zone statement.
The last access control option in Table 11-6 is blackhole. The blackhole access controloption allows you to specify a list of sources that the server will never accept queries for and,importantly, will never use to resolve a query. Many people define a special acl that containsa variety of IP addresses and networks, such as bogon networks or the IP addresses of attack-ers, and then uses this acl in the blackhole option to block queries from these addresses.13
You can see this in Listing 11-13.
Listing 11-13. The blackhole Option
acl "badsource" {
0.0.0.0/8;
1.0.0.0/8;
2.0.0.0/8;
203.28.13.12;
};
...
options {
blackhole { badsource; };
};
...
13. See Chapter 2 for details of bogon networks and other potential sources to block.
4444c11_final.qxd 1/5/05 1:04 AM Page 488
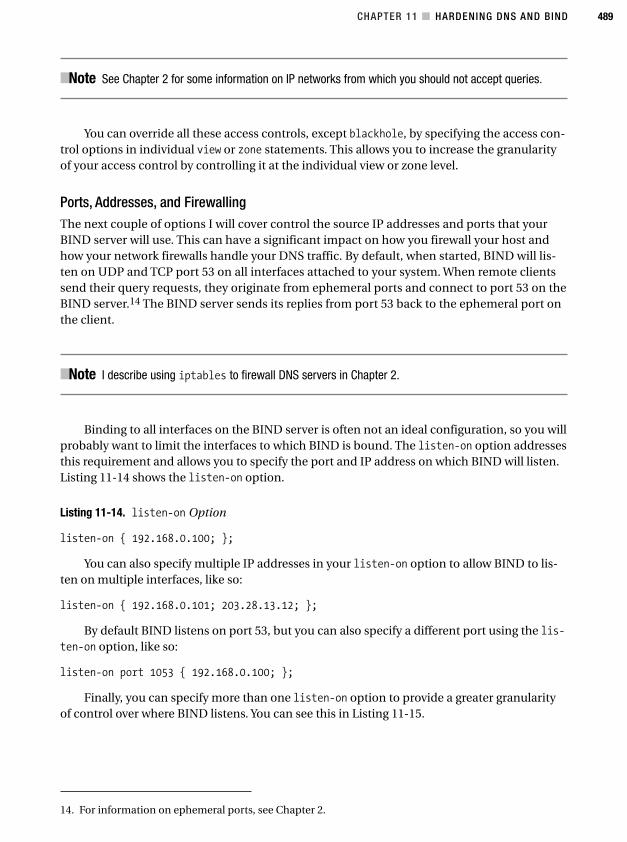
CHAPTER 11 ■ HARDENING DNS AND BIND 489
■Note See Chapter 2 for some information on IP networks from which you should not accept queries.
You can override all these access controls, except blackhole, by specifying the access con-trol options in individual view or zone statements. This allows you to increase the granularityof your access control by controlling it at the individual view or zone level.
Ports, Addresses, and FirewallingThe next couple of options I will cover control the source IP addresses and ports that yourBIND server will use. This can have a significant impact on how you firewall your host andhow your network firewalls handle your DNS traffic. By default, when started, BIND will lis-ten on UDP and TCP port 53 on all interfaces attached to your system. When remote clientssend their query requests, they originate from ephemeral ports and connect to port 53 on theBIND server.14 The BIND server sends its replies from port 53 back to the ephemeral port onthe client.
■Note I describe using iptables to firewall DNS servers in Chapter 2.
Binding to all interfaces on the BIND server is often not an ideal configuration, so you willprobably want to limit the interfaces to which BIND is bound. The listen-on option addressesthis requirement and allows you to specify the port and IP address on which BIND will listen.Listing 11-14 shows the listen-on option.
Listing 11-14. listen-on Option
listen-on { 192.168.0.100; };
You can also specify multiple IP addresses in your listen-on option to allow BIND to lis-ten on multiple interfaces, like so:
listen-on { 192.168.0.101; 203.28.13.12; };
By default BIND listens on port 53, but you can also specify a different port using the lis-ten-on option, like so:
listen-on port 1053 { 192.168.0.100; };
Finally, you can specify more than one listen-on option to provide a greater granularityof control over where BIND listens. You can see this in Listing 11-15.
14. For information on ephemeral ports, see Chapter 2.
4444c11_final.qxd 1/5/05 1:04 AM Page 489
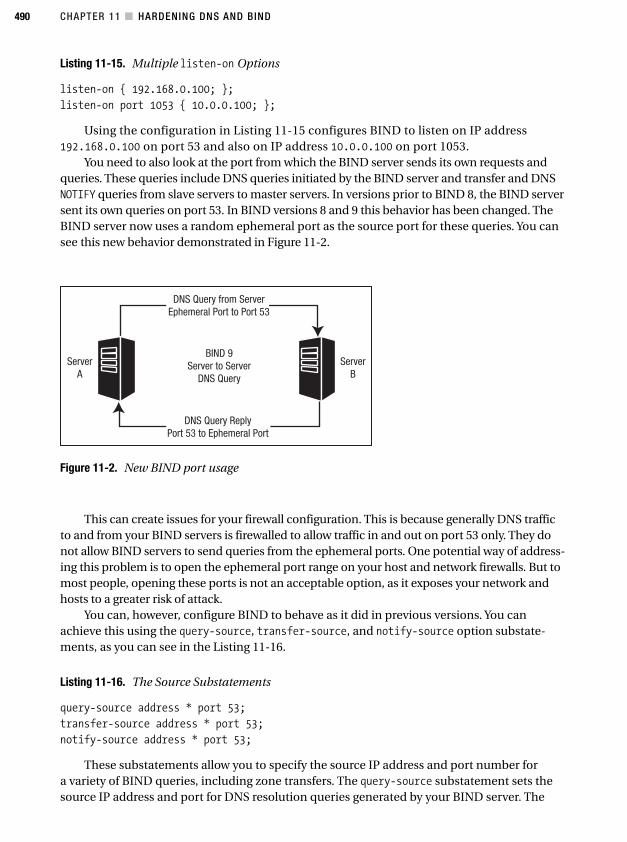
CHAPTER 11 ■ HARDENING DNS AND BIND490
Figure 11-2. New BIND port usage
Listing 11-15. Multiple listen-on Options
listen-on { 192.168.0.100; };
listen-on port 1053 { 10.0.0.100; };
Using the configuration in Listing 11-15 configures BIND to listen on IP address192.168.0.100 on port 53 and also on IP address 10.0.0.100 on port 1053.
You need to also look at the port from which the BIND server sends its own requests andqueries. These queries include DNS queries initiated by the BIND server and transfer and DNSNOTIFY queries from slave servers to master servers. In versions prior to BIND 8, the BIND serversent its own queries on port 53. In BIND versions 8 and 9 this behavior has been changed. TheBIND server now uses a random ephemeral port as the source port for these queries. You cansee this new behavior demonstrated in Figure 11-2.
This can create issues for your firewall configuration. This is because generally DNS trafficto and from your BIND servers is firewalled to allow traffic in and out on port 53 only. They donot allow BIND servers to send queries from the ephemeral ports. One potential way of address-ing this problem is to open the ephemeral port range on your host and network firewalls. But tomost people, opening these ports is not an acceptable option, as it exposes your network andhosts to a greater risk of attack.
You can, however, configure BIND to behave as it did in previous versions. You canachieve this using the query-source, transfer-source, and notify-source option substate-ments, as you can see in the Listing 11-16.
Listing 11-16. The Source Substatements
query-source address * port 53;
transfer-source address * port 53;
notify-source address * port 53;
These substatements allow you to specify the source IP address and port number fora variety of BIND queries, including zone transfers. The query-source substatement sets thesource IP address and port for DNS resolution queries generated by your BIND server. The
4444c11_final.qxd 1/5/05 1:04 AM Page 490
CHAPTER 11 ■ HARDENING DNS AND BIND 491
15. See the article at http://sysadmin.oreilly.com/news/views_0501.html to learn why this could beuseful.
16. See RFC 1996 for details of the DNS NOTIFY function (http://www.ietf.org/rfc/rfc1996.txt).
transfer-source substatement controls the source IP address and port used for zone transfersand refresh queries. The notify-source substatement defines the source IP address and portused for DNS NOTIFY queries.
All these substatements are identical in syntax and have two options: address, whichallows you to specify the source IP address, and port, which allows you to specify the source port.For either you can specify a wildcard using the * symbol. In each substatement in Listing 11-16I have specified a source address of *, which indicates that BIND can send from all local net-work interfaces. For each substatement I have also specified a source port of 53, which indi-cates that BIND will only send queries from port 53. Setting the source substatements as I havein Listing 11-16 will change its behavior back to that of previous BIND releases where queriesare sent from port 53.
■Caution The specification of a fixed port applies only to UDP traffic. Any TCP traffic will still use anephemeral port.
You can also limit the source IP address by specifying a particular IP address, like so:
query-source address 192.168.0.100 port *;
I have also specified a wildcard * as the source port in the query-source substatement.This tells the BIND server to use its new default behavior and to send DNS queries from theephemeral ports.
You can also use the transfer-source and notify-source substatements in your zonestatements. Using either of these substatements in a zone statement will override the valuesin the options statement. This allows you to specify a particular query or transfer query sourcefor an individual zone.15
■Tip I recommend you revert to the previous behavior for your BIND server, as it makes securing yourhosts and networks with firewalls considerably easier.
Notify, Recursion, and ForwardingYou can specify some additional configurations settings in the options statement that canbe useful when configuring your BIND server. The first option is the notify option. Thiscontrols whether BIND will send DNS NOTIFY messages to slave servers to notify them whenzones change.16 When the zone changes, the master server will send the NOTIFY messages toall the name servers, except the master server, listed in each zone. When the slave servers
4444c11_final.qxd 1/5/05 1:04 AM Page 491
CHAPTER 11 ■ HARDENING DNS AND BIND492
receive the NOTIFY messages, they are prompted to check the master server to ensure theyhave the most recent version of the zone. If there is an update to the zone, then the slaveservers will initiate a zone transfer. The notify option can also be set in individual zonestatements to override the value of the option set in the options statement.
The notify option is set to yes by default. You can also specify two other settings for thisoption: no, which stops the sending of the NOTIFY messages, and explicit, which is used withanother option, also-notify. The also-notify option allows you to specify additional servers,other than the name servers defined in your zones, that you can use to receive NOTIFY mes-sages when zones change. You can specify this option in the options statement like this:
notify explicit;
also-notify { 192.168.1.10; 192.168.2.10; };
You can override the also-notify option in the options statement by placing the optionindividually in a zone statement. This allows you to specify additional slave servers to be sentNOTIFY messages on an individual zone basis.
This option is further supplemented by the allow-notify access control option. On a slaveserver this allows you to specify the addresses of all the servers that are authorized to send thisslave server NOTIFY messages. You can specify it like this:
allow-notify { 192.168.1.100; };
The allow-notify option on the previous line configures the server to accept NOTIFYmessages with a source address of 192.168.1.100 only.
The next option I will cover is the recursion option. This option controls whether the BINDserver will allow recursion. Recursion is the process that occurs when a DNS server receives aquery for a domain for which it is not authoritative. To provide an answer to this query, the DNSserver must query other DNS servers for the answer. This is called a recursive query.
For example, the BIND server kitten.yourdomainc.com is authoritative for the domain your-domain.com but not for the domain anotherdomain.com. If a client queries the kitten server aboutthe yourdomain.com domain, they will receive an answer because the kitten server is authorita-tive for that domain. If the client then queries the kitten server about the anotherdomain.comdomain and recursion is disabled, then the query will fail. This is because kitten is not authori-tative for that domain and, with recursion disabled, is not allowed to ask other DNS servers foran answer. If recursion was enabled, then the kitten server would attempt to provide an answerto the query by querying its cache or other DNS servers.
By default, the recursion option is set to yes like this:
recursion yes;
The recursion option is linked to the allow-recursion access control option. Using thisoption you can specify which of your clients is allowed to recursively query the server. Onlyyour trusted internal clients should be allowed to make recursive queries. You do not want toprovide answers to recursive queries to external sources. This is to prevent your bandwidthand resources from being used by unauthorized people and to reduce the exposure of yourBIND server to a potential attack.
One method of allowing controlled recursion is to define an acl for your trusted hosts ornetworks and specify this acl in your allow-recursion option. Listing 11-17 demonstrates thismethod.
4444c11_final.qxd 1/5/05 1:04 AM Page 492
CHAPTER 11 ■ HARDENING DNS AND BIND 493
Listing 11-17. Controlling the Recursion Option
acl "trusted" {
192.168.0.0/24;
192.168.1.0/24;
};
...
options {
recursion yes;
allow-recursion { trusted; };
};
...
In Listing 11-17 only the 192.168.0.0/24 and the 192.168.1.0/24 networks are able torecursively query the server.
Lastly, I will cover the forward and forwarders options. These options allow you to configurea BIND server to forward all or some queries to another DNS server for resolution. The forwardersoptions allow you to specify a list of DNS servers for queries to be forwarded to, like this:
forwarders { 192.168.1.110; };
In the previous line I have configured BIND to forward all queries to the DNS server at192.168.1.110. You can also specify forwarding to a particular port on an IP address like this:
forwarders { 192.168.0.100 1053; };
In the previous line I have configured BIND to forward all queries to the DNS server at IPaddress 192.168.0.100 and to port 1053.
The forward option modifies the behavior of the forwarders option. It has two settings,only and first. When the forward option is set to only, then the BIND server will forward allqueries to the designated forwarders. If set to first, then queries will be forwarded; how-ever, if the forwarder is unable to answer the query, then the BIND server will then attemptto answer the query itself. The default setting for this option is first.
You can override both of these global options by using them in individual zone statements.
■Note I recommend you review the BIND Administrator’s Reference Manual available at http://www.bind9.net/Bv9ARM.html for full details of all the options available in the options statement.
Views and ZonesIn this section I will briefly cover the view and zone statements and how they are constructed.This is by no means a definitive explanation of these statements; I recommend you do furtherresearch and study to ensure you fully understand how both statement types work and howthey can impact your DNS configuration and design.
4444c11_final.qxd 1/5/05 1:04 AM Page 493
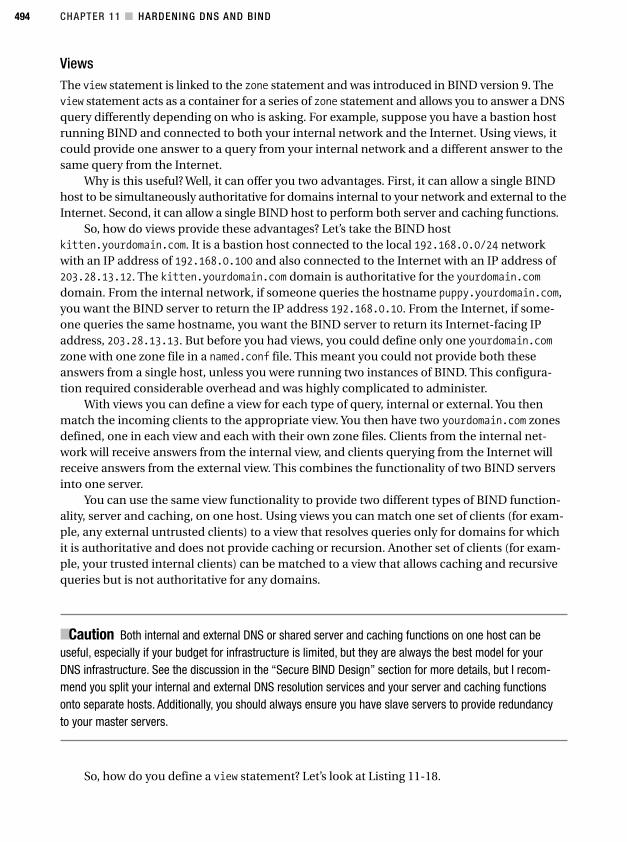
CHAPTER 11 ■ HARDENING DNS AND BIND494
ViewsThe view statement is linked to the zone statement and was introduced in BIND version 9. Theview statement acts as a container for a series of zone statement and allows you to answer a DNSquery differently depending on who is asking. For example, suppose you have a bastion hostrunning BIND and connected to both your internal network and the Internet. Using views, itcould provide one answer to a query from your internal network and a different answer to thesame query from the Internet.
Why is this useful? Well, it can offer you two advantages. First, it can allow a single BINDhost to be simultaneously authoritative for domains internal to your network and external to theInternet. Second, it can allow a single BIND host to perform both server and caching functions.
So, how do views provide these advantages? Let’s take the BIND hostkitten.yourdomain.com. It is a bastion host connected to the local 192.168.0.0/24 networkwith an IP address of 192.168.0.100 and also connected to the Internet with an IP address of203.28.13.12. The kitten.yourdomain.com domain is authoritative for the yourdomain.comdomain. From the internal network, if someone queries the hostname puppy.yourdomain.com,you want the BIND server to return the IP address 192.168.0.10. From the Internet, if some-one queries the same hostname, you want the BIND server to return its Internet-facing IPaddress, 203.28.13.13. But before you had views, you could define only one yourdomain.comzone with one zone file in a named.conf file. This meant you could not provide both theseanswers from a single host, unless you were running two instances of BIND. This configura-tion required considerable overhead and was highly complicated to administer.
With views you can define a view for each type of query, internal or external. You thenmatch the incoming clients to the appropriate view. You then have two yourdomain.com zonesdefined, one in each view and each with their own zone files. Clients from the internal net-work will receive answers from the internal view, and clients querying from the Internet willreceive answers from the external view. This combines the functionality of two BIND serversinto one server.
You can use the same view functionality to provide two different types of BIND function-ality, server and caching, on one host. Using views you can match one set of clients (for exam-ple, any external untrusted clients) to a view that resolves queries only for domains for whichit is authoritative and does not provide caching or recursion. Another set of clients (for exam-ple, your trusted internal clients) can be matched to a view that allows caching and recursivequeries but is not authoritative for any domains.
■Caution Both internal and external DNS or shared server and caching functions on one host can beuseful, especially if your budget for infrastructure is limited, but they are always the best model for yourDNS infrastructure. See the discussion in the “Secure BIND Design” section for more details, but I recom-mend you split your internal and external DNS resolution services and your server and caching functionsonto separate hosts. Additionally, you should always ensure you have slave servers to provide redundancyto your master servers.
So, how do you define a view statement? Let’s look at Listing 11-18.
4444c11_final.qxd 1/5/05 1:04 AM Page 494
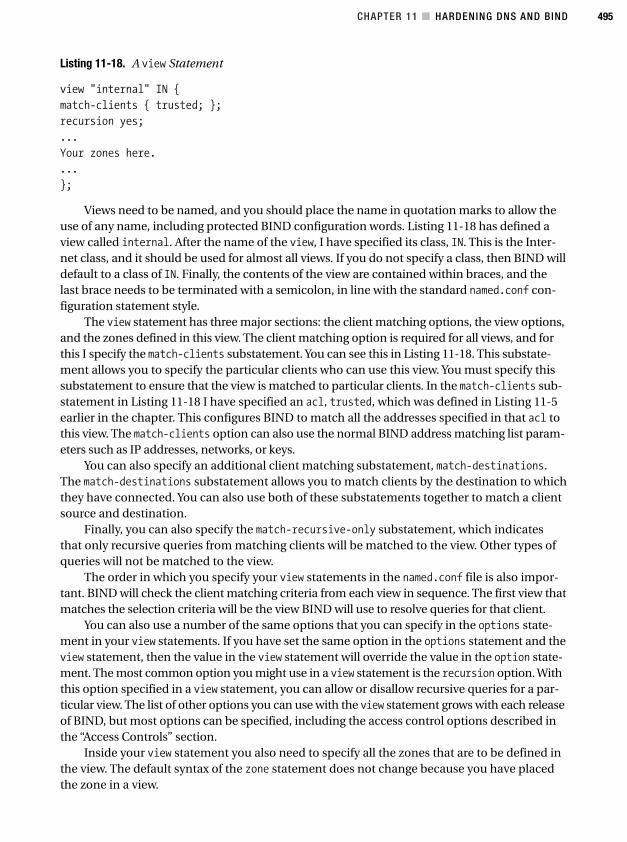
CHAPTER 11 ■ HARDENING DNS AND BIND 495
Listing 11-18. A view Statement
view "internal" IN {
match-clients { trusted; };
recursion yes;
...
Your zones here.
...
};
Views need to be named, and you should place the name in quotation marks to allow theuse of any name, including protected BIND configuration words. Listing 11-18 has defined aview called internal. After the name of the view, I have specified its class, IN. This is the Inter-net class, and it should be used for almost all views. If you do not specify a class, then BIND willdefault to a class of IN. Finally, the contents of the view are contained within braces, and thelast brace needs to be terminated with a semicolon, in line with the standard named.conf con-figuration statement style.
The view statement has three major sections: the client matching options, the view options,and the zones defined in this view. The client matching option is required for all views, and forthis I specify the match-clients substatement. You can see this in Listing 11-18. This substate-ment allows you to specify the particular clients who can use this view. You must specify thissubstatement to ensure that the view is matched to particular clients. In the match-clients sub-statement in Listing 11-18 I have specified an acl, trusted, which was defined in Listing 11-5earlier in the chapter. This configures BIND to match all the addresses specified in that acl tothis view. The match-clients option can also use the normal BIND address matching list param-eters such as IP addresses, networks, or keys.
You can also specify an additional client matching substatement, match-destinations.The match-destinations substatement allows you to match clients by the destination to whichthey have connected. You can also use both of these substatements together to match a clientsource and destination.
Finally, you can also specify the match-recursive-only substatement, which indicatesthat only recursive queries from matching clients will be matched to the view. Other types ofqueries will not be matched to the view.
The order in which you specify your view statements in the named.conf file is also impor-tant. BIND will check the client matching criteria from each view in sequence. The first view thatmatches the selection criteria will be the view BIND will use to resolve queries for that client.
You can also use a number of the same options that you can specify in the options state-ment in your view statements. If you have set the same option in the options statement and theview statement, then the value in the view statement will override the value in the option state-ment. The most common option you might use in a view statement is the recursion option. Withthis option specified in a view statement, you can allow or disallow recursive queries for a par-ticular view. The list of other options you can use with the view statement grows with each releaseof BIND, but most options can be specified, including the access control options described inthe “Access Controls” section.
Inside your view statement you also need to specify all the zones that are to be defined inthe view. The default syntax of the zone statement does not change because you have placedthe zone in a view.
4444c11_final.qxd 1/5/05 1:04 AM Page 495
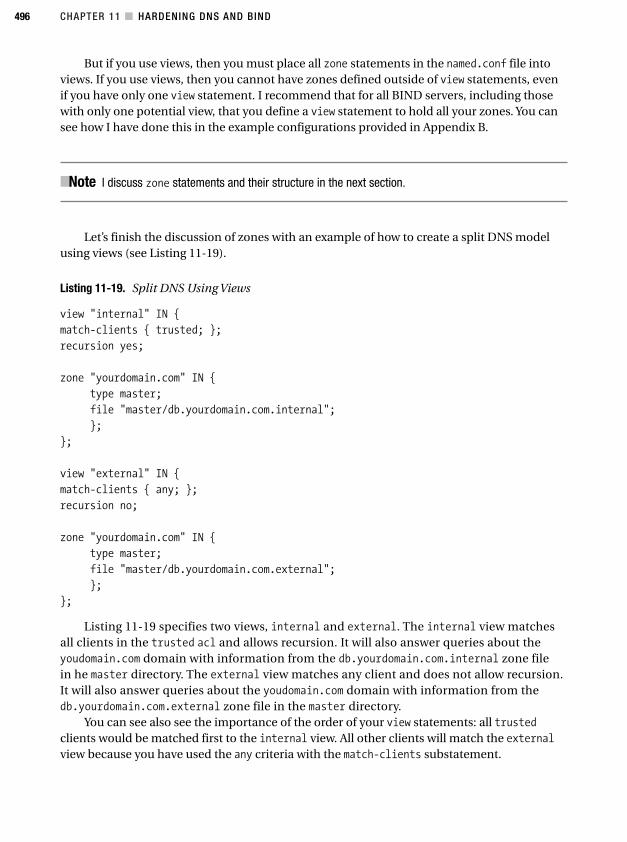
CHAPTER 11 ■ HARDENING DNS AND BIND496
But if you use views, then you must place all zone statements in the named.conf file intoviews. If you use views, then you cannot have zones defined outside of view statements, evenif you have only one view statement. I recommend that for all BIND servers, including thosewith only one potential view, that you define a view statement to hold all your zones. You cansee how I have done this in the example configurations provided in Appendix B.
■Note I discuss zone statements and their structure in the next section.
Let’s finish the discussion of zones with an example of how to create a split DNS modelusing views (see Listing 11-19).
Listing 11-19. Split DNS Using Views
view "internal" IN {
match-clients { trusted; };
recursion yes;
zone "yourdomain.com" IN {
type master;
file "master/db.yourdomain.com.internal";
};
};
view "external" IN {
match-clients { any; };
recursion no;
zone "yourdomain.com" IN {
type master;
file "master/db.yourdomain.com.external";
};
};
Listing 11-19 specifies two views, internal and external. The internal view matchesall clients in the trusted acl and allows recursion. It will also answer queries about theyoudomain.com domain with information from the db.yourdomain.com.internal zone filein he master directory. The external view matches any client and does not allow recursion.It will also answer queries about the youdomain.com domain with information from thedb.yourdomain.com.external zone file in the master directory.
You can see also see the importance of the order of your view statements: all trustedclients would be matched first to the internal view. All other clients will match the externalview because you have used the any criteria with the match-clients substatement.
4444c11_final.qxd 1/5/05 1:04 AM Page 496
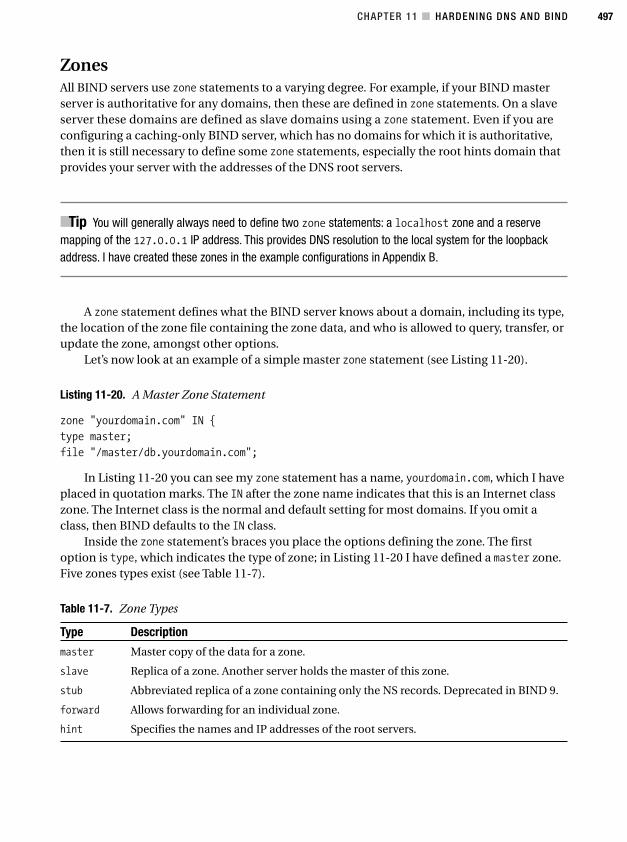
CHAPTER 11 ■ HARDENING DNS AND BIND 497
ZonesAll BIND servers use zone statements to a varying degree. For example, if your BIND masterserver is authoritative for any domains, then these are defined in zone statements. On a slaveserver these domains are defined as slave domains using a zone statement. Even if you areconfiguring a caching-only BIND server, which has no domains for which it is authoritative,then it is still necessary to define some zone statements, especially the root hints domain thatprovides your server with the addresses of the DNS root servers.
■Tip You will generally always need to define two zone statements: a localhost zone and a reservemapping of the 127.0.0.1 IP address. This provides DNS resolution to the local system for the loopbackaddress. I have created these zones in the example configurations in Appendix B.
A zone statement defines what the BIND server knows about a domain, including its type,the location of the zone file containing the zone data, and who is allowed to query, transfer, orupdate the zone, amongst other options.
Let’s now look at an example of a simple master zone statement (see Listing 11-20).
Listing 11-20. A Master Zone Statement
zone "yourdomain.com" IN {
type master;
file "/master/db.yourdomain.com";
In Listing 11-20 you can see my zone statement has a name, yourdomain.com, which I haveplaced in quotation marks. The IN after the zone name indicates that this is an Internet classzone. The Internet class is the normal and default setting for most domains. If you omit aclass, then BIND defaults to the IN class.
Inside the zone statement’s braces you place the options defining the zone. The firstoption is type, which indicates the type of zone; in Listing 11-20 I have defined a master zone.Five zones types exist (see Table 11-7).
Table 11-7. Zone Types
Type Description
master Master copy of the data for a zone.
slave Replica of a zone. Another server holds the master of this zone.
stub Abbreviated replica of a zone containing only the NS records. Deprecated in BIND 9.
forward Allows forwarding for an individual zone.
hint Specifies the names and IP addresses of the root servers.
4444c11_final.qxd 1/5/05 1:04 AM Page 497
CHAPTER 11 ■ HARDENING DNS AND BIND498
Master zones are the master copy of zone data for a domain and provide authoritativeanswers to queries for that domain. To define a master zone, you must define at least the typeand file options. If either of these is omitted, the zone will not load.
A slave zone is a replica of a master zone. You define a slave zone on a secondary or slaveDNS server. The slave server connects to the master server and transfers the zone’s data eitherwhen prompted by a DNS NOTIFY message or on a regular schedule. You define the master DNSservers for each slave zone in the zone definition like this:
zone "yourdomain.com" IN {
type slave;
file "/slave/db.yourdomain.com";
masters { 192.168.0.100; };
The masters option allows you to specify the IP address of DNS server that holds the mas-ter zone for a domain. The slave zone will use this IP address to retrieve the zone data. You canspecify multiple IP addresses in this option and particular port numbers, as you can see inListing 11-21.
Listing 11-21. Multiple Master Servers
masters { 192.168.0.100; 192.168.1.100 1053; };
In Listing 11-21 I have specified two master servers, 192.168.0.100 and 192.168.1.100.I have also configured the slave server to connect to the master server at 192.168.1.100 onport 1053 instead of the normal port 53. To define a functional slave zone, you must defineat least the type, file, and masters options. If any of these is omitted, the zone will not load.
A stub type zone is like a slave zone but contains only a subset of the data of the masterzone. In this case it contains only the NS, or name server, records for the zone. Unless you havepreviously used stub zones in BIND 4 or 8, then you will probably not use them with BIND 9,and support is now limited for them.
A forward zone allows you to specify the forwarding of DNS queries on an individualdomain basis. With a forward zone, you can specify a forwarder or forwarders for a particulardomain. For example, all queries for the yetanotherdomain.com domain could be forwarded tothe DNS server 192.168.1.110 like this:
zone "yetanotherdomain.com" {
type forward;
forwarders { 192.168.1.110; };
};
You can include multiple forwarders in your forwarders substatement. Additionally, likethe masters option, you can specify a particular port on the IP address of the forwarder.
■Note See the “Notify, Recursion, and Forwarding” section for additional information on forwarding.
The last domain type, hint, is used for hint zones that define the initial set of root serversthat BIND will use in resolving queries. The root servers provide “seed data” sources to your
4444c11_final.qxd 1/5/05 1:04 AM Page 498
CHAPTER 11 ■ HARDENING DNS AND BIND 499
17. You will find a brief but comprehensive presentation on root servers at http://www.root-servers.org/presentations/rootops-gac-rio.pdf.
DNS server to help initiate resolution. These root servers provide an entry point into the DNS“cloud” and point your DNS servers to other DNS servers that may be able to resolve queries.17
A hint zone is always required for a caching BIND server that resolves recursive queries forclients. It is not required for a BIND server that is simply authoritative for a domain or domains.You can specify a hint zone like this:
zone "." {
type hint;
file "db.hint";
};
The name for a hint zone is always an ending punctuation mark, and the zone type is hint.If you need to define a hint zone, then I recommend you place this zone statement before allyour other zone statements in the named.conf file.
The next option in Listing 11-20 is the file option. This option defines the location of thezone file that contains the zone data. Several types of zone statements, such as master, slave,and stub, require that a zone file option be defined. I will not discuss the contents of zone files,as this is a much broader topic than the scope of this chapter allows. It is important to remem-ber that if your BIND daemon is in a chroot jail, then these files are defined relative to the rootdirectory of the chroot jail. I also recommend you distinctly name your zone data files so as tomake their contents readily identifiable. I tend to use a naming convention like the following:
db.domainname.tld.suffix
replacing domainname.tld with the domain name (for example, yourdomain.com) and suffixwith the suffix.
■Note For references to information on building zone files, see the “Resources” section at the end of thechapter.
THE HINT ZONE
The content of the hint zone data file includes the names and IP addresses of the root DNS servers.These addresses change occasionally, so you should ensure you have a regular process to update thisfile. For example, you could redirect the output of a dig command to the hints zone data file like this:
kitten# dig @l.root-servers.net . ns > /chroot/named/master/db.hint
You can also download this data (if you trust the source) from a variety of FTP servers and Web sites. ManyDNS administrators write scripts and automate this process with cron.
4444c11_final.qxd 1/5/05 1:04 AM Page 499
CHAPTER 11 ■ HARDENING DNS AND BIND500
18. http://www.nominum.com/content/documents/bind9arm.pdf
19. TSIG is defined by RFC 2845 (http://www.faqs.org/rfcs/rfc2845.html).
Each zone statement can also contain a number of options, including many of the optionsthat can be defined in the options statement. If you specify an option in the zone statementthat is also set in the options statement, then the zone statement option will override theoptions statement option for that zone.
Table 11-8 lists some of the key options available to the zone statement. I explained almostall these options earlier in the chapter, in a variety of different sections; where I have done this,I have referred to those sections in the table. You can read about the additional options notlisted in Table 11-8 in the BIND Administrator Reference Manual.18
Table 11-8. A Selection of Zone Statement Options
Option Description
allow-notify See the description in the “Notify, Recursion, and Forwarding” section.
allow-query See the description in the “Access Controls” section.
allow-transfer See the description in the “Access Controls” section.
notify See the description in the “Notify, Recursion, and Forwarding” section.
also-notify See the description in the “Notify, Recursion, and Forwarding” section.
masters Species the master DNS servers for a slave zone.
forward See the description in the “Notify, Recursion, and Forwarding” section.
forwarders See the description in the “Notify, Recursion, and Forwarding” section.
transfer-source See the description in the “Ports, Addresses, and Firewalling” section.
notify-source See the description in the “Ports, Addresses, and Firewalling” section.
allow-update Specifies who is allowed to dynamically update master zones.
update-policy Specifies policy for Dynamic DNS updates.
■Note One of the areas I have not covered is the dynamic update of DNS data. This is disabled by defaultbut can be controlled with the allow-update and update-policy access control options. See http://www.bind9.net/Bv9ARM.ch04.html#dynamic_update and http://www.bind9.net/Bv9ARM.ch07.html#dynamic_update_security for more details on dynamic updates.
TSIGTransaction signatures (TSIG) provide a mechanism for verifying the identity of the DNSservers with which you are communicating.19 Before TSIG was available, the only methodavailable to determine if information from a particular DNS server was authentic was via IPaddress verification. Unfortunately, IP addresses are easily spoofed and do not generally pro-vide adequate certainty of a server’s identity. TSIG adds cryptographic signatures to DNS
4444c11_final.qxd 1/5/05 1:04 AM Page 500
CHAPTER 11 ■ HARDENING DNS AND BIND 501
20. Much like the digital signatures you looked at in Chapter 8
transactions to authenticate those transactions. This signature acts as a shared secret betweenthe servers that are communicating. TSIG is most commonly used to authenticate zone trans-fers between primary and secondary DNS servers but can also be used to secure queries,responses, and dynamic updates.
■Caution TSIG will not work for transfers between BIND servers and Microsoft DNS servers. MicrosoftDNS supports a variation of GSS-TSIG only, which is a Microsoft-proprietary implementation of secure DNSupdates. It uses a different algorithm and is not compatible with TSIG.
TSIG works by signing each DNS transaction between two servers. The transaction is signedby adding a TSIG record to the DNS transaction. The TSIG record is created by hashing the con-tents of the DNS transaction with a key.20 This key is identical on both servers and represents theshared secret between the two servers. The sending server hashes the DNS transaction with thekey. It then sends the DNS transaction and the TSIG record to the receiving server. The receivingserver verifies, using its copy of the key, that the hash is valid. If it is valid, then the receiving serveraccepts the DNS transaction.
Let’s first look at an example of using TSIG. Say you have two servers, kitten.yourdomain.comwith the IP address 192.168.0.2 and puppy.yourdomain.com with the IP address 192.168.0.1. Youwill secure zone transfers between the two servers using TSIG.
The first step in doing this is to create a key that both servers will use. You can do this oneither server using the dnssec-keygen command. This command is provided with the BINDdistribution and allows you to generate keys for TSIG (and also for DNSSEC, which is wherethe name of the command comes from), as you can see in Listing 11-22.
Listing 11-22. The dnssec-keygen Command
kitten# dnssec-keygen -a HMAC-MD5 -b 512 -n HOST kitten_puppy.yourdomain.com
Let’s break down this command. The first option in the command, -a, allows you to spec-ify the algorithm to be used to generate the key. I have specified HMAC-MD5, which is the onlyalgorithm you can use for your TSIG keys. The -b option specifies the length of the key in bits.I have used the highest possible value, 512. I recommend you do the same. The -n option tellsthe dnssec-keygen command what type of key you want to generate, and I have specified HOST,which is the only appropriate type of key for TSIG transactions. Lastly I have called the key,kitten_puppy.yourdomain.com, making clear its purpose as the shared secret between thesetwo servers. I recommend naming all your keys in a similar manner.
The command in Listing 11-22 created two files:Kkitten_puppy.yourdomain.com.+157+45723.key andKkitten_puppy.yourdomain.com.+157+45723.private. The filenames are structured like this:
Kname_of_key.+algorithm_number+random_key_id.suffix
They have a key name of kitten_puppy.yourdomain.com and an algorithm number of157, which indicates the algorithm HMAC-MD5. You can ignore the random key identifier. The
4444c11_final.qxd 1/5/05 1:04 AM Page 501
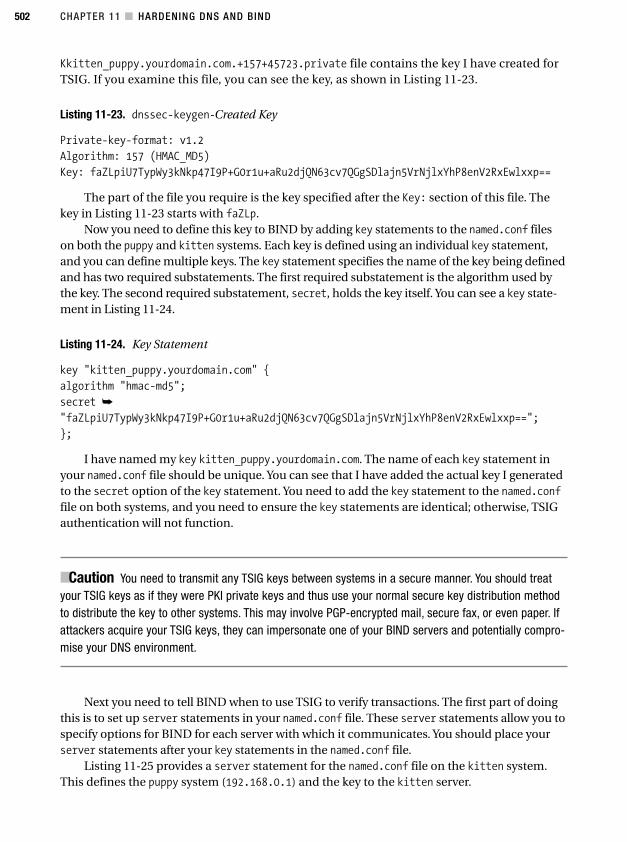
CHAPTER 11 ■ HARDENING DNS AND BIND502
Kkitten_puppy.yourdomain.com.+157+45723.private file contains the key I have created forTSIG. If you examine this file, you can see the key, as shown in Listing 11-23.
Listing 11-23. dnssec-keygen-Created Key
Private-key-format: v1.2
Algorithm: 157 (HMAC_MD5)
Key: faZLpiU7TypWy3kNkp47I9P+G0r1u+aRu2djQN63cv7QGgSDlajn5VrNjlxYhP8enV2RxEwlxxp==
The part of the file you require is the key specified after the Key: section of this file. Thekey in Listing 11-23 starts with faZLp.
Now you need to define this key to BIND by adding key statements to the named.conf fileson both the puppy and kitten systems. Each key is defined using an individual key statement,and you can define multiple keys. The key statement specifies the name of the key being definedand has two required substatements. The first required substatement is the algorithm used bythe key. The second required substatement, secret, holds the key itself. You can see a key state-ment in Listing 11-24.
Listing 11-24. Key Statement
key "kitten_puppy.yourdomain.com" {
algorithm "hmac-md5";
secret ➥
"faZLpiU7TypWy3kNkp47I9P+G0r1u+aRu2djQN63cv7QGgSDlajn5VrNjlxYhP8enV2RxEwlxxp==";
};
I have named my key kitten_puppy.yourdomain.com. The name of each key statement inyour named.conf file should be unique. You can see that I have added the actual key I generatedto the secret option of the key statement. You need to add the key statement to the named.conffile on both systems, and you need to ensure the key statements are identical; otherwise, TSIGauthentication will not function.
■Caution You need to transmit any TSIG keys between systems in a secure manner. You should treatyour TSIG keys as if they were PKI private keys and thus use your normal secure key distribution methodto distribute the key to other systems. This may involve PGP-encrypted mail, secure fax, or even paper. Ifattackers acquire your TSIG keys, they can impersonate one of your BIND servers and potentially compro-mise your DNS environment.
Next you need to tell BIND when to use TSIG to verify transactions. The first part of doingthis is to set up server statements in your named.conf file. These server statements allow you tospecify options for BIND for each server with which it communicates. You should place yourserver statements after your key statements in the named.conf file.
Listing 11-25 provides a server statement for the named.conf file on the kitten system.This defines the puppy system (192.168.0.1) and the key to the kitten server.
4444c11_final.qxd 1/5/05 1:04 AM Page 502
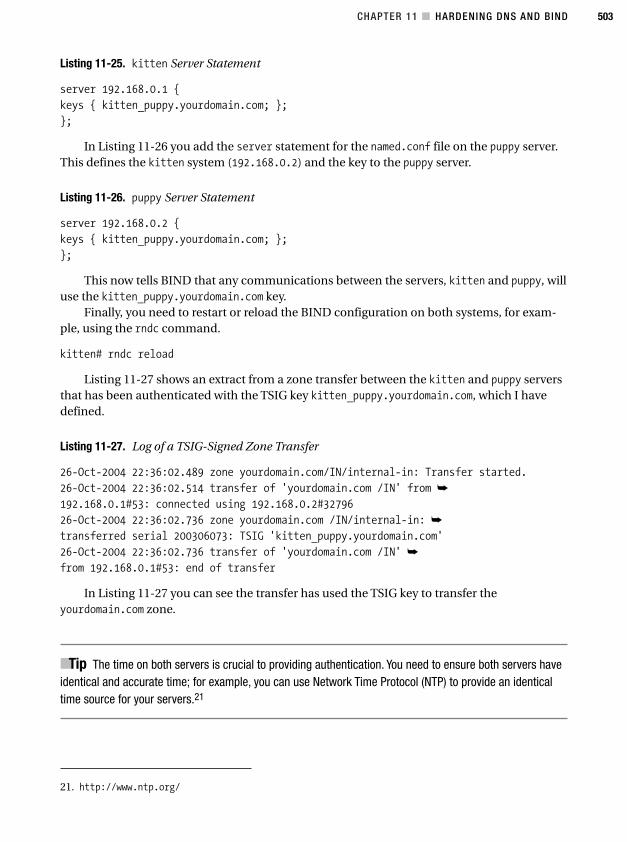
CHAPTER 11 ■ HARDENING DNS AND BIND 503
21. http://www.ntp.org/
Listing 11-25. kitten Server Statement
server 192.168.0.1 {
keys { kitten_puppy.yourdomain.com; };
};
In Listing 11-26 you add the server statement for the named.conf file on the puppy server.This defines the kitten system (192.168.0.2) and the key to the puppy server.
Listing 11-26. puppy Server Statement
server 192.168.0.2 {
keys { kitten_puppy.yourdomain.com; };
};
This now tells BIND that any communications between the servers, kitten and puppy, willuse the kitten_puppy.yourdomain.com key.
Finally, you need to restart or reload the BIND configuration on both systems, for exam-ple, using the rndc command.
kitten# rndc reload
Listing 11-27 shows an extract from a zone transfer between the kitten and puppy serversthat has been authenticated with the TSIG key kitten_puppy.yourdomain.com, which I havedefined.
Listing 11-27. Log of a TSIG-Signed Zone Transfer
26-Oct-2004 22:36:02.489 zone yourdomain.com/IN/internal-in: Transfer started.
26-Oct-2004 22:36:02.514 transfer of 'yourdomain.com /IN' from ➥
192.168.0.1#53: connected using 192.168.0.2#32796
26-Oct-2004 22:36:02.736 zone yourdomain.com /IN/internal-in: ➥
transferred serial 200306073: TSIG 'kitten_puppy.yourdomain.com'
26-Oct-2004 22:36:02.736 transfer of 'yourdomain.com /IN' ➥
from 192.168.0.1#53: end of transfer
In Listing 11-27 you can see the transfer has used the TSIG key to transfer theyourdomain.com zone.
■Tip The time on both servers is crucial to providing authentication. You need to ensure both servers haveidentical and accurate time; for example, you can use Network Time Protocol (NTP) to provide an identicaltime source for your servers.21
4444c11_final.qxd 1/5/05 1:04 AM Page 503
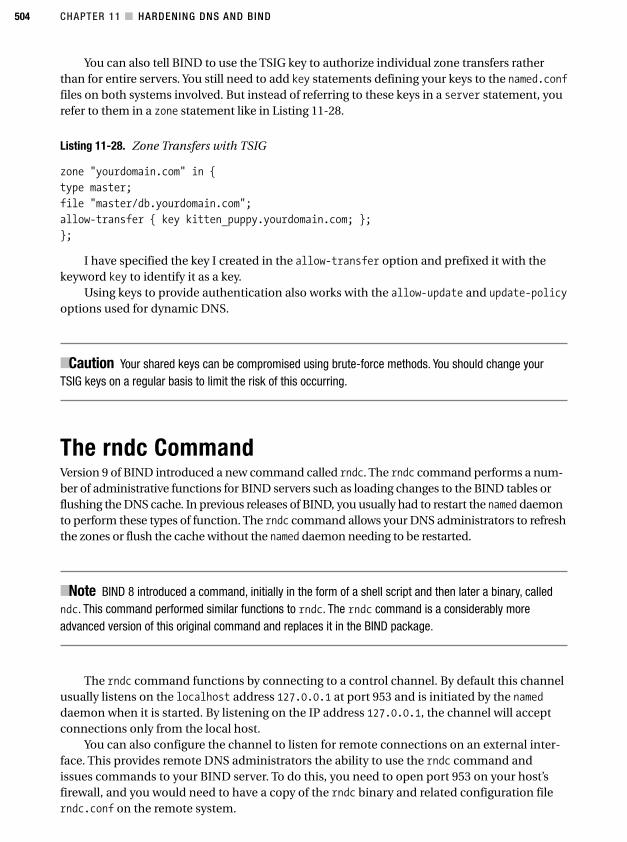
CHAPTER 11 ■ HARDENING DNS AND BIND504
You can also tell BIND to use the TSIG key to authorize individual zone transfers ratherthan for entire servers. You still need to add key statements defining your keys to the named.conffiles on both systems involved. But instead of referring to these keys in a server statement, yourefer to them in a zone statement like in Listing 11-28.
Listing 11-28. Zone Transfers with TSIG
zone "yourdomain.com" in {
type master;
file "master/db.yourdomain.com";
allow-transfer { key kitten_puppy.yourdomain.com; };
};
I have specified the key I created in the allow-transfer option and prefixed it with thekeyword key to identify it as a key.
Using keys to provide authentication also works with the allow-update and update-policyoptions used for dynamic DNS.
■Caution Your shared keys can be compromised using brute-force methods. You should change yourTSIG keys on a regular basis to limit the risk of this occurring.
The rndc CommandVersion 9 of BIND introduced a new command called rndc. The rndc command performs a num-ber of administrative functions for BIND servers such as loading changes to the BIND tables orflushing the DNS cache. In previous releases of BIND, you usually had to restart the named daemonto perform these types of function. The rndc command allows your DNS administrators to refreshthe zones or flush the cache without the named daemon needing to be restarted.
■Note BIND 8 introduced a command, initially in the form of a shell script and then later a binary, calledndc. This command performed similar functions to rndc. The rndc command is a considerably moreadvanced version of this original command and replaces it in the BIND package.
The rndc command functions by connecting to a control channel. By default this channelusually listens on the localhost address 127.0.0.1 at port 953 and is initiated by the nameddaemon when it is started. By listening on the IP address 127.0.0.1, the channel will acceptconnections only from the local host.
You can also configure the channel to listen for remote connections on an external inter-face. This provides remote DNS administrators the ability to use the rndc command andissues commands to your BIND server. To do this, you need to open port 953 on your host’sfirewall, and you would need to have a copy of the rndc binary and related configuration filerndc.conf on the remote system.
4444c11_final.qxd 1/5/05 1:04 AM Page 504
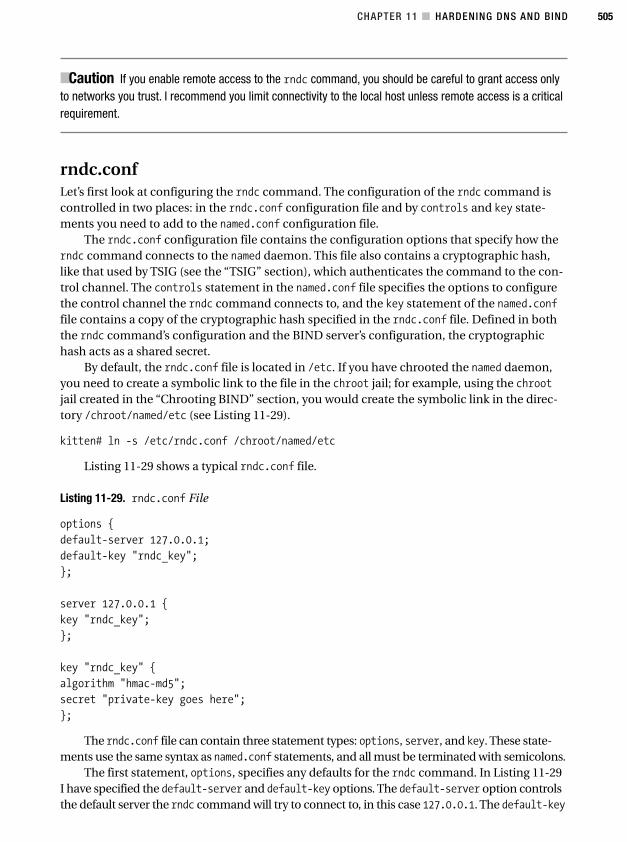
CHAPTER 11 ■ HARDENING DNS AND BIND 505
■Caution If you enable remote access to the rndc command, you should be careful to grant access onlyto networks you trust. I recommend you limit connectivity to the local host unless remote access is a criticalrequirement.
rndc.confLet’s first look at configuring the rndc command. The configuration of the rndc command iscontrolled in two places: in the rndc.conf configuration file and by controls and key state-ments you need to add to the named.conf configuration file.
The rndc.conf configuration file contains the configuration options that specify how therndc command connects to the named daemon. This file also contains a cryptographic hash,like that used by TSIG (see the “TSIG” section), which authenticates the command to the con-trol channel. The controls statement in the named.conf file specifies the options to configurethe control channel the rndc command connects to, and the key statement of the named.conffile contains a copy of the cryptographic hash specified in the rndc.conf file. Defined in boththe rndc command’s configuration and the BIND server’s configuration, the cryptographichash acts as a shared secret.
By default, the rndc.conf file is located in /etc. If you have chrooted the named daemon,you need to create a symbolic link to the file in the chroot jail; for example, using the chrootjail created in the “Chrooting BIND” section, you would create the symbolic link in the direc-tory /chroot/named/etc (see Listing 11-29).
kitten# ln -s /etc/rndc.conf /chroot/named/etc
Listing 11-29 shows a typical rndc.conf file.
Listing 11-29. rndc.conf File
options {
default-server 127.0.0.1;
default-key "rndc_key";
};
server 127.0.0.1 {
key "rndc_key";
};
key "rndc_key" {
algorithm "hmac-md5";
secret "private-key goes here";
};
The rndc.conf file can contain three statement types: options, server, and key. These state-ments use the same syntax as named.conf statements, and all must be terminated with semicolons.
The first statement, options, specifies any defaults for the rndc command. In Listing 11-29I have specified the default-server and default-key options. The default-server option controlsthe default server the rndc command will try to connect to, in this case 127.0.0.1. The default-key
4444c11_final.qxd 1/5/05 1:04 AM Page 505
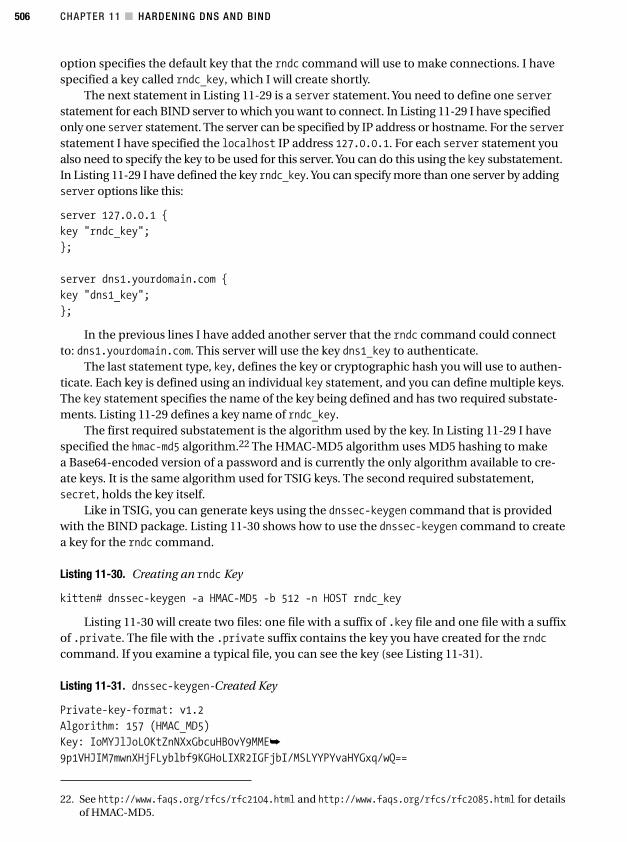
CHAPTER 11 ■ HARDENING DNS AND BIND506
22. See http://www.faqs.org/rfcs/rfc2104.html and http://www.faqs.org/rfcs/rfc2085.html for detailsof HMAC-MD5.
option specifies the default key that the rndc command will use to make connections. I havespecified a key called rndc_key, which I will create shortly.
The next statement in Listing 11-29 is a server statement. You need to define one serverstatement for each BIND server to which you want to connect. In Listing 11-29 I have specifiedonly one server statement. The server can be specified by IP address or hostname. For the serverstatement I have specified the localhost IP address 127.0.0.1. For each server statement youalso need to specify the key to be used for this server. You can do this using the key substatement.In Listing 11-29 I have defined the key rndc_key. You can specify more than one server by addingserver options like this:
server 127.0.0.1 {
key "rndc_key";
};
server dns1.yourdomain.com {
key "dns1_key";
};
In the previous lines I have added another server that the rndc command could connectto: dns1.yourdomain.com. This server will use the key dns1_key to authenticate.
The last statement type, key, defines the key or cryptographic hash you will use to authen-ticate. Each key is defined using an individual key statement, and you can define multiple keys.The key statement specifies the name of the key being defined and has two required substate-ments. Listing 11-29 defines a key name of rndc_key.
The first required substatement is the algorithm used by the key. In Listing 11-29 I havespecified the hmac-md5 algorithm.22 The HMAC-MD5 algorithm uses MD5 hashing to makea Base64-encoded version of a password and is currently the only algorithm available to cre-ate keys. It is the same algorithm used for TSIG keys. The second required substatement,secret, holds the key itself.
Like in TSIG, you can generate keys using the dnssec-keygen command that is providedwith the BIND package. Listing 11-30 shows how to use the dnssec-keygen command to createa key for the rndc command.
Listing 11-30. Creating an rndc Key
kitten# dnssec-keygen -a HMAC-MD5 -b 512 -n HOST rndc_key
Listing 11-30 will create two files: one file with a suffix of .key file and one file with a suffixof .private. The file with the .private suffix contains the key you have created for the rndccommand. If you examine a typical file, you can see the key (see Listing 11-31).
Listing 11-31. dnssec-keygen-Created Key
Private-key-format: v1.2
Algorithm: 157 (HMAC_MD5)
Key: IoMYJlJoLOKtZnNXxGbcuHB0vY9MME➥
9p1VHJIM7mwnXHjFLyblbf9KGHoLIXR2IGFjbI/MSLYYPYvaHYGxq/wQ==
4444c11_final.qxd 1/5/05 1:04 AM Page 506
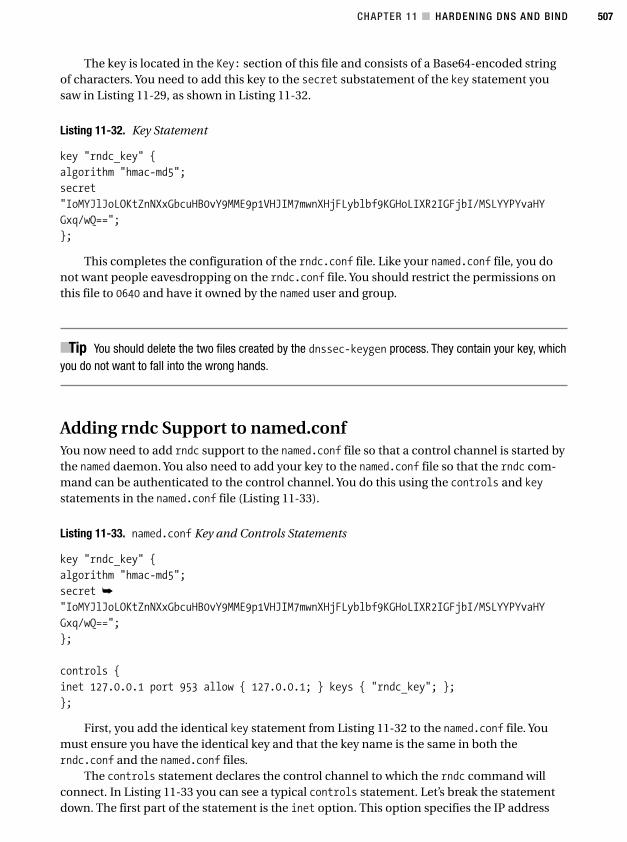
CHAPTER 11 ■ HARDENING DNS AND BIND 507
The key is located in the Key: section of this file and consists of a Base64-encoded stringof characters. You need to add this key to the secret substatement of the key statement yousaw in Listing 11-29, as shown in Listing 11-32.
Listing 11-32. Key Statement
key "rndc_key" {
algorithm "hmac-md5";
secret
"IoMYJlJoLOKtZnNXxGbcuHB0vY9MME9p1VHJIM7mwnXHjFLyblbf9KGHoLIXR2IGFjbI/MSLYYPYvaHY
Gxq/wQ==";
};
This completes the configuration of the rndc.conf file. Like your named.conf file, you donot want people eavesdropping on the rndc.conf file. You should restrict the permissions onthis file to 0640 and have it owned by the named user and group.
■Tip You should delete the two files created by the dnssec-keygen process. They contain your key, whichyou do not want to fall into the wrong hands.
Adding rndc Support to named.confYou now need to add rndc support to the named.conf file so that a control channel is started bythe named daemon. You also need to add your key to the named.conf file so that the rndc com-mand can be authenticated to the control channel. You do this using the controls and keystatements in the named.conf file (Listing 11-33).
Listing 11-33. named.conf Key and Controls Statements
key "rndc_key" {
algorithm "hmac-md5";
secret ➥
"IoMYJlJoLOKtZnNXxGbcuHB0vY9MME9p1VHJIM7mwnXHjFLyblbf9KGHoLIXR2IGFjbI/MSLYYPYvaHY
Gxq/wQ==";
};
controls {
inet 127.0.0.1 port 953 allow { 127.0.0.1; } keys { "rndc_key"; };
};
First, you add the identical key statement from Listing 11-32 to the named.conf file. Youmust ensure you have the identical key and that the key name is the same in both therndc.conf and the named.conf files.
The controls statement declares the control channel to which the rndc command willconnect. In Listing 11-33 you can see a typical controls statement. Let’s break the statementdown. The first part of the statement is the inet option. This option specifies the IP address
4444c11_final.qxd 1/5/05 1:04 AM Page 507

CHAPTER 11 ■ HARDENING DNS AND BIND508
and port on which the control channel will listen. In Listing 11-33 specifies the loopback addressof 127.0.0.1 and the port 953. This means only users on the local system will be able to connectto the control channel, and it will not be open to external connections. If you wanted to openthe channel to external connections, you would need to specify an external interface (see List-ing 11-34).
Listing 11-34. Control Channel on an External Interface
controls {
inet 192.168.0.1 port 953 allow { trusted; } keys { "rndc_key"; };
};
The allow option specifies who is allowed to connect to the control channel. The option cancontain IP addresses, networks, or acl statements that you have already specified. Listing 11-33allows connections only from the loopback address 127.0.0.1. Listing 11-34 specifies the trustedacl. This acl would need to be defined in your named.conf file.
The last option of the controls statements is the keys option. This specifies which key state-ment provides the cryptographic signature that is used to authenticate the rndc command to thecontrol channel. Listing 11-33 specifies rndc_key, which I have defined in both the rndc.confand named.conf files.
Using rndcNow let’s look at the functionality of the rndc command. The rndc command consists ofcommand-line options and server commands and is constructed like this:
kitten# rndc options command
The options allow you to specify which BIND server to which you want the rndc com-mand to connect. The command-line options are mostly self-explanatory and replicate muchof information configured in the rndc.conf file (see Table 11-9).
Table 11-9. rndc Options
Options Description
-c file Uses file as the configuration file. Defaults to /etc/rndc.conf.
-s server Connects to the server indicated by server. Defaults to the default-serverspecified in the rndc.conf file.
-p port Connects to port. Defaults to 953.
-V Enables verbose logging.
-y key Specifies a particular key ID to use. The key ID must be defined in the rndc.conffile.
For example, I use the -c and -s options in Listing 11-35.
Listing 11-35. Using rndc Options
kitten# rndc -c /etc/rndc_other.conf -s puppy.yourdomain.com reload
4444c11_final.qxd 1/5/05 1:04 AM Page 508
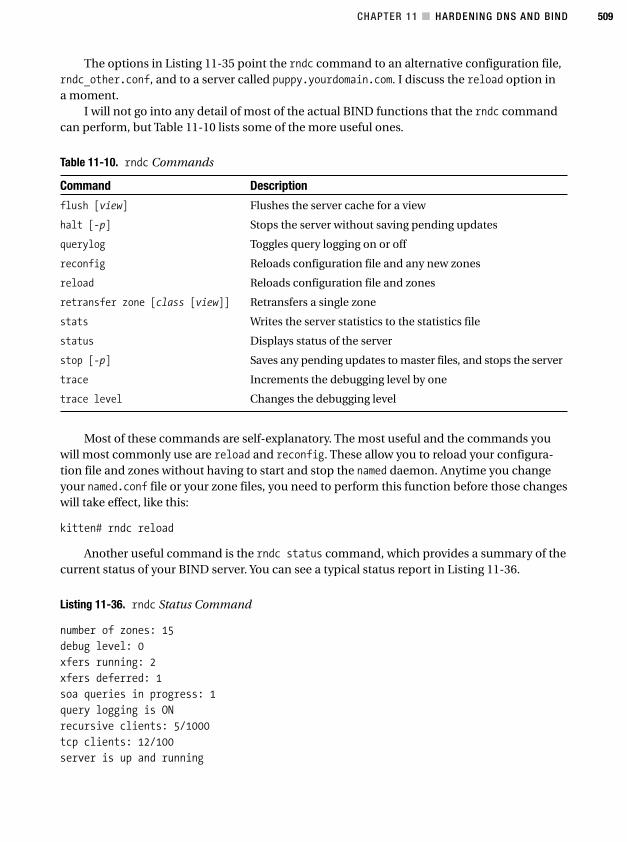
CHAPTER 11 ■ HARDENING DNS AND BIND 509
The options in Listing 11-35 point the rndc command to an alternative configuration file,rndc_other.conf, and to a server called puppy.yourdomain.com. I discuss the reload option ina moment.
I will not go into any detail of most of the actual BIND functions that the rndc commandcan perform, but Table 11-10 lists some of the more useful ones.
Table 11-10. rndc Commands
Command Description
flush [view] Flushes the server cache for a view
halt [-p] Stops the server without saving pending updates
querylog Toggles query logging on or off
reconfig Reloads configuration file and any new zones
reload Reloads configuration file and zones
retransfer zone [class [view]] Retransfers a single zone
stats Writes the server statistics to the statistics file
status Displays status of the server
stop [-p] Saves any pending updates to master files, and stops the server
trace Increments the debugging level by one
trace level Changes the debugging level
Most of these commands are self-explanatory. The most useful and the commands youwill most commonly use are reload and reconfig. These allow you to reload your configura-tion file and zones without having to start and stop the named daemon. Anytime you changeyour named.conf file or your zone files, you need to perform this function before those changeswill take effect, like this:
kitten# rndc reload
Another useful command is the rndc status command, which provides a summary of thecurrent status of your BIND server. You can see a typical status report in Listing 11-36.
Listing 11-36. rndc Status Command
number of zones: 15
debug level: 0
xfers running: 2
xfers deferred: 1
soa queries in progress: 1
query logging is ON
recursive clients: 5/1000
tcp clients: 12/100
server is up and running
4444c11_final.qxd 1/5/05 1:04 AM Page 509
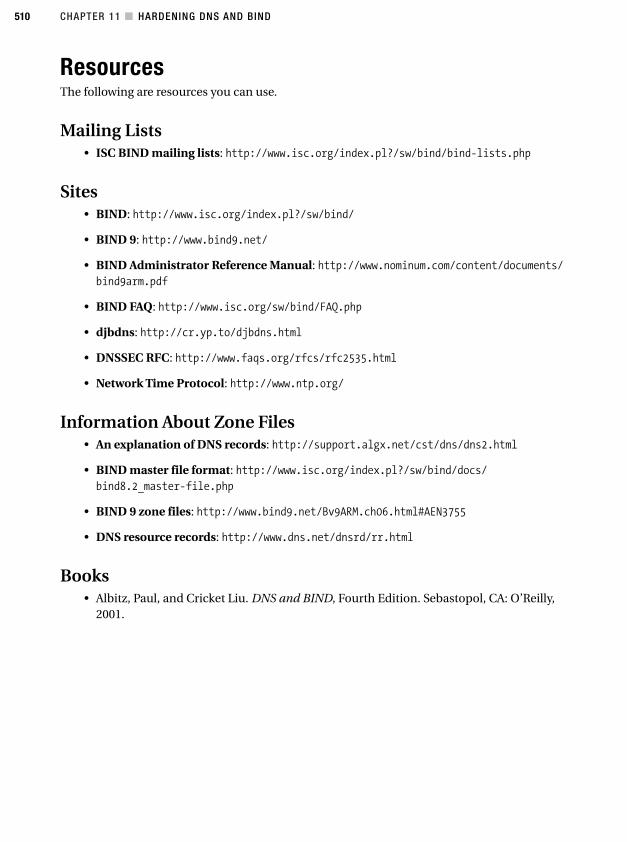
CHAPTER 11 ■ HARDENING DNS AND BIND510
ResourcesThe following are resources you can use.
Mailing Lists• ISC BIND mailing lists: http://www.isc.org/index.pl?/sw/bind/bind-lists.php
Sites• BIND: http://www.isc.org/index.pl?/sw/bind/
• BIND 9: http://www.bind9.net/
• BIND Administrator Reference Manual: http://www.nominum.com/content/documents/bind9arm.pdf
• BIND FAQ: http://www.isc.org/sw/bind/FAQ.php
• djbdns: http://cr.yp.to/djbdns.html
• DNSSEC RFC: http://www.faqs.org/rfcs/rfc2535.html
• Network Time Protocol: http://www.ntp.org/
Information About Zone Files• An explanation of DNS records: http://support.algx.net/cst/dns/dns2.html
• BIND master file format: http://www.isc.org/index.pl?/sw/bind/docs/bind8.2_master-file.php
• BIND 9 zone files: http://www.bind9.net/Bv9ARM.ch06.html#AEN3755
• DNS resource records: http://www.dns.net/dnsrd/rr.html
Books• Albitz, Paul, and Cricket Liu. DNS and BIND, Fourth Edition. Sebastopol, CA: O’Reilly,
2001.
4444c11_final.qxd 1/5/05 1:04 AM Page 510
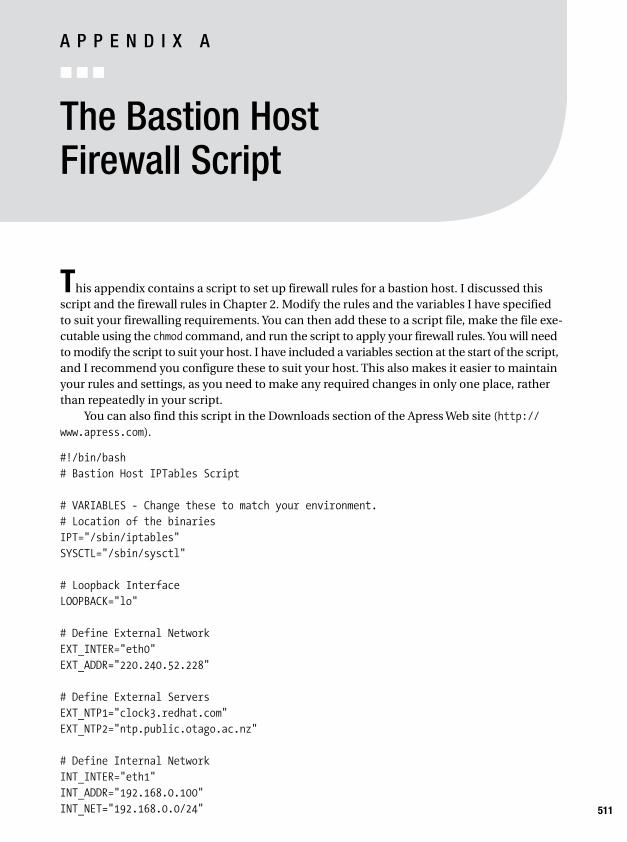
511
A P P E N D I X A
■ ■ ■
The Bastion Host Firewall Script
This appendix contains a script to set up firewall rules for a bastion host. I discussed thisscript and the firewall rules in Chapter 2. Modify the rules and the variables I have specifiedto suit your firewalling requirements. You can then add these to a script file, make the file exe-cutable using the chmod command, and run the script to apply your firewall rules. You will needto modify the script to suit your host. I have included a variables section at the start of the script,and I recommend you configure these to suit your host. This also makes it easier to maintainyour rules and settings, as you need to make any required changes in only one place, ratherthan repeatedly in your script.
You can also find this script in the Downloads section of the Apress Web site (http://www.apress.com).
#!/bin/bash
# Bastion Host IPTables Script
# VARIABLES - Change these to match your environment.
# Location of the binaries
IPT="/sbin/iptables"
SYSCTL="/sbin/sysctl"
# Loopback Interface
LOOPBACK="lo"
# Define External Network
EXT_INTER="eth0"
EXT_ADDR="220.240.52.228"
# Define External Servers
EXT_NTP1="clock3.redhat.com"
EXT_NTP2="ntp.public.otago.ac.nz"
# Define Internal Network
INT_INTER="eth1"
INT_ADDR="192.168.0.100"
INT_NET="192.168.0.0/24"
4444AppA_final.qxd 1/5/05 1:05 AM Page 511
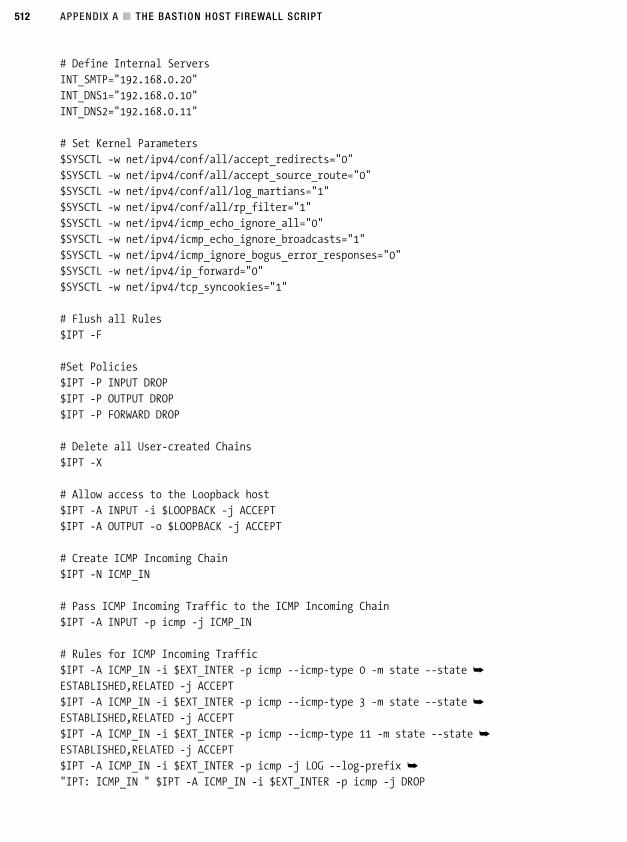
APPENDIX A ■ THE BASTION HOST F IREWALL SCRIPT512
# Define Internal Servers
INT_SMTP="192.168.0.20"
INT_DNS1="192.168.0.10"
INT_DNS2="192.168.0.11"
# Set Kernel Parameters
$SYSCTL -w net/ipv4/conf/all/accept_redirects="0"
$SYSCTL -w net/ipv4/conf/all/accept_source_route="0"
$SYSCTL -w net/ipv4/conf/all/log_martians="1"
$SYSCTL -w net/ipv4/conf/all/rp_filter="1"
$SYSCTL -w net/ipv4/icmp_echo_ignore_all="0"
$SYSCTL -w net/ipv4/icmp_echo_ignore_broadcasts="1"
$SYSCTL -w net/ipv4/icmp_ignore_bogus_error_responses="0"
$SYSCTL -w net/ipv4/ip_forward="0"
$SYSCTL -w net/ipv4/tcp_syncookies="1"
# Flush all Rules
$IPT -F
#Set Policies
$IPT -P INPUT DROP
$IPT -P OUTPUT DROP
$IPT -P FORWARD DROP
# Delete all User-created Chains
$IPT -X
# Allow access to the Loopback host
$IPT -A INPUT -i $LOOPBACK -j ACCEPT
$IPT -A OUTPUT -o $LOOPBACK -j ACCEPT
# Create ICMP Incoming Chain
$IPT -N ICMP_IN
# Pass ICMP Incoming Traffic to the ICMP Incoming Chain
$IPT -A INPUT -p icmp -j ICMP_IN
# Rules for ICMP Incoming Traffic
$IPT -A ICMP_IN -i $EXT_INTER -p icmp --icmp-type 0 -m state --state ➥
ESTABLISHED,RELATED -j ACCEPT
$IPT -A ICMP_IN -i $EXT_INTER -p icmp --icmp-type 3 -m state --state ➥
ESTABLISHED,RELATED -j ACCEPT
$IPT -A ICMP_IN -i $EXT_INTER -p icmp --icmp-type 11 -m state --state ➥
ESTABLISHED,RELATED -j ACCEPT
$IPT -A ICMP_IN -i $EXT_INTER -p icmp -j LOG --log-prefix ➥
"IPT: ICMP_IN " $IPT -A ICMP_IN -i $EXT_INTER -p icmp -j DROP
4444AppA_final.qxd 1/5/05 1:05 AM Page 512

# Create ICMP Outgoing Chain
$IPT -N ICMP_OUT
# Pass ICMP Outgoing Traffic to the ICMP Outgoing Chain
$IPT -A OUTPUT -p icmp -j ICMP_OUT
# Rules for ICMP Outgoing Traffic
$IPT -A ICMP_OUT -o $EXT_INTER -p icmp --icmp-type 8 -m state --state ➥
NEW -j ACCEPT
$IPT -A ICMP_OUT -o $EXT_INTER -p icmp -j LOG --log-prefix "IPT: ICMP_OUT "
$IPT -A ICMP_OUT -o $EXT_INTER -p icmp -j DROP
# Create Bad Sources Chain
$IPT -N BAD_SOURCES
# Pass traffic with bad source addresses to the Bad Sources Chain
$IPT -A INPUT -j BAD_SOURCES
# Rules for traffic with bad source addresses
# Drop incoming traffic allegedly from our own host
$IPT -A BAD_SOURCES -i $INT_INTER -s $INT_ADDR -j DROP
$IPT -A BAD_SOURCES -i $EXT_INTER -s $EXT_ADDR -j DROP
# Drop outgoing traffic not from our own host
$IPT -A BAD_SOURCES -o $INT_INTER -s ! $INT_ADDR -j DROP
$IPT -A BAD_SOURCES -o $EXT_INTER -s ! $EXT_ADDR -j DROP
# Drop traffic from other bad sources
$IPT -A BAD_SOURCES -s 168.254.0.0/16 -j DROP
$IPT -A BAD_SOURCES -i $EXT_INTER -s 10.0.0.0/8 -j DROP
$IPT -A BAD_SOURCES -i $EXT_INTER -s 172.16.0.0/12 -j DROP
$IPT -A BAD_SOURCES -i $EXT_INTER -s 192.168.0.0/16 -j DROP
$IPT -A BAD_SOURCES -i $EXT_INTER -s 192.0.2.0/24 -j DROP
$IPT -A BAD_SOURCES -i $EXT_INTER -s 224.0.0.0/4 -j DROP
$IPT -A BAD_SOURCES -i $EXT_INTER -s 240.0.0.0/5 -j DROP
$IPT -A BAD_SOURCES -i $EXT_INTER -s 248.0.0.0/5 -j DROP
$IPT -A BAD_SOURCES -i $EXT_INTER -s 127.0.0.0/8 -j DROP
$IPT -A BAD_SOURCES -i $EXT_INTER -s 255.255.255.255/32 -j DROP
$IPT -A BAD_SOURCES -i $EXT_INTER -s 0.0.0.0/8 -j DROP
# Create Bad Flags Chain
$IPT -N BAD_FLAGS
# Pass traffic with bad flags to the Bad Flags Chain
$IPT -A INPUT -p tcp -j BAD_FLAGS
APPENDIX A ■ THE BASTION HOST F IREWALL SCRIPT 513
4444AppA_final.qxd 1/5/05 1:05 AM Page 513
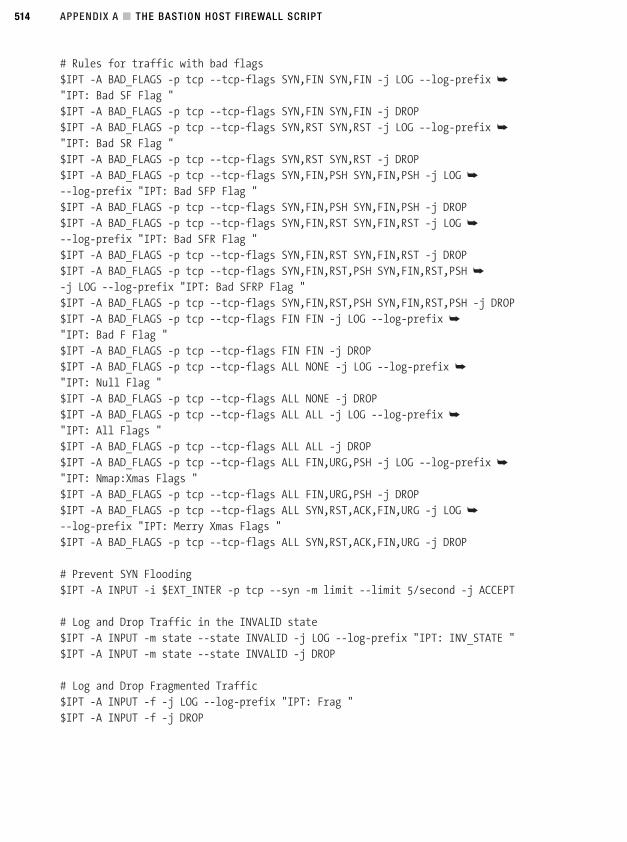
# Rules for traffic with bad flags
$IPT -A BAD_FLAGS -p tcp --tcp-flags SYN,FIN SYN,FIN -j LOG --log-prefix ➥
"IPT: Bad SF Flag "
$IPT -A BAD_FLAGS -p tcp --tcp-flags SYN,FIN SYN,FIN -j DROP
$IPT -A BAD_FLAGS -p tcp --tcp-flags SYN,RST SYN,RST -j LOG --log-prefix ➥
"IPT: Bad SR Flag "
$IPT -A BAD_FLAGS -p tcp --tcp-flags SYN,RST SYN,RST -j DROP
$IPT -A BAD_FLAGS -p tcp --tcp-flags SYN,FIN,PSH SYN,FIN,PSH -j LOG ➥
--log-prefix "IPT: Bad SFP Flag "
$IPT -A BAD_FLAGS -p tcp --tcp-flags SYN,FIN,PSH SYN,FIN,PSH -j DROP
$IPT -A BAD_FLAGS -p tcp --tcp-flags SYN,FIN,RST SYN,FIN,RST -j LOG ➥
--log-prefix "IPT: Bad SFR Flag "
$IPT -A BAD_FLAGS -p tcp --tcp-flags SYN,FIN,RST SYN,FIN,RST -j DROP
$IPT -A BAD_FLAGS -p tcp --tcp-flags SYN,FIN,RST,PSH SYN,FIN,RST,PSH ➥
-j LOG --log-prefix "IPT: Bad SFRP Flag "
$IPT -A BAD_FLAGS -p tcp --tcp-flags SYN,FIN,RST,PSH SYN,FIN,RST,PSH -j DROP
$IPT -A BAD_FLAGS -p tcp --tcp-flags FIN FIN -j LOG --log-prefix ➥
"IPT: Bad F Flag "
$IPT -A BAD_FLAGS -p tcp --tcp-flags FIN FIN -j DROP
$IPT -A BAD_FLAGS -p tcp --tcp-flags ALL NONE -j LOG --log-prefix ➥
"IPT: Null Flag "
$IPT -A BAD_FLAGS -p tcp --tcp-flags ALL NONE -j DROP
$IPT -A BAD_FLAGS -p tcp --tcp-flags ALL ALL -j LOG --log-prefix ➥
"IPT: All Flags "
$IPT -A BAD_FLAGS -p tcp --tcp-flags ALL ALL -j DROP
$IPT -A BAD_FLAGS -p tcp --tcp-flags ALL FIN,URG,PSH -j LOG --log-prefix ➥
"IPT: Nmap:Xmas Flags "
$IPT -A BAD_FLAGS -p tcp --tcp-flags ALL FIN,URG,PSH -j DROP
$IPT -A BAD_FLAGS -p tcp --tcp-flags ALL SYN,RST,ACK,FIN,URG -j LOG ➥
--log-prefix "IPT: Merry Xmas Flags "
$IPT -A BAD_FLAGS -p tcp --tcp-flags ALL SYN,RST,ACK,FIN,URG -j DROP
# Prevent SYN Flooding
$IPT -A INPUT -i $EXT_INTER -p tcp --syn -m limit --limit 5/second -j ACCEPT
# Log and Drop Traffic in the INVALID state
$IPT -A INPUT -m state --state INVALID -j LOG --log-prefix "IPT: INV_STATE "
$IPT -A INPUT -m state --state INVALID -j DROP
# Log and Drop Fragmented Traffic
$IPT -A INPUT -f -j LOG --log-prefix "IPT: Frag "
$IPT -A INPUT -f -j DROP
APPENDIX A ■ THE BASTION HOST F IREWALL SCRIPT514
4444AppA_final.qxd 1/5/05 1:05 AM Page 514
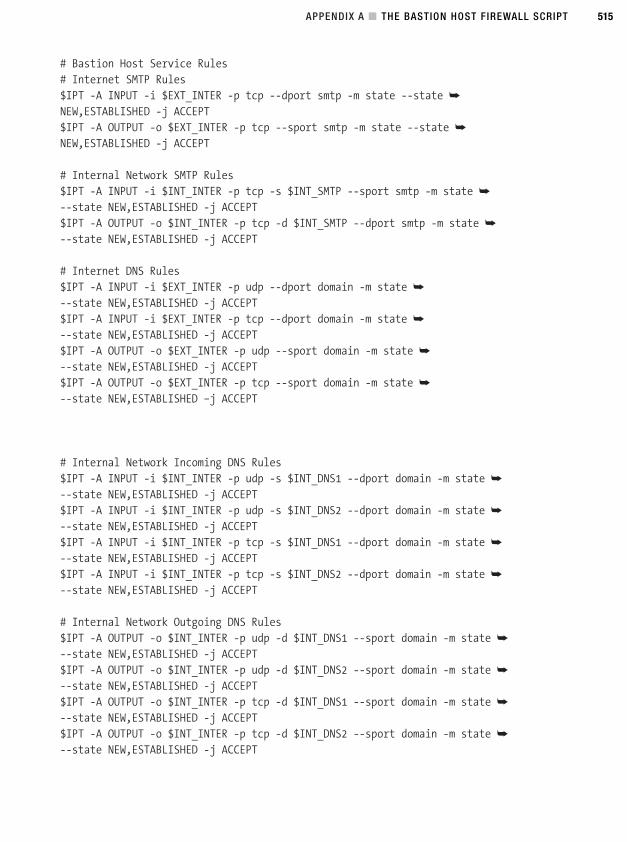
# Bastion Host Service Rules
# Internet SMTP Rules
$IPT -A INPUT -i $EXT_INTER -p tcp --dport smtp -m state --state ➥
NEW,ESTABLISHED -j ACCEPT
$IPT -A OUTPUT -o $EXT_INTER -p tcp --sport smtp -m state --state ➥
NEW,ESTABLISHED -j ACCEPT
# Internal Network SMTP Rules
$IPT -A INPUT -i $INT_INTER -p tcp -s $INT_SMTP --sport smtp -m state ➥
--state NEW,ESTABLISHED -j ACCEPT
$IPT -A OUTPUT -o $INT_INTER -p tcp -d $INT_SMTP --dport smtp -m state ➥
--state NEW,ESTABLISHED -j ACCEPT
# Internet DNS Rules
$IPT -A INPUT -i $EXT_INTER -p udp --dport domain -m state ➥
--state NEW,ESTABLISHED -j ACCEPT
$IPT -A INPUT -i $EXT_INTER -p tcp --dport domain -m state ➥
--state NEW,ESTABLISHED -j ACCEPT
$IPT -A OUTPUT -o $EXT_INTER -p udp --sport domain -m state ➥
--state NEW,ESTABLISHED -j ACCEPT
$IPT -A OUTPUT -o $EXT_INTER -p tcp --sport domain -m state ➥
--state NEW,ESTABLISHED –j ACCEPT
# Internal Network Incoming DNS Rules
$IPT -A INPUT -i $INT_INTER -p udp -s $INT_DNS1 --dport domain -m state ➥
--state NEW,ESTABLISHED -j ACCEPT
$IPT -A INPUT -i $INT_INTER -p udp -s $INT_DNS2 --dport domain -m state ➥
--state NEW,ESTABLISHED -j ACCEPT
$IPT -A INPUT -i $INT_INTER -p tcp -s $INT_DNS1 --dport domain -m state ➥
--state NEW,ESTABLISHED -j ACCEPT
$IPT -A INPUT -i $INT_INTER -p tcp -s $INT_DNS2 --dport domain -m state ➥
--state NEW,ESTABLISHED -j ACCEPT
# Internal Network Outgoing DNS Rules
$IPT -A OUTPUT -o $INT_INTER -p udp -d $INT_DNS1 --sport domain -m state ➥
--state NEW,ESTABLISHED -j ACCEPT
$IPT -A OUTPUT -o $INT_INTER -p udp -d $INT_DNS2 --sport domain -m state ➥
--state NEW,ESTABLISHED -j ACCEPT
$IPT -A OUTPUT -o $INT_INTER -p tcp -d $INT_DNS1 --sport domain -m state ➥
--state NEW,ESTABLISHED -j ACCEPT
$IPT -A OUTPUT -o $INT_INTER -p tcp -d $INT_DNS2 --sport domain -m state ➥
--state NEW,ESTABLISHED -j ACCEPT
APPENDIX A ■ THE BASTION HOST F IREWALL SCRIPT 515
4444AppA_final.qxd 1/5/05 1:05 AM Page 515
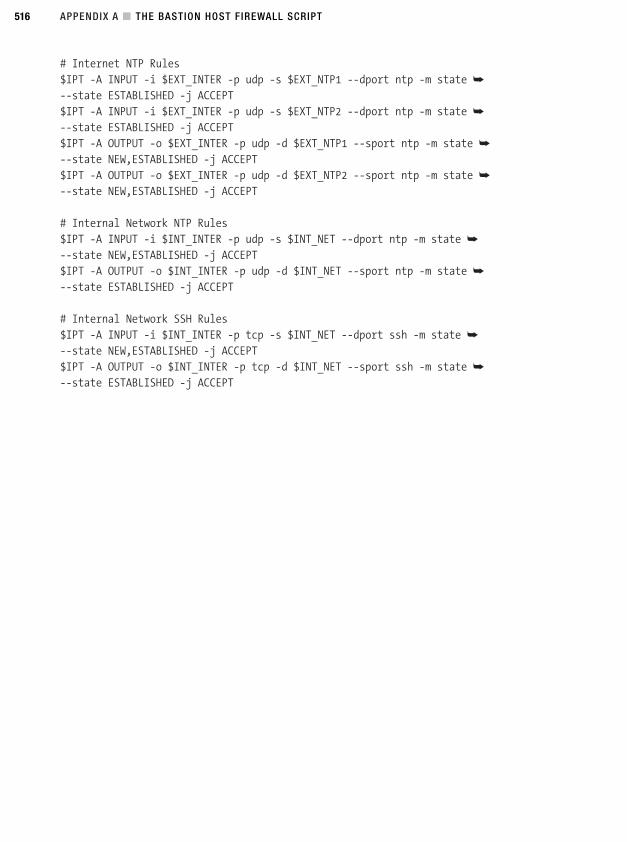
# Internet NTP Rules
$IPT -A INPUT -i $EXT_INTER -p udp -s $EXT_NTP1 --dport ntp -m state ➥
--state ESTABLISHED -j ACCEPT
$IPT -A INPUT -i $EXT_INTER -p udp -s $EXT_NTP2 --dport ntp -m state ➥
--state ESTABLISHED -j ACCEPT
$IPT -A OUTPUT -o $EXT_INTER -p udp -d $EXT_NTP1 --sport ntp -m state ➥
--state NEW,ESTABLISHED -j ACCEPT
$IPT -A OUTPUT -o $EXT_INTER -p udp -d $EXT_NTP2 --sport ntp -m state ➥
--state NEW,ESTABLISHED -j ACCEPT
# Internal Network NTP Rules
$IPT -A INPUT -i $INT_INTER -p udp -s $INT_NET --dport ntp -m state ➥
--state NEW,ESTABLISHED -j ACCEPT
$IPT -A OUTPUT -o $INT_INTER -p udp -d $INT_NET --sport ntp -m state ➥
--state ESTABLISHED -j ACCEPT
# Internal Network SSH Rules
$IPT -A INPUT -i $INT_INTER -p tcp -s $INT_NET --dport ssh -m state ➥
--state NEW,ESTABLISHED -j ACCEPT
$IPT -A OUTPUT -o $INT_INTER -p tcp -d $INT_NET --sport ssh -m state ➥
--state ESTABLISHED -j ACCEPT
APPENDIX A ■ THE BASTION HOST F IREWALL SCRIPT516
4444AppA_final.qxd 1/5/05 1:05 AM Page 516
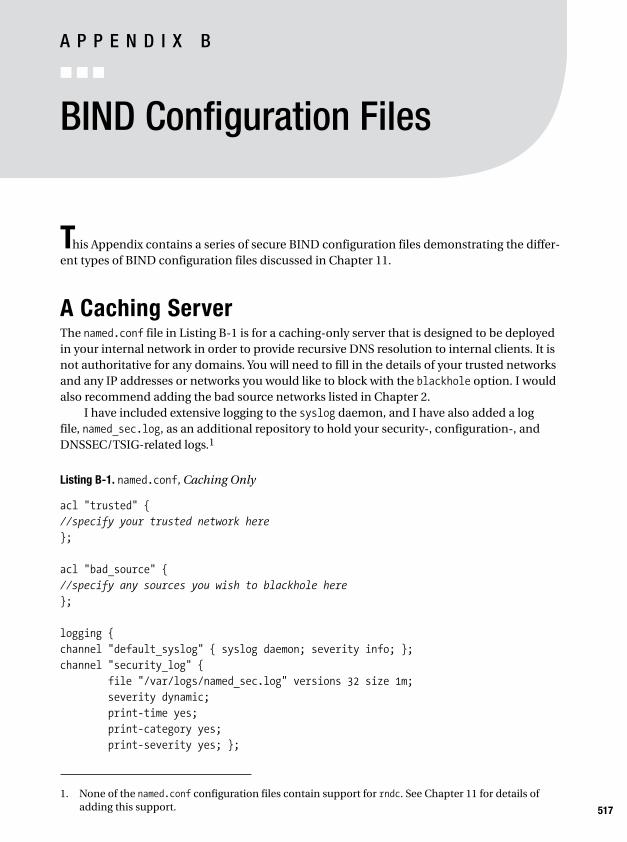
517
A P P E N D I X B
■ ■ ■
BIND Configuration Files
This Appendix contains a series of secure BIND configuration files demonstrating the differ-ent types of BIND configuration files discussed in Chapter 11.
A Caching ServerThe named.conf file in Listing B-1 is for a caching-only server that is designed to be deployedin your internal network in order to provide recursive DNS resolution to internal clients. It isnot authoritative for any domains. You will need to fill in the details of your trusted networksand any IP addresses or networks you would like to block with the blackhole option. I wouldalso recommend adding the bad source networks listed in Chapter 2.
I have included extensive logging to the syslog daemon, and I have also added a logfile, named_sec.log, as an additional repository to hold your security-, configuration-, andDNSSEC/TSIG-related logs.1
Listing B-1. named.conf, Caching Only
acl "trusted" {
//specify your trusted network here
};
acl "bad_source" {
//specify any sources you wish to blackhole here
};
logging {
channel "default_syslog" { syslog daemon; severity info; };
channel "security_log" {
file "/var/logs/named_sec.log" versions 32 size 1m;
severity dynamic;
print-time yes;
print-category yes;
print-severity yes; };
1. None of the named.conf configuration files contain support for rndc. See Chapter 11 for details ofadding this support.
4444AppB_final.qxd 1/5/05 1:07 AM Page 517
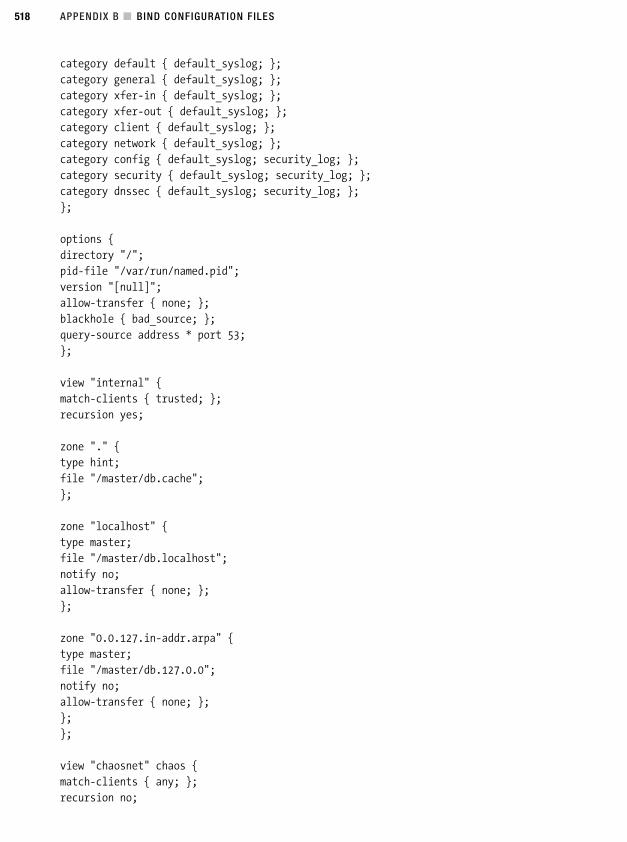
APPENDIX B ■ BIND CONFIGURATION FILES518
category default { default_syslog; };
category general { default_syslog; };
category xfer-in { default_syslog; };
category xfer-out { default_syslog; };
category client { default_syslog; };
category network { default_syslog; };
category config { default_syslog; security_log; };
category security { default_syslog; security_log; };
category dnssec { default_syslog; security_log; };
};
options {
directory "/";
pid-file "/var/run/named.pid";
version "[null]";
allow-transfer { none; };
blackhole { bad_source; };
query-source address * port 53;
};
view "internal" {
match-clients { trusted; };
recursion yes;
zone "." {
type hint;
file "/master/db.cache";
};
zone "localhost" {
type master;
file "/master/db.localhost";
notify no;
allow-transfer { none; };
};
zone "0.0.127.in-addr.arpa" {
type master;
file "/master/db.127.0.0";
notify no;
allow-transfer { none; };
};
};
view "chaosnet" chaos {
match-clients { any; };
recursion no;
4444AppB_final.qxd 1/5/05 1:07 AM Page 518
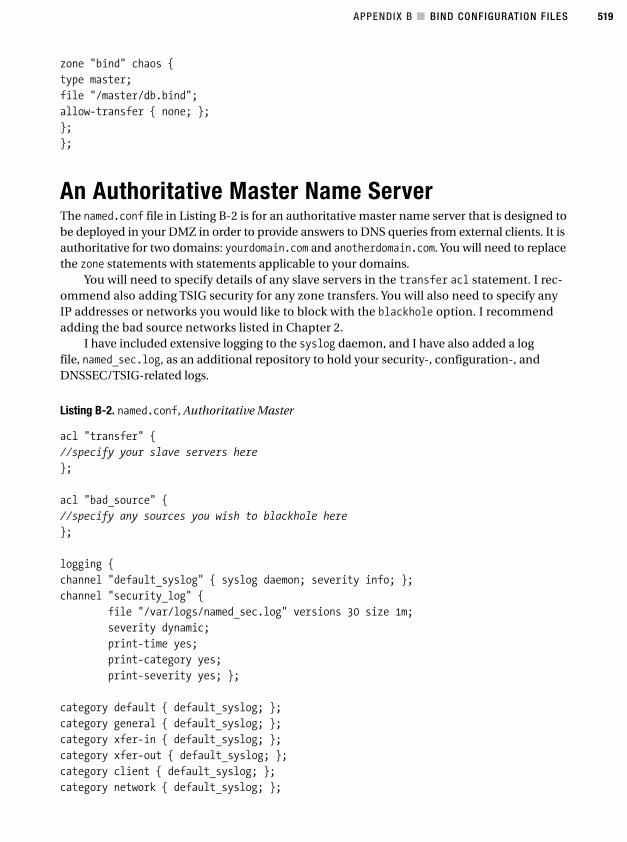
APPENDIX B ■ BIND CONFIGURATION FILES 519
zone "bind" chaos {
type master;
file "/master/db.bind";
allow-transfer { none; };
};
};
An Authoritative Master Name ServerThe named.conf file in Listing B-2 is for an authoritative master name server that is designed tobe deployed in your DMZ in order to provide answers to DNS queries from external clients. It isauthoritative for two domains: yourdomain.com and anotherdomain.com. You will need to replacethe zone statements with statements applicable to your domains.
You will need to specify details of any slave servers in the transfer acl statement. I rec-ommend also adding TSIG security for any zone transfers. You will also need to specify anyIP addresses or networks you would like to block with the blackhole option. I recommendadding the bad source networks listed in Chapter 2.
I have included extensive logging to the syslog daemon, and I have also added a logfile, named_sec.log, as an additional repository to hold your security-, configuration-, andDNSSEC/TSIG-related logs.
Listing B-2. named.conf, Authoritative Master
acl "transfer" {
//specify your slave servers here
};
acl "bad_source" {
//specify any sources you wish to blackhole here
};
logging {
channel "default_syslog" { syslog daemon; severity info; };
channel "security_log" {
file "/var/logs/named_sec.log" versions 30 size 1m;
severity dynamic;
print-time yes;
print-category yes;
print-severity yes; };
category default { default_syslog; };
category general { default_syslog; };
category xfer-in { default_syslog; };
category xfer-out { default_syslog; };
category client { default_syslog; };
category network { default_syslog; };
4444AppB_final.qxd 1/5/05 1:07 AM Page 519
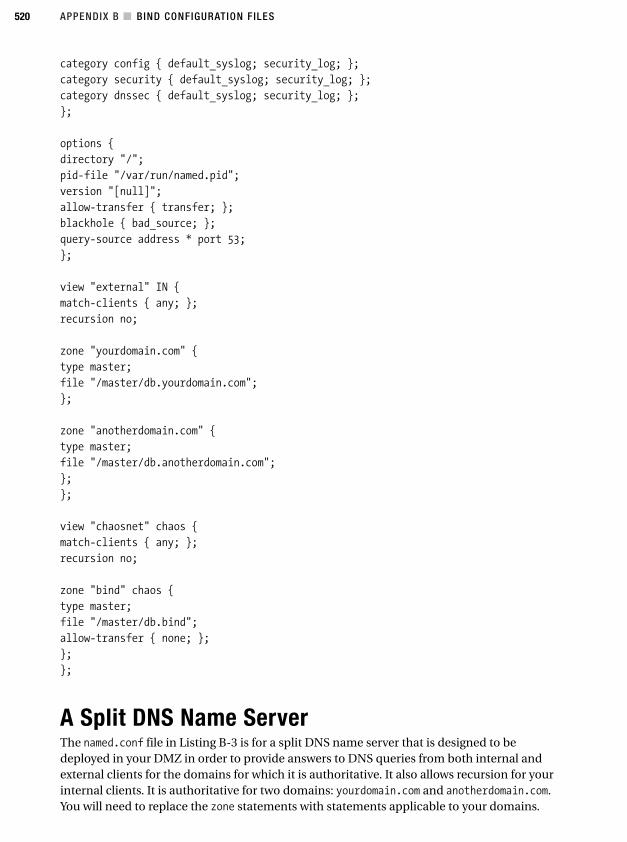
APPENDIX B ■ BIND CONFIGURATION FILES520
category config { default_syslog; security_log; };
category security { default_syslog; security_log; };
category dnssec { default_syslog; security_log; };
};
options {
directory "/";
pid-file "/var/run/named.pid";
version "[null]";
allow-transfer { transfer; };
blackhole { bad_source; };
query-source address * port 53;
};
view "external" IN {
match-clients { any; };
recursion no;
zone "yourdomain.com" {
type master;
file "/master/db.yourdomain.com";
};
zone "anotherdomain.com" {
type master;
file "/master/db.anotherdomain.com";
};
};
view "chaosnet" chaos {
match-clients { any; };
recursion no;
zone "bind" chaos {
type master;
file "/master/db.bind";
allow-transfer { none; };
};
};
A Split DNS Name ServerThe named.conf file in Listing B-3 is for a split DNS name server that is designed to bedeployed in your DMZ in order to provide answers to DNS queries from both internal andexternal clients for the domains for which it is authoritative. It also allows recursion for yourinternal clients. It is authoritative for two domains: yourdomain.com and anotherdomain.com.You will need to replace the zone statements with statements applicable to your domains.
4444AppB_final.qxd 1/5/05 1:07 AM Page 520
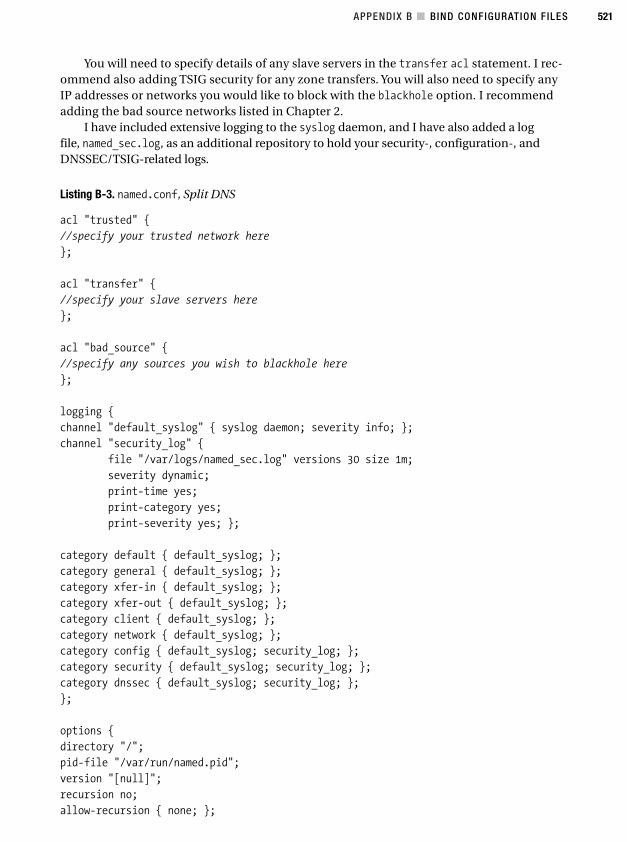
APPENDIX B ■ BIND CONFIGURATION FILES 521
You will need to specify details of any slave servers in the transfer acl statement. I rec-ommend also adding TSIG security for any zone transfers. You will also need to specify anyIP addresses or networks you would like to block with the blackhole option. I recommendadding the bad source networks listed in Chapter 2.
I have included extensive logging to the syslog daemon, and I have also added a logfile, named_sec.log, as an additional repository to hold your security-, configuration-, andDNSSEC/TSIG-related logs.
Listing B-3. named.conf, Split DNS
acl "trusted" {
//specify your trusted network here
};
acl "transfer" {
//specify your slave servers here
};
acl "bad_source" {
//specify any sources you wish to blackhole here
};
logging {
channel "default_syslog" { syslog daemon; severity info; };
channel "security_log" {
file "/var/logs/named_sec.log" versions 30 size 1m;
severity dynamic;
print-time yes;
print-category yes;
print-severity yes; };
category default { default_syslog; };
category general { default_syslog; };
category xfer-in { default_syslog; };
category xfer-out { default_syslog; };
category client { default_syslog; };
category network { default_syslog; };
category config { default_syslog; security_log; };
category security { default_syslog; security_log; };
category dnssec { default_syslog; security_log; };
};
options {
directory "/";
pid-file "/var/run/named.pid";
version "[null]";
recursion no;
allow-recursion { none; };
4444AppB_final.qxd 1/5/05 1:07 AM Page 521
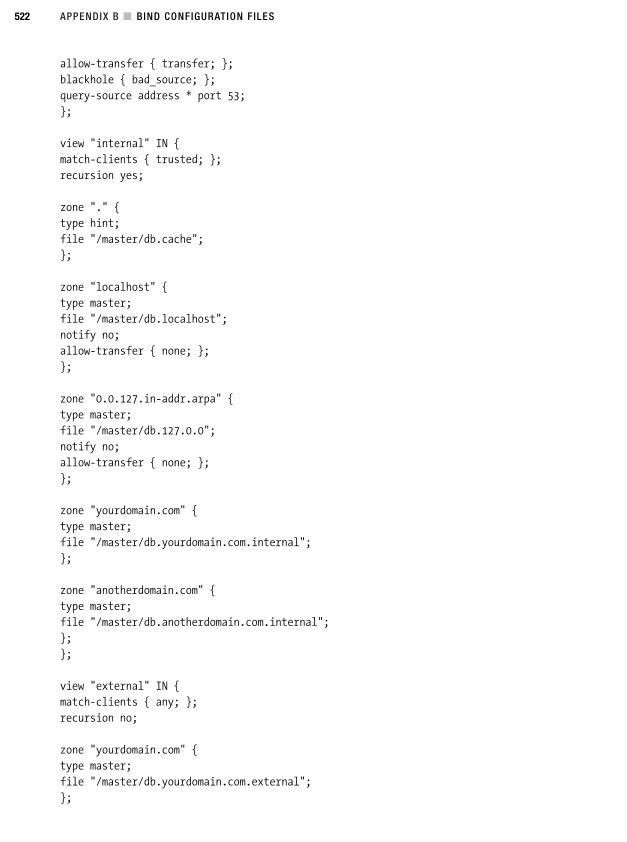
APPENDIX B ■ BIND CONFIGURATION FILES522
allow-transfer { transfer; };
blackhole { bad_source; };
query-source address * port 53;
};
view "internal" IN {
match-clients { trusted; };
recursion yes;
zone "." {
type hint;
file "/master/db.cache";
};
zone "localhost" {
type master;
file "/master/db.localhost";
notify no;
allow-transfer { none; };
};
zone "0.0.127.in-addr.arpa" {
type master;
file "/master/db.127.0.0";
notify no;
allow-transfer { none; };
};
zone "yourdomain.com" {
type master;
file "/master/db.yourdomain.com.internal";
};
zone "anotherdomain.com" {
type master;
file "/master/db.anotherdomain.com.internal";
};
};
view "external" IN {
match-clients { any; };
recursion no;
zone "yourdomain.com" {
type master;
file "/master/db.yourdomain.com.external";
};
4444AppB_final.qxd 1/5/05 1:07 AM Page 522
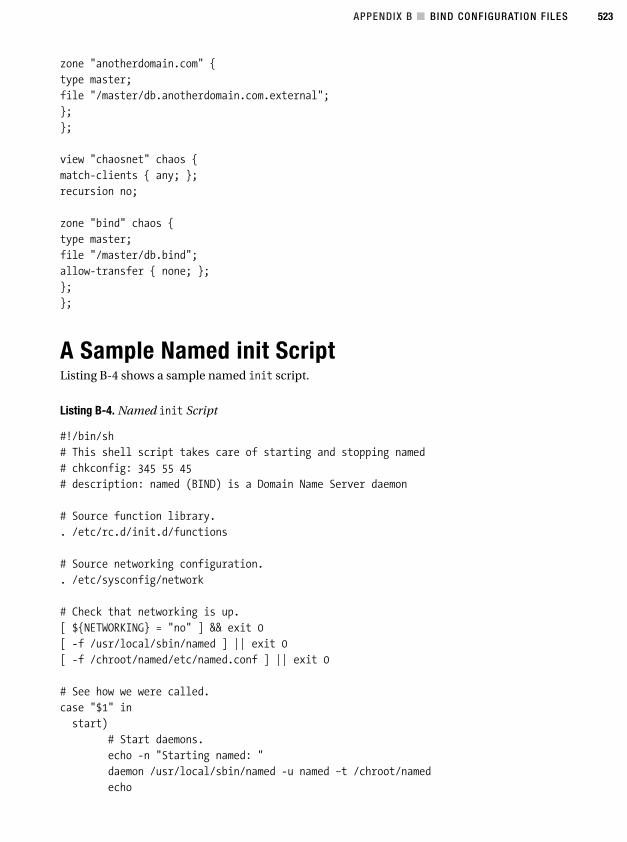
APPENDIX B ■ BIND CONFIGURATION FILES 523
zone "anotherdomain.com" {
type master;
file "/master/db.anotherdomain.com.external";
};
};
view "chaosnet" chaos {
match-clients { any; };
recursion no;
zone "bind" chaos {
type master;
file "/master/db.bind";
allow-transfer { none; };
};
};
A Sample Named init ScriptListing B-4 shows a sample named init script.
Listing B-4. Named init Script
#!/bin/sh
# This shell script takes care of starting and stopping named
# chkconfig: 345 55 45
# description: named (BIND) is a Domain Name Server daemon
# Source function library.
. /etc/rc.d/init.d/functions
# Source networking configuration.
. /etc/sysconfig/network
# Check that networking is up.
[ ${NETWORKING} = "no" ] && exit 0
[ -f /usr/local/sbin/named ] || exit 0
[ -f /chroot/named/etc/named.conf ] || exit 0
# See how we were called.
case "$1" in
start)
# Start daemons.
echo -n "Starting named: "
daemon /usr/local/sbin/named -u named –t /chroot/named
echo
4444AppB_final.qxd 1/5/05 1:07 AM Page 523
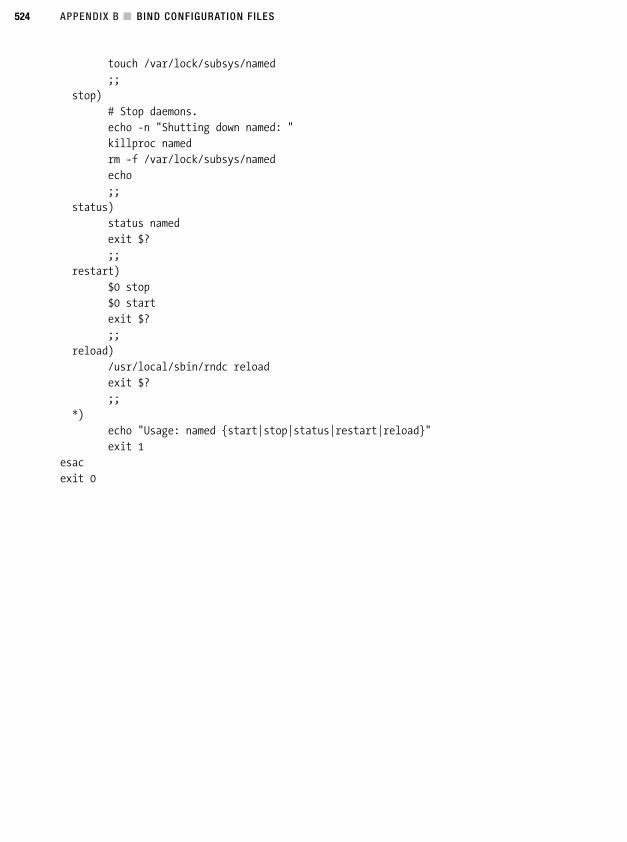
APPENDIX B ■ BIND CONFIGURATION FILES524
touch /var/lock/subsys/named
;;
stop)
# Stop daemons.
echo -n "Shutting down named: "
killproc named
rm -f /var/lock/subsys/named
echo
;;
status)
status named
exit $?
;;
restart)
$0 stop
$0 start
exit $?
;;
reload)
/usr/local/sbin/rndc reload
exit $?
;;
*)
echo "Usage: named {start|stop|status|restart|reload}"
exit 1
esac
exit 0
4444AppB_final.qxd 1/5/05 1:07 AM Page 524
525
A P P E N D I X C
■ ■ ■
Checkpoints
This appendix summarizes the checkpoints from each chapter.
Chapter 1Install only what you need. Use your distribution’s minimal installation option. Removeextraneous or unnecessary packages. Confirm that each package on your system is actu-ally required by your system.
Do not install your system when connected to the Internet or an Internet-connectednetwork. Install any required patches and updates offline.
Secure your system’s physical security, BIOS, and boot loader. Protect your boot processwith passwords. I recommend using the Grub boot loader rather than the LILO bootloader, as Grub has a more robust security model.
Start only the services you need for your system, and secure the functions controlled inthe inittab file.
Secure your console and virtual terminals. Also ensure your login screen provides theminimum possible information to a user or potential attacker. Defense through obscu-rity can be a powerful tool. The less information you reveal about your system and itspurpose, the better.
Add only those users and groups that you require. Delete any others. Refer to the list ofthe users and groups I have provided in Chapter 1 to find some of those users who canbe removed.
Use MD5 passwords and shadow passwording. Ensure users select secure passwordsand configure your passwording environment accordingly. Ensure passwords arescheduled to regularly expire.
Turn on user (and if required process) accounting for your system. Monitor the reportsgenerated by these accounting processes regularly for anomalies.
Use sudo rather than root to administer your system. Ensure you carefully test your sudoconfiguration before implementing it to ensure it is secure.
4444AppC_final.qxd 1/5/05 1:08 AM Page 525
APPENDIX C ■ CHECKPOINTS526
Use PAM to secure the authentication processes of your system. PAM offers an easy-to-use, highly configurable framework to control access to your system using a large numberof different criteria.
Confirm the integrity of any files you download or install on your system using methodssuch as MD5 and SHA1 checksums or digital signatures. This includes using the rpm com-mand with the --checksig option to verify any RPM files.
Review the available kernel hardening options, and install one of the packages or patchesto further harden your kernel. I recommend the Openwall patch, but if you want to takekernel security further, then an access control model-based package such as SELinux,whilst requiring more implementation effort, offers a considerable amount of additionalsecurity.
Keep up with security updates, and keep informed about newly discovered vulnerabilitiesusing resources such as Security Focus’s Vulnerability Database and the CERT advisorymailings.
Chapter 2Base your firewall on a minimalist design that denies by default and allows by exception.You should build your firewall like building a wall around your host and remove only thosebricks you absolutely need to see through.
Use a default policy of DROP for your built-in chains. This is in line with the denial bydefault model I have recommended by allowing only incoming and outgoing trafficyou’ve explicitly authorized.
Model your traffic and design your firewall on paper before you start creating your rules.This should include incoming and outgoing connections, the source, and destination ofyour traffic, including addresses and ports. You can also include the required connectionstates for your traffic.
Use connection states to further restrict your allowed incoming and outgoing traffic.If you only require existing connections to enter and leave your host, then you can usestates to control this. Only allow new connections in and out of your hosts if they areabsolutely required.
Ensure you have a suitable amount of logging in place so that you know what is going onwith your firewall. Ensure you have sufficient disk space to hold the required volume of logs.
Set rules to block spoofed addresses, bad flags, bad fragments, and states and to limit thepossibility of Denial of Service attacks. These types of attacks change and evolve overtime. You should keep updated with new variations and attacks on mailing lists such asthe Netfilter list and on the security lists and sites (see Chapter 1).
4444AppC_final.qxd 1/5/05 1:08 AM Page 526
If you take care to test them, the Patch-O-Matic tool comes with several useful patchesand modules that can extend iptables functionality. Additionally, review and carefullyconfigure your kernel parameters to best suit the requirements of your environment.
Use a tool such as tcpdump to examine the traffic on your host to ensure your firewall isfully functional and allowing or denying the right traffic. Remember you can filter yourtraffic to display only the traffic on which you want to focus.
Chapter 3OpenSSL is a widely used and useful open-source version of the SSL protocol that can beused to secure a variety of applications. I recommend developing a solid knowledge of itscapabilities and functionality.
If you have unencrypted connections, then you can use Stunnel with OpenSSL to encap-sulate and secure them.
Use a VPN tool utilizing IPSec such as Openswan to secure your network connections,securely join two systems, or two subnets together across the Internet.
Do not use clear-text administrations tools such as rsh and telnet. Replace them withSSH-based tools.
Though you can tunnel X through SSH I recommend you exercise caution in doing thisor indeed in running X on a production server system at all.
Chapter 4Ensure you understand how basic Unix permissions work and grant only the minimumpermissions you need to users and applications to maintain functionality.
World permissions are dangerous and potentially allow attackers to misuse files andapplications. Review all the objects on your system with world-readable, world-writable,and world-executable permissions and ensure you understand why they have those per-missions. If they do not need those permissions, then revoke them!
Sticky bits allow you to better control access to directories where multiple users sharedaccess permissions by allowing users to manage only the files and objects they have cre-ated. Investigate the potential of using sticky bits where you have directories in whichmultiple users shared access permissions.
Amongst the most dangerous permission settings on your system are setuid and setgidpermissions. When set on binaries, these allow any users to adopt the permissions of theobject’s owner or group when running that binary. These binaries have the potential to beserious vulnerabilities on your system, and you should check that all setuid and setgidbinaries actually require these permissions to function. If they do not, then remove them!
APPENDIX C ■ CHECKPOINTS 527
4444AppC_final.qxd 1/5/05 1:08 AM Page 527
All files and objects on your system should be owned by a user and belong to a group. Anyfiles that do not could potentially be malicious in nature, and you should investigate themand either assign them to a user or group or remove them.
You should regularly scan your system for unowned files and objects with world-permissionsset and/or with setuid or setgid permissions. You can use tools such as sXid or Adeos todo this. Files with these permissions introduced into your system without your approvalare often signs of a potential attack or penetration of your system.
Immutable files cannot be changed, deleted, hard-linked to, or renamed even by the rootuser. They allow you to protect some files—for example, configuration files and someimportant binaries—from most forms of compromise. You should examine your systemfor files or binaries that you can make immutable. On some bastion-type systems, youmay be able to make most of your configuration files and binaries immutable. Remem-ber, you will need to remove their immutable status to update or upgrade your config-uration and binaries.
File encryption provides a useful method of securing your individual files against eaves-dropping by an attacker. Use file encryption to secure files that need to be kept private.Always ensure you choose a suitable passphrase to secure your encrypted files to preventyour encrypted files from being compromised.
You can mount your file systems (including removable file systems) with a variety of options,including mounting them read-only, preventing setuid and setgid permissions from func-tioning, stopping devices from being interpreted, and disallowing binary execution. Theseoptions, especially when used with removable devices such as CD drives, and floppy drives,as well as pluggable devices such as USB drives, reduce the risk of a threat being introducedto your system from these devices. You should examine what file systems you have and howthey are mounted.
Like you can encrypt files, you can also create entire encrypted file systems. This allowsyou to create secure, encrypted file systems for large numbers of files that need to beprotected. Or create protected file systems for devices such as laptops to secure sensitiveinformation while in transit.
Monitoring your files and objects for changes is a good way of detecting unauthorizedaccess to your systems. You can use a file integrity scanner such as Tripwire to monitorthe characteristics of your files and objects such as size, permissions, ownership, andhash values. Tripwire will alert you via e-mail or through a report of any files or objectson your system that have changed from an established baseline.
Chapter 5If your logging environment is large, is complicated, or you want to better control yourlogs and their destinations and filtering, then I recommend you use Syslog-NG.
Constantly refine your logging environment to ensure you have picked up on all thepossible sources of information.
Constantly refine your filtering so you are not overwhelmed with irrelevant log data.
APPENDIX C ■ CHECKPOINTS528
4444AppC_final.qxd 1/5/05 1:08 AM Page 528
Secure the transmission of your logs, as an attacker can gain considerable advantages byreading your logs.
Use correlation and analysis tools to highlight the messages important to you, and usealerting tools to get that information to you.
Design and manage your archiving and rotation of logs to ensure you keep the informa-tion you need for the time frame and discard information that is not relevant.
Chapter 6Remember to keep up-to-date with regular security reviews.
Schedule regular checks of your system for root kits.
Ensure your users have secure passwords, and regularly check the integrity and securityof your users’ passwords.
For a consistent approach to some base-level security, run a hardening script such asBastille Linux across your systems.
Use NMAP to scan your systems to confirm that you know and understand all the serv-ices and ports that are active on your systems.
Use a tool such as Nessus or SARA to audit your applications and systems for knownvulnerabilities.
If you are attempting to investigate a potential penetration, keep detailed records bothfor your own purposes and in case auditors or law enforcement require evidence of thepenetration.
If you recover a system, you should follow the basic rules I have articulated.
Chapter 7Keep your mail server software up-to-date by regularly checking its site (http://www.sendmail.org for Sendmail and http://www.postfix.org for Postfix). You should alsoconsider subscribing to any announcement mailing lists available for your mail server.
Keep informed about threats to your mail infrastructure via mailing lists such as BugTraqand via Web sites such as CERT (http://www.cert.org). I also detail a variety of other sitesand mailing lists in Chapter 1.
Ensure you have secured your mail server from penetration and DoS attacks by configur-ing your mail server securely, as described in this chapter. You should also ensure yourfirewall rules are strong and secure as described in Chapter 2.
Keep on top of new trends in spammer tactics and antispam techniques. You can dothis at sites such as http://spam.abuse.net/ and http://www.arachnoid.com/lutusp/antispam.html.
APPENDIX C ■ CHECKPOINTS 529
4444AppC_final.qxd 1/5/05 1:08 AM Page 529
Regularly tweak your antispam rules and checks to ensure they are doing the job. Askyour users to forward spam that slips through your filters to a central Spam mailbox, anduse this spam to tweak your antispam rules. Regularly check the efficiency of any RBLsyou have defined against other available RBLs.
Ensure your antivirus software is up-to-date and that your virus definitions are updatedregularly.
Chapter 8Where possible, you should try to always use TLS encryption for your mail transmission.
Handle your TLS keys and passphrases with the same level of security you would treatother system passwords.
If you need relaying, use SMTP AUTH with Cyrus SASL with authenticate your users andensure only legitimate users are allowed to relay mail through your MTA.
Always try to use SMTP AUTH in conjunction with TLS encryption.
Keep your OpenSSL and Cyrus SASL packages up-to-date to ensure you address anypotential vulnerabilities and exploits.
Chapter 9Choose appropriate remote e-mail access for your site, taking into consideration the pur-poses, benefits, and disadvantages of the available protocols. I recommend for security,stability and available access controls that you use a server based on IMAP.
Choose a stable and secure server as your platform for remote e-mail access and ensureyou periodically update it and apply any relevant security patches.
If you are using a product such as UW-IMAP or Qpopper, which have proven to havea number of security flaws, consider using another application such as Cyrus IMAP.
Consider chrooting your remote e-mail installation to further secure your installationsfrom penetration. I show you how to do this using Cyrus IMAP.
Always ensure you use SSL/TSL-enabled remote access via IMAP or POP, and ensure yourclients use SSL/TLS to encrypt any connections. This will protect your e-mail traffic fromeavesdropping during its transmission.
Always use a secure authentication method such as those available through Cyrus SASLto authenticate your users against the remote e-mail access server. Also consider usinga “sealed” system where the only local shell logins are for system administration use only,and all other users have access to their e-mail stores only.
If you are going to use Fetchmail, then ensure you use TLS to ensure all connections areencrypted. If you cannot use TLS, try to tunnel your connections through OpenSSH. Thiswill help prevent attackers from eavesdropping on your Fetchmail sessions.
APPENDIX C ■ CHECKPOINTS530
4444AppC_final.qxd 1/5/05 1:08 AM Page 530
Chapter 10Unless you have a real need to run an FTP server, then I recommend you do not run one.The inherent insecurities in FTP server daemons and the difficulty in securing FTP trafficmake FTP an extremely risky proposition as a production service.
If you do choose to run an FTP server, then I recommend the vsftpd FTP server availablefrom http://vsftpd.beasts.org/. It is secure, has good performance, and contains a num-ber of security features including support for SSL/TLS FTP transfers.
Ensure you adequately firewall your FTP server. You should utilize the ip_conntrack_ftpmodule provided with iptables to enable FTP connection state tracking. This providesyou with the ability to limit the types of connections made to your host. Additionally, youshould look at limiting the range of ephemeral ports used by your FTP server for its dataconnections.
If you going to allow local user access to your FTP server, consider limiting the networksable to log into that server. I recommend you allow access only from trusted networks.
I recommend placing your local users in chroot jails. The vsftpd server allows you tochroot your local users into their home directories.
If you are going to allow the uploading of files to your FTP server, ensure you set your umaskand default upload permissions carefully to prevent the uploading of files that could beused to compromise your host. For example, restrict the uploading of executable files.
Ensure you set up resource controls on your FTP server to limit the number of incomingconnections and the number of connections from an individual IP address. This limits the risk that your FTP server could be subject to a DoS attack. You could also limit the datatransfer volumes on your FTP server.
Examine the feasibility of using SSL/TLS for your FTP control and data connections. Youwill need to utilize FTP clients that support SSL/TLS.0
Chapter 11One of the key reasons so many BIND servers are the targets of attacks is that a large num-ber of vulnerabilities have been discovered in older versions of BIND. If you are running anolder version of BIND, especially a version prior to BIND 8, you should upgrade immedi-ately. You should keep your BIND version up-to-date and regularly monitor the CERT andBIND mailing lists and the ISC Web site for notifications of any vulnerabilities or issues.
When designing your DNS infrastructure, you should provide separate servers for yourserver and caching functions. This reduces the risk that an attack on one function will affectthe other function. The same principle applies to your internal- and external-facing BINDservers. You should place your external BIND servers in a DMZ, protected by a firewall, ora similar network design. These servers should not also provide server or caching functionsfor your internal network. You should provide other servers, located on your internal net-work, for the provision of server and caching functions for your internal clients.
APPENDIX C ■ CHECKPOINTS 531
4444AppC_final.qxd 1/5/05 1:08 AM Page 531
Always ensure you have suitable slave servers for all your master servers. For every domainfor which you are authoritative, you should ensure you have at least one slave server thatwill able to resolve that domain in the event the master server is unavailable.
You should place your BIND installation in a chroot jail and run it as a nonprivileged user.This will help limit the risk that if an attacker compromises BIND that they will be able todo further damage on your host.
Use access control lists, created with acl statements, to centralize the management ofwhom has access to the functions of your BIND server. This allows you to specify youraccess controls at one source rather than having to update numerous options in yournamed.conf file.
Ensure you are logging enough information and that you regularly review your logs tocheck for anomalies. I recommend logging from your BIND daemon be directed to thesyslog daemon.
Hide your BIND version using the version option in your options statement. Remember,if you want to log requests for your BIND version, then you need to configure a bind chaos
class domain in your named.conf file.
Only allow trusted sources to perform functions, for example, recursion. Do not openyour BIND server to recursive queries or caching functions from external sources. Onlyallow your internal, trusted networks to perform these functions. The only access externalsources should have to your BIND servers is for the external resolution of domains for whichyour BIND servers are authoritative.
If you use the rndc command to control your BIND server, you should preferably allowaccess only to the local system. The rndc command authenticates to the BIND serverusing a key. You should protect your rndc.conf file to ensure an attacker cannot reador write to this file and potentially compromise the key.
Consider using TSIG to secure communications between your DNS servers. Using a key-based hash with your DNS transactions provides a greater level of confidence that you arecommunicating with the correct and authentic server. Remember you need to protect yourTSIG keys by securing the permissions of your configuration files. If attackers compromiseyour keys, then they can impersonate the server with which you are communicating.
APPENDIX C ■ CHECKPOINTS532
4444AppC_final.qxd 1/5/05 1:08 AM Page 532

Index
533
■Special Characters- flag, 189-? option, 213- syntax, 221! prefix, 224$> operator, 356$>+ operator, 356\d escape character, 19\n escape character, 251\t escape character, 19=m suffix, 210-> symbol, 219-2 option, 172-4 option, 172-6 option, 172-A flag, 83-a (nessusd option), 306
■AA option, 393-a option, 14, 240-a switch, 327ACCEPT policy, 82accept statement, 154, 304–5accept_redirects parameter, 126Access Control List (ACL), 75, 188access db, 352–53access permissions, 188–96
overview, 188–91setuid and setgid permissions, 194–96sticky bits, 193–94umask command, 191–92world-readable, world-writable, and
world-executable files, 192–93accounting
process, 44–46user, 42–44
acct package, 44accton command, 45ACK flag, 112ACL (Access Control List), 75, 188acl statement, 477action-log file, 295--add option, 11adeos command, 198Adeos command-line options, 197adm user, 28agent forwarding, 172, 177–79AH (Authentication Header), 166
ALL flag, 114ALL variable, 39allow_untrusted_routing option, 361allowanonymous option, 419AllowGroups option, 183allow-notify control, 487allowplaintext option, 419allow-query control, 487allow-recursion control, 487allow-transfer control, 487allow-transfer option, 479AllowUsers option, 183AMaVis, 370–72anacron service, 9Andrews System Group, 407anonymous identifier, 428ANONYMOUS mechanism, 387anonymous_enable option, 452, 457antispam, 351–64
overview, 351settings for Postfix, 357–64settings for Sendmail, 351–57
antivirus scanning, of e-mail server, 364–72installing ClamAV, 364–68integrating ClamAV with Postfix, 370–72integrating ClamAV with Sendmail,
368–70overview, 364
ANY flag, 112any keyword, 480anyone identifier, 428Apache Web server, 3, 152apmd service, 9APOP protocol, 435apt.conf file, 63apt-get command, 62–63, 448ArchiveDetectEncrypted option, 366ArchiveMaxCompressionRatio option, 366ArchiveMaxFiles option, 366ArchiveMaxFileSize option, 366ArchiveMaxRecursion option, 366ARP, 109as limit, 52ASCII, 203atd service, 9AUTH command, 393auth facility, 236auth module, 46authconfig tool, 35
4444_IDX_final.qxd 1/5/05 1:09 AM Page 533

■INDEX534
authentication, 1, 410. See also mail,authenticating and securing
Authentication Header (AH), 166authentication-agent forwarding, 179authorization, 39, 410auth-priv facility, 236authwarnings flag, 339auto option, 205AUTO protocol, 435Autodetect option, 72autofs service, 9automated security hardening, with Bastille
Linux, 290–95Bastille logging, 295installing Bastille Linux, 291–92overview, 290–91running Bastille, 292–94
automating Fetchmail, 438–40auxprop (Auxiliary Property), 392awk command, 286
■B-b (clamav-milter option), 369-b option, 174-B option, 441background option, 451backup user, 28BAD_FLAGS chain, 113banner_file option, 454barf function, 166bash script, 426Basic Input/Output System (BIOS), 5basics of hardening. See hardening basicsBastille Linux, 290–95
installing, 291–92logging, 295overview, 290–91running, 292–94
bastion host, creating firewalls for, 97–117bastion host rules, 116–17firewall logging, 101–5handling ICMP traffic, 105–8iptables and TCP flags, 111–16
blocking bad flag combinations, 113–15overview, 111–12SYN flooding, 115–16
overview, 97–98securing bastion services, 98–101spoofing, hijacking, and denial of service
attacks, 108–11bastion host firewall script, 511–16Batchmode option, 181Beale, Jay, 291bin user, 28BIND
chrooting, 472–73configuration files, 517–24
authoritative master name server, 519–20caching server, 517–19overview, 517sample named init script, 523–24split DNS name server, 520–23
configuring, 476–500access control lists, 479–80logging, 480–84options, 484–93overview, 476–79views and zones, 493–96zones, 497–500
installing, 470–71permissions in chroot jail, 473–74resources, 510rndc command, 504–9
adding rndc support to named.conf,507–8
overview, 504–5rndc.conf, 505–7using rndc, 508–9
secure BIND design, 467–70starting and running named daemon,
474–76/bin/false script, 21BIOS (Basic Input/Output System), 5blackhole control, 487blackhole option, 517blacklist_recipients feature, 352blind spoofing, 109Blowfish, 209boat loader, 5–8
overview, 5securing grub with password, 6–8securing LILO with password, 5–6
Boolean, 125/boot directory, 71boot image, 121boot sequencing, 15bottlenecking, 116Bourne script, 319Bourne shell command, 178Brute-force cracking, 287btmp file, 44buffer overflow, 74Build command, 378builddefs.h file, 449burst function, 115bzImage option, 72
■Cc flag, 189-C option, 172-c option, 390–91C programming language, 73CA (Certificate Authority), 139, 142–48,
374–76, 459
4444_IDX_final.qxd 1/5/05 1:09 AM Page 534

ca (Openssl command-line function), 142cache poisoning, of DNS server, 465CAfile option, 262–63-CAfile option, 151Calendar rule type, 276-CApath option, 151Carnegie Mellon University, 388–89cat command, 38catchall flag, 254cert option, 262Certificate Authority (CA), 139, 142–48,
374–76, 459Certificate Revocation List (CRL), 149certificates, signing, 142–48certs directory, 260CFS, 208chage tool, 36chains, of iptables rules, 82CHAOSnet protocol, 485chattr command, 198–99--checkall option, 284CheckHostIP option, 181CheckPoint Firewall, 79checksecurity, 196--checksig option, 61chkconfig, 10–11Chkrootkit, 285–86chmod command, 189–90, 193–94, 511chmod man, 191chroot command, 416, 472chroot jail, permissions in, 473–74chroot_list_enable option, 457chroot_local_user option, 457chrooting
BIND, 472–73Postfix, 330–33Sendmail SMTP gateway or relay, 324–30
/chroot/sendmail/dev directory, populating,327–28
/chroot/sendmail/etc directory, populating,326–27
CIDR notation, 311--cipher-algo option, 203Cisco devices, 235Cisco PIX firewall, 97ClamAV
installing, 364–68integrating with Postfix, 370–72integrating with Sendmail, 368–70
clamav-milter program, 365, 369clamd daemon, 365clamscan tool, 365client authentication, 140client category, 484command-line options, 11, 26comment module, 123–24--comment module, 124
compat_check feature, 352compilers and development tools, 64–66
overview, 64removing, 64–65restricting, 65–66
Compression option, 181-conf option, 267config category, 484.config file, 71config script, 141CONFIG_CRYPTO prefix, 210configure statement, 410conn section, 164connect statement, 154connect_from_port_20 option, 454ConnectionRateThrottle directive, 342connections and remote administration. See
also public-key encryptionoverview, 137remote administration, 169–85
configuring ssh and sshd, 180–83forwarding X with OpenSSH, 184–85overview, 169–71port forwarding with OpenSSH, 183–84scp and sftp, 175–76ssh, 171–75ssh-agent and agent forwarding, 177–79sshd daemon, 179–80
resources, 185console, 16console.perms file, 17, 207contrib directory, 179, 242controls statement, 477core limit, 52correlation, 265CPAN, 291cpu limit, 52CRAM-MD5 mechanism, 387create option, 213create_dirs( ) option, 246createmailbox command, 427crit priority, 238CRL (Certificate Revocation List), 149-crldays option, 149crond service, 9, 46--cronjob option, 284Cryptoloop, 208cryptosystem, 143cryptsetup command, 211–12cryptsetup package, 209Crystal Reports, 256cups service, 9Custom (installation option), 2cut command, 286cyradm tool, 426Cyrus IMAP, 407–29
access control and authorization, 425–28
■INDEX 535
4444_IDX_final.qxd 1/5/05 1:09 AM Page 535
Cyrus IMAP (continued)authentication with SASL, 422–25configuring, 417–22
integrating Cyrus IMAP with Sendmailand Postfix, 421–22
overview, 417–20installing and compiling, 409–11installing into chroot jail, 411–17
adding Cyrus IMAP binaries andlibraries, 412–13
overview, 411–12permissions and ownership, 415populating /chroot/cyrus/dev
directory, 413–14populating /chroot/cyrus/etc directory,
414–15starting and stopping Cyrus IMAP in
chroot jail, 416–17overview, 407–9testing with imtest/pop3test, 428–29
Cyrus SASL. See SMTP AUTH using CyrusSASL
cyrus-sasl package, 388
■D-d (logrotate Command-Line Option), 279-d (nessusd option), 306-D (clamav-milter option), 369-D (nessusd option), 306daemon user, 28daemons, 10data corruption and alteration, of DNS
server, 466dd command, 210–11DDoS. See Distributed Denial of Service
attacksdeb package, 470Debian, 9, 11–13, 76default category, 484default policy, 90default statement, 304–5default_bits option, 145default_debug channel, 483default_process_limit option, 344default_stderr channel, 483default_syslog channel, 483defaults option, 205–6--del option, 11delay option, 157deleteaclmailboxd command, 427deletemailbox command, 427deleting unnecessary users and groups,
28–30Demilitarized Zone (DMZ), 91, 324, 519Denial of Service (DoS) attacks, 4, 51, 108–11,
167, 463. See also Distributed Denialof Service (DDoS) attacks
on DNS server, 465–66and FTP server, 443–44, 455–56protecting Fetchmail from, 440–41
deny statement, 304–5deny_email_enable option, 453DenyGroups option, 183DenyUsers option, 183dep option, 72-des3 option, 142desktop user, 28destination{ }, 244, 249–52-detach option, 267dev option, 205–6development tools. See compilers and
development toolsDictionary-based cracking, 287.diff file, 70dig command, 486DIGEST-MD5 mechanism, 387digital signatures, 138
and GNU privacy guard, 58–59and RPM, 59–61
dir_group( ) option, 246dir_owner( ) option, 246dir_perm( ) option, 246--disable-threads option, 471DISCARD option, 360Distributed Denial of Service (DDoS) attacks,
limiting risk of, 341–46overview, 341–42with Postfix, 344–46with Sendmail, 342–44
distribution security sites, 76djbdns package, 467-dla options, 193dm_mod module, 210dm-crypt module, 208–10DMZ (Demilitarized Zone), 91, 324, 519DNS server
choosing, 466–67resources, 510risks to, 464–66
cache poisoning, 465data corruption and alteration, 466denial of service attacks, 465–66man-in-the-middle attacks, 464–65overview, 464
and transaction signatures (TSIG),500–504
DNS_COMMANDS command alias, 40DNS_SERVERS command alias, 40dnscache application, 467DNSSEC, 464dnssec category, 484dnssec-keygen command, 501domains, 469DontCont option, 270
■INDEX536
4444_IDX_final.qxd 1/5/05 1:09 AM Page 536

DoS. See Denial of Service (DoS) attacksdownloading updates and patches, 61–64
apt-get, 62–63overview, 61up2date, 62Yum, 63–64
--dport flag, 84, 123DROP policy, 82, 98, 132dselect tool, 65dsniff, 318dump command, 205DUNNO option, 359
■E-e option, 174e2fsprogs package, 198Eavesdropping, 138echo (Shell command), 340egrep command, 286EHLO command, 385EJBCA, 139EL (Enterprise Linux), 67e-mail, hardening remote access to, 403–42.
See also Cyrus IMAP; Fetchmailchoosing IMAP or POP servers, 405–6how IMAP or POP server is at risk, 406–7IMAP, 404overview, 403POP, 404–5resources, 441–42
e-mail server, antivirus scanning of, 364–72installing ClamAV, 364–68integrating ClamAV with Postfix, 370–72integrating ClamAV with Sendmail, 368–70overview, 364
emailto attribute, 222emerg priority, 238–39emulate GCC trampolines option, 72--enable-inet6 option, 433--enable-krb4 option, 388--enable-login option, 388-enable-opie option, 433--enable-sql option, 388encrypted file system, creating, 208–15
enabling functionality, 209–10encrypting loop file system, 210–14installing userland tools, 209overview, 208–9remounting, 215unmounting encrypted file system, 214
encrypting files, 202–4encryption. See public-key encryptionEnhanced Simple Mail Transfer Protocol
(ESMTP), 334enhdnsbl feature lines, 353Enterprise Linux (EL), 67ephemeral port, 437
err priority, 237error-log file, 295ESMTP (Enhanced Simple Mail Transfer
Protocol), 334ESTABLISHED connection, 93–97/etc/default/useradd file, 24/etc/fstab file, 208/etc/group file, 20/etc/groups file, 23/etc/gshadow file, 24/etc/ipsec.secrets file, 164/etc/login.defs file, 36/etc/modules.conf file, 210/etc/pam.d directory, 31, 55/etc/pam.d/passwd file, 34/etc/passwd file, 20/etc/security directory, 207/etc/shadow file, 20, 23/etc/shells file, 21/etc/ssh file, 173/etc/sysconfig/iptables file, 131/etc/tripwire directory, 225eth0 interface, 87eth1 interface, 87Ethereal, 80, 318ETRN command, 336–38Ettercap, 318Eudora, 374exec command, 340exec option, 205–6execute permission, 189exit (shell command), 340EXPIRE, 25EXPN command, disabling, 337–38
■F-F flag, 89-f (logrotate command-line option), 279f_infotoemerg filter, 253facility( ) filter, 252fallback flag, 254Fedora, 62Fetchmail
configuring and running, 434–41automating Fetchmail securely, 438–40overview, 434–35protecting Fetchmail from denial of
service attacks, 440–41tunneling Fetchmail with SSH, 437–38using Fetchmail with OpenSSL, 435–36
installing, 431–34overview, 430–31
.fetchmailrc file, 439FIFO (First In First Out), 69file( ) source, 247–49File Transfer Protocol. See FTPfile_open_mode option, 458
■INDEX 537
4444_IDX_final.qxd 1/5/05 1:09 AM Page 537

files and file systems, 187–231. See alsopermissions and attributes; Tripwire
capabilities and lcap, 200–201creating encrypted file system, 208–15
enabling functionality, 209–10encrypting loop file system, 210–14installing userland tools, 209overview, 208–9remounting, 215unmounting encrypted file system, 214
encrypting files, 202–4ensuring file integrity, 57–61
digital signatures and GNU privacyguard, 58–59
MD5 and SHA1 checksums, 57–58overview, 57RPM and digital signatures, 59–61
file destination, 481immutable files, 196–99Network File System (NFS), 229–30overview, 187–88resources, 231securely mounting file systems, 204–7securing removable devices, 207–8
filesnarf tool, 318filter table, 82filter{ }, 244, 252–53FIN flag, 112–13final flag, 254find command, 192–93, 205, 286, 315finger command, 21Firestarter tool, 129firewalls, 79–136
adding first rules, 83–85and boot sequencing, 15choosing filtering criteria, 86–87creating basic firewall, 91–97creating for bastion host, 97–117
bastion host rules, 116–17firewall logging, 101–5handling ICMP traffic, 105–8iptables and TCP flags, 111–16overview, 97–98securing bastion services, 98–101spoofing, hijacking, and denial of
service attacks, 108–11enabling during installation, 2firewalling FTP server, 446–48how Linux firewall works, 80–83
chains, 82overview, 80–82policies, 82–83tables, 82
iptables command, 87–91kernel modules, 117. See also Patch-o-Matickernel parameters, 124–29. See also Patch-o-
Matic
/proc/sys/net/ipv4/conf/all/accept_redirects, 126
/proc/sys/net/ipv4/conf/all/accept_source_route, 126
/proc/sys/net/ipv4/conf/all/log_martians, 126–27
/proc/sys/net/ipv4/conf/all/rp_filter,127–28
/proc/sys/net/ipv4/icmp_echo_ignore_all, 128
/proc/sys/net/ipv4/icmp_echo_ignore_broadcasts, 128
/proc/sys/net/ipv4/icmp_ignore_bogus_error_responses,128
/proc/sys/net/ipv4/ip_forward, 129/proc/sys/net/ipv4/tcp_syncookies, 129overview, 117, 124–26managing iptables and rules, 129–35
iptables init scripts, 131iptables-save and iptables-restore,
130–31overview, 129–30testing and troubleshooting, 132–35
overview, 79–80resources, 136
First In First Out (FIFO), 69-fN option, 183FORWARD chain, 82, 92forward option, 493forward type, 497ForwardAgent option, 181forwarders option, 493forwarding X, with OpenSSH, 184–85ForwardX11 option, 181FQDN (Fully Qualified Domain Name), 375fraggling, 109FreeSWAN, 162-fromstart option, 269fsck command, 205fsize limit, 52FTP server, 443–61
adding SSL/TLS support, 459–60configuring vsftpd for anonymous FTP,
450–56general configuration, 451–52general security, 454–55mode and access rights, 452–54overview, 450–51preventing denial of service attacks,
455–56configuring vsftpd with local users, 456–59firewalling FTP server, 446–48how FTP works, 444–46installing vsftpd, 448–50overview, 443–44resources, 461
■INDEX538
4444_IDX_final.qxd 1/5/05 1:09 AM Page 538

starting and stopping vsftpd, 461what FTP server to use, 448
ftp user, 28ftpd_banner option, 454Fully Qualified Domain Name (FQDN), 375
■G-g option, 184games user, 28gcc package, 65gdm user, 28GECOS3, 21gendsa (Openssl command-line function),
142general category, 484Generic Security Services Application
Programming Interface (GSSAPI),422
genrsa option, 142Gentoo, 76, 382getpwent mechanism, 423GFI, 351GID, 24Gimp Toolkit (GTK), 302–3glibc, 72GMP (GNU Multi-Precision), 159gnats user, 28Gnome Lokkit, 129GNU Multi-Precision (GMP), 159GNU Privacy Guard (GPG), 4, 58–59, 432goaway flag, 339gopher user, 28gpasswd command, 27gpg -c command, 202gpg command, 202GPG (GNU Privacy Guard), 4, 58–59, 432gpg --import option, 58gpm service, 9Graphical User Interface (GUI), 3group( ) option, 246groupadd command, 26groupdel command, 28groupmod command, 28groups. See users and groupsgrsecurity package, 74Grub, securing with password, 6–8grub.conf configuration file, 73GSSAPI (Generic Security Services Applica-
tion Programming Interface), 422GTK (Gimp Toolkit), 302–3GuardDog tool, 129GUI (Graphical User Interface), 3
■H-h option, 212–13halt user, 28handshake, 140
hardening basics, 1–77. See also kernelboot sequencing, 15compilers and development tools, 64–66
overview, 64removing, 64–65restricting, 65–66
Debian init scripts, 11–13downloading updates and patches, 61–64
apt-get, 62–63overview, 61up2date, 62Yum, 63–64
ensuring file integrity, 57–61digital signatures and GNU privacy
guard, 58–59MD5 and SHA1 checksums, 57–58overview, 57RPM and digital signatures, 59–61
inittab file, 13–14installing distribution securely, 2–4keeping informed about security, 75–76overview, 1–2pluggable authentication modules (PAM),
46–56overview, 46–48PAM module stacking, 48–49PAM “other” service, 49–50restricting su using, 50–51restricting users to specific login times
with, 53–56setting limits with, 51–53
process accounting, 44–46Red Hat console, 16–17Red Hat init scripts, 10–11resources, 76–77securing boat loader, 5–8
overview, 5securing Grub with password, 6–8securing LILO with password, 5–6
securing console, 16securing login screens, 18–19securing virtual terminals, 17–18users and groups, 19–44
adding groups, 26–28adding users, 24–26deleting unnecessary users and groups,
28–30groups, 23–24overview, 19–22password aging, 35–37passwords, 31–35shadow passwording, 22–23sudo, 37–42user accounting, 42–44
hash, 146head command, 286header checks, Sendmail, 354–57
■INDEX 539
4444_IDX_final.qxd 1/5/05 1:09 AM Page 539

help command, 427--help option, 153, 284, 471hide_ids option, 454hijacking, 108–11hint type, 497HMAC-MD5 algorithm, 506home directory, 25/home partition, 21host( ) filter, 252host keys, 173host selector, 134HTML (Hyper Text Markup Language), 302HTTPS (Hyper Text Transfer Protocol–
Secured), 84
■I-i flag, 83–84-I flag, 87IANA (Internet Assigned Numbers
Authority), 86ICMP (Internet Control Message Protocol),
81ICMP traffic, handling, 105–8, 128icmp_echo_ignore_all parameter, 128--icmp-type flag, 107id command, 286identd user, 28if option, 211ifconfig, 80IGNORE option, 360IKE (Internet Key Exchange), 165IMAP (Internet Message Access Protocol),
403–7. See also Cyrus IMAPimmutable files, 196–99import module, 121imtest tool, 428INACTIVE option, 25include command, 278include function, 354inet option, 507inetd and xinetd-based connections, 167–69inetd daemon, 167–68--init option, 226init process, 4init script, 10, 475init scripts
Debian init scripts, 11–13Red Hat init scripts, 10–11sample named init script, 523–24
inittab file, 13–14inner layer security, 282–95
automated security hardening withBastille Linux, 290–95
Bastille logging, 295installing Bastille Linux, 291–92overview, 290–91running Bastille, 292–94
overview, 282scanning for exploits and root kits, 282–86
Chkrootkit, 285–86overview, 282–83Rootkit Hunter, 283–85
testing password security, 287–90INPUT chain, 82, 107, 113-input option, 267insmod command, 122–23Installation option (Custom), 2Installation option (Minimal), 2installing
Bastille Linux, 291–92BIND, 470–71Fetchmail, 431–34Openwall Project, 69–73SEC, 267–68userland tools, 209vsftpd, 448–50
Internet Assigned Numbers Authority(IANA), 86
Internet Control Message Protocol. See ICMPInternet Key Exchange (IKE), 165Internet Message Access Protocol. See IMAPInternet Systems Consortium (ISC), 466intrusion, 286INVALID state, 93, 116invoke-rc.d command, 168IP security (IPSec), 159ip_conntrack_ftp module, 446–47ip_forward option, 125–26ipchains command, 81ipfwadm command, 81iprange module, 121, 122ipsec command, 161, 166–67IPSec (IP security), 159ipsec setup command, 166ipsec showhostkey --right command, 165IPSec, VPNs, and Openswan, 159–67
firewalling for Openswan and IPSec,165–66
ipsec command, 166–67ipsec.conf file, 162–65overview, 159–62
ipsec.o module, 161ipt_conntrack module, 93iptables and TCP flags, 111–16
blocking bad flag combinations, 113–15managing iptables and rules, 129–35
iptables init scripts, 131iptables-save and iptables-restore,
130–31overview, 129–30testing and troubleshooting, 132–35
overview, 111–12SYN flooding, 115–16
iptables command, 83, 87–91
■INDEX540
4444_IDX_final.qxd 1/5/05 1:09 AM Page 540

iptables match module, 115iptables-restore command, 130–31iptables-save command, 130–31IPv4 networking, 476IPv6, 433, 476irc user, 28irda service, 9ISC (Internet Systems Consortium), 466isdn service, 9issue.net file, 18
■J-j flag, 84Janicke, Lutz, 382John the Ripper (JTR) password cracker,
287–90
■KKDE (K Desktop Environment), 295Kerberos, 410kerberos4 mechanism, 389kerberos5 mechanism, 389kern facility, 236kern logging, 128kernel, 1–2, 5–6, 8, 66–75
getting kernel source, 66–68grsecurity package, 74Linux Intrusion Defense System (LIDS), 74modules, 117. See also Patch-o-MaticOpenwall Project, 68–74
installing, 69–73overview, 68–69testing, 73–74
overview, 66parameters, 124–29. See also Patch-o-
Matic/proc/sys/net/ipv4/conf/all/
accept_redirects, 126/proc/sys/net/ipv4/conf/all/
accept_source_route, 126/proc/sys/net/ipv4/conf/all/
log_martians, 126–27/proc/sys/net/ipv4/conf/all/rp_filter,
127–28/proc/sys/net/ipv4/icmp_echo_ignore_
all, 128/proc/sys/net/ipv4/icmp_echo_ignore_
broadcasts, 128/proc/sys/net/ipv4/icmp_ignore_
bogus_error_responses, 128/proc/sys/net/ipv4/ip_forward, 129/proc/sys/net/ipv4/tcp_syncookies,
129overview, 117, 124–26
Rule Set Based Access Controls (RSBAC)project, 74
SELinux package, 75
key statement, 477keyserver, 60keytable, 9klipsdebug option, 163klogd daemon, 234KPOP protocol, 435kudzu service, 9
■L-l (clamav-milter option), 369l flag, 189-L flag, 88-l option, 36, 174, 441lame-servers category, 484LAN (Local Area Network), 110Lasser, Jon, 291last command, 43, 314lastb command, 43lastcomm command, 45lastlog command, 44LaTeX, 302lcap command, 200–201LDAP (Lightweight Directory Access
Protocol), 392ldap mechanism, 423ldd command, 328, 381–83, 412libmilter library, 368libnet, 318libnids, 318libol library, 241libpam-cracklib, 32LIDS (Linux Intrusion Defense System), 74,
318Lightweight Directory Access Protocol
(LDAP), 392LILO, securing with password, 5–6lilo.conf, 73limit module, 115--limit-burst option, 115limits.conf file, 52--line-numbers flag, 88Linux Intrusion Defense System (LIDS), 74,
318list user, 28listaclmailboxl command, 427listen option, 451, 452listen_address option, 452listen-on option, 489listmailbox command, 427listquota command, 427LMTP (Local Mail Transfer Protocol), 409lmtp socket, 420–22lo host, 98Local Area Network (LAN), 110Local Mail Transfer Protocol (LMTP), 409local option, 157Local port forwarding, 183
■INDEX 541
4444_IDX_final.qxd 1/5/05 1:09 AM Page 541

local_destination_concurrency_limit option,344–45
local_enable option, 457local0–local7 facility, 236localhost keyword, 480localnets keyword, 480--localstatedir option, 153log_martians parameter, 126–27log{ }, 253–54logger command, 259logger (command-line tool), 263–64logging and log monitoring, 233–80. See also
syslog; syslog-NGfirewall logging, 101–5log analysis and correlation, 264–76
building SEC rules, 270–76inputting messages to SEC, 269–70installing and running SEC, 267–68overview, 264–66
log management and rotation, 277–79overview, 233resources, 280
logging statement, 477login command, 50LOGIN mechanism, 387–88login screens, 18–19login_alert.conf file, 55login.defs file, 23LoginGraceTime option, 183--log-ip-options flag, 102--log-level flag, 102--log-prefix flag, 101logrotate tool, 277–79--log-tcp-options flag, 102--log-tcp-sequence flag, 102loop file system, encrypting, 210–14Loop-AES, 208Loopback addresses, 109losetup command, 211, 214lp user, 28lpd service, 9lpd user, 28lpr facility, 236ls command, 45, 188, 193, 286, 315ls_recurse_enable option, 455
■M-m mins option, 239-m option, 36-M option, 36, 416m4 command, 334mail, authenticating and securing, 373–402.
See also TLSoverview, 373resources, 402SMTP AUTH using Cyrus SASL, 387–89
compiling Cyrus SASL, 388
configuring SASL saslauthd, 389overview, 387–88
SMTP AUTH using Cyrus SASL for Postfix,395–400
compiling Cyrus SASL into Postfix,395–96
configuring Cyrus SASL for Postfix,396–98
overview, 395using SMTP client authentication with
Postfix, 400using SMTP server authentication with
Postfix, 398–400SMTP AUTH using Cyrus SASL for
Sendmail, 389–95compiling Cyrus SASL into Sendmail,
390–91configuring Cyrus SASL for Sendmail,
391–92overview, 389–90using SMTP client authentication with
Sendmail, 394–95using SMTP server authentication with
Sendmail, 392–93testing SMTP AUTH with Outlook Express,
400–401Mail Exchange Record (MX), 349mail server, 321–72, 346–64
antispam, 351–64antispam settings for Postfix, 357–64antispam settings for Sendmail, 351–57overview, 351
antivirus scanning of e-mail server, 364–72installing ClamAV, 364–68integrating ClamAV with Postfix, 370–72integrating ClamAV with Sendmail,
368–70overview, 364
choosing, 321–23how mail server is at risk, 323overview, 321, 346protecting mail server, 323–33
chrooting Postfix, 330–33chrooting Sendmail SMTP gateway or
relay, 324–30overview, 323–24
relaying, 346–51overview, 346–47in Postfix, 350–51in Sendmail, 348–50testing if you are open relay, 347–48
resources, 372securing SMTP server, 333–46
disabling dangerous and legacy SMTPcommands, 336–38
limiting risk of (Distributed) DoSattacks, 341–46
■INDEX542
4444_IDX_final.qxd 1/5/05 1:09 AM Page 542

obfuscating MTA banner and version,333–35
overview, 333Sendmail and smrsh, 339–40some additional Sendmail privacy flags,
339writing to files safely, 340–41
Mail Submission Program (MSP), 323Mail Transfer Agent (MTA), 146, 333–35mail user, 28mail_always option, 41mail_badpass option, 41mail_no_host option, 41mail_no_perms option, 41mail_no_user option, 41mailCA, 375Maildir mailbox, 25maildrop program, 340mailing lists, 75–76mailnull user, 28mailq command, 328mailsnarf tool, 318main.cf file, 335make bzImage command, 160make config command, 71make mrproper function, 70make oldconfig command, 72make process, 260, 459makedepend command, 409makemap command, 349man user, 29Mandrake, 17, 76man-in-the-middle attacks, on DNS server,
464–65mark facility, 236, 239–40master type, 497match( ) filter, 252match-clients substatement, 496match-destinations substatement, 495match-recursive-only substatement, 495max_clients option, 455max_per_ip option, 455--max-children (clamav-milter option), 369MaxDaemonChildren directive, 342MaxHeaderLength option, 343maxlogins limit, 52MaxMessageLength option, 343MaxMIMEHeaderLength option, 343MAY option, 386MD5, 2, 4, 6–7, 21, 23, 31, 34, 57, 287–88md5sum command, 57memlock limit, 52Message digest, 57, 138message_size_limit option, 346Microsoft Certificate Server, 139MinFreeBlocks option, 344minimal installation option, 2, 525
mkfs.ext3 command, 214mknod command, 327, 413, 472–73mode numbers, 190modprobe command, 210module command, 121module stacking, 33modules_install command, 121modules_install option, 72MonMotha tool, 129mounting file systems securely, 204–7mport module, 123MSP (Mail Submission Program), 323MTA (Mail Transfer Agent), 146, 333–35multiport module, 123MUST option, 386MUST_NOPEERMATCH option, 386mux file, 391MX (Mail Exchange Record), 349MySQL, 39, 256–59
■Nn option, 120named daemon, 472, 474–76named.conf file, 476–78, 507–8NASL (Nessus Attack Scripting Language),
302NAT (Network Address Translation), 79, 445NAT-T (Network Address Translation
Traversal), 160needmailhelo flag, 339Nessus, 281, 295, 302–13
overview, 302–5running Nessus client, 307–13running Nessusd daemon, 306–7
Nessus Attack Scripting Language (NASL),302
nessus client options, 307nessus-adduser command, 304nessus-mkcert command, 304NessusWX, 307net selector, 134NetBSD, 80Netcat, 319Netfilter, 79–81netfs service, 9NetHack, 3netmask( ) filter, 252Netscape Certificate Management System,
139netstat -a command, 169, 296netstat command, 286Network Address Translation (NAT), 79, 445Network Address Translation Traversal
(NAT-T), 160network category, 484Network File System (NFS), 229–30Network Time Protocol (NTP), 100–101, 503
■INDEX 543
4444_IDX_final.qxd 1/5/05 1:09 AM Page 543

NEW connection, 93–97newaliases command, 328-newca option, 145newgrp command, 27news user, 29NFS (Network File System), 229–30nfslock service, 9nfsnobody user, 29nfswatch command, 230NMAP, 296–301nmap tool, 112–13no_oe.conf file, 165noactive option, 398noanonymous option, 398–99noauto option, 205nobody user, 29nobodyreturn flag, 339--nocolors option, 284--nodeps option, 65-nodes option, 376nodev option, 205nodictionary option, 398noexec option, 205–6nofile limit, 52-nofromstart option, 269NONE option, 112noplaintext option, 398nopriv_user option, 452noreceipts flag, 339normal mode, 197noshell, 21–22nosuid option, 205–6notify-source substatement, 491nouser option, 205–6noverb flag, 339nproc limit, 52NSA, 75nscd user, 29NTML protocol, 433NTP (Network Time Protocol), 100–101, 503ntpd service, 9ntsysv, 11null channel, 483null destination, 481
■O-o option, 172, 369-o=w flag, 192obscure option, 32ODBC (Open Database Connectivity), 256ODMR (On-Demand Mail Relay), 430OE (Opportunistic Encryption), 162of option, 211On-Demand Mail Relay (ODMR), 430one-way hash, 138Open Database Connectivity (ODBC), 256
OpenSSH, 169–71, 312forwarding X with, 184–85port forwarding with, 183–84
OpenSSL, 302, 377, 435–36, 459. See also SSL,TLS, and OpenSSL
openssl command, 150–52openssl s_client command, 150openssl s_server function, 151openssl.cnf file, 143Openwall Project, 68–74
installing, 69–73overview, 68–69testing, 73–74
operator user, 29Opportunistic Encryption (OE), 162op.ps file, 330optional module, 47options statement, 477options{ }, 244–46-out option, 142outer layer security, 295–313
Nessus, 302–13overview, 302–5running Nessus client, 307–13running Nessusd daemon, 306–7
NMAP, 296–301overview, 295
Outlook Express, 374OUTPUT chain, 107owner option, 205–6, 246ownership, 196
■Pp flag, 189-p flag, 83-p (nessusd option), 306-P0 (NMAP command-line option), 310PAM (pluggable authentication modules),
46–56enabling, 170module stacking, 48–49modules, 16, 31–32, 34overview, 46–48PAM “other” service, 49–50Red Hat preconfiguration with, 1–2restricting su using, 50–51restricting users to specific login times
with, 53–56setting limits with, 51–53
pam_access.so module, 56pam_console.so, 16pam_cracklib.so module, 32–33pam_deny.so module, 49pam_env.so module, 56pam_group.so module, 56pam_limits.so module, 51pam_local.so module, 48
■INDEX544
4444_IDX_final.qxd 1/5/05 1:09 AM Page 544

pam_login_alert.so module, 54–55pam_rhosts_auth.so module, 49pam_server_name option, 458pam_stack.so module, 48pam_time.so module, 53pam_unix.so module, 32pam_warn.so module, 50pamnotsosecure.so module, 48parameters, kernel, 124–29
overview, 124–26/proc/sys/net/ipv4/conf/all/
accept_redirects, 126/proc/sys/net/ipv4/conf/all/
accept_source_route, 126/proc/sys/net/ipv4/conf/all/
log_martians, 126–27/proc/sys/net/ipv4/conf/all/rp_filter,
127–28/proc/sys/net/ipv4/
icmp_echo_ignore_all, 128/proc/sys/net/ipv4/
icmp_echo_ignore_broadcasts, 128/proc/sys/net/ipv4/
icmp_ignore_bogus_error_responses,128
/proc/sys/net/ipv4/ip_forward, 129/proc/sys/net/ipv4/tcp_syncookies, 129
paranoid mode, 197passwd file, 194passwd function, 49password module, 47password option, 6PasswordAuthentication option, 182password.lst file, 288passwords, 31–35
aging, 35–37shadow passwording, 22–23testing security of, 287–90
John the Ripper (JTR) password cracker,287–90
overview, 287PASV command, 444–45pasv_max_port option, 455pasv_min_port option, 455patches. See updates and patchesPatch-O-Matic (POM), 117–24, 527
comment module, 123–24iprange module, 122mport module, 123overview, 117–21
PaX project, 74pcmcia service, 9PDF file format, 302Peer certificate verification, 156PEM file, 460PERL, 65perl-TK, 291
-perm option, 192permissions and attributes, 188–96
access permissions, 188–96overview, 188–91setuid and setgid permissions, 194–96sticky bits, 193–94umask command, 191–92world-readable, world-writable, and
world-executable files, 192–93overview, 188ownership, 196
permit_mynetworks permission, 362permit_sasl_authenticated permission, 362PermitRootLogin option, 182PGP-MIME, 374pgp.net key server, 67PID (Process ID), 366, 485PIN, 31ping command, 105pipe( ) source, 247–51PKI (public-key infrastructure), 138PLAIN mechanism, 387pluggable authentication modules. See PAMPluto IKE, 163plutodebug option, 163policies, 82–83policy file, 218POM. See Patch-O-MaticPOP (Post Office Protocol), 403–7, 435pop3test tool, 428PORT command, 444port forwarding, with OpenSSH, 183–84portmap service, 9PortSentry tool, 342Post Office Protocol (POP), 403–7, 435Postfix, 330–33, 335, 529
antispam configuration, 360–64antispam settings for, 357–64chrooting, 330–33header and body checks, 359–60integrating Cyrus IMAP with, 421–22limiting risk of Denial of Service (DoS)
attacks with, 344–46relaying in, 350–51restriction list, 358–59SMTP AUTH using Cyrus SASL for, 395–400
compiling Cyrus SASL into Postfix,395–96
configuring Cyrus SASL for Postfix,396–98
overview, 395using SMTP client authentication with
Postfix, 400using SMTP server authentication with
Postfix, 398–400TLS with, 381–86
compiling TLS into Postfix, 382–83
■INDEX 545
4444_IDX_final.qxd 1/5/05 1:09 AM Page 545

Postfix (continued)configuring TLS in Postfix, 383–85overview, 381–82using TLS for specific host, 385–86
Postfix-TLS patch, 385postgres user, 29PostgreSQL, 392postmap command, 338, 386postrotate command, 279--prefix option, 260, 471--prefixconfigure option, 434prerotate command, 279print-category option, 482--print-report option, 227print-severity option, 482print-time option, 482priority( ) filter, 252priority limit, 52private-key encryption, 202/proc directory, 69/proc/crypto file, 210process accounting, 44–46Process ID (PID), 366, 485procmail program, 340/proc/sys/net/ipv4/conf/all/
accept_redirects, 126/proc/sys/net/ipv4/conf/all/
accept_source_route, 126/proc/sys/net/ipv4/conf/all/log_martians,
126–27/proc/sys/net/ipv4/conf/all/rp_filter, 127–28/proc/sys/net/ipv4/icmp_echo_ignore_all,
128/proc/sys/net/ipv4/
icmp_echo_ignore_broadcasts, 128/proc/sys/net/ipv4/
icmp_ignore_bogus_error_responses,128
/proc/sys/net/ipv4/ip_forward, 129/proc/sys/net/ipv4/tcp_syncookies, 129ProFTPD FTP server, 448program( ) filter, 252property summaries, 221protocol option, 157proxy user, 29ps -A command, 169ps command, 286PSH flag, 112public-key encryption, 58, 137–69
inetd and xinetd-based connections, 167–69IPSec, VPNs, and Openswan, 159–67
firewalling for Openswan and IPSec,165–66
ipsec command, 166–67ipsec.conf file, 162–65overview, 159–62
overview, 137–39
SSL, TLS, and OpenSSL, 140–52creating certificate authority and
signing certificates, 142–48overview, 140–42revoking certificate, 149–50testing connections using openssl
command, 150–52Stunnel, 152–58
public-key infrastructure (PKI), 138
■Qq option, 121query-source substatement, 490queue_minfree option, 346--quiet (clamav-milter option), 369quit command, 427
■R-r option, 30, 240-R option, 172RAM (Random Access Memory), 178Raymond, Eric S., 430RBLs, and Sendmail, 353–54rcp command, 175read permission, 189recurse attribute, 223recursion option, 492Red Hat, 1, 3, 9
console, 16–17init scripts, 10–11
REJECT policy, 82reject_invalid_hostname restriction, 362reject_multi_recipient_bounce restriction,
362reject_non_fqdn_recipient restriction, 362reject_non_fqdn_sender restriction, 362reject_unauth_destination restriction, 362reject_unknown_hostname restriction, 362reject_unknown_recipient_domain
restriction, 362reject_unknown_sender_domain restriction,
362RELATED state, 93relaying, 346–51
overview, 346–47in Postfix, 350–51in Sendmail, 348–50testing if you are open relay, 347–48
reload option, 213, 243remote access to e-mail, hardening.
See e-mail, hardening remoteaccess to
remote command, 175Remote port forwarding, 183Remote Procedure Call (RPC), 229remounting encrypted file system, 215removable devices, 207–8
■INDEX546
4444_IDX_final.qxd 1/5/05 1:09 AM Page 546

remove option, 213removing compilers and development tools,
64–65renamemailbox command, 427--report-mode option, 284req (Openssl command-line function), 142required flag, 47requisite flag, 47resize option, 213resources, 510
connections and remote administration,securing, 185
DNS server, 510e-mail, hardening remote access to,
441–42files and file systems, securing, 231FTP server, securing, 461hardening basics, 76–77logging and log monitoring, 280mail, authenticating and securing, 402tools, using for security testing, 319–20
--restore option, 289restricted option, 6restrictexpand flag, 339restrictmailq flag, 339restrictqrun flag, 339RFC 1122, 128RFC 3164, 234rhnsd service, 9RHSBL (Right-Hand Side Blacklist), 363rkhunter script, 283rkhunter.log file, 284RLIMIT_NPROC setting, 69rlogin command, 171rndc command, 463, 485, 504–9
adding rndc support to named.conf,507–8
overview, 504–5rndc.conf, 505–7using rndc, 508–9
rndc stats command, 485rndc status command, 509rndc.conf file, 505ro option, 205–6root kit, 282–83root user, 29Rootkit Hunter, 283–85routers, 126rp_filter File, 127–28RPA protocol, 433RPC (Remote Procedure Call), 229rpc user, 29rpcuser user, 29RPM, 59–61, 200, 283rpm --checksig command, 61rpm --import command, 60rpm user, 29
RPOP Protocol, 435rsa (Openssl command-line function), 142RSA private key, 141rsa_cert_file option, 460RSAAuthentication option, 182rsautl (Openssl command-line function), 142RSBAC (Rule Set Based Access Controls)
project, 74rss limit, 52RST flag, 112rule attribute, 222Rule Set Based Access Controls (RSBAC)
project, 74rulename attribute, 223ruleset, 131–32RunAsUser option, 341Rusty Russell, 80rw option, 205–6
■Ss flag, 189-s flag, 94s_client (Openssl command-line function),
142s_server (Openssl command-line function),
142sa tool, 46SafeFileEnvironment option, 340–41Samba, 10SANS, 75SARA (Security Auditor’s Research Assistant),
319SASL (Simple Authentication and Security
Layer), 328sasl_pwcheck_method option, 418saslauthd daemon, 389sasldb2 file, 425saslpasswd2 command, 392, 397SASLv2, 390SATAN (Security Administrator Tool for
Analyzing Systems), 319/sbin/nologin script, 21ScanArchive option, 366ScanMail option, 366ScanOLE2 option, 366ScanRAR option, 366Scheidler, Balazs, 241scp command, 165, 175–76script command, 317SDPS protocol, 435SEC, 104, 265–76
actions, 276building SEC rules, 270–76command-line options, 268FAQ, 276inputting messages to, 269–70installing and running, 267–68
■INDEX 547
4444_IDX_final.qxd 1/5/05 1:09 AM Page 547
SEC (continued)pattern types, 271rule types, 272
sec.pl script, 267sec.startup file, 268Secure Hash Algorithm (SHA), 57Secure Sockets Layer. See SSL, TLS, and
OpenSSLSecure Wide Area Network (S/WAN), 159secure_email_list_enable option, 453Security Administrator Tool for Analyzing
Systems (SATAN), 319Security Auditor’s Research Assistant (SARA),
319security category, 484security, keeping informed about, 75–76security sites, 75–76security testing. See tools, using for security
testingsed command, 286SELinux package, 74–75Sendmail, 8, 377–81, 529
antispam settings for, 351–57banner control, 333–35chrooting Sendmail SMTP gateway or
relay, 324–30header checks, 354–57integrating ClamAV with, 368–72integrating Cyrus IMAP with, 421–22limiting risk of Denial of Service (DoS)
attacks with, 342–44privacy flags, 339and RBLs, 353–54relaying in, 348–50and smrsh, 339–40SMTP AUTH using Cyrus SASL for, 389–95
compiling Cyrus SASL into Sendmail,390–91
configuring Cyrus SASL for Sendmail,391–92
overview, 389–90using SMTP client authentication with
Sendmail, 394–95using SMTP server authentication with
Sendmail, 392–93TLS with, 377–81
compiling Sendmail with TLS, 378configuring Sendmail with TLS, 379–80overview, 377–78using TLS with specific hosts, 380–81
sendmail.cf file, 333–34sendmail.mc file, 333–34server authentication, 140server statement, 477service configuration files, 46session module, 47--session option, 289
setaclmailboxs command, 427setgid permission, 194–96setquota command, 427setuid permission, 194–96severity attribute, 223sftp command, 175–76SHA (Secure Hash Algorithm), 57SHA1 checksum, 57–58sha1sum command, 57shadow authentication, 424shadow mechanism, 389, 423shadow passwording, 2, 22–23sharedscripts option, 279SHELL, 25shell commands, 340shellcmd action, 276--show option, 289–90shows tables command, 258shutdown command, 14shutdown user, 29shutdown.allowed file, 14SIGINT, 133Simple Authentication and Security Layer
(SASL), 328Simple Mail Transfer Protocol (SMTP), 147,
321. See also SMTP serverSingleWithSuppress rule type, 275site.config.m4 file, 390SKEL, 25--skip-keypress option, 284Slackware, 382slave type, 497sleep command, 438S/MIME, 374smime (Openssl command-line function), 142SmoothWall, 79smrsh shell, 339–40SMsg macro, 355SMTP AUTH using Cyrus SASL, 387–89
compiling Cyrus SASL, 388configuring SASL saslauthd, 389overview, 387–88for Postfix, 395–400
compiling Cyrus SASL into Postfix,395–96
configuring Cyrus SASL for Postfix,396–98
overview, 395using SMTP client authentication with
Postfix, 400using SMTP server authentication with
Postfix, 398–400for Sendmail, 389–95
compiling Cyrus SASL into Sendmail,390–91
configuring Cyrus SASL for Sendmail,391–92
■INDEX548
4444_IDX_final.qxd 1/5/05 1:09 AM Page 548

overview, 389–90using SMTP client authentication with
Sendmail, 394–95using SMTP server authentication with
Sendmail, 392–93SMTP server, 333–46
disabling commands, 336–38ETRN, 338EXPN, 337–38overview, 336VRFY, 336–37
limiting risk of (Distributed) DoS attacks,341–46
overview, 341–42with Postfix, 344–46with Sendmail, 342–44
obfuscating MTA banner and version,333–35
overview, 333Postfix, 335Sendmail, 333–35
overview, 333privacy flags, 339Sendmail and smrsh, 339–40writing to files safely, 340–41
smtpd_delay_reject option, 361smtpd_error_sleep_time option, 344–45smtpd_hard_error_limit option, 344–45smtpd_helo_required option, 361smtpd_recipient_limit option, 344–45smtpd_soft_error_limit option, 344–45smurf attack, 128smurfing, 109snmpd service, 9snmtptrap service, 9Snort, 319sockets, 81soft limit, 52source port, 86source tarball, 216source{ }, 244, 246–49SourceForge, 216source-routed packets, 126sources.list file, 63-sP scan type, 297SpamAssassin, 351spoofing, 108–11--sport flag, 123--sport option, 84SQL server, 250srvrsmtp.c file, 335-sS scan type, 297SSH, 15–16, 92, 95–96, 171–75, 230
configuring, 180–83tunneling Fetchmail with, 437–38
ssh command, 171, 438ssh connection, 133
ssh-add options, 178ssh-agent and agent forwarding, 177–79sshd daemon, 179–80, 437sshd options, 180sshd server, 170sshd service, 9sshd user, 29sshd_config file, 176, 180–83ssh-keygen command, 173--ssl option, 436SSL, TLS, and OpenSSL, 140–52
creating certificate authority and signingcertificates, 142–48
overview, 140–42revoking certificate, 149–50SSL/TLS support, 459–60testing connections using openssl
command, 150–52--sslcert option, 436--sslcertck option, 436--sslcertpath option, 436SSLdump, 152--sslfingerprint option, 436--sslkey option, 436--sslproto option, 436-sT scan type, 297stack, 47, 52stacktest, 74STARTTLS, 374, 379–80-starttls option, 150--state flag, 94state module, 93, 115stateful packet-filtering firewall, 81stateful protocol, 444stateless packet-filtering firewall, 81stats( ) option, 246--status option, 289stderr destination, 481--stdout option, 289sticky bits, 193–94stop rule, 224StreamMaxLength option, 366StreamSaveToDisk option, 366strict_rfc821_envelopes option, 361StrictHostKeyChecking option, 181StrictModes option, 182strings command, 286stub type, 497Stunnel, 152–58, 260stunnel.conf file, 154stunnel.pem file, 156stunnel-sample.conf, 154su command, 50–51, 273-sU scan type, 297subnet-to-subnet connection, 164sudo command, 37–42sudoers file, 38–40
■INDEX 549
4444_IDX_final.qxd 1/5/05 1:09 AM Page 549

sufficient flag, 47suid option, 205–6Sun Microsystems, 46Suppress rule type, 274–75SuSE, 10, 179, 382S/WAN (Secure Wide Area Network), 159sXid tool, 196symmetrical encryption, 202SYN cookies, 116, 129SYN flag, 112SYN flooding, 115–16--syn option, 116sync( ) option, 246sync user, 29sys user, 29sysacc service, 13--sysconfdir option, 153–54, 260sysctl command, 124–25sysctl.conf file, 124syslog, 233–40
configuring, 104, 235–39actions, 237–38combining multiple selectors, 238–39facilities, 235–36overview, 235priorities, 236–37
overview, 233–35starting syslogd and its options, 239–40
syslog_enable option, 452syslog2ng script, 242syslog.conf file, 239syslog-NG, 241–64, 327–28
contrib directory, 242installing and configuring, 241–42logging to database with, 256–59overview, 241running and configuring, 242–54
destination{ }, 249–52filter{}, 252–53log{ }, 253–54options{ }, 244–46overview, 242–44source{ }, 246–49
sample syslog-ng.conf file, 254–56secure logging with, 259–63testing logging with logger, 263–64
syslog-NG File-Expansion Macros, 250system administrator, 37system-auth service, 46
■T-t flag, 90t option, 120-t option, 174, 475tables, in Netfilter, 82TakeNext option, 270TCP flags. See iptables and TCP flags
tcp( ) source, 247–48TCP SYN scan, 296–97TCP (Transmission Control Protocol), 81TCP Wrapper, 154tcpdump command, 132–35, 319--tcp-flags flag, 112TCP/IP (Transmission Control Protocol /
Internet Protocol), 137, 322telnet command, 171telnetd user, 29Tempest-shielding technology, 144--test option, 289–90testing. See also tools, using for security
testingiptables, 132–35Openwall Project, 73–74password security, 287–90
John the Ripper (JTR) password cracker,287–90
overview, 287SMTP AUTH with Outlook Express,
400–401TEST-NET address range, 109three-way handshake, 111time line, 276time_reopen( ) option, 246time.conf file, 53TIMEOUTbusy option, 157TIMEOUTclose option, 157TIMEOUTidle option, 157Titan package, 319title option, 8TLS (Transport Layer Security), 140, 373–86.
See also SSL, TLS, and OpenSSLcreating certificates for, 374–77overview, 373–74with Postfix, 381–86
compiling TLS into Postfix, 382–83configuring TLS in Postfix, 383–85overview, 381–82using TLS for specific host, 385–86
with Sendmail, 377–81compiling Sendmail with TLS, 378configuring Sendmail with TLS, 379–80overview, 377–78using TLS with specific hosts, 380–81
/tmp directory, 68tools, using for security testing, 281–321.
See also inner layer security; outerlayer security
additional security tools, 318–19other methods of detecting penetration,
313–16overview, 281–82recovering from penetration, 315–18resources, 319–20
traceroute command, 106
■INDEX550
4444_IDX_final.qxd 1/5/05 1:09 AM Page 550

transaction signatures (TSIG), 463, 500–504transfer acl statement, 519Transmission Control Protocol / Internet
Protocol (TCP/IP), 137, 322Transmission Control Protocol (TCP), 81Transport Layer Security. See SSL, TLS, and
OpenSSL; TLSTrendMicro, 351Tripwire, 187, 215–29
configuring, 216–18overview, 215–16policy, 218–29
global variables, 218–19initializing and running Tripwire,
224–29overview, 218Tripwire rules, 219–24
property masks, 220tripwire-setup-keyfiles command, 224–25Trojan program, 282troubleshooting iptables, 132–35TSIG (transaction signatures), 463, 500–504twadmin command, 225, 228–29twcfg.txt file, 217–18twinstall.sh script, 224twpol.txt file, 217–18twprint command, 227--twrfile option, 227–28TXT record, 486–87
■Uu flag, 190-u option, 258, 475UBE (Unsolicited Bulk E-mail), 346UCE (Unsolicited Commercial E-mail), 346UDP packets, 465udp( ) source, 247–48UDP (User Datagram Protocol), 81, 135,
298UID (Unique ID), 408ulimit command, 53umask command, 191–92umount command, 214uname -a command, 66, 73uname command, 286Unique ID (UID), 408unix-dgram( ) source, 247–48unix-stream( ) source, 247–48unmounting encrypted file system, 214Unsolicited Bulk E-mail (UBE), 346Unsolicited Commercial E-mail (UCE),
346up2date command, 61–62-update option, 228--update-policy option, 229update.rc-d command, 11–12update-rc.d command, 168
updates and patches, downloading, 61–64apt-get, 62–63overview, 61up2date, 62Yum, 63–64
URG flag, 112urlsnarf tool, 318use_time_recvd( ) option, 246use_uid option, 51UsePriviledgeSeparation option, 182user account, 19User Datagram Protocol (UDP), 81, 135, 298user facility, 236user option, 205–6useradd command, 24userdel command, 28usermod command, 28users and groups, 19–44
adding groups, 26–28adding users, 24–26deleting unnecessary users and groups,
28–30overview, 19–22passwords, 31–37shadow passwording, 22–23sudo, 37–42user accounting, 42–44
usertty( ) option, 251/usr/sbin directory, 224/usr/src directory, 67, 69/usr/src/linux directory, 68, 70uucp facility, 236uucp user, 29
■V-v flag, 133, 243-v (logrotate command-line option), 279-V option, 199Vaarandi, Risto, 266vcsa user, 29verbose mode, 197--verify gpg option, 59verify (Openssl command-line function),
142verify option, 156VerifyReverseMapping option, 183--versioncheck option, 284versions option, 482view statement, 477, 493Virtual Network Computing (VNC), 157–58virtual private networks. See IPSec, VPNs,
and Openswanvirtual terminals, 14, 17–18visudo command, 38Vlock tool, 17–18VNC (Virtual Network Computing), 157–58VPNs. See IPSec, VPNs, and Openswan
■INDEX 551
4444_IDX_final.qxd 1/5/05 1:09 AM Page 551

VRFY command, disabling, 336–37vsftpd
configuring for anonymous FTP, 450–56general configuration, 451–52general security, 454–55mode and access rights, 452–54overview, 450–51preventing denial of service attacks,
455–56configuring with local users, 456–59installing, 448–50starting and stopping, 461
vsftpd.conf file, 450, 460vsftpd.conf man file, 454-vv flag, 133-vv option, 61
■Ww command, 314w flag, 190-w option, 441Wd entry, 54Webmin, 169who command, 42, 314wildcard, 54winbind service, 9window option, 272--with-auth option, 410--with-com_err option, 410--with-cyrus-group option, 410--with-cyrus-user option, 410--with-krb option, 410--with-openssl option, 410--with-pam option, 388--with-sasl option, 410--with-saslauthd option, 388--with-ssl option, 153--wordlist option, 289world-readable, world-writable, and
world-executable files, 192–93write action, 272write permission, 189–90
write_enable option, 454writing to files safely, 340–41wtmp file, 43, 314WU-FTPD FTP server, 448-www option, 151www-data user, 29
■X-X flag, 91X forwarding, with OpenSSH, 184–85X mode, 290-X option, 172-x option, 172X11, 184–85, 307–8x509 (Openssl command-line function), 142xfer-in category, 484xferlog_enable option, 452xferlog_std_format option, 452xfer-out category, 484xfs service, 9xfs user, 29xinetd daemon, 167–68Xmas-style scanning, 114Xprobe, 299X-Windows, 3, 169, 293
■Yy option, 120, 393-y option, 174, 211yast tool, 65Yellow Dog Updater, Modified (Yum), 63–64Yellow Dog web site, 76ypbind service, 9yum command, 61–64, 209Yum (Yellow dog Updater, Modified), 63–64
■Z-Z flag, 91zero address, 111Zeroconf IP address range, 109Zlib, 170zone statement, 477, 493–94
■INDEX552
4444_IDX_final.qxd 1/5/05 1:09 AM Page 552