getting started with onenote and copying a shared notebook
TRANSCRIPT
Getting Started with OneNote and Copying a Shared Notebook
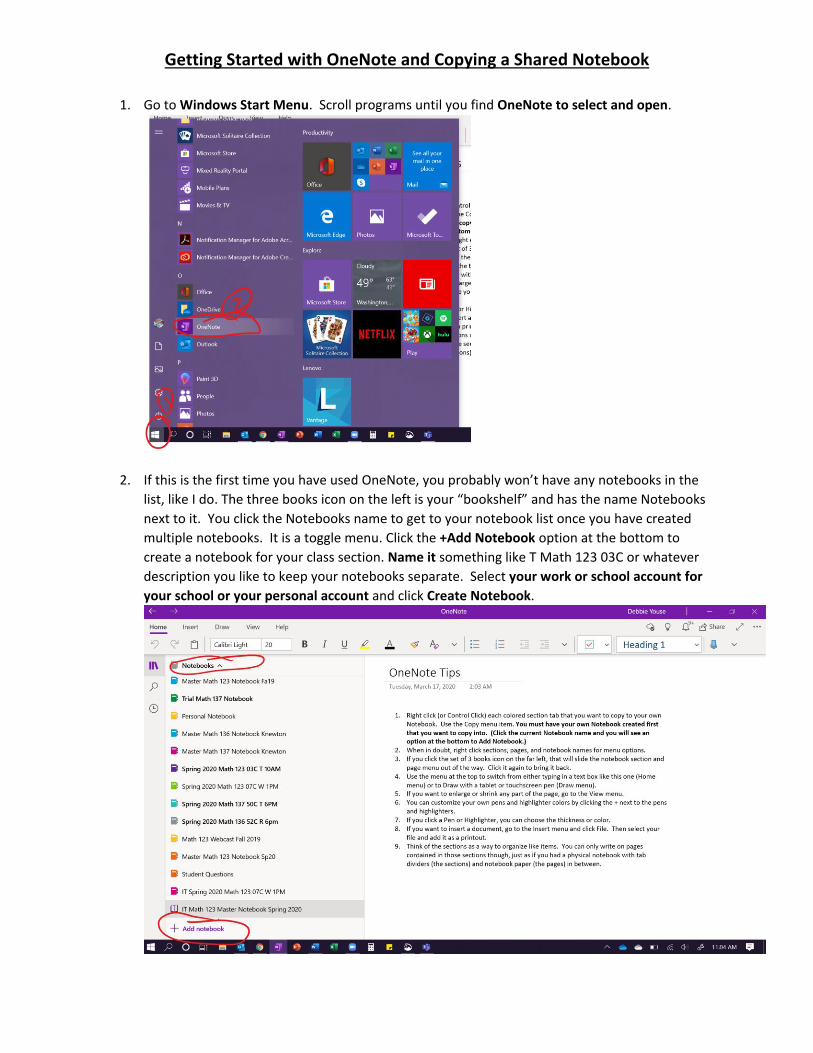
1. Go to Windows Start Menu. Scroll programs until you find OneNote to select and open.
2. If this is the first time you have used OneNote, you probably won’t have any notebooks in the
list, like I do. The three books icon on the left is your “bookshelf” and has the name Notebooks
next to it. You click the Notebooks name to get to your notebook list once you have created
multiple notebooks. It is a toggle menu. Click the +Add Notebook option at the bottom to
create a notebook for your class section. Name it something like T Math 123 03C or whatever
description you like to keep your notebooks separate. Select your work or school account for
your school or your personal account and click Create Notebook.
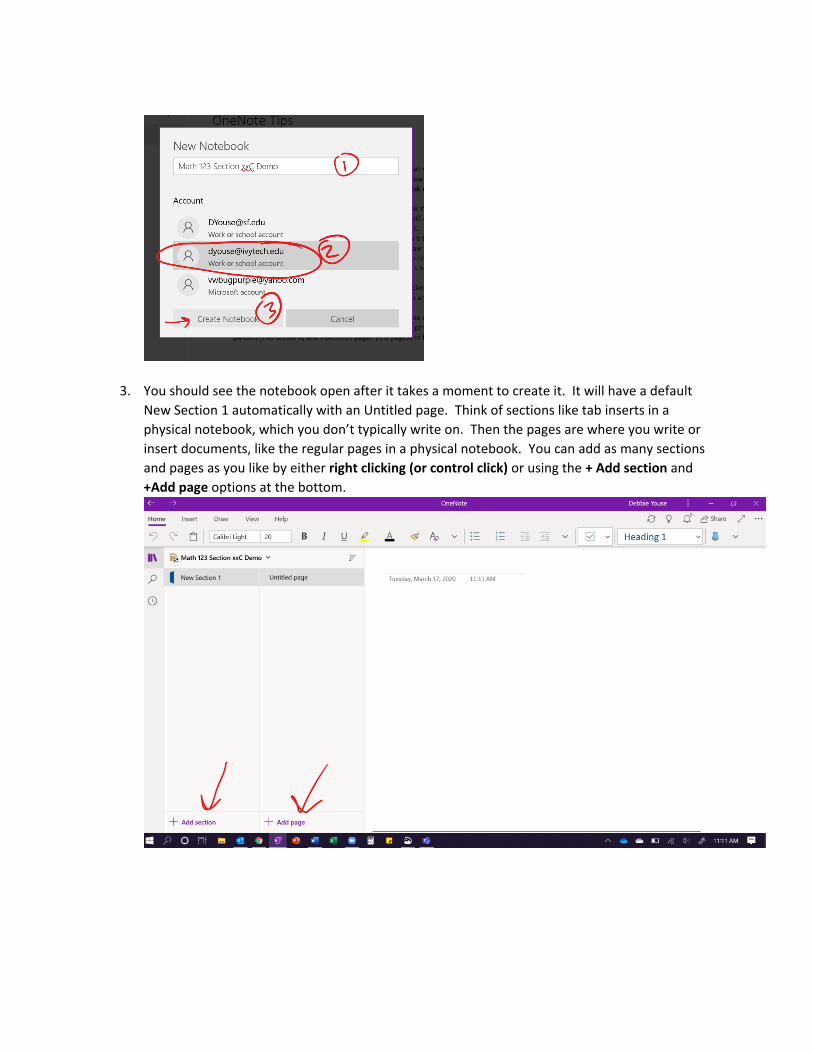
3. You should see the notebook open after it takes a moment to create it. It will have a default
New Section 1 automatically with an Untitled page. Think of sections like tab inserts in a
physical notebook, which you don’t typically write on. Then the pages are where you write or
insert documents, like the regular pages in a physical notebook. You can add as many sections
and pages as you like by either right clicking (or control click) or using the + Add section and
+Add page options at the bottom.
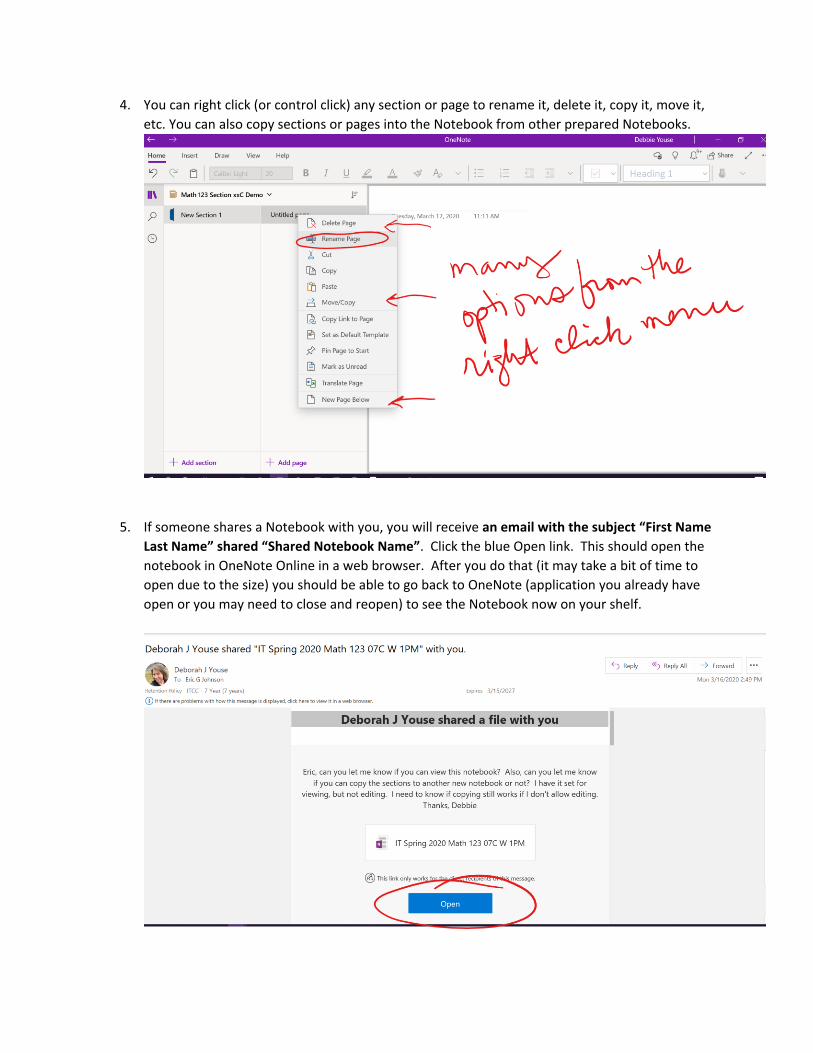
4. You can right click (or control click) any section or page to rename it, delete it, copy it, move it,
etc. You can also copy sections or pages into the Notebook from other prepared Notebooks.
5. If someone shares a Notebook with you, you will receive an email with the subject “First Name
Last Name” shared “Shared Notebook Name”. Click the blue Open link. This should open the
notebook in OneNote Online in a web browser. After you do that (it may take a bit of time to
open due to the size) you should be able to go back to OneNote (application you already have
open or you may need to close and reopen) to see the Notebook now on your shelf.
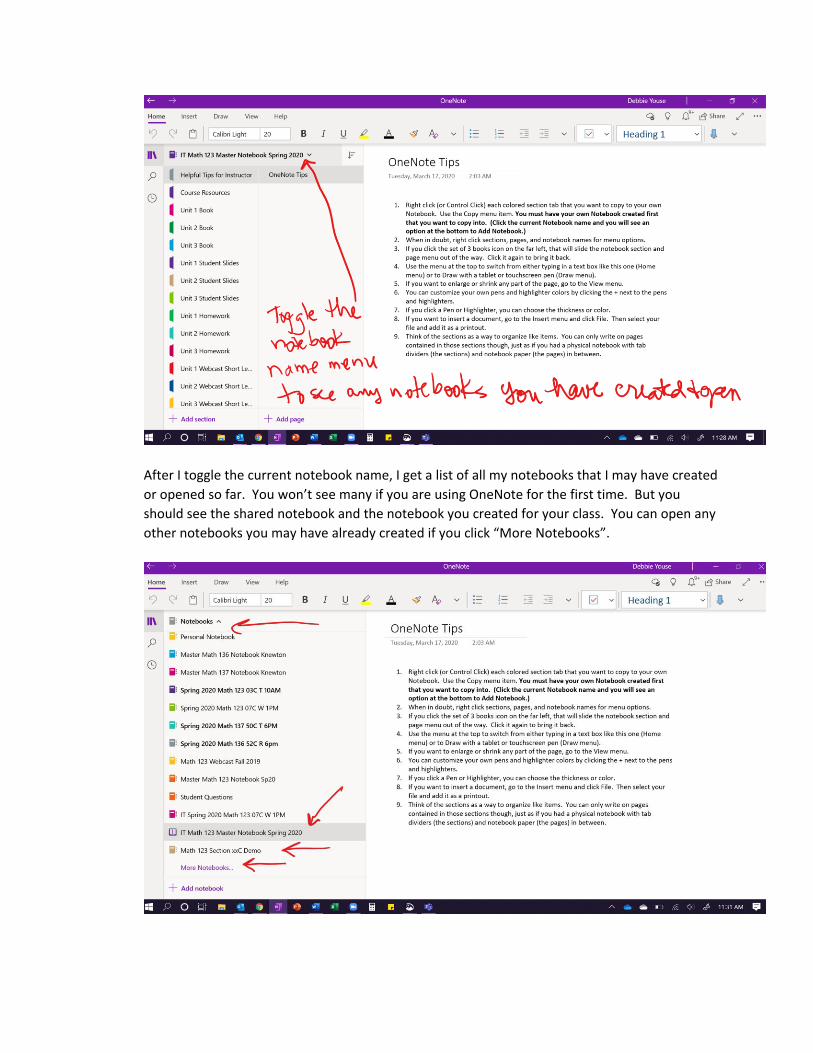
After I toggle the current notebook name, I get a list of all my notebooks that I may have created
or opened so far. You won’t see many if you are using OneNote for the first time. But you
should see the shared notebook and the notebook you created for your class. You can open any
other notebooks you may have already created if you click “More Notebooks”.

6. You can copy the sections from the shared notebook (or any of your own notebooks) into your
course notebook. The shared notebook cannot be edited, meaning you won’t be able to write
on the pages or add to it. That’s why you are going to copy the sections into your own class
notebook, which will then be fully editable. (The person sharing might allow editing in the
shared notebook. By default, it is view only.) Click the shared notebook name at the top next
to the bookshelf so you are in that notebook. Right click (or control click) the section name
you want to copy to bring up the menu. Select move/copy.
7. On the pop-up menu, scroll if needed to find and select your course notebook name. Then click
the COPY button. DO NOT CLICK THE MOVE BUTTON. That will remove it from the the shared
notebook.

8. You can click the current notebook name to bring up your bookshelf list of notebooks to then
select your class notebook. You should now see the copied section in your class notebook.
9. Go back to the shared notebook (click the current notebook name to bring up the bookshelf list
of notebooks to select the shared notebook). Repeat steps 6 & 7 to copy whatever sections you
want to copy into your course notebook. Remember you can only write on pages (not
sections) using the Draw menu with the pen options. Do this with your mouse or a tablet pen.
10. If you want to make your own pages or insert your own files, you can do that too. In your own
course notebook, you can name a page and then go to the Insert menu followed by clicking the
File link.
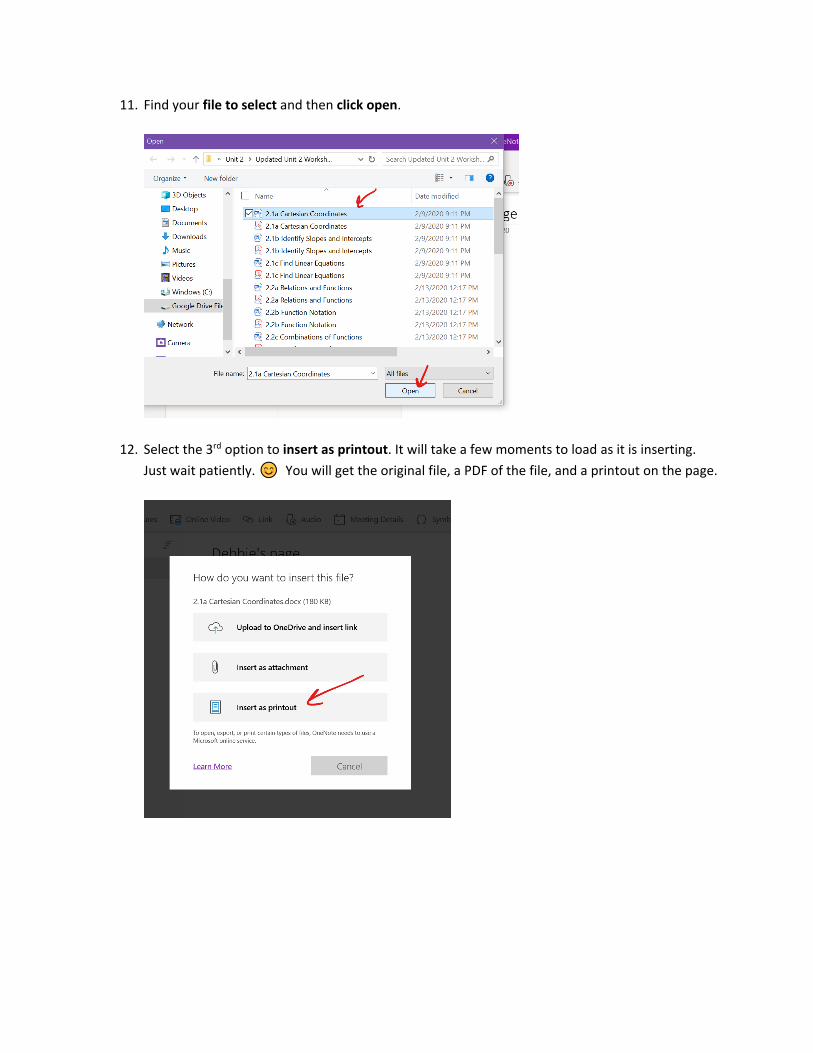
11. Find your file to select and then click open.
12. Select the 3rd option to insert as printout. It will take a few moments to load as it is inserting.
Just wait patiently. You will get the original file, a PDF of the file, and a printout on the page.
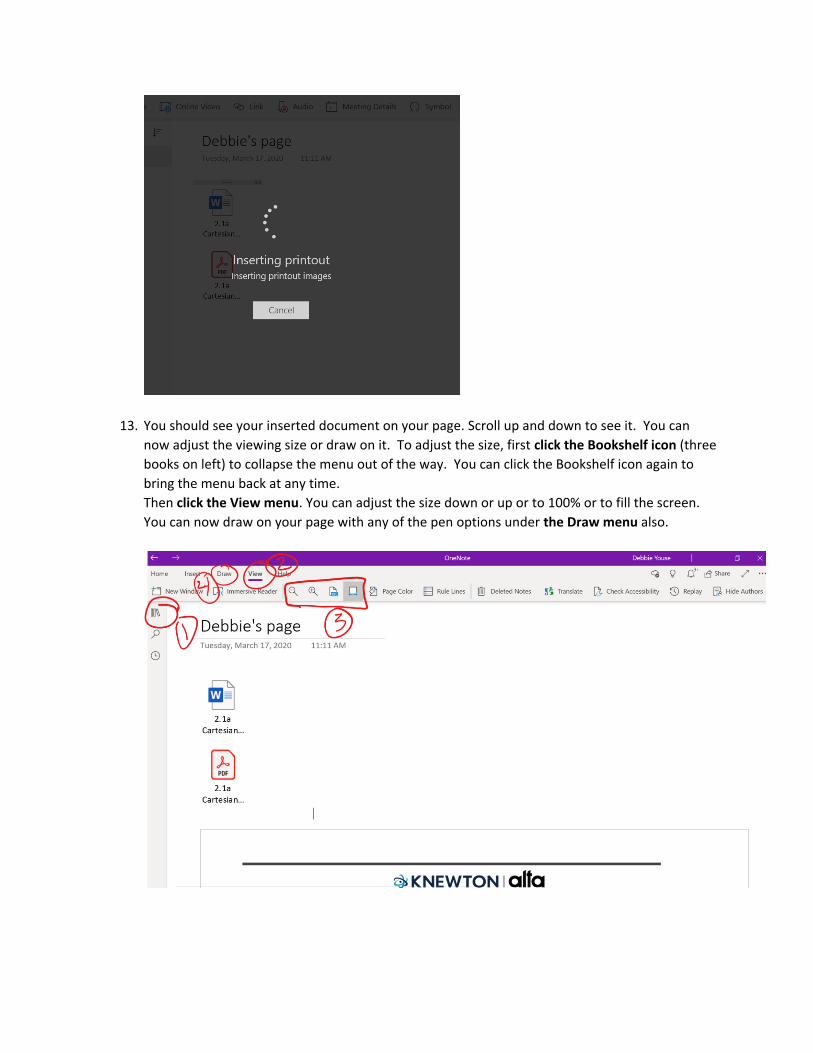
13. You should see your inserted document on your page. Scroll up and down to see it. You can
now adjust the viewing size or draw on it. To adjust the size, first click the Bookshelf icon (three
books on left) to collapse the menu out of the way. You can click the Bookshelf icon again to
bring the menu back at any time.
Then click the View menu. You can adjust the size down or up or to 100% or to fill the screen.
You can now draw on your page with any of the pen options under the Draw menu also.

14. From the Draw menu you have options to add pens or highlighters (click + next to them), or you
can change existing pen colors by clicking the actual pen to bring up the color menu, or you can
click the eraser to bring up different eraser size options. Play around with this and customize it
the way you like. I have maxed out my color pen and highlighter options.
GOOD LUCK AND THE BEST WAY TO LEARN HOW TO USE ONENOTE IS TO PLAY AROUND AND
TRY IT! I think you’ll love it! It has totally changed the way I teach and gives me super flexibility
in what I can do. You can scroll down and to the right to keep writing to infinity and beyond
too! It’s like an infinite white board.