notebook software application manual - audentia
TRANSCRIPT

NotebookSoftware Application
Manual
V3.3
Software Application Manual
2
Copyright and Trademarks Notice
Copyright © Micro-Star Int’l Co., Ltd. All rights reserved. The MSI logo used is a registered
trademark of Micro-Star Int’l Co., Ltd. All other marks and names mentioned may be trademarks
of their respective owners. No warranty as to accuracy or completeness is expressed or implied.
MSI reserves the right to make changes to this document without prior notice.
Technical Support
If a problem arises with your system and no solution can be obtained from the user’s manual,
please contact your place of purchase or local distributor. Alternatively, you may contact our
technical staff for further guidance at: http://support.msi.com/
Revision History
Version Revision History Date
3.3 Latest Released 07, 2018

Preface
1-3
3
About This Manual
This Software Application Manual provides instructions and illustrations on installing and using
the software applications which are exclusively designed by MSI. This manual will give users
more on how your notebook can be more efficient, convenient, and enjoyable with the help of
these software applications.
The software applications selected here may be optionally supported for particular models.
Contact the local dealer for further information if necessary.
MSI Dragon Center 2.0 (for Gaming Series only) ..................................... 7
The MSI Dragon Center 2.0 app is to be installed in user’s MSI gaming notebooks, you can get
total control over your PC. The redesigned Dragon Center 2.0 monitors and optimizes system
performance through various customizable profiles and prioritize in-game performance.
MSI Dragon Dashboard 2.0 (iOS & Android) (for Gaming Series only) ..... 30
MSI Dragon Dashboard 2.0 is designed to connect your personal computer or notebook to your
mobile device remotely. Users will be able to enjoy various customized functions offered by
MSI.
Nahimic 3 (for selected models only) ....................................................... 38
Nahimic 3 is designed to give users the best audio experience, offering various audio effects
and automatic recording function.
SteelSeries Engine 3 (SSE 3) (for selected Gaming Series only) .............. 47
SteelSeries Engine 3 allows user to have full control over keyboard bindings and to customize
the color, effects, and levels of illumination on your notebook.
The new software suite also offers cross platform support for all SteelSeries products and
features a cloud syncing system to make sure you always have your profiles wherever you are.
SteelSeries Engine 3 is only available in GT, GS, GE Gaming Series only.
MSI True Color (for selected models only)............................................... 71
MSI True Color allows users to select the best color setting for the content being viewed. It
characterizes and controls laptop panels for precise image presentation. When the application
is launched, the display automatically changes to the assigned color setting.
Software Application Manual
4
Help Desk (for selected models only) ...................................................... 88
MSI Help Desk allows users to get live update information, receive the latest news and
important notices.
MSI Battery Calibration .............................................................. 94
MSI Battery Calibration helps to extend the life cycle of the battery. It automatically refreshes the
battery capacity through efficient processes of charging, discharging and recharging the battery.
Recovery Image Backup Tool .................................................... 99
Recovery Image Backup Tool, the utility designed to backup the recovery image to blank DVD
disks, a USB flash disk or ISO files. They can be used to recover the system to manufacturer’s
default settings when it is needed. Usage of this application on any product with no
authorization may be prohibited.

Preface
1-5
5
Note
Software Application Manual
6
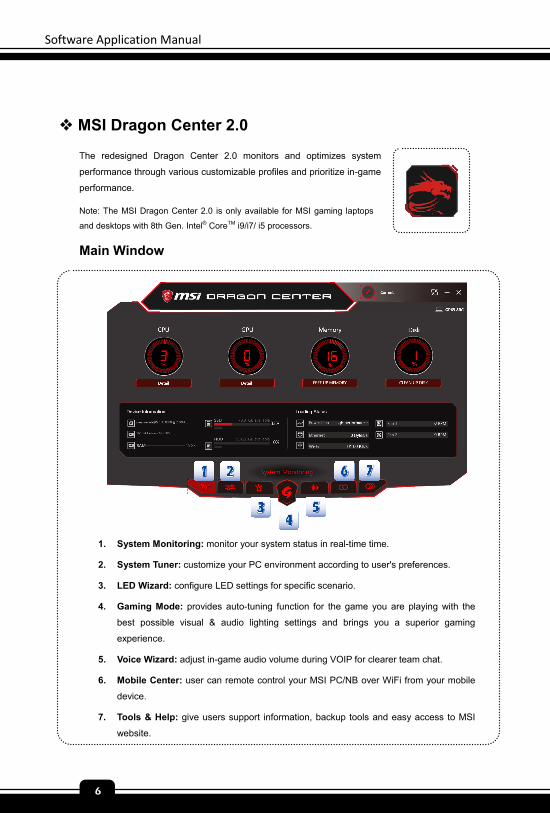
MSI Dragon Center 2.0
The redesigned Dragon Center 2.0 monitors and optimizes system
performance through various customizable profiles and prioritize in-game
performance.
Note: The MSI Dragon Center 2.0 is only available for MSI gaming laptops
and desktops with 8th Gen. Intel® CoreTM i9/i7/ i5 processors.
Main Window
1. System Monitoring: monitor your system status in real-time time.
2. System Tuner: customize your PC environment according to user's preferences.
3. LED Wizard: configure LED settings for specific scenario.
4. Gaming Mode: provides auto-tuning function for the game you are playing with the
best possible visual & audio lighting settings and brings you a superior gaming
experience.
5. Voice Wizard: adjust in-game audio volume during VOIP for clearer team chat.
6. Mobile Center: user can remote control your MSI PC/NB over WiFi from your mobile
device.
7. Tools & Help: give users support information, backup tools and easy access to MSI
website.
Preface
1-7
7
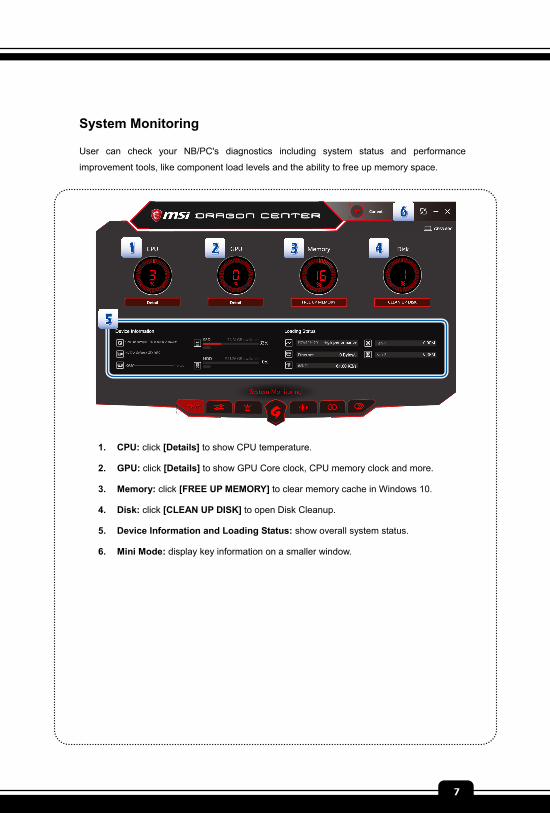
System Monitoring
User can check your NB/PC's diagnostics including system status and performance
improvement tools, like component load levels and the ability to free up memory space.
1. CPU: click [Details] to show CPU temperature.
2. GPU: click [Details] to show GPU Core clock, CPU memory clock and more.
3. Memory: click [FREE UP MEMORY] to clear memory cache in Windows 10.
4. Disk: click [CLEAN UP DISK] to open Disk Cleanup.
5. Device Information and Loading Status: show overall system status.
6. Mini Mode: display key information on a smaller window.
Software Application Manual
8
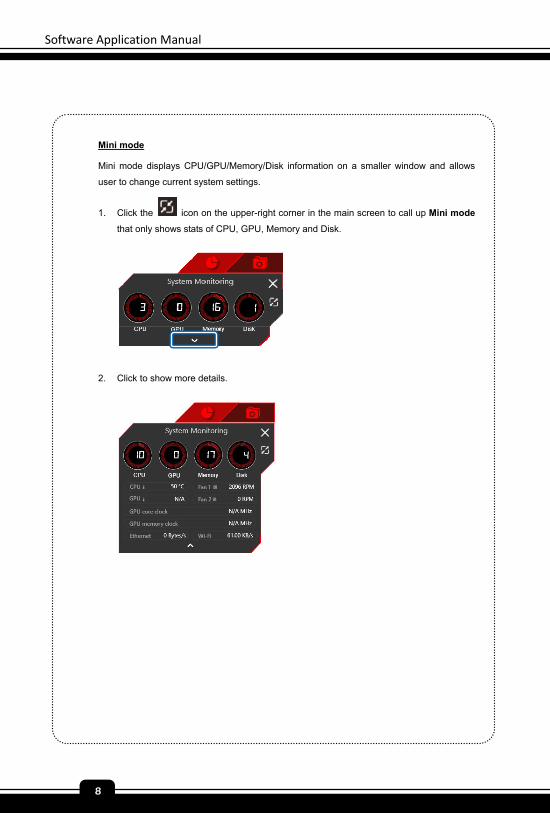
Mini mode
Mini mode displays CPU/GPU/Memory/Disk information on a smaller window and allows
user to change current system settings.
1. Click the icon on the upper-right corner in the main screen to call up Mini mode
that only shows stats of CPU, GPU, Memory and Disk.
2. Click to show more details.
Preface
1-9
9
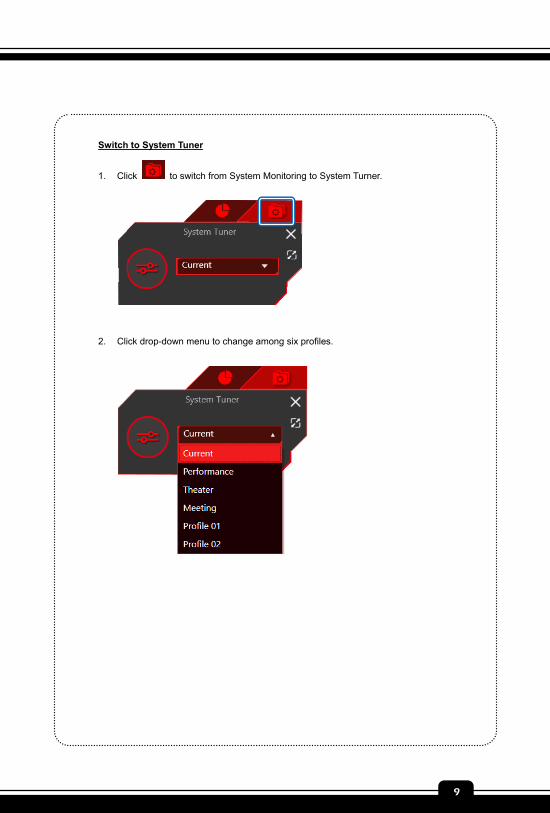
Switch to System Tuner
1. Click to switch from System Monitoring to System Turner.
2. Click drop-down menu to change among six profiles.
Software Application Manual
10
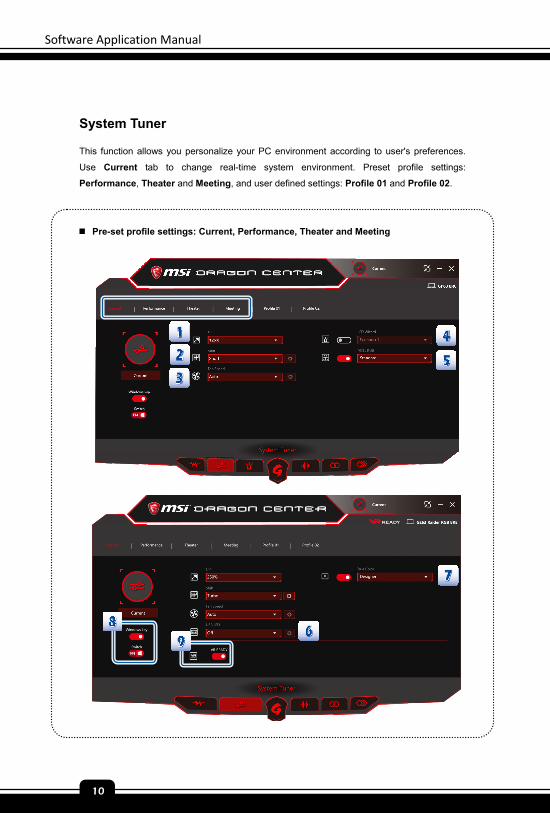
System Tuner
This function allows you personalize your PC environment according to user's preferences.
Use Current tab to change real-time system environment. Preset profile settings:
Performance, Theater and Meeting, and user defined settings: Profile 01 and Profile 02.
Pre-set profile settings: Current, Performance, Theater and Meeting
Preface
1-11
11
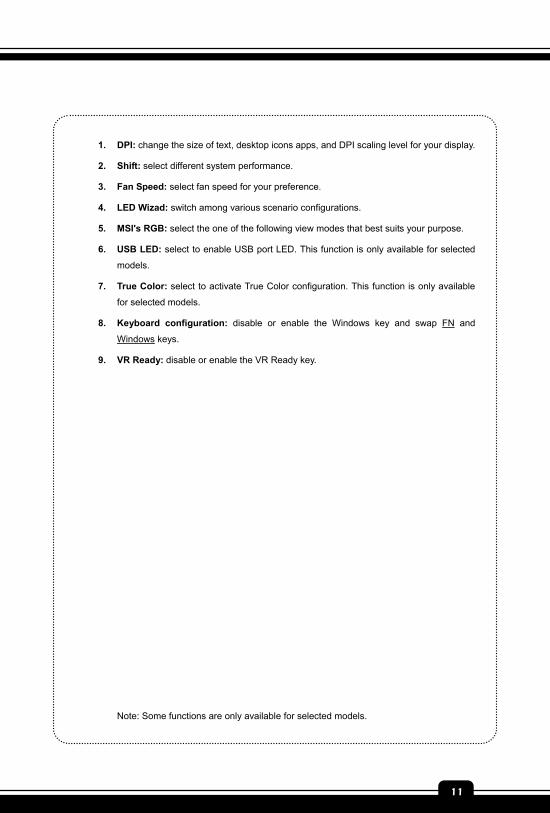
1. DPI: change the size of text, desktop icons apps, and DPI scaling level for your display.
2. Shift: select different system performance.
3. Fan Speed: select fan speed for your preference.
4. LED Wizad: switch among various scenario configurations.
5. MSI's RGB: select the one of the following view modes that best suits your purpose.
6. USB LED: select to enable USB port LED. This function is only available for selected
models.
7. True Color: select to activate True Color configuration. This function is only available
for selected models.
8. Keyboard configuration: disable or enable the Windows key and swap FN and
Windows keys.
9. VR Ready: disable or enable the VR Ready key.
Note: Some functions are only available for selected models.
Software Application Manual
12
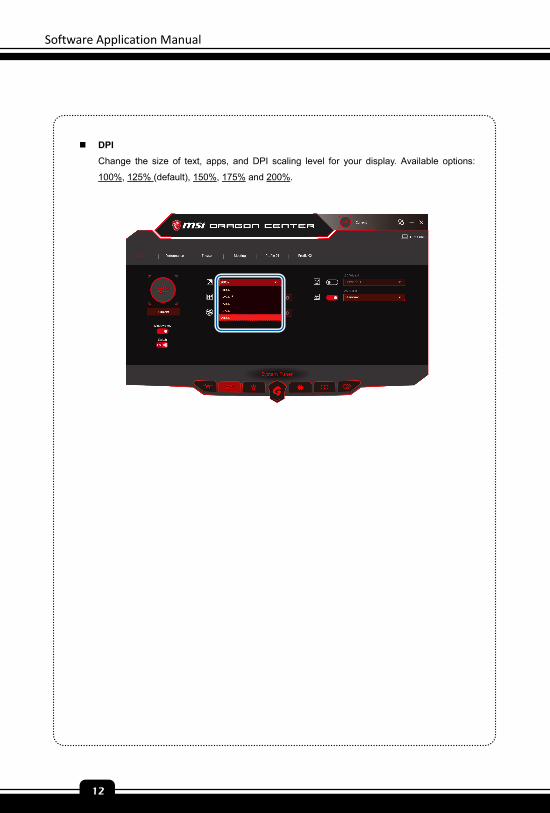
DPI
Change the size of text, apps, and DPI scaling level for your display. Available options:
100%, 125% (default), 150%, 175% and 200%.
Preface
1-13
13
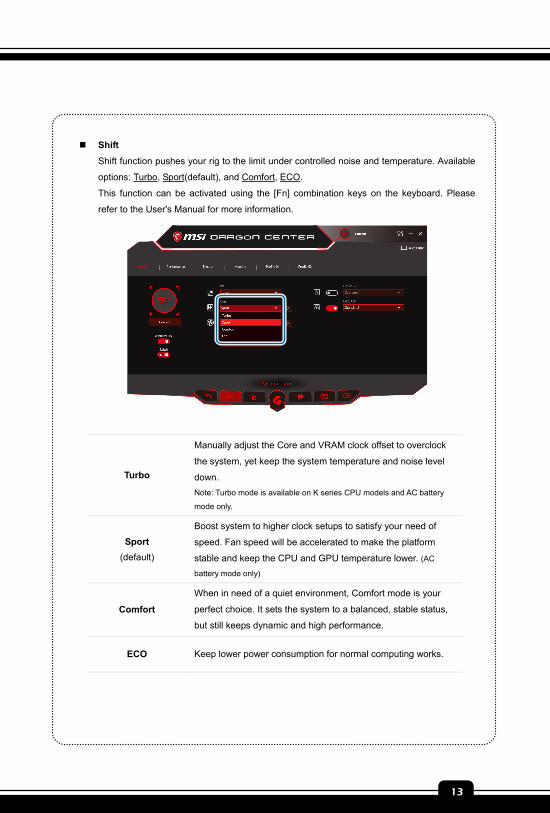
Shift
Shift function pushes your rig to the limit under controlled noise and temperature. Available
options: Turbo, Sport(default), and Comfort, ECO.
This function can be activated using the [Fn] combination keys on the keyboard. Please
refer to the User's Manual for more information.
Turbo
Manually adjust the Core and VRAM clock offset to overclock
the system, yet keep the system temperature and noise level
down.
Note: Turbo mode is available on K series CPU models and AC battery
mode only.
Sport
(default)
Boost system to higher clock setups to satisfy your need of
speed. Fan speed will be accelerated to make the platform
stable and keep the CPU and GPU temperature lower. (AC
battery mode only)
Comfort
When in need of a quiet environment, Comfort mode is your
perfect choice. It sets the system to a balanced, stable status,
but still keeps dynamic and high performance.
ECO Keep lower power consumption for normal computing works.
Software Application Manual
14
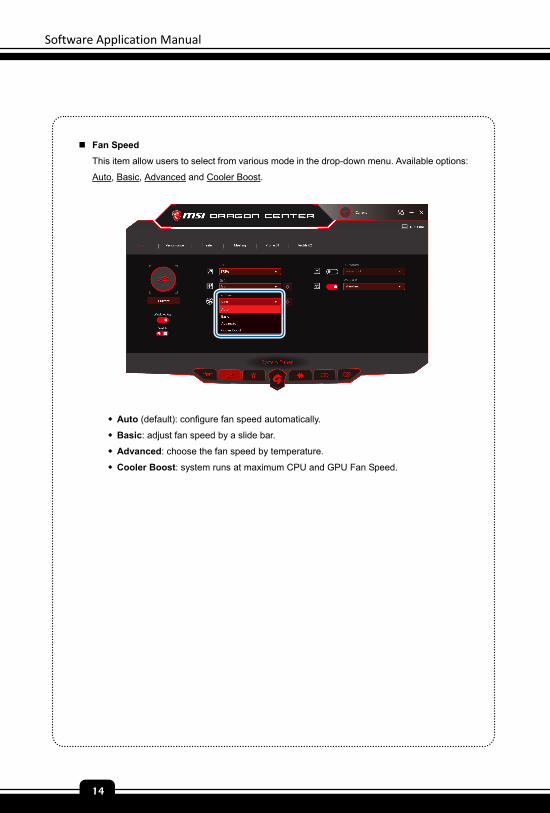
Fan Speed
This item allow users to select from various mode in the drop-down menu. Available options:
Auto, Basic, Advanced and Cooler Boost.
Auto (default): configure fan speed automatically.
Basic: adjust fan speed by a slide bar.
Advanced: choose the fan speed by temperature.
Cooler Boost: system runs at maximum CPU and GPU Fan Speed.
Preface
1-15
15
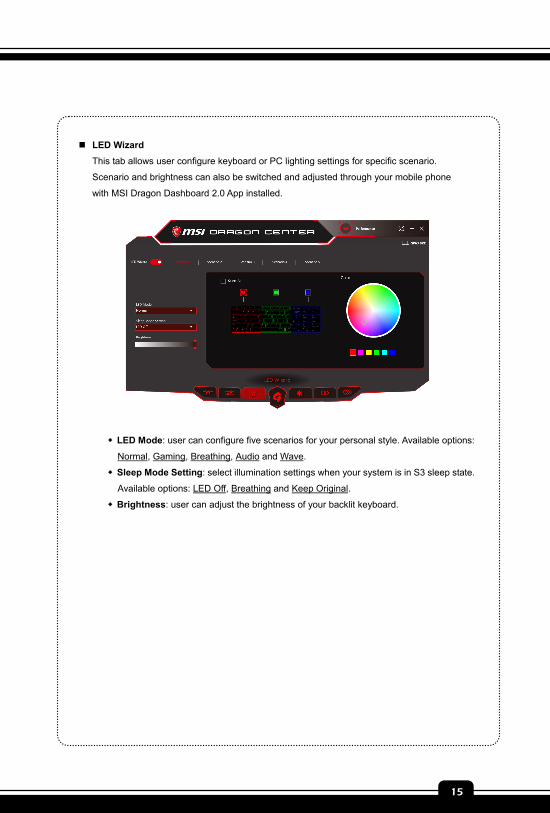
LED Wizard
This tab allows user configure keyboard or PC lighting settings for specific scenario.
Scenario and brightness can also be switched and adjusted through your mobile phone
with MSI Dragon Dashboard 2.0 App installed.
LED Mode: user can configure five scenarios for your personal style. Available options:
Normal, Gaming, Breathing, Audio and Wave.
Sleep Mode Setting: select illumination settings when your system is in S3 sleep state.
Available options: LED Off, Breathing and Keep Original.
Brightness: user can adjust the brightness of your backlit keyboard.
Software Application Manual
16
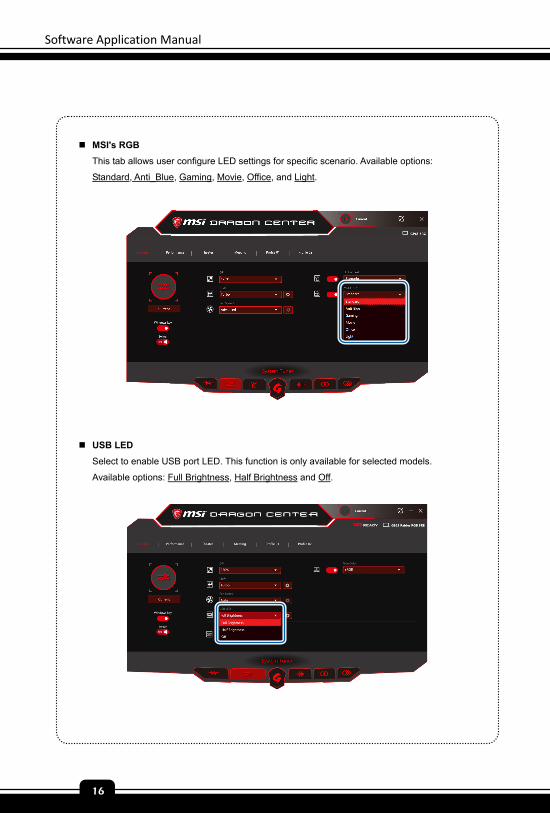
MSI's RGB
This tab allows user configure LED settings for specific scenario. Available options:
Standard, Anti_Blue, Gaming, Movie, Office, and Light.
USB LED
Select to enable USB port LED. This function is only available for selected models.
Available options: Full Brightness, Half Brightness and Off.

Preface
1-17
17
True Color
Select to activate True Color configuration. This function is only available for selected
models. Available options: Gamer, Anti_Blue, sRGB, Designer, Office, and Movie.
Keyboard Configuration
To disable or enable the Windows key and to swap FN and Windows key. .
Enable or disable Windows key
Swap Fn and Windows key
Software Application Manual
18
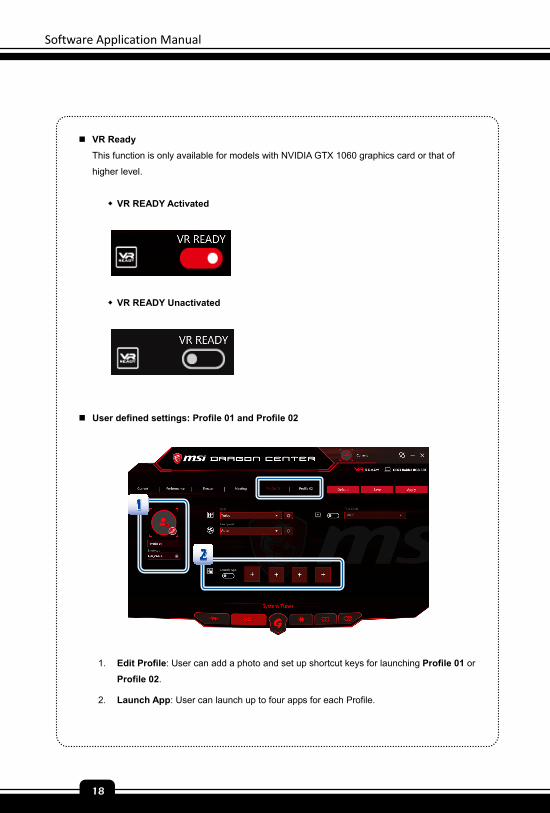
VR Ready
This function is only available for models with NVIDIA GTX 1060 graphics card or that of
higher level.
VR READY Activated
VR READY Unactivated
User defined settings: Profile 01 and Profile 02
1. Edit Profile: User can add a photo and set up shortcut keys for launching Profile 01 or
Profile 02.
2. Launch App: User can launch up to four apps for each Profile.

Preface
1-19
19
Gaming Mode
You can use Gaming Mode to automatically tune up system components to perform best
with supported games. Available options: System Optimzation, Shift Mode, True Color
and Nahimic.
Click Settings to slect from Gaming Mode Options:
System Optimization: Free up memory and prioritize game applications
Shift Mode: Check to select different system performance.
True Color: Check to activate True Color configuration.
Nahimic: Check to activate Nahimic configuration.
Software Application Manual
20
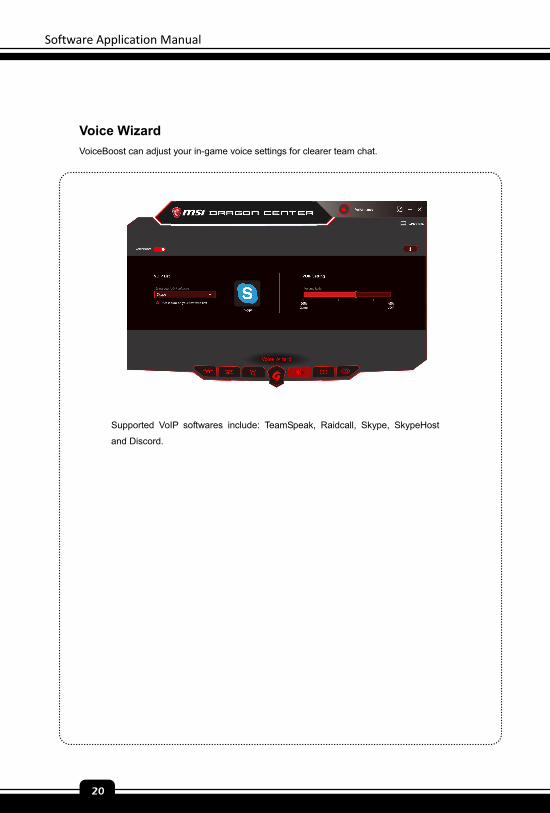
Voice Wizard
VoiceBoost can adjust your in-game voice settings for clearer team chat.
Supported VoIP softwares include: TeamSpeak, Raidcall, Skype, SkypeHost
and Discord.
Preface
1-21
21
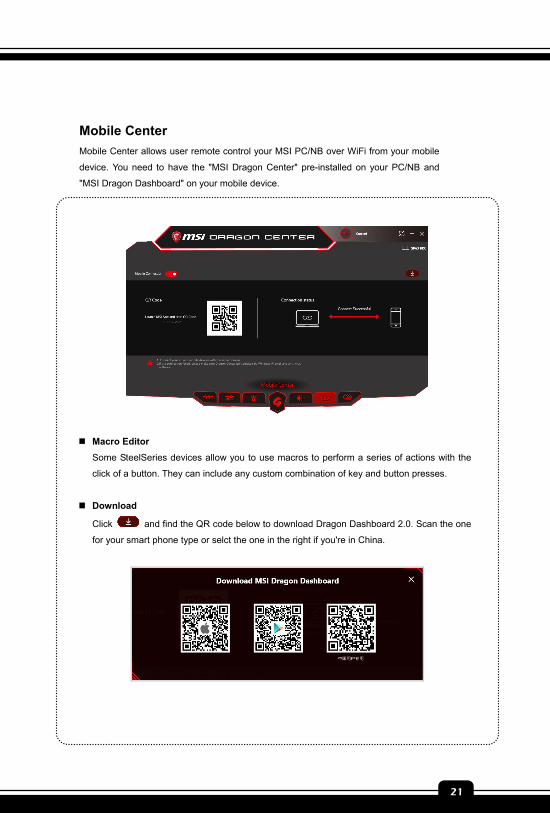
Mobile Center
Mobile Center allows user remote control your MSI PC/NB over WiFi from your mobile
device. You need to have the "MSI Dragon Center" pre-installed on your PC/NB and
"MSI Dragon Dashboard" on your mobile device.
Macro Editor
Some SteelSeries devices allow you to use macros to perform a series of actions with the
click of a button. They can include any custom combination of key and button presses.
Download
Click and find the QR code below to download Dragon Dashboard 2.0. Scan the one
for your smart phone type or selct the one in the right if you're in China.
Software Application Manual
22
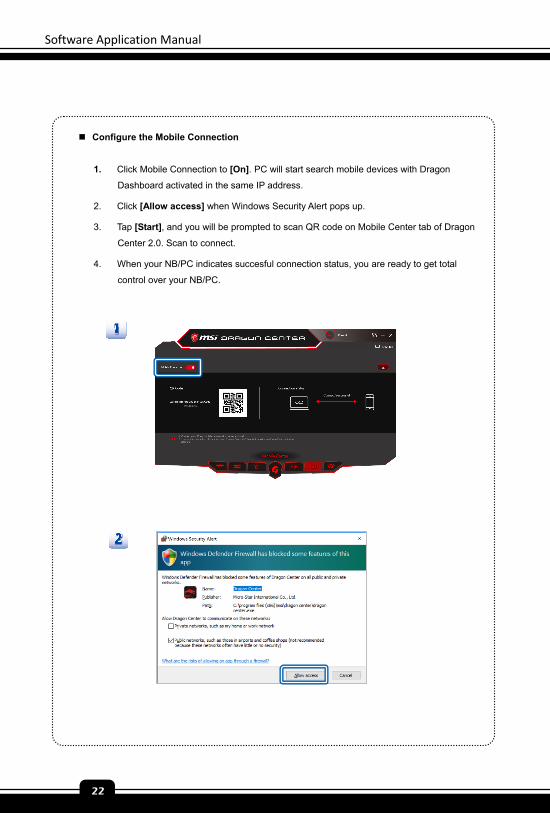
Configure the Mobile Connection
1. Click Mobile Connection to [On]. PC will start search mobile devices with Dragon
Dashboard activated in the same IP address.
2. Click [Allow access] when Windows Security Alert pops up.
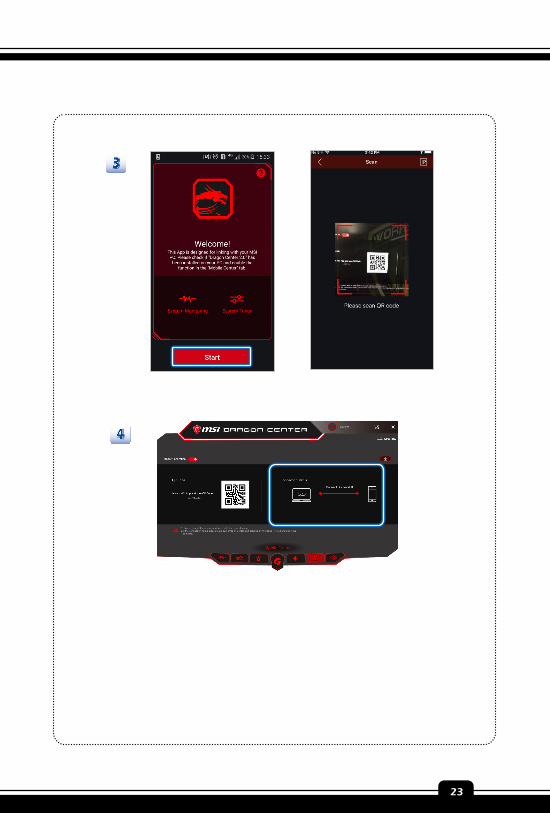
3. Tap [Start], and you will be prompted to scan QR code on Mobile Center tab of Dragon
Center 2.0. Scan to connect.
4. When your NB/PC indicates succesful connection status, you are ready to get total
control over your NB/PC.
Preface
1-23
23
Software Application Manual
24
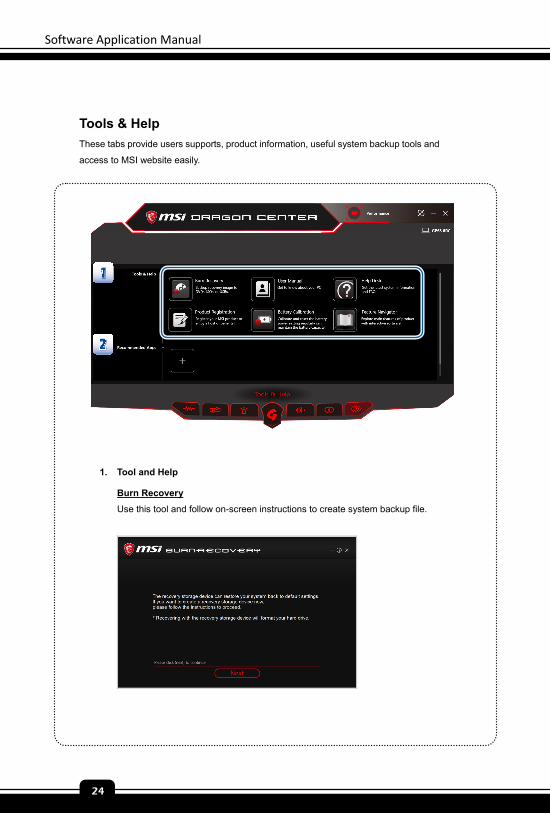
Tools & Help
These tabs provide users supports, product information, useful system backup tools and
access to MSI website easily.
1. Tool and Help
Burn Recovery
Use this tool and follow on-screen instructions to create system backup file.
Preface
1-25
25
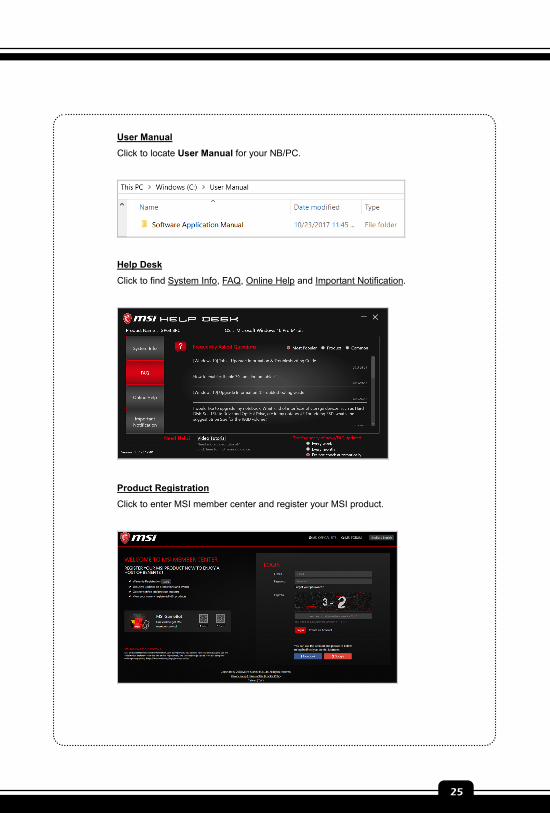
User Manual
Click to locate User Manual for your NB/PC.
Help Desk
Click to find System Info, FAQ, Online Help and Important Notification.
Product Registration
Click to enter MSI member center and register your MSI product.
Software Application Manual
26
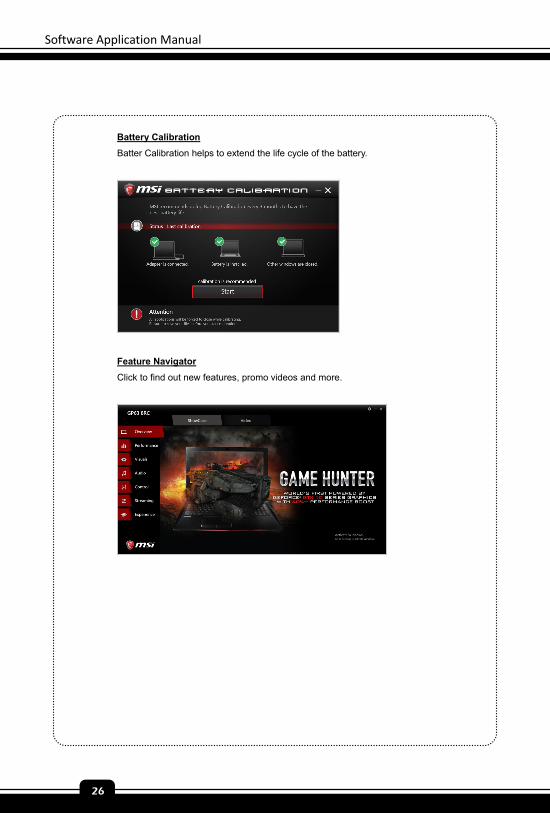
Battery Calibration
Batter Calibration helps to extend the life cycle of the battery.
Feature Navigator
Click to find out new features, promo videos and more.
Preface
1-27
27
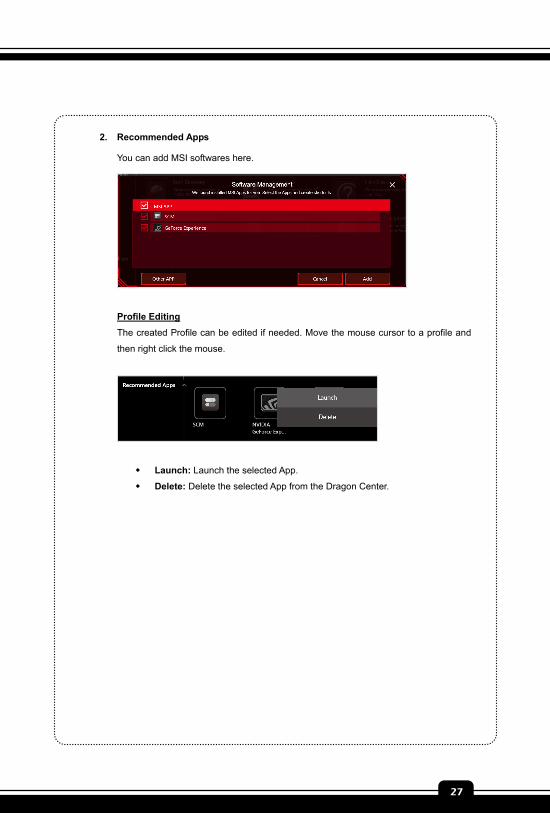
2. Recommended Apps
You can add MSI softwares here.
Profile Editing
The created Profile can be edited if needed. Move the mouse cursor to a profile and
then right click the mouse.
Launch: Launch the selected App.
Delete: Delete the selected App from the Dragon Center.

Software Application Manual
28
Note
Preface
1-29
29
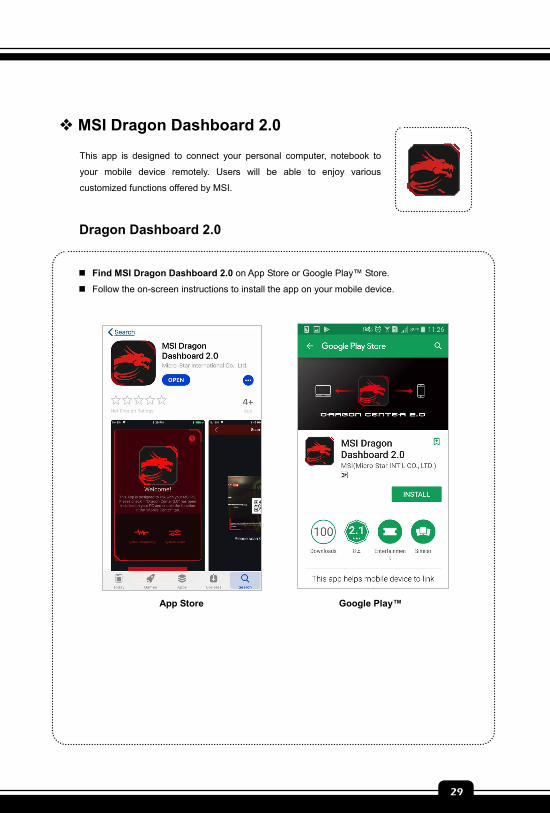
MSI Dragon Dashboard 2.0
This app is designed to connect your personal computer, notebook to
your mobile device remotely. Users will be able to enjoy various
customized functions offered by MSI.
Dragon Dashboard 2.0
Find MSI Dragon Dashboard 2.0 on App Store or Google Play™ Store.
Follow the on-screen instructions to install the app on your mobile device.
App Store Google Play™
Software Application Manual
30
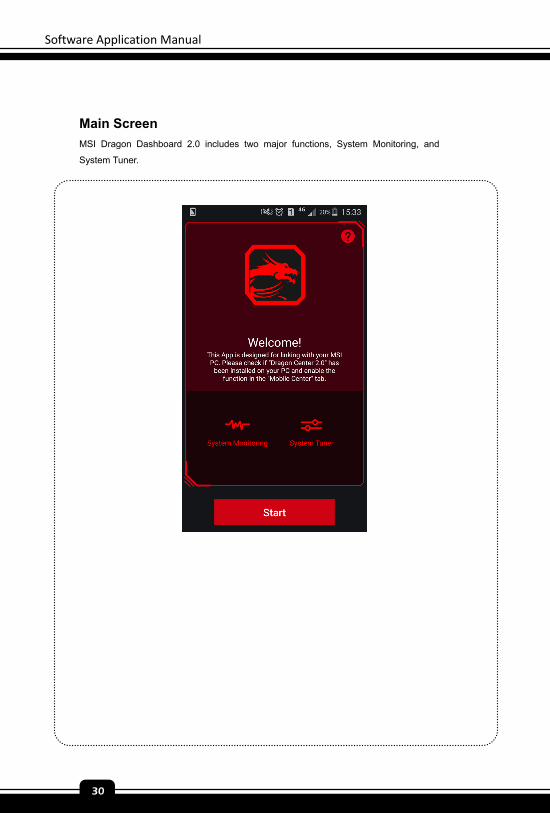
Main Screen
MSI Dragon Dashboard 2.0 includes two major functions, System Monitoring, and
System Tuner.
Preface
1-31
31
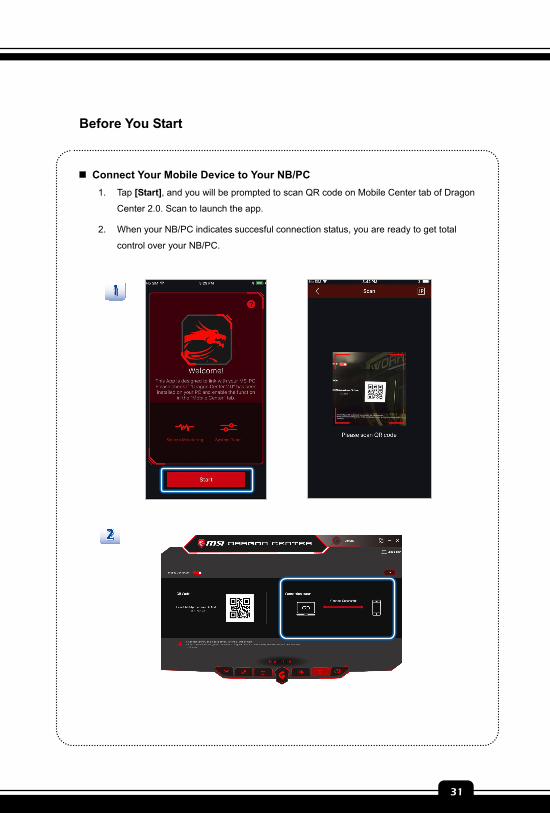
Before You Start
Connect Your Mobile Device to Your NB/PC
1. Tap [Start], and you will be prompted to scan QR code on Mobile Center tab of Dragon
Center 2.0. Scan to launch the app.
2. When your NB/PC indicates succesful connection status, you are ready to get total
control over your NB/PC.
Software Application Manual
32
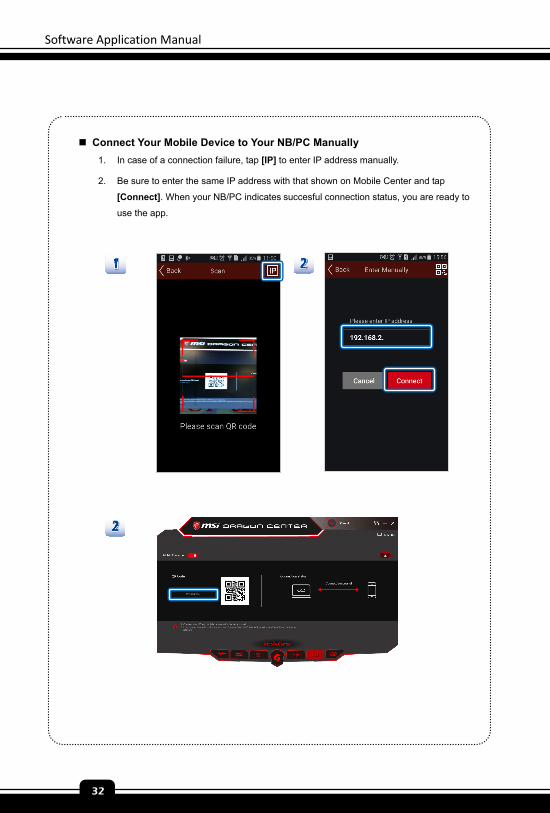
Connect Your Mobile Device to Your NB/PC Manually
1. In case of a connection failure, tap [IP] to enter IP address manually.
2. Be sure to enter the same IP address with that shown on Mobile Center and tap
[Connect]. When your NB/PC indicates succesful connection status, you are ready to
use the app.
Preface
1-33
33
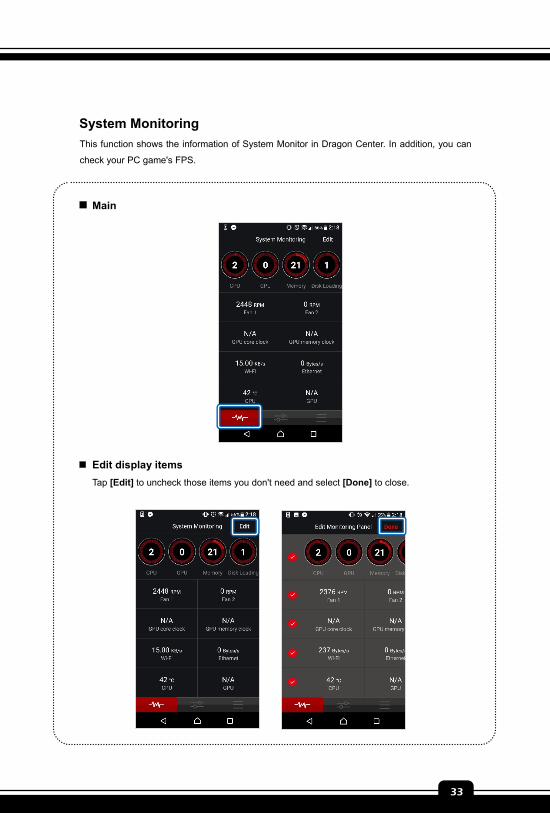
System Monitoring
This function shows the information of System Monitor in Dragon Center. In addition, you can
check your PC game's FPS.
Main
Edit display items
Tap [Edit] to uncheck those items you don't need and select [Done] to close.
Software Application Manual
34
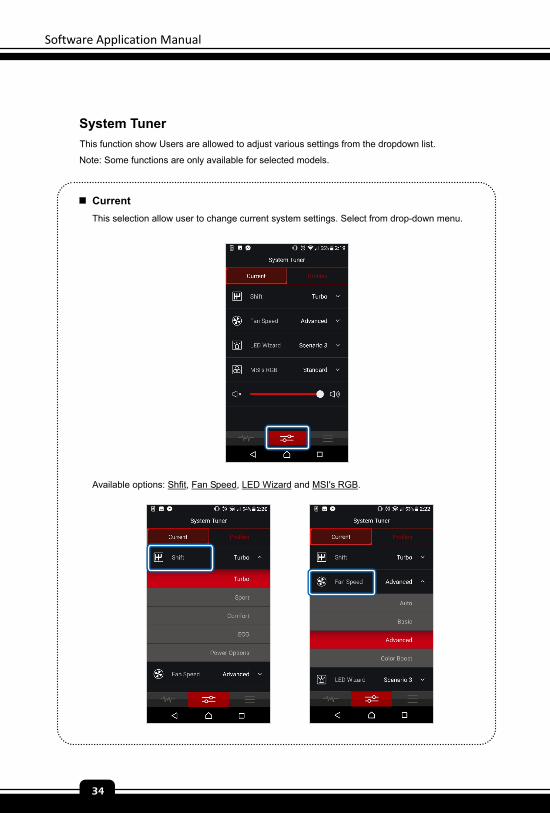
System Tuner
This function show Users are allowed to adjust various settings from the dropdown list.
Note: Some functions are only available for selected models.
Current
This selection allow user to change current system settings. Select from drop-down menu.
Available options: Shfit, Fan Speed, LED Wizard and MSI's RGB.

Preface
1-35
35
Profiles
This selection allow user to change profile settings. Select from drop-down menu.
Software Application Manual
36
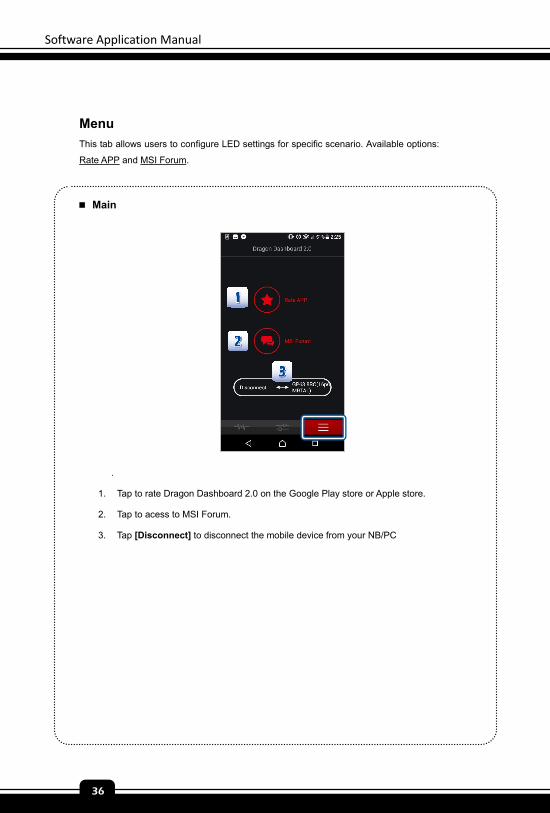
Menu
This tab allows users to configure LED settings for specific scenario. Available options:
Rate APP and MSI Forum.
Main
.
1. Tap to rate Dragon Dashboard 2.0 on the Google Play store or Apple store.
2. Tap to acess to MSI Forum.
3. Tap [Disconnect] to disconnect the mobile device from your NB/PC

Preface
1-37
37
Note
Software Application Manual
38
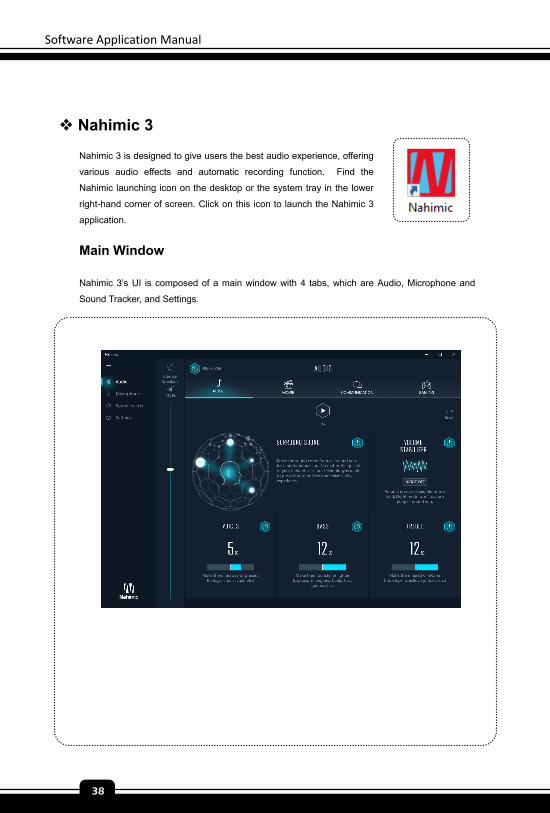
Nahimic 3
Nahimic 3 is designed to give users the best audio experience, offering
various audio effects and automatic recording function. Find the
Nahimic launching icon on the desktop or the system tray in the lower
right-hand corner of screen. Click on this icon to launch the Nahimic 3
application.
Main Window
Nahimic 3’s UI is composed of a main window with 4 tabs, which are Audio, Microphone and
Sound Tracker, and Settings.
Preface
1-39
39
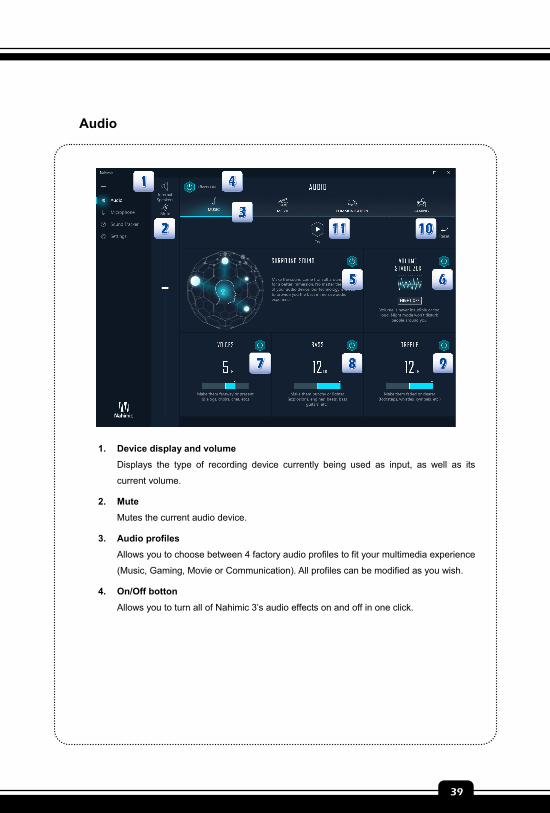
Audio
1. Device display and volume
Displays the type of recording device currently being used as input, as well as its
current volume.
2. Mute
Mutes the current audio device.
3. Audio profiles
Allows you to choose between 4 factory audio profiles to fit your multimedia experience
(Music, Gaming, Movie or Communication). All profiles can be modified as you wish.
4. On/Off botton
Allows you to turn all of Nahimic 3’s audio effects on and off in one click.

Software Application Manual
40
5. Surround Sound
Surround Sound is an audio effect mainly dedicated to headphones acoustic
experience. Here is what it does.
Gaming and Movies
Virtualizes the multichannel audio stream from the game engine or the movie
soundtrack and downmixes it in order to retrieve a multichannel listening
experience over your stereo headphones or speakers.
Music
Expands the stereo for a wider sound stage.
6. Volume Stabilizer
This compressor maintains a constant volume for all elements of the audio experience
(dialogs, soundtrack, explosions, etc.) to make them all sound softer, balanced or
louder. The Quiet On / Off option allows to enter a night mode by removing some
basses. This way, you won’t disturb people around you if you’re using speakers to play
your media.
7. Voices
Boosts (or removes) the speech in movies, video games and incoming communication
from -12 to +12 dB. eded.
8. Bass
Increases (or decreases) the energy in low frequencies from -12 to +12 dB.
9. Treble
Increases (or decreases) the energy in high frequencies from -12 to +12 dB.
10. Reset
Restores the current profile to its default settings. 11. Try
Launches an audio sample that allows to test audio settings.
Preface
1-41
41
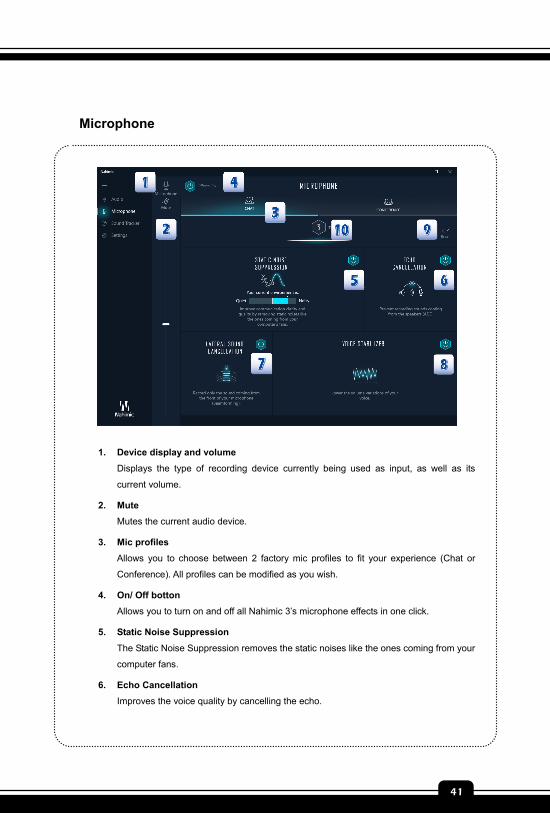
Microphone
1. Device display and volume
Displays the type of recording device currently being used as input, as well as its
current volume.
2. Mute
Mutes the current audio device.
3. Mic profiles
Allows you to choose between 2 factory mic profiles to fit your experience (Chat or
Conference). All profiles can be modified as you wish.
4. On/ Off botton
Allows you to turn on and off all Nahimic 3’s microphone effects in one click.
5. Static Noise Suppression
The Static Noise Suppression removes the static noises like the ones coming from your
computer fans.
6. Echo Cancellation
Improves the voice quality by cancelling the echo.
Software Application Manual
42
7. Lateral Sound Cancellation
Only records the sound coming from the front of your microphone.
8. Voice Stabilizer
Levels the volume of your voice in order to avoid any saturation and maintains a
constant and clear communication.
9. Reset
Restores the current profile to its default settings.
10. Try
Turns the microphone loopback On/Off.
Preface
1-43
43
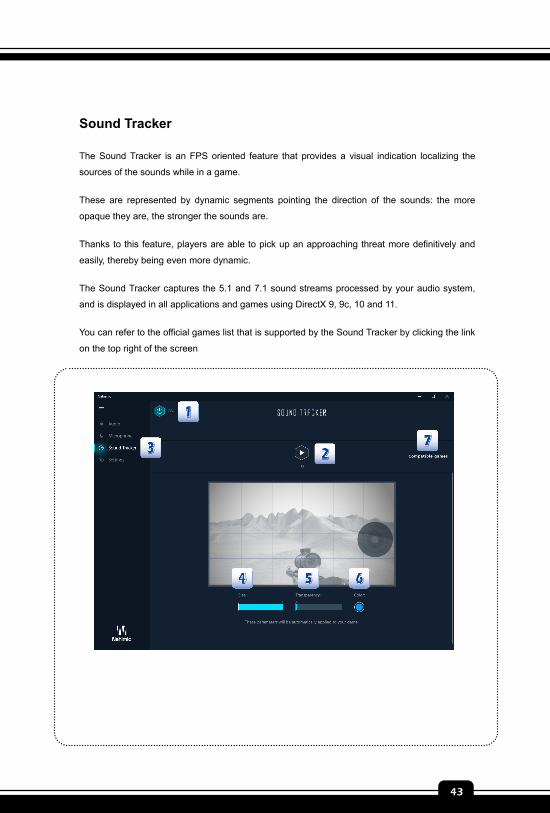
Sound Tracker
The Sound Tracker is an FPS oriented feature that provides a visual indication localizing the
sources of the sounds while in a game.
These are represented by dynamic segments pointing the direction of the sounds: the more
opaque they are, the stronger the sounds are.
Thanks to this feature, players are able to pick up an approaching threat more definitively and
easily, thereby being even more dynamic.
The Sound Tracker captures the 5.1 and 7.1 sound streams processed by your audio system,
and is displayed in all applications and games using DirectX 9, 9c, 10 and 11.
You can refer to the official games list that is supported by the Sound Tracker by clicking the link
on the top right of the screen
Software Application Manual
44
1. ON / OFF Button
You can disable the Sound Tracker by switching this option OFF.
2. Try
Launch a 7.1 audio sample allowing you to preview how the radar will react in your
game.
3. Sound Tracker
You can place the Sound Tracker wherever you want on your screen with a drag and
drop action, or with a simple click.
4. Scale
Adjust the scale of the Sound Tracker, making it look bigger or smaller.
5. Transparency
Adjust the transparency of the Sound Tracker, making it look more or less discrete.
6. Color
Click the colored circle to open the color edition window. You can apply the color you
want to the dynamic segments
7. Compatible games
Clicking this link opens the official Nahimic website, and leads to the list of compatible
games able to display the Sound Tracker.
Preface
1-45
45
Settings
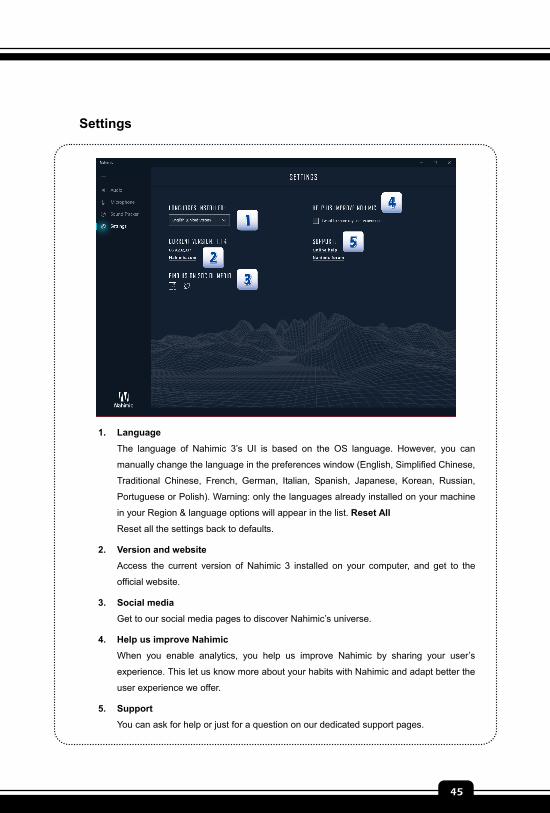
1. Language
The language of Nahimic 3’s UI is based on the OS language. However, you can
manually change the language in the preferences window (English, Simplified Chinese,
Traditional Chinese, French, German, Italian, Spanish, Japanese, Korean, Russian,
Portuguese or Polish). Warning: only the languages already installed on your machine
in your Region & language options will appear in the list. Reset All
Reset all the settings back to defaults.
2. Version and website
Access the current version of Nahimic 3 installed on your computer, and get to the
official website.
3. Social media
Get to our social media pages to discover Nahimic’s universe.
4. Help us improve Nahimic When you enable analytics, you help us improve Nahimic by sharing your user’s
experience. This let us know more about your habits with Nahimic and adapt better the
user experience we offer.
5. Support You can ask for help or just for a question on our dedicated support pages.

Software Application Manual
46
Note
Preface
1-47
47
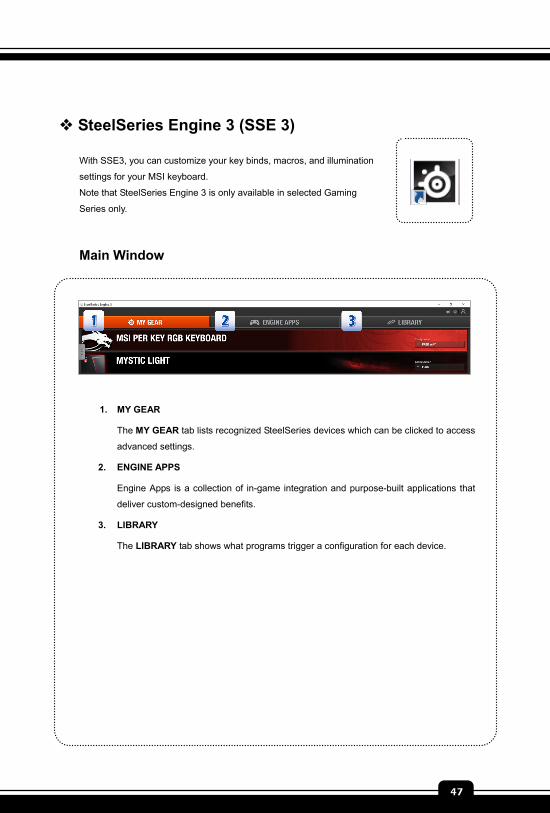
SteelSeries Engine 3 (SSE 3)
With SSE3, you can customize your key binds, macros, and illumination
settings for your MSI keyboard.
Note that SteelSeries Engine 3 is only available in selected Gaming
Series only.
Main Window
1. MY GEAR
The MY GEAR tab lists recognized SteelSeries devices which can be clicked to access
advanced settings.
2. ENGINE APPS
Engine Apps is a collection of in-game integration and purpose-built applications that
deliver custom-designed benefits.
3. LIBRARY
The LIBRARY tab shows what programs trigger a configuration for each device.
Software Application Manual
48
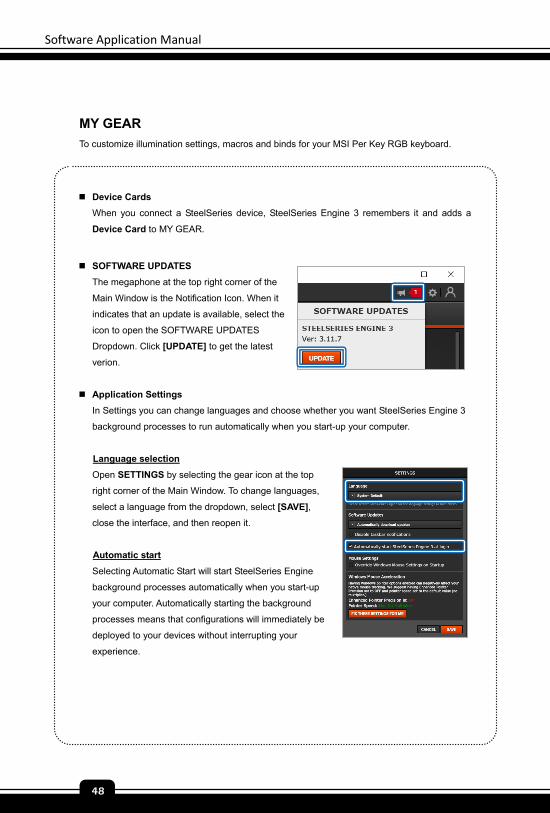
MY GEAR
To customize illumination settings, macros and binds for your MSI Per Key RGB keyboard.
Device Cards
When you connect a SteelSeries device, SteelSeries Engine 3 remembers it and adds a
Device Card to MY GEAR.
SOFTWARE UPDATES
The megaphone at the top right corner of the
Main Window is the Notification Icon. When it
indicates that an update is available, select the
icon to open the SOFTWARE UPDATES
Dropdown. Click [UPDATE] to get the latest
verion.
Application Settings
In Settings you can change languages and choose whether you want SteelSeries Engine 3
background processes to run automatically when you start-up your computer.
Language selection
Open SETTINGS by selecting the gear icon at the top
right corner of the Main Window. To change languages,
select a language from the dropdown, select [SAVE],
close the interface, and then reopen it.
Automatic start
Selecting Automatic Start will start SteelSeries Engine
background processes automatically when you start-up
your computer. Automatically starting the background
processes means that configurations will immediately be
deployed to your devices without interrupting your
experience.
Preface
1-49
49
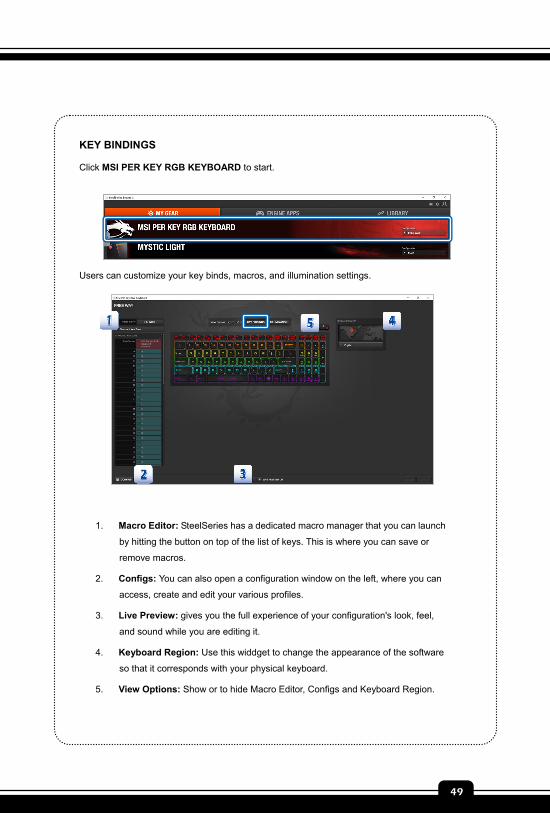
KEY BINDINGS
Click MSI PER KEY RGB KEYBOARD to start.
Users can customize your key binds, macros, and illumination settings.
1. Macro Editor: SteelSeries has a dedicated macro manager that you can launch
by hitting the button on top of the list of keys. This is where you can save or
remove macros.
2. Configs: You can also open a configuration window on the left, where you can
access, create and edit your various profiles.
3. Live Preview: gives you the full experience of your configuration's look, feel,
and sound while you are editing it.
4. Keyboard Region: Use this widdget to change the appearance of the software
so that it corresponds with your physical keyboard.
5. View Options: Show or to hide Macro Editor, Configs and Keyboard Region.
Software Application Manual
50
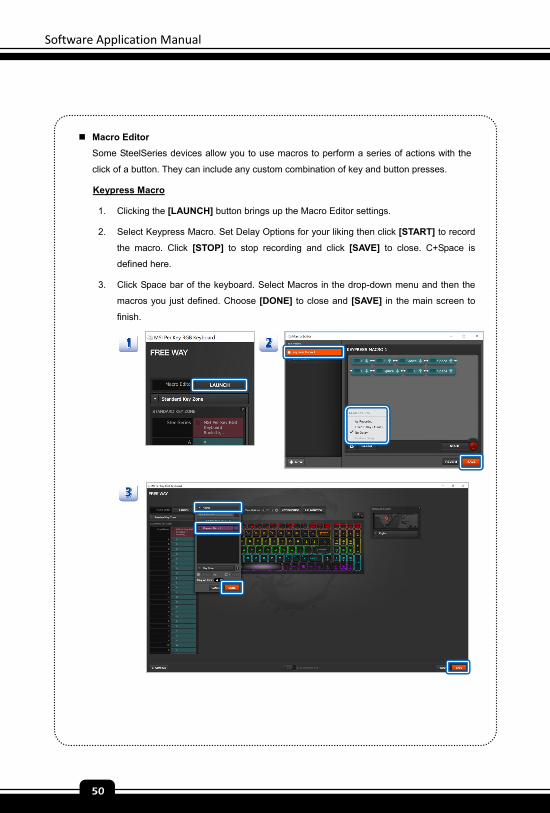
Macro Editor
Some SteelSeries devices allow you to use macros to perform a series of actions with the
click of a button. They can include any custom combination of key and button presses.
Keypress Macro
1. Clicking the [LAUNCH] button brings up the Macro Editor settings.
2. Select Keypress Macro. Set Delay Options for your liking then click [START] to record
the macro. Click [STOP] to stop recording and click [SAVE] to close. C+Space is
defined here.
3. Click Space bar of the keyboard. Select Macros in the drop-down menu and then the
macros you just defined. Choose [DONE] to close and [SAVE] in the main screen to
finish.
Preface
1-51
51
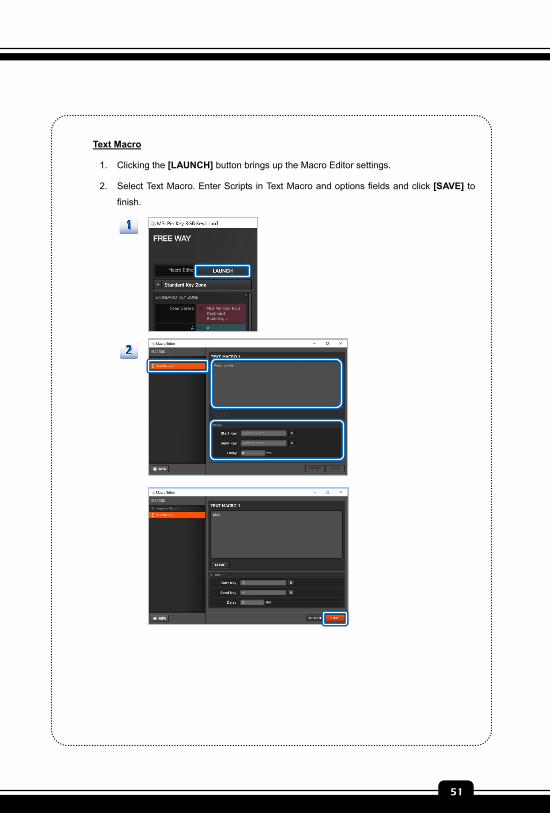
Text Macro
1. Clicking the [LAUNCH] button brings up the Macro Editor settings.
2. Select Text Macro. Enter Scripts in Text Macro and options fields and click [SAVE] to
finish.
Software Application Manual
52
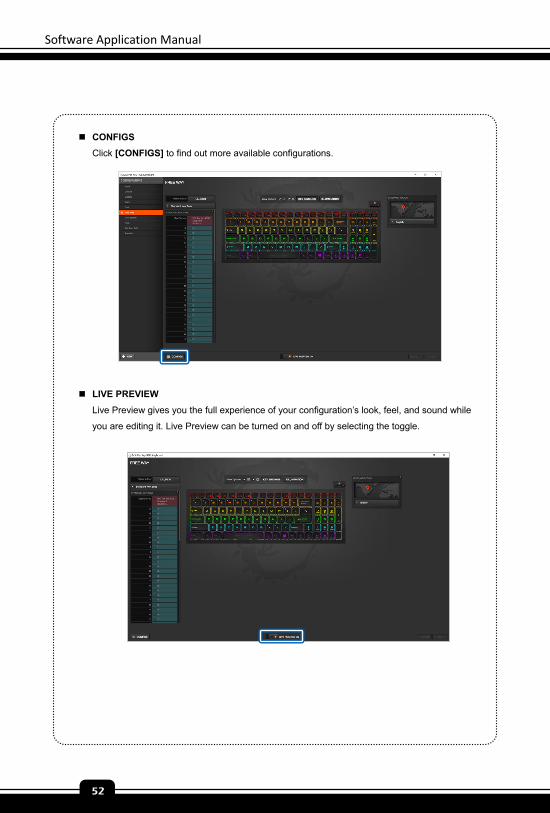
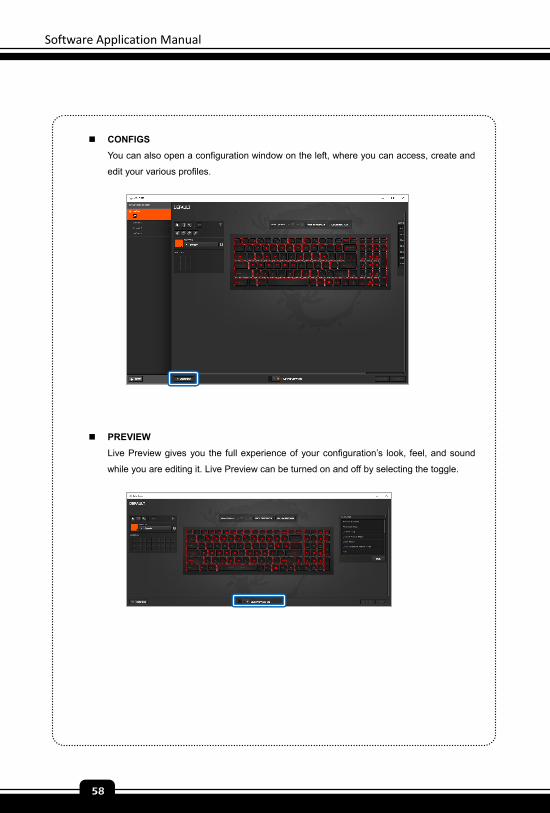
CONFIGS
Click [CONFIGS] to find out more available configurations.
LIVE PREVIEW
Live Preview gives you the full experience of your configuration’s look, feel, and sound while
you are editing it. Live Preview can be turned on and off by selecting the toggle.
Preface
1-53
53
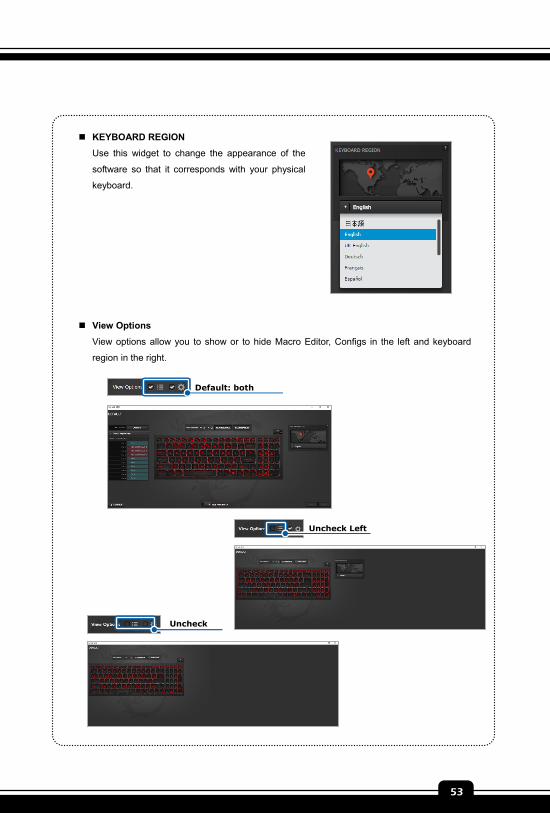
KEYBOARD REGION
Use this widget to change the appearance of the
software so that it corresponds with your physical
keyboard.
View Options
View options allow you to show or to hide Macro Editor, Configs in the left and keyboard
region in the right.
Default: both
Uncheck Left
Uncheck
Software Application Manual
54
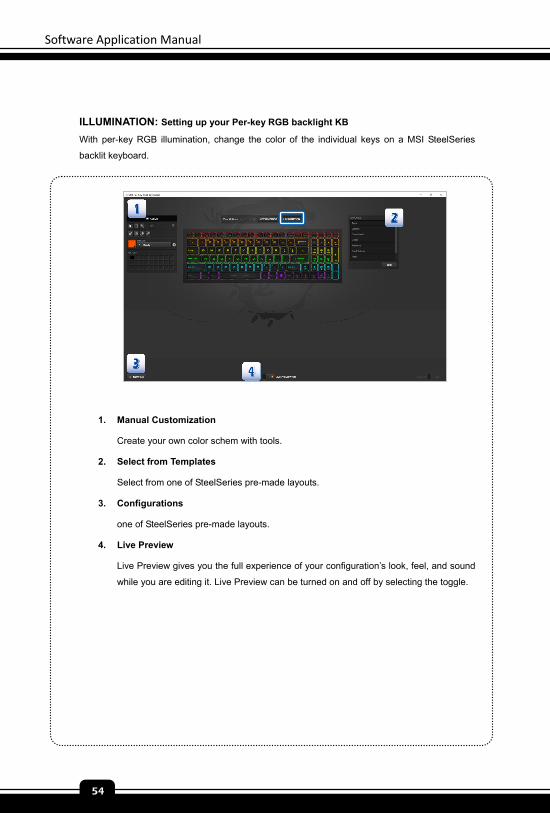
ILLUMINATION: Setting up your Per-key RGB backlight KB
With per-key RGB illumination, change the color of the individual keys on a MSI SteelSeries
backlit keyboard.
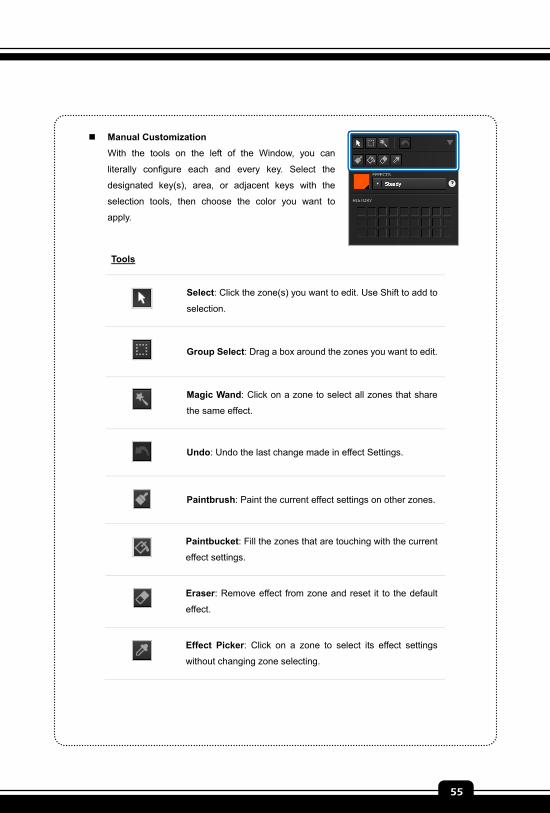
1. Manual Customization
Create your own color schem with tools.
2. Select from Templates
Select from one of SteelSeries pre-made layouts.
3. Configurations
one of SteelSeries pre-made layouts.
4. Live Preview
Live Preview gives you the full experience of your configuration’s look, feel, and sound
while you are editing it. Live Preview can be turned on and off by selecting the toggle.
Preface
1-55
55
Manual Customization
With the tools on the left of the Window, you can
literally configure each and every key. Select the
designated key(s), area, or adjacent keys with the
selection tools, then choose the color you want to
apply.
Tools
Select: Click the zone(s) you want to edit. Use Shift to add to
selection.
Group Select: Drag a box around the zones you want to edit.
Magic Wand: Click on a zone to select all zones that share
the same effect.
Undo: Undo the last change made in effect Settings.
Paintbrush: Paint the current effect settings on other zones.
Paintbucket: Fill the zones that are touching with the current
effect settings.
Eraser: Remove effect from zone and reset it to the default
effect.
Effect Picker: Click on a zone to select its effect settings
without changing zone selecting.
Software Application Manual
56
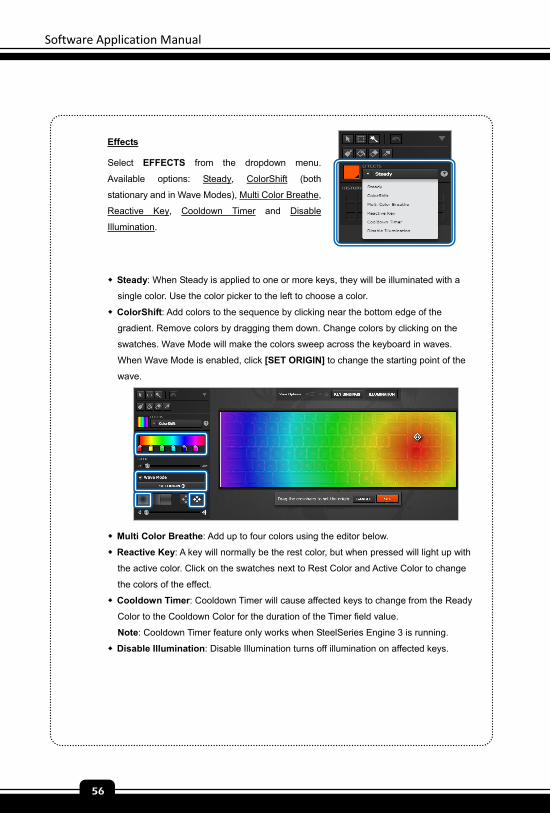
Effects
Select EFFECTS from the dropdown menu.
Available options: Steady, ColorShift (both
stationary and in Wave Modes), Multi Color Breathe,
Reactive Key, Cooldown Timer and Disable
Illumination.
Steady: When Steady is applied to one or more keys, they will be illuminated with a
single color. Use the color picker to the left to choose a color.
ColorShift: Add colors to the sequence by clicking near the bottom edge of the
gradient. Remove colors by dragging them down. Change colors by clicking on the
swatches. Wave Mode will make the colors sweep across the keyboard in waves.
When Wave Mode is enabled, click [SET ORIGIN] to change the starting point of the
wave.
Multi Color Breathe: Add up to four colors using the editor below.
Reactive Key: A key will normally be the rest color, but when pressed will light up with
the active color. Click on the swatches next to Rest Color and Active Color to change
the colors of the effect.
Cooldown Timer: Cooldown Timer will cause affected keys to change from the Ready
Color to the Cooldown Color for the duration of the Timer field value.
Note: Cooldown Timer feature only works when SteelSeries Engine 3 is running.
Disable Illumination: Disable Illumination turns off illumination on affected keys.
Preface
1-57
57
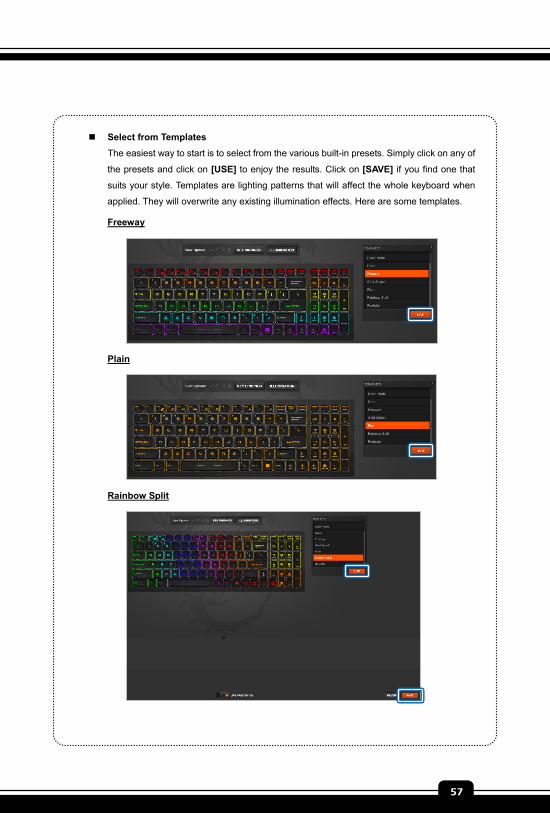
Select from Templates
The easiest way to start is to select from the various built-in presets. Simply click on any of
the presets and click on [USE] to enjoy the results. Click on [SAVE] if you find one that
suits your style. Templates are lighting patterns that will affect the whole keyboard when
applied. They will overwrite any existing illumination effects. Here are some templates.
Freeway
Plain
Rainbow Split
Software Application Manual
58
CONFIGS
You can also open a configuration window on the left, where you can access, create and
edit your various profiles.
PREVIEW
Live Preview gives you the full experience of your configuration’s look, feel, and sound
while you are editing it. Live Preview can be turned on and off by selecting the toggle.
Preface
1-59
59
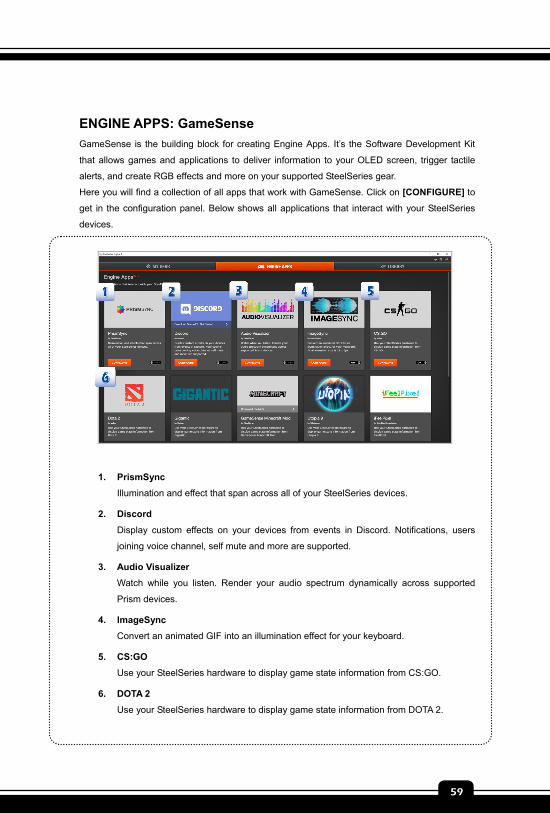
ENGINE APPS: GameSense
GameSense is the building block for creating Engine Apps. It’s the Software Development Kit
that allows games and applications to deliver information to your OLED screen, trigger tactile
alerts, and create RGB effects and more on your supported SteelSeries gear.
Here you will find a collection of all apps that work with GameSense. Click on [CONFIGURE] to
get in the configuration panel. Below shows all applications that interact with your SteelSeries
devices.
1. PrismSync
Illumination and effect that span across all of your SteelSeries devices.
2. Discord
Display custom effects on your devices from events in Discord. Notifications, users
joining voice channel, self mute and more are supported.
3. Audio Visualizer
Watch while you listen. Render your audio spectrum dynamically across supported
Prism devices.
4. ImageSync
Convert an animated GIF into an illumination effect for your keyboard.
5. CS:GO
Use your SteelSeries hardware to display game state information from CS:GO.
6. DOTA 2
Use your SteelSeries hardware to display game state information from DOTA 2.
Software Application Manual
60
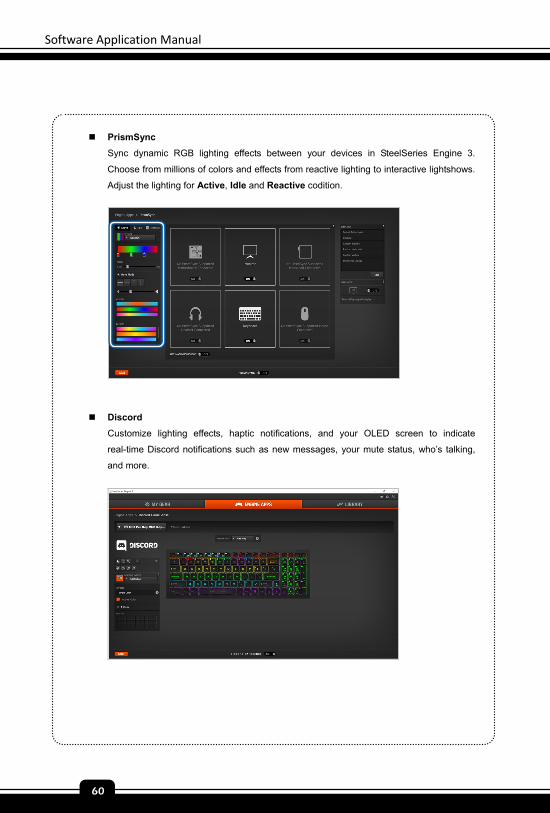
PrismSync
Sync dynamic RGB lighting effects between your devices in SteelSeries Engine 3.
Choose from millions of colors and effects from reactive lighting to interactive lightshows.
Adjust the lighting for Active, Idle and Reactive codition.
Discord
Customize lighting effects, haptic notifications, and your OLED screen to indicate
real-time Discord notifications such as new messages, your mute status, who’s talking,
and more.
Preface
1-61
61
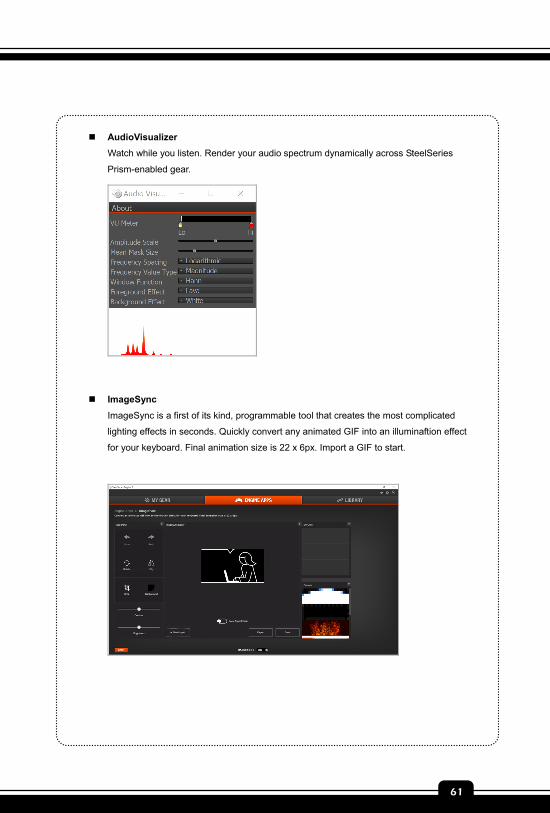
AudioVisualizer
Watch while you listen. Render your audio spectrum dynamically across SteelSeries
Prism-enabled gear.
ImageSync
ImageSync is a first of its kind, programmable tool that creates the most complicated
lighting effects in seconds. Quickly convert any animated GIF into an illuminaftion effect
for your keyboard. Final animation size is 22 x 6px. Import a GIF to start.

Software Application Manual
62
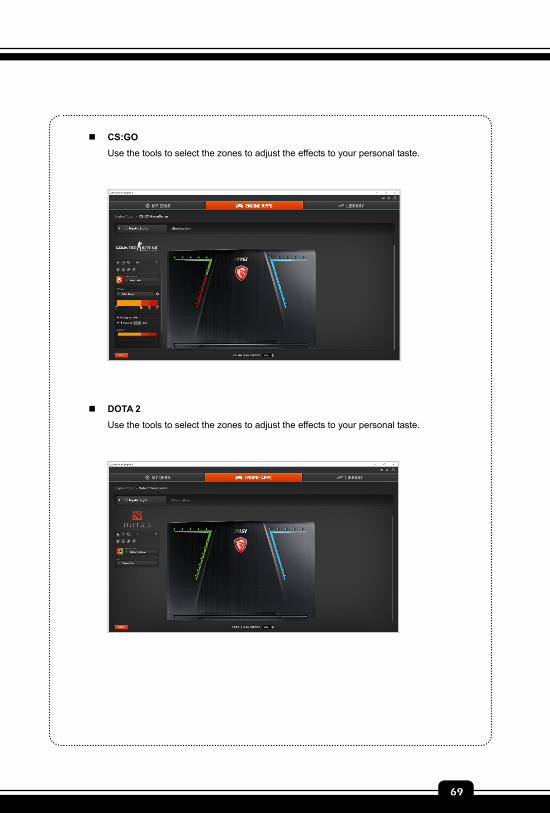
CS:GO
Use the tools to select the zones to adjust the effects to your personal taste.
DOTA 2
Use the tools to select the zones to adjust the effects to your personal taste.
Preface
1-63
63
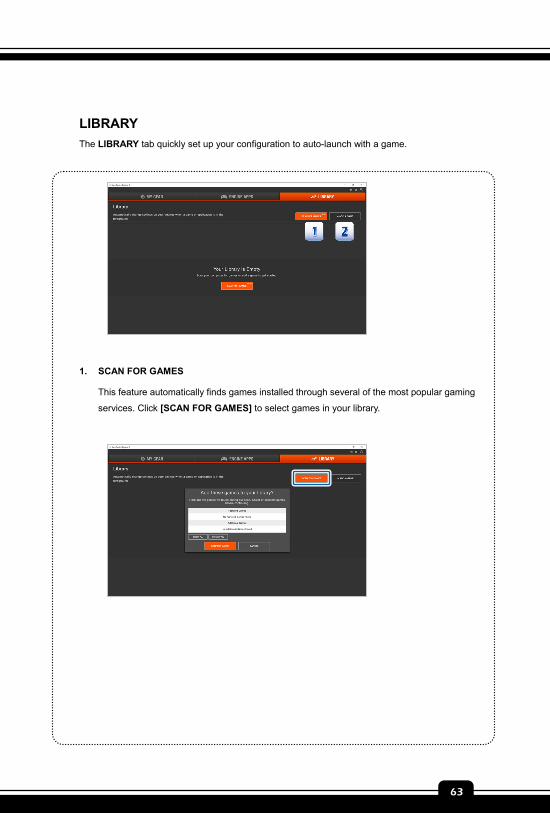
LIBRARY
The LIBRARY tab quickly set up your configuration to auto-launch with a game.
1. SCAN FOR GAMES This feature automatically finds games installed through several of the most popular gaming
services. Click [SCAN FOR GAMES] to select games in your library.
Software Application Manual
64
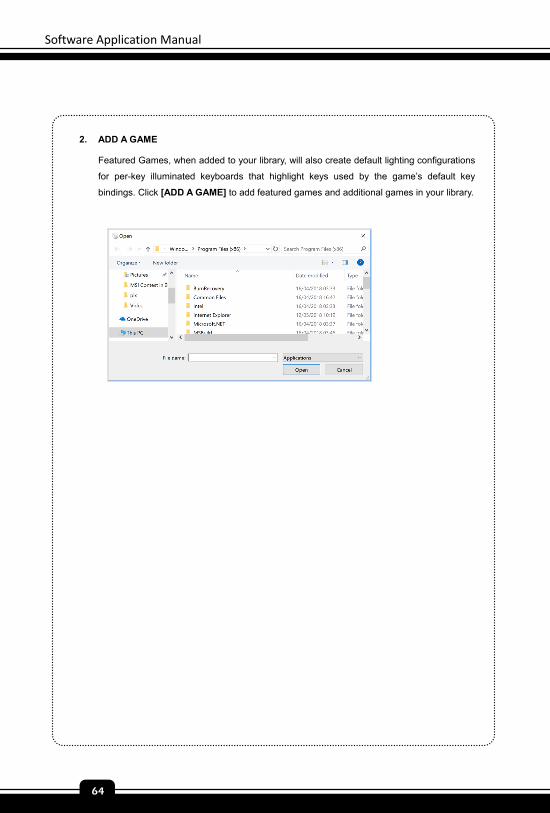
2. ADD A GAME
Featured Games, when added to your library, will also create default lighting configurations
for per-key illuminated keyboards that highlight keys used by the game’s default key
bindings. Click [ADD A GAME] to add featured games and additional games in your library.
Preface
1-65
65
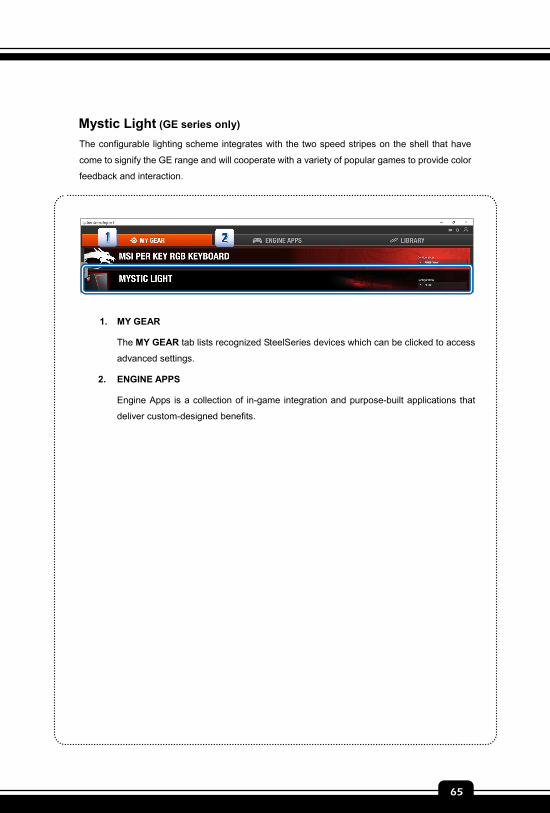
Mystic Light (GE series only)
The configurable lighting scheme integrates with the two speed stripes on the shell that have
come to signify the GE range and will cooperate with a variety of popular games to provide color
feedback and interaction.
1. MY GEAR
The MY GEAR tab lists recognized SteelSeries devices which can be clicked to access
advanced settings.
2. ENGINE APPS
Engine Apps is a collection of in-game integration and purpose-built applications that
deliver custom-designed benefits.
Software Application Manual
66
MY GEAR
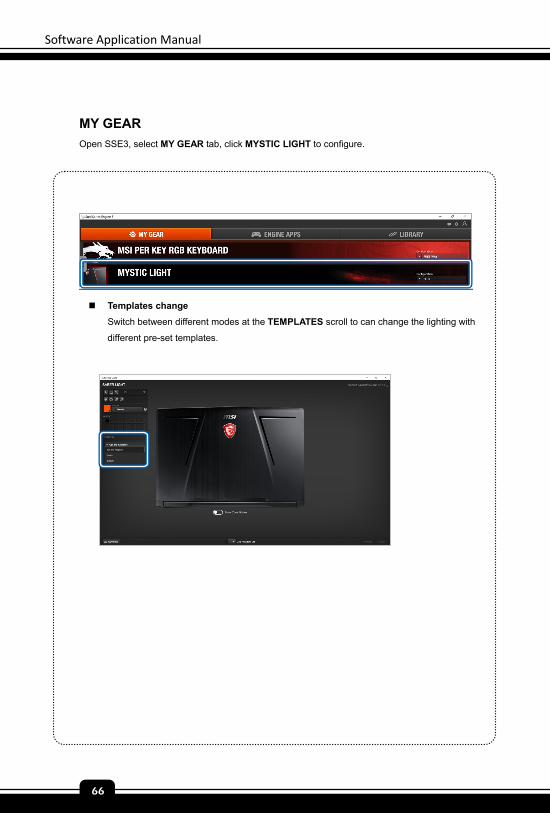
Open SSE3, select MY GEAR tab, click MYSTIC LIGHT to configure.
Templates change
Switch between different modes at the TEMPLATES scroll to can change the lighting with
different pre-set templates.
Preface
1-67
67
Effect Configuration
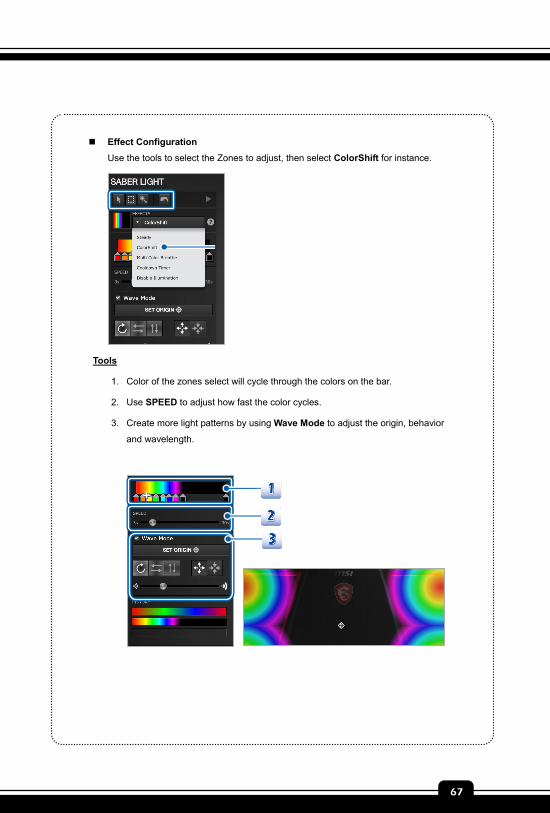
Use the tools to select the Zones to adjust, then select ColorShift for instance.
Tools
1. Color of the zones select will cycle through the colors on the bar.
2. Use SPEED to adjust how fast the color cycles.
3. Create more light patterns by using Wave Mode to adjust the origin, behavior
and wavelength.
Software Application Manual
68
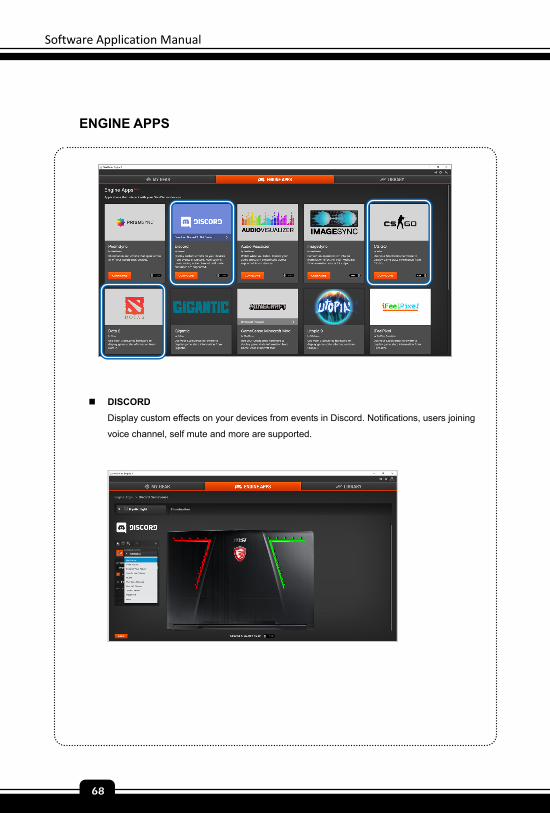
ENGINE APPS
DISCORD
Display custom effects on your devices from events in Discord. Notifications, users joining
voice channel, self mute and more are supported.
Preface
1-69
69
CS:GO
Use the tools to select the zones to adjust the effects to your personal taste.
DOTA 2
Use the tools to select the zones to adjust the effects to your personal taste.

Software Application Manual
70
Note

Preface
1-71
71
MSI True Color
MSI True Color 2.0 allows users to select the best color settings for the
displayed contents. It can customize and control laptop panels for precise
image presentation. When the application is launched, the display will
automatically adapt to the assigned color settings.
When the True Color 2.0 application is successfully installed, its
launching icon will appear in the system tray. Click on this icon to
launch.
Basic & Advanced View Modes
There are Basic View Mode and Advanced View Modes in True Color 2.0. Basic View Mode
provides quick access to six View Modes. Advanced View Mode allows users to customize the
user defined settings and give access to True Color’s tools. Click on the triangle at the bottom of
the application can switch between basic and advanced View Modes in True Color 2.0.
Basic View Mode
Advanced View Mode
Software Application Manual
72
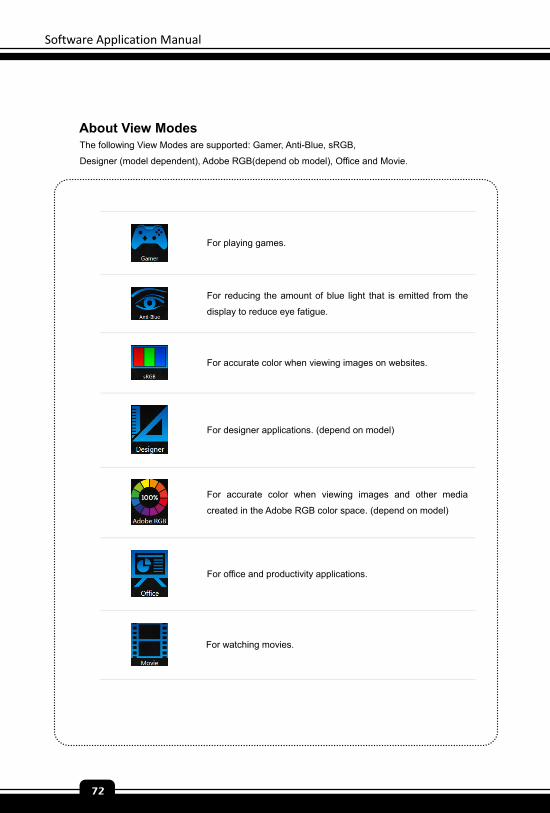
About View Modes The following View Modes are supported: Gamer, Anti-Blue, sRGB,
Designer (model dependent), Adobe RGB(depend ob model), Office and Movie.
For playing games.
For reducing the amount of blue light that is emitted from the
display to reduce eye fatigue.
For accurate color when viewing images on websites.
For designer applications. (depend on model)
For accurate color when viewing images and other media
created in the Adobe RGB color space. (depend on model)
For office and productivity applications.
For watching movies.
Preface
1-73
73
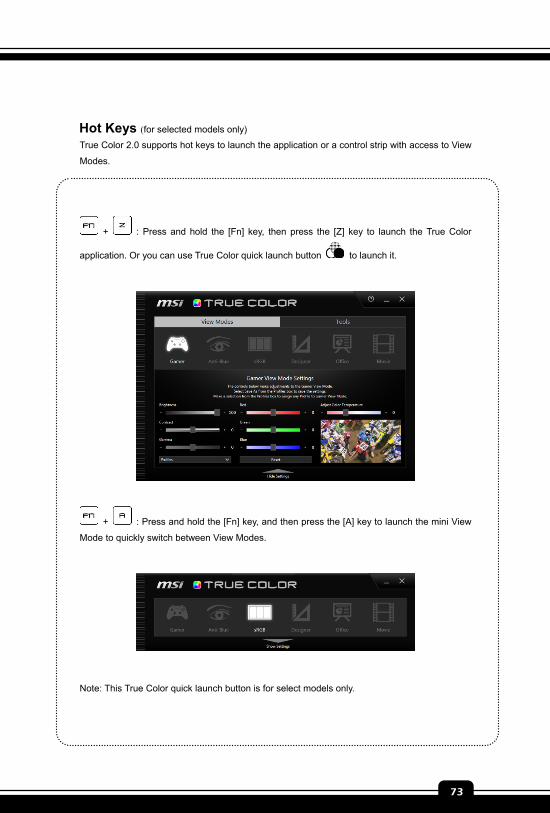
Hot Keys (for selected models only) True Color 2.0 supports hot keys to launch the application or a control strip with access to View
Modes.
+ : Press and hold the [Fn] key, then press the [Z] key to launch the True Color
application. Or you can use True Color quick launch button to launch it.
+ : Press and hold the [Fn] key, and then press the [A] key to launch the mini View
Mode to quickly switch between View Modes.
Note: This True Color quick launch button is for select models only.
Software Application Manual
74
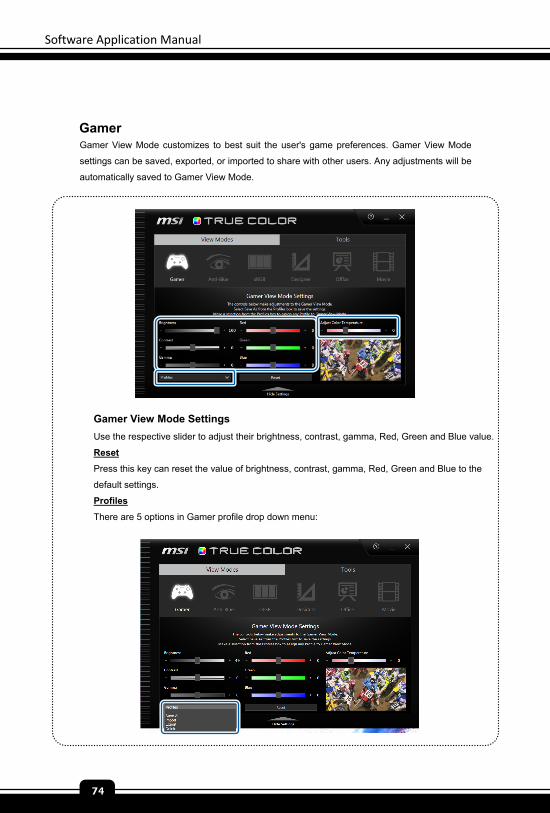
Gamer Gamer View Mode customizes to best suit the user's game preferences. Gamer View Mode
settings can be saved, exported, or imported to share with other users. Any adjustments will be
automatically saved to Gamer View Mode.
Gamer View Mode Settings
Use the respective slider to adjust their brightness, contrast, gamma, Red, Green and Blue value.
Reset
Press this key can reset the value of brightness, contrast, gamma, Red, Green and Blue to the
default settings.
Profiles
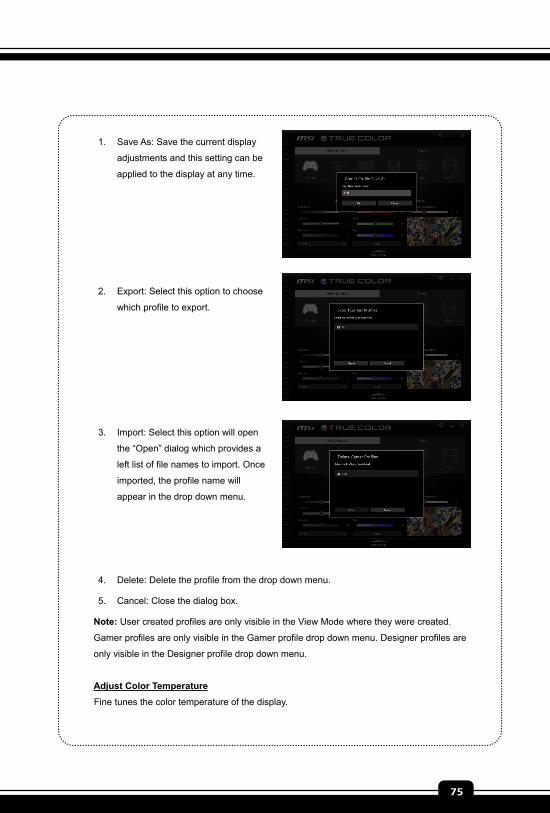
There are 5 options in Gamer profile drop down menu:
Preface
1-75
75
1. Save As: Save the current display
adjustments and this setting can be
applied to the display at any time.
2. Export: Select this option to choose
which profile to export.
3. Import: Select this option will open
the “Open” dialog which provides a
left list of file names to import. Once
imported, the profile name will
appear in the drop down menu.
4. Delete: Delete the profile from the drop down menu.
5. Cancel: Close the dialog box.
Note: User created profiles are only visible in the View Mode where they were created.
Gamer profiles are only visible in the Gamer profile drop down menu. Designer profiles are
only visible in the Designer profile drop down menu.
Adjust Color Temperature
Fine tunes the color temperature of the display.
Software Application Manual
76
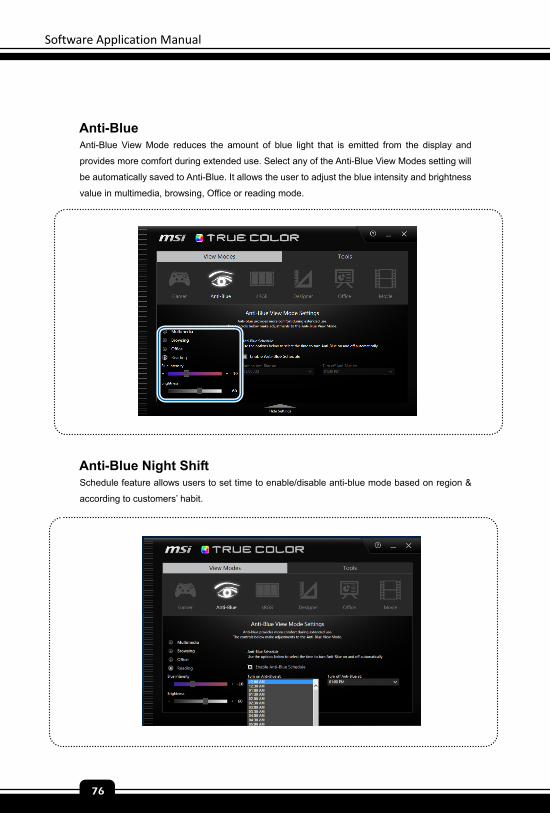
Anti-Blue Anti-Blue View Mode reduces the amount of blue light that is emitted from the display and
provides more comfort during extended use. Select any of the Anti-Blue View Modes setting will
be automatically saved to Anti-Blue. It allows the user to adjust the blue intensity and brightness
value in multimedia, browsing, Office or reading mode.
Anti-Blue Night Shift Schedule feature allows users to set time to enable/disable anti-blue mode based on region &
according to customers’ habit.
Preface
1-77
77
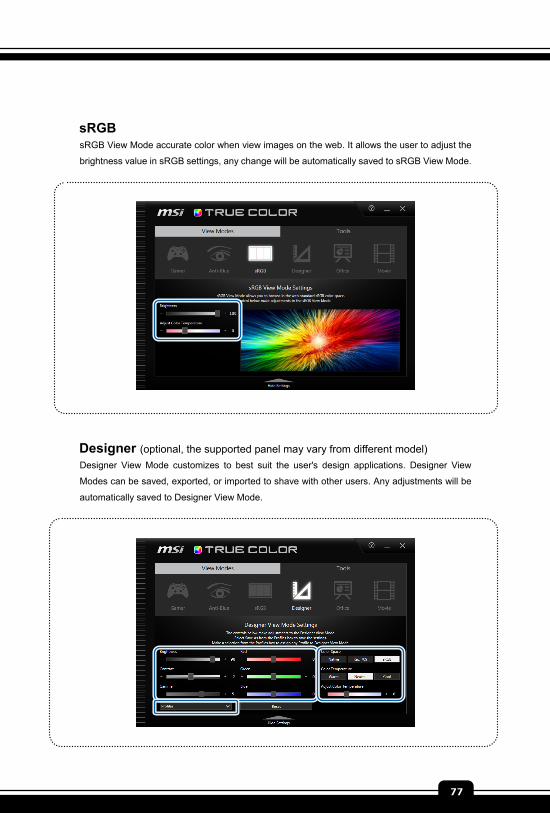
sRGB sRGB View Mode accurate color when view images on the web. It allows the user to adjust the
brightness value in sRGB settings, any change will be automatically saved to sRGB View Mode.
Designer (optional, the supported panel may vary from different model)
Designer View Mode customizes to best suit the user's design applications. Designer View
Modes can be saved, exported, or imported to shave with other users. Any adjustments will be
automatically saved to Designer View Mode.
Disabled
Software Application Manual
78
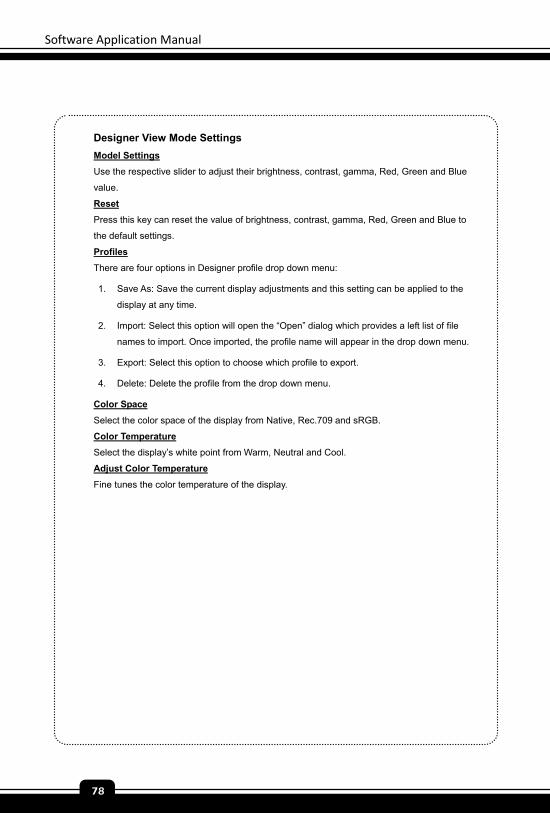
Designer View Mode Settings
Model Settings
Use the respective slider to adjust their brightness, contrast, gamma, Red, Green and Blue
value.
Reset
Press this key can reset the value of brightness, contrast, gamma, Red, Green and Blue to
the default settings.
Profiles
There are four options in Designer profile drop down menu:
1. Save As: Save the current display adjustments and this setting can be applied to the
display at any time.
2. Import: Select this option will open the “Open” dialog which provides a left list of file
names to import. Once imported, the profile name will appear in the drop down menu.
3. Export: Select this option to choose which profile to export.
4. Delete: Delete the profile from the drop down menu.
Color Space
Select the color space of the display from Native, Rec.709 and sRGB.
Color Temperature
Select the display’s white point from Warm, Neutral and Cool.
Adjust Color Temperature
Fine tunes the color temperature of the display.
Preface
1-79
79
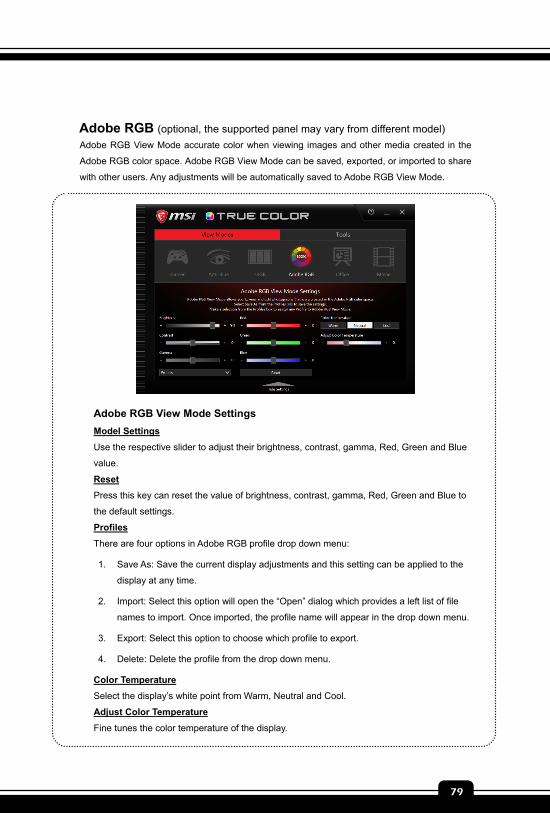
Adobe RGB (optional, the supported panel may vary from different model) Adobe RGB View Mode accurate color when viewing images and other media created in the
Adobe RGB color space. Adobe RGB View Mode can be saved, exported, or imported to share
with other users. Any adjustments will be automatically saved to Adobe RGB View Mode.
Adobe RGB View Mode Settings
Model Settings
Use the respective slider to adjust their brightness, contrast, gamma, Red, Green and Blue
value.
Reset
Press this key can reset the value of brightness, contrast, gamma, Red, Green and Blue to
the default settings.
Profiles
There are four options in Adobe RGB profile drop down menu:
1. Save As: Save the current display adjustments and this setting can be applied to the
display at any time.
2. Import: Select this option will open the “Open” dialog which provides a left list of file
names to import. Once imported, the profile name will appear in the drop down menu.
3. Export: Select this option to choose which profile to export.
4. Delete: Delete the profile from the drop down menu.
Color Temperature
Select the display’s white point from Warm, Neutral and Cool.
Adjust Color Temperature
Fine tunes the color temperature of the display.
Software Application Manual
80
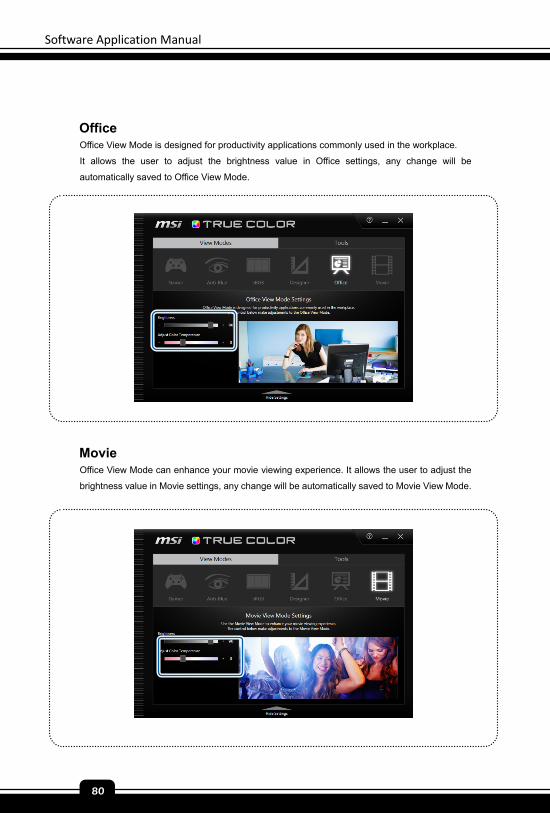
Office Office View Mode is designed for productivity applications commonly used in the workplace.
It allows the user to adjust the brightness value in Office settings, any change will be
automatically saved to Office View Mode.
Movie Office View Mode can enhance your movie viewing experience. It allows the user to adjust the
brightness value in Movie settings, any change will be automatically saved to Movie View Mode.
Preface
1-81
81
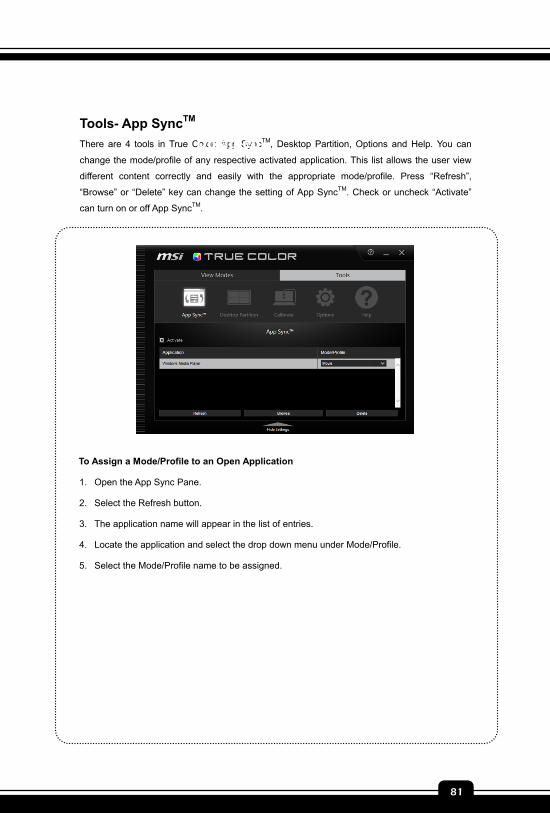
Tools- App SyncTM
There are 4 tools in True Color: App SyncTM, Desktop Partition, Options and Help. You can
change the mode/profile of any respective activated application. This list allows the user view
different content correctly and easily with the appropriate mode/profile. Press “Refresh”,
“Browse” or “Delete” key can change the setting of App SyncTM. Check or uncheck “Activate”
can turn on or off App SyncTM.
To Assign a Mode/Profile to an Open Application
1. Open the App Sync Pane.
2. Select the Refresh button.
3. The application name will appear in the list of entries.
4. Locate the application and select the drop down menu under Mode/Profile.
5. Select the Mode/Profile name to be assigned.
Disabled
Software Application Manual
82
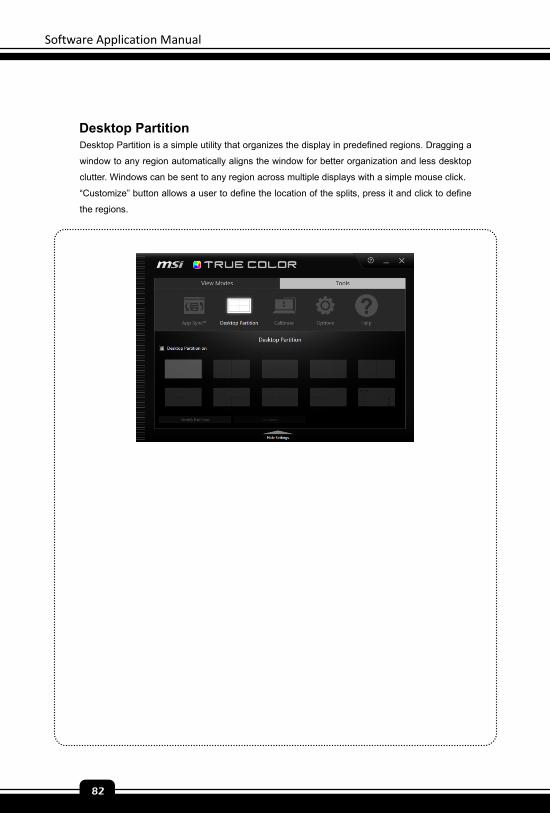
Desktop Partition Desktop Partition is a simple utility that organizes the display in predefined regions. Dragging a
window to any region automatically aligns the window for better organization and less desktop
clutter. Windows can be sent to any region across multiple displays with a simple mouse click.
“Customize” button allows a user to define the location of the splits, press it and click to define
the regions.
Preface
1-83
83
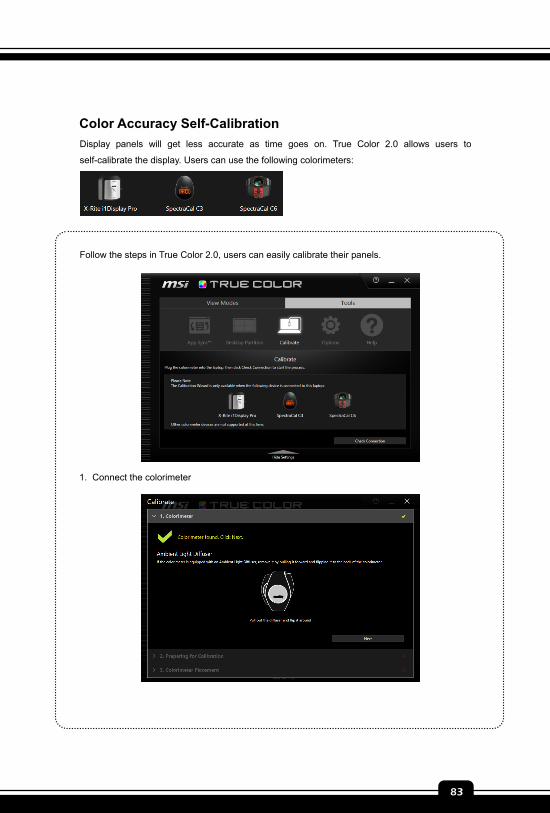
Color Accuracy Self-Calibration
Display panels will get less accurate as time goes on. True Color 2.0 allows users to
self-calibrate the display. Users can use the following colorimeters:
Follow the steps in True Color 2.0, users can easily calibrate their panels.
1. Connect the colorimeter
Software Application Manual
84
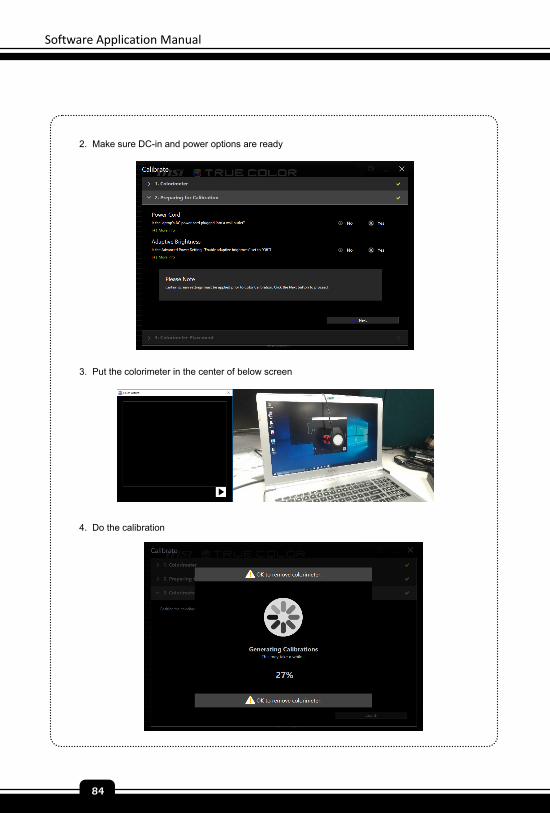
2. Make sure DC-in and power options are ready
3. Put the colorimeter in the center of below screen
4. Do the calibration
Preface
1-85
85
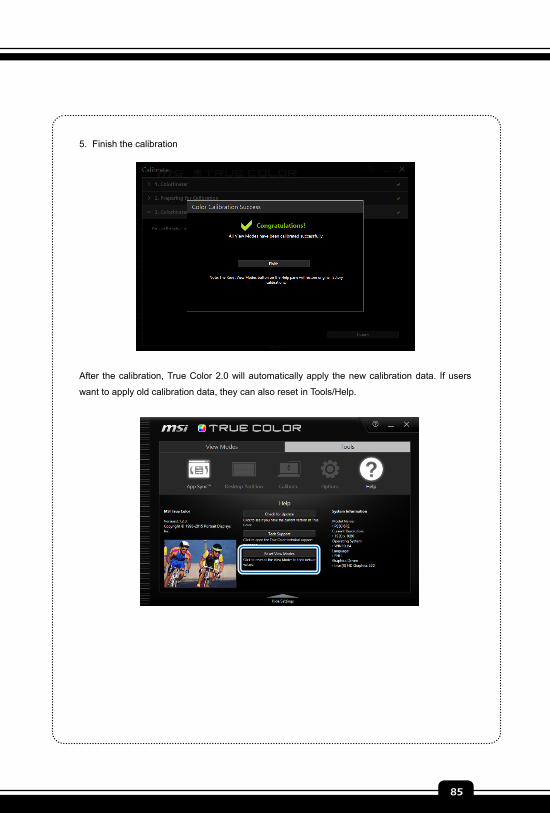
5. Finish the calibration
After the calibration, True Color 2.0 will automatically apply the new calibration data. If users
want to apply old calibration data, they can also reset in Tools/Help.
Software Application Manual
86
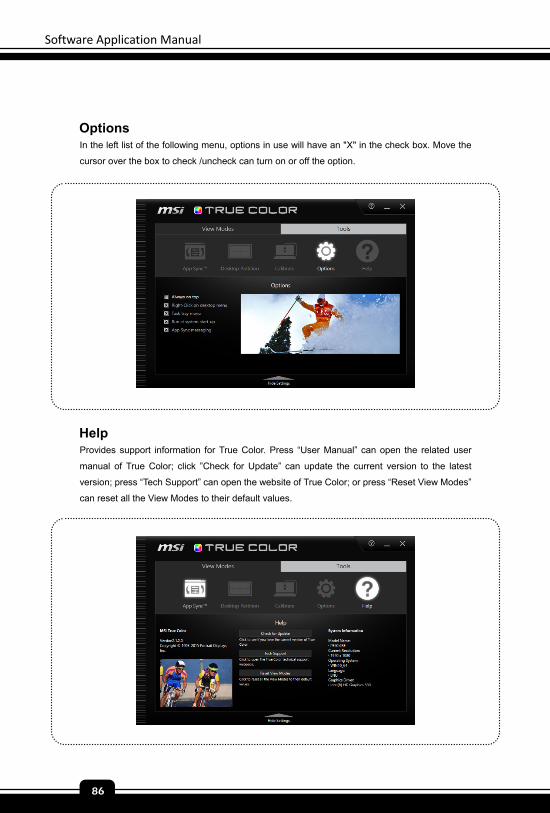
Options In the left list of the following menu, options in use will have an "X" in the check box. Move the
cursor over the box to check /uncheck can turn on or off the option.
Help Provides support information for True Color. Press “User Manual” can open the related user
manual of True Color; click ”Check for Update” can update the current version to the latest
version; press “Tech Support” can open the website of True Color; or press “Reset View Modes”
can reset all the View Modes to their default values.

Preface
1-87
87
Note
Software Application Manual
88
Help Desk
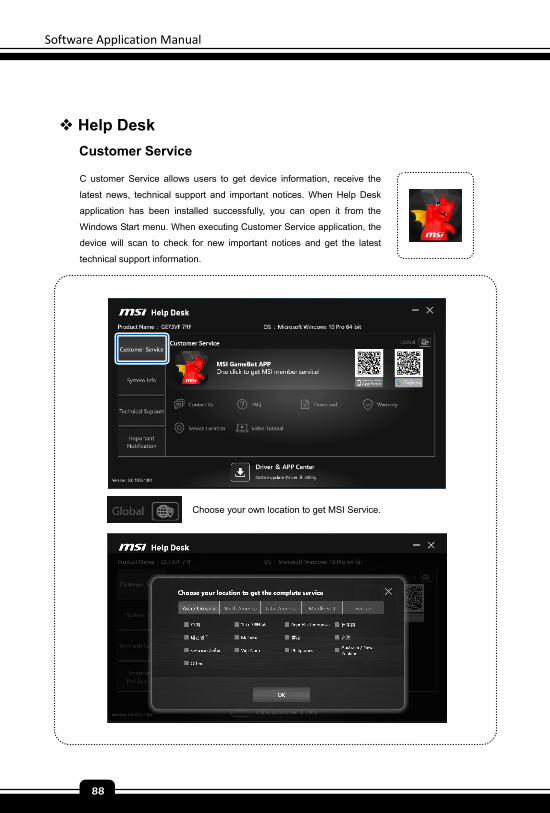
Customer Service
C ustomer Service allows users to get device information, receive the
latest news, technical support and important notices. When Help Desk
application has been installed successfully, you can open it from the
Windows Start menu. When executing Customer Service application, the
device will scan to check for new important notices and get the latest
technical support information.
Choose your own location to get MSI Service.
Preface
1-89
89
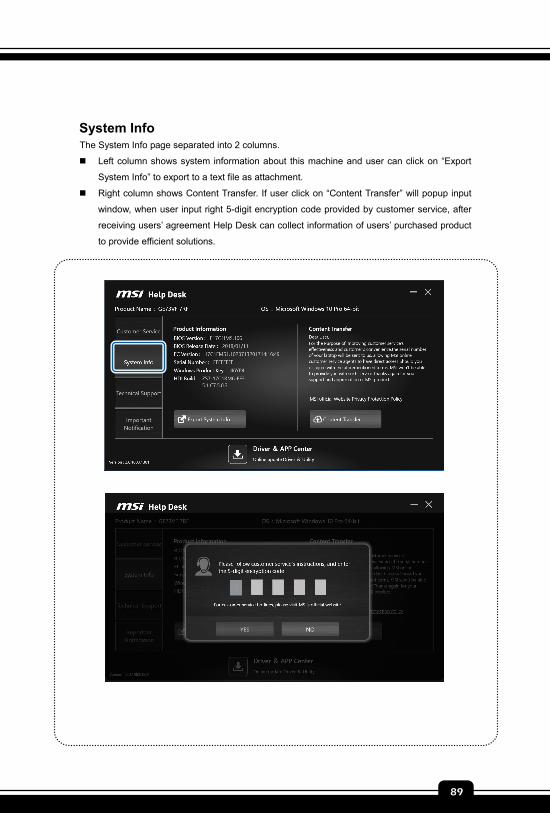
System Info The System Info page separated into 2 columns.
Left column shows system information about this machine and user can click on “Export
System Info” to export to a text file as attachment.
Right column shows Content Transfer. If user click on “Content Transfer” will popup input
window, when user input right 5-digit encryption code provided by customer service, after
receiving users’ agreement Help Desk can collect information of users’ purchased product
to provide efficient solutions.
Software Application Manual
90
Technical Support
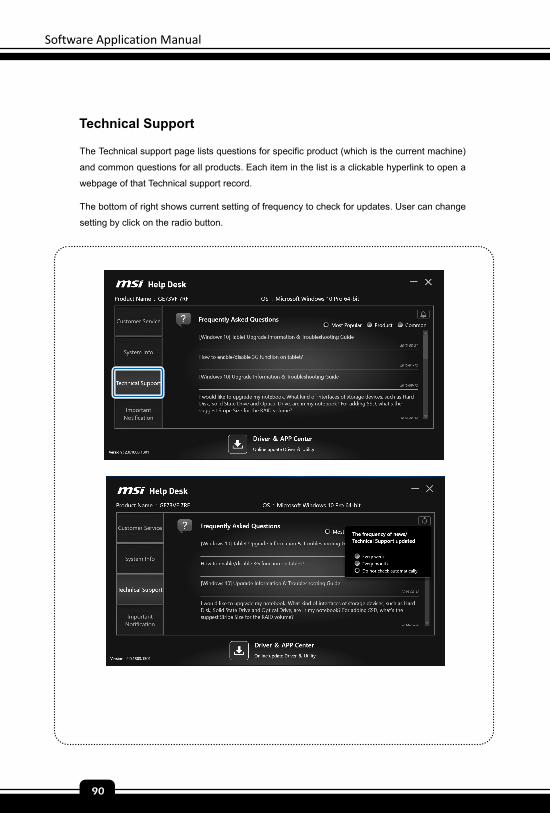
The Technical support page lists questions for specific product (which is the current machine)
and common questions for all products. Each item in the list is a clickable hyperlink to open a
webpage of that Technical support record.
The bottom of right shows current setting of frequency to check for updates. User can change
setting by click on the radio button.
Preface
1-91
91
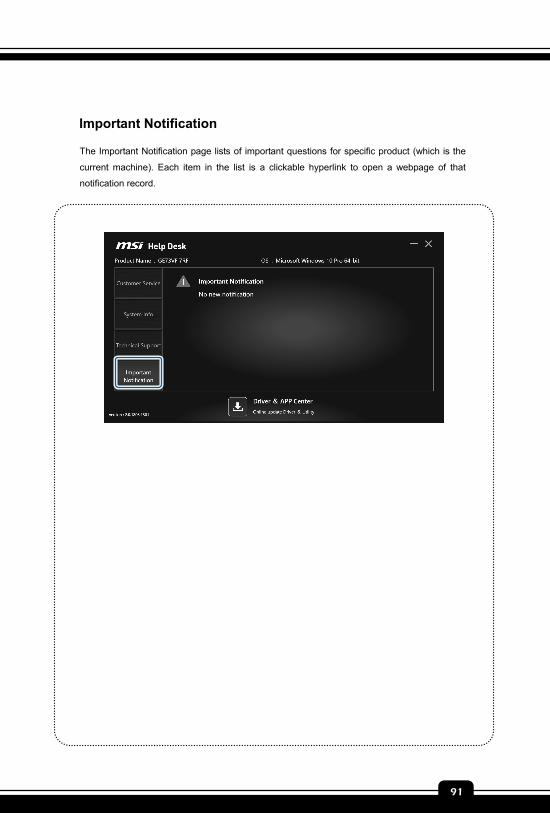
Important Notification
The Important Notification page lists of important questions for specific product (which is the
current machine). Each item in the list is a clickable hyperlink to open a webpage of that
notification record.
Software Application Manual
92
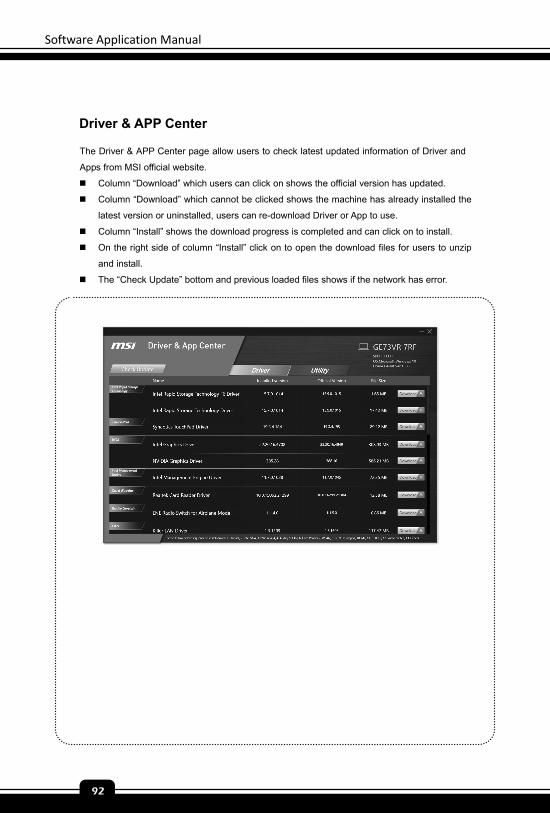
Driver & APP Center
The Driver & APP Center page allow users to check latest updated information of Driver and
Apps from MSI official website.
Column “Download” which users can click on shows the official version has updated.
Column “Download” which cannot be clicked shows the machine has already installed the
latest version or uninstalled, users can re-download Driver or App to use.
Column “Install” shows the download progress is completed and can click on to install.
On the right side of column “Install” click on to open the download files for users to unzip
and install.
The “Check Update” bottom and previous loaded files shows if the network has error.
Preface
1-93
93
Software Application Manual
94
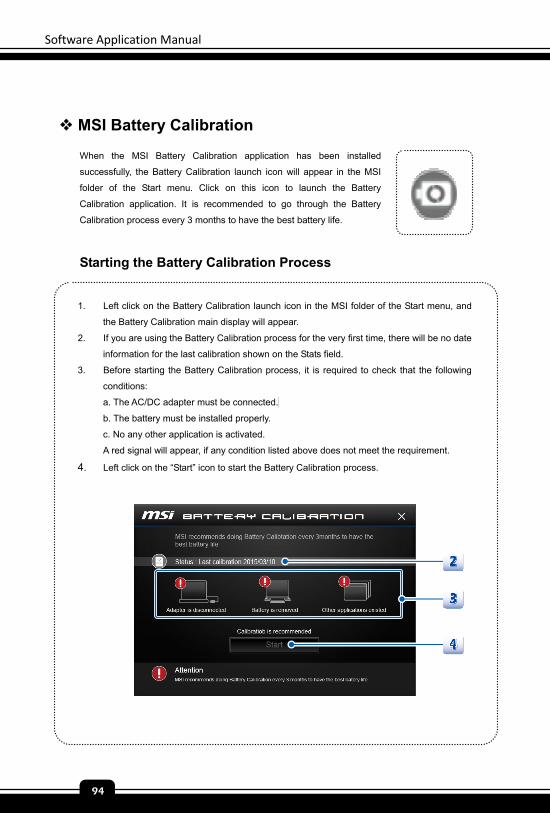
MSI Battery Calibration
When the MSI Battery Calibration application has been installed
successfully, the Battery Calibration launch icon will appear in the MSI
folder of the Start menu. Click on this icon to launch the Battery
Calibration application. It is recommended to go through the Battery
Calibration process every 3 months to have the best battery life.
Starting the Battery Calibration Process
1. Left click on the Battery Calibration launch icon in the MSI folder of the Start menu, and
the Battery Calibration main display will appear.
2. If you are using the Battery Calibration process for the very first time, there will be no date
information for the last calibration shown on the Stats field.
3. Before starting the Battery Calibration process, it is required to check that the following
conditions:
a. The AC/DC adapter must be connected.
b. The battery must be installed properly.
c. No any other application is activated.
A red signal will appear, if any condition listed above does not meet the requirement.
4. Left click on the “Start” icon to start the Battery Calibration process.

Preface
1-95
95
5. The calibration process status will be shown on the display telling users that the system is
now charging, recharging, or discharging.
6. Calibration completed.
Note: MSI recommends doing Battery Calibration every 3 months to
have the best battery life.

Software Application Manual
96
7. If the calibration process kept going failed, please replace the battery only with the same
or equivalent type recommended by the manufacturer. Consult an authorized retailer or
service center for further information and assistance.
Preface
1-97
97
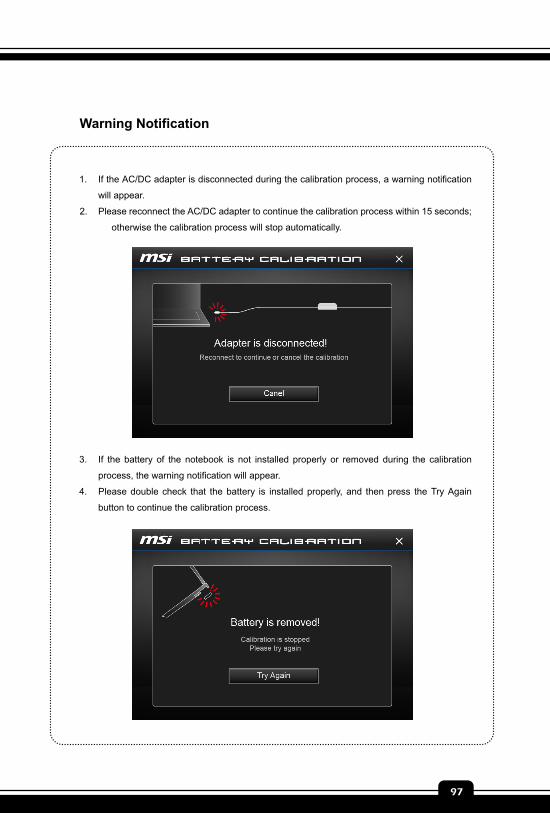
Warning Notification
1. If the AC/DC adapter is disconnected during the calibration process, a warning notification
will appear.
2. Please reconnect the AC/DC adapter to continue the calibration process within 15 seconds;
otherwise the calibration process will stop automatically.
3. If the battery of the notebook is not installed properly or removed during the calibration
process, the warning notification will appear.
4. Please double check that the battery is installed properly, and then press the Try Again
button to continue the calibration process.
Software Application Manual
98
Note
Preface
1-99
99
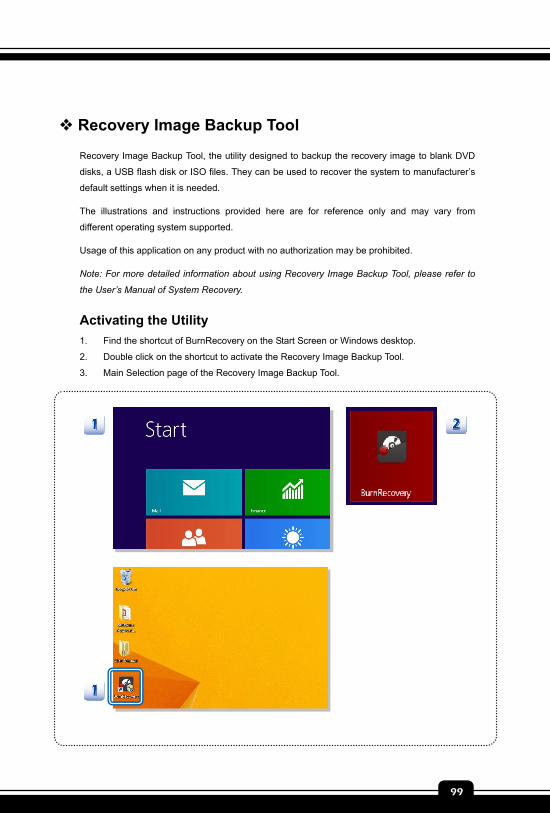
Recovery Image Backup Tool
Recovery Image Backup Tool, the utility designed to backup the recovery image to blank DVD
disks, a USB flash disk or ISO files. They can be used to recover the system to manufacturer’s
default settings when it is needed.
The illustrations and instructions provided here are for reference only and may vary from
different operating system supported.
Usage of this application on any product with no authorization may be prohibited.
Note: For more detailed information about using Recovery Image Backup Tool, please refer to
the User’s Manual of System Recovery.
Activating the Utility
1. Find the shortcut of BurnRecovery on the Start Screen or Windows desktop.
2. Double click on the shortcut to activate the Recovery Image Backup Tool.
3. Main Selection page of the Recovery Image Backup Tool.
Software Application Manual
100
Preface
1-101
101
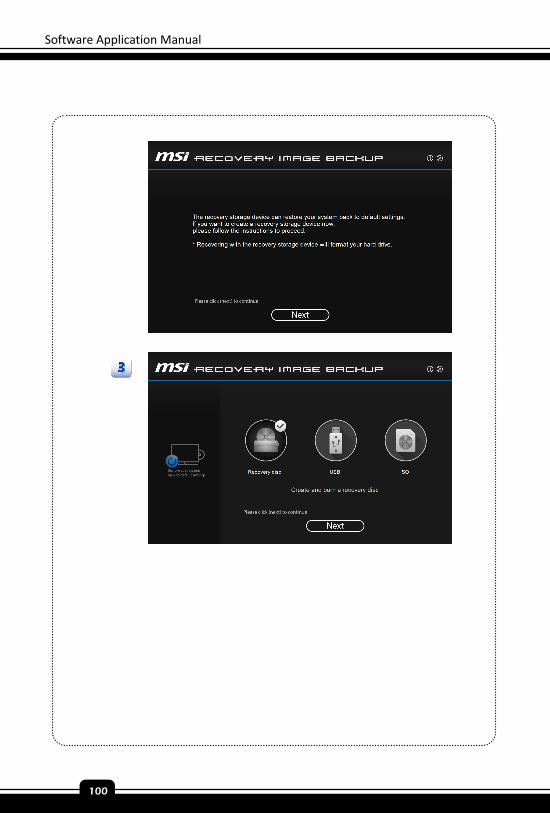
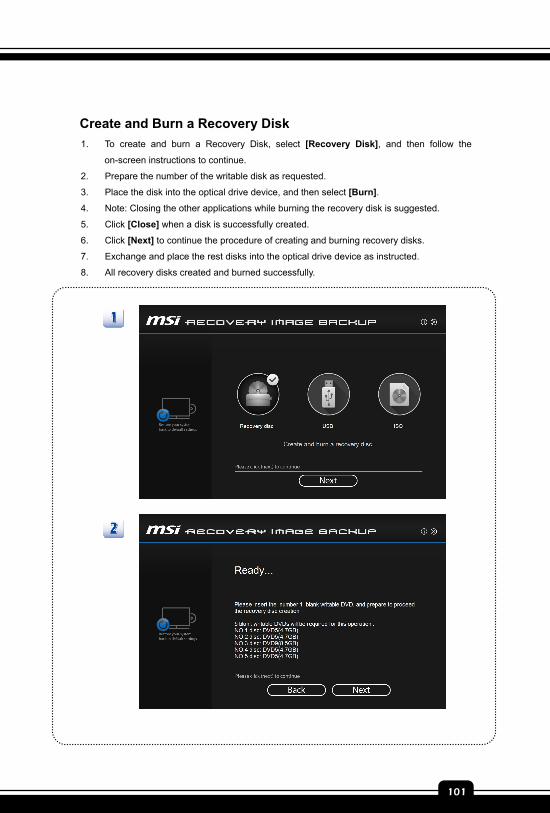
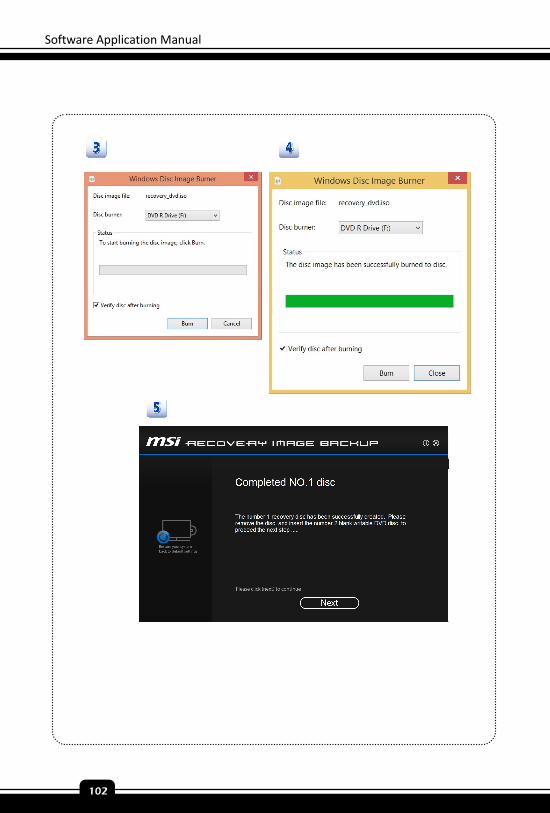
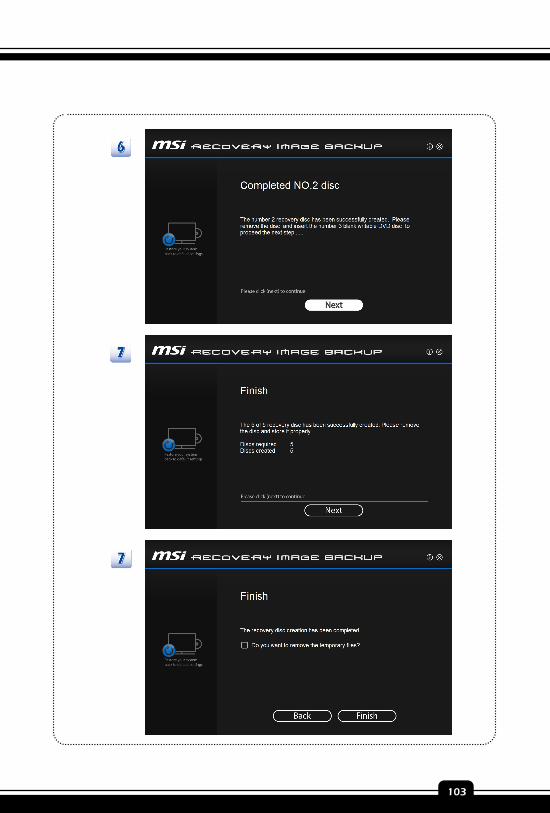
Create and Burn a Recovery Disk
1. To create and burn a Recovery Disk, select [Recovery Disk], and then follow the
on-screen instructions to continue.
2. Prepare the number of the writable disk as requested.
3. Place the disk into the optical drive device, and then select [Burn].
4. Note: Closing the other applications while burning the recovery disk is suggested.
5. Click [Close] when a disk is successfully created.
6. Click [Next] to continue the procedure of creating and burning recovery disks.
7. Exchange and place the rest disks into the optical drive device as instructed.
8. All recovery disks created and burned successfully.
Software Application Manual
102
Preface
1-103
103
Software Application Manual
104
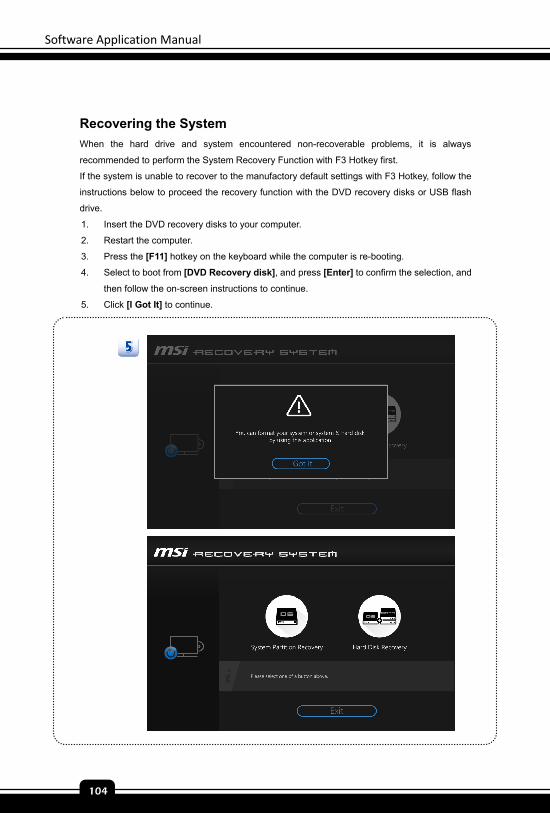
Recovering the System
When the hard drive and system encountered non-recoverable problems, it is always
recommended to perform the System Recovery Function with F3 Hotkey first.
If the system is unable to recover to the manufactory default settings with F3 Hotkey, follow the
instructions below to proceed the recovery function with the DVD recovery disks or USB flash
drive.
1. Insert the DVD recovery disks to your computer.
2. Restart the computer.
3. Press the [F11] hotkey on the keyboard while the computer is re-booting.
4. Select to boot from [DVD Recovery disk], and press [Enter] to confirm the selection, and
then follow the on-screen instructions to continue.
5. Click [I Got It] to continue.
Preface
1-105
105
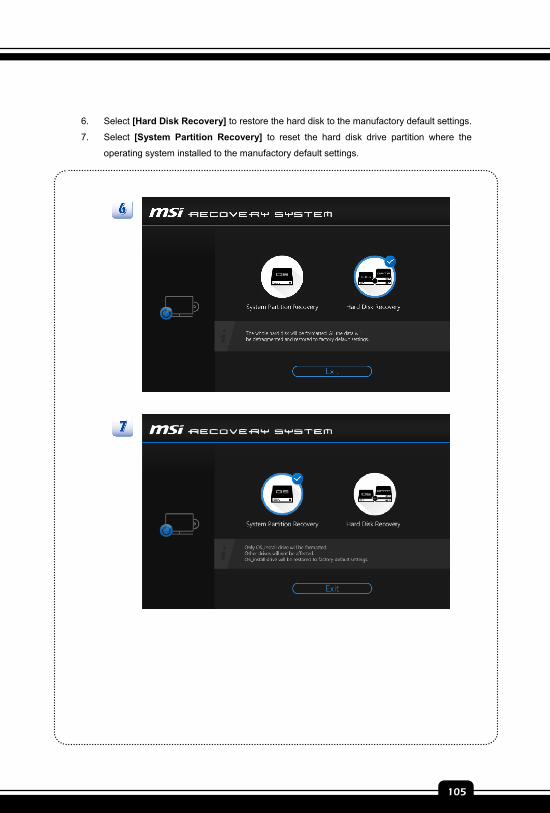
6. Select [Hard Disk Recovery] to restore the hard disk to the manufactory default settings.
7. Select [System Partition Recovery] to reset the hard disk drive partition where the
operating system installed to the manufactory default settings.
Software Application Manual
106
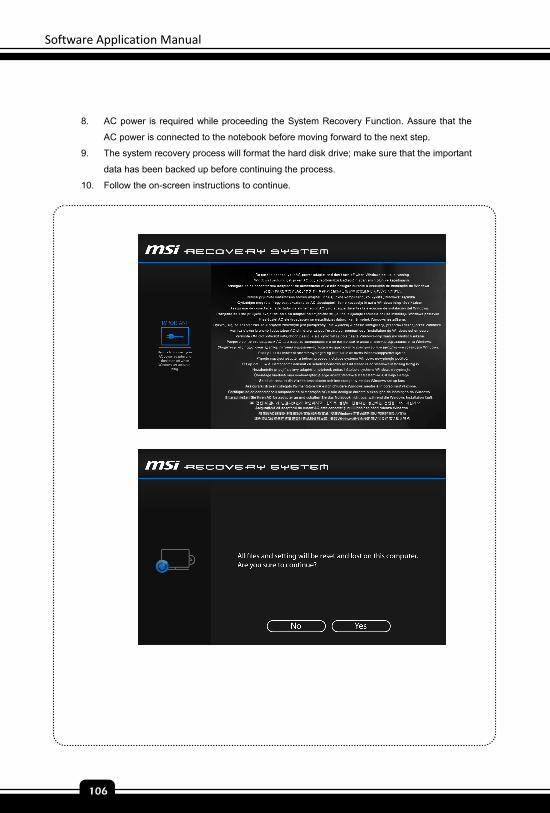
8. AC power is required while proceeding the System Recovery Function. Assure that the
AC power is connected to the notebook before moving forward to the next step.
9. The system recovery process will format the hard disk drive; make sure that the important
data has been backed up before continuing the process.
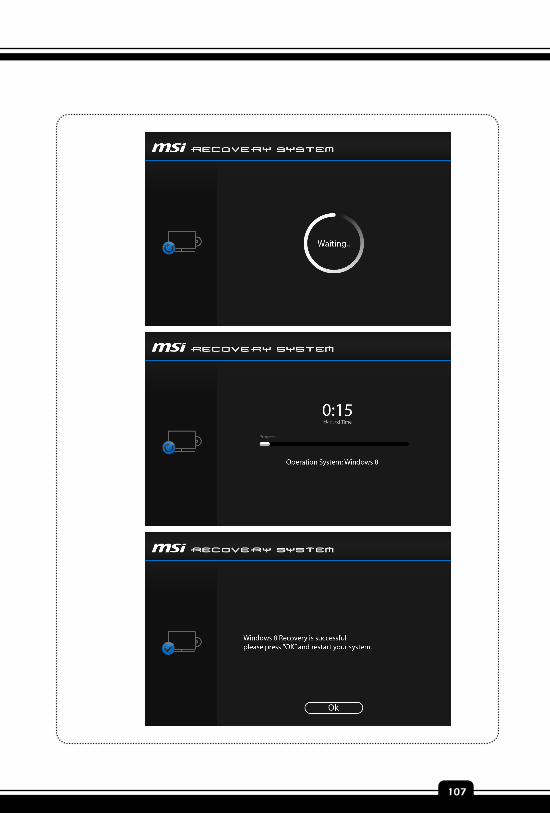
10. Follow the on-screen instructions to continue.
Preface
1-107
107
Software Application Manual
108
Note