flexpde getting started
TRANSCRIPT
FlexPDE Getting Started
Version 5 5/17/05
Copyright ©2005 PDE Solutions Inc.
© 2005 PDE Solutions Inc. Complying with all copyright laws is the responsibility of the user. Without limiting the rights under copyright, no part of this document may be reproduced, stored in or introduced into a retrieval system, or transmitted in any form or by any means (electronic, mechanical, photocopying, or otherwise) without the express written permission of PDE Solutions Inc. PDE Solutions may have patents, patent applications, trademarks, and copyrights or other intellectual property rights covering subject matter in this document. Except as provided in any written license agreement from PDE Solutions Inc., the furnishing of this document does not give you any license to these patents, trademarks, copyrights or other intellectual property. PDE Solutions, and FlexPDE are either registered trademarks or trademarks of PDE Solutions Inc. in the United States and/or other countries. Electronic versions of this manual and other manuals in the FlexPDE documentation series are available online at www.pdesolutions.com. Electronic versions are updated more frequently than printed versions, and may reflect recent developments in FlexPDE more accurately .
Table of Contents 1. Foreword ...............................................................................................1 2. Installation .............................................................................................2 3. Starting FlexPDE...................................................................................3 4. The Main Menu Bar...............................................................................6
4.1. The File Menu.................................................................................7 4.2. The Controls Menu.......................................................................11 4.3. The Stop Menu .............................................................................12
5. The Tool Bar........................................................................................15 6. Editing Descriptor Files .......................................................................16 7. Domain Review ...................................................................................19 8. While the Problem Runs .....................................................................22 9. When the Problem Finishes................................................................27 10. Viewing Saved Graphic Files ............................................................29 11. Example Problems ............................................................................32 12. Registering FlexPDE.........................................................................33
12.1. The Register Dialog....................................................................34 12.2. Upgrading Dongles.....................................................................37
1
1. Foreword This manual presents an overview of how to install and interact with FlexPDE on your computer. It does not address the issues of how to pose a partial differential equations problem in the scripting language of FlexPDE. These issues are addressed in the companion volumes "User Guide" and "Reference".

2
2. Installation The general principles of installation for FlexPDE are the same across all platforms: the set of installation files must be extracted from the compressed distribution archive and placed in the system file hierarchy. The details of how this is done vary with computer platform. There are two media options for FlexPDE installation: • Installation from CDROM. Your documentation package should
include printed Installation instructions. An electronic version of these instructions will be found in the individual operating system folders on the CDROM.
• Installation from Internet download. Click the "Installation" link next
to the version download you have chosen.
3
3. Starting FlexPDE Starting FlexPDE
Windows The FlexPDE installation program will place a FlexPDE icon on your desktop. You can start FlexPDE merely by double-clicking this icon. Alternatively, you can use a File Manager to navigate to the folder where FlexPDE was installed, and then double-click on the FlexPDE executable. The installation program will also create an association of the .pde extension with the installed FlexPDE executable, so that FlexPDE can be started merely by double-clicking a script file in the file manager. MAC OSX FlexPDE is installed in the "Applications | flexpde5" folder. Navigate to this folder and open the flexpde5 application. Association of the .pde extension with flexpde5 can be made manually using the standard procedures of the operating system. Linux FlexPDE is installed in the "/usr/local/flexpde5" directory. You can start FlexPDE by typing a command line in a console window, or from the file manager by navigating to the /usr/local/flexpde5 directory and opening the flexpde5 application. Association of the ".pde" extension with flexpde5 can be made manually using the standard procedures of the operating system. You can also place a FlexPDE icon on your desktop using the "fpde5icon.png" file included in the installation files.
4
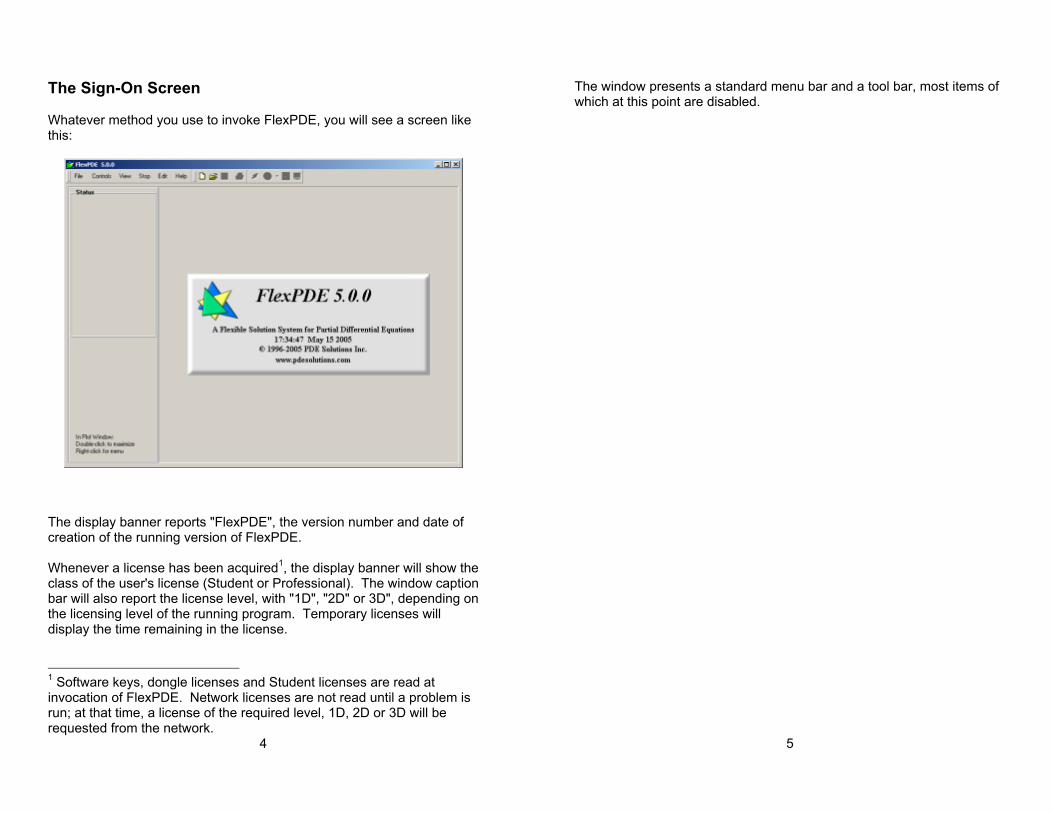
The Sign-On Screen Whatever method you use to invoke FlexPDE, you will see a screen like this:
The display banner reports "FlexPDE", the version number and date of creation of the running version of FlexPDE. Whenever a license has been acquired1, the display banner will show the class of the user's license (Student or Professional). The window caption bar will also report the license level, with "1D", "2D" or 3D", depending on the licensing level of the running program. Temporary licenses will display the time remaining in the license.
1 Software keys, dongle licenses and Student licenses are read at invocation of FlexPDE. Network licenses are not read until a problem is run; at that time, a license of the required level, 1D, 2D or 3D will be requested from the network.
5
The window presents a standard menu bar and a tool bar, most items of which at this point are disabled.
6
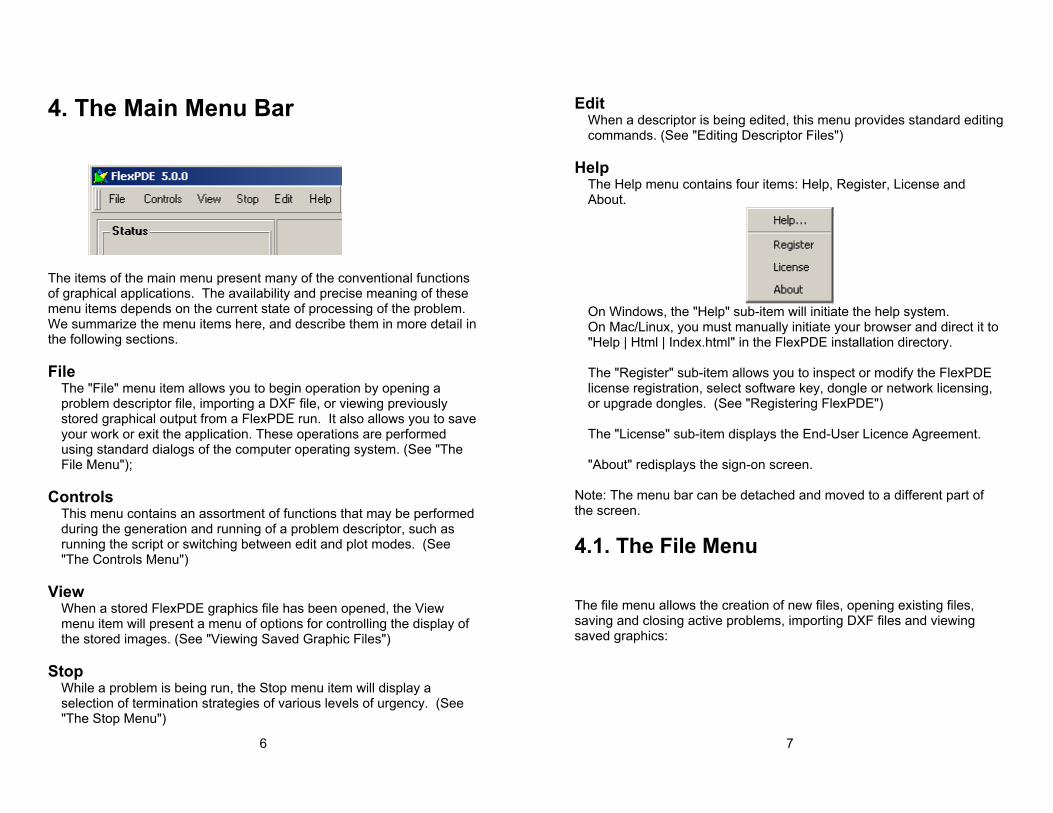
4. The Main Menu Bar
The items of the main menu present many of the conventional functions of graphical applications. The availability and precise meaning of these menu items depends on the current state of processing of the problem. We summarize the menu items here, and describe them in more detail in the following sections. File
The "File" menu item allows you to begin operation by opening a problem descriptor file, importing a DXF file, or viewing previously stored graphical output from a FlexPDE run. It also allows you to save your work or exit the application. These operations are performed using standard dialogs of the computer operating system. (See "The File Menu");
Controls
This menu contains an assortment of functions that may be performed during the generation and running of a problem descriptor, such as running the script or switching between edit and plot modes. (See "The Controls Menu")
View When a stored FlexPDE graphics file has been opened, the View menu item will present a menu of options for controlling the display of the stored images. (See "Viewing Saved Graphic Files")
Stop
While a problem is being run, the Stop menu item will display a selection of termination strategies of various levels of urgency. (See "The Stop Menu")
7
Edit
When a descriptor is being edited, this menu provides standard editing commands. (See "Editing Descriptor Files")
Help
The Help menu contains four items: Help, Register, License and About.
On Windows, the "Help" sub-item will initiate the help system. On Mac/Linux, you must manually initiate your browser and direct it to "Help | Html | Index.html" in the FlexPDE installation directory. The "Register" sub-item allows you to inspect or modify the FlexPDE license registration, select software key, dongle or network licensing, or upgrade dongles. (See "Registering FlexPDE") The "License" sub-item displays the End-User Licence Agreement. "About" redisplays the sign-on screen.
Note: The menu bar can be detached and moved to a different part of the screen.
4.1. The File Menu The file menu allows the creation of new files, opening existing files, saving and closing active problems, importing DXF files and viewing saved graphics:
8
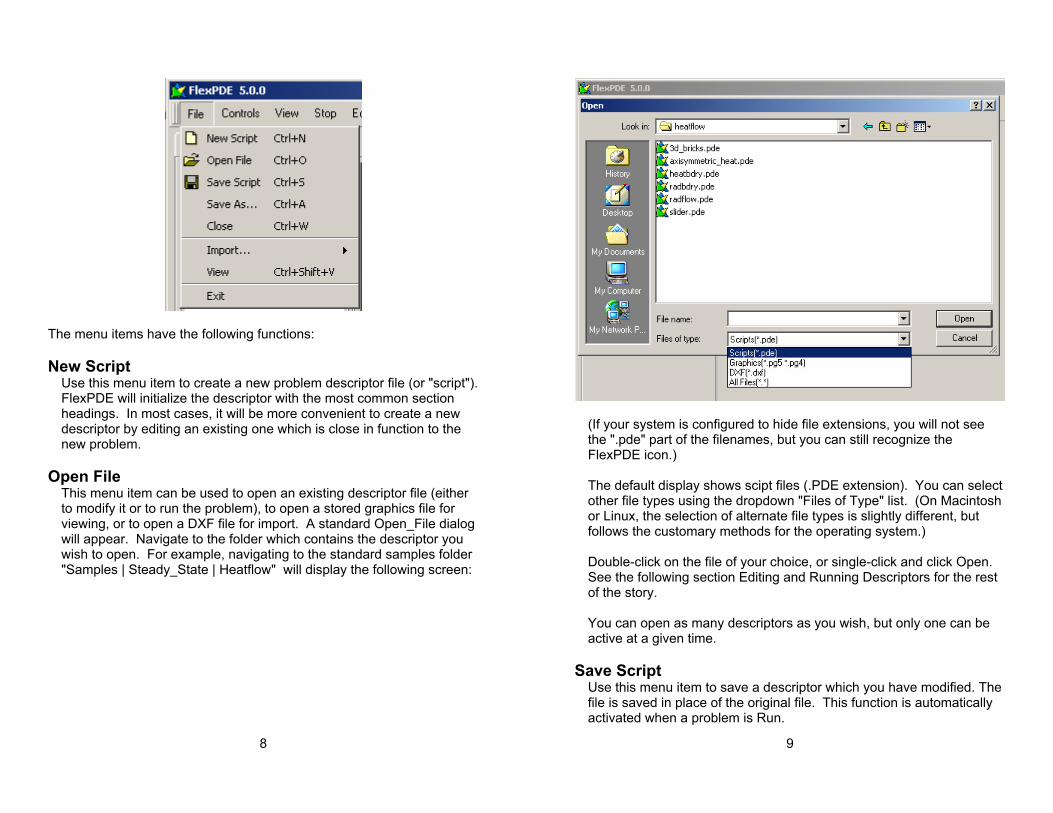
The menu items have the following functions: New Script
Use this menu item to create a new problem descriptor file (or "script"). FlexPDE will initialize the descriptor with the most common section headings. In most cases, it will be more convenient to create a new descriptor by editing an existing one which is close in function to the new problem.
Open File
This menu item can be used to open an existing descriptor file (either to modify it or to run the problem), to open a stored graphics file for viewing, or to open a DXF file for import. A standard Open_File dialog will appear. Navigate to the folder which contains the descriptor you wish to open. For example, navigating to the standard samples folder "Samples | Steady_State | Heatflow" will display the following screen:
9
(If your system is configured to hide file extensions, you will not see the ".pde" part of the filenames, but you can still recognize the FlexPDE icon.) The default display shows scipt files (.PDE extension). You can select other file types using the dropdown "Files of Type" list. (On Macintosh or Linux, the selection of alternate file types is slightly different, but follows the customary methods for the operating system.)
Double-click on the file of your choice, or single-click and click Open. See the following section Editing and Running Descriptors for the rest of the story.
You can open as many descriptors as you wish, but only one can be active at a given time.
Save Script
Use this menu item to save a descriptor which you have modified. The file is saved in place of the original file. This function is automatically activated when a problem is Run.
10
Save As
Use this menu item to save to a new file name a descriptor which you have modified. The original source file will remain unchanged.
Close
Use this menu item to disconnect from a descriptor. Import
Use this menu item to import descriptors from other formats. The only option available at this time is "DXF", which will import a descriptor from AutoCad version R14. See the Technical Note Importing DXF Files for more information. (This function is the same as "Open File" with the DXF file type selected.)
View
Use this menu item to open a file of saved graphical output from a FlexPDE5 problem which was run and completed at an earlier time. A standard Open_File dialog will appear. Navigate the folder containing the desired ".pg5" file. Double-click on the file of your choice, or single-click and click Open. See the following section "Viewing Saved Graphics Files" for more information. You may View more than one saved problem, and you may open files for viewing while other descriptors are open, but you should not open the same problem for simultaneous viewing and running, since file access conflicts may occur. (This function is the same as "Open File" with the "Graphics" file type selected.)
Exit
Click here to terminate your FlexPDE session. All open descriptors and Views will be closed. If changes have been made and not saved, you will be prompted.
11
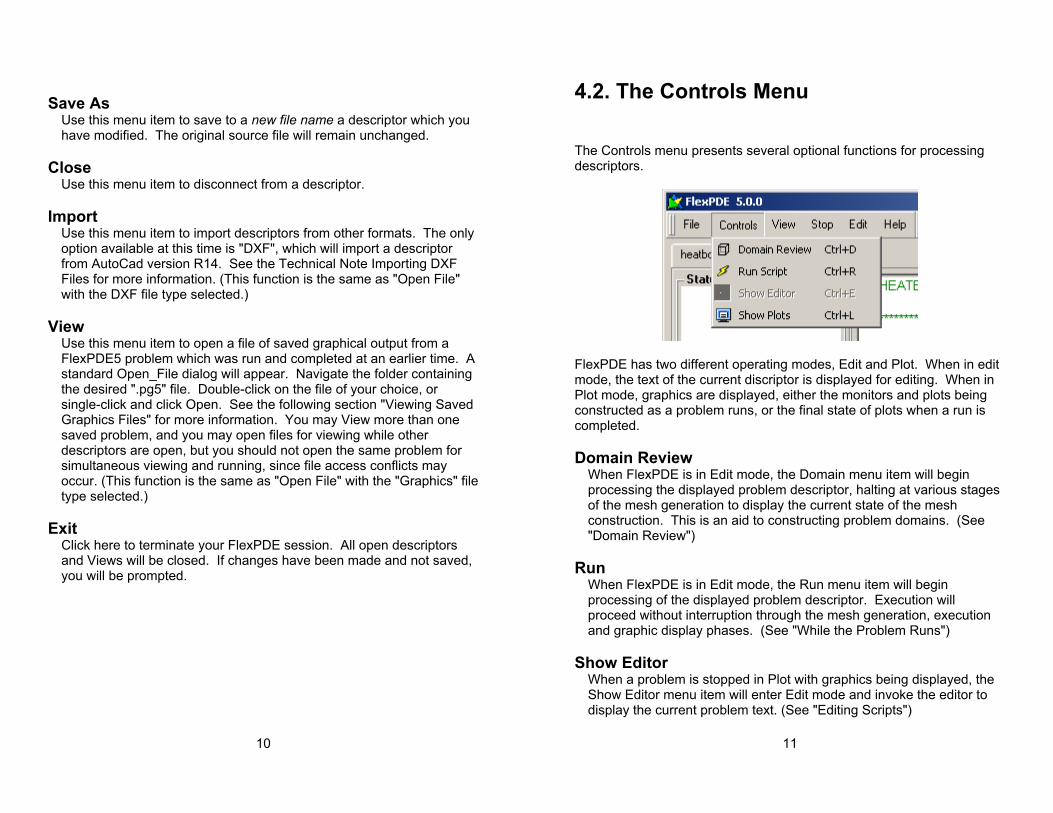
4.2. The Controls Menu The Controls menu presents several optional functions for processing descriptors.
FlexPDE has two different operating modes, Edit and Plot. When in edit mode, the text of the current discriptor is displayed for editing. When in Plot mode, graphics are displayed, either the monitors and plots being constructed as a problem runs, or the final state of plots when a run is completed. Domain Review
When FlexPDE is in Edit mode, the Domain menu item will begin processing the displayed problem descriptor, halting at various stages of the mesh generation to display the current state of the mesh construction. This is an aid to constructing problem domains. (See "Domain Review")
Run
When FlexPDE is in Edit mode, the Run menu item will begin processing of the displayed problem descriptor. Execution will proceed without interruption through the mesh generation, execution and graphic display phases. (See "While the Problem Runs")
Show Editor
When a problem is stopped in Plot with graphics being displayed, the Show Editor menu item will enter Edit mode and invoke the editor to display the current problem text. (See "Editing Scripts")
12
Show Plots When a problem is in the Edit mode, the Show Plots menu item will switch to Plot mode and display the current state of the problem graphics.
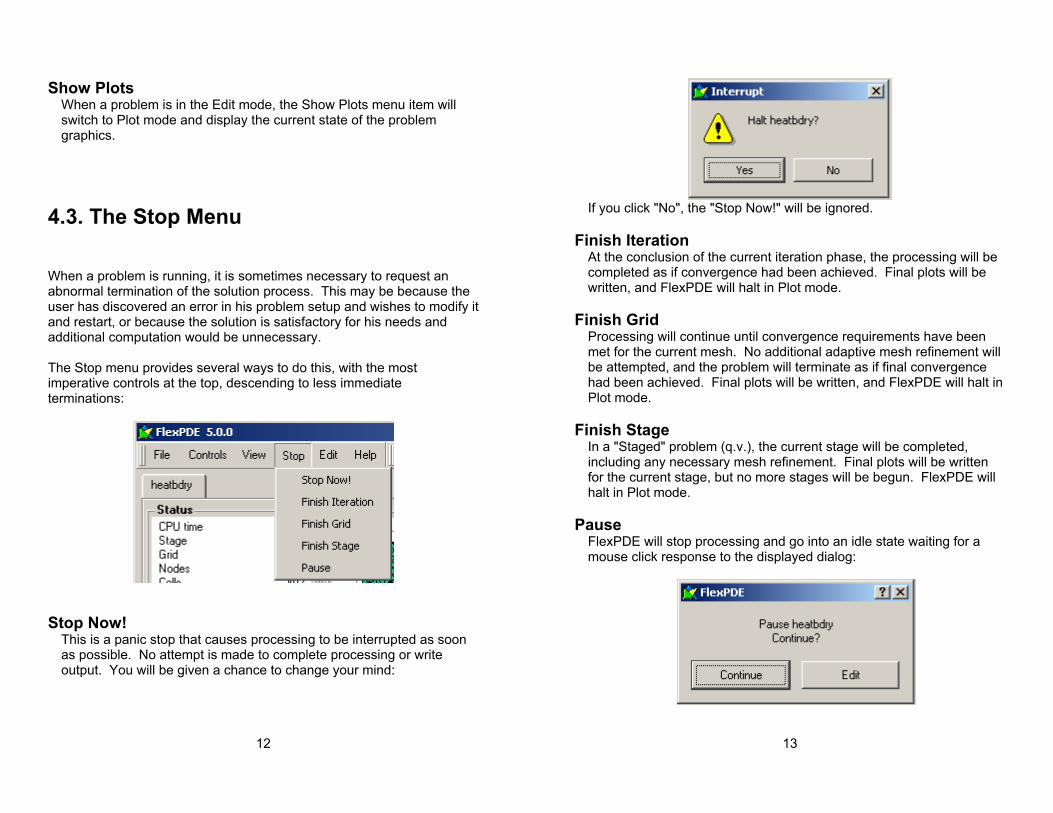
4.3. The Stop Menu When a problem is running, it is sometimes necessary to request an abnormal termination of the solution process. This may be because the user has discovered an error in his problem setup and wishes to modify it and restart, or because the solution is satisfactory for his needs and additional computation would be unnecessary. The Stop menu provides several ways to do this, with the most imperative controls at the top, descending to less immediate terminations:
Stop Now! This is a panic stop that causes processing to be interrupted as soon as possible. No attempt is made to complete processing or write output. You will be given a chance to change your mind:
13
If you click "No", the "Stop Now!" will be ignored.
Finish Iteration At the conclusion of the current iteration phase, the processing will be completed as if convergence had been achieved. Final plots will be written, and FlexPDE will halt in Plot mode.
Finish Grid Processing will continue until convergence requirements have been met for the current mesh. No additional adaptive mesh refinement will be attempted, and the problem will terminate as if final convergence had been achieved. Final plots will be written, and FlexPDE will halt in Plot mode.
Finish Stage In a "Staged" problem (q.v.), the current stage will be completed, including any necessary mesh refinement. Final plots will be written for the current stage, but no more stages will be begun. FlexPDE will halt in Plot mode.
Pause FlexPDE will stop processing and go into an idle state waiting for a mouse click response to the displayed dialog:
14
"Continue" will resume processing at the point where it was interrupted. "Edit" will terminate processing as if "Stop Now!" had been clicked. This function can be used to temporarily free computer resources for a more important task without terminating the FlexPDE run.
15
5. The Tool Bar
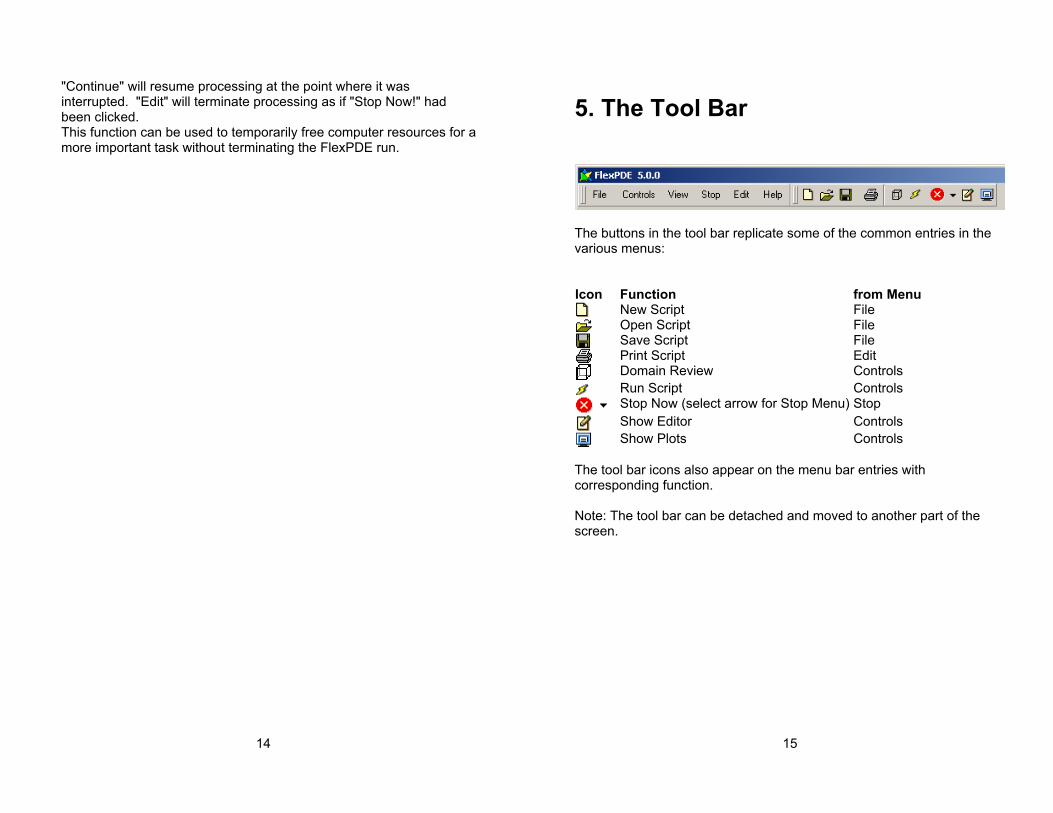
The buttons in the tool bar replicate some of the common entries in the various menus:
Icon Function from Menu New Script File Open Script File Save Script File Print Script Edit Domain Review Controls Run Script Controls
Stop Now (select arrow for Stop Menu) Stop
Show Editor Controls Show Plots Controls
The tool bar icons also appear on the menu bar entries with corresponding function. Note: The tool bar can be detached and moved to another part of the screen.
16
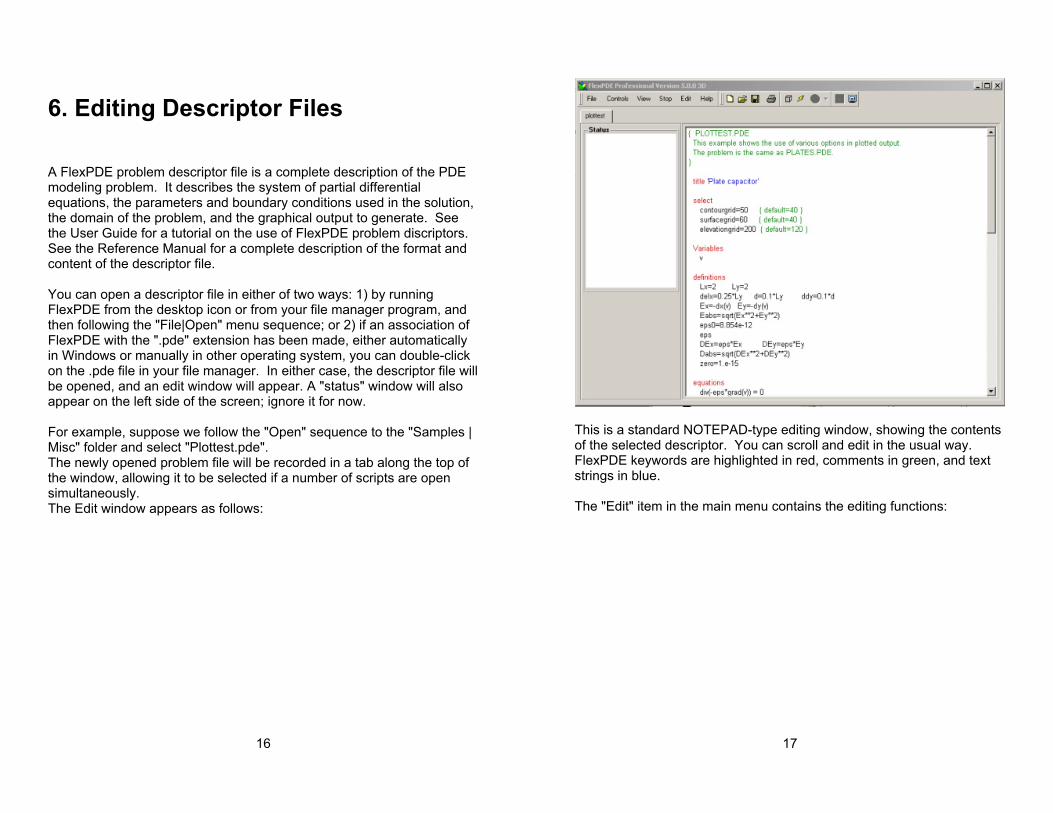
6. Editing Descriptor Files A FlexPDE problem descriptor file is a complete description of the PDE modeling problem. It describes the system of partial differential equations, the parameters and boundary conditions used in the solution, the domain of the problem, and the graphical output to generate. See the User Guide for a tutorial on the use of FlexPDE problem discriptors. See the Reference Manual for a complete description of the format and content of the descriptor file. You can open a descriptor file in either of two ways: 1) by running FlexPDE from the desktop icon or from your file manager program, and then following the "File|Open" menu sequence; or 2) if an association of FlexPDE with the ".pde" extension has been made, either automatically in Windows or manually in other operating system, you can double-click on the .pde file in your file manager. In either case, the descriptor file will be opened, and an edit window will appear. A "status" window will also appear on the left side of the screen; ignore it for now. For example, suppose we follow the "Open" sequence to the "Samples | Misc" folder and select "Plottest.pde". The newly opened problem file will be recorded in a tab along the top of the window, allowing it to be selected if a number of scripts are open simultaneously. The Edit window appears as follows:
17
This is a standard NOTEPAD-type editing window, showing the contents of the selected descriptor. You can scroll and edit in the usual way. FlexPDE keywords are highlighted in red, comments in green, and text strings in blue. The "Edit" item in the main menu contains the editing functions:
18
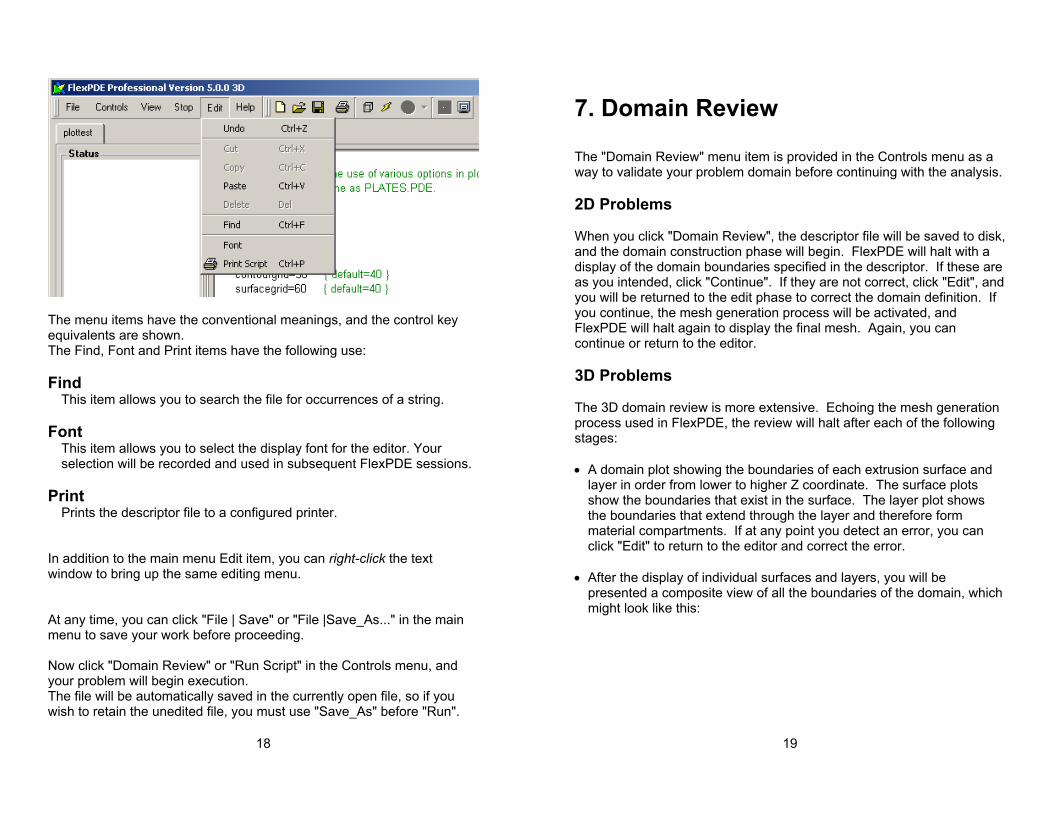
The menu items have the conventional meanings, and the control key equivalents are shown. The Find, Font and Print items have the following use:
Find
This item allows you to search the file for occurrences of a string. Font
This item allows you to select the display font for the editor. Your selection will be recorded and used in subsequent FlexPDE sessions.
Prints the descriptor file to a configured printer.
In addition to the main menu Edit item, you can right-click the text window to bring up the same editing menu.
At any time, you can click "File | Save" or "File |Save_As..." in the main menu to save your work before proceeding. Now click "Domain Review" or "Run Script" in the Controls menu, and your problem will begin execution. The file will be automatically saved in the currently open file, so if you wish to retain the unedited file, you must use "Save_As" before "Run".
19
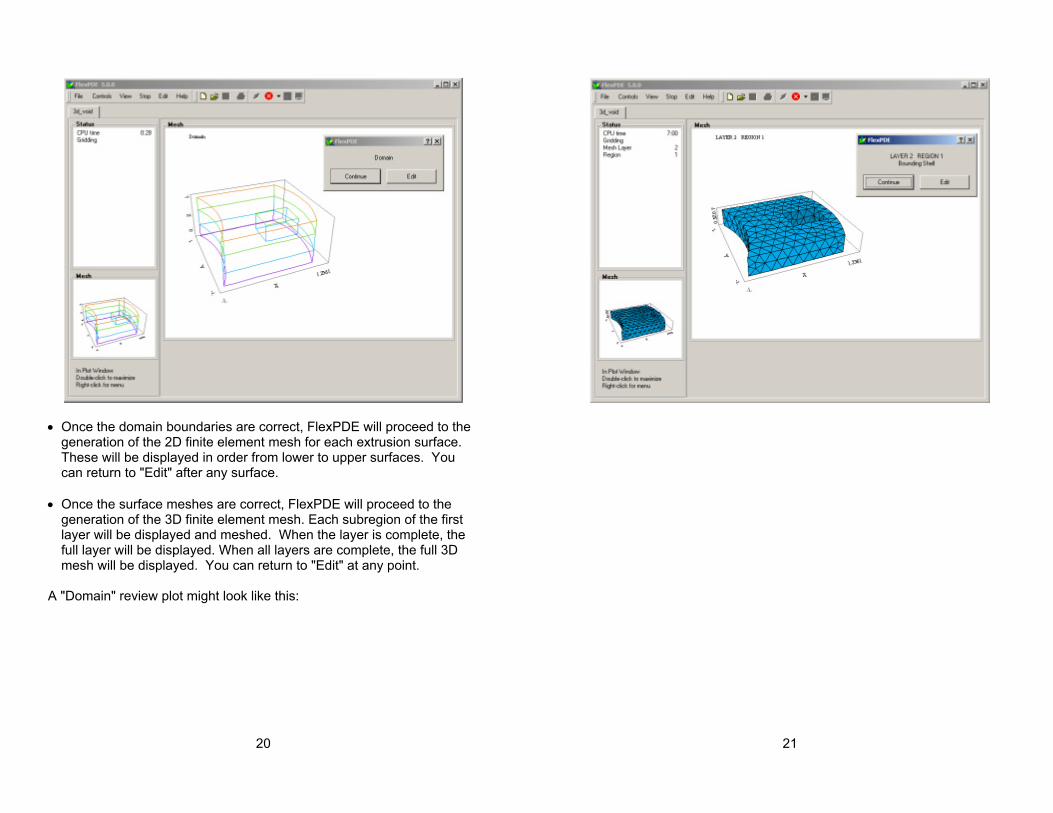
7. Domain Review The "Domain Review" menu item is provided in the Controls menu as a way to validate your problem domain before continuing with the analysis. 2D Problems When you click "Domain Review", the descriptor file will be saved to disk, and the domain construction phase will begin. FlexPDE will halt with a display of the domain boundaries specified in the descriptor. If these are as you intended, click "Continue". If they are not correct, click "Edit", and you will be returned to the edit phase to correct the domain definition. If you continue, the mesh generation process will be activated, and FlexPDE will halt again to display the final mesh. Again, you can continue or return to the editor. 3D Problems The 3D domain review is more extensive. Echoing the mesh generation process used in FlexPDE, the review will halt after each of the following stages: • A domain plot showing the boundaries of each extrusion surface and
layer in order from lower to higher Z coordinate. The surface plots show the boundaries that exist in the surface. The layer plot shows the boundaries that extend through the layer and therefore form material compartments. If at any point you detect an error, you can click "Edit" to return to the editor and correct the error.
• After the display of individual surfaces and layers, you will be
presented a composite view of all the boundaries of the domain, which might look like this:
20
• Once the domain boundaries are correct, FlexPDE will proceed to the
generation of the 2D finite element mesh for each extrusion surface. These will be displayed in order from lower to upper surfaces. You can return to "Edit" after any surface.
• Once the surface meshes are correct, FlexPDE will proceed to the
generation of the 3D finite element mesh. Each subregion of the first layer will be displayed and meshed. When the layer is complete, the full layer will be displayed. When all layers are complete, the full 3D mesh will be displayed. You can return to "Edit" at any point.
A "Domain" review plot might look like this:
21
22
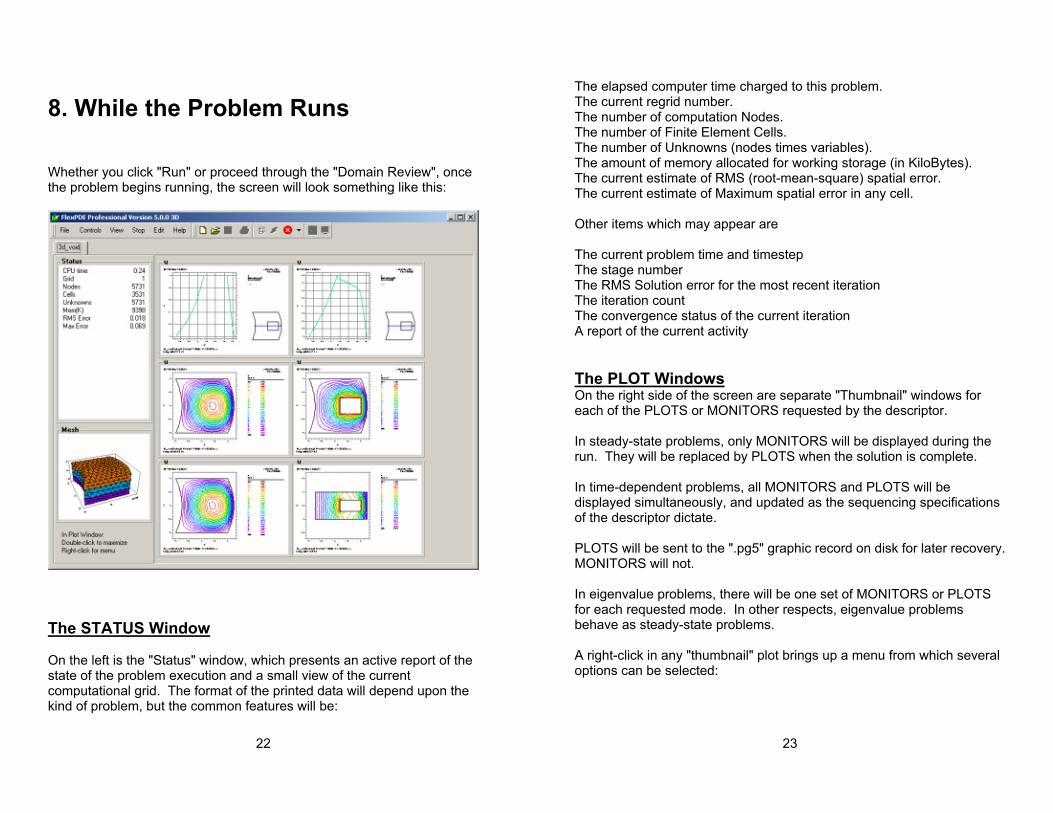
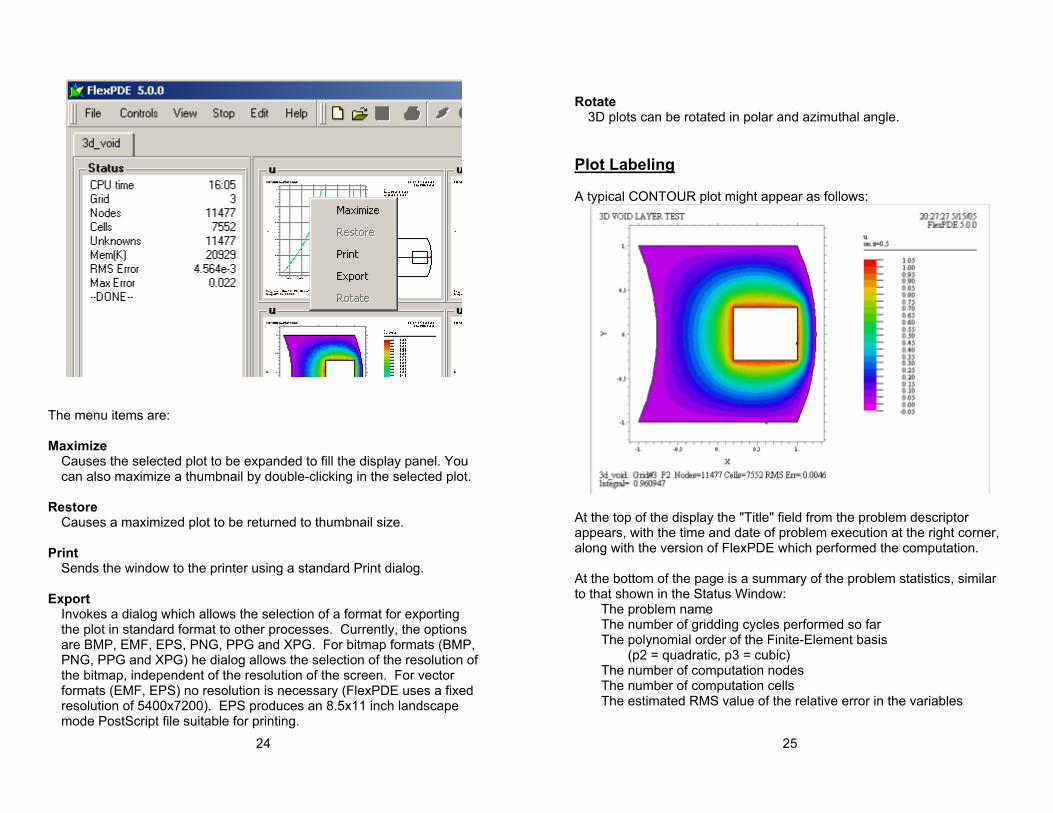
8. While the Problem Runs Whether you click "Run" or proceed through the "Domain Review", once the problem begins running, the screen will look something like this:
The STATUS Window On the left is the "Status" window, which presents an active report of the state of the problem execution and a small view of the current computational grid. The format of the printed data will depend upon the kind of problem, but the common features will be:
23
The elapsed computer time charged to this problem. The current regrid number. The number of computation Nodes. The number of Finite Element Cells. The number of Unknowns (nodes times variables). The amount of memory allocated for working storage (in KiloBytes). The current estimate of RMS (root-mean-square) spatial error. The current estimate of Maximum spatial error in any cell. Other items which may appear are The current problem time and timestep The stage number The RMS Solution error for the most recent iteration The iteration count The convergence status of the current iteration A report of the current activity The PLOT Windows On the right side of the screen are separate "Thumbnail" windows for each of the PLOTS or MONITORS requested by the descriptor. In steady-state problems, only MONITORS will be displayed during the run. They will be replaced by PLOTS when the solution is complete. In time-dependent problems, all MONITORS and PLOTS will be displayed simultaneously, and updated as the sequencing specifications of the descriptor dictate. PLOTS will be sent to the ".pg5" graphic record on disk for later recovery. MONITORS will not. In eigenvalue problems, there will be one set of MONITORS or PLOTS for each requested mode. In other respects, eigenvalue problems behave as steady-state problems. A right-click in any "thumbnail" plot brings up a menu from which several options can be selected:
24
The menu items are:
Maximize
Causes the selected plot to be expanded to fill the display panel. You can also maximize a thumbnail by double-clicking in the selected plot.
Restore
Causes a maximized plot to be returned to thumbnail size. Print
Sends the window to the printer using a standard Print dialog. Export
Invokes a dialog which allows the selection of a format for exporting the plot in standard format to other processes. Currently, the options are BMP, EMF, EPS, PNG, PPG and XPG. For bitmap formats (BMP, PNG, PPG and XPG) he dialog allows the selection of the resolution of the bitmap, independent of the resolution of the screen. For vector formats (EMF, EPS) no resolution is necessary (FlexPDE uses a fixed resolution of 5400x7200). EPS produces an 8.5x11 inch landscape mode PostScript file suitable for printing.
25
Rotate
3D plots can be rotated in polar and azimuthal angle.
Plot Labeling A typical CONTOUR plot might appear as follows:
At the top of the display the "Title" field from the problem descriptor appears, with the time and date of problem execution at the right corner, along with the version of FlexPDE which performed the computation. At the bottom of the page is a summary of the problem statistics, similar to that shown in the Status Window:
The problem name The number of gridding cycles performed so far The polynomial order of the Finite-Element basis
(p2 = quadratic, p3 = cubic) The number of computation nodes The number of computation cells The estimated RMS value of the relative error in the variables
26
In staged problems, the stage number will be reported. In eigenvalue problems, the mode number will be reported. In time dependent problems, the current problem time and timestep will be reported. By default, FlexPDE computes the integral under the displayed curve, and this value is reported as "Integral". Any requested REPORTS will appear in the bottom line. A typical ELEVATION plot might appear as follows:
Here all the labeling of the contour plot appears, as well as a thumbnail plot of the problem domain, showing the position of the elevation in the figure. For boundary plots, the joints of the boundary are numbered on the thumbnail. The numbers also appear along the baseline of the elevation plot for positional reference.
27
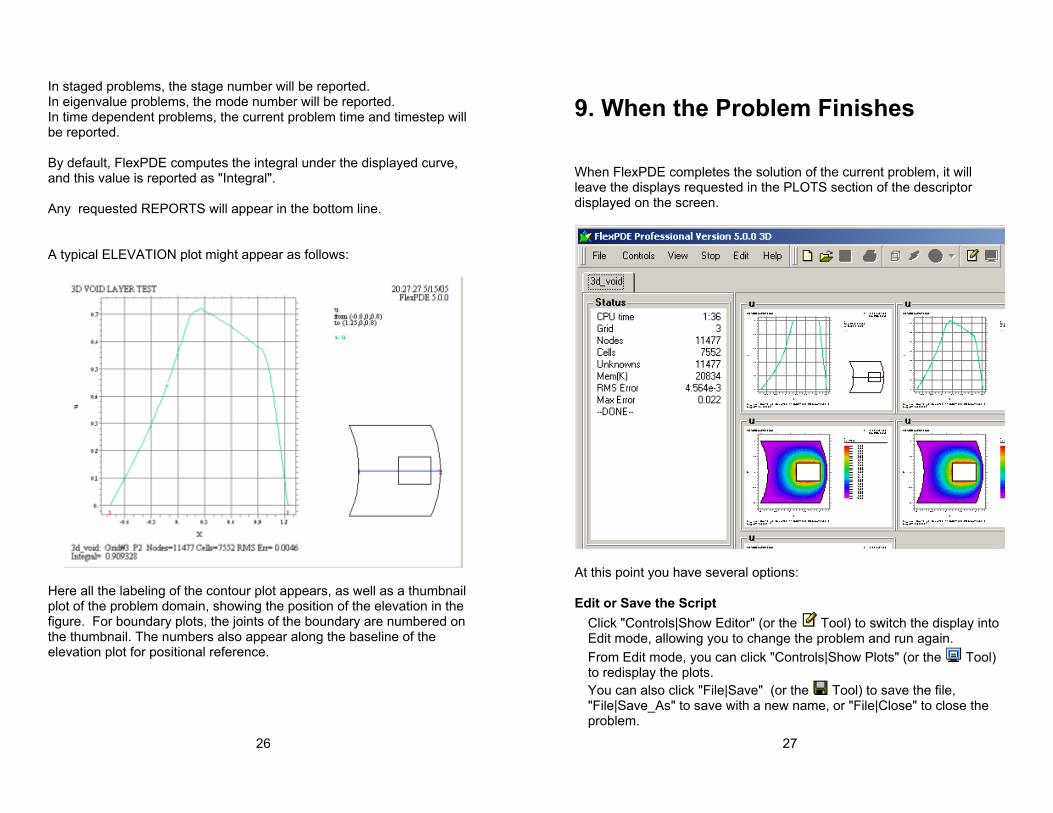
9. When the Problem Finishes When FlexPDE completes the solution of the current problem, it will leave the displays requested in the PLOTS section of the descriptor displayed on the screen.
At this point you have several options: Edit or Save the Script
Click "Controls|Show Editor" (or the Tool) to switch the display into Edit mode, allowing you to change the problem and run again. From Edit mode, you can click "Controls|Show Plots" (or the Tool) to redisplay the plots. You can also click "File|Save" (or the Tool) to save the file, "File|Save_As" to save with a new name, or "File|Close" to close the problem.
28
Switch to Another Problem
Each currently open problem is represented by a named tab on the tab bar. You can switch back and forth among open problems by selecting any tab.
Open a New File
Click "File|Open" (or the Tool) to open another problem script without closing the current problem.
29
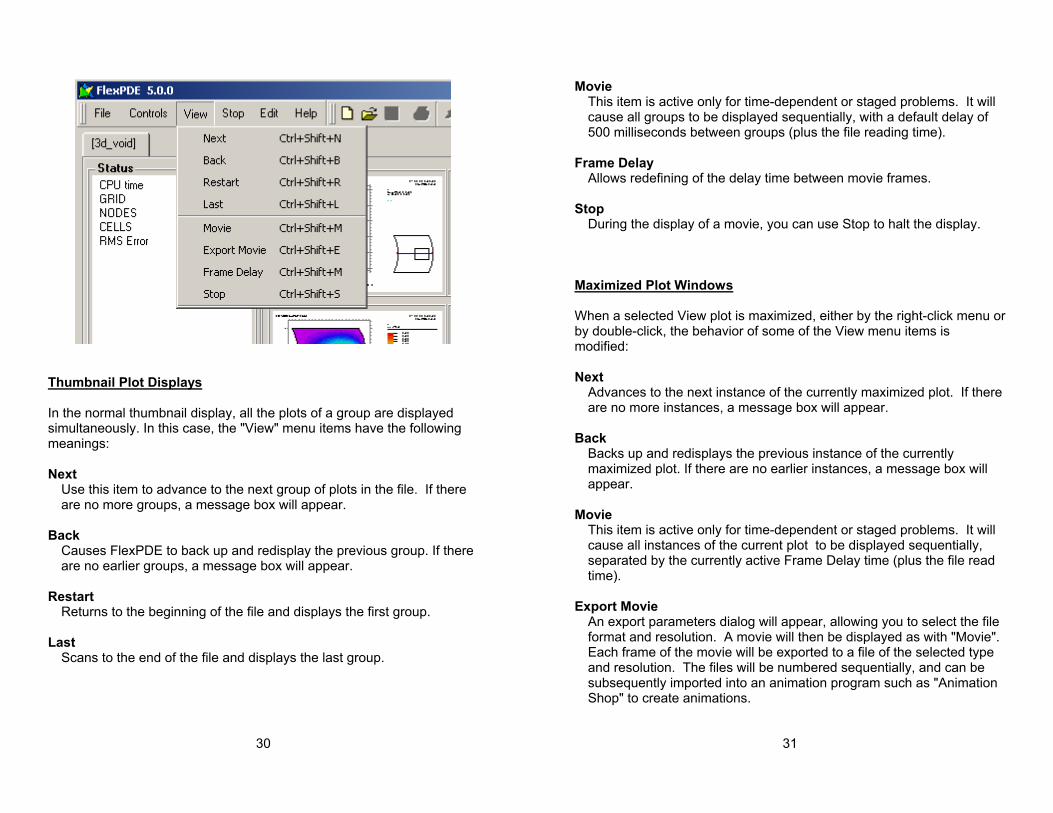
10. Viewing Saved Graphic Files Whenever a problem is run by FlexPDE 5, the graphical output selected by the PLOTS section of the descriptor is written to a file with the extension ".pg5". These files can later be viewed by FlexPDE without re-running the job. You can open these files either from the "File | Open" menu or the "File | View" menu item on the main FlexPDE menu. A standard "Open_File" dialog will appear, from which you may select from the available files on your system. Once a file is selected, the first block of plots will be displayed. On the left is a "Status" window, much like the one that appears during the run. Not all the runtime information will appear here, but only those items necessary to identify the current group of plots. In steady-state problems, all the PLOT windows will be displayed. If the problem is staged, then each stage will appear in a separate group. In time-dependent problems, each plot time group specified in the PLOTS section of the descriptor will form a display group. The Problem Tab shows the file name in brackets ("[","]"), to indicate that this is a "View" file, not a PDE problem. You can use the "View" item in the main menu to control the viewing of these stored graphics:
30
Thumbnail Plot Displays In the normal thumbnail display, all the plots of a group are displayed simultaneously. In this case, the "View" menu items have the following meanings: Next
Use this item to advance to the next group of plots in the file. If there are no more groups, a message box will appear.
Back
Causes FlexPDE to back up and redisplay the previous group. If there are no earlier groups, a message box will appear.
Restart
Returns to the beginning of the file and displays the first group. Last
Scans to the end of the file and displays the last group.
31
Movie This item is active only for time-dependent or staged problems. It will cause all groups to be displayed sequentially, with a default delay of 500 milliseconds between groups (plus the file reading time).
Frame Delay
Allows redefining of the delay time between movie frames. Stop
During the display of a movie, you can use Stop to halt the display.
Maximized Plot Windows When a selected View plot is maximized, either by the right-click menu or by double-click, the behavior of some of the View menu items is modified: Next
Advances to the next instance of the currently maximized plot. If there are no more instances, a message box will appear.
Back
Backs up and redisplays the previous instance of the currently maximized plot. If there are no earlier instances, a message box will appear.
Movie
This item is active only for time-dependent or staged problems. It will cause all instances of the current plot to be displayed sequentially, separated by the currently active Frame Delay time (plus the file read time).
Export Movie
An export parameters dialog will appear, allowing you to select the file format and resolution. A movie will then be displayed as with "Movie". Each frame of the movie will be exported to a file of the selected type and resolution. The files will be numbered sequentially, and can be subsequently imported into an animation program such as "Animation Shop" to create animations.
32
11. Example Problems The standard distribution of FlexPDE includes over one hundred example problems, showing the application of FlexPDE to many areas of study. These problem scripts are installed by the standard installation procedure, and are located in a tree structure headed by the "Samples" folder in the installation directory. Modifying a copy of an existing descriptor is frequently the most efficient way to start building a descriptor for a new problem. Also included in the distribution, in the "Backstrom_Books" folder, are many samples from books written by Prof. Gunnar Backstrom showing the use of FlexPDE in an academic environment. See professor Backstrom's website.
33
12. Registering FlexPDE The standard distribution of FlexPDE will run demonstration problems as provided by PDE Solutions Inc, or view stored graphics files from FlexPDE runs without need for license registration. Any other use requires a license, which may be purchased from PDE Solutions Inc in one of many forms (Student and Evaluation licenses are free). Dongles The standard method of licensing FlexPDE Professional Version is by use of a portable hardware license key (or dongle). You should receive this device in your FlexPDE distribution kit. The standard dongle for use with FlexPDE 5 is a USB device. You may request a parallel port dongle at the time of your order. In order for FlexPDE to find the dongle, you must 1) install the dongle in an appropriate USB connector or hub, 2) run "dongle_install" program in the "license" subdirectory of the FlexPDE installation directory (to load the dongle driver into the system). 3) start FlexPDE and click "Help | Register" to inform FlexPDE that it is to look for a dongle license. (See "The Register Dialog") Software Keys The standard method of licensing FlexPDE Student version, and the optional method for FlexPDE Professional, is by use of a software key. This numeric key encodes information about your license. For Student licenses, it encodes the name of the student, and may be moved from one machine to another, but may only be used on one machine at any time. For Professional licenses, the key encodes the identification of one unique host computer, and cannot be used on any other computer.

34
You will receive your key as a file "flexpde5key.txt". Copy this file unmodified to the flexpde installation directory (you may need administrator privileges to do this). Network Licenses FlexPDE can be licensed over a network, in which case one selected machine in the network runs the license manager service (with a dongle attached), and client computers on the network can request licenses to run FlexPDE on a first-come first-served basis up to the limit of the licensed number of stations. To tell FlexPDE to search the network for a license server, click "Help | Register" select "Network" licensing. (See "The Register Dialog")
12.1. The Register Dialog To open the license registration dialog, click "Help" on the main menu bar, then click "Register". The following dialog will appear:
35
Computer ID This field is the unique identification of your computer. It may be used to request a software key or Evaluation license for FlexPDE Professional.
Select a License Method
If your license has already been registered, this box will display the details of that registration. In the case displayed, a) the license method is by USB dongle; b) the dongle serial number is #200636f9.
If you are registering for the first time, you can select one of the three options: Dongle, Network or Key.
Dongle method
36
If you license is to be read from a locally attached dongle, click the "Dongle" button to select the dongle licensing method, then click "Read Dongle". FlexPDE will search the USB and Parallel ports for an appropriate license dongle. If no dongle is found, or if the dongle driver has not been installed, the search will fail, and FlexPDE will report an error.
Click "Register" to install this as the active license method. In future, every time you start FlexPDE it will search the USB and Parallel ports for the dongle.
Network method
If you select "Network", then "Register", FlexPDE will search your network for a running license manager, and return the status of that license.
In future, every time you start FlexPDE, it will expect to find a network license manager to grant licenses. In fact, the request for a network license will not be made until you actually "Run" a problem. At that time, a license of the appropriate class, 1D, 2D or 3D will be requested from the network. The acquired license will be held until the current invocation of FlexPDE is terminated. In this way, networks of FlexPDE users can get optimal use out of the mix of 1D, 2D and 3D licenses that have been purchased.
Key method
If you have copied your license key file "flexpde5key.txt" to the installation directory, this file will already have been read. Selecting "Key" will display the license key contained in that file. If you want to enter the keys manually, either type or paste them in the window provided. Click "Register" to install this as the active license method. In future, every time you start FlexPDE, it will look for the license key file in the installation folder.
37
The "Read Dongle" button
This button will read the contents of the dongle without installing it as the selected license method. If you want to keep this selection, you must click "register".
License Features
This line displays the characteristics encoded in the license identified by the previous selections. In the case displayed above, the license encodes a four-user FlexPDE Professional license for 1D or 2D problems. Two of these four users can also run 3D problems.
12.2. Upgrading Dongles You can use the Register dialog to field-upgrade a dongle. If you have previously been issued a FlexPDE version 4 or 5 dongle, and subsequently purchase an upgrade, you will be sent a software key which encodes the upgrade. Note: Dongles issued with FlexPDE version 2 or version 3 cannot be upgraded to version 5. You will be sent a new version 5 dongle when upgrading from previous versions. Click "Help | Register" in the main menu. The registration dialog will show you the current state of your license. Now check the "Upgrade" box. Your Register dialog will look like this:
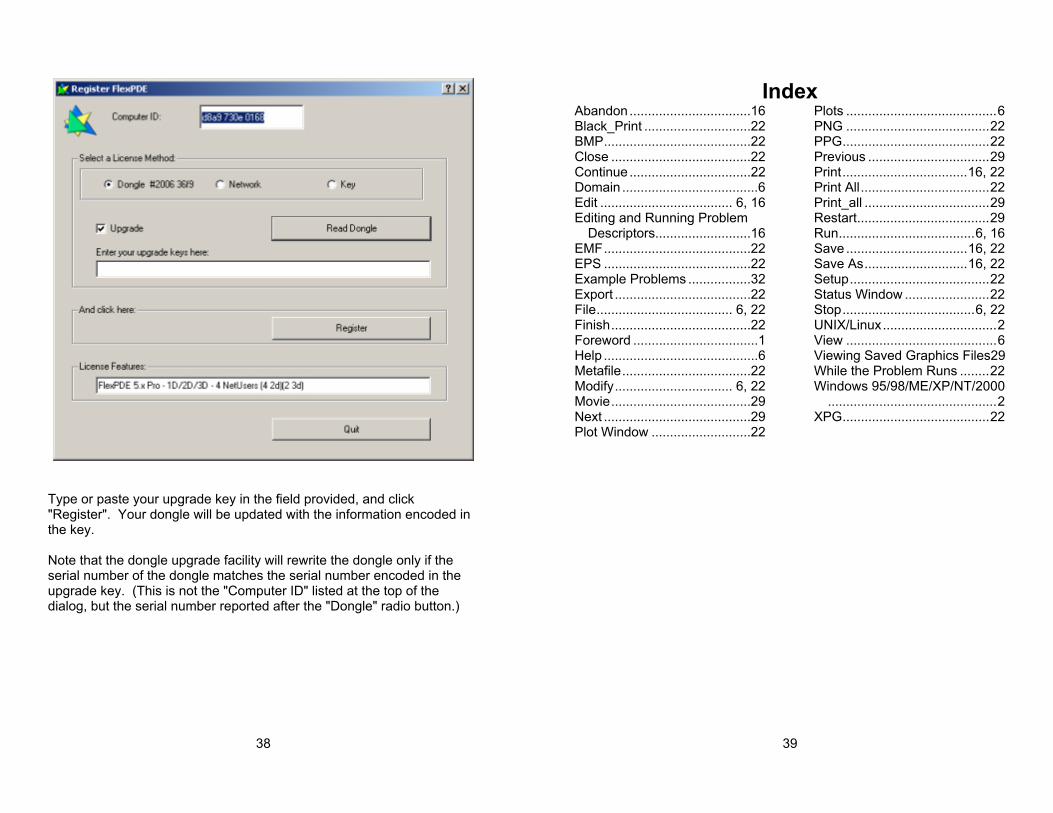
38
Type or paste your upgrade key in the field provided, and click "Register". Your dongle will be updated with the information encoded in the key. Note that the dongle upgrade facility will rewrite the dongle only if the serial number of the dongle matches the serial number encoded in the upgrade key. (This is not the "Computer ID" listed at the top of the dialog, but the serial number reported after the "Dongle" radio button.)
39
Index Abandon.................................16 Black_Print .............................22 BMP........................................22 Close ......................................22 Continue.................................22 Domain .....................................6 Edit .................................... 6, 16 Editing and Running Problem
Descriptors..........................16 EMF........................................22 EPS ........................................22 Example Problems .................32 Export .....................................22 File..................................... 6, 22 Finish......................................22 Foreword ..................................1 Help ..........................................6 Metafile...................................22 Modify................................ 6, 22 Movie......................................29 Next ........................................29 Plot Window ...........................22
Plots .........................................6 PNG .......................................22 PPG........................................22 Previous .................................29 Print..................................16, 22 Print All...................................22 Print_all ..................................29 Restart....................................29 Run.....................................6, 16 Save .................................16, 22 Save As............................16, 22 Setup......................................22 Status Window .......................22 Stop....................................6, 22 UNIX/Linux...............................2 View .........................................6 Viewing Saved Graphics Files29 While the Problem Runs ........22 Windows 95/98/ME/XP/NT/2000
..............................................2 XPG........................................22