form engine guide - resource central - schoolmessenger
TRANSCRIPT

Form Engine Guide
SchoolMessenger 100 Enterprise Way, Suite A-300 Scotts Valley, CA 95066 888-527-5225 www.schoolmessenger.com

Form Engine Guide
©2019 Intrado. [10292019]. All rights reserved. May not be reproduced without express written permission. 2
Contents Introduction ........................................................................................................................................................... 3
Form Building Basics ........................................................................................................................................... 3
About Form Templates ....................................................................................................................................... 3
About Form Instances ........................................................................................................................................ 3
Accessing the Form Library ................................................................................................................................ 4
Managing Form Templates .................................................................................................................................. 4
Adding a New Form Template ........................................................................................................................... 4
Editing a Form Template .................................................................................................................................... 8
Configuring Form Template Input Fields ............................................................................................................ 9
Checkbox Field .............................................................................................................................................. 9
Radio Button ................................................................................................................................................ 10
Text Field ..................................................................................................................................................... 10
Text Area ...................................................................................................................................................... 11
Hidden Field ................................................................................................................................................. 12
Managing Revisions ........................................................................................................................................... 13
Viewing Submissions ......................................................................................................................................... 13
Forms Security .................................................................................................................................................... 14
Form Library Security ....................................................................................................................................... 14
Roles ............................................................................................................................................................ 14
Direct Permissions ....................................................................................................................................... 15
Actual Permissions ....................................................................................................................................... 16
Form Template Security ............................................................................................................................... 16
Managing Form Instances ................................................................................................................................. 17
Creating a Form Page ...................................................................................................................................... 17
Creating Forms on Existing Pages ................................................................................................................... 21
Editing Form Instances .................................................................................................................................... 21

Form Engine Guide
©2019 Intrado. [10292019]. All rights reserved. May not be reproduced without express written permission. 3
Introduction The Form Library is an easy-to-use tool that makes it easy to design, organize, and implement customized online
forms. With this tool, you can create your own custom forms for your website, allow visitors to submit the form
online, and track all visitor submissions. The Form Builder also offers many different features and options during
both the form creation process as well as the form submission steps. The Form Builder streamlines the online
form creation and organization process. Some of the ways in which the Form Builder component is important are:
Online creation and submission of forms: Form design and submission tracking can be completely handled online – no additional software installations or localized files are required.
Forms can be fully customized: The Form Builder features a similar Rich Text editor as the web content editor, allowing you to design and customize your submission forms any way you choose!
Easy-to-use reporting options: Form submission results can be saved online, emailed, and exported to a spreadsheet file for reporting and tracking purposes.
Form Building Basics There are two components to the Form system – the Form Template and the Form Instance – and it is
important to understand the distinction between the two.
About Form Templates Form Templates are templates that are used as a standardized form from which individual form instances can be
generated. They can also be copied and changed to create other new form templates. The form template acts as
a master copy of the form and individual submissions are copies of the template. Any changes made to the form
template will result in a change to all future submissions for that form.
About Form Instances Form Instances are submitted copies of the form template that include the submission information. Changes to
form instances can only be made in the submitted information field.

Form Engine Guide
©2019 Intrado. [10292019]. All rights reserved. May not be reproduced without express written permission. 4
Accessing the Form Library The Form Library can be accessed by adding the /form extension to your website domain URL, in the address
bar. For example, if your domain is www.yourdomainhere.com, then the URL to access the Form Library would be
www.yourdomainhere.com/form
From the Form Library, users can search among the forms available and are able to click Fill Out Form to fill out
any of the forms they have access to fill out.
Managing Form Templates
Adding a New Form Template At the form library, click Manage Form Templates. This brings you to a list of all the Form Templates in the
current category. Clicking on Add Form Template will open up the Rich Text editor where you can design and
create your custom online form.
Enter a Name for your form. This will be the display name for your form. On sites with multiple language support,
Locale is used to describe the language of the form.
To add the template to one or more categories, click the icon to the right of the Category field. A list of
categories and subcategories will appear.

Form Engine Guide
©2019 Intrado. [10292019]. All rights reserved. May not be reproduced without express written permission. 5
The Template Content area is the body of your form. The Rich Text editor grants you the ability and freedom to
design the form as you choose. You may design and customize the form to your specifications.

Form Engine Guide
©2019 Intrado. [10292019]. All rights reserved. May not be reproduced without express written permission. 6
In addition to the normal formatting functions available in the Rich Text editor, additional form-only features are
included in the editor.
ICON DEFINITION FUNCTION
Checkbox Inserts a checkbox.
Radio Button Makes a button for selecting a single
option among a group of options.
Text Field Creates a field for text input.
Text Area Makes a field for text input with multiple
rows.
Selection Field Creates a drop-down menu box.
Hidden Field A hidden field the user cannot see.
The next section will go into more detail on how to set up each of these individual form input components.
The On Submission area gives options that allow you to control how the form submissions are saved.
Save data to default location will save the form submissions in the Form Builder along with the template.
Do Not Save Data can only be selected if the Email Notifications are enabled; there will not be any online record of the submission if this option is selected.
Save data to specified folder will save each Form Submission as an entry in a folder in the Workspaces or eLearning Server.
Save and attach to specified Workflow connects the form submission to a workflow which can be used to trigger a series of tasks.
You can use the Auto-Email field to send an automated email response to the user after they fill out the form.
Select the Email Field where the user enters their email address, fill out the Email Body and, if you wish, specify
that the user will also be sent a copy of their submission (via the Include form data option).

Form Engine Guide
©2019 Intrado. [10292019]. All rights reserved. May not be reproduced without express written permission. 7
If you want guest users to have to fill out a CAPTCHA, check Enable security measure on Guest users. This
can help prevent spam-bots from sending in automated submissions to your form.
The After Submission area allows the author of the form template to specify what a user sees after the form has
been submitted. If the form was filled out from the /form area then by default, after filling out the form, the user will
be taken back to the /form area. If the form was added to a page via a Form Portlet, then, by default, the page will
reload after the user submits the form.
The user can be redirected to a specific URL once the form has been filled out. Show Specified Message will
display a custom message after the form is submitted before returning the user to the default location.
You can select Send email notification to specified users or addresses to send an email with the form
contents each time the form is submitted. To add users already on the site, click on to open the user picker.
When the pop-up window appears, select the groups and site users to be emailed on form submission and click
Add. Once all the users to be contacted have been added to the list at the bottom half of the user picker, select
OK.
To add e-mail addresses not associated with user accounts on the site, enter them into the Email Addresses field.
If there are multiple addresses, they should be separated by a semi-colon (;). In email notifications, the Title field
appears as the subject line of the notification message.
Once the information has been filled out, click the Validation Check button to ensure that all the input fields have
been configured correctly. If any fields require additional configuration, a message will be displayed above the
Rich Text editor area, detailing the necessary changes. Complete the configurations and click the Validation
Check button again. When the Successful indication text appears, click the Next button.
Check off any fields you wish to be mandatory. A form cannot be submitted unless the mandatory fields are
populated. You can also enter in a customized Error Message to display when the Mandatory fields are missing
on submission.

Form Engine Guide
©2019 Intrado. [10292019]. All rights reserved. May not be reproduced without express written permission. 8
Click Publish Form Template to create the new form template. This will create the first version of your form
template. To continue editing the form template before publishing, click Back to return to the editor page.
Editing a Form Template Click the name of the custom form you wish to edit in the Manage Form Templates interface. This opens up the
View page.
Click the Edit tab to access the Rich Text Editor. Editing the form allows you to rename your form, change or add
input fields, as well as reorganize the layout of the form.
Apply any desired changes to your form template. Click on the Next button to proceed.

Form Engine Guide
©2019 Intrado. [10292019]. All rights reserved. May not be reproduced without express written permission. 9
Apply any changes to the Mandatory checkboxes or Error Message fields. Click the Publish Form Template
button to publish the changes.
Note: The Save As Draft button can be used to save any changes you’ve made without creating a new version of
the form. This feature when you want to make additional changes to the form are required before publishing the
new version.
Configuring Form Template Input Fields The most important elements in designing a custom online form are the input fields. These are the areas that will
take a user’s input on submission. Depending on the type of input field, the configuration may differ slightly.
Checkbox Field The checkbox field puts a checkbox on your custom online form. The checkbox can be either Selected or Not
Selected, and the Value of the checkbox is displayed when it is submitted as Selected.
When the Checkbox button is selected in the editor, a pop-up window appears that prompts for these values:
Name: The display name of the input field as it would appear in submission reports. The Name field is not case-sensitive and should not include any special characters or spaces. Underscores “_” are accepted.
Value: The display value in submission reports when the checkbox is Selected.
Selected: Sets whether the checkbox is Selected by default.
It is also possible to access the checkbox properties window by right-
clicking on the checkbox, and selecting Checkbox Properties.
Enter the Name and Value for your checkbox. You can also specify if you want the checkbox to be selected by
default by checking the Selected checkbox. Click OK.

Form Engine Guide
©2019 Intrado. [10292019]. All rights reserved. May not be reproduced without express written permission. 10
Radio Button Radio buttons can be set up to allow users to select one option from a list of choices. Radio buttons are similar to
checkboxes, but are generally not used as standalone input fields. Radio buttons are great for multiple-choice
questions where the user selects one option.
When the Radio Button icon is selected in the editor, a pop-up window appears that prompts for these values:
Name: The display name of the input field as it would appear in submission reports. The Name field is not case-sensitive and should not include any special characters or spaces. Underscores are allowed however.
Value: The display value in submission reports when the radio button is Selected.
Selected: Sets whether the radio button is Selected by default.
You can also access the radio button properties window by right-
clicking on the radio button and clicking Radio Button Properties.
Enter the Name and Value for your radio button. You can also specify if you want the radio button to be selected
by default by checking the Selected checkbox. Click OK.
To group a set of radio buttons so that users can only select one of the choices in a group, the Name of each of
those radio buttons must be exactly the same. The Value field will indicate which of the options was selected.
Text Field A text field can take any input and store that submission. Text fields offer a single line of input, and can be
configured to allow a set number of characters or be without limit.
When the Text Field button is selected in the editor, a pop-up window appears that prompts for these values:
Name: The display name of the input field as it would appear in submission reports. The Name field is not case-sensitive, and should not include any special characters or spaces. Underscores “_” are accepted.
Value: The default value to display in the text field. Setting a default value is optional.
Character Width: The display width of the text field, in character spaces.
Maximum Characters: The maximum number of characters to allow on input.
Type: Choose the sort of data that will be entered in the field.
It is also possible to access the text field properties window by right-clicking on the text field, and selecting Text
Field Properties.
Enter the Name and Value for your text field. You can also define the Character Width and Maximum
Characters for the text field – if you do not specify values for these fields, they will be set to their default values.
Select the Type of input and click OK.

Form Engine Guide
©2019 Intrado. [10292019]. All rights reserved. May not be reproduced without express written permission. 11
Text Area The text area input field is an extension of the text field and allows for a large block of content instead of limiting
input to a single line. You can configure the size of the text area to be as large or as little you like.
When the Text Area button is selected in the editor, a pop-up window appears that prompts for these values:
Name: The display name of the input field as it would appear in submission reports. The Name field is not case-sensitive and should not include any special characters or spaces. Underscores “_” are accepted.
Columns: The width of the text area to display, measured in character spaces.
Rows: The number of rows of the text area to display.
Value: The default value to display in the text area. This is optional.
It is also possible to access the text field properties window by right-
clicking on the text field, and selecting Text Area Properties.
Enter the Name of your text area. You can also define the number of Columns and Rows and set a default
Value. If you do not specify values for these fields, they will be set to their default values. Click OK.
Selection Field The selection field can be configured as a drop-down menu, a single item selection box, or a multiple item
selection box.
When you click the Selection Field button, the selection field
properties window pops up.
Name: The display name of the input field.
Size: The number of lines to display. To generate a dropdown menu, set Size to 0 or 1. Larger values will instead generate a selection box.
Allow multiple selections: Check this to allow more than one item to be selected. Allow multiple selections will only work for selection field Sizes greater than 1.
Text: The display text for the list items.
Value: The value stored when corresponding text is selected.
Add: Includes Text and Value item into the list.
Modify: Replaces the selected item in the list with the current Text and Value fields.
Up: Moves the selected item up the list.
Down: Moves the selected item down the list.
Set as selected value: Sets selected item as the default selection.
Delete: Removes selected item from the list.

Form Engine Guide
©2019 Intrado. [10292019]. All rights reserved. May not be reproduced without express written permission. 12
It is also possible to access the selection field properties window by right-clicking on the text field, and selecting
Selection Field Properties.
Enter the Name of the selection field and specify the Size. Determine if you want to Allow multiple selections.
Enter items in the list by providing a display name in the Text field, and the corresponding Value. The order of the
items in the list can be rearranged by using the Up and Down buttons.
Set the default value to be displayed in the selection field by clicking the Set as selected value button with the
desired item selected. Click OK.
Hidden Field With a hidden field, you can include a value with the form that is not visible to the user. This can be useful if
you have multiple similar forms that are being processed by the same workflow.
When you click the Hidden Field button, the hidden field properties
window is displayed.
Name: The display name of the input field as it would appear in submission reports. The Name field is not case-sensitive and should not include any special characters or spaces. Underscores “_” are accepted.
Value: The value to display under the Name header in the submission reports.
It is also possible to access the text field properties window by right-clicking on the text field and selecting Hidden
Field Properties.

Form Engine Guide
©2019 Intrado. [10292019]. All rights reserved. May not be reproduced without express written permission. 13
Managing Revisions The form builder features version control on any form templates you create. What this means is that every time
you click the Publish Form Template button, a new version of the form template is created and added to the
form template Revisions tab.
In the Revisions tab, you will see a list of versions of the form, along with their creator and date of publishing. In
order to view a previous revision of the form template, click on the Revision Name of the version you would like
to access.
The revision that is being currently used for the template is indicated by the word Live appearing in the right-hand
Action column. To bring another revision into use, click on the Make Live link. Revisions can be deleted by
clicking the Delete link in the Action column.
All the form submissions are attached to the revision version to which they were submitted. If a revision is deleted,
all submissions to that version of the form are deleted as well.
Viewing Submissions Submissions to the form can be viewed directly from the form template interface.
Clicking on the Submissions tab will bring up a table containing all the submissions that have been made to the
current version of the form. The Name column displays the name of the form instance that was submitted to, and
User shows the identity of the user that submitted the form. If the form is submitted by a visitor that has not
logged in to the site, the user column will display Guest.
After the Submitted On column containing the date of submission, there is a column for each input field in the
form, identified by its Name attribute. To delete a form submission, click on in the Action column at the right
side of the table.

Form Engine Guide
©2019 Intrado. [10292019]. All rights reserved. May not be reproduced without express written permission. 14
To download and save form submissions to your own computer, click Export to Excel. This saves the form
submissions table as a CSV file, which can be opened by Microsoft Excel and other spreadsheet programs. The
Export to Excel link appears after there is one or more submission to be able to save.
Delete All will delete all the form submissions associated with the displayed revision.
The Submissions tab only displays submissions for one version of a form at a time. If you are missing older
submissions, use the Version drop down menu to choose the revision that was previously in place.
Forms Security There are two levels of security that can be configured for forms using Presence, first at the Form Library level
and secondly for particular form templates.
Form Library Security Security at the Form Library level (http://www.yoursite.com/form) is controlled through the Form Builder. At the
main view of the Form Library, click Manage Form Templates to access the Form Builder. Clicking on the
Security tab, you are presented with three more tabs:
Roles The Roles tab allows users and groups to be added to pre-defined security roles. Form Template Root
Administrators have full access to access, create, edit, and delete any form categories, form templates, their
revisions, and their submissions. Only users in this role can access and use the Manage Form Categories
interface.
Form Template Root Authors have the ability to edit all the form templates, as well as create new form
templates. Users in the Authors role are unable to view submissions or configure security to a form template
unless they are the creator of that form template. Authors do not see the Manage Form Categories link from the
Form Library.
Users and groups in the Form Template Root Browsers role are able to access the Form Library to be able to
fill out forms. Browsers do not see the Manage Form Templates and Manage Form Categories links from the
Form Library.
To assign a user or group to a role, click the symbol next the role name to expand the list of users in that role.
Click Add to open the user picker window. From this window select the users or groups you’d like to grant
permissions to by clicking their name and clicking Add. When you have selected your users, click OK.
Form Engine Guide
©2019 Intrado. [10292019]. All rights reserved. May not be reproduced without express written permission. 15
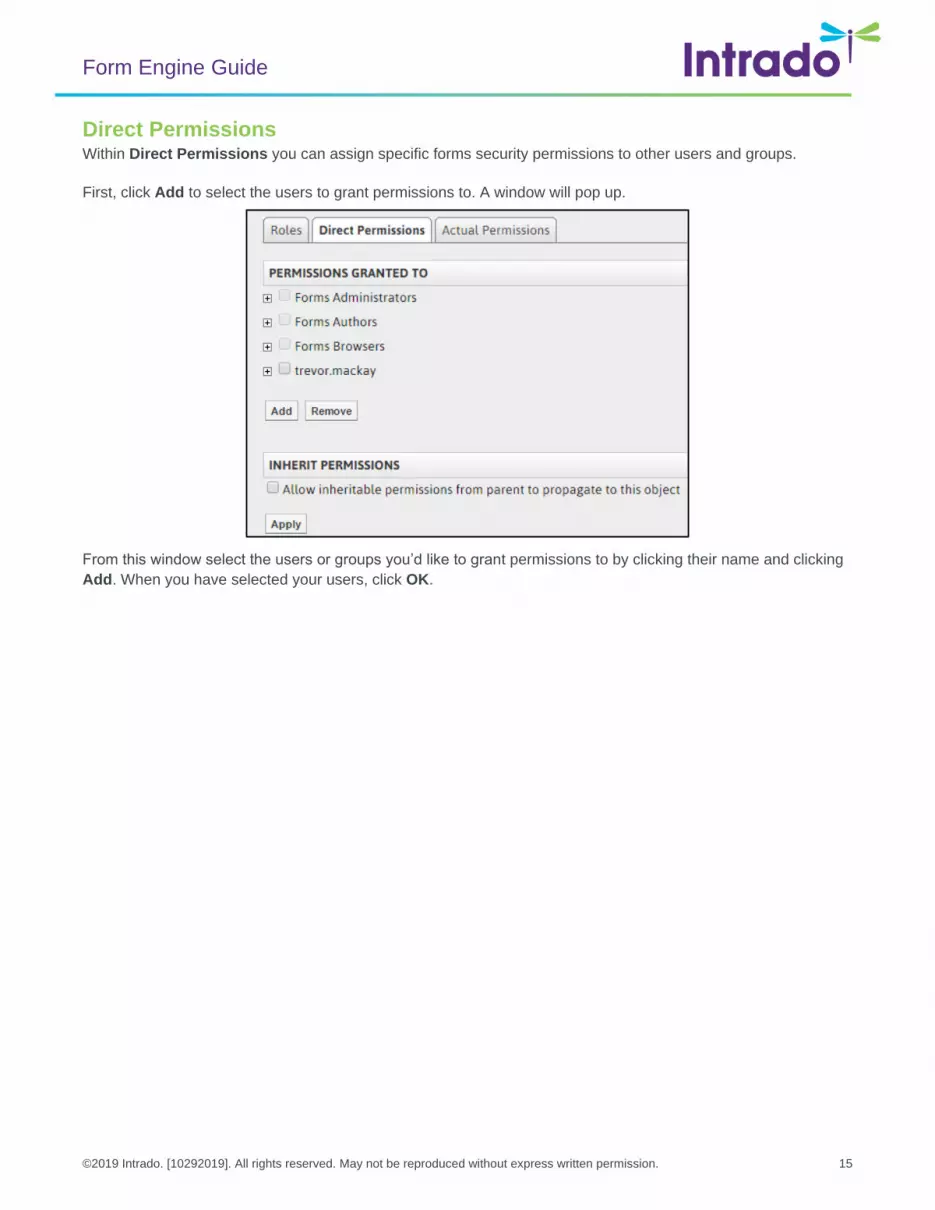
Direct Permissions Within Direct Permissions you can assign specific forms security permissions to other users and groups.
First, click Add to select the users to grant permissions to. A window will pop up.
From this window select the users or groups you’d like to grant permissions to by clicking their name and clicking
Add. When you have selected your users, click OK.

Form Engine Guide
©2019 Intrado. [10292019]. All rights reserved. May not be reproduced without express written permission. 16
To individually assign permissions to each user, click on the beside their name. From here you can assign
specific permissions:
PERMISSION WHAT IT ALLOWS YOU TO DO
Create Can add Form Templates.
Delete Can delete Form Templates.
Read Can view the Form Library.
Write Can make changes to Form Templates.
Full Control
All of the above, as well as the ability to manage Form
Categories, assign permissions to others, and view
submissions on forms they did not create.
Actual Permissions Actual Permissions allows you to view what permissions specific users have on your Form Library. Users higher
up the security hierarchy may already have permissions to your Form Library. Users with entire site permissions
(or higher tiers of security hierarchy) may have permissions to your Form Library if you have the Allow
Inheritable Permissions From Parent to Propagate to This Object checkbox selected on the Direct
Permissions screen.
Form Template Security The ability to manage security settings for a particular form template allows Administrators to assign some users
the ability to access and maintain a particular form without necessarily giving them the access to control all the
forms on the site.
To configure security for a specific form template, it is the same process to add specific users and groups to the
Direct Permissions as in the Form Library.

Form Engine Guide
©2019 Intrado. [10292019]. All rights reserved. May not be reproduced without express written permission. 17
Managing Form Instances
Creating a Form Page Creating a form page on your site is a similar process to adding any other type of page. Hover over Page in the
Administrative Toolbar and click Form Page.
Fill in the Page Name field for your new page.
The Page URL field will automatically be filled in. The Page URL is used to build the Friendly URL used to access
the page. If you wish to make modifications to the Page URL, click and then you can change the text. Keep in
mind that only alphanumeric characters, underscores and dashes can be used. Any other characters will be
automatically removed.
By default, you will be assigned as the Page Owner. If you wish to set someone else as the owner, click
the icon.
When the User Picker opens, choose the user you wish to make the owner, and click Add then click OK.

Form Engine Guide
©2019 Intrado. [10292019]. All rights reserved. May not be reproduced without express written permission. 18
If you want to set the page as the user's homepage in their user profile, click Replace Page Owner's website
with this page.
Note: On some sites, you may also have a Category drop-down that you can use to select a category for the
page.
To finish creating the Form Page, click Create.
On the page you’ve created, toggle on Design Mode. Click the icon for the Custom Form portlet. This will
bring you to the Form Details page, where this form instance is configured.

Form Engine Guide
©2019 Intrado. [10292019]. All rights reserved. May not be reproduced without express written permission. 19
The Form Template field is the only mandatory field. Click the Browse link to the right of the field. The Browse
window pops up. Choose the desired template by clicking the Select link.
The On Submission option allows you to control how the form submissions are saved. Save data to default
location will save the form submissions in the Form Builder along with the template.
Save data to specified folder will save each Form Submission as an entry in a folder in the Workspaces or
eLearning Server. Save and attach to specified Workflow connects the form submission to a workflow which
can be used to trigger a series of tasks.
You can use the Auto-Email field to send an automated email response to the user after they fill out the form.
Select the Email Field where the user enters their email address, fill out the Email Body and, if you wish, specify
that the user will also be sent a copy of their submission (via the Include form data option).

Form Engine Guide
©2019 Intrado. [10292019]. All rights reserved. May not be reproduced without express written permission. 20
If you want guest users to have to fill out a CAPTCHA, check Enable security measure on Guest users. This
can help prevent spam-bots from sending in automated submissions to your form.
After Submission allows the author of the form template to specify what a user sees after the form has been
submitted. By default, the form will reload the page that the form was accessed from.
The user can be redirected to a specific URL once the form has been filled out. Show Specified Message will
display a custom message after the form is submitted before returning the user to the default location.
You can select Send email notification to specified users or addresses to send an email with the form
contents each time the form is submitted. To add users already on the site, click on to open the user picker.
When the pop-up window appears, select the groups and site users to be emailed on form submission and click
Add. Once all the users to be contacted have been added to the list at the bottom half of the user picker, select
OK.
To add e-mail addresses not associated with user accounts on the site, enter them into the Email Addresses field.
If there are multiple addresses, they should be separated by a semi-colon (;). In email notifications, the Title field
appears as the subject line of the notification message.
To complete the configuration process of your Form Page, click the Update Form button.

Form Engine Guide
©2019 Intrado. [10292019]. All rights reserved. May not be reproduced without express written permission. 21
Creating Forms on Existing Pages To add form instances on an existing page, we would use Form portlets.
To add a form portlet to a page, toggle on Design Mode. Click the Forms category and then drag and drop the
Custom Form portlet on to the area of the page where the form is to be added.
Hover over the new Custom Form portlet and click the button to configure the portlet.
Configure the portlet as described in the previous section.
Editing Form Instances Hover over the new Custom Form portlet and click the button to configure the portlet.
Configure the portlet as described in the Creating a Form Page section.