deploying harmony workforce optimization ... - avaya support
TRANSCRIPT
Deploying Harmony WorkforceOptimization with Avaya Aura®Communication Manager and AvayaAura® Contact Center
Release 5.2.2November 2017
© 2017, Avaya Inc.All Rights Reserved.
NoticeWhile reasonable efforts have been made to ensure that theinformation in this document is complete and accurate at the time ofprinting, Avaya assumes no liability for any errors. Avaya reservesthe right to make changes and corrections to the information in thisdocument without the obligation to notify any person or organizationof such changes.Documentation disclaimer“Documentation” means information published in varying mediumswhich may include product information, operating instructions andperformance specifications that are generally made available to usersof products. Documentation does not include marketing materials.Avaya shall not be responsible for any modifications, additions, ordeletions to the original published version of Documentation unlesssuch modifications, additions, or deletions were performed by or onthe express behalf of Avaya. End User agrees to indemnify and holdharmless Avaya, Avaya's agents, servants and employees against allclaims, lawsuits, demands and judgments arising out of, or inconnection with, subsequent modifications, additions or deletions tothis documentation, to the extent made by End User.Link disclaimerAvaya is not responsible for the contents or reliability of any linkedwebsites referenced within this site or Documentation provided byAvaya. Avaya is not responsible for the accuracy of any information,statement or content provided on these sites and does notnecessarily endorse the products, services, or information describedor offered within them. Avaya does not guarantee that these links willwork all the time and has no control over the availability of the linkedpages.WarrantyAvaya provides a limited warranty on Avaya hardware and software.Refer to your sales agreement to establish the terms of the limitedwarranty. In addition, Avaya’s standard warranty language, as well asinformation regarding support for this product while under warranty isavailable to Avaya customers and other parties through the AvayaSupport website: https://support.avaya.com/helpcenter/getGenericDetails?detailId=C20091120112456651010 under the link“Warranty & Product Lifecycle” or such successor site as designatedby Avaya. Please note that if You acquired the product(s) from anauthorized Avaya Channel Partner outside of the United States andCanada, the warranty is provided to You by said Avaya ChannelPartner and not by Avaya.“Hosted Service” means an Avaya hosted service subscription thatYou acquire from either Avaya or an authorized Avaya ChannelPartner (as applicable) and which is described further in Hosted SASor other service description documentation regarding the applicablehosted service. If You purchase a Hosted Service subscription, theforegoing limited warranty may not apply but You may be entitled tosupport services in connection with the Hosted Service as describedfurther in your service description documents for the applicableHosted Service. Contact Avaya or Avaya Channel Partner (asapplicable) for more information.Hosted ServiceTHE FOLLOWING APPLIES ONLY IF YOU PURCHASE AN AVAYAHOSTED SERVICE SUBSCRIPTION FROM AVAYA OR AN AVAYACHANNEL PARTNER (AS APPLICABLE), THE TERMS OF USEFOR HOSTED SERVICES ARE AVAILABLE ON THE AVAYAWEBSITE, HTTPS://SUPPORT.AVAYA.COM/LICENSEINFO UNDERTHE LINK “Avaya Terms of Use for Hosted Services” OR SUCHSUCCESSOR SITE AS DESIGNATED BY AVAYA, AND AREAPPLICABLE TO ANYONE WHO ACCESSES OR USES THEHOSTED SERVICE. BY ACCESSING OR USING THE HOSTEDSERVICE, OR AUTHORIZING OTHERS TO DO SO, YOU, ONBEHALF OF YOURSELF AND THE ENTITY FOR WHOM YOU AREDOING SO (HEREINAFTER REFERRED TO INTERCHANGEABLYAS “YOU” AND “END USER”), AGREE TO THE TERMS OF USE. IFYOU ARE ACCEPTING THE TERMS OF USE ON BEHALF ACOMPANY OR OTHER LEGAL ENTITY, YOU REPRESENT THATYOU HAVE THE AUTHORITY TO BIND SUCH ENTITY TO THESETERMS OF USE. IF YOU DO NOT HAVE SUCH AUTHORITY, OR IF
YOU DO NOT WISH TO ACCEPT THESE TERMS OF USE, YOUMUST NOT ACCESS OR USE THE HOSTED SERVICE ORAUTHORIZE ANYONE TO ACCESS OR USE THE HOSTEDSERVICE.LicensesTHE SOFTWARE LICENSE TERMS AVAILABLE ON THE AVAYAWEBSITE, HTTPS://SUPPORT.AVAYA.COM/LICENSEINFO,UNDER THE LINK “AVAYA SOFTWARE LICENSE TERMS (AvayaProducts)” OR SUCH SUCCESSOR SITE AS DESIGNATED BYAVAYA, ARE APPLICABLE TO ANYONE WHO DOWNLOADS,USES AND/OR INSTALLS AVAYA SOFTWARE, PURCHASEDFROM AVAYA INC., ANY AVAYA AFFILIATE, OR AN AVAYACHANNEL PARTNER (AS APPLICABLE) UNDER A COMMERCIALAGREEMENT WITH AVAYA OR AN AVAYA CHANNEL PARTNER.UNLESS OTHERWISE AGREED TO BY AVAYA IN WRITING,AVAYA DOES NOT EXTEND THIS LICENSE IF THE SOFTWAREWAS OBTAINED FROM ANYONE OTHER THAN AVAYA, AN AVAYAAFFILIATE OR AN AVAYA CHANNEL PARTNER; AVAYARESERVES THE RIGHT TO TAKE LEGAL ACTION AGAINST YOUAND ANYONE ELSE USING OR SELLING THE SOFTWAREWITHOUT A LICENSE. BY INSTALLING, DOWNLOADING ORUSING THE SOFTWARE, OR AUTHORIZING OTHERS TO DO SO,YOU, ON BEHALF OF YOURSELF AND THE ENTITY FOR WHOMYOU ARE INSTALLING, DOWNLOADING OR USING THESOFTWARE (HEREINAFTER REFERRED TOINTERCHANGEABLY AS “YOU” AND “END USER”), AGREE TOTHESE TERMS AND CONDITIONS AND CREATE A BINDINGCONTRACT BETWEEN YOU AND AVAYA INC. OR THEAPPLICABLE AVAYA AFFILIATE (“AVAYA”).Avaya grants You a license within the scope of the license typesdescribed below, with the exception of Heritage Nortel Software, forwhich the scope of the license is detailed below. Where the orderdocumentation does not expressly identify a license type, theapplicable license will be a Designated System License as set forthbelow in the Designated System(s) License (DS) section asapplicable. The applicable number of licenses and units of capacityfor which the license is granted will be one (1), unless a differentnumber of licenses or units of capacity is specified in thedocumentation or other materials available to You. “Software” meanscomputer programs in object code, provided by Avaya or an AvayaChannel Partner, whether as stand-alone products, pre-installed onhardware products, and any upgrades, updates, patches, bug fixes,or modified versions thereto. “Designated Processor” means a singlestand-alone computing device. “Server” means a set of DesignatedProcessors that hosts (physically or virtually) a software applicationto be accessed by multiple users. “Instance” means a single copy ofthe Software executing at a particular time: (i) on one physicalmachine; or (ii) on one deployed software virtual machine (“VM”) orsimilar deployment.License typesConcurrent User License (CU). End User may install and use theSoftware on multiple Designated Processors or one or more Servers,so long as only the licensed number of Units are accessing and usingthe Software at any given time. A “Unit” means the unit on whichAvaya, at its sole discretion, bases the pricing of its licenses and canbe, without limitation, an agent, port or user, an e-mail or voice mailaccount in the name of a person or corporate function (e.g.,webmaster or helpdesk), or a directory entry in the administrativedatabase utilized by the Software that permits one user to interfacewith the Software. Units may be linked to a specific, identified Serveror an Instance of the Software.Heritage Nortel Software“Heritage Nortel Software” means the software that was acquired byAvaya as part of its purchase of the Nortel Enterprise SolutionsBusiness in December 2009. The Heritage Nortel Software is thesoftware contained within the list of Heritage Nortel Products locatedat https://support.avaya.com/LicenseInfo under the link “HeritageNortel Products” or such successor site as designated by Avaya. ForHeritage Nortel Software, Avaya grants Customer a license to useHeritage Nortel Software provided hereunder solely to the extent ofthe authorized activation or authorized usage level, solely for thepurpose specified in the Documentation, and solely as embedded in,for execution on, or for communication with Avaya equipment.Charges for Heritage Nortel Software may be based on extent ofactivation or use authorized as specified in an order or invoice.

CopyrightExcept where expressly stated otherwise, no use should be made ofmaterials on this site, the Documentation, Software, Hosted Service,or hardware provided by Avaya. All content on this site, thedocumentation, Hosted Service, and the product provided by Avayaincluding the selection, arrangement and design of the content isowned either by Avaya or its licensors and is protected by copyrightand other intellectual property laws including the sui generis rightsrelating to the protection of databases. You may not modify, copy,reproduce, republish, upload, post, transmit or distribute in any wayany content, in whole or in part, including any code and softwareunless expressly authorized by Avaya. Unauthorized reproduction,transmission, dissemination, storage, and or use without the expresswritten consent of Avaya can be a criminal, as well as a civil offenseunder the applicable law.VirtualizationThe following applies if the product is deployed on a virtual machine.Each product has its own ordering code and license types. Note,unless otherwise stated, that each Instance of a product must beseparately licensed and ordered. For example, if the end usercustomer or Avaya Channel Partner would like to install twoInstances of the same type of products, then two products of thattype must be ordered.Third Party Components“Third Party Components” mean certain software programs orportions thereof included in the Software or Hosted Service maycontain software (including open source software) distributed underthird party agreements (“Third Party Components”), which containterms regarding the rights to use certain portions of the Software(“Third Party Terms”). As required, information regarding distributedLinux OS source code (for those products that have distributed LinuxOS source code) and identifying the copyright holders of the ThirdParty Components and the Third Party Terms that apply is availablein the products, Documentation or on Avaya’s website at: https://support.avaya.com/Copyright or such successor site as designatedby Avaya. The open source software license terms provided as ThirdParty Terms are consistent with the license rights granted in theseSoftware License Terms, and may contain additional rights benefitingYou, such as modification and distribution of the open sourcesoftware. The Third Party Terms shall take precedence over theseSoftware License Terms, solely with respect to the applicable ThirdParty Components to the extent that these Software License Termsimpose greater restrictions on You than the applicable Third PartyTerms.The following applies only if the H.264 (AVC) codec is distributed withthe product. THIS PRODUCT IS LICENSED UNDER THE AVCPATENT PORTFOLIO LICENSE FOR THE PERSONAL USE OF ACONSUMER OR OTHER USES IN WHICH IT DOES NOT RECEIVEREMUNERATION TO (i) ENCODE VIDEO IN COMPLIANCE WITHTHE AVC STANDARD (“AVC VIDEO”) AND/OR (ii) DECODE AVCVIDEO THAT WAS ENCODED BY A CONSUMER ENGAGED IN APERSONAL ACTIVITY AND/OR WAS OBTAINED FROM A VIDEOPROVIDER LICENSED TO PROVIDE AVC VIDEO. NO LICENSE ISGRANTED OR SHALL BE IMPLIED FOR ANY OTHER USE.ADDITIONAL INFORMATION MAY BE OBTAINED FROM MPEG LA,L.L.C. SEE HTTP://WWW.MPEGLA.COM.Service ProviderTHE FOLLOWING APPLIES TO AVAYA CHANNEL PARTNER’SHOSTING OF AVAYA PRODUCTS OR SERVICES. THE PRODUCTOR HOSTED SERVICE MAY USE THIRD PARTY COMPONENTSSUBJECT TO THIRD PARTY TERMS AND REQUIRE A SERVICEPROVIDER TO BE INDEPENDENTLY LICENSED DIRECTLY FROMTHE THIRD PARTY SUPPLIER. AN AVAYA CHANNEL PARTNER’SHOSTING OF AVAYA PRODUCTS MUST BE AUTHORIZED INWRITING BY AVAYA AND IF THOSE HOSTED PRODUCTS USEOR EMBED CERTAIN THIRD PARTY SOFTWARE, INCLUDINGBUT NOT LIMITED TO MICROSOFT SOFTWARE OR CODECS,THE AVAYA CHANNEL PARTNER IS REQUIRED TOINDEPENDENTLY OBTAIN ANY APPLICABLE LICENSEAGREEMENTS, AT THE AVAYA CHANNEL PARTNER’S EXPENSE,DIRECTLY FROM THE APPLICABLE THIRD PARTY SUPPLIER.WITH RESPECT TO CODECS, IF THE AVAYA CHANNELPARTNER IS HOSTING ANY PRODUCTS THAT USE OR EMBEDTHE G.729 CODEC, H.264 CODEC, OR H.265 CODEC, THE
AVAYA CHANNEL PARTNER ACKNOWLEDGES AND AGREESTHE AVAYA CHANNEL PARTNER IS RESPONSIBLE FOR ANYAND ALL RELATED FEES AND/OR ROYALTIES. THE G.729CODEC IS LICENSED BY SIPRO LAB TELECOM INC. SEE WWW.SIPRO.COM/CONTACT.HTML. THE H.264 (AVC) CODEC ISLICENSED UNDER THE AVC PATENT PORTFOLIO LICENSE FORTHE PERSONAL USE OF A CONSUMER OR OTHER USES INWHICH IT DOES NOT RECEIVE REMUNERATION TO: (I) ENCODEVIDEO IN COMPLIANCE WITH THE AVC STANDARD (“AVCVIDEO”) AND/OR (II) DECODE AVC VIDEO THAT WAS ENCODEDBY A CONSUMER ENGAGED IN A PERSONAL ACTIVITY AND/ORWAS OBTAINED FROM A VIDEO PROVIDER LICENSED TOPROVIDE AVC VIDEO. NO LICENSE IS GRANTED OR SHALL BEIMPLIED FOR ANY OTHER USE. ADDITIONAL INFORMATIONFOR H.264 (AVC) AND H.265 (HEVC) CODECS MAY BEOBTAINED FROM MPEG LA, L.L.C. SEE HTTP://WWW.MPEGLA.COM.Compliance with LawsYou acknowledge and agree that it is Your responsibility forcomplying with any applicable laws and regulations, including, but notlimited to laws and regulations related to call recording, data privacy,intellectual property, trade secret, fraud, and music performancerights, in the country or territory where the Avaya product is used.Preventing Toll Fraud“Toll Fraud” is the unauthorized use of your telecommunicationssystem by an unauthorized party (for example, a person who is not acorporate employee, agent, subcontractor, or is not working on yourcompany's behalf). Be aware that there can be a risk of Toll Fraudassociated with your system and that, if Toll Fraud occurs, it canresult in substantial additional charges for your telecommunicationsservices.Avaya Toll Fraud interventionIf You suspect that You are being victimized by Toll Fraud and Youneed technical assistance or support, call Technical Service CenterToll Fraud Intervention Hotline at +1-800-643-2353 for the UnitedStates and Canada. For additional support telephone numbers, seethe Avaya Support website: https://support.avaya.com or suchsuccessor site as designated by Avaya.Security VulnerabilitiesInformation about Avaya’s security support policies can be found inthe Security Policies and Support section of https://support.avaya.com/security.Suspected Avaya product security vulnerabilities are handled per theAvaya Product Security Support Flow (https://support.avaya.com/css/P8/documents/100161515).Downloading DocumentationFor the most current versions of Documentation, see the AvayaSupport website: https://support.avaya.com, or such successor siteas designated by Avaya.Contact Avaya SupportSee the Avaya Support website: https://support.avaya.com forproduct or Hosted Service notices and articles, or to report a problemwith your Avaya product or Hosted Service. For a list of supporttelephone numbers and contact addresses, go to the Avaya Supportwebsite: https://support.avaya.com (or such successor site asdesignated by Avaya), scroll to the bottom of the page, and selectContact Avaya Support.Regulatory StatementsTrademarksThe trademarks, logos and service marks (“Marks”) displayed in thissite, the Documentation, Hosted Service(s), and product(s) providedby Avaya are the registered or unregistered Marks of Avaya, itsaffiliates, its licensors, its suppliers, or other third parties. Users arenot permitted to use such Marks without prior written consent fromAvaya or such third party which may own the Mark. Nothingcontained in this site, the Documentation, Hosted Service(s) andproduct(s) should be construed as granting, by implication, estoppel,or otherwise, any license or right in and to the Marks without theexpress written permission of Avaya or the applicable third party.

Avaya is a registered trademark of Avaya Inc.All non-Avaya trademarks are the property of their respective owners.Linux® is the registered trademark of Linus Torvalds in the U.S. andother countries.
Contents
Chapter 1: Introduction.......................................................................................................... 13Purpose................................................................................................................................ 13Prerequisites......................................................................................................................... 13
Chapter 2: Harmony Workforce Optimization overview...................................................... 14Components......................................................................................................................... 14Adapters............................................................................................................................... 16Topology............................................................................................................................... 17Deployment configurations..................................................................................................... 18Signaling events.................................................................................................................... 19DMCC recording methods...................................................................................................... 20Recording tone...................................................................................................................... 21Multiplicity............................................................................................................................. 21Agent profiles overview.......................................................................................................... 21
Chapter 3: Avaya Aura® Contact Center and Harmony Workforce Optimizationintegration............................................................................................................................... 23
Call recording options............................................................................................................ 24Active call recording........................................................................................................ 24Passive call recording...................................................................................................... 25
Integration overview.............................................................................................................. 25Integration scenarios............................................................................................................. 28License requirements............................................................................................................ 29License types........................................................................................................................ 31Trusted licensing support....................................................................................................... 32
Exporting a third-party CA certificate from the AES server.................................................. 33Configuring trusted licensing secure connection for AES adapter........................................ 33Importing a CA certificate to Avaya adapter keystore.......................................................... 34Configuring trusted licensing parameters for Avaya adapter................................................ 34
Chapter 4: Avaya Aura® Contact Center configuration...................................................... 36Configuration checklist........................................................................................................... 36Application Enablement Services configuration........................................................................ 38
Logging in to the Application Enablement Services server.................................................. 38Verifying TSAPI and DMCC services................................................................................. 39Verifying the status of switch connection........................................................................... 39Adding a CTI user........................................................................................................... 39Edit User field descriptions............................................................................................... 39Verifying the CTI user...................................................................................................... 40Adding devices................................................................................................................ 40Adding a device group..................................................................................................... 41Adding devices and hunt group extensions to a device group.............................................. 41
November 2017 Deploying Harmony Workforce Optimization with Avaya Aura® CommunicationManager and Avaya Aura® Contact Center 5Comments on this document? [email protected]
Adding a device group to a CTI user................................................................................. 41Performing the TSAPI test................................................................................................ 42TSAPI test field descriptions............................................................................................. 42Configuring the Processor Ethernet or CLAN IP address.................................................... 43Deleting the gatekeeper configuration............................................................................... 43
Avaya Aura® Communication Manager configuration............................................................... 43Installing Avaya Site Administration.................................................................................. 43Logging in to Avaya Site Administration............................................................................. 44Verifying the CTI link and enhanced conferencing configuration.......................................... 45Adding a CTI link............................................................................................................. 45Administering system parameters..................................................................................... 45Enabling disconnect supervision for incoming calls............................................................ 46Configuring UCID for SIP trunks....................................................................................... 46Disabling AAPC or IQ...................................................................................................... 47Enabling passing of UCID for conference or transfer.......................................................... 47Administering a class of restriction.................................................................................... 48Administering agent stations............................................................................................. 48Verifying a codec set........................................................................................................ 48Configuring IP network regions......................................................................................... 49Administering virtual IP soft phones.................................................................................. 49
Device Media and Call Control Services configuration.............................................................. 50Administering stations...................................................................................................... 50Enabling the DMCC unencrypted port............................................................................... 51Performing the DMCC test............................................................................................... 51DMCC test field descriptions............................................................................................ 52
Avaya Aura® Contact Center configuration.............................................................................. 52Importing a CCT user...................................................................................................... 52Assigning agents............................................................................................................. 53
SIP phones and SPAN configuration....................................................................................... 53Configuring a SIP user..................................................................................................... 53Enabling third-party controls on SIP phones...................................................................... 54Configuring SNMP on Avaya OneX soft phones................................................................. 54Enabling the recording of agent-to-agent conversation....................................................... 55
Chapter 5: Deployment process............................................................................................ 56Chapter 6: Planning and preconfiguration........................................................................... 57
Planning checklist.................................................................................................................. 57Configuration information....................................................................................................... 57
Signaling and Automatic Call Distribution information......................................................... 57Harmony Workforce Optimization installation information.................................................... 59
Configuration tools and utilities............................................................................................... 61Hardware requirements......................................................................................................... 62Software requirements........................................................................................................... 68Network requirements............................................................................................................ 71
Contents
November 2017 Deploying Harmony Workforce Optimization with Avaya Aura® CommunicationManager and Avaya Aura® Contact Center 6Comments on this document? [email protected]

Port assignments.................................................................................................................. 71Preinstallation checklist.......................................................................................................... 71
Assigning metrics to the Network Interface Cards.............................................................. 73Registering for PLDS....................................................................................................... 74Downloading software from PLDS.................................................................................... 74Installing the TSAPI client for Windows............................................................................. 75
Product compatibility.............................................................................................................. 76Transport Layer Security 1.2 support....................................................................................... 76
Enabling TLS 1.2............................................................................................................. 76Disabling TLS 1.0............................................................................................................ 78Disabling TLS 1.1............................................................................................................ 79Disabling SSL ................................................................................................................ 81Installing a certificate on the SQL server........................................................................... 82Configuring force encryption on the SQL server................................................................. 82Verifying the encryption of the connection on the SQL server.............................................. 83
Chapter 7: Deployment........................................................................................................... 85Single box installation............................................................................................................ 85
Installing Harmony Workforce Optimization on a single server............................................. 85Multibox installation............................................................................................................... 91
Installing Harmony Workforce Optimization on multiple servers........................................... 93Chapter 8: Configuration........................................................................................................ 99
Configure browser settings for SSL......................................................................................... 99Configuring settings for Internet Explorer........................................................................... 99Configuring settings for Google Chrome.......................................................................... 100Configuring settings for Mozilla Firefox............................................................................ 101
Configure log values............................................................................................................ 102Modifying default values for logs..................................................................................... 102
Configure SysAdmin............................................................................................................ 102Logging on to SysAdmin................................................................................................ 102Importing the license file................................................................................................ 103Configuring hosted or premise deployments ................................................................... 103Adding tenants.............................................................................................................. 104Adding tenant details..................................................................................................... 105Adding contact details.................................................................................................... 106Adding users................................................................................................................. 106Configuring license details............................................................................................. 107Mapping assets............................................................................................................. 108Adding storage drives.................................................................................................... 109Mapping storage drives.................................................................................................. 111Viewing tenant summary................................................................................................ 111Modifying tenant status.................................................................................................. 112
Configure parameters for Avaya Aura® Contact Center deployments....................................... 112Parameter configuration checklist................................................................................... 112
Contents
November 2017 Deploying Harmony Workforce Optimization with Avaya Aura® CommunicationManager and Avaya Aura® Contact Center 7Comments on this document? [email protected]
Configuring component parameters................................................................................ 114Performing bulk actions.................................................................................................. 115
Configure dynamic parameters for Avaya Aura® Contact Center deployments......................... 124Dynamic parameter configuration checklist...................................................................... 124Configuring dynamic parameters for the recorder............................................................. 125Configuration values for dynamic recorder parameter....................................................... 126Configuring dynamic parameters for the adapter.............................................................. 127Restarting the Harmony Workforce Optimization components........................................... 129
Configure the node name for DNS deployments.................................................................... 130Node name configuration checklist ................................................................................. 130Stopping the Harmony Workforce Optimization components............................................. 130Changing the node name............................................................................................... 130Starting the Harmony Workforce Optimization components............................................... 132Configuring component parameters................................................................................ 132Restarting the Harmony Workforce Optimization components........................................... 133
Configuring voice multiplicity................................................................................................ 133Configuring Recorder parameters for voice multiplicity..................................................... 133Configuring Avaya adapter parameters for voice multiplicity.............................................. 134Configuring AES adapter parameters for voice multiplicity................................................ 134Configuring AACCNet adapter parameters for voice multiplicity......................................... 135
Configure trusted authentication........................................................................................... 135Trusted authentication support........................................................................................ 135Creating a Service Principal Name (SPN)........................................................................ 136Updating the Harmony Workforce Optimization component services.................................. 136Enabling Single Sign-On for Internet Explorer.................................................................. 137Enabling Single Sign-On for Google Chrome................................................................... 137Accessing the Harmony Workforce Optimization application............................................. 138Enabling logging for trusted authentication...................................................................... 138
Install and configure the Screen Capture and Desktop Monitor applications............................. 139Overview...................................................................................................................... 139Installing the Screen Capture application......................................................................... 139Installing Screen Capture and Desktop Monitor applications............................................. 140Screen Capture and Desktop Monitor field descriptions.................................................... 142Installing and configuring the Screen Capture application using MSI packager................... 142Verifying the Screen Capture application logs.................................................................. 143Uploading the Screen Capture application logs................................................................ 144Verifying the agent login................................................................................................. 144Uninstalling the Screen Capture and Desktop Monitor applications.................................... 145Configuring Screen Capture parameters ......................................................................... 146Configure the Desktop Monitor application....................................................................... 148
Install the Screen Capture application on a terminal service server.......................................... 151Installing the Screen Capture application using the command line method......................... 151Uninstalling the Screen Capture application using the command line method..................... 152
Contents
November 2017 Deploying Harmony Workforce Optimization with Avaya Aura® CommunicationManager and Avaya Aura® Contact Center 8Comments on this document? [email protected]
Installing the Screen Capture application using the GUI method........................................ 152Uninstalling the Screen Capture application using the GUI method.................................... 153
Limitations.......................................................................................................................... 153Chapter 9: Administration.................................................................................................... 155
Administration checklist....................................................................................................... 155Setting passwords for services.msc components................................................................... 156Starting the Harmony Workforce Optimization web application ............................................... 156Maintenance....................................................................................................................... 157
Backup and restore....................................................................................................... 157Taking a backup of the server data.................................................................................. 157Restoring the data......................................................................................................... 158Taking a backup of the database files.............................................................................. 159Restoring the database files........................................................................................... 160Running the installer in maintenance mode..................................................................... 160Server maintenance activities......................................................................................... 161Database maintenance activities.................................................................................... 162Component maintenance activities.................................................................................. 163Infrastructure maintenance activities............................................................................... 163Server restart maintenance activities............................................................................... 165
Certificate management....................................................................................................... 166Replacing self-signed certificates with CA-signed SSL certificates..................................... 166
Chapter 10: Post installation verification........................................................................... 167System verification checklist................................................................................................. 167Starting the SysAdmin service.............................................................................................. 167Logging on to SysAdmin...................................................................................................... 168Starting the web application service...................................................................................... 168Logging on to Harmony Workforce Optimization .................................................................... 168Verifying Harmony Workforce Optimization service logs.......................................................... 169Component log verification................................................................................................... 170
Log Manager log messages........................................................................................... 170Media Manager log messages........................................................................................ 170Messaging log messages............................................................................................... 170Process Checklist log messages.................................................................................... 171Packet Sniffer log messages.......................................................................................... 171Recorder log messages................................................................................................. 172
Chapter 11: Post configuration verification....................................................................... 174Checklist............................................................................................................................. 174Avaya adapter log verification............................................................................................... 174AES adapter log verification................................................................................................. 175AACCNet adapter log verification.......................................................................................... 177Recorder log verification...................................................................................................... 177
Chapter 12: High Availability and Redundancy implementation...................................... 179Overview............................................................................................................................ 179
Contents
November 2017 Deploying Harmony Workforce Optimization with Avaya Aura® CommunicationManager and Avaya Aura® Contact Center 9Comments on this document? [email protected]
Configuring Database Redundancy....................................................................................... 181Creating the Windows 2012 cluster................................................................................. 181Installing and configuring the SQL Server 2016 basic availability group............................. 185
Configuring the web application Server Redundancy.............................................................. 188Creating the first instance of the web application.............................................................. 188Creating the second instance of the web application on the same server........................... 190Configuring the Apache load balancer............................................................................. 194Starting the Harmony Workforce Optimization components............................................... 195Configuring High Availability........................................................................................... 195
Configuring Recorder Redundancy....................................................................................... 197Overview...................................................................................................................... 197Configuring Recorder parameters for High Availability...................................................... 198Configuring Avaya adapter parameters for High Availability.............................................. 199Configuring Messaging parameters for High Availability.................................................... 200Configuring dynamic parameters for the recorder............................................................. 200
Configuring Screen Capture Redundancy.............................................................................. 203High Availability support for the Screen Capture application.............................................. 203Configuring High Availability for the Screen Capture application........................................ 204Starting the Screen Capture service................................................................................ 204
Geo-redundancy................................................................................................................. 205Geo-redundancy High Availability support....................................................................... 205Geo-redundancy High Availability in Harmony Workforce Optimization.............................. 205Geo-redundancy High Availability failover scenarios......................................................... 206Configuring Recorder parameters for geo-redundancy High Availability............................. 207Configuring AES adapter parameters for geo-redundancy High Availability........................ 208Configuring Avaya adapter parameters for geo-redundancy High Availability...................... 209Configuring dynamic parameters for the adapter.............................................................. 210
Chapter 13: Load balancing implementation..................................................................... 212Overview............................................................................................................................ 212Configuring load balancing parameters for Recorder.............................................................. 213Configuring dynamic parameters for the recorder................................................................... 214Dynamic recorder parameter configuration values for load balancing....................................... 214Configuring load balancing parameters for Avaya adapter...................................................... 217Configuring dynamic parameters for Avaya adapter .............................................................. 218
Chapter 14: Troubleshooting............................................................................................... 220SysAdmin login page displays the Invalid License key message.............................................. 220Emails are not delivered to recipients.................................................................................... 220Interaction playback fails...................................................................................................... 221Failed to join the instance NODE2 to the availability group AG1.............................................. 223Interaction playback issues.................................................................................................. 223Unable to view components in SysAdmin when installing through maintenance mode............... 224Services disappear from Windows console when Harmony Workforce Optimization installer isrun and closed in maintenance mode.................................................................................... 224
Contents
November 2017 Deploying Harmony Workforce Optimization with Avaya Aura® CommunicationManager and Avaya Aura® Contact Center 10Comments on this document? [email protected]

Install or upgrade program fails............................................................................................ 225Chapter 15: Resources......................................................................................................... 226
Documentation.................................................................................................................... 226Viewing Avaya Mentor videos............................................................................................... 227Support.............................................................................................................................. 228
Appendix A: Avaya Proactive Outreach Manager deployment........................................ 229Integration overveiw............................................................................................................ 229Configuration information..................................................................................................... 231
Signaling information .................................................................................................... 231Avaya Proactive Outreach Manager configuration.................................................................. 232
Prerequisites for configuring Avaya Aura® Contact Center on Communication Managerwith Avaya Proactive Outreach Manager......................................................................... 232Enabling recorder integration.......................................................................................... 232Enabling UCID generation.............................................................................................. 232Configuring POM reports............................................................................................... 233
Parameter configuration for Avaya Proactive Outreach Manager deployments......................... 238Parameter configuration checklist .................................................................................. 238Configuring component parameters................................................................................ 240Performing bulk actions................................................................................................. 241
Dynamic parameter configuration for Avaya Proactive Outreach Manager deployments............ 246Dynamic parameter configuration checklist...................................................................... 246Configuring dynamic parameters for the recorder............................................................. 247Configuring dynamic parameters for the adapter.............................................................. 249Restarting the components............................................................................................. 252
Limitations.......................................................................................................................... 253Voice multiplicity configuration.............................................................................................. 254
Configuring Recorder parameters for voice multiplicity..................................................... 254Configuring Avaya adapter parameters for voice multiplicity.............................................. 255Configuring AES adapter parameters for voice multiplicity................................................ 255Configuring AACCNet adapter parameters for voice multiplicity......................................... 256Configuring POM adapter parameters for voice multiplicity............................................... 256
Post configuration verification............................................................................................... 257Checklist....................................................................................................................... 257Avaya adapter log verification......................................................................................... 257AES adapter log verification........................................................................................... 258POM adapter log verification.......................................................................................... 260AACCNet adapter log verification.................................................................................... 260Recorder log verification................................................................................................ 261
High Availability and Redundancy implementation.................................................................. 262Overview...................................................................................................................... 262Configuring Recorder parameters for High Availability...................................................... 263Configuring Avaya adapter parameters for High Availability.............................................. 264Configuring Messaging parameters for High Availability.................................................... 265
Contents
November 2017 Deploying Harmony Workforce Optimization with Avaya Aura® CommunicationManager and Avaya Aura® Contact Center 11Comments on this document? [email protected]

Configuring dynamic parameters for the recorder............................................................. 265Load balancing implementation............................................................................................ 268
Overview...................................................................................................................... 268Configuring load balancing parameters for Recorder........................................................ 270Configuring dynamic parameters for the recorder............................................................. 270Dynamic recorder parameter configuration values for load balancing................................. 271Configuring load balancing parameters for Avaya adapter................................................ 274Configuring load balancing parameters for POM adapter.................................................. 275Configuring dynamic parameters for Avaya adapter ........................................................ 276
Appendix B: Pparameter descriptions................................................................................ 277Component parameter descriptions...................................................................................... 277
Log Manager parameters............................................................................................... 277Process checklist parameters......................................................................................... 278Packet Sniffer parameters.............................................................................................. 279System Administration parameters.................................................................................. 281Analytics parameters..................................................................................................... 282Webapp parameters...................................................................................................... 283
Adapter parameter descriptions............................................................................................ 284Avaya adapter parameters............................................................................................. 284AES adapter parameters................................................................................................ 287AACCNet adapter parameters........................................................................................ 290POM adapter parameters............................................................................................... 295Media manager parameters........................................................................................... 298Messaging parameters.................................................................................................. 300Recorder parameters..................................................................................................... 302
Appendix C: IPaddress update process............................................................................. 309Overview............................................................................................................................ 309Updating database server IP address................................................................................... 309Running scripts on the hosted database................................................................................ 310Running scripts on the tenant database................................................................................. 311Updating web server IP address........................................................................................... 312Updating Apache server IP address...................................................................................... 312Generating certificates......................................................................................................... 316Updating IP address for components.................................................................................... 316
Parameter configuration for IP address update................................................................ 317Updating dynamic parameters for components...................................................................... 318
Dynamic parameter configuration for IP address update................................................... 319Updating IP address of the Screen Capture application.......................................................... 319Changing the host data IP address....................................................................................... 320Updating IP address for Harmony Workforce Optimization ..................................................... 321
Contents
November 2017 Deploying Harmony Workforce Optimization with Avaya Aura® CommunicationManager and Avaya Aura® Contact Center 12Comments on this document? [email protected]

Chapter 1: Introduction
PurposeThis document contains the checklist and procedures for the installation, configuration, initialadministration, and basic maintenance of . Harmony Workforce Optimization on Avaya Aura®
Contact Center on Avaya Aura® Communication Manager.
PrerequisitesBefore deploying Harmony Workforce Optimization, ensure that you have the followingknowledge, skills, and tools:
Knowledge• Spanning or Port Mirroring• Avaya Telephony Platforms such as Application Enablement Services and Communication
Manager• Automatic Call Distribution such as Avaya Aura® Contact Center• Dialers such as Avaya Proactive Contact with CTI and Avaya Proactive Outreach Manager.
Skills• How to execute SQL scripts and queries.• How to validate logs.• How to run switch commands for spanning or port mirroring.
Tools• Wireshark• Notepad ++• TSAPI client• MIB Browser
November 2017 Deploying Harmony Workforce Optimization with Avaya Aura® CommunicationManager and Avaya Aura® Contact Center 13Comments on this document? [email protected]
Chapter 2: Harmony WorkforceOptimization overview
Harmony Workforce Optimization is a web-based suite of tightly integrated tools, designed toenhance and improve all aspects of your contact center operations and performance. The solution iseasy to implement, maintain, and manage in a variety of contact center deployment models fromcentralized contact centers to distributed branches and work-at-home agents. Harmony WorkforceOptimization offers contact centers the ultimate workforce optimization functionality and flexibility.
It is a comprehensive solution that provides contact center staff and businesses with scalableapplications that synchronize and unify the entire workforce, regardless of VoIP architecture.
Harmony Workforce Optimization has sophisticated yet easy-to-use monitoring, recording, qualityassurance, reporting, and analytic features. It provides contact center management and agents alikewith all the tools necessary to effectively manage the entire agent life cycle process.
ComponentsName DescriptionLog Manager Collects and zips log data into a single zip file to debug issues and
fetches packet dumps from the Packet Sniffer component. You canconfigure the period for which you want to maintain the zipped files.
Media Manager Manages media files for conversion, encryption, storage, videogeneration, download, and compression. Media manager comprisesof the following components:
• Converter: Retrieves audio recordings that are in G.711, G722,and G.729 codec from storage and converts them to browsermedia player-friendly formats such as WAV/MP4/M4a. Theconversion is done based on the call codec or mixed codec callrecorded.
• Encryption Decryption (ED) Service: Encrypts and decryptsrecorded calls. Recorder sends a message to ED Service toencrypt and move the call to local storage. From the 256–bit keys,ED Service randomly selects one key and encrypts the call. Thepass phrases used for generating the keys are stored in an
Table continues…
November 2017 Deploying Harmony Workforce Optimization with Avaya Aura® CommunicationManager and Avaya Aura® Contact Center 14Comments on this document? [email protected]
Name Descriptionencrypted format in the database. ED Service zips the fwd, bwd,and inf files into one compressed file and screens into anothercompressed file. Then ED Service encrypts these compressedfiles.
• Storage Manager: Archives, copies, moves, compress, anddeletes calls and screens across physical locations. You candefine storage rules as per your requirements. For example, youcan specify retention periods, storage locations, clients, sites,groups, employees, ANI number, DNIS number, call duration, andcall hold duration.
• Video Generator: Processes requests to download calls withscreens in MP4 and M4a (only audio without screens) format. Thecomponent checks for requests in the database, processes thesame by mixing both audio and video files, and then saves themfor download in MP4 format.
• G729 Compressor: Retrieves G.711 and G.722 calls from storageand compresses them to G.729 format to reduce storage size.
• External Call Playback: Converts the external calls in the followingformats to PCM Wav file for call playback in Harmony WorkforceOptimization
- Wav-G711 u law stereo and mono
- Wav-G711 a law stereo and mono
- Wav-G726 mono and stereo
- Wav-G729 mono and stereo
- Mp4 h264 mono and stereo
- M4a AAC mono and stereoMessaging Acts like a proxy between the Recorder and Screen component.
The Recorder directly interacts with the Messaging componentwhich in turn checks for bandwidth availability and accordinglyprocesses screen requests.
Integrates with Customer Relationship Management (CRM)applications to receive different types of HTTP events. Thecomponent captures additional customer information such as CreditCard details and passes the information to the Recorder forprocessing.
Enables provisioning synchronization of agents and supervisors inHarmony Workforce Optimization.
Process Checklist Monitors all components and checks if the processes are running.Process Checklist sends appropriate alerts and restarts the servicesthat are not running.
Table continues…
Components
November 2017 Deploying Harmony Workforce Optimization with Avaya Aura® CommunicationManager and Avaya Aura® Contact Center 15Comments on this document? [email protected]
Name DescriptionPacket Sniffer Sniffs Network Interface Card (NIC) data and saves them as files for
debugging. Packet sniffer writes all the received packets into localfiles along with a timestamp. You can limit the storage consumed byspecifying the file size and the number of files before wrapping. Youcan also upload the sniffed packets to a central location.
Recorder Records interactions based on events received from RTP and CTIinformation and chat, email, and SMS based on events receivedfrom CTI information. The recorder uses adapters to receivesignaling and media from phones. The recorder receives AutomaticCall Distribution (ACD) information from other Harmony WorkforceOptimization components.
Web Application Provides an interface that allows users to monitor live interactions,playback recorded interactions, perform quality evaluations on agentinteractions, and supports quiz, coaching, and report functionalities.
SysAdmin Provides an interface to manage tenants, configure parametervalues for components and adapters, and monitor alerts.
Screen Capture Runs on Agent desktop and captures screens during an interaction.Screens are uploaded to the server and tagged to an interaction.
Adapters Connects to Avaya Automatic Call Distributors and Avaya PBXs toprovide voice streams, call signaling, dialer, agent information, chat,email, and SMS. Different adapters are used in the respectiveHarmony Workforce Optimization deployment configurations.
The Harmony Workforce Optimization Recorder receives data fromthe adapters and annotates the interaction entries in the databasealong with the metadata.
AdaptersAdapters connect to Automatic Call Distributors and PBXs to provide voice streams, call signaling,dialer, agent information, chat, email, and SMS.
DescriptionAvaya adapter Used to connect to Communication Manager through AES server using
the Device Media and Call Control (DMCC) interface to receive voicestreams and send voice streams to the Recorder.
AES adapter Used to
• Connect to Communication Manager through AES server usingTSAPI events to receive and send call signaling to the Recorder.
• Monitor skill or hunt groups in Avaya Aura® Contact Centerenvironment. When an agent logs in or logs out from a skill or huntgroup, AES adapter sends agent-extension association information to
Table continues…
Harmony Workforce Optimization overview
November 2017 Deploying Harmony Workforce Optimization with Avaya Aura® CommunicationManager and Avaya Aura® Contact Center 16Comments on this document? [email protected]
Descriptionthe Recorder. AES adapter starts monitoring call events for theextensions configured.
AACCNet adapter Used to connect to Avaya Aura® Contact Center and Avaya ContactCenter Select to receive and send agent information and business datato the Recorder.
POM adapter Used to send signaling or call events for outbound calls invoked byAvaya Proactive Outreach Manager to the Recorder.
Integrates with Avaya Proactive Outreach Manager through eventservices APIs to send dialer information, call signalling, and agentinformation to the Recorder.
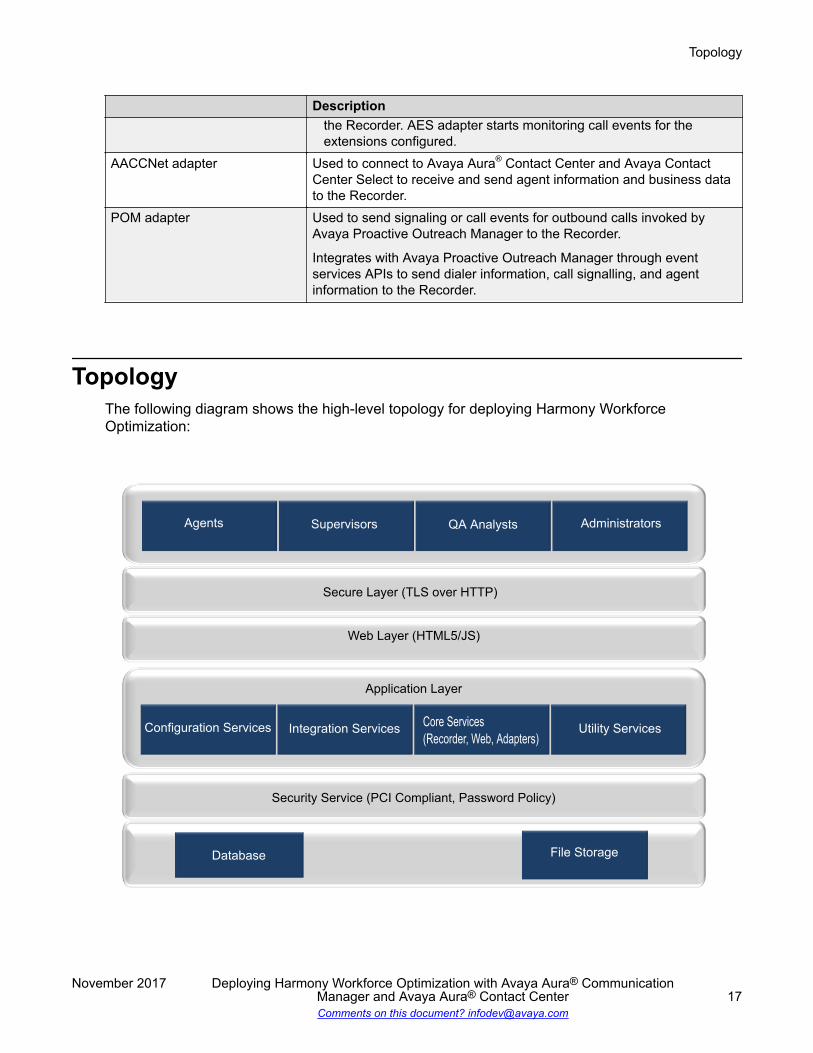
TopologyThe following diagram shows the high-level topology for deploying Harmony WorkforceOptimization:
PSTN
Agents Supervisors QA Analysts Administrators
Database File Storage
Configuration Services
Supervisors
Integration Services Core Services(Recorder, Web, Adapters)
Utility Services
Secure Layer (TLS over HTTP)
Web Layer (HTML5/JS)
Application Layer
Security Service (PCI Compliant, Password Policy)
Topology
November 2017 Deploying Harmony Workforce Optimization with Avaya Aura® CommunicationManager and Avaya Aura® Contact Center 17Comments on this document? [email protected]
Deployment configurationsHarmony Workforce Optimization supports the following deployment models:
• Single site, single server
• Single site, multiple servers
• Multiple sites, multiple servers
Harmony Workforce Optimization scales from single site environments to distributed multisiteenterprises. Harmony Workforce Optimization also supports multiple accounts across multiple siteconfiguration models where recorded interactions are stored at individual sites or a centralrepository.
Single Site, Single ServerIn a single site deployment model, all users are located within the same physical location. A typicalsingle site, single server deployment implements all the necessary components such as storage,database, application, and recording servers using one server. This deployment is cost-effectivefor organizations with limited hardware budgets.The single site, single server deployment contains a single server where all necessarycomponents are installed. Components for recording, monitoring, web application, database,storage, and reporting are all plugged into the network’s data switch. Voice traffic is captured in theserver through port spanning and switch configuration. You can capture interactions betweenagents and customers. If needed, you can also monitor agent-to-agent conversations by spanningeach individual agent phone to Harmony Workforce Optimization.
Single Site, Multiple ServersA single site, multiserver deployment can accommodate as many users as required by distributingthe server components across multiple physical servers. Typically, separate physical servers existfor the application, database, and recording components.In a single site, multiple servers deployment model, the Harmony Workforce Optimization server islinked to the data switch of the network through the Voice NIC configured on the server. Theswitch is configured to copy all voice traffic to the Harmony Workforce Optimization server throughthe use of port spanning.
Multiple Sites, Multiple ServersIn a multiple sites, multiple servers deployment model:
• Agents are spread across multiple geographical locations.• Multiple instances of recording, monitoring, and storage services are installed to scale to
handle larger number of agents.• Only one instance of the web application and database is installed.• All the services are split and deployed across multiple physical server spread across multiple
geographical locations.The number of agents that a multisite environment can handle depends on the underlying networkinfrastructure such as routers used and available bandwidth.
Harmony Workforce Optimization overview
November 2017 Deploying Harmony Workforce Optimization with Avaya Aura® CommunicationManager and Avaya Aura® Contact Center 18Comments on this document? [email protected]
Signaling eventsHarmony Workforce Optimization supports different Avaya environments for recordinginteractions. However, the primary requirement for any environment is to capture signaling events.You can successfully trace every interaction if you capture the following signaling events:
• Call signaling events for voice and nonvoice transactions
• Media stream events
• Automatic Call Distribution (ACD) signaling and external call variables to tag interaction toagents as per business rules
Call signaling for voiceCall signaling triggers the following events:
• Offhook event gets triggered when the phone goes off hook and a dial tone is heard.• Connected event gets triggered when the call is answered.• Hold event gets triggered when the agent puts the call on hold.• Resume event gets triggered when the agent resumes the on-hold call.• Onhook event gets triggered when the receiver is put down or when the call ends.• Transfer Info event gets triggered when the agent does a blind or consultation transfer to a
supervisor or another agent. The recorder receives the event from the adapter.• Conference Info event gets triggered when the agent starts a conference between a
customer and a supervisor or another agent. The recorder receives the event from theadapter.
• RTP Started Info event provides information about the IP address and ports of the local andremote phones to the recorder.
• Phone extension information is sent to the recorder by adapter to provide IP phone extensionmapping.
• Call information is sent to the recorder by adapter to provide called party, calling party, andcall direction.
• Voice stream information is sent to the recorder by adapter to provide media end pointinformation.
• SNMP events for getting IP address in SPAN based recording.
Call signaling for nonvoice transactionsCall signaling triggers the following events:
• Offhook, and Connected events gets triggered when the agent answers a chat or emailtransaction.
• Hold event gets triggered when the agent puts the transaction on hold.• Resume event gets triggered when the agent resumes the on-hold transaction.• Onhook event gets triggered when the agent closes the chat or email transaction.
Signaling events
November 2017 Deploying Harmony Workforce Optimization with Avaya Aura® CommunicationManager and Avaya Aura® Contact Center 19Comments on this document? [email protected]

• Transfer Info event gets triggered when the agent does a blind or consultation transfer to asupervisor or another agent. The recorder receives the event from the adapter.
• Conference Info event gets triggered when the agent starts a conference between acustomer and a supervisor or another agent. The recorder receives the event from theadapter.
• Call information is sent to the recorder by adapter to provide called party, calling party, andcall direction.
ACD signaling and external call variablesThe Harmony Workforce Optimization recorder needs the agent information and external callvariables to tag an interaction with the agent who is handling the interaction. The recorder tagseach interaction with the business data that the agent enters in the desktop tools for eachinteraction. Agent login, agent logout, ACD information or extended call info, and wrapup data arethe events that the recorder tags.
Passive recordingPassive recording is a recording method used for IP recording deployments to capture voicetransmission or RTP through a network spanning configuration also known as port mirroring. Thecall events and RTP stream are mirrored directly to the recording server. However, the networkswitch must support port mirroring capabilities. There are no additional PBX licenses required. IPrecording or passive recording cannot be used for analog or digital extension.Harmony Workforce Optimization recorder uses SPAN to get voice and adapter to get callsignaling and agent information.
Active recordingActive recording, also known as Conference Mode Recording, conferences the agent call to therecording server. The recording system captures voice transmission by integrating with specificPBX models. You might need to get additional PBX licenses. Active recording does not requireport mirroring and supports end points such as analog or digital.Harmony Workforce Optimization uses PBX to get voice streams and passes the voice streams tothe recorder for recording an interaction. Harmony Workforce Optimization uses adapter to getagent information and call signaling.Harmony Workforce Optimization allows call recording for Digital or Analog stations.
DMCC recording methodsSingle-step conferenceHarmony Workforce Optimization uses the AES Device Media Call Control (DMCC) service toregister a pool of standalone recording devices. The application uses the AES TSAPI service tomonitor the target extension for Established Call events. Whenever the extension joins a call, anEstablished Call event occurs that triggers the application to use the Single Step Conferencingmethod to add a recording device to the call. The application receives the call RTP media streamthrough the recording device and records the call.
Harmony Workforce Optimization overview
November 2017 Deploying Harmony Workforce Optimization with Avaya Aura® CommunicationManager and Avaya Aura® Contact Center 20Comments on this document? [email protected]
Multiple registrationHarmony Workforce Optimization uses the AES Device Media Call Control (DMCC) service toregister itself as a recording device at the target extension. When the target extension joins a call,the application automatically receives the call RTP media stream through the recording device andrecords the call. Information about the call is derived from the Established event that is generatedwhen the target extension joins the call.
Recording toneRecording tone is a feature that inserts a tone in the audio stream to indicate that a call is beingrecorded. Harmony Workforce Optimization supports the recording tone feature for Avaya Aura®
Contact Center on Communication Manager active recording deployments.
MultiplicityMultiplicity is defined as the ability of an agent to handle multiple concurrent contacts, improvingthe customer experience and enhancing agent productivity and efficiency. Harmony WorkforceOptimization supports multi-channel communication such as voice, chat, email, and SMS. Withmultiplicity, a single agent may have multiple data records describing the current agent status. Forexample, each contact being worked concurrently by the agent will have a record.
Harmony Workforce Optimization supports multiplicity for voice and nonvoice transactions forAvaya Aura® Contact Center on Communication Manager and Avaya Proactive Outreach Managerdeployments.
Note:
You can configure multiplicity in the Recording Settings page of the Administrator module ofthe Harmony Workforce Optimization application. For more information on how to configurerecording settings, see Administering Harmony Workforce Optimization Select.
Agent profiles overviewBased on the signaling event, the recorder tags an interaction with the agent ID or extension. Skillcalls are assigned to an agent ID, whereas extension or directory number (DN) calls are assignedto an extension. When an agent takes a call by logging into the phone, the call gets assigned tothe agent ID. If an agent takes calls on an extension or DN without logging into the phone, the callgets assigned to the extension.
If an agent profile is configured for 100% recording and if the extension or DN is configured for ondemand segment recording, then the agent profile takes priority. However, if the agent has not
Recording tone
November 2017 Deploying Harmony Workforce Optimization with Avaya Aura® CommunicationManager and Avaya Aura® Contact Center 21Comments on this document? [email protected]
logged in to the phone or if the agent profile is configured for fixed seating, then the extension orDN takes priority.
You can configure agent profiles for fixed seating and free seating in Harmony WorkforceOptimization.
Fixed SeatingIn a fixed seating environment, an agent is allocated an extension. The agent can log in to onlythat extension with the individual agent ID. To implement fixed seating in Harmony WorkforceOptimization, configure the Extension in the Recording Settings for an employee profile.
Free SeatingIn a free seating environment, an agent can log in to any extension by using the individual agentID. To implement free seating in Harmony Workforce Optimization, you must have two employeeprofiles and the Recording Settings must specify the following:
• The Agent ID in one employee profile• The Extension in the other employee profile
Harmony Workforce Optimization overview
November 2017 Deploying Harmony Workforce Optimization with Avaya Aura® CommunicationManager and Avaya Aura® Contact Center 22Comments on this document? [email protected]

Chapter 3: Avaya Aura® Contact Center andHarmony WorkforceOptimization integration
For the Harmony Workforce Optimization application to record incoming and outgoing calls, youmust configure Avaya Application Enablement Services (AES) and Avaya Aura® CommunicationManager using the following services:
• Telephony Services Application Programming Interface (TSAPI)
• Device and Media and Call Control Interface (DMCC)
The Harmony Workforce Optimization application monitors devices that are configured under theCTI user and receives call related events on all the devices from AES. The Harmony WorkforceOptimization VoIP Logger creates recording channels that emulate IP soft phones to receive audiostreams. The Harmony Workforce Optimization manages an SQL database with extensive calldetails. Using the Harmony Workforce Optimization web application, you can play back recordedcalls and track call details information for the configured stations. Before installing HarmonyWorkforce Optimization, ensure that the AES and Communication Manager are available to recordcalls.
Harmony Workforce Optimization supports integration with the following Avaya products:
Avaya Aura® Contact CenterHarmony Workforce Optimization integrates with Avaya Aura® Contact Center to offer acomprehensive suite of scalable solutions for dynamic contact center environments. AACCintegrates with to offer voice, email and web chat only.
Avaya Aura® Communication ManagerCommunication Manager is the open, highly-reliable and extensible IP Telephony foundation onwhich Avaya delivers Unified Communications solutions to large and small enterprises. The productdelivers rich voice and video capabilities and provides for a resilient, distributed network of gatewaysand analog, digital and IP-based communication devices. Communication Manager includesadvanced mobility features, built-in conference calling and contact center applications, and E911capabilities.
Avaya Proactive Outreach ManagerThe Harmony Workforce Optimization integration with Avaya Proactive Outreach Manager (POM)provides a solution for unified, outbound capability to communicate through channels of interactionlike traditional voice and video. POM is an application for interactive outbound Voice, SMS and E-
November 2017 Deploying Harmony Workforce Optimization with Avaya Aura® CommunicationManager and Avaya Aura® Contact Center 23Comments on this document? [email protected]
mail notifications. With POM, you can easily design and deploy campaigns that deliver the rightinformation and service over the right media from the right resource at the right time.
Note:The Harmony Workforce Optimization integration with POM does not support secure channel.
Call recording options
Active call recordingIn the integration of Avaya Aura® Contact Center and Communication Manager, active callrecording is designed for VoIP and TDM mixed environments. In active recording, the voice trafficis generated through DMCC Multiple Registration or Single Step Conference method. ApplicationEnablement Services (AES) provides signaling or call information when you integrate AES adapterwith AES through TSAPI API. With DMCC integration, DMCC service provides a single voicestream for both customer and agent voice conversations. The Harmony Workforce Optimizationrecording system accordingly records a call as a single voice conversation without speakerseparation.
Note:• DMCC Multiple Registration method supports H323 IP endpoints and DCP endpoints.
• DMCC Single Step Conference method supports all end points. For example, SIP, H323,and DCP.
You can deploy active call recording in a centralized manner.
In the integration of Avaya Aura® Contact Center and Communication Manager, the following isthe sequence of events for the active call recording:
1. The Avaya adapter sends the media stream from Avaya DMCC service to the recorder.
2. The AES adapter sends call signaling events and other call related business data fromAvaya TSAPI service to the recorder.
3. The AES adapter recorder communicates with the database to check for recordingbusiness rules and agent details.
4. After recording the call, the recorder stores the call details in the database and the audiofiles on the storage server.
5. The application server receives HTTP/Web requests and the application server, internallyretrieves the calls, and plays back the call.
Avaya Aura® Contact Center and Harmony Workforce Optimization integration
November 2017 Deploying Harmony Workforce Optimization with Avaya Aura® CommunicationManager and Avaya Aura® Contact Center 24Comments on this document? [email protected]

Passive call recordingIn the integration of Avaya Aura® Contact Center and Communication Manager, passive callrecording is designed for VoIP environments. In passive recording, the voice traffic is generatedthrough SPAN. Application Enablement Services (AES) provides signaling or call informationwhen you integrate AES adapter with AES through TSAPI API. The customer and agent voicestreams are separately made available to Harmony Workforce Optimization to achieve speakerseparation with spanning. Depending on the call flow, you can deploy passive call recording in acentralized or decentralized manner.
In the integration of Avaya Aura® Contact Center and Communication Manager, the following isthe sequence of events for the passive call recording:
1. The AES adapter starts monitoring extensions and relevant hunt groups and sends agentlogin events to the recorder.
2. The recorder captures the RTP and RTCP traffic through SPAN.
3. The AES adapter sends call events to all recorders.
4. The recorder starts recording when it receives the Call Start event from the AES adapter.
5. The recorder stops recording when it receives the Call End event. The recorder stores therecording in the Harmony Workforce Optimization database.
Integration overviewHarmony Workforce Optimization integration with Avaya Aura® Contact Center on Avaya Aura®
Communication Manager supports the following deployments:
• Avaya Aura® Contact Center on Avaya Aura® Communication Manager active recording
• Avaya Aura® Contact Center on Avaya Aura® Communication Manager passive recording
Integration overview
November 2017 Deploying Harmony Workforce Optimization with Avaya Aura® CommunicationManager and Avaya Aura® Contact Center 25Comments on this document? [email protected]

Agent and extension-based active recording
In active recording, the Harmony Workforce Optimization Recorder uses Avaya adapter to getvoice streams, AES adapter to get call signaling, and AACCNet adapter to get agent login andlogout information and business data. Additionally, AACCNet adapter is also used to getsignalling, agent login and logout information, and business data for nonvoice transactions. Thecall comes from the PSTN and lands on Avaya Aura® Communication Manager. The call is thenrouted to the available agent phone. Avaya Aura® Application Enablement Services receives thecall signaling information from Communication Manager and then sends it to the AES adapter.AES adapter then processes it and sends it to the Harmony Workforce Optimization Recorder.
Avaya Aura® Contact Center and Harmony Workforce Optimization integration
November 2017 Deploying Harmony Workforce Optimization with Avaya Aura® CommunicationManager and Avaya Aura® Contact Center 26Comments on this document? [email protected]

For active recording, you must:• Connect the recorder to an AES adapter, an Avaya adapter, and an AACCNet adapter.• Configure parameters to enable TSAPI signalling in AES adapter .• Configure parameters to enable device media and call control (DMCC) for single step
conference or multiple registrations in Avaya adapter.• Configure parameters to enable CCT signalling for agent information and business data in
AACCNet adapter for both voice and nonvoice transactions.
Agent and extension-based SPAN or passive recording
Integration overview
November 2017 Deploying Harmony Workforce Optimization with Avaya Aura® CommunicationManager and Avaya Aura® Contact Center 27Comments on this document? [email protected]
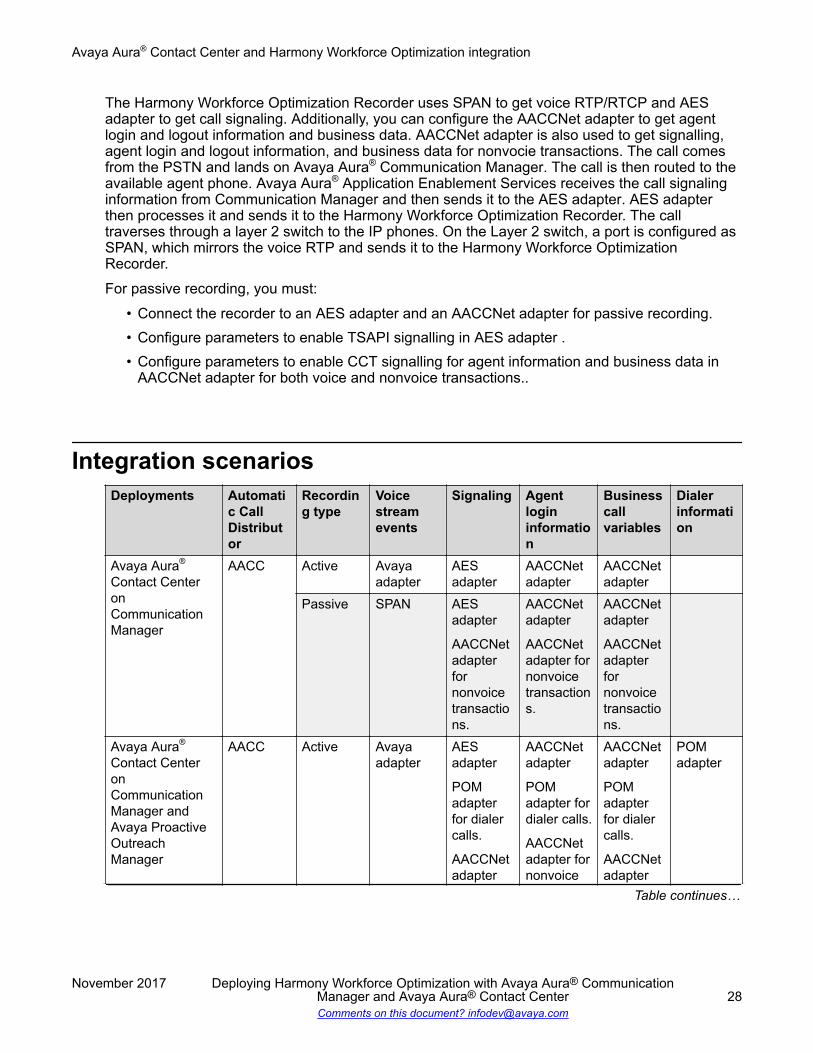
The Harmony Workforce Optimization Recorder uses SPAN to get voice RTP/RTCP and AESadapter to get call signaling. Additionally, you can configure the AACCNet adapter to get agentlogin and logout information and business data. AACCNet adapter is also used to get signalling,agent login and logout information, and business data for nonvocie transactions. The call comesfrom the PSTN and lands on Avaya Aura® Communication Manager. The call is then routed to theavailable agent phone. Avaya Aura® Application Enablement Services receives the call signalinginformation from Communication Manager and then sends it to the AES adapter. AES adapterthen processes it and sends it to the Harmony Workforce Optimization Recorder. The calltraverses through a layer 2 switch to the IP phones. On the Layer 2 switch, a port is configured asSPAN, which mirrors the voice RTP and sends it to the Harmony Workforce OptimizationRecorder.For passive recording, you must:
• Connect the recorder to an AES adapter and an AACCNet adapter for passive recording.• Configure parameters to enable TSAPI signalling in AES adapter .• Configure parameters to enable CCT signalling for agent information and business data in
AACCNet adapter for both voice and nonvoice transactions..
Integration scenariosDeployments Automati
c CallDistributor
Recording type
Voicestreamevents
Signaling Agentlogininformation
Businesscallvariables
Dialerinformation
Avaya Aura®
Contact CenteronCommunicationManager
AACC Active Avayaadapter
AESadapter
AACCNetadapter
AACCNetadapter
Passive SPAN AESadapter
AACCNetadapterfornonvoicetransactions.
AACCNetadapter
AACCNetadapter fornonvoicetransactions.
AACCNetadapter
AACCNetadapterfornonvoicetransactions.
Avaya Aura®
Contact CenteronCommunicationManager andAvaya ProactiveOutreachManager
AACC Active Avayaadapter
AESadapter
POMadapterfor dialercalls.
AACCNetadapter
AACCNetadapter
POMadapter fordialer calls.
AACCNetadapter fornonvoice
AACCNetadapter
POMadapterfor dialercalls.
AACCNetadapter
POMadapter
Table continues…
Avaya Aura® Contact Center and Harmony Workforce Optimization integration
November 2017 Deploying Harmony Workforce Optimization with Avaya Aura® CommunicationManager and Avaya Aura® Contact Center 28Comments on this document? [email protected]
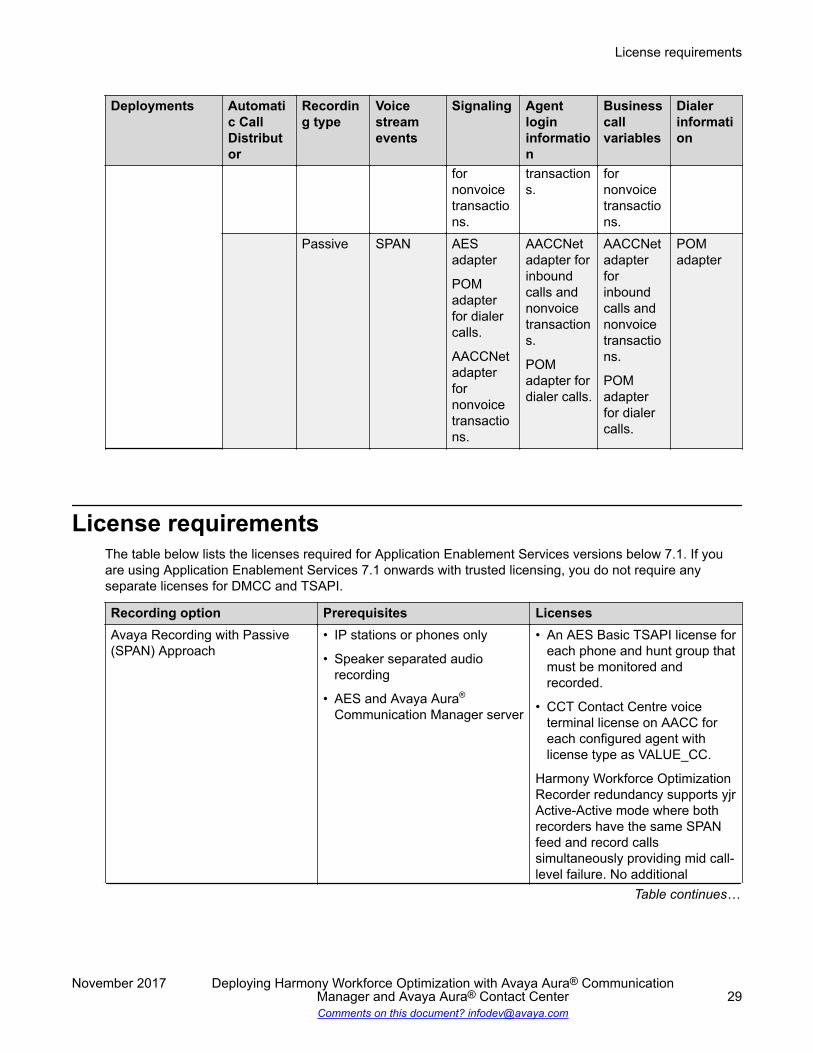
Deployments Automatic CallDistributor
Recording type
Voicestreamevents
Signaling Agentlogininformation
Businesscallvariables
Dialerinformation
fornonvoicetransactions.
transactions.
fornonvoicetransactions.
Passive SPAN AESadapter
POMadapterfor dialercalls.
AACCNetadapterfornonvoicetransactions.
AACCNetadapter forinboundcalls andnonvoicetransactions.
POMadapter fordialer calls.
AACCNetadapterforinboundcalls andnonvoicetransactions.
POMadapterfor dialercalls.
POMadapter
License requirementsThe table below lists the licenses required for Application Enablement Services versions below 7.1. If youare using Application Enablement Services 7.1 onwards with trusted licensing, you do not require anyseparate licenses for DMCC and TSAPI.
Recording option Prerequisites LicensesAvaya Recording with Passive(SPAN) Approach
• IP stations or phones only
• Speaker separated audiorecording
• AES and Avaya Aura®
Communication Manager server
• An AES Basic TSAPI license foreach phone and hunt group thatmust be monitored andrecorded.
• CCT Contact Centre voiceterminal license on AACC foreach configured agent withlicense type as VALUE_CC.
Harmony Workforce OptimizationRecorder redundancy supports yjrActive-Active mode where bothrecorders have the same SPANfeed and record callssimultaneously providing mid call-level failure. No additional
Table continues…
License requirements
November 2017 Deploying Harmony Workforce Optimization with Avaya Aura® CommunicationManager and Avaya Aura® Contact Center 29Comments on this document? [email protected]

Recording option Prerequisites Licenseslicenses are required for thisredundant setup.
Avaya Recording with Active(DMCC) Approach using Multiple-Registrations method
• IP H.323, DCP stations, andSIP phones
• No speaker separated audiorecording
• AES and Avaya Aura®
Communication Manager server
• An AES Basic TSAPI license foreach phone and hunt group thatmust be monitored andrecorded.
• IP Station license onCommunication Manager foreach phone with license type asVALUE_IP_STA.
• A DMCC Basic license for everyphone or station that must berecorded.
• CCT Contact Centre voiceterminal license on AACC foreach configured agent withlicense type as VALUE_CC.
• An additional Media Processor(Medpro) channel for everyconcurrent call or phone thatmust be recorded.
Harmony Workforce OptimizationRecorder redundancy supportsboth the Active-Active and theActive-Passive modes. Noadditional licenses or medprochannels are required for Active-Passive setup. For Active-Activemode, double the licenses andmedpro capacity is required.
Avaya Recording with Active(DMCC) Approach using SingleStep Conference method
• Any station/phone IP H.323, IPSIP, and DCP
• No speaker separated audiorecording
• AES and Avaya Aura®
Communication Manager server
• An AES Basic TSAPI license foreach phone and hunt group thatmust be monitored andrecorded.
• A DMCC full license for everyconcurrent call, agent, andstation that must be recorded.
• An additional AES Basic TSAPIlicense for each DMCCSoftphone Station required forSingle Step Conferencing.
• An additional Media Processor(Medpro) channel for everyconcurrent call or phone thatmust be recorded.
Table continues…
Avaya Aura® Contact Center and Harmony Workforce Optimization integration
November 2017 Deploying Harmony Workforce Optimization with Avaya Aura® CommunicationManager and Avaya Aura® Contact Center 30Comments on this document? [email protected]

Recording option Prerequisites Licenses• CCT Contact Centre voice
terminal license on AACC foreach configured agent withlicense type as VALUE_CC.
The Harmony WorkforceOptimization recorder redundancysupports both the Active-Activeand the Active-Passive modes.No additional licenses or medprochannels are required for Active-Passive setup. For Active-Activemode, double the licenses andmedpro capacity is required.
License typesLicense type DescriptionVALUE_STA A station license that a recording solution consumes
for single step conference or service observingmethods per recorder. The multiple registrationmethod does not require a station license.
VALUE_IP_STA An IP station license that a recording solutionconsumes for single step conference, serviceobserving, and multiple registration methods.
VALUE_DMCC_DMC A DMCC basic license from the AES WebLM serverused by those who have a large pool of existingunused VALUE_IP_STA and VALUE_STA licensesfrom which they can draw.
In all the forms of call recording, a DMCC device isused as a recording device. DMCC devices used torecord media must be registered. The act ofregistering a DMCC device consumes a DMCClicense.
VALUE_DMCC_DMC + VALUE_IP_STA +VALUE_STA
A DMCC full license.
VALUE_TSAPI_USERS A TSAPI basic user license.
Typically, the application monitors a target devicefor calls using DMCC, TSAPI or JTAPI. In all ofthese cases, a TSAPI device monitor consumes aTSAPI basic user license. Monitoring the target
Table continues…
License types
November 2017 Deploying Harmony Workforce Optimization with Avaya Aura® CommunicationManager and Avaya Aura® Contact Center 31Comments on this document? [email protected]
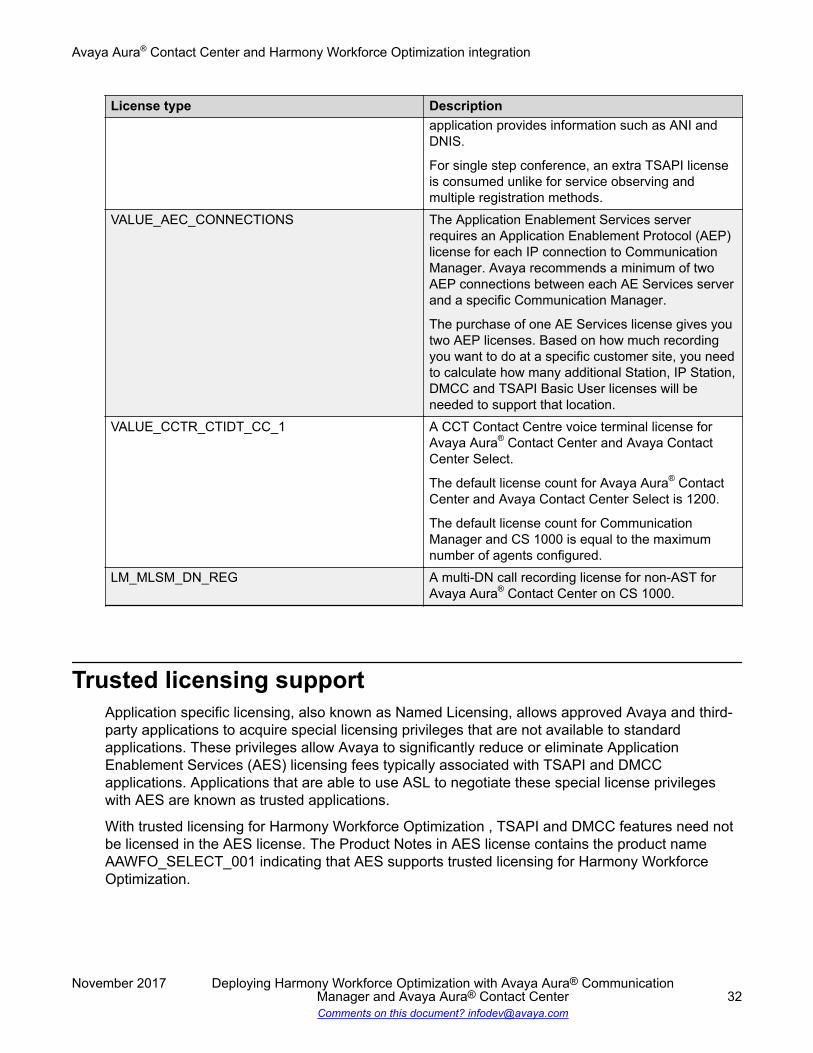
License type Descriptionapplication provides information such as ANI andDNIS.
For single step conference, an extra TSAPI licenseis consumed unlike for service observing andmultiple registration methods.
VALUE_AEC_CONNECTIONS The Application Enablement Services serverrequires an Application Enablement Protocol (AEP)license for each IP connection to CommunicationManager. Avaya recommends a minimum of twoAEP connections between each AE Services serverand a specific Communication Manager.
The purchase of one AE Services license gives youtwo AEP licenses. Based on how much recordingyou want to do at a specific customer site, you needto calculate how many additional Station, IP Station,DMCC and TSAPI Basic User licenses will beneeded to support that location.
VALUE_CCTR_CTIDT_CC_1 A CCT Contact Centre voice terminal license forAvaya Aura® Contact Center and Avaya ContactCenter Select.
The default license count for Avaya Aura® ContactCenter and Avaya Contact Center Select is 1200.
The default license count for CommunicationManager and CS 1000 is equal to the maximumnumber of agents configured.
LM_MLSM_DN_REG A multi-DN call recording license for non-AST forAvaya Aura® Contact Center on CS 1000.
Trusted licensing supportApplication specific licensing, also known as Named Licensing, allows approved Avaya and third-party applications to acquire special licensing privileges that are not available to standardapplications. These privileges allow Avaya to significantly reduce or eliminate ApplicationEnablement Services (AES) licensing fees typically associated with TSAPI and DMCCapplications. Applications that are able to use ASL to negotiate these special license privilegeswith AES are known as trusted applications.
With trusted licensing for Harmony Workforce Optimization , TSAPI and DMCC features need notbe licensed in the AES license. The Product Notes in AES license contains the product nameAAWFO_SELECT_001 indicating that AES supports trusted licensing for Harmony WorkforceOptimization.
Avaya Aura® Contact Center and Harmony Workforce Optimization integration
November 2017 Deploying Harmony Workforce Optimization with Avaya Aura® CommunicationManager and Avaya Aura® Contact Center 32Comments on this document? [email protected]
Note:
Secure communication is a must for application specific licensing to work.
To obtain trusted licensing support for Harmony Workforce Optimization, perform the followingtasks:
• Export third-party CA certificate from AES server.
• Configure trusted licensing secure connection for AES adapter.
• Configure parameters for trusted licensing in AES adapter.
• Import the CA certificate to Avaya adapter keystore.
• Configure parameters for trusted licensing in Avaya adapter.
Exporting a third-party CA certificate from the AES serverProcedure
1. Log in to AES server.
2. Click Security > Certificate Management > Server Certificates
The default identity certificate for the alias aeservices is displayed.
Note:
The Issued by column displays the CA name that has issued the certificate to AES.
3. Click Security > Certificate Management > CA Trusted Certificates.
4. Select the CA Trusted Certificate and click Export.5. On the Trusted Certificate Export page, copy the certificate details from BEGIN
CERTIFICATE to END CERTIFICATE.
6. Save the certificate as .cer file.
Configuring trusted licensing secure connection for AES adapterProcedure
1. On the server that hosts the Harmony Workforce Optimization application, go to C:\Program Files (x86)\Avaya\AE Services\TSAPI Client\TSLIB.INI .
2. Right-click the TSLIB.INI file, select Open with and click Notepad.
3. Update the Trusted CA File parameter with the path where the exported .cer file fromAES is saved.
4. Click Save to close the file.
Trusted licensing support
November 2017 Deploying Harmony Workforce Optimization with Avaya Aura® CommunicationManager and Avaya Aura® Contact Center 33Comments on this document? [email protected]
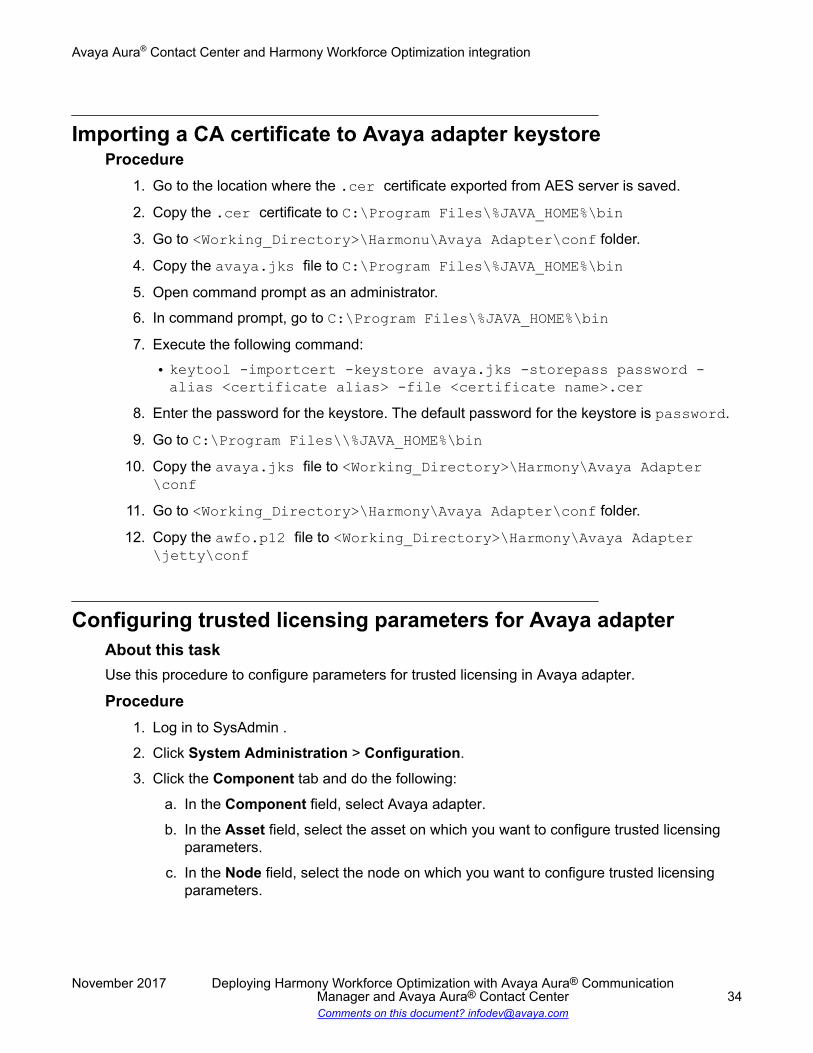
Importing a CA certificate to Avaya adapter keystoreProcedure
1. Go to the location where the .cer certificate exported from AES server is saved.
2. Copy the .cer certificate to C:\Program Files\%JAVA_HOME%\bin3. Go to <Working_Directory>\Harmonu\Avaya Adapter\conf folder.
4. Copy the avaya.jks file to C:\Program Files\%JAVA_HOME%\bin5. Open command prompt as an administrator.
6. In command prompt, go to C:\Program Files\%JAVA_HOME%\bin7. Execute the following command:
• keytool -importcert -keystore avaya.jks -storepass password -alias <certificate alias> -file <certificate name>.cer
8. Enter the password for the keystore. The default password for the keystore is password.
9. Go to C:\Program Files\\%JAVA_HOME%\bin10. Copy the avaya.jks file to <Working_Directory>\Harmony\Avaya Adapter
\conf11. Go to <Working_Directory>\Harmony\Avaya Adapter\conf folder.
12. Copy the awfo.p12 file to <Working_Directory>\Harmony\Avaya Adapter\jetty\conf
Configuring trusted licensing parameters for Avaya adapterAbout this taskUse this procedure to configure parameters for trusted licensing in Avaya adapter.
Procedure1. Log in to SysAdmin .
2. Click System Administration > Configuration.
3. Click the Component tab and do the following:
a. In the Component field, select Avaya adapter.
b. In the Asset field, select the asset on which you want to configure trusted licensingparameters.
c. In the Node field, select the node on which you want to configure trusted licensingparameters.
Avaya Aura® Contact Center and Harmony Workforce Optimization integration
November 2017 Deploying Harmony Workforce Optimization with Avaya Aura® CommunicationManager and Avaya Aura® Contact Center 34Comments on this document? [email protected]
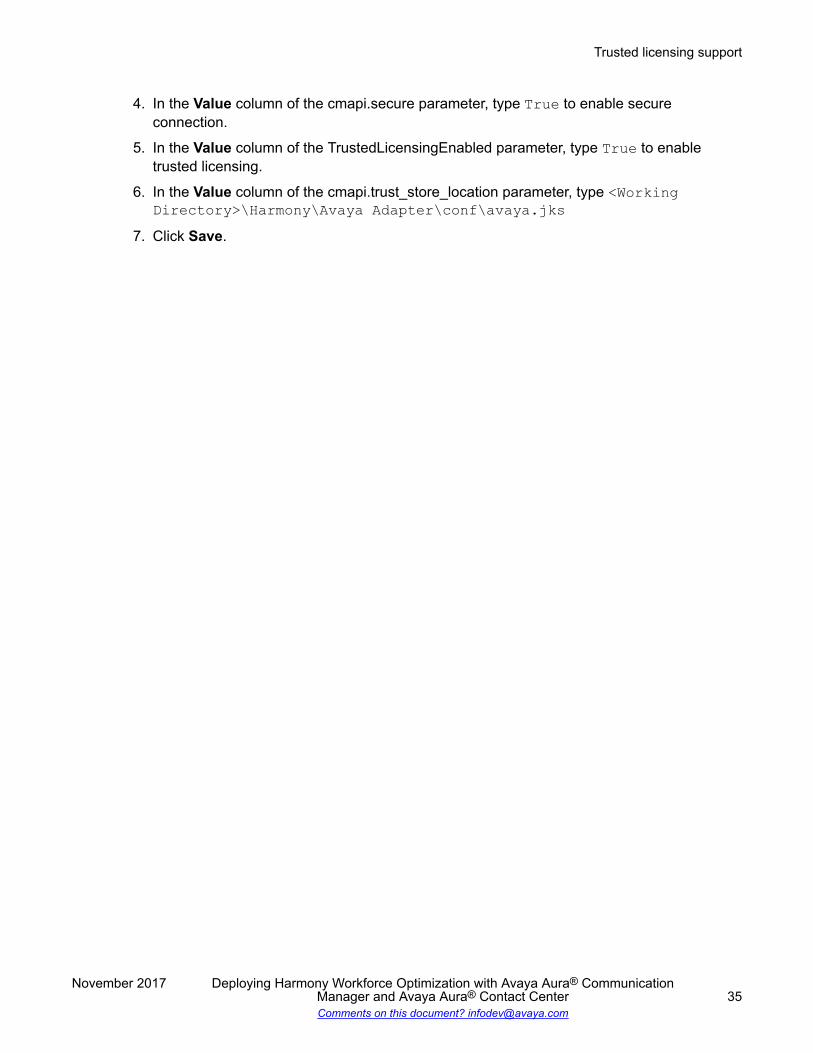
4. In the Value column of the cmapi.secure parameter, type True to enable secureconnection.
5. In the Value column of the TrustedLicensingEnabled parameter, type True to enabletrusted licensing.
6. In the Value column of the cmapi.trust_store_location parameter, type <WorkingDirectory>\Harmony\Avaya Adapter\conf\avaya.jks
7. Click Save.
Trusted licensing support
November 2017 Deploying Harmony Workforce Optimization with Avaya Aura® CommunicationManager and Avaya Aura® Contact Center 35Comments on this document? [email protected]

Chapter 4: Avaya Aura® Contact Centerconfiguration
Configuration checklistNo. Task Description Notes
1 Configure ApplicationEnablement Services .
• Login to the AESserver.
• Verify TSAPI andDMCC services.
• Verify the status ofswitch connection.
• Add a CTI user.
• Add Devices.
• Add Hunt GroupExtensions to DevicesList.
• Add Device Group.
• Add Device and HuntGroup Extensions toDevice Group.
• Add Device Group tothe CTI user.
• Perform the TSAPITest.
• Configure PE andCLAN IP address.
• Delete gatewayconfiguration.
See:
• Logging in to the ApplicationEnablement Services server onpage 38
• Verifying TSAPI and DMCCservices on page 39
• Verifying the status of switchconnection on page 39
• Adding a CTI user on page 39
• Adding devices on page 40
• Adding a device group onpage 41
• Adding devices and hunt groupextensions to a devicegroup on page 41
• Adding a device group to a CTIuser on page 41
• Performing the TSAPI test onpage 42
• Configuring the ProcessorEthernet or CLAN IPaddress on page 43
• Deleting the gatekeeperconfiguration on page 43
Table continues…
November 2017 Deploying Harmony Workforce Optimization with Avaya Aura® CommunicationManager and Avaya Aura® Contact Center 36Comments on this document? [email protected]

No. Task Description Notes
2 Deploy ApplicationEnablement Services7.0.1 super patch 3(7.0.1.0.3.15-0) if youare using ApplicationEnablement Services7.0.1 version.
See Deploying Avaya Aura®
Application Enablement Servicesin Virtualized Environment on theAvaya Support site.
If you are usingApplication EnablementServices 7.1 version.,you need not deploy thesuper patch 3.
3 ConfigureCommunicationManager using thefollowing tasks:
• Install Avaya SiteAdministration.
• Log in to Avaya SiteAdministration.
• Verify the CTI link andenhancedconferencingconfiguration.
• Add the CTI link.
• Administer systemparameters.
• Configure UCID forSIP trunks.
• Disable AAPC or IQ.
• Enable passing ofUCID for conferenceor transfer.
• Administer class ofrestriction (COR).
• Administer agentstations.
• Verify the codec set.
• Configure IP networkregions.
• Administer virtual IPsoft phones.
See:
• Installing Avaya SiteAdministration on page 43
• Logging in to Avaya SiteAdministration on page 44
• Verifying the CTI link andenhanced conferencingconfiguration on page 45
• Adding a CTI link on page 45
• Administering systemparameters on page 45
• Configuring UCID for SIPtrunks on page 46
• Disabling AAPC or IQ onpage 47
• Enabling passing of UCID forconference or transfer onpage 47
• Administering a class ofrestriction on page 48
• Administering agentstations on page 48
• Verifying a codec set onpage 48
• Configuring IP networkregions on page 49
• Administering virtual IP softphones on page 49
4 Deploy CommunicationManager 7.0.1 (patch00.0.441.0-23235) if you
See Deploying Avaya Aura®
Communication Manager on theAvaya Support site.
If you are usingCommunicationManager 7.1 version,
Table continues…
Configuration checklist
November 2017 Deploying Harmony Workforce Optimization with Avaya Aura® CommunicationManager and Avaya Aura® Contact Center 37Comments on this document? [email protected]
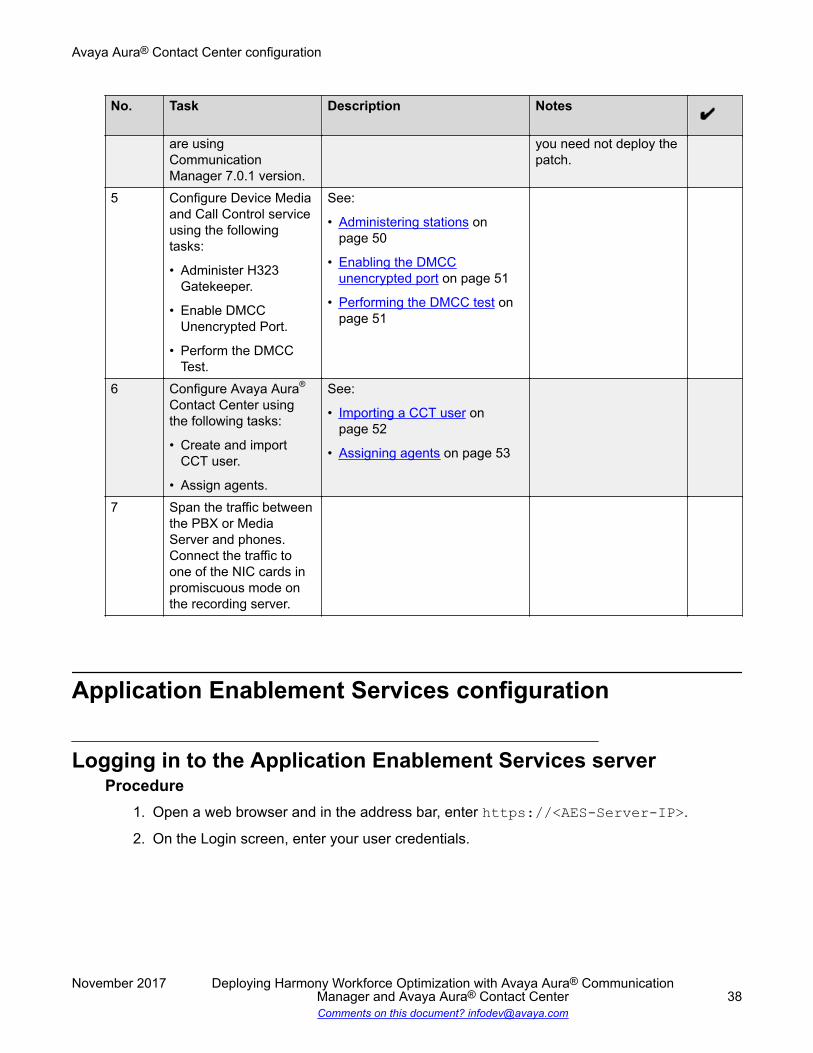
No. Task Description Notes
are usingCommunicationManager 7.0.1 version.
you need not deploy thepatch.
5 Configure Device Mediaand Call Control serviceusing the followingtasks:
• Administer H323Gatekeeper.
• Enable DMCCUnencrypted Port.
• Perform the DMCCTest.
See:
• Administering stations onpage 50
• Enabling the DMCCunencrypted port on page 51
• Performing the DMCC test onpage 51
6 Configure Avaya Aura®
Contact Center usingthe following tasks:
• Create and importCCT user.
• Assign agents.
See:
• Importing a CCT user onpage 52
• Assigning agents on page 53
7 Span the traffic betweenthe PBX or MediaServer and phones.Connect the traffic toone of the NIC cards inpromiscuous mode onthe recording server.
Application Enablement Services configuration
Logging in to the Application Enablement Services serverProcedure
1. Open a web browser and in the address bar, enter https://<AES-Server-IP>.
2. On the Login screen, enter your user credentials.
Avaya Aura® Contact Center configuration
November 2017 Deploying Harmony Workforce Optimization with Avaya Aura® CommunicationManager and Avaya Aura® Contact Center 38Comments on this document? [email protected]

Verifying TSAPI and DMCC servicesProcedure
1. Log in to the Application Enablement Services server.
2. Click Maintenance > Service Controller.
The system displays the Service Controller page.
3. Verify that the TSAPI Service is running.
4. (Optional) If you are using DMCC, verify that the DMCC Service is running.
Verifying the status of switch connectionProcedure
1. Log in to the Application Enablement Services server.
2. Click Status > Status and Control > Switch Conn Summary .
The system displays the Switch Conn Summary page.
3. Verify that the Conn State displays the status as Talking for CM.
4. Make a note of the Switch Connection name for later use while configuring DMCC.
Adding a CTI userProcedure
1. Log in to the Application Enablement Services server.
2. On the left panel, click User Management > Add User.3. On the Edit User page, enter the required information in the given fields.
4. To save the changes, click Apply.
5. Make a note of the CTI user name and Password for later use during the configuration.
Edit User field descriptionsName DescriptionUser Id The user ID provided to the user. This is a
mandatory field.
Table continues…
Application Enablement Services configuration
November 2017 Deploying Harmony Workforce Optimization with Avaya Aura® CommunicationManager and Avaya Aura® Contact Center 39Comments on this document? [email protected]

Name DescriptionCommon Name The name that the user prefers to use. This is a
mandatory field.Surname The surname of the user. This is a mandatory field.User Password The password assigned to the user. The password
must consists of minimum 8 characters thatincludes an upper case, a lower case character, anumeric digit, and a special character.
Confirm Password The option to re-enter the password.CT User The option to add a CT user.
Verifying the CTI userProcedure
1. Log in to the Application Enablement Services server.
2. On the left panel, click the CTI OAM Administration link.
3. Click Administration > Security database > CTI User > List All Users.
4. To view the list of all users, click List User.5. Verify that the CTI user that you created is available in the list.
6. (Optional) To monitor all devices configured in the devices list by using the CTI user,select the Unrestricted Access check box.
7. (Optional) To assign Device Group to the CTI user, clear the Unrestricted Access checkbox.
Adding devicesAbout this taskUse this procedure to add the stations you want to record calls from by assigning the stations tothe CTI user.
Procedure1. Log in to the Application Enablement Services server.
2. On the left panel, click the CTI OAM Administration link.
3. Click Security > Security database > Devices.
4. Enter the device station number in the text box next to the Add Device field.
5. Click Add Device.
Avaya Aura® Contact Center configuration
November 2017 Deploying Harmony Workforce Optimization with Avaya Aura® CommunicationManager and Avaya Aura® Contact Center 40Comments on this document? [email protected]
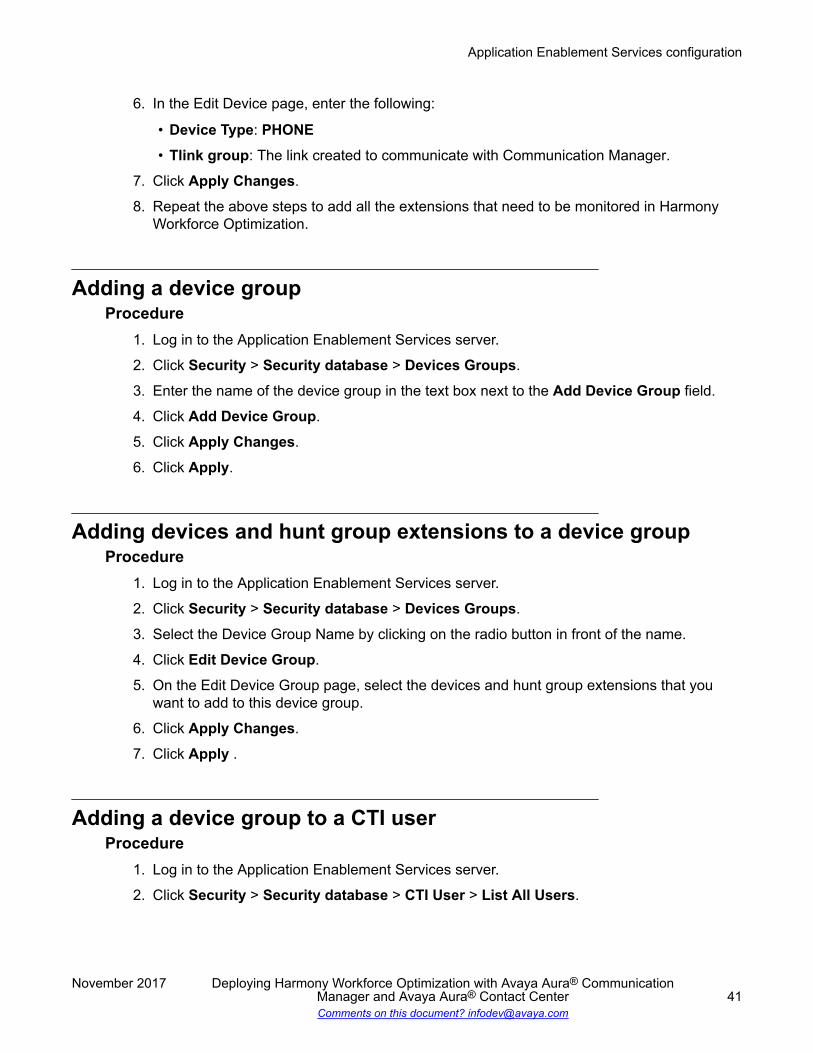
6. In the Edit Device page, enter the following:
• Device Type: PHONE• Tlink group: The link created to communicate with Communication Manager.
7. Click Apply Changes.
8. Repeat the above steps to add all the extensions that need to be monitored in HarmonyWorkforce Optimization.
Adding a device groupProcedure
1. Log in to the Application Enablement Services server.
2. Click Security > Security database > Devices Groups.
3. Enter the name of the device group in the text box next to the Add Device Group field.
4. Click Add Device Group.
5. Click Apply Changes.
6. Click Apply.
Adding devices and hunt group extensions to a device groupProcedure
1. Log in to the Application Enablement Services server.
2. Click Security > Security database > Devices Groups.
3. Select the Device Group Name by clicking on the radio button in front of the name.
4. Click Edit Device Group.
5. On the Edit Device Group page, select the devices and hunt group extensions that youwant to add to this device group.
6. Click Apply Changes.
7. Click Apply .
Adding a device group to a CTI userProcedure
1. Log in to the Application Enablement Services server.
2. Click Security > Security database > CTI User > List All Users.
Application Enablement Services configuration
November 2017 Deploying Harmony Workforce Optimization with Avaya Aura® CommunicationManager and Avaya Aura® Contact Center 41Comments on this document? [email protected]

3. Select the CTI user to which you want to assign the device group.
4. To open the Edit CTI User page, click Edit.5. To assign Device Group to the CTI user, ensure that the Unrestricted Access check box
remains clear.
When you select Unrestricted Access, all devices configured in the devices list getmonitored by the CTI user.
6. Select the required device groups.
7. Select the Call Monitoring check box.
8. Click Apply Changes.
Performing the TSAPI testProcedure
1. Log in to the Application Enablement Services server.
2. Click Utilities > Diagnostics > AE Service > TSAPI Test.3. Enter the required information.
4. Note down the TSAPI TLINK. You will need the link during post installation configuration.
5. To make the connection, click Dial.
The system displays a success message indicating completion of the configuration on theAvaya server.
TSAPI test field descriptionsName DescriptionTLink A Tlink. When a communication channel (switch
connection) is provisioned between AES server andCommunication Manager a Tlink is createddynamically by the TSAPI service running on AESserver.
User A valid user identifier (user ID in User Management;login ID in Linux) in the User field.
Password The password.From A device ID in the From field (call origin).To A device ID in the To field (call destination).
Avaya Aura® Contact Center configuration
November 2017 Deploying Harmony Workforce Optimization with Avaya Aura® CommunicationManager and Avaya Aura® Contact Center 42Comments on this document? [email protected]
Configuring the Processor Ethernet or CLAN IP addressProcedure
1. Log in to the Application Enablement Services server.
2. Click Configuration Manager Interface > Switch Connections.
3. On the right pane, click Connection Name > Edit PE/CLAN IPs.
4. On the Edit Processor Ethernet IP page, replace the hostname with IP address of theAvaya Aura® Communication Manager switch connection.
5. In the text box next to the Add/Edit Name or IP, enter the Communication Manager IPaddress.
6. Click Add/Edit Name or IP.
Deleting the gatekeeper configurationBefore you beginLog in to the Application Enablement Services server. After configuring the Processor Ethernet IPaddress, ensure you delete the gatekeeper configuration as it is no longer required.
Procedure1. Log in into the Application Enablement Services server.
2. Click Configuration Manager Interface > Switch Connections.
3. On the right pane, click Edit H.323 Gatekeeper.4. On the Edit H.323 Gatekeeper page, click Delete IP.
Avaya Aura® Communication Manager configuration
Installing Avaya Site AdministrationProcedure
1. Download the Avaya Site Administration software from http://support.avaya.com..
2. Click Support by Product > Downloads.
3. In the Enter Your Product Here section, type Avaya Site Administration.
4. In the Choose Release drop down list, click 6.0.x.
Avaya Aura® Communication Manager configuration
November 2017 Deploying Harmony Workforce Optimization with Avaya Aura® CommunicationManager and Avaya Aura® Contact Center 43Comments on this document? [email protected]
5. Click Avaya Site Administration 6.0 Service Pack 1, 6.0.x from the search results.
6. Run the Site_Admin_6_00_007_SP1.01.exe file.
7. Follow the steps in the Setup wizard to install Avaya Site Administration on the computer.
Logging in to Avaya Site AdministrationAbout this taskAvaya Site Administration supports a terminal emulation mode, which is directly equivalent tousing commands on a dumb terminal or through a Telnet session. Use this procedure to accessthe Communication Manager through a Telnet session.
Note:You can also access the Communication Manager through a putty session or through AvayaAura® System Manager.
Procedure1. To start Avaya Site Administration, click Start > Programs > Avaya Site Administration.2. Click File > New > Voice System.
The Add Voice System screen is displayed.
3. In the Voice System Name text box, type a unique name for voice system you want toadd.
4. Click Next.5. Select the Network Connection option and then click Next.6. In the FQDN or IP address text box, type the IP address of the server on which the
Communication Manager is installed.
7. Click Next till you navigate to the screen where you must provide credentials forauthentication.
8. For authentication, configure the following fields:
a. Login: Type the login user ID.
b. Password: Type the password.
c. Password (again): Type the password again to confirm.
9. Click Next and then click Test to test if the connection with Communication Manager isestablished.
10. Click Next and then click Finish.
Avaya Aura® Contact Center configuration
November 2017 Deploying Harmony Workforce Optimization with Avaya Aura® CommunicationManager and Avaya Aura® Contact Center 44Comments on this document? [email protected]

Verifying the CTI link and enhanced conferencing configurationProcedure
1. Click Start > Programs > Avaya Site Administration.
2. On the left pane, click General > Start GEDI.3. On the right pane, click display system-parameters customer-options from the
drop down list and then click send [return].4. Go to page 3 and verify that the Computer Telephony Adjunct Links option is set to y.
If this option is not set to y, then contact the Avaya sales team or business partner for aproper license file.
5. Go to page 4 and verify that the Enhanced Conferencing option is set to y.
Adding a CTI linkProcedure
1. Click Start > Programs > Avaya Site Administration.
2. On the left pane, click Advanced > Start Emulation.
3. On the right pane, click enter.4. Type the command add cti-link n where n is an available CTI link number and then
press Enter.5. Enter an available extension number in the Extension field.
The CTI link number and extension number can vary.
6. Enter ADJ-IP in the Type field, and a descriptive name in the Name field.
7. Use the default values in the remaining fields.
Administering system parametersProcedure
1. Click Start > Programs > Avaya Site Administration.
2. On the left pane, click General > Start GEDI.3. On the right pane, click display system-parameters features from the drop down
list and then click send [return].4. Go to page 5 and verify that the Create Universal Call ID (UCID) option is set to y.
5. In UCID Network Node ID, enter an available node ID.
Avaya Aura® Communication Manager configuration
November 2017 Deploying Harmony Workforce Optimization with Avaya Aura® CommunicationManager and Avaya Aura® Contact Center 45Comments on this document? [email protected]
6. Go to page 13 and ensure that the Send UCID to ASAI option is set to y.
The Send UCID to ASAI parameter sends the universal call ID to Harmony WorkforceOptimization.
Enabling disconnect supervision for incoming callsAbout this taskUse this procedure to enable disconnect supervision for incoming calls so that transfer calls do notget dropped when recording is enabled for Single Step Conference and Multiple Registrations.
Procedure1. Click Start > Programs > Avaya Site Administration.
2. In the navigation pane, click Advanced > Start Emulation.
3. Click enter.4. Type the command change trunk—group, enter the trunk group number, and then press
Enter.5. Go to page 1 and configure the following option:
Disconnect Supervision-In: Type y.
Configuring UCID for SIP trunksAbout this taskUse this procedure to configure SIP trunks between Communication Manager and SessionManager.
Procedure1. Click Start > Programs > Avaya Site Administration.
2. In the navigation pane, click Advanced > Start Emulation.
3. Click enter.4. Type the command change trunk—group and then press Enter.
5. Go to page 3 and configure the following options:
a. UUI Treatment: Type shared.
b. Send UCID?: Type y.
Avaya Aura® Contact Center configuration
November 2017 Deploying Harmony Workforce Optimization with Avaya Aura® CommunicationManager and Avaya Aura® Contact Center 46Comments on this document? [email protected]
Disabling AAPC or IQAbout this taskThe Avaya Communication Manager fails to pass the same UCID for conference and transfercalls, if AAPC or IQ is used for reporting Avaya Aura® Call Center Elite data in CommunicationManager. Use this procedure to disable AAPC or IQ in Communication Manager.
Procedure1. Click Start > Programs > Avaya Site Administration.
2. On the left pane, click Advanced > Start Emulation.
3. On the right pane, click enter.4. Type the command change system-parameters features command and then press
Enter.5. Click next page to go to page 12.
6. On Page 12, ensure the AAPC/IQ (appl ccr) : option is blank.
Enabling passing of UCID for conference or transferAbout this taskBy default, in case of conference or transfer, Communication Manager generates new UCID forthe new call legs and sends this new UCID as part of the call. This cause a problem with callstitching for Harmony Workforce Optimization recorded calls. Use this procedure to configureenable Communication Manager to pass the same UCID for conference and transfer.
Before you beginEnsure that you disable AAPC or IQ in Communication Manager.
Procedure1. Click Start > Programs > Avaya Site Administration.
2. On the left pane, click Advanced > Start Emulation.
3. On the right pane, click enter.4. Type the command change system-parameters special-applications
command and then press Enter.5. Click next page to go to page 5.
6. On Page 5, set the (SA8702) - CDR Enhancements for Network? option to y.
7. Repeat Step 1 to Step 3 to execute the command to copy UCID for station conference andtransfer.
Avaya Aura® Communication Manager configuration
November 2017 Deploying Harmony Workforce Optimization with Avaya Aura® CommunicationManager and Avaya Aura® Contact Center 47Comments on this document? [email protected]

8. Type the command change system-parameters features command and then pressEnter.
9. Click next page to go to page 5.
10. On Page 5, set the Copy UCID for Station Conference/Transfer? option to y.
Administering a class of restrictionProcedure
1. Click Start > Programs > Avaya Site Administration.
2. On the left pane, click Advanced > Start Emulation.
3. On the right pane, click enter.4. Type the command change cor n where n is class of restriction (COR) number assigned
to the target stations and virtual IP softphones and then press Enter.5. Set the Calling Party Restriction field to none.
Administering agent stationsProcedure
1. Click Start > Programs > Avaya Site Administration.
2. On the left pane, click Advanced > Start Emulation.
3. On the right pane, click enter.4. Type the command add change station n where n is the agent station number and
then press Enter.5. Verify that the COR field reflects the COR created while administering the class of
restrictions.
Verifying a codec setProcedure
1. Click Start > Programs > Avaya Site Administration.
2. On the left pane, click Advanced > Start Emulation.
3. On the right pane, click enter.4. Type the command change ip-codec-set n command where, n is the codec set for
the virtual IP softphones used for single step conferencing. and then press Enter.
Avaya Aura® Contact Center configuration
November 2017 Deploying Harmony Workforce Optimization with Avaya Aura® CommunicationManager and Avaya Aura® Contact Center 48Comments on this document? [email protected]
5. Verify that the system displays the following:
• Audio Codec: G.711MU, G.711A and G.729.
• Frames Per Pkt: 2
Avaya Contact Recorder uses G.729A recording format in a test configuration.
6. In the Media Encryption section, configure the following in the same order to enable SRTP:
• 1-srtp-aescm128-hmac80• aes• none
7. (Optional) If the codec set is already defined, verify and note the assigned codecs.
Configuring IP network regionsProcedure
1. Click Start > Programs > Avaya Site Administration.
2. On the left pane, click Advanced > Start Emulation.
3. On the right pane, click enter.4. Type the command change ip-network-region n where n is an available CTI link
number and then press Enter.5. Set the RTCP Sender to y.
Administering virtual IP soft phonesAbout this taskUse this procedure to administer virtual IP softphones, by selecting the class of restriction (COR)so that the DMCC station can conference calls that need to be recorded.
Procedure1. Click Start > Programs > Avaya Site Administration.
2. On the left pane, click Advanced > Start Emulation.
3. On the right pane, click enter.4. Type the command add station n command, where n is an available extension
number, and then press Enter.5. Configure the following fields:
a. In the Type field, type 4621.
b. In the Name field, type a descriptive name .
Avaya Aura® Communication Manager configuration
November 2017 Deploying Harmony Workforce Optimization with Avaya Aura® CommunicationManager and Avaya Aura® Contact Center 49Comments on this document? [email protected]

c. In the COR field, type the appropriate values that support single step conferencing..
d. In the IP SoftPhone? field, type y6. Click next page to go to page 4.
7. On Page 4, do the following in the Button Assignments section:
a. In Button 4, enter conf-dsp.
b. In Button 3, remove the default value.
Next stepsRepeat this procedure to administer all the virtual IP softphones by using sequential extensionnumbers and the same security code for the softphones.
Device Media and Call Control Services configuration
Administering stationsAbout this taskUse this procedure to make changes in multiple registrations and single step conferencing. Whilein multiple registrations the changes are made for extensions that are recorded, in single stepconferencing, the changes are made to the DMCC stations.
Procedure1. Click Start > Programs > Avaya Site Administration.
2. On the left pane, click Advanced > Start Emulation.
3. On the right pane, click enter.4. Type the command add change station n where n is the first agent extension number
and then press Enter.5. To allow a recording device to be registered for the station, set IP Soft Phone to y.
6. In the Security Code field, enter the required code.
All agents must use the same security code in the Harmony Workforce Optimizationenvironment.
Next stepsRepeat this procedure to administer all stations that must be recorded and monitored.
Avaya Aura® Contact Center configuration
November 2017 Deploying Harmony Workforce Optimization with Avaya Aura® CommunicationManager and Avaya Aura® Contact Center 50Comments on this document? [email protected]
Enabling the DMCC unencrypted portProcedure
1. Log in to the Application Enablement Services server.
2. On the left pane, click Networking > Ports .
The system displays the Ports page with the DMCC Server Ports section.
3. In the Enabled column, select the Unencrypted Port check box.
4. Note down the unencrypted port and encrypted port numbers to be used later in the DMCCconfiguration.
Performing the DMCC testAbout this taskUse this procedure to do a DMCC first party test on the DMCC stations, because the Avayaadapter in Harmony Workforce Optimization acts as a first party for DMCC stations used in singlestep conferencing. This procedure is also used to do a third party test on the extensions that mustbe recorded.
Procedure1. Log in to the Application Enablement Services server.
2. Click Utilities > Diagnostics > AES Service > DMCC Test.3. On the DMCC Test page, enter the required information for the first party call on the DMCC
stations.
4. Click Make First Party Call.
The First Party Call Test Result displays the results of the respective application names asPassed.
5. Go to the DMCC Test page again and enter the required information for the third party callon the DMCC stations.
6. Click Make Third Party Call.
The Third Party Call Test Result displays the results of the respective application names asPassed.
Device Media and Call Control Services configuration
November 2017 Deploying Harmony Workforce Optimization with Avaya Aura® CommunicationManager and Avaya Aura® Contact Center 51Comments on this document? [email protected]

DMCC test field descriptionsName DescriptionUser The user name to log into AE Services.User Password The user password to log into AE Services.TLS The TLS check box must be cleared for the test.Switch Name The appropriate switch to be selected.Switch IP (optional) The IP address of the switch (optional).Caller Extension The caller extension.Caller Extension Password The password for the caller extension.Callee Extension The callee extension.
Button DescriptionMake First Party Call Selected to make a first party call.
When you make a Make First Party Call, yourbrowser displays the First Party Call Test.
Make Third Party Call Selected to make a first tird party call.
When you make a Make Third Party Call, yourbrowser displays the Third Party Call Test.
Avaya Aura® Contact Center configuration
Importing a CCT userAbout this taskThe AACCNet adapter uses the credentials of a valid Windows user on the Avaya Aura® ContactCenter server or on the Avaya Contact Center Select server to receive events from the server.Use this procedure to import and configure the Windows user in the CCT console.
Procedure1. On the Avaya Aura® Contact Center server or on the Avaya Contact Center Select server,
click Start > All Programs > Avaya > Contact Center > Communication ControlToolkit > CCT console to open the CCT Admin Configuration tool.
The system displays the CCT Admin Configuration tool.
2. From the left navigation pane, select Communication Control Toolkit > BulkProvisioning Tools > Import Windows Users.
Avaya Aura® Contact Center configuration
November 2017 Deploying Harmony Workforce Optimization with Avaya Aura® CommunicationManager and Avaya Aura® Contact Center 52Comments on this document? [email protected]

3. To search for the user you want to import, click Search for Users on the right pane.
4. Select the user and click Add .
The system displays the username in the Selected Users section.
5. To import the selected Windows User as the CCT user, click Import Selected Users onthe right pane.
Assigning agentsAbout this taskUse this procedure to assign agents to the user who receives CCT events by using the WebAdmintool on the Avaya Aura® Contact Center server or on the Avaya Contact Center Select server.
Procedure1. On the Avaya Aura® Contact Center server or on the Avaya Contact Center Select server,
click Start > All Programs > Avaya > Contact Center > Communication ControlToolkit > CCT console to open the CCT Admin Configuration tool.
2. From the left pane, click Users .
The system displays the list of the CCT users including the imported user.
3. To open the Update CCT User page, double-click the imported user.
Make a note of the Domain and Username in the Login User Name section, because theAACCNet adapter uses both as credentials to connect.
4. To assign agents to the CCT user, click Agent Assignments.
5. Click the check boxes next to the users whom you want to assign to the CCT user.
6. To assign the users, click the right arrow.
7. Click Save.
SIP phones and SPAN configuration
Configuring a SIP userBefore you beginYou must be an existing SIP user.
Procedure1. Log in to Avaya Aura® System Manager and click User Management > Manage > Users.
SIP phones and SPAN configuration
November 2017 Deploying Harmony Workforce Optimization with Avaya Aura® CommunicationManager and Avaya Aura® Contact Center 53Comments on this document? [email protected]

The system displays a list of users.
2. Click the user that you want to configure, and click Edit.3. To open the CM station form, click the CM Endpoint profile check box.
4. Click Endpoint Editor.5. In the General Option section, click Avaya for the Type of 3PCC Enabled option.
6. In the Feature Option section, click the IP Softphone check box.
Enabling third-party controls on SIP phonesProcedure
1. Download the 46xx settings file from Avaya Support site.
2. Right-click the 46xx settings file, select Open with and click Notepad.
3. Update the value for the following parameter:
• ENABLE_OOD_MSG_TLS_ONLY: Update the value for this parameter to 0.
4. Click Save to close the file.
Configuring SNMP on Avaya OneX soft phonesProcedure
1. Log in to a web browser and type the following url: http ://<CommunicationManager server IP>.
The system displays the Avaya Aura® Communication Manager system managementinterface.
2. Click Administration > Server (Maintenance).
The system displays the Server Administration page.
3. On the left pane of the Server Administration page, click Agent Status.
4. Ensure that before making any changes in SNMP the Master Agent is in Down status.
5. Click Stop Master Agent to ensure that the Master Agent is in Down status.
6. On the left pane, click Access.
7. Click Add/Change and enter the following:
• IP address: Enter the IP address of the machines where the AES adapter is running.• Access: Click read-only.• Community Name: Enter the community name provided for the SNMP community. This
name must be same as the name configured for the SNMPCommunityString .parameterin AES adapter.
Avaya Aura® Contact Center configuration
November 2017 Deploying Harmony Workforce Optimization with Avaya Aura® CommunicationManager and Avaya Aura® Contact Center 54Comments on this document? [email protected]

8. Click Submit.9. On the left pane, click Access.
The system displays the Access page.
10. On the right pane, click Start Master Agent to ensure that the Master Agent status is UP.
Enabling the recording of agent-to-agent conversationAbout this taskWhen SPAN is configured at the core switch, agent to agent conversation might not show up inthe SPAN. Communication Manager supports shuffling of media streams thereby allowing IPphones to send media directly between each other bypassing the media gateway. Shuffling mustbe disabled to record internal calls between IP phones. Use this procedure to disable IP to IPdirect audio for individual IP phones or for a whole IP network region.
Procedure1. Login to Communication Manager through Avaya Site Administration.
2. Click Start > Programs > Avaya Site Administration.
3. On the left pane, click Advanced > Start Emulation.
4. On the right pane, click enter.5. To disable IP-IP Direct Audio for individual IP phones, type the command change
station xxxx where xxxx is the phone extension number and then press Enter.
6. Click next page to go to page 2.
7. On page 2, set the IP Audio Harpinning? option to y.
8. To disable IP-IP Direct Audio for an IP network region, type the command change ip—network region n where n is the existing network region used for the agent’s IPphones and softphones and then press Enter.
9. Click next page to go to page 2.
10. On page 2, set the Intra-region IP-IP Direct Audio option and the Inter-region IP-IPDirect Audip option to no.
11. Set the IP Audio Harpinning? option to y.
SIP phones and SPAN configuration
November 2017 Deploying Harmony Workforce Optimization with Avaya Aura® CommunicationManager and Avaya Aura® Contact Center 55Comments on this document? [email protected]
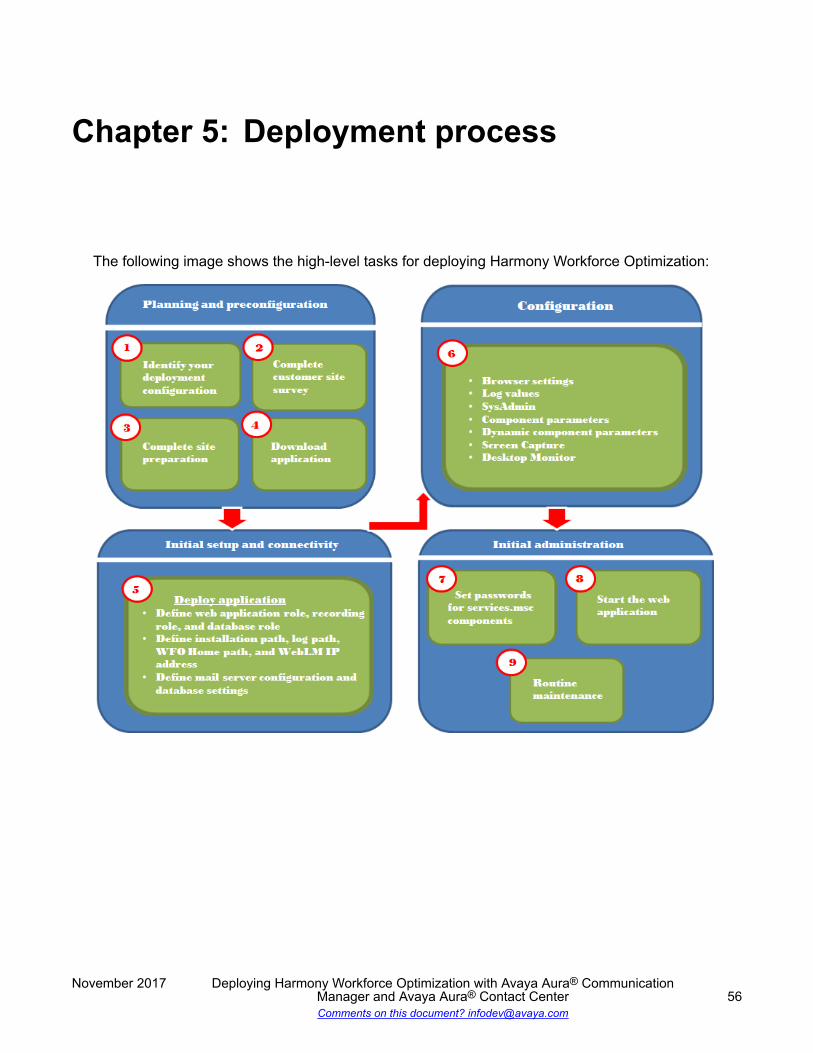
Chapter 5: Deployment process
The following image shows the high-level tasks for deploying Harmony Workforce Optimization:
November 2017 Deploying Harmony Workforce Optimization with Avaya Aura® CommunicationManager and Avaya Aura® Contact Center 56Comments on this document? [email protected]
Chapter 6: Planning and preconfiguration
Planning checklistNo. Task Reference Notes
1 Download the requireddocumentation.
See Documentation onpage 226.
2 Gather configuration information. See Harmony WorkforceOptimization installationinformation on page 59.
3 Plan for site preparation. See Preinstallationchecklist on page 71.
Configuration information
Signaling and Automatic Call Distribution informationTo maintain a record of the Harmony Workforce Optimization configuration information, take aprintout of the following table and work with your network administrator to fill the empty cells:
Signalling for AES/TSAPI on AES serverName Value DescriptionIP address The IP address of the server
where AES is installed.Port The port number of the server
where AES is installed. Thedefault port number 4721. This isrequired only for Device Mediaand Call Control (DMCC).
Secure Port The secure port number of theserver where AES is installed.The default port number is 4722.
Table continues…
November 2017 Deploying Harmony Workforce Optimization with Avaya Aura® CommunicationManager and Avaya Aura® Contact Center 57Comments on this document? [email protected]
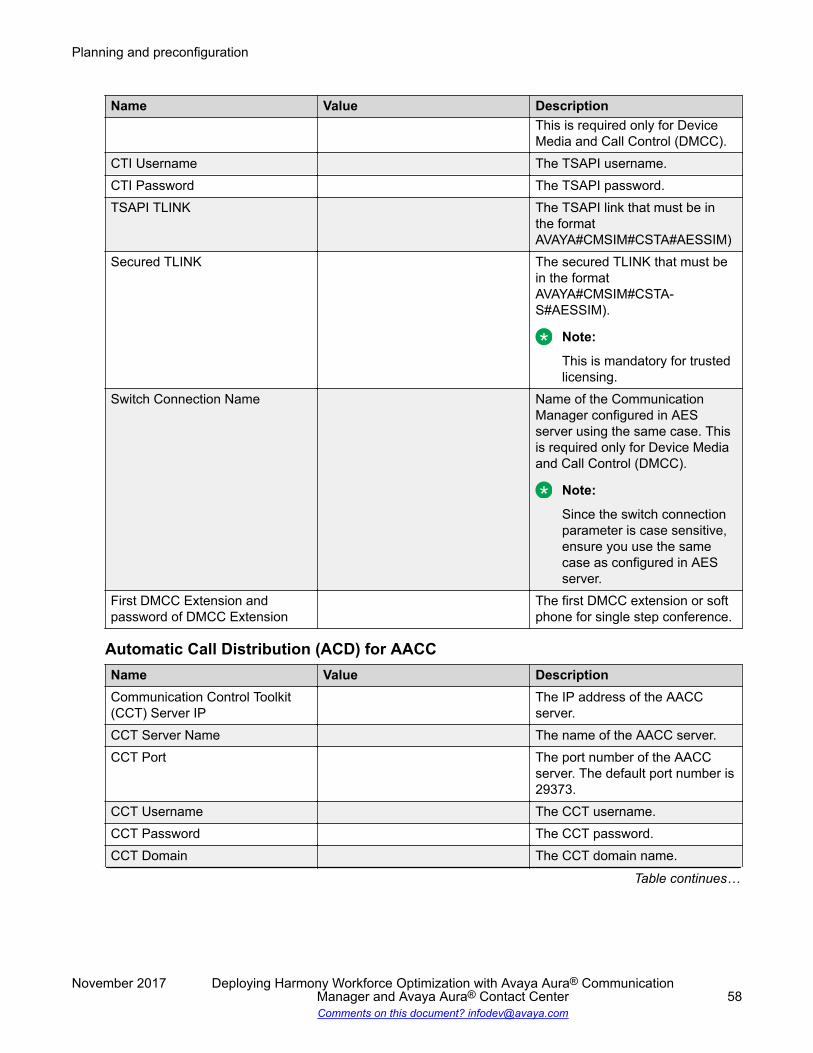
Name Value DescriptionThis is required only for DeviceMedia and Call Control (DMCC).
CTI Username The TSAPI username.CTI Password The TSAPI password.TSAPI TLINK The TSAPI link that must be in
the formatAVAYA#CMSIM#CSTA#AESSIM)
Secured TLINK The secured TLINK that must bein the formatAVAYA#CMSIM#CSTA-S#AESSIM).
Note:
This is mandatory for trustedlicensing.
Switch Connection Name Name of the CommunicationManager configured in AESserver using the same case. Thisis required only for Device Mediaand Call Control (DMCC).
Note:
Since the switch connectionparameter is case sensitive,ensure you use the samecase as configured in AESserver.
First DMCC Extension andpassword of DMCC Extension
The first DMCC extension or softphone for single step conference.
Automatic Call Distribution (ACD) for AACCName Value DescriptionCommunication Control Toolkit(CCT) Server IP
The IP address of the AACCserver.
CCT Server Name The name of the AACC server.CCT Port The port number of the AACC
server. The default port number is29373.
CCT Username The CCT username.CCT Password The CCT password.CCT Domain The CCT domain name.
Table continues…
Planning and preconfiguration
November 2017 Deploying Harmony Workforce Optimization with Avaya Aura® CommunicationManager and Avaya Aura® Contact Center 58Comments on this document? [email protected]
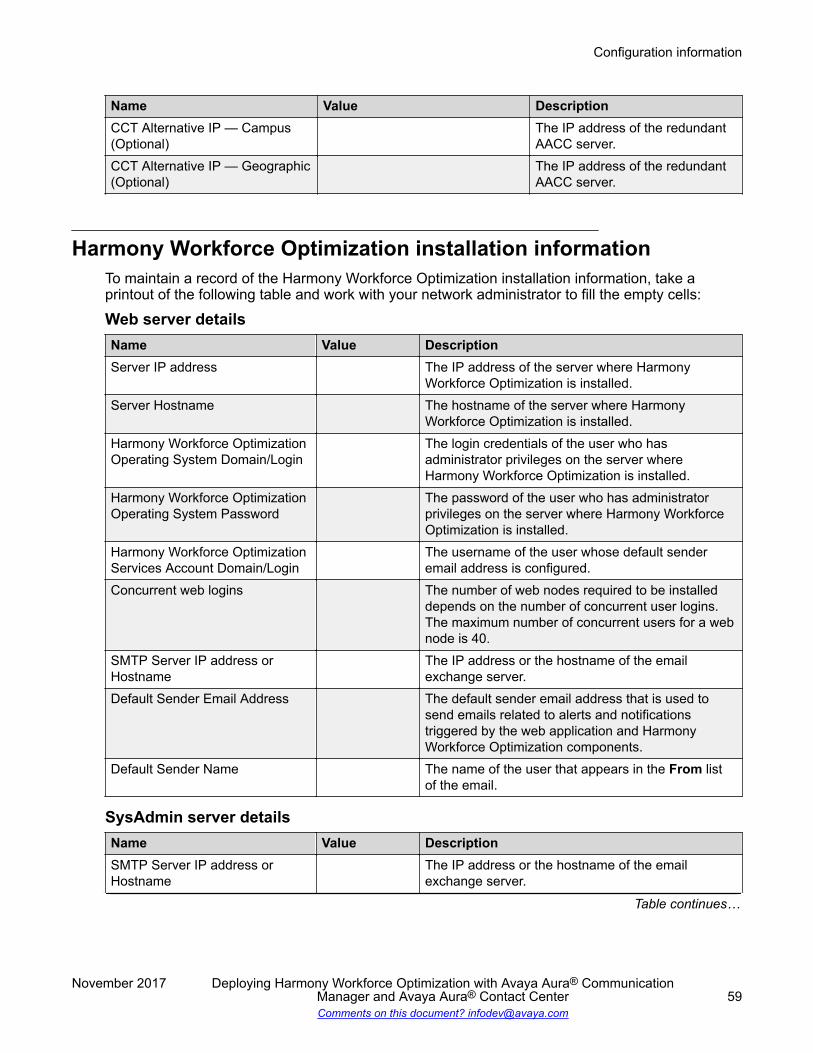
Name Value DescriptionCCT Alternative IP — Campus(Optional)
The IP address of the redundantAACC server.
CCT Alternative IP — Geographic(Optional)
The IP address of the redundantAACC server.
Harmony Workforce Optimization installation informationTo maintain a record of the Harmony Workforce Optimization installation information, take aprintout of the following table and work with your network administrator to fill the empty cells:
Web server detailsName Value DescriptionServer IP address The IP address of the server where Harmony
Workforce Optimization is installed.Server Hostname The hostname of the server where Harmony
Workforce Optimization is installed.Harmony Workforce OptimizationOperating System Domain/Login
The login credentials of the user who hasadministrator privileges on the server whereHarmony Workforce Optimization is installed.
Harmony Workforce OptimizationOperating System Password
The password of the user who has administratorprivileges on the server where Harmony WorkforceOptimization is installed.
Harmony Workforce OptimizationServices Account Domain/Login
The username of the user whose default senderemail address is configured.
Concurrent web logins The number of web nodes required to be installeddepends on the number of concurrent user logins.The maximum number of concurrent users for a webnode is 40.
SMTP Server IP address orHostname
The IP address or the hostname of the emailexchange server.
Default Sender Email Address The default sender email address that is used tosend emails related to alerts and notificationstriggered by the web application and HarmonyWorkforce Optimization components.
Default Sender Name The name of the user that appears in the From listof the email.
SysAdmin server detailsName Value DescriptionSMTP Server IP address orHostname
The IP address or the hostname of the emailexchange server.
Table continues…
Configuration information
November 2017 Deploying Harmony Workforce Optimization with Avaya Aura® CommunicationManager and Avaya Aura® Contact Center 59Comments on this document? [email protected]
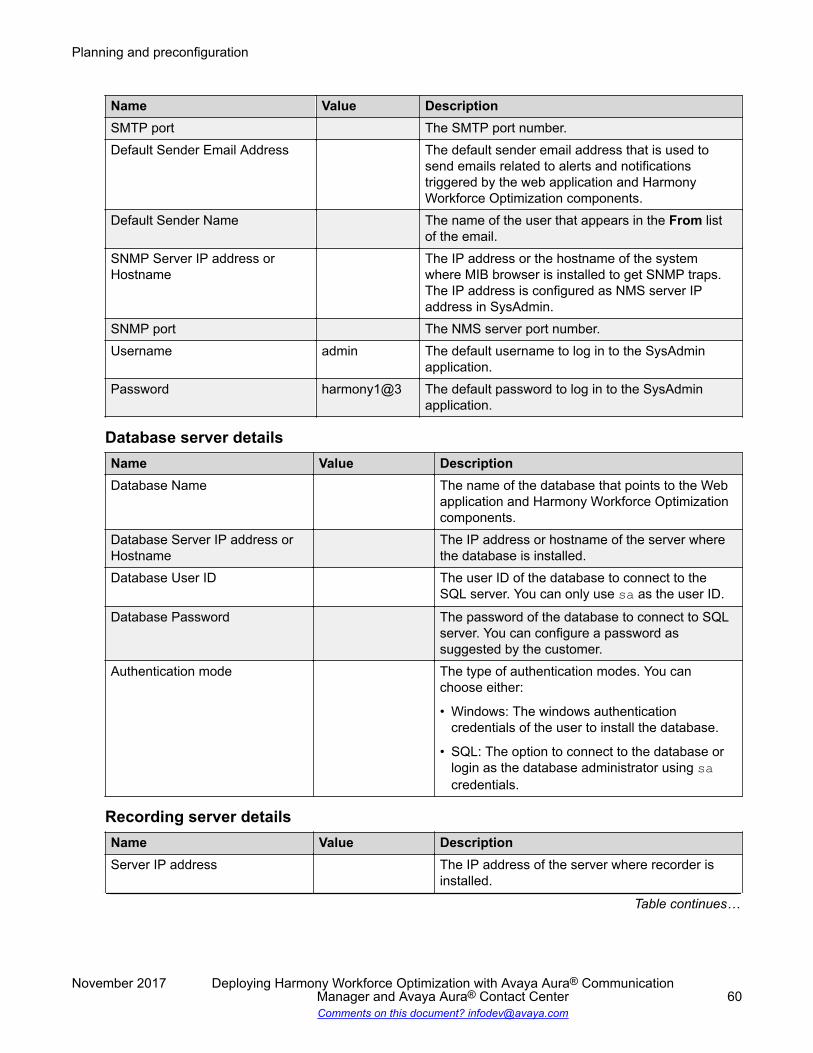
Name Value DescriptionSMTP port The SMTP port number.Default Sender Email Address The default sender email address that is used to
send emails related to alerts and notificationstriggered by the web application and HarmonyWorkforce Optimization components.
Default Sender Name The name of the user that appears in the From listof the email.
SNMP Server IP address orHostname
The IP address or the hostname of the systemwhere MIB browser is installed to get SNMP traps.The IP address is configured as NMS server IPaddress in SysAdmin.
SNMP port The NMS server port number.Username admin The default username to log in to the SysAdmin
application.Password harmony1@3 The default password to log in to the SysAdmin
application.
Database server detailsName Value DescriptionDatabase Name The name of the database that points to the Web
application and Harmony Workforce Optimizationcomponents.
Database Server IP address orHostname
The IP address or hostname of the server wherethe database is installed.
Database User ID The user ID of the database to connect to theSQL server. You can only use sa as the user ID.
Database Password The password of the database to connect to SQLserver. You can configure a password assuggested by the customer.
Authentication mode The type of authentication modes. You canchoose either:
• Windows: The windows authenticationcredentials of the user to install the database.
• SQL: The option to connect to the database orlogin as the database administrator using sacredentials.
Recording server detailsName Value DescriptionServer IP address The IP address of the server where recorder is
installed.
Table continues…
Planning and preconfiguration
November 2017 Deploying Harmony Workforce Optimization with Avaya Aura® CommunicationManager and Avaya Aura® Contact Center 60Comments on this document? [email protected]
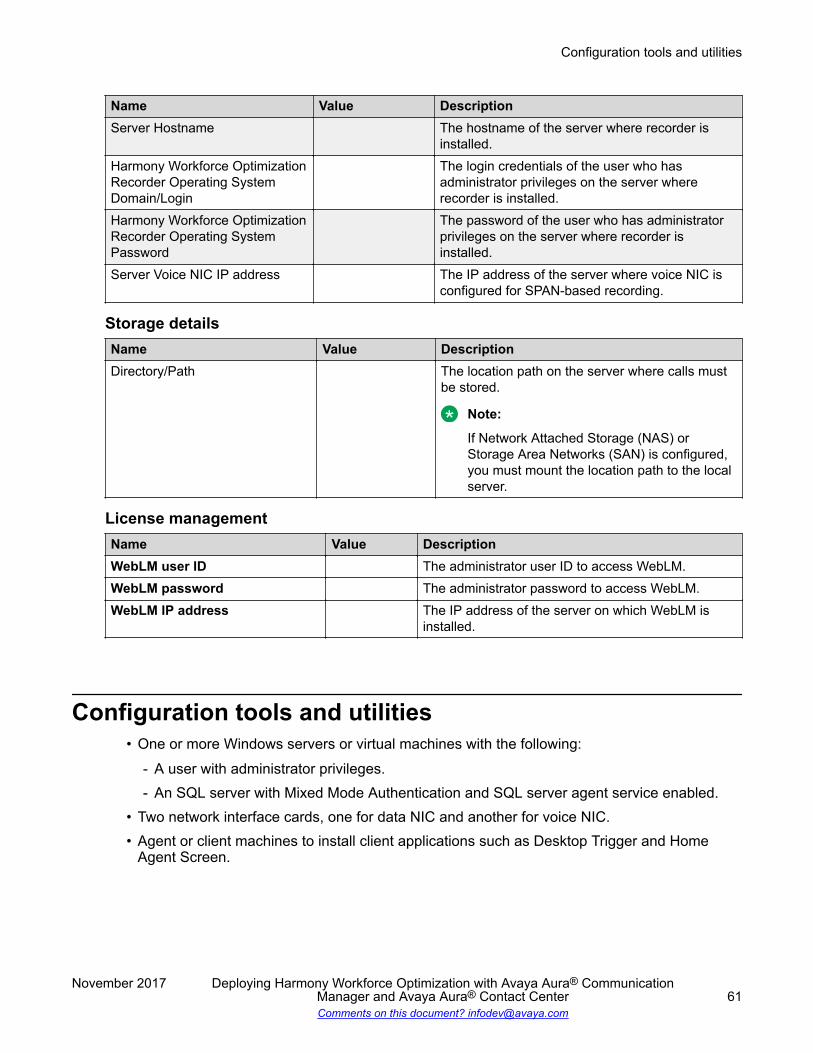
Name Value DescriptionServer Hostname The hostname of the server where recorder is
installed.Harmony Workforce OptimizationRecorder Operating SystemDomain/Login
The login credentials of the user who hasadministrator privileges on the server whererecorder is installed.
Harmony Workforce OptimizationRecorder Operating SystemPassword
The password of the user who has administratorprivileges on the server where recorder isinstalled.
Server Voice NIC IP address The IP address of the server where voice NIC isconfigured for SPAN-based recording.
Storage detailsName Value DescriptionDirectory/Path The location path on the server where calls must
be stored.
Note:
If Network Attached Storage (NAS) orStorage Area Networks (SAN) is configured,you must mount the location path to the localserver.
License managementName Value DescriptionWebLM user ID The administrator user ID to access WebLM.WebLM password The administrator password to access WebLM.WebLM IP address The IP address of the server on which WebLM is
installed.
Configuration tools and utilities• One or more Windows servers or virtual machines with the following:
- A user with administrator privileges.- An SQL server with Mixed Mode Authentication and SQL server agent service enabled.
• Two network interface cards, one for data NIC and another for voice NIC.• Agent or client machines to install client applications such as Desktop Trigger and Home
Agent Screen.
Configuration tools and utilities
November 2017 Deploying Harmony Workforce Optimization with Avaya Aura® CommunicationManager and Avaya Aura® Contact Center 61Comments on this document? [email protected]
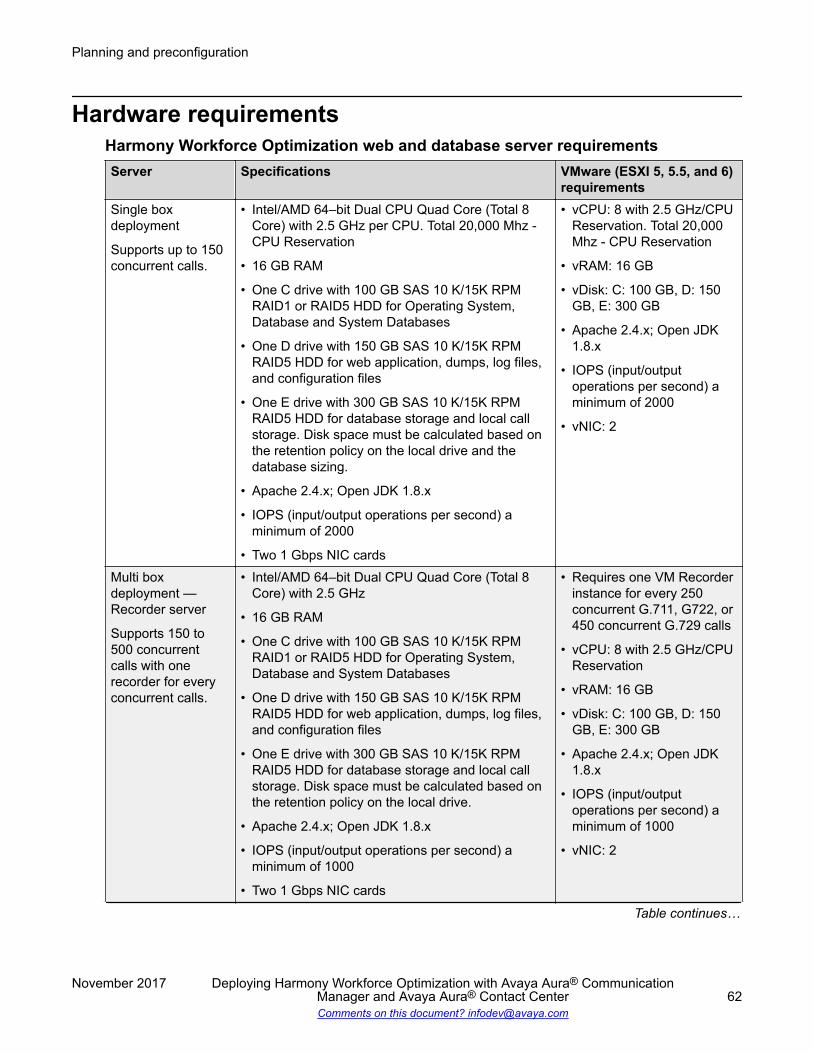
Hardware requirementsHarmony Workforce Optimization web and database server requirementsServer Specifications VMware (ESXI 5, 5.5, and 6)
requirementsSingle boxdeployment
Supports up to 150concurrent calls.
• Intel/AMD 64–bit Dual CPU Quad Core (Total 8Core) with 2.5 GHz per CPU. Total 20,000 Mhz -CPU Reservation
• 16 GB RAM
• One C drive with 100 GB SAS 10 K/15K RPMRAID1 or RAID5 HDD for Operating System,Database and System Databases
• One D drive with 150 GB SAS 10 K/15K RPMRAID5 HDD for web application, dumps, log files,and configuration files
• One E drive with 300 GB SAS 10 K/15K RPMRAID5 HDD for database storage and local callstorage. Disk space must be calculated based onthe retention policy on the local drive and thedatabase sizing.
• Apache 2.4.x; Open JDK 1.8.x
• IOPS (input/output operations per second) aminimum of 2000
• Two 1 Gbps NIC cards
• vCPU: 8 with 2.5 GHz/CPUReservation. Total 20,000Mhz - CPU Reservation
• vRAM: 16 GB
• vDisk: C: 100 GB, D: 150GB, E: 300 GB
• Apache 2.4.x; Open JDK1.8.x
• IOPS (input/outputoperations per second) aminimum of 2000
• vNIC: 2
Multi boxdeployment —Recorder server
Supports 150 to500 concurrentcalls with onerecorder for everyconcurrent calls.
• Intel/AMD 64–bit Dual CPU Quad Core (Total 8Core) with 2.5 GHz
• 16 GB RAM
• One C drive with 100 GB SAS 10 K/15K RPMRAID1 or RAID5 HDD for Operating System,Database and System Databases
• One D drive with 150 GB SAS 10 K/15K RPMRAID5 HDD for web application, dumps, log files,and configuration files
• One E drive with 300 GB SAS 10 K/15K RPMRAID5 HDD for database storage and local callstorage. Disk space must be calculated based onthe retention policy on the local drive.
• Apache 2.4.x; Open JDK 1.8.x
• IOPS (input/output operations per second) aminimum of 1000
• Two 1 Gbps NIC cards
• Requires one VM Recorderinstance for every 250concurrent G.711, G722, or450 concurrent G.729 calls
• vCPU: 8 with 2.5 GHz/CPUReservation
• vRAM: 16 GB
• vDisk: C: 100 GB, D: 150GB, E: 300 GB
• Apache 2.4.x; Open JDK1.8.x
• IOPS (input/outputoperations per second) aminimum of 1000
• vNIC: 2
Table continues…
Planning and preconfiguration
November 2017 Deploying Harmony Workforce Optimization with Avaya Aura® CommunicationManager and Avaya Aura® Contact Center 62Comments on this document? [email protected]
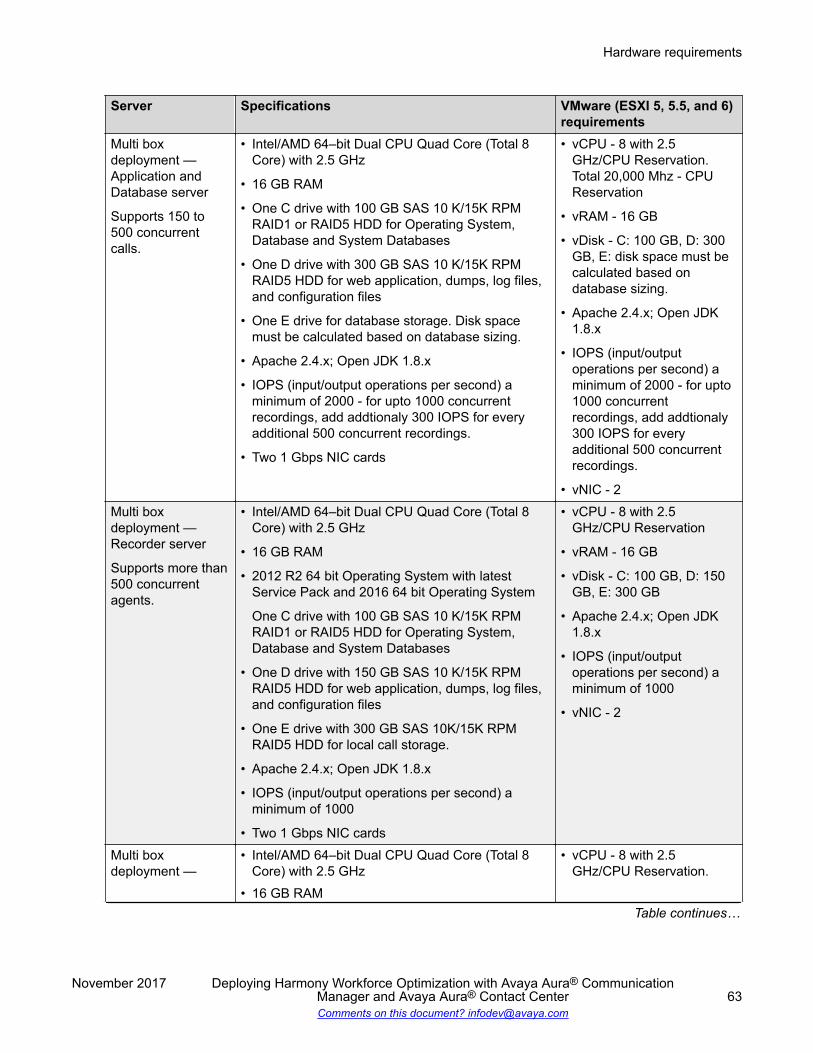
Server Specifications VMware (ESXI 5, 5.5, and 6)requirements
Multi boxdeployment —Application andDatabase server
Supports 150 to500 concurrentcalls.
• Intel/AMD 64–bit Dual CPU Quad Core (Total 8Core) with 2.5 GHz
• 16 GB RAM
• One C drive with 100 GB SAS 10 K/15K RPMRAID1 or RAID5 HDD for Operating System,Database and System Databases
• One D drive with 300 GB SAS 10 K/15K RPMRAID5 HDD for web application, dumps, log files,and configuration files
• One E drive for database storage. Disk spacemust be calculated based on database sizing.
• Apache 2.4.x; Open JDK 1.8.x
• IOPS (input/output operations per second) aminimum of 2000 - for upto 1000 concurrentrecordings, add addtionaly 300 IOPS for everyadditional 500 concurrent recordings.
• Two 1 Gbps NIC cards
• vCPU - 8 with 2.5GHz/CPU Reservation.Total 20,000 Mhz - CPUReservation
• vRAM - 16 GB
• vDisk - C: 100 GB, D: 300GB, E: disk space must becalculated based ondatabase sizing.
• Apache 2.4.x; Open JDK1.8.x
• IOPS (input/outputoperations per second) aminimum of 2000 - for upto1000 concurrentrecordings, add addtionaly300 IOPS for everyadditional 500 concurrentrecordings.
• vNIC - 2Multi boxdeployment —Recorder server
Supports more than500 concurrentagents.
• Intel/AMD 64–bit Dual CPU Quad Core (Total 8Core) with 2.5 GHz
• 16 GB RAM
• 2012 R2 64 bit Operating System with latestService Pack and 2016 64 bit Operating System
One C drive with 100 GB SAS 10 K/15K RPMRAID1 or RAID5 HDD for Operating System,Database and System Databases
• One D drive with 150 GB SAS 10 K/15K RPMRAID5 HDD for web application, dumps, log files,and configuration files
• One E drive with 300 GB SAS 10K/15K RPMRAID5 HDD for local call storage.
• Apache 2.4.x; Open JDK 1.8.x
• IOPS (input/output operations per second) aminimum of 1000
• Two 1 Gbps NIC cards
• vCPU - 8 with 2.5GHz/CPU Reservation
• vRAM - 16 GB
• vDisk - C: 100 GB, D: 150GB, E: 300 GB
• Apache 2.4.x; Open JDK1.8.x
• IOPS (input/outputoperations per second) aminimum of 1000
• vNIC - 2
Multi boxdeployment —
• Intel/AMD 64–bit Dual CPU Quad Core (Total 8Core) with 2.5 GHz
• 16 GB RAM
• vCPU - 8 with 2.5GHz/CPU Reservation.
Table continues…
Hardware requirements
November 2017 Deploying Harmony Workforce Optimization with Avaya Aura® CommunicationManager and Avaya Aura® Contact Center 63Comments on this document? [email protected]

Server Specifications VMware (ESXI 5, 5.5, and 6)requirements
Application andDatabase server
Supports more than500 concurrentagents.
• 2012 R2 64 bit Operating System with latestService Pack and 2016 64 bit Operating System
One C drive with 100 GB SAS 10 K/15K RPMRAID1 or RAID5 HDD for Operating System,Database and System Databases
• One D drive with 300 GB SAS 10 K/15K RPMRAID5 HDD for web application, dumps, log files,and configuration files
• Apache 2.4.x; Open JDK 1.8.x
• IOPS (input/output operations per second) aminimum of 1500 - for upto 1000 concurrentrecordings, add addtionaly 300 IOPS for everyadditional 500 concurrent recordings for databaseserver.
• IOPS (input/output operations per second) aminimum of 500 for web application server.
• Two 1 Gbps NIC cards
Total 20,000 Mhz - CPUReservation
• vRAM - 16 GB
• vDisk - C: 100 GB, D: 300GB, E: disk space must becalculated based ondatabase sizing.
• Apache 2.4.x; Open JDK1.8.x
• IOPS (input/outputoperations per second) aminimum of 1500 - for upto1000 concurrentrecordings, add addtionaly300 IOPS for everyadditional 500 concurrentrecordings for databaseserver.
• IOPS (input/outputoperations per second) aminimum of 500 for webapplication server.
• vNIC - 2
WFM database server specifications: Number ofagentssupported
Specifications Operating system and SQL serverspecifications and recommendations
Upto 400 • 4 core processor
• 8 GB memory
• 80 GB storage space required fordatabase after 3 years
• Windows server 2012 R2/2016 englishversion GUI mode
• All windows updates applied.• Fixed IP.• Fast storage, write stall <=5 ms and read
stall <=20 ms under sustained load.• Microsoft SQL server 2008 R2/2016
(including Analysis Services andWorkstation components) with latestupdates.
• All databases must be case insensitive.Collation
400 to 1500 • 4 core processor
• 16 GB memory
• 120 GB storage space required fordatabase after 3 years
1500 to 4000 • 6 core processor
• 32 GB memory
Table continues…
Planning and preconfiguration
November 2017 Deploying Harmony Workforce Optimization with Avaya Aura® CommunicationManager and Avaya Aura® Contact Center 64Comments on this document? [email protected]
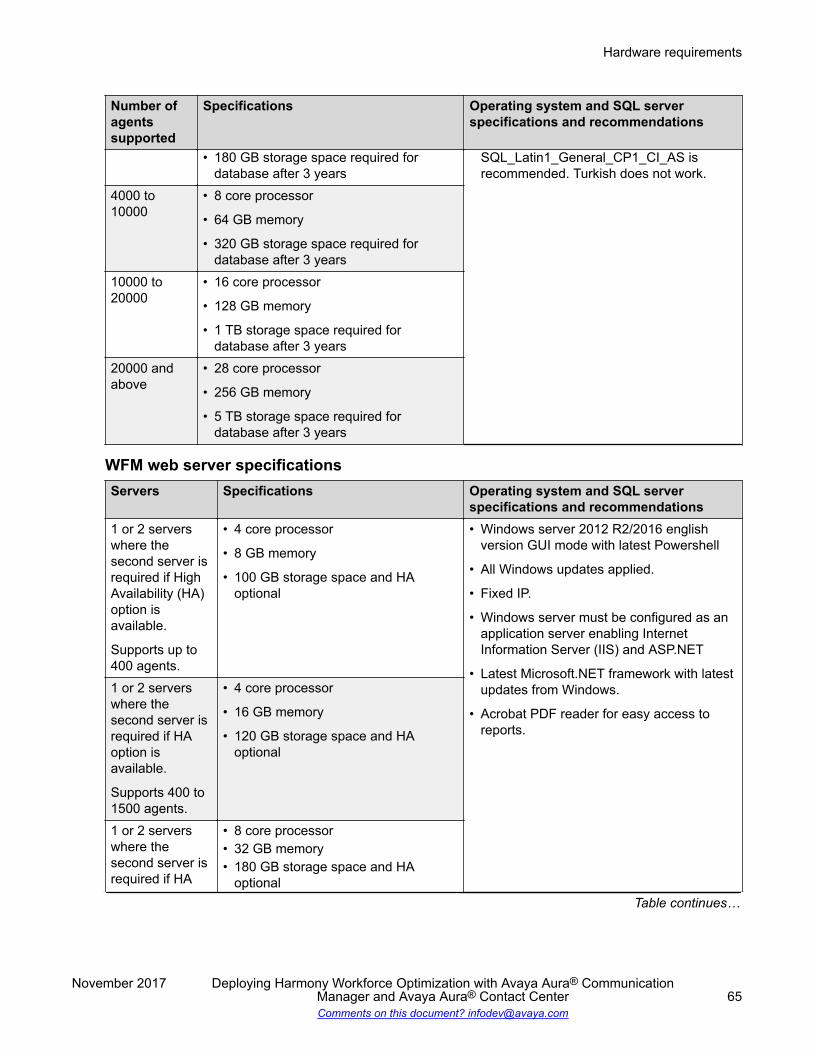
Number ofagentssupported
Specifications Operating system and SQL serverspecifications and recommendations
• 180 GB storage space required fordatabase after 3 years
SQL_Latin1_General_CP1_CI_AS isrecommended. Turkish does not work.
4000 to10000
• 8 core processor
• 64 GB memory
• 320 GB storage space required fordatabase after 3 years
10000 to20000
• 16 core processor
• 128 GB memory
• 1 TB storage space required fordatabase after 3 years
20000 andabove
• 28 core processor
• 256 GB memory
• 5 TB storage space required fordatabase after 3 years
WFM web server specificationsServers Specifications Operating system and SQL server
specifications and recommendations1 or 2 serverswhere thesecond server isrequired if HighAvailability (HA)option isavailable.
Supports up to400 agents.
• 4 core processor
• 8 GB memory
• 100 GB storage space and HAoptional
• Windows server 2012 R2/2016 englishversion GUI mode with latest Powershell
• All Windows updates applied.
• Fixed IP.
• Windows server must be configured as anapplication server enabling InternetInformation Server (IIS) and ASP.NET
• Latest Microsoft.NET framework with latestupdates from Windows.
• Acrobat PDF reader for easy access toreports.
1 or 2 serverswhere thesecond server isrequired if HAoption isavailable.
Supports 400 to1500 agents.
• 4 core processor
• 16 GB memory
• 120 GB storage space and HAoptional
1 or 2 serverswhere thesecond server isrequired if HA
• 8 core processor• 32 GB memory• 180 GB storage space and HA
optionalTable continues…
Hardware requirements
November 2017 Deploying Harmony Workforce Optimization with Avaya Aura® CommunicationManager and Avaya Aura® Contact Center 65Comments on this document? [email protected]
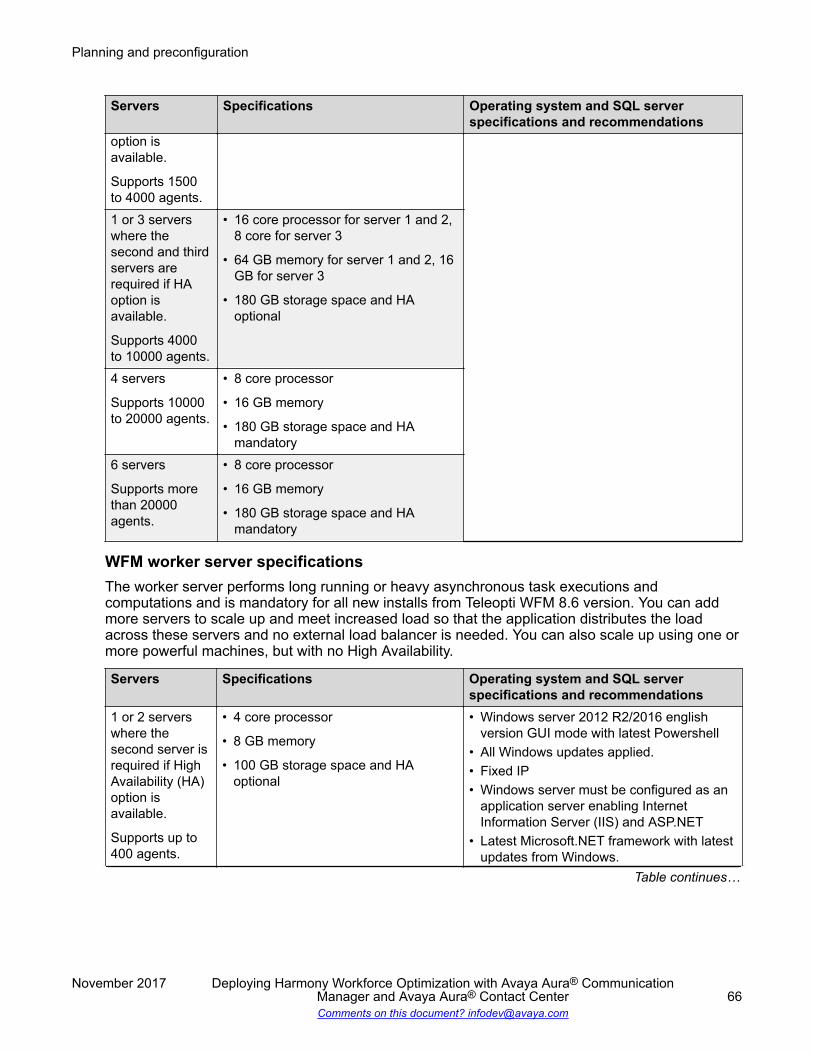
Servers Specifications Operating system and SQL serverspecifications and recommendations
option isavailable.
Supports 1500to 4000 agents.1 or 3 serverswhere thesecond and thirdservers arerequired if HAoption isavailable.
Supports 4000to 10000 agents.
• 16 core processor for server 1 and 2,8 core for server 3
• 64 GB memory for server 1 and 2, 16GB for server 3
• 180 GB storage space and HAoptional
4 servers
Supports 10000to 20000 agents.
• 8 core processor
• 16 GB memory
• 180 GB storage space and HAmandatory
6 servers
Supports morethan 20000agents.
• 8 core processor
• 16 GB memory
• 180 GB storage space and HAmandatory
WFM worker server specificationsThe worker server performs long running or heavy asynchronous task executions andcomputations and is mandatory for all new installs from Teleopti WFM 8.6 version. You can addmore servers to scale up and meet increased load so that the application distributes the loadacross these servers and no external load balancer is needed. You can also scale up using one ormore powerful machines, but with no High Availability.
Servers Specifications Operating system and SQL serverspecifications and recommendations
1 or 2 serverswhere thesecond server isrequired if HighAvailability (HA)option isavailable.
Supports up to400 agents.
• 4 core processor
• 8 GB memory
• 100 GB storage space and HAoptional
• Windows server 2012 R2/2016 englishversion GUI mode with latest Powershell
• All Windows updates applied.• Fixed IP• Windows server must be configured as an
application server enabling InternetInformation Server (IIS) and ASP.NET
• Latest Microsoft.NET framework with latestupdates from Windows.
Table continues…
Planning and preconfiguration
November 2017 Deploying Harmony Workforce Optimization with Avaya Aura® CommunicationManager and Avaya Aura® Contact Center 66Comments on this document? [email protected]
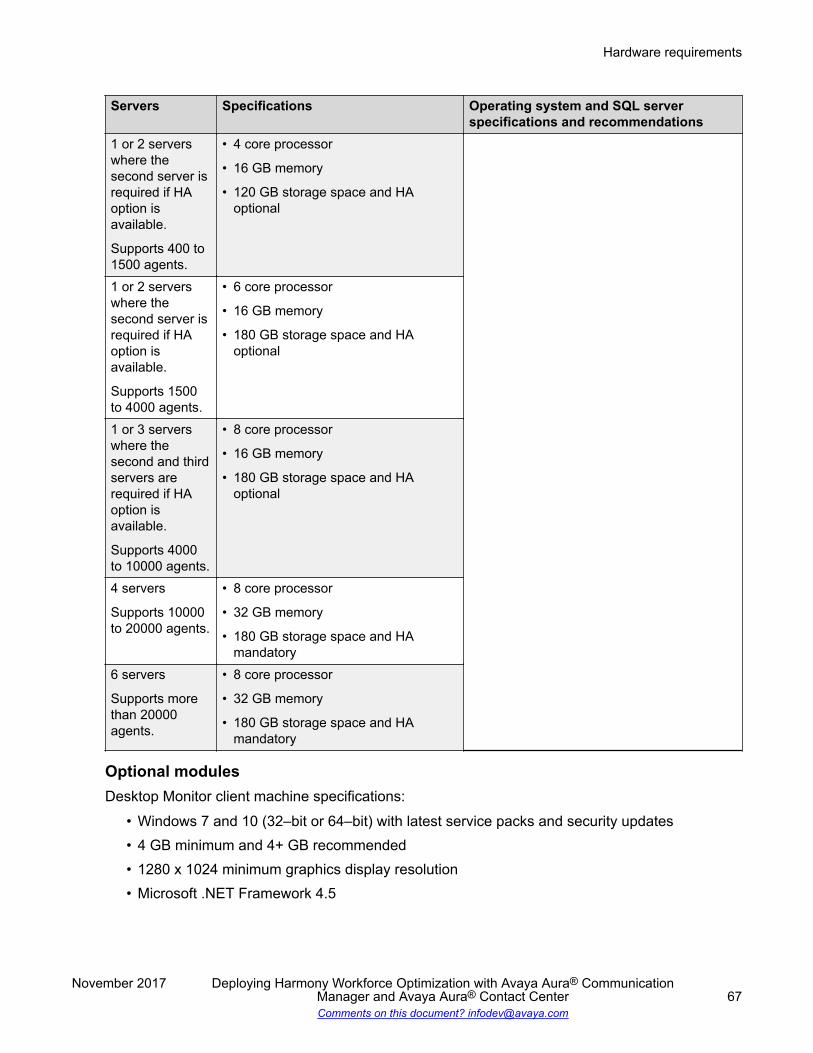
Servers Specifications Operating system and SQL serverspecifications and recommendations
1 or 2 serverswhere thesecond server isrequired if HAoption isavailable.
Supports 400 to1500 agents.
• 4 core processor
• 16 GB memory
• 120 GB storage space and HAoptional
1 or 2 serverswhere thesecond server isrequired if HAoption isavailable.
Supports 1500to 4000 agents.
• 6 core processor
• 16 GB memory
• 180 GB storage space and HAoptional
1 or 3 serverswhere thesecond and thirdservers arerequired if HAoption isavailable.
Supports 4000to 10000 agents.
• 8 core processor
• 16 GB memory
• 180 GB storage space and HAoptional
4 servers
Supports 10000to 20000 agents.
• 8 core processor
• 32 GB memory
• 180 GB storage space and HAmandatory
6 servers
Supports morethan 20000agents.
• 8 core processor
• 32 GB memory
• 180 GB storage space and HAmandatory
Optional modulesDesktop Monitor client machine specifications:
• Windows 7 and 10 (32–bit or 64–bit) with latest service packs and security updates• 4 GB minimum and 4+ GB recommended• 1280 x 1024 minimum graphics display resolution• Microsoft .NET Framework 4.5
Hardware requirements
November 2017 Deploying Harmony Workforce Optimization with Avaya Aura® CommunicationManager and Avaya Aura® Contact Center 67Comments on this document? [email protected]

• Microsoft Visual Studio 2008 Professional or Developers Edition SP1 (Development/Studioonly)
Software requirementsTable 1: Harmony Workforce Optimization software
Software Supported version NotesHarmony Workforce Optimization 5.2.2 -
Table 2: License management
Software Supported version NotesAvaya WebLM 6.3.8, 7.0.1, and 7.1 -
Table 3: Operating systems and software
Software Supported version Location ReferenceWindows Server 2012 R2 (64–bit OS) with
latest service pack and2016 (64–bit OS)
- -
Table 4: Database
Software Supported version NotesSQL Server 2012/2016 (64–bit) Standard
Edition
Table 5: Reporting services
Software Supported version NotesAdobe Reader 8.0 or later -
Table 6: Client software
Software Supported version NotesWindows Operating System 7, 8, and 10 with 32–bit and 64–
bit-
Internet Explorer 11 -Mozilla FireFox 53.0.3 and 57.0.2 -Google Chrome 56.0.2924.76 (64-bit) and 60 -Microsoft Edge 38.14393.1066.0 and 40 -
Table continues…
Planning and preconfiguration
November 2017 Deploying Harmony Workforce Optimization with Avaya Aura® CommunicationManager and Avaya Aura® Contact Center 68Comments on this document? [email protected]
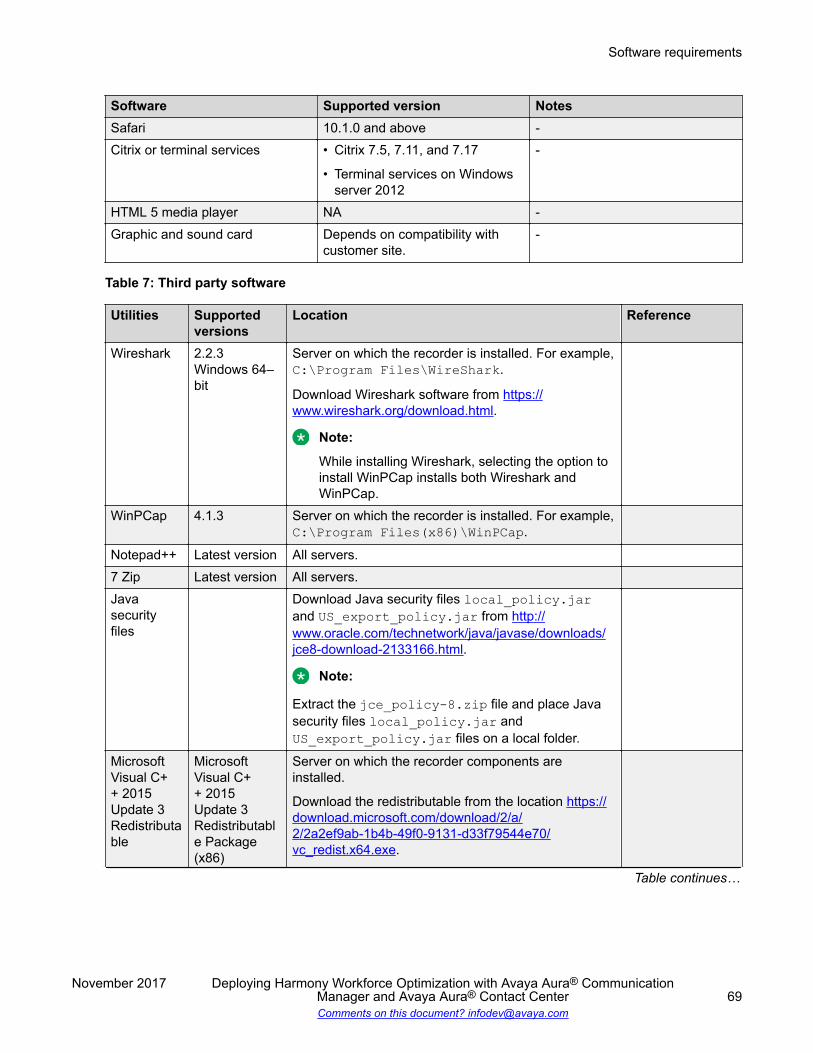
Software Supported version NotesSafari 10.1.0 and above -Citrix or terminal services • Citrix 7.5, 7.11, and 7.17
• Terminal services on Windowsserver 2012
-
HTML 5 media player NA -Graphic and sound card Depends on compatibility with
customer site.-
Table 7: Third party software
Utilities Supportedversions
Location Reference
Wireshark 2.2.3Windows 64–bit
Server on which the recorder is installed. For example,C:\Program Files\WireShark.
Download Wireshark software from https://www.wireshark.org/download.html.
Note:
While installing Wireshark, selecting the option toinstall WinPCap installs both Wireshark andWinPCap.
WinPCap 4.1.3 Server on which the recorder is installed. For example,C:\Program Files(x86)\WinPCap.
Notepad++ Latest version All servers.7 Zip Latest version All servers.Javasecurityfiles
Download Java security files local_policy.jarand US_export_policy.jar from http://www.oracle.com/technetwork/java/javase/downloads/jce8-download-2133166.html.
Note:
Extract the jce_policy-8.zip file and place Javasecurity files local_policy.jar andUS_export_policy.jar files on a local folder.
MicrosoftVisual C++ 2015Update 3Redistributable
MicrosoftVisual C++ 2015Update 3Redistributable Package(x86)
Server on which the recorder components areinstalled.
Download the redistributable from the location https://download.microsoft.com/download/2/a/2/2a2ef9ab-1b4b-49f0-9131-d33f79544e70/vc_redist.x64.exe.
Table continues…
Software requirements
November 2017 Deploying Harmony Workforce Optimization with Avaya Aura® CommunicationManager and Avaya Aura® Contact Center 69Comments on this document? [email protected]
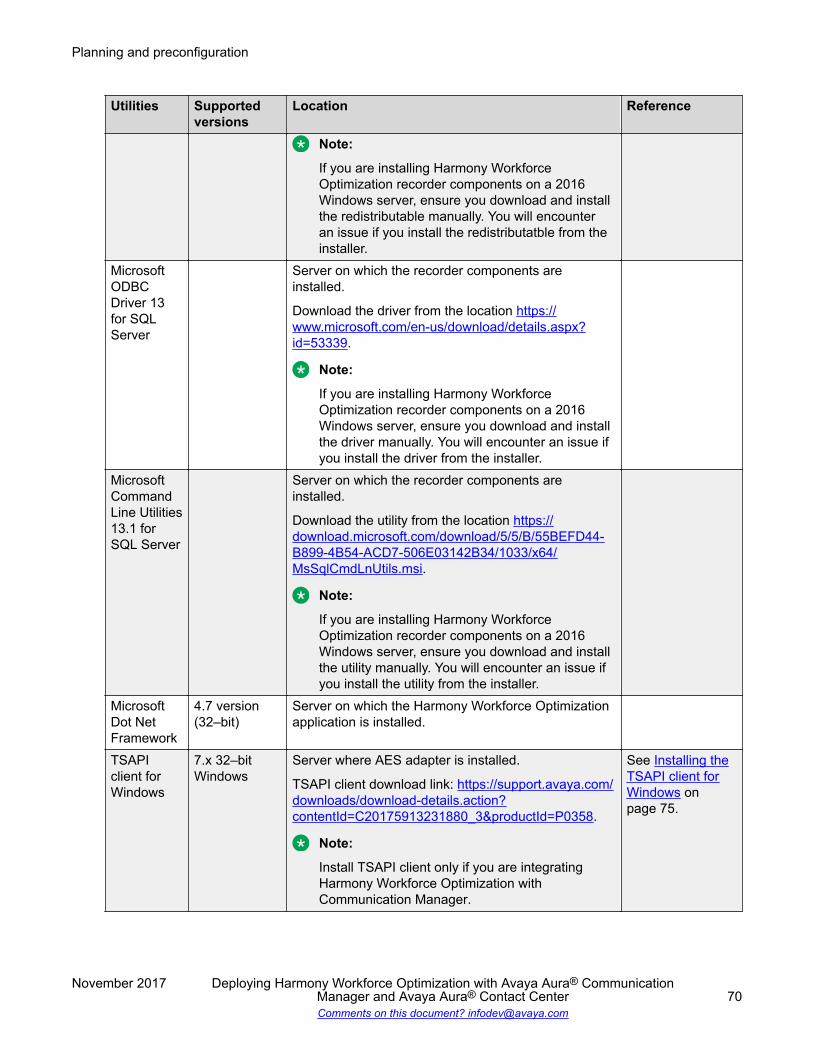
Utilities Supportedversions
Location Reference
Note:
If you are installing Harmony WorkforceOptimization recorder components on a 2016Windows server, ensure you download and installthe redistributable manually. You will encounteran issue if you install the redistributatble from theinstaller.
MicrosoftODBCDriver 13for SQLServer
Server on which the recorder components areinstalled.
Download the driver from the location https://www.microsoft.com/en-us/download/details.aspx?id=53339.
Note:
If you are installing Harmony WorkforceOptimization recorder components on a 2016Windows server, ensure you download and installthe driver manually. You will encounter an issue ifyou install the driver from the installer.
MicrosoftCommandLine Utilities13.1 forSQL Server
Server on which the recorder components areinstalled.
Download the utility from the location https://download.microsoft.com/download/5/5/B/55BEFD44-B899-4B54-ACD7-506E03142B34/1033/x64/MsSqlCmdLnUtils.msi.
Note:
If you are installing Harmony WorkforceOptimization recorder components on a 2016Windows server, ensure you download and installthe utility manually. You will encounter an issue ifyou install the utility from the installer.
MicrosoftDot NetFramework
4.7 version(32–bit)
Server on which the Harmony Workforce Optimizationapplication is installed.
TSAPIclient forWindows
7.x 32–bitWindows
Server where AES adapter is installed.
TSAPI client download link: https://support.avaya.com/downloads/download-details.action?contentId=C20175913231880_3&productId=P0358.
Note:
Install TSAPI client only if you are integratingHarmony Workforce Optimization withCommunication Manager.
See Installing theTSAPI client forWindows onpage 75.
Planning and preconfiguration
November 2017 Deploying Harmony Workforce Optimization with Avaya Aura® CommunicationManager and Avaya Aura® Contact Center 70Comments on this document? [email protected]
Network requirements• Deployment models must use Fast Ethernet LAN connections. Minimum 1000BASE-T is
preferred.• Multisite deployments must use T1, E1, MPLS, or its equivalent connection to utilize the
bandwidth between site locations.• Each recording server must install two 1-Gbps network interface cards (NICs). Each NIC
must have a distinct static IP address. Use one card for standard network access and theother as a packet sniffing interface.
• You must direct the SPAN traffic in your SPAN configuration to the IP address of the NIC.When you run the Harmony Workforce Optimization installer, the packet sniffing NIC isreferred to as the Voice NIC.
• You must configure the Session Initiation Protocol (SIP) and Real-time Transport Protocol(RTP) traffic to route to the Voice NIC of the recording server in the SPAN configuration.
Port assignmentsIf the Harmony Workforce Optimization deployment is limited to the local intranet, then you do notneed to open any ports on the firewall. If you want to provide external access to HarmonyWorkforce Optimization, with firewalls on both ends of a private WAN, open relevant ports. Forcomplete port matrix information, see Avaya Port Matrix: Harmony Workforce Optimization 5.2.2available on the support website at http://support.avaya.com.
Preinstallation checklistNo. Task Reference
1 Ensure that the servers with required operating system andWindows service packs are available, as per systemrequirements. The Windows server should have all thelatest patches.
-
2 Ensure that your network administrator enables the DataNetwork Interface Card (NIC) and Packet Sniffer or VoiceNIC on the servers where the recorder is installed.
-
3 Ensure that network considerations are met. See Network requirements onpage 71.
4 Ensure that your network administrator configures a validmail server.
-
Table continues…
Network requirements
November 2017 Deploying Harmony Workforce Optimization with Avaya Aura® CommunicationManager and Avaya Aura® Contact Center 71Comments on this document? [email protected]
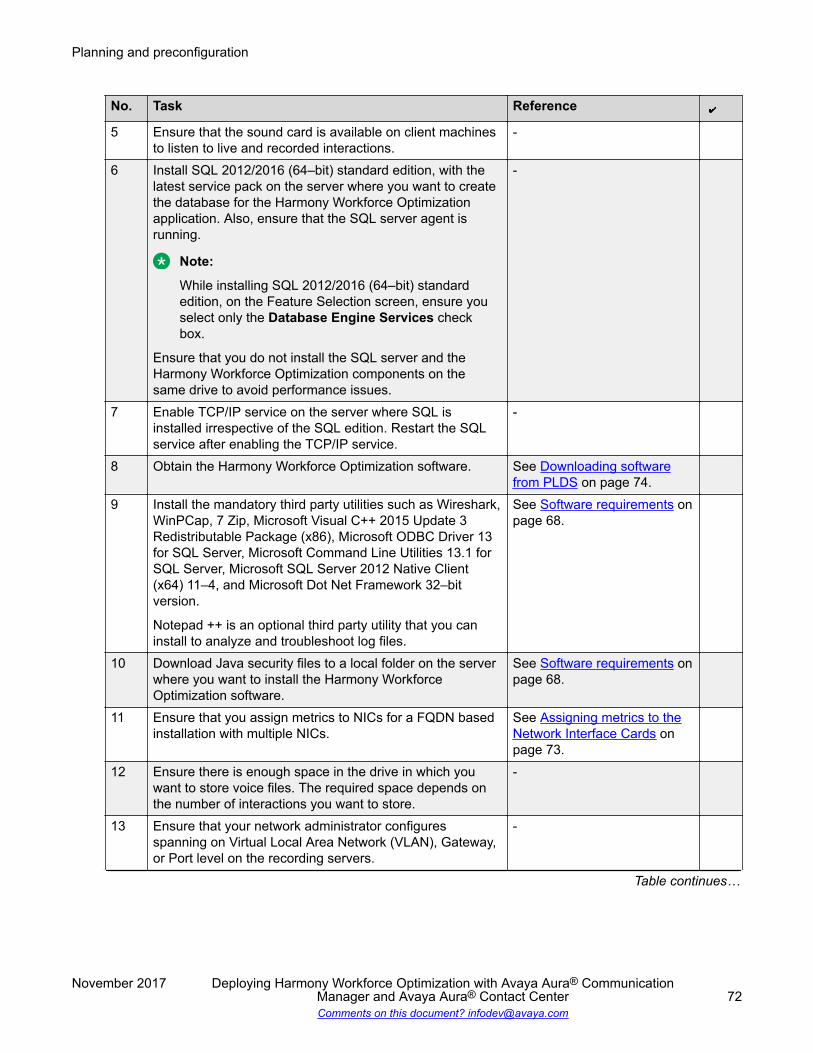
No. Task Reference
5 Ensure that the sound card is available on client machinesto listen to live and recorded interactions.
-
6 Install SQL 2012/2016 (64–bit) standard edition, with thelatest service pack on the server where you want to createthe database for the Harmony Workforce Optimizationapplication. Also, ensure that the SQL server agent isrunning.
Note:
While installing SQL 2012/2016 (64–bit) standardedition, on the Feature Selection screen, ensure youselect only the Database Engine Services checkbox.
Ensure that you do not install the SQL server and theHarmony Workforce Optimization components on thesame drive to avoid performance issues.
-
7 Enable TCP/IP service on the server where SQL isinstalled irrespective of the SQL edition. Restart the SQLservice after enabling the TCP/IP service.
-
8 Obtain the Harmony Workforce Optimization software. See Downloading softwarefrom PLDS on page 74.
9 Install the mandatory third party utilities such as Wireshark,WinPCap, 7 Zip, Microsoft Visual C++ 2015 Update 3Redistributable Package (x86), Microsoft ODBC Driver 13for SQL Server, Microsoft Command Line Utilities 13.1 forSQL Server, Microsoft SQL Server 2012 Native Client(x64) 11–4, and Microsoft Dot Net Framework 32–bitversion.
Notepad ++ is an optional third party utility that you caninstall to analyze and troubleshoot log files.
See Software requirements onpage 68.
10 Download Java security files to a local folder on the serverwhere you want to install the Harmony WorkforceOptimization software.
See Software requirements onpage 68.
11 Ensure that you assign metrics to NICs for a FQDN basedinstallation with multiple NICs.
See Assigning metrics to theNetwork Interface Cards onpage 73.
12 Ensure there is enough space in the drive in which youwant to store voice files. The required space depends onthe number of interactions you want to store.
-
13 Ensure that your network administrator configuresspanning on Virtual Local Area Network (VLAN), Gateway,or Port level on the recording servers.
-
Table continues…
Planning and preconfiguration
November 2017 Deploying Harmony Workforce Optimization with Avaya Aura® CommunicationManager and Avaya Aura® Contact Center 72Comments on this document? [email protected]
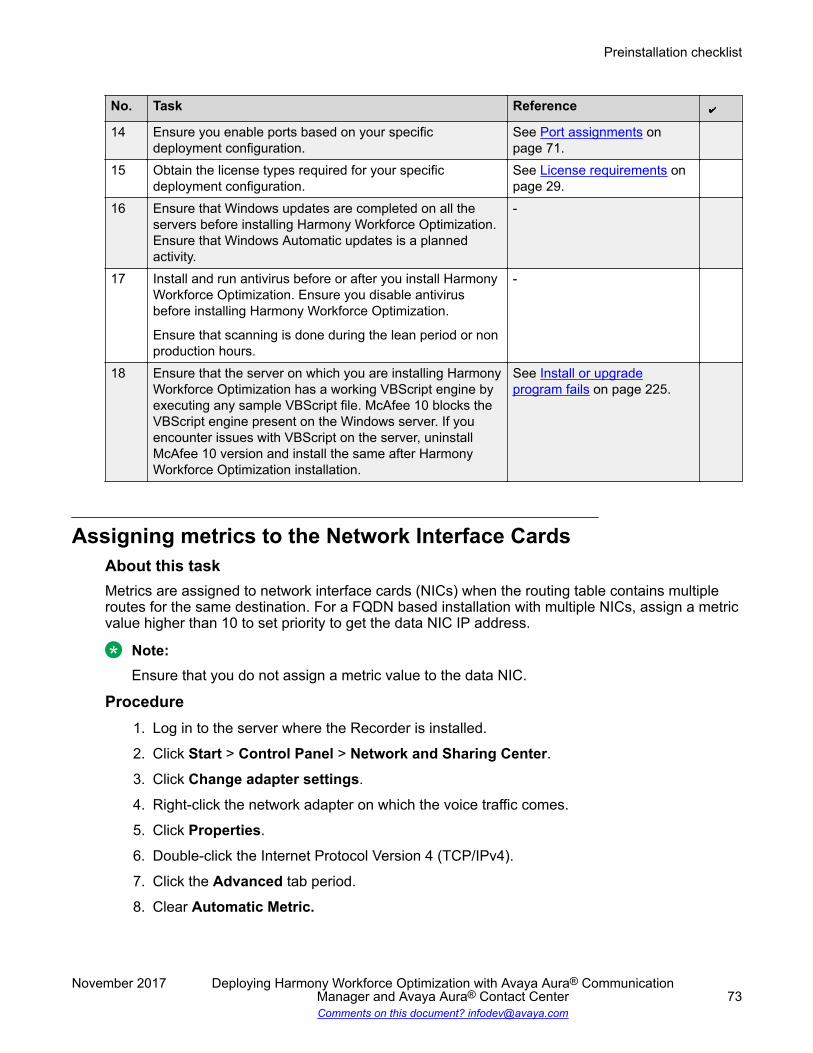
No. Task Reference
14 Ensure you enable ports based on your specificdeployment configuration.
See Port assignments onpage 71.
15 Obtain the license types required for your specificdeployment configuration.
See License requirements onpage 29.
16 Ensure that Windows updates are completed on all theservers before installing Harmony Workforce Optimization.Ensure that Windows Automatic updates is a plannedactivity.
-
17 Install and run antivirus before or after you install HarmonyWorkforce Optimization. Ensure you disable antivirusbefore installing Harmony Workforce Optimization.
Ensure that scanning is done during the lean period or nonproduction hours.
-
18 Ensure that the server on which you are installing HarmonyWorkforce Optimization has a working VBScript engine byexecuting any sample VBScript file. McAfee 10 blocks theVBScript engine present on the Windows server. If youencounter issues with VBScript on the server, uninstallMcAfee 10 version and install the same after HarmonyWorkforce Optimization installation.
See Install or upgradeprogram fails on page 225.
Assigning metrics to the Network Interface CardsAbout this taskMetrics are assigned to network interface cards (NICs) when the routing table contains multipleroutes for the same destination. For a FQDN based installation with multiple NICs, assign a metricvalue higher than 10 to set priority to get the data NIC IP address.
Note:Ensure that you do not assign a metric value to the data NIC.
Procedure1. Log in to the server where the Recorder is installed.
2. Click Start > Control Panel > Network and Sharing Center.3. Click Change adapter settings.
4. Right-click the network adapter on which the voice traffic comes.
5. Click Properties.
6. Double-click the Internet Protocol Version 4 (TCP/IPv4).
7. Click the Advanced tab period.
8. Clear Automatic Metric.
Preinstallation checklist
November 2017 Deploying Harmony Workforce Optimization with Avaya Aura® CommunicationManager and Avaya Aura® Contact Center 73Comments on this document? [email protected]

9. In the Interface Metric field, enter a value higher than 10.
10. Click OK.
11. Click OK.
Registering for PLDSProcedure
1. Go to the Avaya Product Licensing and Delivery System (PLDS) website at https://plds.avaya.com.
The PLDS website redirects you to the Avaya single sign-on (SSO) webpage.
2. Log in to SSO with your SSO ID and password.
3. On the PLDS registration page, register as:
• An Avaya Partner: Enter the Partner Link ID. To know your Partner Link ID, send anemail to [email protected].
• A customer: Enter one of the following:
- Company Sold-To
- Ship-To number
- License authorization code (LAC)
4. Click Submit.
Avaya sends the PLDS access confirmation within one business day.
Downloading software from PLDSProcedure
1. In your web browser, type http://plds.avaya.com to go to the Avaya PLDS website.
2. On the PLDS website, enter your Login ID and password.
3. On the Home page, select Assets.
4. Select View Downloads.
5. Click the search icon ( ) for Company Name.
6. In the Search Companies dialog box, do the following:
a. In the %Name field, type Avaya or the Partner company name.
b. Click Search Companies.
c. Locate the correct entry and click the Select link.
Planning and preconfiguration
November 2017 Deploying Harmony Workforce Optimization with Avaya Aura® CommunicationManager and Avaya Aura® Contact Center 74Comments on this document? [email protected]
7. Search for the available downloads by using one of the following:
• In Download Pub ID, type the download pub ID.
• In the Application field, click the application name.
8. Click Search Downloads.
9. Scroll down to the entry for the download file, and click the Download link.
10. Select a location where you want to save the file, and click Save.
11. (Optional) If you receive an error message, click the message, install Active X, andcontinue with the download.
12. (Optional) When the system displays the security warning, click Install.
When the installation is complete, PLDS displays the downloads again with a check marknext to the downloads that have completed successfully.
Installing the TSAPI client for WindowsAbout this taskFor Avaya Aura® Contact Center on Communication Manager deployments, ensure you installTSAPI client on the server where AES adapter is installed.
Procedure1. Go to https://support.avaya.com/downloads/download-details.action?
contentId=C20175913231880_3&productId=P0358.
2. Login with your user credentials.
3. Click Download and extract the tsapi-client-win32-7.1.0-67.zip file.
4. Double-click the setup.exe file and click Next.
5. Select the license agreement option and click Next.6. Click Browse to specify the destination folder and click Next.7. Enter Host Name or IP Address of the AES server and click Add to List.
Note:
Do not change the default value of the Port Number.8. Click Next.9. Click Downloads and select Avaya Aura AE Services 7.0 or 7.1 TSAPI Client for
Windows.
You must login or register to download the executable.
10. Accept the File Download Agreement and click Submit.11. Click Install.
Preinstallation checklist
November 2017 Deploying Harmony Workforce Optimization with Avaya Aura® CommunicationManager and Avaya Aura® Contact Center 75Comments on this document? [email protected]
12. Click Finish.
Product compatibilityFor the latest and most accurate compatibility information, go to https://support.avaya.com/CompatibilityMatrix/Index.aspx
Transport Layer Security 1.2 support
Enabling TLS 1.2About this taskHarmony Workforce Optimization supports the Transport Layer Security (TLS) 1.2 protocol toprovide communication security. Ensure that the Harmony Workforce Optimization web applicationservers and the database server are in the same domain.
Before you beginInstall ODBC 13.1 driver on the servers where the Harmony Workforce Optimization componentsand the SQL database is running.
Procedure1. Log in to the server on which the web application components and the SQL database is
running.
2. Open the registry located on: HKEY_LOCAL_MACHINE\SYSTEM\CurrentControlSet\Control\SecurityProviders\SCHANNEL\Protocols
Note:
Ensure you take a backup of the above registry entries in case you need to revert.
3. Right-click the Protocols folder and click New > Key.
A folder is created. Rename the folder to TLS 1.2.
4. Right-click the TLS 1.2 folder and click New > Key.
A folder is created. Rename the folder to Client.
5. Right-click the TLS 1.2 folder and click New > Key.
A folder is created. Rename the folder to Server.
6. Right-click the Client folder and click New > DWORD (32–bit) Value.
Planning and preconfiguration
November 2017 Deploying Harmony Workforce Optimization with Avaya Aura® CommunicationManager and Avaya Aura® Contact Center 76Comments on this document? [email protected]
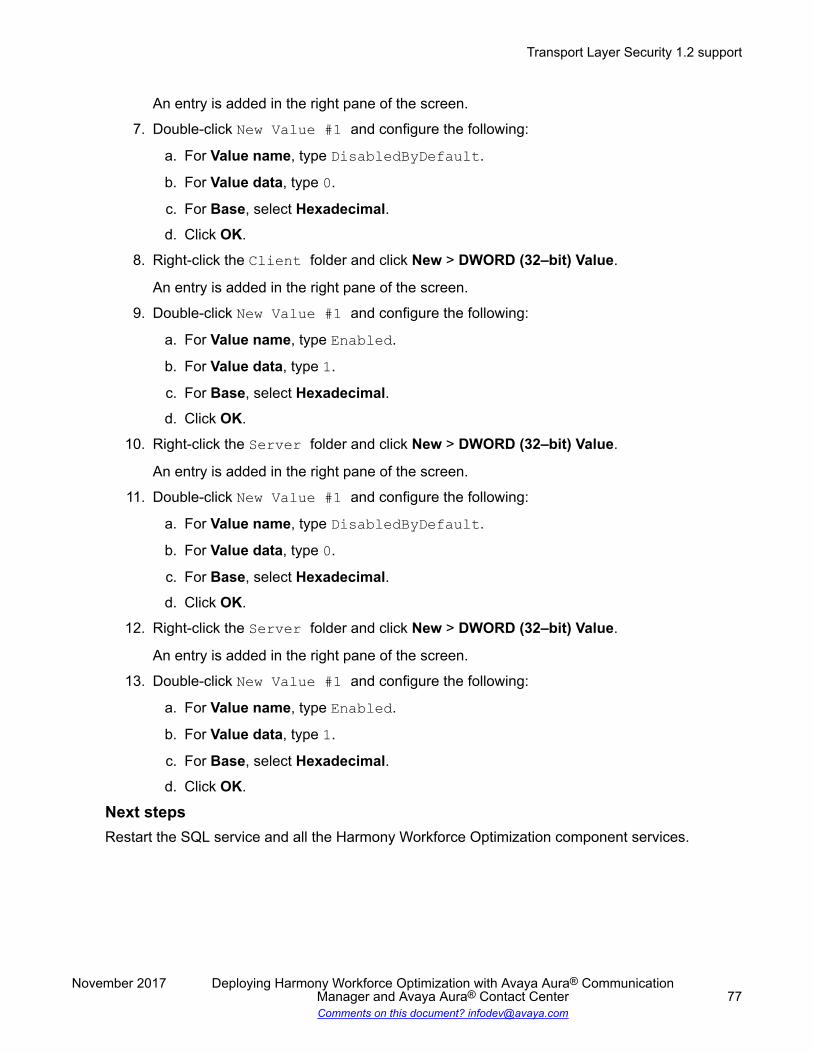
An entry is added in the right pane of the screen.
7. Double-click New Value #1 and configure the following:
a. For Value name, type DisabledByDefault.
b. For Value data, type 0.
c. For Base, select Hexadecimal.d. Click OK.
8. Right-click the Client folder and click New > DWORD (32–bit) Value.
An entry is added in the right pane of the screen.
9. Double-click New Value #1 and configure the following:
a. For Value name, type Enabled.
b. For Value data, type 1.
c. For Base, select Hexadecimal.d. Click OK.
10. Right-click the Server folder and click New > DWORD (32–bit) Value.
An entry is added in the right pane of the screen.
11. Double-click New Value #1 and configure the following:
a. For Value name, type DisabledByDefault.
b. For Value data, type 0.
c. For Base, select Hexadecimal.d. Click OK.
12. Right-click the Server folder and click New > DWORD (32–bit) Value.
An entry is added in the right pane of the screen.
13. Double-click New Value #1 and configure the following:
a. For Value name, type Enabled.
b. For Value data, type 1.
c. For Base, select Hexadecimal.d. Click OK.
Next stepsRestart the SQL service and all the Harmony Workforce Optimization component services.
Transport Layer Security 1.2 support
November 2017 Deploying Harmony Workforce Optimization with Avaya Aura® CommunicationManager and Avaya Aura® Contact Center 77Comments on this document? [email protected]
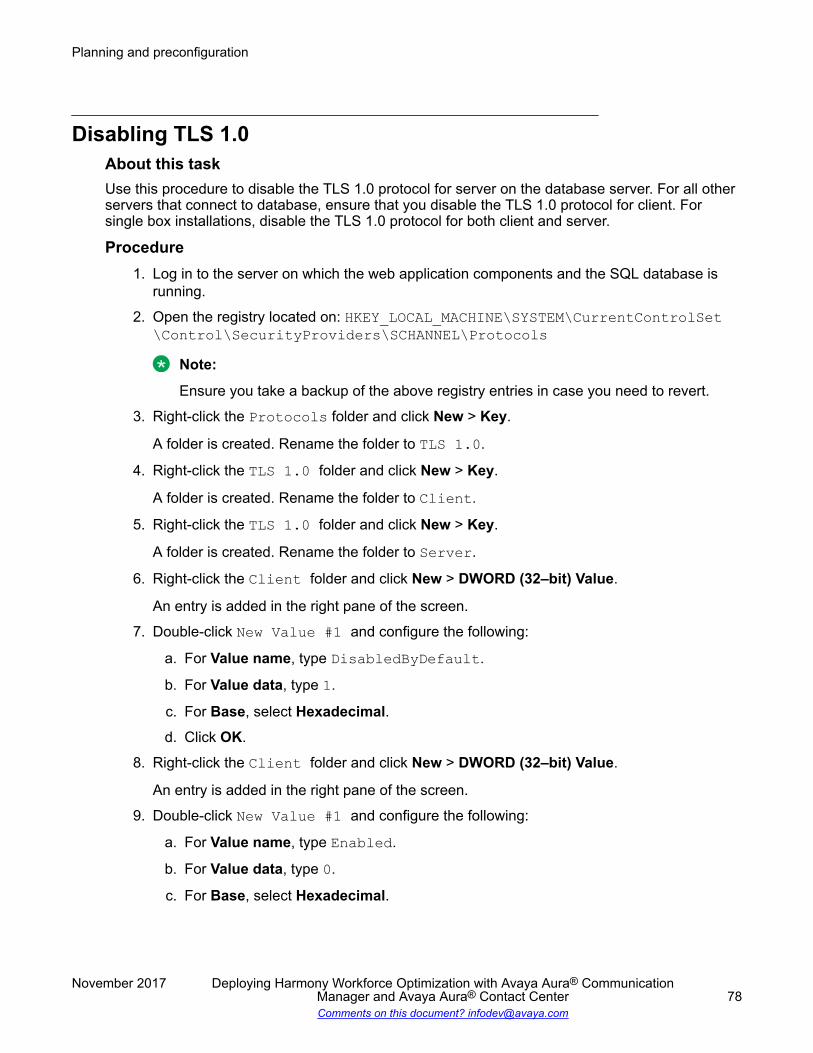
Disabling TLS 1.0About this taskUse this procedure to disable the TLS 1.0 protocol for server on the database server. For all otherservers that connect to database, ensure that you disable the TLS 1.0 protocol for client. Forsingle box installations, disable the TLS 1.0 protocol for both client and server.
Procedure1. Log in to the server on which the web application components and the SQL database is
running.
2. Open the registry located on: HKEY_LOCAL_MACHINE\SYSTEM\CurrentControlSet\Control\SecurityProviders\SCHANNEL\Protocols
Note:
Ensure you take a backup of the above registry entries in case you need to revert.
3. Right-click the Protocols folder and click New > Key.
A folder is created. Rename the folder to TLS 1.0.
4. Right-click the TLS 1.0 folder and click New > Key.
A folder is created. Rename the folder to Client.
5. Right-click the TLS 1.0 folder and click New > Key.
A folder is created. Rename the folder to Server.
6. Right-click the Client folder and click New > DWORD (32–bit) Value.
An entry is added in the right pane of the screen.
7. Double-click New Value #1 and configure the following:
a. For Value name, type DisabledByDefault.
b. For Value data, type 1.
c. For Base, select Hexadecimal.d. Click OK.
8. Right-click the Client folder and click New > DWORD (32–bit) Value.
An entry is added in the right pane of the screen.
9. Double-click New Value #1 and configure the following:
a. For Value name, type Enabled.
b. For Value data, type 0.
c. For Base, select Hexadecimal.
Planning and preconfiguration
November 2017 Deploying Harmony Workforce Optimization with Avaya Aura® CommunicationManager and Avaya Aura® Contact Center 78Comments on this document? [email protected]

d. Click OK.
10. Right-click the Server folder and click New > DWORD (32–bit) Value.
An entry is added in the right pane of the screen.
11. Double-click New Value #1 and configure the following:
a. For Value name, type DisabledByDefault.
b. For Value data, type 1.
c. For Base, select Hexadecimal.d. Click OK.
12. Right-click the Server folder and click New > DWORD (32–bit) Value.
An entry is added in the right pane of the screen.
13. Double-click New Value #1 and configure the following:
a. For Value name, type Enabled.
b. For Value data, type 0.
c. For Base, select Hexadecimal.d. Click OK.
Next stepsRestart the SQL service and all the Harmony Workforce Optimization component services.
Disabling TLS 1.1About this taskUse this procedure to disable the TLS 1.1 protocol for server on the database server. For all otherservers that connect to database, ensure that you disable the TLS 1.1 protocol for client. Forsingle box installations, disable the TLS 1.1 protocol for both client and server.
Procedure1. Log in to the server on which the web application components and the SQL database is
running.
2. Open the registry located on: HKEY_LOCAL_MACHINE\SYSTEM\CurrentControlSet\Control\SecurityProviders\SCHANNEL\Protocols
Note:
Ensure you take a backup of the above registry entries in case you need to revert.
3. Right-click the Protocols folder and click New > Key.
A folder is created. Rename the folder to TLS 1.1.
Transport Layer Security 1.2 support
November 2017 Deploying Harmony Workforce Optimization with Avaya Aura® CommunicationManager and Avaya Aura® Contact Center 79Comments on this document? [email protected]
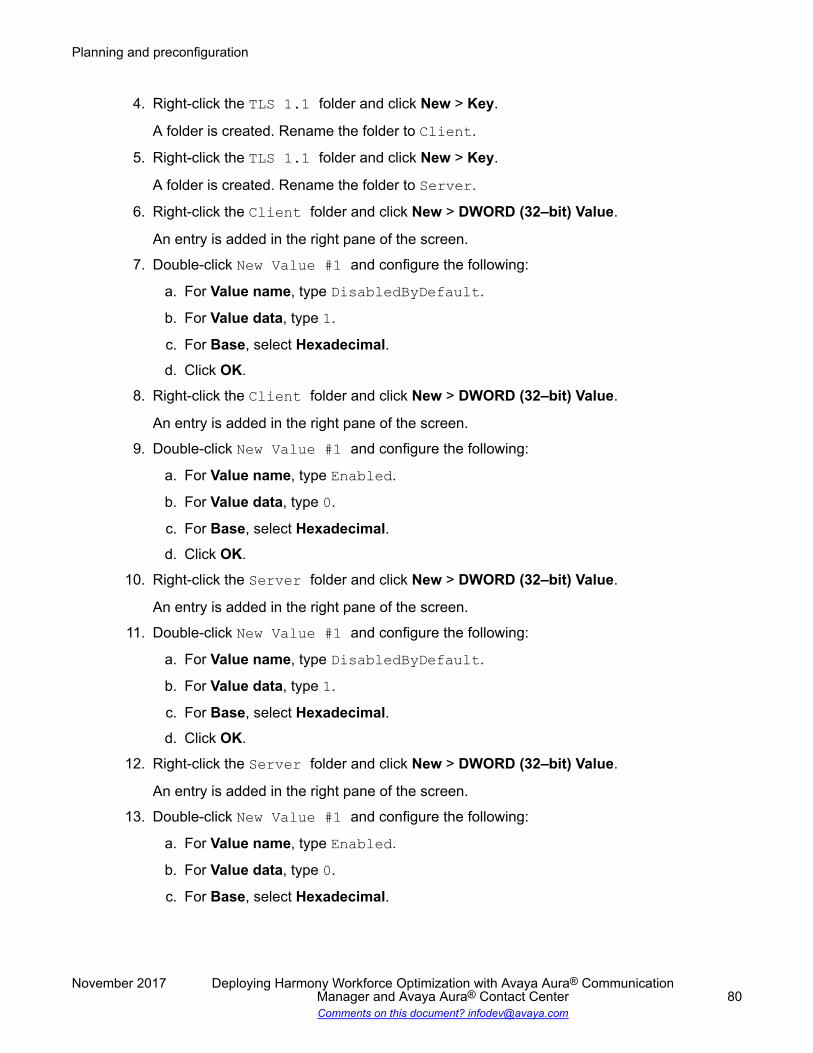
4. Right-click the TLS 1.1 folder and click New > Key.
A folder is created. Rename the folder to Client.
5. Right-click the TLS 1.1 folder and click New > Key.
A folder is created. Rename the folder to Server.
6. Right-click the Client folder and click New > DWORD (32–bit) Value.
An entry is added in the right pane of the screen.
7. Double-click New Value #1 and configure the following:
a. For Value name, type DisabledByDefault.
b. For Value data, type 1.
c. For Base, select Hexadecimal.d. Click OK.
8. Right-click the Client folder and click New > DWORD (32–bit) Value.
An entry is added in the right pane of the screen.
9. Double-click New Value #1 and configure the following:
a. For Value name, type Enabled.
b. For Value data, type 0.
c. For Base, select Hexadecimal.d. Click OK.
10. Right-click the Server folder and click New > DWORD (32–bit) Value.
An entry is added in the right pane of the screen.
11. Double-click New Value #1 and configure the following:
a. For Value name, type DisabledByDefault.
b. For Value data, type 1.
c. For Base, select Hexadecimal.d. Click OK.
12. Right-click the Server folder and click New > DWORD (32–bit) Value.
An entry is added in the right pane of the screen.
13. Double-click New Value #1 and configure the following:
a. For Value name, type Enabled.
b. For Value data, type 0.
c. For Base, select Hexadecimal.
Planning and preconfiguration
November 2017 Deploying Harmony Workforce Optimization with Avaya Aura® CommunicationManager and Avaya Aura® Contact Center 80Comments on this document? [email protected]
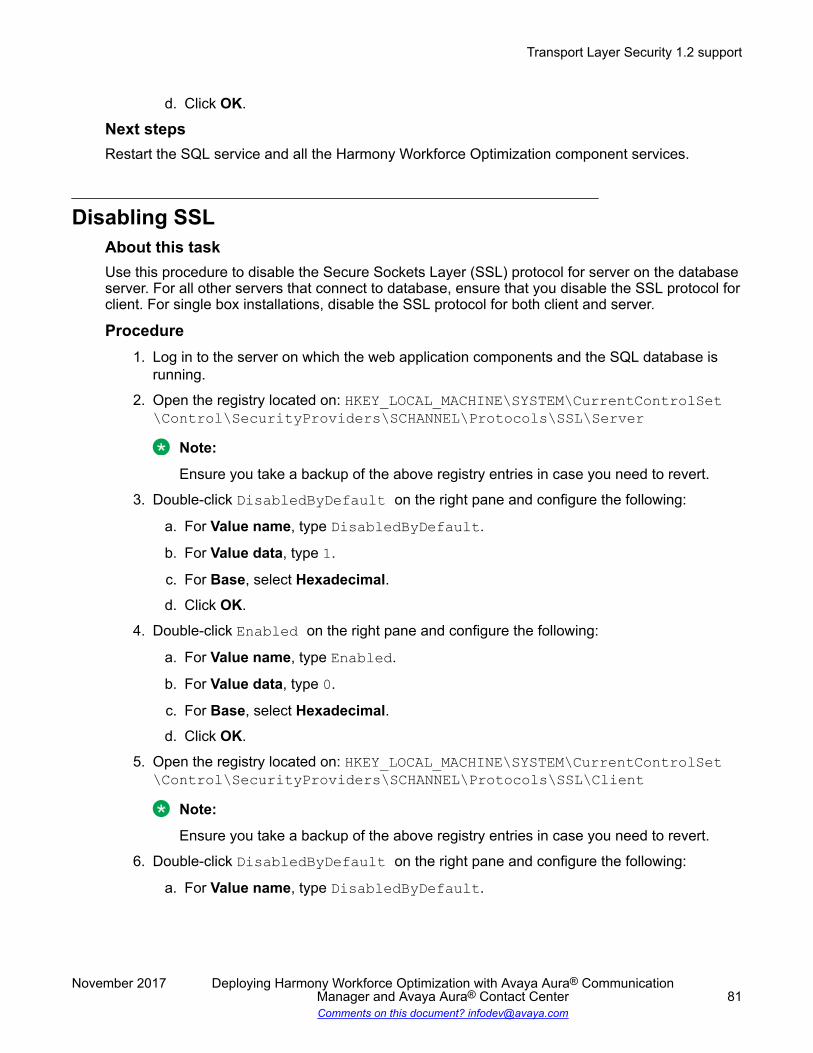
d. Click OK.
Next stepsRestart the SQL service and all the Harmony Workforce Optimization component services.
Disabling SSLAbout this taskUse this procedure to disable the Secure Sockets Layer (SSL) protocol for server on the databaseserver. For all other servers that connect to database, ensure that you disable the SSL protocol forclient. For single box installations, disable the SSL protocol for both client and server.
Procedure1. Log in to the server on which the web application components and the SQL database is
running.
2. Open the registry located on: HKEY_LOCAL_MACHINE\SYSTEM\CurrentControlSet\Control\SecurityProviders\SCHANNEL\Protocols\SSL\Server
Note:
Ensure you take a backup of the above registry entries in case you need to revert.
3. Double-click DisabledByDefault on the right pane and configure the following:
a. For Value name, type DisabledByDefault.
b. For Value data, type 1.
c. For Base, select Hexadecimal.d. Click OK.
4. Double-click Enabled on the right pane and configure the following:
a. For Value name, type Enabled.
b. For Value data, type 0.
c. For Base, select Hexadecimal.d. Click OK.
5. Open the registry located on: HKEY_LOCAL_MACHINE\SYSTEM\CurrentControlSet\Control\SecurityProviders\SCHANNEL\Protocols\SSL\Client
Note:
Ensure you take a backup of the above registry entries in case you need to revert.
6. Double-click DisabledByDefault on the right pane and configure the following:
a. For Value name, type DisabledByDefault.
Transport Layer Security 1.2 support
November 2017 Deploying Harmony Workforce Optimization with Avaya Aura® CommunicationManager and Avaya Aura® Contact Center 81Comments on this document? [email protected]
b. For Value data, type 1.
c. For Base, select Hexadecimal.d. Click OK.
7. Double-click Enabled on the right pane and configure the following:
a. For Value name, type Enabled.
b. For Value data, type 0.
c. For Base, select Hexadecimal.d. Click OK.
Next stepsRestart the SQL service and all the Harmony Workforce Optimization component services.
Installing a certificate on the SQL serverAbout this taskUse this procedure to install certificate on the SQL server using MMC to use encryption.
Procedure1. Click Start > Run > mmc.
2. On the MMC, click File > Add/Remove Snap-in....3. In the Add/Remove Snap-ins dialog box, in the Available snap-ins section, click
Certificates and then click Add.
4. In the Certificates snap-in dialog box, click Computer account and then click Next.5. Select Local computer: (the computer this console is running on) and click Finish.
6. In the Add/Remove Snap-ins dialog box, click OK.
7. On the MMC, expand Certificates (Local Computer) in the left pane.
8. Right-click the Personal folder, select All Tasks and click Import.
The Certificate Request Wizard dialog box opens.
9. Complete the Certificate Import Wizard to add a certificate to the server.
Configuring force encryption on the SQL serverAbout this taskUse this procedure to install certificate on the SQL server using MMC to use encryption.
Planning and preconfiguration
November 2017 Deploying Harmony Workforce Optimization with Avaya Aura® CommunicationManager and Avaya Aura® Contact Center 82Comments on this document? [email protected]
Procedure1. Click Start > SQL Server Configuration Manager.2. Expand SQL Server Network Configuration, right-click Protocols for <server instance>,
and then select Properties.
The Protocols for <server instance> Properties dialog box opens.
3. On the Certificate tab, select the desired certificate from the drop down for the Certificatebox, and then click OK.
4. On the Flags tab, in the ForceEncryption box, select Yes and then click OK to close thedialog box.
5. Restart the SQL service.
Verifying the encryption of the connection on the SQL serverAbout this taskUse this procedure to execute an SQL query for checking encrypted connections. The valueTRUE maps with the encrypt_option and implies that the connection is encrypted.
Procedure1. Open command prompt and navigate to C:\Program Files\Microsoft SQL Server
\Client SDK\ODBC\130\Tools\Bin.
2. Type the query, sqlcmd -S <SQL server IP address> -U <SQL username> -P<SQL password> -N -Q "select * from sys.dm_exec_connections and pressEnter.
3. Verify the following output of the query:
• session_id most_recent_session_id connect_time net_transportprotocol_type protocol_version endpoint_id encrypt_optionauth_scheme node_affinity num_reads num_writes last_readlast_write net_packet_size client_net_address client_tcp_portlocal_net_address local_tcp_port connection_idparent_connection_id most_recent_sql_handle --------------------------------- ------------------------------------------------------------------------------------------------------- --------------------------- -------------------------------------------------------------------------------- ------------------------ ----------- ---------------------------------------------- --------------------------------------------------------------- --------------------------------------------------------------- --------------------------------------------------------------------------------------
Transport Layer Security 1.2 support
November 2017 Deploying Harmony Workforce Optimization with Avaya Aura® CommunicationManager and Avaya Aura® Contact Center 83Comments on this document? [email protected]
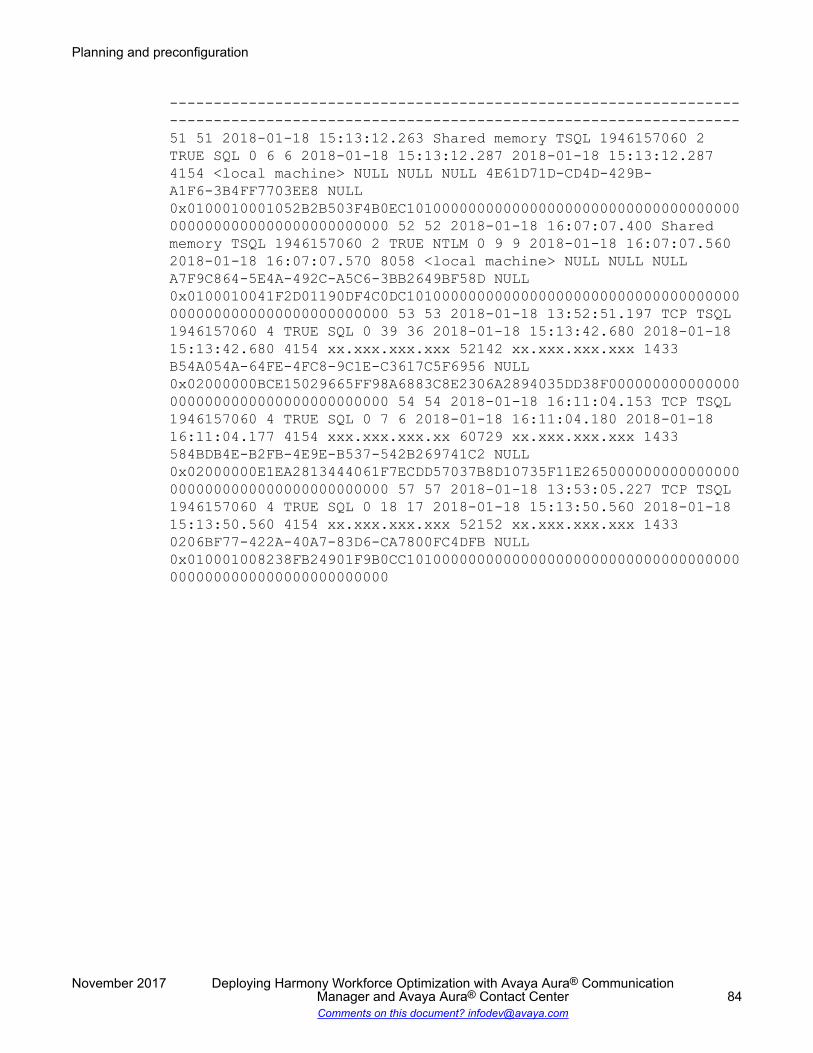
----------------------------------------------------------------------------------------------------------------------------------51 51 2018-01-18 15:13:12.263 Shared memory TSQL 1946157060 2TRUE SQL 0 6 6 2018-01-18 15:13:12.287 2018-01-18 15:13:12.2874154 <local machine> NULL NULL NULL 4E61D71D-CD4D-429B-A1F6-3B4FF7703EE8 NULL0x0100010001052B2B503F4B0EC101000000000000000000000000000000000000000000000000000000000000 52 52 2018-01-18 16:07:07.400 Sharedmemory TSQL 1946157060 2 TRUE NTLM 0 9 9 2018-01-18 16:07:07.5602018-01-18 16:07:07.570 8058 <local machine> NULL NULL NULLA7F9C864-5E4A-492C-A5C6-3BB2649BF58D NULL0x0100010041F2D01190DF4C0DC101000000000000000000000000000000000000000000000000000000000000 53 53 2018-01-18 13:52:51.197 TCP TSQL1946157060 4 TRUE SQL 0 39 36 2018-01-18 15:13:42.680 2018-01-1815:13:42.680 4154 xx.xxx.xxx.xxx 52142 xx.xxx.xxx.xxx 1433B54A054A-64FE-4FC8-9C1E-C3617C5F6956 NULL0x02000000BCE15029665FF98A6883C8E2306A2894035DD38F0000000000000000000000000000000000000000 54 54 2018-01-18 16:11:04.153 TCP TSQL1946157060 4 TRUE SQL 0 7 6 2018-01-18 16:11:04.180 2018-01-1816:11:04.177 4154 xxx.xxx.xxx.xx 60729 xx.xxx.xxx.xxx 1433584BDB4E-B2FB-4E9E-B537-542B269741C2 NULL0x02000000E1EA2813444061F7ECDD57037B8D10735F11E2650000000000000000000000000000000000000000 57 57 2018-01-18 13:53:05.227 TCP TSQL1946157060 4 TRUE SQL 0 18 17 2018-01-18 15:13:50.560 2018-01-1815:13:50.560 4154 xx.xxx.xxx.xxx 52152 xx.xxx.xxx.xxx 14330206BF77-422A-40A7-83D6-CA7800FC4DFB NULL0x010001008238FB24901F9B0CC101000000000000000000000000000000000000000000000000000000000000
Planning and preconfiguration
November 2017 Deploying Harmony Workforce Optimization with Avaya Aura® CommunicationManager and Avaya Aura® Contact Center 84Comments on this document? [email protected]

Chapter 7: Deployment
Single box installation
Installing Harmony Workforce Optimization on a single serverBefore you begin
• Install SQL 2012/2016 standard edition with the latest service pack and ensure the SQLagent is running.
• Install third-party software utilities.
Procedure1. Run the Harmony_5_2_2.exe file as an administrator.
Note:
The installer displays a message to install Microsoft Visual C++ 2015 Update 3Redistributable Package (x64), Microsoft ODBC Driver 13 for SQL Server, MicrosoftCommand Line Utilities 13.1 for SQL Server, and Microsoft SQL Server 2012 NativeClient (x64) 11–4. The message is not displayed if the software is already installed.
Click Install.2. On the Welcome screen, click Next.3. On the License Agreement screen, select I accept the terms in the license agreement,
and then click Next.4. On the Setup Type screen, select one of the following:
• Standard• Custom
5. Click Next.6. (Optional) If you select the Standard option in the Standard Setup screen, do the
following:
a. Select the Web Application Role check box.
b. Select the Web and SysAdmin check boxes.
c. Select the Database Role check box.
November 2017 Deploying Harmony Workforce Optimization with Avaya Aura® CommunicationManager and Avaya Aura® Contact Center 85Comments on this document? [email protected]
d. Select the Recording Role check box.
e. Select the Avaya check box and then select Communication Manager from theSelect Avaya PBX drop down menu.
f. Click Next.
Note:
The installer displays a message to install Zulu-8.23.0.4 JDK 8.0.144.
g. Click Yes to install Zulu-8.23.0.4 JDK 8.0.144.
h. Select the folder where the java security files are located and click OK.
i. Select AACC from the ACD drop down menu.
j. If you are using the POM dialer, select POM from the Dialer drop down menu.
7. Click Next.8. (Optional) If you select the Custom option in the Custom Setup screen, do the following:
a. In the Web Application section, select the Web and SysAdmin check boxes.
b. In the Database section, select the Database check box.
c. In the Utilities section, select the Log Manager, Process Checklist, Packet Sniffer,and Screen Capture check boxes.
d. In the Adapters section, select the Avaya adapter, AES adapter, and AACCNetadapter check boxes.
Note:
If you are using the POM dialer, select the POM adapter check box.
e. In the Recorder section, select the Recorder, Unified Messaging, and MediaManager check boxes.
f. Click Next.
Note:
The installer displays a message to install Zulu-8.23.0.4 JDK 8.0.144.
g. Click Yes to install Zulu-8.23.0.4 JDK 8.0.144.
h. Select the folder where the java security files are located and click OK.
9. Click Next.10. On the Configuration screen, configure the required fields.
11. Click Next.12. On the Database Settings screen, configure the required fields.
13. Click Next.
The system displays the Installation Summary screen. You can click Back to review orchange any installation setting.
Deployment
November 2017 Deploying Harmony Workforce Optimization with Avaya Aura® CommunicationManager and Avaya Aura® Contact Center 86Comments on this document? [email protected]
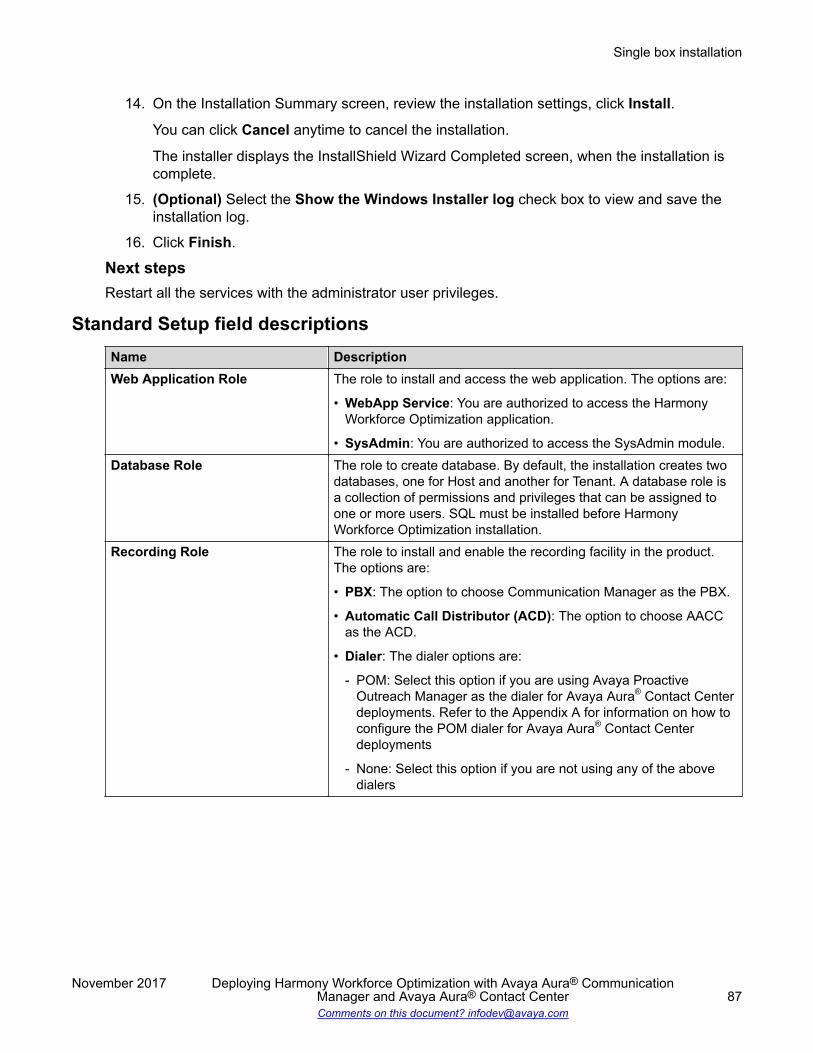
14. On the Installation Summary screen, review the installation settings, click Install.
You can click Cancel anytime to cancel the installation.
The installer displays the InstallShield Wizard Completed screen, when the installation iscomplete.
15. (Optional) Select the Show the Windows Installer log check box to view and save theinstallation log.
16. Click Finish.
Next stepsRestart all the services with the administrator user privileges.
Standard Setup field descriptionsName DescriptionWeb Application Role The role to install and access the web application. The options are:
• WebApp Service: You are authorized to access the HarmonyWorkforce Optimization application.
• SysAdmin: You are authorized to access the SysAdmin module.Database Role The role to create database. By default, the installation creates two
databases, one for Host and another for Tenant. A database role isa collection of permissions and privileges that can be assigned toone or more users. SQL must be installed before HarmonyWorkforce Optimization installation.
Recording Role The role to install and enable the recording facility in the product.The options are:
• PBX: The option to choose Communication Manager as the PBX.
• Automatic Call Distributor (ACD): The option to choose AACCas the ACD.
• Dialer: The dialer options are:
- POM: Select this option if you are using Avaya ProactiveOutreach Manager as the dialer for Avaya Aura® Contact Centerdeployments. Refer to the Appendix A for information on how toconfigure the POM dialer for Avaya Aura® Contact Centerdeployments
- None: Select this option if you are not using any of the abovedialers
Single box installation
November 2017 Deploying Harmony Workforce Optimization with Avaya Aura® CommunicationManager and Avaya Aura® Contact Center 87Comments on this document? [email protected]
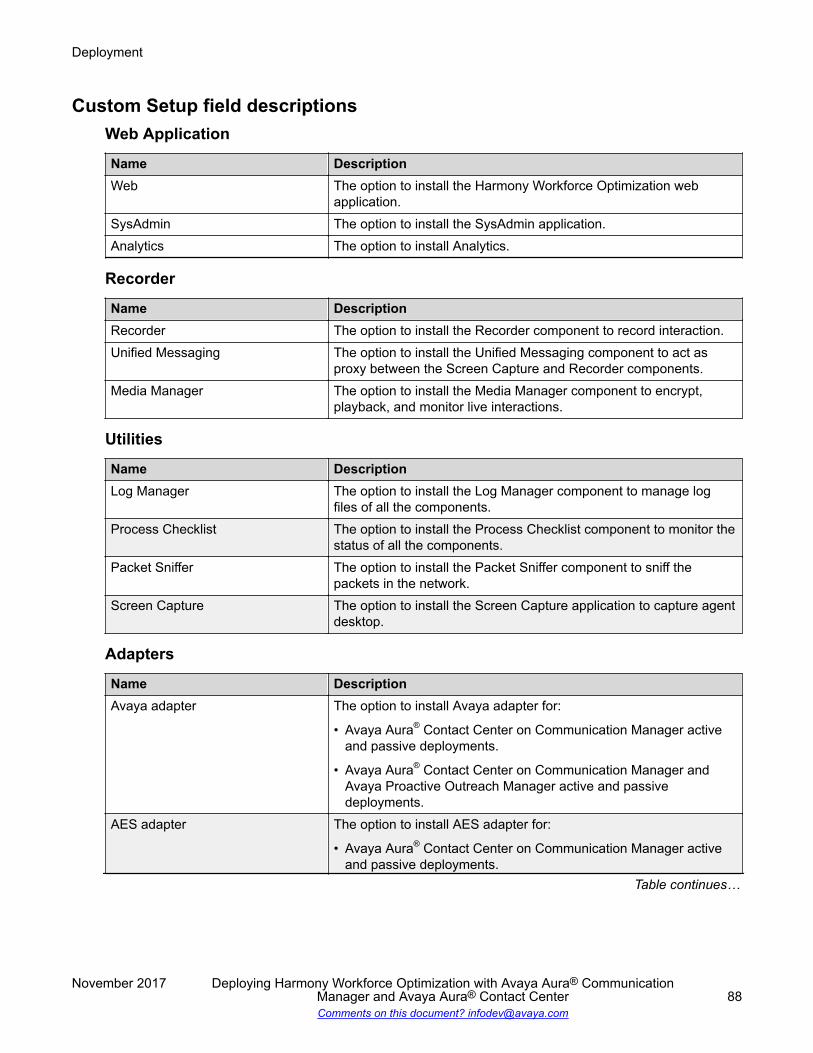
Custom Setup field descriptionsWeb Application
Name DescriptionWeb The option to install the Harmony Workforce Optimization web
application.SysAdmin The option to install the SysAdmin application.Analytics The option to install Analytics.
Recorder
Name DescriptionRecorder The option to install the Recorder component to record interaction.Unified Messaging The option to install the Unified Messaging component to act as
proxy between the Screen Capture and Recorder components.Media Manager The option to install the Media Manager component to encrypt,
playback, and monitor live interactions.
Utilities
Name DescriptionLog Manager The option to install the Log Manager component to manage log
files of all the components.Process Checklist The option to install the Process Checklist component to monitor the
status of all the components.Packet Sniffer The option to install the Packet Sniffer component to sniff the
packets in the network.Screen Capture The option to install the Screen Capture application to capture agent
desktop.
Adapters
Name DescriptionAvaya adapter The option to install Avaya adapter for:
• Avaya Aura® Contact Center on Communication Manager activeand passive deployments.
• Avaya Aura® Contact Center on Communication Manager andAvaya Proactive Outreach Manager active and passivedeployments.
AES adapter The option to install AES adapter for:
• Avaya Aura® Contact Center on Communication Manager activeand passive deployments.
Table continues…
Deployment
November 2017 Deploying Harmony Workforce Optimization with Avaya Aura® CommunicationManager and Avaya Aura® Contact Center 88Comments on this document? [email protected]
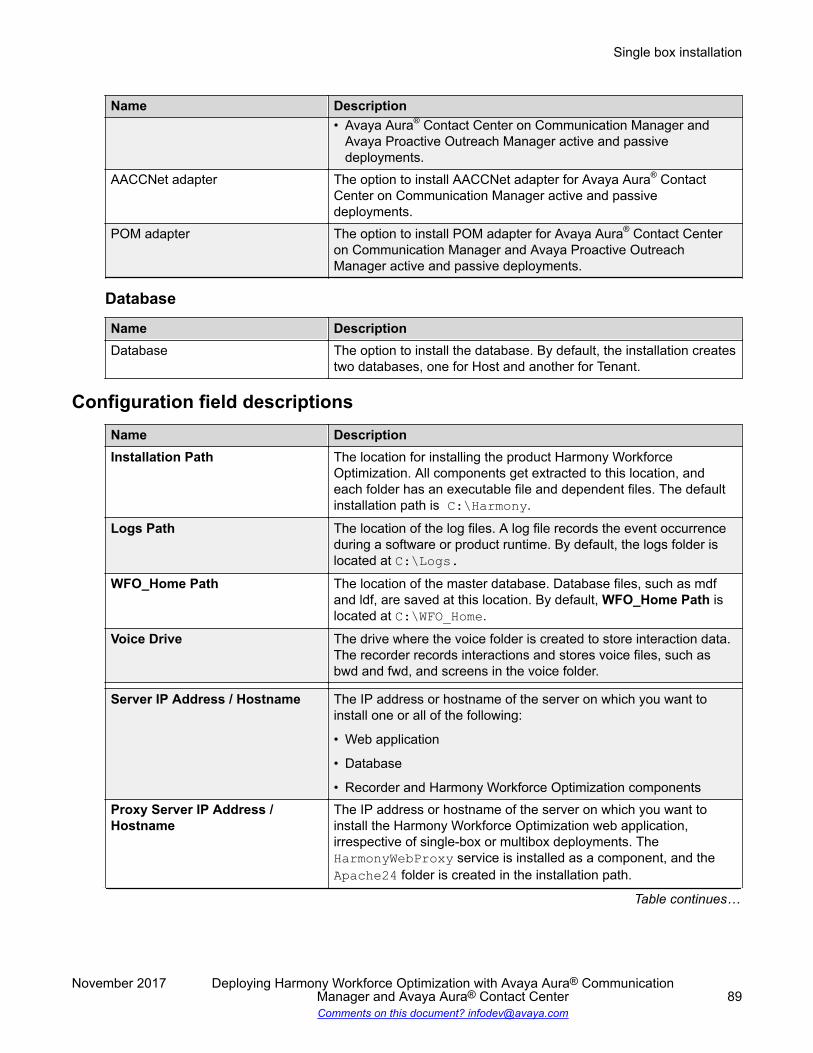
Name Description• Avaya Aura® Contact Center on Communication Manager and
Avaya Proactive Outreach Manager active and passivedeployments.
AACCNet adapter The option to install AACCNet adapter for Avaya Aura® ContactCenter on Communication Manager active and passivedeployments.
POM adapter The option to install POM adapter for Avaya Aura® Contact Centeron Communication Manager and Avaya Proactive OutreachManager active and passive deployments.
Database
Name DescriptionDatabase The option to install the database. By default, the installation creates
two databases, one for Host and another for Tenant.
Configuration field descriptionsName DescriptionInstallation Path The location for installing the product Harmony Workforce
Optimization. All components get extracted to this location, andeach folder has an executable file and dependent files. The defaultinstallation path is C:\Harmony.
Logs Path The location of the log files. A log file records the event occurrenceduring a software or product runtime. By default, the logs folder islocated at C:\Logs.
WFO_Home Path The location of the master database. Database files, such as mdfand ldf, are saved at this location. By default, WFO_Home Path islocated at C:\WFO_Home.
Voice Drive The drive where the voice folder is created to store interaction data.The recorder records interactions and stores voice files, such asbwd and fwd, and screens in the voice folder.
Server IP Address / Hostname The IP address or hostname of the server on which you want toinstall one or all of the following:
• Web application
• Database
• Recorder and Harmony Workforce Optimization componentsProxy Server IP Address /Hostname
The IP address or hostname of the server on which you want toinstall the Harmony Workforce Optimization web application,irrespective of single-box or multibox deployments. TheHarmonyWebProxy service is installed as a component, and theApache24 folder is created in the installation path.
Table continues…
Single box installation
November 2017 Deploying Harmony Workforce Optimization with Avaya Aura® CommunicationManager and Avaya Aura® Contact Center 89Comments on this document? [email protected]

Name DescriptionProxy Port Number The port number of the proxy server that enables web login and call
playback. The default port is 80. Changing the port number requireschange in the parameter configurations for components such asRecorder, Media Manager, and Messaging.
Note:
Do not use port number 443.Server FQDN The fully qualified domain name of the server on which you want to
install one or all of the following:
• Web application
• Database
• Recorder and Harmony Workforce Optimization components
Note:
For IP-based installation, ensure that you configure FQDN withan IP address. Else, in multibox deployments, you willencounter issues when importing SSL certificates.
Database Settings field descriptionsName DescriptionDatabase Server IP Address / Hostname The IP address or hostname of the server where
you are creating the database. You can also point toan existing database.
Named Instance The option to install the database using the namedinstance mode. You can point to a named instanceof the SQL installation and enter the name of theinstance.
Port Number The port number of the server where the databaseis installed. The default port number is 1433.
Failover Database IP Address / Hostname The IP address or hostname of the server that actsas a secondary database server when the primarydatabase server fails.
Windows authentication credentials of currentuser
The option to install the database using WindowsAuthentication credentials of the current user.
You must have a Windows domain account for theHarmony Workforce Optimization applicationservices.
SQL server authentication credentials The option to install the database using SQL serverauthentication. You can connect to the database or
Table continues…
Deployment
November 2017 Deploying Harmony Workforce Optimization with Avaya Aura® CommunicationManager and Avaya Aura® Contact Center 90Comments on this document? [email protected]
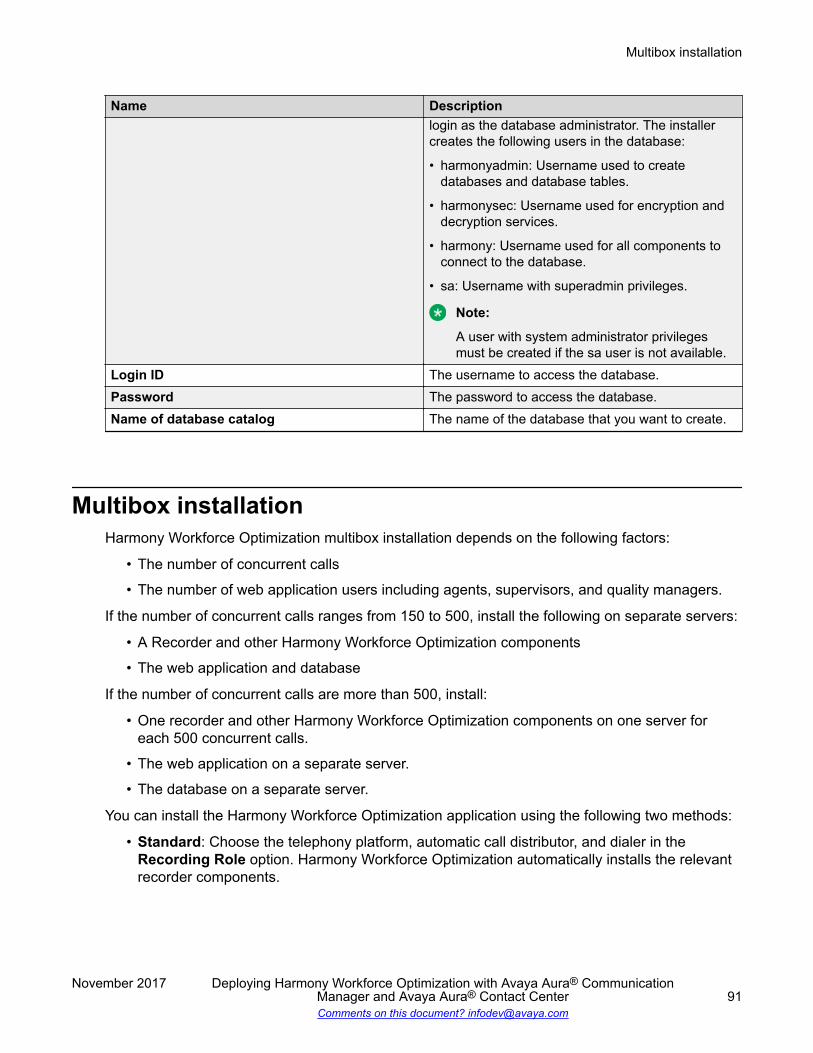
Name Descriptionlogin as the database administrator. The installercreates the following users in the database:
• harmonyadmin: Username used to createdatabases and database tables.
• harmonysec: Username used for encryption anddecryption services.
• harmony: Username used for all components toconnect to the database.
• sa: Username with superadmin privileges.
Note:
A user with system administrator privilegesmust be created if the sa user is not available.
Login ID The username to access the database.Password The password to access the database.Name of database catalog The name of the database that you want to create.
Multibox installationHarmony Workforce Optimization multibox installation depends on the following factors:
• The number of concurrent calls
• The number of web application users including agents, supervisors, and quality managers.
If the number of concurrent calls ranges from 150 to 500, install the following on separate servers:
• A Recorder and other Harmony Workforce Optimization components
• The web application and database
If the number of concurrent calls are more than 500, install:
• One recorder and other Harmony Workforce Optimization components on one server foreach 500 concurrent calls.
• The web application on a separate server.
• The database on a separate server.
You can install the Harmony Workforce Optimization application using the following two methods:
• Standard: Choose the telephony platform, automatic call distributor, and dialer in theRecording Role option. Harmony Workforce Optimization automatically installs the relevantrecorder components.
Multibox installation
November 2017 Deploying Harmony Workforce Optimization with Avaya Aura® CommunicationManager and Avaya Aura® Contact Center 91Comments on this document? [email protected]

Table 8: If the number of concurrent calls range from 150 to 500
Server Role NotesServer 1 - Web Application Role
- Database Role
Installs the web application anddatabase.
Server 2 - Recording Role Installs the Recorder and otherHarmony WorkforceOptimization components.
Table 9: If the number of concurrent calls are more than 500
Server Role NotesServer 1 - Database Role Installs the database.Server 2 - Web Application Role Installs the web application.Server 3 - Recording Role For each 500 concurrent calls,
install a new recorder server.
Installs the Recorder and otherHarmony WorkforceOptimization components.
• Custom: Choose individual components that you want to install for any deployment.
Table 10: If the number of concurrent calls range from 150 to 500
Server Component NotesServer 1 - Web
- Database
Installs the web application anddatabase.
Server 2 - Recorder
- Utilities
- Adapters
Installs the Recorder, Utilities,and Adapters.
Table 11: If the number of concurrent calls are more than 500
Server Role NotesServer 1 - Database Install the database.Server 2 - Web Install the web application.Server 3 - Recorder
- Utilities
- Adapters
For each 500 concurrent calls,install a new recorder server.
Installs the Recorder, Utilities,and Adapters.
Related linksInstalling Harmony Workforce Optimization on multiple servers on page 93
Deployment
November 2017 Deploying Harmony Workforce Optimization with Avaya Aura® CommunicationManager and Avaya Aura® Contact Center 92Comments on this document? [email protected]

Installing Harmony Workforce Optimization on multiple serversBefore you begin
• Install SQL 2012/2016 standard edition with the latest service pack and ensure the SQLagent is running.
• Install third-party software utilities.
Procedure1. Run the Harmony_5_2_2.exe file as an administrator.
Note:
The installer displays a message to install Microsoft Visual C++ 2015 Update 3Redistributable Package (x64), Microsoft ODBC Driver 13 for SQL Server, MicrosoftCommand Line Utilities 13.1 for SQL Server, and Microsoft SQL Server 2012 NativeClient (x64) 11–4. The message is not displayed if the software is already installed.
Click Install.2. On the Welcome screen, click Next.3. On the License Agreement screen, select I accept the terms in the license agreement,
and then click Next.4. On the Setup Type screen, select one of the following:
• Standard• Custom
5. Click Next.6. (Optional) If you select the Standard option in the Standard Setup screen, do the
following:
a. Select the Web Application Role: check box.
b. Select the Web and SysAdmin check boxes.
c. Select the Database Role check box.
d. Select the Recording Role check box.
e. Select the Avaya check box and then select Communication Manager from theSelect Avaya PBX drop down menu.
f. Click Next.
Note:
The installer displays a message to install Zulu-8.23.0.4 JDK 8.0.144.
g. Click Yes to install Zulu-8.23.0.4 JDK 8.0.144.
h. Select the folder where the java security files are located and click OK.
Multibox installation
November 2017 Deploying Harmony Workforce Optimization with Avaya Aura® CommunicationManager and Avaya Aura® Contact Center 93Comments on this document? [email protected]

i. Select AACC from the ACD drop down menu.
j. If you are using the POM dialer, select the Dialer check box, and then select POM.
k. If you are using the POM dialer, select POM from the Dialer drop down menu.
7. Click Next.8. (Optional) If you select the Custom option in the Custom Setup screen, do the following:
a. In the Web Application section, select the Web and SysAdmin check boxes.
b. In the Database section, select the Database check box.
c. In the Utilities section, select the Log Manager, Process Checklist, Packet Sniffer,and Screen Capture check boxes.
d. In the Adapters section, select the Avaya adapter, AES adapter, and AACCNetadapter check boxes.
Note:
If you are using the POM dialer, select the POM adapter check box.
e. In the Recorder section, select the Recorder, Unified Messaging, and MediaManager check boxes.
f. Click Next.
Note:
The installer displays a message to install Zulu-8.23.0.4 JDK 8.0.144.
g. Click Yes to install Zulu-8.23.0.4 JDK 8.0.144.
h. Select the folder where the java security files are located and click OK.
9. Click Next.10. On the Configuration screen, configure the required fields.
11. Click Next.12. On the Database Settings screen, configure the required fields.
13. Click Next.
The system displays the Installation Summary screen. You can click Back to review orchange any installation setting.
14. On the Installation Summary screen, review the installation settings, click Install.
You can click Cancel anytime to cancel the installation.
The installer displays the InstallShield Wizard Completed screen, when the installation iscomplete.
15. (Optional) Select the Show the Windows Installer log check box to view and save theinstallation log.
16. Click Finish.
Deployment
November 2017 Deploying Harmony Workforce Optimization with Avaya Aura® CommunicationManager and Avaya Aura® Contact Center 94Comments on this document? [email protected]
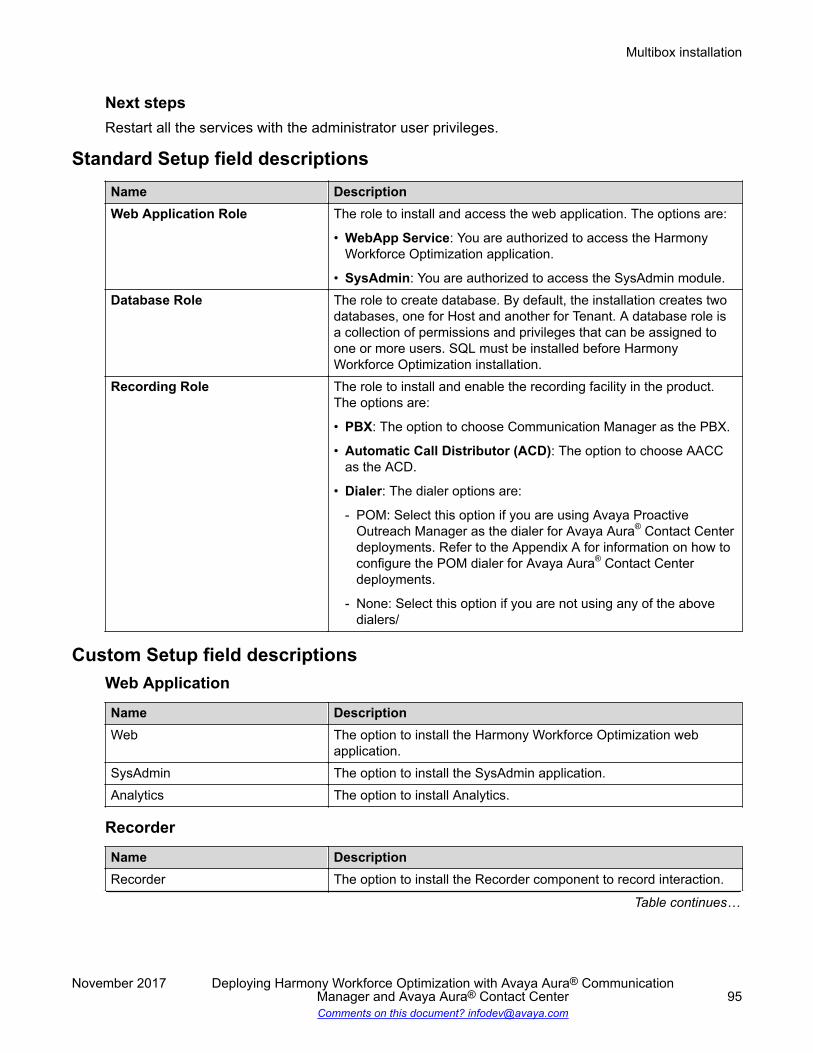
Next stepsRestart all the services with the administrator user privileges.
Standard Setup field descriptionsName DescriptionWeb Application Role The role to install and access the web application. The options are:
• WebApp Service: You are authorized to access the HarmonyWorkforce Optimization application.
• SysAdmin: You are authorized to access the SysAdmin module.Database Role The role to create database. By default, the installation creates two
databases, one for Host and another for Tenant. A database role isa collection of permissions and privileges that can be assigned toone or more users. SQL must be installed before HarmonyWorkforce Optimization installation.
Recording Role The role to install and enable the recording facility in the product.The options are:
• PBX: The option to choose Communication Manager as the PBX.
• Automatic Call Distributor (ACD): The option to choose AACCas the ACD.
• Dialer: The dialer options are:
- POM: Select this option if you are using Avaya ProactiveOutreach Manager as the dialer for Avaya Aura® Contact Centerdeployments. Refer to the Appendix A for information on how toconfigure the POM dialer for Avaya Aura® Contact Centerdeployments.
- None: Select this option if you are not using any of the abovedialers/
Custom Setup field descriptionsWeb Application
Name DescriptionWeb The option to install the Harmony Workforce Optimization web
application.SysAdmin The option to install the SysAdmin application.Analytics The option to install Analytics.
Recorder
Name DescriptionRecorder The option to install the Recorder component to record interaction.
Table continues…
Multibox installation
November 2017 Deploying Harmony Workforce Optimization with Avaya Aura® CommunicationManager and Avaya Aura® Contact Center 95Comments on this document? [email protected]
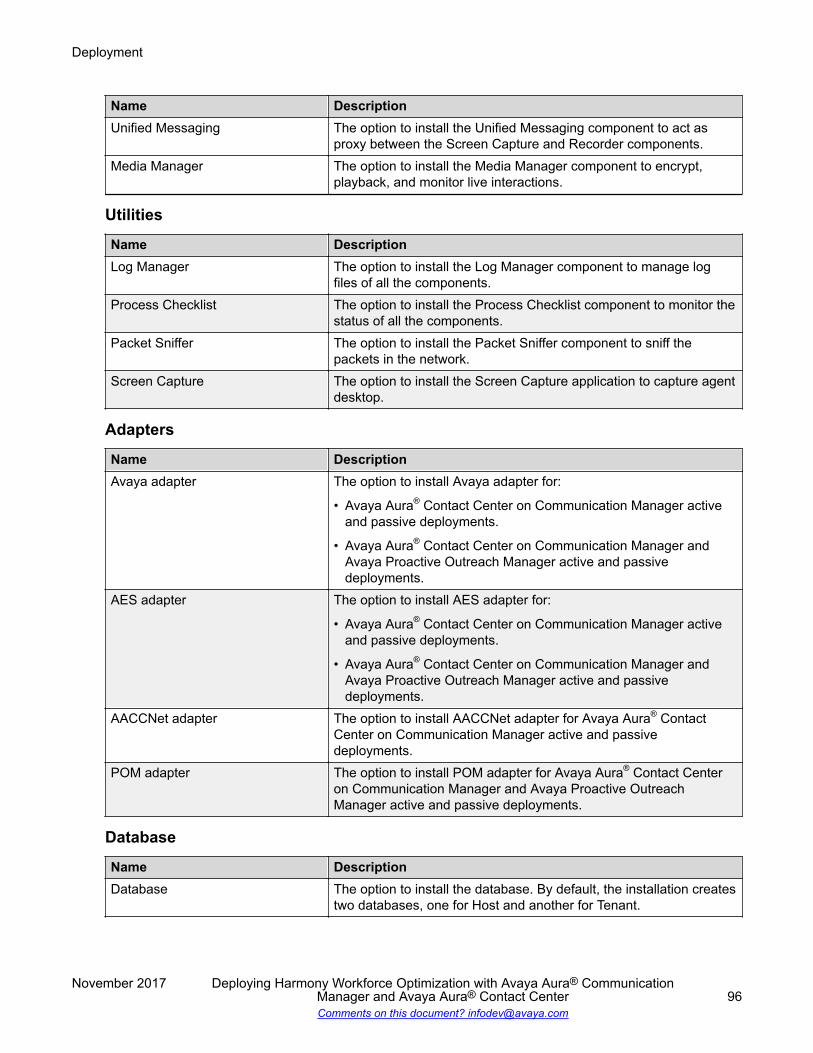
Name DescriptionUnified Messaging The option to install the Unified Messaging component to act as
proxy between the Screen Capture and Recorder components.Media Manager The option to install the Media Manager component to encrypt,
playback, and monitor live interactions.
Utilities
Name DescriptionLog Manager The option to install the Log Manager component to manage log
files of all the components.Process Checklist The option to install the Process Checklist component to monitor the
status of all the components.Packet Sniffer The option to install the Packet Sniffer component to sniff the
packets in the network.Screen Capture The option to install the Screen Capture application to capture agent
desktop.
Adapters
Name DescriptionAvaya adapter The option to install Avaya adapter for:
• Avaya Aura® Contact Center on Communication Manager activeand passive deployments.
• Avaya Aura® Contact Center on Communication Manager andAvaya Proactive Outreach Manager active and passivedeployments.
AES adapter The option to install AES adapter for:
• Avaya Aura® Contact Center on Communication Manager activeand passive deployments.
• Avaya Aura® Contact Center on Communication Manager andAvaya Proactive Outreach Manager active and passivedeployments.
AACCNet adapter The option to install AACCNet adapter for Avaya Aura® ContactCenter on Communication Manager active and passivedeployments.
POM adapter The option to install POM adapter for Avaya Aura® Contact Centeron Communication Manager and Avaya Proactive OutreachManager active and passive deployments.
Database
Name DescriptionDatabase The option to install the database. By default, the installation creates
two databases, one for Host and another for Tenant.
Deployment
November 2017 Deploying Harmony Workforce Optimization with Avaya Aura® CommunicationManager and Avaya Aura® Contact Center 96Comments on this document? [email protected]
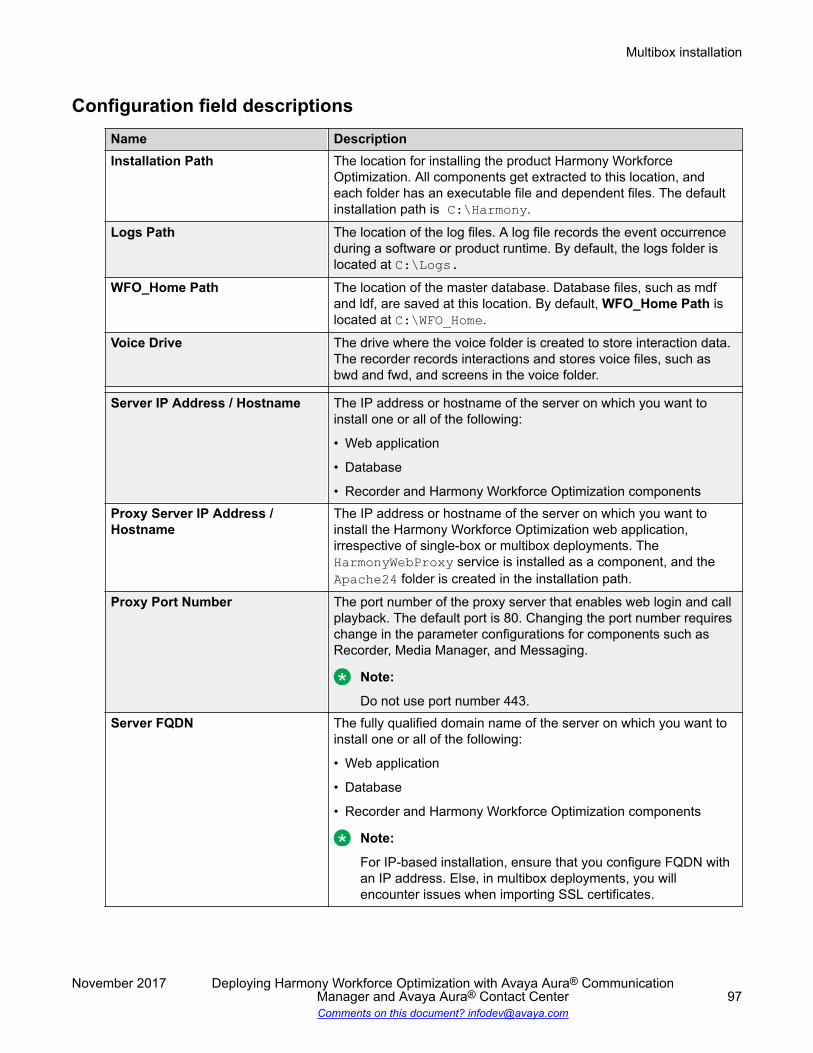
Configuration field descriptionsName DescriptionInstallation Path The location for installing the product Harmony Workforce
Optimization. All components get extracted to this location, andeach folder has an executable file and dependent files. The defaultinstallation path is C:\Harmony.
Logs Path The location of the log files. A log file records the event occurrenceduring a software or product runtime. By default, the logs folder islocated at C:\Logs.
WFO_Home Path The location of the master database. Database files, such as mdfand ldf, are saved at this location. By default, WFO_Home Path islocated at C:\WFO_Home.
Voice Drive The drive where the voice folder is created to store interaction data.The recorder records interactions and stores voice files, such asbwd and fwd, and screens in the voice folder.
Server IP Address / Hostname The IP address or hostname of the server on which you want toinstall one or all of the following:
• Web application
• Database
• Recorder and Harmony Workforce Optimization componentsProxy Server IP Address /Hostname
The IP address or hostname of the server on which you want toinstall the Harmony Workforce Optimization web application,irrespective of single-box or multibox deployments. TheHarmonyWebProxy service is installed as a component, and theApache24 folder is created in the installation path.
Proxy Port Number The port number of the proxy server that enables web login and callplayback. The default port is 80. Changing the port number requireschange in the parameter configurations for components such asRecorder, Media Manager, and Messaging.
Note:
Do not use port number 443.Server FQDN The fully qualified domain name of the server on which you want to
install one or all of the following:
• Web application
• Database
• Recorder and Harmony Workforce Optimization components
Note:
For IP-based installation, ensure that you configure FQDN withan IP address. Else, in multibox deployments, you willencounter issues when importing SSL certificates.
Multibox installation
November 2017 Deploying Harmony Workforce Optimization with Avaya Aura® CommunicationManager and Avaya Aura® Contact Center 97Comments on this document? [email protected]

Database Settings field descriptionsName DescriptionDatabase Server IP Address / Hostname The IP address or hostname of the server where
you are creating the database. You can also point toan existing database.
Named Instance The option to install the database using the namedinstance mode. You can point to a named instanceof the SQL installation and enter the name of theinstance.
Port Number The port number of the server where the databaseis installed. The default port number is 1433.
Failover Database IP Address / Hostname The IP address or hostname of the server that actsas a secondary database server when the primarydatabase server fails.
Windows authentication credentials of currentuser
The option to install the database using WindowsAuthentication credentials of the current user.
You must have a Windows domain account for theHarmony Workforce Optimization applicationservices.
SQL server authentication credentials The option to install the database using SQL serverauthentication. You can connect to the database orlogin as the database administrator. The installercreates the following users in the database:
• harmonyadmin: Username used to createdatabases and database tables.
• harmonysec: Username used for encryption anddecryption services.
• harmony: Username used for all components toconnect to the database.
• sa: Username with superadmin privileges.
Note:
A user with system administrator privilegesmust be created if the sa user is not available.
Login ID The username to access the database.Password The password to access the database.Name of database catalog The name of the database that you want to create.
Deployment
November 2017 Deploying Harmony Workforce Optimization with Avaya Aura® CommunicationManager and Avaya Aura® Contact Center 98Comments on this document? [email protected]
Chapter 8: Configuration
Configure browser settings for SSL
Configuring settings for Internet ExplorerAbout this taskUse this procedure to import the self-signed certificate to the browser trust store. In a multiboxdeployment with SSL support, call playback takes place only when the browser sources the self-signed certificates from the browser trust store.
Procedure1. In the address bar of your browser, type the IP address of the server where the media
manager and the recorder is installed with the https protocol.
The systems displays the following error message: There is a problem with thiswebsite's security certificate.
2. Click Continue to this website (not recommended).3. On the address bar, click Certificate error.4. In the Untrusted Certificate popup, click View certificates.
5. In the Certificate window, click Install Certificate.
6. Click Next.7. In Certificate Store, select Place all certificates in the following store, and click Browse.
8. Select the Show physical stores check box.
9. Click Trusted Root Certification Authentications and click OK.
10. Click Next.11. Click Finish.
12. In the Security Warning dialog box, click Yes.
The system displays the message: The import was successful.Next stepsRestart your Internet Explorer browser.
November 2017 Deploying Harmony Workforce Optimization with Avaya Aura® CommunicationManager and Avaya Aura® Contact Center 99Comments on this document? [email protected]

Configuring settings for Google ChromeAbout this taskUse this procedure to import the self-signed certificate to the browser trust store. In a multiboxdeployment with SSL support, call playback takes place only when the browser sources the self-signed certificates from the browser trust store.
Before you beginDownload the certificate to your local server.
Procedure1. In your browser address bar, type the IP address of the server where the media manager
and the recorder is installed with the https protocol.
The system displays an error message.
2. On the address bar, click the View site information ( ) icon.
3. Click Details.
4. Click View Certificate.
The system displays the Certificate pane.
5. Click the Details tab and click Copy to File.
6. Click Next.7. Select Base64 encoded X.509 (.CER).8. Click Next.9. Click Browse and specify the file name that you want to export to the desktop.
10. Click Save.
11. Click Next and click Finish.
The system displays the message that the export is successful.
12. Click OK.
13. Go to the saved folder and double click the certificate.
14. Click Install Certificate.
15. Click Next.16. Select the Place all certificates in the following store check box.
17. Click Browse and select Trusted Root Certification Authorities.
18. Click Next.19. Click Finish.
20. The system displays the Security dialog box.
Configuration
November 2017 Deploying Harmony Workforce Optimization with Avaya Aura® CommunicationManager and Avaya Aura® Contact Center 100Comments on this document? [email protected]
21. Click Yes.
The system displays the message that the import is successful.
22. Click OK.
Next stepsRestart your Google Chrome browser.
Configuring settings for Mozilla FirefoxAbout this taskUse this procedure to import the self-signed certificate to the browser trust store. In a multiboxdeployment with SSL support, call playback takes place only when the browser sources the self-signed certificates from the browser trust store.
Procedure1. In your browser address bar, type the IP address of the server where the media manager
and the recorder is installed with the https protocol.
The system displays an error message.
2. Do one of the following whichever is displayed for your version of Firefox:
• Click the Advanced button.
• Click I Understand the Risks.
3. Click Add Exception.
4. Click Confirm Security Exception.
The system automatically imports the root signer certificate into the Firefox certificate truststore.
5. Close all instances of Firefox in your system.
Next stepsRestart your Mozilla Firefox browser.
Configure browser settings for SSL
November 2017 Deploying Harmony Workforce Optimization with Avaya Aura® CommunicationManager and Avaya Aura® Contact Center 101Comments on this document? [email protected]
Configure log values
Modifying default values for logsAbout this taskThe logs folder contains log files that help in debugging issues. However, the default limit for thenumber of log files is 20 and the size for each log file is 40 MB.Use this procedure to change the default value for log file size and the number of the log files.
Procedure1. Go to the WFO_Home folder located at C:\WFO_Home if you have not changed the default
location during installation.
2. In the ICMCommon.properties file, update the following parameters:
• NoOfLogFiles
• LogFileSize
3. Click Save.
4. Restart the Harmony Workforce Optimization components.
Configure SysAdmin
Logging on to SysAdminAbout this taskBefore you login into the SysAdmin application for the first time, ensure you clear the browsercache.
Procedure1. Open a compatible web browser on your computer.
2. Type the IP address of SysAdmin server in the standard dotted-decimal notation.
For example, http://<ServerIP>/sysadmin/ where server IP is the IP address of theserver where the web application is installed.
3. Type your User Name and Password.
The default user name is admin and the default password is harmony1@3.
4. Click Login.
Configuration
November 2017 Deploying Harmony Workforce Optimization with Avaya Aura® CommunicationManager and Avaya Aura® Contact Center 102Comments on this document? [email protected]
If you are logging in to the SysAdmin application for the first time, change the passwordand make a note of the new password. There is no reset mechanism to change thepassword.
Importing the license fileAbout this taskWhen you login into the SysAdmin application for the first time, you must import the license (xml)file that you generated from PLDS.
Procedure1. Log in to SysAdmin for the first time.
2. On the License Configuration page, type the Mac ID of the machine on which theSysAdmin application is installed.
3. Click Browse to browse for the license file.
4. Click Import.
The License page is displayed with license details such as file name, name of the personwho imported the file, and the date and time when the file was imported.
5. On the License page, click on the license file to download it.
Configuring hosted or premise deploymentsAbout this taskWhen you login into the SysAdmin application for the first time, configure the following types ofdeployments:
• Hosted: Supports single and multi-tenancy capability.• Premise: Allows deployment from a premise infrastructure. Premise deployments also
support single and multi-tenancy capability where multiple tenants can be based out ofdifferent geographical locations within an organization.
Procedure1. Log in to SysAdmin for the first time.
2. In the Type of Deployment? section, select one of the following:
• Hosted
• Premise
3. In the Mode of Tenants? section, select one of the following:
• Single Tenant
• Multiple Tenant
Configure SysAdmin
November 2017 Deploying Harmony Workforce Optimization with Avaya Aura® CommunicationManager and Avaya Aura® Contact Center 103Comments on this document? [email protected]
4. For premise type of deployment with single tenant, enter the appropriate information in thefields.
5. Click Save.
Next stepsConfigure tenants for the following:
• Hosted type of deployment with single or multiple tenants.• Premised type of deployment with multiple tenants.
Tenant configuration field descriptionsConfigure TenantName DescriptionTenant Name The name of the tenant.Alias The tenant alias.Tenant Code The code of the tenant.Address The address of the tenant.Country The country of the tenant.State/Province The state or province of the tenant.City The city of the tenant.
Configure Tenant AdministratorName DescriptionFirst Name The first name of the tenant administrator.Last Name The last name of the tenant administrator.Username The username the tenant administrator uses to log
into the application.Email The email address of the tenant administrator.Phone The phone number of the tenant administrator.
Adding tenantsAbout this taskUse this procedure to create and manage tenants by configuring the following:
• Tenant details such as tenant name, alias, address, and status.• Contact details such as email and phone.• User management to manage tenant administrators.• License details such as available licenses, purchased licenses, edition, and license expiry
date.
Configuration
November 2017 Deploying Harmony Workforce Optimization with Avaya Aura® CommunicationManager and Avaya Aura® Contact Center 104Comments on this document? [email protected]
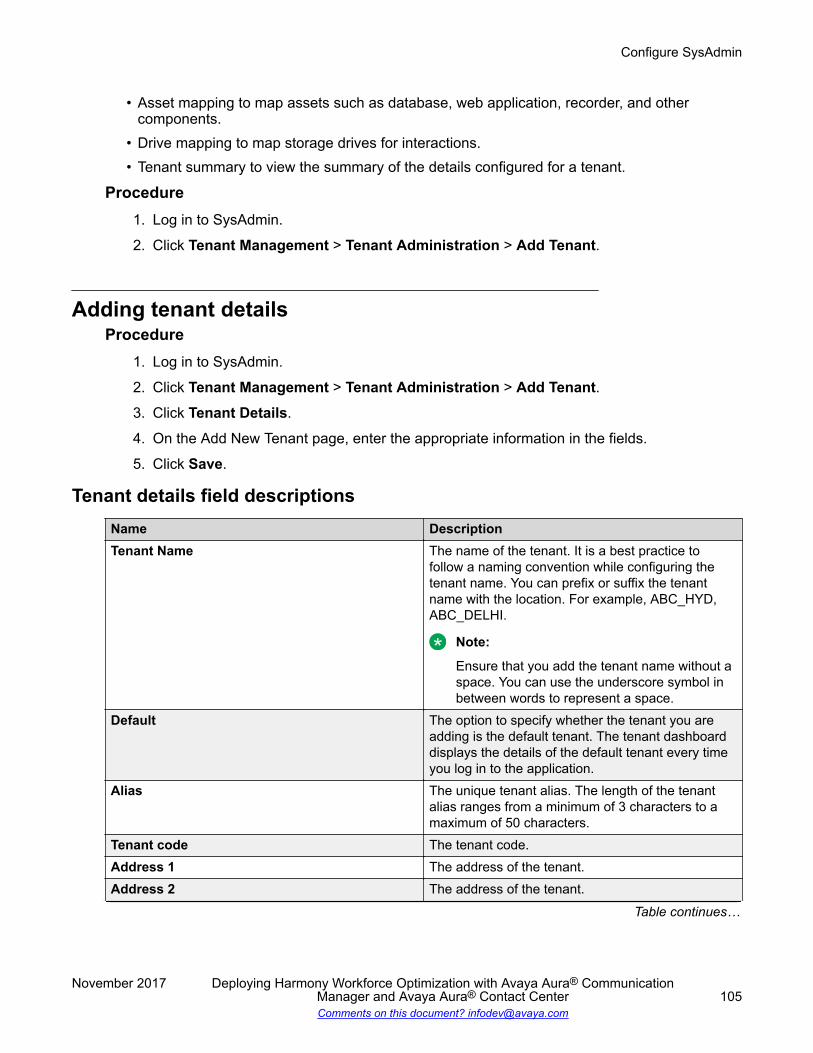
• Asset mapping to map assets such as database, web application, recorder, and othercomponents.
• Drive mapping to map storage drives for interactions.• Tenant summary to view the summary of the details configured for a tenant.
Procedure1. Log in to SysAdmin.
2. Click Tenant Management > Tenant Administration > Add Tenant.
Adding tenant detailsProcedure
1. Log in to SysAdmin.
2. Click Tenant Management > Tenant Administration > Add Tenant.3. Click Tenant Details.
4. On the Add New Tenant page, enter the appropriate information in the fields.
5. Click Save.
Tenant details field descriptionsName DescriptionTenant Name The name of the tenant. It is a best practice to
follow a naming convention while configuring thetenant name. You can prefix or suffix the tenantname with the location. For example, ABC_HYD,ABC_DELHI.
Note:
Ensure that you add the tenant name without aspace. You can use the underscore symbol inbetween words to represent a space.
Default The option to specify whether the tenant you areadding is the default tenant. The tenant dashboarddisplays the details of the default tenant every timeyou log in to the application.
Alias The unique tenant alias. The length of the tenantalias ranges from a minimum of 3 characters to amaximum of 50 characters.
Tenant code The tenant code.Address 1 The address of the tenant.Address 2 The address of the tenant.
Table continues…
Configure SysAdmin
November 2017 Deploying Harmony Workforce Optimization with Avaya Aura® CommunicationManager and Avaya Aura® Contact Center 105Comments on this document? [email protected]
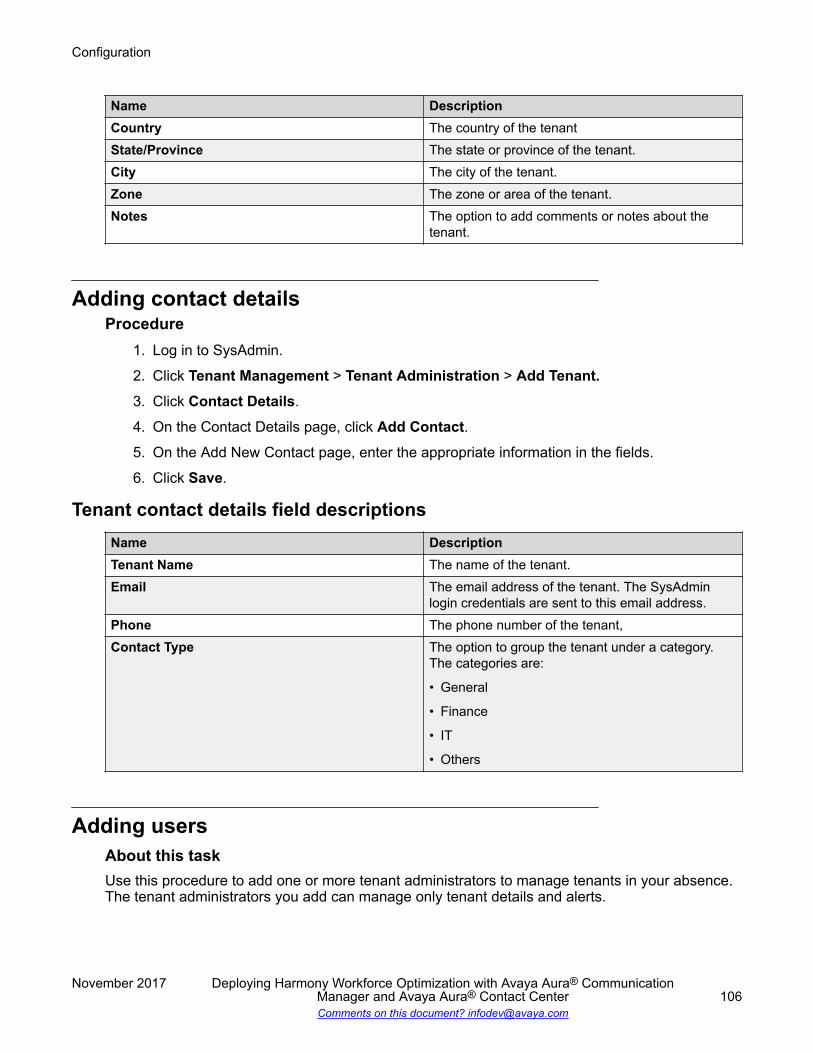
Name DescriptionCountry The country of the tenantState/Province The state or province of the tenant.City The city of the tenant.Zone The zone or area of the tenant.Notes The option to add comments or notes about the
tenant.
Adding contact detailsProcedure
1. Log in to SysAdmin.
2. Click Tenant Management > Tenant Administration > Add Tenant.3. Click Contact Details.
4. On the Contact Details page, click Add Contact.5. On the Add New Contact page, enter the appropriate information in the fields.
6. Click Save.
Tenant contact details field descriptionsName DescriptionTenant Name The name of the tenant.Email The email address of the tenant. The SysAdmin
login credentials are sent to this email address.Phone The phone number of the tenant,Contact Type The option to group the tenant under a category.
The categories are:
• General
• Finance
• IT
• Others
Adding usersAbout this taskUse this procedure to add one or more tenant administrators to manage tenants in your absence.The tenant administrators you add can manage only tenant details and alerts.
Configuration
November 2017 Deploying Harmony Workforce Optimization with Avaya Aura® CommunicationManager and Avaya Aura® Contact Center 106Comments on this document? [email protected]
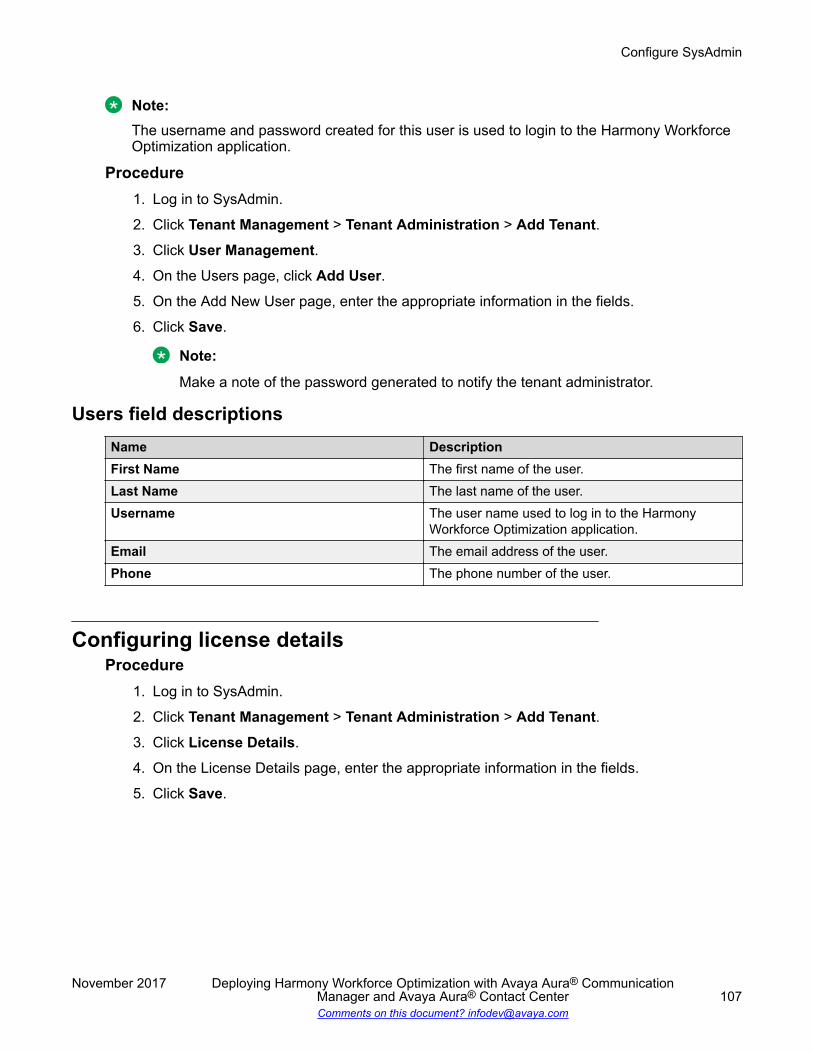
Note:The username and password created for this user is used to login to the Harmony WorkforceOptimization application.
Procedure1. Log in to SysAdmin.
2. Click Tenant Management > Tenant Administration > Add Tenant.3. Click User Management.4. On the Users page, click Add User.5. On the Add New User page, enter the appropriate information in the fields.
6. Click Save.
Note:
Make a note of the password generated to notify the tenant administrator.
Users field descriptionsName DescriptionFirst Name The first name of the user.Last Name The last name of the user.Username The user name used to log in to the Harmony
Workforce Optimization application.Email The email address of the user.Phone The phone number of the user.
Configuring license detailsProcedure
1. Log in to SysAdmin.
2. Click Tenant Management > Tenant Administration > Add Tenant.3. Click License Details.
4. On the License Details page, enter the appropriate information in the fields.
5. Click Save.
Configure SysAdmin
November 2017 Deploying Harmony Workforce Optimization with Avaya Aura® CommunicationManager and Avaya Aura® Contact Center 107Comments on this document? [email protected]
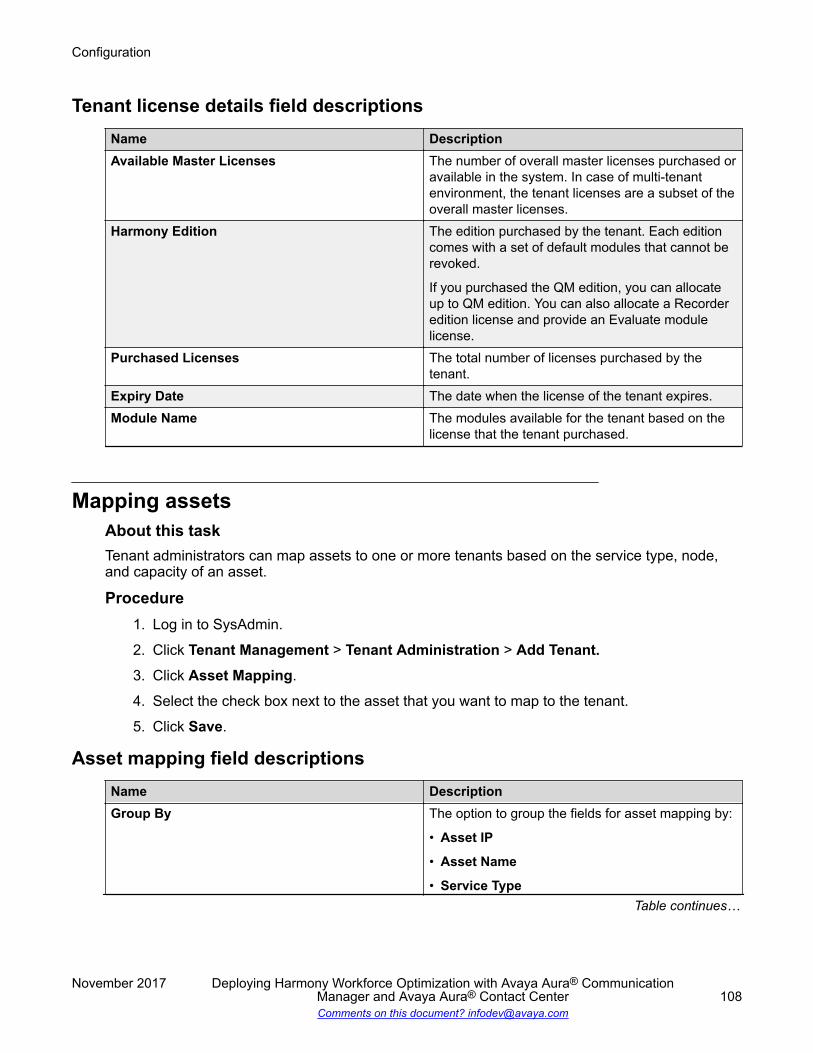
Tenant license details field descriptionsName DescriptionAvailable Master Licenses The number of overall master licenses purchased or
available in the system. In case of multi-tenantenvironment, the tenant licenses are a subset of theoverall master licenses.
Harmony Edition The edition purchased by the tenant. Each editioncomes with a set of default modules that cannot berevoked.
If you purchased the QM edition, you can allocateup to QM edition. You can also allocate a Recorderedition license and provide an Evaluate modulelicense.
Purchased Licenses The total number of licenses purchased by thetenant.
Expiry Date The date when the license of the tenant expires.Module Name The modules available for the tenant based on the
license that the tenant purchased.
Mapping assetsAbout this taskTenant administrators can map assets to one or more tenants based on the service type, node,and capacity of an asset.
Procedure1. Log in to SysAdmin.
2. Click Tenant Management > Tenant Administration > Add Tenant.3. Click Asset Mapping.
4. Select the check box next to the asset that you want to map to the tenant.
5. Click Save.
Asset mapping field descriptionsName DescriptionGroup By The option to group the fields for asset mapping by:
• Asset IP
• Asset Name
• Service TypeTable continues…
Configuration
November 2017 Deploying Harmony Workforce Optimization with Avaya Aura® CommunicationManager and Avaya Aura® Contact Center 108Comments on this document? [email protected]
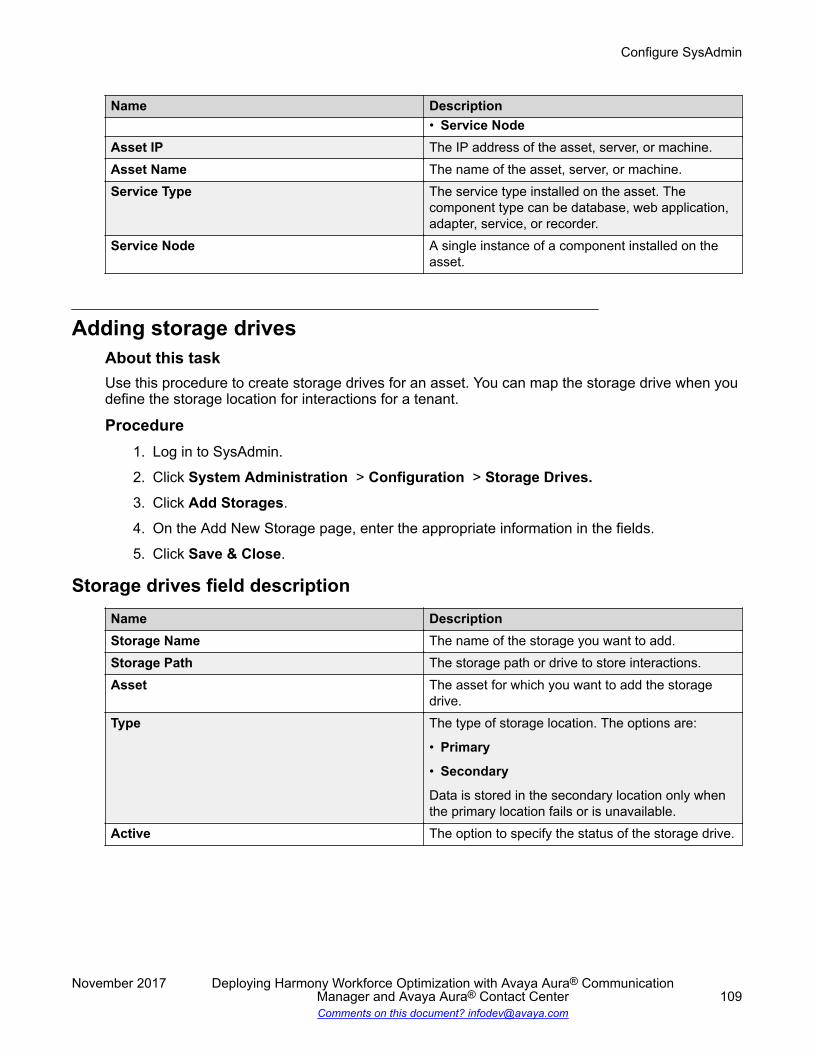
Name Description• Service Node
Asset IP The IP address of the asset, server, or machine.Asset Name The name of the asset, server, or machine.Service Type The service type installed on the asset. The
component type can be database, web application,adapter, service, or recorder.
Service Node A single instance of a component installed on theasset.
Adding storage drivesAbout this taskUse this procedure to create storage drives for an asset. You can map the storage drive when youdefine the storage location for interactions for a tenant.
Procedure1. Log in to SysAdmin.
2. Click System Administration > Configuration > Storage Drives.3. Click Add Storages.
4. On the Add New Storage page, enter the appropriate information in the fields.
5. Click Save & Close.
Storage drives field descriptionName DescriptionStorage Name The name of the storage you want to add.Storage Path The storage path or drive to store interactions.Asset The asset for which you want to add the storage
drive.Type The type of storage location. The options are:
• Primary
• Secondary
Data is stored in the secondary location only whenthe primary location fails or is unavailable.
Active The option to specify the status of the storage drive.
Configure SysAdmin
November 2017 Deploying Harmony Workforce Optimization with Avaya Aura® CommunicationManager and Avaya Aura® Contact Center 109Comments on this document? [email protected]

Configuring a persistent connection for storage drivesAbout this taskUse this procedure to configure a persistent connection between the following drives:
• Harmony Workforce Optimization• Network Attached Storage (NAS) or Storage Area Networks (SAN)
To retrieve call data, the NAS or SAN drive must be connected to the server where HarmonyWorkforce Optimization is installed.
Procedure1. On the Harmony Workforce Optimization server, click Start > Run > Task Scheduler.
The system displays the Windows Task Scheduler screen.
2. On the menu bar, click Action > Create Task.
3. On the General tab, do the following:
a. In the Name field, type a name for the task.b. Click Change User or Group and add System as the user account.c. Select the Run with highest privileges check box.
4. On the Trigger tab, do the following:
a. Click New.b. Select the Daily option.c. Select the Request task every check box and select 10 minutes from the drop-down
list.
Retain the default setting for duration of 1 day.d. Select the Stop task if it runs longer than: check box.
Retain the default setting of 3 days.e. Select the Enabled check box.f. Click OK.
5. On the Actions tab, do the following:
a. Click New.b. In the Program/script field, click Browse and navigate to the location C:\Windows
\system32\net.exec. In the Add arguments (optional) field, type use K: \\<IP address of the
NAS or SAN drive>\<storage drive>\ <password> /user:<username> /persistent:yes.
d. Click OK.
K:\ drive is created on the Harmony Workforce Optimization server and is mapped tothe NAS or SAN drive.
Configuration
November 2017 Deploying Harmony Workforce Optimization with Avaya Aura® CommunicationManager and Avaya Aura® Contact Center 110Comments on this document? [email protected]
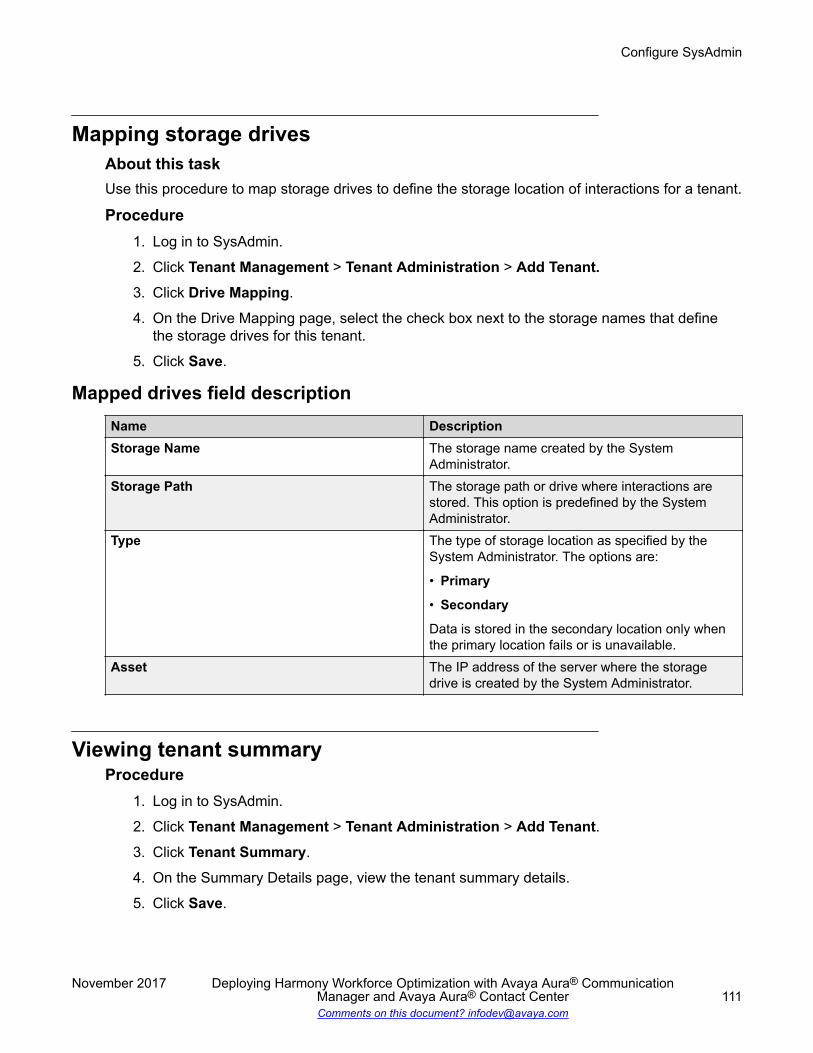
Mapping storage drivesAbout this taskUse this procedure to map storage drives to define the storage location of interactions for a tenant.
Procedure1. Log in to SysAdmin.
2. Click Tenant Management > Tenant Administration > Add Tenant.3. Click Drive Mapping.
4. On the Drive Mapping page, select the check box next to the storage names that definethe storage drives for this tenant.
5. Click Save.
Mapped drives field descriptionName DescriptionStorage Name The storage name created by the System
Administrator.Storage Path The storage path or drive where interactions are
stored. This option is predefined by the SystemAdministrator.
Type The type of storage location as specified by theSystem Administrator. The options are:
• Primary
• Secondary
Data is stored in the secondary location only whenthe primary location fails or is unavailable.
Asset The IP address of the server where the storagedrive is created by the System Administrator.
Viewing tenant summaryProcedure
1. Log in to SysAdmin.
2. Click Tenant Management > Tenant Administration > Add Tenant.3. Click Tenant Summary.
4. On the Summary Details page, view the tenant summary details.
5. Click Save.
Configure SysAdmin
November 2017 Deploying Harmony Workforce Optimization with Avaya Aura® CommunicationManager and Avaya Aura® Contact Center 111Comments on this document? [email protected]
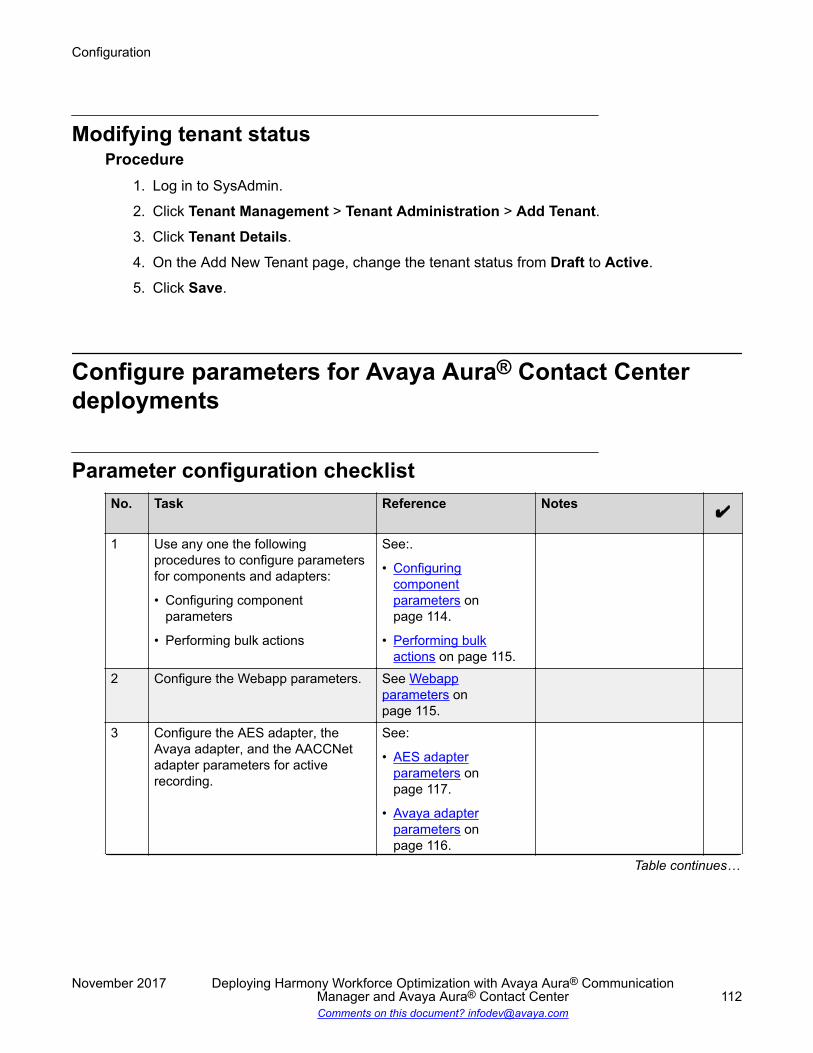
Modifying tenant statusProcedure
1. Log in to SysAdmin.
2. Click Tenant Management > Tenant Administration > Add Tenant.3. Click Tenant Details.
4. On the Add New Tenant page, change the tenant status from Draft to Active.
5. Click Save.
Configure parameters for Avaya Aura® Contact Centerdeployments
Parameter configuration checklistNo. Task Reference Notes
1 Use any one the followingprocedures to configure parametersfor components and adapters:
• Configuring componentparameters
• Performing bulk actions
See:.
• Configuringcomponentparameters onpage 114.
• Performing bulkactions on page 115.
2 Configure the Webapp parameters. See Webappparameters onpage 115.
3 Configure the AES adapter, theAvaya adapter, and the AACCNetadapter parameters for activerecording.
See:
• AES adapterparameters onpage 117.
• Avaya adapterparameters onpage 116.
Table continues…
Configuration
November 2017 Deploying Harmony Workforce Optimization with Avaya Aura® CommunicationManager and Avaya Aura® Contact Center 112Comments on this document? [email protected]

No. Task Reference Notes
• AACCNet adapterparameters onpage 118.
4 Configure the AES adapter and theAvaya adapter for passive recording.
See:
• AES adapterparameters onpage 117.
• Avaya adapterparameters onpage 116.
5 Configure the messagingparameters for on-demandrecording.
See Messagingparameters onpage 121.
6 Configure the media managerparameters for call encryption.
See Media managerparameters onpage 120.
7 Configure the recorder parameters. See RecorderParameters onpage 122.
8 Configure the following componentparameters:
• Log Manager
• Process Checklist
• Packet Sniffer
• System Administration
• Analytics
See:
• Log Managerparameters onpage 277
• Process checklistparameters onpage 278
• Packet Snifferparameters onpage 279
• System Administrationparameters onpage 281
• Analyticsparameters onpage 282
Configure parameters for Avaya Aura® Contact Center deployments
November 2017 Deploying Harmony Workforce Optimization with Avaya Aura® CommunicationManager and Avaya Aura® Contact Center 113Comments on this document? [email protected]
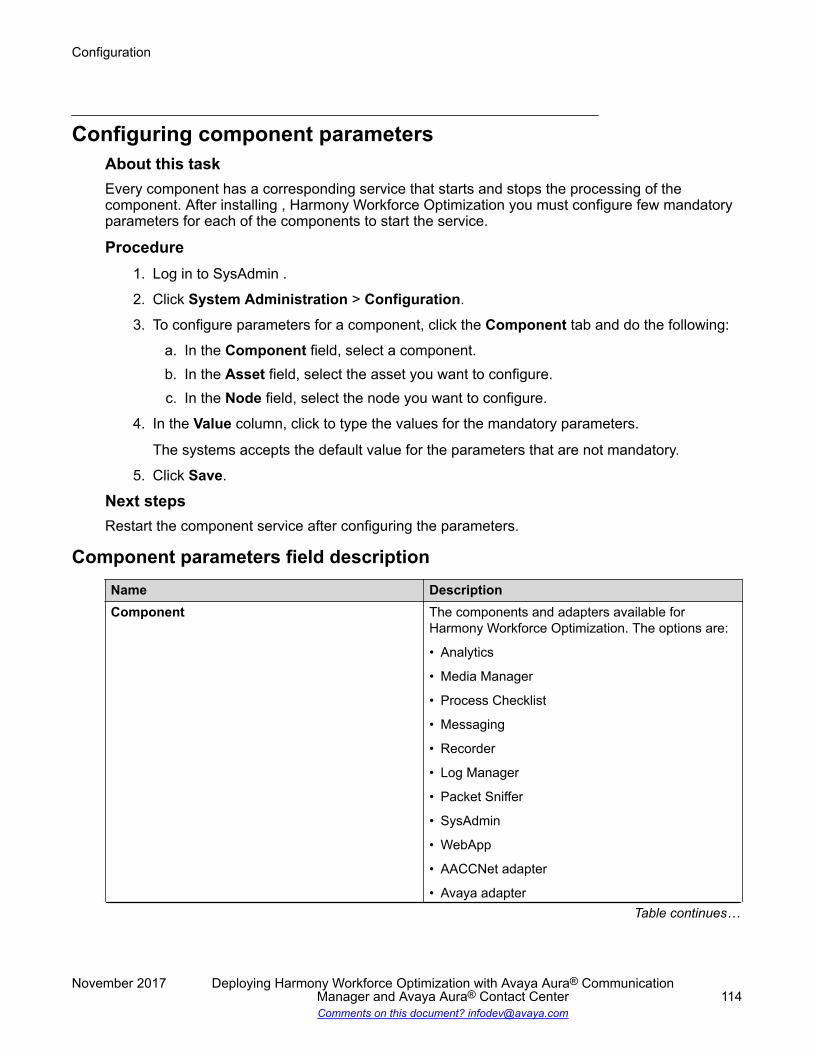
Configuring component parametersAbout this taskEvery component has a corresponding service that starts and stops the processing of thecomponent. After installing , Harmony Workforce Optimization you must configure few mandatoryparameters for each of the components to start the service.
Procedure1. Log in to SysAdmin .
2. Click System Administration > Configuration.
3. To configure parameters for a component, click the Component tab and do the following:
a. In the Component field, select a component.b. In the Asset field, select the asset you want to configure.c. In the Node field, select the node you want to configure.
4. In the Value column, click to type the values for the mandatory parameters.
The systems accepts the default value for the parameters that are not mandatory.
5. Click Save.
Next stepsRestart the component service after configuring the parameters.
Component parameters field descriptionName DescriptionComponent The components and adapters available for
Harmony Workforce Optimization. The options are:
• Analytics
• Media Manager
• Process Checklist
• Messaging
• Recorder
• Log Manager
• Packet Sniffer
• SysAdmin
• WebApp
• AACCNet adapter
• Avaya adapterTable continues…
Configuration
November 2017 Deploying Harmony Workforce Optimization with Avaya Aura® CommunicationManager and Avaya Aura® Contact Center 114Comments on this document? [email protected]
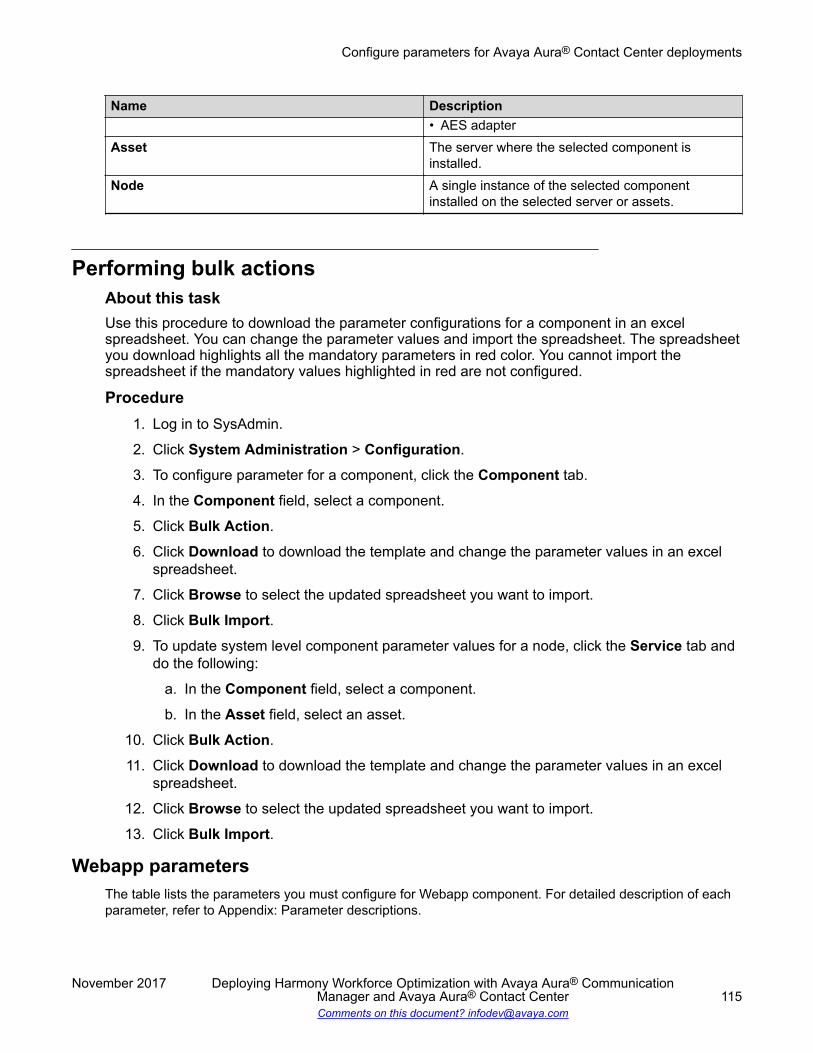
Name Description• AES adapter
Asset The server where the selected component isinstalled.
Node A single instance of the selected componentinstalled on the selected server or assets.
Performing bulk actionsAbout this taskUse this procedure to download the parameter configurations for a component in an excelspreadsheet. You can change the parameter values and import the spreadsheet. The spreadsheetyou download highlights all the mandatory parameters in red color. You cannot import thespreadsheet if the mandatory values highlighted in red are not configured.
Procedure1. Log in to SysAdmin.
2. Click System Administration > Configuration.
3. To configure parameter for a component, click the Component tab.
4. In the Component field, select a component.
5. Click Bulk Action.
6. Click Download to download the template and change the parameter values in an excelspreadsheet.
7. Click Browse to select the updated spreadsheet you want to import.
8. Click Bulk Import.9. To update system level component parameter values for a node, click the Service tab and
do the following:
a. In the Component field, select a component.
b. In the Asset field, select an asset.
10. Click Bulk Action.
11. Click Download to download the template and change the parameter values in an excelspreadsheet.
12. Click Browse to select the updated spreadsheet you want to import.
13. Click Bulk Import.
Webapp parametersThe table lists the parameters you must configure for Webapp component. For detailed description of eachparameter, refer to Appendix: Parameter descriptions.
Configure parameters for Avaya Aura® Contact Center deployments
November 2017 Deploying Harmony Workforce Optimization with Avaya Aura® CommunicationManager and Avaya Aura® Contact Center 115Comments on this document? [email protected]
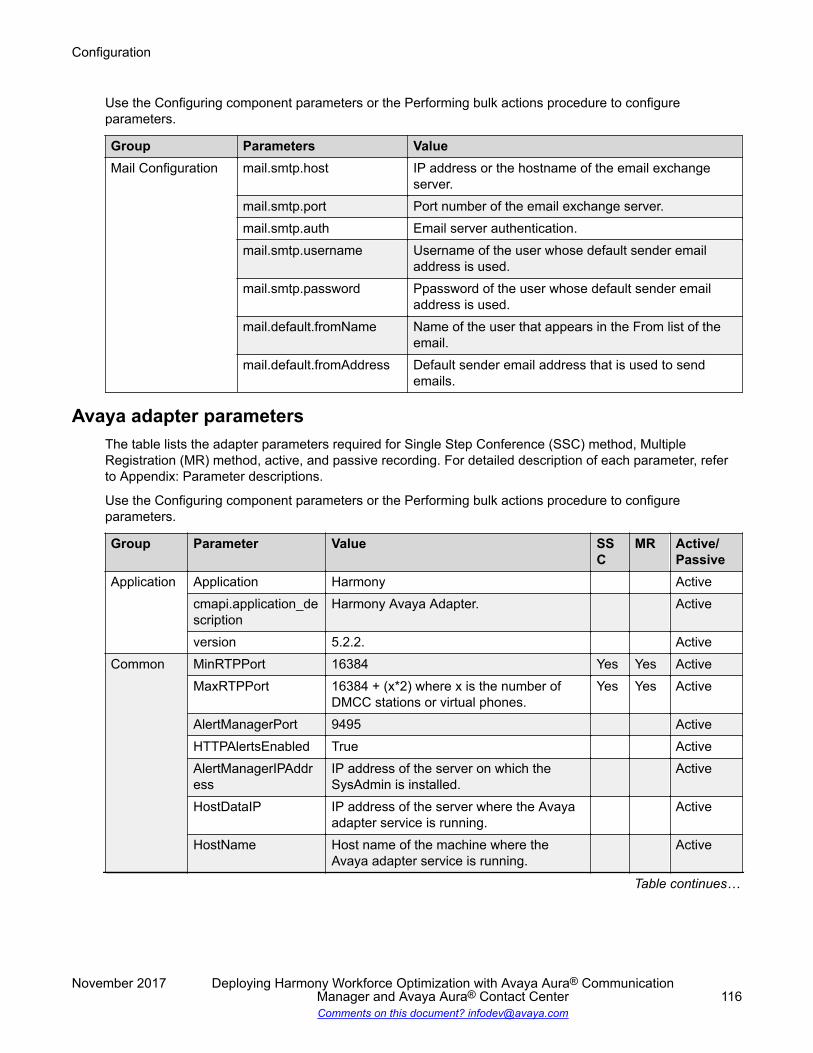
Use the Configuring component parameters or the Performing bulk actions procedure to configureparameters.
Group Parameters ValueMail Configuration mail.smtp.host IP address or the hostname of the email exchange
server.mail.smtp.port Port number of the email exchange server.mail.smtp.auth Email server authentication.mail.smtp.username Username of the user whose default sender email
address is used.mail.smtp.password Ppassword of the user whose default sender email
address is used.mail.default.fromName Name of the user that appears in the From list of the
email.mail.default.fromAddress Default sender email address that is used to send
emails.
Avaya adapter parametersThe table lists the adapter parameters required for Single Step Conference (SSC) method, MultipleRegistration (MR) method, active, and passive recording. For detailed description of each parameter, referto Appendix: Parameter descriptions.
Use the Configuring component parameters or the Performing bulk actions procedure to configureparameters.
Group Parameter Value SSC
MR Active/Passive
Application Application Harmony Activecmapi.application_description
Harmony Avaya Adapter. Active
version 5.2.2. ActiveCommon MinRTPPort 16384 Yes Yes Active
MaxRTPPort 16384 + (x*2) where x is the number ofDMCC stations or virtual phones.
Yes Yes Active
AlertManagerPort 9495 ActiveHTTPAlertsEnabled True ActiveAlertManagerIPAddress
IP address of the server on which theSysAdmin is installed.
Active
HostDataIP IP address of the server where the Avayaadapter service is running.
Active
HostName Host name of the machine where theAvaya adapter service is running.
Active
Table continues…
Configuration
November 2017 Deploying Harmony Workforce Optimization with Avaya Aura® CommunicationManager and Avaya Aura® Contact Center 116Comments on this document? [email protected]
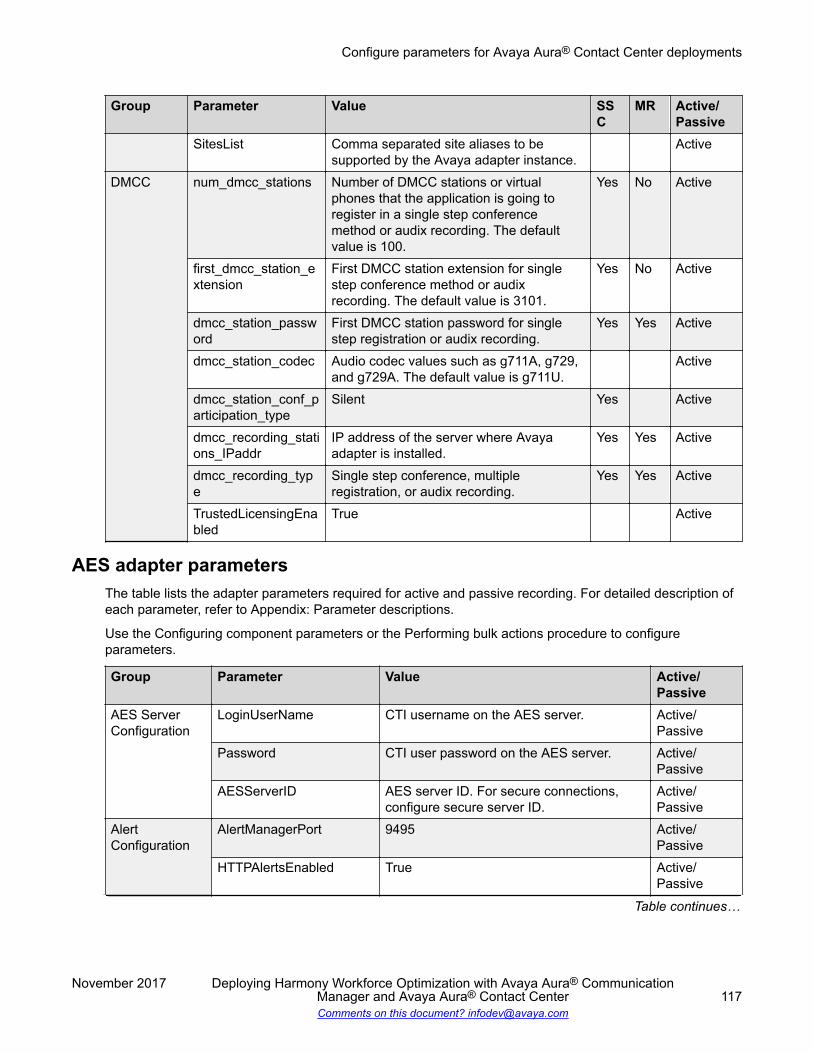
Group Parameter Value SSC
MR Active/Passive
SitesList Comma separated site aliases to besupported by the Avaya adapter instance.
Active
DMCC num_dmcc_stations Number of DMCC stations or virtualphones that the application is going toregister in a single step conferencemethod or audix recording. The defaultvalue is 100.
Yes No Active
first_dmcc_station_extension
First DMCC station extension for singlestep conference method or audixrecording. The default value is 3101.
Yes No Active
dmcc_station_password
First DMCC station password for singlestep registration or audix recording.
Yes Yes Active
dmcc_station_codec Audio codec values such as g711A, g729,and g729A. The default value is g711U.
Active
dmcc_station_conf_participation_type
Silent Yes Active
dmcc_recording_stations_IPaddr
IP address of the server where Avayaadapter is installed.
Yes Yes Active
dmcc_recording_type
Single step conference, multipleregistration, or audix recording.
Yes Yes Active
TrustedLicensingEnabled
True Active
AES adapter parametersThe table lists the adapter parameters required for active and passive recording. For detailed description ofeach parameter, refer to Appendix: Parameter descriptions.
Use the Configuring component parameters or the Performing bulk actions procedure to configureparameters.
Group Parameter Value Active/Passive
AES ServerConfiguration
LoginUserName CTI username on the AES server. Active/Passive
Password CTI user password on the AES server. Active/Passive
AESServerID AES server ID. For secure connections,configure secure server ID.
Active/Passive
AlertConfiguration
AlertManagerPort 9495 Active/Passive
HTTPAlertsEnabled True Active/Passive
Table continues…
Configure parameters for Avaya Aura® Contact Center deployments
November 2017 Deploying Harmony Workforce Optimization with Avaya Aura® CommunicationManager and Avaya Aura® Contact Center 117Comments on this document? [email protected]

Group Parameter Value Active/Passive
AlertManagerIPAddress IP address of the server on which theSysAdmin is installed.
Active/Passive
ComponentOptions
HuntGroupExtensions Skill or hunt group extensions. Active/Passive
MaxNoOfContactInstancesForVoice
1 for single contact instance and 10 formultiple contact instances. The defaultvalue is 1.
Active/Passive
SitesList Comma separated site aliases to besupported by the AES adapter instance.
Active/Passive
TrustedLicensingEnabled True Active/Passive
Debug LogLevel Trace Active/Passive
LogTSAPIEvents True Active/Passive
Queue Size MaxSizeOfDatabaseTable The maximum size of database table. Thedefault value is 1000.
Active/Passive
Server Ports AESAdapterServerPort 33012 Active/Passive
AESAdapterDynConfigPort
33019 Active/Passive
AACCNet adapter parametersThe table lists the adapter parameters required for active and passive recording. For detailed description ofeach parameter, refer to Appendix: Parameter descriptions.
Use the Configuring component parameters or the Performing bulk actions procedure to configureparameters.
Group Name Value Active/Passive
AACC Server Config CCT_Host_Name IP address of the AACC server runningthe CCT service.
Active
CCT_Port 29373 ActiveUsername Username of the Windows user to
validate the Communication ControlToolkit server.
Active
Password Password of the Windows user to validatethe Communication Control Toolkit server.
Active
CCT_CampusAlternateServerIP
IP address of the redundant AACCserver.
Active
Table continues…
Configuration
November 2017 Deploying Harmony Workforce Optimization with Avaya Aura® CommunicationManager and Avaya Aura® Contact Center 118Comments on this document? [email protected]

Group Name Value Active/Passive
CCT_GeographicAlternateServerIP
IP address of the redundant AACCserver.
Active
ComponentConfigurations
LocalhostIP IP address of the server on which theAACCNet adapter is running.
Active
Component Options Domain Domain of the Windows user to validatethe Communication Control Toolkit server.
Active
LocalhostPort 34301 ActiveContactTypesToMonitor Support for voice, email, and chat. ActiveAlertManagerPort 9495 ActiveHTTPAlertsEnabled True ActiveAlertManagerIPAddress IP address of the server on which the
SysAdmin is installed.Active
NonVoiceAgentExtensionPrefix
To configure the prefix in the agentextension for nonvoice calls. Currently,the calls to extension with prefix “x” cometo the terminal DefaultNode_CCMM. Fornonvoice calls, remove the prefix fromthat extension.
Active
SendAgentLoginMessage True ActiveSendAgentLogoutMessage
True Active
SendScreenCaptureMessage
True for nonvoice transactions. Active
SendAgentLoginForNonVoice
True for nonvoice transactions. Active
SendAgentLogoutForNonVoice
True for nonvoice transactions. Active
SendRTPInfoForNonVoice True for nonvoice transactions. ActiveSendCallHoldInfoForNonVoice
True for nonvoice transactions. Active
SendCallResumeInfoForNonVoice
True for nonvoice transactions. Active
SendContactIDForCallStitchingNonVoice
True for nonvoice transactions. Active
SendPhoneExtInfo True ActiveRecorder ValueMapping
Var8, Var9, and Var10 Business variables. ActiveSkillID Skill ID Active
Configure parameters for Avaya Aura® Contact Center deployments
November 2017 Deploying Harmony Workforce Optimization with Avaya Aura® CommunicationManager and Avaya Aura® Contact Center 119Comments on this document? [email protected]
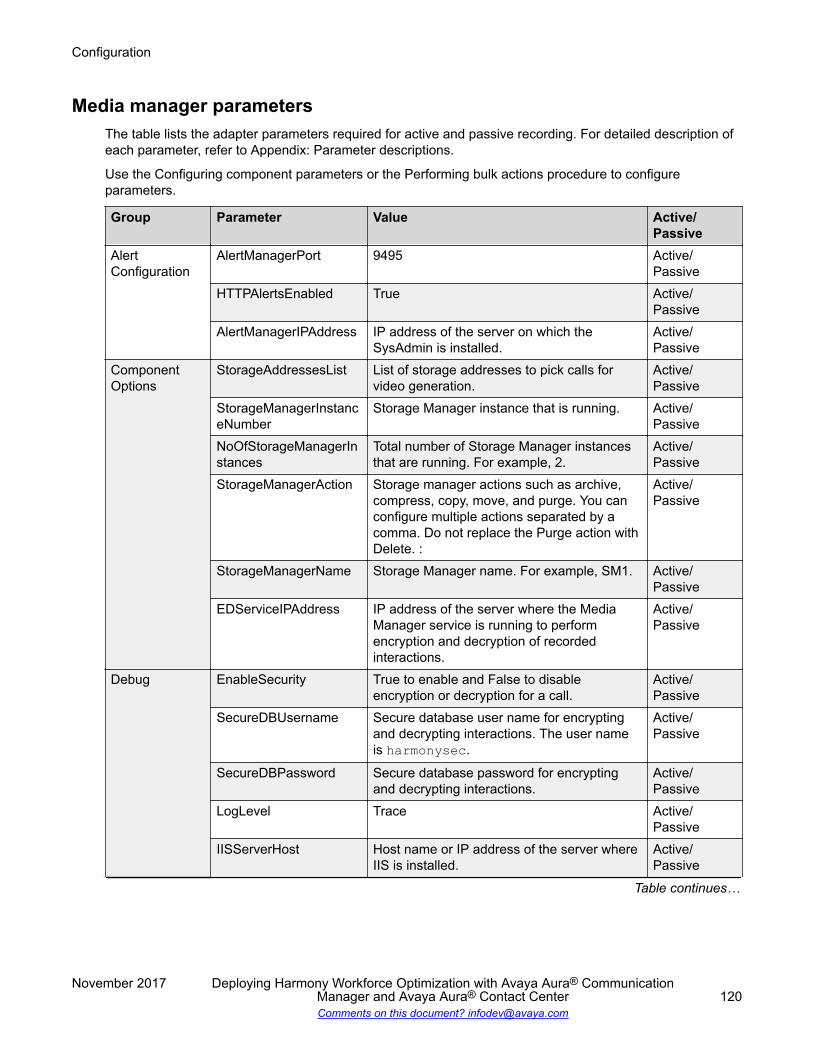
Media manager parametersThe table lists the adapter parameters required for active and passive recording. For detailed description ofeach parameter, refer to Appendix: Parameter descriptions.
Use the Configuring component parameters or the Performing bulk actions procedure to configureparameters.
Group Parameter Value Active/Passive
AlertConfiguration
AlertManagerPort 9495 Active/Passive
HTTPAlertsEnabled True Active/Passive
AlertManagerIPAddress IP address of the server on which theSysAdmin is installed.
Active/Passive
ComponentOptions
StorageAddressesList List of storage addresses to pick calls forvideo generation.
Active/Passive
StorageManagerInstanceNumber
Storage Manager instance that is running. Active/Passive
NoOfStorageManagerInstances
Total number of Storage Manager instancesthat are running. For example, 2.
Active/Passive
StorageManagerAction Storage manager actions such as archive,compress, copy, move, and purge. You canconfigure multiple actions separated by acomma. Do not replace the Purge action withDelete. :
Active/Passive
StorageManagerName Storage Manager name. For example, SM1. Active/Passive
EDServiceIPAddress IP address of the server where the MediaManager service is running to performencryption and decryption of recordedinteractions.
Active/Passive
Debug EnableSecurity True to enable and False to disableencryption or decryption for a call.
Active/Passive
SecureDBUsername Secure database user name for encryptingand decrypting interactions. The user nameis harmonysec.
Active/Passive
SecureDBPassword Secure database password for encryptingand decrypting interactions.
Active/Passive
LogLevel Trace Active/Passive
IISServerHost Host name or IP address of the server whereIIS is installed.
Active/Passive
Table continues…
Configuration
November 2017 Deploying Harmony Workforce Optimization with Avaya Aura® CommunicationManager and Avaya Aura® Contact Center 120Comments on this document? [email protected]

Group Parameter Value Active/Passive
WorkingDir Current working directory folder where therecorder stores interaction data.
Active/Passive
Server Ports IISServerPort 443 Active/Passive
StorageConfiguration
StoragePath Location to store non encrypted audio filesand screens. For example, D:\Voice.
Active/Passive
SecureStoragePath Location to store encrypted audio files andscreens. For example, D:\Secure.
Active/Passive
Messaging parametersThe table lists the adapter parameters required for active and passive recording. For detailed description ofeach parameter, refer to Appendix: Parameter descriptions.
Use the Configuring component parameters or the Performing bulk actions procedure to configureparameters.
Group Parameter Value Active/Passive
AlertConfiguration
AlertManagerPort 9495 Active/Passive
HTTPAlertsEnabled
True Active/Passive
AlertManagerIPAddress
IP address of the server on which the SysAdmin isinstalled.
Active/Passive
OceanaProvisioningConfiguration
DomainReplaceString
A dummy domain name for Call Center Elite onCommunication Manager deployments.
Active/Passive
UM_Core nat.apacheIP IP address where Apache is running for the ScreenCapture to connect to the Unified Messagingcomponent.
Active/Passive
proxyIP Host name or IP address where the web applicationserver is deployed.
Active/Passive
HarmonyRMSApplication
Harmony is the default value. For Desktop Monitorapplication, the value must be boffice.
Active/Passive
UM_Core_IP_Ports
MessagingServerIP
IP address where the Messaging service is running. Active/Passive
RecorderServerIP IP address where the recorder server is running tosend the Screen Login information to the recorder.
Active/Passive
EDServiceIPAddress
IP address where Media Manager is running toencrypt and decrypt screens.
Active/Passive
Table continues…
Configure parameters for Avaya Aura® Contact Center deployments
November 2017 Deploying Harmony Workforce Optimization with Avaya Aura® CommunicationManager and Avaya Aura® Contact Center 121Comments on this document? [email protected]
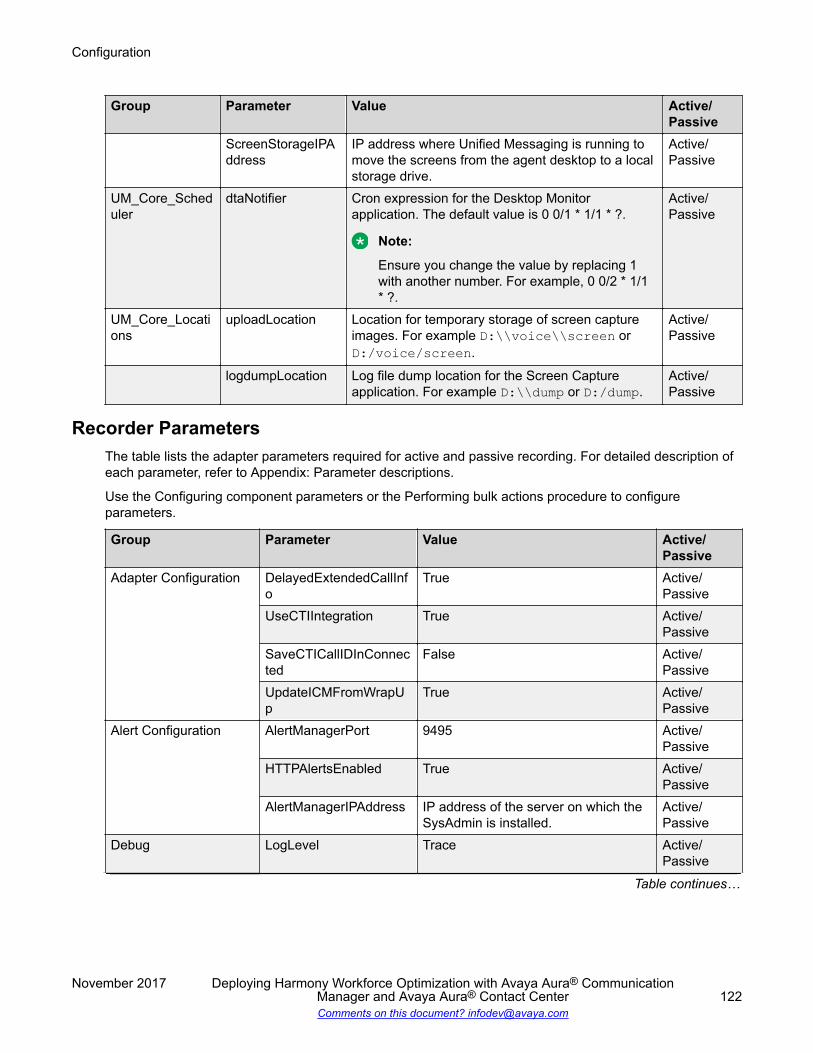
Group Parameter Value Active/Passive
ScreenStorageIPAddress
IP address where Unified Messaging is running tomove the screens from the agent desktop to a localstorage drive.
Active/Passive
UM_Core_Scheduler
dtaNotifier Cron expression for the Desktop Monitorapplication. The default value is 0 0/1 * 1/1 * ?.
Note:
Ensure you change the value by replacing 1with another number. For example, 0 0/2 * 1/1* ?.
Active/Passive
UM_Core_Locations
uploadLocation Location for temporary storage of screen captureimages. For example D:\\voice\\screen orD:/voice/screen.
Active/Passive
logdumpLocation Log file dump location for the Screen Captureapplication. For example D:\\dump or D:/dump.
Active/Passive
Recorder ParametersThe table lists the adapter parameters required for active and passive recording. For detailed description ofeach parameter, refer to Appendix: Parameter descriptions.
Use the Configuring component parameters or the Performing bulk actions procedure to configureparameters.
Group Parameter Value Active/Passive
Adapter Configuration DelayedExtendedCallInfo
True Active/Passive
UseCTIIntegration True Active/Passive
SaveCTICallIDInConnected
False Active/Passive
UpdateICMFromWrapUp
True Active/Passive
Alert Configuration AlertManagerPort 9495 Active/Passive
HTTPAlertsEnabled True Active/Passive
AlertManagerIPAddress IP address of the server on which theSysAdmin is installed.
Active/Passive
Debug LogLevel Trace Active/Passive
Table continues…
Configuration
November 2017 Deploying Harmony Workforce Optimization with Avaya Aura® CommunicationManager and Avaya Aura® Contact Center 122Comments on this document? [email protected]
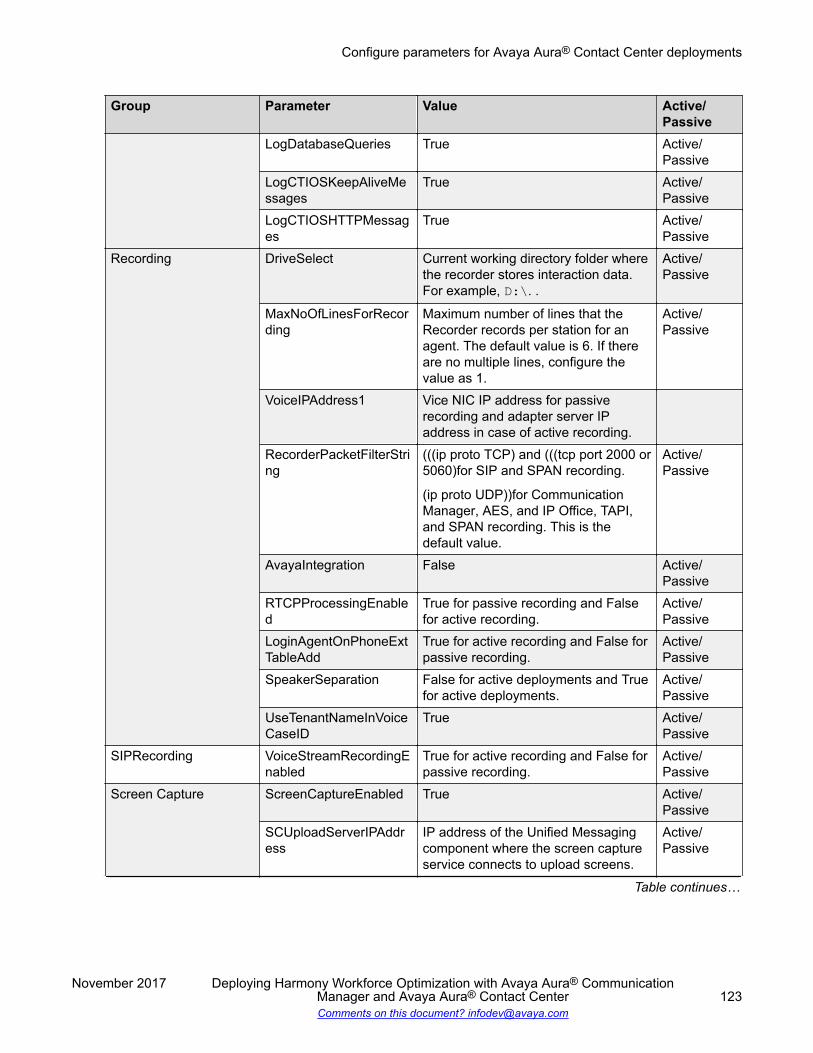
Group Parameter Value Active/Passive
LogDatabaseQueries True Active/Passive
LogCTIOSKeepAliveMessages
True Active/Passive
LogCTIOSHTTPMessages
True Active/Passive
Recording DriveSelect Current working directory folder wherethe recorder stores interaction data.For example, D:\. .
Active/Passive
MaxNoOfLinesForRecording
Maximum number of lines that theRecorder records per station for anagent. The default value is 6. If thereare no multiple lines, configure thevalue as 1.
Active/Passive
VoiceIPAddress1 Vice NIC IP address for passiverecording and adapter server IPaddress in case of active recording.
RecorderPacketFilterString
(((ip proto TCP) and (((tcp port 2000 or5060)for SIP and SPAN recording.
(ip proto UDP))for CommunicationManager, AES, and IP Office, TAPI,and SPAN recording. This is thedefault value.
Active/Passive
AvayaIntegration False Active/Passive
RTCPProcessingEnabled
True for passive recording and Falsefor active recording.
Active/Passive
LoginAgentOnPhoneExtTableAdd
True for active recording and False forpassive recording.
Active/Passive
SpeakerSeparation False for active deployments and Truefor active deployments.
Active/Passive
UseTenantNameInVoiceCaseID
True Active/Passive
SIPRecording VoiceStreamRecordingEnabled
True for active recording and False forpassive recording.
Active/Passive
Screen Capture ScreenCaptureEnabled True Active/Passive
SCUploadServerIPAddress
IP address of the Unified Messagingcomponent where the screen captureservice connects to upload screens.
Active/Passive
Table continues…
Configure parameters for Avaya Aura® Contact Center deployments
November 2017 Deploying Harmony Workforce Optimization with Avaya Aura® CommunicationManager and Avaya Aura® Contact Center 123Comments on this document? [email protected]
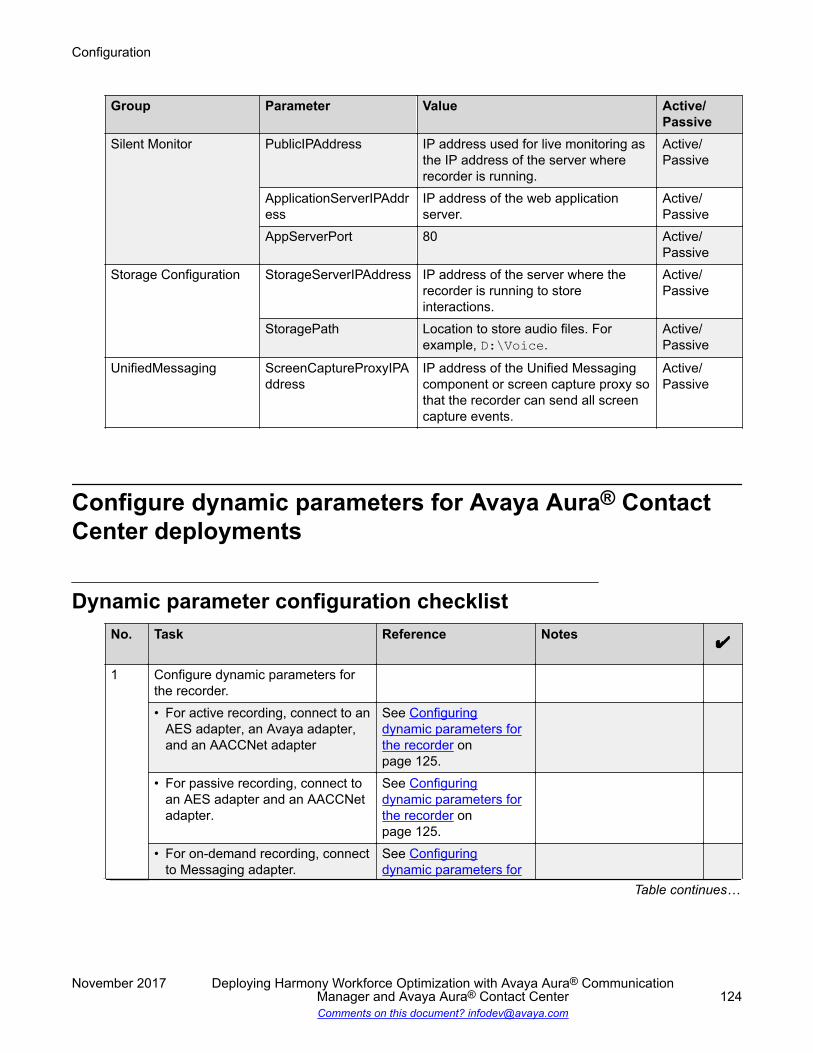
Group Parameter Value Active/Passive
Silent Monitor PublicIPAddress IP address used for live monitoring asthe IP address of the server whererecorder is running.
Active/Passive
ApplicationServerIPAddress
IP address of the web applicationserver.
Active/Passive
AppServerPort 80 Active/Passive
Storage Configuration StorageServerIPAddress IP address of the server where therecorder is running to storeinteractions.
Active/Passive
StoragePath Location to store audio files. Forexample, D:\Voice.
Active/Passive
UnifiedMessaging ScreenCaptureProxyIPAddress
IP address of the Unified Messagingcomponent or screen capture proxy sothat the recorder can send all screencapture events.
Active/Passive
Configure dynamic parameters for Avaya Aura® ContactCenter deployments
Dynamic parameter configuration checklistNo. Task Reference Notes
1 Configure dynamic parameters forthe recorder.• For active recording, connect to an
AES adapter, an Avaya adapter,and an AACCNet adapter
See Configuringdynamic parameters forthe recorder onpage 125.
• For passive recording, connect toan AES adapter and an AACCNetadapter.
See Configuringdynamic parameters forthe recorder onpage 125.
• For on-demand recording, connectto Messaging adapter.
See Configuringdynamic parameters for
Table continues…
Configuration
November 2017 Deploying Harmony Workforce Optimization with Avaya Aura® CommunicationManager and Avaya Aura® Contact Center 124Comments on this document? [email protected]
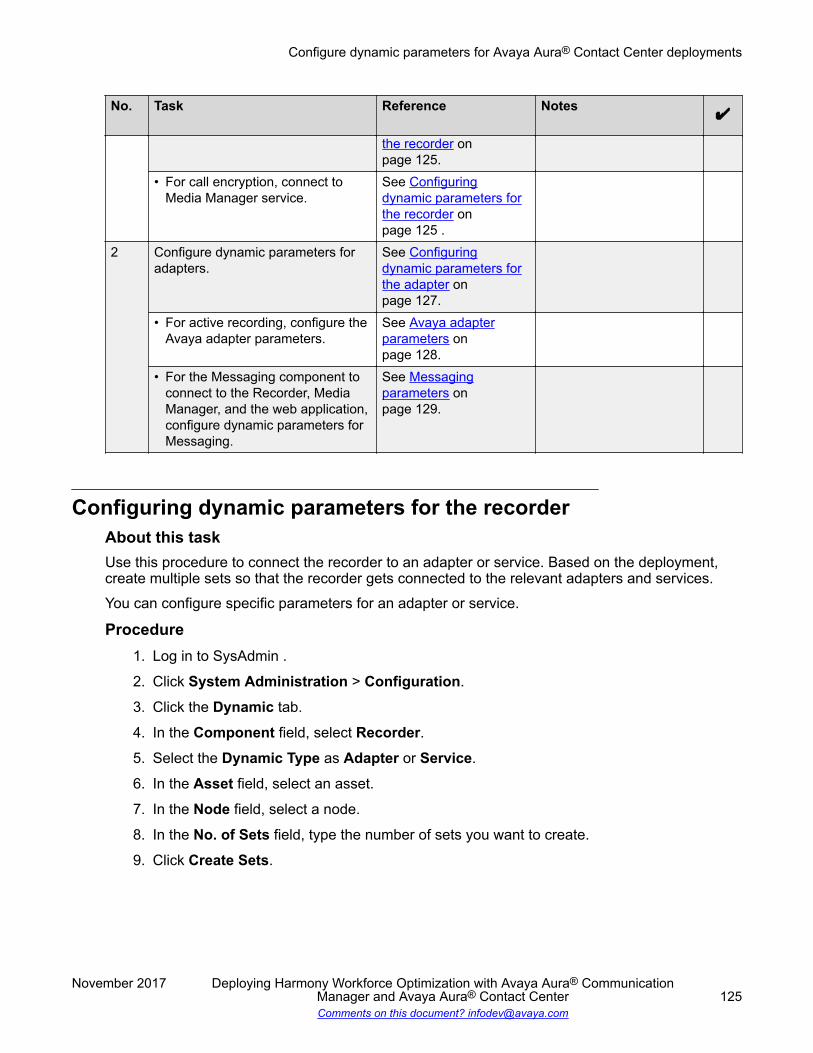
No. Task Reference Notes
the recorder onpage 125.
• For call encryption, connect toMedia Manager service.
See Configuringdynamic parameters forthe recorder onpage 125 .
2 Configure dynamic parameters foradapters.
See Configuringdynamic parameters forthe adapter onpage 127.
• For active recording, configure theAvaya adapter parameters.
See Avaya adapterparameters onpage 128.
• For the Messaging component toconnect to the Recorder, MediaManager, and the web application,configure dynamic parameters forMessaging.
See Messagingparameters onpage 129.
Configuring dynamic parameters for the recorderAbout this taskUse this procedure to connect the recorder to an adapter or service. Based on the deployment,create multiple sets so that the recorder gets connected to the relevant adapters and services.You can configure specific parameters for an adapter or service.
Procedure1. Log in to SysAdmin .
2. Click System Administration > Configuration.
3. Click the Dynamic tab.
4. In the Component field, select Recorder.5. Select the Dynamic Type as Adapter or Service.
6. In the Asset field, select an asset.
7. In the Node field, select a node.
8. In the No. of Sets field, type the number of sets you want to create.
9. Click Create Sets.
Configure dynamic parameters for Avaya Aura® Contact Center deployments
November 2017 Deploying Harmony Workforce Optimization with Avaya Aura® CommunicationManager and Avaya Aura® Contact Center 125Comments on this document? [email protected]

Configuration values for dynamic recorder parameterAdapter setsThe table below lists the three adapter sets you must create for the recorder to connect to AES adapter,Avaya adapter, and AACCNet adapter. For on-demand recording, create another adapter set for therecorder to connect to the Messaging component.
Parameter ValueComponent RecorderDynamic Type AdapterAsset Name of the server where the recorder is installedNode Name of the instance of the recorder installed on the selected
server or asset.No of Sets 4 for active recording and 3 for passive recording,Adapter Dynamic Set 1Name AES adapterServerAddress The IP address of the server where AES adapter is installed.ServerPort 33012Adapter Dynamic Set 2Name Avaya adapterServerAddress The IP address of the server where Avaya adapter is installed.ServerPort 34101ServerLocalPort 33333WebURLString /AvayaAdapter/MonitorSitesRecorderRequiestAdapter Dynamic Set 3Name AACCNet adapterServerAddress The IP address of the server where AACCNet adapter is installed.ServerPort 34301ServerLocalPort 33334WebURLString /AACCAdapter/MonitorSitesRecorderRequestAdapter Dynamic Set 4Name Unified MessagingServerAddress The IP address of the server where the Unified Messaging
component is installed.ServerPort 33022
Service setsFor call encryption, create a service set for the recorder to connect to the Media Manager component.
Configuration
November 2017 Deploying Harmony Workforce Optimization with Avaya Aura® CommunicationManager and Avaya Aura® Contact Center 126Comments on this document? [email protected]
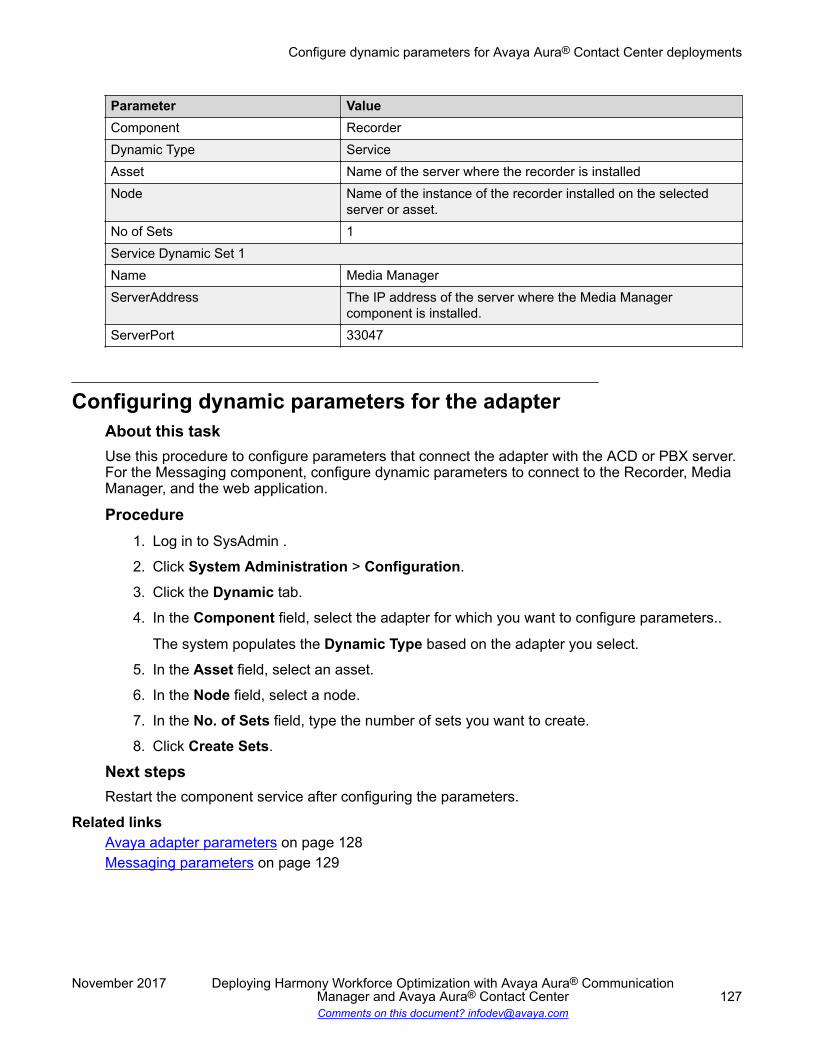
Parameter ValueComponent RecorderDynamic Type ServiceAsset Name of the server where the recorder is installedNode Name of the instance of the recorder installed on the selected
server or asset.No of Sets 1Service Dynamic Set 1Name Media ManagerServerAddress The IP address of the server where the Media Manager
component is installed.ServerPort 33047
Configuring dynamic parameters for the adapterAbout this taskUse this procedure to configure parameters that connect the adapter with the ACD or PBX server.For the Messaging component, configure dynamic parameters to connect to the Recorder, MediaManager, and the web application.
Procedure1. Log in to SysAdmin .
2. Click System Administration > Configuration.
3. Click the Dynamic tab.
4. In the Component field, select the adapter for which you want to configure parameters..
The system populates the Dynamic Type based on the adapter you select.
5. In the Asset field, select an asset.
6. In the Node field, select a node.
7. In the No. of Sets field, type the number of sets you want to create.
8. Click Create Sets.
Next stepsRestart the component service after configuring the parameters.
Related linksAvaya adapter parameters on page 128Messaging parameters on page 129
Configure dynamic parameters for Avaya Aura® Contact Center deployments
November 2017 Deploying Harmony Workforce Optimization with Avaya Aura® CommunicationManager and Avaya Aura® Contact Center 127Comments on this document? [email protected]
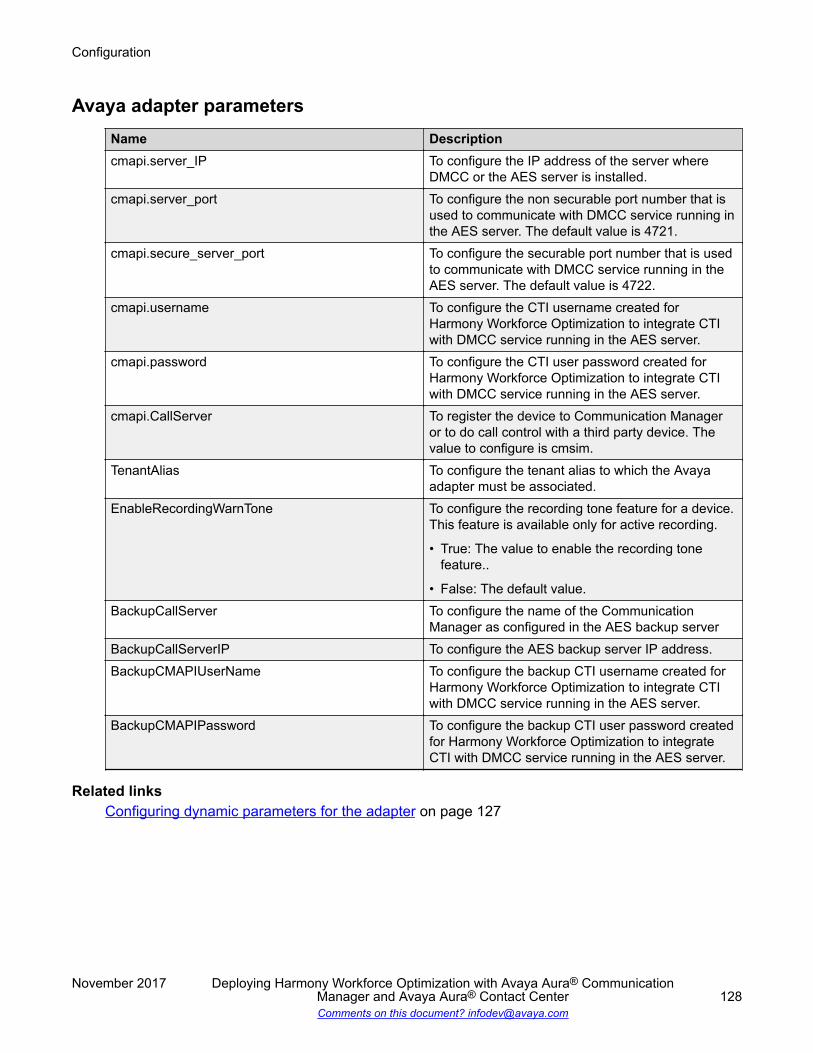
Avaya adapter parametersName Descriptioncmapi.server_IP To configure the IP address of the server where
DMCC or the AES server is installed.cmapi.server_port To configure the non securable port number that is
used to communicate with DMCC service running inthe AES server. The default value is 4721.
cmapi.secure_server_port To configure the securable port number that is usedto communicate with DMCC service running in theAES server. The default value is 4722.
cmapi.username To configure the CTI username created forHarmony Workforce Optimization to integrate CTIwith DMCC service running in the AES server.
cmapi.password To configure the CTI user password created forHarmony Workforce Optimization to integrate CTIwith DMCC service running in the AES server.
cmapi.CallServer To register the device to Communication Manageror to do call control with a third party device. Thevalue to configure is cmsim.
TenantAlias To configure the tenant alias to which the Avayaadapter must be associated.
EnableRecordingWarnTone To configure the recording tone feature for a device.This feature is available only for active recording.
• True: The value to enable the recording tonefeature..
• False: The default value.BackupCallServer To configure the name of the Communication
Manager as configured in the AES backup serverBackupCallServerIP To configure the AES backup server IP address.BackupCMAPIUserName To configure the backup CTI username created for
Harmony Workforce Optimization to integrate CTIwith DMCC service running in the AES server.
BackupCMAPIPassword To configure the backup CTI user password createdfor Harmony Workforce Optimization to integrateCTI with DMCC service running in the AES server.
Related linksConfiguring dynamic parameters for the adapter on page 127
Configuration
November 2017 Deploying Harmony Workforce Optimization with Avaya Aura® CommunicationManager and Avaya Aura® Contact Center 128Comments on this document? [email protected]

Messaging parametersParameter DescriptionTenant To configure the tenant to which the Messaging
component must be associated.wrapupTime To configure the wrap up time for screens in
minutes.bandwidth To configure the bandwidth required for screen
upload. This parameter must be configured basedon what is configured for the maxPermitSizeparameter.
maxPermitSize To configure the maximum number of concurrentscreens to upload.
timeToUpload To configure the time to resume screen upload oncethe maximum size for screen upload is reached.
proxyIP To specify the host name or IP address of theserver where the web application is deployed. Youcan view screen captures while monitoring liveinteractions.
proxyPort To specify the port number where the webapplication server or Apache server is running.
proxyProtocol To specify the host protocol (http or https) where theweb application server or Apache server is installed.
EDServiceIPAddress To configure the IP address of the server whereMedia Manager is running to encrypt and decryptscreens.
EDServicePort To configure the port number for Media Manager.The default value is 33047.
RecorderServerIP To specify the IP address of the server where therecorder is running to send the Screen Logininformation to the recorder.
RecorderServerPort To configure the port number for recorder. Thedefault value is 33024.
SecondaryRecorders To specify the IP address of the server where thesecondary recorder is running.
Related linksConfiguring dynamic parameters for the adapter on page 127
Restarting the Harmony Workforce Optimization componentsProcedure
1. Log in to the server that hosts the web application components.
Configure dynamic parameters for Avaya Aura® Contact Center deployments
November 2017 Deploying Harmony Workforce Optimization with Avaya Aura® CommunicationManager and Avaya Aura® Contact Center 129Comments on this document? [email protected]
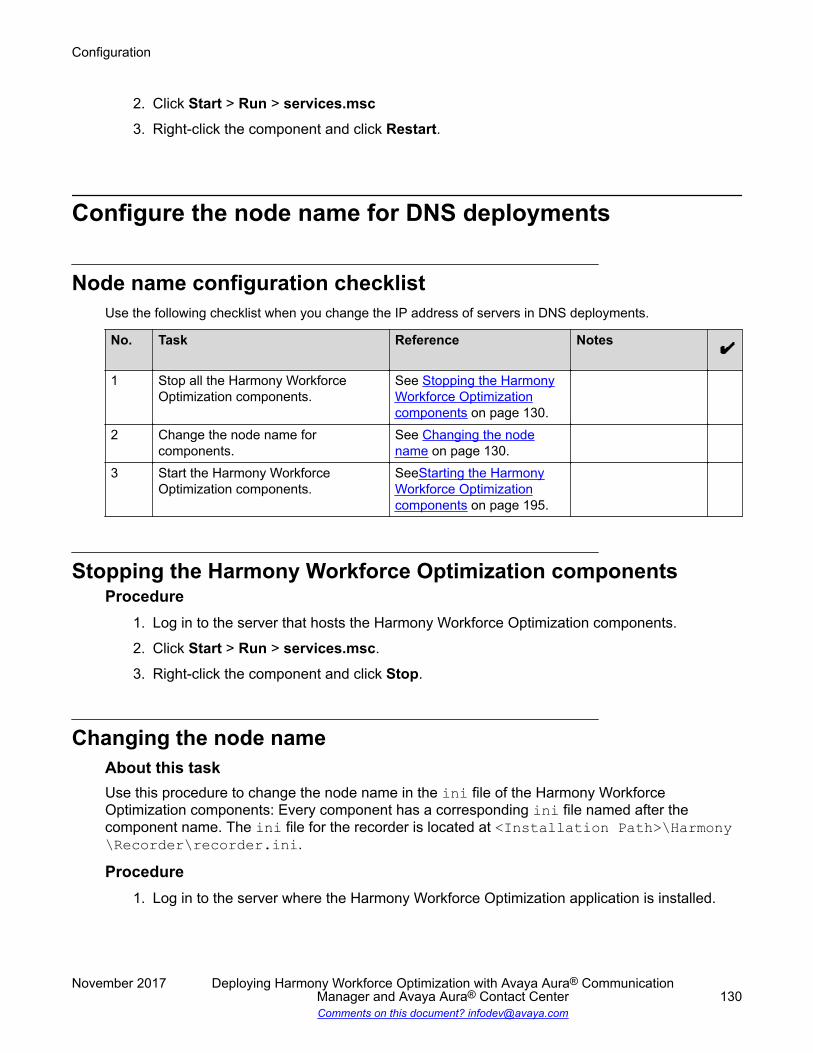
2. Click Start > Run > services.msc3. Right-click the component and click Restart.
Configure the node name for DNS deployments
Node name configuration checklistUse the following checklist when you change the IP address of servers in DNS deployments.
No. Task Reference Notes
1 Stop all the Harmony WorkforceOptimization components.
See Stopping the HarmonyWorkforce Optimizationcomponents on page 130.
2 Change the node name forcomponents.
See Changing the nodename on page 130.
3 Start the Harmony WorkforceOptimization components.
SeeStarting the HarmonyWorkforce Optimizationcomponents on page 195.
Stopping the Harmony Workforce Optimization componentsProcedure
1. Log in to the server that hosts the Harmony Workforce Optimization components.
2. Click Start > Run > services.msc.
3. Right-click the component and click Stop.
Changing the node nameAbout this taskUse this procedure to change the node name in the ini file of the Harmony WorkforceOptimization components: Every component has a corresponding ini file named after thecomponent name. The ini file for the recorder is located at <Installation Path>\Harmony\Recorder\recorder.ini.
Procedure1. Log in to the server where the Harmony Workforce Optimization application is installed.
Configuration
November 2017 Deploying Harmony Workforce Optimization with Avaya Aura® CommunicationManager and Avaya Aura® Contact Center 130Comments on this document? [email protected]
2. Go to <Installation Path>\Harmony to view the component folders.
3. Go to the respective component folder to change the node name in the<component>.ini file for the following components:
• Recorder
• Log Manager
• Media Manager
• Process Checklist
• Packet Sniffer
• AES adapter
4. In the component folder, right-click the respective <component>.ini file.
5. Select Open with, and click Notepad.
6. Update the value for the following parameter:
• NodeName: Update the node name.
7. Click Save to close the file.
8. Go to <Installation Path>\Harmony\<component>\conf folder for the followingcomponents:
• Avaya adapter
• POM adapter (if you are using POM dialer)
9. Right-click the avayaadapter.properties file.
10. Select Open with, and click Notepad.
11. Update the value for the following parameter:
• NodeName: Update the node name.
12. Click Save to close the file.
13. Go to <Installation Path>\Harmony\AACCAdapter folder.
14. In the component folder, right-click the AACCNetAdapterConfig.xml file.
15. Select Open with, and click Notepad.
16. Update the value for the following parameter:
• NodeName: Update the node name.
17. Click Save to close the file.
18. Go to <Installation Path>\Harmony\UnifiedMessaging\wrapper\conf folder.
19. Right-click the wrapper.conf file.
20. Select Open with, and click Notepad.
Configure the node name for DNS deployments
November 2017 Deploying Harmony Workforce Optimization with Avaya Aura® CommunicationManager and Avaya Aura® Contact Center 131Comments on this document? [email protected]

21. Update the value for the following parameter:
• NodeName: Update the node name.
22. Click Save to close the file.
Starting the Harmony Workforce Optimization componentsProcedure
1. Log in to the server that hosts the web application components.
2. Click Start > Run > services.msc3. Right-click the following components and click Restart:
• WebApp Service• Harmony WebProxy
Configuring component parametersAbout this taskEvery component has a corresponding service that starts and stops the processing of thecomponent. After installing Harmony Workforce Optimization, you must configure few mandatoryparameters for each of the components to start the service.
Procedure1. Log in to SysAdmin.
2. Click System Administration > Configuration.
3. To configure parameters for a component, click the Component tab and do the following:
a. In the Component field, select a component.
b. In the Asset field, select the asset you want to configure.
c. In the Node field, select the node you want to configure.
4. In the Value column, click to type the values for the mandatory parameters.
The systems accepts the default value for the parameters that are not mandatory.
5. Click Save.
Next stepsRestart the component service after configuring the parameters.
Configuration
November 2017 Deploying Harmony Workforce Optimization with Avaya Aura® CommunicationManager and Avaya Aura® Contact Center 132Comments on this document? [email protected]
Restarting the Harmony Workforce Optimization componentsProcedure
1. Log in to the server that hosts the web application components.
2. Click Start > Run > services.msc.
3. Right-click the component and click Restart.
Configuring voice multiplicity
Configuring Recorder parameters for voice multiplicityProcedure
1. Log in to SysAdmin .
2. Click System Administration > Configuration.
3. To configure parameters for a component, click the Component tab and do the following:
a. In the Component field, select Recorder.b. In the Asset field, select the asset you want to configure.
c. In the Node field, select the node you want to configure.
4. In the Value column, configure the following parameters:
a. For MultiplicityEnabled parameter, type True.
b. For MaxNoOfContactInstancesForVoice parameter, type the number of contactinstances for voice transactions that you want an agent to handle concurrently.
The default value is 10.
c. For MaxNoOfContactInstancesForNonVoice parameter, type the number of contactinstances for nonvoice transactions that you want an agent to handle concurrently..
The default value is 10.
5. Click Save.
Next stepsRestart the component service after configuring the parameters.
Configuring voice multiplicity
November 2017 Deploying Harmony Workforce Optimization with Avaya Aura® CommunicationManager and Avaya Aura® Contact Center 133Comments on this document? [email protected]
Configuring Avaya adapter parameters for voice multiplicityProcedure
1. Log in to SysAdmin .
2. Click System Administration > Configuration.
3. To configure parameters for a component, click the Component tab and do the following:
a. In the Component field, select Avaya adapter.
b. In the Asset field, select the asset you want to configure.
c. In the Node field, select the node you want to configure.
4. In the Value column of the MultiplicityEnabled parameter, type True.
5. Click Save.
Next stepsRestart the component service after configuring the parameters.
Configuring AES adapter parameters for voice multiplicityProcedure
1. Log in to SysAdmin .
2. Click System Administration > Configuration.
3. To configure parameters for a component, click the Component tab and do the following:
a. In the Component field, select AES adapter.
b. In the Asset field, select the asset you want to configure.
c. In the Node field, select the node you want to configure.
4. In the Value column of the MaxNoOfContactInstances parameter, type the number ofcontact instances for voice transactions that you want an agent to handle concurrently.
The default value is 10.
5. Click Save.
Next stepsRestart the component service after configuring the parameters.
Configuration
November 2017 Deploying Harmony Workforce Optimization with Avaya Aura® CommunicationManager and Avaya Aura® Contact Center 134Comments on this document? [email protected]
Configuring AACCNet adapter parameters for voice multiplicityProcedure
1. Log in to SysAdmin .
2. Click System Administration > Configuration.
3. To configure parameters for a component, click the Component tab and do the following:
a. In the Component field, select AACCNet adapter.
b. In the Asset field, select the asset you want to configure.
c. In the Node field, select the node you want to configure.
4. In the Value column, configure the following parameters:
a. For MultiplicityEnabled parameter, type True.
b. For FirstContactInstanceForNonVoice parameter, type 11 if theMaxNoOfContactInstancesForNonVoice parameter in Recorder is set to 10.
c. For MaxNoOfContactInstancesForNonVoice parameter, type the number of contactinstances for nonvoice transactions that you want an agent to handle concurrently.
The default value is 10.
5. Click Save.
Next stepsRestart the component service after configuring the parameters.
Configure trusted authentication
Trusted authentication supportHarmony Workforce Optimization supports trusted authentication where you can set up WindowsSingle Sign-On (SSO) with the Harmony Workforce Optimization web application.
Note:
Trusted authentication works only if you deploy Harmony Workforce Optimization and AD on afully qualified domain name (FQDN).
Prerequisites• Create one or more Harmony Workforce Optimization users that match with users in AD.• Add the created user to the local administrator.
Configure trusted authentication
November 2017 Deploying Harmony Workforce Optimization with Avaya Aura® CommunicationManager and Avaya Aura® Contact Center 135Comments on this document? [email protected]
• Create a service account in the AD domain.
ConfigurationsTo set up Windows SSO with the Harmony Workforce Optimization web application, ensure youconfigure the following:
• Create a Service Principal Name (SPN) for the FQDN and service account on the HarmonyWorkforce Optimization web application.
• Update the Harmony Workforce Optimization component services to run with the serviceaccount.
• Set up browser configurations for Internet Explorer (IE) and Chrome. The Microsoft Edgebrowser does not require any configurations for trusted authentication.
Note:The Firefox and Safari browsers do not support trusted authentication.
• Select the Enable Trusted Authentication check box in the General Settings page of theHarmony Workforce Optimization web application.
• Create one or more employee profiles in Harmony Workforce Optimization with the sameusername as configured in AD. For more information on how to create employee profiles, seethe Administering Harmony Workforce Optimization guide.
• Enable logging for trusted authentication to troubleshoot issues.
Creating a Service Principal Name (SPN)Procedure
1. Log in to the AD server as an administrator.
2. Click Start > Run > PowerShell3. Execute the following command:
setspn -A HTTP/<server-fqdn> <domain>\<user_account> where<server-dqdn> is the fully qualified domain name of the server that is used toaccess the Harmony Workforce Optimization application, <domain> is the domainname of the user account, and <usre_account> is the newly created user account.
Updating the Harmony Workforce Optimization componentservices
About this taskUse this procedure to update the Harmony Workforce Optimization component services to runwith the service account created in the AD domain.
Configuration
November 2017 Deploying Harmony Workforce Optimization with Avaya Aura® CommunicationManager and Avaya Aura® Contact Center 136Comments on this document? [email protected]
Procedure1. Click Start > Run.
2. In the Run window, type services.msc.
3. Click OK.
4. Right-click on any of the Harmony Workforce Optimization components and clickProperties.
5. In the new window, click Log On Tab.
6. Change the password to the local system administrator password, confirm the password,and click OK.
The system displays a dialog box with the following message: The account<username> has been granted the Log on as a service right.
7. Click OK.
Enabling Single Sign-On for Internet ExplorerProcedure
1. Open Internet Explorer.
2. Click Tools > Internet Options.
3. In the Internet Options window, click Security.
4. In the Zones section, select Local Intranet, and then click Sites.
5. In the Local Intranet window, click Advanced.
6. In the Websites section, type the FQDN, and then click Add.
7. In the Local Intranet window, click OK.
8. In the Internet Options window, click OK.
9. Close the browser.
Enabling Single Sign-On for Google ChromeProcedure
1. Open Google Chrome.
2. At the top right corner, click Customize and control Google Chrome > Settings.
3. In the Settings page, scroll down and click Advanced.
4. In the System section, click Open proxy settings.
The Internet Options window opens.
Configure trusted authentication
November 2017 Deploying Harmony Workforce Optimization with Avaya Aura® CommunicationManager and Avaya Aura® Contact Center 137Comments on this document? [email protected]
5. In the Internet Options window, click Security.
6. In the Zones section, select Local Intranet, and then click Sites.
7. In the Local Intranet window, click Advanced.
8. In the Websites section, type the FQDN, and then click Add.
9. In the Local Intranet window, click OK.
10. In the Internet Options window, click OK.
11. Close the browser.
Accessing the Harmony Workforce Optimization applicationProcedure
1. Open a compatible web browser on your computer.
Note:
The Firefox and Safari browsers do not support trusted authentication.
2. On the address bar of your browser, type https://<<FQDN>>:443/trustedauth/login?tenant=<<tenantalias>>, and click Enter.
3. Type your User Name and Password.
4. Click Login.
Enabling logging for trusted authenticationAbout this taskUse this procedure to enable logging for trusted authentication. To troubleshoot issues, use theWebapp-Dev-Application log file located at <drive>:\Logs\Webapp-Dev-Application.log.
Procedure1. Go to INSTALLATION_DIR/Web/jetty/resources..
2. Right-click the log4j.properties file, select Open with, and click Notepad.
3. Type waffle.servlet.NegotiateSecurityFilter.level = FINE at the end ofthe page.
4. Click Save and close the file.
Configuration
November 2017 Deploying Harmony Workforce Optimization with Avaya Aura® CommunicationManager and Avaya Aura® Contact Center 138Comments on this document? [email protected]
Install and configure the Screen Capture and DesktopMonitor applications
OverviewScreen CaptureThe Messaging component acts like a proxy server and interacts directly with the recorder tocapture screens in Harmony Workforce Optimization. The Messaging component checks forbandwidth availability and accordingly processes screen requests.The benefits of implementing Messaging as a proxy server are:
• Reduces bandwidth issues and latency.• Increases processing speed.• Controls and checks for the bandwidth limit.
Note:The Screen Capture component stops capturing screens if the disk is full on the agentmachine. Even after you create some free disk space on the agent machine, screens getcaptured only when you restart the screen service.
Desktop MonitorDesktop Monitor is a client-server solution to capture and monitor employee desktops and identifythe quality of employees’ daily interactions. The solution provides access to customer informationfrom native and web-based applications. No additional programming or customization is required.Desktop Monitor operates in two modes:
• Monitoring mode: The mode running on desktops of employees who are attending to voiceand non-voice interactions in the contact center. This is the default mode.
• Learning mode: The mode installed on the supervisor or manager’s desktop for monitoringinteractions of employees. When Learning Console starts, the monitoring mode automaticallychanges to the learning mode.
Installing the Screen Capture applicationAbout this taskUse the procedure to install the Screen Capture application on a single agent machine. Theinstallation configures the Unified Messaging IP address for screen in the registry.
Before you beginEnsure that you uninstall previous Screen Capture files and delete all registry entries.
Install and configure the Screen Capture and Desktop Monitor applications
November 2017 Deploying Harmony Workforce Optimization with Avaya Aura® CommunicationManager and Avaya Aura® Contact Center 139Comments on this document? [email protected]
Procedure1. Click Harmony > Screen Capture located on the server that hosts the web application
components.
2. Run the HarmonyScreenCapture.exe file.
3. On the Welcome screen, click Next.4. On the License Agreement screen, select I accept the terms in the license agreement,
and then click Next.5. On the Required Information screen, configure the required fields.
6. Click Next.7. Click Install.
The system creates the Screen registry located on: HKEY_LOCAL_MACHINE\SOFTWARE\Wow6432Node\KnoahSoft\Harmony\Screen and the Screen folder on C:\ProgramFiles (x86)\Harmony\Screen with the following files:
• Logs: The folder where screen capture logs are saved.
• ScreenCapture.pem: Key certificates
• Screen.exe: Service
• Screen.ini:
• ScreenCapture.exe: An application that captures desktop images.
• ScreenCapture.cerNext stepsStart the Screen Capture service.
Installing Screen Capture and Desktop Monitor applicationsAbout this taskUse the procedure to install the Screen Capture and Desktop Monitor (DTA) applications on asingle agent machine. The installation configures the Unified Messaging IP address for screen inthe registry and also creates browser add-ons automatically.
Before you beginEnsure that you uninstall previous Screen Capture files and delete all registry entries.
Procedure1. Click Harmony > Screen Capture located on the server that hosts the web application
components.
2. Run the HarmonyScreenCapture.exe file.
Configuration
November 2017 Deploying Harmony Workforce Optimization with Avaya Aura® CommunicationManager and Avaya Aura® Contact Center 140Comments on this document? [email protected]

3. On the Welcome screen, click Next.4. On the License Agreement screen, select I accept the terms in the license agreement,
and then click Next.5. On the Required Information screen, click Advanced.
6. On the Advanced Information screen, configure the required fields.
7. Click Next.8. Click Install.
The system creates the Screen registry located on: HKEY_LOCAL_MACHINE\SOFTWARE\Wow6432Node\KnoahSoft\Harmony\Screen and the Screen folder on C:\ProgramFiles (x86)\Harmony\Screen with the following files:
Note:
The below files are created only if you configure the Install DTA field as Yes in theAdvanced Information screen.
• Logs: The folder where screen capture logs are saved.
• AVAYADESKTOPAGENT.xpi: Browser add-ons for Chrome.
• ChromeNMH.exe: Browser add-ons for Chrome.
• DTAHlpr.exe: Native application support.
• DTAHook.dll: Native application add-on 32–bit support.
• DTAHook64.dll: Naive application add-ons 64–bit support.
• FireFoxNMH.exe: Browser add-ons for Firefox.
• HarmonyBHO.dll: Browser add-ons for IE 32–bit.
• HarmonyBHO64.dll: Browser add-ons for IE 64–bit.
• HarmonyDTA.crx: Browser add-on for Chrome.
• HarmonyDTA.pem: Browser add-on for Chrome.
• harmonydta.xml: Browser add-ons for Firefox.
• manifest.json: Browser support for Chrome.
• manifest-firefox.json: Browser support for Forefox.
• ScreenCapture.pem: Key certificates
• Screen.exe: Service
• Screen.ini:
• ScreenCapture.exe: An application that captures desktop images.
Install and configure the Screen Capture and Desktop Monitor applications
November 2017 Deploying Harmony Workforce Optimization with Avaya Aura® CommunicationManager and Avaya Aura® Contact Center 141Comments on this document? [email protected]
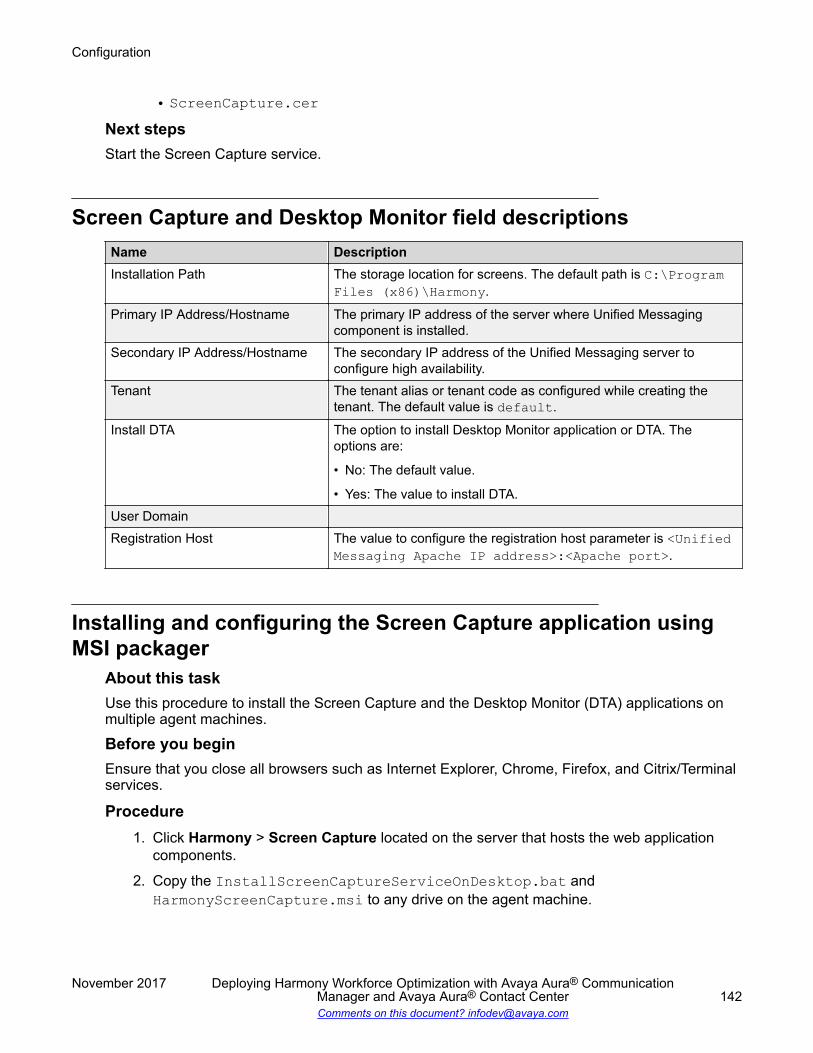
• ScreenCapture.cerNext stepsStart the Screen Capture service.
Screen Capture and Desktop Monitor field descriptionsName DescriptionInstallation Path The storage location for screens. The default path is C:\Program
Files (x86)\Harmony.
Primary IP Address/Hostname The primary IP address of the server where Unified Messagingcomponent is installed.
Secondary IP Address/Hostname The secondary IP address of the Unified Messaging server toconfigure high availability.
Tenant The tenant alias or tenant code as configured while creating thetenant. The default value is default.
Install DTA The option to install Desktop Monitor application or DTA. Theoptions are:
• No: The default value.
• Yes: The value to install DTA.User DomainRegistration Host The value to configure the registration host parameter is <Unified
Messaging Apache IP address>:<Apache port>.
Installing and configuring the Screen Capture application usingMSI packager
About this taskUse this procedure to install the Screen Capture and the Desktop Monitor (DTA) applications onmultiple agent machines.
Before you beginEnsure that you close all browsers such as Internet Explorer, Chrome, Firefox, and Citrix/Terminalservices.
Procedure1. Click Harmony > Screen Capture located on the server that hosts the web application
components.
2. Copy the InstallScreenCaptureServiceOnDesktop.bat andHarmonyScreenCapture.msi to any drive on the agent machine.
Configuration
November 2017 Deploying Harmony Workforce Optimization with Avaya Aura® CommunicationManager and Avaya Aura® Contact Center 142Comments on this document? [email protected]

3. Open command prompt as an administrator and navigate to the drive where you haveplaced the InstallScreenCaptureServiceOnDesktop.bat andHarmonyScreenCapture.msi. For example, D:\HarmonyScreenCapture.msi.
4. Press Enter.
5. Run any one of the following commands:
• to configure parameters for the Screen Capture application and install the DesktopMonitor application or DTA.
• msiexec /i HarmonyScreenCapture.msi /qn /passiveCONNECTURL=<IP_ADDRESS> REGISTRATIONHOST="" TENANT=defaultUSER_DOMAIN="<@userdomain.com>" INSTALL_DTA=No INSTALLLEVEL=300ADDSOURCE="Screen" to configure parameters for the Screen Capture application.
Next stepsStart the Screen Capture service.
Verifying the Screen Capture application logsAbout this taskUse this procedure to verify if the database table is updated with relevant information afteruploading the Screen Capture application logs.
Procedure1. Click Start > SQL Server Management Studio on the server where the Harmony
Workforce Optimization database is installed.
2. Select the tenant database and click New Query.
3. Type the query, Select * from PROXY_SCREEN_RECON and click Execute.
4. Verify if the Proxy_Screen_Recon table is updated with the following columns:
• Proxy_Screen_Recon_Id: The ID generated by the database for indexing.
• Emp_Id: The employee id of the agent configured in the Employee table.
• Tenant: Tenant alias to which the agent belongs to.
• Source_File_Path: The location where screens are uploaded. For example, D:\Voice\Screens.
• Target_File_Path: The voice case ID path where screens must exist along with voicefiles.
• KS_Call_Identifier: The unique ID generated by the recorder for each call.
• Screen_Capture_File_Name: The file name format. For example, Scr_0.7z.
• Interval: The Interval between two screen captures.
Install and configure the Screen Capture and Desktop Monitor applications
November 2017 Deploying Harmony Workforce Optimization with Avaya Aura® CommunicationManager and Avaya Aura® Contact Center 143Comments on this document? [email protected]

• SC_End_At_Count: The total number of screens captured for a call.
• Status: A for action not completed and I for action completed.
• Execution_Type: B for failure to move files and execute queries. Q for successful filesmovement and query execution.
Uploading the Screen Capture application logsAbout this taskHarmony Workforce Optimization supports uploading of the Screen Capture application log filesfrom agent machine to the central storage feature.
ProcedureTo upload the log files, type the URL in your browser: http://IP address:port number/generalCommand?request=LOGDUMP&sNetworkId=username&uuId=userID&tokenEnabled=TRUE
Verifying the agent loginAbout this taskYou can view and verify agent login when the proxy server receives the agentDesktopLoginrequest. The request is sent when the screen capture component is started on an agent machineor when an agent logs in to his desktop.The request must contain the following parameters:
• Network_id• AgentMachineName• AgentMachineIP• appname• uuid• tenant• SessionID
Procedure1. Click Start > SQL Server Management Studio on the server where the Harmony
Workforce Optimization database is installed.
2. Select the master database and click New Query.
3. Type the query, Select * from AGENT_SCREEN_LOGIN and click Execute.
Configuration
November 2017 Deploying Harmony Workforce Optimization with Avaya Aura® CommunicationManager and Avaya Aura® Contact Center 144Comments on this document? [email protected]

4. Verify if the proxy server has inserted a record in the Agent_Screen_Login table with thefollowing columns updated:
• Agent_Screen_Login_Id: A number generated for indexing.
• S_NetworkID: The desktop login user ID.
• UUID: Agent machine generated unique ID.
• Machine_IP: Agent machine IP address.
• Machine_Name: Agent machine name.
• Harmony_networkID: Network ID configured in the Employee table for this agent.
• Login_Time: Agent login time into the desktop.
• Login_Status: S for a successful login and F for a failed login.
• Var1 to var5: For future usage.
• Status: A for active and I for Inactive.
The proxy server must send a response back to the screen with upload port details andsilent monitor details.
Uninstalling the Screen Capture and Desktop Monitorapplications
About this taskYou can run the HarmonyScreenCapture.exe to do the following tasks:
• Modify: To view the already installed features selected by default. You can select the featuresthat you want to install and clear the check box to uninstall the features.
• Remove: To uninstall the Screen Capture and Desktop Monitor (DTA) applications.
Procedure1. Right-click HarmonyScreenCapture.exe and click Run as Administrator.2. Click Next.3. On the Program Maintenance window, select Modify to manage the features that you want
to install or uninstall and click Next .4. On the Custom Setup window, select the features that you want to install or uninstall and
click Next .5. On the Ready to Modify the Program window, click Modify depending on what you want to
do.
6. Click Finish.
7. On the Program Maintenance window, select Remove to uninstall the Screen Captureapplication.
Install and configure the Screen Capture and Desktop Monitor applications
November 2017 Deploying Harmony Workforce Optimization with Avaya Aura® CommunicationManager and Avaya Aura® Contact Center 145Comments on this document? [email protected]

8. On the Remove the Program window, click Remove.
9. Click Finish.
Configuring Screen Capture parametersAbout this taskUse this procedure to configure Screen Capture parameters in Recorder and Messagingcomponents.
Procedure1. Log in to SysAdmin .
2. Click System Administration > Configuration.
3. Click the Component tab and do the following:
a. In the Component field, click Recorder to configure Screen Capture parameters inRecorder.
b. In the Component field, click Messaging to configure Screen Capture parameters inMessaging.
c. In the Asset field, select the asset on which you want to configure high availability.
d. In the Node field, select the node on which you want to configure high availability.
4. In the Value column, click to type the values for Screen Capture parameters.
5. Click Save.
Next stepsRestart the component service after configuring the parameters.
Related linksScreen Capture parameters on page 146
Screen Capture parametersRecorder parametersUse the procedure Configuring component parameters to select the Recorder component and usethe table below to configure parameters for Screen Capture.
Parameter DescriptionScreenCaptureScreenCaptureEnabled To enable screen capture. The options are:
• True: The value to enable screen capture of agentdesktop.
Table continues…
Configuration
November 2017 Deploying Harmony Workforce Optimization with Avaya Aura® CommunicationManager and Avaya Aura® Contact Center 146Comments on this document? [email protected]
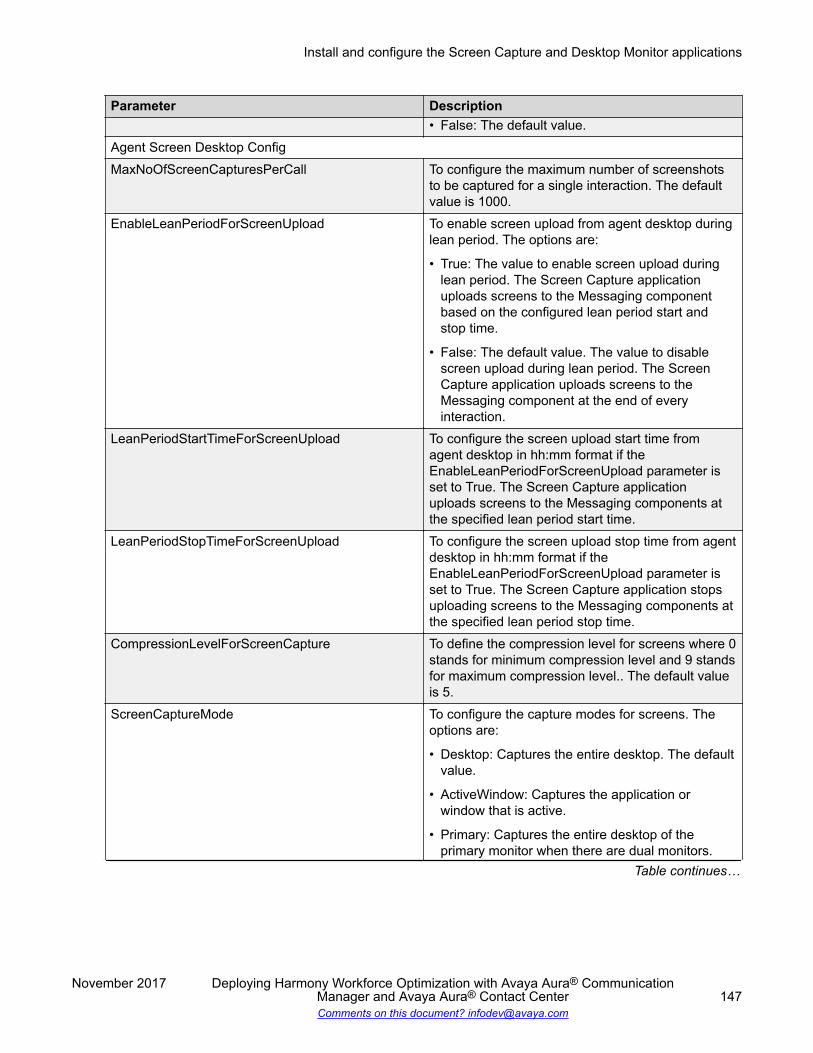
Parameter Description• False: The default value.
Agent Screen Desktop ConfigMaxNoOfScreenCapturesPerCall To configure the maximum number of screenshots
to be captured for a single interaction. The defaultvalue is 1000.
EnableLeanPeriodForScreenUpload To enable screen upload from agent desktop duringlean period. The options are:
• True: The value to enable screen upload duringlean period. The Screen Capture applicationuploads screens to the Messaging componentbased on the configured lean period start andstop time.
• False: The default value. The value to disablescreen upload during lean period. The ScreenCapture application uploads screens to theMessaging component at the end of everyinteraction.
LeanPeriodStartTimeForScreenUpload To configure the screen upload start time fromagent desktop in hh:mm format if theEnableLeanPeriodForScreenUpload parameter isset to True. The Screen Capture applicationuploads screens to the Messaging components atthe specified lean period start time.
LeanPeriodStopTimeForScreenUpload To configure the screen upload stop time from agentdesktop in hh:mm format if theEnableLeanPeriodForScreenUpload parameter isset to True. The Screen Capture application stopsuploading screens to the Messaging components atthe specified lean period stop time.
CompressionLevelForScreenCapture To define the compression level for screens where 0stands for minimum compression level and 9 standsfor maximum compression level.. The default valueis 5.
ScreenCaptureMode To configure the capture modes for screens. Theoptions are:
• Desktop: Captures the entire desktop. The defaultvalue.
• ActiveWindow: Captures the application orwindow that is active.
• Primary: Captures the entire desktop of theprimary monitor when there are dual monitors.
Table continues…
Install and configure the Screen Capture and Desktop Monitor applications
November 2017 Deploying Harmony Workforce Optimization with Avaya Aura® CommunicationManager and Avaya Aura® Contact Center 147Comments on this document? [email protected]

Parameter Description• ActiveMonitor: Captures the entire desktop of the
monitor that is active (on which the cursor moves)amongst the dual monitors.
NoOfLogicalCPUForScreenCompression To configure the number of logical CPUs that 7zuses to generate the compressed file. 0 stands forusage of all logical CPUs. The default value is 2.
Messaging parametersUse the procedure Configuring component parameters to select the Messaging component anduse the table below to configure parameters for Screen Capture.
Parameter DescriptionUM_COREHandleLeanPeriodInMessaging To configure if the lean period configuration for
screens in Recorder must be considered by theMessaging component. The options are:
• True: The value for the Messaging component toconsider the lean period configured in Recorder.The Screen Capture application uploads screensto the Messaging component based on theconfigured lean period start and stop time.
• False: The default value.
The value to configure when you do not want theMessaging component to consider the lean periodconfiguration for screens in Recorder. If theScreen Capture application is of a version olderthan 5.2.2, ensure that you configure thisparameter as False. The Screen Captureapplication uploads screens to the Messagingcomponent at the end of every interaction.
Related linksConfiguring Screen Capture parameters on page 146
Configure the Desktop Monitor applicationConfiguring resource files
About this taskUse this procedure to configure resource files so that the spy icon captures the required valuesyou specify while configuring the Learning Console.
Configuration
November 2017 Deploying Harmony Workforce Optimization with Avaya Aura® CommunicationManager and Avaya Aura® Contact Center 148Comments on this document? [email protected]
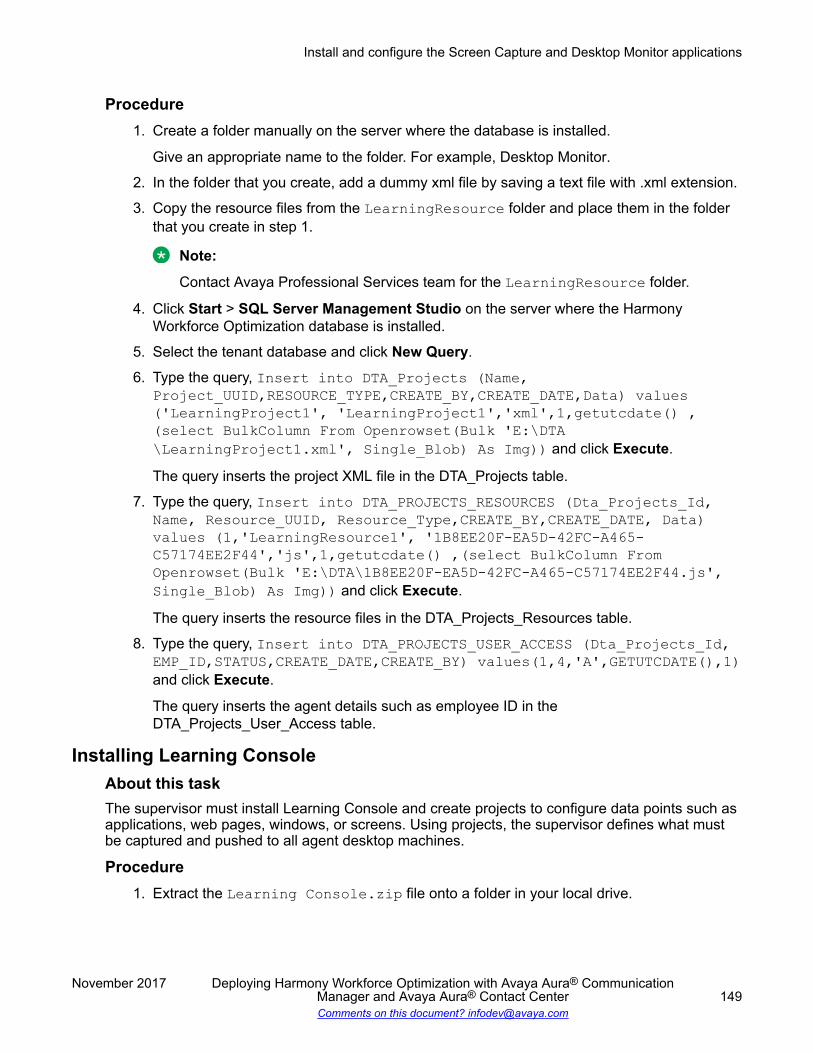
Procedure1. Create a folder manually on the server where the database is installed.
Give an appropriate name to the folder. For example, Desktop Monitor.
2. In the folder that you create, add a dummy xml file by saving a text file with .xml extension.
3. Copy the resource files from the LearningResource folder and place them in the folderthat you create in step 1.
Note:
Contact Avaya Professional Services team for the LearningResource folder.
4. Click Start > SQL Server Management Studio on the server where the HarmonyWorkforce Optimization database is installed.
5. Select the tenant database and click New Query.
6. Type the query, Insert into DTA_Projects (Name,Project_UUID,RESOURCE_TYPE,CREATE_BY,CREATE_DATE,Data) values('LearningProject1', 'LearningProject1','xml',1,getutcdate() ,(select BulkColumn From Openrowset(Bulk 'E:\DTA\LearningProject1.xml', Single_Blob) As Img)) and click Execute.
The query inserts the project XML file in the DTA_Projects table.
7. Type the query, Insert into DTA_PROJECTS_RESOURCES (Dta_Projects_Id,Name, Resource_UUID, Resource_Type,CREATE_BY,CREATE_DATE, Data)values (1,'LearningResource1', '1B8EE20F-EA5D-42FC-A465-C57174EE2F44','js',1,getutcdate() ,(select BulkColumn FromOpenrowset(Bulk 'E:\DTA\1B8EE20F-EA5D-42FC-A465-C57174EE2F44.js',Single_Blob) As Img)) and click Execute.
The query inserts the resource files in the DTA_Projects_Resources table.
8. Type the query, Insert into DTA_PROJECTS_USER_ACCESS (Dta_Projects_Id,EMP_ID,STATUS,CREATE_DATE,CREATE_BY) values(1,4,'A',GETUTCDATE(),1)and click Execute.
The query inserts the agent details such as employee ID in theDTA_Projects_User_Access table.
Installing Learning ConsoleAbout this taskThe supervisor must install Learning Console and create projects to configure data points such asapplications, web pages, windows, or screens. Using projects, the supervisor defines what mustbe captured and pushed to all agent desktop machines.
Procedure1. Extract the Learning Console.zip file onto a folder in your local drive.
Install and configure the Screen Capture and Desktop Monitor applications
November 2017 Deploying Harmony Workforce Optimization with Avaya Aura® CommunicationManager and Avaya Aura® Contact Center 149Comments on this document? [email protected]
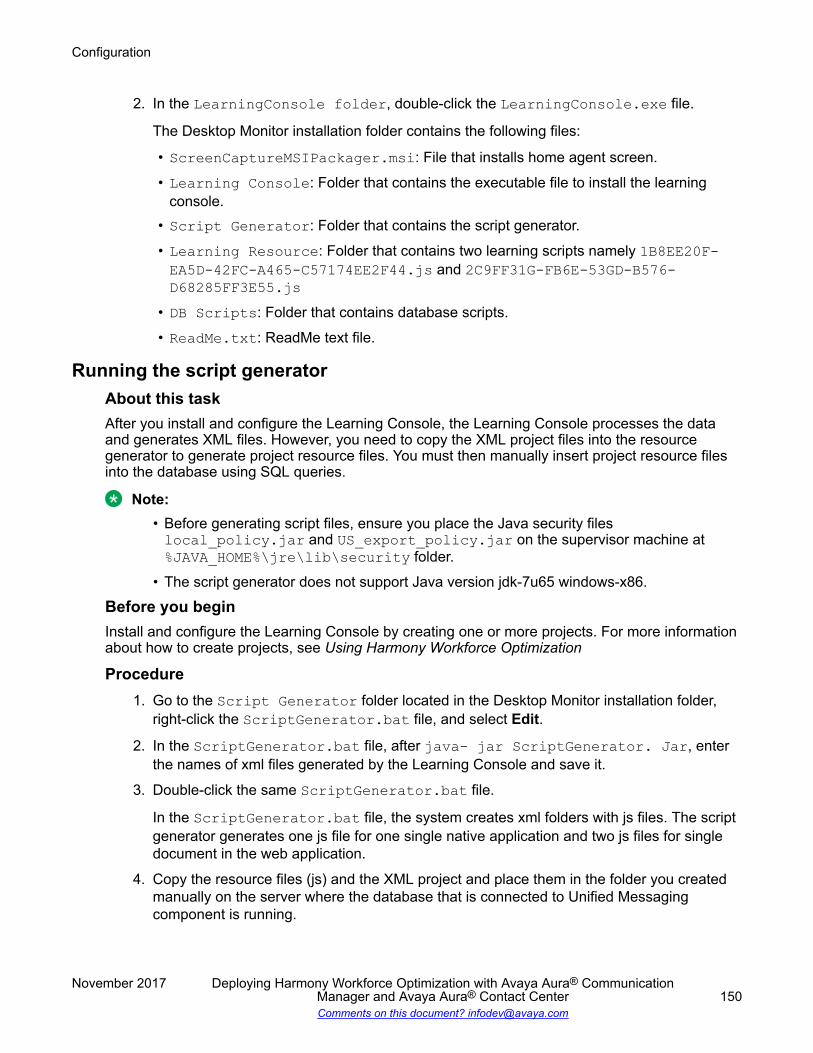
2. In the LearningConsole folder, double-click the LearningConsole.exe file.
The Desktop Monitor installation folder contains the following files:
• ScreenCaptureMSIPackager.msi: File that installs home agent screen.
• Learning Console: Folder that contains the executable file to install the learningconsole.
• Script Generator: Folder that contains the script generator.
• Learning Resource: Folder that contains two learning scripts namely 1B8EE20F-EA5D-42FC-A465-C57174EE2F44.js and 2C9FF31G-FB6E-53GD-B576-D68285FF3E55.js
• DB Scripts: Folder that contains database scripts.
• ReadMe.txt: ReadMe text file.
Running the script generatorAbout this taskAfter you install and configure the Learning Console, the Learning Console processes the dataand generates XML files. However, you need to copy the XML project files into the resourcegenerator to generate project resource files. You must then manually insert project resource filesinto the database using SQL queries.
Note:• Before generating script files, ensure you place the Java security fileslocal_policy.jar and US_export_policy.jar on the supervisor machine at%JAVA_HOME%\jre\lib\security folder.
• The script generator does not support Java version jdk-7u65 windows-x86.
Before you beginInstall and configure the Learning Console by creating one or more projects. For more informationabout how to create projects, see Using Harmony Workforce Optimization
Procedure1. Go to the Script Generator folder located in the Desktop Monitor installation folder,
right-click the ScriptGenerator.bat file, and select Edit.
2. In the ScriptGenerator.bat file, after java- jar ScriptGenerator. Jar, enterthe names of xml files generated by the Learning Console and save it.
3. Double-click the same ScriptGenerator.bat file.
In the ScriptGenerator.bat file, the system creates xml folders with js files. The scriptgenerator generates one js file for one single native application and two js files for singledocument in the web application.
4. Copy the resource files (js) and the XML project and place them in the folder you createdmanually on the server where the database that is connected to Unified Messagingcomponent is running.
Configuration
November 2017 Deploying Harmony Workforce Optimization with Avaya Aura® CommunicationManager and Avaya Aura® Contact Center 150Comments on this document? [email protected]
5. Click Start > SQL Server Management Studio on the server where the HarmonyWorkforce Optimization database is installed.
6. Select the tenant database and click New Query.
7. Type the query, select * from DTA_Projects --Insert into DTA_Projects(Name, Project_UUID,RESOURCE_TYPE,create_by,CREATE_DATE,Data)values ('abc_reg', 'abc(6D7667EA284E4810BD0B196534BC8634)','xml',1,getutcdate() ,(select BulkColumn From Openrowset(Bulk 'E:\DTA\abc(6D7667EA284E4810BD0B196534BC8634).xml', Single_Blob) As Img))and click Execute.
The query inserts the project XML file in the DTA_Projects table.
8. Type the query, select * from DTA_PROJECTS_RESOURCES ---Insert intoDTA_PROJECTS_RESOURCES (Dta_Projects_Id, Name, Resource_UUID,Resource_Type,CREATE_BY,CREATE_DATE, Data) values (82,'abc','04F554E7D0F042099C18B4D662718B1E','js',1,getutcdate() ,(selectBulkColumn From Openrowset(Bulk 'E:\DTA\abc(6D7667EA284E4810BD0B196534BC8634).xml_\04F554E7D0F042099C18B4D662718B1E.js', Single_Blob) As Img)) and clickExecute.
The query inserts the resource files in the DTA_Projects_Resources table.
9. Type the query, select * from DTA_PROJECTS_USER_ACCESS --Insert intoDTA_PROJECTS_USER_ACCESS (Dta_Projects_Id,EMP_ID,STATUS,CREATE_DATE,CREATE_BY) values(82,3,'A',GETUTCDATE(),1) and click Execute.
The query inserts the agent details such as employee ID in theDTA_Projects_User_Access table. The query assigns a project to any agent with employeeID and project ID.
Install the Screen Capture application on a terminalservice server
Installing the Screen Capture application using the command linemethod
About this taskUse this procedure to install the Screen Capture applications on a terminal services server. Whenyou install an application in Install Mode, the HKEY_CURRENT_USER information is primarilywritten to the registry key HKEY_LOCAL_MACHINE\SOFTWARE\Microsoft\Windows NT
Install the Screen Capture application on a terminal service server
November 2017 Deploying Harmony Workforce Optimization with Avaya Aura® CommunicationManager and Avaya Aura® Contact Center 151Comments on this document? [email protected]
\CurrentVersion\Terminal Server\Install. This registry key information is thencirculated to HKEY_CURRENT_USER for each user when they log in to the terminal server.
Procedure1. Log in to the terminal service server.
2. Open command prompt as an administrator and type change user /install and pressEnter.
The system displays the following message: User session is ready to installapplication.
3. Navigate to Harmony > Screen Capture and type AWFOSScreenCapture.exe -i.4. Type change user /execute and press Enter to place the server back to the execute
mode.
Ensure that the data folder located at C:\ProgramData\Avaya\Data has read and writepermission.
Uninstalling the Screen Capture application using the commandline method
Before you beginEnsure that you stop the Screen Capture service.
Procedure1. Log on to the terminal service server.
2. Open command prompt as an administrator and type change user /install and pressEnter.
The system displays the following message: User session is ready to installapplication.
3. Navigate to Harmony > Screen Capture and type AWFOSScreenCapture.exe -u.
4. Type change user /execute and press Enter to place the server back to the executemode.
Installing the Screen Capture application using the GUI methodProcedure
1. Click Harmony > Screen Capture located on the server that hosts the web applicationcomponents.
2. Copy the HarmonyScreenCapture.msi to any drive on the agent machine.
Configuration
November 2017 Deploying Harmony Workforce Optimization with Avaya Aura® CommunicationManager and Avaya Aura® Contact Center 152Comments on this document? [email protected]

3. Click Start > Control Panel > Install Application on Remote Desktop.
4. Click Next and then click Browse to select HarmonyScreenCapture.msi.
5. Click Next to proceed with the installation.
6. Click Finish.
Uninstalling the Screen Capture application using the GUI methodBefore you beginEnsure that you stop the Screen Capture service.
Procedure1. Click Harmony > Screen Capture located on the server that hosts the web application
components.
2. Copy the HarmonyScreenCapture.msi to any drive on the agent machine.
3. Click Start > Control Panel > Install Application on Remote Desktop.
4. Click Next and then click Browse to select HarmonyScreenCapture.msi.
5. Click Next to uninstall the application.
6. Click Finish.
LimitationsAvaya Aura® Contact Center on Communication Manager deployment limitations
• Call recording does not work for any SIP phones as the phone IP address is not available forpassive recording. As a workaround, you must configure a second recorder instance on thesame recorder server for SIP based recording.
• High availability fails when there is a network disconnection for AES and Avaya Aura®
Contact Center servers. The standby secondary server does not become active automaticallywhen the active primary server is down.
• In multiple transfer and conference scenarios, calls are not stitched together because theICM_ENTERPRISE ID appears different for agent and supervisor calls.
• When Avaya adapter loses connection with Device Media Call Control (DMCC) during a livecall and regains connection, the recording tone that was previously heard is not heardanymore for the live call. This happens in active recording in single step conference.
• With multiplicity, calls are not getting recorded for more than forty agents.• If you modify or remove an extension in the Harmony Workforce Optimization application, the
Avaya adapter DebugServlet retains the stale entry of the extension until the cleanup task isexecuted in the background. The task is usually executed in 30 minutes.
Limitations
November 2017 Deploying Harmony Workforce Optimization with Avaya Aura® CommunicationManager and Avaya Aura® Contact Center 153Comments on this document? [email protected]
• Beep tone once enabled for an extension, is heard even if an interaction is not recorded.
Installer limitations• When you uninstall the Harmony Workforce Optimization application, the log manager
component is not removed from services.msc and appears as running in disabled state.
Harmony Workforce Optimization component limitations• The Harmony Workforce Optimization components do not send email alert messages when
the connection to the database is lost. However, the components send SNMP traps.• When you disable and enable the data NIC on a server, you must restart all Harmony
Workforce Optimization components running on that server.• Harmony Workforce Optimization supports only 40 characters for interaction metadata
values. If an automatic call distribution (ACD) or a customer relationship management (CRM)system sends values more than 40 characters, the values will be truncated to 40 characters.
• Harmony Workforce Optimization does not record supervisor calls (voice or non-voice) whenthe coaching, intrusion, whisper, or barge feature is enabled for an agent.
• When a new tenant is created or an existing tenant is marked as default in SysAdmin, thewebapp service takes 5 minutes to load the tenant. Ensure that you wait for 5 minutes if youwant to log in to the application without the tenant alias.
• After you apply the latest Windows patches, sometimes, Internet Explorer fails to play audiofor live interactions. As a workaround, refresh the Live Monitoring playback window.
• When any ACD or PBX becomes non-functional or is restarted, the respective HarmonyWorkforce Optimization adapters must be restarted after the ACD or PBX becomesfunctional.
• Voice drive is not created in a multibox deployment, where you install web application,SysAdmin, and database on one box and Harmony Workforce Optimization components onanother box. As a workaround, you must manually create a voice drive on the server onwhich the Harmony Workforce Optimization components is installed.
Configuration
November 2017 Deploying Harmony Workforce Optimization with Avaya Aura® CommunicationManager and Avaya Aura® Contact Center 154Comments on this document? [email protected]
Chapter 9: Administration
Administration checklistNo. Task Reference Notes
1 Change the password for all thecomponents. Use the password that youuse to log in to web application.
See Settingpasswords forservices.msccomponents onpage 156.
2 Refresh and then restart the webservices.
See Restarting theHarmony WorkforceOptimizationcomponents onpage 133.
3 Start the web application using thefollowing URL: https://<HOSTNAME or IPaddress>/. Log in with the credentials ofa user created during tenant creation andperform the following:
• Configure data partition if required.
• Add organization, organization units,sites, departments, and designations.
• Upload employee data manually or byusing an excel spreadsheet.
• Assign supervisors to agents oremployees.
• Configure agent ID, extension, deviceID, or line instance for employees.
• Cross check group access forsupervisors and managers.
• Enable settings for voice and screencapture for agents.
• Configure user and report privileges forthe respective designations.
For moreinformation, seeAdministeringHarmony WorkforceOptimization.
November 2017 Deploying Harmony Workforce Optimization with Avaya Aura® CommunicationManager and Avaya Aura® Contact Center 155Comments on this document? [email protected]
Setting passwords for services.msc componentsAbout this taskUse this procedure to change the password for all the components for windows authenticationbased installation.
Procedure1. Click Start > Run.
2. In the Run window, type services.msc.
3. Click OK.
4. Right-click on any of the Harmony Workforce Optimization components and clickProperties.
5. In the new window, click Log On Tab.
6. Change the password to the local system administrator password, confirm the password,and click OK.
The system displays a dialog box with the following message: The account<username> has been granted the Log on as a service right.
7. Click OK.
Starting the Harmony Workforce Optimization webapplication
About this taskAfter the installation, you can start the Harmony Workforce Optimization web application and log inas the administrator.
Procedure1. Log in to the server hosting the web application component.
2. Click Start > Run > services.msc > WebApp Service > Start.3. When the service starts, enter the following URL in your browser: http://
<WebServerIP>/ , where server name is the Harmony Workforce Optimization webapplication host server system name or IP address.
4. Log in with the following credentials:
• UserID• Password
Administration
November 2017 Deploying Harmony Workforce Optimization with Avaya Aura® CommunicationManager and Avaya Aura® Contact Center 156Comments on this document? [email protected]
Use the login credentials of the tenant user you created in SysAdmin. See:Adding users onpage 106.
5. Change the password after you log in for the first time.
Maintenance
Backup and restoreBackup and restore is an important maintenance activity that you must perform on a regular basisas a precautionary measure. Take a backup of the server and the database so that, in case of anyfailure, you can revert to the original state using the restoration procedures.
For the Harmony Workforce Optimization application, you can take a complete backup of theserver as an image using external tools. You can also take an image of the server in case theserver is hosted on virtual machines. Apart from the database, also back up the following folders:
• WFO Home: Contains the master database properties, Avaya WebLM configurationproperties, and mail configuration properties.
• Voice: Contains recorded voice and screen files.
• VoiceData: Contains sniffer files.
• Logs: Contains log files that record the event occurrence during a software or productruntime.
Taking a backup of the server dataAbout this taskUse this procedure to take a backup of the data that exists on the server where the webapplication is installed. For multiserver installations, take a backup of the data that exists on theweb application server and the recorder server.
Before you beginStop the services of all components. Stop the Process Checklist service first. Otherwise, theProcess Checklist service restarts other services when it finds a service in a stopped state.
Procedure1. In the Harmony Workforce Optimization web application server, copy the following folders
to take a backup:
• WFO_Home folder located at C:\WFO_Home by default. Avaya recommends that youinstall this folder on E:\ drive so that there is no conflict with the installation directory.
Maintenance
November 2017 Deploying Harmony Workforce Optimization with Avaya Aura® CommunicationManager and Avaya Aura® Contact Center 157Comments on this document? [email protected]

• Working directory folder located at C:\<Working_Directory> by default. Avayarecommends that you install this folder on E:\ drive.
• Registry key located at HKEY_LOCAL_MACHINE\SOFTWARE\Wow6432Node\Avaya.
• Logs folder located at C:\Logs by default. Avaya recommends that you install thisfolder on E:\ drive as logs can occupy a lot of space.
2. In the Harmony Workforce Optimization Recorder server, copy the following folders to takea backup:
• WFO_Home folder located at C:\WFO_Home by default. Avaya recommends that youinstall this folder on E:\ drive so that there is no conflict with the installation directoryand voice directory.
• Working directory folder located at C:\<Working_Directory> by default. Avayarecommends that you install this folder on E:\ drive.
• Registry key located at HKEY_LOCAL_MACHINE\SOFTWARE\Wow6432Node\Avaya.
• Voice folder from the drive you specified during installation.
• VoiceData folder from the drive you specified for Voice folder during installation.
• Logs folder located at C:\Logs by default. Avaya recommends that you install thisfolder on E:\ drive as logs can occupy a lot of space.
Restoring the dataAbout this taskUse this procedure to restore the data on the server with the same IP address.
Before you begin• Install the same operating system with the same version (64 bit) on the new server.• Maintain the same partitions with the same drives.• Install the same version of the database.• Install all third-party software.• Uninstall the Harmony Workforce Optimization application in case there is an existing version
and reinstall the Harmony Workforce Optimization application. While reinstalling, use thesame drives and folder names that is used for the previous installation.
Procedure1. Stop the Harmony Workforce Optimization services.
a. Log in to the server that hosts the Harmony Workforce Optimization components.
b. Click Start > Run > services.msc.
c. Right-click the component and click Stop..
Administration
November 2017 Deploying Harmony Workforce Optimization with Avaya Aura® CommunicationManager and Avaya Aura® Contact Center 158Comments on this document? [email protected]
2. Restore the WFO_Home folder at C:\WFO_Home or E:\WFO_Home3. Restore the working directory folder at C:\<Working_Directory> or E:
\<Working_Directory>.
4. Restore the registry key located at HKEY_LOCAL_MACHINE\SOFTWARE\Wow6432Node\Avaya
5. Restore the Voice folder on the drive you specified during installation.
6. Restore the VoiceData folder on the drive you specified during installation.
7. Restore the Logs folder at C:\Logs or E:\Logs.
8. Start the Harmony Workforce Optimization services.
Taking a backup of the database filesAbout this taskUse this procedure to take a complete backup of the master database of the Harmony WorkforceOptimization application and the tenant database during a lean period. Store the backup files on aserver that is different from the location where SQL is running.
Procedure1. Click Start > SQL Management Studio on the server where the Harmony Workforce
Optimization database is installed.
2. Login using sa credentials.
3. Select the master database of Harmony Workforce Optimization and right-click Tasks >Back Up.
4. Select Backup type as FULL, click Options in the left pane, and select the Overwriteoption, and select the Verify option if you want the system to check for database backupcompletion.
5. Click Add to add the location and the name of the backup file.
6. Enter a file name with .bak extension and date and time stamp it for future reference.
7. Click OK to close the screen.
8. Click OK to start the database backup process and click Stop action now to terminate thebackup process.
The Progress pane indicates the percentage of completion. After the backup is complete, amessage indicating successful backup is displayed.
9. Repeat Step 1 to Step 8 to take a backup of the tenant database.
Note:
For Step 3, select the tenant database instead of the master database of HarmonyWorkforce Optimization.
Maintenance
November 2017 Deploying Harmony Workforce Optimization with Avaya Aura® CommunicationManager and Avaya Aura® Contact Center 159Comments on this document? [email protected]
Restoring the database filesAbout this taskUse this procedure to restore the master database files or the tenant database files therebyensuring database recovery.
Before you beginBefore you restore either the master database of Harmony Workforce Optimization or the tenantdatabase, delete the existing database that you want to restore.
Procedure1. Click Start > SQL Server Management Studio on the server where the Harmony
Workforce Optimization database is installed.
2. Select the master database of Harmony Workforce Optimization and right-click Delete.
3. To restore the tenant database, select the tenant database and right-click Delete.
4. Select Databases and right-click Restore.
5. In the Restore Database dialog box, use the Source section to specify the source andlocation of the backup sets to be restored.
6. Select Database to restore the database from the list of backed up files.
In the Destination section, the Database field is populated with the name of the databaseto be restored.
7. In the Backup sets to restore grid, select the backup files to be restored.
8. Click OK.
Running the installer in maintenance modeAbout this taskYou can run the installer in maintenance mode on the server where Harmony WorkforceOptimization is installed to do the following tasks:
• Modify: To view the already installed features selected by default. You can select the featuresthat you want to install and clear the check box to uninstall the features.
• Remove: To uninstall the Harmony Workforce Optimization product completely.
Procedure1. Right-click Harmony_5_2_2.exe and click Run as Administrator.2. Click Next.3. On the Program Maintenance window, select Modify to manage the features that you want
to install or uninstall and click Next .
Administration
November 2017 Deploying Harmony Workforce Optimization with Avaya Aura® CommunicationManager and Avaya Aura® Contact Center 160Comments on this document? [email protected]
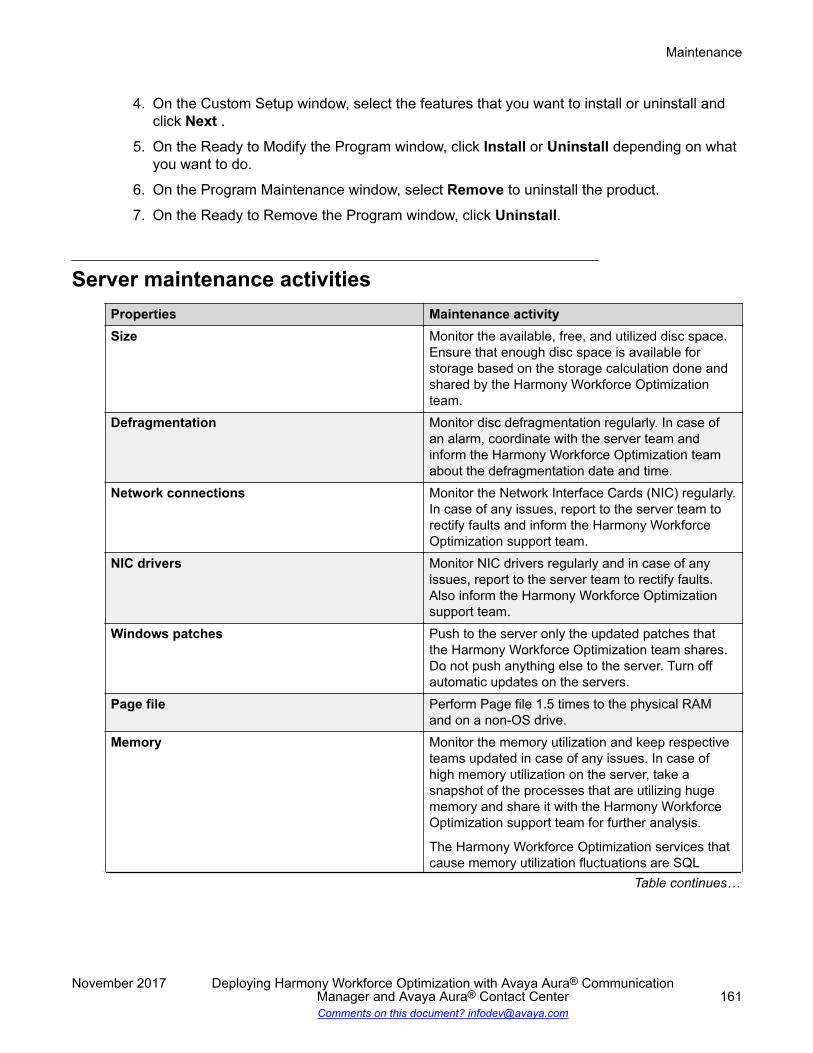
4. On the Custom Setup window, select the features that you want to install or uninstall andclick Next .
5. On the Ready to Modify the Program window, click Install or Uninstall depending on whatyou want to do.
6. On the Program Maintenance window, select Remove to uninstall the product.
7. On the Ready to Remove the Program window, click Uninstall.
Server maintenance activitiesProperties Maintenance activitySize Monitor the available, free, and utilized disc space.
Ensure that enough disc space is available forstorage based on the storage calculation done andshared by the Harmony Workforce Optimizationteam.
Defragmentation Monitor disc defragmentation regularly. In case ofan alarm, coordinate with the server team andinform the Harmony Workforce Optimization teamabout the defragmentation date and time.
Network connections Monitor the Network Interface Cards (NIC) regularly.In case of any issues, report to the server team torectify faults and inform the Harmony WorkforceOptimization support team.
NIC drivers Monitor NIC drivers regularly and in case of anyissues, report to the server team to rectify faults.Also inform the Harmony Workforce Optimizationsupport team.
Windows patches Push to the server only the updated patches thatthe Harmony Workforce Optimization team shares.Do not push anything else to the server. Turn offautomatic updates on the servers.
Page file Perform Page file 1.5 times to the physical RAMand on a non-OS drive.
Memory Monitor the memory utilization and keep respectiveteams updated in case of any issues. In case ofhigh memory utilization on the server, take asnapshot of the processes that are utilizing hugememory and share it with the Harmony WorkforceOptimization support team for further analysis.
The Harmony Workforce Optimization services thatcause memory utilization fluctuations are SQL
Table continues…
Maintenance
November 2017 Deploying Harmony Workforce Optimization with Avaya Aura® CommunicationManager and Avaya Aura® Contact Center 161Comments on this document? [email protected]
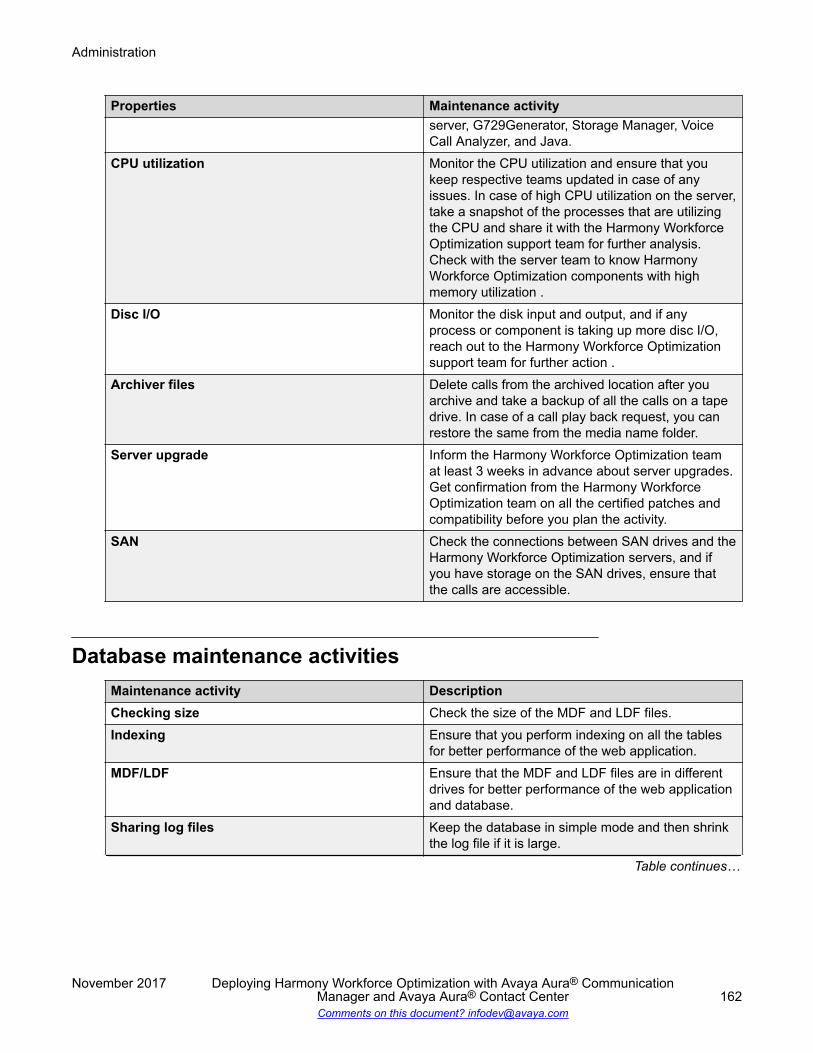
Properties Maintenance activityserver, G729Generator, Storage Manager, VoiceCall Analyzer, and Java.
CPU utilization Monitor the CPU utilization and ensure that youkeep respective teams updated in case of anyissues. In case of high CPU utilization on the server,take a snapshot of the processes that are utilizingthe CPU and share it with the Harmony WorkforceOptimization support team for further analysis.Check with the server team to know HarmonyWorkforce Optimization components with highmemory utilization .
Disc I/O Monitor the disk input and output, and if anyprocess or component is taking up more disc I/O,reach out to the Harmony Workforce Optimizationsupport team for further action .
Archiver files Delete calls from the archived location after youarchive and take a backup of all the calls on a tapedrive. In case of a call play back request, you canrestore the same from the media name folder.
Server upgrade Inform the Harmony Workforce Optimization teamat least 3 weeks in advance about server upgrades.Get confirmation from the Harmony WorkforceOptimization team on all the certified patches andcompatibility before you plan the activity.
SAN Check the connections between SAN drives and theHarmony Workforce Optimization servers, and ifyou have storage on the SAN drives, ensure thatthe calls are accessible.
Database maintenance activitiesMaintenance activity DescriptionChecking size Check the size of the MDF and LDF files.Indexing Ensure that you perform indexing on all the tables
for better performance of the web application.MDF/LDF Ensure that the MDF and LDF files are in different
drives for better performance of the web applicationand database.
Sharing log files Keep the database in simple mode and then shrinkthe log file if it is large.
Table continues…
Administration
November 2017 Deploying Harmony Workforce Optimization with Avaya Aura® CommunicationManager and Avaya Aura® Contact Center 162Comments on this document? [email protected]
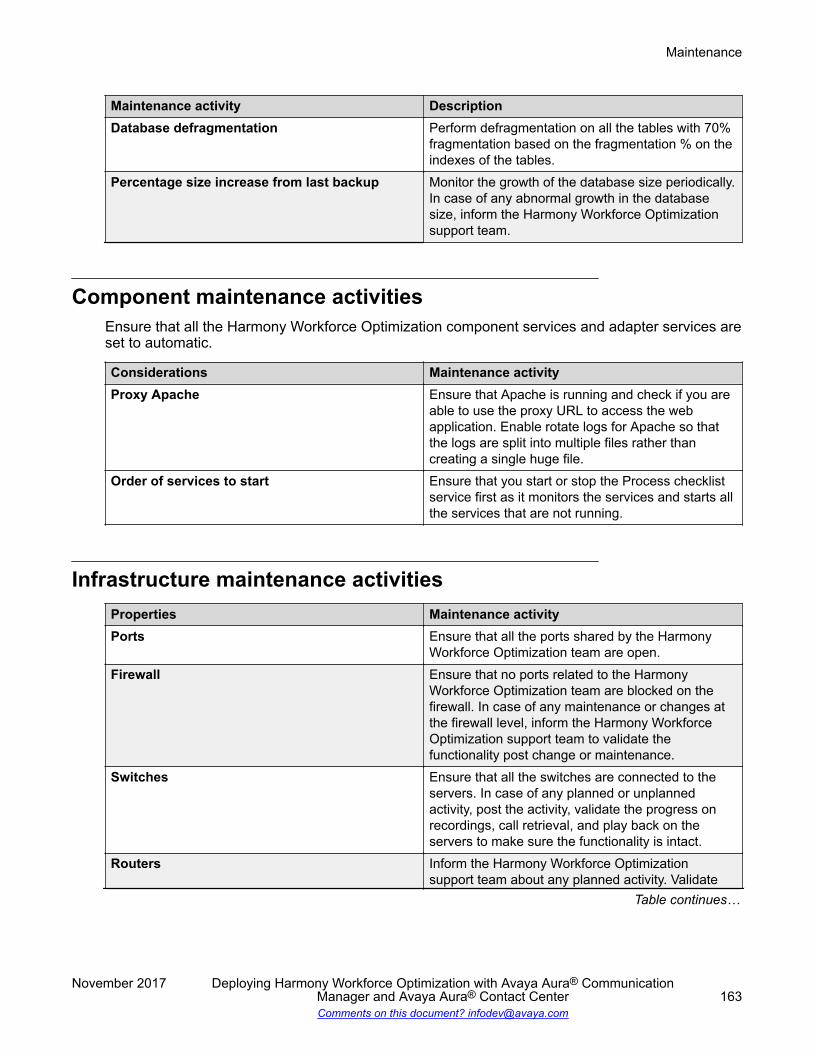
Maintenance activity DescriptionDatabase defragmentation Perform defragmentation on all the tables with 70%
fragmentation based on the fragmentation % on theindexes of the tables.
Percentage size increase from last backup Monitor the growth of the database size periodically.In case of any abnormal growth in the databasesize, inform the Harmony Workforce Optimizationsupport team.
Component maintenance activitiesEnsure that all the Harmony Workforce Optimization component services and adapter services areset to automatic.
Considerations Maintenance activityProxy Apache Ensure that Apache is running and check if you are
able to use the proxy URL to access the webapplication. Enable rotate logs for Apache so thatthe logs are split into multiple files rather thancreating a single huge file.
Order of services to start Ensure that you start or stop the Process checklistservice first as it monitors the services and starts allthe services that are not running.
Infrastructure maintenance activitiesProperties Maintenance activityPorts Ensure that all the ports shared by the Harmony
Workforce Optimization team are open.Firewall Ensure that no ports related to the Harmony
Workforce Optimization team are blocked on thefirewall. In case of any maintenance or changes atthe firewall level, inform the Harmony WorkforceOptimization support team to validate thefunctionality post change or maintenance.
Switches Ensure that all the switches are connected to theservers. In case of any planned or unplannedactivity, post the activity, validate the progress onrecordings, call retrieval, and play back on theservers to make sure the functionality is intact.
Routers Inform the Harmony Workforce Optimizationsupport team about any planned activity. Validate
Table continues…
Maintenance
November 2017 Deploying Harmony Workforce Optimization with Avaya Aura® CommunicationManager and Avaya Aura® Contact Center 163Comments on this document? [email protected]

Properties Maintenance activityand ensure that the Harmony WorkforceOptimization functionality is intact after planned orunplanned activities.
VLAN Notify the changes in VLAN to the HarmonyWorkforce Optimization support team to assess theimpact on recordings and application performance.Inform the Harmony Workforce Optimization teamat least one week in advance about the plannedactivities.
IP changes Notify the changes in the IP address of the serversto the Harmony Workforce Optimization supportteam to assess the impact on recordings andapplication performance. Inform the HarmonyWorkforce Optimization team at least one week inadvance about the planned activities.
DNS Notify changes in DNS to the Harmony WorkforceOptimization support team to assess the impact onrecordings and application performance. Inform theHarmony Workforce Optimization team at least oneweek in advance about the planned activities.
QOS Quality of Service (QOS) is a major issue in VOIPimplementations. The issue is about how toguarantee packet traffic for voice or other mediaconnection to avoid delay or drop caused due tointerference from other lower priority traffic.
Consider the following:
• Latency: Delay of packet delivery.
• Jitter: Variations in delay of packet delivery.
• Packet Loss: Heavy network traffic causingnetwork to drop packets.
• Burstiness of Loss and Jitter: Loss and discards inbursts.
Group policy Notify the change in group policy for InternetExplorer on supervisor machines, group policy ofservers, users, and agent’s desktops to theHarmony Workforce Optimization support team toassess the impact of Harmony WorkforceOptimization functionality.
Security Notify any change in the security patches on theserver to the Harmony Workforce Optimizationteam. Ensure that you install only the certified list ofsecurity patches on the servers.
Table continues…
Administration
November 2017 Deploying Harmony Workforce Optimization with Avaya Aura® CommunicationManager and Avaya Aura® Contact Center 164Comments on this document? [email protected]

Properties Maintenance activityCommunication Manager upgrade (environmentspecific)
Notify Call manager, AES, IP Office upgrades to theHarmony Workforce Optimization support team tovalidate the impacts of the upgrade and to ensurethat the production is smooth without any issues.Inform the Harmony Workforce Optimization teamat least two weeks in advance about the scheduledactivities.
Gateway Notify the changes in gateway to the HarmonyWorkforce Optimization support team to ensure allcalls are recorded. Inform the Harmony WorkforceOptimization team at least two weeks in advanceabout the planned activities.
Access credentials For user account with administrator privileges,provide password without expiry to the HarmonyWorkforce Optimization support team. In case ofany change in the password, reach out to theHarmony Workforce Optimization support team.
Server restart maintenance activitiesConsiderations Maintenance activityOrder of services to stop or start after reboot Stop the Process Checklist service and all other
Harmony Workforce Optimization services andensure that all the services are set to manual ordisabled mode before you reboot or shut down theserver. After the server is functional, start all otherservices first and then start the Process Checklistservice.
Ensure that you run the Avaya Debug Servlet tocheck the recorder role and if the recorder service isrunning.
Check map drive status Check the map drive status, and in case of anyfailures, check the respective component logs andtake necessary action with the server team. Informthe Harmony Workforce Optimization support teamin case of failure.
Maintenance
November 2017 Deploying Harmony Workforce Optimization with Avaya Aura® CommunicationManager and Avaya Aura® Contact Center 165Comments on this document? [email protected]
Certificate management
Replacing self-signed certificates with CA-signed SSL certificatesAbout this taskUse this procedure to replace the self-signed Harmony Workforce Optimization certificate with aCA-signed SSL certificate.
Procedure1. Log in to the server that hosts the web application components.
2. Click Start > Run > services.msc.
3. Right-click the Harmony WebProxy service and click Stop.
4. Copy the SSL key file to the Apache installation folder located at the installation path youspecify during installation. For example, C:\Harmony\Apache24\conf\ssl.key\.
5. Copy the CA-signed certificate file to the Apache installation folder located at theinstallation path you specify during installation. For example, C:\Harmony\Apache24\conf\ssl.crt\.
6. Right-click the httpd-ssl.conf file located at the installation path in the extra folder.For example, C:\Harmony\Apache24\conf\extra.
7. Click Edit with Notepad ++.
8. Search for /conf/ssl.crt/server.crt.
9. Replace server.crt with the name of the CA-signed certificate file.
10. Search for /conf/ssl.key/server.key.
11. Replace server.key with the name of the SSL key file.
12. Click Save to close the file.
13. Restart the Harmony WebProxy service.
Next stepsOpen the Harmony Workforce Optimization application on a web browser using the URL:http://<IPAddress>/ depending on the server configuration. The URL automatically getsredirected to https://<hostname>/.
Administration
November 2017 Deploying Harmony Workforce Optimization with Avaya Aura® CommunicationManager and Avaya Aura® Contact Center 166Comments on this document? [email protected]

Chapter 10: Post installation verification
System verification checklistNo. Tasks Reference
1 Start the SysAdmin service. See Starting the SysAdmin service onpage 167.
2 Access the SysAdmin URL.3 Start the web application service. See Starting the web application service on
page 168.4 Access the web application URL. See Logging on to Harmony Workforce
Optimization on page 168.5 Verify the log files of the following
components:• Log manager See Log Manager log messages on
page 170.• Media manager See Media Manager log messages on
page 170.• Messaging See Messaging log messages on page 170.• Process checklist See Process Checklist log messages on
page 171.• Packet sniffer See Packet Sniffer log messages on
page 171.• Recorder See Recorder log messages on page 172.
Starting the SysAdmin serviceProcedure
1. Log in to the server that hosts the web application components.
2. Click Start > Run > services.msc.
3. Right-click SysAdmin Service and click Restart.
November 2017 Deploying Harmony Workforce Optimization with Avaya Aura® CommunicationManager and Avaya Aura® Contact Center 167Comments on this document? [email protected]
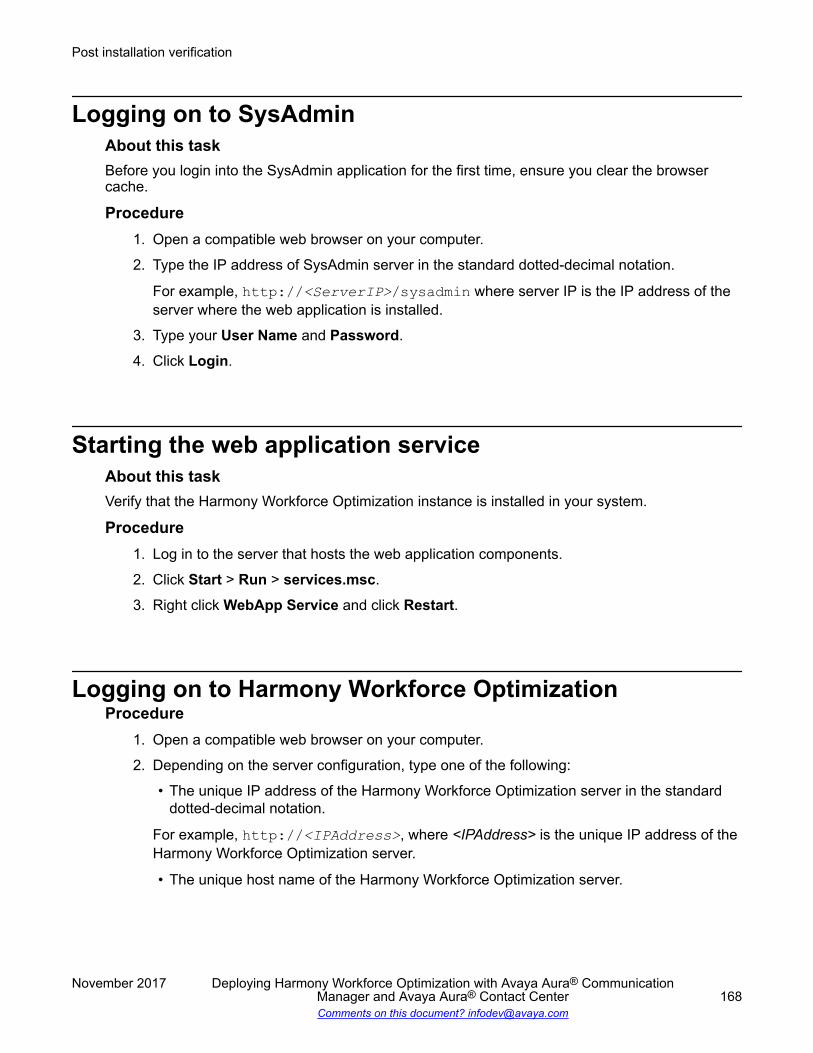
Logging on to SysAdminAbout this taskBefore you login into the SysAdmin application for the first time, ensure you clear the browsercache.
Procedure1. Open a compatible web browser on your computer.
2. Type the IP address of SysAdmin server in the standard dotted-decimal notation.
For example, http://<ServerIP>/sysadmin where server IP is the IP address of theserver where the web application is installed.
3. Type your User Name and Password.
4. Click Login.
Starting the web application serviceAbout this taskVerify that the Harmony Workforce Optimization instance is installed in your system.
Procedure1. Log in to the server that hosts the web application components.
2. Click Start > Run > services.msc.
3. Right click WebApp Service and click Restart.
Logging on to Harmony Workforce OptimizationProcedure
1. Open a compatible web browser on your computer.
2. Depending on the server configuration, type one of the following:
• The unique IP address of the Harmony Workforce Optimization server in the standarddotted-decimal notation.
For example, http://<IPAddress>, where <IPAddress> is the unique IP address of theHarmony Workforce Optimization server.
• The unique host name of the Harmony Workforce Optimization server.
Post installation verification
November 2017 Deploying Harmony Workforce Optimization with Avaya Aura® CommunicationManager and Avaya Aura® Contact Center 168Comments on this document? [email protected]

For example, http://<FQDN>, where <FQDN> is the domain name of the HarmonyWorkforce Optimization server.
You can now log in to the Harmony Workforce Optimization application.
3. Type the user name and password.
Use the login credentials of the tenant user you created in SysAdmin.
4. Click Sign in.
The system displays the Harmony Workforce Optimization home page. When you log in tothe application for the first time, the system displays the Settings dialog box to configuredata partition.
Verifying Harmony Workforce Optimization service logsAbout this taskAfter installing the Harmony Workforce Optimization application, verify the log files to ensure thatall the services are functional. The location of the Logs folder is specified during installation. Bydefault, the Logs folder is located at C:\Logs.
Procedure1. Go to the Logs folder at <Logs Path>\Logs or at a location specified during the
Harmony Workforce Optimization installation.
2. Verify whether the component services in the following log files are functional:
• LogManager.log• MediaManager.log• Messaging.log• ProcessChecklist.log• PacketSniffer.log• Recorder.log
Verifying Harmony Workforce Optimization service logs
November 2017 Deploying Harmony Workforce Optimization with Avaya Aura® CommunicationManager and Avaya Aura® Contact Center 169Comments on this document? [email protected]

Component log verification
Log Manager log messagesMessage DescriptionLogManager started: Running build.... The Log Manager service is functional.Connection opened with database at ipaddress : xx.xxx.xxx.xx and databasename HARMONYDB_April14th_5_2_2
The Log Manager component is connected to thedatabase on the server with IP addressxx.xxx.xxx.xx and database nameHARMONYDB_April14th_5_2_2.
Media Manager log messagesMessage DescriptionMediaManager started: Running build... The Media Manager service is functional.Connection opened with database at ipaddress : xx.xxx.xxx.xx and databasename HARMONYDB_April14th_5_2_2
The Media Manager component is connected to thedatabase on the server with IP addressxx.xxx.xxx.xx and database nameHARMONYDB_April14th_5_2_2.
2 storage server details loaded fromdatabase
The Media Manager is loading storage serverdetails from the tenant database.
Using local path "D:\Voice\" forstorage
The Media Manager is validating the storage pathcreated in web application.
Messaging log messagesMessage DescriptionMessaging started: Running build... The Messaging service is functional.Connection opened with database atip address : xx.xxx.xxx.xx anddatabase nameHARMONYDB_April14th_5_2_2
The Messaging component is connected to thedatabase on the server with IP address xx.xxx.xxx.xxand database name HARMONYDB_April14th_5_2_2.
Post installation verification
November 2017 Deploying Harmony Workforce Optimization with Avaya Aura® CommunicationManager and Avaya Aura® Contact Center 170Comments on this document? [email protected]
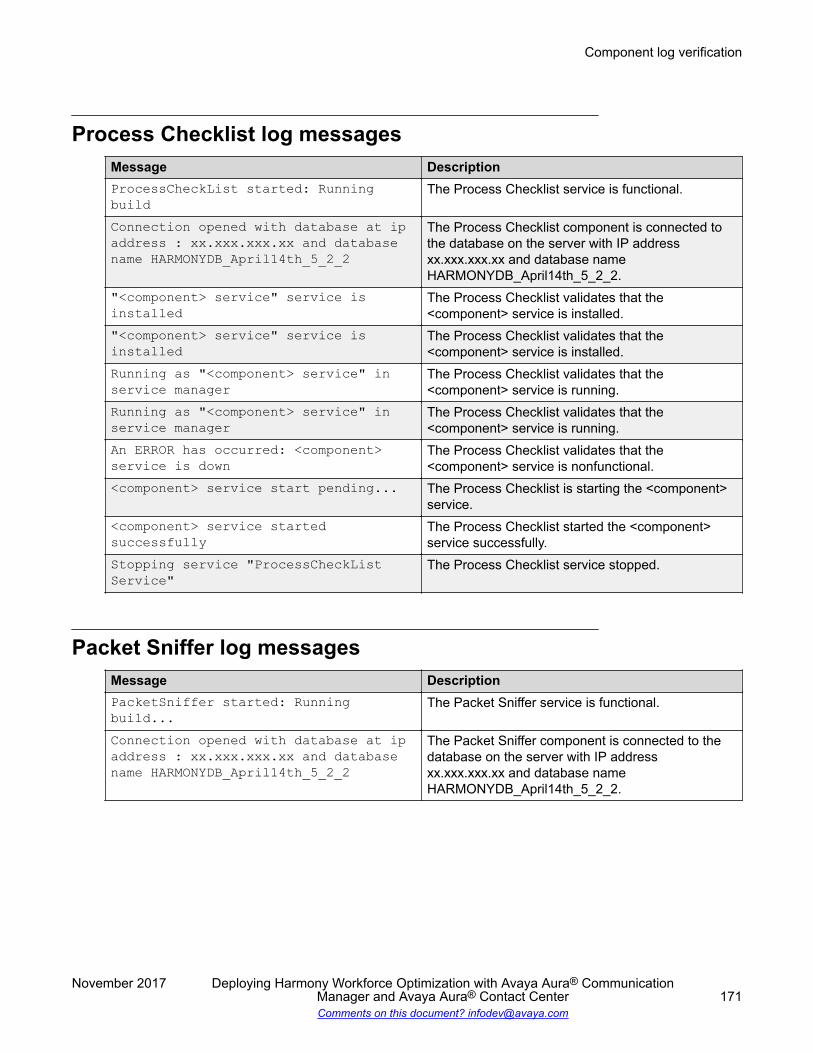
Process Checklist log messagesMessage DescriptionProcessCheckList started: Runningbuild
The Process Checklist service is functional.
Connection opened with database at ipaddress : xx.xxx.xxx.xx and databasename HARMONYDB_April14th_5_2_2
The Process Checklist component is connected tothe database on the server with IP addressxx.xxx.xxx.xx and database nameHARMONYDB_April14th_5_2_2.
"<component> service" service isinstalled
The Process Checklist validates that the<component> service is installed.
"<component> service" service isinstalled
The Process Checklist validates that the<component> service is installed.
Running as "<component> service" inservice manager
The Process Checklist validates that the<component> service is running.
Running as "<component> service" inservice manager
The Process Checklist validates that the<component> service is running.
An ERROR has occurred: <component>service is down
The Process Checklist validates that the<component> service is nonfunctional.
<component> service start pending... The Process Checklist is starting the <component>service.
<component> service startedsuccessfully
The Process Checklist started the <component>service successfully.
Stopping service "ProcessCheckListService"
The Process Checklist service stopped.
Packet Sniffer log messagesMessage DescriptionPacketSniffer started: Runningbuild...
The Packet Sniffer service is functional.
Connection opened with database at ipaddress : xx.xxx.xxx.xx and databasename HARMONYDB_April14th_5_2_2
The Packet Sniffer component is connected to thedatabase on the server with IP addressxx.xxx.xxx.xx and database nameHARMONYDB_April14th_5_2_2.
Component log verification
November 2017 Deploying Harmony Workforce Optimization with Avaya Aura® CommunicationManager and Avaya Aura® Contact Center 171Comments on this document? [email protected]

Recorder log messagesMessage DescriptionRecorder started: Running build... The Recorder service is functional.Connection opened with database at ipaddress : xx.xxx.xxx.xx and databasename HARMONYDB_April14th_5_2_2
The Recorder component is connected to thedatabase on the server with IP addressxx.xxx.xxx.xx and database nameHARMONYDB_April14th_5_2_2.
Storage server details loaded fromdatabase 1
The Recorder loaded the storage server details.
02/28/17 22:35:47 (PST) [22156]CKnoahsARKDatabase.c :356 INFO - {Callup_icm_s_GetAgentsInfo('','')}
The Recorder validates the Recording Settingsconfigurations for all agents in the HarmonyWorkforce Optimization application every minuteusing the stored procedure {Callup_icm_s_GetAgentsInfo('','')}.
Recorder connected to primary AESAdapter at ip address xx.xxx.xxx.xxxand port 33012
The Recorder is connected to the primary AESadapter on the server with IP address xx.xxx.xxx.xxxand port number 33012.
Recorder connected to primary AvayaAdapter at ip address xx.xxx.xxx.xxxand port 34101
The Recorder is connected to the primary Avayaadapter on the server with IP address xx.xxx.xxx.xxxand port number 34101.
Received VOIP_CTIOS_AGENT_LOGIN withagentID 20001 and agentExtension 20001
The Recorder received the login information for theagent with ID 20001 and extension 20001 from therelevant adapter based on the deployment.
Received CTIOS_AGENT_LOGIN withagent_id 20001 for agent withextension 20001 and line_instance 1
The Recorder received the login information for theagent with ID 20001, extension 20001, and lineinstance 1 from the relevant adapter based on thedeployment.
Received VOIP_CTIOS_AGENT_CALL_STATEwith agentExtension 20001 andagentState OFF_HOOK for deviceId 20001
The Recorder received call state information as offhook for the agent with extension 20001 and deviceID 20001 from the signalling adapter based on thedeployment.
Received VOIP_CTIOS_AGENT_CALL_INFOwith agentExtension 20001
The Recorder received call information for the agentwith extension 20001 from the signaling adapterbased on the deployment.
Received VOIP_CTIOS_AGENT_CALL_STATEwith agentExtension 20001 andagentState ON_CONNECTED for deviceId20001
The Recorder received call state information asconnected for agent with extension 20001 anddevice ID 20001 from the signaling adapter basedon the deployment.
ReceivedVOIP_CTIOS_AGENT_EXTENDED_CALL_INFOwith agentExtension 20001 andcallIdentifier 1638
The Recorder received extended call information foragent with extension 20001 and call identifier 1638from the signaling adapter based on thedeployment.
Table continues…
Post installation verification
November 2017 Deploying Harmony Workforce Optimization with Avaya Aura® CommunicationManager and Avaya Aura® Contact Center 172Comments on this document? [email protected]

Message DescriptionReceivedVOIP_CTIOS_AGENT_CALL_ACD_INFO withagentExtension 20001 and lineInstance1
The Recorder received call ACD information foragent with extension 20001 and line instance 1 fromthe ACD adapter based on the deployment.
Received CTIOS_CALL_ACD_INFO_MESSAGEfor agent with extension 20001 andcall_identifier 37496593
The Recorder received call ACD informationmessage for agent with extension 20001 and callidentifier 37496593 from the ACD adapter based onthe deployment.
Received VOIP_CTIOS_PHONE_EXT_INFO The Recorder received phone extension informationfrom the relevant adapter based on the deployment.
Received CTIOS_PHONE_EXT_INFO forextension 20001, ip address x.x.xx.xxand extension status Added
The Recorder received phone extension informationfor extension 20001 on IP address x.x.xx.xx andextension status as added.
Received CTIOS_CALL_STATE_MSG_OFF_HOOKfor agent with extension 20001 andline_instance 1 with call_identifier37496593
The Recorder received call state message as offhook for agent with extension 20001, line instance1, and call identifier 37496593 from the signalingadapter based on the deployment.
Received CTIOS_CALL_INFO_MESSAGE withcalled party "20001", calling party"20012" and call_typeCALL_TYPE_INBOUND for agent withextension 20001 and skill_group_id 0and line_instance 1 withcall_identifier 37496593
The Recorder received call information messagewith the following call details:
• Called party: 20001
• Calling party: 20012
• Call type: Inbound
• Extension: 20001
• Skill group ID: 0
• Line instance: 1
• Call identifier: 31496593ReceivedVOIP_CTIOS_AGENT_CALL_END_RESPONSE_CODE with end cause AGENT_ENDED
The Recorder received call end response code thatstates that the agent ended the call from thesignaling adapter based on the deployment.
Received VOIP_CTIOS_AGENT_CALL_STATEwith agentExtension 20001 andagentState ON_HOOK for deviceId 20001
The Recorder received call state as on hook foragent with extension 20001 and device ID 20001from the signaling adapter based on thedeployment.
ReceivedVOIP_CTIOS_AGENT_CALL_WRAPUP_DATA withagentExtension 20001 callWrapUpDataand lineInstance 1
The Recorder received call wrap up data for agentwith extension 20001, call wrap up data, and lineinstance 1 from the signaling adapter based on thedeployment.
Component log verification
November 2017 Deploying Harmony Workforce Optimization with Avaya Aura® CommunicationManager and Avaya Aura® Contact Center 173Comments on this document? [email protected]
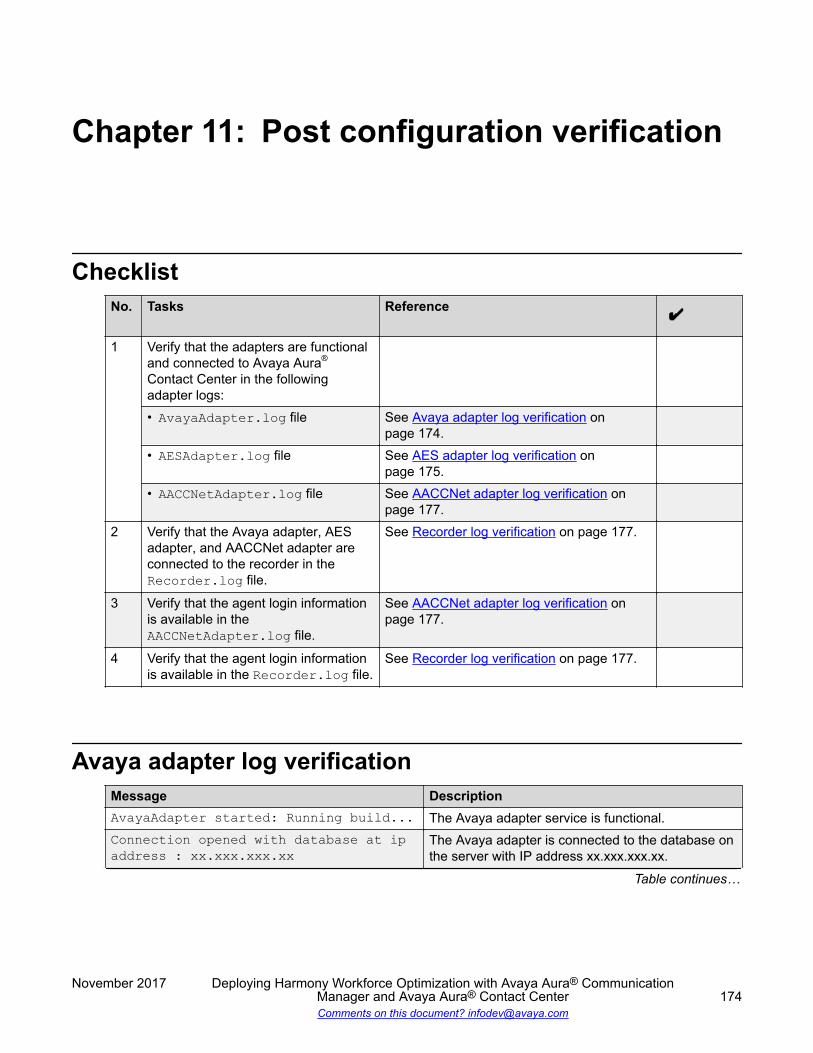
Chapter 11: Post configuration verification
ChecklistNo. Tasks Reference
1 Verify that the adapters are functionaland connected to Avaya Aura®
Contact Center in the followingadapter logs:• AvayaAdapter.log file See Avaya adapter log verification on
page 174.• AESAdapter.log file See AES adapter log verification on
page 175.• AACCNetAdapter.log file See AACCNet adapter log verification on
page 177.2 Verify that the Avaya adapter, AES
adapter, and AACCNet adapter areconnected to the recorder in theRecorder.log file.
See Recorder log verification on page 177.
3 Verify that the agent login informationis available in theAACCNetAdapter.log file.
See AACCNet adapter log verification onpage 177.
4 Verify that the agent login informationis available in the Recorder.log file.
See Recorder log verification on page 177.
Avaya adapter log verificationMessage DescriptionAvayaAdapter started: Running build... The Avaya adapter service is functional.Connection opened with database at ipaddress : xx.xxx.xxx.xx
The Avaya adapter is connected to the database onthe server with IP address xx.xxx.xxx.xx.
Table continues…
November 2017 Deploying Harmony Workforce Optimization with Avaya Aura® CommunicationManager and Avaya Aura® Contact Center 174Comments on this document? [email protected]

Message DescriptionStarted Loading Extensions configuredfor recording in database
The Avaya adapter is loading extensions configuredfor recording in database.
Connected to Primary DatabaseServerxx.xxx.xxx.xxx for default
The Avaya adapter is connected to the primarydatabase server on IP address xx.xxx.xxx.xxx.
Successfully got a service provider tothe AES Server with session_id6E423EE9816ED8E55DC5FA0EB2F2523C-
The Avaya adapter is connected to the DMCCservice on AES server on the session ID6E423EE9816ED8E55DC5FA0EB2F2523C.
Successfully registered recordingdevice with extension 21151
The Avaya adapter is registering the recordingstation on the DMCC station recording device21151.
Added element 21151 to pool The Avaya adapter added the DMCC recordingstation 21151 to the pool.
Received CSTA_REGISTERED_EVENT eventfor Recording Device extension 21151
The Avaya adapter received a registered event fromDMCC service on AES server for the recordingdevice extension 21151.
AES adapter log verificationMessage DescriptionAESAdapter started: Running build... The AES adapter service is functional."AESAdapter Service" Service Stopped The AES adapter service stopped. Restart the service.Connection opened with database atip address : xx.xxx.xxx.xx
The AES adapter is connected to the database on theserver with IP address xx.xxx.xxx.xx.
ACSOpenStream Success The AES adapter is connected to the TSAPI serviceon the AES server.
ACSOpenStream Failed The connection between the AES adapter and theAES server is lost.
Ensure that the AES server is connected toCommunication Manager and the TSAPI client isinstalled and configured correctly.
HuntGroupMonitoring Started The AES adapter is loading the hunt group parametervalue configured in SysAdmin.
Added to MonitorPendingAgentsTable The AES adapter is adding the hunt group, agent IDs,and extensions in theMonitorPendingAgentsTable.
Received ACS_OPEN_STREAM_CONF event The AES adapter is successfully connected with theAES server.
Table continues…
AES adapter log verification
November 2017 Deploying Harmony Workforce Optimization with Avaya Aura® CommunicationManager and Avaya Aura® Contact Center 175Comments on this document? [email protected]

Message DescriptionAdapter connected to client at ipaddress xx.xxx.xxx.xxx and port51446
The AES adapter is successfully connected with therecorder on the server with IP address xx.xxx.xxx.xxxand port number 51446.
CTILinkStatus is LinkUp The connection between the AES server andCommunication Manager is active.
CTILinkStatus is LinkDown The connection between the AES server andCommunication Manager is lost.
Ensure that the AES server is connected to theCommunication Manager and the TSAPI client isinstalled and configured correctly.
Started monitoring on hunt groupextension
The AES adapter started monitoring the hunt groupextensions.
Monitoring started for huntgroupextension 51001
The AES adapter started monitoring the hunt groupand all agents mapped to the hunt group number51001 in Communication Manager.
Found agent_id 29033 withagent_extension 29033 inAgentLoginTable
The AES adapter found agent ID 29033 with extension29033 in the AgentLoginTable. Because the agentID and extension are identical, the recording isextension based.
Monitoring started for extension29033
The AES adapter started monitoring extension 29033.
Added agent_id 29033 with extension29033 to AgentLoginTable
The AES adapter added agent ID 29033 withextension 29033 to AgentLoginTable.
Received CSTA_MONITOR_CONF eventreceived for agent_id 29033 andagent_extension 29033
The AES adapter received confirmation on themonitoring event for agent ID 29033 and agentextension 29033.
Sending VOIP_CTIOS_AGENT_LOGIN withagentID 29033 for agent withextension 29033, line_instance 1
The AES adapter is sending agent login informationfor agent ID 29033 with extension 29033 on lineinstance 1 to the recorder.
Starting to monitor new agent_id52013
The AES adapter started monitoring agent ID 52013.
Received CSTA_LOGGED_ON event foragent_id 52013 and agent_extension29033
The agent has logged in to extension 29033 withagent ID 52013. Because the agent ID and extensionare not identical, the recording is agent based.
Found agent_id 52013 withagent_extension 29033 inAgentLoginTable
The AES adapter found agent ID 52013 with extension29033 in the tableAgentLoginTable.
Added agent_id 52013 with extensionto AgentLoginTable.
The AES adapter added agent ID 52013 withextension 29033 to AgentLoginTable.
Sending VOIP_CTIOS_AGENT_LOGIN withagentID 52013 for agent withextension 29033, line_instance 1
The AES adapter is sending agent login informationfor agent ID 52013 with extension 29033 on lineinstance 1 to the recorder.
Post configuration verification
November 2017 Deploying Harmony Workforce Optimization with Avaya Aura® CommunicationManager and Avaya Aura® Contact Center 176Comments on this document? [email protected]
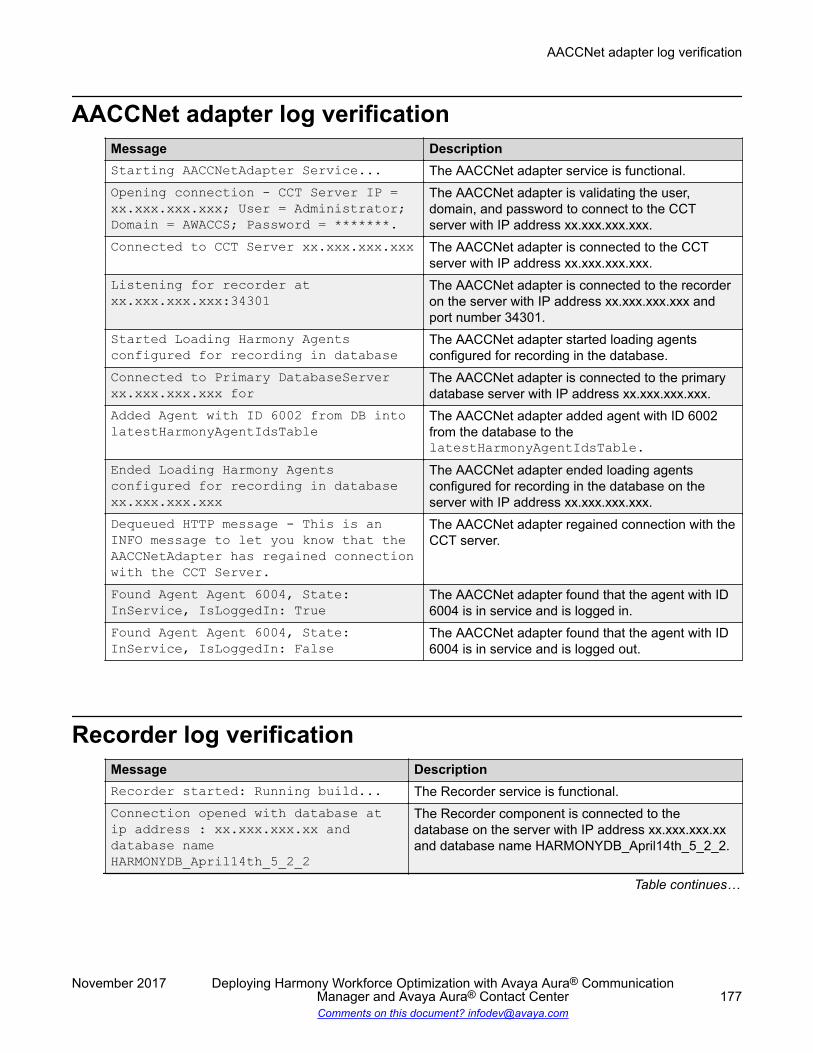
AACCNet adapter log verificationMessage DescriptionStarting AACCNetAdapter Service... The AACCNet adapter service is functional.Opening connection - CCT Server IP =xx.xxx.xxx.xxx; User = Administrator;Domain = AWACCS; Password = *******.
The AACCNet adapter is validating the user,domain, and password to connect to the CCTserver with IP address xx.xxx.xxx.xxx.
Connected to CCT Server xx.xxx.xxx.xxx The AACCNet adapter is connected to the CCTserver with IP address xx.xxx.xxx.xxx.
Listening for recorder atxx.xxx.xxx.xxx:34301
The AACCNet adapter is connected to the recorderon the server with IP address xx.xxx.xxx.xxx andport number 34301.
Started Loading Harmony Agentsconfigured for recording in database
The AACCNet adapter started loading agentsconfigured for recording in the database.
Connected to Primary DatabaseServerxx.xxx.xxx.xxx for
The AACCNet adapter is connected to the primarydatabase server with IP address xx.xxx.xxx.xxx.
Added Agent with ID 6002 from DB intolatestHarmonyAgentIdsTable
The AACCNet adapter added agent with ID 6002from the database to thelatestHarmonyAgentIdsTable.
Ended Loading Harmony Agentsconfigured for recording in databasexx.xxx.xxx.xxx
The AACCNet adapter ended loading agentsconfigured for recording in the database on theserver with IP address xx.xxx.xxx.xxx.
Dequeued HTTP message - This is anINFO message to let you know that theAACCNetAdapter has regained connectionwith the CCT Server.
The AACCNet adapter regained connection with theCCT server.
Found Agent Agent 6004, State:InService, IsLoggedIn: True
The AACCNet adapter found that the agent with ID6004 is in service and is logged in.
Found Agent Agent 6004, State:InService, IsLoggedIn: False
The AACCNet adapter found that the agent with ID6004 is in service and is logged out.
Recorder log verificationMessage DescriptionRecorder started: Running build... The Recorder service is functional.Connection opened with database atip address : xx.xxx.xxx.xx anddatabase nameHARMONYDB_April14th_5_2_2
The Recorder component is connected to thedatabase on the server with IP address xx.xxx.xxx.xxand database name HARMONYDB_April14th_5_2_2.
Table continues…
AACCNet adapter log verification
November 2017 Deploying Harmony Workforce Optimization with Avaya Aura® CommunicationManager and Avaya Aura® Contact Center 177Comments on this document? [email protected]

Message DescriptionConfigDatabase : SelectSTORAGE_ID,STORAGE_NAME,STORAGE_PATH,USER_NAME,PASSWORD,HOST_IP,UPDATE_DATE,STORAGE_THRESHOLD_SPACE fromSYSTEM_STORAGE_DETAILS where host_ip= 'xx.xxx.xxx.xxx' orhost_ip='xx.xxx.xxx.xxx'
The Recorder is validating the following storagedetails:
• Storage ID
• Storage name
• Storage path
• Username
• Password
• Host IP
• Update date
• Storage threshold spaceStorage server details loaded fromdatabase 1
The Recorder loaded the storage server details.
02/28/17 22:35:47 (PST) [22156]CKnoahsARKDatabase.c :356 INFO -{Call up_icm_s_GetAgentsInfo('','')}
The Recorder validates the Recording Settingsconfigurations for all agents in the Harmony WorkforceOptimization application every minute using the storedprocedure {Callup_icm_s_GetAgentsInfo('','')}.
Recorder connected to primary AvayaAdapter at ip address xx.xxx.xxx.xxxand port 34101
The Recorder is connected to the primary Avayaadapter on the server with IP address xx.xxx.xxx.xxxand port number 34101.
Recorder connected to primary AESAdapter at ip address xx.xxx.xxx.xxxand port 33012
The Recorder is connected to the primary AESadapter on the server with IP address xx.xxx.xxx.xxxand port number 33012.
Recorder connected to primary AACCAdapter at ip address xx.xxx.xxx.xxxand port 34301
The Recorder is connected to the primary AACCNetadapter on the server with IP address xx.xxx.xxx.xxxand port number 34301.
Received CTIOS_AGENT_LOGIN withagent_id 20001 for agent withextension 20001 and line_instance 1
The Recorder received the login information for theagent with ID 20001, extension 20001, and lineinstance 1 from AACCNet adapter.
Post configuration verification
November 2017 Deploying Harmony Workforce Optimization with Avaya Aura® CommunicationManager and Avaya Aura® Contact Center 178Comments on this document? [email protected]

Chapter 12: High Availability andRedundancy implementation
OverviewHigh availability of Harmony Workforce Optimization is achieved in a cost-effective manner byusing various failover strategies .
Database redundancyDatabase redundancy is achieved using the Always On Availability Groups option in the SQLserver for database high availability. This option meets both local high availability and geo-redundancy needs provided you are using MS SQL server 2012/2016 Enterprise Edition .The SQL database in Harmony Workforce Optimization can be shared with other applications aslong as appropriate resources are allocated. To minimize MS SQL servers, sharing is possible withother applications that support SQL 2012/ 2016. Depending on no local high availability and otherdeployment aspects, such as dedicated tenant or less number of tenants, the Basic AvailabilityGroup option in SQL server 2016 Standard Edition can be used. This option supports two nodeswhere one node is primary in data center and the other is secondary in disaster recovery. Thissupports geo-redundancy but not high availability.
Web application server redundancyWeb application servers are deployed as active-active servers to meet local high availability andgeo-redundancy requirements. However, Network Load Balancers (NLBs) are required to ensurethat users are split evenly between multiple web application servers. If one of the web applicationserver becomes nonfunctional, the NLB routes users to the available server. Web applicationservers can be split across data centers for geo-redundancy purposes.
Note:Note that Avaya recommends an external NLB, not the NLB function provided by Microsoft .
The DNS entry pointing to a virtual IP address on the load balancer distributes the user sessionsacross all the web application instances. The web application instances are independent, and nosession replication is done between them. If any web application instance fails, user sessions onthat instance are forced to log out and log in to another instance through the NLB.
Storage server redundancyDuring storage server failure, the Harmony Workforce Optimization recorder component has thecapability to write files locally to avoid loss of data. If the recorder loses connectivity to the storageserver, voice and screen capture files are written locally within the storage space of the recorder.These files are moved to central storage when connectivity is restored. This is the reason for
November 2017 Deploying Harmony Workforce Optimization with Avaya Aura® CommunicationManager and Avaya Aura® Contact Center 179Comments on this document? [email protected]
separating the recorder server component from the primary application server in a single-serverdeployment. The recorder cannot write files locally in a single-server deployment if the server fails.
Multiple SPAN portsAvaya recommends multiple SPAN ports to avoid loss of recording due to port failure. BecauseHarmony Workforce Optimization relies on SPAN, failure occurring at the data switch level mustbe mitigated in the best way possible.
Multi-interface supportIn the absence of a multiple server model, installing multiple NIC cards in a single server canprovide redundancy at the NIC level. Normally, if a NIC fails, all traffic stops. However, by groupingtogether several NICs into one logical NIC, availability is maximized. With teaming, if one NICfails, the network connection continues to operate on the other NICs.A multi-interface NIC configuration can also be used to connect multiple SPANs to the recordingserver. The traffic in each SPAN can be forwarded to a separate interface. A multi-interface NICconfiguration also supports failover at the switch level. Two switches in failover mode connected totwo SPANs can direct traffic to the two NICs. If the primary switch fails and the backup switchbecomes primary, Harmony Workforce Optimization still continues to record interactions.Harmony Workforce Optimization supports maximum five NICs in a multi-interface NICconfiguration.
Recording server redundancyOn the recorder side, high availability is implemented by deploying the recorders in pairs: one isactive while the other one is in hot standby mode. Based on this deployment mode, the followingfailover strategy is provided:
• A heartbeat mechanism is used between the active and standby server. The recording mediacan be sent to both recorders simultaneously for a more robust solution, for example, Active-Active recording. If the primary recorder is healthy at the end of the recording, the recordingis discarded by the standby server to avoid storing duplicate files. However, if the primaryrecorder or server fails in the middle of a call, the full recording is captured by the standbyserver. If the heartbeat fails, the standby server takes over without losing any recording data.Note that when a failure occurs, the standby server stays as the primary server until a restartoccurs or until it fails or gets restarted.
• If the recorder loses connectivity to the storage server, voice and screen capture files arewritten locally within the storage space of the recorder. These files are moved to centralstorage when connectivity is restored.
• If the recorder loses connectivity to the database, all database updates are queued to thelocal file system and applied after connectivity is restored.
• Multiple NIC cards can be installed and configured on the recorder to account for NICfailures. The recorder can read data from multiple NIC cards.
High Availability and Redundancy implementation
November 2017 Deploying Harmony Workforce Optimization with Avaya Aura® CommunicationManager and Avaya Aura® Contact Center 180Comments on this document? [email protected]
Configuring Database Redundancy
Creating the Windows 2012 clusterInstalling the failover clustering feature
About this taskUse this procedure to install the Failover Clustering feature on the two member servers on whichyou want to configure database redundancy.
Before you begin• Install two Windows 2012 R2 Standard servers in AD domain that are needed to be a part of
the cluster.• Create a cluster administrator account that is a member of local administrator groups for both
the member servers. Get administrator privileges on both the servers.• Create a shared folder in any domain server.• Install MS SQL 2016 Standard on both the member servers.• Create the database and take full back up on one of these two member servers.
Procedure1. Click Start > Server Manager.2. On the Manage menu, click Add Roles and Features.
3. On the Before you begin page, click Next.4. On the Select installation type page, click Role-based or feature-based installation and
click Next.5. On the Select destination server page, click the server where you want to install the feature
and click Next.6. On the Select server roles page, click Next.7. On the Select features page, select the Failover Clustering check box.
8. To install the failover cluster management tools, click Add Features and click Next.9. On the Confirm installation selections page, click Install.
10. Select the Create the cluster now using the validated nodes check box, and click oneof the following:
• Finish: If the results indicate that the tests were completed successfully and you want tocreate a cluster immediately.
• View Reports: If the results indicate that there were warnings or failures.
Configuring Database Redundancy
November 2017 Deploying Harmony Workforce Optimization with Avaya Aura® CommunicationManager and Avaya Aura® Contact Center 181Comments on this document? [email protected]

Creating the failover clusterProcedure
1. Click Start > Server Manager.2. Click Tools > Failover Cluster Manager on the menu bar.
The system displays the Failover Cluster Manager page.
3. To create a cluster, click Create Cluster at one of the following locations:
• On the Failover Cluster Manager option
• In the Actions column on the right pane
• In Management section of the Failover Cluster Manager page
The system starts the Create Cluster wizard .
4. On the Before you begin page, review the information and click Next.
To ensure that the servers are connected, configured correctly, and supported by Microsoft,validate the configuration before creating the cluster.
5. Type the names of all the servers that will be part of the cluster.
You can specify more than one node at a time using comma separation. For example:MyServer1, MyServer2, MyServer3.
6. (Optional) Click one of the following if the system displays the Validation Warning page toindicate that the nodes are not validated:
• Yes. When I click Next, run configuration validation tests, andthen return to the process of creating cluster.
• No. I do not require support from Microsoft for this cluster, andthere do not want to run the validation tests. When I click Next,continue creating the cluster.
7. On the Access Point for Administering the Cluster page, do the following:
In the Cluster Name, type the NetBIOS name that connects to the cluster.
8. Click Next.9. Review the Confirmation screen.
10. Do one of the following:
a. To add all eligible storage to the cluster, select the Add all eligible storage to thecluster check box and click Next.
b. If you choose not to add all eligible storage to the cluster, you can add specific disksafter the cluster is created.
11. Review the summary report and click Finish.
A Failover Cluster Manager automatically connects to the cluster when the wizard finishes.
High Availability and Redundancy implementation
November 2017 Deploying Harmony Workforce Optimization with Avaya Aura® CommunicationManager and Avaya Aura® Contact Center 182Comments on this document? [email protected]
Next stepsConfigure a File Share Witness on a server that is not part of the cluster.
Related linksFailover cluster field descriptions on page 183
Failover cluster field descriptions
Name DescriptionCluster Name The NetBIOS name used to connect to the cluster.
During cluster creation, a computer object is alsocreated in the Active Directory domain and in theOrganizational Unit where the cluster nodescomputer objects are located.
If the servers have no NICs configured for DHCP,then a static IP address is prompted. If any of thenetworks are configured for DHCP, then an IPv4DHCP assigned address will be used.
Note:
If you do not want the Active Directory objectfor the cluster to be placed in the sameOrganizational Unit (OU) as the servers, thespecific OU can be designated by specifyingthe full distinguished name. For more detailson how to create a cluster in a restrictive activedirectory environment, see http://blogs.msdn.com/b/clustering/archive/2012/03/30/10289577.aspx
Related linksCreating the failover cluster on page 182
Node and file majority quorumYou must configure node and file share majority quorum in the absence of a shared storage. A fileshare witness must be configured on a server that is not part of the cluster. A file share witness isa basic file share that the cluster computer name has read and write access. The first stepinvolves creating the file share. For example, if the cluster computer name is MYCLUSTER, thencreate a file share on your data center and provide read or write access to MYCLUSTER. The fileshare does not need to reside on a Windows 2012 server but the file must be on a WindowsServer in the same domain as the cluster.
Configuring the Node and File Majority QuorumAbout this taskUse this procedure to provide read or write access to the cluster computer name that you create atboth the share level and NTFS level.
Configuring Database Redundancy
November 2017 Deploying Harmony Workforce Optimization with Avaya Aura® CommunicationManager and Avaya Aura® Contact Center 183Comments on this document? [email protected]
Procedure1. Click Start > Server Manager.2. Click Files and Storage Services on the left pane.
3. In the TASKS tab in the right corner of the page, click New Share.
The system displays the New Share Wizard page.
4. On the Select the profile for this share page, click the file share profile that you want toshare files with and click Next.
5. On the Select the server and path for this share page, do the following:
a. In Server, select the server where you want to do the file share.b. In Share location, click an option depending on the location that you want to choose
for file share.
6. Click Next.7. On the Specify share name page, do the following:
a. In Share name, type a share name.b. In Local path to share, provide the path of the location where the folder is to be
shared.c. In Remote path to share, provide the remote path for the share.
8. Click Next.9. On the Configure share settings page, click one of the following options depending on your
requirements:
• Enable access-based enumeration• Allow caching of share
Caching of shares is not required for a file share witness.• Encrypt data access
10. Click Next.11. On the Specify permissions to control access page, click Customize permissions and
click Next.12. On the Advanced Security Settings for FSW page, click Add.
13. On the Permission Entry for FSW page, click Select a principal.14. On the Select User, Computer, Service Account, or Group page, click Object Types.
15. On the Object Types page, select the Computers check box and click OK.
16. On the Select User, Computer, Service Account, or Group page, in the Enter the objectname to select field, type the name of your cluster and click Check Names.
17. On the Permission Entry for FSW page, in the Basic permissions section, select theModify check box to allow your cluster to get read or write access to the file share.
High Availability and Redundancy implementation
November 2017 Deploying Harmony Workforce Optimization with Avaya Aura® CommunicationManager and Avaya Aura® Contact Center 184Comments on this document? [email protected]
18. On the Advanced Security Settings for FSW page, check whether the cluster you specifiedis showing the Allow in the Type column.
19. On the Advanced Security Settings for FSW page, click the Share tab and repeat theprocess so that your cluster gets access permissions at both the NTFS and Share leveland click Apply.
20. On the New Share Wizard page, in Confirm selections section, confirm that the settingsare correct and click Create.
The system displays the View results section with the confirmation that the share issuccessfully created.
21. Click Close.
22. Change the quorum type of the primary server using Failover Cluster Manager.
a. On the Failover Cluster Manager page, right-click mycluster, and click MoreActions > Configure Cluster Quorum Settings period?
b. On the Configure Cluster Quorum Wizard page, in the Select Quorum ConfigurationOption section, select the Add or change the quorum witness option and clickNext.
23. On the Configure Cluster Quorum Wizard page, in the Select Quorum Configuration Optionsection, do the following:
a. Select the Configure a file share witness (recommended for specialconfiguration) option
b. Browse the path of the file share witness that you created on the data center
24. Click Next.
The system displays the Confirmation section with the message: Your cluster quorumconfiguration will be changed to the configuration shown above.
25. Click one of the following depending on your requirements:
• View Report: To view the report.
• Finish: To close the wizard.
Installing and configuring the SQL Server 2016 basic availabilitygroupCreating the basic availability groups in the SQL server 2016
About this taskAs against database mirroring where you can use only synchronous commit mode, in the basichigh availability groups in SQL server 2016, you can configure both synchronous andasynchronous commit modes. You can use the asynchronous commit mode to create yoursecondary replica in Azure. As a result, you can also create a basic disaster recovery solution with
Configuring Database Redundancy
November 2017 Deploying Harmony Workforce Optimization with Avaya Aura® CommunicationManager and Avaya Aura® Contact Center 185Comments on this document? [email protected]
SQL Server Standard Edition. The endpoint configuration is required, and there is no difference inthe configuration when compared to the traditional Enterprise Availability Groups.
Procedure1. Click Start > SQL Server Management Studio.
2. On Object Explorer, right-click AlwaysOn High Availability > New Availability GroupWizard.
3. On the New Availability Group Wizard of the Management Studio, do the following:
• In the Availability group name field, type an availability group name.• To specify that you want to create basic availability group in standard edition, select the
Basic Availability Group check box.• To configure Always On Availability Groups to failover when a database goes offline,
select the Database level Health Detection check box.
4. On the Select Databases page, select the user database for the availability groups andclick OK.
Only one database can be added to a basic availability group.
5. On the Specify Replicas page, click Add Replica.
You cannot specify more than two replicas: Primary and secondary.
6. On the Specify an instance of SQL Server to host a secondary replica page, click theReplicas tab.
The system displays the Availability Replicas section.
7. Depending on your requirements, select the check boxes in the Automatic Failover and theSynchrous Commit columns.
8. (Optional) In the Readable Secondary section, select whether you want to configure areadable secondary for Primary Initial Role.
Read access is unavailable on the secondary replica.
9. Click the Endpoints tab.
10. Click the Backup Preferences tab, and ensure that the page is completely disabled.
The disabled page indicates that the secondary replica does not support backups.However, you can take snapshots of the secondary what? for a static reporting copy.
11. To create an availability group listener, click the Listener tab and do the following:
You can create only one listener for a basic high availability group.
a. Select the Create an availability group listener check box.b. Type the required details in the Listener DNS Name, Port, and Network Mode fields.c. Select the Subnet and IP Address.
The secondary machine can be in the same data center and IP subnets, or on adifferent one.
High Availability and Redundancy implementation
November 2017 Deploying Harmony Workforce Optimization with Avaya Aura® CommunicationManager and Avaya Aura® Contact Center 186Comments on this document? [email protected]
Synchronizing data between two replicasProcedure
1. On the Select your data synchronization preference page, select one of the following checkboxes :
• Full• Join only• Skip initial data synchronization
2. After the availability group wizard shows task complete, right-click your Availability Groupin Object Explorer and click Show Dashboard.
The system displays the details of the basic availability group.
Related linksBasic availability groups in SQL server 2016 field descriptions on page 187
Basic availability groups in SQL server 2016 field descriptions
Name DescriptionSynchronous Commit Emphasizes high availability over performance at
the cost of increased transaction latency. Undersynchronous commit mode, transactions wait tosend the transaction confirmation to the client untilthe secondary replica has hardened the log to disk.When data synchronization begins on a secondarydatabase, the secondary replica begins applyingincoming log records from the correspondingprimary database. As soon as every log record hasbeen hardened, the secondary database enters theSYNCHRONIZED state. Thereafter, every newtransaction is hardened by the secondary replicabefore the log record is written to the local log file.When all the secondary databases of a givensecondary replica are synchronized, synchronouscommit mode supports manual failover and,optionally, automatic failover.
Automatic Failover Supports database mirroring sessions running witha witness in high-safety mode. In high-safety modewith automatic failover, after the database issynchronized, if the principal database becomesunavailable, an automatic failover occurs. Anautomatic failover causes the mirror server to takeover the role of principal server and bring its copy ofthe database online as the principal database.Synchronizing the database prevents data lossduring failover because every transaction
Table continues…
Configuring Database Redundancy
November 2017 Deploying Harmony Workforce Optimization with Avaya Aura® CommunicationManager and Avaya Aura® Contact Center 187Comments on this document? [email protected]

Name Descriptioncommitted on the principal database is alsocommitted on the mirror database.
Readable Secondary Allows read-only access to all its secondarydatabases. However, readable secondarydatabases are not set to read-only. They aredynamic. A given secondary database changes aschanges on the corresponding primary databaseare applied to the secondary database. For a typicalsecondary replica, the data, including durablememory optimized tables, in the secondarydatabases is in near real time. Furthermore, full-textindexes are synchronized with the secondarydatabases. In many circumstances, data latencybetween a primary database and the correspondingsecondary database is only a few seconds.
Related linksSynchronizing data between two replicas on page 187
Configuring the web application Server Redundancy
Creating the first instance of the web applicationInstalling Harmony Workforce Optimization on a single server
Before you begin• Install SQL 2012/2016 standard edition with the latest service pack and ensure the SQL
agent is running.• Install third-party software utilities.
Procedure1. Run the Harmony_5_2_2.exe file as an administrator.
Note:
The installer displays a message to install Microsoft Visual C++ 2015 Update 3Redistributable Package (x64), Microsoft ODBC Driver 13 for SQL Server, MicrosoftCommand Line Utilities 13.1 for SQL Server, and Microsoft SQL Server 2012 NativeClient (x64) 11–4. The message is not displayed if the software is already installed.
Click Install.2. On the Welcome screen, click Next.
High Availability and Redundancy implementation
November 2017 Deploying Harmony Workforce Optimization with Avaya Aura® CommunicationManager and Avaya Aura® Contact Center 188Comments on this document? [email protected]

3. On the License Agreement screen, select I accept the terms in the license agreement,and then click Next.
4. On the Setup Type screen, select one of the following:
• Standard• Custom
5. Click Next.6. (Optional) If you select the Standard option in the Standard Setup screen, do the
following:
a. Select the Web Application Role check box.
b. Select the Web and SysAdmin check boxes.
c. Select the Database Role check box.
d. Select the Recording Role check box.
e. Select the Avaya check box and then select Communication Manager from theSelect Avaya PBX drop down menu.
f. Click Next.
Note:
The installer displays a message to install Zulu-8.23.0.4 JDK 8.0.144.
g. Click Yes to install Zulu-8.23.0.4 JDK 8.0.144.
h. Select the folder where the java security files are located and click OK.
i. Select AACC from the ACD drop down menu.
j. If you are using the POM dialer, select POM from the Dialer drop down menu.
7. Click Next.8. (Optional) If you select the Custom option in the Custom Setup screen, do the following:
a. In the Web Application section, select the Web and SysAdmin check boxes.
b. In the Database section, select the Database check box.
c. In the Utilities section, select the Log Manager, Process Checklist, Packet Sniffer,and Screen Capture check boxes.
d. In the Adapters section, select the Avaya adapter, AES adapter, and AACCNetadapter check boxes.
Note:
If you are using the POM dialer, select the POM adapter check box.
e. In the Recorder section, select the Recorder, Unified Messaging, and MediaManager check boxes.
f. Click Next.
Configuring the web application Server Redundancy
November 2017 Deploying Harmony Workforce Optimization with Avaya Aura® CommunicationManager and Avaya Aura® Contact Center 189Comments on this document? [email protected]

Note:
The installer displays a message to install Zulu-8.23.0.4 JDK 8.0.144.
g. Click Yes to install Zulu-8.23.0.4 JDK 8.0.144.
h. Select the folder where the java security files are located and click OK.
9. Click Next.10. On the Configuration screen, configure the required fields.
11. Click Next.12. On the Database Settings screen, configure the required fields.
13. Click Next.
The system displays the Installation Summary screen. You can click Back to review orchange any installation setting.
14. On the Installation Summary screen, review the installation settings, click Install.
You can click Cancel anytime to cancel the installation.
The installer displays the InstallShield Wizard Completed screen, when the installation iscomplete.
15. (Optional) Select the Show the Windows Installer log check box to view and save theinstallation log.
16. Click Finish.
Next stepsRestart all the services with the administrator user privileges.
Creating the second instance of the web application on the sameserverChanging the binding port of the second instance of jetty
About this taskUse this procedure to set up a second instance of the web application on the same server.
Before you beginEnsure you stop the following services if they are running:
• Harmony WebProxy service• WebApp service
Procedure1. Go to INSTALLATION_DIR/Web/.
High Availability and Redundancy implementation
November 2017 Deploying Harmony Workforce Optimization with Avaya Aura® CommunicationManager and Avaya Aura® Contact Center 190Comments on this document? [email protected]
2. Search for the jetty folder.
3. Copy the jetty folder to the same directory and rename the folder to jetty-l.
4. Go to INSTALLATION_DIR/Web/jetty-l/etc/jetty.xml.
5. Open the jetty.xml file with a standard text editor and do the following:
Search for jetty.port and change the value from 9290 to 9291.
6. Save and close the file.
Next stepsChange the port and node of the second instance of the web application.
Changing the port and node of the second instance of the web applicationBefore you beginChange the binding port of the second instance of jetty.
Procedure1. Go to INSTALLATION_DIR/Web/jetty-1/2. Open the start.ini file with a standard text editor and do the following:
Search for Dserver.node and change the value from Node1 to Node2.
3. Save and close the file.
Next stepsCreate the wrapper folder for the second instance of the web application
Creating the wrapper folder for the second instance of the web applicationBefore you begin
• Change the binding port of the second instance of the jetty.• Change the port and node of the second instance of the web application.
Procedure1. Go to INSTALLATION_DIR/Web/.
2. Search for the Wrapper folder, copy this folder under the same directory, and rename it towrapper-1.
3. Go to INSTALLATION_DIR/Web/wrapper-1/conf/.
4. Open the wrapper.conf file with a standard text editor and do the following:
a. Search for wrapper.app.env.server.node and change the value from Node1 toNode2.
b. Search for webwrapper.log and change the name of the log file fromwebwrapper.log to webwrapper-1.log.
Configuring the web application Server Redundancy
November 2017 Deploying Harmony Workforce Optimization with Avaya Aura® CommunicationManager and Avaya Aura® Contact Center 191Comments on this document? [email protected]
c. Search for wrapper.working.dir and change the working directory to the newlycreated jetty-1 directory, INSTALLATION_DIR/Web/jetty-1.
d. Search for wrapper.console.title and change the value of this property fromWebApp Service to WebApp Service-2.
e. Search for wrapper.ntservice.name and change the value of this property fromHarmonyWebApp to HarmonyWebApp-2.
f. Search for wrapper.ntservice.displayname and change the value of thisproperty from WebApp Service to WebApp Service-2.
g. Search for wrapper.ntservice.description and change the value of thisproperty from Harmony WebApp Service to Harmony WebApp Service-2.
5. Save and close the file.
Next stepsInstall the second instance of jetty as a Windows service.
Installing the second instance of jetty as a Windows serverAbout this taskUse this procedure to set up a second instance of the web application on the same server.
Before you begin• Change the binding port of the second instance of the jetty.• Change the port and node of the second instance of the web application.• Create the wrapper folder of the second instance of the web application.
Procedure1. Open a command prompt.
2. In command prompt, go to INSTALLATION_DIR/Web/wrapper-1/bat/.
3. Run the batch file installService.bat.
4. Open the Windows service manager and click Refresh.
The system displays the WebApp Service-2 component.
5. Save and close the file.
Next stepsSpecify the log location of the second instance of the web application.
Specifying the log location of the second instance of the web applicationBefore you begin
• Change the binding port of the second instance of the jetty.• Change the port and node of the second instance of the web application.
High Availability and Redundancy implementation
November 2017 Deploying Harmony Workforce Optimization with Avaya Aura® CommunicationManager and Avaya Aura® Contact Center 192Comments on this document? [email protected]
• Create a wrapper folder for the second instance of the web application.• Install the second instance of jetty as a Windows service.
Procedure1. Go to the WFO_HOME folder.
2. Search for the Webapp_logback_Node1.xml file, copy this file under the same folder,and rename the file to Webapp_logback_Node2.xml.
3. Open Webapp_logback_Node2.xml with a standard text editor.
4. Search for <property name="logsDir".
The system displays <property name="logsDir" value="<<LOGS_FOLDER>>/Webapp" />
where, <<LOGS_FOLDER>> is any folder according to your installation.
5. Change Webapp to Webapp-2.
The system appends Webapp-2 to the logs of the second instance of the Webapp service.
6. Save and close the file.
Next stepsMapping the new instance to a tenant.
Mapping the new instance to a tenantProcedure
1. Log in to SysAdmin .
2. Click System Administration > Configuration.
3. To configure parameters for a component, click the Component tab and do the following:
a. In the Component field, select a WebApp.
b. In the Asset field, select the asset you want to map the tenant.
c. In the Node field, Node2.
4. In the Value column, configure the following parameters.
a. WebappPort: Update the value from 9690 to 9692.
b. WebappWebsocketPort: Update the value from 9390 to 9392.
5. Click Save.
Next stepsConfigure Apache load balancer.
Configuring the web application Server Redundancy
November 2017 Deploying Harmony Workforce Optimization with Avaya Aura® CommunicationManager and Avaya Aura® Contact Center 193Comments on this document? [email protected]
Configuring the Apache load balancerAbout this taskUse this procedure to configure Apache as a load balancer for multiple instances of webapplications.
Procedure1. Go to INSTALLATION_DIR/Apache24/conf/ .
2. Open the httpd.conf file with a standard text editor and enable the following modules inApache, if not already enabled:
• LoadModule heartbeat_module modules/mod_heartbeat.so• LoadModule lbmethod_byrequests_module modules/mod_lbmethod_byrequests.so
• LoadModule proxy_balancer_module modules/mod_proxy_balancer.so• LoadModule slotmem_shm_module modules/mod_slotmem_shm.so
3. Save and close the file.
4. Go to INSTALLATION_DIR/Apache24/conf/extra.
5. Open the httpd-ssl.conf file with a standard text editor and do the following:
a. Add the proxy balancer above the Proxy Rules section for webapp services asfollows:<Proxy balancer://webappcluster>Order Deny, AllowAllow from allBalancerMember http://SERVER_IP:9690BalancerMember http://SERVER_IP:9691</Proxy>
b. Replace SERVER_IP with the real IP of the server where the webapp is installed.
c. Ensure that the port number 9691 is same as the port set for DWebappPort in thejety-1 file located at INSTALLATION_DIR/Web/jetty-1/.
d. Add the proxy balancer for the UI application service as follows:<Proxy balancer://uicluster>Order Deny, AllowAllow from allBalancerMember http://SERVER_IP:9290BalancerMember http://SERVER_IP:9292</Proxy>
e. Replace SERVER_IP with the real IP of the server where the service is installed.
f. Ensure that the port number 9292 is same as the port set for jetty.port in thejetty.xml file located at INSTALLATION_DIR/Web/jetty-1/etc/.
High Availability and Redundancy implementation
November 2017 Deploying Harmony Workforce Optimization with Avaya Aura® CommunicationManager and Avaya Aura® Contact Center 194Comments on this document? [email protected]
6. Search for the following proxy rule for web application:ProxyPassMatch ^/webapp/(.*) http://SERVER_IP:9690/webapp/$1ProxyPassReverse ^/webapp/(.*) http://SERVER_IP:9690/webapp/$1
7. Change the proxy rule in Step 6 to use the cluster as follows:ProxyPassMatch ^/webapp/(.*) balancer://webappcluster/webapp/$1ProxyPassReverse ^/webapp/(.*) balancer://webappcluster/webapp/$1
8. Search for the following proxy rule for the UI:ProxyPassMatch ^/Harmony/(.*) http://SERVER_IP:9290/Harmony/$1ProxyPassReverse ^/Harmony/(.*) http://SERVER_IP:9290/Harmony/$1
9. Change the proxy rule in Step 8 to use the cluster as follows:ProxyPassMatch ^/Harmony/(.*) balancer://uicluster/Harmony/$1ProxyPassReverse ^/Harmony/(.*) balancer://uicluster/Harmony/$1
10. Save and close the file.
Next stepsStart the Harmony Workforce Optimization components.
Starting the Harmony Workforce Optimization componentsProcedure
1. Log in to the server that hosts the web application components.
2. Click Start > Run > services.msc3. Right-click the following components and click Restart:
• WebApp Service• WebApp Service-2
• Harmony WebProxy
Configuring High AvailabilityAbout this taskUse this procedure to configure high availability for servers where Harmony WorkforceOptimization is installed. You can deploy an additional server for each web application server. Youmust configure the IP address of the external load balancer in the Harmony WorkforceOptimization web application to proxy web requests coming to the Harmony WorkforceOptimization web services. To maintain data consistency across all web nodes, configureWindows DFS on WFO_Home directory.
Configuring the web application Server Redundancy
November 2017 Deploying Harmony Workforce Optimization with Avaya Aura® CommunicationManager and Avaya Aura® Contact Center 195Comments on this document? [email protected]

Note:The WFO_Home path must be the same in all high availability servers to maintain dataconsistency. Ensure you stop all web nodes in all the servers where the web application isinstalled.
Procedure1. Log in to the server that hosts the web application components.
2. Click Start > Run > services.msc > WebApp Service > Stop.
3. Go to the WFO_Home folder located at C:\WFO_Home if you have not changed the locationduring installation.
4. In the WFO_Home folder, right-click the WebappConfig.Properties file, select Openwith, and click Notepad.
5. Search and change the value for ProxyIp to the load balance IP address or domainname.
6. Search and change the value for ProxyPort to the port of the external load balancer.
7. Search and change the value for WebappGenericAccessUrl to the external loadbalancer IP/FQDN:PORT.
8. Search for webapp.imagesURL and change the value to the external load balancer IP/FQDN:PORT.
9. Search for webapp.ksHomeAccessURL and change the value to the external loadbalancer IP/FQDN:PORT.
10. Click Save to close the file.
11. Change the node name in the high availability server so that every web application has aunique node name. For more information, see Changing the node name on page 196.
Next stepsRestart all the Harmony Workforce Optimization services.
Related linksChanging the node name for high availability configuration on page 196
Changing the node name for high availability configurationAbout this taskFollow this procedure to change the node name of any Harmony Workforce Optimization WebAppserver.
Procedure1. (Optional) Stop the Harmony WebApp service from the service manager if it is running.
2. Navigate to INSTALLATION_DIR/Web/jetty/.
3. Open the start.ini file with a standard text editor.
High Availability and Redundancy implementation
November 2017 Deploying Harmony Workforce Optimization with Avaya Aura® CommunicationManager and Avaya Aura® Contact Center 196Comments on this document? [email protected]

4. Search for Dserver.node and change the value from Node1 to Node2.
5. Click Save to close the file.
6. Navigate to INSTALLATION_DIR/Web/wrapper/conf/.
7. Open the wrapper.conf file with a standard text editor and search forwrapper.app.env.server.node and change the value of this property from Node1 toNode2.
8. Click Save to close the file.
9. Navigate to the WFO_HOME folder.
10. Search for the Webapp_logback_Node1.xml file and rename this file toWebapp_logback_Node2.xml.
Related linksConfiguring High Availability on page 195
Configuring Recorder Redundancy
OverviewAvaya recommends a secondary or backup recording server for seamless recording. In passiverecording, both the primary and secondary backup recorders are connected to two separate SPANsessions and to their local adapters. If the primary server fails, the secondary server continues torecord calls from the SPAN session. In active recording, both the primary and secondary backuprecorders are connected to their local data NICs and local adapters. Using keep alive events, therecorder, at regular intervals, checks if the connection with the adapters and the SPAN session isactive. This phenomenon is referred to as heartbeat. Recorder failover and redundancy can beachieved by deploying recording servers in pairs.
High availability recording in Avaya Aura® Contact Center on Avaya Aura® CommunicationManager deployments can be implemented in two ways:
• Active-Standby: The primary recorder server is active, and the secondary or backup server isin hot standby mode. A seamless failover to the standby or secondary recorder happenswhen the active or primary recorder fails. In active-standby high availability mode, 100% callrecording is not possible. Data might be lost if the recorder becomes nonfunctional on anactive call or till the time the secondary recorder becomes active and gets the events fromthe adapters.
• Active-Active: Both the primary and secondary recorder servers are active and record calls.The secondary recorder server deletes the call only after ensuring that the primary server isfunctional till the call ends.
Configuring Recorder Redundancy
November 2017 Deploying Harmony Workforce Optimization with Avaya Aura® CommunicationManager and Avaya Aura® Contact Center 197Comments on this document? [email protected]

The critical adapters send keep alive events with active status to the recorder as long as theirsignaling is active with PBX or ACD servers. When the signaling in any adapter is lost, the adapterstill sends the keep alive events to the recorder but with inactive status. In such cases, the primaryrecorder communicates with the secondary recorder and sends a request to switch over. If thesecondary recorder accepts the request, the primary recorder successfully switches its role to asecondary recorder and vice versa. If the adapter connectivity of the secondary recorder is alsolost, the status of the current primary recorder remains as primary.
Both Avaya Aura® Communication Manager and Avaya Aura® Application Enablement Servicessupport local high availability and are configured with a single virtual IP address. Both, the AESadapter and Avaya adapter connect to the virtual IP address of Avaya Aura® ApplicationEnablement Services. Similarly, Avaya Aura® Contact Center also supports local high availabilityand is configured with a virtual IP address. Avaya Aura® Contact Center, using its own virtual IPaddress, connects to the AACCNet adapter and also to the virtual IP address of Avaya Aura®
Application Enablement Services.
You can implement failover by connecting adapters to each recorder, PBX, and ACD.
Recordingtype
Criticaladapter
Adapters connectedto each recorder
Adapters for signaling withPBX
Adaptersconnected to ACD
Active AES adapter • Avaya adapter
• AES adapter
• AACCNet adapter
• Avaya adapter
• AES adapter
Note:
Both the adapters getevents from AvayaAura® CommunicationManager through AvayaAura® ApplicationEnablement Services.
AACCNet adapter
Passive AES adapter • AES adapter
• AACCNet adapter
• AES adapter
Note:
The AES adapter getevents from AvayaAura® CommunicationManager through AvayaAura® ApplicationEnablement Services.
AACCNet adapter
Configuring Recorder parameters for High AvailabilityAbout this taskUse this procedure to configure recorder parameters for high availability.
Procedure1. Log in to SysAdmin .
High Availability and Redundancy implementation
November 2017 Deploying Harmony Workforce Optimization with Avaya Aura® CommunicationManager and Avaya Aura® Contact Center 198Comments on this document? [email protected]

2. Click System Administration > Configuration.
3. Click the Component tab and do the following:
a. In the Component field, select Recorder.b. In the Asset field, select the asset on which you want to configure high availability.
c. In the Node field, select the node on which you want to configure high availability.
4. In the Value column of the RecorderFailoverEnabled parameter, configure the followingparameters:
• RecorderFailoverEnabled: Type True to enable failover.
• RecorderFailoverIPAddress: Enter the IP address of the failover recorder server.
• FailoverNodeName: Enter the node name of the recorder failover server.
5. Click Save.
Next stepsRestart the component service after configuring the parameters.
Configuring Avaya adapter parameters for High AvailabilityAbout this taskUse this procedure to configure the adapter failover mode for Avaya Aura® Contact Center onAvaya Aura® Communication Manager deployments.
Procedure1. Log in to SysAdmin .
2. Click System Administration > Configuration.
3. Click the Component tab and do the following:
a. In the Component field, select Avaya adapter.
b. In the Asset field, select the asset on which you want to configure high availability.
c. In the Node field, select the node on which you want to configure high availability.
4. In the Value column of the AdapterFailoverMode parameter, type any one of the following:
• No-HA• Active-Passive• Active-Active
5. If you configure the AdapterFailoverMode parameter as Active-Active, configure thefollowing parameter:
• dmcc_recording_instance: Type 0 for primary Avaya adapter and 1 for secondary Avayaadapter.
Configuring Recorder Redundancy
November 2017 Deploying Harmony Workforce Optimization with Avaya Aura® CommunicationManager and Avaya Aura® Contact Center 199Comments on this document? [email protected]
6. Click Save.
Next stepsRestart the component service after configuring the parameters.
Configuring Messaging parameters for High AvailabilityAbout this taskUse this procedure to configure Messaging parameters to support high availability for screens.The Messaging component will redirect all screen connections to the Apache Messaging service.
Procedure1. Log in to SysAdmin .
2. Click System Administration > Configuration.
3. Click the Component tab and do the following:
a. In the Component field, select Messaging.
b. In the Asset field, select the asset on which you want to configure high availability.
c. In the Node field, select the node on which you want to configure high availability.
4. In the Value column of the peerMessagingURL parameter, type wss://<<APACHE_MESSAGING_IP>>:8443/ws/netty?.
5. Click Save.
Next stepsRestart the component service after configuring the parameters.
Configuring dynamic parameters for the recorderAbout this taskUse this procedure to connect the recorder to an adapter or service. Based on the deployment,create multiple sets so that the recorder gets connected to the relevant adapters and services.You can configure specific parameters for an adapter or service.
Procedure1. Log in to SysAdmin .
2. Click System Administration > Configuration.
3. Click the Dynamic tab.
4. In the Component field, select Recorder.5. Select the Dynamic Type as Adapter or Service.
High Availability and Redundancy implementation
November 2017 Deploying Harmony Workforce Optimization with Avaya Aura® CommunicationManager and Avaya Aura® Contact Center 200Comments on this document? [email protected]

6. In the Asset field, select an asset.
7. In the Node field, select a node.
8. In the No. of Sets field, type the number of sets you want to create.
9. Click Create Sets.
Next stepsRestart the component service after configuring the parameters.
Related linksDynamic recorder parameter configuration values for High Availability on page 201
Dynamic recorder parameter configuration values for High AvailabilityPrimary recorderThe table below lists the four adapter sets you must create for the primary recorder to connect to localadapters such as AES adapter, Avaya adapter, AACCNet adapter and Messaging.
Parameter ValueComponent Recorder 1Dynamic Type AdapterAsset Name of the server where the recorder 1 is installedNode Name of the instance of the recorder 1 installed on the selected
server or asset.No of Sets 3 for active recording and 2 for passive recording,Adapter Dynamic Set 1Name AES adapter 1ServerAddress The IP address of the server where AES adapter 1 is installed.ServerPort 33012IsCritical TrueAdapter Dynamic Set 2Name Avaya adapter 1ServerAddress The IP address of the server where Avaya adapter 1 is installed.ServerPort 34101ServerLocalPort 33333WebURLString /AvayaAdapter/MonitorSitesRecorderRequestAdapter Dynamic Set 3Name AACCNet adapter 1ServerAddress The IP address of the server where AACCNet adapter 1 is
installed.ServerPort 34301
Table continues…
Configuring Recorder Redundancy
November 2017 Deploying Harmony Workforce Optimization with Avaya Aura® CommunicationManager and Avaya Aura® Contact Center 201Comments on this document? [email protected]

Parameter ValueServerLocalPort 33334WebURLString /AACCAdapter/MonitorSitesRecorderRequestAdapter Dynamic Set 4Name Unified Messaging 1ServerAddress The IP address of the server where the Unified Messaging
component is installed.ServerPort 33022
Secondary recorderThe table below lists the four adapter sets you must create for the secondary recorder to connect to localadapters such as AES adapter, Avaya adapter, AACCNet adapter and Messaging.
Parameter ValueComponent Recorder 2Dynamic Type AdapterAsset Name of the server where the recorder 2 is installedNode Name of the instance of the recorder 2 installed on the selected
server or asset.No of Sets 3 for active recording and 2 for passive recording,Adapter Dynamic Set 1Name AES adapter 2ServerAddress The IP address of the server where AES adapter 2 is installed.ServerPort 33012IsCritical TrueAdapter Dynamic Set 2Name Avaya adapter 2ServerAddress The IP address of the server where Avaya adapter 2 is installed.ServerPort 34101ServerLocalPort 33333WebURLString /AvayaAdapter/MonitorSitesRecorderRequestAdapter Dynamic Set 3Name AACCNet adapter 2ServerAddress The IP address of the server where AACCNet adapter 2 is
installed.ServerPort 34301ServerLocalPort 33334WebURLString /AACCAdapter/MonitorSitesRecorderRequest
Table continues…
High Availability and Redundancy implementation
November 2017 Deploying Harmony Workforce Optimization with Avaya Aura® CommunicationManager and Avaya Aura® Contact Center 202Comments on this document? [email protected]
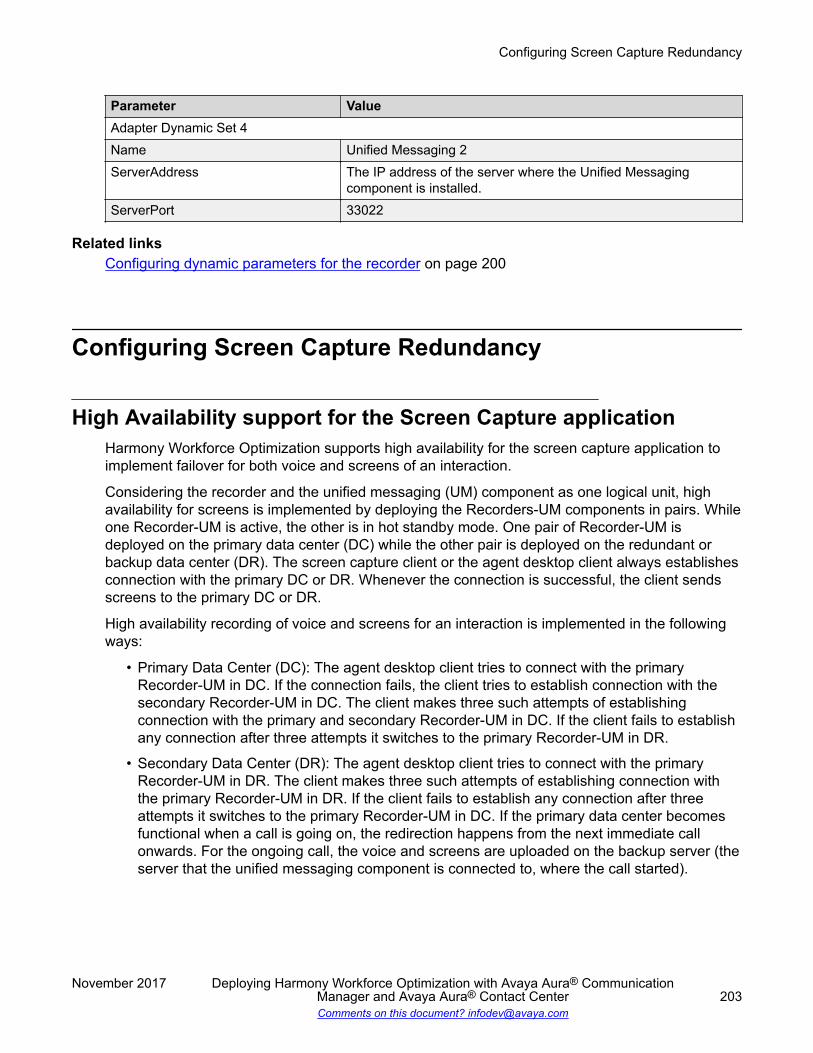
Parameter ValueAdapter Dynamic Set 4Name Unified Messaging 2ServerAddress The IP address of the server where the Unified Messaging
component is installed.ServerPort 33022
Related linksConfiguring dynamic parameters for the recorder on page 200
Configuring Screen Capture Redundancy
High Availability support for the Screen Capture applicationHarmony Workforce Optimization supports high availability for the screen capture application toimplement failover for both voice and screens of an interaction.
Considering the recorder and the unified messaging (UM) component as one logical unit, highavailability for screens is implemented by deploying the Recorders-UM components in pairs. Whileone Recorder-UM is active, the other is in hot standby mode. One pair of Recorder-UM isdeployed on the primary data center (DC) while the other pair is deployed on the redundant orbackup data center (DR). The screen capture client or the agent desktop client always establishesconnection with the primary DC or DR. Whenever the connection is successful, the client sendsscreens to the primary DC or DR.
High availability recording of voice and screens for an interaction is implemented in the followingways:
• Primary Data Center (DC): The agent desktop client tries to connect with the primaryRecorder-UM in DC. If the connection fails, the client tries to establish connection with thesecondary Recorder-UM in DC. The client makes three such attempts of establishingconnection with the primary and secondary Recorder-UM in DC. If the client fails to establishany connection after three attempts it switches to the primary Recorder-UM in DR.
• Secondary Data Center (DR): The agent desktop client tries to connect with the primaryRecorder-UM in DR. The client makes three such attempts of establishing connection withthe primary Recorder-UM in DR. If the client fails to establish any connection after threeattempts it switches to the primary Recorder-UM in DC. If the primary data center becomesfunctional when a call is going on, the redirection happens from the next immediate callonwards. For the ongoing call, the voice and screens are uploaded on the backup server (theserver that the unified messaging component is connected to, where the call started).
Configuring Screen Capture Redundancy
November 2017 Deploying Harmony Workforce Optimization with Avaya Aura® CommunicationManager and Avaya Aura® Contact Center 203Comments on this document? [email protected]
High availability recording can be implemented in the following scenarios based on your businessrequirements.
• Active-Active: In this scenario, both the primary and secondary Recorder-UM servers areactive and record voice and screens. The secondary Recorder-UM server deletes the callonly after ensuring that the primary server is functional till the call ends.
• Active-Standby: In this scenario, the primary Recorder-UM server is active and the secondaryor backup server is in hot standby mode. A seamless failover to the standby or secondaryRecorder-UM server happens when the active or primary recorder fails. In active-standbyhigh availability mode, 100% call recording is not possible. Data might be lost if the Recorder-UM becomes nonfunctional on an active call or till the time the secondary Recorder-UMbecomes active and gets the events from the adapters.
Configuring High Availability for the Screen Capture applicationProcedure
1. Go to the server that hosts the web application components.
2. Open the Screen registry located on: HKEY_LOCAL_MACHINE\SOFTWARE\Wow6432Node\Avaya\Screen.
3. On the right pane, configure the values of the following parameters:
a. ConnectURL: wss://<Primary Unified Messaging IP address>:8443/ws/netty/
b. SecondaryConnectURL: wss://<Primary Unified Messaging IP addressof the data redundancy server>:8443/ws/netty/
c. DataPath: Enter the path as C:\Program Data\Avaya to specify the storagelocation of screens.
Next stepsStart the Screen Capture service.
Starting the Screen Capture serviceProcedure
1. Log in to the server that hosts the web application components.
2. Click Start > Run > services.msc.
3. Right click Screen Capture Service and click Restart.
High Availability and Redundancy implementation
November 2017 Deploying Harmony Workforce Optimization with Avaya Aura® CommunicationManager and Avaya Aura® Contact Center 204Comments on this document? [email protected]
Geo-redundancy
Geo-redundancy High Availability supportHarmony Workforce Optimization provides support for Application Enablement Services (AES)geo redundant high availability. Deployment of Application Enablement Services (AES) 7.1 andAvaya Aura® Communication Manager is simulated across two network subnets. Geo redundanthigh availability consists of the following components:
• Primary data center that has the following components:
- Main Communication Manager: Handles all the call processing in sunny day scenario andhandles traffic from clients in primary data center as well as in secondary data center.
- Primary AES: Handles all CTI connections with Harmony Workforce Optimization andcommunicates with primary Communication Manager in sunny day.
- Clients: Registers to main Communication Manager in sunny day.
• Secondary data center that has the following components:
- Survivable core Communication Manager: Becomes active when main CommunicationManager is down and handles all the call processing and traffic from clients in primary datacenter as well as secondary data center. If there is loss of WAN connectivity betweenprimary data center and secondary data center, then the survivable core CommunicationManager handles only calls from secondary data center.
- Standby AES: Remains in standby mode in sunny day. AES services will be down on thestandby AES and also the web page will not be accessible.
- Clients: Registers to main Communication Manager in sunny day and registers tosurvivable core when main Communication Manager is not reachable.
Both the primary and standby AES have the same hostname and a common TLink. Since both theprimary and standby AES are in different network subnets, they do not have a common virtual IPaddress. One AES is in active mode and the other is in standby mode. You can manually invokeinterchange to make the standby AES active. All data, including users. is synchronized betweenprimary AES and standby AES.
Geo-redundancy High Availability in Harmony WorkforceOptimization
Harmony Workforce Optimization deployment supports active-active and active-standbyconfiguration in geo redundant high availability setups.
Geo-redundancy
November 2017 Deploying Harmony Workforce Optimization with Avaya Aura® CommunicationManager and Avaya Aura® Contact Center 205Comments on this document? [email protected]
Active-ActiveFor active-active deployments, do the following:
• Maintain two different sets of Recorder, AES adapter, and Avaya adapter in both primarydata center and secondary data center.
• Deploy and configure Recorder, AES adapter, and Avaya adapter on two different serverswith recorder failover and active-active configuration in Avaya adapter.
• Configure primary and backup AES server details in AES adapter and Avaya adapter.• Configure primary recorder on one server with AES adapter and Avaya adapter connected to
primary AES server.• Configure backup recorder on another server with AES adapter and Avaya adapter
connected to primary AES server.• Configure high availability between primary and secondary recorder.• Connect each recorder to an Avaya adapter to get voice streams. Both the recorders record
calls with active streams. The primary recorder retains the calls while the backup recorderdiscards the calls.
Active-StandbyFor active-standby deployments, do the following:
• Maintain two different sets of Recorder, AES adapter, and Avaya adapter in both primarydata center and secondary data center.
• Deploy and configure Recorder, AES adapter, and Avaya adapter on two different serverswith recorder failover and active-standby configuration in Avaya adapter.
• Configure primary and backup AES server details in AES adapter and Avaya adapter.• Configure primary recorder on one server with AES adapter and Avaya adapter connected to
primary AES server.• Configure backup recorder on another server with AES adapter and Avaya adapter
connected to primary AES server.• Configure high availability between primary and secondary recorder.• Connect each recorder to an Avaya adapter to get voice streams. Avaya adapter on primary
recorder gets voice streams while the Avaya adapter on backup recorder does not get voicestreams. Only primary recorder record calls. The backup recorder does not record callsbecause it does not get voice streams. When a switch-over happens, ongoing calls are lostand the calls taken after the switch-over is recorder.
Geo-redundancy High Availability failover scenariosHigh availability is configured both in primary Communication Manager and survivable core (ESS)Communication Manager. High availability is also configured in AES server 1(Active) and in AESserver 2 (standby). AES server 1 and AES server 2 are connected to primary CommunicationManager initially. If primary Communication Manager goes down, AES server 1 and AES server 2are connected to survivable core (ESS) Communication Manager. The primary CommunicationManager is always active by default while the survivable core (ESS) Communication Manager is
High Availability and Redundancy implementation
November 2017 Deploying Harmony Workforce Optimization with Avaya Aura® CommunicationManager and Avaya Aura® Contact Center 206Comments on this document? [email protected]
standby by default and preferred primary too. AES adapter and Avaya adapter connect to activeAES server as primary connectivity and standby AES server as backup connectivity. AES adapterand Avaya adapter get events from primary AES server. If the primary AES server fails, then theAES adapter and Avaya adapter connect to backup AES server to get events.
Primary Communication Manager failureWhen primary Communication Manager fails, the primary AES server which is in active stateconnects to survivable core Communication Manager. AES adapter and Avaya adapter continueto receive events from primary AES server. The primary recorder records calls without anyhiccups. When the primary Communication Manager becomes functional, the primary AES serverswitches connection from survivable core Communication Manager to primary CommunicationManager. AES adapter and Avaya adapter continue to receive events from primary AES serverand the recorder continues to record calls.
Primary AES failureWhen primary AES server fails, the AES server which is in standby mode becomes active. AESadapter and Avaya adapter continue to receive events from the active AES server for which thebackup AES server details are configured in the respective adapter configuration. Connectionswitch to the active AES server takes about 5 minutes and any ongoing calls during this period islost. Calls taken after the switch-over happens are recorded because AES adapter and Avayaadapter receive events from the active AES server.
WAN disconnect between primary data center and secondary data centerWhen the WAN connective between primary data center and secondary data center fails, both theprimary Communication Manager and the survivable core Communication Manager becomeactive. The AES server connects to the respective Communication Manager in their data centerand receive and send events to the Harmony Workforce Optimization recorder. Both the recordersrecord calls as the recorders are not aware of the active-standby status of the data centers. Thiscondition is called as Split brain as both data centers function independent of each other.
Configuring Recorder parameters for geo-redundancy HighAvailability
About this taskUse this procedure to configure recorder parameters for geo redundant high availability.
Procedure1. Log in to SysAdmin .
2. Click System Administration > Configuration.
3. Click the Component tab and do the following:
a. In the Component field, select Recorder.b. In the Asset field, select the asset on which you want to configure high availability.
c. In the Node field, select the node on which you want to configure high availability.
Geo-redundancy
November 2017 Deploying Harmony Workforce Optimization with Avaya Aura® CommunicationManager and Avaya Aura® Contact Center 207Comments on this document? [email protected]

4. In the Value column of the RecorderFailoverEnabled parameter, configure the followingparameters:
• RecorderFailoverEnabled: Type True to enable failover.
• RecorderFailoverIPAddress: Enter the IP address of the failover recorder server.
• FailoverNodeName: Enter the node name of the recorder failover server.
5. Click Save.
Next stepsRestart the component service after configuring the parameters.
Configuring AES adapter parameters for geo-redundancy HighAvailability
About this taskUse this procedure to configure the adapter failover mode for geo redundant high availability inCall Center Elite on Communication Manager deployments.
Procedure1. Log in to SysAdmin .
2. Click System Administration > Configuration.
3. Click the Component tab and do the following:
a. In the Component field, select AES adapter.
b. In the Asset field, select the asset on which you want to configure high availability.
c. In the Node field, select the node on which you want to configure high availability.
4. In the AESServer Configuration section, configure the following parameters:
• AESServerID: The primary AES server TLINK.
• AESBackupServerID: The backup AES server TLINK.
• LoginUserName: AES CTI username.
• Password: AES CTI password.
5. Click Save.
Next stepsRestart the component service after configuring the parameters.
High Availability and Redundancy implementation
November 2017 Deploying Harmony Workforce Optimization with Avaya Aura® CommunicationManager and Avaya Aura® Contact Center 208Comments on this document? [email protected]

Configuring Avaya adapter parameters for geo-redundancy HighAvailability
About this taskUse this procedure to configure the adapter failover mode for geo redundant high availability inCall Center Elite on Communication Manager deployments.
Procedure1. Log in to SysAdmin .
2. Click System Administration > Configuration.
3. Click the Component tab and do the following:
a. In the Component field, select Avaya adapter.
b. In the Asset field, select the asset on which you want to configure high availability.
c. In the Node field, select the node on which you want to configure high availability.
4. In the Value column of the AdapterFailoverMode parameter, type any one of the following:
• No-HA• Active-Passive• Active-Active
5. If you configure the AdapterFailoverMode parameter as Active-Active, configure thefollowing parameters:
• dmcc_recording_instance: Type 0 for primary Avaya adapter and 1 for secondary Avayaadapter.
6. In the DMCC section, configure the following parameters:
• ReconnectToAESServerAttempts: Type 3 to specify the number of attempts toreconnect to the existing DMCC session when the connection is lost.
• ReconnectToSessionTime: Type 60 to specify the session timeout in seconds toreconnect to the existing DMCC session.
7. Click Save.
Next stepsRestart the component service after configuring the parameters.
Geo-redundancy
November 2017 Deploying Harmony Workforce Optimization with Avaya Aura® CommunicationManager and Avaya Aura® Contact Center 209Comments on this document? [email protected]
Configuring dynamic parameters for the adapterAbout this taskUse this procedure to configure parameters that connect the adapter with the ACD or PBX server.For the Messaging component, configure dynamic parameters to connect to the Recorder, MediaManager, and the web application.
Procedure1. Log in to SysAdmin .
2. Click System Administration > Configuration.
3. Click the Dynamic tab.
4. In the Component field, select the adapter for which you want to configure parameters..
The system populates the Dynamic Type based on the adapter you select.
5. In the Asset field, select an asset.
6. In the Node field, select a node.
7. In the No. of Sets field, type the number of sets you want to create.
8. Click Create Sets.
Next stepsRestart the component service after configuring the parameters.
Related linksAvaya adapter parameters on page 210
Avaya adapter parametersRequired integration parameters
Name Descriptioncmapi.server_IP To configure the IP address of the server where
DMCC or the AES server is installed.cmapi.server_port To configure the non securable port number that is
used to communicate with DMCC service running inthe AES server. The default value is 4721.
cmapi.secure_server_port To configure the securable port number that is usedto communicate with DMCC service running in theAES server. The default value is 4722.
cmapi.username To configure the CTI username created forHarmony Workforce Optimization to integrate CTIwith DMCC service running in the AES server.
Table continues…
High Availability and Redundancy implementation
November 2017 Deploying Harmony Workforce Optimization with Avaya Aura® CommunicationManager and Avaya Aura® Contact Center 210Comments on this document? [email protected]

Name Descriptioncmapi.password To configure the CTI user password created for
Harmony Workforce Optimization to integrate CTIwith DMCC service running in the AES server.
cmapi.CallServer To register the device to Communication Manageror to do call control with a third party device. Thedefault value is cmsim.
TenantAlias To configure the tenant alias to which the Avayaadapter must be associated.
EnableRecordingWarnTone To configure the recording tone feature for a device.This feature is available only for active recording.
• True: The value to enable the recording tonefeature.
• False: The default value.BackupCallServer To configure the Communication Manager name as
configured in the backup AES server.BackupCallServerIP To configure the IP address of the server where the
backup AES server is installed.BackupCMAPIUsername To configure the CTI username created for
Harmony Workforce Optimization to integrate CTIwith DMCC service running in the backup AESserver.
BackupCMAPIPassword To configure the CTI user password created forHarmony Workforce Optimization to integrate CTIwith DMCC service running in the backup AESserver.
Related linksConfiguring dynamic parameters for the adapter on page 210
Geo-redundancy
November 2017 Deploying Harmony Workforce Optimization with Avaya Aura® CommunicationManager and Avaya Aura® Contact Center 211Comments on this document? [email protected]
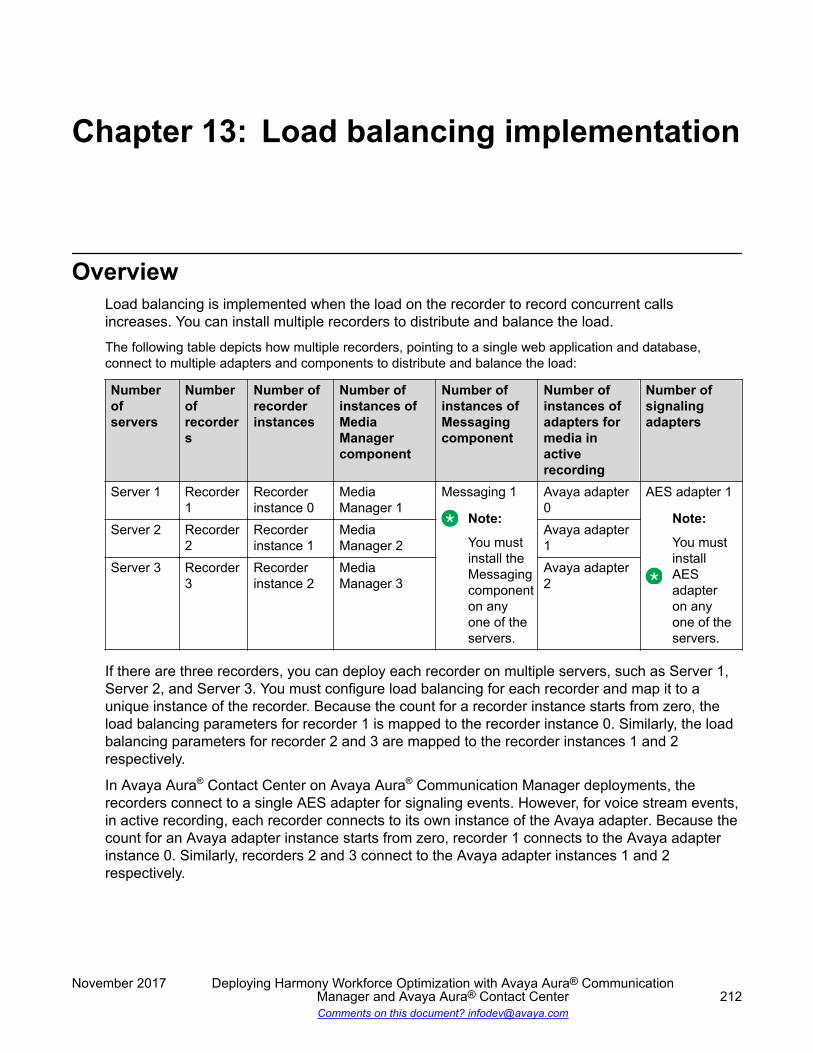
Chapter 13: Load balancing implementation
OverviewLoad balancing is implemented when the load on the recorder to record concurrent callsincreases. You can install multiple recorders to distribute and balance the load.
The following table depicts how multiple recorders, pointing to a single web application and database,connect to multiple adapters and components to distribute and balance the load:
Numberofservers
Numberofrecorders
Number ofrecorderinstances
Number ofinstances ofMediaManagercomponent
Number ofinstances ofMessagingcomponent
Number ofinstances ofadapters formedia inactiverecording
Number ofsignalingadapters
Server 1 Recorder1
Recorderinstance 0
MediaManager 1
Messaging 1
Note:
You mustinstall theMessagingcomponenton anyone of theservers.
Avaya adapter0
AES adapter 1
Note:
You mustinstallAESadapteron anyone of theservers.
Server 2 Recorder2
Recorderinstance 1
MediaManager 2
Avaya adapter1
Server 3 Recorder3
Recorderinstance 2
MediaManager 3
Avaya adapter2
If there are three recorders, you can deploy each recorder on multiple servers, such as Server 1,Server 2, and Server 3. You must configure load balancing for each recorder and map it to aunique instance of the recorder. Because the count for a recorder instance starts from zero, theload balancing parameters for recorder 1 is mapped to the recorder instance 0. Similarly, the loadbalancing parameters for recorder 2 and 3 are mapped to the recorder instances 1 and 2respectively.
In Avaya Aura® Contact Center on Avaya Aura® Communication Manager deployments, therecorders connect to a single AES adapter for signaling events. However, for voice stream events,in active recording, each recorder connects to its own instance of the Avaya adapter. Because thecount for an Avaya adapter instance starts from zero, recorder 1 connects to the Avaya adapterinstance 0. Similarly, recorders 2 and 3 connect to the Avaya adapter instances 1 and 2respectively.
November 2017 Deploying Harmony Workforce Optimization with Avaya Aura® CommunicationManager and Avaya Aura® Contact Center 212Comments on this document? [email protected]
Note:
Each recorder must have a dedicated Media Manager component but must point to a singleMessaging component.
Using a built-in logic, the signaling and voice stream adapters send their respective events to theappropriate instance of the recorder. If there are 12 extensions and 3 recorder instances, theadapters divide each extension by the number of recorder instances. Events are then sent to therecorder whose instance number matches with the remainder. For example, if the extension is2345, the adapters divide 2345 by 3 and send the events to the recorder instance 2.
Load balancing for Avaya Aura® Contact Center on Avaya Aura® Communication Managerdeployments can be achieved by performing the following tasks:
• Configure multiple instances of the recorder in load balancing mode.
• Connect multiple recorders to a single instance of AES adapter, multiple instances of Avayaadapter, single Messaging component, and multiple Media Manager components.
• Configure the load balancing parameters in the Avaya adapter.
Configuring load balancing parameters for RecorderAbout this taskUse this procedure to enable and configure load balancing parameters for each recorder instance.
Before you beginEnsure you configure the network load balancing settings for Windows.
Procedure1. Log in to SysAdmin .
2. Click System Administration > Configuration.
3. Click the Component tab and do the following:
a. In the Component field, select Recorder.b. In the Asset field, select the asset on which you want to configure load balancing
parameters for the Recorder.
c. In the Node field, select the node on which you want to configure load balancingparameters for the Recorder.
4. In the Value column of the Load Balancing section, configure the following parameters:
• ServerInstance: Retain the default value of this parameter.
• RecorderInstance: Enter the recorder instance value that this recorder must connect.The value must start from zero.
• LoadBalancingEnabled: Type True to enable load balancing.
Configuring load balancing parameters for Recorder
November 2017 Deploying Harmony Workforce Optimization with Avaya Aura® CommunicationManager and Avaya Aura® Contact Center 213Comments on this document? [email protected]
5. Click Save.
6. Repeat steps 1 to 4 to configure load balancing parameters for other instances of therecorder.
Next stepsRestart the recorder service after configuring the parameters.
Configuring dynamic parameters for the recorderAbout this taskUse this procedure to connect the recorder to an adapter or service. Based on the deployment,create multiple sets so that the recorder gets connected to the relevant adapters and services.Login to SysAdmin .You can configure specific parameters for an adapter or service.
Procedure1. Log in to SysAdmin .
2. Click System Administration > Configuration.
3. Click the Dynamic tab.
4. In the Component field, select Recorder.5. Select the Dynamic Type as Adapter or Service.
6. In the Asset field, select an asset.
7. In the Node field, select a node.
8. In the No. of Sets field, type the number of sets you want to create.
9. Click Create Sets.
Next stepsRestart the component service after configuring the parameters.
Dynamic recorder parameter configuration values for loadbalancing
Recorder 1The table below lists the three adapter sets you must create for recorder 1 to connect to AES adapter,Avaya adapter, and the Messaging component. You must create one service set for the recorder 1 toconnect to Media Manager.
Load balancing implementation
November 2017 Deploying Harmony Workforce Optimization with Avaya Aura® CommunicationManager and Avaya Aura® Contact Center 214Comments on this document? [email protected]
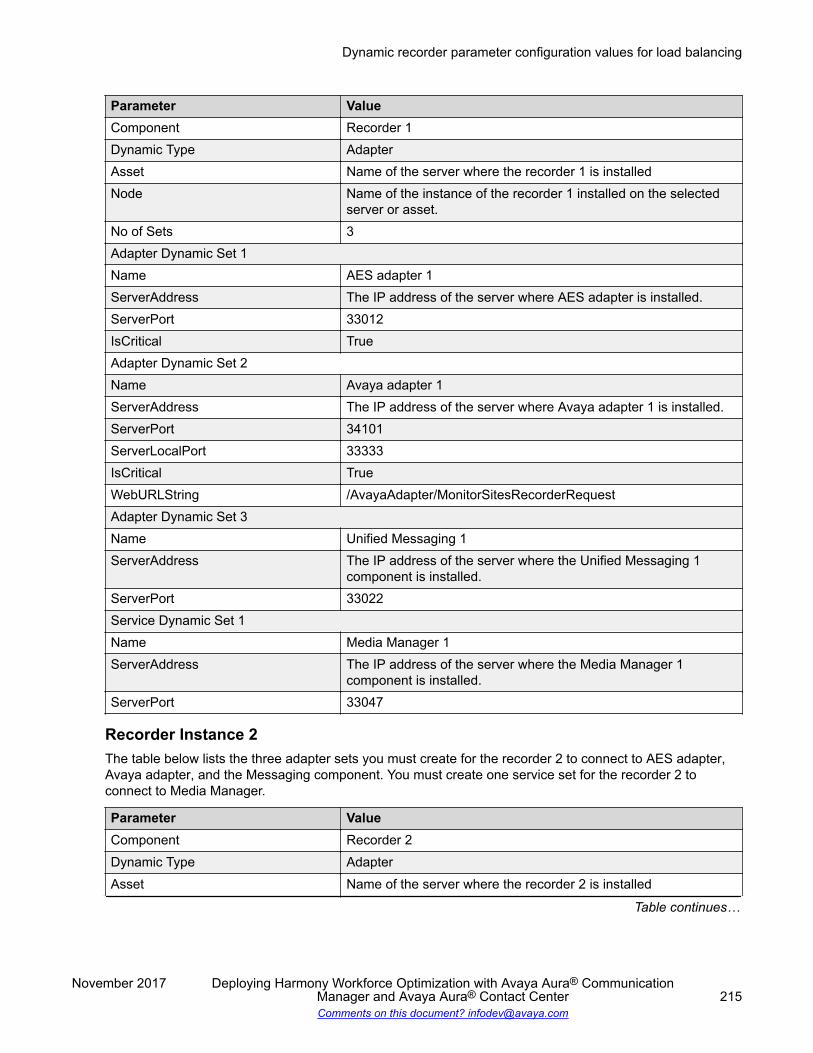
Parameter ValueComponent Recorder 1Dynamic Type AdapterAsset Name of the server where the recorder 1 is installedNode Name of the instance of the recorder 1 installed on the selected
server or asset.No of Sets 3Adapter Dynamic Set 1Name AES adapter 1ServerAddress The IP address of the server where AES adapter is installed.ServerPort 33012IsCritical TrueAdapter Dynamic Set 2Name Avaya adapter 1ServerAddress The IP address of the server where Avaya adapter 1 is installed.ServerPort 34101ServerLocalPort 33333IsCritical TrueWebURLString /AvayaAdapter/MonitorSitesRecorderRequestAdapter Dynamic Set 3Name Unified Messaging 1ServerAddress The IP address of the server where the Unified Messaging 1
component is installed.ServerPort 33022Service Dynamic Set 1Name Media Manager 1ServerAddress The IP address of the server where the Media Manager 1
component is installed.ServerPort 33047
Recorder Instance 2The table below lists the three adapter sets you must create for the recorder 2 to connect to AES adapter,Avaya adapter, and the Messaging component. You must create one service set for the recorder 2 toconnect to Media Manager.
Parameter ValueComponent Recorder 2Dynamic Type AdapterAsset Name of the server where the recorder 2 is installed
Table continues…
Dynamic recorder parameter configuration values for load balancing
November 2017 Deploying Harmony Workforce Optimization with Avaya Aura® CommunicationManager and Avaya Aura® Contact Center 215Comments on this document? [email protected]
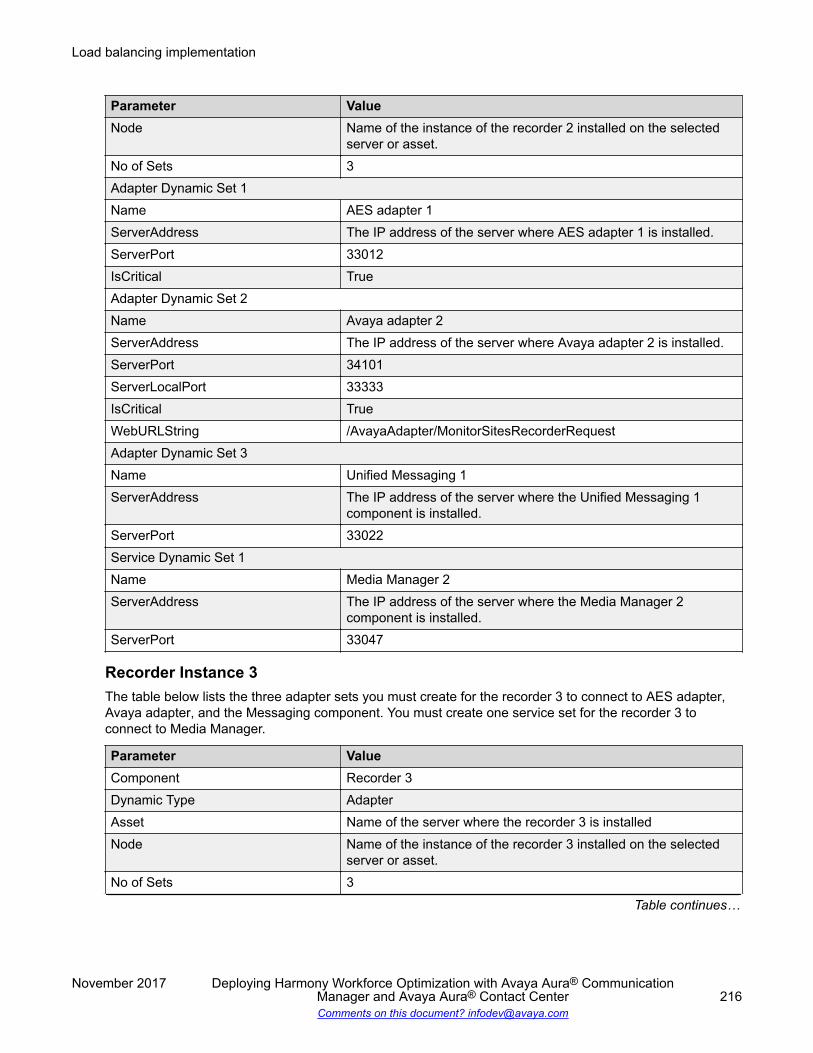
Parameter ValueNode Name of the instance of the recorder 2 installed on the selected
server or asset.No of Sets 3Adapter Dynamic Set 1Name AES adapter 1ServerAddress The IP address of the server where AES adapter 1 is installed.ServerPort 33012IsCritical TrueAdapter Dynamic Set 2Name Avaya adapter 2ServerAddress The IP address of the server where Avaya adapter 2 is installed.ServerPort 34101ServerLocalPort 33333IsCritical TrueWebURLString /AvayaAdapter/MonitorSitesRecorderRequestAdapter Dynamic Set 3Name Unified Messaging 1ServerAddress The IP address of the server where the Unified Messaging 1
component is installed.ServerPort 33022Service Dynamic Set 1Name Media Manager 2ServerAddress The IP address of the server where the Media Manager 2
component is installed.ServerPort 33047
Recorder Instance 3The table below lists the three adapter sets you must create for the recorder 3 to connect to AES adapter,Avaya adapter, and the Messaging component. You must create one service set for the recorder 3 toconnect to Media Manager.
Parameter ValueComponent Recorder 3Dynamic Type AdapterAsset Name of the server where the recorder 3 is installedNode Name of the instance of the recorder 3 installed on the selected
server or asset.No of Sets 3
Table continues…
Load balancing implementation
November 2017 Deploying Harmony Workforce Optimization with Avaya Aura® CommunicationManager and Avaya Aura® Contact Center 216Comments on this document? [email protected]
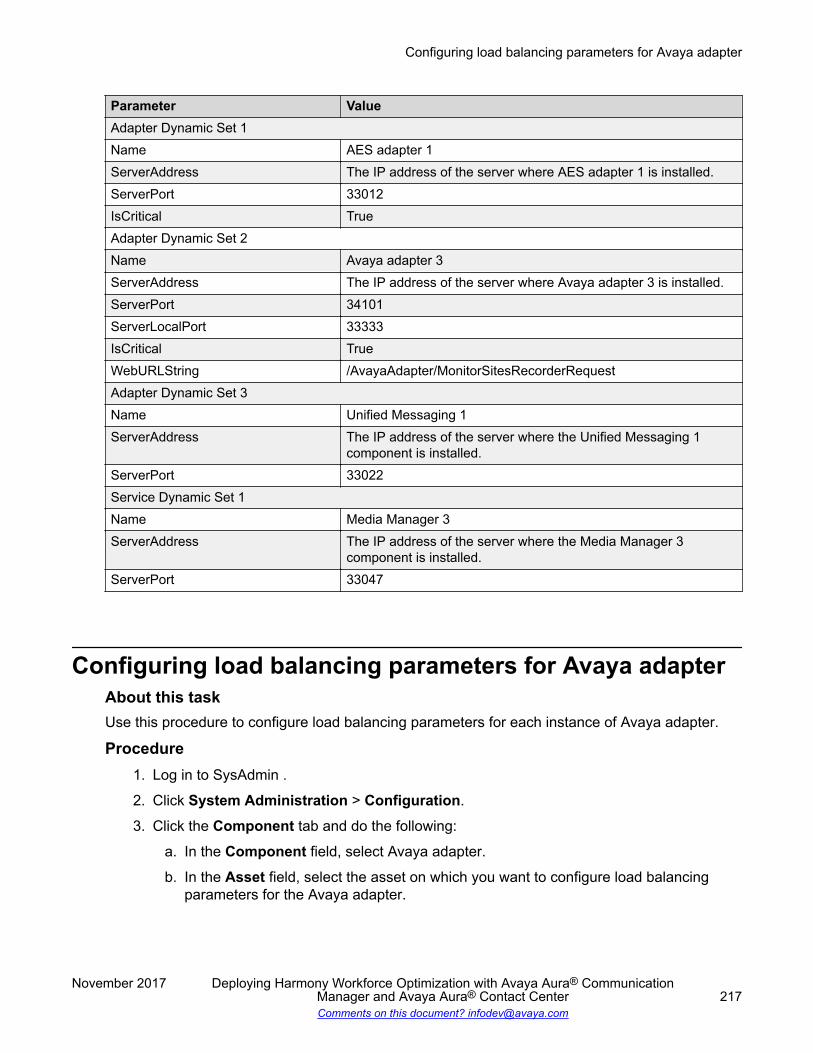
Parameter ValueAdapter Dynamic Set 1Name AES adapter 1ServerAddress The IP address of the server where AES adapter 1 is installed.ServerPort 33012IsCritical TrueAdapter Dynamic Set 2Name Avaya adapter 3ServerAddress The IP address of the server where Avaya adapter 3 is installed.ServerPort 34101ServerLocalPort 33333IsCritical TrueWebURLString /AvayaAdapter/MonitorSitesRecorderRequestAdapter Dynamic Set 3Name Unified Messaging 1ServerAddress The IP address of the server where the Unified Messaging 1
component is installed.ServerPort 33022Service Dynamic Set 1Name Media Manager 3ServerAddress The IP address of the server where the Media Manager 3
component is installed.ServerPort 33047
Configuring load balancing parameters for Avaya adapterAbout this taskUse this procedure to configure load balancing parameters for each instance of Avaya adapter.
Procedure1. Log in to SysAdmin .
2. Click System Administration > Configuration.
3. Click the Component tab and do the following:
a. In the Component field, select Avaya adapter.
b. In the Asset field, select the asset on which you want to configure load balancingparameters for the Avaya adapter.
Configuring load balancing parameters for Avaya adapter
November 2017 Deploying Harmony Workforce Optimization with Avaya Aura® CommunicationManager and Avaya Aura® Contact Center 217Comments on this document? [email protected]

c. In the Node field, select the node on which you want to configure load balancingparameters for the Avaya adapter.
4. In the Value column of the DMCC section, configure the following parameters:
• dmcc_load_balancing_enabled: Type True to enable load balancing.
• dmcc_max_number_of_load_balancing_servers: Enter the total number of loadbalancing servers where Avaya adapter is installed.
• dmcc_load_balancing_instance: Enter the adapter instance value that this Avayaadapter must connect. The value must start from zero.
5. Click Save.
6. Repeat steps 1 to 4 to configure load balancing parameters for other instances of theAvaya adapter.
Next stepsRestart the Avaya adapter service after configuring the parameters.
Configuring dynamic parameters for Avaya adapterAbout this taskWhen you use multiple instances of Avaya adapter, ensure you configure each instance of theAvaya adapter with a different CTI username.. Use this procedure to configure dynamicparameters that connect multiple instances of Avaya adapter with the ACD or PBX server.
Procedure1. Log in to SysAdmin .
2. Click System Administration > Configuration.
3. Click the Dynamic tab.
4. In the Component field, select Avaya adapter.
The system populates the Dynamic Type based on the adapter you select.
5. In the Asset field, select an asset.
6. In the Node field, select a node.
7. In the No. of Sets field, type the number of sets you want to create.
8. Click Create Sets.
9. In the Value column, configure the following parameters for each instance of the Avayaadapter.
a. cmapi.username: Type the CTI username configured for the instance
b. cmapi.password: Type the CTI password configured for the instance.
Load balancing implementation
November 2017 Deploying Harmony Workforce Optimization with Avaya Aura® CommunicationManager and Avaya Aura® Contact Center 218Comments on this document? [email protected]

10. Click Save.
Next stepsRestart the component service after configuring the parameters.
Configuring dynamic parameters for Avaya adapter
November 2017 Deploying Harmony Workforce Optimization with Avaya Aura® CommunicationManager and Avaya Aura® Contact Center 219Comments on this document? [email protected]
Chapter 14: Troubleshooting
SysAdmin login page displays the Invalid License keymessage
ConditionWhile logging into SysAdmin, the system displays the following error message: InvalidLicense key.
CauseHarmony Workforce Optimization does not support the Avaya WebLM version.
Solution1. Check the Avaya WebLM version.2. If the version is earlier than 6.3.8, then reinstall the latest version.
Emails are not delivered to recipientsConditionWhen a user sends a report through an email, the recipient does not receive the email.
CauseThe email settings are set incorrectly.
Solution 11. Log in to SysAdmin .2. Click System Administration > Configuration.3. To configure parameters for a component, click the Component tab and do the following:
a. In the Component field, select Webapp.b. In the Asset field, select the asset.c. In the Node field, select the node.
4. In the Value column, check if the following parameters are configured correctly:• mail.smtp.host
November 2017 Deploying Harmony Workforce Optimization with Avaya Aura® CommunicationManager and Avaya Aura® Contact Center 220Comments on this document? [email protected]
• mail.smtp.port• mail.smtp.auth• mail.transport.protocol• mail.smtp.username• mail.smtp.password• mail.default.fromAddress• mail.default.fromName
5. Click Save to close the file.6. Restart the web application service.
Solution 21. Restart web application service.2. Log in to the server that hosts the web application component.3. Click Start > Run > services.msc > WebApp Service > Start.
Interaction playback failsConditionInteraction playback fails, and the system displays the following error message: You cannotplay this interaction as the audio could not be loaded either because ofunsupported file formant or server/ network failure.Cause
• Harmony Workforce Optimization components cannot find the interaction files at theconfigured storage location.
• The browser does not support the file format.
Solution 11. Confirm that the browser supports HTML5.2. The following browser version are certified:
• Internet Explorer 11 and above• Google Chrome 43.x and above• Mozilla Firefox 33.x and above
Solution 21. Verify that the proxy is configured to the correct location where the interactions exist.2. Go to <Installation Path>\Harmony\Apache24\conf\extra.
3. Right-click the httpd-ssl.conf file.
Interaction playback fails
November 2017 Deploying Harmony Workforce Optimization with Avaya Aura® CommunicationManager and Avaya Aura® Contact Center 221Comments on this document? [email protected]

4. Click Edit with Notepad ++.5. Point the parameter DocumentRoot to the WFO_HOME path.6. Point the parameter Directory to the WFO_HOME path.7. Click Save to close the file.
Solution 31. Start the Media Manager service.2. Log in to the server that hosts the web application components.3. Click Start > Run > services.msc.4. Right-click the Media Manager service and click Start.
Solution 41. Verify the Media Manager log file.2. Go to the Logs folder at <Logs Path>\Logs or at a location specified during the
Harmony Workforce Optimization installation.3. Right-click the MediaManager.log file.
4. Click Edit with Notepad ++.5. Check for the message Sending Response is
result=SUCCESS&callURL=https://<IP address> xx.xxx.xxx.xxx:443/default_FLDR/VoiceConvertedFiles/JUDITH%5Fdefault%5FCS1K%5F7002%5F03152016%5F152740%5F000241%5F0%2E50/JUDITH%5Fdefault%5FCS1K%5F7002%5F03152016%5F152740%5F000241%5F0%2E50.wav&scEndCount=324.The message contains a URL with the IP address of the web application server and thevoice case ID located at <WFO_Home>\default_FLDR\VoiceConvertedFiles.
6. Change the file format from .wav to .jpeg in the URL:
7. On the address bar of your browser, type the URL: https://<IP address>xx.xxx.xxx.xxx:443/default_FLDR/VoiceConvertedFiles/JUDITH%5Fdefault%5FCS1K%5F7002%5F03152016%5F152740%5F000241%5F0%2E50/JUDITH%5Fdefault%5FCS1K%5F7002%5F03152016%5F152740%5F000241%5F0%2E50.jpeg&scEndCount=324.
The system displays the audio graph of the interaction.8. On the address bar of the client browser, type the URL: https://<IP address>
xx.xxx.xxx.xxx:443/default_FLDR/VoiceConvertedFiles/JUDITH%5Fdefault%5FCS1K%5F7002%5F03152016%5F152740%5F000241%5F0%2E50/JUDITH%5Fdefault%5FCS1K%5F7002%5F03152016%5F152740%5F000241%5F0%2E50.jpeg&scEndCount=324 .
The system displays the audio graph of the interaction on the client browser.9. (Optional) If you get an error message in the MediaManager.log file, based on the
message information, do the following:• Check whether physical file is available in the storage location.
Troubleshooting
November 2017 Deploying Harmony Workforce Optimization with Avaya Aura® CommunicationManager and Avaya Aura® Contact Center 222Comments on this document? [email protected]

• Check whether the physical file is encrypted.
Failed to join the instance NODE2 to the availability groupAG1
ConditionWhile setting up the basic availability groups in SQL Server 2016, the system might display thefollowing error message: Failed to join the instance ‘NODE2’ to theavailability group ‘AG1’.(Microsoft.SqlServer.Management.SDK.TaskForms)CauseThe endpoint is blocked by firewall.
Solution1. Ensure that the endpoint Hadr_endpoint on default port 5022 is not blocked by a firewall.2. Confirm the following:
• Startup account of primary server is added to all the secondary servers• Startup accounts of all secondary servers are added to primary servers• Startup account of each replica is added to other replicas
3. If the logon account of SQL Server is “Nt service\” or local system account, then, ensurethat the system account (Domainname\systemname$) of each replica is added to otherreplicas.
4. Grant the connect permission on endpoints created on each replicas for startup account ofother replica servers (Grant the connect permission on endpoints even if startup account ofother replicas are added as sysadmins).
5. Ensure that the SQL Server name (select @@servername) matches with the hostname.6. Ensure cluster service startup account is part of the SQL Server logins.
Interaction playback issuesConditionWhen a user tries to playback an interaction of type MP4, the user might face issues with the MP4video.
CauseThe Windows media player might not be upgraded to the latest version, or there are more thanone media players on the user machine.
Failed to join the instance NODE2 to the availability group AG1
November 2017 Deploying Harmony Workforce Optimization with Avaya Aura® CommunicationManager and Avaya Aura® Contact Center 223Comments on this document? [email protected]
SolutionPlay the MP4 video on a Windows media player with the latest version, or use any other mediaplayer.
Unable to view components in SysAdmin when installingthrough maintenance mode
ConditionIn the SysAdmin application, few components are not displayed at times when you install throughmaintenance mode.
Solution1. Click Start > SQL Server Management Studio on the server where the Harmony
Workforce Optimization database is installed.2. Select the HARMONY Host database and click New Query.3. Type the query, UPDATE KSLOOKUP SET STATUS='A' where
LOOKUP_CODE='COMPONENT_TYPE' AND STATUS='I' andLOOKUP_TYPE='COMPNAME' and click Execute.
Replace COMPNAME with the component name.The component is now visible in the SysAdmin Configuration window.
Services disappear from Windows console when HarmonyWorkforce Optimization installer is run and closed inmaintenance mode
ConditionWhen the Harmony Workforce Optimization installer is run in maintenance mode to add or removea component, and the program is killed manually or through server reboot, the existing services inthe server are not visible in Windows Services Console.
CauseServices disappear from the Windows console because of the process being killed or due toserver reboot.
Solution1. Open the Harmony Workforce Optimization installer in maintenance mode to install a
random component.You can remove the component later, if it is not required.
Troubleshooting
November 2017 Deploying Harmony Workforce Optimization with Avaya Aura® CommunicationManager and Avaya Aura® Contact Center 224Comments on this document? [email protected]
2. Right-click Harmony_5_2_2.exe and click Run as Administrator.3. Click Next.4. On the Program Maintenance window, select Modify to manage the features that you want
to install or uninstall and click Next .5. On the Custom Setup window, select the component that you want to install and click
Next .6. On the Ready to Modify the Program window, click Install.
The system restores the services back in Windows Services Console.7. On the Program Maintenance window, select Remove to uninstall the component.8. On the Ready to Remove the Program window, click Uninstall.
Install or upgrade program failsConditionThe install or upgrade program fails while upgrading from McAfee version 8.8 to 10.
CauseMcAfee version 10 antivirus system blocks the VBScript engine present in a Windows server.
Solution1. Open Control Panel > Programs > Uninstall a program
The system displays the Programs and Features page.2. Click McAfee Endpoint Security Threat Prevention.
The systems displays the following message: Are you sure you want touninstall McAfee Endpoint Security Threat Prevention?
3. Click Yes.4. After the uninstall process is complete, refresh the Programs list.
The list still displays the McAfee Agent.5. Open command prompt and navigate to C:\Program Files\McAfee\Agent\x86
folder.
6. Run the following command: frminst.exe/remove=agent.
The McAfee agent gets uninstalled.7. Run the MCPR tool to remove any McAfee components available from McAfee.
You can now install or upgrade Harmony Workforce Optimization .
Install or upgrade program fails
November 2017 Deploying Harmony Workforce Optimization with Avaya Aura® CommunicationManager and Avaya Aura® Contact Center 225Comments on this document? [email protected]
Chapter 15: Resources
DocumentationSee the following related documents at http://support.avaya.com:
Documentnumber
Title Use this document to: Audience
Table continues…Overview
Harmony WorkforceOptimization Overview andSpecification
Provide a high-level functionaldescription of the capabilities of theHarmony Workforce Optimizationapplication.
All
ImplementingDeploying Harmony WorkforceOptimization with Avaya Aura®
Communication Manager andAvaya Aura® Call Center Elite
Provides checklist and proceduresfor the installation, configuration,initial administration, and basicmaintenance ofHarmony WorkforceOptimization with Avaya Aura®
Communication Manager and AvayaAura® Call Center Elite.
Deploymentengineers andsupportpersonnel
Deploying Harmony WorkforceOptimization with IP Office andIP Office Contact Center
Provides checklist and proceduresfor the installation, configuration,initial administration, and basicmaintenance ofHarmony WorkforceOptimization with IP Office and IPOffice Contact Center.
Deploymentengineers andsupportpersonnel
Deploying Harmony WorkforceOptimization with IP Office andAvaya Contact Center Select
Provides checklist and proceduresfor the installation, configuration,initial administration, and basicmaintenance ofHarmony WorkforceOptimization with IP Office andAvaya Contact Center Select.
Deploymentengineers andsupportpersonnel
Deploying Harmony WorkforceOptimization with Avaya Aura®
Communication Manager andAvaya Oceana™ Solution
Provides checklist and proceduresfor the installation, configuration,initial administration, and basicmaintenance ofHarmony WorkforceOptimization with Avaya Aura®
Deploymentengineers andsupportpersonnel
November 2017 Deploying Harmony Workforce Optimization with Avaya Aura® CommunicationManager and Avaya Aura® Contact Center 226Comments on this document? [email protected]
Documentnumber
Title Use this document to: Audience
Communication Manager and AvayaOceana™ Solution.
Deploying Harmony WorkforceOptimization with AvayaCommunication Server 1000and Avaya Aura® ContactCenter
Provides checklist and proceduresfor the installation, configuration,initial administration, and basicmaintenance of Harmony WorkforceOptimization with AvayaCommunication Server 1000 andAvaya Aura® Contact Center.
Deploymentengineers andsupportpersonnel
AdministeringAdministering HarmonyWorkforce Optimization
Explain how to use HarmonyWorkforce Optimization to configureyour system, employee data,settings, and recording rules andperform routine maintenance tasks.
The content is available in twoformats: HTML and PDF.
Administrators
UsingHarmony WorkforceOptimization Quick ReferenceGuide for Supervisors
Understand the most common usertasks that a Supervisor performs.
Users
Harmony WorkforceOptimization Quick ReferenceGuide for Call Center Agents
Understand the most common usertasks that an Agent performs.
Users
Harmony WorkforceOptimization Quick ReferenceGuide for QA Analyst
Understand the most common usertasks that a QA Analyst performs.
Users
Harmony WorkforceOptimization Quick ReferenceGuide for Administrators
Understand the most common usertasks that an Administrator performs.
Administrators
Viewing Avaya Mentor videosAvaya Mentor videos provide technical content on how to install, configure, and troubleshootAvaya products.
About this taskVideos are available on the Avaya Support website, listed under the video document type, and onthe Avaya-run channel on YouTube.
Viewing Avaya Mentor videos
November 2017 Deploying Harmony Workforce Optimization with Avaya Aura® CommunicationManager and Avaya Aura® Contact Center 227Comments on this document? [email protected]
Procedure• To find videos on the Avaya Support website, go to http://support.avaya.com and perform one
of the following actions:
- In Search, type Avaya Mentor Videos to see a list of the available videos.
- In Search, type the product name. On the Search Results page, select Video in theContent Type column on the left.
• To find the Avaya Mentor videos on YouTube, go to www.youtube.com/AvayaMentor andperform one of the following actions:
- Enter a key word or key words in the Search Channel to search for a specific product ortopic.
- Scroll down Playlists, and click the name of a topic to see the available list of videosposted on the website.
Note:
Videos are not available for all products.
SupportGo to the Avaya Support website at http://support.avaya.com for the most up-to-datedocumentation, product notices, and knowledge articles. You can also search for release notes,downloads, and resolutions to issues. Use the online service request system to create a servicerequest. Chat with live agents to get answers to questions, or request an agent to connect you to asupport team if an issue requires additional expertise.
Resources
November 2017 Deploying Harmony Workforce Optimization with Avaya Aura® CommunicationManager and Avaya Aura® Contact Center 228Comments on this document? [email protected]

Appendix A: Avaya Proactive OutreachManager deployment
Integration overveiwHarmony Workforce Optimization integration with Avaya Aura® Call Center Elite (Call Center Elite)on Avaya Aura® Communication Manager (Communication Manager) with Avaya ProactiveOutreach Manager supports the following deployments:
• Avaya Aura® Contact Center on Communication Manager and Avaya Proactive OutreachManager active recording
• Avaya Aura® Contact Center on Communication Manager and Avaya Proactive OutreachManager passive recording
Agent and extension-based active recordingPure outbound callsIn active recording, for outbound calls, the Harmony Workforce Optimization Recorder uses Avayaadapter to get voice streams, POM adapter to get call signalling, agent information, businessvariables, and dialer information. When a Avaya Proactive Outreach Manager agent logs on to theagent desktop, Avaya Proactive Outreach Manager establishes a voice path or nail-up to theagent's extension. When the agent is nailed up, the Calling Line Identification (CLID) numberconfigured on Avaya Aura® Experience Portal appears on the agent deskphone. Depending on theprogressive or preview campaign type, Avaya Proactive Outreach Manager initiates a call to thecustomer, patches the agent to send a preview of customer information, and then initiates the callto the customer.Avaya Proactive Outreach Manager then initiates the call to the agent's extension if the agent isassigned to a skill set that is attached to a currently running Avaya Proactive Outreach Managercampaign. Once the agent is nailed up, POM adapter sends the agent login information andAvaya adapter sends the stream event to the Recorder. Avaya Proactive Outreach Manageranchors the call on a Media Processing Platform (MPP) server and routes the call through theSession Manager to the agent's extension. Avaya Proactive Outreach Manager automaticallypatches the customer call with the ongoing nail-up call. Avaya adapter receives the stream eventonly once from Avaya Aura® Application Enablement Services till it is nailed up for the outboundcampaign. Once the campaign ends, nail-up call ends and the agent is logged out from theRecorder.
Blended callsIn a blended scenario, Avaya Proactive Outreach Manager agent is configured with both outboundand inbound skills. Avaya Proactive Outreach Manager will nail-up the agent for outbound callsand if there are outstanding calls in Inbound skill, Avaya Proactive Outreach Manager will end the
November 2017 Deploying Harmony Workforce Optimization with Avaya Aura® CommunicationManager and Avaya Aura® Contact Center 229Comments on this document? [email protected]
nail-up call and release the agent for inbound calls. The Harmony Workforce OptimizationRecorder uses Avaya adapter to get voice streams. AES adapter to get call signaling, andAACCNet adapter agent login and logout information, and business data. Additionally, AACCNetadapter is also used to get signalling, agent login and logout information, and business data fornonvoice transactions. The call comes from the PSTN and lands on Avaya Aura® ExperiencePortal and after self-service call, Avaya Aura® Experience Portal transfers the call toAvaya Aura®
Contact Center and is routed to an available voice agent. Avaya Aura® Application EnablementServices receives the call signaling information from Communication Manager and then sends it tothe AES adapter. AES adapter then processes it and sends it to the Harmony WorkforceOptimization Recorder. The call traverses through a layer 2 switch to the IP phones.For active recording, you must:
• Connect the recorder to a POM adapter, an AES adapter, an Avaya adapter, and anAACCNet adapter.
• Configure parameters for call signalling in POM adapter for outbound calls and AES adapterfor inbound calls.
• Configure parameters to enable device media and call control (DMCC) for single stepconference or multiple registrations in Avaya adapter.
• Configure parameters to enable CCT signaling for agent information and business data inAACCNet adapter for both voice and nonvoice transactions.
Agent and extension-based SPAN or passive recordingPure outbound callsIn passive recording, for outbound calls, the Harmony Workforce Optimization Recorder usesSPAN to get voice streams, POM adapter to get call signalling, agent information, businessvariables, and dialer information. When a Avaya Proactive Outreach Manager agent logs on to theagent desktop, Avaya Proactive Outreach Manager establishes a voice path or nail-up to theagent's extension. When the agent is nailed up, the Calling Line Identification (CLID) numberconfigured on Avaya Aura® Experience Portal appears on the agent deskphone. Depending on theprogressive or preview campaign type, Avaya Proactive Outreach Manager initiates a call to thecustomer, patches the agent to send a preview of customer information, and then initiates the callto the customer.Avaya Proactive Outreach Manager then initiates the call to the agent's extension if the agent isassigned to a skill set that is attached to a currently running Avaya Proactive Outreach Managercampaign. Once the agent is nailed up, POM adapter sends the agent login information and thestream events are sent to the Recorder through SPAN. Avaya Proactive Outreach Manageranchors the call on a Media Processing Platform (MPP) server and routes the call through theSession Manager to the agent's extension. Avaya Proactive Outreach Manager automaticallypatches the customer call with the ongoing nail-up call. Once the campaign ends, nail-up call endsand the agent is logged out from the Recorder.
Blended callsIn a blended scenario, Avaya Proactive Outreach Manager agent is configured with both outboundand inbound skills. Avaya Proactive Outreach Manager will nail-up the agent for outbound callsand if there are outstanding calls in Inbound skill, Avaya Proactive Outreach Manager will end thenail-up call and release the agent for inbound calls. The Harmony Workforce OptimizationRecorder uses SPAN Avaya adapter to get voice streams and AES adapter to get call signaling,and AACCNet adapter agent login and logout information, and business data. Additionally,AACCNet adapter is also used to get signalling, agent login and logout information, and businessdata for nonvoice transactions. The call comes from the PSTN and lands on Avaya Aura®
Avaya Proactive Outreach Manager deployment
November 2017 Deploying Harmony Workforce Optimization with Avaya Aura® CommunicationManager and Avaya Aura® Contact Center 230Comments on this document? [email protected]

Experience Portal and after self-service call, Avaya Aura® Experience Portal transfers the call toAvaya Aura® Contact Center and is routed to an available voice agent. Avaya Aura® ApplicationEnablement Services receives the call signaling information from Communication Manager andthen sends it to the AES adapter. AES adapter then processes it and sends it to the HarmonyWorkforce Optimization Recorder. The call traverses through a layer 2 switch to the IP phones. Onthe Layer 2 switch, a port is configured as SPAN, which mirrors the voice RTP and sends it to theHarmony Workforce Optimization Recorder.For passive recording, you must:
• Connect the recorder to an AES adapter and AACCNet adapter for inbound calls andnonvoice transactions, and a POM adapter for outbound calls.
• Configure parameters for call signalling, agent information, and business data in POMadapter for outbound calls and AES adapter for inbound calls.
Configuration information
Signaling informationTo maintain a record of the Harmony Workforce Optimization configuration information, take aprintout of the following table and work with your network administrator to fill the empty cells:
Signaling for Avaya Proactive Outreach ManagerName Value DescriptionIP address The IP address of the primary
server where Avaya ProactiveOutreach Manager is installed.
Port The port number of the primaryserver where Avaya ProactiveOutreach Manager is installed.
Auxiliary IP address The IP address of the auxiliaryserver where Avaya ProactiveOutreach Manager is installed.
Auxiliary Port The port number of the auxiliaryserver where Avaya ProactiveOutreach Manager is installed.
Username The Avaya Proactive OutreachManager username.
Password The Avaya Proactive OutreachManager password.
Configuration information
November 2017 Deploying Harmony Workforce Optimization with Avaya Aura® CommunicationManager and Avaya Aura® Contact Center 231Comments on this document? [email protected]
Avaya Proactive Outreach Manager configuration
Prerequisites for configuring Avaya Aura® Contact Center onCommunication Manager with Avaya Proactive Outreach Manager
No. Task Reference Notes
1 Configure Avaya ProactiveOutreach Manager using thefollowing tasks:
• Enable recorder integration.
• Enable UCID generation.
• Configure Avaya ProactiveOutreach Manager reports togather metadata informationfor interactions.
See:
• Enabling recorderintegration on page 232
• Enabling UCIDgeneration on page 232
• Configuring POM reports onpage 233
Enabling recorder integrationProcedure
1. Login to POM web interface using the URL: https://<Aux POM Server IPaddress>/.
2. Go to POM Home > Configurations menu > Global Configurations.
3. Select the Enable Recording check box in the Recorder section.
4. In the Agent settings section, go to ANI for external consult calls, and select AgentExtension.
5. Click Save.
Enabling UCID generationAbout this taskPOM’s Nailer and Driver CC-XML applications interact with Avaya Aura® Experience Portal andMPP to perform telephony operations. POM applications provide the Universal Call Identifier in theform of metadata of recording APIs.
Avaya Proactive Outreach Manager deployment
November 2017 Deploying Harmony Workforce Optimization with Avaya Aura® CommunicationManager and Avaya Aura® Contact Center 232Comments on this document? [email protected]
Procedure1. Login to EPM web interface using the URL: https://EPM-server/VoicePortal,
where EPM-server is the hostname or IP address of the system where the primary EPMsoftware is installed.
2. Go to System Configurations > Applications.3. Select the check box next to Nailer and click Edit.4. in the Advanced Parameters section, go to Generate UCID option, and click Yes.
5. Go to System Configurations > Applications.6. Select the check box next to POMDriverApp and click Edit.7. in the Advanced Parameters section, go to Generate UCID option, and click Yes.
8. Click Save.
Configuring POM reportsFor deployments using POM version prior to 3.1.1, metadata information such as reason code,POM session ID, completion code, skill ID, and skill name are not updated for interactions that arerecorded. The metadata information is extracted from POM reports using Harmony WorkforceOptimization ETL scripts that run every 15 minutes. The POM reports must be scheduled to runevery hour.
Since POM generates reports with the same name and prefix, it is challenging for the HarmonyWorkforce Optimization ETL script to identify appropriate reports and process them. To mitigatethis challenge, a shell script is provided to copy the relevant set of reports at regular intervals to adifferent location. This location is then used while configuring ETL job in Harmony WorkforceOptimization.
To fetch the metadata information for interactions, perform the following tasks only if you are usinga POM version prior to 3.1.1:
• Create the following POM reports:
- POM Call End Reason Code: CDR_Harmony.xml- POM Campaign Detail: PCD_Harmony.xml- POM Campaign and Skill Information: PCPH_Harmony.xml
• Schedule the POM reports.
• Configure Harmony Workforce Optimization user in EPM.
• Copy the generated POM reports for Harmony Workforce Optimization ETL process..
• Configure the Cron trigger.
• Process the POM reports in Harmony Workforce Optimization.
Avaya Proactive Outreach Manager configuration
November 2017 Deploying Harmony Workforce Optimization with Avaya Aura® CommunicationManager and Avaya Aura® Contact Center 233Comments on this document? [email protected]

Note:
For the POM 3.1.1 version, you need not configure POM reports and ETL process.
Creating POM contact details reportProcedure
1. Login to EPM web interface using the URL: https://EPM-server/VoicePortal,where EPM-server is the hostname or IP address of the system where the primary EPMsoftware is installed.
2. Go to Reports > Custom and click Add.
3. Select Standard Reports and select Contact Detail Report from the drop down in theSelect a Source Report section.
4. Configure the following fields:
• Report Name: Type the name of the report. For example, Harmony_CDR.
• Date and Time: Select the date and time as required.
• Optional Filters: Select All for all the filters in this section.
5. Click Save to save the report.
Creating POM campaign details reportProcedure
1. Login to EPM web interface using the URL: https://EPM-server/VoicePortal,where EPM-server is the hostname or IP address of the system where the primary EPMsoftware is installed.
2. Go to Reports > Custom and click Add.
3. Select Standard Reports and select POM Campaign Detail from the drop down in theSelect a Source Report section.
4. Configure the following fields:
• Report Name: Type the name of the report. For example, Harmony_PCD.
• Date and Time: Select the date and time as required.
• Optional Filters: Select All for all the filters in this section.
5. Click Save to save the report.
Creating POM campaign parameters history reportProcedure
1. Login to EPM web interface using the URL: https://EPM-server/VoicePortal,where EPM-server is the hostname or IP address of the system where the primary EPMsoftware is installed.
2. Go to Reports > Custom and click Add.
Avaya Proactive Outreach Manager deployment
November 2017 Deploying Harmony Workforce Optimization with Avaya Aura® CommunicationManager and Avaya Aura® Contact Center 234Comments on this document? [email protected]
3. Select Standard Reports and select POM Campaign Parameters History from the dropdown in the Select a Source Report section.
4. Configure the following fields:
• Report Name: Type the name of the report. For example, Harmony_PCPH.
• Date and Time: Select the date and time as required.
• Optional Filters: Select All for all the filters in this section.
5. Click Save to save the report.
Scheduling POM reportsProcedure
1. Login to EPM web interface using the URL: https://EPM-server/VoicePortal,where EPM-server is the hostname or IP address of the system where the primary EPMsoftware is installed.
2. Go to Reports > Scheduled and click Add.
3. Select Custom Reports and select the custom reports you created from the drop down inthe Select a Source Report section.
4. Configure the following sections:
• Schedule Date and Time: Schedule the data and time of the reports.
• Report Date and Time: Set the data and time of the reports.
• Notification Methods And Output Options: Select Generate Event and select outputas CSV.
5. Retain the other default values.
6. Click Save.
7. Repeat the steps for all the POM reports.
Configuring Harmony Workforce Optimization user in Experience PortalProcedure
1. Login to EPM web interface using the URL: https://EPM-server/VoicePortal,where EPM-server is the hostname or IP address of the system where the primary EPMsoftware is installed.
2. Go to User Management > Users and click Add.
3. Configure the following fields:
• Name: Type the name of the Harmony Workforce Optimization user.
• Enable: Select Yes.
• Role: Select Administration, Maintenance, Operations, and Reporting.
• Password: Type a password.
Avaya Proactive Outreach Manager configuration
November 2017 Deploying Harmony Workforce Optimization with Avaya Aura® CommunicationManager and Avaya Aura® Contact Center 235Comments on this document? [email protected]
• Verify Password: Type the password again to confirm.
• Enforce Password Longevity: Select the check box.
4. Click Save.
Copying the generated POM reports for Harmony Workforce OptimizationETL process
Procedure1. Log in to the server hosting the Harmony Workforce Optimization web application.
2. Go to C:\<WFO_HOME>\ETLTasks\POMReportsParser..
3. Download Copyreports.sh and place the file in the Harmony Workforce Optimizationuser’s home directory.
4. Right-click the Copyreports.sh file, select Open with and click Notepad.
5. Update the values for the following parameters:
• SOURCEDIR: Enter the path where EPM generates the report files.
• TARGETDIR: Enter the path where the cron job will copy the files. This is the path fromwhere Harmony Workforce Optimization ETL processes the report files and removesthem once the processing is done.
6. Click Save to close the file.
Executing the Cron triggerProcedure
1. Log in to the server hosting the Harmony Workforce Optimization web application.
2. Open a command prompt.
3. In the command prompt, go to the path you provided for the TARGETDIR parameter in thecopyreports.sh file.
4. Execute the following commands:
• Crontab-e• 14, 19, 34, 49 **** /home/Harmony/copyscripts.sh, where the path /home/Harmony refers to the path of the Harmony user.
• corntab-l: Displays the cron jobs listed.
Processing the POM reports in Harmony Workforce OptimizationAbout this taskThe ETL task, when invoked, pulls all the available reports under the configured directory on thePOM server and downloads them on the Harmony Workforce Optimization server for processing.There are no source folder or unique names with which POM creates its report output files.Therefore, Harmony Workforce Optimization fetches all the POM reports, identifies the appropriate
Avaya Proactive Outreach Manager deployment
November 2017 Deploying Harmony Workforce Optimization with Avaya Aura® CommunicationManager and Avaya Aura® Contact Center 236Comments on this document? [email protected]

report, and processes them. During the synchronization process, the source files are removedfrom the POM server.
Procedure1. Log in to the server hosting the Harmony Workforce Optimization web application.
2. Go to C:\<WFO_HOME>\ETLTasks\POMReportsParser.
3. Right-click the POM_Configurations.sql file, select Open with and click Notepad.
4. Configure the following parameters:
• set @POM_VERSION= Type the POM version. Ensure the version is 3.0.4 or 3.0.5.
• set @POM_SERVER_IP= Type the POM server IP address.
• set @POM_SERVER_USERNAME= Type the POM server username.
• set @POM_SERVER_PASSWORD= Type the POM server password.
• set @POM_SERVER_PORT= Type the POM server SSH port number.
• set @POM_REPORTS_DIRECTORY= Type the POM path where the cron job copiesthe files. The path is the TARGETDIR from where the ETL processes the report files andremoves them once the processing is done..
5. Click Start > SQL Management Studioon the server where Harmony WorkforceOptimization database is installed.
6. Select the tenant database and run the script POM_Configurations.sql .7. On the tenant database, click New Query.
8. Type the query, UPDATE HARMONY_ETL_TASK SET SCHEDULE_STATUS='NEW',STATUS='A', UPDATE_BY=0, UPDATE_DATE=GETUTCDATE() whereTASK_NAME='POMReportsParser'GO and click Execute.
Avaya Proactive Outreach Manager configuration
November 2017 Deploying Harmony Workforce Optimization with Avaya Aura® CommunicationManager and Avaya Aura® Contact Center 237Comments on this document? [email protected]
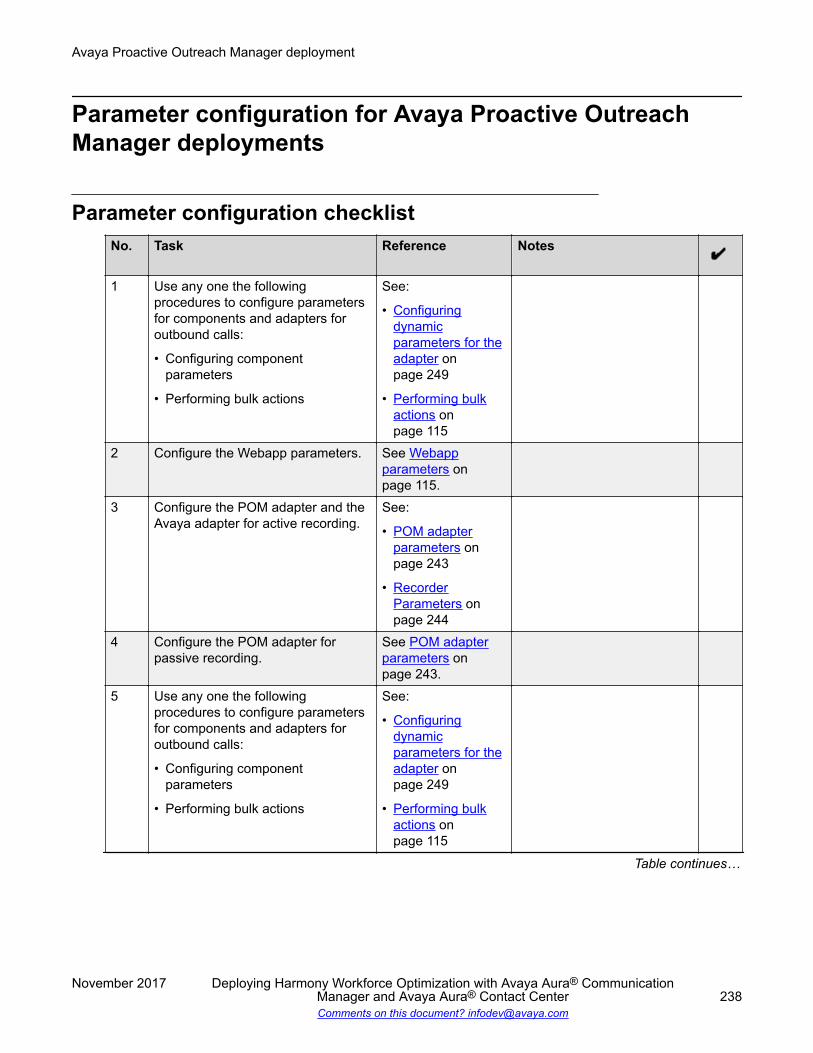
Parameter configuration for Avaya Proactive OutreachManager deployments
Parameter configuration checklistNo. Task Reference Notes
1 Use any one the followingprocedures to configure parametersfor components and adapters foroutbound calls:
• Configuring componentparameters
• Performing bulk actions
See:
• Configuringdynamicparameters for theadapter onpage 249
• Performing bulkactions onpage 115
2 Configure the Webapp parameters. See Webappparameters onpage 115.
3 Configure the POM adapter and theAvaya adapter for active recording.
See:
• POM adapterparameters onpage 243
• RecorderParameters onpage 244
4 Configure the POM adapter forpassive recording.
See POM adapterparameters onpage 243.
5 Use any one the followingprocedures to configure parametersfor components and adapters foroutbound calls:
• Configuring componentparameters
• Performing bulk actions
See:
• Configuringdynamicparameters for theadapter onpage 249
• Performing bulkactions onpage 115
Table continues…
Avaya Proactive Outreach Manager deployment
November 2017 Deploying Harmony Workforce Optimization with Avaya Aura® CommunicationManager and Avaya Aura® Contact Center 238Comments on this document? [email protected]
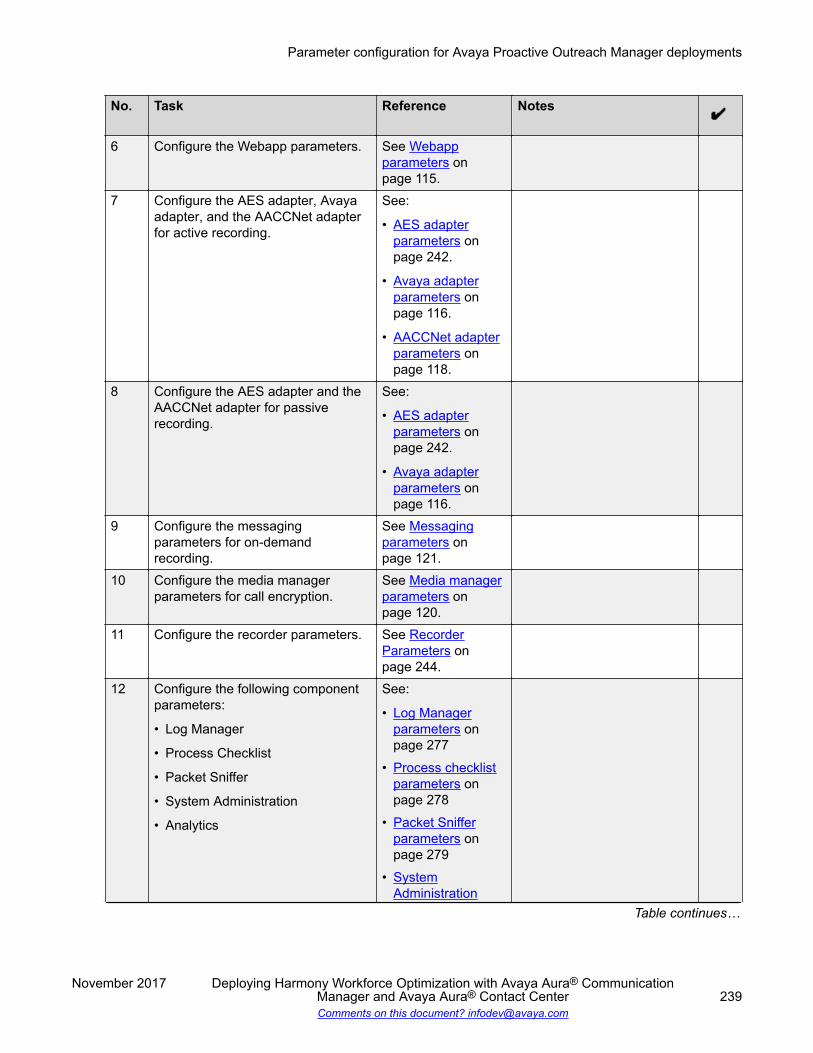
No. Task Reference Notes
6 Configure the Webapp parameters. See Webappparameters onpage 115.
7 Configure the AES adapter, Avayaadapter, and the AACCNet adapterfor active recording.
See:
• AES adapterparameters onpage 242.
• Avaya adapterparameters onpage 116.
• AACCNet adapterparameters onpage 118.
8 Configure the AES adapter and theAACCNet adapter for passiverecording.
See:
• AES adapterparameters onpage 242.
• Avaya adapterparameters onpage 116.
9 Configure the messagingparameters for on-demandrecording.
See Messagingparameters onpage 121.
10 Configure the media managerparameters for call encryption.
See Media managerparameters onpage 120.
11 Configure the recorder parameters. See RecorderParameters onpage 244.
12 Configure the following componentparameters:
• Log Manager
• Process Checklist
• Packet Sniffer
• System Administration
• Analytics
See:
• Log Managerparameters onpage 277
• Process checklistparameters onpage 278
• Packet Snifferparameters onpage 279
• SystemAdministration
Table continues…
Parameter configuration for Avaya Proactive Outreach Manager deployments
November 2017 Deploying Harmony Workforce Optimization with Avaya Aura® CommunicationManager and Avaya Aura® Contact Center 239Comments on this document? [email protected]
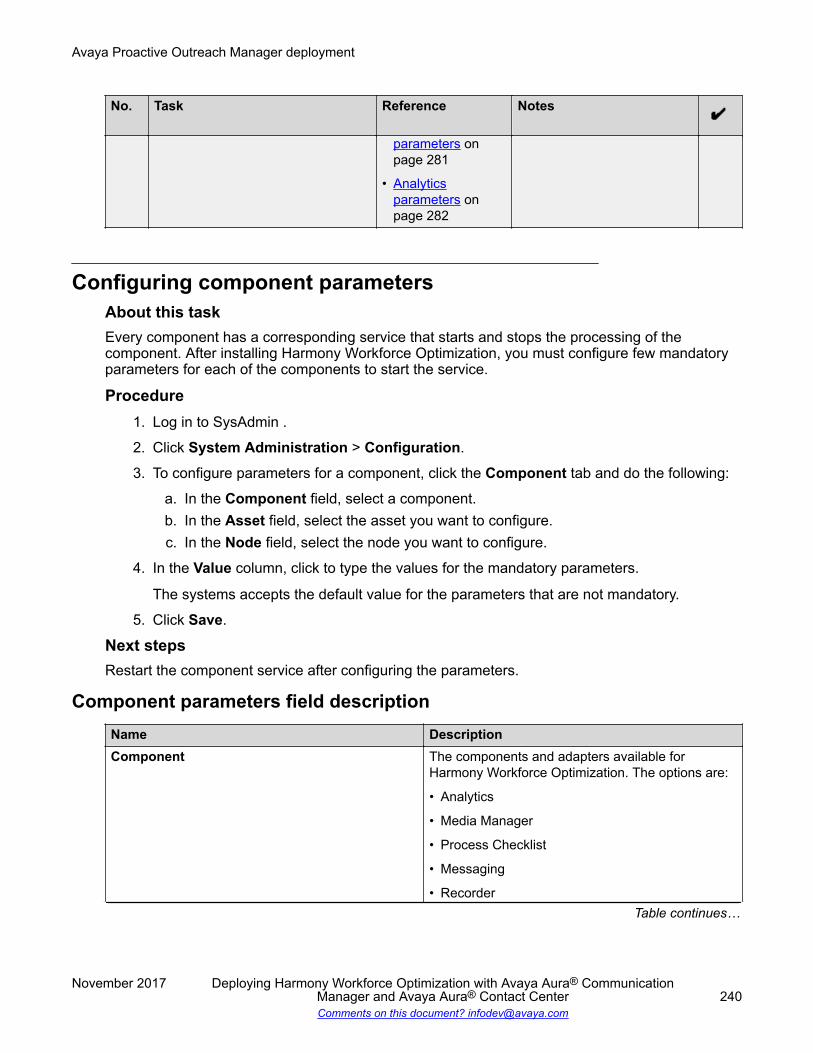
No. Task Reference Notes
parameters onpage 281
• Analyticsparameters onpage 282
Configuring component parametersAbout this taskEvery component has a corresponding service that starts and stops the processing of thecomponent. After installing Harmony Workforce Optimization, you must configure few mandatoryparameters for each of the components to start the service.
Procedure1. Log in to SysAdmin .
2. Click System Administration > Configuration.
3. To configure parameters for a component, click the Component tab and do the following:
a. In the Component field, select a component.b. In the Asset field, select the asset you want to configure.c. In the Node field, select the node you want to configure.
4. In the Value column, click to type the values for the mandatory parameters.
The systems accepts the default value for the parameters that are not mandatory.
5. Click Save.
Next stepsRestart the component service after configuring the parameters.
Component parameters field descriptionName DescriptionComponent The components and adapters available for
Harmony Workforce Optimization. The options are:
• Analytics
• Media Manager
• Process Checklist
• Messaging
• RecorderTable continues…
Avaya Proactive Outreach Manager deployment
November 2017 Deploying Harmony Workforce Optimization with Avaya Aura® CommunicationManager and Avaya Aura® Contact Center 240Comments on this document? [email protected]
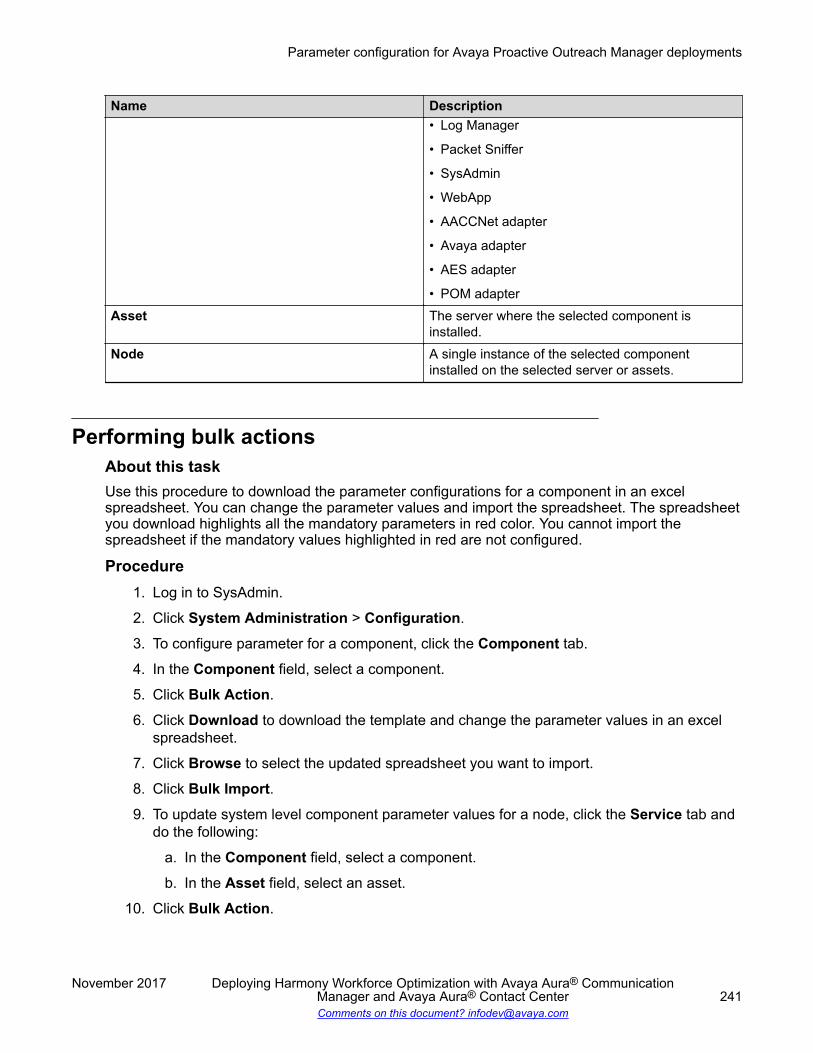
Name Description• Log Manager
• Packet Sniffer
• SysAdmin
• WebApp
• AACCNet adapter
• Avaya adapter
• AES adapter
• POM adapterAsset The server where the selected component is
installed.Node A single instance of the selected component
installed on the selected server or assets.
Performing bulk actionsAbout this taskUse this procedure to download the parameter configurations for a component in an excelspreadsheet. You can change the parameter values and import the spreadsheet. The spreadsheetyou download highlights all the mandatory parameters in red color. You cannot import thespreadsheet if the mandatory values highlighted in red are not configured.
Procedure1. Log in to SysAdmin.
2. Click System Administration > Configuration.
3. To configure parameter for a component, click the Component tab.
4. In the Component field, select a component.
5. Click Bulk Action.
6. Click Download to download the template and change the parameter values in an excelspreadsheet.
7. Click Browse to select the updated spreadsheet you want to import.
8. Click Bulk Import.9. To update system level component parameter values for a node, click the Service tab and
do the following:
a. In the Component field, select a component.
b. In the Asset field, select an asset.
10. Click Bulk Action.
Parameter configuration for Avaya Proactive Outreach Manager deployments
November 2017 Deploying Harmony Workforce Optimization with Avaya Aura® CommunicationManager and Avaya Aura® Contact Center 241Comments on this document? [email protected]
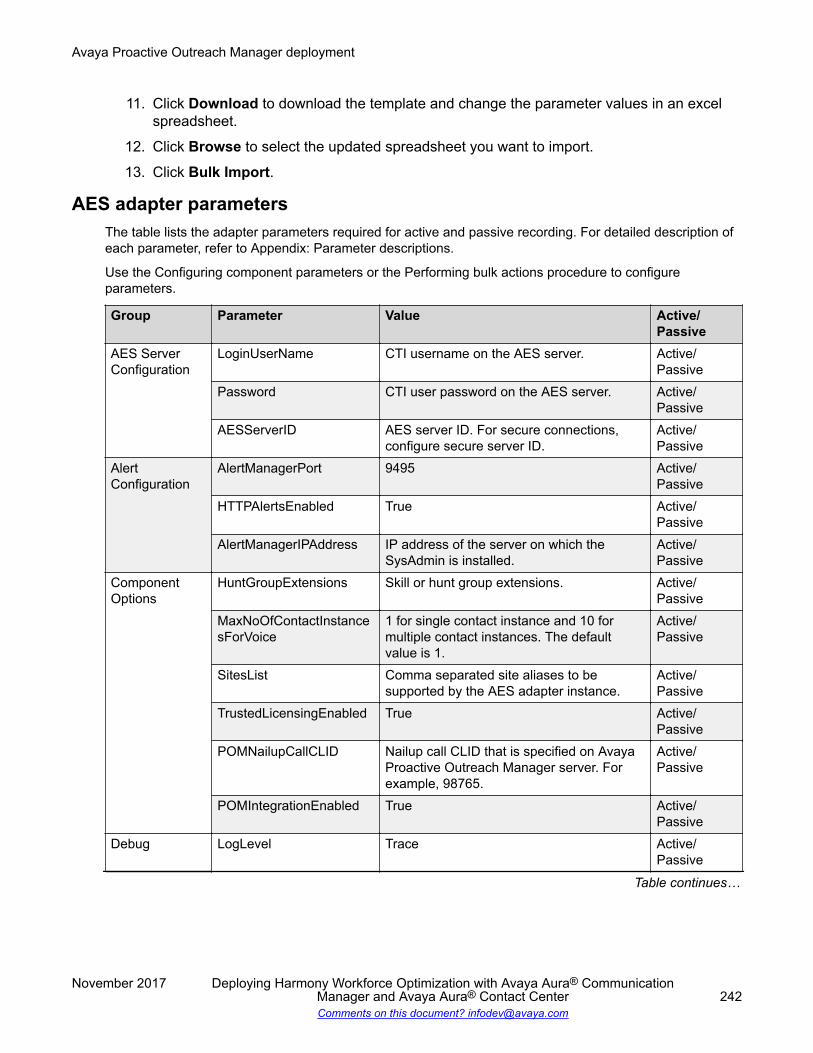
11. Click Download to download the template and change the parameter values in an excelspreadsheet.
12. Click Browse to select the updated spreadsheet you want to import.
13. Click Bulk Import.
AES adapter parametersThe table lists the adapter parameters required for active and passive recording. For detailed description ofeach parameter, refer to Appendix: Parameter descriptions.
Use the Configuring component parameters or the Performing bulk actions procedure to configureparameters.
Group Parameter Value Active/Passive
AES ServerConfiguration
LoginUserName CTI username on the AES server. Active/Passive
Password CTI user password on the AES server. Active/Passive
AESServerID AES server ID. For secure connections,configure secure server ID.
Active/Passive
AlertConfiguration
AlertManagerPort 9495 Active/Passive
HTTPAlertsEnabled True Active/Passive
AlertManagerIPAddress IP address of the server on which theSysAdmin is installed.
Active/Passive
ComponentOptions
HuntGroupExtensions Skill or hunt group extensions. Active/Passive
MaxNoOfContactInstancesForVoice
1 for single contact instance and 10 formultiple contact instances. The defaultvalue is 1.
Active/Passive
SitesList Comma separated site aliases to besupported by the AES adapter instance.
Active/Passive
TrustedLicensingEnabled True Active/Passive
POMNailupCallCLID Nailup call CLID that is specified on AvayaProactive Outreach Manager server. Forexample, 98765.
Active/Passive
POMIntegrationEnabled True Active/Passive
Debug LogLevel Trace Active/Passive
Table continues…
Avaya Proactive Outreach Manager deployment
November 2017 Deploying Harmony Workforce Optimization with Avaya Aura® CommunicationManager and Avaya Aura® Contact Center 242Comments on this document? [email protected]
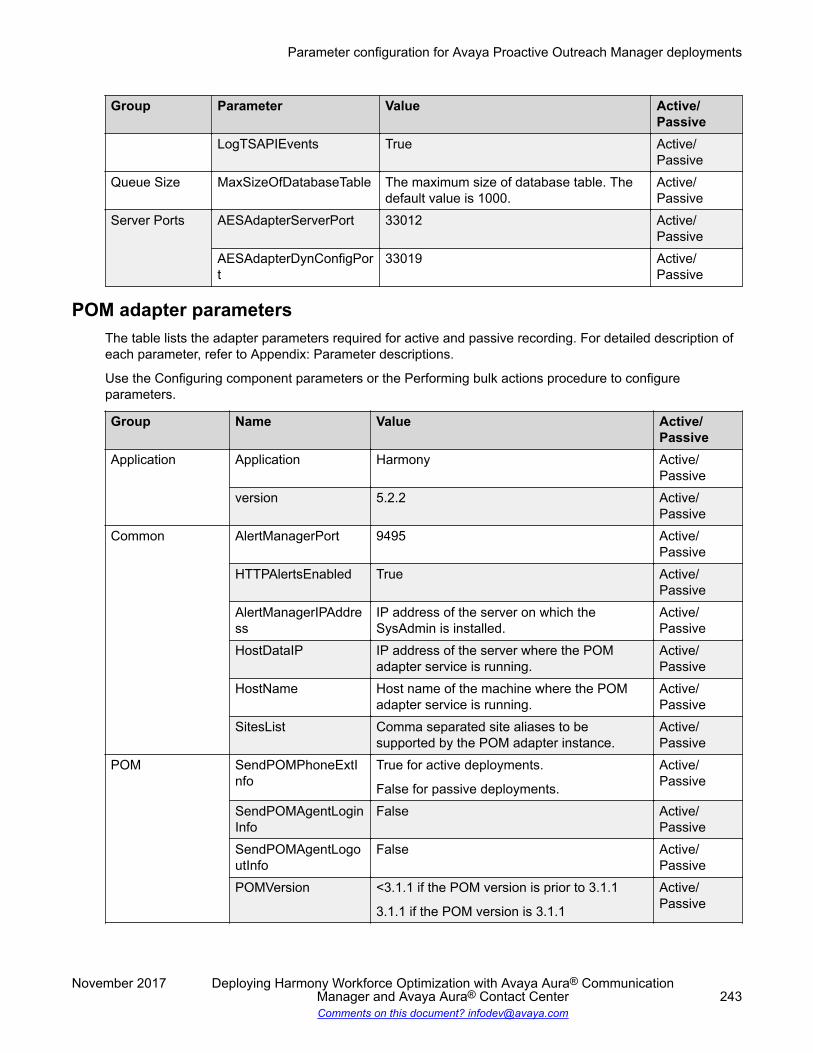
Group Parameter Value Active/Passive
LogTSAPIEvents True Active/Passive
Queue Size MaxSizeOfDatabaseTable The maximum size of database table. Thedefault value is 1000.
Active/Passive
Server Ports AESAdapterServerPort 33012 Active/Passive
AESAdapterDynConfigPort
33019 Active/Passive
POM adapter parametersThe table lists the adapter parameters required for active and passive recording. For detailed description ofeach parameter, refer to Appendix: Parameter descriptions.
Use the Configuring component parameters or the Performing bulk actions procedure to configureparameters.
Group Name Value Active/Passive
Application Application Harmony Active/Passive
version 5.2.2 Active/Passive
Common AlertManagerPort 9495 Active/Passive
HTTPAlertsEnabled True Active/Passive
AlertManagerIPAddress
IP address of the server on which theSysAdmin is installed.
Active/Passive
HostDataIP IP address of the server where the POMadapter service is running.
Active/Passive
HostName Host name of the machine where the POMadapter service is running.
Active/Passive
SitesList Comma separated site aliases to besupported by the POM adapter instance.
Active/Passive
POM SendPOMPhoneExtInfo
True for active deployments.
False for passive deployments.
Active/Passive
SendPOMAgentLoginInfo
False Active/Passive
SendPOMAgentLogoutInfo
False Active/Passive
POMVersion <3.1.1 if the POM version is prior to 3.1.1
3.1.1 if the POM version is 3.1.1
Active/Passive
Parameter configuration for Avaya Proactive Outreach Manager deployments
November 2017 Deploying Harmony Workforce Optimization with Avaya Aura® CommunicationManager and Avaya Aura® Contact Center 243Comments on this document? [email protected]
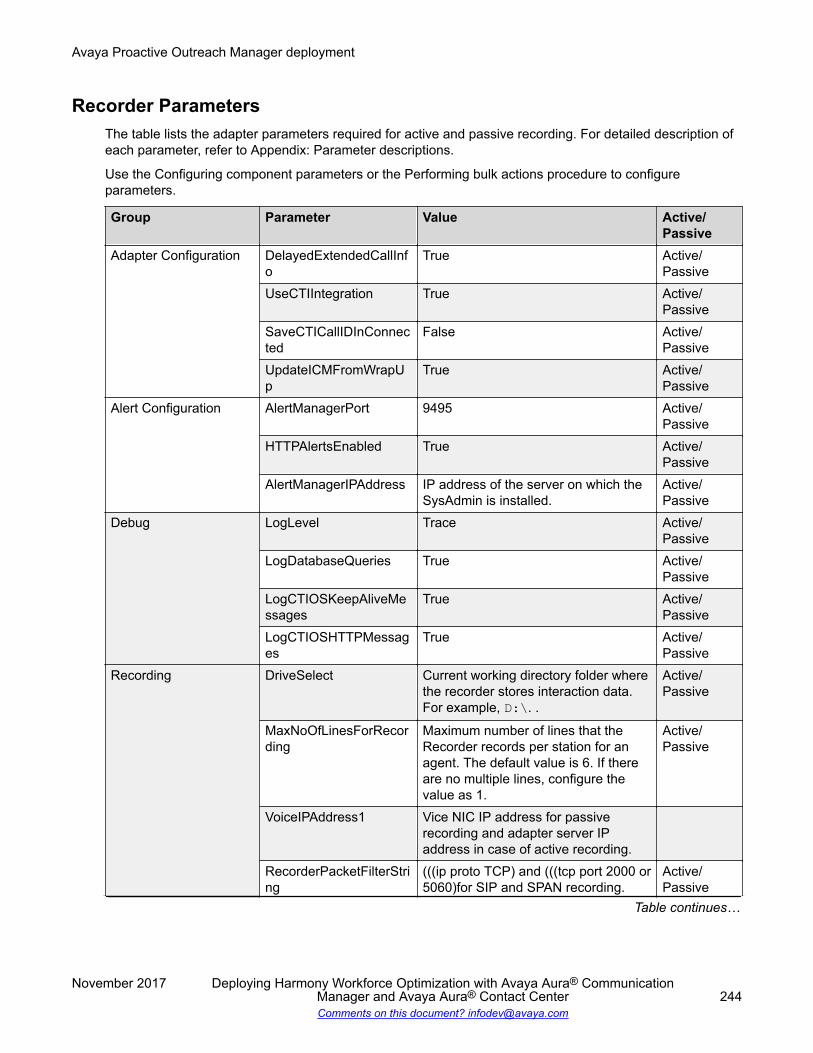
Recorder ParametersThe table lists the adapter parameters required for active and passive recording. For detailed description ofeach parameter, refer to Appendix: Parameter descriptions.
Use the Configuring component parameters or the Performing bulk actions procedure to configureparameters.
Group Parameter Value Active/Passive
Adapter Configuration DelayedExtendedCallInfo
True Active/Passive
UseCTIIntegration True Active/Passive
SaveCTICallIDInConnected
False Active/Passive
UpdateICMFromWrapUp
True Active/Passive
Alert Configuration AlertManagerPort 9495 Active/Passive
HTTPAlertsEnabled True Active/Passive
AlertManagerIPAddress IP address of the server on which theSysAdmin is installed.
Active/Passive
Debug LogLevel Trace Active/Passive
LogDatabaseQueries True Active/Passive
LogCTIOSKeepAliveMessages
True Active/Passive
LogCTIOSHTTPMessages
True Active/Passive
Recording DriveSelect Current working directory folder wherethe recorder stores interaction data.For example, D:\. .
Active/Passive
MaxNoOfLinesForRecording
Maximum number of lines that theRecorder records per station for anagent. The default value is 6. If thereare no multiple lines, configure thevalue as 1.
Active/Passive
VoiceIPAddress1 Vice NIC IP address for passiverecording and adapter server IPaddress in case of active recording.
RecorderPacketFilterString
(((ip proto TCP) and (((tcp port 2000 or5060)for SIP and SPAN recording.
Active/Passive
Table continues…
Avaya Proactive Outreach Manager deployment
November 2017 Deploying Harmony Workforce Optimization with Avaya Aura® CommunicationManager and Avaya Aura® Contact Center 244Comments on this document? [email protected]
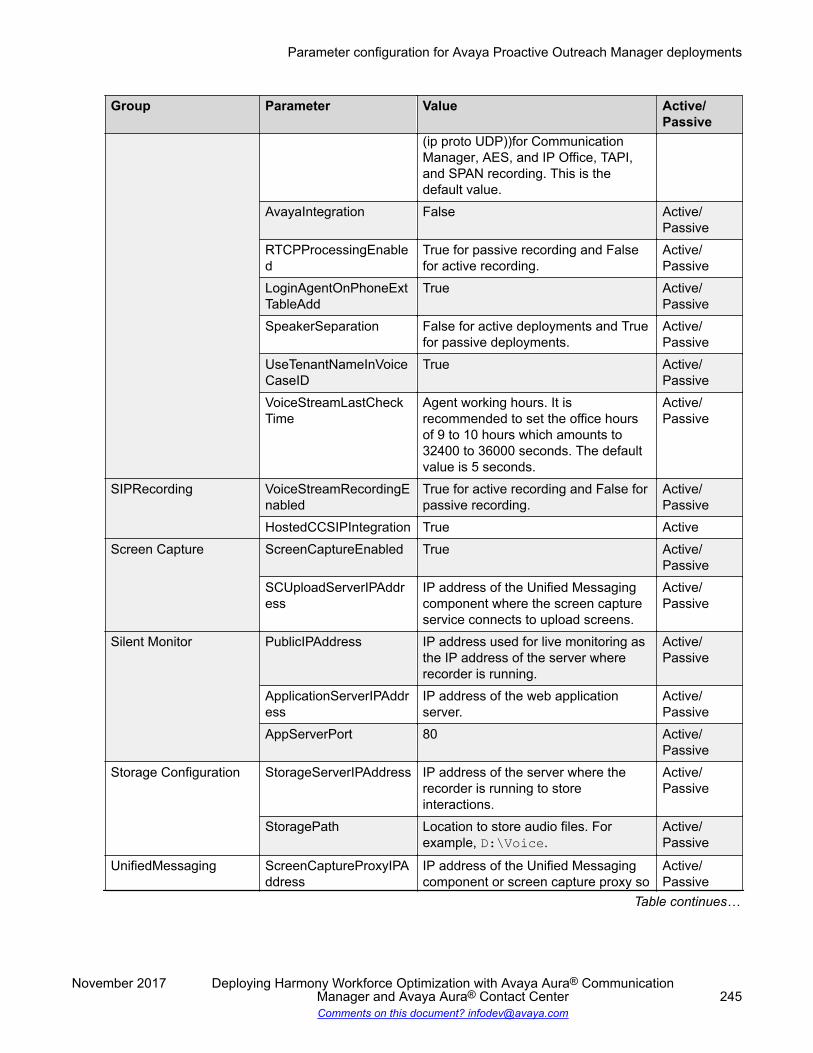
Group Parameter Value Active/Passive
(ip proto UDP))for CommunicationManager, AES, and IP Office, TAPI,and SPAN recording. This is thedefault value.
AvayaIntegration False Active/Passive
RTCPProcessingEnabled
True for passive recording and Falsefor active recording.
Active/Passive
LoginAgentOnPhoneExtTableAdd
True Active/Passive
SpeakerSeparation False for active deployments and Truefor passive deployments.
Active/Passive
UseTenantNameInVoiceCaseID
True Active/Passive
VoiceStreamLastCheckTime
Agent working hours. It isrecommended to set the office hoursof 9 to 10 hours which amounts to32400 to 36000 seconds. The defaultvalue is 5 seconds.
Active/Passive
SIPRecording VoiceStreamRecordingEnabled
True for active recording and False forpassive recording.
Active/Passive
HostedCCSIPIntegration True ActiveScreen Capture ScreenCaptureEnabled True Active/
PassiveSCUploadServerIPAddress
IP address of the Unified Messagingcomponent where the screen captureservice connects to upload screens.
Active/Passive
Silent Monitor PublicIPAddress IP address used for live monitoring asthe IP address of the server whererecorder is running.
Active/Passive
ApplicationServerIPAddress
IP address of the web applicationserver.
Active/Passive
AppServerPort 80 Active/Passive
Storage Configuration StorageServerIPAddress IP address of the server where therecorder is running to storeinteractions.
Active/Passive
StoragePath Location to store audio files. Forexample, D:\Voice.
Active/Passive
UnifiedMessaging ScreenCaptureProxyIPAddress
IP address of the Unified Messagingcomponent or screen capture proxy so
Active/Passive
Table continues…
Parameter configuration for Avaya Proactive Outreach Manager deployments
November 2017 Deploying Harmony Workforce Optimization with Avaya Aura® CommunicationManager and Avaya Aura® Contact Center 245Comments on this document? [email protected]
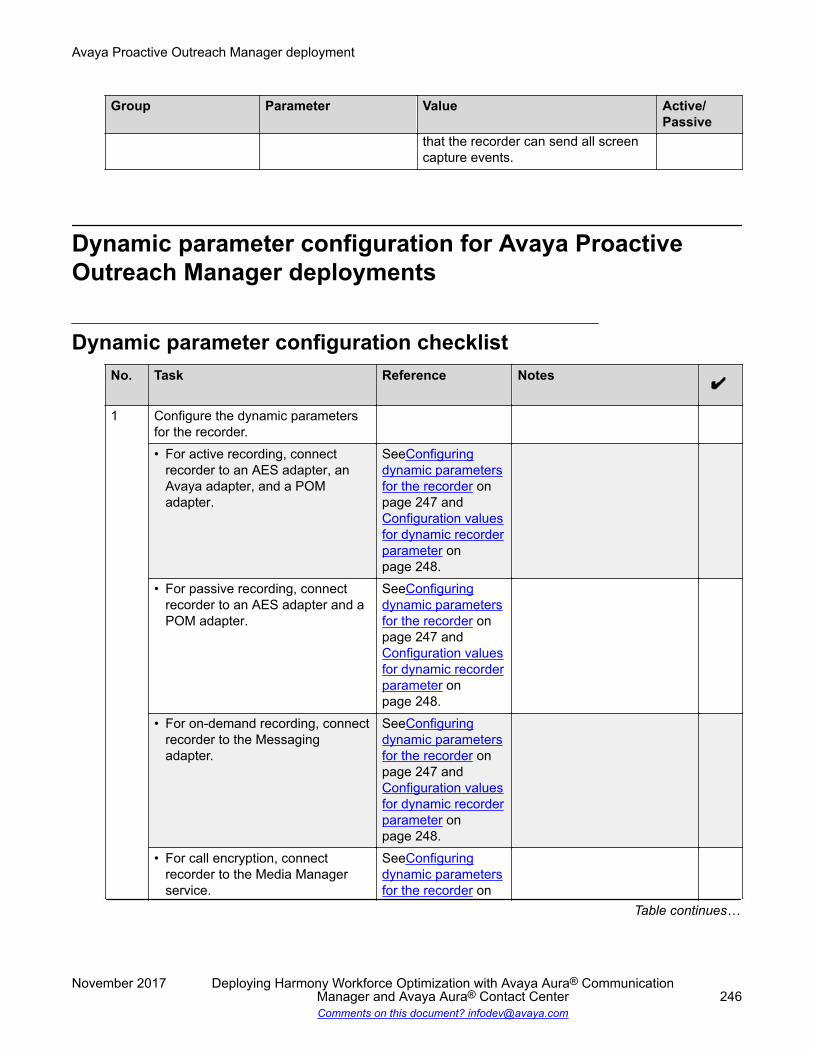
Group Parameter Value Active/Passive
that the recorder can send all screencapture events.
Dynamic parameter configuration for Avaya ProactiveOutreach Manager deployments
Dynamic parameter configuration checklistNo. Task Reference Notes
1 Configure the dynamic parametersfor the recorder.• For active recording, connect
recorder to an AES adapter, anAvaya adapter, and a POMadapter.
SeeConfiguringdynamic parametersfor the recorder onpage 247 and Configuration valuesfor dynamic recorderparameter onpage 248.
• For passive recording, connectrecorder to an AES adapter and aPOM adapter.
SeeConfiguringdynamic parametersfor the recorder onpage 247 and Configuration valuesfor dynamic recorderparameter onpage 248.
• For on-demand recording, connectrecorder to the Messagingadapter.
SeeConfiguringdynamic parametersfor the recorder onpage 247 and Configuration valuesfor dynamic recorderparameter onpage 248.
• For call encryption, connectrecorder to the Media Managerservice.
SeeConfiguringdynamic parametersfor the recorder on
Table continues…
Avaya Proactive Outreach Manager deployment
November 2017 Deploying Harmony Workforce Optimization with Avaya Aura® CommunicationManager and Avaya Aura® Contact Center 246Comments on this document? [email protected]

No. Task Reference Notes
page 247 and Configuration valuesfor dynamic recorderparameter onpage 248.
2 Configure dynamic parameters foradapters.
See Configuringdynamic parametersfor the adapter onpage 249.
• For active recording, configure theAvaya adapter and the POMadapter parameters.
See Avaya adapterparameters onpage 250and POMadapterparameters onpage 251.
• For the Messaging component toconnect to the Recorder, MediaManager, and the web application,configure dynamic parameters forMessaging.
See Messagingparameters onpage 252.
Configuring dynamic parameters for the recorderAbout this taskUse this procedure to connect the recorder to an adapter or service. Based on the deployment,create multiple sets so that the recorder gets connected to the relevant adapters and services.You can configure specific parameters for an adapter or service.
Procedure1. Log in to SysAdmin .
2. Click System Administration > Configuration.
3. Click the Dynamic tab.
4. In the Component field, select Recorder.5. Select the Dynamic Type as Adapter or Service.
6. In the Asset field, select an asset.
7. In the Node field, select a node.
8. In the No. of Sets field, type the number of sets you want to create.
9. Click Create Sets.
Dynamic parameter configuration for Avaya Proactive Outreach Manager deployments
November 2017 Deploying Harmony Workforce Optimization with Avaya Aura® CommunicationManager and Avaya Aura® Contact Center 247Comments on this document? [email protected]
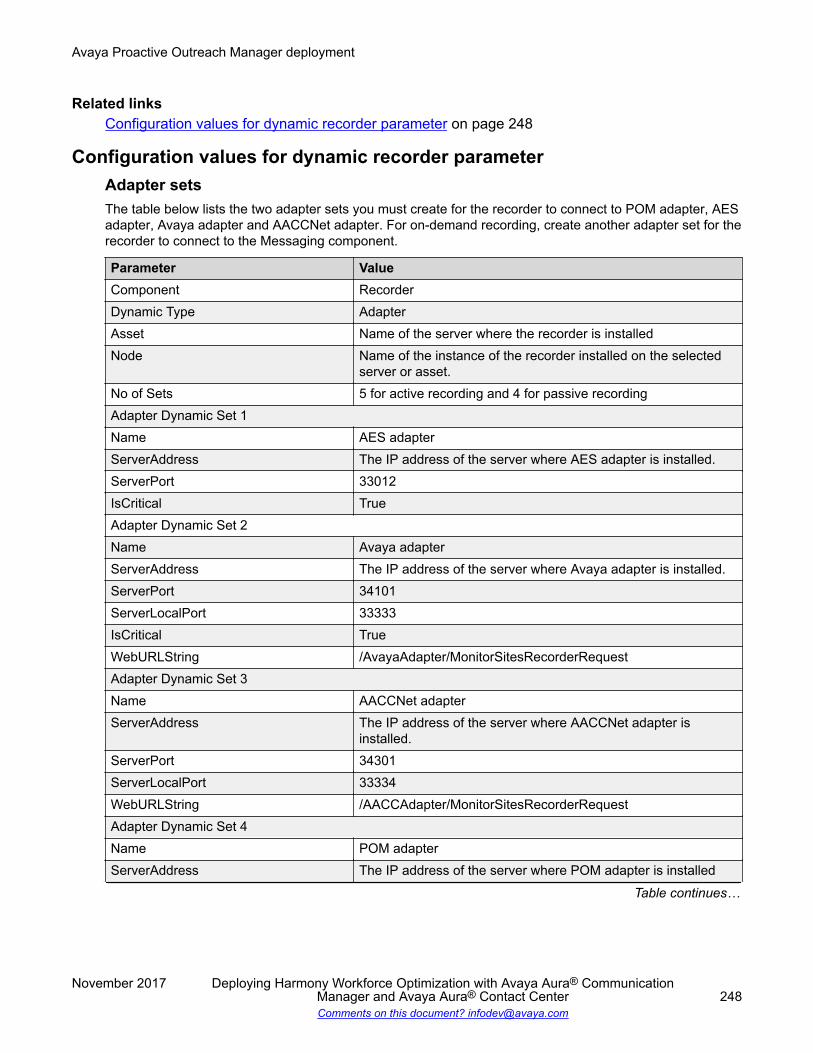
Related linksConfiguration values for dynamic recorder parameter on page 248
Configuration values for dynamic recorder parameterAdapter setsThe table below lists the two adapter sets you must create for the recorder to connect to POM adapter, AESadapter, Avaya adapter and AACCNet adapter. For on-demand recording, create another adapter set for therecorder to connect to the Messaging component.
Parameter ValueComponent RecorderDynamic Type AdapterAsset Name of the server where the recorder is installedNode Name of the instance of the recorder installed on the selected
server or asset.No of Sets 5 for active recording and 4 for passive recordingAdapter Dynamic Set 1Name AES adapterServerAddress The IP address of the server where AES adapter is installed.ServerPort 33012IsCritical TrueAdapter Dynamic Set 2Name Avaya adapterServerAddress The IP address of the server where Avaya adapter is installed.ServerPort 34101ServerLocalPort 33333IsCritical TrueWebURLString /AvayaAdapter/MonitorSitesRecorderRequestAdapter Dynamic Set 3Name AACCNet adapterServerAddress The IP address of the server where AACCNet adapter is
installed.ServerPort 34301ServerLocalPort 33334WebURLString /AACCAdapter/MonitorSitesRecorderRequestAdapter Dynamic Set 4Name POM adapterServerAddress The IP address of the server where POM adapter is installed
Table continues…
Avaya Proactive Outreach Manager deployment
November 2017 Deploying Harmony Workforce Optimization with Avaya Aura® CommunicationManager and Avaya Aura® Contact Center 248Comments on this document? [email protected]
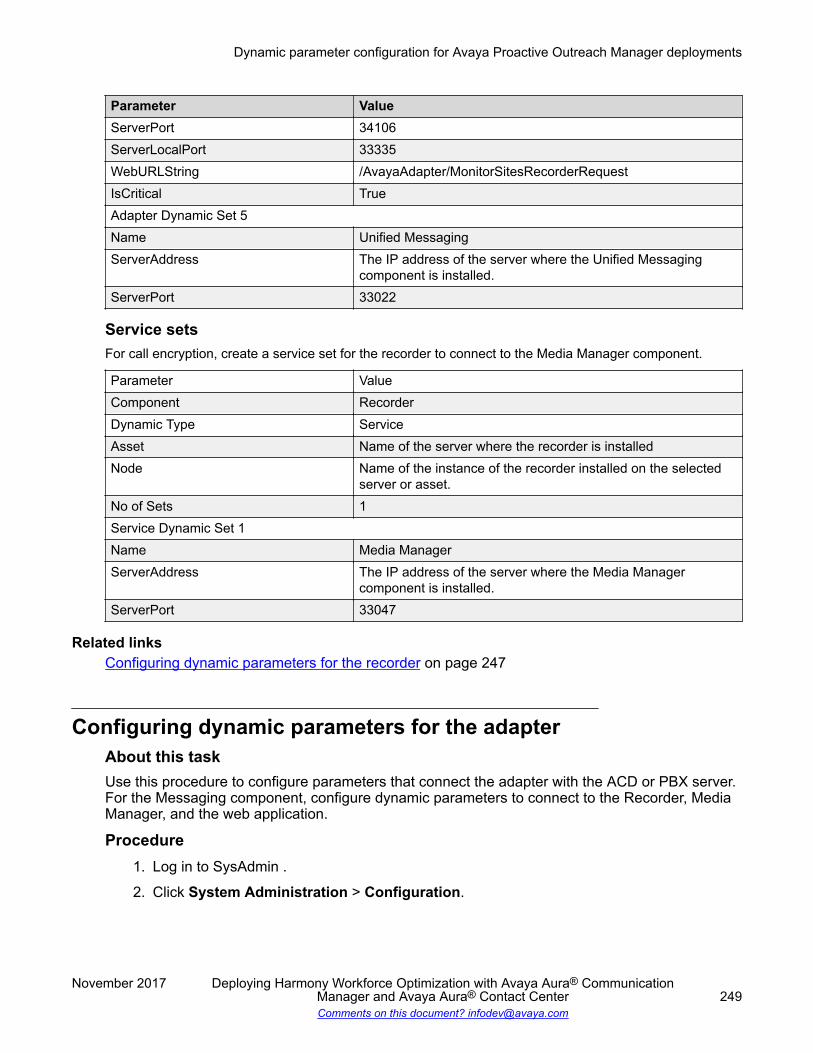
Parameter ValueServerPort 34106ServerLocalPort 33335WebURLString /AvayaAdapter/MonitorSitesRecorderRequestIsCritical TrueAdapter Dynamic Set 5Name Unified MessagingServerAddress The IP address of the server where the Unified Messaging
component is installed.ServerPort 33022
Service setsFor call encryption, create a service set for the recorder to connect to the Media Manager component.
Parameter ValueComponent RecorderDynamic Type ServiceAsset Name of the server where the recorder is installedNode Name of the instance of the recorder installed on the selected
server or asset.No of Sets 1Service Dynamic Set 1Name Media ManagerServerAddress The IP address of the server where the Media Manager
component is installed.ServerPort 33047
Related linksConfiguring dynamic parameters for the recorder on page 247
Configuring dynamic parameters for the adapterAbout this taskUse this procedure to configure parameters that connect the adapter with the ACD or PBX server.For the Messaging component, configure dynamic parameters to connect to the Recorder, MediaManager, and the web application.
Procedure1. Log in to SysAdmin .
2. Click System Administration > Configuration.
Dynamic parameter configuration for Avaya Proactive Outreach Manager deployments
November 2017 Deploying Harmony Workforce Optimization with Avaya Aura® CommunicationManager and Avaya Aura® Contact Center 249Comments on this document? [email protected]
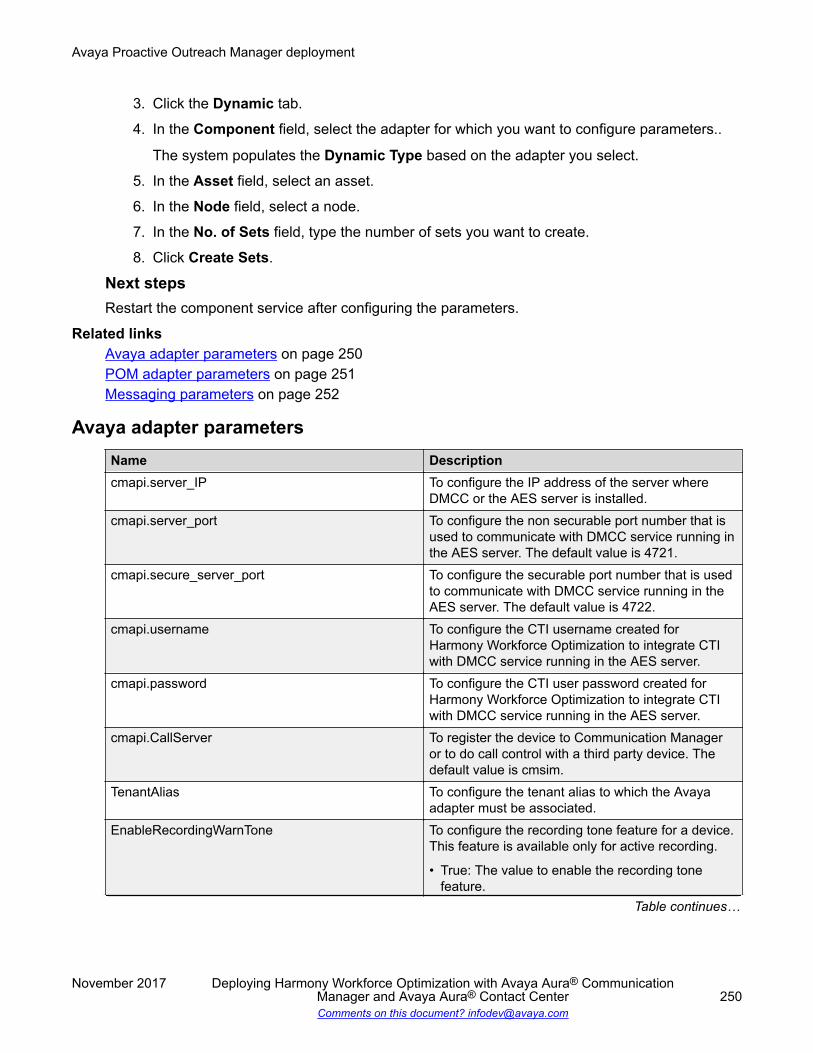
3. Click the Dynamic tab.
4. In the Component field, select the adapter for which you want to configure parameters..
The system populates the Dynamic Type based on the adapter you select.
5. In the Asset field, select an asset.
6. In the Node field, select a node.
7. In the No. of Sets field, type the number of sets you want to create.
8. Click Create Sets.
Next stepsRestart the component service after configuring the parameters.
Related linksAvaya adapter parameters on page 250POM adapter parameters on page 251Messaging parameters on page 252
Avaya adapter parametersName Descriptioncmapi.server_IP To configure the IP address of the server where
DMCC or the AES server is installed.cmapi.server_port To configure the non securable port number that is
used to communicate with DMCC service running inthe AES server. The default value is 4721.
cmapi.secure_server_port To configure the securable port number that is usedto communicate with DMCC service running in theAES server. The default value is 4722.
cmapi.username To configure the CTI username created forHarmony Workforce Optimization to integrate CTIwith DMCC service running in the AES server.
cmapi.password To configure the CTI user password created forHarmony Workforce Optimization to integrate CTIwith DMCC service running in the AES server.
cmapi.CallServer To register the device to Communication Manageror to do call control with a third party device. Thedefault value is cmsim.
TenantAlias To configure the tenant alias to which the Avayaadapter must be associated.
EnableRecordingWarnTone To configure the recording tone feature for a device.This feature is available only for active recording.
• True: The value to enable the recording tonefeature.
Table continues…
Avaya Proactive Outreach Manager deployment
November 2017 Deploying Harmony Workforce Optimization with Avaya Aura® CommunicationManager and Avaya Aura® Contact Center 250Comments on this document? [email protected]
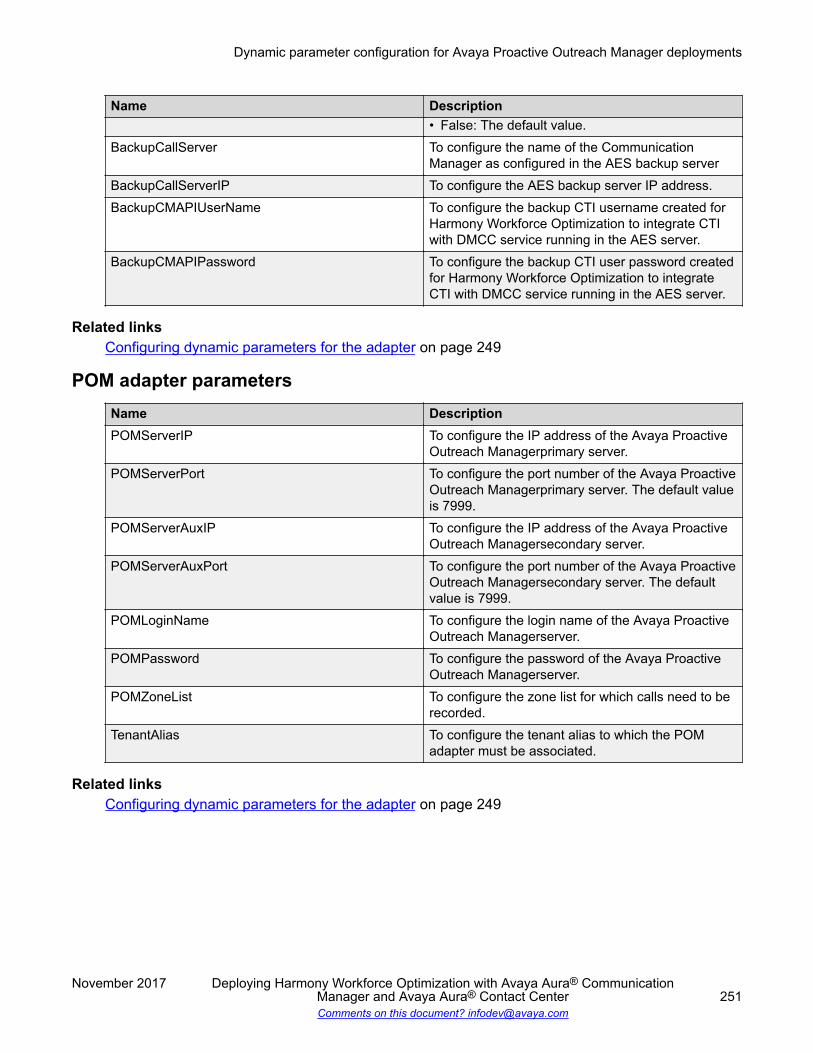
Name Description• False: The default value.
BackupCallServer To configure the name of the CommunicationManager as configured in the AES backup server
BackupCallServerIP To configure the AES backup server IP address.BackupCMAPIUserName To configure the backup CTI username created for
Harmony Workforce Optimization to integrate CTIwith DMCC service running in the AES server.
BackupCMAPIPassword To configure the backup CTI user password createdfor Harmony Workforce Optimization to integrateCTI with DMCC service running in the AES server.
Related linksConfiguring dynamic parameters for the adapter on page 249
POM adapter parametersName DescriptionPOMServerIP To configure the IP address of the Avaya Proactive
Outreach Managerprimary server.POMServerPort To configure the port number of the Avaya Proactive
Outreach Managerprimary server. The default valueis 7999.
POMServerAuxIP To configure the IP address of the Avaya ProactiveOutreach Managersecondary server.
POMServerAuxPort To configure the port number of the Avaya ProactiveOutreach Managersecondary server. The defaultvalue is 7999.
POMLoginName To configure the login name of the Avaya ProactiveOutreach Managerserver.
POMPassword To configure the password of the Avaya ProactiveOutreach Managerserver.
POMZoneList To configure the zone list for which calls need to berecorded.
TenantAlias To configure the tenant alias to which the POMadapter must be associated.
Related linksConfiguring dynamic parameters for the adapter on page 249
Dynamic parameter configuration for Avaya Proactive Outreach Manager deployments
November 2017 Deploying Harmony Workforce Optimization with Avaya Aura® CommunicationManager and Avaya Aura® Contact Center 251Comments on this document? [email protected]
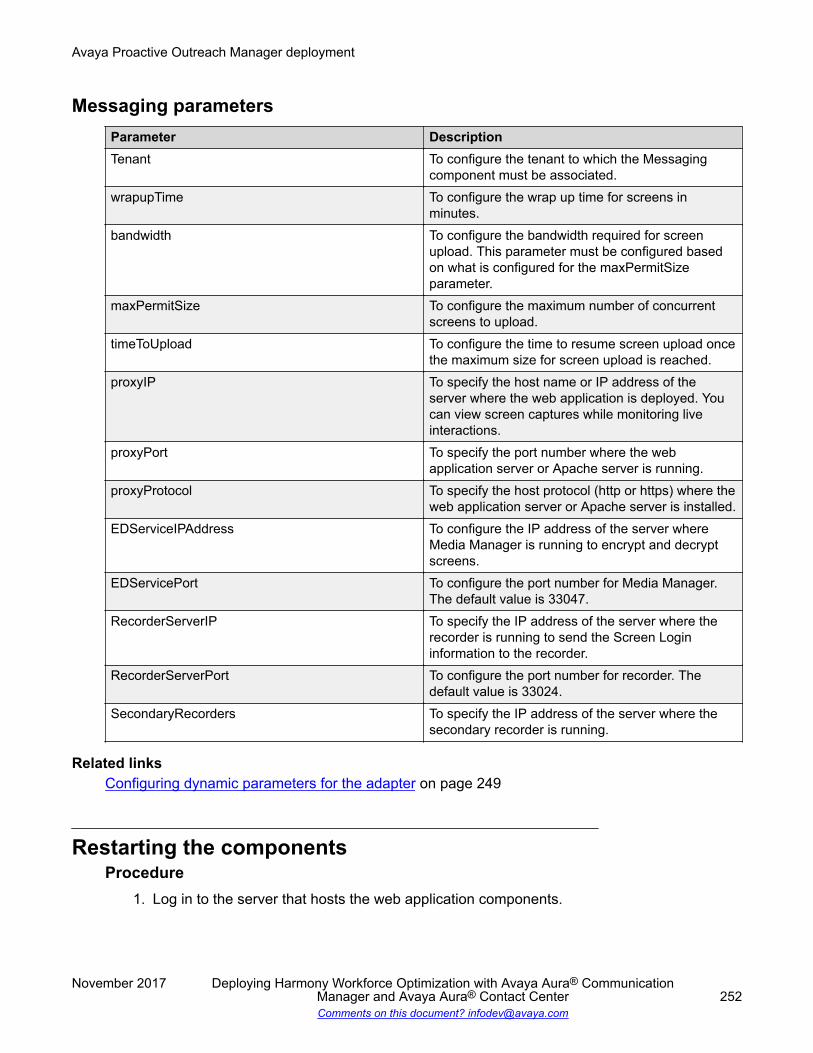
Messaging parametersParameter DescriptionTenant To configure the tenant to which the Messaging
component must be associated.wrapupTime To configure the wrap up time for screens in
minutes.bandwidth To configure the bandwidth required for screen
upload. This parameter must be configured basedon what is configured for the maxPermitSizeparameter.
maxPermitSize To configure the maximum number of concurrentscreens to upload.
timeToUpload To configure the time to resume screen upload oncethe maximum size for screen upload is reached.
proxyIP To specify the host name or IP address of theserver where the web application is deployed. Youcan view screen captures while monitoring liveinteractions.
proxyPort To specify the port number where the webapplication server or Apache server is running.
proxyProtocol To specify the host protocol (http or https) where theweb application server or Apache server is installed.
EDServiceIPAddress To configure the IP address of the server whereMedia Manager is running to encrypt and decryptscreens.
EDServicePort To configure the port number for Media Manager.The default value is 33047.
RecorderServerIP To specify the IP address of the server where therecorder is running to send the Screen Logininformation to the recorder.
RecorderServerPort To configure the port number for recorder. Thedefault value is 33024.
SecondaryRecorders To specify the IP address of the server where thesecondary recorder is running.
Related linksConfiguring dynamic parameters for the adapter on page 249
Restarting the componentsProcedure
1. Log in to the server that hosts the web application components.
Avaya Proactive Outreach Manager deployment
November 2017 Deploying Harmony Workforce Optimization with Avaya Aura® CommunicationManager and Avaya Aura® Contact Center 252Comments on this document? [email protected]
2. Click Start > Run > services.msc3. Right-click the component and click Restart.
LimitationsAvaya Aura® Contact Center on Communication Manager deployment limitations
• Call recording does not work for any SIP phones as the phone IP address is not available forpassive recording. As a workaround, you must configure a second recorder instance on thesame recorder server for SIP based recording.
• High availability fails when there is a network disconnection for AES and Avaya Aura®
Contact Center servers. The standby secondary server does not become active automaticallywhen the active primary server is down.
• In multiple transfer and conference scenarios, calls are not stitched together because theICM_ENTERPRISE ID appears different for agent and supervisor calls.
• When Avaya adapter loses connection with Device Media Call Control (DMCC) during a livecall and regains connection, the recording tone that was previously heard is not heardanymore for the live call. This happens in active recording in single step conference.
• With multiplicity, calls are not getting recorded for more than forty agents.• If you modify or remove an extension in the Harmony Workforce Optimization application, the
Avaya adapter DebugServlet retains the stale entry of the extension until the cleanup task isexecuted in the background. The task is usually executed in 30 minutes.
Avaya Proactive Outreach Manager (POM) deployment limitations• If the POM agent is in a nailed up connection with POM for more than the number of seconds
configured in the VoiceStreamLastCheckTime parameter, the Recorder records the rest ofthe calls as NORTP until the nailed up connection is disconnected and connected again.
• When the POM adapter service is restarted during production hours, all ongoing interactionswill be lost till the POM adapter service is functional and connected to the recorder service.
• Consult, transfer, and conference calls made from POM client is recorded as a singleoutbound call for an agent in POM multiplicity.
Installer limitations• When you uninstall the Harmony Workforce Optimization application, the log manager
component is not removed from services.msc and appears as running in disabled state.
Harmony Workforce Optimization component limitations• The Harmony Workforce Optimization components do not send email alert messages when
the connection to the database is lost. However, the components send SNMP traps.• When you disable and enable the data NIC on a server, you must restart all Harmony
Workforce Optimization components running on that server.• Harmony Workforce Optimization supports only 40 characters for interaction metadata
values. If an automatic call distribution (ACD) or a customer relationship management (CRM)system sends values more than 40 characters, the values will be truncated to 40 characters.
Limitations
November 2017 Deploying Harmony Workforce Optimization with Avaya Aura® CommunicationManager and Avaya Aura® Contact Center 253Comments on this document? [email protected]

• Harmony Workforce Optimization does not record supervisor calls (voice or non-voice) whenthe coaching, intrusion, whisper, or barge feature is enabled for an agent.
• When a new tenant is created or an existing tenant is marked as default in SysAdmin, thewebapp service takes 5 minutes to load the tenant. Ensure that you wait for 5 minutes if youwant to log in to the application without the tenant alias.
• After you apply the latest Windows patches, sometimes, Internet Explorer fails to play audiofor live interactions. As a workaround, refresh the Live Monitoring playback window.
• When any ACD or PBX becomes non-functional or is restarted, the respective HarmonyWorkforce Optimization adapters must be restarted after the ACD or PBX becomesfunctional.
• Voice drive is not created in a multibox deployment, where you install web application,SysAdmin, and database on one box and Harmony Workforce Optimization components onanother box. As a workaround, you must manually create a voice drive on the server onwhich the Harmony Workforce Optimization components is installed.
Voice multiplicity configuration
Configuring Recorder parameters for voice multiplicityProcedure
1. Log in to SysAdmin .
2. Click System Administration > Configuration.
3. To configure parameters for a component, click the Component tab and do the following:
a. In the Component field, select Recorder.b. In the Asset field, select the asset you want to configure.
c. In the Node field, select the node you want to configure.
4. In the Value column, configure the following parameters:
a. For MultiplicityEnabled parameter, type True.
b. For MaxNoOfContactInstancesForVoice parameter, type the number of contactinstances for voice transactions that you want an agent to handle concurrently.
The default value is 10.
c. For MaxNoOfContactInstancesForNonVoice parameter, type the number of contactinstances for nonvoice transactions that you want an agent to handle concurrently..
The default value is 10.
5. Click Save.
Avaya Proactive Outreach Manager deployment
November 2017 Deploying Harmony Workforce Optimization with Avaya Aura® CommunicationManager and Avaya Aura® Contact Center 254Comments on this document? [email protected]
Next stepsRestart the component service after configuring the parameters.
Configuring Avaya adapter parameters for voice multiplicityProcedure
1. Log in to SysAdmin .
2. Click System Administration > Configuration.
3. To configure parameters for a component, click the Component tab and do the following:
a. In the Component field, select Avaya adapter.
b. In the Asset field, select the asset you want to configure.
c. In the Node field, select the node you want to configure.
4. In the Value column of the MultiplicityEnabled parameter, type True.
5. Click Save.
Next stepsRestart the component service after configuring the parameters.
Configuring AES adapter parameters for voice multiplicityProcedure
1. Log in to SysAdmin .
2. Click System Administration > Configuration.
3. To configure parameters for a component, click the Component tab and do the following:
a. In the Component field, select AES adapter.
b. In the Asset field, select the asset you want to configure.
c. In the Node field, select the node you want to configure.
4. In the Value column of the MaxNoOfContactInstances parameter, type 9.
5. Click Save.
Next stepsRestart the component service after configuring the parameters.
Voice multiplicity configuration
November 2017 Deploying Harmony Workforce Optimization with Avaya Aura® CommunicationManager and Avaya Aura® Contact Center 255Comments on this document? [email protected]
Configuring AACCNet adapter parameters for voice multiplicityProcedure
1. Log in to SysAdmin .
2. Click System Administration > Configuration.
3. To configure parameters for a component, click the Component tab and do the following:
a. In the Component field, select AACCNet adapter.
b. In the Asset field, select the asset you want to configure.
c. In the Node field, select the node you want to configure.
4. In the Value column, configure the following parameters:
a. For MultiplicityEnabled parameter, type True.
b. For FirstContactInstanceForNonVoice parameter, type 11 if theMaxNoOfContactInstancesForNonVoice parameter in Recorder is set to 10.
c. For MaxNoOfContactInstancesForNonVoice parameter, type the number of contactinstances for nonvoice transactions that you want an agent to handle concurrently.
The default value is 10.
5. Click Save.
Next stepsRestart the component service after configuring the parameters.
Configuring POM adapter parameters for voice multiplicityProcedure
1. Log in to SysAdmin .
2. Click System Administration > Configuration.
3. To configure parameters for a component, click the Component tab and do the following:
a. In the Component field, select POM adapter.
b. In the Asset field, select the asset you want to configure.
c. In the Node field, select the node you want to configure.
4. In the Value column, configure the following parameters:
a. For MultiplicityEnabled parameter, type True.
b. For POMContactInstanceForVoice parameter, type 10.
5. Click Save.
Avaya Proactive Outreach Manager deployment
November 2017 Deploying Harmony Workforce Optimization with Avaya Aura® CommunicationManager and Avaya Aura® Contact Center 256Comments on this document? [email protected]
Next stepsRestart the component service after configuring the parameters.
Post configuration verification
ChecklistNo. Tasks Reference
1 Verify that the adapters are functionaland connected to Avaya Aura®
Contact Center in the followingadapter logs:• AvayaAdapter.log file See Avaya adapter log verification on
page 257.• AESAdapter.log file See AES adapter log verification on
page 258.• AACCNetAdapter.log file See AACCNet adapter log verification on
page 260.2 Verify that the POM adapter is
functional and connected to AvayaProactive Outreach Manager in thePOMAdapter.log file.
3 Verify that the POM adapter, Avayaadapter, AES adapter, and AACCNetadapter are connected to the recorderin the Recorder.log file.
See Recorder log verification on page 261.
4 Verify that the agent login informationis available in the POMAdapter.logand AACCNetAdapter.log files.
See and AACCNet adapter logverification on page 260.
5 Verify that the agent login informationis available in the Recorder.log file.
See Recorder log verification on page 261.
Avaya adapter log verificationMessage DescriptionAvayaAdapter started: Running build... The Avaya adapter service is functional.
Table continues…
Post configuration verification
November 2017 Deploying Harmony Workforce Optimization with Avaya Aura® CommunicationManager and Avaya Aura® Contact Center 257Comments on this document? [email protected]

Message DescriptionConnection opened with database at ipaddress : xx.xxx.xxx.xx
The Avaya adapter is connected to the database onthe server with IP address xx.xxx.xxx.xx.
Started Loading Extensions configuredfor recording in database
The Avaya adapter is loading extensions configuredfor recording in database.
Connected to Primary DatabaseServerxx.xxx.xxx.xxx for default
The Avaya adapter is connected to the primarydatabase server on IP address xx.xxx.xxx.xxx.
Successfully got a service provider tothe AES Server with session_id6E423EE9816ED8E55DC5FA0EB2F2523C-
The Avaya adapter is connected to the DMCCservice on AES server on the session ID6E423EE9816ED8E55DC5FA0EB2F2523C.
Successfully registered recordingdevice with extension 21151
The Avaya adapter is registering the recordingstation on the DMCC station recording device21151.
Added element 21151 to pool The Avaya adapter added the DMCC recordingstation 21151 to the pool.
Received CSTA_REGISTERED_EVENT eventfor Recording Device extension 21151
The Avaya adapter received a registered event fromDMCC service on AES server for the recordingdevice extension 21151.
AES adapter log verificationMessage DescriptionAESAdapter started: Running build... The AES adapter service is functional."AESAdapter Service" Service Stopped The AES adapter service stopped. Restart the service.Connection opened with database atip address : xx.xxx.xxx.xx
The AES adapter is connected to the database on theserver with IP address xx.xxx.xxx.xx.
ACSOpenStream Success The AES adapter is connected to the TSAPI serviceon the AES server.
ACSOpenStream Failed The connection between the AES adapter and theAES server is lost.
Ensure that the AES server is connected toCommunication Manager and the TSAPI client isinstalled and configured correctly.
HuntGroupMonitoring Started The AES adapter is loading the hunt group parametervalue configured in SysAdmin.
Added to MonitorPendingAgentsTable The AES adapter is adding the hunt group, agent IDs,and extensions in theMonitorPendingAgentsTable.
Received ACS_OPEN_STREAM_CONF event The AES adapter is successfully connected with theAES server.
Table continues…
Avaya Proactive Outreach Manager deployment
November 2017 Deploying Harmony Workforce Optimization with Avaya Aura® CommunicationManager and Avaya Aura® Contact Center 258Comments on this document? [email protected]

Message DescriptionAdapter connected to client at ipaddress xx.xxx.xxx.xxx and port51446
The AES adapter is successfully connected with therecorder on the server with IP address xx.xxx.xxx.xxxand port number 51446.
CTILinkStatus is LinkUp The connection between the AES server andCommunication Manager is active.
CTILinkStatus is LinkDown The connection between the AES server andCommunication Manager is lost.
Ensure that the AES server is connected to theCommunication Manager and the TSAPI client isinstalled and configured correctly.
Started monitoring on hunt groupextension
The AES adapter started monitoring the hunt groupextensions.
Monitoring started for huntgroupextension 51001
The AES adapter started monitoring the hunt groupand all agents mapped to the hunt group number51001 in Communication Manager.
Found agent_id 29033 withagent_extension 29033 inAgentLoginTable
The AES adapter found agent ID 29033 with extension29033 in the AgentLoginTable. Because the agentID and extension are identical, the recording isextension based.
Monitoring started for extension29033
The AES adapter started monitoring extension 29033.
Added agent_id 29033 with extension29033 to AgentLoginTable
The AES adapter added agent ID 29033 withextension 29033 to AgentLoginTable.
Received CSTA_MONITOR_CONF eventreceived for agent_id 29033 andagent_extension 29033
The AES adapter received confirmation on themonitoring event for agent ID 29033 and agentextension 29033.
Sending VOIP_CTIOS_AGENT_LOGIN withagentID 29033 for agent withextension 29033, line_instance 1
The AES adapter is sending agent login informationfor agent ID 29033 with extension 29033 on lineinstance 1 to the recorder.
Starting to monitor new agent_id52013
The AES adapter started monitoring agent ID 52013.
Received CSTA_LOGGED_ON event foragent_id 52013 and agent_extension29033
The agent has logged in to extension 29033 withagent ID 52013. Because the agent ID and extensionare not identical, the recording is agent based.
Found agent_id 52013 withagent_extension 29033 inAgentLoginTable
The AES adapter found agent ID 52013 with extension29033 in the tableAgentLoginTable.
Added agent_id 52013 with extensionto AgentLoginTable.
The AES adapter added agent ID 52013 withextension 29033 to AgentLoginTable.
Sending VOIP_CTIOS_AGENT_LOGIN withagentID 52013 for agent withextension 29033, line_instance 1
The AES adapter is sending agent login informationfor agent ID 52013 with extension 29033 on lineinstance 1 to the recorder.
Post configuration verification
November 2017 Deploying Harmony Workforce Optimization with Avaya Aura® CommunicationManager and Avaya Aura® Contact Center 259Comments on this document? [email protected]

POM adapter log verificationMessage DescriptionPOMAdapter Build Label... The POM adapter service is functional.Started Loading Extensions configuredfor recording in database
The POM adapter is loading extensions configuredfor recording in database.
Started Loading Agent ID’s configuredfor recording in database
The POM adapter is loading agent IDs configuredfor recording in database.
Connected to Primary DatabaseServerxx.xxx.xxx.xxx for default
The POM adapter is connected to the primarydatabase server on IP address xx.xxx.xxx.xxx.
Connected to POM Serverxx.xxx.xxx.xxx:7999
The POM adapter is connected to the POM serveron IP address xx.xxx.xxx.xxx and on port 7999.
AACCNet adapter log verificationMessage DescriptionStarting AACCNetAdapter Service... The AACCNet adapter service is functional.Opening connection - CCT Server IP =xx.xxx.xxx.xxx; User = Administrator;Domain = AWACCS; Password = *******.
The AACCNet adapter is validating the user,domain, and password to connect to the CCTserver with IP address xx.xxx.xxx.xxx.
Connected to CCT Server xx.xxx.xxx.xxx The AACCNet adapter is connected to the CCTserver with IP address xx.xxx.xxx.xxx.
Listening for recorder atxx.xxx.xxx.xxx:34301
The AACCNet adapter is connected to the recorderon the server with IP address xx.xxx.xxx.xxx andport number 34301.
Started Loading Harmony Agentsconfigured for recording in database
The AACCNet adapter started loading agentsconfigured for recording in the database.
Connected to Primary DatabaseServerxx.xxx.xxx.xxx for
The AACCNet adapter is connected to the primarydatabase server with IP address xx.xxx.xxx.xxx.
Added Agent with ID 6002 from DB intolatestHarmonyAgentIdsTable
The AACCNet adapter added agent with ID 6002from the database to thelatestHarmonyAgentIdsTable.
Ended Loading Harmony Agentsconfigured for recording in databasexx.xxx.xxx.xxx
The AACCNet adapter ended loading agentsconfigured for recording in the database on theserver with IP address xx.xxx.xxx.xxx.
Dequeued HTTP message - This is anINFO message to let you know that theAACCNetAdapter has regained connectionwith the CCT Server.
The AACCNet adapter regained connection with theCCT server.
Table continues…
Avaya Proactive Outreach Manager deployment
November 2017 Deploying Harmony Workforce Optimization with Avaya Aura® CommunicationManager and Avaya Aura® Contact Center 260Comments on this document? [email protected]

Message DescriptionFound Agent Agent 6004, State:InService, IsLoggedIn: True
The AACCNet adapter found that the agent with ID6004 is in service and is logged in.
Found Agent Agent 6004, State:InService, IsLoggedIn: False
The AACCNet adapter found that the agent with ID6004 is in service and is logged out.
Recorder log verificationMessage DescriptionRecorder started: Running build... The Recorder service is functional.Connection opened with database atip address : xx.xxx.xxx.xx anddatabase nameHARMONYDB_April14th_5_2_2
The Recorder component is connected to thedatabase on the server with IP address xx.xxx.xxx.xxand database name HARMONYDB_April14th_5_2_2.
ConfigDatabase : SelectSTORAGE_ID,STORAGE_NAME,STORAGE_PATH,USER_NAME,PASSWORD,HOST_IP,UPDATE_DATE,STORAGE_THRESHOLD_SPACE fromSYSTEM_STORAGE_DETAILS where host_ip= 'xx.xxx.xxx.xxx' orhost_ip='xx.xxx.xxx.xxx'
The Recorder is validating the following storagedetails:
• Storage ID
• Storage name
• Storage path
• Username
• Password
• Host IP
• Update date
• Storage threshold spaceStorage server details loaded fromdatabase 1
The Recorder loaded the storage server details.
02/28/17 22:35:47 (PST) [22156]CKnoahsARKDatabase.c :356 INFO -{Call up_icm_s_GetAgentsInfo('','')}
The Recorder validates the Recording Settingsconfigurations for all agents in the Harmony WorkforceOptimization application every minute using the storedprocedure {Callup_icm_s_GetAgentsInfo('','')}.
Recorder connected to primary AvayaAdapter at ip address xx.xxx.xxx.xxxand port 34101
The Recorder is connected to the primary Avayaadapter on the server with IP address xx.xxx.xxx.xxxand port number 34101.
Recorder connected to primary AESAdapter at ip address xx.xxx.xxx.xxxand port 33012
The Recorder is connected to the primary AESadapter on the server with IP address xx.xxx.xxx.xxxand port number 33012.
Table continues…
Post configuration verification
November 2017 Deploying Harmony Workforce Optimization with Avaya Aura® CommunicationManager and Avaya Aura® Contact Center 261Comments on this document? [email protected]
Message DescriptionRecorder connected to primary AACCAdapter at ip address xx.xxx.xxx.xxxand port 34301
The Recorder is connected to the primary AACCNetadapter on the server with IP address xx.xxx.xxx.xxxand port number 34301.
Received CTIOS_AGENT_LOGIN withagent_id 20001 for agent withextension 20001 and line_instance 1
The Recorder received the login information for theagent with ID 20001, extension 20001, and lineinstance 1 from AACCNet adapter.
High Availability and Redundancy implementation
OverviewAvaya recommends a secondary or backup recording server for seamless recording. In passiverecording, both the primary and secondary backup recorders are connected to two separate SPANsessions and to their local adapters. If the primary server fails, the secondary server continues torecord calls from the SPAN session. In active recording, both the primary and secondary backuprecorders are connected to their local data NICs and local adapters. Using keep alive events, therecorder, at regular intervals, checks if the connection with the adapters and the SPAN session isactive. This phenomenon is referred to as heartbeat. Recorder failover and redundancy can beachieved by deploying recording servers in pairs.
High availability recording in Avaya Aura® Contact Center on Avaya Aura® CommunicationManager deployments can be implemented in two ways:
• Active-Standby: The primary recorder server is active, and the secondary or backup server isin hot standby mode. A seamless failover to the standby or secondary recorder happenswhen the active or primary recorder fails. In active-standby high availability mode, 100% callrecording is not possible. Data might be lost if the recorder becomes nonfunctional on anactive call or till the time the secondary recorder becomes active and gets the events fromthe adapters.
• Active-Active: Both the primary and secondary recorder servers are active and record calls.The secondary recorder server deletes the call only after ensuring that the primary server isfunctional till the call ends.
The critical adapters send keep alive events with active status to the recorder as long as theirsignaling is active with PBX or ACD servers. When the signaling in any adapter is lost, the adapterstill sends the keep alive events to the recorder but with inactive status. In such cases, the primaryrecorder communicates with the secondary recorder and sends a request to switch over. If thesecondary recorder accepts the request, the primary recorder successfully switches its role to asecondary recorder and vice versa. If the adapter connectivity of the secondary recorder is alsolost, the status of the current primary recorder remains as primary.
Both Avaya Aura® Communication Manager and Avaya Aura® Application Enablement Servicessupport local high availability and are configured with a single virtual IP address. Both, the AES
Avaya Proactive Outreach Manager deployment
November 2017 Deploying Harmony Workforce Optimization with Avaya Aura® CommunicationManager and Avaya Aura® Contact Center 262Comments on this document? [email protected]

adapter and Avaya adapter connect to the virtual IP address of Avaya Aura® ApplicationEnablement Services. Avaya Proactive Outreach Manager also supports local high availabilitywhere each Avaya Proactive Outreach Manager is configured with a standalone IP address. EachPOM adapter connects to the standalone IP address of their respective Avaya Proactive OutreachManager.
Similarly, Avaya Aura® Contact Center also supports local high availability and is configured with avirtual IP address. Avaya Aura® Contact Center, using its own virtual IP address, connects to theAACCNet adapter and also to the virtual IP address of Avaya Aura® Application EnablementServices.
You can implement failover by connecting adapters to each recorder, PBX, and ACD.
Recordingtype
Criticaladapter
Adapters connectedto each recorder
Adapters for signaling withPBX
Adaptersconnected to ACD
Active • Avayaadapter
• AESadapter
• POMadapter
• Avaya adapter
• AES adapter
• AACCNet adapter
• POM adapter
• AES adapter
Note:
Both the adapters getevents from AvayaAura® CommunicationManager through AvayaAura® ApplicationEnablement Services.
• POM adapter
AACCNet adapter
Passive • AESadapter
• POMadapter
• AES adapter
• AACCNet adapter
• POM adapter
• AES adapter
Note:
The AES adapter getevents from AvayaAura® CommunicationManager through AvayaAura® ApplicationEnablement Services.
• POM adapter
AACCNet adapter
Configuring Recorder parameters for High AvailabilityAbout this taskUse this procedure to configure recorder parameters for high availability.
Procedure1. Log in to SysAdmin .
2. Click System Administration > Configuration.
High Availability and Redundancy implementation
November 2017 Deploying Harmony Workforce Optimization with Avaya Aura® CommunicationManager and Avaya Aura® Contact Center 263Comments on this document? [email protected]
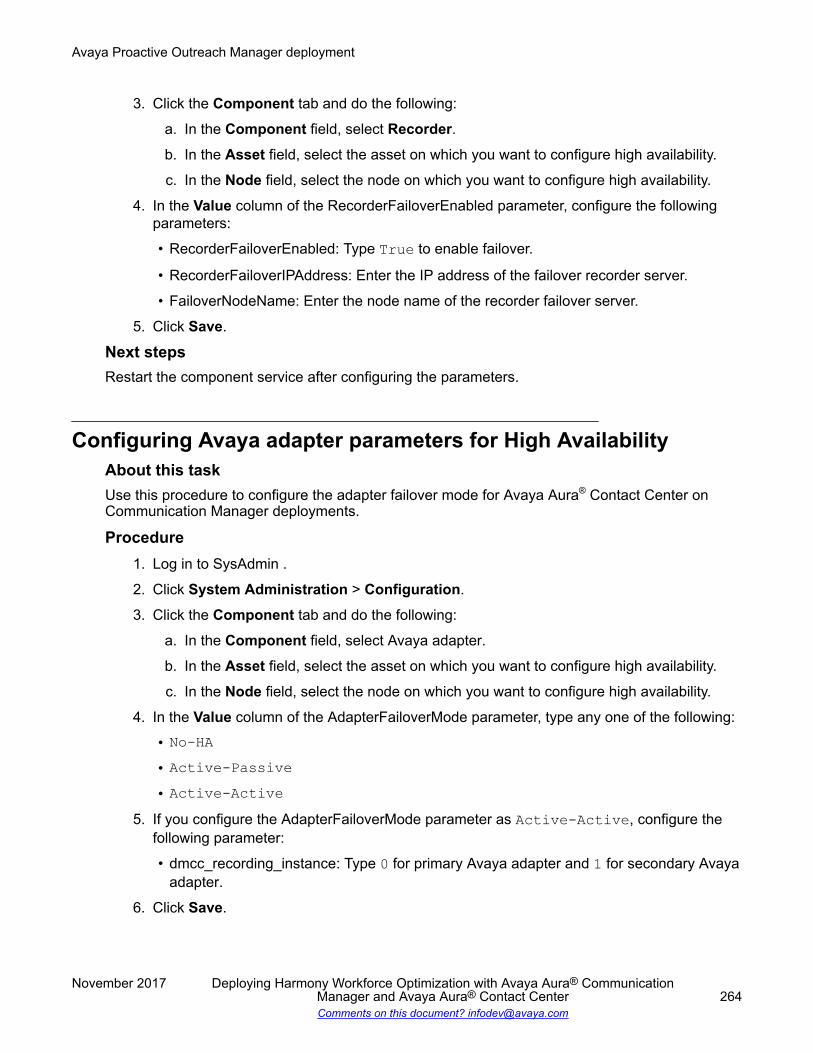
3. Click the Component tab and do the following:
a. In the Component field, select Recorder.b. In the Asset field, select the asset on which you want to configure high availability.
c. In the Node field, select the node on which you want to configure high availability.
4. In the Value column of the RecorderFailoverEnabled parameter, configure the followingparameters:
• RecorderFailoverEnabled: Type True to enable failover.
• RecorderFailoverIPAddress: Enter the IP address of the failover recorder server.
• FailoverNodeName: Enter the node name of the recorder failover server.
5. Click Save.
Next stepsRestart the component service after configuring the parameters.
Configuring Avaya adapter parameters for High AvailabilityAbout this taskUse this procedure to configure the adapter failover mode for Avaya Aura® Contact Center onCommunication Manager deployments.
Procedure1. Log in to SysAdmin .
2. Click System Administration > Configuration.
3. Click the Component tab and do the following:
a. In the Component field, select Avaya adapter.
b. In the Asset field, select the asset on which you want to configure high availability.
c. In the Node field, select the node on which you want to configure high availability.
4. In the Value column of the AdapterFailoverMode parameter, type any one of the following:
• No-HA• Active-Passive• Active-Active
5. If you configure the AdapterFailoverMode parameter as Active-Active, configure thefollowing parameter:
• dmcc_recording_instance: Type 0 for primary Avaya adapter and 1 for secondary Avayaadapter.
6. Click Save.
Avaya Proactive Outreach Manager deployment
November 2017 Deploying Harmony Workforce Optimization with Avaya Aura® CommunicationManager and Avaya Aura® Contact Center 264Comments on this document? [email protected]
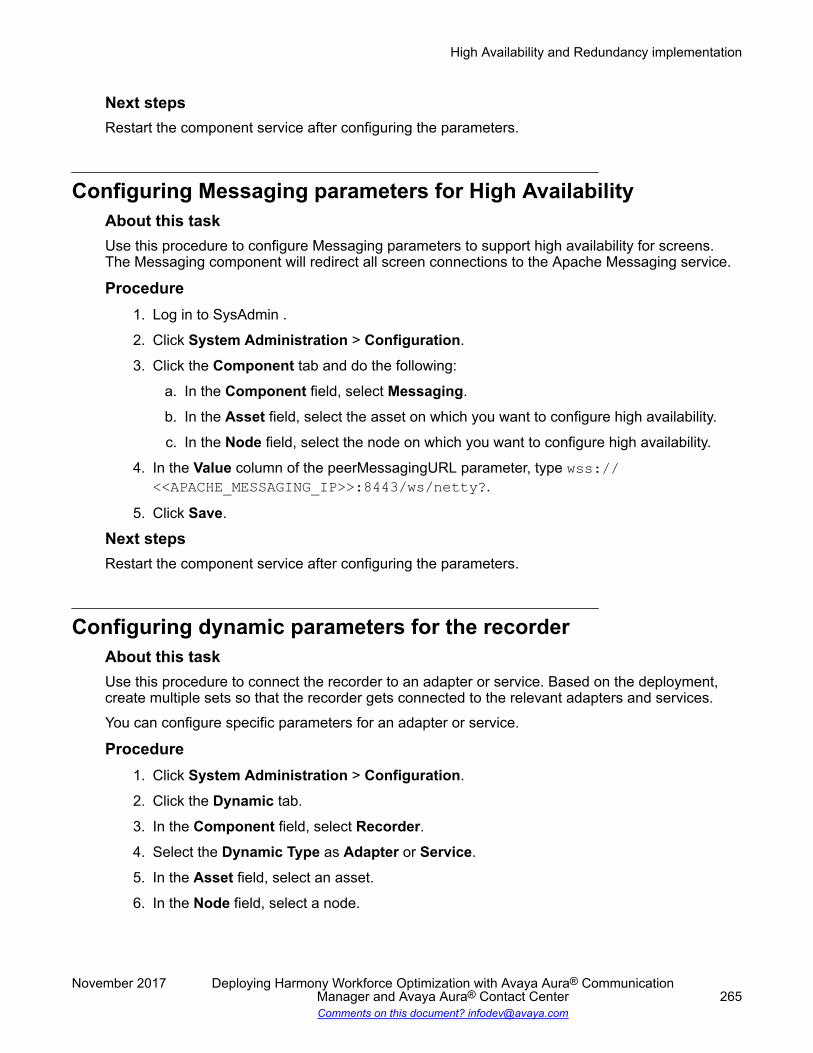
Next stepsRestart the component service after configuring the parameters.
Configuring Messaging parameters for High AvailabilityAbout this taskUse this procedure to configure Messaging parameters to support high availability for screens.The Messaging component will redirect all screen connections to the Apache Messaging service.
Procedure1. Log in to SysAdmin .
2. Click System Administration > Configuration.
3. Click the Component tab and do the following:
a. In the Component field, select Messaging.
b. In the Asset field, select the asset on which you want to configure high availability.
c. In the Node field, select the node on which you want to configure high availability.
4. In the Value column of the peerMessagingURL parameter, type wss://<<APACHE_MESSAGING_IP>>:8443/ws/netty?.
5. Click Save.
Next stepsRestart the component service after configuring the parameters.
Configuring dynamic parameters for the recorderAbout this taskUse this procedure to connect the recorder to an adapter or service. Based on the deployment,create multiple sets so that the recorder gets connected to the relevant adapters and services.You can configure specific parameters for an adapter or service.
Procedure1. Click System Administration > Configuration.
2. Click the Dynamic tab.
3. In the Component field, select Recorder.4. Select the Dynamic Type as Adapter or Service.
5. In the Asset field, select an asset.
6. In the Node field, select a node.
High Availability and Redundancy implementation
November 2017 Deploying Harmony Workforce Optimization with Avaya Aura® CommunicationManager and Avaya Aura® Contact Center 265Comments on this document? [email protected]

7. In the No. of Sets field, type the number of sets you want to create.
8. Click Create Sets.
Next stepsRestart the component service after configuring the parameters.
Related linksDynamic recorder parameter configuration values for High Availability on page 266
Dynamic recorder parameter configuration values for High AvailabilityPrimary recorderThe table below lists the five adapter sets you must create for the primary recorder to connect to localadapters such as POM adapter, AES adapter, Avaya adapter, AACCNet adapter, and Messaging.
Parameter ValueComponent Recorder 1Dynamic Type AdapterAsset Name of the server where the recorder 1 is installedNode Name of the instance of the recorder 1 installed on the selected
server or asset.No of Sets 5 for active recording and 4 for passive recording,Adapter Dynamic Set 1Name POM adapter 1ServerAddress The IP address of the server where POM adapter 1 is installed.ServerPort 34106ServerLocalPort 33335IsCritical TrueWebURLString /AvayaAdapter/MonitorSitesRecorderRequestAdapter Dynamic Set 2Name AES adapter 1ServerAddress The IP address of the server where AES adapter 1 is installed.ServerPort 33012IsCritical TrueAdapter Dynamic Set 3Name Avaya adapter 1ServerAddress The IP address of the server where Avaya adapter 1 is installed.ServerPort 34101ServerLocalPort 33333IsCritical True
Table continues…
Avaya Proactive Outreach Manager deployment
November 2017 Deploying Harmony Workforce Optimization with Avaya Aura® CommunicationManager and Avaya Aura® Contact Center 266Comments on this document? [email protected]

Parameter ValueWebURLString /AvayaAdapter/MonitorSitesRecorderRequestAdapter Dynamic Set 4Name AACCNet adapter 1ServerAddress The IP address of the server where AACCNet adapter 1 is
installed.ServerPort 34301ServerLocalPort 33334WebURLString /AACCAdapter/MonitorSitesRecorderRequestAdapter Dynamic Set 5Name Unified Messaging 1ServerAddress The IP address of the server where the Unified Messaging
component is installed.ServerPort 33022
Secondary recorderThe table below lists the five adapter sets you must create for the secondary recorder to connect to localadapters such as POM adapter, AES adapter, Avaya adapter, AACCNet adapter. and Messaging.
Parameter ValueComponent Recorder 2Dynamic Type AdapterAsset Name of the server where the recorder 2 is installedNode Name of the instance of the recorder 2 installed on the selected
server or asset.No of Sets 5 for active recording and 4 for passive recording,Adapter Dynamic Set 1Name POM adapter 2ServerAddress The IP address of the server where POM adapter 2 is installed.ServerPort 34106ServerLocalPort 33335IsCritical TrueWebURLString /AvayaAdapter/MonitorSitesRecorderRequestAdapter Dynamic Set 2Name AES adapter 2ServerAddress The IP address of the server where AES adapter 2 is installed.ServerPort 33012IsCritical True
Table continues…
High Availability and Redundancy implementation
November 2017 Deploying Harmony Workforce Optimization with Avaya Aura® CommunicationManager and Avaya Aura® Contact Center 267Comments on this document? [email protected]

Parameter ValueAdapter Dynamic Set 3Name Avaya adapter 2ServerAddress The IP address of the server where Avaya adapter 2 is installed.ServerPort 34101ServerLocalPort 33333IsCritical TrueWebURLString /AvayaAdapter/MonitorSitesRecorderRequestAdapter Dynamic Set 4Name AACCNet adapter 2ServerAddress The IP address of the server where AACCNet adapter 2 is
installed.ServerPort 34301ServerLocalPort 33334WebURLString /AACCAdapter/MonitorSitesRecorderRequestAdapter Dynamic Set 5Name Unified Messaging 2ServerAddress The IP address of the server where the Unified Messaging
component is installed.ServerPort 33022
Related linksConfiguring dynamic parameters for the recorder on page 265
Load balancing implementation
OverviewLoad balancing is implemented when the load on the recorder to record concurrent callsincreases. You can install multiple recorders to distribute and balance the load.
The following table depicts how multiple recorders, pointing to a single web application and database,connect to multiple adapters and components to distribute and balance the load:
Avaya Proactive Outreach Manager deployment
November 2017 Deploying Harmony Workforce Optimization with Avaya Aura® CommunicationManager and Avaya Aura® Contact Center 268Comments on this document? [email protected]

Numberofservers
Numberofrecorders
Number ofrecorderinstances
Number ofinstances ofMediaManagercomponent
Number ofinstances ofMessagingcomponent
Number ofinstances ofadapters formedia inactiverecording
Number ofsignaling andACD adapters
Server 1 Recorder1
Recorderinstance 0
MediaManager 1
Messaging 1
Note:
You mustinstall theMessagingcomponenton anyone of theservers.
Avaya adapter0
• POMadapter
• AES adapter
Note:
You mustinstallAESadapteron anyone of theservers.
Server 2 Recorder2
Recorderinstance 1
MediaManager 2
Avaya adapter1
Server 3 Recorder3
Recorderinstance 2
MediaManager 3
Avaya adapter2
If there are three recorders, you can deploy each recorder on multiple servers, such as Server 1,Server 2, and Server 3. You must configure load balancing for each recorder and map it to aunique instance of the recorder. Because the count for a recorder instance starts from zero, theload balancing parameters for recorder 1 is mapped to the recorder instance 0. Similarly, the loadbalancing parameters for recorder 2 and 3 are mapped to the recorder instances 1 and 2respectively.
In Avaya Aura® Contact Center on Avaya Aura® Communication Manager with Avaya ProactiveOutreach Manager deployments, the recorders connect to a POM adapter and an AES adapter forsignaling and ACD events. However, for voice stream events, in active recording, each recorderconnects to its own instance of the Avaya adapter. Because the count for an Avaya adapterinstance starts from zero, recorder 1 connects to the Avaya adapter instance 0. Similarly,recorders 2 and 3 connect to the Avaya adapter instances 1 and 2 respectively.
Note:
Each recorder must have a dedicated Media Manager component but must point to a singleMessaging component.
Using a built-in logic, the signaling and voice stream adapters send their respective events to theappropriate instance of the recorder. If there are 12 extensions and 3 recorder instances, theadapters divide each extension by the number of recorder instances. Events are then sent to therecorder whose instance number matches with the remainder. For example, if the extension is2345, the adapters divide 2345 by 3 and send the events to the recorder instance 2.
Load balancing for Avaya Aura® Contact Center on Avaya Aura® Communication Manager withAvaya Proactive Outreach Manager deployments can be achieved by performing the followingtasks:
• Configure multiple instances of the recorder in load balancing mode.
Load balancing implementation
November 2017 Deploying Harmony Workforce Optimization with Avaya Aura® CommunicationManager and Avaya Aura® Contact Center 269Comments on this document? [email protected]
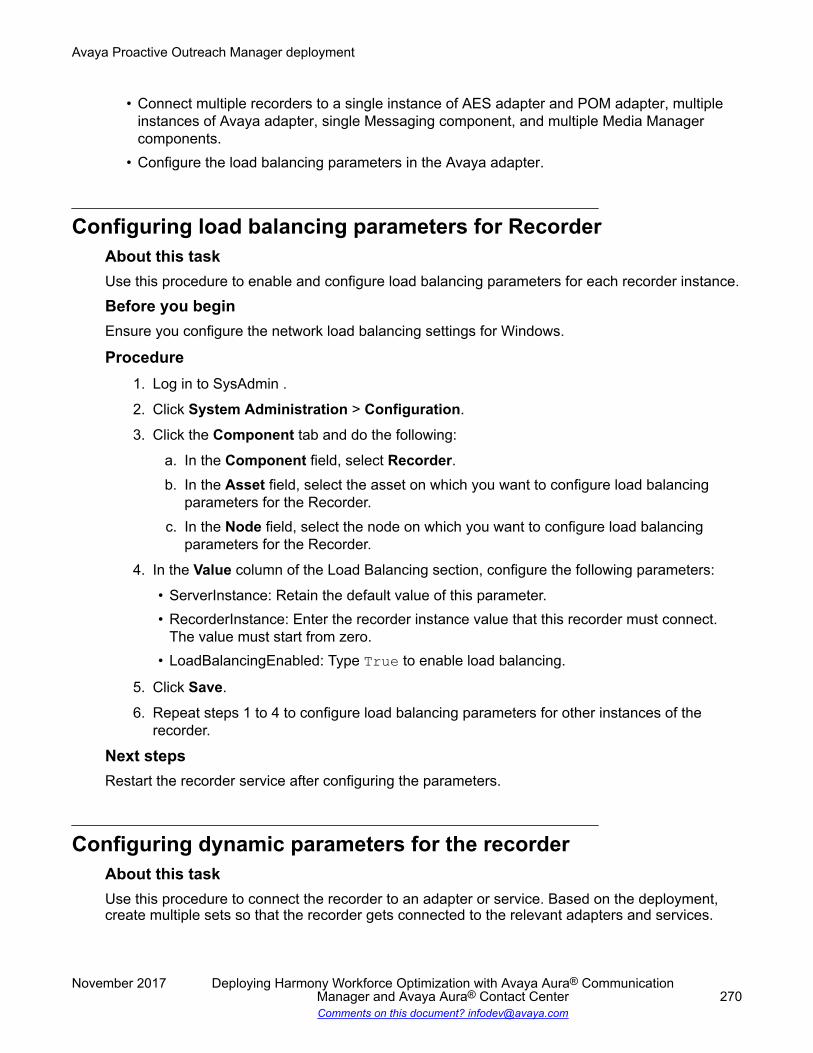
• Connect multiple recorders to a single instance of AES adapter and POM adapter, multipleinstances of Avaya adapter, single Messaging component, and multiple Media Managercomponents.
• Configure the load balancing parameters in the Avaya adapter.
Configuring load balancing parameters for RecorderAbout this taskUse this procedure to enable and configure load balancing parameters for each recorder instance.
Before you beginEnsure you configure the network load balancing settings for Windows.
Procedure1. Log in to SysAdmin .
2. Click System Administration > Configuration.
3. Click the Component tab and do the following:
a. In the Component field, select Recorder.b. In the Asset field, select the asset on which you want to configure load balancing
parameters for the Recorder.c. In the Node field, select the node on which you want to configure load balancing
parameters for the Recorder.
4. In the Value column of the Load Balancing section, configure the following parameters:
• ServerInstance: Retain the default value of this parameter.• RecorderInstance: Enter the recorder instance value that this recorder must connect.
The value must start from zero.• LoadBalancingEnabled: Type True to enable load balancing.
5. Click Save.
6. Repeat steps 1 to 4 to configure load balancing parameters for other instances of therecorder.
Next stepsRestart the recorder service after configuring the parameters.
Configuring dynamic parameters for the recorderAbout this taskUse this procedure to connect the recorder to an adapter or service. Based on the deployment,create multiple sets so that the recorder gets connected to the relevant adapters and services.
Avaya Proactive Outreach Manager deployment
November 2017 Deploying Harmony Workforce Optimization with Avaya Aura® CommunicationManager and Avaya Aura® Contact Center 270Comments on this document? [email protected]

You can configure specific parameters for an adapter or service.
Procedure1. Log in to SysAdmin .
2. Click System Administration > Configuration.
3. Click the Dynamic tab.
4. In the Component field, select Recorder.5. Select the Dynamic Type as Adapter or Service.
6. In the Asset field, select an asset.
7. In the Node field, select a node.
8. In the No. of Sets field, type the number of sets you want to create.
9. Click Create Sets.
Next stepsRestart the component service after configuring the parameters.
Dynamic recorder parameter configuration values for loadbalancing
Recorder 1The table below lists the four adapter sets you must create for recorder 1 to connect to AES adapter, POMadapter, Avaya adapter, and the Messaging component. You must create one service set for the recorder 1to connect to Media Manager.
Parameter ValueComponent Recorder 1Dynamic Type AdapterAsset Name of the server where the recorder 1 is installedNode Name of the instance of the recorder 1 installed on the selected
server or asset.No of Sets 4Adapter Dynamic Set 1Name AES adapter 1ServerAddress The IP address of the server where AES adapter 1 is installed.ServerPort 33012IsCritical TrueAdapter Dynamic Set 2
Table continues…
Load balancing implementation
November 2017 Deploying Harmony Workforce Optimization with Avaya Aura® CommunicationManager and Avaya Aura® Contact Center 271Comments on this document? [email protected]
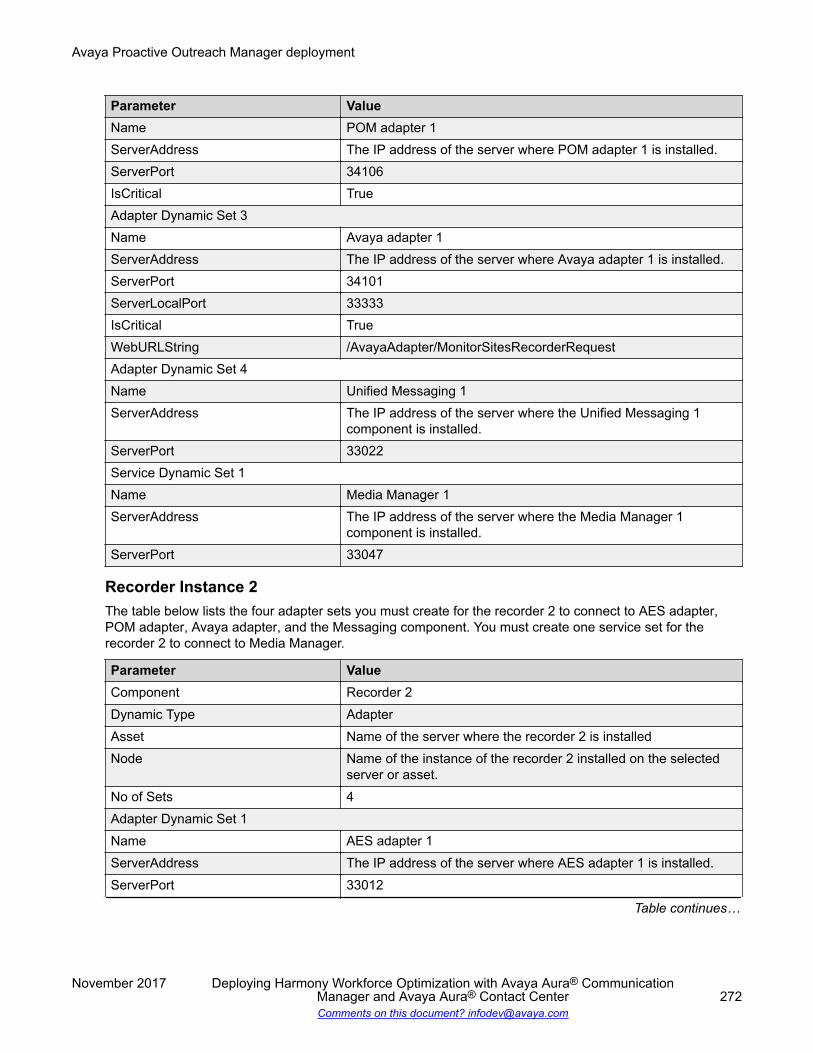
Parameter ValueName POM adapter 1ServerAddress The IP address of the server where POM adapter 1 is installed.ServerPort 34106IsCritical TrueAdapter Dynamic Set 3Name Avaya adapter 1ServerAddress The IP address of the server where Avaya adapter 1 is installed.ServerPort 34101ServerLocalPort 33333IsCritical TrueWebURLString /AvayaAdapter/MonitorSitesRecorderRequestAdapter Dynamic Set 4Name Unified Messaging 1ServerAddress The IP address of the server where the Unified Messaging 1
component is installed.ServerPort 33022Service Dynamic Set 1Name Media Manager 1ServerAddress The IP address of the server where the Media Manager 1
component is installed.ServerPort 33047
Recorder Instance 2The table below lists the four adapter sets you must create for the recorder 2 to connect to AES adapter,POM adapter, Avaya adapter, and the Messaging component. You must create one service set for therecorder 2 to connect to Media Manager.
Parameter ValueComponent Recorder 2Dynamic Type AdapterAsset Name of the server where the recorder 2 is installedNode Name of the instance of the recorder 2 installed on the selected
server or asset.No of Sets 4Adapter Dynamic Set 1Name AES adapter 1ServerAddress The IP address of the server where AES adapter 1 is installed.ServerPort 33012
Table continues…
Avaya Proactive Outreach Manager deployment
November 2017 Deploying Harmony Workforce Optimization with Avaya Aura® CommunicationManager and Avaya Aura® Contact Center 272Comments on this document? [email protected]

Parameter ValueIsCritical TrueAdapter Dynamic Set 2Name POM adapter 1ServerAddress The IP address of the server where POM adapter 1 is installed.ServerPort 34106IsCritical TrueAdapter Dynamic Set 3Name Avaya adapter 2ServerAddress The IP address of the server where Avaya adapter 2 is installed.ServerPort 34101ServerLocalPort 33333IsCritical TrueWebURLString /AvayaAdapter/MonitorSitesRecorderRequestAdapter Dynamic Set 4Name Unified Messaging 1ServerAddress The IP address of the server where the Unified Messaging 1
component is installed.ServerPort 33022Service Dynamic Set 1Name Media Manager 2ServerAddress The IP address of the server where the Media Manager 2
component is installed.ServerPort 33047
Recorder Instance 3The table below lists the four adapter sets you must create for the recorder 3 to connect to AES adapter,POM adapter, Avaya adapter, and the Messaging component. You must create one service set for therecorder 3 to connect to Media Manager.
Parameter ValueComponent Recorder 3Dynamic Type AdapterAsset Name of the server where the recorder 3 is installedNode Name of the instance of the recorder 3 installed on the selected
server or asset.No of Sets 4Adapter Dynamic Set 1Name AES adapter 1
Table continues…
Load balancing implementation
November 2017 Deploying Harmony Workforce Optimization with Avaya Aura® CommunicationManager and Avaya Aura® Contact Center 273Comments on this document? [email protected]
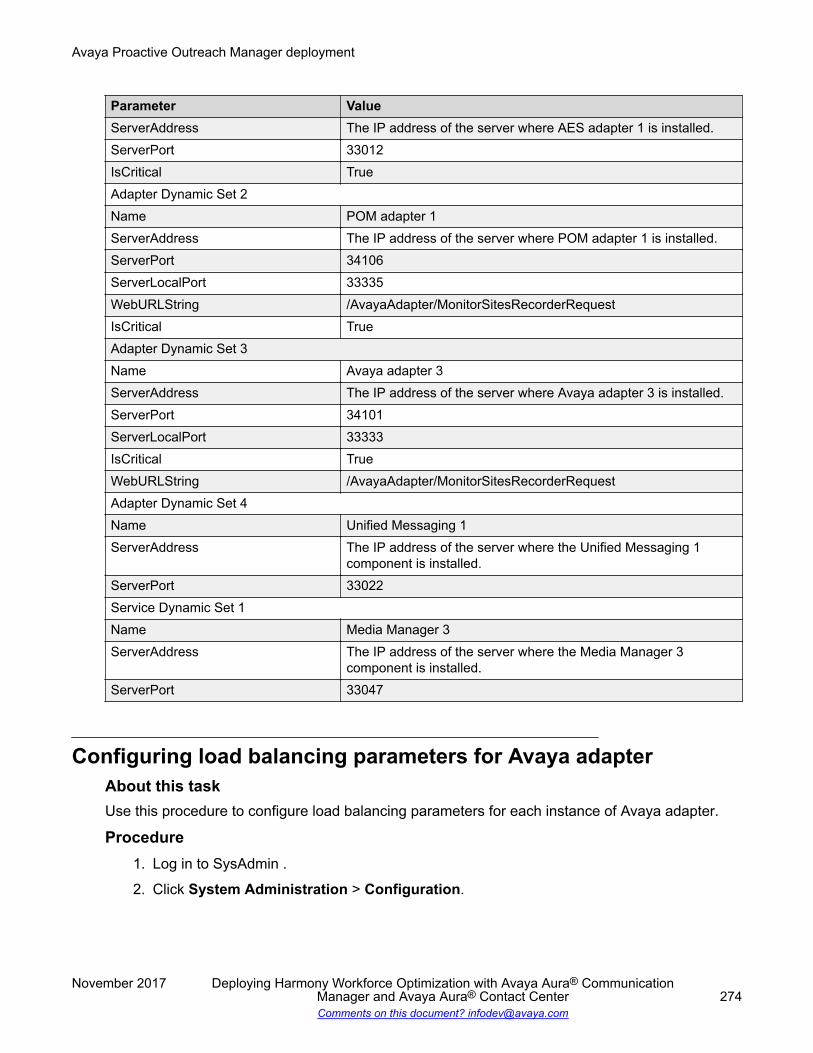
Parameter ValueServerAddress The IP address of the server where AES adapter 1 is installed.ServerPort 33012IsCritical TrueAdapter Dynamic Set 2Name POM adapter 1ServerAddress The IP address of the server where POM adapter 1 is installed.ServerPort 34106ServerLocalPort 33335WebURLString /AvayaAdapter/MonitorSitesRecorderRequestIsCritical TrueAdapter Dynamic Set 3Name Avaya adapter 3ServerAddress The IP address of the server where Avaya adapter 3 is installed.ServerPort 34101ServerLocalPort 33333IsCritical TrueWebURLString /AvayaAdapter/MonitorSitesRecorderRequestAdapter Dynamic Set 4Name Unified Messaging 1ServerAddress The IP address of the server where the Unified Messaging 1
component is installed.ServerPort 33022Service Dynamic Set 1Name Media Manager 3ServerAddress The IP address of the server where the Media Manager 3
component is installed.ServerPort 33047
Configuring load balancing parameters for Avaya adapterAbout this taskUse this procedure to configure load balancing parameters for each instance of Avaya adapter.
Procedure1. Log in to SysAdmin .
2. Click System Administration > Configuration.
Avaya Proactive Outreach Manager deployment
November 2017 Deploying Harmony Workforce Optimization with Avaya Aura® CommunicationManager and Avaya Aura® Contact Center 274Comments on this document? [email protected]
3. Click the Component tab and do the following:
a. In the Component field, select Avaya adapter.
b. In the Asset field, select the asset on which you want to configure load balancingparameters for the Avaya adapter.
c. In the Node field, select the node on which you want to configure load balancingparameters for the Avaya adapter.
4. In the Value column of the DMCC section, configure the following parameters:
• dmcc_load_balancing_enabled: Type True to enable load balancing.
• dmcc_max_number_of_load_balancing_servers: Enter the total number of loadbalancing servers where Avaya adapter is installed.
• dmcc_load_balancing_instance: Enter the adapter instance value that this Avayaadapter must connect. The value must start from zero.
5. Click Save.
6. Repeat steps 1 to 4 to configure load balancing parameters for other instances of theAvaya adapter.
Next stepsRestart the Avaya adapter service after configuring the parameters.
Configuring load balancing parameters for POM adapterAbout this taskUse this procedure to configure load balancing parameters for each instance of POM adapter.
Procedure1. Log in to SysAdmin .
2. Click System Administration > Configuration.
3. Click the Component tab and do the following:
a. In the Component field, select POM adapter.
b. In the Asset field, select the asset on which you want to configure load balancingparameters for the POM adapter.
c. In the Node field, select the node on which you want to configure load balancingparameters for the POM adapter.
4. In the Value column of the POM section, configure the following parameters:
• POMLoadBalancingEnabled: Type True to enable load balancing.
• POMMaxNumberofLoadBalancingServers: Enter the total number of load balancingservers where POM adapter is installed.
Load balancing implementation
November 2017 Deploying Harmony Workforce Optimization with Avaya Aura® CommunicationManager and Avaya Aura® Contact Center 275Comments on this document? [email protected]
5. Click Save.
6. Repeat steps 1 to 4 to configure load balancing parameters for other instances of the POMadapter.
Next stepsRestart the POM adapter service after configuring the parameters.
Configuring dynamic parameters for Avaya adapterAbout this taskWhen you use multiple instances of Avaya adapter, ensure you configure each instance of theAvaya adapter with a different CTI username.. Use this procedure to configure dynamicparameters that connect multiple instances of Avaya adapter with the ACD or PBX server.
Procedure1. Log in to SysAdmin .
2. Click System Administration > Configuration.
3. Click the Dynamic tab.
4. In the Component field, select Avaya adapter.
The system populates the Dynamic Type based on the adapter you select.
5. In the Asset field, select an asset.
6. In the Node field, select a node.
7. In the No. of Sets field, type the number of sets you want to create.
8. Click Create Sets.
9. In the Value column, configure the following parameters for each instance of the Avayaadapter.
a. cmapi.username: Type the CTI username configured for the instance
b. cmapi.password: Type the CTI password configured for the instance.
10. Click Save.
Next stepsRestart the component service after configuring the parameters.
Avaya Proactive Outreach Manager deployment
November 2017 Deploying Harmony Workforce Optimization with Avaya Aura® CommunicationManager and Avaya Aura® Contact Center 276Comments on this document? [email protected]

Appendix B: Pparameter descriptions
Component parameter descriptions
Log Manager parametersUse the procedure Configuring component parameters to select the Log Manager component anduse the table below to configure parameters for Log Manager.
Parameters DescriptionAlertsConfigurationAlertManagerIPAddress To configure the IP address of the server where
Alert Manager is running to receive Log Manager-related alerts.
AlertManagerPort To configure the port number for Alert Manager. Thedefault value is 9495.
HTTPAlertsEnabled To enable the HTTP alerts to send Alert Manager-related alerts. The options are:
• True: The default value.
• False: With this value, you cannot view AlertManager-related alerts.
ComponentOptionsMonitorApplicationsList To configure the list of components. Log files are
created by each component likeRecorder,MediaManager,SIPAdapter separated bya comma.
DeleteLogsOlderThan To configure the number of days after which the logfiles must be deleted for each component. Thedefault value is 30. You can configure thisparameter depending on how many days you wantto retain the log files.
DeleteOldLogsOlderThan To configure the number of days after which the logfiles must be deleted from the Oldlogs folder. Thedefault value is 30. You can configure this
Table continues…
November 2017 Deploying Harmony Workforce Optimization with Avaya Aura® CommunicationManager and Avaya Aura® Contact Center 277Comments on this document? [email protected]
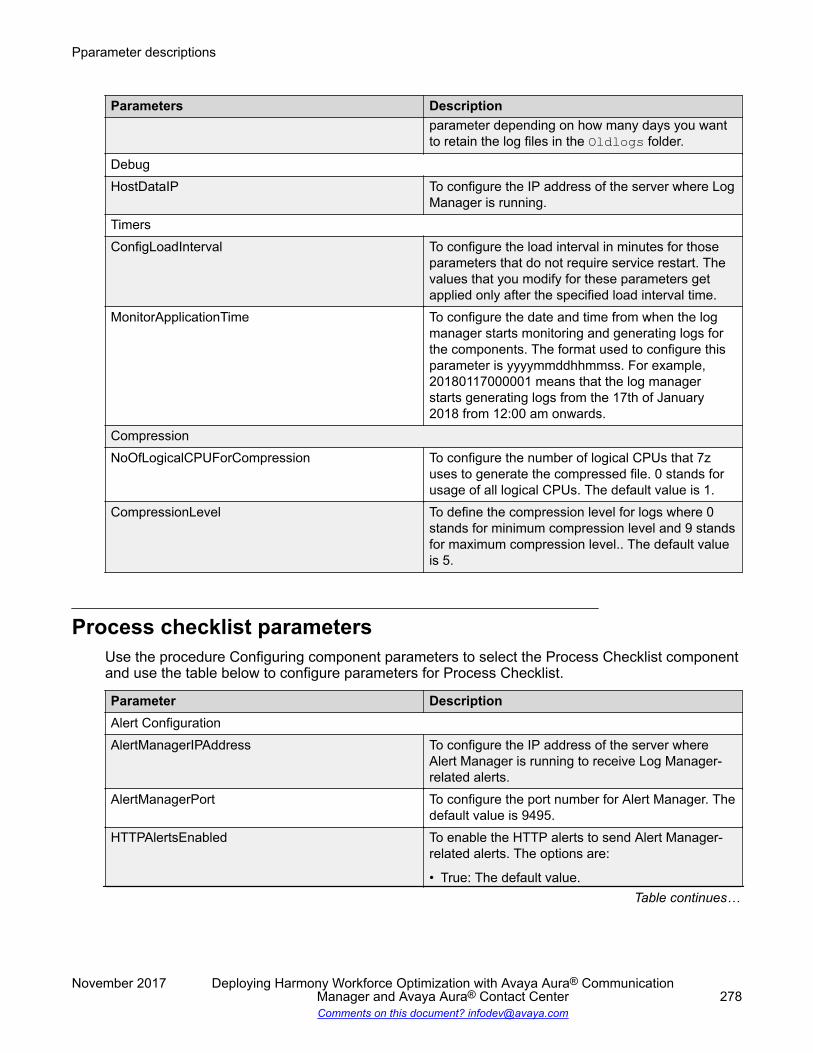
Parameters Descriptionparameter depending on how many days you wantto retain the log files in the Oldlogs folder.
DebugHostDataIP To configure the IP address of the server where Log
Manager is running.TimersConfigLoadInterval To configure the load interval in minutes for those
parameters that do not require service restart. Thevalues that you modify for these parameters getapplied only after the specified load interval time.
MonitorApplicationTime To configure the date and time from when the logmanager starts monitoring and generating logs forthe components. The format used to configure thisparameter is yyyymmddhhmmss. For example,20180117000001 means that the log managerstarts generating logs from the 17th of January2018 from 12:00 am onwards.
CompressionNoOfLogicalCPUForCompression To configure the number of logical CPUs that 7z
uses to generate the compressed file. 0 stands forusage of all logical CPUs. The default value is 1.
CompressionLevel To define the compression level for logs where 0stands for minimum compression level and 9 standsfor maximum compression level.. The default valueis 5.
Process checklist parametersUse the procedure Configuring component parameters to select the Process Checklist componentand use the table below to configure parameters for Process Checklist.
Parameter DescriptionAlert ConfigurationAlertManagerIPAddress To configure the IP address of the server where
Alert Manager is running to receive Log Manager-related alerts.
AlertManagerPort To configure the port number for Alert Manager. Thedefault value is 9495.
HTTPAlertsEnabled To enable the HTTP alerts to send Alert Manager-related alerts. The options are:
• True: The default value.Table continues…
Pparameter descriptions
November 2017 Deploying Harmony Workforce Optimization with Avaya Aura® CommunicationManager and Avaya Aura® Contact Center 278Comments on this document? [email protected]
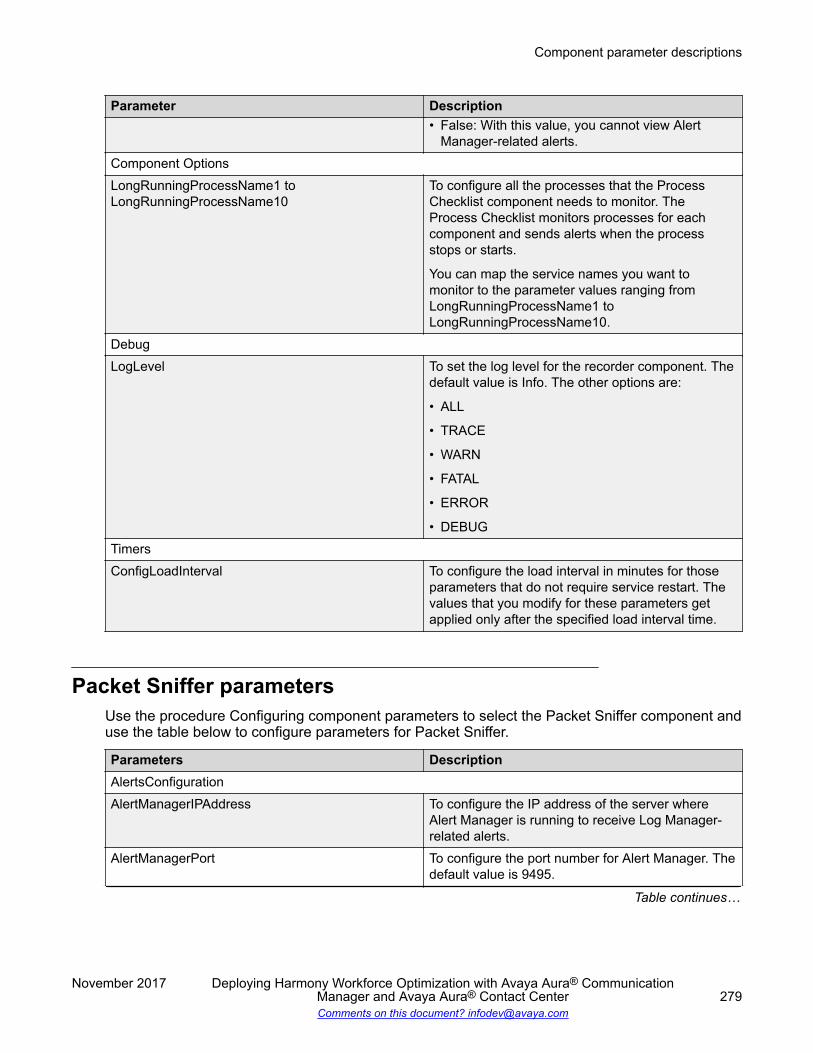
Parameter Description• False: With this value, you cannot view Alert
Manager-related alerts.Component OptionsLongRunningProcessName1 toLongRunningProcessName10
To configure all the processes that the ProcessChecklist component needs to monitor. TheProcess Checklist monitors processes for eachcomponent and sends alerts when the processstops or starts.
You can map the service names you want tomonitor to the parameter values ranging fromLongRunningProcessName1 toLongRunningProcessName10.
DebugLogLevel To set the log level for the recorder component. The
default value is Info. The other options are:
• ALL
• TRACE
• WARN
• FATAL
• ERROR
• DEBUGTimersConfigLoadInterval To configure the load interval in minutes for those
parameters that do not require service restart. Thevalues that you modify for these parameters getapplied only after the specified load interval time.
Packet Sniffer parametersUse the procedure Configuring component parameters to select the Packet Sniffer component anduse the table below to configure parameters for Packet Sniffer.
Parameters DescriptionAlertsConfigurationAlertManagerIPAddress To configure the IP address of the server where
Alert Manager is running to receive Log Manager-related alerts.
AlertManagerPort To configure the port number for Alert Manager. Thedefault value is 9495.
Table continues…
Component parameter descriptions
November 2017 Deploying Harmony Workforce Optimization with Avaya Aura® CommunicationManager and Avaya Aura® Contact Center 279Comments on this document? [email protected]
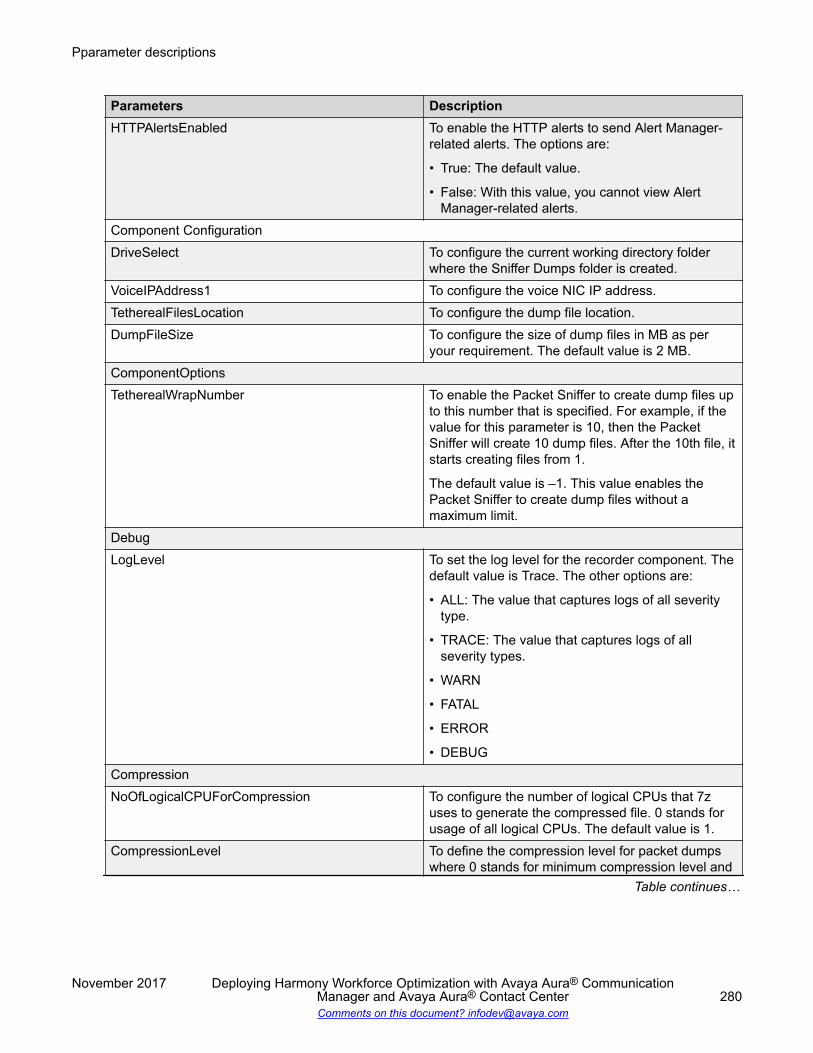
Parameters DescriptionHTTPAlertsEnabled To enable the HTTP alerts to send Alert Manager-
related alerts. The options are:
• True: The default value.
• False: With this value, you cannot view AlertManager-related alerts.
Component ConfigurationDriveSelect To configure the current working directory folder
where the Sniffer Dumps folder is created.VoiceIPAddress1 To configure the voice NIC IP address.TetherealFilesLocation To configure the dump file location.DumpFileSize To configure the size of dump files in MB as per
your requirement. The default value is 2 MB.ComponentOptionsTetherealWrapNumber To enable the Packet Sniffer to create dump files up
to this number that is specified. For example, if thevalue for this parameter is 10, then the PacketSniffer will create 10 dump files. After the 10th file, itstarts creating files from 1.
The default value is –1. This value enables thePacket Sniffer to create dump files without amaximum limit.
DebugLogLevel To set the log level for the recorder component. The
default value is Trace. The other options are:
• ALL: The value that captures logs of all severitytype.
• TRACE: The value that captures logs of allseverity types.
• WARN
• FATAL
• ERROR
• DEBUGCompressionNoOfLogicalCPUForCompression To configure the number of logical CPUs that 7z
uses to generate the compressed file. 0 stands forusage of all logical CPUs. The default value is 1.
CompressionLevel To define the compression level for packet dumpswhere 0 stands for minimum compression level and
Table continues…
Pparameter descriptions
November 2017 Deploying Harmony Workforce Optimization with Avaya Aura® CommunicationManager and Avaya Aura® Contact Center 280Comments on this document? [email protected]
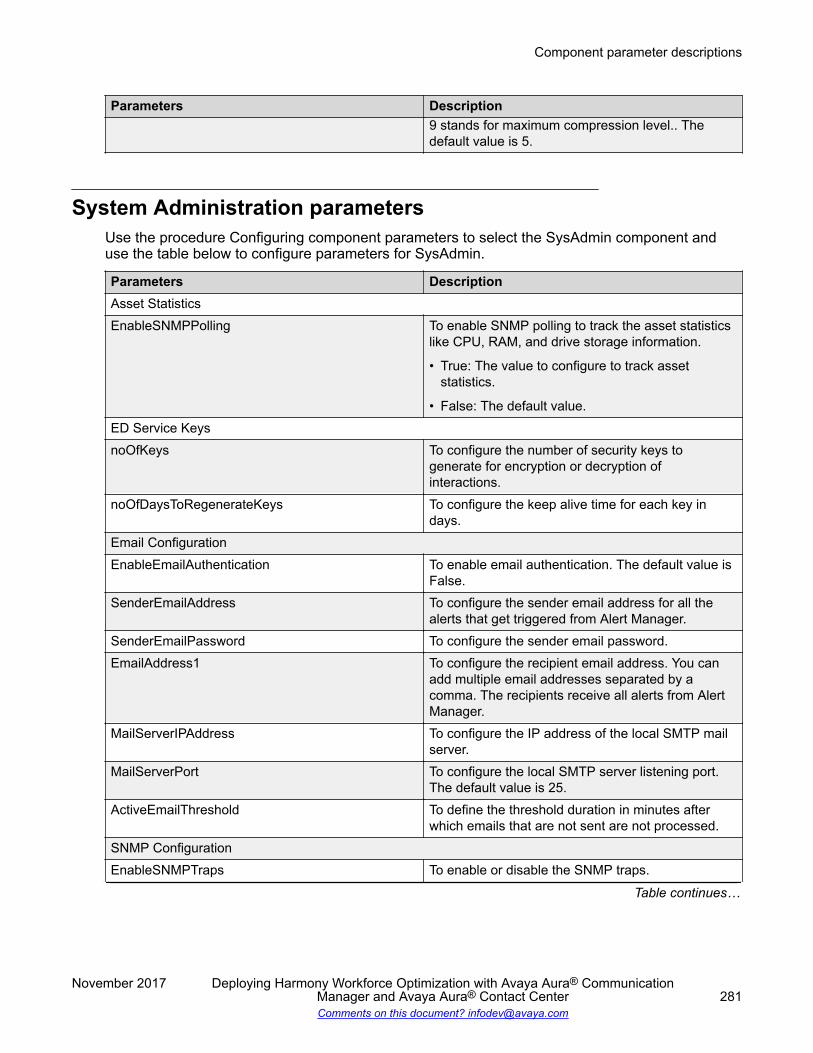
Parameters Description9 stands for maximum compression level.. Thedefault value is 5.
System Administration parametersUse the procedure Configuring component parameters to select the SysAdmin component anduse the table below to configure parameters for SysAdmin.
Parameters DescriptionAsset StatisticsEnableSNMPPolling To enable SNMP polling to track the asset statistics
like CPU, RAM, and drive storage information.
• True: The value to configure to track assetstatistics.
• False: The default value.ED Service KeysnoOfKeys To configure the number of security keys to
generate for encryption or decryption ofinteractions.
noOfDaysToRegenerateKeys To configure the keep alive time for each key indays.
Email ConfigurationEnableEmailAuthentication To enable email authentication. The default value is
False.SenderEmailAddress To configure the sender email address for all the
alerts that get triggered from Alert Manager.SenderEmailPassword To configure the sender email password.EmailAddress1 To configure the recipient email address. You can
add multiple email addresses separated by acomma. The recipients receive all alerts from AlertManager.
MailServerIPAddress To configure the IP address of the local SMTP mailserver.
MailServerPort To configure the local SMTP server listening port.The default value is 25.
ActiveEmailThreshold To define the threshold duration in minutes afterwhich emails that are not sent are not processed.
SNMP ConfigurationEnableSNMPTraps To enable or disable the SNMP traps.
Table continues…
Component parameter descriptions
November 2017 Deploying Harmony Workforce Optimization with Avaya Aura® CommunicationManager and Avaya Aura® Contact Center 281Comments on this document? [email protected]
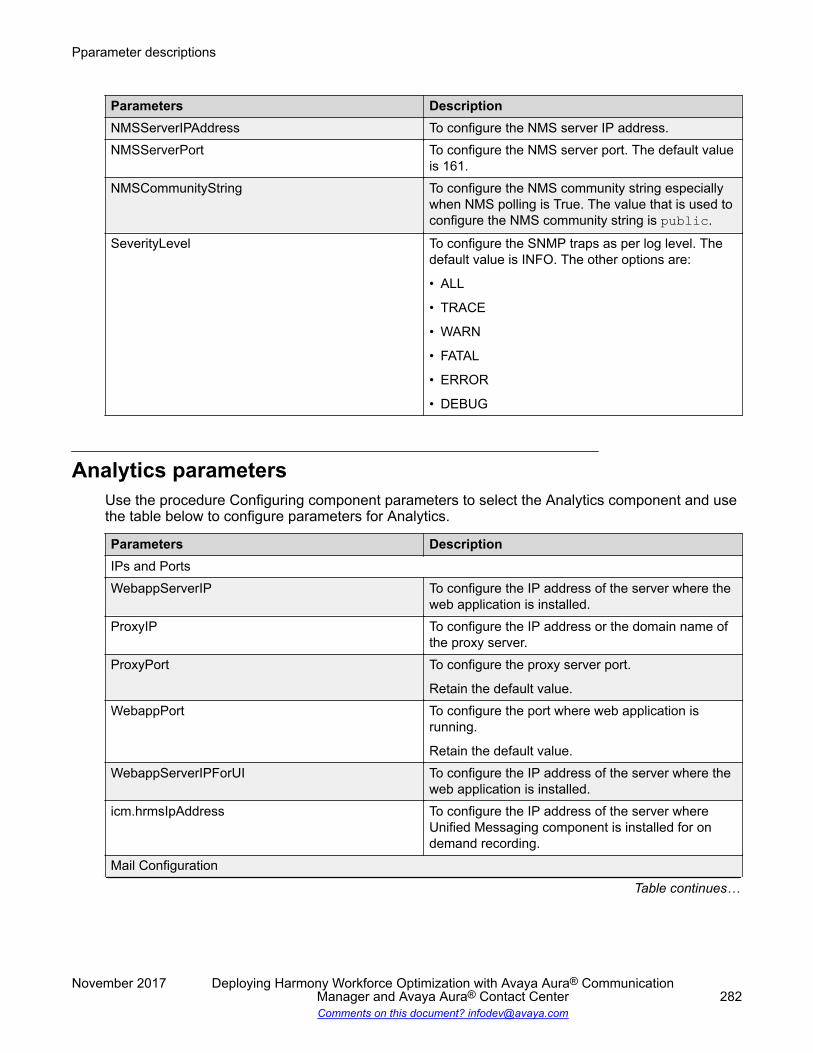
Parameters DescriptionNMSServerIPAddress To configure the NMS server IP address.NMSServerPort To configure the NMS server port. The default value
is 161.NMSCommunityString To configure the NMS community string especially
when NMS polling is True. The value that is used toconfigure the NMS community string is public.
SeverityLevel To configure the SNMP traps as per log level. Thedefault value is INFO. The other options are:
• ALL
• TRACE
• WARN
• FATAL
• ERROR
• DEBUG
Analytics parametersUse the procedure Configuring component parameters to select the Analytics component and usethe table below to configure parameters for Analytics.
Parameters DescriptionIPs and PortsWebappServerIP To configure the IP address of the server where the
web application is installed.ProxyIP To configure the IP address or the domain name of
the proxy server.ProxyPort To configure the proxy server port.
Retain the default value.WebappPort To configure the port where web application is
running.
Retain the default value.WebappServerIPForUI To configure the IP address of the server where the
web application is installed.icm.hrmsIpAddress To configure the IP address of the server where
Unified Messaging component is installed for ondemand recording.
Mail Configuration
Table continues…
Pparameter descriptions
November 2017 Deploying Harmony Workforce Optimization with Avaya Aura® CommunicationManager and Avaya Aura® Contact Center 282Comments on this document? [email protected]
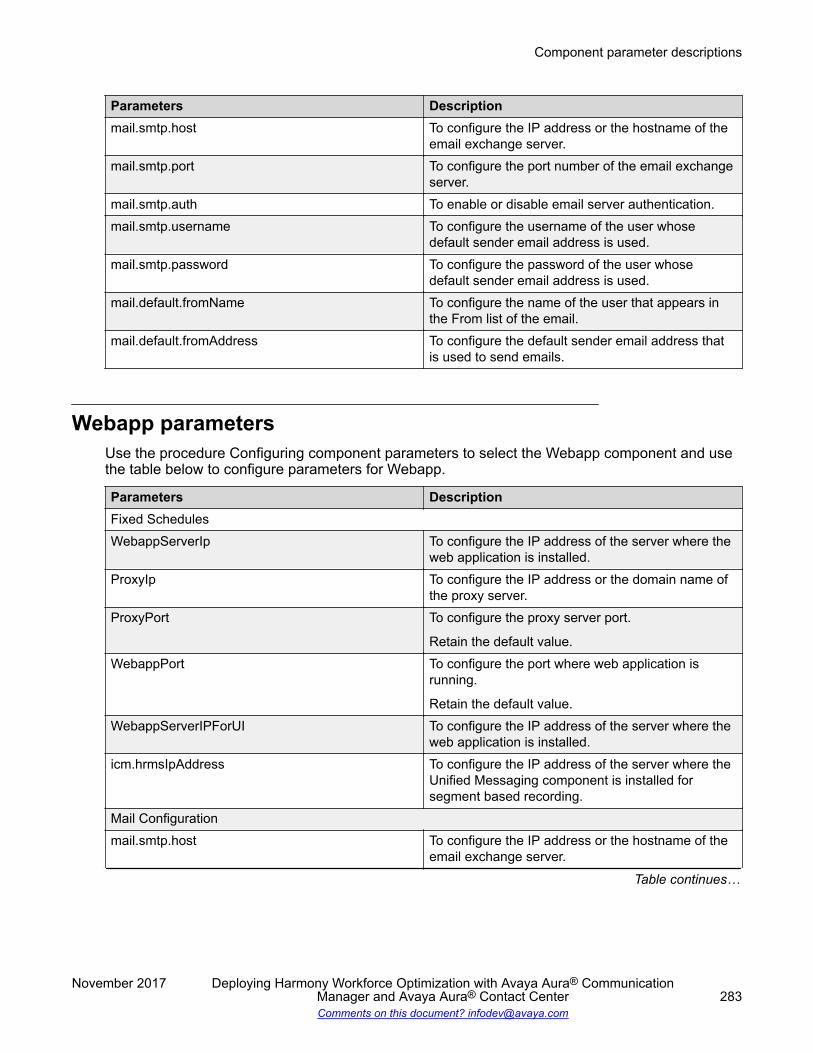
Parameters Descriptionmail.smtp.host To configure the IP address or the hostname of the
email exchange server.mail.smtp.port To configure the port number of the email exchange
server.mail.smtp.auth To enable or disable email server authentication.mail.smtp.username To configure the username of the user whose
default sender email address is used.mail.smtp.password To configure the password of the user whose
default sender email address is used.mail.default.fromName To configure the name of the user that appears in
the From list of the email.mail.default.fromAddress To configure the default sender email address that
is used to send emails.
Webapp parametersUse the procedure Configuring component parameters to select the Webapp component and usethe table below to configure parameters for Webapp.
Parameters DescriptionFixed SchedulesWebappServerIp To configure the IP address of the server where the
web application is installed.ProxyIp To configure the IP address or the domain name of
the proxy server.ProxyPort To configure the proxy server port.
Retain the default value.WebappPort To configure the port where web application is
running.
Retain the default value.WebappServerIPForUI To configure the IP address of the server where the
web application is installed.icm.hrmsIpAddress To configure the IP address of the server where the
Unified Messaging component is installed forsegment based recording.
Mail Configurationmail.smtp.host To configure the IP address or the hostname of the
email exchange server.
Table continues…
Component parameter descriptions
November 2017 Deploying Harmony Workforce Optimization with Avaya Aura® CommunicationManager and Avaya Aura® Contact Center 283Comments on this document? [email protected]
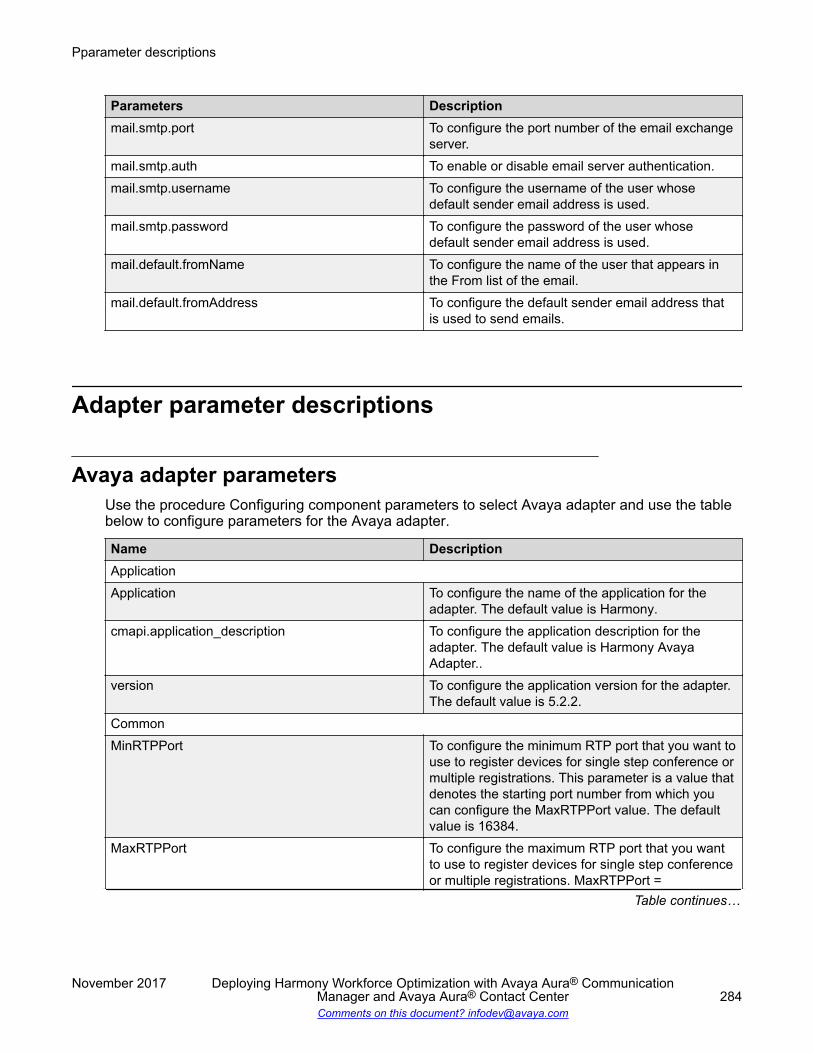
Parameters Descriptionmail.smtp.port To configure the port number of the email exchange
server.mail.smtp.auth To enable or disable email server authentication.mail.smtp.username To configure the username of the user whose
default sender email address is used.mail.smtp.password To configure the password of the user whose
default sender email address is used.mail.default.fromName To configure the name of the user that appears in
the From list of the email.mail.default.fromAddress To configure the default sender email address that
is used to send emails.
Adapter parameter descriptions
Avaya adapter parametersUse the procedure Configuring component parameters to select Avaya adapter and use the tablebelow to configure parameters for the Avaya adapter.
Name DescriptionApplicationApplication To configure the name of the application for the
adapter. The default value is Harmony.cmapi.application_description To configure the application description for the
adapter. The default value is Harmony AvayaAdapter..
version To configure the application version for the adapter.The default value is 5.2.2.
CommonMinRTPPort To configure the minimum RTP port that you want to
use to register devices for single step conference ormultiple registrations. This parameter is a value thatdenotes the starting port number from which youcan configure the MaxRTPPort value. The defaultvalue is 16384.
MaxRTPPort To configure the maximum RTP port that you wantto use to register devices for single step conferenceor multiple registrations. MaxRTPPort =
Table continues…
Pparameter descriptions
November 2017 Deploying Harmony Workforce Optimization with Avaya Aura® CommunicationManager and Avaya Aura® Contact Center 284Comments on this document? [email protected]
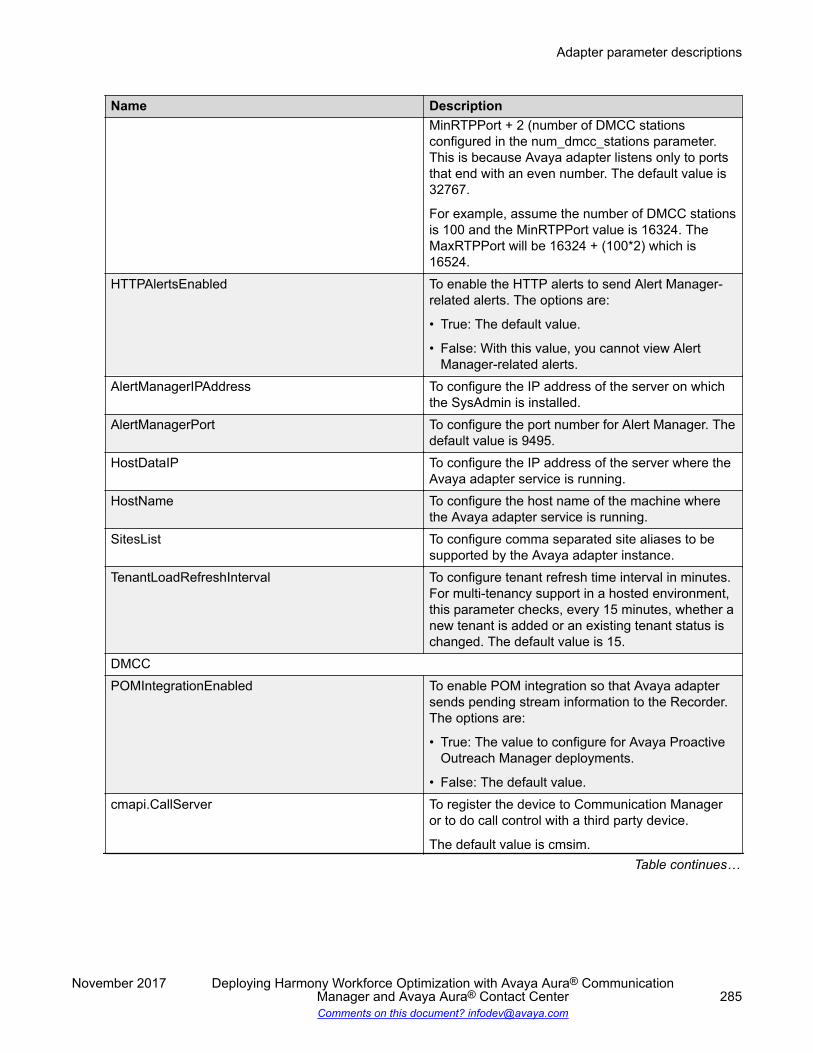
Name DescriptionMinRTPPort + 2 (number of DMCC stationsconfigured in the num_dmcc_stations parameter.This is because Avaya adapter listens only to portsthat end with an even number. The default value is32767.
For example, assume the number of DMCC stationsis 100 and the MinRTPPort value is 16324. TheMaxRTPPort will be 16324 + (100*2) which is16524.
HTTPAlertsEnabled To enable the HTTP alerts to send Alert Manager-related alerts. The options are:
• True: The default value.
• False: With this value, you cannot view AlertManager-related alerts.
AlertManagerIPAddress To configure the IP address of the server on whichthe SysAdmin is installed.
AlertManagerPort To configure the port number for Alert Manager. Thedefault value is 9495.
HostDataIP To configure the IP address of the server where theAvaya adapter service is running.
HostName To configure the host name of the machine wherethe Avaya adapter service is running.
SitesList To configure comma separated site aliases to besupported by the Avaya adapter instance.
TenantLoadRefreshInterval To configure tenant refresh time interval in minutes.For multi-tenancy support in a hosted environment,this parameter checks, every 15 minutes, whether anew tenant is added or an existing tenant status ischanged. The default value is 15.
DMCCPOMIntegrationEnabled To enable POM integration so that Avaya adapter
sends pending stream information to the Recorder.The options are:
• True: The value to configure for Avaya ProactiveOutreach Manager deployments.
• False: The default value.cmapi.CallServer To register the device to Communication Manager
or to do call control with a third party device.
The default value is cmsim.Table continues…
Adapter parameter descriptions
November 2017 Deploying Harmony Workforce Optimization with Avaya Aura® CommunicationManager and Avaya Aura® Contact Center 285Comments on this document? [email protected]
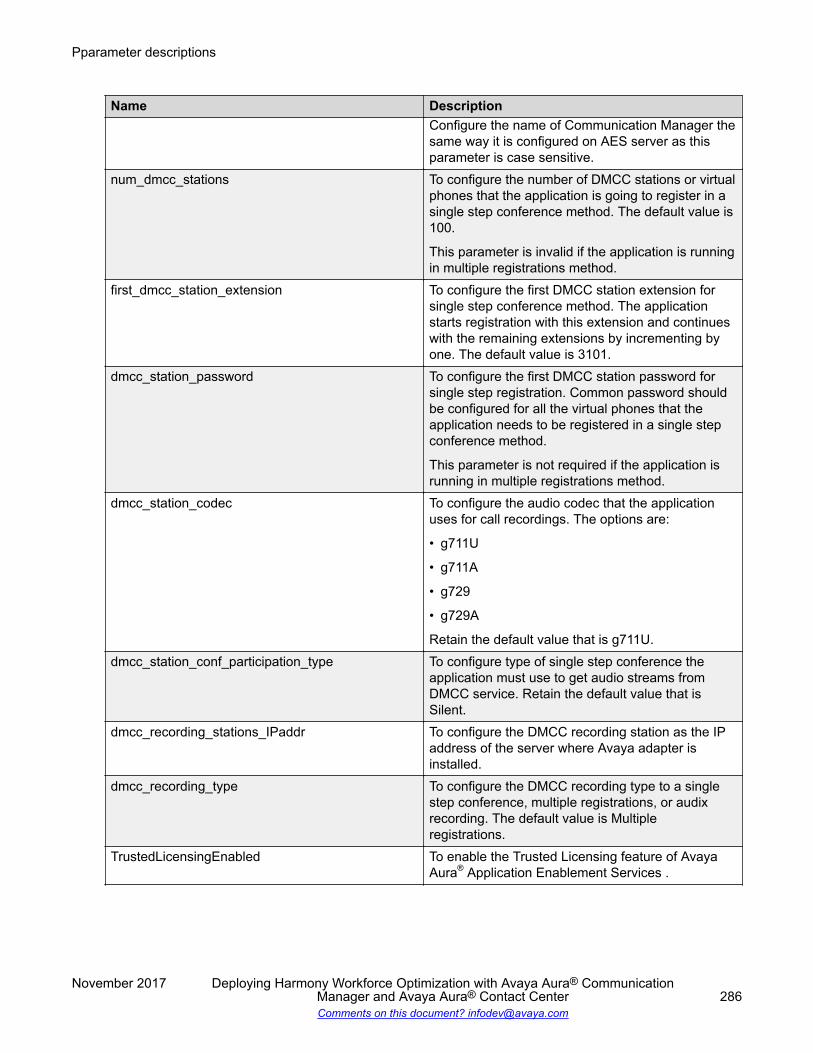
Name DescriptionConfigure the name of Communication Manager thesame way it is configured on AES server as thisparameter is case sensitive.
num_dmcc_stations To configure the number of DMCC stations or virtualphones that the application is going to register in asingle step conference method. The default value is100.
This parameter is invalid if the application is runningin multiple registrations method.
first_dmcc_station_extension To configure the first DMCC station extension forsingle step conference method. The applicationstarts registration with this extension and continueswith the remaining extensions by incrementing byone. The default value is 3101.
dmcc_station_password To configure the first DMCC station password forsingle step registration. Common password shouldbe configured for all the virtual phones that theapplication needs to be registered in a single stepconference method.
This parameter is not required if the application isrunning in multiple registrations method.
dmcc_station_codec To configure the audio codec that the applicationuses for call recordings. The options are:
• g711U
• g711A
• g729
• g729A
Retain the default value that is g711U.dmcc_station_conf_participation_type To configure type of single step conference the
application must use to get audio streams fromDMCC service. Retain the default value that isSilent.
dmcc_recording_stations_IPaddr To configure the DMCC recording station as the IPaddress of the server where Avaya adapter isinstalled.
dmcc_recording_type To configure the DMCC recording type to a singlestep conference, multiple registrations, or audixrecording. The default value is Multipleregistrations.
TrustedLicensingEnabled To enable the Trusted Licensing feature of AvayaAura® Application Enablement Services .
Pparameter descriptions
November 2017 Deploying Harmony Workforce Optimization with Avaya Aura® CommunicationManager and Avaya Aura® Contact Center 286Comments on this document? [email protected]
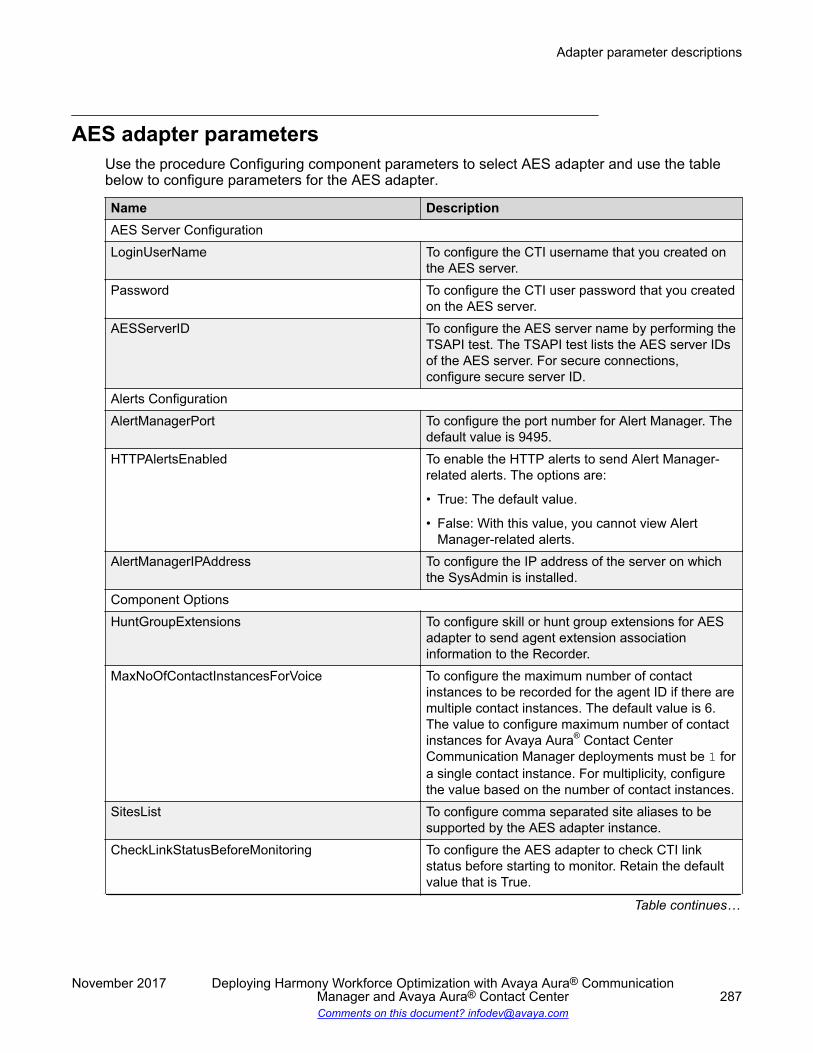
AES adapter parametersUse the procedure Configuring component parameters to select AES adapter and use the tablebelow to configure parameters for the AES adapter.
Name DescriptionAES Server ConfigurationLoginUserName To configure the CTI username that you created on
the AES server.Password To configure the CTI user password that you created
on the AES server.AESServerID To configure the AES server name by performing the
TSAPI test. The TSAPI test lists the AES server IDsof the AES server. For secure connections,configure secure server ID.
Alerts ConfigurationAlertManagerPort To configure the port number for Alert Manager. The
default value is 9495.HTTPAlertsEnabled To enable the HTTP alerts to send Alert Manager-
related alerts. The options are:
• True: The default value.
• False: With this value, you cannot view AlertManager-related alerts.
AlertManagerIPAddress To configure the IP address of the server on whichthe SysAdmin is installed.
Component OptionsHuntGroupExtensions To configure skill or hunt group extensions for AES
adapter to send agent extension associationinformation to the Recorder.
MaxNoOfContactInstancesForVoice To configure the maximum number of contactinstances to be recorded for the agent ID if there aremultiple contact instances. The default value is 6.The value to configure maximum number of contactinstances for Avaya Aura® Contact CenterCommunication Manager deployments must be 1 fora single contact instance. For multiplicity, configurethe value based on the number of contact instances.
SitesList To configure comma separated site aliases to besupported by the AES adapter instance.
CheckLinkStatusBeforeMonitoring To configure the AES adapter to check CTI linkstatus before starting to monitor. Retain the defaultvalue that is True.
Table continues…
Adapter parameter descriptions
November 2017 Deploying Harmony Workforce Optimization with Avaya Aura® CommunicationManager and Avaya Aura® Contact Center 287Comments on this document? [email protected]
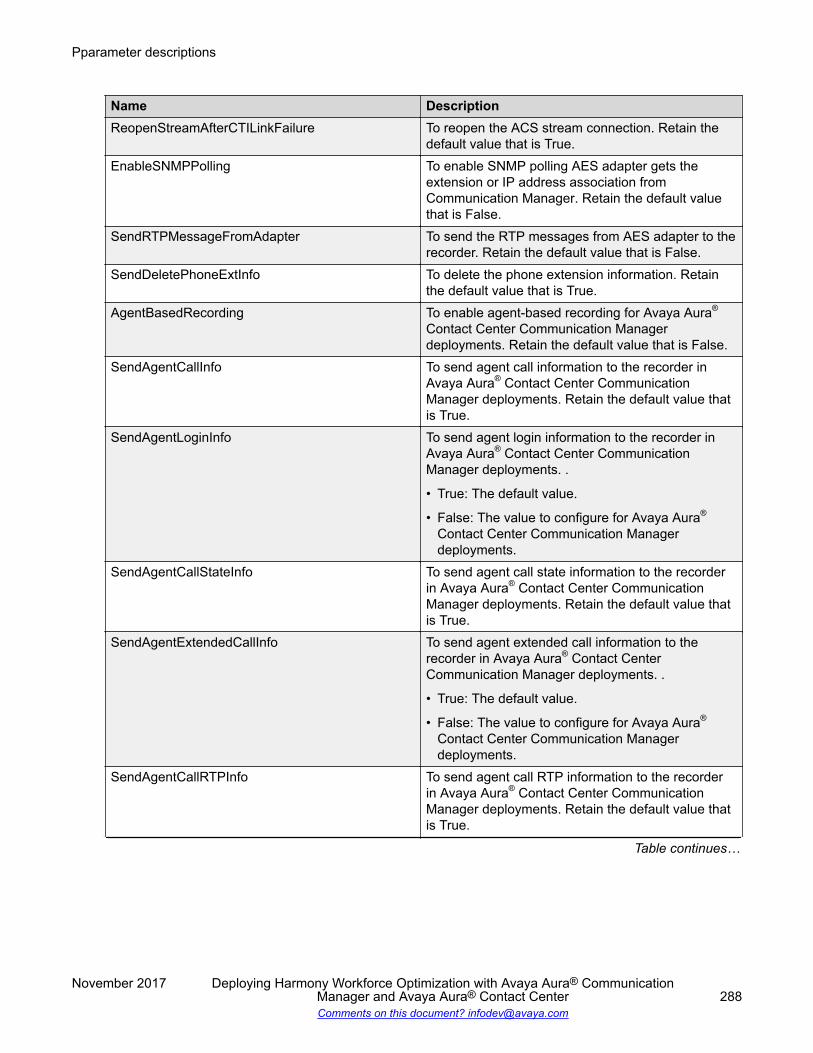
Name DescriptionReopenStreamAfterCTILinkFailure To reopen the ACS stream connection. Retain the
default value that is True.EnableSNMPPolling To enable SNMP polling AES adapter gets the
extension or IP address association fromCommunication Manager. Retain the default valuethat is False.
SendRTPMessageFromAdapter To send the RTP messages from AES adapter to therecorder. Retain the default value that is False.
SendDeletePhoneExtInfo To delete the phone extension information. Retainthe default value that is True.
AgentBasedRecording To enable agent-based recording for Avaya Aura®
Contact Center Communication Managerdeployments. Retain the default value that is False.
SendAgentCallInfo To send agent call information to the recorder inAvaya Aura® Contact Center CommunicationManager deployments. Retain the default value thatis True.
SendAgentLoginInfo To send agent login information to the recorder inAvaya Aura® Contact Center CommunicationManager deployments. .
• True: The default value.
• False: The value to configure for Avaya Aura®
Contact Center Communication Managerdeployments.
SendAgentCallStateInfo To send agent call state information to the recorderin Avaya Aura® Contact Center CommunicationManager deployments. Retain the default value thatis True.
SendAgentExtendedCallInfo To send agent extended call information to therecorder in Avaya Aura® Contact CenterCommunication Manager deployments. .
• True: The default value.
• False: The value to configure for Avaya Aura®
Contact Center Communication Managerdeployments.
SendAgentCallRTPInfo To send agent call RTP information to the recorderin Avaya Aura® Contact Center CommunicationManager deployments. Retain the default value thatis True.
Table continues…
Pparameter descriptions
November 2017 Deploying Harmony Workforce Optimization with Avaya Aura® CommunicationManager and Avaya Aura® Contact Center 288Comments on this document? [email protected]

Name DescriptionSendPhoneExtInfo To send phone extension information messages to
the recorder in Avaya Aura® Contact CenterCommunication Manager deployments. .
• True: The default value.
• False: The value to configure for Avaya Aura®
Contact Center Communication Managerdeployments.
SendAgentCallEndResponseCodeInfo To send agent call end response code information tothe recorder in Avaya Aura® Contact CenterCommunication Manager deployments. Retain thedefault value that is True.
SendAgentCallFailedInfo To send agent call failed information to the recorderin Avaya Aura® Contact Center CommunicationManager deployments. Retain the default value thatis True.
SendAgentCallTransferInfo To send agent call transfer information to therecorder in Avaya Aura® Contact CenterCommunication Manager deployments. Retain thedefault value that is True.
SendAgentCallConferenceInfo To send agent call conference information to therecorder in Avaya Aura® Contact CenterCommunication Manager deployments. Retain thedefault value that is True.
POMNailupCallCLID To configure the nailup call CLID that is specified onAvaya Proactive Outreach Manager server. Forexample, 98765.
POMIntegrationEnabled To enable Avaya Proactive Outreach Managerintegration for the Recorder to check nailed upconnections in AES adapter. The options are:
• True: The value to enable for Avaya Aura® ContactCenter on Avaya Aura® Communication Managerwith Avaya Proactive Outreach Managerdeployments.
• False: The default value.
The value to disable Avaya Proactive OutreachManager integration.
TrustedLicensingEnabled To enable the Trusted Licensing feature of AvayaAura® Application Enablement Services .
DebugLogTSAPIEvents To configure the TSAPI events to be visible in the
log file, The options are:
• True: The value to configure TSAPI events.Table continues…
Adapter parameter descriptions
November 2017 Deploying Harmony Workforce Optimization with Avaya Aura® CommunicationManager and Avaya Aura® Contact Center 289Comments on this document? [email protected]
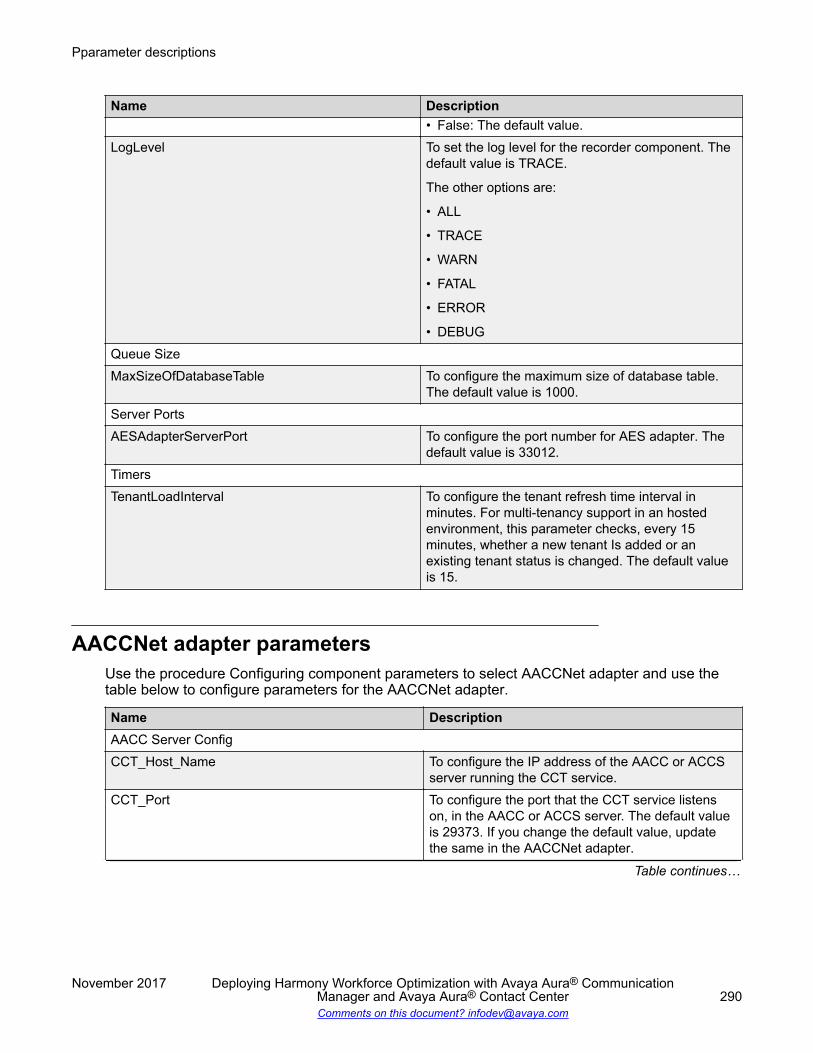
Name Description• False: The default value.
LogLevel To set the log level for the recorder component. Thedefault value is TRACE.
The other options are:
• ALL
• TRACE
• WARN
• FATAL
• ERROR
• DEBUGQueue SizeMaxSizeOfDatabaseTable To configure the maximum size of database table.
The default value is 1000.Server PortsAESAdapterServerPort To configure the port number for AES adapter. The
default value is 33012.TimersTenantLoadInterval To configure the tenant refresh time interval in
minutes. For multi-tenancy support in an hostedenvironment, this parameter checks, every 15minutes, whether a new tenant Is added or anexisting tenant status is changed. The default valueis 15.
AACCNet adapter parametersUse the procedure Configuring component parameters to select AACCNet adapter and use thetable below to configure parameters for the AACCNet adapter.
Name DescriptionAACC Server ConfigCCT_Host_Name To configure the IP address of the AACC or ACCS
server running the CCT service.CCT_Port To configure the port that the CCT service listens
on, in the AACC or ACCS server. The default valueis 29373. If you change the default value, updatethe same in the AACCNet adapter.
Table continues…
Pparameter descriptions
November 2017 Deploying Harmony Workforce Optimization with Avaya Aura® CommunicationManager and Avaya Aura® Contact Center 290Comments on this document? [email protected]
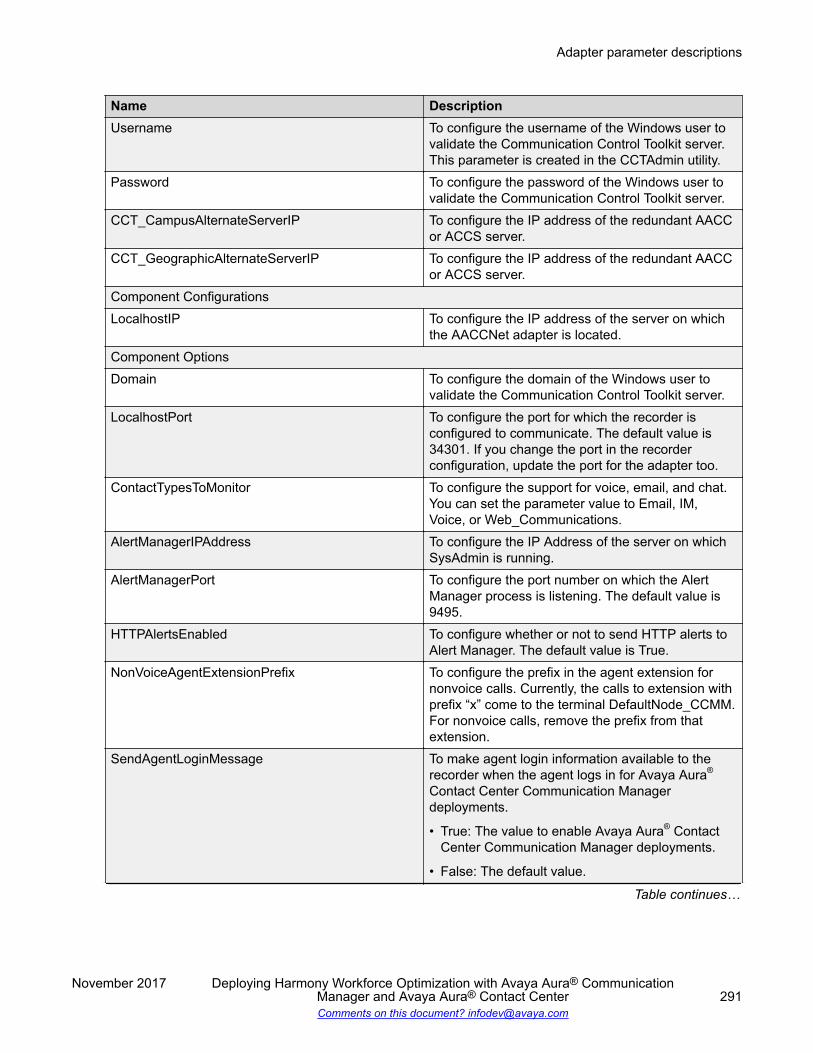
Name DescriptionUsername To configure the username of the Windows user to
validate the Communication Control Toolkit server.This parameter is created in the CCTAdmin utility.
Password To configure the password of the Windows user tovalidate the Communication Control Toolkit server.
CCT_CampusAlternateServerIP To configure the IP address of the redundant AACCor ACCS server.
CCT_GeographicAlternateServerIP To configure the IP address of the redundant AACCor ACCS server.
Component ConfigurationsLocalhostIP To configure the IP address of the server on which
the AACCNet adapter is located.Component OptionsDomain To configure the domain of the Windows user to
validate the Communication Control Toolkit server.LocalhostPort To configure the port for which the recorder is
configured to communicate. The default value is34301. If you change the port in the recorderconfiguration, update the port for the adapter too.
ContactTypesToMonitor To configure the support for voice, email, and chat.You can set the parameter value to Email, IM,Voice, or Web_Communications.
AlertManagerIPAddress To configure the IP Address of the server on whichSysAdmin is running.
AlertManagerPort To configure the port number on which the AlertManager process is listening. The default value is9495.
HTTPAlertsEnabled To configure whether or not to send HTTP alerts toAlert Manager. The default value is True.
NonVoiceAgentExtensionPrefix To configure the prefix in the agent extension fornonvoice calls. Currently, the calls to extension withprefix “x” come to the terminal DefaultNode_CCMM.For nonvoice calls, remove the prefix from thatextension.
SendAgentLoginMessage To make agent login information available to therecorder when the agent logs in for Avaya Aura®
Contact Center Communication Managerdeployments.
• True: The value to enable Avaya Aura® ContactCenter Communication Manager deployments.
• False: The default value.
Table continues…
Adapter parameter descriptions
November 2017 Deploying Harmony Workforce Optimization with Avaya Aura® CommunicationManager and Avaya Aura® Contact Center 291Comments on this document? [email protected]

Name DescriptionSendAgentLogoutMessage To make agent logout information available to the
recorder when the agent logs out for Avaya Aura®
Contact Center Communication Managerdeployments.
• True: The value to enable Avaya Aura® ContactCenter Communication Manager deployments.
• False: The default value.SendCallInfoMessage To send agent call information to the recorder for
Avaya Aura® Contact Center CommunicationManager deployments. Retain the default value thatis False.
SendAgentCallStateInfo To send agent call state information to the recorderfor Avaya Aura® Contact Center CommunicationManager deployments. Retain the default value thatis False.
SendCallACDInfoMessage To make agent call ACD information available to therecorder for Avaya Aura® Contact CenterCommunication Manager deployments. Retain thedefault value that is True.
SendCallWrapupData To make call wrapup data available to the recorderfor Avaya Aura® Contact Center CommunicationManager deployments. Retain the default value thatis True.
SendCallRTPInfo To send agent call RTP information to the recorderfor Avaya Aura® Contact Center CommunicationManager deployments. Retain the default value thatis False.
SendContactIDForCallStitching To send the icmEnterpriseID as the call ID duringagent wrapup messages for Avaya Aura® ContactCenter Communication Manager deployments.Retain the default value that is True.
SendScreenCaptureMessage To send screen capture messages to the recorderfor nonvoice transactions for Avaya Aura® ContactCenter Communication Manager deployments. Theoptions are:
• True: The value to enable for nonvoicetransactions in Avaya Aura® Contact CenterCommunication Manager deployments.
• False: The default value.SendAgentLoginForNonVoice To make agent login information for nonvoice
transactions available to the recorder when theagent logs in for Avaya Aura® Contact Center
Table continues…
Pparameter descriptions
November 2017 Deploying Harmony Workforce Optimization with Avaya Aura® CommunicationManager and Avaya Aura® Contact Center 292Comments on this document? [email protected]

Name DescriptionCommunication Manager deployments. The optionsare:
• True: The value to enable for nonvoicetransactions in Avaya Aura® Contact CenterCommunication Manager deployments.
• False: The default value.SendAgentLogoutForNonVoice To make agent logout information for nonvoice
transactions available to the recorder when theagent logs out for Avaya Aura® Contact CenterCommunication Manager deployments. The optionsare:
• True: The value to enable for nonvoicetransactions in Avaya Aura® Contact CenterCommunication Manager deployments.
• False: The default value.SendRTPInfoForNonVoice To send agent call RTP information to the recorder
for nonvoice transactions for Avaya Aura® ContactCenter Communication Manager deployments. Theoptions are:
• True: The value to enable for nonvoicetransactions in Avaya Aura® Contact CenterCommunication Manager deployments.
• False: The default value.SendCallHoldInfoForNonVoice To send call hold information messages to the
recorder for nonvoice transactions for Avaya Aura®
Contact Center Communication Managerdeployments. The options are:
• True: The value to enable for nonvoicetransactions in Avaya Aura® Contact CenterCommunication Manager deployments.
• False: The default value.SendCallResumeInfoForNonVoice To send call resume information messages to the
recorder for nonvoice transactions for Avaya Aura®
Contact Center Communication Managerdeployments. The options are:
• True: The value to enable for nonvoicetransactions in Avaya Aura® Contact CenterCommunication Manager deployments.
• False: The default value.SendContactIDForCallStitchingNonVoice To send the icmEnterpriseID as the call ID during
agent wrapup messages for nonvoice transactionsTable continues…
Adapter parameter descriptions
November 2017 Deploying Harmony Workforce Optimization with Avaya Aura® CommunicationManager and Avaya Aura® Contact Center 293Comments on this document? [email protected]
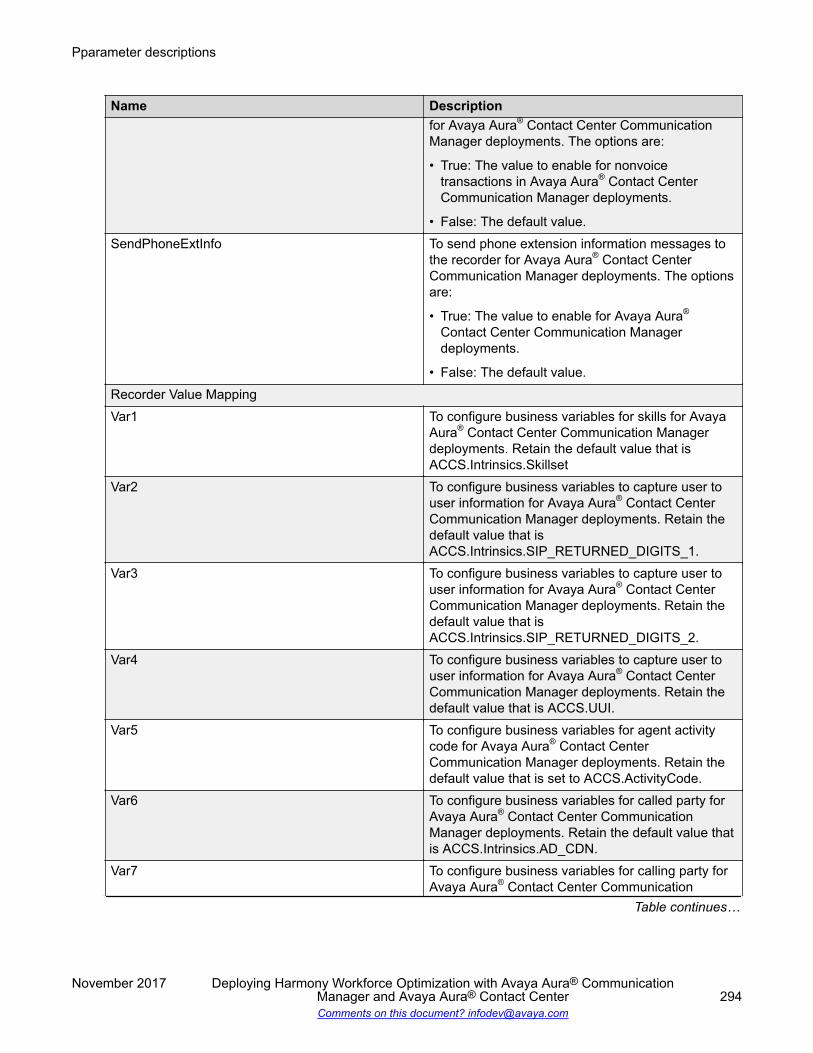
Name Descriptionfor Avaya Aura® Contact Center CommunicationManager deployments. The options are:
• True: The value to enable for nonvoicetransactions in Avaya Aura® Contact CenterCommunication Manager deployments.
• False: The default value.SendPhoneExtInfo To send phone extension information messages to
the recorder for Avaya Aura® Contact CenterCommunication Manager deployments. The optionsare:
• True: The value to enable for Avaya Aura®
Contact Center Communication Managerdeployments.
• False: The default value.Recorder Value MappingVar1 To configure business variables for skills for Avaya
Aura® Contact Center Communication Managerdeployments. Retain the default value that isACCS.Intrinsics.Skillset
Var2 To configure business variables to capture user touser information for Avaya Aura® Contact CenterCommunication Manager deployments. Retain thedefault value that isACCS.Intrinsics.SIP_RETURNED_DIGITS_1.
Var3 To configure business variables to capture user touser information for Avaya Aura® Contact CenterCommunication Manager deployments. Retain thedefault value that isACCS.Intrinsics.SIP_RETURNED_DIGITS_2.
Var4 To configure business variables to capture user touser information for Avaya Aura® Contact CenterCommunication Manager deployments. Retain thedefault value that is ACCS.UUI.
Var5 To configure business variables for agent activitycode for Avaya Aura® Contact CenterCommunication Manager deployments. Retain thedefault value that is set to ACCS.ActivityCode.
Var6 To configure business variables for called party forAvaya Aura® Contact Center CommunicationManager deployments. Retain the default value thatis ACCS.Intrinsics.AD_CDN.
Var7 To configure business variables for calling party forAvaya Aura® Contact Center Communication
Table continues…
Pparameter descriptions
November 2017 Deploying Harmony Workforce Optimization with Avaya Aura® CommunicationManager and Avaya Aura® Contact Center 294Comments on this document? [email protected]
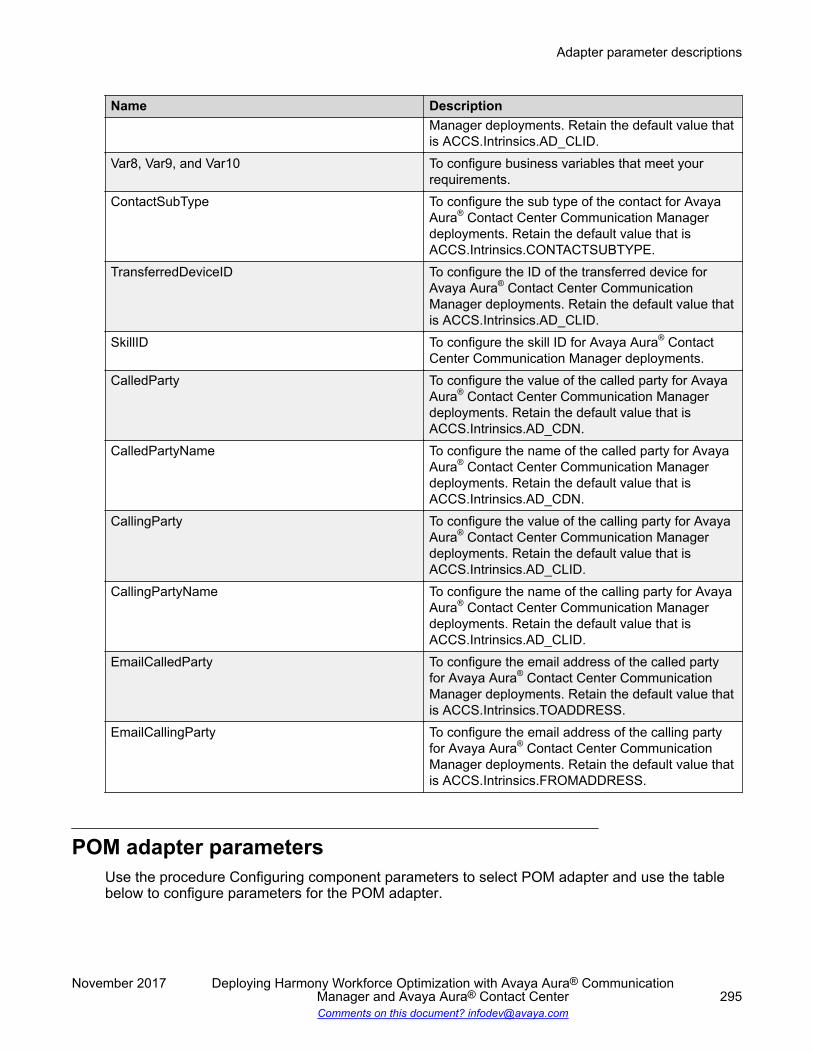
Name DescriptionManager deployments. Retain the default value thatis ACCS.Intrinsics.AD_CLID.
Var8, Var9, and Var10 To configure business variables that meet yourrequirements.
ContactSubType To configure the sub type of the contact for AvayaAura® Contact Center Communication Managerdeployments. Retain the default value that isACCS.Intrinsics.CONTACTSUBTYPE.
TransferredDeviceID To configure the ID of the transferred device forAvaya Aura® Contact Center CommunicationManager deployments. Retain the default value thatis ACCS.Intrinsics.AD_CLID.
SkillID To configure the skill ID for Avaya Aura® ContactCenter Communication Manager deployments.
CalledParty To configure the value of the called party for AvayaAura® Contact Center Communication Managerdeployments. Retain the default value that isACCS.Intrinsics.AD_CDN.
CalledPartyName To configure the name of the called party for AvayaAura® Contact Center Communication Managerdeployments. Retain the default value that isACCS.Intrinsics.AD_CDN.
CallingParty To configure the value of the calling party for AvayaAura® Contact Center Communication Managerdeployments. Retain the default value that isACCS.Intrinsics.AD_CLID.
CallingPartyName To configure the name of the calling party for AvayaAura® Contact Center Communication Managerdeployments. Retain the default value that isACCS.Intrinsics.AD_CLID.
EmailCalledParty To configure the email address of the called partyfor Avaya Aura® Contact Center CommunicationManager deployments. Retain the default value thatis ACCS.Intrinsics.TOADDRESS.
EmailCallingParty To configure the email address of the calling partyfor Avaya Aura® Contact Center CommunicationManager deployments. Retain the default value thatis ACCS.Intrinsics.FROMADDRESS.
POM adapter parametersUse the procedure Configuring component parameters to select POM adapter and use the tablebelow to configure parameters for the POM adapter.
Adapter parameter descriptions
November 2017 Deploying Harmony Workforce Optimization with Avaya Aura® CommunicationManager and Avaya Aura® Contact Center 295Comments on this document? [email protected]
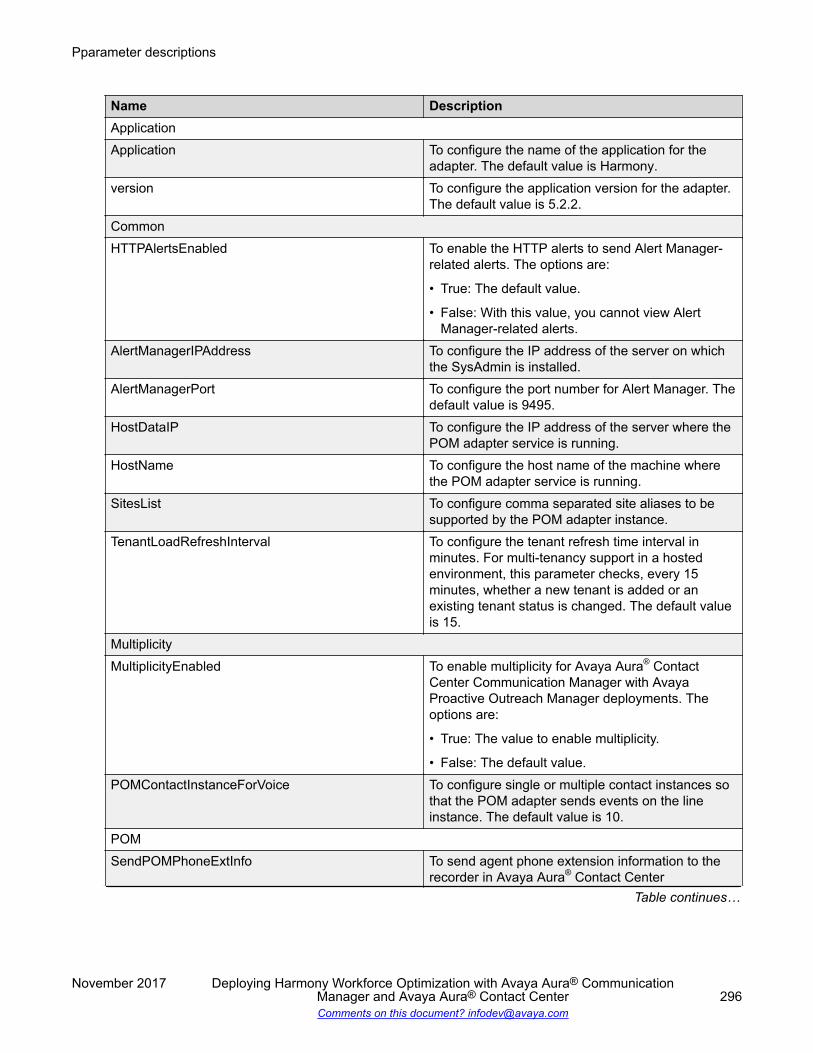
Name DescriptionApplicationApplication To configure the name of the application for the
adapter. The default value is Harmony.version To configure the application version for the adapter.
The default value is 5.2.2.CommonHTTPAlertsEnabled To enable the HTTP alerts to send Alert Manager-
related alerts. The options are:
• True: The default value.
• False: With this value, you cannot view AlertManager-related alerts.
AlertManagerIPAddress To configure the IP address of the server on whichthe SysAdmin is installed.
AlertManagerPort To configure the port number for Alert Manager. Thedefault value is 9495.
HostDataIP To configure the IP address of the server where thePOM adapter service is running.
HostName To configure the host name of the machine wherethe POM adapter service is running.
SitesList To configure comma separated site aliases to besupported by the POM adapter instance.
TenantLoadRefreshInterval To configure the tenant refresh time interval inminutes. For multi-tenancy support in a hostedenvironment, this parameter checks, every 15minutes, whether a new tenant is added or anexisting tenant status is changed. The default valueis 15.
MultiplicityMultiplicityEnabled To enable multiplicity for Avaya Aura® Contact
Center Communication Manager with AvayaProactive Outreach Manager deployments. Theoptions are:
• True: The value to enable multiplicity.
• False: The default value.POMContactInstanceForVoice To configure single or multiple contact instances so
that the POM adapter sends events on the lineinstance. The default value is 10.
POMSendPOMPhoneExtInfo To send agent phone extension information to the
recorder in Avaya Aura® Contact CenterTable continues…
Pparameter descriptions
November 2017 Deploying Harmony Workforce Optimization with Avaya Aura® CommunicationManager and Avaya Aura® Contact Center 296Comments on this document? [email protected]

Name DescriptionCommunication Manager with Avaya ProactiveOutreach Manager deployments. The options are:
• True: The default value.
The value to configure for active deployments.
• False: The value to configure for passivedeployments.
SendPOMAgentLoginInfo To send agent login information to the recorder. Theoptions are:
• True: The default value.
• False: The value to configure for Avaya Aura®
Contact Center Communication Manager withAvaya Proactive Outreach Manager deployments.
SendPOMAgentCallInfo To send agent call information to the recorder inAvaya Aura® Contact Center CommunicationManager with Avaya Proactive Outreach Managerdeployments. Retain the default value that is True.
SendPOMAgentCallStateInfo To send agent call state information to the recorderin Avaya Aura® Contact Center CommunicationManager with Avaya Proactive Outreach Managerdeployments. Retain the default value that is True.
SendPOMAgentCallDialerInfo To send agent call dialer information to the recorderin Avaya Aura® Contact Center CommunicationManager with Avaya Proactive Outreach Managerdeployments. Retain the default value that is True.
SendPOMAgentCallMetadataInfo To send agent call metadata information to therecorder in Avaya Aura® Contact CenterCommunication Manager with Avaya ProactiveOutreach Manager deployments. Retain the defaultvalue that is True.
SendPOMAgentLogoutInfo To send agent logout information to the recorder.The options are:
• True: The default value.
• False: The value to configure for Avaya Aura®
Contact Center Communication Manager withAvaya Proactive Outreach Manager deployments.
POMVersion To configure the POM version that is used in AvayaAura® Contact Center Communication Manager withAvaya Proactive Outreach Manager deployments.The options are:
• <3.1.1: The value to configure if the POM versionis prior to the 3.1.1 version.
Table continues…
Adapter parameter descriptions
November 2017 Deploying Harmony Workforce Optimization with Avaya Aura® CommunicationManager and Avaya Aura® Contact Center 297Comments on this document? [email protected]
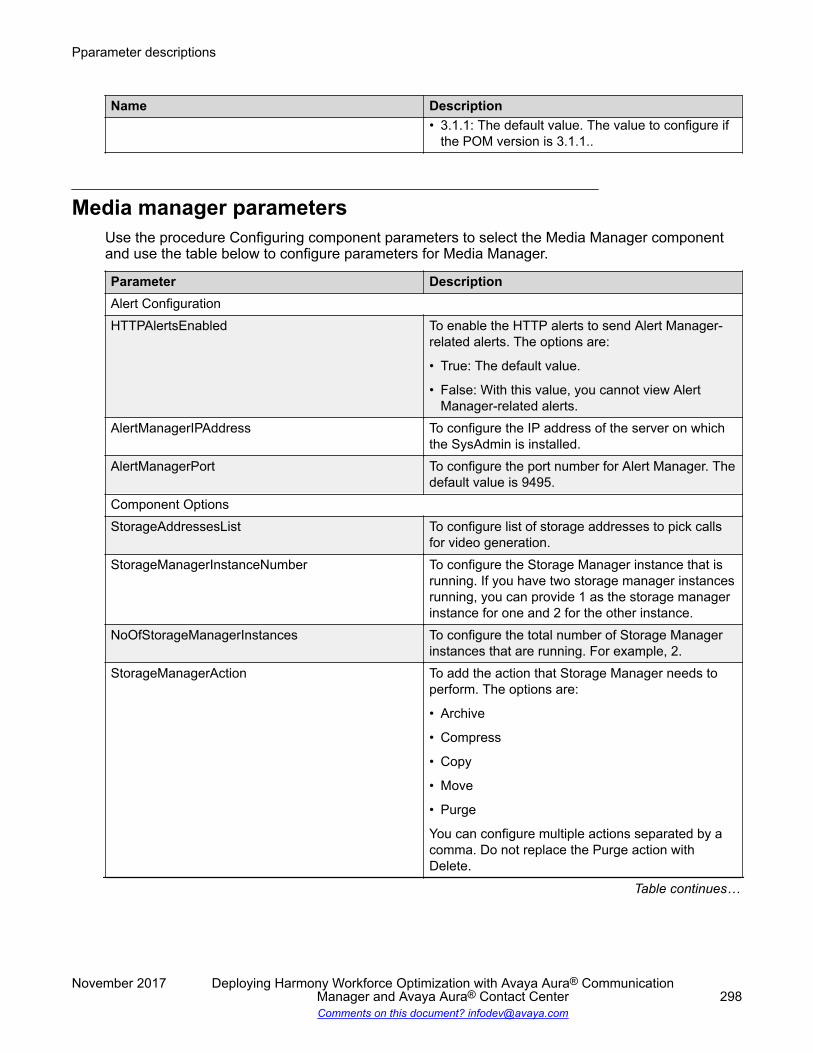
Name Description• 3.1.1: The default value. The value to configure if
the POM version is 3.1.1..
Media manager parametersUse the procedure Configuring component parameters to select the Media Manager componentand use the table below to configure parameters for Media Manager.
Parameter DescriptionAlert ConfigurationHTTPAlertsEnabled To enable the HTTP alerts to send Alert Manager-
related alerts. The options are:
• True: The default value.
• False: With this value, you cannot view AlertManager-related alerts.
AlertManagerIPAddress To configure the IP address of the server on whichthe SysAdmin is installed.
AlertManagerPort To configure the port number for Alert Manager. Thedefault value is 9495.
Component OptionsStorageAddressesList To configure list of storage addresses to pick calls
for video generation.StorageManagerInstanceNumber To configure the Storage Manager instance that is
running. If you have two storage manager instancesrunning, you can provide 1 as the storage managerinstance for one and 2 for the other instance.
NoOfStorageManagerInstances To configure the total number of Storage Managerinstances that are running. For example, 2.
StorageManagerAction To add the action that Storage Manager needs toperform. The options are:
• Archive
• Compress
• Copy
• Move
• Purge
You can configure multiple actions separated by acomma. Do not replace the Purge action withDelete.
Table continues…
Pparameter descriptions
November 2017 Deploying Harmony Workforce Optimization with Avaya Aura® CommunicationManager and Avaya Aura® Contact Center 298Comments on this document? [email protected]

Parameter DescriptionStorageManagerName To configure the Storage Manager name. For
example, SM1.EDServiceIPAddress To configure the IP address of the server where the
Media Manager service is running to performencryption and decryption of recorded interactions.
DebugEnableSecurity To enable encryption or decryption for a call. The
options are:
• True: The default value that functions only whenyou configure the secure storage path parameter.Else, Media Manager stops functioning.
• False: The value to disable encryption ordecryption for calls and screens.
LogDatabaseQueries To enable recorder to log all database queries in themedia manager specific log file. The options are:
• True: The value that is required for alldeployments. The default value.
• False:SecureDBUsername To configure a secure database user name for
encrypting and decrypting interactions. The username is harmonysec.
SecureDBPassword To configure a secure database password forencrypting and decrypting interactions.
LogLevel To set the log level for the recorder component. Thedefault value is TRACE. The other options are:
• ALL
• TRACE
• WARN
• FATAL
• ERROR
• DEBUGIISServerHost To configure the host name or IP address of the
server where IIS is installed.WorkingDir To configure the current working directory folder
where the recorder stores interaction data. Forexample, D:\. where the voice folder is created tostore interaction data.
Server Ports
Table continues…
Adapter parameter descriptions
November 2017 Deploying Harmony Workforce Optimization with Avaya Aura® CommunicationManager and Avaya Aura® Contact Center 299Comments on this document? [email protected]

Parameter DescriptionIISServerPort To configure the port number for an IIS server. The
default value is 443.Storage ConfigurationStoragePath To configure a location to store non encrypted audio
files and screens. For example, D:\Voice.
SecureStoragePath To configure a location to store encrypted audio filesand screens. For example, D:\Secure.
Note:
The time taken by Media Manager to loadstorage details is 5 minutes. Rules for thespecified storage path gets affected after 5minutes.
TimersConfigLoadInterval To configure the load interval in minutes for those
parameters that do not require service restart. Thevalues that you modify for these parameters getapplied only after the specified load interval time.The default value is 15.
DelayBetweenAlerts To configure the delay between different types ofalerts. The default value is 5 minutes.
TenantLoadInterval To configure the tenant refresh time interval inminutes. For multi-tenancy support in a hostedenvironment, this parameter checks, every 15minutes, whether a new tenant is added or anexisting tenant status is changed. The default valueis 15.
CompressionNoOfLogicalCPUForCompression To configure the number of logical CPUs that 7z
uses to generate the compressed file. 0 stands forusage of all logical CPUs. The default value is 0.
CompressionLevel To define the compression level for screens where 0stands for minimum compression level and 9 standsfor maximum compression level.. The default valueis 5.
Messaging parametersUse the procedure Configuring component parameters to select the Messaging component anduse the table below to configure parameters for Messaging.
Pparameter descriptions
November 2017 Deploying Harmony Workforce Optimization with Avaya Aura® CommunicationManager and Avaya Aura® Contact Center 300Comments on this document? [email protected]
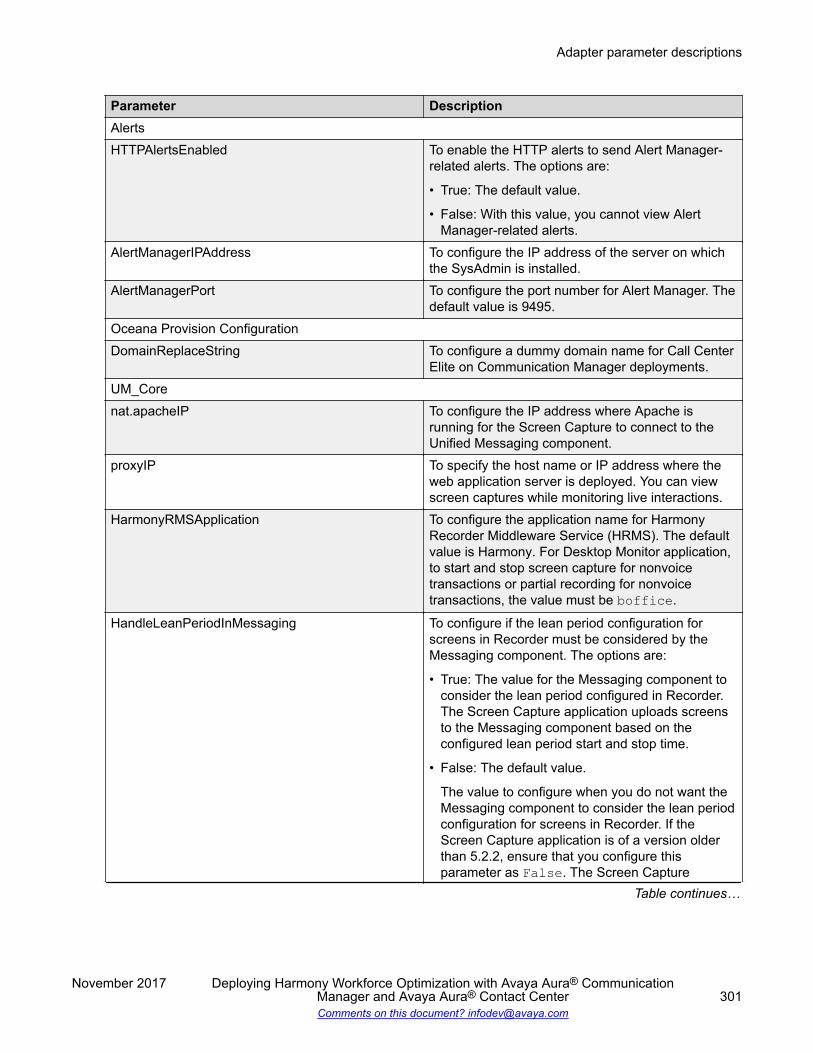
Parameter DescriptionAlertsHTTPAlertsEnabled To enable the HTTP alerts to send Alert Manager-
related alerts. The options are:
• True: The default value.
• False: With this value, you cannot view AlertManager-related alerts.
AlertManagerIPAddress To configure the IP address of the server on whichthe SysAdmin is installed.
AlertManagerPort To configure the port number for Alert Manager. Thedefault value is 9495.
Oceana Provision ConfigurationDomainReplaceString To configure a dummy domain name for Call Center
Elite on Communication Manager deployments.UM_Corenat.apacheIP To configure the IP address where Apache is
running for the Screen Capture to connect to theUnified Messaging component.
proxyIP To specify the host name or IP address where theweb application server is deployed. You can viewscreen captures while monitoring live interactions.
HarmonyRMSApplication To configure the application name for HarmonyRecorder Middleware Service (HRMS). The defaultvalue is Harmony. For Desktop Monitor application,to start and stop screen capture for nonvoicetransactions or partial recording for nonvoicetransactions, the value must be boffice.
HandleLeanPeriodInMessaging To configure if the lean period configuration forscreens in Recorder must be considered by theMessaging component. The options are:
• True: The value for the Messaging component toconsider the lean period configured in Recorder.The Screen Capture application uploads screensto the Messaging component based on theconfigured lean period start and stop time.
• False: The default value.
The value to configure when you do not want theMessaging component to consider the lean periodconfiguration for screens in Recorder. If theScreen Capture application is of a version olderthan 5.2.2, ensure that you configure thisparameter as False. The Screen Capture
Table continues…
Adapter parameter descriptions
November 2017 Deploying Harmony Workforce Optimization with Avaya Aura® CommunicationManager and Avaya Aura® Contact Center 301Comments on this document? [email protected]

Parameter Descriptionapplication uploads screens to the Messagingcomponent at the end of every interaction.
UM_Core_IP_PortsMessagingServerIP To specify the IP address where the Messaging
service is running.RecorderServerIP To specify the IP address where the recorder server
is running to send the Screen Login information tothe recorder.
EDServiceIPAddress To configure the IP address where Media Manageris running to encrypt and decrypt screens.
ScreenStorageIPAddress To configure the IP address where UnifiedMessaging is running to move the screens from theagent desktop to a local storage drive.
UM_Core_SchedulersdtaNotifier To configure the cron expression for the Desktop
Monitor application. The default value is 0 0/1 * 1/1* ?.
Note:
Ensure you change the value by replacing 1with another number. For example, 0 0/2 * 1/1* ?.
UM_Core_LocationsuploadLocation To configure the location for temporary storage of
screen capture images. For example D:\\voice\\screen or D:/voice/screen.
logdumpLocation To configure the log file dump location for theScreen Capture application. For example D:\\dump or D:/dump.
Recorder parametersUse the procedure Configuring component parameters to select the Recorder component and usethe table below to configure parameters for Recorder.
Parameter DescriptionAdapter ConfigurationDelayedExtendedCallInfo To update the call variable information in the
interactions table for calls that have the agentTable continues…
Pparameter descriptions
November 2017 Deploying Harmony Workforce Optimization with Avaya Aura® CommunicationManager and Avaya Aura® Contact Center 302Comments on this document? [email protected]
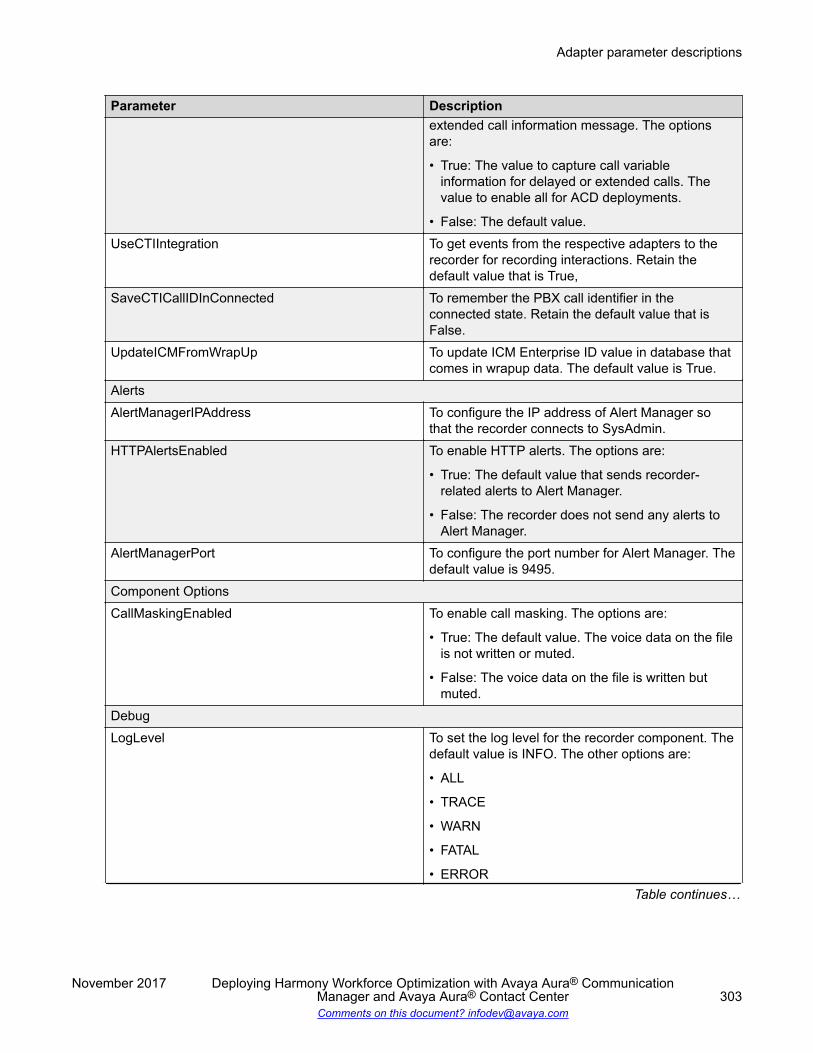
Parameter Descriptionextended call information message. The optionsare:
• True: The value to capture call variableinformation for delayed or extended calls. Thevalue to enable all for ACD deployments.
• False: The default value.UseCTIIntegration To get events from the respective adapters to the
recorder for recording interactions. Retain thedefault value that is True,
SaveCTICallIDInConnected To remember the PBX call identifier in theconnected state. Retain the default value that isFalse.
UpdateICMFromWrapUp To update ICM Enterprise ID value in database thatcomes in wrapup data. The default value is True.
AlertsAlertManagerIPAddress To configure the IP address of Alert Manager so
that the recorder connects to SysAdmin.HTTPAlertsEnabled To enable HTTP alerts. The options are:
• True: The default value that sends recorder-related alerts to Alert Manager.
• False: The recorder does not send any alerts toAlert Manager.
AlertManagerPort To configure the port number for Alert Manager. Thedefault value is 9495.
Component OptionsCallMaskingEnabled To enable call masking. The options are:
• True: The default value. The voice data on the fileis not written or muted.
• False: The voice data on the file is written butmuted.
DebugLogLevel To set the log level for the recorder component. The
default value is INFO. The other options are:
• ALL
• TRACE
• WARN
• FATAL
• ERRORTable continues…
Adapter parameter descriptions
November 2017 Deploying Harmony Workforce Optimization with Avaya Aura® CommunicationManager and Avaya Aura® Contact Center 303Comments on this document? [email protected]
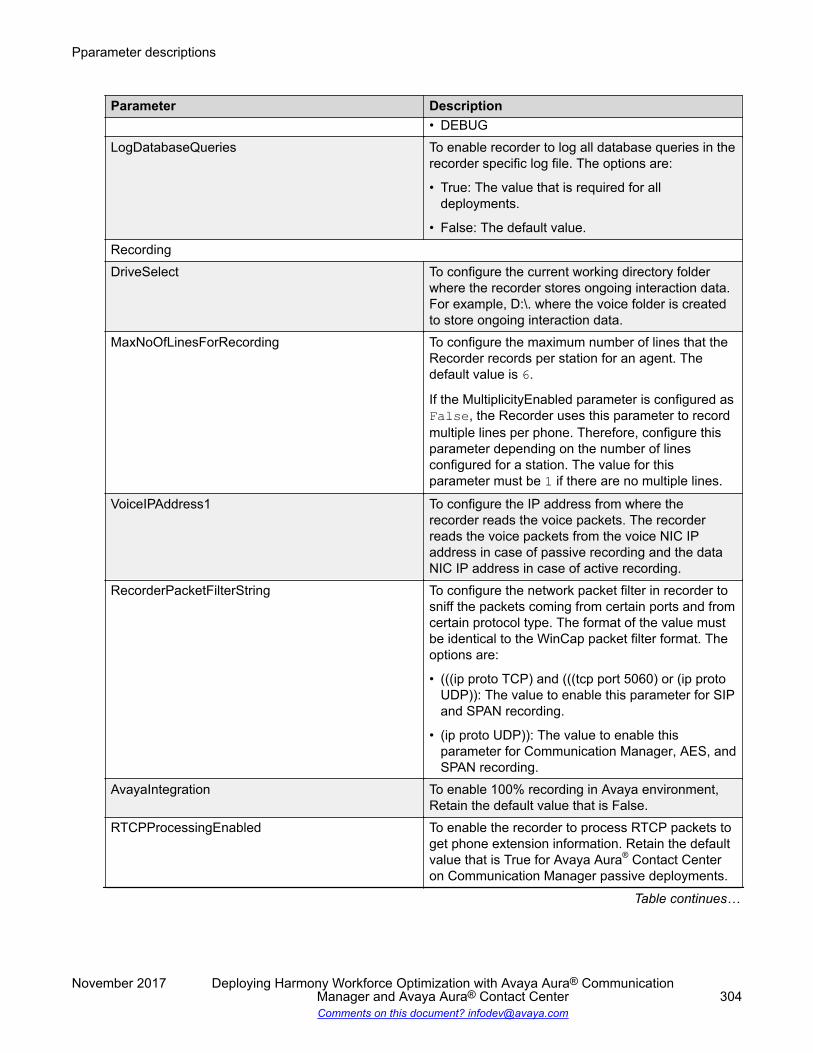
Parameter Description• DEBUG
LogDatabaseQueries To enable recorder to log all database queries in therecorder specific log file. The options are:
• True: The value that is required for alldeployments.
• False: The default value.RecordingDriveSelect To configure the current working directory folder
where the recorder stores ongoing interaction data.For example, D:\. where the voice folder is createdto store ongoing interaction data.
MaxNoOfLinesForRecording To configure the maximum number of lines that theRecorder records per station for an agent. Thedefault value is 6.
If the MultiplicityEnabled parameter is configured asFalse, the Recorder uses this parameter to recordmultiple lines per phone. Therefore, configure thisparameter depending on the number of linesconfigured for a station. The value for thisparameter must be 1 if there are no multiple lines.
VoiceIPAddress1 To configure the IP address from where therecorder reads the voice packets. The recorderreads the voice packets from the voice NIC IPaddress in case of passive recording and the dataNIC IP address in case of active recording.
RecorderPacketFilterString To configure the network packet filter in recorder tosniff the packets coming from certain ports and fromcertain protocol type. The format of the value mustbe identical to the WinCap packet filter format. Theoptions are:
• (((ip proto TCP) and (((tcp port 5060) or (ip protoUDP)): The value to enable this parameter for SIPand SPAN recording.
• (ip proto UDP)): The value to enable thisparameter for Communication Manager, AES, andSPAN recording.
AvayaIntegration To enable 100% recording in Avaya environment,Retain the default value that is False.
RTCPProcessingEnabled To enable the recorder to process RTCP packets toget phone extension information. Retain the defaultvalue that is True for Avaya Aura® Contact Centeron Communication Manager passive deployments.
Table continues…
Pparameter descriptions
November 2017 Deploying Harmony Workforce Optimization with Avaya Aura® CommunicationManager and Avaya Aura® Contact Center 304Comments on this document? [email protected]

Parameter DescriptionLoginAgentOnPhoneExtTableAdd To add the IP address of a phone to the table so
that the recorder can record interactions of thatphone. The options are:
• True: The value to enable for Avaya Aura®
Contact Center on Communication Managerdeployments.
• False: The default value.SpeakerSeparationEnabled To configure the audio stereo mode. The options
are:
• True: The default value that sets the audio stereomode to WAVE_FILE_FORMAT_STEREO. Thevalue you must enable for passive deployments.
• False: The value that sets the audio stereo modeto WAVE_FILE_FORMAT_MONO. The value youmust enable for active deployments.
VoiceStreamLastCheckTime To configure the stale agent or nailed up voicestream interval in seconds for Avaya ProactiveOutreach Manager deployments. .
It is recommended to set the office hours of 9 to 10hours which amounts to 32400 to 36000 seconds.The default value is 5 seconds.
SIPRecordingVoiceStreamRecordingEnabled To configure voice stream recording based on the
current agent details. The options are:
• True: The value to enable for active recordingdeployments.
• False: The default value.HostedCCSIPIntegration To process the SIP message to login the agent and
generate the voice stream messages. The optionsare:
• True: The value to enable for Avaya Aura®
Contact Center on Communication Manager withAvaya Proactive Outreach Manager deployments.The parameter saves the voice streaminformation coming from Avaya adapter (DMCC)and records all the outbound calls for the nailedup Avaya Proactive Outreach Manager agent.
Note:
Avaya adapter receives voice stream startinformation when the agent is nailed up andvoice stream stop information when the
Table continues…
Adapter parameter descriptions
November 2017 Deploying Harmony Workforce Optimization with Avaya Aura® CommunicationManager and Avaya Aura® Contact Center 305Comments on this document? [email protected]
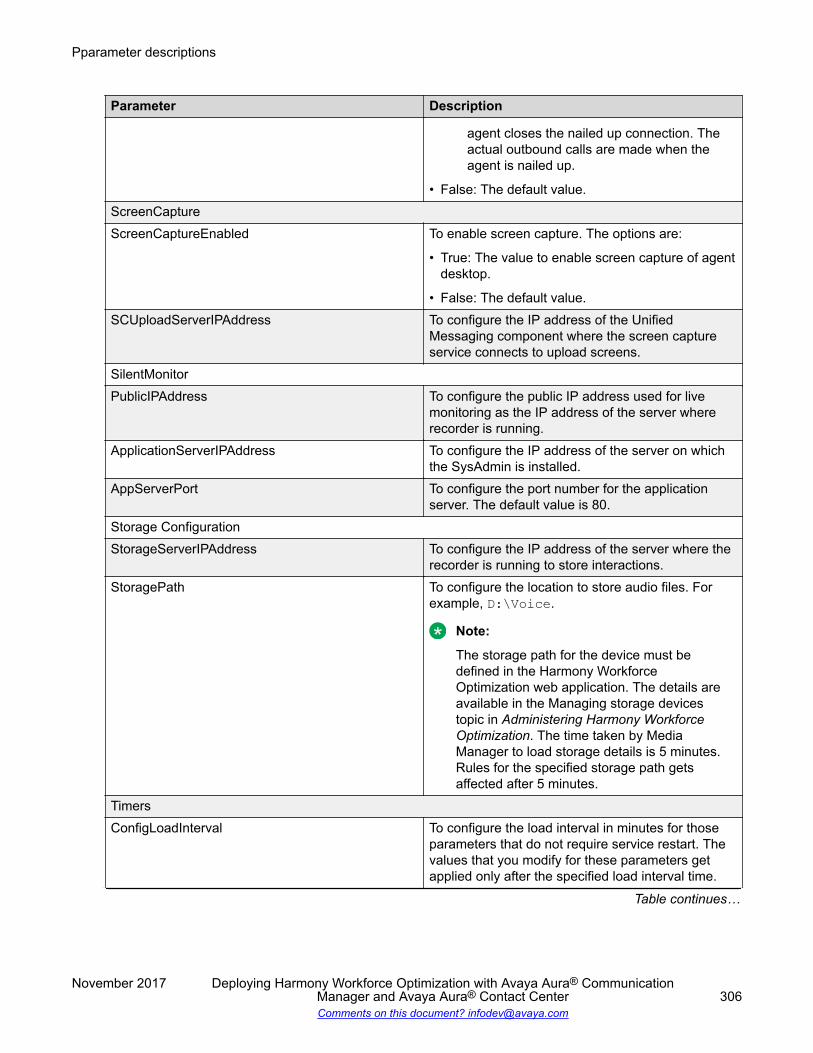
Parameter Description
agent closes the nailed up connection. Theactual outbound calls are made when theagent is nailed up.
• False: The default value.ScreenCaptureScreenCaptureEnabled To enable screen capture. The options are:
• True: The value to enable screen capture of agentdesktop.
• False: The default value.SCUploadServerIPAddress To configure the IP address of the Unified
Messaging component where the screen captureservice connects to upload screens.
SilentMonitorPublicIPAddress To configure the public IP address used for live
monitoring as the IP address of the server whererecorder is running.
ApplicationServerIPAddress To configure the IP address of the server on whichthe SysAdmin is installed.
AppServerPort To configure the port number for the applicationserver. The default value is 80.
Storage ConfigurationStorageServerIPAddress To configure the IP address of the server where the
recorder is running to store interactions.StoragePath To configure the location to store audio files. For
example, D:\Voice.
Note:
The storage path for the device must bedefined in the Harmony WorkforceOptimization web application. The details areavailable in the Managing storage devicestopic in Administering Harmony WorkforceOptimization. The time taken by MediaManager to load storage details is 5 minutes.Rules for the specified storage path getsaffected after 5 minutes.
TimersConfigLoadInterval To configure the load interval in minutes for those
parameters that do not require service restart. Thevalues that you modify for these parameters getapplied only after the specified load interval time.
Table continues…
Pparameter descriptions
November 2017 Deploying Harmony Workforce Optimization with Avaya Aura® CommunicationManager and Avaya Aura® Contact Center 306Comments on this document? [email protected]

Parameter DescriptionTenantLoadInterval To configure the tenant refresh time interval in
minutes. For multi-tenancy support in a hostedenvironment, this parameter checks, every 15minutes, whether a new tenant is added or anexisting tenant status is changed. The default valueis 15.
MessagingScreenCaptureProxyIPAddress To configure the IP address of the Unified
Messaging component or screen capture proxy sothat the recorder can send all screen captureevents.
Agent Screen Desktop ConfigMaxNoOfScreenCapturesPerCall To configure the maximum number of screenshots
to be captured for a single interaction. The defaultvalue is 1000.
EnableLeanPeriodForScreenUpload To enable screen upload from agent desktop duringlean period. The options are:
• True: The value to enable screen upload duringlean period.
• False: The default value. The value to disablescreen upload during lean period.
LeanPeriodStartTimeForScreenUpload To configure the screen upload start time fromagent desktop in hh:mm format if theEnableLeanPeriodForScreenUpload parameter isset to True.
LeanPeriodStopTimeForScreenUpload To configure the screen upload stop time from agentdesktop in hh:mm format if theEnableLeanPeriodForScreenUpload parameter isset to True.
CompressionLevelForScreenCapture To define the compression level for screens where 0stands for minimum compression level and 9 standsfor maximum compression level.. The default valueis 5.
ScreenCaptureMode To configure the capture modes for screens. Theoptions are:
• Desktop: Captures the entire desktop. The defaultvalue.
• ActiveWindow: Captures the application orwindow that is active.
• Primary: Captures the entire desktop of theprimary monitor when there are dual monitors.
Table continues…
Adapter parameter descriptions
November 2017 Deploying Harmony Workforce Optimization with Avaya Aura® CommunicationManager and Avaya Aura® Contact Center 307Comments on this document? [email protected]
Parameter Description• ActiveMonitor: Captures the entire desktop of the
monitor that is active (on which the cursor moves)amongst the dual monitors.
NoOfLogicalCPUForScreenCompression To configure the number of logical CPUs that 7zuses to generate the compressed file. 0 stands forusage of all logical CPUs. The default value is 2.
Pparameter descriptions
November 2017 Deploying Harmony Workforce Optimization with Avaya Aura® CommunicationManager and Avaya Aura® Contact Center 308Comments on this document? [email protected]

Appendix C: IPaddress update process
OverviewIn the Harmony Workforce Optimization implementation, an IP address update involves manualchanges to the IP address in the following components:
• Database server: Apart from changing the database server IP address, you must also updatetables in the Hosted and Tenant databases.
• SysAdmin and web application server: You must update parameters in thewebappconfig.properties file and in the Apache configuration files.
• Recorder components server: You can use SysAdmin to update parameters for Recorder andother Harmony Workforce Optimization components.
PrerequisitesBefore you change the IP address of any component, do the following:
• Stop all the Harmony Workforce Optimization services from Windows services.• Take a backup of the database.• Note down the startup type of the Harmony Workforce Optimization components in Windows
services.• Change the Harmony Workforce Optimization services to disabled state in Windows services.
Updating database server IP addressProcedure
1. Log on to the server that hosts the web application components.
2. Go to the WFO_Home folder located at C:\WFO_Home if you have not changed the locationduring installation.
3. Right-click the MasterDatabase.Properties file, and click Open with > Notepad.
4. Type the new IP address for the following parameters:
• DatabaseServerIpAddress
• BackupDatabaseServerIpAddress.
November 2017 Deploying Harmony Workforce Optimization with Avaya Aura® CommunicationManager and Avaya Aura® Contact Center 309Comments on this document? [email protected]
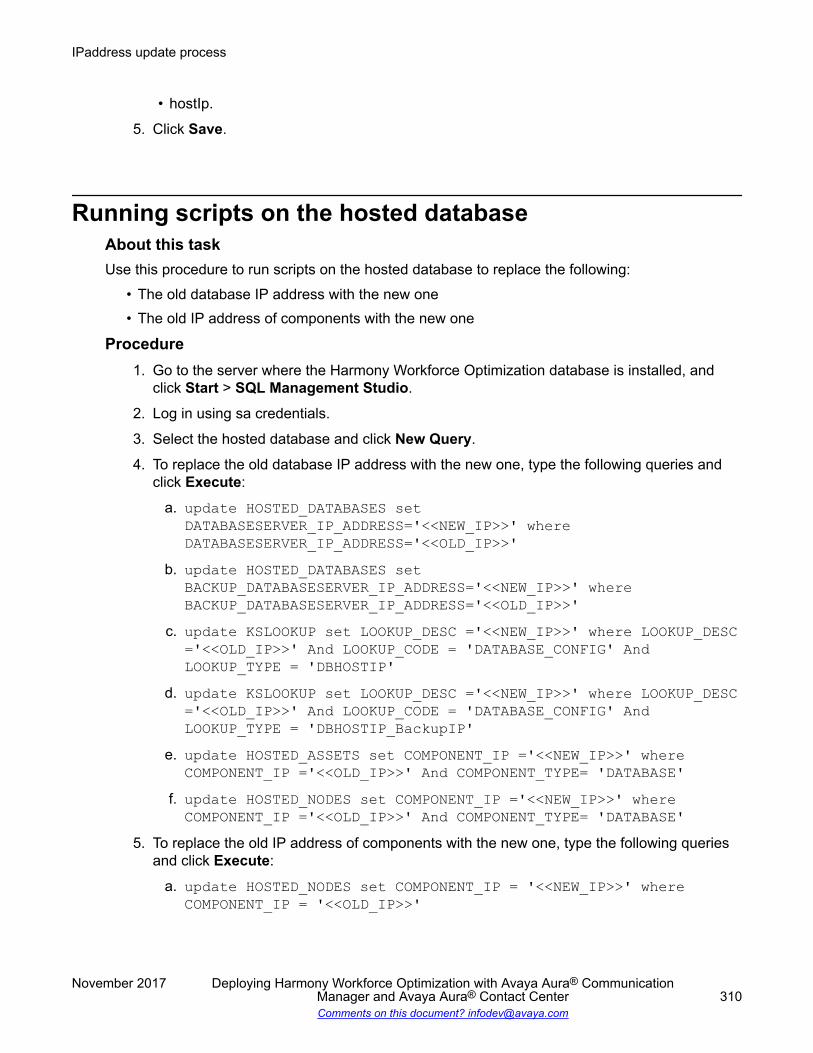
• hostIp.
5. Click Save.
Running scripts on the hosted databaseAbout this taskUse this procedure to run scripts on the hosted database to replace the following:
• The old database IP address with the new one• The old IP address of components with the new one
Procedure1. Go to the server where the Harmony Workforce Optimization database is installed, and
click Start > SQL Management Studio.
2. Log in using sa credentials.
3. Select the hosted database and click New Query.
4. To replace the old database IP address with the new one, type the following queries andclick Execute:
a. update HOSTED_DATABASES setDATABASESERVER_IP_ADDRESS='<<NEW_IP>>' whereDATABASESERVER_IP_ADDRESS='<<OLD_IP>>'
b. update HOSTED_DATABASES setBACKUP_DATABASESERVER_IP_ADDRESS='<<NEW_IP>>' whereBACKUP_DATABASESERVER_IP_ADDRESS='<<OLD_IP>>'
c. update KSLOOKUP set LOOKUP_DESC ='<<NEW_IP>>' where LOOKUP_DESC='<<OLD_IP>>' And LOOKUP_CODE = 'DATABASE_CONFIG' AndLOOKUP_TYPE = 'DBHOSTIP'
d. update KSLOOKUP set LOOKUP_DESC ='<<NEW_IP>>' where LOOKUP_DESC='<<OLD_IP>>' And LOOKUP_CODE = 'DATABASE_CONFIG' AndLOOKUP_TYPE = 'DBHOSTIP_BackupIP'
e. update HOSTED_ASSETS set COMPONENT_IP ='<<NEW_IP>>' whereCOMPONENT_IP ='<<OLD_IP>>' And COMPONENT_TYPE= 'DATABASE'
f. update HOSTED_NODES set COMPONENT_IP ='<<NEW_IP>>' whereCOMPONENT_IP ='<<OLD_IP>>' And COMPONENT_TYPE= 'DATABASE'
5. To replace the old IP address of components with the new one, type the following queriesand click Execute:
a. update HOSTED_NODES set COMPONENT_IP = '<<NEW_IP>>' whereCOMPONENT_IP = '<<OLD_IP>>'
IPaddress update process
November 2017 Deploying Harmony Workforce Optimization with Avaya Aura® CommunicationManager and Avaya Aura® Contact Center 310Comments on this document? [email protected]

b. update HOSTED_NODES set HOST_ID = '<<NEW_IP>>' where HOST_ID ='<<OLD_IP>>'
c. update HOSTED_ASSETS set COMPONENT_IP = '<<NEW_IP>>' whereCOMPONENT_IP = '<<OLD_IP>>'
d. update HOSTED_ASSETS set SERVER_UID = '<<NEW_IP>>' whereSERVER_UID = '<<OLD_IP>>'
e. update STORAGE_DETAILS set HOST_IP = '<<NEW_IP>>' where HOST_IP= '<<OLD_IP>>'
Running scripts on the tenant databaseAbout this taskUse this procedure to run scripts on the tenant database to replace the old IP address with thenew one for tables related to storage manager and reports.
Procedure1. Go to the server where the Harmony Workforce Optimization database is installed, and
click Start > SQL Management Studio.
2. Log in using sa credentials.
3. Select the tenant database and click New Query.
4. Type the following queries and click Execute:
a. update HARMONY_SM_DETAILS set IP_ADDRESS='<<NEW_IP>>' whereIP_ADDRESS='<<OLD_IP>>’
b. update HARMONY_SM_LIST set IP_ADDRESS='<<NEW_IP>>' whereIP_ADDRESS='<<OLD_IP>>'
c. update INTERACTION_MEDIA_INFO set STORAGE_IP_ADDRESS='<<NEW_IP>>' where STORAGE_IP_ADDRESS ='<<OLD_IP>>'
d. update INTERACTION_MEDIA_INFO_HISTORY set STORAGE_IP_ADDRESS='<<NEW_IP>>' where STORAGE_IP_ADDRESS ='<<OLD_IP>>'
e. update HARMONY_DOWNLOAD_MEDIA set STORAGE_IP ='<<NEW_IP>>'where STORAGE_IP ='<<OLD_IP>>'
f. update HARMONY_DOWNLOAD_MEDIA set DOWNLOAD_URL =Replace(DOWNLOAD_URL, '<< OLD_IP >>', '<< NEW_IP >>')
g. update HARMONY_REPORT_OUTPUT set REPORT_OUTPUT_LOCATION =Replace(REPORT_OUTPUT_LOCATION, '<< OLD_IP >>', '<< NEW_IP >>')
Running scripts on the tenant database
November 2017 Deploying Harmony Workforce Optimization with Avaya Aura® CommunicationManager and Avaya Aura® Contact Center 311Comments on this document? [email protected]

Updating web server IP addressAbout this taskUse this procedure to update the web server IP address in thewebappconfig_x.x.x.x_Node.properties and sysadminconfig.properties files.
Note:If the port configured before changing the IP address is other than 443, do not change theport.
Procedure1. Log in to the server that hosts the web application components.
2. Go to the WFO_Home folder located at C:\WFO_Home if you have not changed the locationduring installation.
3. Right-click the webappconfig_x.x.x.x_Node.properties andsysadminconfig.properties files, and click Open with > Notepad.
4. Type the new IP address for the following parameters:
• WebappServerIp
• WebappServerIpForUI
• ProxyIp.
5. Click Save.
Updating Apache server IP addressAbout this taskUse this procedure to update the Apache server IP address in the httpd-ssl.conf file.
Note:If the port configured before changing the IP address is other than the ones mentioned in theproxy rules below, do not change the port.
Procedure1. Log on to the server that hosts the web application components.
2. Go to <Installation Path>\Harmony\Apache24\conf\extra.
3. Right-click the httpd-ssl.conf file.
4. Click Edit with Notepad ++.
IPaddress update process
November 2017 Deploying Harmony Workforce Optimization with Avaya Aura® CommunicationManager and Avaya Aura® Contact Center 312Comments on this document? [email protected]
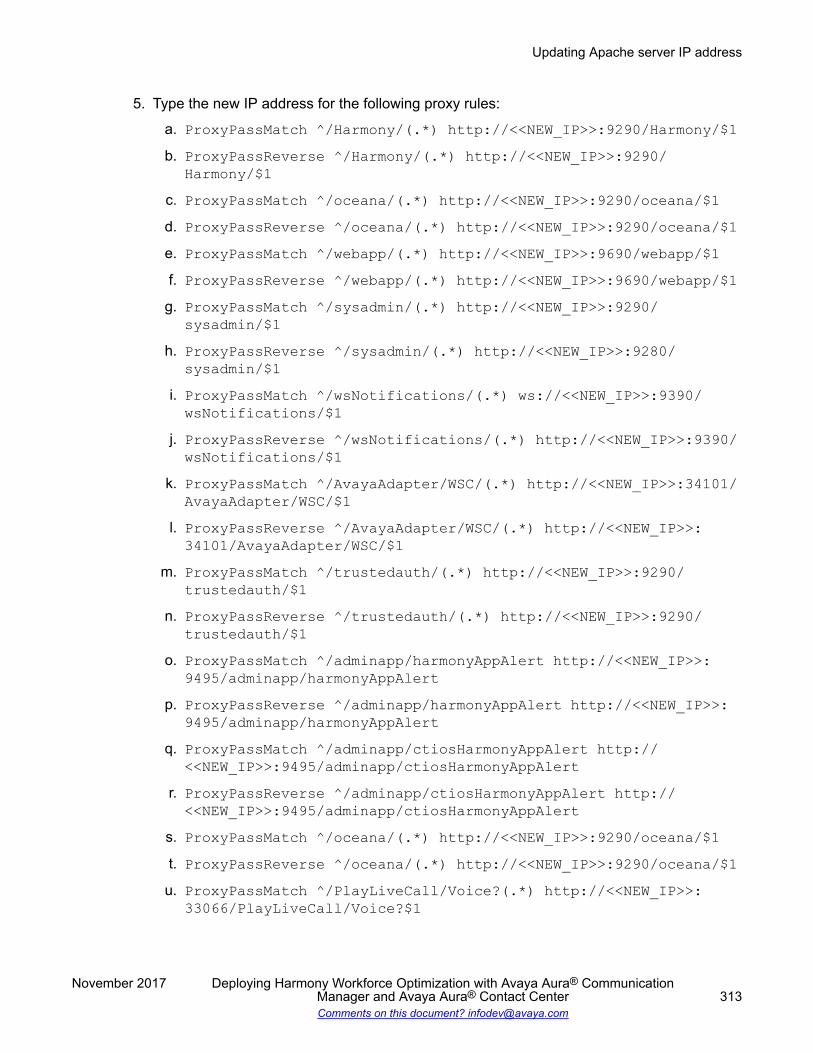
5. Type the new IP address for the following proxy rules:
a. ProxyPassMatch ^/Harmony/(.*) http://<<NEW_IP>>:9290/Harmony/$1b. ProxyPassReverse ^/Harmony/(.*) http://<<NEW_IP>>:9290/
Harmony/$1c. ProxyPassMatch ^/oceana/(.*) http://<<NEW_IP>>:9290/oceana/$1d. ProxyPassReverse ^/oceana/(.*) http://<<NEW_IP>>:9290/oceana/$1e. ProxyPassMatch ^/webapp/(.*) http://<<NEW_IP>>:9690/webapp/$1f. ProxyPassReverse ^/webapp/(.*) http://<<NEW_IP>>:9690/webapp/$1
g. ProxyPassMatch ^/sysadmin/(.*) http://<<NEW_IP>>:9290/sysadmin/$1
h. ProxyPassReverse ^/sysadmin/(.*) http://<<NEW_IP>>:9280/sysadmin/$1
i. ProxyPassMatch ^/wsNotifications/(.*) ws://<<NEW_IP>>:9390/wsNotifications/$1
j. ProxyPassReverse ^/wsNotifications/(.*) http://<<NEW_IP>>:9390/wsNotifications/$1
k. ProxyPassMatch ^/AvayaAdapter/WSC/(.*) http://<<NEW_IP>>:34101/AvayaAdapter/WSC/$1
l. ProxyPassReverse ^/AvayaAdapter/WSC/(.*) http://<<NEW_IP>>:34101/AvayaAdapter/WSC/$1
m. ProxyPassMatch ^/trustedauth/(.*) http://<<NEW_IP>>:9290/trustedauth/$1
n. ProxyPassReverse ^/trustedauth/(.*) http://<<NEW_IP>>:9290/trustedauth/$1
o. ProxyPassMatch ^/adminapp/harmonyAppAlert http://<<NEW_IP>>:9495/adminapp/harmonyAppAlert
p. ProxyPassReverse ^/adminapp/harmonyAppAlert http://<<NEW_IP>>:9495/adminapp/harmonyAppAlert
q. ProxyPassMatch ^/adminapp/ctiosHarmonyAppAlert http://<<NEW_IP>>:9495/adminapp/ctiosHarmonyAppAlert
r. ProxyPassReverse ^/adminapp/ctiosHarmonyAppAlert http://<<NEW_IP>>:9495/adminapp/ctiosHarmonyAppAlert
s. ProxyPassMatch ^/oceana/(.*) http://<<NEW_IP>>:9290/oceana/$1t. ProxyPassReverse ^/oceana/(.*) http://<<NEW_IP>>:9290/oceana/$1
u. ProxyPassMatch ^/PlayLiveCall/Voice?(.*) http://<<NEW_IP>>:33066/PlayLiveCall/Voice?$1
Updating Apache server IP address
November 2017 Deploying Harmony Workforce Optimization with Avaya Aura® CommunicationManager and Avaya Aura® Contact Center 313Comments on this document? [email protected]
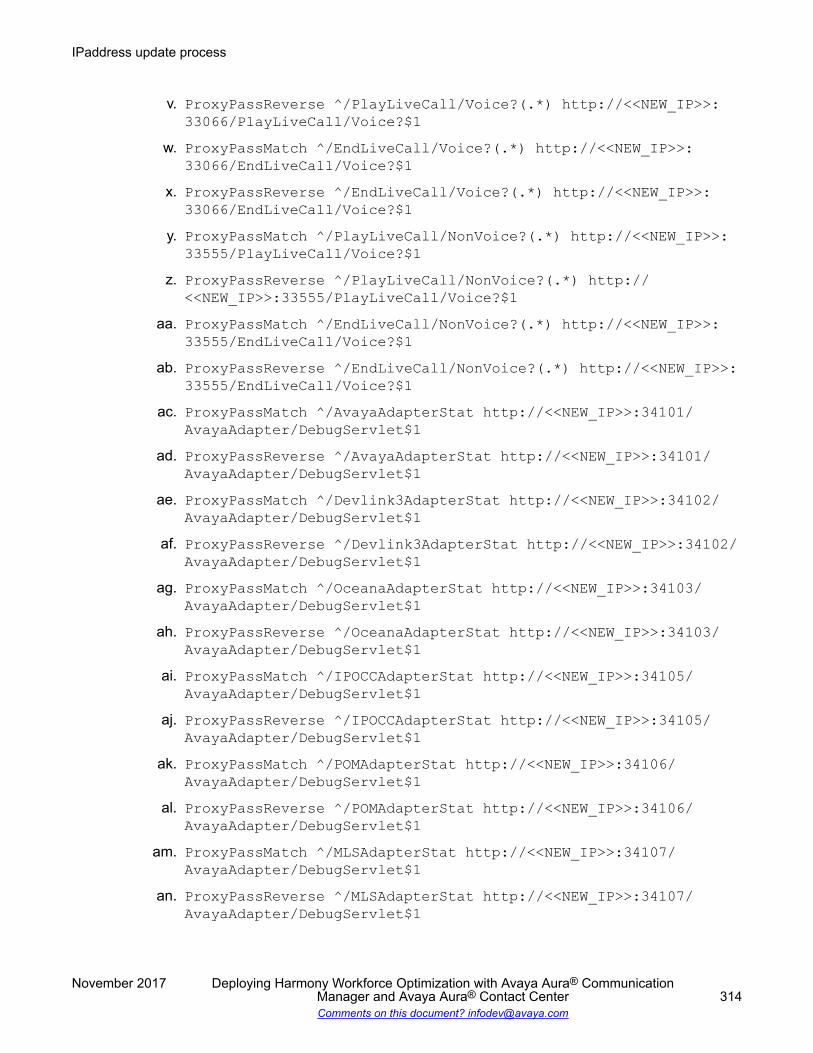
v. ProxyPassReverse ^/PlayLiveCall/Voice?(.*) http://<<NEW_IP>>:33066/PlayLiveCall/Voice?$1
w. ProxyPassMatch ^/EndLiveCall/Voice?(.*) http://<<NEW_IP>>:33066/EndLiveCall/Voice?$1
x. ProxyPassReverse ^/EndLiveCall/Voice?(.*) http://<<NEW_IP>>:33066/EndLiveCall/Voice?$1
y. ProxyPassMatch ^/PlayLiveCall/NonVoice?(.*) http://<<NEW_IP>>:33555/PlayLiveCall/Voice?$1
z. ProxyPassReverse ^/PlayLiveCall/NonVoice?(.*) http://<<NEW_IP>>:33555/PlayLiveCall/Voice?$1
aa. ProxyPassMatch ^/EndLiveCall/NonVoice?(.*) http://<<NEW_IP>>:33555/EndLiveCall/Voice?$1
ab. ProxyPassReverse ^/EndLiveCall/NonVoice?(.*) http://<<NEW_IP>>:33555/EndLiveCall/Voice?$1
ac. ProxyPassMatch ^/AvayaAdapterStat http://<<NEW_IP>>:34101/AvayaAdapter/DebugServlet$1
ad. ProxyPassReverse ^/AvayaAdapterStat http://<<NEW_IP>>:34101/AvayaAdapter/DebugServlet$1
ae. ProxyPassMatch ^/Devlink3AdapterStat http://<<NEW_IP>>:34102/AvayaAdapter/DebugServlet$1
af. ProxyPassReverse ^/Devlink3AdapterStat http://<<NEW_IP>>:34102/AvayaAdapter/DebugServlet$1
ag. ProxyPassMatch ^/OceanaAdapterStat http://<<NEW_IP>>:34103/AvayaAdapter/DebugServlet$1
ah. ProxyPassReverse ^/OceanaAdapterStat http://<<NEW_IP>>:34103/AvayaAdapter/DebugServlet$1
ai. ProxyPassMatch ^/IPOCCAdapterStat http://<<NEW_IP>>:34105/AvayaAdapter/DebugServlet$1
aj. ProxyPassReverse ^/IPOCCAdapterStat http://<<NEW_IP>>:34105/AvayaAdapter/DebugServlet$1
ak. ProxyPassMatch ^/POMAdapterStat http://<<NEW_IP>>:34106/AvayaAdapter/DebugServlet$1
al. ProxyPassReverse ^/POMAdapterStat http://<<NEW_IP>>:34106/AvayaAdapter/DebugServlet$1
am. ProxyPassMatch ^/MLSAdapterStat http://<<NEW_IP>>:34107/AvayaAdapter/DebugServlet$1
an. ProxyPassReverse ^/MLSAdapterStat http://<<NEW_IP>>:34107/AvayaAdapter/DebugServlet$1
IPaddress update process
November 2017 Deploying Harmony Workforce Optimization with Avaya Aura® CommunicationManager and Avaya Aura® Contact Center 314Comments on this document? [email protected]

ao. ProxyPassMatch ^/CiscoAdapterStat http://<<NEW_IP>>:34201/AvayaAdapter/DebugServlet$1
ap. ProxyPassReverse ^/CiscoAdapterStat http://<<NEW_IP>>:34201/AvayaAdapter/DebugServlet$1
aq. ProxyPassMatch ^/AACCNetAdapterStat http://<<NEW_IP>>:34301/AvayaAdapter/DebugServlet$1
ar. ProxyPassReverse ^/AACCNetAdapterStat http://<<NEW_IP>>:34301/AvayaAdapter/DebugServlet$1
as. ProxyPassMatch ^/rmsapi/(.*) http://<<NEW_IP>>:33023/$1at. ProxyPassReverse ^/rmsapi/(.*) http://<<NEW_IP>>:33023/$1
6. Click Save.
7. Go to <Installation Path>\Harmony\Apache24_WS\conf\extra.
8. Right-click the httpd-ssl.conf file.
9. Click Edit with Notepad ++.
10. Type the new IP address for the following proxy rules:
a. redirectMatch 302 ^/Screen/ wss://<<NEW_IP>>:8443/ws/netty?b. ProxyPass /ws/ ws://<<NEW_IP>>:4235/c. ProxyPassReverse /ws/ ws://<<NEW_IP>>:4235/d. ProxyPass /ws1/ ws://<<NEW_IP>>:6988/e. ProxyPassReverse /ws1/ ws://<<NEW_IP>>:6988/f. ProxyPass /ws2/ ws://<<NEW_IP>>:2345/
g. ProxyPassReverse /ws2/ ws://<<NEW_IP>>:2345/h. ProxyPass /ws3/ ws://<<NEW_IP>>:7745/i. ProxyPassReverse /ws3/ ws://<<NEW_IP>>:7745/j. ProxyPass /ws4/ ws://<<NEW_IP>>:6745/
k. ProxyPassReverse /ws4/ ws://<<NEW_IP>>:6745/11. Click Save.
Next stepsStart the sysadmin, webapp, and Apache services.
Updating Apache server IP address
November 2017 Deploying Harmony Workforce Optimization with Avaya Aura® CommunicationManager and Avaya Aura® Contact Center 315Comments on this document? [email protected]
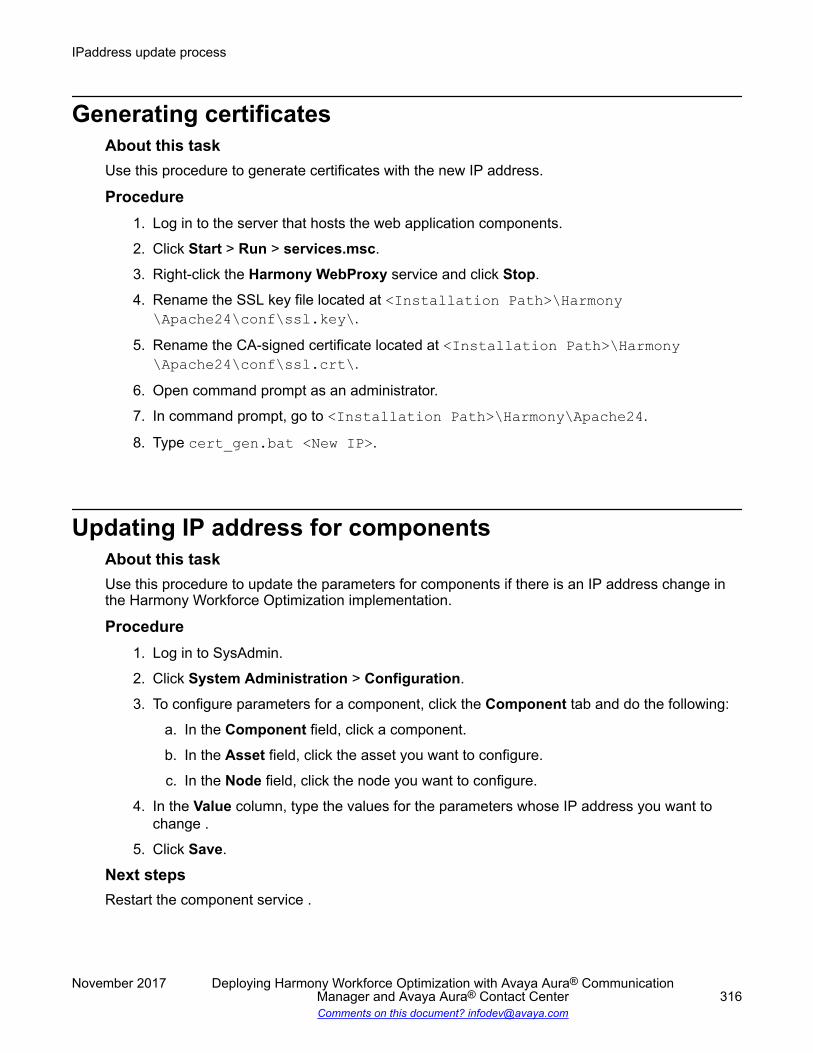
Generating certificatesAbout this taskUse this procedure to generate certificates with the new IP address.
Procedure1. Log in to the server that hosts the web application components.
2. Click Start > Run > services.msc.
3. Right-click the Harmony WebProxy service and click Stop.
4. Rename the SSL key file located at <Installation Path>\Harmony\Apache24\conf\ssl.key\.
5. Rename the CA-signed certificate located at <Installation Path>\Harmony\Apache24\conf\ssl.crt\.
6. Open command prompt as an administrator.
7. In command prompt, go to <Installation Path>\Harmony\Apache24.
8. Type cert_gen.bat <New IP>.
Updating IP address for componentsAbout this taskUse this procedure to update the parameters for components if there is an IP address change inthe Harmony Workforce Optimization implementation.
Procedure1. Log in to SysAdmin.
2. Click System Administration > Configuration.
3. To configure parameters for a component, click the Component tab and do the following:
a. In the Component field, click a component.
b. In the Asset field, click the asset you want to configure.
c. In the Node field, click the node you want to configure.
4. In the Value column, type the values for the parameters whose IP address you want tochange .
5. Click Save.
Next stepsRestart the component service .
IPaddress update process
November 2017 Deploying Harmony Workforce Optimization with Avaya Aura® CommunicationManager and Avaya Aura® Contact Center 316Comments on this document? [email protected]
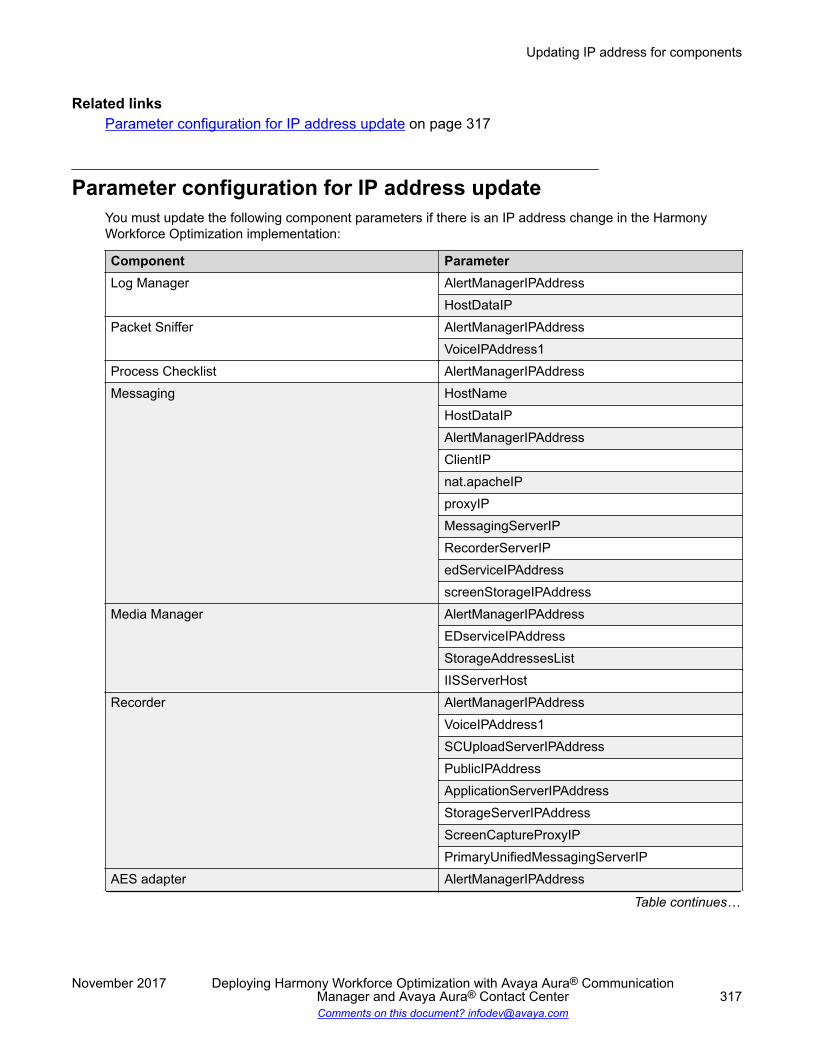
Related linksParameter configuration for IP address update on page 317
Parameter configuration for IP address updateYou must update the following component parameters if there is an IP address change in the HarmonyWorkforce Optimization implementation:
Component ParameterLog Manager AlertManagerIPAddress
HostDataIPPacket Sniffer AlertManagerIPAddress
VoiceIPAddress1Process Checklist AlertManagerIPAddressMessaging HostName
HostDataIPAlertManagerIPAddressClientIPnat.apacheIPproxyIPMessagingServerIPRecorderServerIPedServiceIPAddressscreenStorageIPAddress
Media Manager AlertManagerIPAddressEDserviceIPAddressStorageAddressesListIISServerHost
Recorder AlertManagerIPAddressVoiceIPAddress1SCUploadServerIPAddressPublicIPAddressApplicationServerIPAddressStorageServerIPAddressScreenCaptureProxyIPPrimaryUnifiedMessagingServerIP
AES adapter AlertManagerIPAddress
Table continues…
Updating IP address for components
November 2017 Deploying Harmony Workforce Optimization with Avaya Aura® CommunicationManager and Avaya Aura® Contact Center 317Comments on this document? [email protected]
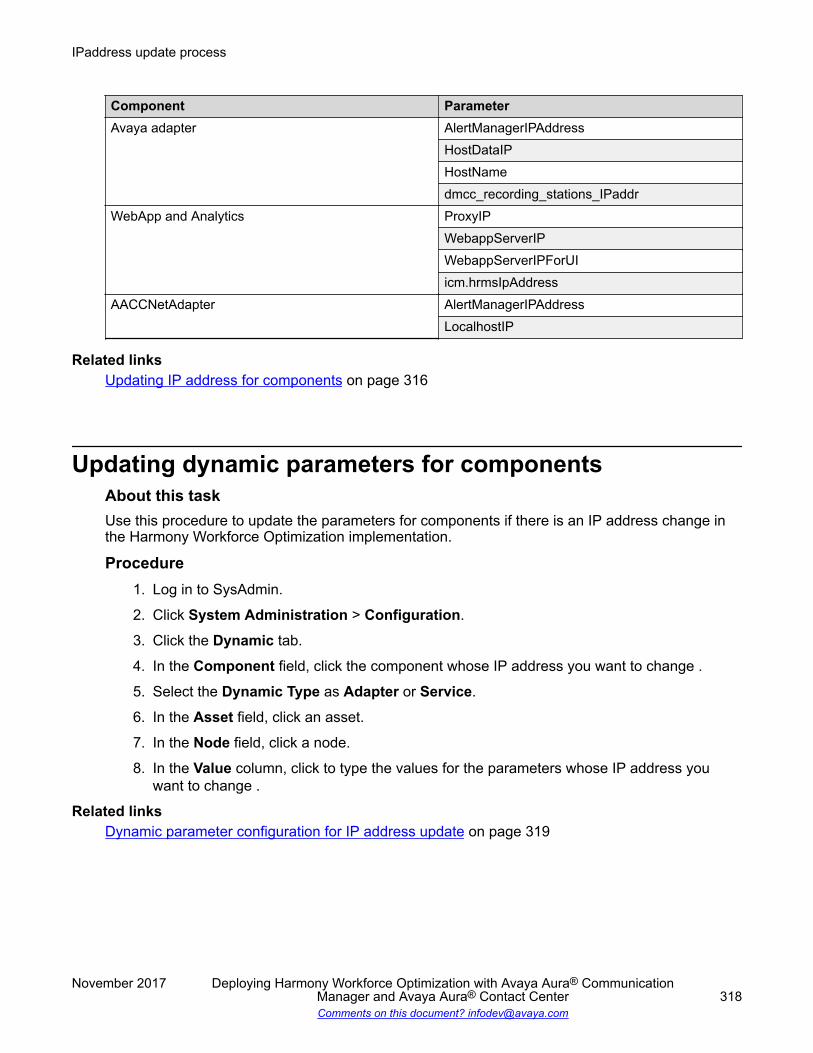
Component ParameterAvaya adapter AlertManagerIPAddress
HostDataIPHostNamedmcc_recording_stations_IPaddr
WebApp and Analytics ProxyIPWebappServerIPWebappServerIPForUIicm.hrmsIpAddress
AACCNetAdapter AlertManagerIPAddressLocalhostIP
Related linksUpdating IP address for components on page 316
Updating dynamic parameters for componentsAbout this taskUse this procedure to update the parameters for components if there is an IP address change inthe Harmony Workforce Optimization implementation.
Procedure1. Log in to SysAdmin.
2. Click System Administration > Configuration.
3. Click the Dynamic tab.
4. In the Component field, click the component whose IP address you want to change .
5. Select the Dynamic Type as Adapter or Service.
6. In the Asset field, click an asset.
7. In the Node field, click a node.
8. In the Value column, click to type the values for the parameters whose IP address youwant to change .
Related linksDynamic parameter configuration for IP address update on page 319
IPaddress update process
November 2017 Deploying Harmony Workforce Optimization with Avaya Aura® CommunicationManager and Avaya Aura® Contact Center 318Comments on this document? [email protected]

Dynamic parameter configuration for IP address updateYou must update the following parameters if there is an IP address change in the Harmony WorkforceOptimization implementation:
Component Dynamic Type ParameterRecorder Adapter ServerAddress
BackupServerAddressService IPAddress
BackupIPAddressMessaging Tenant edServiceIPAddress
RecorderServerIPsecondaryRecordersProxyIP
Related linksUpdating dynamic parameters for components on page 318
Updating IP address of the Screen Capture applicationAbout this taskUse this procedure to update the Messaging IP address for the screen in the registry.
Procedure1. Log on to the server on which the web application components and the SQL database are
running.
2. Open the registry located at: HKEY_LOCAL_MACHINE\SOFTWARE\WOW6432Node\AVAYA\Screen
3. Take a backup of the registry entries.
4. Configure the values of the following parameters:
a. ConnextURL: Update the IP address of the server where the Messaging component isrunning in the URL wss://<Unified Messaging IP address>:8443/ws/netty/
b. SecondaryConnectURL: Update the secondary IP address of the server where theMessaging component is running in the URL wss://<Secondary UnifiedMessaging IP address>:8443/ws/netty/
Next stepsRestart the Screen Capture services.
Updating IP address of the Screen Capture application
November 2017 Deploying Harmony Workforce Optimization with Avaya Aura® CommunicationManager and Avaya Aura® Contact Center 319Comments on this document? [email protected]

Changing the host data IP addressAbout this taskUse this procedure to change the host data IP address in the ini file or properties file of theHarmony Workforce Optimization components. Every component has a corresponding ini filenamed after the component name.
Procedure1. Log on to the server where the Harmony Workforce Optimization application is installed.
2. Go to <Installation Path>\Harmony to view the component folders.
3. Click one of the following component folders:
• Recorder
• Log Manager
• Media Manager
• Process Checklist
• Packet Sniffer
• AES adapter
• PCS adapter (if you are using PCS dialer)
4. In the component folder, right-click the respective <component>.ini file.
5. Click Open with > Notepad.
6. Update the value for the following parameter:
• HostDataIP: Update the IP address.
7. Click Save.
8. Go to <Installation Path>\Harmony\<component>\conf folder for the followingcomponents:
• Avaya adapter
• POM adapter:if you are using POM dialer
9. Right-click the <component>.properties file.
10. Click Open with > Notepad.
11. Update the value for the following parameter:
• HostDataIP: Update the IP address.
12. Click Save.
Next stepsRestart all the component services.
IPaddress update process
November 2017 Deploying Harmony Workforce Optimization with Avaya Aura® CommunicationManager and Avaya Aura® Contact Center 320Comments on this document? [email protected]
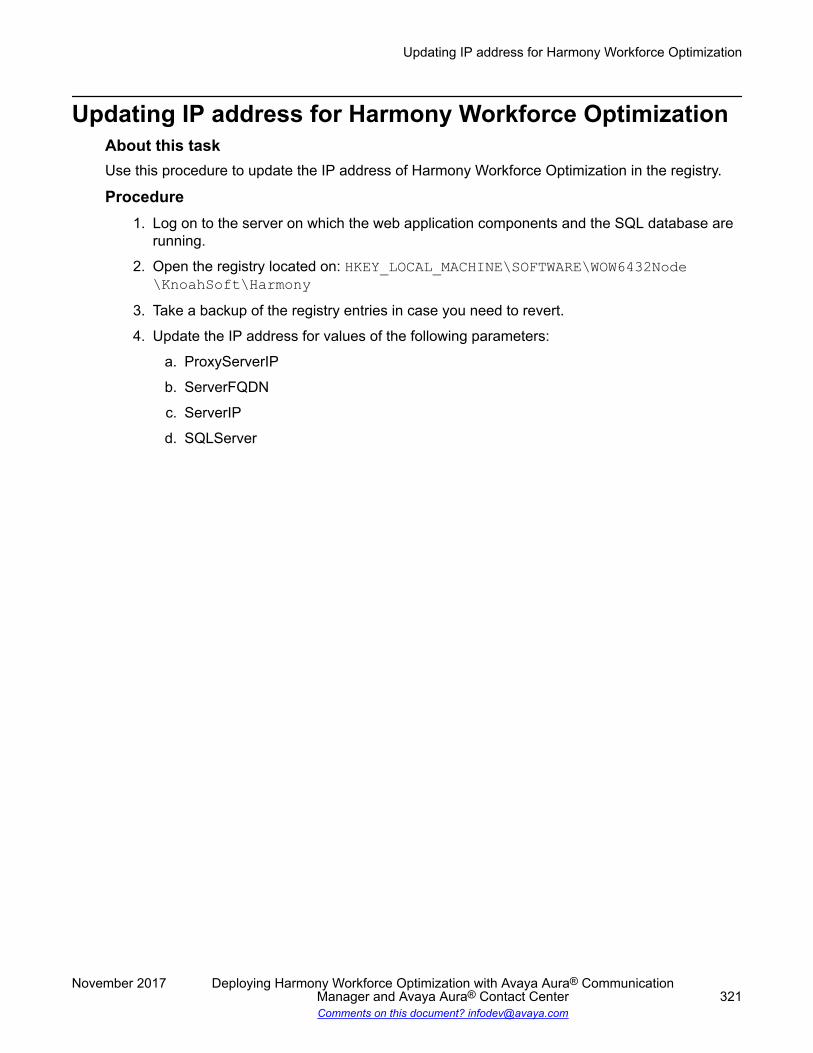
Updating IP address for Harmony Workforce OptimizationAbout this taskUse this procedure to update the IP address of Harmony Workforce Optimization in the registry.
Procedure1. Log on to the server on which the web application components and the SQL database are
running.
2. Open the registry located on: HKEY_LOCAL_MACHINE\SOFTWARE\WOW6432Node\KnoahSoft\Harmony
3. Take a backup of the registry entries in case you need to revert.
4. Update the IP address for values of the following parameters:
a. ProxyServerIP
b. ServerFQDN
c. ServerIP
d. SQLServer
Updating IP address for Harmony Workforce Optimization
November 2017 Deploying Harmony Workforce Optimization with Avaya Aura® CommunicationManager and Avaya Aura® Contact Center 321Comments on this document? [email protected]
Index
AAACC ................................................................... 36, 112, 124AACCNet adapter
required parameters for AACC on CommunicationManager ..............................................................118, 290
AACCNet adapter log verificationpost configuration ............................................... 177, 260
accessingsysadmin .................................................................... 167web application ...........................................................138
Active call recording .............................................................24active recording
AACC deployments ...................................................... 25Avaya Aura Contact Center deployments ...................229
adapterconfiguring geo redundant HA parameters .................210configuring parameters .......................................127, 249
adapter parameterconfiguring .......................................... 199, 208, 209, 264
adapters ...............................................................................16adding
CTI link ......................................................................... 45CTI user ........................................................................39device group ................................................................. 41devices ......................................................................... 40
Addingcontact details .............................................................106tenant details .............................................................. 105tenants ........................................................................104users ...........................................................................106
administeringagent stations ......................................................... 48, 50class of restriction .........................................................48system parameters ....................................................... 45virtual IP soft phones .................................................... 49
AES adapterrequired parameters for Avaya Aura Contact Center onCommunication Manager ........................................... 287required parameters for Call Center Elite onCommunication Manager ....................................117, 242trusted licensing secure connection ............................. 33
AES adapter log verificationpost configuration ............................................... 175, 258
Analytics ............................................................................ 282Analytics parameters ......................................................... 282Apache server IP address
updating ......................................................................312assigning
users .............................................................................53Assigning metrics
multiple NICs ................................................................ 73Avaya adapter
Avaya adapter (continued)configuring dynamic parameters ........................ 218, 276required dynamic parameter for Call Center Elite ...... 210required dynamic parameters for AACC onCommunication Manager ........................................... 128required parameter for Avaya Aura Contact Center ... 284required parameter for Call Center Elite ..................... 116
Avaya adapter log verificationpost configuration ............................................... 174, 257
Avaya adapter parametertrusted licensing parameters ........................................ 34
Avaya adapter with POMrequired dynamic parameters for CC Elite onCommunication Manager ........................................... 250
Avaya Aura Contact Center ... 25, 36, 112, 124, 232, 238, 246Avaya Aura Contact Center] .............................................. 229Avaya Aura Contact Center and Avaya Aura CommunicationManager integration .............................................................23Avaya Proactive Outreach Manager ..................................229
Bbackup ............................................................................... 157basic availability groups .....................................................185browser setting
Google Chrome .......................................................... 100Internet Explorer ........................................................... 99
browser settingsMozilla Firefox ............................................................ 101
bulk actionsexporting and importing parameters ................... 115, 241
Ccall signaling ........................................................................ 19CA-signed SSL certificate
replacing self-signed certificate .................................. 166changing
port and node of second instance of web application .191Changing
second instance of jetty .............................................. 190Changing server IP address
DNS deployment ........................................................ 130changing the host data IP address .................................... 320changing the node name
DNS deployments .......................................................130high availability ........................................................... 196
checking log filesservices ...................................................................... 169
checking statusSwitch Conn in AES server .......................................... 39
checklistinitial administration .................................................... 155
November 2017 Deploying Harmony Workforce Optimization with Avaya Aura® CommunicationManager and Avaya Aura® Contact Center 322Comments on this document? [email protected]
checklist (continued)planning ........................................................................ 57post installation verification .........................167, 174, 257pre-installation .............................................................. 71
CM ....................................................................................... 36Communication Manager .............36, 112, 124, 232, 238, 246component parameter
configuring .......................................... 114, 132, 240, 316component parameters .............................................. 114, 240components ......................................................................... 14
configuring dynamic parameters ................................ 318configuration
network port ..................................................................71Configuration ................................................................. 89, 97configuration checklist
AACC-CM .....................................................................36configuration tools and utilities
deployment ................................................................... 61configuring
Apache load balancer .................................................194Avaya adapter .....................................................217, 274component parameters .......................114, 132, 240, 316geo-redundancy high availability ........................ 208, 209geo-redundant high availability ...................................207high availability ........................... 195, 198–200, 263–265IP network regions ........................................................49log file parameters ...................................................... 102PE and CLAN IPs ......................................................... 43persistent connection ..................................................110POM adapter .............................................................. 275recorder .............................................................. 213, 270resource files .............................................................. 148screen capture ....................................................139, 142screen capture and DTA .............................................140screen capture parameters .........................................146SIP user ........................................................................53SNMP on Avaya OneX soft phones ..............................54UCID .............................................................................46
Configuring ........................................................................ 103license details ............................................................. 107POM reports ............................................................... 233
configuring AACCNet adapter parametervoice multiplicity ..................................................135, 256
configuring AES adapter parametervoice multiplicity ..................................................134, 255
configuring avaya adapter parametervoice multiplicity ..................................................134, 255
Configuring AWFOS user in EPM ......................................235configuring dynamic parameters
Avaya adapter .....................................................218, 276components ................................................................ 318
configuring geo redundant HA parametersadapter ....................................................................... 210
configuring HAscreen capture ............................................................204
configuring parametersadapter ............................................................... 127, 249
configuring parameters (continued)recorder .............................. 125, 200, 214, 247, 265, 270
configuring POM adapter parametervoice multiplicity ..........................................................256
configuring recorder parametervoice multiplicity ..................................................133, 254
Contact Center ...........................................................238, 246Copying POM reports for AWFOS ETL process ................236crating a SPN
trusted authentication ................................................. 136creating
wrapper folder for second instance of web application.....................................................................................191
CreatingPOM campaign detail report .......................................234POM campaign parameters history report ..................234POM contact details report ......................................... 234
CTI User .............................................................................. 39custom setup ................................................................. 88, 95
field descriptions .....................................................88, 95
Ddatabase
maintenance activities ........................................ 162, 163database files
AWFOS ...............................................................159, 160database server IP address
updating ......................................................................309Database Settings ......................................................... 90, 98deleting
gatekeeper configuration .............................................. 43deployment
configuration tools and utilities ..................................... 61deployment tools .......................................................... 13limitations ............................................................153, 253process ......................................................................... 56
deployment configurations ...................................................18deployment environments ....................................................28deployment scenarios
AACC active recording ................................................. 25AACC passive recording .............................................. 25Avaya Aura Contact Center active recording ..............229Avaya Aura Contact Center passive recording ...........229
desktop trigger client machine ............................................. 62disabling
AAPC or IQ ...................................................................47SSL ...............................................................................81TLS 1.0 ......................................................................... 78TLS 1.1 ......................................................................... 79
DMCC recording methodsmultiple registrations .....................................................20step conference ............................................................ 20
DMCC testfirst party call ................................................................ 52third party call ............................................................... 52
DNS deployment
Index
November 2017 Deploying Harmony Workforce Optimization with Avaya Aura® CommunicationManager and Avaya Aura® Contact Center 323Comments on this document? [email protected]

DNS deployment (continued)Changing server IP address ....................................... 130
dynamic parameter configuration checklistAACC-Communication Manager ................................ 124Contact Center-Communication Manager with AvayaProactive Outreach Manager ......................................246
dynamic parametersIP address updates .....................................................319Messaging .......................................................... 129, 252
dynamic recorder parameterAACC-Communication Manager
high availability .................................................... 201load balancing ..................................................... 214
AACC-Communication Manager with POMhigh availability .................................................... 266load balancing ..................................................... 271
Eenabling
disconnect supervision ................................................. 46DMCC unencrypted port ...............................................51recording agent-to-agent conversion for SPAN ............ 55third party controls on SIP phones ............................... 54TLS ............................................................................... 76UCID for conference or transfer ................................... 47
enabling loggingtrusted authentication ................................................. 138
Enabling recorder integrationAvaya Proactive Outreach Manager ...........................232
enabling SSOGoogle Chrome .......................................................... 137Internet Explorer ......................................................... 137
Enabling UCID generationAvaya Proactive Outreach Manager ...........................232
encrypted connections ...................................................82, 83ethernet
network considerations .................................................71executing
script generator ...........................................................150Executing the Cron trigger ................................................. 236
Ffailover and redundancy .................................................... 179field descriptions .................................................................. 39
basic availability groups in SQL server 2016 ..............187component parameters .......................................114, 240database settings ................................................... 90, 98DMCC test .................................................................... 52failover cluster ............................................................ 183install custom setup ................................................ 88, 95installing configuration information ......................... 89, 97install standard profile .............................................87, 95screen capture and desktop monitor .......................... 142TSAPI test .................................................................... 42
fixed seating .........................................................................21
free seating .......................................................................... 21
Ggenerating certificates ........................................................316Geo-redundancy high availability
AWFOS .......................................................................205failover scenarios ........................................................206
Geo redundanthigh availability ........................................................... 205
GUI methoduninstalling screen capture .........................................153
Hhardware requirements
multi box deployment ....................................................62single box deployment ..................................................62
high availability .......................................................... 179, 195High availability recording
AACC on CM .............................................................. 197AACC on CM with POM ............................................. 262
High availability supportscreen capture ............................................................203
hostedpremise .......................................................................103
hosted databaserunning scripts .....................................................310, 311
Iimporting
CCT user ...................................................................... 52importing CA certificate
Avaya adapter keystore ................................................34Importing license file .......................................................... 103infrastructure
maintenance activities ................................................ 163initial administration
starting web application .............................................. 156installation
worksheet ..................................................................... 59install database server
field descriptions .....................................................90, 98installing
Avaya Site Administration .............................................43custom ............................................................ 85, 93, 188learning console ......................................................... 149screen capture ............................................139, 140, 142standard ..........................................................85, 93, 188TSAPI client ..................................................................75
Installingmultibox ........................................................................ 91second instance of jetty as a Windows server ............192
installing and DTAscreen capture ............................................139, 140, 142
Index
November 2017 Deploying Harmony Workforce Optimization with Avaya Aura® CommunicationManager and Avaya Aura® Contact Center 324Comments on this document? [email protected]
installing certificate .............................................................. 82installing screen capture
GUI method ................................................................ 152terminal services server ..............................................151
integration scenariosAvaya Aura Contact Center on Communication Manager.......................................................................................28
IP address updateoverview ..................................................................... 309parameter configuration ..............................................317
Kkey customer configuration information
AACC on Communication Manager ............................. 57AACC on Communication Manager with Avaya ProactiveOutreach Manager ......................................................231
Llegal notices .............................................................................License ................................................................................ 31license requirements ............................................................29limitations
deployment ......................................................... 153, 253load balancing
configuring .................................. 213, 217, 270, 274, 275Load Balancing
AACC on CM .............................................................. 212AACC on CM with POM ............................................. 268
log file parametersconfiguring .................................................................. 102
loggingAvaya Site Administration .............................................44
logging inAES server ................................................................... 38
logging onsysadmin ............................................................ 102, 168
Log Manager parameters .................................................. 277log verification
post installation ...................................................170–172
MMaintenance mode
uninstall ...................................................................... 160Managing
storage drives ............................................................. 109Mapped drives
field descriptions ......................................................... 111mapping
new instance to tenant ................................................193Mapping
assets ......................................................................... 108storage drives ..............................................................111
Media manager parameters .......................................120, 298
Messaging dynamic parameters ................................129, 252messaging parameter
configuring .......................................................... 200, 265Messaging parameters .............................................. 121, 300Modifying
tenant status ............................................................... 112multi box deployment — application and database server .. 62multi box deployment — Recorder server ........................... 62multiple NICs
assigning metrics ..........................................................73Multiplicity ............................................................................ 21
Nnetwork considerations
ethernet ........................................................................ 71network port
configuration ................................................................. 71
Ooverview ...............................................................................14
PPacket Sniffer parameters ................................................. 279parameter configuration checklist
AACC-Communication Manager .................................112Contact Center-Communication Manager with AvayaProactive Outreach Manager ......................................238
parametersAnalytics ..................................................................... 282Log Manager .............................................................. 277Media manager ...................................................120, 298Messaging .......................................................... 121, 300Packet Sniffer ............................................................. 279Process checklist ........................................................278Recorder .....................................................122, 244, 302Screen Capture .......................................................... 146System Administration ................................................281Webapp ...............................................................115, 283
passive call recording .......................................................... 25planning
checklist ........................................................................57PLDS ................................................................................... 74
downloading software ...................................................74POM adapter
required dynamic parameters for CC Elite onCommunication Manager with POM ...........................251required parameter for AACC and Avaya ProactiveOutreach Manager ......................................................295required parameter for Call Center Elite and AvayaProactive Outreach Manager ......................................243
POM adapter log verificationpost configuration ....................................................... 260
port .......................................................................................71
Index
November 2017 Deploying Harmony Workforce Optimization with Avaya Aura® CommunicationManager and Avaya Aura® Contact Center 325Comments on this document? [email protected]

post configurationAACCNet adapter log verification .......................177, 260AES adapter log verification ............................... 175, 258Avaya adapter log verification .............................174, 257POM adapter log verification ...................................... 260Recorder log verification .....................................177, 261
post installationlog verification .....................................................170–172
post installation verificationchecklist ......................................................167, 174, 257
pre-installationchecklist ........................................................................71
premisehosted .........................................................................103
prerequisite .......................................................................... 13prerequisites
Avaya Aura Contact Center-Communication Manager onAvaya Proactive Outreach Manager ...........................232
process ................................................................................ 56Process checklist parameters ............................................278Processing POM reports in AWFOS ..................................236product compatibility ............................................................ 76
Rrecorder
configuring parameters .......125, 200, 214, 247, 265, 270Recorder log verification
post configuration ............................................... 177, 261recorder parameter
AACC-Communication Manage ................................. 126AACC on CM with POM ............................................. 248configuring .................................................. 198, 207, 263
Recorder parameters .........................................122, 244, 302recording
active ............................................................................ 19passive ......................................................................... 19
Recording tone .................................................................... 21registering ............................................................................ 74related documentation ....................................................... 226replacing self-signed certificate
CA-signed SSL certificate ...........................................166requirement
database .......................................................................68operating system .......................................................... 68reporting services ......................................................... 68
restartingAvaya Workforce Optimization Select components.............................................................................129, 252
restarting the componentsDNS deployments .......................................................133
restore ................................................................................157restoring
AWFOS .......................................................................160data .............................................................................158
restoring AWFOSdatabase files ............................................................. 160
runningDMCC test .................................................................... 51TSAPI test .................................................................... 42
running scriptshosted database ................................................. 310, 311
SScheduling POM reports ....................................................235screen capture
configuring HA ............................................................ 204Screen Capture ..........................................................143, 144screen capture and desktop monitor ................................. 142
field descriptions .........................................................142Screen Capture and Desktop Monitor
overview ..................................................................... 139uninstall ...................................................................... 145
screen capture parametersconfiguring .................................................................. 146
Screen Capture parameters .............................................. 146Screen IP address update
updating registry ................................................. 319, 321script generator
executing .................................................................... 150server
maintenance activities ................................................ 161server data
AWFOS .......................................................................157server restart
maintenance activities ................................................ 165services
checking log files ........................................................ 169services.msc components ................................................. 156setting
password .................................................................... 156setting up
availability groups in SQL server ................................ 185second instance of Webapp ............................... 191, 192Windows 2012 cluster ........................................ 181–183
Setting upsecond instance of WebApp on same server ............. 190
single box deployment ......................................................... 62software requirement ........................................................... 68specifying
log location of the second instance of Webapp .......... 192SQL server .....................................................................82, 83
MMC ............................................................................. 82SSL
disabling ....................................................................... 81standard profile .............................................................. 87, 95
field descriptions .....................................................87, 95starting
screen capture service ............................................... 204web application service .............................................. 168
Startingwebapp components .......................................... 132, 195
starting web application
Index
November 2017 Deploying Harmony Workforce Optimization with Avaya Aura® CommunicationManager and Avaya Aura® Contact Center 326Comments on this document? [email protected]
starting web application (continued)initial administration .................................................... 156
stopping the componentsDNS deployments .......................................................130
Storage drivesfield descriptions .........................................................109
support ...............................................................................228synchronizing data
two replicas .................................................................187sysadmin
logging on ................................................... 102, 167, 168SysAdmin ...........................................................102, 167, 168System Administration ....................................................... 281System Administration parameters ....................................281
Ttaking a backup
AWFOS ...............................................................157, 159taking a backup AWFOS
database files ............................................................. 159server data ..................................................................157
tenantfield descriptions .........................................................104
Tenant contact detailsfield descriptions .................................................106, 108
Tenant detailsfield descriptions .........................................................105
Tenant license detailsfield descriptions .........................................................108
terminal services serverinstalling screen capture .....................................151, 152uninstalling screen capture .........................................152
third-party CA certificatetrusted licensing support ...............................................33
TLSenabling ........................................................................ 76
TLS 1.0disabling ....................................................................... 78
TLS 1.1disabling ....................................................................... 79
topology ............................................................................... 17troubleshooting
basic availability group ............................................... 223corrupt VBScript engine ..............................................225emails not delivered ....................................................220install program failure ................................................. 225interaction playback fails ............................................ 221interaction playback issues .........................................223invalid license key .......................................................220maintenance mode ..................................................... 224McAfee upgrade from 8.8 to 10 .................................. 225Services become invisible when installer is run andclosed in maintenance mode ......................................224upgrade program failure ............................................. 225
trusted authentication ................................................ 137, 138Trusted authentication support .......................................... 135
trusted licensing parametersAvaya adapter ...............................................................34
trusted licensing support ......................................................32TSAPI client
installing ........................................................................75
Uuninstalling screen capture
GUI method ................................................................ 153terminal services server ..............................................152
updatingApache server IP address .......................................... 312component services ....................................................136database server IP address ........................................309web server IP address ................................................312
updating registryIP address update ...................................................... 321Screen IP address update .......................................... 319
uploadingScreen Capture logs ...................................................144
Usersfield descriptions .........................................................107
Vverifying
agent login .................................................................. 144codec set ...................................................................... 48CTI link ......................................................................... 45CTI user ........................................................................40DMCC service .............................................................. 39Screen Capture logs ...................................................143TSAPI service ...............................................................39
videos ................................................................................ 227Viewing
tenant summary .......................................................... 111voice multiplicity
configuring AACCNet adapter parameters ......... 135, 256configuring AES adapter parameters ................. 134, 255configuring avaya adapter parameters ............... 134, 255configuring POM adapter parameters ........................ 256configuring recorder parameters ........................ 133, 254
WWebapp ......................................................................115, 283web application .................................................................. 156Webapp parameters ...................................................115, 283web server IP address
updating ......................................................................312worksheet
installation .....................................................................59
Index
November 2017 Deploying Harmony Workforce Optimization with Avaya Aura® CommunicationManager and Avaya Aura® Contact Center 327Comments on this document? [email protected]