deploying big data management 10.2.1 on the microsoft
TRANSCRIPT

Deploying Big Data Management 10.2.1 on the Microsoft Azure Cloud Platform through the Azure Marketplace
© Copyright Informatica LLC 2018, 2021. Informatica, the Informatica logo, and Big Data Management are trademarks or registered trademarks of Informatica LLC in the United States and many jurisdictions throughout the world. A current list of Informatica trademarks is available on the web at https://www.informatica.com/trademarks.html.

AbstractCustomers of Microsoft Azure and Informatica can deploy Informatica® Big Data Management 10.2.1 through the Azure marketplace. The automated marketplace solution fully integrates Big Data Management with the Azure cloud platform and the Azure HDInsight cluster. The installed solution includes several preconfigured mappings that you can use to discover the capabilities of Big Data Management to load, transform, and write data to various Azure storage resources.
Supported Versions• Big Data Management 10.2.1
Table of ContentsOverview . . . . . . . . . . . . . . . . . . . . . . . . . . . . . . . . . . . . . . . . . . . . . . . . . . . . . . . . . . . . . . . . . 2
The Big Data Management Solution on Azure Marketplace. . . . . . . . . . . . . . . . . . . . . . . . . . . . . . . . . . 4
Informatica Domain. . . . . . . . . . . . . . . . . . . . . . . . . . . . . . . . . . . . . . . . . . . . . . . . . . . . . . . . . 4
Informatica clients. . . . . . . . . . . . . . . . . . . . . . . . . . . . . . . . . . . . . . . . . . . . . . . . . . . . . . . . . . 5
Azure Platform Elements. . . . . . . . . . . . . . . . . . . . . . . . . . . . . . . . . . . . . . . . . . . . . . . . . . . . . . 5
Implementation Overview. . . . . . . . . . . . . . . . . . . . . . . . . . . . . . . . . . . . . . . . . . . . . . . . . . . . . 6
Pre-Implementation Tasks. . . . . . . . . . . . . . . . . . . . . . . . . . . . . . . . . . . . . . . . . . . . . . . . . . . . . . . 6
Verify Prerequisites. . . . . . . . . . . . . . . . . . . . . . . . . . . . . . . . . . . . . . . . . . . . . . . . . . . . . . . . . 6
Gather Storage Account and Other Information. . . . . . . . . . . . . . . . . . . . . . . . . . . . . . . . . . . . . . . 7
Provision the Big Data Management on Azure Marketplace Solution. . . . . . . . . . . . . . . . . . . . . . . . . . . . 9
Begin Provisioning the Big Data Management on Azure Marketplace Solution. . . . . . . . . . . . . . . . . . . . 9
Choose the Implementation Type. . . . . . . . . . . . . . . . . . . . . . . . . . . . . . . . . . . . . . . . . . . . . . . 10
Deploy a Domain and Configure Azure Resources. . . . . . . . . . . . . . . . . . . . . . . . . . . . . . . . . . . . . 10
Monitoring Instance Provision and Informatica Domain Creation. . . . . . . . . . . . . . . . . . . . . . . . . . . . . 18
Logs . . . . . . . . . . . . . . . . . . . . . . . . . . . . . . . . . . . . . . . . . . . . . . . . . . . . . . . . . . . . . . . . . 21
Post-Implementation Tasks. . . . . . . . . . . . . . . . . . . . . . . . . . . . . . . . . . . . . . . . . . . . . . . . . . . . . 22
Get the Informatica Administrator IP Address from the Azure Console. . . . . . . . . . . . . . . . . . . . . . . . 22
Download, Install, and Configure the Developer Client. . . . . . . . . . . . . . . . . . . . . . . . . . . . . . . . . . 23
Using the Pre-Installed Mappings. . . . . . . . . . . . . . . . . . . . . . . . . . . . . . . . . . . . . . . . . . . . . . . . . 24
Pre-Installed Mappings. . . . . . . . . . . . . . . . . . . . . . . . . . . . . . . . . . . . . . . . . . . . . . . . . . . . . . 24
Ready To Go Scripts. . . . . . . . . . . . . . . . . . . . . . . . . . . . . . . . . . . . . . . . . . . . . . . . . . . . . . . . 25
Run the Mappings. . . . . . . . . . . . . . . . . . . . . . . . . . . . . . . . . . . . . . . . . . . . . . . . . . . . . . . . . 27
Next Steps. . . . . . . . . . . . . . . . . . . . . . . . . . . . . . . . . . . . . . . . . . . . . . . . . . . . . . . . . . . . . . . . 27
OverviewCustomers of Microsoft Azure and Informatica can deploy a big data solution that fully integrates Big Data Management with the Azure cloud platform and the HDInsight cluster.
Several different methods are available for deploying Big Data Management:
2

Hybrid deployment
Install and configure the Informatica domain and Big Data Management on-premises, and configure them to push processing to the HDInsight cluster.
Manual cloud deployment
Manually install and configure the Informatica domain and Big Data Management on Azure cloud platform VMs in the same region as your HDInsight cluster, or deploy the domain on-premises.
Marketplace cloud deployment
Execute a Big Data Management deployment from the Azure marketplace to create an Informatica domain and an HDInsight cluster in the Azure cloud, exploring Big Data Management functionality through prepackaged mappings.
The Big Data Management marketplace solution on Azure enables you to automate the deployment of the Informatica domain, an HDInsight cluster, and integration with storage and other resources in the Azure cloud platform. The marketplace solution includes prepackaged mappings that demonstrate various Big Data Management functionality.
The architecture of the marketplace solution on the Azure platform is essentially the same as the manual implementation of a Big Data Management cloud deployment described in the image in the previous section.
When you configure the implementation of the Azure marketplace Big Data Management solution, you make choices about the size of VMs on the Azure platform, the number of worker nodes, and other aspects of the deployed solution.
The following diagram shows the architecture of the Big Data Management on Azure marketplace solution:
The numbers in the architecture diagram correspond to items in the following list:
1. A virtual network, or vnet, and subnets to contain the Big Data Management deployment.
2. The Informatica domain, including the Model Repository Service and the Data Integration Service.
3

3. Azure SQL server databases to act as Informatica domain repositories:
• Domain repository database
• Model repository
In addition, the solution requires a third database to act as a Hive metadata repository.
See “Informatica Domain” on page 4 for an explanation of each repository.
4. An SQL data warehouse, to act as a repository for data sources and targets.
5. Azure Data Lake storage (ADLS) or blob storage, to act as a repository for data sources and targets.
6. Network security groups to contain authentication and authorization settings.
7. Additional storage space on the cluster.
8. Big Data Management clients, such as the Developer tool or an infacmd console. See “Informatica clients” on page 5 for an explanation of each of these.
The Big Data Management Solution on Azure Marketplace
The solution includes fully configured Azure resources including ADLS and a SQL data warehouse for storage, an HDInsight cluster for processing, and an Informatica domain populated with sample data and mappings.
Informatica DomainThe Informatica domain is a server component that hosts application services, such as the Model Repository Service and the Data Integration Service. These services, together with domain clients, enable you to create and run mappings and other objects to extract, transform, and write data.
Application Services
Model Repository Service
The Model Repository Service manages the Model repository. The Model repository stores metadata created by Informatica products in a relational database to enable collaboration among the products. Informatica Developer, the Data Integration Service, and the Administrator tool store metadata in the Model repository.
Data Integration Service
The Data Integration Service is an application service in the Informatica domain that performs data integration tasks for the Developer tool and for external clients.
The Informatica domain can run several other services. For more information about Informatica services, see the Informatica Application Service Guide.
Domain Repositories
Informatica repositories, posted on SQL databases, store metadata about domain objects. Informatica repositories include the following:
Domain configuration repository
The domain configuration repository stores configuration metadata about the Informatica domain. It also stores user privileges and permissions.
Model repository
The Model repository stores metadata for projects and folders and their contents, including all repository objects such as mappings and workflows.
In addition to these domain repositories, the solution also requires a repository for Hive metadata. This repository is hosted on an SQL database. It stores Hive table metadata to enable Hadoop operations.
4

For more information about domain repositories, see the Informatica Application Service Guide.
Informatica clientsYou can use several different clients with Informatica Big Data Management:
Administrator tool
The Administrator tool enables you to create and administer services, connections, and other domain objects.
Developer tool
The Developer tool enables you to create and run mappings and other objects that enable you to access, transform, and write data to targets.
Command line interface
The command line interface offers hundreds of commands to assist in administering the Informatica domain, creating and running repository objects, administering security features, and maintaining domain repositories.
Azure Platform ElementsThe Big Data Management solution automatically creates a virtual network on the Azure cloud platform with the following Azure platform elements:
• A network services gateway
• An HDInsight cluster with varying choices of attached storage resources such as ADLS, WASB (general) storage, or an Azure SQL data warehouse.You can choose from the following options when you configure the automated deployment:
•New WASB storage cluster, new Azure SQL database and new Azure SQL data warehouse
•Existing WASB cluster, new Azure SQL database and new Azure SQL data warehouse
•Existing WASB cluster without an SQL database and data warehouse
•New ADLS storage, new Azure SQL database and new Azure SQL data warehouse
5

Implementation OverviewThe following diagram shows how the marketplace solution is implemented:
Pre-Implementation TasksBefore you start the automated Big Data Management deployment, perform the following pre-implementation tasks:
• Verify prerequisites.
• If you plan to use Azure Data Lake storage with the Big Data Management implementation, gather information about the service principal account.
Verify PrerequisitesVerify the following prerequisites:
• You have a Microsoft Azure subscription.
• You have access and permissions to create the following resources on the Azure platform:
- Virtual network (vnet)
- Network security group
- Storage resources
- Virtual machines
- HDInsight cluster
- Azure SQL server database
- Azure data warehouse
• You have a valid Big Data Management license that you have downloaded to your local machine or a location on your network.
6

• You have created a sufficient number of CPU cores in the region where you plan to deploy the Big Data Management solution. The following table lists supported regions:
Americas Europe Asia and Oceania
- Brazil South- Canada central- Canada East- Central US- East US- East US 2- North Central US- South Central US- West Central US- West US- West US 2
- North Europe- UK South- UK West- West Europe
- Australia East- Australia Southeast- Central India- East Asia- Japan East- Japan West- Korea central- Korea South- South India- Southeast Asia
Note: If your desired region is not listed, contact Informatica support to check support for your desired region.
Gather Storage Account and Other InformationIf you plan to use an existing Azure Data Lake storage (ADLS) account with the HDInsight cluster, gather information about the ADLS service principal to allow you to configure access to the storage for solution elements.
In addition, you will need to know other information about the ADLS account.
The service principal is an Azure user that meets the following requirements:
• Permissions to access required directories in ADLS storage.
• Certificate-based authentication for ADLS storage.
• Key-based authentication for ADLS storage.
The following table lists the information to gather and the location in the Azure portal where you can find it:
Property Description Where to Find
ADLS storage account name Name of the ADLS account. 1. Select the Resource Groups tab.2. Select the resource group where the storage
resides.3. Select the ADLS storage resource.4. Select the Access keys tab.5. Find the Storage Account Name property and
copy the value.
ADLS resource group Resource group that the ADLS account is a member of.
Select the Resource Groups tab and copy the name of the resource group that the ADLS is a member of.
ADLS Storage Account Key An octet string that provides a key for the ADLS storage associated with the service principal.
1. Select the Resource Groups tab.2. Select the resource group where the storage
resides.3. Select the ADLS storage resource.4. Select the Access keys tab.5. Find the Key property and copy the value.
7

Property Description Where to Find
Service Principal Object ID An octet string that provides a key associated with the service principal.
1. Select the All Services tab.2. In the All services search box, type "enterprise."
The portal displays a list of resources whose names contain the word "enterprise."
3. Select the Enterprise Applications resource.4. Under Application Type, select All Applications,
then click Apply.5. Use the search bar if you know part of the
Service Principal name.6. Find the Service Principal and copy the value
under Object ID.
Service Principal Application ID ID of the service principal user that represents the HDInsight cluster. Has permissions on the root folder of the ADLS storage account.
1. Select the Azure Active Directory tab.2. Click App Registrations.3. Search for and find the application name.4. Copy the value under Application ID.
Service Principal Certificate Content
The Base64 encoded text of the public certificate used with the service principal.The Azure administrator must generate this certificate content. For more information, see Azure documentation.
Subscription ID ID of the Azure account to use in the cluster creation process.
Open the Azure Portal and click the Overview tab to view the Subscription ID property.
Tenant ID A GUID string associated with the Azure Active Directory.
Select the Azure Active Directory tab and click Properties. Find the Directory ID property. The value of this property is also the tenant ID.
Client Secret An octet string that provides a key for an application associated with the Service Principal.
Attention: The key is visible only immediately after the administrator creates it. Perform the following steps immediately after key creation is complete. Subsequently, the key value is hidden and cannot be copied.1. Select the Azure Active Directory tab.2. Click App Registrations.3. Search for and find the service principal name.4. Click Settings.5. Click Keys.6. Create a key, and immediately copy its value.
Container Name Name of the container in which the WASB storage account resides.A container is a virtual collection of services that a platform developer can use to deploy applications.
1. Select the Resource Groups tab.2. Search for and select the resource group in
which the WASB storage resides.3. In the resource group properties, find and select
the WASB storage resource.4. In the storage account properties, copy the
name. The storage resource name and the container name are the same.
8

Property Description Where to Find
Tenant Authentication URI URI that represents the authorization endpoint.
1. Select the Azure Active Directory tab.2. Click App Registrations.3. Click Endpoints.4. Copy the value of the OAUTH 2.0 Authorization
Endpoint property.
Data Lake Service Principal OAUTH Token Endpoint
Endpoint for OAUTH token based authentication.
1. Select the Azure Active Directory tab.2. Click App Registrations.3. Click Endpoints.4. Copy the value of the OAUTH 2.0 Token Endpoint
property.
Provision the Big Data Management on Azure Marketplace SolutionWhen you provision the Big Data Management solution on Azure marketplace, you launch the wizard and configure basic properties. Then you go on to configure the solution.
Begin Provisioning the Big Data Management on Azure Marketplace SolutionUse the Azure Marketplace website to provision Azure cluster resources including a Big Data Management deployment.
When you implement the Big Data Management solution on Azure marketplace, you launch the wizard, configure basic properties, and then choose from among three implementation types.
1. Search for and select the Big Data Management 10.2.1 solution.
a. Log in to the Azure marketplace website. Use the search bar to search for Informatica Big Data Management.
b. Select Informatica Big Data Management BYOL.
The following image shows the app to select for the 10.2.1 Big Data Management solution:XXXXXXX XXXXXXXX XXXXXXXXXXXXXXX
Click Get it now to launch the solution wizard.
c. Read the details of the terms of use and click Continue.
The wizard redirects the browser window to the Big Data Management BYOL solution on the Azure portal.
d. Click the Create button at the bottom of the screen.
A series of panels opens to enable you to configure the solution on the Azure platform.
2. Supply information in the Basics panel, and then click OK.
9

Configure the following properties:
Property Description
Subscription Select the existing Azure subscription that you want to use for the deployment.
Resource group The resource group where you want to stage the deployment. You can create a new resource group or select an existing one.
Location Choose the location for the resource group. This should be a location where you have already the VM cores that you want to use for the deployment.
Go on to choose the type of implementation you require.
Choose the Implementation TypeYou can choose to create an entirely new implementation or create a new Informatica domain to use existing Azure resources.
Choose from among the available implementation types, as shown in the following image:
Deploy a Domain and Configure Azure ResourcesCreate an Informatica domain and configure new or existing Azure resources to use with it.
1. Supply information in the Informatica Domain Settings panel, and then click OK.
This tab allows you to configure additional details of the Informatica domain. All properties in this tab are mandatory.
10

Configure the following properties:
Property Description
Informatica BDM version Verify that version 10.2.1 is selected.
Informatica domain name Type a name for the Informatica domain to be created.
Informatica domain administrator name
User ID for the Informatica domain administrator account.
Informatica domain password
Password for the Informatica domain administrator.After you type the password, retype it in the next field.
Keyphrase for encryption key Create a keyphrase to create an encryption key.After you type the keyphrase, retype it in the next field.
Informatica license file Click the Folder icon to browse to the location of the Informatica license file on your local system.When you select the license file and click OK, Azure uploads the file.
2. Supply information in the Node Settings panel, and then click OK.
This tab allows you to configure details of the virtual machines (VMs) that the automated implementation devotes to the solution.Configure the following properties:
Property Description
Select the OS for the VM Select Red Hat Enterprise Linux 7.3.
Number of nodes in the domain
Number of nodes in the domain.Note: This is not the same as the cluster node count, which you configure in another panel.Default is 1.You can configure up to 29 nodes.
Machine prefix Type an alphanumeric string that will be a prefix on the name of each virtual machine in the Informatica domain.For example, if you use the prefix "infa" then Azure will identify virtual machines in the domain with this string at the beginning of the name.
VM Username Username that you use to log in to the virtual machine that hosts the Informatica domain.
Authentication type Authentication protocol you use to communicate with the Informatica domain.Default is Password.
Password Password to use to log in to the virtual machine that hosts the Informatica domain.
Machine size Select from among the available preconfigured VMs. The default is 1x Standard DS11.
3. Supply information in the Database Settings panel, and then click OK.
11

This tab allows you to configure settings for the Informatica domain database, where Informatica stores metadata about domain objects and jobs.
At the top of the panel, you choose between creating a new database or using an existing one. The following image shows the control to use to make this choice:
The following sections describe the properties to configure for each case.
Configure the following properties:
Property Description
Database type Select SQL Server 2014.
Database machine name Name for the virtual machine that hosts the domain database.
Database username Username for the administrator of the virtual machine host of the database. The HDInsight cluster uses these credentials to log into the virtual machine where the database is hosted.
Password Password for the database machine administrator.After you type the password, retype it in the next field.
Database machine size Select a size from among the available pre-configured virtual machines. The default is 1x Standard DS3.
Informatica domain DB User
Name of the database user. The Informatica domain uses this account to communicate with the domain database.
Informatica domain DB Password
Password for the database user.After you type the password, retype it in the next field.
If you choose to use an existing SQL Server database for the domain database, configure the following properties:
Property Description
Database type Select SQL Server 2014.
Database machine name Name for the virtual machine that hosts the domain database.
Database port The port that the database uses to listen for connections.
Database name Name of the database to use as the domain database.
12

Property Description
Informatica domain DB User Name of the database user. The Informatica domain uses this account to communicate with the domain database.
Informatica domain DB Password
Password for the database user.After you type the password, retype it in the next field.
4. Supply information in the Informatica Big Data Management Configuration panel, and then click OK.
This tab allows you to configure the HDInsight cluster.
At the top of the panel, you choose between creating a new cluster or using an existing one. The following image shows the control to use to make this choice:
If you choose to create a new cluster, configure the following properties:
Configure the following properties in the Cluster Details area:
Property Description
HDInsight Cluster Name
Name of the HDInsight cluster where you want Informatica to process jobs.
HDInsight Cluster Username
User login for the cluster. This is usually the same login you use to log in to the Ambari cluster management tool.
Password Password for the HDInsight cluster user.After you type the password, retype it in the next field.
HDInsight Cluster SSH Username
Account name you use to log in to the cluster head node.
Password Password to access the cluster SSH host.After you type the password, retype it in the next field.
If you choose to use an existing cluster, configure the following properties in the Cluster Configuration area:
Property Description
Existing Cluster Resource Group
Resource group that the cluster is a member of.
HDInsight Cluster Name Name of the HDInsight cluster where you want Informatica to process jobs.
13

Property Description
HDInsight Cluster Username User login for the cluster. This is usually the same login you use to log in to the Ambari cluster management tool.
Password Password for the HDInsight cluster user.
HDInsight Cluster SSH Host Name
Account name you use to log in to the cluster head node.
Password Password to access the cluster SSH host.
Head Node Hostname of the HDInsight Cluster
Name of the cluster head node host.
HDInsight Cluster Port Port that the HDInsight cluster uses to listen for connections. Default is 8080.
After you configure the initial cluster properties, configure the following properties in the Cluster Configuration section:
At the top of the section, you choose between following physical storage types for the HDInsight cluster:Azure storage
General purpose storage is available in v.1 (GPv1) and v. 2 (GPv2). Both come in standard and premium versions. The standard storage version uses magnetic media tape storage. Only standard storage supports Hadoop.
Azure general storage is also known as WASB storage.
Use this disk storage for data sources and targets.
Data Lake Store
Azure Data Lake Storage provides massively scalable data storage optimized for Hadoop analytics engines. You can use ADLS to archive structured and unstructured data, and access it via Hive, Spark, or the native Informatica run-time engine.
The following image shows the control to use to make this choice:
After you choose the storage type, configure the properties for the physical storage choice.
14

Configure the following properties for Azure storage:
Property Description
HeadNode size Choose a machine size for the cluster head node. The cluster head node performs cluster management functions.Default: 1x Standard D3 v2
Cluster worker node count
Number of worker nodes in the cluster. the worker nodes support job processing. This number does not count the head and gateway nodes, which are created by default.
WorkerNode size Choose a machine size for each cluster worker node.Default: 2x Standard D3 v2
ZookeeperNode size Choose a machine size for the cluster Zookeeper node. The zookeeper node controls leader election of master services on head nodes.Default: 1x Standard D14
Configure the following properties for Azure Data Lake storage:
Property Description
Data Lake Store Account * Identify the Data Lake Store account to use.
Data Lake Store Resource Group * Identify the resource group where the Data Lake Store resides.
Data Lake Root Folder Path to the Data Lake root folder.You can type any path, beginning with / and additional alphanumeric characters.
Cluster Identity Resource URI Path to the cluster identity resource.This path should start with https://
Tenant Authentication URI * Path for tenant authentication.This path should start with https://
AAD Tenant ID * ID of the Azure Active Directory (AAD) tenant.
Service Principal Object ID Specifies the unique application ID of the service principal. The service principal is the account used to access Data Lake Store data.
Service Principal Application ID * ID of the service principal user that represents the HDInsight cluster. Has permissions on the root folder of the ADLS storage account.
Service Principal Certificate Contents
The Base64 encoded text of the public certificate used with the service principal.
Service Principal Certificate Password
Private key for the service principal. The password enables the service principal to read and write to the Data Lake Store.This private key must be associated with the service principal certificate.
15

Property Description
HeadNode size Choose a machine size for the cluster head node. The cluster head node performs cluster management functions.Default: 1x Standard D3 v2
Cluster worker node count Number of worker nodes in the cluster. the worker nodes support job processing. This number does not count the head and gateway nodes, which are created by default.
WorkerNode size Choose a machine size for each cluster worker node.Default: 2x Standard D3 v2
* Make a note of the values for properties marked with an asterisk. You can use these property values later when you “Editing and Running the Ready To Go Files” on page 26.
5. Supply information in the BDM Services Settings panel, and then click OK.
Use this tab to set up Informatica services. For more information about Informatica services, see the Informatica Application Service Guide.Configure the following properties for Big Data Management services:
Property Description
Model Repository Service Name (MRS)
Name of the Model Repository Service.The Model Repository Service manages metadata about mappings, workflows and applications.
Data Integration Service Name (DIS)
Name of the Data Integration Service.The Data Integration Service runs mappings and workflows.
MRS Database username Username for the Model Repository Service database.The Model Repository Service database stores Model repository data
MRS Database password Password for the Model Repository Service database.
Workflow Database username Username for the workflow user. Informatica requires a separate database user account to run workflow jobs.
Workflow Database password Password for the workflow user.
6. Supply information in the Create Additional Resources panel, and then click OK.
This panel enables you to configure properties for the SQL database and the SQL data warehouse.
At the top of the section, you choose whether to create the SQL Server database.
The following image shows the control to use to make this choice:
16

If you choose to create an SQL Server database, configure the following properties:
Property Description
Server name Name of the SQL Server database server.
Server Admin Login Database server administrator account ID.
Password Password for the database server administrator. Retype the password in the following field.
You can also create an SQL data warehouse.
The following image shows the control to use to make this choice:
If you choose to create an SQL data warehouse, configure the following properties:
Property Description
Database name Name of the SQL data warehouse to create.
DW Database Edition
Type of the data warehouse to create. Accept the default value.Default: DataWarehouse.
Database Tier You can select from several available data warehouse tiers. See the Microsoft Azure website for tier pricing.Default: Gen1.
Database Requested Service Object Name
Size of the VM instance where the database resides.The default value of this property depends on your choice for the database tier. Recommendation: accept the default value of the property after you choose the database tier.
Collation Set the collation type for the data warehouse.Collations provide the locale, code page, sort order and character sensitivity rules for character-based data types. For more information and for a list and description of available collations, see Microsoft Azure documentation.Default: SQL_Latin1_General_CP1_CI_AS
7. Supply information in the Infrastructure Settings panel, and then click OK.
Use this tab to set up cluster resources for the Big Data Management implementation.Storage account
Storage resource that the virtual machines that run the Big Data Management implementation will use for data storage.
Select from the existing storage accounts or create a new one.
To create a new storage account, click the right pointing arrowhead, as shown in the following image:
17

HDI Cluster Virtual Network
Virtual network (vnet) that the HDInsight cluster belongs to.
If you plan to use an existing cluster, select the vnet that the existing cluster belongs to.
If you chose to create a new HDInsight cluster in the Informatica Big Data Management Configuration panel, you can create a new vnet in which the cluster can reside in this step.
To create a new vnet, click the right pointing arrowhead, as shown in the following image:
Subnets
The subnet that the virtual network contains.
Choose from among the subnets that are available in the virtual network.
8. Verify the choices in the Summary panel, and then click OK.
9. Read the terms of use in the Create panel, and then click Create.
When you click Create, Azure deploys Big Data Management and creates resources in the environment that you configured.
Monitoring Instance Provision and Informatica Domain CreationYou can use cloud platform dashboards, logs, or other artifacts to see whether cluster creation succeeded and how to locate and identify the Informatica domain on the cloud platform.
During Deployment
After you finish configuring the solution and start the deployment process, the Azure dashboard indicates deployment status in the top right corner. The following image shows this indicator:
18

When you click on the "Deployment in progress..." link, the dashboard displays detailed status of the deployment job, including resources as they are created. The following image shows this display:
When Deployment is Complete
The automated deployment includes the following resources:
• Storage account
• Virtual network (vnet)
• Network security group
• Virtual machine hosting databases
• HDInsight cluster
• Informatica domain
• Azure SQL database, if selected
• Azure SQL data warehouse, if selected
19

Perform these steps to use your Azure dashboard to verify the status of resource deployment:
1. Use the dashboard search bar to search for the resource group that contains the Big Data Management deployment.The dashboard displays the Overview view of the resource group, with resource deployment status as a clickable link in the upper right corner.
2. Click the resource deployment status link.The following image shows how the link appears:
When you click the deployment status link, a detail window opens listing the failed and successful deployments, as shown in the following image:
3. Click the Error details link for information about failed resource deployments.
4. Click the Overview tab to see a list of the resources in a resource group. The following image shows a portion of a resource group with a large number of resources:
20

5. You can click column headings in the display to sort by name, type, or location of the resource.
LogsAfter the completion of Big Data Management deployment, consult logs to see the success or failure of solution element creation.
You can access the following logs on the VM that hosts the Informatica domain:
Installation log
Records the installation of the Informatica domain, Informatica services, and repositories. In case any of the installation tasks failed, you can check the log for the command that failed.
Filename: Informatica_10.2.1_Services_<timestamp>.logLocation: /home/ec2-user/Informatica/server/
Azure extension operation logs
Records the installation of Azure resources and services.
Filename: extension.logLocation: /var/log/azure/Microsoft.OSCExtensions.CustomScriptForLinux/1.5.2.2/
Note: A subdirectory in the above path under /download/0/ contains sdtout and errout logs . The directory also contains the file converted.sh, which contains the script that was executed to install Azure resources and services.
Command execution log
This log records the following events:
• Creation of Informatica connections, cluster configurations, and services
• Population of the data warehouse and SQL databases
• Import of sample mappings to the Model repository. This is recorded in the Project importing section of the log.
21

• Data Integration Service recycling to register all changes.
At the top of the log file is a summary section that lists automated tasks and their status. Beneath the summary section are detailed sections about each task. If any of the tasks failed complete successfully, you can look at the detailed section for the task to troubleshoot the task.
Filename: Oneclicksolution_results.log Location: /home/<User ID>/
Post-Implementation TasksAfter the marketplace solution is finished deploying, perform the tasks in this section.
Get the Informatica Administrator IP Address from the Azure ConsoleAfter deployment is complete, you can look in the Azure console for a property that allows you to access the Administrator tool.
The Administrator tool enables you to administer the Informatica domain, services, repository objects, users and roles, and all other aspects of the domain.
1. In the Azure console, select the resource group where you deployed Big Data Management.
2. Select the VM instance where the Data Integration Service is deployed.
The portal displays properties for the VM instance.
The following image shows an example of how the portal displays VM properties:
3. Move the mouse over the value of the Public IP Address property, then to the right.
A Click to Copy control appears. Click to copy the IP address.
4. Edit the /etc/hosts file of the local machine where your web browser resides. Add the IP address to the hosts file.
The file is located on Windows at the following path: C:\Windows\System32\drivers\etc\hostsThe resulting hosts file might look like this, with the Informatica domain entry on the last line:
# Copyright (c) 1993-2006 Microsoft Corp.# For example:#
22

# 102.54.94.97 rhino.acme.com # source server# 38.25.63.10 x.acme.com # x client host# localhost name resolution is handle within DNS itself.# 127.0.0.1 localhost 10.20.30.40 hn0-hdiwas.4rfn4okocaerpji0yhys468e0g.ix.internal.cloud app.net
5. Copy the URL and use it to open the Administrator tool in a separate browser window. Append the default port 6008.
The value of this property is the URL for the Administrator tool. Example:
https://10.20.30.40:6008/Administrator/You can also use the VM name. For example:
https://<VM name>:6008/Administrator/Tip: Bookmark the Administrator tool URL to allow for quick future access.
Download, Install, and Configure the Developer ClientUse the Developer tool client to open, edit and run the preconfigured mappings that are installed with the Model repository, as well as mappings that you design.
You can install the developer tool client on the Azure cloud platform in the same vnet as the Informatica domain, or on another network on-premises.
1. Download the Developer tool installer from the download site.
a. Open the email message that you received from Informatica containing the Big Data Management license. The message also contains a URL that you can use to download the Developer tool installer from the Informatica download site.
b. Download the installation .zip file from the Informatica Electronic Software Download site to a directory on your machine and then extract the installer files.
2. Run the Developer tool installer.
3. If you install the Developer tool outside the domain vnet, you must add the domain IP address and VM name to the hosts file on the Windows machine where the Developer tool runs.
The Hosts file is used by the operating system to map human-friendly hostnames to numerical Internet Protocol (IP) addresses which identify and locate a host in an IP network.
If you install the Developer tool on the Data Integration Service domain VM in the Azure vnet, skip this step.
a. Log into the machine where the Developer tool is installed.
b. Open the hosts file for editing.
The hosts file is located at the following path: C:\Windows\System32\drivers\etc\hostsc. Add an entry to the hosts file for the domain IP address and fully qualified host name.
For example, the resulting hosts file might look like this, with the Informatica domain entry on the last line:
# Copyright (c) 1993-2006 Microsoft Corp.# For example:## 102.54.94.97 rhino.acme.com # source server# 38.25.63.10 x.acme.com # x client host# localhost name resolution is handle within DNS itself.# 127.0.0.1 localhost 10.20.30.40 hn0-hdiwas.4rfn4okocaerpji0yhys468e0g.ix.internal.cloud app.net
4. Launch the Developer tool.
The first time that the Developer tool launches, it displays the Welcome page.
23

5. Click the icon in the upper right corner of the display to open the Developer tool Workbench.
The Workbench is the primary developer tool user interface.
6. Connect to the Informatica domain on the Azure platform.
a. Click Window > Preferences.
The Preferences dialog box appears.
b. Select Informatica > Domains.
c. Click Add.
The New Domain dialog box appears.
d. Enter the domain name, host name, and port number.
e. Click Finish, and then click OK.
Using the Pre-Installed MappingsThe marketplace solution contains sample pre-configured mappings that you can use as templates for your own mappings.
This section lists and describes the mappings and contains instructions for how to run them.
Pre-Installed MappingsUse the Developer tool to open and run the pre-installed mappings that the automated deployment contains.
Browse the folders in the Informatica_BDM_Sample project to access the pre-installed mappings. The following image shows the project folders:
The following table lists pre-installed sample mappings that you can use with Azure HDInsight:
Folder Mapping Name Purpose
Azure m_Blob_ADLS_to_Azure_DW Demonstrates moving data from ADLS storage to data warehouse
Azure m_SQL_DB_to_ADLS Demonstrates moving data from SQL DB storage to ADLS
24

Folder Mapping Name Purpose
Azure m_SQL_DB_to_Blob Demonstrates moving data from SQL DB storage to blob storage
Complex_Types m_Create_Array_of_Structs Demonstrates creating nested complex types by creating an array of structs
Complex_Types m_Create_Arrays Demonstrates creation of array data types
Complex_Types m_Create_Structs Demonstrates creation of struct data types
Complex_Types m_Process_Array Demonstrates use of arrays
Complex_Types m_R2H Demonstrates building hierarchical structure from relational sources
Complex_Types m_R2H_Mini Demonstrates building simple hierarchical structures from relational sources
DI_Transformations ALL_DI_Transformation Demonstrates how to use all data integration transformations in Hadoop pushdown mode
Hive_ACID_Merge Hive_Acid_Merge Demonstrates usage of Update Strategy transformation on Hive tables that have transaction capability enabled on supported Hadoop distributions
Intelligent_Structure m_ISD Demonstrates use of models exported from Intelligent Structure Discovery
Python m_Python Demonstrates invoking data science model usage of Python transformation in a Big Data Integration mapping
Python M_Titanic_PredictiveAnalysis_LoadHive Demonstrates usage of Python based data science models to predict mortality rate of Titanic passengers
Sqoop_Enhancements m_mssql_to_HDFS Demonstrates ingestion of data from Microsoft SQL Server (via SQOOP) into HDFS
Sqoop_Enhancements m_mssql_to_Hive Demonstrates ingestion of data from Microsoft SQL Server (via SQOOP) into Hive
Ready To Go ScriptsUse a Ready To Go script to prepare the pre-installed mappings to run in your environment.
The automated deployment populates the /opt/Informatica/Archive/BDMFiles/ready_to_go/ directory on the Informatica domain machine with three sets of files. Each set is comprised of the following files:Input file
The input.properties file contains a series of properties that you populate with information about cluster storage locations, including authentication information, which the pre-installed mappings require to run successfully.
Script file
The script edits the pre-installed mappings with values from the input file.
25
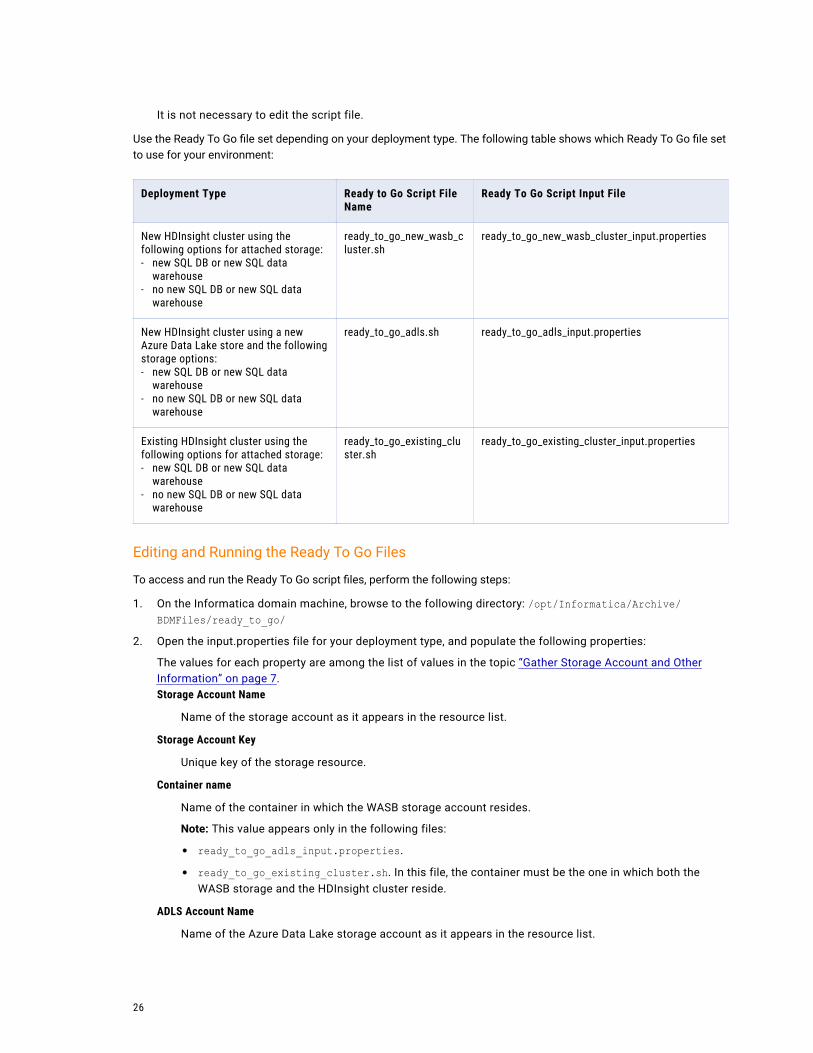
It is not necessary to edit the script file.
Use the Ready To Go file set depending on your deployment type. The following table shows which Ready To Go file set to use for your environment:
Deployment Type Ready to Go Script File Name
Ready To Go Script Input File
New HDInsight cluster using the following options for attached storage:- new SQL DB or new SQL data
warehouse- no new SQL DB or new SQL data
warehouse
ready_to_go_new_wasb_cluster.sh
ready_to_go_new_wasb_cluster_input.properties
New HDInsight cluster using a new Azure Data Lake store and the following storage options:- new SQL DB or new SQL data
warehouse- no new SQL DB or new SQL data
warehouse
ready_to_go_adls.sh ready_to_go_adls_input.properties
Existing HDInsight cluster using the following options for attached storage:- new SQL DB or new SQL data
warehouse- no new SQL DB or new SQL data
warehouse
ready_to_go_existing_cluster.sh
ready_to_go_existing_cluster_input.properties
Editing and Running the Ready To Go Files
To access and run the Ready To Go script files, perform the following steps:
1. On the Informatica domain machine, browse to the following directory: /opt/Informatica/Archive/BDMFiles/ready_to_go/
2. Open the input.properties file for your deployment type, and populate the following properties:
The values for each property are among the list of values in the topic “Gather Storage Account and Other Information” on page 7.Storage Account Name
Name of the storage account as it appears in the resource list.
Storage Account Key
Unique key of the storage resource.
Container name
Name of the container in which the WASB storage account resides.
Note: This value appears only in the following files:
• ready_to_go_adls_input.properties.
• ready_to_go_existing_cluster.sh. In this file, the container must be the one in which both the WASB storage and the HDInsight cluster reside.
ADLS Account Name
Name of the Azure Data Lake storage account as it appears in the resource list.
26

ADLS Application ID
ID string for the application.
ADLS Key
Unique key of the Azure Data Lake storage resource.
ADLS Token Endpoint
A URL representing the OAUTH 2.0 token endpoint of the Azure Data Lake storage resource.
To get this value, click on the App Registrations tab.
Note: The input.properties files contain sample values. Be sure to replace the sample values with real values that you obtain from the Azure portal.
3. Run the Ready To Go script that corresponds to the input.properties file that you populated.
Run the MappingsBrowse to the mapping in the Developer tool and double-click the mapping to open it in the editor.
Each of the included mappings is configured to use the Spark runtime engine. You must use the Spark run-time engine to run the pre-configured mappings.
To run a mapping, select it in the list of mappings in the Navigator, and choose Run > Run.
Ready to Go Script Logs
The following logs record Ready to Go script execution:
• ready_to_go_new_wasb_cluster.log
• ready_to_go_existing_cluster.log
• ready_to_go_adls.log
Location: home/<OS user name>/
Next StepsAfter you use the pre-installed mappings to learn how Big Data Management accesses and transforms data on the Azure platform, you can use the developer tool to create and run your own mappings in the deployment environment that you created.
To learn more about how to use Big Data Management, read the Big Data Management documentation. Each of these guides is available in the Big Data Management documentation set on the Informatica Network at http://network.informatica.com.
Informatica Application Service Guide
Describes the Model Repository Service, Data Integration Service, and other application services that Big Data Management uses.
Big Data Management User Guide
Describes how to use Informatica Developer and Informatica Administrator to manage connections between the Informatica domain and the cluster, and how to create mappings in the Developer tool.
Informatica Developer User Guide
Contains full details about how to use the Developer tool to create and run mappings and workflows.
27

Informatica Developer Mapping Guide
Contains full details about how to develop mappings in the Developer tool.
Informatica Developer Mapping Transformation Guide
Contains details about each of the transformations that are available to use in mappings.
AuthorMark Pritchard
28