deploying the analytics productsiapp template in the f5
TRANSCRIPT

Deploying the Analytics Products iApp Template in the F5® BIG-IP® System
Analytics Products iApp Template Version 2.0.6
December 8, 2021, Document Version 1.0.0
Table of Contents Objective ....................................................................................................................................................... 1
Prerequisites ................................................................................................................................................. 1
Deploying the Analytics Products iApp Template in the BIG-IP System ....................................................... 2
Import the Analytics Products iApp template to the BIG-IP ..................................................................... 2
Create the iApp in the BIG-IP .................................................................................................................... 3
Configuring Advanced iApp Settings ............................................................................................................. 5
Disabling Strict Updates ................................................................................................................................ 8
How to Change the Source Address Translation of the iApp’s Virtual Server .............................................. 9
How to Upgrade an iApp with a new template .......................................................................................... 10
Upgrade when the new iApp template has a different name than the old iApp template ................... 10
Upgrade when the new iApp template has the same name as the old iApp template.......................... 10
How to change run-time priority for iRules ................................................................................................ 11
How to Disable an iApp ............................................................................................................................... 12
How to delete an iApp ................................................................................................................................ 12
Troubleshooting .......................................................................................................................................... 13
Known Issues ............................................................................................................................................... 15
Legal Notices ............................................................................................................................................... 17

1
Objective This document details how to deploy the Analytics products: Application Traffic Insight (ATI), Shape AI Fraud Engine (SAFE), and Recognize.
• ATI is a Proof-of-Value (PoV) tool that provides insight into unwanted user connections,
devices, and behavior on your web application.
• SAFE is a fraud detection and prevention solution that blocks numerous types of fraud,
including account takeover, malicious account creation, exploitation of stolen accounts,
fraudulent applications, among others.
• Recognize rescues known, good consumers from the frustration of excessive logins and
reauthentication, helping brands safely grow topline revenue. Recognize achieves this
by accurately identifying, in real-time, returning consumers and other legitimate
consumers through the power of deep analytics and the broad reach of the F5 network.
This document is for customers using the BIG-IP system on their web sites and mobile apps, who would also like to apply the monitoring and protection features offered by the Analytics Products.
Prerequisites Before deploying or upgrading an iApp in the F5® BIG-IP® system, you should ensure the following:
1. Your BIG-IP version is 12.1.0 or later, with the LTM Module provisioned and licensed.
2. You have backed up the BIG-IP configuration as described here: Backing up your BIG-IP
system configuration.
3. Your virtual server must have an HTTP profile and default pool attached to it.
4. If the BIG-IP system is behind a firewall, you should allow access for the following F5 host servers, DNS servers, ports, and routing servers so that the system can complete the update tasks:
• Host servers: o us.gimp.zeronaught.com on port 443
• DNS servers: o The firewall should allow port 53 UDP access for DNS resolution. o The BIG-IP DNS Servers List should be configured with accessible DNS name servers.
• Routing and HTTP Proxy servers: o To reach dip.zeronaught.com, the BIG-IP system chooses an interface based on the current
routing table. The BIG-IP system's routing table includes both the management and Traffic Management Microkernel (TMM) interfaces. For more information, see K13284: Overview of management interface routing (11.x and later).
2
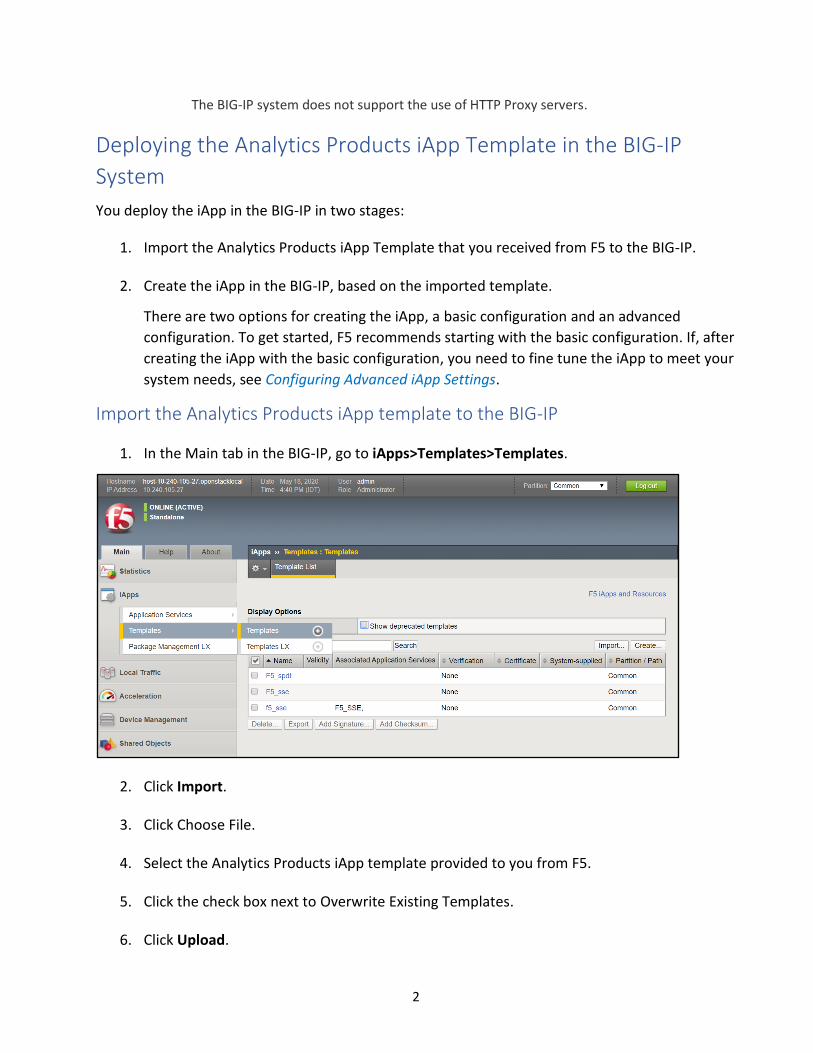
The BIG-IP system does not support the use of HTTP Proxy servers.
Deploying the Analytics Products iApp Template in the BIG-IP
System
You deploy the iApp in the BIG-IP in two stages:
1. Import the Analytics Products iApp Template that you received from F5 to the BIG-IP.
2. Create the iApp in the BIG-IP, based on the imported template.
There are two options for creating the iApp, a basic configuration and an advanced
configuration. To get started, F5 recommends starting with the basic configuration. If, after
creating the iApp with the basic configuration, you need to fine tune the iApp to meet your
system needs, see Configuring Advanced iApp Settings.
Import the Analytics Products iApp template to the BIG-IP
1. In the Main tab in the BIG-IP, go to iApps>Templates>Templates.
2. Click Import.
3. Click Choose File.
4. Select the Analytics Products iApp template provided to you from F5.
5. Click the check box next to Overwrite Existing Templates.
6. Click Upload.

3
The Analytics Products iApp template is now displayed in the list of templates.
Create the iApp in the BIG-IP
1. In the Main tab in the BIG-IP, go to iApps>Application Services>Applications.
2. Click Create.
The New Application Service screen appears.
3. Assign a name to the iApp.
4
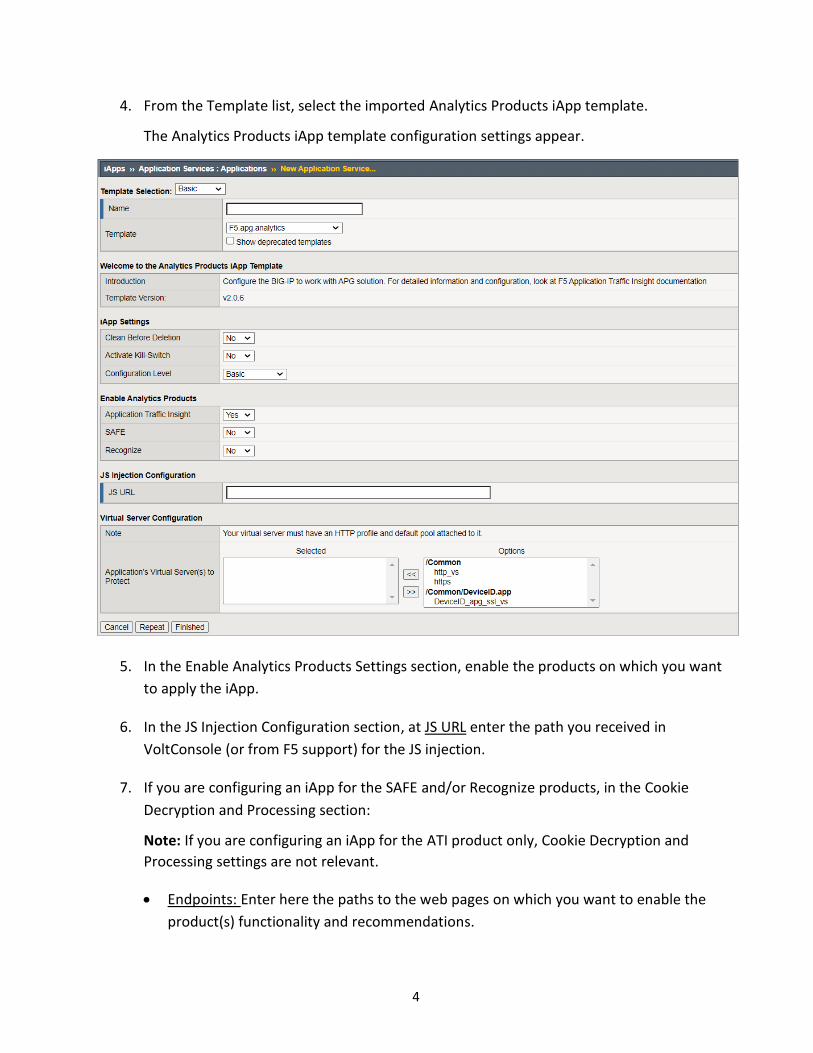
4. From the Template list, select the imported Analytics Products iApp template.
The Analytics Products iApp template configuration settings appear.
5. In the Enable Analytics Products Settings section, enable the products on which you want
to apply the iApp.
6. In the JS Injection Configuration section, at JS URL enter the path you received in
VoltConsole (or from F5 support) for the JS injection.
7. If you are configuring an iApp for the SAFE and/or Recognize products, in the Cookie
Decryption and Processing section:
Note: If you are configuring an iApp for the ATI product only, Cookie Decryption and
Processing settings are not relevant.
• Endpoints: Enter here the paths to the web pages on which you want to enable the
product(s) functionality and recommendations.

5
Note: Endpoints are not case sensitive. Regardless of whether you use upper- or lower-
case letters, all letters are set to lower-case.
If you configured at least one endpoint here, you must assign a value for Encryption
Key for Cookie Decryption and Processing to work.
• Product: If you are creating an iApp for both SAFE and Recognize products, select on
which product (SAFE, Recognize, or both) to apply the endpoint.
• Encryption Key: Enter the Encryption Key you received from F5 for the
recommendation cookie. The key must be base64 encoded.
8. In the Virtual Server Configuration section, at Application’s Virtual Server(s) to Protect,
select your web application’s virtual server(s).
Note:
• Selecting at least one virtual server is mandatory. Your iApp will not run if it is not
assigned to at least one virtual server.
• The virtual server(s) you select here must have an HTTP profile attached to it. If you
select a virtual server that does not have an HTTP profile attached to it, you will not be
able to complete iApp configuration.
• Every virtual server you select here must have a default pool attached to it.
• If you choose more than one virtual server here, they must all be the same type, either
all HTTP or all HTTPS. To use virtual servers of different types, create an iApp for each
type.
• The iApp must be deployed on the same partition as the virtual server(s) you select
here.
9. Click Finished.
Configuring Advanced iApp Settings
After you have created the iApp, you may want to fine tune the iApp configuration to better suit
your system needs. These instructions present the advanced configuration options for the
Analytics Products iApp template.
To configure advanced iApp settings:
6
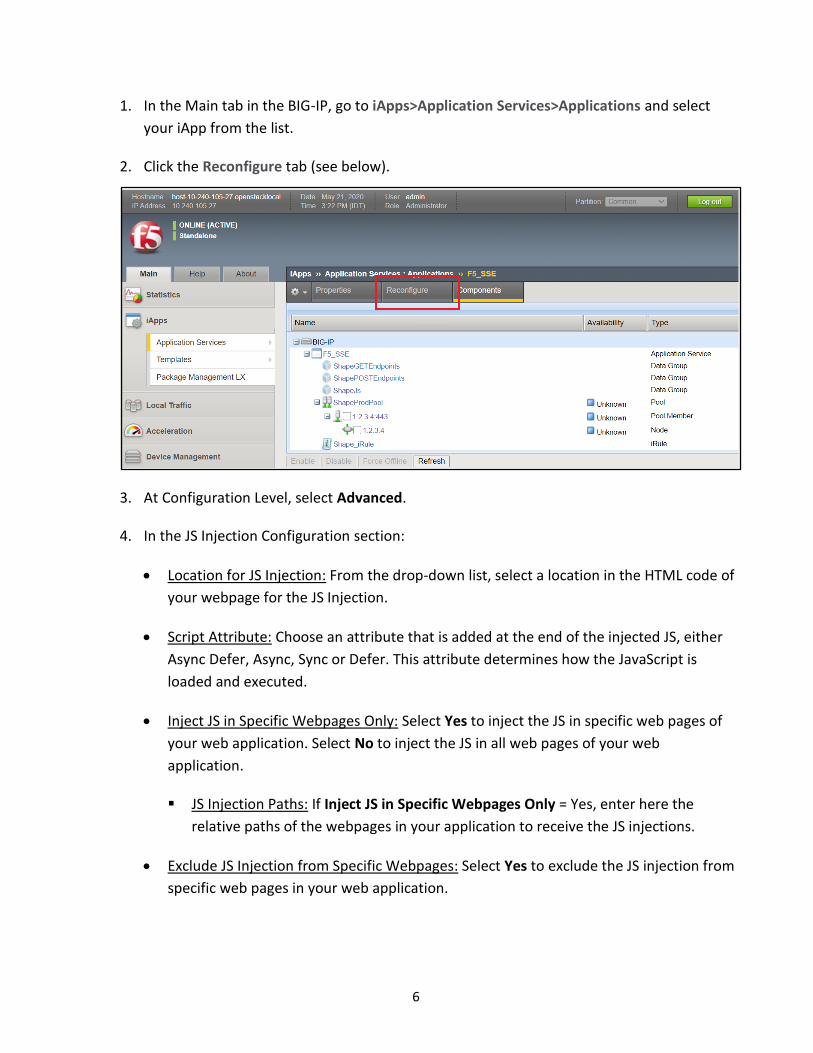
1. In the Main tab in the BIG-IP, go to iApps>Application Services>Applications and select
your iApp from the list.
2. Click the Reconfigure tab (see below).
3. At Configuration Level, select Advanced.
4. In the JS Injection Configuration section:
• Location for JS Injection: From the drop-down list, select a location in the HTML code of
your webpage for the JS Injection.
• Script Attribute: Choose an attribute that is added at the end of the injected JS, either
Async Defer, Async, Sync or Defer. This attribute determines how the JavaScript is
loaded and executed.
• Inject JS in Specific Webpages Only: Select Yes to inject the JS in specific web pages of
your web application. Select No to inject the JS in all web pages of your web
application.
▪ JS Injection Paths: If Inject JS in Specific Webpages Only = Yes, enter here the
relative paths of the webpages in your application to receive the JS injections.
• Exclude JS Injection from Specific Webpages: Select Yes to exclude the JS injection from
specific web pages in your web application.
7
▪ JS Excluded Paths: If you set Exclude JS injection from Specific Webpages = Yes,
enter here the relative paths of the web pages in your application that the JS
injections should be excluded from.
5. If you are configuring an iApp for the SAFE and/or Recognize products, in the Cookie
Decryption and Processing section:
Note: If you are configuring an iApp for the ATI product only, Cookie Decryption and
Processing settings are not relevant.
• SAFE Header Name to Add: Assign a header name for the fraud recommendation
header, or use the default header name.
• Recognize Header Name to Add: Assign a header name for the device category header,
or use the default header name.
6. In the Pool Configuration section:
• Cookie Persistence for the Service Pool: Select Enable if, after initial load-balancing, you
want HTTP requests of the same session always sent to the same pool member in the
Service Pool. Select Disable if you want the BIG-IP to perform standard load balancing.
• Domain: If you entered a relative path in JS URL, enter here a domain to receive HTTP
requests, or use the default value. If you used a full path, the domain of the full path is
automatically used.
• Add HTTP Health Check: Choose whether to perform the HTTP Health Check on the
entire pool. The HTTP Health Check is performed in intervals of 5 seconds. If you
activate the health check, the following related settings are displayed:
• Liveness Path: The path to the site where the health check will be performed on the
entire pool.
• Port: The port on which the health check is performed.
• Response Code: Enter the code that will indicate a successful health check result in
the response from the site that was checked.
7. In the Advanced Features section:
• Add Connecting IP to Headers: Select Yes to add the connecting IP to the XFF header
and to add an Analytic Header that includes the connecting IP.
8
Note: If an HTTP profile attached to one of the web application’s virtual servers has an
XFF header added to it and this setting is set to Yes, requests will show duplicate client
IPs in the XFF headers. To avoid this situation, either remove the XFF header from the
HTTP profile (see here for more details) or set this setting to No.
• Choose a Parent Server-Side SSL Profile for the Service Pool: Select an SSL profile (or
use the default) that will be attached to a new virtual server for routing traffic to the
Service Pool.
Note: Selecting an SSL profile here is mandatory, and only one SSL profile can be
selected.
• Encrypting Virtual Server IP: A default IP is assigned. If you have a virtual server already
configured to this IP, assign a different IP here.
• Use SNI: Select Yes to use Server Name Indication (SNI) for pool members.
• Enable Debug: Select Yes to enable debug logs.
8. Click Finished.
Disabling Strict Updates
After you initially create the iApp in the BIG-IP, by default the iApp is created so that you cannot
make any configuration changes to the components of the iApp, such as iRules, pool members,
and pool nodes.
You can change this default setting so that you can make changes to the iApp’s components as
follows:
1. In the Main tab in the BIG-IP, go to iApps>Application Services>Applications.
2. In the iApp list, click on the iApp.
3. Click on the Properties tab.

9
4. At Application Service, select Advanced.
5. For Strict Updates, remove the check in the check box.
6. Click Update.
Note: Disabling strict updates should be implemented with caution. If you need to do this,
F5 recommends that after making configuration changes in iApp components, re-enable
the strict updates and do not leave this setting permanently disabled.
How to Change the Source Address Translation of the iApp’s
Virtual Server
The iApp creates a virtual server with default settings that are taken from the virtual server you
selected at Application’s Virtual Server(s) to Protect. To change the Source Address Translation of
the iApp’s virtual server:
1. Disable strict updates on the iApp, as explained in the previous section Disabling Strict
Updates.
2. In the Main tab in the BIG-IP, go to Local Traffic>Virtual Servers>Virtual Server List.
3. Select the virtual server of your iApp from the list. The name of the virtual server is <name
of iApp> >+_apg_ssl_vs. For example, if the name of your iApp is analytics, the name of the
virtual server will be analytics_apg_ssl_vs.
10
4. In the virtual server properties screen, go to the Configuration section and at Source
Address Translation, select one of the translation options: Auto Map, SNAT, or None.
5. Click Update.
Note: F5 recommends re-enabling strict updates after you complete this procedure.
How to Upgrade an iApp with a new template There are two methods for upgrading an iApp with a new template, depending on whether the
new iApp template has the same name as the old iApp template or if it has a different name than
the old iApp template.
Upgrade when the new iApp template has a different name than the old iApp
template
Note: If there are any setting values in the old template that you want to use in the new template,
make sure to record these values before deleting the old template.
1. Import the new Analytics Products iApp template to the BIG-IP, as explained in Import the
Analytics Products iApp template to the BIG-IP.
2. Delete the old iApp, as explained in How to delete an iApp.
3. Configure the iApp with the new template, as explained in Create the iApp in the BIG-IP.
Upgrade when the new iApp template has the same name as the old iApp
template
1. Import the new Analytics Products iApp template to the BIG-IP, as explained in Import the
Analytics Products iApp template to the BIG-IP.
2. In the Main tab in the BIG-IP, go to iApps>Application Services>Applications.
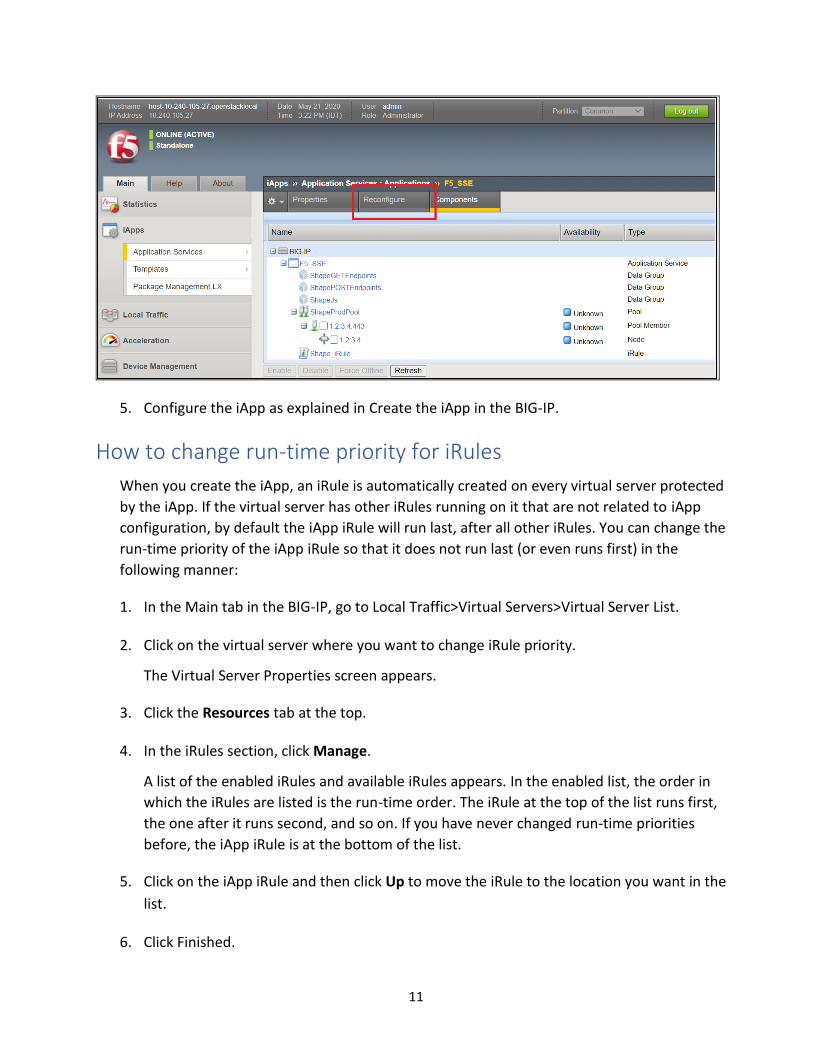
3. In the iApp list, click on the iApp that you want to upgrade.
4. Click on the Reconfigure tab (see below).
11
5. Configure the iApp as explained in Create the iApp in the BIG-IP.
How to change run-time priority for iRules
When you create the iApp, an iRule is automatically created on every virtual server protected
by the iApp. If the virtual server has other iRules running on it that are not related to iApp
configuration, by default the iApp iRule will run last, after all other iRules. You can change the
run-time priority of the iApp iRule so that it does not run last (or even runs first) in the
following manner:
1. In the Main tab in the BIG-IP, go to Local Traffic>Virtual Servers>Virtual Server List.
2. Click on the virtual server where you want to change iRule priority.
The Virtual Server Properties screen appears.
3. Click the Resources tab at the top.
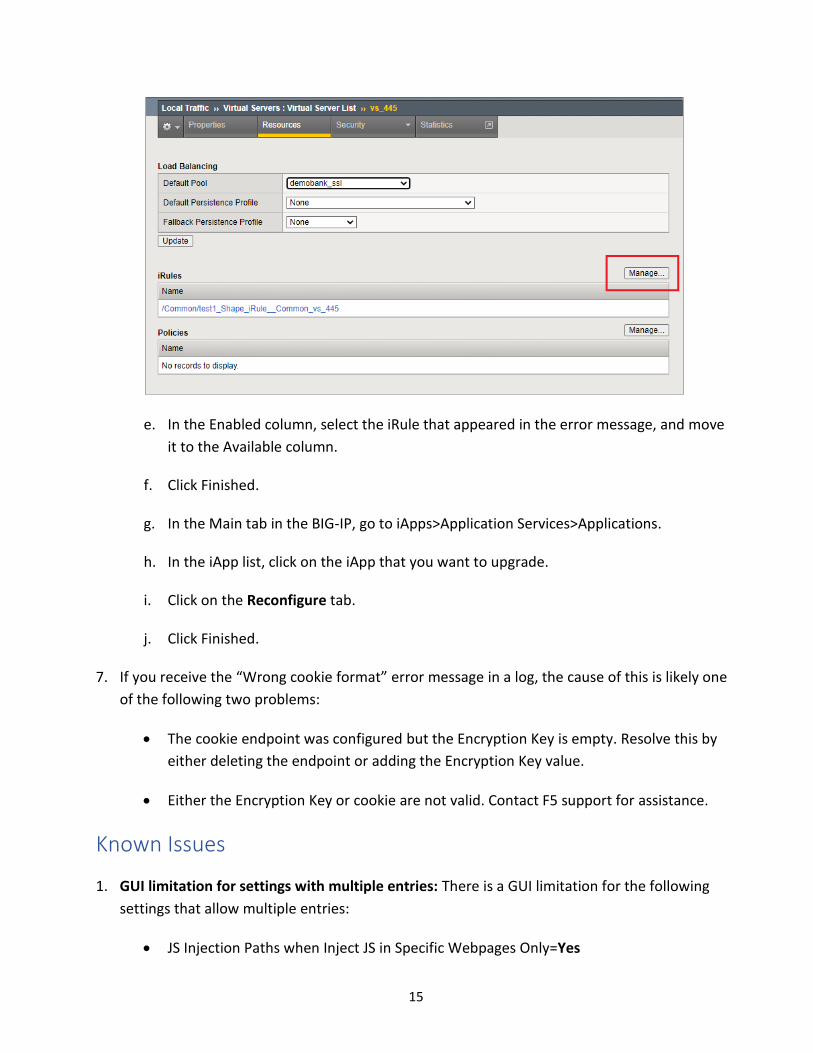
4. In the iRules section, click Manage.
A list of the enabled iRules and available iRules appears. In the enabled list, the order in
which the iRules are listed is the run-time order. The iRule at the top of the list runs first,
the one after it runs second, and so on. If you have never changed run-time priorities
before, the iApp iRule is at the bottom of the list.
5. Click on the iApp iRule and then click Up to move the iRule to the location you want in the
list.
6. Click Finished.
12
How to Disable an iApp
You can disable an iApp so that it is not currently active, but not permanently deleted. When
disabling an iApp, its configuration is maintained and when you re-activate it all configuration
settings are intact. When the iApp is disabled, HTTP requests are sent to the web application’s
server directly without any intervention from Device ID+, SAFE, or Recognize.
To disable an iApp:
1. In the Main tab in the BIG-IP, go to iApps>Application Services>Applications.
2. In the iApp list, click on the iApp that you want to disable.
3. Click on the Reconfigure tab.
4. In the General section, at Activate Kill-Switch select Yes.
5. Click Finished.
How to delete an iApp
To delete an iApp:
1. In the Main tab in the BIG-IP, go to iApps>Application Services>Applications.
2. In the iApp list, click on the iApp that you want to delete.
3. Click on the Reconfigure tab.
4. In the General section, at Clean Before Deletion select Yes.
5. Click Finished.
6. Go to iApps>Application Services>Applications.
7. In the list of iApps, select the check box next to iApp you are deleting.
8. Click Delete.
9. In the Confirm Delete screen, click Delete again.
Note: If an HTML profile was attached to the virtual server prior to creating the iApp, you
need to re-attach it after deleting the iApp.
13
Troubleshooting
1. If you receive the following error message when you click Finish to complete iApp
configuration:
01071912:3: HTTP_REQUEST event in rule (/Common/target_ssl_vip) requires an
associated HTTP or FASTHTTP profile on the virtual-server.
This is because you have selected a virtual server(s) that does not have an HTTP profile attached to it.
To fix this problem, do the following:
a. In the Main tab in the BIG-IP, go to Local Traffic>Virtual Servers>Virtual Server List.
b. From the list of virtual servers, select the virtual server that you want your iApp to run on.
c. In the Configuration section, for HTTP Profile (Client), select http.
d. Click Update.
e. Return to the iApp configuration, select your virtual server, and complete iApp
configuration.
2. If you receive the following error message when you click Finish to complete iApp
configuration:
01071912:3: SSL::disable in rule (/Common/iapp-
test_APG_iRule__Common_shop.f5se.com-http-vs) requires an associated
SERVERSSL or CLIENTSSL or PERSIST profile on the virtual-server
(/Common/shop.f5se.com-http-vs).
This is because you have selected both HTTP and HTTPS virtual servers for your iApp. To fix this, you must select virtual servers of the same type, either HTTP or HTTPS.
3. If you use a FQDN in Service pool and receive the following error message when you perform
Clean before deletion:
01070110:3: Node address '/Common/_auto_34.95.74.240' is referenced by a
member of pool '/Common/sse_ProdPool'.
You need to delete the node mentioned in the error message. Go to Local Traffic>Nodes>Node List, delete the node from the list, and then perform Clean Before Deletion again.

14
4. If you see duplicate IPs in the XFF header, this is because the XFF injection is enabled in both
the HTTP profile and in the iApp. To disable the injection in the HTTP profile, do the following:
a. In the Main tab in the BIG-IP, go to Local Traffic>Profiles>Services>HTTP.
b. Select the HTTP profile that you use for your web application.
c. At Insert X-Forwarded-For choose Disabled.
d. Click Update.
You can also fix this issue by setting Add Connecting IP to Headers = No.
5. If you receive the following error message when you click Finish to complete iApp
configuration:
01070333:3: Virtual Server /Common/<IAPP_NAME>_ssl_vs illegally shares destination
address, source address, service port, ip-protocol, and vlan with Virtual Server
/Common/<IAPP_NAME>_ssl_vs.
You need to change the Encrypting Virtual Server IP.
6. If you have already created an iApp, then import an updated iApp template with the same
name as the original template, and receive the following error message:
01070341:3: Virtual server <YOUR_VS> references rule
<YOUR_IAPP_NAME>_apg_iRule__<YOUR_VS> which does not exist.
Do the following:
a. In the Main tab in the BIG-IP, go to Local Traffic>Virtual Servers>Virtual Server List.
b. From the list of virtual servers, select the virtual server of your iApp.
c. Click the Resources tab at the top of the screen.
d. In the iRules section, click Manage on the far right.
15
e. In the Enabled column, select the iRule that appeared in the error message, and move
it to the Available column.
f. Click Finished.
g. In the Main tab in the BIG-IP, go to iApps>Application Services>Applications.
h. In the iApp list, click on the iApp that you want to upgrade.
i. Click on the Reconfigure tab.
j. Click Finished.
7. If you receive the “Wrong cookie format” error message in a log, the cause of this is likely one
of the following two problems:
• The cookie endpoint was configured but the Encryption Key is empty. Resolve this by
either deleting the endpoint or adding the Encryption Key value.
• Either the Encryption Key or cookie are not valid. Contact F5 support for assistance.
Known Issues
1. GUI limitation for settings with multiple entries: There is a GUI limitation for the following
settings that allow multiple entries:
• JS Injection Paths when Inject JS in Specific Webpages Only=Yes

16
• JS Excluded Paths when Exclude JS Injection from Specific Webpages=Yes
• Endpoints for Cookie Decryption and Processing
For all the settings listed above, if you delete an entry that is not at the bottom of the list you
must click Finished before adding a new entry.

17
Legal Notices
Publication Number
MAN-0808-01
Copyright
Copyright © 2021, F5 Networks, Inc. All rights reserved.
F5 Networks, Inc. (F5) believes the information it furnishes to be accurate and reliable. However,
F5 assumes no responsibility for the use of this information, nor any infringement of patents or
other rights of third parties which may result from its use. No license is granted by implication or
otherwise under any patent, copyright, or other intellectual property right of F5 except as
specifically described by applicable user licenses. F5 reserves the right to change specifications at
any time without notice.
Trademarks
For a current list of F5 trademarks and service marks, see http://www.f5.com/about/guidelines-
policies/trademarks/.
All other product and company names herein may be trademarks of their respective owners.
Patents
This product may be protected by one or more patents indicated at:
https://f5.com/about-us/policies/patents