day one: cloud native routing with crpd - juniper networks
TRANSCRIPT
DAY O
NE: C
LOU
D N
ATIVE RO
UTIN
G W
ITH cRPD
Mali, A
elmans, Paul, Kodali, N
allamothu, Flik, Tepper
Juniper Networks Books are focused on network reliability and
efficiency. Peruse the complete library at www.juniper.net/dayone.
DAY ONE: CLOUD NATIVE ROUTING WITH cRPD
By Hitesh Mali, Melchior Aelmans, Arijit Paul, Vinay K Nallamothu, Praveena Kodali, Valentijn Flik, Michel Tepper
DAY ONE: CLOUD NATIVE ROUTING WITH cRPD
This book focuses on containerized Routing Protocol Daemon (cRPD) and covers its charac-teristics, advantages, use cases, and installation, while also providing some perspective on containerized networking. Test out the trial version and follow along: https://www.juniper.net/us/en/dm/crpd-trial/.
IT’S DAY ONE AND YOU HAVE A JOB TO DO:
n Understand what cRPD is and what its architecture looks like.
n Work on and install cRPD.
n Deploy cRPD for various use cases.
n Troubleshoot and monitor cRPD.
“This power-packed book provides many great examples that are easy to follow and that can help you accelerate your transition towards cloud native networking. The authors provide an excellent overview of the concepts and Juniper’s RPD is a world-class product and it’s great to see how eas-ily it can be used in cloud environments. Above all, it was great fun to read and it inspired me for future projects.” Andree Toonk, Cloud Infrastructure Architect
“Containerized RPD brings the scalability and stability of Junos that was not previously seen into the modern software stack. It truly bridges the gap between software engineering and networking. Best of all, there is no need to reinvest in tools and monitoring systems. cRPD opens the door for creative system designs and many thanks to the Juniper engineering team to make this happen so seamlessly.”
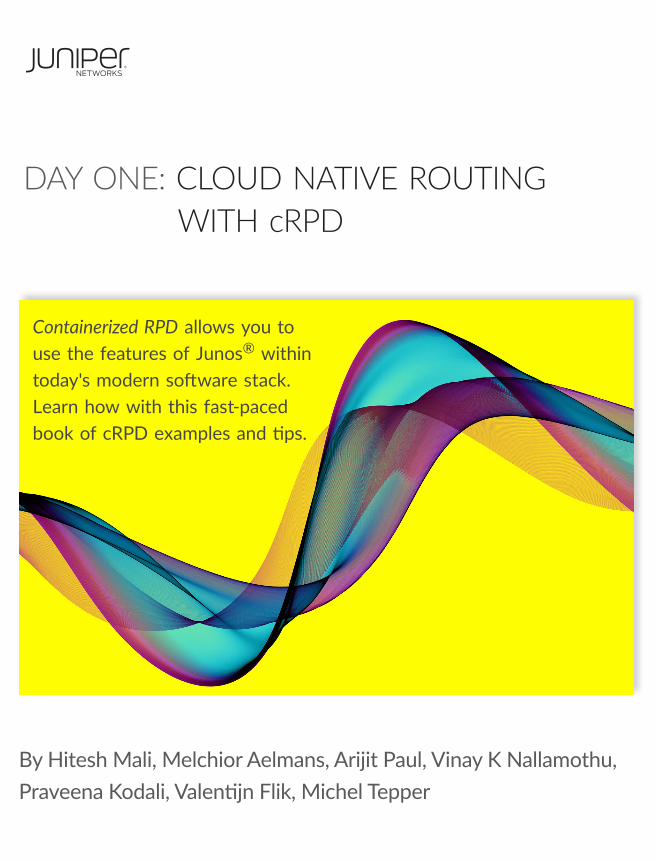
Kai Ren, ComcastContainerized RPD allows you to use the features of Junos® within today's modern software stack. Learn how with this fast-paced book of cRPD examples and tips.
“This Day One book gives meaningful and easy-to-understand insights into cRPD. The power of cRPD is its flexibility, which enables a variety of use cases across a range of customer segments, thanks to its Junos OS routing stack, automation, and manageability stack, and its ability to pro-gram third-party data planes. The authors present complex concepts in easily understandable tutori-als and I highly recommended it for anyone who wants to get started with this powerful Juniper technology.” - Dr. Martin Horneffer, Squad Lead Internet Backbone Architecture, Tier 1 Operator
ISBN 978-1736316054
9 781736 316054
5 3 0 0 0
DAY O
NE: C
LOU
D N
ATIVE RO
UTIN
G W
ITH cRPD
Mali, A
elmans, Paul, Kodali, N
allamothu, Flik, Tepper
Juniper Networks Books are focused on network reliability and
efficiency. Peruse the complete library at www.juniper.net/dayone.
DAY ONE: CLOUD NATIVE ROUTING WITH cRPD
By Hitesh Mali, Melchior Aelmans, Arijit Paul, Vinay K Nallamothu, Praveena Kodali, Valentijn Flik, Michel Tepper
DAY ONE: CLOUD NATIVE ROUTING WITH cRPD
This book focuses on containerized Routing Protocol Daemon (cRPD) and covers its charac-teristics, advantages, use cases, and installation, while also providing some perspective on containerized networking. Test out the trial version and follow along: https://www.juniper.net/us/en/dm/crpd-trial/.
IT’S DAY ONE AND YOU HAVE A JOB TO DO:
n Understand what cRPD is and what its architecture looks like.
n Work on and install cRPD.
n Deploy cRPD for various use cases.
n Troubleshoot and monitor cRPD.
“This power-packed book provides many great examples that are easy to follow and that can help you accelerate your transition towards cloud native networking. The authors provide an excellent overview of the concepts and Juniper’s RPD is a world-class product and it’s great to see how eas-ily it can be used in cloud environments. Above all, it was great fun to read and it inspired me for future projects.” Andree Toonk, Cloud Infrastructure Architect
“Containerized RPD brings the scalability and stability of Junos that was not previously seen into the modern software stack. It truly bridges the gap between software engineering and networking. Best of all, there is no need to reinvest in tools and monitoring systems. cRPD opens the door for creative system designs and many thanks to the Juniper engineering team to make this happen so seamlessly.”
Kai Ren, ComcastContainerized RPD allows you to use the features of Junos® within today's modern software stack. Learn how with this fast-paced book of cRPD examples and tips.
“This Day One book gives meaningful and easy-to-understand insights into cRPD. The power of cRPD is its flexibility, which enables a variety of use cases across a range of customer segments, thanks to its Junos OS routing stack, automation, and manageability stack, and its ability to pro-gram third-party data planes. The authors present complex concepts in easily understandable tutori-als and I highly recommended it for anyone who wants to get started with this powerful Juniper technology.”
-Yogesh Kumar, Director of Product Management, Cloud Ready Data Center, Juniper Networks
ISBN 978-1736316054
9 781736 316054
5 3 0 0 0
Day One: Cloud Native Routing with cRPD
by Hitesh Mali, Melchior Aelmans, Arijit Paul, Vinay K Nallamothu, Praveena Kodali, Valentijn Flik, and Michel Tepper
Chapter 1: Introduction to cRPD . . . . . . . . . . . . . . . . . . . . . . . . . . . . . . . . . . . . . . . . . . . . . . .7
Chapter 2: Junos cRPD . . . . . . . . . . . . . . . . . . . . . . . . . . . . . . . . . . . . . . . . . . . . . . . . . . . . . .14
Chapter 3: cRPD Use Cases . . . . . . . . . . . . . . . . . . . . . . . . . . . . . . . . . . . . . . . . . . . . . . . . . 30
Chapter 4: Monitoring and Telemetry . . . . . . . . . . . . . . . . . . . . . . . . . . . . . . . . . . . . . . . . . .78
Chapter 5: Troubleshooting . . . . . . . . . . . . . . . . . . . . . . . . . . . . . . . . . . . . . . . . . . . . . . . . . .89

iv
© 2021 by Juniper Networks, Inc. All rights reserved. Juniper Networks and Junos are registered trademarks of Juniper Networks, Inc. in the United States and other countries. The Juniper Networks Logo and the Junos logo, are trademarks of Juniper Networks, Inc. All other trademarks, service marks, registered trademarks, or registered service marks are the property of their respective owners. Juniper Networks assumes no responsibility for any inaccuracies in this document. Juniper Networks reserves the right to change, modify, transfer, or otherwise revise this publication without notice.
Published by Juniper Networks BooksAuthors: Hitesh Mali, Melchior Aelmans, Arijit Paul, Vinay K Nallamothu, Praveena Kodali, Valentijn Flik, and Michel TepperTechnical Reviewers: Marcel Wiget, Qasim Arham Editor in Chief: Patrick AmesCopyeditor: Nancy Koerbel
ISBN Paper: 978-1-7363160-5-4ISBN Ebook: 978-1-7363160-4-7Version History: v1, August 2021 2 3 4 5 6 7 8 9 10
About the Authors
Hitesh Mali is a Consulting Engineer at Juniper. He enjoys working on various emerging networking technologies and has spent the last decade helping Cable MSO (Multiple System Operators) build their network solutions.
Melchior Aelmans is a Consulting Engineer at Juniper Networks where he has been working with many operators on the design and evolution of their networks. He has over 15 years of experience in various operations and engineering positions with Cloud Providers, Data Centers, and Service Providers. Melchior enjoys evangelizing and discussing routing protocols, routing security, internet routing and peering, and data center architectures. He also participates in IETF and RIPE, is a regular attendee and presenter at conferences and meetings, is a member of the NANOG Program Committee, and a board member at the NLNOG foundation.
Arijit Paul is a DevOps and Cloud Solution engineer at Juniper Networks. He is passionate about network automation, open source, and cloud native technologies, and believes in building robust network solutions by consuming them. He has gained a wide range of experience in working with various networking technologies for the past two decades.
Vinay K Nallamothu is a Principal Engineer at Juniper’s routing technology team, currently working in the areas of SDN, Disaggregation, and Cloud networking. He is closely involved in the design and implementation of cRPD. In the past, he worked on multicast routing, VPN, and security technologies. He enjoys working with customers to build robust, scalable, and programmable networks. He has been with Juniper Networks since 2005.
Praveena Kodali is an Information Development Engineer at Juniper Networks. Since 2018 she has been creating, writing, and developing technical documentation for networking applications with a focus on physical, virtual-ized, and containerized security and routing products.
Valentijn Flik is a Network/System architect at VPRO Broadcasting Company, where he has been working on the design and evolution of their networks. He has over 15 years of experience in various operations and network/systems engineering. Always interested in new and emerging new network techniques/designs, he likes to visualize everything in Visio.
Michel Tepper is a Solution Architect for Nuvias in the Netherlands. He has also been a Juniper instructor since 2006, and a Juniper Ambassador, holding a number of Juniper certifications for different tracks.
AcknowledgmentsThe authors would like to thank Manish Gupta, Marcel Wiget, Qasim Arham, Rick Mur, and Patrick Ames for their valuable contributions, content, input, software, comments, and mental support.
v
Welcome to Day One
This book is part of the Day One library, produced and published by Juniper Net-works Books. Day One books cover the Junos OS and Juniper Networks network administration with straightforward explanations, step-by-step instructions, and practical examples that are easy to follow.
� Download a free PDF edition at https://www.juniper.net/dayone
� Purchase the paper edition at Vervante Corporation (www.vervante.com).
Key cRPD Resources
The authors of this book highly recommend the following cRPD resources, espe-cially the Juniper TechLibrary and its up-to-date information and specifications:
� cRPD Deployment Guide for Linux Server: https://www.juniper.net/documen-tation/us/en/software/crpd/crpd-deployment/index.html
� Juniper cRPD Solutions page: https://www.juniper.net/us/en/solutions/crpd/.
� cRPD Free Trial: https://www.juniper.net/us/en/dm/crpd-trial/
What You Need to Know Before Reading This Book
Before reading this book, you need to be familiar with the basic administrative functions of Linux and the Junos operating system, including the ability to work with operational commands and to read, understand, and change Junos configura-tions. There are several books in the Day One library on learning the Junos OS: https://www.juniper.net/dayone.
This book makes a few assumptions about you, the reader:
� You are familiar and versed in using the Junos CLI for router configuration.
� You are familiar with basic Linux commands and configuration.
� You are familiar with SONiC and the concepts of disaggregated networking.
� You have a basic understanding of routing protocols.
� You can build out the lab topologies used in this book without detailed set up instructions, so you should be familiar with Docker, Kubernetes, etc.
The authors assume you have read these Day One books:
� Day One: Building Containers with Docker and the cSRX
� Day One: Building Containers with Kubernetes and Contrail
vi
What You Will Learn by Reading This Book
After reading this book you will be able to:
�
�
�
�
Understand what cRPD is and what its architecture looks like.
Work on and install cRPD.
Deploy cRPD for various use cases.
Troubleshoot and monitor cRPD.
Additional Resources on Network Topology Simulation
cRPD is a lightweight virtual product that spins up in seconds and is perfect to simu-late complex and extensive network topologies for troubleshooting purposes or test-ing out new feathers before deploying them in the live network.
Diving into all the different simulation tools and platforms is beyond the scope of this Day One book, hence it only provides a few pointers. The authors highly recom-mend those in need of network simulation to consider https://nrelabs.io, https://con-tainerlab.srlinux.dev/, and https://gitlab.com/mwiget/honeycomb-crpd-mesh.
For Juniper cRPD 20.4 on Docker desktop: https://community.juniper.net/answers/blogs/marcel-wiget1/2021/02/17/juniper-crpd-204-on-docker-desktop.
To set up cRPD (Junos) CNI with KIND on Mac: https://github.com/qarham/q-crpd-cni/tree/main/mac-kind.
A data center used to be a small room in an office building where a few servers that hosted business applications were placed. Switches connected those servers togeth-er in a Layer 2 domain, and routers forwarded them to other networks, as firewalls ensured that no traffic left or entered the network unless a policy determined otherwise.
Later, the dependency on these applications increased when companies switched over to digital transformation. To ensure better housing conditions—including cooling, redundant power, and physical security—these systems were placed at co-location facilities or in purpose-built rooms. A business could lose money every second the network was not available. This begot a new generation of data center networking hardware that introduced switches upgraded with Layer 3 routing fea-tures able to accommodate more traffic, and switch and route that traffic at higher speeds.
Chapter 1
Introduction to cRPD

8 Chapter 1: Introduction to cRPD
With the introduction of public cloud services like Amazon Web Services (AWS), Microsoft Azure, Google GCP, Alibaba Cloud, and many others; data center net-working now involves much more than just connecting a few routers and switches together. At the same time, the scale of local (or co-located) data centers—now referred to as private clouds—grew tremendously, and data center networking designs had to change completely to accommodate the staggering growth of re-quired resources. The biggest change in designing a data center network was that these networks were growing too big to keep supporting stretched Layer 2 net-works. It didn’t mean that Layer 2 networking was going away, but it no longer provided the right infrastructure on which to build the data center infrastructure. Now switching hardware is capable of IP routing at line-rate speeds. Today’s modern data center infrastructure is based on Layer 3-routed IP networks and not on Layer 2 VLANs.
As applications may still require Layer 2 connectivity (VMware, VMotion, or other VM live migration technologies have long been the dominant use case for this requirement) the option still needs to be available. The ability to run applica-tions other than traffic forwarding on the network, the desire to create smaller network segments to secure resources inside the data center and enable highly scalable multi-tenancy (one very important requirement for any cloud type de-ployment), and the requirement to build massively scalable data centers has sparked the need for a new type of data center networking.
One of the defining concepts behind software-defined networking (SDN) is sepa-rating the control plane from the data plane, thus separating traffic forwarding from higher level connectivity requirements, ensuring that the data center net-work transforms into a highly-scalable fabric architecture that supports many different applications to run on top of it. We typically refer to this as the underlay (the fabric) and the overlay (the applications).
With the advent of this evolution of SDN, vendors like Juniper Networks started to disaggregate hardware and software. Previously these were combined, and one would buy a box, a router, or a switch with software running on it. More or less by definition they couldn’t be used separately, and software from vendor A couldn’t run on vendor B’s box. Today, those purchasing networking equipment have a wide variety of options to choose from with regard to hardware and its control plane, the software. It’s not uncommon to run SONiC on a switch and replace the routing stack in SONiC with that from another vendor. This way op-erators can mix and match and tailor solutions to fit their networking demands.
This book focuses on containerized routing protocol daemon (cRPD), it covers characteristics, advantages, use cases, and installation, and gives some perspective on containerized networking. If you get as enthusiastic about cRPD as we did, we invite you to test it out yourself. A cRPD trial version is free to download via: https://www.juniper.net/us/en/dm/crpd-trial/.
9 Introduction to Linux Routing
Introduction to Linux Routing
cRPD leverages the Linux kernel to forward traffic and store the forwarding infor-mation base (FIB). Modern x86 hardware architectures and Linux implementa-tion offer a great platform for routers and are capable in terms of throughput and performance. There will always be a place for dedicated, ASIC-based hardware to perform routing functions, but it is out of scope for this book to discuss the pros and cons of those differences.
This chapter isn’t a deep dive into the Linux routing stack, but it does introduce concepts like the Netlink socket, which is the Linux kernel interface used for transferring information between kernel and userspace processes, that you need to understand. Netlink is used in this book to program routes into the Linux kernel.
Netlink
As stated, Netlink is a Linux kernel interface used for communication between both the kernel and user space processes, and between different userspace pro-cesses. cRPD is an example of a userspace process as Netlink communication in itself cannot traverse host boundaries.
Netlink provides a standard socket-based interface for userspace processes, and a kernel-side API for internal use by kernel modules.
Routing Protocol Daemons
Linux offers options to run daemons in userspace and have those control the Linux kernel forwarding. Some examples of the open-source daemons available are BIRD and FRRouting. The Juniper Networking routing daemon is cRPD.
cRPD runs as a userspace application maintaining the route state information in the RIB and forwards the routes into the FIB leveraging Netlink, based on local route selection criteria. It contains the RPD, PPMD, CLI, MGD, and BFD pro-cesses. cRPD also defines how routing protocols such as ISIS, OSPF, and BGP op-erate, including selecting routes and maintaining forwarding tables.
The network interfaces present in the underlying OS kernel are exposed to the cRPD container when running in host network mode. cRPD learns about all the network interfaces and adds route state for them. If there are additional Docker containers running in the system, all the containers and applications running in the same network namespace can access the same set of network interfaces and state.
10 Chapter 1: Introduction to cRPD
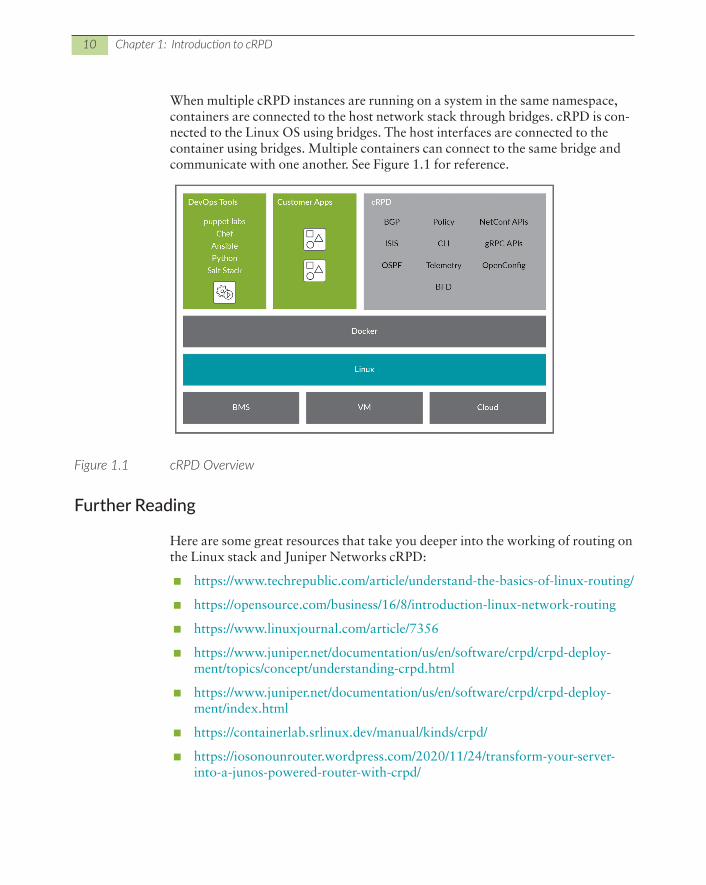
When multiple cRPD instances are running on a system in the same namespace, containers are connected to the host network stack through bridges. cRPD is con-nected to the Linux OS using bridges. The host interfaces are connected to the container using bridges. Multiple containers can connect to the same bridge and communicate with one another. See Figure 1.1 for reference.
Figure 1.1 cRPD Overview
Further Reading
Here are some great resources that take you deeper into the working of routing on the Linux stack and Juniper Networks cRPD:
� https://www.techrepublic.com/article/understand-the-basics-of-linux-routing/
� https://opensource.com/business/16/8/introduction-linux-network-routing
� https://www.linuxjournal.com/article/7356
� https://www.juniper.net/documentation/us/en/software/crpd/crpd-deploy-ment/topics/concept/understanding-crpd.html
� https://www.juniper.net/documentation/us/en/software/crpd/crpd-deploy-ment/index.html
� https://containerlab.srlinux.dev/manual/kinds/crpd/
� https://iosonounrouter.wordpress.com/2020/11/24/transform-your-server-into-a-junos-powered-router-with-crpd/
11 Underlay and Overlay Networking
Underlay and Overlay Networking
Now let’s concentrate on underlay and overlay networking concepts to get a clear understanding of them for the remainder of the book. Let’s also touch on some architectural decisions to be made when designing an IP fabric. Underlay, overlay, and IP fabric (also referred to as CLOS) concepts are used not only in today’s data centers but also in edge routing use cases where customers build the edge routers using ‘pizza boxes’ interconnected by using IP fabrics.
Underlay Networking
The underlay network is a physical infrastructure over which an overlay network is built. In data center environments, the role of the physical underlay network is to provide Unicast IP connectivity from any physical device (server, storage device, router, or switch) to any other physical device.
As the underlying network responsible for delivery of packets across networks, an ideal underlay network provides low-latency, non-blocking, high-bandwidth con-nectivity from any point in the network to any other point in the network.
Overlay Networking
Overlay networking, often referred to as SDN, is a method of using software to create layers of network abstraction that can be used to run multiple, separate, dis-crete, and virtualized network layers on top of the physical network, often provid-ing new application and security benefits.
All nodes in an overlay network are connected to one another by means of logical or virtual links and each of these links correspond to a path in the underlying network.
The purpose of the overlay network is to add functionality without a complete network redesign. Overlay network protocols include Virtual Extensible LAN (VXLAN), Network Virtualization using Generic Encapsulation (NVGRE), ge-neric routing encapsulation (GRE), IP multicast, network virtualization overlays 3 (NVO3), MPLSoUPD, MPLSoGRE, SRoMPLS, and SRv6.
Common examples of an overlay network are distributed systems such as peer-to-peer networks and client server applications because their nodes run on top of the internet.
The nodes of the overlay network are interconnected using virtual or logical links, which form an overlay topology, although these nodes may be connected through physical links in the underlying networks. From an application perspective the overlay network ‘looks and feels’ as if it has a direct connection. In other words,
12 Chapter 1: Introduction to cRPD
two nodes may be connected with a logical connection (overlay tunnel) despite being several hops apart in the underlying network.
The overlay network interconnects all the application nodes and provides the con-nectivity between them.
Table 1.1 quickly compares underlay and overlay networks.
Table 1.1 Underlay Versus Overlay
Underlay Network Overlay Network
DescriptionAn Underlay Network is a physical infrastructure above which an overlay network is built.
An Overlay Network is a virtual network that is built on top of an underlying Network infrastructure/Network layer (the underlay).
Traffic Flow Transmits packets which traverse over network devices like switches and routers.
Transmits packets only along the virtual links between the overlay nodes.
Deployment Time Time consuming activity to introduce new services and functions.
Ability to rapidly and incrementally deploy new functions through edge-centric innovations because connections are virtual (tunnels).
Packet Control Hardware oriented. Software oriented.
Packet Encapsulation and Overhead
Packet delivery and reliability occurs at layer-3 and layer-4.
Needs to encapsulate packets across source and destination, hence incurs additional overhead.
Multipath Forwarding
Less scalable options of multipath forwarding.
Support for multipath forwarding within virtual networks.
Multi Tenancy Requires non-overlapping IP addressing. Ability to manage overlapping IP addresses between multiple tenants.
ScalabilityLess scalable.
VLAN provides 4096 VLANs.
Designed to provide more scalability than underlay network.
VXLAN e.g. provides up to 16 million identifiers.
13 Underlay and Overlay Networking
ProtocolsUnderlay protocols include Ethernet Switching, VLAN, Routing, OSPF, ISIS, RIFT, etc.
Overlay network protocols include Virtual Extensible LAN (VXLAN), Network Virtualization using Generic Encapsulation (NVGRE), generic routing encapsulation (GRE), MPLS and Segment Routing, IP multicast, and Network Virtualization overlays 3 (NVO3).
MORE? This article published in the Internet Protocol Journal dives much deeper into the different protocols used in data center networking and the authors highly recommend it: https://ipj.dreamhosters.com/wp-content/uploads/2020/09/232-ipj-2.pdf.
The Junos containerized routing protocol daemon (cRPD) offers deployment-hardened, feature-rich routing functionality in a container for cloud-native de-ployments. Decoupling the control plane from the data plane offers platform flexibility, simplicity, automation, elastic scalability, and operational efficiency, delivering a true “One Junos” experience in routers, servers, or any Linux-based device. By packaging the Junos operating system applications and their related routing stacks, such as a Docker container, Juniper extends traditional disaggrega-tion by creating a flexible consumption model for network applications that can be easily scaled out. Service providers, cloud operators, and enterprises can deploy Junos cRPD in their existing server-based environments to address their unique requirements.
The containerized routing protocol process (cRPD) is Juniper’s routing protocol process (RPD) decoupled from Junos OS and packaged as a Docker container to run in Linux-based environments. cRPD runs as a user space application and learns route state through various routing protocols and maintains the complete set in the routing information base (RIB), also known as the routing table. The RPD process is also responsible for downloading the routes into the forwarding information base (FIB), also known as forwarding table based on local selection criteria. In a Juniper Networks router the Packet Forwarding Engine (PFE) holds the FIB and does packet forwarding, whereas in cRPD on the host, the Linux ker-nel stores the FIB and performs packet forwarding. cRPD can also be deployed to provide control plane-only services such as BGP route reflection.
Chapter 2
Junos cRPD
15
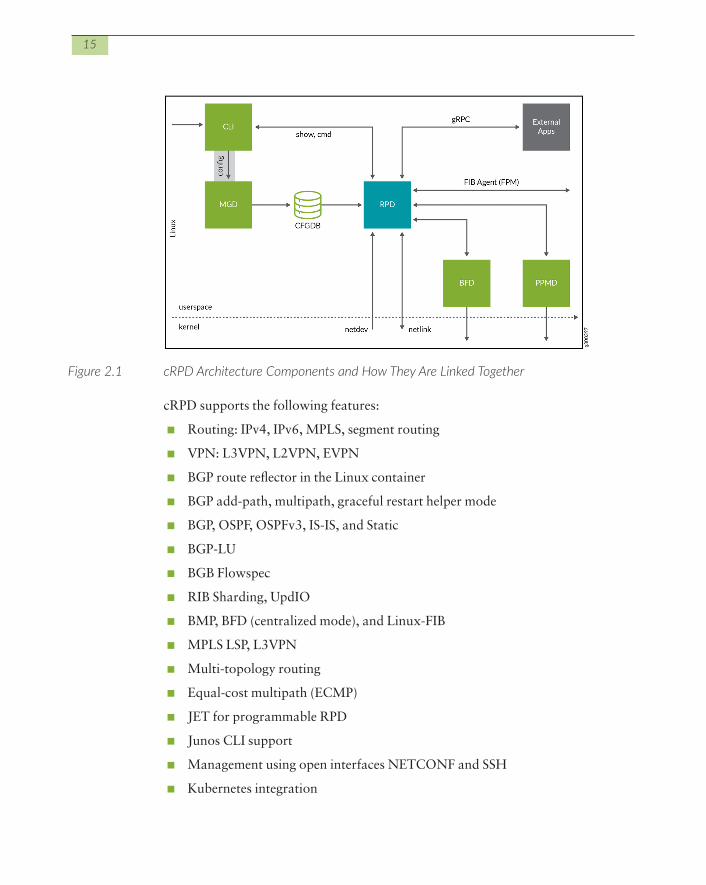
Figure 2.1 cRPD Architecture Components and How They Are Linked Together
cRPD supports the following features:
� Routing: IPv4, IPv6, MPLS, segment routing
� VPN: L3VPN, L2VPN, EVPN
� BGP route reflector in the Linux container
� BGP add-path, multipath, graceful restart helper mode
� BGP, OSPF, OSPFv3, IS-IS, and Static
� BGP-LU
� BGB Flowspec
� RIB Sharding, UpdIO
� BMP, BFD (centralized mode), and Linux-FIB
� MPLS LSP, L3VPN
� Multi-topology routing
� Equal-cost multipath (ECMP)
� JET for programmable RPD
� Junos CLI support
� Management using open interfaces NETCONF and SSH
� Kubernetes integration
16 Chapter 2: Junos cRPD
NOTE A list of features supported in Junos cRPD appears in the 20.4R1 release, additional features will be added in later cRPD Junos releases.
This chapter shows you how to install Docker on different operating systems, how to set up docker networks, and how to spin up containers on the Docker platform.
Docker Installation
Let’s install Docker on a couple of different platforms.
MAC OS System Requirements
MacOS El Capitan 10.11 and newer macOS releases are supported. At a mini-mum, Docker for Mac requires macOS Yosemite 10.10.3 or newer, with the caveat that going forward 10.10.x is a use-at-your-own risk proposition.
Docker has prepackaged all necessary parts including the Docker Engine, Docker CLI client, Docker Compose, Docker Machine, and Kitematic in one Mac installer (.dmg file) and you can download it from the Docker official website here: https://docs.docker.com/docker-for-mac/install/.
To download the Docker Desktop installation file, you have to get a DockerHub account. Registration of the DockerHub account is free with a valid email address.
Okay, once downloaded, install Docker Desktop.
Windows 10 System Requirements
You need Windows 10, 64 bit: Pro, Enterprise, or Education (1607 Anniversary Update, Build 14393 or later). For more details, see https://community.juniper.net/answers/blogs/marcel-wiget1/2021/02/17/juniper-crpd-204-on-docker-desktop.
Docker has prepackaged all necessary parts including Docker Engine, Docker CLI client, Docker Compose, Docker Machine, and Kitematic in one Windows install-er (.exe file) and you can download it from the Docker official website through https://docs.docker.com/docker-for-windows/install/.
To download the Docker Desktop installation file, you need to log in to your Docker Hub account. Registration of a new Docker Hub account is free with a valid email address.
After the Docker installer has been downloaded, you can run it directly. After in-stallation has succeeded, you need to log out of Windows to complete installation.
Docker does not start automatically after installation. To start it, search for Dock-er, select Docker Desktop for Windows in the search results, and click it.
17 Docker Installation
Ubuntu System Requirements
To install Docker CE, you need the 64-bit version of one of these Ubuntu versions:
� Disco 19.04
� Cosmic 18.10
� Bionic 18.04 (LTS)
� Xenial 16.04 (LTS)
Docker CE is supported on x86_64 (or amd64), armhf, arm64, s390x (IBM Z), and ppc64le (IBM Power) architectures. For more details, see https://docs.docker.com/engine/install/ubuntu/.
To start, uninstall older versions of Docker called docker, docker.io, or docker en-gine. This can be done by running:
$ sudo apt-get remove docker docker-engine docker.io containerd runc
Now set up the repository:
1. Update the apt package index:
$ sudo apt-get update
2. Install packages to allow apt to use a repository over HTTPS:
$ sudo apt-get install \> apt-transport-https \> ca-certificates \> curl \> gnupg-agent \> software-properties-common
3. Add Docker’s official GPG key:
$ curl -fsSL https://download.docker.com/linux/ubuntu/gpg | sudo apt-key add -OK
4. Verify that you now have the key with the fingerprint 9DC8 5822 9FC7 DD38 854A E2D8 8D81 803C 0EBF CD88, by searching for the last eight characters of the fingerprint:
$ sudo apt-key fingerprint 0EBFCD88pub rsa4096 2017-02-22 [SCEA] 9DC8 5822 9FC7 DD38 854A E2D8 8D81 803C 0EBF CD88uid [ unknown] Docker Release (CE deb) <[email protected]>sub rsa4096 2017-02-22 [S]
5. Use the following command to set up the stable repository. For x86_64/amd64, you can run:
$ sudo add-apt-repository \> .deb [arch=amd64] https://download.docker.com/linux/ubuntu \> $(lsb_release -cs) \> stable.
18 Chapter 2: Junos cRPD
Verification
After installing Docker on any OS, and the docker -v command in the command line, you can check the current docker version at the terminal:
# docker -vDocker version 19.03.2, build 6a30dfc
This message shows that your installation appears to be working correctly.
Basic Docker Commands
The basic docker commands are:
To show the Docker version in detail, run:
# docker version
To list all Docker images:
# docker images
To create an image from a Docker file:
# docker build [OPTIONS] PATH | URL | -
To create an image from a .img or a .tar file:
# docker load [OPTIONS] PATH
To remove an image:
# docker rmi [OPTIONS] IMAGE [IMAGE...]
To tag an image to a name:
# docker tag SOURCE_IMAGE[:TAG] TARGET_IMAGE[:TAG]
Container-Related CommandsTo create a container but not to start it:
# docker create [OPTIONS] IMAGE [COMMAND] [ARG...]
To rename a Docker container:
# docker rename OLD_NAME NEW_NAME
To create a container and to run a command with it:
# docker run [OPTIONS] IMAGE [COMMAND] [ARG...]
The container will stop after the command has finished command execution by de-fault. For interactive processes (like a shell), you must use -i -t together to allocate a

19 Verification
tty for the container process. To start a container in detached mode, option “-d” should be used. Detached mode means the container starts up and runs in the background.
To list all Docker containers:
# docker ps -a
To stop a container:
# docker stop [OPTIONS] CONTAINER [CONTAINER...]
To delete a container:
# docker rm [OPTIONS] CONTAINER [CONTAINER...]
Network-Related Commands
To create a network:
# docker network create [OPTIONS] NETWORK
To list all networks:
# docker network ls
To check the details of a network:
# docker network inspect [OPTIONS] NETWORK [NETWORK...]
To connect a container to a network:
# docker network connect [OPTIONS] NETWORK CONTAINER
To disconnect a container from a network:
# docker network disconnect [OPTIONS] NETWORK CONTAINER
To remove a network:
# docker network rm NETWORK [NETWORK...]
A network cannot be removed with a container attached to it. Before removing a network, please make sure all containers attached to it have been removed.
To show Docker container summary info:
# docker inspect [OPTIONS] NAME|ID [NAME|ID...]
To show container run logs:
# docker logs [OPTIONS] CONTAINER
To show container port exposure and mapping:
# docker port CONTAINER [PRIVATE_PORT[/PROTO]]
20 Chapter 2: Junos cRPD
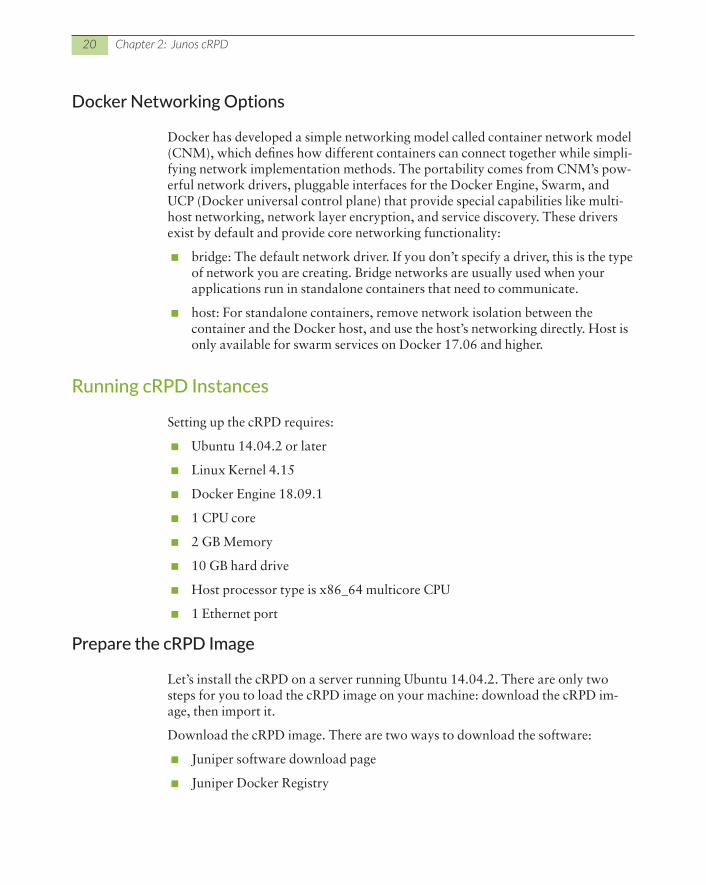
Docker Networking Options
Docker has developed a simple networking model called container network model (CNM), which defines how different containers can connect together while simpli-fying network implementation methods. The portability comes from CNM’s pow-erful network drivers, pluggable interfaces for the Docker Engine, Swarm, and UCP (Docker universal control plane) that provide special capabilities like multi-host networking, network layer encryption, and service discovery. These drivers exist by default and provide core networking functionality:
� bridge: The default network driver. If you don’t specify a driver, this is the type of network you are creating. Bridge networks are usually used when your applications run in standalone containers that need to communicate.
� host: For standalone containers, remove network isolation between the container and the Docker host, and use the host’s networking directly. Host is only available for swarm services on Docker 17.06 and higher.
Running cRPD Instances
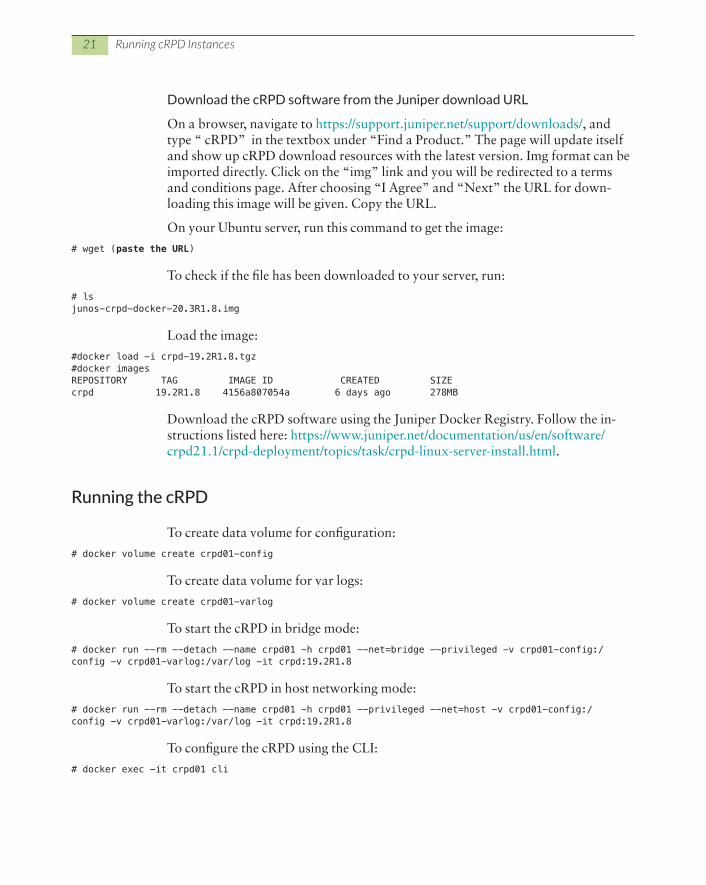
Setting up the cRPD requires:
� Ubuntu 14.04.2 or later
� Linux Kernel 4.15
� Docker Engine 18.09.1
� 1 CPU core
� 2 GB Memory
� 10 GB hard drive
� Host processor type is x86_64 multicore CPU
� 1 Ethernet port
Prepare the cRPD Image
Let’s install the cRPD on a server running Ubuntu 14.04.2. There are only two steps for you to load the cRPD image on your machine: download the cRPD im-age, then import it.
Download the cRPD image. There are two ways to download the software:
� Juniper software download page
� Juniper Docker Registry
21 Running cRPD Instances
Download the cRPD software from the Juniper download URL
On a browser, navigate to https://support.juniper.net/support/downloads/, and type “ cRPD” in the textbox under “Find a Product.” The page will update itself and show up cRPD download resources with the latest version. Img format can be imported directly. Click on the “img” link and you will be redirected to a terms and conditions page. After choosing “I Agree” and “Next” the URL for down-loading this image will be given. Copy the URL.
On your Ubuntu server, run this command to get the image:
# wget (paste the URL)
To check if the file has been downloaded to your server, run:
# lsjunos-crpd-docker-20.3R1.8.img
Load the image:
#docker load -i crpd-19.2R1.8.tgz#docker imagesREPOSITORY TAG IMAGE ID CREATED SIZE crpd 19.2R1.8 4156a807054a 6 days ago 278MB
Download the cRPD software using the Juniper Docker Registry. Follow the in-structions listed here: https://www.juniper.net/documentation/us/en/software/crpd21.1/crpd-deployment/topics/task/crpd-linux-server-install.html.
Running the cRPD
To create data volume for configuration:
# docker volume create crpd01-config
To create data volume for var logs:
# docker volume create crpd01-varlog
To start the cRPD in bridge mode:
# docker run --rm --detach --name crpd01 -h crpd01 --net=bridge --privileged -v crpd01-config:/config -v crpd01-varlog:/var/log -it crpd:19.2R1.8
To start the cRPD in host networking mode:
# docker run --rm --detach --name crpd01 -h crpd01 --privileged --net=host -v crpd01-config:/config -v crpd01-varlog:/var/log -it crpd:19.2R1.8
To configure the cRPD using the CLI:
# docker exec -it crpd01 cli
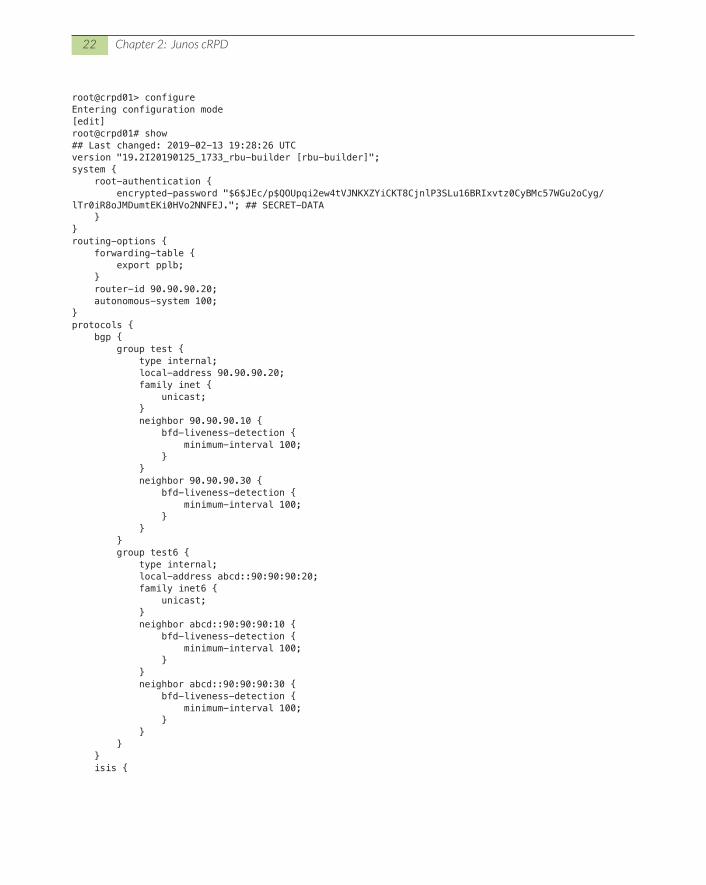
22 Chapter 2: Junos cRPD
root@crpd01> configureEntering configuration mode[edit]root@crpd01# show## Last changed: 2019-02-13 19:28:26 UTCversion "19.2I20190125_1733_rbu-builder [rbu-builder]";system { root-authentication { encrypted-password "$6$JEc/p$QOUpqi2ew4tVJNKXZYiCKT8CjnlP3SLu16BRIxvtz0CyBMc57WGu2oCyg/lTr0iR8oJMDumtEKi0HVo2NNFEJ."; ## SECRET-DATA }}routing-options { forwarding-table { export pplb; } router-id 90.90.90.20; autonomous-system 100;}protocols { bgp { group test { type internal; local-address 90.90.90.20; family inet { unicast; } neighbor 90.90.90.10 { bfd-liveness-detection { minimum-interval 100; } } neighbor 90.90.90.30 { bfd-liveness-detection { minimum-interval 100; } } } group test6 { type internal; local-address abcd::90:90:90:20; family inet6 { unicast; } neighbor abcd::90:90:90:10 { bfd-liveness-detection { minimum-interval 100; } } neighbor abcd::90:90:90:30 { bfd-liveness-detection { minimum-interval 100; } } } } isis {
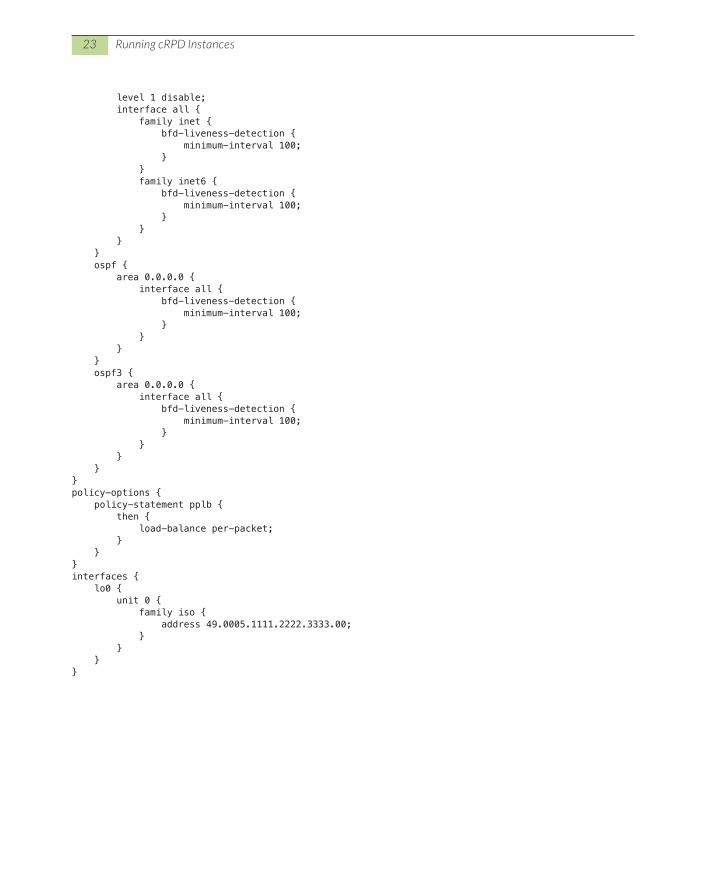
23 Running cRPD Instances
level 1 disable; interface all { family inet { bfd-liveness-detection { minimum-interval 100; } } family inet6 { bfd-liveness-detection { minimum-interval 100; } } } } ospf { area 0.0.0.0 { interface all { bfd-liveness-detection { minimum-interval 100; } } } } ospf3 { area 0.0.0.0 { interface all { bfd-liveness-detection { minimum-interval 100; } } } }}policy-options { policy-statement pplb { then { load-balance per-packet; } }}interfaces { lo0 { unit 0 { family iso { address 49.0005.1111.2222.3333.00; } } }}
24 Chapter 2: Junos cRPD
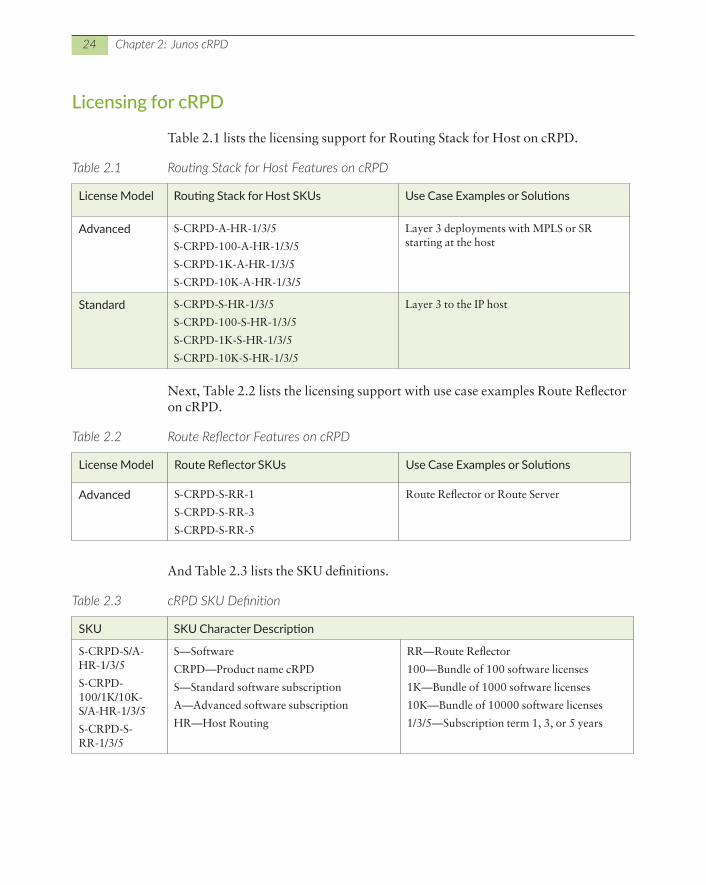
Licensing for cRPD
Table 2.1 lists the licensing support for Routing Stack for Host on cRPD.
Table 2.1 Routing Stack for Host Features on cRPD
License Model Routing Stack for Host SKUs Use Case Examples or Solutions
Advanced S-CRPD-A-HR-1/3/5
S-CRPD-100-A-HR-1/3/5
S-CRPD-1K-A-HR-1/3/5
S-CRPD-10K-A-HR-1/3/5
Layer 3 deployments with MPLS or SR starting at the host
Standard S-CRPD-S-HR-1/3/5
S-CRPD-100-S-HR-1/3/5
S-CRPD-1K-S-HR-1/3/5
S-CRPD-10K-S-HR-1/3/5
Layer 3 to the IP host
Next, Table 2.2 lists the licensing support with use case examples Route Reflector on cRPD.
Table 2.2 Route Reflector Features on cRPD
License Model Route Reflector SKUs Use Case Examples or Solutions
Advanced S-CRPD-S-RR-1
S-CRPD-S-RR-3
S-CRPD-S-RR-5
Route Reflector or Route Server
And Table 2.3 lists the SKU definitions.
Table 2.3 cRPD SKU Definition
SKU SKU Character Description
S-CRPD-S/A-HR-1/3/5
S-CRPD-100/1K/10K-S/A-HR-1/3/5
S-CRPD-S-RR-1/3/5
S—Software
CRPD—Product name cRPD
S—Standard software subscription
A—Advanced software subscription
HR—Host Routing
RR—Route Reflector
100—Bundle of 100 software licenses
1K—Bundle of 1000 software licenses
10K—Bundle of 10000 software licenses
1/3/5—Subscription term 1, 3, or 5 years
25 Packaging Additional Utilities in cRPD
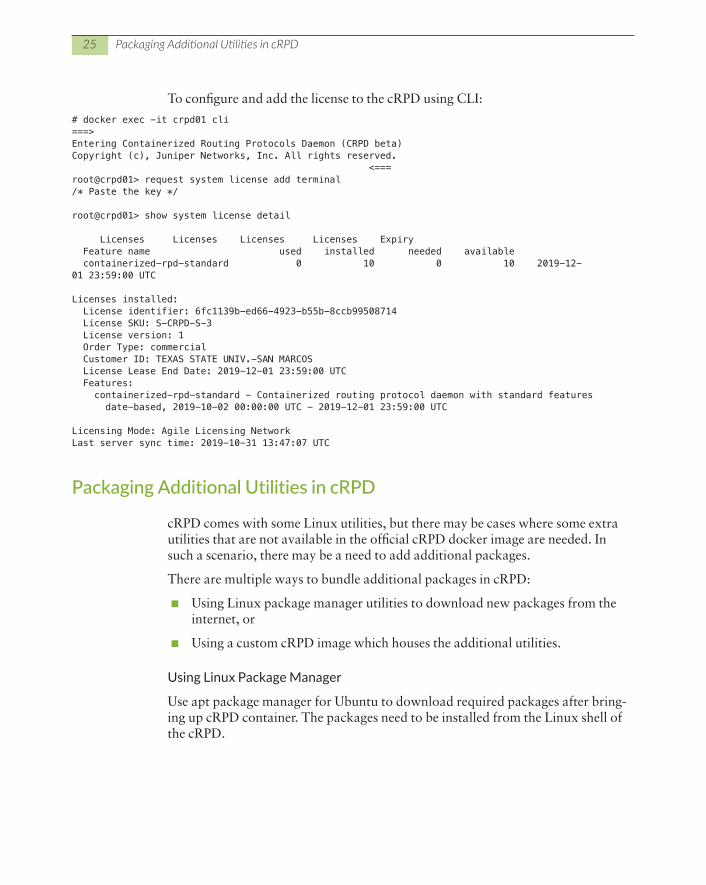
To configure and add the license to the cRPD using CLI:
# docker exec -it crpd01 cli===>Entering Containerized Routing Protocols Daemon (CRPD beta)Copyright (c), Juniper Networks, Inc. All rights reserved. <===root@crpd01> request system license add terminal/* Paste the key */
root@crpd01> show system license detail
Licenses Licenses Licenses Licenses Expiry Feature name used installed needed available containerized-rpd-standard 0 10 0 10 2019-12-01 23:59:00 UTC
Licenses installed: License identifier: 6fc1139b-ed66-4923-b55b-8ccb99508714 License SKU: S-CRPD-S-3 License version: 1 Order Type: commercial Customer ID: TEXAS STATE UNIV.-SAN MARCOS License Lease End Date: 2019-12-01 23:59:00 UTC Features: containerized-rpd-standard - Containerized routing protocol daemon with standard features date-based, 2019-10-02 00:00:00 UTC - 2019-12-01 23:59:00 UTC
Licensing Mode: Agile Licensing NetworkLast server sync time: 2019-10-31 13:47:07 UTC
Packaging Additional Utilities in cRPD
cRPD comes with some Linux utilities, but there may be cases where some extra utilities that are not available in the official cRPD docker image are needed. In such a scenario, there may be a need to add additional packages.
There are multiple ways to bundle additional packages in cRPD:
� Using Linux package manager utilities to download new packages from the internet, or
� Using a custom cRPD image which houses the additional utilities.
Using Linux Package Manager
Use apt package manager for Ubuntu to download required packages after bring-ing up cRPD container. The packages need to be installed from the Linux shell of the cRPD.
26 Chapter 2: Junos cRPD
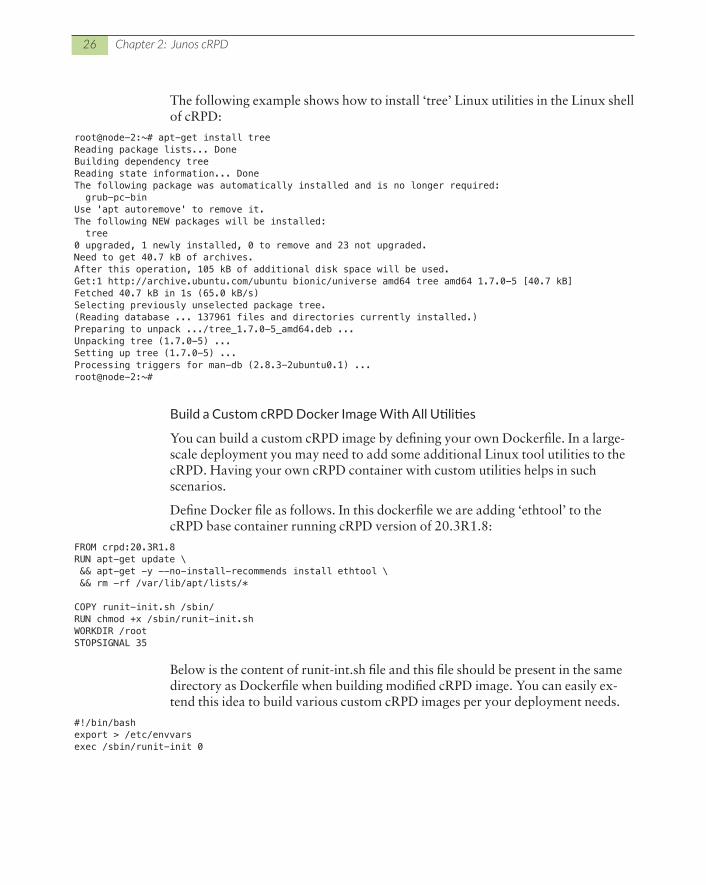
The following example shows how to install ‘tree’ Linux utilities in the Linux shell of cRPD:
root@node-2:~# apt-get install treeReading package lists... DoneBuilding dependency treeReading state information... DoneThe following package was automatically installed and is no longer required: grub-pc-binUse 'apt autoremove' to remove it.The following NEW packages will be installed: tree0 upgraded, 1 newly installed, 0 to remove and 23 not upgraded.Need to get 40.7 kB of archives.After this operation, 105 kB of additional disk space will be used.Get:1 http://archive.ubuntu.com/ubuntu bionic/universe amd64 tree amd64 1.7.0-5 [40.7 kB]Fetched 40.7 kB in 1s (65.0 kB/s)Selecting previously unselected package tree.(Reading database ... 137961 files and directories currently installed.)Preparing to unpack .../tree_1.7.0-5_amd64.deb ...Unpacking tree (1.7.0-5) ...Setting up tree (1.7.0-5) ...Processing triggers for man-db (2.8.3-2ubuntu0.1) ...root@node-2:~#
Build a Custom cRPD Docker Image With All Utilities
You can build a custom cRPD image by defining your own Dockerfile. In a large-scale deployment you may need to add some additional Linux tool utilities to the cRPD. Having your own cRPD container with custom utilities helps in such scenarios.
Define Docker file as follows. In this dockerfile we are adding ‘ethtool’ to the cRPD base container running cRPD version of 20.3R1.8:
FROM crpd:20.3R1.8RUN apt-get update \ && apt-get -y --no-install-recommends install ethtool \ && rm -rf /var/lib/apt/lists/*
COPY runit-init.sh /sbin/RUN chmod +x /sbin/runit-init.sh WORKDIR /rootSTOPSIGNAL 35
Below is the content of runit-int.sh file and this file should be present in the same directory as Dockerfile when building modified cRPD image. You can easily ex-tend this idea to build various custom cRPD images per your deployment needs.
#!/bin/bash export > /etc/envvarsexec /sbin/runit-init 0
27 cRPD Installation in Kubernetes
cRPD Installation in Kubernetes
NOTE It is assumed that the reader already has a working Kubernetes cluster. In this section show how you can bring up cRPD in the Kubernetes cluster as an application POD.
Please ensure that you have docker images for cRPD available on each kubernetes cluster node. You can do that either by setting up a local registry for cRPD image or you can individually copy a cRPD docker image on each Kubernetes node.
cRPD Running as an Application POD
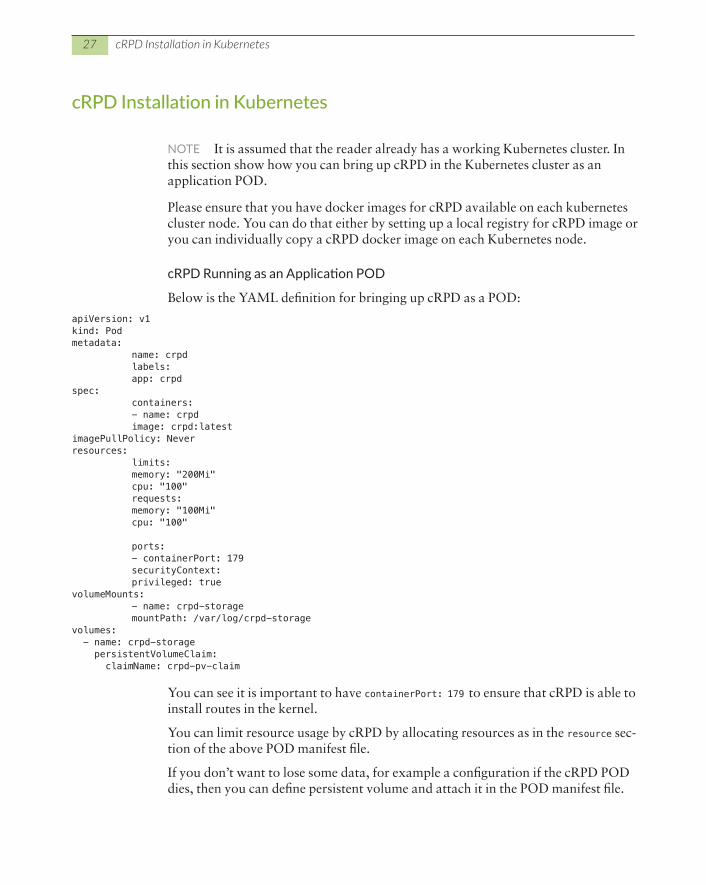
Below is the YAML definition for bringing up cRPD as a POD:
apiVersion: v1 kind: Pod metadata: name: crpd labels: app: crpd spec: containers: - name: crpd image: crpd:latestimagePullPolicy: Never resources: limits: memory: "200Mi" cpu: "100" requests: memory: "100Mi" cpu: "100"
ports: - containerPort: 179 securityContext: privileged: true volumeMounts: - name: crpd-storage mountPath: /var/log/crpd-storage volumes: - name: crpd-storage persistentVolumeClaim: claimName: crpd-pv-claim
You can see it is important to have containerPort: 179 to ensure that cRPD is able to install routes in the kernel.
You can limit resource usage by cRPD by allocating resources as in the resource sec-tion of the above POD manifest file.
If you don’t want to lose some data, for example a configuration if the cRPD POD dies, then you can define persistent volume and attach it in the POD manifest file.
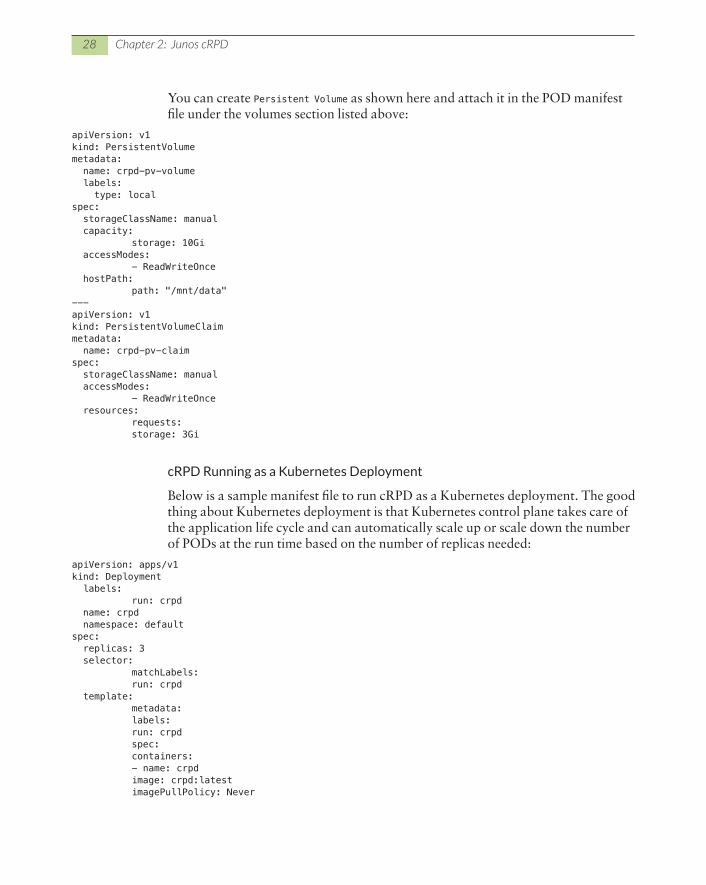
28 Chapter 2: Junos cRPD
You can create Persistent Volume as shown here and attach it in the POD manifest file under the volumes section listed above:
apiVersion: v1kind: PersistentVolumemetadata: name: crpd-pv-volume labels: type: localspec: storageClassName: manual capacity: storage: 10Gi accessModes: - ReadWriteOnce hostPath: path: "/mnt/data"---apiVersion: v1kind: PersistentVolumeClaimmetadata: name: crpd-pv-claimspec: storageClassName: manual accessModes: - ReadWriteOnce resources: requests: storage: 3Gi
cRPD Running as a Kubernetes Deployment
Below is a sample manifest file to run cRPD as a Kubernetes deployment. The good thing about Kubernetes deployment is that Kubernetes control plane takes care of the application life cycle and can automatically scale up or scale down the number of PODs at the run time based on the number of replicas needed:
apiVersion: apps/v1 kind: Deployment labels: run: crpd name: crpd namespace: default spec: replicas: 3 selector: matchLabels: run: crpd template: metadata: labels: run: crpd spec: containers: - name: crpd image: crpd:latest imagePullPolicy: Never

29 cRPD Installation in Kubernetes
This manifest file is an example of how to define cRPD deployment. The impor-tant thing to note is that you can dynamically bring the number of cRPD PODs up and down by changing the value of replicas defined in the YAML file. We also need to have a Kubernetes service abstraction and expose the deployment using Kubernetes services.
This chapter provides an overview of some of the aforementioned use cases where cRPD can play a role. Some use cases will contain just an overview of an idea, oth-ers go into great detail and cover complete solutions. You can tailor these cases to your own situation as we suggest new directions and new ways to deploy cRPD.
Multi-homing Hosts to an IP-fabric
Eliminating Layer 2 connections in WANs has been good practice for a couple of years now. The authors also believe that it makes good sense to avoid as many Layer 2 connections inside the data center as possible. Routing on the host (ROTH) is a process that has become reality with the availability of virtualized routing daemons. Juniper cRPD is the perfect solution for this task as it can speak to all current popular routing protocols.
With these options available the host becomes part of the IP fabric underlay and could terminate tunnels natively on the host, removing much of the demand from the ToR or access switch.
The underlay routing protocol options operators can choose from several IGPs like OSPF and ISIS to BGP and even more recent additions like RIFT. In the over-lay there are many options to choose from as well: MPLS-based tunnels, segment routing, and VXLAN, just to name a few.
Chapter 3
cRPD Use Cases
31 Overlay / Underlay
Overlay / Underlay
The way data centers are designed is changing rapidly. Until recently a lot of Layer 2 designs were being used, and even though these are designs understood by most network engineers there are some huge disadvantages, namely:
� Loop prevention can become complex
� Ethernet switching tables can grow rapidly and become a limiting factor
� Traffic engineering is hardly possible
To overcome these limitations MPLS is sometimes used in data centers because it already proved itself in the service provider world. But using this technology means you need MPLS routers everywhere in your network, quickly making it an expensive solution. Most of the time EVPN is used in the control plane for the MPLS solution, and obviously MPLS is used in the data plane. But now the same EVPN control plane is available using VXLAN in the data plane. To further re-duce Layer 2 in the infrastructure you can terminate the VXLAN tunnels in the hosts/hypervisors using software VTEPs instead of terminating them in the hard-ware of the TOR switches. In this model you use a routed underlay network to set up VXLAN overlay tunnels.
EVPN uses an address type (NLRI) in MBGP to advertise MAC addresses in the data plane, replacing the flooding mechanism used by switches and VPLS. So when you want to connect all your end nodes (hosts or hypervisors) on Layer 3, you need BGP on every end node. The cRPD offers you this. You can run MBGP in it for the overlay functionality. The same cRPD container can handle the routing for the underlay network. This can be done with different routing protocols but when scaling is an issue the only suitable choices are probably BGP or a protocol specially designed for situations like this: RIFT (Routing in Fat Trees). More about that later in this chapter.
Egress Peering Engineering From the Host
Egress peer traffic engineering (EPE) allows a host or central controller to instruct an ingress router within a domain to direct traffic towards a specific egress router and external interface to reach a particular destination outside the network. cRPD enables egress peer traffic engineering to select the best advertised egress route and map that route to a specific egress point. Load balancing is implemented at the in-gress, ensuring optimum utilization of the advertised egress routes.
In Figure 3.1 the ingress functionality is run on a Linux device that is hosting a Ju-niper Networks cRPD.
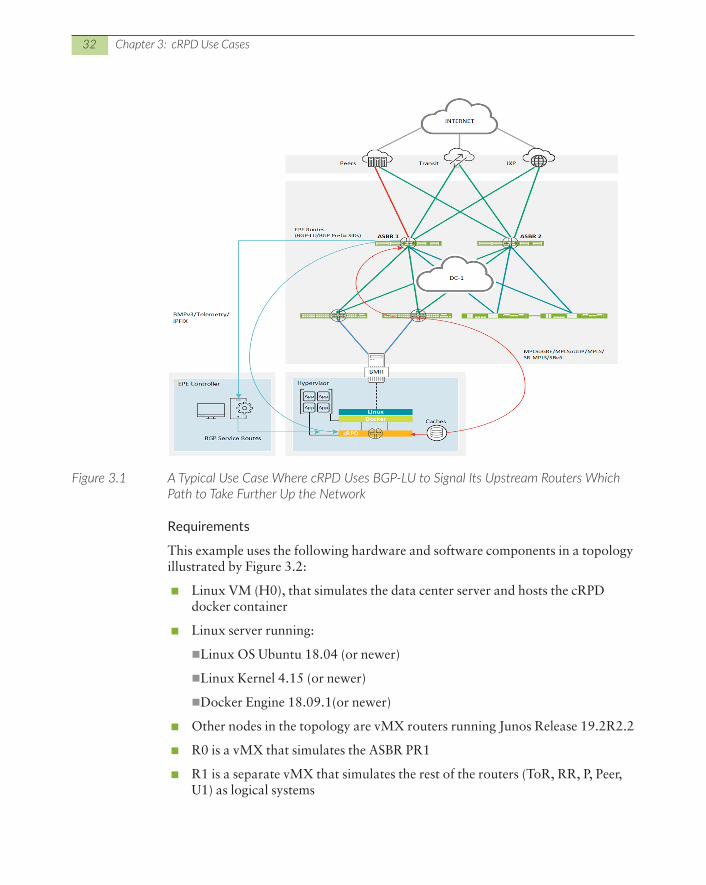
32 Chapter 3: cRPD Use Cases
Figure 3.1 A Typical Use Case Where cRPD Uses BGP-LU to Signal Its Upstream Routers Which Path to Take Further Up the Network
Requirements
This example uses the following hardware and software components in a topology illustrated by Figure 3.2:
� Linux VM (H0), that simulates the data center server and hosts the cRPD docker container
� Linux server running:
�Linux OS Ubuntu 18.04 (or newer)
�Linux Kernel 4.15 (or newer)
�Docker Engine 18.09.1(or newer)
� Other nodes in the topology are vMX routers running Junos Release 19.2R2.2
� R0 is a vMX that simulates the ASBR PR1
� R1 is a separate vMX that simulates the rest of the routers (ToR, RR, P, Peer, U1) as logical systems
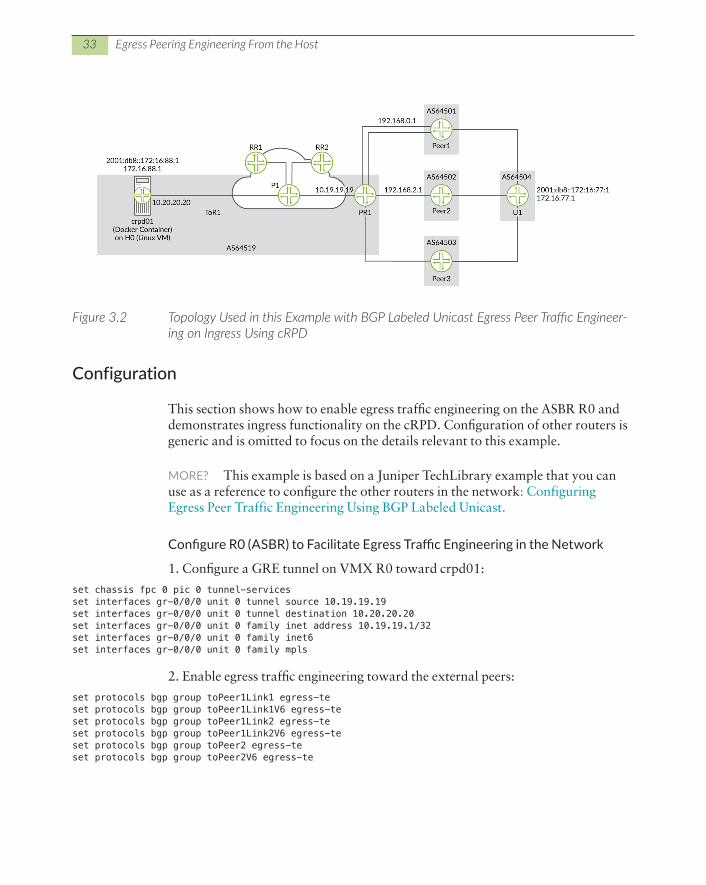
33 Egress Peering Engineering From the Host
Figure 3.2 Topology Used in this Example with BGP Labeled Unicast Egress Peer Traffic Engineer-ing on Ingress Using cRPD
Configuration
This section shows how to enable egress traffic engineering on the ASBR R0 and demonstrates ingress functionality on the cRPD. Configuration of other routers is generic and is omitted to focus on the details relevant to this example.
MORE? This example is based on a Juniper TechLibrary example that you can use as a reference to configure the other routers in the network: Configuring Egress Peer Traffic Engineering Using BGP Labeled Unicast.
Configure R0 (ASBR) to Facilitate Egress Traffic Engineering in the Network
1. Configure a GRE tunnel on VMX R0 toward crpd01:
set chassis fpc 0 pic 0 tunnel-servicesset interfaces gr-0/0/0 unit 0 tunnel source 10.19.19.19set interfaces gr-0/0/0 unit 0 tunnel destination 10.20.20.20set interfaces gr-0/0/0 unit 0 family inet address 10.19.19.1/32set interfaces gr-0/0/0 unit 0 family inet6set interfaces gr-0/0/0 unit 0 family mpls
2. Enable egress traffic engineering toward the external peers:
set protocols bgp group toPeer1Link1 egress-teset protocols bgp group toPeer1Link1V6 egress-teset protocols bgp group toPeer1Link2 egress-teset protocols bgp group toPeer1Link2V6 egress-teset protocols bgp group toPeer2 egress-teset protocols bgp group toPeer2V6 egress-te
34 Chapter 3: cRPD Use Cases
3. Create policies that export the ARP routes that egress traffic engineering created and apply them to the IBGP core in the labeled unicast family:
set policy-options policy-statement export_to_rrs term a from protocol arpset policy-options policy-statement export_to_rrs term a from rib inet.3set policy-options policy-statement export_to_rrs term a then next-hop selfset policy-options policy-statement export_to_rrs term a then acceptset policy-options policy-statement export_to_rrs term b from protocol arpset policy-options policy-statement export_to_rrs term b from rib inet6.3set policy-options policy-statement export_to_rrs term b then next-hop selfset policy-options policy-statement export_to_rrs term b then acceptset policy-options policy-statement export_to_rrs term c from protocol bgpset policy-options policy-statement export_to_rrs term c then acceptset policy-options policy-statement export_to_rrs term default then rejectset protocols bgp group toRRs type internalset protocols bgp group toRRs local-address 10.19.19.19set protocols bgp group toRRs family inet labeled-unicast rib inet.3set protocols bgp group toRRs family inet6 labeled-unicast rib inet6.3set protocols bgp group toRRs export export_to_rrsset protocols bgp group toRRs neighbor 10.6.6.6set protocols bgp group toRRs neighbor 10.7.7.7set protocols bgp group toRRs export export_to_rrs
4. Re-advertise Internet routes from external peers with the next hop unchanged:
set protocols bgp group toRRs family inet unicast add-path receiveset protocols bgp group toRRs family inet unicast add-path send path-count 6set protocols bgp group toRRs family inet6 unicast add-path receiveset protocols bgp group toRRs family inet6 unicast add-path send path-count 6set protocols bgp group toRRs export export_to_rrs
Configure the cRPD (Ingress Node) to Control EPE Decisions in the Network
1. On the Linux shell create the IP tunnel:
host@h0:~# ip tunnel add gre1 mode gre remote 10.19.19.19 local 10.20.20.20 ttl 255 host@h0:~# ip link set gre1 up
2. Enter the cRPD Junos CLI and configure the protocols. These will bring up OSPF and BGP sessions at cRPD01. The routes installed on the cRPD will bring up the GRE tunnel in Linux:
set policy-options prefix-list SvrV6Pfxes 2001:db8::172:16:88:1/128set policy-options prefix-list SvrV4Pfxes 172.16.88.1/32set policy-options prefix-list SvrV4lo 10.20.20.20/32set policy-options policy-statement export_lo1 term a from prefix-list SvrV4loset policy-options policy-statement export_lo1 term a then acceptset policy-options policy-statement export_lo1 term def then rejectset policy-options policy-statement export_to_peers term a from prefix-list SvrV4Pfxesset policy-options policy-statement export_to_peers term a then acceptset policy-options policy-statement export_to_peers term b from prefix-list SvrV6Pfxesset policy-options policy-statement export_to_peers term b then acceptset policy-options policy-statement export_to_peers term def then rejectset routing-options router-id 10.20.20.20set routing-options autonomous-system 19set routing-options rib inet.3 static route 10.19.19.19/32 next-hop gre1
35 Egress Peering Engineering From the Host
set routing-options rib inet6.3 static route ::ffff:10.19.19.19/128 next-hop gre1set protocols bgp group toRRs type internalset protocols bgp group toRRs local-address 10.20.20.20set protocols bgp group toRRs family inet labeled-unicast rib inet.3set protocols bgp group toRRs family inet unicast add-path receiveset protocols bgp group toRRs family inet unicast add-path send path-count 6set protocols bgp group toRRs family inet6 labeled-unicast rib inet6.3set protocols bgp group toRRs family inet6 unicast add-path receiveset protocols bgp group toRRs family inet6 unicast add-path send path-count 6set protocols bgp group toRRs neighbor 10.6.6.6set protocols bgp group toRRs neighbor 10.7.7.7set protocols bgp connect-retry-interval 1set protocols bgp hold-time 6set protocols bgp export export_to_peersset protocols ospf export export_lo1set protocols ospf area 0.0.0.0 interface ens3f1
Verification
1. On crpd01, verify that the routing protocol sessions are up:
host@crpd01> show ospf neighbor
Address Interface State ID Pri Dead10.20.21.2 ens3f1 Full 8.8.8.8 128 36
host@crpd01> show bgp summaryThreading mode: BGP I/OGroups: 1 Peers: 2 Down peers: 0Table Tot Paths Act Paths Suppressed History Damp State Pendinginet.0 40 5 0 0 0 0inet.3 8 4 0 0 0 0inet6.0 42 5 0 0 0 0inet6.3 8 4 0 0 0 0Peer AS InPkt OutPkt OutQ Flaps Last Up/Dwn State|#Active/Received/Accepted/Damped...10.6.6.6 19 31 9 0 0 6 Establ inet.0: 5/20/20/0 inet.3: 4/4/4/0 inet6.0: 5/21/21/0 inet6.3: 4/4/4/0
2. On crpd01, verify that IPv4 routes for U1 are installed. You should see the BGP routes with all available next hops: 192.168.0.1, 192.168.1.1, 192.168.2.1, and 192.168.3.1:
host@crpd01> show route 172.16.77.1/32
inet.0: 27 destinations, 44 routes (25 active, 0 holddown, 2 hidden)+ = Active Route, - = Last Active, * = Both
172.16.77.1/32 *[BGP/170] 00:05:25, localpref 100, from 10.6.6.6
36 Chapter 3: cRPD Use Cases
AS path: 1 4 I, validation-state: unverified > via gre1, Push 300912 [BGP/170] 00:05:25, localpref 100, from 10.6.6.6 AS path: 1 4 I, validation-state: unverified > via gre1, Push 301040 [BGP/170] 00:05:25, localpref 100, from 10.6.6.6 AS path: 2 4 I, validation-state: unverified > via gre1, Push 301056 [BGP/170] 00:05:25, localpref 100, from 10.6.6.6 AS path: 3 4 I, validation-state: unverified > via gre1, Push 300976
3. On crpd01, verify that IPv6 routes for U1 are installed:
host@crpd01> show route 2001:db8::172:16:77:1inet6.0: 15 destinations, 31 routes (13 active, 0 holddown, 2 hidden)+ = Active Route, - = Last Active, * = Both
2001:db8::172:16:77:1/128 *[BGP/170] 00:09:45, localpref 100, from 10.6.6.6 AS path: 1 4 I, validation-state: unverified > via gre1, Push 301072 [BGP/170] 00:09:45, localpref 100, from 10.6.6.6 AS path: 1 4 I, validation-state: unverified > via gre1, Push 301088 [BGP/170] 00:09:45, localpref 100, from 10.6.6.6 AS path: 2 4 I, validation-state: unverified > via gre1, Push 301104 [BGP/170] 00:09:45, localpref 100, from 10.6.6.6 AS path: 3 4 I, validation-state: unverified > via gre1, Push 301120
4. On crpd01, verify next-hop resolution for IPv4:
host@crpd01> show route 172.16.77.1 extensive
inet.0: 27 destinations, 44 routes (25 active, 0 holddown, 2 hidden)172.16.77.1/32 (4 entries, 1 announced)TSI:KRT in-kernel 172.16.77.1/32 -> {indirect(-)} *BGP Preference: 170/-101 Next hop type: Indirect, Next hop index: 0 Address: 0x4c4a3bc Next-hop reference count: 10 Source: 10.6.6.6 Next hop type: Router, Next hop index: 0 Next hop: via gre1, selected Label operation: Push 300912
5. On crpd01, verify next-hop resolution for IPv6:
host@crpd01> show route 2001:db8::172:16:77:1 extensive
inet6.0: 15 destinations, 31 routes (13 active, 0 holddown, 2 hidden)2001:db8::172:16:77:1/128 (4 entries, 1 announced)TSI:KRT in-kernel 2001:db8::172:16:77:1/128 -> {indirect(-)} *BGP Preference: 170/-101
37 Egress Peering Engineering From the Host
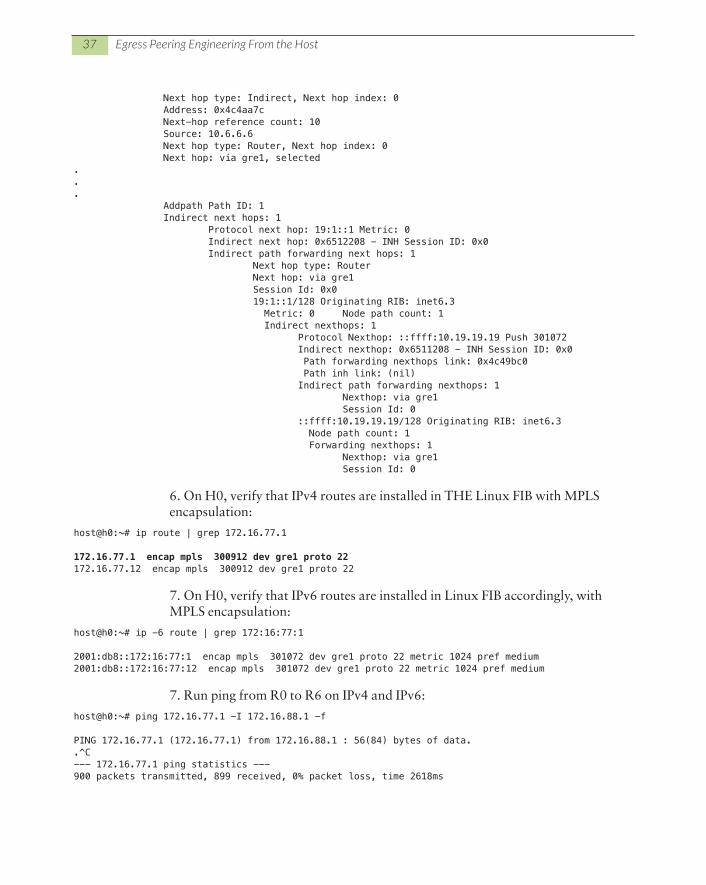
Next hop type: Indirect, Next hop index: 0 Address: 0x4c4aa7c Next-hop reference count: 10 Source: 10.6.6.6 Next hop type: Router, Next hop index: 0 Next hop: via gre1, selected... Addpath Path ID: 1 Indirect next hops: 1 Protocol next hop: 19:1::1 Metric: 0 Indirect next hop: 0x6512208 - INH Session ID: 0x0 Indirect path forwarding next hops: 1 Next hop type: Router Next hop: via gre1 Session Id: 0x0 19:1::1/128 Originating RIB: inet6.3 Metric: 0 Node path count: 1 Indirect nexthops: 1 Protocol Nexthop: ::ffff:10.19.19.19 Push 301072 Indirect nexthop: 0x6511208 - INH Session ID: 0x0 Path forwarding nexthops link: 0x4c49bc0 Path inh link: (nil) Indirect path forwarding nexthops: 1 Nexthop: via gre1 Session Id: 0 ::ffff:10.19.19.19/128 Originating RIB: inet6.3 Node path count: 1 Forwarding nexthops: 1 Nexthop: via gre1 Session Id: 0
6. On H0, verify that IPv4 routes are installed in THE Linux FIB with MPLS encapsulation:
host@h0:~# ip route | grep 172.16.77.1
172.16.77.1 encap mpls 300912 dev gre1 proto 22172.16.77.12 encap mpls 300912 dev gre1 proto 22
7. On H0, verify that IPv6 routes are installed in Linux FIB accordingly, with MPLS encapsulation:
host@h0:~# ip -6 route | grep 172:16:77:1
2001:db8::172:16:77:1 encap mpls 301072 dev gre1 proto 22 metric 1024 pref medium2001:db8::172:16:77:12 encap mpls 301072 dev gre1 proto 22 metric 1024 pref medium
7. Run ping from R0 to R6 on IPv4 and IPv6:
host@h0:~# ping 172.16.77.1 -I 172.16.88.1 -f
PING 172.16.77.1 (172.16.77.1) from 172.16.88.1 : 56(84) bytes of data..^C--- 172.16.77.1 ping statistics ---900 packets transmitted, 899 received, 0% packet loss, time 2618ms
38 Chapter 3: cRPD Use Cases
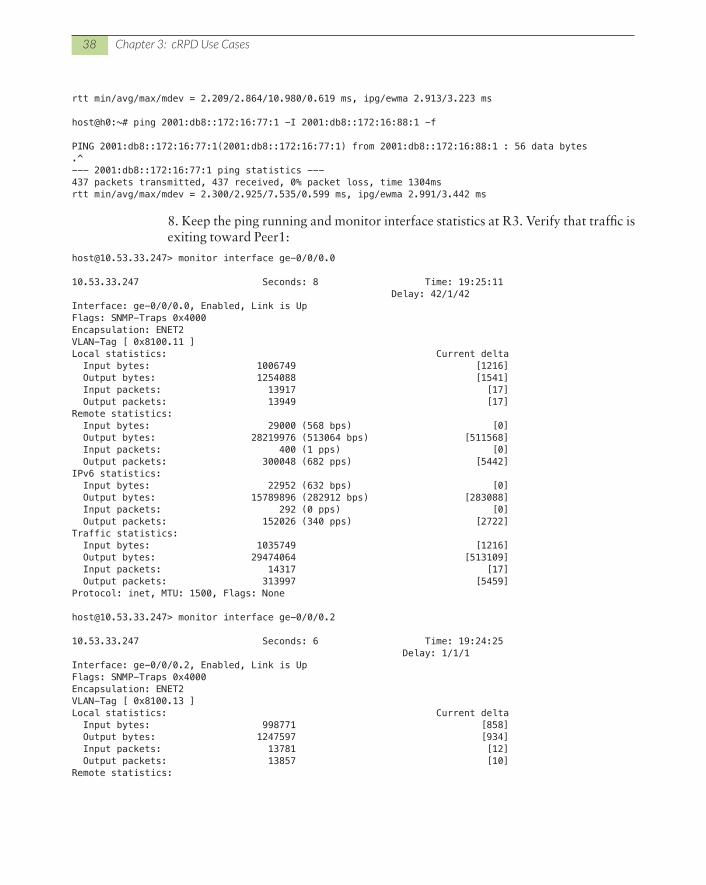
rtt min/avg/max/mdev = 2.209/2.864/10.980/0.619 ms, ipg/ewma 2.913/3.223 ms
host@h0:~# ping 2001:db8::172:16:77:1 -I 2001:db8::172:16:88:1 -f
PING 2001:db8::172:16:77:1(2001:db8::172:16:77:1) from 2001:db8::172:16:88:1 : 56 data bytes.^--- 2001:db8::172:16:77:1 ping statistics ---437 packets transmitted, 437 received, 0% packet loss, time 1304msrtt min/avg/max/mdev = 2.300/2.925/7.535/0.599 ms, ipg/ewma 2.991/3.442 ms
8. Keep the ping running and monitor interface statistics at R3. Verify that traffic is exiting toward Peer1:
[email protected]> monitor interface ge-0/0/0.0
10.53.33.247 Seconds: 8 Time: 19:25:11 Delay: 42/1/42Interface: ge-0/0/0.0, Enabled, Link is UpFlags: SNMP-Traps 0x4000Encapsulation: ENET2VLAN-Tag [ 0x8100.11 ]Local statistics: Current delta Input bytes: 1006749 [1216] Output bytes: 1254088 [1541] Input packets: 13917 [17] Output packets: 13949 [17]Remote statistics: Input bytes: 29000 (568 bps) [0] Output bytes: 28219976 (513064 bps) [511568] Input packets: 400 (1 pps) [0] Output packets: 300048 (682 pps) [5442]IPv6 statistics: Input bytes: 22952 (632 bps) [0] Output bytes: 15789896 (282912 bps) [283088] Input packets: 292 (0 pps) [0] Output packets: 152026 (340 pps) [2722]Traffic statistics: Input bytes: 1035749 [1216] Output bytes: 29474064 [513109] Input packets: 14317 [17] Output packets: 313997 [5459]Protocol: inet, MTU: 1500, Flags: None
[email protected]> monitor interface ge-0/0/0.2
10.53.33.247 Seconds: 6 Time: 19:24:25 Delay: 1/1/1Interface: ge-0/0/0.2, Enabled, Link is UpFlags: SNMP-Traps 0x4000Encapsulation: ENET2VLAN-Tag [ 0x8100.13 ]Local statistics: Current delta Input bytes: 998771 [858] Output bytes: 1247597 [934] Input packets: 13781 [12] Output packets: 13857 [10]Remote statistics:
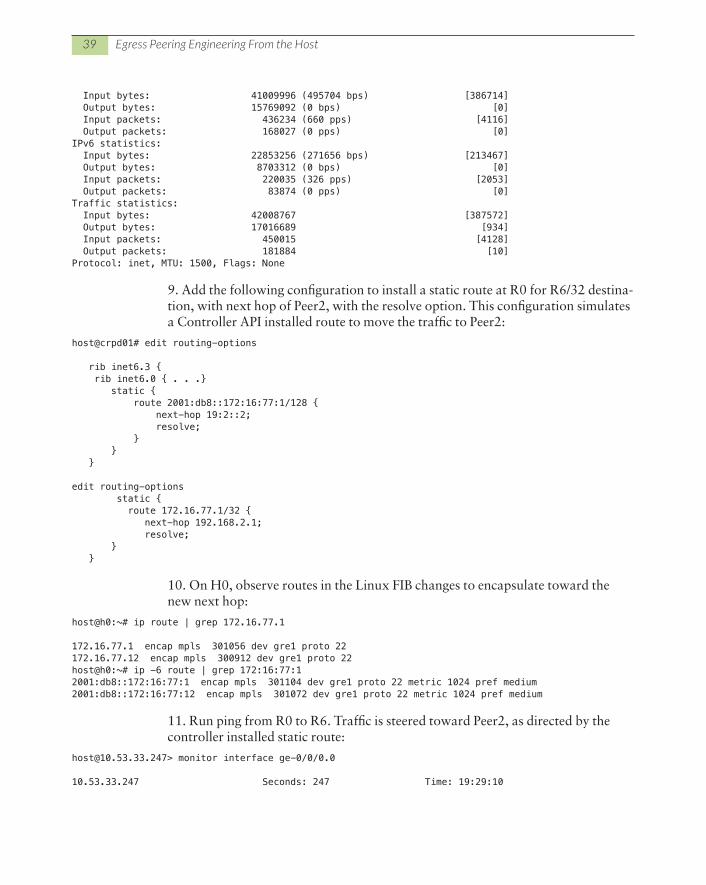
39 Egress Peering Engineering From the Host
Input bytes: 41009996 (495704 bps) [386714] Output bytes: 15769092 (0 bps) [0] Input packets: 436234 (660 pps) [4116] Output packets: 168027 (0 pps) [0]IPv6 statistics: Input bytes: 22853256 (271656 bps) [213467] Output bytes: 8703312 (0 bps) [0] Input packets: 220035 (326 pps) [2053] Output packets: 83874 (0 pps) [0]Traffic statistics: Input bytes: 42008767 [387572] Output bytes: 17016689 [934] Input packets: 450015 [4128] Output packets: 181884 [10]Protocol: inet, MTU: 1500, Flags: None
9. Add the following configuration to install a static route at R0 for R6/32 destina-tion, with next hop of Peer2, with the resolve option. This configuration simulates a Controller API installed route to move the traffic to Peer2:
host@crpd01# edit routing-options
rib inet6.3 { rib inet6.0 { . . .} static { route 2001:db8::172:16:77:1/128 { next-hop 19:2::2; resolve; } } }
edit routing-options static { route 172.16.77.1/32 { next-hop 192.168.2.1; resolve; } }
10. On H0, observe routes in the Linux FIB changes to encapsulate toward the new next hop:
host@h0:~# ip route | grep 172.16.77.1
172.16.77.1 encap mpls 301056 dev gre1 proto 22172.16.77.12 encap mpls 300912 dev gre1 proto 22host@h0:~# ip -6 route | grep 172:16:77:12001:db8::172:16:77:1 encap mpls 301104 dev gre1 proto 22 metric 1024 pref medium2001:db8::172:16:77:12 encap mpls 301072 dev gre1 proto 22 metric 1024 pref medium
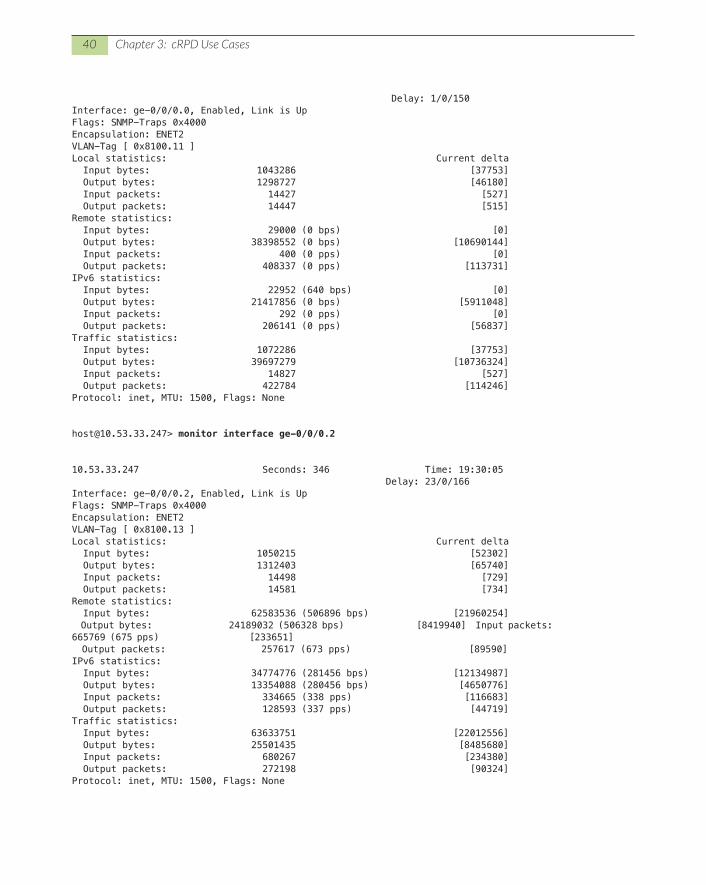
11. Run ping from R0 to R6. Traffic is steered toward Peer2, as directed by the controller installed static route:
[email protected]> monitor interface ge-0/0/0.0
10.53.33.247 Seconds: 247 Time: 19:29:10
40 Chapter 3: cRPD Use Cases
Delay: 1/0/150Interface: ge-0/0/0.0, Enabled, Link is UpFlags: SNMP-Traps 0x4000Encapsulation: ENET2VLAN-Tag [ 0x8100.11 ]Local statistics: Current delta Input bytes: 1043286 [37753] Output bytes: 1298727 [46180] Input packets: 14427 [527] Output packets: 14447 [515]Remote statistics: Input bytes: 29000 (0 bps) [0] Output bytes: 38398552 (0 bps) [10690144] Input packets: 400 (0 pps) [0] Output packets: 408337 (0 pps) [113731]IPv6 statistics: Input bytes: 22952 (640 bps) [0] Output bytes: 21417856 (0 bps) [5911048] Input packets: 292 (0 pps) [0] Output packets: 206141 (0 pps) [56837]Traffic statistics: Input bytes: 1072286 [37753] Output bytes: 39697279 [10736324] Input packets: 14827 [527] Output packets: 422784 [114246]Protocol: inet, MTU: 1500, Flags: None
[email protected]> monitor interface ge-0/0/0.2
10.53.33.247 Seconds: 346 Time: 19:30:05 Delay: 23/0/166Interface: ge-0/0/0.2, Enabled, Link is UpFlags: SNMP-Traps 0x4000Encapsulation: ENET2VLAN-Tag [ 0x8100.13 ]Local statistics: Current delta Input bytes: 1050215 [52302] Output bytes: 1312403 [65740] Input packets: 14498 [729] Output packets: 14581 [734]Remote statistics: Input bytes: 62583536 (506896 bps) [21960254] Output bytes: 24189032 (506328 bps) [8419940] Input packets: 665769 (675 pps) [233651] Output packets: 257617 (673 pps) [89590]IPv6 statistics: Input bytes: 34774776 (281456 bps) [12134987] Output bytes: 13354088 (280456 bps) [4650776] Input packets: 334665 (338 pps) [116683] Output packets: 128593 (337 pps) [44719]Traffic statistics: Input bytes: 63633751 [22012556] Output bytes: 25501435 [8485680] Input packets: 680267 [234380] Output packets: 272198 [90324]Protocol: inet, MTU: 1500, Flags: None
41 L3VPN in MSP
L3VPN in MSP
This use case discusses the configuration of Layer 3 VPN (VRF) on a cRPD in-stance with an MPLS Segment Routing data plane. In edge cloud infrastructure application-specific PE routers are replaced by a cloud-native workload, such as the cRPD for routing function with Linux forwarding plane, to provide Layer 3 overlay services. The cRPD Layer 3 VPN feature leverages the support provided in Linux for VRF and MPLS, and enables the routing instance functionality along the Junos RPD multiprotocol BGP support to allow Layer 3 overlay functionality.
Using cRPD’s multiprotocol BGP functionality, the local prefixes and the learned prefixes in the VRF are advertised and received. Corresponding MPLS routes are added into the Linux MPLS forwarding table. The prefixes learned from remote PEs get into the VRF routing table based on route-target policy.
Linux VRF
A VRF in the Linux kernel is represented by a network device handled by a VRF driver. When a VRF device is created, it is associated with a routing table and net-work interfaces are then assigned to a VRF device as shown in Figure 3.3.
Figure 3.3 VRF in Linux Kernel
Packets that come in through such devices to the VRF are looked up in the routing table associated with the VRF device. Similarly egress routing rules are used to send packets to the VRF driver before sending it out on the actual interface.
MORE? Please refer to the Linux documentation at https://www.kernel.org/doc/Documentation/networking/vrf.txt for more information on Linux VRF.
42 Chapter 3: cRPD Use Cases
MPLS in Linux
The MPLS configuration is supported in cRPD, including SR-MPLS, for forward-ing packets to the destination in the MPLS network. To leverage cRPD’s MPLS capability, it’s advised to run the containers on a system running Linux kernel ver-sion 4.8 or later. The MPLS kernel module mpls_router must be installed in the container for MPLS to work in the Linux kernel.
The steps to load the MPLS module on Linux host are:
Load the MPLS modules in the container using modprobe:
lab@poc-server-20:~$ modprobe mpls_iptunnellab@poc-server-20:~$ modprobe mpls_router
Verify the MPLS modules loaded in host OS:
lab@poc-server-20:~$ lsmod | grep mplsmpls_iptunnel 16384 1mpls_router 28672 2 mpls_iptunnel,pwip_tunnel 24576 4 mpls_router,ip_gre,ipip,sit
After loading the mpls_router on the host, configure the following commands to activate MPLS on the interface:
lab@poc-server-20:~$ sudo sysctl -w net.mpls.platform_labels=1048575
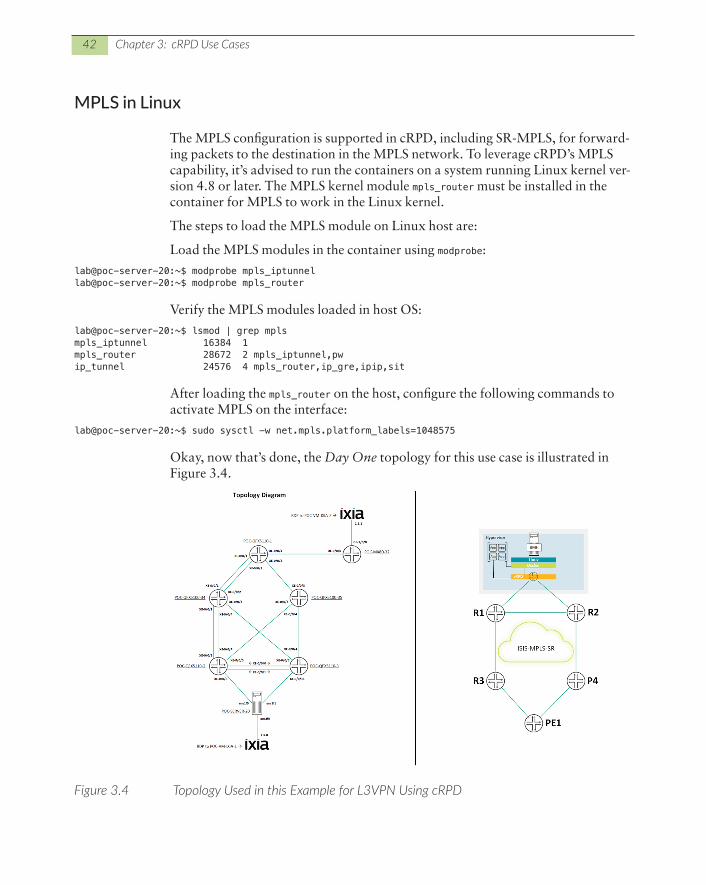
Okay, now that’s done, the Day One topology for this use case is illustrated in Figure 3.4.
Figure 3.4 Topology Used in this Example for L3VPN Using cRPD
43 L3VPN in MSP
Before you configure a Layer 3 VPN (VRF), MPLS modules need to be installed on the host OS on which the cRPD instance is created. Here we will configure IGP and MPLS protocols on cRPD.
When cRPD is launched in host networking mode, the server host interface and IP address is visible to the cRPD container. You do not have to configure the inter-face IP address in cRPD, but the IGP and MPLS protocol is a required configura-tion on cRPD.
In this example ISIS IGP and MPLS segment routing is used for the data plane:
root@crpd01# show |display set set protocols isis interface ens1f0set protocols isis interface lo.0 passiveset protocols isis source-packet-routing srgb start-label 8000set protocols isis source-packet-routing srgb index-range 100000set protocols isis source-packet-routing node-segment ipv4-index 10set protocols isis source-packet-routing node-segment ipv6-index 11set protocols isis level 1 disable
Let’s verify ISIS IGP:
root@crpd01# run show isis adjacency Interface System L State Hold (secs) SNPAens1f0 poc-qfx5110-2 2 Up 7 44:aa:50:c8:8c:6b
[edit]root@crpd01#
Notice the cRPD learned the remote PE lo0 address 10.10.10.6 through ISI:
root@crpd01# run show route protocol isis 10.10.10.6/32
inet.0: 25 destinations, 25 routes (25 active, 0 holddown, 0 hidden)+ = Active Route, - = Last Active, * = Both
10.10.10.6/32 *[IS-IS/18] 4w1d 20:17:09, metric 40 > to 1.1.1.73 via ens1f0
inet.3: 6 destinations, 6 routes (6 active, 0 holddown, 0 hidden)+ = Active Route, - = Last Active, * = Both
10.10.10.6/32 *[L-ISIS/14] 3w2d 18:57:50, metric 40 > to 1.1.1.73 via ens1f0, Push 1032
[edit]root@crpd01#
On the Linux host the forwarding table is programed with the correct information:
lab@poc-server-20:~$ ip route | grep 10.10.10.610.10.10.6 via 1.1.1.73 dev ens1f0 proto 22 lab@poc-server-20:~$
44 Chapter 3: cRPD Use Cases
Now let’s verify the MPLS. In a typical Junos router the family MPLS configura-tion is required on the interface. In the Linux host family an MPLS configuration is not required. As the MPLS modules have been loaded, MPLS will be enabled on all host interfaces which will be used for MPLS forwarding.
Junos uses MPLS.0 table for the label route but cRPD by default does not create MPLS.0 table and this needs to be explicitly enabled in cRPD:
root@crpd01# set routing-options rib mpls.0
We’re using ISIS to signal MPLS segment routing in this example:
set protocols isis source-packet-routing srgb start-label 8000set protocols isis source-packet-routing srgb index-range 100000set protocols isis source-packet-routing node-segment ipv4-index 10set protocols isis source-packet-routing node-segment ipv6-index 11
Let’s enable protocol MPLS on the Linux host interface:
set protocols mpls interface ens1f0
Now verify the MPLS SR and MPLS route table is on the cRPD:
root@crpd01# run show isis overview Instance: master Router ID: 10.10.10.10 Hostname: crpd01 Sysid: 0010.0010.0010 Areaid: 49.0010 Adjacency holddown: enabled Maximum Areas: 3 LSP life time: 1200 Attached bit evaluation: enabled SPF delay: 200 msec, SPF holddown: 5000 msec, SPF rapid runs: 3 IPv4 is enabled, IPv6 is enabled, SPRING based MPLS is enabled Traffic engineering: enabled Restart: Disabled Helper mode: Enabled Layer2-map: Disabled Source Packet Routing (SPRING): Enabled SRGB Config Range : SRGB Start-Label : 8000, SRGB Index-Range : 100000 SRGB Block Allocation: Success SRGB Start Index : 8000, SRGB Size : 100000, Label-Range: [ 8000, 107999 ] Node Segments: Enabled Ipv4 Index : 10, Ipv6 Index : 11 SRv6: Disabled Post Convergence Backup: Disabled Level 1 Internal route preference: 15 External route preference: 160 Prefix export count: 0 Wide metrics are enabled, Narrow metrics are enabled Source Packet Routing is enabled Level 2 Internal route preference: 18 External route preference: 165
45 L3VPN in MSP
Prefix export count: 0 Wide metrics are enabled, Narrow metrics are enabled Source Packet Routing is enabled [edit]root@crpd01#
root@crpd01# run show route table inet.3
inet.3: 6 destinations, 6 routes (6 active, 0 holddown, 0 hidden)+ = Active Route, - = Last Active, * = Both
10.10.10.1/32 *[L-ISIS/14] 3w2d 19:17:08, metric 30 > to 1.1.1.73 via ens1f0, Push 100110.10.10.2/32 *[L-ISIS/14] 3w2d 19:16:32, metric 20 > to 1.1.1.73 via ens1f0, Push 103410.10.10.3/32 *[L-ISIS/14] 3w2d 19:17:08, metric 20 > to 1.1.1.73 via ens1f0, Push 103510.10.10.4/32 *[L-ISIS/14] 3w2d 19:16:32, metric 10 > to 1.1.1.73 via ens1f010.10.10.5/32 *[L-ISIS/14] 3w2d 19:17:08, metric 20 > to 1.1.1.73 via ens1f0, Push 100310.10.10.6/32 *[L-ISIS/14] 3w2d 19:17:08, metric 40 > to 1.1.1.73 via ens1f0, Push 1032
[edit]root@crpd01#
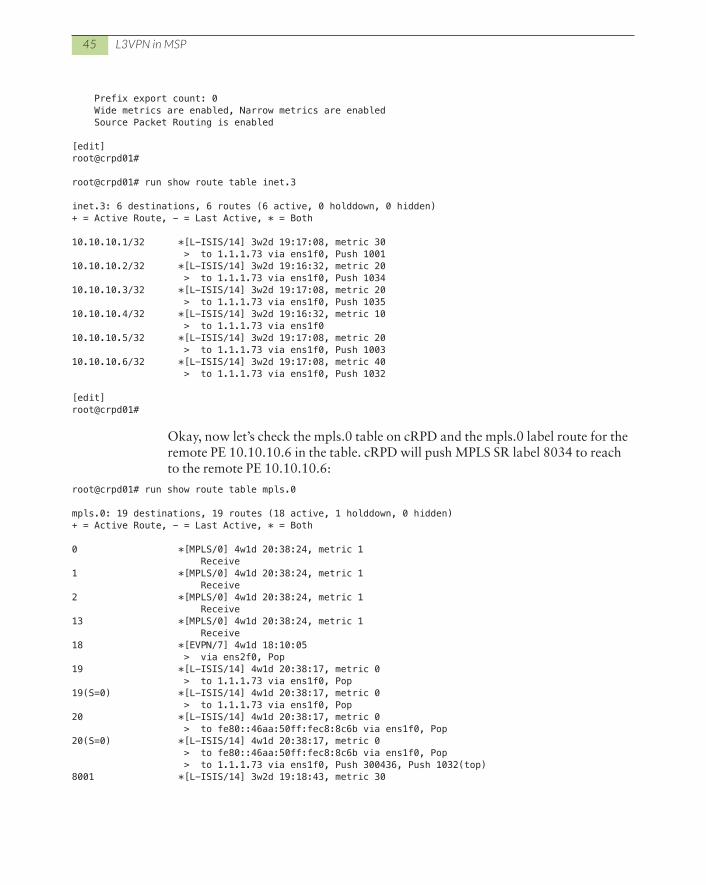
Okay, now let’s check the mpls.0 table on cRPD and the mpls.0 label route for the remote PE 10.10.10.6 in the table. cRPD will push MPLS SR label 8034 to reach to the remote PE 10.10.10.6:
root@crpd01# run show route table mpls.0
mpls.0: 19 destinations, 19 routes (18 active, 1 holddown, 0 hidden)+ = Active Route, - = Last Active, * = Both
0 *[MPLS/0] 4w1d 20:38:24, metric 1 Receive1 *[MPLS/0] 4w1d 20:38:24, metric 1 Receive2 *[MPLS/0] 4w1d 20:38:24, metric 1 Receive13 *[MPLS/0] 4w1d 20:38:24, metric 1 Receive18 *[EVPN/7] 4w1d 18:10:05 > via ens2f0, Pop 19 *[L-ISIS/14] 4w1d 20:38:17, metric 0 > to 1.1.1.73 via ens1f0, Pop 19(S=0) *[L-ISIS/14] 4w1d 20:38:17, metric 0 > to 1.1.1.73 via ens1f0, Pop 20 *[L-ISIS/14] 4w1d 20:38:17, metric 0 > to fe80::46aa:50ff:fec8:8c6b via ens1f0, Pop 20(S=0) *[L-ISIS/14] 4w1d 20:38:17, metric 0 > to fe80::46aa:50ff:fec8:8c6b via ens1f0, Pop > to 1.1.1.73 via ens1f0, Push 300436, Push 1032(top)8001 *[L-ISIS/14] 3w2d 19:18:43, metric 30
46 Chapter 3: cRPD Use Cases
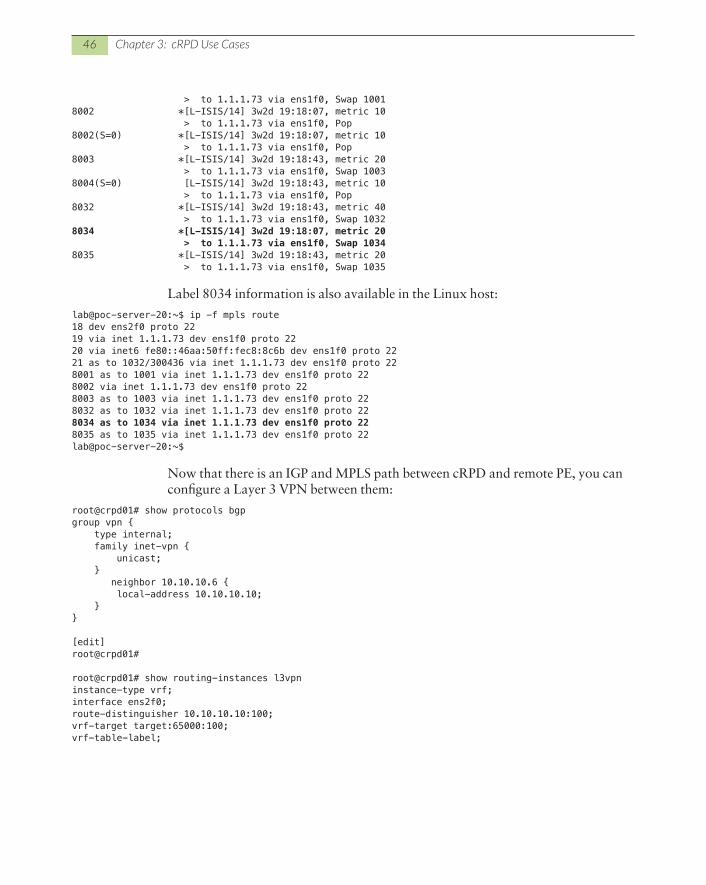
> to 1.1.1.73 via ens1f0, Swap 10018002 *[L-ISIS/14] 3w2d 19:18:07, metric 10 > to 1.1.1.73 via ens1f0, Pop 8002(S=0) *[L-ISIS/14] 3w2d 19:18:07, metric 10 > to 1.1.1.73 via ens1f0, Pop 8003 *[L-ISIS/14] 3w2d 19:18:43, metric 20 > to 1.1.1.73 via ens1f0, Swap 10038004(S=0) [L-ISIS/14] 3w2d 19:18:43, metric 10 > to 1.1.1.73 via ens1f0, Pop 8032 *[L-ISIS/14] 3w2d 19:18:43, metric 40 > to 1.1.1.73 via ens1f0, Swap 10328034 *[L-ISIS/14] 3w2d 19:18:07, metric 20 > to 1.1.1.73 via ens1f0, Swap 10348035 *[L-ISIS/14] 3w2d 19:18:43, metric 20 > to 1.1.1.73 via ens1f0, Swap 1035
Label 8034 information is also available in the Linux host:
lab@poc-server-20:~$ ip -f mpls route18 dev ens2f0 proto 22 19 via inet 1.1.1.73 dev ens1f0 proto 22 20 via inet6 fe80::46aa:50ff:fec8:8c6b dev ens1f0 proto 22 21 as to 1032/300436 via inet 1.1.1.73 dev ens1f0 proto 22 8001 as to 1001 via inet 1.1.1.73 dev ens1f0 proto 22 8002 via inet 1.1.1.73 dev ens1f0 proto 22 8003 as to 1003 via inet 1.1.1.73 dev ens1f0 proto 22 8032 as to 1032 via inet 1.1.1.73 dev ens1f0 proto 22 8034 as to 1034 via inet 1.1.1.73 dev ens1f0 proto 22 8035 as to 1035 via inet 1.1.1.73 dev ens1f0 proto 22 lab@poc-server-20:~$
Now that there is an IGP and MPLS path between cRPD and remote PE, you can configure a Layer 3 VPN between them:
root@crpd01# show protocols bgp group vpn { type internal; family inet-vpn { unicast; } neighbor 10.10.10.6 { local-address 10.10.10.10; }}
[edit]root@crpd01#
root@crpd01# show routing-instances l3vpn instance-type vrf;interface ens2f0;route-distinguisher 10.10.10.10:100;vrf-target target:65000:100;vrf-table-label;
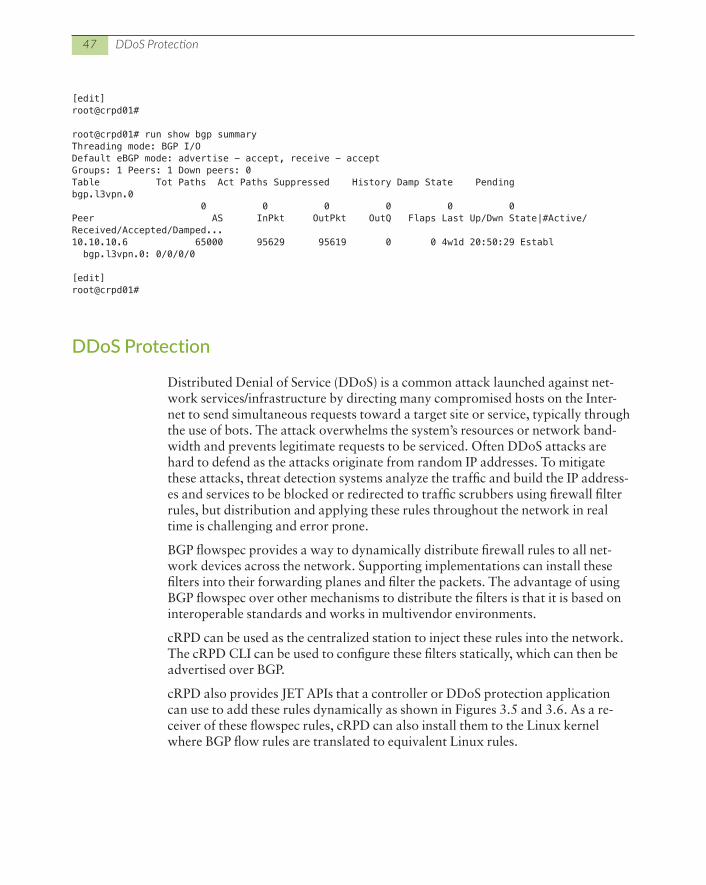
47 DDoS Protection
[edit]root@crpd01#
root@crpd01# run show bgp summary Threading mode: BGP I/ODefault eBGP mode: advertise - accept, receive - acceptGroups: 1 Peers: 1 Down peers: 0Table Tot Paths Act Paths Suppressed History Damp State Pendingbgp.l3vpn.0 0 0 0 0 0 0Peer AS InPkt OutPkt OutQ Flaps Last Up/Dwn State|#Active/Received/Accepted/Damped...10.10.10.6 65000 95629 95619 0 0 4w1d 20:50:29 Establ bgp.l3vpn.0: 0/0/0/0
[edit]root@crpd01#
DDoS Protection
Distributed Denial of Service (DDoS) is a common attack launched against net-work services/infrastructure by directing many compromised hosts on the Inter-net to send simultaneous requests toward a target site or service, typically through the use of bots. The attack overwhelms the system’s resources or network band-width and prevents legitimate requests to be serviced. Often DDoS attacks are hard to defend as the attacks originate from random IP addresses. To mitigate these attacks, threat detection systems analyze the traffic and build the IP address-es and services to be blocked or redirected to traffic scrubbers using firewall filter rules, but distribution and applying these rules throughout the network in real time is challenging and error prone.
BGP flowspec provides a way to dynamically distribute firewall rules to all net-work devices across the network. Supporting implementations can install these filters into their forwarding planes and filter the packets. The advantage of using BGP flowspec over other mechanisms to distribute the filters is that it is based on interoperable standards and works in multivendor environments.
cRPD can be used as the centralized station to inject these rules into the network. The cRPD CLI can be used to configure these filters statically, which can then be advertised over BGP.
cRPD also provides JET APIs that a controller or DDoS protection application can use to add these rules dynamically as shown in Figures 3.5 and 3.6. As a re-ceiver of these flowspec rules, cRPD can also install them to the Linux kernel where BGP flow rules are translated to equivalent Linux rules.
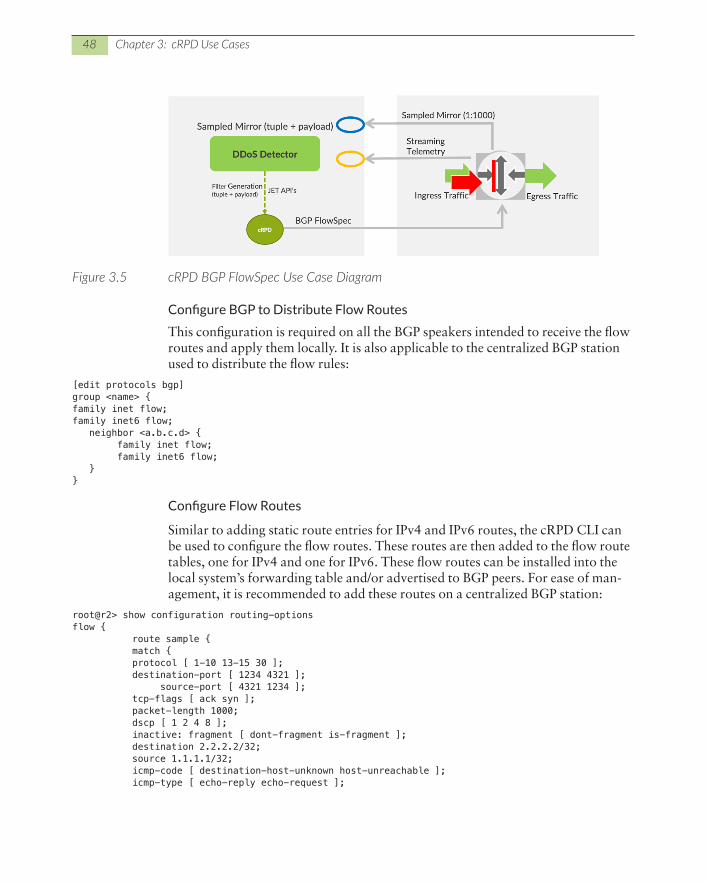
48 Chapter 3: cRPD Use Cases
Figure 3.5 cRPD BGP FlowSpec Use Case Diagram
Configure BGP to Distribute Flow RoutesThis configuration is required on all the BGP speakers intended to receive the flow routes and apply them locally. It is also applicable to the centralized BGP station used to distribute the flow rules:
[edit protocols bgp]group <name> {family inet flow;family inet6 flow; neighbor <a.b.c.d> { family inet flow; family inet6 flow; }}
Configure Flow Routes
Similar to adding static route entries for IPv4 and IPv6 routes, the cRPD CLI can be used to configure the flow routes. These routes are then added to the flow route tables, one for IPv4 and one for IPv6. These flow routes can be installed into the local system’s forwarding table and/or advertised to BGP peers. For ease of man-agement, it is recommended to add these routes on a centralized BGP station:
root@r2> show configuration routing-optionsflow { route sample { match { protocol [ 1-10 13-15 30 ]; destination-port [ 1234 4321 ]; source-port [ 4321 1234 ]; tcp-flags [ ack syn ]; packet-length 1000; dscp [ 1 2 4 8 ]; inactive: fragment [ dont-fragment is-fragment ]; destination 2.2.2.2/32; source 1.1.1.1/32; icmp-code [ destination-host-unknown host-unreachable ]; icmp-type [ echo-reply echo-request ];
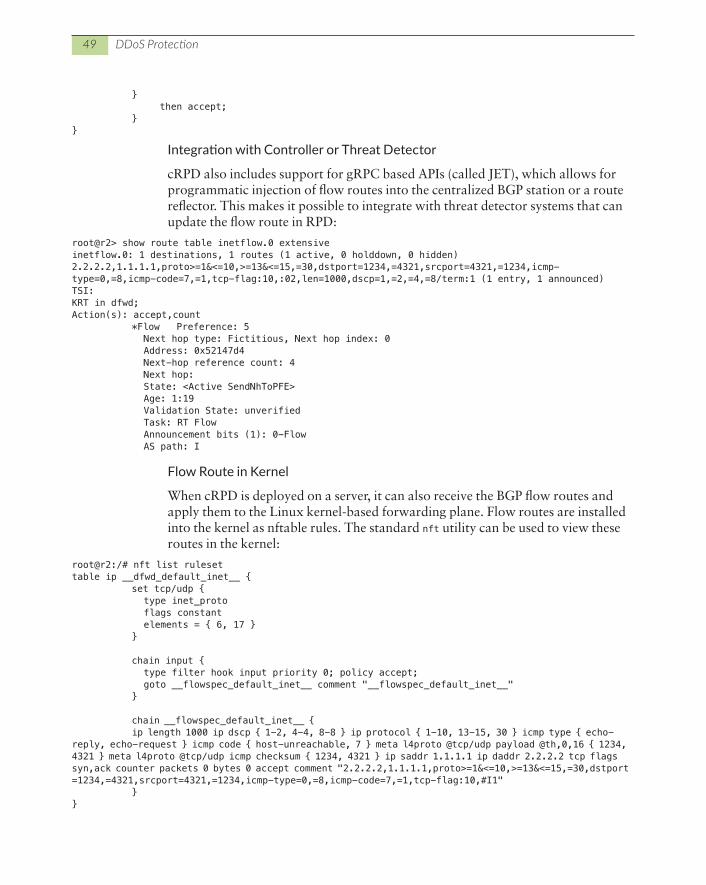
49 DDoS Protection
} then accept; }}
Integration with Controller or Threat Detector
cRPD also includes support for gRPC based APIs (called JET), which allows for programmatic injection of flow routes into the centralized BGP station or a route reflector. This makes it possible to integrate with threat detector systems that can update the flow route in RPD:
root@r2> show route table inetflow.0 extensiveinetflow.0: 1 destinations, 1 routes (1 active, 0 holddown, 0 hidden)2.2.2.2,1.1.1.1,proto>=1&<=10,>=13&<=15,=30,dstport=1234,=4321,srcport=4321,=1234,icmp-type=0,=8,icmp-code=7,=1,tcp-flag:10,:02,len=1000,dscp=1,=2,=4,=8/term:1 (1 entry, 1 announced)TSI:KRT in dfwd;Action(s): accept,count *Flow Preference: 5 Next hop type: Fictitious, Next hop index: 0 Address: 0x52147d4 Next-hop reference count: 4 Next hop: State: <Active SendNhToPFE> Age: 1:19 Validation State: unverified Task: RT Flow Announcement bits (1): 0-Flow AS path: I
Flow Route in Kernel
When cRPD is deployed on a server, it can also receive the BGP flow routes and apply them to the Linux kernel-based forwarding plane. Flow routes are installed into the kernel as nftable rules. The standard nft utility can be used to view these routes in the kernel:
root@r2:/# nft list rulesettable ip __dfwd_default_inet__ { set tcp/udp { type inet_proto flags constant elements = { 6, 17 } } chain input { type filter hook input priority 0; policy accept; goto __flowspec_default_inet__ comment "__flowspec_default_inet__" } chain __flowspec_default_inet__ { ip length 1000 ip dscp { 1-2, 4-4, 8-8 } ip protocol { 1-10, 13-15, 30 } icmp type { echo-reply, echo-request } icmp code { host-unreachable, 7 } meta l4proto @tcp/udp payload @th,0,16 { 1234, 4321 } meta l4proto @tcp/udp icmp checksum { 1234, 4321 } ip saddr 1.1.1.1 ip daddr 2.2.2.2 tcp flags syn,ack counter packets 0 bytes 0 accept comment "2.2.2.2,1.1.1.1,proto>=1&<=10,>=13&<=15,=30,dstport=1234,=4321,srcport=4321,=1234,icmp-type=0,=8,icmp-code=7,=1,tcp-flag:10,#I1" }}
50 Chapter 3: cRPD Use Cases
Route Reflector / Route Server
Generally, internal BGP (IBGP) enabled devices need to be fully meshed because IBGP does not re-advertise BGP updates to other IBGP-enabled devices. The full mesh is a logical mesh achieved through configuration of multiple neighbor state-ments on each IBGP-enabled device.
A full mesh is not necessarily a physical full mesh. Maintaining a full mesh (logical or physical) does not scale well in large deployments. Hence RFC4456 (https://tools.ietf.org/html/rfc4456) describes “An Alternative to Full Mesh Internal BGP (IBGP)” namely “BGP Route Reflection.”
Juniper has been offering a virtual Route Reflector (vRR) product that allows you to implement route reflector capability using a general purpose virtual machine (VM) that can be run on a 64-bit Intel-based blade server or appliance.
Because a route reflector works in the control plane, it can run in a virtualized en-vironment. A vRR on an Intel-based blade server or appliance works the same as a route reflector on a router, providing a scalable alternative to full mesh IBGP peering.
The vRR product has the following features:
� Scalability: By implementing the vRR feature, you can gain scalability improvements, depending on the server core hardware on which the feature runs. Also, you can implement vRRs at multiple locations in the network, which helps scale the BGP network with lower cost.
� Faster and more flexible deployment: You can install the vRR feature on an Intel serve using open-source tools, which reduces your router maintenance.
� Space savings: Hardware-based RRs require central office space. You can deploy the vRR feature on any server that is available in the server infrastruc-ture or in the data centers, saving space.
cRPD, however, provides some advantages over Juniper’s vRR product. The most significant difference between vRR and cRPD operating as a RR is boot-up time. In the case of cRPD it takes a few seconds to bring it up, whereas vRR can take a few minutes to come up.
Also, cRPD is highly scalable compared to vRR when run against the RR use case of one of the hyperscalers for their network. Table 3.1 lists some RR requirements in terms of scale:
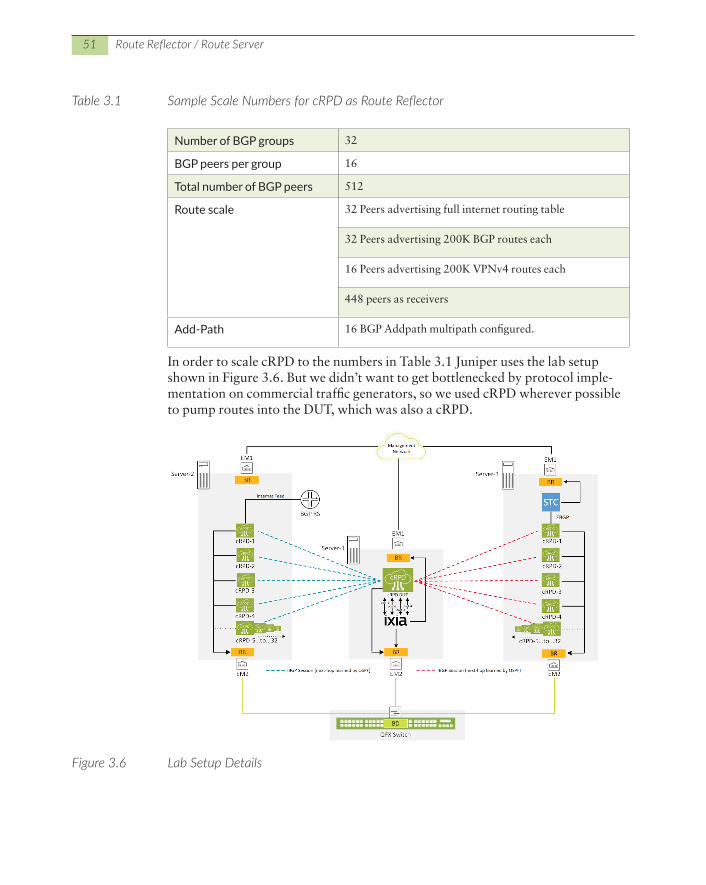
51 Route Reflector / Route Server
Table 3.1 Sample Scale Numbers for cRPD as Route Reflector
Number of BGP groups 32
BGP peers per group 16
Total number of BGP peers 512
Route scale 32 Peers advertising full internet routing table
32 Peers advertising 200K BGP routes each
16 Peers advertising 200K VPNv4 routes each
448 peers as receivers
Add-Path 16 BGP Addpath multipath configured.
In order to scale cRPD to the numbers in Table 3.1 Juniper uses the lab setup shown in Figure 3.6. But we didn’t want to get bottlenecked by protocol imple-mentation on commercial traffic generators, so we used cRPD wherever possible to pump routes into the DUT, which was also a cRPD.
Figure 3.6 Lab Setup Details

52 Chapter 3: cRPD Use Cases
In Figure 3.6 you can see:
� Server 1 is running cRPD DUT. It has 16 BGP peer groups configured. It has 32 BGP neighbors towards server1 and another 32 towards server 3. Server 1 also has vIXIA running and it has 448 BGP peers with cRPD DUT and 16 peers out of these are pumping 200K VPNv4 routes towards cRPD DUT.
� There are 32 cRPD instances running on server 2. One of these 32 cRPDs is getting the entire internet routing table by connecting to the Juniper Lab route-server. It is giving this internet feed to cRPD DUT running in server 1 and the other 31 cRPDs running in server 2.
� Similarly, server 2 had 32 cRPDs and one vSTC running. vSTC is pumping 200K BGP routes towards one cRPD. These 200K routes are getting distrib-uted across other 32 cRPDs running on server 3.
The server that was used for this setup had the resource specifications shown in screen capture of Figure 3.7.
Figure 3.7 Sample Server Specification
53 Route Reflector / Route Server
While deploying this scale customers will have multiple RRs sharing the load, but it was a handy use case for cRPD to validate its stability given enough CPU and memory. We were able to bring it up to scale with a cRPD acting as a DUT with this configuration for BGP:
protocols { bgp { path-selection external-router-id; update-threading; family inet { unicast { add-path { send { path-count 16; multipath; } } no-install; } } group group1 { type internal; local-address 5.5.5.5; peer-as 64512; local-as 64512 loops 2; neighbor 1.1.1.2; neighbor 1.1.1.3; neighbor 1.1.1.4; neighbor 1.1.1.5; neighbor 1.1.1.6; neighbor 1.1.1.7; neighbor 1.1.1.8; neighbor 1.1.1.9; neighbor 1.1.1.10; neighbor 1.1.1.11; neighbor 1.1.1.12; neighbor 1.1.1.13; neighbor 1.1.1.14; neighbor 1.1.1.15; neighbor 1.1.1.16; neighbor 1.1.1.17; }.... local-address 5.5.5.5; advertise-inactive; mtu-discovery; log-updown; drop-path-attributes 128; cluster 5.5.5.5; multipath; multipath-build-priority { low; }}
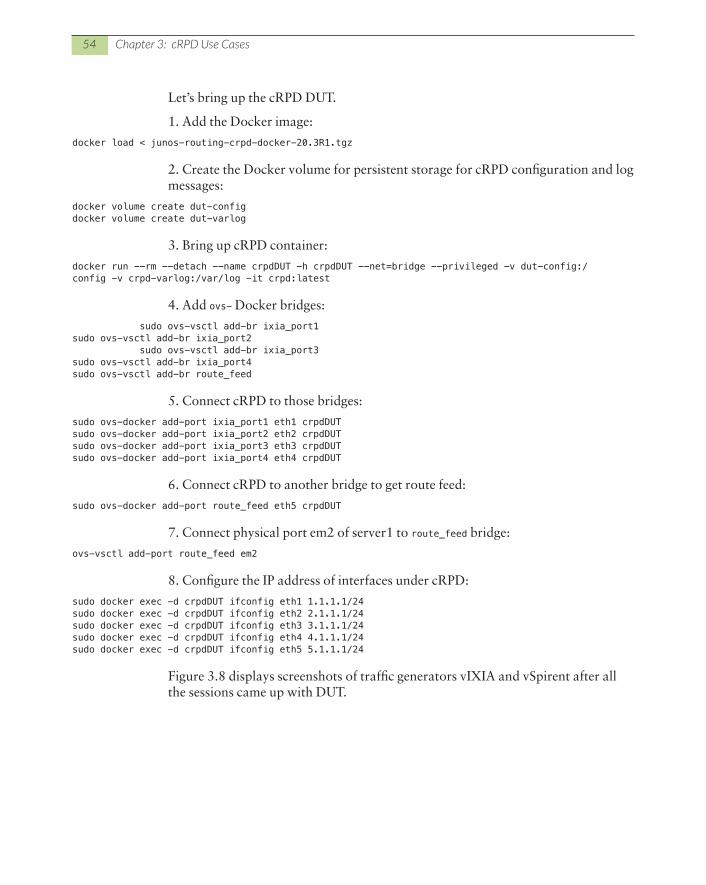
54 Chapter 3: cRPD Use Cases
Let’s bring up the cRPD DUT.
1. Add the Docker image:
docker load < junos-routing-crpd-docker-20.3R1.tgz
2. Create the Docker volume for persistent storage for cRPD configuration and log messages:
docker volume create dut-configdocker volume create dut-varlog
3. Bring up cRPD container:
docker run --rm --detach --name crpdDUT -h crpdDUT --net=bridge --privileged -v dut-config:/config -v crpd-varlog:/var/log -it crpd:latest
4. Add ovs- Docker bridges:
sudo ovs-vsctl add-br ixia_port1sudo ovs-vsctl add-br ixia_port2 sudo ovs-vsctl add-br ixia_port3sudo ovs-vsctl add-br ixia_port4sudo ovs-vsctl add-br route_feed
5. Connect cRPD to those bridges:
sudo ovs-docker add-port ixia_port1 eth1 crpdDUTsudo ovs-docker add-port ixia_port2 eth2 crpdDUTsudo ovs-docker add-port ixia_port3 eth3 crpdDUTsudo ovs-docker add-port ixia_port4 eth4 crpdDUT
6. Connect cRPD to another bridge to get route feed:
sudo ovs-docker add-port route_feed eth5 crpdDUT
7. Connect physical port em2 of server1 to route_feed bridge:
ovs-vsctl add-port route_feed em2
8. Configure the IP address of interfaces under cRPD:
sudo docker exec -d crpdDUT ifconfig eth1 1.1.1.1/24 sudo docker exec -d crpdDUT ifconfig eth2 2.1.1.1/24 sudo docker exec -d crpdDUT ifconfig eth3 3.1.1.1/24 sudo docker exec -d crpdDUT ifconfig eth4 4.1.1.1/24 sudo docker exec -d crpdDUT ifconfig eth5 5.1.1.1/24
Figure 3.8 displays screenshots of traffic generators vIXIA and vSpirent after all the sessions came up with DUT.
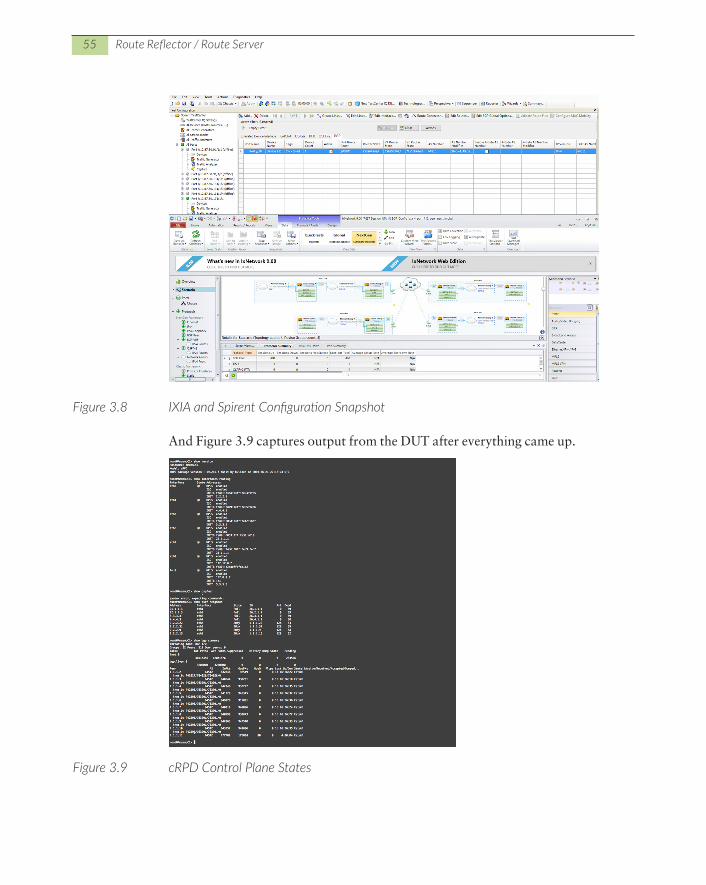
55 Route Reflector / Route Server
Figure 3.8 IXIA and Spirent Configuration Snapshot
And Figure 3.9 captures output from the DUT after everything came up.
Figure 3.9 cRPD Control Plane States
56 Chapter 3: cRPD Use Cases
Whitebox/SONiC
Traditionally networking gear is sold as a fully integrated product. Vendors often use in-house designed ASICs and software and hardware tightly coupled with their proprietary network OS.
These proprietary networking products are often deployed across a wide variety of networks catering to different complex use cases. So they must be feature rich, but can also be expensive to build and develop. Given the number of features that they pack, any new feature must go through long and rigorous qualification cycles to ensure backwards compatibility.
The hyper-scale data centers use CLOS architecture for the data center network fabric, so they typically don’t require many of the advanced routing features such as MPLS and IGP routing protocols. Most of the deployments just use single-hop EBGP to bring up the CLOS underlay. However, these network operators have the challenge of rapidly changing requirements as new applications are onboarded. Most often their requirements are so unique to their network and dynamic in na-ture that traditional routing protocols are not suited and often require SDN con-trollers to orchestrate the network. These network operators found that proprietary closed systems are not suited for their rapidly changing requirements and moved toward a model where they can better operate.
A whitebox router/switch is a networking product whose hardware and software are disaggregated and made available by different vendors. This gives flexibility to customers who don’t always want the rich features of a proprietary OS but still allows them to build and run their own software.
SONiC is an Opensource Network Operating System (NOS) for whitebox routing and switching platforms. Initiated by Microsoft, it has been open sourced and cur-rently sponsored by ONF with many players from the networking, telco, and data center world participating in its development. It’s gaining popularity. Originally intended for deployment in data centers as a TOR device, it has since found its way into diverse roles in the spine as cell site routers in 5G RAN.
MORE? If you want to learn more about SONiC visit the following URLs:
� https://azure.github.io/SONiC/
� https://github.com/Azure/SONiC/wiki/Architecture
SONiC comes with the Free Range Routing (FRR) routing stack as the default routing stack. cRPD can be used as an alternative routing stack for SONiC plat-forms as shown in Figure 3.10.
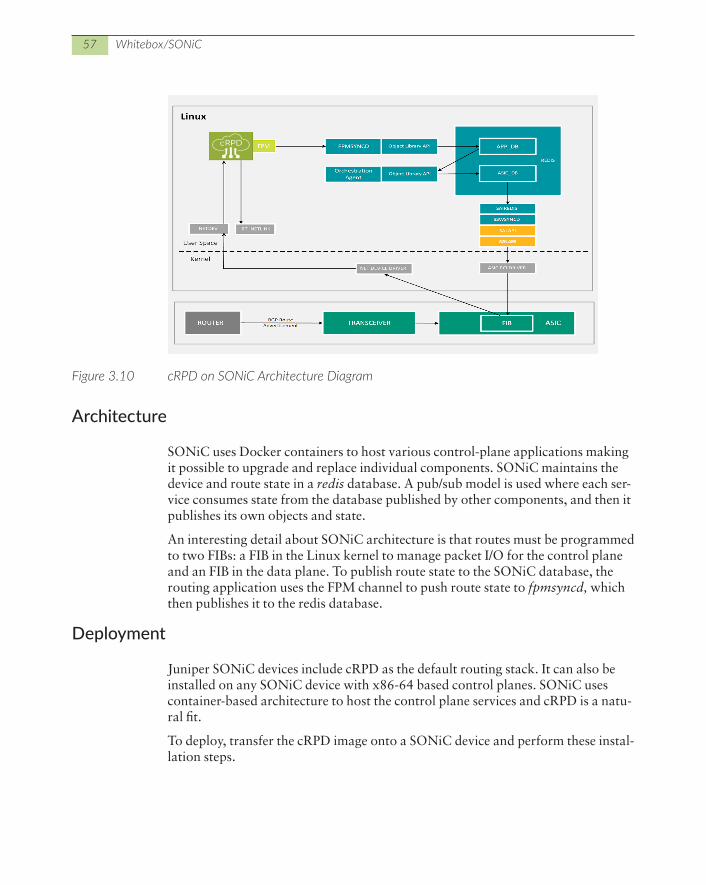
57 Whitebox/SONiC
Figure 3.10 cRPD on SONiC Architecture Diagram
Architecture
SONiC uses Docker containers to host various control-plane applications making it possible to upgrade and replace individual components. SONiC maintains the device and route state in a redis database. A pub/sub model is used where each ser-vice consumes state from the database published by other components, and then it publishes its own objects and state.
An interesting detail about SONiC architecture is that routes must be programmed to two FIBs: a FIB in the Linux kernel to manage packet I/O for the control plane and an FIB in the data plane. To publish route state to the SONiC database, the routing application uses the FPM channel to push route state to fpmsyncd, which then publishes it to the redis database.
Deployment
Juniper SONiC devices include cRPD as the default routing stack. It can also be installed on any SONiC device with x86-64 based control planes. SONiC uses container-based architecture to host the control plane services and cRPD is a natu-ral fit.
To deploy, transfer the cRPD image onto a SONiC device and perform these instal-lation steps.
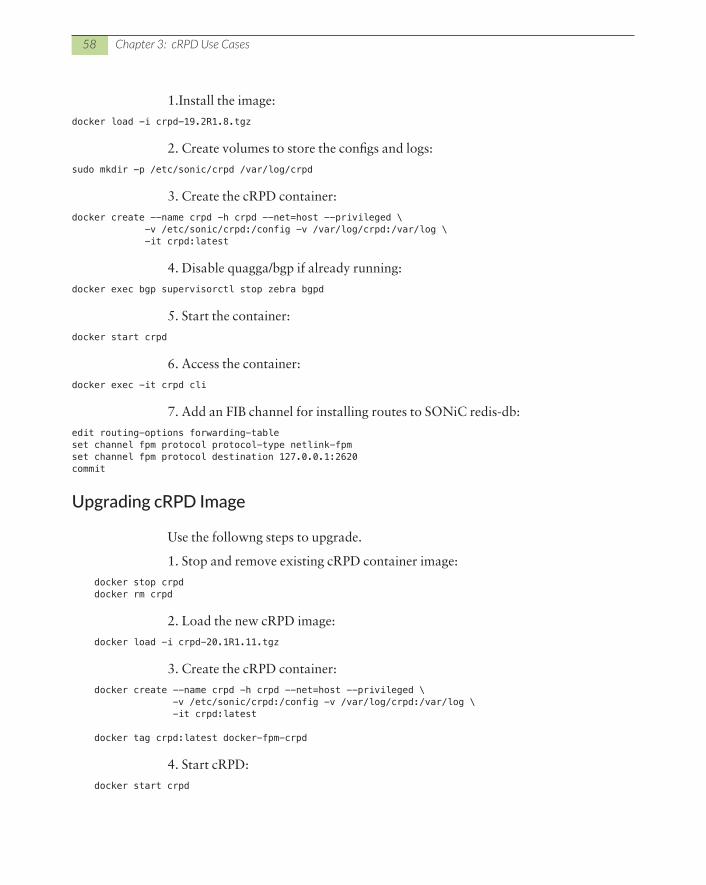
58 Chapter 3: cRPD Use Cases
1.Install the image:
docker load -i crpd-19.2R1.8.tgz
2. Create volumes to store the configs and logs:
sudo mkdir -p /etc/sonic/crpd /var/log/crpd
3. Create the cRPD container:
docker create --name crpd -h crpd --net=host --privileged \ -v /etc/sonic/crpd:/config -v /var/log/crpd:/var/log \ -it crpd:latest
4. Disable quagga/bgp if already running:
docker exec bgp supervisorctl stop zebra bgpd
5. Start the container:
docker start crpd
6. Access the container:
docker exec -it crpd cli
7. Add an FIB channel for installing routes to SONiC redis-db:
edit routing-options forwarding-table set channel fpm protocol protocol-type netlink-fpmset channel fpm protocol destination 127.0.0.1:2620commit
Upgrading cRPD Image
Use the followng steps to upgrade.
1. Stop and remove existing cRPD container image:
docker stop crpd docker rm crpd
2. Load the new cRPD image:
docker load -i crpd-20.1R1.11.tgz
3. Create the cRPD container:
docker create --name crpd -h crpd --net=host --privileged \ -v /etc/sonic/crpd:/config -v /var/log/crpd:/var/log \ -it crpd:latest
docker tag crpd:latest docker-fpm-crpd
4. Start cRPD:
docker start crpd
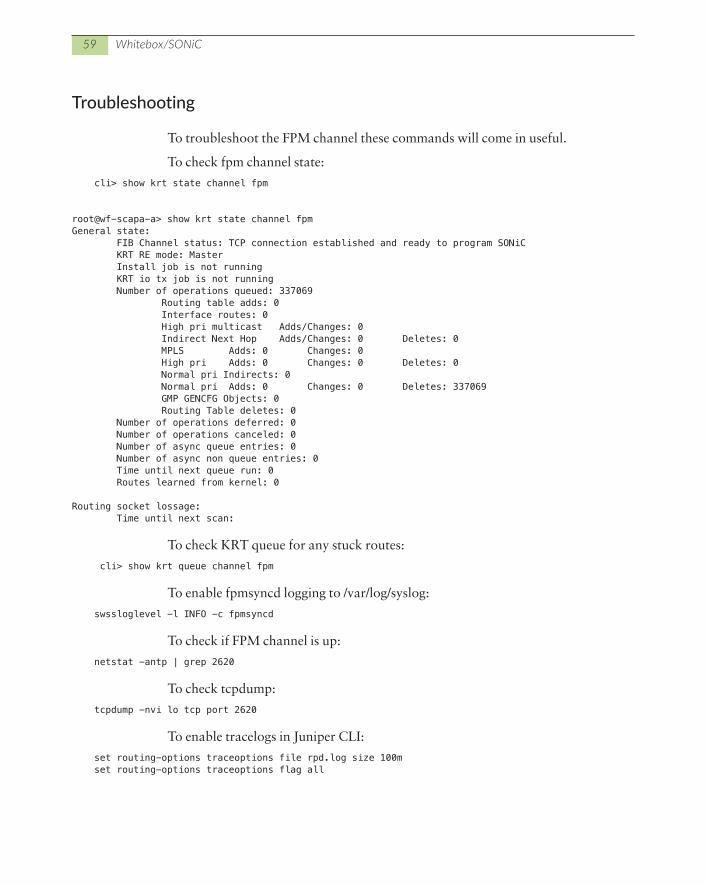
59 Whitebox/SONiC
Troubleshooting
To troubleshoot the FPM channel these commands will come in useful.
To check fpm channel state:
cli> show krt state channel fpm
root@wf-scapa-a> show krt state channel fpm General state: FIB Channel status: TCP connection established and ready to program SONiC KRT RE mode: Master Install job is not running KRT io tx job is not running Number of operations queued: 337069 Routing table adds: 0 Interface routes: 0 High pri multicast Adds/Changes: 0 Indirect Next Hop Adds/Changes: 0 Deletes: 0 MPLS Adds: 0 Changes: 0 High pri Adds: 0 Changes: 0 Deletes: 0 Normal pri Indirects: 0 Normal pri Adds: 0 Changes: 0 Deletes: 337069 GMP GENCFG Objects: 0 Routing Table deletes: 0 Number of operations deferred: 0 Number of operations canceled: 0 Number of async queue entries: 0 Number of async non queue entries: 0 Time until next queue run: 0 Routes learned from kernel: 0
Routing socket lossage: Time until next scan:
To check KRT queue for any stuck routes:
cli> show krt queue channel fpm
To enable fpmsyncd logging to /var/log/syslog:
swssloglevel -l INFO -c fpmsyncd
To check if FPM channel is up:
netstat -antp | grep 2620
To check tcpdump:
tcpdump -nvi lo tcp port 2620
To enable tracelogs in Juniper CLI:
set routing-options traceoptions file rpd.log size 100m set routing-options traceoptions flag all
60 Chapter 3: cRPD Use Cases
To add routes learned from RPD to the redis-db:
fpmsyncdTo use redis-cli to examine entries:
] $ sudo redis-cli
To fetch the route table keys:
127.0.0.1:6379> keys ROUTE_TABLE:* 1) "ROUTE_TABLE:fc00:1::32" 2) "ROUTE_TABLE:10.0.0.58/31" 3) "ROUTE_TABLE:::1" 4) "ROUTE_TABLE:fc00::70/126" 5) "ROUTE_TABLE:fc00::78/126" 6) "ROUTE_TABLE:1.1.1.1 7) "ROUTE_TABLE:10.216.32.0/20" 8) "ROUTE_TABLE:10.1.0.32" 9) "ROUTE_TABLE:fc00::74/126" 10) "ROUTE_TABLE:240.127.1.0/24"
To fetch the attributes for a given route key:
127.0.0.1:6379> hgetall "ROUTE_TABLE:10.51.128.0/19" 1) "nexthop" 2) "0.0.0.0" 3) "ifname" 4) "eth0"
To display all keys:
127.0.0.1:6379> keys *
To live monitor operations on redis-db (can be very noisy):
sudo redis-cli monitor
Routing in Fat Trees (RIFT)
One of the newest protocols on the block is RIFT which claims to solve multiple issues, combining both Link-State and Distance-Vector protocol advantages and mitigating its respective challenges. A brief way to describe the protocol is that it is Distance-Vector southbound and Link-State northbound, hence advertising a default route downwards in the fabric and only more specific routes upwards.
MORE? This chapter isn’t a full deep dive into the RIFT protocol so the authors suggest reading all about RIFT in the following Day One book: https://www.juniper.net/documentation/en_US/day-one-books/DO_RIFT.pdf. It covers not only the Juniper RIFT implementation but also the open-source implementation, the RIFT Wireshark dissector, and troubleshooting tips and tricks.
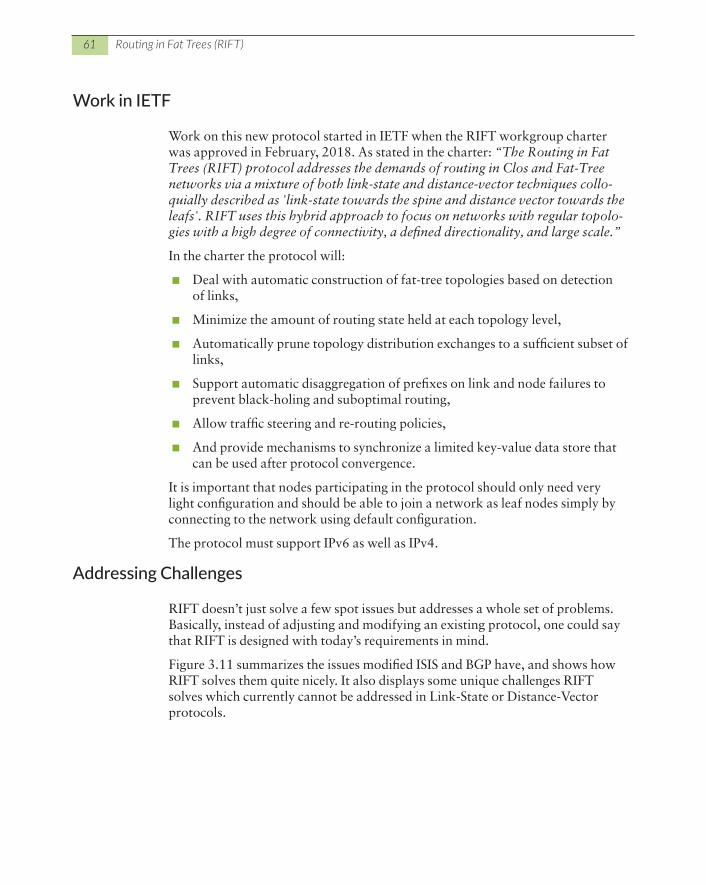
61 Routing in Fat Trees (RIFT)
Work in IETF
Work on this new protocol started in IETF when the RIFT workgroup charter was approved in February, 2018. As stated in the charter: “The Routing in Fat Trees (RIFT) protocol addresses the demands of routing in Clos and Fat-Tree networks via a mixture of both link-state and distance-vector techniques collo-quially described as 'link-state towards the spine and distance vector towards the leafs'. RIFT uses this hybrid approach to focus on networks with regular topolo-gies with a high degree of connectivity, a defined directionality, and large scale.”
In the charter the protocol will:
� Deal with automatic construction of fat-tree topologies based on detection of links,
� Minimize the amount of routing state held at each topology level,
� Automatically prune topology distribution exchanges to a sufficient subset of links,
� Support automatic disaggregation of prefixes on link and node failures to prevent black-holing and suboptimal routing,
� Allow traffic steering and re-routing policies,
� And provide mechanisms to synchronize a limited key-value data store that can be used after protocol convergence.
It is important that nodes participating in the protocol should only need very light configuration and should be able to join a network as leaf nodes simply by connecting to the network using default configuration.
The protocol must support IPv6 as well as IPv4.
Addressing Challenges
RIFT doesn’t just solve a few spot issues but addresses a whole set of problems. Basically, instead of adjusting and modifying an existing protocol, one could say that RIFT is designed with today’s requirements in mind.
Figure 3.11 summarizes the issues modified ISIS and BGP have, and shows how RIFT solves them quite nicely. It also displays some unique challenges RIFT solves which currently cannot be addressed in Link-State or Distance-Vector protocols.
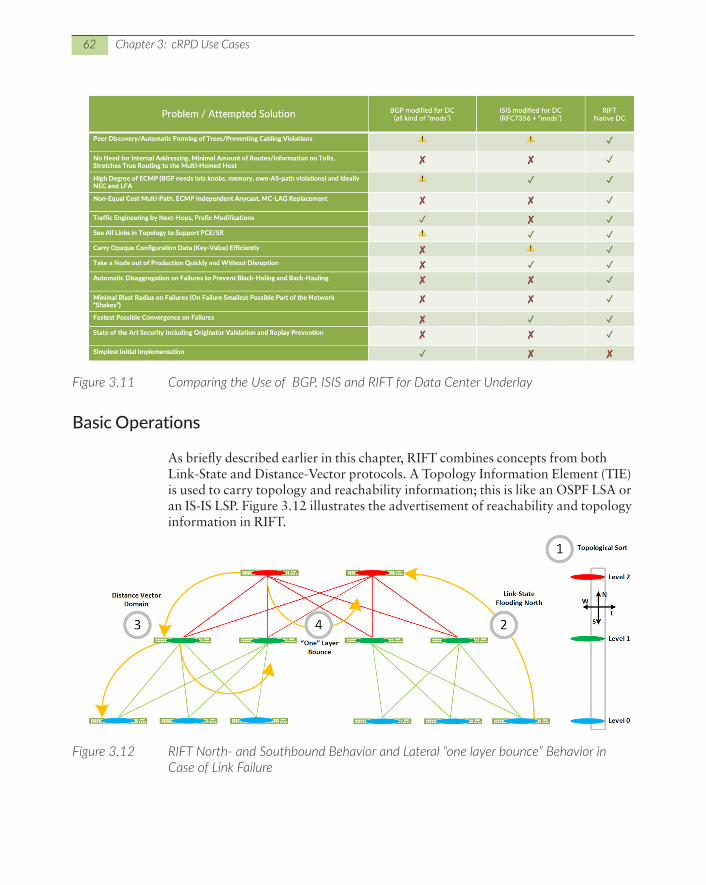
62 Chapter 3: cRPD Use Cases
Figure 3.11 Comparing the Use of BGP, ISIS and RIFT for Data Center Underlay
Basic Operations
As briefly described earlier in this chapter, RIFT combines concepts from both Link-State and Distance-Vector protocols. A Topology Information Element (TIE) is used to carry topology and reachability information; this is like an OSPF LSA or an IS-IS LSP. Figure 3.12 illustrates the advertisement of reachability and topology information in RIFT.
Figure 3.12 RIFT North- and Southbound Behavior and Lateral “one layer bounce” Behavior in Case of Link Failure

63 Routing in Fat Trees (RIFT)
Okay, with those definitions and a drawing in our pocket, let’s look at how the protocol works:
� The topology in Figure 3.12 shows a 5-stage CLOS or a fabric with three levels; Top of Fabric (ToF) in red, spines in green, and the leaf switches are blue.
� Looking at the leaf routing table one can observe, in normal operations, only default routes towards the higher level in the fabric. This is somewhat compa-rable to a Level 1 router’s routing table in IS-IS or a totally stubby area in OSPF.
� The higher up into the fabric, the more routes one will see in their respective switches routing table with the ToF holding every route in its routing table. Hence, spines will partially, and ToF will have full knowledge of the complete fabric and thread routes as a distance-vector protocol would.
� Routing information sent down into the fabric is only bounced up again one layer. This is used for automatic disaggregation and flood reduction. We’ll get to the specifics of that later on.
It’s interesting to note that in contrast to some other protocols, RIFT currently doesn’t require anything new from a forwarding plane and ASIC perspective – it’s a control plane protocol. Routes installed into forwarding are just like those we are used to.
Operational Advantages
Authors from Cisco, Juniper, Yandex, and Comcast have worked on the specifica-tions, hence RIFT is, just like IS-IS and BGP, an open standard. So it is by nature multivendor and interoperable, and besides fixing existing routing protocol issues it aims to add some very appealing features.
Automatic Disaggregation
In normal circumstances, devices other than those in the ToF stage rely on the de-fault route to forward packets towards the ToF, while more specific routes are available to forward packets towards the ToR switches. What happens in Figure 3.13 if the C3—>D2 link fails? B2, B6, and D6 will continue forwarding traffic towards C3 based on the default route being advertised in the TIE flooded by C3, but C3 will no longer have a route by which it can reach 2001:db8:3e8:100::/64— so this traffic will be dropped at C3.
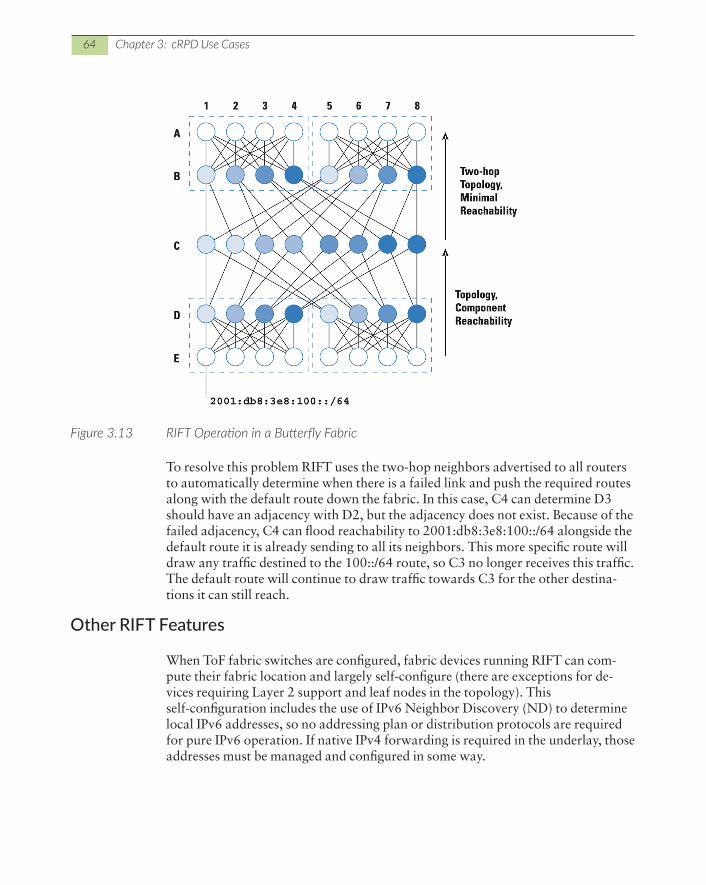
64 Chapter 3: cRPD Use Cases
Figure 3.13 RIFT Operation in a Butterfly Fabric
To resolve this problem RIFT uses the two-hop neighbors advertised to all routers to automatically determine when there is a failed link and push the required routes along with the default route down the fabric. In this case, C4 can determine D3 should have an adjacency with D2, but the adjacency does not exist. Because of the failed adjacency, C4 can flood reachability to 2001:db8:3e8:100::/64 alongside the default route it is already sending to all its neighbors. This more specific route will draw any traffic destined to the 100::/64 route, so C3 no longer receives this traffic. The default route will continue to draw traffic towards C3 for the other destina-tions it can still reach.
Other RIFT Features
When ToF fabric switches are configured, fabric devices running RIFT can com-pute their fabric location and largely self-configure (there are exceptions for de-vices requiring Layer 2 support and leaf nodes in the topology). This self-configuration includes the use of IPv6 Neighbor Discovery (ND) to determine local IPv6 addresses, so no addressing plan or distribution protocols are required for pure IPv6 operation. If native IPv4 forwarding is required in the underlay, those addresses must be managed and configured in some way.
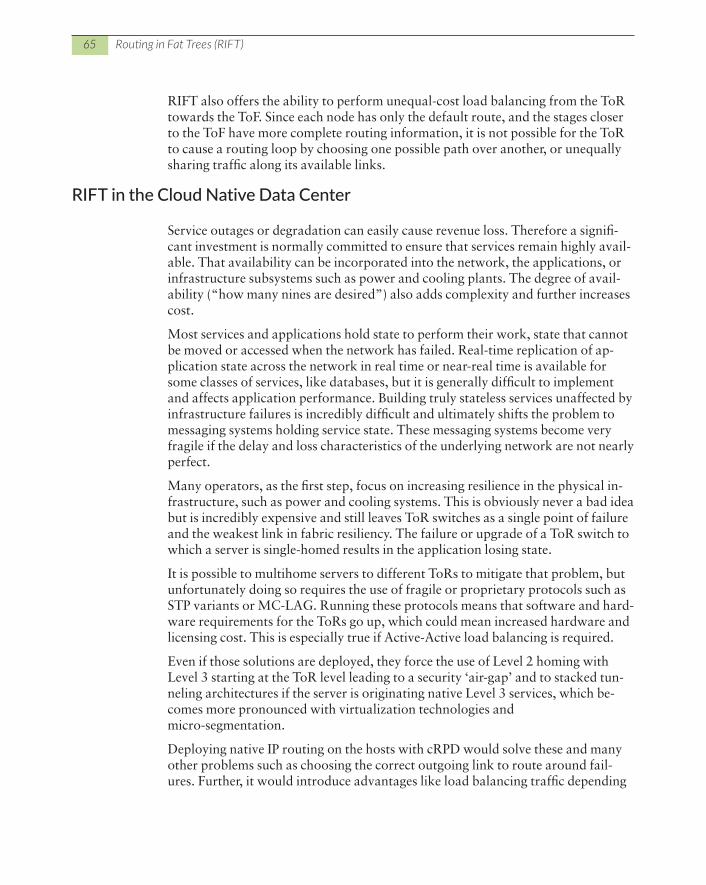
65 Routing in Fat Trees (RIFT)
RIFT also offers the ability to perform unequal-cost load balancing from the ToR towards the ToF. Since each node has only the default route, and the stages closer to the ToF have more complete routing information, it is not possible for the ToR to cause a routing loop by choosing one possible path over another, or unequally sharing traffic along its available links.
RIFT in the Cloud Native Data Center
Service outages or degradation can easily cause revenue loss. Therefore a signifi-cant investment is normally committed to ensure that services remain highly avail-able. That availability can be incorporated into the network, the applications, or infrastructure subsystems such as power and cooling plants. The degree of avail-ability (“how many nines are desired”) also adds complexity and further increases cost.
Most services and applications hold state to perform their work, state that cannot be moved or accessed when the network has failed. Real-time replication of ap-plication state across the network in real time or near-real time is available for some classes of services, like databases, but it is generally difficult to implement and affects application performance. Building truly stateless services unaffected by infrastructure failures is incredibly difficult and ultimately shifts the problem to messaging systems holding service state. These messaging systems become very fragile if the delay and loss characteristics of the underlying network are not nearly perfect.
Many operators, as the first step, focus on increasing resilience in the physical in-frastructure, such as power and cooling systems. This is obviously never a bad idea but is incredibly expensive and still leaves ToR switches as a single point of failure and the weakest link in fabric resiliency. The failure or upgrade of a ToR switch to which a server is single-homed results in the application losing state.
It is possible to multihome servers to different ToRs to mitigate that problem, but unfortunately doing so requires the use of fragile or proprietary protocols such as STP variants or MC-LAG. Running these protocols means that software and hard-ware requirements for the ToRs go up, which could mean increased hardware and licensing cost. This is especially true if Active-Active load balancing is required.
Even if those solutions are deployed, they force the use of Level 2 homing with Level 3 starting at the ToR level leading to a security ‘air-gap’ and to stacked tun-neling architectures if the server is originating native Level 3 services, which be-comes more pronounced with virtualization technologies and micro-segmentation.
Deploying native IP routing on the hosts with cRPD would solve these and many other problems such as choosing the correct outgoing link to route around fail-ures. Further, it would introduce advantages like load balancing traffic depending
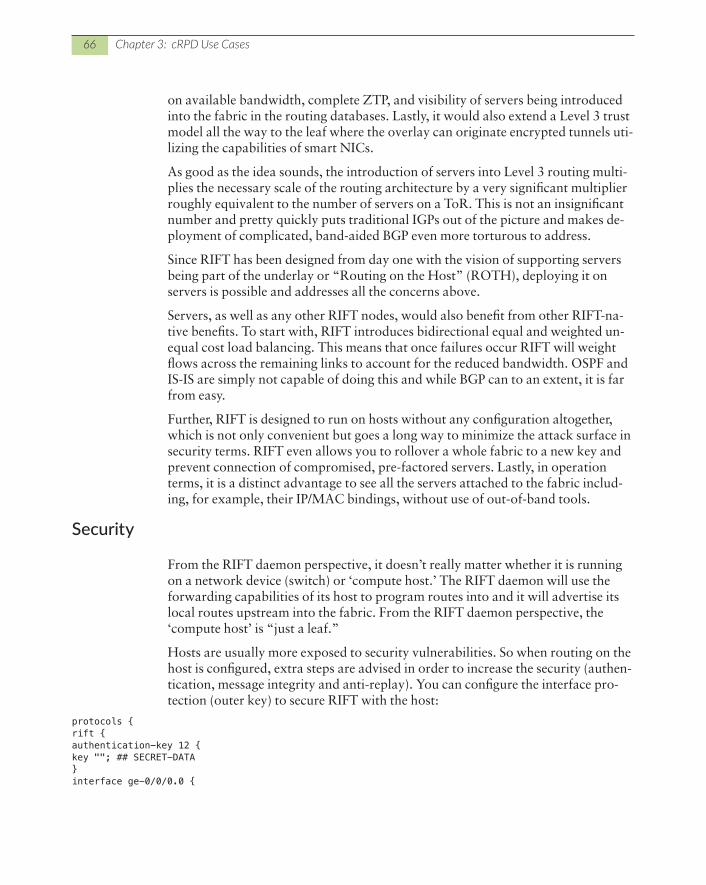
66 Chapter 3: cRPD Use Cases
on available bandwidth, complete ZTP, and visibility of servers being introduced into the fabric in the routing databases. Lastly, it would also extend a Level 3 trust model all the way to the leaf where the overlay can originate encrypted tunnels uti-lizing the capabilities of smart NICs.
As good as the idea sounds, the introduction of servers into Level 3 routing multi-plies the necessary scale of the routing architecture by a very significant multiplier roughly equivalent to the number of servers on a ToR. This is not an insignificant number and pretty quickly puts traditional IGPs out of the picture and makes de-ployment of complicated, band-aided BGP even more torturous to address.
Since RIFT has been designed from day one with the vision of supporting servers being part of the underlay or “Routing on the Host” (ROTH), deploying it on servers is possible and addresses all the concerns above.
Servers, as well as any other RIFT nodes, would also benefit from other RIFT-na-tive benefits. To start with, RIFT introduces bidirectional equal and weighted un-equal cost load balancing. This means that once failures occur RIFT will weight flows across the remaining links to account for the reduced bandwidth. OSPF and IS-IS are simply not capable of doing this and while BGP can to an extent, it is far from easy.
Further, RIFT is designed to run on hosts without any configuration altogether, which is not only convenient but goes a long way to minimize the attack surface in security terms. RIFT even allows you to rollover a whole fabric to a new key and prevent connection of compromised, pre-factored servers. Lastly, in operation terms, it is a distinct advantage to see all the servers attached to the fabric includ-ing, for example, their IP/MAC bindings, without use of out-of-band tools.
Security
From the RIFT daemon perspective, it doesn’t really matter whether it is running on a network device (switch) or ‘compute host.’ The RIFT daemon will use the forwarding capabilities of its host to program routes into and it will advertise its local routes upstream into the fabric. From the RIFT daemon perspective, the ‘compute host’ is “just a leaf.”
Hosts are usually more exposed to security vulnerabilities. So when routing on the host is configured, extra steps are advised in order to increase the security (authen-tication, message integrity and anti-replay). You can configure the interface pro-tection (outer key) to secure RIFT with the host:
protocols { rift { authentication-key 12 { key ""; ## SECRET-DATA } interface ge-0/0/0.0 {
67 cRPD as Cloud Native Routing Stack in 5G
lie-authentication strict; allowed-authentication-keys 12; # (Example using key-id 12)lie-origination-key 12; } } }
The most interesting part of ROTH using RIFT is probably that it eliminates the need for Layer 2 connectivity between the host and fabric because by nature RIFT will advertise its routes on all available links and load-balance traffic over those links. It will also receive default routes from its northbound tier and load-balance egress traffic over those links. Hence there is no need for Layer 2 anymore.
MORE? The authors realize these few pages don’t even come close covering all the aspects of the RIFT protocol. Hence, we strongly recommend reading https://www.juniper.net/documentation/en_US/day-one-books/DO_RIFT.pdf which gives a full 360 degree view of the protocol.
cRPD as Cloud Native Routing Stack in 5G
Before we get into cRPD deployment as Cloud Native Routing Stack, let’s quickly review the xHaul transport network for 5G.
Going back two decades, in order to support different applications service provid-ers had multiple networks that were built around many different technologies like TDM, X.25, ATM , Frame Relay, SONET, and IP. It was quickly realized that run-ning so many different types of networks was not financially viable and everyone eventually settled on IP.
Going by the same principle, when various network functions are getting virtual-ized service providers want to build a common cloud platform to host all virtual network functions from different vendors while building the network.
4G was all about addressing bandwidth requirements for the end user. 5G is going to provide more network agility and an immersive experience for the end user. The specification for Next Generation RAN (NG-RAN) evolved in OpenRAN (Open Radio Access Networks). The full potential of 5G networks can only be realized with the right combination of hardware and software. This is possible once the service providers fully align themselves towards OpenRAN, which is an approach where service providers are disaggregating mobile front-haul and mid-haul net-works by building them around cloud native principles. This approach allows ser-vice providers to mix and match technologies from different vendors that can help deliver new capabilities in a cost-effective manner. It also helps transform tradi-tional radio access networks by making them open, resilient, and scalable.
68 Chapter 3: cRPD Use Cases
OpenRAN-based networks use specialized hardware which are COTS-based (x86 based systems), and the various functions are implemented by software running inside it. Baseband unit (BBU) found in traditional telco networks is decomposed into three functional components, a Radio Unit (RU), a Distributed Unit (DU), and a Central Unit (CU). Based on control user plane separation (CUPS) construct, CU can be further segregated into distinct control plane (CU-CP) and user plane (CU-UP) functions. This decoupling helps bring flexibility to deployment – you can either co-locate RU, DU, and CU together, or you can deploy them at different locations. If latency is the concern, RU, DU, and CU can be placed together at the edge.
A RU in 5G consists of an LO PHY and a RF transmitter. The LO PHY part is im-plemented using a FPGA or ASIC to get high-packet performance. The connection between RU and DU is known as fronthaul, which connects LO PHY and HI PHY. It is also known as an F2 interface. DU manages the packet transmission of radio to and from the RU over the fronthaul link conforming to eCPRI (enhanced CPRI) standard.
DU is connected to CU using the F1 mid-haul interface. An implementation of DU CTOS would consist of a server chassis with hardware acceleration PCIe cards and an open-source MAC/RLC stack. Deploying OpenRAN functions on x86 hard-ware in a cloud native environment using Container Network Functions (CNF) requires data plane acceleration and it has to be delivered at the application level as these network functions will not have access to the kernel. Some of the data plane acceleration techniques like XDP/DPDK/SmartNic are suitable to address that requirement.
Why Cloud Native?
5G is going to bring in many innovations, network fungibility, and agility into tra-ditional telco networks. To quickly iterate and provide value to customers, cloud native is the way to go. Four benefits of cloud native are:
� Microservices - This means the software will be modular in nature and each of the components can be managed, updated, and deployed independently.
� Containers - CNF is highly portable and lightweight, easy to deploy compared to VNF which uses the VM format of delivering the application.
� Continuous Delivery - You can take advantage of various CI/CD pipelines to quickly push changes to deployment.
� DevOps - You can automate many of the day one and day two deployment challenges.
Figure 3.14 illustrates 5G RAN network evolution.
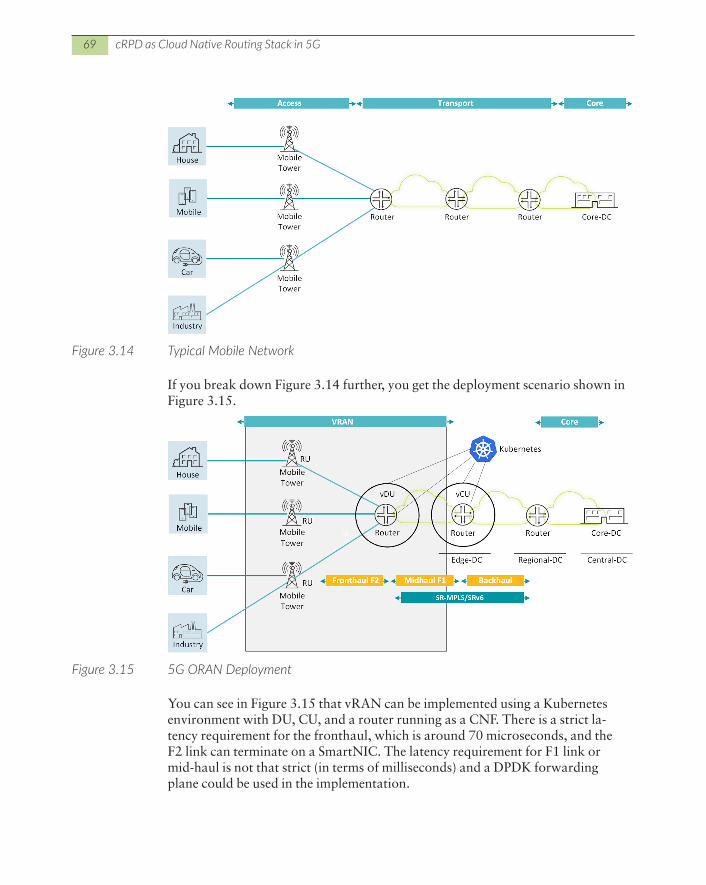
69 cRPD as Cloud Native Routing Stack in 5G
Figure 3.14 Typical Mobile Network
If you break down Figure 3.14 further, you get the deployment scenario shown in Figure 3.15.
Figure 3.15 5G ORAN Deployment
You can see in Figure 3.15 that vRAN can be implemented using a Kubernetes environment with DU, CU, and a router running as a CNF. There is a strict la-tency requirement for the fronthaul, which is around 70 microseconds, and the F2 link can terminate on a SmartNIC. The latency requirement for F1 link or mid-haul is not that strict (in terms of milliseconds) and a DPDK forwarding plane could be used in the implementation.

70 Chapter 3: cRPD Use Cases
Let’s do a lab demonstration, where the vRAN part is being implemented and:
� The router is being replaced by cRPD as the cloud native routing stack in Kubernetes deployments, DU, and CU.
� The DU and CU application is simulated using Kubernetes pod running busybox application.
� Instead of an enhanced data plane like DPDK, the Linux kernel is used to showcase the demonstration.
� Calico is used as the primary Kubernetes CNI but in principle any CNI could be used.
� The DU and CU application pods are acting as CE device to the cRPD (which is acting as a router).
� Communication between DU and CU is facilitated by using SR-MPLS transport.
� The lab is capable to bringing up both IPv4/IPv6 transport. Please keep in mind that operators are mostly inclined towards IPv6 for vRAN infrastruc-ture.
The lab topology is shown in Figure 3.16:
Figure 3.16 Sample Kubernetes Cluster with Three Nodes – Physical Connectivity
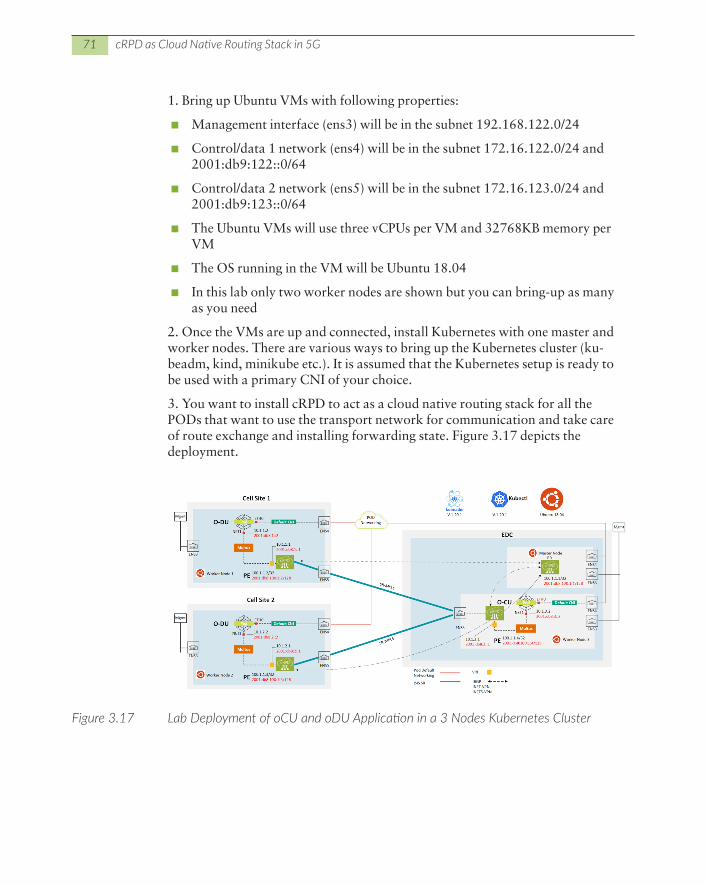
71 cRPD as Cloud Native Routing Stack in 5G
1. Bring up Ubuntu VMs with following properties:
� Management interface (ens3) will be in the subnet 192.168.122.0/24
� Control/data 1 network (ens4) will be in the subnet 172.16.122.0/24 and 2001:db9:122::0/64
� Control/data 2 network (ens5) will be in the subnet 172.16.123.0/24 and 2001:db9:123::0/64
� The Ubuntu VMs will use three vCPUs per VM and 32768KB memory per VM
� The OS running in the VM will be Ubuntu 18.04
� In this lab only two worker nodes are shown but you can bring-up as many as you need
2. Once the VMs are up and connected, install Kubernetes with one master and worker nodes. There are various ways to bring up the Kubernetes cluster (ku-beadm, kind, minikube etc.). It is assumed that the Kubernetes setup is ready to be used with a primary CNI of your choice.
3. You want to install cRPD to act as a cloud native routing stack for all the PODs that want to use the transport network for communication and take care of route exchange and installing forwarding state. Figure 3.17 depicts the deployment.
Figure 3.17 Lab Deployment of oCU and oDU Application in a 3 Nodes Kubernetes Cluster
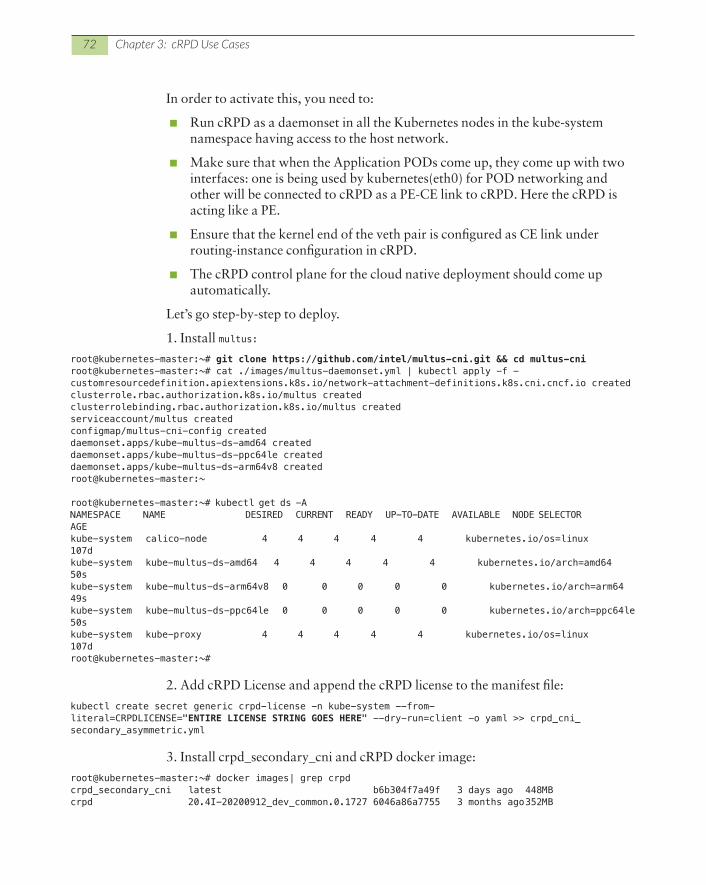
72 Chapter 3: cRPD Use Cases
In order to activate this, you need to:
� Run cRPD as a daemonset in all the Kubernetes nodes in the kube-system namespace having access to the host network.
� Make sure that when the Application PODs come up, they come up with two interfaces: one is being used by kubernetes(eth0) for POD networking and other will be connected to cRPD as a PE-CE link to cRPD. Here the cRPD is acting like a PE.
� Ensure that the kernel end of the veth pair is configured as CE link under routing-instance configuration in cRPD.
� The cRPD control plane for the cloud native deployment should come up automatically.
Let’s go step-by-step to deploy.
1. Install multus:
root@kubernetes-master:~# git clone https://github.com/intel/multus-cni.git && cd multus-cniroot@kubernetes-master:~# cat ./images/multus-daemonset.yml | kubectl apply -f -customresourcedefinition.apiextensions.k8s.io/network-attachment-definitions.k8s.cni.cncf.io createdclusterrole.rbac.authorization.k8s.io/multus createdclusterrolebinding.rbac.authorization.k8s.io/multus createdserviceaccount/multus createdconfigmap/multus-cni-config createddaemonset.apps/kube-multus-ds-amd64 createddaemonset.apps/kube-multus-ds-ppc64le createddaemonset.apps/kube-multus-ds-arm64v8 createdroot@kubernetes-master:~ root@kubernetes-master:~# kubectl get ds -ANAMESPACE NAME DESIRED CURRENT READY UP-TO-DATE AVAILABLE NODE SELECTOR AGEkube-system calico-node 4 4 4 4 4 kubernetes.io/os=linux 107dkube-system kube-multus-ds-amd64 4 4 4 4 4 kubernetes.io/arch=amd64 50skube-system kube-multus-ds-arm64v8 0 0 0 0 0 kubernetes.io/arch=arm64 49skube-system kube-multus-ds-ppc64le 0 0 0 0 0 kubernetes.io/arch=ppc64le 50skube-system kube-proxy 4 4 4 4 4 kubernetes.io/os=linux 107droot@kubernetes-master:~#
2. Add cRPD License and append the cRPD license to the manifest file:
kubectl create secret generic crpd-license -n kube-system --from-literal=CRPDLICENSE="ENTIRE LICENSE STRING GOES HERE" --dry-run=client -o yaml >> crpd_cni_secondary_asymmetric.yml
3. Install crpd_secondary_cni and cRPD docker image:
root@kubernetes-master:~# docker images| grep crpdcrpd_secondary_cni latest b6b304f7a49f 3 days ago 448MBcrpd 20.4I-20200912_dev_common.0.1727 6046a86a7755 3 months ago 352MB

73 cRPD as Cloud Native Routing Stack in 5G
crpd latest 6046a86a7755 3 months ago 352MBcrpd_cni latest 1ccbaa8a7831 5 months ago 527MBroot@kubernetes-master:~#
4. Apply tags to Kubernetes worker nodes:
root@kubernetes-master:~# kubectl label nodes node-1 site=cell1node/node-1 labeledroot@kubernetes-master:~# kubectl label nodes node-3 nocrpd=yesnode/node-3 labeledroot@kubernetes-master:~# kubectl get nodes --show-labelsNAME STATUS ROLES AGE VERSION LABELSkubernetes-master Ready master 107d v1.20.1 beta.kubernetes.io/arch=amd64,beta.kubernetes.io/os=linux,kubernetes.io/arch=amd64,kubernetes.io/hostname=kubernetes-master,kubernetes.io/os=linux,node-role.kubernetes.io/master=node-1 Ready <none> 107d v1.20.1 beta.kubernetes.io/arch=amd64,beta.kubernetes.io/os=linux,kubernetes.io/arch=amd64,kubernetes.io/hostname=node-1,kubernetes.io/os=linux,site=cell1node-2 Ready <none> 107d v1.20.1 beta.kubernetes.io/arch=amd64,beta.kubernetes.io/os=linux,kubernetes.io/arch=amd64,kubernetes.io/hostname=node-2,kubernetes.io/os=linux,site=cellnode-3 Ready <none> 107d v1.20.1 beta.kubernetes.io/arch=amd64,beta.kubernetes.io/os=linux,kubernetes.io/arch=amd64,kubernetes.io/hostname=node-3,kubernetes.io/os=linux,nocrpd=yes,site=edcroot@kubernetes-master:~#
5. Apply cRPD manifest file:
root@kubernetes-master:~# kubectl apply -f crpd_cni_secondary.ymlWarning: rbac.authorization.k8s.io/v1beta1 ClusterRole is deprecated in v1.17+, unavailable in v1.22+; use rbac.authorization.k8s.io/v1 ClusterRoleclusterrole.rbac.authorization.k8s.io/crpd createdWarning: rbac.authorization.k8s.io/v1beta1 ClusterRoleBinding is deprecated in v1.17+, unavailable in v1.22+; use rbac.authorization.k8s.io/v1 ClusterRoleBindingclusterrolebinding.rbac.authorization.k8s.io/crpd createdserviceaccount/crpd createdconfigmap/crpd-configmap createdsecret/crpd-license createddaemonset.apps/kube-crpd-worker-ds createddaemonset.apps/kube-crpd-master-ds created root@kubernetes-master:~# kubectl get ds -ANAMESPACE NAME DESIRED CURRENT READY UP-TO-DATE AVAILABLE NODE SELECTOR AGEkube-system calico-node 4 4 3 4 3 kubernetes.io/os=linux 107dkube-system kube-crpd-master-ds 1 1 1 1 1 <none> 20skube-system kube-crpd-worker-ds 2 2 2 2 2 <none> 20skube-system kube-multus-ds-amd64 4 4 4 4 4 kubernetes.io/arch=amd64 5h23mkube-system kube-multus-ds-arm64v8 0 0 0 0 0 kubernetes.io/arch=arm64 5h23mkube-system kube-multus-ds-ppc64le 0 0 0 0 0 kubernetes.io/arch=ppc64le 5h23mkube-system kube-proxy 4 4 4 4 4 kubernetes.io/os=linux 107d
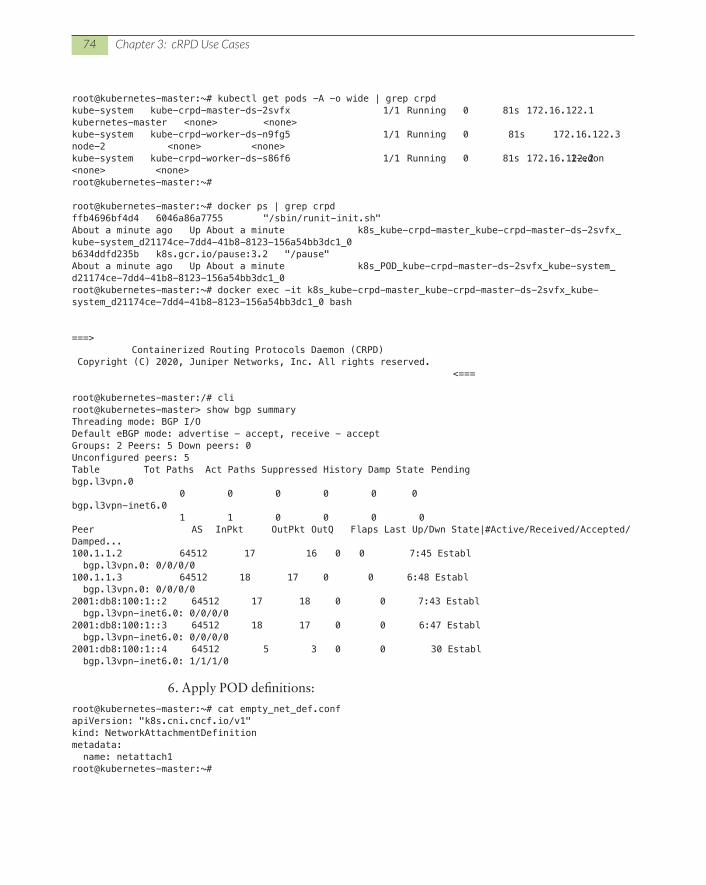
74 Chapter 3: cRPD Use Cases
root@kubernetes-master:~# kubectl get pods -A -o wide | grep crpdkube-system kube-crpd-master-ds-2svfx 1/1 Running 0 81s 172.16.122.1 kubernetes-master <none> <none>kube-system kube-crpd-worker-ds-n9fg5 1/1 Running 0 81s 172.16.122.3 node-2 <none> <none>kube-system kube-crpd-worker-ds-s86f6 1/1 Running 0 81s 172.16.122.2 node-1 <none> <none>root@kubernetes-master:~#
root@kubernetes-master:~# docker ps | grep crpdffb4696bf4d4 6046a86a7755 "/sbin/runit-init.sh" About a minute ago Up About a minute k8s_kube-crpd-master_kube-crpd-master-ds-2svfx_kube-system_d21174ce-7dd4-41b8-8123-156a54bb3dc1_0b634ddfd235b k8s.gcr.io/pause:3.2 "/pause" About a minute ago Up About a minute k8s_POD_kube-crpd-master-ds-2svfx_kube-system_d21174ce-7dd4-41b8-8123-156a54bb3dc1_0root@kubernetes-master:~# docker exec -it k8s_kube-crpd-master_kube-crpd-master-ds-2svfx_kube-system_d21174ce-7dd4-41b8-8123-156a54bb3dc1_0 bash
===> Containerized Routing Protocols Daemon (CRPD) Copyright (C) 2020, Juniper Networks, Inc. All rights reserved. <=== root@kubernetes-master:/# cliroot@kubernetes-master> show bgp summaryThreading mode: BGP I/ODefault eBGP mode: advertise - accept, receive - acceptGroups: 2 Peers: 5 Down peers: 0Unconfigured peers: 5Table Tot Paths Act Paths Suppressed History Damp State Pendingbgp.l3vpn.0 0 0 0 0 0 0bgp.l3vpn-inet6.0 1 1 0 0 0 0Peer AS InPkt OutPkt OutQ Flaps Last Up/Dwn State|#Active/Received/Accepted/Damped...100.1.1.2 64512 17 16 0 0 7:45 Establ bgp.l3vpn.0: 0/0/0/0100.1.1.3 64512 18 17 0 0 6:48 Establ bgp.l3vpn.0: 0/0/0/02001:db8:100:1::2 64512 17 18 0 0 7:43 Establ bgp.l3vpn-inet6.0: 0/0/0/02001:db8:100:1::3 64512 18 17 0 0 6:47 Establ bgp.l3vpn-inet6.0: 0/0/0/02001:db8:100:1::4 64512 5 3 0 0 30 Establ bgp.l3vpn-inet6.0: 1/1/1/0
6. Apply POD definitions:
root@kubernetes-master:~# cat empty_net_def.confapiVersion: "k8s.cni.cncf.io/v1"kind: NetworkAttachmentDefinitionmetadata: name: netattach1root@kubernetes-master:~#
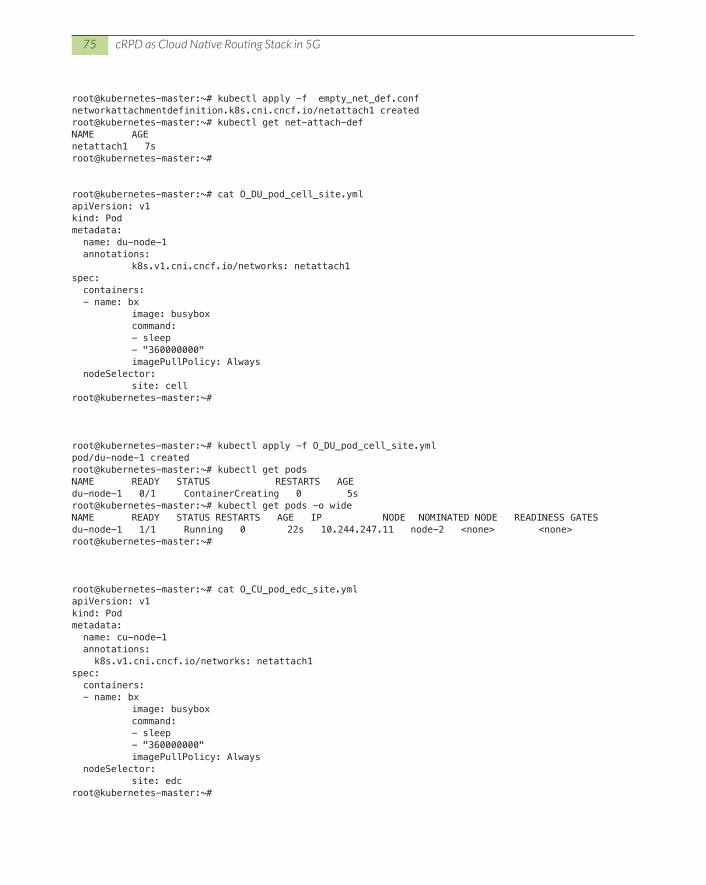
75 cRPD as Cloud Native Routing Stack in 5G
root@kubernetes-master:~# kubectl apply -f empty_net_def.confnetworkattachmentdefinition.k8s.cni.cncf.io/netattach1 createdroot@kubernetes-master:~# kubectl get net-attach-defNAME AGEnetattach1 7sroot@kubernetes-master:~# root@kubernetes-master:~# cat O_DU_pod_cell_site.ymlapiVersion: v1kind: Podmetadata: name: du-node-1 annotations: k8s.v1.cni.cncf.io/networks: netattach1spec: containers: - name: bx image: busybox command: - sleep - "360000000" imagePullPolicy: Always nodeSelector: site: cellroot@kubernetes-master:~# root@kubernetes-master:~# kubectl apply -f O_DU_pod_cell_site.ymlpod/du-node-1 createdroot@kubernetes-master:~# kubectl get podsNAME READY STATUS RESTARTS AGEdu-node-1 0/1 ContainerCreating 0 5sroot@kubernetes-master:~# kubectl get pods -o wideNAME READY STATUS RESTARTS AGE IP NODE NOMINATED NODE READINESS GATESdu-node-1 1/1 Running 0 22s 10.244.247.11 node-2 <none> <none>root@kubernetes-master:~#
root@kubernetes-master:~# cat O_CU_pod_edc_site.ymlapiVersion: v1kind: Podmetadata: name: cu-node-1 annotations: k8s.v1.cni.cncf.io/networks: netattach1spec: containers: - name: bx image: busybox command: - sleep - "360000000" imagePullPolicy: Always nodeSelector: site: edcroot@kubernetes-master:~#
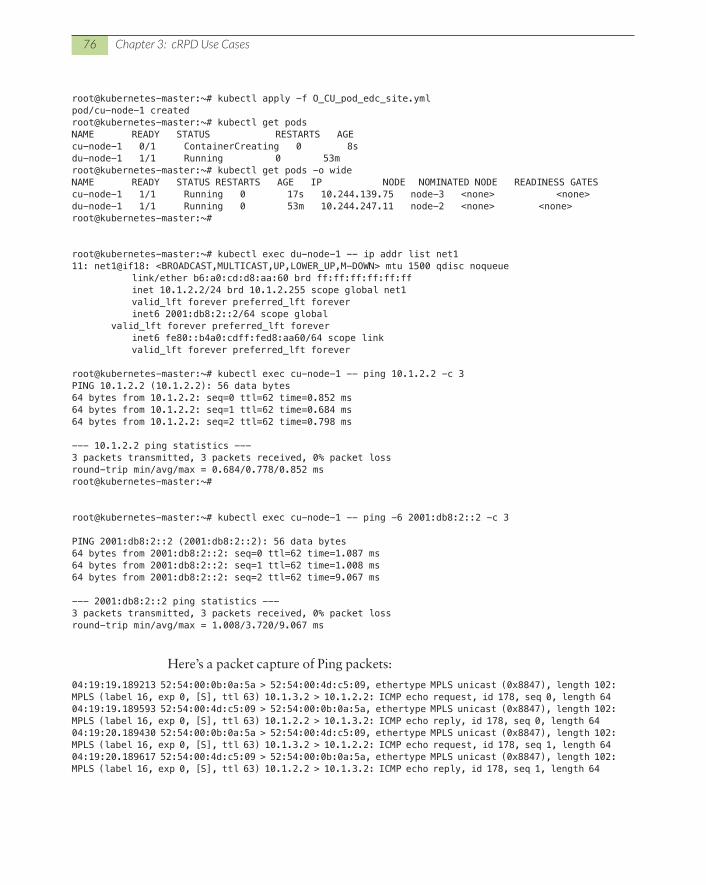
76 Chapter 3: cRPD Use Cases
root@kubernetes-master:~# kubectl apply -f O_CU_pod_edc_site.ymlpod/cu-node-1 createdroot@kubernetes-master:~# kubectl get podsNAME READY STATUS RESTARTS AGEcu-node-1 0/1 ContainerCreating 0 8sdu-node-1 1/1 Running 0 53mroot@kubernetes-master:~# kubectl get pods -o wideNAME READY STATUS RESTARTS AGE IP NODE NOMINATED NODE READINESS GATEScu-node-1 1/1 Running 0 17s 10.244.139.75 node-3 <none> <none>du-node-1 1/1 Running 0 53m 10.244.247.11 node-2 <none> <none>root@kubernetes-master:~#
root@kubernetes-master:~# kubectl exec du-node-1 -- ip addr list net111: net1@if18: <BROADCAST,MULTICAST,UP,LOWER_UP,M-DOWN> mtu 1500 qdisc noqueue link/ether b6:a0:cd:d8:aa:60 brd ff:ff:ff:ff:ff:ff inet 10.1.2.2/24 brd 10.1.2.255 scope global net1 valid_lft forever preferred_lft forever inet6 2001:db8:2::2/64 scope global valid_lft forever preferred_lft forever inet6 fe80::b4a0:cdff:fed8:aa60/64 scope link valid_lft forever preferred_lft forever root@kubernetes-master:~# kubectl exec cu-node-1 -- ping 10.1.2.2 -c 3PING 10.1.2.2 (10.1.2.2): 56 data bytes64 bytes from 10.1.2.2: seq=0 ttl=62 time=0.852 ms64 bytes from 10.1.2.2: seq=1 ttl=62 time=0.684 ms64 bytes from 10.1.2.2: seq=2 ttl=62 time=0.798 ms --- 10.1.2.2 ping statistics ---3 packets transmitted, 3 packets received, 0% packet lossround-trip min/avg/max = 0.684/0.778/0.852 msroot@kubernetes-master:~# root@kubernetes-master:~# kubectl exec cu-node-1 -- ping -6 2001:db8:2::2 -c 3 PING 2001:db8:2::2 (2001:db8:2::2): 56 data bytes64 bytes from 2001:db8:2::2: seq=0 ttl=62 time=1.087 ms64 bytes from 2001:db8:2::2: seq=1 ttl=62 time=1.008 ms64 bytes from 2001:db8:2::2: seq=2 ttl=62 time=9.067 ms --- 2001:db8:2::2 ping statistics ---3 packets transmitted, 3 packets received, 0% packet lossround-trip min/avg/max = 1.008/3.720/9.067 ms
Here’s a packet capture of Ping packets:
04:19:19.189213 52:54:00:0b:0a:5a > 52:54:00:4d:c5:09, ethertype MPLS unicast (0x8847), length 102: MPLS (label 16, exp 0, [S], ttl 63) 10.1.3.2 > 10.1.2.2: ICMP echo request, id 178, seq 0, length 6404:19:19.189593 52:54:00:4d:c5:09 > 52:54:00:0b:0a:5a, ethertype MPLS unicast (0x8847), length 102: MPLS (label 16, exp 0, [S], ttl 63) 10.1.2.2 > 10.1.3.2: ICMP echo reply, id 178, seq 0, length 6404:19:20.189430 52:54:00:0b:0a:5a > 52:54:00:4d:c5:09, ethertype MPLS unicast (0x8847), length 102: MPLS (label 16, exp 0, [S], ttl 63) 10.1.3.2 > 10.1.2.2: ICMP echo request, id 178, seq 1, length 6404:19:20.189617 52:54:00:4d:c5:09 > 52:54:00:0b:0a:5a, ethertype MPLS unicast (0x8847), length 102: MPLS (label 16, exp 0, [S], ttl 63) 10.1.2.2 > 10.1.3.2: ICMP echo reply, id 178, seq 1, length 64
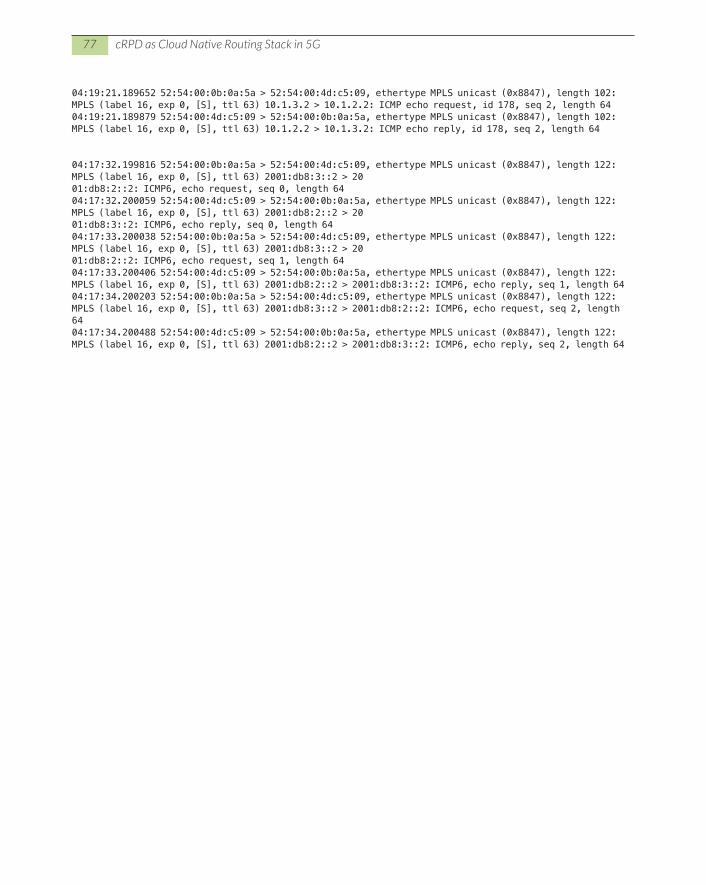
77 cRPD as Cloud Native Routing Stack in 5G
04:19:21.189652 52:54:00:0b:0a:5a > 52:54:00:4d:c5:09, ethertype MPLS unicast (0x8847), length 102: MPLS (label 16, exp 0, [S], ttl 63) 10.1.3.2 > 10.1.2.2: ICMP echo request, id 178, seq 2, length 6404:19:21.189879 52:54:00:4d:c5:09 > 52:54:00:0b:0a:5a, ethertype MPLS unicast (0x8847), length 102: MPLS (label 16, exp 0, [S], ttl 63) 10.1.2.2 > 10.1.3.2: ICMP echo reply, id 178, seq 2, length 64 04:17:32.199816 52:54:00:0b:0a:5a > 52:54:00:4d:c5:09, ethertype MPLS unicast (0x8847), length 122: MPLS (label 16, exp 0, [S], ttl 63) 2001:db8:3::2 > 2001:db8:2::2: ICMP6, echo request, seq 0, length 6404:17:32.200059 52:54:00:4d:c5:09 > 52:54:00:0b:0a:5a, ethertype MPLS unicast (0x8847), length 122: MPLS (label 16, exp 0, [S], ttl 63) 2001:db8:2::2 > 2001:db8:3::2: ICMP6, echo reply, seq 0, length 6404:17:33.200038 52:54:00:0b:0a:5a > 52:54:00:4d:c5:09, ethertype MPLS unicast (0x8847), length 122: MPLS (label 16, exp 0, [S], ttl 63) 2001:db8:3::2 > 2001:db8:2::2: ICMP6, echo request, seq 1, length 6404:17:33.200406 52:54:00:4d:c5:09 > 52:54:00:0b:0a:5a, ethertype MPLS unicast (0x8847), length 122: MPLS (label 16, exp 0, [S], ttl 63) 2001:db8:2::2 > 2001:db8:3::2: ICMP6, echo reply, seq 1, length 6404:17:34.200203 52:54:00:0b:0a:5a > 52:54:00:4d:c5:09, ethertype MPLS unicast (0x8847), length 122: MPLS (label 16, exp 0, [S], ttl 63) 2001:db8:3::2 > 2001:db8:2::2: ICMP6, echo request, seq 2, length 6404:17:34.200488 52:54:00:4d:c5:09 > 52:54:00:0b:0a:5a, ethertype MPLS unicast (0x8847), length 122: MPLS (label 16, exp 0, [S], ttl 63) 2001:db8:2::2 > 2001:db8:3::2: ICMP6, echo reply, seq 2, length 64
cRPD supports various automation and telemetry frameworks like JET, YANG-based model-driven streaming telemetry, openconfig, NetConf, PyEz, and gRPC. This chapter shows you how to set up a monitoring solution using open-source tools. The entire setup can be defined using a single Docker-composed file. Let’s use a very simple network topology using three cRPDs as shown in Figure 4.1.
The aim of this lab is to showcase how to set up a cloud-native monitoring frame-work for cRPD using:
1. Grafana as a Dashboard
2. Prometheus as a collector for node-exporter and cAdvisor
3. Telegraf as a collector for cRPD Junos OpenConfig Telemetry
In this setup:
� There are iBGP sessions among three cRPDs: Test-cRPD, baseline-cRPD, and Internet-cRPD
� Test-cRPD is our DUT
� Baseline-cRPD is another cRPD running a different release
� Internet-cRPD is pulling the internet routing table from the lab and reflecting it to Test-cRPD and baseline-cRPD
Chapter 4
Monitoring and Telemetry
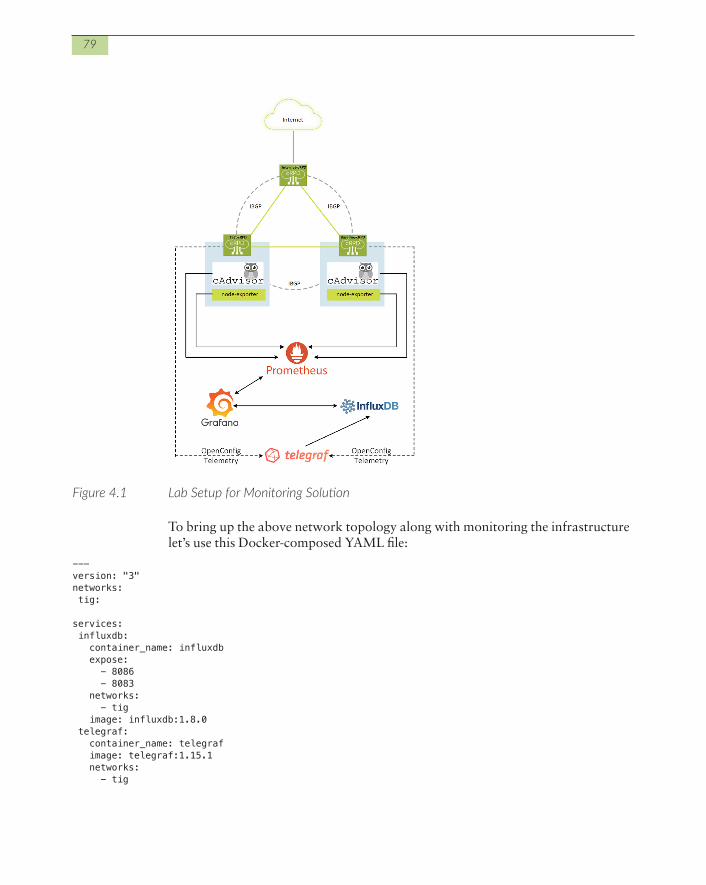
79
Figure 4.1 Lab Setup for Monitoring Solution
To bring up the above network topology along with monitoring the infrastructure let’s use this Docker-composed YAML file:
---version: "3"networks: tig: services: influxdb: container_name: influxdb expose: - 8086 - 8083 networks: - tig image: influxdb:1.8.0 telegraf: container_name: telegraf image: telegraf:1.15.1 networks: - tig
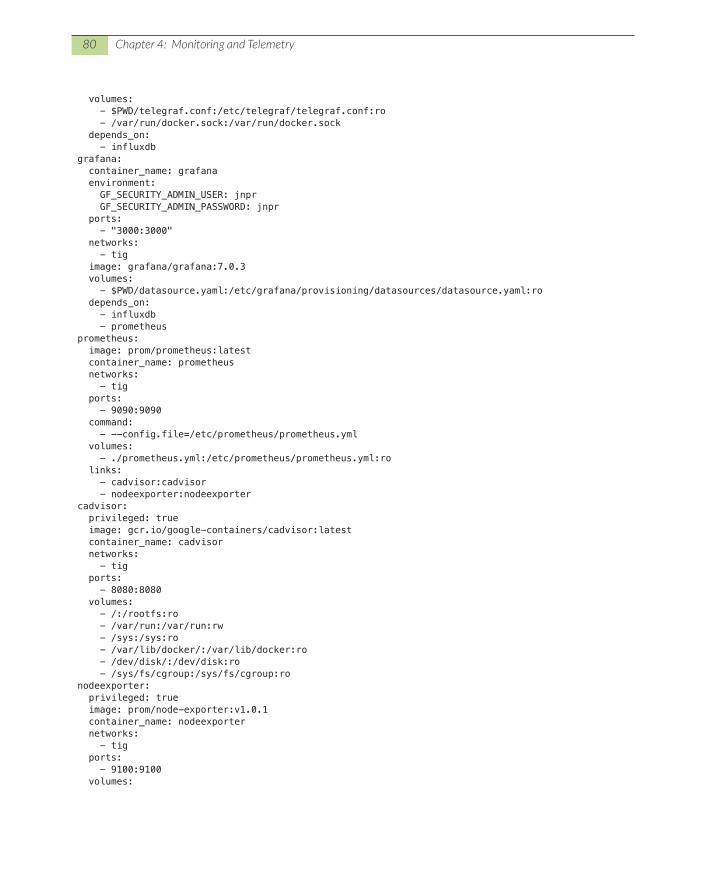
80 Chapter 4: Monitoring and Telemetry
volumes: - $PWD/telegraf.conf:/etc/telegraf/telegraf.conf:ro - /var/run/docker.sock:/var/run/docker.sock depends_on: - influxdb grafana: container_name: grafana environment: GF_SECURITY_ADMIN_USER: jnpr GF_SECURITY_ADMIN_PASSWORD: jnpr ports: - "3000:3000" networks: - tig image: grafana/grafana:7.0.3 volumes: - $PWD/datasource.yaml:/etc/grafana/provisioning/datasources/datasource.yaml:ro depends_on: - influxdb - prometheus prometheus: image: prom/prometheus:latest container_name: prometheus networks: - tig ports: - 9090:9090 command: - --config.file=/etc/prometheus/prometheus.yml volumes: - ./prometheus.yml:/etc/prometheus/prometheus.yml:ro links: - cadvisor:cadvisor - nodeexporter:nodeexporter cadvisor: privileged: true image: gcr.io/google-containers/cadvisor:latest container_name: cadvisor networks: - tig ports: - 8080:8080 volumes: - /:/rootfs:ro - /var/run:/var/run:rw - /sys:/sys:ro - /var/lib/docker/:/var/lib/docker:ro - /dev/disk/:/dev/disk:ro - /sys/fs/cgroup:/sys/fs/cgroup:ro nodeexporter: privileged: true image: prom/node-exporter:v1.0.1 container_name: nodeexporter networks: - tig ports: - 9100:9100 volumes:

81
- /proc:/host/proc:ro - /sys:/host/sys:ro - /:/rootfs:ro - ${PWD}/crpd_image_size:/host/crpd_image_size command: - '--path.procfs=/host/proc' - '--path.rootfs=/rootfs' - '--path.sysfs=/host/sys' - '--collector.filesystem.ignored-mount-points=^/(sys|proc|dev|host|etc)($$|/)' - '--collector.textfile.directory=/host/crpd_image_size' restart: unless-stopped testcrpd: privileged: true image: crpd:20.4I-20201227.0.1259 container_name: crpdtest networks: - tig volumes: - ${PWD}/testcrpd:/config - ${PWD}/license:/config/license baselinecrpd: privileged: true image: crpd:20.3R1.4 container_name: crpdbaseline networks: - tig volumes: - ${PWD}/baselinecrpd:/config - ${PWD}/license:/config/license internetcrpd: privileged: true image: crpd:20.3R1.4 container_name: internetcrpd network_mode: bridge volumes: - ${PWD}/internetcrpd:/config - ${PWD}/license:/config/license
NOTE A network “tig” is defined, which is accessible by all services.
In the docker-compose file the following services are brought up:
InfluxDb: This one uses influxdb:1.8.0 image version, exposes ports 8086 and 8083 over network tig.
Telegraf: This one is used as a collector for Junos OpenConfig Telemetry and stores the sensor values in InfluxDB TSDB. It uses telegraf version 1.15.1 and mounts preconfigured telegraf.conf when the container comes up. An excerpt from the telegraf.conf file given below:
..[[outputs.influxdb]] urls = ["http://influxdb:8086"] database = "jnpr" username = "jnpr" password = "jnpr"
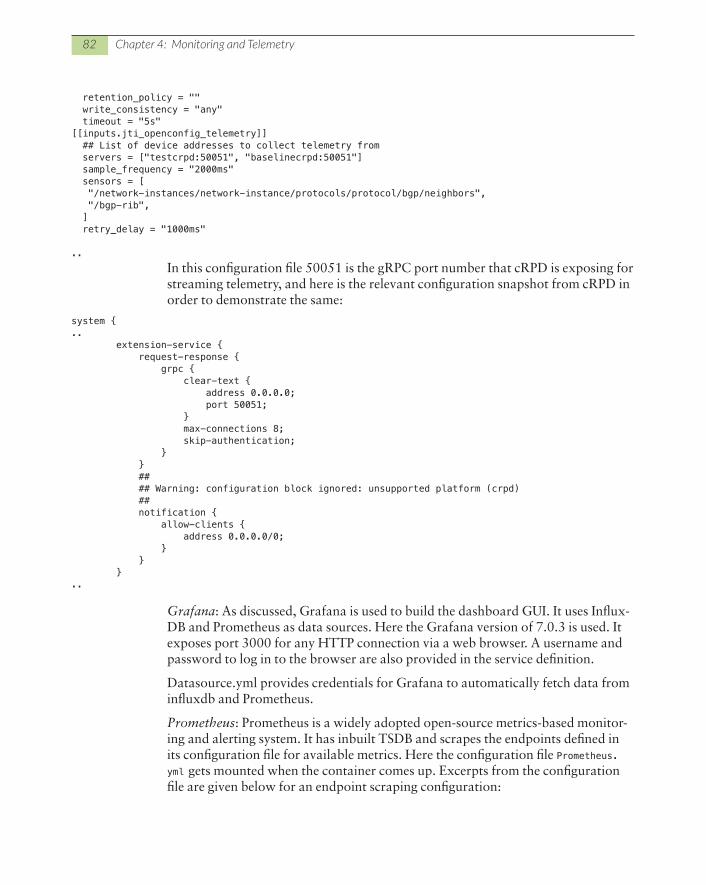
82 Chapter 4: Monitoring and Telemetry
retention_policy = "" write_consistency = "any" timeout = "5s"[[inputs.jti_openconfig_telemetry]] ## List of device addresses to collect telemetry from servers = ["testcrpd:50051", "baselinecrpd:50051"] sample_frequency = "2000ms" sensors = [ "/network-instances/network-instance/protocols/protocol/bgp/neighbors", "/bgp-rib", ] retry_delay = "1000ms"
..In this configuration file 50051 is the gRPC port number that cRPD is exposing for streaming telemetry, and here is the relevant configuration snapshot from cRPD in order to demonstrate the same:
system {.. extension-service { request-response { grpc { clear-text { address 0.0.0.0; port 50051; } max-connections 8; skip-authentication; } } ## ## Warning: configuration block ignored: unsupported platform (crpd) ## notification { allow-clients { address 0.0.0.0/0; } } }..
Grafana: As discussed, Grafana is used to build the dashboard GUI. It uses Influx-DB and Prometheus as data sources. Here the Grafana version of 7.0.3 is used. It exposes port 3000 for any HTTP connection via a web browser. A username and password to log in to the browser are also provided in the service definition.
Datasource.yml provides credentials for Grafana to automatically fetch data from influxdb and Prometheus.
Prometheus: Prometheus is a widely adopted open-source metrics-based monitor-ing and alerting system. It has inbuilt TSDB and scrapes the endpoints defined in its configuration file for available metrics. Here the configuration file Prometheus.yml gets mounted when the container comes up. Excerpts from the configuration file are given below for an endpoint scraping configuration:
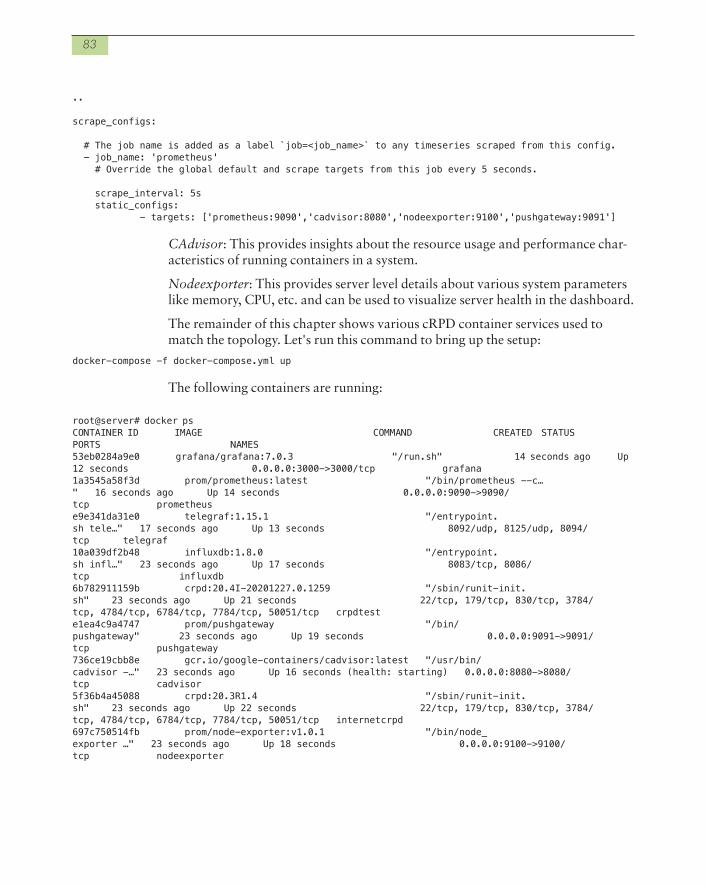
83
..
scrape_configs:
# The job name is added as a label `job=<job_name>` to any timeseries scraped from this config. - job_name: 'prometheus' # Override the global default and scrape targets from this job every 5 seconds.
scrape_interval: 5s static_configs: - targets: ['prometheus:9090','cadvisor:8080','nodeexporter:9100','pushgateway:9091']
CAdvisor: This provides insights about the resource usage and performance char-acteristics of running containers in a system.
Nodeexporter: This provides server level details about various system parameters like memory, CPU, etc. and can be used to visualize server health in the dashboard.
The remainder of this chapter shows various cRPD container services used to match the topology. Let's run this command to bring up the setup:
docker-compose -f docker-compose.yml up
The following containers are running:
root@server# docker psCONTAINER ID IMAGE COMMAND CREATED STATUS PORTS NAMES53eb0284a9e0 grafana/grafana:7.0.3 "/run.sh" 14 seconds ago Up 12 seconds 0.0.0.0:3000->3000/tcp grafana1a3545a58f3d prom/prometheus:latest "/bin/prometheus --c…" 16 seconds ago Up 14 seconds 0.0.0.0:9090->9090/tcp prometheuse9e341da31e0 telegraf:1.15.1 "/entrypoint.sh tele…" 17 seconds ago Up 13 seconds 8092/udp, 8125/udp, 8094/tcp telegraf10a039df2b48 influxdb:1.8.0 "/entrypoint.sh infl…" 23 seconds ago Up 17 seconds 8083/tcp, 8086/tcp influxdb6b782911159b crpd:20.4I-20201227.0.1259 "/sbin/runit-init.sh" 23 seconds ago Up 21 seconds 22/tcp, 179/tcp, 830/tcp, 3784/tcp, 4784/tcp, 6784/tcp, 7784/tcp, 50051/tcp crpdteste1ea4c9a4747 prom/pushgateway "/bin/pushgateway" 23 seconds ago Up 19 seconds 0.0.0.0:9091->9091/tcp pushgateway736ce19cbb8e gcr.io/google-containers/cadvisor:latest "/usr/bin/cadvisor -…" 23 seconds ago Up 16 seconds (health: starting) 0.0.0.0:8080->8080/tcp cadvisor5f36b4a45088 crpd:20.3R1.4 "/sbin/runit-init.sh" 23 seconds ago Up 22 seconds 22/tcp, 179/tcp, 830/tcp, 3784/tcp, 4784/tcp, 6784/tcp, 7784/tcp, 50051/tcp internetcrpd697c750514fb prom/node-exporter:v1.0.1 "/bin/node_exporter …" 23 seconds ago Up 18 seconds 0.0.0.0:9100->9100/tcp nodeexporter
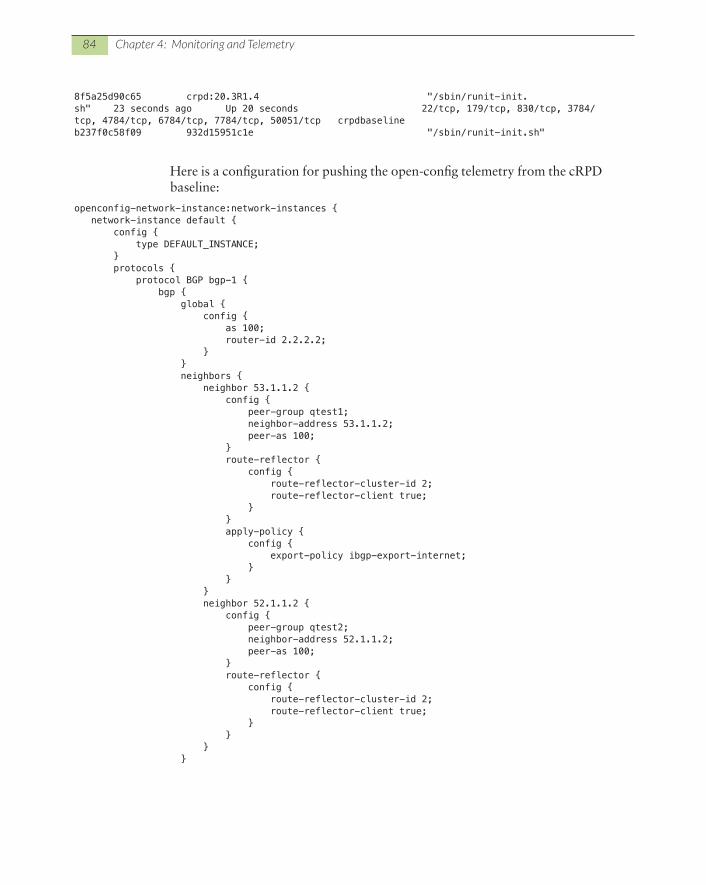
84 Chapter 4: Monitoring and Telemetry
8f5a25d90c65 crpd:20.3R1.4 "/sbin/runit-init.sh" 23 seconds ago Up 20 seconds 22/tcp, 179/tcp, 830/tcp, 3784/tcp, 4784/tcp, 6784/tcp, 7784/tcp, 50051/tcp crpdbaselineb237f0c58f09 932d15951c1e "/sbin/runit-init.sh"
Here is a configuration for pushing the open-config telemetry from the cRPD baseline:
openconfig-network-instance:network-instances { network-instance default { config { type DEFAULT_INSTANCE; } protocols { protocol BGP bgp-1 { bgp { global { config { as 100; router-id 2.2.2.2; } } neighbors { neighbor 53.1.1.2 { config { peer-group qtest1; neighbor-address 53.1.1.2; peer-as 100; } route-reflector { config { route-reflector-cluster-id 2; route-reflector-client true; } } apply-policy { config { export-policy ibgp-export-internet; } } } neighbor 52.1.1.2 { config { peer-group qtest2; neighbor-address 52.1.1.2; peer-as 100; } route-reflector { config { route-reflector-cluster-id 2; route-reflector-client true; } } } }

85
} } } }}
One way to quickly check if cRPD is streaming telemetry is by using JTIMON. To install JTIMON:
1. Clone git repository:
git clone https://github.com/nileshsimaria/jtimon.git
2. Install GO using apt install golang-go:
Cdmkdir goexport GOPATH=$HOME/gogo get -v github.com/golang/protobuf/protogo get -v github.com/gorilla/muxgo get -v github.com/influxdata/influxdb1-client/v2go get -v github.com/prometheus/client_golang/prometheus/promhttpgo get -v github.com/spf13/pflaggo get -v golang.org/x/net/contextgo get -v google.golang.org/grpcgo get -v github.com/nileshsimaria/jtimon/authentication
3. Change the package path in influx.go and subscribe_gnmi.go from github.com/influxdata/influxdb/client/v2 to github.com/influxdata/influxdb1-client/v2:
cd $GOPATH/src/github.com/nileshsimaria/jtimon/vendor/google.golang.org/mv grpc GRPC_BKUPcd root/jtimon/jtimon/Go build
root@ubuntu:~/jtimon/jtimon# ./jtimon -hUsage of ./jtimon: --compression string Enable HTTP/2 compression (gzip) --config strings Config file name(s) --config-file-list string List of Config files --consume-test-data Consume test data --explore-config Explore full config of JTIMON and exit --generate-test-data Generate test data --json Convert telemetry packet into JSON --log-mux-stdout All logs to stdout --max-run int Max run time in seconds --no-per-packet-goroutines Spawn per packet go routines --pprof Profile JTIMON --pprof-port int32 Profile port (default 6060) --prefix-check Report missing __prefix__ in telemetry packet --print Print Telemetry data --prometheus Stats for prometheus monitoring system --prometheus-host string IP to bind Prometheus service to (default "127.0.0.1")
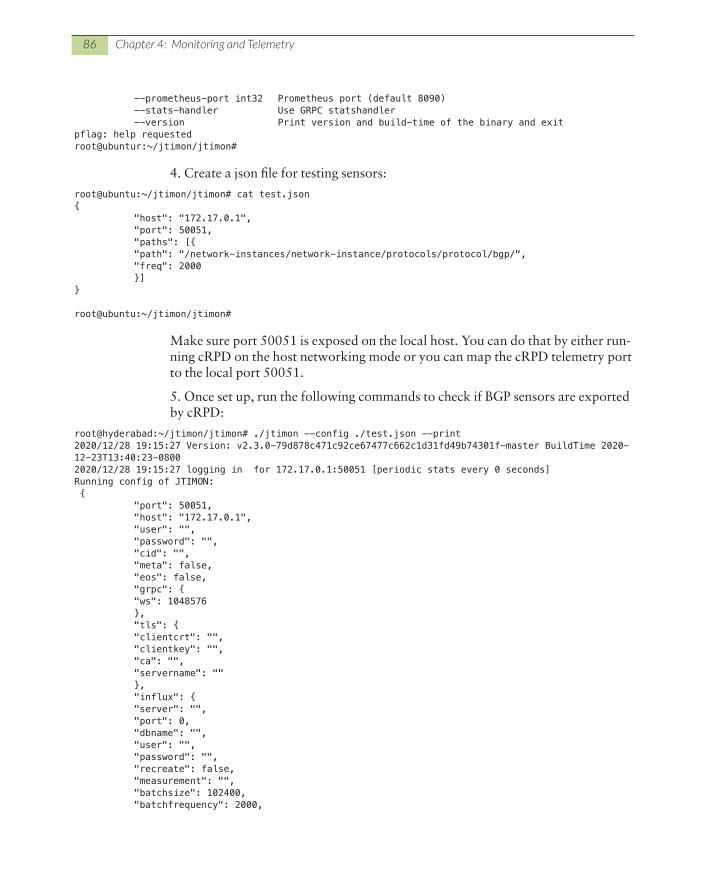
86 Chapter 4: Monitoring and Telemetry
--prometheus-port int32 Prometheus port (default 8090) --stats-handler Use GRPC statshandler --version Print version and build-time of the binary and exitpflag: help requestedroot@ubuntur:~/jtimon/jtimon#
4. Create a json file for testing sensors:
root@ubuntu:~/jtimon/jtimon# cat test.json{ "host": "172.17.0.1", "port": 50051, "paths": [{ "path": "/network-instances/network-instance/protocols/protocol/bgp/", "freq": 2000 }]}
root@ubuntu:~/jtimon/jtimon#
Make sure port 50051 is exposed on the local host. You can do that by either run-ning cRPD on the host networking mode or you can map the cRPD telemetry port to the local port 50051.
5. Once set up, run the following commands to check if BGP sensors are exported by cRPD:
root@hyderabad:~/jtimon/jtimon# ./jtimon --config ./test.json --print2020/12/28 19:15:27 Version: v2.3.0-79d878c471c92ce67477c662c1d31fd49b74301f-master BuildTime 2020-12-23T13:40:23-08002020/12/28 19:15:27 logging in for 172.17.0.1:50051 [periodic stats every 0 seconds]Running config of JTIMON: { "port": 50051, "host": "172.17.0.1", "user": "", "password": "", "cid": "", "meta": false, "eos": false, "grpc": { "ws": 1048576 }, "tls": { "clientcrt": "", "clientkey": "", "ca": "", "servername": "" }, "influx": { "server": "", "port": 0, "dbname": "", "user": "", "password": "", "recreate": false, "measurement": "", "batchsize": 102400, "batchfrequency": 2000,
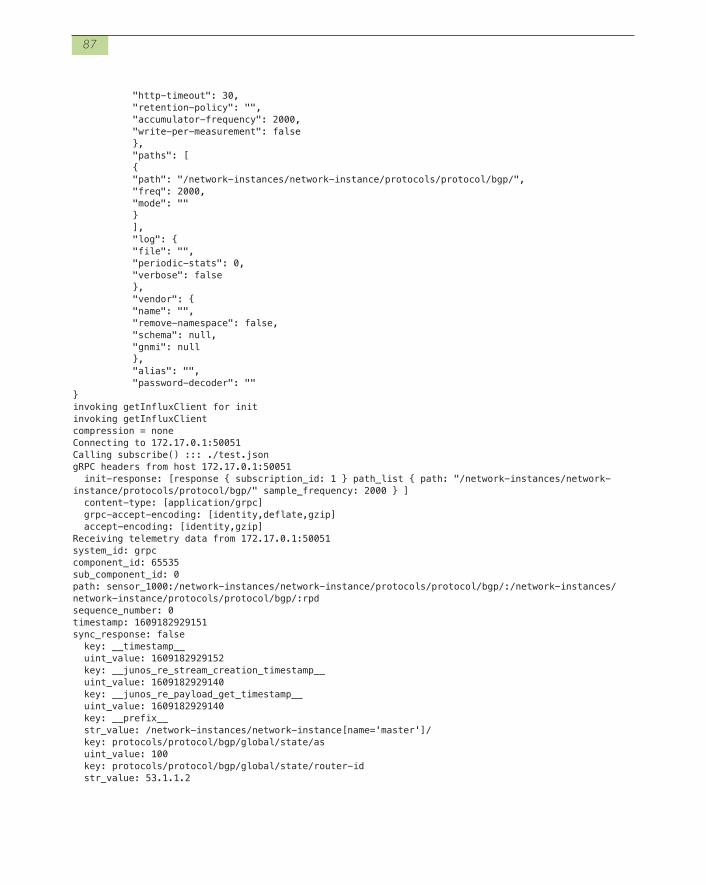
87
"http-timeout": 30, "retention-policy": "", "accumulator-frequency": 2000, "write-per-measurement": false }, "paths": [ { "path": "/network-instances/network-instance/protocols/protocol/bgp/", "freq": 2000, "mode": "" } ], "log": { "file": "", "periodic-stats": 0, "verbose": false }, "vendor": { "name": "", "remove-namespace": false, "schema": null, "gnmi": null }, "alias": "", "password-decoder": ""}invoking getInfluxClient for initinvoking getInfluxClientcompression = noneConnecting to 172.17.0.1:50051Calling subscribe() ::: ./test.jsongRPC headers from host 172.17.0.1:50051 init-response: [response { subscription_id: 1 } path_list { path: "/network-instances/network-instance/protocols/protocol/bgp/" sample_frequency: 2000 } ] content-type: [application/grpc] grpc-accept-encoding: [identity,deflate,gzip] accept-encoding: [identity,gzip]Receiving telemetry data from 172.17.0.1:50051system_id: grpccomponent_id: 65535sub_component_id: 0path: sensor_1000:/network-instances/network-instance/protocols/protocol/bgp/:/network-instances/network-instance/protocols/protocol/bgp/:rpdsequence_number: 0timestamp: 1609182929151sync_response: false key: __timestamp__ uint_value: 1609182929152 key: __junos_re_stream_creation_timestamp__ uint_value: 1609182929140 key: __junos_re_payload_get_timestamp__ uint_value: 1609182929140 key: __prefix__ str_value: /network-instances/network-instance[name='master']/ key: protocols/protocol/bgp/global/state/as uint_value: 100 key: protocols/protocol/bgp/global/state/router-id str_value: 53.1.1.2
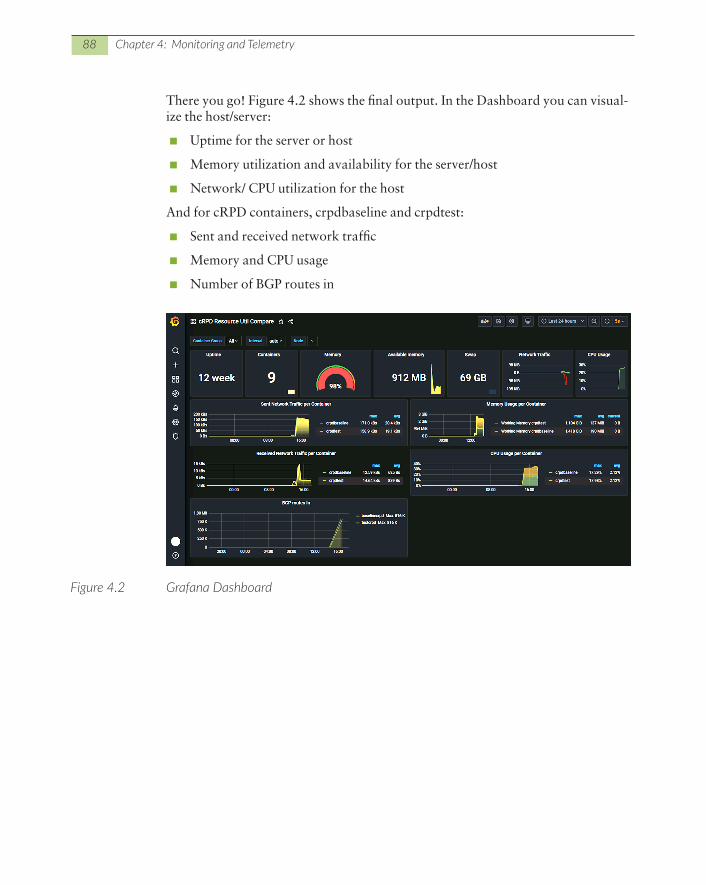
88 Chapter 4: Monitoring and Telemetry
There you go! Figure 4.2 shows the final output. In the Dashboard you can visual-ize the host/server:
� Uptime for the server or host
� Memory utilization and availability for the server/host
� Network/ CPU utilization for the host
And for cRPD containers, crpdbaseline and crpdtest:
� Sent and received network traffic
� Memory and CPU usage
� Number of BGP routes in
Figure 4.2 Grafana Dashboard
Troubleshooting determines why something does not work as expected and how to resolve the problem. You can troubleshoot issues at the CLI, container, Docker, rpd crashes, core files, and by using log messages stored at /var/log/messages.
Unable to Install Linux Packages/utilities
As a part of learning or troubleshooting you might often find it useful to install additional software packages. Since cRPD is built on Ubuntu distribution, you should be able to install packages from Ubuntu repositories.
If you are unable to reach the Ubuntu repositories, start checking your network reachability.
As a first step, verify that the host network is set up correctly to reach the internet. Tools like ping, ip, and traceroute will be useful.
As a next step, check if the default route is present in the cRPD Linux shell to reach public repositories:
root@node-2:~# ip route showdefault via 192.168.122.1 dev ens3 proto static
Docker creates an interface “eth0” in each container by default in bridge mode, and adds it to the Docker bridge. The Docker bridge is connected to the host net-work. All traffic in and out of the Docker bridge towards the host network is NAT’d, so basically the host where the cRPD is running does SNAT for the traffic going towards the Internet from cRPD. Similarly, it does DNAT for return traffic reaching the cRPD Docker container. It is very important to check internet reach-ability from the host itself.
Chapter 5
Troubleshooting
90 Chapter 5: Troubleshooting
One may also need to run “apt-get update” prior to running any “apt install” command.
Also, please check “/etc/resolv.conf” to make sure DNS is properly configured both at the cRPD Linux shell and at the host, so that domain names are properly resolved.
Where Are My Crashed Files?
When a process inside cRPD dumps core, corefile is collected and stored on the host filesystem. It should be noted that the corefiles are not stored within the con-tainer volume itself.
Crash files can be found under /var/crash on the host or to a location defined by the sysctl kernel.core_pattern. Please note that you may need to manually create this directory under the host if it is not available in order to have crash files to be saved under them.
NOTE Unlike Junos, corefiles generated by cRPD don’t include config files and other data and should be collected separately.
How to Enable MPLS Routing?
To enable MPLS routing:
root@kubernetes-master:~# uname -a Linux kubernetes-master 4.15.0-130-generic #134-Ubuntu SMP Tue Jan 5 20:46:26 UTC 2021 x86_64 x86_64 x86_64 GNU/Linux root@kubernetes-master:~# root@kubernetes-master:~# lsmod | grep mpls root@kubernetes-master:~# sudo apt-get install linux-modules-extra-4.15.0-130-generic Reading package lists... Done Building dependency tree Reading state information... Done The following package was automatically installed and is no longer required: root@kubernetes-master:~# modprobe mpls_router root@kubernetes-master:~# modprobe mpls_iptunnel root@kubernetes-master:~# cat /proc/sys/net/mpls/platform_labels 0 root@kubernetes-master:~# echo 1048575 > /proc/sys/net/mpls/platform_labels root@kubernetes-master:~# cat /proc/sys/net/mpls/conf/ens5/input 0 root@kubernetes-master:~# echo 1 > /proc/sys/net/mpls/conf/ens5/input
Whereas ens5 is the core facing interface in the Linux host.
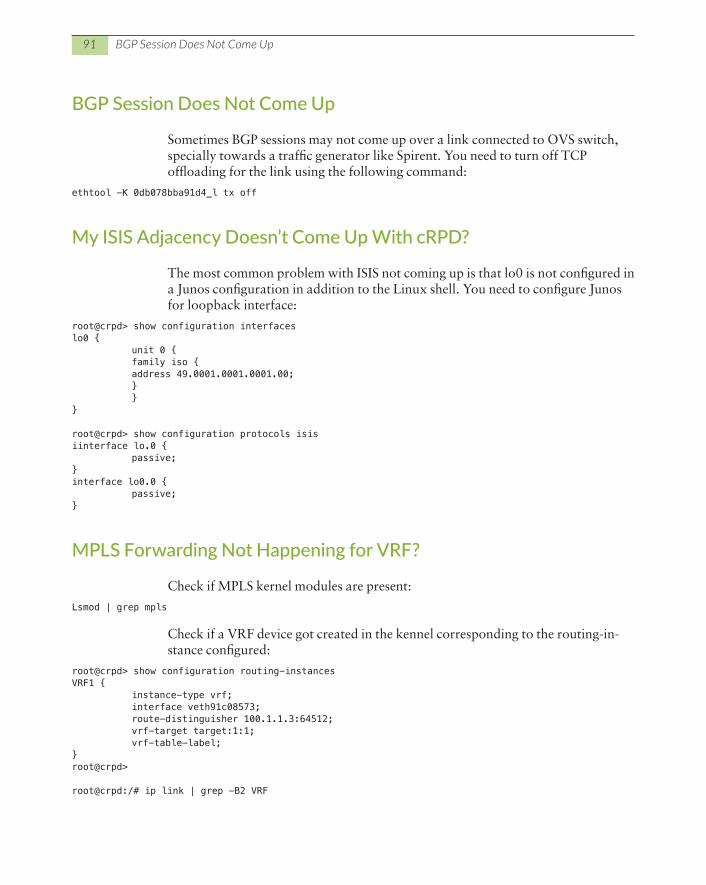
91 BGP Session Does Not Come Up
BGP Session Does Not Come Up
Sometimes BGP sessions may not come up over a link connected to OVS switch, specially towards a traffic generator like Spirent. You need to turn off TCP offloading for the link using the following command:
ethtool -K 0db078bba91d4_l tx off
My ISIS Adjacency Doesn’t Come Up With cRPD?
The most common problem with ISIS not coming up is that lo0 is not configured in a Junos configuration in addition to the Linux shell. You need to configure Junos for loopback interface:
root@crpd> show configuration interfaceslo0 { unit 0 { family iso { address 49.0001.0001.0001.00; } }}
root@crpd> show configuration protocols isisiinterface lo.0 { passive;}interface lo0.0 { passive;}
MPLS Forwarding Not Happening for VRF?
Check if MPLS kernel modules are present:
Lsmod | grep mpls
Check if a VRF device got created in the kennel corresponding to the routing-in-stance configured:
root@crpd> show configuration routing-instancesVRF1 { instance-type vrf; interface veth91c08573; route-distinguisher 100.1.1.3:64512; vrf-target target:1:1; vrf-table-label;}root@crpd>
root@crpd:/# ip link | grep -B2 VRF

92 Chapter 5: Troubleshooting
19: __crpd-vrf1: <MASTER,UP,LOWER_UP> mtu 65536 qdisc noqueue state UP mode DEFAULT group default qlen 1000 link/ether b2:e0:06:71:ab:b9 brd ff:ff:ff:ff:ff:ff alias VRF1root@crpd:/#
Where Are cRPD Links Connected?
The best option is to run LLDP. LLDP is not available under the Junos configura-tion in cRPD, but you can install LLDP in the cRPD Linux shell:
root@crpd:/# apt-get install lldpdReading package lists... DoneBuilding dependency treeReading state information... DoneThe following additional packages will be installed: libevent-2.1-6 libgdbm-compat4 libgdbm5 libicu60 libpci3 libperl5.26 libsensors4 libsnmp-base libsnmp30 libwrap0 libxml2 netbase perl perl-base perl-modules-5.26Suggested packages: gdbm-l10n lm-sensors snmp-mibs-downloader snmpd perl-doc libterm-readline-gnu-perl | libterm-readline-perl-perl makeThe following NEW packages will be installed: libevent-2.1-6 libgdbm-compat4 libgdbm5 libicu60 libpci3 libperl5.26 libsensors4 libsnmp-base libsnmp30 libwrap0 libxml2 lldpd netbase perl perl-modules-5.26The following packages will be upgraded: perl-base1 upgraded, 15 newly installed, 0 to remove and 31 not upgraded.Need to get 18.2 MB of archives.After this operation, 80.8 MB of additional disk space will be used.
root@crpd:/# lldpcli[lldpcli] $ show-- Show running system information neighbors Show neighbors data interfaces Show interfaces data chassis Show local chassis data statistics Show statistics configuration Show running configurationrunning-configuration Show running configuration[lldpcli] $ show neighbors
Not Able to Reach the Internet From cRPD
Can’t reach the internet from cRPD after fetching the internet routing table from the lab server? This can happen when the cRPD is peering with a lab server for the internet feed. The internet routes get installed in the kernel and when you try to reach a public destination it gets resolved over the internet routes received from the lab server, which gets dropped there.
93 How Can I Get Internet Feed to cRPD?
How Can I Get Internet Feed to cRPD?
Juniper has an internet feed lab server that is reachable from the Juniper lab ac-cepting all incoming BGP connections. Once a BGP session is brought up with that server, the internet feed can be established. The configuration on cRPD side goes like this:
root@internet# show protocols bgp group tointernetfeedmultihop;local-address <lab_route_server_ip>;receive-buffer 256k;peer-as 10458;local-as 69;neighbor 192.168.69.71;
[edit]root@internet#
Seeking Technical Support
When you run out of options to troubleshoot the issue and need to reach out to Juniper technical support, the following command will be useful to gather the in-formation needed by the support team.
cli> request support information