corporate user user guide for qa i-portal
TRANSCRIPT

Corporate User User Guide
for QA i-Portal
Version 1.0
Examples shown in this User Guide are for demonstration purpose only.
They might not reflect the actual information published on QA i-Portal.

Table of Contents
1. Access the QA i-Portal ............................................................................................................................. 1
2. Create Organisational Account ................................................................................................................. 2
3. Login to corporate user account ................................................................................................................ 4
4. Submit a new application .......................................................................................................................... 6
i. Send Application Form to applicant ................................................................................................... 6
ii. Wait for Applicant to fill in the Application Form ............................................................................ 8
iii. Review the Application Form filled by applicant .............................................................................. 9
5. Find an application ................................................................................................................................. 14
6. Submit additional documents after application is submitted .................................................................. 15
7. Download payment receipt ..................................................................................................................... 16
8. Resend Application Form to Applicant .................................................................................................. 17
9. Download submitted Application Form ................................................................................................. 18
10. Download submitted documents ............................................................................................................. 19
11. Change details of user account/password ............................................................................................... 20
12. Disallow Documents Upload by Applicant ............................................................................................ 22
13. Delete Application .................................................................................................................................. 23

1
1. Access the QA i-Portal
The Operating Systems supported by the QA i-Portal are Windows Vista, 7, 8, 8.1, 10; macOS
Sierra, and the supported browsers are Firefox version 18-55, Chrome version 27-60, Safari version
6-10, Internet Explorer 11.
To visit the i-Portal as Applicant, open any supported browser and access QA i-Portal Home Page at
https://iportal.hkcaavq.edu.hk.
2
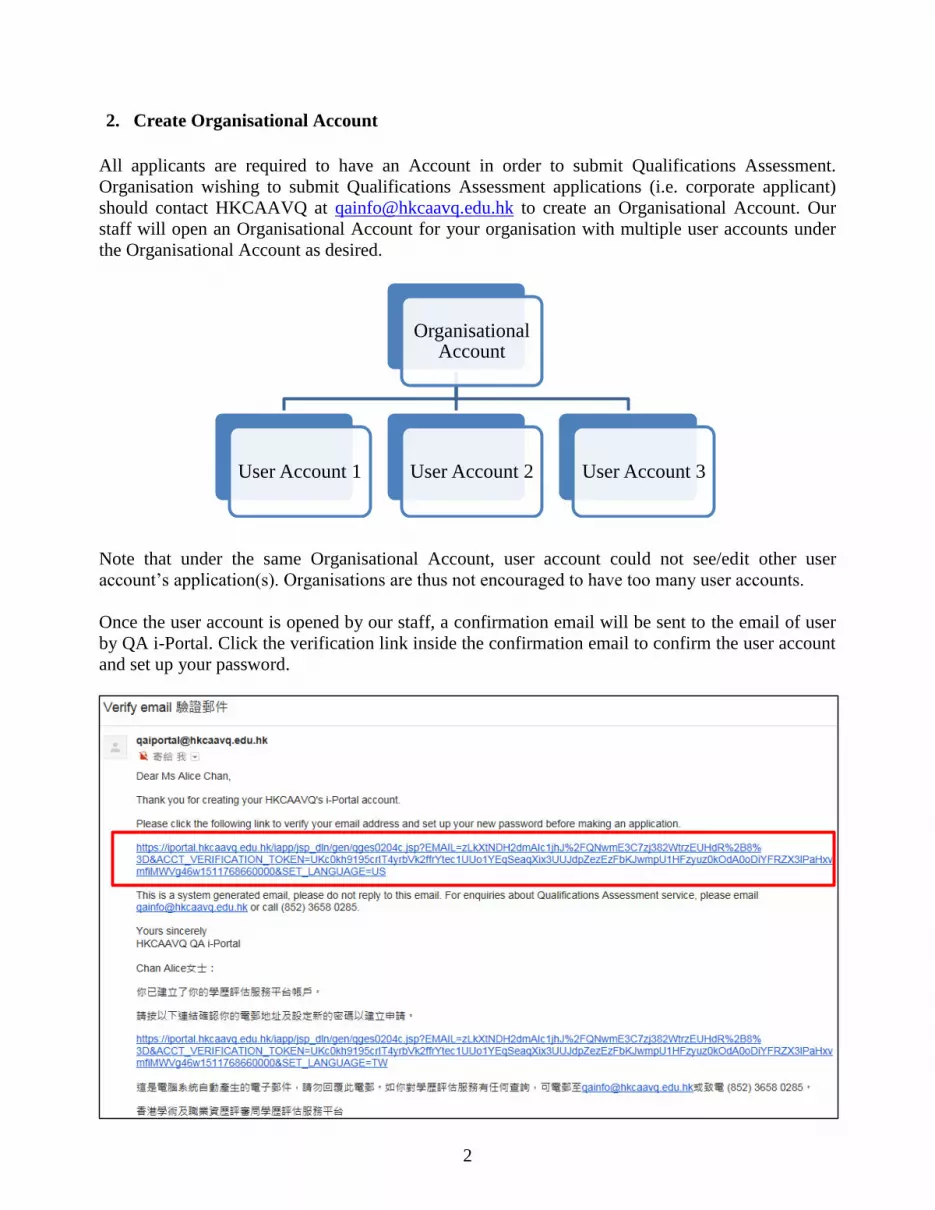
2. Create Organisational Account
All applicants are required to have an Account in order to submit Qualifications Assessment.
Organisation wishing to submit Qualifications Assessment applications (i.e. corporate applicant)
should contact HKCAAVQ at [email protected] to create an Organisational Account. Our
staff will open an Organisational Account for your organisation with multiple user accounts under
the Organisational Account as desired.
Note that under the same Organisational Account, user account could not see/edit other user
account’s application(s). Organisations are thus not encouraged to have too many user accounts.
Once the user account is opened by our staff, a confirmation email will be sent to the email of user
by QA i-Portal. Click the verification link inside the confirmation email to confirm the user account
and set up your password.
Organisational Account
User Account 1 User Account 2 User Account 3

3
QA i-Portal will take you direct to login page for Corporate Applicant.

4
3. Login to corporate user account
To login, click <Corporate Applicant> on QA i-Portal Home Page.

5
Click <Login> after reading the Disclaimer.

6
Input Email Address and Password and click <Login> to login to the system.
4. Submit a new application
i. Send Application Form to applicant
After log in, you will be lead to the ‘My Application’ page. Click the <Create New
Application> button to start.

7
Fill in all required information. Click <Send Application Form to Applicant> button.
QA i-Portal will send an email with hyperlink accessing the Application Form to the
Applicant’s email address you have filled in. You might want to contact the Applicant yourself
to ensure he/she does not miss the email and to remind him/her to check his/her junk mailbox as
well in case he/she cannot not find it.
Since Purpose of Qualifications Assessment is related to assessment fee, it could only be
edited by you.

8
ii. Wait for Applicant to fill in the Application Form
When the Applicant is filling in the Application Form, you will be able to see what they have
entered and saved even before they return the Application Form to you. You can see the
Application Form in progress by clicking the name of the applicant under ‘Applicant Name’.
Once the Applicant has completed filling in the Application Form, he/she can click the
<Confirm and send to organisation> to send the Application Form back to you for review.
If you would like to receive the email notifications sent from QA i-Portal other than the
user account’s email, please input your email address in <Additional Email>.

9
The Application Form will then be returned to you, you will receive an email notification from
QA i-Portal, a message will also be displayed under ‘Message’.
iii. Review the Application Form filled by applicant
Click the name of the Applicant under Applicant Name to access the Application Form.

10
Review the Application Form filled by the Applicant.

11
Under ‘Document’ screen, you will be allowed to upload documents on top of what the
Applicant has uploaded. You can also delete documents that have been uploaded by the
Applicant.
Please note that by choosing to upload documents, you are also certifying that you (or your
organisation) have seen the originals of all the documents to be uploaded.
Under ‘Declaration’ screen, you can enter any special message you would like us to know
about this Application under Remarks in ‘Message to HKCAAVQ from your organisation’.

12
Click <Confirm> to confirm details entered.
Choose a payment method and click <Pay and Submit Application> or <Submit
Application>.

13
Application is submitted to HKCAAVQ.
Some information could only be filled by Applicant, e.g. their personal information,
qualifications, their Declaration etc. If you would like Applicant to change anything in the
Application Form after he/she has returned the Application Form to you, click <Resend
this application form to applicant>. QA i-Portal will send another hyperlink to Applicant
for access to the Application Form. The hyperlink in the email previously sent to applicant
will become invalid.

14
5. Find an application
After login, QA i-Portal will direct you to ‘My Application’ page.
Applications are displayed in chronological order based on the ‘Status Last Changed on’ column
by default.
To view the records in a specific order, you may change the sorting key by clicking a column
heading. For example, once you click <Applicant Name>, the Applications will be ordered
according to Applicant’s Name.

15
6. Submit additional documents after application is submitted
At the ‘My Application’ page, click <Upload Additional Document> at the end of the row of the
Application you would like to upload additional document for.
Upload additional document in the appropriate row by using the ‘Select Files’ button.

16
After finish uploading all additional documents, click <Submit>.
7. Download payment receipt
You can only see payment receipt online if you have paid by credit card online. After login, QA i-
Portal will direct you to ‘My Application’ page. Click <My Online Payment>.

17
When you are at ‘My Online Payment’ screen, click <View Receipt>.
HKCAAVQ would have sent the payment receipt to your registered email upon receiving the
payment if you have settled the payment by other payment methods.
8. Resend Application Form to Applicant
After login, QA i-Portal will direct you to ‘My Application’ page. Click on the name of the
Applicant you would like to resend the Application Form to.

18
Click <Resend this application form to applicant> at the right hand corner.
9. Download submitted Application Form
After login, QA i-Portal will direct you to ‘My Application’ page. Click <Download Completed
Form> on the row of the Application you would like to download submitted Application Form for.
The Application Form submitted will start to download immediately.

19
10. Download submitted documents
After login, QA i-Portal will direct you to ‘My Application’ page. Click <Upload Additional
Document> on the row of the Application you would like to download submitted document.
You will be at ‘Submit Additional Document’ screen, scroll to the bottom of the screen. Click
<Download All Documents>.
If you would like to download each file individually, you can click the button next to the file
name under ‘Previously Submitted Document(s)’.

20
11. Change details of user account/password
At the ‘My Application’ page, click <My Profile>.
After changing the details under your account, click <Save>.

21
If you would like to change your password, click <Change Password>.
Enter current password, and new password. Click <Save>.

22
12. Disallow Documents Upload by Applicant
If you do not want applicants to upload documents themselves, check the box < Disallow
Documents Upload by Applicant> and click <Save>. All applications created in your account
will not allow applicants to upload documents.
In applicants’ online application, the screen will be displayed as below. Step 3 is default set to
< 2. Your organisation will upload the documents for me> and the applicants cannot choose to
upload documents.
Please note if you have previously allowed applicants to upload documents, once you choose
‘Disallow Documents Upload by Applicant’, all documents previously uploaded by applicants will
be purged without notification if he/she edit the application form him/herself.

23
Copyright © 2018 Hong Kong Council for Accreditation of Academic and Vocational Qualifications (HKCAAVQ)
13. Delete Application
After login, QA i-Portal will direct you to ‘My Application’ page. Check the box next to the
Applicant’s name to select the Application you would like to delete. Click <Delete Selected
Applications>.
Click <OK> if you are sure you want to delete the selected Application.