end user manual – bidding for rfx 1 1. logging on - erp portal
TRANSCRIPT
End User Manual – Bidding for Rfx
1
1. Logging on _______________________________________________ 2
2. View List of RFXs __________________________________________ 3
3. View RFx Details __________________________________________ 5
4. Intention to Participate ______________________________________ 9
5. Pay EMD _______________________________________________ 11
6. Create/Submit RFx Response (Bid) ___________________________ 18
7. View Bid/ Modify Bid _______________________________________ 32

End User Manual – Bidding for Rfx
2
1. Logging on
To access Air India e-tenders, navigate to https://erpportal.airindia.in/irj/portal and log on with your username and password.
In case you are an existing vendor with Air India; and do not have a username/password yet, please get in touch with [email protected] to generate your login credentials. If you are a new vendor and do not yet have a vendor code with Air India; please first fill up the vendor registration form by click on the “Supplier Registration” link at the bottom of the screen. While you have not yet received your username/password, you can view a list of current public tenders by clicking on the “Tenders” link at the bottom of the home page https://erpportal.airindia.in/irj/portal.
End User Manual – Bidding for Rfx
3
2. View List of RFXs
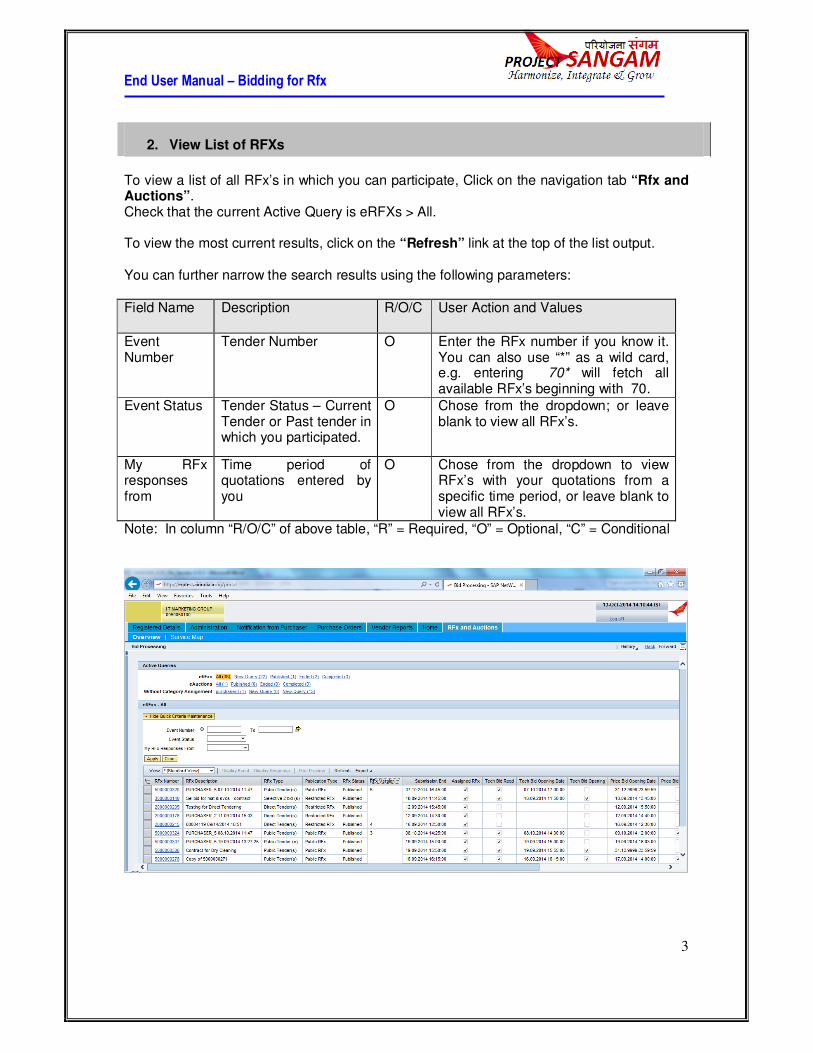
To view a list of all RFx’s in which you can participate, Click on the navigation tab “Rfx and Auctions”. Check that the current Active Query is eRFXs > All. To view the most current results, click on the “Refresh” link at the top of the list output. You can further narrow the search results using the following parameters:
Field Name Description R/O/C User Action and Values
Event Number
Tender Number O Enter the RFx number if you know it. You can also use “*” as a wild card, e.g. entering 70* will fetch all available RFx’s beginning with 70.
Event Status Tender Status – Current Tender or Past tender in which you participated.
O Chose from the dropdown; or leave blank to view all RFx’s.
My RFx responses from
Time period of quotations entered by you
O Chose from the dropdown to view RFx’s with your quotations from a specific time period, or leave blank to view all RFx’s.
Note: In column “R/O/C” of above table, “R” = Required, “O” = Optional, “C” = Conditional
End User Manual – Bidding for Rfx
4
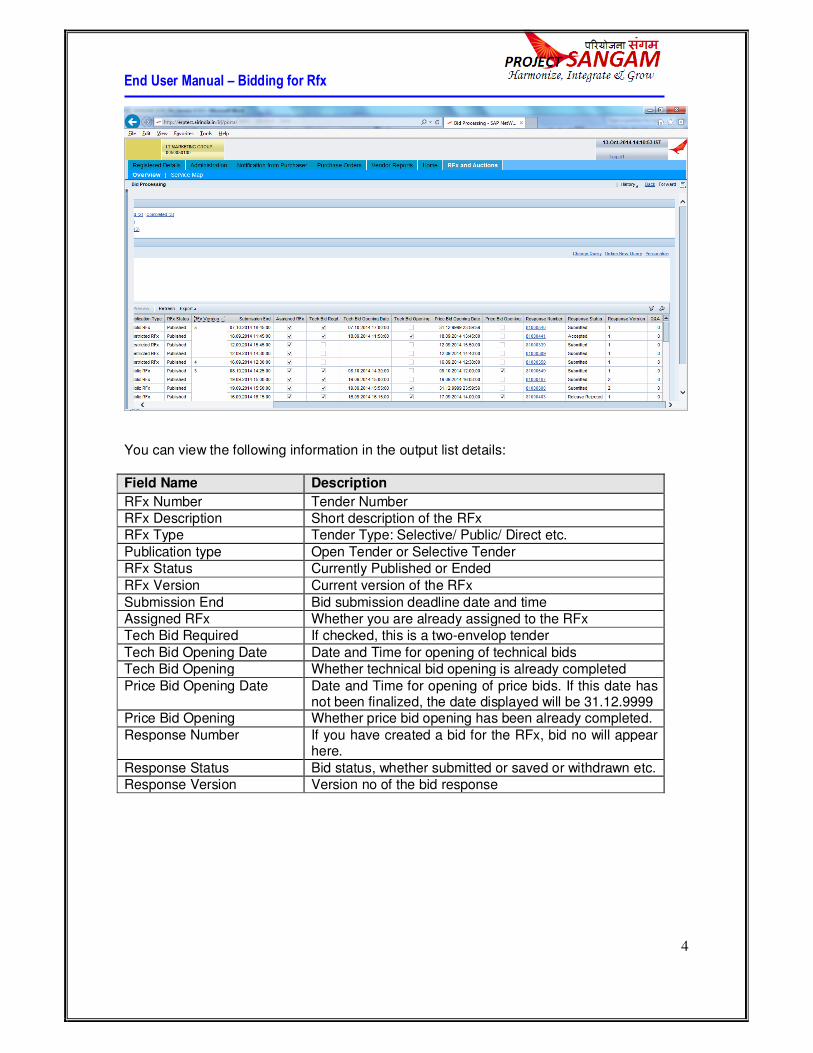
You can view the following information in the output list details:
Field Name Description
RFx Number Tender Number
RFx Description Short description of the RFx
RFx Type Tender Type: Selective/ Public/ Direct etc.
Publication type Open Tender or Selective Tender
RFx Status Currently Published or Ended
RFx Version Current version of the RFx
Submission End Bid submission deadline date and time
Assigned RFx Whether you are already assigned to the RFx
Tech Bid Required If checked, this is a two-envelop tender
Tech Bid Opening Date Date and Time for opening of technical bids
Tech Bid Opening Whether technical bid opening is already completed
Price Bid Opening Date Date and Time for opening of price bids. If this date has not been finalized, the date displayed will be 31.12.9999
Price Bid Opening Whether price bid opening has been already completed.
Response Number If you have created a bid for the RFx, bid no will appear here.
Response Status Bid status, whether submitted or saved or withdrawn etc.
Response Version Version no of the bid response
End User Manual – Bidding for Rfx
5
3. View RFx Details
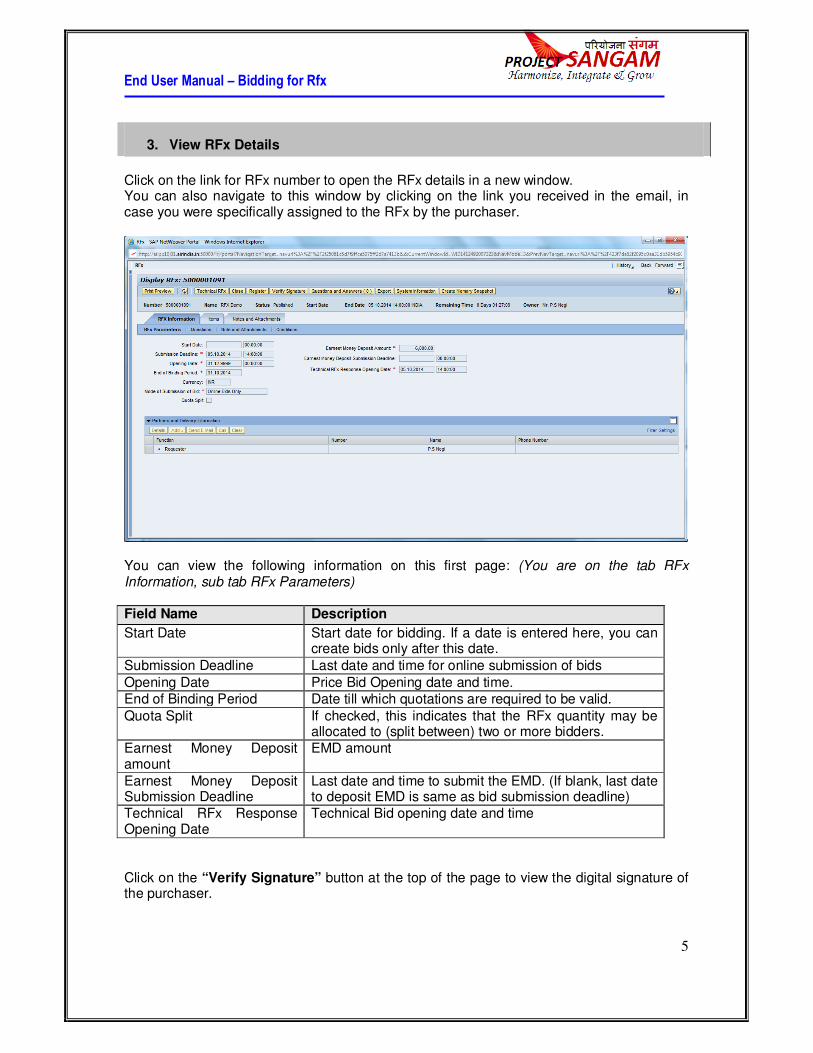
Click on the link for RFx number to open the RFx details in a new window. You can also navigate to this window by clicking on the link you received in the email, in case you were specifically assigned to the RFx by the purchaser.
You can view the following information on this first page: (You are on the tab RFx Information, sub tab RFx Parameters) Field Name Description
Start Date Start date for bidding. If a date is entered here, you can create bids only after this date.
Submission Deadline Last date and time for online submission of bids
Opening Date Price Bid Opening date and time.
End of Binding Period Date till which quotations are required to be valid.
Quota Split If checked, this indicates that the RFx quantity may be allocated to (split between) two or more bidders.
Earnest Money Deposit amount
EMD amount
Earnest Money Deposit Submission Deadline
Last date and time to submit the EMD. (If blank, last date to deposit EMD is same as bid submission deadline)
Technical RFx Response Opening Date
Technical Bid opening date and time
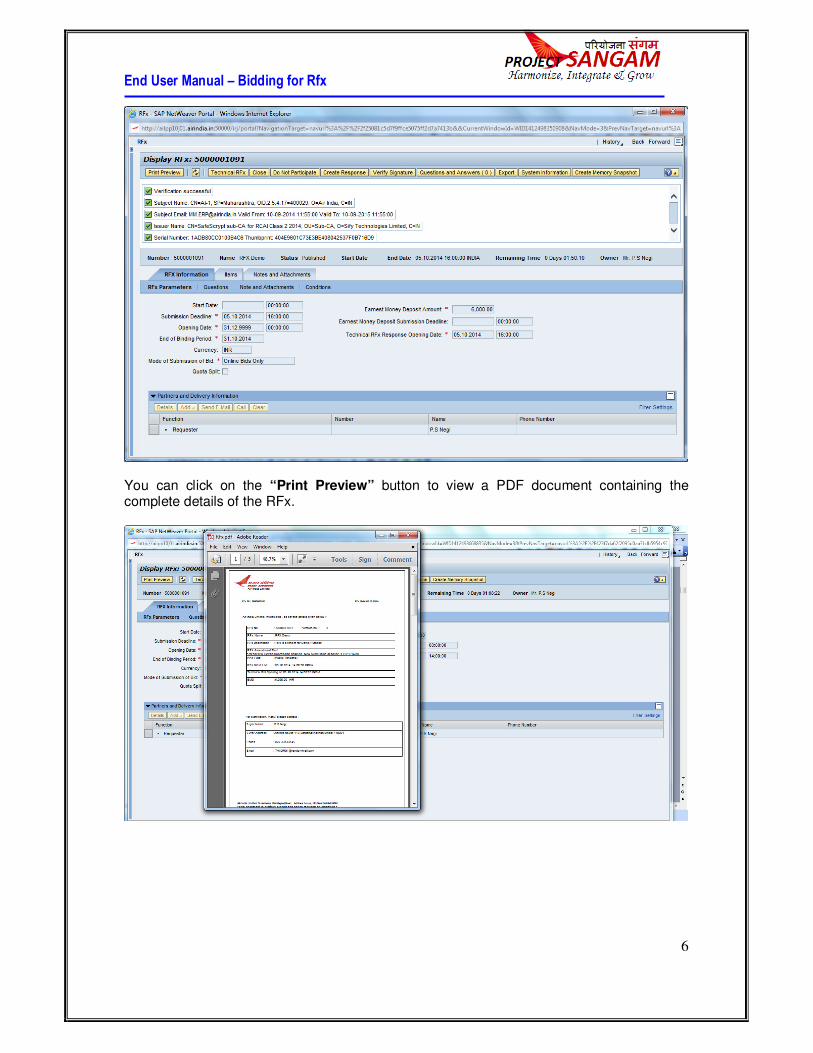
Click on the “Verify Signature” button at the top of the page to view the digital signature of the purchaser.
End User Manual – Bidding for Rfx
6
You can click on the “Print Preview” button to view a PDF document containing the complete details of the RFx.
End User Manual – Bidding for Rfx
7
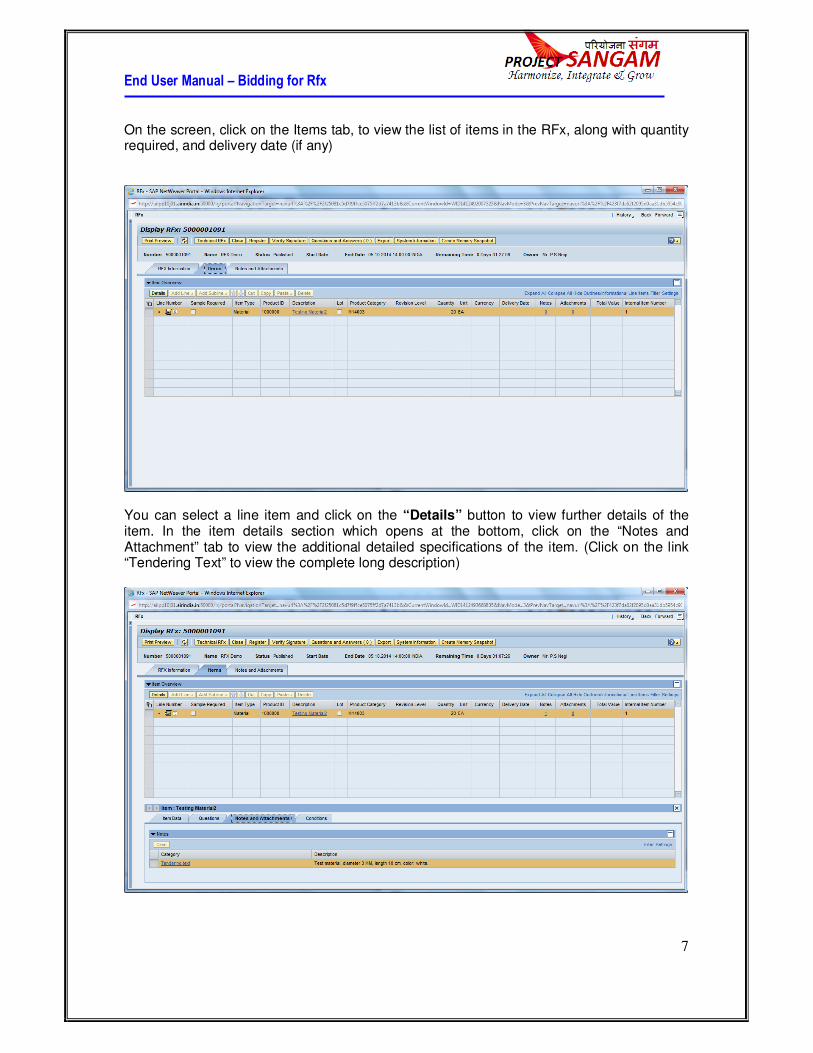
On the screen, click on the Items tab, to view the list of items in the RFx, along with quantity required, and delivery date (if any)
You can select a line item and click on the “Details” button to view further details of the item. In the item details section which opens at the bottom, click on the “Notes and Attachment” tab to view the additional detailed specifications of the item. (Click on the link “Tendering Text” to view the complete long description)
End User Manual – Bidding for Rfx
8
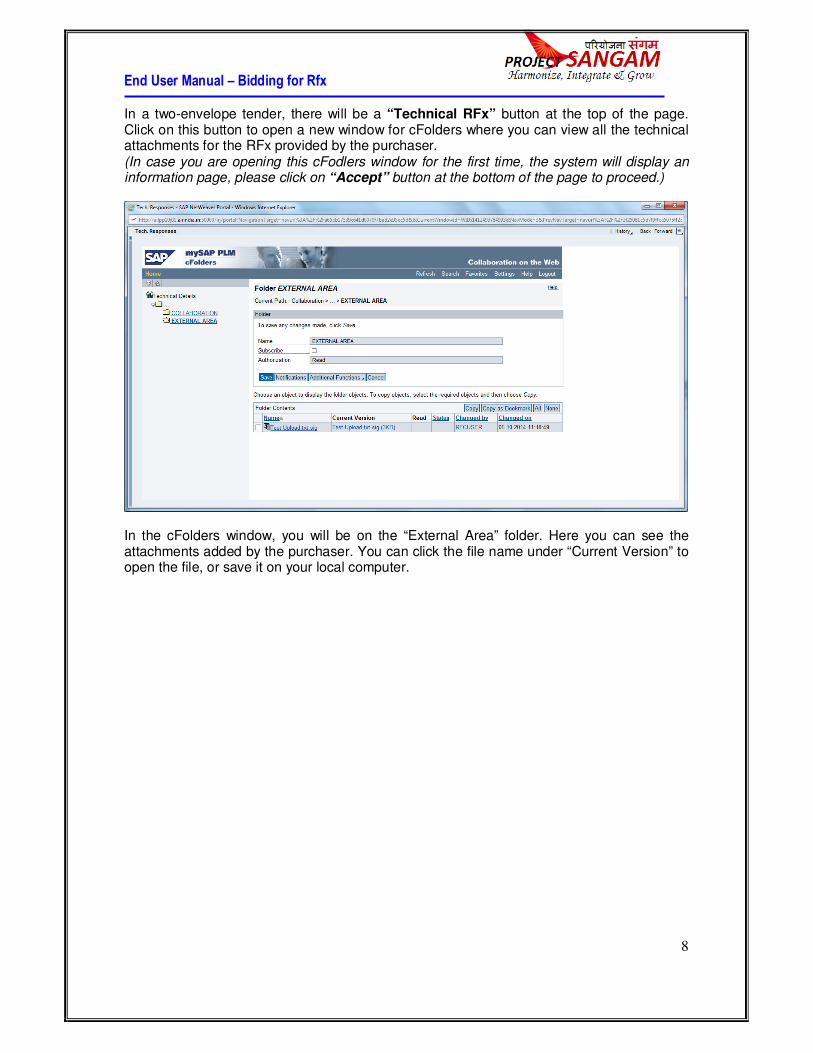
In a two-envelope tender, there will be a “Technical RFx” button at the top of the page. Click on this button to open a new window for cFolders where you can view all the technical attachments for the RFx provided by the purchaser. (In case you are opening this cFodlers window for the first time, the system will display an information page, please click on “Accept” button at the bottom of the page to proceed.)
In the cFolders window, you will be on the “External Area” folder. Here you can see the attachments added by the purchaser. You can click the file name under “Current Version” to open the file, or save it on your local computer.
End User Manual – Bidding for Rfx
9
4. Intention to Participate
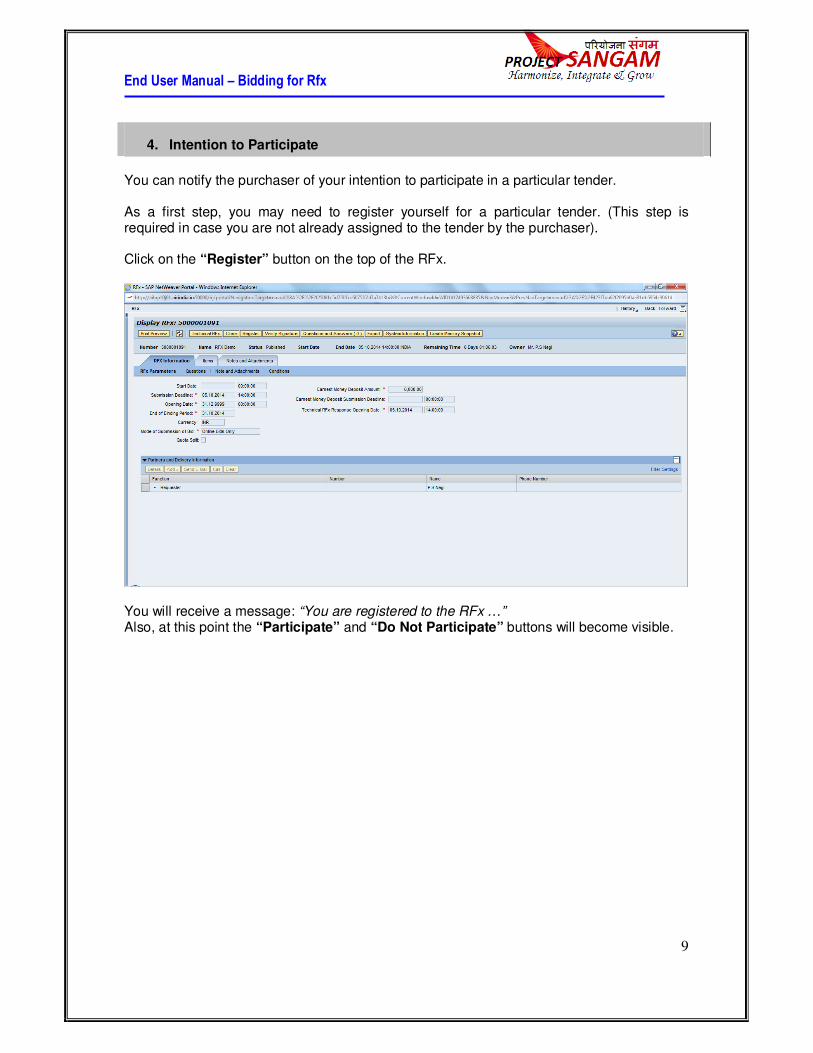
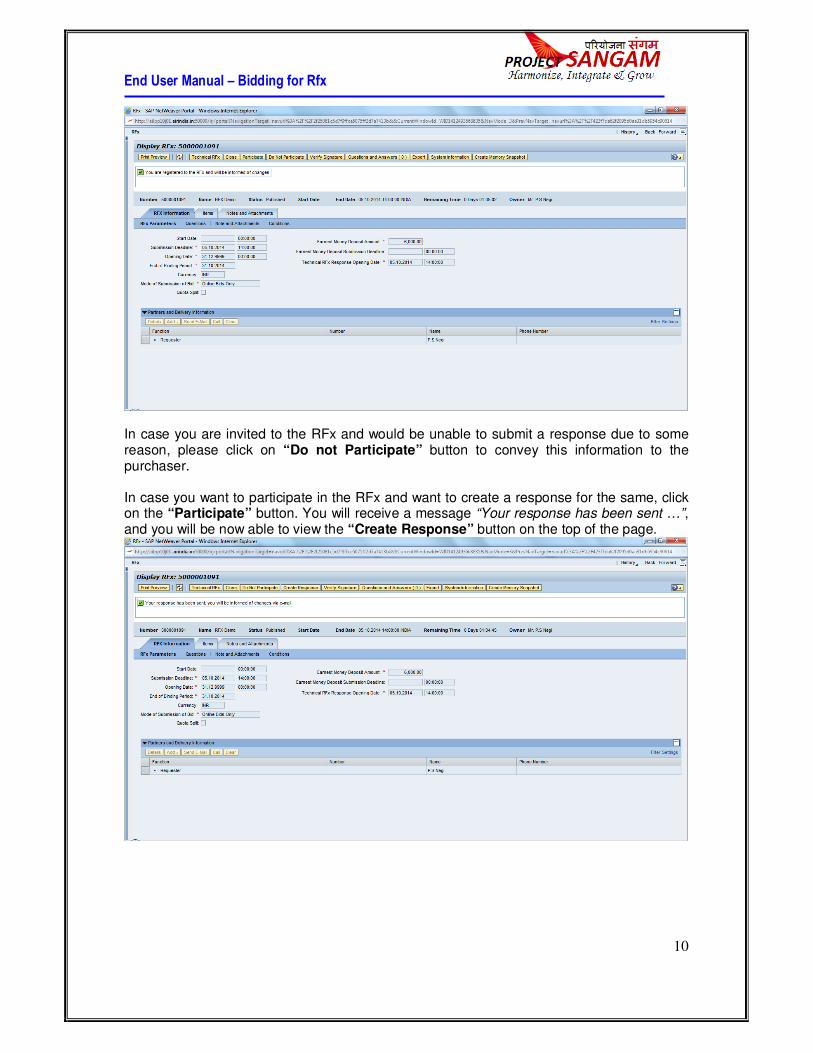
You can notify the purchaser of your intention to participate in a particular tender. As a first step, you may need to register yourself for a particular tender. (This step is required in case you are not already assigned to the tender by the purchaser). Click on the “Register” button on the top of the RFx.
You will receive a message: “You are registered to the RFx …” Also, at this point the “Participate” and “Do Not Participate” buttons will become visible.
End User Manual – Bidding for Rfx
10
In case you are invited to the RFx and would be unable to submit a response due to some reason, please click on “Do not Participate” button to convey this information to the purchaser. In case you want to participate in the RFx and want to create a response for the same, click on the “Participate” button. You will receive a message “Your response has been sent …”, and you will be now able to view the “Create Response” button on the top of the page.
End User Manual – Bidding for Rfx
11
5. Pay EMD
In case EMD is applicable for a particular RFx, you must first pay the EMD amount before you will be able to submit a quote for the RFx. You can pay EMD online using your credit card/ netbanking/ NEFT, or offline through either a DD or a Pay order. If you are paying EMD offline, please contact the purchase official or the responsible authority mentioned in the RFx with the required document. You will be able to submit your quote for the RFx once your payment has been recorded in the system.
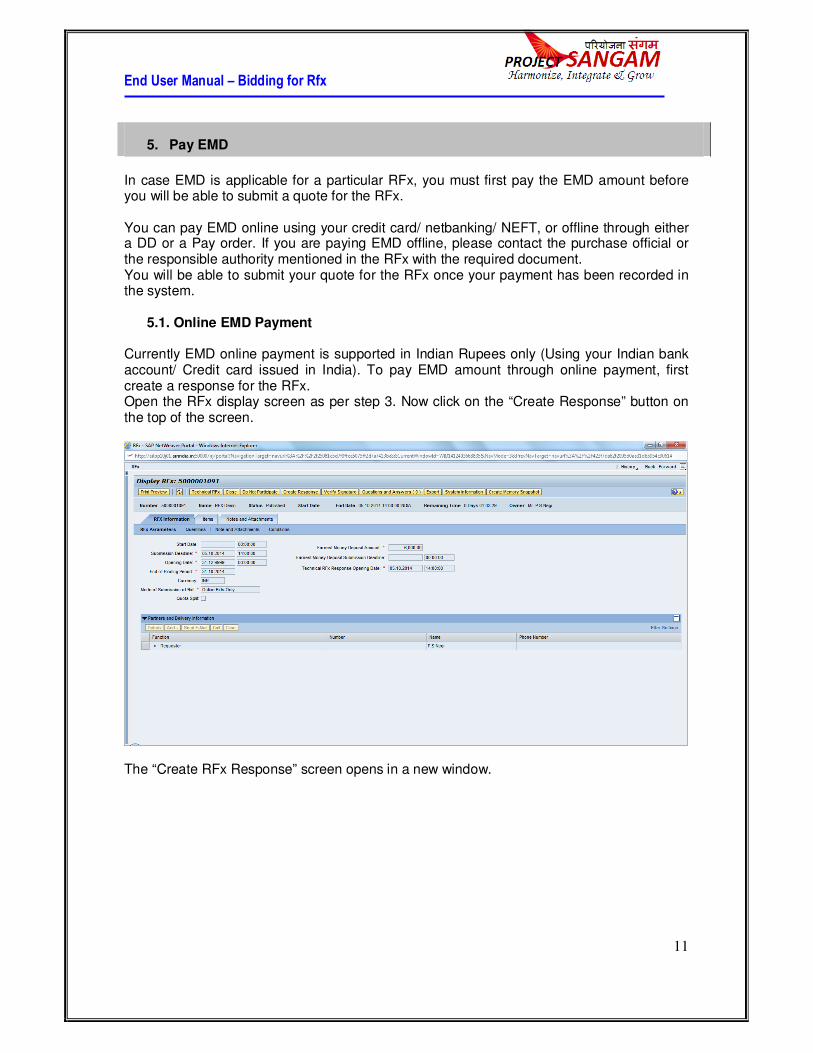
5.1. Online EMD Payment Currently EMD online payment is supported in Indian Rupees only (Using your Indian bank account/ Credit card issued in India). To pay EMD amount through online payment, first create a response for the RFx. Open the RFx display screen as per step 3. Now click on the “Create Response” button on the top of the screen.
The “Create RFx Response” screen opens in a new window.
End User Manual – Bidding for Rfx
12
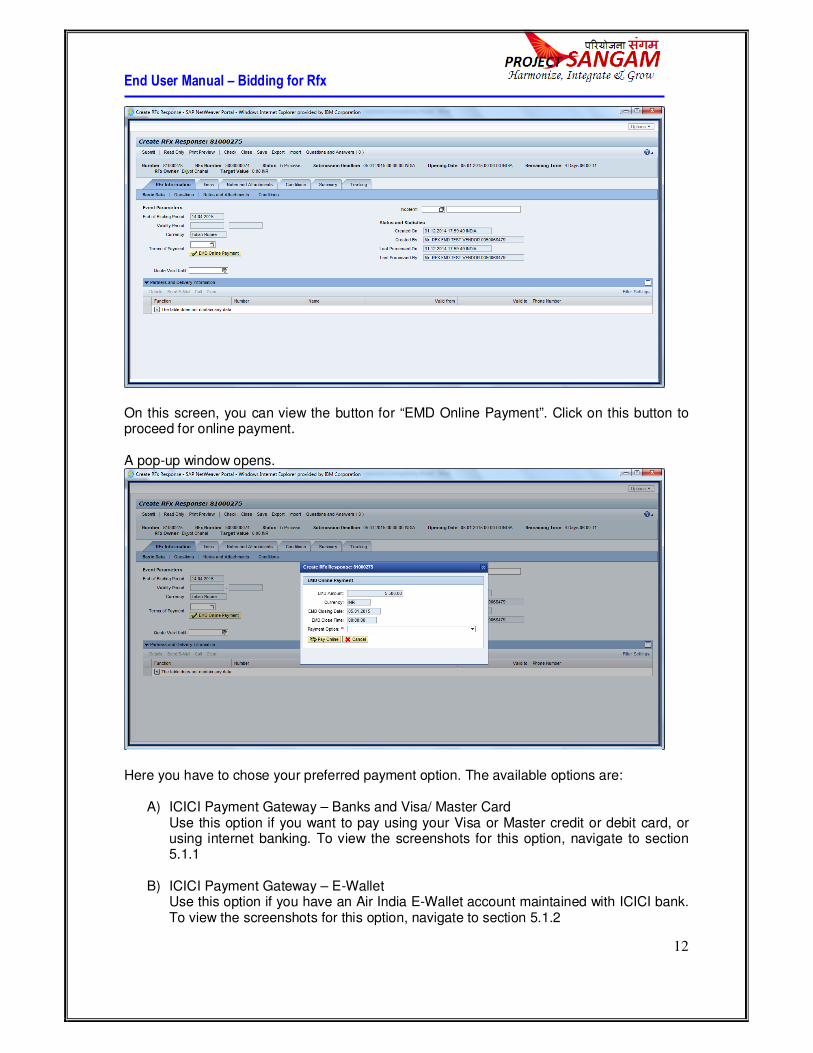
On this screen, you can view the button for “EMD Online Payment”. Click on this button to proceed for online payment. A pop-up window opens.
Here you have to chose your preferred payment option. The available options are:
A) ICICI Payment Gateway – Banks and Visa/ Master Card Use this option if you want to pay using your Visa or Master credit or debit card, or using internet banking. To view the screenshots for this option, navigate to section 5.1.1
B) ICICI Payment Gateway – E-Wallet Use this option if you have an Air India E-Wallet account maintained with ICICI bank. To view the screenshots for this option, navigate to section 5.1.2
End User Manual – Bidding for Rfx
13
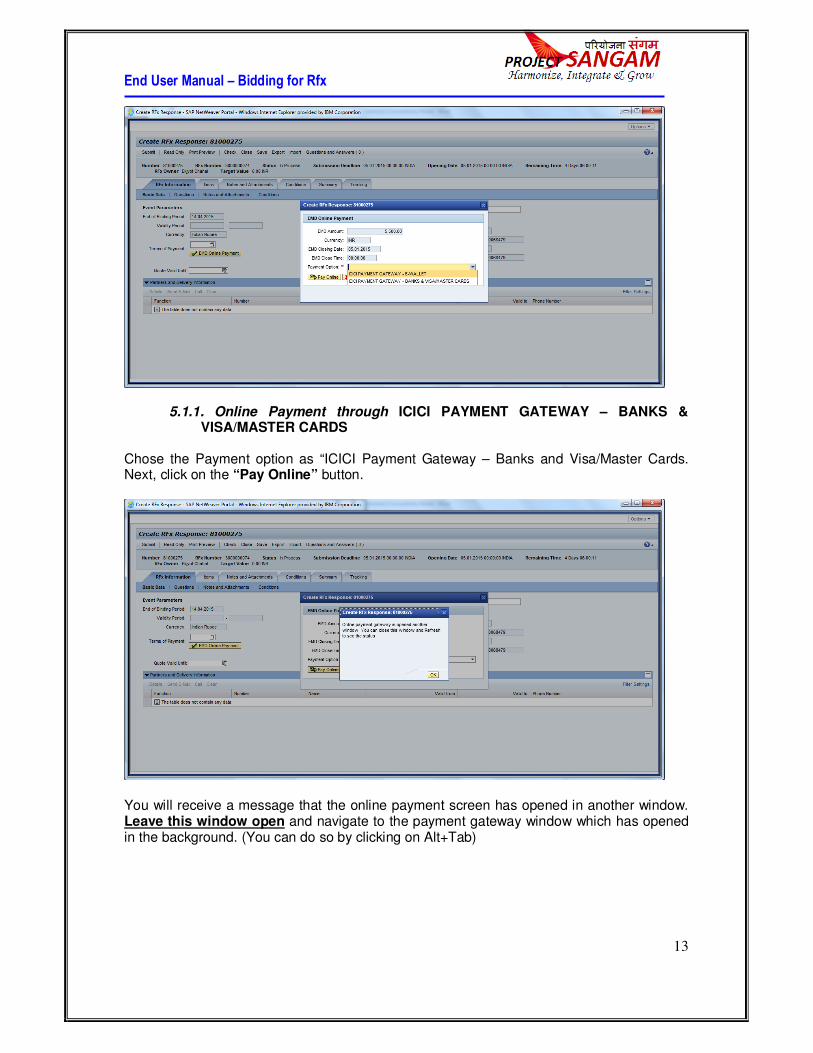
5.1.1. Online Payment through ICICI PAYMENT GATEWAY – BANKS & VISA/MASTER CARDS
Chose the Payment option as “ICICI Payment Gateway – Banks and Visa/Master Cards. Next, click on the “Pay Online” button.
You will receive a message that the online payment screen has opened in another window. Leave this window open and navigate to the payment gateway window which has opened in the background. (You can do so by clicking on Alt+Tab)
End User Manual – Bidding for Rfx
14
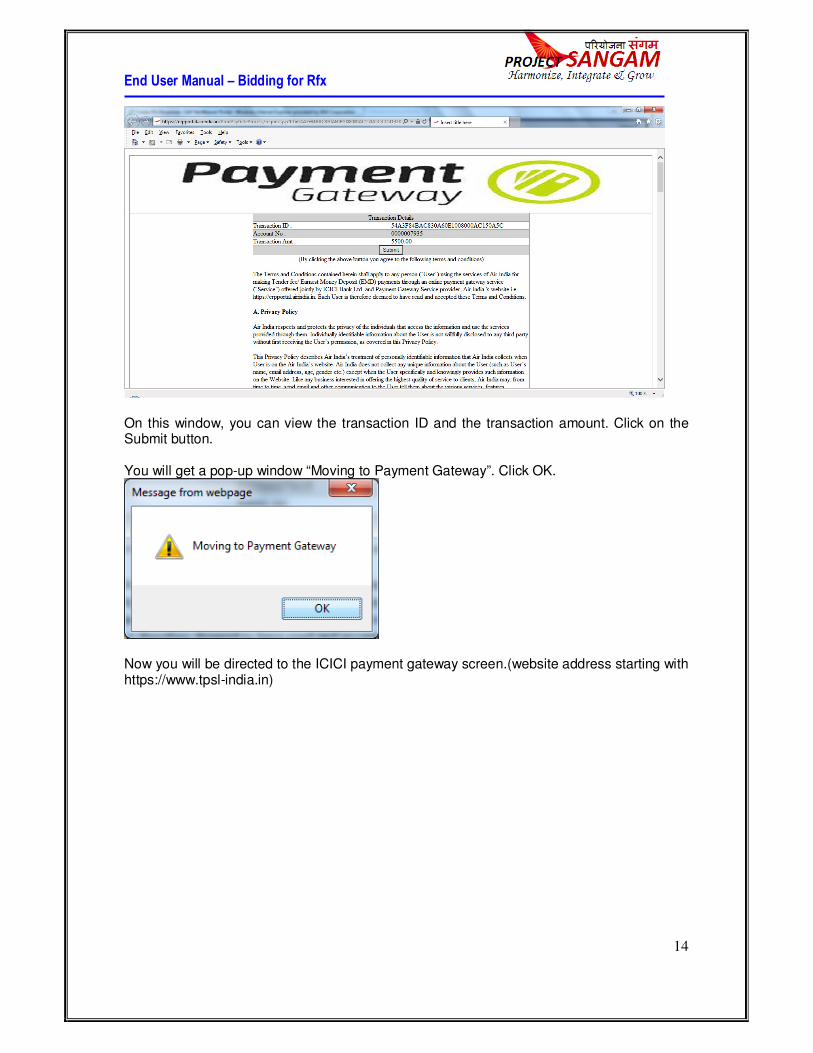
On this window, you can view the transaction ID and the transaction amount. Click on the Submit button. You will get a pop-up window “Moving to Payment Gateway”. Click OK.
Now you will be directed to the ICICI payment gateway screen.(website address starting with https://www.tpsl-india.in)
End User Manual – Bidding for Rfx
15
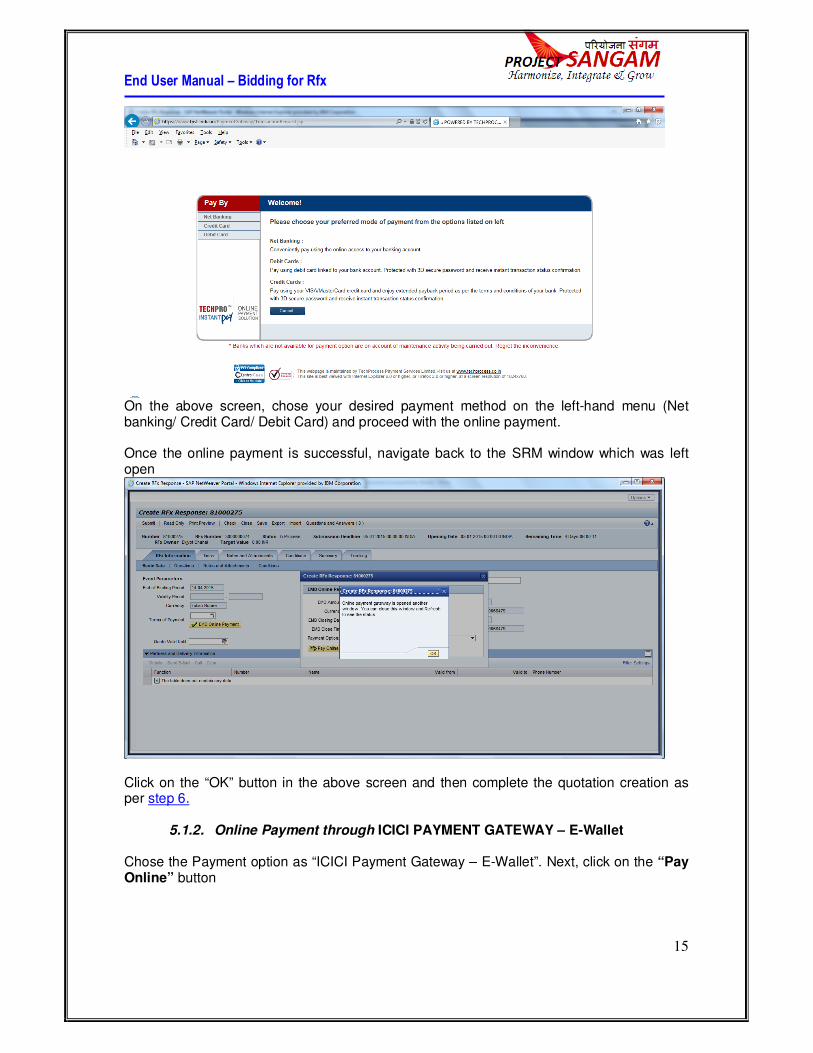
On the above screen, chose your desired payment method on the left-hand menu (Net banking/ Credit Card/ Debit Card) and proceed with the online payment. Once the online payment is successful, navigate back to the SRM window which was left open
Click on the “OK” button in the above screen and then complete the quotation creation as per step 6.
5.1.2. Online Payment through ICICI PAYMENT GATEWAY – E-Wallet Chose the Payment option as “ICICI Payment Gateway – E-Wallet”. Next, click on the “Pay Online” button
End User Manual – Bidding for Rfx
16
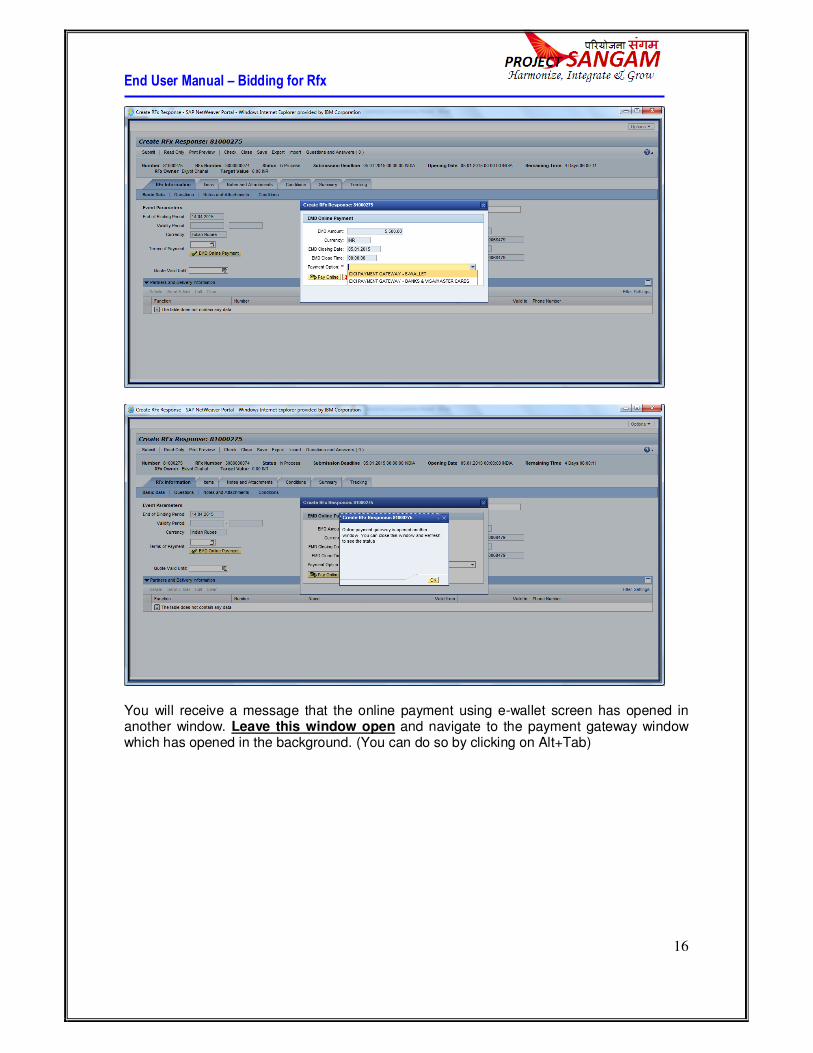
You will receive a message that the online payment using e-wallet screen has opened in another window. Leave this window open and navigate to the payment gateway window which has opened in the background. (You can do so by clicking on Alt+Tab)
End User Manual – Bidding for Rfx
17
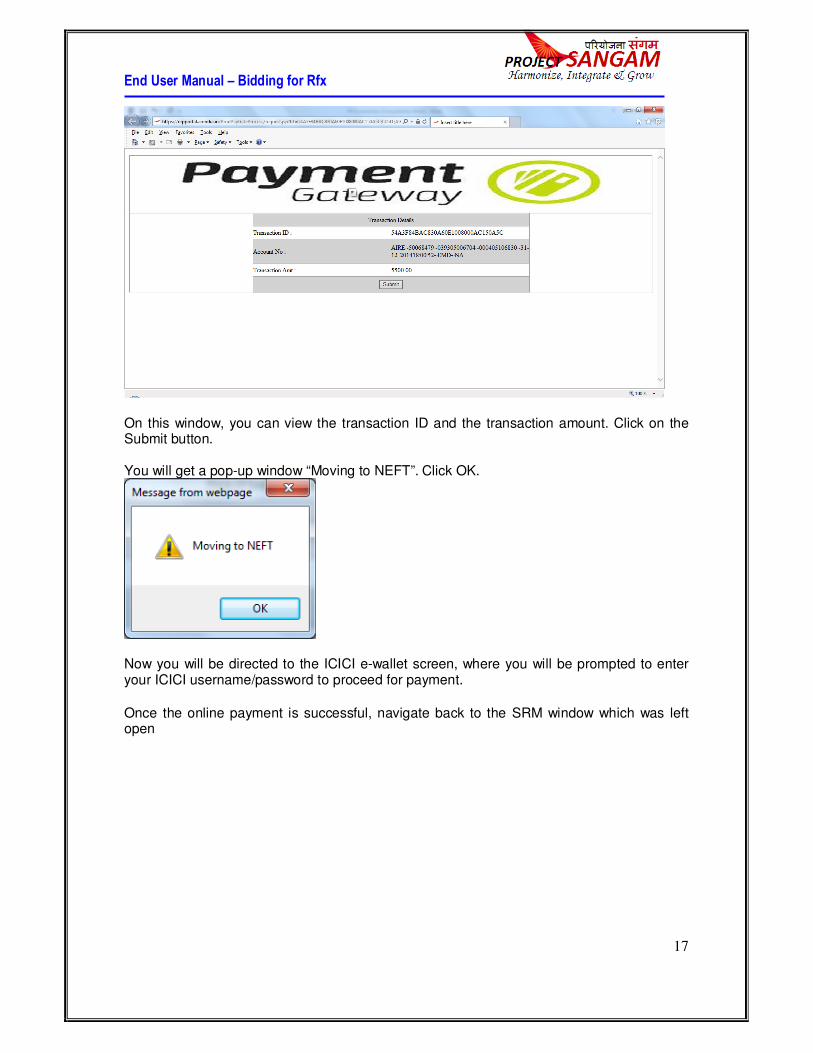
On this window, you can view the transaction ID and the transaction amount. Click on the Submit button. You will get a pop-up window “Moving to NEFT”. Click OK.
Now you will be directed to the ICICI e-wallet screen, where you will be prompted to enter your ICICI username/password to proceed for payment.
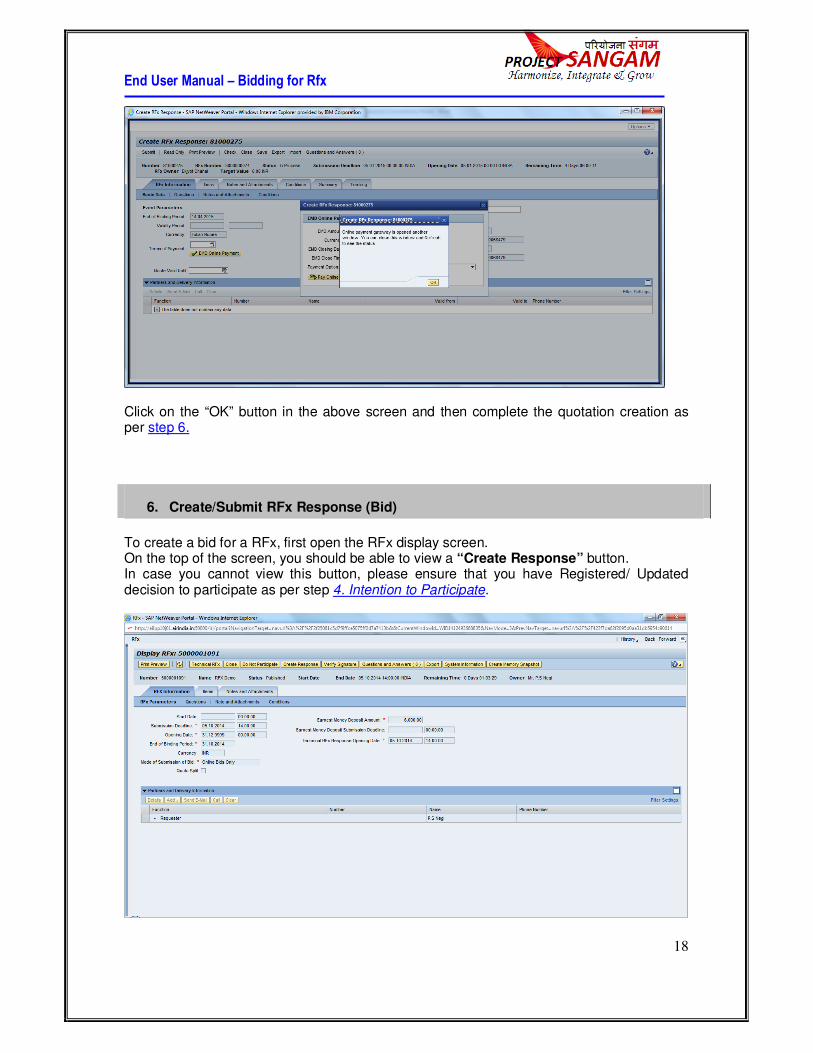
Once the online payment is successful, navigate back to the SRM window which was left open
End User Manual – Bidding for Rfx
18
Click on the “OK” button in the above screen and then complete the quotation creation as per step 6.
6. Create/Submit RFx Response (Bid)
To create a bid for a RFx, first open the RFx display screen. On the top of the screen, you should be able to view a “Create Response” button. In case you cannot view this button, please ensure that you have Registered/ Updated decision to participate as per step 4. Intention to Participate.

End User Manual – Bidding for Rfx
19
Click on the “Create Response” button to start creating your bid. The “Create RFx Response” screen opens in a new window.
On this screen, fill up the following information:
Field Name Description R/O/C User Action and Values
Currency Currency for your quotation
C Select currency from the dropdown. This will be available only if the purchaser has allowed multiple currencies for bidding.
Terms of Payment
Payment terms R Chose the payment term from the dropdown.
Incoterm Delivery Incoterms O Chose the first field from a dropdown, and fill further location details in the second text field.
Quote Valid Unitl
Quote validity end date R Enter quotation valid till date. For reference, the minimum validity end date required by the purchaser is displayed above in the “Binding Period” field.
Note: In column “R/O/C” of above table, “R” = Required, “O” = Optional, “C” = Conditional
End User Manual – Bidding for Rfx
20
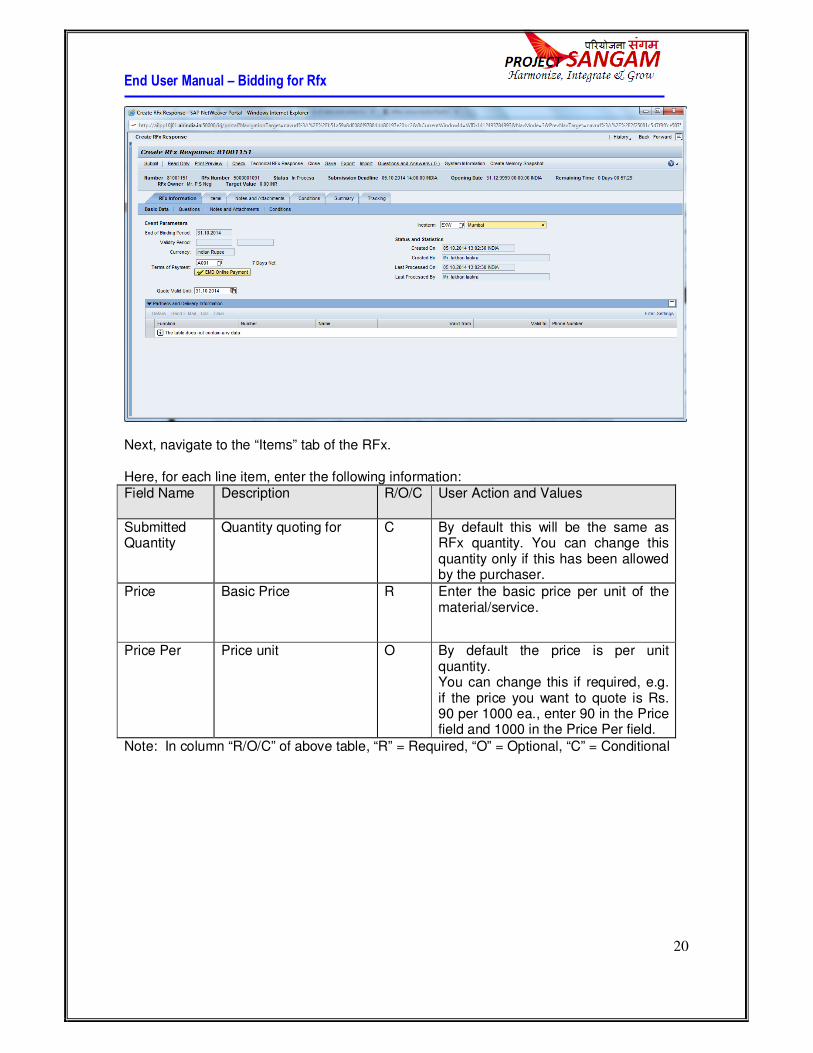
Next, navigate to the “Items” tab of the RFx. Here, for each line item, enter the following information: Field Name Description R/O/C User Action and Values
Submitted Quantity
Quantity quoting for C By default this will be the same as RFx quantity. You can change this quantity only if this has been allowed by the purchaser.
Price Basic Price R Enter the basic price per unit of the material/service.
Price Per Price unit O By default the price is per unit quantity. You can change this if required, e.g. if the price you want to quote is Rs. 90 per 1000 ea., enter 90 in the Price field and 1000 in the Price Per field.
Note: In column “R/O/C” of above table, “R” = Required, “O” = Optional, “C” = Conditional
End User Manual – Bidding for Rfx
21
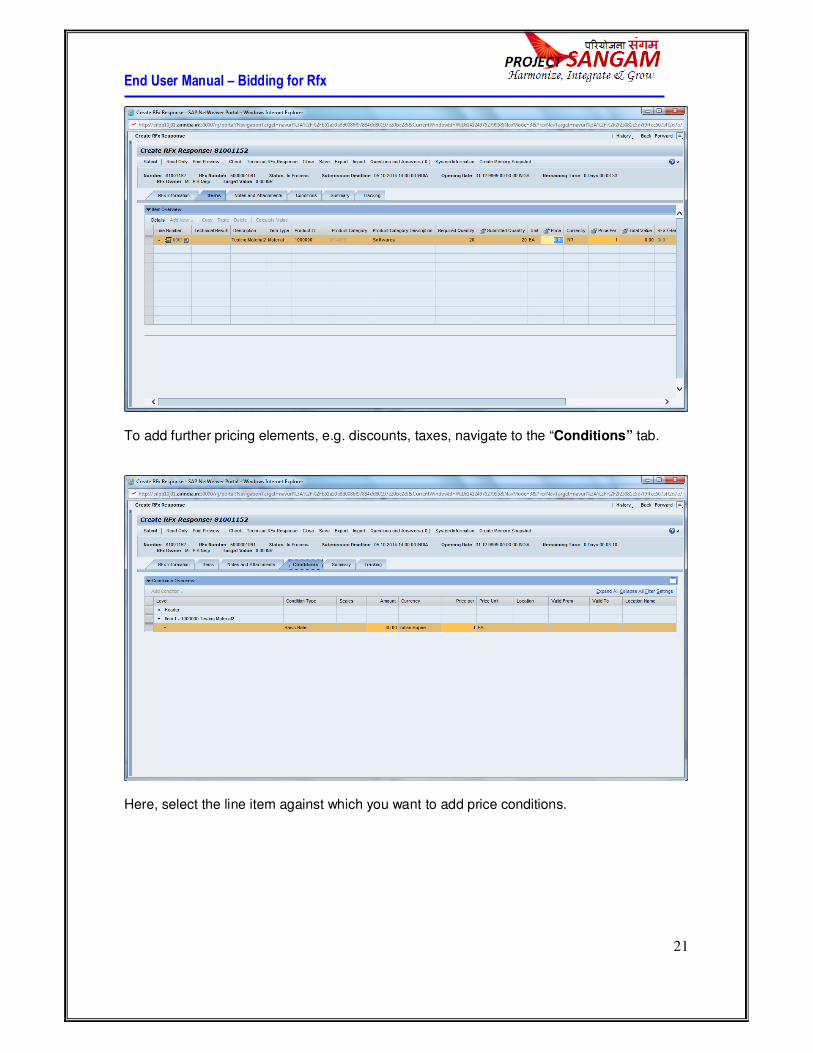
To add further pricing elements, e.g. discounts, taxes, navigate to the “Conditions” tab.
Here, select the line item against which you want to add price conditions.
End User Manual – Bidding for Rfx
22
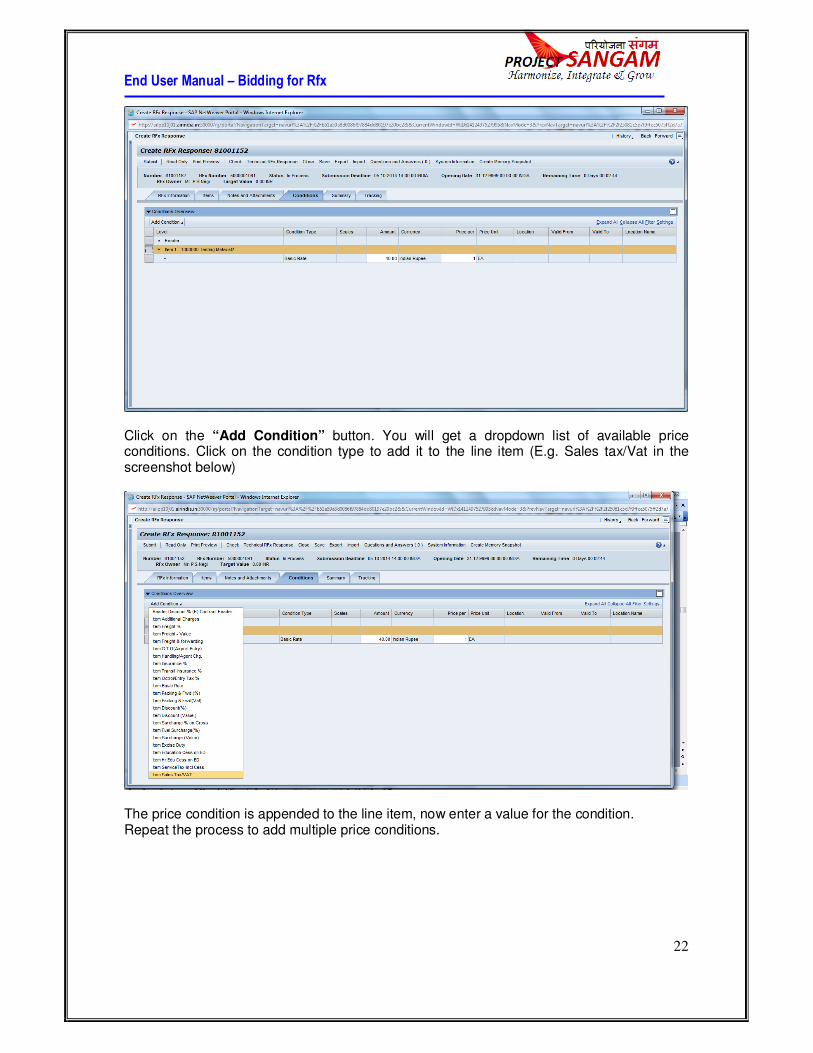
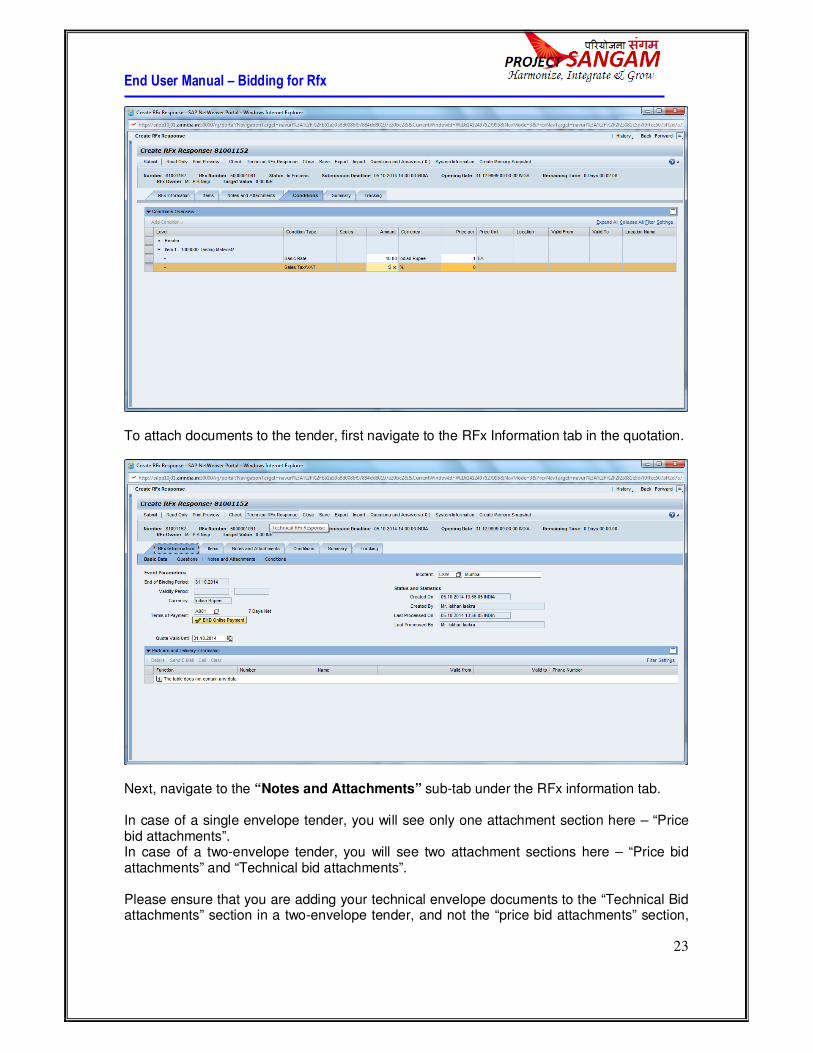
Click on the “Add Condition” button. You will get a dropdown list of available price conditions. Click on the condition type to add it to the line item (E.g. Sales tax/Vat in the screenshot below)
The price condition is appended to the line item, now enter a value for the condition. Repeat the process to add multiple price conditions.
End User Manual – Bidding for Rfx
23
To attach documents to the tender, first navigate to the RFx Information tab in the quotation.
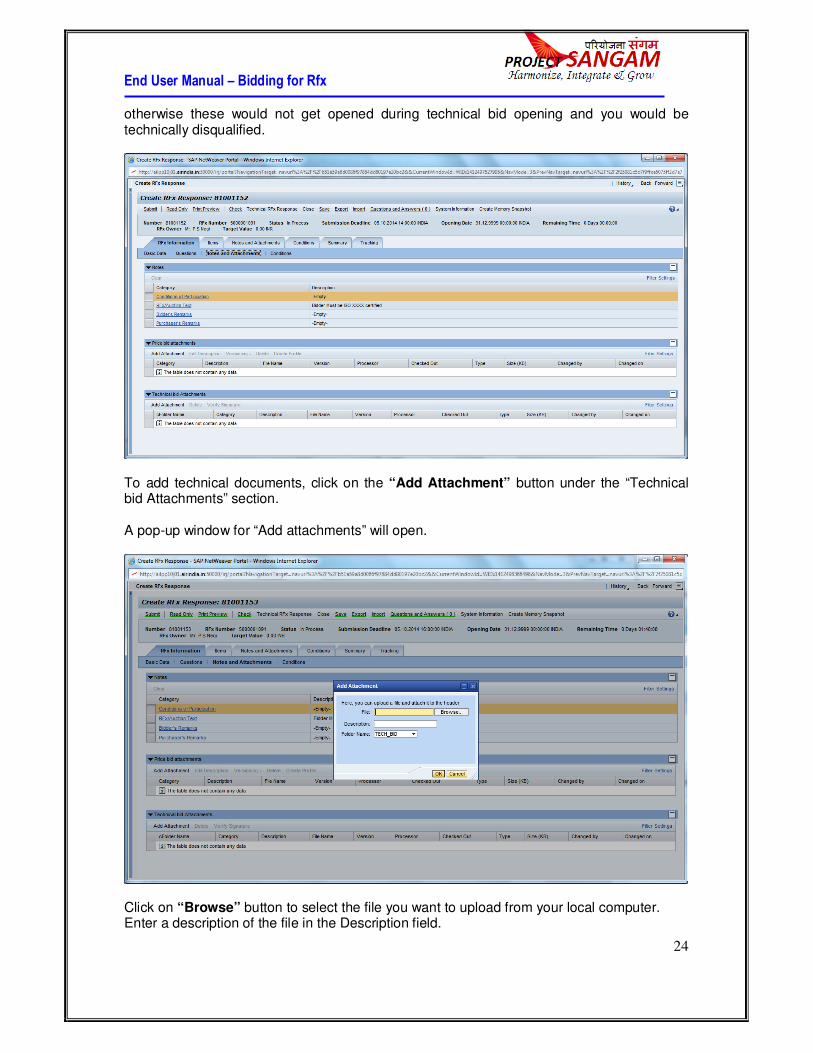
Next, navigate to the “Notes and Attachments” sub-tab under the RFx information tab. In case of a single envelope tender, you will see only one attachment section here – “Price bid attachments”. In case of a two-envelope tender, you will see two attachment sections here – “Price bid attachments” and “Technical bid attachments”. Please ensure that you are adding your technical envelope documents to the “Technical Bid attachments” section in a two-envelope tender, and not the “price bid attachments” section,
End User Manual – Bidding for Rfx
24
otherwise these would not get opened during technical bid opening and you would be technically disqualified.
To add technical documents, click on the “Add Attachment” button under the “Technical bid Attachments” section. A pop-up window for “Add attachments” will open.
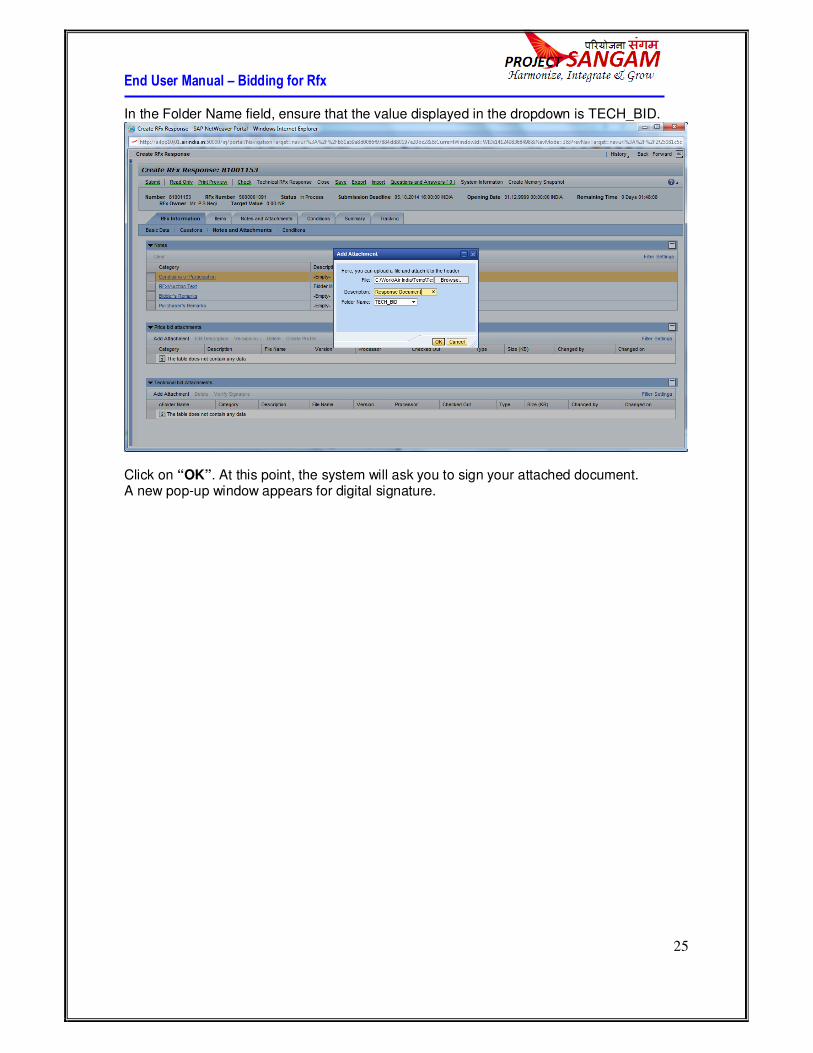
Click on “Browse” button to select the file you want to upload from your local computer. Enter a description of the file in the Description field.
End User Manual – Bidding for Rfx
25
In the Folder Name field, ensure that the value displayed in the dropdown is TECH_BID.
Click on “OK”. At this point, the system will ask you to sign your attached document. A new pop-up window appears for digital signature.
End User Manual – Bidding for Rfx
26
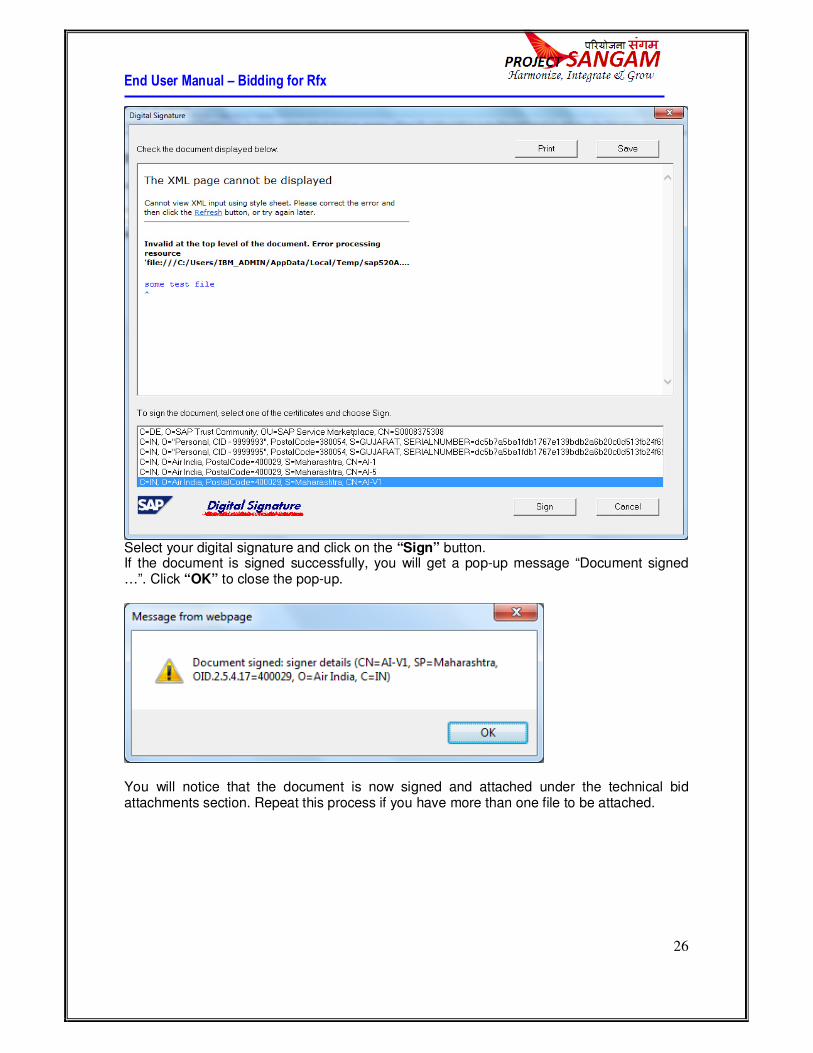
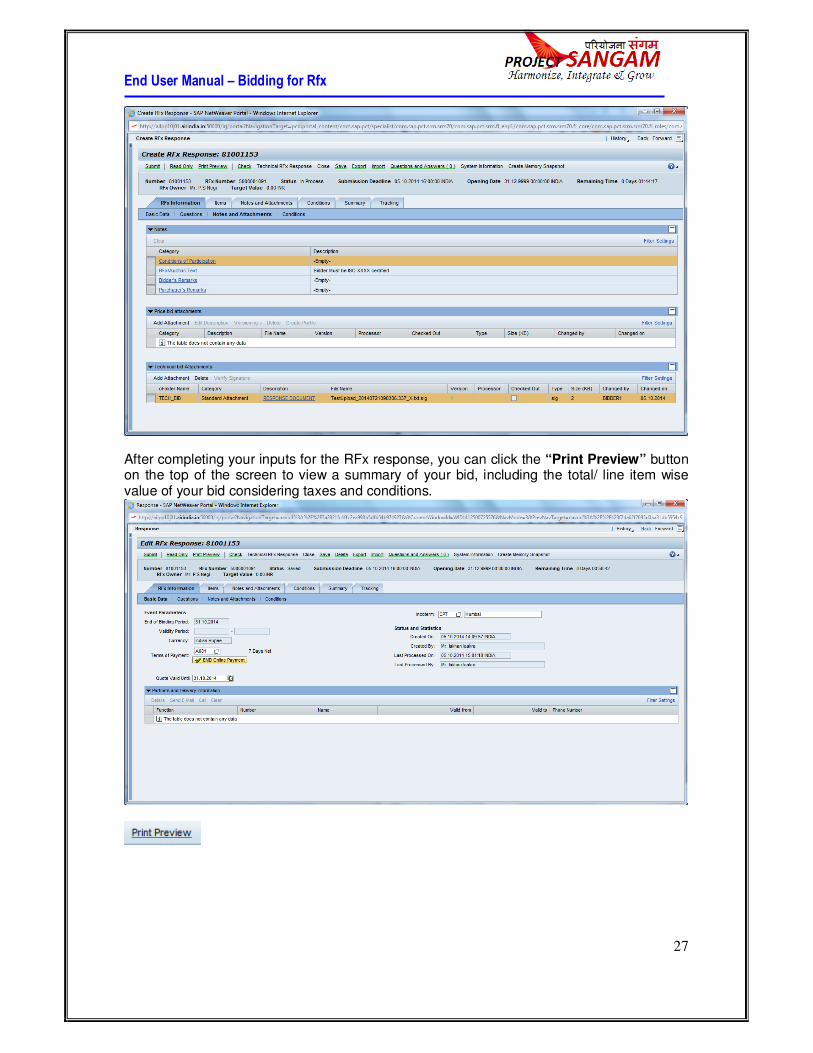
Select your digital signature and click on the “Sign” button. If the document is signed successfully, you will get a pop-up message “Document signed …”. Click “OK” to close the pop-up.
You will notice that the document is now signed and attached under the technical bid attachments section. Repeat this process if you have more than one file to be attached.
End User Manual – Bidding for Rfx
27
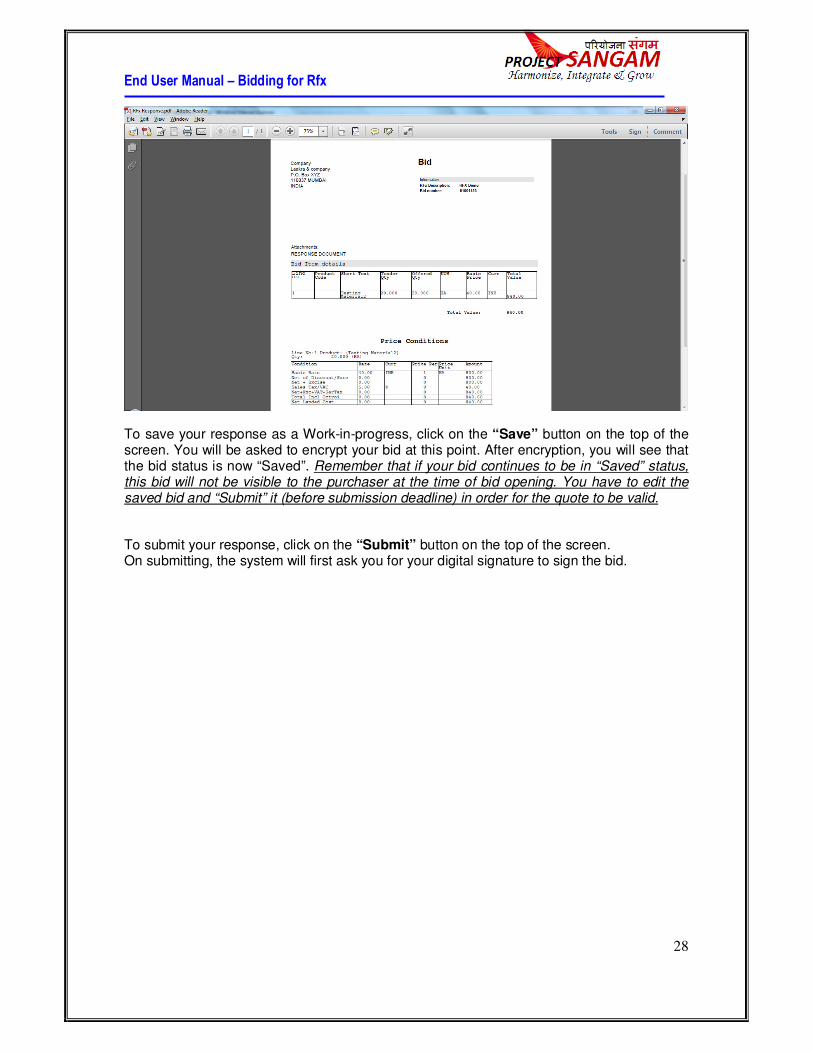
After completing your inputs for the RFx response, you can click the “Print Preview” button on the top of the screen to view a summary of your bid, including the total/ line item wise value of your bid considering taxes and conditions.
End User Manual – Bidding for Rfx
28
To save your response as a Work-in-progress, click on the “Save” button on the top of the screen. You will be asked to encrypt your bid at this point. After encryption, you will see that the bid status is now “Saved”. Remember that if your bid continues to be in “Saved” status, this bid will not be visible to the purchaser at the time of bid opening. You have to edit the saved bid and “Submit” it (before submission deadline) in order for the quote to be valid. To submit your response, click on the “Submit” button on the top of the screen. On submitting, the system will first ask you for your digital signature to sign the bid.
End User Manual – Bidding for Rfx
29
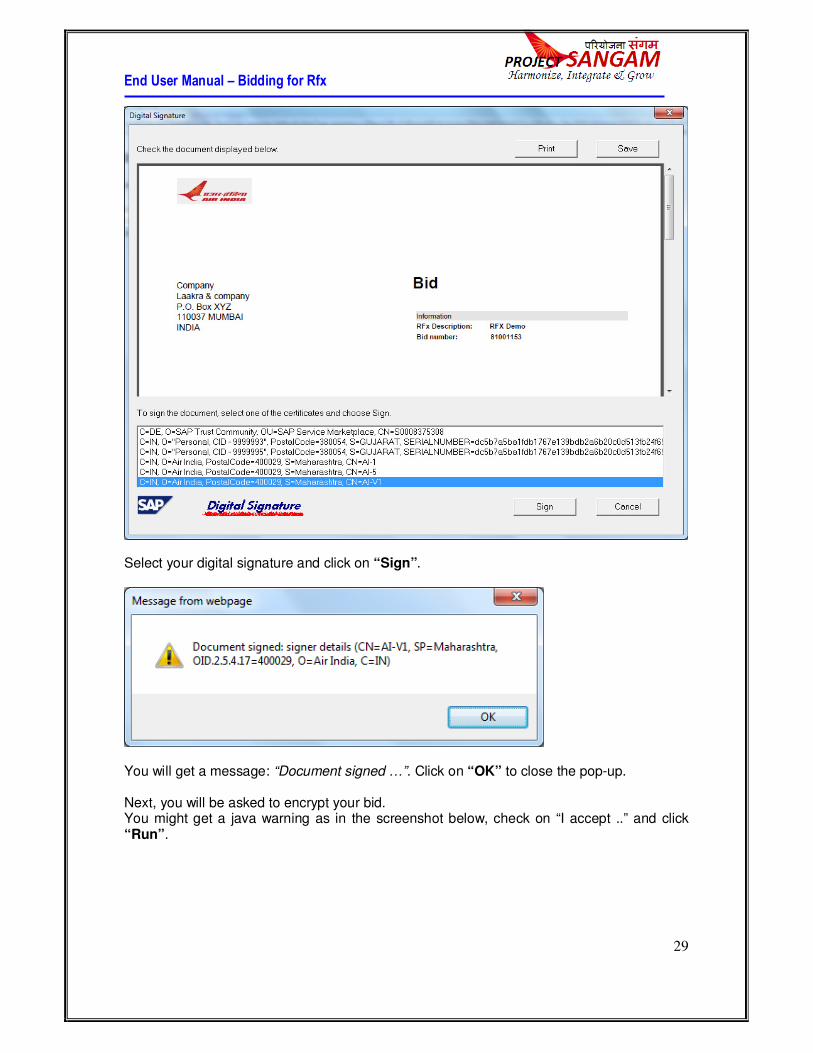
Select your digital signature and click on “Sign”.
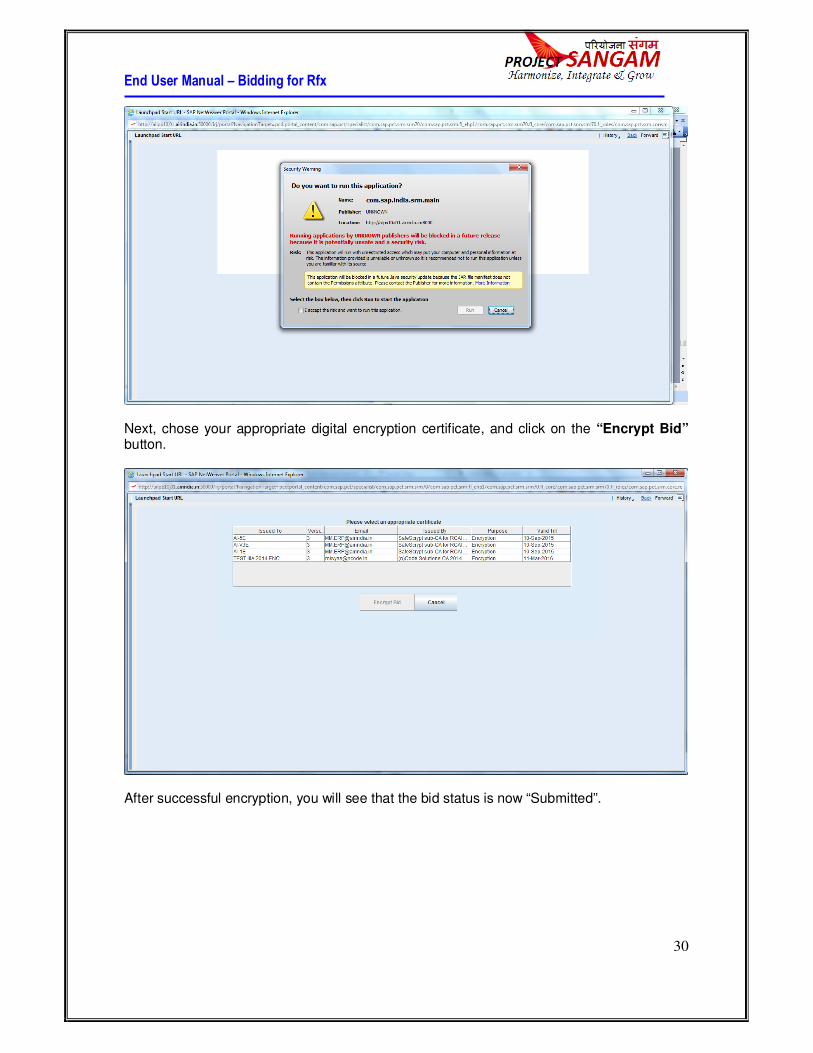
You will get a message: “Document signed …”. Click on “OK” to close the pop-up. Next, you will be asked to encrypt your bid. You might get a java warning as in the screenshot below, check on “I accept ..” and click “Run”.
End User Manual – Bidding for Rfx
30
Next, chose your appropriate digital encryption certificate, and click on the “Encrypt Bid” button.
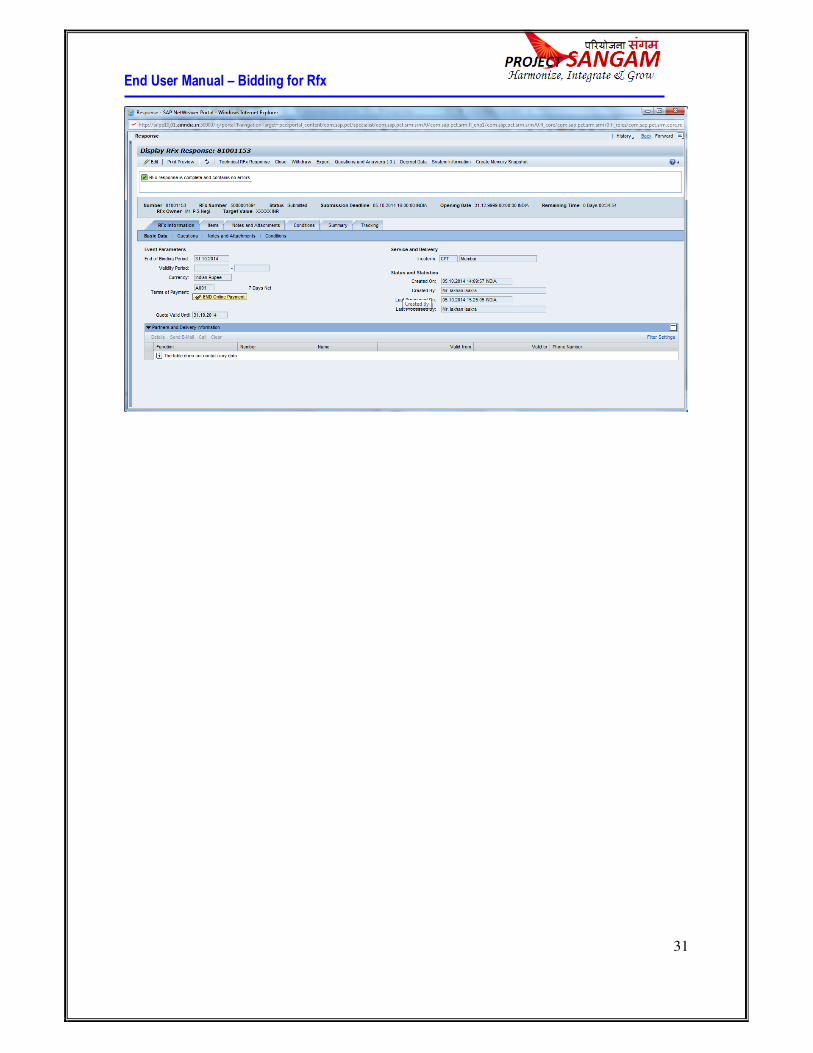
After successful encryption, you will see that the bid status is now “Submitted”.
End User Manual – Bidding for Rfx
31
End User Manual – Bidding for Rfx
32
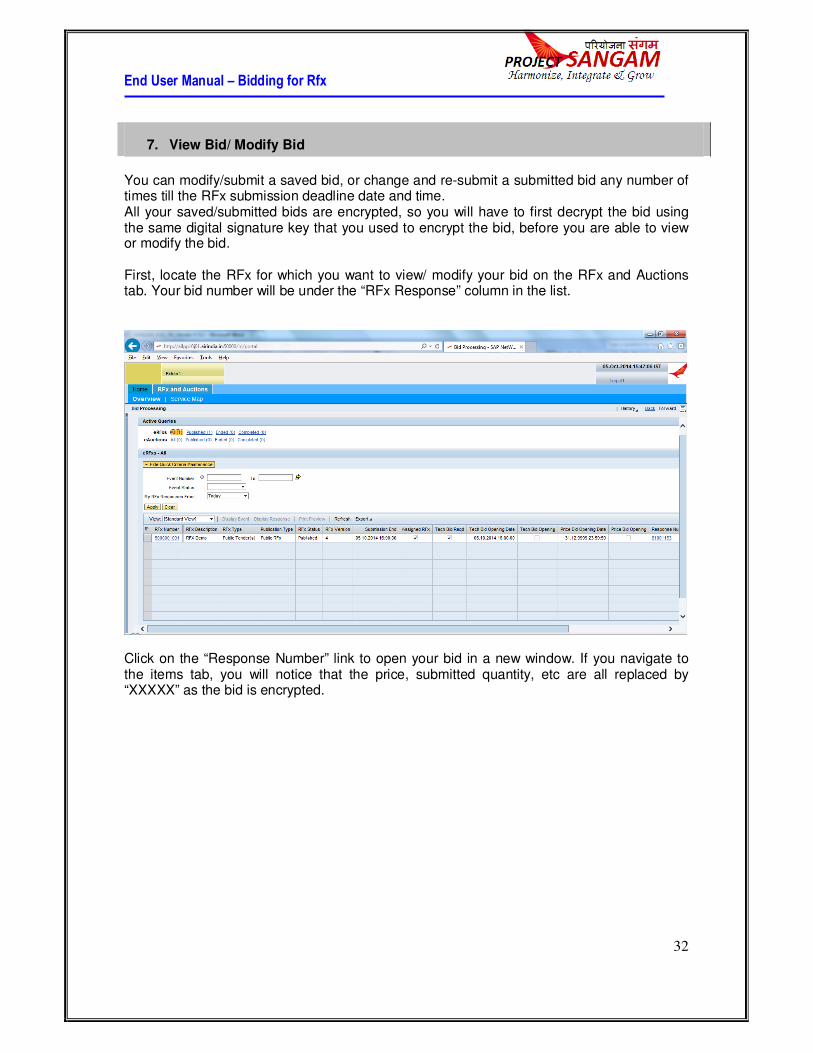
7. View Bid/ Modify Bid
You can modify/submit a saved bid, or change and re-submit a submitted bid any number of times till the RFx submission deadline date and time. All your saved/submitted bids are encrypted, so you will have to first decrypt the bid using the same digital signature key that you used to encrypt the bid, before you are able to view or modify the bid. First, locate the RFx for which you want to view/ modify your bid on the RFx and Auctions tab. Your bid number will be under the “RFx Response” column in the list.
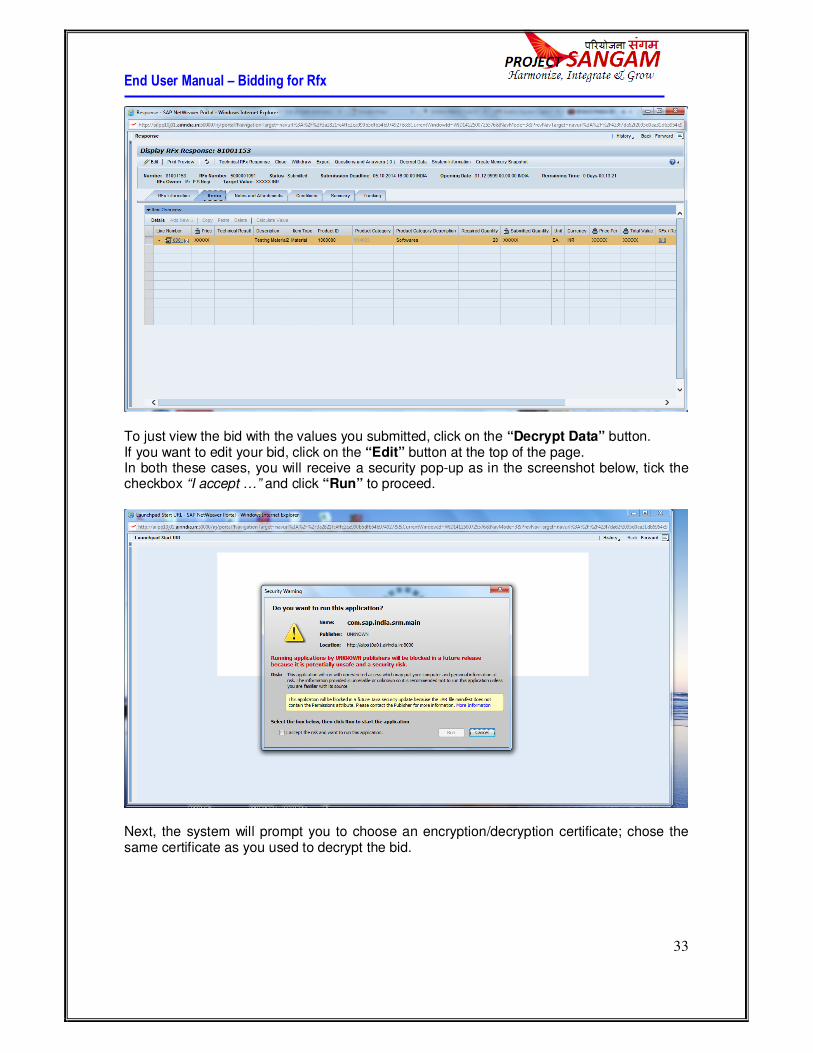
Click on the “Response Number” link to open your bid in a new window. If you navigate to the items tab, you will notice that the price, submitted quantity, etc are all replaced by “XXXXX” as the bid is encrypted.
End User Manual – Bidding for Rfx
33
To just view the bid with the values you submitted, click on the “Decrypt Data” button. If you want to edit your bid, click on the “Edit” button at the top of the page. In both these cases, you will receive a security pop-up as in the screenshot below, tick the checkbox “I accept …” and click “Run” to proceed.
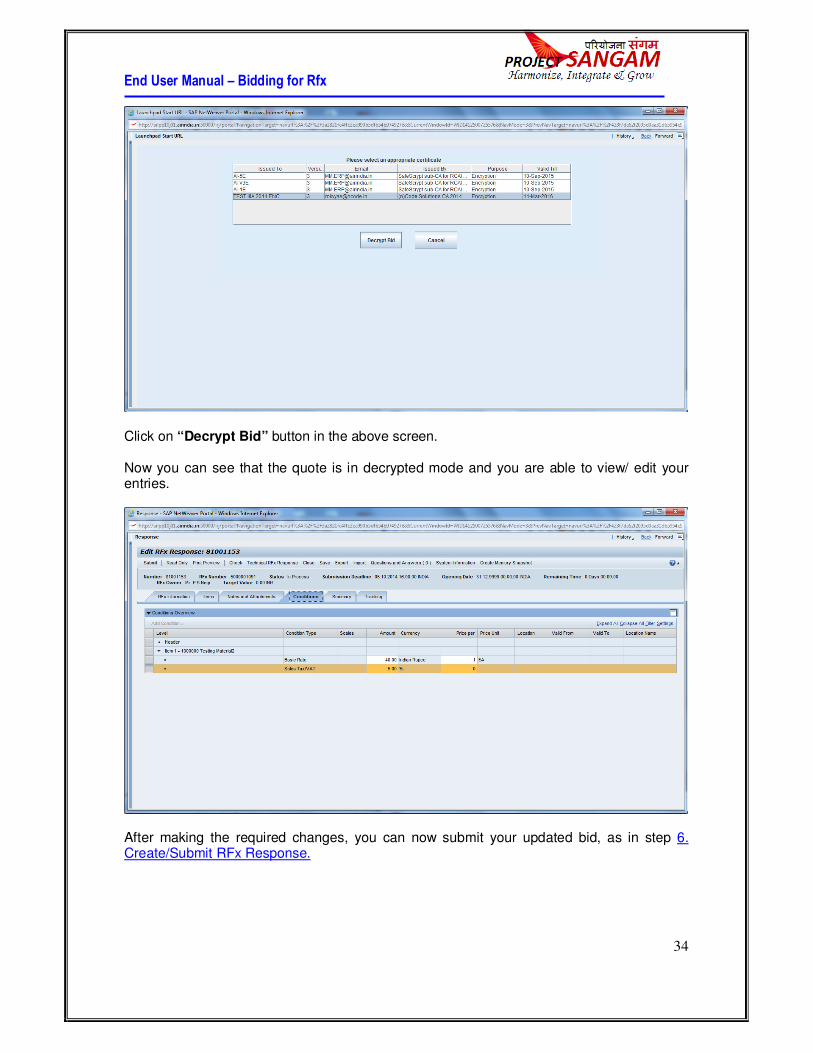
Next, the system will prompt you to choose an encryption/decryption certificate; chose the same certificate as you used to decrypt the bid.
End User Manual – Bidding for Rfx
34
Click on “Decrypt Bid” button in the above screen. Now you can see that the quote is in decrypted mode and you are able to view/ edit your entries.
After making the required changes, you can now submit your updated bid, as in step 6. Create/Submit RFx Response.