copy/document server reference - printego.de
TRANSCRIPT
Operating Instructions
Copy/Document ServerReference
this machine and keep it handy for future reference. For safe and correct use, be sure to read th before using the machine.
Placing Originals
Copying
Document Server
Appendix
1
2
3
4
Read this manual carefully before you use eSafety Information in "About This Machine"
Introduction
This manual contains detailed instructions and notes on the operation and use of this machine. For yoursafety and benefit, read this manual carefully before using the machine. Keep this manual in a handyplace for quick reference.
Important
Contents of this manual are subject to change without prior notice. In no event will the company be li-able for direct, indirect, special, incidental, or consequential damages as a result of handling or oper-ating the machine.
Notes:
Some illustrations in this manual might be slightly different from the machine.
Certain options might not be available in some countries. For details, please contact your local dealer.
Caution:
Use of controls or adjustments or performance of procedures other than those specified in this manualmight result in hazardous radiation exposure.
Notes:
The model names of the machines do not appear in the following pages. Check the type of your ma-chine before reading this manual. (For details, see “Machine Types”, About This Machine.)
• Type 1: MP C3500/Aficio MP C3500/ISC 3535
• Type 2: MP C4500/Aficio MP C4500/ISC 4045
Certain types might not be available in some countries. For details, please contact your local dealer.
Depending on which country you are in, certain units may be optional. For details, please contact yourlocal dealer.
Two kinds of size notation are employed in this manual. With this machine refer to the metric version.
For good copy quality, the supplier recommends that you use genuine toner from the supplier.
The supplier shall not be responsible for any damage or expense that might result from the use of partsother than genuine parts from the supplier with your office products.

i
Manuals for This Machine
Refer to the manuals that are relevant to what you want to do with the machine.
❖ About This MachineBe sure to read the Safety Information in this manual before using the machine.This manual provides an introduction to the functions of the machine. It alsoexplains the control panel, preparation procedures for using the machine,how to enter text, and how to install the CD-ROMs provided.
❖ General Settings GuideExplains User Tools settings, and Address Book procedures such as register-ing fax numbers, e-mail addresses, and user codes. Also refer to this manualfor explanations on how to connect the machine.
❖ TroubleshootingProvides a guide to solving common problems, and explains how to replacepaper, toner, staples, and other consumables.
❖ Security ReferenceThis manual is for administrators of the machine. It explains security func-tions that the administrators can use to protect data from being tampered, orprevent the machine from unauthorized use. Also refer to this manual for theprocedures for registering administrators, as well as setting user and admin-istrator authentication.
❖ Copy/ Document Server ReferenceExplains Copier and Document Server functions and operations. Also refer tothis manual for explanations on how to place originals.
❖ Facsimile ReferenceExplains Facsimile functions and operations.
❖ Printer ReferenceExplains Printer functions and operations.
❖ Scanner ReferenceExplains Scanner functions and operations.
❖ Network GuideExplains how to configure and operate the machine in a network environ-ment, and use the software provided.This manual covers all models, and includes descriptions of functions andsettings that might not be available on this machine. Images, illustrations, andinformation about operating systems that are supported might also differslightly from those of this machine.
ii
❖ Other manuals• Quick Reference Copy Guide• Quick Reference Fax Guide• Quick Reference Printer Guide• Quick Reference Scanner Guide• PostScript3 Supplement• UNIX Supplement• Manuals for DeskTopBinder Lite
• DeskTopBinder Lite Setup Guide• DeskTopBinder Introduction Guide• Auto Document Link Guide
Note❒ Manuals provided are specific to machine types.❒ Adobe Acrobat Reader/Adobe Reader must be installed in order to view the
manuals as PDF files.❒ For “UNIX Supplement”, please visit our Web site or consult an authorized
dealer.❒ “PostScript3 Supplement” and “UNIX Supplement” include descriptions of
functions and settings that might not be available on this machine.
iii
What You Can Do with This Machine <Colour Functions/Colour Adjustments>
Colour Copying
You can switch the colour copy mode depending on the type of originals usedand the desired finish.See p.40 “Selecting a Colour Mode”.
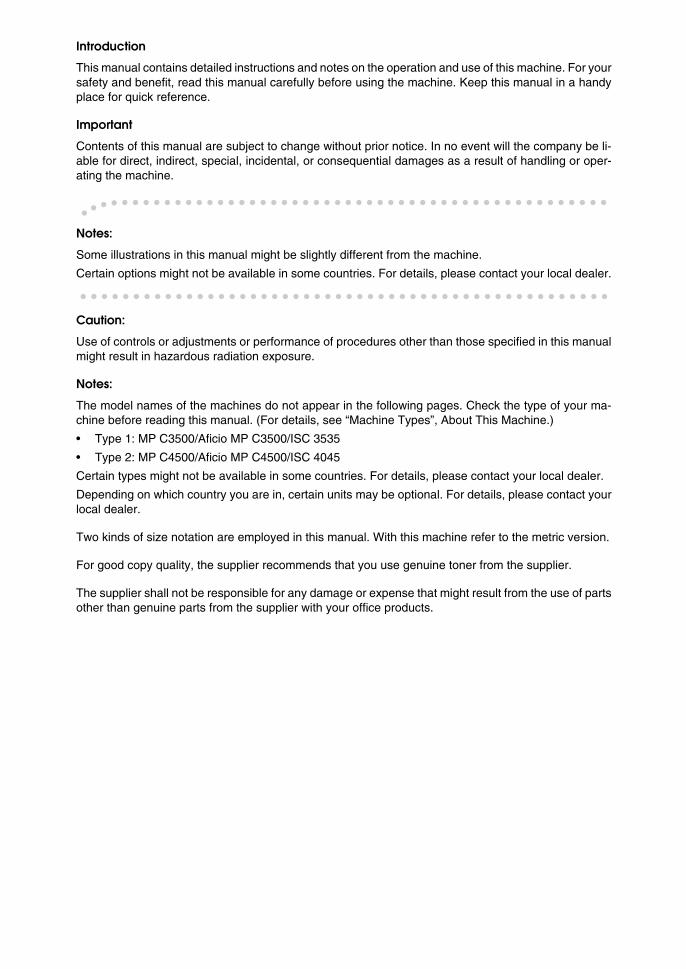
❖ Full Colour CopyCopies using four colours: yellow, magenta, cyan and black.
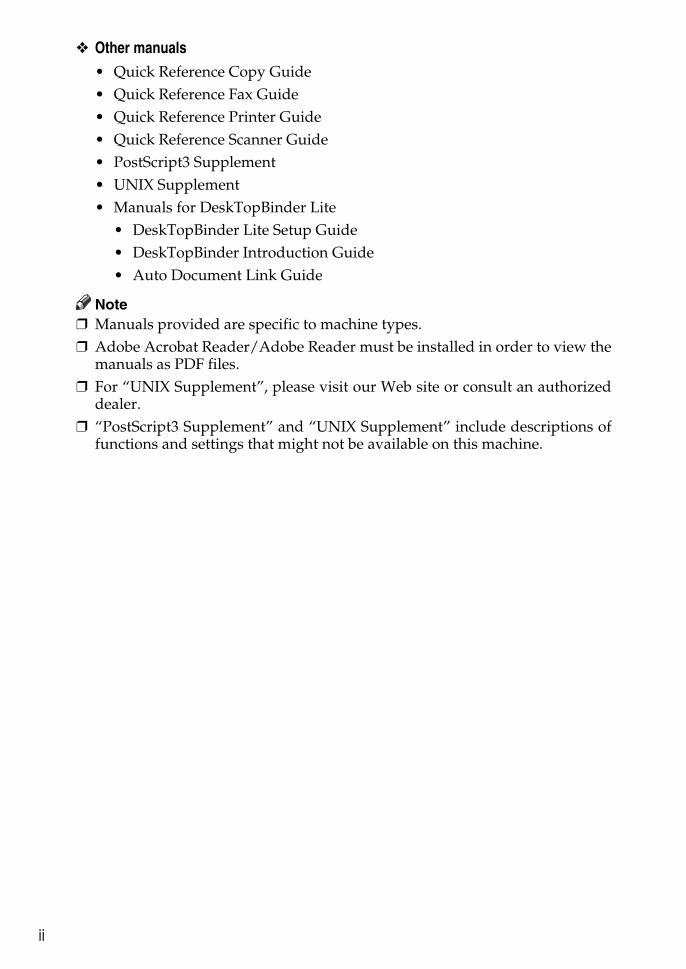
❖ Black/White CopyCopies in black and white even if the original is coloured.
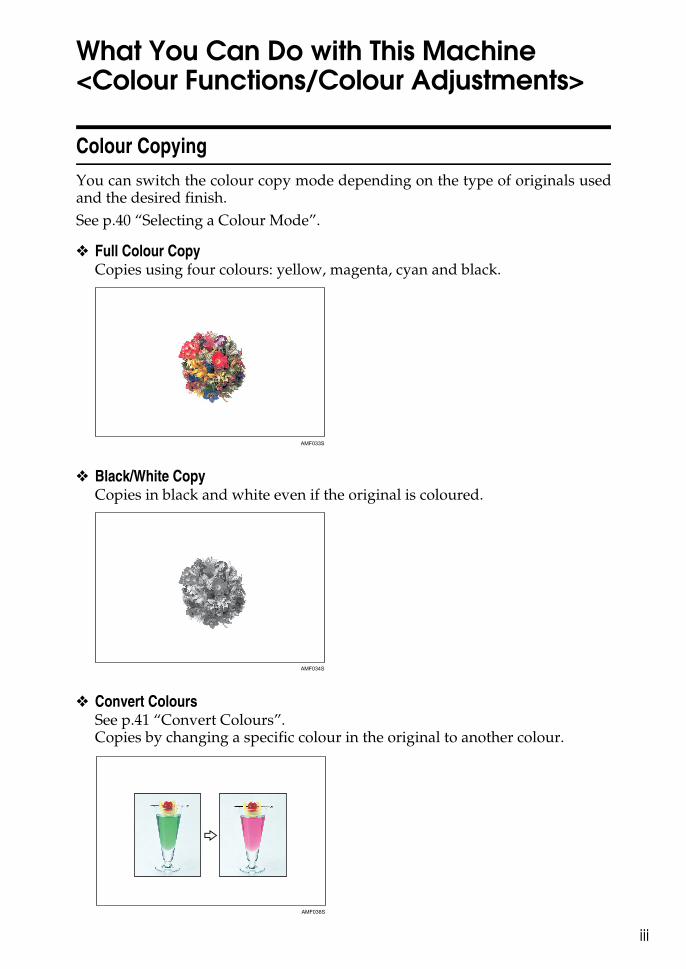
❖ Convert ColoursSee p.41 “Convert Colours”.Copies by changing a specific colour in the original to another colour.
AMF033S
AMF034S
AMF038S
iv
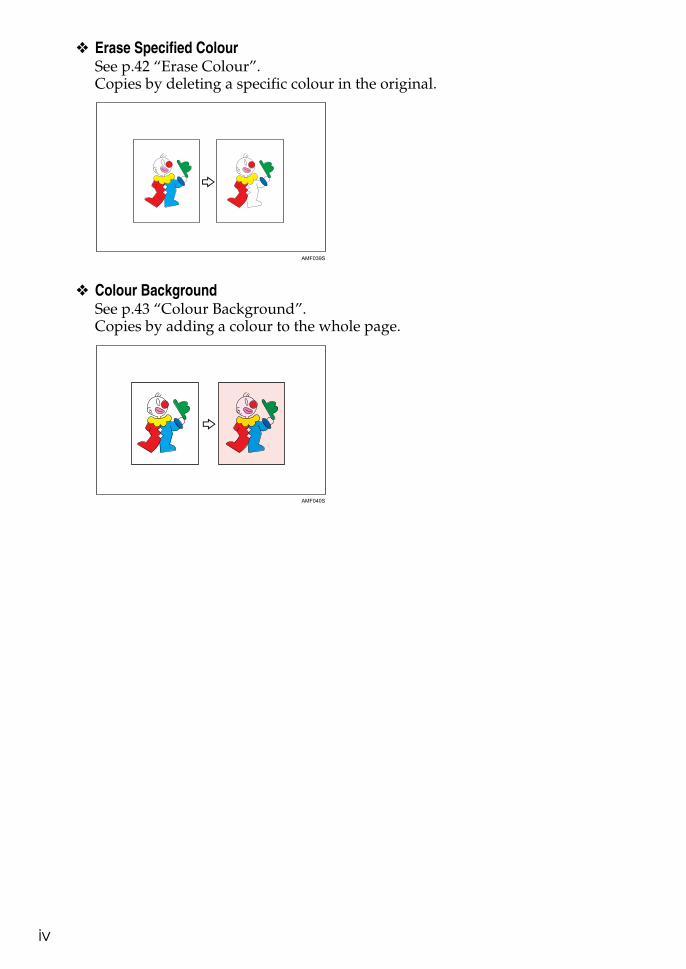
❖ Erase Specified ColourSee p.42 “Erase Colour”.Copies by deleting a specific colour in the original.
❖ Colour BackgroundSee p.43 “Colour Background”.Copies by adding a colour to the whole page.
AMF039S
AMF040S
v
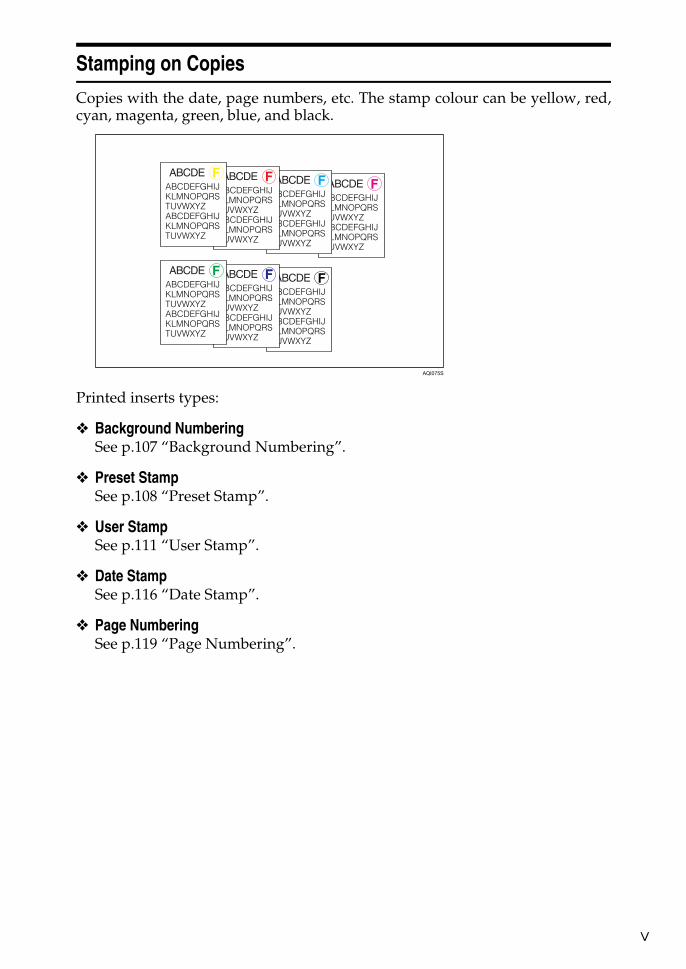
Stamping on Copies
Copies with the date, page numbers, etc. The stamp colour can be yellow, red,cyan, magenta, green, blue, and black.
Printed inserts types:
❖ Background NumberingSee p.107 “Background Numbering”.
❖ Preset StampSee p.108 “Preset Stamp”.
❖ User StampSee p.111 “User Stamp”.
❖ Date StampSee p.116 “Date Stamp”.
❖ Page NumberingSee p.119 “Page Numbering”.
AQI075S
vi
Adjusting Colours
See p.47 “Colour Adjustment”.
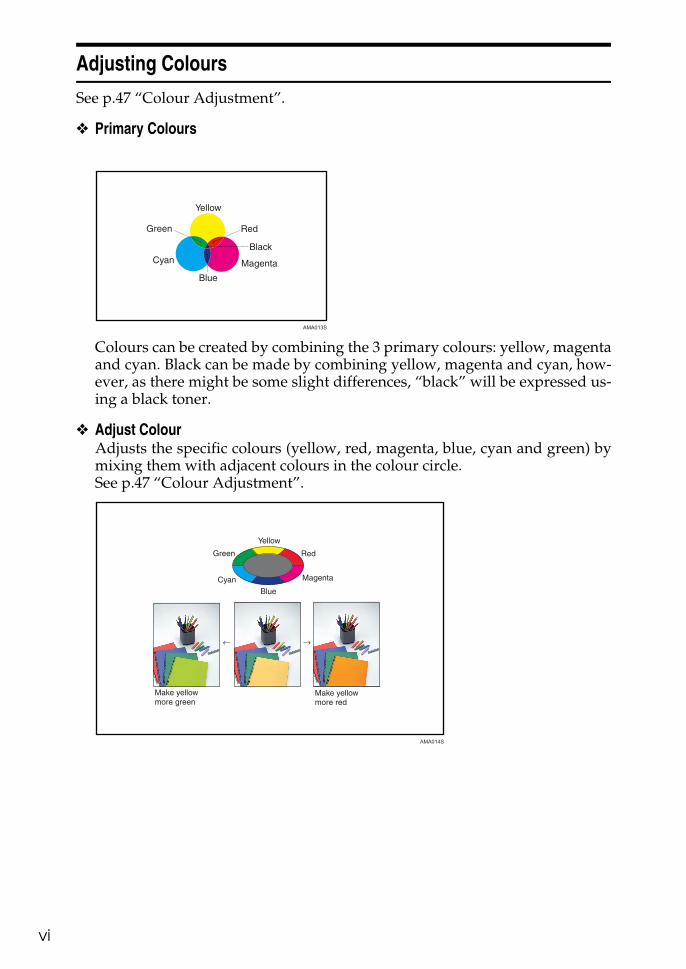
❖ Primary Colours
Colours can be created by combining the 3 primary colours: yellow, magentaand cyan. Black can be made by combining yellow, magenta and cyan, how-ever, as there might be some slight differences, “black” will be expressed us-ing a black toner.
❖ Adjust ColourAdjusts the specific colours (yellow, red, magenta, blue, cyan and green) bymixing them with adjacent colours in the colour circle.See p.47 “Colour Adjustment”.
AMA013S
AMA014S
vii
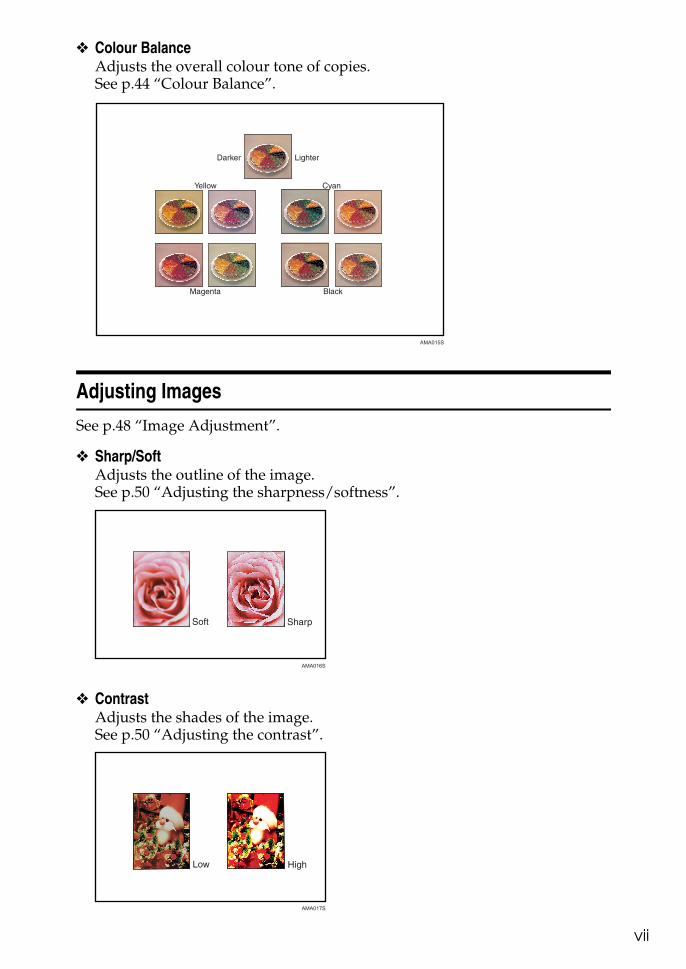
❖ Colour BalanceAdjusts the overall colour tone of copies.See p.44 “Colour Balance”.
Adjusting Images
See p.48 “Image Adjustment”.
❖ Sharp/SoftAdjusts the outline of the image.See p.50 “Adjusting the sharpness/softness”.
❖ ContrastAdjusts the shades of the image.See p.50 “Adjusting the contrast”.
AMA015S
AMA016S
AMA017S
viii
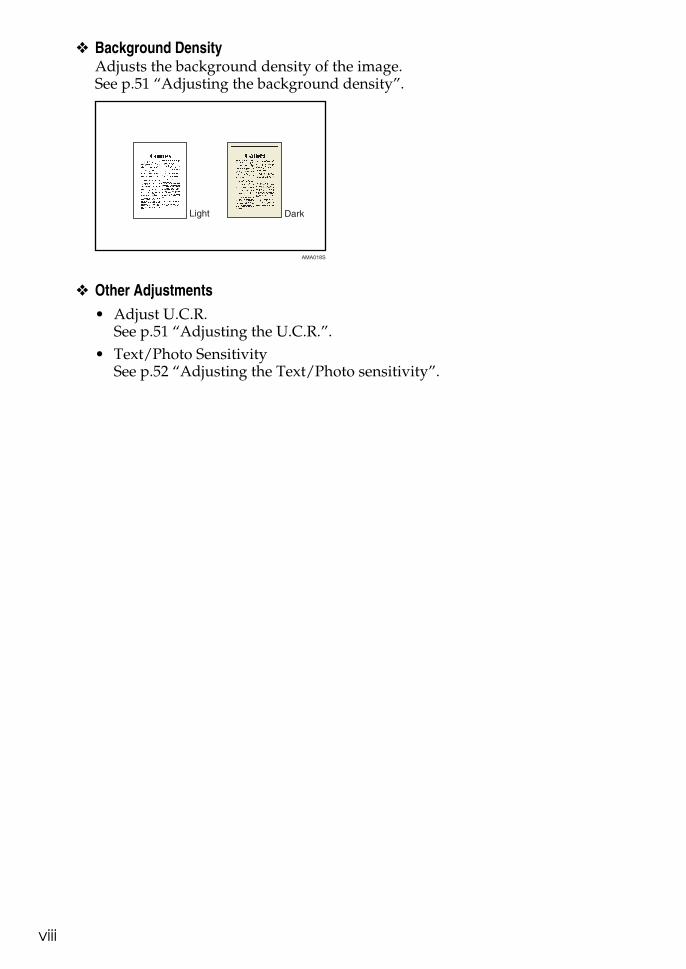
❖ Background DensityAdjusts the background density of the image.See p.51 “Adjusting the background density”.
❖ Other Adjustments• Adjust U.C.R.
See p.51 “Adjusting the U.C.R.”.• Text/Photo Sensitivity
See p.52 “Adjusting the Text/Photo sensitivity”.
AMA018S
ix
What You Can Do with This Machine
Functions differ depending on machine type and options.
ReferenceSee p.3 “Functions Requiring Optional Configurations”.
Types of Duplex Copies
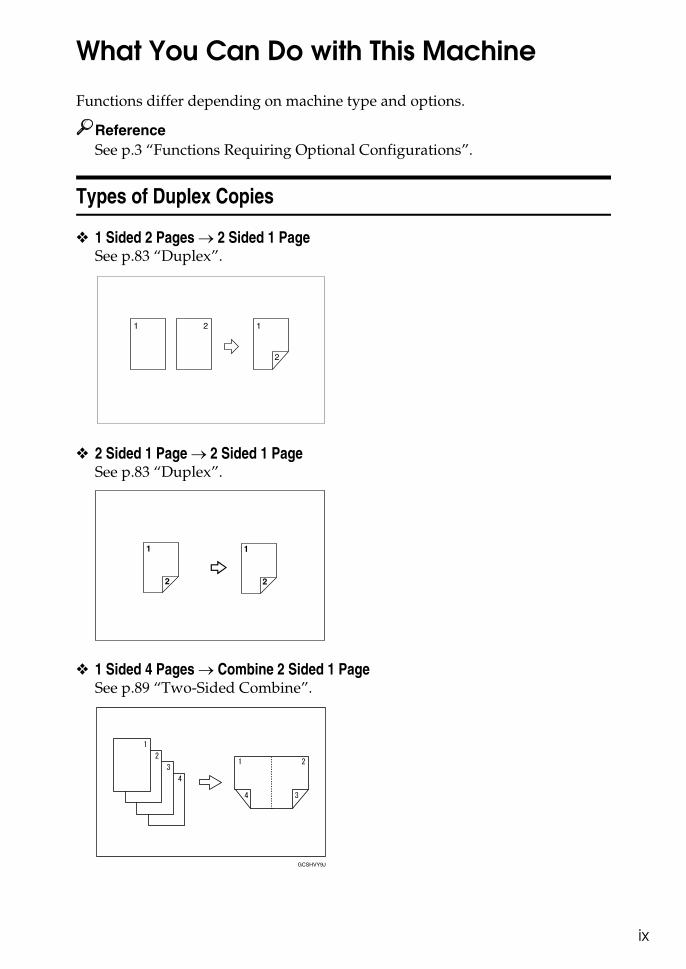
❖ 1 Sided 2 Pages → 2 Sided 1 PageSee p.83 “Duplex”.
❖ 2 Sided 1 Page → 2 Sided 1 PageSee p.83 “Duplex”.
❖ 1 Sided 4 Pages → Combine 2 Sided 1 PageSee p.89 “Two-Sided Combine”.
GCSHVY9J
x
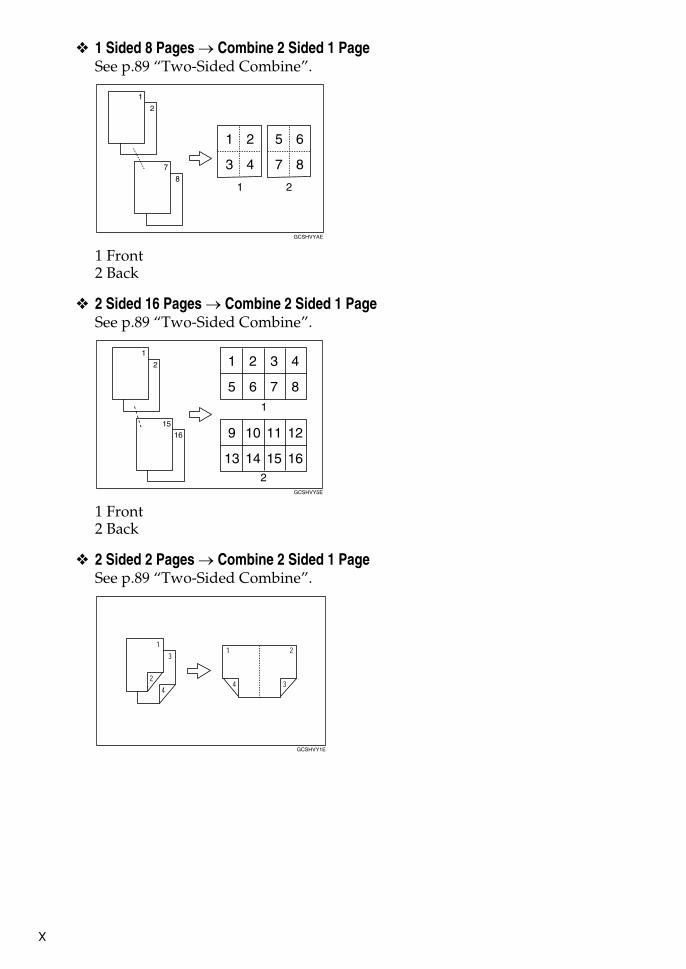
❖ 1 Sided 8 Pages → Combine 2 Sided 1 PageSee p.89 “Two-Sided Combine”.
1 Front2 Back
❖ 2 Sided 16 Pages → Combine 2 Sided 1 PageSee p.89 “Two-Sided Combine”.
1 Front2 Back
❖ 2 Sided 2 Pages → Combine 2 Sided 1 PageSee p.89 “Two-Sided Combine”.
GCSHVYAE
GCSHVY5E
GCSHVY1E
xi
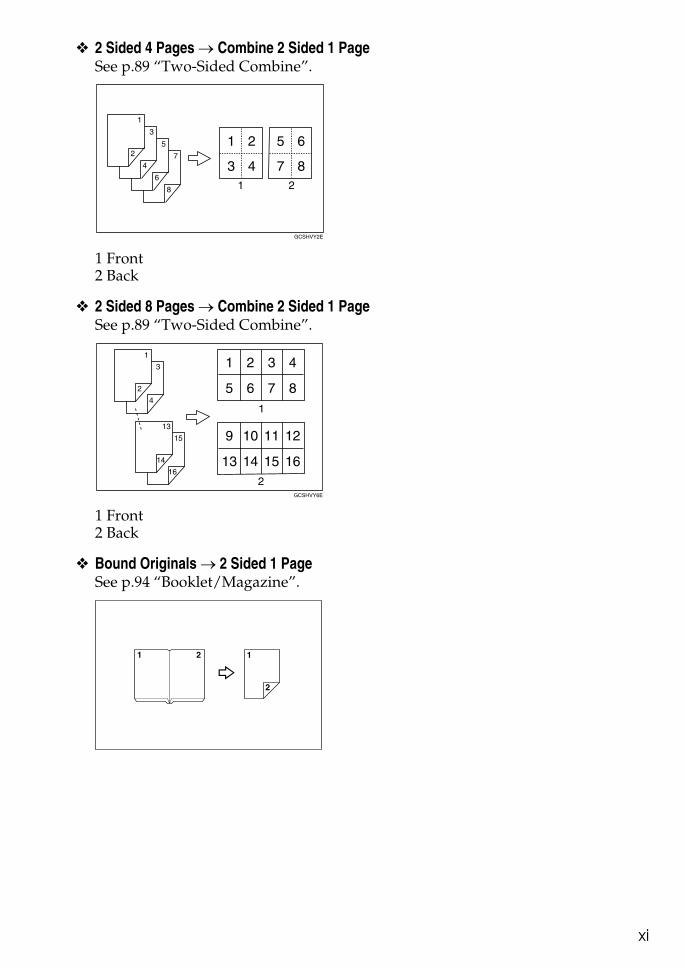
❖ 2 Sided 4 Pages → Combine 2 Sided 1 PageSee p.89 “Two-Sided Combine”.
1 Front2 Back
❖ 2 Sided 8 Pages → Combine 2 Sided 1 PageSee p.89 “Two-Sided Combine”.
1 Front2 Back
❖ Bound Originals → 2 Sided 1 PageSee p.94 “Booklet/Magazine”.
GCSHVY2E
GCSHVY6E

xii
❖ Front & Back Bound Originals → 2 Sided PagesSee p.94 “Booklet/Magazine”.
Copying Book Originals
❖ 1 Sided 4 Pages → BookletSee p.94 “Booklet/Magazine”.• Open to left
• Open to right
GCBOOK0E
GCBOOK1E
xiii
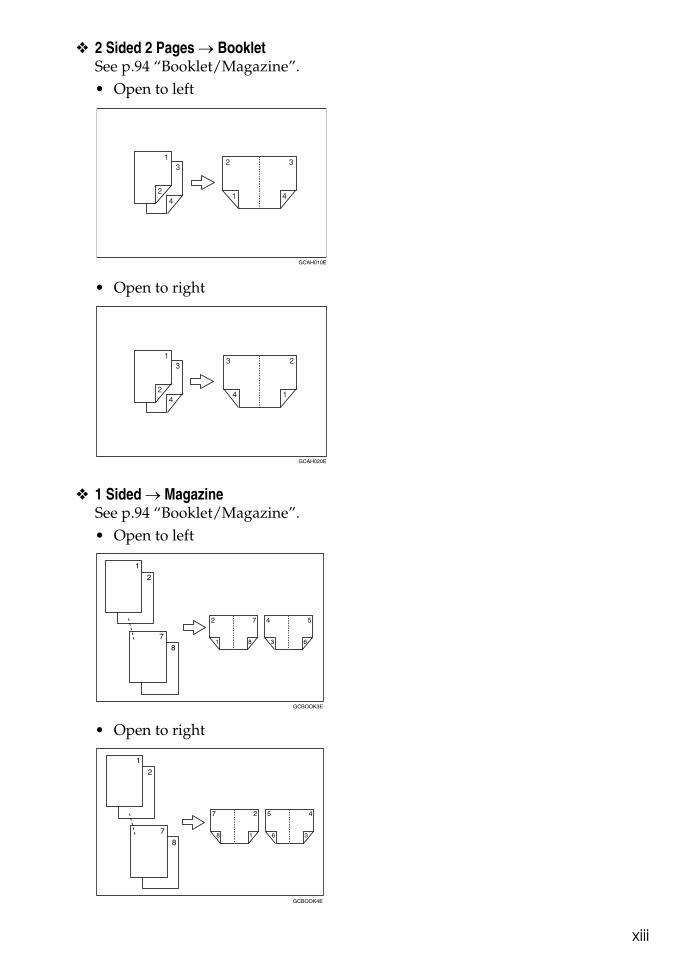
❖ 2 Sided 2 Pages → BookletSee p.94 “Booklet/Magazine”.• Open to left
• Open to right
❖ 1 Sided → MagazineSee p.94 “Booklet/Magazine”.• Open to left
• Open to right
GCAH010E
GCAH020E
GCBOOK3E
GCBOOK4E

xiv
❖ 2 Sided → MagazineSee p.94 “Booklet/Magazine”.• Open to left
• Open to right
GCAH030E
GCAH040E
xv
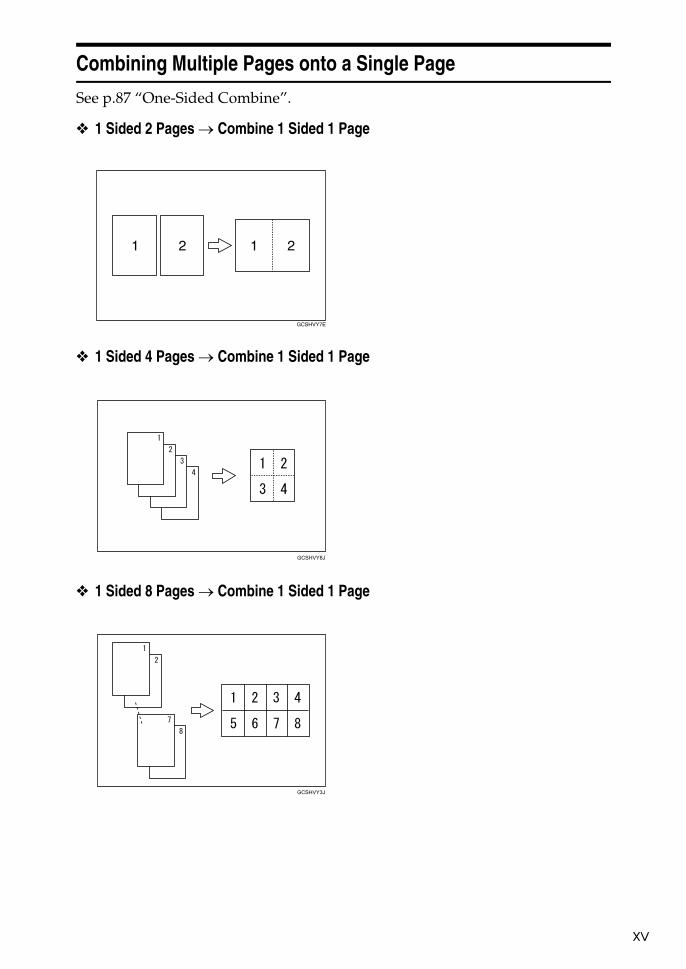
Combining Multiple Pages onto a Single Page
See p.87 “One-Sided Combine”.
❖ 1 Sided 2 Pages → Combine 1 Sided 1 Page
❖ 1 Sided 4 Pages → Combine 1 Sided 1 Page
❖ 1 Sided 8 Pages → Combine 1 Sided 1 Page
GCSHVY7E
GCSHVY8J
GCSHVY3J
xvi
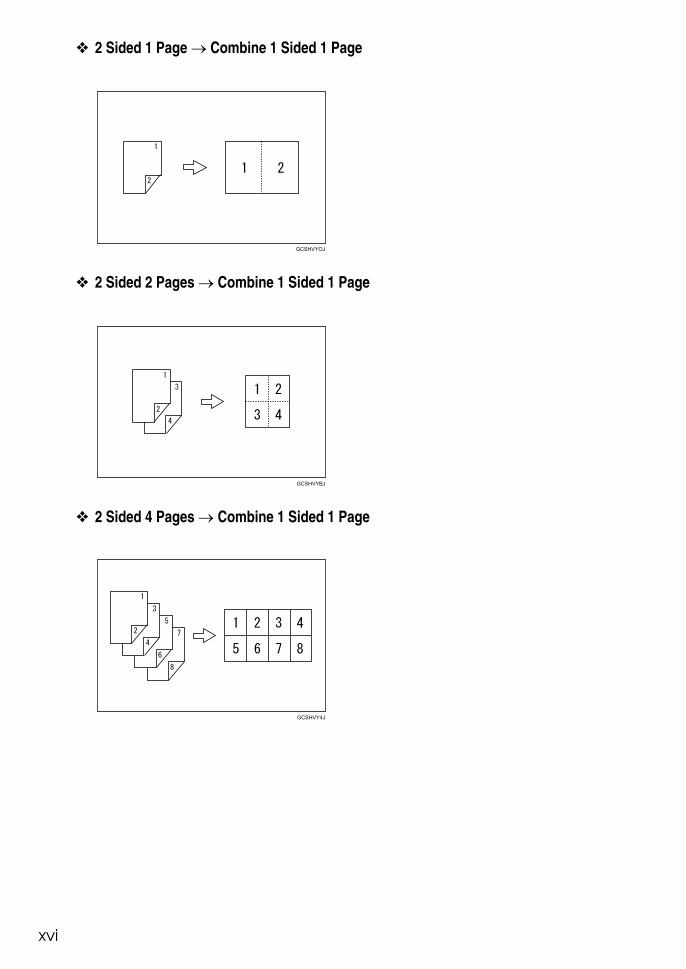
❖ 2 Sided 1 Page → Combine 1 Sided 1 Page
❖ 2 Sided 2 Pages → Combine 1 Sided 1 Page
❖ 2 Sided 4 Pages → Combine 1 Sided 1 Page
GCSHVYOJ
GCSHVYBJ
GCSHVY4J
xvii
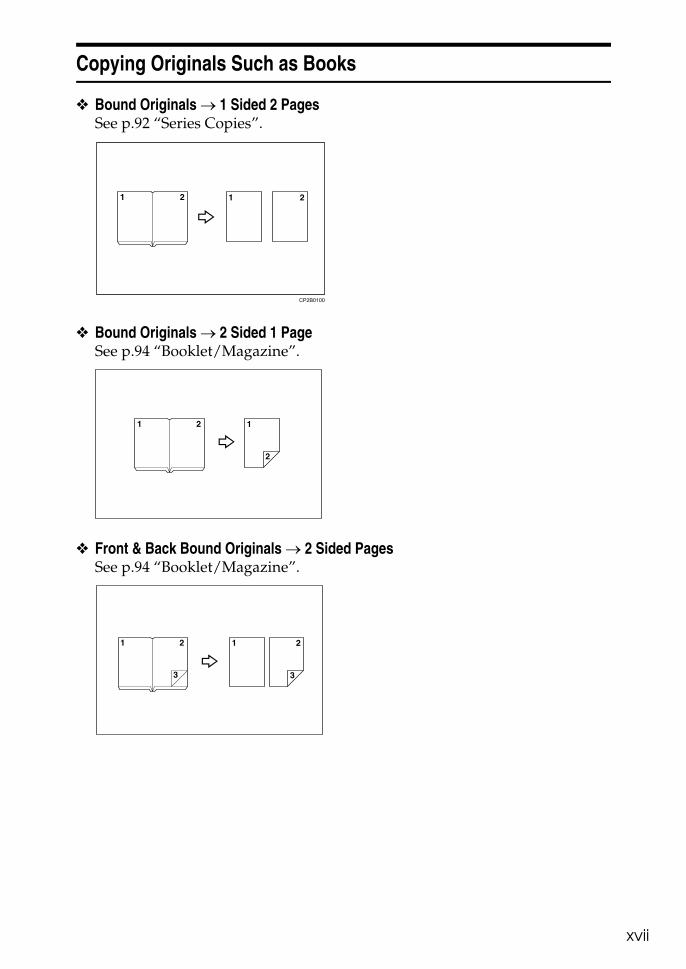
Copying Originals Such as Books
❖ Bound Originals → 1 Sided 2 PagesSee p.92 “Series Copies”.
❖ Bound Originals → 2 Sided 1 PageSee p.94 “Booklet/Magazine”.
❖ Front & Back Bound Originals → 2 Sided PagesSee p.94 “Booklet/Magazine”.
CP2B0100
xviii
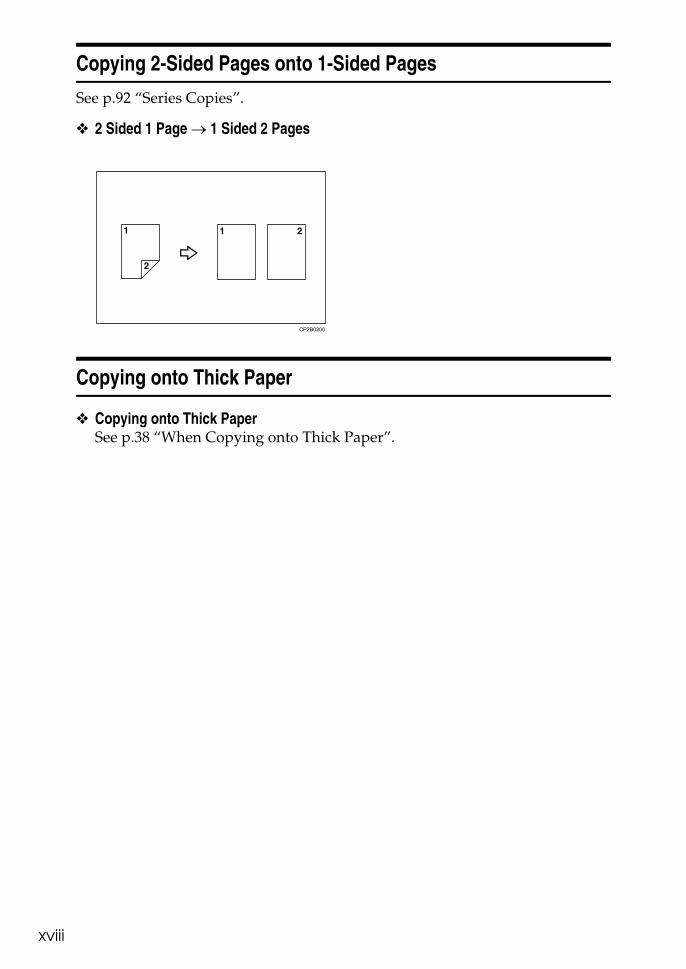
Copying 2-Sided Pages onto 1-Sided Pages
See p.92 “Series Copies”.
❖ 2 Sided 1 Page → 1 Sided 2 Pages
Copying onto Thick Paper
❖ Copying onto Thick PaperSee p.38 “When Copying onto Thick Paper”.
CP2B0200
xix
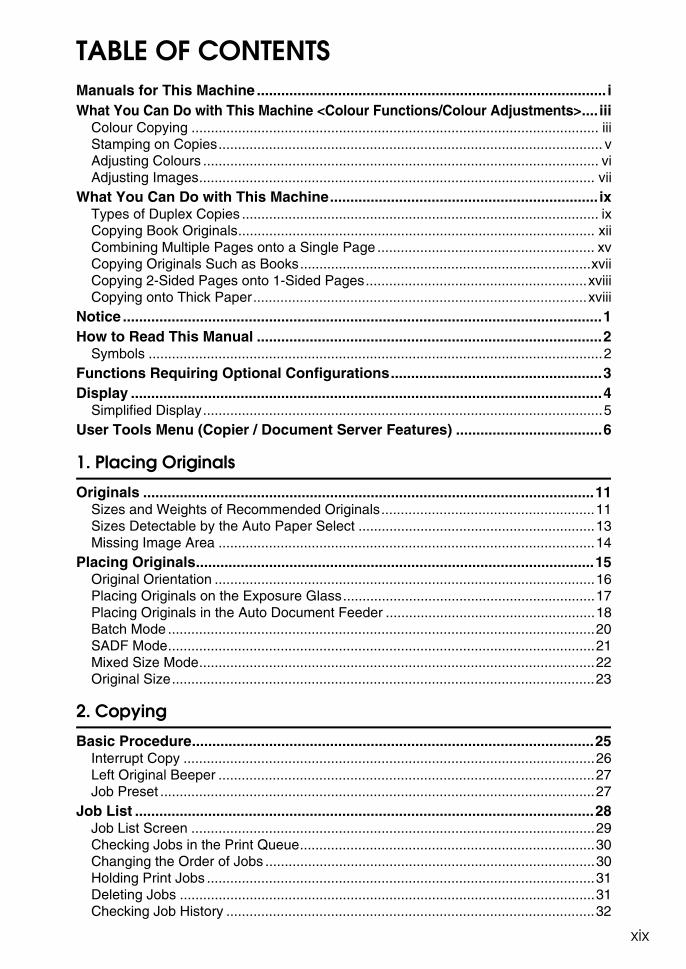
TABLE OF CONTENTSManuals for This Machine ...................................................................................... iWhat You Can Do with This Machine <Colour Functions/Colour Adjustments>.... iii
Colour Copying ......................................................................................................... iiiStamping on Copies................................................................................................... vAdjusting Colours ...................................................................................................... viAdjusting Images...................................................................................................... vii
What You Can Do with This Machine.................................................................. ixTypes of Duplex Copies ............................................................................................ ixCopying Book Originals............................................................................................ xiiCombining Multiple Pages onto a Single Page ........................................................ xvCopying Originals Such as Books...........................................................................xviiCopying 2-Sided Pages onto 1-Sided Pages.........................................................xviiiCopying onto Thick Paper......................................................................................xviii
Notice ......................................................................................................................1How to Read This Manual .....................................................................................2
Symbols .....................................................................................................................2Functions Requiring Optional Configurations....................................................3Display ....................................................................................................................4
Simplified Display.......................................................................................................5User Tools Menu (Copier / Document Server Features) ....................................6
1. Placing Originals
Originals ...............................................................................................................11Sizes and Weights of Recommended Originals.......................................................11Sizes Detectable by the Auto Paper Select .............................................................13Missing Image Area .................................................................................................14
Placing Originals..................................................................................................15Original Orientation ..................................................................................................16Placing Originals on the Exposure Glass.................................................................17Placing Originals in the Auto Document Feeder ......................................................18Batch Mode ..............................................................................................................20SADF Mode..............................................................................................................21Mixed Size Mode......................................................................................................22Original Size.............................................................................................................23
2. Copying
Basic Procedure...................................................................................................25Interrupt Copy ..........................................................................................................26Left Original Beeper .................................................................................................27Job Preset ................................................................................................................27
Job List .................................................................................................................28Job List Screen ........................................................................................................29Checking Jobs in the Print Queue............................................................................30Changing the Order of Jobs .....................................................................................30Holding Print Jobs ....................................................................................................31Deleting Jobs ...........................................................................................................31Checking Job History ...............................................................................................32
xx
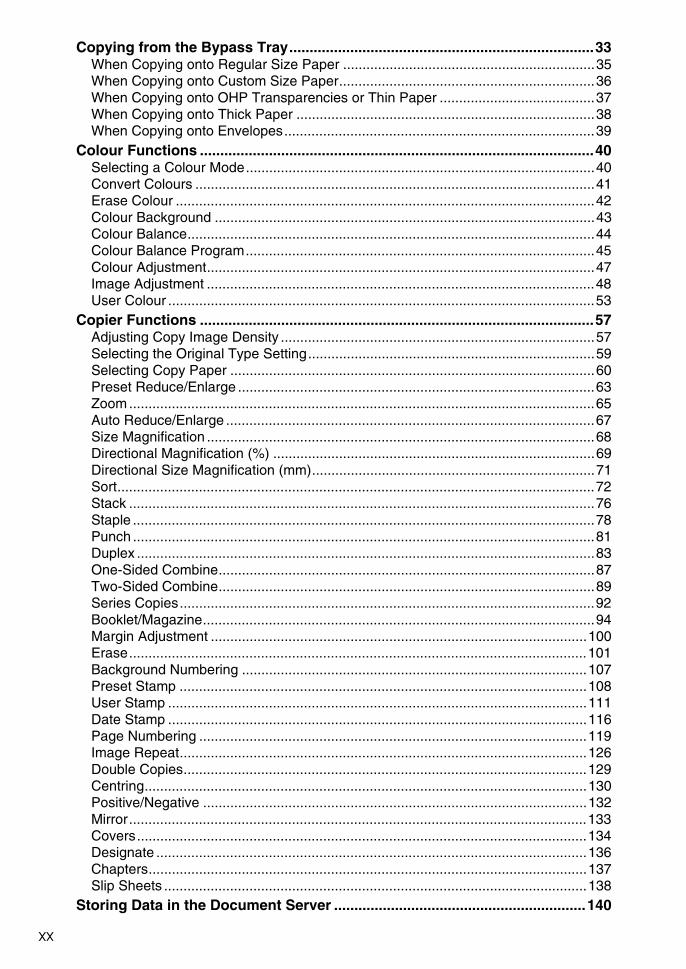
Copying from the Bypass Tray...........................................................................33When Copying onto Regular Size Paper .................................................................35When Copying onto Custom Size Paper..................................................................36When Copying onto OHP Transparencies or Thin Paper ........................................37When Copying onto Thick Paper .............................................................................38When Copying onto Envelopes................................................................................39
Colour Functions .................................................................................................40Selecting a Colour Mode..........................................................................................40Convert Colours .......................................................................................................41Erase Colour ............................................................................................................42Colour Background ..................................................................................................43Colour Balance.........................................................................................................44Colour Balance Program..........................................................................................45Colour Adjustment....................................................................................................47Image Adjustment ....................................................................................................48User Colour ..............................................................................................................53
Copier Functions .................................................................................................57Adjusting Copy Image Density .................................................................................57Selecting the Original Type Setting..........................................................................59Selecting Copy Paper ..............................................................................................60Preset Reduce/Enlarge ............................................................................................63Zoom........................................................................................................................65Auto Reduce/Enlarge ...............................................................................................67Size Magnification ....................................................................................................68Directional Magnification (%) ...................................................................................69Directional Size Magnification (mm).........................................................................71Sort...........................................................................................................................72Stack ........................................................................................................................76Staple .......................................................................................................................78Punch .......................................................................................................................81Duplex ......................................................................................................................83One-Sided Combine.................................................................................................87Two-Sided Combine.................................................................................................89Series Copies...........................................................................................................92Booklet/Magazine.....................................................................................................94Margin Adjustment .................................................................................................100Erase......................................................................................................................101Background Numbering .........................................................................................107Preset Stamp .........................................................................................................108User Stamp ............................................................................................................111Date Stamp ............................................................................................................116Page Numbering ....................................................................................................119Image Repeat.........................................................................................................126Double Copies........................................................................................................129Centring..................................................................................................................130Positive/Negative ...................................................................................................132Mirror......................................................................................................................133Covers....................................................................................................................134Designate ...............................................................................................................136Chapters.................................................................................................................137Slip Sheets .............................................................................................................138
Storing Data in the Document Server ..............................................................140
xxi
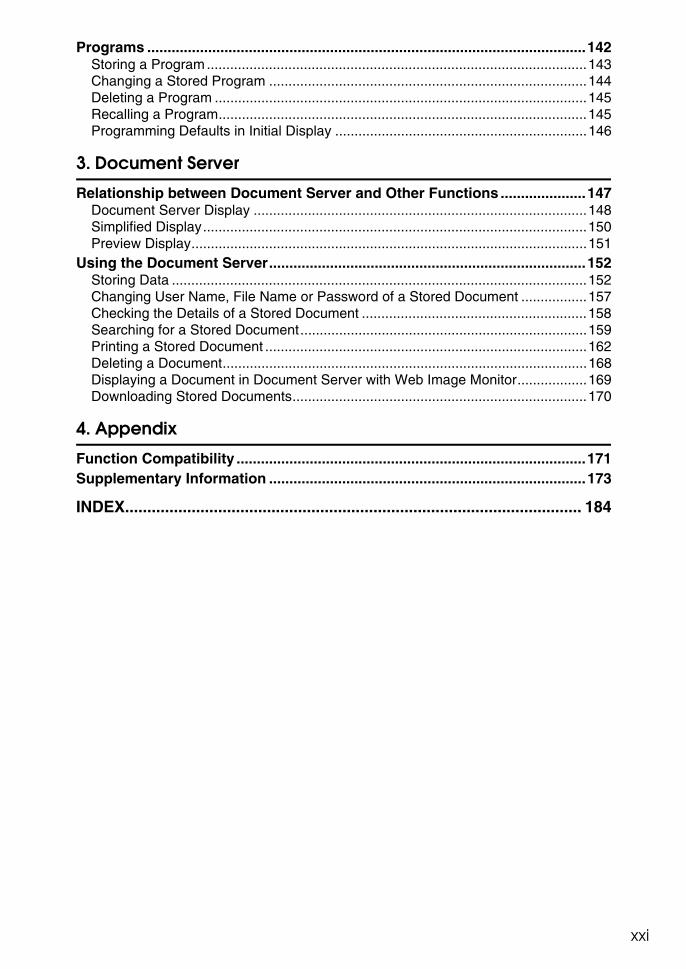
Programs ............................................................................................................142Storing a Program..................................................................................................143Changing a Stored Program ..................................................................................144Deleting a Program ................................................................................................145Recalling a Program...............................................................................................145Programming Defaults in Initial Display .................................................................146
3. Document Server
Relationship between Document Server and Other Functions .....................147Document Server Display ......................................................................................148Simplified Display...................................................................................................150Preview Display......................................................................................................151
Using the Document Server..............................................................................152Storing Data ...........................................................................................................152Changing User Name, File Name or Password of a Stored Document .................157Checking the Details of a Stored Document ..........................................................158Searching for a Stored Document..........................................................................159Printing a Stored Document ...................................................................................162Deleting a Document..............................................................................................168Displaying a Document in Document Server with Web Image Monitor..................169Downloading Stored Documents............................................................................170
4. Appendix
Function Compatibility ......................................................................................171Supplementary Information ..............................................................................173
INDEX....................................................................................................... 184

xxii
1
Notice
Do not copy or print any item for which reproduction is prohibited by law.Copying or printing the following items is generally prohibited by local law:bank notes, revenue stamps, bonds, stock certificates, bank drafts, checks, pass-ports, driver's licenses.The preceding list is meant as a guide only and is not inclusive. We assume noresponsibility for its completeness or accuracy. If you have any questions con-cerning the legality of copying or printing certain items, consult with your legaladvisor.The colour samples in this manual may differ slightly from the colours of actualcopies.Colours on colour keys or the colour circle may differ slightly from the coloursof actual copies.This machine is equipped with a function that prevents making counterfeit bankbills. Due to this function the original images similar to bank bills may not becopied properly.
2
How to Read This Manual
Note❒ For proper use of this product, be sure to read About This Machine first.❒ Supplementary information about the copier mode is described in “Supple-
mentary Information”.
Referencep.173 “Supplementary Information”About This Machine
Symbols
This manual uses the following symbols:
Indicates important safety notes.Ignoring these notes could result in serious injury or death. Be sure to read these notes.They can be found in the “Safety Information” section of About This Machine.
Indicates important safety notes.Ignoring these notes could result in moderate or minor injury, or damage to themachine or to property. Be sure to read these notes. They can be found in the“Safety Information” section of About This Machine.
Indicates points to pay attention to when using the machine, and explanationsof likely causes of paper misfeeds, damage to originals, or loss of data. Be sureto read these explanations.
Indicates supplementary explanations of the machine's functions, and instruc-tions on resolving user errors.
This symbol is located at the end of sections. It indicates where you can find fur-ther relevant information.[ ]Indicates the names of keys that appear on the machine's display panel.{ }Indicates the names of keys on the machine's control panel.
3
Functions Requiring Optional Configurations
Certain functions require special machine configuration and extra options as follows:Stack: SR790, Booklet Finisher SR3020 or Finisher SR3030Staple: SR790, Booklet Finisher SR3020 or Finisher SR3030Staple (Centre): Booklet Finisher SR3020Punch: Booklet Finisher SR3020 or Finisher SR3030, Punch kit
Note❒ The bridge unit and paper tray unit are required when you install the finisher.
4
Display
The function items displayed serve as selector keys. You can select or specify anitem by lightly pressing them.When you select or specify an item on the display panel, it is highlighted like
. Keys appearing as cannot be used.
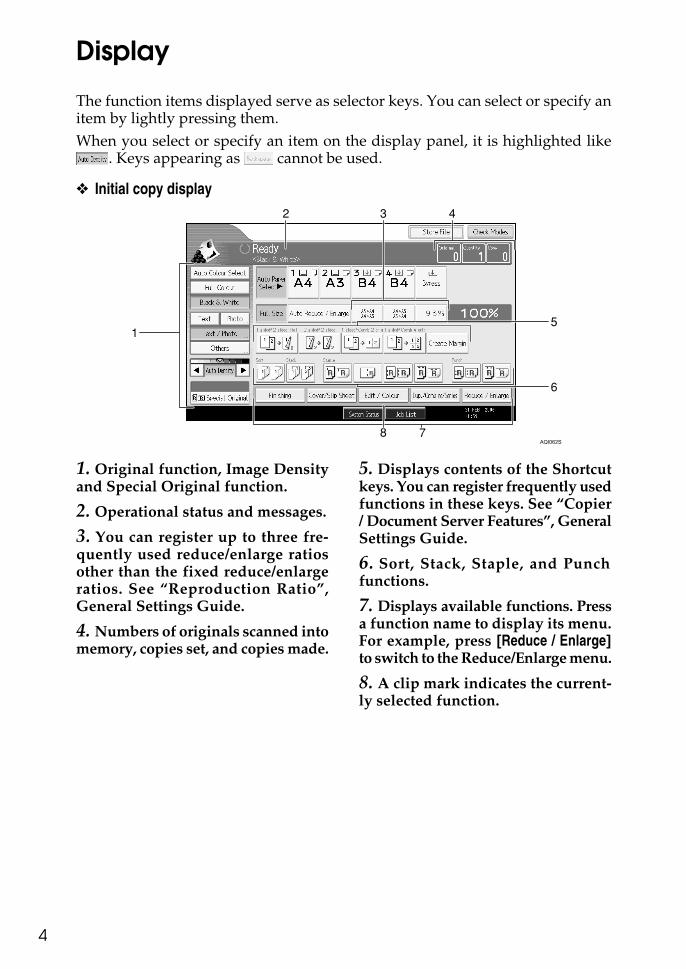
❖ Initial copy display
1. Original function, Image Densityand Special Original function.
2. Operational status and messages.
3. You can register up to three fre-quently used reduce/enlarge ratiosother than the fixed reduce/enlargeratios. See “Reproduction Ratio”,General Settings Guide.
4. Numbers of originals scanned intomemory, copies set, and copies made.
5. Displays contents of the Shortcutkeys. You can register frequently usedfunctions in these keys. See “Copier/ Document Server Features”, GeneralSettings Guide.
6. Sort, Stack, Staple, and Punchfunctions.
7. Displays available functions. Pressa function name to display its menu.For example, press [Reduce / Enlarge]to switch to the Reduce/Enlarge menu.
8. A clip mark indicates the current-ly selected function.
AQI062S
5
Simplified Display
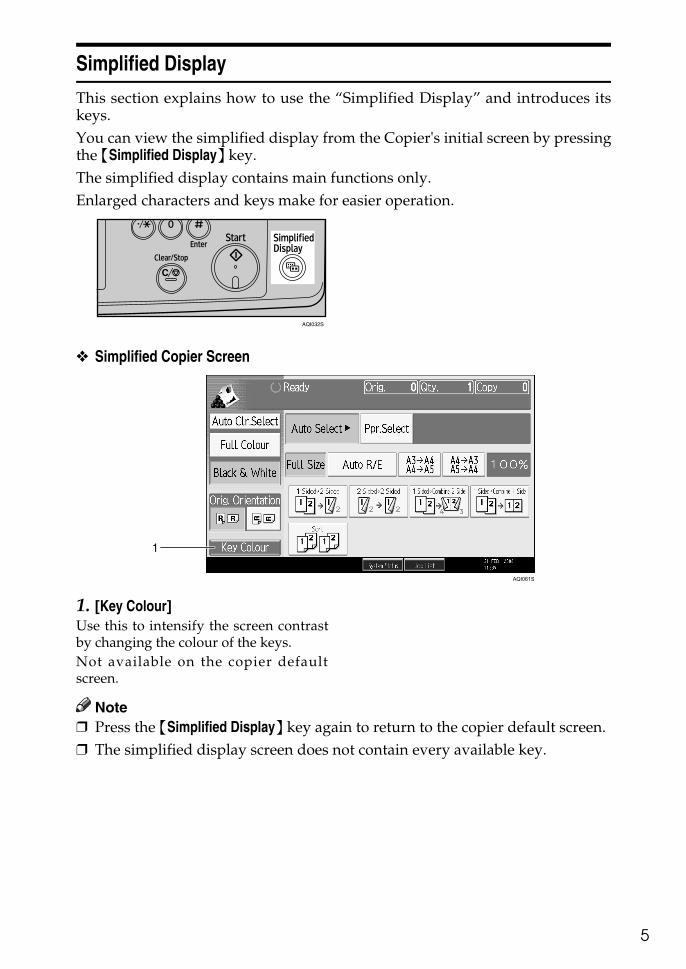
This section explains how to use the “Simplified Display” and introduces itskeys.You can view the simplified display from the Copier's initial screen by pressingthe {Simplified Display} key.The simplified display contains main functions only.Enlarged characters and keys make for easier operation.
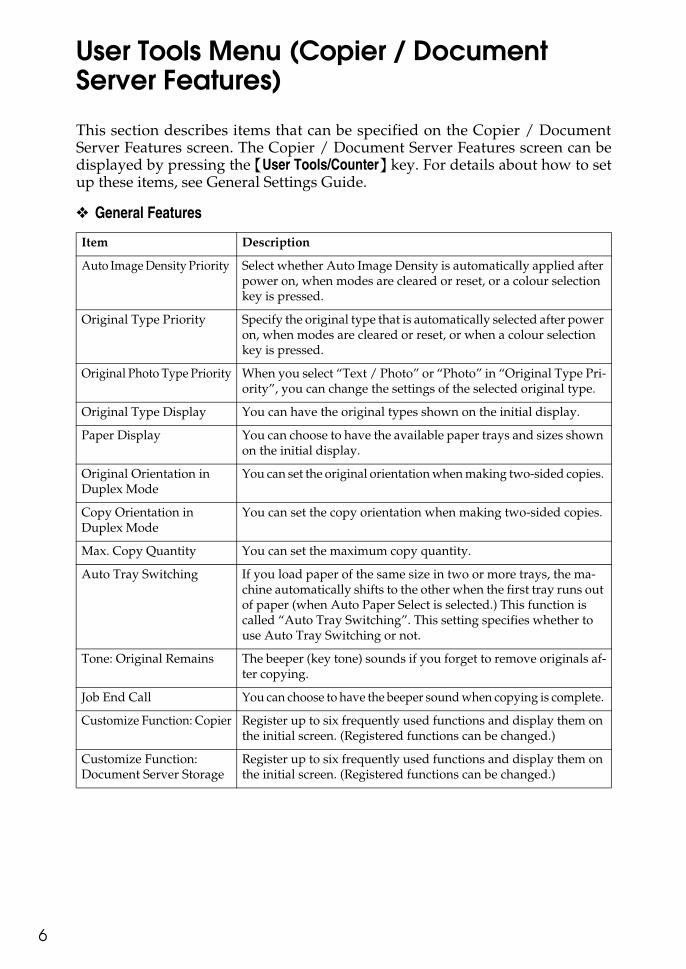
❖ Simplified Copier Screen
1. [Key Colour]Use this to intensify the screen contrastby changing the colour of the keys. Not available on the copier defaultscreen.
Note❒ Press the {Simplified Display} key again to return to the copier default screen.❒ The simplified display screen does not contain every available key.
AQI032S
AQI061S
6
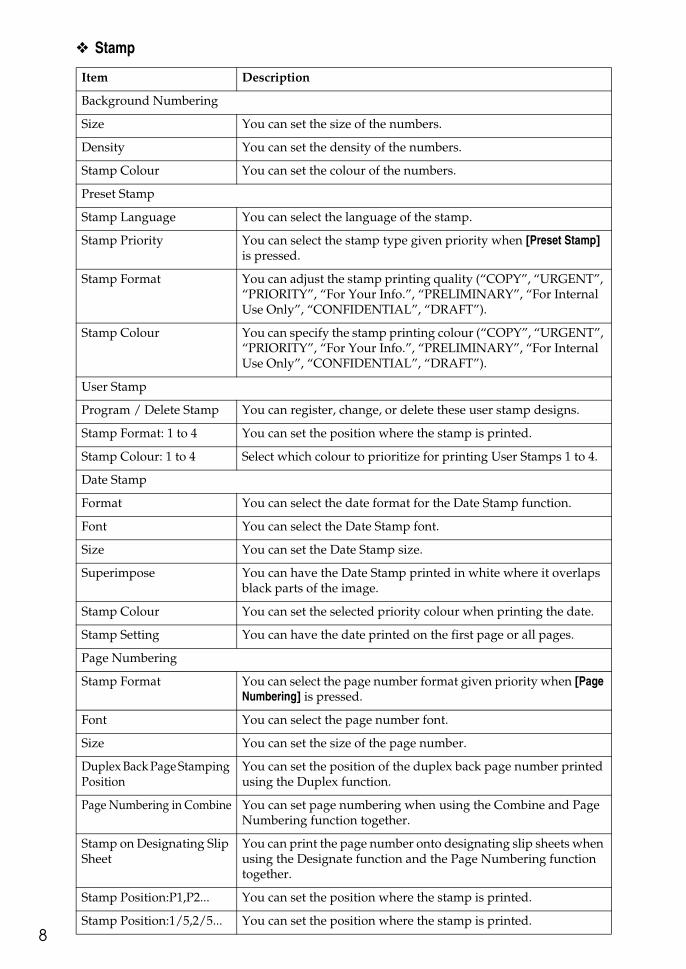
User Tools Menu (Copier / Document Server Features)
This section describes items that can be specified on the Copier / DocumentServer Features screen. The Copier / Document Server Features screen can bedisplayed by pressing the {User Tools/Counter} key. For details about how to setup these items, see General Settings Guide.
❖ General Features
Item Description
Auto Image Density Priority Select whether Auto Image Density is automatically applied after power on, when modes are cleared or reset, or a colour selection key is pressed.
Original Type Priority Specify the original type that is automatically selected after power on, when modes are cleared or reset, or when a colour selection key is pressed.
Original Photo Type Priority When you select “Text / Photo” or “Photo” in “Original Type Pri-ority”, you can change the settings of the selected original type.
Original Type Display You can have the original types shown on the initial display.
Paper Display You can choose to have the available paper trays and sizes shown on the initial display.
Original Orientation in Duplex Mode
You can set the original orientation when making two-sided copies.
Copy Orientation in Duplex Mode
You can set the copy orientation when making two-sided copies.
Max. Copy Quantity You can set the maximum copy quantity.
Auto Tray Switching If you load paper of the same size in two or more trays, the ma-chine automatically shifts to the other when the first tray runs out of paper (when Auto Paper Select is selected.) This function is called “Auto Tray Switching”. This setting specifies whether to use Auto Tray Switching or not.
Tone: Original Remains The beeper (key tone) sounds if you forget to remove originals af-ter copying.
Job End Call You can choose to have the beeper sound when copying is complete.
Customize Function: Copier Register up to six frequently used functions and display them on the initial screen. (Registered functions can be changed.)
Customize Function: Document Server Storage
Register up to six frequently used functions and display them on the initial screen. (Registered functions can be changed.)

7
❖ Reproduction Ratio
❖ Edit
Item Description
Shortcut R / E You can register up to three frequently used Reduce/Enlarge ra-tios other than the fixed Reduce/Enlarge ratio and have them shown on the initial display. You can also change registered Re-duce/ Enlarge ratios.
R / E Ratio Specify the enlargement and reduction ratios that appear on the copier screen when you press [Reduce / Enlarge].
R / E Ratio Priority Specify the enlargement and reduction ratios that are prioritized when you press [Reduce / Enlarge].
Ratio for Create Margin You can set a Reduce/Enlarge ratio when registering Create Mar-gin in a shortcut key.
Item Description
Front Margin: Left / Right You can specify left and right margins on the front side of copies using the Margin Adjustment function.
Back Margin: Left / Right You can specify left and right margins on the back side of copies using the Margin Adjustment function.
Front Margin: Top / Bottom You can specify top and bottom margins on the front side of cop-ies using the Margin Adjustment function.
Back Margin: Top / Bottom You can specify top and bottom margins on the back side of copies using the Margin Adjustment function.
1 Sided → 2 Sided Auto Margin: TtoT
When using the 1 sided → 2 sided Duplex function, you can spec-ify margins on the back side.
1 Sided → 2 Sided Auto Margin: TtoB
When using the 1 sided → 2 sided Duplex function, you can spec-ify margins on the back side.
Erase Border Width You can specify the width of erased border margins using this function.
Erase Original Shadow in Combine
In Combine Copy or Booklet/Magazine Copy mode, you can specify whether to erase a 3 mm, 0.1" bounding margin around all four edges of each original.
Erase Centre Width You can specify the width of the erased centre margins using this function.
Front Cover Copy in Combine You can make a combined copy on the front cover sheet when you select the Front Cover function.
Copy Order in Combine You can set the copy order when using the Combine function to Left to Right or Top to Bottom.
Orientation: Booklet, Magazine You can select the orientation of copies to open when using Book-let or Magazine function.
Copy on Designating Page in Combine
You can make a combined copy on the inserted slip sheets when using the Desig./Chapter Copy function.
Image Repeat Separation Line You can select a separation line used in the Image Repeat function from: None, Solid, Broken A, Broken B, or Crop Marks.
Double Copies Separation Line
You can select a separation line used in the Double Copies func-tion from: None, Solid, Broken A, Broken B, or Crop Marks.
Separation Line in Combine You can select a separation line used in the Combine function from: None, Solid, Broken A, Broken B, or Crop Marks.
8
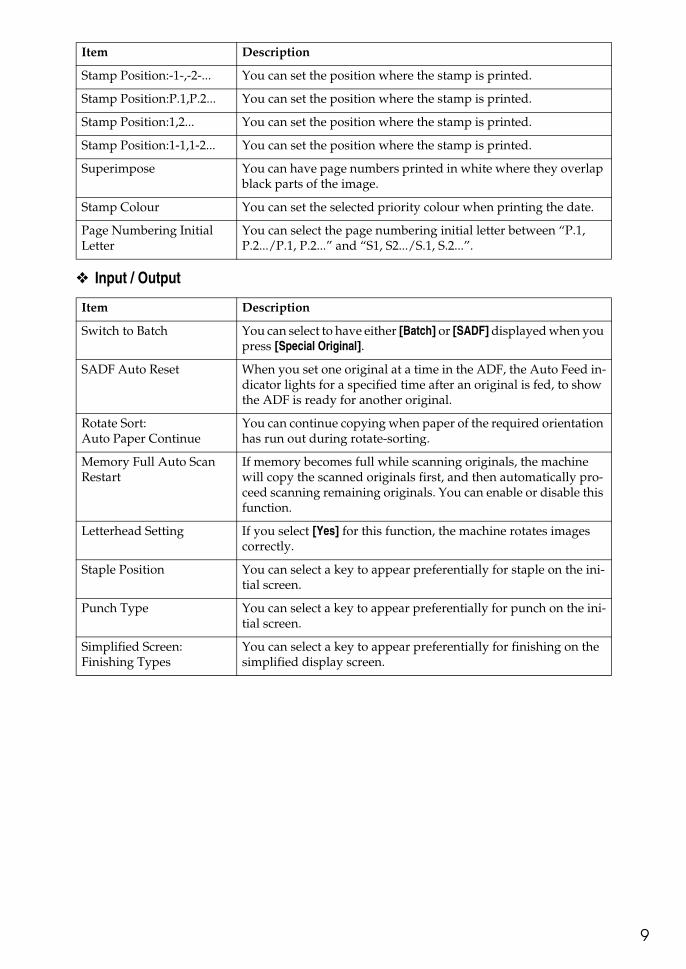
❖ Stamp
Item Description
Background Numbering
Size You can set the size of the numbers.
Density You can set the density of the numbers.
Stamp Colour You can set the colour of the numbers.
Preset Stamp
Stamp Language You can select the language of the stamp.
Stamp Priority You can select the stamp type given priority when [Preset Stamp] is pressed.
Stamp Format You can adjust the stamp printing quality (“COPY”, “URGENT”, “PRIORITY”, “For Your Info.”, “PRELIMINARY”, “For Internal Use Only”, “CONFIDENTIAL”, “DRAFT”).
Stamp Colour You can specify the stamp printing colour (“COPY”, “URGENT”, “PRIORITY”, “For Your Info.”, “PRELIMINARY”, “For Internal Use Only”, “CONFIDENTIAL”, “DRAFT”).
User Stamp
Program / Delete Stamp You can register, change, or delete these user stamp designs.
Stamp Format: 1 to 4 You can set the position where the stamp is printed.
Stamp Colour: 1 to 4 Select which colour to prioritize for printing User Stamps 1 to 4.
Date Stamp
Format You can select the date format for the Date Stamp function.
Font You can select the Date Stamp font.
Size You can set the Date Stamp size.
Superimpose You can have the Date Stamp printed in white where it overlaps black parts of the image.
Stamp Colour You can set the selected priority colour when printing the date.
Stamp Setting You can have the date printed on the first page or all pages.
Page Numbering
Stamp Format You can select the page number format given priority when [Page Numbering] is pressed.
Font You can select the page number font.
Size You can set the size of the page number.
Duplex Back Page Stamping Position
You can set the position of the duplex back page number printed using the Duplex function.
Page Numbering in Combine You can set page numbering when using the Combine and Page Numbering function together.
Stamp on Designating Slip Sheet
You can print the page number onto designating slip sheets when using the Designate function and the Page Numbering function together.
Stamp Position:P1,P2... You can set the position where the stamp is printed.
Stamp Position:1/5,2/5... You can set the position where the stamp is printed.
9
❖ Input / Output
Stamp Position:-1-,-2-... You can set the position where the stamp is printed.
Stamp Position:P.1,P.2... You can set the position where the stamp is printed.
Stamp Position:1,2... You can set the position where the stamp is printed.
Stamp Position:1-1,1-2... You can set the position where the stamp is printed.
Superimpose You can have page numbers printed in white where they overlap black parts of the image.
Stamp Colour You can set the selected priority colour when printing the date.
Page Numbering Initial Letter
You can select the page numbering initial letter between “P.1, P.2.../P.1, P.2...” and “S1, S2.../S.1, S.2...”.
Item Description
Switch to Batch You can select to have either [Batch] or [SADF] displayed when you press [Special Original].
SADF Auto Reset When you set one original at a time in the ADF, the Auto Feed in-dicator lights for a specified time after an original is fed, to show the ADF is ready for another original.
Rotate Sort: Auto Paper Continue
You can continue copying when paper of the required orientation has run out during rotate-sorting.
Memory Full Auto Scan Restart
If memory becomes full while scanning originals, the machine will copy the scanned originals first, and then automatically pro-ceed scanning remaining originals. You can enable or disable this function.
Letterhead Setting If you select [Yes] for this function, the machine rotates images correctly.
Staple Position You can select a key to appear preferentially for staple on the ini-tial screen.
Punch Type You can select a key to appear preferentially for punch on the ini-tial screen.
Simplified Screen: Finishing Types
You can select a key to appear preferentially for finishing on the simplified display screen.
Item Description
10
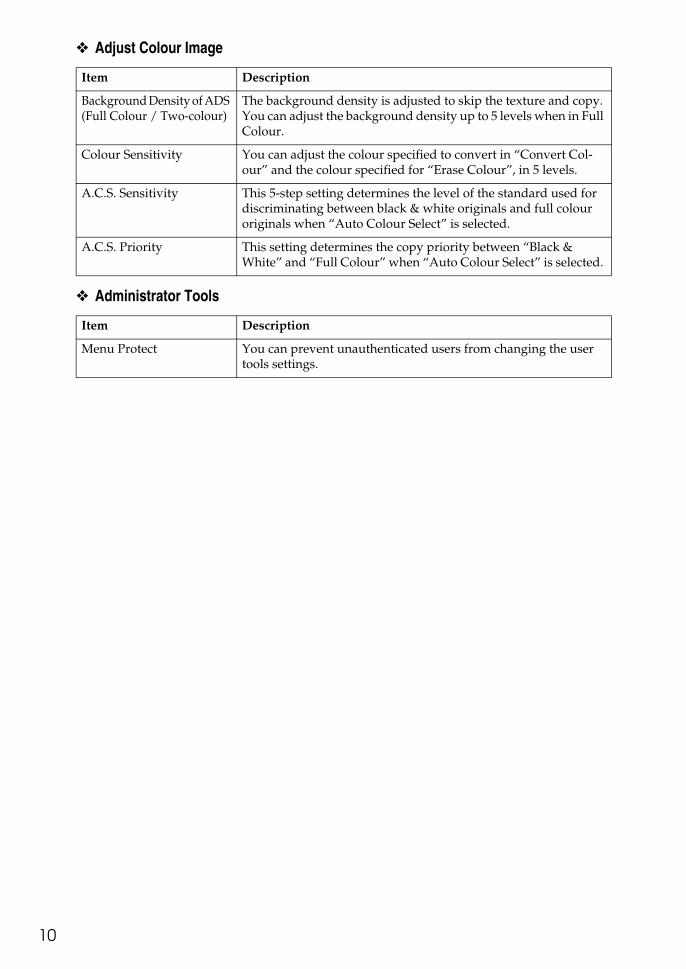
❖ Adjust Colour Image
❖ Administrator Tools
Item Description
Background Density of ADS (Full Colour / Two-colour)
The background density is adjusted to skip the texture and copy. You can adjust the background density up to 5 levels when in Full Colour.
Colour Sensitivity You can adjust the colour specified to convert in “Convert Col-our” and the colour specified for “Erase Colour”, in 5 levels.
A.C.S. Sensitivity This 5-step setting determines the level of the standard used for discriminating between black & white originals and full colour originals when “Auto Colour Select” is selected.
A.C.S. Priority This setting determines the copy priority between “Black & White” and “Full Colour” when “Auto Colour Select” is selected.
Item Description
Menu Protect You can prevent unauthenticated users from changing the user tools settings.
1. Placing Originals
11
This chapter describes the types of originals you can set and how to place origi-nals.
Originals
This section describes the types of originals that can be placed, paper sizes thatare automatically detected, and missing image area.
Note❒ As the colour of markers or highlighters is difficult to reproduce, the copy
might not come out depending on the colour or a different colour might becopied.
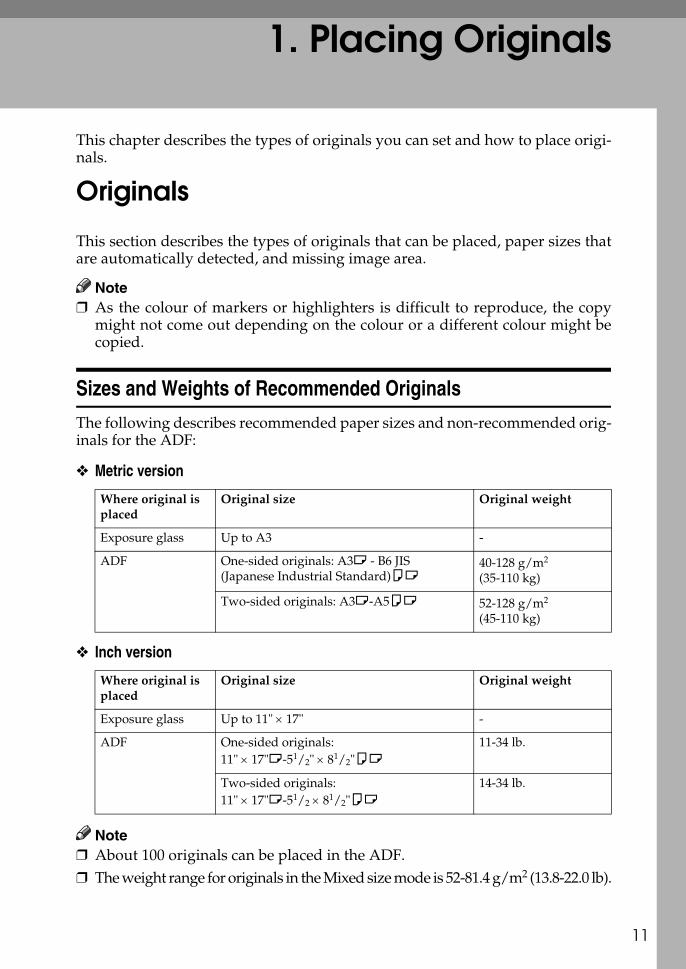
Sizes and Weights of Recommended Originals
The following describes recommended paper sizes and non-recommended orig-inals for the ADF:
❖ Metric version
❖ Inch version
Note❒ About 100 originals can be placed in the ADF.❒ The weight range for originals in the Mixed size mode is 52-81.4 g/m2 (13.8-22.0 lb).
Where original is placed
Original size Original weight
Exposure glass Up to A3 -
ADF One-sided originals: A3L - B6 JIS (Japanese Industrial Standard)KL
40-128 g/m2 (35-110 kg)
Two-sided originals: A3L-A5KL 52-128 g/m2 (45-110 kg)
Where original is placed
Original size Original weight
Exposure glass Up to 11" × 17" -
ADF One-sided originals: 11" × 17"L-51/2" × 81/2"KL
11-34 lb.
Two-sided originals: 11" × 17"L-51/2 × 81/2"KL
14-34 lb.
Placing Originals
12
1
Non-compatible originals for the Auto Document Feeder
Placing the following types of originals in the ADF can cause paper misfeeds orlight & black lines or result in damage to the originals. Place these originals onthe exposure glass instead.• Originals other than those specified on “Sizes and Weights of Recommended
Originals”• Stapled or clipped originals• Perforated or torn originals• Curled, folded, or creased originals• Pasted originals• Originals with any kind of coating, such as thermal fax paper, art paper, alu-
minum foil, carbon paper, or conductive paper• Originals with perforated lines• Originals with indexes, tags, or other projecting parts• Sticky originals such as translucent paper• Thin, highly flexible originals• Thick originals such as postcards• Bound originals such as books• Transparent originals such as OHP transparencies or translucent paper• Originals that are still wet with ink or white-out
Note❒ The original might become dirty if it is written with a pencil or a similar tool.
Originals
13
1
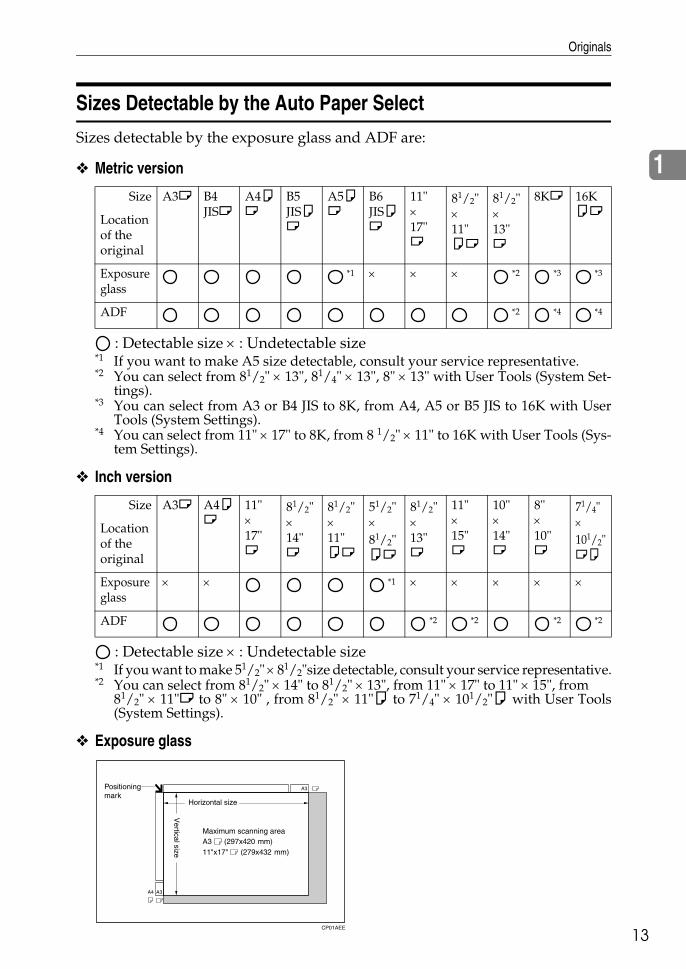
Sizes Detectable by the Auto Paper Select
Sizes detectable by the exposure glass and ADF are:
❖ Metric version
: Detectable size × : Undetectable size*1 If you want to make A5 size detectable, consult your service representative.*2 You can select from 81/2" × 13", 81/4" × 13", 8" × 13" with User Tools (System Set-
tings).*3 You can select from A3 or B4 JIS to 8K, from A4, A5 or B5 JIS to 16K with User
Tools (System Settings).*4 You can select from 11" × 17" to 8K, from 8 1/2" × 11" to 16K with User Tools (Sys-
tem Settings).
❖ Inch version
: Detectable size × : Undetectable size*1 If you want to make 51/2" × 81/2"size detectable, consult your service representative.*2 You can select from 81/2" × 14" to 81/2" × 13", from 11" × 17" to 11" × 15", from
81/2" × 11"L to 8" × 10" , from 81/2" × 11"K to 71/4" × 101/2"K with User Tools(System Settings).
❖ Exposure glass
Size A3L B4 JISL
A4KL
B5 JISKL
A5KL
B6 JISKL
11" × 17"L
81/2" × 11"KL
81/2" × 13"L
8KL 16KKL
Location of the original
Exposure glass
*1 × × × *2 *3 *3
ADF *2 *4 *4
Size A3L A4KL
11" × 17"L
81/2" × 14"L
81/2" × 11"KL
51/2" × 81/2"KL
81/2" × 13"L
11" × 15"L
10" × 14"L
8" × 10"L
71/4" × 101/2"LK
Location of the original
Exposure glass
× × *1 × × × × ×
ADF *2 *2 *2 *2
CP01AEE
Placing Originals
14
1
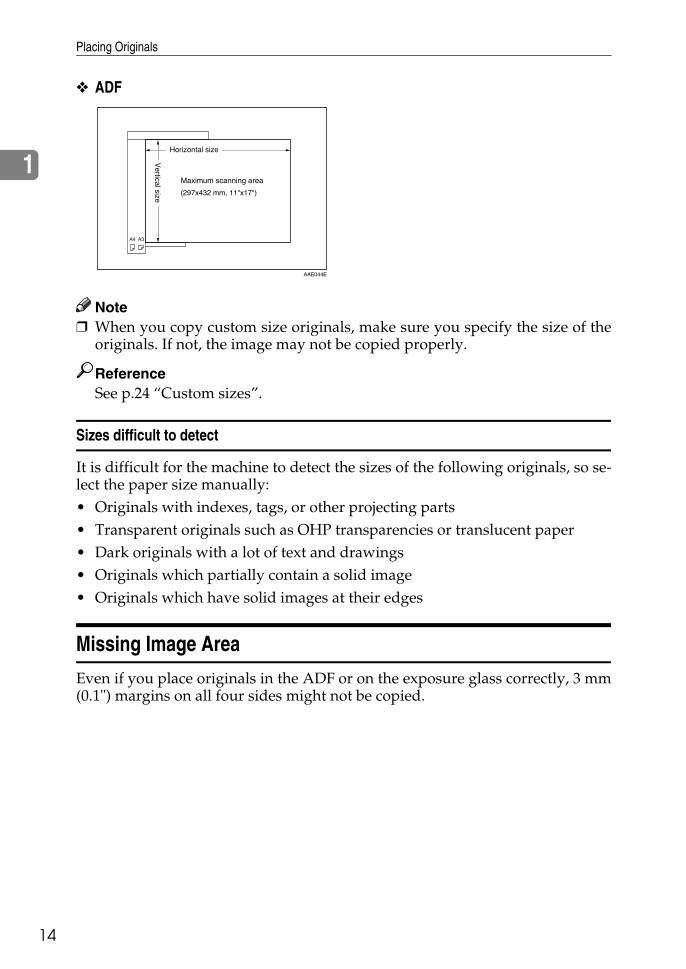
❖ ADF
Note❒ When you copy custom size originals, make sure you specify the size of the
originals. If not, the image may not be copied properly.
ReferenceSee p.24 “Custom sizes”.
Sizes difficult to detect
It is difficult for the machine to detect the sizes of the following originals, so se-lect the paper size manually:• Originals with indexes, tags, or other projecting parts• Transparent originals such as OHP transparencies or translucent paper• Dark originals with a lot of text and drawings• Originals which partially contain a solid image• Originals which have solid images at their edges
Missing Image Area
Even if you place originals in the ADF or on the exposure glass correctly, 3 mm(0.1") margins on all four sides might not be copied.
AAE044E
Placing Originals
15
1
Placing Originals
This section describes the procedure for placing originals on the exposure glassand in the ADF.Take care to place originals after any correction fluid and ink has completelydried. Not taking this precaution could cause marks on the exposure glass thatwill be copied onto paper.
Note❒ For original sizes you can set, see “Originals”.
ReferenceSee p.11 “Originals”.
Placing Originals
16
1
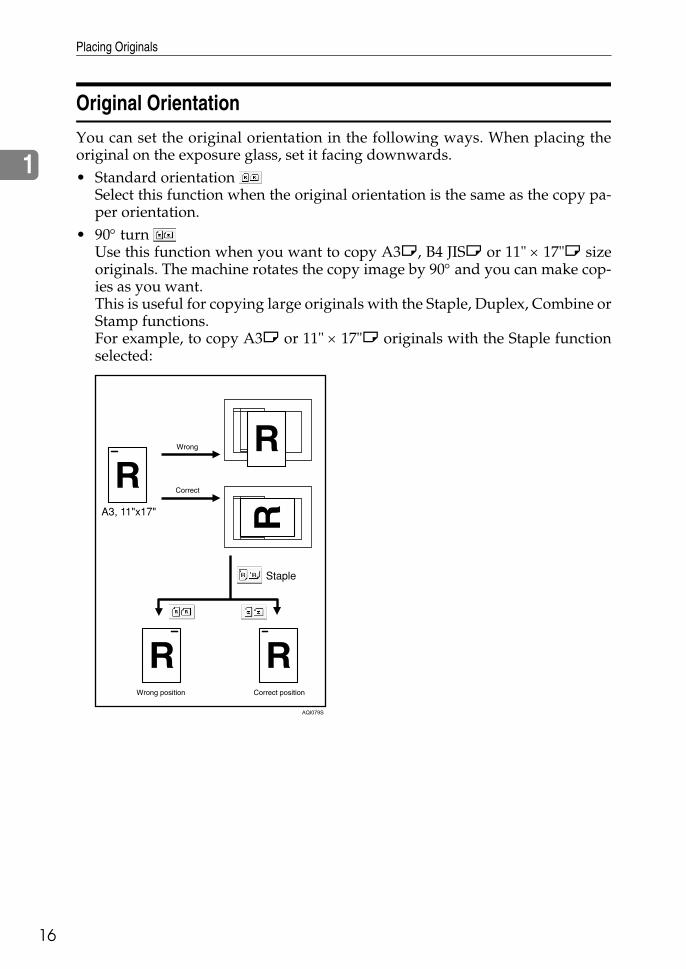
Original Orientation
You can set the original orientation in the following ways. When placing theoriginal on the exposure glass, set it facing downwards.• Standard orientation
Select this function when the original orientation is the same as the copy pa-per orientation.
• 90° turn Use this function when you want to copy A3L, B4 JISL or 11" × 17"L sizeoriginals. The machine rotates the copy image by 90° and you can make cop-ies as you want.This is useful for copying large originals with the Staple, Duplex, Combine orStamp functions.For example, to copy A3L or 11" × 17"L originals with the Staple functionselected:
AQI079S
Placing Originals
17
1
A Press [Special Original].
B Select the original orientation ( or ), and then press [OK].
Note❒ It is recommended to use this function together with the [Auto Paper Select]
or [Auto Reduce / Enlarge] function.
Placing Originals on the Exposure Glass
Place originals on the exposure glass.
Important❒ Do not lift the exposure glass cover or ADF forcefully. Otherwise, the cover
of the ADF might open or be damaged.
A Lift the exposure glass cover or ADF.Be sure to lift the exposure glass cover or ADF by more than 30 degrees. Oth-erwise, the size of the original might not be detected correctly.
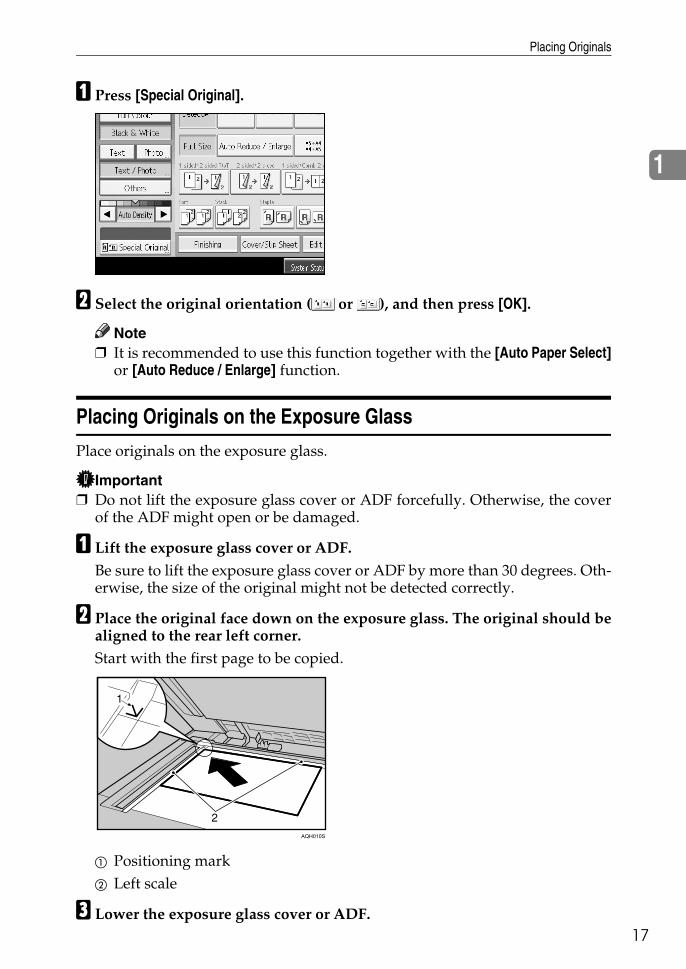
B Place the original face down on the exposure glass. The original should bealigned to the rear left corner. Start with the first page to be copied.
A Positioning markB Left scale
C Lower the exposure glass cover or ADF.
AQH010S
Placing Originals
18
1
Placing Originals in the Auto Document Feeder
Place originals in the ADF.Settings should be made in the following situations:
❖ When placing originals consisting of more than 100 pages: See p.20 “Batch Mode”.
❖ When placing originals one by one: See p.21 “SADF Mode”.
❖ When copying originals of various sizes:See p.22 “Mixed Size Mode”.
❖ When placing custom size originals:See p.24 “Custom sizes”.
Placing Originals
19
1
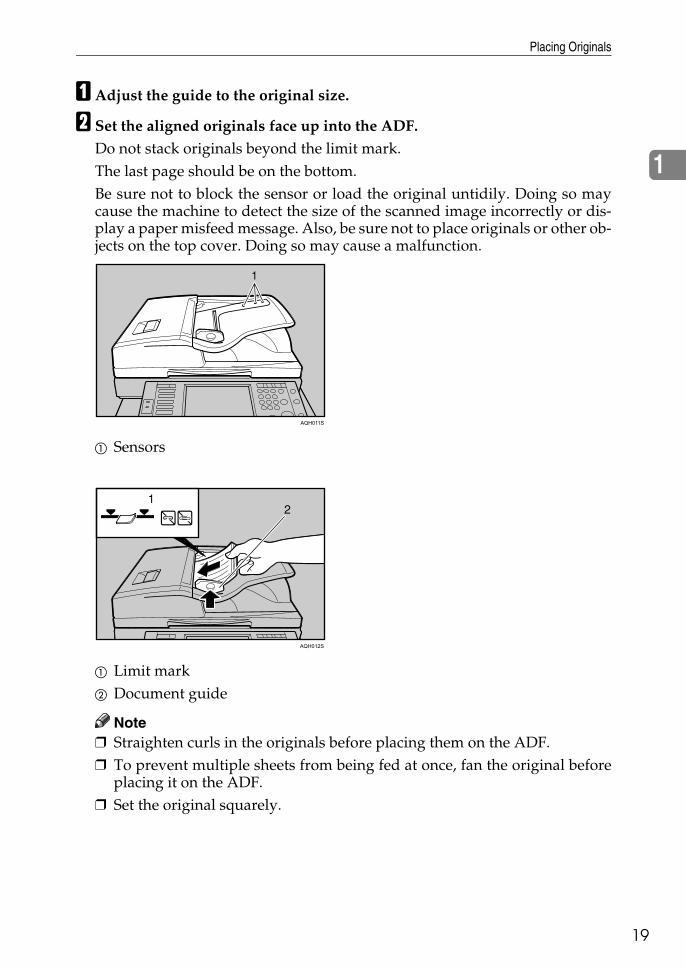
A Adjust the guide to the original size.
B Set the aligned originals face up into the ADF. Do not stack originals beyond the limit mark.The last page should be on the bottom.Be sure not to block the sensor or load the original untidily. Doing so maycause the machine to detect the size of the scanned image incorrectly or dis-play a paper misfeed message. Also, be sure not to place originals or other ob-jects on the top cover. Doing so may cause a malfunction.
A Sensors
A Limit markB Document guide
Note❒ Straighten curls in the originals before placing them on the ADF.❒ To prevent multiple sheets from being fed at once, fan the original before
placing it on the ADF.❒ Set the original squarely.
AQH011S
AQH012S
Placing Originals
20
1
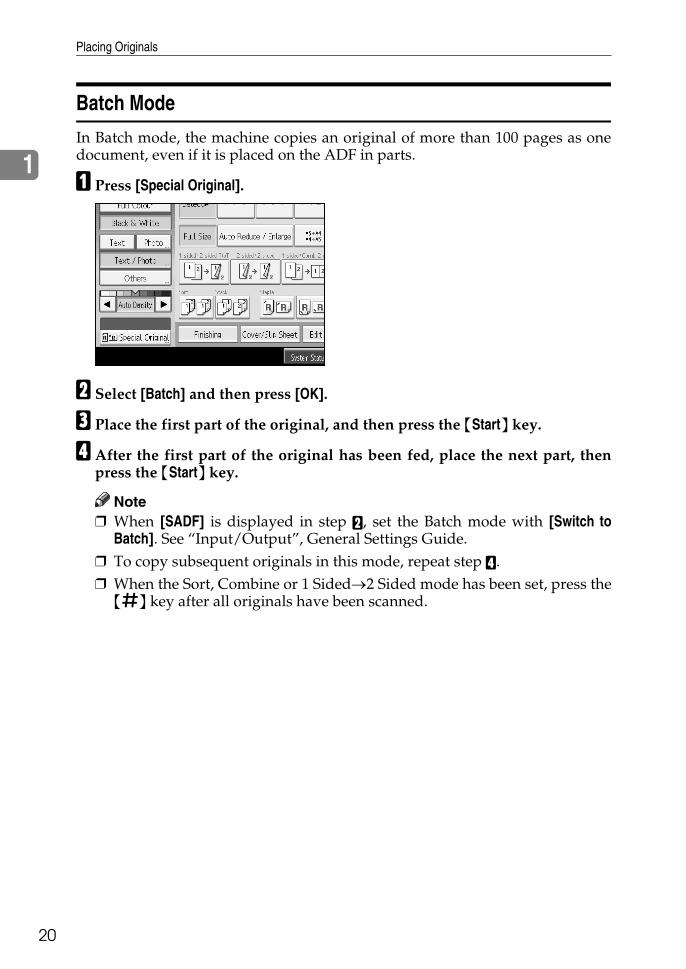
Batch Mode
In Batch mode, the machine copies an original of more than 100 pages as onedocument, even if it is placed on the ADF in parts.
A Press [Special Original].
B Select [Batch] and then press [OK].
C Place the first part of the original, and then press the {Start} key.
D After the first part of the original has been fed, place the next part, thenpress the {Start} key.
Note❒ When [SADF] is displayed in step B, set the Batch mode with [Switch to
Batch]. See “Input/Output”, General Settings Guide.❒ To copy subsequent originals in this mode, repeat step D. ❒ When the Sort, Combine or 1 Sided→2 Sided mode has been set, press the{q} key after all originals have been scanned.
Placing Originals
21
1
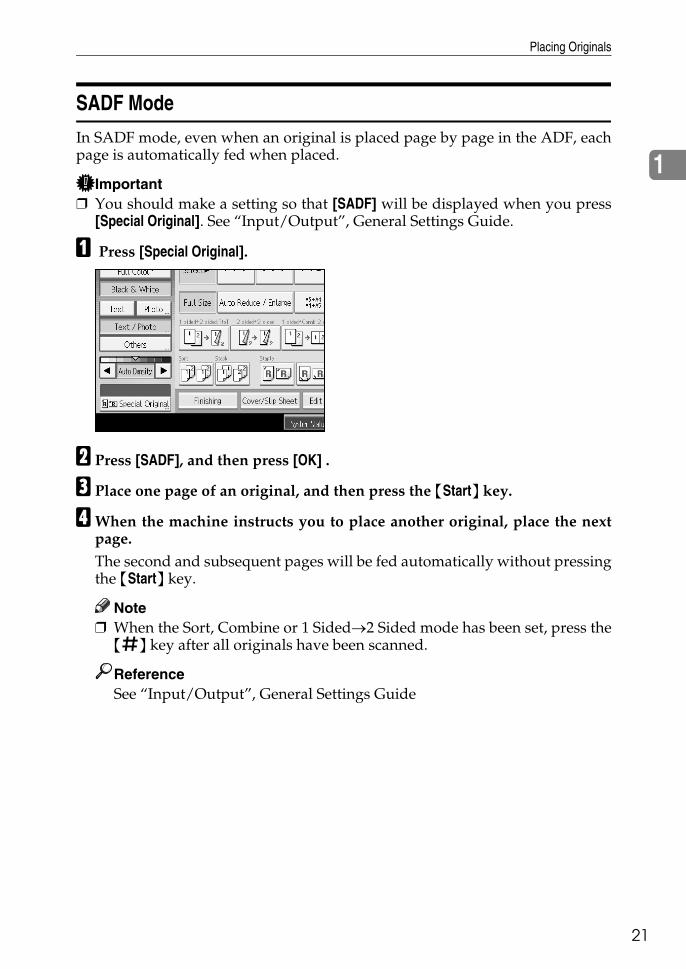
SADF Mode
In SADF mode, even when an original is placed page by page in the ADF, eachpage is automatically fed when placed.
Important❒ You should make a setting so that [SADF] will be displayed when you press
[Special Original]. See “Input/Output”, General Settings Guide.
A Press [Special Original].
B Press [SADF], and then press [OK] .
C Place one page of an original, and then press the {Start} key.
DWhen the machine instructs you to place another original, place the nextpage.The second and subsequent pages will be fed automatically without pressingthe {Start} key.
Note❒ When the Sort, Combine or 1 Sided→2 Sided mode has been set, press the{q} key after all originals have been scanned.
ReferenceSee “Input/Output”, General Settings Guide
Placing Originals
22
1
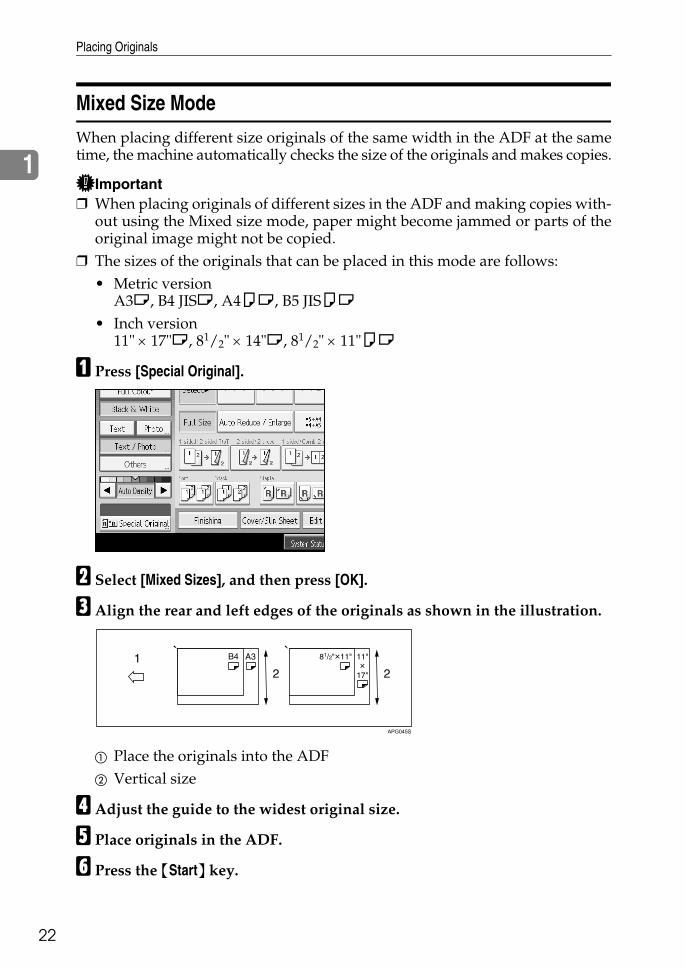
Mixed Size Mode
When placing different size originals of the same width in the ADF at the sametime, the machine automatically checks the size of the originals and makes copies.
Important❒ When placing originals of different sizes in the ADF and making copies with-
out using the Mixed size mode, paper might become jammed or parts of theoriginal image might not be copied.
❒ The sizes of the originals that can be placed in this mode are follows:• Metric version
A3L, B4 JISL, A4KL, B5 JISKL• Inch version
11" × 17"L, 81/2" × 14"L, 81/2" × 11"KL
A Press [Special Original].
B Select [Mixed Sizes], and then press [OK].
C Align the rear and left edges of the originals as shown in the illustration.
A Place the originals into the ADFB Vertical size
D Adjust the guide to the widest original size.
E Place originals in the ADF.
F Press the {Start} key.
APG045S
Placing Originals
23
1
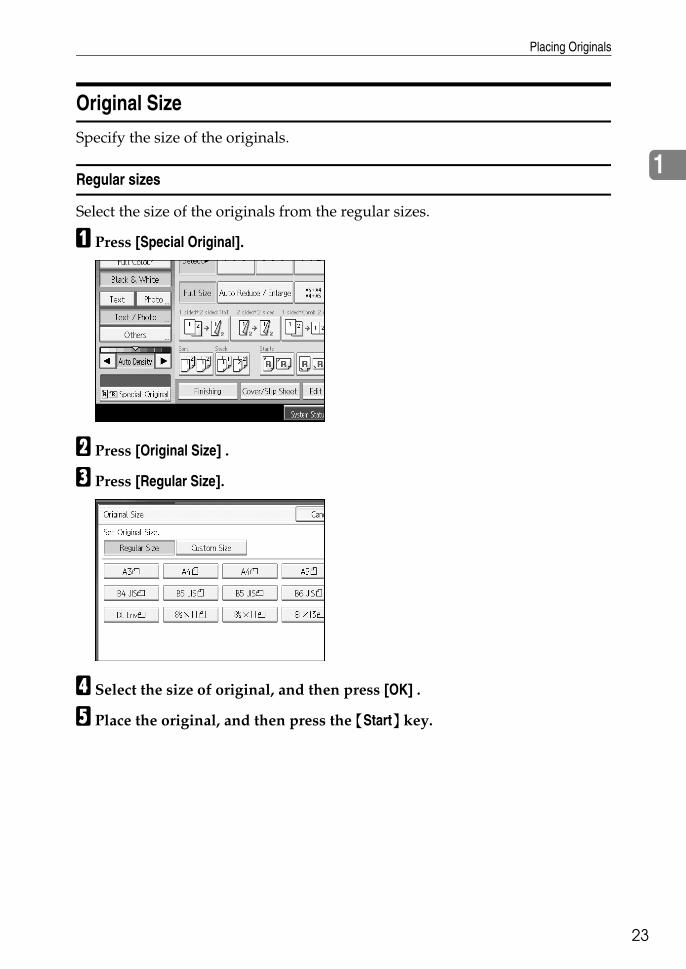
Original Size
Specify the size of the originals.
Regular sizes
Select the size of the originals from the regular sizes.
A Press [Special Original].
B Press [Original Size] .
C Press [Regular Size].
D Select the size of original, and then press [OK] .
E Place the original, and then press the {Start} key.
Placing Originals
24
1
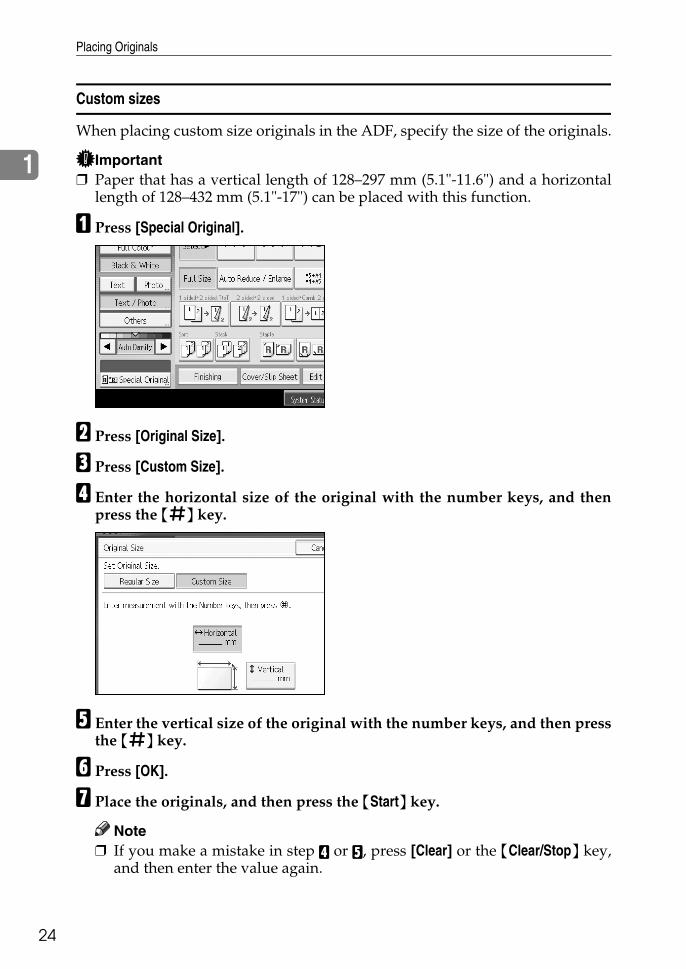
Custom sizes
When placing custom size originals in the ADF, specify the size of the originals.
Important❒ Paper that has a vertical length of 128–297 mm (5.1"-11.6") and a horizontal
length of 128–432 mm (5.1"-17") can be placed with this function.
A Press [Special Original].
B Press [Original Size].
C Press [Custom Size].
D Enter the horizontal size of the original with the number keys, and thenpress the {q} key.
E Enter the vertical size of the original with the number keys, and then pressthe {q} key.
F Press [OK].
G Place the originals, and then press the {Start} key.
Note❒ If you make a mistake in step D or E, press [Clear] or the {Clear/Stop} key,
and then enter the value again.
2. Copying
25
This chapter describes the procedure for making copies in various modes.
Basic Procedure
This section describes the basic procedure for making copies.
Important❒ When User Code Authentication is set, enter your user code (up to eight dig-
its) with the number keys so that the machine accepts copy jobs. See “Admin-istrator Tools”, General Settings Guide.
❒ When Basic Authentication, Windows Authentication, LDAP Authentica-tion, or Integration Server Authentication is set, enter your login user nameand user password so that the machine accepts copy jobs. Ask the user ad-ministrator for the login user name and login password. For details, see“When the Authentication Screen is Displayed”, About This Machine.
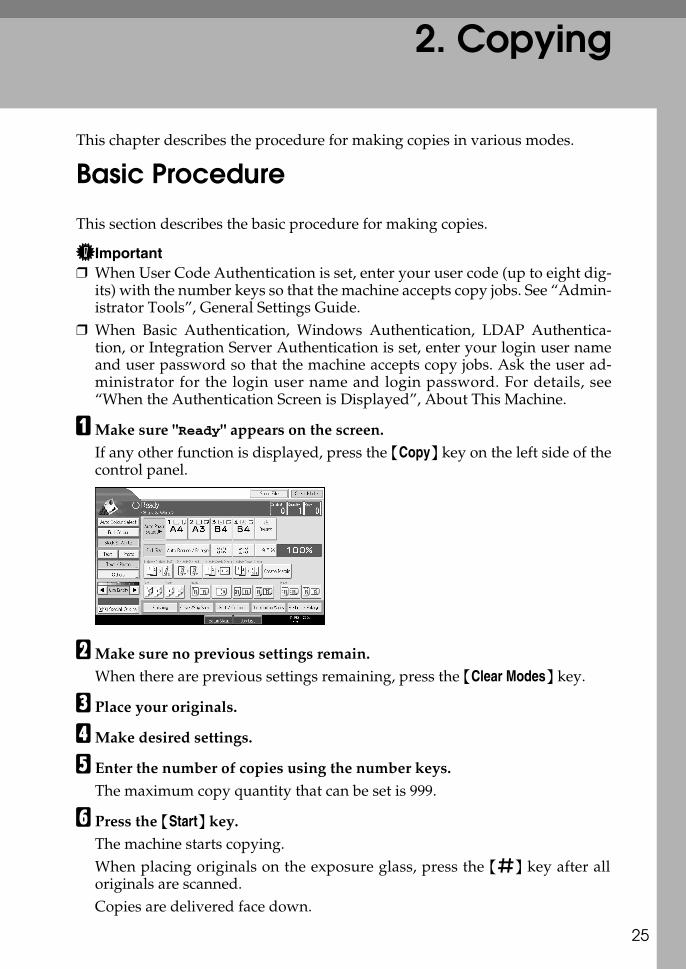
AMake sure "Ready" appears on the screen.If any other function is displayed, press the {Copy} key on the left side of thecontrol panel.
BMake sure no previous settings remain. When there are previous settings remaining, press the {Clear Modes} key.
C Place your originals.
DMake desired settings.
E Enter the number of copies using the number keys.The maximum copy quantity that can be set is 999.
F Press the {Start} key.The machine starts copying.When placing originals on the exposure glass, press the {q} key after alloriginals are scanned.Copies are delivered face down.
Copying
26
2
Note❒ Always log off when you have finished using the machine to prevent un-
authorized users from using the machine.❒ To stop the machine during a multi-copy run, press the {Clear/Stop} key.❒ To cancel all copy jobs and return the machine to the default condition,
press the {Clear Modes} key.❒ To clear entered values, press the {Clear/Stop} key or [Cancel] on the screen.❒ To confirm settings, press the [Check Modes].
Interrupt Copy
Use this function if you want to interrupt a long copy job to make urgently needed copies.
Important❒ You cannot use the Interrupt Copy function when fax originals are being
scanned or the scanner function is being used.
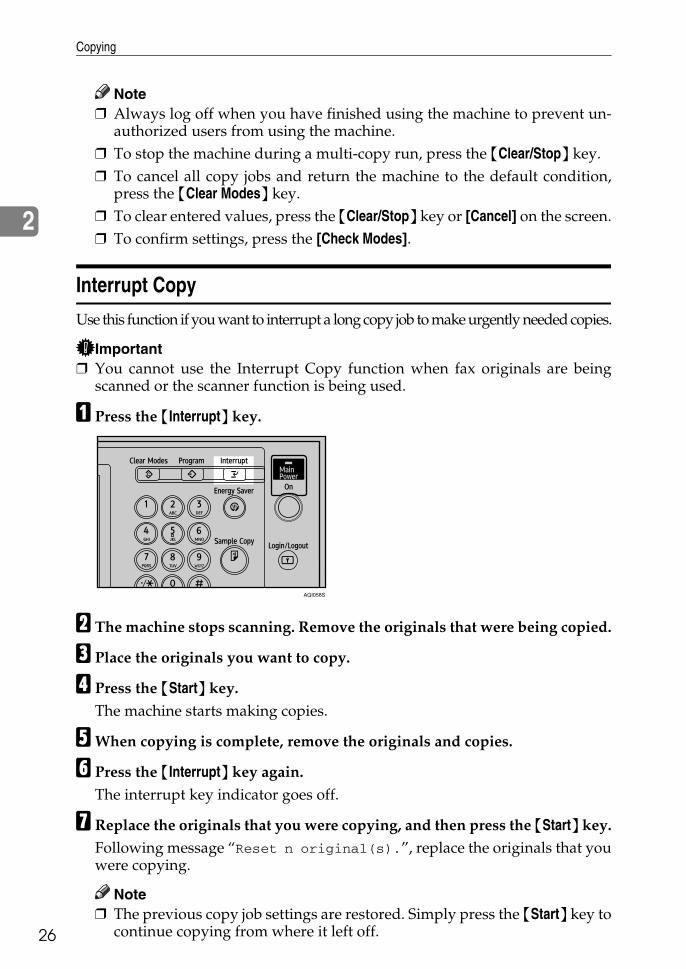
A Press the {Interrupt} key.
B The machine stops scanning. Remove the originals that were being copied.
C Place the originals you want to copy.
D Press the {Start} key.The machine starts making copies.
EWhen copying is complete, remove the originals and copies.
F Press the {Interrupt} key again.The interrupt key indicator goes off.
G Replace the originals that you were copying, and then press the {Start} key.Following message “Reset n original(s).”, replace the originals that youwere copying.
Note❒ The previous copy job settings are restored. Simply press the {Start} key to
continue copying from where it left off.
AQI058S
Basic Procedure
27
2
Left Original Beeper
The beeper sounds and an error message is displayed when you leave your orig-inals on the exposure glass after copying.
ReferenceFor details, see “Copier / Document Server Features”, General SettingsGuide.
Job Preset
You can set up the next copy content during copying. If a long copy job is inprogress and you do not want to wait for it to finish, you can use this functionto set up the next copy job in advance. When the current copy job is finished, thenext job will start automatically.
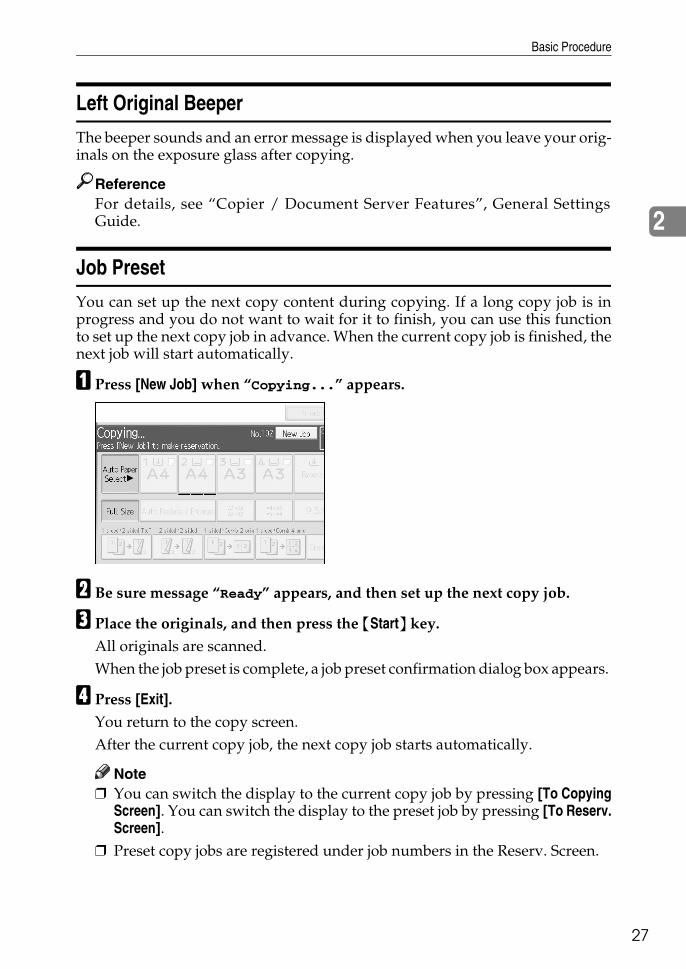
A Press [New Job] when “Copying...” appears.
B Be sure message “Ready” appears, and then set up the next copy job.
C Place the originals, and then press the {Start} key.All originals are scanned.When the job preset is complete, a job preset confirmation dialog box appears.
D Press [Exit].You return to the copy screen.After the current copy job, the next copy job starts automatically.
Note❒ You can switch the display to the current copy job by pressing [To Copying
Screen]. You can switch the display to the preset job by pressing [To Reserv.Screen].
❒ Preset copy jobs are registered under job numbers in the Reserv. Screen.
Copying
28
2
Job List
Jobs printed using Copy, Document Server, or Printer mode are temporarilystored in the machine, and then executed in order. The Job List function allowsyou to manage these jobs. For example, you can cancel incorrect job settings orprint an urgent document.
Note❒ You cannot use the Job List function when Interrupt Copy is active. ❒ Documents printed using the facsimile function and scanner function are not
displayed in the job list.
Job List
29
2
Job List Screen
This section explains displays and icons that appear in the Job List screen. The Job List screen varies depending on whether [Job Order] is selected withPrint Priority for the System Settings. For details about the setting procedure, see“System Settings”, General Settings Guide.
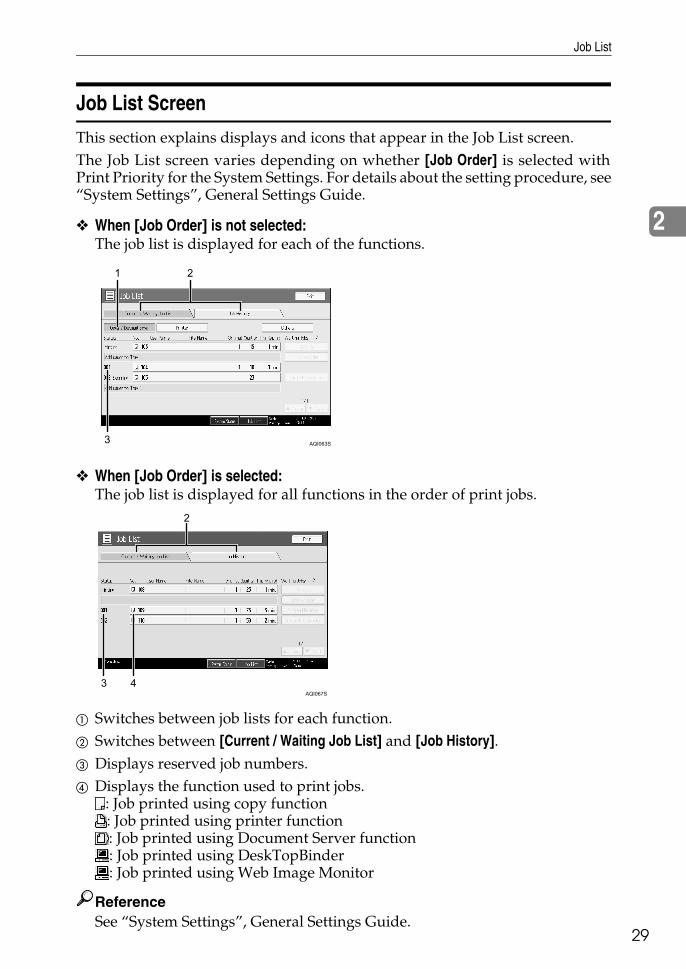
❖ When [Job Order] is not selected:The job list is displayed for each of the functions.
❖ When [Job Order] is selected:The job list is displayed for all functions in the order of print jobs.
A Switches between job lists for each function. B Switches between [Current / Waiting Job List] and [Job History].C Displays reserved job numbers.D Displays the function used to print jobs.
: Job printed using copy function: Job printed using printer function: Job printed using Document Server function: Job printed using DeskTopBinder: Job printed using Web Image Monitor
ReferenceSee “System Settings”, General Settings Guide.
AQI063S
AQI067S
Copying
30
2
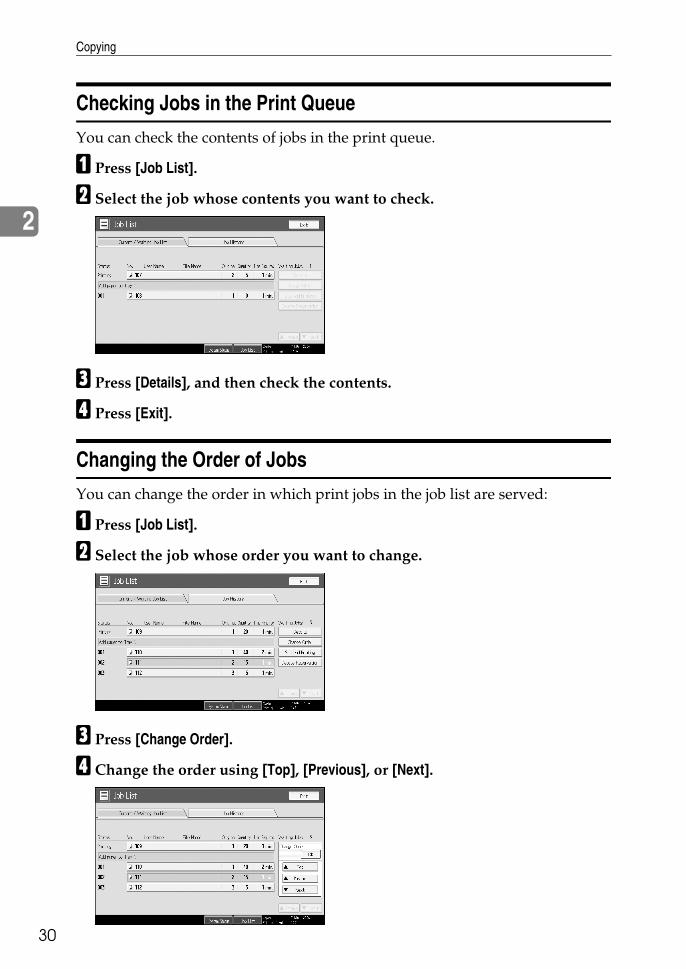
Checking Jobs in the Print Queue
You can check the contents of jobs in the print queue.
A Press [Job List].
B Select the job whose contents you want to check.
C Press [Details], and then check the contents.
D Press [Exit].
Changing the Order of Jobs
You can change the order in which print jobs in the job list are served:
A Press [Job List].
B Select the job whose order you want to change.
C Press [Change Order].
D Change the order using [Top], [Previous], or [Next].
Job List
31
2
E Press [OK].
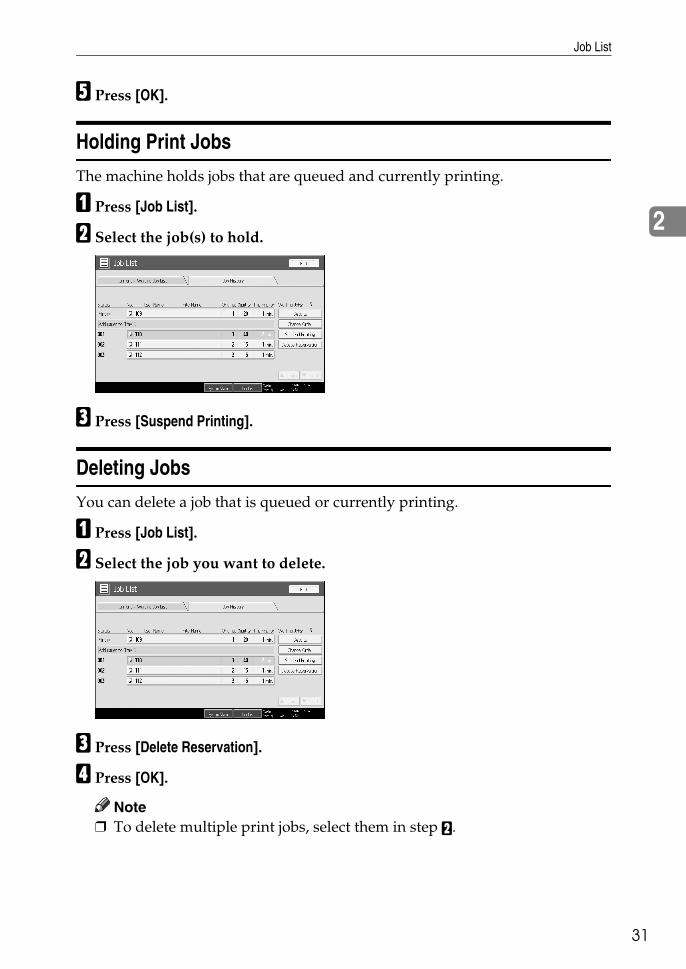
Holding Print Jobs
The machine holds jobs that are queued and currently printing.
A Press [Job List].
B Select the job(s) to hold.
C Press [Suspend Printing].
Deleting Jobs
You can delete a job that is queued or currently printing.
A Press [Job List].
B Select the job you want to delete.
C Press [Delete Reservation].
D Press [OK].
Note❒ To delete multiple print jobs, select them in step B.
Copying
32
2
Checking Job History
You can view the history and contents of completed print jobs.
A Press [Job List].
B Press [Job History].A list of completed print jobs appears.
C Select the job whose contents you want to check.
D Press [Details], and then check the contents.
E Press [Exit].

Copying from the Bypass Tray
33
2
Copying from the Bypass Tray
Use the bypass tray to copy onto OHP transparencies, adhesive labels, translu-cent paper, postcards and copy paper that cannot be loaded in the paper trays.
Important❒ When the duplex unit is attached, the default is [1 Sided → 2 Sided]. When cop-
ying from the bypass tray, cancel [1 Sided → 2 Sided] in [Dup./Combine/Series].You can change the initial settings. See “Programming Defaults in Initial Display”.
❒ Paper that has a vertical length of 90-305 mm (3.6-12 inch) and a horizontallength of 148-457.2 mm (5.9-18 inch) can be copied from the bypass tray.However, when paper larger than 433 mm (17.1 inch) in size is used, the pa-per may become wrinkled, may not be fed into the machine, or may cause pa-per jams.
❒ The machine can detect the following sizes as regular size copy paper: A3L,A4L, A5L, A6L. If you want to use the size of paper other than the above,be sure to specify the size.
❒ When copying on OHP transparencies or paper heavier than 81 g/m2 (about70 kg, 21 lb.), you need to specify the type and size of paper with “SpecialOriginal”.
❒ The maximum number of sheets you can load at the same time depends onpaper type. The maximum number of sheets should not exceed the upper limit.
❒ When copying paper lighter than 59 g/m2 or tracing paper, you need to spec-ify the paper type.
❖ [Bypass Tray Usage]Press [Bypass Tray Usage] to display a description on using the bypass tray.
Copying
34
2
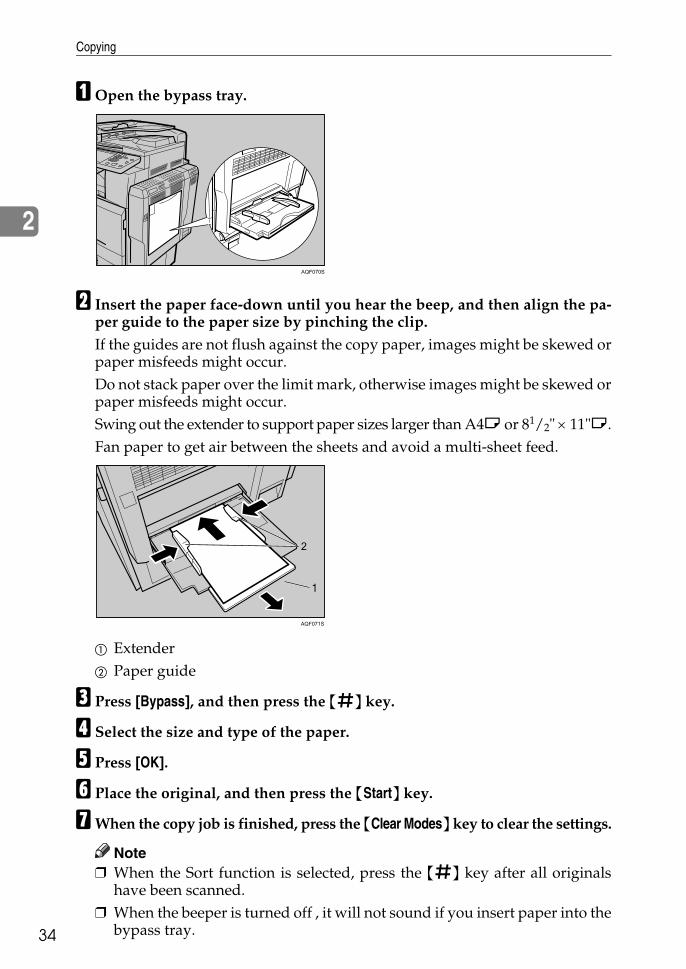
A Open the bypass tray.
B Insert the paper face-down until you hear the beep, and then align the pa-per guide to the paper size by pinching the clip.If the guides are not flush against the copy paper, images might be skewed orpaper misfeeds might occur.Do not stack paper over the limit mark, otherwise images might be skewed orpaper misfeeds might occur.Swing out the extender to support paper sizes larger than A4L or 81/2" × 11"L.Fan paper to get air between the sheets and avoid a multi-sheet feed.
A ExtenderB Paper guide
C Press [Bypass], and then press the {q} key.
D Select the size and type of the paper.
E Press [OK].
F Place the original, and then press the {Start} key.
GWhen the copy job is finished, press the {Clear Modes} key to clear the settings.
Note❒ When the Sort function is selected, press the {q} key after all originals
have been scanned.❒ When the beeper is turned off , it will not sound if you insert paper into the
bypass tray.
AQF070S
AQF071S
Copying from the Bypass Tray
35
2
ReferenceSee p.146 “Programming Defaults in Initial Display”.See “System Settings”, General Settings Guide.
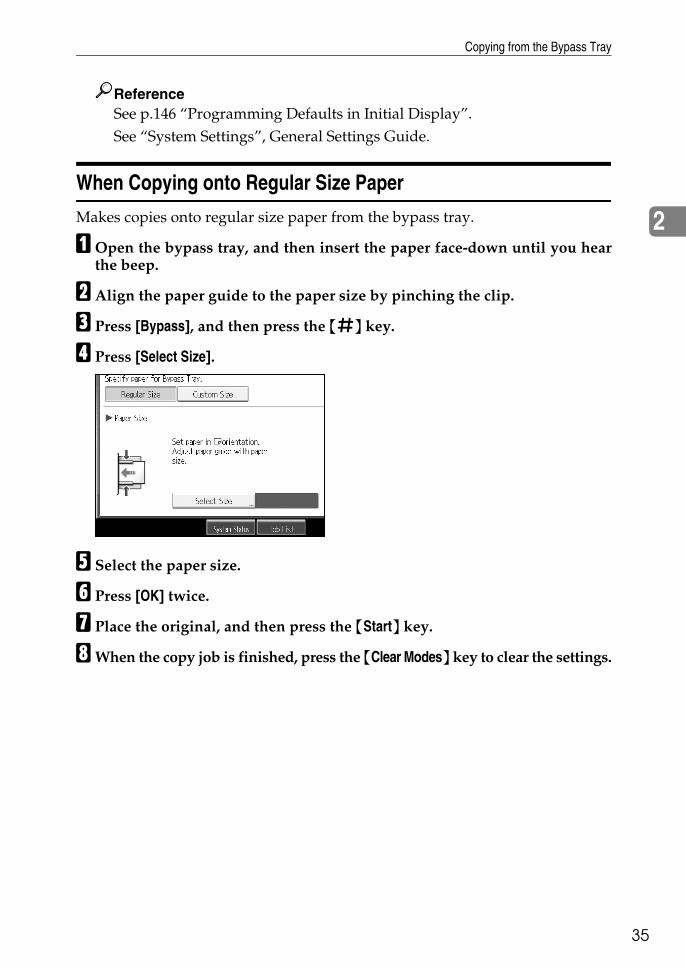
When Copying onto Regular Size Paper
Makes copies onto regular size paper from the bypass tray.
A Open the bypass tray, and then insert the paper face-down until you hearthe beep.
B Align the paper guide to the paper size by pinching the clip.
C Press [Bypass], and then press the {q} key.
D Press [Select Size].
E Select the paper size.
F Press [OK] twice.
G Place the original, and then press the {Start} key.
HWhen the copy job is finished, press the {Clear Modes} key to clear the settings.
Copying
36
2
When Copying onto Custom Size Paper
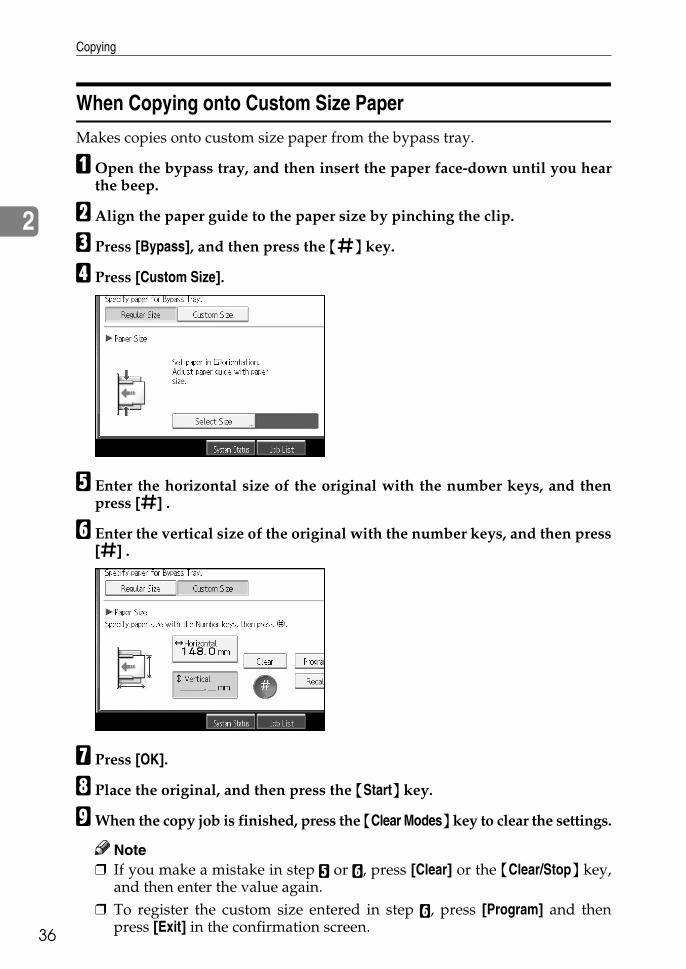
Makes copies onto custom size paper from the bypass tray.
A Open the bypass tray, and then insert the paper face-down until you hearthe beep.
B Align the paper guide to the paper size by pinching the clip.
C Press [Bypass], and then press the {q} key.
D Press [Custom Size].
E Enter the horizontal size of the original with the number keys, and thenpress [q] .
F Enter the vertical size of the original with the number keys, and then press[q] .
G Press [OK].
H Place the original, and then press the {Start} key.
IWhen the copy job is finished, press the {Clear Modes} key to clear the settings.
Note❒ If you make a mistake in step E or F, press [Clear] or the {Clear/Stop} key,
and then enter the value again.❒ To register the custom size entered in step F, press [Program] and then
press [Exit] in the confirmation screen.
Copying from the Bypass Tray
37
2
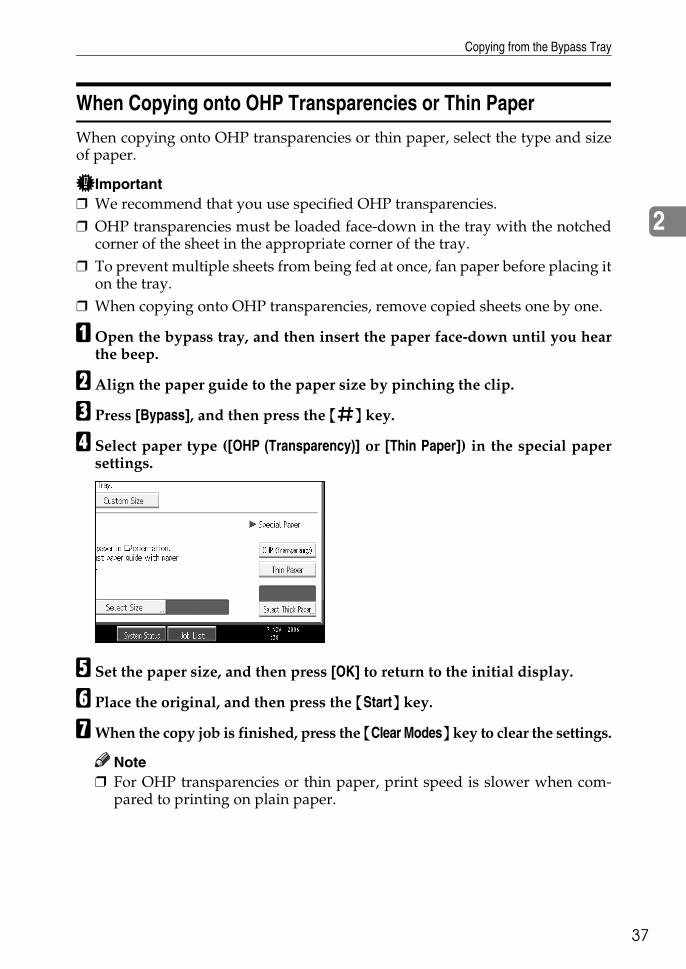
When Copying onto OHP Transparencies or Thin Paper
When copying onto OHP transparencies or thin paper, select the type and sizeof paper.
Important❒ We recommend that you use specified OHP transparencies.❒ OHP transparencies must be loaded face-down in the tray with the notched
corner of the sheet in the appropriate corner of the tray.❒ To prevent multiple sheets from being fed at once, fan paper before placing it
on the tray.❒ When copying onto OHP transparencies, remove copied sheets one by one.
A Open the bypass tray, and then insert the paper face-down until you hearthe beep.
B Align the paper guide to the paper size by pinching the clip.
C Press [Bypass], and then press the {q} key.
D Select paper type ([OHP (Transparency)] or [Thin Paper]) in the special papersettings.
E Set the paper size, and then press [OK] to return to the initial display.
F Place the original, and then press the {Start} key.
GWhen the copy job is finished, press the {Clear Modes} key to clear the settings.
Note❒ For OHP transparencies or thin paper, print speed is slower when com-
pared to printing on plain paper.
Copying
38
2
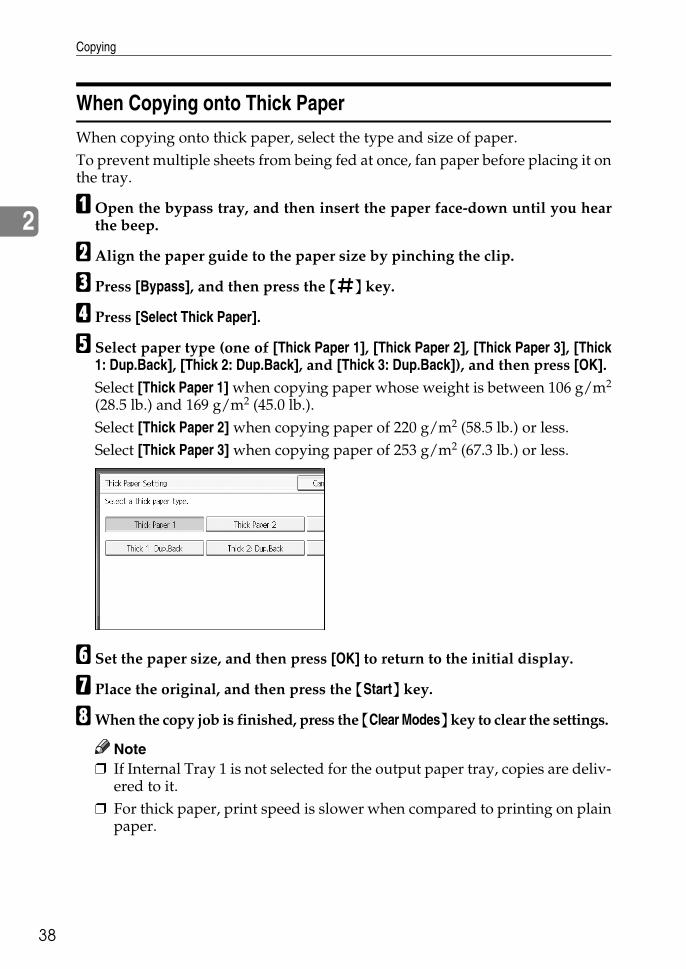
When Copying onto Thick Paper
When copying onto thick paper, select the type and size of paper.To prevent multiple sheets from being fed at once, fan paper before placing it onthe tray.
A Open the bypass tray, and then insert the paper face-down until you hearthe beep.
B Align the paper guide to the paper size by pinching the clip.
C Press [Bypass], and then press the {q} key.
D Press [Select Thick Paper].
E Select paper type (one of [Thick Paper 1], [Thick Paper 2], [Thick Paper 3], [Thick1: Dup.Back], [Thick 2: Dup.Back], and [Thick 3: Dup.Back]), and then press [OK].Select [Thick Paper 1] when copying paper whose weight is between 106 g/m2
(28.5 lb.) and 169 g/m2 (45.0 lb.).Select [Thick Paper 2] when copying paper of 220 g/m2 (58.5 lb.) or less.Select [Thick Paper 3] when copying paper of 253 g/m2 (67.3 lb.) or less.
F Set the paper size, and then press [OK] to return to the initial display.
G Place the original, and then press the {Start} key.
HWhen the copy job is finished, press the {Clear Modes} key to clear the settings.
Note❒ If Internal Tray 1 is not selected for the output paper tray, copies are deliv-
ered to it.❒ For thick paper, print speed is slower when compared to printing on plain
paper.
Copying from the Bypass Tray
39
2
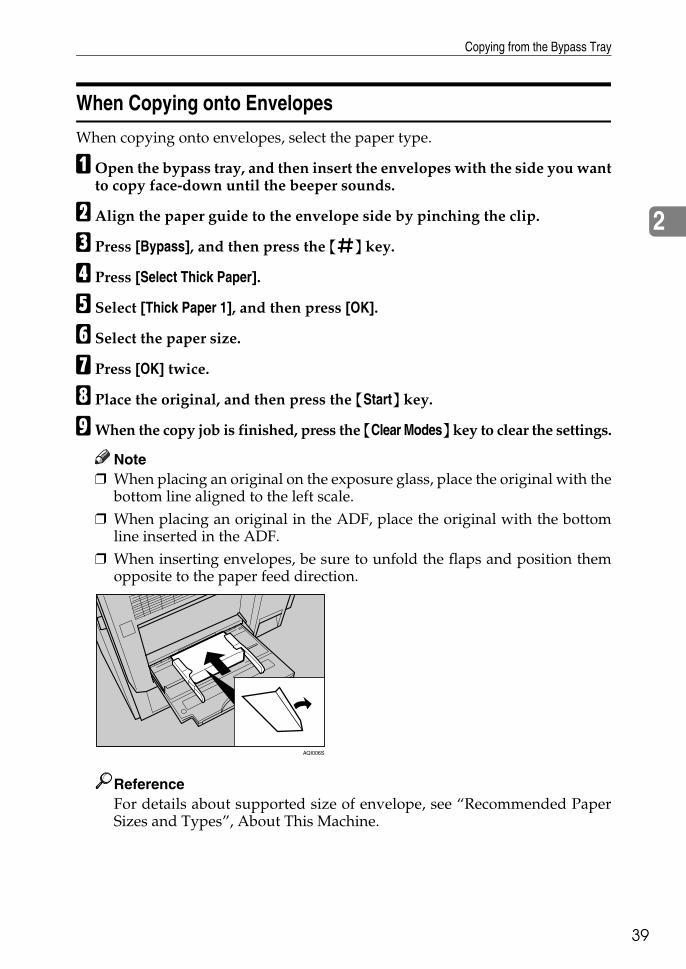
When Copying onto Envelopes
When copying onto envelopes, select the paper type.
A Open the bypass tray, and then insert the envelopes with the side you wantto copy face-down until the beeper sounds.
B Align the paper guide to the envelope side by pinching the clip.
C Press [Bypass], and then press the {q} key.
D Press [Select Thick Paper].
E Select [Thick Paper 1], and then press [OK].
F Select the paper size.
G Press [OK] twice.
H Place the original, and then press the {Start} key.
IWhen the copy job is finished, press the {Clear Modes} key to clear the settings.
Note❒ When placing an original on the exposure glass, place the original with the
bottom line aligned to the left scale.❒ When placing an original in the ADF, place the original with the bottom
line inserted in the ADF.❒ When inserting envelopes, be sure to unfold the flaps and position them
opposite to the paper feed direction.
ReferenceFor details about supported size of envelope, see “Recommended PaperSizes and Types”, About This Machine.
AQI006S
Copying
40
2
Colour Functions
This section describes functions that are used for colour copying.
Selecting a Colour Mode
Select a colour (or colours) that suits your originals and copying requirements. For colour images, see “What You Can Do with This Machine <Colour Func-tions/Colour Adjustments>”.The following three colour modes are available:
❖ Auto Colour SelectionJudges the colour of the original automatically, and copies either in full colouror black/white.
❖ Full Colour CopyCopies by overlaying yellow, magenta, cyan and black.
❖ Black/White CopyCopies in black regardless of the colour of the original.
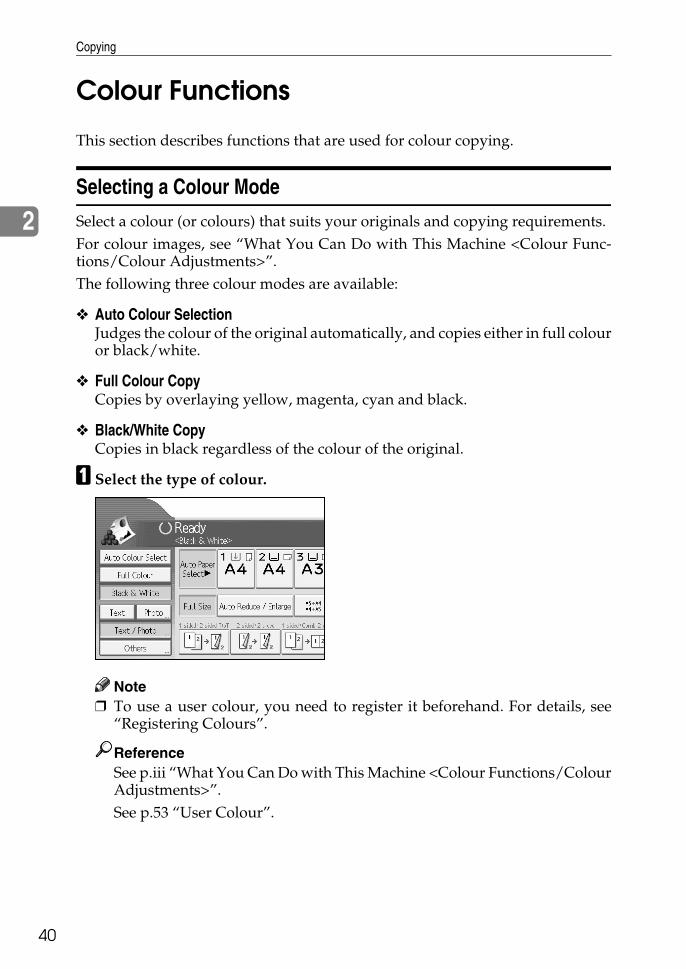
A Select the type of colour.
Note❒ To use a user colour, you need to register it beforehand. For details, see
“Registering Colours”.
ReferenceSee p.iii “What You Can Do with This Machine <Colour Functions/ColourAdjustments>”.See p.53 “User Colour”.

Colour Functions
41
2
Convert Colours
Copies by changing the colour in the original to a different colour.
Important❒ It is possible to specify up to 4 colours.❒ To use this function, [Full Colour] must be selected.❒ If any other colour mode is selected, you cannot select [Convert Colour].
A Press [Full Colour].
B Press [Edit / Colour].
CMake sure that [Colour] is selected before pressing [Convert Colour].
D Select any one item from [Conversion 1] to [Conversion 4].
Copying
42
2
E Selects the colour to be converted.
F Selects the new colour. You can adjust the density of each colour in four steps. To select User Colour, press [User Colour], and then select the colour.
G After selecting all colours to be converted, press [OK] three times.
H Place the originals, and then press the {Start} key.
Note❒ The width of the colour to be converted can be adjusted in five levels. If the
colour width is set to [Wider] and red has been specified, colours, which areclose to magenta or orange, will also be converted. The colour width canbe adjusted in User Tools. This adjustment will be valid in “Erase Colour”.See “Adjust Colour Image”, General Settings Guide.
❒ When you want to change the converted colour in step F, press from [Con-version 1] to [Conversion 4] and make the selection again.
❒ When changing more than two colours, repeat steps D to F.❒ The full colour counter will advance by “1”.
Erase Colour
Copies by erasing a certain colour in the image of the original.
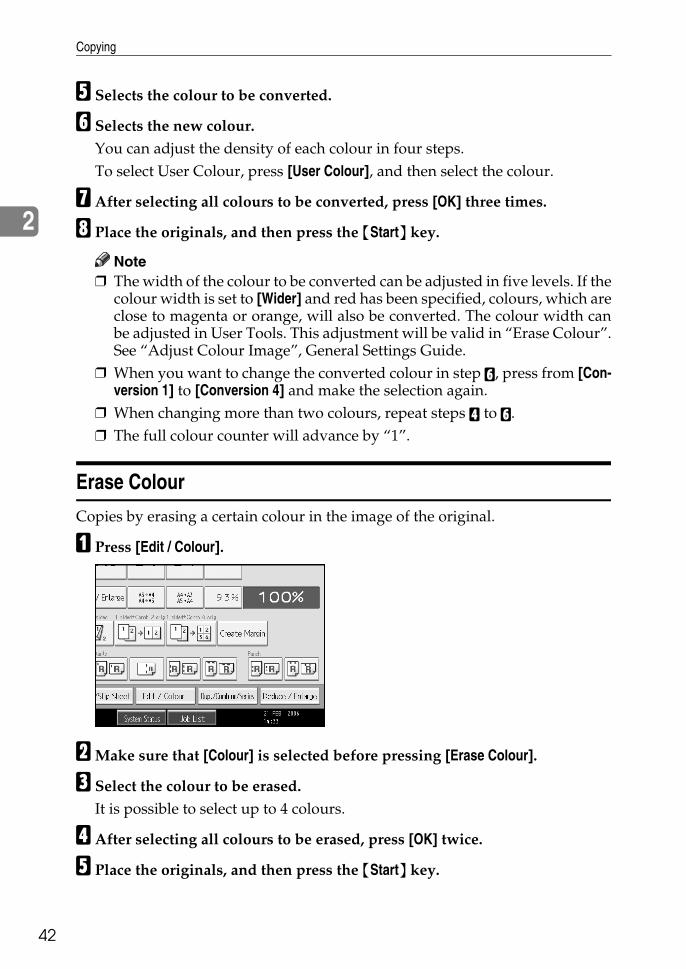
A Press [Edit / Colour].
BMake sure that [Colour] is selected before pressing [Erase Colour].
C Select the colour to be erased.It is possible to select up to 4 colours.
D After selecting all colours to be erased, press [OK] twice.
E Place the originals, and then press the {Start} key.
Colour Functions
43
2
Note❒ The width of the colour to be deleted can be adjusted in five levels. If the
colour width is set to [Wider] and red has been specified, colours, which areclose to magenta or orange, will also be deleted. The colour width can beadjusted in User Tools. See “Adjust Colour Image”, General SettingsGuide.
❒ You can cancel the selection by pressing the selected (highlighted) key instep C.
❒ When the Full Colour Copy is selected, the full colour counter will advanceby “1”. When the Black/White is selected, the mono-colour counter willadvance by “1”.
Colour Background
Copies by adding a colour in the whole page.
Important❒ Since the Colour Background function overprints the entire original, the col-
our of the image may change.
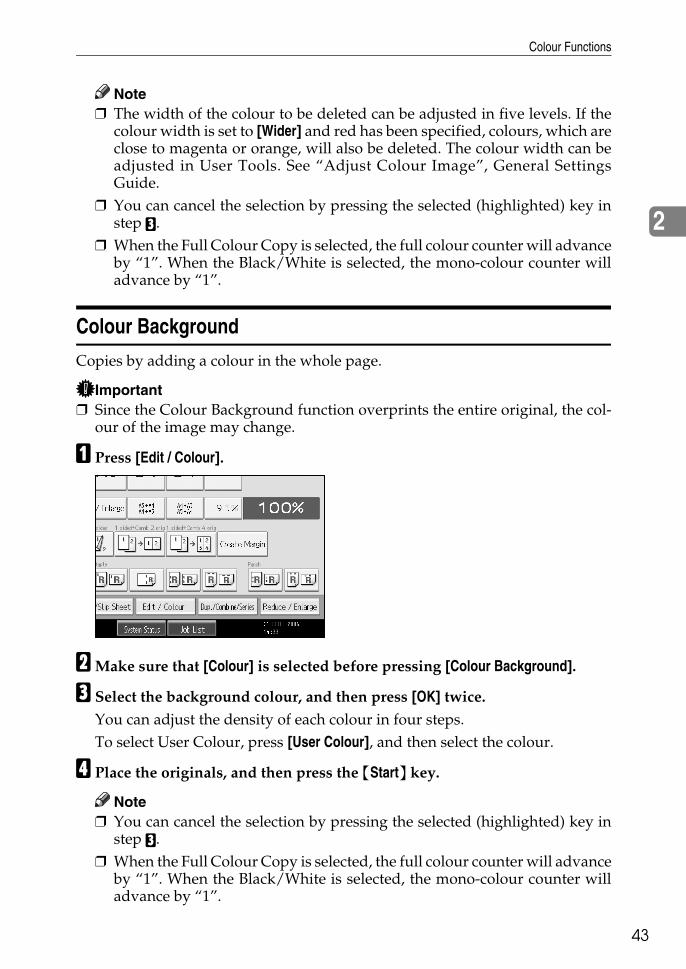
A Press [Edit / Colour].
BMake sure that [Colour] is selected before pressing [Colour Background].
C Select the background colour, and then press [OK] twice.You can adjust the density of each colour in four steps. To select User Colour, press [User Colour], and then select the colour.
D Place the originals, and then press the {Start} key.
Note❒ You can cancel the selection by pressing the selected (highlighted) key in
step C.❒ When the Full Colour Copy is selected, the full colour counter will advance
by “1”. When the Black/White is selected, the mono-colour counter willadvance by “1”.
Copying
44
2
Colour Balance
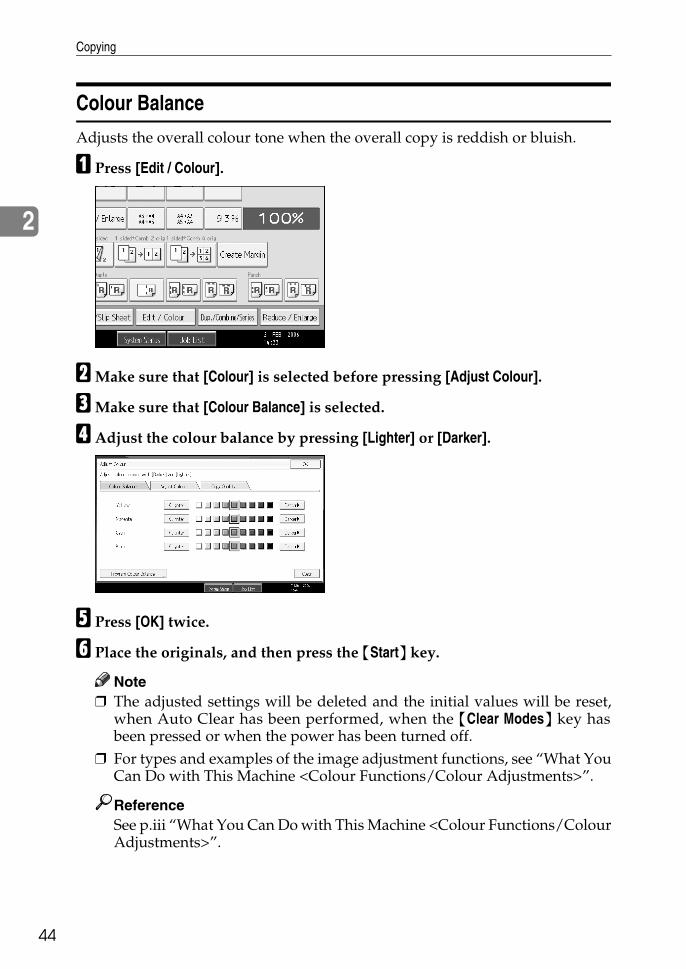
Adjusts the overall colour tone when the overall copy is reddish or bluish.
A Press [Edit / Colour].
BMake sure that [Colour] is selected before pressing [Adjust Colour].
CMake sure that [Colour Balance] is selected.
D Adjust the colour balance by pressing [Lighter] or [Darker].
E Press [OK] twice.
F Place the originals, and then press the {Start} key.
Note❒ The adjusted settings will be deleted and the initial values will be reset,
when Auto Clear has been performed, when the {Clear Modes} key hasbeen pressed or when the power has been turned off.
❒ For types and examples of the image adjustment functions, see “What YouCan Do with This Machine <Colour Functions/Colour Adjustments>”.
ReferenceSee p.iii “What You Can Do with This Machine <Colour Functions/ColourAdjustments>”.
Colour Functions
45
2
Colour Balance Program
You can also store the colour balance setting as a colour balance program andrecall it when you want to use it.You can store up to three programs.
Note❒ If you want to change the registered settings, register them one more time. In
this case, the previously registered contents will be changed.
Registering the adjusted colour balance
Register adjusted colour balance settings so that you can use them later.
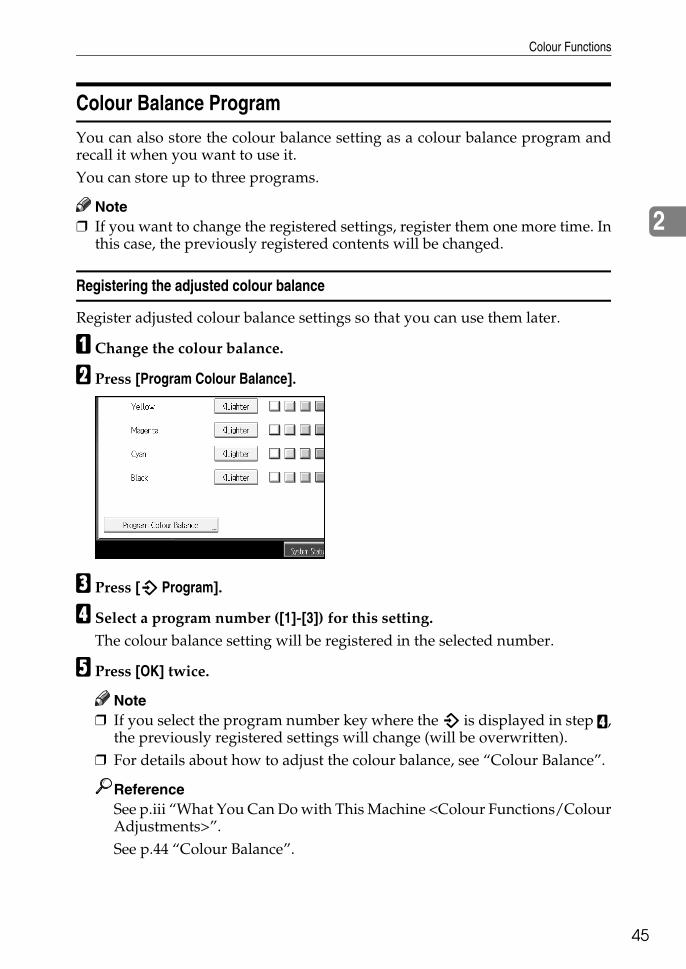
A Change the colour balance.
B Press [Program Colour Balance].
C Press [m Program].
D Select a program number ([1]-[3]) for this setting.The colour balance setting will be registered in the selected number.
E Press [OK] twice.
Note❒ If you select the program number key where the m is displayed in step D,
the previously registered settings will change (will be overwritten).❒ For details about how to adjust the colour balance, see “Colour Balance”.
ReferenceSee p.iii “What You Can Do with This Machine <Colour Functions/ColourAdjustments>”.See p.44 “Colour Balance”.
Copying
46
2
Changing the registered contents
Changes contents stored in colour balance programs.
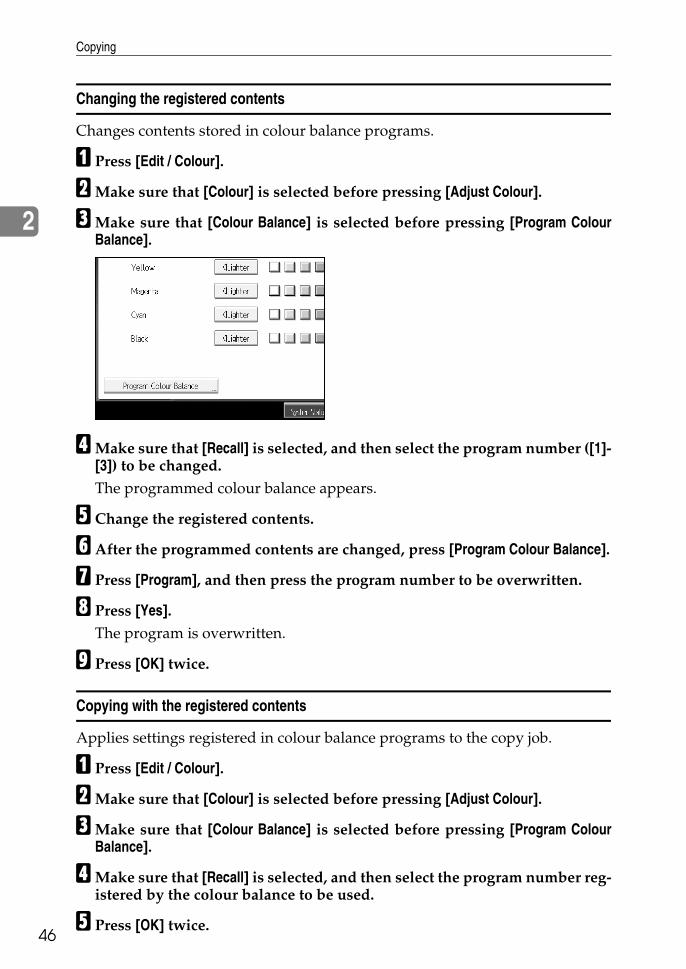
A Press [Edit / Colour].
BMake sure that [Colour] is selected before pressing [Adjust Colour].
CMake sure that [Colour Balance] is selected before pressing [Program ColourBalance].
DMake sure that [Recall] is selected, and then select the program number ([1]-[3]) to be changed.The programmed colour balance appears.
E Change the registered contents.
F After the programmed contents are changed, press [Program Colour Balance].
G Press [Program], and then press the program number to be overwritten.
H Press [Yes].The program is overwritten.
I Press [OK] twice.
Copying with the registered contents
Applies settings registered in colour balance programs to the copy job.
A Press [Edit / Colour].
BMake sure that [Colour] is selected before pressing [Adjust Colour].
CMake sure that [Colour Balance] is selected before pressing [Program ColourBalance].
DMake sure that [Recall] is selected, and then select the program number reg-istered by the colour balance to be used.
E Press [OK] twice.

Colour Functions
47
2
F Place the originals, and then press the {Start} key.
Note❒ After copying has been completed, pressing the {Clear Modes} key deletes
the recalled contents.
Deleting the registered contents
Deletes contents stored in colour balance programs.
A Press [Edit / Colour].
BMake sure that [Colour] is selected before pressing [Adjust Colour].
CMake sure that [Colour Balance] is selected before pressing [Program ColourBalance].
D Press [Delete], and then select the program number registered by the colourbalance to be deleted.
E Press [Yes].
F Press [OK] twice.
Colour Adjustment
Adjusts the specific colours (yellow, red, magenta, blue, cyan and green) by mix-ing them with adjacent colours in the colour circle.You can adjust up to three colours from yellow, red, magenta, blue, cyan, orgreen.
Important❒ This function is not available if Black & White is selected.
A Press [Edit / Colour].
BMake sure that [Colour] is selected before pressing [Adjust Colour].
C Press [Adjust Colour].
Copying
48
2
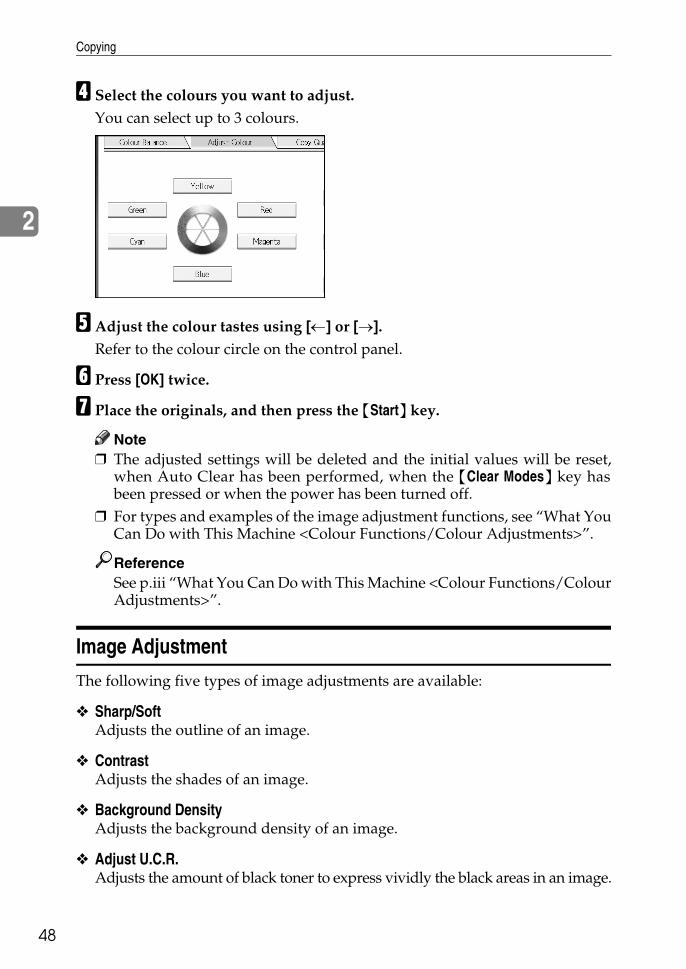
D Select the colours you want to adjust.You can select up to 3 colours.
E Adjust the colour tastes using [←] or [→].Refer to the colour circle on the control panel.
F Press [OK] twice.
G Place the originals, and then press the {Start} key.
Note❒ The adjusted settings will be deleted and the initial values will be reset,
when Auto Clear has been performed, when the {Clear Modes} key hasbeen pressed or when the power has been turned off.
❒ For types and examples of the image adjustment functions, see “What YouCan Do with This Machine <Colour Functions/Colour Adjustments>”.
ReferenceSee p.iii “What You Can Do with This Machine <Colour Functions/ColourAdjustments>”.
Image Adjustment
The following five types of image adjustments are available:
❖ Sharp/SoftAdjusts the outline of an image.
❖ ContrastAdjusts the shades of an image.
❖ Background DensityAdjusts the background density of an image.
❖ Adjust U.C.R.Adjusts the amount of black toner to express vividly the black areas in an image.
Colour Functions
49
2
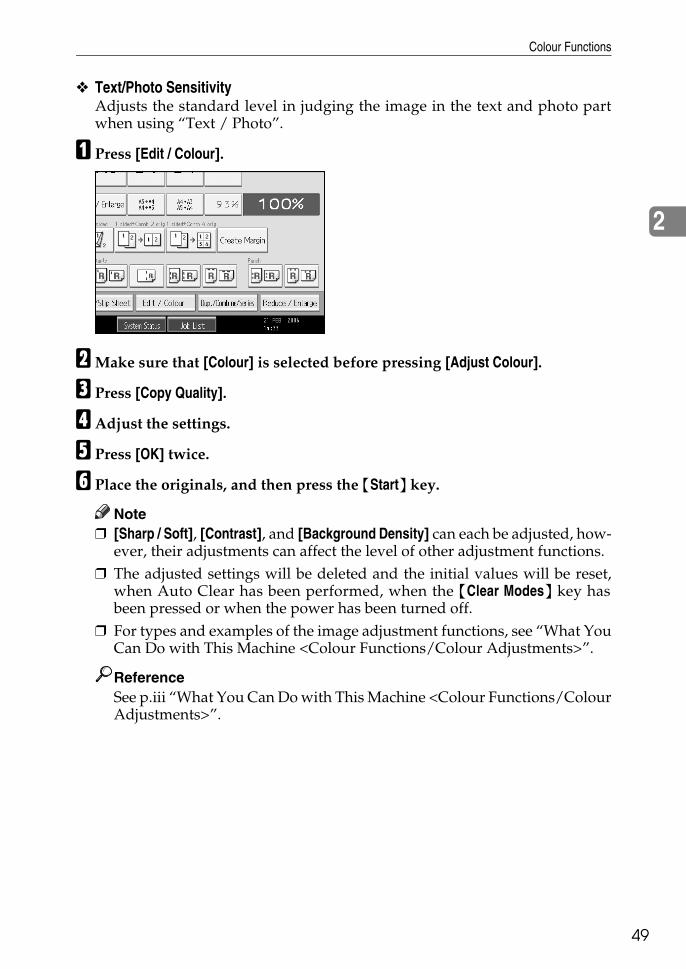
❖ Text/Photo SensitivityAdjusts the standard level in judging the image in the text and photo partwhen using “Text / Photo”.
A Press [Edit / Colour].
BMake sure that [Colour] is selected before pressing [Adjust Colour].
C Press [Copy Quality].
D Adjust the settings.
E Press [OK] twice.
F Place the originals, and then press the {Start} key.
Note❒ [Sharp / Soft], [Contrast], and [Background Density] can each be adjusted, how-
ever, their adjustments can affect the level of other adjustment functions.❒ The adjusted settings will be deleted and the initial values will be reset,
when Auto Clear has been performed, when the {Clear Modes} key hasbeen pressed or when the power has been turned off.
❒ For types and examples of the image adjustment functions, see “What YouCan Do with This Machine <Colour Functions/Colour Adjustments>”.
ReferenceSee p.iii “What You Can Do with This Machine <Colour Functions/ColourAdjustments>”.
Copying
50
2
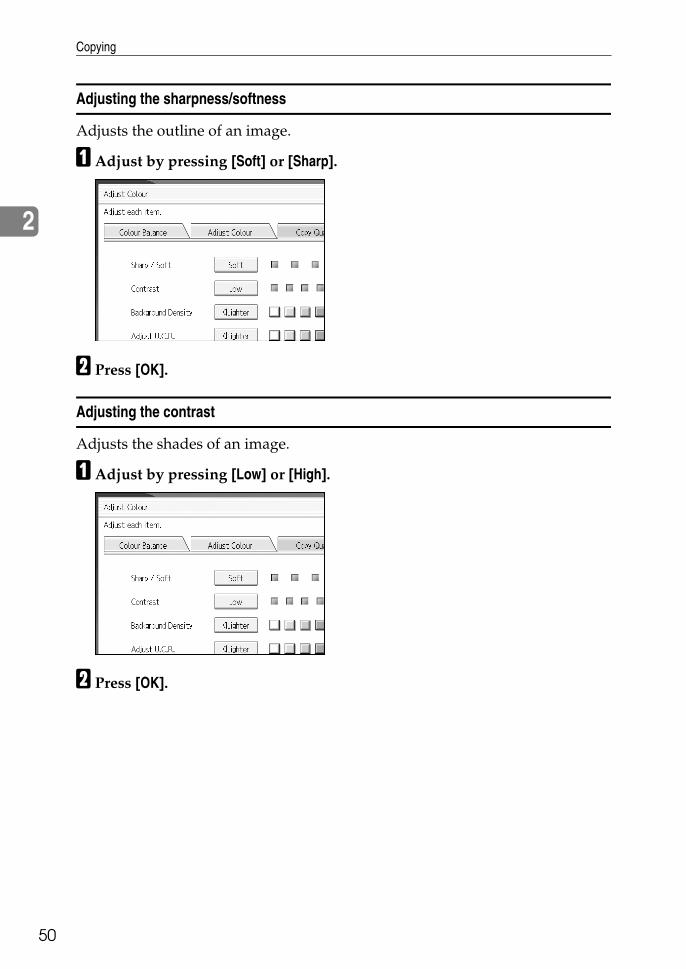
Adjusting the sharpness/softness
Adjusts the outline of an image.
A Adjust by pressing [Soft] or [Sharp].
B Press [OK].
Adjusting the contrast
Adjusts the shades of an image.
A Adjust by pressing [Low] or [High].
B Press [OK].
Colour Functions
51
2
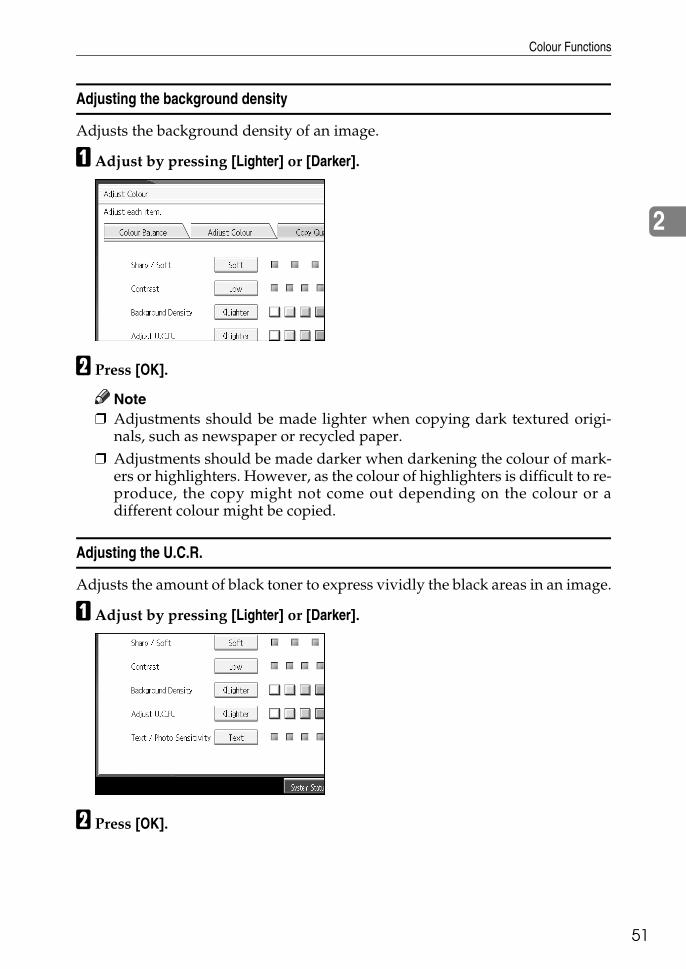
Adjusting the background density
Adjusts the background density of an image.
A Adjust by pressing [Lighter] or [Darker].
B Press [OK].
Note❒ Adjustments should be made lighter when copying dark textured origi-
nals, such as newspaper or recycled paper.❒ Adjustments should be made darker when darkening the colour of mark-
ers or highlighters. However, as the colour of highlighters is difficult to re-produce, the copy might not come out depending on the colour or adifferent colour might be copied.
Adjusting the U.C.R.
Adjusts the amount of black toner to express vividly the black areas in an image.
A Adjust by pressing [Lighter] or [Darker].
B Press [OK].
Copying
52
2
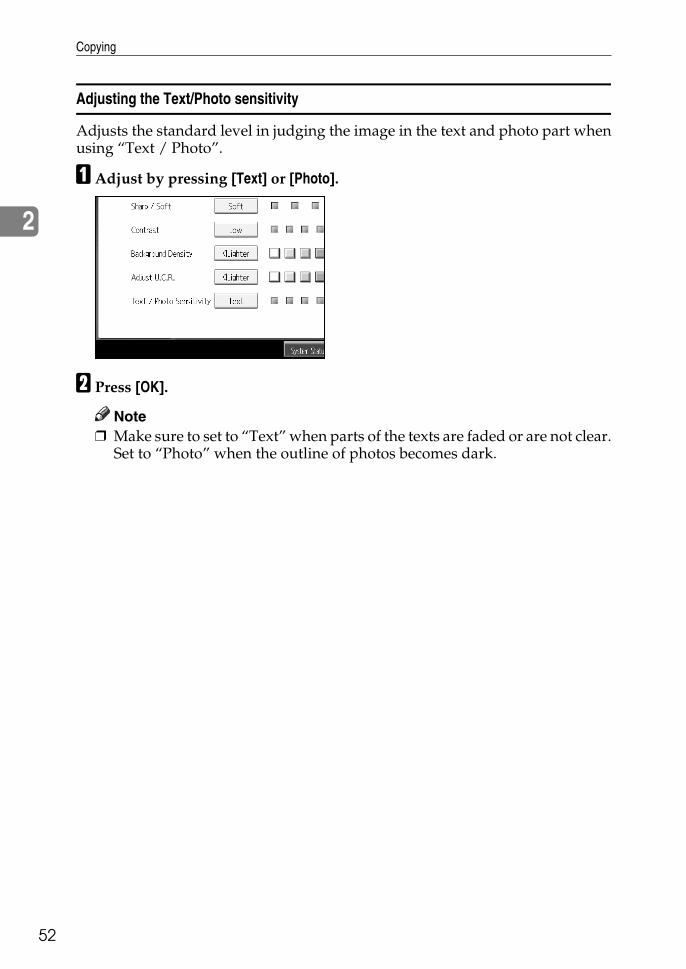
Adjusting the Text/Photo sensitivity
Adjusts the standard level in judging the image in the text and photo part whenusing “Text / Photo”.
A Adjust by pressing [Text] or [Photo].
B Press [OK].
Note❒ Make sure to set to “Text” when parts of the texts are faded or are not clear.
Set to “Photo” when the outline of photos becomes dark.
Colour Functions
53
2
User Colour
You can register User Colours made by adjusting the density of yellow, magen-ta, cyan, and black. You can also give a name to the colours you register, andprint out a list of user colours.You can create colours by: • Adjusting the density of each colour based on the density of a chosen basic
colour.• Directly specifying the density of each colour using the number keys.
Note❒ Adjust the colours to be registered so that the total of yellow, magenta, cyan
and black is under 400%.❒ When copying using user colours, the fine shades might vary depending on
the condition of the machine.❒ In order to correctly reproduce originals, the values, which have been input,
are corrected inside the machine, and copies are made using the best suitablevalues. Therefore, there might be slight colour differences when copying us-ing “Text” and when using “Photo”.
❒ Up to 15 colours can be registered. ❒ Sample prints of user colours can also be made on an A4K, 81/2" × 11"K,
A3L, or 11" × 17"L size page.❒ When printing a list of user colours, the full colour counter will advance by
“1”.❒ For types and examples of the image adjustment functions, see “What You
Can Do with This Machine <Colour Functions/Colour Adjustments>”.
ReferenceSee p.iii “What You Can Do with This Machine <Colour Functions/ColourAdjustments>”.
Copying
54
2
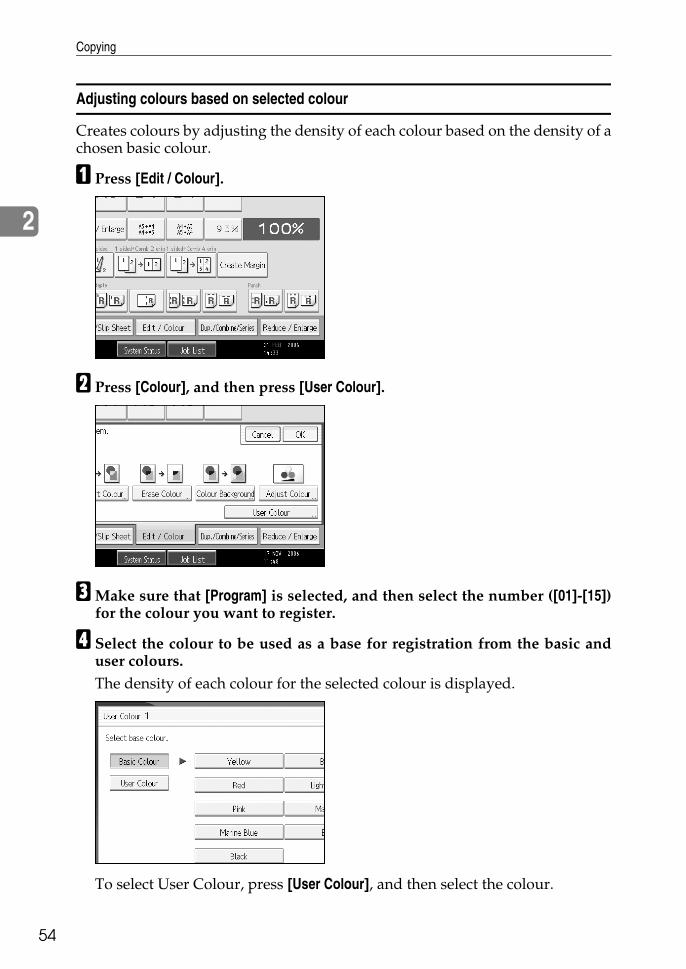
Adjusting colours based on selected colour
Creates colours by adjusting the density of each colour based on the density of achosen basic colour.
A Press [Edit / Colour].
B Press [Colour], and then press [User Colour].
CMake sure that [Program] is selected, and then select the number ([01]-[15])for the colour you want to register.
D Select the colour to be used as a base for registration from the basic anduser colours.The density of each colour for the selected colour is displayed.
To select User Colour, press [User Colour], and then select the colour.

Colour Functions
55
2
E Select the colour whose density is to be specified, and then specify the den-sity in percentages using [n] or [o].
F Check names and densities of each colour, and press [OK].
G Press [OK] twice.
Note❒ It is also possible to specify density by pressing [Adjust with Number Keys] in
step E.❒ Selecting a user colour key that is indicated by a solid line will change
(overwrite) the contents of that colour.
Creating colours by directly specifying the density of each colour with number keys
Creates colours by directly specifying the density of each colour using the number keys.
A Press [Edit / Colour].
B Press [Colour], and then press [User Colour].
CMake sure that [Program] is selected, and then select the number ([01]-[15])for the colour you want to register.
D Press [Custom Setting].
E Select the colour whose density is to be specified.
F Enter the density (%) using the number keys, and then press the {q} key.Repeat steps E-F if you want to specify the density of multiple colours.
G Check names and densities of each colour, and press [OK].
H Press [OK] three times.
Note❒ It is also possible to specify density by pressing [Adjust with [n] [o]] and
then using [n] and [o] in step F.❒ Selecting a user colour key that is indicated by a solid line will change
(overwrite) the contents of that colour.
Copying
56
2
Renaming a user colour
Renames a user colour.
A Press [Edit / Colour].
B Press [Colour], and then press [User Colour].
CMake sure that [Program] is selected, and then select the number ([01]-[15])for the colour you want to rename.
D Select the colour you want to rename.
E Press [Change Name].
F Enter the name of the colour (up to 16 characters), and then press [OK].
G Press [OK] three times.
Deleting user colours
Deletes user colours.
Important❒ You can not delete colours registered in the program or user colours that are currently being used.
A Press [Edit / Colour].
B Press [Colour], and then press [User Colour].
C Press [Delete].
D Select the number of the user colour (whose key is indicated by a solid line)you want to delete.
E Press [Yes].
F Press [OK] twice.
Printing a list of user colours
Prints a list of user colours.
A Press [Edit / Colour].
B Press [Colour], and then press [User Colour].
C Check the copy paper, and then press [Print Sample of User Colour].The list of user colours is output in the internal tray.
Note❒ The list will be copied on a A4K, 81/2" × 11"K, A3L or 11" × 17"L sheet.
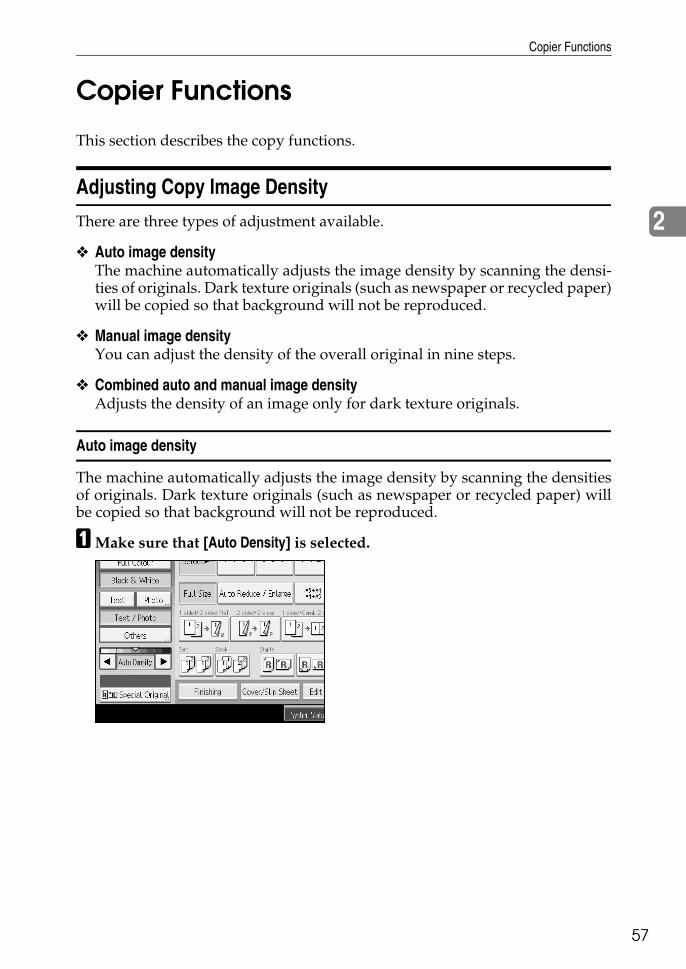
Copier Functions
57
2
Copier Functions
This section describes the copy functions.
Adjusting Copy Image Density
There are three types of adjustment available.
❖ Auto image densityThe machine automatically adjusts the image density by scanning the densi-ties of originals. Dark texture originals (such as newspaper or recycled paper)will be copied so that background will not be reproduced.
❖ Manual image densityYou can adjust the density of the overall original in nine steps.
❖ Combined auto and manual image densityAdjusts the density of an image only for dark texture originals.
Auto image density
The machine automatically adjusts the image density by scanning the densitiesof originals. Dark texture originals (such as newspaper or recycled paper) willbe copied so that background will not be reproduced.
AMake sure that [Auto Density] is selected.
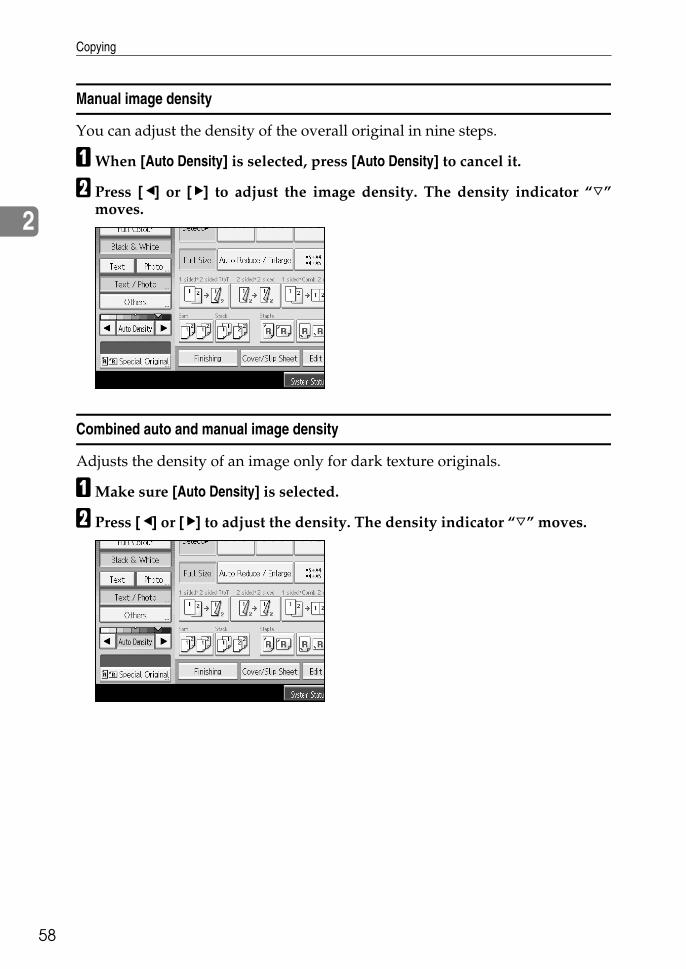
Copying
58
2
Manual image density
You can adjust the density of the overall original in nine steps.
AWhen [Auto Density] is selected, press [Auto Density] to cancel it.
B Press [W] or [V] to adjust the image density. The density indicator “{”moves.
Combined auto and manual image density
Adjusts the density of an image only for dark texture originals.
AMake sure [Auto Density] is selected.
B Press [W] or [V] to adjust the density. The density indicator “{” moves.
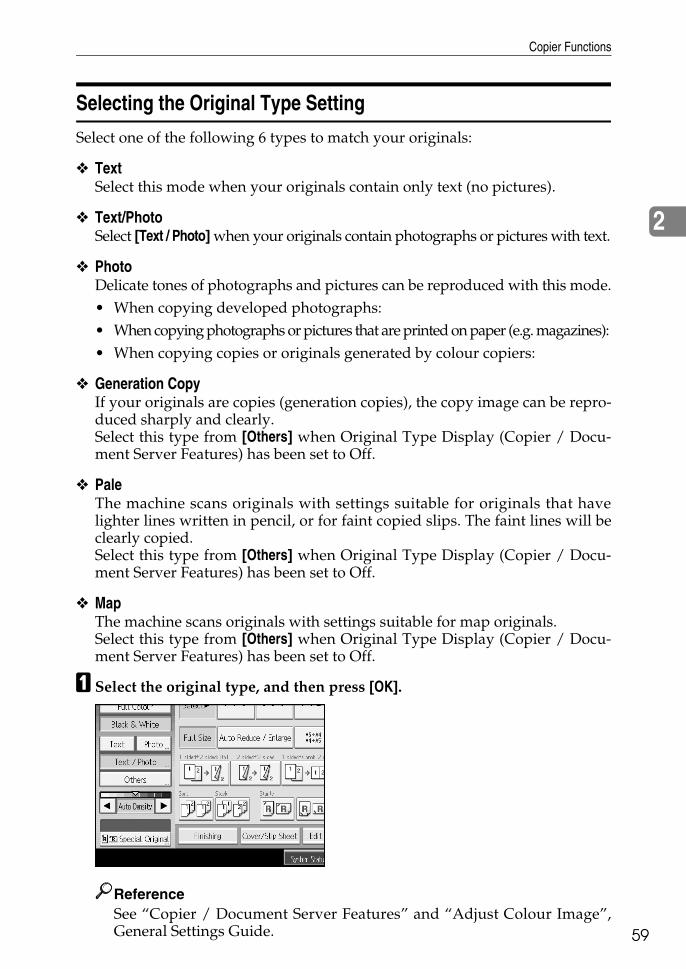
Copier Functions
59
2
Selecting the Original Type Setting
Select one of the following 6 types to match your originals:
❖ TextSelect this mode when your originals contain only text (no pictures).
❖ Text/PhotoSelect [Text / Photo] when your originals contain photographs or pictures with text.
❖ PhotoDelicate tones of photographs and pictures can be reproduced with this mode.• When copying developed photographs:• When copying photographs or pictures that are printed on paper (e.g. magazines):• When copying copies or originals generated by colour copiers:
❖ Generation CopyIf your originals are copies (generation copies), the copy image can be repro-duced sharply and clearly.Select this type from [Others] when Original Type Display (Copier / Docu-ment Server Features) has been set to Off.
❖ PaleThe machine scans originals with settings suitable for originals that havelighter lines written in pencil, or for faint copied slips. The faint lines will beclearly copied.Select this type from [Others] when Original Type Display (Copier / Docu-ment Server Features) has been set to Off.
❖ MapThe machine scans originals with settings suitable for map originals. Select this type from [Others] when Original Type Display (Copier / Docu-ment Server Features) has been set to Off.
A Select the original type, and then press [OK].
ReferenceSee “Copier / Document Server Features” and “Adjust Colour Image”,General Settings Guide.
Copying
60
2
Selecting Copy Paper
There are two ways to select copy paper:
❖ Auto Paper SelectThe machine selects a suitable size of copy paper automatically based on orig-inal size and reproduction ratio.
❖ Manual Paper SelectChoose the tray containing the paper you want to copy onto: a paper tray, by-pass tray or LCT.
See the following table for copy paper sizes and orientations that can be usedwith Auto Paper Select (when copying at a ratio of 100%):
❖ Metric version
❖ Inch version
Note❒ Only the paper trays set to [No Display] or [Recycled Paper] in Paper Type in
Tray Paper Setting in System Settings and also set to [Yes] in Apply Auto Pa-per Select can be selected in Auto Paper Select mode.
ReferenceSee “Tray Paper Settings”, General Settings Guide.See “Copier / Document Server Features”, General Settings Guide.See p.14 “Sizes difficult to detect”.
Where original is set Paper size and orientation
Exposure glass A3L, B4 JISL, A4KL, B5 JISKL, 8" × 13"L
ADF A3L, B4 JISL, A4KL, B5 JISKL, A5KL, 11" × 17"L, 81/2" × 11"KL, 8" × 13"L, 8KL, 16KKL
Where original is set Paper size and orientation
Exposure glass 11" × 17"L, 81/2" × 14"L, 81/2" × 11"KL
ADF A3L, A4KL, 11" × 17"L, 81/2" × 14"L, 81/2" × 11"KL, 51/2" × 81/2"KL, 10" × 14"L, 71/4" × 101/2"L
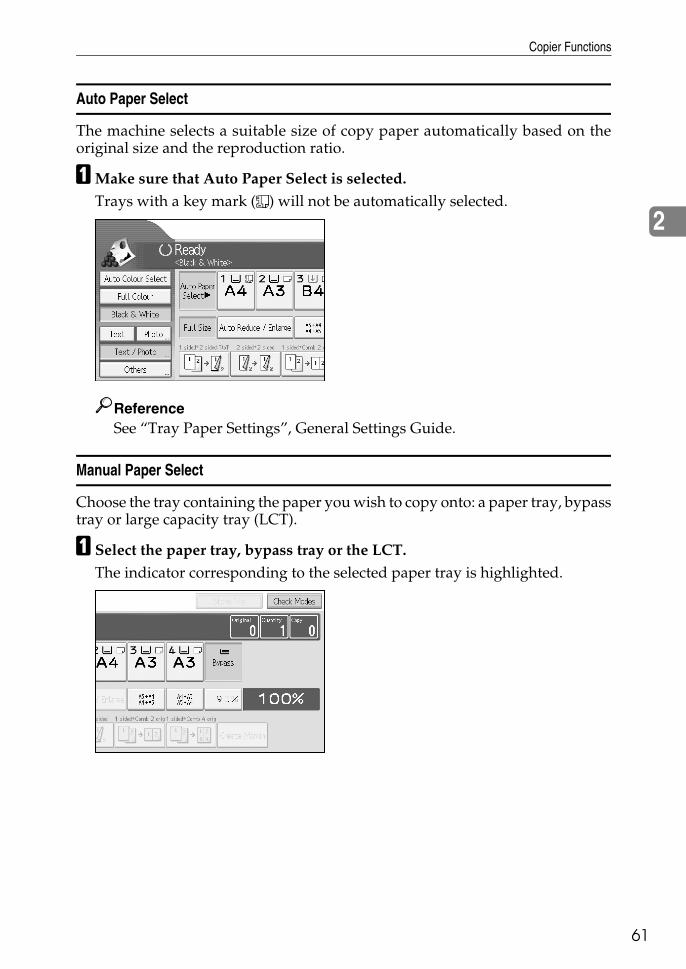
Copier Functions
61
2
Auto Paper Select
The machine selects a suitable size of copy paper automatically based on theoriginal size and the reproduction ratio.
AMake sure that Auto Paper Select is selected.Trays with a key mark ( ) will not be automatically selected.
ReferenceSee “Tray Paper Settings”, General Settings Guide.
Manual Paper Select
Choose the tray containing the paper you wish to copy onto: a paper tray, bypasstray or large capacity tray (LCT).
A Select the paper tray, bypass tray or the LCT.The indicator corresponding to the selected paper tray is highlighted.
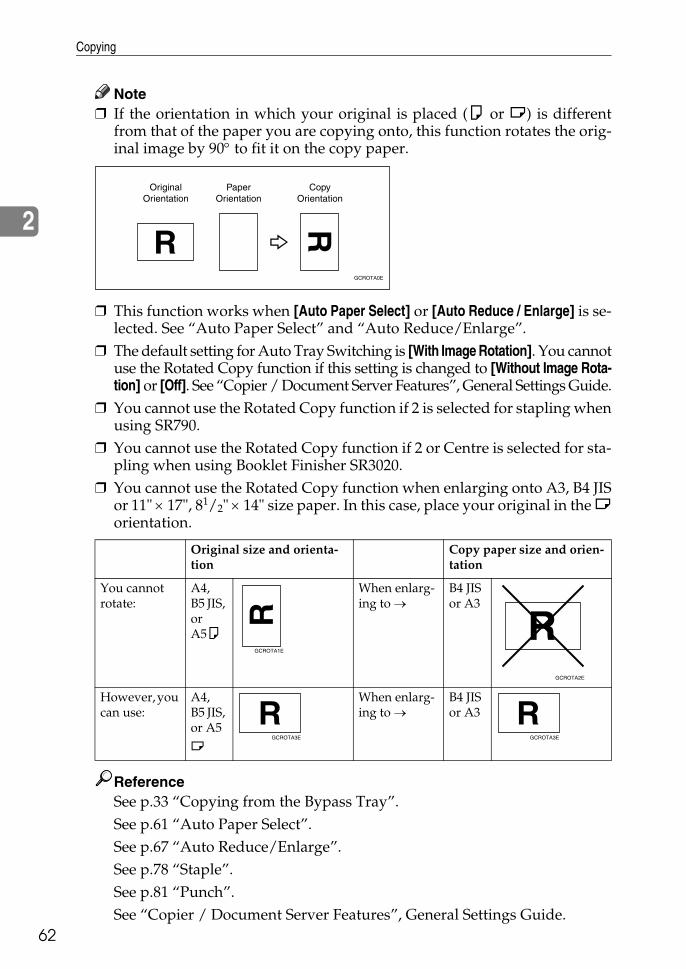
Copying
62
2
Note❒ If the orientation in which your original is placed (K or L) is different
from that of the paper you are copying onto, this function rotates the orig-inal image by 90° to fit it on the copy paper.
❒ This function works when [Auto Paper Select] or [Auto Reduce / Enlarge] is se-lected. See “Auto Paper Select” and “Auto Reduce/Enlarge”.
❒ The default setting for Auto Tray Switching is [With Image Rotation]. You cannotuse the Rotated Copy function if this setting is changed to [Without Image Rota-tion] or [Off]. See “Copier / Document Server Features”, General Settings Guide.
❒ You cannot use the Rotated Copy function if 2 is selected for stapling whenusing SR790.
❒ You cannot use the Rotated Copy function if 2 or Centre is selected for sta-pling when using Booklet Finisher SR3020.
❒ You cannot use the Rotated Copy function when enlarging onto A3, B4 JISor 11" × 17", 81/2" × 14" size paper. In this case, place your original in the Lorientation.
ReferenceSee p.33 “Copying from the Bypass Tray”.See p.61 “Auto Paper Select”.See p.67 “Auto Reduce/Enlarge”.See p.78 “Staple”.See p.81 “Punch”.See “Copier / Document Server Features”, General Settings Guide.
Original size and orienta-tion
Copy paper size and orien-tation
You cannot rotate:
A4, B5 JIS, or A5K
When enlarg-ing to →
B4 JIS or A3
However, you can use:
A4, B5 JIS, or A5
L
When enlarg-ing to →
B4 JIS or A3
GCROTA0E
GCROTA1E
GCROTA2E
GCROTA3E GCROTA3E
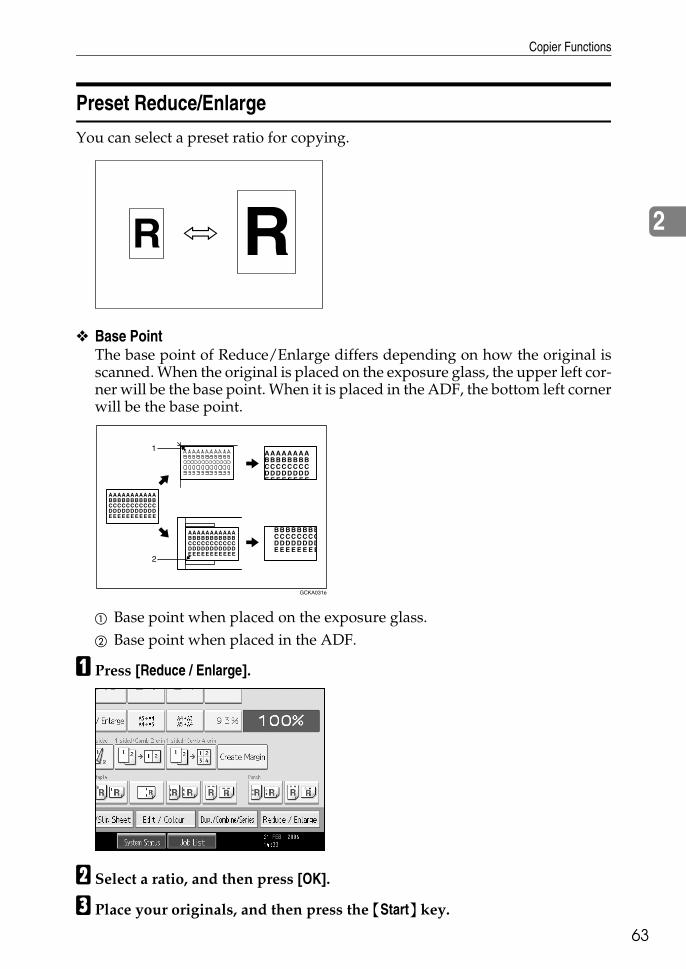
Copier Functions
63
2
Preset Reduce/Enlarge
You can select a preset ratio for copying.
❖ Base PointThe base point of Reduce/Enlarge differs depending on how the original isscanned. When the original is placed on the exposure glass, the upper left cor-ner will be the base point. When it is placed in the ADF, the bottom left cornerwill be the base point.
A Base point when placed on the exposure glass.B Base point when placed in the ADF.
A Press [Reduce / Enlarge].
B Select a ratio, and then press [OK].
C Place your originals, and then press the {Start} key.
GCKA031e
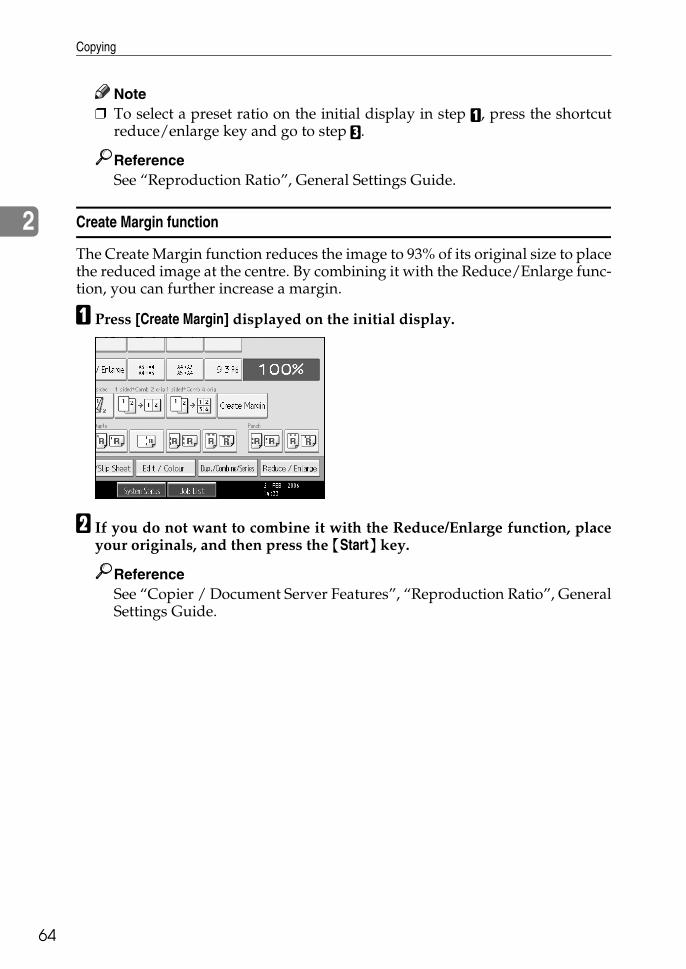
Copying
64
2
Note❒ To select a preset ratio on the initial display in step A, press the shortcut
reduce/enlarge key and go to step C.
ReferenceSee “Reproduction Ratio”, General Settings Guide.
Create Margin function
The Create Margin function reduces the image to 93% of its original size to placethe reduced image at the centre. By combining it with the Reduce/Enlarge func-tion, you can further increase a margin.
A Press [Create Margin] displayed on the initial display.
B If you do not want to combine it with the Reduce/Enlarge function, placeyour originals, and then press the {Start} key.
ReferenceSee “Copier / Document Server Features”, “Reproduction Ratio”, GeneralSettings Guide.
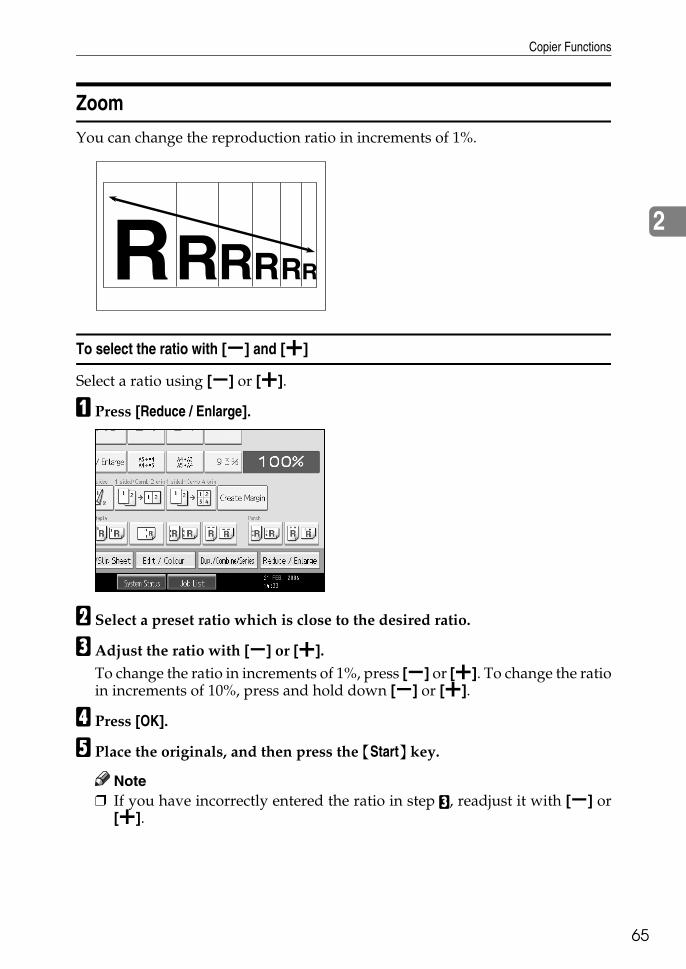
Copier Functions
65
2
Zoom
You can change the reproduction ratio in increments of 1%.
To select the ratio with [o] and [n]
Select a ratio using [o] or [n].
A Press [Reduce / Enlarge].
B Select a preset ratio which is close to the desired ratio.
C Adjust the ratio with [o] or [n]. To change the ratio in increments of 1%, press [o] or [n]. To change the ratioin increments of 10%, press and hold down [o] or [n].
D Press [OK].
E Place the originals, and then press the {Start} key.
Note❒ If you have incorrectly entered the ratio in step C, readjust it with [o] or
[n].
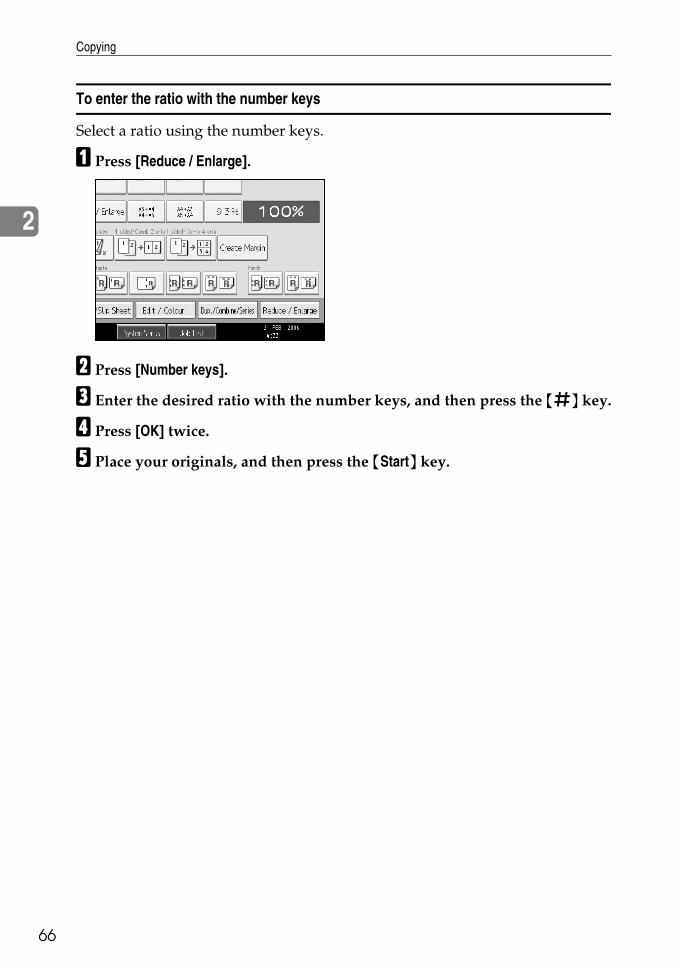
Copying
66
2
To enter the ratio with the number keys
Select a ratio using the number keys.
A Press [Reduce / Enlarge].
B Press [Number keys].
C Enter the desired ratio with the number keys, and then press the {q} key.
D Press [OK] twice.
E Place your originals, and then press the {Start} key.
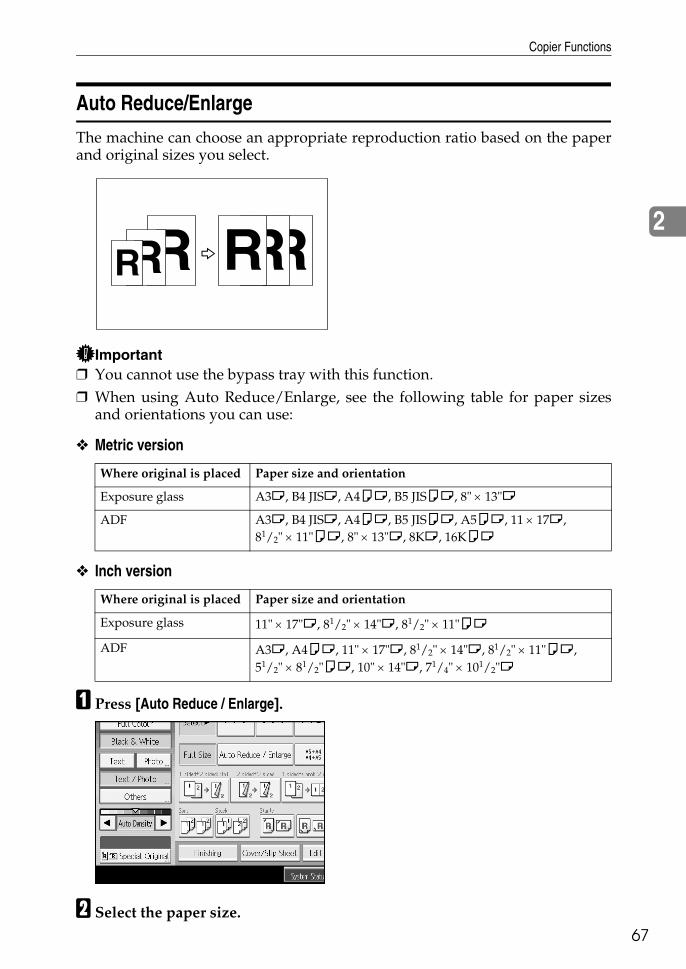
Copier Functions
67
2
Auto Reduce/Enlarge
The machine can choose an appropriate reproduction ratio based on the paperand original sizes you select.
Important❒ You cannot use the bypass tray with this function.❒ When using Auto Reduce/Enlarge, see the following table for paper sizes
and orientations you can use:
❖ Metric version
❖ Inch version
A Press [Auto Reduce / Enlarge].
B Select the paper size.
Where original is placed Paper size and orientation
Exposure glass A3L, B4 JISL, A4KL, B5 JISKL, 8" × 13"L
ADF A3L, B4 JISL, A4KL, B5 JISKL, A5KL, 11 × 17L, 81/2" × 11"KL, 8" × 13"L, 8KL, 16KKL
Where original is placed Paper size and orientation
Exposure glass 11" × 17"L, 81/2" × 14"L, 81/2" × 11"KL
ADF A3L, A4KL, 11" × 17"L, 81/2" × 14"L, 81/2" × 11"KL, 51/2" × 81/2"KL, 10" × 14"L, 71/4" × 101/2"L
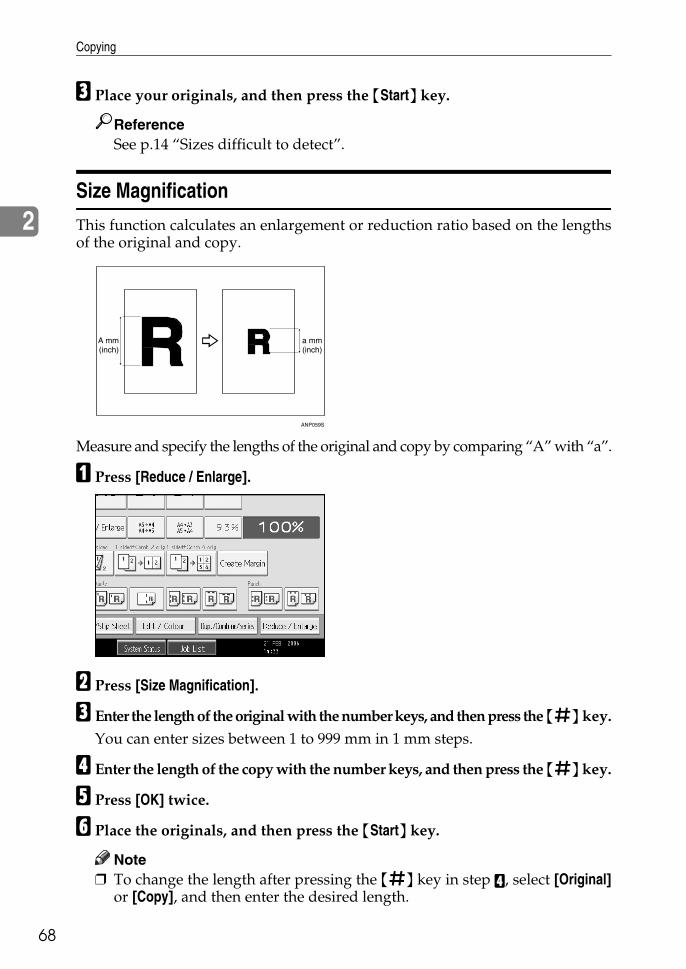
Copying
68
2
C Place your originals, and then press the {Start} key.
ReferenceSee p.14 “Sizes difficult to detect”.
Size Magnification
This function calculates an enlargement or reduction ratio based on the lengthsof the original and copy.
Measure and specify the lengths of the original and copy by comparing “A” with “a”.
A Press [Reduce / Enlarge].
B Press [Size Magnification].
C Enter the length of the original with the number keys, and then press the {q} key.You can enter sizes between 1 to 999 mm in 1 mm steps.
D Enter the length of the copy with the number keys, and then press the {q} key.
E Press [OK] twice.
F Place the originals, and then press the {Start} key.
Note❒ To change the length after pressing the {q} key in step D, select [Original]
or [Copy], and then enter the desired length.
ANP059S
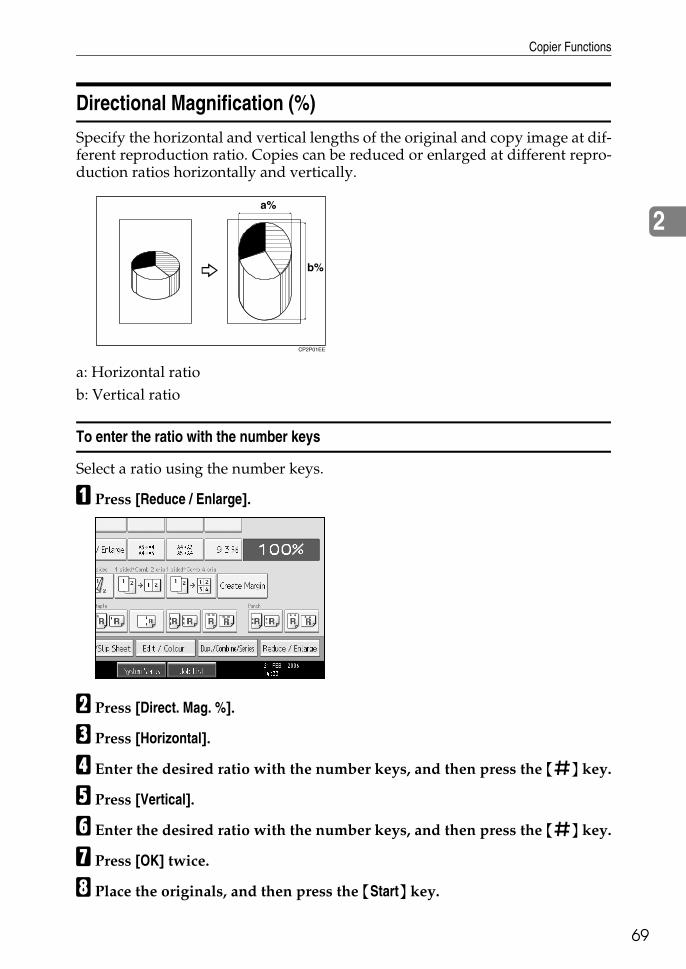
Copier Functions
69
2
Directional Magnification (%)
Specify the horizontal and vertical lengths of the original and copy image at dif-ferent reproduction ratio. Copies can be reduced or enlarged at different repro-duction ratios horizontally and vertically.
a: Horizontal ratiob: Vertical ratio
To enter the ratio with the number keys
Select a ratio using the number keys.
A Press [Reduce / Enlarge].
B Press [Direct. Mag. %].
C Press [Horizontal].
D Enter the desired ratio with the number keys, and then press the {q} key.
E Press [Vertical].
F Enter the desired ratio with the number keys, and then press the {q} key.
G Press [OK] twice.
H Place the originals, and then press the {Start} key.
CP2P01EE

Copying
70
2
To specify the ratio with [o] and [n]
Select a ratio using [o] or [n].
A Press [Reduce / Enlarge].
B Press [Direct. Mag. %].
C Press [[n] [o] keys].
D Press [Horizontal].
E Adjust the ratio using [n] or [o].Pressing [n] or [o] changes the ratio in increments of 1%. Pressing and hold-ing down [n] or [o] changes it in increments of 10%.
F Press [Vertical].
G Adjust the ratio with [n] or [o].
H Press [OK] twice.
I Place your originals, and then press the {Start} key.
Note❒ If you have incorrectly entered the ratio in step E or G, readjust it with [n]
or [o].
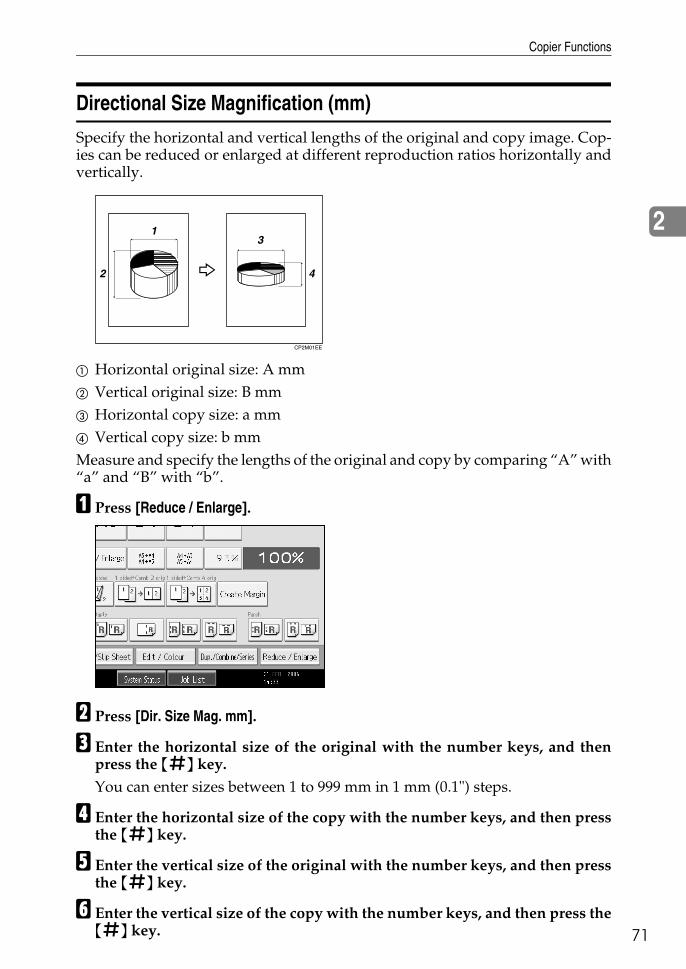
Copier Functions
71
2
Directional Size Magnification (mm)
Specify the horizontal and vertical lengths of the original and copy image. Cop-ies can be reduced or enlarged at different reproduction ratios horizontally andvertically.
A Horizontal original size: A mmB Vertical original size: B mmC Horizontal copy size: a mmD Vertical copy size: b mmMeasure and specify the lengths of the original and copy by comparing “A” with“a” and “B” with “b”.
A Press [Reduce / Enlarge].
B Press [Dir. Size Mag. mm].
C Enter the horizontal size of the original with the number keys, and thenpress the {q} key.You can enter sizes between 1 to 999 mm in 1 mm (0.1") steps.
D Enter the horizontal size of the copy with the number keys, and then pressthe {q} key.
E Enter the vertical size of the original with the number keys, and then pressthe {q} key.
F Enter the vertical size of the copy with the number keys, and then press the{q} key.
CP2M01EE
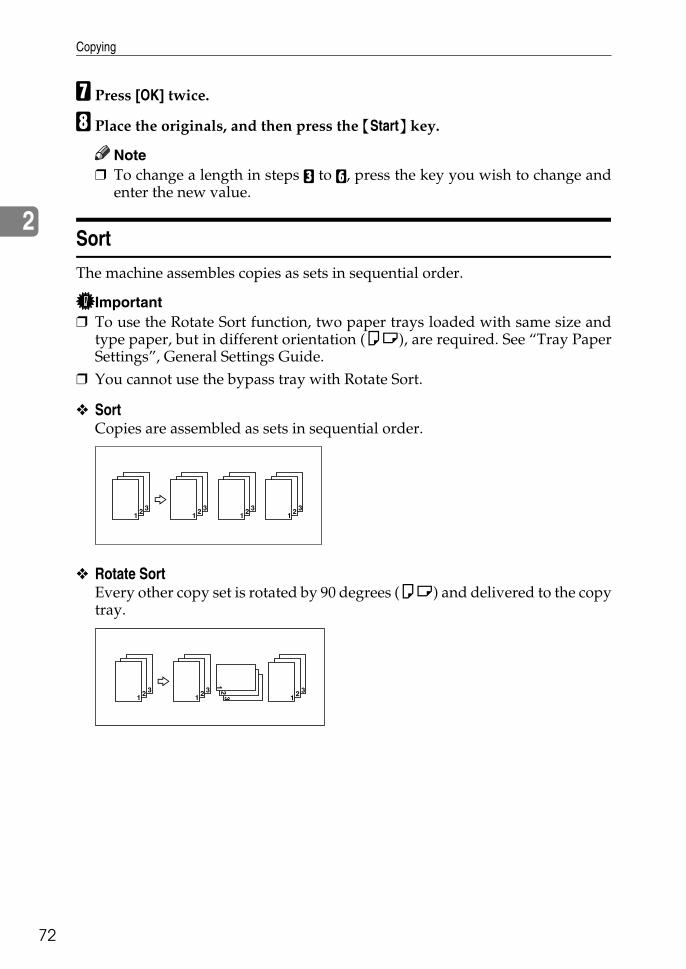
Copying
72
2
G Press [OK] twice.
H Place the originals, and then press the {Start} key.
Note❒ To change a length in steps C to F, press the key you wish to change and
enter the new value.
Sort
The machine assembles copies as sets in sequential order.
Important❒ To use the Rotate Sort function, two paper trays loaded with same size and
type paper, but in different orientation (KL), are required. See “Tray PaperSettings”, General Settings Guide.
❒ You cannot use the bypass tray with Rotate Sort.
❖ SortCopies are assembled as sets in sequential order.
❖ Rotate SortEvery other copy set is rotated by 90 degrees (KL) and delivered to the copytray.
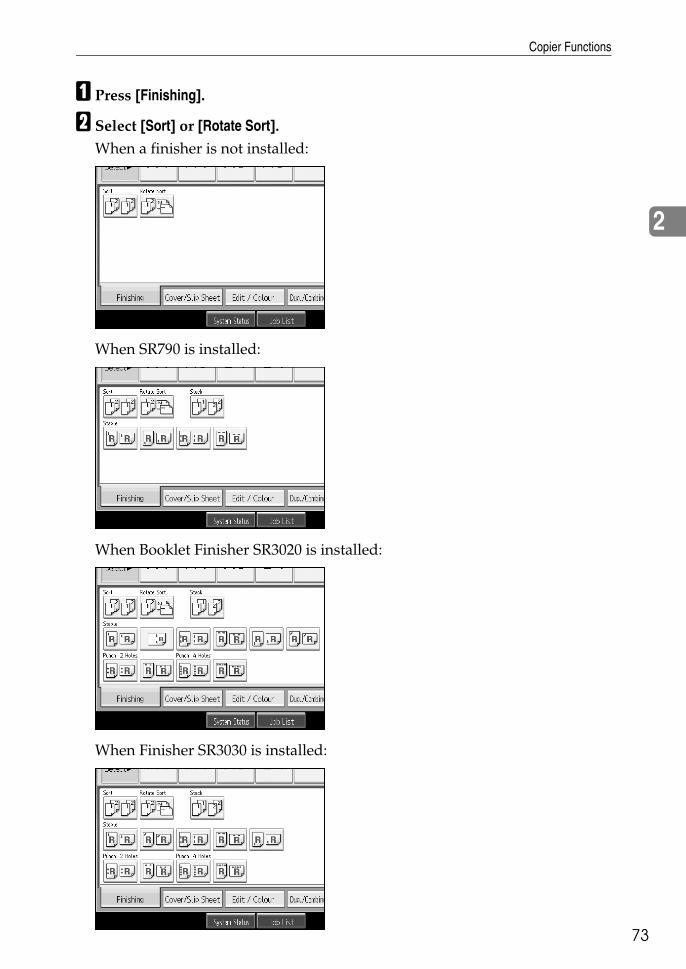
Copier Functions
73
2
A Press [Finishing].
B Select [Sort] or [Rotate Sort].When a finisher is not installed:
When SR790 is installed:
When Booklet Finisher SR3020 is installed:
When Finisher SR3030 is installed:
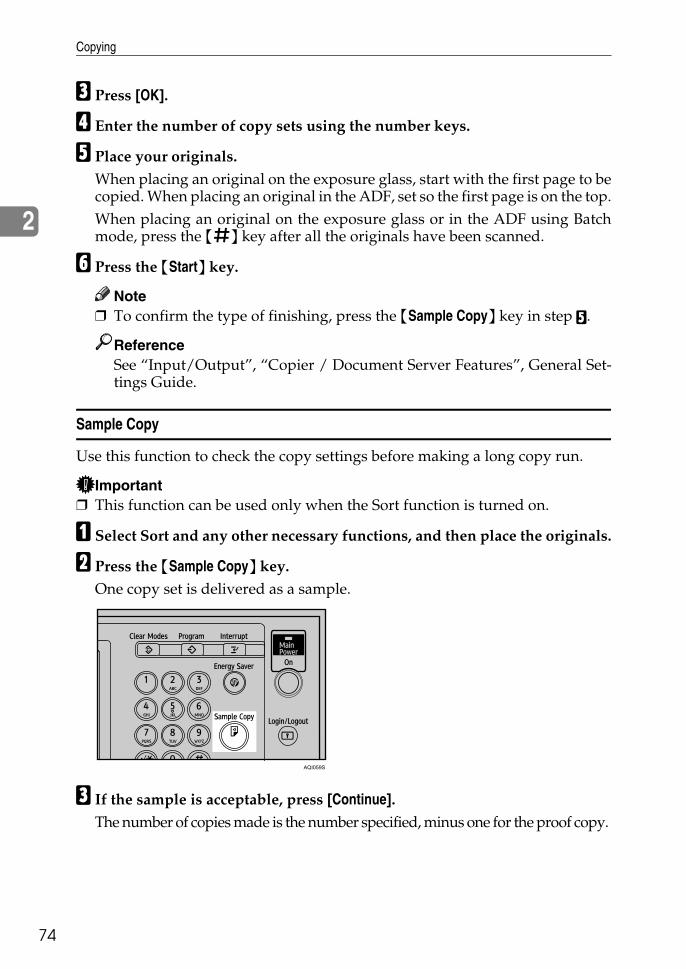
Copying
74
2
C Press [OK].
D Enter the number of copy sets using the number keys.
E Place your originals.When placing an original on the exposure glass, start with the first page to becopied. When placing an original in the ADF, set so the first page is on the top.When placing an original on the exposure glass or in the ADF using Batchmode, press the {q} key after all the originals have been scanned.
F Press the {Start} key.
Note❒ To confirm the type of finishing, press the {Sample Copy} key in step E.
ReferenceSee “Input/Output”, “Copier / Document Server Features”, General Set-tings Guide.
Sample Copy
Use this function to check the copy settings before making a long copy run.
Important❒ This function can be used only when the Sort function is turned on.
A Select Sort and any other necessary functions, and then place the originals.
B Press the {Sample Copy} key.One copy set is delivered as a sample.
C If the sample is acceptable, press [Continue].The number of copies made is the number specified, minus one for the proof copy.
AQI059S

Copier Functions
75
2
Note❒ If you press [Suspend] after checking the results, return to step A to adjust
the copy settings as necessary. You can change the settings for Staple,Punch, Duplex (1 sided → 2 sided, 2 sided → 2 sided), Copy Orientation,Margin Adjust., Cover/Slip Sheet, Stamp, and Designate. However, de-pending on the combination of functions, you may not be able to changesome settings.
ReferenceSee p.171 “Function Compatibility”.
Changing the number of sets
You can change the number of copy sets during copying.
Important❒ This function can only be used when the Sort function is turned on.
AWhile “Copying...” is displayed, press the {Clear/Stop} key.
B Press [Change Quantity].
C Enter the number of copy sets with the number keys, and then press the{q} key.
D Press [Continue].Copying starts again.
Note❒ The number of sets you can enter in step C differs depending on when the{Clear/Stop} key is pressed.
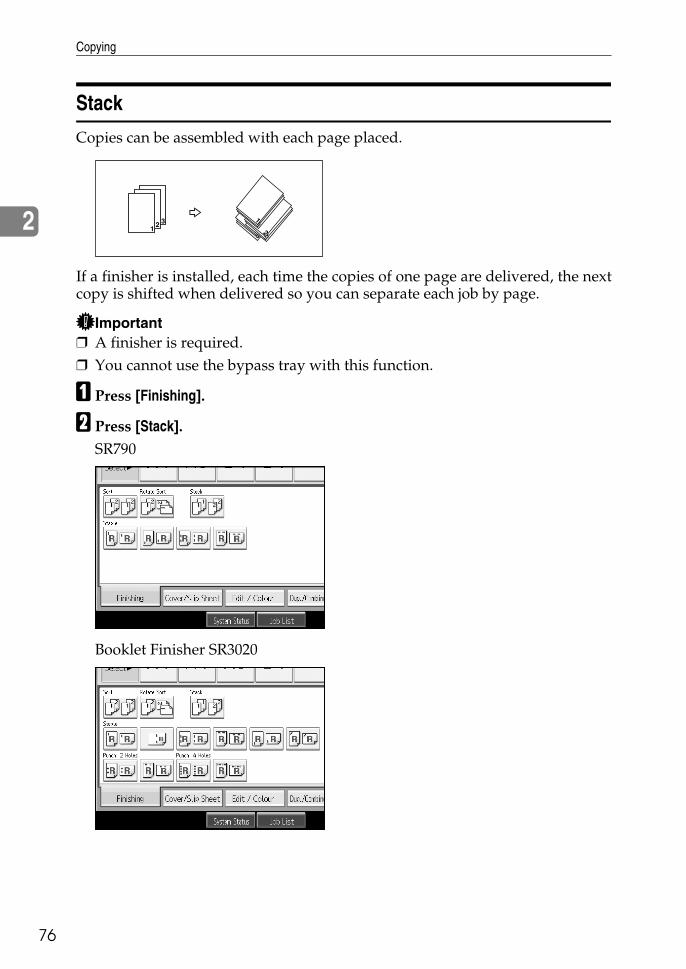
Copying
76
2
Stack
Copies can be assembled with each page placed.
If a finisher is installed, each time the copies of one page are delivered, the nextcopy is shifted when delivered so you can separate each job by page.
Important❒ A finisher is required.❒ You cannot use the bypass tray with this function.
A Press [Finishing].
B Press [Stack].SR790
Booklet Finisher SR3020
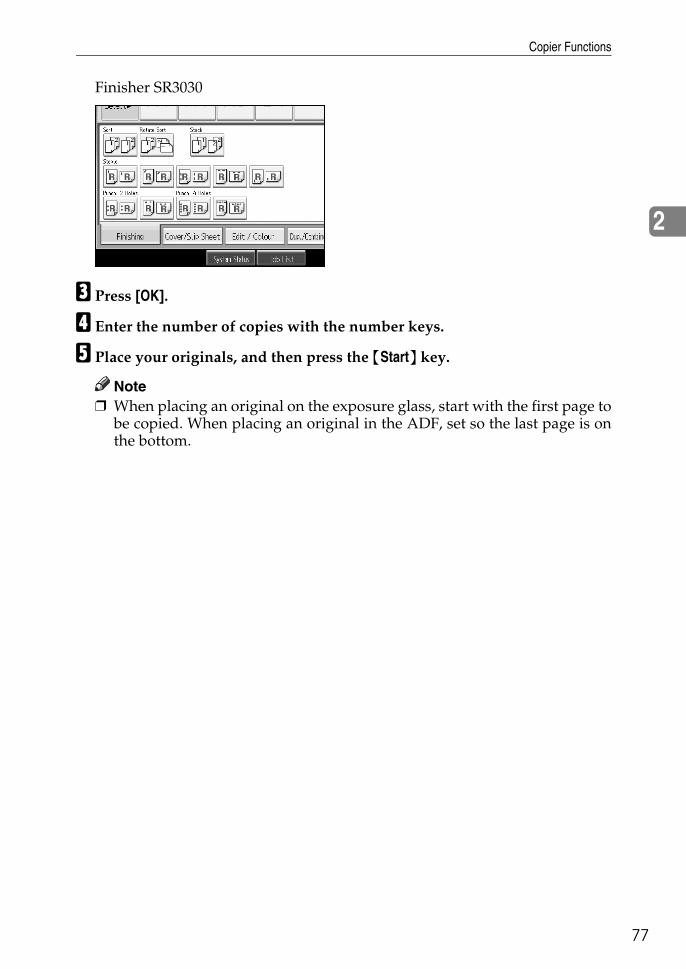
Copier Functions
77
2
Finisher SR3030
C Press [OK].
D Enter the number of copies with the number keys.
E Place your originals, and then press the {Start} key.
Note❒ When placing an original on the exposure glass, start with the first page to
be copied. When placing an original in the ADF, set so the last page is onthe bottom.
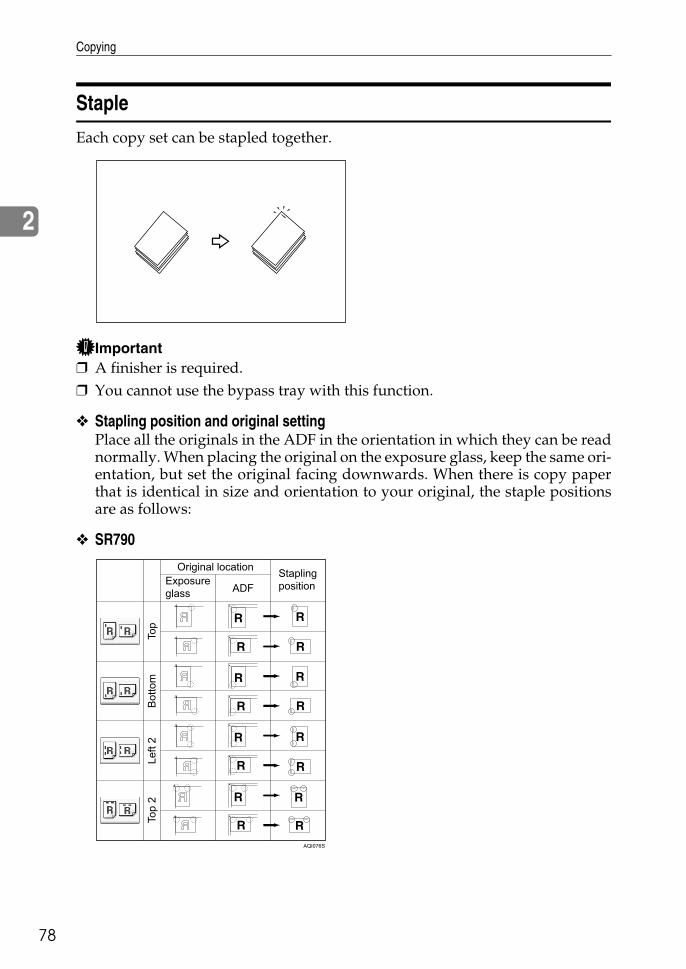
Copying
78
2
Staple
Each copy set can be stapled together.
Important❒ A finisher is required.❒ You cannot use the bypass tray with this function.
❖ Stapling position and original settingPlace all the originals in the ADF in the orientation in which they can be readnormally. When placing the original on the exposure glass, keep the same ori-entation, but set the original facing downwards. When there is copy paperthat is identical in size and orientation to your original, the staple positionsare as follows:
❖ SR790
AQI076S

Copier Functions
79
2
❖ Booklet Finisher SR3020
❖ Finisher SR3030
AQI077S
AQI051S

Copying
80
2
These tables show the stapling positions, not the orientation of delivery.Left 2K and Top 2L are not available for paper larger than A4 size.
A Press [Finishing].
B Select one of the stapling positions. SR790
Booklet Finisher SR3020
Finisher SR3030
When you select a stapling position, Sort mode is automatically selected.
C Press [OK].
D Enter the number of copy sets using the number keys.
E Place your originals, and then press the {Start} key.
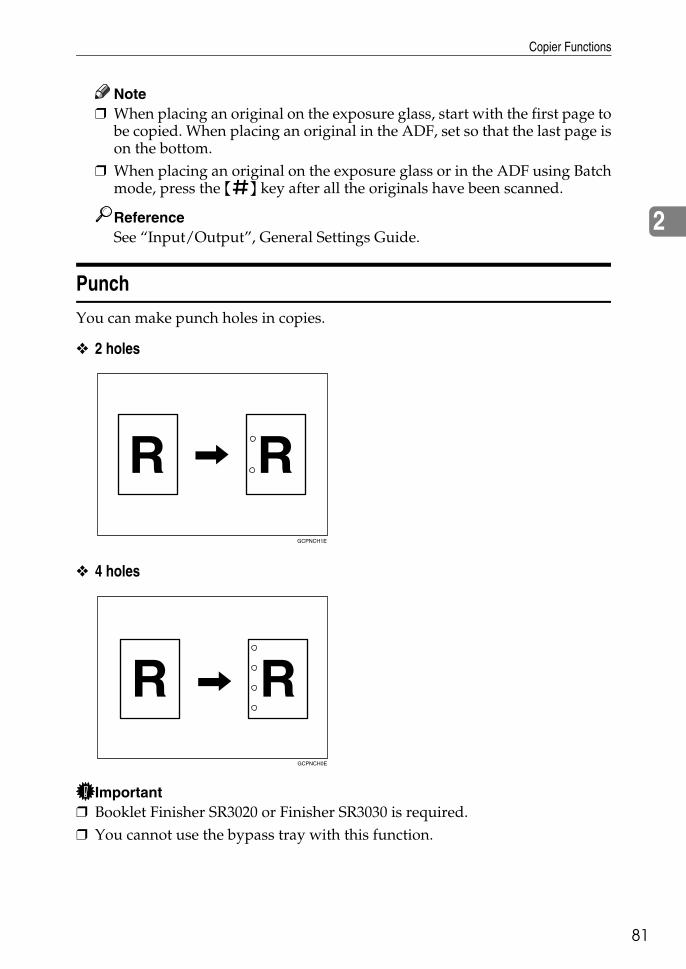
Copier Functions
81
2
Note❒ When placing an original on the exposure glass, start with the first page to
be copied. When placing an original in the ADF, set so that the last page ison the bottom.
❒ When placing an original on the exposure glass or in the ADF using Batchmode, press the {q} key after all the originals have been scanned.
ReferenceSee “Input/Output”, General Settings Guide.
Punch
You can make punch holes in copies.
❖ 2 holes
❖ 4 holes
Important❒ Booklet Finisher SR3020 or Finisher SR3030 is required.❒ You cannot use the bypass tray with this function.
GCPNCH1E
GCPNCH0E
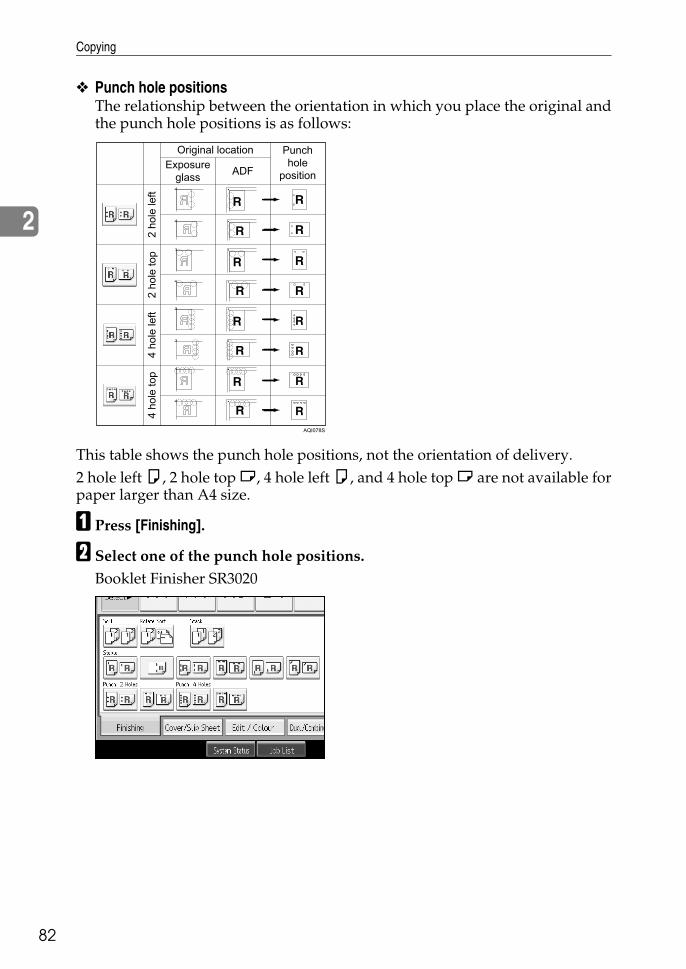
Copying
82
2
❖ Punch hole positionsThe relationship between the orientation in which you place the original andthe punch hole positions is as follows:
This table shows the punch hole positions, not the orientation of delivery.2 hole left K, 2 hole top L, 4 hole left K, and 4 hole top L are not available forpaper larger than A4 size.
A Press [Finishing].
B Select one of the punch hole positions. Booklet Finisher SR3020
AQI078S
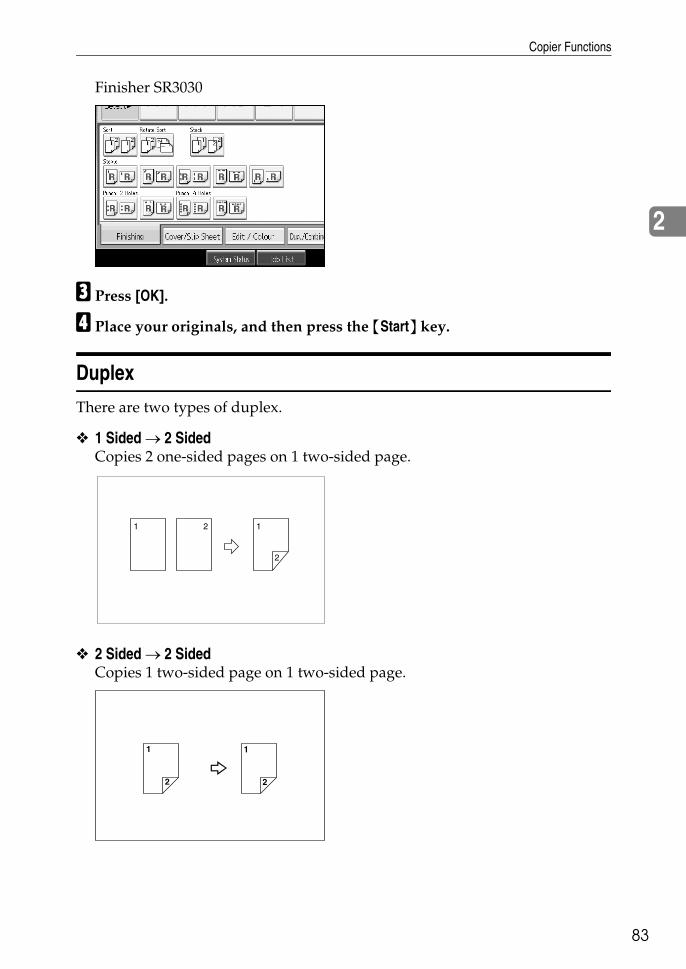
Copier Functions
83
2
Finisher SR3030
C Press [OK].
D Place your originals, and then press the {Start} key.
Duplex
There are two types of duplex.
❖ 1 Sided → 2 SidedCopies 2 one-sided pages on 1 two-sided page.
❖ 2 Sided → 2 SidedCopies 1 two-sided page on 1 two-sided page.
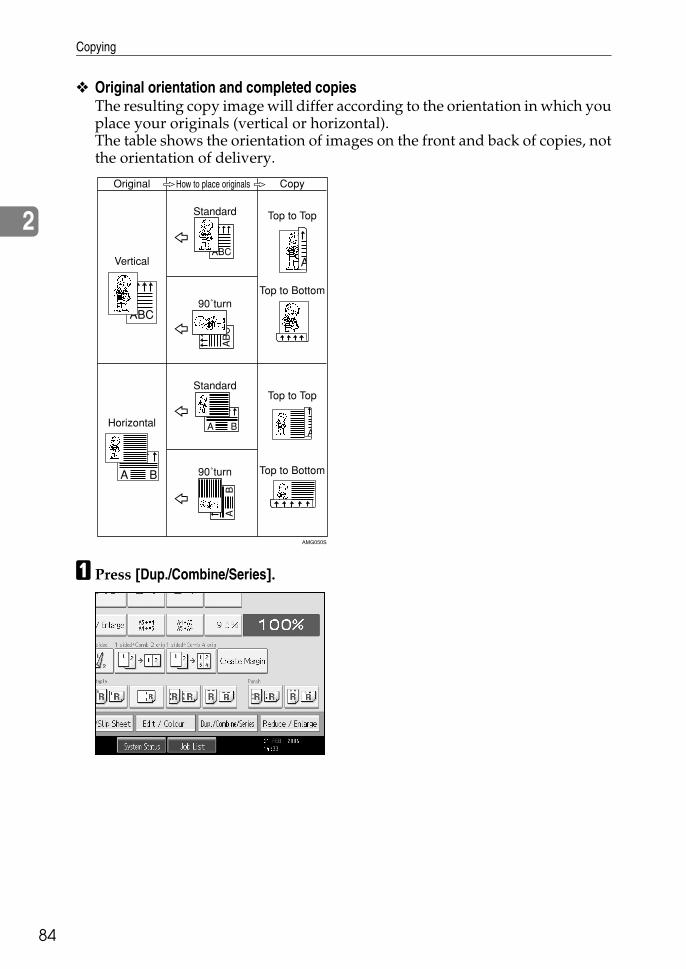
Copying
84
2
❖ Original orientation and completed copiesThe resulting copy image will differ according to the orientation in which youplace your originals (vertical or horizontal).The table shows the orientation of images on the front and back of copies, notthe orientation of delivery.
A Press [Dup./Combine/Series].
AMG050S
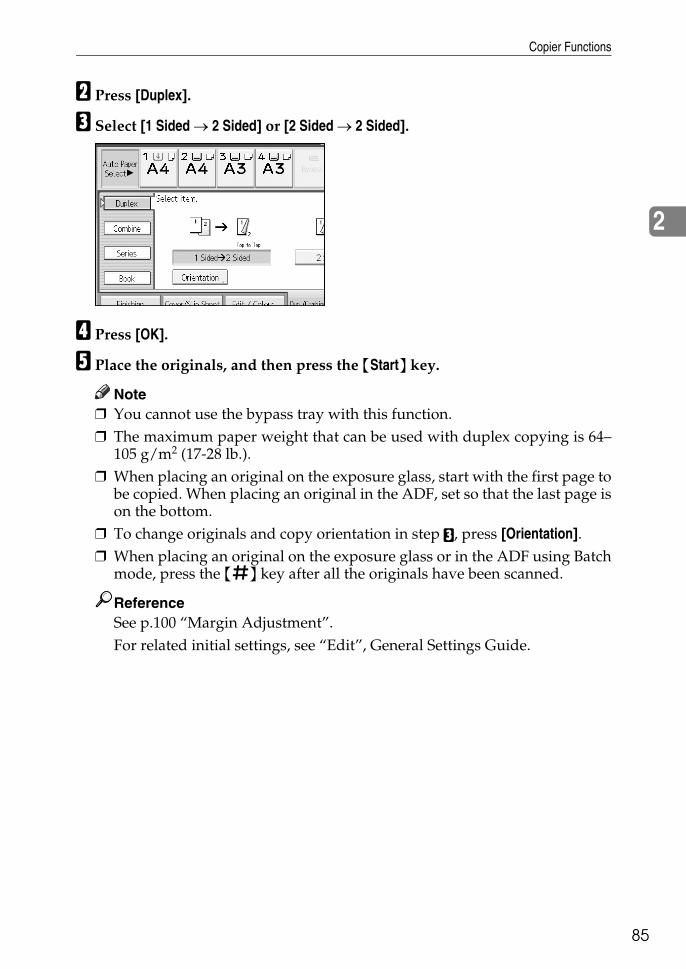
Copier Functions
85
2
B Press [Duplex].
C Select [1 Sided → 2 Sided] or [2 Sided → 2 Sided].
D Press [OK].
E Place the originals, and then press the {Start} key.
Note❒ You cannot use the bypass tray with this function.❒ The maximum paper weight that can be used with duplex copying is 64–
105 g/m2 (17-28 lb.).❒ When placing an original on the exposure glass, start with the first page to
be copied. When placing an original in the ADF, set so that the last page ison the bottom.
❒ To change originals and copy orientation in step C, press [Orientation].❒ When placing an original on the exposure glass or in the ADF using Batch
mode, press the {q} key after all the originals have been scanned.
ReferenceSee p.100 “Margin Adjustment”.For related initial settings, see “Edit”, General Settings Guide.
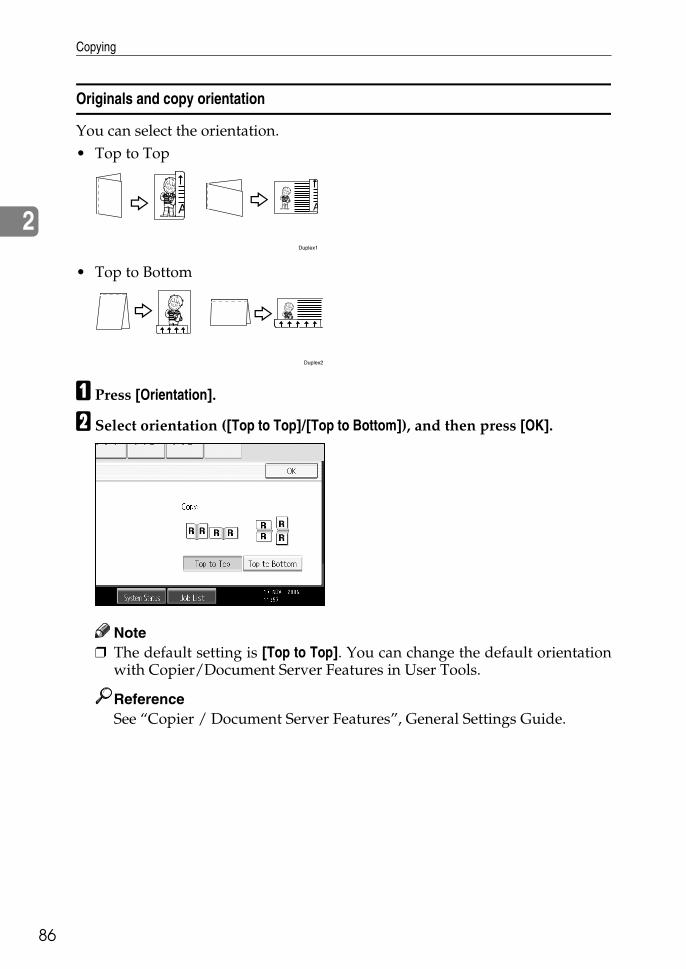
Copying
86
2
Originals and copy orientation
You can select the orientation.• Top to Top
• Top to Bottom
A Press [Orientation].
B Select orientation ([Top to Top]/[Top to Bottom]), and then press [OK].
Note❒ The default setting is [Top to Top]. You can change the default orientation
with Copier/Document Server Features in User Tools.
ReferenceSee “Copier / Document Server Features”, General Settings Guide.
Duplex1
Duplex2
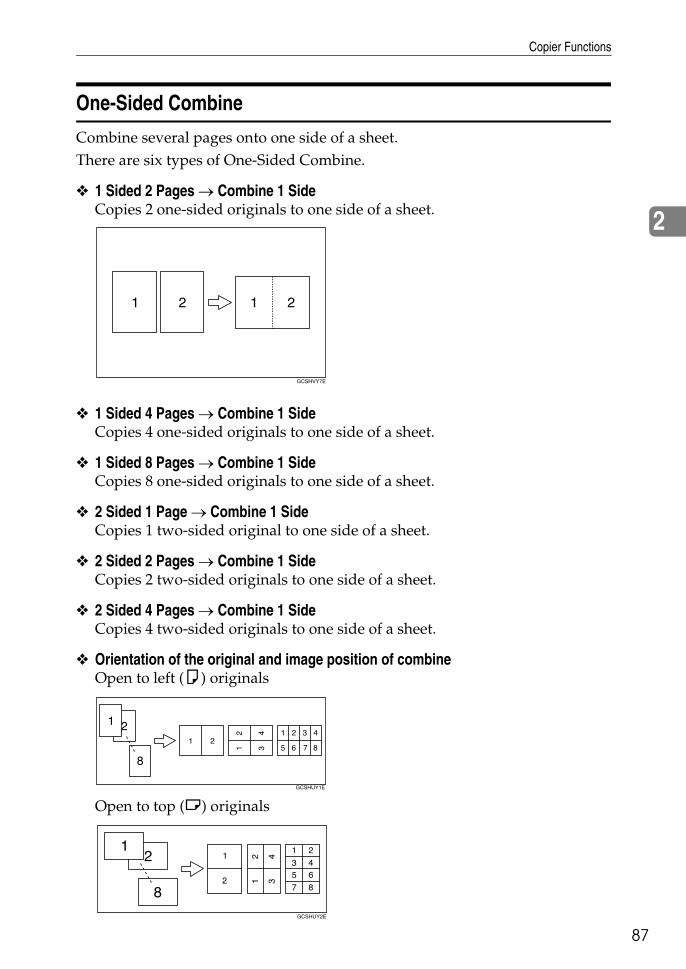
Copier Functions
87
2
One-Sided Combine
Combine several pages onto one side of a sheet.There are six types of One-Sided Combine.
❖ 1 Sided 2 Pages → Combine 1 SideCopies 2 one-sided originals to one side of a sheet.
❖ 1 Sided 4 Pages → Combine 1 SideCopies 4 one-sided originals to one side of a sheet.
❖ 1 Sided 8 Pages → Combine 1 SideCopies 8 one-sided originals to one side of a sheet.
❖ 2 Sided 1 Page → Combine 1 SideCopies 1 two-sided original to one side of a sheet.
❖ 2 Sided 2 Pages → Combine 1 SideCopies 2 two-sided originals to one side of a sheet.
❖ 2 Sided 4 Pages → Combine 1 SideCopies 4 two-sided originals to one side of a sheet.
❖ Orientation of the original and image position of combineOpen to left (K) originals
Open to top (L) originals
GCSHVY7E
GCSHUY1E
GCSHUY2E

Copying
88
2
Placing originals (originals placed in the ADF)• Originals read from left to right
• Originals read from top to bottom
A Press [Dup./Combine/Series].
B Press [Combine].
C Select [1 Sided] or [2 Sided] for Original, and then press [Combine 1 Side] forCopy.
D Select the number of originals to combine.
E Select the paper size.
F Press [OK].
G Place your originals, and then press the {Start} key.
Combine5
Combine6
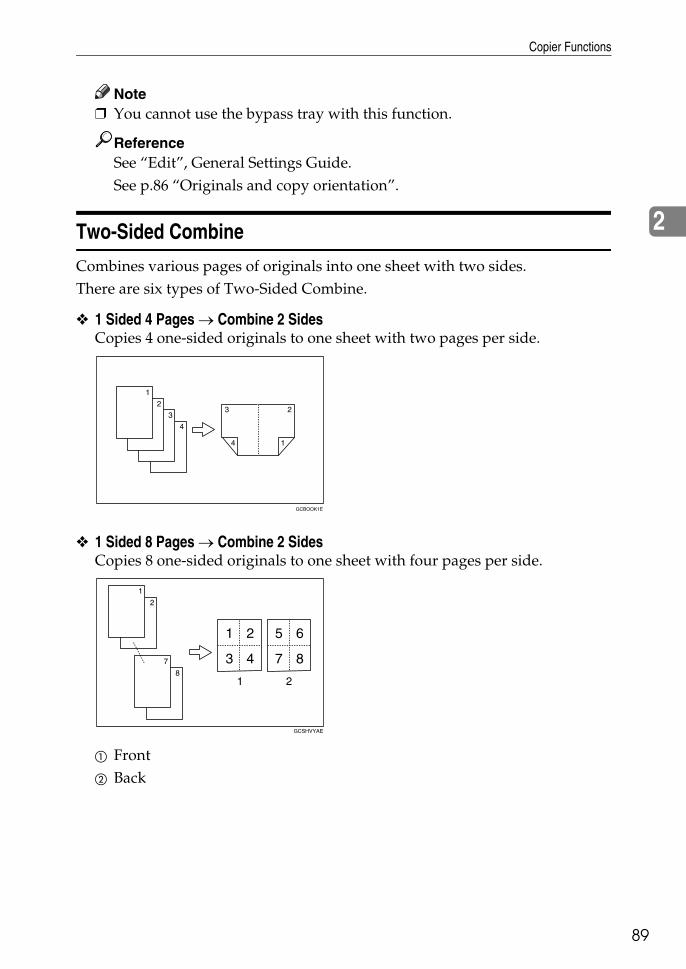
Copier Functions
89
2
Note❒ You cannot use the bypass tray with this function.
ReferenceSee “Edit”, General Settings Guide.See p.86 “Originals and copy orientation”.
Two-Sided Combine
Combines various pages of originals into one sheet with two sides.There are six types of Two-Sided Combine.
❖ 1 Sided 4 Pages → Combine 2 SidesCopies 4 one-sided originals to one sheet with two pages per side.
❖ 1 Sided 8 Pages → Combine 2 SidesCopies 8 one-sided originals to one sheet with four pages per side.
A FrontB Back
GCBOOK1E
GCSHVYAE
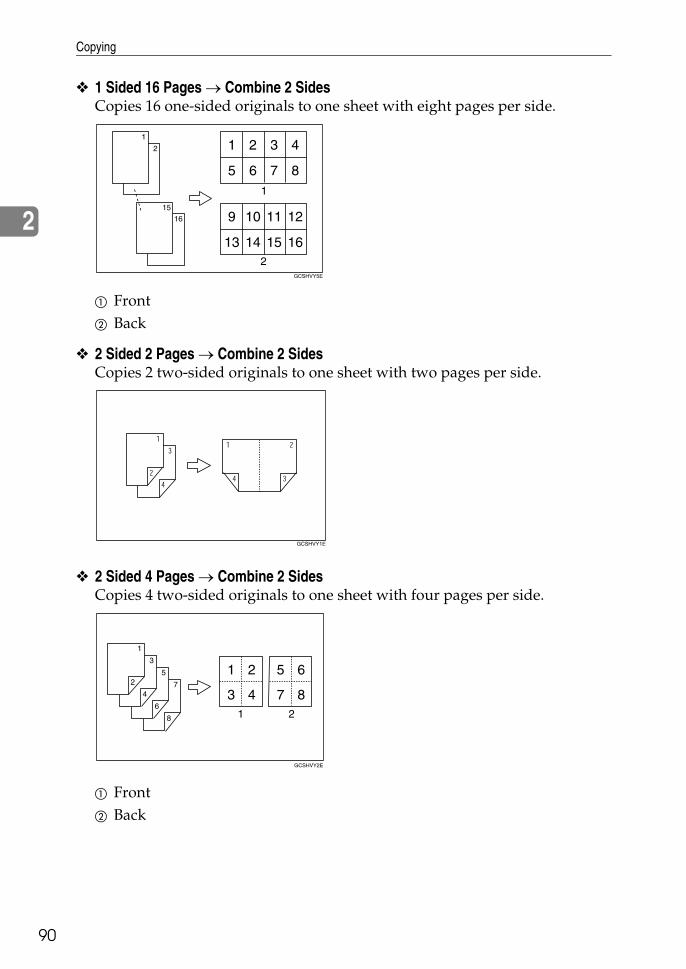
Copying
90
2
❖ 1 Sided 16 Pages → Combine 2 SidesCopies 16 one-sided originals to one sheet with eight pages per side.
A FrontB Back
❖ 2 Sided 2 Pages → Combine 2 SidesCopies 2 two-sided originals to one sheet with two pages per side.
❖ 2 Sided 4 Pages → Combine 2 SidesCopies 4 two-sided originals to one sheet with four pages per side.
A FrontB Back
GCSHVY5E
GCSHVY1E
GCSHVY2E

Copier Functions
91
2
❖ 2 Sided 8 Pages → Combine 2 SidesCopies 8 two-sided originals to one sheet with eight pages per side.
A FrontB Back
A Press [Dup./Combine/Series].
B Press [Combine].
C Select [1 Sided] or [2 Sided] for Original, and then press [Combine 2 Sides] forCopy.
D Press [Orientation].
E Select orientation ([Top to Top]/[Top to Bottom]), and then press [OK].
F Select the number of originals to combine.
G Select the paper size.
GCSHVY6E
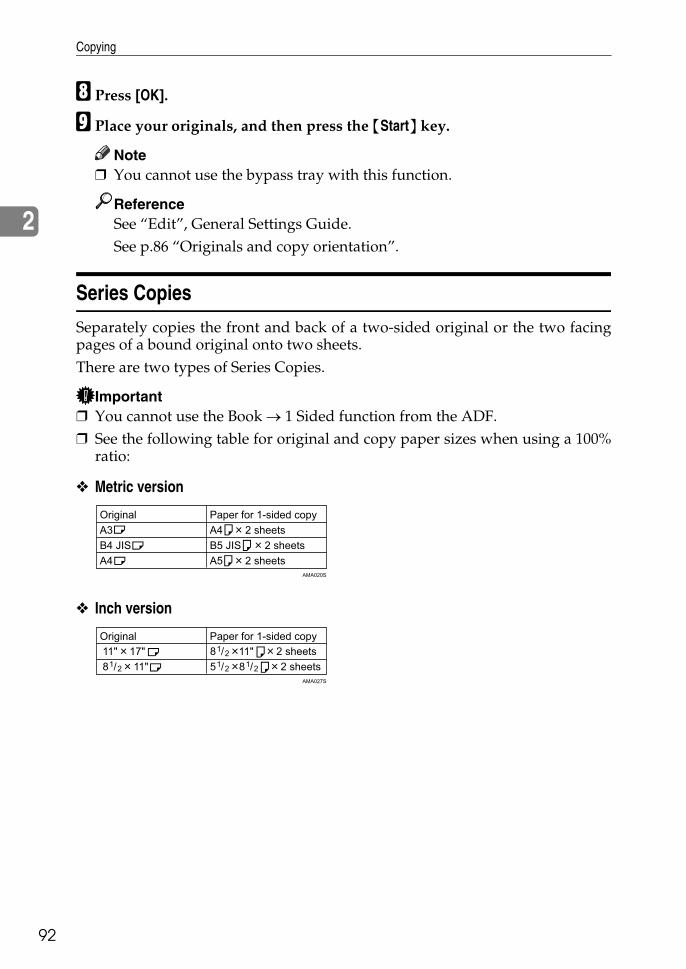
Copying
92
2
H Press [OK].
I Place your originals, and then press the {Start} key.
Note❒ You cannot use the bypass tray with this function.
ReferenceSee “Edit”, General Settings Guide.See p.86 “Originals and copy orientation”.
Series Copies
Separately copies the front and back of a two-sided original or the two facingpages of a bound original onto two sheets.There are two types of Series Copies.
Important❒ You cannot use the Book → 1 Sided function from the ADF.❒ See the following table for original and copy paper sizes when using a 100%
ratio:
❖ Metric version
❖ Inch version
AMA020S
AMA027S
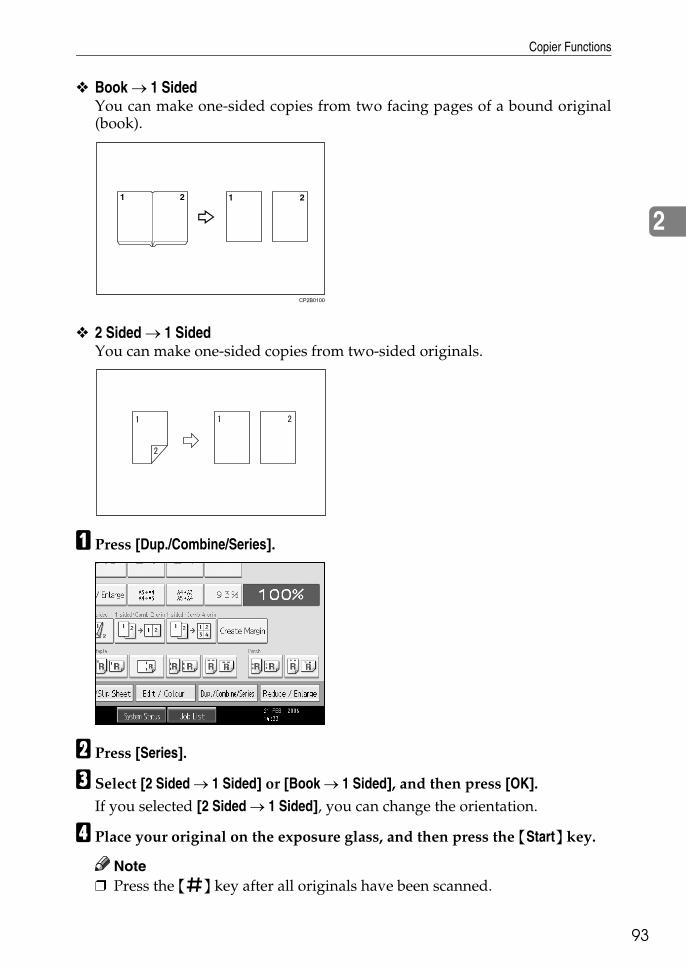
Copier Functions
93
2
❖ Book → 1 SidedYou can make one-sided copies from two facing pages of a bound original(book).
❖ 2 Sided → 1 SidedYou can make one-sided copies from two-sided originals.
A Press [Dup./Combine/Series].
B Press [Series].
C Select [2 Sided → 1 Sided] or [Book → 1 Sided], and then press [OK].If you selected [2 Sided → 1 Sided], you can change the orientation.
D Place your original on the exposure glass, and then press the {Start} key.
Note❒ Press the {q} key after all originals have been scanned.
CP2B0100

Copying
94
2
Booklet/Magazine
Copies two or more originals in page order.There are six types of Booklet/Magazine.
Important❒ The following table shows the paper sizes of two-sided original and two-sid-
ed copy (when copying at a ratio of 100%):
❖ Metric version
❖ Inch version
❖ 1 Sided → BookletMake copies in page order for a folded booklet as shown.• Open to left
• Open to right
AMA020S
AMA027S
GCBOOK0E
GCBOOK1E

Copier Functions
95
2
❖ 2 Sided → BookletMake two-sided originals to copies in page order for a folded booklet asshown.• Open to left
• Open to right
❖ 1 Sided → MagazineCopies two or more originals to make copies in page order when they arefolded and stacked.• Open to left
GCAH010E
GCAH020E
GCBOOK3E
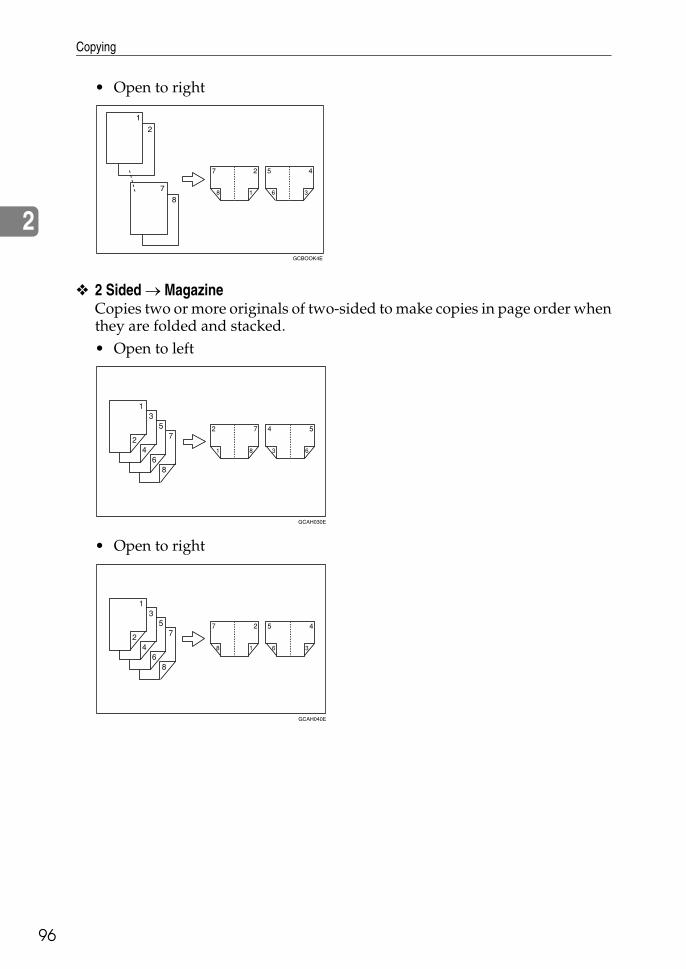
Copying
96
2
• Open to right
❖ 2 Sided → MagazineCopies two or more originals of two-sided to make copies in page order whenthey are folded and stacked.• Open to left
• Open to right
GCBOOK4E
GCAH030E
GCAH040E
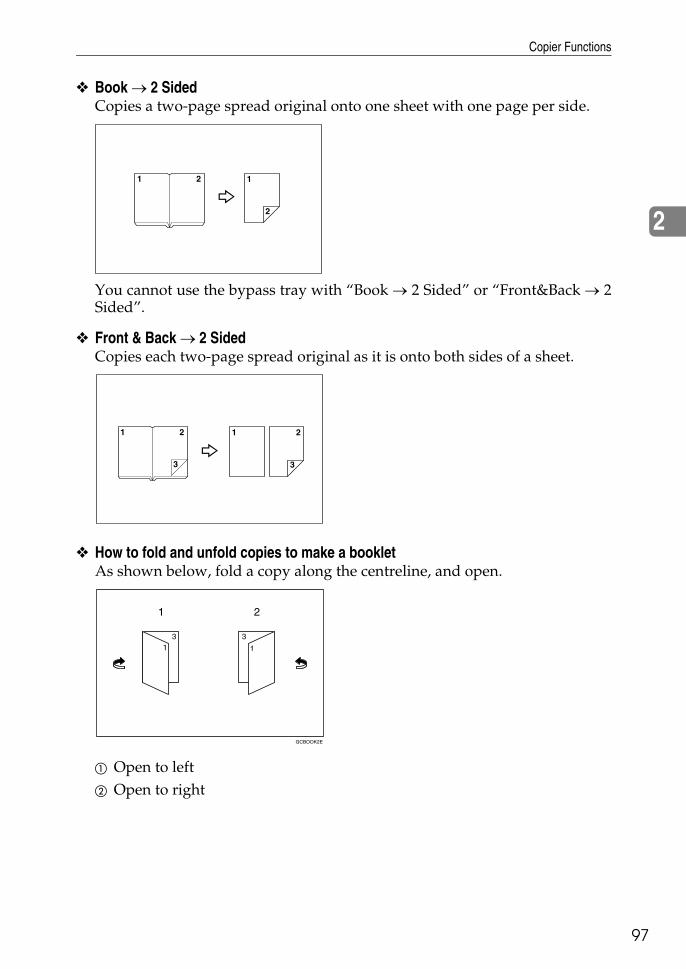
Copier Functions
97
2
❖ Book → 2 SidedCopies a two-page spread original onto one sheet with one page per side.
You cannot use the bypass tray with “Book → 2 Sided” or “Front&Back → 2Sided”.
❖ Front & Back → 2 SidedCopies each two-page spread original as it is onto both sides of a sheet.
❖ How to fold and unfold copies to make a bookletAs shown below, fold a copy along the centreline, and open.
A Open to leftB Open to right
GCBOOK2E
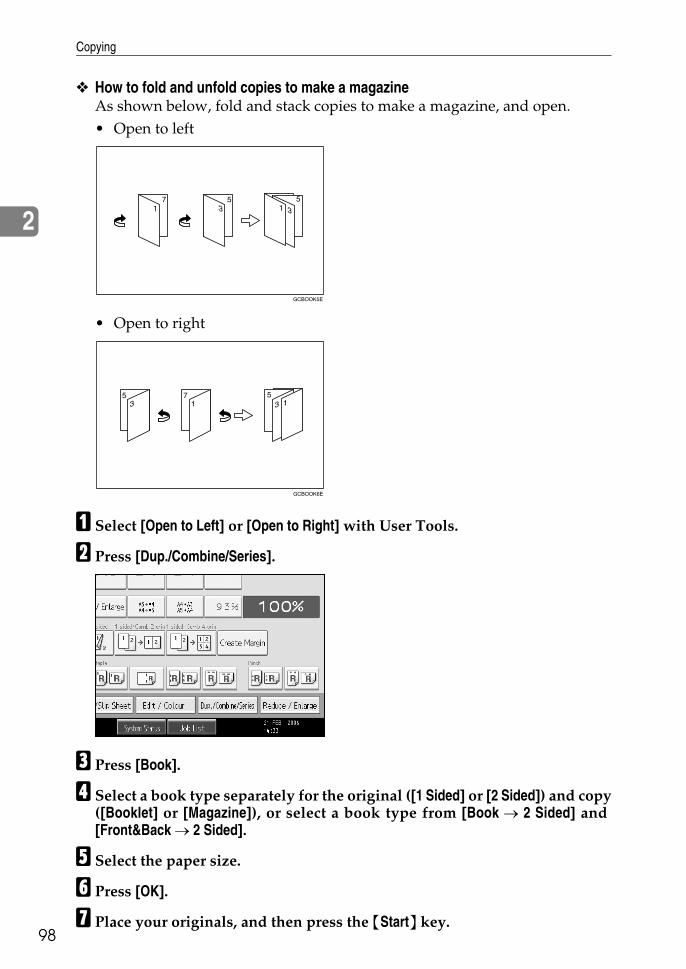
Copying
98
2
❖ How to fold and unfold copies to make a magazineAs shown below, fold and stack copies to make a magazine, and open. • Open to left
• Open to right
A Select [Open to Left] or [Open to Right] with User Tools.
B Press [Dup./Combine/Series].
C Press [Book].
D Select a book type separately for the original ([1 Sided] or [2 Sided]) and copy([Booklet] or [Magazine]), or select a book type from [Book → 2 Sided] and[Front&Back → 2 Sided].
E Select the paper size.
F Press [OK].
G Place your originals, and then press the {Start} key.
GCBOOK5E
GCBOOK6E
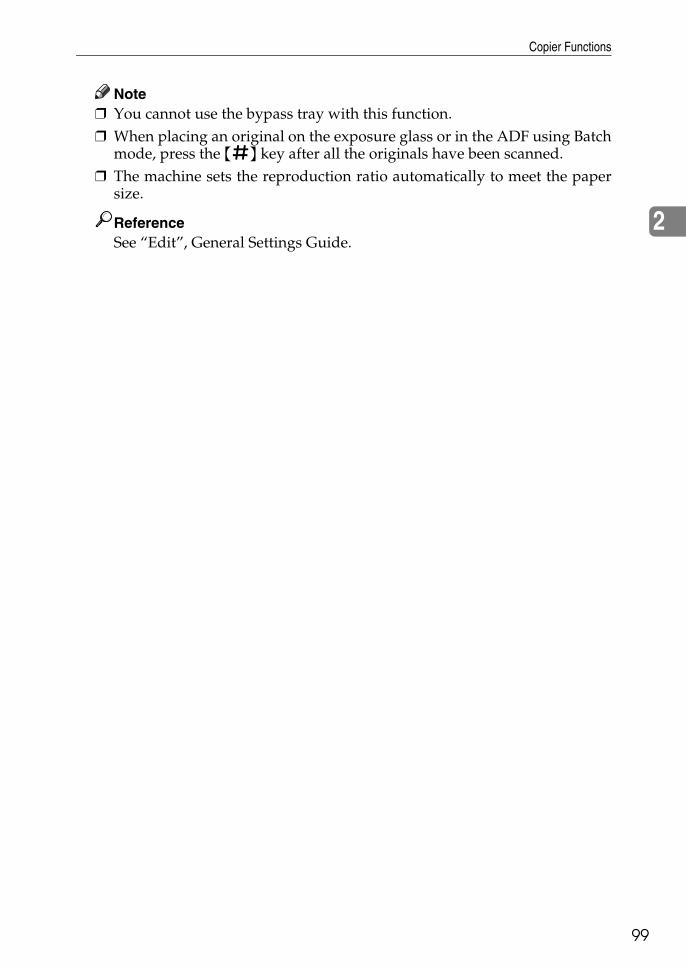
Copier Functions
99
2
Note❒ You cannot use the bypass tray with this function.❒ When placing an original on the exposure glass or in the ADF using Batch
mode, press the {q} key after all the originals have been scanned.❒ The machine sets the reproduction ratio automatically to meet the paper
size.
ReferenceSee “Edit”, General Settings Guide.
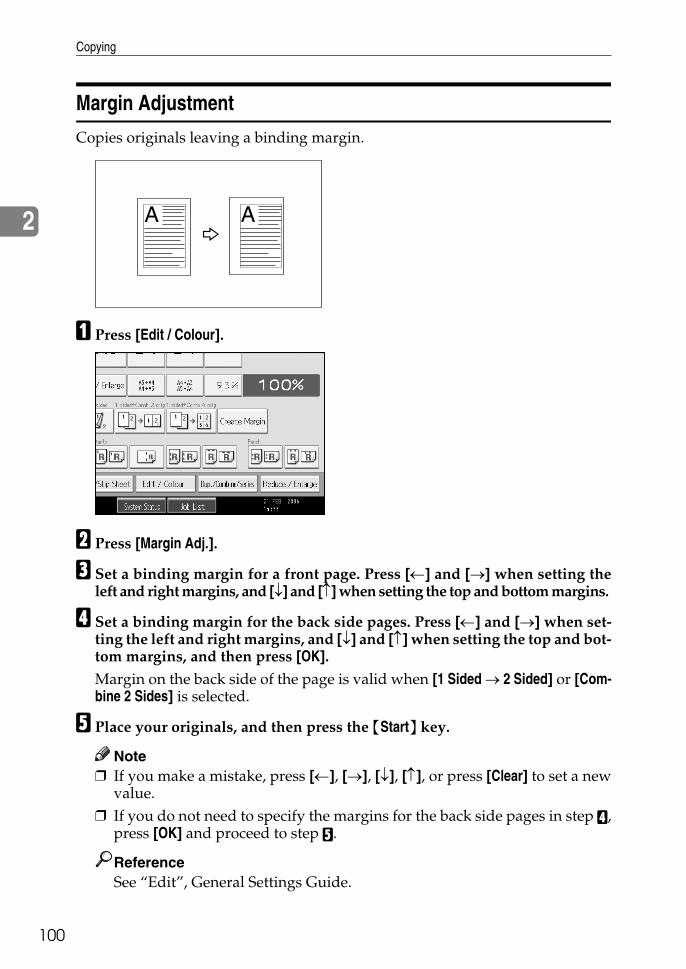
Copying
100
2
Margin Adjustment
Copies originals leaving a binding margin.
A Press [Edit / Colour].
B Press [Margin Adj.].
C Set a binding margin for a front page. Press [←] and [→] when setting theleft and right margins, and [↓] and [↑] when setting the top and bottom margins.
D Set a binding margin for the back side pages. Press [←] and [→] when set-ting the left and right margins, and [↓] and [↑] when setting the top and bot-tom margins, and then press [OK].Margin on the back side of the page is valid when [1 Sided → 2 Sided] or [Com-bine 2 Sides] is selected.
E Place your originals, and then press the {Start} key.
Note❒ If you make a mistake, press [←], [→], [↓], [↑], or press [Clear] to set a new
value.❒ If you do not need to specify the margins for the back side pages in step D,
press [OK] and proceed to step E.
ReferenceSee “Edit”, General Settings Guide.
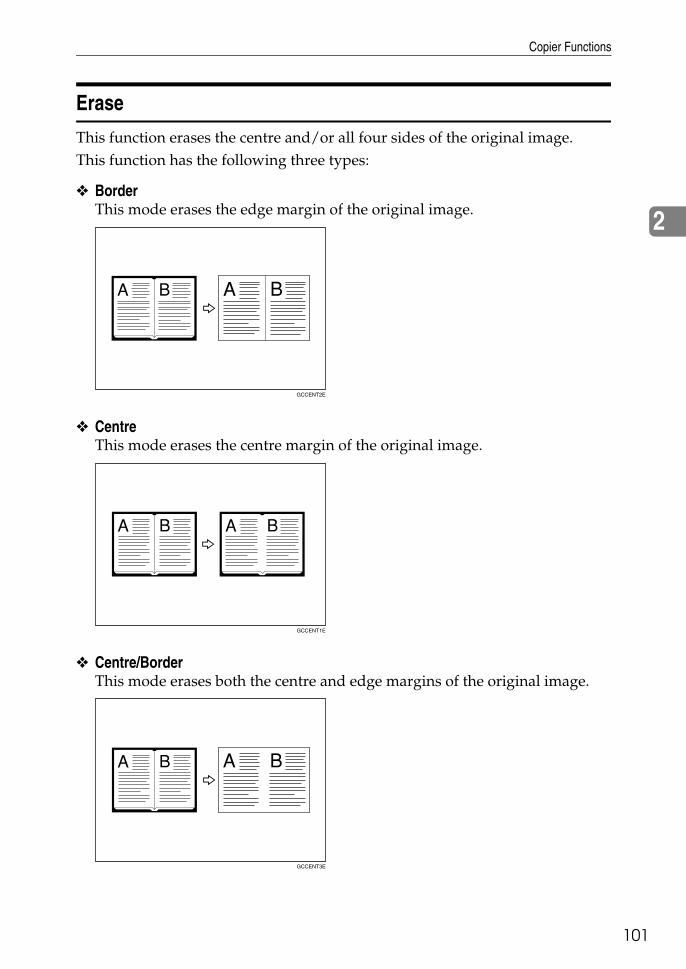
Copier Functions
01
2
1
Erase
This function erases the centre and/or all four sides of the original image.This function has the following three types:
❖ BorderThis mode erases the edge margin of the original image.
❖ CentreThis mode erases the centre margin of the original image.
❖ Centre/BorderThis mode erases both the centre and edge margins of the original image.
GCCENT2E
GCCENT1E
GCCENT3E

Copying
102
2
Note❒ The erase width is set to 10 mm (0.4 inch) as a default. You can change this
setting with User Tools. See “Edit”, General Settings Guide.❒ The relationship between the original orientation and the erased part is as follows:
A Erased partB 2-99 mm (0.1"-3.9")
Border Erase (same width)
This mode erases the edge margin of the original image.
A Press [Edit / Colour].
B Press [Erase].
C Press [Erase Centre / Border].
D Press [Same Width].
L original K original
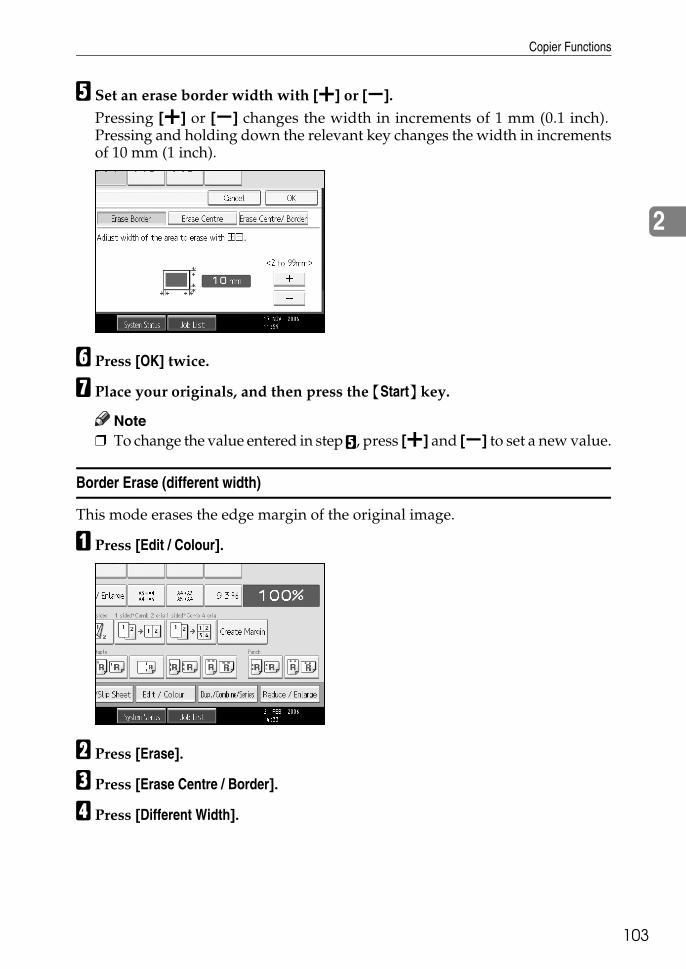
Copier Functions
03
2
1
E Set an erase border width with [n] or [o].Pressing [n] or [o] changes the width in increments of 1 mm (0.1 inch).Pressing and holding down the relevant key changes the width in incrementsof 10 mm (1 inch).
F Press [OK] twice.
G Place your originals, and then press the {Start} key.
Note❒ To change the value entered in step E, press [n] and [o] to set a new value.
Border Erase (different width)
This mode erases the edge margin of the original image.
A Press [Edit / Colour].
B Press [Erase].
C Press [Erase Centre / Border].
D Press [Different Width].
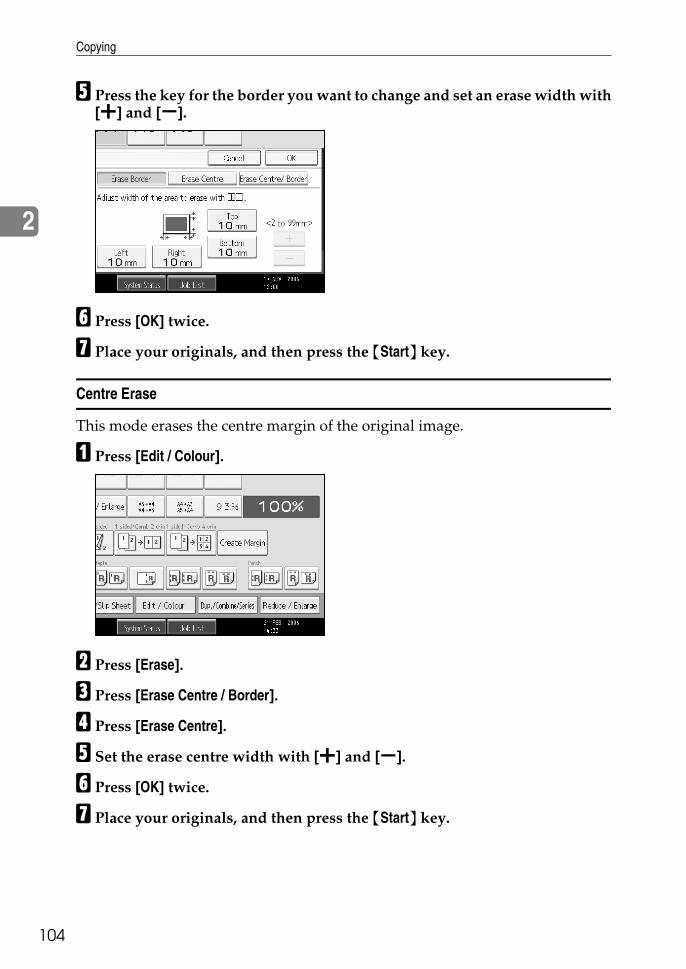
Copying
104
2
E Press the key for the border you want to change and set an erase width with[n] and [o].
F Press [OK] twice.
G Place your originals, and then press the {Start} key.
Centre Erase
This mode erases the centre margin of the original image.
A Press [Edit / Colour].
B Press [Erase].
C Press [Erase Centre / Border].
D Press [Erase Centre].
E Set the erase centre width with [n] and [o].
F Press [OK] twice.
G Place your originals, and then press the {Start} key.
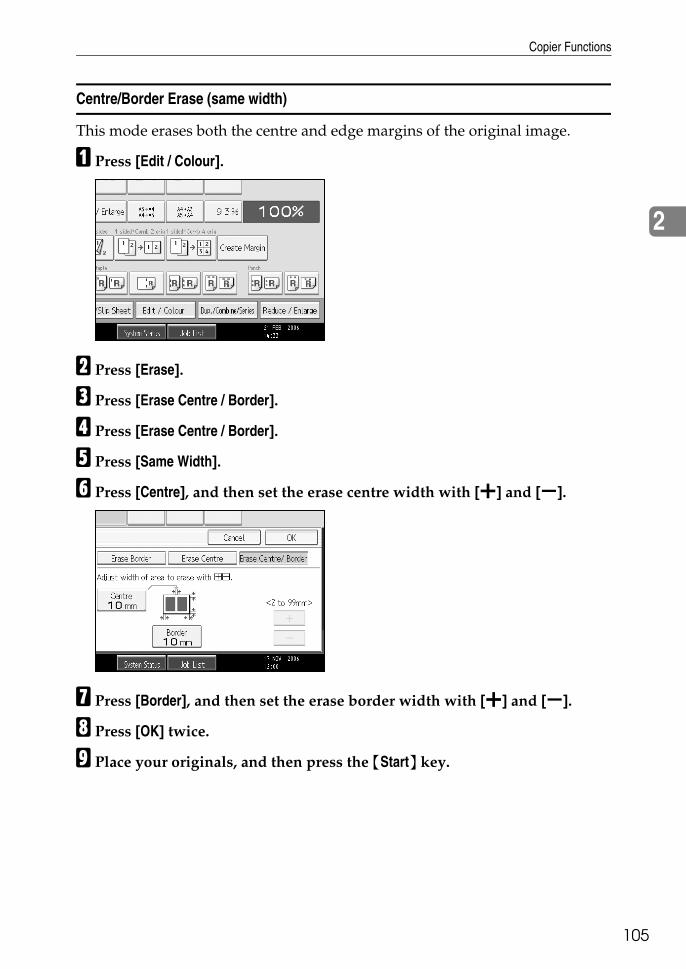
Copier Functions
05
2
1
Centre/Border Erase (same width)
This mode erases both the centre and edge margins of the original image.
A Press [Edit / Colour].
B Press [Erase].
C Press [Erase Centre / Border].
D Press [Erase Centre / Border].
E Press [Same Width].
F Press [Centre], and then set the erase centre width with [n] and [o].
G Press [Border], and then set the erase border width with [n] and [o].
H Press [OK] twice.
I Place your originals, and then press the {Start} key.
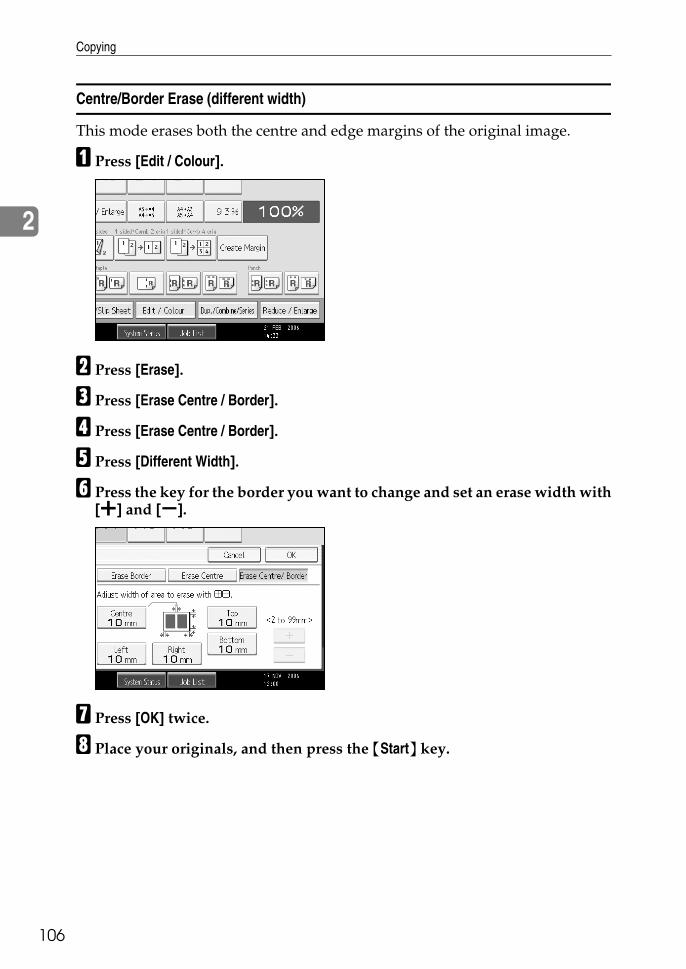
Copying
106
2
Centre/Border Erase (different width)
This mode erases both the centre and edge margins of the original image.
A Press [Edit / Colour].
B Press [Erase].
C Press [Erase Centre / Border].
D Press [Erase Centre / Border].
E Press [Different Width].
F Press the key for the border you want to change and set an erase width with[n] and [o].
G Press [OK] twice.
H Place your originals, and then press the {Start} key.
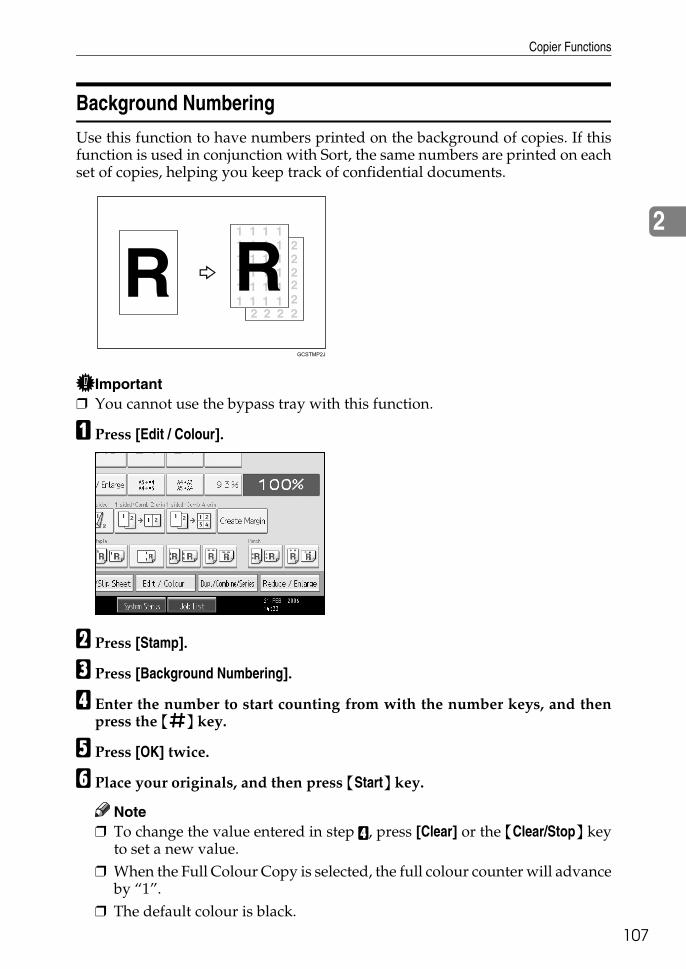
Copier Functions
07
2
1
Background Numbering
Use this function to have numbers printed on the background of copies. If thisfunction is used in conjunction with Sort, the same numbers are printed on eachset of copies, helping you keep track of confidential documents.
Important❒ You cannot use the bypass tray with this function.
A Press [Edit / Colour].
B Press [Stamp].
C Press [Background Numbering].
D Enter the number to start counting from with the number keys, and thenpress the {q} key.
E Press [OK] twice.
F Place your originals, and then press {Start} key.
Note❒ To change the value entered in step D, press [Clear] or the {Clear/Stop} key
to set a new value.❒ When the Full Colour Copy is selected, the full colour counter will advance
by “1”.❒ The default colour is black.
GCSTMP2J
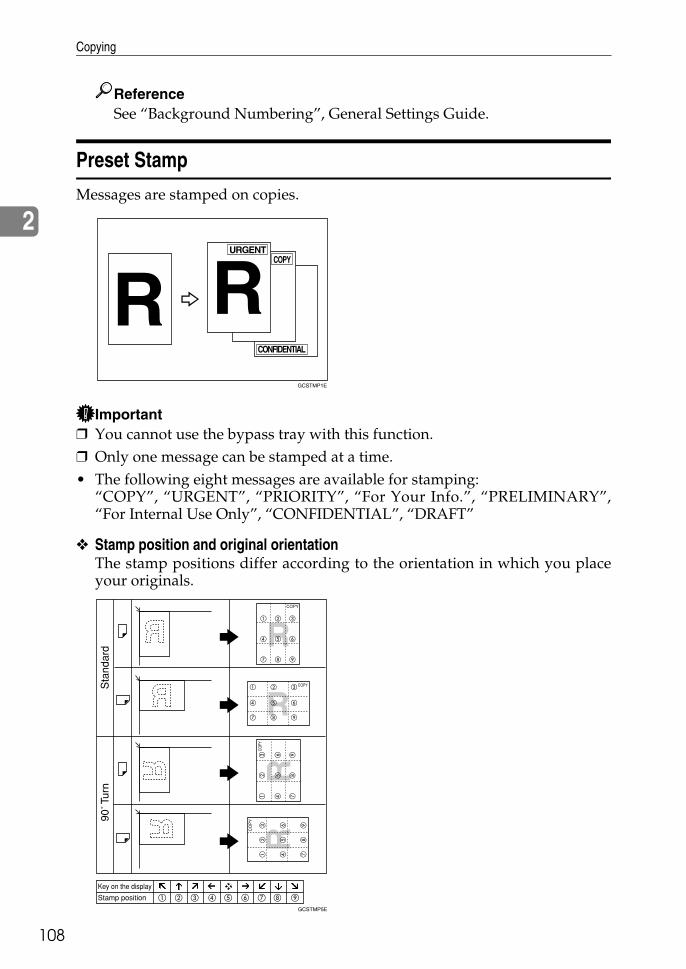
Copying
108
2
ReferenceSee “Background Numbering”, General Settings Guide.
Preset Stamp
Messages are stamped on copies.
Important❒ You cannot use the bypass tray with this function.❒ Only one message can be stamped at a time.• The following eight messages are available for stamping:
“COPY”, “URGENT”, “PRIORITY”, “For Your Info.”, “PRELIMINARY”,“For Internal Use Only”, “CONFIDENTIAL”, “DRAFT”
❖ Stamp position and original orientationThe stamp positions differ according to the orientation in which you placeyour originals.
GCSTMP1E
GCSTMP5E
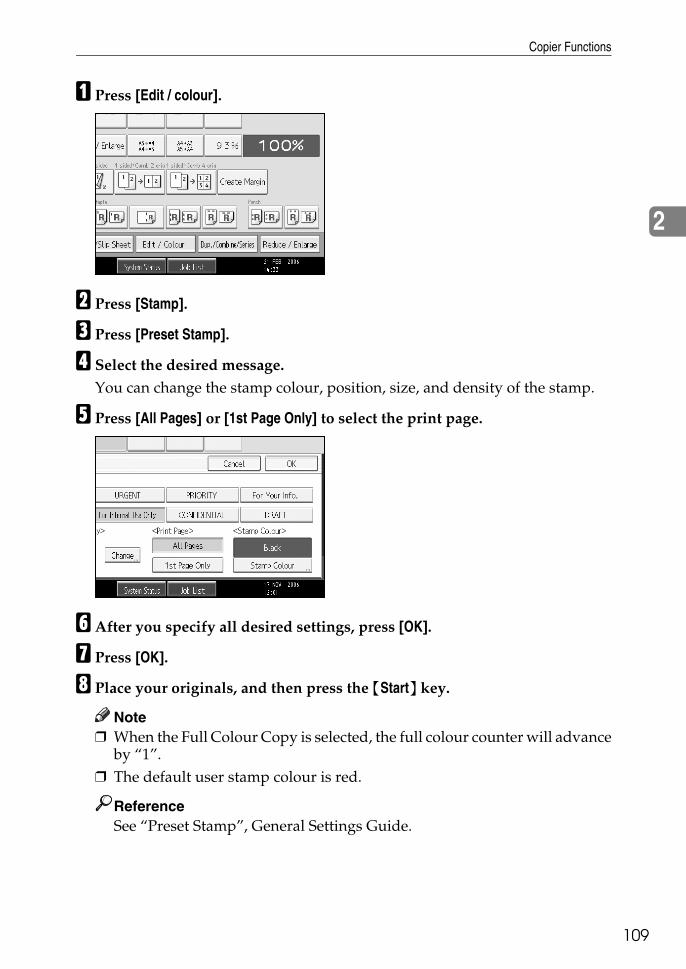
Copier Functions
09
2
1
A Press [Edit / colour].
B Press [Stamp].
C Press [Preset Stamp].
D Select the desired message.You can change the stamp colour, position, size, and density of the stamp.
E Press [All Pages] or [1st Page Only] to select the print page.
F After you specify all desired settings, press [OK].
G Press [OK].
H Place your originals, and then press the {Start} key.
Note❒ When the Full Colour Copy is selected, the full colour counter will advance
by “1”.❒ The default user stamp colour is red.
ReferenceSee “Preset Stamp”, General Settings Guide.
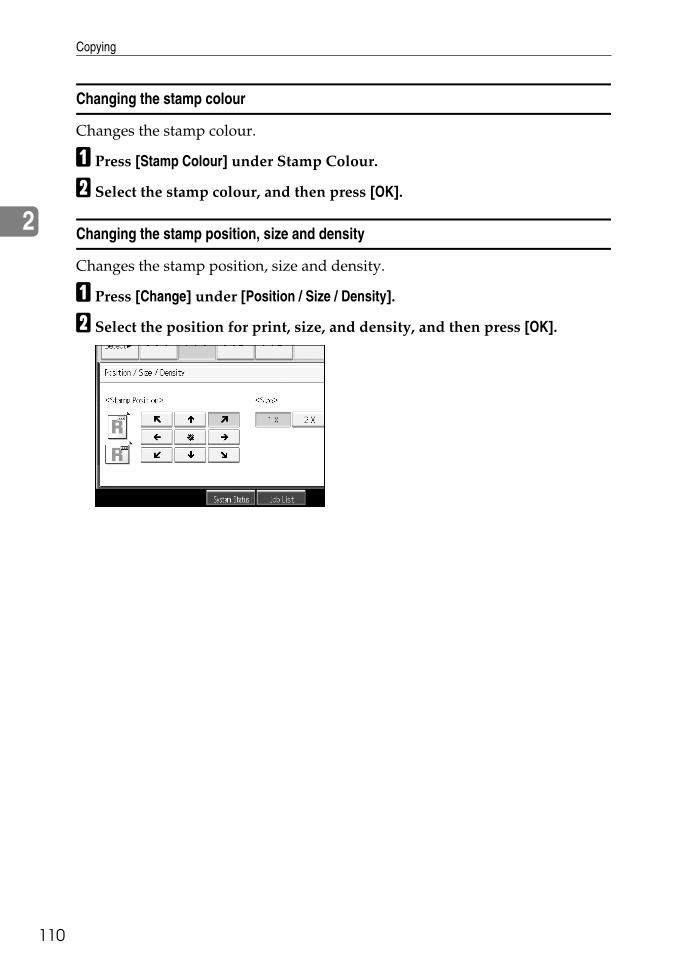
Copying
110
2
Changing the stamp colour
Changes the stamp colour.
A Press [Stamp Colour] under Stamp Colour.
B Select the stamp colour, and then press [OK].
Changing the stamp position, size and density
Changes the stamp position, size and density.
A Press [Change] under [Position / Size / Density].
B Select the position for print, size, and density, and then press [OK].
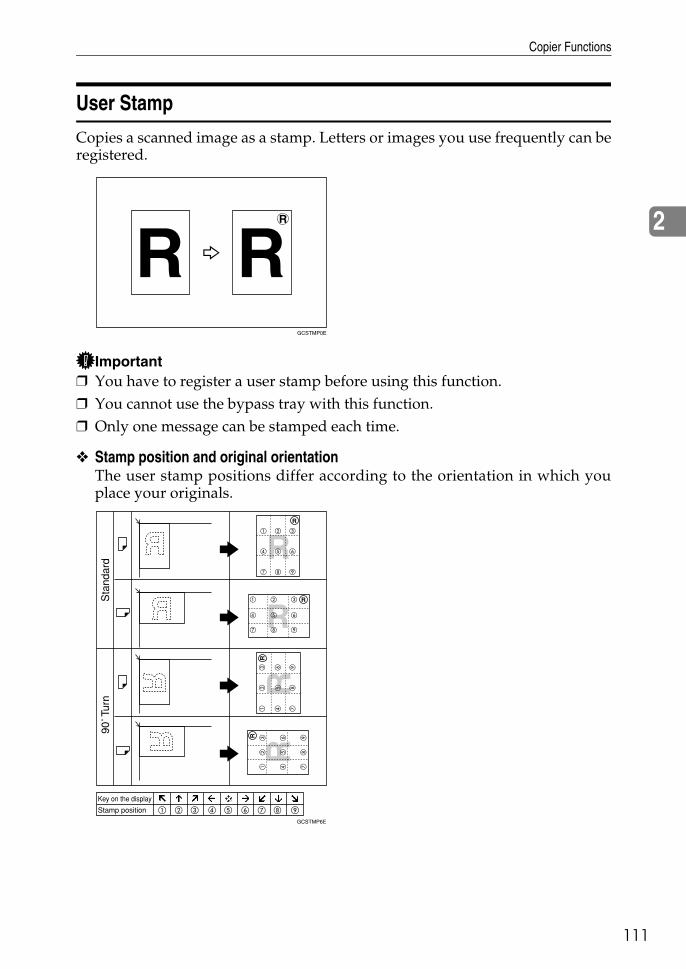
Copier Functions
11
2
1
User Stamp
Copies a scanned image as a stamp. Letters or images you use frequently can beregistered.
Important❒ You have to register a user stamp before using this function.❒ You cannot use the bypass tray with this function.❒ Only one message can be stamped each time.
❖ Stamp position and original orientationThe user stamp positions differ according to the orientation in which youplace your originals.
GCSTMP0E
GCSTMP6E
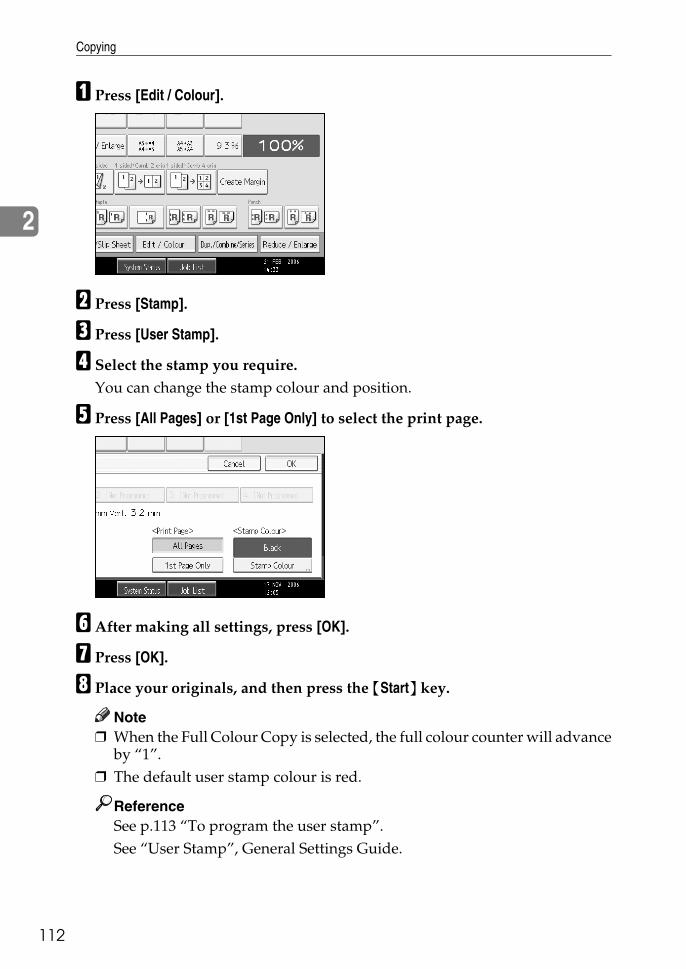
Copying
112
2
A Press [Edit / Colour].
B Press [Stamp].
C Press [User Stamp].
D Select the stamp you require.You can change the stamp colour and position.
E Press [All Pages] or [1st Page Only] to select the print page.
F After making all settings, press [OK].
G Press [OK].
H Place your originals, and then press the {Start} key.
Note❒ When the Full Colour Copy is selected, the full colour counter will advance
by “1”.❒ The default user stamp colour is red.
ReferenceSee p.113 “To program the user stamp”.See “User Stamp”, General Settings Guide.

Copier Functions
13
2
1
Changing the user stamp colour
Changes the stamp colour.
A Press [Stamp Colour] under Stamp Colour.
B Select the stamp colour, and then press [OK].
Changing the user stamp position
Changes the stamp position.
A Press [Change] under Stamp Position.
B Select the desired position, and then press [OK].
To program the user stamp
This function scans an image that is used as a user stamp.The range of stamp images for readability is 10–297 mm (0.4"-11.7") high and 10–432 mm (0.4"-17.0") wide. However, if the value exceeds the maximum value ofthe area (5,000 mm2, 7.75 inch2), it is corrected within the range of the area auto-matically.
A Press the {User Tools/Counter} key.
AQI036S
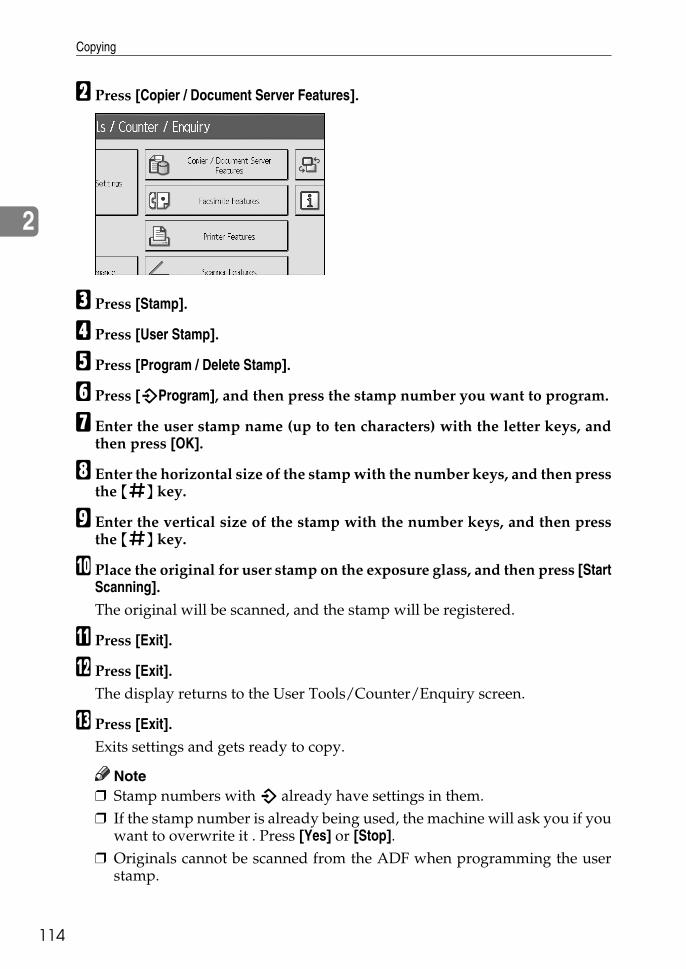
Copying
114
2
B Press [Copier / Document Server Features].
C Press [Stamp].
D Press [User Stamp].
E Press [Program / Delete Stamp].
F Press [mProgram], and then press the stamp number you want to program.
G Enter the user stamp name (up to ten characters) with the letter keys, andthen press [OK].
H Enter the horizontal size of the stamp with the number keys, and then pressthe {q} key.
I Enter the vertical size of the stamp with the number keys, and then pressthe {q} key.
J Place the original for user stamp on the exposure glass, and then press [StartScanning].The original will be scanned, and the stamp will be registered.
K Press [Exit].
L Press [Exit].The display returns to the User Tools/Counter/Enquiry screen.
M Press [Exit].Exits settings and gets ready to copy.
Note❒ Stamp numbers with m already have settings in them.❒ If the stamp number is already being used, the machine will ask you if you
want to overwrite it . Press [Yes] or [Stop].❒ Originals cannot be scanned from the ADF when programming the user
stamp.
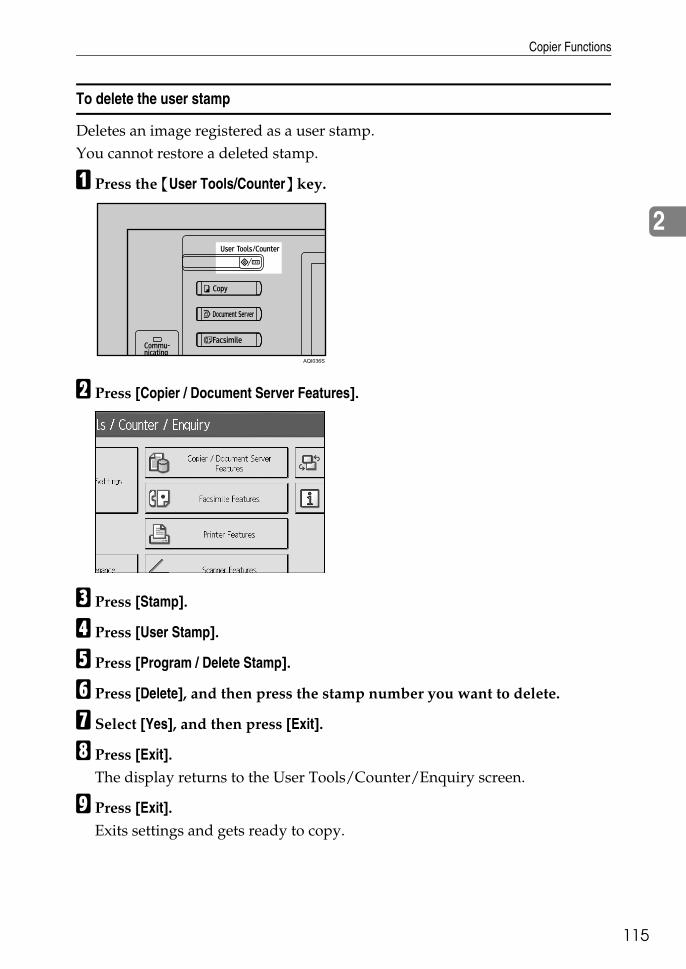
Copier Functions
15
2
1
To delete the user stamp
Deletes an image registered as a user stamp.You cannot restore a deleted stamp.
A Press the {User Tools/Counter} key.
B Press [Copier / Document Server Features].
C Press [Stamp].
D Press [User Stamp].
E Press [Program / Delete Stamp].
F Press [Delete], and then press the stamp number you want to delete.
G Select [Yes], and then press [Exit].
H Press [Exit].The display returns to the User Tools/Counter/Enquiry screen.
I Press [Exit].Exits settings and gets ready to copy.
AQI036S
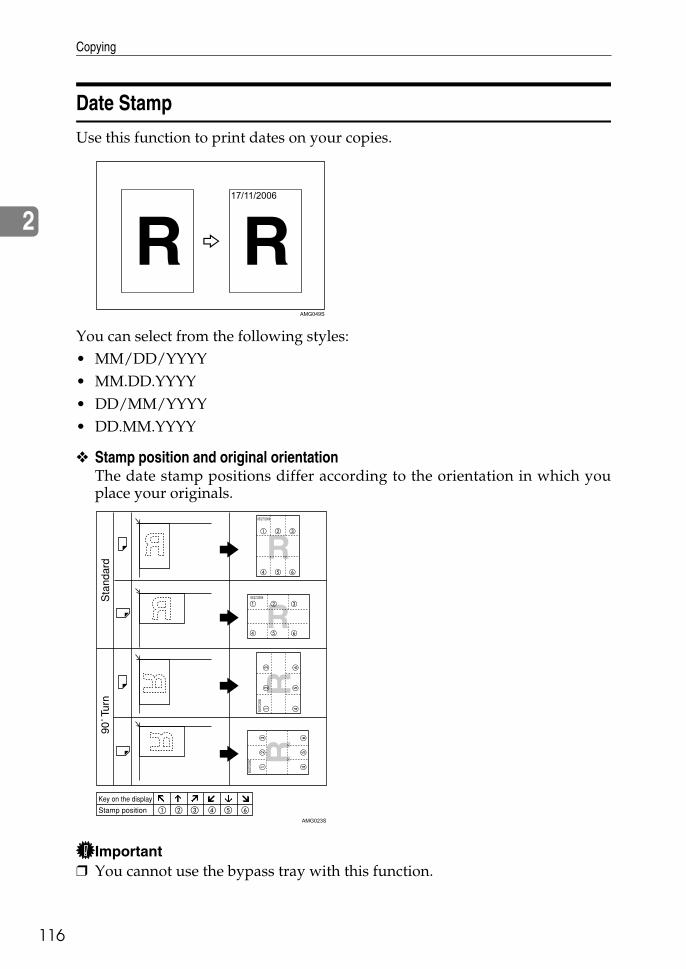
Copying
116
2
Date Stamp
Use this function to print dates on your copies.
You can select from the following styles:• MM/DD/YYYY• MM.DD.YYYY• DD/MM/YYYY• DD.MM.YYYY
❖ Stamp position and original orientationThe date stamp positions differ according to the orientation in which youplace your originals.
Important❒ You cannot use the bypass tray with this function.
AMG049S
AMG023S
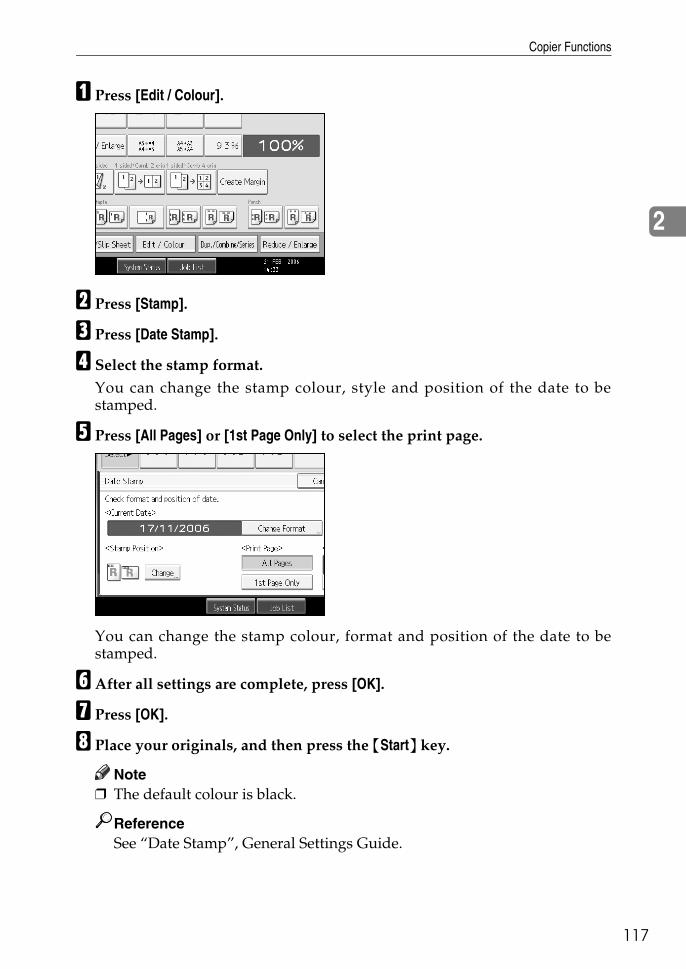
Copier Functions
17
2
1
A Press [Edit / Colour].
B Press [Stamp].
C Press [Date Stamp].
D Select the stamp format. You can change the stamp colour, style and position of the date to bestamped.
E Press [All Pages] or [1st Page Only] to select the print page.
You can change the stamp colour, format and position of the date to bestamped.
F After all settings are complete, press [OK].
G Press [OK].
H Place your originals, and then press the {Start} key.
Note❒ The default colour is black.
ReferenceSee “Date Stamp”, General Settings Guide.
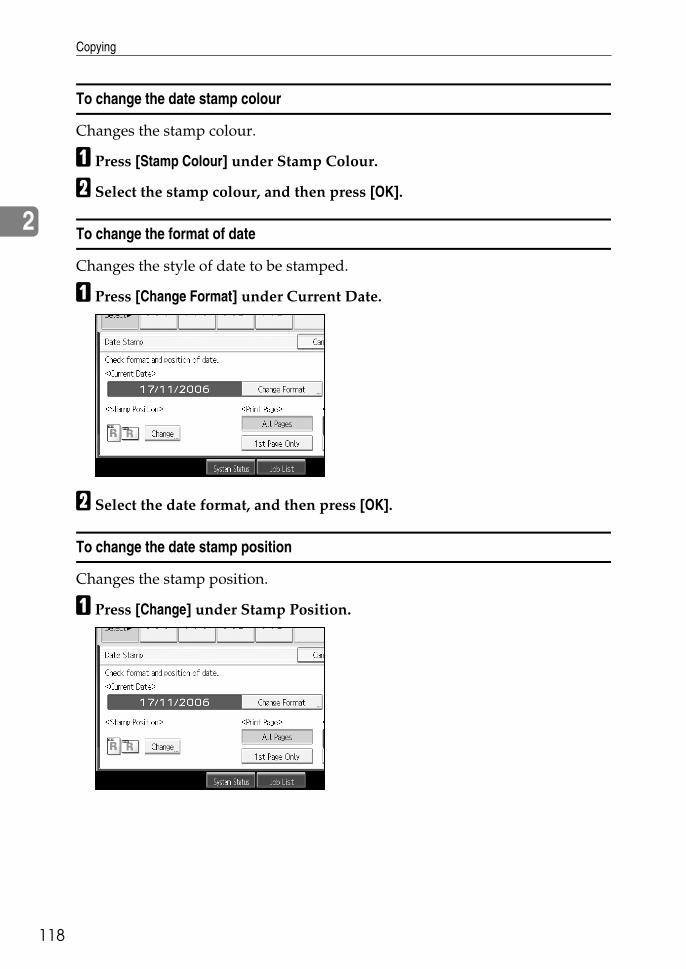
Copying
118
2
To change the date stamp colour
Changes the stamp colour.
A Press [Stamp Colour] under Stamp Colour.
B Select the stamp colour, and then press [OK].
To change the format of date
Changes the style of date to be stamped.
A Press [Change Format] under Current Date.
B Select the date format, and then press [OK].
To change the date stamp position
Changes the stamp position.
A Press [Change] under Stamp Position.
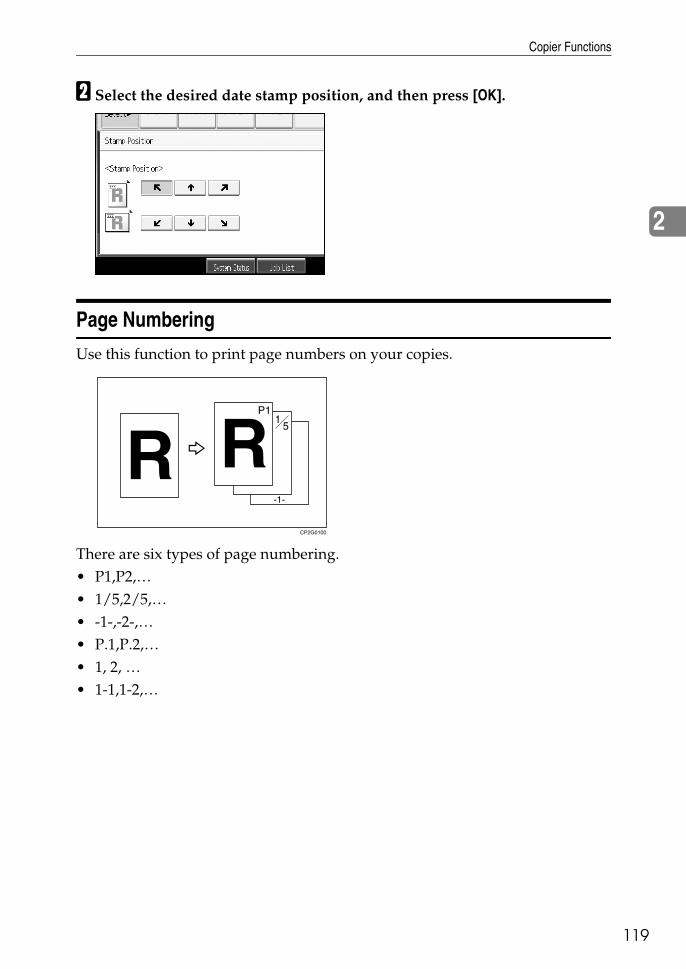
Copier Functions
19
2
1
B Select the desired date stamp position, and then press [OK].
Page Numbering
Use this function to print page numbers on your copies.
There are six types of page numbering.• P1,P2,…• 1/5,2/5,…• -1-,-2-,…• P.1,P.2,…• 1, 2, …• 1-1,1-2,…
CP2G0100
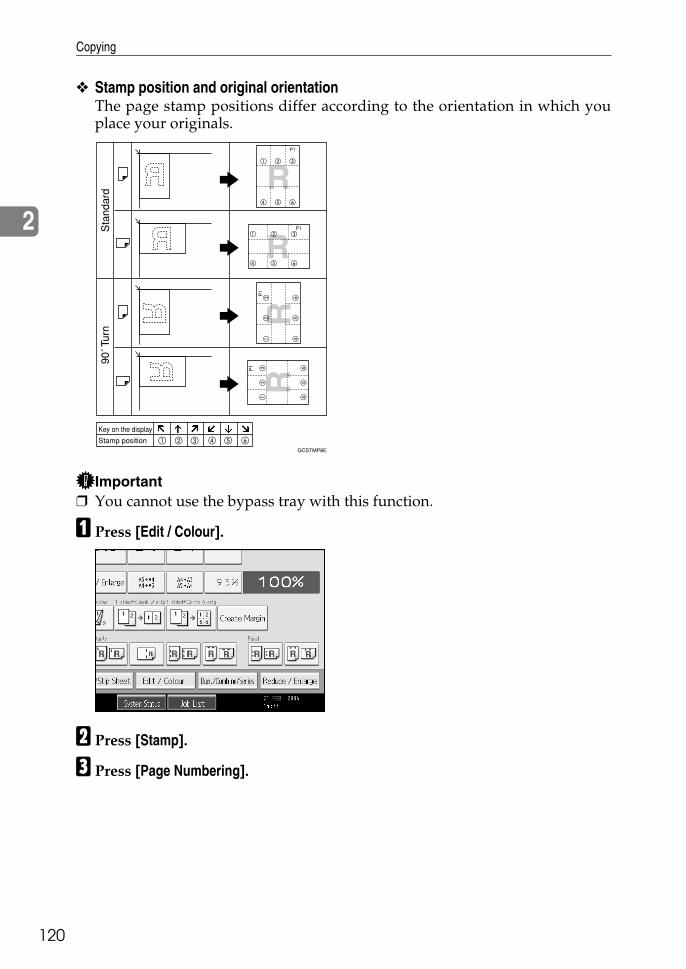
Copying
120
2
❖ Stamp position and original orientationThe page stamp positions differ according to the orientation in which youplace your originals.
Important❒ You cannot use the bypass tray with this function.
A Press [Edit / Colour].
B Press [Stamp].
C Press [Page Numbering].
GCSTMP8E
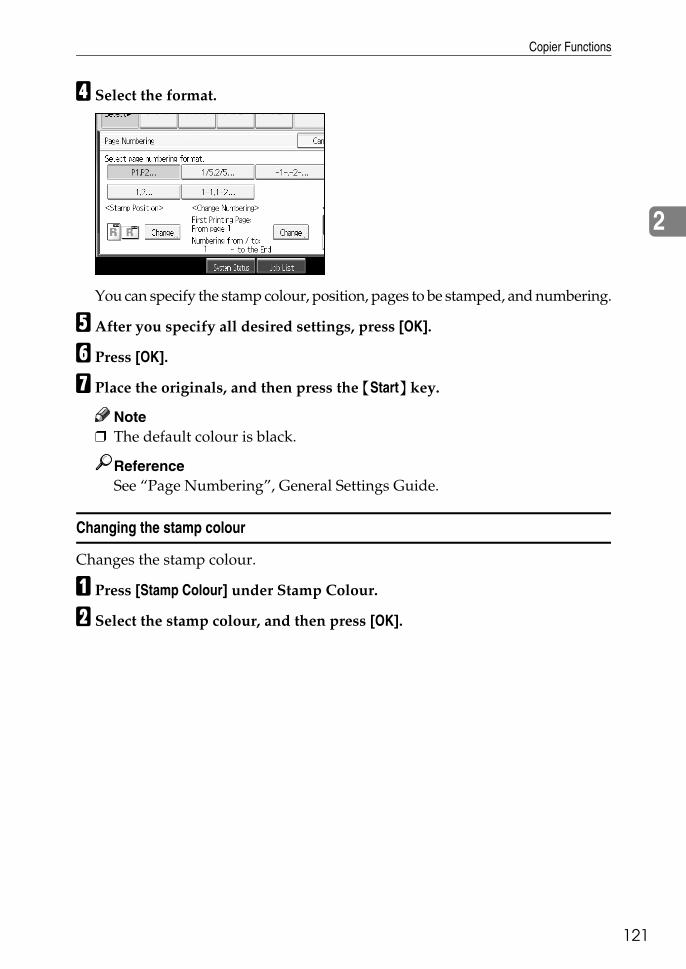
Copier Functions
21
2
1
D Select the format.
You can specify the stamp colour, position, pages to be stamped, and numbering.
E After you specify all desired settings, press [OK].
F Press [OK].
G Place the originals, and then press the {Start} key.
Note❒ The default colour is black.
ReferenceSee “Page Numbering”, General Settings Guide.
Changing the stamp colour
Changes the stamp colour.
A Press [Stamp Colour] under Stamp Colour.
B Select the stamp colour, and then press [OK].
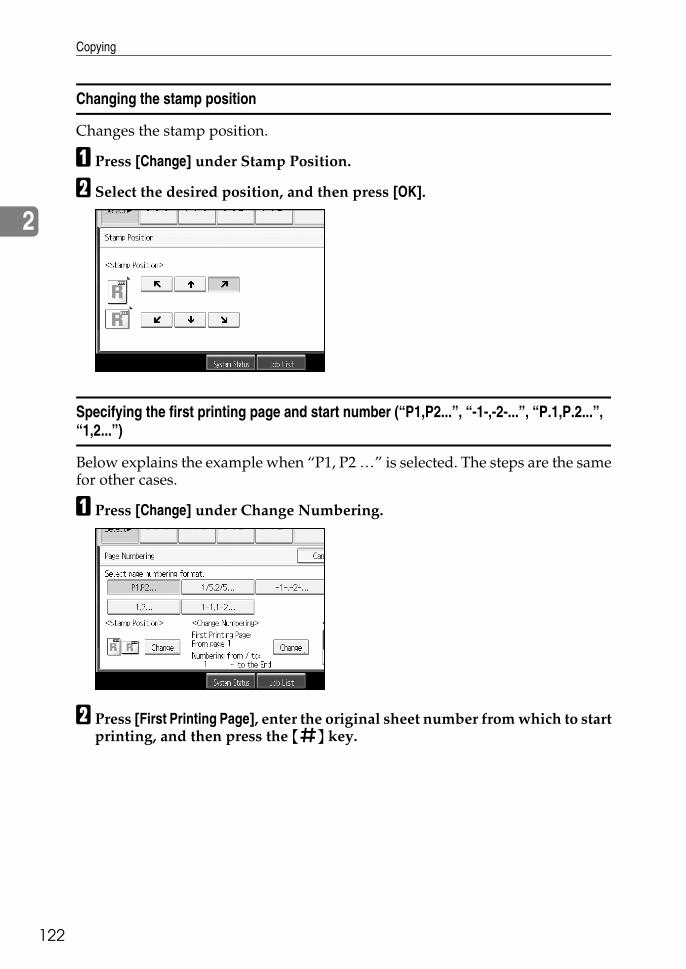
Copying
122
2
Changing the stamp position
Changes the stamp position.
A Press [Change] under Stamp Position.
B Select the desired position, and then press [OK].
Specifying the first printing page and start number (“P1,P2...”, “-1-,-2-...”, “P.1,P.2...”, “1,2...”)
Below explains the example when “P1, P2 …” is selected. The steps are the samefor other cases.
A Press [Change] under Change Numbering.
B Press [First Printing Page], enter the original sheet number from which to startprinting, and then press the {q} key.
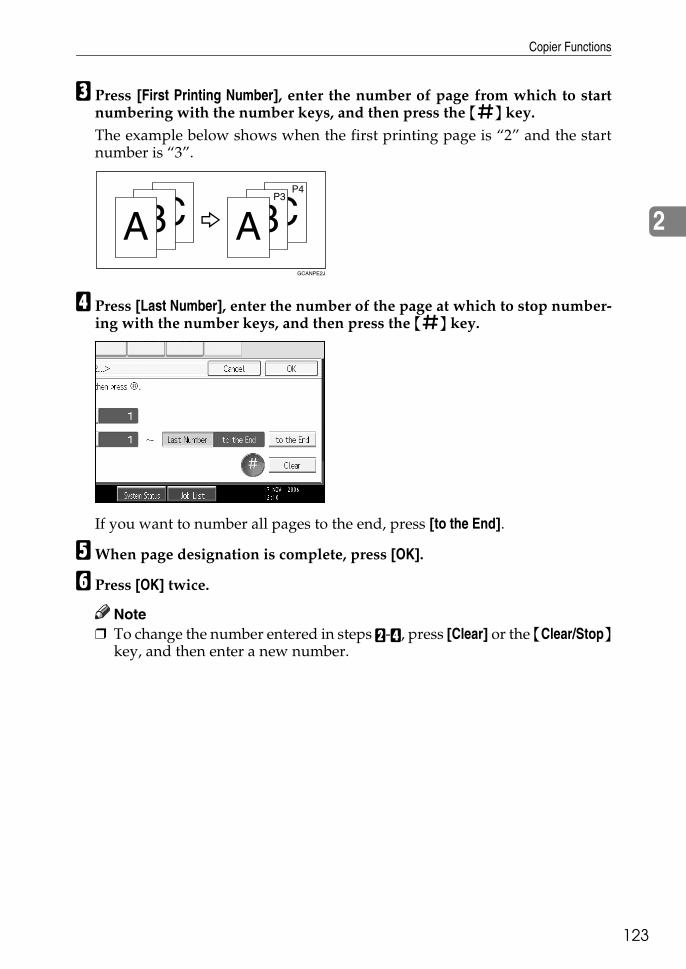
Copier Functions
23
2
1
C Press [First Printing Number], enter the number of page from which to startnumbering with the number keys, and then press the {q} key. The example below shows when the first printing page is “2” and the startnumber is “3”.
D Press [Last Number], enter the number of the page at which to stop number-ing with the number keys, and then press the {q} key.
If you want to number all pages to the end, press [to the End].
EWhen page designation is complete, press [OK].
F Press [OK] twice.
Note❒ To change the number entered in steps B-D, press [Clear] or the {Clear/Stop}
key, and then enter a new number.
GCANPE2J

Copying
124
2
Specifying the first printing page and start number (“1/5,2/5…”)
A Press [Change] under Change Numbering.
B Press [First Printing Page], enter the original sheet number from which to startprinting, and then press the {q} key.
You can enter between 1 and 9999 for the original sheet number from whichto start printing.
C Press [First Printing Number], enter the number of page from which to startnumbering with the number keys, and then press the {q} key.
D Press [Last Number], enter the number of page at which to stop numberingwith the number keys, and then press the {q} key.Proceed to step E when not changing.If you want to number all pages to the end, press [to the End].The last number is the last page number to print. For example, if Total Pagesis ten, if you want to print up to seven pages and do not want to print frompage 8 on, enter “7” for Last Number. Normally, you do not need to enter thenumber.
E Press [Total Pages], enter the total number of original pages with the numberkeys, and then press the {q} key.
FWhen page designation is complete, press [OK].
G Press [OK] twice.
Note❒ To change the number entered in steps B-E, press [Clear] or the {Clear/Stop}
key, and then enter a new number.❒ To change the settings (the first printing page, the number of page from
which to start numbering, or total number of pages) after pressing [OK] instep F, press [Change] and then enter the numbers again.
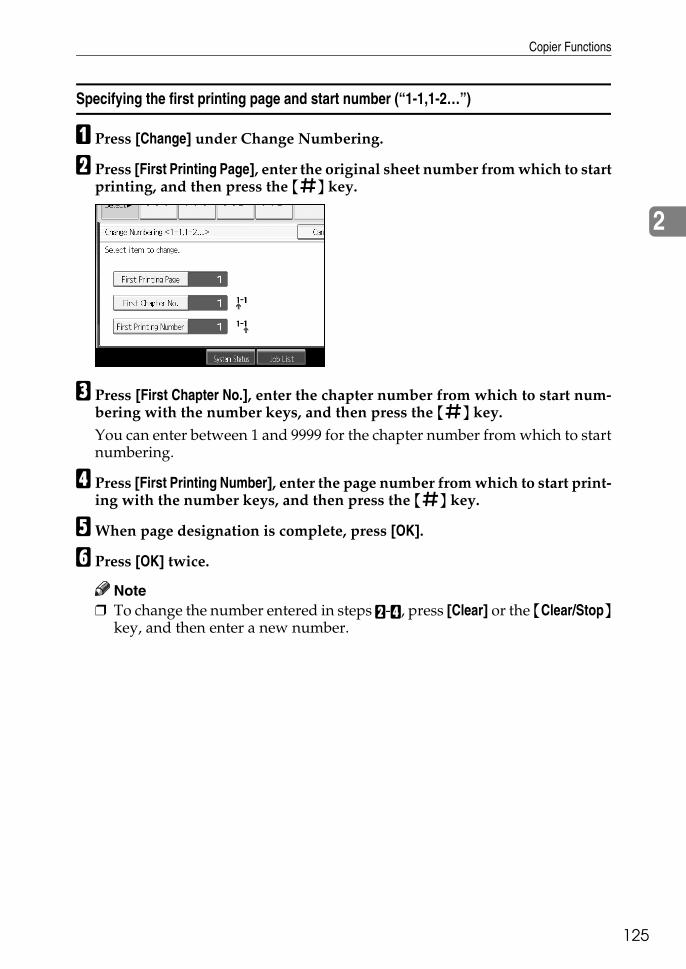
Copier Functions
25
2
1
Specifying the first printing page and start number (“1-1,1-2…”)
A Press [Change] under Change Numbering.
B Press [First Printing Page], enter the original sheet number from which to startprinting, and then press the {q} key.
C Press [First Chapter No.], enter the chapter number from which to start num-bering with the number keys, and then press the {q} key.You can enter between 1 and 9999 for the chapter number from which to startnumbering.
D Press [First Printing Number], enter the page number from which to start print-ing with the number keys, and then press the {q} key.
EWhen page designation is complete, press [OK].
F Press [OK] twice.
Note❒ To change the number entered in steps B-D, press [Clear] or the {Clear/Stop}
key, and then enter a new number.
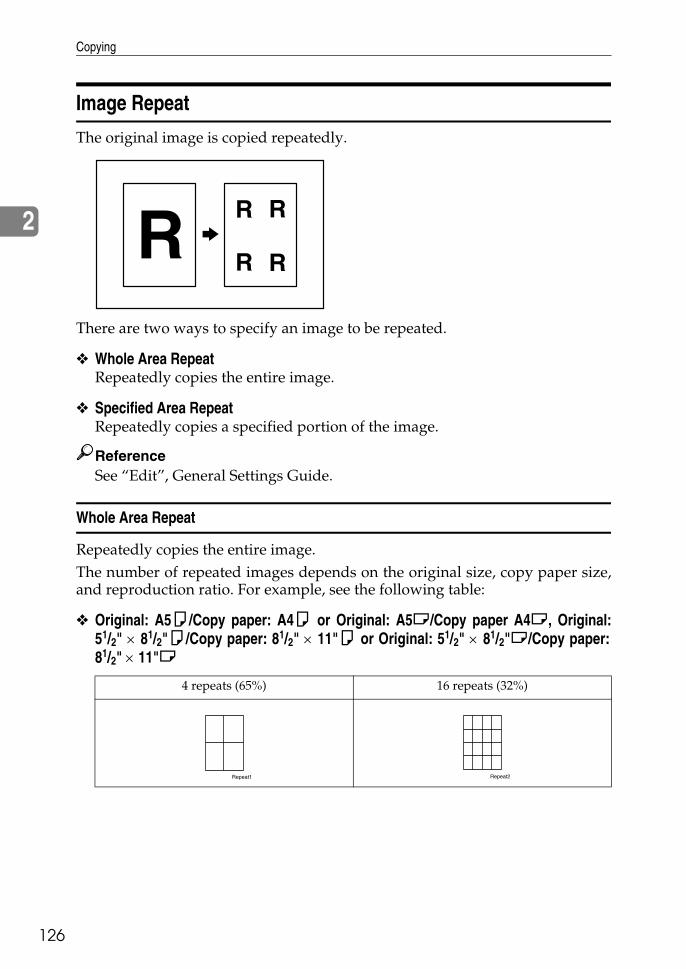
Copying
126
2
Image Repeat
The original image is copied repeatedly.
There are two ways to specify an image to be repeated.
❖ Whole Area RepeatRepeatedly copies the entire image.
❖ Specified Area RepeatRepeatedly copies a specified portion of the image.
ReferenceSee “Edit”, General Settings Guide.
Whole Area Repeat
Repeatedly copies the entire image.The number of repeated images depends on the original size, copy paper size,and reproduction ratio. For example, see the following table:
❖ Original: A5K/Copy paper: A4K or Original: A5L/Copy paper A4L, Original:51/2" × 81/2"K/Copy paper: 81/2" × 11"K or Original: 51/2" × 81/2"L/Copy paper:81/2" × 11"L
4 repeats (65%) 16 repeats (32%)
Repeat1 Repeat2
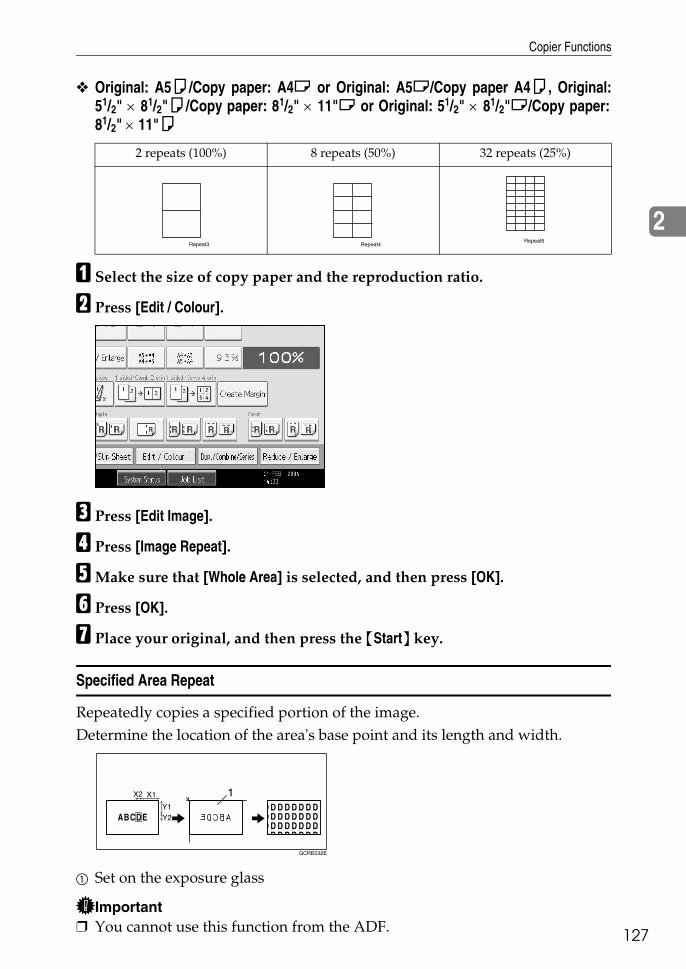
Copier Functions
27
2
1
❖ Original: A5K/Copy paper: A4L or Original: A5L/Copy paper A4K, Original:51/2" × 81/2"K/Copy paper: 81/2" × 11"L or Original: 51/2" × 81/2"L/Copy paper:81/2" × 11"K
A Select the size of copy paper and the reproduction ratio.
B Press [Edit / Colour].
C Press [Edit Image].
D Press [Image Repeat].
EMake sure that [Whole Area] is selected, and then press [OK].
F Press [OK].
G Place your original, and then press the {Start} key.
Specified Area Repeat
Repeatedly copies a specified portion of the image.Determine the location of the area's base point and its length and width.
A Set on the exposure glass
Important❒ You cannot use this function from the ADF.
2 repeats (100%) 8 repeats (50%) 32 repeats (25%)
Repeat3 Repeat4Repeat5
GCRE032E
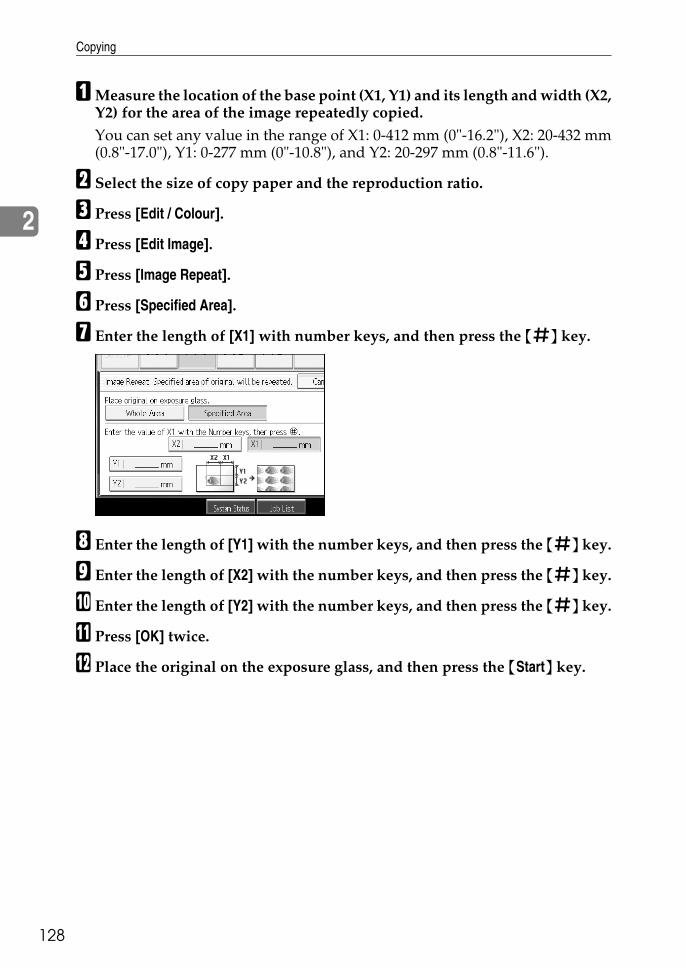
Copying
128
2
AMeasure the location of the base point (X1, Y1) and its length and width (X2,Y2) for the area of the image repeatedly copied.You can set any value in the range of X1: 0-412 mm (0"-16.2"), X2: 20-432 mm(0.8"-17.0"), Y1: 0-277 mm (0"-10.8"), and Y2: 20-297 mm (0.8"-11.6").
B Select the size of copy paper and the reproduction ratio.
C Press [Edit / Colour].
D Press [Edit Image].
E Press [Image Repeat].
F Press [Specified Area].
G Enter the length of [X1] with number keys, and then press the {q} key.
H Enter the length of [Y1] with the number keys, and then press the {q} key.
I Enter the length of [X2] with the number keys, and then press the {q} key.
J Enter the length of [Y2] with the number keys, and then press the {q} key.
K Press [OK] twice.
L Place the original on the exposure glass, and then press the {Start} key.
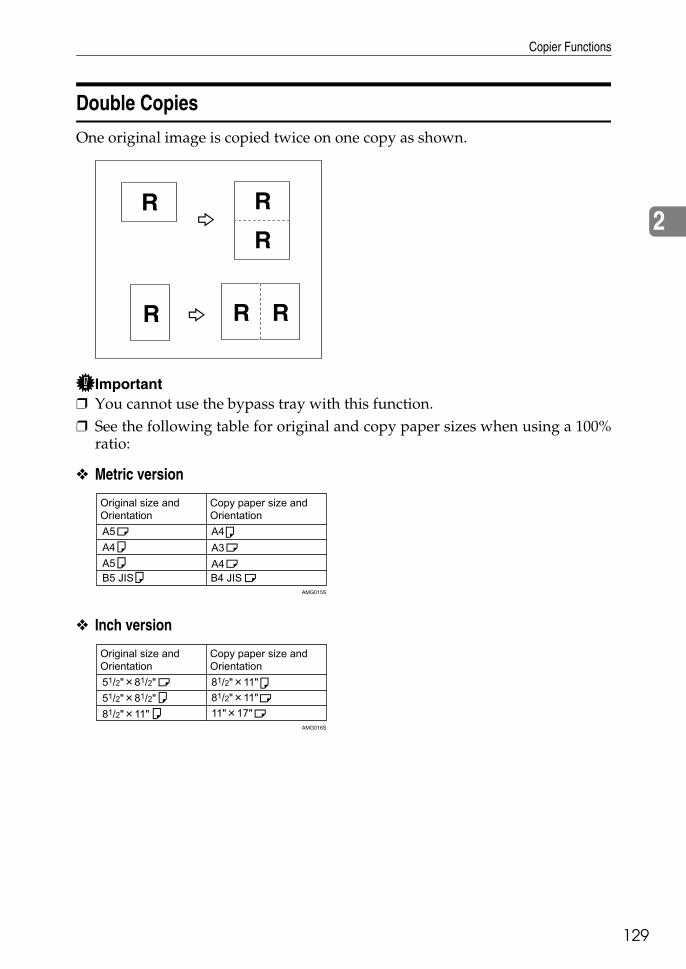
Copier Functions
29
2
1
Double Copies
One original image is copied twice on one copy as shown.
Important❒ You cannot use the bypass tray with this function.❒ See the following table for original and copy paper sizes when using a 100%
ratio:
❖ Metric version
❖ Inch version
AMG015S
AMG016S
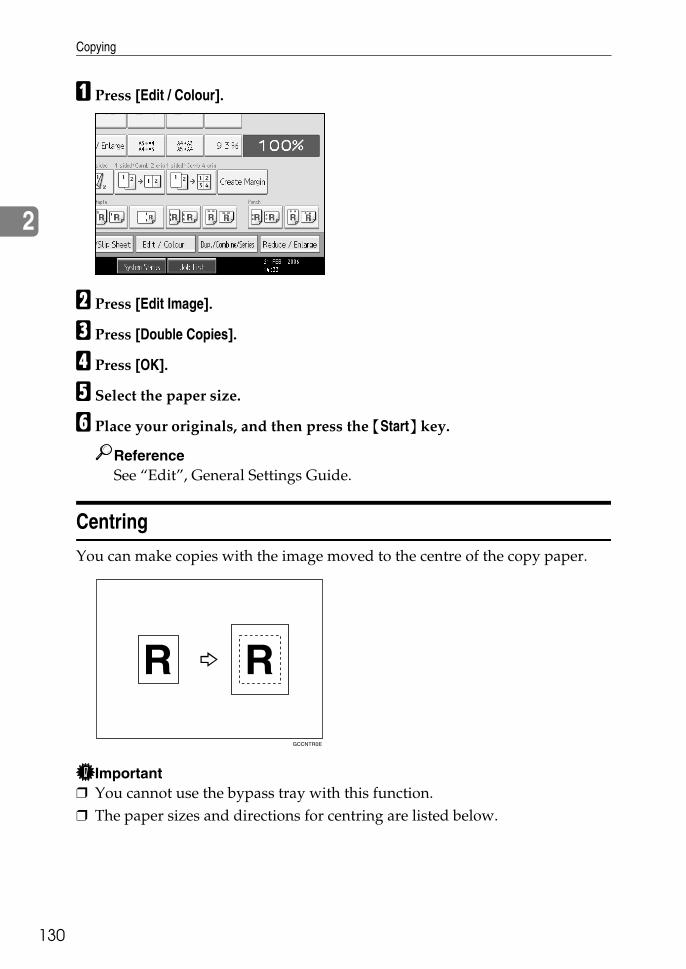
Copying
130
2
A Press [Edit / Colour].
B Press [Edit Image].
C Press [Double Copies].
D Press [OK].
E Select the paper size.
F Place your originals, and then press the {Start} key.
ReferenceSee “Edit”, General Settings Guide.
Centring
You can make copies with the image moved to the centre of the copy paper.
Important❒ You cannot use the bypass tray with this function.❒ The paper sizes and directions for centring are listed below.
GCCNTR0E
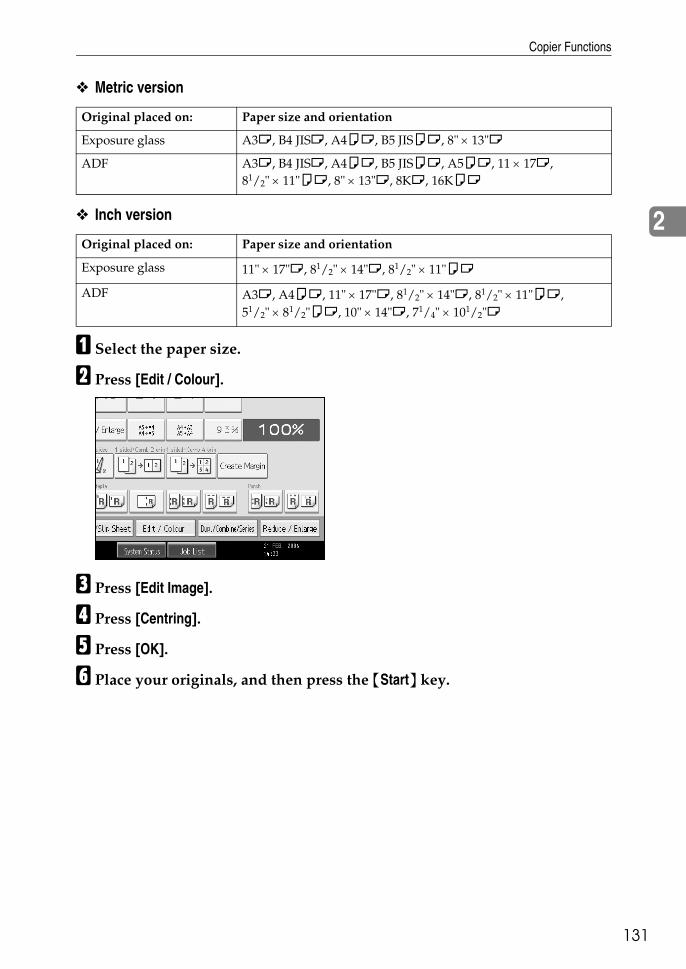
Copier Functions
31
2
1
❖ Metric version
❖ Inch version
A Select the paper size.
B Press [Edit / Colour].
C Press [Edit Image].
D Press [Centring].
E Press [OK].
F Place your originals, and then press the {Start} key.
Original placed on: Paper size and orientation
Exposure glass A3L, B4 JISL, A4KL, B5 JISKL, 8" × 13"L
ADF A3L, B4 JISL, A4KL, B5 JISKL, A5KL, 11 × 17L, 81/2" × 11"KL, 8" × 13"L, 8KL, 16KKL
Original placed on: Paper size and orientation
Exposure glass 11" × 17"L, 81/2" × 14"L, 81/2" × 11"KL
ADF A3L, A4KL, 11" × 17"L, 81/2" × 14"L, 81/2" × 11"KL, 51/2" × 81/2"KL, 10" × 14"L, 71/4" × 101/2"L
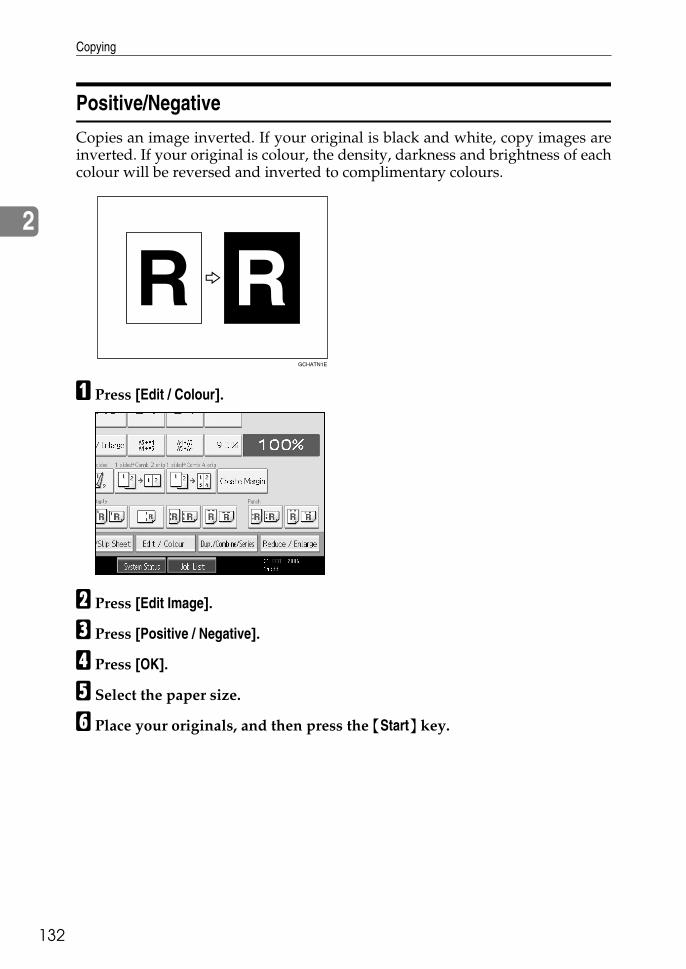
Copying
132
2
Positive/Negative
Copies an image inverted. If your original is black and white, copy images areinverted. If your original is colour, the density, darkness and brightness of eachcolour will be reversed and inverted to complimentary colours.
A Press [Edit / Colour].
B Press [Edit Image].
C Press [Positive / Negative].
D Press [OK].
E Select the paper size.
F Place your originals, and then press the {Start} key.
GCHATN1E

Copier Functions
33
2
1
Mirror
Copies by reversing the image from left to right, as reflected in a mirror.
A Press [Edit / Colour].
B Press [Edit Image].
C Press [Mirror Image].
D Press [OK].
E Place the originals, and then press the {Start} key.
GCMILL1J
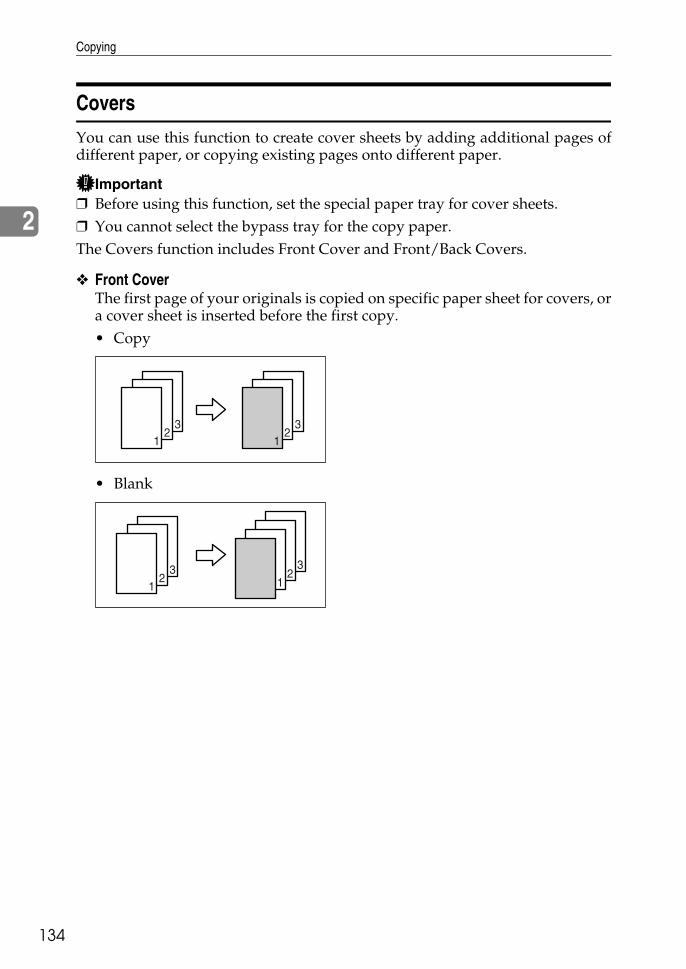
Copying
134
2
Covers
You can use this function to create cover sheets by adding additional pages ofdifferent paper, or copying existing pages onto different paper.
Important❒ Before using this function, set the special paper tray for cover sheets.❒ You cannot select the bypass tray for the copy paper.The Covers function includes Front Cover and Front/Back Covers.
❖ Front CoverThe first page of your originals is copied on specific paper sheet for covers, ora cover sheet is inserted before the first copy.• Copy
• Blank
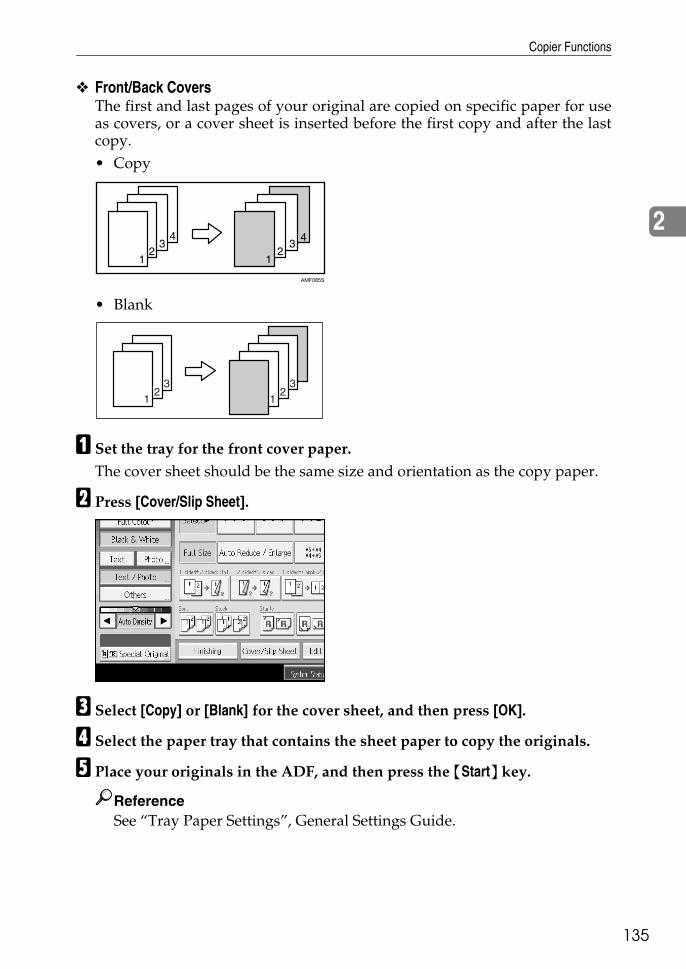
Copier Functions
35
2
1
❖ Front/Back CoversThe first and last pages of your original are copied on specific paper for useas covers, or a cover sheet is inserted before the first copy and after the lastcopy.• Copy
• Blank
A Set the tray for the front cover paper.The cover sheet should be the same size and orientation as the copy paper.
B Press [Cover/Slip Sheet].
C Select [Copy] or [Blank] for the cover sheet, and then press [OK].
D Select the paper tray that contains the sheet paper to copy the originals.
E Place your originals in the ADF, and then press the {Start} key.
ReferenceSee “Tray Paper Settings”, General Settings Guide.
AMF085S
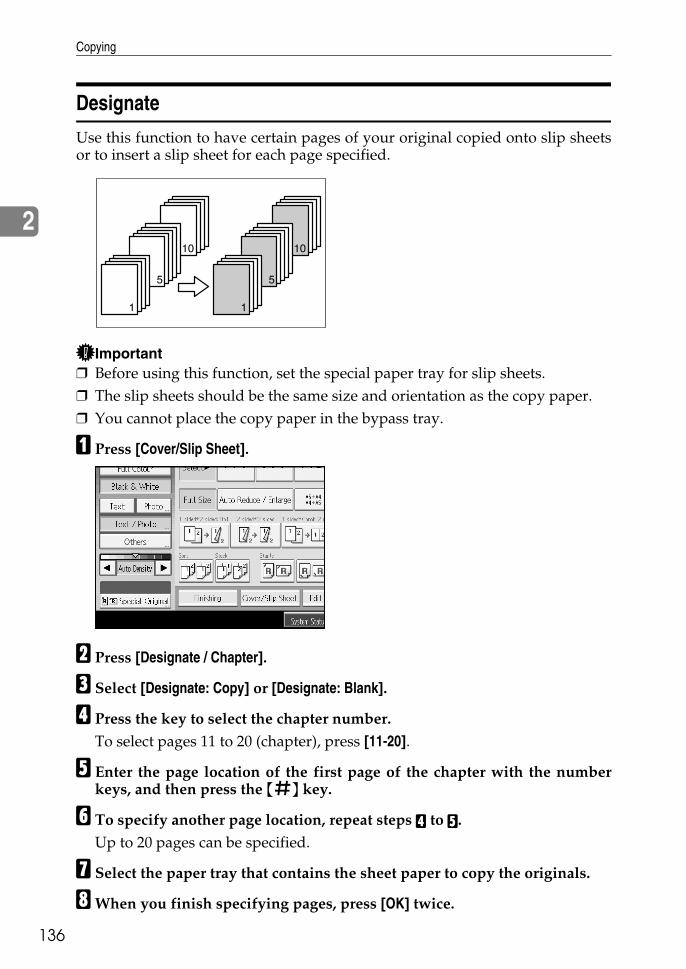
Copying
136
2
Designate
Use this function to have certain pages of your original copied onto slip sheetsor to insert a slip sheet for each page specified.
Important❒ Before using this function, set the special paper tray for slip sheets.❒ The slip sheets should be the same size and orientation as the copy paper.❒ You cannot place the copy paper in the bypass tray.
A Press [Cover/Slip Sheet].
B Press [Designate / Chapter].
C Select [Designate: Copy] or [Designate: Blank].
D Press the key to select the chapter number.To select pages 11 to 20 (chapter), press [11-20].
E Enter the page location of the first page of the chapter with the numberkeys, and then press the {q} key.
F To specify another page location, repeat steps D to E.Up to 20 pages can be specified.
G Select the paper tray that contains the sheet paper to copy the originals.
HWhen you finish specifying pages, press [OK] twice.
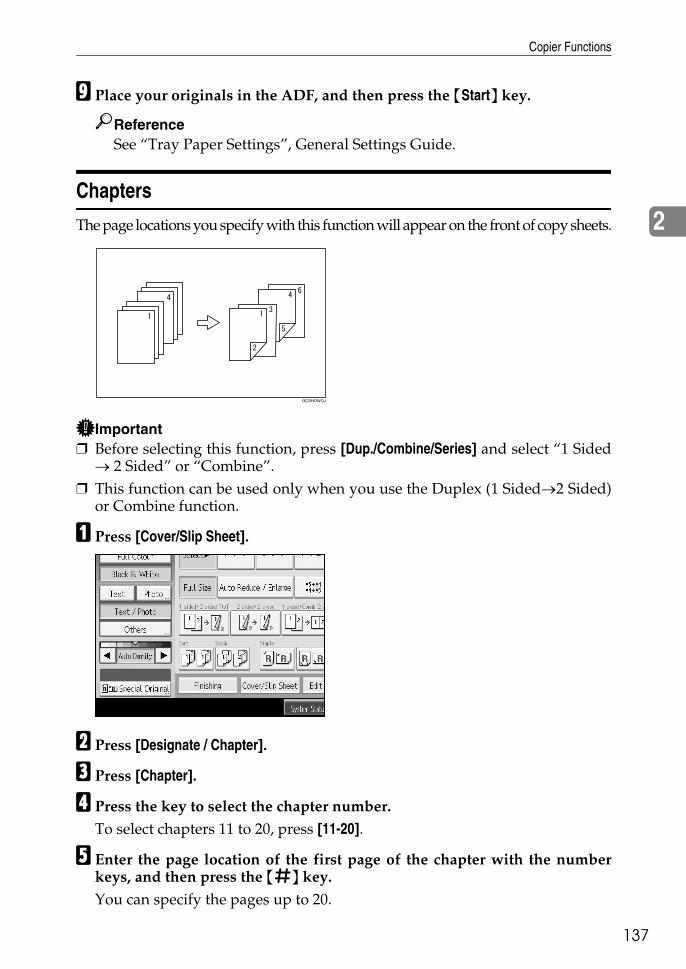
Copier Functions
37
2
1
I Place your originals in the ADF, and then press the {Start} key.
ReferenceSee “Tray Paper Settings”, General Settings Guide.
Chapters
The page locations you specify with this function will appear on the front of copy sheets.
Important❒ Before selecting this function, press [Dup./Combine/Series] and select “1 Sided
→ 2 Sided” or “Combine”.❒ This function can be used only when you use the Duplex (1 Sided→2 Sided)
or Combine function.
A Press [Cover/Slip Sheet].
B Press [Designate / Chapter].
C Press [Chapter].
D Press the key to select the chapter number.To select chapters 11 to 20, press [11-20].
E Enter the page location of the first page of the chapter with the numberkeys, and then press the {q} key.You can specify the pages up to 20.
GCSHOWOJ
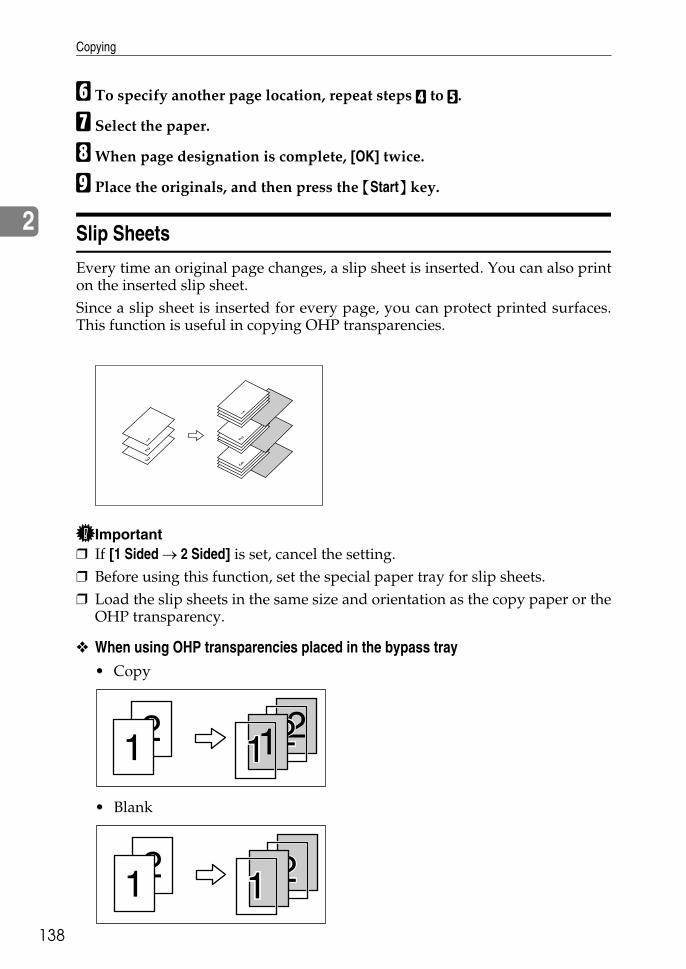
Copying
138
2
F To specify another page location, repeat steps D to E.
G Select the paper.
HWhen page designation is complete, [OK] twice.
I Place the originals, and then press the {Start} key.
Slip Sheets
Every time an original page changes, a slip sheet is inserted. You can also printon the inserted slip sheet.Since a slip sheet is inserted for every page, you can protect printed surfaces.This function is useful in copying OHP transparencies.
Important❒ If [1 Sided → 2 Sided] is set, cancel the setting.❒ Before using this function, set the special paper tray for slip sheets.❒ Load the slip sheets in the same size and orientation as the copy paper or the
OHP transparency.
❖ When using OHP transparencies placed in the bypass tray• Copy
• Blank
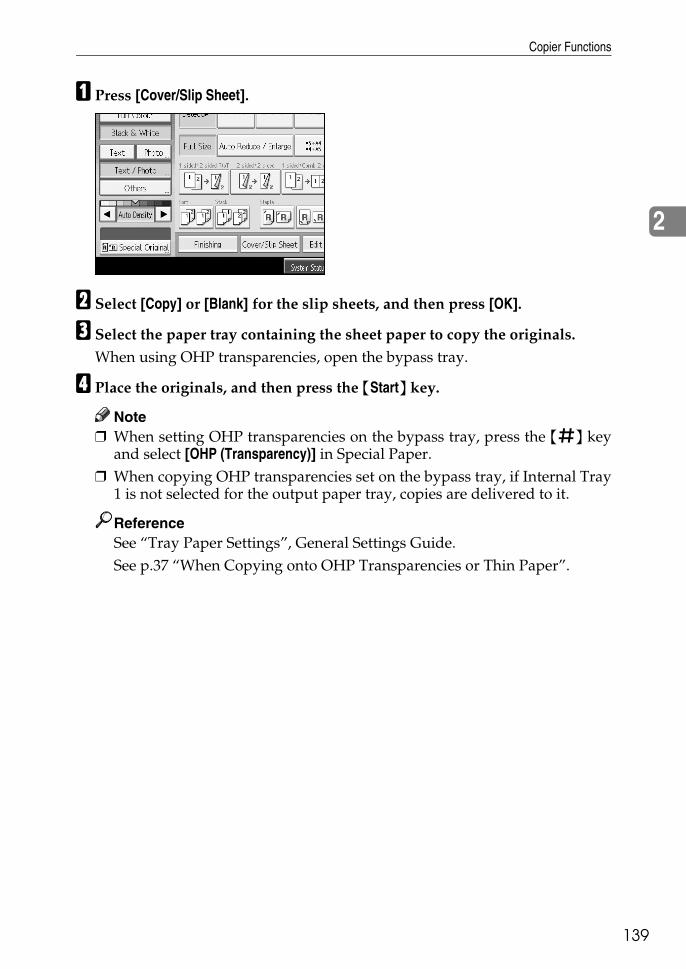
Copier Functions
39
2
1
A Press [Cover/Slip Sheet].
B Select [Copy] or [Blank] for the slip sheets, and then press [OK].
C Select the paper tray containing the sheet paper to copy the originals.When using OHP transparencies, open the bypass tray.
D Place the originals, and then press the {Start} key.
Note❒ When setting OHP transparencies on the bypass tray, press the {q} key
and select [OHP (Transparency)] in Special Paper.❒ When copying OHP transparencies set on the bypass tray, if Internal Tray
1 is not selected for the output paper tray, copies are delivered to it.
ReferenceSee “Tray Paper Settings”, General Settings Guide.See p.37 “When Copying onto OHP Transparencies or Thin Paper”.
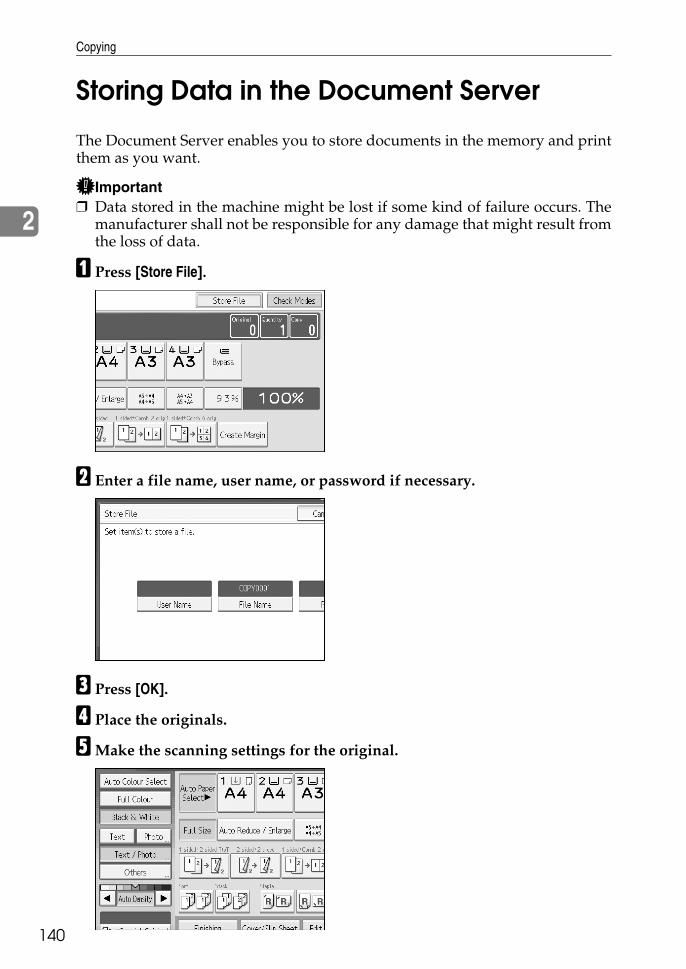
Copying
140
2
Storing Data in the Document Server
The Document Server enables you to store documents in the memory and printthem as you want.
Important❒ Data stored in the machine might be lost if some kind of failure occurs. The
manufacturer shall not be responsible for any damage that might result fromthe loss of data.
A Press [Store File].
B Enter a file name, user name, or password if necessary.
C Press [OK].
D Place the originals.
EMake the scanning settings for the original.
Storing Data in the Document Server
41
2
1
F Press the {Start} key.Stores scanned originals in memory and makes one set of copies.
Note❒ To stop scanning, press the {Clear/Stop} key. To resume a paused scanning
job, press [Continue] in the confirmation display. To delete scanned imagesand cancel the job, press [Stop]. The originals placed in the ADF are deliv-ered.
❒ When placing an original on the exposure glass, press the {q} key afterall the originals have been scanned.
❒ Data stored in the Document Server is set to be deleted after three days bythe factory default. You can specify the period after which the stored datais deleted automatically. For details about changing settings, see “Admin-istrator Tools”, General Settings Guide.
❒ To check if the document has been stored, press the {Document Server} key.❒ If you want to store another document, do so after copying is complete.❒ For details about the Document Server, see “Document Server”.❒ For details about printing stored documents, see “Printing a Stored Document”.❒ For details about setting user name, file name, and password, see “Storing
Data”.❒ Depending on the security setting, [Access Privileges] may appear instead
of [User Name]. For details about specifying [Access Privileges], consult theadministrator.
ReferenceSee p.147 “Document Server”.See p.152 “Using the Document Server”.See p.162 “Printing a Stored Document”.See p.152 “Storing Data”.
Copying
142
2
Programs
You can store the frequently used copy job settings in the machine memory andrecall them for future use.You can store up to 10 programs.
Note❒ When a specified program is registered as the default, its values become the
default settings, which are displayed without pressing the {Program} key,when modes are cleared or reset, and after the operation switch is turned on.See “Programming Defaults in Initial Display”.
❒ Paper settings are stored based on paper size. So if you place more than onepaper tray of the same size, the paper tray prioritized with User Tools (Sys-tem Settings) will be selected first. See “Tray Paper Settings”, General SettingsGuide.
❒ Programs are not deleted by turning the power off or by pressing the {ClearModes} key.
ReferenceSee p.146 “Programming Defaults in Initial Display”.See “Tray Paper Settings”, General Settings Guide.
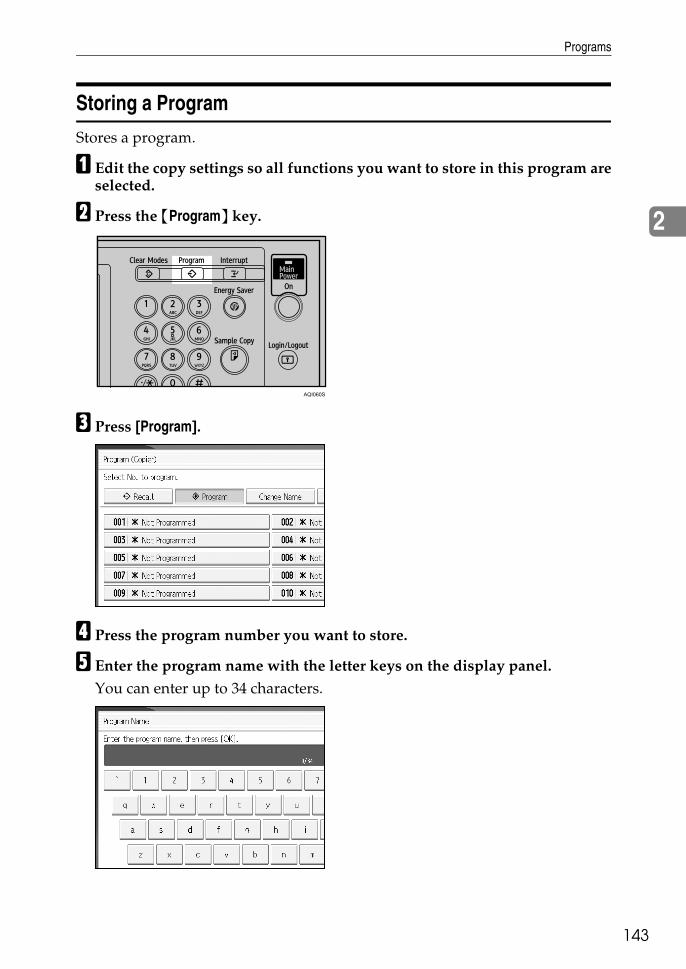
Programs
43
2
1
Storing a Program
Stores a program.
A Edit the copy settings so all functions you want to store in this program areselected.
B Press the {Program} key.
C Press [Program].
D Press the program number you want to store.
E Enter the program name with the letter keys on the display panel.You can enter up to 34 characters.
AQI060S

Copying
144
2
F Press [OK].The screen returns to the program screen, showing the program number fol-lowed by the program name. The screen returns to the initial copy display af-ter a short time.
Note❒ Program numbers with m against them already have settings made for
them.
Changing a Stored Program
Changes program settings.
A Check the program settings.
B Set the contents of a program.
C Press the {Program} key.
D Press [Program].
E Press the program number you want to change.
F Press [Yes].
G Enter the program name.You can enter up to 34 characters.
H Press [OK].The screen returns to the program screen, showing the program number fol-lowed by the program name. The screen returns to the initial copy display af-ter a short time.
Note❒ When you want to check the contents of a program, recall the program.❒ When it is overwritten, the previous program is deleted.
ReferenceSee p.145 “Recalling a Program”.
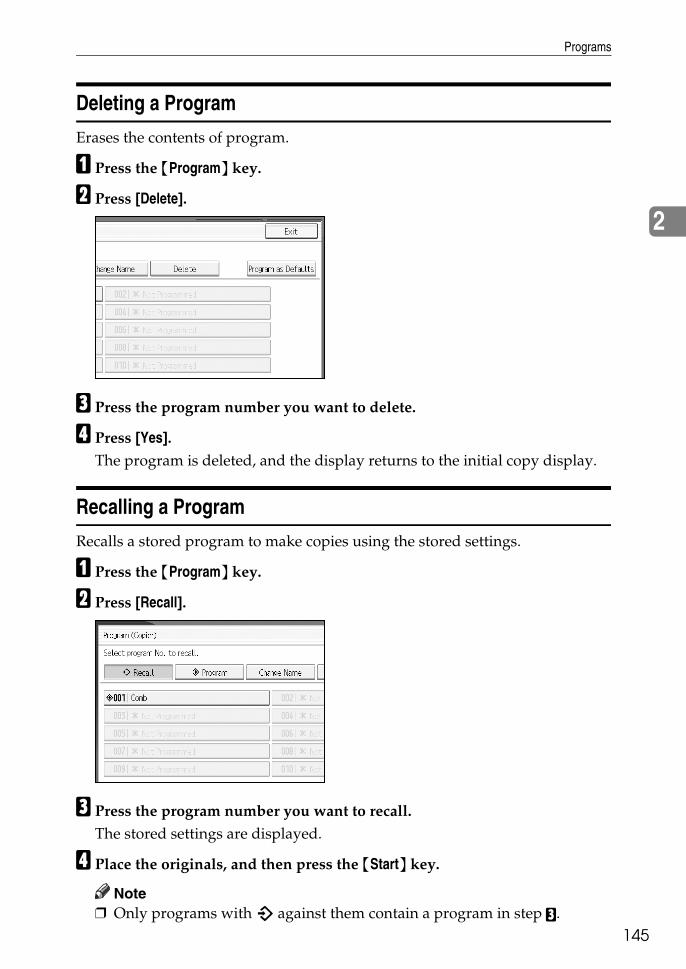
Programs
45
2
1
Deleting a Program
Erases the contents of program.
A Press the {Program} key.
B Press [Delete].
C Press the program number you want to delete.
D Press [Yes].The program is deleted, and the display returns to the initial copy display.
Recalling a Program
Recalls a stored program to make copies using the stored settings.
A Press the {Program} key.
B Press [Recall].
C Press the program number you want to recall.The stored settings are displayed.
D Place the originals, and then press the {Start} key.
Note❒ Only programs with m against them contain a program in step C.
Copying
146
2
Programming Defaults in Initial Display
This section describes how to program defaults for the initial display whenmodes are cleared or reset, or immediately after the operation switch is turnedon.The default settings you can program are Colour Mode, Paper Tray, OriginalType, Density, Special Original, Original Orientation, Cover/Slip Sheet, Edit /Colour, Dup./Combine/Series, Reduce / Enlarge, and Finishing.
A Specify scan settings and any other settings you require in the initial display.
B Press the {Program} key.
C Press [Program as Defaults].
D Press [Program].
EWhen a confirmation dialog appears, press [Yes].The current settings are programmed as defaults. The screen returns to the in-itial display.
Note❒ To restore the factory default settings on the initial display, press [Restore
Factory Defaults].❒ The default settings can be programmed separately for the normal screen
and simplified display screens.
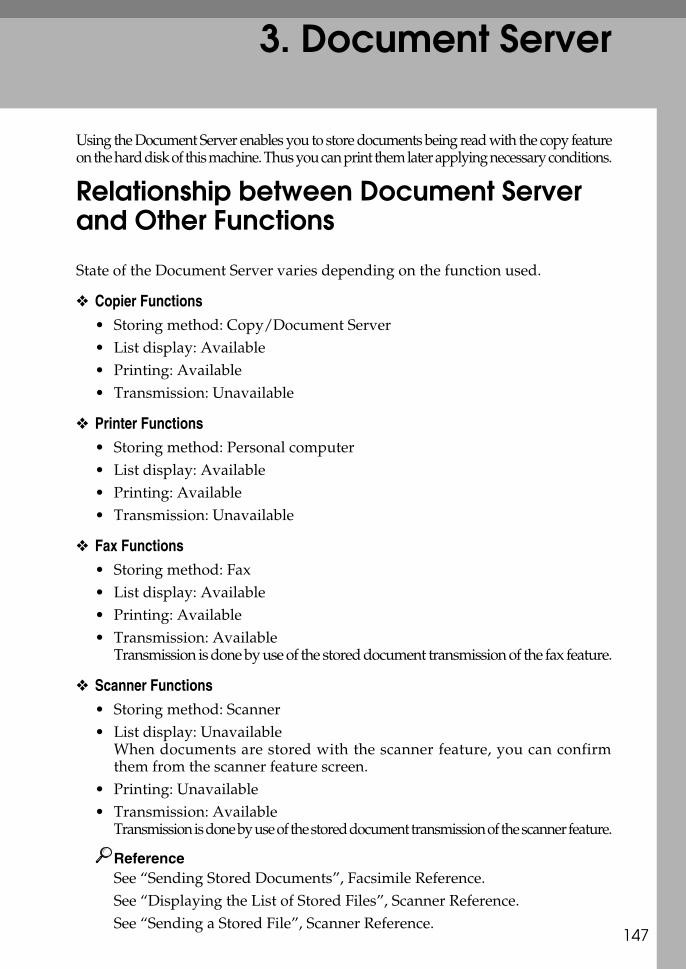
3. Document Server
47
1Using the Document Server enables you to store documents being read with the copy featureon the hard disk of this machine. Thus you can print them later applying necessary conditions.
Relationship between Document Server and Other Functions
State of the Document Server varies depending on the function used.
❖ Copier Functions• Storing method: Copy/Document Server• List display: Available• Printing: Available• Transmission: Unavailable
❖ Printer Functions• Storing method: Personal computer• List display: Available• Printing: Available• Transmission: Unavailable
❖ Fax Functions• Storing method: Fax• List display: Available• Printing: Available• Transmission: Available
Transmission is done by use of the stored document transmission of the fax feature.
❖ Scanner Functions• Storing method: Scanner• List display: Unavailable
When documents are stored with the scanner feature, you can confirmthem from the scanner feature screen.
• Printing: Unavailable• Transmission: Available
Transmission is done by use of the stored document transmission of the scanner feature.
ReferenceSee “Sending Stored Documents”, Facsimile Reference.See “Displaying the List of Stored Files”, Scanner Reference.See “Sending a Stored File”, Scanner Reference.

Document Server
148
3
Document Server Display
Following explains the screens and icons displayed in the Document Serverfunction.
❖ Document Server initial display
1. The operational status or messageis displayed.
2. The currently selected screen's ti-tle is displayed.
3. The number of the originals be-ing read with the memory as well asthe number of paper set and copiedare displayed.
4. Keys for the operation are displayed.
5. An icon that corresponds to thestoring function and the colour modeselected is displayed.
AQI064S
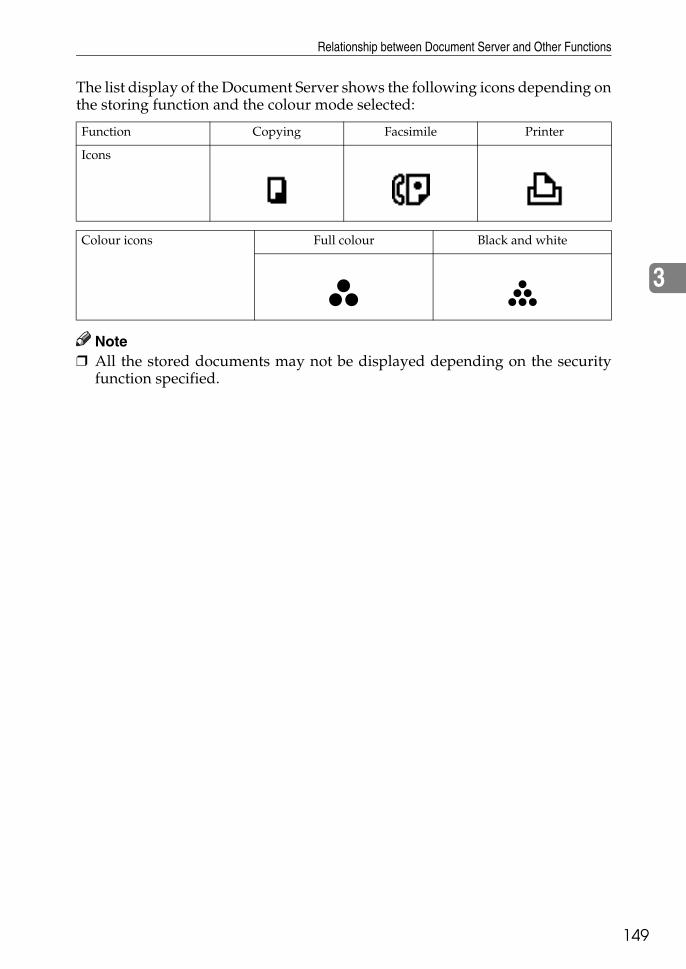
Relationship between Document Server and Other Functions
49
3
1
The list display of the Document Server shows the following icons depending onthe storing function and the colour mode selected:
Note❒ All the stored documents may not be displayed depending on the security
function specified.
Function Copying Facsimile Printer
Icons
Colour icons Full colour Black and white
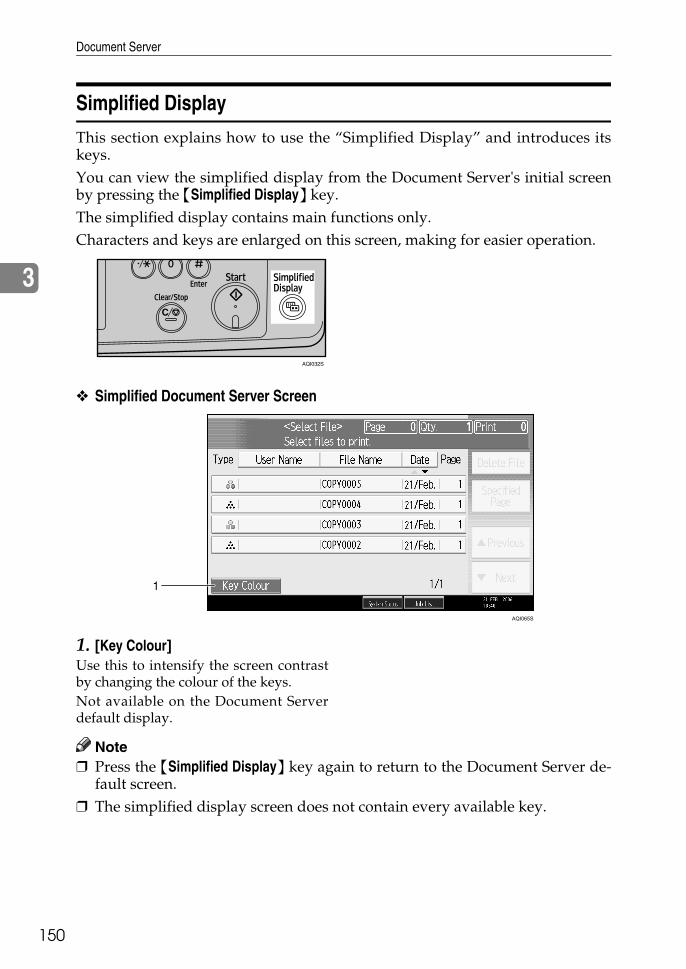
Document Server
150
3
Simplified Display
This section explains how to use the “Simplified Display” and introduces itskeys.You can view the simplified display from the Document Server's initial screenby pressing the {Simplified Display} key.The simplified display contains main functions only.Characters and keys are enlarged on this screen, making for easier operation.
❖ Simplified Document Server Screen
1. [Key Colour]Use this to intensify the screen contrastby changing the colour of the keys.Not available on the Document Serverdefault display.
Note❒ Press the {Simplified Display} key again to return to the Document Server de-
fault screen.❒ The simplified display screen does not contain every available key.
AQI032S
AQI065S
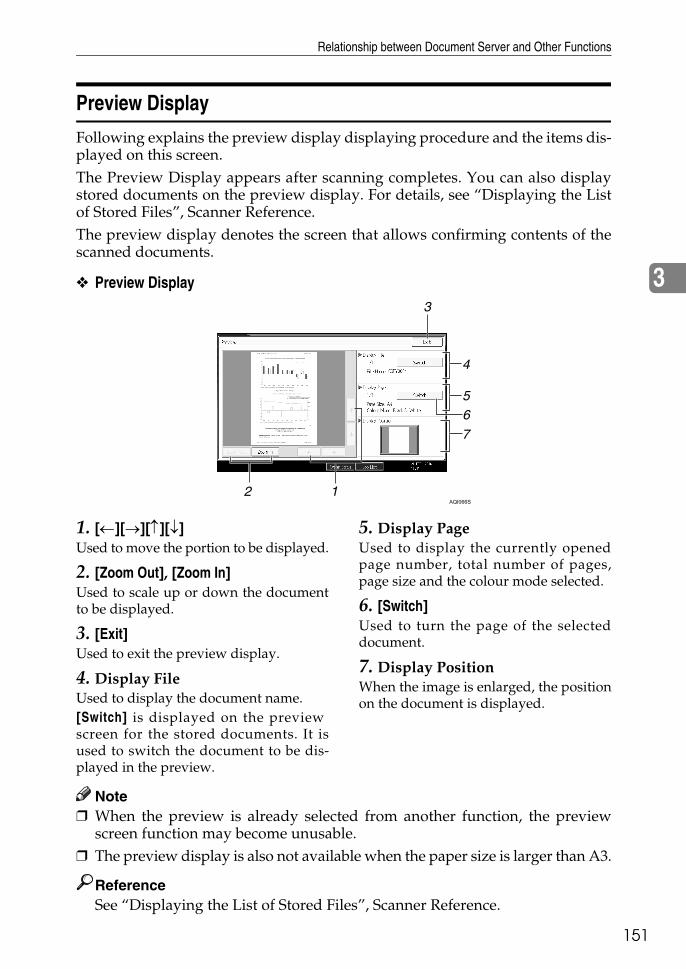
Relationship between Document Server and Other Functions
51
3
1
Preview Display
Following explains the preview display displaying procedure and the items dis-played on this screen.The Preview Display appears after scanning completes. You can also displaystored documents on the preview display. For details, see “Displaying the Listof Stored Files”, Scanner Reference.The preview display denotes the screen that allows confirming contents of thescanned documents.
❖ Preview Display
1. [←][→][↑][↓]Used to move the portion to be displayed.
2. [Zoom Out], [Zoom In]Used to scale up or down the documentto be displayed.
3. [Exit]Used to exit the preview display.
4. Display FileUsed to display the document name.[Switch] is displayed on the previewscreen for the stored documents. It isused to switch the document to be dis-played in the preview.
5. Display PageUsed to display the currently openedpage number, total number of pages,page size and the colour mode selected.
6. [Switch]Used to turn the page of the selecteddocument.
7. Display PositionWhen the image is enlarged, the positionon the document is displayed.
Note❒ When the preview is already selected from another function, the preview
screen function may become unusable.❒ The preview display is also not available when the paper size is larger than A3.
ReferenceSee “Displaying the List of Stored Files”, Scanner Reference.
AQI066S
Document Server
152
3
Using the Document Server
Following describes how to use the Document Server.
Storing Data
Following describes the procedure for storing documents on the DocumentServer.
Important❒ Data stored in the machine might be lost if some kind of failure occurs. The
manufacturer shall not be responsible for any damage resulting from loss ofdata.
❒ When entering your password or recording it to your notebook or like, besure to protect it from being seen by others. Care must also be exercised forsafe keeping of its recording paper.
❒ Enter the password in the range of four and eight digits.❒ It is advisable not to use the same number such as “0000” or continuous num-
bers such as “1234” for your password. These numbers are imagine fully andthey do not provide sufficient security.
❒ When you have selected a document using a correct password, it remains beingselected after the operation is finished. As is, therefore, the document is leftoperable to those who don't know the password. After the operation, be sureto press the {Clear Modes} key to cancel the selected state of the document.
❒ User names registered to the stored documents of the Document Server areused for identifying the documents' authors and the nature of the documents.They don't function as a protective means of confidential documents.
❒ When turning on the fax transmission or scanning by the scanner, make surethat all other operations are ended.
❖ File NameA document name such as “COPY0001” and “COPY0002” is automatically at-tached to the scanned document. You can change the document name.
❖ User NameYou can specify the user name so that the person or department that hasstored the document can be identified. Two approaches are available in spec-ifying the user name. One is specifying the name being registered from theAddress Book Management and the other is entering another name.
❖ PasswordYou can specify a password for a document to be stored. When a password isset for a document, you are to enter that password for printing the document.Above arrangement prevents unauthorized printing of the document. A keymark will be attached to the document for which a password has been set.
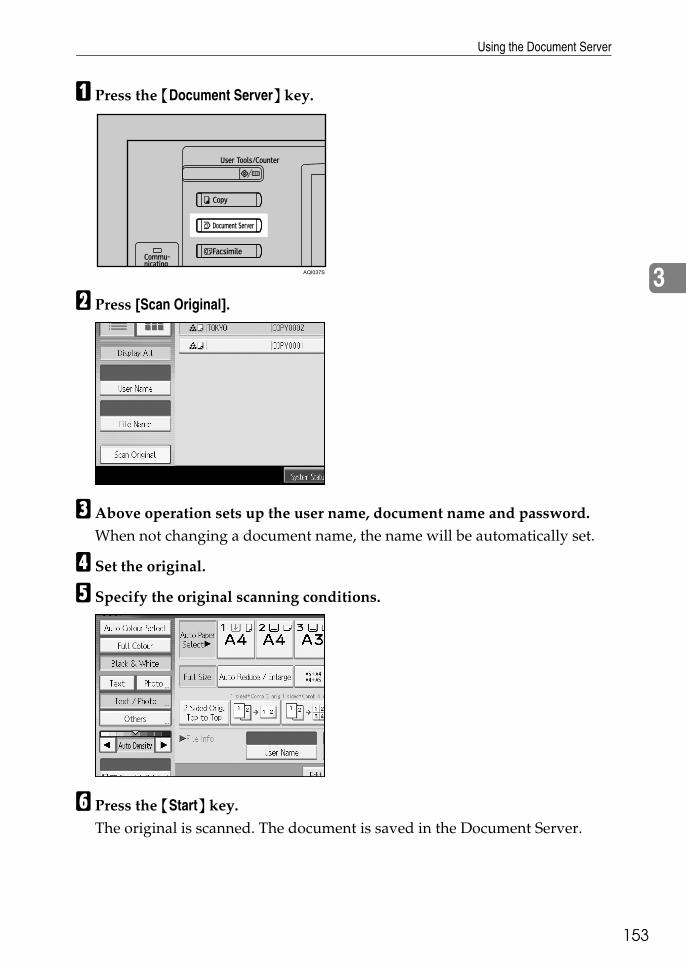
Using the Document Server
53
3
1
A Press the {Document Server} key.
B Press [Scan Original].
C Above operation sets up the user name, document name and password.When not changing a document name, the name will be automatically set.
D Set the original.
E Specify the original scanning conditions.
F Press the {Start} key.The original is scanned. The document is saved in the Document Server.
AQI037S
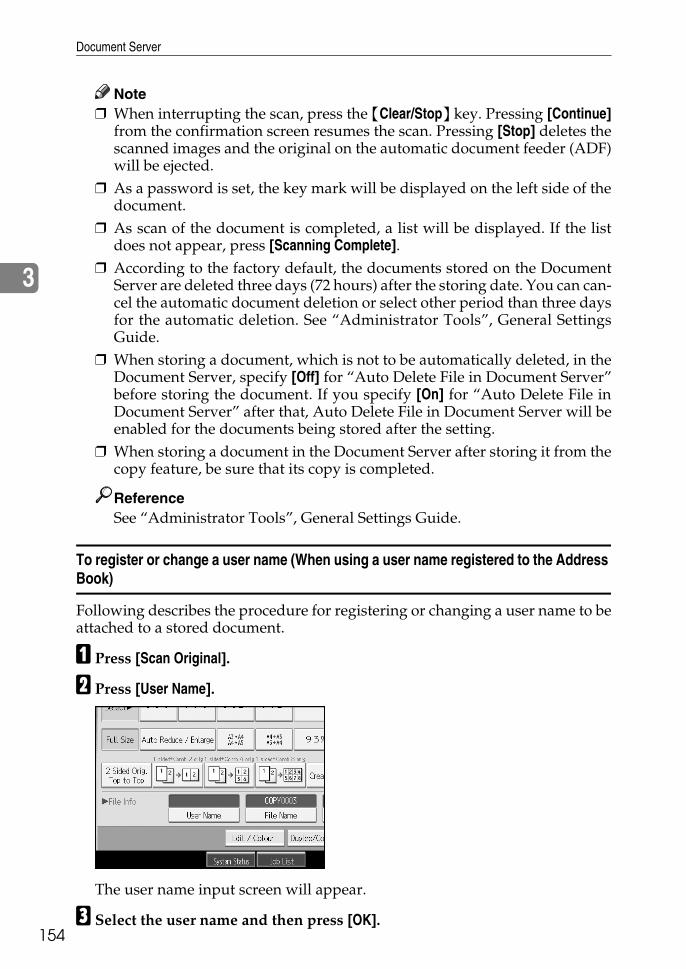
Document Server
154
3
Note❒ When interrupting the scan, press the {Clear/Stop} key. Pressing [Continue]
from the confirmation screen resumes the scan. Pressing [Stop] deletes thescanned images and the original on the automatic document feeder (ADF)will be ejected.
❒ As a password is set, the key mark will be displayed on the left side of thedocument.
❒ As scan of the document is completed, a list will be displayed. If the listdoes not appear, press [Scanning Complete].
❒ According to the factory default, the documents stored on the DocumentServer are deleted three days (72 hours) after the storing date. You can can-cel the automatic document deletion or select other period than three daysfor the automatic deletion. See “Administrator Tools”, General SettingsGuide.
❒ When storing a document, which is not to be automatically deleted, in theDocument Server, specify [Off] for “Auto Delete File in Document Server”before storing the document. If you specify [On] for “Auto Delete File inDocument Server” after that, Auto Delete File in Document Server will beenabled for the documents being stored after the setting.
❒ When storing a document in the Document Server after storing it from thecopy feature, be sure that its copy is completed.
ReferenceSee “Administrator Tools”, General Settings Guide.
To register or change a user name (When using a user name registered to the Address Book)
Following describes the procedure for registering or changing a user name to beattached to a stored document.
A Press [Scan Original].
B Press [User Name].
The user name input screen will appear.
C Select the user name and then press [OK].
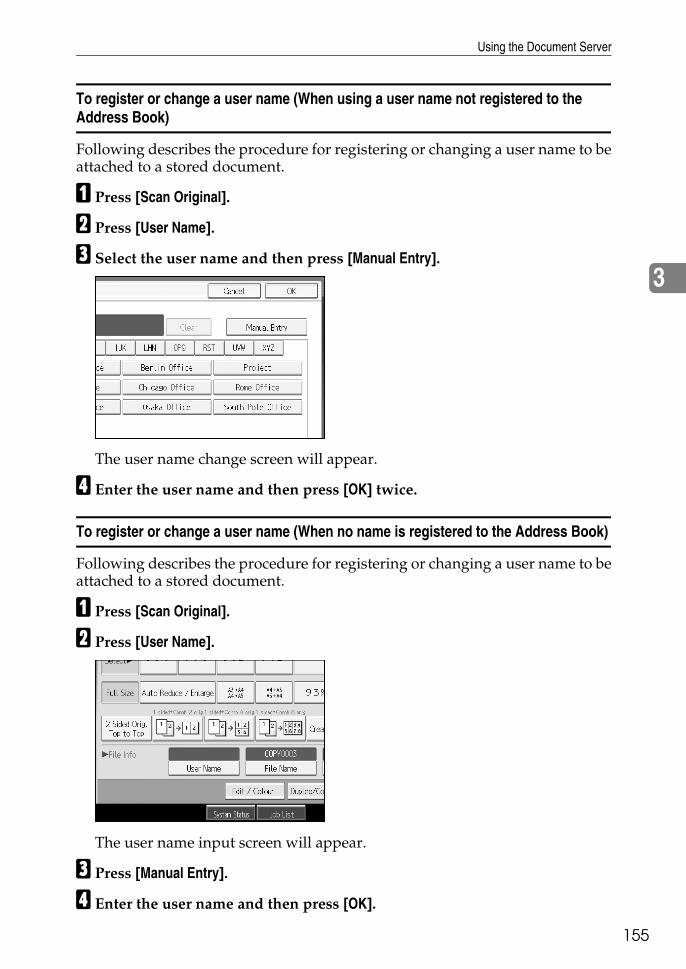
Using the Document Server
55
3
1
To register or change a user name (When using a user name not registered to the Address Book)
Following describes the procedure for registering or changing a user name to beattached to a stored document.
A Press [Scan Original].
B Press [User Name].
C Select the user name and then press [Manual Entry].
The user name change screen will appear.
D Enter the user name and then press [OK] twice.
To register or change a user name (When no name is registered to the Address Book)
Following describes the procedure for registering or changing a user name to beattached to a stored document.
A Press [Scan Original].
B Press [User Name].
The user name input screen will appear.
C Press [Manual Entry].
D Enter the user name and then press [OK].
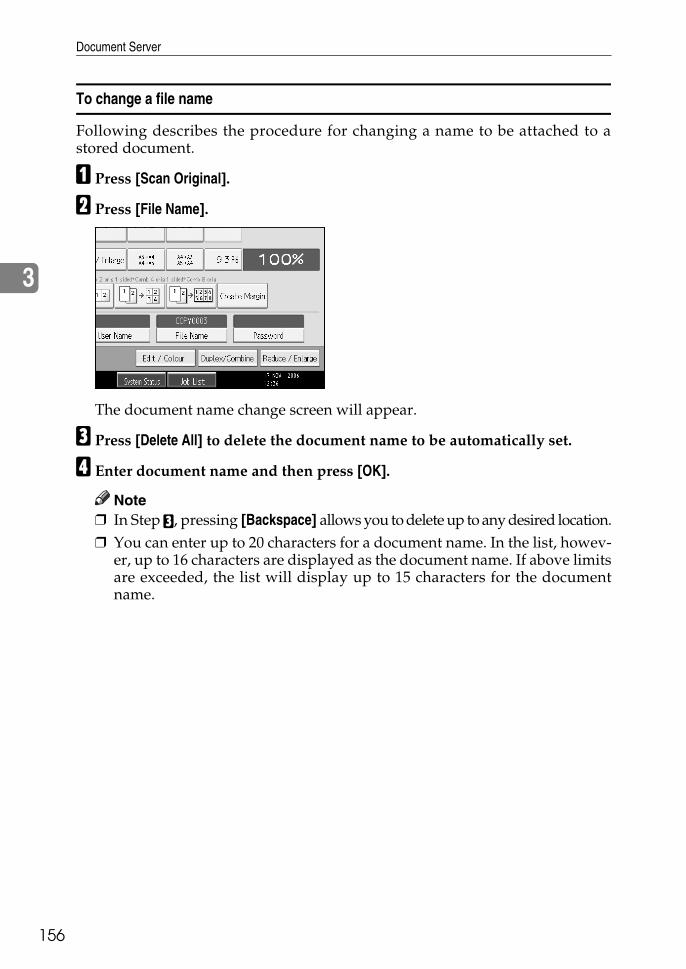
Document Server
156
3
To change a file name
Following describes the procedure for changing a name to be attached to astored document.
A Press [Scan Original].
B Press [File Name].
The document name change screen will appear.
C Press [Delete All] to delete the document name to be automatically set.
D Enter document name and then press [OK].
Note❒ In Step C, pressing [Backspace] allows you to delete up to any desired location.❒ You can enter up to 20 characters for a document name. In the list, howev-
er, up to 16 characters are displayed as the document name. If above limitsare exceeded, the list will display up to 15 characters for the documentname.
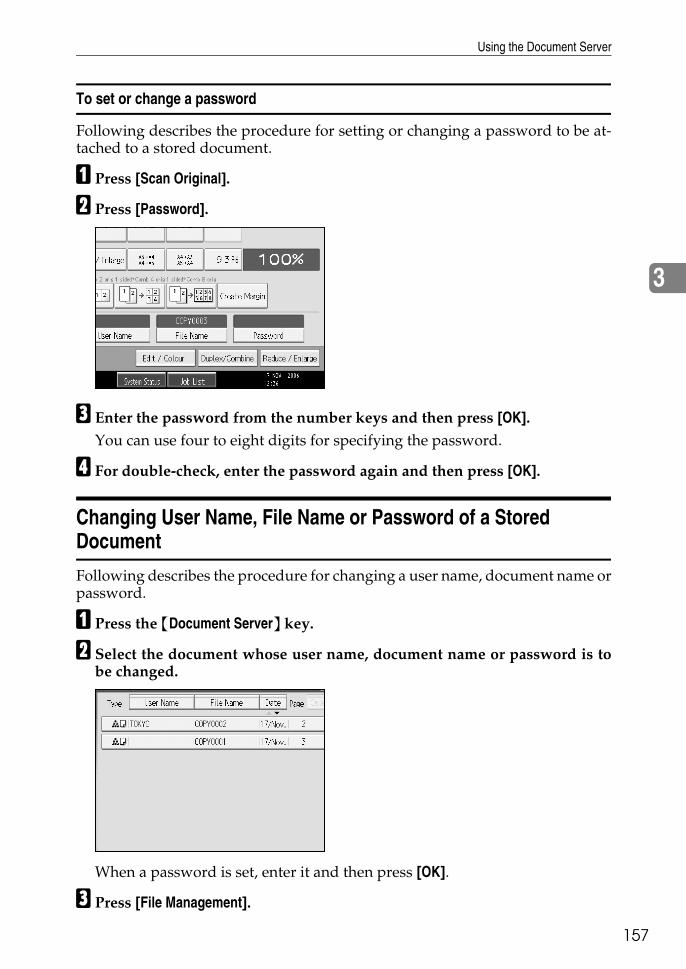
Using the Document Server
57
3
1
To set or change a password
Following describes the procedure for setting or changing a password to be at-tached to a stored document.
A Press [Scan Original].
B Press [Password].
C Enter the password from the number keys and then press [OK].You can use four to eight digits for specifying the password.
D For double-check, enter the password again and then press [OK].
Changing User Name, File Name or Password of a Stored Document
Following describes the procedure for changing a user name, document name orpassword.
A Press the {Document Server} key.
B Select the document whose user name, document name or password is tobe changed.
When a password is set, enter it and then press [OK].
C Press [File Management].
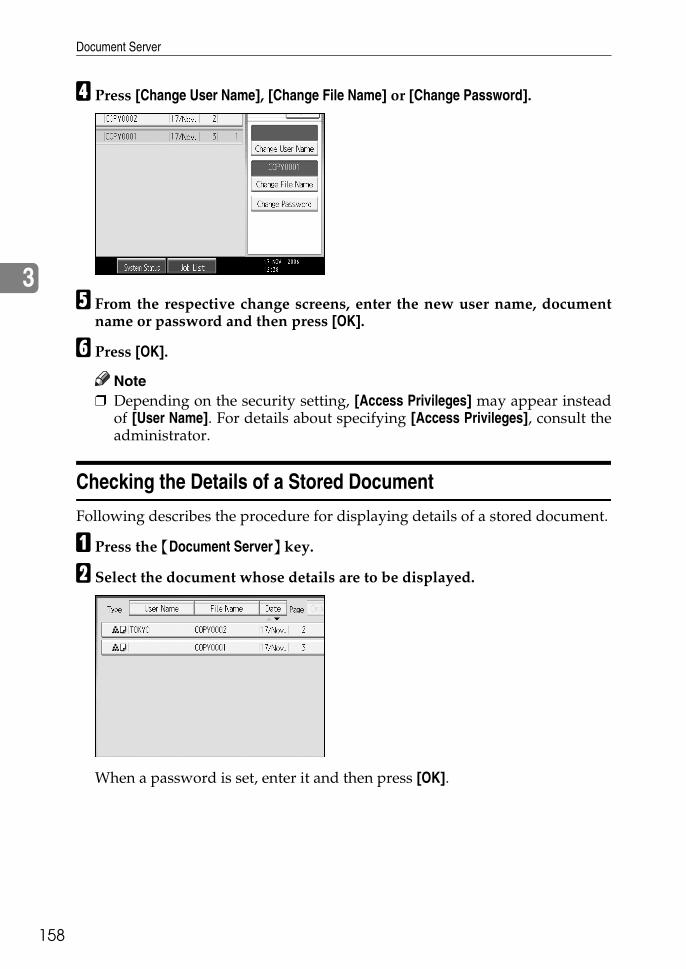
Document Server
158
3
D Press [Change User Name], [Change File Name] or [Change Password].
E From the respective change screens, enter the new user name, documentname or password and then press [OK].
F Press [OK].
Note❒ Depending on the security setting, [Access Privileges] may appear instead
of [User Name]. For details about specifying [Access Privileges], consult theadministrator.
Checking the Details of a Stored Document
Following describes the procedure for displaying details of a stored document.
A Press the {Document Server} key.
B Select the document whose details are to be displayed.
When a password is set, enter it and then press [OK].
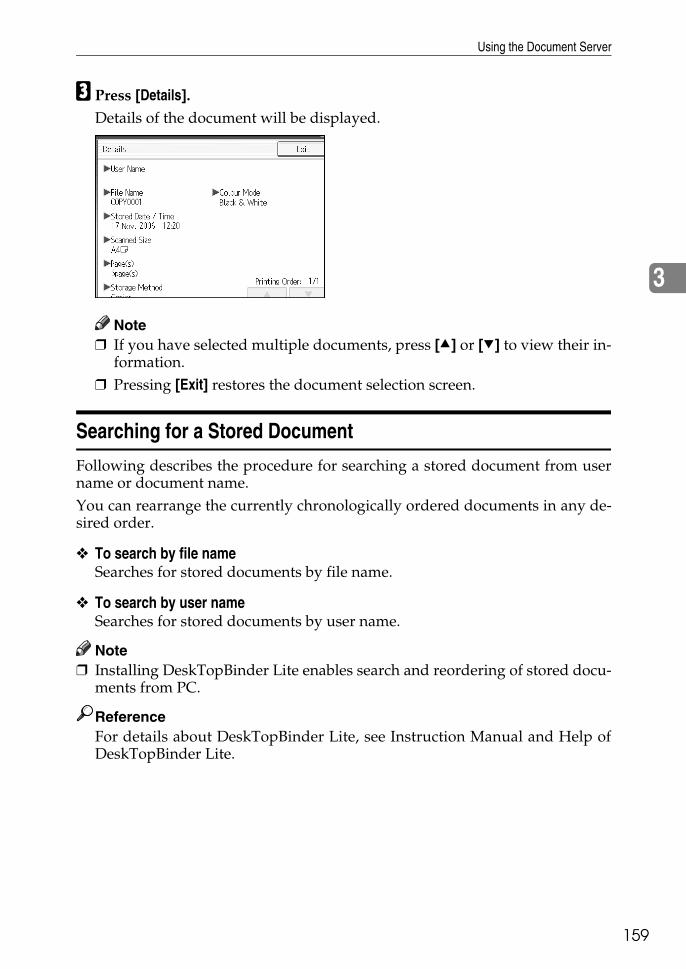
Using the Document Server
59
3
1
C Press [Details].Details of the document will be displayed.
Note❒ If you have selected multiple documents, press [U] or [T] to view their in-
formation.❒ Pressing [Exit] restores the document selection screen.
Searching for a Stored Document
Following describes the procedure for searching a stored document from username or document name.You can rearrange the currently chronologically ordered documents in any de-sired order.
❖ To search by file nameSearches for stored documents by file name.
❖ To search by user nameSearches for stored documents by user name.
Note❒ Installing DeskTopBinder Lite enables search and reordering of stored docu-
ments from PC.
ReferenceFor details about DeskTopBinder Lite, see Instruction Manual and Help ofDeskTopBinder Lite.
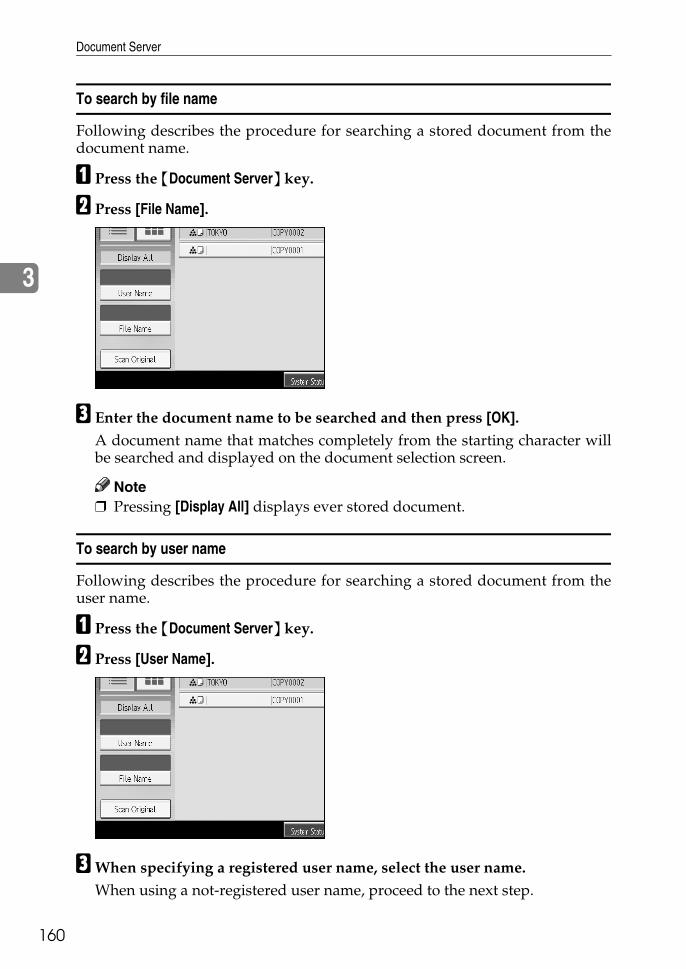
Document Server
160
3
To search by file name
Following describes the procedure for searching a stored document from thedocument name.
A Press the {Document Server} key.
B Press [File Name].
C Enter the document name to be searched and then press [OK].A document name that matches completely from the starting character willbe searched and displayed on the document selection screen.
Note❒ Pressing [Display All] displays ever stored document.
To search by user name
Following describes the procedure for searching a stored document from theuser name.
A Press the {Document Server} key.
B Press [User Name].
CWhen specifying a registered user name, select the user name.When using a not-registered user name, proceed to the next step.
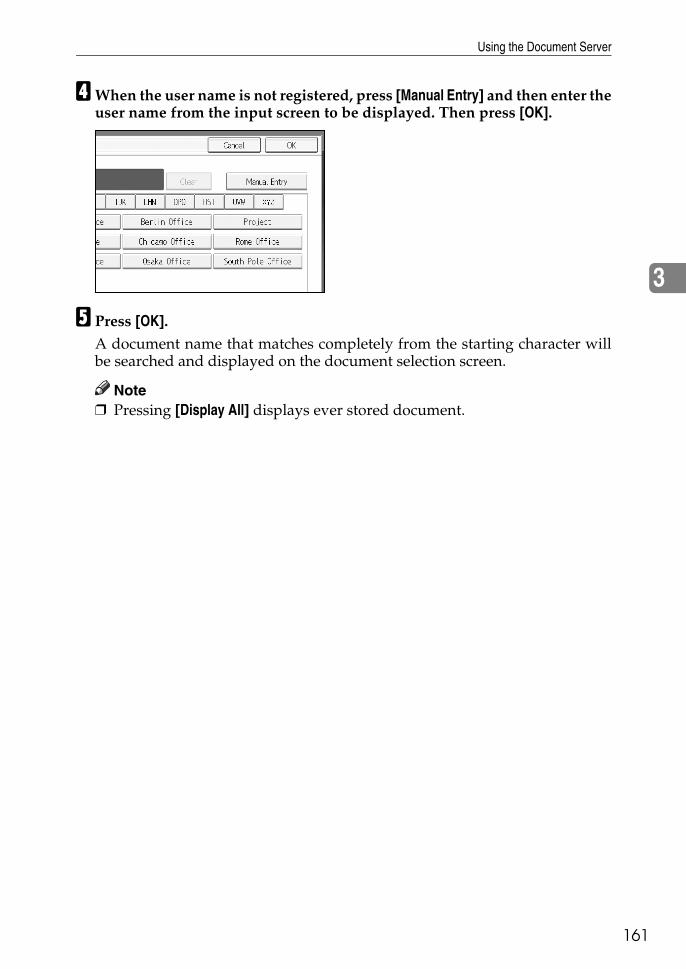
Using the Document Server
61
3
1
DWhen the user name is not registered, press [Manual Entry] and then enter theuser name from the input screen to be displayed. Then press [OK].
E Press [OK].A document name that matches completely from the starting character willbe searched and displayed on the document selection screen.
Note❒ Pressing [Display All] displays ever stored document.
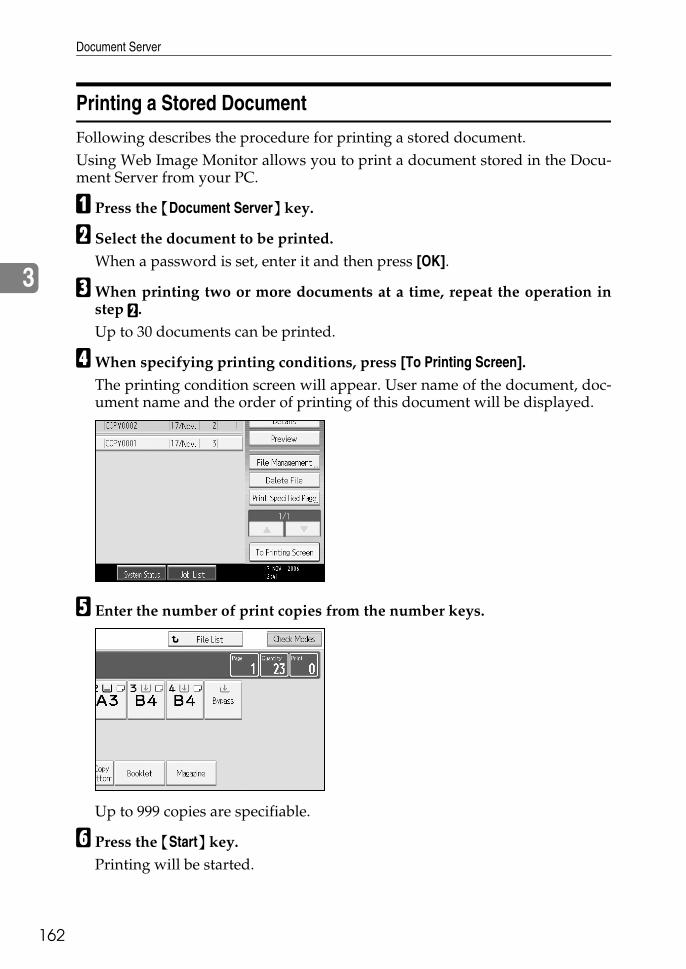
Document Server
162
3
Printing a Stored Document
Following describes the procedure for printing a stored document.Using Web Image Monitor allows you to print a document stored in the Docu-ment Server from your PC.
A Press the {Document Server} key.
B Select the document to be printed.When a password is set, enter it and then press [OK].
CWhen printing two or more documents at a time, repeat the operation instep B.Up to 30 documents can be printed.
DWhen specifying printing conditions, press [To Printing Screen].The printing condition screen will appear. User name of the document, doc-ument name and the order of printing of this document will be displayed.
E Enter the number of print copies from the number keys.
Up to 999 copies are specifiable.
F Press the {Start} key.Printing will be started.

Using the Document Server
63
3
1
Note❒ You can search the target document using, in step B, [User Name] or [File
Name] situated in the left side of the screen.❒ Some of the selected documents may not be printed due to the difference
in the size or resolution.❒ When changing the printing order, cancel the highlight and then specify
the order correctly.❒ Pressing the {Clear Modes} key cancels every selection.❒ Pressing [Order] displays the selected documents in the printing order.❒ The copy and printer features hold the specified printing conditions after
the operation is over and apply them at the next printing. The fax featuredoes not have the function of storing the printing conditions.
❒ When two or more documents are specified, the printing conditions arestored on the first document but not on the succeeding documents.
❒ Following settings are available for the printing conditions. For respectiveprinting results, see “Copier Functions”.• Book binding style (2 Sided Top to Top, 2 Sided Top to Bottom, Maga-
zine, Booklet)• Treatment of front cover (Cover/Slip Sheet, Edit / Stamp)• Finish (Sort, Rotate Sort, Stack, Staple, Punch)
❒ When printing two or more copies while selecting the sort function, youcan confirm the finish by printing only one copy.
❒ When printing two or more documents at a time, you can print them as asingle continuous document by specifying the order of their printing.
❒ When printing two or more documents at a time, the printing conditionsset for the first document are applied to all the remaining documents.
❒ When two or more documents are selected, pressing [U][T] allows you toconfirm the user name, document name and printing order of the docu-ment selected in step B.
❒ Pressing [Select File] restores the document selection screen.❒ The Stamp function is not specifiable to the documents being stored from
the fax feature.
ReferenceSee p.57 “Copier Functions”
When interrupting printing
Following describes the procedure for interrupting printing work.
A Press the {Clear/Stop} key.
B Press [Stop].

Document Server
164
3
Changing number of print copies while printing is in progress
Following describes the procedure for changing the number of print copies afterprinting is started.
Important❒ This feature is enabled when the sort function is selected in the printing conditions.
A Press the {Clear/Stop} key.
B Press [Change Quantity].
C Enter the number of print copies anew from the number keys.
D Press the {q} key.
E Press [Continue].Printing will be resumed.
Note❒ The range of print copies enterable in step C depends on the timing of your
pressing the {Clear/Stop} key.
Sample Print
When print copies are massive, you can print a single copy in advance to check appro-priateness of the printing order of the selected documents and the printing conditions.
Important❒ This feature is enabled when the sort function is selected in the printing conditions.
A Select the document to be printed.
When a password is set, enter it and then press [OK].
B Press the {Sample Copy} key.Only one copy will be printed.
C Press [Continue].Printing will be resumed.
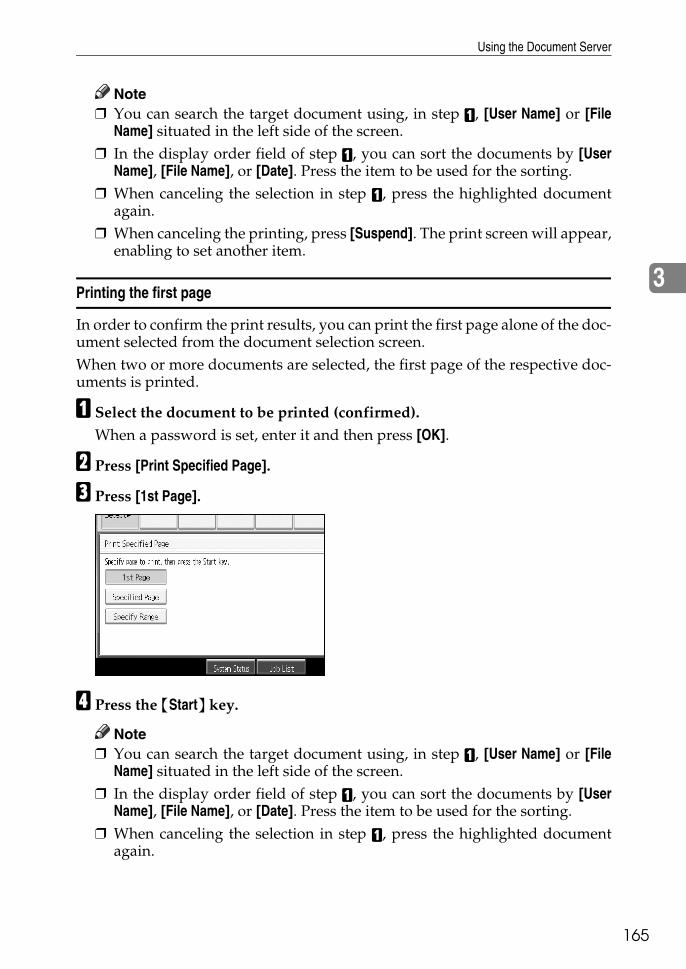
Using the Document Server
65
3
1
Note❒ You can search the target document using, in step A, [User Name] or [File
Name] situated in the left side of the screen.❒ In the display order field of step A, you can sort the documents by [User
Name], [File Name], or [Date]. Press the item to be used for the sorting.❒ When canceling the selection in step A, press the highlighted document
again.❒ When canceling the printing, press [Suspend]. The print screen will appear,
enabling to set another item.
Printing the first page
In order to confirm the print results, you can print the first page alone of the doc-ument selected from the document selection screen.When two or more documents are selected, the first page of the respective doc-uments is printed.
A Select the document to be printed (confirmed).When a password is set, enter it and then press [OK].
B Press [Print Specified Page].
C Press [1st Page].
D Press the {Start} key.
Note❒ You can search the target document using, in step A, [User Name] or [File
Name] situated in the left side of the screen.❒ In the display order field of step A, you can sort the documents by [User
Name], [File Name], or [Date]. Press the item to be used for the sorting.❒ When canceling the selection in step A, press the highlighted document
again.
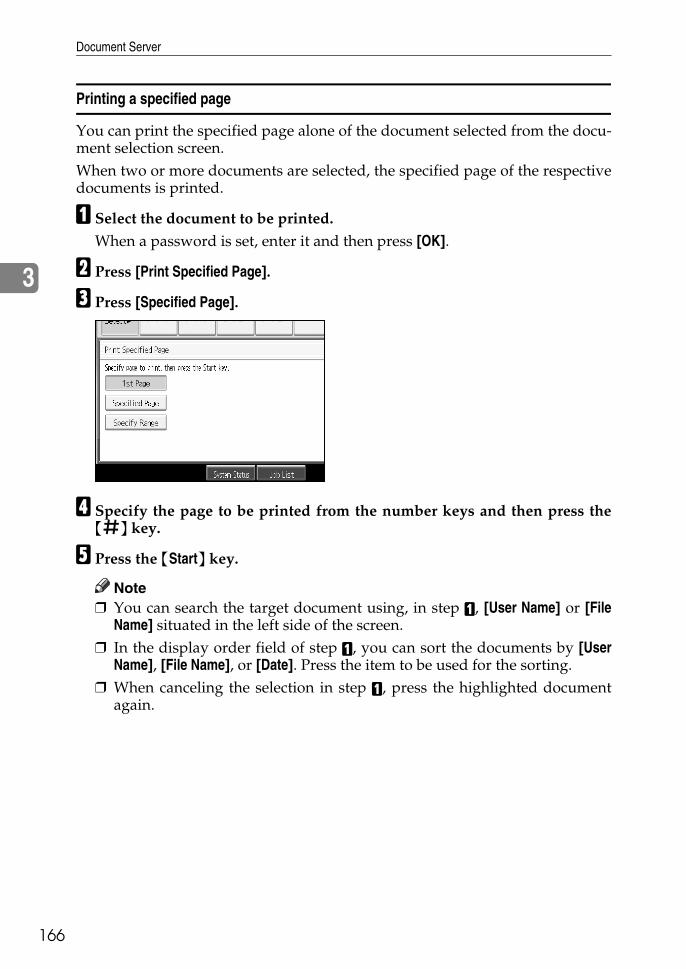
Document Server
166
3
Printing a specified page
You can print the specified page alone of the document selected from the docu-ment selection screen.When two or more documents are selected, the specified page of the respectivedocuments is printed.
A Select the document to be printed.When a password is set, enter it and then press [OK].
B Press [Print Specified Page].
C Press [Specified Page].
D Specify the page to be printed from the number keys and then press the{q} key.
E Press the {Start} key.
Note❒ You can search the target document using, in step A, [User Name] or [File
Name] situated in the left side of the screen.❒ In the display order field of step A, you can sort the documents by [User
Name], [File Name], or [Date]. Press the item to be used for the sorting.❒ When canceling the selection in step A, press the highlighted document
again.
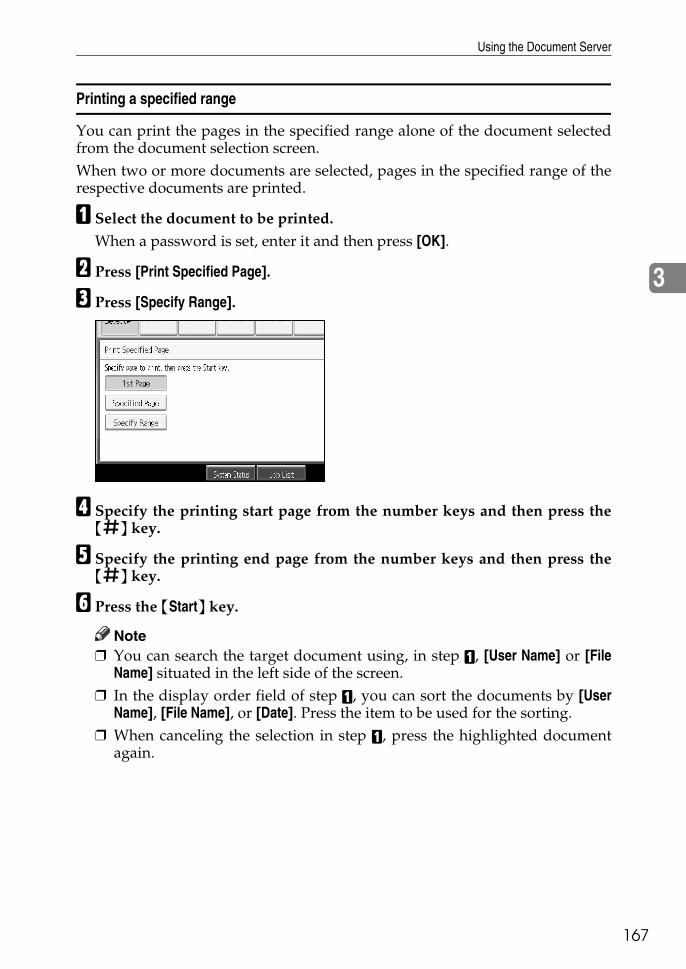
Using the Document Server
67
3
1
Printing a specified range
You can print the pages in the specified range alone of the document selectedfrom the document selection screen.When two or more documents are selected, pages in the specified range of therespective documents are printed.
A Select the document to be printed.When a password is set, enter it and then press [OK].
B Press [Print Specified Page].
C Press [Specify Range].
D Specify the printing start page from the number keys and then press the{q} key.
E Specify the printing end page from the number keys and then press the{q} key.
F Press the {Start} key.
Note❒ You can search the target document using, in step A, [User Name] or [File
Name] situated in the left side of the screen.❒ In the display order field of step A, you can sort the documents by [User
Name], [File Name], or [Date]. Press the item to be used for the sorting.❒ When canceling the selection in step A, press the highlighted document
again.

Document Server
168
3
Deleting a Document
Following describes the procedure for deleting a stored document.
Important❒ The Document Server can store up to 1000 documents. As the number of
stored documents reaches 1000, storing of a new document becomes unavail-able. Thus, you should delete unnecessary documents as much as practicable.
A Press the {Document Server} key.
B Select the document to be deleted.When a password is set, enter it and then press [OK].
C Press [Delete File].
D Press [Yes].
Note❒ You can delete the stored documents at a time. See “Administrator Tools”,
General Settings Guide.❒ Using Web Image Monitor allows you to print a document stored in the
Document Server from your PC.❒ It is also possible to select two or more documents and delete them.❒ You can search the target document using, [File Name] or [User Name] situ-
ated in the left side of the screen.❒ In the display order field, you can sort the documents by [User Name], [File
Name], or [Date]. Press the item to be used for the sorting.❒ When you could not identify the target document from the document
name, print the first page alone of the document in order to confirm theprint results.
❒ When canceling your selection, press the highlighted document again.
ReferenceSee “Administrator Tools”, General Settings Guide.For the Web Image Monitor starting procedure, see p.169 “Displaying aDocument in Document Server with Web Image Monitor”.
Using the Document Server
69
3
1
Displaying a Document in Document Server with Web Image Monitor
Following describes the procedure for confirming contents of a stored documenton the PC screen by use of Web Image Monitor.
A Start a Web browser.
B Enter “http:// (IPv4 address of this machine) /” to the address.Top page of Web Image Monitor will be displayed.
C Click [Document Server].The list of documents in the Document Server will be displayed.
D Click of the document you want to confirm.Information of the document will be displayed.
E Confirm contents of the document.
Note❒ You can change the document list display format in step C. Click the
(Thumbnails), (Icons), or (Details).❒ When you want to enlarge the preview display in step E, click [Enlarge Image].
Document Server
170
3
Downloading Stored Documents
Following describes the procedure for downloading a stored document to thePC by use of Web Image Monitor.
Important❒ When downloading a document stored with the copy feature, you must pre-
pare the extended data conversion board.
A Start a Web browser.
B Enter “http://(IPv4 address of this machine)/” to the address.Top page of Web Image Monitor will be displayed.
C Click [Document Server].The list of documents in the Document Server will be displayed.
D Click of the document you want to download.
E Select [PDF] or [Multi-page TIFF] for the file format.The data will be downloaded.
F Click [OK].
Note❒ You can change the document list display format in step C. Click the
(Thumbnails), (Icons), or (Details).❒ In step E, you cannot select [Multi-page TIFF] for a document being stored
with the copy or printer.❒ When downloading a document with [Multi-page TIFF] in step E, you must
prepare a Printer/Scanner Unit and File Format Converter.
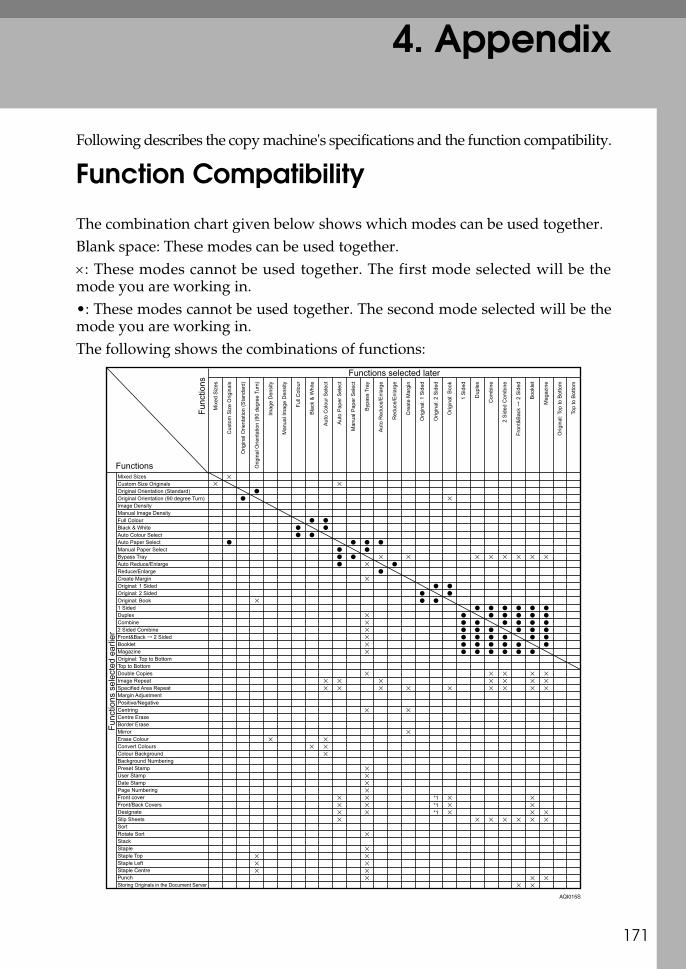
4. Appendix
71
1Following describes the copy machine's specifications and the function compatibility.
Function Compatibility
The combination chart given below shows which modes can be used together.Blank space: These modes can be used together.×: These modes cannot be used together. The first mode selected will be themode you are working in.•: These modes cannot be used together. The second mode selected will be themode you are working in.The following shows the combinations of functions:
AQI015S
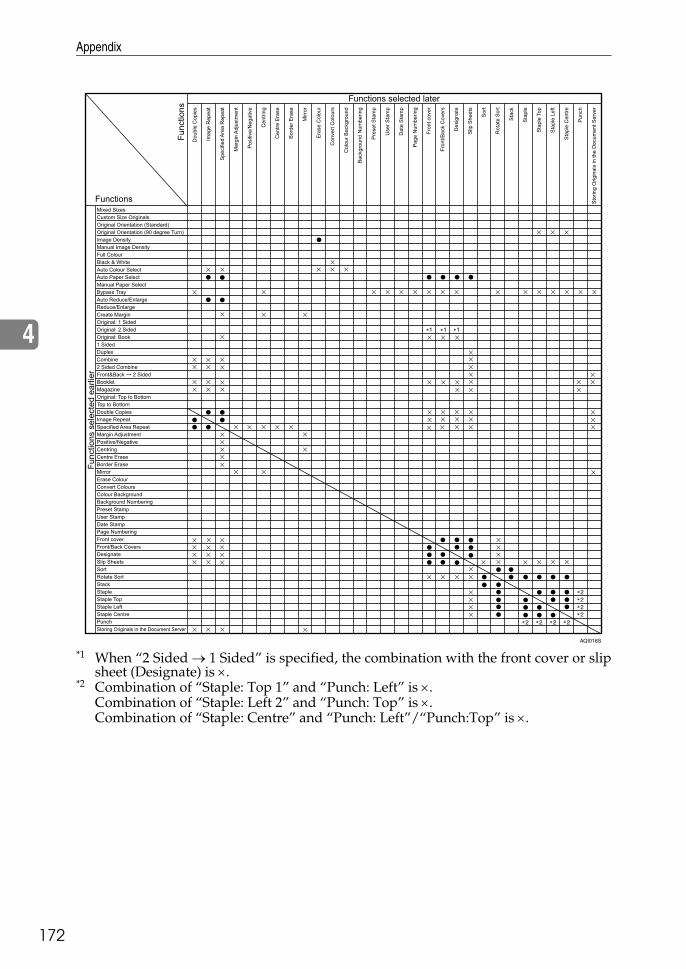
Appendix
172
4
*1 When “2 Sided → 1 Sided” is specified, the combination with the front cover or slipsheet (Designate) is ×.
*2 Combination of “Staple: Top 1” and “Punch: Left” is ×.Combination of “Staple: Left 2” and “Punch: Top” is ×.Combination of “Staple: Centre” and “Punch: Left”/“Punch:Top” is ×.
AQI016S

Supplementary Information
73
4
1
Supplementary Information
Following describes the detailed specifications of the respective functions.
❖ Mixed Size mode• Since small originals may not be correctly aligned with the original guide,
the copy image may be slanted.• You can place originals of two different sizes at a time.• Copying speed and scanning speed will be reduced.
❖ Bypass Tray Copy• The following paper sizes can be selected as the standard sizes:
A3L, A4KL, A5KL, A6L, B4 JISL, B5 JISKL, B6 JISL, 12" × 18"L,11" × 17"L, 81/2" × 14"L, 81/4" × 14"L, 81/2" × 11"KL, 51/2" × 81/2"L,71/4" × 101/2"KL, 8" × 13"L, 81/2" × 13"L, 81/4" × 13"L, 11" × 15"L, 10" × 14"L, 8" × 10"L, 8KL, 16KKL, 91/2" × 41/2"K, 71/2" × 37/8"K, C6 EnvK, C5 EnvK, DL EnvK
• When the beeper is turned off, it will not sound if you insert paper into thebypass tray. See “System Settings”, General Settings Guide.
❖ Preset Reduce/Enlarge• You can select one of 12 preset ratios (5 enlargement ratios, 7 reduction ratios).• Following shows the relation between the original's size and copied-to pa-
per size at respective scaling factors.• Metric version
400% (Area ratio 16 times):-200% (Area ratio 4 times): A5 → A3, B6 JIS → B4 JIS141% (Area ratio 2 times): A4 → A3, A5 → A4, B5 JIS → B4 JIS, B6 JIS → B5 JIS122%: A4 → B4 JIS, A5 → B5 JIS115%: B4 JIS → A3, B5 JIS → A4, B6 JIS → A593%:-82%: B4 JIS → A4, B5 JIS → A575%: B4 JIS→F4, B4 JIS→F71% (Area ratio 1/2times): A3 → A4, A4 → A5, B4 JIS → B5 JIS, B5 JIS → B6 JIS65%: A3→F50% (Area ratio 1/4times): A3 → A5, B4 JIS → B6 JIS25%:-
Appendix
174
4
• Inch version400% (Area ratio 16 times): -200% (Area ratio 4 times): 51/2" × 81/2"→11" × 17"155% (Area ratio 2 times): 51/2" × 81/2"→81/2" × 14"129%: 81/2" × 11"→11" × 17"121%: 81/2" × 14"→11" × 17"93%: -85%: F→81/2" × 11"78%: 81/2" × 14"→81/2" × 11"73%: 11" × 15"→81/2" × 11"65%: 11" × 17"→81/2" × 11"50% (Area ratio 1/4times): 11" × 17"→51/2" × 81/2"25%: -
• You can select a ratio regardless of the size of an original or copy paper.With some ratios, parts of the image might not be copied or margins willappear on copies.
• If a Copy Data Security Unit is installed, you can select the factor from 50to 400%.
❖ Zoom• The reproduction ratios you can specify are 25-400%. The factor can be
from 50 to 400%, when the machine is equipped with a Copy Data SecurityUnit.
• You can select a ratio regardless of the size of an original or copy paper.With some ratios, parts of the image might not be copied or margins willappear on copies.
❖ Size Magnification• If the calculated ratio is over the maximum or under the minimum ratio, it
is automatically adjusted to within available range. However, with someratios, parts of the image might not be copied or margins will appear oncopies.
• The reproduction ratios you can specify are 25-400%. If the machine isequipped with a Copy Data Security Unit, the range is from 50 to 400%.
❖ Directional Size Magnification• The reproduction ratio you can specify are 25-400%. If the machine is
equipped with a Copy Data Security Unit, the range is from 50 to 400%.• When entering a percentage ratio, you can specify any value in the permit-
ted range, regardless of original or copy paper size. However, dependingon settings and other conditions, part of the image may not be copied, ormargins will appear on copies.
• When entering a size in mm, if the calculated ratio is over the maximum orunder the minimum ratio, it is automatically adjusted to within availablerange. However, with some ratios, parts of the image might not be copiedor margins will appear on copies.
Supplementary Information
75
4
1
❖ Sort, Rotate Sort, Stack• Following shows the stackable paper sizes and the orientation.
• SR79012" × 18"L, A3L, B4 JISL, A4KL, B5 JISKL, A5KL, 11" × 17"L,81/2" × 14"L, 81/2" × 11"KL, 51/2" × 81/2"L, 71/4" × 101/2"KL, 8" × 13"L, 81/2" × 13"KL, 81/2" × 13"L, 8KL, 16KKL
• Booklet Finisher SR302012" × 18"L, A3L, B4 JISL, A4KL, B5 JISKL, A5KL, B6 JISL,A6L, 11" × 17"L, 81/2" × 14"L, 81/2" × 11"KL, 51/2" × 81/2"L, 71/4" × 101/2"KL, 8" × 13"L, 81/2" × 13"KL, 81/2" × 13"L, 8KL,16KKL
• Finisher SR303012" × 18"L, A3L, B4 JISL, A4KL, B5 JISKL, A5KL, B6 JISL,A6L, 11" × 17"L, 81/2" × 14"L, 81/2" × 11"KL, 51/2" × 81/2"L, 71/4" × 101/2"KL, 8" × 13"L, 81/2" × 13"KL, 81/2" × 13"L, 8KL,16KKL
• Paper sizes and orientations that can be used in the Rotate Sort function areA4KL, B5 JISKL and 81/2" × 11"KL.
• The number of copies that can be placed on the tray is as follows. When thenumber of copies exceeds capacity, remove copies from the tray.• Internal tray
A4, 81/2" × 11" or smaller: 500 sheetsB4 JIS, 81/2" × 14" or larger: 250 sheets
• Internal tray 2125 sheets
• SR790 (Finisher upper tray)A4, 81/2" × 11" or smaller: 250 sheetsB4 JIS, 81/2" × 14" or larger: 50 sheets
• SR790 (On the Finisher shift tray, stack unstapled paper)A4, 81/2" × 11" or smaller: 1000 sheetsB4 JIS, 81/2" × 14" or larger: 500 sheets
• SR790 (On the Finisher shift tray, stack stapled paper)A4K, 81/2" × 11"K: 10 to 50-leaf binding...100 to 20 copies, 2 to 9-leafbinding...100 copiesA4L, B5 JISL, 81/2" × 11"L: 10 to 50-leaf binding...50 to 10 copies, 2 to9-leaf binding...100 copiesA3L, B4 JISL, 11" × 17"L, 81/2" × 14"L, 12" × 18"L: 10 to 30-leaf bind-ing...50 to 10 copies, 2 to 9-leaf binding...50 copies
• Booklet Finisher SR3020 (Finisher tray)A4, 81/2" × 11" or smaller: 250 sheetsB4 JIS, 81/2" × 14" or larger: 50 sheets
Appendix
176
4
• Booklet Finisher SR3020 (On the Finisher tray 2, stack unstapled paper)A4K, 81/2" × 11"K: 2000 sheetsA3L, A4L, B4 JISL, B5 JISKL, 11" × 17"L, 81/2" × 14"L, 81/2" × 11"L, 12" × 18"L: 1000 sheetsA5K: 500 sheetsA5L, B6 JISL, 51/2" × 81/2"L, A6L: 100 sheets
• Booklet Finisher SR3020 (On the Finisher tray 2, stack stapled paper)A4K, 81/2" × 11"K: 13 to 50-leaf binding…150 to 40 copies, 2 to 12-leafbinding…150 copiesA4L, B5 JISKL, 81/2" × 11"L: 10 to 50-leaf binding…100 to 20 copies,2 to 9-leaf binding…100 copiesA3L, B4 JISL, 11" × 17"L, 81/2" × 14"L, 12" × 18"L: 10 to 30-leaf bind-ing…100 to 33 copies, 2 to 9-leaf binding…100 copiesWhen using the mixed size mode: 2 to 30-leaf binding…50 copies
• Booklet Finisher SR3020 (Booklet tray)12" × 18"L, A3L, B4 JISL, A4L, B5 JISL, 11" × 17"L, 81/2" × 14"L,81/2" × 11"L: 2 to 5-leaf binding…30 copies, 6 to 10-leaf binding…15copies, 11 to 15-leaf binding…10 copies
• Finisher SR3030 (Finisher tray)A4, 81/2" × 11" or smaller: 250 sheetsB4 JIS, 81/2" × 14" or larger: 50 sheets
• Finisher SR3030 (On the Finisher tray 2, stack unstapled paper)A4K, 81/2" × 11"K: 3000 sheetsA3L, A4L, B4 JISL, B5 JISKL, 11" × 17"L, 81/2" × 14"L, 81/2" × 11"L, 12" × 18"L: 1500 sheetsA5K: 500 sheetsA5L, B6 JISL, 51/2" × 81/2"L, A6L: 100 sheets
• Finisher SR3030 (On the Finisher tray 2, stack stapled paper)A4K, 81/2" × 11"K: 20 to 50-leaf binding…150 to 60 copies, 2 to 19-leafbinding…150 copiesA4L, B5 JISKL, 81/2" × 11"L: 15 to 50-leaf binding…100 to 30 copies,2 to 14-leaf binding…100 copiesA3L, B4 JISL, 11" × 17"L, 81/2" × 14"L, 12" × 18"L: 15 to 30-leaf bind-ing…100 to 50 copies, 2 to 14-leaf binding…100 copiesWhen using the mixed size mode: 2 to 30-leaf binding…50 copies
• When using the Rotate Sort or Staple functions, the capacity may be reduced.• Installing the finisher to the internal tray also reduces the number of paper
it can house.
Supplementary Information
77
4
1
❖ Staple• The following type of paper cannot be stapled:
• Postcard• Translucent paper• OHP transparencies• Label paper (adhesive labels)• Curled paper• Paper of low stiffness• Paper of mixed sizes
• In the following cases, copies will be delivered to the shift tray without stapling:• When the number of sheets for one set is over stapler capacity.• When memory reaches 0% during copying.
• When using the Staple function with [1 Sided → 1 Sided], [1 Sided → 2 Sided],[2 Sided → 1 Sided], [2 Sided → 2 Sided], or [Double Copies], select K originalfor L and L original for K copy.
• When using the Staple function with [1 sided → Comb 2 orig], [1 sided → 2sided:TtoB], [1 sided → 2 sided:TtoT], or [Double Copies], select K paper for Loriginal and L for K original.
• When using the Staple function [Staple: Left 2] or [Staple: Top 2] with theCombine function [1 Sided → 1 Sided], [1 Sided → 2 Sided], [2 Sided → 1 Sided],[2 Sided → 2 Sided], or [Double Copies], select K paper for L original and Lpaper for K original.
• If a finisher is installed, the mixed size mode and the auto paper selectionfunction become available. These functions make it possible to choose thepaper appropriate for stapling from the mixed sizes. Prior to the operation,you should set on the feed tray the paper of the size to be used. Followingsizes allow the stapling when mixed with other sizes.• A3L and A4K• B4 JISL and B5 JISK• 11" × 17"L and 81/2" × 11"K
• Paper sizes and orientation that can be used in the Staple function and thestapler capacity are as follows:• SR790
12" × 18"L, A3L, B4 JISL, 11" × 17"L, 81/2" × 14"L, 81/4" × 14"L, 8" × 13"L, 81/2" × 13"L, 81/4" × 13"L, 11" × 15"L, 10" × 14"L, 8KL: 30sheetsA4KL, B5 JISKL, 81/2" × 11"KL, 71/4" × 101/2"KL, 8" × 10"L,16KKL: 50 sheets
Appendix
178
4
• Booklet Finisher SR302012" × 18"L, A3L, B4 JISL, 11" × 17"L, 81/2" × 14"L, 81/4" × 14"L, 8" × 13"L, 81/2" × 13"L, 81/4" × 13"L, 11" × 15"L, 10" × 14"L, 8" × 10"L, 8KL: 30 sheetsA4KL, B5 JISKL, 81/2" × 11"KL, 71/4" × 101/2"KL, 16KKL: 50sheetsWhen using the mixed size mode: 30 sheetsWhen stapling centre: 12" × 18"L, A3L, B4 JISL, A4L, B5 JISL, 11" × 17"L, 81/2" × 14"L, 81/2" × 11"L: 15 sheets
• Finisher SR303012" × 18"L, A3L, B4 JISL, 11" × 17"L, 81/2" × 14"L, 81/4" × 14"L, 8" × 13"L, 81/2" × 13"L, 81/4" × 13"L, 11" × 15"L, 10" × 14"L, 8" × 10"L, 8KL: 30 sheetsA4KL, B5 JISKL, 81/2" × 11"KL, 71/4" × 101/2"KL, 16KKL: 50sheetsWhen using the mixed size mode: 30 sheets
• When stapling B4 JISL, A3L, Legal 81/2" × 14"L, 11" × 17"L, 12" × 18"L,be sure to extend the paper support plate of the finisher tray.
• When the number of copies exceeds tray capacity, copying stops. If thishappens, remove the copies from the shift tray, and then resume copying.The tray capacity for the stapled sheets is as follows: (paper weight: 80 g/m2, 20 lb.)• SR790 (Finisher shift tray)
A4K, 81/2" × 11"K: 10 to 50-leaf binding...100 to 20 copies, 2 to 9-leafbinding...100 copiesA4L, B5 JISL, 81/2" × 11"L: 10 to 50-leaf binding...50 to 10 copies, 2 to9-leaf binding...100 copiesA3L, B4L, 11" × 17"L, 81/2" × 14"L, 12" × 18"L: 10 to 30-leaf bind-ing...50 to 10 copies, 2 to 9-leaf binding...50 copies
• Booklet Finisher SR3020A4K, 81/2" × 11"K: 13 to 50-leaf binding…150 to 40 copies, 2 to 12-leafbinding…150 copiesA4L, B5 JISKL, 81/2" × 11"L: 10 to 50-leaf binding…100 to 20 copies,2 to 9-leaf binding…100 copiesA3L, B4 JISL, 11" × 17"L, 81/2" × 14"L, 12" × 18"L: 10 to 30-leaf bind-ing…100 to 33 copies, 2 to 9-leaf binding…100 copiesWhen using the mixed size mode: 2 to 30-leaf binding…50 copiesWhen stapling centre: 12" × 18"L, A3L, B4 JISL, A4L, B5 JISL, 11" × 17"L, 81/2" × 14"L, 81/2" × 11"L: 2 to 5-leaf binding…30 copies,6 to 10-leaf binding…15 copies, 11 to 15-leaf binding…10 copies
• Finisher SR3030A4K, 81/2" × 11"K: 20 to 50-leaf binding…150 to 60 copies, 2 to 19-leafbinding…150 copiesA4L, B5 JISKL, 81/2" × 11"L: 15 to 50-leaf binding…100 to 30 copies,2 to 14-leaf binding…100 copiesA3L, B4 JISL, 11" × 17"L, 81/2" × 14"L, 12" × 18"L: 15 to 30-leaf bind-ing…100 to 50 copies, 2 to 14-leaf binding…100 copiesWhen using the mixed size mode: 2 to 30-leaf binding…50 copies
Supplementary Information
79
4
1
• You cannot change stapling positions during copying.• When the original image is rotated, the staple orientation changes by 90°.• The maximum original image size that can be rotated is as follows: Metric
version: A4, Inch version: 81/2" × 11"• When using [Staple: Slant], [Staple: Bottom Slant], [Staple: Left 2], or [Staple: Top
2] with Combine, Double copies or Auto Reduce / Enlarge function,"Blank part will appear. Check orientation." message may ap-pear depending on the orientation of originals and paper you placed. Inthis case, change the paper orientation.
• When [Staple: Left 2], or [Staple: Top 2] is selected, the following settings areuseful to rotate images appropriately:• [Auto Reduce / Enlarge] or [Auto Paper Select]• Replace [Auto Tray Switching] with [With Image Rotation] in the User Tool's
Copier / Document Server Features• If you select [Staple: Centre] with the optional booklet finisher, the machine
staples and folds the paper in the centre, then delivers the paper folded.• If you select [Staple: Centre] from the Booklet or Magazine function, the ma-
chine staples the paper, and folds it like a book, then delivers the paperfolded.
❖ Punch• When using Punch and Combine, Double Copies, or Auto Reduce/En-
large, the message "Blank part will appear. Check orientation."may appear because of the orientation of the original and the copy paper.If this occurs, change the orientation of the copy paper.
• Since punch holes are made in each copy, the punch hole positions varyslightly.
• Punchable paper sizes are as follows:• 2 and 4 holes type (2 holes)
A3L, B4 JISL, A4LK, B5 JISKL, A5KL, 11" × 17"L, 81/2" × 14"L,81/4" × 14"L, 81/2" × 11"KL, 71/4" × 101/2"KL, 81/2" × 13"L, 81/4" × 13"L, 8" × 13"L, 51/2" × 81/2"L, 11" × 15"L, 10" × 14"L, 8" × 10"L, 8KL, 16KKL
• 2 and 4 holes type (4 holes)A3L, B4 JISL, A4K, B5 JISK, 11" × 17"L, 81/2" × 11"K, 71/4" × 101/2"K, 11" × 15"L, 8KL, 16KK
• 4 holes typeA3L, B4 JISL, A4KL, B5 JISKL, A5KL, 11" × 17"L, 81/2" × 14"L,81/4" × 14"L, 81/2" × 11"KL, 71/4" × 101/2"KL, 81/2" × 13"L, 81/4" × 13"L, 8" × 13"L, 51/2" × 81/2"L, 11" × 15"L, 10" × 14"L, 8" × 10"L, 8KL, 16KKL
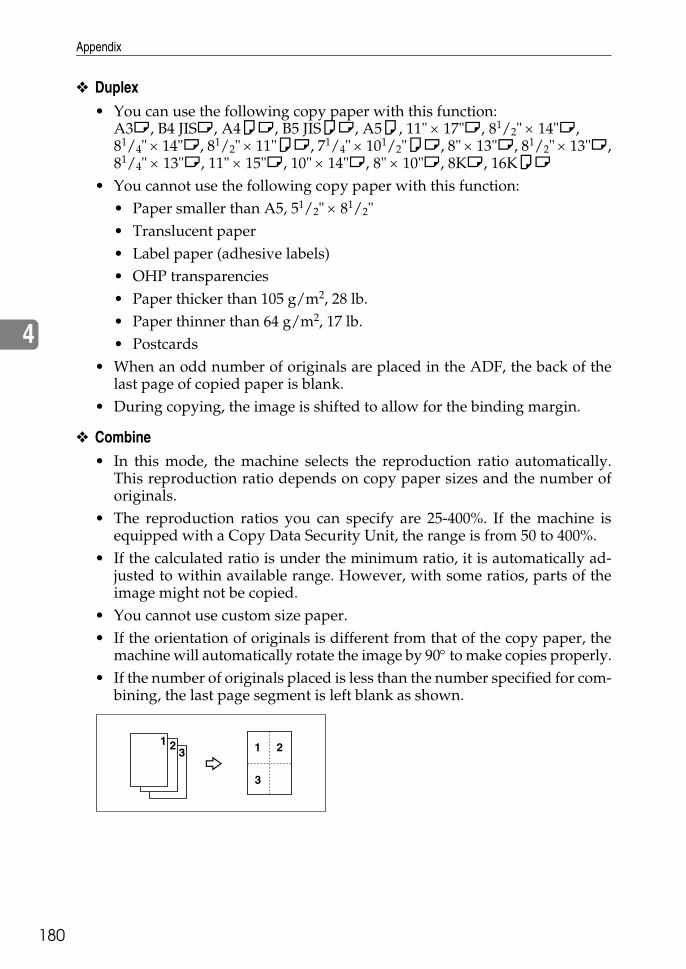
Appendix
180
4
❖ Duplex• You can use the following copy paper with this function:
A3L, B4 JISL, A4KL, B5 JISKL, A5K, 11" × 17"L, 81/2" × 14"L, 81/4" × 14"L, 81/2" × 11"KL, 71/4" × 101/2"KL, 8" × 13"L, 81/2" × 13"L,81/4" × 13"L, 11" × 15"L, 10" × 14"L, 8" × 10"L, 8KL, 16KKL
• You cannot use the following copy paper with this function:• Paper smaller than A5, 51/2" × 81/2"• Translucent paper• Label paper (adhesive labels)• OHP transparencies• Paper thicker than 105 g/m2, 28 lb.• Paper thinner than 64 g/m2, 17 lb.• Postcards
• When an odd number of originals are placed in the ADF, the back of thelast page of copied paper is blank.
• During copying, the image is shifted to allow for the binding margin.
❖ Combine• In this mode, the machine selects the reproduction ratio automatically.
This reproduction ratio depends on copy paper sizes and the number oforiginals.
• The reproduction ratios you can specify are 25-400%. If the machine isequipped with a Copy Data Security Unit, the range is from 50 to 400%.
• If the calculated ratio is under the minimum ratio, it is automatically ad-justed to within available range. However, with some ratios, parts of theimage might not be copied.
• You cannot use custom size paper.• If the orientation of originals is different from that of the copy paper, the
machine will automatically rotate the image by 90° to make copies properly.• If the number of originals placed is less than the number specified for com-
bining, the last page segment is left blank as shown.
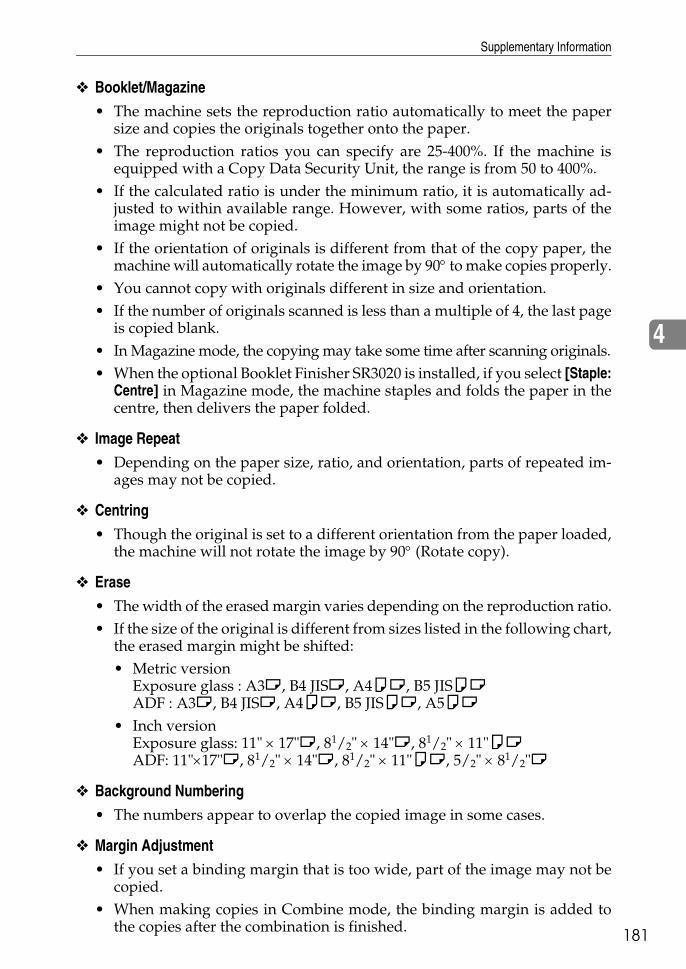
Supplementary Information
81
4
1
❖ Booklet/Magazine• The machine sets the reproduction ratio automatically to meet the paper
size and copies the originals together onto the paper.• The reproduction ratios you can specify are 25-400%. If the machine is
equipped with a Copy Data Security Unit, the range is from 50 to 400%.• If the calculated ratio is under the minimum ratio, it is automatically ad-
justed to within available range. However, with some ratios, parts of theimage might not be copied.
• If the orientation of originals is different from that of the copy paper, themachine will automatically rotate the image by 90° to make copies properly.
• You cannot copy with originals different in size and orientation.• If the number of originals scanned is less than a multiple of 4, the last page
is copied blank.• In Magazine mode, the copying may take some time after scanning originals.• When the optional Booklet Finisher SR3020 is installed, if you select [Staple:
Centre] in Magazine mode, the machine staples and folds the paper in thecentre, then delivers the paper folded.
❖ Image Repeat• Depending on the paper size, ratio, and orientation, parts of repeated im-
ages may not be copied.
❖ Centring• Though the original is set to a different orientation from the paper loaded,
the machine will not rotate the image by 90° (Rotate copy).
❖ Erase• The width of the erased margin varies depending on the reproduction ratio.• If the size of the original is different from sizes listed in the following chart,
the erased margin might be shifted:• Metric version
Exposure glass : A3L, B4 JISL, A4KL, B5 JISKLADF : A3L, B4 JISL, A4KL, B5 JISKL, A5KL
• Inch versionExposure glass: 11" × 17"L, 81/2" × 14"L, 81/2" × 11"KLADF: 11"×17"L, 81/2" × 14"L, 81/2" × 11"KL, 5/2" × 81/2"L
❖ Background Numbering• The numbers appear to overlap the copied image in some cases.
❖ Margin Adjustment• If you set a binding margin that is too wide, part of the image may not be
copied.• When making copies in Combine mode, the binding margin is added to
the copies after the combination is finished.
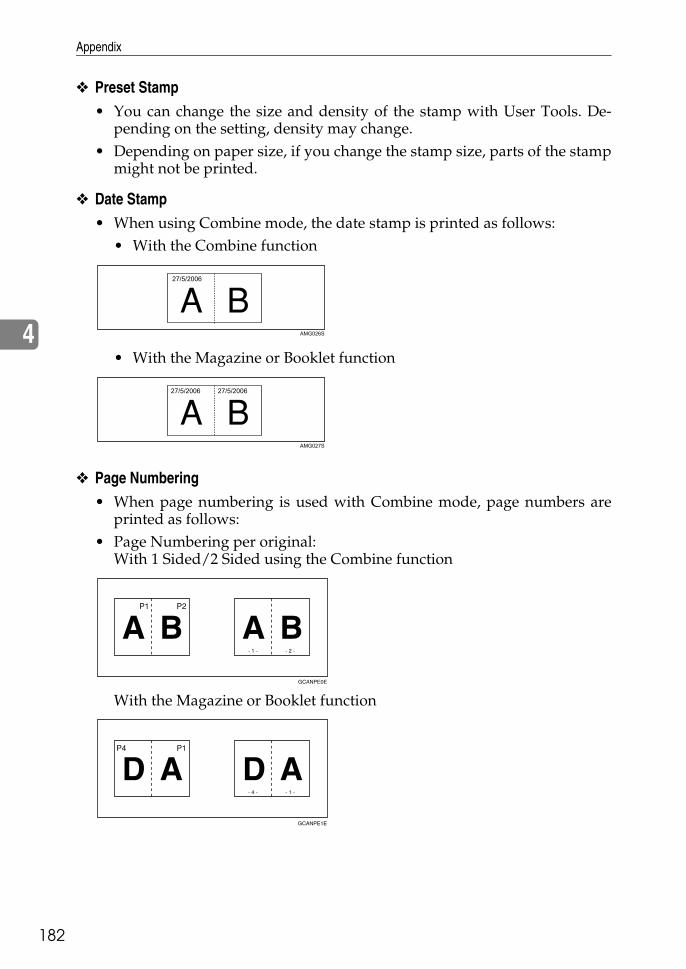
Appendix
182
4
❖ Preset Stamp• You can change the size and density of the stamp with User Tools. De-
pending on the setting, density may change.• Depending on paper size, if you change the stamp size, parts of the stamp
might not be printed.
❖ Date Stamp• When using Combine mode, the date stamp is printed as follows:
• With the Combine function
• With the Magazine or Booklet function
❖ Page Numbering• When page numbering is used with Combine mode, page numbers are
printed as follows:• Page Numbering per original:
With 1 Sided/2 Sided using the Combine function
With the Magazine or Booklet function
AMG026S
AMG027S
GCANPE0E
GCANPE1E
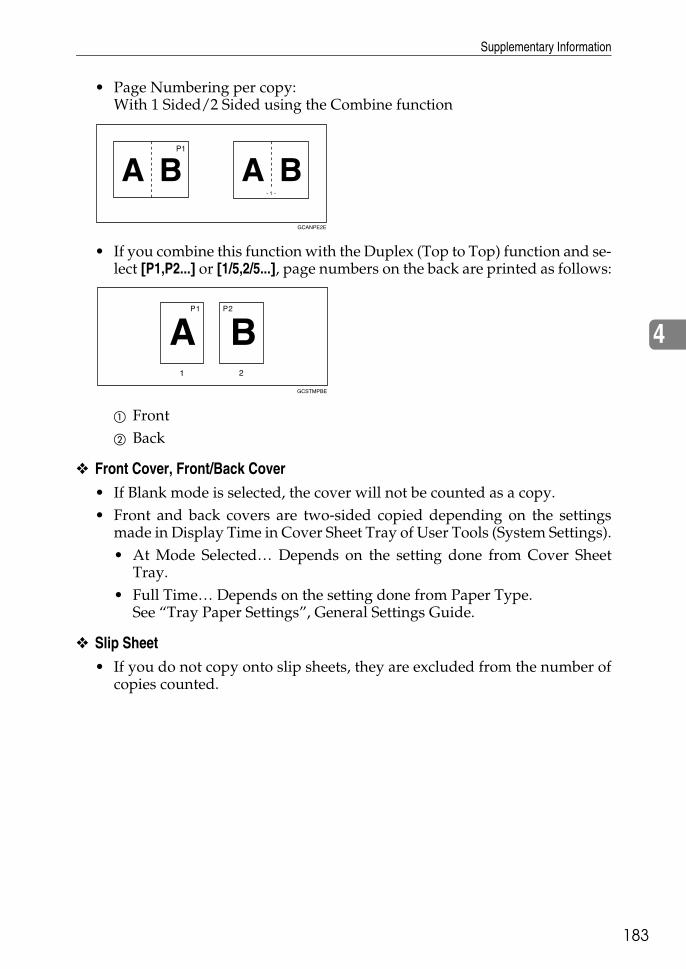
Supplementary Information
83
4
1
• Page Numbering per copy:With 1 Sided/2 Sided using the Combine function
• If you combine this function with the Duplex (Top to Top) function and se-lect [P1,P2...] or [1/5,2/5...], page numbers on the back are printed as follows:
A FrontB Back
❖ Front Cover, Front/Back Cover• If Blank mode is selected, the cover will not be counted as a copy.• Front and back covers are two-sided copied depending on the settings
made in Display Time in Cover Sheet Tray of User Tools (System Settings).• At Mode Selected… Depends on the setting done from Cover Sheet
Tray.• Full Time… Depends on the setting done from Paper Type.
See “Tray Paper Settings”, General Settings Guide.
❖ Slip Sheet• If you do not copy onto slip sheets, they are excluded from the number of
copies counted.
GCANPE2E
GCSTMPBE

184
INDEX
1 Sided 16 Pages to Combine 2 Sides, 891 Sided 2 Pages to Combine 1 Side, 871 Sided 4 Pages to Combine 1 Side, 871 Sided 4 Pages to Combine 2 Sides, 891 Sided 8 Pages to Combine 1 Side, 871 Sided 8 Pages to Combine 2 Sides, 891 Sided to 2 Sides, 831 Sided to Booklet, 941 Sided to Magazine, 942 Sided 16 Pages to Combine 2 Sides, 892 Sided 1 Page to Combine 1 Side, 872 Sided 2 Pages to Combine 1 Side, 872 Sided 4 Pages to Combine 1 Side, 872 Sided 4 Pages to Combine 2 Sides, 892 Sided 8 Pages to Combine 2 Sides, 892 Sided to 1 Sided, 922 Sided to 2 Sided, 832 Sided to Booklet, 94
A
Adjust Colour, vi, 47Adjust Colour Image, 6Adjusting Colours Based on Selected Colour, 54Adjusting Copy Image Density, 57Adjusting the background density, 51Adjusting the contrast, 50Adjusting the sharpness/softness, 50Adjusting the Text/Photo sensitivity, 52Adjusting the U.C.R., 51Adjust U.C.R., vii, 48Administrator Tools, 6Auto Document Feeder, 12Auto image density, 57Auto Paper Select, 60, 61Auto Reduce/Enlarge, 67
B
Background Density, vii, 48Background Numbering, v, 107, 173Basic Procedure, 25Batch mode, 20Binding margin, 100Black/White Copy, iii, 40Booklet, 94Booklet/Magazine, xii, xvii, 94, 173Book to 1 Sided, 92Book to 2 Sided, 94Border Erase, 101, 102, 103, 105, 106
Bypass tray, 35, 36Bypass Tray Copy, 173
C
Centre, 104, 105, 106Centre/Border Erase, 101, 105, 106Centre Erase, 101, 104Centring, 130, 173Changing a Stored Program, 144Changing the Number of Sets, 75Changing the order of jobs, 30Changing the registered contents, 46Changing User Name, File Name or
Password of a Stored Document, 157Chapters, 137Checking Job History, 32Checking jobs in the print queue, 30Checking the Details of a Stored Document, 158Colour Background, iii, 43Colour Balance, vi, 44Colour Functions, 40Combine, 173Combined auto and
manual image density, 57, 58Contrast, vii, 48Convert Colours, iii, 41Copier Functions, 57, 147Copying, 25Copying 2-Sided Pages, xviiiCopying 2-Sided Pages onto
1-Sided Pages, xviiiCopying from the Bypass Tray, 33Copying onto envelopes, 39Copying onto OHP Transparencies, 37Copying onto Thick Paper, xviii, 38Copying onto Thin Paper, 37Copying originals of various sizes, 22Copying Originals Such as Books, xviiCovers, 134Create Margin function, 64Creating Colours by
Directly Specifying the Density of Each Colour with Number Keys, 55
Custom size paper, 36Custom sizes, 24
85
1D
Date, 118Date Stamp, v, 116, 173Deleting a Document, 168Deleting a Program, 145Deleting jobs, 31Deleting User colours, 56Designate, 136Directional Magnification, 69, 70Directional Size Magnification (mm), 71Display, 4Displaying a Document in Document
Server with Web Image Monitor, 169Document Server, 147Document Server Display, 148Double Copies, 129Downloading Stored Documents, 170Duplex, ix, 83, 173
E
Edit, 6Erase, 101, 173Erase Colour, 42Erase Specified Colour, iii
F
Fax Functions, 147First Printing Number, 122, 124, 125First Printing Page, 122, 124, 125Front/Back Covers, 134Front & Back to 2 Sided, 94Front Cover, 134Front Cover, Front/Back Cover, 173Full Colour Copy, iii, 40Function Compatibility, 171
G
General Features, 6Generation Copy, 59
H
Holding print jobs, 31How to fold and
unfold copies to make a booklet, 94How to fold and
unfold copies to make a magazine, 94How to Read This Manual, 2
I
Image density, 57Image Repeat, 126, 173Initial Display, 146Input / Output, 6Interrupt Copy, 26Interrupting Printing, 163Invert, 132
J
Job List, 28Job List screen, 29Job Preset, 27
L
Last Number, 122, 124Left Original Beeper, 27
M
Magazine, 94Manual image density, 58Manual Paper Select, 61Manuals for This Machine, iMap, 59Margin Adjustment, 100, 173Mirror, 133Missing image area, 14Mixed size mode, 22, 173
O
One-Sided Combine, xv, 87Option, 3Orientation, 111Original orientation, 16, 78, 108, 111,
116, 119Original orientation and completed copies, 83Originals, 11, 14Originals and copy orientation, 86Original size, 23
186
AE AE B222-7658P
Page Numbering, v, 119, 121, 122, 124, 125, 173
Pale, 59Photo, 59Placing Originals, 11, 15Placing Originals in the
Auto Document Feeder, 18Placing originals of different sizes, 22Placing Originals on the Exposure Glass, 17Positive/Negative, 132Preset Reduce/Enlarge, 63, 173Preset Stamp, v, 108, 110, 173Preview Display, 151Primary Colours, viPrinter Functions, 147Printing a List of user colours, 56Printing a Specified Page, 166Printing a Stored Document, 162Printing the First Page, 165Program, 146Program Colour Balance, 45Programming Defaults, 146Programs, 142Punch, 81Punch hole positions, 81
R
Recalling a Program, 145Reflect, 133Registering the adjusted colour balance, 45Regular sizes, 23Renaming a Colour, 56Repeat, 126Reproduction Ratio, 6Reverse, 132Rotate Sort, 72
S
SADF, 21SADF mode, 21Sample Copy, 74Sample Print, 164Scanner Functions, 147Searching for a Stored Document, 159Selecting a Colour Mode, 40Selecting Copy Paper, 60Series Copies, 92Sharp/Soft, vii, 48Simplified Display, 5, 150Size Magnification, 68, 173
Sizes and Weights of Recommended Originals, 11
Sizes Detectable, 13Sizes difficult to detect, 14Slip Sheets, 138, 173Sort, 72, 173Specified Area Repeat, 126, 127Stack, 76, 173Stamp, 6Stamp Colour, 110, 113, 118, 121Stamp density, 110Stamp position, 108, 110, 111, 113, 116,
118, 119, 122Stamp size, 110Staple, 78, 173Stapling position, 78Stapling position and original setting, 78Storing a Program, 143Storing Data, 152Storing Data in the Document Server, 140Symbols, 2
T
Text, 59Text/Photo, 59Text/Photo Sensitivity, vii, 48To change a file name, 156To change the format of date, 118To delete the user stamp, 115To enter the ratio with the number keys, 66, 69To program the user stamp, 113To register or change a user name, 154, 155To search by file name, 160To search by user name, 160To set or change a Password, 157Two-Sided Combine, 89
U
User Colour, 53User Stamp, v, 111, 113, 115
W
What You Can Do with This Machine, iii, ixWhole Area Repeat, 126
Z
Zoom, 65, 173
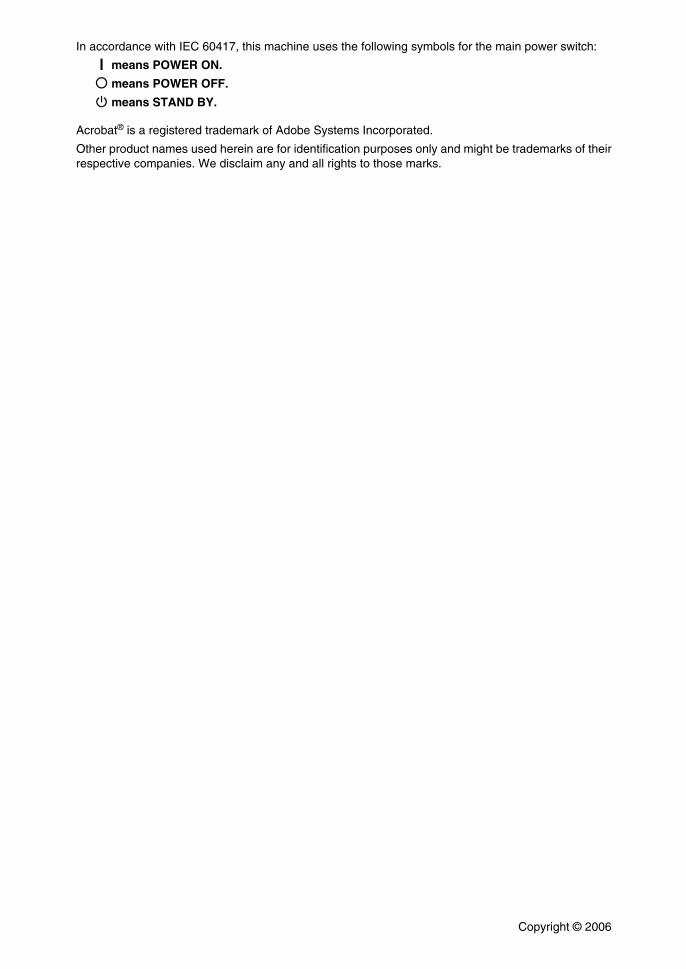
In accordance with IEC 60417, this machine uses the following symbols for the main power switch:
a means POWER ON.
b means POWER OFF.
c means STAND BY.
Acrobat® is a registered trademark of Adobe Systems Incorporated.
Other product names used herein are for identification purposes only and might be trademarks of theirrespective companies. We disclaim any and all rights to those marks.
Copyright © 2006
Operating Instructions
Copy/Docum
ent Server
Referenc eType for MP C3500/Aficio MP C3500/ISC 3535
Type for MP C4500/Aficio MP C4500/ISC 4045AE AE B222-7658