commissioning quick instructions - spot weld, inc
TRANSCRIPT

HWH welding systems
Commissioning
Quick instructions
36045-01en
Imprint
Harms &WendeGmbH & Co. KG
Grossmoorkehre 9
21079 Hamburg
Tel.: +49 40 766 904-0
Fax: +49 40 766 904-88
E-mail: [email protected]
www.harms-wende.de
Representativemanaging director:
Ralf Bothfeld
All rights reserved
Reproduction of this technical documentation, including excerpts, regardless of themethod, is prohibited without prior writ-ten agreement by Harms &WendeGmbH & Co. KG. Infringements will obligate the perpetrator to pay damages. All rightsreserved in the event of patent issue or utility model registration.
We reserve the right to make changes to the content of the documentation and the availability of the products without priorannouncement. The original document is in German (national language of themanufacturer). All translations are copies ofthe original document. Technical changes reserved.
Liability exclusion
All data refer to systems andmachines with average utilisation. If in doubt, please contact the HWH service department,telephone: +49 40 766 904-84.
Harms & WendeGmbH & Co. KG accepts no liability for damage caused through the installation and operation of other soft-ware applications.
Contents
ContentsContents i1 Commissioning a Genius module 31.1 Overview 41.2 Installation of the XOperating software 41.3 Link module with PC (TCP/IP) 81.4 Check system connections 121.5 Welding gun configuration 131.6 Welding gun force calibration (optional) 141.6.1 Digital force calibration 151.6.2 Analogue force calibration 19
1.7 Initial welding operation with scale divisions (Skt) 221.8 Adapt constant current controller (KSR) 221.8.1 Edit welding parameter 231.8.2 KSR set-up welding operations 24
Notes 26
36045-01en | 2015-07 | Commissioning | Quick instructions i

1 Commissioning aGeniusmodule
1 Commissioning a Genius moduleThese quick instructions guide you through the basic steps of commissioning your system. They are described here usingthe example of a Genius module with theXPegasus Gold operating software and the following PC configuration. Not all ofthe selection options in this example are available with certain products of theXSoftware package, e.g. selection of the data-base.
PC configuration used
n Windows 7n MS Excel 2010 for editing the CSV templatesn Installation CD XPegasus Gold
Further information on the system requirements can be found in the software documentation for your XOperating software.
Prepare module
n Wire as per technical data for module, if available; link to networkn Select/define IP address (V4) for themodule. The system owner specifies the network address range. Default IP
address of the Genius modules on delivery: 192.6.10.48n After wiring, assign the IP address using a laptop with cross-over connection or via the network see Link module with
PC (TCP/IP), p. 8
NoteWhen commissioningmodules, the system's network may not yet be available. Commissioning without linking to a networkis therefore also possible. However, it is always necessary to assign an IP address to themodule.
1.1 Overview 41.2 Installation of the XOperating software 41.3 Link module with PC (TCP/IP) 81.4 Check system connections 121.5 Welding gun configuration 131.6 Welding gun force calibration (optional) 14
1.6.1 Digital force calibration 151.6.2 Analogue force calibration 19
1.7 Initial welding operation with scale divisions (Skt) 221.8 Adapt constant current controller (KSR) 22
1.8.1 Edit welding parameter 231.8.2 KSR set-up welding operations 24
36045-01en | 2015-07 | Commissioning | Quick instructions 3
1.1 Overview
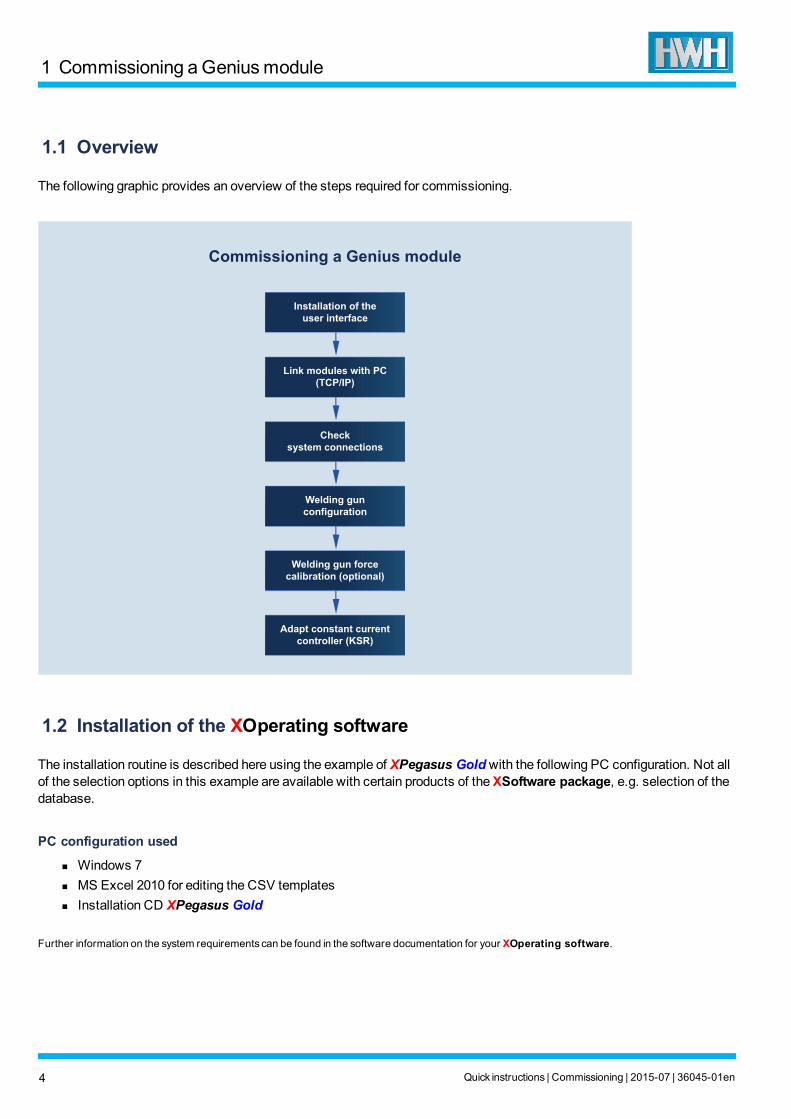
The following graphic provides an overview of the steps required for commissioning.
Check
system connections
Welding gun
configuration
Welding gun force
calibration (optional)
Adapt constant current
controller (KSR)
Link modules with PC
(TCP/IP)
Installation of the
user interface
Commissioning a Genius module
1.2 Installation of the XOperating software
The installation routine is described here using the example of XPegasus Goldwith the following PC configuration. Not allof the selection options in this example are available with certain products of theXSoftware package, e.g. selection of thedatabase.
PC configuration used
n Windows 7n MS Excel 2010 for editing the CSV templatesn Installation CD XPegasus Gold
Further information on the system requirements can be found in the software documentation for your XOperating software.
1 Commissioning aGeniusmodule
4 Quick instructions | Commissioning | 2015-07 | 36045-01en
1 Commissioning aGeniusmodule
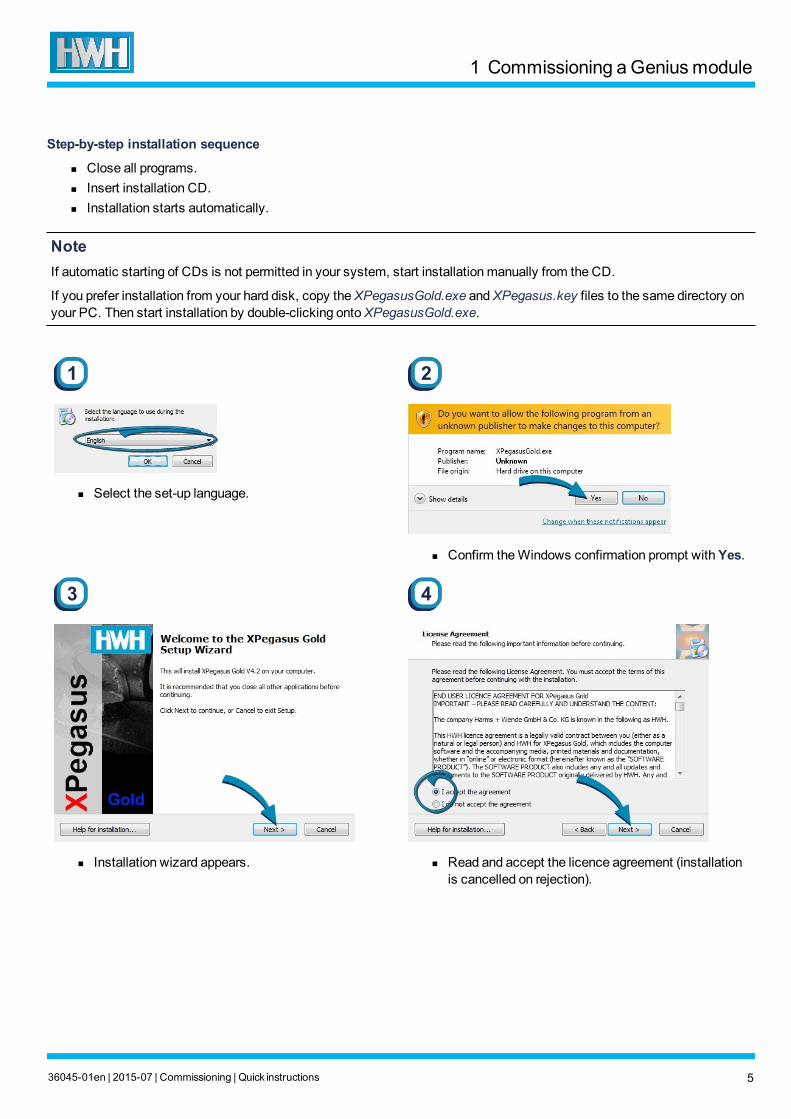
Step-by-step installation sequence
n Close all programs.n Insert installation CD.n Installation starts automatically.
NoteIf automatic starting of CDs is not permitted in your system, start installationmanually from the CD.
If you prefer installation from your hard disk, copy theXPegasusGold.exe andXPegasus.key files to the same directory onyour PC. Then start installation by double-clicking ontoXPegasusGold.exe.
1
n Select the set-up language.
2
n Confirm theWindows confirmation prompt withYes.
3
n Installation wizard appears.
4
n Read and accept the licence agreement (installationis cancelled on rejection).
36045-01en | 2015-07 | Commissioning | Quick instructions 5
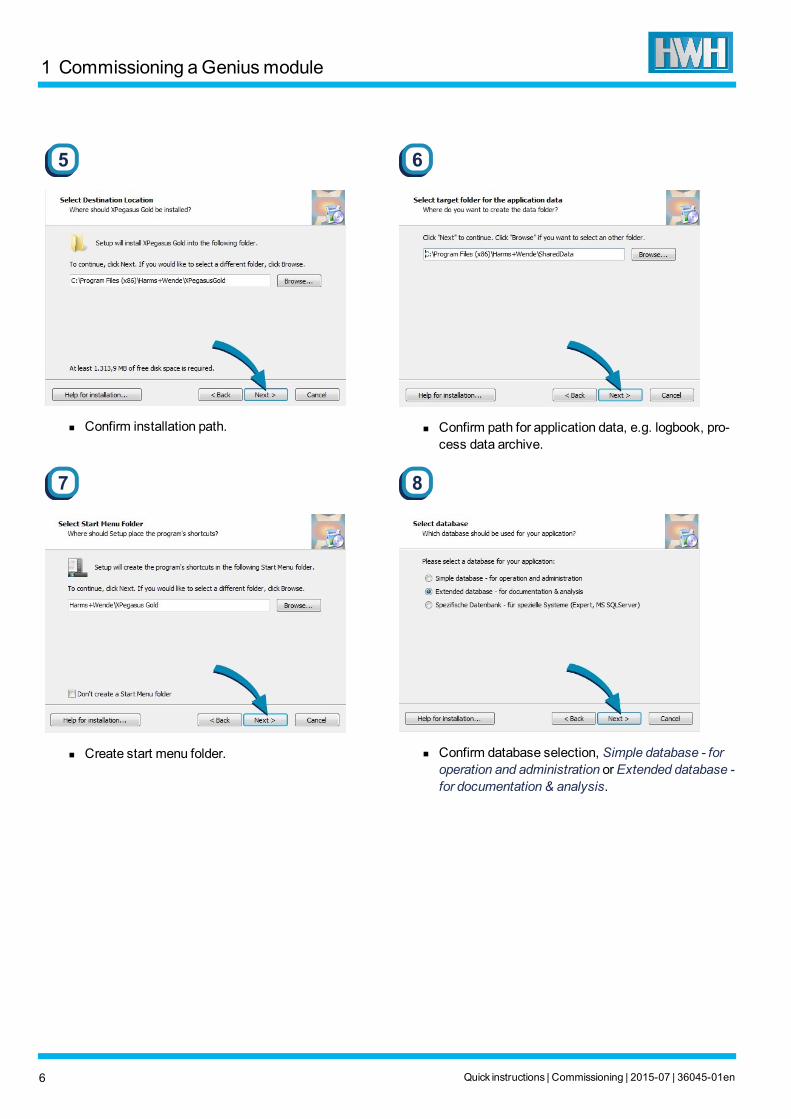
5
n Confirm installation path.
6
n Confirm path for application data, e.g. logbook, pro-cess data archive.
7
n Create start menu folder.
8
n Confirm database selection, Simple database - foroperation and administration orExtended database -for documentation & analysis.
1 Commissioning aGeniusmodule
6 Quick instructions | Commissioning | 2015-07 | 36045-01en
1 Commissioning aGeniusmodule
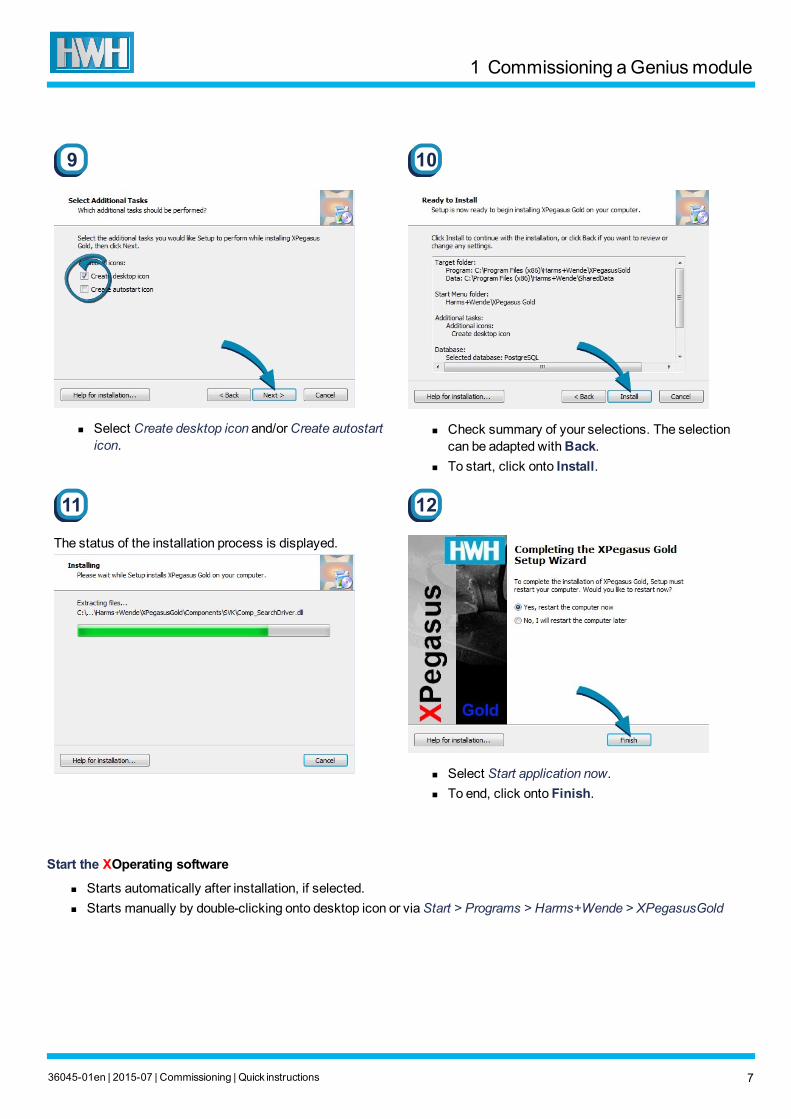
9
n Select Create desktop icon and/orCreate autostarticon.
10
n Check summary of your selections. The selectioncan be adapted withBack.
n To start, click onto Install.
11
The status of the installation process is displayed.
12
n Select Start application now.n To end, click onto Finish.
Start the XOperating software
n Starts automatically after installation, if selected.n Starts manually by double-clicking onto desktop icon or viaStart > Programs > Harms+Wende > XPegasusGold
36045-01en | 2015-07 | Commissioning | Quick instructions 7
NoteIf you receive an error message, please check whether theXPegasus key file (XPegasus.key) is stored on your PC in theprogram directory (depending on operating system) under Harms+Wende\. If not, copy the file from the installation CD tothis folder. Then restart the application.
Further information on installation can be found in the software documentation for your XOperating software.
The next step is Link module with PC (TCP/IP), p. 8.
1.3 Link module with PC (TCP/IP)
ImportantEvery modulemay only be connected with one installedXOperating software. The parametrisation of amodule from dif-ferent installations leads to data loss in the documentation.
In a client server solution (XPegasus Platinum) modules are accessed through the server. Thereby it is possible to para-metrisemodules on different clients connected to one server. Every committed change in a client server setup is docu-mented on the server.
1 Commissioning aGeniusmodule
8 Quick instructions | Commissioning | 2015-07 | 36045-01en
1 Commissioning aGeniusmodule
1
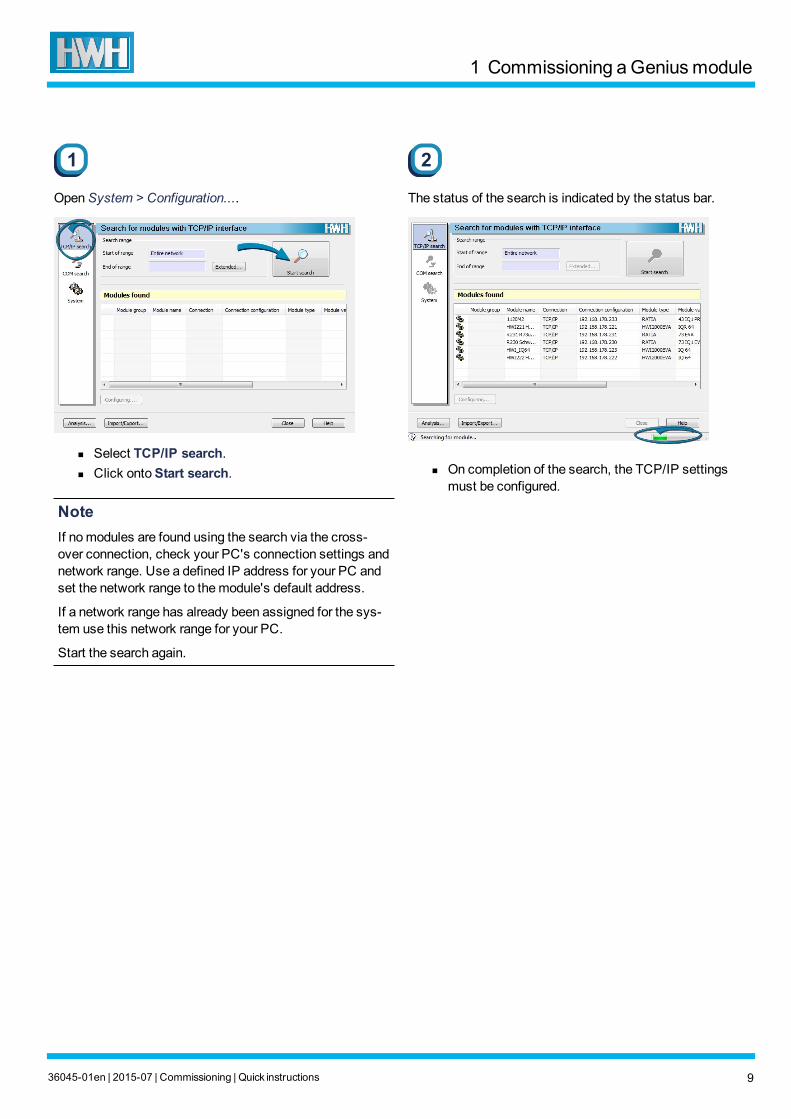
OpenSystem > Configuration....
n Select TCP/IP search.n Click ontoStart search.
NoteIf nomodules are found using the search via the cross-over connection, check your PC's connection settings andnetwork range. Use a defined IP address for your PC andset the network range to themodule's default address.
If a network range has already been assigned for the sys-tem use this network range for your PC.
Start the search again.
2
The status of the search is indicated by the status bar.
n On completion of the search, the TCP/IP settingsmust be configured.
36045-01en | 2015-07 | Commissioning | Quick instructions 9
3
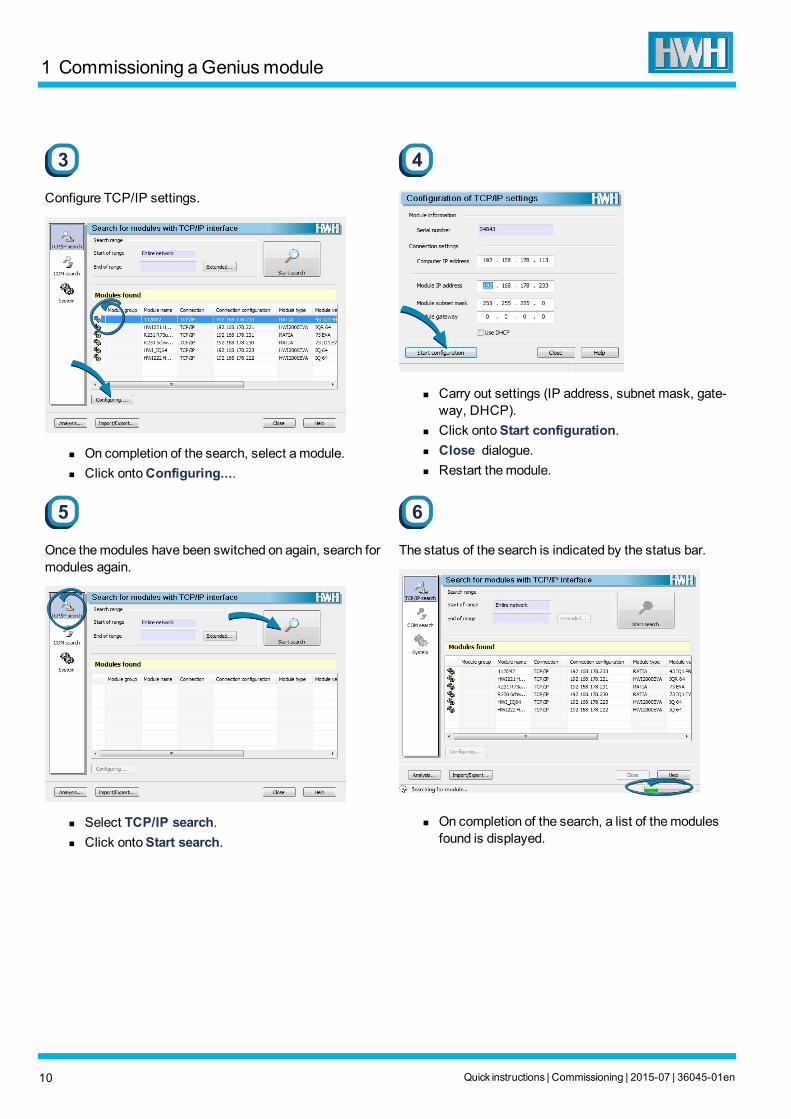
Configure TCP/IP settings.
n On completion of the search, select amodule.n Click ontoConfiguring....
4
n Carry out settings (IP address, subnet mask, gate-way, DHCP).
n Click ontoStart configuration.n Close dialogue.n Restart themodule.
5
Once themodules have been switched on again, search formodules again.
n Select TCP/IP search.n Click ontoStart search.
6
The status of the search is indicated by the status bar.
n On completion of the search, a list of themodulesfound is displayed.
1 Commissioning aGeniusmodule
10 Quick instructions | Commissioning | 2015-07 | 36045-01en
1 Commissioning aGeniusmodule
7
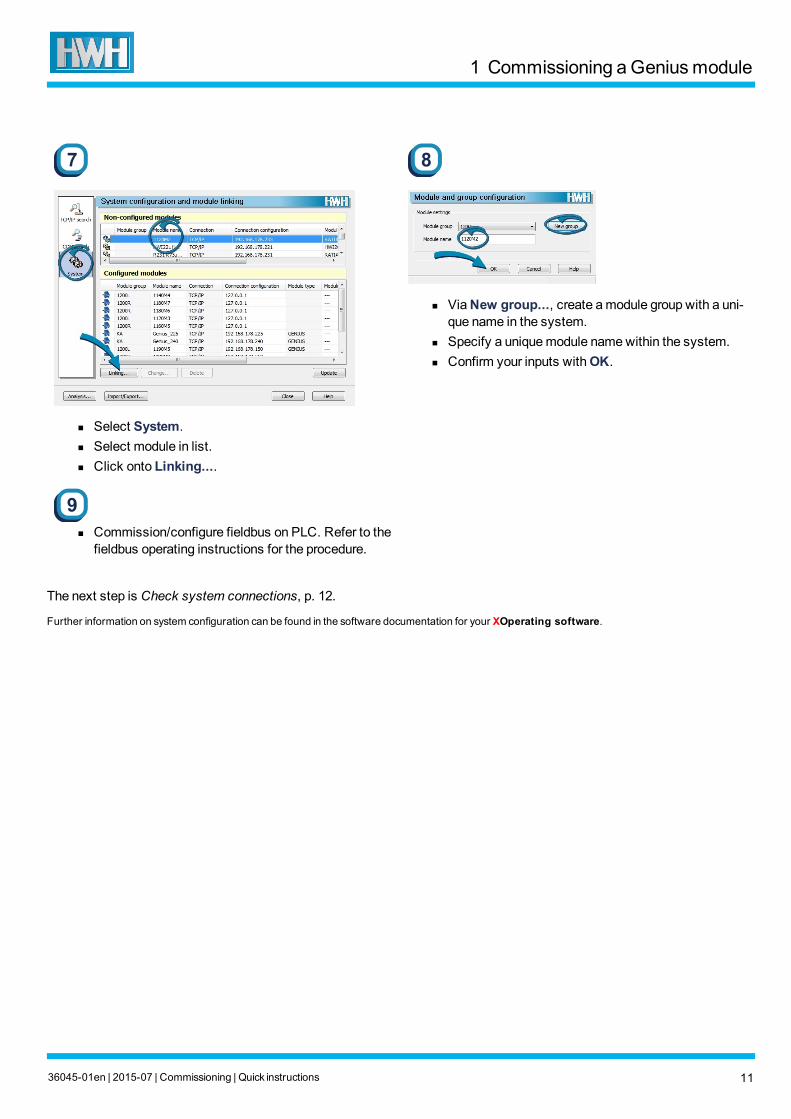
n Select System.n Select module in list.n Click onto Linking....
8
n ViaNew group..., create amodule group with a uni-que name in the system.
n Specify a uniquemodule namewithin the system.n Confirm your inputs withOK.
9
n Commission/configure fieldbus on PLC. Refer to thefieldbus operating instructions for the procedure.
The next step is Check system connections, p. 12.
Further information on system configuration can be found in the software documentation for your XOperating software.
36045-01en | 2015-07 | Commissioning | Quick instructions 11
1.4 Check system connections
1
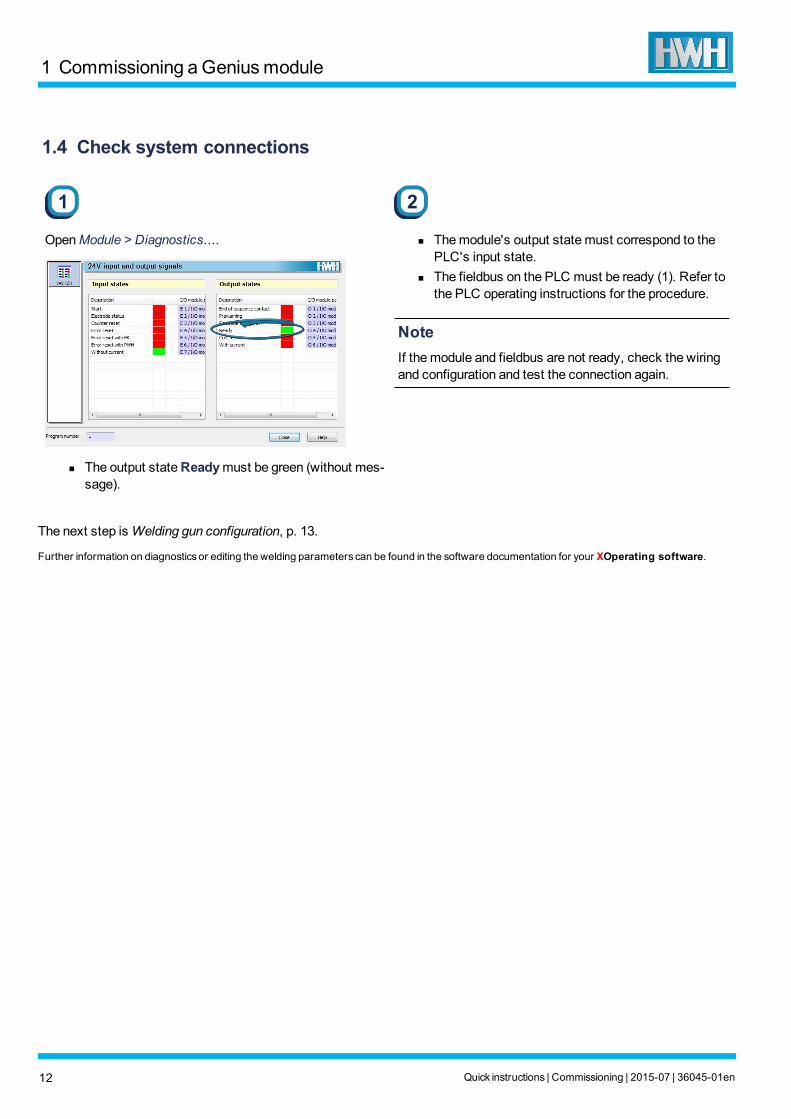
OpenModule > Diagnostics....
n The output stateReadymust be green (without mes-sage).
2
n Themodule's output state must correspond to thePLC's input state.
n The fieldbus on the PLC must be ready (1). Refer tothe PLC operating instructions for the procedure.
NoteIf themodule and fieldbus are not ready, check the wiringand configuration and test the connection again.
The next step isWelding gun configuration, p. 13.
Further information on diagnostics or editing the welding parameters can be found in the software documentation for your XOperating software.
1 Commissioning aGeniusmodule
12 Quick instructions | Commissioning | 2015-07 | 36045-01en
1 Commissioning aGeniusmodule
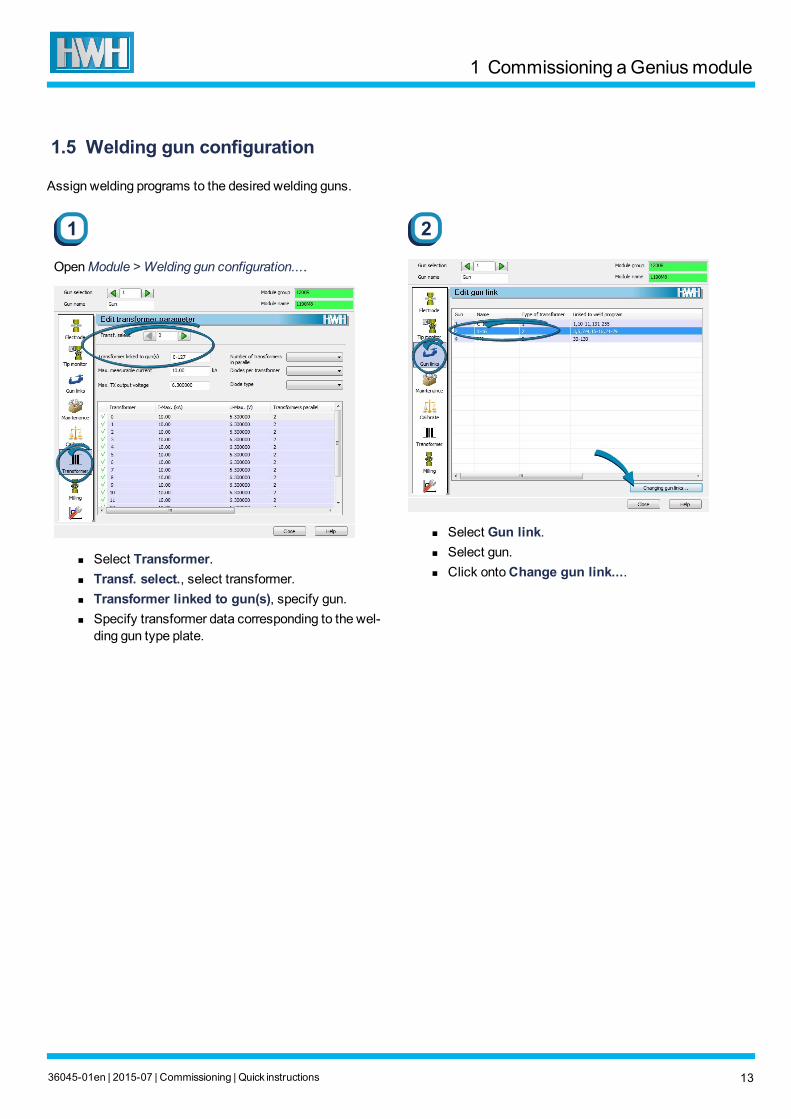
1.5 Welding gun configuration
Assign welding programs to the desired welding guns.
1
OpenModule > Welding gun configuration....
n Select Transformer.n Transf. select., select transformer.n Transformer linked to gun(s), specify gun.n Specify transformer data corresponding to the wel-
ding gun type plate.
2
n Select Gun link.n Select gun.n Click ontoChange gun link....
36045-01en | 2015-07 | Commissioning | Quick instructions 13
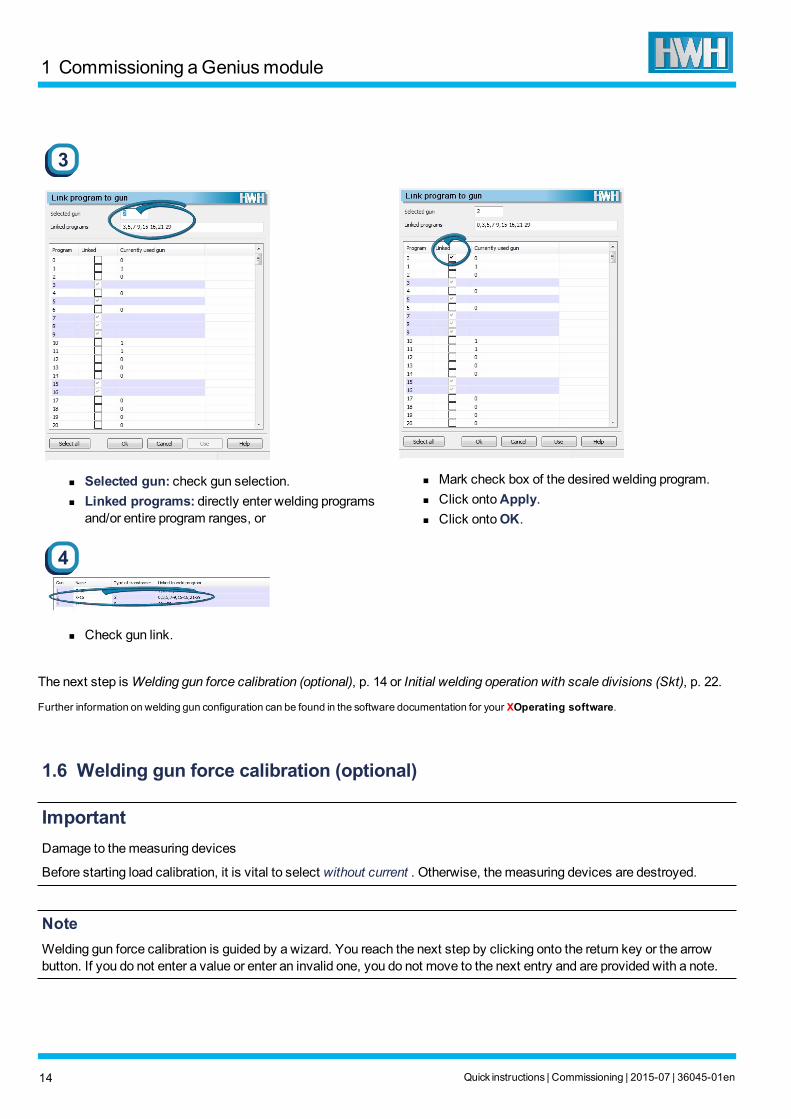
3
n Selected gun: check gun selection.n Linked programs: directly enter welding programs
and/or entire program ranges, or
n Mark check box of the desired welding program.n Click ontoApply.n Click ontoOK.
4
n Check gun link.
The next step isWelding gun force calibration (optional), p. 14 or Initial welding operation with scale divisions (Skt), p. 22.
Further information on welding gun configuration can be found in the software documentation for your XOperating software.
1.6 Welding gun force calibration (optional)
ImportantDamage to themeasuring devices
Before starting load calibration, it is vital to select without current . Otherwise, themeasuring devices are destroyed.
NoteWelding gun force calibration is guided by a wizard. You reach the next step by clicking onto the return key or the arrowbutton. If you do not enter a value or enter an invalid one, you do not move to the next entry and are provided with a note.
1 Commissioning aGeniusmodule
14 Quick instructions | Commissioning | 2015-07 | 36045-01en
1 Commissioning aGeniusmodule
The force corresponding to the nominal value specifications is transferred digitally via the fieldbus. If you have not connec-ted a fieldbus, youmust measure the force in analogue form with a load cell on the welding gun and enter the data accor-dingly.
1.6.1 Digital force calibration 151.6.2 Analogue force calibration 19
1.6.1 Digital force calibration
ImportantDamage to themeasuring devices
Before starting load calibration, it is vital to select without current . Otherwise, themeasuring devices are destroyed.
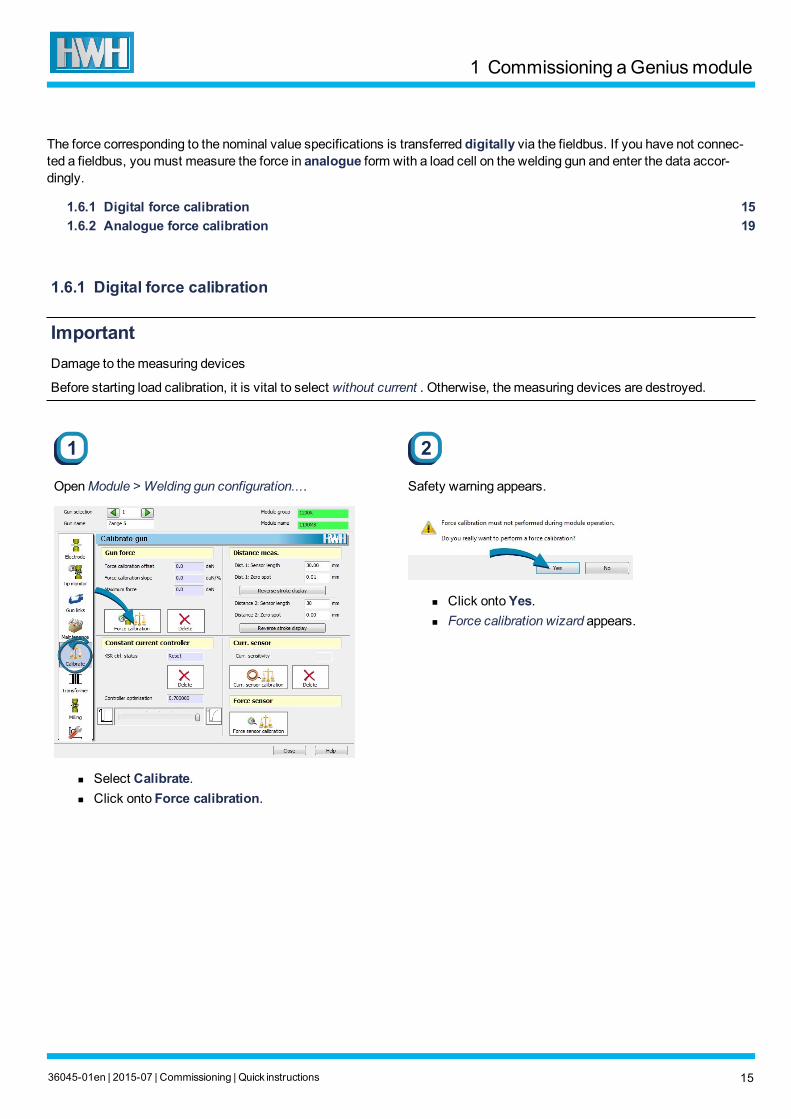
1
OpenModule > Welding gun configuration....
n Select Calibrate.n Click onto Force calibration.
2
Safety warning appears.
n Click ontoYes.n Force calibration wizard appears.
36045-01en | 2015-07 | Commissioning | Quick instructions 15

3
n Check whether the welding gun to be calibrated hasbeen selected.
n EnterSet spot for 1st meas..n Press the return key or click onto the arrow button.
4
n Enter the 1st measured force value according to thewelding gun's technical data.
n Press the return key or click onto the arrow button.
Conversion tables for gun force adaptation
Valencyof a bit
Nominal valueof 1st measurement [%]
1st measuredforce [daN]
Nominal valueof 2nd measurement [%]
2nd measuredforce [daN]
20 N 50% 253 100% 508
50 N 50% 634 100% 1270
100 N 50% 1269 100% 2540
8-bit: 0...255 (0...100%)
Valencyof a bit
Nominal valueof 1st measurement [%]
1st measuredforce [daN]
Nominal valueof 2nd measurement [%]
2nd measuredforce [daN]
1 N 50% 3274 100% 6553
16-bit: 0...65,535 (0...100%)
1 Commissioning aGeniusmodule
16 Quick instructions | Commissioning | 2015-07 | 36045-01en
1 Commissioning aGeniusmodule
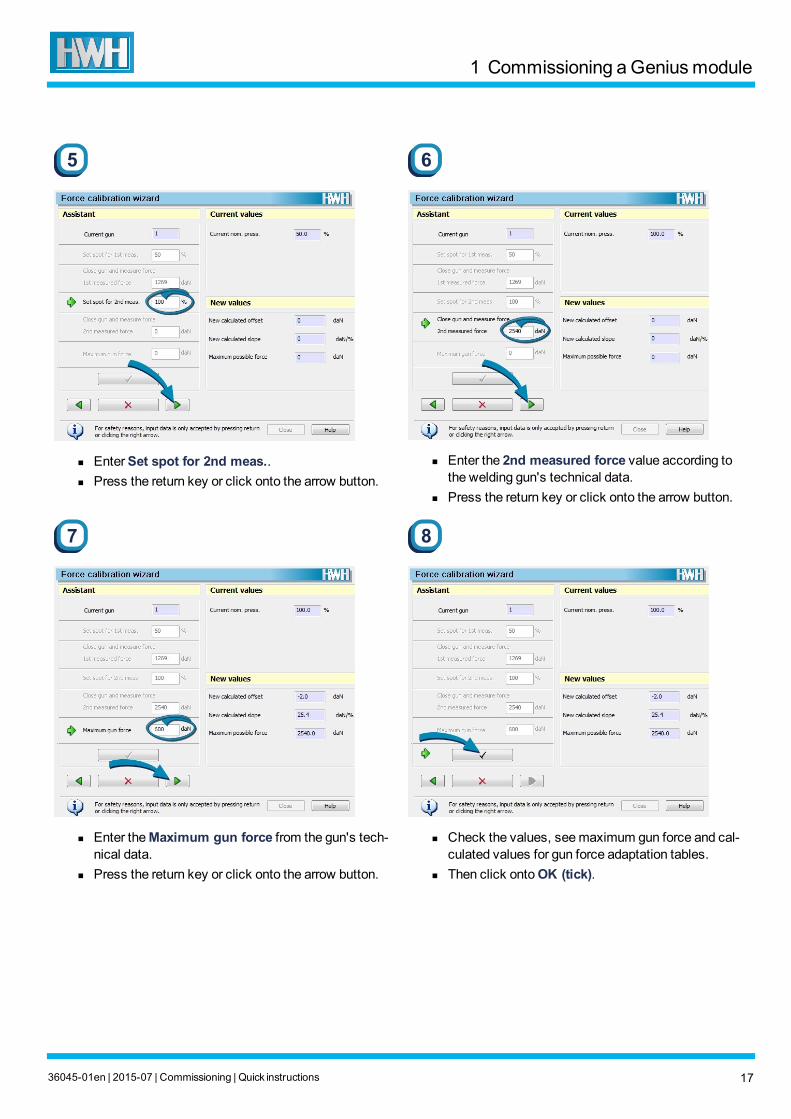
5
n EnterSet spot for 2nd meas..n Press the return key or click onto the arrow button.
6
n Enter the 2nd measured force value according tothe welding gun's technical data.
n Press the return key or click onto the arrow button.
7
n Enter theMaximum gun force from the gun's tech-nical data.
n Press the return key or click onto the arrow button.
8
n Check the values, seemaximum gun force and cal-culated values for gun force adaptation tables.
n Then click ontoOK (tick).
36045-01en | 2015-07 | Commissioning | Quick instructions 17
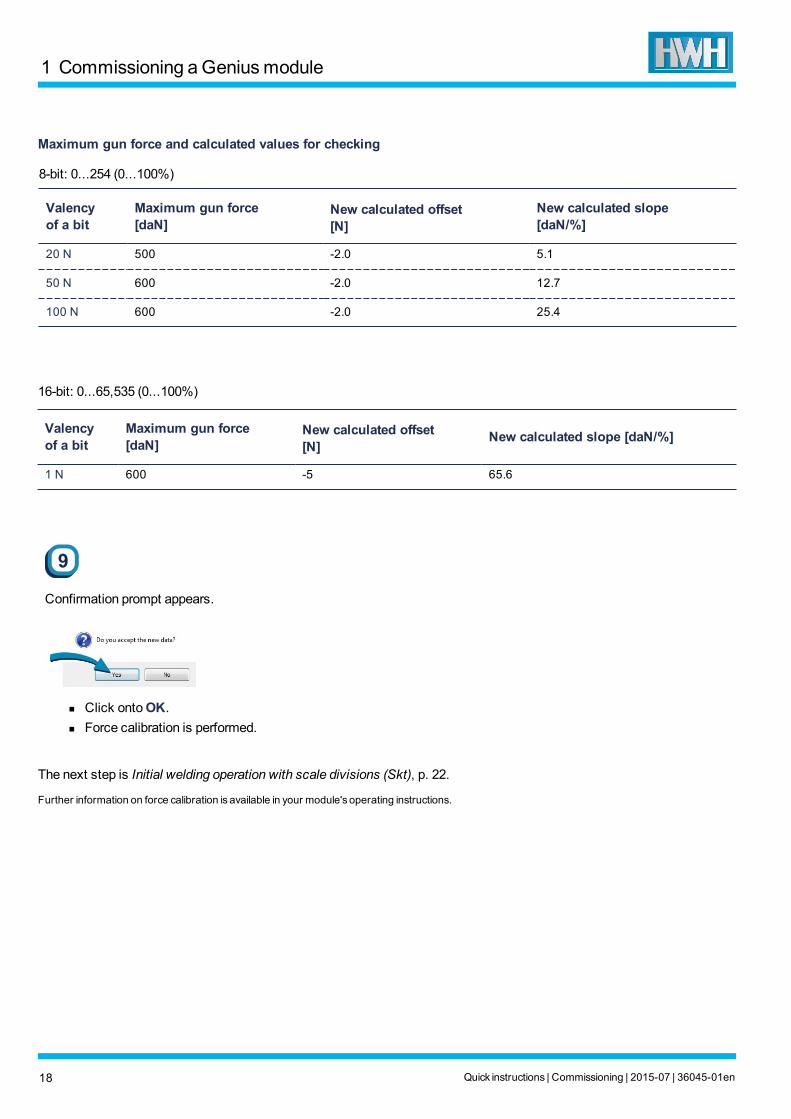
Maximum gun force and calculated values for checking
Valencyof a bit
Maximum gun force[daN]
New calculated offset[N]
New calculated slope[daN/%]
20 N 500 -2.0 5.1
50 N 600 -2.0 12.7
100 N 600 -2.0 25.4
8-bit: 0...254 (0...100%)
Valencyof a bit
Maximum gun force[daN]
New calculated offset[N]
New calculated slope [daN/%]
1 N 600 -5 65.6
16-bit: 0...65,535 (0...100%)
9
Confirmation prompt appears.
n Click ontoOK.n Force calibration is performed.
The next step is Initial welding operation with scale divisions (Skt), p. 22.
Further information on force calibration is available in your module's operating instructions.
1 Commissioning aGeniusmodule
18 Quick instructions | Commissioning | 2015-07 | 36045-01en
1 Commissioning aGeniusmodule
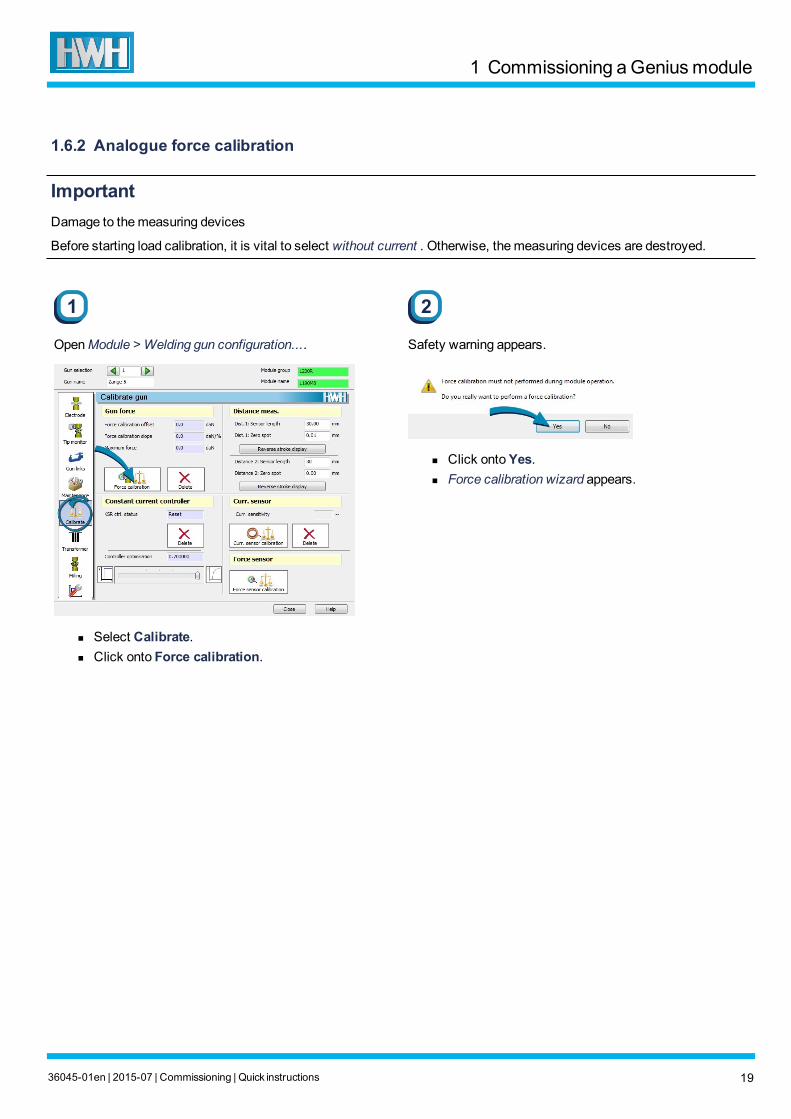
1.6.2 Analogue force calibration
ImportantDamage to themeasuring devices
Before starting load calibration, it is vital to select without current . Otherwise, themeasuring devices are destroyed.
1
OpenModule > Welding gun configuration....
n Select Calibrate.n Click onto Force calibration.
2
Safety warning appears.
n Click ontoYes.n Force calibration wizard appears.
36045-01en | 2015-07 | Commissioning | Quick instructions 19
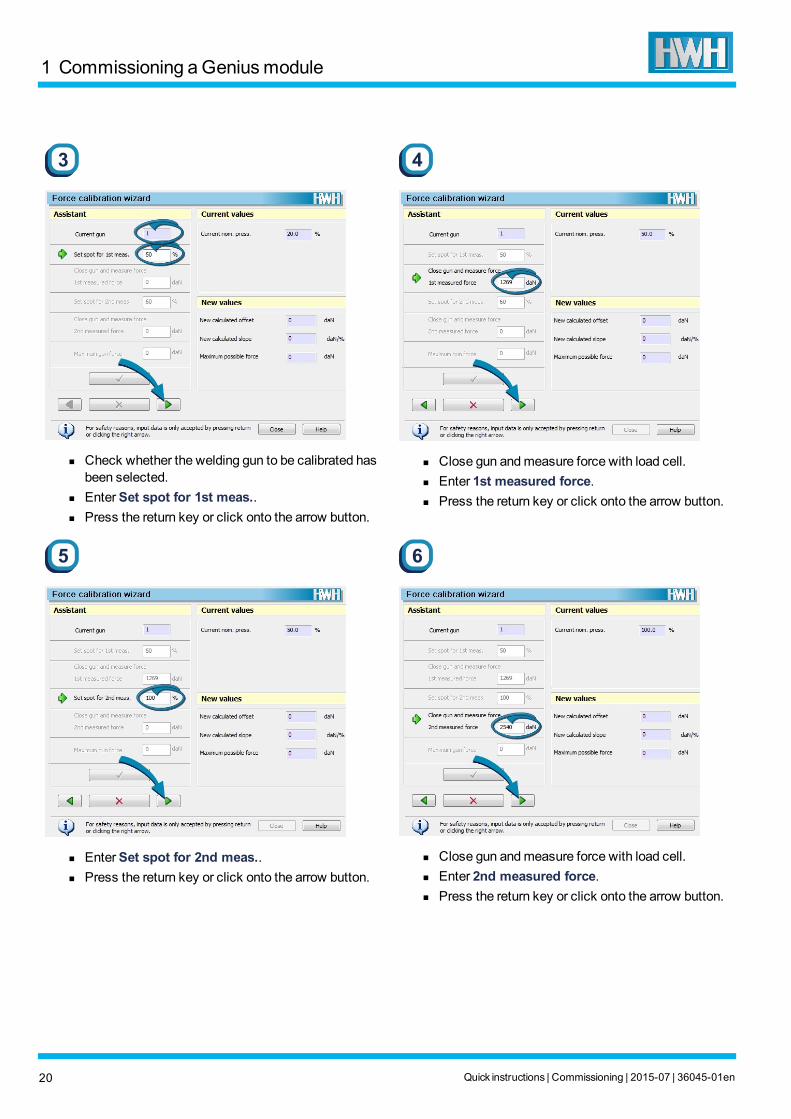
3
n Check whether the welding gun to be calibrated hasbeen selected.
n EnterSet spot for 1st meas..n Press the return key or click onto the arrow button.
4
n Close gun andmeasure force with load cell.n Enter 1st measured force.n Press the return key or click onto the arrow button.
5
n EnterSet spot for 2nd meas..n Press the return key or click onto the arrow button.
6
n Close gun andmeasure force with load cell.n Enter 2nd measured force.n Press the return key or click onto the arrow button.
1 Commissioning aGeniusmodule
20 Quick instructions | Commissioning | 2015-07 | 36045-01en
1 Commissioning aGeniusmodule
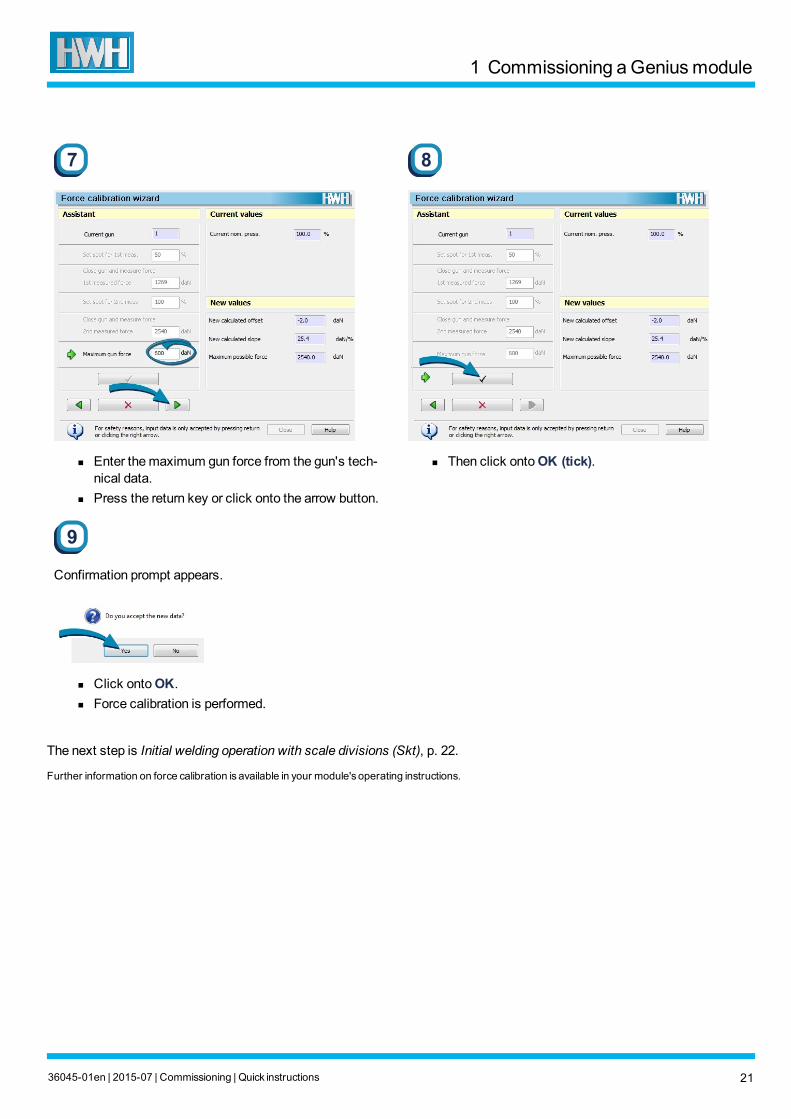
7
n Enter themaximum gun force from the gun's tech-nical data.
n Press the return key or click onto the arrow button.
8
n Then click ontoOK (tick).
9
Confirmation prompt appears.
n Click ontoOK.n Force calibration is performed.
The next step is Initial welding operation with scale divisions (Skt), p. 22.
Further information on force calibration is available in your module's operating instructions.
36045-01en | 2015-07 | Commissioning | Quick instructions 21

1.7 Initial welding operation with scale divisions (Skt)
The initial test welding operation with scale divisions is used to check themeasurement inputs required for controlled wel-ding.
1
OpenModule > Editing welding parameters....
n Select Overview.n Select Program selection 0.n Select Program status Free.n Select Control modeSKT.n Perform initial welding operation.
2
OpenModule > Analysis....
n Select Programme selection 0.n Currentmust correspond to an appropriate value.n Voltagemust be > 0.1 V.
NoteIf you do not obtain plausible values, check the wiring andrepeat the initial welding operation.
The next step is Adapt constant current controller (KSR), p. 22.
Further information on diagnostics or editing the welding parameters can be found in the software documentation for your XOperating software.
1.8 Adapt constant current controller (KSR)
To adapt the constant current controller, youmust edit certain welding parameters and perform five KSR set-up welding ope-rations.
1.8.1 Edit welding parameter 231.8.2 KSR set-up welding operations 24
1 Commissioning aGeniusmodule
22 Quick instructions | Commissioning | 2015-07 | 36045-01en
1 Commissioning aGeniusmodule
1.8.1 Edit welding parameter
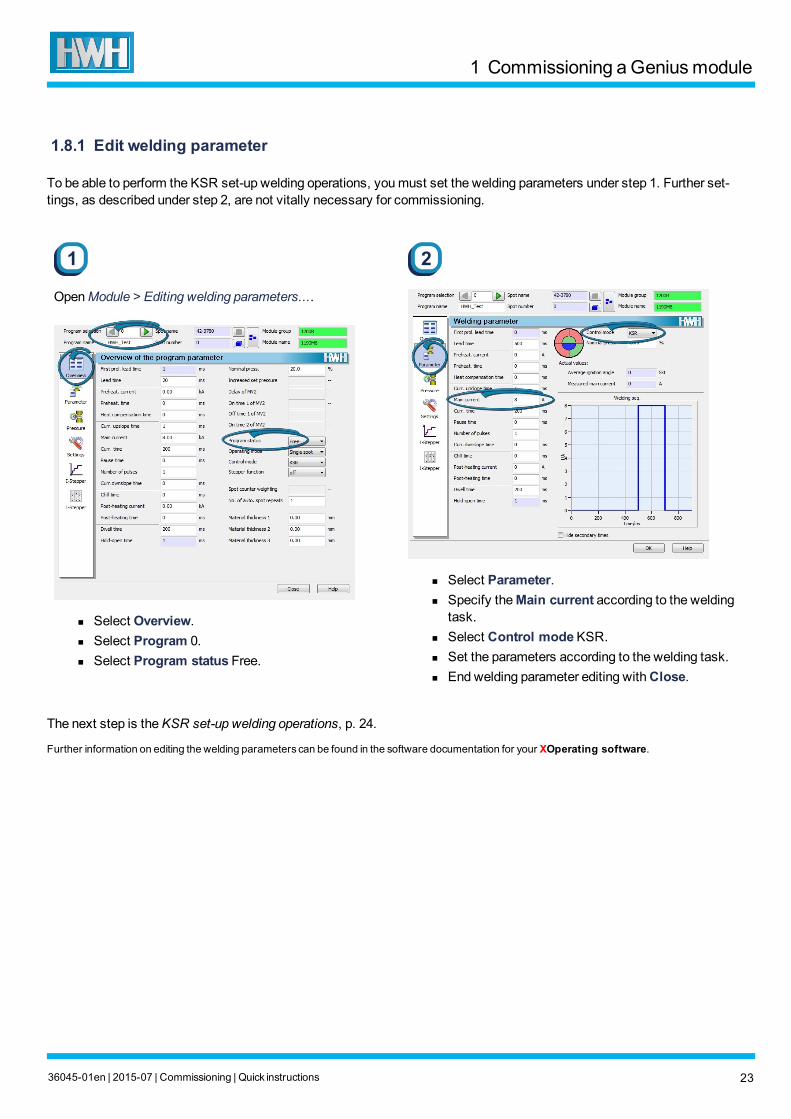
To be able to perform the KSR set-up welding operations, youmust set the welding parameters under step 1. Further set-tings, as described under step 2, are not vitally necessary for commissioning.
1
OpenModule > Editing welding parameters....
n Select Overview.n Select Program 0.n Select Program status Free.
2
n Select Parameter.n Specify theMain current according to the welding
task.n Select Control modeKSR.n Set the parameters according to the welding task.n Endwelding parameter editing withClose.
The next step is theKSR set-up welding operations, p. 24.
Further information on editing the welding parameters can be found in the software documentation for your XOperating software.
36045-01en | 2015-07 | Commissioning | Quick instructions 23
1.8.2 KSR set-up welding operations
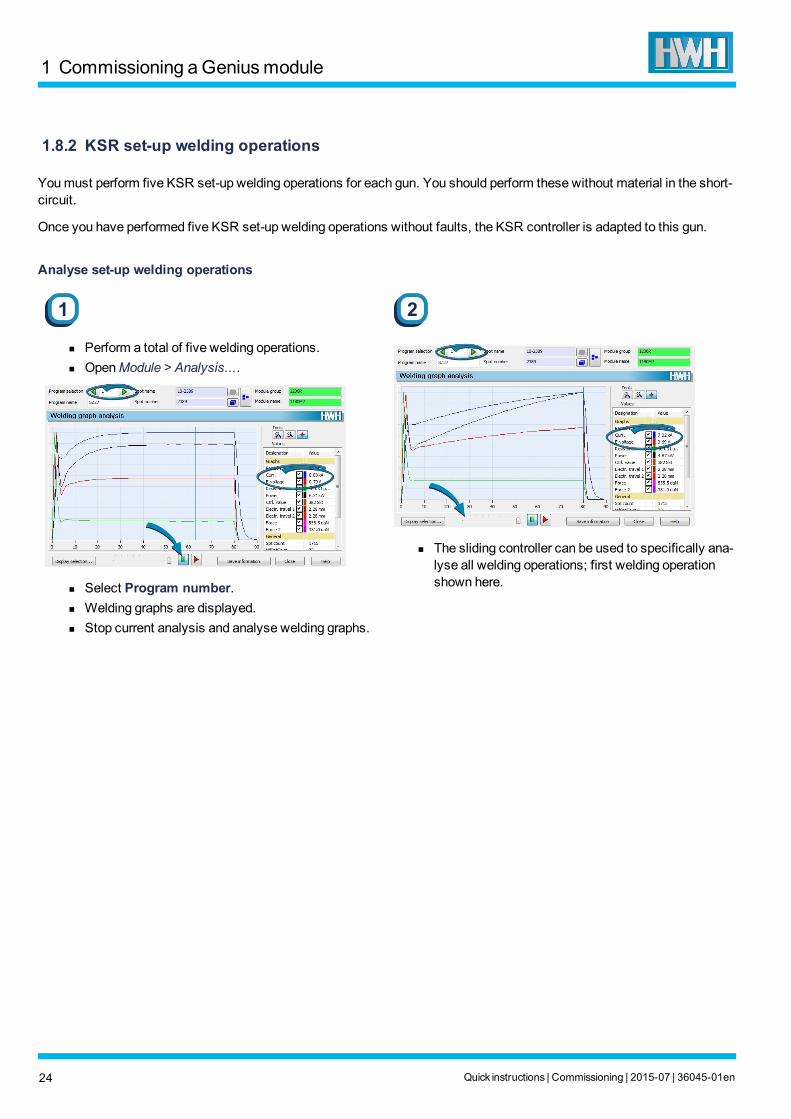
Youmust perform five KSR set-up welding operations for each gun. You should perform these without material in the short-circuit.
Once you have performed five KSR set-up welding operations without faults, the KSR controller is adapted to this gun.
Analyse set-up welding operations
1
n Perform a total of five welding operations.n OpenModule > Analysis....
n Select Program number.n Welding graphs are displayed.n Stop current analysis and analyse welding graphs.
2
n The sliding controller can be used to specifically ana-lyse all welding operations; first welding operationshown here.
1 Commissioning aGeniusmodule
24 Quick instructions | Commissioning | 2015-07 | 36045-01en
1 Commissioning aGeniusmodule
Check KSR controller status
1
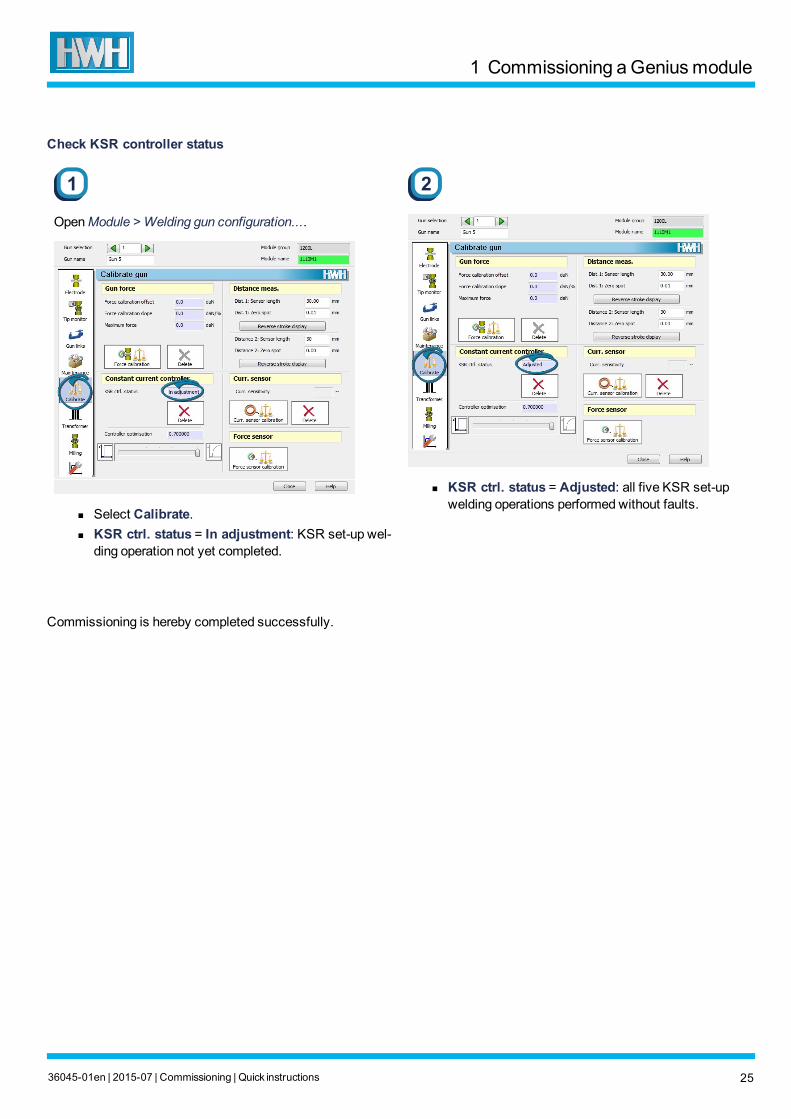
OpenModule > Welding gun configuration....
n Select Calibrate.n KSR ctrl. status = In adjustment: KSR set-up wel-
ding operation not yet completed.
2
n KSR ctrl. status = Adjusted: all five KSR set-upwelding operations performed without faults.
Commissioning is hereby completed successfully.
36045-01en | 2015-07 | Commissioning | Quick instructions 25

Notes
Notes
26 Quick instructions | Commissioning | 2015-07 | 36045-01en