application help for sap product lifecycle costing
TRANSCRIPT
User Guide | PUBLICSAP Product Lifecycle Costing2021-12-23
Application Help for SAP Product Lifecycle CostingRelease 4.0 Support Package 3
© 2
021 S
AP S
E or
an
SAP affi
liate
com
pany
. All r
ight
s re
serv
ed.
THE BEST RUN
Content
1 SAP Product Lifecycle Costing 4.0. . . . . . . . . . . . . . . . . . . . . . . . . . . . . . . . . . . . . . . . . . . . . . . 9
2 Getting Started. . . . . . . . . . . . . . . . . . . . . . . . . . . . . . . . . . . . . . . . . . . . . . . . . . . . . . . . . . . . .122.1 Logging In. . . . . . . . . . . . . . . . . . . . . . . . . . . . . . . . . . . . . . . . . . . . . . . . . . . . . . . . . . . . . . . . . 122.2 My Home. . . . . . . . . . . . . . . . . . . . . . . . . . . . . . . . . . . . . . . . . . . . . . . . . . . . . . . . . . . . . . . . . . 132.3 Autocomplete for Fields. . . . . . . . . . . . . . . . . . . . . . . . . . . . . . . . . . . . . . . . . . . . . . . . . . . . . . . . 142.4 Managing Messages. . . . . . . . . . . . . . . . . . . . . . . . . . . . . . . . . . . . . . . . . . . . . . . . . . . . . . . . . . 16
3 Searching and Filtering. . . . . . . . . . . . . . . . . . . . . . . . . . . . . . . . . . . . . . . . . . . . . . . . . . . . . . . 193.1 Searching Globally. . . . . . . . . . . . . . . . . . . . . . . . . . . . . . . . . . . . . . . . . . . . . . . . . . . . . . . . . . . 193.2 Filtering in the Cockpit View. . . . . . . . . . . . . . . . . . . . . . . . . . . . . . . . . . . . . . . . . . . . . . . . . . . . .203.3 Filtering in the Calculation View. . . . . . . . . . . . . . . . . . . . . . . . . . . . . . . . . . . . . . . . . . . . . . . . . . 20
Simple Filtering in the Costing Structure. . . . . . . . . . . . . . . . . . . . . . . . . . . . . . . . . . . . . . . . . 20Filtering in the Side Panel. . . . . . . . . . . . . . . . . . . . . . . . . . . . . . . . . . . . . . . . . . . . . . . . . . . . 21Advanced Filter. . . . . . . . . . . . . . . . . . . . . . . . . . . . . . . . . . . . . . . . . . . . . . . . . . . . . . . . . . . 22
3.4 Filtering in the Administration View. . . . . . . . . . . . . . . . . . . . . . . . . . . . . . . . . . . . . . . . . . . . . . . .243.5 Filtering in the Variants View. . . . . . . . . . . . . . . . . . . . . . . . . . . . . . . . . . . . . . . . . . . . . . . . . . . . 25
4 Using the Cockpit. . . . . . . . . . . . . . . . . . . . . . . . . . . . . . . . . . . . . . . . . . . . . . . . . . . . . . . . . . .264.1 Using Tags. . . . . . . . . . . . . . . . . . . . . . . . . . . . . . . . . . . . . . . . . . . . . . . . . . . . . . . . . . . . . . . . . 284.2 Assigning Statuses. . . . . . . . . . . . . . . . . . . . . . . . . . . . . . . . . . . . . . . . . . . . . . . . . . . . . . . . . . . 29
5 Personalizing the Calculation View. . . . . . . . . . . . . . . . . . . . . . . . . . . . . . . . . . . . . . . . . . . . . . 315.1 Changing the Layout in the Table. . . . . . . . . . . . . . . . . . . . . . . . . . . . . . . . . . . . . . . . . . . . . . . . . 315.2 Changing the Layout in the Side Panel. . . . . . . . . . . . . . . . . . . . . . . . . . . . . . . . . . . . . . . . . . . . . 325.3 Working with Layouts. . . . . . . . . . . . . . . . . . . . . . . . . . . . . . . . . . . . . . . . . . . . . . . . . . . . . . . . . 33
6 Folders. . . . . . . . . . . . . . . . . . . . . . . . . . . . . . . . . . . . . . . . . . . . . . . . . . . . . . . . . . . . . . . . . . . 356.1 Creating a Folder. . . . . . . . . . . . . . . . . . . . . . . . . . . . . . . . . . . . . . . . . . . . . . . . . . . . . . . . . . . . 356.2 Moving a Folder. . . . . . . . . . . . . . . . . . . . . . . . . . . . . . . . . . . . . . . . . . . . . . . . . . . . . . . . . . . . . 366.3 Renaming a Folder. . . . . . . . . . . . . . . . . . . . . . . . . . . . . . . . . . . . . . . . . . . . . . . . . . . . . . . . . . . 376.4 Deleting a Folder. . . . . . . . . . . . . . . . . . . . . . . . . . . . . . . . . . . . . . . . . . . . . . . . . . . . . . . . . . . . .38
7 Projects. . . . . . . . . . . . . . . . . . . . . . . . . . . . . . . . . . . . . . . . . . . . . . . . . . . . . . . . . . . . . . . . . . 397.1 Creating a Project. . . . . . . . . . . . . . . . . . . . . . . . . . . . . . . . . . . . . . . . . . . . . . . . . . . . . . . . . . . . 427.2 Deleting a Project. . . . . . . . . . . . . . . . . . . . . . . . . . . . . . . . . . . . . . . . . . . . . . . . . . . . . . . . . . . . 437.3 Working with Project Data. . . . . . . . . . . . . . . . . . . . . . . . . . . . . . . . . . . . . . . . . . . . . . . . . . . . . . 447.4 Moving a Calculation to Another Project. . . . . . . . . . . . . . . . . . . . . . . . . . . . . . . . . . . . . . . . . . . . 507.5 Moving a Project to a Folder. . . . . . . . . . . . . . . . . . . . . . . . . . . . . . . . . . . . . . . . . . . . . . . . . . . . . 51
2 PUBLICApplication Help for SAP Product Lifecycle Costing
Content
8 Project Lifecycle. . . . . . . . . . . . . . . . . . . . . . . . . . . . . . . . . . . . . . . . . . . . . . . . . . . . . . . . . . . .528.1 Selecting Lifecycle Periods. . . . . . . . . . . . . . . . . . . . . . . . . . . . . . . . . . . . . . . . . . . . . . . . . . . . . 538.2 Entering Lifecycle Quantities. . . . . . . . . . . . . . . . . . . . . . . . . . . . . . . . . . . . . . . . . . . . . . . . . . . . 558.3 One-Time Costs. . . . . . . . . . . . . . . . . . . . . . . . . . . . . . . . . . . . . . . . . . . . . . . . . . . . . . . . . . . . . 56
Creating One-Time Costs. . . . . . . . . . . . . . . . . . . . . . . . . . . . . . . . . . . . . . . . . . . . . . . . . . . . 59Distributing One-Time Costs. . . . . . . . . . . . . . . . . . . . . . . . . . . . . . . . . . . . . . . . . . . . . . . . . . 61
8.4 Surcharges. . . . . . . . . . . . . . . . . . . . . . . . . . . . . . . . . . . . . . . . . . . . . . . . . . . . . . . . . . . . . . . . 63Defining Surcharge Rules. . . . . . . . . . . . . . . . . . . . . . . . . . . . . . . . . . . . . . . . . . . . . . . . . . . . 65Applying Surcharges. . . . . . . . . . . . . . . . . . . . . . . . . . . . . . . . . . . . . . . . . . . . . . . . . . . . . . . 67
8.5 Preparing Versions for Lifecycle Calculation. . . . . . . . . . . . . . . . . . . . . . . . . . . . . . . . . . . . . . . . . 698.6 Calculating the Project Lifecycle . . . . . . . . . . . . . . . . . . . . . . . . . . . . . . . . . . . . . . . . . . . . . . . . . .718.7 Lifecycle Versions. . . . . . . . . . . . . . . . . . . . . . . . . . . . . . . . . . . . . . . . . . . . . . . . . . . . . . . . . . . . 72
Generating Lifecycle Versions. . . . . . . . . . . . . . . . . . . . . . . . . . . . . . . . . . . . . . . . . . . . . . . . . 73Base Versions. . . . . . . . . . . . . . . . . . . . . . . . . . . . . . . . . . . . . . . . . . . . . . . . . . . . . . . . . . . . 73Using References in Base Versions. . . . . . . . . . . . . . . . . . . . . . . . . . . . . . . . . . . . . . . . . . . . . .74Price Determination for Lifecycle Versions. . . . . . . . . . . . . . . . . . . . . . . . . . . . . . . . . . . . . . . . 75Editing Lifecycle Versions. . . . . . . . . . . . . . . . . . . . . . . . . . . . . . . . . . . . . . . . . . . . . . . . . . . . 76
8.8 Authorizations for Projects. . . . . . . . . . . . . . . . . . . . . . . . . . . . . . . . . . . . . . . . . . . . . . . . . . . . . 77Authorization Level and Types. . . . . . . . . . . . . . . . . . . . . . . . . . . . . . . . . . . . . . . . . . . . . . . . . 77My Authorizations. . . . . . . . . . . . . . . . . . . . . . . . . . . . . . . . . . . . . . . . . . . . . . . . . . . . . . . . . 78Managing Authorizations. . . . . . . . . . . . . . . . . . . . . . . . . . . . . . . . . . . . . . . . . . . . . . . . . . . . 79
9 Calculations. . . . . . . . . . . . . . . . . . . . . . . . . . . . . . . . . . . . . . . . . . . . . . . . . . . . . . . . . . . . . . . 829.1 Creating New Calculations. . . . . . . . . . . . . . . . . . . . . . . . . . . . . . . . . . . . . . . . . . . . . . . . . . . . . .829.2 Copying a Calculation and Version. . . . . . . . . . . . . . . . . . . . . . . . . . . . . . . . . . . . . . . . . . . . . . . . 839.3 Renaming a Calculation. . . . . . . . . . . . . . . . . . . . . . . . . . . . . . . . . . . . . . . . . . . . . . . . . . . . . . . .849.4 Deleting a Calculation. . . . . . . . . . . . . . . . . . . . . . . . . . . . . . . . . . . . . . . . . . . . . . . . . . . . . . . . . 85
10 Calculation Versions. . . . . . . . . . . . . . . . . . . . . . . . . . . . . . . . . . . . . . . . . . . . . . . . . . . . . . . . .8610.1 Creating Calculation Versions. . . . . . . . . . . . . . . . . . . . . . . . . . . . . . . . . . . . . . . . . . . . . . . . . . . 8710.2 Version Header Data in Calculation Versions. . . . . . . . . . . . . . . . . . . . . . . . . . . . . . . . . . . . . . . . . 8810.3 Renaming a Calculation Version. . . . . . . . . . . . . . . . . . . . . . . . . . . . . . . . . . . . . . . . . . . . . . . . . . 9210.4 Deleting a Calculation Version. . . . . . . . . . . . . . . . . . . . . . . . . . . . . . . . . . . . . . . . . . . . . . . . . . . 9210.5 Setting a Calculation Version to Current. . . . . . . . . . . . . . . . . . . . . . . . . . . . . . . . . . . . . . . . . . . . 9310.6 Highlighting Items in a Calculation Version. . . . . . . . . . . . . . . . . . . . . . . . . . . . . . . . . . . . . . . . . . 94
Highlighting Using Mass Change. . . . . . . . . . . . . . . . . . . . . . . . . . . . . . . . . . . . . . . . . . . . . . . 9510.7 Comparing Calculation Versions. . . . . . . . . . . . . . . . . . . . . . . . . . . . . . . . . . . . . . . . . . . . . . . . . 96
Working with Templates. . . . . . . . . . . . . . . . . . . . . . . . . . . . . . . . . . . . . . . . . . . . . . . . . . . . . 98Adapting Item Keys. . . . . . . . . . . . . . . . . . . . . . . . . . . . . . . . . . . . . . . . . . . . . . . . . . . . . . . 100
10.8 Copying a Calculation Version. . . . . . . . . . . . . . . . . . . . . . . . . . . . . . . . . . . . . . . . . . . . . . . . . . 10210.9 Creating a Link to a Calculation Version. . . . . . . . . . . . . . . . . . . . . . . . . . . . . . . . . . . . . . . . . . . . 10210.10 Opening a Shared Link to a Calculation Version. . . . . . . . . . . . . . . . . . . . . . . . . . . . . . . . . . . . . . 103
Application Help for SAP Product Lifecycle CostingContent PUBLIC 3
10.11 Analyzing Costs in a Calculation Version. . . . . . . . . . . . . . . . . . . . . . . . . . . . . . . . . . . . . . . . . . . 10410.12 Freezing a Calculation Version. . . . . . . . . . . . . . . . . . . . . . . . . . . . . . . . . . . . . . . . . . . . . . . . . . 105
Automatic Updates in Frozen Calculation Versions. . . . . . . . . . . . . . . . . . . . . . . . . . . . . . . . . 10610.13 Using Master Data in Calculation Versions. . . . . . . . . . . . . . . . . . . . . . . . . . . . . . . . . . . . . . . . . . 106
Updating Master Data in a Calculation Version. . . . . . . . . . . . . . . . . . . . . . . . . . . . . . . . . . . . 107Master Data Dependencies for Items. . . . . . . . . . . . . . . . . . . . . . . . . . . . . . . . . . . . . . . . . . . 108
10.14 Changing the Valuation Date in a Calculation Version. . . . . . . . . . . . . . . . . . . . . . . . . . . . . . . . . . 10910.15 Using Costing Sheets in Calculation Versions. . . . . . . . . . . . . . . . . . . . . . . . . . . . . . . . . . . . . . . . 11010.16 Mass Change for Items in a Calculation Version. . . . . . . . . . . . . . . . . . . . . . . . . . . . . . . . . . . . . . 112
Performing a Mass Change . . . . . . . . . . . . . . . . . . . . . . . . . . . . . . . . . . . . . . . . . . . . . . . . . . 113Actions Available for Mass Change. . . . . . . . . . . . . . . . . . . . . . . . . . . . . . . . . . . . . . . . . . . . . 115Managing Configurations for Mass Change. . . . . . . . . . . . . . . . . . . . . . . . . . . . . . . . . . . . . . . 118
11 Costing Structures. . . . . . . . . . . . . . . . . . . . . . . . . . . . . . . . . . . . . . . . . . . . . . . . . . . . . . . . . 12011.1 Creating Costing Structures. . . . . . . . . . . . . . . . . . . . . . . . . . . . . . . . . . . . . . . . . . . . . . . . . . . . 12011.2 Working with Items. . . . . . . . . . . . . . . . . . . . . . . . . . . . . . . . . . . . . . . . . . . . . . . . . . . . . . . . . . 122
Adding Items in Costing Structures. . . . . . . . . . . . . . . . . . . . . . . . . . . . . . . . . . . . . . . . . . . . 122Cut, Copy, and Paste. . . . . . . . . . . . . . . . . . . . . . . . . . . . . . . . . . . . . . . . . . . . . . . . . . . . . . .123Activating and Deactivating Items and Assemblies. . . . . . . . . . . . . . . . . . . . . . . . . . . . . . . . . .124
11.3 Item Categories. . . . . . . . . . . . . . . . . . . . . . . . . . . . . . . . . . . . . . . . . . . . . . . . . . . . . . . . . . . . 126Calculation Version. . . . . . . . . . . . . . . . . . . . . . . . . . . . . . . . . . . . . . . . . . . . . . . . . . . . . . . . 127Documents. . . . . . . . . . . . . . . . . . . . . . . . . . . . . . . . . . . . . . . . . . . . . . . . . . . . . . . . . . . . . 131Materials. . . . . . . . . . . . . . . . . . . . . . . . . . . . . . . . . . . . . . . . . . . . . . . . . . . . . . . . . . . . . . . 134Internal Activities. . . . . . . . . . . . . . . . . . . . . . . . . . . . . . . . . . . . . . . . . . . . . . . . . . . . . . . . . 138External Activities. . . . . . . . . . . . . . . . . . . . . . . . . . . . . . . . . . . . . . . . . . . . . . . . . . . . . . . . 140Processes. . . . . . . . . . . . . . . . . . . . . . . . . . . . . . . . . . . . . . . . . . . . . . . . . . . . . . . . . . . . . . 143Subcontracting. . . . . . . . . . . . . . . . . . . . . . . . . . . . . . . . . . . . . . . . . . . . . . . . . . . . . . . . . . 145Resources and Tools. . . . . . . . . . . . . . . . . . . . . . . . . . . . . . . . . . . . . . . . . . . . . . . . . . . . . . . 148Text Items. . . . . . . . . . . . . . . . . . . . . . . . . . . . . . . . . . . . . . . . . . . . . . . . . . . . . . . . . . . . . . 150Variable Items. . . . . . . . . . . . . . . . . . . . . . . . . . . . . . . . . . . . . . . . . . . . . . . . . . . . . . . . . . . 152Referenced Version. . . . . . . . . . . . . . . . . . . . . . . . . . . . . . . . . . . . . . . . . . . . . . . . . . . . . . . .157
11.4 Organizational Data for Items. . . . . . . . . . . . . . . . . . . . . . . . . . . . . . . . . . . . . . . . . . . . . . . . . . . 15711.5 Quantities for Items. . . . . . . . . . . . . . . . . . . . . . . . . . . . . . . . . . . . . . . . . . . . . . . . . . . . . . . . . . 15811.6 Prices for Items. . . . . . . . . . . . . . . . . . . . . . . . . . . . . . . . . . . . . . . . . . . . . . . . . . . . . . . . . . . . .16011.7 Calculated Values for Items. . . . . . . . . . . . . . . . . . . . . . . . . . . . . . . . . . . . . . . . . . . . . . . . . . . . 162
12 Working with Variants. . . . . . . . . . . . . . . . . . . . . . . . . . . . . . . . . . . . . . . . . . . . . . . . . . . . . . . 16412.1 Variant Base Version. . . . . . . . . . . . . . . . . . . . . . . . . . . . . . . . . . . . . . . . . . . . . . . . . . . . . . . . . 16412.2 Variant Matrix. . . . . . . . . . . . . . . . . . . . . . . . . . . . . . . . . . . . . . . . . . . . . . . . . . . . . . . . . . . . . . 166
Creating a Variant Matrix. . . . . . . . . . . . . . . . . . . . . . . . . . . . . . . . . . . . . . . . . . . . . . . . . . . .167Opening a Variant Matrix. . . . . . . . . . . . . . . . . . . . . . . . . . . . . . . . . . . . . . . . . . . . . . . . . . . .168Changing Quantities and Units of Measure in a Variant Matrix. . . . . . . . . . . . . . . . . . . . . . . . . .168
4 PUBLICApplication Help for SAP Product Lifecycle Costing
Content
Removing Markings from a Variant Matrix. . . . . . . . . . . . . . . . . . . . . . . . . . . . . . . . . . . . . . . . 170Deleting a Variant Matrix. . . . . . . . . . . . . . . . . . . . . . . . . . . . . . . . . . . . . . . . . . . . . . . . . . . . 171
12.3 Variants. . . . . . . . . . . . . . . . . . . . . . . . . . . . . . . . . . . . . . . . . . . . . . . . . . . . . . . . . . . . . . . . . . 172Creating New Variants. . . . . . . . . . . . . . . . . . . . . . . . . . . . . . . . . . . . . . . . . . . . . . . . . . . . . .172Deleting Variants. . . . . . . . . . . . . . . . . . . . . . . . . . . . . . . . . . . . . . . . . . . . . . . . . . . . . . . . . 173Displaying Variants. . . . . . . . . . . . . . . . . . . . . . . . . . . . . . . . . . . . . . . . . . . . . . . . . . . . . . . . 174Calculating Variants. . . . . . . . . . . . . . . . . . . . . . . . . . . . . . . . . . . . . . . . . . . . . . . . . . . . . . . 175Creating a Sum Variant. . . . . . . . . . . . . . . . . . . . . . . . . . . . . . . . . . . . . . . . . . . . . . . . . . . . . 176Generating Calculation Versions from Variants. . . . . . . . . . . . . . . . . . . . . . . . . . . . . . . . . . . . 177
12.4 Performance Optimization for Variants. . . . . . . . . . . . . . . . . . . . . . . . . . . . . . . . . . . . . . . . . . . . 178
13 References for Calculation Versions. . . . . . . . . . . . . . . . . . . . . . . . . . . . . . . . . . . . . . . . . . . . 18013.1 Referencing a Calculation Version. . . . . . . . . . . . . . . . . . . . . . . . . . . . . . . . . . . . . . . . . . . . . . . . 18113.2 Opening a Referenced Version. . . . . . . . . . . . . . . . . . . . . . . . . . . . . . . . . . . . . . . . . . . . . . . . . . 18213.3 Updating References. . . . . . . . . . . . . . . . . . . . . . . . . . . . . . . . . . . . . . . . . . . . . . . . . . . . . . . . . 183
14 Working with Processes. . . . . . . . . . . . . . . . . . . . . . . . . . . . . . . . . . . . . . . . . . . . . . . . . . . . . 185
15 Determining Accounts. . . . . . . . . . . . . . . . . . . . . . . . . . . . . . . . . . . . . . . . . . . . . . . . . . . . . . .18715.1 Automatic Account Determination. . . . . . . . . . . . . . . . . . . . . . . . . . . . . . . . . . . . . . . . . . . . . . . 18715.2 Disabling Automatic Account Determination. . . . . . . . . . . . . . . . . . . . . . . . . . . . . . . . . . . . . . . . 189
16 Determining Prices. . . . . . . . . . . . . . . . . . . . . . . . . . . . . . . . . . . . . . . . . . . . . . . . . . . . . . . . . 19116.1 Valid Prices. . . . . . . . . . . . . . . . . . . . . . . . . . . . . . . . . . . . . . . . . . . . . . . . . . . . . . . . . . . . . . . . 19116.2 Automatic Price Determination. . . . . . . . . . . . . . . . . . . . . . . . . . . . . . . . . . . . . . . . . . . . . . . . . .19216.3 Creating Price Determination Strategies. . . . . . . . . . . . . . . . . . . . . . . . . . . . . . . . . . . . . . . . . . . 19416.4 Adding Price Determination Strategies to Projects and Calculation Versions. . . . . . . . . . . . . . . . . . 19516.5 Triggering Automatic Price Determination. . . . . . . . . . . . . . . . . . . . . . . . . . . . . . . . . . . . . . . . . . 19716.6 Disabling Automatic Price Determination. . . . . . . . . . . . . . . . . . . . . . . . . . . . . . . . . . . . . . . . . . 19816.7 Setting Prices Using Prices from Master Data. . . . . . . . . . . . . . . . . . . . . . . . . . . . . . . . . . . . . . . 19916.8 Changing Values in Price Fields Manually. . . . . . . . . . . . . . . . . . . . . . . . . . . . . . . . . . . . . . . . . . 200
17 Calculating Quantities and Costs. . . . . . . . . . . . . . . . . . . . . . . . . . . . . . . . . . . . . . . . . . . . . . 20217.1 Calculating Total Quantities of an Item. . . . . . . . . . . . . . . . . . . . . . . . . . . . . . . . . . . . . . . . . . . . 202
Base Quantities. . . . . . . . . . . . . . . . . . . . . . . . . . . . . . . . . . . . . . . . . . . . . . . . . . . . . . . . . . 203Assembly Quantities. . . . . . . . . . . . . . . . . . . . . . . . . . . . . . . . . . . . . . . . . . . . . . . . . . . . . . 203Lot Size. . . . . . . . . . . . . . . . . . . . . . . . . . . . . . . . . . . . . . . . . . . . . . . . . . . . . . . . . . . . . . . 204Fixed Quantities. . . . . . . . . . . . . . . . . . . . . . . . . . . . . . . . . . . . . . . . . . . . . . . . . . . . . . . . . .205
17.2 Calculating Total Costs of an Item. . . . . . . . . . . . . . . . . . . . . . . . . . . . . . . . . . . . . . . . . . . . . . . .20617.3 Calculating Overheads. . . . . . . . . . . . . . . . . . . . . . . . . . . . . . . . . . . . . . . . . . . . . . . . . . . . . . . 20817.4 Rolling Up Costs and Calculating on Assembly Level. . . . . . . . . . . . . . . . . . . . . . . . . . . . . . . . . . 209
18 Custom Fields and Formulas. . . . . . . . . . . . . . . . . . . . . . . . . . . . . . . . . . . . . . . . . . . . . . . . . . 21018.1 Custom Fields for Items. . . . . . . . . . . . . . . . . . . . . . . . . . . . . . . . . . . . . . . . . . . . . . . . . . . . . . . 212
Application Help for SAP Product Lifecycle CostingContent PUBLIC 5
Creating Custom Fields for Items. . . . . . . . . . . . . . . . . . . . . . . . . . . . . . . . . . . . . . . . . . . . . . 213Modifying Custom Fields for Items. . . . . . . . . . . . . . . . . . . . . . . . . . . . . . . . . . . . . . . . . . . . . 216Deleting Custom Fields for Items. . . . . . . . . . . . . . . . . . . . . . . . . . . . . . . . . . . . . . . . . . . . . . 217Rollup of Custom Field Values. . . . . . . . . . . . . . . . . . . . . . . . . . . . . . . . . . . . . . . . . . . . . . . . 218Formulas for Custom Fields for Items and Standard Fields. . . . . . . . . . . . . . . . . . . . . . . . . . . .220Calculated Values for Custom Fields for Items and Standard Fields. . . . . . . . . . . . . . . . . . . . . .243Units of Measure and Currencies for Custom Fields for Items. . . . . . . . . . . . . . . . . . . . . . . . . . 245
18.2 Custom Fields for Master Data. . . . . . . . . . . . . . . . . . . . . . . . . . . . . . . . . . . . . . . . . . . . . . . . . . 248Creating Custom Fields for Master Data. . . . . . . . . . . . . . . . . . . . . . . . . . . . . . . . . . . . . . . . .250Modifying Custom Fields for Master Data. . . . . . . . . . . . . . . . . . . . . . . . . . . . . . . . . . . . . . . . 252Deleting Custom Fields for Master Data. . . . . . . . . . . . . . . . . . . . . . . . . . . . . . . . . . . . . . . . . 253
19 Analytics and Reporting with External Tools. . . . . . . . . . . . . . . . . . . . . . . . . . . . . . . . . . . . . . 25519.1 SAP PLC Analytic Views. . . . . . . . . . . . . . . . . . . . . . . . . . . . . . . . . . . . . . . . . . . . . . . . . . . . . . .25719.2 Accessing Views Using SAP Analysis for Microsoft Office. . . . . . . . . . . . . . . . . . . . . . . . . . . . . . . .26119.3 Accessing Data from Custom Calculation Views. . . . . . . . . . . . . . . . . . . . . . . . . . . . . . . . . . . . . .263
20 Importing Data. . . . . . . . . . . . . . . . . . . . . . . . . . . . . . . . . . . . . . . . . . . . . . . . . . . . . . . . . . . . 26520.1 Connecting to an SAP ERP System. . . . . . . . . . . . . . . . . . . . . . . . . . . . . . . . . . . . . . . . . . . . . . . 26520.2 Selecting a Level of Import from SAP ERP. . . . . . . . . . . . . . . . . . . . . . . . . . . . . . . . . . . . . . . . . . 26620.3 Importing BOMs and Routings from SAP ERP. . . . . . . . . . . . . . . . . . . . . . . . . . . . . . . . . . . . . . . 266
Steps for Importing BOMs and Routings. . . . . . . . . . . . . . . . . . . . . . . . . . . . . . . . . . . . . . . . 26820.4 Importing Document Structures from SAP ERP. . . . . . . . . . . . . . . . . . . . . . . . . . . . . . . . . . . . . . 270
Steps for Importing Document Structures. . . . . . . . . . . . . . . . . . . . . . . . . . . . . . . . . . . . . . . 27120.5 Importing Costing Structures from Microsoft Excel. . . . . . . . . . . . . . . . . . . . . . . . . . . . . . . . . . . .272
Steps for Importing Costing Structures from Microsoft Excel. . . . . . . . . . . . . . . . . . . . . . . . . . 273Field Requirements for the Microsoft Excel Template. . . . . . . . . . . . . . . . . . . . . . . . . . . . . . . . 274Importing Values for Custom Fields . . . . . . . . . . . . . . . . . . . . . . . . . . . . . . . . . . . . . . . . . . . 288Importing Values for Standard Fields. . . . . . . . . . . . . . . . . . . . . . . . . . . . . . . . . . . . . . . . . . . 296Creating an Import File Using the Microsoft Excel Template. . . . . . . . . . . . . . . . . . . . . . . . . . . 297
21 Working with Master Data. . . . . . . . . . . . . . . . . . . . . . . . . . . . . . . . . . . . . . . . . . . . . . . . . . . 30321.1 Allowed Characters when Creating Master Data. . . . . . . . . . . . . . . . . . . . . . . . . . . . . . . . . . . . . 30421.2 Using Local Master Data. . . . . . . . . . . . . . . . . . . . . . . . . . . . . . . . . . . . . . . . . . . . . . . . . . . . . . 30521.3 Using Master Data from SAP ERP. . . . . . . . . . . . . . . . . . . . . . . . . . . . . . . . . . . . . . . . . . . . . . . . 307
22 Costing and Analysis Master Data. . . . . . . . . . . . . . . . . . . . . . . . . . . . . . . . . . . . . . . . . . . . . 30822.1 Accounts. . . . . . . . . . . . . . . . . . . . . . . . . . . . . . . . . . . . . . . . . . . . . . . . . . . . . . . . . . . . . . . . . 30822.2 Account Groups. . . . . . . . . . . . . . . . . . . . . . . . . . . . . . . . . . . . . . . . . . . . . . . . . . . . . . . . . . . . 309
Creating Account Groups. . . . . . . . . . . . . . . . . . . . . . . . . . . . . . . . . . . . . . . . . . . . . . . . . . . .311Assigning a Single Account to an Account Group. . . . . . . . . . . . . . . . . . . . . . . . . . . . . . . . . . . 311Assigning a Range of Accounts to an Account Group. . . . . . . . . . . . . . . . . . . . . . . . . . . . . . . . 312Removing Accounts from an Account Group. . . . . . . . . . . . . . . . . . . . . . . . . . . . . . . . . . . . . . 313
6 PUBLICApplication Help for SAP Product Lifecycle Costing
Content
Deleting Account Groups. . . . . . . . . . . . . . . . . . . . . . . . . . . . . . . . . . . . . . . . . . . . . . . . . . . 31322.3 Material Account Determination. . . . . . . . . . . . . . . . . . . . . . . . . . . . . . . . . . . . . . . . . . . . . . . . . 314
Working with Attributes for Material Account Determination. . . . . . . . . . . . . . . . . . . . . . . . . . .31522.4 Valuation Classes. . . . . . . . . . . . . . . . . . . . . . . . . . . . . . . . . . . . . . . . . . . . . . . . . . . . . . . . . . . 31722.5 Overhead Groups. . . . . . . . . . . . . . . . . . . . . . . . . . . . . . . . . . . . . . . . . . . . . . . . . . . . . . . . . . . 31822.6 Cost Component Splits. . . . . . . . . . . . . . . . . . . . . . . . . . . . . . . . . . . . . . . . . . . . . . . . . . . . . . . 319
Creating Cost Component Splits. . . . . . . . . . . . . . . . . . . . . . . . . . . . . . . . . . . . . . . . . . . . . . 320Assigning Account Groups to Cost Component Splits. . . . . . . . . . . . . . . . . . . . . . . . . . . . . . . 321Removing Account Groups from Cost Component Splits. . . . . . . . . . . . . . . . . . . . . . . . . . . . . 322
22.7 Costing Sheets. . . . . . . . . . . . . . . . . . . . . . . . . . . . . . . . . . . . . . . . . . . . . . . . . . . . . . . . . . . . . 322Creating Costing Sheets. . . . . . . . . . . . . . . . . . . . . . . . . . . . . . . . . . . . . . . . . . . . . . . . . . . . 324Base Rows. . . . . . . . . . . . . . . . . . . . . . . . . . . . . . . . . . . . . . . . . . . . . . . . . . . . . . . . . . . . . 325Overhead Rows. . . . . . . . . . . . . . . . . . . . . . . . . . . . . . . . . . . . . . . . . . . . . . . . . . . . . . . . . . 327Sum Rows. . . . . . . . . . . . . . . . . . . . . . . . . . . . . . . . . . . . . . . . . . . . . . . . . . . . . . . . . . . . . .333
23 Logistics Master Data. . . . . . . . . . . . . . . . . . . . . . . . . . . . . . . . . . . . . . . . . . . . . . . . . . . . . . .33523.1 Plants. . . . . . . . . . . . . . . . . . . . . . . . . . . . . . . . . . . . . . . . . . . . . . . . . . . . . . . . . . . . . . . . . . . 33523.2 Work Centers. . . . . . . . . . . . . . . . . . . . . . . . . . . . . . . . . . . . . . . . . . . . . . . . . . . . . . . . . . . . . . 336
Assigning Processes and Activities to Work Centers. . . . . . . . . . . . . . . . . . . . . . . . . . . . . . . . 33823.3 Processes. . . . . . . . . . . . . . . . . . . . . . . . . . . . . . . . . . . . . . . . . . . . . . . . . . . . . . . . . . . . . . . . 33923.4 Material Types. . . . . . . . . . . . . . . . . . . . . . . . . . . . . . . . . . . . . . . . . . . . . . . . . . . . . . . . . . . . . 34123.5 Material Groups. . . . . . . . . . . . . . . . . . . . . . . . . . . . . . . . . . . . . . . . . . . . . . . . . . . . . . . . . . . . 34123.6 Materials (General Data). . . . . . . . . . . . . . . . . . . . . . . . . . . . . . . . . . . . . . . . . . . . . . . . . . . . . . 34223.7 Materials (Plant-Specific Data). . . . . . . . . . . . . . . . . . . . . . . . . . . . . . . . . . . . . . . . . . . . . . . . . 34323.8 Material Prices. . . . . . . . . . . . . . . . . . . . . . . . . . . . . . . . . . . . . . . . . . . . . . . . . . . . . . . . . . . . . 345
Creating Material Prices in Master Data. . . . . . . . . . . . . . . . . . . . . . . . . . . . . . . . . . . . . . . . . 347Using Price Components and Price Splits in Material Prices. . . . . . . . . . . . . . . . . . . . . . . . . . . 348
23.9 Customers. . . . . . . . . . . . . . . . . . . . . . . . . . . . . . . . . . . . . . . . . . . . . . . . . . . . . . . . . . . . . . . .35023.10 Vendors. . . . . . . . . . . . . . . . . . . . . . . . . . . . . . . . . . . . . . . . . . . . . . . . . . . . . . . . . . . . . . . . . . 350
24 Finance Master Data. . . . . . . . . . . . . . . . . . . . . . . . . . . . . . . . . . . . . . . . . . . . . . . . . . . . . . . .35224.1 Controlling Areas. . . . . . . . . . . . . . . . . . . . . . . . . . . . . . . . . . . . . . . . . . . . . . . . . . . . . . . . . . . 35224.2 Company Codes. . . . . . . . . . . . . . . . . . . . . . . . . . . . . . . . . . . . . . . . . . . . . . . . . . . . . . . . . . . . 35324.3 Profit Centers. . . . . . . . . . . . . . . . . . . . . . . . . . . . . . . . . . . . . . . . . . . . . . . . . . . . . . . . . . . . . . 35424.4 Business Areas. . . . . . . . . . . . . . . . . . . . . . . . . . . . . . . . . . . . . . . . . . . . . . . . . . . . . . . . . . . . . 35524.5 Cost Centers. . . . . . . . . . . . . . . . . . . . . . . . . . . . . . . . . . . . . . . . . . . . . . . . . . . . . . . . . . . . . . 35624.6 Activity Types and Account Determination. . . . . . . . . . . . . . . . . . . . . . . . . . . . . . . . . . . . . . . . . .35724.7 Activity Prices. . . . . . . . . . . . . . . . . . . . . . . . . . . . . . . . . . . . . . . . . . . . . . . . . . . . . . . . . . . . . 358
Creating Activity Prices in Master Data. . . . . . . . . . . . . . . . . . . . . . . . . . . . . . . . . . . . . . . . . .359Using Price Components and Price Splits in Activity Prices. . . . . . . . . . . . . . . . . . . . . . . . . . . .361
25 Global Settings. . . . . . . . . . . . . . . . . . . . . . . . . . . . . . . . . . . . . . . . . . . . . . . . . . . . . . . . . . . .363
Application Help for SAP Product Lifecycle CostingContent PUBLIC 7

25.1 Other Languages for Master Data Descriptions. . . . . . . . . . . . . . . . . . . . . . . . . . . . . . . . . . . . . . 363
Activating Description Languages. . . . . . . . . . . . . . . . . . . . . . . . . . . . . . . . . . . . . . . . . . . . . 364
Deactivating Description Languages. . . . . . . . . . . . . . . . . . . . . . . . . . . . . . . . . . . . . . . . . . . 364
25.2 Personal Data. . . . . . . . . . . . . . . . . . . . . . . . . . . . . . . . . . . . . . . . . . . . . . . . . . . . . . . . . . . . . . 365
Searching for Personal Data. . . . . . . . . . . . . . . . . . . . . . . . . . . . . . . . . . . . . . . . . . . . . . . . . 365
Downloading Personal Data. . . . . . . . . . . . . . . . . . . . . . . . . . . . . . . . . . . . . . . . . . . . . . . . . .367
Deleting Personal Data. . . . . . . . . . . . . . . . . . . . . . . . . . . . . . . . . . . . . . . . . . . . . . . . . . . . . 368
25.3 Currencies. . . . . . . . . . . . . . . . . . . . . . . . . . . . . . . . . . . . . . . . . . . . . . . . . . . . . . . . . . . . . . . . 369
25.4 Exchange Rate Types. . . . . . . . . . . . . . . . . . . . . . . . . . . . . . . . . . . . . . . . . . . . . . . . . . . . . . . . .370
25.5 Currency Exchange Rates. . . . . . . . . . . . . . . . . . . . . . . . . . . . . . . . . . . . . . . . . . . . . . . . . . . . . .371
Creating Currency Exchange Rates in Master Data. . . . . . . . . . . . . . . . . . . . . . . . . . . . . . . . . 372
25.6 Units of Measure. . . . . . . . . . . . . . . . . . . . . . . . . . . . . . . . . . . . . . . . . . . . . . . . . . . . . . . . . . . . 373
25.7 Material Price and Activity Price Sources. . . . . . . . . . . . . . . . . . . . . . . . . . . . . . . . . . . . . . . . . . . 375
Creating Material Price and Activity Price Sources in Master Data. . . . . . . . . . . . . . . . . . . . . . . 376
25.8 Global Default Values. . . . . . . . . . . . . . . . . . . . . . . . . . . . . . . . . . . . . . . . . . . . . . . . . . . . . . . . .377
25.9 User Groups. . . . . . . . . . . . . . . . . . . . . . . . . . . . . . . . . . . . . . . . . . . . . . . . . . . . . . . . . . . . . . . 378
Creating a User Group. . . . . . . . . . . . . . . . . . . . . . . . . . . . . . . . . . . . . . . . . . . . . . . . . . . . . 378
Adding a Subgroup to a User Group. . . . . . . . . . . . . . . . . . . . . . . . . . . . . . . . . . . . . . . . . . . . 379
Removing a User or Subgroup from a User Group. . . . . . . . . . . . . . . . . . . . . . . . . . . . . . . . . . 380
Deleting a User Group. . . . . . . . . . . . . . . . . . . . . . . . . . . . . . . . . . . . . . . . . . . . . . . . . . . . . 380
25.10 Statuses. . . . . . . . . . . . . . . . . . . . . . . . . . . . . . . . . . . . . . . . . . . . . . . . . . . . . . . . . . . . . . . . . .381
Creating Statuses in Master Data. . . . . . . . . . . . . . . . . . . . . . . . . . . . . . . . . . . . . . . . . . . . . 382
25.11 Configuration. . . . . . . . . . . . . . . . . . . . . . . . . . . . . . . . . . . . . . . . . . . . . . . . . . . . . . . . . . . . . . 383
Redirect Link to Application Help. . . . . . . . . . . . . . . . . . . . . . . . . . . . . . . . . . . . . . . . . . . . . .384
Set Maximum Number of Import Items. . . . . . . . . . . . . . . . . . . . . . . . . . . . . . . . . . . . . . . . . 384
Set Maximum Number of Variants in Sum Variant. . . . . . . . . . . . . . . . . . . . . . . . . . . . . . . . . . 385
Integrate SAP Analysis for Microsoft Office. . . . . . . . . . . . . . . . . . . . . . . . . . . . . . . . . . . . . . .386
26 User-Specific Settings. . . . . . . . . . . . . . . . . . . . . . . . . . . . . . . . . . . . . . . . . . . . . . . . . . . . . . 387
26.1 User-Specific Default Values. . . . . . . . . . . . . . . . . . . . . . . . . . . . . . . . . . . . . . . . . . . . . . . . . . . 387
27 Keyboard Navigation and Shortcuts. . . . . . . . . . . . . . . . . . . . . . . . . . . . . . . . . . . . . . . . . . . . 388
28 Troubleshooting. . . . . . . . . . . . . . . . . . . . . . . . . . . . . . . . . . . . . . . . . . . . . . . . . . . . . . . . . . . 402
29 Glossary. . . . . . . . . . . . . . . . . . . . . . . . . . . . . . . . . . . . . . . . . . . . . . . . . . . . . . . . . . . . . . . . . 411
8 PUBLICApplication Help for SAP Product Lifecycle Costing
Content
1 SAP Product Lifecycle Costing 4.0
Product Information
Product SAP Product Lifecycle Costing
Release 4.0, Support Package 03
Based On SAP HANA 2.0 SPS 05
Use
In today’s fast-evolving market, companies strive to provide innovative, customer-driven products at highly competitive prices. SAP Product Lifecycle Costing is a solution that calculates costs and other dimensions for products and quotations in an early stage of the product lifecycle.
With SAP Product Lifecycle Costing, you can calculate costs quickly and precisely. You can simulate and compare alternatives to gain better visibility and control throughout your product lifecycle. This transparency helps you to identify costs and harness cost-saving potential. You can optimize product quality, drive profit margins, and mitigate future risk to make the most favorable product costing decisions for the entire lifecycle of your products.
You can use SAP Product Lifecycle Costing stand-alone or integrate it with your existing solution landscape to calculate variables of cost in real time using data from your enterprise software.
Features
● Early calculation of costs for new products before complete structural data and prices are available● Creation and maintenance of projects to group together calculations and calculation versions● Generation of lifecycle versions to calculate costs throughout the project lifecycle● Creation of surcharges to reflect increases and decreases in material and activity prices● Creation and distribution of one-time costs across the project lifecycle● Creation and maintenance of custom fields and formulas● Integration with SAP ERP to import data and structures, such as bills of materials (BOMs), routings, and
standard prices● Import of existing structures including BOMs and routings from Microsoft Excel● Master data management to manually maintain and use data that is not yet available in SAP ERP● Master Data Replication Tool to facilitate the replication of master data from external sources.● Custom price sources and flexible price-determination logic
Application Help for SAP Product Lifecycle CostingSAP Product Lifecycle Costing 4.0 PUBLIC 9
● Calculation versioning to compare costing alternatives● Target costing and the constant refinement of data throughout the entire product lifecycle● Creation of variants to compare costs and pricing for different product configurations● Creation of sum variant to aggregate the total costs and total volumes of all displayed variants.
NoteWhen integrating SAP Product Lifecycle Costing with other SAP software using a runtime license obtained from SAP or its distributors, the restrictions of such runtime license apply.
Use Cases
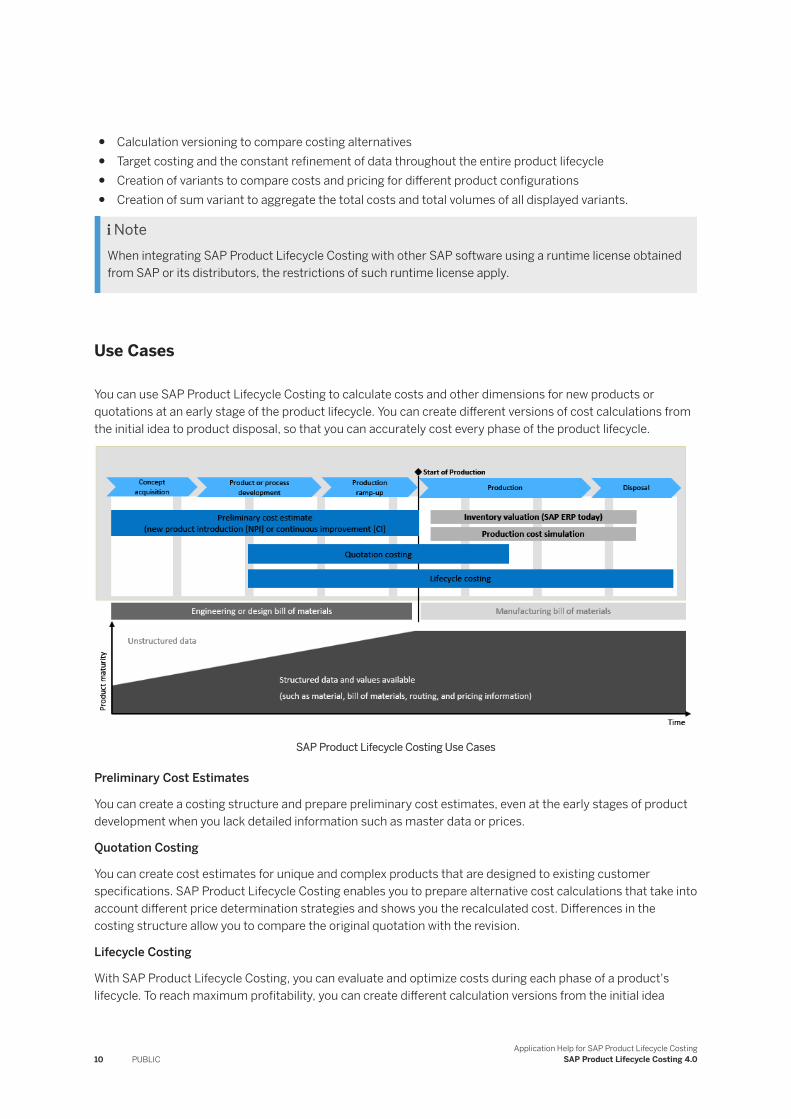
You can use SAP Product Lifecycle Costing to calculate costs and other dimensions for new products or quotations at an early stage of the product lifecycle. You can create different versions of cost calculations from the initial idea to product disposal, so that you can accurately cost every phase of the product lifecycle.
SAP Product Lifecycle Costing Use Cases
Preliminary Cost Estimates
You can create a costing structure and prepare preliminary cost estimates, even at the early stages of product development when you lack detailed information such as master data or prices.
Quotation Costing
You can create cost estimates for unique and complex products that are designed to existing customer specifications. SAP Product Lifecycle Costing enables you to prepare alternative cost calculations that take into account different price determination strategies and shows you the recalculated cost. Differences in the costing structure allow you to compare the original quotation with the revision.
Lifecycle Costing
With SAP Product Lifecycle Costing, you can evaluate and optimize costs during each phase of a product's lifecycle. To reach maximum profitability, you can create different calculation versions from the initial idea
10 PUBLICApplication Help for SAP Product Lifecycle Costing
SAP Product Lifecycle Costing 4.0
through the start of production and throughout the manufacturing process until product disposal. You can calculate and evaluate one-off costs and special costs associated with warranties, service and support, and disposal. You can also analyze direct material and manufacturing costs, define cost-reduction targets, and support procurement and manufacturing operations.
Application Help for SAP Product Lifecycle CostingSAP Product Lifecycle Costing 4.0 PUBLIC 11
2 Getting Started
The topics listed here describe some general aspects to consider before you start working with SAP Product Lifecycle Costing.
Related Information
Logging In [page 12]My Home [page 13]Autocomplete for Fields [page 14]Managing Messages [page 16]
2.1 Logging In
You will encounter multiple dialogs when logging in to SAP Product Lifecycle Costing, including system selection and authentication dialogs. Please consider the following:
Selecting a System
When logging in to SAP Product Lifecycle Costing, you can select the system that you want to work in. You can log into the application multiple times in order to work in different systems simultaneously.
Adding a System Connection
Your system administrator can configure additional system connections in the configuration file. Only configured systems appear in the login dialog. For more information, see Connection Settings in the Administrator's Guide for SAP Product Lifecycle Costing on SAP Help Portal at http://help.sap.com/plc.
Viewing System Details
Once you've logged in, the status bar at the lower right of your screen provides information about your current system connection. You can hover over the connection symbol for additional details such as alias, host, and port.
Changing Systems
To change systems, log out and log back in again, choosing a different system.
12 PUBLICApplication Help for SAP Product Lifecycle Costing
Getting Started
Specifying a Language
The login language you select determines the language used for display names and descriptions shown for standard and custom fields as well as for master data descriptions. The regional settings of your Microsoft Windows operating system determine how your date, time, number, and currency values are formatted and displayed.
User Authentication
When logging in, your identity is verified before connecting to the system. You may be required to enter a user ID, password or other identifying factors, such as a passcode. The credentials you are required to enter depend on the identity provider (IdP) configured for your system. If you have questions regarding the authentication process, please contact your system administrator.
Changing Your Password
How you change your password depends on the identity provider (IdP) configured for your system. For questions regarding changing your password, please contact your system administrator.
2.2 My Home
My Home is your first point of entry into SAP Product Lifecycle Costing. This view shows up to six of your most recently opened calculation versions.
You can do the following here:
● Click a calculation version to open it● Create a new project● Create a new calculation and first calculation version● Use the Search field to find a project, calculation, or calculation version
Personalizing Your Workspace
You can also personalize your workspace with background images. An Images folder is located under the following path:
C:\Users\{username}\AppData\Local\SAP\ProductLifecycleCosting\Images
This folder is created automatically the first time you log on to SAP Product Lifecycle Costing. You can add background images that you want to display to this folder and use them in My Home view.
Application Help for SAP Product Lifecycle CostingGetting Started PUBLIC 13

Uploading Images
Restrict your upload to files with the following format:
● File type: .JPG or .jpg● Maximum size: 10Mb
Uploaded images are automatically scaled to fit your screen. Low quality images may appear pixilated. For best results, the recommended dimensions are 1920 pixels (width) x 1080 pixels (height).
Displaying Images
● If several images are available in the folder, the system randomly selects one of your uploaded images and displays it for the duration of each login.
● If you prefer to display one constant image, remove all images from the folder except the one that you want to display.
● If you do not save any images in this folder, a standard SAP image is displayed.
2.3 Autocomplete for Fields
When you are working with projects, calculations, calculation versions, or master data in SAP Product Lifecycle Costing, you often need to create references to other master data. For example, you specify the material referenced in an item of a calculation version or the company code referenced in a plant. To make it easy for you to find master data fast, key fields use autocomplete functionality at field level.
Autocomplete is available for fields, as follows:
● When maintaining projects in the Project view● In costing structures in the Calculation view● In the Version Header Data and Item Details areas in the Calculation view● In master data shown in the Administration view
Getting Suggested Values
If autocomplete is available for a field, you activate it by pressing the space bar or by entering one or more characters in the field that you want to fill in. You then receive a list of possible valid values available.
14 PUBLICApplication Help for SAP Product Lifecycle Costing
Getting Started
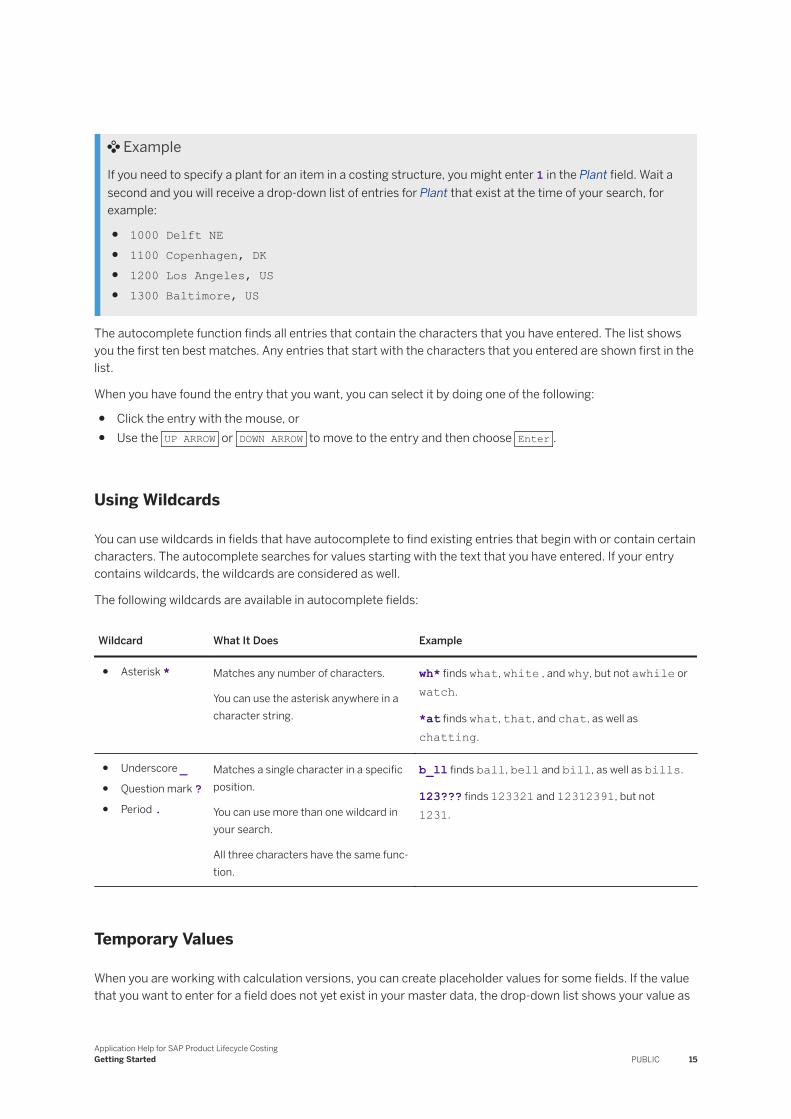
ExampleIf you need to specify a plant for an item in a costing structure, you might enter 1 in the Plant field. Wait a second and you will receive a drop-down list of entries for Plant that exist at the time of your search, for example:
● 1000 Delft NE● 1100 Copenhagen, DK● 1200 Los Angeles, US● 1300 Baltimore, US
The autocomplete function finds all entries that contain the characters that you have entered. The list shows you the first ten best matches. Any entries that start with the characters that you entered are shown first in the list.
When you have found the entry that you want, you can select it by doing one of the following:
● Click the entry with the mouse, or● Use the UP ARROW or DOWN ARROW to move to the entry and then choose Enter .
Using Wildcards
You can use wildcards in fields that have autocomplete to find existing entries that begin with or contain certain characters. The autocomplete searches for values starting with the text that you have entered. If your entry contains wildcards, the wildcards are considered as well.
The following wildcards are available in autocomplete fields:
Wildcard What It Does Example
● Asterisk * Matches any number of characters.
You can use the asterisk anywhere in a character string.
wh* finds what, white , and why, but not awhile or watch.
*at finds what, that, and chat, as well as chatting.
● Underscore _● Question mark ?● Period .
Matches a single character in a specific position.
You can use more than one wildcard in your search.
All three characters have the same function.
b_ll finds ball, bell and bill, as well as bills.
123??? finds 123321 and 12312391, but not 1231.
Temporary Values
When you are working with calculation versions, you can create placeholder values for some fields. If the value that you want to enter for a field does not yet exist in your master data, the drop-down list shows your value as
Application Help for SAP Product Lifecycle CostingGetting Started PUBLIC 15
<Temporary>. For example, you may want to create an item for a material that does not yet exist in the master data. This allows you to continue to work on cost planning even when some key master data has not yet been finalized. For more information about how this works in calculation versions, see Using Master Data in Calculation Versions [page 106].
2.4 Managing Messages
SAP Product Lifecycle Costing provides a message view that allows you to access all messages for your current logon session from anywhere in the application.
Each message gives you the following information:
● A symbol describing the message type● Date and time● Message text
You can open the message view to delete, copy, filter, and hide messages received during your current logon session. All messages for the current logon session are initially saved in the message view. Warning and error messages that are unresolved remain colored for emphasis. Warning and error messages that have been resolved, along with success and info messages, are greyed out in the message history. The last message generated is shown in the status bar at the bottom of your current view. The status bar is cleared when you move between the views, however the message history remains unchanged.
Opening and Closing the Message View
1. To open the message view, choose at the lower left corner of your current view.
2. To close the message view, choose at the top right corner of the message area in your current view.
Message Types
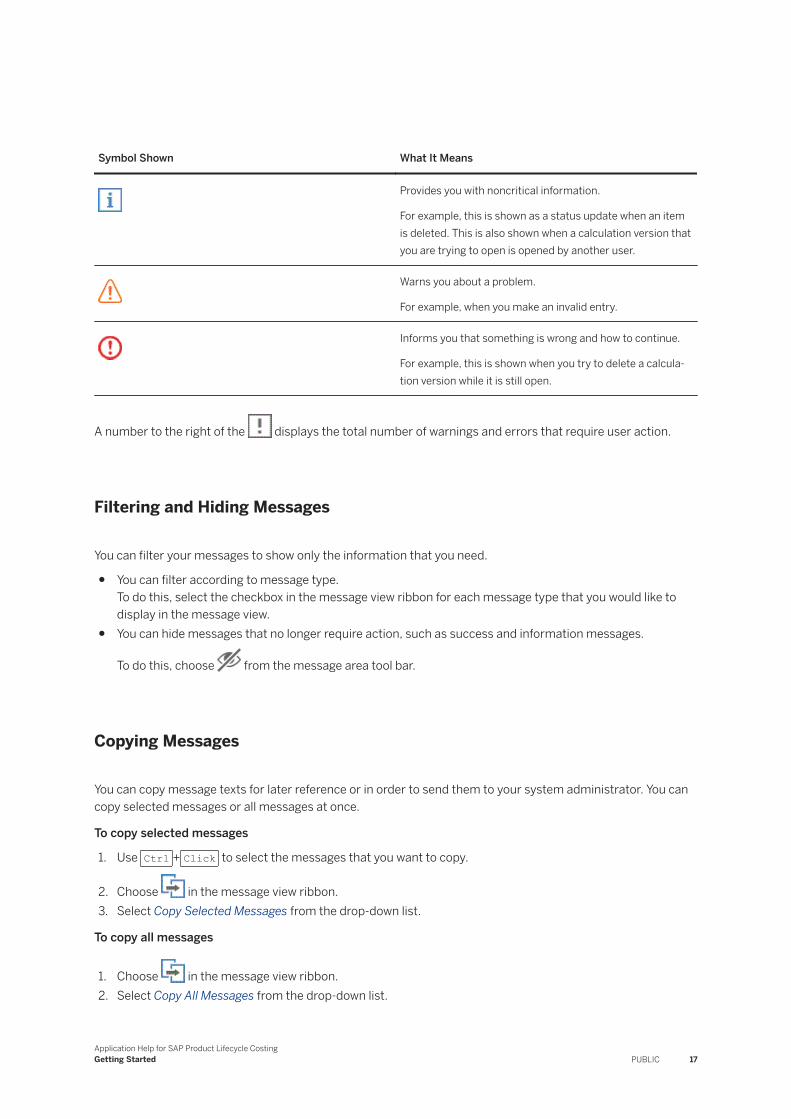
The following message types are displayed in the message view:
Symbol Shown What It Means
Confirms the successful completion of an operation.
For example, this is shown when you have saved a calculation version successfully.
16 PUBLICApplication Help for SAP Product Lifecycle Costing
Getting Started
Symbol Shown What It Means
Provides you with noncritical information.
For example, this is shown as a status update when an item is deleted. This is also shown when a calculation version that you are trying to open is opened by another user.
Warns you about a problem.
For example, when you make an invalid entry.
Informs you that something is wrong and how to continue.
For example, this is shown when you try to delete a calculation version while it is still open.
A number to the right of the displays the total number of warnings and errors that require user action.
Filtering and Hiding Messages
You can filter your messages to show only the information that you need.
● You can filter according to message type.To do this, select the checkbox in the message view ribbon for each message type that you would like to display in the message view.
● You can hide messages that no longer require action, such as success and information messages.
To do this, choose from the message area tool bar.
Copying Messages
You can copy message texts for later reference or in order to send them to your system administrator. You can copy selected messages or all messages at once.
To copy selected messages
1. Use Ctrl + Click to select the messages that you want to copy.
2. Choose in the message view ribbon.3. Select Copy Selected Messages from the drop-down list.
To copy all messages
1. Choose in the message view ribbon.2. Select Copy All Messages from the drop-down list.
Application Help for SAP Product Lifecycle CostingGetting Started PUBLIC 17
Deleting Messages
You can delete messages that are no longer relevant for your current session. You can delete selected messages or delete all messages at once.
To delete selected messages
1. Use Ctrl + Click to select the messages that you want to delete.
2. Choose in the message view ribbon.3. Select Delete Selected Messages from the drop-down list.
To delete all messages
1. Choose in the message view ribbon.2. Select Delete All Messages from the drop-down list.
18 PUBLICApplication Help for SAP Product Lifecycle Costing
Getting Started
3 Searching and Filtering
You have a number of options for searching and filtering throughout SAP Product Lifecycle Costing.
Related Information
Searching Globally [page 19]Filtering in the Cockpit View [page 20]Filtering in the Calculation View [page 20]Filtering in the Administration View [page 24]Filtering in the Variants View [page 25]
3.1 Searching Globally
You can use the Search field in the upper right corner of the application to search for projects, calculations, and calculation versions.
Your search terms are highlighted in the result list for easy identification. You can use a search filter to limit the context of your search. You can also limit the maximum number of results displayed.
Note the following when using the global search:
● If you enter a single character in the search field, all projects, calculations, and calculation versions containing that character are displayed.
● If you continue to enter a combination of letters, all fields containing exactly that character combination are displayed.
● You can use typical operators such as and and or.● You can sort all columns in the search results in ascending or descending order.● You can use the search results to open your selection in the Cockpit or Calculation view.
Related Information
Searching and Filtering [page 19]Filtering in the Cockpit View [page 20]Filtering in the Calculation View [page 20]Filtering in the Administration View [page 24]
Application Help for SAP Product Lifecycle CostingSearching and Filtering PUBLIC 19
3.2 Filtering in the Cockpit View
You can filter the list of objects shown in the Cockpit view using the filter field in the object list.
You can also choose (Show My Objects) to filter all entries in the object list by your user ID. The results then show only the projects and calculations versions that you have created or for which you are responsible.
Related Information
Searching and Filtering [page 19]Searching Globally [page 19]Filtering in the Calculation View [page 20]Filtering in the Administration View [page 24]
3.3 Filtering in the Calculation View
You can filter in the costing structure, table, and in the side panel in the Calculation view.
Related Information
Simple Filtering in the Costing Structure [page 20]Advanced Filter [page 22]Filtering in the Side Panel [page 21]
3.3.1 Simple Filtering in the Costing Structure
You can use the Filter field in the Calculation view for simple filtering of the costing structure and the table. You can add additional fields to the table by dragging and dropping them from the side panel.
Filtering begins as soon as you make an entry in the filter field shown in the header area above the costing structure. Items that match the filter are expanded and made visible, including items that were initially hidden or collapsed.
Note the following when you filter in the costing structure and table:
● Matching text is not highlighted.
20 PUBLICApplication Help for SAP Product Lifecycle Costing
Searching and Filtering
● While filtering a costing structure, you can add and delete items. Keep in mind that when you delete a filtered item, all subitems belonging to that item are also deleted. This can include subitems that are not displayed after filtering.
● The filter in the costing structure does not affect the results of a mass change. This means that if you filter the costing structure and then perform a mass change, all affected items in the costing structure are changed, not just those that are visible.
● For standard fields with formulas and for all custom fields, only the displayed value is searchable. For example, if a formula-calculated value is displayed, the manually-entered value, if any, is not searchable.
● To perform complex filtering, you can use an advanced filter.
Special Field Types
There are additional considerations to take into account for some field types:
● When filtering for numbers, pay attention to decimal separators. The entry 3. filters for 3.22 and 13.22, but not 30 or 300.
● To filter for highlighted fields, begin typing the color, for example green, orange, or yellow.● To filter for dates and times, the best approach is to enter the format used in your regional settings. For
example, in North America, begin entering the format 10/25/2017 1:00pm. You can also filter for the year and time individually.
● You cannot filter for fields with checkboxes.
Related Information
Advanced Filter [page 22]
3.3.2 Filtering in the Side Panel
You can use the filter in the side panel of the Calculation view to find fields at header and item level.
Filtering begins as soon as you make an entry in the filter field for Version Header Data or Item Details in the side panel at the right.
Note the following when you filter in the side panel:
● You can only filter for field names, not for the values entered in the fields.● If you enter a single character in the filter, all fields containing that character somewhere in the field name
are displayed. All other fields are temporarily hidden.● If you continue to enter a combination of letters, all fields containing exactly that character combination
are displayed.
Application Help for SAP Product Lifecycle CostingSearching and Filtering PUBLIC 21
3.3.3 Advanced Filter
If you need to filter a calculation version with several more complex criteria, you can use an advanced filter in the Calculation view.
You can create a detailed filter configuration with multiple fields and different operators. For example, you can filter for materials belonging to a specific material type and produced in a specific plant at a specific price. You can also filter, for example, for all items with a total cost higher than 1000 Euros.
You can save, rename, and delete advanced filters.
Things to Consider
● You can filter for any field in your calculation version.This includes standard fields, custom fields, comment fields, and highlighting fields.
● If an advanced filter is active, you can refine your search results using the simple filter text box. If you specify a new advanced filter, the simple filter field will be reset.
● Your filter settings remain active for a calculation version until you reset the filter or restart the application.● If you want to use a set of filter settings regularly, you can save them as a personal or corporate filter.
After saving, they are available in the Filter option in the ribbon and can be applied directly to any calculation version.
Related Information
Applying an Advanced Filter [page 22]Managing Advanced Filters [page 23]
3.3.3.1 Applying an Advanced Filter
You are working in a calculation version in the Calculation view and you want to use an advanced filter with multiple criteria.
Procedure
1. From the ribbon, choose Advanced Filter. You can also use the keyboard shortcut CTRL+F .
This opens the Advanced Filter dialog.2. [Optional] Under Filter Management, select a saved filter.
22 PUBLICApplication Help for SAP Product Lifecycle Costing
Searching and Filtering
NoteYou can select from corporate and personal filters. Corporate filters can be accessed and used by everyone in your organization. Personal filters can only be accessed by you.
3. Under Filter By, select new filter fields.
Narrow your filter with operators such as is or greater than or equal to. The available operators change depending on the field that you select. You can add as many filter rows as necessary. The number of affected items is shown at the top of the dialog.
4. [Optional] Enter a name for the filter settings and save them as a corporate or personal filter. Select the Corporate Filter checkbox if you want to make the filter available for everyone in your organization.
NoteYou need additional authorization to save a corporate filter.
5. Choose Apply Filter to apply the settings to the calculation version or Reset All to clear the filter and start again.
Results
● The costing structure shows the items that match your filter conditions.● An Advanced Filter bar is displayed at the left of the field for simple filtering. You can check the tooltip to
see the filter name (if you've saved it) and the current settings.● The filter settings remain active until you clear the filter or restart the application. To clear the filter, close
the Advanced Filter bar or use the Clear Filter command under Filter in the ribbon.
Related Information
Managing Advanced Filters [page 23]
3.3.3.2 Managing Advanced Filters
You can also rename and delete advanced filters that have been saved.
To do this, choose Filter in the ribbon and then use the Manage Filters option.
NoteThere are two types of filters: personal and corporate.
● Personal filters can only be accessed, renamed, and deleted by the user who created them.● Corporate filters can be accessed and used by everyone in your organization. However, you need
additional authorization to rename and delete them.
Application Help for SAP Product Lifecycle CostingSearching and Filtering PUBLIC 23
Renaming Advanced Filters
You can rename saved filters. To do this, select a filter from the list in the Manage Filters dialog. Choose Rename, and enter a new name. Press Enter or click anywhere outside the name field and then close the dialog.
Deleting Advanced Filters
You can delete a filter if you no longer need it. To do this, select a filter from the list and choose Delete. If you delete a filter by mistake, you can restore it by clicking on the provided link. This link is available until you delete another filter or close the dialog.
3.4 Filtering in the Administration View
You can filter master data in the Administration view.
Filtering Master Data Areas and Fields
You can use the filter fields in the navigation structure and in the side panel of the Administration view to find master data areas and fields by name.
Note the following when you filter here:
● You use these filters to find master data areas and field names. You cannot filter for values entered in these fields.
● Filtering begins as soon as you make an entry in one of the filter fields.● If you enter a combination of letters, all fields containing exactly that character combination are displayed.
Filtering Master Data
Once you have selected a master data area in the navigation structure, you can set additional filter criteria and use operators (for example, is or contains) to optimize your search for master data. You can set the maximum number of results to be shown. The system remembers your filter criteria as you move between views.
Related Information
Working with Master Data [page 303]
24 PUBLICApplication Help for SAP Product Lifecycle Costing
Searching and Filtering
Searching and Filtering [page 19]Searching Globally [page 19]Filtering in the Cockpit View [page 20]Filtering in the Calculation View [page 20]
3.5 Filtering in the Variants View
You can filter variants to find attributes and items you are looking for. You do this using the filter above the costing structure in the variant base.
You filter the variant base as you would any other calculation version in the Calculation view. The filter is then applied to all of the variants displayed in the variant matrix. Once applied, you can select and deselect the filtered items for each variant.
You filter in the Variants view as yo do in the Calculation view, with the following additions:
● You can filter for new items that are indicated with green rectangles.To do this, enter New in the filter.
● You can filter for modified items that are indicated with orange rectangles.To do this, enter Modified in the filter.
● Unlike the filter in the Calculation view, you cannot add or delete items in the variant base while filtering. This is because the variant base cannot be changed while the variant matrix is open.
Related Information
Filtering in the Calculation View [page 20]
Application Help for SAP Product Lifecycle CostingSearching and Filtering PUBLIC 25
4 Using the Cockpit
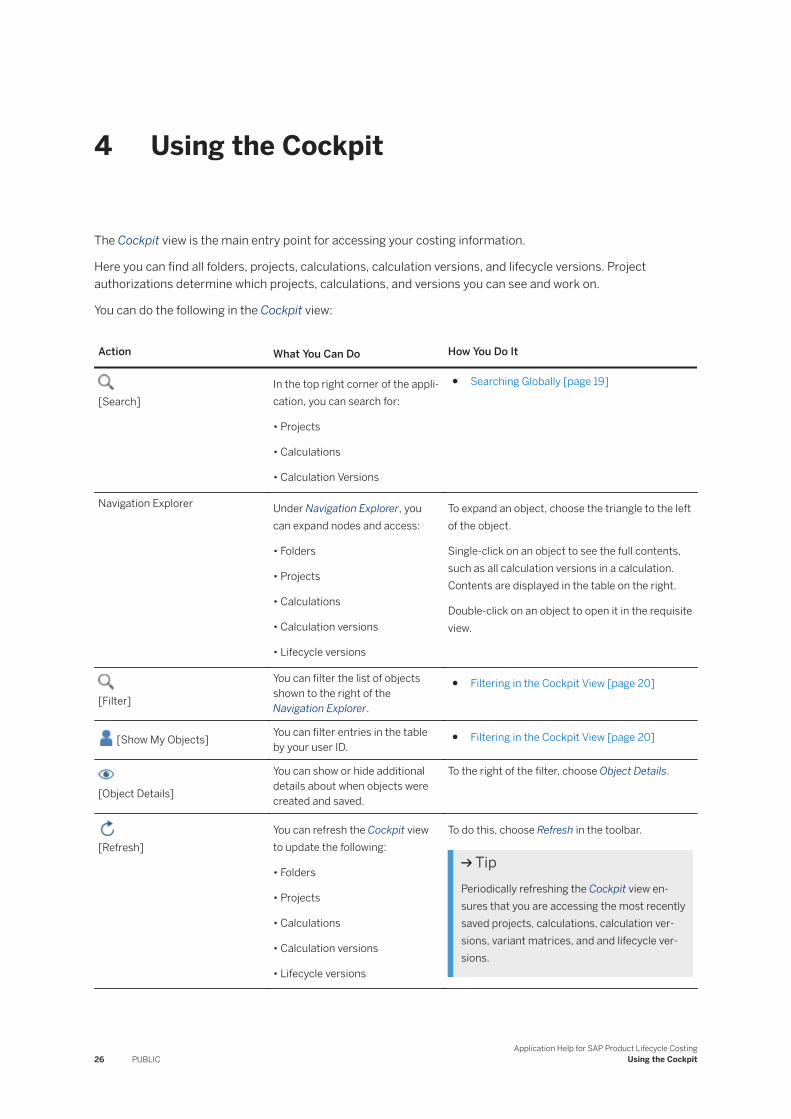
The Cockpit view is the main entry point for accessing your costing information.
Here you can find all folders, projects, calculations, calculation versions, and lifecycle versions. Project authorizations determine which projects, calculations, and versions you can see and work on.
You can do the following in the Cockpit view:
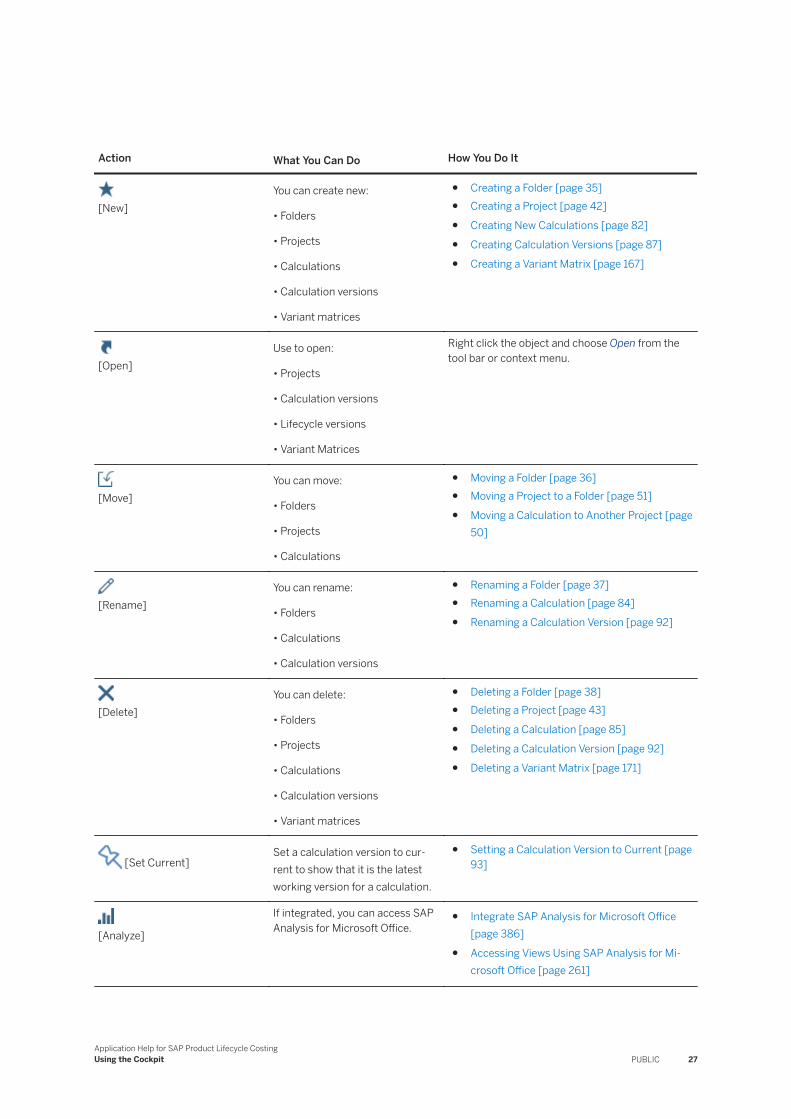
Action What You Can Do How You Do It
[Search]In the top right corner of the application, you can search for:
• Projects
• Calculations
• Calculation Versions
● Searching Globally [page 19]
Navigation Explorer Under Navigation Explorer, you can expand nodes and access:
• Folders
• Projects
• Calculations
• Calculation versions
• Lifecycle versions
To expand an object, choose the triangle to the left of the object.
Single-click on an object to see the full contents, such as all calculation versions in a calculation. Contents are displayed in the table on the right.
Double-click on an object to open it in the requisite view.
[Filter]
You can filter the list of objects shown to the right of the Navigation Explorer.
● Filtering in the Cockpit View [page 20]
[Show My Objects] You can filter entries in the table by your user ID.
● Filtering in the Cockpit View [page 20]
[Object Details]
You can show or hide additional details about when objects were created and saved.
To the right of the filter, choose Object Details.
[Refresh]You can refresh the Cockpit view to update the following:
• Folders
• Projects
• Calculations
• Calculation versions
• Lifecycle versions
To do this, choose Refresh in the toolbar.
TipPeriodically refreshing the Cockpit view ensures that you are accessing the most recently saved projects, calculations, calculation versions, variant matrices, and and lifecycle versions.
26 PUBLICApplication Help for SAP Product Lifecycle Costing
Using the Cockpit
Action What You Can Do How You Do It
[New]You can create new:
• Folders
• Projects
• Calculations
• Calculation versions
• Variant matrices
● Creating a Folder [page 35]● Creating a Project [page 42]● Creating New Calculations [page 82]● Creating Calculation Versions [page 87]● Creating a Variant Matrix [page 167]
[Open]Use to open:
• Projects
• Calculation versions
• Lifecycle versions
• Variant Matrices
Right click the object and choose Open from the tool bar or context menu.
[Move]You can move:
• Folders
• Projects
• Calculations
● Moving a Folder [page 36]● Moving a Project to a Folder [page 51]● Moving a Calculation to Another Project [page
50]
[Rename]You can rename:
• Folders
• Calculations
• Calculation versions
● Renaming a Folder [page 37]● Renaming a Calculation [page 84]● Renaming a Calculation Version [page 92]
[Delete]You can delete:
• Folders
• Projects
• Calculations
• Calculation versions
• Variant matrices
● Deleting a Folder [page 38]● Deleting a Project [page 43]● Deleting a Calculation [page 85]● Deleting a Calculation Version [page 92]● Deleting a Variant Matrix [page 171]
[Set Current]Set a calculation version to current to show that it is the latest working version for a calculation.
● Setting a Calculation Version to Current [page 93]
[Analyze]
If integrated, you can access SAP Analysis for Microsoft Office.
● Integrate SAP Analysis for Microsoft Office [page 386]
● Accessing Views Using SAP Analysis for Microsoft Office [page 261]
Application Help for SAP Product Lifecycle CostingUsing the Cockpit PUBLIC 27
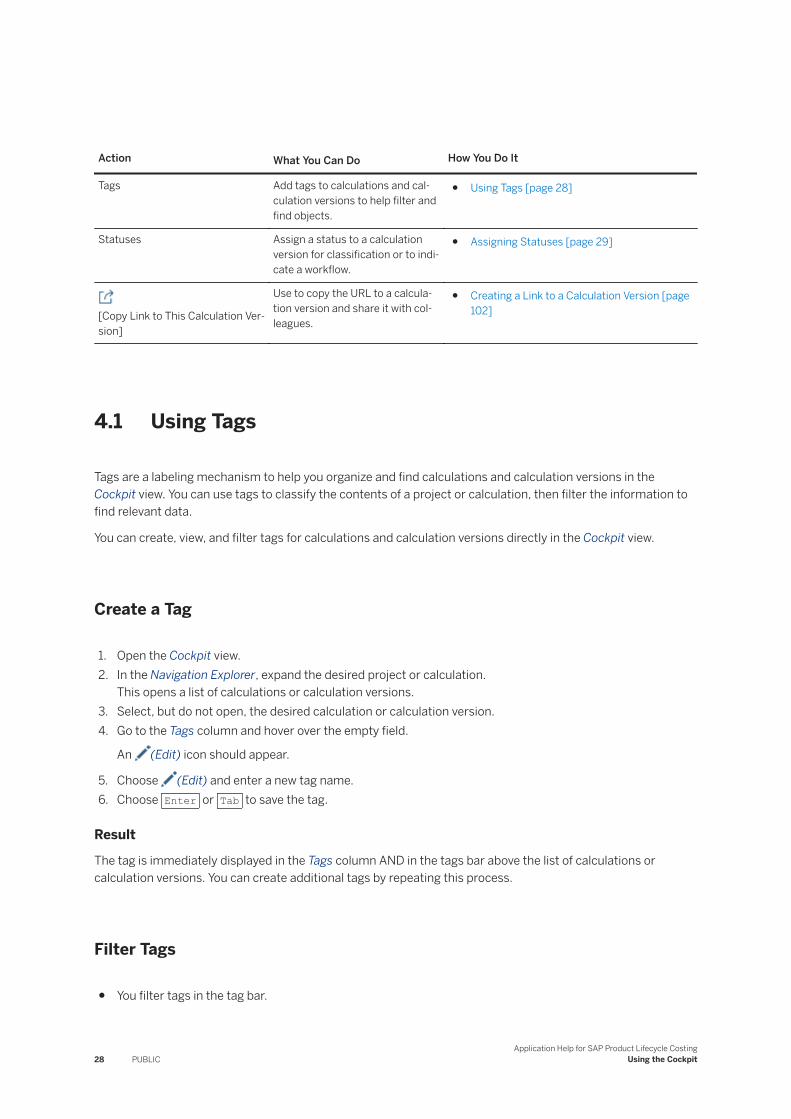
Action What You Can Do How You Do It
Tags Add tags to calculations and calculation versions to help filter and find objects.
● Using Tags [page 28]
Statuses Assign a status to a calculation version for classification or to indicate a workflow.
● Assigning Statuses [page 29]
[Copy Link to This Calculation Version]
Use to copy the URL to a calculation version and share it with colleagues.
● Creating a Link to a Calculation Version [page 102]
4.1 Using Tags
Tags are a labeling mechanism to help you organize and find calculations and calculation versions in the Cockpit view. You can use tags to classify the contents of a project or calculation, then filter the information to find relevant data.
You can create, view, and filter tags for calculations and calculation versions directly in the Cockpit view.
Create a Tag
1. Open the Cockpit view.2. In the Navigation Explorer, expand the desired project or calculation.
This opens a list of calculations or calculation versions.3. Select, but do not open, the desired calculation or calculation version.4. Go to the Tags column and hover over the empty field.
An (Edit) icon should appear.
5. Choose (Edit) and enter a new tag name.6. Choose Enter or Tab to save the tag.
Result
The tag is immediately displayed in the Tags column AND in the tags bar above the list of calculations or calculation versions. You can create additional tags by repeating this process.
Filter Tags
● You filter tags in the tag bar.
28 PUBLICApplication Help for SAP Product Lifecycle Costing
Using the Cockpit
● Objects are only filtered in the screen in which they are displayed. This means you can filter calculations in the list of calculations. You can filter calculation versions in the list of calculation versions.
● Each tag in the tag bar includes a counter to indicate how often each tag is used.● Tags in the tag bar turn blue when actively filtered.● The filter is cumulative. If you select two tags in the tag bar, you will only retrieve objects that include both
tags.
Steps1. Open the Cockpit view.2. Expand the desired project or calculation to display the list of calculations or calculation versions.3. In the tag bar, above the list of calculations or calculation versions, select the tags you want to filter.
Note, actively filtered tags turn blue.
ResultThe filter is applied cumulatively for all tags selected. Objects that contain all tags being filtered are displayed in the object list.
Remove a Tag
1. Open the Cockpit view.2. In the Navigation Explorer, expand the desired project or calculation.
This opens a list of calculations or calculation versions.3. In this list, select but do not open, the desired calculation or calculation version.4. In the Tags column, hover over the tag you want to delete.
The (Edit) icon should reappear.
5. Choose (Edit) to activate the (Delete) function.
6. Choose (Delete) to remove the tag from the calculation or calculation version.
Result● The tag is immediately removed from the Tags column for that particular calculation or calculation version.● Each time you remove a tag from the Tags column, the counter for the tag decreases in the tag bar.● When you remove the last of a particular tag from the Tags column, the tag is also removed from the tag
bar.
4.2 Assigning Statuses
You can assign statuses to calculation versions.
Statuses are an optional labeling mechanism by which to identify or track the progress of your calculation versions. You can assign statuses to calculation versions to organize or help with identification. You might assign statuses to a series of calculation versions to indicate a particular workflow in a project, for example, Draft, In Review, and Approved.
Application Help for SAP Product Lifecycle CostingUsing the Cockpit PUBLIC 29
You can assign a status to a calculation version using the dropdown in the list of calculation versions in the Cockpit view. To remove a status, you can select #No Status from the same dropdown.
You can create and maintain statuses in the Administration view, in the Global Settings area, under Statuses.
Procedure
1. Open the Cockpit view.2. In the Navigation Explorer, expand the desired calculation to display the list of calculations or versions.3. Select, but do not open, the desired calculation version.4. In the Status column, use the dropdown to select an existing status.
Note, if you do not see an expected status in the dropdown, refresh the Cockpit and check the dropdown again.
Result
Active statuses are immediately applied and saved to calculation versions when selected.
Related Information
Statuses [page 381]Creating Statuses in Master Data [page 382]
30 PUBLICApplication Help for SAP Product Lifecycle Costing
Using the Cockpit
5 Personalizing the Calculation View
You can customize the layout of the table and the side panel in the Calculation view to meet your needs.
You can make the following changes in the layout of the view:
● Add and remove columns in the table● Change the order of columns in the table● Resize column width● Decide which fields you want to hide or show in the side panel
Any changes you make in the current layout of the Calculation view are saved immediately and will be used when you next log on. This layout is used for all opened and newly created calculation versions until you change the layout again or switch to a different layout.
If you want to switch between different layouts, you can use personal layouts and corporate layouts:
● To create a personal layout, you save the layout settings that you've made and give the layout a name. This layout is for your use only.
● Corporate layouts can be used by anyone. You need additional authorizations to save or modify corporate layouts. If you're authorized to work with these layouts, you can save layout settings and give them a name in the same way as for personal layouts.
Related Information
Changing the Layout in the Table [page 31]Changing the Layout in the Side Panel [page 32]Working with Layouts [page 33]
5.1 Changing the Layout in the Table
You can change the layout of the table in the Calculation view.
You can make the following changes in the table layout:
Layout Change How to Do It
Add a column Select a field in the side panel for Version Header, Item Details, Costing Sheet or Cost Component Split and then drag and drop it to the table header row.
Application Help for SAP Product Lifecycle CostingPersonalizing the Calculation View PUBLIC 31
Layout Change How to Do It
Remove a column Open the context menu for a column header, and choose Remove Column from Table.
Change column order Drag and drop a column header to change its position in the table.
Resize a column Drag the border between two column headers to make a header wider or narrower.
Note the following when changing your table layout:
● If you move a field from the side panel to the table, the field is not removed from the side panel. You can add the fields multiple times.
● If a field contains an ID and a description, only the ID is added to the table.● If a field has an accompanying unit of measure or currency, this field is also added or removed together
with the field to which it applies.● The first column must be the calculation structure. It's not possible to move another field to the left of this
column.
Displaying Costing Sheet Rows and Cost Components in the Table
You can also add costing sheet rows and components from a cost component split to the table as columns. Note the following when moving these fields to the table:
● The descriptions of the costing sheet rows and cost components are displayed in the column headers. If no description is available in the current logon language, the ID is displayed instead.
● If you select another costing sheet or cost component split in the calculation version, the table columns are updated accordingly. Any columns that are not part of the newly selected costing sheet or component split are no longer shown in the table.
Related Information
Working with Layouts [page 33]
5.2 Changing the Layout in the Side Panel
You can change the layout of fields in the Calculation view.
You can change the layout in the following areas in the side panel:
● Version Header Data
32 PUBLICApplication Help for SAP Product Lifecycle Costing
Personalizing the Calculation View
● Item Details
You can make the following changes in the layout in the side panel:
Layout Change How to Do It
Hide a field Go to Version Header or Item Details and open the context menu for a field in the side panel. Then choose Hide Field.
Show a field Open the context menu anywhere in the side panel, and choose Show Field. Then choose the field that you want to display again in the side panel.
Show all fields Open the context menu anywhere in the side panel and choose Show All Fields. Any fields that you have hidden in the Calculation view are now shown.
Note the following when changing the layout in the side panel:
● If you hide a field, it is hidden in all item categories.● If you hide all of the fields for a group in the side panel, the group header is also hidden.
Related Information
Working with Layouts [page 33]
5.3 Working with Layouts
You can save all of the changes that you've made in the Calculation view as a layout with a specific name. Then you can switch to this layout whenever you want to use it.
To switch between different layouts, use the Layout button in the ribbon and select a layout from the drop-down list.
There are two types of layouts: personal and corporate.
● Any user can save personal layouts. Personal layouts can only be used by the user who saved them. They are not available for other users.
● Corporate layouts make it possible to provide standard layouts for the Calculation view. Unlike personal layouts, corporate layouts can be accessed and used by everyone in your organization.
NoteYou need additional authorizations to save, rename, and delete corporate layouts.
Application Help for SAP Product Lifecycle CostingPersonalizing the Calculation View PUBLIC 33
Saving Layouts
To save a layout, choose the Layout button in the ribbon and then the Save As option. You can save a layout under a new or an existing name. If you choose an existing layout, it will be overwritten.
Renaming Layouts
You can change the name of a layout if necessary. To do this, choose the Layout button in the ribbon and then the Manage option. The list of layouts provides an option to edit an entry. Enter a new name and then close the dialog to make your changes effective.
Deleting Layouts
You can delete a layout if you no longer need it. To do this, choose the Layout button in the ribbon and then the Manage option. The list of layouts provides an option to delete an entry.
Related Information
Changing the Layout in the Table [page 31]Changing the Layout in the Side Panel [page 32]
34 PUBLICApplication Help for SAP Product Lifecycle Costing
Personalizing the Calculation View
6 Folders
Folders are named containers that hold projects and other folders. You can use folders to organize and group together projects and to structure the hierarchy between them.
You can create, delete, rename, and move folders in the navigation explorer in the Cockpit view.
Things to Consider
● A root folder is automatically created in the navigation explorer in the Cockpit view and shares the name of the system in which you are working. You cannot move, rename, or delete the root folder.
● You can save any project or folder in any other folder, regardless of controlling area. You can nest folders up to 10 levels. The contents of the projects are not affected when moved between folders.
● Folders may contain projects that you are not authorized to see or work with. These projects may prevent you from deleting the folder even though the folder appears to be empty.
● When you upgrade from earlier releases, all projects appear under the root folder. You can then organize them into additional folders as desired.
Related Information
Creating a Folder [page 35]Moving a Folder [page 36]Renaming a Folder [page 37]Moving a Project to a Folder [page 51]Deleting a Folder [page 38]
6.1 Creating a Folder
You can create folders and use them to group related projects or structure projects and other folders. You can create a new folder in the root folder or in any other folder or subfolder. You do this in the Cockpit view.
Prerequisites
You are authorized to create folders.
Application Help for SAP Product Lifecycle CostingFolders PUBLIC 35
Procedure
1. In the Cockpit view, select the root folder or any other folder in which you would like to create a new folder.2. In the ribbon, choose New, then Folder. You can also choose New Folder in the context menu.
A new folder is created in edit mode in the folder you selected.3. Give the folder a name and press Enter, or click anywhere the navigation explorer to save the entry.
Note, folders on different levels can have the same name. You must give folders on the same level unique names.
Results
The new folder is saved and is displayed alphabetically in the location you selected.
6.2 Moving a Folder
You can move a folder under the root folder or into another folder, one folder at a time. Moving a folder also moves its entire substructure. You can move folders that contain frozen and referenced calculation versions. You can move folders that contain projects and other folders, regardless of controlling area.
Prerequisites
● You are authorized to update folders.● The destination folder does not already contain a folder with the same name as the folder you are moving.
The destination folder itself can have the same name.
Procedure
1. In the Cockpit view, select the folder you want to move.2. In the ribbon, choose Move.
You can also use the context menu or the keyboard shortcut CTRL + X .
3. In the Move Folder dialog, select the root folder or another folder into which you would like to move the folder, then choose Move.
36 PUBLICApplication Help for SAP Product Lifecycle Costing
Folders
Results
The folder is placed alphabetically in the location you have selected.
6.3 Renaming a Folder
You can rename a folder in the Cockpit view. Note, folders on the same level must have unique names. You can give folders on different levels the same name.
Prerequisites
You are authorized to update folders.
Procedure
1. Select the folder you want to rename in the Cockpit view.2. In the ribbon, choose Rename.
You can also use the context menu, or choose F2 .
3. Enter a new name and press Enter to confirm your change.
You can discard your change by pressing ESC before you press Enter.
Results
The folder is renamed.
Application Help for SAP Product Lifecycle CostingFolders PUBLIC 37
6.4 Deleting a Folder
You can delete folders that no longer contain projects in the Cockpit view. If you delete a folder, all empty subfolders are also deleted. Note, some folders may contain projects that you are not authorized to see. These projects may prevent you from deleting the folder though you believe the folder to be empty.
Prerequisites
● You are authorized to delete folders.● The folder you want to delete no longer contains any projects.
Procedure
1. In the Cockpit view, select a folder for deletion.2. In the ribbon, choose Delete. In the Delete Folder dialog, choose Delete again to confirm.
You can also select Delete in the context menu.
Results
The folder and any empty subfolders are deleted from the navigation explorer in the Cockpit view.
38 PUBLICApplication Help for SAP Product Lifecycle Costing
Folders
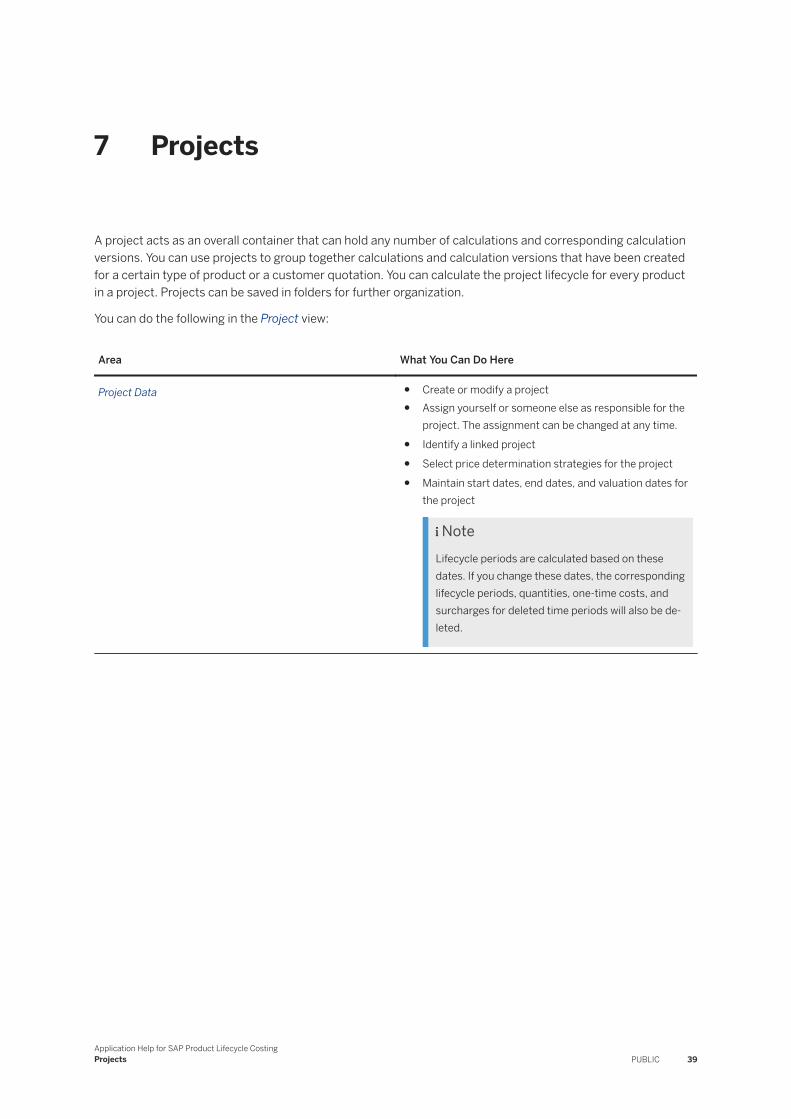
7 Projects
A project acts as an overall container that can hold any number of calculations and corresponding calculation versions. You can use projects to group together calculations and calculation versions that have been created for a certain type of product or a customer quotation. You can calculate the project lifecycle for every product in a project. Projects can be saved in folders for further organization.
You can do the following in the Project view:
Area What You Can Do Here
Project Data ● Create or modify a project● Assign yourself or someone else as responsible for the
project. The assignment can be changed at any time.● Identify a linked project● Select price determination strategies for the project● Maintain start dates, end dates, and valuation dates for
the project
NoteLifecycle periods are calculated based on these dates. If you change these dates, the corresponding lifecycle periods, quantities, one-time costs, and surcharges for deleted time periods will also be deleted.
Application Help for SAP Product Lifecycle CostingProjects PUBLIC 39
Area What You Can Do Here
Project Lifecycle Prepare individual calculation versions for project lifecycle calculation.
Here you can:
● Assign or unassign one-time costs to individual calculation versions
● Determine how material and activity surcharges, if any, are applied to individual calculation versions
● View the total of all planned quantities and the unit of measure for each calculation selected for the project. These quantities are used when distributing one-time costs across calculations.
● Calculate the project lifecycle for selected calculation versions and automatically generate lifecycle versions for each lifecycle period in the project.
CautionCreating surcharges and applying one-time costs to calculations in the project does NOT automatically apply them to individual calculation versions. To include these costs in the lifecycle calculation, you must apply them here, to individual calculation versions, before calculating the project lifecycle.
Lifecycle Periods Choose one of the following lifecycle period types for each year in the project lifecycle:
● Yearly● Quarterly● Monthly● Custom
NoteThe project start date, end date, and lifecycle valuation date determine which years are available for selection.
40 PUBLICApplication Help for SAP Product Lifecycle Costing
Projects
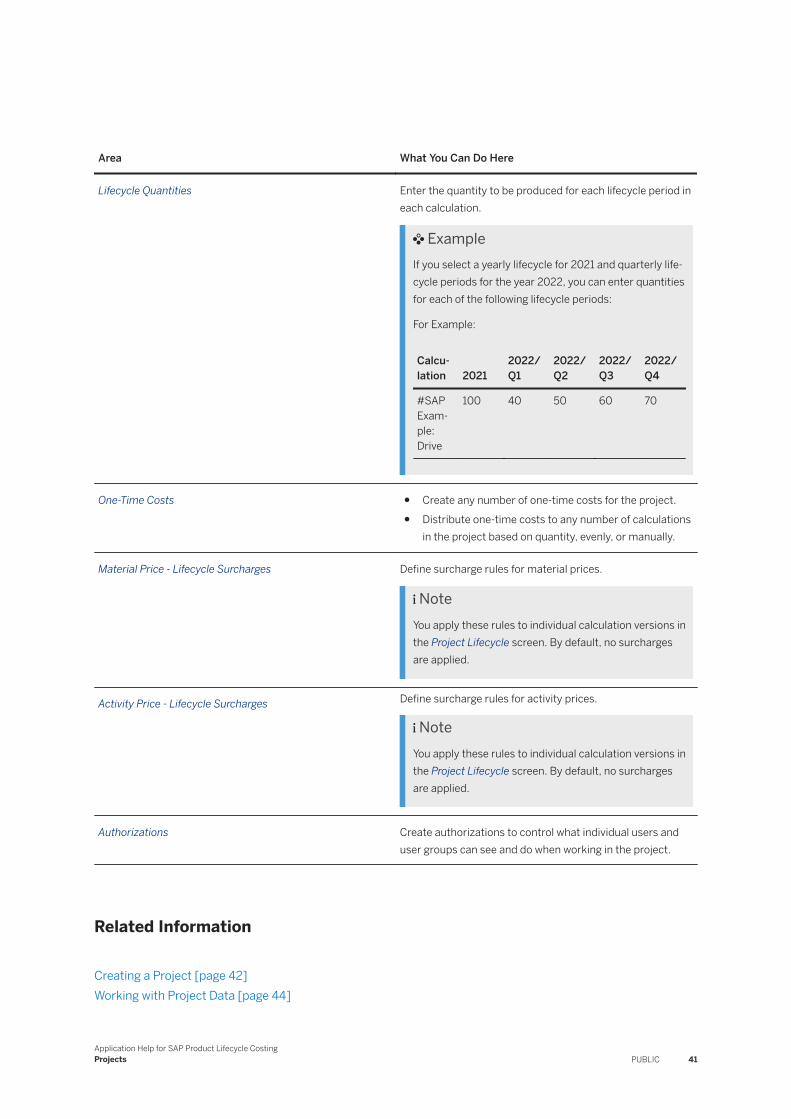
Area What You Can Do Here
Lifecycle Quantities Enter the quantity to be produced for each lifecycle period in each calculation.
ExampleIf you select a yearly lifecycle for 2021 and quarterly lifecycle periods for the year 2022, you can enter quantities for each of the following lifecycle periods:
For Example:
Calculation 2021
2022/Q1
2022/Q2
2022/Q3
2022/Q4
#SAP Example: Drive
100 40 50 60 70
One-Time Costs ● Create any number of one-time costs for the project.● Distribute one-time costs to any number of calculations
in the project based on quantity, evenly, or manually.
Material Price - Lifecycle Surcharges Define surcharge rules for material prices.
NoteYou apply these rules to individual calculation versions in the Project Lifecycle screen. By default, no surcharges are applied.
Activity Price - Lifecycle Surcharges Define surcharge rules for activity prices.
NoteYou apply these rules to individual calculation versions in the Project Lifecycle screen. By default, no surcharges are applied.
Authorizations Create authorizations to control what individual users and user groups can see and do when working in the project.
Related Information
Creating a Project [page 42]Working with Project Data [page 44]
Application Help for SAP Product Lifecycle CostingProjects PUBLIC 41

Project Lifecycle [page 52]Authorizations for Projects [page 77]
7.1 Creating a Project
When creating calculations and calculation versions you must always save them in a project.
You can create a new project in the Cockpit view or in the Project view.
Things to Consider
● Projects can contain any number of calculations and corresponding calculation versions. You can save or move projects into folders for further organization.
● You cannot change the project ID or controlling area once the project is saved.● If global and user-specific settings are configured, they are automatically applied to the project and all
calculations created for the project, but can be adapted.● If you want to calculate project lifecycle costs, you must enter a start date, end date, and lifecycle valuation
date for the project.
Steps
To create a project in the Cockpit view:
1. Select any folder in the navigation explorer.2. In the ribbon, choose New, then Project.
You can also use the context menu or the keyboard shortcut Ctrl + Q .This opens a Create New Project dialog.
3. Enter a project ID and project name, along with the controlling area, material and activity price strategies, and reporting currency. Then choose Create.The Project view opens allowing you to enter additional comments and information.
4. If you have nothing more to add, choose Close to find your project in the Cockpit view.5. If you enter additional project data, choose Save, then Close, to find your project in the Cockpit view.
To create a project in the Project view:
1. Open the Project view.2. In the ribbon, choose New.
This opens a new project in the Project view.3. Under Project Data, complete all mandatory fields. These fields are marked with an asterisk (*).4. Save and close the project.
This returns you to the Calculation view. You can find your project in the Navigation Explorer in alphabetical order.
42 PUBLICApplication Help for SAP Product Lifecycle Costing
Projects
NoteYou can leave the project open while working in the Cockpit view. This allows you to modify project data while creating a calculation version for the project. However, this prevents other users from modifying project data for the open project.
Related Information
Deleting a Project [page 43]Working with Project Data [page 44]Moving a Calculation to Another Project [page 50]Moving a Project to a Folder [page 51]Project Lifecycle [page 52]Authorizations for Projects [page 77]
7.2 Deleting a Project
If you no longer need a project, you can delete it from the Cockpit view.
CautionWhen you delete a project, all of its calculations, calculation versions, and lifecycle versions are permanently deleted.
Prerequisites
● All calculation versions belonging to a project must be closed before you can delete the project.● If a project contains a frozen calculation version, the project cannot be deleted.
Steps
1. Select a project.2. Choose Delete in the ribbon.
You can also use the context menu or press DEL .This opens a dialog box.
3. Choose Delete All.
Application Help for SAP Product Lifecycle CostingProjects PUBLIC 43
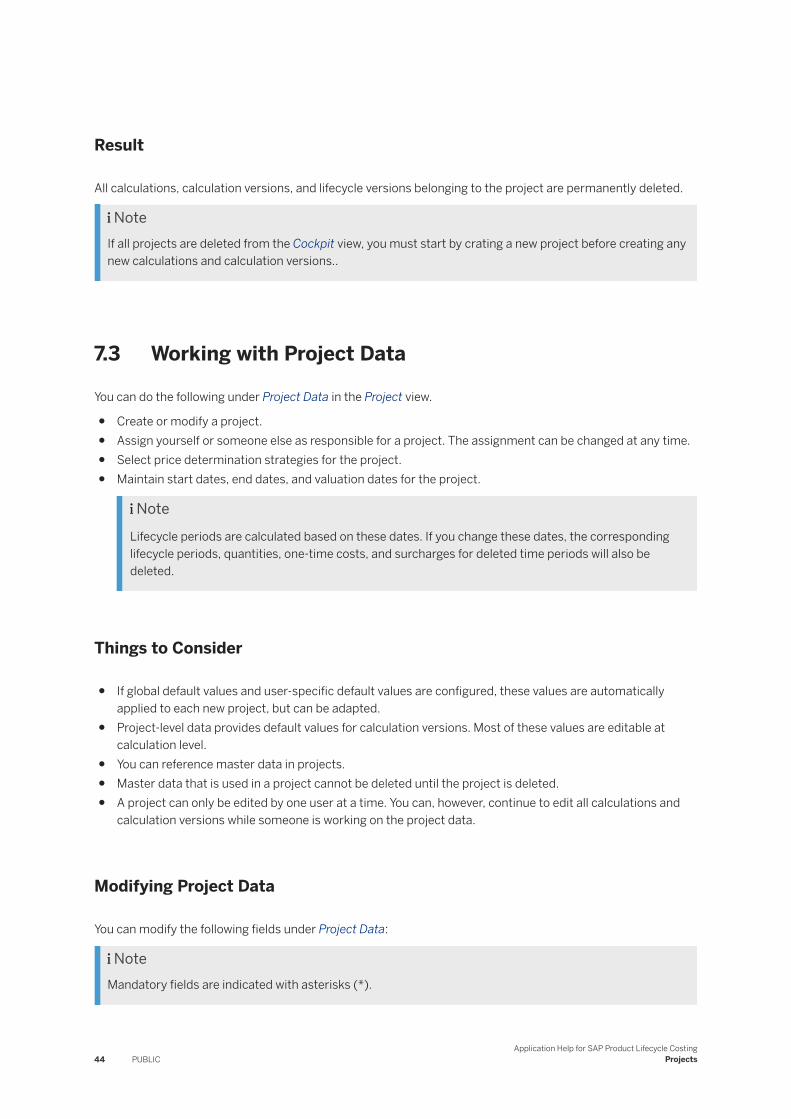
Result
All calculations, calculation versions, and lifecycle versions belonging to the project are permanently deleted.
NoteIf all projects are deleted from the Cockpit view, you must start by crating a new project before creating any new calculations and calculation versions..
7.3 Working with Project Data
You can do the following under Project Data in the Project view.
● Create or modify a project.● Assign yourself or someone else as responsible for a project. The assignment can be changed at any time.● Select price determination strategies for the project.● Maintain start dates, end dates, and valuation dates for the project.
NoteLifecycle periods are calculated based on these dates. If you change these dates, the corresponding lifecycle periods, quantities, one-time costs, and surcharges for deleted time periods will also be deleted.
Things to Consider
● If global default values and user-specific default values are configured, these values are automatically applied to each new project, but can be adapted.
● Project-level data provides default values for calculation versions. Most of these values are editable at calculation level.
● You can reference master data in projects.● Master data that is used in a project cannot be deleted until the project is deleted.● A project can only be edited by one user at a time. You can, however, continue to edit all calculations and
calculation versions while someone is working on the project data.
Modifying Project Data
You can modify the following fields under Project Data:
NoteMandatory fields are indicated with asterisks (*).
44 PUBLICApplication Help for SAP Product Lifecycle Costing
Projects
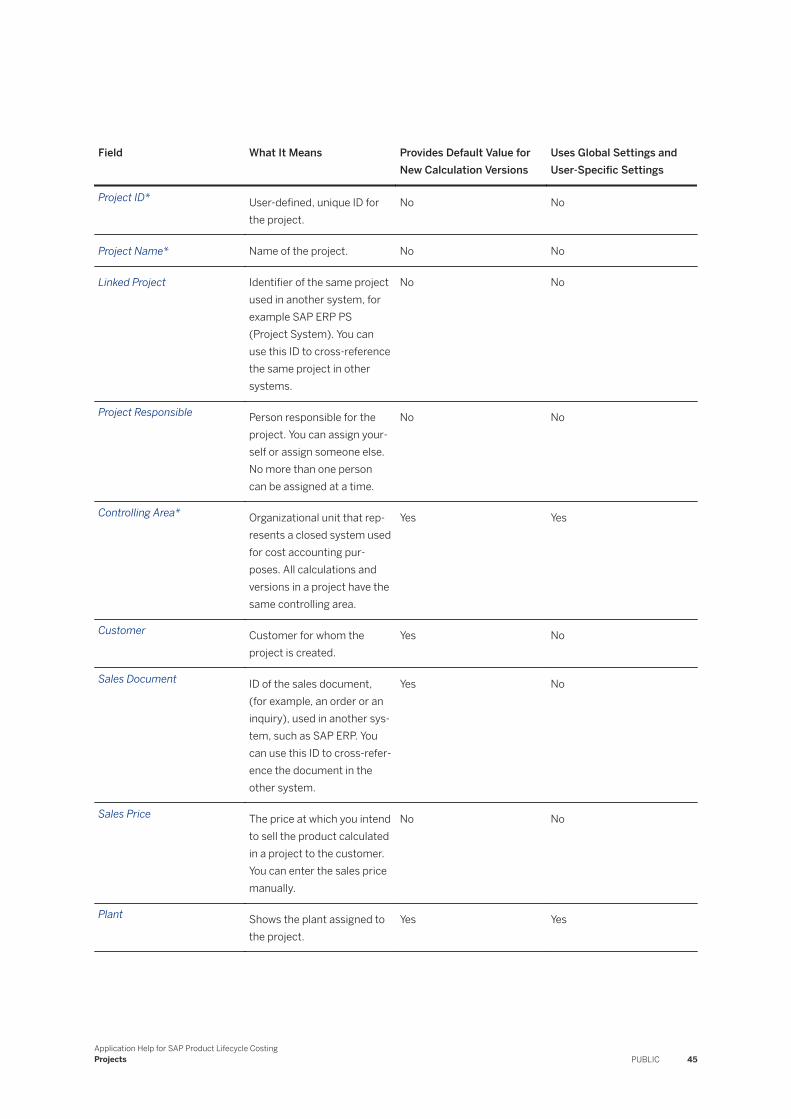
Field What It Means Provides Default Value for New Calculation Versions
Uses Global Settings and User-Specific Settings
Project ID* User-defined, unique ID for the project.
No No
Project Name* Name of the project. No No
Linked Project Identifier of the same project used in another system, for example SAP ERP PS (Project System). You can use this ID to cross-reference the same project in other systems.
No No
Project Responsible Person responsible for the project. You can assign yourself or assign someone else. No more than one person can be assigned at a time.
No No
Controlling Area* Organizational unit that represents a closed system used for cost accounting purposes. All calculations and versions in a project have the same controlling area.
Yes Yes
Customer Customer for whom the project is created.
Yes No
Sales Document ID of the sales document, (for example, an order or an inquiry), used in another system, such as SAP ERP. You can use this ID to cross-reference the document in the other system.
Yes No
Sales Price The price at which you intend to sell the product calculated in a project to the customer. You can enter the sales price manually.
No No
Plant Shows the plant assigned to the project.
Yes Yes
Application Help for SAP Product Lifecycle CostingProjects PUBLIC 45
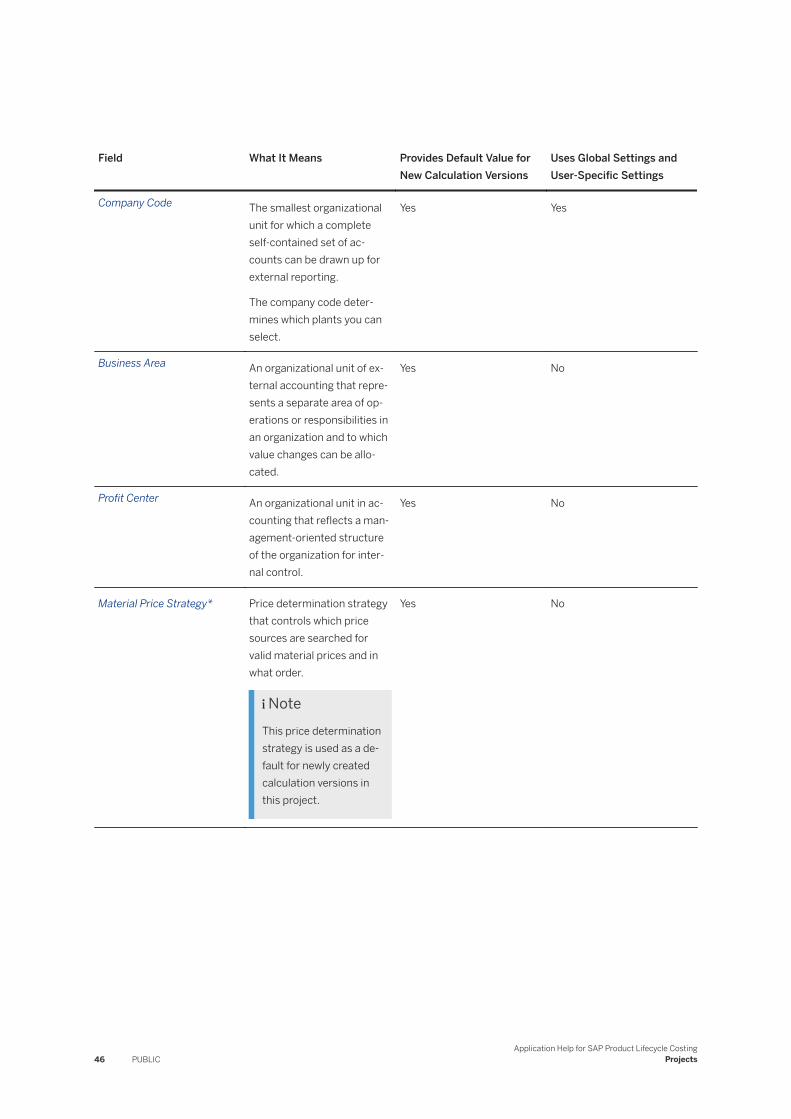
Field What It Means Provides Default Value for New Calculation Versions
Uses Global Settings and User-Specific Settings
Company Code The smallest organizational unit for which a complete self-contained set of accounts can be drawn up for external reporting.
The company code determines which plants you can select.
Yes Yes
Business Area An organizational unit of external accounting that represents a separate area of operations or responsibilities in an organization and to which value changes can be allocated.
Yes No
Profit Center An organizational unit in accounting that reflects a management-oriented structure of the organization for internal control.
Yes No
Material Price Strategy* Price determination strategy that controls which price sources are searched for valid material prices and in what order.
NoteThis price determination strategy is used as a default for newly created calculation versions in this project.
Yes No
46 PUBLICApplication Help for SAP Product Lifecycle Costing
Projects

Field What It Means Provides Default Value for New Calculation Versions
Uses Global Settings and User-Specific Settings
Activity Price Strategy* Price determination strategy that controls which price sources are searched for valid activity prices and in what order.
NoteThis price determination strategy is used as a default for newly created calculation versions in this project.
Yes No
Reporting Currency Currency used for all calculated values, including: total costs, cost per total quantity, prices on assembly level, and other costs. If you change the reporting currency, all relevant amounts are recalculated.
Yes Yes
Costing Sheet Defines how overheads are determined and how sums are calculated.
Yes Yes
Cost Component Split Breaks down costs by account group to identify main cost drivers in the calculation versions within your project.
Yes Yes
Exchange Rate Type Specifies the exchange rate type for a project.
Exchange rate types allow you to define different exchange rates for different business scenarios. For example, you may have an optimistic or pessimistic rate for the conversion of one currency into another.
Yes No
Application Help for SAP Product Lifecycle CostingProjects PUBLIC 47
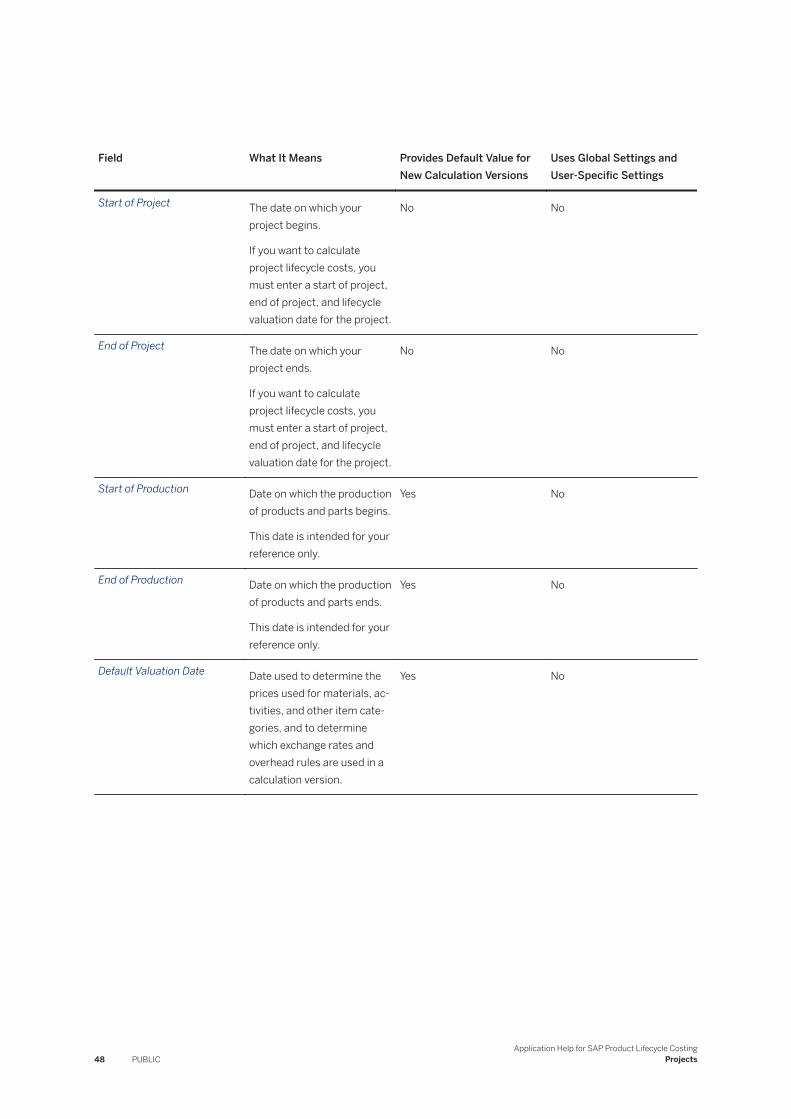
Field What It Means Provides Default Value for New Calculation Versions
Uses Global Settings and User-Specific Settings
Start of Project The date on which your project begins.
If you want to calculate project lifecycle costs, you must enter a start of project, end of project, and lifecycle valuation date for the project.
No No
End of Project The date on which your project ends.
If you want to calculate project lifecycle costs, you must enter a start of project, end of project, and lifecycle valuation date for the project.
No No
Start of Production Date on which the production of products and parts begins.
This date is intended for your reference only.
Yes No
End of Production Date on which the production of products and parts ends.
This date is intended for your reference only.
Yes No
Default Valuation Date Date used to determine the prices used for materials, activities, and other item categories, and to determine which exchange rates and overhead rules are used in a calculation version.
Yes No
48 PUBLICApplication Help for SAP Product Lifecycle Costing
Projects
Field What It Means Provides Default Value for New Calculation Versions
Uses Global Settings and User-Specific Settings
Lifecycle Valuation Date Date used to determine the prices, exchange rates, and overheads used for each lifecycle period. You set the lifecycle valuation date for the project’s first lifecycle period, typically start of the fiscal year.
Subsequent lifecycle periods follow the same date pattern. For example, if you set the lifecycle valuation date to May 1, 2020 and you select monthly lifecycle periods the first year. the next valuation dates used are June 1, 2020, July 1, 2020, and so on.
If you want to calculate project lifecycle costs, you must enter a start of project, end of project, and lifecycle valuation date for the project.
No No
More Information
Projects [page 39]
Creating a Project [page 42]
Deleting a Project [page 43]
Application Help for SAP Product Lifecycle CostingProjects PUBLIC 49
7.4 Moving a Calculation to Another Project
You can move an existing calculation to another project.
Prerequisites
● You are authorized to edit calculations and calculation versions● The calculation that you want to move and the target project have the same controlling area● All versions of the calculation are closed before the calculation is moved
Context
When you begin work on a calculation, you may not yet know which project it should belong to. You can create the calculation in a generic project. Later on in the costing process, you can move the calculation and all of its versions to a more specific project in the same controlling area.
NoteYou can move calculations in and out of projects regardless of the folders in which the projects are organized.
Procedure
1. In the Cockpit view, select a project and then select the calculation that you want to move.2. In the ribbon, choose Move.
You can also use the context menu or the keyboard shortcut Ctrl + X .
3. Enter the target project ID and choose Move.
You can use autocomplete to find a project.
Results
The selected calculation is moved in alphabetical order to the project that you entered.
50 PUBLICApplication Help for SAP Product Lifecycle Costing
Projects
Related Information
Moving a Project to a Folder [page 51]
7.5 Moving a Project to a Folder
You can move a project into the root folder or into any other folder. You can move one project at a time. You can also move projects that contain frozen and referenced calculation versions.
Prerequisites
● You are authorized to view folders and edit the project you are moving.● The project is closed.
Procedure
1. In the Cockpit view, select the project you want to move.2. In the menu choose Move.3. In the Move Project dialog, select the root folder or any other folder into which you would like to move the
project.4. Choose Move.
Results
The project is moved and placed alphabetically in the location you have selected.
Related Information
Folders [page 35]Creating a Folder [page 35]
Application Help for SAP Product Lifecycle CostingProjects PUBLIC 51
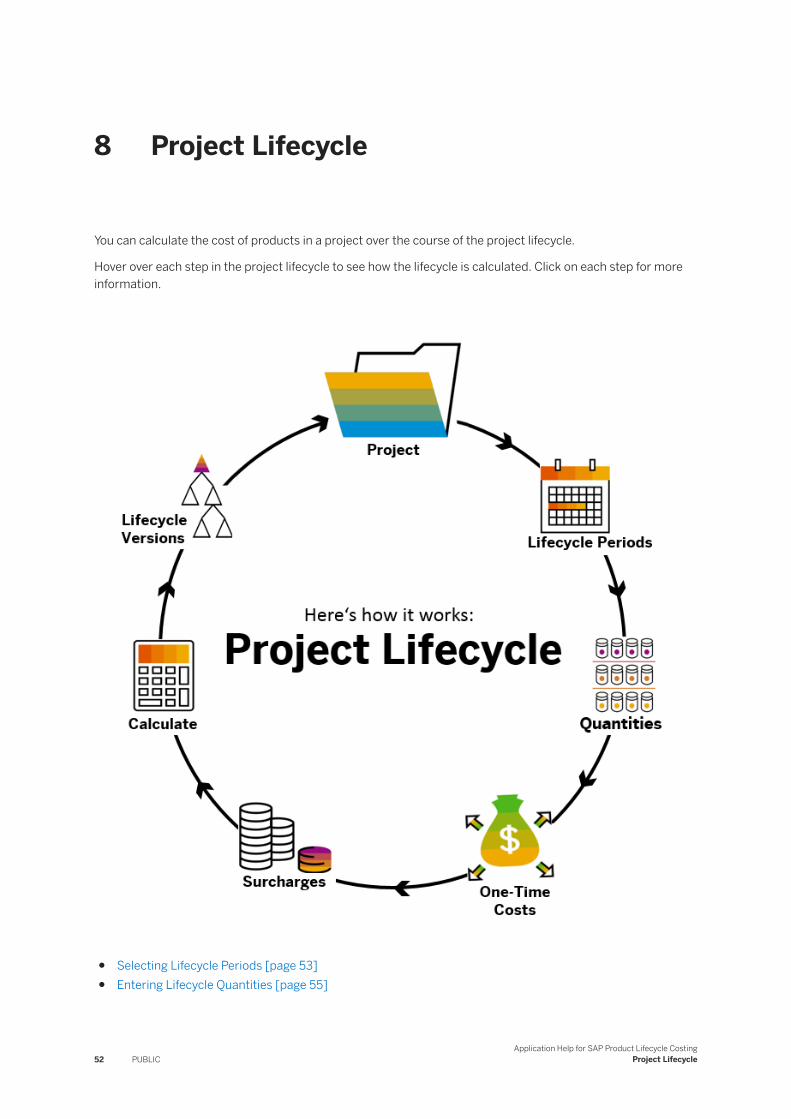
8 Project Lifecycle
You can calculate the cost of products in a project over the course of the project lifecycle.
Hover over each step in the project lifecycle to see how the lifecycle is calculated. Click on each step for more information.
● Selecting Lifecycle Periods [page 53]● Entering Lifecycle Quantities [page 55]
52 PUBLICApplication Help for SAP Product Lifecycle Costing
Project Lifecycle
● One-Time Costs [page 56]● Calculating the Project Lifecycle [page 71]● Lifecycle Versions [page 72]● Creating a Project [page 42]● Project Lifecycle [page 52]● Surcharges [page 63]
Related Information
Projects [page 39]Selecting Lifecycle Periods [page 53]Entering Lifecycle Quantities [page 55]One-Time Costs [page 56]Surcharges [page 63]Preparing Versions for Lifecycle Calculation [page 69]Calculating the Project Lifecycle [page 71]Generating Lifecycle Versions [page 73]
8.1 Selecting Lifecycle Periods
You can select different lifecycle periods for each year in the project lifecycle.
Prerequisites
● The project has been created.● A start date, end date, and lifecycle valuation date have been entered for the project.
Tip○ You can enter or change these dates in the Project view under Project Data.○ If you change these dates, the corresponding lifecycle periods, quantities, one-time costs, and
surcharges for deleted time periods will also be deleted.
Context
You can choose between yearly, quarterly, monthly, and custom lifecycle periods. The start and end dates of the project determine the years for which lifecycle periods can be created. The lifecycle periods that you create
Application Help for SAP Product Lifecycle CostingProject Lifecycle PUBLIC 53
are applied to each calculation in the project. When you calculate the project lifecycle for individual calculation versions, lifecycle versions are generated for every lifecycle period that contains a quantity.
CautionCalculating a large number of lifecycle periods, for example monthly lifecycle periods over a multi-year project, can have an impact on system performance.
Procedure
1. In the Cockpit, use the context menu to open the project.2. In the Navigation Explorer, under Project Lifecycle, choose Lifecycle Periods.
A dropdown for each year in the project is displayed.3. For each year, select a lifecycle period: Yearly, Quarterly, Monthly, or Custom.
Note, if you change a period type, for example from monthly to yearly, the quantities and one-time costs defined for the old period, are lost.
4. [Optional] Modify one or more lifecycle period descriptions.
These are the labels used for the lifecycle versions that are generated and visible in the Cockpit view. They're also used in the screens: Llifecycle Quantities and One-Time Costs.
5. Save the lifecycle periods.
Results
The lifecycle periods that you created are applied to each calculation in the project.
Next Steps
You can now enter quantities for the defined lifecycle periods.
Related Information
Entering Lifecycle Quantities [page 55]Project Lifecycle [page 52]
54 PUBLICApplication Help for SAP Product Lifecycle Costing
Project Lifecycle
8.2 Entering Lifecycle Quantities
You can enter the quantity of the item to be produced for each lifecycle period in the calculation. Lifecycle periods that do not include a quantity are not calculated as part of the project lifecycle.
Prerequisites
● The project has been created.● A start date, end date, and lifecycle valuation date have been entered for the project.● Lifecycle periods have been defined for the project.
Context
You enter quantities in the Project view under Lifecycle Quantities.
Note● If the quantity for a calculation is removed, the one-time costs are also removed and recalculated.● If the quantity for a calculation is changed, the one-time costs are recalculated based on the new
quantity.
Procedure
1. In the Cockpit, use the context menu to open the project.2. In the Navigation Explorer, under Project Lifecycle, choose Lifecycle Quantities.3. For each calculation, in each lifecycle period, enter the number of items you want to produce.4. Save your entries.
Results
When you calculate the project lifecycle for a specific calculation version, every period that has a quantity is calculated. Lifecycle versions are automatically generated for each lifecycle period. You can access the lifecycle versions in the Cockpit view under the calculation version (base version) for which they were calculated.
Application Help for SAP Product Lifecycle CostingProject Lifecycle PUBLIC 55
Next Steps
If you have one-time costs, you can now distribute one-time costs across the product lifecycle.
Related Information
One-Time Costs [page 56]Project Lifecycle [page 52]
8.3 One-Time Costs
You can create one-time costs for a project and distribute them across the project lifecycle. This allows you to spread a single cost, such as a setup cost or the cost of a machine, across different products in the project over multiple lifecycle periods.
Things to Consider
● You can create and distribute one-time costs in the Project view under One-Time Costs.● Once you’ve distributed one-time costs, you must navigate back to the Project Lifecycle area and assign
the one-time costs to the desired calculation versions in order to include the costs in the project lifecycle.● Once you've assigned the one-time costs to a calculation version, you can calculate the project lifecycle.
Lifecycle versions for each lifecycle period are automatically generated and are saved in the Cockpit view. You'll find them in the Navigation Explorer directly below the calculation version that was calculated. The one-time costs appear under the root item in your calculation version as Distributed Costs.
56 PUBLICApplication Help for SAP Product Lifecycle Costing
Project Lifecycle

How Distribution Works
You can distribute one-time costs as follows:
Distribution Type What It Means Example
Based on Quantity Distributes the one-time cost proportionately across the selected calculations in the project. The portion distributed is based on the sum of all quantities entered for each calculation.
Project #SAP Example: Make Parts includes two calculations: #SHAFT and #DRIVE. Over the course of the project lifecycle, you produce 300 units, as follows:
● #SHAFT.– 200 Units● #DRIVE – 100 Units
You distribute a one-time cost of 100 EUR to both calculations, Based on Quantity.
The cost is distributed as follows:
● #SHAFT = 100 x (2/3) = 66.67 EUR
● #DRIVE = 100 x (1/3) = 33.33 EUR
Result:
● For #SHAFT, 66.67 EUR is then spread across lifecycle periods in the calculation, proportional to the quantity in each lifecycle period, equally, or manually, depending on the distribution type selected.
● For #DRIVE, 33.33 EUR is likewise distributed.
Application Help for SAP Product Lifecycle CostingProject Lifecycle PUBLIC 57
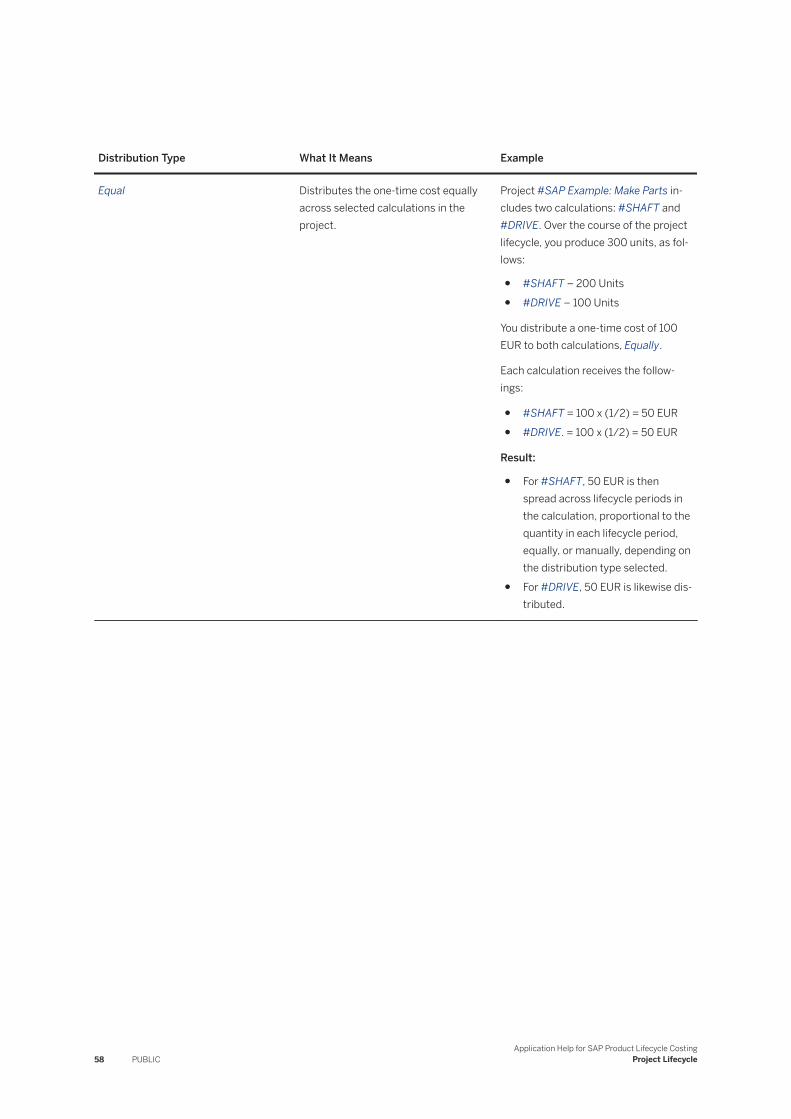
Distribution Type What It Means Example
Equal Distributes the one-time cost equally across selected calculations in the project.
Project #SAP Example: Make Parts includes two calculations: #SHAFT and #DRIVE. Over the course of the project lifecycle, you produce 300 units, as follows:
● #SHAFT – 200 Units● #DRIVE – 100 Units
You distribute a one-time cost of 100 EUR to both calculations, Equally.
Each calculation receives the followings:
● #SHAFT = 100 x (1/2) = 50 EUR● #DRIVE. = 100 x (1/2) = 50 EUR
Result:
● For #SHAFT, 50 EUR is then spread across lifecycle periods in the calculation, proportional to the quantity in each lifecycle period, equally, or manually, depending on the distribution type selected.
● For #DRIVE, 50 EUR is likewise distributed.
58 PUBLICApplication Help for SAP Product Lifecycle Costing
Project Lifecycle
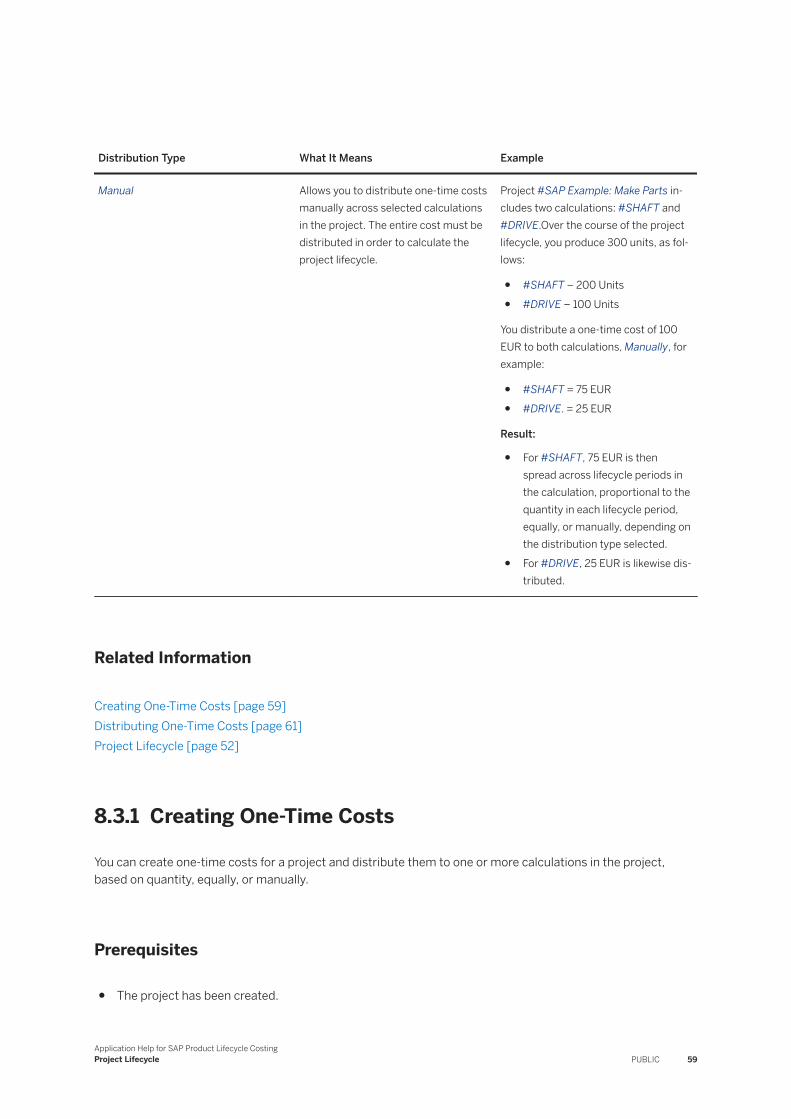
Distribution Type What It Means Example
Manual Allows you to distribute one-time costs manually across selected calculations in the project. The entire cost must be distributed in order to calculate the project lifecycle.
Project #SAP Example: Make Parts includes two calculations: #SHAFT and #DRIVE.Over the course of the project lifecycle, you produce 300 units, as follows:
● #SHAFT – 200 Units● #DRIVE – 100 Units
You distribute a one-time cost of 100 EUR to both calculations, Manually, for example:
● #SHAFT = 75 EUR● #DRIVE. = 25 EUR
Result:
● For #SHAFT, 75 EUR is then spread across lifecycle periods in the calculation, proportional to the quantity in each lifecycle period, equally, or manually, depending on the distribution type selected.
● For #DRIVE, 25 EUR is likewise distributed.
Related Information
Creating One-Time Costs [page 59]Distributing One-Time Costs [page 61]Project Lifecycle [page 52]
8.3.1 Creating One-Time Costs
You can create one-time costs for a project and distribute them to one or more calculations in the project, based on quantity, equally, or manually.
Prerequisites
● The project has been created.
Application Help for SAP Product Lifecycle CostingProject Lifecycle PUBLIC 59
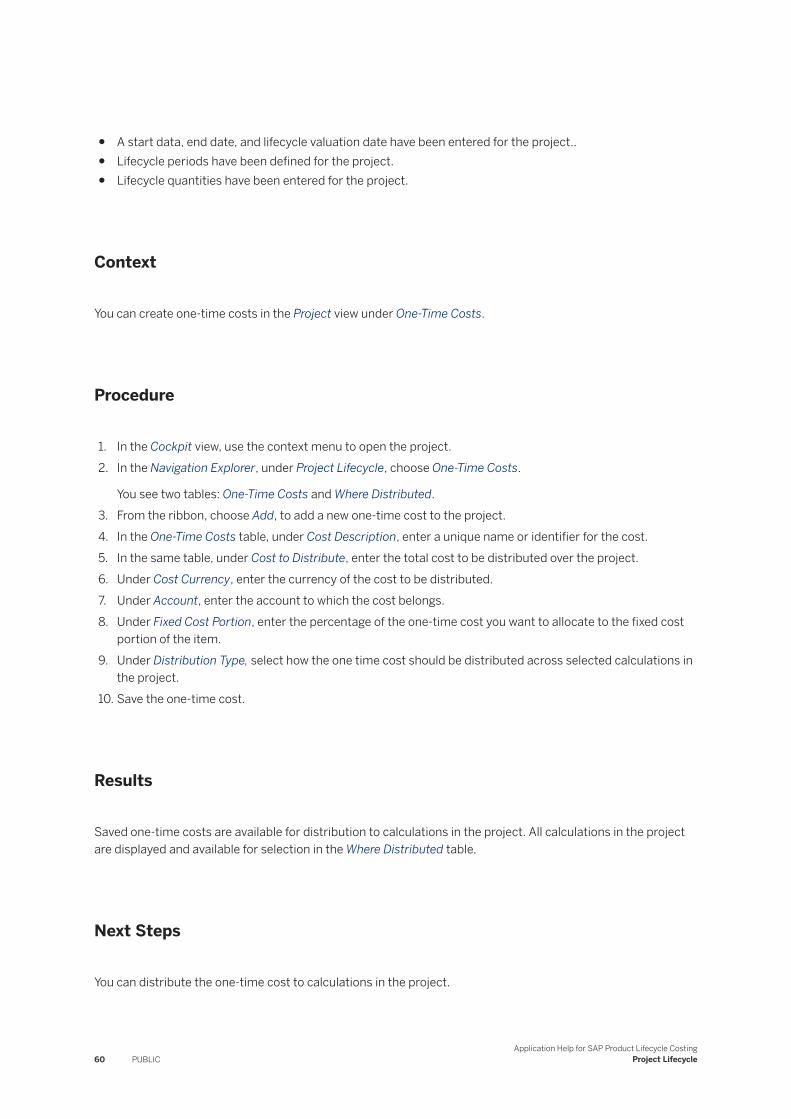
● A start data, end date, and lifecycle valuation date have been entered for the project..● Lifecycle periods have been defined for the project.● Lifecycle quantities have been entered for the project.
Context
You can create one-time costs in the Project view under One-Time Costs.
Procedure
1. In the Cockpit view, use the context menu to open the project.2. In the Navigation Explorer, under Project Lifecycle, choose One-Time Costs.
You see two tables: One-Time Costs and Where Distributed.3. From the ribbon, choose Add, to add a new one-time cost to the project.4. In the One-Time Costs table, under Cost Description, enter a unique name or identifier for the cost.5. In the same table, under Cost to Distribute, enter the total cost to be distributed over the project.6. Under Cost Currency, enter the currency of the cost to be distributed.7. Under Account, enter the account to which the cost belongs.8. Under Fixed Cost Portion, enter the percentage of the one-time cost you want to allocate to the fixed cost
portion of the item.9. Under Distribution Type, select how the one time cost should be distributed across selected calculations in
the project.10. Save the one-time cost.
Results
Saved one-time costs are available for distribution to calculations in the project. All calculations in the project are displayed and available for selection in the Where Distributed table.
Next Steps
You can distribute the one-time cost to calculations in the project.
60 PUBLICApplication Help for SAP Product Lifecycle Costing
Project Lifecycle
Related Information
Distributing One-Time Costs [page 61]Project Lifecycle [page 52]
8.3.2 Distributing One-Time Costs
You can choose how to distribute one-time costs across selected calculations in a project. You can then choose how to distribute those portions across the lifecycle periods.
Prerequisites
● The project has been created.● A start date, end date, and lifecycle valuation date have been entered for the project.● Lifecycle periods have been defined for the project.● Lifecycle quantities have been entered for the project.● The one-time cost you are distributing has been created.
Context
You can distribute one-time costs in the Project view under One-Time Costs.
Procedure
1. In the Navigation Explorer, under Project Lifecycle, choose One-Time Costs.2. In the One-Time Costs table, select the cost you want to distribute.3. In the Where Distributed table, select the calculations to which you want to distribute the one-time cost.
The one-time cost will be divided between the selected calculations based on the distribution type you chose for the one-time cost.
TipMake sure you've assigned quantities to your lifecycle periods. You can only start assigning one-time costs to your calculations once lifecycle periods have been created and quantities have been assigned.
4. In the Where Distributed table, under Distribution Type, select how to distribute the one-time cost across the lifecycle periods. You can choose from the following:
Application Help for SAP Product Lifecycle CostingProject Lifecycle PUBLIC 61
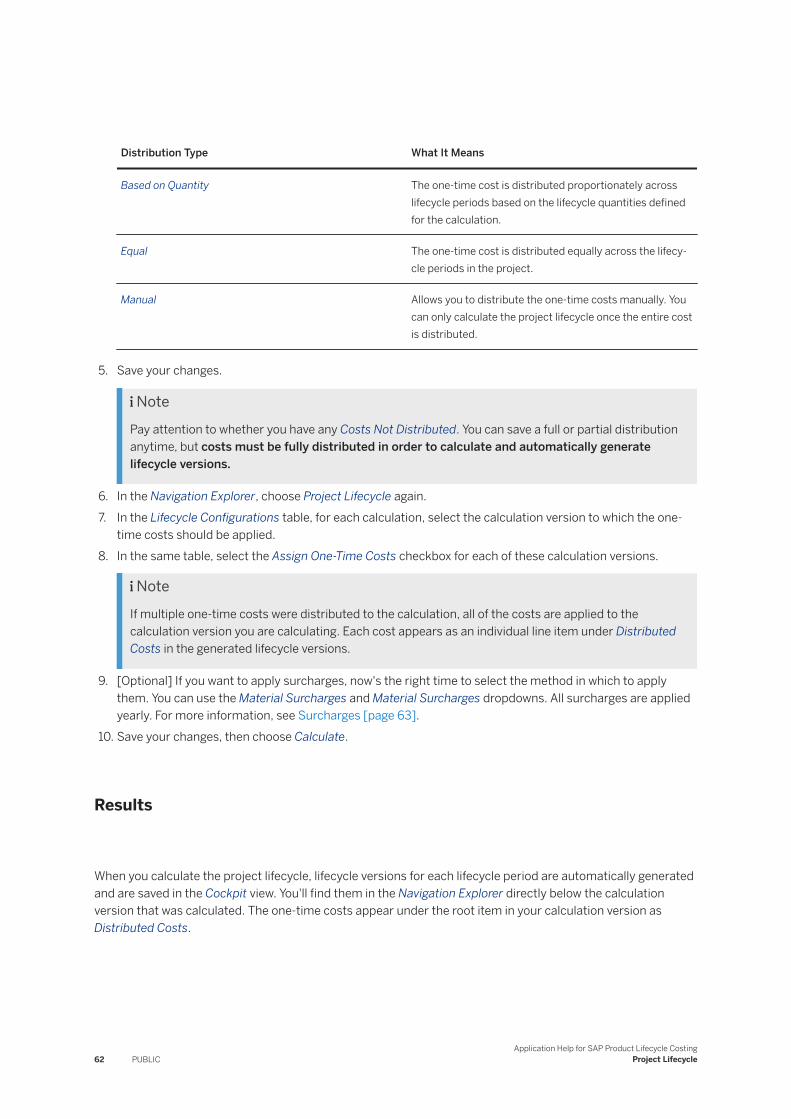
Distribution Type What It Means
Based on Quantity The one-time cost is distributed proportionately across lifecycle periods based on the lifecycle quantities defined for the calculation.
Equal The one-time cost is distributed equally across the lifecycle periods in the project.
Manual Allows you to distribute the one-time costs manually. You can only calculate the project lifecycle once the entire cost is distributed.
5. Save your changes.
NotePay attention to whether you have any Costs Not Distributed. You can save a full or partial distribution anytime, but costs must be fully distributed in order to calculate and automatically generate lifecycle versions.
6. In the Navigation Explorer, choose Project Lifecycle again.7. In the Lifecycle Configurations table, for each calculation, select the calculation version to which the one-
time costs should be applied.8. In the same table, select the Assign One-Time Costs checkbox for each of these calculation versions.
NoteIf multiple one-time costs were distributed to the calculation, all of the costs are applied to the calculation version you are calculating. Each cost appears as an individual line item under Distributed Costs in the generated lifecycle versions.
9. [Optional] If you want to apply surcharges, now's the right time to select the method in which to apply them. You can use the Material Surcharges and Material Surcharges dropdowns. All surcharges are applied yearly. For more information, see Surcharges [page 63].
10. Save your changes, then choose Calculate.
Results
When you calculate the project lifecycle, lifecycle versions for each lifecycle period are automatically generated and are saved in the Cockpit view. You'll find them in the Navigation Explorer directly below the calculation version that was calculated. The one-time costs appear under the root item in your calculation version as Distributed Costs.
62 PUBLICApplication Help for SAP Product Lifecycle Costing
Project Lifecycle
Related Information
Surcharges [page 63]Preparing Versions for Lifecycle Calculation [page 69]Calculating the Project Lifecycle [page 71]Project Lifecycle [page 52]
8.4 Surcharges
You can apply surcharges to material prices and activity prices in order to take into account increases or decreases in item prices over time when calculating the lifecycle costs for a project.
This gives you additional flexibility when working with lifecycle versions. For example, you can calculate the total cost of a product until the end of production. Surcharges allow you to estimate how the prices for materials and activities will change over time in the future.
As part of a project's lifecycle, you can define surcharge rules and then decide how and when you want to apply surcharges during lifecycle calculation for a project. You can apply surcharges After Price Determination, with No Price Determination, or after No Price Found. When you generate lifecycle versions, you can then see the effects of surcharges overall and at item level. You can apply surcharges as needed for each calculation version in a project.
Where You Create Surcharges
● You create surcharges and define surcharge rules in the Project view under Material Price - Lifecycle Surcharges and Activity Price - Lifecycle Surcharges.
● You can apply surcharges to individual calculation versions in the Project view under Project Lifecycle.
Application Help for SAP Product Lifecycle CostingProject Lifecycle PUBLIC 63
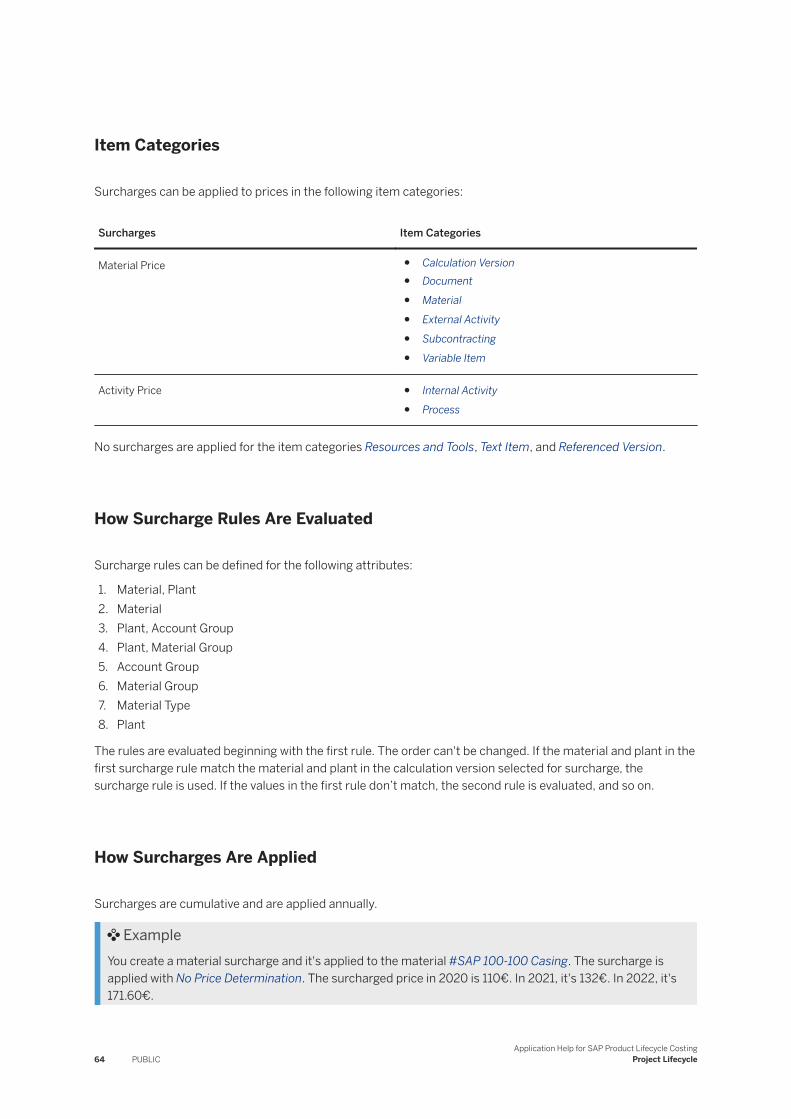
Item Categories
Surcharges can be applied to prices in the following item categories:
Surcharges Item Categories
Material Price ● Calculation Version● Document● Material● External Activity● Subcontracting● Variable Item
Activity Price ● Internal Activity● Process
No surcharges are applied for the item categories Resources and Tools, Text Item, and Referenced Version.
How Surcharge Rules Are Evaluated
Surcharge rules can be defined for the following attributes:
1. Material, Plant2. Material3. Plant, Account Group4. Plant, Material Group5. Account Group6. Material Group7. Material Type8. Plant
The rules are evaluated beginning with the first rule. The order can't be changed. If the material and plant in the first surcharge rule match the material and plant in the calculation version selected for surcharge, the surcharge rule is used. If the values in the first rule don’t match, the second rule is evaluated, and so on.
How Surcharges Are Applied
Surcharges are cumulative and are applied annually.
ExampleYou create a material surcharge and it's applied to the material #SAP 100-100 Casing. The surcharge is applied with No Price Determination. The surcharged price in 2020 is 110€. In 2021, it's 132€. In 2022, it's 171.60€.
64 PUBLICApplication Help for SAP Product Lifecycle Costing
Project Lifecycle
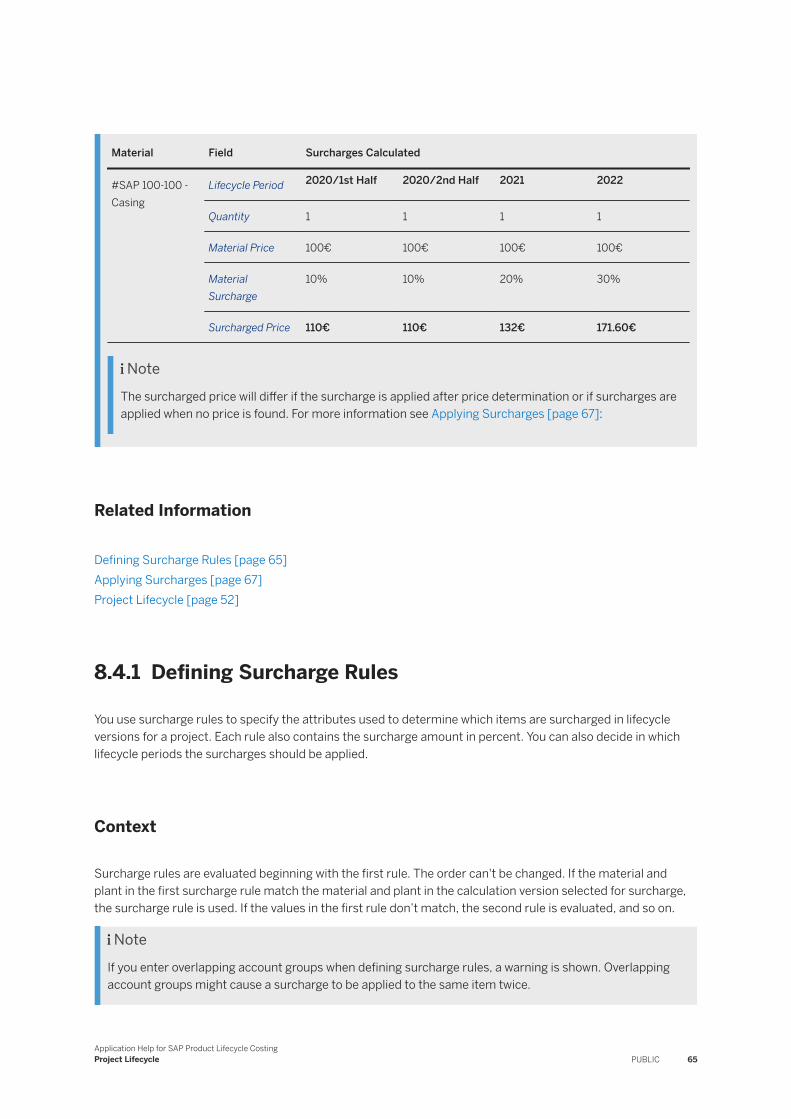
Material Field Surcharges Calculated
#SAP 100-100 - Casing
Lifecycle Period 2020/1st Half 2020/2nd Half 2021 2022
Quantity 1 1 1 1
Material Price 100€ 100€ 100€ 100€
Material Surcharge
10% 10% 20% 30%
Surcharged Price 110€ 110€ 132€ 171.60€
NoteThe surcharged price will differ if the surcharge is applied after price determination or if surcharges are applied when no price is found. For more information see Applying Surcharges [page 67]:
Related Information
Defining Surcharge Rules [page 65]Applying Surcharges [page 67]Project Lifecycle [page 52]
8.4.1 Defining Surcharge Rules
You use surcharge rules to specify the attributes used to determine which items are surcharged in lifecycle versions for a project. Each rule also contains the surcharge amount in percent. You can also decide in which lifecycle periods the surcharges should be applied.
Context
Surcharge rules are evaluated beginning with the first rule. The order can't be changed. If the material and plant in the first surcharge rule match the material and plant in the calculation version selected for surcharge, the surcharge rule is used. If the values in the first rule don’t match, the second rule is evaluated, and so on.
NoteIf you enter overlapping account groups when defining surcharge rules, a warning is shown. Overlapping account groups might cause a surcharge to be applied to the same item twice.
Application Help for SAP Product Lifecycle CostingProject Lifecycle PUBLIC 65
Procedure
1. In the Cockpit view, use the ribbon or context menu to open a project.2. Choose Material Price - Lifecycle Surcharges or Activity Price - Lifecycle Surcharges, depending upon the
type of surcharge rule you need.3. In the table, choose the surcharge dependency that you want to use, and then double-click or press Enter
to open the rule details.4. Choose Add in the ribbon or context menu.5. Enter the attributes to be used, for example, a combination of material and plant, and specify the
surcharge in percentage for the relevant lifecycle periods. Note that the year that production starts is emphasized in bold.
For example, you could define a rule for a surcharge on the material #Pump-100 coming from the plant MAIN. You can set a surcharge of 5% for 2020 and 2021, and a surcharge of 10% for 2022.
6. Save your entries.
Results
Surcharge rules are defined for the project and are ready to be applied when you calculate the project lifecycle for individual calculation versions.
NoteIf a master data object (plant, account group, material group, cost center, or activity type) is used in a surcharge rule, the master data object can't be deleted.
Next Steps
You can now determine how surcharges will be applied to individual calculation versions in the project. For more information, see Applying Surcharges [page 67].
For more information about preparing calculation versions for calculation generally, see Preparing Versions for Lifecycle Calculation [page 69].
Related Information
Surcharges [page 63]Applying Surcharges [page 67]Preparing Versions for Lifecycle Calculation [page 69]Calculating the Project Lifecycle [page 71]
66 PUBLICApplication Help for SAP Product Lifecycle Costing
Project Lifecycle
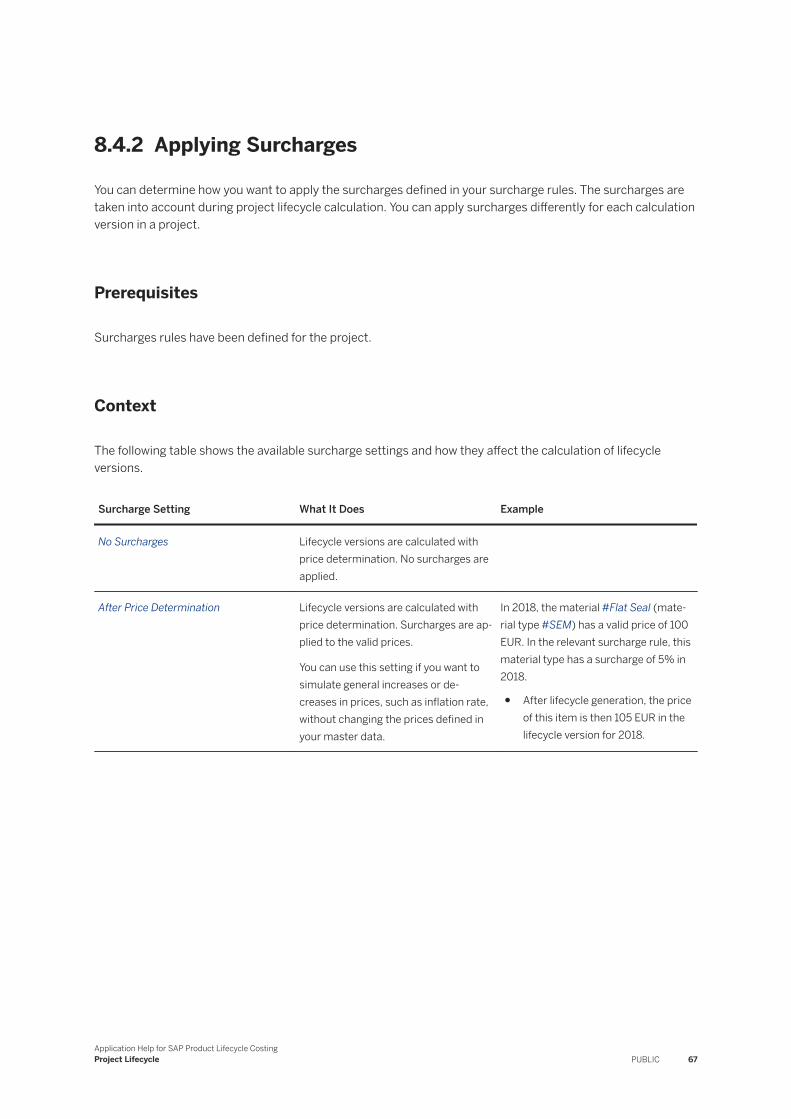
8.4.2 Applying Surcharges
You can determine how you want to apply the surcharges defined in your surcharge rules. The surcharges are taken into account during project lifecycle calculation. You can apply surcharges differently for each calculation version in a project.
Prerequisites
Surcharges rules have been defined for the project.
Context
The following table shows the available surcharge settings and how they affect the calculation of lifecycle versions.
Surcharge Setting What It Does Example
No Surcharges Lifecycle versions are calculated with price determination. No surcharges are applied.
After Price Determination Lifecycle versions are calculated with price determination. Surcharges are applied to the valid prices.
You can use this setting if you want to simulate general increases or decreases in prices, such as inflation rate, without changing the prices defined in your master data.
In 2018, the material #Flat Seal (material type #SEM) has a valid price of 100 EUR. In the relevant surcharge rule, this material type has a surcharge of 5% in 2018.
● After lifecycle generation, the price of this item is then 105 EUR in the lifecycle version for 2018.
Application Help for SAP Product Lifecycle CostingProject Lifecycle PUBLIC 67
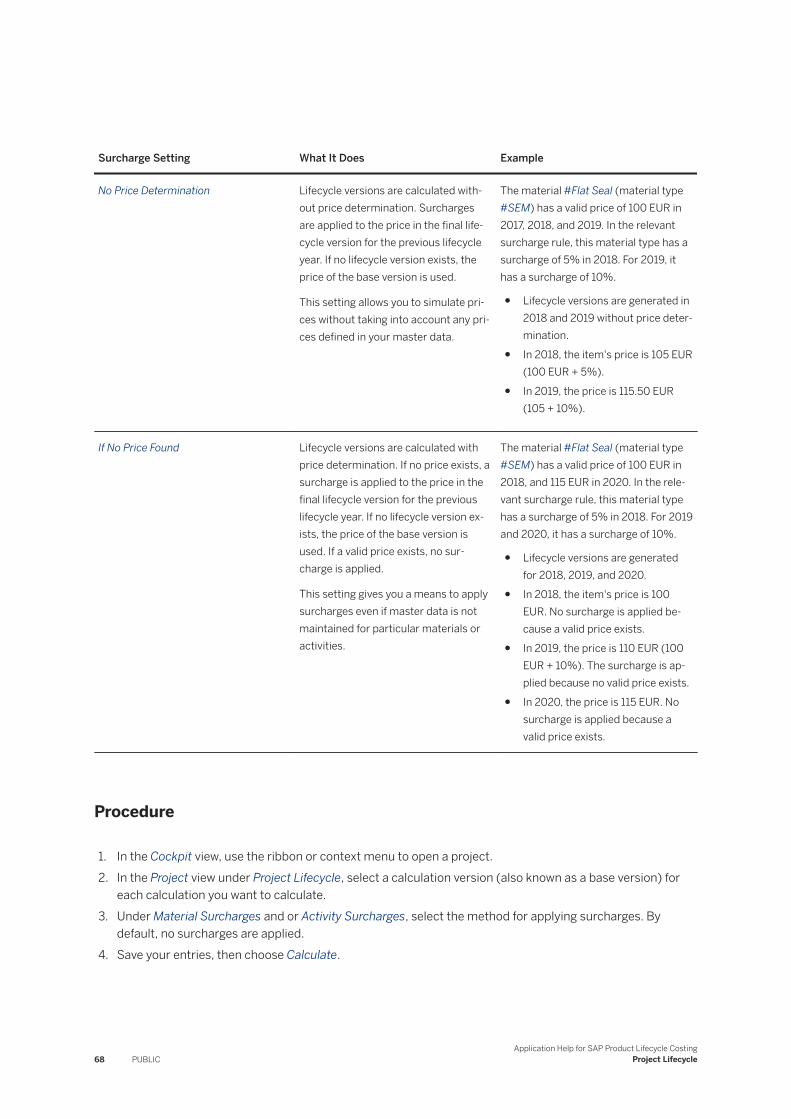
Surcharge Setting What It Does Example
No Price Determination Lifecycle versions are calculated without price determination. Surcharges are applied to the price in the final lifecycle version for the previous lifecycle year. If no lifecycle version exists, the price of the base version is used.
This setting allows you to simulate prices without taking into account any prices defined in your master data.
The material #Flat Seal (material type #SEM) has a valid price of 100 EUR in 2017, 2018, and 2019. In the relevant surcharge rule, this material type has a surcharge of 5% in 2018. For 2019, it has a surcharge of 10%.
● Lifecycle versions are generated in 2018 and 2019 without price determination.
● In 2018, the item's price is 105 EUR (100 EUR + 5%).
● In 2019, the price is 115.50 EUR (105 + 10%).
If No Price Found Lifecycle versions are calculated with price determination. If no price exists, a surcharge is applied to the price in the final lifecycle version for the previous lifecycle year. If no lifecycle version exists, the price of the base version is used. If a valid price exists, no surcharge is applied.
This setting gives you a means to apply surcharges even if master data is not maintained for particular materials or activities.
The material #Flat Seal (material type #SEM) has a valid price of 100 EUR in 2018, and 115 EUR in 2020. In the relevant surcharge rule, this material type has a surcharge of 5% in 2018. For 2019 and 2020, it has a surcharge of 10%.
● Lifecycle versions are generated for 2018, 2019, and 2020.
● In 2018, the item's price is 100 EUR. No surcharge is applied because a valid price exists.
● In 2019, the price is 110 EUR (100 EUR + 10%). The surcharge is applied because no valid price exists.
● In 2020, the price is 115 EUR. No surcharge is applied because a valid price exists.
Procedure
1. In the Cockpit view, use the ribbon or context menu to open a project.2. In the Project view under Project Lifecycle, select a calculation version (also known as a base version) for
each calculation you want to calculate.3. Under Material Surcharges and or Activity Surcharges, select the method for applying surcharges. By
default, no surcharges are applied.4. Save your entries, then choose Calculate.
68 PUBLICApplication Help for SAP Product Lifecycle Costing
Project Lifecycle
Results
● One lifecycle version is generated for each lifecycle period that has a total quantity greater than zero. Surcharges are applied according to your settings.
● You can open the lifecycle versions in the Cockpit view to see how prices, overheads, and exchange rates have changed the overall cost of the product each year. If a surcharge has been applied for an item, this is shown as part of the price information in the Item Details. The surcharge amount is shown in the Surcharge (%) field and the price source for the item is shown as Surcharged Price.
● You can also visualize the costs and quantities for these lifecycle versions across all lifecycle periods using SAP Analysis for Microsoft Office and the corresponding SAP PLC Analytic views for projects.
Related Information
Surcharges [page 63]Defining Surcharge Rules [page 65]Calculating the Project Lifecycle [page 71]Analytics and Reporting with External Tools [page 255]
8.5 Preparing Versions for Lifecycle Calculation
If you want to include one-time costs and surcharges in the project lifecycle calculation for a particular calculation version, you must prepare the calculation version to include the costs before calculating.
CautionCreating surcharges for a project or creating one-time costs and applying them to calculations in the project does NOT automatically apply them to all calculation versions in the project. You must trigger the application of costs and surcharges for each calculation version before calculating the project lifecycle.
Prerequisites
1. A project has been created.2. A project start date, end date, and lifecycle valuation date have been entered for the project.3. Lifecycle periods have been selected for each year in the project.4. Lifecycle quantities have been entered for all lifecycle periods5. One-time costs, if any, have been distributed to selected calculations in the project.6. Material and activity surcharges, if any, have been created for the project.
Application Help for SAP Product Lifecycle CostingProject Lifecycle PUBLIC 69
Context
You can configure the project lifecycle in the Project view under Project Lifecycle. You can select and configure one calculation version at a time for each calculation in the project. All configured calculation versions can be calculated together at one time. Lifecycle versions are generated for every calculation version you calculate.
Procedure
1. In the Project view, go to the Navigation Explorer and choose Project Lifecycle.2. On the right, under Lifecycle Configurations, select a calculation version for each calculation you plan to
calculate.3. Check the Assign One-Time Costs checkbox to assign one-time costs to the selected calculation version.
NoteIf multiple one-time costs were distributed to the calculation, all of the costs are applied to the calculation version you are calculating. Each cost appears as an individual line item under Distributed Costs in the generated lifecycle versions.
4. Under Material Surcharges and Activity Surcharges, use the dropdown to select the method in which surcharges, if any, are applied to the selected calculation version.
NoteAll surcharges are applied yearly.
5. Save your entries.
Result
The selected calculation versions are ready for calculation. The one-time costs and surcharges will be applied when you calculate the project lifecycle for the selected calculation versions.
Next Steps
You can now calculate the project lifecycle for the selected calculation versions.
Related Information
Calculating the Project Lifecycle [page 71]Project Lifecycle [page 52]
70 PUBLICApplication Help for SAP Product Lifecycle Costing
Project Lifecycle
8.6 Calculating the Project Lifecycle
You can calculate the total cost of a project and its included products over the project lifecycle. When you calculate the project lifecycle, lifecycle versions for the planned dates and quantities are automatically generated and displayed under the selected calculation version (base version) in the Cockpit view.
Prerequisites
1. A project has been created.2. A project start date, end date, and lifecycle valuation date have been entered for the project.3. Lifecycle periods have been selected for each year in the project.4. Lifecycle quantities have been entered for all lifecycle periods.5. One-time costs, if any, have been distributed to selected calculations in the project.6. Material and activity surcharges, if any, have been created for the project.
Context
You can calculate the project lifeycle in the Project view under Project Lifecycle.
Procedure
1. In the Cockpit view, open the project you want to calculate.2. In the Navigation Explorer, choose Project Lifecycle.3. On the right, under Lifecycle Configurations, select a calculation version for each calculation you want to
calculate.4. [Optional] Select the Assign One-Time Costs checkbox to assign one-time costs to the selected calculation
version.
NoteIf multiple one-time costs were distributed to the calculation, all of the costs are applied to each calculation version you've selected.
5. Under Material Surcharges and Activity Surcharges, use the dropdown to select the method in which surcharges, if any, are applied to the selected calculation versions.
NoteAll surcharges are applied yearly.
Application Help for SAP Product Lifecycle CostingProject Lifecycle PUBLIC 71
6. Save your entries, then choose Calculate.
Results
● The project lifecycle is calculated for each calculation version selected.● One lifecycle version is generated for each lifecycle period in which you have entered a total quantity
greater than zero.● Lifecycle versions are saved in the Cockpit view, under the calculation versions (base versions) calculated.
You can open lifecycle versions from the Navigation Explorer in the Cockpit view to see how prices, overheads, and exchange rates have changed the overall cost of the product each year.
● One-time costs appear as individual line items under Distributed Costs in the lifecycle versions.● Surcharges are shown as part of the price information in the item details. The surcharge amount is shown
in the Surcharge (%) field, and the price source for the item is shown as Surcharged Price.● You can visualize the costs and quantities for these lifecycle versions across all lifecycle periods using SAP
Analysis for Microsoft Office and the corresponding SAP PLC Analytic views for projects.
Related Information
Project Lifecycle [page 52]Preparing Versions for Lifecycle Calculation [page 69]Analytics and Reporting with External Tools [page 255]
8.7 Lifecycle Versions
Lifecycle versions are calculation versions generated for a particular period of time defined in the lifecycle of a project.
You use these versions to calculate costs for different lifecycle periods over the course of the project lifecycle. Lifecycle versions are automatically generated when calculating the project lifecycle for individual calculation versions.
Things to Consider
● Lifecycle versions ( ) are shown in the Navigation Explorer in the Cockpit view. They're saved under the calculation version for which the project lifecycle was calculated.
● You can edit lifecycle versions in the Calculation view.When you save changes to a lifecycle version, the existing version is overwritten and the version type
changes to Manual Lifecycle Version ( ). The next time you calculate the project, you can generate new
72 PUBLICApplication Help for SAP Product Lifecycle Costing
Project Lifecycle
lifecycle versions or keep the lifecycle versions with manual changes. Once new lifecycle versions are generated and manual changes are overwritten, you cannot retrieve the manual changes.
● Lifecycle versions can't be referenced in other versions, used as base versions when calculating the project lifecycle, or set as current versions.
● You can visualize the costs and quantities of lifecycle versions across all lifecycle periods using SAP Analysis for Microsoft Office and the corresponding SAP PLC Analytic Views for projects.
Related Information
Generating Lifecycle Versions [page 73]Base Versions [page 73]Using References in Base Versions [page 74]Price Determination for Lifecycle Versions [page 75]Editing Lifecycle Versions [page 76]
8.7.1 Generating Lifecycle Versions
Lifecycle versions are automatically generated for all defined lifecycle periods with quantities greater than zero, when you calculate the project lifecycle.
For more information, see Calculating the Project Lifecycle [page 71].
8.7.2 Base Versions
The calculation version you select when calculating the project lifecycle is also known as the base version. It's the basis for generating lifecycle versions in a project. This means that you build up the costing structure and prices that you want to use in the calculation version (base version) before assigning one-time costs, triggering the application of surcharges, and calculating the project lifecycle.
The base version used for each generated lifecycle version can be found in the side panel under Version Header Data Base Version .
Things to Consider
● Lifecycle versions and frozen versions can't be used as base versions.● If a calculation version is deleted and it was used as a base version, all generated lifecycle versions are also
deleted.● The unit of measure for total quantity used by the base version is also used for the lifecycle versions.● Base versions can contain references to other calculation versions that are in the same project or that are
in different projects but have the same controlling area.
Application Help for SAP Product Lifecycle CostingProject Lifecycle PUBLIC 73

Related Information
Lifecycle Versions [page 72]Calculating the Project Lifecycle [page 71]Using References in Base Versions [page 74]
8.7.3 Using References in Base Versions
You can reuse parts and assemblies in different products and variants by adding them as references. Base versions can contain references to other calculation versons that are in the same project or that are in different projects but have the same controlling area.
ExampleAssume that you have a base version #SAP Pump. This base version references another version, #SAP Shaft. You calculate project lifecycle costs for #SAP Pump using this base version for two lifecycle periods: 2019 and 2020. If #SAP Shaft is in the same project as #SAP Pump and you have also selected a base version for each, then lifecycle versions are generated for both calculation versions for 2019 and 2020. If this is not the case, then lifecycle versions are only generated for #SAP Pump, and the system must handle the references to #SAP Shaft differently.
Handling of References in Base Versions
There are three possible scenarios for the handling of the reference to #SAP Shaft in the generated lifecycle versions for #SAP Pump:
Scenario How References are Handled
Lifecycle versions exist for the referenced version If lifecycle versions already exist for #SAP Shaft for 2019 and 2020, they are used for the generated lifecycle versions for #SAP Pump for these lifecycle periods.
No lifecycle version exists for the referenced version in a lifecycle period
In this case, #SAP Shaft has existing lifecycle versions for 2017 and 2018, but not for 2019 or 2020. When you generate lifecycle versions for #SAP Pump, the existing lifecycle version for #SAP Shaft for 2018 is used for both lifecycle periods 2019 and 2020. This ensures that the latest version of the #SAP Shaft is used in the generated lifecycle versions for #SAP Pump.
74 PUBLICApplication Help for SAP Product Lifecycle Costing
Project Lifecycle
Scenario How References are Handled
No lifecycle versions exist at all for the referenced version It's also possible that no lifecycle versions exist at all for #SAP Shaft. In this case, when you generate lifecycle versions for #SAP Pump, the version of #SAP Shaft included in the base version for #SAP Pump is used in each of the lifecycle periods.
NoteIf you calculate project lifecycle costs for several base versions at the same time in the same project, the following occurs to ensure that the base version uses information from the respective lifecycle version:
● Lifecycle versions are generated for the reference version first.● Then lifecycle versions are generated for the base version.
Related Information
Base Versions [page 73]References for Calculation Versions [page 180]Referencing a Calculation Version [page 181]Opening a Referenced Version [page 182]Updating References [page 183]Referenced Version [page 157]
8.7.4 Price Determination for Lifecycle Versions
When lifecycle versions are generated, automatic price determination is triggered. This ensures that the most up-to-date prices are used for each lifecycle version. This applies for the following item categories: Material, Document, Subcontracting, External Activity, and Internal Activity.
As part of your project data, you set a lifecycle valuation date. This date is used for the project’s first lifecycle period, for example, the start of the fiscal year. Based on this, lifecycle valuation dates are automatically set for each subsequent lifecycle period.
ExampleIf you set the lifecycle valuation date to May 1, 2020 and you select monthly lifecycle periods the first year. the next valuation dates used are June 1, 2020, July 1, 2020, and so on.
New lifecycle valuation dates trigger price determination. This means that new prices, costing sheet overheads, and exchange rates that are valid for these dates are automatically found for the lifecycle versions, if available. Even if total quantities remain the same, prices and ultimately total cost will likely differ based on the lifecycle period.
Application Help for SAP Product Lifecycle CostingProject Lifecycle PUBLIC 75

Things to Consider
● Automatic price determination is done for items in the lifecycle version for which automatic price determination is available.
● If a valid price is found, it is set and the price source is set accordingly.● If no valid prices are found or if price determination is disabled, the following occurs:
○ Prices from the prior lifecycle version are taken, if available.○ The price source is set to Manual Price.
● If you have defined surcharge rules and applied surcharges as part of lifecycle calculation for your project, surcharges may also be applied after price determination or if no price is found. For more information, see Surcharges in the related links below.
Related Information
Determining Prices [page 191]Surcharges [page 63]
8.7.5 Editing Lifecycle Versions
You can edit and save changes to lifecyle versions.
Context
When you calculate the project lifecycle for a calculation version, separate lifecycle versions for each lifecycle period within the start and end dates for the project are automatically generated and saved in the Cockpit view. You can open and edit these lifecycle versions.
Procedure
1. In the Cockpit view, open the Lifecycle Version ( ) you want to change.
The lifecycle version opens in the Calculation view.2. Make the desired changes and choose Save.
Note, you can also choose Save As. This does not change the lifecycle version. This saves the lifecycle
version as a regular Calculation Version ( ) in the Cockpit view, alphabetically, below the calculation.
76 PUBLICApplication Help for SAP Product Lifecycle Costing
Project Lifecycle
Results
The lifecycle version is overwritten and the version type changes to Manual Lifecycle Version ( ). The next time you calculate the project, you are given the option to generate new lifecycle versions, which overwrite the manual lifecycle versions, or to keep the manual lifecycle versions.
Related Information
Lifecycle Versions [page 72]
8.8 Authorizations for Projects
You can use authorizations to control what users are allowed to do when they work in a project or with calculation versions in a project.
When you assign a user or a user group to a project, you provide authorizations for specific actions such as reading, editing, or deleting the project. Each authorization applies to the project itself and all calculations and calculation versions belonging to the project.
● You can manage authorizations for users and user groups in the Project view under Authorizations.● You can create user groups in the Administration view under Global Settings.
Related Information
Authorization Level and Types [page 77]My Authorizations [page 78]Managing Authorizations [page 79]User Groups [page 378]
8.8.1 Authorization Level and Types
You assign authorizations for calculations and calculation versions at project level.
The creator of a new project is automatically authorized to administer the project. This means that they can add users and user groups to the project and authorize these users to perform various actions for the project.
NoteYou only need to assign one authorization to a user for each project. The highest authorization includes all lower authorizations for that project.
Application Help for SAP Product Lifecycle CostingProject Lifecycle PUBLIC 77

Authorization Types
The following authorizations can be assigned to users and user groups at project level.
Authorization Types
Authorization Allows You To
Read
(Default Authorization)
● See the project in the Cockpit view● See authorized users and user groups for the project in
the Project view● Search for the project and all its calculations and ver
sions using the global search field● See all calculations and calculation versions for the
project in the Cockpit view● See calculated results for all calculation versions be
longing to the project● Open everything you are authorized to see in any SAP
HANA View
NoteThis authorization does not allow you to:
● Edit or save changes to the project● Save changes for any calculation versions in the
project● Open referenced versions that you are not other
wise authorized to read
Create/Edit
(Includes Read)
● Update and save the project● Create calculations in the project● Update calculations in the project● Create calculation versions in the project● Copy calculation versions in the project (create as copy)● Edit and save calculation versions in the project
Create/Edit/Freeze/Delete
(Includes Create/Edit)
● Freeze versions in the project● Delete the project● Delete calculations in the project● Delete calculation versions in the project
Administer
(Includes full Edit)
● Grant and revoke authorizations for others for the project
8.8.2 My AuthorizationsYou can view your own authorizations in the Project view under My Authorizations. You cannot change your own authorizations.
If you have individual authorization and you are also included in a user group authorized for the project, you receive the highest authorization granted either individually or by the user group. For example, if you are
78 PUBLICApplication Help for SAP Product Lifecycle Costing
Project Lifecycle
granted Read authorization for a project and are also included in a user group that has been granted Create/Edit authorization for the project, you receive Create/Edit authorization for that project.
Related Information
Managing Authorizations [page 79]
8.8.3 Managing Authorizations
If you are authorized to administer a project, you can add and remove users and user groups from the project. You can also change authorizations for users and user groups to determine what they are allowed to do when they work with a project and its calculation versions.
You manage authorizations for users and user groups in the Project view under Authorizations.
Related Information
Authorizing Users and User Groups for a Project [page 79]Removing Users and User Groups from a Project [page 80]Changing Authorizations for Users and User Groups [page 80]
8.8.3.1 Authorizing Users and User Groups for a Project
If you are authorized to administer a project, you can add users and user groups to the project and specify an authorization. Unless you make a different selection, each user or user group that you add to a project initially receives the Read authorization.
Prerequisites
● The user that you want to add exists SAP Product Lifecycle Costing.● The user group that you want to add exists in master data.
Procedure
1. Open the project in the Project view.
Application Help for SAP Product Lifecycle CostingProject Lifecycle PUBLIC 79
2. In the Navigation Explorer, choose Authorizations.3. Under Other Users or User Groups, enter the user or group that you would like to add to the project and
choose an authorization.4. Save your changes.
Related Information
User Groups [page 378]
8.8.3.2 Removing Users and User Groups from a Project
If you are authorized to administer a project, you can remove a user or user group from the project. When the user or user group is removed, the user or user group no longer has any authorizations for the project.
Procedure
1. Open the project in the Project view.2. In the Navigation Explorer, choose Authorizations.3. Under Other Users or User Groups, select a user or group and choose the Remove command.4. Save your changes.
Note, if a user or member of a user group is working in a project at the same time that the user or group is removed from the project, they can continue to work in the project and save their changes. After reopening the project, the removal of authorizations takes effect. The user will then no longer be able to work in the project.
8.8.3.3 Changing Authorizations for Users and User Groups
If you are authorized to administer a project, you can change the authorization for other users and user groups that are assigned to the project.
Procedure
1. Open the project in the Project view.2. In the Navigation Explorer, choose Authorizations.3. Under Other Users or User Groups, find the user or group and select the authorization that you would like
to assign.
80 PUBLICApplication Help for SAP Product Lifecycle Costing
Project Lifecycle
4. Save your changes.
Related Information
Managing Authorizations [page 79]
Application Help for SAP Product Lifecycle CostingProject Lifecycle PUBLIC 81
9 Calculations
Each calculation acts as an overall folder for a set of calculation versions.
You can use the Cockpit to obtain an overview of the calculations and the versions they contain.
Things to Consider
● You can create any number of versions for a calculation.● When you create a new calculation, an initial version is automatically created.● Each calculation is assigned to a project.
Related Information
Creating New Calculations [page 82]Moving a Calculation to Another Project [page 50]
9.1 Creating New Calculations
When you create a new calculation, an initial calculation version is automatically created.
Steps
1. Open the Cockpit view or the Calculation view.2. In the Cockpit choose New, and then New Calculation.
In the Calculation view, choose New.3. Choose a project under which you would like to create your new calculation, or create a new project under
which to create the calculation.4. Choose Save and enter new names for your calculation and calculation version.5. Save your entries.
82 PUBLICApplication Help for SAP Product Lifecycle Costing
Calculations
Result
You can continue working with the new calculation and version in the Calculation view. The new calculation and version are displayed in the Cockpit view under the project where they were created.
Related Information
Creating a Project [page 42]
9.2 Copying a Calculation and Version
You can use an existing calculation and calculation version as the basis for creating a new calculation and version. This is useful if you need to create a calculation for a product or part that is similar to one that already exists. After copying the calculation and version, you can adjust the content as necessary.
You can save the new calculation and version as part of the same project as the original calculation and version or assign them to another project. The controlling area of the project is important when copying calculations and versions.
Same Controlling Area
If you copy a calculation and version to the same project or to another project with the same controlling area, the following occurs:
● All values except the linked project ID are copied to a new calculation version.● The master data timestamp remains unchanged.● Account and price determination are not triggered.
Different Controlling Area
If you copy a calculation and version to a project with a different controlling area, the following occurs:
● All references to master data are copied to the new calculation version, but are validated based on the new controlling area.
● The master data timestamp remains unchanged.● Account and price determination are triggered.
When copying to a project with a different controlling area, some data may not be defined in the controlling area of the target project. This is handled as follows for field values that do not exist in the target controlling area:
Application Help for SAP Product Lifecycle CostingCalculations PUBLIC 83
● If a temporary value is allowed for a field, the field value is copied and the description is set to <Temporary>.
● If a temporary value is not allowed for a field, nothing is copied and the field is left blank. This is the case, for example, for Costing Sheet, Component Split, and Account.
Steps
1. In the Cockpit view, select a project, calculation, and a calculation version.Be careful not to open the calculation version, or you will end up in the Calculation view.
2. In the ribbon, choose New, and then New Calculation as Copy.You can also use the context menu or the keyboard shortcut Ctrl + Shift + N .
3. Select a target project.You can use autocomplete to find a project.
4. Choose Create.A copy of the calculation and calculation version is created in the project and opened in the Calculation view.
5. Choose Save, and enter new names for your copied calculation and calculation version.6. Save your entries.
Result
You have created a new calculation with its first version by copying the selected calculation. The new calculation and version are added to the list of calculations in the Cockpit view.
9.3 Renaming a Calculation
You can rename a calculation in the Cockpit view.
Steps
1. Select a calculation in the Cockpit view.2. Choose Rename in the ribbon.
You can also use the context menu or press F2 .3. Enter a new name and press Enter to confirm your change.
You can discard your change by pressing ESC before you press Enter .
84 PUBLICApplication Help for SAP Product Lifecycle Costing
Calculations
9.4 Deleting a Calculation
You can delete a calculation and all of its versions in the Cockpit view.
Prerequisites
● All versions of the calculation must be closed before the calculation can be deleted. If a calculation version is opened by another user, you must wait until the user has closed the calculation version to delete the calculation.
● If a calculation contains a frozen calculation version, the calculation cannot be deleted.
Steps
To delete a calculation, do the following:
1. Select a calculation.2. Choose Delete in the ribbon.
You can also use the context menu or press DEL .This opens a dialog box.
3. Choose Delete All to delete the calculation and all of its versions.
Application Help for SAP Product Lifecycle CostingCalculations PUBLIC 85

10 Calculation Versions
You use the Calculation view to work on a specific calculation version in a calculation. This is where you work on costing structures.
Note● Fields with asterisks (*) are mandatory fields.● Grayed-out fields are read only fields.
This view consists of several main areas:
Key Figures
In the Key Figures area at the upper right, you can keep an eye on the total cost, total quantity, and cost per unit in each calculation version.
Costing Structure
This is the hierarchical tree structure on the left. This structure shows all of the items currently included in a calculation version. You can expand and collapse the structure using the buttons in the Costing Structure header. You can use the filter to narrow down the number of items shown in the costing structure. You can also expand and collapse a single level in a costing structure.
Version Header Data
Version header data is shown in the side panel on the right. This is information about the project and calculation to which the calculation version belongs, including project name and ID, linked project, calculation name and ID, and controlling area. You can maintain general costing data such as total quantity, reporting currency, and exchange rate type here. You can also see who last changed the version and when the changes were made.
Item Details
Item details are also shown in the side panel on the right. After selecting an item in the costing structure, you can view and modify information for each item here. In the Item Details area, you can work with information
86 PUBLICApplication Help for SAP Product Lifecycle Costing
Calculation Versions

about organization, quantities, prices, and calculated values. You can also see who last changed the item and when the changes were made.
Costing Sheet
You can find the costing sheet for a calculation version in the side panel on the right. The costing sheet defines how overheads are determined and how sums are calculated. You can select the costing sheet that you want to use in a drop-down list. The values calculated by the costing sheet are shown for every item that you select.
Cost Component Split
The cost component split is also shown in the side panel on the right. You can analyze the breakdown of costs for each item and identify the major cost drivers. Costs (positive values) are shown as dark blue bars from left to right, and revenues (negative values) are shown as light blue bars from right to left. The cost component split updates automatically with every change. You can sort the results according to ID, description, or costs, by selecting the corresponding table headers.
NoteIf the application stops working for any reason, for example, if your network connection is interrupted, your unsaved calculation versions are not lost. When you restart the application, you are asked whether you want to recover your unsaved calculation versions or discard all of your unsaved changes. If you choose to recover, the system opens all of the calculation versions that were open at the time the issue occurred.
Related Information
Costing Structures [page 120]Version Header Data in Calculation Versions [page 88]Working with Items [page 122]Calculating Quantities and Costs [page 202]Analyzing Costs in a Calculation Version [page 104]Costing Sheets [page 322]Cost Component Splits [page 319]Creating Calculation Versions [page 87]Using Master Data in Calculation Versions [page 106]
10.1 Creating Calculation Versions
You can create a new calculation version for an existing calculation.
Application Help for SAP Product Lifecycle CostingCalculation Versions PUBLIC 87
Steps
1. Open the Cockpit view and select a calculation in which you want to create a new version.2. In the ribbon at the upper left, choose New and then New Version.
You can also use the context menu in the navigation explorer or the keyboard shortcut Ctrl + M .This creates a new calculation version and displays it in the Calculation view.
3. Choose Save.4. Enter a name for your calculation version and save your entry.
Result
You can continue working with the new version in the Calculation view. The new calculation version is saved in the project of the parent calculation in the Cockpit view.
10.2 Version Header Data in Calculation Versions
Each calculation version in SAP Product Lifecycle Costing has a version header that provides general information about the version.
The version header is also the root item in the costing structure. The following fields are available when working with version header data in the Calculation view:
Field Shown What It Means
Project ID User-defined, unique identifier for a project.
Project Name Name of the project. This can only be changed in the Project view.
Linked Project ID of the same project, which is used in another system, for example SAP ERP PS (Project System). This ID can be used to cross-reference with any other system. This can only be changed in the Project view.
Calculation ID Unique identifier for a calculation.
This ID is automatically generated for each calculation when the calculation is created. It is identical for all versions of a calculation and cannot be changed.
88 PUBLICApplication Help for SAP Product Lifecycle Costing
Calculation Versions
Field Shown What It Means
Calculation Name Name of the calculation, which includes by default the name that you have given the initial calculation version.
Calculation names are unique. They cannot be duplicated. The name is identical for all versions of a calculation and can only be changed by renaming the calculation in the Cockpit view.
Controlling Area Organizational unit in a company, used to represent a closed system for cost accounting purposes.
The controlling area may include single or multiple company codes that may use different currencies. Each controlling area can have a single or multiple accounts. All internal allocations refer exclusively to objects in the same controlling area.
The controlling area is defined when creating a project and cannot be changed later once the project is saved. All calculation versions in a project have the same controlling area.
Version ID Unique identifier for a calculation version.
This ID is automatically generated for each calculation version when the version is created and cannot be changed.
Version Name Name of the calculation version.
You can rename a calculation version using this field.
Each calculation can have multiple versions, but no two version names can be the same for a calculation.
Version Type Shows if a version has been created manually (Calculation Version) or generated by project lifecycle calculation (Lifecycle Version).
Lifecycle Period Identifies the relevant lifecycle time period if the calculation shown is a lifecycle version.
Base Version Displays the ID and name of the calculation version used as a basis for generating lifecycle versions.
Comments Section where you can write comments about the calculation version. This field is for your reference only.
Customer A business partner from whom receivables are due for things such as goods delivered, services performed, and rights transferred.
Application Help for SAP Product Lifecycle CostingCalculation Versions PUBLIC 89
Field Shown What It Means
Sales Document Identifies a sales document (for example, an order or an inquiry) referenced in another system such as SAP ERP. This ID can be used to cross-reference the document in the other system.
Sales Price The price at which you intend to sell the product, the cost of which was calculated in a calculation version, to the customer. You can enter the sales price manually.
Total Quantity This is the quantity that is planned for the overall calculation version. The quantity can be expressed in any unit of measure.
Reporting Currency The currency used for the calculation.
The following calculated values are displayed using the reporting currency:
● Cost per Total Quantity● Other Costs● Total Costs
● Fields calculated according to the costing sheet (for example, direct material costs and material overhead)
The transaction currency of each item is automatically converted into the reporting currency using an exchange rate that is specified in the Administration view.
You can change the reporting currency in the side panel. If you change the reporting currency, all relevant amounts are recalculated using the new currency.
Costing Sheet Defines how overheads are determined and how sums are calculated in a calculation version. The name and description of the costing sheet used in the current calculation version is shown in the side panel.
You can select a costing sheet in the Costing Sheet area in the side panel. You can maintain costing sheets in the Administration view.
Cost Component Split The cost component split breaks down costs by account group to identify main cost drivers.
You can select a cost component split in the Cost Component Split area in the side panel. You can configure account groups and cost component splits in the Administration view.
90 PUBLICApplication Help for SAP Product Lifecycle Costing
Calculation Versions
Field Shown What It Means
Exchange Rate Type Specifies the exchange rate type to be used in a calculation version. By default, a new calculation version receives the exchange rate type specified at project level. You can change the exchange rate type for a calculation version as necessary.
You can maintain exchange rate types in the Administration view.
Start of Production Date on which the production of products and parts that are costed in the investment phase begins.
This date is not validated and is only intended for your reference.
End of Production Date on which the production of the products and parts that were costed in the investment phase is completed.
This date is not validated and is only intended for your reference.
Valuation Date The date used to determine the prices used for materials, activities, and other components.
For example, the raw material 100-100 has two valid prices. A price of 22 euros for the period between January 1 – December 31, 2014. A price of 24 euros for the period between January 1 – December 31, 2015. The calculation version has a valuation date of December 20, 2014. The price used for that raw material is 22 euros. If you change the valuation date to January 14, 2015, the price of 24 euros is used.
Master Data Timestamp Shows when the master data was copied to your calculation.
This is set to the creation date of the calculation version. If master data is subsequently changed elsewhere, calculations using that master data remain unchanged; the calculation versions are not automatically updated.
For example, if you refer to plant 1000 with the description Dresden in your calculation version and the description for plant 1000 is subsequently changed to Dresden/Plauen in the master data, the description you see in your calculation version remains Dresden.
This ensures that data saved in your calculations is not unexpectedly changed, regardless of whether you update, change, rename, or delete your master data.
Application Help for SAP Product Lifecycle CostingCalculation Versions PUBLIC 91
10.3 Renaming a Calculation Version
You can rename calculation versions as necessary. To do this, you must be in the Calculation view.
Steps
1. Open a calculation version.2. Go to the Version Name field in the Version Header Data section in the side panel.3. Enter a new name and save your entry.
To discard your change before saving, press ESC .
10.4 Deleting a Calculation Version
You can delete a calculation version in the Cockpit view.
Prerequisites
● A calculation version must be closed before you can delete it. If the calculation version is opened by another user, you must wait until the user has closed the calculation version before you can delete it.
● A calculation version that is referenced in another calculation version cannot be deleted.● Frozen calculation versions cannot be deleted.
NoteWhen a calculation version is deleted, any lifecycle versions that have been generated for the calculation version are also automatically deleted. However, it is possible that lifecycle versions may be referenced in other lifecycle versions. This prevents deletion of the calculation version. This can happen in the following situation:
You have a calculation #SAP Pump that has a reference to another calculation, #SAP Shaft. You also have lifecycle versions for each of these calculations, for example #SAP Pump - 2020 and #SAP Shaft 2020. You cannot delete #SAP Shaft because of this reference. To remove all references, including those in lifecycle versions, so that you can delete #SAP Shaft, make sure that you've done the following:
● Remove the reference to #SAP Shaft in your #SAP Pump calculation.● Regenerate the project lifecycle costs for #SAP Pump. You need to do this to remove the references to
#SAP Shaft in the generated lifecycle versions.
92 PUBLICApplication Help for SAP Product Lifecycle Costing
Calculation Versions
Steps
1. Expand a calculation in the Cockpit view and select a calculation version.2. Choose Delete in the ribbon.
You can also use the context menu or press DEL .This opens a dialog box.
3. Choose Delete.
10.5 Setting a Calculation Version to Current
You can set a calculation version to current to show that it is the latest working version for a calculation.
Things to Consider
● The first calculation version created for a calculation is automatically set to current.
● The current version is indicated by a symbol.● Each calculation must have one current calculation version. If you want to delete the existing current
version, you must set another calculation version to current first.● Only current calculation versions can be referenced in other calculation versions.● You can set a calculation to current in the Cockpit view or in the Calculation view.
Steps
1. In the Cockpit view, select the calculation version that you want to set to current.You can also open the calculation version in the Calculation view.
2. In the ribbon, choose Set Current or use the keyboard shortcut Ctrl + Shift + C .In the Cockpit view, you can also use the context menu.
Result
The calculation version is set to current.
Application Help for SAP Product Lifecycle CostingCalculation Versions PUBLIC 93
10.6 Highlighting Items in a Calculation Version
You can use highlighting if you need to mark items in a calculation version for any reason. For example, you might want to highlight incomplete items, items that need to be updated, or items that require a cost reduction. You can use yellow, orange, and green highlighting colors.
Things to Consider
● To save your highlighting, you must save your calculation version.● You can highlight single items and assemblies, but not single fields. When you highlight an item or
assembly, a solid symbol is shown with the highlighting color.● If an assembly includes a highlighted item, but is not highlighted itself, the symbol is shown as an outline,
and the highlighting color is muted.● You can filter a costing structure for highlighting, by color. For more information, see Filtering in the
Calculation View in the Getting Started section.
Highlighting Items
The highlighting fields are available at the top of the Item Details in the side panel in the Calculation view.
● To highlight an item, select the item in the costing structure and then click the corresponding button in the Highlight side panel group.
● To remove the highlighting, click the activated highlighting button again.
Showing Highlighting in the Table
By default, the highlighting fields are not included in the layout of the table in the Calculation view. If you'd like to show highlighting in the table, you can drag and drop one or more of the highlighting fields from the side panel to the table header area. This gives you an overview of the highlighting in a calculation version.
● You can then click the highlighting field directly in the table to activate or deactivate highlighting.● You can also use the context menu to activate or remove highlighting for an item in the table.
Related Information
Highlighting Using Mass Change [page 95]Personalizing the Calculation View [page 31]Filtering in the Calculation View [page 20]
94 PUBLICApplication Help for SAP Product Lifecycle Costing
Calculation Versions
10.6.1 Highlighting Using Mass Change
You can use mass change to highlight multiple items in a calculation version at a time. For example, you might do this to identify items with a specific comment, price, or confidence level.
To show highlighting in the table, remember to drag and drop the desired highlighting field from the side panel to the table header area.
Add Highlighting
You can use mass change to add highlighting to the items you have filtered.
ExampleYou'd like to add an orange highlighting field to items in your calculation version that have a very low confidence level.
Select the root item and open the Mass Change dialog. Under Filter By, select Confidence Level. Leave the operator as is and choose 1- Very Low as the value to search for. Under Change To, select the field Highlight Orange and the action Set Value. Activate the New Value checkbox, and then Change Items. All items with a very low confidence level now include an orange highlighting field.
Remove Highlighting
You can filter to remove highlighting for specific items.
ExampleYou’ve added yellow highlighting to all items with a fixed price of 24 EUR. Later, you add yellow highlighting to all items with a fixed price of 42 EUR. You want to remove the highlighting for all fields with a fixed price of 24 EUR.
Under Filter By, select Price (Fixed) and is, then enter 24. Under Change To, select Highlight Yellow, then Set Value, and deselect the New Value checkbox. The yellow highlighting is now removed for items with a fixed price of 24 EUR. Items with a fixed price of 42 EUR remain highlighted.
You can also use mass change to remove highlighting by color.
ExampleYou've activated green highlighting fields for various items and subitems throughout a calculation version. You now want to remove all green highlighting.
Select the root item. Open the Mass Change dialog and clear the filter. Under Change To, enter Highlight Green, select Set Value, and deselect the New Value checkbox. All green highlighting is removed. The green highlighting column remains in the calculation table until you remove it.
Application Help for SAP Product Lifecycle CostingCalculation Versions PUBLIC 95
Related Information
Highlighting Items in a Calculation Version [page 94]Performing a Mass Change [page 113]Managing Configurations for Mass Change [page 118]Highlighting Items in a Calculation Version [page 94]
10.7 Comparing Calculation Versions
You can compare calculation versions in SAP Product Lifecycle Costing.
You can select two calculation versions and compare the items and values for desired fields, side-by-side in a single table. Colored markings indicate how the second version differs from the first. You can apply templates to change the fields and the order in which they appear. You can switch between templates and save your changes as personal and corporate layouts. At any time, you can export information from the table to a Microsoft Excel file.
You select the calculation versions you want to compare in the Cockpit view.
Comparing Item Keys
Each item in a calculation version belongs to an item category (for example, Material, Internal Activity, and so on). For comparison purposes, each item category has a standard item key. The item key is the concatenation of the fields used to make up each item category, for example, Material#100-110#PT1. When two versions are compared, the item keys are evaluated.
NoteYou can adapt item keys in the Administration view. This allows you to determine which item category fields are evaluated when comparing calculation versions. For example, you might adapt the item category for Material to include a custom field. For more information, see Adapting Item Keys [page 100].
What the Colors Mean
Colored markings indicate how items differ from the first calculation version to the second calculation version.
NoteYou can turn on Accessibility above the table for additional icons and text.
96 PUBLICApplication Help for SAP Product Lifecycle Costing
Calculation Versions
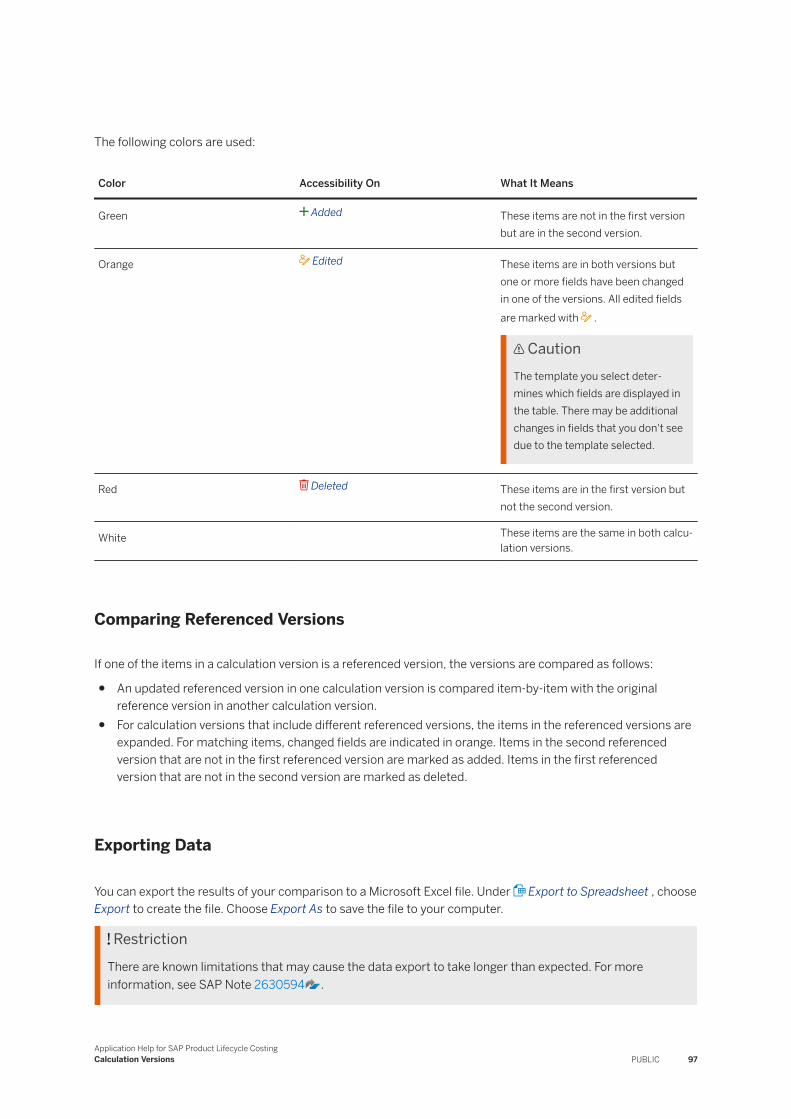
The following colors are used:
Color Accessibility On What It Means
Green Added These items are not in the first version but are in the second version.
Orange Edited These items are in both versions but one or more fields have been changed in one of the versions. All edited fields are marked with .
CautionThe template you select determines which fields are displayed in the table. There may be additional changes in fields that you don't see due to the template selected.
Red Deleted These items are in the first version but not the second version.
White These items are the same in both calculation versions.
Comparing Referenced Versions
If one of the items in a calculation version is a referenced version, the versions are compared as follows:
● An updated referenced version in one calculation version is compared item-by-item with the original reference version in another calculation version.
● For calculation versions that include different referenced versions, the items in the referenced versions are expanded. For matching items, changed fields are indicated in orange. Items in the second referenced version that are not in the first referenced version are marked as added. Items in the first referenced version that are not in the second version are marked as deleted.
Exporting Data
You can export the results of your comparison to a Microsoft Excel file. Under Export to Spreadsheet , choose Export to create the file. Choose Export As to save the file to your computer.
RestrictionThere are known limitations that may cause the data export to take longer than expected. For more information, see SAP Note 2630594 .
Application Help for SAP Product Lifecycle CostingCalculation Versions PUBLIC 97
Procedure
To compare two calculation versions:
1. Open the Cockpit view.2. Using the context menu, right-click on a primary calculation and choose Select to Compare.3. Right-click on a secondary calculation and choose Compare With....4. Log in using your SAP PLC user and password.
The Compare Calculation Versions application opens in a web browser. The calculation versions you selected are compared in the table.
NoteYou can also initiate the comparison process from the ribbon by choosing Compare, then Compare Versions. Once you log in, you can enter or use autocomplete to search for the calculation versions you want to compare. Tip: Enter the calculation name. This will bring up the project, calculation, and all versions in the calculation.
ResultThe calculation versions you’ve entered are compared based on the item key for item category. The items in the second calculation version are compared to the primary calculation version and differences are marked. The fields you see in the table depend on the template you have applied to the table. Changed fields are displayed side-by-side so you can compare the differences.
Related Information
Working with Templates [page 98]Adapting Item Keys [page 100]
10.7.1 Working with Templates
When comparing calculation versions, you can apply templates to change the fields you're comparing and the order in which they appear in the table.
You can switch between templates, create new templates, and save templates for personal or corporate use. Table columns can be resized and you can save these preferences for each template in the top right corner of the table.
Create a New Template
When you create and save a new template, it's immediately applied to the calculation versions you are comparing and it's added to the list of templates available for future use. If you’ve saved it as a corporate template, it is available for everyone in your organization.
98 PUBLICApplication Help for SAP Product Lifecycle Costing
Calculation Versions
Procedure
1. Under Settings, choose New.2. In the New Template dialog, enter the name of your new layout. If you want to make it available for
everyone, select the Corporate checkbox.3. Click on a field to add it to the template. Press SHIFT and click to add a range of fields. You can filter for
fields by clicking on Column Name.Added fields appear in the table on the right. Click on added fields again to remove them.
4. Use the arrows to adjust the order in which the fields appear in the application. Double arrows move the field to the top or bottom of the list. Single arrows move the field up or down one position.
5. Save the template.
Edit a Template
You can always edit your personal templates. If you have the right authorization, you can also edit corporate templates.
Procedure
1. Under Settings, choose Edit.The Edit Template dialog appears.
2. Use the arrows to adjust the order in which the fields appear in the application. Double arrows move the field to the top or bottom of the list. Single arrows move the field up or down one position.
3. Save the template
Change Templates
If you have the right authorization, you can select from a list of saved personal and corporate templates.
Procedure
1. Under Settings, choose Change.2. In the Find Layout Type dialog, single-click on the template you want to apply.
You can preview the fields contained in a template, by choosing .3. Check the Template field at the top right of the table to ensure the correct template is applied.
Delete a Template
You can delete a template once it's applied to the table.
Procedure1. Use any method to apply the template you want to delete.
Tip: The Template field in the top right corner displays the name of the template applied.
Application Help for SAP Product Lifecycle CostingCalculation Versions PUBLIC 99
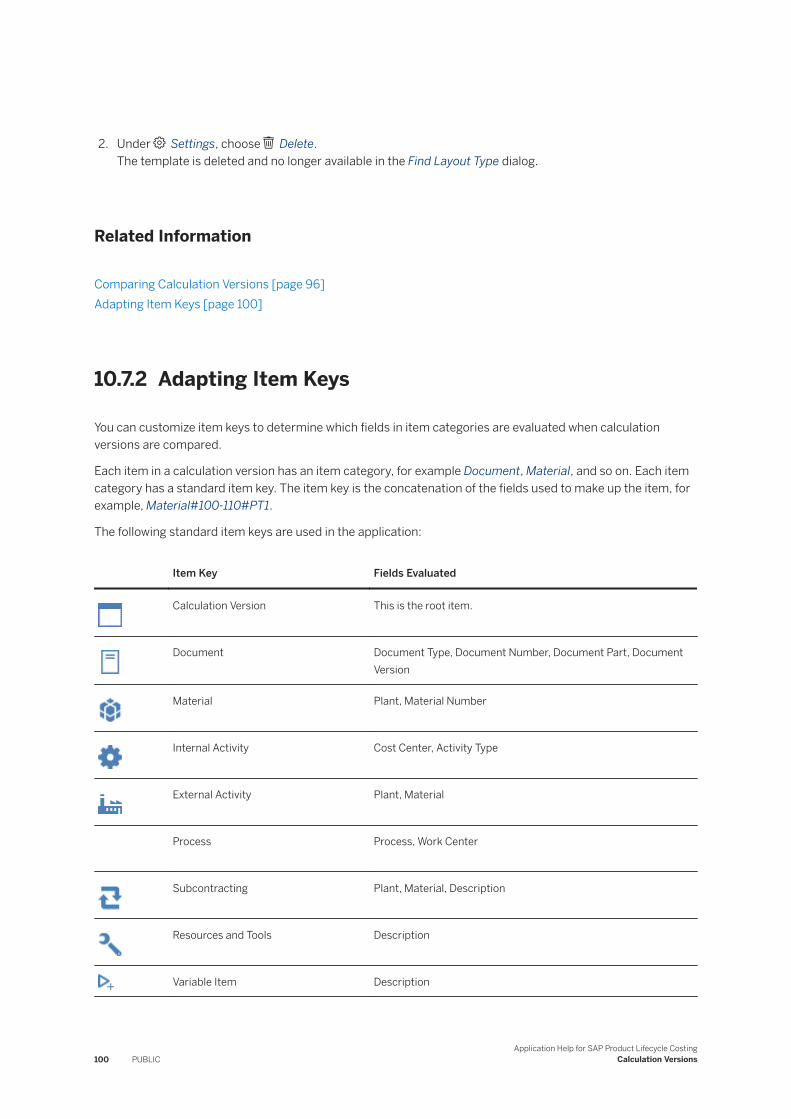
2. Under Settings, choose Delete.The template is deleted and no longer available in the Find Layout Type dialog.
Related Information
Comparing Calculation Versions [page 96]Adapting Item Keys [page 100]
10.7.2 Adapting Item Keys
You can customize item keys to determine which fields in item categories are evaluated when calculation versions are compared.
Each item in a calculation version has an item category, for example Document, Material, and so on. Each item category has a standard item key. The item key is the concatenation of the fields used to make up the item, for example, Material#100-110#PT1.
The following standard item keys are used in the application:
Item Key Fields Evaluated
Calculation Version This is the root item.
Document Document Type, Document Number, Document Part, Document Version
Material Plant, Material Number
Internal Activity Cost Center, Activity Type
External Activity Plant, Material
Process Process, Work Center
Subcontracting Plant, Material, Description
Resources and Tools Description
Variable Item Description
100 PUBLICApplication Help for SAP Product Lifecycle Costing
Calculation Versions
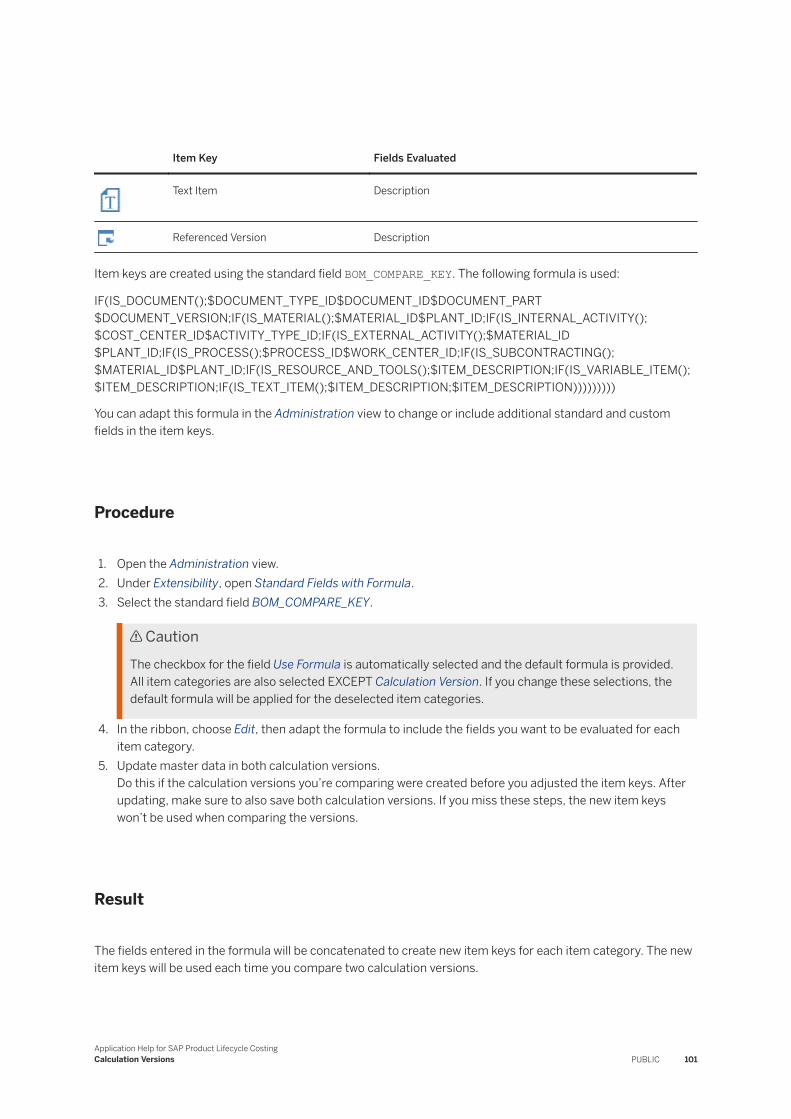
Item Key Fields Evaluated
Text Item Description
Referenced Version Description
Item keys are created using the standard field BOM_COMPARE_KEY. The following formula is used:
IF(IS_DOCUMENT();$DOCUMENT_TYPE_ID$DOCUMENT_ID$DOCUMENT_PART$DOCUMENT_VERSION;IF(IS_MATERIAL();$MATERIAL_ID$PLANT_ID;IF(IS_INTERNAL_ACTIVITY();$COST_CENTER_ID$ACTIVITY_TYPE_ID;IF(IS_EXTERNAL_ACTIVITY();$MATERIAL_ID$PLANT_ID;IF(IS_PROCESS();$PROCESS_ID$WORK_CENTER_ID;IF(IS_SUBCONTRACTING();$MATERIAL_ID$PLANT_ID;IF(IS_RESOURCE_AND_TOOLS();$ITEM_DESCRIPTION;IF(IS_VARIABLE_ITEM();$ITEM_DESCRIPTION;IF(IS_TEXT_ITEM();$ITEM_DESCRIPTION;$ITEM_DESCRIPTION)))))))))
You can adapt this formula in the Administration view to change or include additional standard and custom fields in the item keys.
Procedure
1. Open the Administration view.2. Under Extensibility, open Standard Fields with Formula.3. Select the standard field BOM_COMPARE_KEY.
CautionThe checkbox for the field Use Formula is automatically selected and the default formula is provided. All item categories are also selected EXCEPT Calculation Version. If you change these selections, the default formula will be applied for the deselected item categories.
4. In the ribbon, choose Edit, then adapt the formula to include the fields you want to be evaluated for each item category.
5. Update master data in both calculation versions.Do this if the calculation versions you’re comparing were created before you adjusted the item keys. After updating, make sure to also save both calculation versions. If you miss these steps, the new item keys won’t be used when comparing the versions.
Result
The fields entered in the formula will be concatenated to create new item keys for each item category. The new item keys will be used each time you compare two calculation versions.
Application Help for SAP Product Lifecycle CostingCalculation Versions PUBLIC 101
Related Information
Updating Master Data in a Calculation Version [page 107]Comparing Calculation Versions [page 96]
10.8 Copying a Calculation Version
You can copy a calculation version within an existing calculation.
Steps
1. Open the Cockpit view.2. Open a calculation and select a calculation version.
Be careful not to open the calculation version or you will end up in the Calculation view.3. In the ribbon at the upper left, choose New and then New Version as Copy.
You can also use the context menu or the keyboard shortcut Ctrl + Shift + M .This creates a copy of the selected calculation version and displays it in the Calculation view.
4. Choose Save.5. Enter a name for the copied calculation version and save your entry.
Result
You can continue working on your new calculation version in the Calculation view. The new calculation version is saved in the parent calculation from which it was copied in the Cockpit view.
10.9 Creating a Link to a Calculation Version
You can create a link to a calculation version from the Cockpit view or from an open calculation in the Calculation view. You can then share the link with others.
Procedure
1. To create a link, use the Copy Link to This Calculation command:
102 PUBLICApplication Help for SAP Product Lifecycle Costing
Calculation Versions

○ In the Cockpit view, select a calculation version and then open the context menu.○ In the Calculation view, choose Export in the ribbon and then choose the command in the dropdown.
The URL for the calculation version is copied to your clipboard.2. Paste the URL in an email or other forum and share it with others.
Note, the person receiving the URL must have a connection to the system specified in the link configured in order to open the calculation version.
Related Information
Opening a Shared Link to a Calculation Version [page 103]
10.10 Opening a Shared Link to a Calculation Version
You can open a link to a calculation version that another person has shared with you.
Prerequisites
● SAP Product Lifecycle Costing is installed on your computer.● A connection to the system specified in the link has been configured.
Context
Someone has shared a hyperlink or plain-text link to a calculation version with you.
Procedure
1. Double-click to open a hyperlink, or paste a plain text link into any web browser to open.
If the connection is configured, the link opens in the application. If single sign-on is configured, no additional log-on is required.
2. You can now work in and save the calculation version as you would any other calculation version.
Note: If you're having difficulty opening the link, make sure that a connection to the system specified in the link is configured. Your configured systems are shown in the SAP Product Lifecycle Costing dialog when you log on. You can also check the system details in the lower right-hand corner of the application to see if you
Application Help for SAP Product Lifecycle CostingCalculation Versions PUBLIC 103
are logged on to the system specified in the link. For detailed connection information, see the administrator's guide for this product.
10.11 Analyzing Costs in a Calculation Version
Using a Cost Component Split
From the moment you begin creating a costing structure in your calculation version, you can analyze the choices that you make regarding materials, processes, activities, prices, quantities, overheads, and so on. You can do this by creating cost component splits in the Cost Component Splits area in the Administration view.
A cost component split breaks costs into units called cost components. These cost components provide detailed cost information and allow you to analyze the breakdown of costs by specific account groups. These cost component splits identify the major cost drivers for the root item, items, assemblies, and subitems in your calculation version.
You can select the cost component split using a dropdown list in the side panel of the Calculation view under Cost Component Splits.
Using Price Components in a Cost Component Split
When creating material prices and activity prices, you can split the prices into multiple price components.
● Price components allow you to break down costs over multiple accounts and sum them into one account group. You can then use a cost component split to visualize how the accounts are distributed among account groups.
● If costs are assigned to accounts that are not part of an account group, or if the account group is not selected in the cost component split, the accounts are displayed as unassigned costs.
By splitting costs across account groups you increase transparency regarding cost drivers and can compare prices at a granular level for each item in your costing structure.
Related Information
Cost Component Splits [page 319]Analytics and Reporting with External Tools [page 255]Using Price Components and Price Splits in Material Prices [page 348]
104 PUBLICApplication Help for SAP Product Lifecycle Costing
Calculation Versions
10.12 Freezing a Calculation Version
You can freeze a calculation version to ensure that the version is preserved in its current state and cannot be edited or deleted.
Context
Freezing might be necessary to archive the current calculation version for auditing purposes or if an important milestone for the project has been reached.
A frozen calculation version can no longer be changed. However, you can still use the frozen version to create a new copy of the calculation version or save it as a new version.
Procedure
1. Open the calculation version that you want to freeze.2. Choose Freeze in the ribbon.
You can also use the keyboard shortcut Alt + F .
3. Choose OK to confirm.
Results
The selected calculation version is frozen. This status is indicated by a symbol (Frozen Version). This is shown next to the calculation version name in the tab in the Calculation view and in the list in the Cockpit view.
Note● After you have frozen a calculation version, you can no longer change, delete, or “unfreeze” it. However,
you can open it and save it as a new version, which you can edit.● You cannot delete a project or calculation that contains a frozen version.● If a calculation version has lifecycle version, these versions are also frozen together with the associated
base version. Lifecycle versions cannot be frozen individually.
Related Information
Automatic Updates in Frozen Calculation Versions [page 106]
Application Help for SAP Product Lifecycle CostingCalculation Versions PUBLIC 105
10.12.1 Automatic Updates in Frozen Calculation Versions
Certain automatic updates still take place for frozen calculation versions.
Even if a calculation version has been frozen, some fields are still updated automatically. The following fields are automatically updated in the frozen version if you change them in the corresponding calculation or project to which the calculation version is assigned:
● Calculation Name● Project Name● Linked Project
Note that you can only change the name of the assigned calculation, project, or linked project. You cannot assign the frozen calculation version to a different calculation or project entirely.
Updates of Custom Fields
If custom fields are used in your frozen version, the following changes in the custom fields are also automatically updated in the frozen version:
● Name or description of a custom field● Assignment to a side panel group● Rollup type
Note that if the rollup type is added or changed, this does not affect the calculation results for the custom field in a frozen calculation version. The symbol shown for the rollup type may differ from the rollup that is actually used in the frozen calculation version. For example, assume the rollup type is changed from Average to Sum. The custom field in the frozen version shows the symbol for Sum, but the field value is still calculated using the Average rollup type.
If a new custom field is created or if an existing custom field is applied to additional item categories, this field is also shown in the frozen version. However, the field remains empty.
If a custom field is deleted, it is also deleted in the frozen calculation version. However, values in other fields which might have used the deleted fields as calculation input remain unchanged.
10.13 Using Master Data in Calculation Versions
When you create calculations, you use master data that has either been defined locally in SAP Product Lifecycle Costing or replicated from your SAP ERP system. You can use replicated data if your SAP ERP system has been integrated with SAP Product Lifecycle Costing. In addition, when working with calculation versions, you can create items with contents (for example, Materials) that do not yet exist in the master data. These are called temporary entries.
NoteWhen integrating SAP Product Lifecycle Costing with other SAP software using a runtime license obtained from SAP or its distributors, the restrictions of such runtime license apply.
106 PUBLICApplication Help for SAP Product Lifecycle Costing
Calculation Versions
Temporary Entries
You may need to work on your calculation version even if some master data is not yet available.
For example, you may want to add a material to your costing structure that does not yet exist in your master data. You can do so by entering an arbitrary material number. In this case your entry is marked as <Temporary> in your calculation version. You can save your calculation version and continue with your cost planning.
Master Data Timestamp
When you create a new calculation version, the master data timestamp shows when the master data was copied to your calculation version. If master data used in a calculation version is changed or deleted at a later point in time, versions that use this master data are not affected.
For example, if you use a material in a calculation version and this material is later deleted in the Administration view, the material is not removed from any calculation versions in which it has been used.
Related Information
Updating Master Data in a Calculation Version [page 107]Master Data Dependencies for Items [page 108]Working with Master Data [page 303]
10.13.1 Updating Master Data in a Calculation Version
You can update the master data in a calculation version with the most recent master data available. You do this in the Calculation view.
When you update the master data in your calculation version, you include the most recent materials and descriptions, accounts, and prices, as well as the most recent changes to a selected costing sheet or to the cost component split. You also replace temporary entries that did not exist in master data at the time they were entered in the calculation version.
NoteYou are updating all master data in your calculation version to the most recent version, not just a selection of master data.
Application Help for SAP Product Lifecycle CostingCalculation Versions PUBLIC 107
Steps
1. From the ribbon at the top left in the Calculation view, choose Update.A dialog box appears warning that you are about to update all master data in your calculation version.
2. Choose OK to complete the update, or Cancel.
Result
The update does the following:
● Sets the master data timestamp for the calculation version to the current time, reloads all data, and re-triggers account determination and price determination.
● All master data used in the calculation version is updated to the most recent version. Any manual changes made in dependent master data are also replaced.
● Manually set prices are replaced by prices from master data, if available. Price determination ensures that only prices which are valid at the new master data timestamp are shown.
● If a manual price has been set for an item, it is reset to the price from master data, if available. If no price is available in master data, the manual price is kept.
10.13.2 Master Data Dependencies for Items
Certain fields in items are dependent upon master data. These dependent fields are filled automatically when you create or update an item in a calculation version in the Calculation view.
Example● If plant-specific data exists for a material, the Overhead Group and Valuation Class fields are filled
automatically when you add the material to your costing structure.● For documents, when all key attributes identifying a document are filled, the Document Status and
Design Office fields are filled automatically.● Item category descriptions are also automatically taken over from master data.
Such dependent fields are also updated whenever you import data from SAP ERP or Microsoft Excel.
Changing Dependent Fields Manually
Fields that depend upon a material or document are initially set automatically. You can modify these dependent values manually or using mass change. This applies for both standard fields and custom fields.
This allows you to make modifications flexibly and simulate effects without making changes in your master data centrally. For example, you could change the material type for an item from #RAW (raw materials) to #SEM (semi-finished products) to check the effects on overhead costs.
108 PUBLICApplication Help for SAP Product Lifecycle Costing
Calculation Versions
To provide transparency about such modifications, the following occurs if you change such dependent data manually or using mass change:
● The modified field is marked with a colored background to show that a change has been made.● In the costing structure, a colored rectangle marks the row that contains the modified item.
Muted coloring is used for parent items that contain a modified item.● In both the modified field and the costing structure, a tooltip lists the fields that have been changed and
also shows the current value for each field in your master data.
The colored marking remains in place until you do one of the following:
● Update the master data for the calculation version.● Change the modified field back to the original master data value.● Change the item that the field depends on, for example, by changing the material ID.● Replace the changed item with one that does not yet exist in your master data. In this case, the item
becomes temporary and any previous changes to fields that are dependent on master data are no longer relevant.
● Import a new structure.
10.14 Changing the Valuation Date in a Calculation Version
The valuation date is the date on which the total cost of a calculation is determined and valid. The date the calculation is created is automatically set as the initial valuation date for the calculation version.
In master data, you can maintain the period for which material prices, activity prices, and currency exchange rates are valid. You can also create costing sheets that include overheads and overhead rates that are valid for a particular time period. When you change the valuation date in a calculation version, automatic price determination for that calculation version is triggered. This means that master data is reevaluated and prices, exchange rates, and overhead rates that are valid as of the new valuation date, are found and used in the calculation version.
Considering the Master Data Timestamp
Changing the valuation date triggers automatic price determination, however, automatic price determination only checks for prices created up to the time of your master data timestamp. If you want to use prices created after your master data timestamp, you must update the master data in your calculation version before you change the valuation date.
Steps
To change the valuation date for a calculation version, do the following:
1. In the side panel of the Calculation view under Version Header Data, enter a new valuation date.A dialog box appears indicating that your calculation results are likely to change.
Application Help for SAP Product Lifecycle CostingCalculation Versions PUBLIC 109
2. Choose OK to accept the new valuation date, or Cancel.
Result
The following happens when you change the valuation date:
● Price determination is triggered.● Prices are replaced with master data that existed as of the date of your last master data timestamp.● Prices that you included manually are replaced with prices from master data, if available, and overheads as
of the valuation date are considered.
Related Information
Creating Material Prices in Master Data [page 347]Creating Activity Prices in Master Data [page 359]Creating Currency Exchange Rates in Master Data [page 372]Determining Prices [page 191]Updating Master Data in a Calculation Version [page 107]
10.15 Using Costing Sheets in Calculation Versions
You can use a costing sheet in a calculation version to sum up costs and calculate indirect costs as overheads.
A costing sheet defines the rules that are used to create sums and to calculate and apply overheads. You can use one costing sheet to compare up to three costing scenarios in a single calculation version. In the side panel, you can select between the total cost scenarios to see each total cost breakdown, as well as how each scenario affects the cost component split. In the item details, you can see the total cost and other calculated values for each costing scenario.
You can create costing sheets in the Administration view. You can apply costing sheets to calculation versions in the Calculation view.
Prerequisites
A costing sheet has been created in the Administration view.
110 PUBLICApplication Help for SAP Product Lifecycle Costing
Calculation Versions
Procedure
1. In the Calculation view, open a calculation version.2. In the side panel, open the Costing Sheets area.3. Use the dropdown to select a costing sheet and apply it to the calculation version.
NoteIf more than one costing scenario has been created for the costing sheet, you can use the second dropdown to select between costing scenarios. You can also apply different costing scenarios when viewing the cost component split.
Result
When you use a costing sheet in a calculation version, the following occurs:
● In the Costing Sheets section, you can see a breakdown of costs by costing sheet row. If more than one costing scenario has been created for the selected costing sheet, you can use the second dropdown to switch between costing scenarios to see how the breakdown changes.
● In the Cost Component Split section, you can apply different cost component splits and different total cost scenarios, to see how the indirect costs are broken down by account group.
● In the Item Details, you can see the total cost and corresponding calculated values for each enabled costing scenario in the costing sheet. Note, each time you select a costing sheet or update master data, the first total cost scenario is displayed by default.
TipDragging and Dropping Fields: You can drag and drop fields from each costing scenario in the costing sheet to the table in your calculation version. This allows you to compare fields from different costing scenarios side-by-side.
Caution○ Updating Master Data: If you've created or updated a costing sheet for use in an existing
calculation version, be sure to update the master data time stamp in the calculation version. Otherwise, you will not be able to access the updated costing sheet from the calculation version.
○ Valuation Dates: Pay attention to the valuation date in your calculation version. Costing sheet overheads are only applied to the calculation version if the valuation date of the version falls within the valid-from and valid-to dates defined in the costing sheet overhead rules.
Related Information
Costing Sheets [page 322]Calculating Overheads [page 208]
Application Help for SAP Product Lifecycle CostingCalculation Versions PUBLIC 111
Calculated Values for Items [page 162]
10.16 Mass Change for Items in a Calculation Version
You can use Mass Change to change the value of fields for multiple items in a single calculation version. This allows you to quickly replace the value in these fields without having to search for the individual items in which they are located.
You can perform a mass change in the Calculation view. To identify the items that you want to change, you can enter new filter and change conditions or select from a list of saved personal and corporate configurations.
You can apply these configurations to an entire calculation version or limit the change to an individual item and its subitems.
Things to Consider
● You can change the value of any editable field in any item category. This includes standard fields, custom fields, comment fields, and highlighting fields.
● The filter in the costing structure does not affect the results of a mass change. This means that if you filter the costing structure and then perform a mass change, all affected items in the costing structure are changed, not just those that are visible.
ExampleYou filter the costing structure for items with plant #PT24 (Dresden). In the costing structure, you only see items with plant #PT24 (Dresden). In the mass change filter, you then filter for all items with a fixed price greater than 1,000 EUR and increase the price of these items by 5%. In your costing structure, 5% is added to all items with a fixed price greater than 1,000 EUR, not just to items with plant #PT24 (Dresden). If you want to limit the 5% price increase to items with plant #PT24 (Dresden), you can add plant #PT24 (Dresden) to your mass change filter.
● Standard or custom fields with a formula can be filtered depending on whether their values are calculated or manually entered.You can also set items affected by the filter to calculated or manual value.
● Your configuration settings remain available until you Reset All or restart the application. You can perform the same mass change for multiple calculation versions in one session using the same configuration.
● If you want to use a configuration regularly, you can save it as a personal or corporate configuration.
Related Information
Performing a Mass Change [page 113]Managing Configurations for Mass Change [page 118]Highlighting Using Mass Change [page 95]
112 PUBLICApplication Help for SAP Product Lifecycle Costing
Calculation Versions
10.16.1 Performing a Mass Change
You can perform a mass change for an entire calculation version or for an item on any level. If you perform a mass change for an assembly item, its subitems are also affected.
Context
You are working in a calculation version and you want to change the value of a field in multiple items at a time.
Procedure
1. Decide the level at which you want to apply the mass change:○ To make changes for an entire calculation version, choose Mass Change for All Items from the ribbon or
context menu. You can also use the keyboard shortcut CTRL + H .○ Alternatively, choose one item in the calculation version and choose Mass Change for Selected Items
and Subitems.
This opens the Mass Change dialog.2. [Optional] Under Manage Configurations for Mass Change, select a saved configuration.
NoteYou can select from corporate and personal configurations. Corporate configurations can be accessed and used by everyone in your organization. Personal configurations can only be accessed by you.
3. Under Filter By, select new filter fields.
Narrow your filter with operators such as is or greater than or equal to. The available operators change depending on the fields you select. You can add as many filter rows as necessary. The number of affected items is shown at the top of the dialog.
4. Under Change To, select the field that you want to change. Next, select an action, then enter a new value.
ExampleChange all internal activities with a price of 0 EUR to a fixed price of 10 EUR. Under Filter By in the first filter row, select Item Category. Leave the operator as is and choose Internal Activity. In a new filter row, select Price (Fixed). Leave the operator as is and enter 0. Under Change To, select the field Price (Fixed) and the action Set Value. Under New Value, enter 10 and select Change Items. All internal activities with the price of 0 EUR are changed to a fixed price of 10 EUR.
TipYou can add a highlighting field to all items you have changed for easy identification. See Highlighting Using Mass Change for more information.
5. [Optional] Save the configuration as a corporate or personal configuration. Select the Corporate checkbox if you want to make the configuration available for everyone in your organization.
Application Help for SAP Product Lifecycle CostingCalculation Versions PUBLIC 113
NoteAdditional authorization is needed to save a corporate configuration.
6. Choose Change Items to apply your changes to the filtered items, or Reset All to clear the configuration and start again.
Results
The changes are applied to all items and subitems that were found using your configuration settings. Your configuration settings remain available for this and other calculation versions until you reset the configuration or restart the application.
Related Information
Mass Change for Items in a Calculation Version [page 112]Managing Configurations for Mass Change [page 118]Highlighting Using Mass Change [page 95]
114 PUBLICApplication Help for SAP Product Lifecycle Costing
Calculation Versions
10.16.2 Actions Available for Mass Change
These are the actions you can take when performing a mass change.
Action What It Does Example
Set Value Sets a specific value for a field. Set new price
For all internal activities with a price of 5 EUR, set a new price of 7 EUR.
1. In the ribbon, choose Mass Change, then Mass Change for All Items....
2. Under Filter By, select Item Category.
3. Use the is operator and choose Internal Activity.
4. In a new filter row, select Price (Fixed). Use the is operator and enter 5.
5. Under Change To, select Price (Fixed) and the action Set Value.
6. Under New Value, enter 7 and select Change Items.
A new price of 7 EUR is set for all internal activities that had a price of 5 EUR.
Replace Text Finds and replaces all or part of a value in any field.
Change part of a description.
Find all descriptions XYZ and replace them with ABC.
1. In the ribbon, choose Mass Change, then Mass Change for All Items....
2. Under Change To, select Description.
3. Under Action, select Replace Text.
4. Under Find, enter XYZ.
5. Under Replace With, enter ABC.
All descriptions with XYZ are changed to ABC.
Application Help for SAP Product Lifecycle CostingCalculation Versions PUBLIC 115
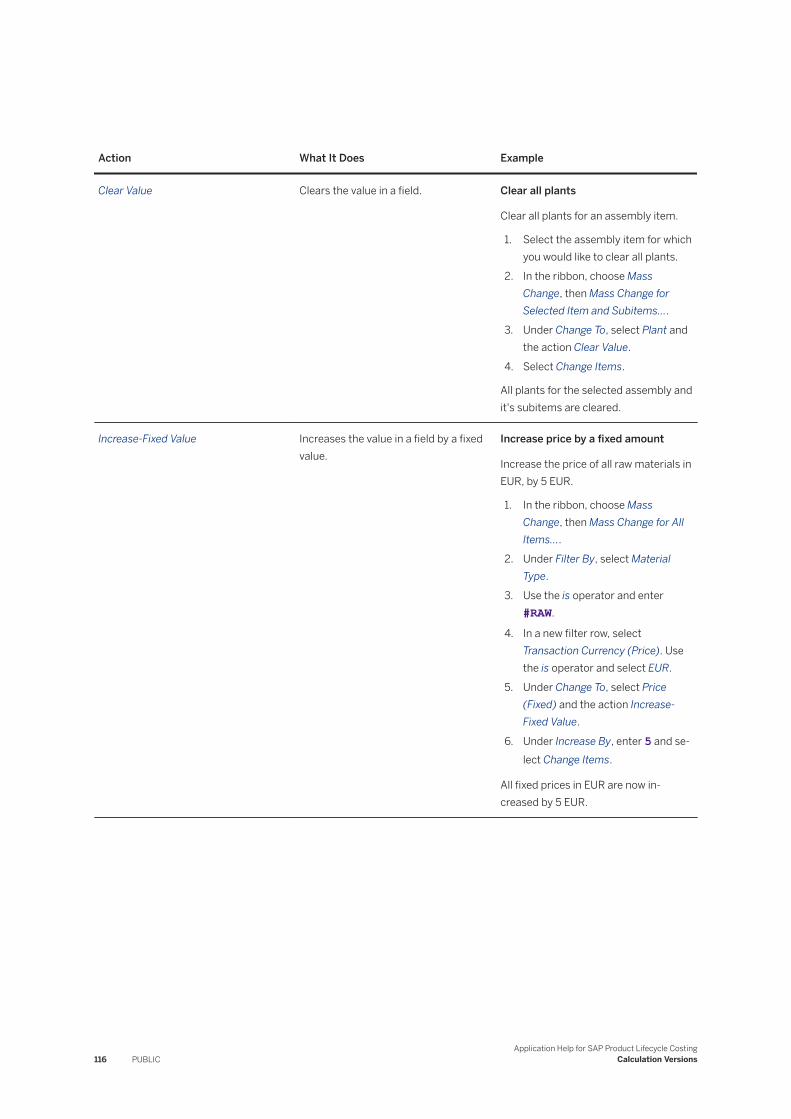
Action What It Does Example
Clear Value Clears the value in a field. Clear all plants
Clear all plants for an assembly item.
1. Select the assembly item for which you would like to clear all plants.
2. In the ribbon, choose Mass Change, then Mass Change for Selected Item and Subitems....
3. Under Change To, select Plant and the action Clear Value.
4. Select Change Items.
All plants for the selected assembly and it's subitems are cleared.
Increase-Fixed Value Increases the value in a field by a fixed value.
Increase price by a fixed amount
Increase the price of all raw materials in EUR, by 5 EUR.
1. In the ribbon, choose Mass Change, then Mass Change for All Items....
2. Under Filter By, select Material Type.
3. Use the is operator and enter #RAW.
4. In a new filter row, select Transaction Currency (Price). Use the is operator and select EUR.
5. Under Change To, select Price (Fixed) and the action Increase-Fixed Value.
6. Under Increase By, enter 5 and select Change Items.
All fixed prices in EUR are now increased by 5 EUR.
116 PUBLICApplication Help for SAP Product Lifecycle Costing
Calculation Versions
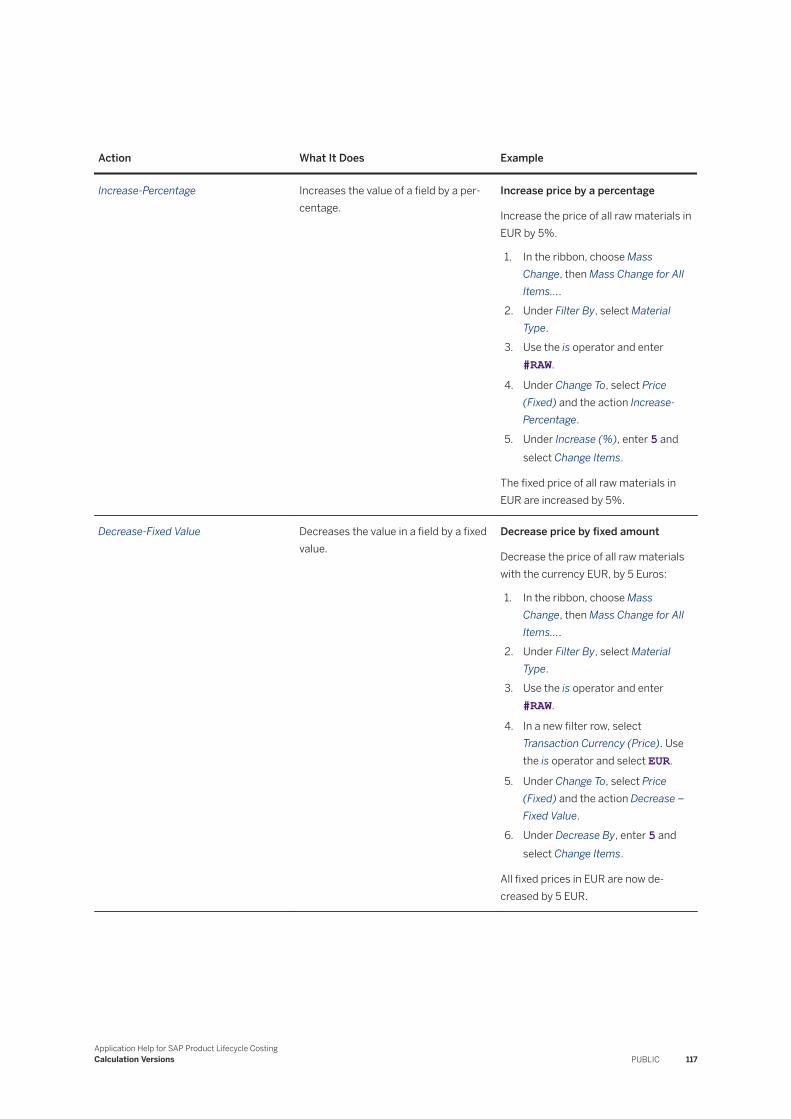
Action What It Does Example
Increase-Percentage Increases the value of a field by a percentage.
Increase price by a percentage
Increase the price of all raw materials in EUR by 5%.
1. In the ribbon, choose Mass Change, then Mass Change for All Items....
2. Under Filter By, select Material Type.
3. Use the is operator and enter #RAW.
4. Under Change To, select Price (Fixed) and the action Increase-Percentage.
5. Under Increase (%), enter 5 and select Change Items.
The fixed price of all raw materials in EUR are increased by 5%.
Decrease-Fixed Value Decreases the value in a field by a fixed value.
Decrease price by fixed amount
Decrease the price of all raw materials with the currency EUR, by 5 Euros:
1. In the ribbon, choose Mass Change, then Mass Change for All Items....
2. Under Filter By, select Material Type.
3. Use the is operator and enter #RAW.
4. In a new filter row, select Transaction Currency (Price). Use the is operator and select EUR.
5. Under Change To, select Price (Fixed) and the action Decrease – Fixed Value.
6. Under Decrease By, enter 5 and select Change Items.
All fixed prices in EUR are now decreased by 5 EUR.
Application Help for SAP Product Lifecycle CostingCalculation Versions PUBLIC 117
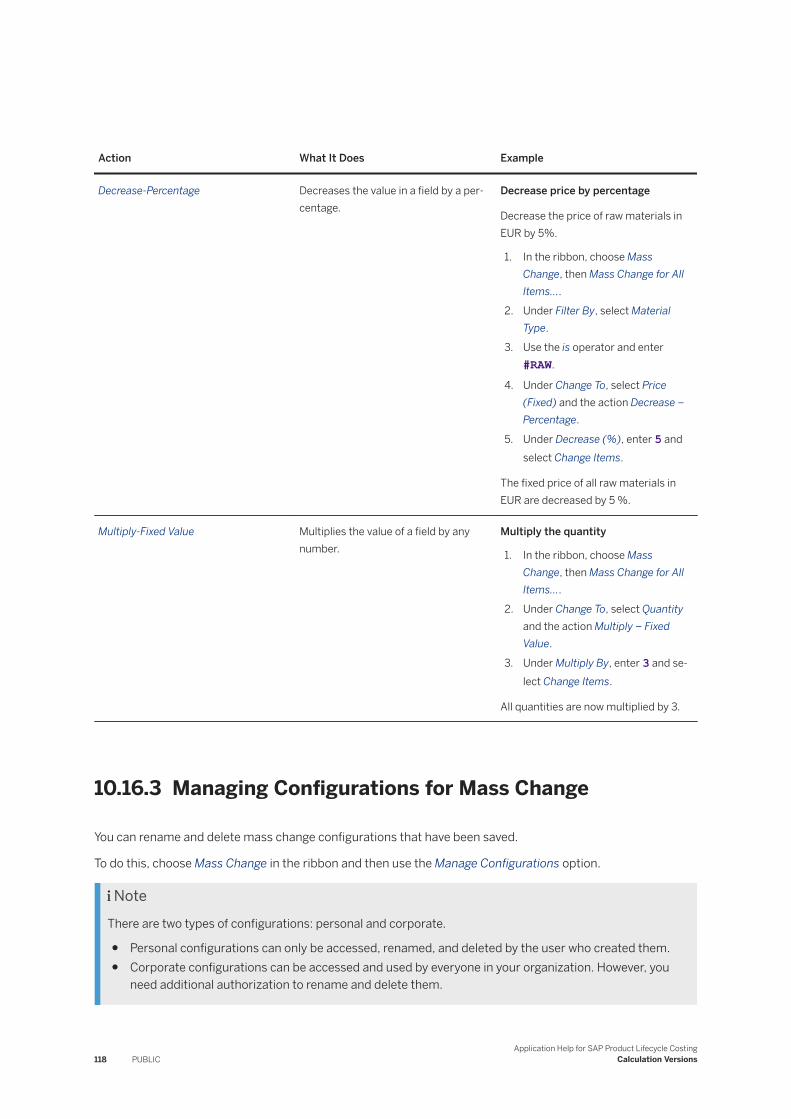
Action What It Does Example
Decrease-Percentage Decreases the value in a field by a percentage.
Decrease price by percentage
Decrease the price of raw materials in EUR by 5%.
1. In the ribbon, choose Mass Change, then Mass Change for All Items....
2. Under Filter By, select Material Type.
3. Use the is operator and enter #RAW.
4. Under Change To, select Price (Fixed) and the action Decrease – Percentage.
5. Under Decrease (%), enter 5 and select Change Items.
The fixed price of all raw materials in EUR are decreased by 5 %.
Multiply-Fixed Value Multiplies the value of a field by any number.
Multiply the quantity
1. In the ribbon, choose Mass Change, then Mass Change for All Items....
2. Under Change To, select Quantity and the action Multiply – Fixed Value.
3. Under Multiply By, enter 3 and select Change Items.
All quantities are now multiplied by 3.
10.16.3 Managing Configurations for Mass Change
You can rename and delete mass change configurations that have been saved.
To do this, choose Mass Change in the ribbon and then use the Manage Configurations option.
NoteThere are two types of configurations: personal and corporate.
● Personal configurations can only be accessed, renamed, and deleted by the user who created them.● Corporate configurations can be accessed and used by everyone in your organization. However, you
need additional authorization to rename and delete them.
118 PUBLICApplication Help for SAP Product Lifecycle Costing
Calculation Versions
Renaming Configurations
You can rename configurations. To do this, select a configuration from the list in the Manage Configurations dialog. Choose Rename, and enter a new name. Press Enter or click anywhere outside the name field and then close the dialog.
Deleting Configurations
You can delete a configuration if you no longer need it. To do this, select a configuration from the list and choose Delete. If you delete a configuration by mistake, you can restore it by clicking on the provided link. This link is available until you delete another configuration or close the dialog.
Related Information
Mass Change for Items in a Calculation Version [page 112]Performing a Mass Change [page 113]
Application Help for SAP Product Lifecycle CostingCalculation Versions PUBLIC 119

11 Costing Structures
Costing structures make up the hierarchical structure of a calculation version. SAP Product Lifecycle Costing supports the creation of costing structures with up to 30,000 items. If you need to calculate more items, you can add referenced versions.
You work with costing structures in the Calculation view.
Working with Costing Structures
You can create a costing structure manually in a calculation version. When doing this, you work with the available item categories as needed for your costing data.
For more information, see the following topics:
● Creating Costing Structures [page 120]● Working with Items [page 122]● Item Categories [page 126]
Importing Costing Structure Data
You can also import up to 30,000 items from SAP ERP or from Microsoft Excel to be used in your costing structure.
For more information, see the following topics:
● Steps for Importing BOMs and Routings [page 268]● Steps for Importing Document Structures [page 271]● Steps for Importing Costing Structures from Microsoft Excel [page 273]● Referencing a Calculation Version [page 181]
11.1 Creating Costing Structures
The costing structure is the basis for calculating costs in a calculation version. A costing structure consists of items to be costed. These items can be based on different types of product-related structures such as document structures, bills of materials (BOMs), and routings.
You can create a costing structure manually by adding items to an open calculation version, such as materials, processes, resources and tools, and internal activities that are used to make a finished or semi-finished product. For each item, you include all available data about the quantity, price, and so on.
120 PUBLICApplication Help for SAP Product Lifecycle Costing
Costing Structures
NoteNote the following before you start:
● Costing structures should include no more than 30,000 items. Note, you can still have hundreds of thousands of cost items in a single costing structure by using other costing versions with substructures as references.
● All mandatory fields receive initial default values. Mandatory fields are denoted by an asterisk (*).● If you enter an invalid value in a field, the previously valid value is restored automatically when you leave
the input field or try to save your changes.● You can adjust entries for individual item fields in the calculation table or in the Item Details area in the
side panel of the Calculation view.● Some fields such as Total Cost are calculated by the system and are display-only.
You can create a costing structure in the Calculation view.
Steps
1. Create a new calculation and initial version or open an existing calculation version.2. Add any items above, below, or as subitems.3. For each item that you add, select an item category.
Depending on the item category, different fields are available in the Costing Structure.
ExampleIf you select the item category Material, the following fields are available:
○ Plant○ Material No.○ Description
4. Check your entries and make changes as necessary.5. Make a setting in the Total Quantity Depends On field. You have the following options:
○ Fixed QuantityCounts the item only once, regardless of the total quantity of the parent assembly.
○ Assembly QuantityCounts an item based on the quantity of the parent assembly.
○ Lot SizeCounts an item based on the lot size you define.
Note○ This setting is relevant for all item categories except Text Item and Calculation Version.○ The default selection is Assembly Quantity.○ If you select Lot Size, you must enter a value for Lot Size under Item Details.
6. [Optional] Enter a base quantity.Base quantities can be used when calculating total quantity based on Assembly Quantity or Lot Size.
7. Activate and deactivate any items.
Application Help for SAP Product Lifecycle CostingCosting Structures PUBLIC 121
To do this, use the respective checkboxes displayed to the left of each item in the costing structure. Select an item to activate and include it in the calculation. Deselect an item to deactivate and exclude it from the calculation.You can use this feature to compare different alternatives. For example, you can facilitate a make or buy decision by adding an item for a purchased part and also an item (with subitems) for a self-made assembly. By activating one or the other, you can see the influence that the items have on the total cost.
8. Save your changes.If you forget to save, a dialog prompts you to save before closing the version.
11.2 Working with Items
The items in a calculation version form the basis for your costing structure. An item can stand alone or have subitems. An item with subitems is an assembly.
Related Information
Adding Items in Costing Structures [page 122]Cut, Copy, and Paste [page 123]Master Data Dependencies for Items [page 108]Activating and Deactivating Items and Assemblies [page 124]Highlighting Items in a Calculation Version [page 94]Item Categories [page 126]Organizational Data for Items [page 157]Quantities for Items [page 158]Prices for Items [page 160]Calculated Values for Items [page 162]
11.2.1 Adding Items in Costing Structures
You can add a new item to a costing structure in one of these three positions:
● Add Item AboveThis adds a new item above the currently selected item.
● Add Item BelowThis adds a new item below the currently selected item.
● Add Item as SubitemThis adds a new item as a subitem to the currently selected item.
NoteWhen you add an item in a costing structure, the new item receives the following default values from the parent item:
122 PUBLICApplication Help for SAP Product Lifecycle Costing
Costing Structures
● Plant● Company code● Business area● Profit center
Steps
1. Choose an item in the costing structure above, below, or to which you would like to add an item.2. In the ribbon, choose Add and select an option for positioning your new item. Alternatively, you can use the
context menu or a keyboard shortcut.3. Specify an item category. By default, a new item is added as a material.
Depending on the item category that you select, different fields are displayed. Complete these fields if the information is available. You do not have to complete all fields to save the calculation version.
Related Information
Keyboard Navigation and Shortcuts [page 388]Cut, Copy, and Paste [page 123]Master Data Dependencies for Items [page 108]Activating and Deactivating Items and Assemblies [page 124]
11.2.2 Cut, Copy, and Paste
Cut, copy, and paste commands are available for values at field level and for items and assemblies in costing structures. Note that cut and copied content can only be pasted within SAP Product Lifecycle Costing.
In the Calculation view, you can cut, copy, and paste cost items as follows:
● From one place in a costing structure to another in the same calculation version.● From one calculation version into another calculation version in the same calculation and project.● From one calculation version into another calculation version in a different calculation or project.
You can copy and paste entire items, including root items, assemblies, and single items. When copying and pasting root items and assemblies, all subitems are automatically included. This helps you reuse information and quickly build calculation versions for product simulation and what-if analysis.
Things to Consider
● Once you have cut or copied an item, you can paste it above, below, or as a subitem of the selected item.
Application Help for SAP Product Lifecycle CostingCosting Structures PUBLIC 123
● The activation status for items remains unchanged when you cut, copy, or paste them.● Price determination and account determination are triggered when you cut, copy, and paste from one
calculation version into another, and master data is automatically updated. The update is based on the header data of the target calculation version (master data timestamp, controlling area, valuation date, and so on).
Working with Root Items
You cannot cut or delete root items. You can copy and paste root items as follows:
● When you copy a root item, you can paste it into the same calculation version or in a different calculation version, calculation, or project. All subitems are automatically included.
● When you copy and paste a root item, the item category of the pasted root item changes to Material and the material description is displayed as the item description. The item categories of the subitems belonging to the pasted root item remain unchanged.
● An item or assembly can only be pasted under a root item as a subitem.
Working with Assembly Items and Single Items
You can cut, copy, and paste assembly items and single items as follows:
● When you cut or copy assembly items or single items, you can paste them in the same calculation version or in a different calculation version, calculation, or project. All subitems are automatically included.
● You can only cut, copy, and paste one item or subitem at a time (unless you are working with an assembly, then all subitems are included).
● When you cut an item, the item is not removed from the costing structure until you paste it in another location.
● Where you can paste depends on the costing structure hierarchy. When you choose where in the costing structure you'd like to paste something, you can check the available paste commands in the ribbon or context menu. This tells you where the cut or copied items can be pasted in relation to the selected item.
Related Information
Keyboard Navigation and Shortcuts [page 388]
11.2.3 Activating and Deactivating Items and Assemblies
When creating a costing structure, you can activate and deactivate items to simulate alternatives in your calculation version. You do this using the respective checkboxes displayed to the left of each item in the costing structure.
124 PUBLICApplication Help for SAP Product Lifecycle Costing
Costing Structures
You can activate and deactivate individual items or entire assemblies in a costing structure. You can select an item or assembly to activate and include it in the calculation. You can deselect an item or assembly to deactivate and exclude it from the calculation. You can use this feature to compare different alternatives. For example, you can facilitate a make or buy decision by adding an item for a purchased part and also an item (with subitems) for a self-made assembly. By activating one or the other you can see the influence on the total cost.
Activating Items
To activate an item, select the checkbox next to it in the costing structure. The item is then included in the calculation and you can change the entries in the fields for the item in the calculation table and in the Item Details area in the side panel. Each item that you activate triggers a recalculation, and the costs are rolled up and included in the total cost of the calculation if they are defined to do so in the costing sheet.
Deactivating Items
To deactivate an item, deselect the checkbox to the left of the item. The entire line of the deactivated item is grayed out. You can no longer add data in the calculation table or side panel for this item. The costs for the item are still visible, but they are no longer included in the total cost of the calculation version.
Activating Assemblies
To activate an assembly, select the checkbox to the left of the root item of the assembly. This checkbox activates all subitems at once. You can deselect the root item to deactivate all subitems or you can deactivate subitems individually. A gray checkbox next to the root item of the assembly means that some subitems are activated and others are deactivated.
Deactivating Assemblies
To deactivate an assembly , deselect the checkbox to the left of the assembly. This deactivates all subitems for that assembly as well. The entire substructure is grayed out and is no longer used in the calculation. You can no longer add data in the calculation table or side panel for this item or any of its subitems, and the item’s costs are no longer rolled up in the calculation. You can manually select and reactivate subitems that have been grayed out.
When an assembly has both selected and deselected subitems, the checkbox to the left of the main item for the assembly fills with a gray square to indicate the change. Reactivated subitems become part of the calculation and costs for the reactivated items are rolled up in the calculation once again.
Application Help for SAP Product Lifecycle CostingCosting Structures PUBLIC 125
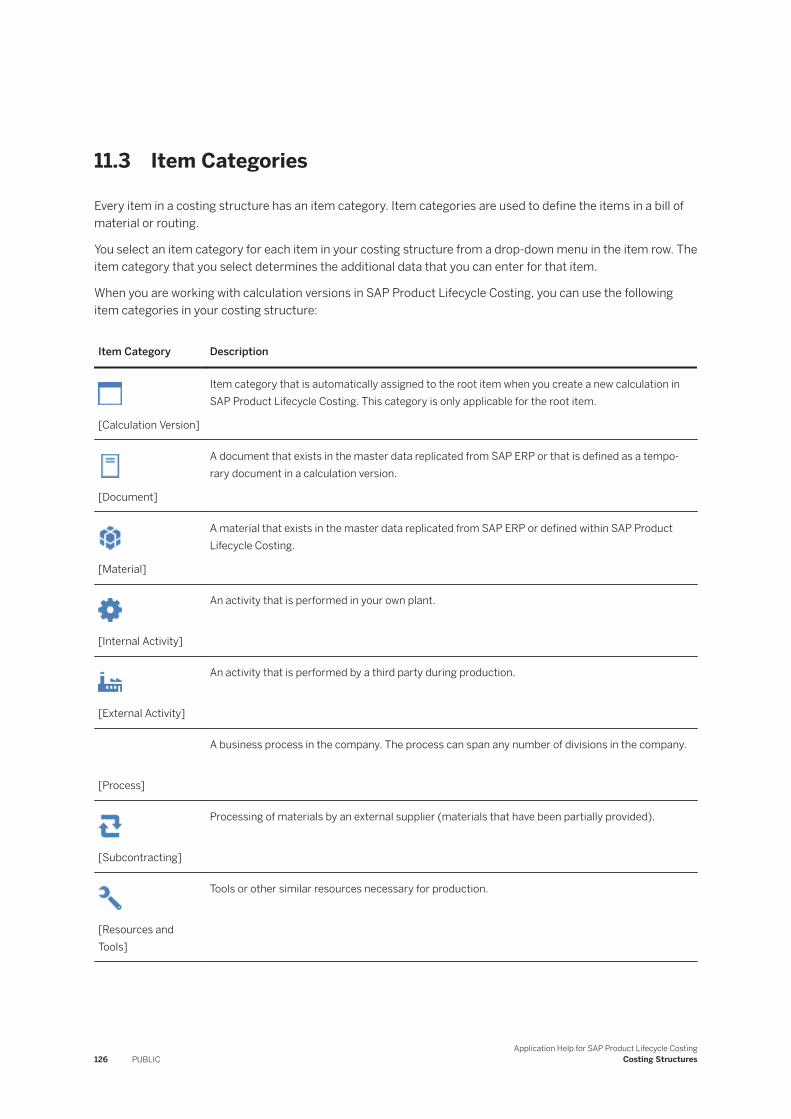
11.3 Item Categories
Every item in a costing structure has an item category. Item categories are used to define the items in a bill of material or routing.
You select an item category for each item in your costing structure from a drop-down menu in the item row. The item category that you select determines the additional data that you can enter for that item.
When you are working with calculation versions in SAP Product Lifecycle Costing, you can use the following item categories in your costing structure:
Item Category Description
[Calculation Version]
Item category that is automatically assigned to the root item when you create a new calculation in SAP Product Lifecycle Costing. This category is only applicable for the root item.
[Document]
A document that exists in the master data replicated from SAP ERP or that is defined as a temporary document in a calculation version.
[Material]
A material that exists in the master data replicated from SAP ERP or defined within SAP Product Lifecycle Costing.
[Internal Activity]
An activity that is performed in your own plant.
[External Activity]
An activity that is performed by a third party during production.
[Process]
A business process in the company. The process can span any number of divisions in the company.
[Subcontracting]
Processing of materials by an external supplier (materials that have been partially provided).
[Resources and Tools]
Tools or other similar resources necessary for production.
126 PUBLICApplication Help for SAP Product Lifecycle Costing
Costing Structures
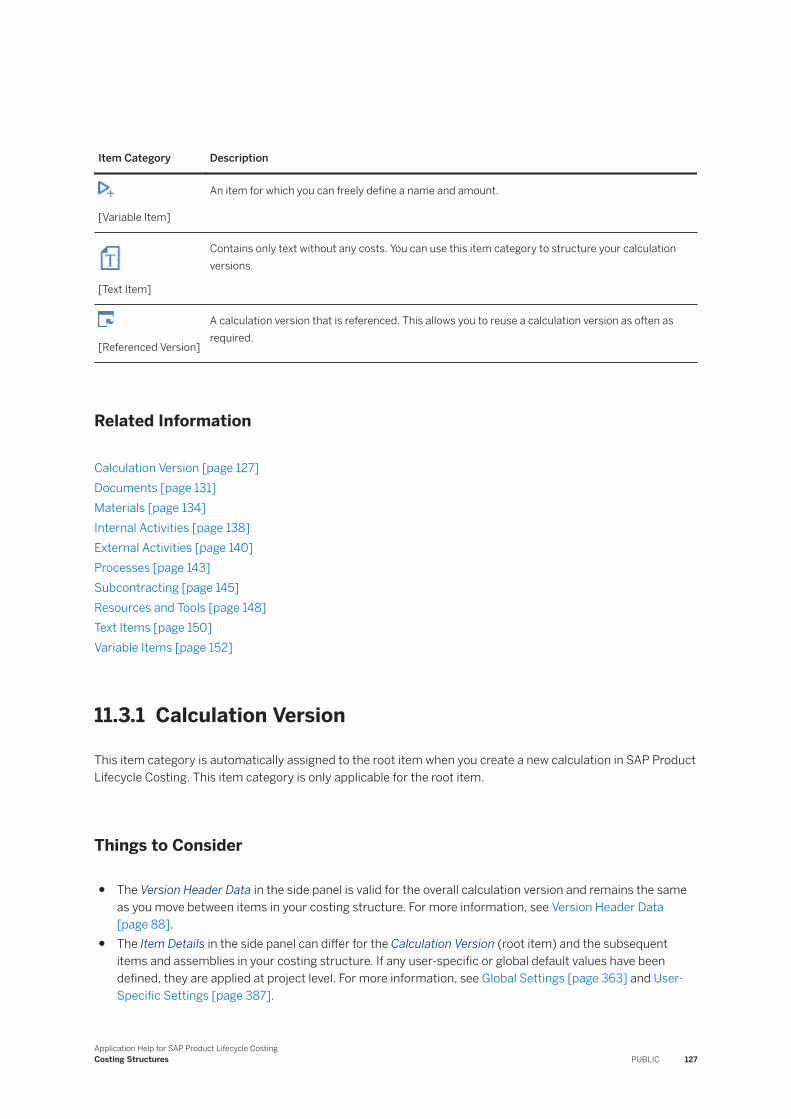
Item Category Description
[Variable Item]
An item for which you can freely define a name and amount.
[Text Item]
Contains only text without any costs. You can use this item category to structure your calculation versions.
[Referenced Version]
A calculation version that is referenced. This allows you to reuse a calculation version as often as required.
Related Information
Calculation Version [page 127]Documents [page 131]Materials [page 134]Internal Activities [page 138]External Activities [page 140]Processes [page 143]Subcontracting [page 145]Resources and Tools [page 148]Text Items [page 150]Variable Items [page 152]
11.3.1 Calculation Version
This item category is automatically assigned to the root item when you create a new calculation in SAP Product Lifecycle Costing. This item category is only applicable for the root item.
Things to Consider
● The Version Header Data in the side panel is valid for the overall calculation version and remains the same as you move between items in your costing structure. For more information, see Version Header Data [page 88].
● The Item Details in the side panel can differ for the Calculation Version (root item) and the subsequent items and assemblies in your costing structure. If any user-specific or global default values have been defined, they are applied at project level. For more information, see Global Settings [page 363] and User-Specific Settings [page 387].
Application Help for SAP Product Lifecycle CostingCosting Structures PUBLIC 127
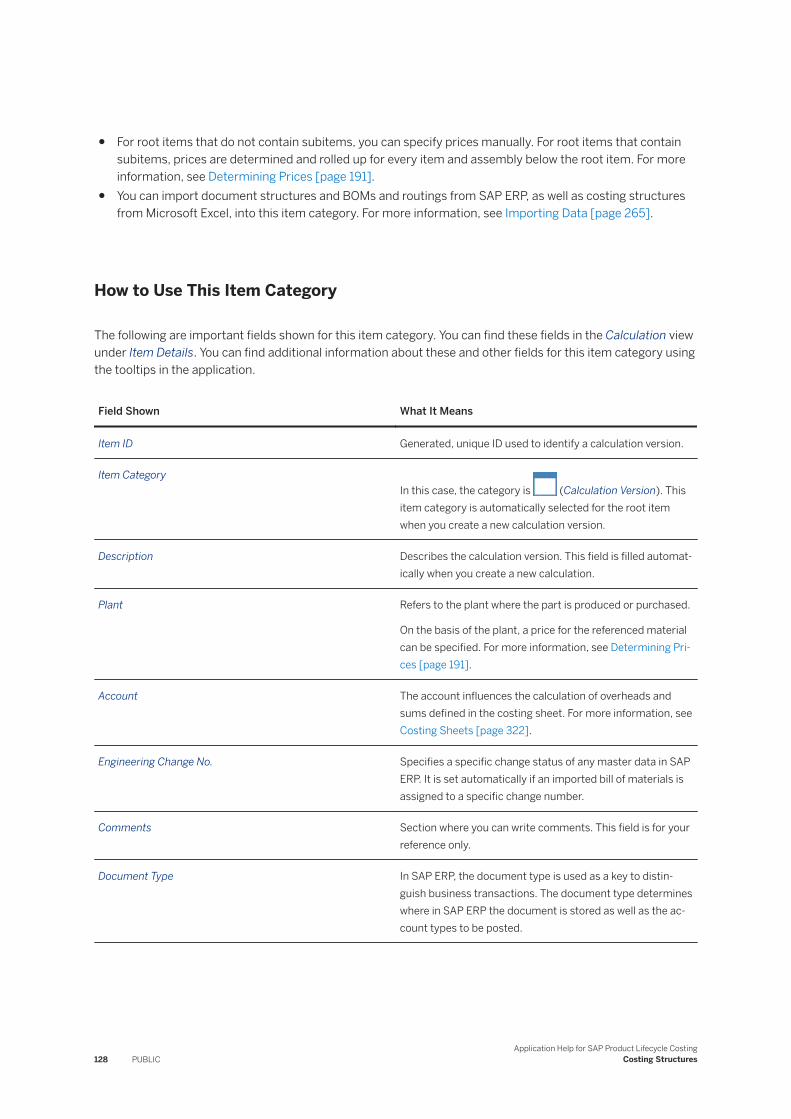
● For root items that do not contain subitems, you can specify prices manually. For root items that contain subitems, prices are determined and rolled up for every item and assembly below the root item. For more information, see Determining Prices [page 191].
● You can import document structures and BOMs and routings from SAP ERP, as well as costing structures from Microsoft Excel, into this item category. For more information, see Importing Data [page 265].
How to Use This Item Category
The following are important fields shown for this item category. You can find these fields in the Calculation view under Item Details. You can find additional information about these and other fields for this item category using the tooltips in the application.
Field Shown What It Means
Item ID Generated, unique ID used to identify a calculation version.
Item CategoryIn this case, the category is (Calculation Version). This item category is automatically selected for the root item when you create a new calculation version.
Description Describes the calculation version. This field is filled automatically when you create a new calculation.
Plant Refers to the plant where the part is produced or purchased.
On the basis of the plant, a price for the referenced material can be specified. For more information, see Determining Prices [page 191].
Account The account influences the calculation of overheads and sums defined in the costing sheet. For more information, see Costing Sheets [page 322].
Engineering Change No. Specifies a specific change status of any master data in SAP ERP. It is set automatically if an imported bill of materials is assigned to a specific change number.
Comments Section where you can write comments. This field is for your reference only.
Document Type In SAP ERP, the document type is used as a key to distinguish business transactions. The document type determines where in SAP ERP the document is stored as well as the account types to be posted.
128 PUBLICApplication Help for SAP Product Lifecycle Costing
Costing Structures
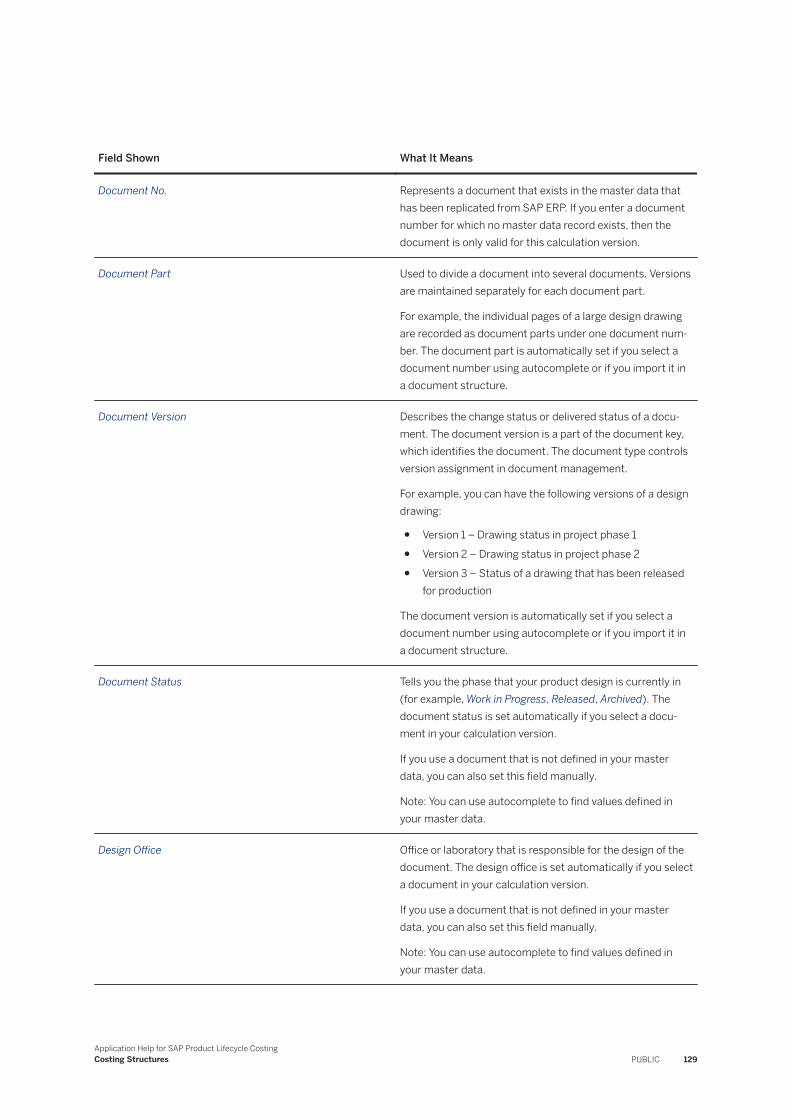
Field Shown What It Means
Document No. Represents a document that exists in the master data that has been replicated from SAP ERP. If you enter a document number for which no master data record exists, then the document is only valid for this calculation version.
Document Part Used to divide a document into several documents. Versions are maintained separately for each document part.
For example, the individual pages of a large design drawing are recorded as document parts under one document number. The document part is automatically set if you select a document number using autocomplete or if you import it in a document structure.
Document Version Describes the change status or delivered status of a document. The document version is a part of the document key, which identifies the document. The document type controls version assignment in document management.
For example, you can have the following versions of a design drawing:
● Version 1 – Drawing status in project phase 1● Version 2 – Drawing status in project phase 2● Version 3 – Status of a drawing that has been released
for production
The document version is automatically set if you select a document number using autocomplete or if you import it in a document structure.
Document Status Tells you the phase that your product design is currently in (for example, Work in Progress, Released, Archived). The document status is set automatically if you select a document in your calculation version.
If you use a document that is not defined in your master data, you can also set this field manually.
Note: You can use autocomplete to find values defined in your master data.
Design Office Office or laboratory that is responsible for the design of the document. The design office is set automatically if you select a document in your calculation version.
If you use a document that is not defined in your master data, you can also set this field manually.
Note: You can use autocomplete to find values defined in your master data.
Application Help for SAP Product Lifecycle CostingCosting Structures PUBLIC 129
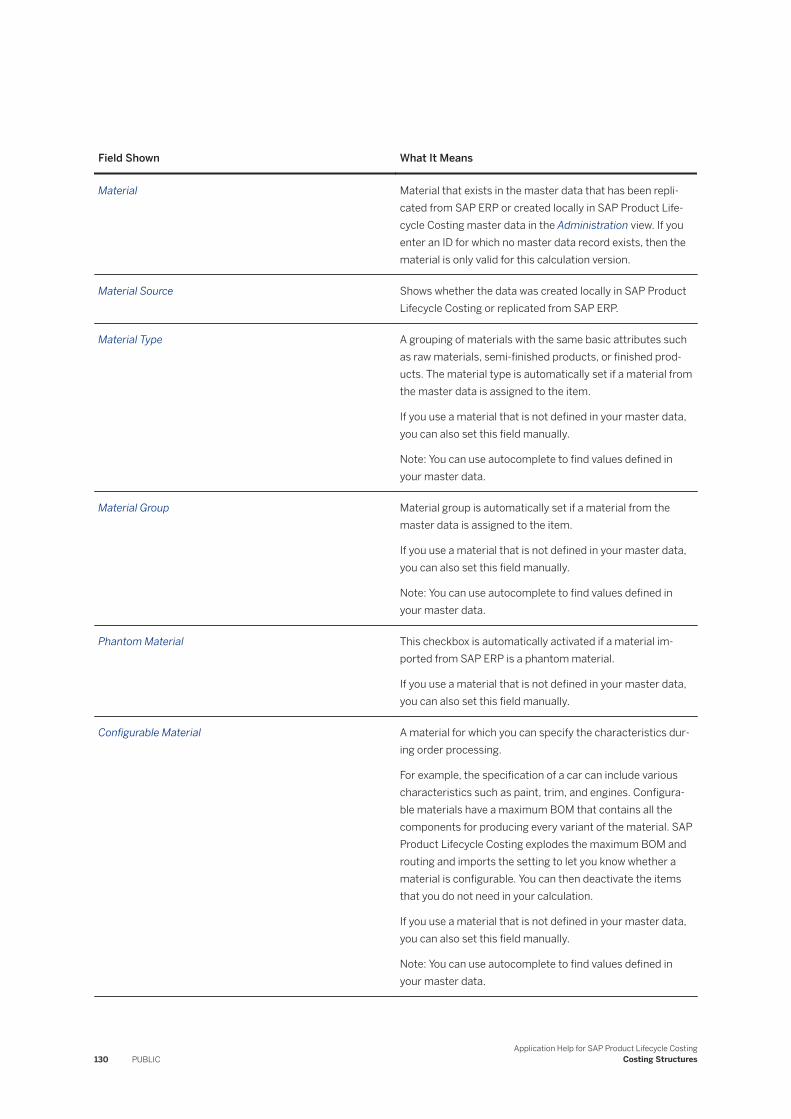
Field Shown What It Means
Material Material that exists in the master data that has been replicated from SAP ERP or created locally in SAP Product Lifecycle Costing master data in the Administration view. If you enter an ID for which no master data record exists, then the material is only valid for this calculation version.
Material Source Shows whether the data was created locally in SAP Product Lifecycle Costing or replicated from SAP ERP.
Material Type A grouping of materials with the same basic attributes such as raw materials, semi-finished products, or finished products. The material type is automatically set if a material from the master data is assigned to the item.
If you use a material that is not defined in your master data, you can also set this field manually.
Note: You can use autocomplete to find values defined in your master data.
Material Group Material group is automatically set if a material from the master data is assigned to the item.
If you use a material that is not defined in your master data, you can also set this field manually.
Note: You can use autocomplete to find values defined in your master data.
Phantom Material This checkbox is automatically activated if a material imported from SAP ERP is a phantom material.
If you use a material that is not defined in your master data, you can also set this field manually.
Configurable Material A material for which you can specify the characteristics during order processing.
For example, the specification of a car can include various characteristics such as paint, trim, and engines. Configura-ble materials have a maximum BOM that contains all the components for producing every variant of the material. SAP Product Lifecycle Costing explodes the maximum BOM and routing and imports the setting to let you know whether a material is configurable. You can then deactivate the items that you do not need in your calculation.
If you use a material that is not defined in your master data, you can also set this field manually.
Note: You can use autocomplete to find values defined in your master data.
130 PUBLICApplication Help for SAP Product Lifecycle Costing
Costing Structures
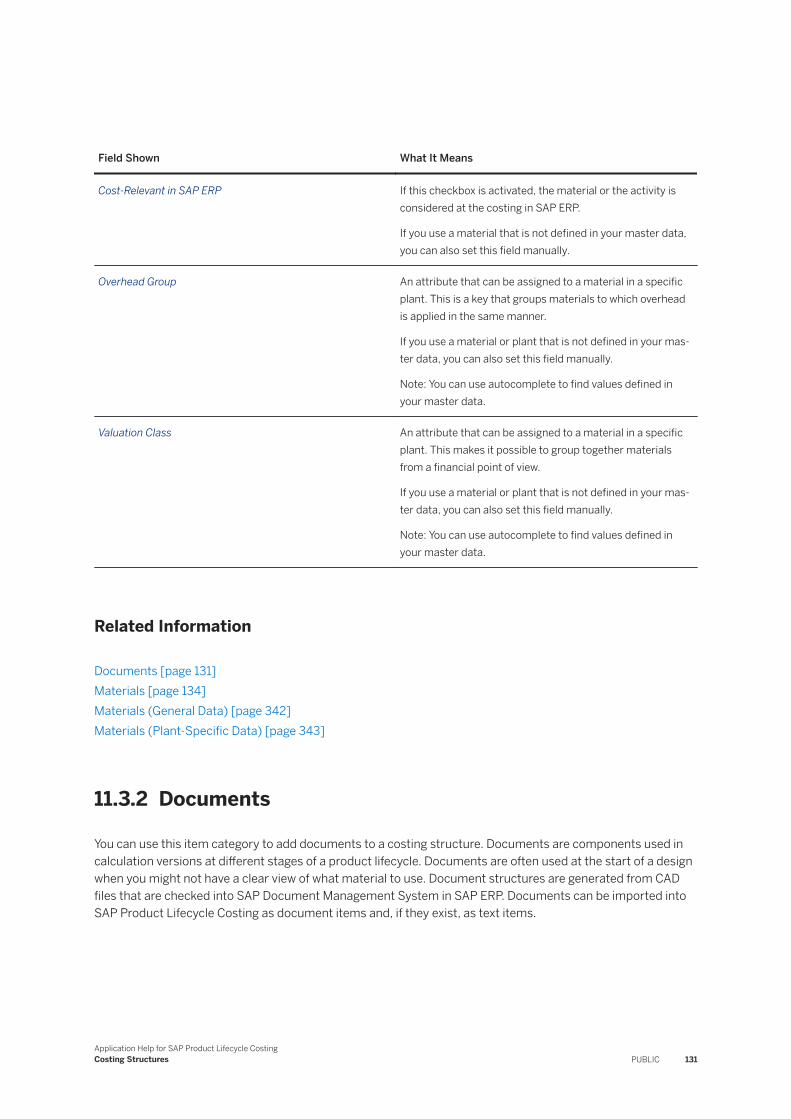
Field Shown What It Means
Cost-Relevant in SAP ERP If this checkbox is activated, the material or the activity is considered at the costing in SAP ERP.
If you use a material that is not defined in your master data, you can also set this field manually.
Overhead Group An attribute that can be assigned to a material in a specific plant. This is a key that groups materials to which overhead is applied in the same manner.
If you use a material or plant that is not defined in your master data, you can also set this field manually.
Note: You can use autocomplete to find values defined in your master data.
Valuation Class An attribute that can be assigned to a material in a specific plant. This makes it possible to group together materials from a financial point of view.
If you use a material or plant that is not defined in your master data, you can also set this field manually.
Note: You can use autocomplete to find values defined in your master data.
Related Information
Documents [page 131]Materials [page 134]Materials (General Data) [page 342]Materials (Plant-Specific Data) [page 343]
11.3.2 Documents
You can use this item category to add documents to a costing structure. Documents are components used in calculation versions at different stages of a product lifecycle. Documents are often used at the start of a design when you might not have a clear view of what material to use. Document structures are generated from CAD files that are checked into SAP Document Management System in SAP ERP. Documents can be imported into SAP Product Lifecycle Costing as document items and, if they exist, as text items.
Application Help for SAP Product Lifecycle CostingCosting Structures PUBLIC 131
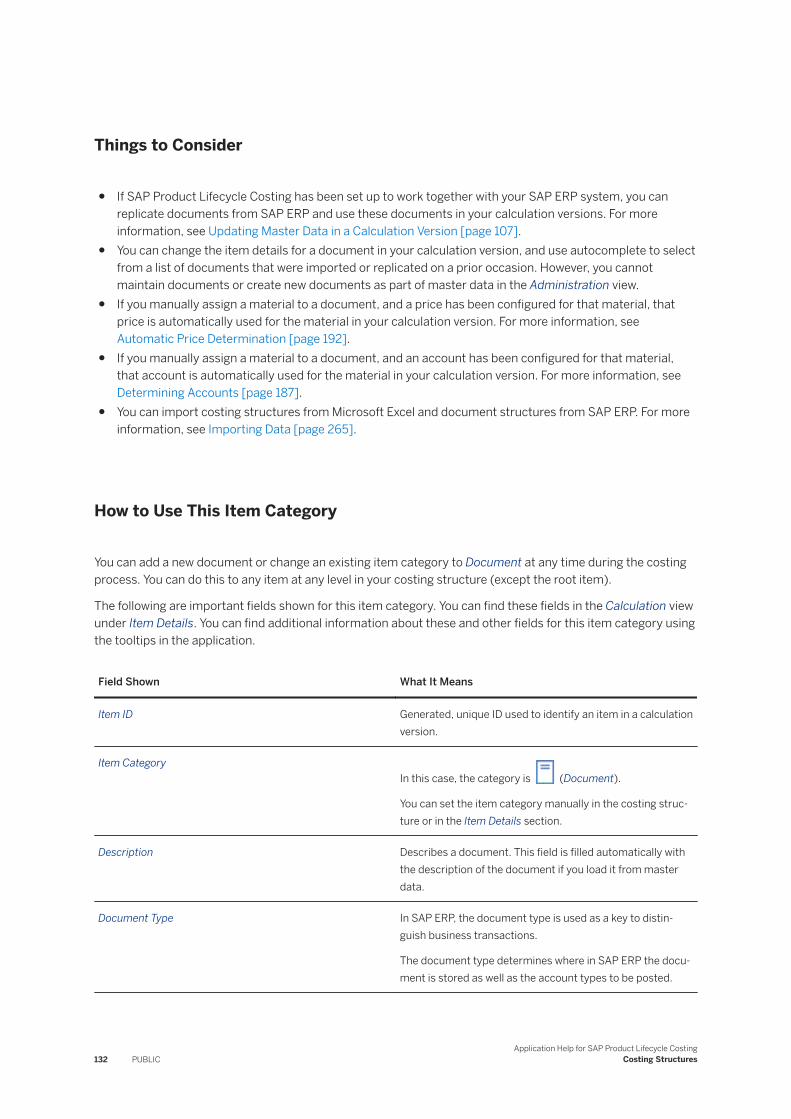
Things to Consider
● If SAP Product Lifecycle Costing has been set up to work together with your SAP ERP system, you can replicate documents from SAP ERP and use these documents in your calculation versions. For more information, see Updating Master Data in a Calculation Version [page 107].
● You can change the item details for a document in your calculation version, and use autocomplete to select from a list of documents that were imported or replicated on a prior occasion. However, you cannot maintain documents or create new documents as part of master data in the Administration view.
● If you manually assign a material to a document, and a price has been configured for that material, that price is automatically used for the material in your calculation version. For more information, see Automatic Price Determination [page 192].
● If you manually assign a material to a document, and an account has been configured for that material, that account is automatically used for the material in your calculation version. For more information, see Determining Accounts [page 187].
● You can import costing structures from Microsoft Excel and document structures from SAP ERP. For more information, see Importing Data [page 265].
How to Use This Item Category
You can add a new document or change an existing item category to Document at any time during the costing process. You can do this to any item at any level in your costing structure (except the root item).
The following are important fields shown for this item category. You can find these fields in the Calculation view under Item Details. You can find additional information about these and other fields for this item category using the tooltips in the application.
Field Shown What It Means
Item ID Generated, unique ID used to identify an item in a calculation version.
Item CategoryIn this case, the category is (Document).
You can set the item category manually in the costing structure or in the Item Details section.
Description Describes a document. This field is filled automatically with the description of the document if you load it from master data.
Document Type In SAP ERP, the document type is used as a key to distinguish business transactions.
The document type determines where in SAP ERP the document is stored as well as the account types to be posted.
132 PUBLICApplication Help for SAP Product Lifecycle Costing
Costing Structures

Field Shown What It Means
Document No. Represents a document that exists in the master data that has been replicated from SAP ERP. If you enter a document number for which no master data record exists, then the document is only valid for this calculation version.
Document Part Used to divide a document into several documents. Versions are maintained separately for each document part.
For example, the individual pages of a large design drawing are recorded as document parts under one document number. The document part is automatically set if you select a document number using autocomplete or if you import it in a document structure.
Document Version Describes the change status or delivered status of a document.
The document version is a part of the document key that identifies the document. The document type controls version assignment in document management.
For example, you can have the following versions of a design drawing:
● Version 1 – Drawing status in project phase 1● Version 2 – Drawing status in project phase 2● Version 3 – Status of a drawing that has been released
for production
The document version is automatically set if you select a document number using autocomplete or if you import it in a document structure.
Document Status Tells you the phase that your product design is currently in (for example, Work in Progress, Released, Archived). The document status is set automatically if you select a document in your calculation version.
If you use a document that is not defined in your master data, you can also set this field manually.
Note: You can use autocomplete to find values defined in your master data.
Application Help for SAP Product Lifecycle CostingCosting Structures PUBLIC 133
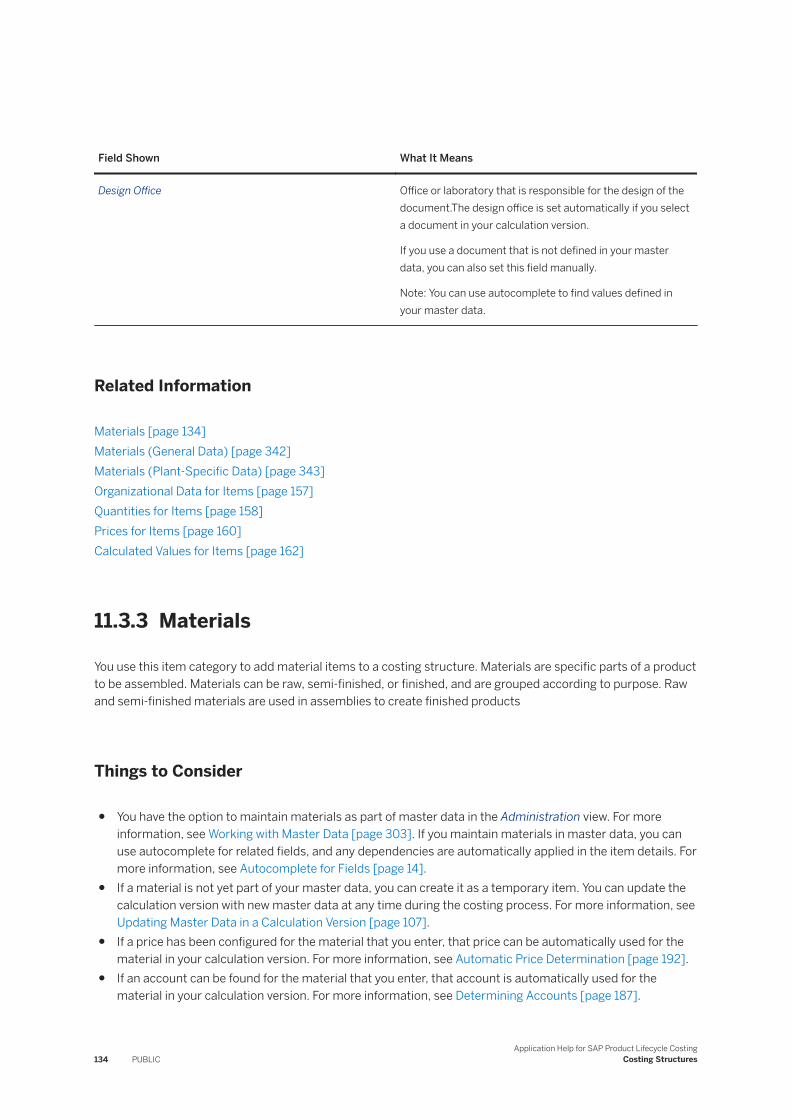
Field Shown What It Means
Design Office Office or laboratory that is responsible for the design of the document.The design office is set automatically if you select a document in your calculation version.
If you use a document that is not defined in your master data, you can also set this field manually.
Note: You can use autocomplete to find values defined in your master data.
Related Information
Materials [page 134]Materials (General Data) [page 342]Materials (Plant-Specific Data) [page 343]Organizational Data for Items [page 157]Quantities for Items [page 158]Prices for Items [page 160]Calculated Values for Items [page 162]
11.3.3 Materials
You use this item category to add material items to a costing structure. Materials are specific parts of a product to be assembled. Materials can be raw, semi-finished, or finished, and are grouped according to purpose. Raw and semi-finished materials are used in assemblies to create finished products
Things to Consider
● You have the option to maintain materials as part of master data in the Administration view. For more information, see Working with Master Data [page 303]. If you maintain materials in master data, you can use autocomplete for related fields, and any dependencies are automatically applied in the item details. For more information, see Autocomplete for Fields [page 14].
● If a material is not yet part of your master data, you can create it as a temporary item. You can update the calculation version with new master data at any time during the costing process. For more information, see Updating Master Data in a Calculation Version [page 107].
● If a price has been configured for the material that you enter, that price can be automatically used for the material in your calculation version. For more information, see Automatic Price Determination [page 192].
● If an account can be found for the material that you enter, that account is automatically used for the material in your calculation version. For more information, see Determining Accounts [page 187].
134 PUBLICApplication Help for SAP Product Lifecycle Costing
Costing Structures
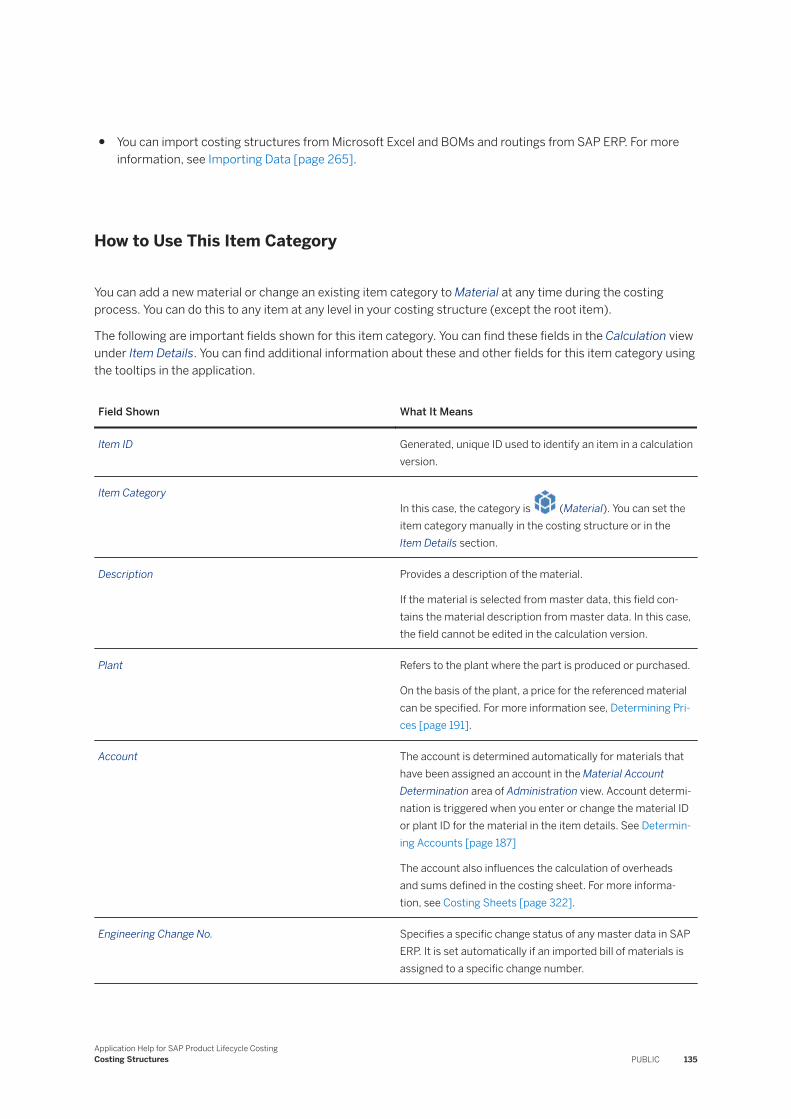
● You can import costing structures from Microsoft Excel and BOMs and routings from SAP ERP. For more information, see Importing Data [page 265].
How to Use This Item Category
You can add a new material or change an existing item category to Material at any time during the costing process. You can do this to any item at any level in your costing structure (except the root item).
The following are important fields shown for this item category. You can find these fields in the Calculation view under Item Details. You can find additional information about these and other fields for this item category using the tooltips in the application.
Field Shown What It Means
Item ID Generated, unique ID used to identify an item in a calculation version.
Item CategoryIn this case, the category is (Material). You can set the item category manually in the costing structure or in the Item Details section.
Description Provides a description of the material.
If the material is selected from master data, this field contains the material description from master data. In this case, the field cannot be edited in the calculation version.
Plant Refers to the plant where the part is produced or purchased.
On the basis of the plant, a price for the referenced material can be specified. For more information see, Determining Prices [page 191].
Account The account is determined automatically for materials that have been assigned an account in the Material Account Determination area of Administration view. Account determination is triggered when you enter or change the material ID or plant ID for the material in the item details. See Determining Accounts [page 187]
The account also influences the calculation of overheads and sums defined in the costing sheet. For more information, see Costing Sheets [page 322].
Engineering Change No. Specifies a specific change status of any master data in SAP ERP. It is set automatically if an imported bill of materials is assigned to a specific change number.
Application Help for SAP Product Lifecycle CostingCosting Structures PUBLIC 135
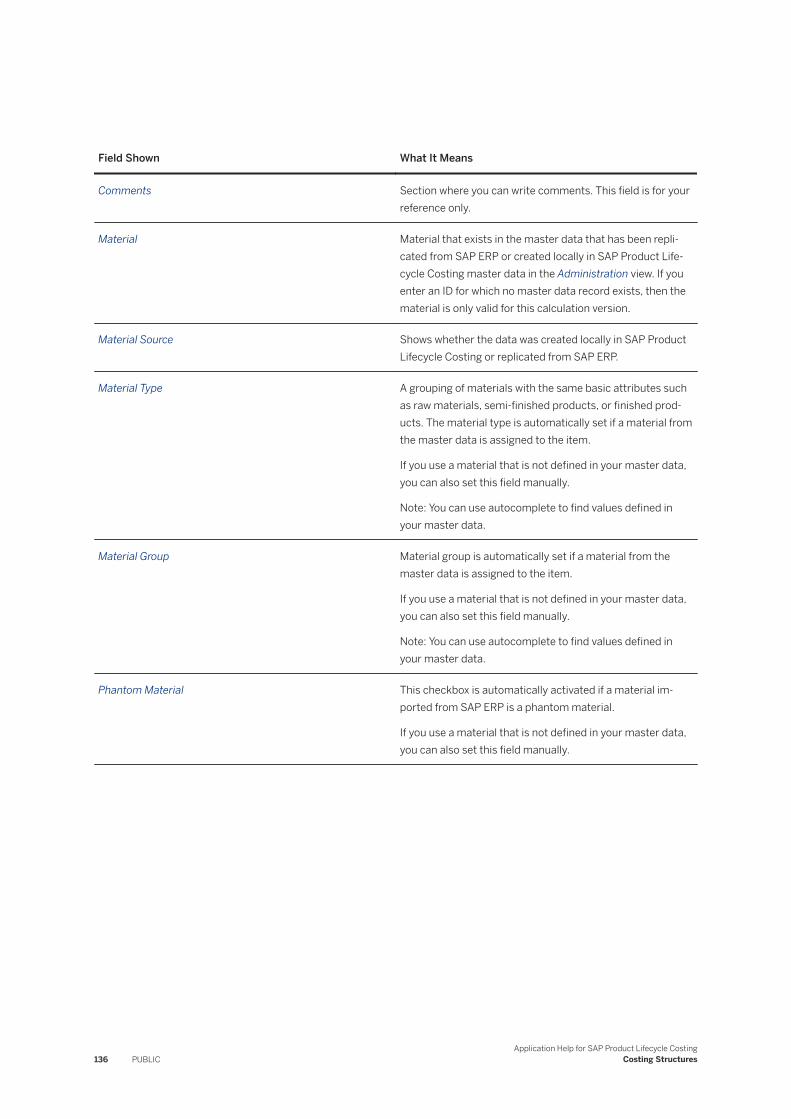
Field Shown What It Means
Comments Section where you can write comments. This field is for your reference only.
Material Material that exists in the master data that has been replicated from SAP ERP or created locally in SAP Product Lifecycle Costing master data in the Administration view. If you enter an ID for which no master data record exists, then the material is only valid for this calculation version.
Material Source Shows whether the data was created locally in SAP Product Lifecycle Costing or replicated from SAP ERP.
Material Type A grouping of materials with the same basic attributes such as raw materials, semi-finished products, or finished products. The material type is automatically set if a material from the master data is assigned to the item.
If you use a material that is not defined in your master data, you can also set this field manually.
Note: You can use autocomplete to find values defined in your master data.
Material Group Material group is automatically set if a material from the master data is assigned to the item.
If you use a material that is not defined in your master data, you can also set this field manually.
Note: You can use autocomplete to find values defined in your master data.
Phantom Material This checkbox is automatically activated if a material imported from SAP ERP is a phantom material.
If you use a material that is not defined in your master data, you can also set this field manually.
136 PUBLICApplication Help for SAP Product Lifecycle Costing
Costing Structures
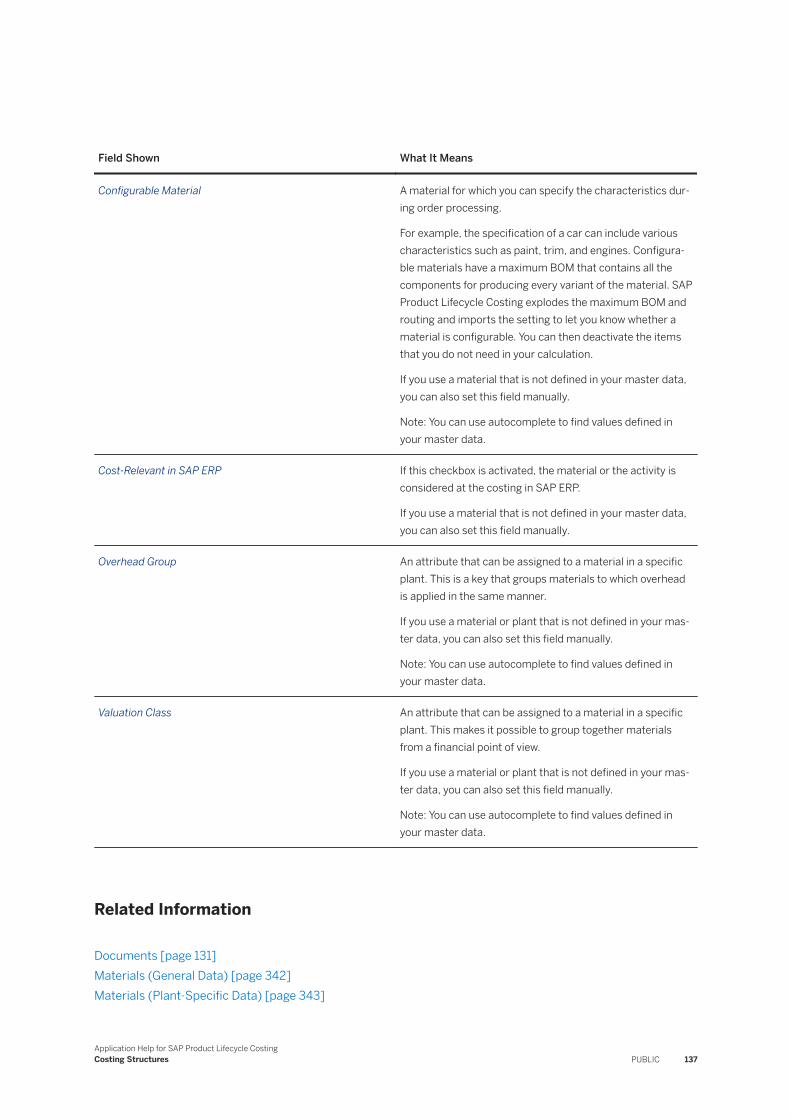
Field Shown What It Means
Configurable Material A material for which you can specify the characteristics during order processing.
For example, the specification of a car can include various characteristics such as paint, trim, and engines. Configura-ble materials have a maximum BOM that contains all the components for producing every variant of the material. SAP Product Lifecycle Costing explodes the maximum BOM and routing and imports the setting to let you know whether a material is configurable. You can then deactivate the items that you do not need in your calculation.
If you use a material that is not defined in your master data, you can also set this field manually.
Note: You can use autocomplete to find values defined in your master data.
Cost-Relevant in SAP ERP If this checkbox is activated, the material or the activity is considered at the costing in SAP ERP.
If you use a material that is not defined in your master data, you can also set this field manually.
Overhead Group An attribute that can be assigned to a material in a specific plant. This is a key that groups materials to which overhead is applied in the same manner.
If you use a material or plant that is not defined in your master data, you can also set this field manually.
Note: You can use autocomplete to find values defined in your master data.
Valuation Class An attribute that can be assigned to a material in a specific plant. This makes it possible to group together materials from a financial point of view.
If you use a material or plant that is not defined in your master data, you can also set this field manually.
Note: You can use autocomplete to find values defined in your master data.
Related Information
Documents [page 131]Materials (General Data) [page 342]Materials (Plant-Specific Data) [page 343]
Application Help for SAP Product Lifecycle CostingCosting Structures PUBLIC 137
Organizational Data for Items [page 157]Quantities for Items [page 158]Prices for Items [page 160]Calculated Values for Items [page 162]
11.3.4 Internal Activities
You use this item category to add internal activities to a costing structure. Internal activities are activities that are performed by persons or machines within a company. They include such actions as the set-up of a machine or the assembly of an item, such as a pump.
Internal activities are included as part of a routing that describes how a product is produced.
Internal activities can be used to influence make or buy decisions when compared to product costings that include externally produced items.
Things to Consider
● You have the option to maintain master data related to internal activities, such as cost centers and activity types, in the Administration view. For more information, see Working with Master Data [page 303]. If you maintain such master data, you can use autocomplete for related fields, and any dependencies are automatically applied in the item details. For more information, see Autocomplete for Fields [page 14].
● If a cost center or activity type is not yet part of your master data, you can create it as a temporary item. You can update the calculation version with new master data at any time during the costing process. For more information, see Updating Master Data in a Calculation Version [page 107].
● Price determination for internal activities is done based on the activity prices maintained in master data. For more information, see Determining Prices [page 191].
● Account determination for internal activities is done based on the activity types maintained in master data. For more information, see Determining Accounts [page 187].
● You can import a costing structure (including bills of materials and routings) from Microsoft Excel. See Importing Data [page 265].
How to Use This Item Category
You can add an internal activity or change an existing item category to Internal Activity at any time during the costing process. You can do this to any item at any level in your costing structure (except the root item).
The following are important fields shown for this item category. You can find these fields in the Calculation view under Item Details. You can find additional information about these and other fields for this item category using the tooltips in the application.
138 PUBLICApplication Help for SAP Product Lifecycle Costing
Costing Structures
Field Shown What It Means
Item ID Generated, unique ID used to identify an item in a calculation version.
Item CategoryIn this case, the category is (Internal Activity).
You can set the item category manually in the costing structure or in the Item Details area.
Description Provides the description of the activity.
Cost Center Specifies the cost center for the activity. Together with the activity type, the cost center determines the price for the activity.
Activity Type Together with the cost center, the activity type determines the price for an item. Activity types can be manually maintained as master data in SAP Product Lifecycle Costing, or replicated from SAP ERP.
Plant Refers to the plant where the part is produced or purchased.
On the basis of the plant, a price for the referenced material can be specified. For more information see, Determining Prices [page 191].
Work Center Organizational unit that defines where and by whom an operation is performed. The activities performed at or by the work center are valuated by charge rates, which can be determined by cost centers and activity types.
Work Center Category Describes the category of work center used, for example, machine, labor, or production line.
Efficiency Output efficiency in percent of the machine or activity executed on the machine or work center. This is for information purposes only.
Account The account is determined automatically for activities that have been assigned an account in the Activity Types area of Administration view. For more information, see Determining Accounts [page 187].
Engineering Change No. Specifies a specific change status of any master data in SAP ERP. It is set automatically if an imported bill of materials is assigned to a specific change number.
Comments Section where you can write comments. This field is for your reference only.
Application Help for SAP Product Lifecycle CostingCosting Structures PUBLIC 139
Related Information
Cost Centers [page 356]Activity Types and Account Determination [page 357]Organizational Data for Items [page 157]Quantities for Items [page 158]Prices for Items [page 160]Calculated Values for Items [page 162]
11.3.5 External Activities
You can use this item category to add external activities to a costing structure. External activities are activities provided by resources outside your company, such as purchasing materials from an external vendor or procuring an external service.
Things to Consider
● You have the option to maintain master data related to external activities, such as materials, in the Administration view. For more information, see Working with Master Data [page 303]. If you maintain materials in master data, you can use autocomplete for related fields, and any dependencies are automatically applied in the item details. For more information, see Autocomplete for Fields [page 14].
● If a material is not yet part of your master data, you can create it as a temporary item. You can update the calculation version with new master data at any time during the costing process. For more information, see Updating Master Data in a Calculation Version [page 107].
● If a price has been configured for the material assigned to the external activity that you enter, that price is automatically used for the external activity in your calculation version. For more information, see Automatic Price Determination [page 192].
● If an account can be found for the material assigned to the external activity, that account is automatically used for the external activity in your calculation version. For more information, see Determining Accounts [page 187].
● You can import a costing structure (including bills of materials and routings) from Microsoft Excel. See Importing Data [page 265].
How to Use This Item Category
You can add an external activity or change an existing item category to External Activity at any time during the costing process. You can do this to any item at any level in your costing structure (except the root item).
The following are important fields shown for this item category. You can find these fields in the Calculation view under Item Details. You can find additional information about these and other fields for this item category using the tooltips in the application.
140 PUBLICApplication Help for SAP Product Lifecycle Costing
Costing Structures
Field Shown What It Means
Item ID Generated, unique ID used to identify an item in a calculation version.
Item CategoryIn this case, the category is (External Activity).
You can set the item category manually in the costing structure or in the Item Details area.
Description Provides a description of the activity.
Plant Refers to the plant where the part is produced or purchased.
On the basis of the plant, a price for the referenced material can be specified. For more information see, Determining Prices [page 191].
Account The account influences the calculation of overheads and sums defined in the costing sheet. For more information, see Costing Sheets [page 322].
Engineering Change No. Specifies a specific change status of any master data in SAP ERP. It is set automatically if an imported bill of materials is assigned to a specific change number.
Comments Section where you can write comments. This field is for your reference only.
Material Material that exists in the master data that has been replicated from SAP ERP or created locally in SAP Product Lifecycle Costing master data in the Administration view. If you enter an ID for which no master data record exists, then the material is only valid for this calculation version.
Material Source Shows whether the data was created locally in SAP Product Lifecycle Costing or replicated from SAP ERP.
Material Type A grouping of materials with the same basic attributes such as raw materials, semi-finished products, or finished products. The material type is automatically set if a material from the master data is assigned to the item.
If you use a material that is not defined in your master data, you can also set this field manually.
Note: You can use autocomplete to find values defined in your master data.
Application Help for SAP Product Lifecycle CostingCosting Structures PUBLIC 141
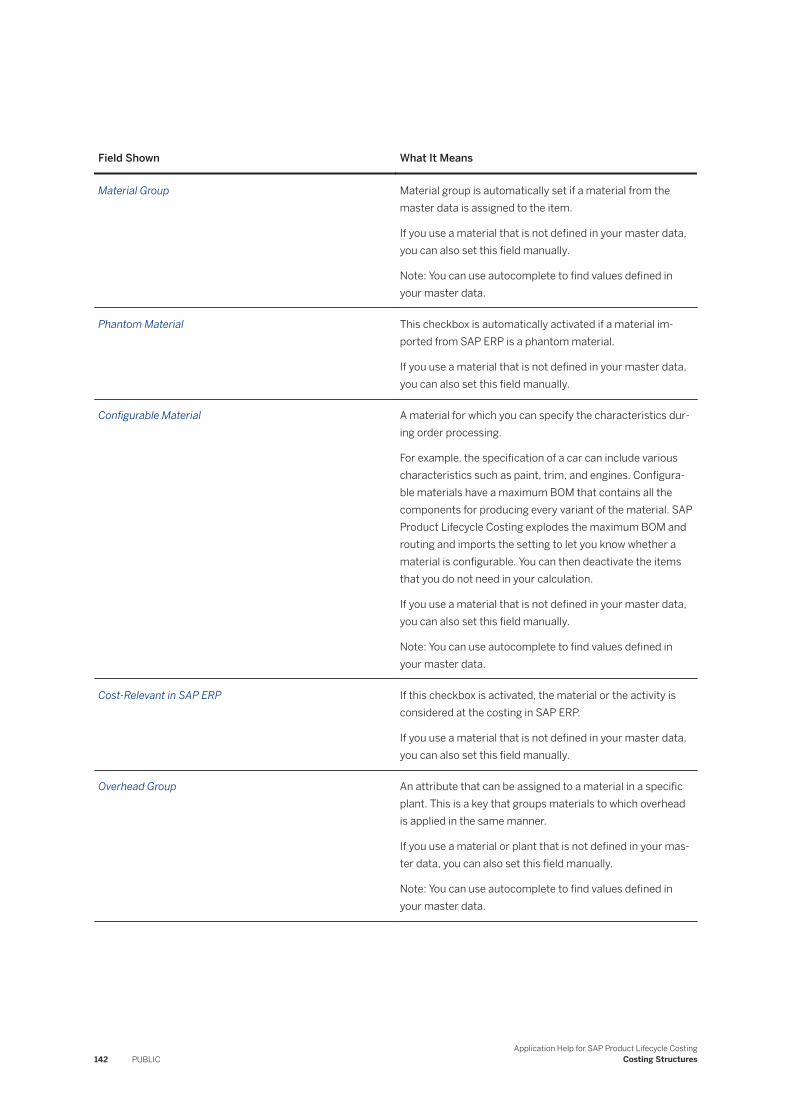
Field Shown What It Means
Material Group Material group is automatically set if a material from the master data is assigned to the item.
If you use a material that is not defined in your master data, you can also set this field manually.
Note: You can use autocomplete to find values defined in your master data.
Phantom Material This checkbox is automatically activated if a material imported from SAP ERP is a phantom material.
If you use a material that is not defined in your master data, you can also set this field manually.
Configurable Material A material for which you can specify the characteristics during order processing.
For example, the specification of a car can include various characteristics such as paint, trim, and engines. Configura-ble materials have a maximum BOM that contains all the components for producing every variant of the material. SAP Product Lifecycle Costing explodes the maximum BOM and routing and imports the setting to let you know whether a material is configurable. You can then deactivate the items that you do not need in your calculation.
If you use a material that is not defined in your master data, you can also set this field manually.
Note: You can use autocomplete to find values defined in your master data.
Cost-Relevant in SAP ERP If this checkbox is activated, the material or the activity is considered at the costing in SAP ERP.
If you use a material that is not defined in your master data, you can also set this field manually.
Overhead Group An attribute that can be assigned to a material in a specific plant. This is a key that groups materials to which overhead is applied in the same manner.
If you use a material or plant that is not defined in your master data, you can also set this field manually.
Note: You can use autocomplete to find values defined in your master data.
142 PUBLICApplication Help for SAP Product Lifecycle Costing
Costing Structures
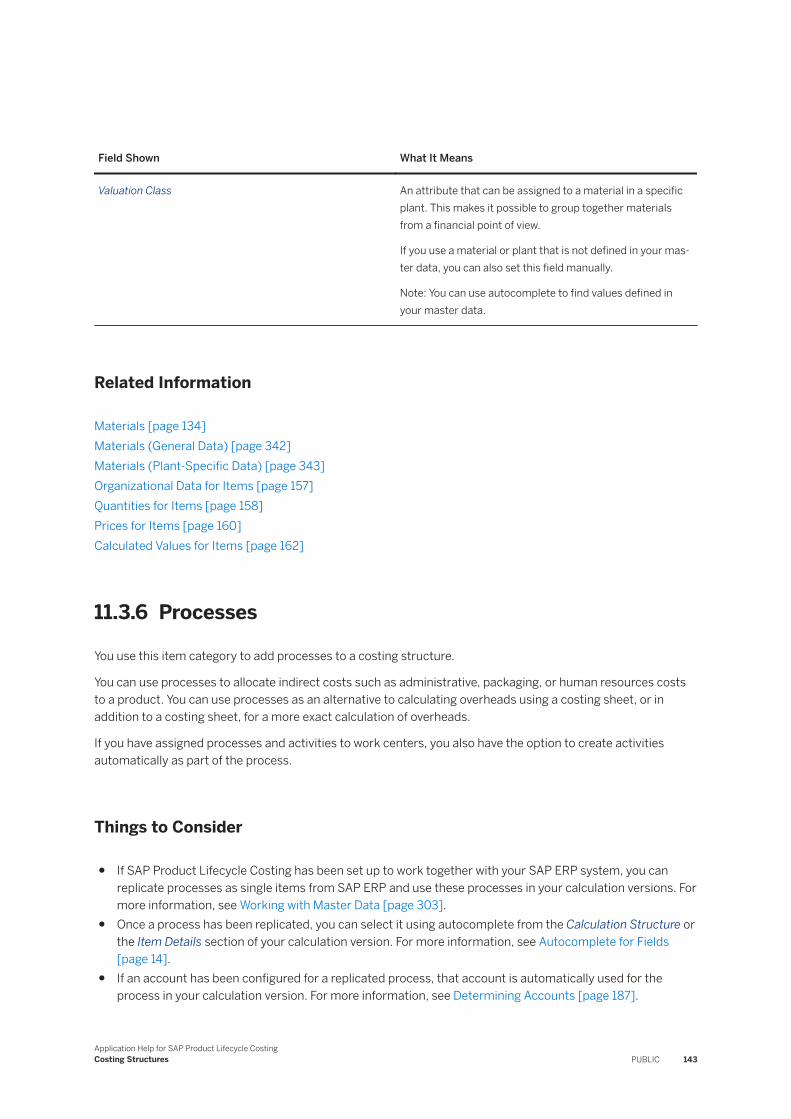
Field Shown What It Means
Valuation Class An attribute that can be assigned to a material in a specific plant. This makes it possible to group together materials from a financial point of view.
If you use a material or plant that is not defined in your master data, you can also set this field manually.
Note: You can use autocomplete to find values defined in your master data.
Related Information
Materials [page 134]Materials (General Data) [page 342]Materials (Plant-Specific Data) [page 343]Organizational Data for Items [page 157]Quantities for Items [page 158]Prices for Items [page 160]Calculated Values for Items [page 162]
11.3.6 Processes
You use this item category to add processes to a costing structure.
You can use processes to allocate indirect costs such as administrative, packaging, or human resources costs to a product. You can use processes as an alternative to calculating overheads using a costing sheet, or in addition to a costing sheet, for a more exact calculation of overheads.
If you have assigned processes and activities to work centers, you also have the option to create activities automatically as part of the process.
Things to Consider
● If SAP Product Lifecycle Costing has been set up to work together with your SAP ERP system, you can replicate processes as single items from SAP ERP and use these processes in your calculation versions. For more information, see Working with Master Data [page 303].
● Once a process has been replicated, you can select it using autocomplete from the Calculation Structure or the Item Details section of your calculation version. For more information, see Autocomplete for Fields [page 14].
● If an account has been configured for a replicated process, that account is automatically used for the process in your calculation version. For more information, see Determining Accounts [page 187].
Application Help for SAP Product Lifecycle CostingCosting Structures PUBLIC 143
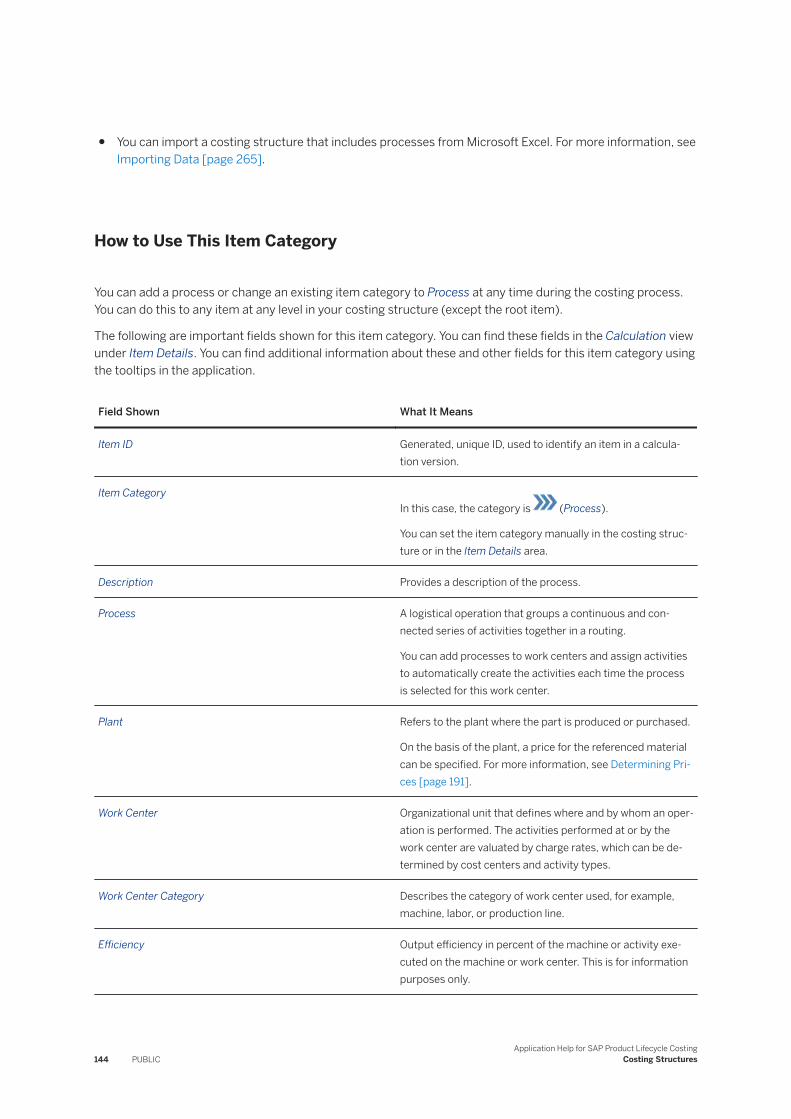
● You can import a costing structure that includes processes from Microsoft Excel. For more information, see Importing Data [page 265].
How to Use This Item Category
You can add a process or change an existing item category to Process at any time during the costing process. You can do this to any item at any level in your costing structure (except the root item).
The following are important fields shown for this item category. You can find these fields in the Calculation view under Item Details. You can find additional information about these and other fields for this item category using the tooltips in the application.
Field Shown What It Means
Item ID Generated, unique ID, used to identify an item in a calculation version.
Item CategoryIn this case, the category is (Process).
You can set the item category manually in the costing structure or in the Item Details area.
Description Provides a description of the process.
Process A logistical operation that groups a continuous and connected series of activities together in a routing.
You can add processes to work centers and assign activities to automatically create the activities each time the process is selected for this work center.
Plant Refers to the plant where the part is produced or purchased.
On the basis of the plant, a price for the referenced material can be specified. For more information, see Determining Prices [page 191].
Work Center Organizational unit that defines where and by whom an operation is performed. The activities performed at or by the work center are valuated by charge rates, which can be determined by cost centers and activity types.
Work Center Category Describes the category of work center used, for example, machine, labor, or production line.
Efficiency Output efficiency in percent of the machine or activity executed on the machine or work center. This is for information purposes only.
144 PUBLICApplication Help for SAP Product Lifecycle Costing
Costing Structures
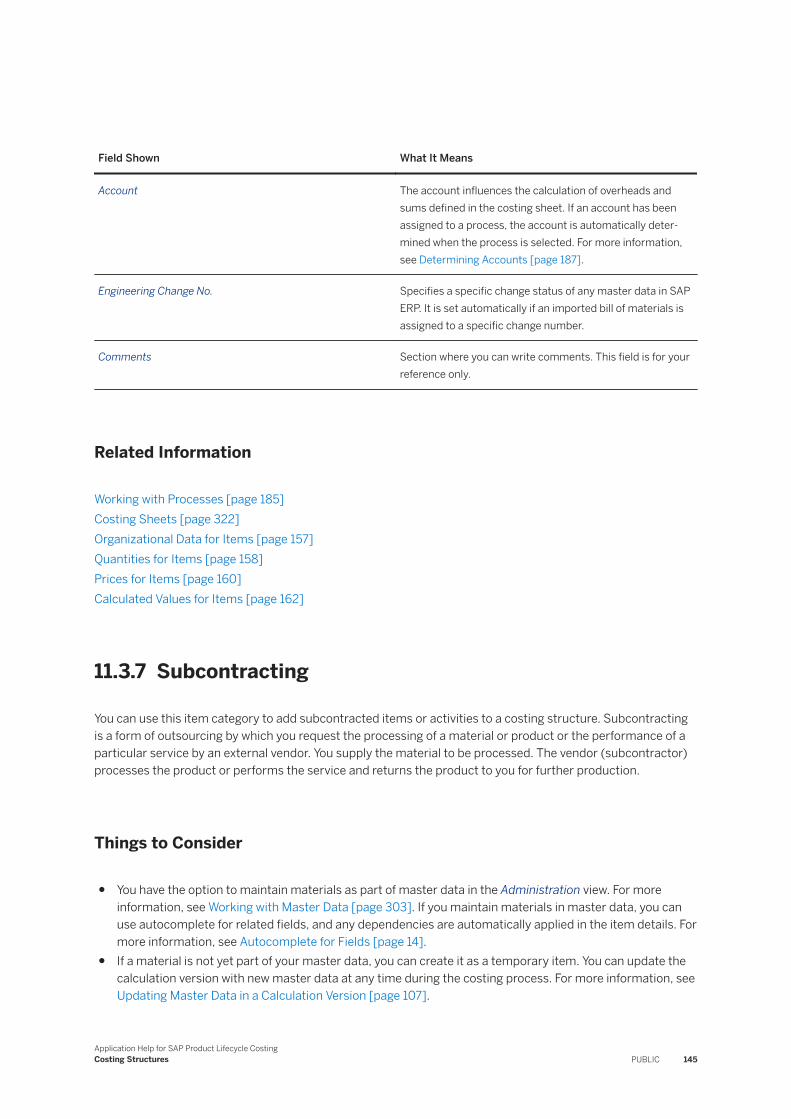
Field Shown What It Means
Account The account influences the calculation of overheads and sums defined in the costing sheet. If an account has been assigned to a process, the account is automatically determined when the process is selected. For more information, see Determining Accounts [page 187].
Engineering Change No. Specifies a specific change status of any master data in SAP ERP. It is set automatically if an imported bill of materials is assigned to a specific change number.
Comments Section where you can write comments. This field is for your reference only.
Related Information
Working with Processes [page 185]Costing Sheets [page 322]Organizational Data for Items [page 157]Quantities for Items [page 158]Prices for Items [page 160]Calculated Values for Items [page 162]
11.3.7 Subcontracting
You can use this item category to add subcontracted items or activities to a costing structure. Subcontracting is a form of outsourcing by which you request the processing of a material or product or the performance of a particular service by an external vendor. You supply the material to be processed. The vendor (subcontractor) processes the product or performs the service and returns the product to you for further production.
Things to Consider
● You have the option to maintain materials as part of master data in the Administration view. For more information, see Working with Master Data [page 303]. If you maintain materials in master data, you can use autocomplete for related fields, and any dependencies are automatically applied in the item details. For more information, see Autocomplete for Fields [page 14].
● If a material is not yet part of your master data, you can create it as a temporary item. You can update the calculation version with new master data at any time during the costing process. For more information, see Updating Master Data in a Calculation Version [page 107].
Application Help for SAP Product Lifecycle CostingCosting Structures PUBLIC 145
● If a price has been configured for the material assigned to the subcontracted item that you enter, that price is automatically used for the subcontracted item in your calculation version. For more information, see Automatic Price Determination [page 192].
● If an account can be found for the material assigned to the subcontracted, that account is automatically used for the subcontracted item in your calculation version. For more information, see Determining Accounts [page 187].
● You can import a costing structure (including BOMs and routings) from Microsoft Excel. For more information, see Importing Data [page 265].
How to Use This Item Category
You can add a subcontracting item or change an existing item category to Subcontracting at any time during the costing process. You can do this to any item at any level in your costing structure (except the root item).
The following are important fields shown for this item category. You can find these fields in the Calculation view under Item Details. You can find additional information about these and other fields for this item category using the tooltips in the application.
Field Shown What It Means
Item ID Generated, unique ID used to identify an item in a calculation version.
Item CategoryIn this case, the category is (Subcontracting).
You can set the item category manually in the costing structure or in the Item Details area.
Description Provides the description of the subcontracting activity.
Plant Refers to the plant where the part is produced or purchased.
On the basis of the plant, a price for the referenced material can be specified. For more information see, Determining Prices [page 191].
Account The account influences the calculation of overheads and sums defined in the costing sheet. For more information, see Costing Sheets [page 322].
Engineering Change No. Specifies a specific change status of any master data in SAP ERP. It is set automatically if an imported bill of materials is assigned to a specific change number.
Comments Section where you can write comments. This field is for your reference only.
146 PUBLICApplication Help for SAP Product Lifecycle Costing
Costing Structures
Field Shown What It Means
Material Material that exists in the master data that has been replicated from SAP ERP or created locally in SAP Product Lifecycle Costing master data in the Administration view. If you enter an ID for which no master data record exists, then the material is only valid for this calculation version.
Material Source Shows whether the data was created locally in SAP Product Lifecycle Costing or replicated from SAP ERP.
Material Type A grouping of materials with the same basic attributes such as raw materials, semi-finished products, or finished products. The material type is automatically set if a material from the master data is assigned to the item.
If you use a material that is not defined in your master data, you can also set this field manually.
Note: You can use autocomplete to find values defined in your master data.
Material Group Material group is automatically set if a material from the master data is assigned to the item.
If you use a material that is not defined in your master data, you can also set this field manually.
Note: You can use autocomplete to find values defined in your master data.
Phantom Material This checkbox is automatically activated if a material imported from SAP ERP is a phantom material.
If you use a material that is not defined in your master data, you can also set this field manually.
Configurable Material A material for which you can specify the characteristics during order processing.
For example, the specification of a car can include various characteristics such as paint, trim, and engines. Configura-ble materials have a maximum BOM that contains all the components for producing every variant of the material. SAP Product Lifecycle Costing explodes the maximum BOM and routing and imports the setting to let you know whether a material is configurable. You can then deactivate the items that you do not need in your calculation.
If you use a material that is not defined in your master data, you can also set this field manually.
Note: You can use autocomplete to find values defined in your master data.
Application Help for SAP Product Lifecycle CostingCosting Structures PUBLIC 147
Field Shown What It Means
Cost-Relevant in SAP ERP If this checkbox is activated, the material or the activity is considered at the costing in SAP ERP.
If you use a material that is not defined in your master data, you can also set this field manually.
Overhead Group An attribute that can be assigned to a material in a specific plant. This is a key that groups materials to which overhead is applied in the same manner.
If you use a material or plant that is not defined in your master data, you can also set this field manually.
Note: You can use autocomplete to find values defined in your master data.
Valuation Class An attribute that can be assigned to a material in a specific plant. This makes it possible to group together materials from a financial point of view.
If you use a material or plant that is not defined in your master data, you can also set this field manually.
Note: You can use autocomplete to find values defined in your master data.
Related Information
Materials [page 134]Materials (General Data) [page 342]Materials (Plant-Specific Data) [page 343]Organizational Data for Items [page 157]Quantities for Items [page 158]Prices for Items [page 160]Calculated Values for Items [page 162]
11.3.8 Resources and Tools
You can use this item category to add resources and tools to a costing structure. Resources and Tools represent machines and other resources that are dedicated to the production of one product only. These resources and tools are too specialized for reuse in other products and therefore must be added to the cost of that product being produced.
148 PUBLICApplication Help for SAP Product Lifecycle Costing
Costing Structures
ExampleA resource might be the production of a special machine to make customized forms for the manufacture of internal parts for a product. A tool might be a drill bit that dulls and must be replaced after every tenth screw is tightened in a particular product.
Things to Consider
● You can manually enter resources and tools into your calculation versions; resources and tools are not maintained as part of your master data.
● You can manually enter a price or account for a resource or tool; prices and accounts are not determined automatically for this item category.
How to Use This Item Category
You can add a resource or tool or change an existing item category to Resources and Tools at any time during the costing process. You can do this to any item at any level in your costing structure (except the root item).
The following are important fields shown for this item category. You can find these fields in the Calculation view under Item Details. You can find additional information about these and other fields for this item category using the tooltips in the application.
Field Shown What It Means
Item ID Generated, unique ID used to identify an item in a calculation version.
Item CategoryIn this case, the category is (Resources and Tools).
You can set the item category manually in the costing structure or in the Item Details area.
Description Describes the activity.
Plant Refers to the plant where the part is produced or purchased. On the basis of the plant, a price for the referenced material can be specified. For more information see, Determining Prices [page 191].
Account The account influences the calculation of overheads and sums defined in the costing sheet. For more information, see Costing Sheets [page 322].
Application Help for SAP Product Lifecycle CostingCosting Structures PUBLIC 149
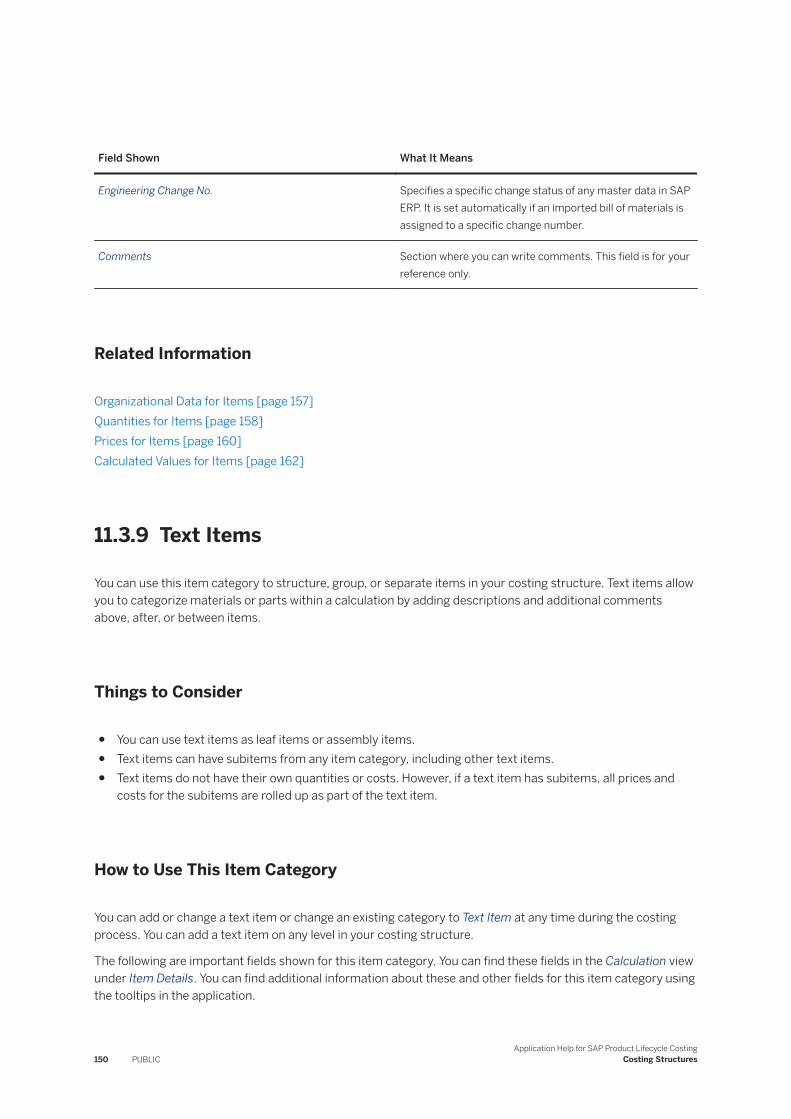
Field Shown What It Means
Engineering Change No. Specifies a specific change status of any master data in SAP ERP. It is set automatically if an imported bill of materials is assigned to a specific change number.
Comments Section where you can write comments. This field is for your reference only.
Related Information
Organizational Data for Items [page 157]Quantities for Items [page 158]Prices for Items [page 160]Calculated Values for Items [page 162]
11.3.9 Text Items
You can use this item category to structure, group, or separate items in your costing structure. Text items allow you to categorize materials or parts within a calculation by adding descriptions and additional comments above, after, or between items.
Things to Consider
● You can use text items as leaf items or assembly items.● Text items can have subitems from any item category, including other text items.● Text items do not have their own quantities or costs. However, if a text item has subitems, all prices and
costs for the subitems are rolled up as part of the text item.
How to Use This Item Category
You can add or change a text item or change an existing category to Text Item at any time during the costing process. You can add a text item on any level in your costing structure.
The following are important fields shown for this item category. You can find these fields in the Calculation view under Item Details. You can find additional information about these and other fields for this item category using the tooltips in the application.
150 PUBLICApplication Help for SAP Product Lifecycle Costing
Costing Structures
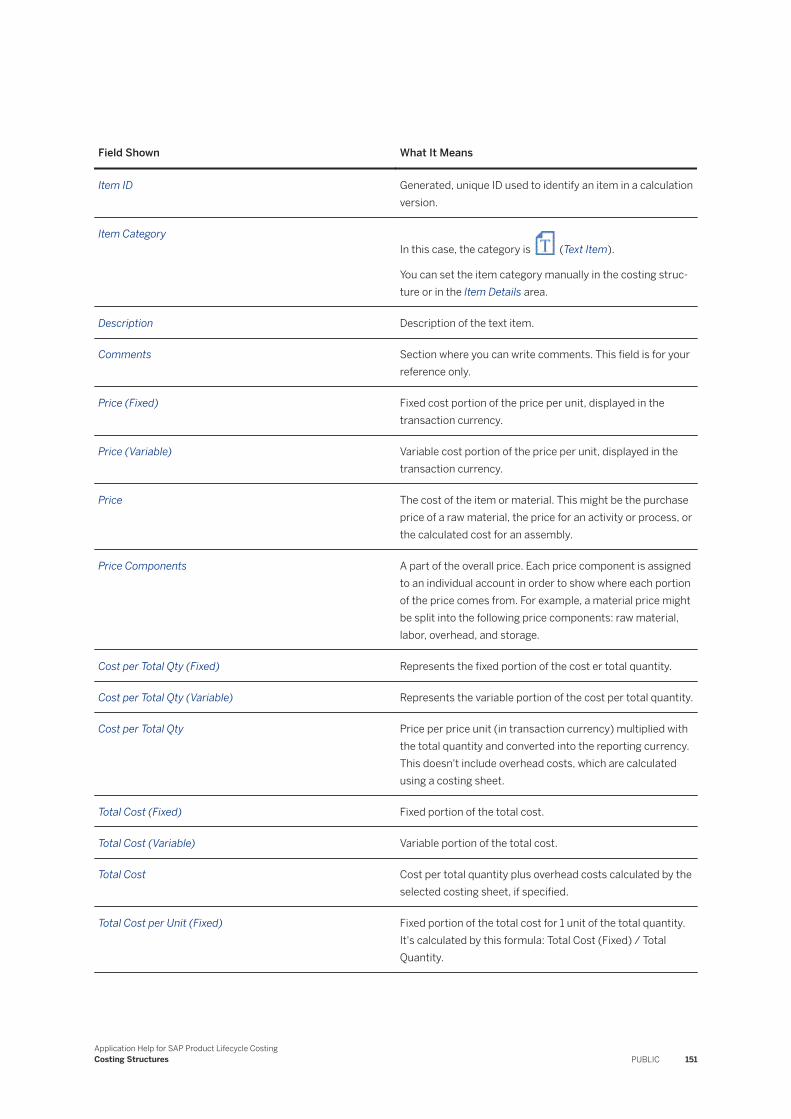
Field Shown What It Means
Item ID Generated, unique ID used to identify an item in a calculation version.
Item CategoryIn this case, the category is (Text Item).
You can set the item category manually in the costing structure or in the Item Details area.
Description Description of the text item.
Comments Section where you can write comments. This field is for your reference only.
Price (Fixed) Fixed cost portion of the price per unit, displayed in the transaction currency.
Price (Variable) Variable cost portion of the price per unit, displayed in the transaction currency.
Price The cost of the item or material. This might be the purchase price of a raw material, the price for an activity or process, or the calculated cost for an assembly.
Price Components A part of the overall price. Each price component is assigned to an individual account in order to show where each portion of the price comes from. For example, a material price might be split into the following price components: raw material, labor, overhead, and storage.
Cost per Total Qty (Fixed) Represents the fixed portion of the cost er total quantity.
Cost per Total Qty (Variable) Represents the variable portion of the cost per total quantity.
Cost per Total Qty Price per price unit (in transaction currency) multiplied with the total quantity and converted into the reporting currency. This doesn't include overhead costs, which are calculated using a costing sheet.
Total Cost (Fixed) Fixed portion of the total cost.
Total Cost (Variable) Variable portion of the total cost.
Total Cost Cost per total quantity plus overhead costs calculated by the selected costing sheet, if specified.
Total Cost per Unit (Fixed) Fixed portion of the total cost for 1 unit of the total quantity. It's calculated by this formula: Total Cost (Fixed) / Total Quantity.
Application Help for SAP Product Lifecycle CostingCosting Structures PUBLIC 151
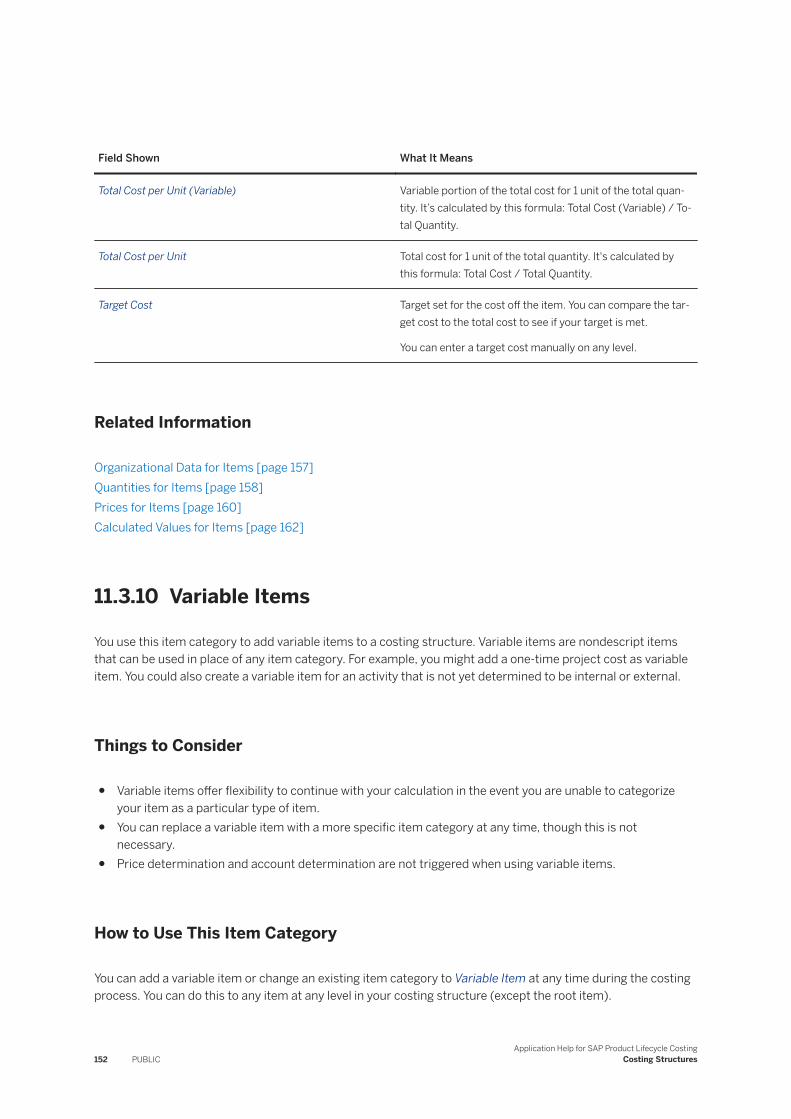
Field Shown What It Means
Total Cost per Unit (Variable) Variable portion of the total cost for 1 unit of the total quantity. It’s calculated by this formula: Total Cost (Variable) / Total Quantity.
Total Cost per Unit Total cost for 1 unit of the total quantity. It's calculated by this formula: Total Cost / Total Quantity.
Target Cost Target set for the cost off the item. You can compare the target cost to the total cost to see if your target is met.
You can enter a target cost manually on any level.
Related Information
Organizational Data for Items [page 157]Quantities for Items [page 158]Prices for Items [page 160]Calculated Values for Items [page 162]
11.3.10 Variable Items
You use this item category to add variable items to a costing structure. Variable items are nondescript items that can be used in place of any item category. For example, you might add a one-time project cost as variable item. You could also create a variable item for an activity that is not yet determined to be internal or external.
Things to Consider
● Variable items offer flexibility to continue with your calculation in the event you are unable to categorize your item as a particular type of item.
● You can replace a variable item with a more specific item category at any time, though this is not necessary.
● Price determination and account determination are not triggered when using variable items.
How to Use This Item Category
You can add a variable item or change an existing item category to Variable Item at any time during the costing process. You can do this to any item at any level in your costing structure (except the root item).
152 PUBLICApplication Help for SAP Product Lifecycle Costing
Costing Structures
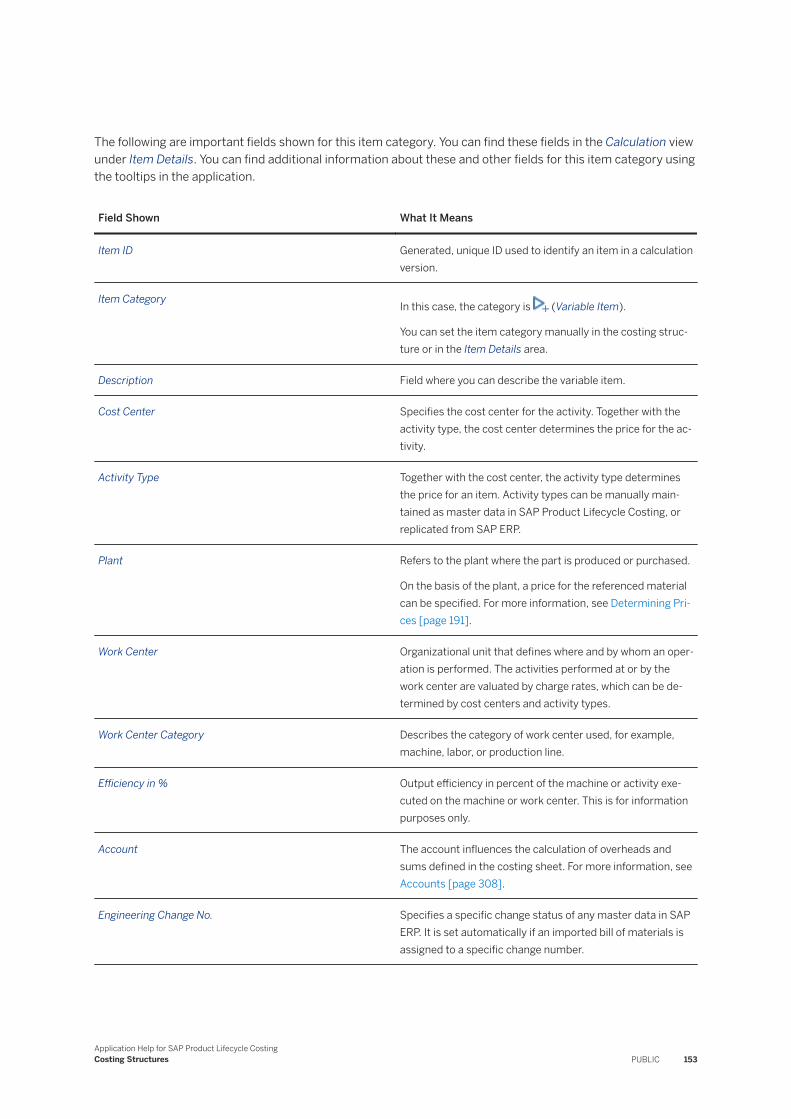
The following are important fields shown for this item category. You can find these fields in the Calculation view under Item Details. You can find additional information about these and other fields for this item category using the tooltips in the application.
Field Shown What It Means
Item ID Generated, unique ID used to identify an item in a calculation version.
Item Category In this case, the category is (Variable Item).
You can set the item category manually in the costing structure or in the Item Details area.
Description Field where you can describe the variable item.
Cost Center Specifies the cost center for the activity. Together with the activity type, the cost center determines the price for the activity.
Activity Type Together with the cost center, the activity type determines the price for an item. Activity types can be manually maintained as master data in SAP Product Lifecycle Costing, or replicated from SAP ERP.
Plant Refers to the plant where the part is produced or purchased.
On the basis of the plant, a price for the referenced material can be specified. For more information, see Determining Prices [page 191].
Work Center Organizational unit that defines where and by whom an operation is performed. The activities performed at or by the work center are valuated by charge rates, which can be determined by cost centers and activity types.
Work Center Category Describes the category of work center used, for example, machine, labor, or production line.
Efficiency in % Output efficiency in percent of the machine or activity executed on the machine or work center. This is for information purposes only.
Account The account influences the calculation of overheads and sums defined in the costing sheet. For more information, see Accounts [page 308].
Engineering Change No. Specifies a specific change status of any master data in SAP ERP. It is set automatically if an imported bill of materials is assigned to a specific change number.
Application Help for SAP Product Lifecycle CostingCosting Structures PUBLIC 153
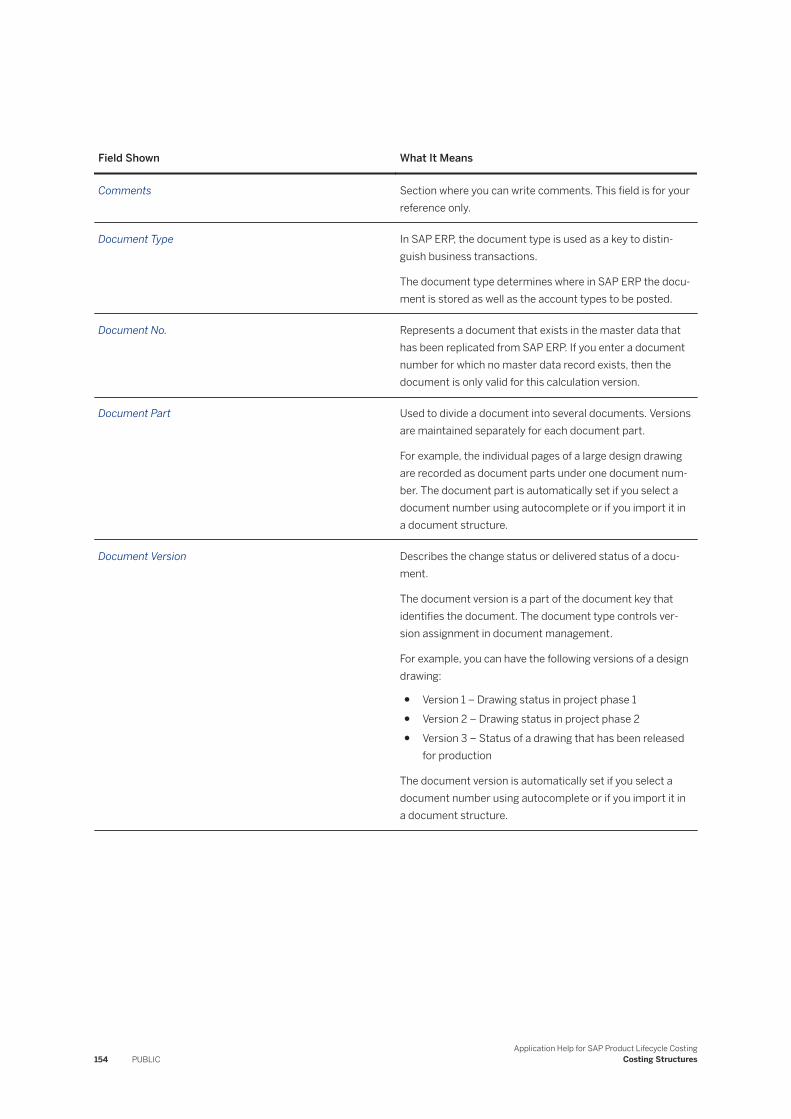
Field Shown What It Means
Comments Section where you can write comments. This field is for your reference only.
Document Type In SAP ERP, the document type is used as a key to distinguish business transactions.
The document type determines where in SAP ERP the document is stored as well as the account types to be posted.
Document No. Represents a document that exists in the master data that has been replicated from SAP ERP. If you enter a document number for which no master data record exists, then the document is only valid for this calculation version.
Document Part Used to divide a document into several documents. Versions are maintained separately for each document part.
For example, the individual pages of a large design drawing are recorded as document parts under one document number. The document part is automatically set if you select a document number using autocomplete or if you import it in a document structure.
Document Version Describes the change status or delivered status of a document.
The document version is a part of the document key that identifies the document. The document type controls version assignment in document management.
For example, you can have the following versions of a design drawing:
● Version 1 – Drawing status in project phase 1● Version 2 – Drawing status in project phase 2● Version 3 – Status of a drawing that has been released
for production
The document version is automatically set if you select a document number using autocomplete or if you import it in a document structure.
154 PUBLICApplication Help for SAP Product Lifecycle Costing
Costing Structures
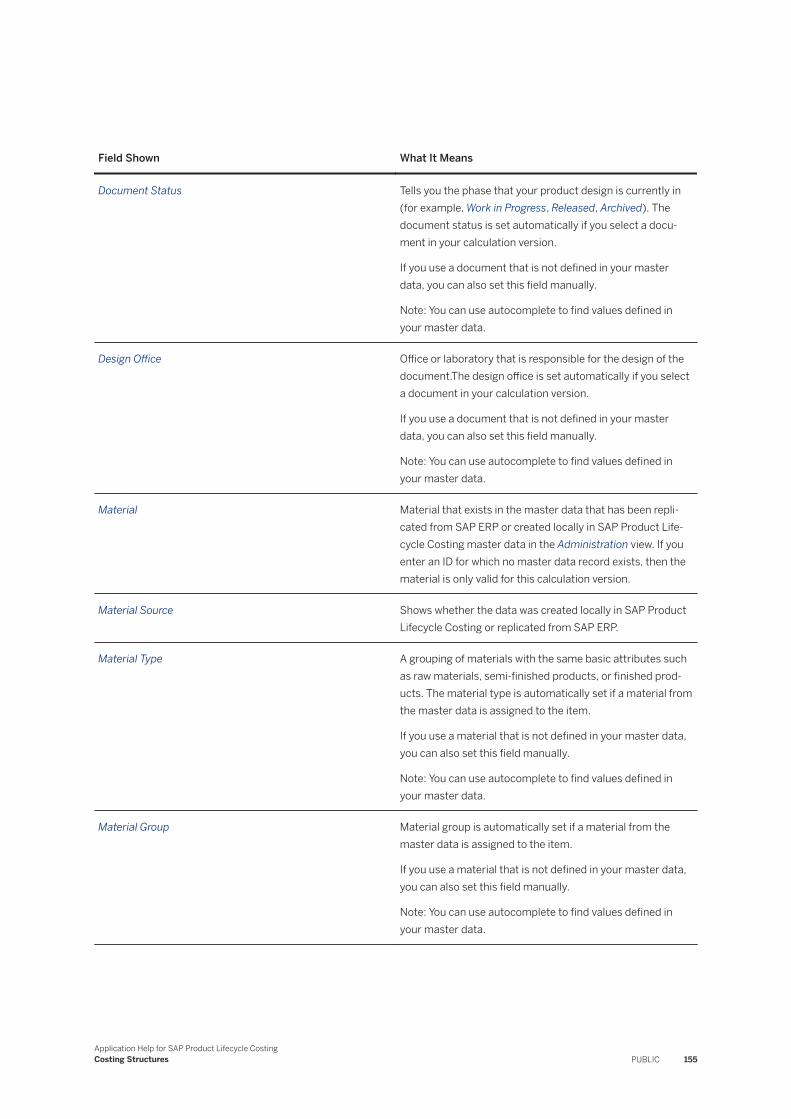
Field Shown What It Means
Document Status Tells you the phase that your product design is currently in (for example, Work in Progress, Released, Archived). The document status is set automatically if you select a document in your calculation version.
If you use a document that is not defined in your master data, you can also set this field manually.
Note: You can use autocomplete to find values defined in your master data.
Design Office Office or laboratory that is responsible for the design of the document.The design office is set automatically if you select a document in your calculation version.
If you use a document that is not defined in your master data, you can also set this field manually.
Note: You can use autocomplete to find values defined in your master data.
Material Material that exists in the master data that has been replicated from SAP ERP or created locally in SAP Product Lifecycle Costing master data in the Administration view. If you enter an ID for which no master data record exists, then the material is only valid for this calculation version.
Material Source Shows whether the data was created locally in SAP Product Lifecycle Costing or replicated from SAP ERP.
Material Type A grouping of materials with the same basic attributes such as raw materials, semi-finished products, or finished products. The material type is automatically set if a material from the master data is assigned to the item.
If you use a material that is not defined in your master data, you can also set this field manually.
Note: You can use autocomplete to find values defined in your master data.
Material Group Material group is automatically set if a material from the master data is assigned to the item.
If you use a material that is not defined in your master data, you can also set this field manually.
Note: You can use autocomplete to find values defined in your master data.
Application Help for SAP Product Lifecycle CostingCosting Structures PUBLIC 155
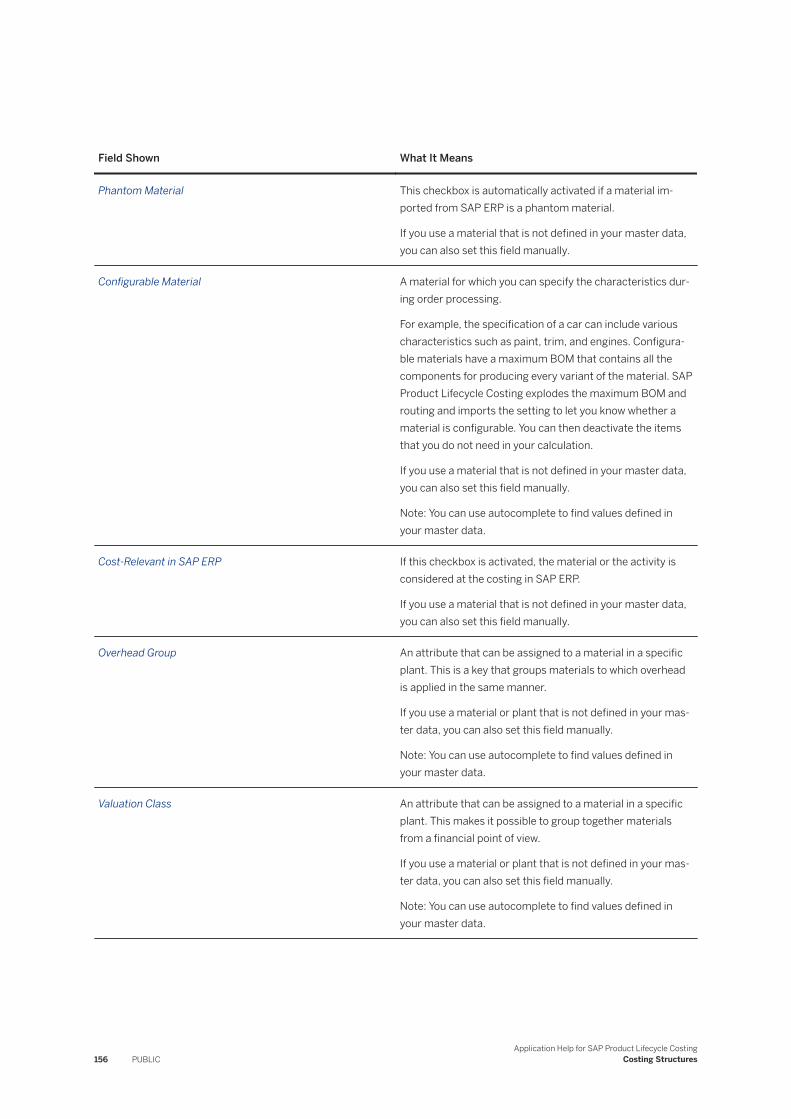
Field Shown What It Means
Phantom Material This checkbox is automatically activated if a material imported from SAP ERP is a phantom material.
If you use a material that is not defined in your master data, you can also set this field manually.
Configurable Material A material for which you can specify the characteristics during order processing.
For example, the specification of a car can include various characteristics such as paint, trim, and engines. Configura-ble materials have a maximum BOM that contains all the components for producing every variant of the material. SAP Product Lifecycle Costing explodes the maximum BOM and routing and imports the setting to let you know whether a material is configurable. You can then deactivate the items that you do not need in your calculation.
If you use a material that is not defined in your master data, you can also set this field manually.
Note: You can use autocomplete to find values defined in your master data.
Cost-Relevant in SAP ERP If this checkbox is activated, the material or the activity is considered at the costing in SAP ERP.
If you use a material that is not defined in your master data, you can also set this field manually.
Overhead Group An attribute that can be assigned to a material in a specific plant. This is a key that groups materials to which overhead is applied in the same manner.
If you use a material or plant that is not defined in your master data, you can also set this field manually.
Note: You can use autocomplete to find values defined in your master data.
Valuation Class An attribute that can be assigned to a material in a specific plant. This makes it possible to group together materials from a financial point of view.
If you use a material or plant that is not defined in your master data, you can also set this field manually.
Note: You can use autocomplete to find values defined in your master data.
156 PUBLICApplication Help for SAP Product Lifecycle Costing
Costing Structures

Related Information
Organizational Data for Items [page 157]Quantities for Items [page 158]Prices for Items [page 160]Calculated Values for Items [page 162]
11.3.11 Referenced Version
You can use this item category to add references to as many other calculation versions as necessary. This allows you to reuse parts and assemblies in different products and variants.
NotePlease see the related links below for more information about how to work with referenced versions.
How to Use This Item Category
● You can add a referenced version or change an existing item category to Reference Version at any time during the costing process. You can do this to any item at any level in your costing structure (except the root item).
● You can cut, copy, and paste items with this category in the same way you would any other item or assembly. In order to paste, the target version must have the same controlling area as the calculation version from which you are pasting
● You cannot add subitems to a referenced version.● Once you have added a referenced version, you cannot change the item category. You can, however, delete
the item from the calculation version in which you are working.
Related Information
References for Calculation Versions [page 180]Referencing a Calculation Version [page 181]Opening a Referenced Version [page 182]Updating References [page 183]
11.4 Organizational Data for Items
When you are working with items in a costing structure, organizational data is also included in the item details.
Application Help for SAP Product Lifecycle CostingCosting Structures PUBLIC 157
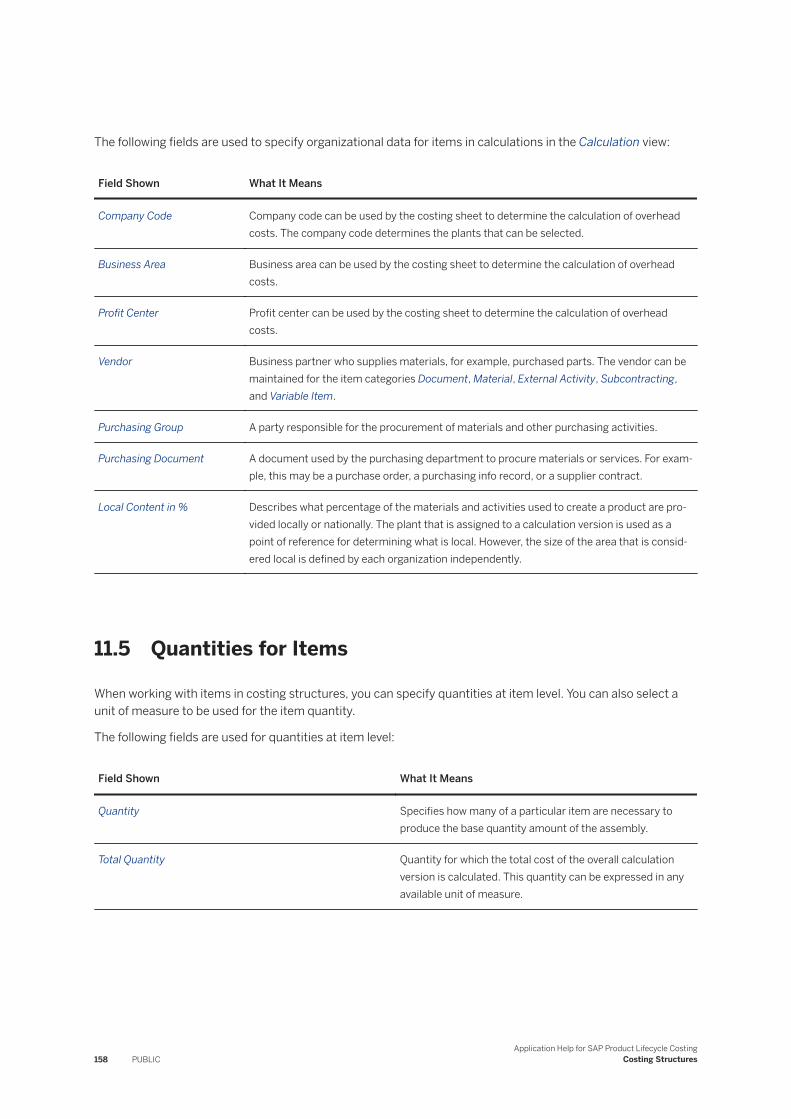
The following fields are used to specify organizational data for items in calculations in the Calculation view:
Field Shown What It Means
Company Code Company code can be used by the costing sheet to determine the calculation of overhead costs. The company code determines the plants that can be selected.
Business Area Business area can be used by the costing sheet to determine the calculation of overhead costs.
Profit Center Profit center can be used by the costing sheet to determine the calculation of overhead costs.
Vendor Business partner who supplies materials, for example, purchased parts. The vendor can be maintained for the item categories Document, Material, External Activity, Subcontracting, and Variable Item.
Purchasing Group A party responsible for the procurement of materials and other purchasing activities.
Purchasing Document A document used by the purchasing department to procure materials or services. For example, this may be a purchase order, a purchasing info record, or a supplier contract.
Local Content in % Describes what percentage of the materials and activities used to create a product are provided locally or nationally. The plant that is assigned to a calculation version is used as a point of reference for determining what is local. However, the size of the area that is considered local is defined by each organization independently.
11.5 Quantities for Items
When working with items in costing structures, you can specify quantities at item level. You can also select a unit of measure to be used for the item quantity.
The following fields are used for quantities at item level:
Field Shown What It Means
Quantity Specifies how many of a particular item are necessary to produce the base quantity amount of the assembly.
Total Quantity Quantity for which the total cost of the overall calculation version is calculated. This quantity can be expressed in any available unit of measure.
158 PUBLICApplication Help for SAP Product Lifecycle Costing
Costing Structures
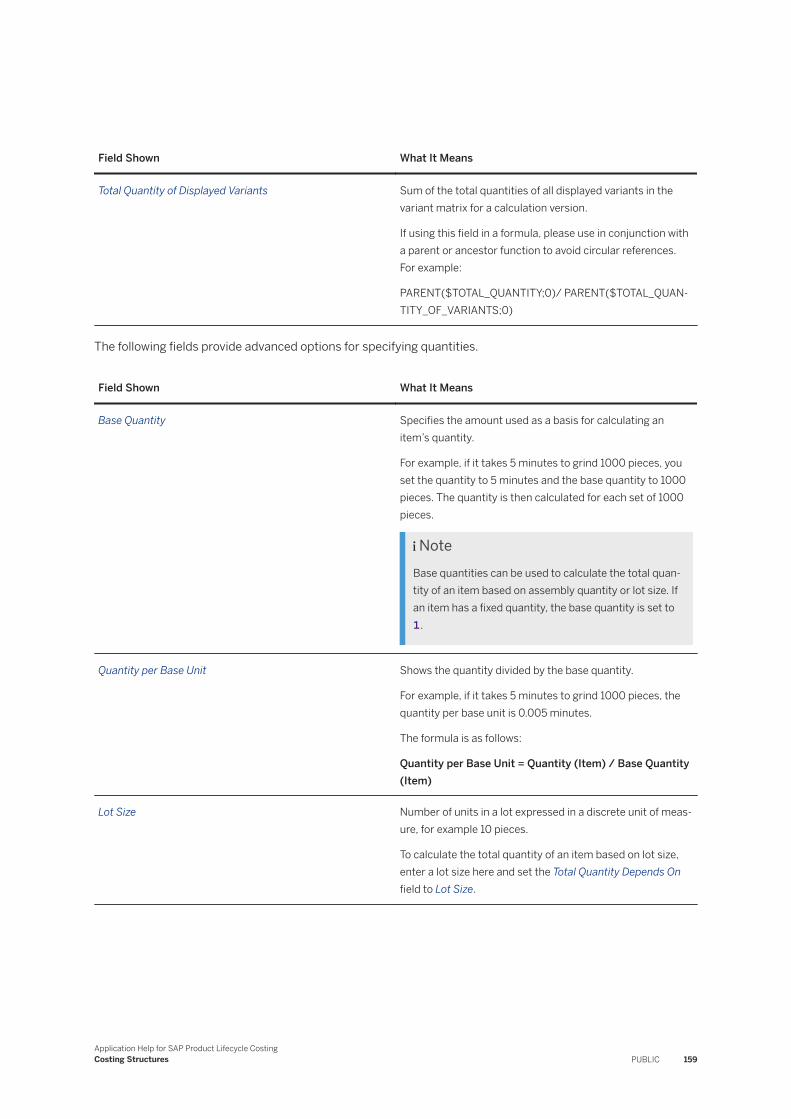
Field Shown What It Means
Total Quantity of Displayed Variants Sum of the total quantities of all displayed variants in the variant matrix for a calculation version.
If using this field in a formula, please use in conjunction with a parent or ancestor function to avoid circular references. For example:
PARENT($TOTAL_QUANTITY;0)/ PARENT($TOTAL_QUANTITY_OF_VARIANTS;0)
The following fields provide advanced options for specifying quantities.
Field Shown What It Means
Base Quantity Specifies the amount used as a basis for calculating an item’s quantity.
For example, if it takes 5 minutes to grind 1000 pieces, you set the quantity to 5 minutes and the base quantity to 1000 pieces. The quantity is then calculated for each set of 1000 pieces.
NoteBase quantities can be used to calculate the total quantity of an item based on assembly quantity or lot size. If an item has a fixed quantity, the base quantity is set to 1.
Quantity per Base Unit Shows the quantity divided by the base quantity.
For example, if it takes 5 minutes to grind 1000 pieces, the quantity per base unit is 0.005 minutes.
The formula is as follows:
Quantity per Base Unit = Quantity (Item) / Base Quantity (Item)
Lot Size Number of units in a lot expressed in a discrete unit of measure, for example 10 pieces.
To calculate the total quantity of an item based on lot size, enter a lot size here and set the Total Quantity Depends On field to Lot Size.
Application Help for SAP Product Lifecycle CostingCosting Structures PUBLIC 159
Field Shown What It Means
Total Quantity Depends On Select from the following settings to determine how the total quantity of an item in a costing structure is calculated. You can choose from the following settings:
● Fixed QuantityCounts the item based on a fixed quantity, regardless of the total quantity of the parent assembly.
● Assembly QuantityCounts an item based on the quantity of the parent assembly.
● Lot SizeCounts an item based on the lot size you define.
NoteIn order to select Lot Size, you must first enter a value in the Lot Size field under Item Details.
Related Information
Calculating Total Quantities of an Item [page 202]Base Quantities [page 203]Assembly Quantities [page 203]Lot Size [page 204]Fixed Quantities [page 205]
11.6 Prices for Items
When working with items in costing structures, you can set and track a valid price at item level. The following fields are used for prices at item level:
Field Shown What It Means
Price (Fixed) The fixed cost portion of the price in the transaction currency, per price unit.
Price (Variable) The variable cost portion of the price in the transaction currency, per price unit.
160 PUBLICApplication Help for SAP Product Lifecycle Costing
Costing Structures
Field Shown What It Means
Price The price or cost of materials or other items. This includes, for example, the purchase price for raw materials, the price for activities and processes, and the calculated price for assemblies.
Price Unit The quantity on which the price and its fixed and variable portions are based.
Price Source Shows the source of a price for an item. You can create and maintain material and activity price sources in master data based on, for example, customers, vendors, projects, contracts, and purchasing info records. If integration with SAP ERP has been set up, this data can also be replicated from your SAP ERP system. Replicated data is display only.
Prices are found for items based on the determination strategy you select. Price determination strategies are created in the Administration view under Material Price Determination and Activity Price Determination. If no valid price exists for the selected price source, the price fields remain unchanged and the most recent valid price source is displayed.
Note● For assemblies (items with subitems), this field is
always set to Calculated Cost, since the price on assembly level is always calculated as a result of the roll-up.
● If a surcharge has been applied to an item price, this field is set to Surcharged Price. This applies only for lifecycle versions.
Surcharge in % Shows the surcharge in percent applied to the item price during project lifecycle calculation. Note that this field is only shown for lifecycle versions.
Confidence Level Shows how reliable a price is. The level is measured on a scale of 1 to 5, with 5 expressing the highest level of reliability. The confidence level for price sources is maintained in master data. The confidence level specified for a price source is set as the default on item level if a price from this price source is used for the item. You can also change the confidence level for prices manually on item level.
Application Help for SAP Product Lifecycle CostingCosting Structures PUBLIC 161
Related Information
Determining Prices [page 191]Calculating Quantities and Costs [page 202]
11.7 Calculated Values for Items
When working with items in costing structures, you can monitor the calculated values at item level. Calculated values are display-only.
The following fields are used for calculated values at item level:
Field Shown What It Means
Cost per Total Qty (Fixed) This represents the fixed portion of the cost per total quantity.
Cost per Total Qty (Variable) This represents the variable portion of the cost per total quantity.
Cost per Total Qty (Price /Price Unit) * Total Quantity = Cost per Total Qty. To calculate the cost per total quantity, the price per price unit (in transaction currency) is multiplied with the total quantity and converted into the reporting currency. Overhead costs which are calculated by the selected costing sheet are NOT included.
Total Cost (Fixed) This represents the fixed portion of the total cost.
This value is influenced by the fixed cost portion (%) from the overhead row or individual overhead rows.
Total Cost (Variable) This represents the variable portion of the total cost.
Total Cost The amount shown here is the cost per total quantity plus overhead costs calculated by the selected costing sheet, if specified.
Total Cost per Unit (Fixed) Shows the fixed portion of the total cost for 1 unit of the total quantity.
It is calculated by this formula: Total Cost (Fixed) / Total Quantity.
162 PUBLICApplication Help for SAP Product Lifecycle Costing
Costing Structures
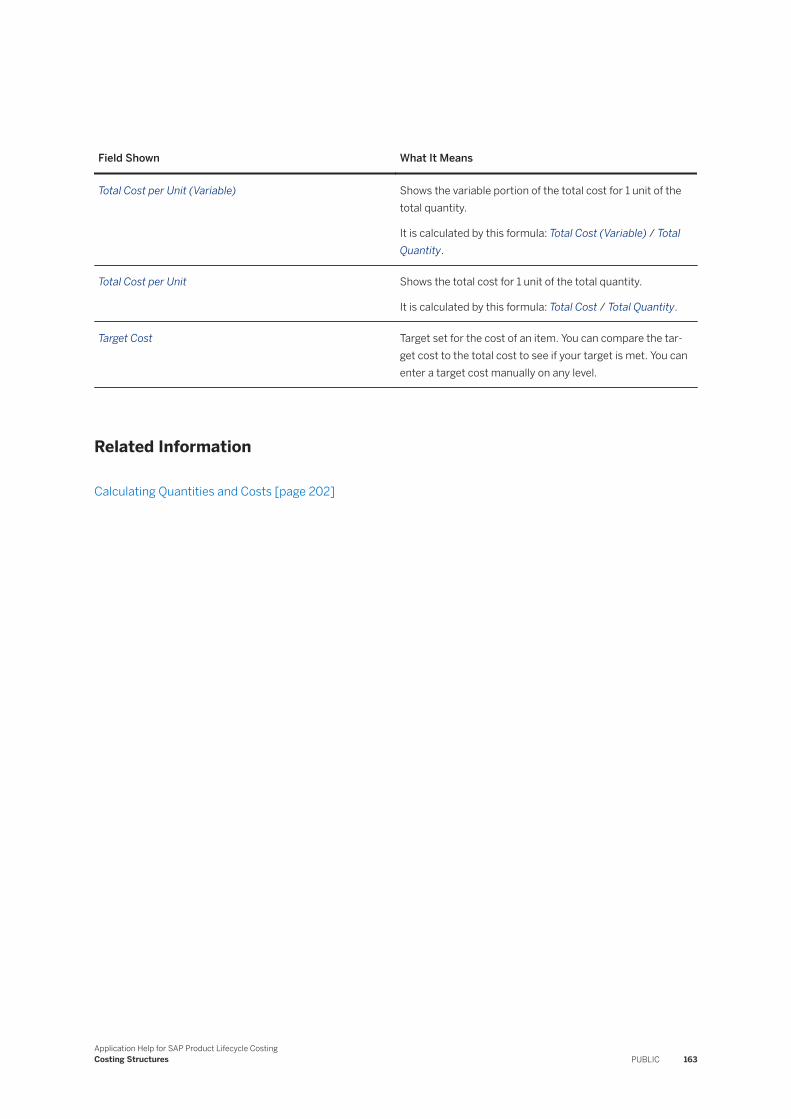
Field Shown What It Means
Total Cost per Unit (Variable) Shows the variable portion of the total cost for 1 unit of the total quantity.
It is calculated by this formula: Total Cost (Variable) / Total Quantity.
Total Cost per Unit Shows the total cost for 1 unit of the total quantity.
It is calculated by this formula: Total Cost / Total Quantity.
Target Cost Target set for the cost of an item. You can compare the target cost to the total cost to see if your target is met. You can enter a target cost manually on any level.
Related Information
Calculating Quantities and Costs [page 202]
Application Help for SAP Product Lifecycle CostingCosting Structures PUBLIC 163
12 Working with Variants
Products are typically created with a range of different models. Variants are different configurations of a product model. You can use variants to tailor your offerings to customers and to compare costs and pricing for different configurations. You can create, calculate, and compare variants with other variants, in the Variants view.
Process Overview
You work with variants as follows:
1. Choose or create a calculation version to use as a variant base version.This can be any editable calculation version and should contain a maximum costing structure that can be used to create all variants for a product.
2. Create a variant matrix for the variant base version. This is the framework in which to create and compare additional variants.
3. Create new variants in the variant matrix and define the components and quantities that should be contained in each variant.
4. Manually adjust quantities and sales prices for variants in the variant matrix.5. Calculate one or more variants to update their quantities and total costs.6. [Optional] Generate one or more new calculation versions based on the variants available in the variant
matrix.
Related Information
Variant Base Version [page 164]Variant Matrix [page 166]Variants [page 172]
12.1 Variant Base Version
A variant base version is any calculation version to which you add a variant matrix. You can use any editable calculation version as a variant base version. In the variant matrix, you select and deselect items to create configurations for your projects, therefore, the variant base version should contain a maximum costing structure that can be used to create all variants for a product.
164 PUBLICApplication Help for SAP Product Lifecycle Costing
Working with Variants
NoteFrozen, referenced, and lifecycle versions, including manual lifecycle versions, cannot be used as variant base versions.
How It Is Used
The variant base version is used in the variant matrix, as follows:
● The costing structure of the variant base version is displayed in the bottom left quarter of the variant matrix.
● You can select and deselect items from the costing structure to include in each variant.● You can filter, expand, and collapse the costing structure in the variant matrix, as you do in the variant base
version.● Formula-calculated and manually-entered quantities, units of measure, and total cost for each item in the
variant base version are displayed in each variant. You can change the quantities and units of measure in each variant manually. You can change the value type in the Quantity field for each item in a variant to determine how the quantities are calculated.
Editing a Variant Base Version
When you edit a variant base version:
● Added and deleted items are automatically created and removed in the variant matrix.● Quantities in the variant matrix that are linked to the variant base version are automatically updated taking
into consideration the selected items and existing values in each variant.● Changes made in the base version are available in the variant matrix but do not overwrite manual values
that have been entered in the variants.● The changes are visible the next time you open the variant matrix. The Total Cost and Total Quantity of new
and changed items are Outdated after a change in the base version. To update, you must recalculate the variant matrix.
Displaying Changes
Colored rectangular markings to the left of the costing structure in the variant matrix, show you where changes were made in the variant base version.
● Green represents new items. Orange represents changed items.● Muted rectangles mark assembly items that contain new and modified subitems.● Hovering over Total Cost and Total Quantity gives you advanced information about quantity dependency
and prices in the variant and variant base version.● Once you’ve evaluated the changes, you can choose Remove Markings in the ribbon to remove the colored
markings.
Application Help for SAP Product Lifecycle CostingWorking with Variants PUBLIC 165
Working with Variant Base Versions
● Copying a variant base version also copies the variant matrix to the new calculation version.● If you move a variant base version to another calculation, the variant matrix moves with it.● Deletion of a variant base version also deletes the variant matrix. Calculation versions generated from the
variant matrix are not affected.● Freezing a variant base version also freezes the variant matrix. You can still open the variant matrix and
generate calculation versions from the existing variants.● If you update master data in a variant base version, the same units of measure and currencies that are
available in the calculation version at the time of the update are also available in the variant matrix.
Related Information
Working with Variants [page 164]Changing Quantities and Units of Measure in a Variant Matrix [page 168]Removing Markings from a Variant Matrix [page 170]
12.2 Variant Matrix
A variant matrix is a set of variants created for one calculation version. It allows you to create, maintain, and compare multiple variants for each product within a project.
You can use a variant matrix to do the following:
● Compare multiple variants for a product in one location.● Simulate and calculate different product configurations by changing items and quantities.● Create new variants based on existing variants in the same variant matrix.● Create a sum variant that adds together the total quantities and total costs of all displayed variants.● Generate new calculation versions using variants.● Update all variants in a variant matrix based on the last saved changes to the variant base version.
You create variant matrices in the Cockpit view. Only one variant matrix can be created for each calculation version. You can create any number of variants for each variant matrix.
Related Information
Creating a Variant Matrix [page 167]Variant Base Version [page 164]Working with Variants [page 164]
166 PUBLICApplication Help for SAP Product Lifecycle Costing
Working with Variants
12.2.1 Creating a Variant Matrix
You can create a variant matrix for a variant base version in the Cockpit view. Using a variant matrix, you can manage all items and quantities for all variants, to simulate products and quickly compare total costs and quantities for each configuration.
Prerequisites
● No other variant matrix has been created for the variant base version.● You have selected a variant base version that is editable. For example, frozen versions, referenced versions,
lifecycle versions, and locked versions are not editable and cannot be used as a basis for a variant matrix.
NoteManual lifecycle versions are editable but can be automatically overwritten. Therefore, they cannot be used as base versions.
Procedure
1. In the Cockpit view, select a calculation version to use as a variant base version.2. In the ribbon choose New, then New Variant Matrix. You can also use the context menu or the keyboard
shortcut Ctrl + Shift + V .
A variant matrix and an initial variant open in the Variants view.3. In the ribbon, choose Save, to save the variant matrix.
Results
A new variant matrix for the chosen variant base version opens in the Variants view. To create a new variant, in the ribbon choose New. To save changes to this or any other variants, save the variant matrix.
Related Information
Variant Matrix [page 166]Variants [page 172]
Application Help for SAP Product Lifecycle CostingWorking with Variants PUBLIC 167
12.2.2 Opening a Variant Matrix
You can open a variant matrix by selecting its variant base version in the Cockpit view.
Prerequisites
● The variant matrix has been saved.● You are authorized to read the calculation version upon which the variant matrix was created.
Procedure
1. In the Cockpit view, select a base version with a variant matrix. Variant matrices are indicated with the icon.
2. In the ribbon, choose Open. You can also select Open Variant Matrix in the context menu, or use the keyboard shortcut Ctrl + Shift + O .
Results
The variant matrix for the selected variant base version opens in the Variants view.
12.2.3 Changing Quantities and Units of Measure in a Variant Matrix
For additional flexibility, you can change how quantities are calculated for each item in each variant in the variant matrix. To do this, you change the value type in the Quantity field for the item.
You can choose from the following:
● Manual Value● Formula-Based Value● Linked Value (Base Version)
Manual Value
This value type allows you to enter a manual value for an item in the selected variant. Quantities that are manually entered into the variant matrix are not overwritten when changes are made to the variant base version.
168 PUBLICApplication Help for SAP Product Lifecycle Costing
Working with Variants
ExampleIn Variant A, you enter a quantity of 2 for the material item Drive. The field’s value type in the variant matrix changes to Manual Value. If you then increase the quantity for Drive to 4 in the variant base version, the quantity for this item in Variant A remains unchanged. The quantity for Drive in Variant A is 2.
Formula-Based Value
Using this value type, the same formula used to calculate Quantity in the variant base version is also used in the variants. Because items in the variant base version and each of the variants can differ, the formula-calculated results in the variant base version and each variant may also differ.
ExampleIn a variant base version, you create an assembly Slug for Casing, with five activated subitems. You then add a formula to the Quantity field that counts the number of active subitems in the assembly. Then you update the master data. In the variant base version, the formula counts the subitems and shows a quantity of 5 in the assembly.
In Variant A, you change the value type for the assembly to Formula-Based Value, then activate all five subitems and calculate the variant. The formula calculates the number of active subitems. The quantity in Variant A remains 5.
Finally, you deselect two subitems in this assembly in Variant A, and save and calculate the variant matrix. The formula calculates the number of active subitems again. This time, the resulting quantity is 3.
Linked Value (Base Version)
This value type establishes a link between the variant base version and the variant. The quantity in the selected variant is calculated in the same way as in the variant base version. This has the following effects:
● If the variant base version has a manual value for a quantity field, the manual value is used wherever the item is used in the variants.
● If the quantity in the variant base version uses a formula, the formula is used wherever the item is used in variants. Items in the variant base version and its variants can differ, therefore the formula-calculated results can also differ.
.
ExampleManual Value
In the variant base version, you add the material item Drive. Enter the quantity 4PC. Save and close the variant base version. In the variant matrix, select Linked Value (Base Version) for the same item. Save and calculate the variant matrix. A manual value of 4PC is shown in the material item Drive wherever Linked Value (Base Version) is selected in a variant.
Application Help for SAP Product Lifecycle CostingWorking with Variants PUBLIC 169
Formula-Based Value
Assume that you have a material assembly Drive, with five subitems. Add a formula to the Quantity field that counts the number of active subitems in the assembly. Update master data, then save and close the variant base version. In Variant A, select the value type Linked Value (Base Version) for the first three subitems in the assembly. Deselect the last two subitems, then save and calculate the variant. The linked value type is selected, so the formula in the variant base versions is also used in the variant. There are only three subitems activated, so the formula-calculated result is 3.
Related Information
Working with Variants [page 164]Variant Base Version [page 164]
12.2.4 Removing Markings from a Variant Matrix
Colored markings in the variant matrix show you where changes were made in the variant base version and help you compare how these changes affect the variants. If you no longer need these markings, you can remove them.
Context
You have reviewed how changes to the variant base version affect individual variants in the variant matrix. You now want to remove the colored markings.
NoteColored markings build upon each other with each change to the variant base version. They are visible until you remove them and then save the variant matrix. If you do not save the variant matrix, the colored markings will appear again the next time the variant matrix is opened.
Procedure
1. Save the variant matrix so that any changes to individual variants are not lost.2. In the ribbon, choose Remove Markings. You can also use the keyboard shortcut Ctrl + F7 . This removes
all rectangular markings to the left of the costing structure.3. Save the variant matrix.
170 PUBLICApplication Help for SAP Product Lifecycle Costing
Working with Variants
Results
The colored markings are removed from the variant matrix. New changes to the variant base version will result in new markings in the variant matrix.
Related Information
Variant Base Version [page 164]Changing Quantities and Units of Measure in a Variant Matrix [page 168]
12.2.5 Deleting a Variant Matrix
You can delete a variant matrix if it is no longer needed. You can do this in the Cockpit view.
Context
You want to delete a variant matrix and all of its variants.
Procedure
1. In the Cockpit view, right-click on the calculation version with the variant matrix you would like to delete.2. In the ribbon , choose Delete, then Delete Variant Matrix.
You can also use the context menu or the keyboard shortcut CTRL + SHIFT + MIINUS SIGN .
3. In the Delete Variant Matrix dialog, choose Delete.
Results
The next time you open the calculation version in the Cockpit view, the variant matrix is no longer shown.
Application Help for SAP Product Lifecycle CostingWorking with Variants PUBLIC 171
12.3 Variants
Variants are individual product configurations. You can use variants to compare differing items, quantities, and prices for each product in a project.
You can select items from the costing structure of the variant base to include in your variants. You can enter quantities and then calculate one or more variants to update the total cost. You can generate new calculation versions for one or more variants to use as the basis for new quotations and product costings.
Things to Consider
● You can include all items that exist in the costing structure of the variant base version in your variants.● If you want to add items to your variants that are not included in the costing structure, you must close the
variant matrix and make changes to the variant base version. Saved changes are identified and available for use in your variants when you reopen the variant matrix.
● You can expand and collapse all items in a variant by expanding and collapsing the costing structure in the variant base version.
● You can filter items in a variant by filtering the costing structure in the variant matrix.● Changing data in a variant does not trigger calculation of the variant. To calculate the total cost you must
choose Calculate in the ribbon.
Related Information
Creating New Variants [page 172]Deleting Variants [page 173]Displaying Variants [page 174]Calculating Variants [page 175]Generating Calculation Versions from Variants [page 177]Performance Optimization for Variants [page 178]
12.3.1 Creating New Variants
You can create a new variant in a variant matrix or you can copy an existing variant to create a new variant. You can create any number of variants in a single variant matrix
Procedure
To create a new variant:
172 PUBLICApplication Help for SAP Product Lifecycle Costing
Working with Variants
1. From the ribbon in the Variants view, choose New.You can also use the context menu or the keyboard shortcut Ctrl + N .A new variant is created to the right the existing variants, if any.
2. [Optional] Rename the variant, then choose Save to save the variant matrix.
To copy an existing variant:
1. Focus anywhere in the variant you would like to copy.2. In the ribbon, choose New, then New Variant as Copy.
You can also use the context menu or the keyboard shortcut Ctrl + Shift + N .A copy of the variant is created to the right of the variant you selected.
3. [Optional] Rename the variant, then choose Save to save the variant matrix.
Related Information
Variants [page 172]Deleting Variants [page 173]Displaying Variants [page 174]Calculating Variants [page 175]Creating a Sum Variant [page 176]Generating Calculation Versions from Variants [page 177]
12.3.2 Deleting Variants
You can delete a variant in a variant matrix if you no longer need it. Note that if you delete the last variant in a variant matrix, the variant matrix is deleted.
Procedure
1. In the Variants view, select the variant that you would like to delete.2. In the toolbar, choose Delete. You can also use the keyboard shortcut Ctrl + - .
3. Save the variant matrix.
Results
Once you delete a variant, it is no longer visible in the variant matrix. Note, if you do not save the variant matrix, the deleted variant will appear again the next time the variant matrix is opened.
Application Help for SAP Product Lifecycle CostingWorking with Variants PUBLIC 173
12.3.3 Displaying Variants
You can choose the variants you want to display in the variant matrix and the order in which you display them. This allows you to easily compare variants side-by-side in the variant matrix.
Context
A Display Variants dialog lists all saved and unsaved variants in the variant matrix in which you are working. Selected variants are displayed in the variant matrix in the order in which they appear in the dialog.
You can do the following here:
● Select or deselect variants to display in the variant matrix● Select or deselect multiple or ALL variants at one time● Sort all variants by column alphabetically in ascending or descending order● Move unsorted variants up or down in the list
Procedure
1. In the Variants view, choose Display Variants.
This opens a Display Variants dialog.2. [Optional] In the Display Variants dialog, sort variants or reorder unsorted variants:
a. To sort variants, click on the header in the column you want to sort. Triangles indicate whether variants are sorted in ascending or descending order. All variants are sorted, even those not selected. To stop sorting, continue clicking the header until you no longer see a triangle.
b. To change the order of a variant, make sure that none of the columns are sorted. To do this check that there are no sorting triangles displayed in the column headers. Select a variant, then use the arrows to move it up or down in the list. You can move one variant at a time.
3. Select the checkbox for each variant that you want to display in the variant matrix.
To select or deselect ALL variants, use the checkbox in the header.4. Choose Apply to close the dialog and display the selected variants in the variant matrix.5. Save the variant matrix before you close it to see the same variants displayed in the same order the next
time you open the variant matrix.
Results
The first selected variant in the list is shown in the first column (far left) in the matrix. The last selected variant in the list is shown in the last column (far right). Use the scroll bar along the bottom of the variant matrix to see the displayed variants.
174 PUBLICApplication Help for SAP Product Lifecycle Costing
Working with Variants
12.3.4 Calculating Variants
If changes are made to a variant, you must actively calculate it in order to update the total cost. This ensures that you always know when a variant is up-to-date. If you do not trigger calculation after making changes, a warning sign appears in front of the total cost of the variant.
Context
You can calculate:
● A single variant● All displayed variants● All variants
You do not need to save a variant before calculating. All variants are saved when you save the variant matrix.
Procedure
1. In the Variants view, choose Calculate.2. Use the dropdown menu to select which variants you want to calculate. You can also use the context menu
or the following keyboard shortcuts:a. Calculate Selected Variant - (F9)b. Calculate Displayed Variants - Ctrl + F9 .c. Calculate All Variants - Ctrl + Shift + F9 .
3. Save the variant matrix.
Results
The variants are calculated and any warnings about outdated costs are removed. The total costs are up-to-date until the next change that affects the total cost is made.
Related Information
Displaying Variants [page 174]Generating Calculation Versions from Variants [page 177]
Application Help for SAP Product Lifecycle CostingWorking with Variants PUBLIC 175
12.3.5 Creating a Sum Variant
You can create a variant that adds together the total quantities and total costs of all displayed variants in a variant matrix. This is called a sum variant. You might use the sum variant to assess total volumes across a selection of variants and then adjust quantities based on the results.
You can create one sum variant in any variant matrix in the Variants view.
Once you’ve calculated and saved the sum variant, you can see the Total Quantity of Displayed Variants in the side panel, in the Calculation view.
Prerequisites
● A variant matrix has been created for the calculation version.● At least two variants have been created in the variant matrix.
Context
● You can only create one sum variant per variant matrix.● The sum variant always appears as the first variant in the matrix. You cannot change the display order of
the sum variant.● Only displayed variants are included in the sum variant. Hidden variants are not included.● Each time you create, display, or hide a variant, the sum variant becomes outdated.
To update the sum variant, always calculate all displayed variants.● You can delete the sum variant at any time, just as you would delete any other variant.● You cannot generate a calculation version for the sum variant.
Procedure
1. Open the Variants view.2. Ensure that you have displayed all variants that you want to include in the sum variant.
Only total quantities and total costs from displayed variants are calculated.3. Use the ribbon or context menu to choose New, then New Variant as Sum.4. Choose Calculate, then Calculate Displayed Variants to update the sum variant.5. Save the variant matrix.
176 PUBLICApplication Help for SAP Product Lifecycle Costing
Working with Variants
Result
● The sum variant is displayed as the first variant in the variant matrix.● The sum of the total costs and total quantities are calculated and up-to-date until further changes are
made to the variant matrix.● The Total Quantity of Displayed Variants is displayed under Quantities in the Calculation view.
Related Information
Working with Variants [page 164]
12.3.6 Generating Calculation Versions from Variants
You can generate a new calculation version for any variant except a sum variant. This is a quick and efficient way to begin any cost estimate or quotation, or to do lifecycle calculations for these variants.
Prerequisites
You've calculated the variants you want to generate into calculation versions.
You've saved the variant matrix.
Context
You can generate a calculation version for:
● One selected variant● All displayed variants● All variants
Generated calculation versions are saved, as follows:
● If you generate a calculation version for a single variant, you can save it in any calculation or project.● If you generate calculation versions for multiple variants at a time, the calculation versions are
automatically saved in the same calculations as the last generated versions for these variants. If no prior versions have been generated, the calculation versions are saved in the same project and calculation as the variant base version.
● If you generate additional calculation versions for the same variants, these calculation versions do not overwrite earlier versions. They are automatically saved as a higher sequential version in the same location (for example, M-Engine Electric - #133(2), M-Engine Electric - #133(3), and so on).
Application Help for SAP Product Lifecycle CostingWorking with Variants PUBLIC 177
Procedure
1. In the Variants view, choose Calculate. Using the dropdown, select and calculate the variants you want to generate into calculation versions.
2. Choose Save, to save the variant matrix.
This activates the Generate button.3. Choose Generate. Using the dropdown, select the variants you want to generate into calculation versions.4. If generating a calculation version for a selected variant, enter the project and calculation in which you
would like to save the new calculation version, and choose Generate.5. If generating calculation versions for displayed or all variants the calculation versions are automatically
saved in the same project and calculation as the variant base version.
Results
All generated versions are available in the Cockpit view:
● Calculation versions generated for single variants are located under the project, calculation, and version name entered.
● Calculation versions generated for displayed variants or all variants are located in the same project and calculation as the variant base version.
Related Information
Creating New Variants [page 172]Deleting Variants [page 173]Displaying Variants [page 174]Calculating Variants [page 175]Creating a Sum Variant [page 176]
12.4 Performance Optimization for Variants
When working with variants, a number of factors affect the performance of your system, including client memory, the number of items in the variant base version, the number of formulas in the system, and the number of variants created.
To optimize system performance when working with variants:
● Hide variants when you are not working with them.● Calculate only a few variants at a time. This is particularly important if the variant base version has a large
number of items.
178 PUBLICApplication Help for SAP Product Lifecycle Costing
Working with Variants
● Save the variant matrix regularly.
RecommendationFor optimal performance, we recommend that you work with no more than 100 variants in a single variant matrix.
Related Information
Working with Variants [page 164]Variants [page 172]Set Maximum Number of Variants in Sum Variant [page 385]
Application Help for SAP Product Lifecycle CostingWorking with Variants PUBLIC 179
13 References for Calculation Versions
If you want to reuse a part or assembly multiple times or in different products and variants, you can include the calculation version in another calculation version as a reference. You use the item category Referenced Version to add a reference to a calculation version.
NoteYou can only reference an entire calculation version. If the part or assembly that you want to reference is part of a larger calculation version, you must first save it as a separate calculation version. Then you can use the Referenced Version item category to add the calculation version as a reference wherever necessary.
When you add a reference, only the root item of the referenced version is shown in your calculation structure (subitems are not shown). If you want to see the entire calculation structure of the referenced version, you can open it in a separate tab in the Calculation view.
Things to Consider
● Once a calculation version has been referenced, any changes to that calculation version must be saved under a new name.
● When working with a referenced version, you can change the values for Quantity, Lot Size, and Quantity Depends On. The total quantity and cost of the reference are then recalculated for the calculation version in which you are working.
● When working with costing sheets, you can apply overheads to referenced versions. You can do this based on the account assigned to the Referenced Version item or based on the item category. If overheads apply to the referenced version, they are calculated on top of the price of the referenced version, and rolled up as defined.
● The price of a referenced version is calculated automatically using the costing sheet for the version in which the reference is made.
● The cost component split for the calculation version in which you are working also includes the distribution of costs for the referenced version. Although the referenced version is shown as one structural item, the cost components or cost line items from the referenced version are kept. This allows you to apply any component split to the version where the reference is made, and also see the costs for the referenced version distributed among these cost components.
● Any custom fields created for the item category Calculation Version are also shown in referenced versions. The values calculated or manually entered for the referenced version are also shown in the Referenced Version item.
Related Information
Referenced Version [page 157]
180 PUBLICApplication Help for SAP Product Lifecycle Costing
References for Calculation Versions
Referencing a Calculation Version [page 181]Opening a Referenced Version [page 182]Updating References [page 183]Using References in Base Versions [page 74]
13.1 Referencing a Calculation Version
Calculations for items and assemblies, such as in-house manufactured parts or multiple-use assemblies, are often reused in multiple calculation versions. You can use the item category Referenced Version to add these calculation versions as individual items to any number of other calculation versions.
Prerequisites
● You can only create references between calculation versions that have the same controlling area.● The calculation version that you are referencing must be marked as the current version.● The versions with which you are working cannot contain circular references. For example, the referenced
version cannot contain a reference to the version in which you are adding the reference.
Context
You want to reuse a calculation version as a part of another calculation version.
Procedure
1. Open the Calculation view.2. Select an existing item that you would like to replace with a referenced version, or choose Add in the ribbon
to add a new item.
You can also use the context menu.3. In the drop-down list for item category, select Referenced Version.
This opens a dialog that allows you filter and search for a calculation version to reference.
The list shows only those versions that are marked as current, and have the same controlling area as the calculation version in which you want to create the reference.
4. Choose a calculation version that you want to reference and then choose Select.
Application Help for SAP Product Lifecycle CostingReferences for Calculation Versions PUBLIC 181
Results
The selected calculation version is added as a new item Referenced Version to the costing structure in the calculation version in which you are working.
In addition, the following occurs:
● The total cost of the referenced version is shown as the price for the item Referenced Version.● If overheads apply to the item Referenced Version, these overheads are calculated on top of the price of the
referenced version, and rolled up as defined.● The cost component split for the calculation version in which you are working also shows the distribution of
costs for the referenced version.● The quantity for one assembly is set by default to 1. You can change the quantity for one assembly or the
lot size for the referenced version. You do this under Item Details in the side panel of the Calculation view.● The item is automatically activated. You can deactivate the referenced version as you would any other item.
Related Information
References for Calculation Versions [page 180]Opening a Referenced Version [page 182]Updating References [page 183]Referenced Version [page 157]
13.2 Opening a Referenced Version
You can open a referenced calculation version in a separate tab in the Calculation view. This displays the full costing structure and allows you to check the referenced version in parallel to the calculation version that is referencing it.
Procedure
1. Open a calculation version in the Calculation view.2. Select the referenced calculation version that you want to view.3. Using the context menu, choose Open Referenced Calculation Version.
Results
The referenced calculation version opens in a new tab at the bottom of the Calculation view.
182 PUBLICApplication Help for SAP Product Lifecycle Costing
References for Calculation Versions
NoteOnce a calculation version has been referenced, any changes to that calculation version must be saved under a new name.
Related Information
References for Calculation Versions [page 180]Referencing a Calculation Version [page 181]Updating References [page 183]Referenced Version [page 157]
13.3 Updating References
When the calculation version that you are referencing is no longer set as the current version, you can update the reference to the current version. You might do this when the status of a quotation changes from Quotation Handed In to Order Approved, and Order Approved is set as the current version. You can update a single reference in a calculation version or you can update all references in a calculation version at one time.
Prerequisites
Your calculation version contains at least one reference.
Procedure
1. From the cockpit, open the calculation version that you want to update.○ To update all references in the calculation version, in the ribbon choose Update References for All
Items.... You can also use the keyboard shortcut Ctrl + Shift + U○ To update references in a selected item, choose Update References for the Selected Item and Subitems.
This opens a list of referenced calculation versions that have been set to current since the last update.2. Select the reference or references that you would like to update to the current calculation version and
choose Update.
NoteYou can select the checkbox in the list header to update all calculation versions at once. If you select checkboxes individually, a small square next to the list header indicates that there are additional versions eligible for update until all eligible versions are selected.
Application Help for SAP Product Lifecycle CostingReferences for Calculation Versions PUBLIC 183
Results
All referenced versions that you have selected are updated and now reference the current calculation version.
Related Information
References for Calculation Versions [page 180]Referenced Version [page 157]Referencing a Calculation Version [page 181]Opening a Referenced Version [page 182]
184 PUBLICApplication Help for SAP Product Lifecycle Costing
References for Calculation Versions
14 Working with Processes
In SAP Product Lifecycle Costing, you can integrate processes, work centers, and activities.
This is helpful for processes that are usually associated with a certain set of activities. You can perform the same process on multiple work centers and assign different activities to the process as required for each work center. After setting up work centers with processes and activities, you can create associated activities automatically when you add a process to a calculation version.
Example
You have a process for stamping a part. You have integrated this stamping process with a work center and assigned all of the activities necessary for stamping parts. When you create this process for a calculation version and select the work center, you can automatically create all of the necessary activities for the process.
Setting Up Work Centers
To set up work centers and automatically create activities using processes, you must define the following as part of your master data in the Administration view:
● The processes relevant for your company● The work centers relevant for your company● The processes that can be executed on a work center● The activities that can be executed on a work center
Adding Activities to Work Centers
When you add activities to a process defined in a work center, you can decide whether the activity is applicable for any process or for a specific process.
● Some activities are always done independently of the process executed. For example, an activity for starting the machine may be relevant for any process.
● Other activities are process dependent. For example, an activity for stamping holes is only relevant for the stamping process.
Application Help for SAP Product Lifecycle CostingWorking with Processes PUBLIC 185
Using Processes in Calculation Versions
Once the relevant master data is created, you can add processes to a costing structure, with the following effects:
● If you enter a process first, you can use autocomplete to select from a list of work centers that support the process.
● If you enter a work center first, you receive a list of all processes that are assigned to that work center.○ Select a process, and you have the option to create the activities assigned to that process
automatically as subitems of the process item.○ Select No Process, and you can create the activities assigned to any process for that work center as
subitems of the process item.
Related Information
Work Centers [page 336]Assigning Processes and Activities to Work Centers [page 338]Processes [page 339]
186 PUBLICApplication Help for SAP Product Lifecycle Costing
Working with Processes
15 Determining Accounts
Costing and analysis in SAP Product Lifecycle Costing is based on the assignment of accounts at item level in calculation versions. Accounts are assigned automatically to certain item categories based on sets of attributes that you specify at master data level. This is called account determination.
Accounts are not always found during account determination. This can occur, for example when a temporary material or activity type is entered that does not exist in master data. If an account cannot be found during account determination, you can enter an account for the item manually.
Related Information
Automatic Account Determination [page 187]Disabling Automatic Account Determination [page 189]Working with Attributes for Material Account Determination [page 315]
15.1 Automatic Account Determination
Accounts can be assigned automatically to certain item categories based on sets of attributes that you specify at master data level. This procedure is called account determination. This helps you find and assign accounts according to the controlling guidelines of your organization.
Setting Up Account Determination
In the Material Account Determination area in the Administration view, you decide which attributes result in the assignment of a particular account in your master data. This can be any combination of the following attributes:
● Controlling area● Plant● Material type● Valuation class
Application Help for SAP Product Lifecycle CostingDetermining Accounts PUBLIC 187
Account Determination in Calculation Versions
Accounts can be determined automatically for the following item categories in which materials from the master data are used:
● Material● Document● External Activity● Subcontracting
Account determination is triggered when you enter or change any one of the following attributes for the item category:
● Material type● Material ID● Valuation class● Plant ID
If you want to change the account or if no account is found through the process of account determination, you can enter an account manually. When you enter an account manually, further account determination is disabled for that item. If you enable account determination again, account determination is triggered and the account for that item is immediately updated.
ExampleYou change the material ID in an existing calculation version. The system checks whether a specific account can be assigned based on your master data, and the following occurs:
● Account determination is triggered, unless it has been disabled for the item. If a new account is found, the previous account is overwritten. If no new account is found, then the previously assigned account is removed. You can manually enter another account at anytime.
● If account determination is disabled for the item, the account for that item is not overwritten. If you enable account determination again, account determination is triggered and the account is immediately updated based on the new material ID.
Internal Activities
Accounts are also automatically determined for internal activities. You can specify an account for each activity type in the Activity Types and Account Determination area of the Administration view. When you add an Internal Activity item in a calculation version and enter an activity type, the account is automatically applied. When you change an activity type in an existing item, account determination is triggered unless it is disabled.
Processes
Account determination is triggered when you change the process ID. If processes with account assignments are replicated from SAP ERP, account determination is also triggered unless it is disabled for the process item.
188 PUBLICApplication Help for SAP Product Lifecycle Costing
Determining Accounts
Related Information
Determining Accounts [page 187]Material Account Determination [page 314]Disabling Automatic Account Determination [page 189]
15.2 Disabling Automatic Account Determination
You can disable automatic account determination for items in a calculation version.
Context
You want to change certain attributes in an item or update master data and prevent the system from automatically updating the account.
NoteIf account determination is disabled and an account is manually entered, the Account field is highlighted, letting you know that the manually entered value differs from the account in master data. You can compare the automatically determined account with the manually entered account by hovering over the tooltip for the Account field.
Procedure
1. In the Calculation view, select the item.2. In the side panel, under Item Details, select the Disable Account Determination checkbox.
Note, if you change the account for an item, the Disable Account Determination checkbox is automatically selected.
Results
Account determination is disabled for the item, and the following occurs:
● Additional changes to the attributes Material Type, Material ID, Valuation Class, or Plant ID no longer trigger account determination for that item.
● If you deselect the Disable Account Determination checkbox, account determination is triggered and the account is immediately updated.
Application Help for SAP Product Lifecycle CostingDetermining Accounts PUBLIC 189
Related Information
Determining Accounts [page 187]Automatic Account Determination [page 187]
190 PUBLICApplication Help for SAP Product Lifecycle Costing
Determining Accounts
16 Determining Prices
SAP Product Lifecycle Costing offers different options to help you set prices for materials and activities in your calculation versions. You can determine prices as follows:
● If prices exist in master data, they can be set automatically using the automatic price determination strategies selected.
● You can set prices manually, using valid prices found in master data.● You can manually change the value for price fields in your calculation versions.
Related Information
Valid Prices [page 191]Automatic Price Determination [page 192]Triggering Automatic Price Determination [page 197]Setting Prices Using Prices from Master Data [page 199]Changing Values in Price Fields Manually [page 200]
16.1 Valid Prices
Only valid prices are automatically selected during price determination.
Material and activity prices are valid if the following calculation version data corresponds to the following price attributes:
1. Master data timestamp is later than the date on which the price was last modified.2. Valuation date is on or between the valid-from and valid-to dates for the price.3. Customer in the calculation version and customer for which the price is defined are the same, or the price
is defined for any (*) customer.4. Calculation version belongs to the project for which the price is defined, or the price is defined for any (*)
project.5. Calculation version belongs to a project with the same controlling area as the price, or the price is valid for
any (*) controlling area.6. The price and price source are part of the price determination strategy selected for the calculation version.
For materials, the price is valid if:
1. Material ID assigned to the item is the same as the material ID for the material price.2. Plant assigned to the item is the same as the plant for the material price. If the price is valid for any (*)
plant, automatic price determination only considers it as valid if no plant is maintained for the item.
Application Help for SAP Product Lifecycle CostingDetermining Prices PUBLIC 191
For activities, the price is valid if:
1. Cost center assigned to the item is the same as the cost center for the activity price, or the activity price is defined for any (*) cost center.
2. Activity type assigned to the item is the same as the activity type for the price, or the activity price is defined for any (*) activity type.
Related Information
Prices for Items [page 160]Determining Prices [page 191]Automatic Price Determination [page 192]Setting Prices Using Prices from Master Data [page 199]
16.2 Automatic Price Determination
Automatic price determination is a means of finding and applying valid prices to materials and activities in your costing structure in a certain order. You can create your own price determination strategies to automatically control when a price is applied using price sources that are created or replicated in your master data. This ensures that prices are consistently used in your costing structures across materials and plants, company-wide.
Prerequisites
● Material and activity price sources are available in master data.● Material and activity prices are available in master data.● Material and activity price determination strategies are created in master data and selected in the project
or calculation version.
How Automatic Price Determination Works
Price determination strategies are used to find prices for the following item categories:
● Materials● Documents● Subcontracting● External Activities● Internal Activities
Material prices and activity prices have price sources assigned in master data. Price determination strategies are created to establish the priority in which these price sources are used in order to find valid prices. A price
192 PUBLICApplication Help for SAP Product Lifecycle Costing
Determining Prices
determination strategy is selected for the project or calculation version. When you enter or change a particular attribute in a calculation version, for example the plant, cost center, customer, or valuation date, price determination is triggered. Price sources are used according to the price determination strategy selected.
Prices are automatically applied to the item as follows:
Valid Price Is Found
1. If a valid price is found for the first price source in the sequence, that price is used.2. If more than one valid price is found, the price with the latest valid-from date is always used.3. If two prices with the same price source have the same valid-from date, the most recently modified price is
used.4. If no valid price is found for the first price source in the sequence, then the second price source in the
sequence is used, and so on.
Result: When a price is found, it is automatically set in the Price field for that item. The price source is displayed in the calculation table and under Item Details in the side panel of the Calculation view.
The following price-related fields are also set for that item:
● Price (Fixed)● Price (Variable)● Transaction Currency● Price Unit● Unit of Measure (Price Unit)● Price Source ID● Confidence Level● Vendor ID● Purchasing Group● Purchasing Document● Local Content %
In addition, the Price Split field is activated and the price components in the Price Components table are considered.
No Valid Price Found
If no valid price is found, the following fields remain unchanged:
● Price (Fixed)● Price (Variable)● Price● Transaction Currency● Price Unit● Unit of Measure (Price Unit)● Vendor ID
Application Help for SAP Product Lifecycle CostingDetermining Prices PUBLIC 193
● Local Content %
In addition, the Price Source field is set to Manual Price and the fields Purchasing Group, Purchasing Document, and Confidence Level are cleared.
Related Information
Valid Prices [page 191]Triggering Automatic Price Determination [page 197]Disabling Automatic Price Determination [page 198]Setting Prices Using Prices from Master Data [page 199]Changing Values in Price Fields Manually [page 200]
16.3 Creating Price Determination Strategies
Standard material and activity price determination strategies (PLC_STANDARD) are delivered with the application. You can create any number of additional price determination strategies and use them in your projects and calculation versions. You can compare multiple pricing alternatives by switching between different price determination strategies.
Prerequisites
● Material prices and activity prices are available in master data.● Material price sources and activity price sources are available in master data.
Context
You want to create a strategy that controls which price sources are used to find valid prices and in what order.
Procedure
1. In the Administration view, under Global Settings, choose one of the following:○ Material Price Determination○ Activity Price Determination
2. Using the ribbon or context menu, choose Add to add a new price determination strategy.
194 PUBLICApplication Help for SAP Product Lifecycle Costing
Determining Prices
3. Enter a name and description for your price determination strategy.
4. Under Price Source Sequence, add or remove price sources using and .5. Use the up and down arrows to change the order in which the price sources will be used.6. Save the strategy.
Results
The price determination strategy is saved and available for use in projects and calculation versions.
NotePrice determination strategies selected in a project are used by default in all calculation versions for that project. You can change the price determination strategy for a calculation version in the side panel of the Calculation view, under Version Header Data.
Related Information
Material Prices [page 345]Activity Prices [page 358]Material Price and Activity Price Sources [page 375]
16.4 Adding Price Determination Strategies to Projects and Calculation Versions
A material price determination strategy and an activity price determination strategy must always be selected in a project and calculation version.
When you select a price determination strategy in a project, the strategy is used as the default strategy in all new calculations and calculation versions created for that project. You can change the strategy selection in each calculation version directly. You can select any strategy created to compare how prices from different price sources affect different products and product variants. If a price determination strategy is added to or changed in a calculation version, automatic price determination is triggered and prices are found based on that strategy.
Prerequisites
● Material price strategies have been created in master data.
Application Help for SAP Product Lifecycle CostingDetermining Prices PUBLIC 195
● Activity price strategies have been created in master data.
Add Price Determination Strategy to a Project
1. Select a project in the Cockpit view. Using the ribbon or the context menu, choose Open.2. Under Price Determination Strategies, use the dropdown to select a price determination strategy. Every
strategy created in master data appears in this dropdown.3. Save and close the project.
ResultThe material and activity price determination strategies you selected are used as default strategies in all new calculations and calculation versions created for this project.
Select Price Determination Strategy in a Calculation Version
1. In the Calculation view, expand the Version Header Data section in the side panel.2. Under Price Determination Strategies, use the dropdown to select a Material Price Strategy and an Activity
Price Strategy.A material price determination strategy and an activity price determination strategy must be selected to save the calculation version.Every price determination strategy created in master data appears in this dropdown.
3. Save the calculation version.
ResultThe price determination strategy you selected is used for the calculation version. Automatic price determination is triggered and prices are found based on that strategy.
196 PUBLICApplication Help for SAP Product Lifecycle Costing
Determining Prices
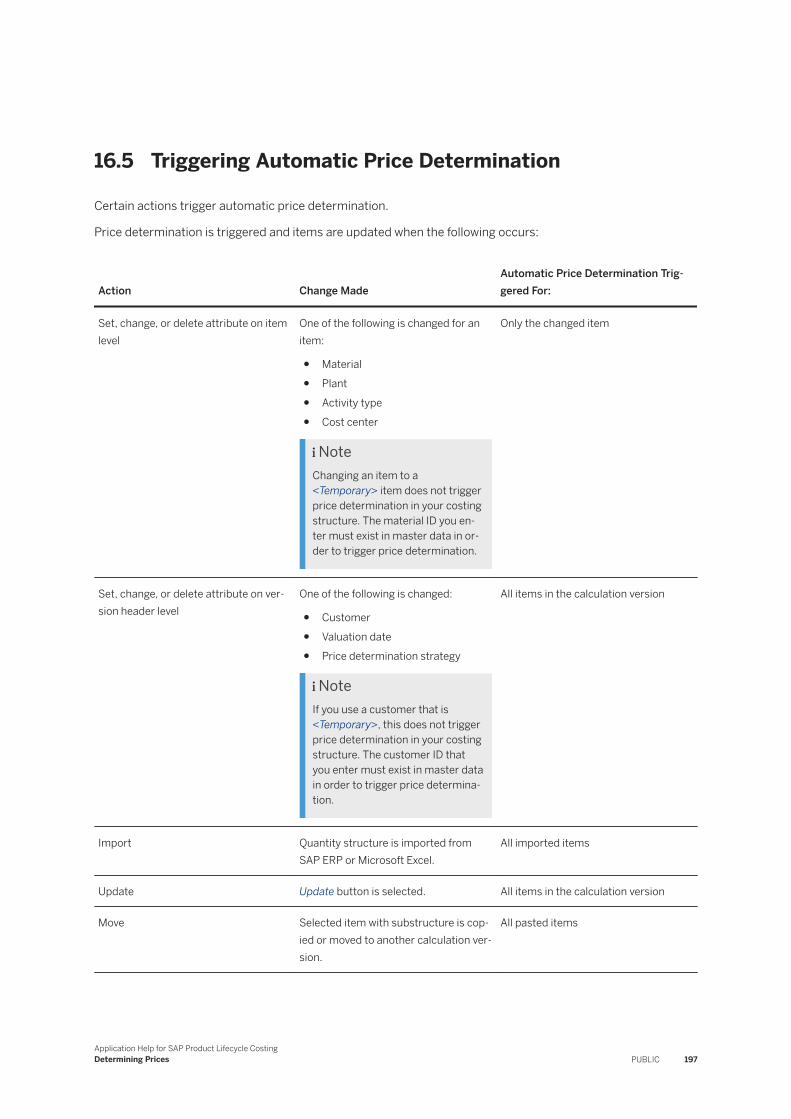
16.5 Triggering Automatic Price Determination
Certain actions trigger automatic price determination.
Price determination is triggered and items are updated when the following occurs:
Action Change MadeAutomatic Price Determination Triggered For:
Set, change, or delete attribute on item level
One of the following is changed for an item:
● Material● Plant● Activity type● Cost center
NoteChanging an item to a <Temporary> item does not trigger price determination in your costing structure. The material ID you enter must exist in master data in order to trigger price determination.
Only the changed item
Set, change, or delete attribute on version header level
One of the following is changed:
● Customer● Valuation date● Price determination strategy
NoteIf you use a customer that is <Temporary>, this does not trigger price determination in your costing structure. The customer ID that you enter must exist in master data in order to trigger price determination.
All items in the calculation version
Import Quantity structure is imported from SAP ERP or Microsoft Excel.
All imported items
Update Update button is selected. All items in the calculation version
Move Selected item with substructure is copied or moved to another calculation version.
All pasted items
Application Help for SAP Product Lifecycle CostingDetermining Prices PUBLIC 197
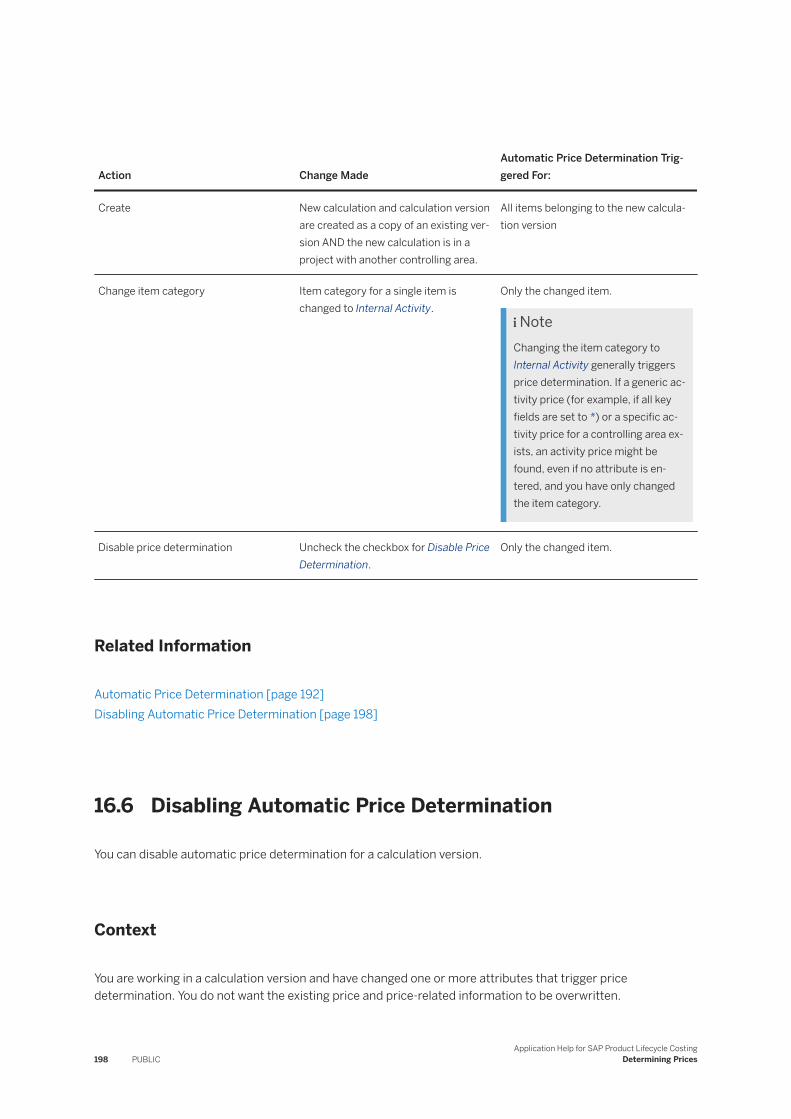
Action Change MadeAutomatic Price Determination Triggered For:
Create New calculation and calculation version are created as a copy of an existing version AND the new calculation is in a project with another controlling area.
All items belonging to the new calculation version
Change item category Item category for a single item is changed to Internal Activity.
Only the changed item.
NoteChanging the item category to Internal Activity generally triggers price determination. If a generic activity price (for example, if all key fields are set to *) or a specific activity price for a controlling area exists, an activity price might be found, even if no attribute is entered, and you have only changed the item category.
Disable price determination Uncheck the checkbox for Disable Price Determination.
Only the changed item.
Related Information
Automatic Price Determination [page 192]Disabling Automatic Price Determination [page 198]
16.6 Disabling Automatic Price Determination
You can disable automatic price determination for a calculation version.
Context
You are working in a calculation version and have changed one or more attributes that trigger price determination. You do not want the existing price and price-related information to be overwritten.
198 PUBLICApplication Help for SAP Product Lifecycle Costing
Determining Prices

Note● Price determination is automatically disabled when you set a price using the Set Price command.● Manually changing a price source to Manual Price does not automatically disable price determination.● You can trigger and disable automatic price determination at any time.
Procedure
1. Open the calculation verion in the Calculation view.2. In Item Details under Prices, select the Disable Price Determination checkbox.
Results
When you disable price determination, it is no longer triggered. However, the application still checks whether the set price corresponds to a vald price in master data. If not, the price is set to Manual Price.
Related Information
Triggering Automatic Price Determination [page 197]
16.7 Setting Prices Using Prices from Master Data
You can manually set a price for an item using valid prices found in master data.
Context
You can set prices for single items (items without subitems) that have the item category:
● Material● Document● Subcontracting● External Activity● Internal Activity
The price you set is only used for the item that you have selected.
Application Help for SAP Product Lifecycle CostingDetermining Prices PUBLIC 199
Procedure
1. Select the item for which you want to set a price.
The item must be a single item that is a material, document, subcontracting, external activity, or internal activity.
2. From the ribbon or using the context menu, choose Set Price.
You can also use the shortcut Alt + P . A dialog is displayed showing all valid prices from master data for the item you have chosen. If more than one valid price exists for a price source, the price with the latest valid-from date is used.
3. Select the price that you want to use, and choose Set Price to confirm.
Results
The price that you have chosen overrides the default price determined by automatic price determination. The Price field and some price-related fields are filled as with automatic price determination. In addition, price determination is automatically disabled to stop further automatic price determination for the item.
NoteYou can deactivate the Disable Price Determination setting at any time to re-enable and trigger automatic price determination for the item.
Related Information
Valid Prices [page 191]Disabling Automatic Price Determination [page 198]
16.8 Changing Values in Price Fields Manually
You can also change values in price fields manually.
You can always set prices for single items (items without subitems) that have the following item categories:
● Calculation Version● Process● Resources and Tools● Variable Item
For item categories where automatic price determination is supported, you can also change prices for single items manually by entering a value in the following price-related fields:
200 PUBLICApplication Help for SAP Product Lifecycle Costing
Determining Prices
● Price (Fixed)● Price (Variable)● Price● Transaction Currency● Price Unit● Unit of Measure (Price Unit)
If you change the price for an item, the price source is set to Manual Price. The manual entry replaces the price that was automatically selected using price determination, and the purchasing group, purchasing document, and confidence level are cleared.
NoteIf price determination is triggered again, your manual changes are replaced by a price found in master data.
Related Information
Triggering Automatic Price Determination [page 197]
Application Help for SAP Product Lifecycle CostingDetermining Prices PUBLIC 201

17 Calculating Quantities and Costs
SAP Product Lifecycle Costing calculates costs on the root, item, and assembly levels of a calculation version and displays the results at every level, immediately.
Related Information
Calculating Total Quantities of an Item [page 202]Calculating Total Costs of an Item [page 206]Calculating Overheads [page 208]Rolling Up Costs and Calculating on Assembly Level [page 209]
17.1 Calculating Total Quantities of an Item
Calculation versions show total quantities at the following levels:
● Calculation version (root item)● Item (items without subitems)● Assembly (item with subitems)
To calculate the total cost for a calculation version, you must enter the total quantity and unit of measure for the overall calculation version (root item).
By default, the quantity for an item is calculated based on the assembly quantity. When working in a calculation version, you can change how you want to calculate the quantity of an item using the Total Quantity Depends On field. The field is available under Quantities (Advanced Options) in the Item Details in the side panel. Here, you decide how to calculate the total quantity of the item based on one of the following:
● Assembly quantity● Lot size● Fixed quantity
For items and assemblies below the root item, the base quantity also influences the calculation of the total quantity.
Related Information
Base Quantities [page 203]Assembly Quantities [page 203]
202 PUBLICApplication Help for SAP Product Lifecycle Costing
Calculating Quantities and Costs
Lot Size [page 204]Fixed Quantities [page 205]
17.1.1 Base Quantities
Base quantity specifies the amount used as a basis for calculating an item’s quantity.
When working with routings and bills of materials, you often have to provide the quantity of an item needed to produce a certain number of units. Known as the quantity per base unit, this number can be very large or very small and therefore difficult to manage. To simplify the calculation, you can establish a base quantity. By default, base quantity is set to 1.
Example
Assume you are grinding slugs to make casings. It takes you 5 minutes to grind 1000 slugs.
● You enter 5 minutes for the item quantity.● You enter a base quantity of 1000 pieces.● The quantity is then calculated for each set of 1000 pieces.
17.1.2 Assembly Quantities
For assembly quantities, the system calculates the total quantity of an item based on the quantity of the parent assembly.
Example● The total quantity for the parent assembly is 2500 pieces.● You enter 5 minutes for the item quantity.● The default value for base quantity remains as 1.● The total quantity of time it takes to grind 2500 pieces is 12,500 minutes, or 5 minutes per piece.
The formula is as follows:
Total Quantity (Item) = (Quantity (Item) / Base Quantity (Item)) * Total Quantity (Parent Assembly)
12,500 Minutes = 5 Minutes / 1 Piece * 2500 Pieces
Using Assembly Quantity and a Base Quantity Together
You can also calculate total quantity based on parent assembly using a base quantity.
Application Help for SAP Product Lifecycle CostingCalculating Quantities and Costs PUBLIC 203
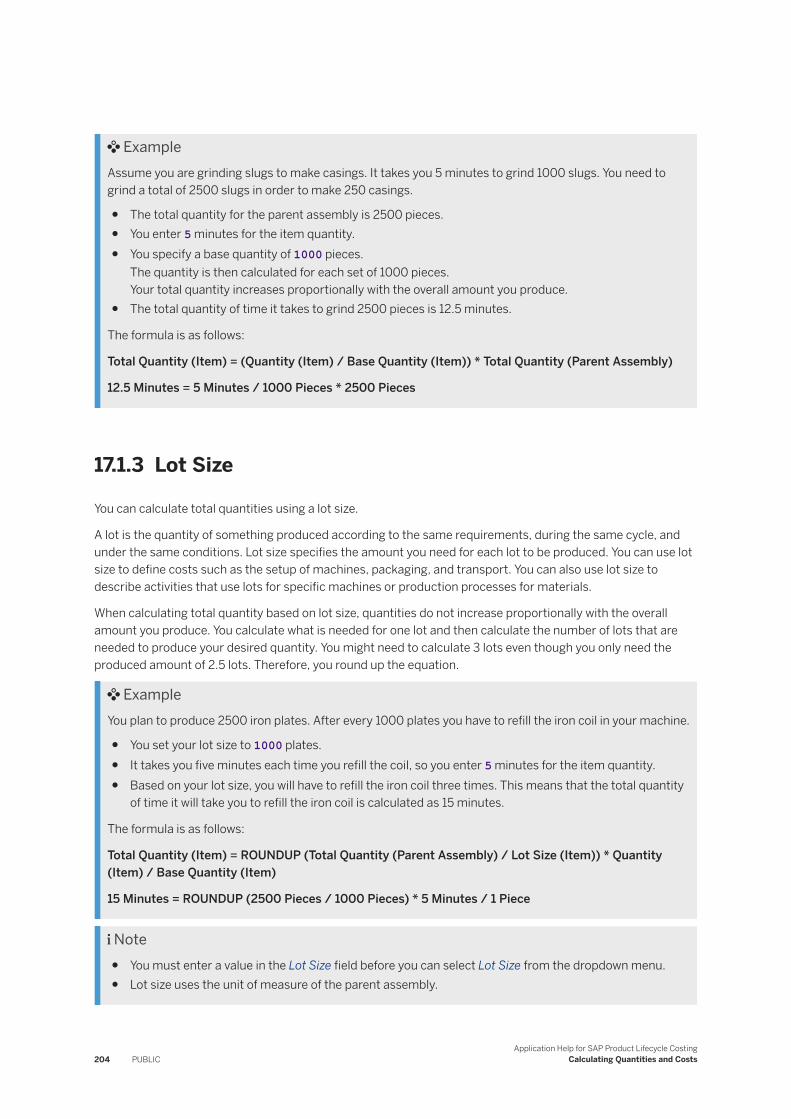
ExampleAssume you are grinding slugs to make casings. It takes you 5 minutes to grind 1000 slugs. You need to grind a total of 2500 slugs in order to make 250 casings.
● The total quantity for the parent assembly is 2500 pieces.● You enter 5 minutes for the item quantity.● You specify a base quantity of 1000 pieces.
The quantity is then calculated for each set of 1000 pieces.Your total quantity increases proportionally with the overall amount you produce.
● The total quantity of time it takes to grind 2500 pieces is 12.5 minutes.
The formula is as follows:
Total Quantity (Item) = (Quantity (Item) / Base Quantity (Item)) * Total Quantity (Parent Assembly)
12.5 Minutes = 5 Minutes / 1000 Pieces * 2500 Pieces
17.1.3 Lot Size
You can calculate total quantities using a lot size.
A lot is the quantity of something produced according to the same requirements, during the same cycle, and under the same conditions. Lot size specifies the amount you need for each lot to be produced. You can use lot size to define costs such as the setup of machines, packaging, and transport. You can also use lot size to describe activities that use lots for specific machines or production processes for materials.
When calculating total quantity based on lot size, quantities do not increase proportionally with the overall amount you produce. You calculate what is needed for one lot and then calculate the number of lots that are needed to produce your desired quantity. You might need to calculate 3 lots even though you only need the produced amount of 2.5 lots. Therefore, you round up the equation.
ExampleYou plan to produce 2500 iron plates. After every 1000 plates you have to refill the iron coil in your machine.
● You set your lot size to 1000 plates.● It takes you five minutes each time you refill the coil, so you enter 5 minutes for the item quantity.● Based on your lot size, you will have to refill the iron coil three times. This means that the total quantity
of time it will take you to refill the iron coil is calculated as 15 minutes.
The formula is as follows:
Total Quantity (Item) = ROUNDUP (Total Quantity (Parent Assembly) / Lot Size (Item)) * Quantity (Item) / Base Quantity (Item)
15 Minutes = ROUNDUP (2500 Pieces / 1000 Pieces) * 5 Minutes / 1 Piece
Note● You must enter a value in the Lot Size field before you can select Lot Size from the dropdown menu.● Lot size uses the unit of measure of the parent assembly.
204 PUBLICApplication Help for SAP Product Lifecycle Costing
Calculating Quantities and Costs
Using Lot Size and Base Quantity Together
You can also calculate total quantity based on lot size using a base quantity.
ExampleYou plan to produce 2500 iron plates. After every 1000 plates you have to refill the iron coil in your machine.
● You set your lot size to 1000 plates.● It takes you 5 minutes to complete 10 refills of iron coil.● You enter 5 minutes for the item quantity.● You enter 10 pieces as your base quantity for the item.● Based on your lot size, you will have to refill the iron coil three times. The 15 minutes it takes you to refill
the iron coil is divided by the base quantity of 10, leaving you with a total quantity of 1.5 minutes to refill the iron coil.
The formula is as follows:
Total Quantity (Item) = ROUNDUP (Total Quantity (Parent Assembly) / Lot Size (Item)) * Quantity (Item) / Base Quantity (Item)
1.5 Minutes = ROUNDUP (2500 Pieces / 1000 Pieces) * 5 Minutes / 10 Pieces
17.1.4 Fixed Quantities
You can calculate total quantity based on a fixed quantity.
For fixed quantities, the item’s quantity is not dependent on the total quantity of the parent assembly. When using a fixed quantity, the base quantity is ignored.
ExampleYou add an activity such as setting up a machine. This takes 20 minutes and is done only once. You enter 20 minutes for the item quantity. Regardless of the quantity of the parent assembly, the total quantity for the item is fixed and equals 20 minutes.
Negative Quantities
You can enter negative quantities for items and assemblies.
If you enter a negative number for the total quantity of a parent assembly, all subitems take on the negative quantity, even when calculated based on fixed quantity. The total cost of the assembly is treated as revenue, and the cost of the product is reduced by the total cost of the parent assembly.
ExampleCrude oil is refined to produce petrol. As part of the refinement process, diesel and kerosene are also produced as by-products. You want to reduce the cost of the petrol by the cost of the refining machine and
Application Help for SAP Product Lifecycle CostingCalculating Quantities and Costs PUBLIC 205
the activities associated with producing these by-products. You change the total quantity of the parent assembly for the refining machine to a negative number. The total quantities for all subitems, even if calculated based on fixed quantity, also become negative. The cost of the petrol is reduced by the total cost of the parent assembly for the refining machine.
Zero Quantities
You can enter zero quantities for items and assemblies.
When you enter a zero quantity for a parent assembly, the quantity for all subitems is set to zero, even if they are calculated based on fixed quantity. The total cost for the assembly is also zero and has no effect on the total cost of the product.
Note that if you enter a quantity of zero for a parent assembly, any formulas remain in effect. In contrast, deactivating the assembly would exclude it from the calculation completely.
Related Information
Fixed Quantities [page 205]
17.2 Calculating Total Costs of an Item
Costs are calculated based on the total quantity and the price of each item in a calculation version.
Total cost is the sum of the cost per total quantity and the overhead costs calculated using a costing sheet, if one is selected for your calculation version. To calculate the cost per total quantity, the price per price unit (in transaction currency) is multiplied by the total quantity and is divided by the price unit. This amount is then converted into the reporting currency.
The formula is as follows:
Cost per Total Quantity = (Price/Price Unit) * Total Quantity
ExampleThe following is an example of how you calculate the total cost for one item (an internal activity) in a calculation version:
● The total quantity for the item is 1000 minutes● The price per unit is 4491 euros per 100 hours● The transaction currency is EUR● The reporting currency is USD● The assumed exchange rate that is valid on the valuation date for the calculation version is 1 EUR =
1.09168 USD
206 PUBLICApplication Help for SAP Product Lifecycle Costing
Calculating Quantities and Costs
Using these values, the formula for calculating the total cost of this item is as follows:
(4491 EUR /100 h) * 1000 min = (4491 EUR /100 h) * 16.66 h = 748.20 EUR = 816.80 USD
Converting Units of Measure
There is a unit of measure for the total quantity and a unit of measure for the price unit. The unit of measure for the total quantity is converted to the unit of measure for the price unit in order to calculate the cost per total quantity. The conversion is done based on the settings made in the Administration view under Global Settings in the Units of Measure area.
Converting Currencies
The transaction currency of an item is converted into the reporting currency based on the exchange rate for the exchange rate type that is valid on the valuation date of the calculation version.
NoteThe transaction currency is used to display the price of an item and its fixed and variable cost portions. Different items in a calculation version can have different transaction currencies.
For example, a material purchased from Europe can have a price shown in euros. Another material purchased from the U.S. can have a price in U.S. dollars. The reporting currency is used for the overall calculation version. It is set in the Version Header Data section in the Calculation view. All calculated values in a calculation version are displayed using this currency. This means that the calculated prices on assembly level are shown in the reporting currency. The individual prices for the subitems in the assembly are shown using the transaction currency.
The exchange rates used for converting currencies are maintained in the Currency Exchange Rates area in the Administration view.
Related Information
Determining Prices [page 191]Units of Measure [page 373]Currency Exchange Rates [page 371]Exchange Rate Types [page 370]
Application Help for SAP Product Lifecycle CostingCalculating Quantities and Costs PUBLIC 207
17.3 Calculating Overheads
If, in addition to the direct costs, you want to calculate indirect costs as overheads, you can assign a costing sheet to your calculation version. You can do this in the side panel of the Calculation view.
The costing sheet defines the rules that are used to calculate bases, overheads, and sums. You can enable up to three total costs in one costing sheet, each representing a different total cost scenario. You can view the total costs side-by-side for each costing sheet row and select the rows that you want to include in the total cost for each costing scenario. If you don'tt want to calculate overheads or sums, you don'tt need to use a costing sheet. In this case, all costs are simply rolled up.
The costing sheet consists of base, overhead, and sum rows. The base rows define which items receive overheads. You can specify whether the base is defined by an account group or item category.
The overhead rows define the actual overhead to be applied to a base or sum row. You define conditions under which the overhead is applied by setting a validity date range. You can also specify an activity type, overhead group, or one or more organizational units, including company code, plant, business area, profit center, cost center, and work center, as a condition for the overhead.
An overhead is applied if the data in an item matches all conditions. An overhead rule results in either a percentage-based overhead (for example, 10%) or a quantity-based overhead (for example, 5 EUR for every 10 PC), or both. You can charge a different fixed cost percentage of the calculated overheads to the credit account for each rule in an overhead row.
Sum rows define intermediate sums that can be used for information only or as a reference for overheads or final sums. You can select a costing sheet in the side panel for any item or assembly to see a breakdown of the costs in your costing sheet by costing sheet row.
For each item, the costing sheet rows are shown as additional columns in the table and in the Costing Sheet area in the side panel in the Calculation view. If you do not use a costing sheet in your calculation version, you can only see values in the Other Costs and Total Cost fields.
Note the following about other costs and total costs:
● All costs that are not considered by any base of the costing sheet are shown as other costs. If you do not use a costing sheet in your calculation version, all costs are shown in the Other Costs field.
● The total cost for each item is calculated by summing up the cost per total quantity and the overheads calculated for each item.
Related Information
Costing Sheets [page 322]Using Costing Sheets in Calculation Versions [page 110]
208 PUBLICApplication Help for SAP Product Lifecycle Costing
Calculating Quantities and Costs
17.4 Rolling Up Costs and Calculating on Assembly Level
After the items without subitems are calculated, the costs are rolled up to the next level.
Rollup is done by summing up the total costs and overheads of all subitems. The costing sheet values on assembly level show the rolled-up values of the subitems as well as the overheads calculated for the item. You can see these values in the table and in the side panel. Overheads that are not marked to be rolled up in the costing sheet are not included in the sum.
The total costs of all subitems are shown as the price of the assembly. This price on assembly level is always shown for one price unit. As it is calculated, the transaction currency of the price on assembly level is set to the reporting currency.
Once you have the price and the total quantity of the assembly, the next steps for calculating the total costs of an assembly are done in the same way as for items without subitems. First, the cost per total quantity is calculated. Then the overheads that must also be considered for this assembly are calculated based on the rules specified in the costing sheet. Finally, the total cost and other costs are calculated.
This rollup and calculation for total costs is done step-by-step for every level of the calculation version up to the highest level (root item). The total costs of the calculation version show you the final result of your overall calculation.
NoteYou have two options when assigning items and assemblies to bases:
● You can assign the assemblies to an account that is included in a different account group from the accounts assigned to the items without subitems.Then you can assign these different account groups to different bases in your costing sheet.
● Alternatively, you can define the bases of your costing sheet by item category.You can specify whether items with subitems, items without subitems, or all items of this item category should be taken into account. If you choose items with subitems, only the assembly is considered in the costing sheet base.
NoteWhile the rollup is done, the fixed and variable cost portions are kept as calculated, and the assignments to accounts are kept for use in analysis later on.
Application Help for SAP Product Lifecycle CostingCalculating Quantities and Costs PUBLIC 209
18 Custom Fields and Formulas
As part of extensibility in SAP Product Lifecycle Costing, you can create custom fields for items and certain master data categories.
Custom fields allow you to tailor the data used in calculation versions to fit your organization's needs. For example, you might add a custom field to calculate the weight of a particular material. You can also create formulas that can be used to calculate custom fields for items and some standard fields.
Types of Fields You Can Create
You can create the following types of custom fields for your items and master data:
Data Type Description How It's Used Allowed Values
Checkbox Field provides a checkbox. Used to store true or false indicators.
NoteIf the checkbox is activated, the value is set to 1. If the checkbox is not activated, the value is set to 0.
Select the checkbox to activate or deactivate the field.
Decimal Allows you to enter fractions, both negative and positive.
Used to store numeric values such as lengths, widths, dimensions, and other key fig-ures for products.
Note● You must specify
whether field requires a unit of measure, currency, or neither.
● The reporting currency is used by default, and can be changed.
Maximum number of characters allowed:
● 7 characters before the decimal point.
● 20 characters after the decimal point.
210 PUBLICApplication Help for SAP Product Lifecycle Costing
Custom Fields and Formulas
Data Type Description How It's Used Allowed Values
Integer Allows you to enter whole numbers, both negative and positive, including zero (0).
Used to store integer values such as the number of items or things represented by whole numbers.
You can enter the following range of integers:
-2147483648 to 2147483647
Text Allows you to enter any combination of letters, numbers, or symbols.
Used to store textual information such as product descriptions or other details.
Max 5000 characters.
Date Field provides a calendar for picking a date. You can also enter a date manually.
Used to enter dates such as launch dates or other important milestones.
Use the calendar to enter a date or manually enter a date in any format.
Link Allows you to enter a valid hyperlink as the value for the custom field.
Used to store links to external content.
Note● You can access the
hyperlink from every view in which the custom field is displayed.
● Linked content opens in your default browser.
Must be a valid hyperlink, or produce a valid hyperlink when calculated.
To be valid, the hyperlink must:
● Begin with http, https, ftp, or sftp
● Not exceed 2000 characters
● Not include spaces
Example○ http://
website.com/path/to/page
○ ftp://ftp.xyz.com
○ https//www.test.com:8080?id=1
Related Information
Custom Fields for Items [page 212]Custom Fields for Master Data [page 248]
Application Help for SAP Product Lifecycle CostingCustom Fields and Formulas PUBLIC 211
18.1 Custom Fields for Items
You can create custom fields for calculation versions on item level. Custom fields allow you to tailor the data used in calculation versions to fit your organization’s needs.
Custom fields are available for use in formulas after you have saved the fields. In order to view and use the custom fields in calculation version, you must also restart the application after saving.
NoteTo optimize performance, a combined maximum of 100 custom fields at item or master data level is recommended.
Calculation Types
You can create custom fields for items that are calculated in the following ways:
● Using a manual valueFor example, you can add a custom field for the length, height, and width of a particular material. You can then enter this measurement manually.
● Using a rollup typeFor example, you can calculate the weight of an assembly by rolling up the sum of all subitems.
● Using a formulaFor example, you can apply a formula that calculates the exact measurement, volume, or quantity of an item automatically. You can use other standard fields and custom fields in your formula.
A custom field can have more than one calculation type. For example, you can add a rollup type to a custom field that is calculated using a formula. You can overwrite formula-computed values with values entered manually and toggle between both.
Where Do You Create Custom Fields
You create custom fields under Administration Extensibility Custom Fields for Items . Here, you decide which item categories should contain the field and under which side panel group the custom field should appear.
Where Are Custom Fields for Items Displayed?
After you save your custom fields and restart your system, the fields are available in the side panel of the Calculation view, under Item Details. They are shown for the item categories and side panel group that you selected when creating the custom field.
212 PUBLICApplication Help for SAP Product Lifecycle Costing
Custom Fields and Formulas
Related Information
Creating Custom Fields for Items [page 213]Adding a Rollup Type to Custom Fields for Items [page 218]Adding a Formula to a Custom Field for Items [page 237]
18.1.1 Creating Custom Fields for Items
You can create custom fields that allow you to enter a value manually. For example, you can add a custom field for the weight of a particular material.
Context
You would like to create a custom field for items. You want to enter values in your custom field manually.
Prerequisites
● You have sufficient authorization to work with custom fields and formulas.● All other users are logged off your SAP Product Lifecycle Costing system.● All calculations and calculation versions are closed.
Steps
1. Go to Administration Extensibility Custom Fields for Items .2. In the ribbon, choose Edit, and then Add.3. Enter a technical name:
○ Custom fields for items have the prefix CUST_.○ Blanks and special characters are not allowed.
NoteYou cannot change the technical name after saving the field.
4. Enter a display name and display description for the relevant logon languages.○ The display name is the field label that you want to appear on the user interface.○ The display description is the tooltip that is shown for the field.
Application Help for SAP Product Lifecycle CostingCustom Fields and Formulas PUBLIC 213
NoteIf you do not enter a display name for a logon language, the technical name is shown for the field label and tooltip. If you enter a display name and no description, the display name is also used for the tooltip.
5. Select one of the following data types for your custom field:
Data Type Description
Checkbox The field provides a checkbox. If the checkbox is activated, the value is set to 1. If the checkbox is not activated, the value is set to 0.
Decimal Field value consists of fractions, both negative and positive.
Integer Field value consists of whole numbers, both negative and positive, including 0 (zero).
Text Field allows you to enter any combination of letters, numbers, or symbols. The maximum length of the resulting text field is set to 5000 characters.
Date Field provides a calendar for picking out a date and allows you to enter a date manually.
Link Field contains a hyperlink.
NoteYou cannot change the data type after saving the field.
6. If you have selected the data type Decimal, do the following:○ Specify whether the field requires unit of measure, a currency, or neither.
NoteYou cannot change this selection after saving.
○ If the field needs a unit of measure, select one in the field next to Default Value. This is mandatory, but you can change this value at any time.If your field needs a currency, the reporting currency for the calculation version is used by default.
7. If you have selected the data type Link, do the following:○ Under Default Value, enter a valid hyperlink.
NoteTo be valid, hyperlinks must:○ Begin with http, https, ftp, or ftps○ Not exceed 2000 characters○ Not include spaces
214 PUBLICApplication Help for SAP Product Lifecycle Costing
Custom Fields and Formulas
Example○ http://website.com/path/to/page○ ftp://ftp.xyz.com○ https://www.test.com:8080?id=1
8. [Optional]: Enter a default value for the field.This initial value is used when a new item that includes the custom field is created. You can change this value manually in your calculation version at any time.
9. Under Show for Item Categories, specify for which item categories the custom field should appear.○ You must select at least one item category.○ If you select Calculation Version, Referenced Version is also automatically selected.○ After saving, you can no longer deselect item categories. You can, however, select additional item
categories.10. Choose a side panel group for the custom field.
The custom field is displayed below the last standard field in this group or below the last custom field created for the group.
11. [Optional]: If your field is an integer, decimal, or text, you can calculate its value using a rollup type. Rollup is not available for checkbox and date fields.
12. Save your changes.A dialog informs you that this will lead to changes in existing calculation versions that use the item categories selected for the custom field.
13. Choose OK to confirm.
Result
Your new custom field is available when you restart the application. You can now enter values in the field manually. You can do this in the side panel of the Calculation view under Item Details.
NoteIf you have specified a rollup type and your selected item is an assembly, then the rolled-up value that has been automatically calculated cannot be manually overwritten.
Related Information
Custom Fields for Items [page 212]Modifying Custom Fields for Items [page 216]Deleting Custom Fields for Items [page 217]Rollup of Custom Field Values [page 218]Formulas for Custom Fields for Items and Standard Fields [page 220]Calculated Values for Custom Fields for Items and Standard Fields [page 243]
Application Help for SAP Product Lifecycle CostingCustom Fields and Formulas PUBLIC 215
18.1.2 Modifying Custom Fields for Items
If you need to modify an existing custom field, you can change the following:
● Display names and descriptions● Default value● The unit of measure, if your field has one● The selected item categories
NoteYou can activate additional item categories for the custom field. However, you cannot deactivate previously selected categories.
All other settings for the custom field become display-only after saving and can no longer be changed.
Context
You would like to make changes to a custom field that you have already saved and have those changes appear in new and existing calculation versions that use the custom field.
Prerequisites
● You have sufficient authorization to work with custom fields and formulas.● All other users are logged off your SAP Product Lifecycle Costing system.● All calculations and calculation versions are closed.
Steps
1. Go to Administration Extensibility Custom Fields for Items .2. In the ribbon, choose Edit.3. Open the details for the field and make any allowed changes.4. Save your changes.
A dialog informs you that you've made changes to an existing custom field and that this will cause changes in calculation versions that already use this field.
5. Choose OK to confirm.
Result
The modified custom field is available when you restart the application. Note that all calculation versions using the custom field now use the modified version of the custom field. This means that if you have changed the
216 PUBLICApplication Help for SAP Product Lifecycle Costing
Custom Fields and Formulas
display name, or added a formula or rollup type to the field, these changes are applied to all old and new calculation versions that use this field.
18.1.3 Deleting Custom Fields for Items
You can delete a custom field if you no longer need it.
Context
You would like to delete a custom field so that it is no longer used in new and existing calculation versions.
NoteAny data that was maintained in this custom field to date will be deleted from existing calculation versions. You will no longer be able to access this data.
Prerequisites
● You have sufficient authorization to work with custom fields and formulas.● The field is not referenced in any formulas that are used to calculate any other fields.● All other users are logged off your SAP Product Lifecycle Costing system.● All calculations and calculation versions are closed.
Steps
1. Go to Administration Extensibility Custom Fields for Items .2. In the ribbon, choose Edit.3. Choose the field to be deleted and then choose Delete.
The system checks for references to formulas used in other fields.If references exist, remove them and try to delete again.
4. Save your changes.
Result
The custom field is no longer shown after you restart your application. All data that was maintained in this custom field is deleted, and the field is removed from the list of custom fields in the Administration view.
Application Help for SAP Product Lifecycle CostingCustom Fields and Formulas PUBLIC 217
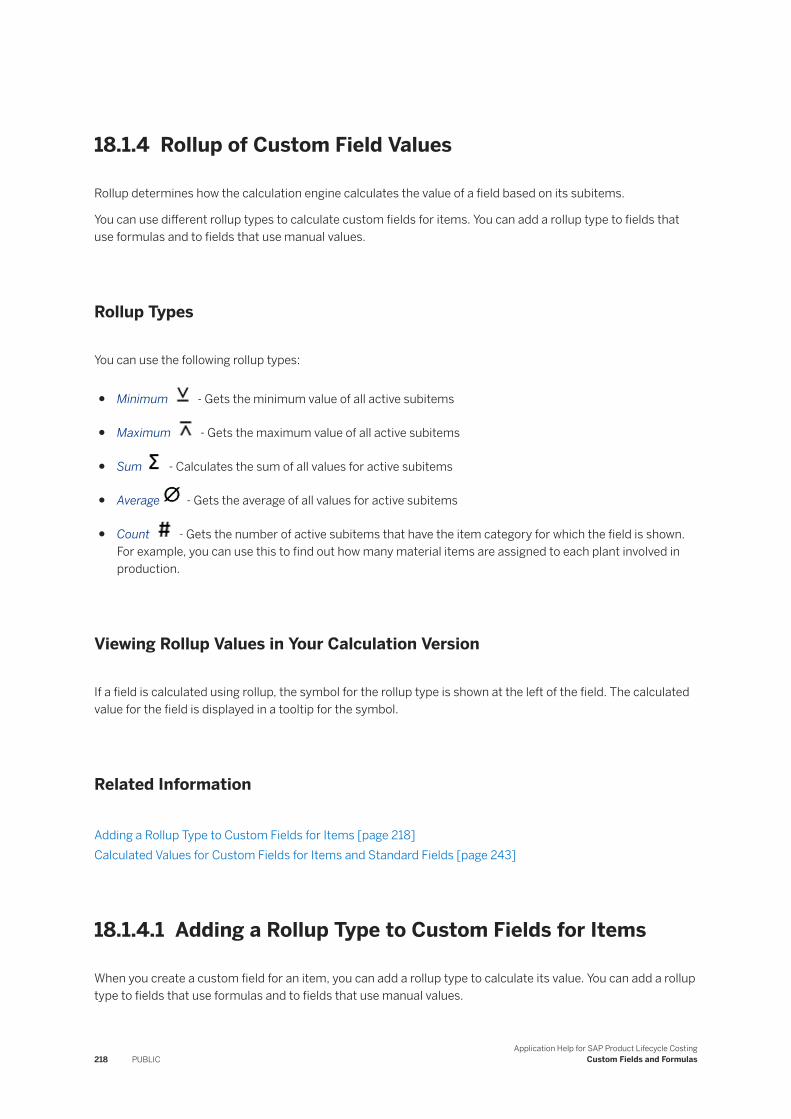
18.1.4 Rollup of Custom Field Values
Rollup determines how the calculation engine calculates the value of a field based on its subitems.
You can use different rollup types to calculate custom fields for items. You can add a rollup type to fields that use formulas and to fields that use manual values.
Rollup Types
You can use the following rollup types:
● Minimum - Gets the minimum value of all active subitems
● Maximum - Gets the maximum value of all active subitems
● Sum - Calculates the sum of all values for active subitems
● Average - Gets the average of all values for active subitems
● Count - Gets the number of active subitems that have the item category for which the field is shown. For example, you can use this to find out how many material items are assigned to each plant involved in production.
Viewing Rollup Values in Your Calculation Version
If a field is calculated using rollup, the symbol for the rollup type is shown at the left of the field. The calculated value for the field is displayed in a tooltip for the symbol.
Related Information
Adding a Rollup Type to Custom Fields for Items [page 218]Calculated Values for Custom Fields for Items and Standard Fields [page 243]
18.1.4.1 Adding a Rollup Type to Custom Fields for Items
When you create a custom field for an item, you can add a rollup type to calculate its value. You can add a rollup type to fields that use formulas and to fields that use manual values.
218 PUBLICApplication Help for SAP Product Lifecycle Costing
Custom Fields and Formulas
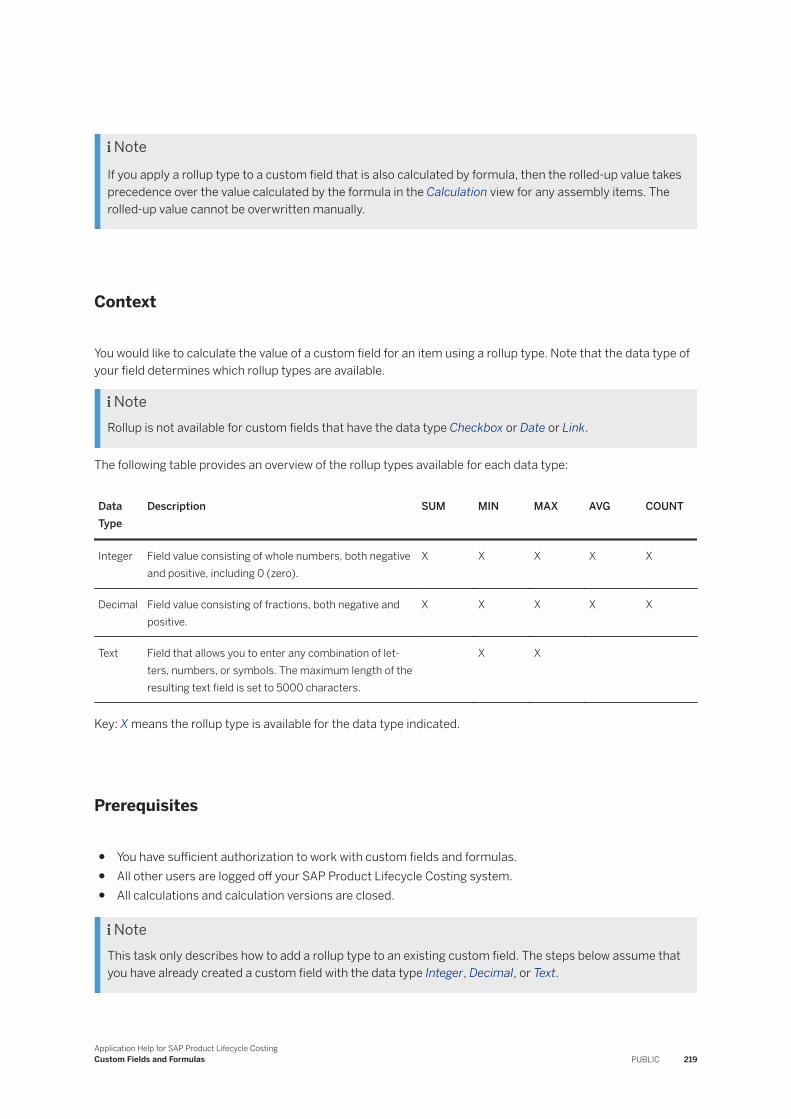
NoteIf you apply a rollup type to a custom field that is also calculated by formula, then the rolled-up value takes precedence over the value calculated by the formula in the Calculation view for any assembly items. The rolled-up value cannot be overwritten manually.
Context
You would like to calculate the value of a custom field for an item using a rollup type. Note that the data type of your field determines which rollup types are available.
NoteRollup is not available for custom fields that have the data type Checkbox or Date or Link.
The following table provides an overview of the rollup types available for each data type:
Data Type
Description SUM MIN MAX AVG COUNT
Integer Field value consisting of whole numbers, both negative and positive, including 0 (zero).
X X X X X
Decimal Field value consisting of fractions, both negative and positive.
X X X X X
Text Field that allows you to enter any combination of letters, numbers, or symbols. The maximum length of the resulting text field is set to 5000 characters.
X X
Key: X means the rollup type is available for the data type indicated.
Prerequisites
● You have sufficient authorization to work with custom fields and formulas.● All other users are logged off your SAP Product Lifecycle Costing system.● All calculations and calculation versions are closed.
NoteThis task only describes how to add a rollup type to an existing custom field. The steps below assume that you have already created a custom field with the data type Integer, Decimal, or Text.
Application Help for SAP Product Lifecycle CostingCustom Fields and Formulas PUBLIC 219
Steps
1. Go to Administration Extensibility Custom Fields for Items .2. In the ribbon, choose Edit and then choose the custom field.3. Choose a rollup type.4. Save your changes.
Result
Your changes are available after restarting the application. The custom field is now calculated using the selected rollup type. This is indicated by a symbol displayed at the left of field.
Related Information
Creating Custom Fields for Items [page 213]Rollup of Custom Field Values [page 218]
18.1.5 Formulas for Custom Fields for Items and Standard Fields
A formula is an algorithm that derives its value from other fields, expressions, or values. Formulas allow you to automatically calculate the value of a field based on other fields.
In SAP Product Lifecycle Costing, you can use formulas to calculate the value of custom fields for items or to add external links which you can then access from the custom fields You can also use formulas to calculate the value of certain standard fields.
If a standard field or a custom field uses a formula, then you can overwrite the calculated value manually. You can use a dropdown menu to toggle between the manual value and the formula-based value.
Viewing Formula-Calculated Values
An Formula-Calculated symbol is displayed at the left of fields that are calculated using a formula. The formula-calculated value and the manually-entered value are displayed in a tooltip for the field.
A dropdown menu is available that allows you to enter a value manually for the field. Using the dropdown menu, you can then also switch between the formula-calculated value and the value entered manually.
220 PUBLICApplication Help for SAP Product Lifecycle Costing
Custom Fields and Formulas

Related Information
Using the Formula Editor [page 221]Operators Available in the Formula Editor [page 223]Functions Available in the Formula Editor [page 224]Adding a Formula to a Custom Field for Items [page 237]Adding a Formula to a Standard Field [page 240]Calculated Values for Custom Fields for Items and Standard Fields [page 243]Units of Measure and Currencies for Custom Fields for Items [page 245]
18.1.5.1 Using the Formula Editor
When you create a custom field or add a formula to a custom field or standard field, you can create the formula using the formula editor. The formula syntax used by the formula editor is similar to what you are familiar with from pocket calculators and other spreadsheet programs. You can choose from predefined lists of functions, fields, and operators to build your formula, or you can enter a formula in the formula editor screen directly. To add a function, field, or operator from a predefined list, double-click on your selection.
NoteString constants must be surrounded by single quotes in a formula. For example, IF($VALUATION_CLASS_ID='300A';100;200)
Prerequisites
● You have sufficient authorization to work with custom fields and formulas.● You are adding a formula to a custom or standard field and you have selected Field Value is Calculated
Using Formula.● All other users are logged off your SAP Product Lifecycle Costing system.● All calculations and calculation versions are closed.
Creating a Formula Using the Formula Editor
You can access the formula editor in the Administration view as follows:
● To create a formula for a custom field, go to Extensibility Custom Fields for Items .
● To create a formula for a standard field, go to Extensibility Standard Fields with Formula .
The following is an example of how to create a formula using the formula editor. Keep in mind that there are multiple ways to enter the formula into the formula editor. The following is just one example.
Application Help for SAP Product Lifecycle CostingCustom Fields and Formulas PUBLIC 221
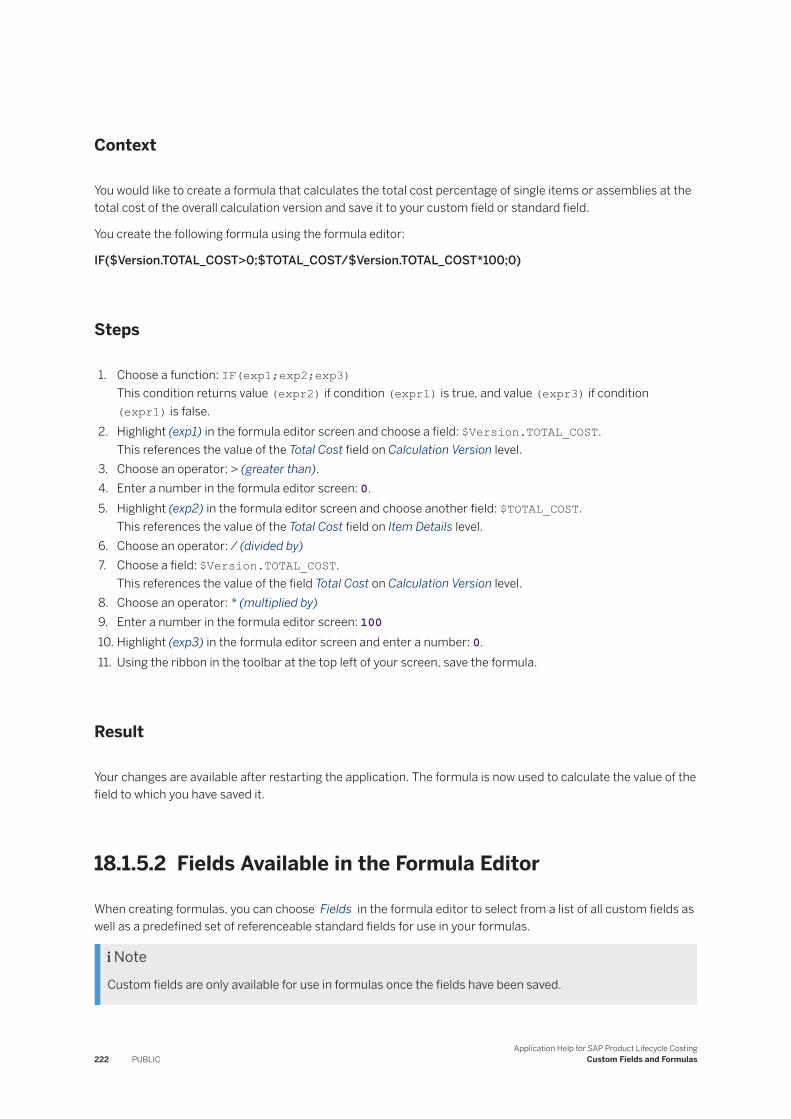
Context
You would like to create a formula that calculates the total cost percentage of single items or assemblies at the total cost of the overall calculation version and save it to your custom field or standard field.
You create the following formula using the formula editor:
IF($Version.TOTAL_COST>0;$TOTAL_COST/$Version.TOTAL_COST*100;0)
Steps
1. Choose a function: IF(exp1;exp2;exp3)This condition returns value (expr2) if condition (expr1) is true, and value (expr3) if condition (expr1) is false.
2. Highlight (exp1) in the formula editor screen and choose a field: $Version.TOTAL_COST.This references the value of the Total Cost field on Calculation Version level.
3. Choose an operator: > (greater than).4. Enter a number in the formula editor screen: 0.5. Highlight (exp2) in the formula editor screen and choose another field: $TOTAL_COST.
This references the value of the Total Cost field on Item Details level.6. Choose an operator: / (divided by)7. Choose a field: $Version.TOTAL_COST.
This references the value of the field Total Cost on Calculation Version level.8. Choose an operator: * (multiplied by)9. Enter a number in the formula editor screen: 10010. Highlight (exp3) in the formula editor screen and enter a number: 0.11. Using the ribbon in the toolbar at the top left of your screen, save the formula.
Result
Your changes are available after restarting the application. The formula is now used to calculate the value of the field to which you have saved it.
18.1.5.2 Fields Available in the Formula Editor
When creating formulas, you can choose Fields in the formula editor to select from a list of all custom fields as well as a predefined set of referenceable standard fields for use in your formulas.
NoteCustom fields are only available for use in formulas once the fields have been saved.
222 PUBLICApplication Help for SAP Product Lifecycle Costing
Custom Fields and Formulas
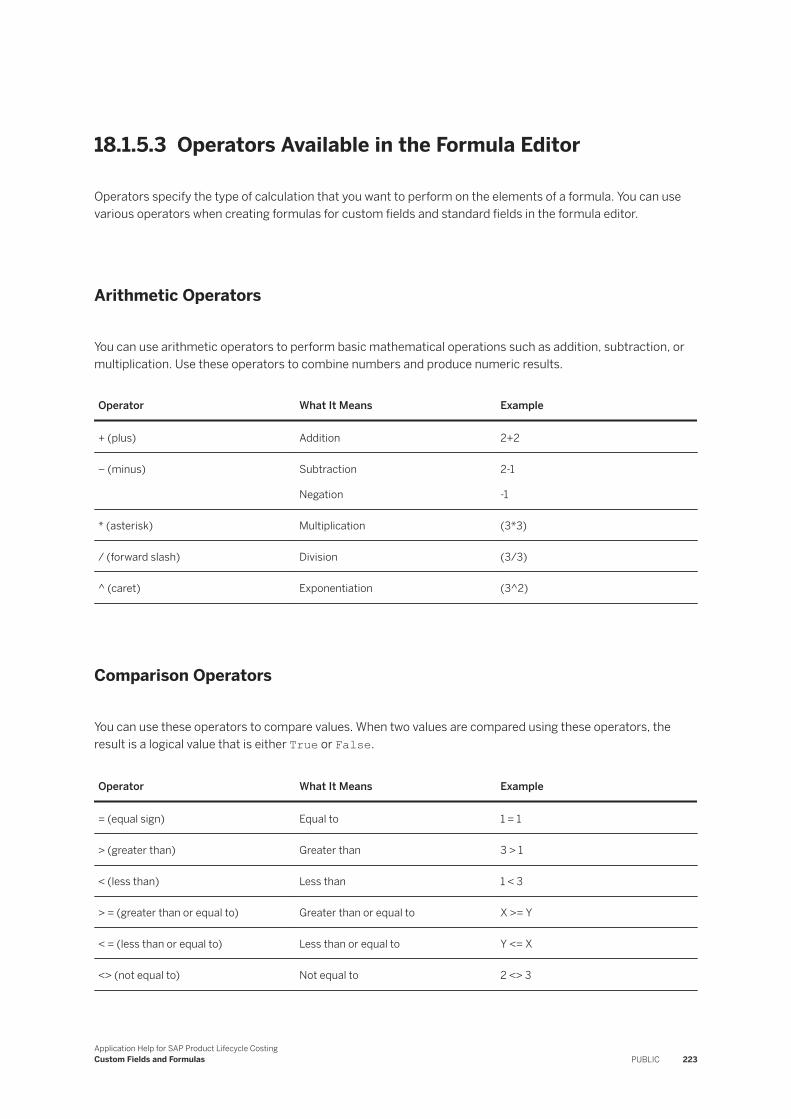
18.1.5.3 Operators Available in the Formula Editor
Operators specify the type of calculation that you want to perform on the elements of a formula. You can use various operators when creating formulas for custom fields and standard fields in the formula editor.
Arithmetic Operators
You can use arithmetic operators to perform basic mathematical operations such as addition, subtraction, or multiplication. Use these operators to combine numbers and produce numeric results.
Operator What It Means Example
+ (plus) Addition 2+2
– (minus) Subtraction
Negation
2-1
-1
* (asterisk) Multiplication (3*3)
/ (forward slash) Division (3/3)
^ (caret) Exponentiation (3^2)
Comparison Operators
You can use these operators to compare values. When two values are compared using these operators, the result is a logical value that is either True or False.
Operator What It Means Example
= (equal sign) Equal to 1 = 1
> (greater than) Greater than 3 > 1
< (less than) Less than 1 < 3
> = (greater than or equal to) Greater than or equal to X >= Y
< = (less than or equal to) Less than or equal to Y <= X
<> (not equal to) Not equal to 2 <> 3
Application Help for SAP Product Lifecycle CostingCustom Fields and Formulas PUBLIC 223
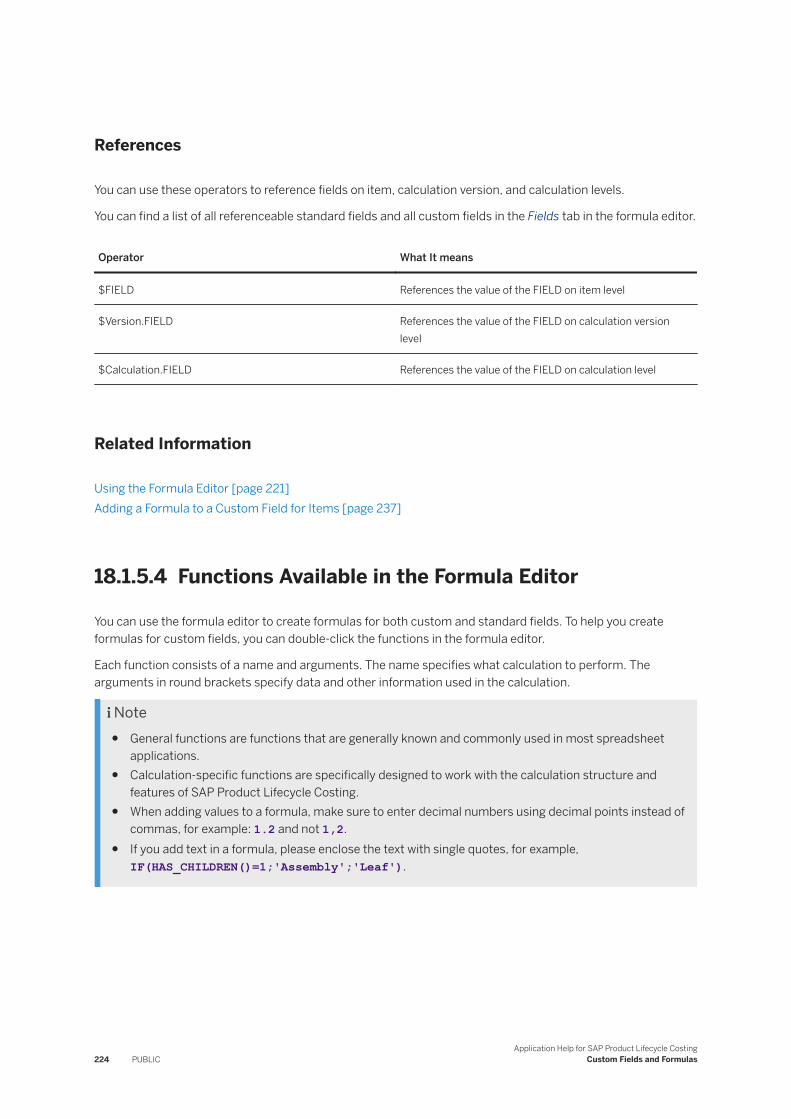
References
You can use these operators to reference fields on item, calculation version, and calculation levels.
You can find a list of all referenceable standard fields and all custom fields in the Fields tab in the formula editor.
Operator What It means
$FIELD References the value of the FIELD on item level
$Version.FIELD References the value of the FIELD on calculation version level
$Calculation.FIELD References the value of the FIELD on calculation level
Related Information
Using the Formula Editor [page 221]Adding a Formula to a Custom Field for Items [page 237]
18.1.5.4 Functions Available in the Formula Editor
You can use the formula editor to create formulas for both custom and standard fields. To help you create formulas for custom fields, you can double-click the functions in the formula editor.
Each function consists of a name and arguments. The name specifies what calculation to perform. The arguments in round brackets specify data and other information used in the calculation.
Note● General functions are functions that are generally known and commonly used in most spreadsheet
applications.● Calculation-specific functions are specifically designed to work with the calculation structure and
features of SAP Product Lifecycle Costing.● When adding values to a formula, make sure to enter decimal numbers using decimal points instead of
commas, for example: 1.2 and not 1,2.● If you add text in a formula, please enclose the text with single quotes, for example,
IF(HAS_CHILDREN()=1;'Assembly';'Leaf').
224 PUBLICApplication Help for SAP Product Lifecycle Costing
Custom Fields and Formulas
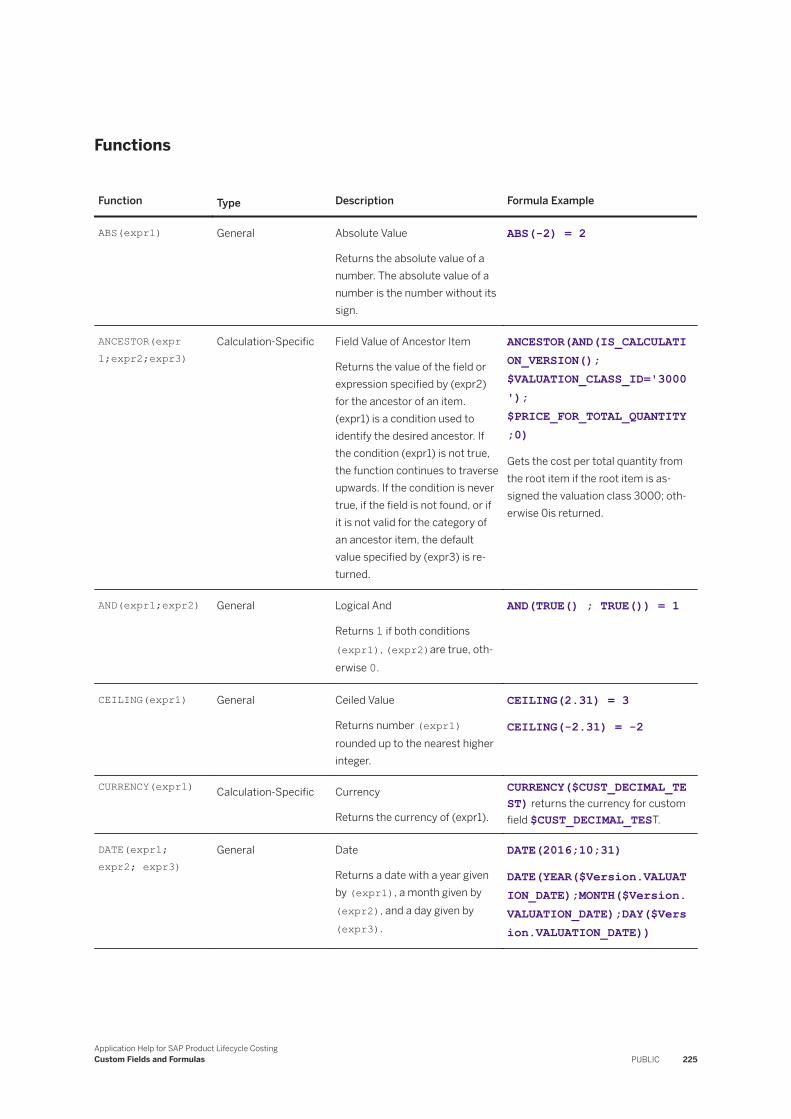
Functions
Function Type Description Formula Example
ABS(expr1) General Absolute Value
Returns the absolute value of a number. The absolute value of a number is the number without its sign.
ABS(-2) = 2
ANCESTOR(expr 1;expr2;expr3)
Calculation-Specific Field Value of Ancestor Item
Returns the value of the field or expression specified by (expr2) for the ancestor of an item. (expr1) is a condition used to identify the desired ancestor. If the condition (expr1) is not true, the function continues to traverse upwards. If the condition is never true, if the field is not found, or if it is not valid for the category of an ancestor item, the default value specified by (expr3) is returned.
ANCESTOR(AND(IS_CALCULATION_VERSION();$VALUATION_CLASS_ID='3000');$PRICE_FOR_TOTAL_QUANTITY;0)
Gets the cost per total quantity from the root item if the root item is assigned the valuation class 3000; otherwise 0is returned.
AND(expr1;expr2) General Logical And
Returns 1 if both conditions (expr1), (expr2)are true, otherwise 0.
AND(TRUE() ; TRUE()) = 1
CEILING(expr1) General Ceiled Value
Returns number (expr1) rounded up to the nearest higher integer.
CEILING(2.31) = 3
CEILING(-2.31) = -2
CURRENCY(expr1) Calculation-Specific Currency
Returns the currency of (expr1).
CURRENCY($CUST_DECIMAL_TEST) returns the currency for custom field $CUST_DECIMAL_TEST.
DATE(expr1; expr2; expr3)
General Date
Returns a date with a year given by (expr1), a month given by (expr2), and a day given by (expr3).
DATE(2016;10;31)
DATE(YEAR($Version.VALUATION_DATE);MONTH($Version.VALUATION_DATE);DAY($Version.VALUATION_DATE))
Application Help for SAP Product Lifecycle CostingCustom Fields and Formulas PUBLIC 225

Function Type Description Formula Example
DAY(expr1) General Day of Date
Returns the day of the date given by (expr1).
DAY($Version.VALUATION_DATE)
DIMENSION(expr1) Calculation-Specific Dimension
Returns the dimension of (expr1).
DIMENSION(<field>) returns the dimension for the unit of measure of <field> .
For example, the formula DIMENSION(<field>) can return one of the following values: VOLUME, LENGTH, STORAGE, TEMPERATURE, AREA, DENSITY, TIME, MASS, ENERGY, FREQUENCY.
NoteThis function only makes sense for use in custom fields that have a unit of measure.
E() General Euler’s Number
Returns Euler’s Number 2.71..., a mathematical constant.
E() = 2.71828182845904523536028…
FALSE() General False
Returns 0
FALSE() = 0
FLOOR(expr1) General Floored Value
Returns number (expr1) rounded down to the nearest lower integer.
FLOOR(2.31) = 2
FLOOR(-2.32) = -3
HAS_CHILDREN() Calculation-Specific Children Flag
Returns 1 if the selected item has children, otherwise 0.
If the selected item in your calculation version has several subitems, this function returns 1. If the selected item has no subitems, this function returns 0.
IF(HAS_CHILDREN()=1;'Assembly';'Leaf')
226 PUBLICApplication Help for SAP Product Lifecycle Costing
Custom Fields and Formulas
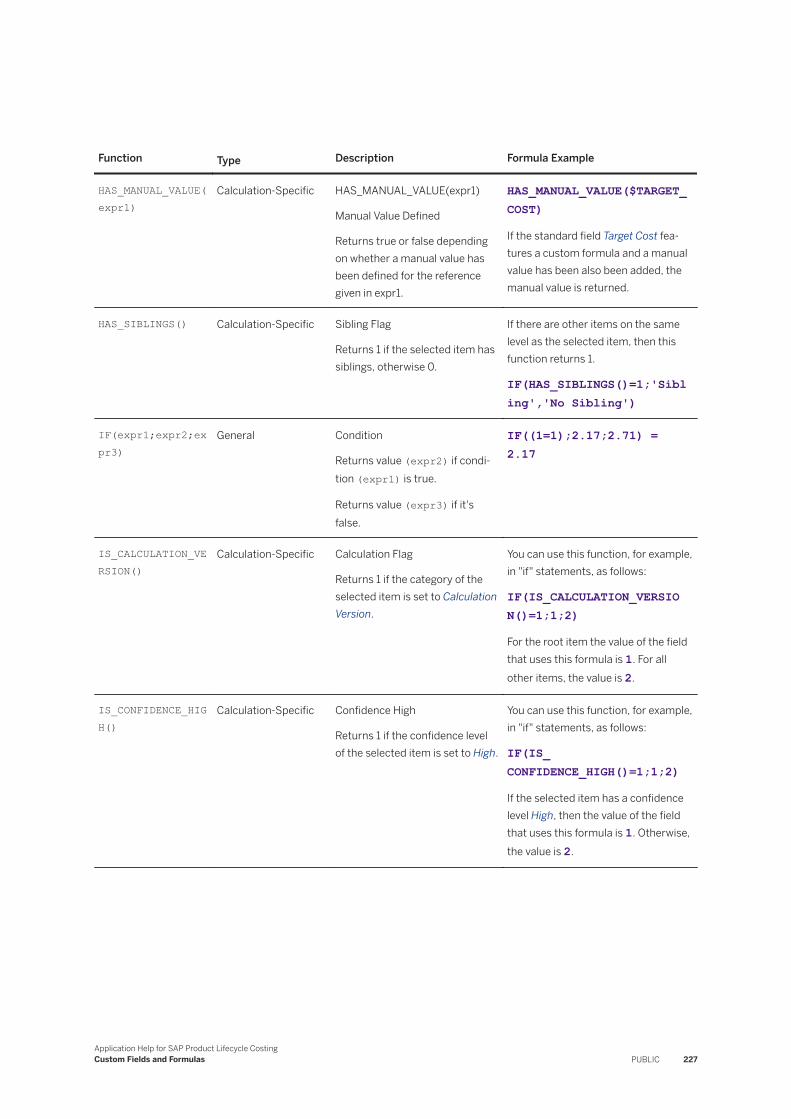
Function Type Description Formula Example
HAS_MANUAL_VALUE(expr1)
Calculation-Specific HAS_MANUAL_VALUE(expr1)
Manual Value Defined
Returns true or false depending on whether a manual value has been defined for the reference given in expr1.
HAS_MANUAL_VALUE($TARGET_COST)
If the standard field Target Cost features a custom formula and a manual value has been also been added, the manual value is returned.
HAS_SIBLINGS() Calculation-Specific Sibling Flag
Returns 1 if the selected item has siblings, otherwise 0.
If there are other items on the same level as the selected item, then this function returns 1.
IF(HAS_SIBLINGS()=1;'Sibling','No Sibling')
IF(expr1;expr2;expr3)
General Condition
Returns value (expr2) if condition (expr1) is true.
Returns value (expr3) if it's false.
IF((1=1);2.17;2.71) = 2.17
IS_CALCULATION_VERSION()
Calculation-Specific Calculation Flag
Returns 1 if the category of the selected item is set to Calculation Version.
You can use this function, for example, in "if" statements, as follows:
IF(IS_CALCULATION_VERSION()=1;1;2)
For the root item the value of the field that uses this formula is 1. For all other items, the value is 2.
IS_CONFIDENCE_HIGH()
Calculation-Specific Confidence High
Returns 1 if the confidence level of the selected item is set to High.
You can use this function, for example, in "if" statements, as follows:
IF(IS_ CONFIDENCE_HIGH()=1;1;2)
If the selected item has a confidence level High, then the value of the field that uses this formula is 1. Otherwise, the value is 2.
Application Help for SAP Product Lifecycle CostingCustom Fields and Formulas PUBLIC 227

Function Type Description Formula Example
IS_CONFIDENCE_LOW()
Calculation-Specific Confidence Low
Returns 1 if the confidence level of the selected item is set to Low.
ou can use this function, for example, in "if" statements, as follows:
IF(IS_ CONFIDENCE_LOW ()=1;1;2)
If the selected item has a confidence level Low, then the value of the field that uses this formula is 1. Otherwise, the value is 2.
IS_CONFIDENCE_MEDIUM()
Calculation-Specific Confidence Medium
Returns 1 if the confidence level of the selected item is set to Medium.
You can use this function, for example, in "if" statements, as follows:
IF(IS_ CONFIDENCE_MEDIUM()=1;1;2)
If the selected item has a confidence level Medium, then the value of the field that uses this formula is 1. Otherwise, the value is 2.
IS_CONFIDENCE_VERY_HIGH()
Calculation-Specific Confidence Very High
Returns 1 if the confidence level of the selected item is set to Very High.
You can use this function, for example, in "if" statements, as follows:
IF(IS_ CONFIDENCE_VERY_HIGH ()=1;1;2)
If the selected item has a confidence level Very High, then the value of the field that uses this formula is 1. Otherwise, the value is 2.
IS_CONFIDENCE_VERY_LOW()
Calculation-Specific Confidence Very Low
Returns 1 if the confidence level of the selected item is set to Very Low.
You can use this function, for example, in "if" statements, as follows:
IF(IS_ CONFIDENCE_VERY_LOW ()=1;1;2)
If the selected item has a confidence level Very Low, then the value of the field that uses this formula is 1. Otherwise, the value is 2.
228 PUBLICApplication Help for SAP Product Lifecycle Costing
Custom Fields and Formulas
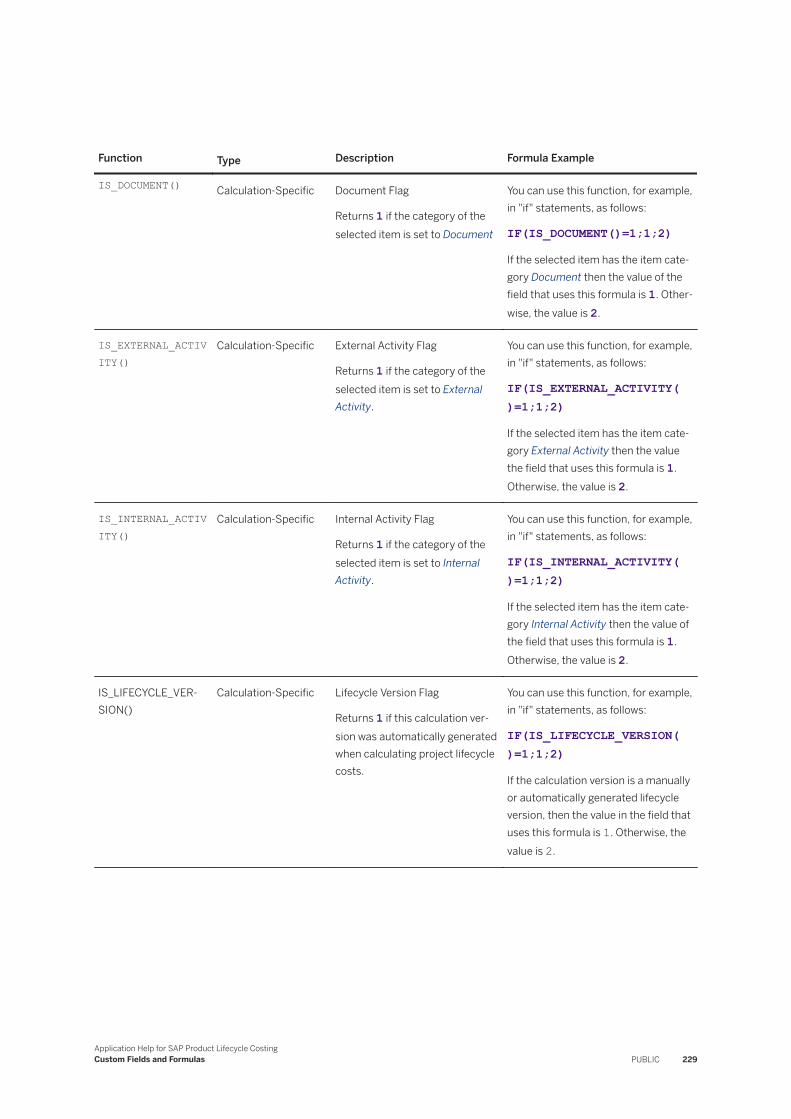
Function Type Description Formula Example
IS_DOCUMENT() Calculation-Specific Document Flag
Returns 1 if the category of the selected item is set to Document
You can use this function, for example, in "if" statements, as follows:
IF(IS_DOCUMENT()=1;1;2)
If the selected item has the item category Document then the value of the field that uses this formula is 1. Otherwise, the value is 2.
IS_EXTERNAL_ACTIVITY()
Calculation-Specific External Activity Flag
Returns 1 if the category of the selected item is set to External Activity.
You can use this function, for example, in "if" statements, as follows:
IF(IS_EXTERNAL_ACTIVITY()=1;1;2)
If the selected item has the item category External Activity then the value the field that uses this formula is 1. Otherwise, the value is 2.
IS_INTERNAL_ACTIVITY()
Calculation-Specific Internal Activity Flag
Returns 1 if the category of the selected item is set to Internal Activity.
You can use this function, for example, in "if" statements, as follows:
IF(IS_INTERNAL_ACTIVITY()=1;1;2)
If the selected item has the item category Internal Activity then the value of the field that uses this formula is 1. Otherwise, the value is 2.
IS_LIFECYCLE_VERSION()
Calculation-Specific Lifecycle Version Flag
Returns 1 if this calculation version was automatically generated when calculating project lifecycle costs.
You can use this function, for example, in "if" statements, as follows:
IF(IS_LIFECYCLE_VERSION()=1;1;2)
If the calculation version is a manually or automatically generated lifecycle version, then the value in the field that uses this formula is 1. Otherwise, the value is 2.
Application Help for SAP Product Lifecycle CostingCustom Fields and Formulas PUBLIC 229
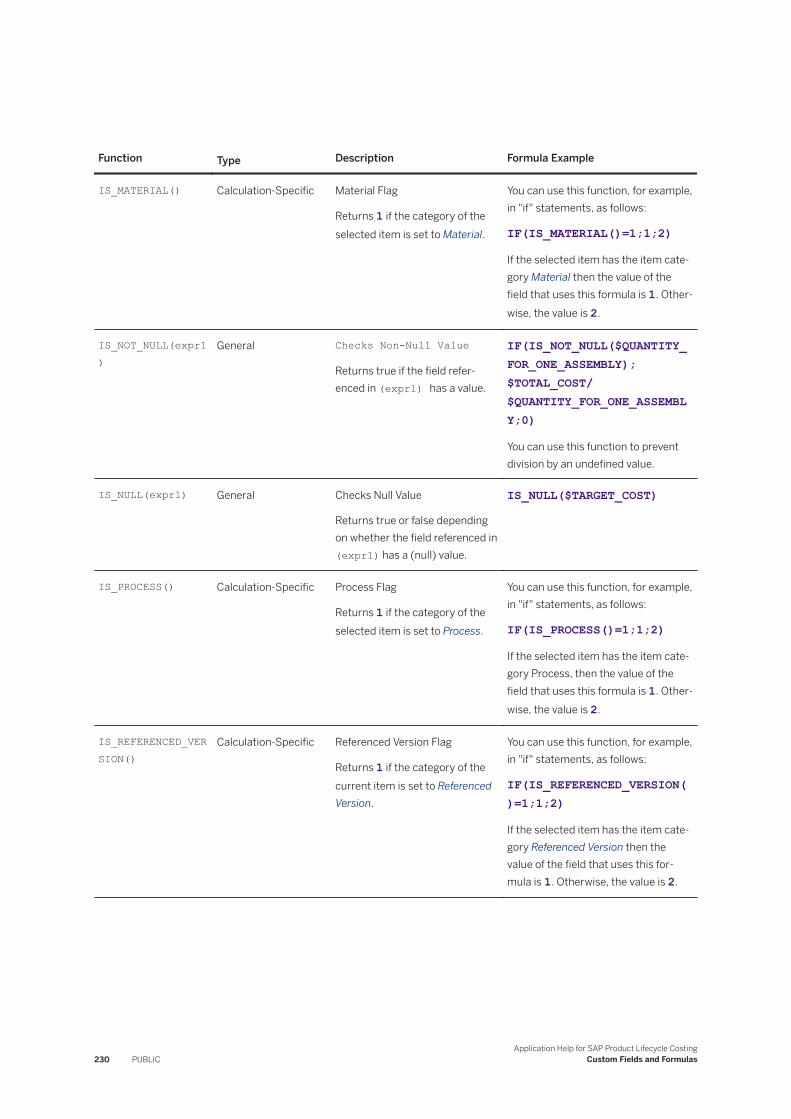
Function Type Description Formula Example
IS_MATERIAL() Calculation-Specific Material Flag
Returns 1 if the category of the selected item is set to Material.
You can use this function, for example, in "if" statements, as follows:
IF(IS_MATERIAL()=1;1;2)
If the selected item has the item category Material then the value of the field that uses this formula is 1. Otherwise, the value is 2.
IS_NOT_NULL(expr1)
General Checks Non-Null Value
Returns true if the field referenced in (expr1) has a value.
IF(IS_NOT_NULL($QUANTITY_FOR_ONE_ASSEMBLY);$TOTAL_COST/$QUANTITY_FOR_ONE_ASSEMBLY;0)
You can use this function to prevent division by an undefined value.
IS_NULL(expr1) General Checks Null Value
Returns true or false depending on whether the field referenced in (expr1) has a (null) value.
IS_NULL($TARGET_COST)
IS_PROCESS() Calculation-Specific Process Flag
Returns 1 if the category of the selected item is set to Process.
You can use this function, for example, in "if" statements, as follows:
IF(IS_PROCESS()=1;1;2)
If the selected item has the item category Process, then the value of the field that uses this formula is 1. Otherwise, the value is 2.
IS_REFERENCED_VERSION()
Calculation-Specific Referenced Version Flag
Returns 1 if the category of the current item is set to Referenced Version.
You can use this function, for example, in "if" statements, as follows:
IF(IS_REFERENCED_VERSION()=1;1;2)
If the selected item has the item category Referenced Version then the value of the field that uses this formula is 1. Otherwise, the value is 2.
230 PUBLICApplication Help for SAP Product Lifecycle Costing
Custom Fields and Formulas
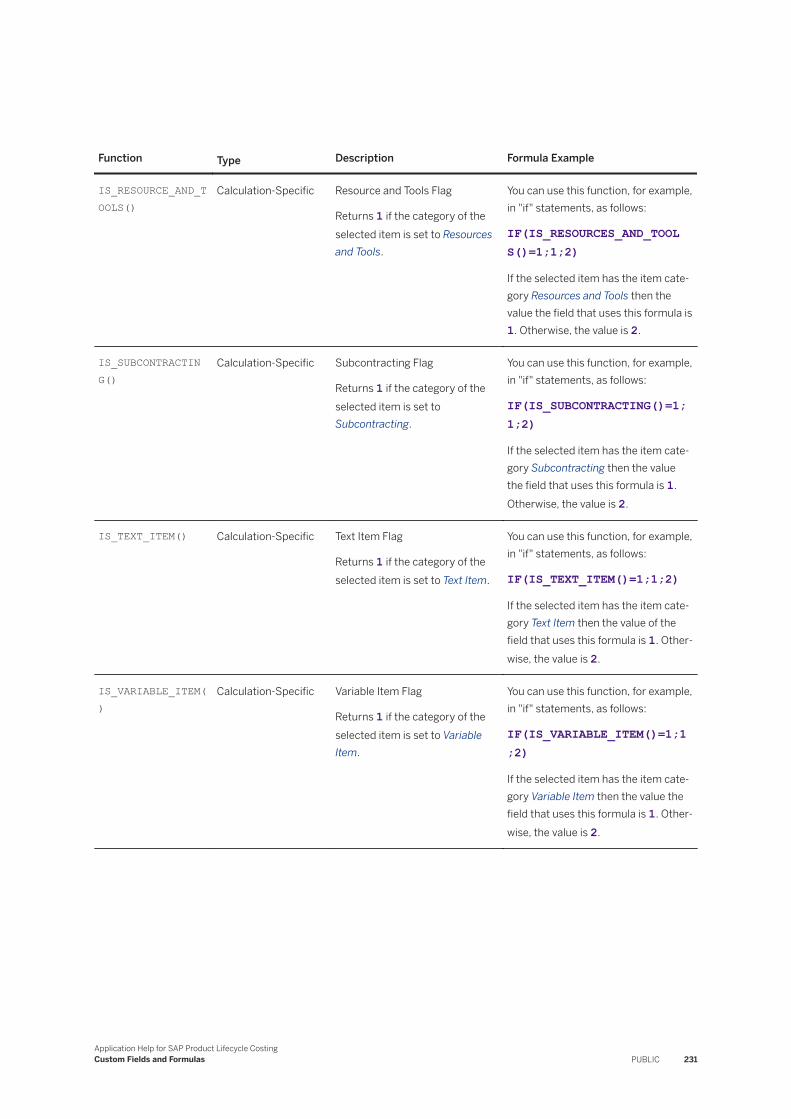
Function Type Description Formula Example
IS_RESOURCE_AND_TOOLS()
Calculation-Specific Resource and Tools Flag
Returns 1 if the category of the selected item is set to Resources and Tools.
You can use this function, for example, in "if" statements, as follows:
IF(IS_RESOURCES_AND_TOOLS()=1;1;2)
If the selected item has the item category Resources and Tools then the value the field that uses this formula is 1. Otherwise, the value is 2.
IS_SUBCONTRACTING()
Calculation-Specific Subcontracting Flag
Returns 1 if the category of the selected item is set to Subcontracting.
You can use this function, for example, in "if" statements, as follows:
IF(IS_SUBCONTRACTING()=1;1;2)
If the selected item has the item category Subcontracting then the value the field that uses this formula is 1. Otherwise, the value is 2.
IS_TEXT_ITEM() Calculation-Specific Text Item Flag
Returns 1 if the category of the selected item is set to Text Item.
You can use this function, for example, in "if" statements, as follows:
IF(IS_TEXT_ITEM()=1;1;2)
If the selected item has the item category Text Item then the value of the field that uses this formula is 1. Otherwise, the value is 2.
IS_VARIABLE_ITEM()
Calculation-Specific Variable Item Flag
Returns 1 if the category of the selected item is set to Variable Item.
You can use this function, for example, in "if" statements, as follows:
IF(IS_VARIABLE_ITEM()=1;1;2)
If the selected item has the item category Variable Item then the value the field that uses this formula is 1. Otherwise, the value is 2.
Application Help for SAP Product Lifecycle CostingCustom Fields and Formulas PUBLIC 231
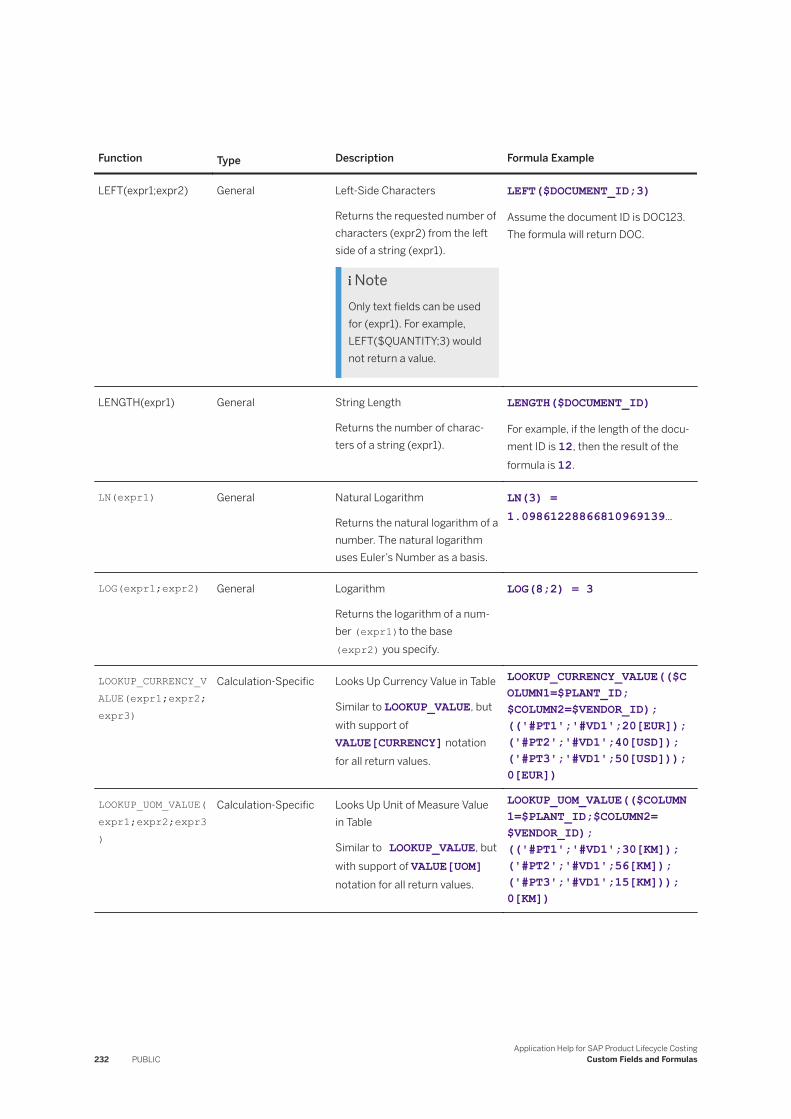
Function Type Description Formula Example
LEFT(expr1;expr2) General Left-Side Characters
Returns the requested number of characters (expr2) from the left side of a string (expr1).
NoteOnly text fields can be used for (expr1). For example, LEFT($QUANTITY;3) would not return a value.
LEFT($DOCUMENT_ID;3)
Assume the document ID is DOC123. The formula will return DOC.
LENGTH(expr1) General String Length
Returns the number of characters of a string (expr1).
LENGTH($DOCUMENT_ID)
For example, if the length of the document ID is 12, then the result of the formula is 12.
LN(expr1) General Natural Logarithm
Returns the natural logarithm of a number. The natural logarithm uses Euler’s Number as a basis.
LN(3) = 1.09861228866810969139…
LOG(expr1;expr2) General Logarithm
Returns the logarithm of a number (expr1)to the base (expr2) you specify.
LOG(8;2) = 3
LOOKUP_CURRENCY_VALUE(expr1;expr2;expr3)
Calculation-Specific Looks Up Currency Value in Table
Similar to LOOKUP_VALUE, but with support of VALUE[CURRENCY] notation for all return values.
LOOKUP_CURRENCY_VALUE(($COLUMN1=$PLANT_ID;$COLUMN2=$VENDOR_ID);(('#PT1';'#VD1';20[EUR]);('#PT2';'#VD1';40[USD]);('#PT3';'#VD1';50[USD]));0[EUR])
LOOKUP_UOM_VALUE(expr1;expr2;expr3)
Calculation-Specific Looks Up Unit of Measure Value in Table
Similar to LOOKUP_VALUE, but with support of VALUE[UOM] notation for all return values.
LOOKUP_UOM_VALUE(($COLUMN1=$PLANT_ID;$COLUMN2=$VENDOR_ID);(('#PT1';'#VD1';30[KM]);('#PT2';'#VD1';56[KM]);('#PT3';'#VD1';15[KM]));0[KM])
232 PUBLICApplication Help for SAP Product Lifecycle Costing
Custom Fields and Formulas
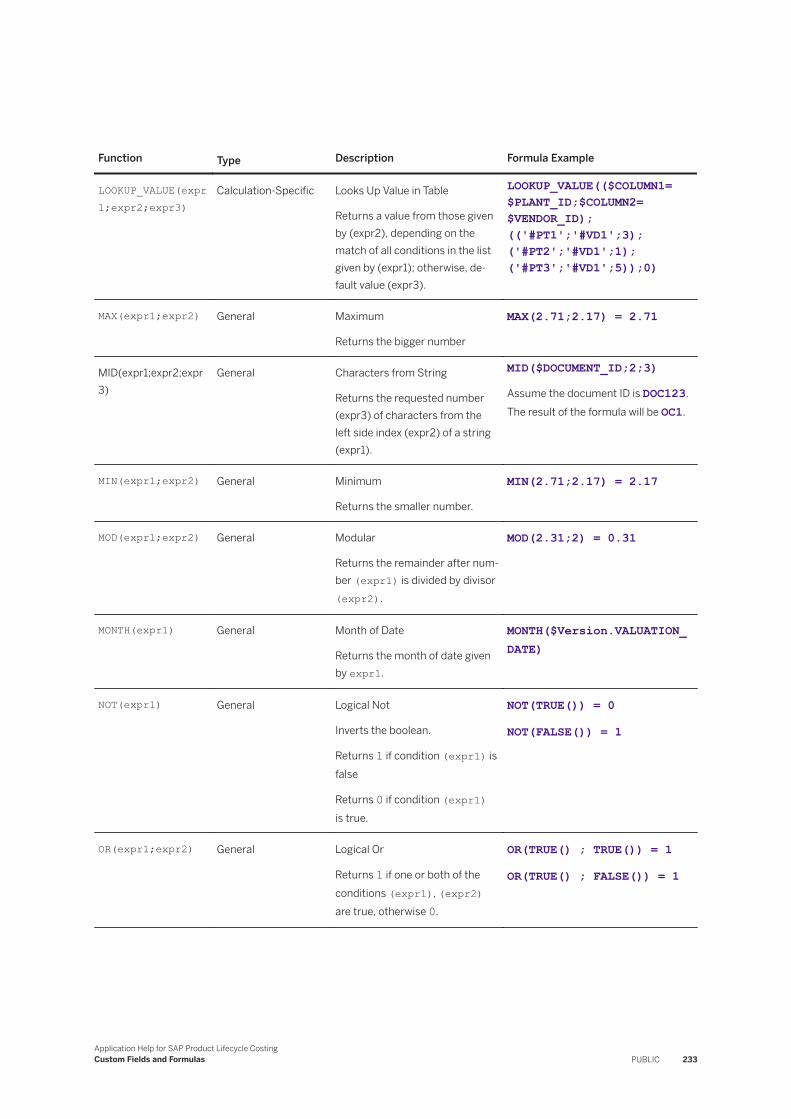
Function Type Description Formula Example
LOOKUP_VALUE(expr1;expr2;expr3)
Calculation-Specific Looks Up Value in Table
Returns a value from those given by (expr2), depending on the match of all conditions in the list given by (expr1); otherwise, default value (expr3).
LOOKUP_VALUE(($COLUMN1=$PLANT_ID;$COLUMN2=$VENDOR_ID);(('#PT1';'#VD1';3);('#PT2';'#VD1';1);('#PT3';'#VD1';5));0)
MAX(expr1;expr2) General Maximum
Returns the bigger number
MAX(2.71;2.17) = 2.71
MID(expr1;expr2;expr3)
General Characters from String
Returns the requested number (expr3) of characters from the left side index (expr2) of a string (expr1).
MID($DOCUMENT_ID;2;3)
Assume the document ID is DOC123. The result of the formula will be OC1.
MIN(expr1;expr2) General Minimum
Returns the smaller number.
MIN(2.71;2.17) = 2.17
MOD(expr1;expr2) General Modular
Returns the remainder after number (expr1) is divided by divisor (expr2).
MOD(2.31;2) = 0.31
MONTH(expr1) General Month of Date
Returns the month of date given by expr1.
MONTH($Version.VALUATION_DATE)
NOT(expr1) General Logical Not
Inverts the boolean.
Returns 1 if condition (expr1) is false
Returns 0 if condition (expr1) is true.
NOT(TRUE()) = 0
NOT(FALSE()) = 1
OR(expr1;expr2) General Logical Or
Returns 1 if one or both of the conditions (expr1), (expr2) are true, otherwise 0.
OR(TRUE() ; TRUE()) = 1
OR(TRUE() ; FALSE()) = 1
Application Help for SAP Product Lifecycle CostingCustom Fields and Formulas PUBLIC 233
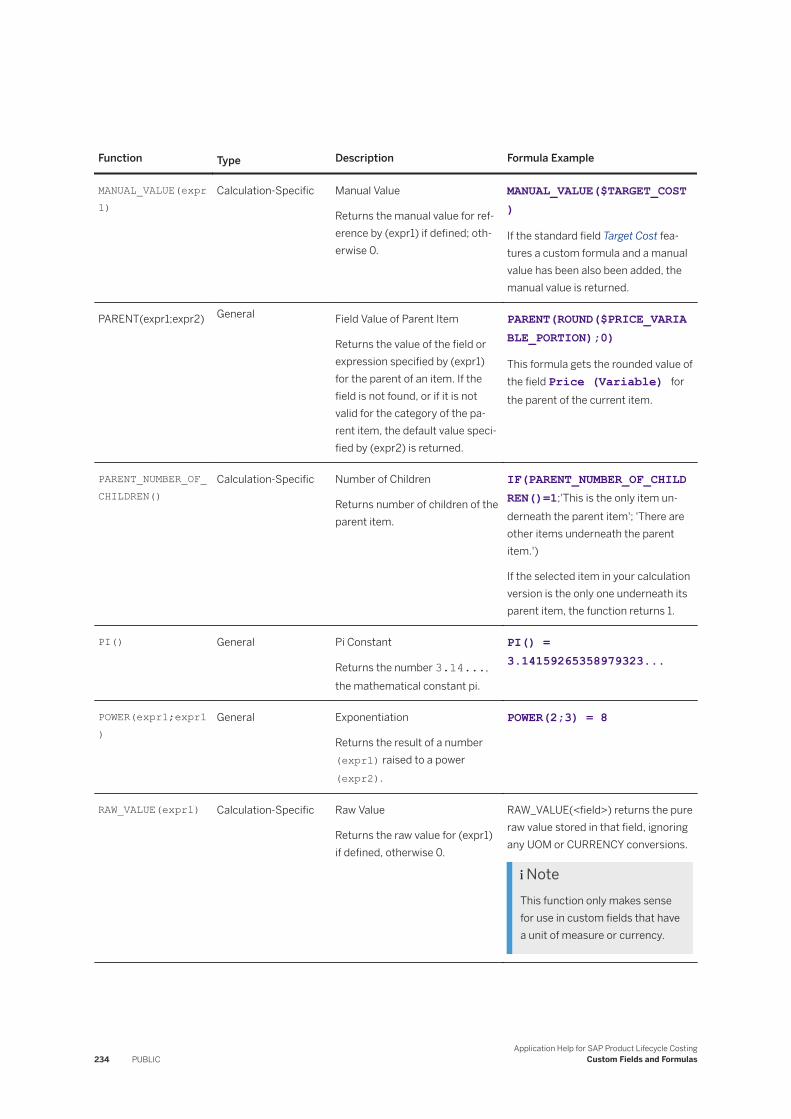
Function Type Description Formula Example
MANUAL_VALUE(expr1)
Calculation-Specific Manual Value
Returns the manual value for reference by (expr1) if defined; otherwise 0.
MANUAL_VALUE($TARGET_COST)
If the standard field Target Cost features a custom formula and a manual value has been also been added, the manual value is returned.
PARENT(expr1;expr2) General Field Value of Parent Item
Returns the value of the field or expression specified by (expr1) for the parent of an item. If the field is not found, or if it is not valid for the category of the parent item, the default value specified by (expr2) is returned.
PARENT(ROUND($PRICE_VARIABLE_PORTION);0)
This formula gets the rounded value of the field Price (Variable) for the parent of the current item.
PARENT_NUMBER_OF_CHILDREN()
Calculation-Specific Number of Children
Returns number of children of the parent item.
IF(PARENT_NUMBER_OF_CHILDREN()=1;'This is the only item underneath the parent item'; 'There are other items underneath the parent item.')
If the selected item in your calculation version is the only one underneath its parent item, the function returns 1.
PI() General Pi Constant
Returns the number 3.14..., the mathematical constant pi.
PI() = 3.14159265358979323...
POWER(expr1;expr1)
General Exponentiation
Returns the result of a number (expr1) raised to a power (expr2).
POWER(2;3) = 8
RAW_VALUE(expr1) Calculation-Specific Raw Value
Returns the raw value for (expr1) if defined, otherwise 0.
RAW_VALUE(<field>) returns the pure raw value stored in that field, ignoring any UOM or CURRENCY conversions.
NoteThis function only makes sense for use in custom fields that have a unit of measure or currency.
234 PUBLICApplication Help for SAP Product Lifecycle Costing
Custom Fields and Formulas
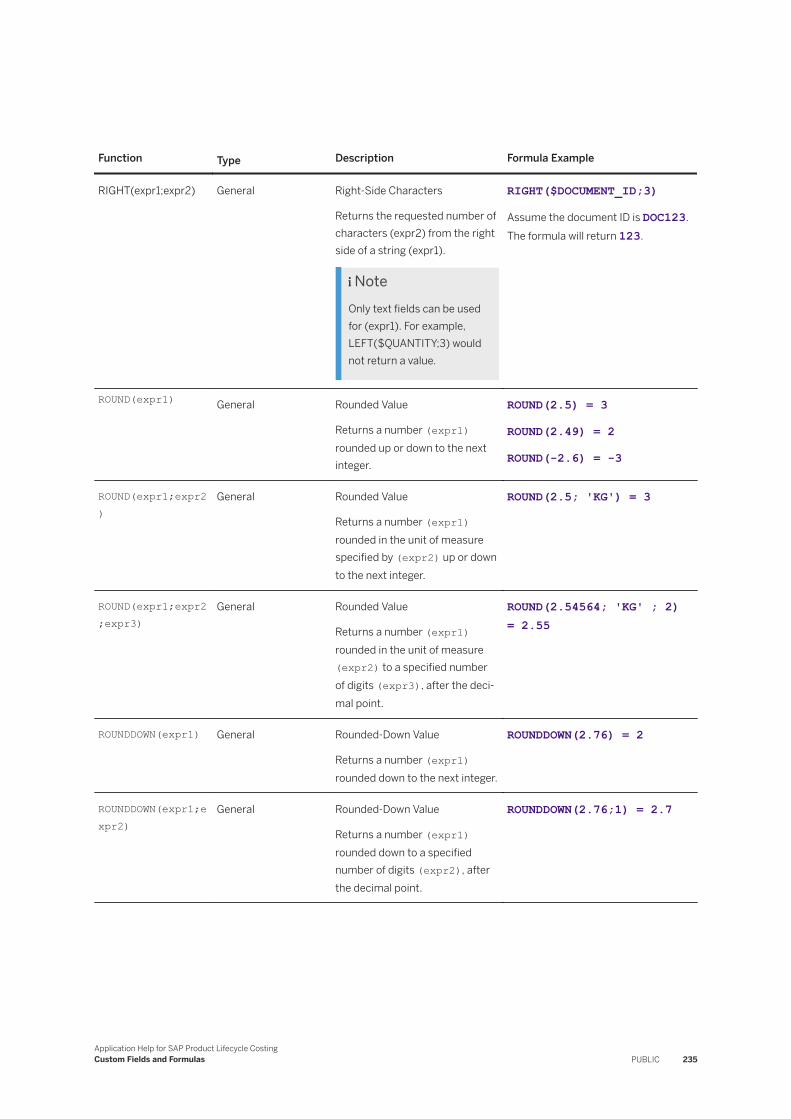
Function Type Description Formula Example
RIGHT(expr1;expr2) General Right-Side Characters
Returns the requested number of characters (expr2) from the right side of a string (expr1).
NoteOnly text fields can be used for (expr1). For example, LEFT($QUANTITY;3) would not return a value.
RIGHT($DOCUMENT_ID;3)
Assume the document ID is DOC123. The formula will return 123.
ROUND(expr1) General Rounded Value
Returns a number (expr1) rounded up or down to the next integer.
ROUND(2.5) = 3
ROUND(2.49) = 2
ROUND(-2.6) = -3
ROUND(expr1;expr2)
General Rounded Value
Returns a number (expr1) rounded in the unit of measure specified by (expr2) up or down to the next integer.
ROUND(2.5; 'KG') = 3
ROUND(expr1;expr2;expr3)
General Rounded Value
Returns a number (expr1) rounded in the unit of measure (expr2) to a specified number of digits (expr3), after the decimal point.
ROUND(2.54564; 'KG' ; 2) = 2.55
ROUNDDOWN(expr1) General Rounded-Down Value
Returns a number (expr1) rounded down to the next integer.
ROUNDDOWN(2.76) = 2
ROUNDDOWN(expr1;expr2)
General Rounded-Down Value
Returns a number (expr1) rounded down to a specified number of digits (expr2), after the decimal point.
ROUNDDOWN(2.76;1) = 2.7
Application Help for SAP Product Lifecycle CostingCustom Fields and Formulas PUBLIC 235
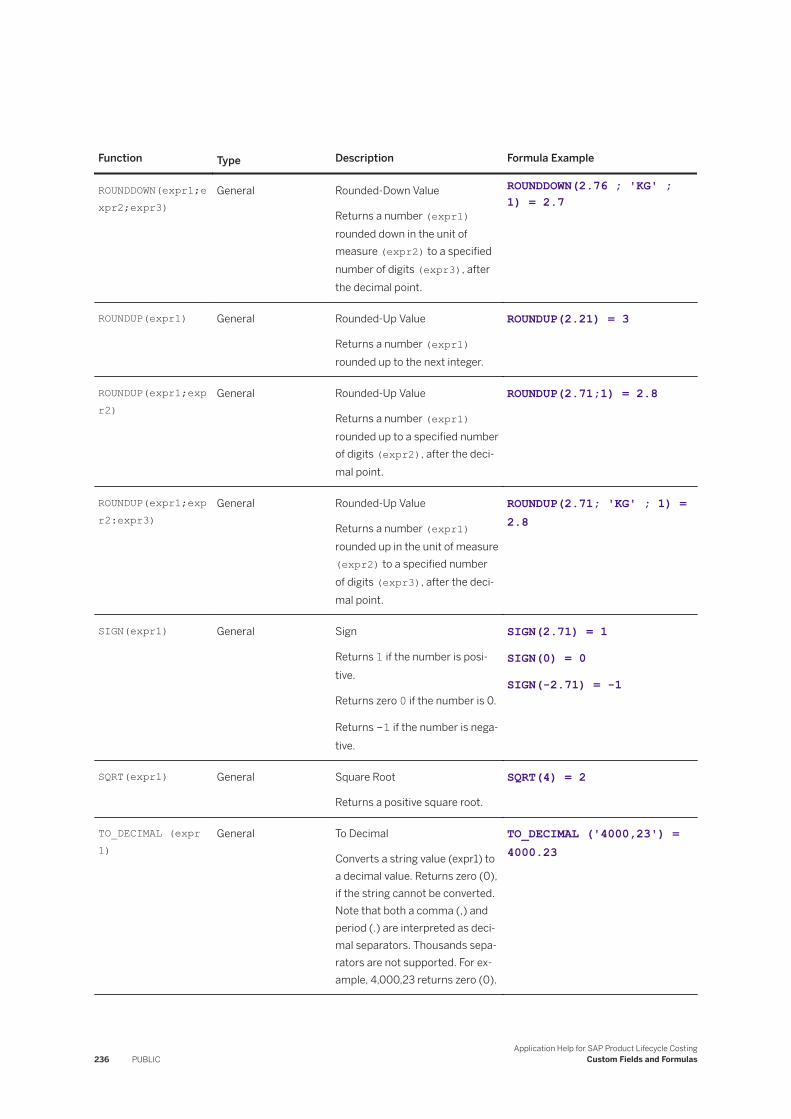
Function Type Description Formula Example
ROUNDDOWN(expr1;expr2;expr3)
General Rounded-Down Value
Returns a number (expr1) rounded down in the unit of measure (expr2) to a specified number of digits (expr3), after the decimal point.
ROUNDDOWN(2.76 ; 'KG' ; 1) = 2.7
ROUNDUP(expr1) General Rounded-Up Value
Returns a number (expr1) rounded up to the next integer.
ROUNDUP(2.21) = 3
ROUNDUP(expr1;expr2)
General Rounded-Up Value
Returns a number (expr1) rounded up to a specified number of digits (expr2), after the decimal point.
ROUNDUP(2.71;1) = 2.8
ROUNDUP(expr1;expr2:expr3)
General Rounded-Up Value
Returns a number (expr1) rounded up in the unit of measure (expr2) to a specified number of digits (expr3), after the decimal point.
ROUNDUP(2.71; 'KG' ; 1) = 2.8
SIGN(expr1) General Sign
Returns 1 if the number is positive.
Returns zero 0 if the number is 0.
Returns -1 if the number is negative.
SIGN(2.71) = 1
SIGN(0) = 0
SIGN(-2.71) = -1
SQRT(expr1) General Square Root
Returns a positive square root.
SQRT(4) = 2
TO_DECIMAL (expr 1)
General To Decimal
Converts a string value (expr1) to a decimal value. Returns zero (0), if the string cannot be converted. Note that both a comma (,) and period (.) are interpreted as decimal separators. Thousands separators are not supported. For example, 4,000,23 returns zero (0).
TO_DECIMAL ('4000,23') = 4000.23
236 PUBLICApplication Help for SAP Product Lifecycle Costing
Custom Fields and Formulas
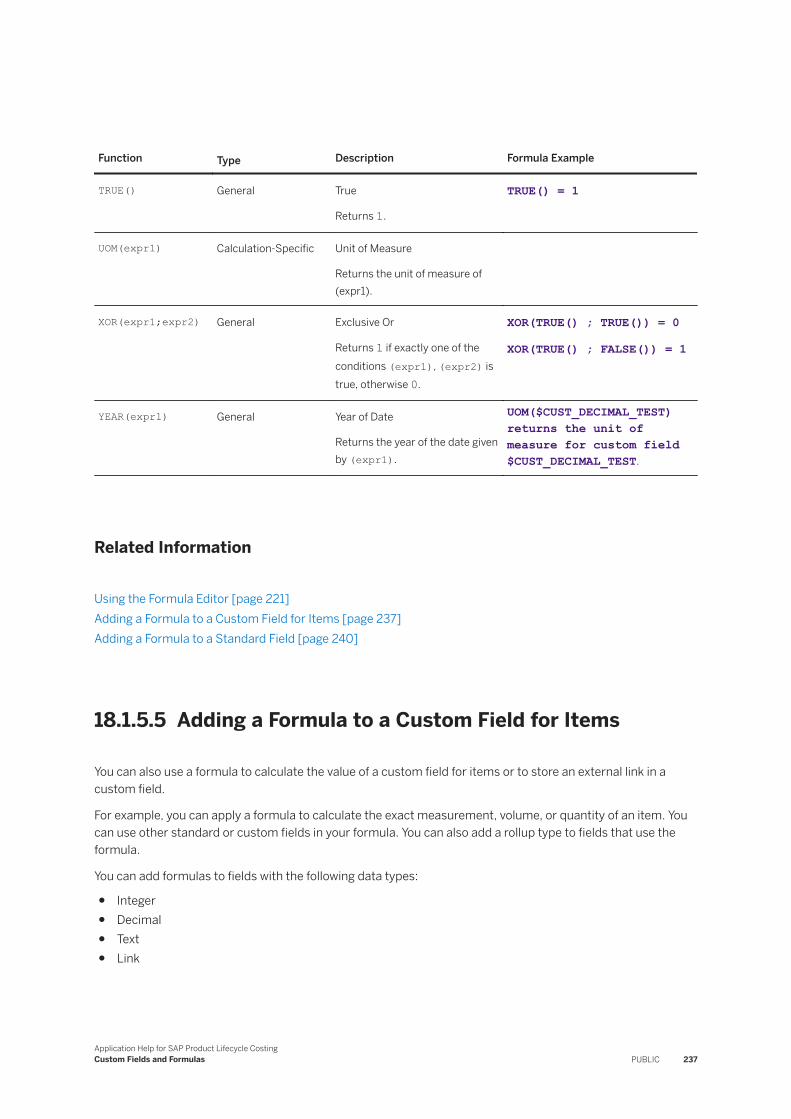
Function Type Description Formula Example
TRUE() General True
Returns 1.
TRUE() = 1
UOM(expr1) Calculation-Specific Unit of Measure
Returns the unit of measure of (expr1).
XOR(expr1;expr2) General Exclusive Or
Returns 1 if exactly one of the conditions (expr1), (expr2) is true, otherwise 0.
XOR(TRUE() ; TRUE()) = 0
XOR(TRUE() ; FALSE()) = 1
YEAR(expr1) General Year of Date
Returns the year of the date given by (expr1).
UOM($CUST_DECIMAL_TEST) returns the unit of measure for custom field $CUST_DECIMAL_TEST.
Related Information
Using the Formula Editor [page 221]Adding a Formula to a Custom Field for Items [page 237]Adding a Formula to a Standard Field [page 240]
18.1.5.5 Adding a Formula to a Custom Field for Items
You can also use a formula to calculate the value of a custom field for items or to store an external link in a custom field.
For example, you can apply a formula to calculate the exact measurement, volume, or quantity of an item. You can use other standard or custom fields in your formula. You can also add a rollup type to fields that use the formula.
You can add formulas to fields with the following data types:
● Integer● Decimal● Text● Link
Application Help for SAP Product Lifecycle CostingCustom Fields and Formulas PUBLIC 237
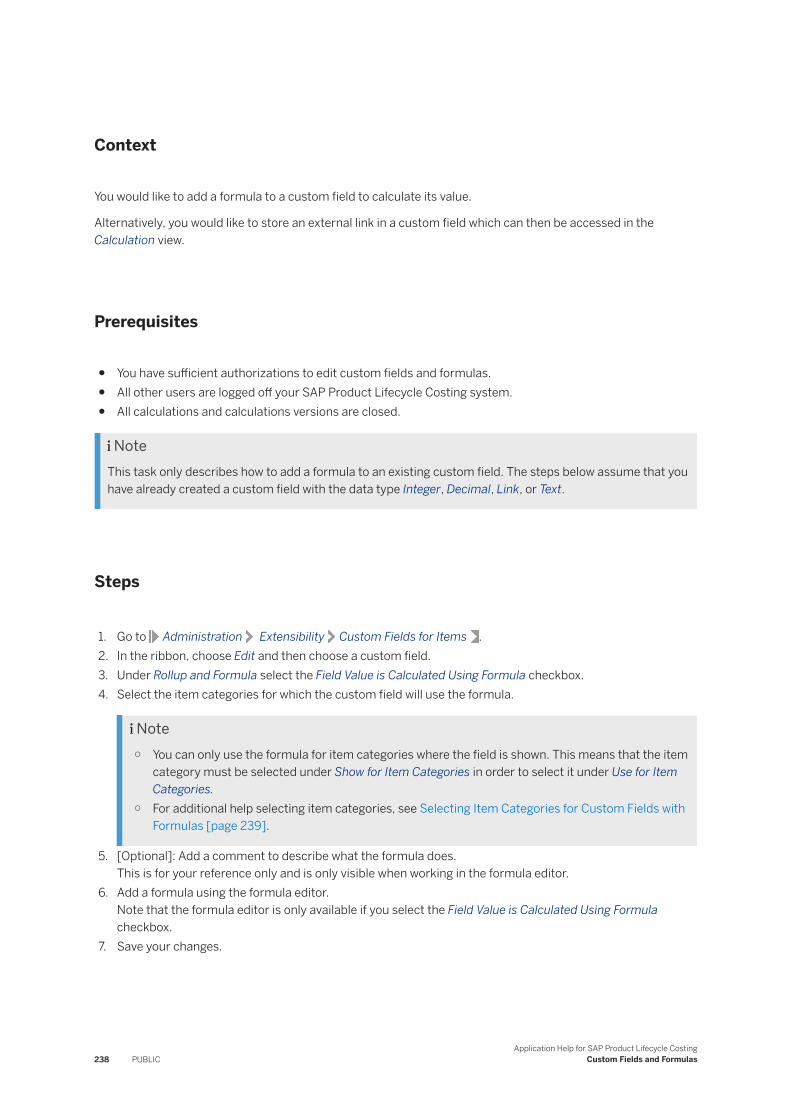
Context
You would like to add a formula to a custom field to calculate its value.
Alternatively, you would like to store an external link in a custom field which can then be accessed in the Calculation view.
Prerequisites
● You have sufficient authorizations to edit custom fields and formulas.● All other users are logged off your SAP Product Lifecycle Costing system.● All calculations and calculations versions are closed.
NoteThis task only describes how to add a formula to an existing custom field. The steps below assume that you have already created a custom field with the data type Integer, Decimal, Link, or Text.
Steps
1. Go to Administration Extensibility Custom Fields for Items .2. In the ribbon, choose Edit and then choose a custom field.3. Under Rollup and Formula select the Field Value is Calculated Using Formula checkbox.4. Select the item categories for which the custom field will use the formula.
Note○ You can only use the formula for item categories where the field is shown. This means that the item
category must be selected under Show for Item Categories in order to select it under Use for Item Categories.
○ For additional help selecting item categories, see Selecting Item Categories for Custom Fields with Formulas [page 239].
5. [Optional]: Add a comment to describe what the formula does.This is for your reference only and is only visible when working in the formula editor.
6. Add a formula using the formula editor.Note that the formula editor is only available if you select the Field Value is Calculated Using Formula checkbox.
7. Save your changes.
238 PUBLICApplication Help for SAP Product Lifecycle Costing
Custom Fields and Formulas
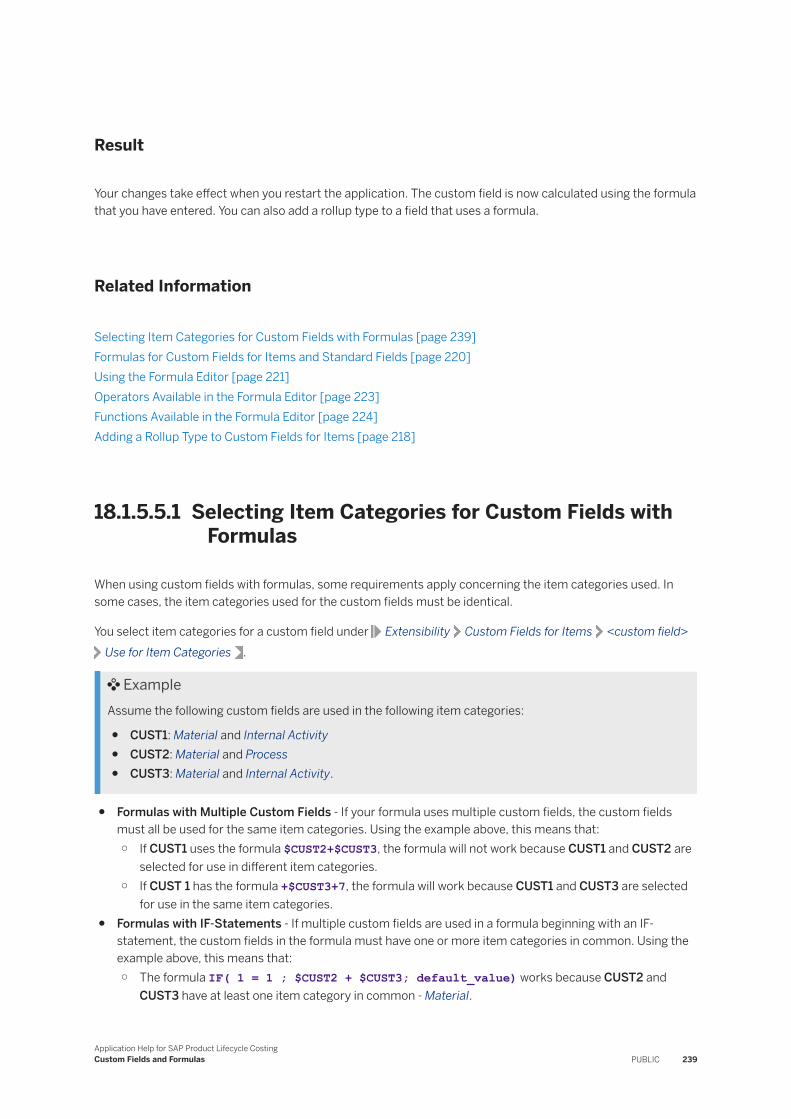
Result
Your changes take effect when you restart the application. The custom field is now calculated using the formula that you have entered. You can also add a rollup type to a field that uses a formula.
Related Information
Selecting Item Categories for Custom Fields with Formulas [page 239]Formulas for Custom Fields for Items and Standard Fields [page 220]Using the Formula Editor [page 221]Operators Available in the Formula Editor [page 223]Functions Available in the Formula Editor [page 224]Adding a Rollup Type to Custom Fields for Items [page 218]
18.1.5.5.1 Selecting Item Categories for Custom Fields with Formulas
When using custom fields with formulas, some requirements apply concerning the item categories used. In some cases, the item categories used for the custom fields must be identical.
You select item categories for a custom field under Extensibility Custom Fields for Items <custom field>Use for Item Categories .
ExampleAssume the following custom fields are used in the following item categories:
● CUST1: Material and Internal Activity● CUST2: Material and Process● CUST3: Material and Internal Activity.
● Formulas with Multiple Custom Fields - If your formula uses multiple custom fields, the custom fields must all be used for the same item categories. Using the example above, this means that:○ If CUST1 uses the formula $CUST2+$CUST3, the formula will not work because CUST1 and CUST2 are
selected for use in different item categories.○ If CUST 1 has the formula +$CUST3+7, the formula will work because CUST1 and CUST3 are selected
for use in the same item categories.● Formulas with IF-Statements - If multiple custom fields are used in a formula beginning with an IF-
statement, the custom fields in the formula must have one or more item categories in common. Using the example above, this means that:○ The formula IF( 1 = 1 ; $CUST2 + $CUST3; default_value) works because CUST2 and
CUST3 have at least one item category in common - Material.
Application Help for SAP Product Lifecycle CostingCustom Fields and Formulas PUBLIC 239
● Formulas using PARENT or ANCESTOR Functions - When using custom fields in PARENT or ANCESTOR functions, the item category is not relevant. You can use different custom fields with different categories in these formulas.
18.1.5.6 Adding a Formula to a Standard Field
You can use formulas to calculate values for standard fields. For example, to produce a wood table, you can overwrite the standard field Quantity with a formula. The formula could then calculate the amount of wood needed to manufacture a table based on custom fields like width, height, and depth for material items.
You can create and use formulas for the standard fields shown under Administration ExtensibilityStandard Fields with Formula .
Context
You would like to use a formula to calculate the value of a standard field that allows formula-based calculation.
Prerequisites
● You have sufficient authorization to work with custom fields and formulas.● All other users are logged off your SAP Product Lifecycle Costing system.● All calculations and calculation versions are closed.
Steps
1. Go to Administration Extensibility Standard Fields with Formula .This shows you a list of available standard fields.
2. Choose the standard field to which you would like to add a formula, and continue under Formula.3. Select the Field Value is Calculated Using Formula checkbox.4. Select the item categories for which the field will use the formula.
NoteYou can only use the formula for item categories where the field is shown. This means the item category must be selected under Show for Item Categories in order to select it under Use for Item Categories.
5. [Optional]: Add a comment to describe what the formula does.This is for your reference only and is only visible when working in the formula editor.
6. Add a formula using the formula editor.
240 PUBLICApplication Help for SAP Product Lifecycle Costing
Custom Fields and Formulas
Note that the formula editor is only available if you select the Field Value is Calculated Using Formula checkbox.
7. Save your changes to activate them in the system.
Result
Your changes take effect when you restart the application. The standard field is now calculated using the
formula that you have entered, and the symbol is displayed at the left of the field to show that it is calculated by formula.
Related Information
Formulas for Custom Fields for Items and Standard Fields [page 220]Using the Formula Editor [page 221]Operators Available in the Formula Editor [page 223]Functions Available in the Formula Editor [page 224]
18.1.5.7 Modifying a Formula
You can modify a formula that you have added to a custom field or standard field.
Context
You would like to make changes to a formula that is used in a standard field or a custom field.
Prerequisites
● You have sufficient authorization to work with custom fields and formulas.● All other users are logged off your SAP Product Lifecycle Costing system.● All calculations and calculation versions are closed.
Application Help for SAP Product Lifecycle CostingCustom Fields and Formulas PUBLIC 241
Steps
1. Select the field that contains the formula you want to modify.
○ If the formula you want to modify is in a custom field, go to Administration Extensibility and choose Custom Fields for Items.
○ If the formula you want to modify is in a standard field, go to Administration Extensibility and choose Standard Fields with Formula.
2. Make sure the Field Value is Calculated Using Formula checkbox is activated.3. [Optional]: Select any additional item categories where the field using the formula will appear.4. [Optional]: Modify the comment describing what the formula does.
This is for your reference only and is only visible when working in the formula editor.5. Enter a new formula using the formula editor.6. Choose Save to activate your changes.
Result
The formula is available in the field where you saved it when you restart the application. Note that the modified formula is used in both new and old calculation versions that include this field.
18.1.5.8 Deactivating a Formula
You can deactivate a formula that you have added to a custom field or standard field.
Context
You would like to stop using a formula in a standard field or a custom field.
Prerequisites
● You have sufficient authorization to work with custom fields and formulas.● All other users are logged off your SAP Product Lifecycle Costing system.● All calculations and calculation versions are closed.
242 PUBLICApplication Help for SAP Product Lifecycle Costing
Custom Fields and Formulas
Steps
1. Select the field that contains the formula you want to deactivate.
○ If the formula you want to deactivate is in a custom field, go to Administration Extensibility , choose Custom Fields for Items and select a field.
○ If the formula you want to deactivate is in a standard field, go to Administration Extensibility , choose Standard Fields with Formula and select a field.
2. Deselect the Field Value is Calculated Using Formula checkbox.3. Choose Save to activate your changes in the system.
Result
The formula is no longer used in the field when you restart your application. Note that the formula has been removed from this field for all old and new calculation versions using this field.
18.1.6 Calculated Values for Custom Fields for Items and Standard Fields
The values for custom fields and certain standard fields can be calculated using a formula or rollup. If this is the case, a symbol is displayed on the left of the field in the table and side panel in the Calculation view.
A tooltip for the symbol or the value provides the following additional information about the value:
● Calculation type● Calculated value● Manual value, if one has been entered
Application Help for SAP Product Lifecycle CostingCustom Fields and Formulas PUBLIC 243
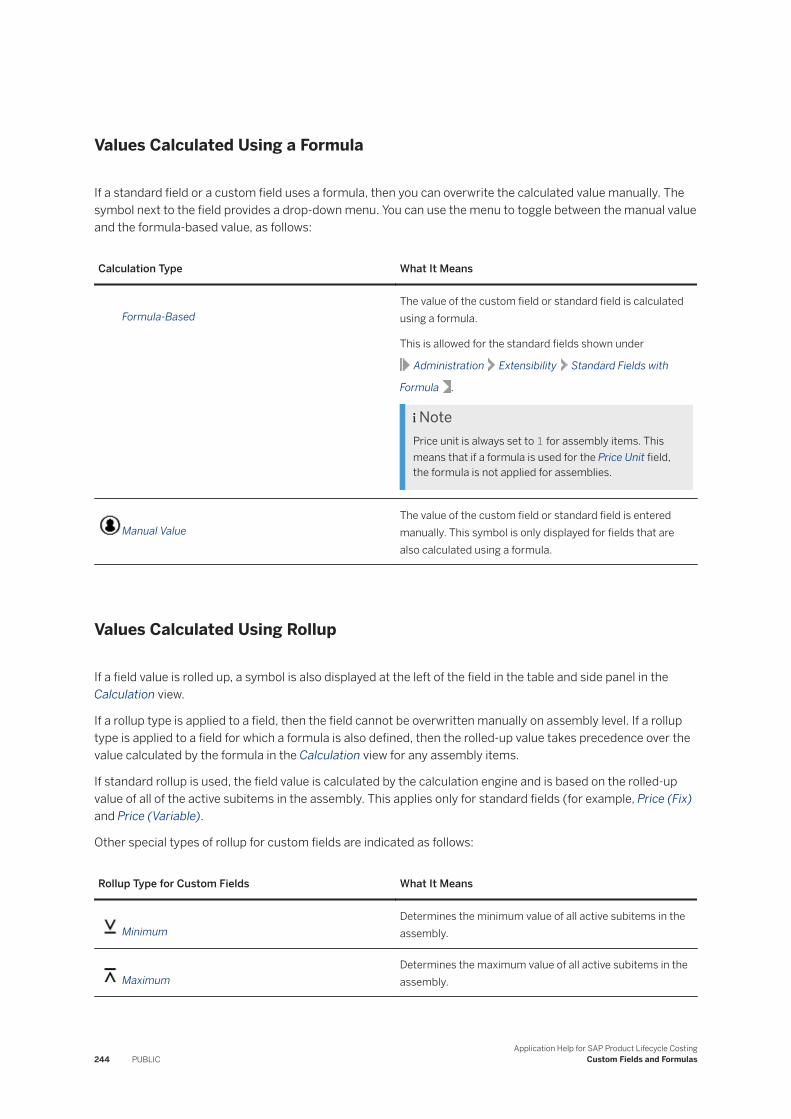
Values Calculated Using a Formula
If a standard field or a custom field uses a formula, then you can overwrite the calculated value manually. The symbol next to the field provides a drop-down menu. You can use the menu to toggle between the manual value and the formula-based value, as follows:
Calculation Type What It Means
Formula-BasedThe value of the custom field or standard field is calculated using a formula.
This is allowed for the standard fields shown under
Administration Extensibility Standard Fields with
Formula .
NotePrice unit is always set to 1 for assembly items. This means that if a formula is used for the Price Unit field, the formula is not applied for assemblies.
Manual ValueThe value of the custom field or standard field is entered manually. This symbol is only displayed for fields that are also calculated using a formula.
Values Calculated Using Rollup
If a field value is rolled up, a symbol is also displayed at the left of the field in the table and side panel in the Calculation view.
If a rollup type is applied to a field, then the field cannot be overwritten manually on assembly level. If a rollup type is applied to a field for which a formula is also defined, then the rolled-up value takes precedence over the value calculated by the formula in the Calculation view for any assembly items.
If standard rollup is used, the field value is calculated by the calculation engine and is based on the rolled-up value of all of the active subitems in the assembly. This applies only for standard fields (for example, Price (Fix) and Price (Variable).
Other special types of rollup for custom fields are indicated as follows:
Rollup Type for Custom Fields What It Means
MinimumDetermines the minimum value of all active subitems in the assembly.
MaximumDetermines the maximum value of all active subitems in the assembly.
244 PUBLICApplication Help for SAP Product Lifecycle Costing
Custom Fields and Formulas
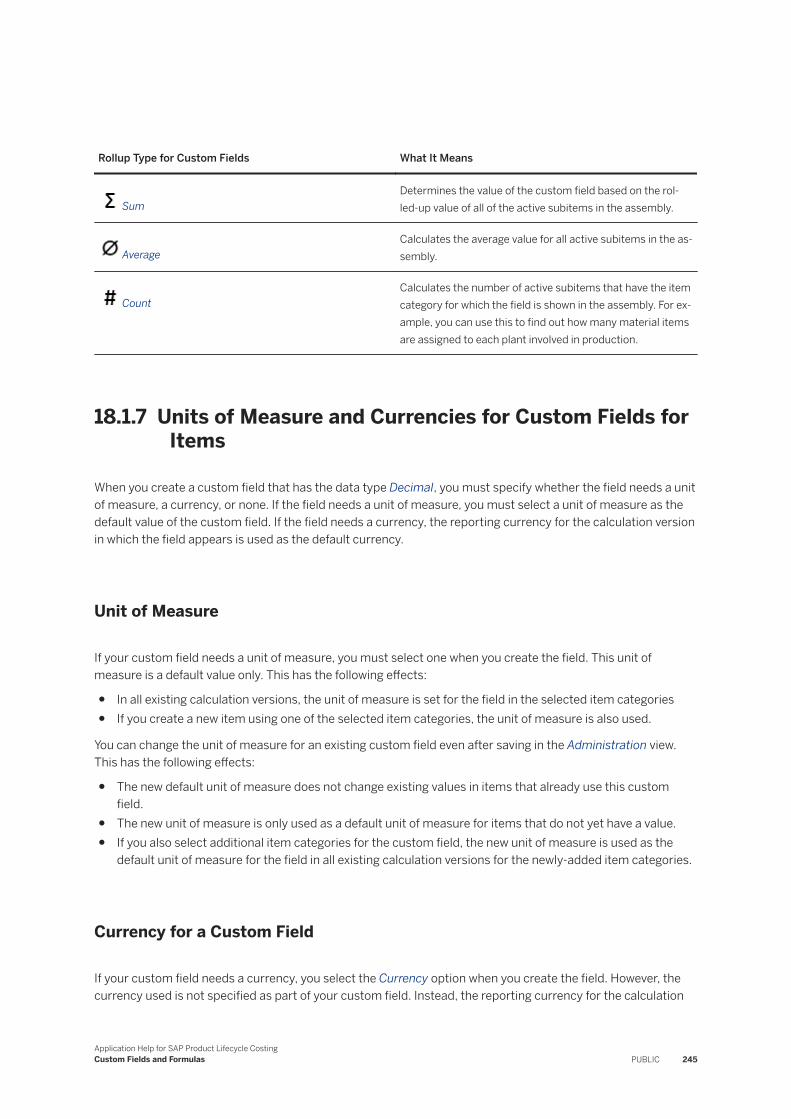
Rollup Type for Custom Fields What It Means
SumDetermines the value of the custom field based on the rolled-up value of all of the active subitems in the assembly.
AverageCalculates the average value for all active subitems in the assembly.
CountCalculates the number of active subitems that have the item category for which the field is shown in the assembly. For example, you can use this to find out how many material items are assigned to each plant involved in production.
18.1.7 Units of Measure and Currencies for Custom Fields for Items
When you create a custom field that has the data type Decimal, you must specify whether the field needs a unit of measure, a currency, or none. If the field needs a unit of measure, you must select a unit of measure as the default value of the custom field. If the field needs a currency, the reporting currency for the calculation version in which the field appears is used as the default currency.
Unit of Measure
If your custom field needs a unit of measure, you must select one when you create the field. This unit of measure is a default value only. This has the following effects:
● In all existing calculation versions, the unit of measure is set for the field in the selected item categories● If you create a new item using one of the selected item categories, the unit of measure is also used.
You can change the unit of measure for an existing custom field even after saving in the Administration view. This has the following effects:
● The new default unit of measure does not change existing values in items that already use this custom field.
● The new unit of measure is only used as a default unit of measure for items that do not yet have a value.● If you also select additional item categories for the custom field, the new unit of measure is used as the
default unit of measure for the field in all existing calculation versions for the newly-added item categories.
Currency for a Custom Field
If your custom field needs a currency, you select the Currency option when you create the field. However, the currency used is not specified as part of your custom field. Instead, the reporting currency for the calculation
Application Help for SAP Product Lifecycle CostingCustom Fields and Formulas PUBLIC 245
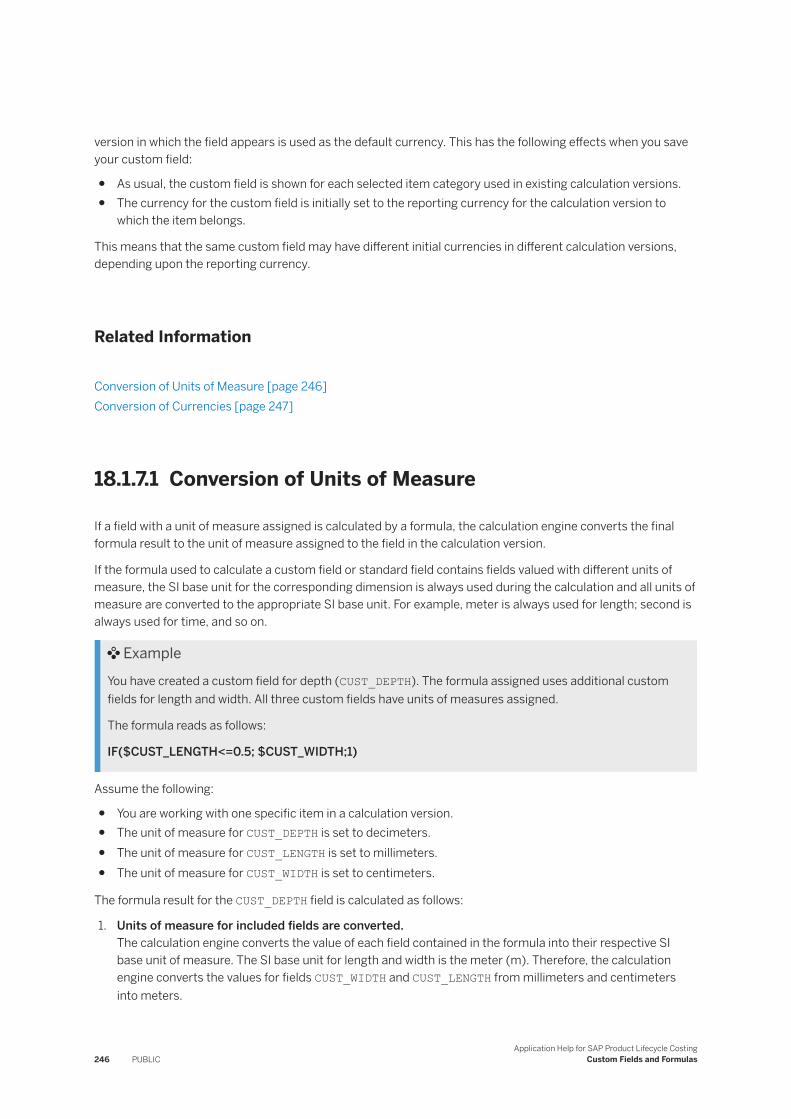
version in which the field appears is used as the default currency. This has the following effects when you save your custom field:
● As usual, the custom field is shown for each selected item category used in existing calculation versions.● The currency for the custom field is initially set to the reporting currency for the calculation version to
which the item belongs.
This means that the same custom field may have different initial currencies in different calculation versions, depending upon the reporting currency.
Related Information
Conversion of Units of Measure [page 246]Conversion of Currencies [page 247]
18.1.7.1 Conversion of Units of Measure
If a field with a unit of measure assigned is calculated by a formula, the calculation engine converts the final formula result to the unit of measure assigned to the field in the calculation version.
If the formula used to calculate a custom field or standard field contains fields valued with different units of measure, the SI base unit for the corresponding dimension is always used during the calculation and all units of measure are converted to the appropriate SI base unit. For example, meter is always used for length; second is always used for time, and so on.
ExampleYou have created a custom field for depth (CUST_DEPTH). The formula assigned uses additional custom fields for length and width. All three custom fields have units of measures assigned.
The formula reads as follows:
IF($CUST_LENGTH<=0.5; $CUST_WIDTH;1)
Assume the following:
● You are working with one specific item in a calculation version.● The unit of measure for CUST_DEPTH is set to decimeters.● The unit of measure for CUST_LENGTH is set to millimeters.● The unit of measure for CUST_WIDTH is set to centimeters.
The formula result for the CUST_DEPTH field is calculated as follows:
1. Units of measure for included fields are converted.The calculation engine converts the value of each field contained in the formula into their respective SI base unit of measure. The SI base unit for length and width is the meter (m). Therefore, the calculation engine converts the values for fields CUST_WIDTH and CUST_LENGTH from millimeters and centimeters into meters.
246 PUBLICApplication Help for SAP Product Lifecycle Costing
Custom Fields and Formulas
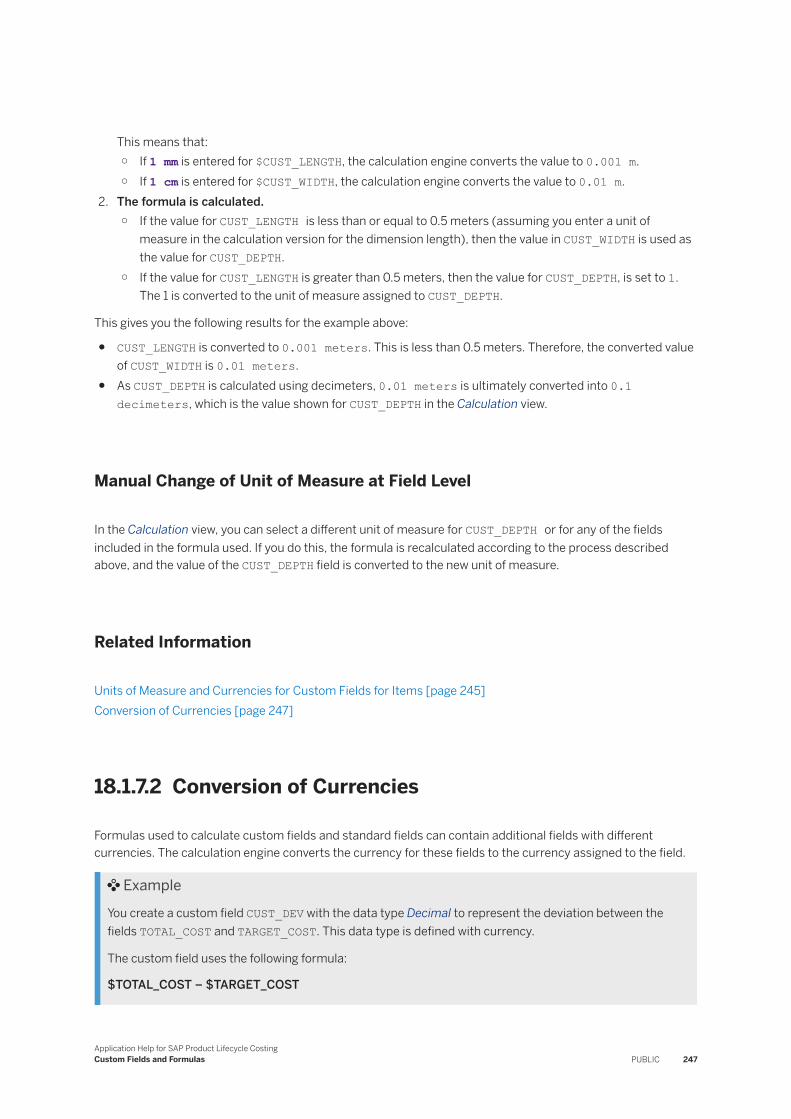
This means that:○ If 1 mm is entered for $CUST_LENGTH, the calculation engine converts the value to 0.001 m.○ If 1 cm is entered for $CUST_WIDTH, the calculation engine converts the value to 0.01 m.
2. The formula is calculated.○ If the value for CUST_LENGTH is less than or equal to 0.5 meters (assuming you enter a unit of
measure in the calculation version for the dimension length), then the value in CUST_WIDTH is used as the value for CUST_DEPTH.
○ If the value for CUST_LENGTH is greater than 0.5 meters, then the value for CUST_DEPTH, is set to 1. The 1 is converted to the unit of measure assigned to CUST_DEPTH.
This gives you the following results for the example above:
● CUST_LENGTH is converted to 0.001 meters. This is less than 0.5 meters. Therefore, the converted value of CUST_WIDTH is 0.01 meters.
● As CUST_DEPTH is calculated using decimeters, 0.01 meters is ultimately converted into 0.1 decimeters, which is the value shown for CUST_DEPTH in the Calculation view.
Manual Change of Unit of Measure at Field Level
In the Calculation view, you can select a different unit of measure for CUST_DEPTH or for any of the fields included in the formula used. If you do this, the formula is recalculated according to the process described above, and the value of the CUST_DEPTH field is converted to the new unit of measure.
Related Information
Units of Measure and Currencies for Custom Fields for Items [page 245]Conversion of Currencies [page 247]
18.1.7.2 Conversion of Currencies
Formulas used to calculate custom fields and standard fields can contain additional fields with different currencies. The calculation engine converts the currency for these fields to the currency assigned to the field.
ExampleYou create a custom field CUST_DEV with the data type Decimal to represent the deviation between the fields TOTAL_COST and TARGET_COST. This data type is defined with currency.
The custom field uses the following formula:
$TOTAL_COST – $TARGET_COST
Application Help for SAP Product Lifecycle CostingCustom Fields and Formulas PUBLIC 247
Assume the total cost is expressed in USD, the target cost is expressed in CAD, and the CUST_DEV field has the currency EUR assigned. The calculation engine converts total cost and target cost to EUR before calculating the value of CUST_DEV.
If you change the currency for CUST_DEV to USD, the calculation engine converts the total cost and target cost to USD in order to recalculate the formula and provide a value in CUST_DEV in USD.
NoteYou can also use formulas that include fields with currencies and use them to calculate fields without currencies. In this case, all fields with currencies are converted to the reporting currency during calculation.
Related Information
Units of Measure and Currencies for Custom Fields for Items [page 245]Conversion of Units of Measure [page 246]
18.2 Custom Fields for Master Data
As part of extensibility in SAP Product Lifecycle Costing, you can create custom fields at master data level. These custom fields allow you to enrich certain master data categories with additional information to meet your business needs.
You can manage these fields and their values at master data level in the Administration view and use them at item level in your calculation versions in the Calculation view.
NoteTo optimize performance, a combined maximum of 100 custom fields at item or master data level is recommended.
Master Data Categories
When you create a custom field for master data, you first select the master data category for the field. You can create checkbox, integer, decimal, text, link, and date fields for the following master data categories:
● Activity prices● Cost centers● Material prices● Materials (general data)● Materials (plant-specific data)● Work centers
248 PUBLICApplication Help for SAP Product Lifecycle Costing
Custom Fields and Formulas
The selected master data category also determines the following:
● The item categories that display the field.● The side panel group to which the field is added in Item Details in calculation versions.
Each master data category applies for a fixed set of item categories and one side panel group. These settings are predefined.
For example, assume that you create a custom field for cost centers. In calculation versions, your field is shown for the item categories Internal Activity and Variable Item. When implemented, the field is shown as the last field in the Organization side panel group under Item Details.
You create these custom fields under Administration Extensibility Custom Fields for Master Data .
Where Are Custom Fields for Master Data Displayed?
After you save a new custom field and restart the application, the following occurs:
● The field is shown in the Administration view for entries in the selected master data category.For example, if you've created a custom field for cost centers, this new field is available in each of the cost centers defined in your system.
● In existing calculation versions in the Calculation view, you'll find the custom field in the relevant item categories for the selected master data category in the corresponding side panel group.Using the example of a custom field for cost centers, the custom field is shown for the item categories Internal Activity and Variable Item and is placed as the last field in the Organization group in the side panel. The field is also shown when you create new items that use these item categories.
Using Custom Fields for Master Data in Items
When a custom field is used in items for calculation versions, it works like other fields at master data level. Any value entered for the custom field at master data level provides the default value for new items in calculation versions if the master data entry is used.
NoteIf you change the value for a custom field at master data level, items in existing calculation versions are not changed automatically. To make sure that an existing calculation version has the latest master data values, you can use the Update Master Data button or, in the case of material prices, trigger price determination.
NoteWhen a custom field for master data is used in a calculation version at item level, the field is editable.
Application Help for SAP Product Lifecycle CostingCustom Fields and Formulas PUBLIC 249
18.2.1 Creating Custom Fields for Master Data
You can create custom fields for certain master data categories.
Prerequisites
● You have sufficient authorization to work with custom fields.● All other users are logged off your SAP Product Lifecycle Costing system.● All calculations and calculation versions are closed.
Context
You would like to create a field for a master data category. You can choose from the following master data categories:
● Activity Prices● Cost Centers● Material Prices● Materials (General Data)● Materials (Plant-Specific Data)● Work Centers
NoteEach master data category applies for a fixed set of item categories and one side panel group. These settings are predefined.
For example, if you create a custom field for cost centers, the field is used for the item categories Internal Activity and Variable Item. In calculation versions using these categories, the field is added as the last field in the Organization group in the side panel. The relevant item categories are shown as display-only information when you access your custom field for master data under Custom Fields for Items in the Administration view
Procedure
1. Go to Administration Extensibility Custom Fields for Master Data .2. In the ribbon, choose Edit, and then Add.3. Select a master data category.4. Enter a technical name.
○ Each custom field automatically receives a prefix that corresponds to the master data type. For example, custom fields for cost centers receive the prefix CCEN_.
250 PUBLICApplication Help for SAP Product Lifecycle Costing
Custom Fields and Formulas
○ Blanks and special characters are not allowed.○ You cannot change the technical name after saving the field.
5. Enter a display name and display description for the relevant logon languages.○ The display name is the field label that you want to appear on the user interface.○ The display description is the tooltip that is shown for the field.
If you do not enter a display name for a logon language, the technical name is shown for the field label and tooltip. If you enter a display name and no description, the display name is also used for the tooltip.
6. Select one of the following data types for your field:
Data Type Description
Checkbox The field provides a checkbox. If the checkbox is activated, the value is set to 1. If the checkbox is not activated, the value is set to 0.
Decimal Field value consists of whole numbers, both negative and positive, including 0 (zero).
Integer Field value consists of fractions, both negative and positive.
Text Field allows you to enter any combination of letters, numbers, or symbols. The maximum length of the resulting text field is set to 5000 characters.
Date Field provides a calendar for picking out a date and allows you to enter a date manually.
Link Field contains a valid hyperlink.
You cannot change the data type after saving the field.
7. If you have selected the data type Link, do the following:○ Under Default Value, enter a valid hyperlink.
NoteValid hyperlinks:○ Begin with http, https, ftp, or ftps.○ Do not include spaces.
Example○ http://website.com/path/to/page○ ftp://ftp.xyz.com○ https://www.test.com:8080?id=1
8. If you have selected the data type Decimal, do the following:
○ Specify whether the field requires a unit of measure, a currency, or neither. You cannot change this selection after saving.
Application Help for SAP Product Lifecycle CostingCustom Fields and Formulas PUBLIC 251
○ If the field needs a unit of measure or a currency, select one in the field next to Default Value. This is mandatory, but you can change this value at any time.
9. [Optional]: Enter a default value for the field.
This default value is used when you create a new entry in the selected master data area in the Administration view. For example, if you provide a default value for a custom field for cost centers, this default value is used in the field when you create a new cost center.
10. Save your changes.
A dialog informs you that this will cause changes in existing calculation versions that use the item categories selected for the custom field.
11. Choose OK to confirm the changes.
Results
When you restart the application, the following occurs:
● Your new custom field is shown in existing entries and in new entries in the respective master data area.● The custom field is shown for items belonging to the item categories that are relevant for the master data
category, both for existing items and when creating new items.● Your custom field for master data is also shown under Custom Field for Items in the Administration view.
Here you also see the relevant item categories and display group for the side panel. However, to make any changes in these fields, you must choose Custom Fields for Master Data.
18.2.2 Modifying Custom Fields for Master Data
If you need to modify a custom field for master data, you can change some information.
Prerequisites
● You have sufficient authorization to work with custom fields.● All other users are logged off your SAP Product Lifecycle Costing system.● All calculations and calculation versions are closed.
Context
You can change the following for existing custom fields for master data:
● Display names and descriptions● Default value
252 PUBLICApplication Help for SAP Product Lifecycle Costing
Custom Fields and Formulas
● Currency or unit of measure, if your custom field has one.
All other settings for the custom field become display-only after saving and can no longer be changed.
Procedure
1. Go to Administration Extensibility Custom Fields for Master Data .2. In the ribbon, choose Edit.3. Open the details for the fields and make any allowed changes.4. Save your changes.
A dialog informs you that you've made changes to an existing custom field and that this will lead to changes in calculation versions that already use this field.
5. Choose OK to confirm.
Results
The modified custom field is available when you restart the application. Note that master data entries using the custom field now use the modified version of the custom field. This means that if you have changed the display name, for example, these changes are applied to all old and new master data entries that use this field and to item categories that are relevant for the master data category.
18.2.3 Deleting Custom Fields for Master Data
You can delete a custom field for master data if you no longer need it.
Prerequisites
● You have sufficient authorization to work with custom fields.● All other users are logged off your SAP Product Lifecycle Costing system.● All calculations and calculation versions are closed.
Context
You would like to delete a custom field so that it is no longer used in new and existing master data and calculation versions.
Application Help for SAP Product Lifecycle CostingCustom Fields and Formulas PUBLIC 253
NoteAll data that was maintained in this custom field to date will be deleted from all existing master data entries and calculation versions. You will no longer be able to access this data.
Procedure
1. Go to Administration Extensibility Custom Fields for Master Data .2. In the ribbon, choose Edit.3. Choose the field to be deleted and then choose Delete.4. Save your changes and restart the application.
Results
The custom field is no longer shown after you restart your application. All data that was maintained in this custom field is deleted, and the field is removed from the list of custom fields in the Administration view, both under Custom Fields for Master Data and Custom Fields for Items.
254 PUBLICApplication Help for SAP Product Lifecycle Costing
Custom Fields and Formulas
19 Analytics and Reporting with External Tools
In addition to costing sheets and cost component splits provided for built-in analysis in SAP Product Lifecycle Costing, you can use external Business Intelligence tools (BI Tools) for freestyle analysis and reporting. SAP Product Lifecycle Costing provides analytic views for this purpose. SAP PLC analytic views are special database views for certain use scenarios. You can use SAP Analysis for Microsoft Office to access SAP PLC analytic views.
You can integrate SAP Analysis for Microsoft Office in the Administration view of SAP Product Lifecycle Costing under Global Settings Configuration Integration.
Note● SAP PLC analytic views are not SAP HANA analytic views.● You must have Read authorization or higher to see the entities (projects, calculations, and calculation
versions) that belong to a project.
Presenting Data
Each SAP PLC analytic view provides a data cube with measures (for example, costs) and attributes that you can use to present data.
Note● The views only show data from saved calculation versions.● You can show both base versions and lifecycle versions in your reports.
For each SAP PLC analytic view, you must specify the input parameters to allow preselection of data. For example, for the component split view and other calculation-related tools, the following input parameters should be defined in the prompt dialog for each BI tool:
● VAR_CALCULATION_VERSION_IDSelect one or more calculation versions for which data should be shown.
● VAR_LANGUAGESelect a language to be used for language-specific texts, for example, item descriptions.
Two realizations are provided for each kind of SAP PLC analytic view:
● View for standard fields, for example, V_EXT_ACTIVITIES.These views are static and are not changed in the application. You may use these views as a basis for creating your own views.
● View for custom fields, for example, V_EXT_ACTIVITIES_CUST.These views contain the same attributes and measures as standard views, but additionally include the custom fields.These views are changed dynamically when the custom fields are added, deleted, or changed.
Application Help for SAP Product Lifecycle CostingAnalytics and Reporting with External Tools PUBLIC 255
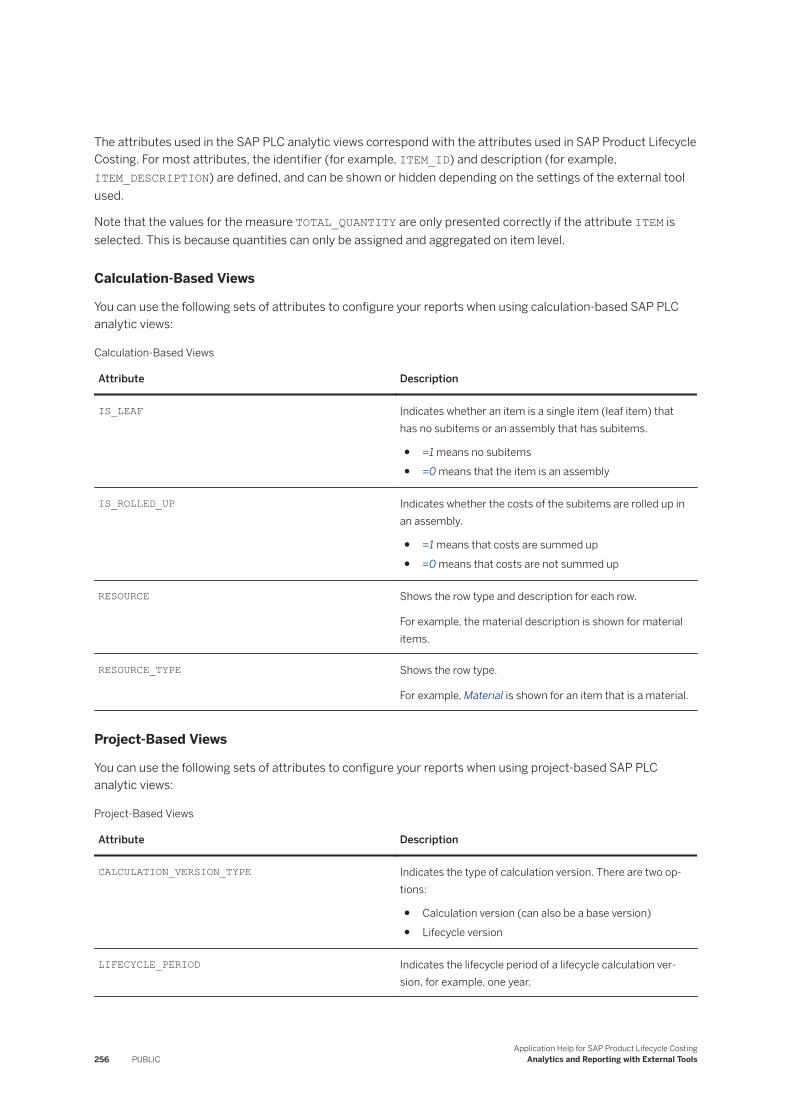
The attributes used in the SAP PLC analytic views correspond with the attributes used in SAP Product Lifecycle Costing. For most attributes, the identifier (for example, ITEM_ID) and description (for example, ITEM_DESCRIPTION) are defined, and can be shown or hidden depending on the settings of the external tool used.
Note that the values for the measure TOTAL_QUANTITY are only presented correctly if the attribute ITEM is selected. This is because quantities can only be assigned and aggregated on item level.
Calculation-Based Views
You can use the following sets of attributes to configure your reports when using calculation-based SAP PLC analytic views:
Calculation-Based Views
Attribute Description
IS_LEAF Indicates whether an item is a single item (leaf item) that has no subitems or an assembly that has subitems.
● =1 means no subitems● =0 means that the item is an assembly
IS_ROLLED_UP Indicates whether the costs of the subitems are rolled up in an assembly.
● =1 means that costs are summed up● =0 means that costs are not summed up
RESOURCE Shows the row type and description for each row.
For example, the material description is shown for material items.
RESOURCE_TYPE Shows the row type.
For example, Material is shown for an item that is a material.
Project-Based Views
You can use the following sets of attributes to configure your reports when using project-based SAP PLC analytic views:
Project-Based Views
Attribute Description
CALCULATION_VERSION_TYPE Indicates the type of calculation version. There are two options:
● Calculation version (can also be a base version)● Lifecycle version
LIFECYCLE_PERIOD Indicates the lifecycle period of a lifecycle calculation version, for example, one year.
256 PUBLICApplication Help for SAP Product Lifecycle Costing
Analytics and Reporting with External Tools
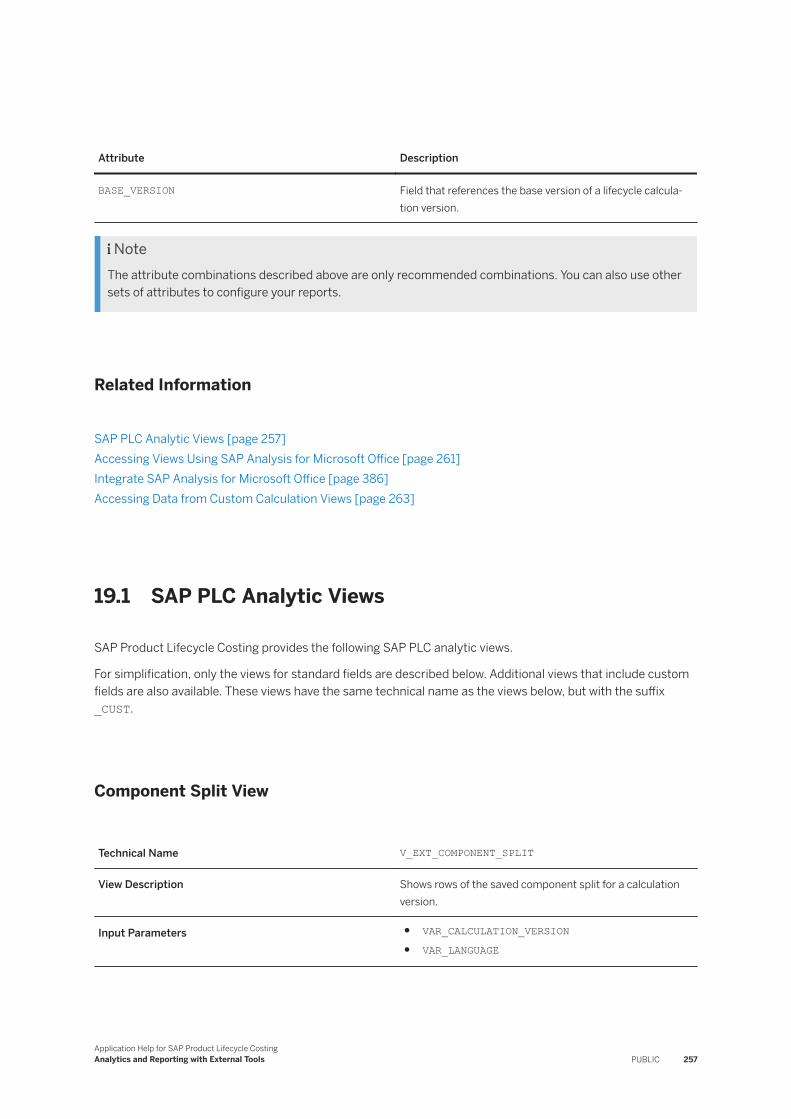
Attribute Description
BASE_VERSION Field that references the base version of a lifecycle calculation version.
NoteThe attribute combinations described above are only recommended combinations. You can also use other sets of attributes to configure your reports.
Related Information
SAP PLC Analytic Views [page 257]Accessing Views Using SAP Analysis for Microsoft Office [page 261]Integrate SAP Analysis for Microsoft Office [page 386]Accessing Data from Custom Calculation Views [page 263]
19.1 SAP PLC Analytic Views
SAP Product Lifecycle Costing provides the following SAP PLC analytic views.
For simplification, only the views for standard fields are described below. Additional views that include custom fields are also available. These views have the same technical name as the views below, but with the suffix _CUST.
Component Split View
Technical Name V_EXT_COMPONENT_SPLIT
View Description Shows rows of the saved component split for a calculation version.
Input Parameters ● VAR_CALCULATION_VERSION● VAR_LANGUAGE
Application Help for SAP Product Lifecycle CostingAnalytics and Reporting with External Tools PUBLIC 257
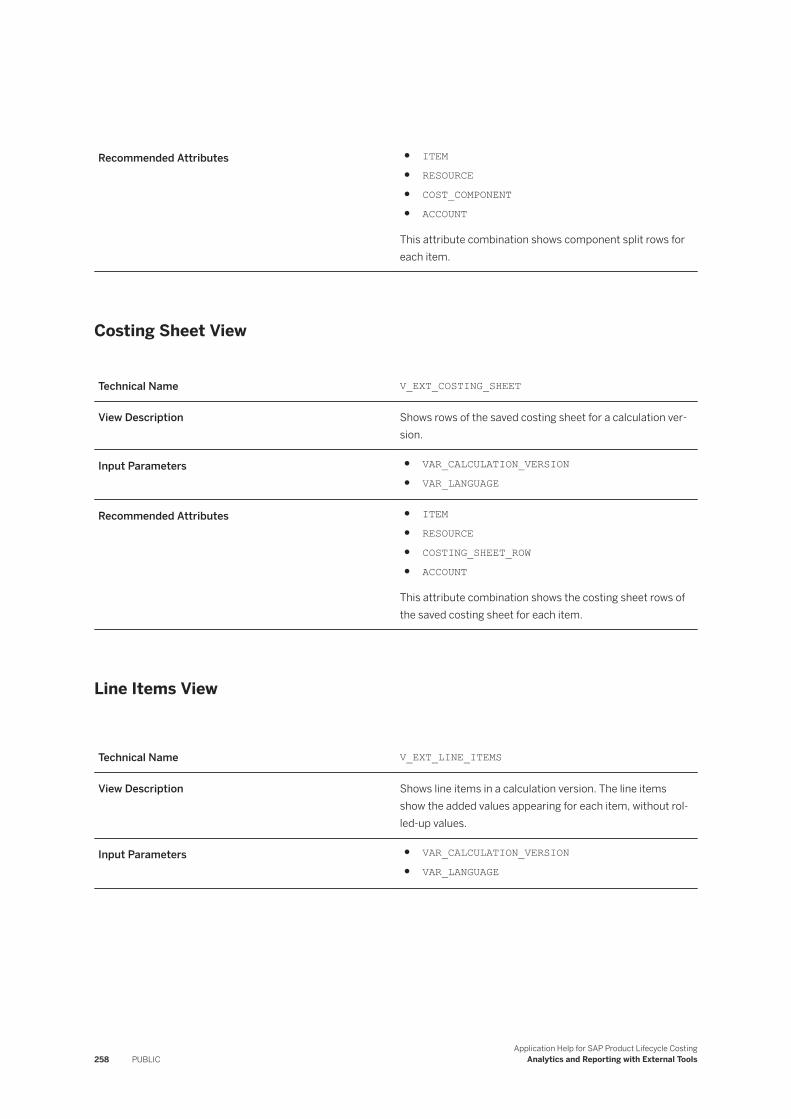
Recommended Attributes ● ITEM● RESOURCE● COST_COMPONENT● ACCOUNT
This attribute combination shows component split rows for each item.
Costing Sheet View
Technical Name V_EXT_COSTING_SHEET
View Description Shows rows of the saved costing sheet for a calculation version.
Input Parameters ● VAR_CALCULATION_VERSION● VAR_LANGUAGE
Recommended Attributes ● ITEM● RESOURCE● COSTING_SHEET_ROW● ACCOUNT
This attribute combination shows the costing sheet rows of the saved costing sheet for each item.
Line Items View
Technical Name V_EXT_LINE_ITEMS
View Description Shows line items in a calculation version. The line items show the added values appearing for each item, without rolled-up values.
Input Parameters ● VAR_CALCULATION_VERSION● VAR_LANGUAGE
258 PUBLICApplication Help for SAP Product Lifecycle Costing
Analytics and Reporting with External Tools
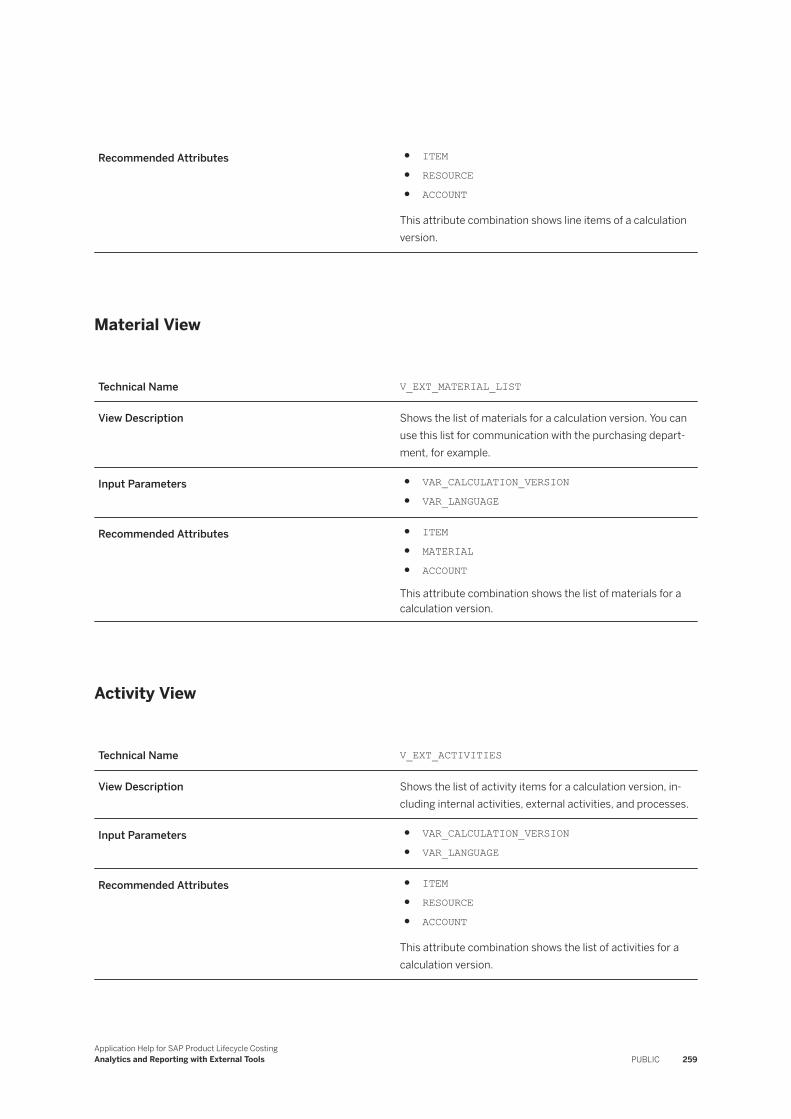
Recommended Attributes ● ITEM● RESOURCE● ACCOUNT
This attribute combination shows line items of a calculation version.
Material View
Technical Name V_EXT_MATERIAL_LIST
View Description Shows the list of materials for a calculation version. You can use this list for communication with the purchasing department, for example.
Input Parameters ● VAR_CALCULATION_VERSION● VAR_LANGUAGE
Recommended Attributes ● ITEM● MATERIAL● ACCOUNT
This attribute combination shows the list of materials for a calculation version.
Activity View
Technical Name V_EXT_ACTIVITIES
View Description Shows the list of activity items for a calculation version, including internal activities, external activities, and processes.
Input Parameters ● VAR_CALCULATION_VERSION● VAR_LANGUAGE
Recommended Attributes ● ITEM● RESOURCE● ACCOUNT
This attribute combination shows the list of activities for a calculation version.
Application Help for SAP Product Lifecycle CostingAnalytics and Reporting with External Tools PUBLIC 259
Project Component Split View
Technical Name V_EXT_PROJECT_COMPONENT_SPLIT
View Description Shows rows of the saved component split for calculation versions of the selected projects without item data.
Input Parameters ● VAR_PROJECTSelect one or more projects for which the calculation versions should be shown.
● VAR_ONLY_CURRENTSpecify if all or only current calculation versions of the selected projects should be shown.
● VAR_LANGUAGESelect a language to be used for language-specific texts.
Recommended Attributes ● PROJECT● CALCULATION_VERSION● COST_COMPONENT
This attribute combination shows component split rows for calculations versions of the selected projects.
Project Costing Sheet View
Technical Name V_EXT_PROJECT_COSTING_SHEET
View Description Shows rows of the saved costing sheet for calculation versions of the selected projects without item data.
Input Parameters ● VAR_PROJECTSelect one or more projects for which the calculation versions should be shown.
● VAR_ONLY_CURRENTSpecify if all or only current calculation versions of the selected projects should be shown.
● VAR_LANGUAGESelect a language to be used for language-specific texts.
260 PUBLICApplication Help for SAP Product Lifecycle Costing
Analytics and Reporting with External Tools
Recommended Attributes ● PROJECT● CALCULATION_VERSION● COSTING_SHEET_ROW
This attribute combination shows costing sheet rows for calculations versions of the selected projects.
Related Information
Accessing Views Using SAP Analysis for Microsoft Office [page 261]
19.2 Accessing Views Using SAP Analysis for Microsoft Office
SAP Analysis for Microsoft Office is an add-in for Microsoft Excel, extending it with multiple functions for accessing and analyzing data in pivot tables. You can access different data sources including SAP HANA, which is used for data storage in SAP Product Lifecycle Costing.
Prerequisites
● SAP Analysis for Microsoft Office must be installed and configured for your SAP Product Lifecycle Costing system. In particular, your SAP HANA database must be configured as the data source in SAP Analysis for Microsoft Office.For step-by-step instructions, see the Administrator's Guide on SAP Help Portal at http://help.sap.com/boaa .
● Your user in SAP Product Lifecycle Costing must have the role AnalyticsViewer_RT.● Calculation versions that you want to analyze must already be created and saved in SAP Product Lifecycle
Costing. You cannot analyze a newly created calculation that has not yet been saved.
Creating Your SAP HANA Data Source
In order to access analytic views, your SAP HANA database must be configured as the data source in SAP Analysis for Microsoft Office.
To do this, proceed as follows:
1. Place your cursor in a cell in the open Microsoft Excel worksheet.2. In the Analysis tab, choose Insert Data Source and then Select Data Source.
Application Help for SAP Product Lifecycle CostingAnalytics and Reporting with External Tools PUBLIC 261
3. Under Logon to SAP BusinessObjects BI Platform, choose Skip to open the dialog for selecting a data source.
4. In the Select Data Source dialog, right-click anywhere in the empty space in the dialog and choose Create New SAP HANA Connection in the menu.
5. Make the following settings for your connection data:
Description Enter any description.
Scheme Choose HTTPS.
Host Name Enter the name of your SAP HANA host, for example, xyz.mo.mycompany.corp.
Port Enter the port used for connection to SAP Product Lifecycle Costing.
Authentication Type Choose Automatic. The system then automatically detects whether single-sign on is enabled. If this is not the case, the uaa authentication type is used instead, and you must enter user name and password.
6. Click Create.
You can use the SAP HANA data source in your subsequent analysis of calculations.
Accessing SAP PLC Analytic Views
You can access the data from SAP PLC analytic views in the selected area of the open Microsoft Excel worksheet. If SAP Analysis for Microsoft Office has been installed correctly, an Analysis tab is available when you open Microsoft Excel.
If SAP Analysis for Microsoft Office has been integrated with SAP Product Lifecycle Costing, you can access the standard SAP PLC analytic views directly by choosing Analyze in the ribbon in the Project, Cockpit, or Calculation view. For more information, see the Administrator's Guide for SAP Product Lifecycle Costing available at http://help.sap.com/plc.
NoteIf integration with SAP Analysis for Microsoft Office has not been set up, make sure to note down the version ID of the relevant calculation version in SAP Product Lifecycle Costing before you start. You will need to enter this after selecting an analytic view.
Accessing Views Without Integration
The following describes how to access views without integration of SAP Analysis for Microsoft Office.
262 PUBLICApplication Help for SAP Product Lifecycle Costing
Analytics and Reporting with External Tools
1. Place your cursor in a cell in the open Microsoft Excel worksheet.2. In the Analysis tab, choose Insert Data Source and then Select Data Source.3. Under Logon to SAP BusinessObjects BI Platform, choose Skip to open the Select Data Source dialog.4. Select your SAP HANA data source to connect.
If single sign-on authentication is not enabled, you must enter your SAP HANA user ID and password for SAP Product Lifecycle Costing. Otherwise, you can open the data source directly.
5. In the dialog box, you can use the Search tab to find views that begin with V_EXT_.Alternatively, you can also choose the Area tab and search for a view in the folder /sap/plc/analytics/.
6. Select a view and enter the calculation version ID or project ID and the relevant language, for example DE.7. After you have confirmed your entries, the data for the view appears in the selected area of the worksheet
in Microsoft Excel.
Each view provides a data cube in which you can freely choose the attributes (dimensions) according to which the numbers (measures) are grouped and then display them in rows or columns. To use different attributes, drag and drop an attribute from the Data Source box to the Rows or Columns box in the side panel. You can also define the background filters in the same way.
More Information
● For more information about working with SAP Analysis for Microsoft Office, see the user assistance available at http://help.sap.com/boaa.
● For more information about integrating SAP Analysis for Microsoft Office with SAP Product Lifecycle Costing, see the Administrator's Guide for SAP Product Lifecycle Costing available at http://help.sap.com/plc.
19.3 Accessing Data from Custom Calculation Views
You can create your own custom SAP PLC analytic views and use SAP Analysis for Microsoft Office to access them.
Prerequisites
● An SAP HANA database project has been created, together with synonyms that allow data to be read from PLC tables.
● The project includes a role that allows data to be read from the current schema, for example qc_power_user.hdbrole.
Sample Code
{ "role": { "name": "qc_power_user",
Application Help for SAP Product Lifecycle CostingAnalytics and Reporting with External Tools PUBLIC 263
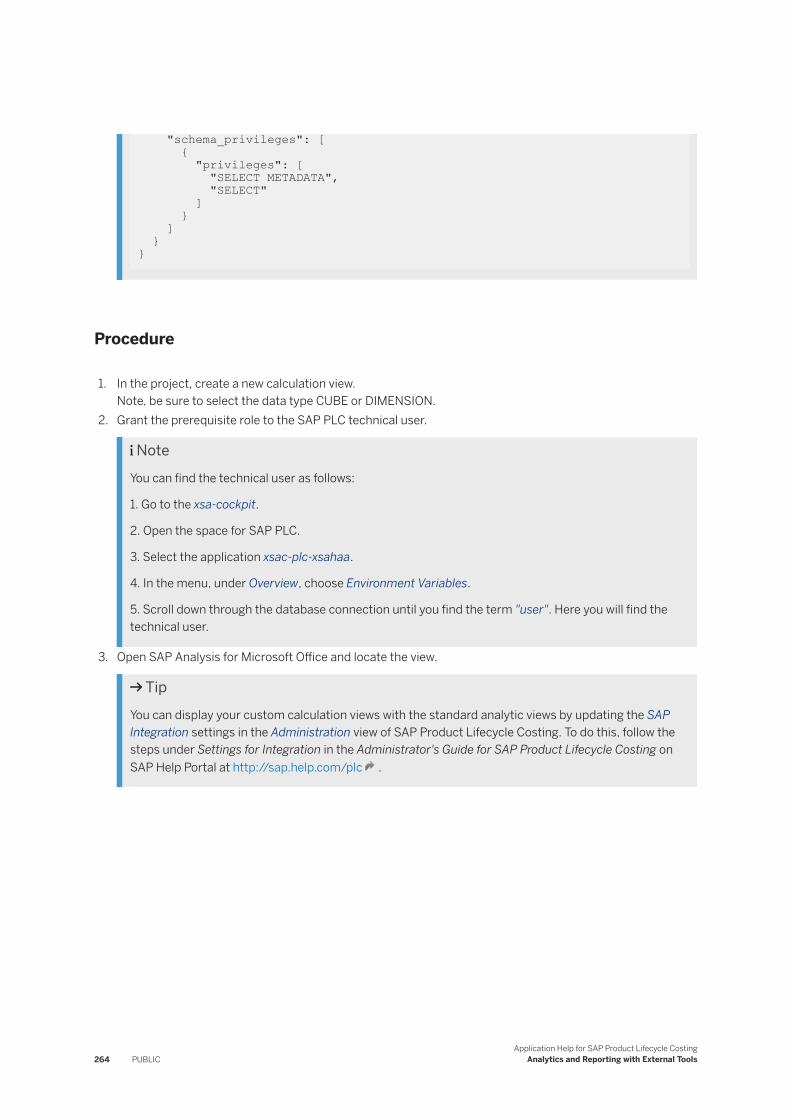
"schema_privileges": [ { "privileges": [ "SELECT METADATA", "SELECT" ] } ] }}
Procedure
1. In the project, create a new calculation view.Note, be sure to select the data type CUBE or DIMENSION.
2. Grant the prerequisite role to the SAP PLC technical user.
NoteYou can find the technical user as follows:
1. Go to the xsa-cockpit.
2. Open the space for SAP PLC.
3. Select the application xsac-plc-xsahaa.
4. In the menu, under Overview, choose Environment Variables.
5. Scroll down through the database connection until you find the term "user". Here you will find the technical user.
3. Open SAP Analysis for Microsoft Office and locate the view.
TipYou can display your custom calculation views with the standard analytic views by updating the SAP Integration settings in the Administration view of SAP Product Lifecycle Costing. To do this, follow the steps under Settings for Integration in the Administrator's Guide for SAP Product Lifecycle Costing on SAP Help Portal at http://sap.help.com/plc .
264 PUBLICApplication Help for SAP Product Lifecycle Costing
Analytics and Reporting with External Tools
20 Importing Data
You can import data for use in your costing structures in SAP Product Lifecycle Costing. The following sections provide information about importing data from SAP ERP and Microsoft Excel.
Your system administrator can configure the maximum number of items you can import from SAP ERP or Microsoft Excel. We recommend costing structures with no more than 30,000 items. Once an import is complete, dependent field values are set and account determination and price determination are triggered.
Related Information
Connecting to an SAP ERP System [page 265]Selecting a Level of Import from SAP ERP [page 266]Importing BOMs and Routings from SAP ERP [page 266]Importing Document Structures from SAP ERP [page 270]Importing Costing Structures from Microsoft Excel [page 272]
20.1 Connecting to an SAP ERP System
To import data, SAP Product Lifecycle Costing must be connected to your SAP ERP system. If you are connected to more than one SAP ERP system, you can select a system when opening the import dialog.
NoteTo import document structures, you must have installed SAP ERP 6.0 EHP 7 or higher.
Your system administrator can enable Single Sign-On for SAP ERP. For more information, see theAdministrator's Guide for SAP Product Lifecycle Costing available on SAP Help Portal at http://help.sap.com/plc.
If Single Sign-On is not enabled, you will need a user and password to log in. You can import data from the system into which you are logged, as often as necessary until you terminate the session.
Related Information
Selecting a Level of Import from SAP ERP [page 266]Importing BOMs and Routings from SAP ERP [page 266]Importing Document Structures from SAP ERP [page 270]
Application Help for SAP Product Lifecycle CostingImporting Data PUBLIC 265
20.2 Selecting a Level of Import from SAP ERP
You can import data for an entire calculation version or for a single item in a costing structure in SAP Product Lifecycle Costing.
You determine the level at which you want to import by selecting an item in the costing structure of a calculation version:
● To import data for an entire calculation version, you must select the root item at version header level.● To import data for a specific item in your costing structure, you must select an item or assembly.
NoteYou can only import BOMs and routings from SAP ERP into items with the category Material. You can only import document structures into items with the category Document. No other options are available in the Import command.
The imported data then replaces the selected item along with any subitems belonging to the selected item in the costing structure.
20.3 Importing BOMs and Routings from SAP ERP
If you want to use data from your SAP ERP system for calculation versions in SAP Product Lifecycle Costing, you can import the data directly. Once an import is complete, dependent field values are set and account determination and price determination are triggered.
You can import the following from SAP ERP:
● A multilevel, exploded bill of material (BOM) available for a specific material in SAP ERP● A routing available for a specific material in SAP ERP
NoteYou can import one BOM explosion and routing at a time. You can specify the depth of the BOM explosion using the import wizard. If a BOM and routing are both selected for import, the routing for the selected material is imported as well as the routing for all contained materials.
If no routing is available on root item level, you can select Any Subordinated Routing. This allows you to import all lower level routings for the subitems of the selected BOM, if any exist.
Item Categories for BOMs
When you import BOMs from SAP ERP, you can import all item categories except the following:
● C (Compatible Unit)● I (PM Structure Element)
266 PUBLICApplication Help for SAP Product Lifecycle Costing
Importing Data
● K (Class Item)
The remaining item categories in SAP ERP are handled as follows:
● Document items and text items are imported to SAP Product Lifecycle Costing as document items and text items.
● All other item categories in SAP ERP are imported into SAP Product Lifecycle Costing as items with the category Material.
NoteYou cannot change the item category of the items in a BOM or routing when you are importing them. However, you can change the item category of the imported items manually after the import.
Item Categories for Routings
Routings are imported into SAP Product Lifecycle Costing with the following item categories:
● External Activity● Process● Subcontracting
Importing Activities
You can import activities even if an activity type is not assigned in SAP ERP. The quantity and unit of measure must be provided in order to import an activity from SAP ERP.
There is a distinction between the fixed and variable parts of the standard values (for example, Setup, Machine, Labor) in a routing operation. If a value greater than zero is entered for the fixed or variable parts of the standard values in SAP ERP, an internal or external activity is created in SAP Product Lifecycle Costing, and the following occurs:
● For items corresponding to the fixed portion of the standard value, the field Total Quantity Depends On is set to Fixed Quantity.
● For items corresponding to the variable portion of the standard value, the field Total Quantity Depends On is set to Assembly Quantity.
This means that items that are derived from standard values that have a variable portion are multiplied by the total quantity. Items that only have a fixed portion are not.
External ActivitiesIf a routing has either a net price or purchasing information record number maintained, it is created as an external activity in SAP Product Lifecycle Costing. The price is set to manual price, the total quantity is dependent on assembly quantity, and the account is set to the cost element of this external activity.
NoteThis account must be available in the master data for SAP Product Lifecycle Costing in order for the import to succeed.
Application Help for SAP Product Lifecycle CostingImporting Data PUBLIC 267
Price determination and account determination are not triggered because no Material ID is filled.
ProcessesInternal activities belonging to one routing operation are grouped together under one process. Each process includes the name of the routing operation and work center ID to which the routing belongs. BOMs and processes are imported on the same hierarchical level below the root item.
Importing Configurable Materials
If your import includes a configurable material, the maximum BOM and the maximum routing are exploded, and all items are activated in the calculation version in SAP Product Lifecycle Costing. Materials that are configurable are flagged as such in the Calculation view in the Item Details section in the side panel. Once the import is finished, you can deactivate or delete items that are not relevant for cost rollup.
Importing Cost-Relevant and Phantom Materials
Items that are marked in SAP ERP as relevant for costing are automatically activated in SAP Product Lifecycle Costing when imported. Phantom materials and items that are not marked in SAP ERP as relevant for costing are also activated in SAP Product Lifecycle Costing by default. Materials that are Cost-Relevant in SAP ERP and Phantom Materials have the corresponding settings in the Calculation view in the Item Details section in the side panel. You can manually deactivate these items, if necessary, once the data has been imported.
Related Information
Steps for Importing BOMs and Routings [page 268]Connecting to an SAP ERP System [page 265]Selecting a Level of Import from SAP ERP [page 266]
20.3.1 Steps for Importing BOMs and Routings
You can import BOMs and routings from SAP ERP.
Steps
Step 1: Open a calculation version and select an item
1. From the Cockpit, open an existing calculation or choose New to create a new one.
268 PUBLICApplication Help for SAP Product Lifecycle Costing
Importing Data
2. In the costing structure on the left, select the item to which you would like to import data.This can be one of the following:○ The root item of the calculation version○ Any item or assembly in the calculation version with the category Material
3. In the ribbon at the top of the Calculation view, choose Import and then select Import BOM and Routing from SAP ERP... in the drop-down menu.
Step 2: Log in to the SAP ERP system and search for a BOM and routing
1. If you are connected to more than one SAP ERP system, select a system.2. Log in to the system.
○ If Single Sign-On for SAP ERP is enabled, you are automatically logged in and can begin searching for BOMs and routings.
○ If Single Sign-On is not enabled, enter your SAP ERP user name and password.The Import BOM and Routing from SAP ERP dialog opens.
3. Using the Selection Filter, search for BOMs and routings using a material number, plant, sales document, and explosion date.By default, these fields are automatically filled with data related to the item that you selected in the Calculation view. The default value for the explosion date is set to the current date. You can edit these fields before searching.
NoteTo import successfully, these entries must match an existing entry in SAP ERP.
4. [Optional] Under BOM Level Depth, enter the number of levels you want to explode.5. Choose Search.
All relevant BOMs and routings are displayed.
Step 3: Select a BOM and/or routing to import
1. Choose one BOM and/or one routing that you want to import, then choose Next.You can choose a single BOM, a single routing, or one of each.
2. [Optional] If no routing for a material exists on root item level but exists for one or more subitems, you can select Any Subordinate Routing. This imports the lower-level routings belonging to the subitems of the selected BOM.
3. Under Import status, the total number of items available for import is displayed. A message explains where the imported data will appear. Any error messages are also shown here.
4. Choose Next to import the entries.
Result
If the import is successful, the dialog closes and the imported calculation structure is shown on the left in the Calculation view.
The imported data replaces the selected item and any subitems below the selected item in the costing structure. If an error occurs during the import process, a message is shown in the import dialog.
Application Help for SAP Product Lifecycle CostingImporting Data PUBLIC 269
Related Information
Importing BOMs and Routings from SAP ERP [page 266]Connecting to an SAP ERP System [page 265]Selecting a Level of Import from SAP ERP [page 266]
20.4 Importing Document Structures from SAP ERP
If you want to import documents from SAP ERP, you can import a multilevel explosion of a document structure that is available for a document information record in SAP ERP into SAP Product Lifecycle Costing.
Once an import is complete, dependent field values are set and account determination and price determination are triggered.
Item Categories for Document Structures
Documents in document structures are imported to SAP Product Lifecycle Costing as document items. Texts are imported as text items. All other item categories in SAP ERP are imported as items with the category Material.
NoteYou cannot change the item category of the items in a document structure when you are importing them. However, you can change the item category of the imported items manually after the import.
Archived Documents
All document structures, including document structures that are archived in SAP ERP are activated and thereby considered in the calculation when imported into SAP Product Lifecycle Costing. Archived documents are marked as Archived in the Calculation view in the Item Details section of the side panel. You can deactivate archived documents, and thereby exclude them from the calculation, after you have completed the import.
Related Information
Steps for Importing Document Structures [page 271]Connecting to an SAP ERP System [page 265]Selecting a Level of Import from SAP ERP [page 266]
270 PUBLICApplication Help for SAP Product Lifecycle Costing
Importing Data
20.4.1 Steps for Importing Document Structures
You can import document structures from SAP ERP into your SAP Product Lifecycle Costing system, as follows:
Steps
Step 1: Open a calculation version and select an item
1. From the Cockpit, open an existing calculation version or choose New to create a new one.2. In the costing structure on the left, select the item to which you would like to import data.
This can be one of the following:○ The root item of the calculation version○ Any item or assembly (item with subitems) in the calculation version that has the item category
Document3. In the ribbon at the top, choose Import and then select Import Document Structure from SAP ERP... in the
drop-down menu.
Step 2: Log in to the SAP ERP system and search for a document structure
1. If you are connected to more than one SAP ERP system, select a system.2. Log in to the system.
○ If Single Sign-On for SAP ERP is enabled, you are automatically logged in and can begin searching for document structures.
○ If Single Sign-On is not enabled, enter your SAP ERP user name and passwordThe Import Document Structure from SAP ERP dialog opens.
3. Using the Selection Filter, search for a document structure to import. You must enter a document type and a document number.If you have selected an item in your costing structure that already contains this information, these fields are filled automatically. You can change the entries for these fields before executing your search.
NoteThese entries must match an existing entry in SAP ERP to be imported successfully.
4. Change the entries for these fields if necessary, and choose Search.5. A list of all relevant document structures is displayed.
Step 3: Select a document structure to import
1. Choose the document structure that you want to import, then choose Next.
NoteYou can only choose one document structure at a time.
Under Import Status, the total number of items available for import are displayed. A message explains where the imported data will be added. Any error messages are also shown here.
2. Choose Next to import the entries.
Application Help for SAP Product Lifecycle CostingImporting Data PUBLIC 271
Result
If the import is successful, the imported document structure is shown in the Calculation view. The imported data replaces the selected item and any existing items below the selected item in the costing structure. If an error occurs during the import process, a message is shown in the import dialog.
Related Information
Importing Document Structures from SAP ERP [page 270]Connecting to an SAP ERP System [page 265]Selecting a Level of Import from SAP ERP [page 266]
20.5 Importing Costing Structures from Microsoft Excel
If you want to import a costing structure, you can create a Microsoft Excel file and use to import costing structures (including bills of materials and routings) into an open calculation version in SAP Product Lifecycle Costing. You can use the Microsoft Excel file that you have created to import data into a new calculation version, as well as to replace a single item or assembly in an existing calculation version.
You can import one costing structure with up to 30,000 items at a time. You can increase or decrease this number depending on system performance. The maximum import limit is configured in the Administration view. We recommend overall costing structures with no more than 30,000 items.
You can import the costing structure to any level in your existing calculation version. Once an import is complete, dependent fields are set and account determination and price determination are triggered, unless disabled.
Note● You can import values for all editable, standard fields and all custom fields in SAP Product Lifecycle
Costing.● You can import prices for all non-assembly items (items without subitems). Price determination is
triggered for all items except those that have price determination disabled in the import template or in the calculation version.
● Accounts can be imported for item categories that do not support automatic account determination and for all items that have account determination disabled. If your Microsoft Excel file contains item categories that support automatic account determination (for example, for Material or Document), and the automatic account determination is not disabled, accounts for these items are set by automatic account determination after import.
● Temporary values are not allowed for Document Type, Material Type, Material Group, Overhead Group, or Valuation Class.
● The program imports all of the items included in the Microsoft Excel file that you have created using the template. If there are items that you do not want to import, you should remove these items from your Microsoft Excel file before you begin the import process.
272 PUBLICApplication Help for SAP Product Lifecycle Costing
Importing Data
Related Information
Steps for Importing Costing Structures from Microsoft Excel [page 273]Field Requirements for the Microsoft Excel Template [page 274]Importing Values for Custom Fields [page 288]Importing Values for Standard Fields [page 296]Creating an Import File Using the Microsoft Excel Template [page 297]
20.5.1 Steps for Importing Costing Structures from Microsoft Excel
You can import costing structures, including bills of materials and routings, into an open calculation version in SAP Product Lifecycle Costing.
Prerequisites
You have created a Microsoft Excel import file using the Microsoft Excel template.
For more information about how to create an import file, see the link to Creating an Import File Using the Microsoft Excel Template below.
Steps
1. From the Cockpit, open a calculation version or choose New, then New Version, to create a new one.2. In the costing structure on the left in the Calculation view, select an item into which you would like to import
data.3. In the ribbon on the top left of the Calculation view, choose Import, then Import Structure from Microsoft
Excel....This command is only active if you have selected an item in the costing structure. Note that the import process is not available for text items.This opens the import dialog.
4. Use Browse to find the file that you would like to import.If you have not yet created an import file, a link to a template is also provided in this dialog.
5. After selecting a file, choose Next to import the file.6. If the import is successful, a message appears indicating that all items were imported.
The imported costing structure is shown on the left in the Calculation view under the selected item.7. If an error occurs during the import process (for example, if the file does not have the required format), a
message is shown in the import dialog explaining the problem and how to resolve it.Choose Back to edit the data in Microsoft Excel. Choose Next to import the corrected data.
8. Once the data has been imported successfully, save your calculation version.
Application Help for SAP Product Lifecycle CostingImporting Data PUBLIC 273
Related Information
Importing Costing Structures from Microsoft Excel [page 272]Creating an Import File Using the Microsoft Excel Template [page 297]Field Requirements for the Microsoft Excel Template [page 274]
20.5.2 Field Requirements for the Microsoft Excel Template
Consider the following field-specific requirements when using the Microsoft Excel template to create an import file:
Note● For fields that are set to manual, such as Set Base Quantity to Manual, the field takes the imported
(manual) value when you import data.● For fields with formulas, the field takes the calculated value based on the formula when you import
data. If the field does not have a formula, it takes the manual value (1).
Field Mandatory or Optional? Things to Consider
Technical Name Mandatory for all item categories
Level Mandatory for all item categories The first item must have the lowest level, for example: 0.
ExampleIf 10 is the lowest level in your calculation structure, the first item must start with 10.
Levels must be exactly one level apart.
ExampleOK: 0,1,2,3
Not OK: 0,2,4,6
274 PUBLICApplication Help for SAP Product Lifecycle Costing
Importing Data
Field Mandatory or Optional? Things to Consider
Item Category Mandatory The following item categories are available in the drop-down list:
● Calculation Version (allowed for top item only)● Material● Internal Activity● External Activity● Process● Subcontracting● Resources and Tools● Variable Item● Text Item
The item category drop-down is in English only. You can add an extra column describing the item categories in another language, if desired.
You can include multiple items with the same item category (including Calculation Version) in a single import.
Description Optional You can enter a description in any language.
Material Optional This field is supported for:
● Calculation Version● Document● Material● External Activity● Subcontracting● Variable Item
For all other item categories, this field is ignored.
Process Optional This field is supported for:
● Internal Activity● Process● Variable Item
For all other item categories, this field is ignored.
Plant Optional This field is supported for all item categories except Text Item.
Cost Center Optional This field is supported for:
● Internal Activity● Variable Item
For all other item categories, this field is ignored.
Application Help for SAP Product Lifecycle CostingImporting Data PUBLIC 275
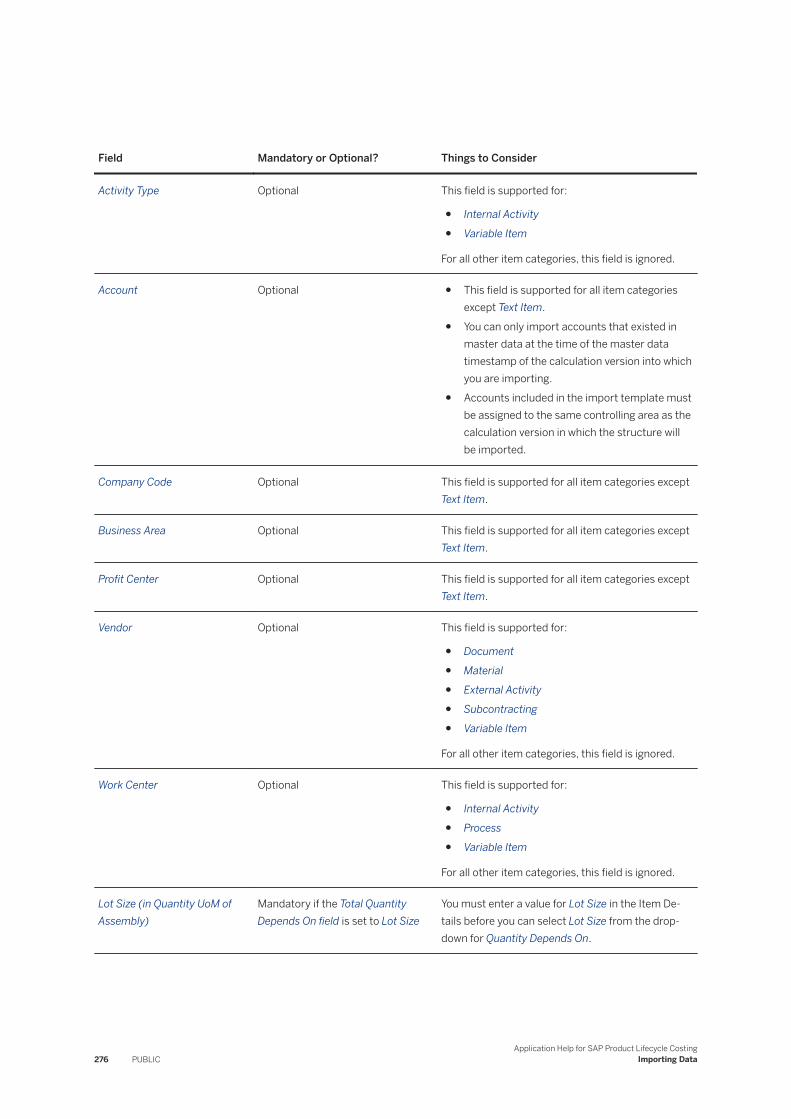
Field Mandatory or Optional? Things to Consider
Activity Type Optional This field is supported for:
● Internal Activity● Variable Item
For all other item categories, this field is ignored.
Account Optional ● This field is supported for all item categories except Text Item.
● You can only import accounts that existed in master data at the time of the master data timestamp of the calculation version into which you are importing.
● Accounts included in the import template must be assigned to the same controlling area as the calculation version in which the structure will be imported.
Company Code Optional This field is supported for all item categories except Text Item.
Business Area Optional This field is supported for all item categories except Text Item.
Profit Center Optional This field is supported for all item categories except Text Item.
Vendor Optional This field is supported for:
● Document● Material● External Activity● Subcontracting● Variable Item
For all other item categories, this field is ignored.
Work Center Optional This field is supported for:
● Internal Activity● Process● Variable Item
For all other item categories, this field is ignored.
Lot Size (in Quantity UoM of Assembly)
Mandatory if the Total Quantity Depends On field is set to Lot Size
You must enter a value for Lot Size in the Item Details before you can select Lot Size from the drop-down for Quantity Depends On.
276 PUBLICApplication Help for SAP Product Lifecycle Costing
Importing Data
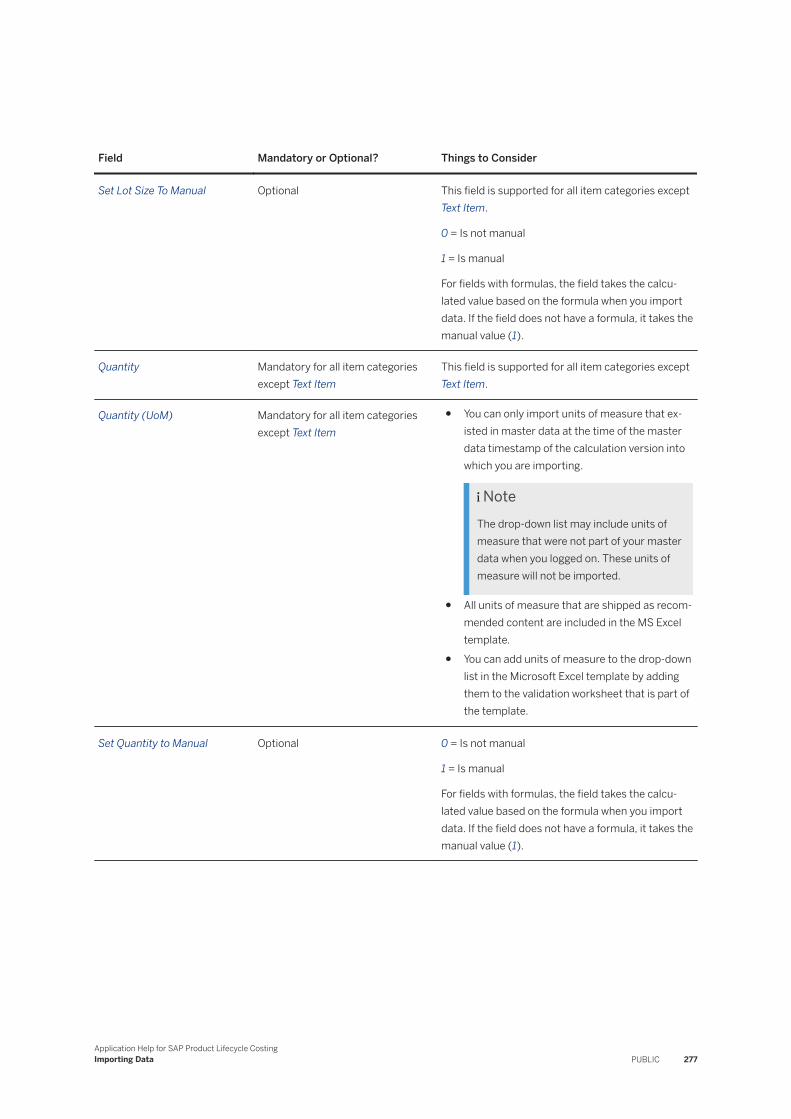
Field Mandatory or Optional? Things to Consider
Set Lot Size To Manual Optional This field is supported for all item categories except Text Item.
0 = Is not manual
1 = Is manual
For fields with formulas, the field takes the calculated value based on the formula when you import data. If the field does not have a formula, it takes the manual value (1).
Quantity Mandatory for all item categories except Text Item
This field is supported for all item categories except Text Item.
Quantity (UoM) Mandatory for all item categories except Text Item
● You can only import units of measure that existed in master data at the time of the master data timestamp of the calculation version into which you are importing.
NoteThe drop-down list may include units of measure that were not part of your master data when you logged on. These units of measure will not be imported.
● All units of measure that are shipped as recommended content are included in the MS Excel template.
● You can add units of measure to the drop-down list in the Microsoft Excel template by adding them to the validation worksheet that is part of the template.
Set Quantity to Manual Optional 0 = Is not manual
1 = Is manual
For fields with formulas, the field takes the calculated value based on the formula when you import data. If the field does not have a formula, it takes the manual value (1).
Application Help for SAP Product Lifecycle CostingImporting Data PUBLIC 277
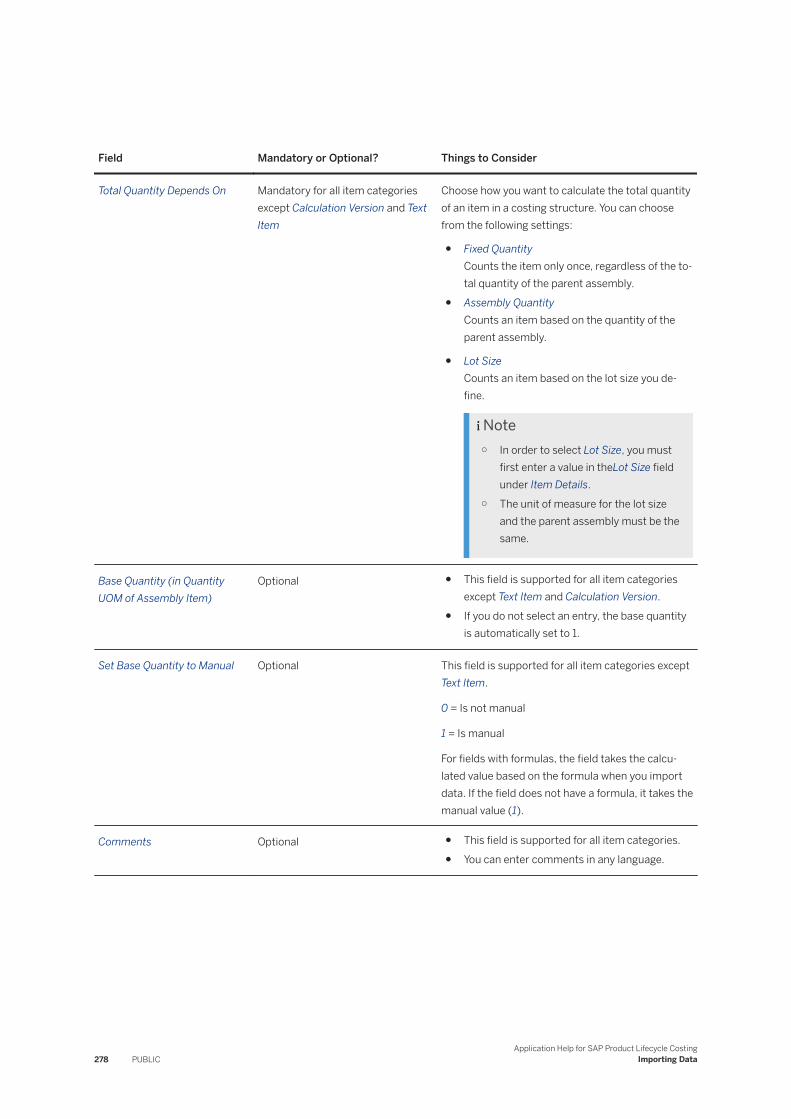
Field Mandatory or Optional? Things to Consider
Total Quantity Depends On Mandatory for all item categories except Calculation Version and Text Item
Choose how you want to calculate the total quantity of an item in a costing structure. You can choose from the following settings:
● Fixed QuantityCounts the item only once, regardless of the total quantity of the parent assembly.
● Assembly QuantityCounts an item based on the quantity of the parent assembly.
● Lot SizeCounts an item based on the lot size you define.
Note○ In order to select Lot Size, you must
first enter a value in theLot Size field under Item Details.
○ The unit of measure for the lot size and the parent assembly must be the same.
Base Quantity (in Quantity UOM of Assembly Item)
Optional ● This field is supported for all item categories except Text Item and Calculation Version.
● If you do not select an entry, the base quantity is automatically set to 1.
Set Base Quantity to Manual Optional This field is supported for all item categories except Text Item.
0 = Is not manual
1 = Is manual
For fields with formulas, the field takes the calculated value based on the formula when you import data. If the field does not have a formula, it takes the manual value (1).
Comments Optional ● This field is supported for all item categories.● You can enter comments in any language.
278 PUBLICApplication Help for SAP Product Lifecycle Costing
Importing Data
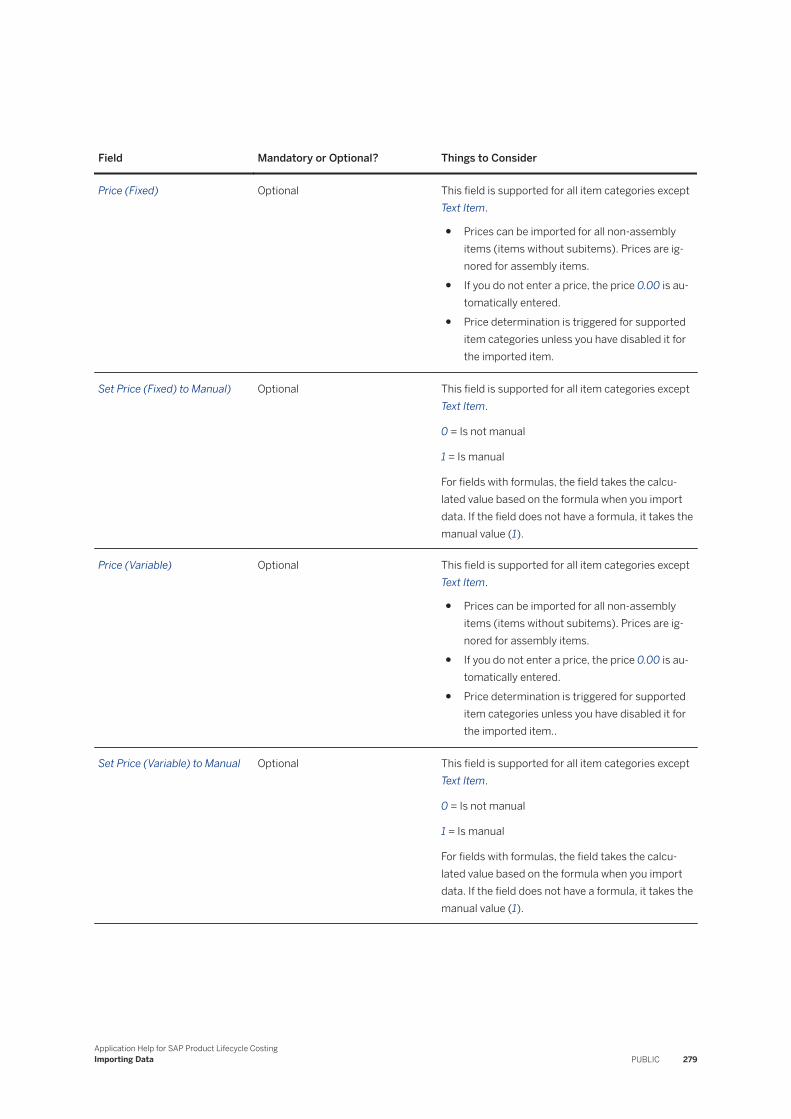
Field Mandatory or Optional? Things to Consider
Price (Fixed) Optional This field is supported for all item categories except Text Item.
● Prices can be imported for all non-assembly items (items without subitems). Prices are ignored for assembly items.
● If you do not enter a price, the price 0.00 is automatically entered.
● Price determination is triggered for supported item categories unless you have disabled it for the imported item.
Set Price (Fixed) to Manual) Optional This field is supported for all item categories except Text Item.
0 = Is not manual
1 = Is manual
For fields with formulas, the field takes the calculated value based on the formula when you import data. If the field does not have a formula, it takes the manual value (1).
Price (Variable) Optional This field is supported for all item categories except Text Item.
● Prices can be imported for all non-assembly items (items without subitems). Prices are ignored for assembly items.
● If you do not enter a price, the price 0.00 is automatically entered.
● Price determination is triggered for supported item categories unless you have disabled it for the imported item..
Set Price (Variable) to Manual Optional This field is supported for all item categories except Text Item.
0 = Is not manual
1 = Is manual
For fields with formulas, the field takes the calculated value based on the formula when you import data. If the field does not have a formula, it takes the manual value (1).
Application Help for SAP Product Lifecycle CostingImporting Data PUBLIC 279
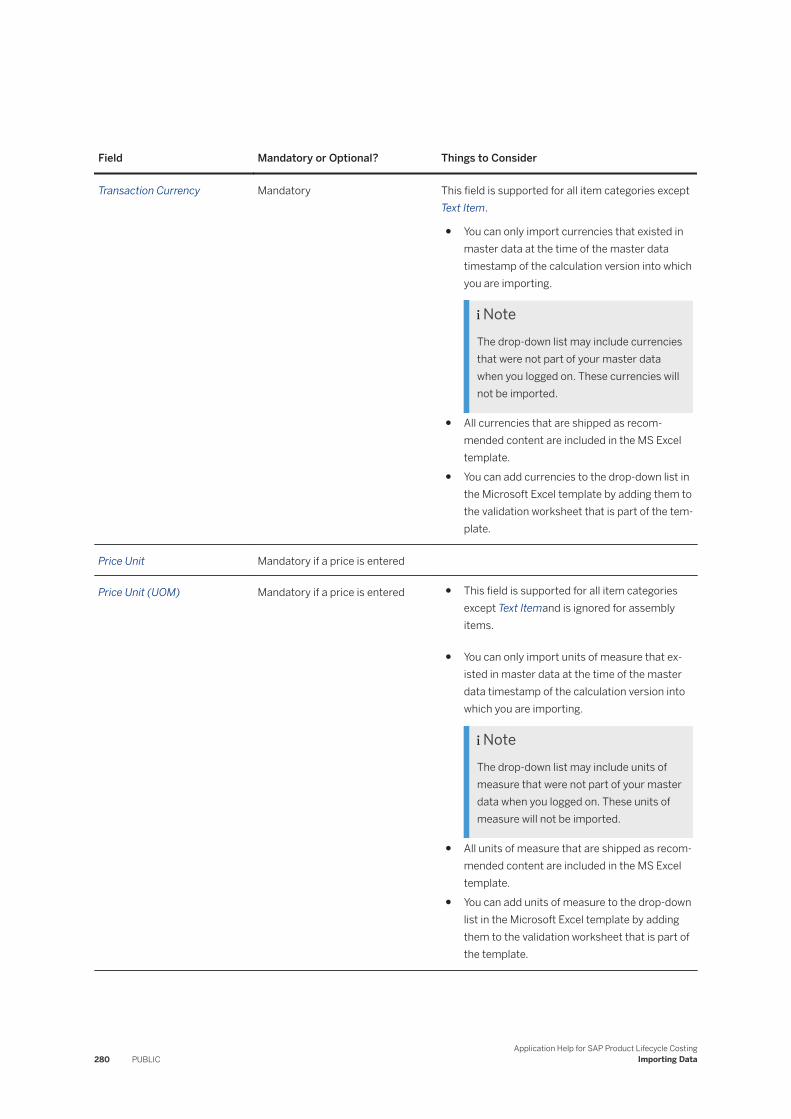
Field Mandatory or Optional? Things to Consider
Transaction Currency Mandatory This field is supported for all item categories except Text Item.
● You can only import currencies that existed in master data at the time of the master data timestamp of the calculation version into which you are importing.
NoteThe drop-down list may include currencies that were not part of your master data when you logged on. These currencies will not be imported.
● All currencies that are shipped as recommended content are included in the MS Excel template.
● You can add currencies to the drop-down list in the Microsoft Excel template by adding them to the validation worksheet that is part of the template.
Price Unit Mandatory if a price is entered
Price Unit (UOM) Mandatory if a price is entered ● This field is supported for all item categories except Text Itemand is ignored for assembly items.
● You can only import units of measure that existed in master data at the time of the master data timestamp of the calculation version into which you are importing.
NoteThe drop-down list may include units of measure that were not part of your master data when you logged on. These units of measure will not be imported.
● All units of measure that are shipped as recommended content are included in the MS Excel template.
● You can add units of measure to the drop-down list in the Microsoft Excel template by adding them to the validation worksheet that is part of the template.
280 PUBLICApplication Help for SAP Product Lifecycle Costing
Importing Data
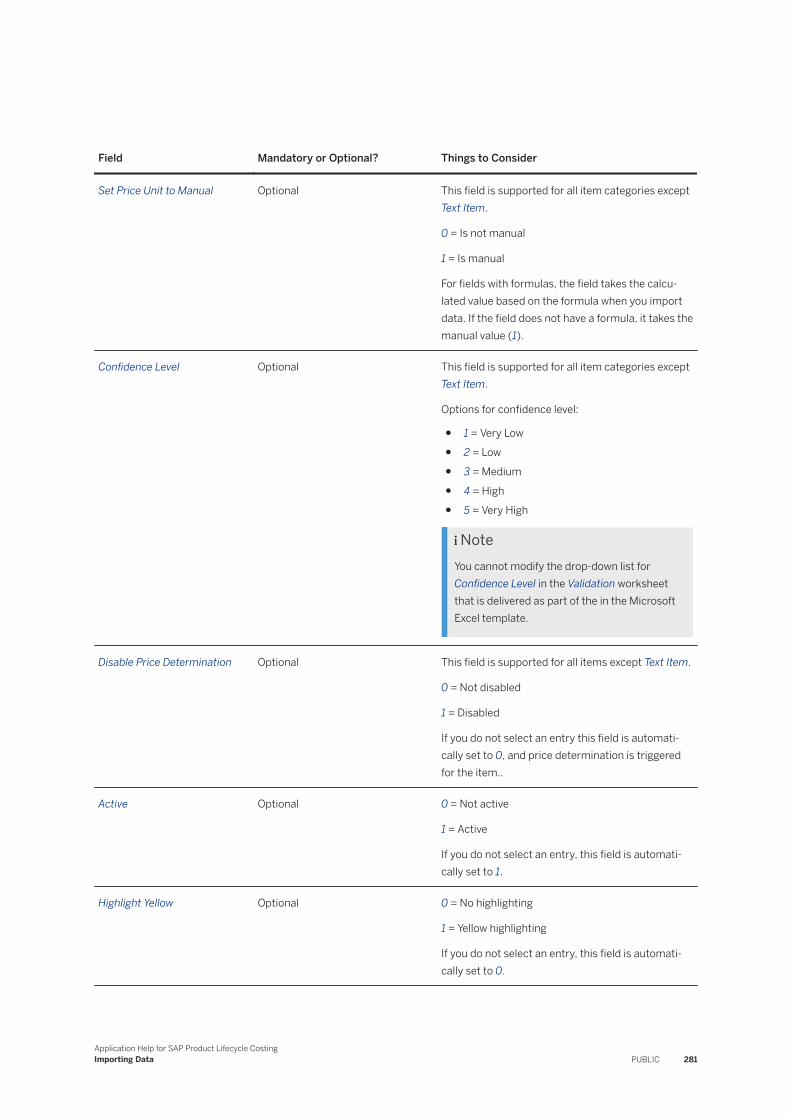
Field Mandatory or Optional? Things to Consider
Set Price Unit to Manual Optional This field is supported for all item categories except Text Item.
0 = Is not manual
1 = Is manual
For fields with formulas, the field takes the calculated value based on the formula when you import data. If the field does not have a formula, it takes the manual value (1).
Confidence Level Optional This field is supported for all item categories except Text Item.
Options for confidence level:
● 1 = Very Low● 2 = Low● 3 = Medium● 4 = High● 5 = Very High
NoteYou cannot modify the drop-down list for Confidence Level in the Validation worksheet that is delivered as part of the in the Microsoft Excel template.
Disable Price Determination Optional This field is supported for all items except Text Item.
0 = Not disabled
1 = Disabled
If you do not select an entry this field is automatically set to 0, and price determination is triggered for the item..
Active Optional 0 = Not active
1 = Active
If you do not select an entry, this field is automatically set to 1.
Highlight Yellow Optional 0 = No highlighting
1 = Yellow highlighting
If you do not select an entry, this field is automatically set to 0.
Application Help for SAP Product Lifecycle CostingImporting Data PUBLIC 281
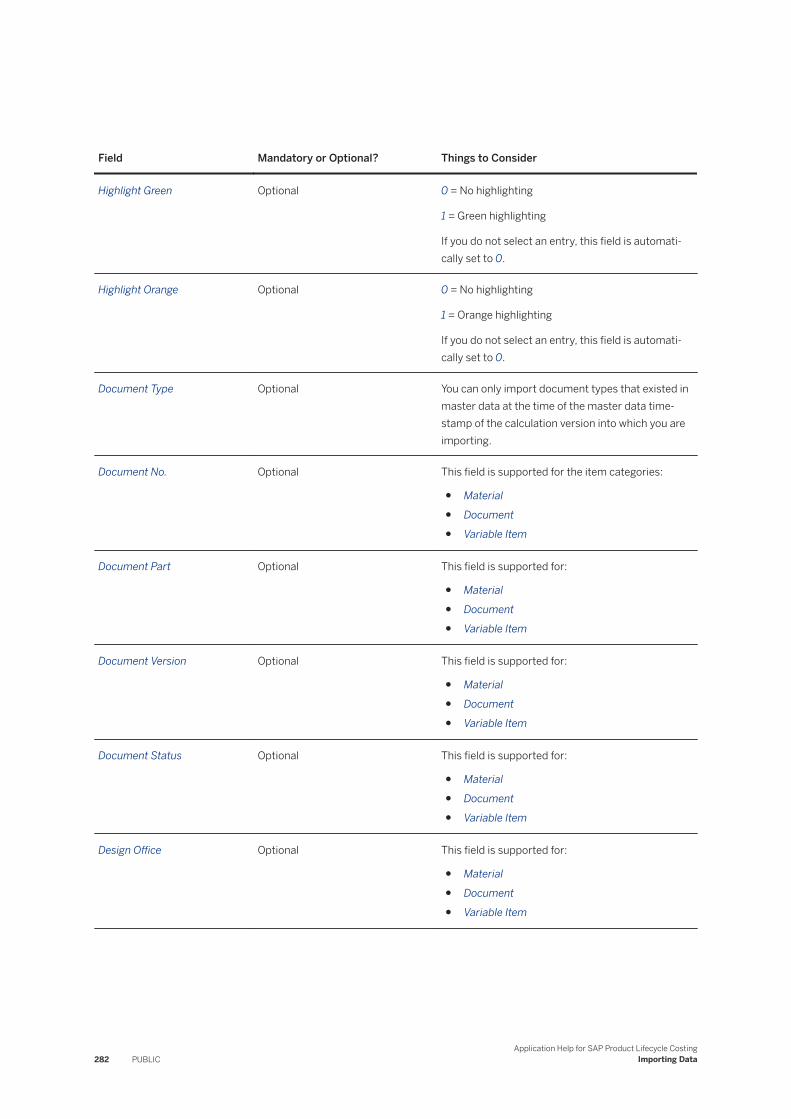
Field Mandatory or Optional? Things to Consider
Highlight Green Optional 0 = No highlighting
1 = Green highlighting
If you do not select an entry, this field is automatically set to 0.
Highlight Orange Optional 0 = No highlighting
1 = Orange highlighting
If you do not select an entry, this field is automatically set to 0.
Document Type Optional You can only import document types that existed in master data at the time of the master data timestamp of the calculation version into which you are importing.
Document No. Optional This field is supported for the item categories:
● Material● Document● Variable Item
Document Part Optional This field is supported for:
● Material● Document● Variable Item
Document Version Optional This field is supported for:
● Material● Document● Variable Item
Document Status Optional This field is supported for:
● Material● Document● Variable Item
Design Office Optional This field is supported for:
● Material● Document● Variable Item
282 PUBLICApplication Help for SAP Product Lifecycle Costing
Importing Data
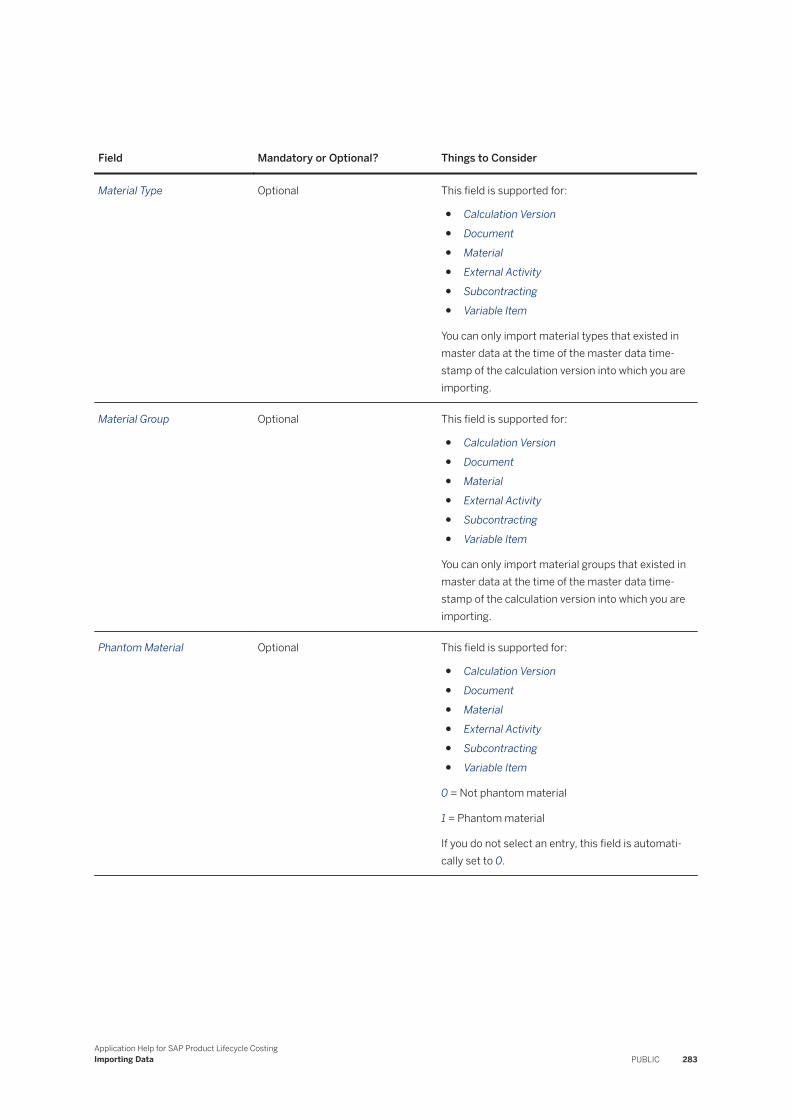
Field Mandatory or Optional? Things to Consider
Material Type Optional This field is supported for:
● Calculation Version● Document● Material● External Activity● Subcontracting● Variable Item
You can only import material types that existed in master data at the time of the master data timestamp of the calculation version into which you are importing.
Material Group Optional This field is supported for:
● Calculation Version● Document● Material● External Activity● Subcontracting● Variable Item
You can only import material groups that existed in master data at the time of the master data timestamp of the calculation version into which you are importing.
Phantom Material Optional This field is supported for:
● Calculation Version● Document● Material● External Activity● Subcontracting● Variable Item
0 = Not phantom material
1 = Phantom material
If you do not select an entry, this field is automatically set to 0.
Application Help for SAP Product Lifecycle CostingImporting Data PUBLIC 283
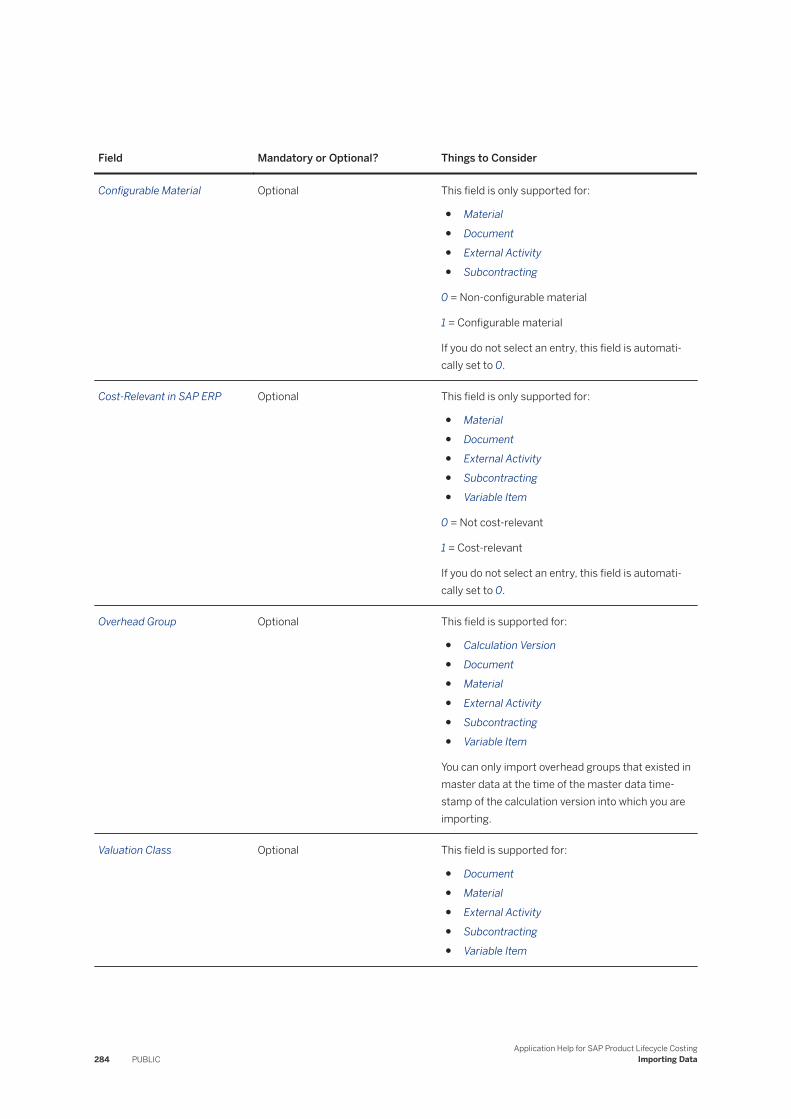
Field Mandatory or Optional? Things to Consider
Configurable Material Optional This field is only supported for:
● Material● Document● External Activity● Subcontracting
0 = Non-configurable material
1 = Configurable material
If you do not select an entry, this field is automatically set to 0.
Cost-Relevant in SAP ERP Optional This field is only supported for:
● Material● Document● External Activity● Subcontracting● Variable Item
0 = Not cost-relevant
1 = Cost-relevant
If you do not select an entry, this field is automatically set to 0.
Overhead Group Optional This field is supported for:
● Calculation Version● Document● Material● External Activity● Subcontracting● Variable Item
You can only import overhead groups that existed in master data at the time of the master data timestamp of the calculation version into which you are importing.
Valuation Class Optional This field is supported for:
● Document● Material● External Activity● Subcontracting● Variable Item
284 PUBLICApplication Help for SAP Product Lifecycle Costing
Importing Data
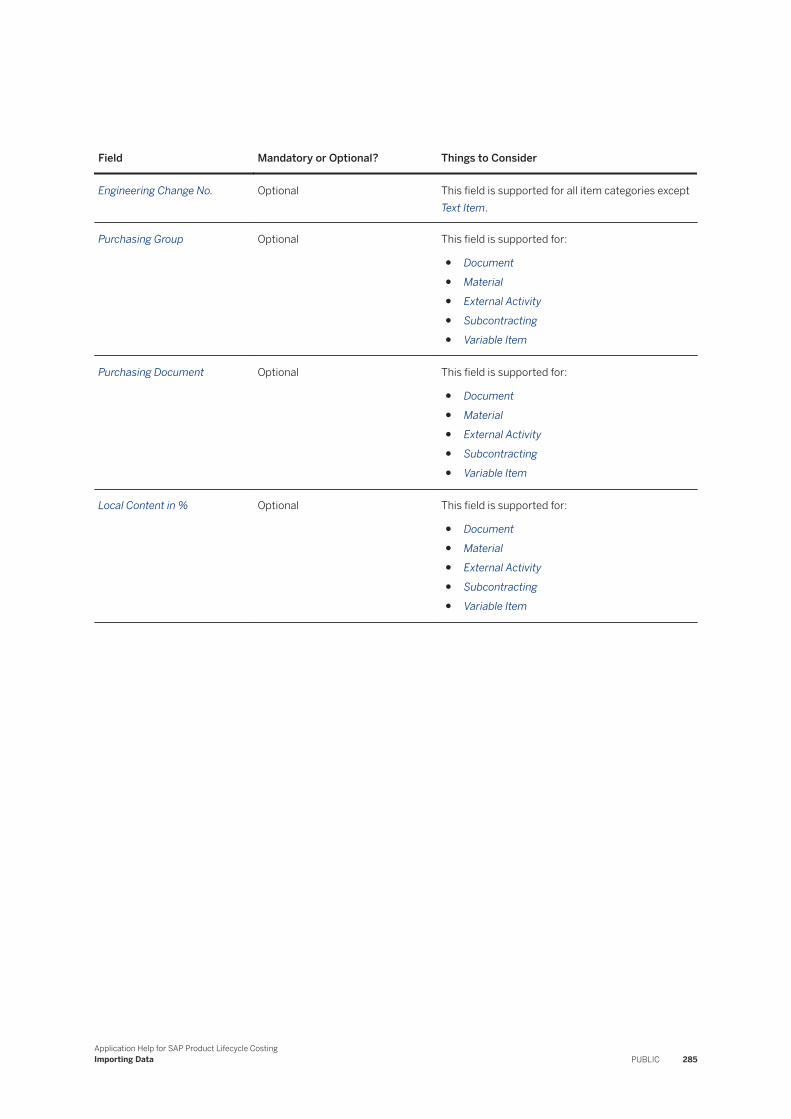
Field Mandatory or Optional? Things to Consider
Engineering Change No. Optional This field is supported for all item categories except Text Item.
Purchasing Group Optional This field is supported for:
● Document● Material● External Activity● Subcontracting● Variable Item
Purchasing Document Optional This field is supported for:
● Document● Material● External Activity● Subcontracting● Variable Item
Local Content in % Optional This field is supported for:
● Document● Material● External Activity● Subcontracting● Variable Item
Application Help for SAP Product Lifecycle CostingImporting Data PUBLIC 285
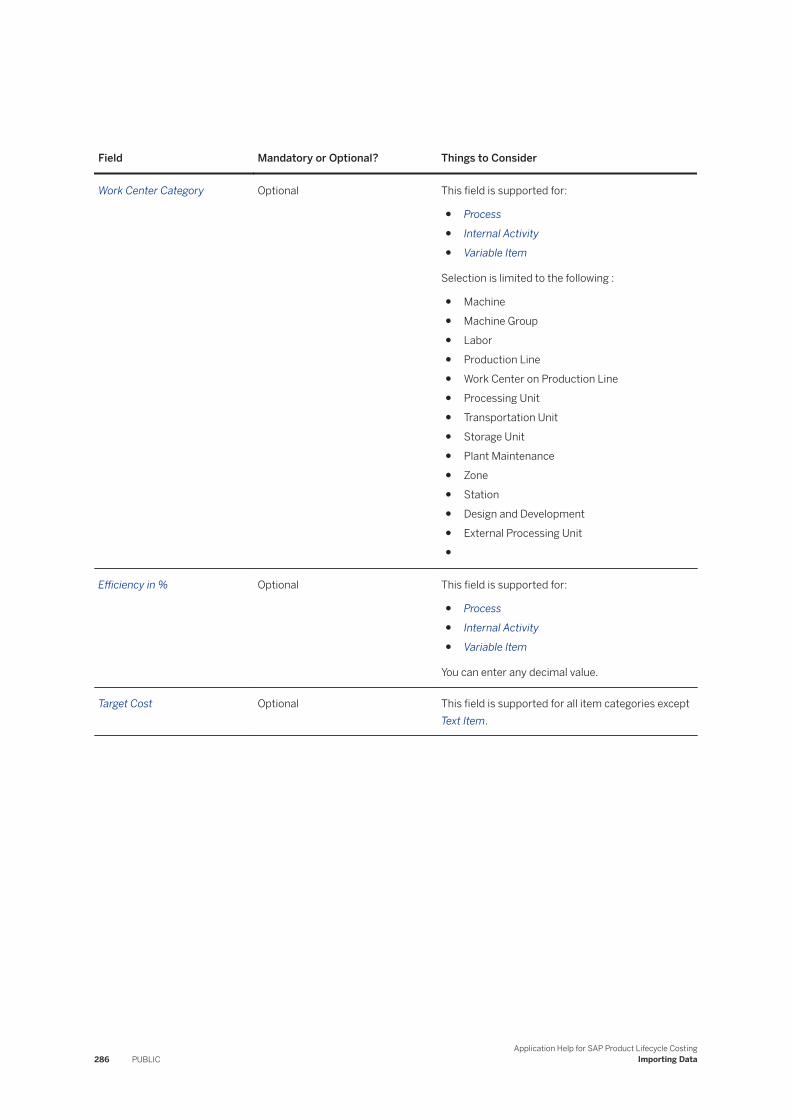
Field Mandatory or Optional? Things to Consider
Work Center Category Optional This field is supported for:
● Process● Internal Activity● Variable Item
Selection is limited to the following :
● Machine● Machine Group● Labor● Production Line● Work Center on Production Line● Processing Unit● Transportation Unit● Storage Unit● Plant Maintenance● Zone● Station● Design and Development● External Processing Unit●
Efficiency in % Optional This field is supported for:
● Process● Internal Activity● Variable Item
You can enter any decimal value.
Target Cost Optional This field is supported for all item categories except Text Item.
286 PUBLICApplication Help for SAP Product Lifecycle Costing
Importing Data
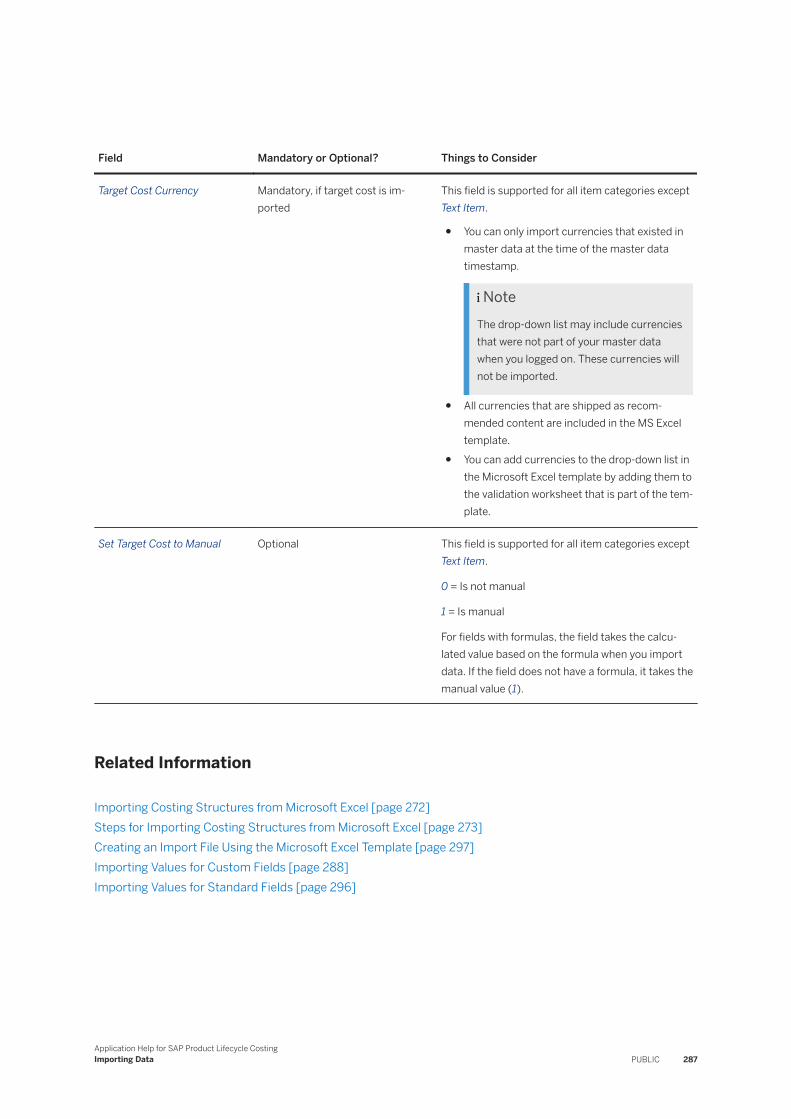
Field Mandatory or Optional? Things to Consider
Target Cost Currency Mandatory, if target cost is imported
This field is supported for all item categories except Text Item.
● You can only import currencies that existed in master data at the time of the master data timestamp.
NoteThe drop-down list may include currencies that were not part of your master data when you logged on. These currencies will not be imported.
● All currencies that are shipped as recommended content are included in the MS Excel template.
● You can add currencies to the drop-down list in the Microsoft Excel template by adding them to the validation worksheet that is part of the template.
Set Target Cost to Manual Optional This field is supported for all item categories except Text Item.
0 = Is not manual
1 = Is manual
For fields with formulas, the field takes the calculated value based on the formula when you import data. If the field does not have a formula, it takes the manual value (1).
Related Information
Importing Costing Structures from Microsoft Excel [page 272]Steps for Importing Costing Structures from Microsoft Excel [page 273]Creating an Import File Using the Microsoft Excel Template [page 297]Importing Values for Custom Fields [page 288]Importing Values for Standard Fields [page 296]
Application Help for SAP Product Lifecycle CostingImporting Data PUBLIC 287
20.5.3 Importing Values for Custom Fields
You can use the Microsoft Excel template to import values into the following custom fields:
● Custom fields for items● Custom fields for master data
Related Information
Adding Custom Fields for Items to the Import Template [page 288]Adding Custom Fields for Master Data to the Import Template [page 292]
20.5.3.1 Adding Custom Fields for Items to the Import Template
You can adapt the Microsoft Excel import template in order to import values for custom fields at item level.
Prerequisites
● You are using the latest Microsoft Excel import template delivered with the SAP Product Lifecycle Costing application.
● The custom fields for the values you are importing already exist in your target system.
Context
The Microsoft Excel import template includes predefined columns and technical fields that allow you to import values for all editable standard fields in the application. The template does not include any custom fields. In order to import values for custom fields created in your system, you need to first add the appropriate columns and technical fields to the import template. You add these fields in place of the original custom field. You do not need to create these additional fields in your target system.
Values are imported as follows:
● If you enter a value in the import template, the value is imported.● If you leave a value in the import template blank, no value is used, UNLESS it is a unit of measure or
currency.● If you leave out a unit field in the import template or leave the value for a unit of measure or currency blank,
the default currency or unit of measure that was defined when the custom field was created is used.
288 PUBLICApplication Help for SAP Product Lifecycle Costing
Importing Data
Procedure
1. In the Microsoft Excel import template, create a new column for each of the following technical fields:
Technical Field Required Why It's Used
CUST_<FIELD>_MANUAL Required Imports the value from the template to the calculation version as a manual value.
If the custom field also has a formula, you can toggle between the newly-imported manual value and the formula-calculated value in the calculation version.
CUST_<FIELD>_IS_MANUAL Required Tells the system whether to display the manual value that is being imported, or an existing formula-calculated value, if any.
CUST_<FIELD>_UNIT Optional
NoteYou only need to add this technical field if the value you are importing has a currency or unit of measure.
Imports a unit of measure or currency for the custom field.
Enter the columns anywhere after the column Item Category. Each column should have one technical field name as a header.
Example
2. [Optional]: For each column header enter a descriptive name and data type.
Headings other than the technical field names are used for information only and do not affect the import.3. Enter a value for each technical field.
Application Help for SAP Product Lifecycle CostingImporting Data PUBLIC 289
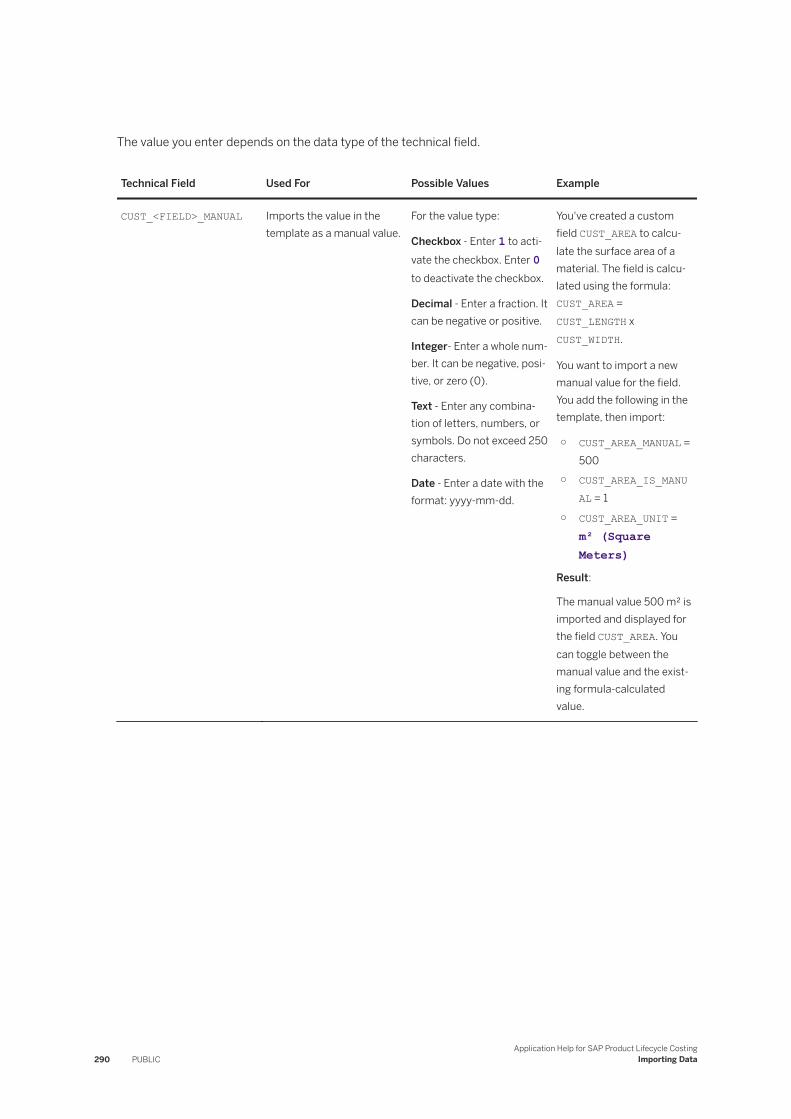
The value you enter depends on the data type of the technical field.
Technical Field Used For Possible Values Example
CUST_<FIELD>_MANUAL Imports the value in the template as a manual value.
For the value type:
Checkbox - Enter 1 to activate the checkbox. Enter 0 to deactivate the checkbox.
Decimal - Enter a fraction. It can be negative or positive.
Integer- Enter a whole number. It can be negative, positive, or zero (0).
Text - Enter any combination of letters, numbers, or symbols. Do not exceed 250 characters.
Date - Enter a date with the format: yyyy-mm-dd.
You've created a custom field CUST_AREA to calculate the surface area of a material. The field is calculated using the formula: CUST_AREA = CUST_LENGTH x CUST_WIDTH.
You want to import a new manual value for the field. You add the following in the template, then import:
○ CUST_AREA_MANUAL = 500
○ CUST_AREA_IS_MANUAL = 1
○ CUST_AREA_UNIT = m² (Square Meters)
Result:
The manual value 500 m² is imported and displayed for the field CUST_AREA. You can toggle between the manual value and the existing formula-calculated value.
290 PUBLICApplication Help for SAP Product Lifecycle Costing
Importing Data
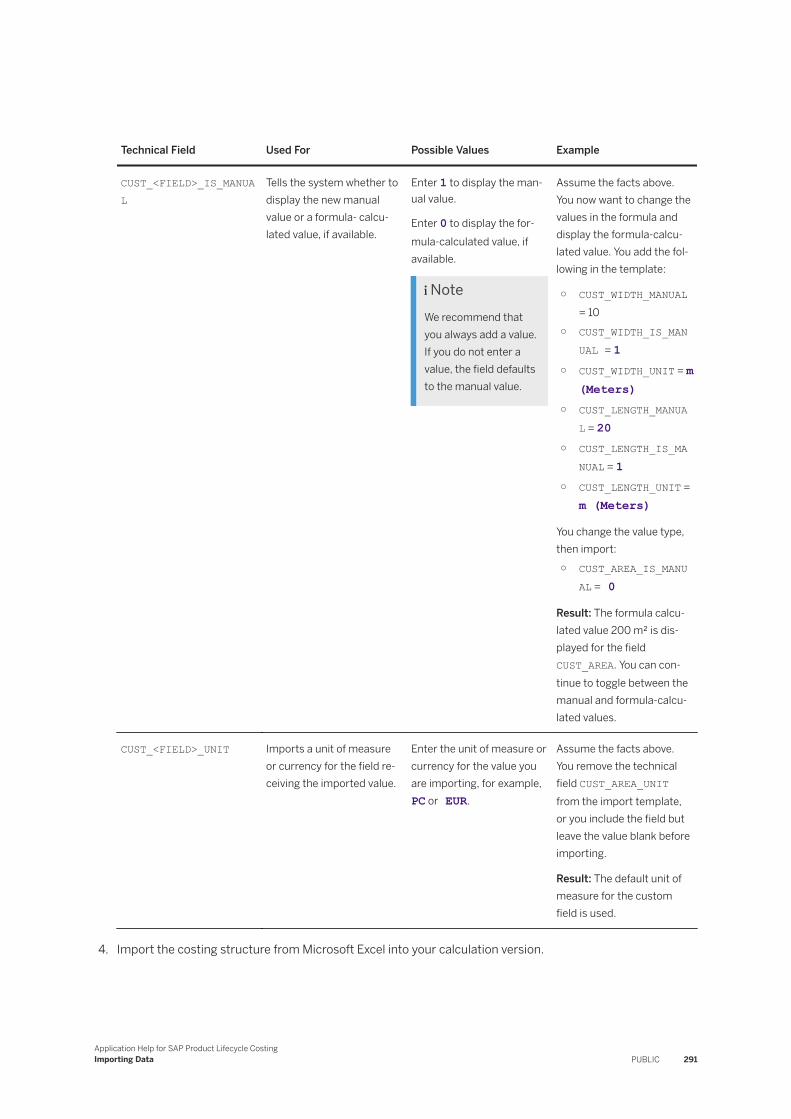
Technical Field Used For Possible Values Example
CUST_<FIELD>_IS_MANUAL
Tells the system whether to display the new manual value or a formula- calculated value, if available.
Enter 1 to display the manual value.
Enter 0 to display the formula-calculated value, if available.
NoteWe recommend that you always add a value. If you do not enter a value, the field defaults to the manual value.
Assume the facts above. You now want to change the values in the formula and display the formula-calculated value. You add the following in the template:
○ CUST_WIDTH_MANUAL = 10
○ CUST_WIDTH_IS_MANUAL = 1
○ CUST_WIDTH_UNIT = m (Meters)
○ CUST_LENGTH_MANUAL = 20
○ CUST_LENGTH_IS_MANUAL = 1
○ CUST_LENGTH_UNIT = m (Meters)
You change the value type, then import:○ CUST_AREA_IS_MANU
AL = 0
Result: The formula calculated value 200 m² is displayed for the field CUST_AREA. You can continue to toggle between the manual and formula-calculated values.
CUST_<FIELD>_UNIT Imports a unit of measure or currency for the field receiving the imported value.
Enter the unit of measure or currency for the value you are importing, for example, PC or EUR.
Assume the facts above. You remove the technical field CUST_AREA_UNIT from the import template, or you include the field but leave the value blank before importing.
Result: The default unit of measure for the custom field is used.
4. Import the costing structure from Microsoft Excel into your calculation version.
Application Help for SAP Product Lifecycle CostingImporting Data PUBLIC 291
Results
The values entered for the technical fields are imported. The correct value type is set and the unit of measure or currency entered is used.
Related Information
Steps for Importing Costing Structures from Microsoft Excel [page 273]
20.5.3.2 Adding Custom Fields for Master Data to the Import Template
You can adapt the Microsoft Excel import template in order to import values for custom fields in your master data.
Prerequisites
● You are using the latest Microsoft Excel import template delivered with the SAP Product Lifecycle Costing application.
● The custom fields for the values you are importing already exist in your target system.
Context
The Microsoft Excel template includes predefined columns and technical fields that allow you to import values for all editable standard fields in the application. The template does not include any custom fields. In order to import values for custom fields created in your system, you need to first add the appropriate columns and technical fields to the import template. You add these fields in place of the original custom field. You do not need to create these additional fields in your target system.
Values are imported as follows:
● If you enter a value in the import template, the value is imported.● If you leave the value in the import template blank but a value for the custom field is maintained in master
data, the value maintained in master data is used.● If you leave the value in the import template blank and no value is maintained in master data, the default
value defined when the custom field was created is used.
292 PUBLICApplication Help for SAP Product Lifecycle Costing
Importing Data
Procedure
1. In the Microsoft Excel import template, create a new column for each of the following technical fields:
Technical Field Required Why It's Used
<PREFIX>_<FIELD>_MANUAL Required Imports the value from the template to the calculation version as a manual value.
If the custom field also has a formula, you can toggle between the newly-imported manual value and the formula-calculated value in the calculation version.
<PREFIX>_<FIELD>_UNIT Optional
NoteYou only need to add this technical field if the value you are importing has a currency or unit of measure.
Imports a unit of measure or currency for the custom field.
Enter the columns anywhere after the column Item Category. Each column should have one technical field name as a header.
Example
2. Check that you have entered the correct prefix for the technical field names.
Prefix Master Data Area
CAPR_ Activity Prices
Application Help for SAP Product Lifecycle CostingImporting Data PUBLIC 293
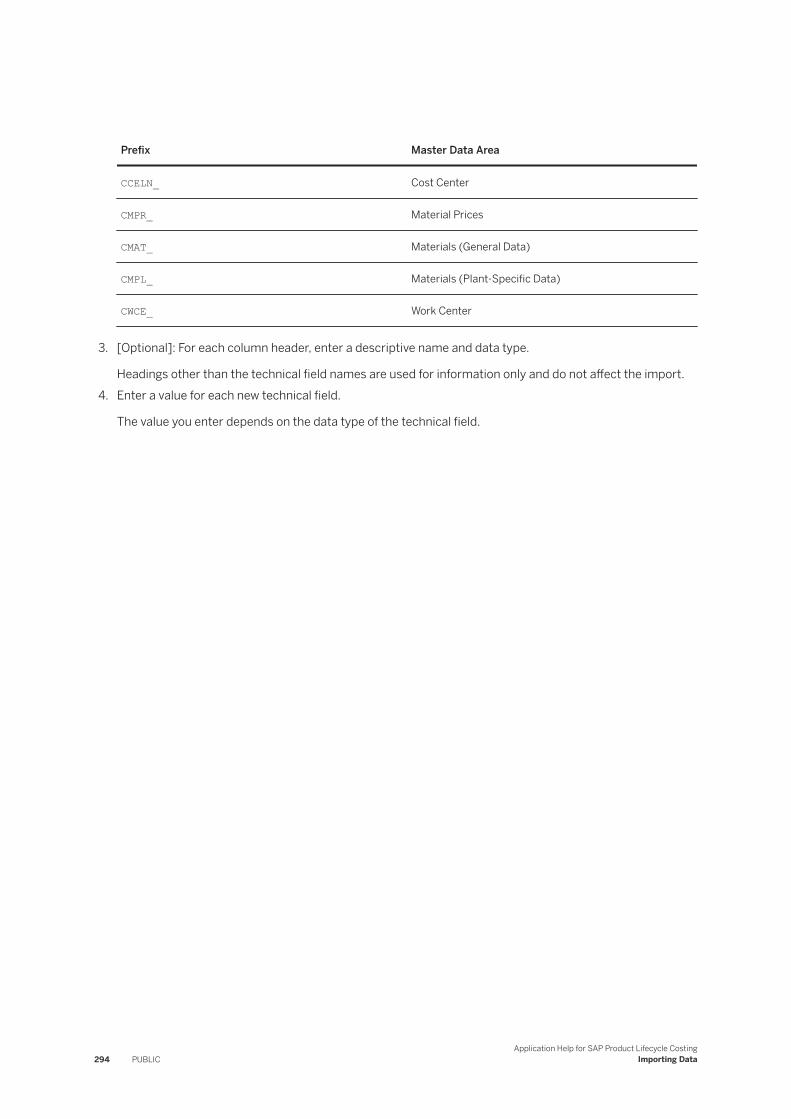
Prefix Master Data Area
CCELN_ Cost Center
CMPR_ Material Prices
CMAT_ Materials (General Data)
CMPL_ Materials (Plant-Specific Data)
CWCE_ Work Center
3. [Optional]: For each column header, enter a descriptive name and data type.
Headings other than the technical field names are used for information only and do not affect the import.4. Enter a value for each new technical field.
The value you enter depends on the data type of the technical field.
294 PUBLICApplication Help for SAP Product Lifecycle Costing
Importing Data
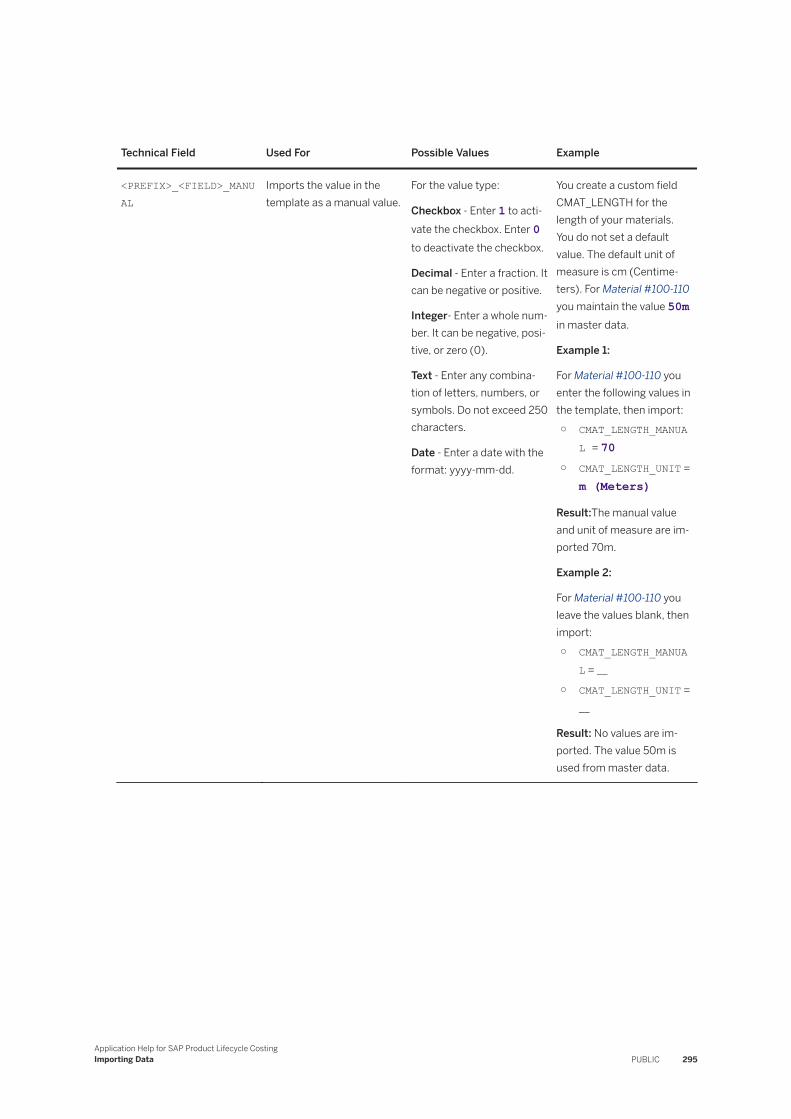
Technical Field Used For Possible Values Example
<PREFIX>_<FIELD>_MANUAL
Imports the value in the template as a manual value.
For the value type:
Checkbox - Enter 1 to activate the checkbox. Enter 0 to deactivate the checkbox.
Decimal - Enter a fraction. It can be negative or positive.
Integer- Enter a whole number. It can be negative, positive, or zero (0).
Text - Enter any combination of letters, numbers, or symbols. Do not exceed 250 characters.
Date - Enter a date with the format: yyyy-mm-dd.
You create a custom field CMAT_LENGTH for the length of your materials. You do not set a default value. The default unit of measure is cm (Centimeters). For Material #100-110 you maintain the value 50m in master data.
Example 1:
For Material #100-110 you enter the following values in the template, then import:○ CMAT_LENGTH_MANUA
L = 70○ CMAT_LENGTH_UNIT =
m (Meters)
Result:The manual value and unit of measure are imported 70m.
Example 2:
For Material #100-110 you leave the values blank, then import:○ CMAT_LENGTH_MANUA
L = __
○ CMAT_LENGTH_UNIT = __
Result: No values are imported. The value 50m is used from master data.
Application Help for SAP Product Lifecycle CostingImporting Data PUBLIC 295
Technical Field Used For Possible Values Example
<PREFIX>_<FIELD>_UNIT Imports a unit of measure or currency for the field receiving the imported value.
Enter the unit of measure or currency for the value you are importing, for example, PC or EUR.
Assume the facts above. For the material #100-120 no master data is maintained. You leave the values for these custom fields blank, then import::○ CMAT_LENGTH_MANUA
L = __
○ CMAT_LENGTH_UNIT = __
Result: No values are imported. No values are available to use from master data. There is no default value for the custom field. The default unit of measure, cm (Centimeters), is the only value displayed.
5. Import the costing structure from Microsoft Excel into your calculation version.
Results
The values entered for the technical fields are imported. If the fields are left blank, the values maintained in master data are used. For fields with no master data maintained, the default value and unit of measure entered when the custom field was created are used. If there is no default value or default unit of measure for the custom field, no values are displayed.
Related Information
Steps for Importing Costing Structures from Microsoft Excel [page 273]
20.5.4 Importing Values for Standard Fields
You can use the Microsoft Excel template delivered with SAP Product Lifecycle to import values into all standard fields in the application.
NoteWe highly recommend using the Microsoft import template delivered with the application due to the additional validation. You can, however, use your own import file to import values into standard fields. To
296 PUBLICApplication Help for SAP Product Lifecycle Costing
Importing Data
ensure success, make sure that you include the technical names of all fields that have values being imported.
How Standard Fields Are Imported
If the field to be imported is included as a column in the Microsoft Excel import template, the following applies:
● If the field contains a value, the value is imported at item level.● If the field does not contain a value and is dependent on master data, the value from master data is used.● If the field does not contain a value and is not dependent on master data, the default value for this field is
used.
If the field to be imported is not included as a column in the Microsoft Excel import template, the following applies:
● If the field is dependent on master data, the dependent value from master data is used.● If the field is not dependent on master data, the default value for this field is used.
20.5.5 Creating an Import File Using the Microsoft Excel Template
You can create a Microsoft Excel file and use it to import costing structures (including BOMs and routings) into an open calculation version in SAP Product Lifecycle Costing.
A template is delivered with your client installation. A local path to the template is displayed in the Import Structure from Microsoft Excel dialog. You can access the dialog by choosing Import, then Import Structure from Microsoft Excel... in the ribbon in the Calculation view.
Prerequisites
Accounts included in the import template must be assigned to the same controlling area as the calculation version into which the structure will be imported.
Note● Accounts can only be imported for item categories that have no automatic account determination. If
your Microsoft Excel file contains item categories that have automatic account determination (for example, for Material or Document), these accounts are not imported. In this case, accounts for these items are set by automatic account determination after import.
● Temporary values are not allowed for Document Type, Material Type, Material Group, Overhead Group, or Valuation Class.
Application Help for SAP Product Lifecycle CostingImporting Data PUBLIC 297
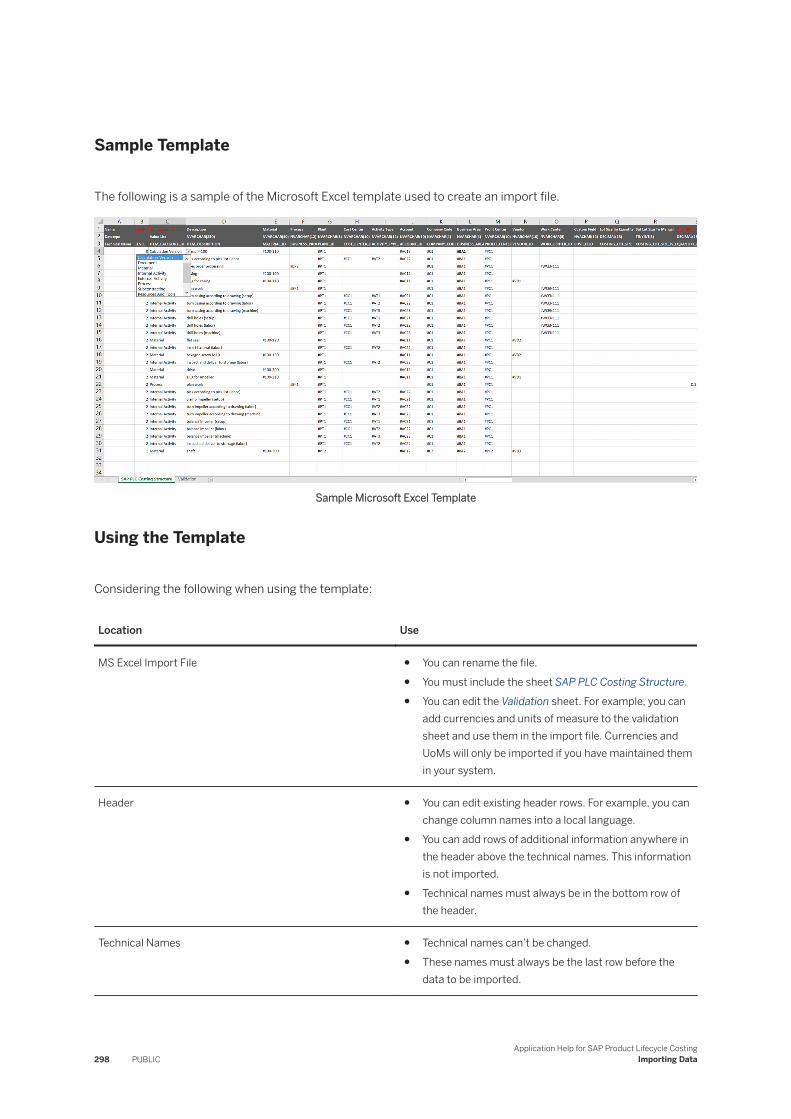
Sample Template
The following is a sample of the Microsoft Excel template used to create an import file.
Sample Microsoft Excel Template
Using the Template
Considering the following when using the template:
Location Use
MS Excel Import File ● You can rename the file.● You must include the sheet SAP PLC Costing Structure.● You can edit the Validation sheet. For example, you can
add currencies and units of measure to the validation sheet and use them in the import file. Currencies and UoMs will only be imported if you have maintained them in your system.
Header ● You can edit existing header rows. For example, you can change column names into a local language.
● You can add rows of additional information anywhere in the header above the technical names. This information is not imported.
● Technical names must always be in the bottom row of the header.
Technical Names ● Technical names can’t be changed.● These names must always be the last row before the
data to be imported.
298 PUBLICApplication Help for SAP Product Lifecycle Costing
Importing Data
Location Use
Columns ● You can rearrange the columns in any order.● All columns must have a technical name in order to be
imported.● Columns with unknown technical names are not im
ported.● You can add columns for custom fields. The custom
fields must exist in your system in order to be imported.● You can add columns for informational purposes any
where in the template. Without a technical name, the information is not imported.
Item Categories ● Item categories are available in English only. You cannot change or add new ones in the Validation sheet.
● Some item categories only support certain fields. If you enter values that are not supported for a specific item category (for example, if you enter an activity type for a material item), the field is ignored during import. For more information, see Field Requirements for the Microsoft Excel Template [page 274]
Work Center Categories ● Work center categories are in English only. You cannot change or add new ones in the Validation sheet.
Items ● The maximum number of items you can import at one time is set by your system administrator. We recommend costing structures no larger than 30,000 items.
Fields ● Mandatory fields are in red and include an asterisk (*).● You can enter values in fields in any language.● If you enter values in fields that are not supported for a
specific item category, the fields are not imported. For example, if you enter an activity type for a material item, the field is ignored during import. For more information, see Field Requirements for the Microsoft Excel Template [page 274]
● Data entered for supported fields is imported in its entirety. Be sure to remove data from fields that you do not want to import.
Creating a Costing Structure
You use the template to create the costing structure that you want to import. The levels that you assign to the items in your template define the hierarchical structure of the data that you are importing. The lowest numerical level in the template (normally, this is 0) always corresponds to the top-level item in the costing structure that you create in your import file.
Application Help for SAP Product Lifecycle CostingImporting Data PUBLIC 299
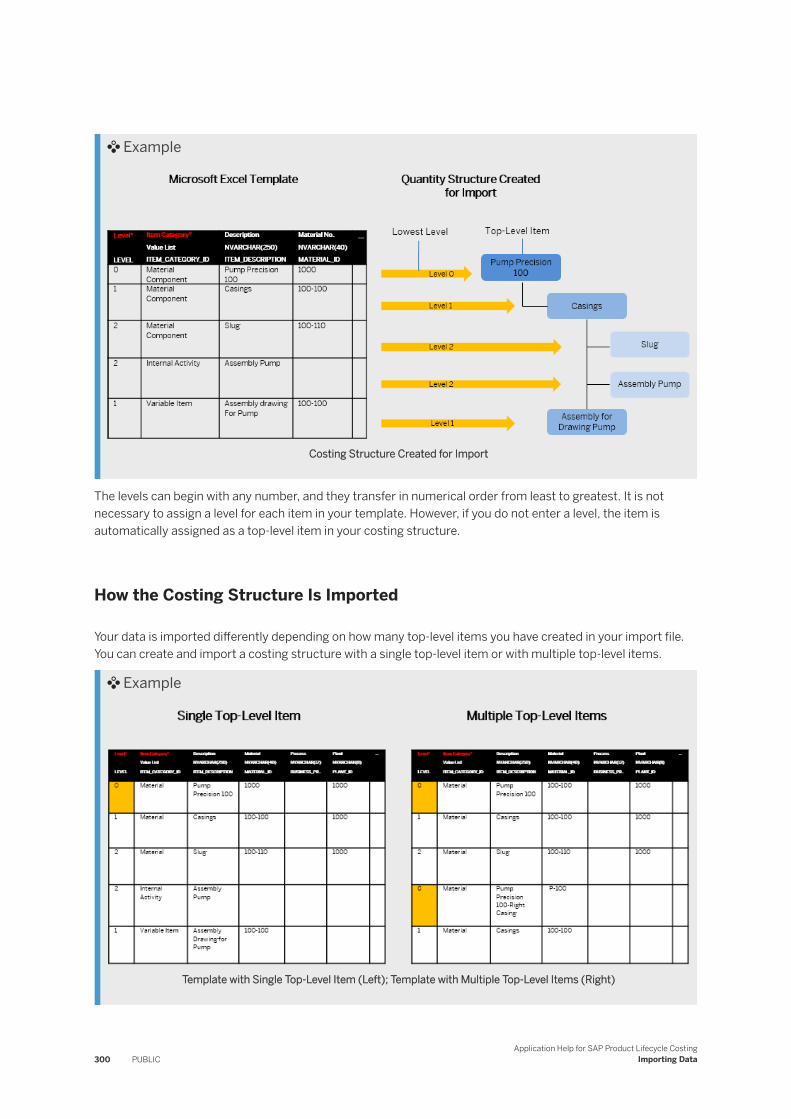
Example
Costing Structure Created for Import
The levels can begin with any number, and they transfer in numerical order from least to greatest. It is not necessary to assign a level for each item in your template. However, if you do not enter a level, the item is automatically assigned as a top-level item in your costing structure.
How the Costing Structure Is Imported
Your data is imported differently depending on how many top-level items you have created in your import file. You can create and import a costing structure with a single top-level item or with multiple top-level items.
Example
Template with Single Top-Level Item (Left); Template with Multiple Top-Level Items (Right)
300 PUBLICApplication Help for SAP Product Lifecycle Costing
Importing Data
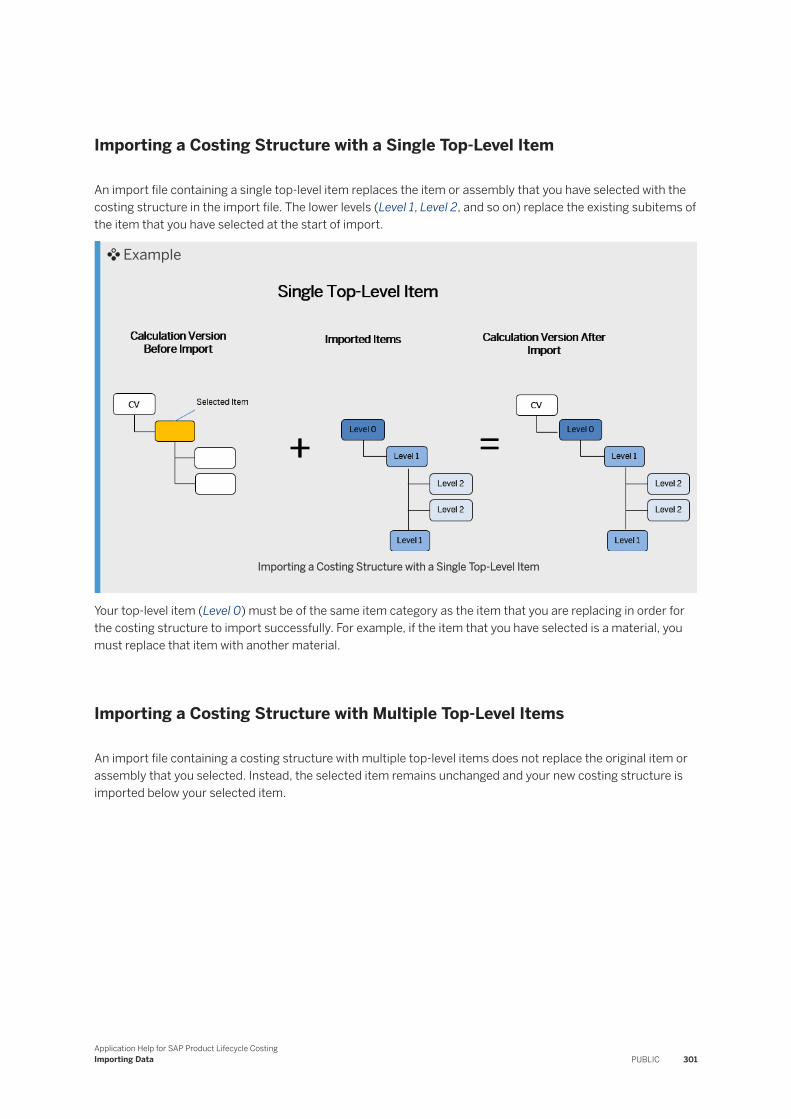
Importing a Costing Structure with a Single Top-Level Item
An import file containing a single top-level item replaces the item or assembly that you have selected with the costing structure in the import file. The lower levels (Level 1, Level 2, and so on) replace the existing subitems of the item that you have selected at the start of import.
Example
Importing a Costing Structure with a Single Top-Level Item
Your top-level item (Level 0) must be of the same item category as the item that you are replacing in order for the costing structure to import successfully. For example, if the item that you have selected is a material, you must replace that item with another material.
Importing a Costing Structure with Multiple Top-Level Items
An import file containing a costing structure with multiple top-level items does not replace the original item or assembly that you selected. Instead, the selected item remains unchanged and your new costing structure is imported below your selected item.
Application Help for SAP Product Lifecycle CostingImporting Data PUBLIC 301
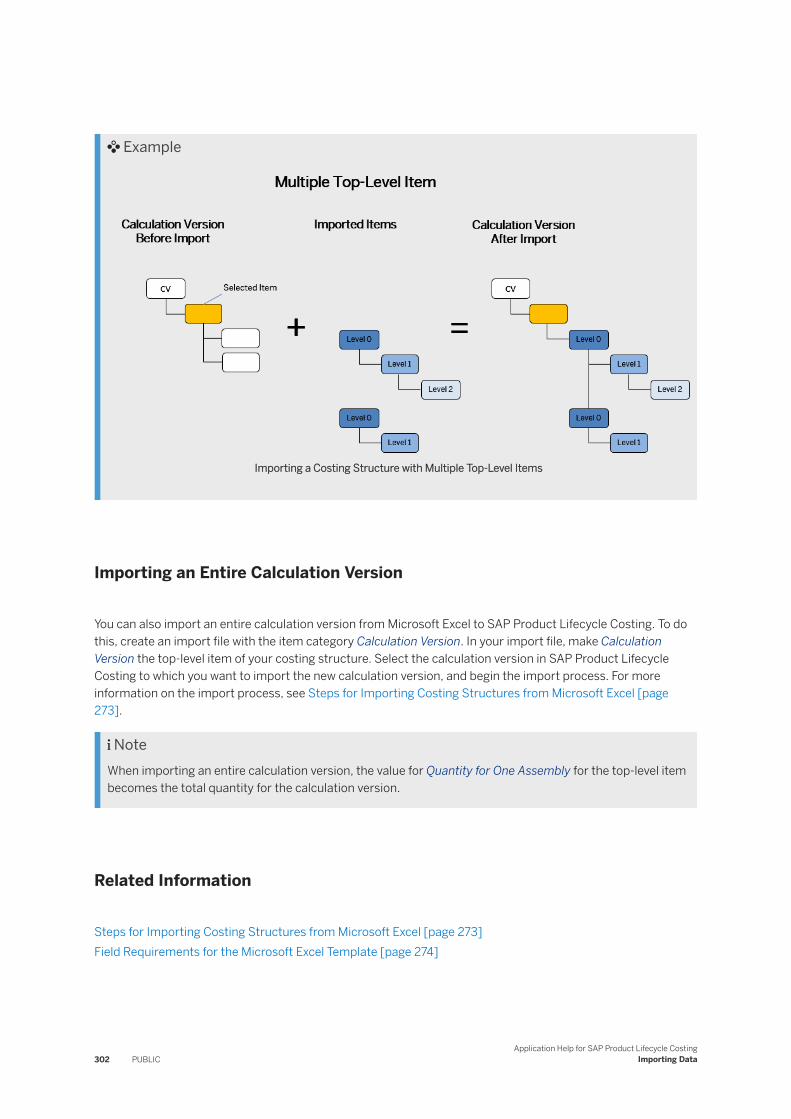
Example
Importing a Costing Structure with Multiple Top-Level Items
Importing an Entire Calculation Version
You can also import an entire calculation version from Microsoft Excel to SAP Product Lifecycle Costing. To do this, create an import file with the item category Calculation Version. In your import file, make Calculation Version the top-level item of your costing structure. Select the calculation version in SAP Product Lifecycle Costing to which you want to import the new calculation version, and begin the import process. For more information on the import process, see Steps for Importing Costing Structures from Microsoft Excel [page 273].
NoteWhen importing an entire calculation version, the value for Quantity for One Assembly for the top-level item becomes the total quantity for the calculation version.
Related Information
Steps for Importing Costing Structures from Microsoft Excel [page 273]Field Requirements for the Microsoft Excel Template [page 274]
302 PUBLICApplication Help for SAP Product Lifecycle Costing
Importing Data
21 Working with Master Data
Master data is information that must be generally and consistently available for use in calculation versions in SAP Product Lifecycle Costing.
Sources of Master Data
You can use master data from the following sources:
● Replicated from your SAP ERP systemFor more information, see the topic Master Data Replication in the Administrator's Guide for SAP Product Lifecycle Costing .
● Defined locally in SAP Product Lifecycle Costing
NoteWhen integrating SAP Product Lifecycle Costing with other SAP software using a runtime license obtained from SAP or its distributors, the restrictions of such runtime license apply.
The Administration view gives you an overview of the available master data and shows you the source of the respective data.
Note the following about master data:
● Master data that has been replicated from SAP ERP is display-only in SAP Product Lifecycle Costing. This data can be used in calculation versions, but cannot be modified in the Administration view.
● You can create, modify, and delete master data that is defined locally in SAP Product Lifecycle Costing.● Data imported from SAP ERP always takes precedence over locally defined master data. This means that if
a set of master data has already been defined in SAP Product Lifecycle Costing and the same master data is then replicated from SAP ERP, the new data from SAP ERP overwrites the entry in SAP Product Lifecycle Costing.
Using Master Data in Calculations
You use the master data shown in the Administration view when you work with new or existing calculations. Any later changes made in the master data do not affect existing calculations. For example, if the description of a plant changes after it has been used in a calculation, the calculation continues to use the old description of the plant unless you update it manually or update all master data for the calculation version. This ensures that your calculation versions are never inadvertently changed due to a modification or deletion of master data.
For some master data, you can enter a temporary value in the calculation version if the master data has not yet been created centrally in SAP Product Lifecycle Costing either as local master data or as data replicated from SAP ERP. This allows you to continue with cost planning at early stages when master data has not yet been finalized. For more information, see Using Master Data in Calculation Versions [page 106].
Application Help for SAP Product Lifecycle CostingWorking with Master Data PUBLIC 303
Filtering
You can filter master data in several places in the Administration view:
● In the navigation structure and in the side panel to filter the list of entries or fields respectively. For more information, see Searching and Filtering [page 19].
● Using the additional filter criteria in the main table, you can filter in master data areas that have a large number of entries. Use the filter criteria provided and set the respective operators (for example, is or contains). You can set the maximum number of results to be shown for your filter criteria. The system remembers your filter criteria as you move between views.
Sorting
You can sort the data shown in the Administration view. To sort a column in the view, click the respective column header. You can also sort multiple columns. To do this, press SHIFT and then click the header of the additional column to be sorted.
Breadcrumb Navigation
The Administration view provides breadcrumb navigation that helps you keep track of your location in each master data area in this view. This hierarchical sequence of navigational links allows you to retrace your steps and to ultimately return to your entry point in a master data area. A back arrow at the beginning of the navigation sequence returns you to the main master data topic area under which you began.
Related Information
Using Local Master Data [page 305]Using Master Data from SAP ERP [page 307]Costing and Analysis Master Data [page 308]Logistics Master Data [page 335]Finance Master Data [page 352]Global Settings [page 363]User-Specific Settings [page 387]
21.1 Allowed Characters when Creating Master Data
You can enter the following characters when entering temporary data or creating master data in SAP Product Lifecycle Costing. This applies to all master data IDs and project IDs.
304 PUBLICApplication Help for SAP Product Lifecycle Costing
Working with Master Data
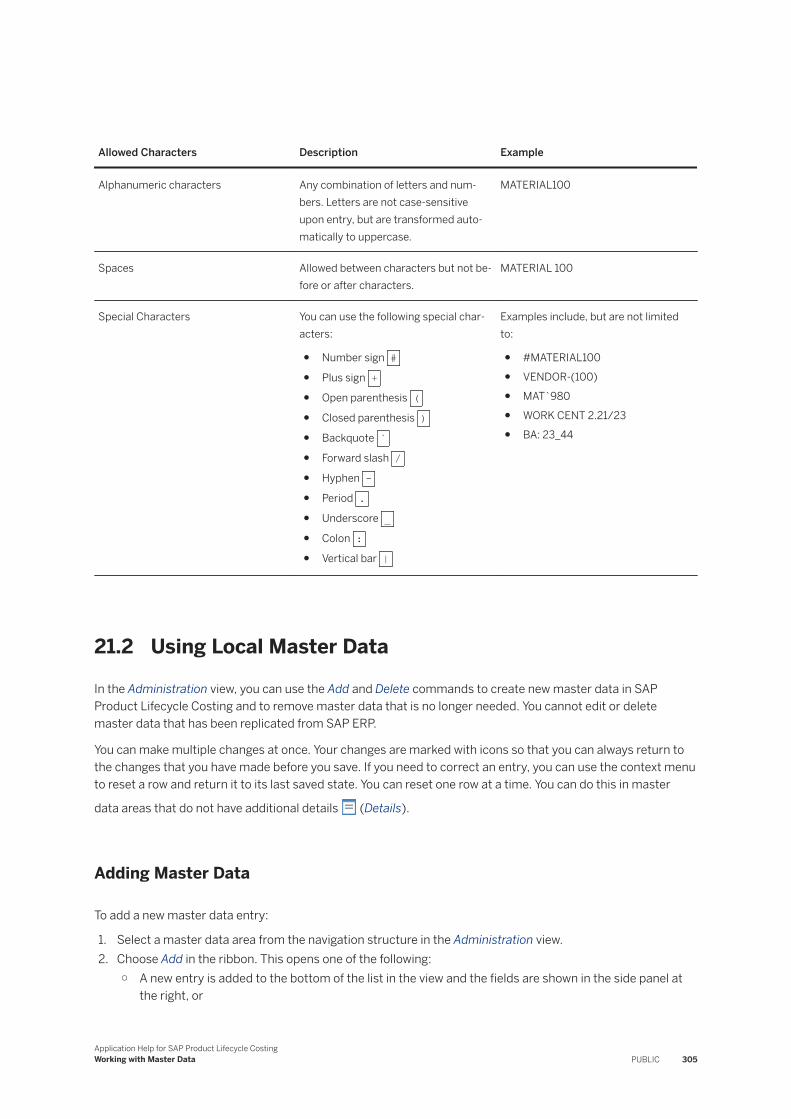
Allowed Characters Description Example
Alphanumeric characters Any combination of letters and numbers. Letters are not case-sensitive upon entry, but are transformed automatically to uppercase.
MATERIAL100
Spaces Allowed between characters but not before or after characters.
MATERIAL 100
Special Characters You can use the following special characters:
● Number sign #● Plus sign +● Open parenthesis (● Closed parenthesis )● Backquote `● Forward slash /● Hyphen -● Period .● Underscore _● Colon :● Vertical bar |
Examples include, but are not limited to:
● #MATERIAL100● VENDOR-(100)● MAT`980● WORK CENT 2.21/23● BA: 23_44
21.2 Using Local Master Data
In the Administration view, you can use the Add and Delete commands to create new master data in SAP Product Lifecycle Costing and to remove master data that is no longer needed. You cannot edit or delete master data that has been replicated from SAP ERP.
You can make multiple changes at once. Your changes are marked with icons so that you can always return to the changes that you have made before you save. If you need to correct an entry, you can use the context menu to reset a row and return it to its last saved state. You can reset one row at a time. You can do this in master
data areas that do not have additional details (Details).
Adding Master Data
To add a new master data entry:
1. Select a master data area from the navigation structure in the Administration view.2. Choose Add in the ribbon. This opens one of the following:
○ A new entry is added to the bottom of the list in the view and the fields are shown in the side panel at the right, or
Application Help for SAP Product Lifecycle CostingWorking with Master Data PUBLIC 305
○ A panel opens directly showing the fields to be filled.
In the table overview, a symbol (Newly Added Row) marks the changed row until you save.3. Fill in the required fields either in the table, in the More Information area in the side panel shown at the right
or directly in the main panel.4. Save your entries.
Modifying Master Data
You can modify master data that is defined locally whenever necessary.
NoteAny changes made in the Administration view do not affect already existing calculation versions.
To modify a master data entry:
1. Select a master data area from the navigation structure in the Administration view.You can enter filter criteria to find an entry.
2. Make any changes in the table or in the More Information area in the side panel shown at the right side of the view and press Enter .If the master data area provides only the table overview, double-click an entry or press Enter to open the panel.
A symbol (Modified Row) marks the changed row until you save.
Note
If you need to undo a change before saving, you can use the Reset command in the context menu to reset any row with unsaved changes and return it to its last saved state.
3. Save your entries.
Deleting Master Data
If a master data entry is not referenced in another master data entry (for example, if a company code references a controlling area that you want to delete) or in a surcharge rule in a project lifecycle, you can delete it in the Administration view.
To delete a master data entry:
1. Select the master data area from the navigation structure in the Administration view.You can enter filter criteria to find an entry.
2. Select the entry that you want to delete and choose Delete in the ribbon.
Note
If you need to make a change before saving, you can use the Reset command in the context menu to reset this or any row with unsaved changes and return it to its last saved state.
306 PUBLICApplication Help for SAP Product Lifecycle Costing
Working with Master Data
3. Save your changes.
Related Information
Working with Master Data [page 303]Using Master Data from SAP ERP [page 307]
21.3 Using Master Data from SAP ERP
If SAP Product Lifecycle Costing has been set up to work together with your SAP ERP system, master data is replicated automatically from SAP ERP.
NoteWhen integrating SAP Product Lifecycle Costing with other SAP software using a runtime license obtained from SAP or its distributors, the restrictions of such runtime license apply.
Master data that is replicated from your SAP ERP system is display-only in SAP Product Lifecycle Costing.
The following data cannot be replicated from SAP ERP. You create and maintain this data locally in SAP Product Lifecycle Costing:
● Account groups● Costing sheets● Cost component splits● Currencies● Activity prices● Work centers
For more information about replicating master data, see the topic Master Data Replication in the Administrator's Guide for SAP Product Lifecycle Costing .
Related Information
Working with Master Data [page 303]Using Local Master Data [page 305]
Application Help for SAP Product Lifecycle CostingWorking with Master Data PUBLIC 307
22 Costing and Analysis Master Data
You can create and manage master data for costing and analysis in SAP Product Lifecycle Costing.
Related Information
Accounts [page 308]Account Groups [page 309]Material Account Determination [page 314]Overhead Groups [page 318]Valuation Classes [page 317]Costing Sheets [page 322]Cost Component Splits [page 319]
22.1 Accounts
You use the Accounts area in the Administration view to manage the accounts used in SAP Product Lifecycle Costing.
You can create account data locally in SAP Product Lifecycle Costing. If integration with SAP ERP has been set up, this data can also be replicated from your SAP ERP system. Replicated data is display-only.
NoteWhen integrating SAP Product Lifecycle Costing with other SAP software using a runtime license obtained from SAP or its distributors, the restrictions of such runtime license apply.
You can do the following here:
● Filter the entries and sort the entries by one or more columns.For more information, see Working with Master Data [page 303].
● Enter descriptions of the accounts in other languages if multi-language support has been activated.For more information, see Other Languages for Master Data Descriptions [page 363].
● Create, modify, and delete account data locally in SAP Product Lifecycle Costing. You can work with this data either directly in the fields in the table or use the fields shown in the More Information area in the side panel at the right.For more information, see Using Local Master Data [page 305].
● If autocomplete is available for a field, you can enter the first few characters of an identifier. A drop-down list then displays all entries that begin with the characters you entered.
The following fields are available in the Accounts area in the Administration view.
308 PUBLICApplication Help for SAP Product Lifecycle Costing
Costing and Analysis Master Data
Field Shown What It Means
Account An up to ten-character identifier for an account. Only numerical digits should be used in order to create meaningful account groups with ranges of accounts.
Account Description Shows the description of the account in the current logon language.
Controlling Area Specifies the controlling area to which the account is assigned.
Controlling Area Description Shows the description of the controlling area in the logon language.
Source Shows whether the data was created locally in SAP Product Lifecycle Costing or replicated from SAP ERP.
22.2 Account GroupsYou use the Account Groups area in the Administration view to manage account groups used in SAP Product Lifecycle Costing. Here, you can group together accounts or ranges of accounts with similar characteristics into one account group.
You can use these account groups as a basis for a costing sheet or as a cost component for a component split. This ensures that the basis of your calculation always aligns with your analysis. For more information, see Cost Component Splits [page 319] and Costing Sheets [page 322].
You can do the following here:
● Create and delete account groups.
NoteIf a field is editable, you can double-click once to switch to editable mode. Another double-click then takes you to the details for the account group. For non-editable fields, a double-click takes you directly to the details for the account group.
● Assign accounts to existing account groups.You can do this by adding single accounts or by adding ranges of accounts with lower and upper limits.
ExampleAccounts are sorted alphanumerically. This means that they are sorted by the first character of an account. If you want to avoid accounts with fewer characters (for example, 1200) being sorted in between accounts with more characters (for example, 11000 to 13000) you must add leading zeros to accounts that have fewer characters (for example, 01200).
● Filter the account groups and sort the account groups by one of the available columns.● Enter descriptions of the account groups in other languages if multi-language support has been activated.
For more information, see Other Languages for Master Data Descriptions [page 363]
Application Help for SAP Product Lifecycle CostingCosting and Analysis Master Data PUBLIC 309
NoteAccount groups have a locking mechanism that ensures that only one user can work on an account group at a given time. However, if you have sufficient access rights, you can still view the existing account groups even if someone else is currently working on them. If you want to make any changes in the account group, you must wait until the other user has closed the Account Groups area.
The following fields are available when working with account groups in the Administration view:
Field Shown What It Means
Account Group Numeric identifier for an account group. This is an organizational entity that combines accounts that belong together logically.
Account Group Description Shows a description of the account group in the logon language.
Controlling Area Specifies the controlling area to which the account group is assigned.
You can only assign accounts to account group that have the same controlling area.
Controlling Area Description Shows the description of the controlling area in the logon language.
Cost Portion You can select a fixed, variable, or fixed and variable cost portion. If the account group is used to define a costing sheet basis or a cost component, only the portion of the cost that is specified here is considered.
Account From This is a mandatory field. You enter the initial account number for the range of accounts that you want to add to this group (for example, 40000). You can enter this number manually or select from the existing account numbers. Autocomplete is available for this field.
NoteYou can also enter a single account number. In this case, you do not need to enter anything in the Account To field.
Description for Account From Describes the initial account.
Account To This is the final account number for the range of accounts that you want to add to this group (for example, 400200). You can enter it manually or select from the existing account numbers.
310 PUBLICApplication Help for SAP Product Lifecycle Costing
Costing and Analysis Master Data
Field Shown What It Means
Description for Account To Describes the final account in the selected range.
Related Information
Creating Account Groups [page 311]Assigning a Single Account to an Account Group [page 311]Assigning a Range of Accounts to an Account Group [page 312]Removing Accounts from an Account Group [page 313]Cost Component Splits [page 319]
22.2.1 Creating Account Groups
You can create an account group in the Account Groups area of the Administration view.
Steps
1. In the Administration view, choose Account Groups.2. Choose Add in the ribbon or open the context menu and choose Add Row.3. Complete all mandatory fields.
NoteThe Cost Portion field defaults to Fixed and Variable. To change your selection, use the drop-down menu.
4. Save your entries.The account group that you have created is empty until you assign accounts to the group.
22.2.2 Assigning a Single Account to an Account Group
You can assign single accounts to an existing account group.
Application Help for SAP Product Lifecycle CostingCosting and Analysis Master Data PUBLIC 311
Steps
1. In the navigation structure at the left of the Administration view, choose Account Groups.2. Select the account group to which you would like to add an account. Choose Details in the ribbon on the
top right or in the context menu.The name of the account group to which you are adding accounts appears in the navigation bar at the top of your screen.
3. In the ribbon on the left, choose Add.A new entry is added to the bottom of the existing Account From column.
4. In the Account From column, enter the account you want to assign to the account group using autocomplete or by entering it manually.If you choose an autocomplete option when filling in Account From the Description for Account From field is completed automatically.
NoteAs you are defining intervals, you can also enter temporary accounts that do not yet exist in your master data. The system will autocomplete the Description for Account From field with the description <Temporary>.
5. Save your entry.
22.2.3 Assigning a Range of Accounts to an Account Group
You can assign a range of accounts to an account group at once.
Steps
1. In the navigation structure at the left of the Administration view, choose Account Groups.2. Select the account group to which you would like to add an account. Choose Details in the ribbon on the
top right or in the context menu.3. In the Account From column, enter the initial account that you want to assign to the account group using
autocomplete or by entering it manually.If you choose an autocomplete option when filling in Account From, the Description for Account From field is filled in automatically.
NoteYou can enter a temporary account number that does not yet exist in your master data. The system fills the Description for Account From field with the description <Temporary>.
4. In the Account To column, enter the last account number from the range of accounts that you are entering. If you choose an autocomplete option when filling in Description for Account To, the field is filled in automatically.
312 PUBLICApplication Help for SAP Product Lifecycle Costing
Costing and Analysis Master Data
NoteYou can add multiple accounts and account ranges to an account group. To do this, choose Add in the ribbon and a new line is added under Account From.
5. Save your entry.
22.2.4 Removing Accounts from an Account Group
You can remove an account or range of accounts that you have assigned to an account group.
Steps
1. In the Account Group area in the Administration view, select Account Groups.2. Select the account group that contains accounts that you would like to remove.3. Choose Details in the ribbon or in the context menu.4. Select an account or range of accounts and choose Delete.5. Save your entry.
22.2.5 Deleting Account Groups
You can delete an account groups if it is not used in any other master data (for example, in a costing sheet or a component split).
Steps
1. In the Account Group area in the Administration view, select Account Groups.2. Select the account group that you would like to delete.3. In the ribbon, choose Delete or choose Delete Row in the context menu.4. Save your changes.
Application Help for SAP Product Lifecycle CostingCosting and Analysis Master Data PUBLIC 313
22.3 Material Account Determination
You use the Material Account Determination area in the Administration view to define the rules by which accounts are automatically assigned to items in a calculation version. Material account determination can be applied to items with the following item categories:
● Material● Document● External Activity● Subcontracting
You can create material account determination locally in SAP Product Lifecycle Costing. For more information, see Working with Attributes for Material Account Determination [page 315]. If integration with SAP ERP has been set up, material account determination is replicated from your SAP ERP system. Replicated data is display-only.
NoteWhen integrating SAP Product Lifecycle Costing with other SAP software using a runtime license obtained from SAP or its distributors, the restrictions of such runtime license apply.
You can do the following here:
● Filter the entries and sort the entries by one or more columns.For more information, see Working with Master Data [page 303].
● Enter descriptions in other languages if multi-language support has been activated.For more information, see Other Languages for Master Data Descriptions [page 363].
● Create, modify, and delete material account determination data locally in SAP Product Lifecycle Costing. You can work with this data either directly in the table or use the fields in the More Information area in the side panel at the right.For more information, see Using Local Master Data [page 305].
● If autocomplete is available for a field, you can enter the first few characters of an identifier. A drop-down list then displays all entries that begin with the characters you entered.
The following fields are available in the Material Account Determination area in the Administration view.
Field Shown What It Means
Controlling Area Identifies the controlling area for which material account determination is applied.
Controlling Area Description Shows the description of the controlling area in the current logon language.
Plant Identifies the plant for which material account determination is applied.
Plant Description Shows a description of the plant in the logon language.
314 PUBLICApplication Help for SAP Product Lifecycle Costing
Costing and Analysis Master Data
Field Shown What It Means
Material Type Identifies a material type for which material account determination is applied.
Material Type Description Shows the description of the material type in the current logon language.
Valuation Class Identifies the valuation class for which material account determination is applied.
Valuation Class Description Shows a description of the valuation class in the current logon language.
Account Identifies the account used for material account determination.
Account Description Shows a description of the account in the current logon language.
Source Shows whether the data was created locally in SAP Product Lifecycle Costing or replicated from SAP ERP.
22.3.1 Working with Attributes for Material Account Determination
You create the rules for material account determination by specifying the dependencies for which the account should be determined. You can use any combination of the following attributes to do this:
● Controlling area● Plant● Material type● Valuation class
ExampleYou create an entry specifying that for controlling area CA01, plant 01, and material type RAW, the account 001 should be assigned.
This means that when you are working in a calculation version, whenever you assign a material to an item that is from plant 01 and is of material type RAW, account 001 is entered automatically in the Account field.
Leaving Fields Empty
If you do not enter a value for Plant, Material Type, or Valuation Class then the account determination rule only takes effect if this attribute is also empty for an item in a calculation version.
Application Help for SAP Product Lifecycle CostingCosting and Analysis Master Data PUBLIC 315
ExampleYou create an entry specifying that for controlling area CA01 and material type RAW, the account 001 should be assigned. You leave Plant empty.
This means that when you are working in a calculation version, account 001 is only entered if you assign a material with material type RAW to an item and you do not specify a plant.
Using Wildcards
You can also use an asterisk as wildcard in Plant, Material Type, and Valuation Class. This means that any value is allowed for the corresponding field in an item in a calculation version.
ExampleYou create an entry specifying that for controlling area CA01, plant 01, and any material type, the account 001 should be assigned.
This means that when you are working in a calculation version, account 001 is entered initially for all materials that have controlling area CA01 and plant 01, regardless of the material type.
How Account Determination Is Applied
When working with wildcards, it is possible that more than one rule might apply for an item. In this case, the more specific rule takes effect. This means that if you have a rule that specifies values for three attributes and another rule that specifies values for only two attributes, the rule that has three attribute values takes effect.
ExampleYou create an entry specifying that for the controlling area CA01, plant 01, material type RAW, and any valuation class, the account 001 should be assigned. You create a second entry specifying that for the controlling area CA01, material type RAW, any plant, and any valuation class, the account 011 should be assigned.
This means that when you are working in a calculation version and create an item for which either rule could apply, for example if you assign a material from plant 01 with the material type RAW, the first rule is used and account 001 is assigned. This is the case because all else remaining constant, the definition for plant in the first rule is more specific.
You may also have rules that specify the same number of attributes, but with different values. In this case, the rule that uses the most specific attributes is used. Attributes for material account determination are evaluated from least specific to most specific. This results in the following sequence, starting with the least specific attribute:
● Controlling area● Plant● Material type
316 PUBLICApplication Help for SAP Product Lifecycle Costing
Costing and Analysis Master Data
● Valuation class
ExampleYou create an entry specifying that for the controlling area CA01, plant 01, any material type, and any valuation class, the account 001 should be assigned. Then you create a second entry specifying that for controlling area CA01, valuation class 07, any plant, and any material type, the account 011 should be assigned.
This means that when you are working in a calculation version and create an item for which both rules could apply, the second rule is used and the account 011 is entered. This is because the valuation class is more specific than plant alone.
Creating Rules for Account Determination
To create an entry that specifies a rule for account determination, do the following:
1. In the navigation structure at the left in the Administration view, choose Material Account Determination.2. Choose Add in the ribbon or Add Row in the context menu. A new entry is added to the list.3. Enter values for one or more attributes that you want to use for account determination, along with an
account, and save your entry.
Related Information
Determining Accounts [page 187]
22.4 Valuation Classes
You use the Valuation Classes area in the Administration view to manage valuation classes used in SAP Product Lifecycle Costing. A valuation class is an attribute that can be assigned to a material in a specific plant. This makes it possible to group together materials from a financial point of view.
You can create this data locally in SAP Product Lifecycle Costing. If integration with SAP ERP has been set up, this data can also be replicated from your SAP ERP system. Replicated data is display-only.
NoteWhen integrating SAP Product Lifecycle Costing with other SAP software using a runtime license obtained from SAP or its distributors, the restrictions of such runtime license apply.
You can do the following here:
● Sort the entries by one or more columns and filter the entries.For more details, see Working with Master Data [page 303].
Application Help for SAP Product Lifecycle CostingCosting and Analysis Master Data PUBLIC 317
● Enter descriptions of the valuation classes in other languages if multi-language support has been activated.For more information, see Other Languages for Master Data Descriptions [page 363].
● Create, modify, and delete valuation class data locally in SAP Product Lifecycle Costing. You can work with this data either directly in the fields in the table or use the fields shown in the More Information area in the side panel at the right.For more information, see Using Local Master Data [page 305].
The following fields are available in the Valuation Classes area in the Administration view.
Field Shown What It Means
Valuation Class An up to four-character identifier for a valuation class.
Valuation Class Description Shows a description of the valuation class in the current logon language.
Source Shows whether the data was created locally in SAP Product Lifecycle Costing or replicated from SAP ERP.
22.5 Overhead Groups
You use the Overhead Groups area in the Administration view to manage overhead groups used in SAP Product Lifecycle Costing. Overhead groups allow you to group together materials for which the same overhead conditions apply.
You can create this data locally in SAP Product Lifecycle Costing. If integration with SAP ERP has been set up, this data can also be replicated from your SAP ERP system. Replicated data is display-only.
NoteWhen integrating SAP Product Lifecycle Costing with other SAP software using a runtime license obtained from SAP or its distributors, the restrictions of such runtime license apply.
You can do the following here:
● Filter entries and sort entries by one or more columns.For more information, see Working with Master Data [page 303].
● Enter descriptions of the overhead groups in other languages if multi-language support has been activated.For more information, see Other Languages for Master Data Descriptions [page 363].
● Create, modify, and delete overhead group data locally in SAP Product Lifecycle Costing. You can work with this data either directly in the fields in the table or use the fields shown in the More Information area in the side panel at the right.For more information, see Using Local Master Data [page 305].
● If autocomplete is available for a field, you can enter the first few characters of an identifier. A drop-down list then displays all entries that begin with the characters you entered.
The following fields are available in the Overhead Groups area in the Administration view.
318 PUBLICApplication Help for SAP Product Lifecycle Costing
Costing and Analysis Master Data
Field Shown What It Means
Overhead Group An up to ten-character identifier for an overhead group.
Overhead Group Description Shows the description of the overhead group in the logon language.
Plant Specifies the plant that is assigned to the overhead group.
Plant Description Shows the description of the plant in the logon language.
Source Shows whether the data was created locally in SAP Product Lifecycle Costing or replicated from SAP ERP.
22.6 Cost Component Splits
You use the Cost Component Splits area in the Administration view to manage the cost component splits used in SAP Product Lifecycle Costing.
Cost component splits allow you to analyze the breakdown of costs by specific account groups and to identify the major cost drivers.
You can do the following here:
● Create, modify, and delete cost component splits.
NoteIf a field is editable, you can double-click once to switch to editable mode. Another double-click then takes you to the details for the cost component split. For non-editable fields, a double-click takes you directly to the details for the account group.
● Filter the entries and sort the entries by one of the columns. For more information, see Working with Master Data [page 303]
● Enter descriptions of the cost component splits in other languages if multi-language support has been activated. For more information, see Other Languages for Master Data Descriptions [page 363]
Once you have created and saved your cost component split, you can find and select it from the drop-down menu in the Calculation view in the side panel under Cost Component Split. For more information, see Calculations [page 82].
NoteCost component splits have a locking mechanism that ensures that only one user can work on a cost component split at a given time. However, if you have sufficient access rights, you can still view the existing cost component splits even if someone else is currently working on them. If you want to make any changes in the cost component split, you must wait until the other user has left the Cost Component Splits area.
Application Help for SAP Product Lifecycle CostingCosting and Analysis Master Data PUBLIC 319
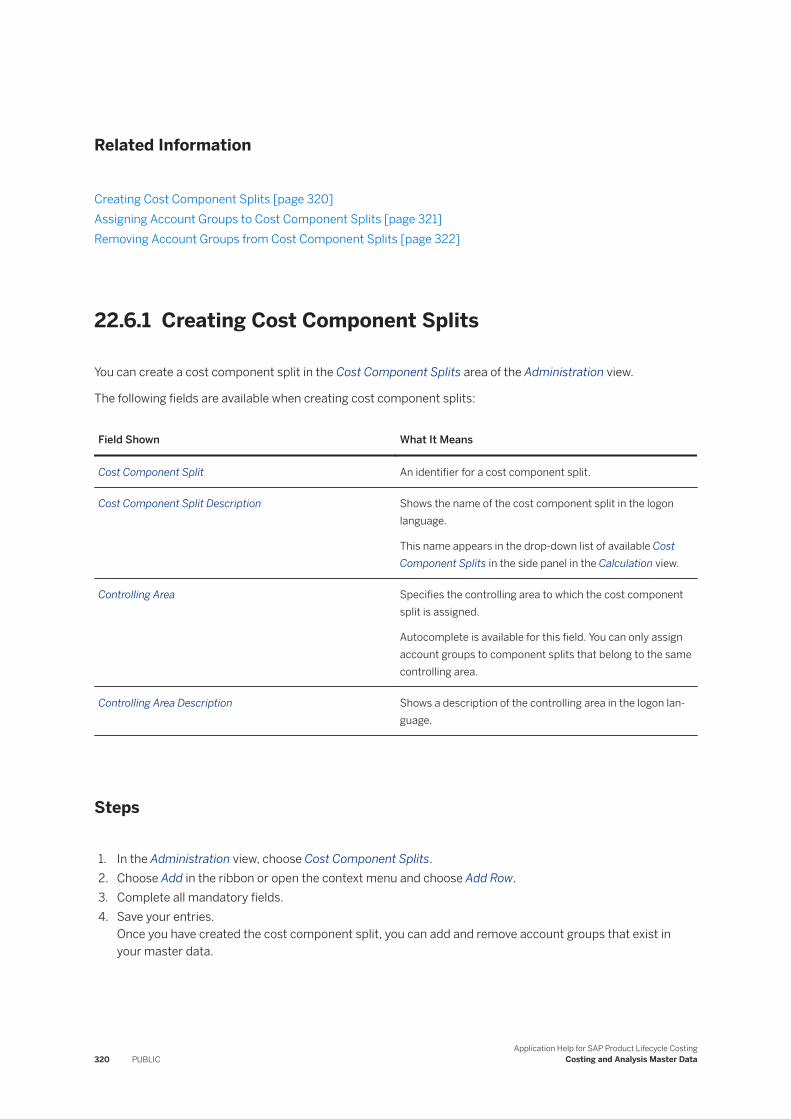
Related Information
Creating Cost Component Splits [page 320]Assigning Account Groups to Cost Component Splits [page 321]Removing Account Groups from Cost Component Splits [page 322]
22.6.1 Creating Cost Component Splits
You can create a cost component split in the Cost Component Splits area of the Administration view.
The following fields are available when creating cost component splits:
Field Shown What It Means
Cost Component Split An identifier for a cost component split.
Cost Component Split Description Shows the name of the cost component split in the logon language.
This name appears in the drop-down list of available Cost Component Splits in the side panel in the Calculation view.
Controlling Area Specifies the controlling area to which the cost component split is assigned.
Autocomplete is available for this field. You can only assign account groups to component splits that belong to the same controlling area.
Controlling Area Description Shows a description of the controlling area in the logon language.
Steps
1. In the Administration view, choose Cost Component Splits.2. Choose Add in the ribbon or open the context menu and choose Add Row.3. Complete all mandatory fields.4. Save your entries.
Once you have created the cost component split, you can add and remove account groups that exist in your master data.
320 PUBLICApplication Help for SAP Product Lifecycle Costing
Costing and Analysis Master Data
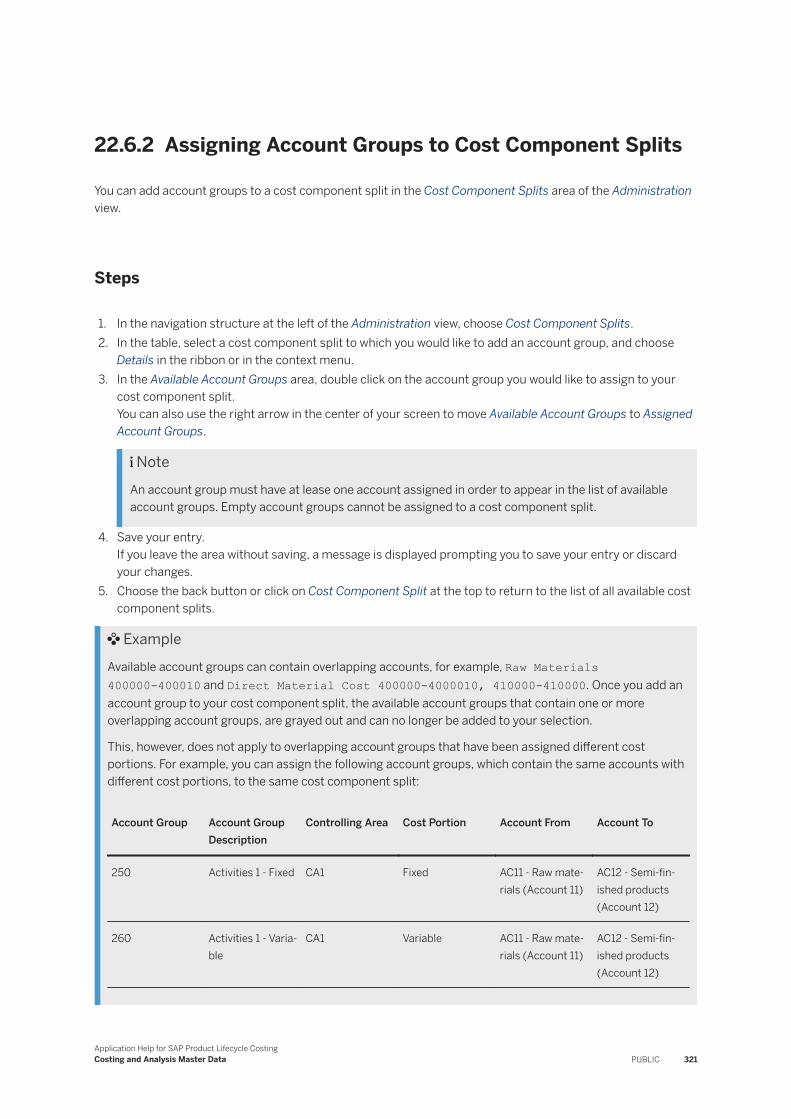
22.6.2 Assigning Account Groups to Cost Component Splits
You can add account groups to a cost component split in the Cost Component Splits area of the Administration view.
Steps
1. In the navigation structure at the left of the Administration view, choose Cost Component Splits.2. In the table, select a cost component split to which you would like to add an account group, and choose
Details in the ribbon or in the context menu.3. In the Available Account Groups area, double click on the account group you would like to assign to your
cost component split.You can also use the right arrow in the center of your screen to move Available Account Groups to Assigned Account Groups.
NoteAn account group must have at lease one account assigned in order to appear in the list of available account groups. Empty account groups cannot be assigned to a cost component split.
4. Save your entry.If you leave the area without saving, a message is displayed prompting you to save your entry or discard your changes.
5. Choose the back button or click on Cost Component Split at the top to return to the list of all available cost component splits.
ExampleAvailable account groups can contain overlapping accounts, for example, Raw Materials 400000-400010 and Direct Material Cost 400000-4000010, 410000-410000. Once you add an account group to your cost component split, the available account groups that contain one or more overlapping account groups, are grayed out and can no longer be added to your selection.
This, however, does not apply to overlapping account groups that have been assigned different cost portions. For example, you can assign the following account groups, which contain the same accounts with different cost portions, to the same cost component split:
Account Group Account Group Description
Controlling Area Cost Portion Account From Account To
250 Activities 1 - Fixed CA1 Fixed AC11 - Raw materials (Account 11)
AC12 - Semi-fin-ished products (Account 12)
260 Activities 1 - Variable
CA1 Variable AC11 - Raw materials (Account 11)
AC12 - Semi-fin-ished products (Account 12)
Application Help for SAP Product Lifecycle CostingCosting and Analysis Master Data PUBLIC 321
22.6.3 Removing Account Groups from Cost Component Splits
You can remove account groups from a cost component split in the Cost Component Splits area of the Administration view.
Steps
1. In the navigation structure at the left of the Administration view, choose Cost Component Splits.2. In the table, select a cost component split from which you would like to remove an account group, and
choose Details in the ribbon or in the context menu.3. In the Assigned Account Groups area, double click on the account group you would like to remove from
your cost component split.You can also use the left arrow in the center of the view to remove account groups from Assigned Account Groups and return them to Available Account Groups.
4. Save your entry.If you leave the area without saving, a message is displayed prompting you to save your entry or discard your changes.
5. Choose Cost Component Split at the top to return to the list of all available cost component splits.
NoteYou can use the double arrow in the center of the view to remove all assigned account groups.
22.7 Costing Sheets
You use the Costing Sheets area in the Administration view to create, edit, and delete costing sheets used in SAP Product Lifecycle Costing. A costing sheet defines the rules that are used to sum up costs and to calculate and apply overheads.
You can enable up to three total costs in one costing sheet, each representing a different costing scenario. For example, you might create an intercompany costing scenario, a group costing scenario, and a margin costing scenario.
You can select the rows that you want to include in the total cost for each costing scenario. When you apply the costing sheet to a calculation version, you can select between the costing scenarios see how they affect the total cost and other calculated values. You can also see how the cost component split changes for each costing scenario.
NoteIf you do not want to calculate overheads or intermediate sums, you do not need to use a costing sheet in your calculation version. In this case, all costs are simply rolled up.
322 PUBLICApplication Help for SAP Product Lifecycle Costing
Costing and Analysis Master Data
Costing Sheet Rows
A costing sheet consists of multiple rows that are processed top to bottom during the calculation of overheads and sums in a calculation version. You can use the following row types in costing sheets:
● Base● Overhead● Sum
There are dependencies between these row types. Most importantly, the first row in your costing sheet must be a Base row. This is necessary because overhead rows and sum rows can only reference rows located above them. You can add as many base rows and overhead rows as you need. However, the referenced base row must always be located above the overhead row. The same applies for sum rows. Only rows that located above the sum row can be referenced in the sum row. If you enter a formula that references rows that are located below the sum row, an error message is shown.
You can do the following in the Costing Sheets area:
● Filter and sort the list of costing sheets by one or more columns. For more information, see Working with Master Data [page 303].
● Enter descriptions of the costing sheets in other languages if multi-language support has been activated. For more information, see Other Languages for Master Data Descriptions [page 363].
● Create, modify, view and delete costing sheets locally in SAP Product Lifecycle Costing.You can maintain costing sheets directly in the fields in the table or use the fields shown in the More Information area in the side panel at the right.
● If autocomplete is available for a field, you can enter the first few characters of an identifier. A drop-down list then displays all entries that begin with the characters that you entered. For more information, see Autocomplete for Fields [page 14].
NoteCosting sheets have a locking mechanism that ensures that only one user can work on a costing sheet at a given time. However, if you have sufficient access rights, you can still view the existing costing sheets even if someone else is currently working on them. If you want to make any changes in the costing sheet, you must wait until the other user has closed the Costing Sheets area.
Related Information
Creating Costing Sheets [page 324]Base Rows [page 325]Overhead Rows [page 327]Sum Rows [page 333]Calculating Quantities and Costs [page 202]Using Costing Sheets in Calculation Versions [page 110]
Application Help for SAP Product Lifecycle CostingCosting and Analysis Master Data PUBLIC 323
22.7.1 Creating Costing Sheets
You can create a costing sheet in the Costing Sheets area in the Administration view.
You can enable up to three total costs in one costing sheet, each representing a different total cost scenario. For example, you might create an intercompany costing scenario, a group costing scenario, and a margin costing scenario.
When you apply the costing sheet to a calculation version, all enabled total costs are calculated. You can select between costing scenarios to see the total cost breakdown by costing sheet row. In the item details, you can see the total cost and other calculated values for each costing scenario. You can also see the breakdown for each costing scenario by account group in the cost component split.
Procedure
1. Create a costing sheet.1. In the Administration view, choose Costing Sheets.
2. In the top left, choose Add , then specify an identifier for the row.This can be up to 5 characters long.
3. In the side panel, under Section Details, enter a controlling area. Note, a costing sheet can only be used in a calculation version with the same controlling area.
4. Next, enter a costing sheet description.You can do this in the logon language and any additional languages that have been configured for your system.
2. [Optional] Enable additional Total Cost scenarios.Do this if you want to compare different costing scenarios using the same costing sheet:1. In the Section Details, under Total Cost, select Total Cost 2 . To enable a third costing scenario, select
Total Cost 3. Note, Total Cost is selected by default.2. Enter a description for each new costing scenario, then save your entries.
3. Create a Base row.
NoteThe first row must always be a Base row.
1. Double-click on the costing sheet to open it.
2. Choose Add then specify an identifier for the row.This can be up to 5 characters long.
3. Under Row Type, select Base. In the side panel, make the necessary entries for the row. For more information, see Base Rows [page 325].
NoteOnce you've created a base row, you can begin creating additional Base, Sum, and Overhead rows.
4. Save your entries.
324 PUBLICApplication Help for SAP Product Lifecycle Costing
Costing and Analysis Master Data
Result
Saved costing sheets can be selected and applied in any calculation version, so long as the costing sheet and version share the same controlling area.
Related Information
Base Rows [page 325]Overhead Rows [page 327]Sum Rows [page 333]Using Costing Sheets in Calculation Versions [page 110]Calculating Overheads [page 208]
22.7.2 Base Rows
As part of a costing sheet in SAP Product Lifecycle Costing, you can create base rows.
The first row in your costing sheet must always be a base row. This allows you to reference this row if you need to crate overhead rows and sum rows as a part of your costing sheet.
A base row typically defines the items for which a particular overhead should be calculated. When you create a base row, you specify whether overheads should be applied to items in the row according to account group or item category.
NoteOnce you have selected Account Group or Item Category for the Base Defined By field in your row and saved your changes, you can no longer change this setting. If you want to change this setting, simply delete the base row and create a new one.
Defining a Base Row by Account Group
You can use account groups if you need fine-grained control of the items that should be considered for overheads. For example, you may use an account group called Raw Materials which contains all accounts related to raw materials. To determine if the cost of a particular item in a calculation version (for example, a material M-100) belongs to a particular base, the system checks whether the account assigned to this item (for example, 400000) belongs to the account group (for example, Raw Materials: 400000-400010) assigned to the base row. If the accounts falls within the range, then the item is considered for overhead calculation.
Application Help for SAP Product Lifecycle CostingCosting and Analysis Master Data PUBLIC 325
If you have decided to define your base by account group, the following fields are available in the side panel for your costing sheet base in the Administration view:
Field Shown What It Means
Account Group Use the drop-down list to select an account group for the base row.
You can create account groups in the Administration view un
der Costing and Analysis Account Groups .
Cost Portion from Account Group This can be one of the following:
● Fixed● Variable● Fixed and Variable
The cost portion is shown here as a read-only field for your information. The cost portion is specified as part of the account group.
Accounts from Account Group This read-only field shows the range of accounts assigned to the account group.
Defining a Base Row by Item Category
Alternatively, if you only want coarse-grained control, you can define a base by selecting an item category. For example, you may want to apply overheads only to items with the category Material that do not have any subitems (that is, excluding assemblies). To determine if the cost of a particular item in a calculation version (for example, a material M-100) belongs to a particular base, the system checks whether the item category of an item (for example, Material) matches the item category selected in the base (for example, Material). If the item categories match, then the item is considered for overhead calculation.
If you have decided to define your base by item category, the following fields are available in the side panel for your costing sheet base in the Administration view:
Field Shown What It Means
Item Category Use the drop-down list to select an item category for the base row.
Subitems Use the drop-down list to specify how overheads are applied.
You can choose one of the following:
● Applies to Items with Subitems (these are assemblies)● Applies to Items Without Subitems● Applies to Any Item
326 PUBLICApplication Help for SAP Product Lifecycle Costing
Costing and Analysis Master Data
Field Shown What It Means
Cost Portion Specifies which part of the overall costs of the item should be considered in the base.
You can choose one of the following in the drop-down list:
● Fixed● Variable● Fixed and Variable
22.7.3 Overhead Rows
As part of a costing sheet in SAP Product Lifecycle Costing, you can create overhead rows.
An overhead row defines the actual overhead that is to be applied to a base row or a sum row. By referencing an existing base row or sum row, you preselect those items that are considered for overhead calculation.
Overhead Rules
For an overhead row, you must define one or more overhead rules. Each overhead rule consists of conditions and consequences. If the conditions are fulfilled, then the consequences apply, meaning that overheads are calculated.
You define conditions under which the overhead is applied by setting a validity date range. You can also specify an activity type, overhead group, or one or more organizational units, including company code, plant, business area, profit center, cost center, and work center. An overhead is applied only if the data in an item matches all conditions. You can enter a formula to incorporate additional non-calculated standard and custom fields. If the result of the formula is true and all conditions are met, the overhead is applied.
ExampleIf an item in a calculation version belongs to plant 1000 and the overhead rule specifies plant 1200 in the condition, no overheads are applied. The same is true for company code, profit center, and business area. If an overhead rule specifies an overhead group in the condition, then the overhead is only calculated for items whose material and plant setting reference the same overhead group. If no conditions are specified in the overhead rule, then this rule applies to all items belonging to the base row or sum row that is referenced by the overhead row.
Percentage and Quantity-Based Overheads
An overhead rule results in either a percentage-based overhead (for example, 10%) or a quantity-based overhead (for example, 5 EUR for every 10 PC), or both. You can define a fixed cost percentage of the calculated
Application Help for SAP Product Lifecycle CostingCosting and Analysis Master Data PUBLIC 327
overheads to be charged to the credit account. The remaining percentage is assigned to the variable cost portion. While the same fixed cost portion is initially applied to each rule in the overhead row, you can override the default and enter different fixed cost portions for each rule.
The following fields are available when creating an overhead row in a costing sheet:
Field Shown What It Means
Overhead Rules Indicates whether any overhead rules exist for an overhead row.
If No is shown here, you must create one or more overhead rules. Otherwise, no overhead is calculated.
You can view or change the overhead rules by selecting the
row and choosing Details in the field itself, in the ribbon, or in the context menu.
Reference Shows the base row or sum row to which the overhead is to be applied. You can use the drop-down list to select a row in your costing sheet.
Credit Account Specifies the account to which the overheads are to be posted. You can use the drop-down list to select an account.
Fixed Cost Portion (%) Allows you to define what percentage of the calculated overheads are assigned to the fixed cost portion that will be charged to the credit account. The remaining portion is assigned to the variable portion.
If you do not specify anything here, the overhead is distributed in the same relation to the fixed and variable portions as the costs of the basis. You only need to specify a percentage here if the overhead costs should be distributed differ-ently to the cost portions.
Use Default Fixed Cost Portion (%) Selected by default, the fixed cost portion defined for an overhead row is initially applied for each overhead rule in that row.
Deselect this checkbox to apply different fixed cost portions to each overhead rule in an overhead row.
Is Rolled Up Allows you to determine whether the overhead costs should be rolled up.
If you select this checkbox, the calculated overheads are included in the sum of the assembly item if the costs of all subitems are calculated.
328 PUBLICApplication Help for SAP Product Lifecycle Costing
Costing and Analysis Master Data
Field Shown What It Means
Included In Indicates whether a row is included in a particular total cost scenario.
NoteTo select rows for a particular costing scenario, you first need to enable the costing scenario in the costing sheet overview screen.
Related Information
Creating Overhead Rows [page 329]Defining Rules for Overhead Rows [page 331]Creating Costing Sheets [page 324]
22.7.3.1 Creating Overhead Rows
You create overhead rows in a costing sheet in order to apply overheads to the referenced base row or sum row.
Prerequisites
● A costing sheet has already been created.● The base or sum row that you want to reference in the overhead row has already been created.
Procedure
1. In the Administration view, choose Costing Sheets, then open the desired costing sheet.
2. Choose Add , then specify an identifier for the row.This can be up to 5 characters long.
3. Under Row Type, select Overhead, then enter a row description.4. Under References, select the base row or sum row to which the overhead should apply.5. Under Section Details, select the Credit Account to which the overheads should be posted.6. Under Fixed Cost Portion (%), enter the percentage of the calculated overheads that should be assigned to
the fixed cost portion that will be charged to the credit account.
Application Help for SAP Product Lifecycle CostingCosting and Analysis Master Data PUBLIC 329
Note○ The remaining portion is assigned to the variable portion.○ You only need to specify a percentage here if the costs should be distributed differently to the fixed
and variable cost portions. If you do not specify anything here, the overhead is distributed in the same relation to the fixed and variable portions as the costs of the basis.
7. [Optional]: Select the Use Default Fixed Portion (%) checkbox, if you want the fixed cost portion defined for the overhead row to be applied for each overhead rule in the row.
NoteDeselect this checkbox if you want to apply different fixed cost portions to each overhead rule in an overhead row.
8. [Optional]: Select the Is Rolled Up checkbox, if you want to include the calculated overheads in the sum of the assembly item when calculating the costs of all subitems.
9. Under Included In, select the total costing scenarios in which the overhead row should be included.
NoteYou only need to consider these checkboxes if more than one costing scenario has been enabled in the costing sheet.
RestrictionA row can only reference another row in a costing scenario if they are both selected as part of the same costing scenario. For example, sum row SUM1 can only reference overhead row OVH1 in the INTERCOMPANY costing scenario if OVH1 is selected as part of the INTERCOMPANY costing scenario.
10. Save your entries.
Next Steps
You can now define rules for the overhead row. Overhead rules determine how and when the overhead is applied to a base row. If no overhead rules are created for an overhead row, then no overhead is calculated for that row.
Related Information
Defining Rules for Overhead Rows [page 331]
330 PUBLICApplication Help for SAP Product Lifecycle Costing
Costing and Analysis Master Data
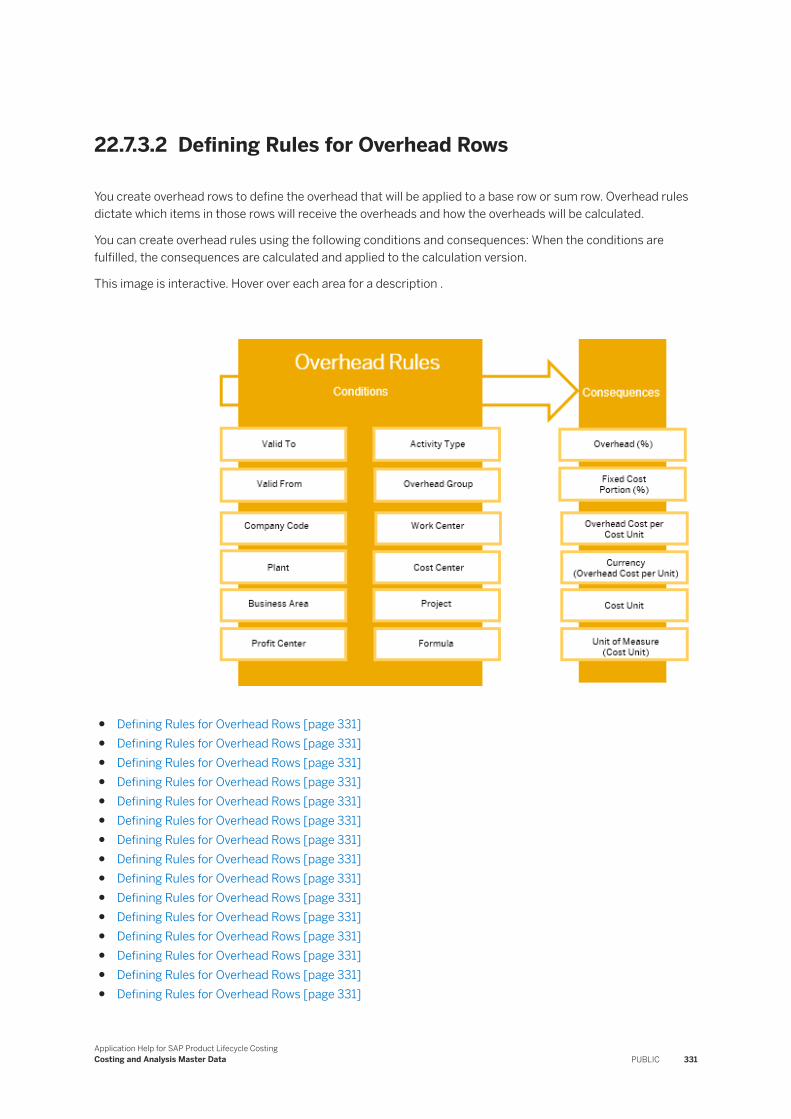
22.7.3.2 Defining Rules for Overhead Rows
You create overhead rows to define the overhead that will be applied to a base row or sum row. Overhead rules dictate which items in those rows will receive the overheads and how the overheads will be calculated.
You can create overhead rules using the following conditions and consequences: When the conditions are fulfilled, the consequences are calculated and applied to the calculation version.
This image is interactive. Hover over each area for a description .
● Defining Rules for Overhead Rows [page 331]● Defining Rules for Overhead Rows [page 331]● Defining Rules for Overhead Rows [page 331]● Defining Rules for Overhead Rows [page 331]● Defining Rules for Overhead Rows [page 331]● Defining Rules for Overhead Rows [page 331]● Defining Rules for Overhead Rows [page 331]● Defining Rules for Overhead Rows [page 331]● Defining Rules for Overhead Rows [page 331]● Defining Rules for Overhead Rows [page 331]● Defining Rules for Overhead Rows [page 331]● Defining Rules for Overhead Rows [page 331]● Defining Rules for Overhead Rows [page 331]● Defining Rules for Overhead Rows [page 331]● Defining Rules for Overhead Rows [page 331]
Application Help for SAP Product Lifecycle CostingCosting and Analysis Master Data PUBLIC 331
● Defining Rules for Overhead Rows [page 331]● Defining Rules for Overhead Rows [page 331]● Defining Rules for Overhead Rows [page 331]● Defining Rules for Overhead Rows [page 331]
Note● If you specify consequences, but do not define any conditions for an overhead rule, then the rule is
applied to all items referenced in the overhead row.● If you do not create any overhead rules for an overhead row, then no overhead is calculated for that row.
Prerequisites
● The costing sheet has already been created.● An overhead row that references a sum or base row has already been created.
Steps
1. Select an overhead row in your costing sheet, then choose (Details) .
2. Choose (Add), to add a new overhead rule.3. Enter a Valid From and Valid To date for the overhead rule.4. Enter additional conditions and consequences for the rule.
ExampleFor plant, enter #PT1. For Overhead (%) enter 10%. This means that when this costing sheet is used during this time period, each item in the calculation version that belongs to plant #PT1 receives an overhead of 10%.
5. [Optional] Enter a formula:
NoteYou can use a formula to incorporate additional, non-calculated, standard and custom fields in your overhead rules that are not included in the predefined fields.
ExampleYou want to consider the overhead group of a parent item in an overhead calculation. Your calculation version contains the following:○ Parent item #100-100 Casing - Overhead group #OG1○ Subitem #100-110 Slug for Casing - Overhead group #OG2
You create an overhead rule that applies 10% overhead according to the following formula AND(PARENT($OVERHEAD_GROUP_ID; '')='#OG1';1=1). The result of the formula is true. A 10% overhead is applied to the subitem #100-110 Slug for Casing because the parent item belongs to the prescribed overhead group (#OG1).
332 PUBLICApplication Help for SAP Product Lifecycle Costing
Costing and Analysis Master Data
1. From the ribbon, choose (Set Formula).2. Use the formula editor to enter a formula, then choose Set.
6. Save your entries.
Result
A new overhead rule is created. Depending on your entries, a percentage-based overhead (for example 10%) or a quantity-based overhead (for example 5 EUR for every 10 PC) is applied. If a formula is present the overhead is applied when all of the conditions are met and the result of the formula is true.
Related Information
Overhead Rows [page 327]Creating Overhead Rows [page 329]Using the Formula Editor [page 221]
22.7.4 Sum Rows
As part of a costing sheet in SAP Product Lifecycle Costing, you can create sum rows.
A sum row defines intermediate sums that can be used for information only or as a reference for overheads or final sums. You define a sum by entering a formula in the References field in a sum row in your costing sheet (for example, BASE1+OH1+BASE3+OH3+SUM4+SUM7. The formula consists of identifiers for rows in your costing sheet separated by a plus sign.
NoteOnly rows that are located above the sum row can be referenced in the sum row. If you enter a formula that references rows that are located below the sum row, an error message is shown.
Prerequisites
● A costing sheet with several rows has been created.● The rows added together to create a sum row in a costing scenario are themselves selected as part of the
costing scenario.
ExampleIn an INTERCOMPANY costing scenario, the sum row SUM1= OVH1+ OVH2 can only be created if OVH1 and OVH2 are included as part of the INTERCOMPANY costing scenario.
Application Help for SAP Product Lifecycle CostingCosting and Analysis Master Data PUBLIC 333
Procedure
1. In the Administration view, choose Costing Sheets, then open the desired costing sheet.
2. Choose Add , then specify an identifier for the row.This can be up to 5 characters long.
3. Under Row Type, select Sum, then enter a row description.4. Under References, enter the rows you would like to add together, for example BASE1+OVH1+BASE2+OVH2.5. Under Included In, select the total costing scenarios in which the sum row should be included.
RestrictionA row can only reference another row in a costing scenario if they are both selected as part of the same costing scenario. For example, sum row SUM1 can only reference overhead row OVH1 in the INTERCOMPANY costing scenario if OVH1 is selected as part of the INTERCOMPANY costing scenario.
6. Save your entries.
Results
In the Costing Sheets section, you can see the total cost breakdown for each costing sheet row. If more than one costing scenario has been created for the selected costing sheet, you can select between costing scenarios to see how the total cost breakdown changes for each row.
334 PUBLICApplication Help for SAP Product Lifecycle Costing
Costing and Analysis Master Data
23 Logistics Master Data
You can create and manage master data for logistics in SAP Product Lifecycle Costing.
Related Information
Plants [page 335]Material Types [page 341]Material Groups [page 341]Materials (General Data) [page 342]Materials (Plant-Specific Data) [page 343]Material Prices [page 345]Customers [page 350]Vendors [page 350]
23.1 PlantsYou use the Plants area in the Administration view to manage plants used in SAP Product Lifecycle Costing.
You can create this data locally in SAP Product Lifecycle Costing. If integration with SAP ERP has been set up, this data can also be replicated from your SAP ERP system. Replicated data is display-only.
NoteWhen integrating SAP Product Lifecycle Costing with other SAP software using a runtime license obtained from SAP or its distributors, the restrictions of such runtime license apply.
You can do the following here:
● Filter entries and sort entries by one or more columns.For more information, see Working with Master Data [page 303].
● Enter descriptions of the plants in other languages if multi-language support has been activated.For more information, see Other Languages for Master Data Descriptions [page 363].
● Create, modify, and delete plant data locally in SAP Product Lifecycle Costing. You can work with this data either directly in the fields in the table or use the fields shown in the More Information area in the side panel at the right.For more information, see Using Local Master Data [page 305].
NoteOnce a plant has been created and saved, the assignment to a particular company code cannot be changed.
Application Help for SAP Product Lifecycle CostingLogistics Master Data PUBLIC 335
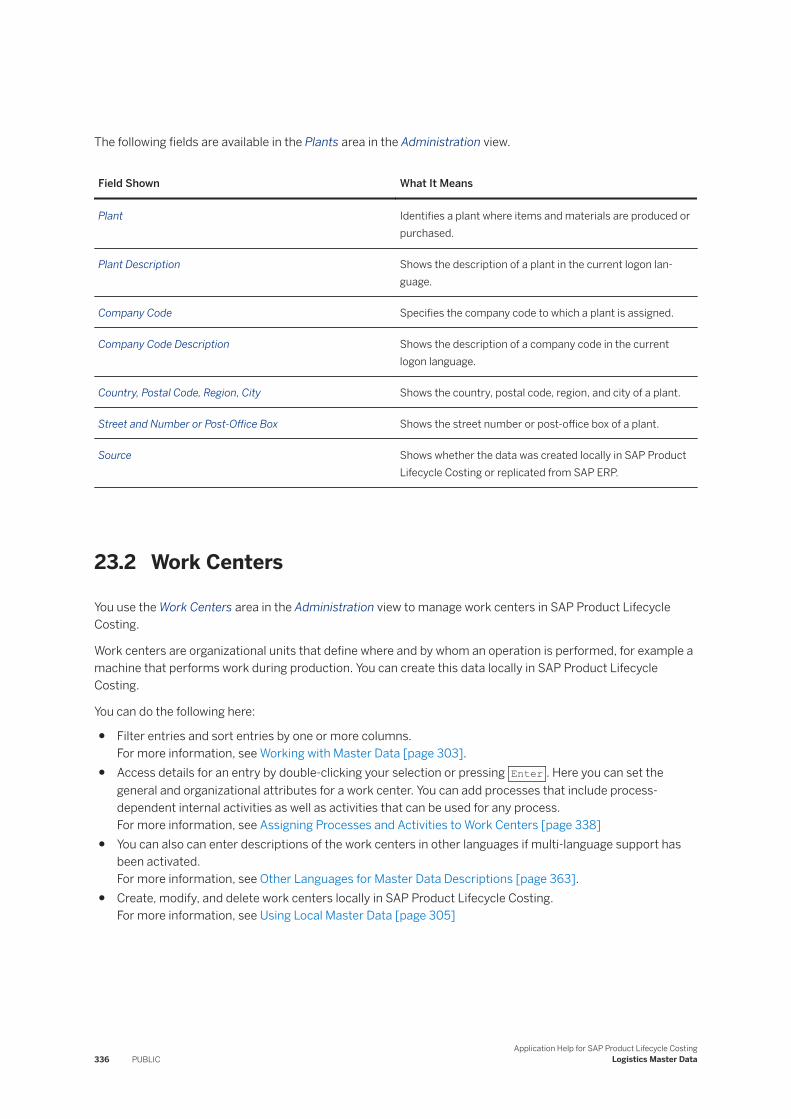
The following fields are available in the Plants area in the Administration view.
Field Shown What It Means
Plant Identifies a plant where items and materials are produced or purchased.
Plant Description Shows the description of a plant in the current logon language.
Company Code Specifies the company code to which a plant is assigned.
Company Code Description Shows the description of a company code in the current logon language.
Country, Postal Code, Region, City Shows the country, postal code, region, and city of a plant.
Street and Number or Post-Office Box Shows the street number or post-office box of a plant.
Source Shows whether the data was created locally in SAP Product Lifecycle Costing or replicated from SAP ERP.
23.2 Work Centers
You use the Work Centers area in the Administration view to manage work centers in SAP Product Lifecycle Costing.
Work centers are organizational units that define where and by whom an operation is performed, for example a machine that performs work during production. You can create this data locally in SAP Product Lifecycle Costing.
You can do the following here:
● Filter entries and sort entries by one or more columns.For more information, see Working with Master Data [page 303].
● Access details for an entry by double-clicking your selection or pressing Enter . Here you can set the general and organizational attributes for a work center. You can add processes that include process-dependent internal activities as well as activities that can be used for any process.For more information, see Assigning Processes and Activities to Work Centers [page 338]
● You can also can enter descriptions of the work centers in other languages if multi-language support has been activated.For more information, see Other Languages for Master Data Descriptions [page 363].
● Create, modify, and delete work centers locally in SAP Product Lifecycle Costing.For more information, see Using Local Master Data [page 305]
336 PUBLICApplication Help for SAP Product Lifecycle Costing
Logistics Master Data
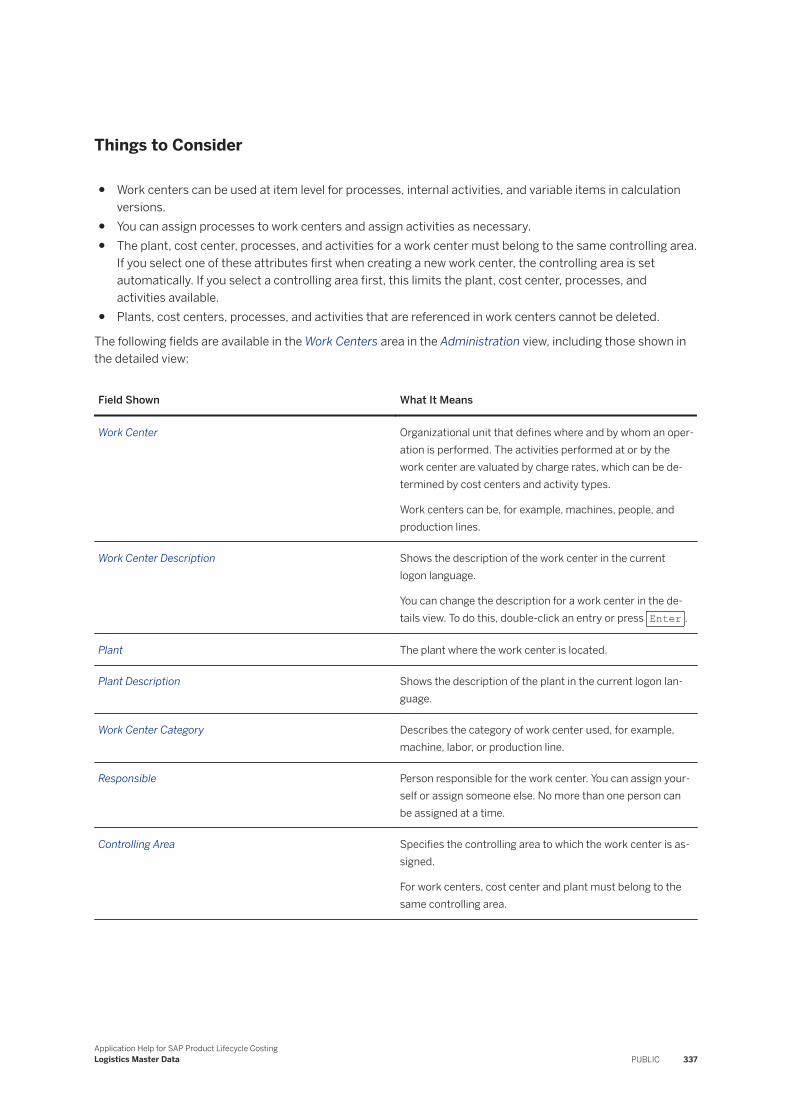
Things to Consider
● Work centers can be used at item level for processes, internal activities, and variable items in calculation versions.
● You can assign processes to work centers and assign activities as necessary.● The plant, cost center, processes, and activities for a work center must belong to the same controlling area.
If you select one of these attributes first when creating a new work center, the controlling area is set automatically. If you select a controlling area first, this limits the plant, cost center, processes, and activities available.
● Plants, cost centers, processes, and activities that are referenced in work centers cannot be deleted.
The following fields are available in the Work Centers area in the Administration view, including those shown in the detailed view:
Field Shown What It Means
Work Center Organizational unit that defines where and by whom an operation is performed. The activities performed at or by the work center are valuated by charge rates, which can be determined by cost centers and activity types.
Work centers can be, for example, machines, people, and production lines.
Work Center Description Shows the description of the work center in the current logon language.
You can change the description for a work center in the details view. To do this, double-click an entry or press Enter .
Plant The plant where the work center is located.
Plant Description Shows the description of the plant in the current logon language.
Work Center Category Describes the category of work center used, for example, machine, labor, or production line.
Responsible Person responsible for the work center. You can assign yourself or assign someone else. No more than one person can be assigned at a time.
Controlling Area Specifies the controlling area to which the work center is assigned.
For work centers, cost center and plant must belong to the same controlling area.
Application Help for SAP Product Lifecycle CostingLogistics Master Data PUBLIC 337
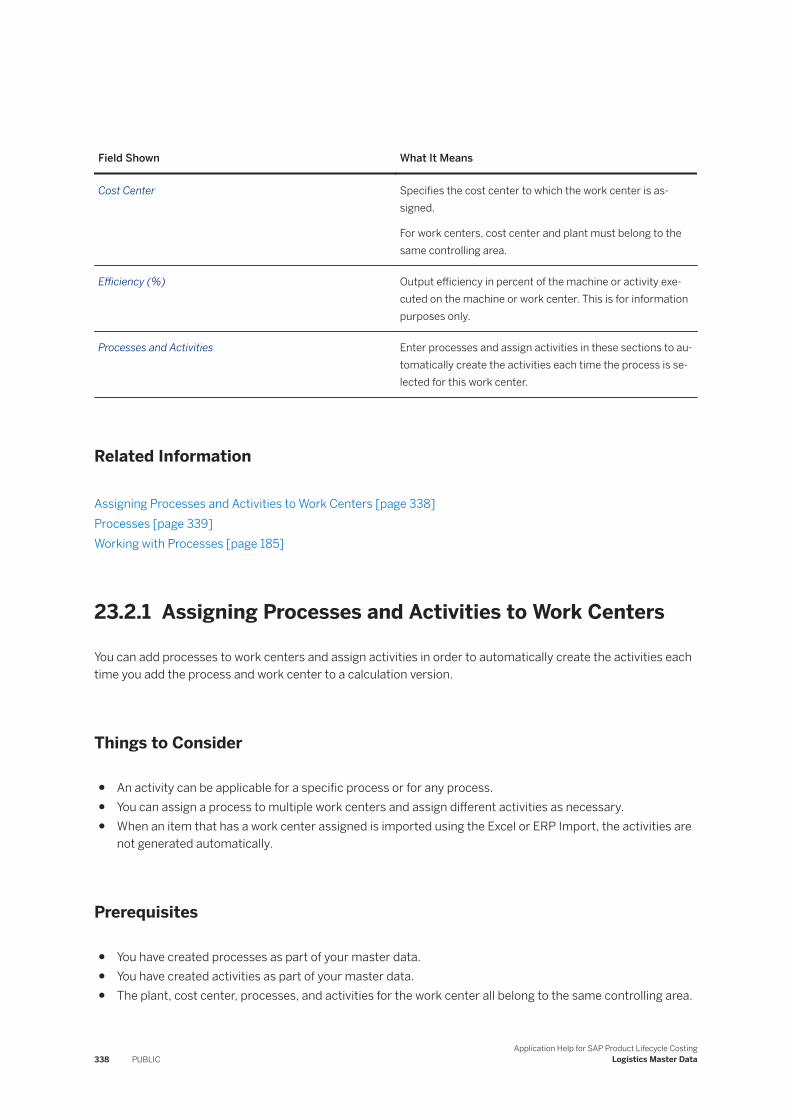
Field Shown What It Means
Cost Center Specifies the cost center to which the work center is assigned.
For work centers, cost center and plant must belong to the same controlling area.
Efficiency (%) Output efficiency in percent of the machine or activity executed on the machine or work center. This is for information purposes only.
Processes and Activities Enter processes and assign activities in these sections to automatically create the activities each time the process is selected for this work center.
Related Information
Assigning Processes and Activities to Work Centers [page 338]Processes [page 339]Working with Processes [page 185]
23.2.1 Assigning Processes and Activities to Work Centers
You can add processes to work centers and assign activities in order to automatically create the activities each time you add the process and work center to a calculation version.
Things to Consider
● An activity can be applicable for a specific process or for any process.● You can assign a process to multiple work centers and assign different activities as necessary.● When an item that has a work center assigned is imported using the Excel or ERP Import, the activities are
not generated automatically.
Prerequisites
● You have created processes as part of your master data.● You have created activities as part of your master data.● The plant, cost center, processes, and activities for the work center all belong to the same controlling area.
338 PUBLICApplication Help for SAP Product Lifecycle Costing
Logistics Master Data
Steps
1. In the Administration view, choose Work Centers.2. Under Process, enter each process that you want to assign to this work center. You can use auto complete
to find available processes.3. Under Activities, add an activity. Specify a process for which the activity is relevant. If you choose the
asterisk, the activity applies to any process.4. Use autocomplete to select an activity type.5. To add additional processes and activities, repeat starting at Step 2.6. Make any additional entries as necessary, and save your entries.
Result
Now, when you add this process to a calculation version and choose this work center, the activities assigned to the process can be automatically added to the process as subitems. When you add a process item and select No Process, the activities assigned to any (*) process for this work center can be automatically added to the process as subitems.
Related Information
Working with Processes [page 185]Work Centers [page 336]
23.3 Processes
You use the Processes area in the Administration view to manage processes in SAP Product Lifecycle Costing.
You can use processes to group together a series of continuous and connected activities in a routing. You can also use processes to allocate indirect costs such as administrative, packaging, or human resources costs, to a product.
You can do the following here:
● Filter entries and sort entries by one or more columns.For more information, see Working with Master Data [page 303].
● Access details for an entry by double-clicking your selection or pressing Enter . Here you can set the general attributes such as controlling area and account for a process and enter process descriptions in other languages if multi-language support has been activated.For more information, see Other Languages for Master Data Descriptions [page 363].
● Create, modify, and delete processes locally in SAP Product Lifecycle Costing.For more information, see Using Local Master Data [page 305].
Application Help for SAP Product Lifecycle CostingLogistics Master Data PUBLIC 339

Things to Consider
● Processes can be used at item level for the item categories Process and Variable Item in calculation versions.
● You can add processes to work centers in the Administration view to express that the processes are supported by the work centers.
The following fields are available in the Processes area in the Administration view, including those shown in the detailed view:
Field Shown What It Means
Process A logistical operation that groups a continuous and connected series of activities together in a routing. A process can be used to allocate indirect costs such as administrative, packaging, or human resources costs to a product, and can be executed on one or multiple work centers.
Process Description Shows the description of the process in the current logon language.
You can change the description for a process in the details view. To do this, double-click an entry or press Enter .
Controlling Area Organizational unit that represents a closed system used for accounting purposes.
This is the controlling area to which the process is assigned.
Controlling Area Description Shows the description of the controlling area in the current logon language.
Account Defines the category that the costs belong to. It can be used as the basis for the calculation of overheads and sums defined in the costing sheet and as a basis for the components of the cost component split
Comments Add any notes about the process here. This field is for your reference only.
Related Information
Working with Processes [page 185]Work Centers [page 336]Assigning Processes and Activities to Work Centers [page 338]Processes [page 143]
340 PUBLICApplication Help for SAP Product Lifecycle Costing
Logistics Master Data
23.4 Material Types
You use the Material Types area in the Administration view to manage material types used in SAP Product Lifecycle Costing.
You can create this data locally in SAP Product Lifecycle Costing. If integration with SAP ERP has been set up, this data can also be replicated from your SAP ERP system. Replicated data is display-only.
NoteWhen integrating SAP Product Lifecycle Costing with other SAP software using a runtime license obtained from SAP or its distributors, the restrictions of such runtime license apply.
You can do the following here:
● Filter entries and sort entries by one or more columns.For more information, see Working with Master Data [page 303].
● Enter descriptions of the material types in other languages if multi-language support has been activated.For more information, see Other Languages for Master Data Descriptions [page 363].
● Create, modify, and delete material type data locally in SAP Product Lifecycle Costing. You can work with this data either directly in the fields in the table or use the fields shown in the More Information area in the side panel at the right.For more information, see Using Local Master Data [page 305].
The following fields are available in the Material Types area in the Administration view.
Field Shown What It Means
Material Type An up to four-character identifier for a material type.
Material Type Description Shows the description of the material type in the current logon language.
Source Shows whether the data was created locally in SAP Product Lifecycle Costing or replicated from SAP ERP.
23.5 Material Groups
You use the Material Groups area in the Administration view to manage material groups used in SAP Product Lifecycle Costing. Material groups allow you to organize materials according to their characteristics.
You can create this data locally in SAP Product Lifecycle Costing. If integration with SAP ERP has been set up, this data can also be replicated from your SAP ERP system. Replicated data is display-only.
NoteWhen integrating SAP Product Lifecycle Costing with other SAP software using a runtime license obtained from SAP or its distributors, the restrictions of such runtime license apply.
Application Help for SAP Product Lifecycle CostingLogistics Master Data PUBLIC 341
You can do the following here:
● Filter entries and sort entries by one or more columns.For more information, see Working with Master Data [page 303].
● Enter descriptions of the material groups in other languages if multi-language support has been activated.For more information, see Other Languages for Master Data Descriptions [page 363].
● Create, modify, and delete material groups locally in SAP Product Lifecycle Costing. You can work with this data either directly in the fields in the table or use the fields shown in the More Information area in the side panel at the right.For more information, see Using Local Master Data [page 305].
The following fields are available in the Material Groups area in the Administration view.
Field Shown What It Means
Material Group Groups together materials and services according to their characteristics, for example, office supplies or beverages.
Material Group Description Shows the description of the material group in the current logon language.
Source Shows whether the data was created locally in SAP Product Lifecycle Costing or replicated from SAP ERP.
23.6 Materials (General Data)
You use the Materials (General Data) area in the Administration view to manage general data about materials used in SAP Product Lifecycle Costing.
You can create this data locally in SAP Product Lifecycle Costing. If integration with SAP ERP has been set up, this data can also be replicated from your SAP ERP system. Replicated data is display-only.
NoteWhen integrating SAP Product Lifecycle Costing with other SAP software using a runtime license obtained from SAP or its distributors, the restrictions of such runtime license apply.
You can do the following here:
● Filter entries and sort entries by one or more columns.For more information, see Working with Master Data [page 303].
● Enter descriptions of the materials in other languages if multi-language support has been activated.For more information, see Other Languages for Master Data Descriptions [page 363].
● Create, modify, and delete general data for materials locally in SAP Product Lifecycle Costing. You can work with this data either directly in the fields in the table or use the fields shown in the More Information area in the side panel at the right.For more information, see Using Local Master Data [page 305].
● If autocomplete is available for a field, you can enter the first few characters of an identifier. A drop-down list then displays all entries that begin with the characters you entered.
342 PUBLICApplication Help for SAP Product Lifecycle Costing
Logistics Master Data

The following fields are available in the Materials (General Data) area in the Administration view.
Field Shown What It Means
Material Identifies a material that can be used in calculation versions.
Material Description Shows the description of the material in the current logon language.
Base Unit of Measure Specifies the base unit of measure to be used for the material.
You can use the drop-down list to select one of the units of measure that are available in the Global Settings in the Administration view.
Material Group Groups together material and services according to their characteristics, for example, office supplies or beverages.
Material Group Description Shows the description of the material group in the current logon language.
Material Type Classifies a material based on attributes, for example, raw materials, semi-finished products, or finished products. It can be used for material account determination.
Material Type Description Shows the description of the material type in the current logon language
Created Using CAD Integration Shows whether a material was created or changed in a CAD system. This indicator cannot be set for materials created in SAP Product Lifecycle Costing.
Phantom Material Tells you if this material is being used as a placeholder until the physical material is actually available.
Configurable Material Tells you if this is a material for which you can specify characteristics during order processing in SAP ERP. The indicator cannot be set for materials created in SAP Product Lifecycle Costing.
23.7 Materials (Plant-Specific Data)
You use the Materials (Plant-Specific Data) area in the Administration view to manage plant-specific material data used in SAP Product Lifecycle Costing.
You can create this data locally in SAP Product Lifecycle Costing. If integration with SAP ERP has been set up, this data can also be replicated from your SAP ERP system. Replicated data is display-only.
Application Help for SAP Product Lifecycle CostingLogistics Master Data PUBLIC 343
NoteWhen integrating SAP Product Lifecycle Costing with other SAP software using a runtime license obtained from SAP or its distributors, the restrictions of such runtime license apply.
You can do the following here:
● Filter entries and sort entries by one or more columns.For more information, see Working with Master Data [page 303].
● Create, modify, and delete plant-specific material data locally in SAP Product Lifecycle Costing. You can work with this data either directly in the fields in the table or use the fields shown in the More Information area in the side panel at the right.For more information, see Using Local Master Data [page 305].
● If autocomplete is available for a field, you can enter the first few characters of an identifier. A drop-down list then displays all entries that begin with the characters you entered.
The following fields are available in the Materials (Plant-Specific Data) area in the Administration view.
Field Shown What It Means
Material Identifies an overhead group that allows you to apply overhead costs in the same way for a set of materials at plant level.
Material Description Shows the description of the material in the current logon language.
Plant Specifies the plant to which the data contained in Overhead Group, Valuation Class, and Material Costing Lot Size refers.
Plant Description Shows the description of the plant in the current logon language.
Overhead Group Identifies an overhead group that allows you to apply overhead costs in the same way for a set of materials at plant level.
Overhead Group Description Shows the description of the overhead group in the current logon language.
Valuation Class Identifies a valuation class that allows you to group together materials from a financial point of view. It can be used for material account determination.
Valuation Class Description Shows the description of the valuation class in the current logon language.
Material Costing Lot Size Lot size that is used for costing in SAP ERP for this material in this plant.
Unit of Measure (Material Costing Lot Size) Unit of measure for the material costing lot size.
344 PUBLICApplication Help for SAP Product Lifecycle Costing
Logistics Master Data
Field Shown What It Means
Source Shows whether the data was created locally in SAP Product Lifecycle Costing or replicated from SAP ERP.
23.8 Material Prices
You use the Material Prices area in the Administration view to create, modify, delete, and view the material prices used in SAP Product Lifecycle Costing. Material prices are assigned to items with the item category Material, Document, Subcontracting and External Activity automatically, or you can assign them manually.
You can create material prices locally in SAP Product Lifecycle Costing. If integration with SAP ERP has been set up, ERP standard prices can also be replicated from your SAP ERP system. Replicated data is display-only.
NoteWhen integrating SAP Product Lifecycle Costing with other SAP software using a runtime license obtained from SAP or its distributors, the restrictions of such runtime license apply.
You can do the following here:
● Filter the entries and then sort the entries by one or more columns.For more information, see Working with Master Data [page 303].
● Create, modify, and delete material prices data locally in SAP Product Lifecycle Costing. You can work with this data either directly in the fields in the table or use the fields shown in the More Information area in the side panel at the right.For more information, see Using Local Master Data [page 305].
● Create price components and assign them to separate accounts and activate or deactivate a price split.For more information see Using Price Components and Price Splits in Material Prices [page 348].
● If autocomplete is available for a field, you can enter the first few characters of an identifier. A drop-down list then displays all entries that begin with the characters you entered.For more information, see Autocomplete for Fields [page 14].
The following fields are available in the Material Prices area in the Administration view.
Field Shown What It Means
Price Source Specifies where the material price comes from.
Material Identifies a material that can be used in calculation versions.
Material Description Shows the description of the material in the logon language.
Application Help for SAP Product Lifecycle CostingLogistics Master Data PUBLIC 345
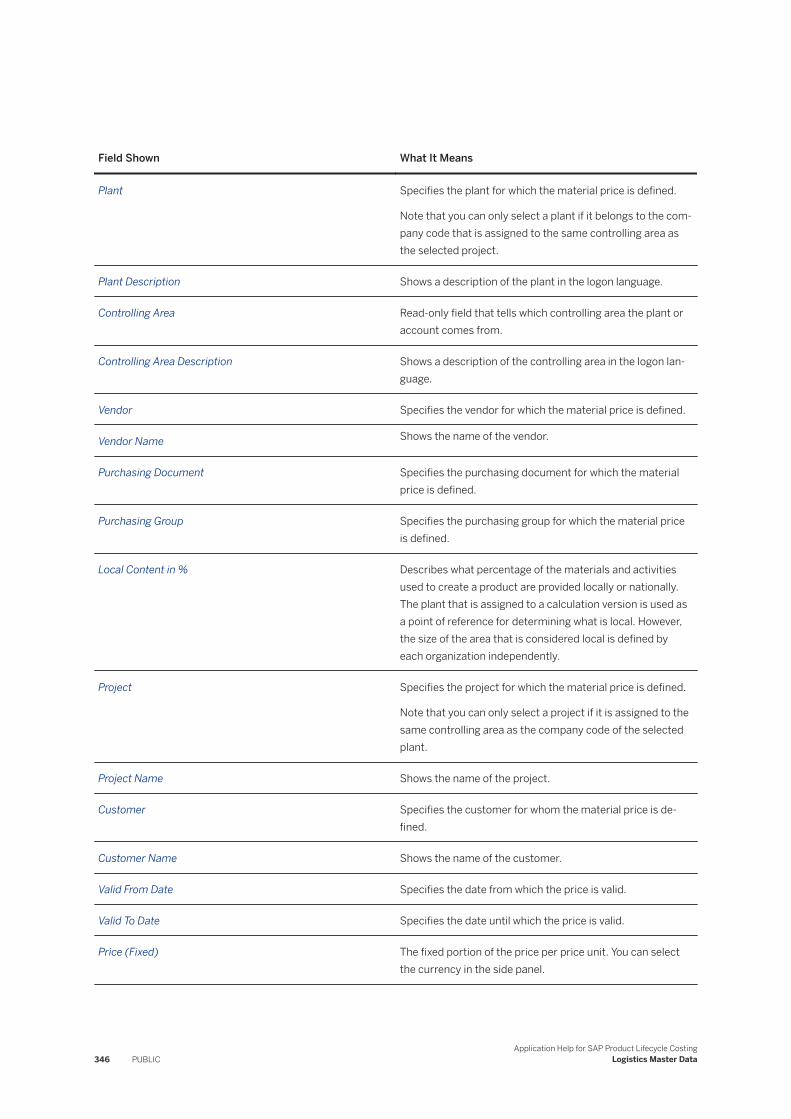
Field Shown What It Means
Plant Specifies the plant for which the material price is defined.
Note that you can only select a plant if it belongs to the company code that is assigned to the same controlling area as the selected project.
Plant Description Shows a description of the plant in the logon language.
Controlling Area Read-only field that tells which controlling area the plant or account comes from.
Controlling Area Description Shows a description of the controlling area in the logon language.
Vendor Specifies the vendor for which the material price is defined.
Vendor Name Shows the name of the vendor.
Purchasing Document Specifies the purchasing document for which the material price is defined.
Purchasing Group Specifies the purchasing group for which the material price is defined.
Local Content in % Describes what percentage of the materials and activities used to create a product are provided locally or nationally. The plant that is assigned to a calculation version is used as a point of reference for determining what is local. However, the size of the area that is considered local is defined by each organization independently.
Project Specifies the project for which the material price is defined.
Note that you can only select a project if it is assigned to the same controlling area as the company code of the selected plant.
Project Name Shows the name of the project.
Customer Specifies the customer for whom the material price is defined.
Customer Name Shows the name of the customer.
Valid From Date Specifies the date from which the price is valid.
Valid To Date Specifies the date until which the price is valid.
Price (Fixed) The fixed portion of the price per price unit. You can select the currency in the side panel.
346 PUBLICApplication Help for SAP Product Lifecycle Costing
Logistics Master Data
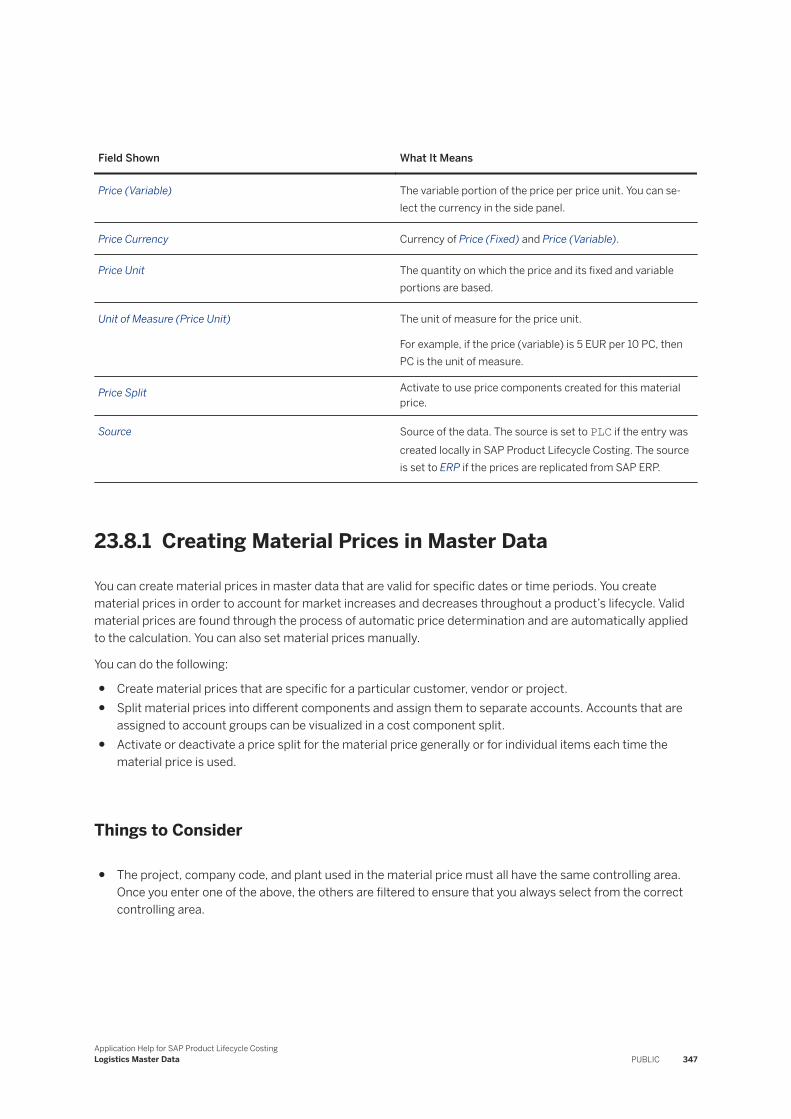
Field Shown What It Means
Price (Variable) The variable portion of the price per price unit. You can select the currency in the side panel.
Price Currency Currency of Price (Fixed) and Price (Variable).
Price Unit The quantity on which the price and its fixed and variable portions are based.
Unit of Measure (Price Unit) The unit of measure for the price unit.
For example, if the price (variable) is 5 EUR per 10 PC, then PC is the unit of measure.
Price Split Activate to use price components created for this material price.
Source Source of the data. The source is set to PLC if the entry was created locally in SAP Product Lifecycle Costing. The source is set to ERP if the prices are replicated from SAP ERP.
23.8.1 Creating Material Prices in Master Data
You can create material prices in master data that are valid for specific dates or time periods. You create material prices in order to account for market increases and decreases throughout a product’s lifecycle. Valid material prices are found through the process of automatic price determination and are automatically applied to the calculation. You can also set material prices manually.
You can do the following:
● Create material prices that are specific for a particular customer, vendor or project.● Split material prices into different components and assign them to separate accounts. Accounts that are
assigned to account groups can be visualized in a cost component split.● Activate or deactivate a price split for the material price generally or for individual items each time the
material price is used.
Things to Consider
● The project, company code, and plant used in the material price must all have the same controlling area. Once you enter one of the above, the others are filtered to ensure that you always select from the correct controlling area.
Application Help for SAP Product Lifecycle CostingLogistics Master Data PUBLIC 347
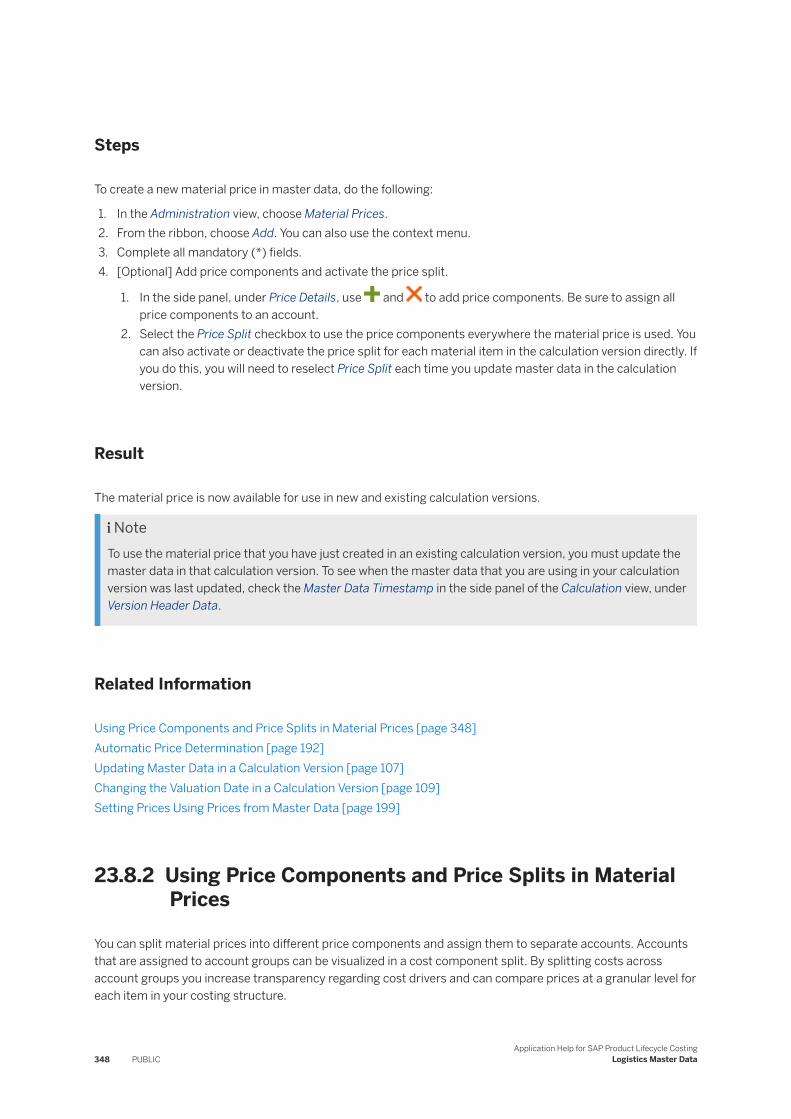
Steps
To create a new material price in master data, do the following:
1. In the Administration view, choose Material Prices.2. From the ribbon, choose Add. You can also use the context menu.3. Complete all mandatory (*) fields.4. [Optional] Add price components and activate the price split.
1. In the side panel, under Price Details, use and to add price components. Be sure to assign all price components to an account.
2. Select the Price Split checkbox to use the price components everywhere the material price is used. You can also activate or deactivate the price split for each material item in the calculation version directly. If you do this, you will need to reselect Price Split each time you update master data in the calculation version.
Result
The material price is now available for use in new and existing calculation versions.
NoteTo use the material price that you have just created in an existing calculation version, you must update the master data in that calculation version. To see when the master data that you are using in your calculation version was last updated, check the Master Data Timestamp in the side panel of the Calculation view, under Version Header Data.
Related Information
Using Price Components and Price Splits in Material Prices [page 348]Automatic Price Determination [page 192]Updating Master Data in a Calculation Version [page 107]Changing the Valuation Date in a Calculation Version [page 109]Setting Prices Using Prices from Master Data [page 199]
23.8.2 Using Price Components and Price Splits in Material Prices
You can split material prices into different price components and assign them to separate accounts. Accounts that are assigned to account groups can be visualized in a cost component split. By splitting costs across account groups you increase transparency regarding cost drivers and can compare prices at a granular level for each item in your costing structure.
348 PUBLICApplication Help for SAP Product Lifecycle Costing
Logistics Master Data
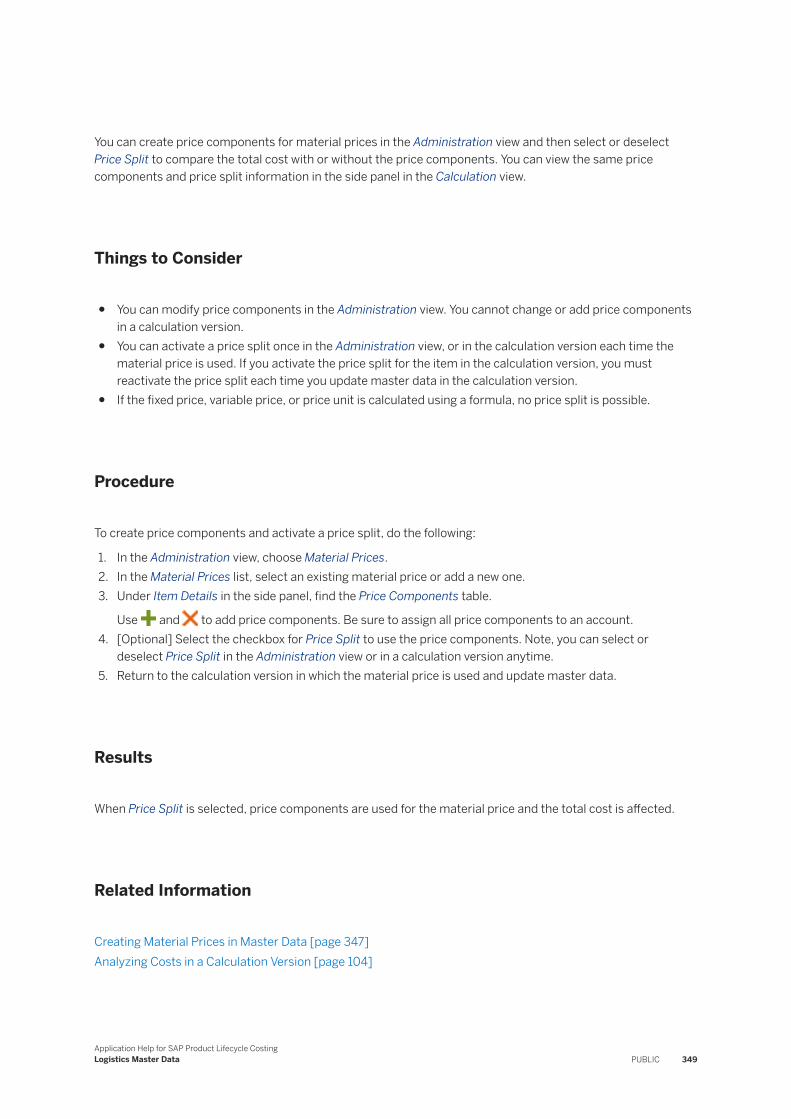
You can create price components for material prices in the Administration view and then select or deselect Price Split to compare the total cost with or without the price components. You can view the same price components and price split information in the side panel in the Calculation view.
Things to Consider
● You can modify price components in the Administration view. You cannot change or add price components in a calculation version.
● You can activate a price split once in the Administration view, or in the calculation version each time the material price is used. If you activate the price split for the item in the calculation version, you must reactivate the price split each time you update master data in the calculation version.
● If the fixed price, variable price, or price unit is calculated using a formula, no price split is possible.
Procedure
To create price components and activate a price split, do the following:
1. In the Administration view, choose Material Prices.2. In the Material Prices list, select an existing material price or add a new one.3. Under Item Details in the side panel, find the Price Components table.
Use and to add price components. Be sure to assign all price components to an account.4. [Optional] Select the checkbox for Price Split to use the price components. Note, you can select or
deselect Price Split in the Administration view or in a calculation version anytime.5. Return to the calculation version in which the material price is used and update master data.
Results
When Price Split is selected, price components are used for the material price and the total cost is affected.
Related Information
Creating Material Prices in Master Data [page 347]Analyzing Costs in a Calculation Version [page 104]
Application Help for SAP Product Lifecycle CostingLogistics Master Data PUBLIC 349
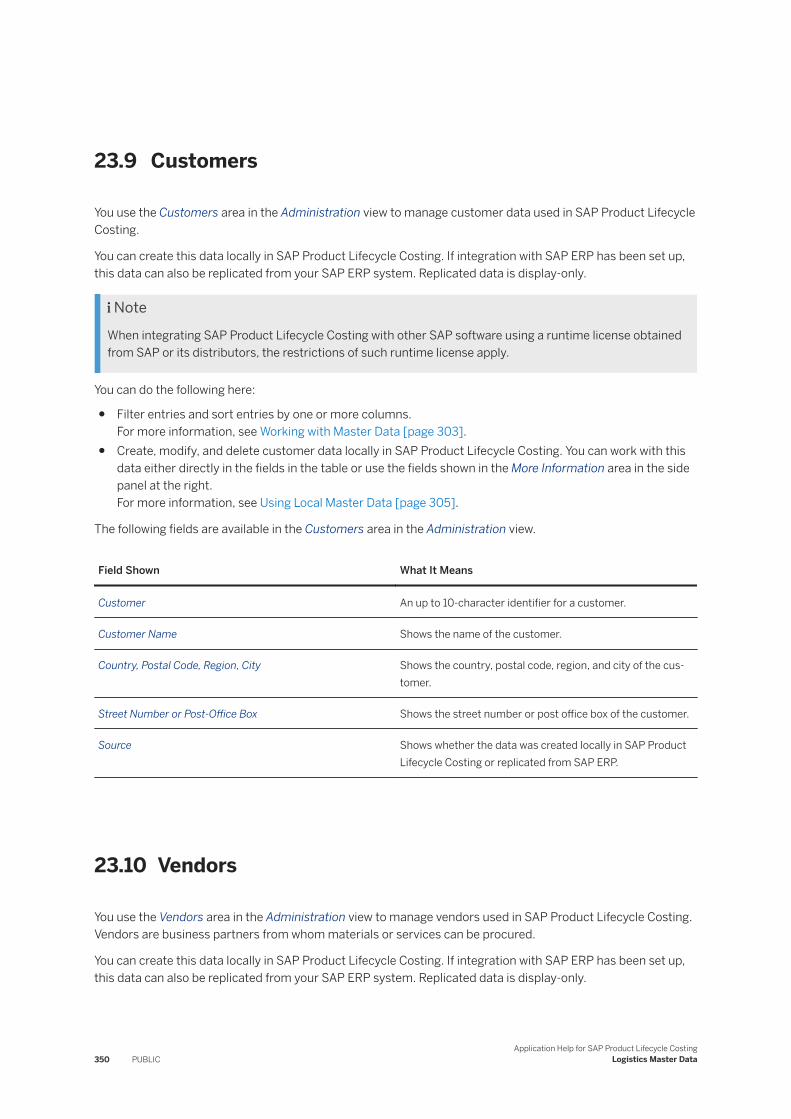
23.9 Customers
You use the Customers area in the Administration view to manage customer data used in SAP Product Lifecycle Costing.
You can create this data locally in SAP Product Lifecycle Costing. If integration with SAP ERP has been set up, this data can also be replicated from your SAP ERP system. Replicated data is display-only.
NoteWhen integrating SAP Product Lifecycle Costing with other SAP software using a runtime license obtained from SAP or its distributors, the restrictions of such runtime license apply.
You can do the following here:
● Filter entries and sort entries by one or more columns.For more information, see Working with Master Data [page 303].
● Create, modify, and delete customer data locally in SAP Product Lifecycle Costing. You can work with this data either directly in the fields in the table or use the fields shown in the More Information area in the side panel at the right.For more information, see Using Local Master Data [page 305].
The following fields are available in the Customers area in the Administration view.
Field Shown What It Means
Customer An up to 10-character identifier for a customer.
Customer Name Shows the name of the customer.
Country, Postal Code, Region, City Shows the country, postal code, region, and city of the customer.
Street Number or Post-Office Box Shows the street number or post office box of the customer.
Source Shows whether the data was created locally in SAP Product Lifecycle Costing or replicated from SAP ERP.
23.10 Vendors
You use the Vendors area in the Administration view to manage vendors used in SAP Product Lifecycle Costing. Vendors are business partners from whom materials or services can be procured.
You can create this data locally in SAP Product Lifecycle Costing. If integration with SAP ERP has been set up, this data can also be replicated from your SAP ERP system. Replicated data is display-only.
350 PUBLICApplication Help for SAP Product Lifecycle Costing
Logistics Master Data
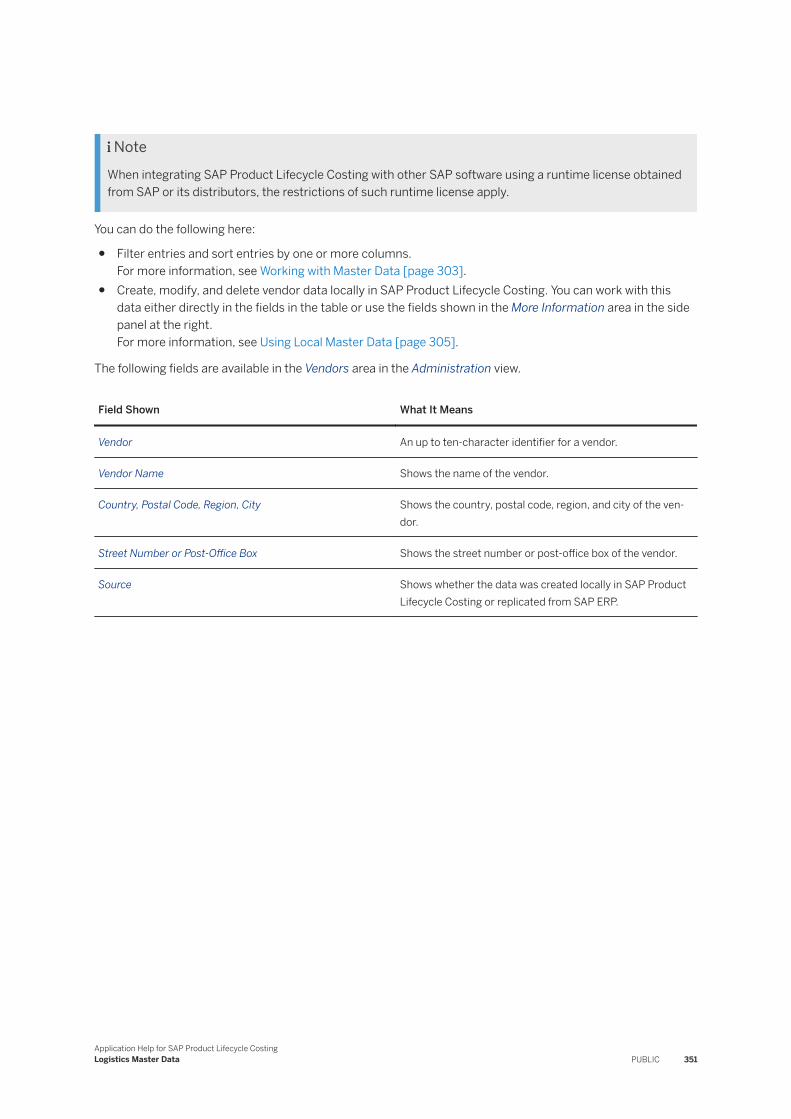
NoteWhen integrating SAP Product Lifecycle Costing with other SAP software using a runtime license obtained from SAP or its distributors, the restrictions of such runtime license apply.
You can do the following here:
● Filter entries and sort entries by one or more columns.For more information, see Working with Master Data [page 303].
● Create, modify, and delete vendor data locally in SAP Product Lifecycle Costing. You can work with this data either directly in the fields in the table or use the fields shown in the More Information area in the side panel at the right.For more information, see Using Local Master Data [page 305].
The following fields are available in the Vendors area in the Administration view.
Field Shown What It Means
Vendor An up to ten-character identifier for a vendor.
Vendor Name Shows the name of the vendor.
Country, Postal Code, Region, City Shows the country, postal code, region, and city of the vendor.
Street Number or Post-Office Box Shows the street number or post-office box of the vendor.
Source Shows whether the data was created locally in SAP Product Lifecycle Costing or replicated from SAP ERP.
Application Help for SAP Product Lifecycle CostingLogistics Master Data PUBLIC 351
24 Finance Master Data
You can create and manage master data for finance in SAP Product Lifecycle Costing.
Related Information
Controlling Areas [page 352]Company Codes [page 353]Profit Centers [page 354]Business Areas [page 355]Cost Centers [page 356]Activity Types and Account Determination [page 357]Activity Prices [page 358]
24.1 Controlling Areas
You use Controlling Areas in the Administration view to manage the controlling areas used in SAP Product Lifecycle Costing.
You can create this data locally in SAP Product Lifecycle Costing. If integration with SAP ERP has been set up, this data can also be replicated from your SAP ERP system. Replicated data is display-only.
NoteWhen integrating SAP Product Lifecycle Costing with other SAP software using a runtime license obtained from SAP or its distributors, the restrictions of such runtime license apply.
You can do the following here:
● Filter entries and sort entries by one or more columns.For more information, see Working with Master Data [page 303].
● Enter descriptions of the controlling areas in other languages if multi-language support has been activated.For more information, see Other Languages for Master Data Descriptions [page 363].
● Create, modify, and delete controlling area data locally in SAP Product Lifecycle Costing. You can work with this data either directly in the fields in the table or use the fields shown in the More Information area in the side panel at the right.For more information, see Using Local Master Data [page 305].
The following fields are available in the Controlling Areas area in the Administration view.
352 PUBLICApplication Help for SAP Product Lifecycle Costing
Finance Master Data
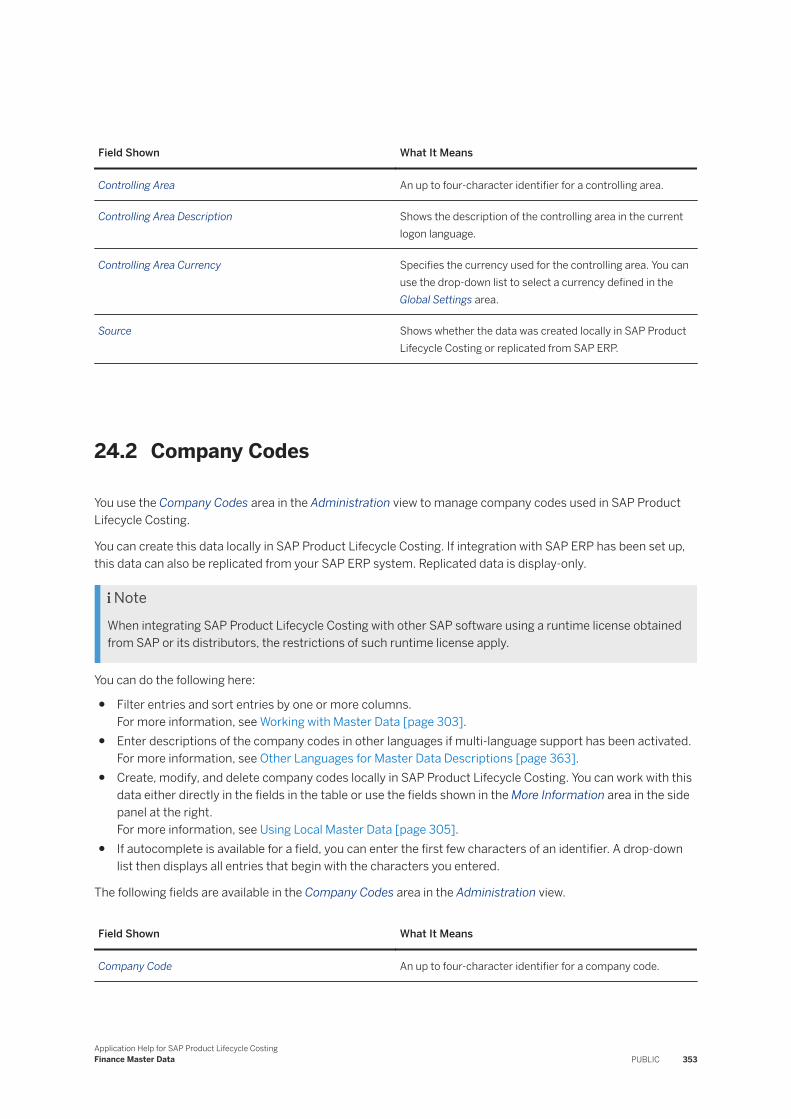
Field Shown What It Means
Controlling Area An up to four-character identifier for a controlling area.
Controlling Area Description Shows the description of the controlling area in the current logon language.
Controlling Area Currency Specifies the currency used for the controlling area. You can use the drop-down list to select a currency defined in the Global Settings area.
Source Shows whether the data was created locally in SAP Product Lifecycle Costing or replicated from SAP ERP.
24.2 Company Codes
You use the Company Codes area in the Administration view to manage company codes used in SAP Product Lifecycle Costing.
You can create this data locally in SAP Product Lifecycle Costing. If integration with SAP ERP has been set up, this data can also be replicated from your SAP ERP system. Replicated data is display-only.
NoteWhen integrating SAP Product Lifecycle Costing with other SAP software using a runtime license obtained from SAP or its distributors, the restrictions of such runtime license apply.
You can do the following here:
● Filter entries and sort entries by one or more columns.For more information, see Working with Master Data [page 303].
● Enter descriptions of the company codes in other languages if multi-language support has been activated.For more information, see Other Languages for Master Data Descriptions [page 363].
● Create, modify, and delete company codes locally in SAP Product Lifecycle Costing. You can work with this data either directly in the fields in the table or use the fields shown in the More Information area in the side panel at the right.For more information, see Using Local Master Data [page 305].
● If autocomplete is available for a field, you can enter the first few characters of an identifier. A drop-down list then displays all entries that begin with the characters you entered.
The following fields are available in the Company Codes area in the Administration view.
Field Shown What It Means
Company Code An up to four-character identifier for a company code.
Application Help for SAP Product Lifecycle CostingFinance Master Data PUBLIC 353
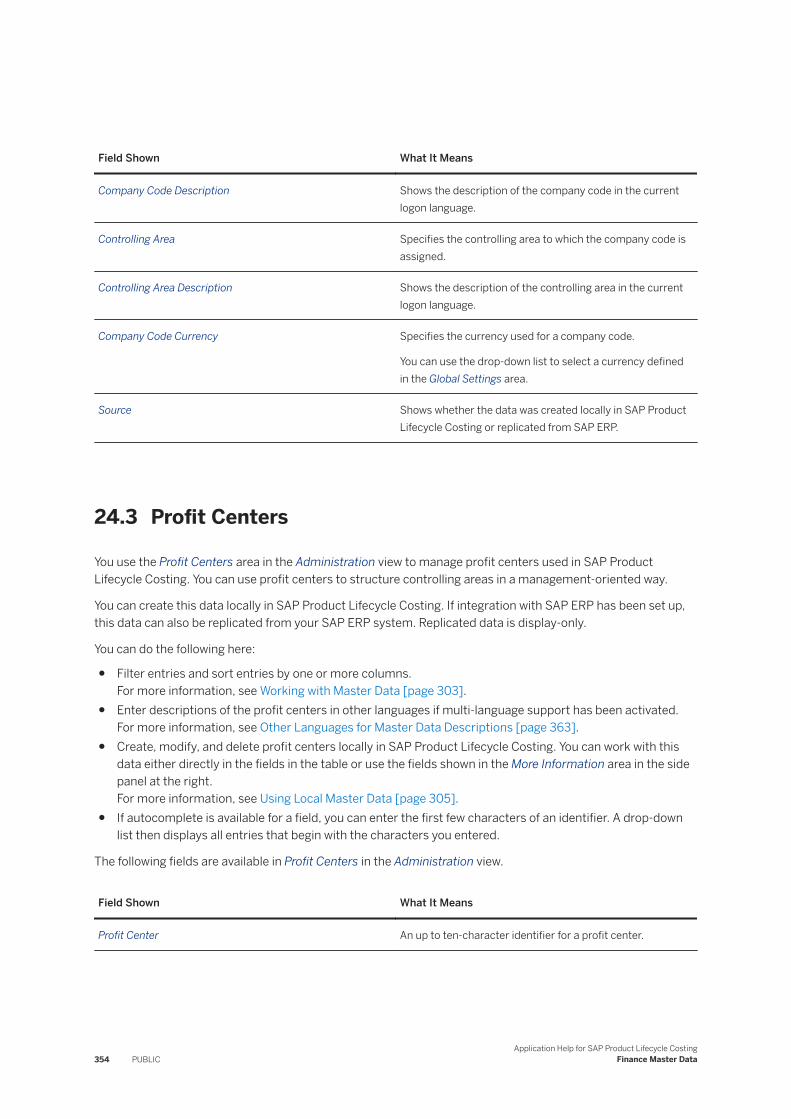
Field Shown What It Means
Company Code Description Shows the description of the company code in the current logon language.
Controlling Area Specifies the controlling area to which the company code is assigned.
Controlling Area Description Shows the description of the controlling area in the current logon language.
Company Code Currency Specifies the currency used for a company code.
You can use the drop-down list to select a currency defined in the Global Settings area.
Source Shows whether the data was created locally in SAP Product Lifecycle Costing or replicated from SAP ERP.
24.3 Profit Centers
You use the Profit Centers area in the Administration view to manage profit centers used in SAP Product Lifecycle Costing. You can use profit centers to structure controlling areas in a management-oriented way.
You can create this data locally in SAP Product Lifecycle Costing. If integration with SAP ERP has been set up, this data can also be replicated from your SAP ERP system. Replicated data is display-only.
You can do the following here:
● Filter entries and sort entries by one or more columns.For more information, see Working with Master Data [page 303].
● Enter descriptions of the profit centers in other languages if multi-language support has been activated.For more information, see Other Languages for Master Data Descriptions [page 363].
● Create, modify, and delete profit centers locally in SAP Product Lifecycle Costing. You can work with this data either directly in the fields in the table or use the fields shown in the More Information area in the side panel at the right.For more information, see Using Local Master Data [page 305].
● If autocomplete is available for a field, you can enter the first few characters of an identifier. A drop-down list then displays all entries that begin with the characters you entered.
The following fields are available in Profit Centers in the Administration view.
Field Shown What It Means
Profit Center An up to ten-character identifier for a profit center.
354 PUBLICApplication Help for SAP Product Lifecycle Costing
Finance Master Data

Field Shown What It Means
Profit Center Description Shows the description of the profit center in the current logon language.
Controlling Area Specifies the relevant controlling area for the profit center.
Controlling Area Description Shows the description of the controlling area in the current logon language.
Source Shows whether the data was created locally in SAP Product Lifecycle Costing or replicated from SAP ERP.
24.4 Business Areas
You use Business Areas in the Administration view to manage business areas used in SAP Product Lifecycle Costing.
You can create this data locally in SAP Product Lifecycle Costing. If integration with SAP ERP has been set up, this data can also be replicated from your SAP ERP system. Replicated data is display-only.
NoteWhen integrating SAP Product Lifecycle Costing with other SAP software using a runtime license obtained from SAP or its distributors, the restrictions of such runtime license apply.
You can do the following here:
● Filter entries and sort entries by one or more columns.For more information, see Working with Master Data [page 303].
● Enter descriptions of the business areas in other languages if multi-language support has been activated.For more information, see Other Languages for Master Data Descriptions [page 363].
● Create, modify, and delete business areas locally in SAP Product Lifecycle Costing. You can work with this data either directly in the fields in the table or use the fields shown in the More Information area in the side panel at the right.For more information, see Using Local Master Data [page 305].
The following fields are available in Business Areas in the Administration view.
Field Shown What It Means
Business Area An up to four-character identifier for a business area.
Business Area Description Shows a description of the business area in the current logon language.
Application Help for SAP Product Lifecycle CostingFinance Master Data PUBLIC 355
Field Shown What It Means
Source Shows whether the data was created locally in SAP Product Lifecycle Costing or replicated from SAP ERP.
24.5 Cost Centers
You use the Cost Centers area in the Administration view to manage cost centers used in SAP Product Lifecycle Costing.
You can create this data locally in SAP Product Lifecycle Costing. If integration with SAP ERP has been set up, this data can also be replicated from your SAP ERP system. Replicated data is display-only.
NoteWhen integrating SAP Product Lifecycle Costing with other SAP software using a runtime license obtained from SAP or its distributors, the restrictions of such runtime license apply.
You can do the following here:
● Filter entries and sort entries by one or more columns.For more information, see Working with Master Data [page 303].
● Enter descriptions of the cost centers in other languages if multi-language support has been activated.For more information, see Other Languages for Master Data Descriptions [page 363].
● Create, modify, and delete cost centers locally in SAP Product Lifecycle Costing. You can work with this data either directly in the fields in the table or use the fields shown in the More Information area in the side panel at the right.For more information, see Using Local Master Data [page 305].
● If autocomplete is available for a field, you can enter the first few characters of an identifier. A drop-down list then displays all entries that begin with the characters you entered.
The following fields are available in the Cost Centers area in the Administration view.
Field Shown What It Means
Cost Center An up to ten-character identifier for a cost center.
Cost Center Description Shows the description of the cost center in the current logon language.
Controlling Area Specifies the relevant controlling area for the cost center.
Controlling Area Description Shows the description of the controlling area in the current logon language.
Source Shows whether the data was created locally in SAP Product Lifecycle Costing or replicated from SAP ERP.
356 PUBLICApplication Help for SAP Product Lifecycle Costing
Finance Master Data
24.6 Activity Types and Account Determination
You use the Activity Types and Account Determination area in the Administration view to manage activity types used in SAP Product Lifecycle Costing.
You can create this data locally in SAP Product Lifecycle Costing. If integration with SAP ERP has been set up, this data can also be replicated from your SAP ERP system. Replicated data is display-only.
NoteWhen integrating SAP Product Lifecycle Costing with other SAP software using a runtime license obtained from SAP or its distributors, the restrictions of such runtime license apply.
You can do the following here:
● Filter entries and sort entries by one or more columns.For more information, see Working with Master Data [page 303].
● Enter descriptions of the activity types in other languages if multi-language support has been activated.For more information, see Other Languages for Master Data Descriptions [page 363].
● Create, modify, and delete activity types locally in SAP Product Lifecycle Costing. You can work with this data either directly in the fields in the table or use the fields shown in the More Information area in the side panel at the right.For more information, see Using Local Master Data [page 305].
● If autocomplete is available for a field, you can enter the first few characters of an identifier. A drop-down list then displays all entries that begin with the characters you entered.
The following fields are available in Activity Types and Account Determination in the Administration view.
Field Shown What It Means
Activity Type An up to six-character identifier for an activity type.
Activity Type Description Shows the description of the activity type in the current logon language.
Controlling Area Specifies the relevant controlling area for the activity type.
Controlling Area Description Shows the description of a controlling area in the current logon language.
Account Specifies the account used for costs related to this activity type.
Account Description Shows the description of an account in the current logon language.
Source Shows whether the data was created locally in SAP Product Lifecycle Costing or replicated from SAP ERP.
Application Help for SAP Product Lifecycle CostingFinance Master Data PUBLIC 357
24.7 Activity Prices
You use the Activity Prices area in the Administration view to create, modify, and delete activity prices used in SAP Product Lifecycle Costing. This is the price for an internal activity and is assigned to items with the item category Internal Activity.
You can create activity prices data locally in SAP Product Lifecycle Costing.
You can do the following here:
● Filter the entries and sort the entries by one or more columns.For more information, see Working with Master Data [page 303].
● Create, modify, and delete activity prices data locally in SAP Product Lifecycle Costing. You can work with this data either directly in the fields in the table or use the fields shown in the More Information area in the side panel at the right.For more information, see Using Local Master Data [page 305].
● Create price components and assign them to separate accounts and activate or deactivate a price split.For more information, see Using Price Components and Price Splits in Activity Prices [page 361]
● If autocomplete is available for a field, you can enter the first few characters of an identifier. A drop-down list then displays all entries that begin with the characters you entered.For more information, see Autocomplete for Fields [page 14].
The following fields are available in the Activity Prices area in the Administration view.
Field Shown What It Means
Price Source Specifies where the price comes from.
Controlling Area Specifies the controlling area for which the activity price is defined.
Controlling Area Description Shows the description of the controlling area in the logon language.
Cost Center Specifies the cost center for which the activity price is defined.
Note you can only select a cost center if it is assigned to the same controlling area as the project and/or activity type.
Cost Center Description Shows the description of the cost center in the logon language.
Activity Type Specifies the activity type for which the activity price is defined. An activity type is a unit in a controlling area that classifies the activities performed in a cost center.
Note that you can only select an activity type if it is assigned to the same controlling area as the project and/or cost center.
358 PUBLICApplication Help for SAP Product Lifecycle Costing
Finance Master Data
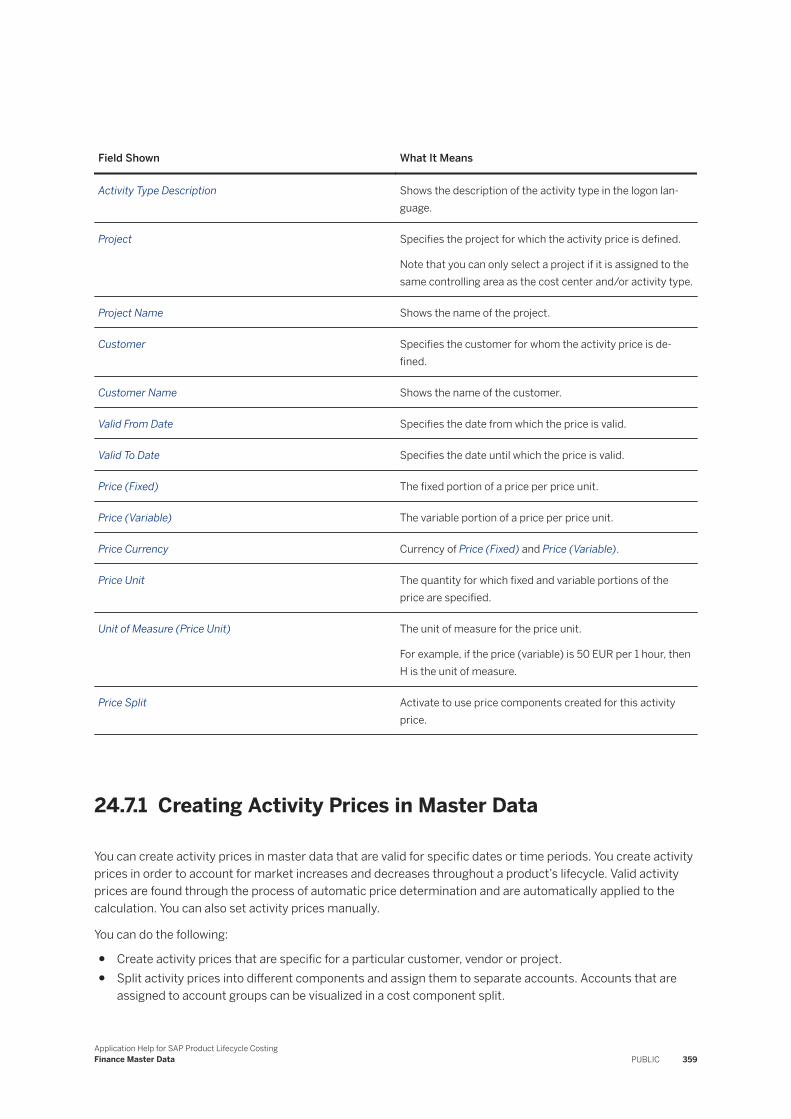
Field Shown What It Means
Activity Type Description Shows the description of the activity type in the logon language.
Project Specifies the project for which the activity price is defined.
Note that you can only select a project if it is assigned to the same controlling area as the cost center and/or activity type.
Project Name Shows the name of the project.
Customer Specifies the customer for whom the activity price is defined.
Customer Name Shows the name of the customer.
Valid From Date Specifies the date from which the price is valid.
Valid To Date Specifies the date until which the price is valid.
Price (Fixed) The fixed portion of a price per price unit.
Price (Variable) The variable portion of a price per price unit.
Price Currency Currency of Price (Fixed) and Price (Variable).
Price Unit The quantity for which fixed and variable portions of the price are specified.
Unit of Measure (Price Unit) The unit of measure for the price unit.
For example, if the price (variable) is 50 EUR per 1 hour, then H is the unit of measure.
Price Split Activate to use price components created for this activity price.
24.7.1 Creating Activity Prices in Master Data
You can create activity prices in master data that are valid for specific dates or time periods. You create activity prices in order to account for market increases and decreases throughout a product’s lifecycle. Valid activity prices are found through the process of automatic price determination and are automatically applied to the calculation. You can also set activity prices manually.
You can do the following:
● Create activity prices that are specific for a particular customer, vendor or project.● Split activity prices into different components and assign them to separate accounts. Accounts that are
assigned to account groups can be visualized in a cost component split.
Application Help for SAP Product Lifecycle CostingFinance Master Data PUBLIC 359
● Activate or deactivate a price split for the activity price generally or for individual items each time the activity price is used.
Things to Consider
● The cost center that you select must be assigned to the same controlling area as the project and/or activity type.
● The activity type that you select must be assigned to the same controlling area as the project and/or cost center.
Steps
To create an activity price in master data, do the following:
1. In the Administration view, choose Activity Prices.2. From the ribbon, choose Add. You can also use the context menu.3. Complete all mandatory (*) fields.4. [Optional] Add price components and activate the price split.
1. In the side panel, under Price Details, use and to add price components. Be sure to assign all price components to an account.
2. Select the Price Split checkbox to use the price components everywhere the activity price is used. You can also activate or deactivate the price split for each activity item in the calculation version directly. If you do this, you will need to reselect Price Split each time you update master data in the calculation version.
Result
The activity price is now available for use in new and existing calculation versions.
NoteTo use the activity price that you have just created in an existing calculation version, you must update the master data in that calculation version. To see when the master data that you are using in your calculation version was last updated, check the Master Data Timestamp in the side panel of the Calculation view, under Version Header Data.
Related Information
Using Price Components and Price Splits in Activity Prices [page 361]Analyzing Costs in a Calculation Version [page 104]
360 PUBLICApplication Help for SAP Product Lifecycle Costing
Finance Master Data
Automatic Price Determination [page 192]Updating Master Data in a Calculation Version [page 107]Changing the Valuation Date in a Calculation Version [page 109]Setting Prices Using Prices from Master Data [page 199]
24.7.2 Using Price Components and Price Splits in Activity Prices
You can split activity prices into different price components and assign them to separate accounts. Accounts that are assigned to account groups can be visualized in a cost component split. By splitting costs across account groups you increase transparency regarding cost drivers and can compare prices at a granular level for each item in your costing structure.
You can create price components for activity prices in the Administration view and then select or deselect Price Split to compare the total coat with or without the price components. You can view the same cost component and price split information in the side panel in the Calculation view.
Things to Consider
● You can activate a price split once in the Administration view, or in the calculation version each time the activity price is used. If you activate the price split for the item in the calculation version, you must reactivate the price split each time you update master data in the calculation version.
● You can modify price components in the Administration view. You cannot change or add price components in a calculation version.
● If the fixed price, variable price, or price unit is calculated using a formula, no price split is possible.● You cannot split activity prices into different components if the controlling area is set to * <Any>.
Procedure
To create price components and activate a price split, do the following:
1. In the Administration view, choose Activity Prices.2. In the Activity Prices list, select an existing activity price or add a new one.3. Under Item Details in the side panel, find the Price Components table.
Use and to add price components. Be sure to assign all price components to an account.4. [Optional] Select the checkbox for Price Split to use the price components. Note, you can select or
deselect Price Split in the Administration view or in a calculation version anytime.5. Return to the calculation version in which the activity price is used and update master data.
Application Help for SAP Product Lifecycle CostingFinance Master Data PUBLIC 361
Results
When Price Split is selected, price components are used for the activity prices and the total cost is affected.
Related Information
Creating Activity Prices in Master Data [page 359]Analyzing Costs in a Calculation Version [page 104]
362 PUBLICApplication Help for SAP Product Lifecycle Costing
Finance Master Data
25 Global Settings
You can make global settings for some aspects of SAP Product Lifecycle Costing. You can make these settings in the Administration view under Global Settings.
Related Information
Other Languages for Master Data Descriptions [page 363]Personal Data [page 365]Currencies [page 369]Exchange Rate Types [page 370]Currency Exchange Rates [page 371]Units of Measure [page 373]Material Price and Activity Price Sources [page 375]Global Default Values [page 377]User Groups [page 378]Statuses [page 381]Configuration [page 383]
25.1 Other Languages for Master Data Descriptions
SAP Product Lifecycle Costing supports multi-language descriptions of master data. You can add a description in another language for any master data that has a description field. For example, you can maintain material descriptions in different languages.
If the descriptions are available in the logon language, these descriptions are then shown in both the master data area in the Administration view and when working with calculation versions in the Calculation view.
You can choose from the list of languages provided in the Languages area in the Administration view. The field names of languages in which you can enter descriptions are always displayed in the English language, even if you are logged on in a different language.
Note● You must restart SAP Product Lifecycle Costing in order for the new settings to take effect.● In order to use the translated versions, the language must be available as a logon language in your
installation of SAP Product Lifecycle Costing. Otherwise, the translation that you enter is visible in the Administration view, but is not shown in the description fields used in calculation versions.
Application Help for SAP Product Lifecycle CostingGlobal Settings PUBLIC 363

Related Information
Activating Description Languages [page 364]Deactivating Description Languages [page 364]
25.1.1 Activating Description Languages
To use an additional language for descriptions, you must activate it and enter descriptions in the corresponding language.
Steps
1. In the Administration view under Global Settings, select Languages.2. Select the Use for Descriptions checkbox of the language that you want to activate.3. Save your selection and restart SAP Product Lifecycle Costing.4. Log on again and return to the master data area in the Administration view.
For each master data object that has a description field, a field is shown at the right in the More Information area for each language that you activated.
5. Enter descriptions for each of your new languages and save your entries.
25.1.2 Deactivating Description Languages
If you no longer want to use a language for descriptions, you can deactivate it.
NoteIf you deactivate a language, any descriptive texts that you have entered in the language are deleted. If you reactivate the language, you must enter new texts.
Steps
1. In the Administration view under Global Settings, select Languages.2. Deselect the checkbox of the language that you no longer need.3. Save your changes.
After restarting SAP Product Lifecycle Costing, the description fields are then no longer shown in the More Information area.
364 PUBLICApplication Help for SAP Product Lifecycle Costing
Global Settings
25.2 Personal Data
You can use the Personal Data area in the Administration view to search for, download, and delete personal data used in SAP Product Lifecycle Costing.
Personal data is any information relating to an identified or identifiable natural person who is the subject of the data, such as ID, address, specific pricing, and so on. In SAP Product Lifecycle Costing, personal data applies to user, customer, and vendor data.
You can do the following here:
● Locate user, customer, and vendor data.● Download a CSV file containing the location, ID, and number of occurrences of the data used.● Delete personal data for a user, customer, or vendor from the application.● Delete personal data for users, customers, and vendors from a specific project.
Things to Consider
● You can search for data by user, customer, or vendor.● Customer and vendor data are deleted from the system. Project-specific personal data and user data is
anonymized and replaced with placeholders throughout the system. For example, user IDs are replaced with the word Deleted in calculation versions in which the user ID has been deleted.
● When you delete personal data, it is also removed from frozen calculation versions.● If the user you are deleting is the sole administrator of a project, you must assign another administrator to
the project before deleting the user.
Related Information
Searching for Personal Data [page 365]Downloading Personal Data [page 367]Deleting Personal Data [page 368]
25.2.1 Searching for Personal Data
You can search for personal data in the Administration view.
Prerequisites
You are authorized to read data and have been assigned the following role template:
Application Help for SAP Product Lifecycle CostingGlobal Settings PUBLIC 365
Action Role Template
Read DataProtOffRead_RT
Context
You would like to know where the personal data for a user, customer, or vendor is used in SAP Product Lifecyle Costing.
Procedure
1. Under Global Settings, go to Personal Data.2. Enter an ID for a user, vendor, or customer.3. Choose Search.
The following information about the personal data is displayed:
Heading What It Means
Table Name Table where the data is located
Column Name Column in the table where the data is located
Number of Rows Number of occurrences in which data is shown
Related Information
Personal Data [page 365]Downloading Personal Data [page 367]Deleting Personal Data [page 368]
366 PUBLICApplication Help for SAP Product Lifecycle Costing
Global Settings
25.2.2 Downloading Personal Data
You can download personal data in the Administration view.
Prerequisites
You are authorized to download data and have been assigned the following role template:
Action Role Template
Read DataProtOffRead_RT
Context
You want to create a report that shows what, where, and how often the personal data of a user, customer, or vendor is used in SAP Product Lifecycle Costing.
Procedure
1. Under Global Settings, go to Personal Data.2. Enter an ID for a user, vendor, or customer.3. Choose Search.
A table displays where the personal data for the data subject you entered is currently used in the application:
Heading What It Means
Table Name Table where the data is located
Column Name Column in the table where the data is located
Number of Rows Number of occurrences in which data is shown
4. Choose Download to create a CSV file with this information. You can save this file to your computer.
For vendors and customers, the CSV file includes additional information:○ Current personal data: This means current information saved in the application for the data subject,
including name, ID, address, valid to and from dates, and whether the data was created in SAP Product Lifecycle Costing or SAP ERP.
○ History of personal data: This is a log of all personal data saved in SAP Product Lifecycle Costing for the customer or vendor, including when the data was entered.
Application Help for SAP Product Lifecycle CostingGlobal Settings PUBLIC 367
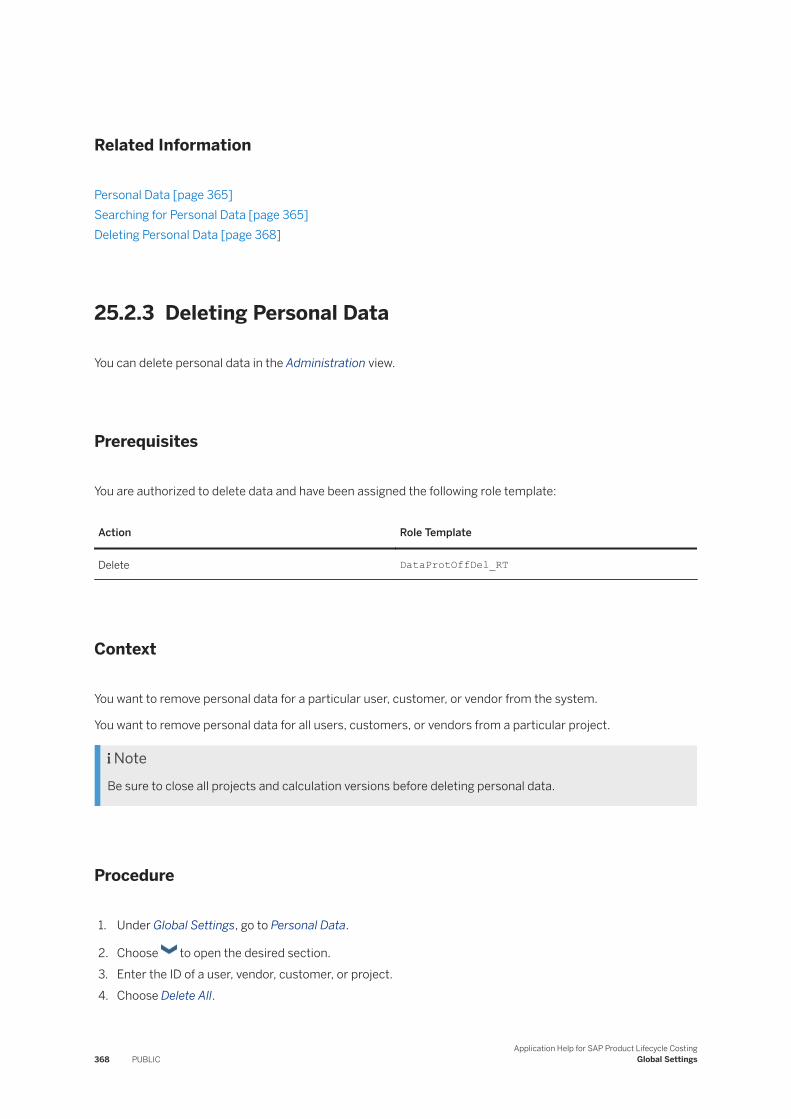
Related Information
Personal Data [page 365]Searching for Personal Data [page 365]Deleting Personal Data [page 368]
25.2.3 Deleting Personal Data
You can delete personal data in the Administration view.
Prerequisites
You are authorized to delete data and have been assigned the following role template:
Action Role Template
Delete DataProtOffDel_RT
Context
You want to remove personal data for a particular user, customer, or vendor from the system.
You want to remove personal data for all users, customers, or vendors from a particular project.
NoteBe sure to close all projects and calculation versions before deleting personal data.
Procedure
1. Under Global Settings, go to Personal Data.
2. Choose to open the desired section.3. Enter the ID of a user, vendor, customer, or project.4. Choose Delete All.
368 PUBLICApplication Help for SAP Product Lifecycle Costing
Global Settings
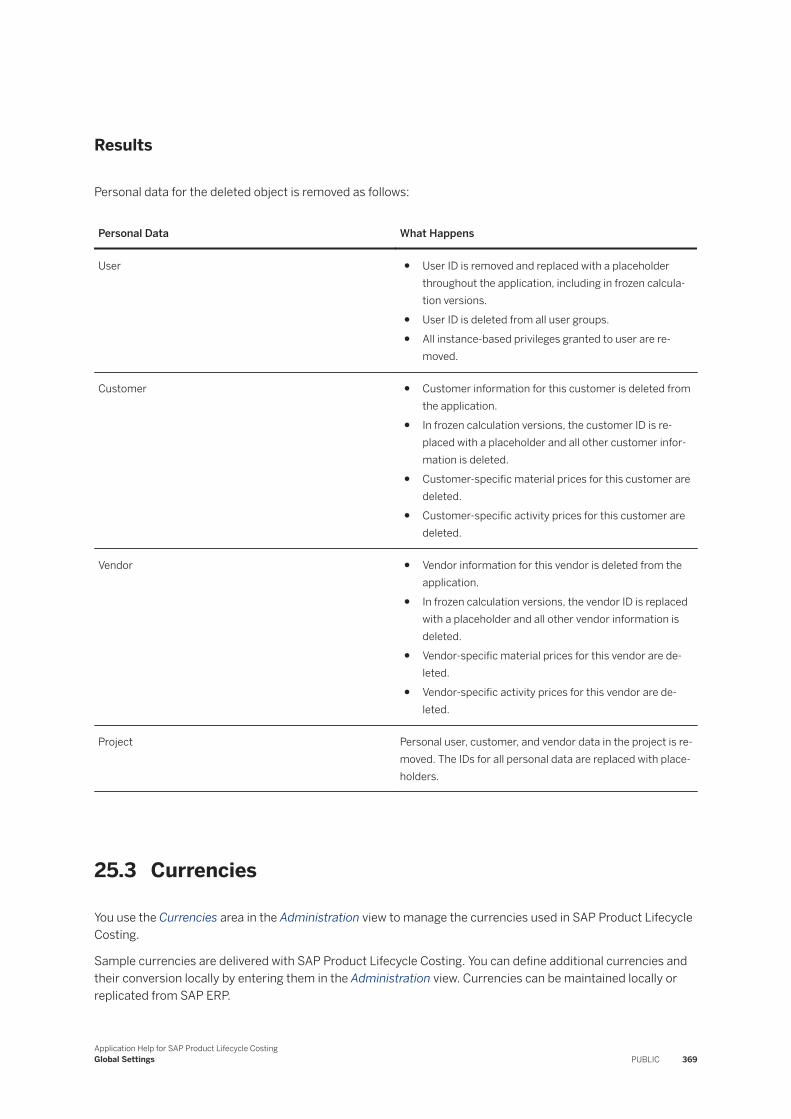
Results
Personal data for the deleted object is removed as follows:
Personal Data What Happens
User ● User ID is removed and replaced with a placeholder throughout the application, including in frozen calculation versions.
● User ID is deleted from all user groups.● All instance-based privileges granted to user are re
moved.
Customer ● Customer information for this customer is deleted from the application.
● In frozen calculation versions, the customer ID is replaced with a placeholder and all other customer information is deleted.
● Customer-specific material prices for this customer are deleted.
● Customer-specific activity prices for this customer are deleted.
Vendor ● Vendor information for this vendor is deleted from the application.
● In frozen calculation versions, the vendor ID is replaced with a placeholder and all other vendor information is deleted.
● Vendor-specific material prices for this vendor are deleted.
● Vendor-specific activity prices for this vendor are deleted.
Project Personal user, customer, and vendor data in the project is removed. The IDs for all personal data are replaced with placeholders.
25.3 Currencies
You use the Currencies area in the Administration view to manage the currencies used in SAP Product Lifecycle Costing.
Sample currencies are delivered with SAP Product Lifecycle Costing. You can define additional currencies and their conversion locally by entering them in the Administration view. Currencies can be maintained locally or replicated from SAP ERP.
Application Help for SAP Product Lifecycle CostingGlobal Settings PUBLIC 369
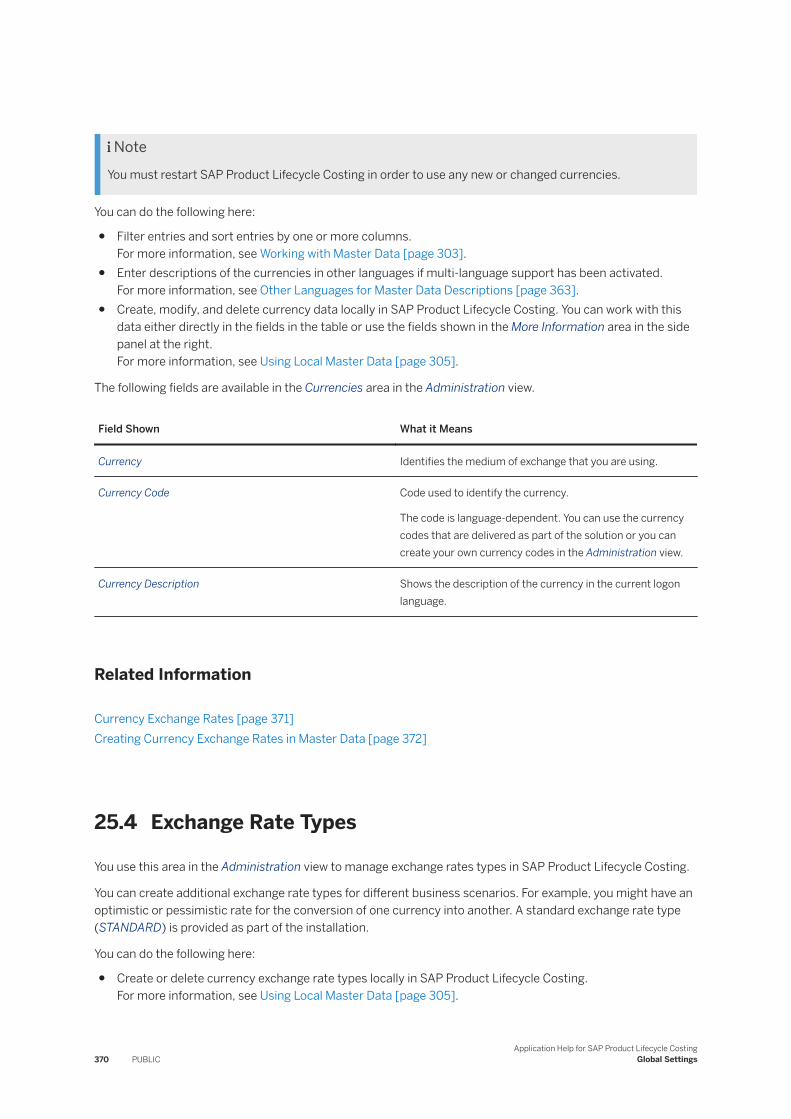
NoteYou must restart SAP Product Lifecycle Costing in order to use any new or changed currencies.
You can do the following here:
● Filter entries and sort entries by one or more columns.For more information, see Working with Master Data [page 303].
● Enter descriptions of the currencies in other languages if multi-language support has been activated.For more information, see Other Languages for Master Data Descriptions [page 363].
● Create, modify, and delete currency data locally in SAP Product Lifecycle Costing. You can work with this data either directly in the fields in the table or use the fields shown in the More Information area in the side panel at the right.For more information, see Using Local Master Data [page 305].
The following fields are available in the Currencies area in the Administration view.
Field Shown What it Means
Currency Identifies the medium of exchange that you are using.
Currency Code Code used to identify the currency.
The code is language-dependent. You can use the currency codes that are delivered as part of the solution or you can create your own currency codes in the Administration view.
Currency Description Shows the description of the currency in the current logon language.
Related Information
Currency Exchange Rates [page 371]Creating Currency Exchange Rates in Master Data [page 372]
25.4 Exchange Rate Types
You use this area in the Administration view to manage exchange rates types in SAP Product Lifecycle Costing.
You can create additional exchange rate types for different business scenarios. For example, you might have an optimistic or pessimistic rate for the conversion of one currency into another. A standard exchange rate type (STANDARD) is provided as part of the installation.
You can do the following here:
● Create or delete currency exchange rate types locally in SAP Product Lifecycle Costing.For more information, see Using Local Master Data [page 305].
370 PUBLICApplication Help for SAP Product Lifecycle Costing
Global Settings
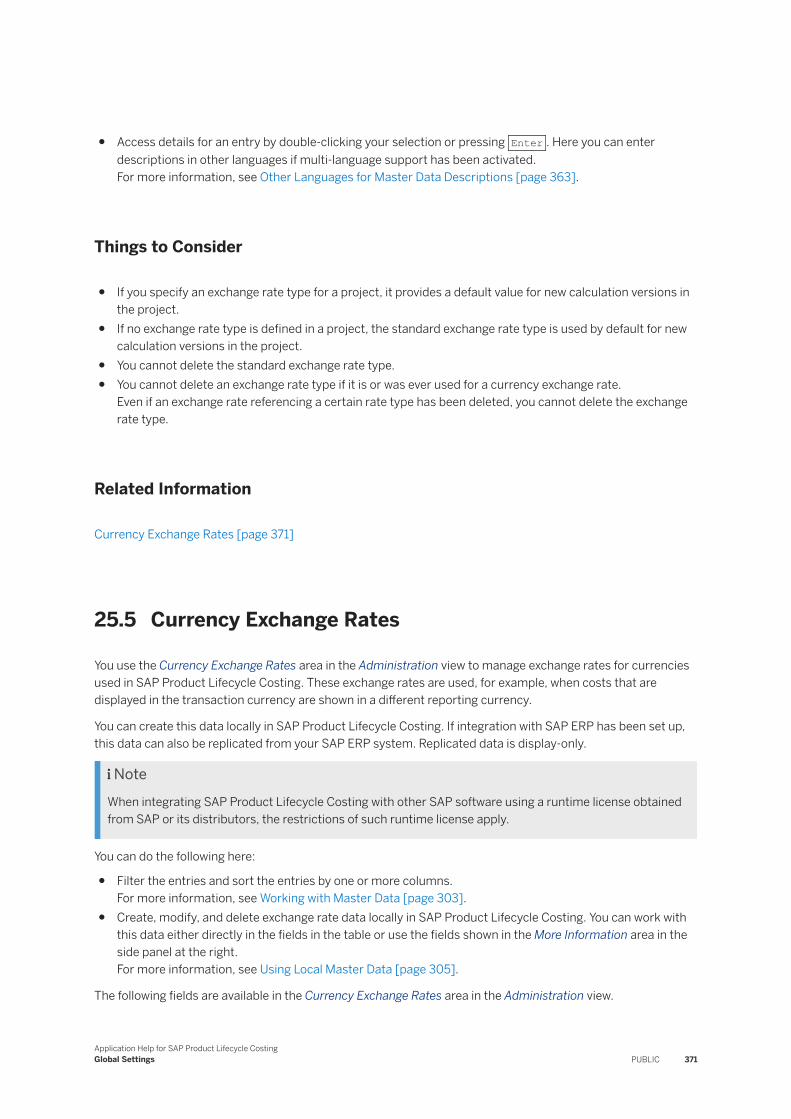
● Access details for an entry by double-clicking your selection or pressing Enter . Here you can enter descriptions in other languages if multi-language support has been activated.For more information, see Other Languages for Master Data Descriptions [page 363].
Things to Consider
● If you specify an exchange rate type for a project, it provides a default value for new calculation versions in the project.
● If no exchange rate type is defined in a project, the standard exchange rate type is used by default for new calculation versions in the project.
● You cannot delete the standard exchange rate type.● You cannot delete an exchange rate type if it is or was ever used for a currency exchange rate.
Even if an exchange rate referencing a certain rate type has been deleted, you cannot delete the exchange rate type.
Related Information
Currency Exchange Rates [page 371]
25.5 Currency Exchange Rates
You use the Currency Exchange Rates area in the Administration view to manage exchange rates for currencies used in SAP Product Lifecycle Costing. These exchange rates are used, for example, when costs that are displayed in the transaction currency are shown in a different reporting currency.
You can create this data locally in SAP Product Lifecycle Costing. If integration with SAP ERP has been set up, this data can also be replicated from your SAP ERP system. Replicated data is display-only.
NoteWhen integrating SAP Product Lifecycle Costing with other SAP software using a runtime license obtained from SAP or its distributors, the restrictions of such runtime license apply.
You can do the following here:
● Filter the entries and sort the entries by one or more columns.For more information, see Working with Master Data [page 303].
● Create, modify, and delete exchange rate data locally in SAP Product Lifecycle Costing. You can work with this data either directly in the fields in the table or use the fields shown in the More Information area in the side panel at the right.For more information, see Using Local Master Data [page 305].
The following fields are available in the Currency Exchange Rates area in the Administration view.
Application Help for SAP Product Lifecycle CostingGlobal Settings PUBLIC 371
Field Shown What It Means
Exchange Rate Type Identifies the type for an exchange rate.
You can define different exchange rate types for different business scenarios. For example, you may have an optimistic or pessimistic rate for the conversion of one currency into another.
From Currency Identifies the source currency for which you are specifying an exchange rate.
To Currency Identifies the target currency for which you are specifying an exchange rate.
From Factor Specifies the number of currency units for the source currency (maintained in the From Currency field).
For example, when converting 100 CHF to 1 USD, the rate is 79.9. The From Factor is 100, and the To Factor is 1.
To Factor Specifies the number of currency units for the target currency (maintained in the To Currency field). For example, when converting 100 CHF to 1 USD, the rate is 79.9. The From Factor is 100, and the To Factor is 1.
Rate Specifies the rate used when exchanging the source currency for the target currency. For example, if 1 EUR is equal to 1.20 USD, then the rate would be 1.20.
Valid From Date Specifies the date from which the exchange rate is valid.
Source Shows whether the data was created locally in SAP Product Lifecycle Costing or replicated from SAP ERP.
Related Information
Exchange Rate Types [page 370]
25.5.1 Creating Currency Exchange Rates in Master Data
You can create currency exchange rates in master data that are valid for specific dates or time periods. You create currency exchange rates for different time periods in order to account for expected or actual currency exchange rate fluctuation during the planning and production of a product. The valuation date of your calculation version determines which currency exchange rates are used for your calculation version.
372 PUBLICApplication Help for SAP Product Lifecycle Costing
Global Settings
Steps
To create a new currency exchange rate in master data, do the following:
1. In the Administration view, choose Currency Exchange Rates.2. Choose Add in the ribbon or open the context menu and choose Add Row.3. Complete all mandatory fields.
When adding the same to and from currencies, make sure that you use different Valid From dates.Make sure to enter a From Factor and To Factor that are equal to or greater than 1.
4. Save your entries.
Result
The currency exchange is now available for use in new and updated calculation versions.
NoteTo use the currency exchange rate that you have just created in an existing calculation version, you must update the master data in that calculation version. To see when the master data you are using in your calculation version was last updated, check the Master Data Timestamp in the side panel of the Calculation view, under Version Header Data.
Related Information
Updating Master Data in a Calculation Version [page 107]Changing the Valuation Date in a Calculation Version [page 109]
25.6 Units of Measure
You use the Units of Measure area in the Administration view to manage the units of measure used in SAP Product Lifecycle Costing. Units of measure are the standard values used to describe measurements such as length, area, volume, mass, and time.
Units of measure can be created locally in SAP Product Lifecycle Costing. If integration with SAP ERP has been set up, this data can also be replicated from your SAP ERP system. Replicated data is display-only.
NoteWhen integrating SAP Product Lifecycle Costing with other SAP software using a runtime license obtained from SAP or its distributors, the restrictions of such runtime license apply.
Application Help for SAP Product Lifecycle CostingGlobal Settings PUBLIC 373
You can do the following here:
● Filter entries and sort entries by one or more columns.For more information, see Working with Master Data [page 303].
● Enter descriptions of units of measure in other languages if multi-language support has been activated.For more information, see Other Languages for Master Data Descriptions [page 363].
● Create, modify, and delete units of measure locally in SAP Product Lifecycle Costing. You can work with this data either directly in the fields in the table or use the fields shown in the More Information area in the side panel at the right.For more information, see Using Local Master Data [page 305].
NoteYou must restart SAP Product Lifecycle Costing in order to use any new units of measure that you have created.
NoteThe following formula is used for converting units of measure into the base units of measures (the variables are described in the table below):
Measurement unit = (N/D * 10^E + AC) * Base unit
The following fields are available in the Units of Measure area in the Administration view:
Field Shown What It Means
Unit of Measure ID used to identify the unit of measure.
Unit of Measure Code Code used to identify the unit of measure. The code is language-dependent. You can define the code in the Administration view or use the code that has been replicated from SAP ERP.
Unit of Measure Description Shows the description of the unit of measure in the current logon language.
Dimension Displays the dimension to which the unit of measure belongs. For example, you use centimeters to describe length. You can use autocomplete in this field to find a dimension.
Dimension Description Shows the description of the selected dimension in the current logon language.
Numerator The numerator for conversion to the base unit.
This corresponds to N in the formula:
Measurement unit = (N/D * 10^E + AC) * Base unit
374 PUBLICApplication Help for SAP Product Lifecycle Costing
Global Settings
Field Shown What It Means
Denominator The denominator for conversion to the base unit.
This corresponds to D in the formula:
Measurement unit = (N/D * 10^E + AC) * Base unit
Exponent Base 10 Exponent used to represent very large or very small numbers for conversions to the base unit.
This corresponds to E in the formula:
Measurement unit = (N/D * 10^E + AC) * Base unit
Additive Constant Additive constant for conversion to the base unit. Sometimes a constant must be added for converting a unit of measure into the base unit of measure of a dimension (for example, when converting a temperature from Celsius to Kelvin, you must add the constant +273.15).
This corresponds to AC in the formula:
Measurement unit = (N/D * 10^E + AC) * Base unit
Source Shows whether the data was created locally in SAP Product Lifecycle Costing or replicated from SAP ERP.
25.7 Material Price and Activity Price Sources
You use the Material Price Sources and the Activity Price Sources areas in the Administration view to manage sources for material prices and activity prices used in SAP Product Lifecycle Costing. A price source identifies where a price comes from, for example, whether it is a vendor price, customer price, ERP standard price, and so on. It also establishes a confidence level.
You can do the following here:
● Create, modify, and delete material or activity price sources.● Select a confidence level for the price source.
Things to Consider
● If a material or activity price source is used in a price, the source cannot be deleted.
Application Help for SAP Product Lifecycle CostingGlobal Settings PUBLIC 375
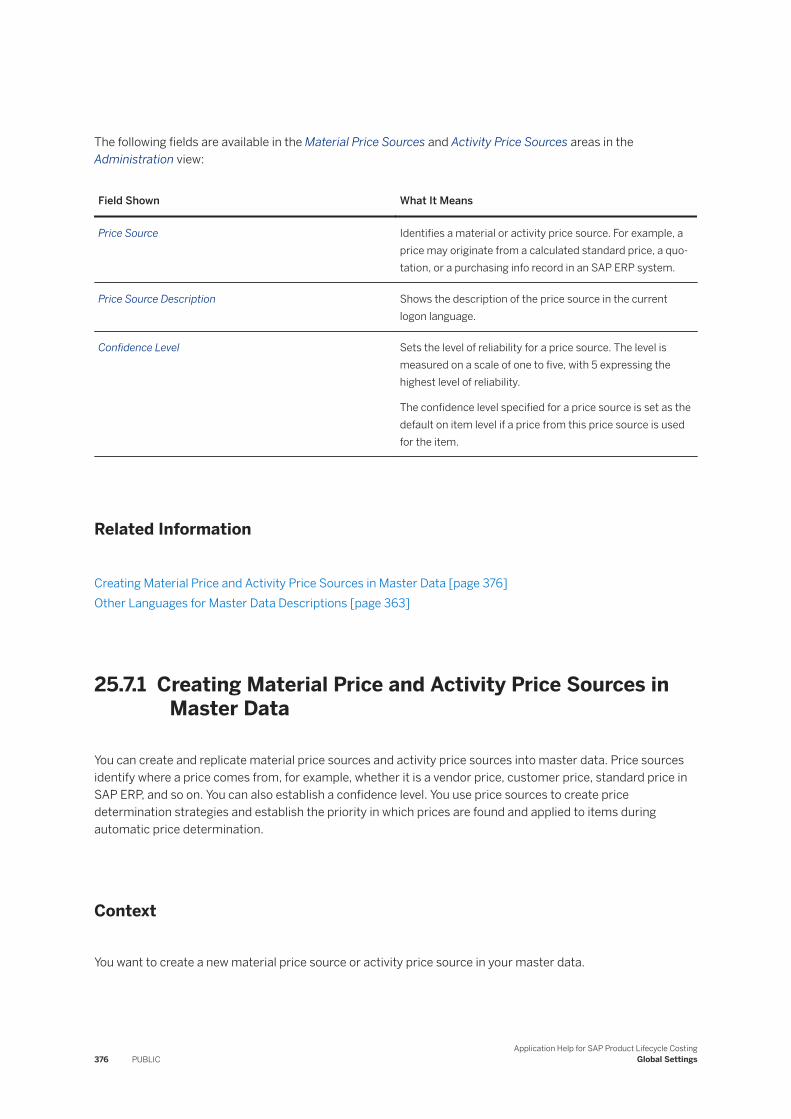
The following fields are available in the Material Price Sources and Activity Price Sources areas in the Administration view:
Field Shown What It Means
Price Source Identifies a material or activity price source. For example, a price may originate from a calculated standard price, a quotation, or a purchasing info record in an SAP ERP system.
Price Source Description Shows the description of the price source in the current logon language.
Confidence Level Sets the level of reliability for a price source. The level is measured on a scale of one to five, with 5 expressing the highest level of reliability.
The confidence level specified for a price source is set as the default on item level if a price from this price source is used for the item.
Related Information
Creating Material Price and Activity Price Sources in Master Data [page 376]Other Languages for Master Data Descriptions [page 363]
25.7.1 Creating Material Price and Activity Price Sources in Master Data
You can create and replicate material price sources and activity price sources into master data. Price sources identify where a price comes from, for example, whether it is a vendor price, customer price, standard price in SAP ERP, and so on. You can also establish a confidence level. You use price sources to create price determination strategies and establish the priority in which prices are found and applied to items during automatic price determination.
Context
You want to create a new material price source or activity price source in your master data.
376 PUBLICApplication Help for SAP Product Lifecycle Costing
Global Settings
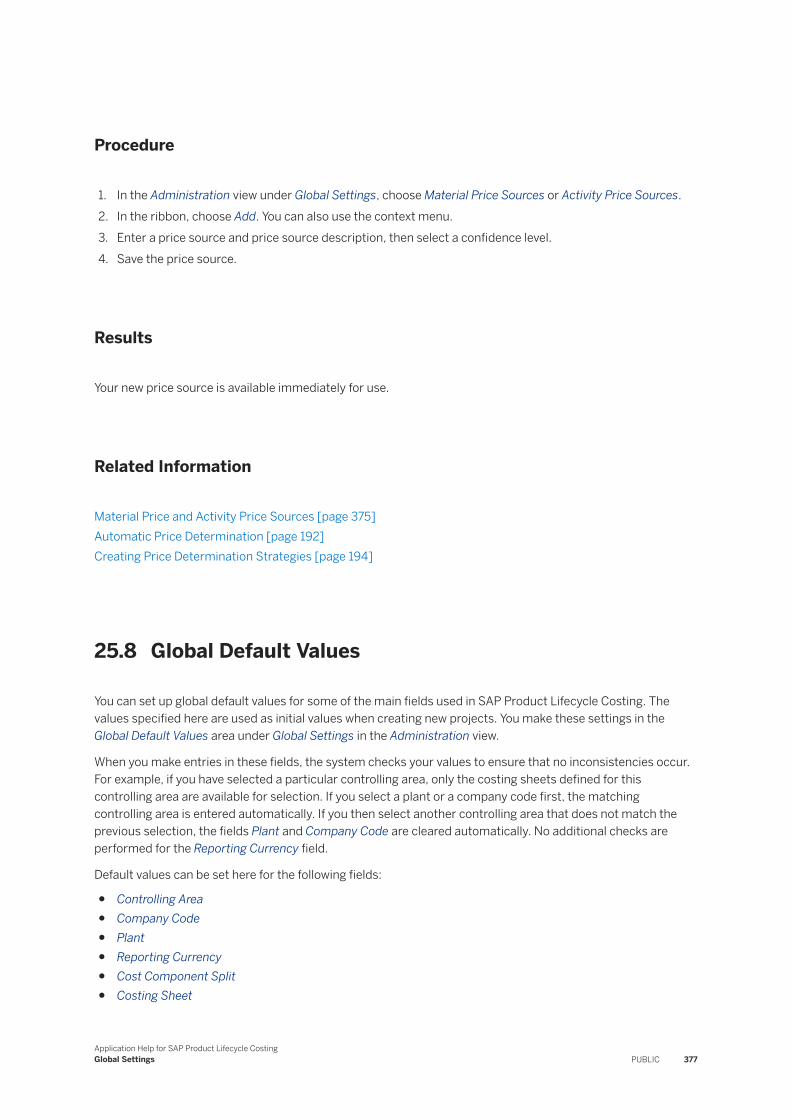
Procedure
1. In the Administration view under Global Settings, choose Material Price Sources or Activity Price Sources.2. In the ribbon, choose Add. You can also use the context menu.3. Enter a price source and price source description, then select a confidence level.4. Save the price source.
Results
Your new price source is available immediately for use.
Related Information
Material Price and Activity Price Sources [page 375]Automatic Price Determination [page 192]Creating Price Determination Strategies [page 194]
25.8 Global Default Values
You can set up global default values for some of the main fields used in SAP Product Lifecycle Costing. The values specified here are used as initial values when creating new projects. You make these settings in the Global Default Values area under Global Settings in the Administration view.
When you make entries in these fields, the system checks your values to ensure that no inconsistencies occur. For example, if you have selected a particular controlling area, only the costing sheets defined for this controlling area are available for selection. If you select a plant or a company code first, the matching controlling area is entered automatically. If you then select another controlling area that does not match the previous selection, the fields Plant and Company Code are cleared automatically. No additional checks are performed for the Reporting Currency field.
Default values can be set here for the following fields:
● Controlling Area● Company Code● Plant● Reporting Currency● Cost Component Split● Costing Sheet
Application Help for SAP Product Lifecycle CostingGlobal Settings PUBLIC 377
NoteIf you have defined user-specific default values, these take precedence over the global default values. For more information, see User-Specific Default Values [page 387].
You must have administrative access rights to maintain global default settings. These settings are configured shortly after installing the solution. In contrast, each user can change any of their user-specific default settings at any time. These defaults take effect only for the user who defines them.
25.9 User Groups
You use this area in the Administration view to create user groups that can be added to projects. You can create hierarchical structures for user groups by adding subgroups.
You can add user groups to projects in the Project view under Authorizations. You can then assign authorizations to these user groups.
Related Information
Creating a User Group [page 378]Adding a Subgroup to a User Group [page 379]Removing a User or Subgroup from a User Group [page 380]Deleting a User Group [page 380]
25.9.1 Creating a User Group
You can create user groups to use for assigning authorizations at project level.
Procedure
1. In the Administration view under Global Settings, choose User Groups.2. In the ribbon, choose Add.3. Under General, enter a user group ID and a description.4. Under Users, enter the user IDs of all users that you want to include in the user group.5. Save your changes.
378 PUBLICApplication Help for SAP Product Lifecycle Costing
Global Settings
Results
If you are authorized to administer a project, you can now assign the user group to that project and set the desired authorizations for the user group.
Related Information
Adding a Subgroup to a User Group [page 379]Removing a User or Subgroup from a User Group [page 380]Deleting a User Group [page 380]
25.9.2 Adding a Subgroup to a User Group
You can create hierarchical structures for user groups by adding subgroups.
Prerequisites
The user group that you are adding as a subgroup already exists in your master data.
Procedure
1. In the Administration view under Global Settings, choose User Groups.2. Choose the user group to which you would like to add a subgroup.3. Under Subgroups, use autocomplete to add user groups that have already been created in master data.4. Save your changes.
Related Information
Creating a User Group [page 378]Deleting a User Group [page 380]Removing a User or Subgroup from a User Group [page 380]
Application Help for SAP Product Lifecycle CostingGlobal Settings PUBLIC 379
25.9.3 Removing a User or Subgroup from a User Group
You can remove users or subgroups from a user group.
Procedure
1. In the Administration view under Global Settings, choose User Groups.2. Select a user or subgroup and use the Remove command to remove any entries that are no longer needed.3. Save your changes.
Related Information
Adding a Subgroup to a User Group [page 379]Deleting a User Group [page 380]
25.9.4 Deleting a User Group
You can delete a user group if you no longer need it.
Prerequisites
The user group is not being used in a project.
Procedure
1. In the Administration view under Global Settings, choose User Groups.2. In the ribbon, choose Delete.3. Save your changes.
380 PUBLICApplication Help for SAP Product Lifecycle Costing
Global Settings
25.10 Statuses
You can create statuses and assign them to calculation versions.
Statuses are an optional labeling mechanism by which to identify and or track the progress of your calculation versions. You can assign statuses to calculation versions to organize or help with identification. You might assign statuses to a series of calculation versions to indicate a particular workflow in a project, for example, Draft, In Review, and Approved.
You create statuses in the Global Settings area in the Administration view. You can select active statuses from a dropdown in the Status column in the Cockpit view. Statuses appear in the dropdown according to the display order they were assigned.
You can set one default status for new and copied calculation versions. You can overwrite the default status for a calculation version at anytime.
The following fields are available in the Statuses area in the Administration view.
Field Shown What It Means
Default Set a status as the default status and all new and copied calculation versions will receive this status by default.
Exception: If you select the Copy Status to Calculation Version checkbox when creating a new status, whenever you create a copy of a calculation with that status, that status is used instead of the default status.
Copy Status to Calculation Version Select this checkbox and this status will be used whenever you create a copy of a calculation version that has this status, even if a default status has been set.
Active Set the status to active in order make it available for use in calculation versions. Inactive statuses remain a part of master data but are no longer available in the Status dropdown.
Status Alphanumeric identifier for the status. If no status name is entered, this identifier is displayed in the Status dropdown.
Status Name Name of the status as you want it to appear in the dropdown in the Cockpit view.
Status Description Enter any additional information that the user should know when selecting this status. This information will appear as a tooltip when you hover over the status name in the dropdown in the Cockpit view.
Display Order Indicates the display order in which the status you create appears in the Status dropdown in the Cockpit view. For example, a status with the display order 1 appears first in the Statuses dropdown (after #No Status).
Application Help for SAP Product Lifecycle CostingGlobal Settings PUBLIC 381
Related Information
Creating Statuses in Master Data [page 382]Assigning Statuses [page 29]
25.10.1 Creating Statuses in Master Data
You can create and maintain statuses in the Administration view, in the Global Settings area, under Statuses.
Procedure
1. In the Administration view under Global Settings, choose Statuses.2. In the Status field, enter an alphanumeric identifier for the status.
This identifier is displayed in the dropdown if no status name is entered.3. [Optional] Complete the following, as necessary:
1. Set as Default status.Do this if you want all new calculation versions and copies to receive this status by default.
2. Set the status to Active .Do this if you want the status to be displayed in the Status dropdown in the Calculation view.
3. Select Copy Status to Calculation Version.Select this checkbox and this status will be used whenever you create a copy of a calculation version that has this status, even if a default status has been set.
4. Enter a display order for the status.This is the order in which the status appears in the Status dropdown in the Cockpit view. For example, enter display order 1 for the most frequently used status so it appears at the top of the list in the dropdown.
5. Enter a status name.This is the name of the status as you want it to appear in the dropdown.
6. Enter a status description.This can be any additional information or directions that the user should know when selecting the status. This information will appear as a tooltip when you hover over the status name in the dropdown.
7. Save your entries.
Result
The new status is immediately available in the Status column in the Cockpit view.
Note, if you no longer need a status you can delete it from master data. A status can only be removed if it is no longer used for any calculation versions.
382 PUBLICApplication Help for SAP Product Lifecycle Costing
Global Settings
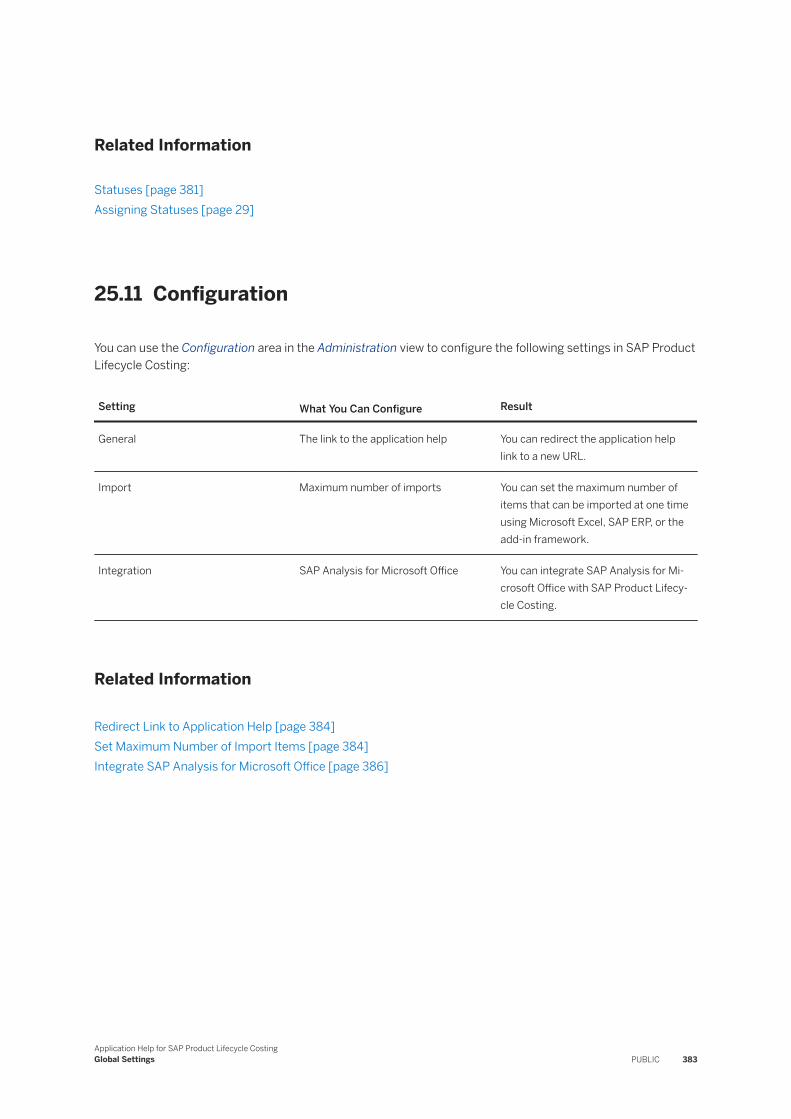
Related Information
Statuses [page 381]Assigning Statuses [page 29]
25.11 Configuration
You can use the Configuration area in the Administration view to configure the following settings in SAP Product Lifecycle Costing:
Setting What You Can Configure Result
General The link to the application help You can redirect the application help link to a new URL.
Import Maximum number of imports You can set the maximum number of items that can be imported at one time using Microsoft Excel, SAP ERP, or the add-in framework.
Integration SAP Analysis for Microsoft Office You can integrate SAP Analysis for Microsoft Office with SAP Product Lifecycle Costing.
Related Information
Redirect Link to Application Help [page 384]Set Maximum Number of Import Items [page 384]Integrate SAP Analysis for Microsoft Office [page 386]
Application Help for SAP Product Lifecycle CostingGlobal Settings PUBLIC 383
25.11.1 Redirect Link to Application Help
By default, the question mark symbol at the upper right corner of the application directs you to the most recent version of the application help for SAP Product Lifecycle Costing on SAP Help Portal.
Context
If necessary, you can use this setting to enter a new URL and direct the help link to another location. You might do this if your company has created customer-specific user assistance for the version and add-ins that you have installed.
● You can link the application to any valid URL.● Unless you enter another URL, the link directs you to the latest version of the product page for SAP Product
Lifecycle Costing on SAP Help Portal. You can always restore this link by leaving the text box empty.● To complete the redirect, you must save your change and restart the application.
Procedure
1. In the Administration view, choose Configuration.2. In the Application Help Link field, enter a valid URL for the location to which you would like to redirect the
link to the application help.3. Choose Save, then restart the application.
25.11.2 Set Maximum Number of Import Items
You can use this setting to set the maximum number of items that can be imported at one time from Microsoft Excel, SAP ERP or using the add-in framework. Limiting the number of items allowed to be imported at one time might improve performance of the application during import.
Context
RecommendationFor optimal performance, we recommend importing no more than 30,000 items at a time.
384 PUBLICApplication Help for SAP Product Lifecycle Costing
Global Settings
Procedure
1. In the Administration view, go to Configuration.2. In the Max No. Import Items field, enter the number of items that users can import at one time.3. Save your change.
Results
The next import will be limited to the number of items entered in this setting.
25.11.3 Set Maximum Number of Variants in Sum Variant
You can set the maximum number of variants that can be included in sum variants. You can use this setting to optimize performance when working with variants.
Procedure
1. In the Administration view, under Global Settings, choose Configuration.2. In the Variants section, under Max No. Variants in Sum, enter a value.
Note, to optimize performance, we recommend that you include no more than 50 variants as part of a sum variant.
3. Save your entries.
Results
The value entered is the maximum number of variants that can be included in a sum variant in this system.
Related Information
Performance Optimization for Variants [page 178]
Application Help for SAP Product Lifecycle CostingGlobal Settings PUBLIC 385
25.11.4 Integrate SAP Analysis for Microsoft Office
You can use this setting to integrate SAP Analysis for Microsoft Office with SAP Product Lifecycle Costing.
Prerequisites
You are authorized to update and delete this setting. The required role template is FrontendSetCorpEdit_RT.
Context
Integration allows you to access SAP Analysis for Microsoft Office from SAP Product Lifecycle Costing using the Analyze ribbon button in the toolbar in the Calculation, Project, and Cockpit views. You no longer need to configure and launch SAP Analysis for Microsoft Office manually.
Procedure
1. In the Administration view, go to Global Settings, then Configuration.2. Under Integration, enter the desired JSON object for the views or reports that you want to add.
By default, integration is enabled for standard SAP PLC analytical views with custom fields.3. [Optional] Add or remove customer-specific analytic views or SAP BusinessObjects Business Intelligence
Platform reports to the menu for the Analyze ribbon button. These entries in the menu are then available for all users with the role Base_RT. Customer-specific views must be defined as SAP HANA calculating views in order to access them using SAP Analysis for Microsoft Office.
Note: If you have not yet saved, you can reset the default JSON object by selecting another area in the navigation structure and then selecting the Configuration area again. You can find an example of such a JSON object under Settings for Integration in the relevant administration guide for SAP Product Lifecycle Costing (on premise or cloud edition) on SAP Help Portal at https://help.sap.com/plc.
4. Choose Save, then restart the application.
386 PUBLICApplication Help for SAP Product Lifecycle Costing
Global Settings
26 User-Specific Settings
You can make user-specific settings in SAP Product Lifecycle Costing. You make these settings in the Administration view.
Related Information
User-Specific Default Values [page 387]
26.1 User-Specific Default Values
You can set up user-specific default values for some of the main fields used in SAP Product Lifecycle Costing. The values specified here are used as initial values when creating new projects. You make these settings in the Default Values area under User-Specific Settings in the Administration view.
NoteUser-specific defaults take precedence over the global default values entered in Global Default Values under Global Settings in the Administration view. For more information, see Global Default Values [page 377].
You can create user-specific default values for the following fields:
● Controlling Area● Company Code● Plant● Reporting Currency● Cost Component Split● Costing Sheet
Application Help for SAP Product Lifecycle CostingUser-Specific Settings PUBLIC 387
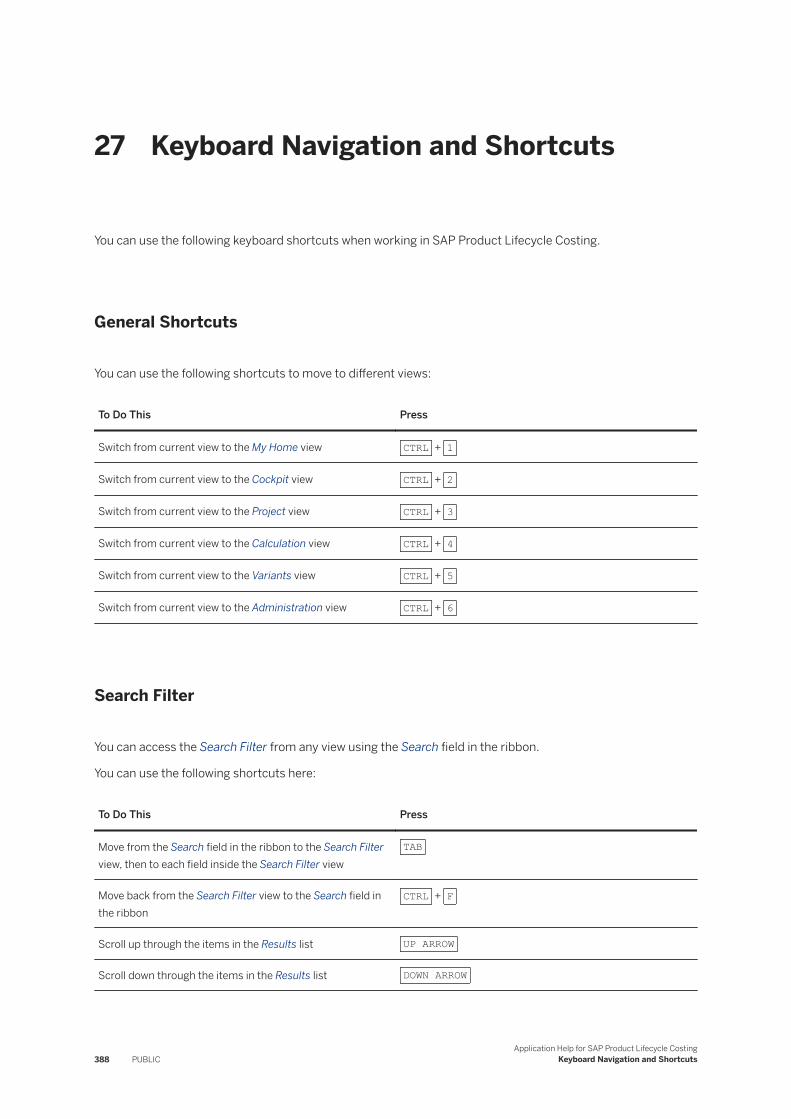
27 Keyboard Navigation and Shortcuts
You can use the following keyboard shortcuts when working in SAP Product Lifecycle Costing.
General Shortcuts
You can use the following shortcuts to move to different views:
To Do This Press
Switch from current view to the My Home view CTRL + 1
Switch from current view to the Cockpit view CTRL + 2
Switch from current view to the Project view CTRL + 3
Switch from current view to the Calculation view CTRL + 4
Switch from current view to the Variants view CTRL + 5
Switch from current view to the Administration view CTRL + 6
Search Filter
You can access the Search Filter from any view using the Search field in the ribbon.
You can use the following shortcuts here:
To Do This Press
Move from the Search field in the ribbon to the Search Filter view, then to each field inside the Search Filter view
TAB
Move back from the Search Filter view to the Search field in the ribbon
CTRL + F
Scroll up through the items in the Results list UP ARROW
Scroll down through the items in the Results list DOWN ARROW
388 PUBLICApplication Help for SAP Product Lifecycle Costing
Keyboard Navigation and Shortcuts
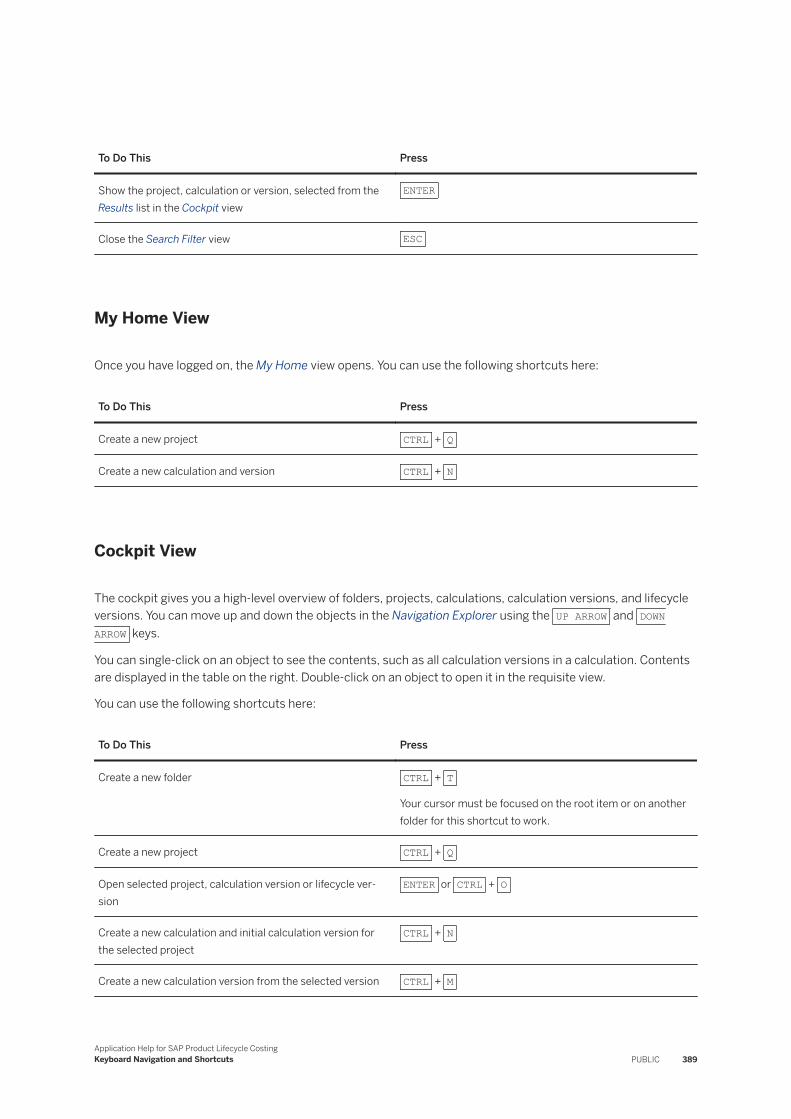
To Do This Press
Show the project, calculation or version, selected from the Results list in the Cockpit view
ENTER
Close the Search Filter view ESC
My Home View
Once you have logged on, the My Home view opens. You can use the following shortcuts here:
To Do This Press
Create a new project CTRL + Q
Create a new calculation and version CTRL + N
Cockpit View
The cockpit gives you a high-level overview of folders, projects, calculations, calculation versions, and lifecycle versions. You can move up and down the objects in the Navigation Explorer using the UP ARROW and DOWN ARROW keys.
You can single-click on an object to see the contents, such as all calculation versions in a calculation. Contents are displayed in the table on the right. Double-click on an object to open it in the requisite view.
You can use the following shortcuts here:
To Do This Press
Create a new folder CTRL + T
Your cursor must be focused on the root item or on another folder for this shortcut to work.
Create a new project CTRL + Q
Open selected project, calculation version or lifecycle version
ENTER or CTRL + O
Create a new calculation and initial calculation version for the selected project
CTRL + N
Create a new calculation version from the selected version CTRL + M
Application Help for SAP Product Lifecycle CostingKeyboard Navigation and Shortcuts PUBLIC 389
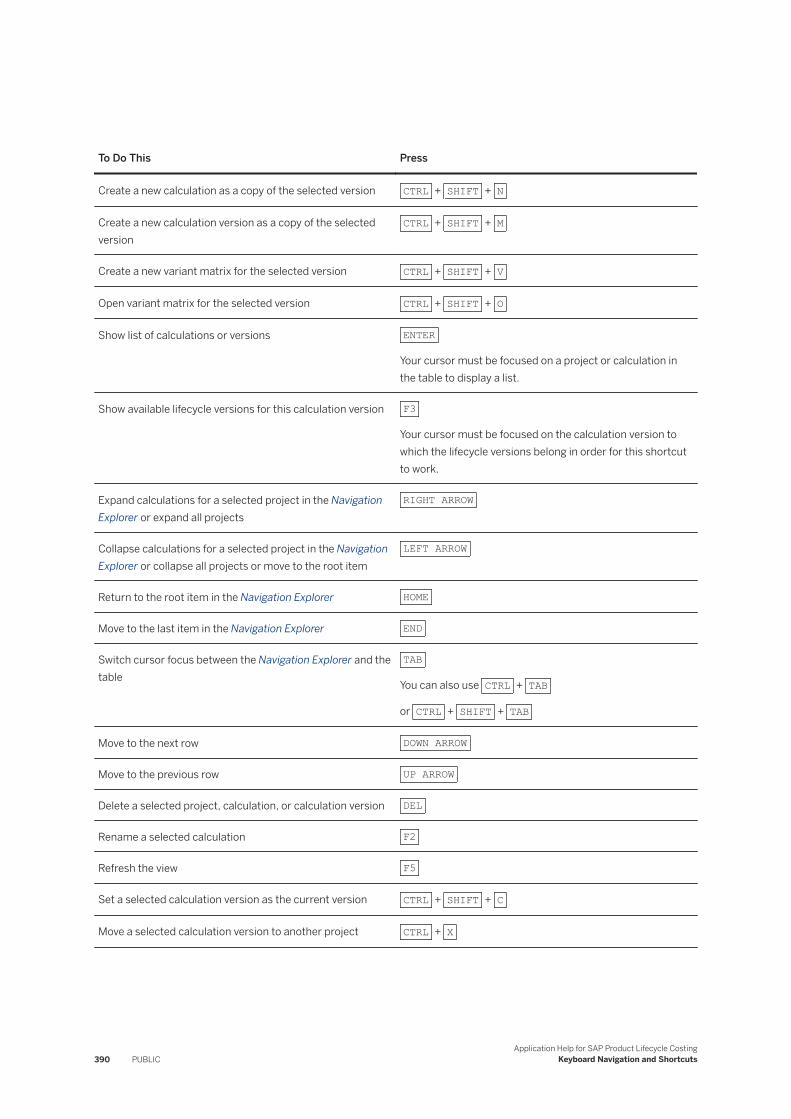
To Do This Press
Create a new calculation as a copy of the selected version CTRL + SHIFT + N
Create a new calculation version as a copy of the selected version
CTRL + SHIFT + M
Create a new variant matrix for the selected version CTRL + SHIFT + V
Open variant matrix for the selected version CTRL + SHIFT + O
Show list of calculations or versions ENTER
Your cursor must be focused on a project or calculation in the table to display a list.
Show available lifecycle versions for this calculation version F3
Your cursor must be focused on the calculation version to which the lifecycle versions belong in order for this shortcut to work.
Expand calculations for a selected project in the Navigation Explorer or expand all projects
RIGHT ARROW
Collapse calculations for a selected project in the Navigation Explorer or collapse all projects or move to the root item
LEFT ARROW
Return to the root item in the Navigation Explorer HOME
Move to the last item in the Navigation Explorer END
Switch cursor focus between the Navigation Explorer and the table
TAB
You can also use CTRL + TAB
or CTRL + SHIFT + TAB
Move to the next row DOWN ARROW
Move to the previous row UP ARROW
Delete a selected project, calculation, or calculation version DEL
Rename a selected calculation F2
Refresh the view F5
Set a selected calculation version as the current version CTRL + SHIFT + C
Move a selected calculation version to another project CTRL + X
390 PUBLICApplication Help for SAP Product Lifecycle Costing
Keyboard Navigation and Shortcuts
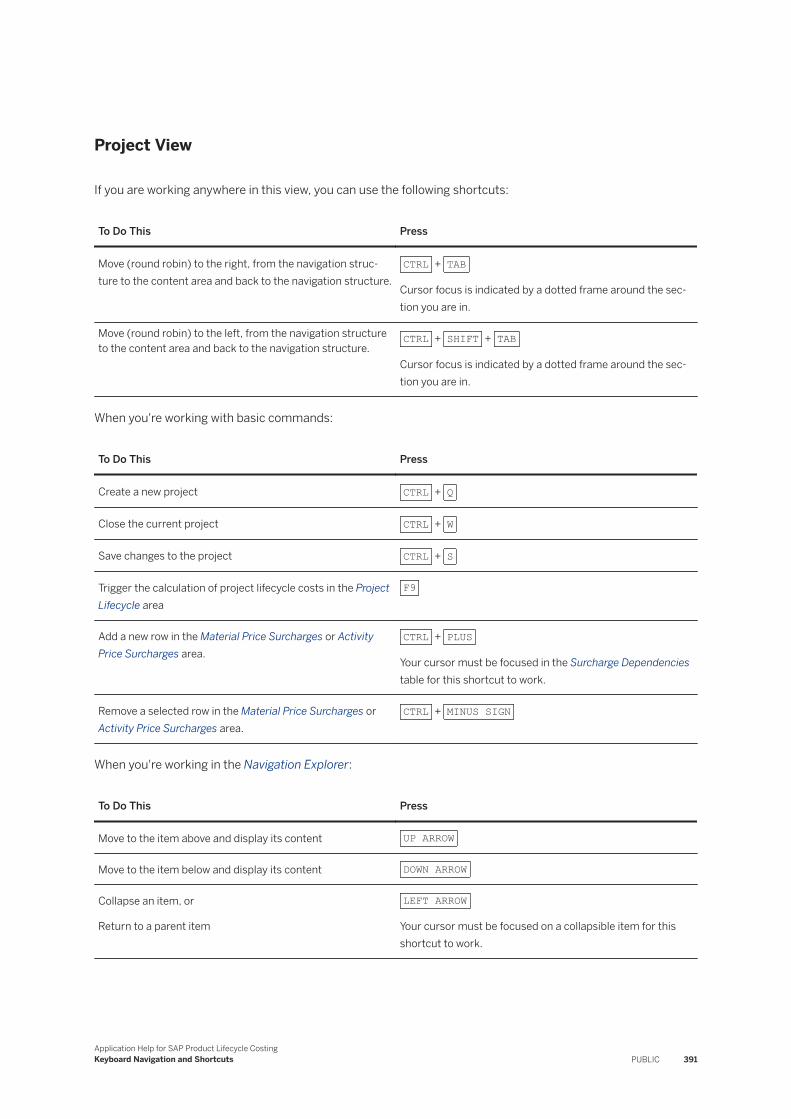
Project View
If you are working anywhere in this view, you can use the following shortcuts:
To Do This Press
Move (round robin) to the right, from the navigation structure to the content area and back to the navigation structure.
CTRL + TAB
Cursor focus is indicated by a dotted frame around the section you are in.
Move (round robin) to the left, from the navigation structure to the content area and back to the navigation structure.
CTRL + SHIFT + TAB
Cursor focus is indicated by a dotted frame around the section you are in.
When you're working with basic commands:
To Do This Press
Create a new project CTRL + Q
Close the current project CTRL + W
Save changes to the project CTRL + S
Trigger the calculation of project lifecycle costs in the Project Lifecycle area
F9
Add a new row in the Material Price Surcharges or Activity Price Surcharges area.
CTRL + PLUS
Your cursor must be focused in the Surcharge Dependencies table for this shortcut to work.
Remove a selected row in the Material Price Surcharges or Activity Price Surcharges area.
CTRL + MINUS SIGN
When you're working in the Navigation Explorer:
To Do This Press
Move to the item above and display its content UP ARROW
Move to the item below and display its content DOWN ARROW
Collapse an item, or
Return to a parent item
LEFT ARROW
Your cursor must be focused on a collapsible item for this shortcut to work.
Application Help for SAP Product Lifecycle CostingKeyboard Navigation and Shortcuts PUBLIC 391
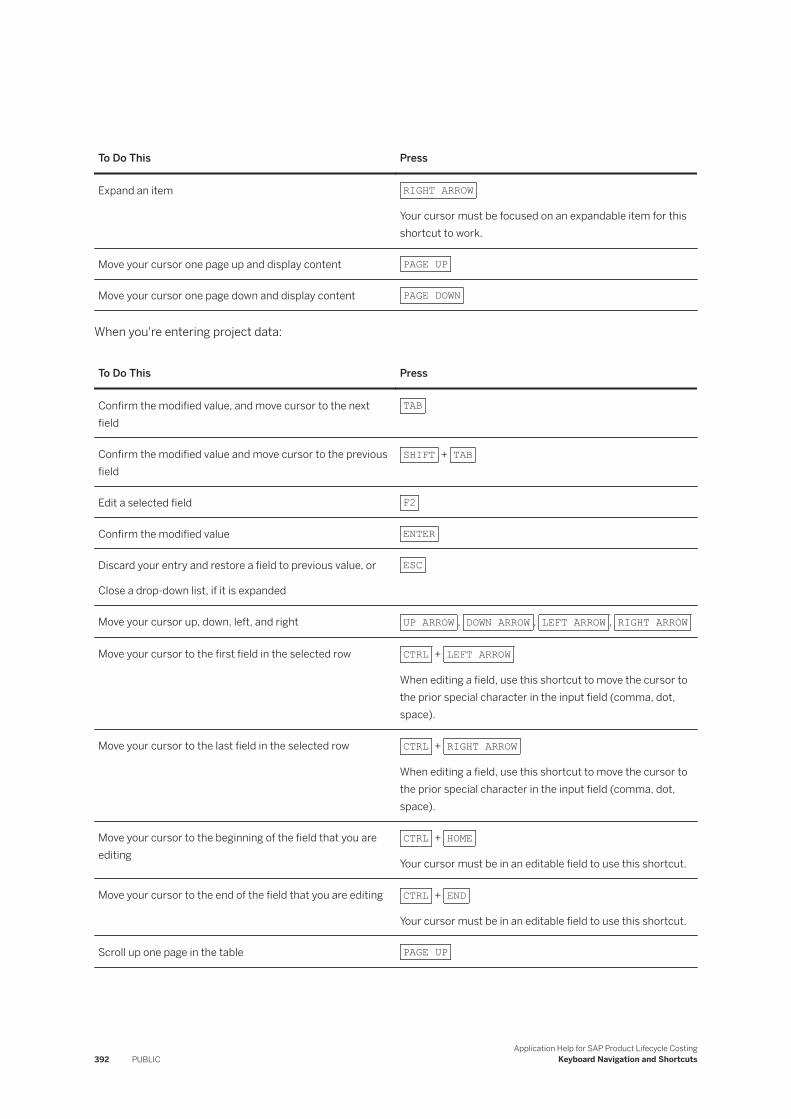
To Do This Press
Expand an item RIGHT ARROW
Your cursor must be focused on an expandable item for this shortcut to work.
Move your cursor one page up and display content PAGE UP
Move your cursor one page down and display content PAGE DOWN
When you're entering project data:
To Do This Press
Confirm the modified value, and move cursor to the next field
TAB
Confirm the modified value and move cursor to the previous field
SHIFT + TAB
Edit a selected field F2
Confirm the modified value ENTER
Discard your entry and restore a field to previous value, or
Close a drop-down list, if it is expanded
ESC
Move your cursor up, down, left, and right UP ARROW , DOWN ARROW , LEFT ARROW , RIGHT ARROW
Move your cursor to the first field in the selected row CTRL + LEFT ARROW
When editing a field, use this shortcut to move the cursor to the prior special character in the input field (comma, dot, space).
Move your cursor to the last field in the selected row CTRL + RIGHT ARROW
When editing a field, use this shortcut to move the cursor to the prior special character in the input field (comma, dot, space).
Move your cursor to the beginning of the field that you are editing
CTRL + HOME
Your cursor must be in an editable field to use this shortcut.
Move your cursor to the end of the field that you are editing CTRL + END
Your cursor must be in an editable field to use this shortcut.
Scroll up one page in the table PAGE UP
392 PUBLICApplication Help for SAP Product Lifecycle Costing
Keyboard Navigation and Shortcuts
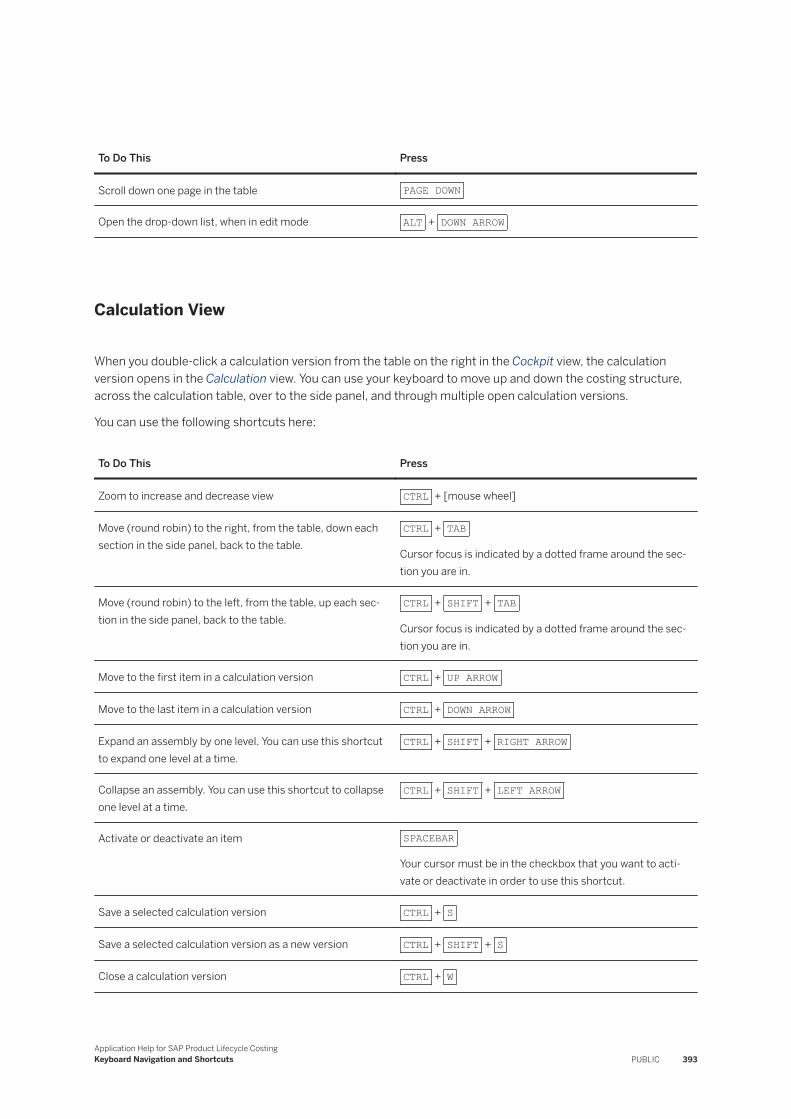
To Do This Press
Scroll down one page in the table PAGE DOWN
Open the drop-down list, when in edit mode ALT + DOWN ARROW
Calculation View
When you double-click a calculation version from the table on the right in the Cockpit view, the calculation version opens in the Calculation view. You can use your keyboard to move up and down the costing structure, across the calculation table, over to the side panel, and through multiple open calculation versions.
You can use the following shortcuts here:
To Do This Press
Zoom to increase and decrease view CTRL + [mouse wheel]
Move (round robin) to the right, from the table, down each section in the side panel, back to the table.
CTRL + TAB
Cursor focus is indicated by a dotted frame around the section you are in.
Move (round robin) to the left, from the table, up each section in the side panel, back to the table.
CTRL + SHIFT + TAB
Cursor focus is indicated by a dotted frame around the section you are in.
Move to the first item in a calculation version CTRL + UP ARROW
Move to the last item in a calculation version CTRL + DOWN ARROW
Expand an assembly by one level. You can use this shortcut to expand one level at a time.
CTRL + SHIFT + RIGHT ARROW
Collapse an assembly. You can use this shortcut to collapse one level at a time.
CTRL + SHIFT + LEFT ARROW
Activate or deactivate an item SPACEBAR
Your cursor must be in the checkbox that you want to activate or deactivate in order to use this shortcut.
Save a selected calculation version CTRL + S
Save a selected calculation version as a new version CTRL + SHIFT + S
Close a calculation version CTRL + W
Application Help for SAP Product Lifecycle CostingKeyboard Navigation and Shortcuts PUBLIC 393
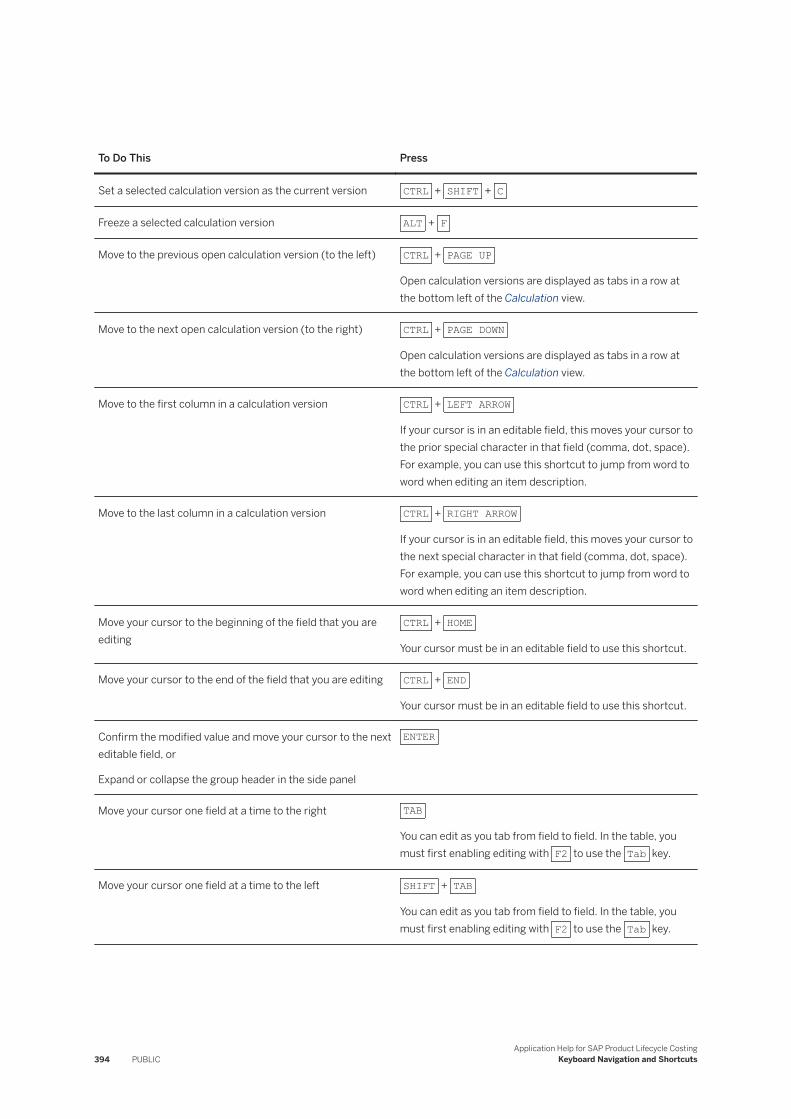
To Do This Press
Set a selected calculation version as the current version CTRL + SHIFT + C
Freeze a selected calculation version ALT + F
Move to the previous open calculation version (to the left) CTRL + PAGE UP
Open calculation versions are displayed as tabs in a row at the bottom left of the Calculation view.
Move to the next open calculation version (to the right) CTRL + PAGE DOWN
Open calculation versions are displayed as tabs in a row at the bottom left of the Calculation view.
Move to the first column in a calculation version CTRL + LEFT ARROW
If your cursor is in an editable field, this moves your cursor to the prior special character in that field (comma, dot, space). For example, you can use this shortcut to jump from word to word when editing an item description.
Move to the last column in a calculation version CTRL + RIGHT ARROW
If your cursor is in an editable field, this moves your cursor to the next special character in that field (comma, dot, space). For example, you can use this shortcut to jump from word to word when editing an item description.
Move your cursor to the beginning of the field that you are editing
CTRL + HOME
Your cursor must be in an editable field to use this shortcut.
Move your cursor to the end of the field that you are editing CTRL + END
Your cursor must be in an editable field to use this shortcut.
Confirm the modified value and move your cursor to the next editable field, or
Expand or collapse the group header in the side panel
ENTER
Move your cursor one field at a time to the right TAB
You can edit as you tab from field to field. In the table, you must first enabling editing with F2 to use the Tab key.
Move your cursor one field at a time to the left SHIFT + TAB
You can edit as you tab from field to field. In the table, you must first enabling editing with F2 to use the Tab key.
394 PUBLICApplication Help for SAP Product Lifecycle Costing
Keyboard Navigation and Shortcuts
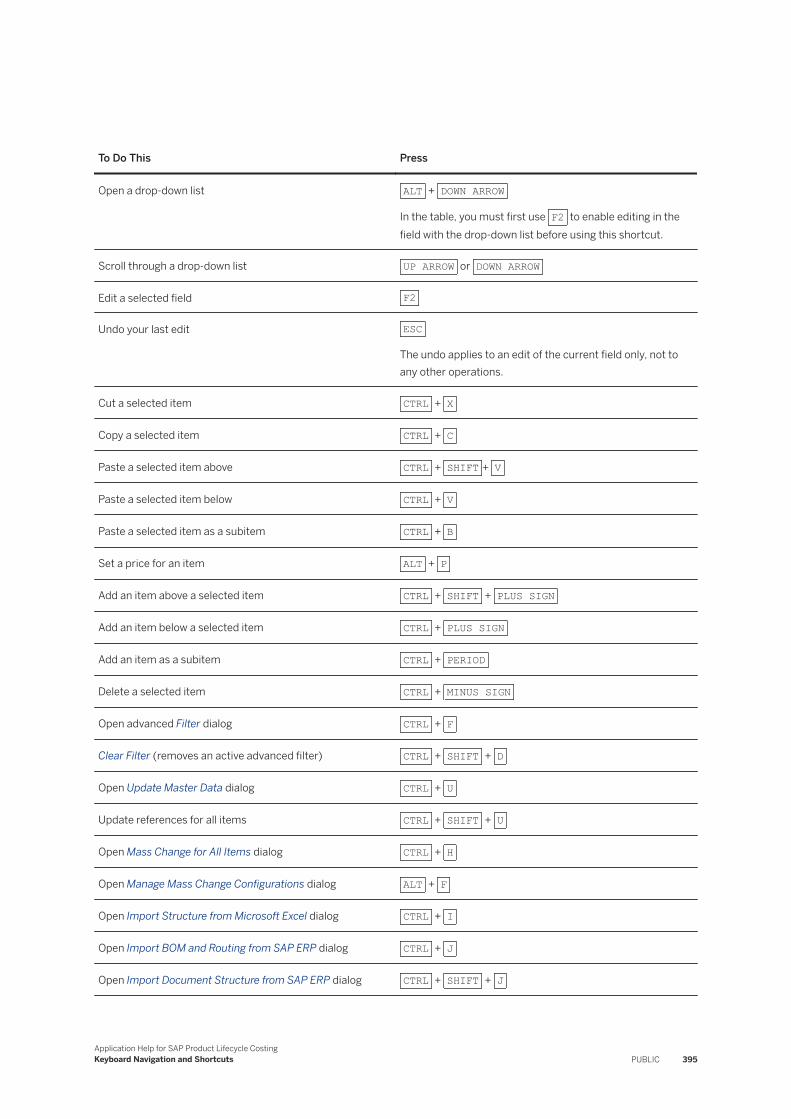
To Do This Press
Open a drop-down list ALT + DOWN ARROW
In the table, you must first use F2 to enable editing in the field with the drop-down list before using this shortcut.
Scroll through a drop-down list UP ARROW or DOWN ARROW
Edit a selected field F2
Undo your last edit ESC
The undo applies to an edit of the current field only, not to any other operations.
Cut a selected item CTRL + X
Copy a selected item CTRL + C
Paste a selected item above CTRL + SHIFT + V
Paste a selected item below CTRL + V
Paste a selected item as a subitem CTRL + B
Set a price for an item ALT + P
Add an item above a selected item CTRL + SHIFT + PLUS SIGN
Add an item below a selected item CTRL + PLUS SIGN
Add an item as a subitem CTRL + PERIOD
Delete a selected item CTRL + MINUS SIGN
Open advanced Filter dialog CTRL + F
Clear Filter (removes an active advanced filter) CTRL + SHIFT + D
Open Update Master Data dialog CTRL + U
Update references for all items CTRL + SHIFT + U
Open Mass Change for All Items dialog CTRL + H
Open Manage Mass Change Configurations dialog ALT + F
Open Import Structure from Microsoft Excel dialog CTRL + I
Open Import BOM and Routing from SAP ERP dialog CTRL + J
Open Import Document Structure from SAP ERP dialog CTRL + SHIFT + J
Application Help for SAP Product Lifecycle CostingKeyboard Navigation and Shortcuts PUBLIC 395
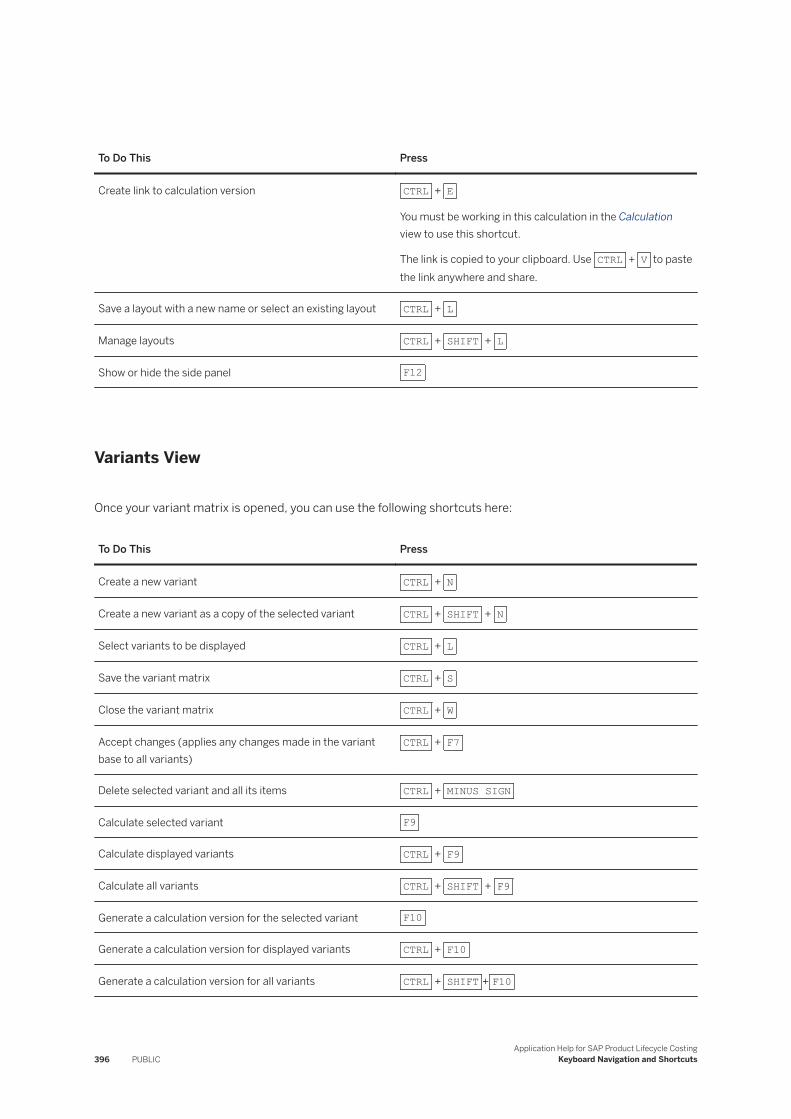
To Do This Press
Create link to calculation version CTRL + E
You must be working in this calculation in the Calculation view to use this shortcut.
The link is copied to your clipboard. Use CTRL + V to paste the link anywhere and share.
Save a layout with a new name or select an existing layout CTRL + L
Manage layouts CTRL + SHIFT + L
Show or hide the side panel F12
Variants View
Once your variant matrix is opened, you can use the following shortcuts here:
To Do This Press
Create a new variant CTRL + N
Create a new variant as a copy of the selected variant CTRL + SHIFT + N
Select variants to be displayed CTRL + L
Save the variant matrix CTRL + S
Close the variant matrix CTRL + W
Accept changes (applies any changes made in the variant base to all variants)
CTRL + F7
Delete selected variant and all its items CTRL + MINUS SIGN
Calculate selected variant F9
Calculate displayed variants CTRL + F9
Calculate all variants CTRL + SHIFT + F9
Generate a calculation version for the selected variant F10
Generate a calculation version for displayed variants CTRL + F10
Generate a calculation version for all variants CTRL + SHIFT + F10
396 PUBLICApplication Help for SAP Product Lifecycle Costing
Keyboard Navigation and Shortcuts
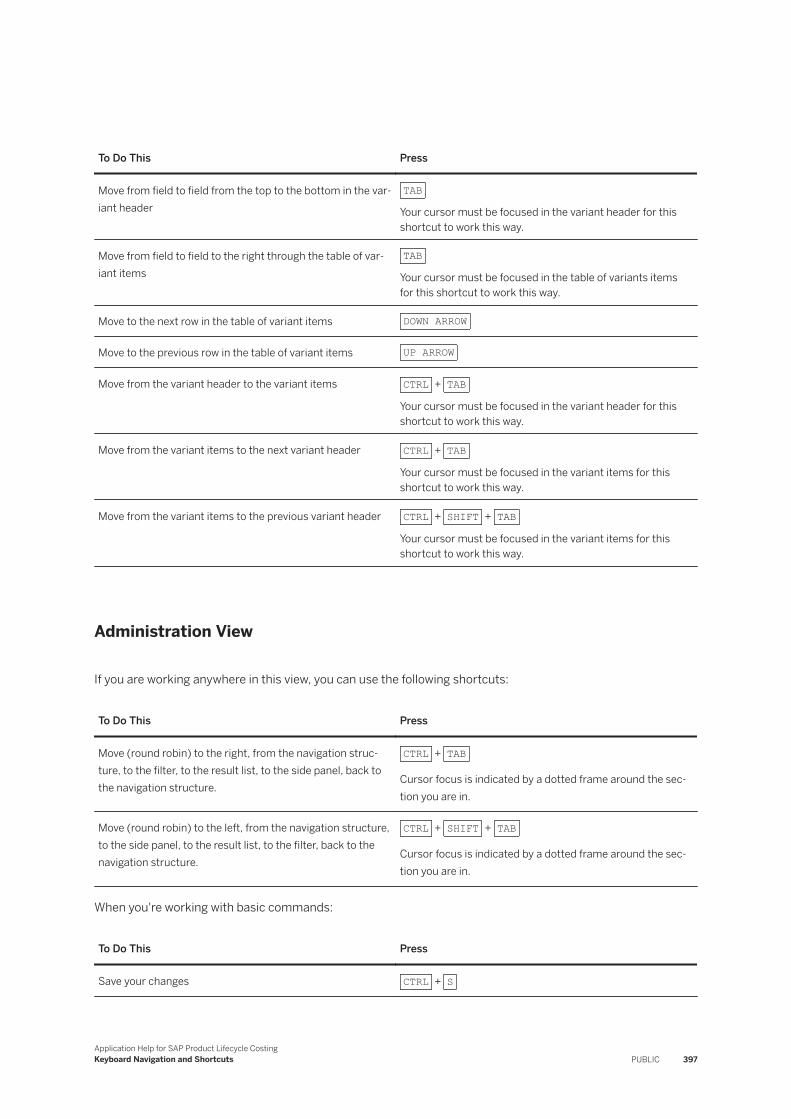
To Do This Press
Move from field to field from the top to the bottom in the variant header
TAB
Your cursor must be focused in the variant header for this shortcut to work this way.
Move from field to field to the right through the table of variant items
TAB
Your cursor must be focused in the table of variants items for this shortcut to work this way.
Move to the next row in the table of variant items DOWN ARROW
Move to the previous row in the table of variant items UP ARROW
Move from the variant header to the variant items CTRL + TAB
Your cursor must be focused in the variant header for this shortcut to work this way.
Move from the variant items to the next variant header CTRL + TAB
Your cursor must be focused in the variant items for this shortcut to work this way.
Move from the variant items to the previous variant header CTRL + SHIFT + TAB
Your cursor must be focused in the variant items for this shortcut to work this way.
Administration View
If you are working anywhere in this view, you can use the following shortcuts:
To Do This Press
Move (round robin) to the right, from the navigation structure, to the filter, to the result list, to the side panel, back to the navigation structure.
CTRL + TAB
Cursor focus is indicated by a dotted frame around the section you are in.
Move (round robin) to the left, from the navigation structure, to the side panel, to the result list, to the filter, back to the navigation structure.
CTRL + SHIFT + TAB
Cursor focus is indicated by a dotted frame around the section you are in.
When you're working with basic commands:
To Do This Press
Save your changes CTRL + S
Application Help for SAP Product Lifecycle CostingKeyboard Navigation and Shortcuts PUBLIC 397
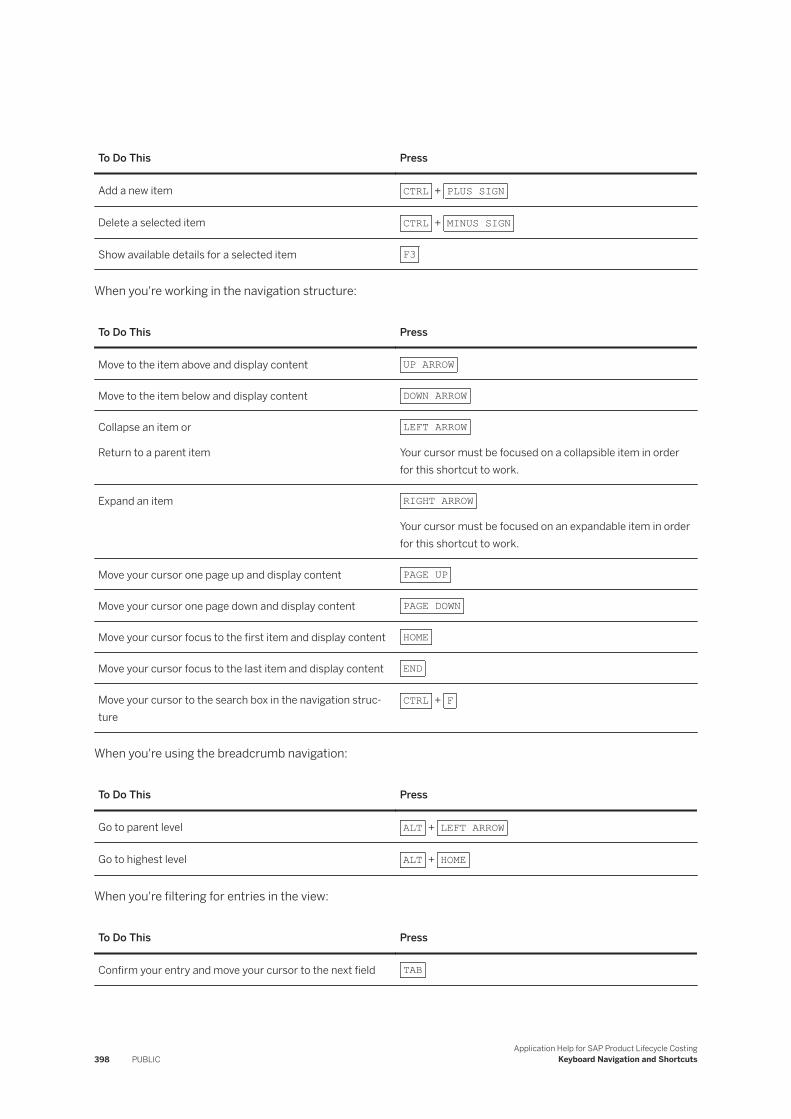
To Do This Press
Add a new item CTRL + PLUS SIGN
Delete a selected item CTRL + MINUS SIGN
Show available details for a selected item F3
When you're working in the navigation structure:
To Do This Press
Move to the item above and display content UP ARROW
Move to the item below and display content DOWN ARROW
Collapse an item or
Return to a parent item
LEFT ARROW
Your cursor must be focused on a collapsible item in order for this shortcut to work.
Expand an item RIGHT ARROW
Your cursor must be focused on an expandable item in order for this shortcut to work.
Move your cursor one page up and display content PAGE UP
Move your cursor one page down and display content PAGE DOWN
Move your cursor focus to the first item and display content HOME
Move your cursor focus to the last item and display content END
Move your cursor to the search box in the navigation structure
CTRL + F
When you're using the breadcrumb navigation:
To Do This Press
Go to parent level ALT + LEFT ARROW
Go to highest level ALT + HOME
When you're filtering for entries in the view:
To Do This Press
Confirm your entry and move your cursor to the next field TAB
398 PUBLICApplication Help for SAP Product Lifecycle Costing
Keyboard Navigation and Shortcuts
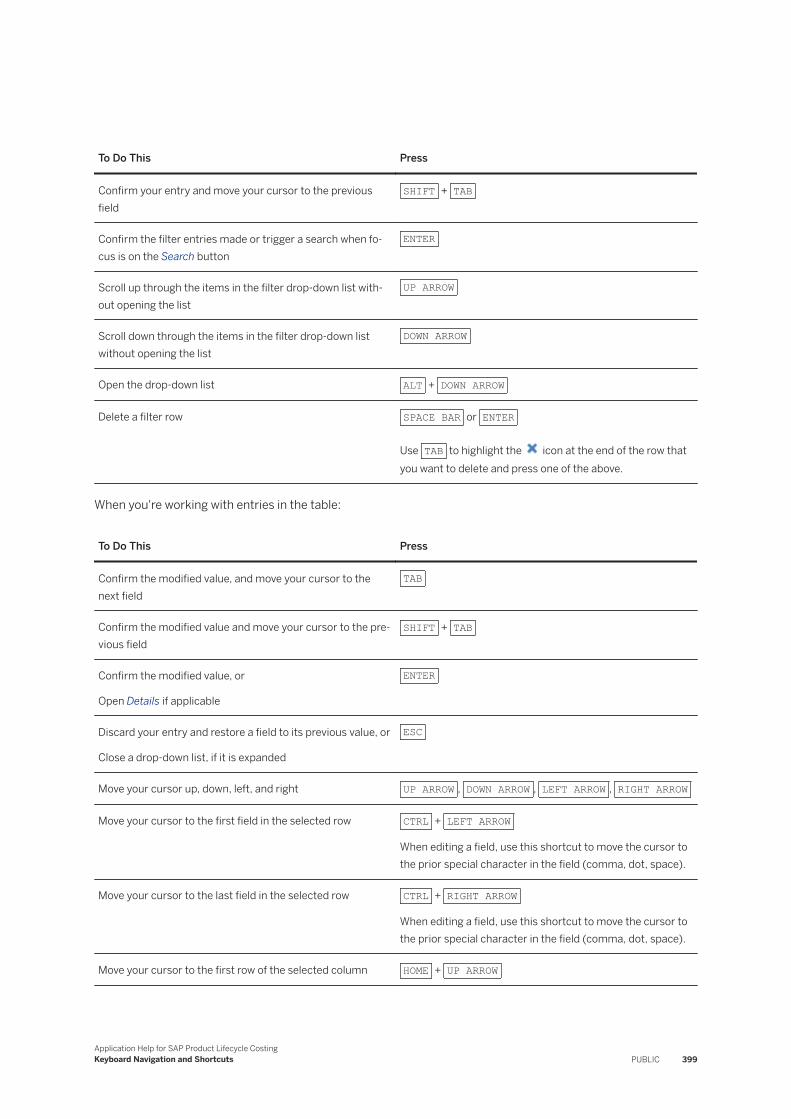
To Do This Press
Confirm your entry and move your cursor to the previous field
SHIFT + TAB
Confirm the filter entries made or trigger a search when focus is on the Search button
ENTER
Scroll up through the items in the filter drop-down list without opening the list
UP ARROW
Scroll down through the items in the filter drop-down list without opening the list
DOWN ARROW
Open the drop-down list ALT + DOWN ARROW
Delete a filter row SPACE BAR or ENTER
Use TAB to highlight the icon at the end of the row that you want to delete and press one of the above.
When you're working with entries in the table:
To Do This Press
Confirm the modified value, and move your cursor to the next field
TAB
Confirm the modified value and move your cursor to the previous field
SHIFT + TAB
Confirm the modified value, or
Open Details if applicable
ENTER
Discard your entry and restore a field to its previous value, or
Close a drop-down list, if it is expanded
ESC
Move your cursor up, down, left, and right UP ARROW , DOWN ARROW , LEFT ARROW , RIGHT ARROW
Move your cursor to the first field in the selected row CTRL + LEFT ARROW
When editing a field, use this shortcut to move the cursor to the prior special character in the field (comma, dot, space).
Move your cursor to the last field in the selected row CTRL + RIGHT ARROW
When editing a field, use this shortcut to move the cursor to the prior special character in the field (comma, dot, space).
Move your cursor to the first row of the selected column HOME + UP ARROW
Application Help for SAP Product Lifecycle CostingKeyboard Navigation and Shortcuts PUBLIC 399
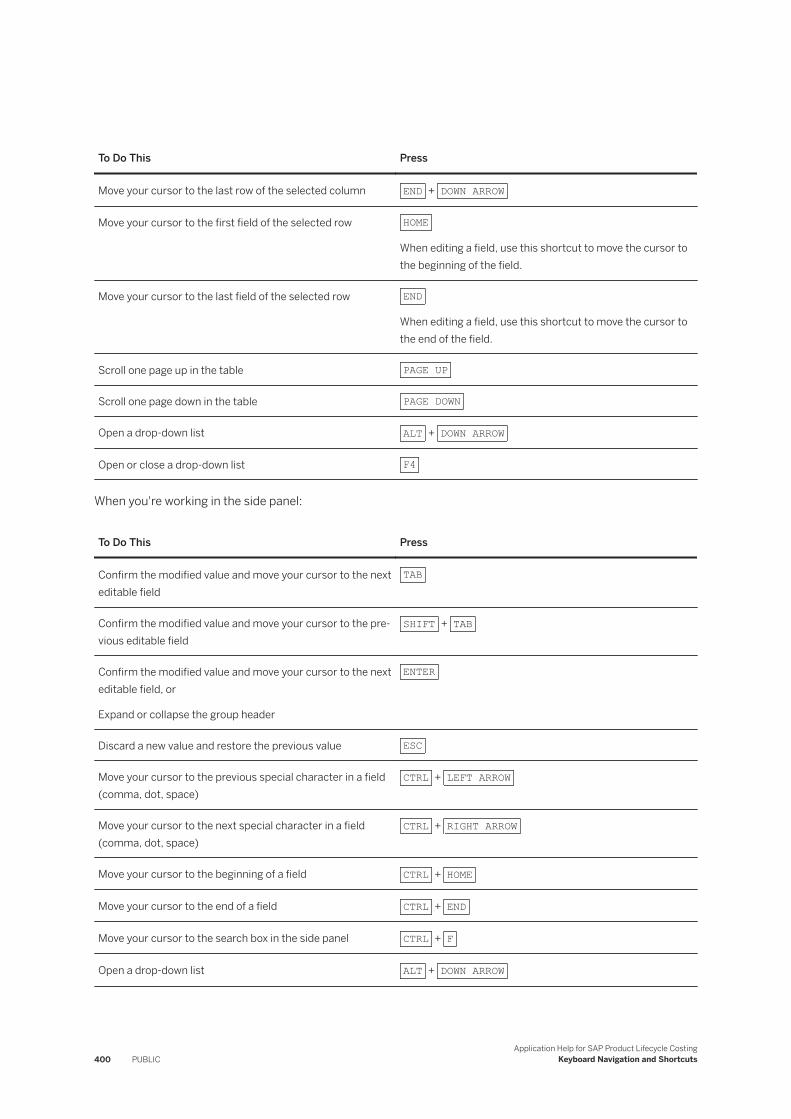
To Do This Press
Move your cursor to the last row of the selected column END + DOWN ARROW
Move your cursor to the first field of the selected row HOME
When editing a field, use this shortcut to move the cursor to the beginning of the field.
Move your cursor to the last field of the selected row END
When editing a field, use this shortcut to move the cursor to the end of the field.
Scroll one page up in the table PAGE UP
Scroll one page down in the table PAGE DOWN
Open a drop-down list ALT + DOWN ARROW
Open or close a drop-down list F4
When you're working in the side panel:
To Do This Press
Confirm the modified value and move your cursor to the next editable field
TAB
Confirm the modified value and move your cursor to the previous editable field
SHIFT + TAB
Confirm the modified value and move your cursor to the next editable field, or
Expand or collapse the group header
ENTER
Discard a new value and restore the previous value ESC
Move your cursor to the previous special character in a field (comma, dot, space)
CTRL + LEFT ARROW
Move your cursor to the next special character in a field (comma, dot, space)
CTRL + RIGHT ARROW
Move your cursor to the beginning of a field CTRL + HOME
Move your cursor to the end of a field CTRL + END
Move your cursor to the search box in the side panel CTRL + F
Open a drop-down list ALT + DOWN ARROW
400 PUBLICApplication Help for SAP Product Lifecycle Costing
Keyboard Navigation and Shortcuts
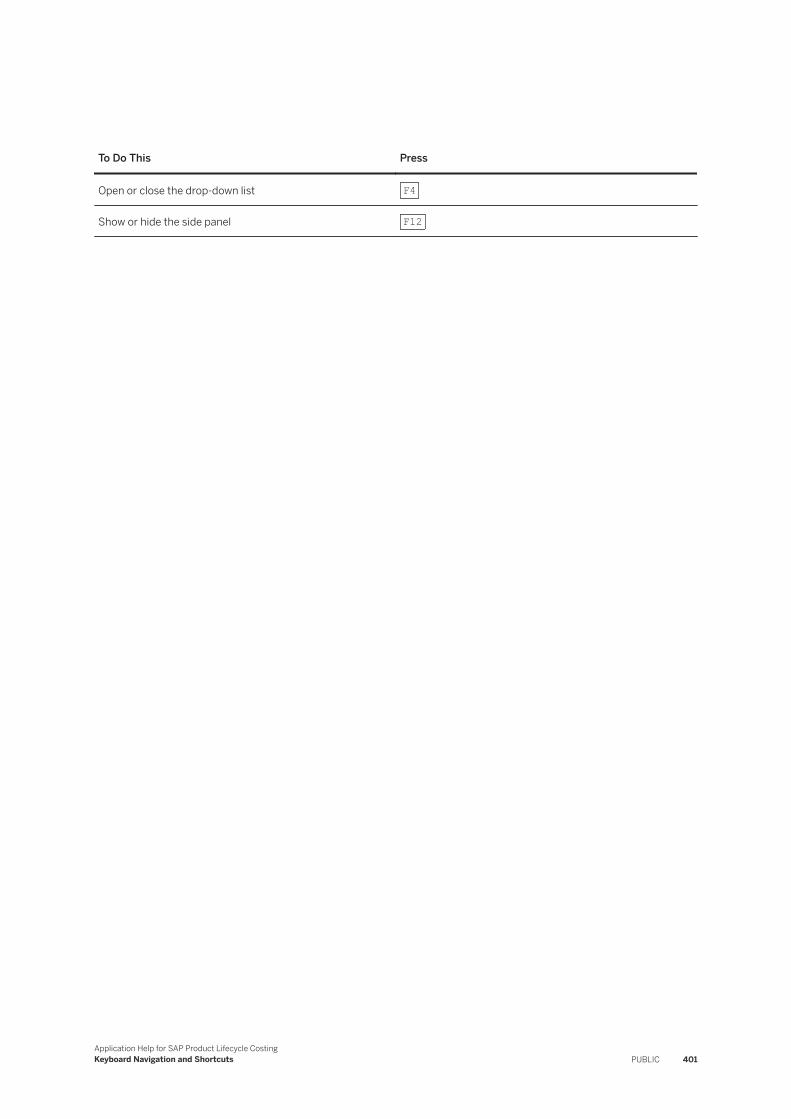
To Do This Press
Open or close the drop-down list F4
Show or hide the side panel F12
Application Help for SAP Product Lifecycle CostingKeyboard Navigation and Shortcuts PUBLIC 401
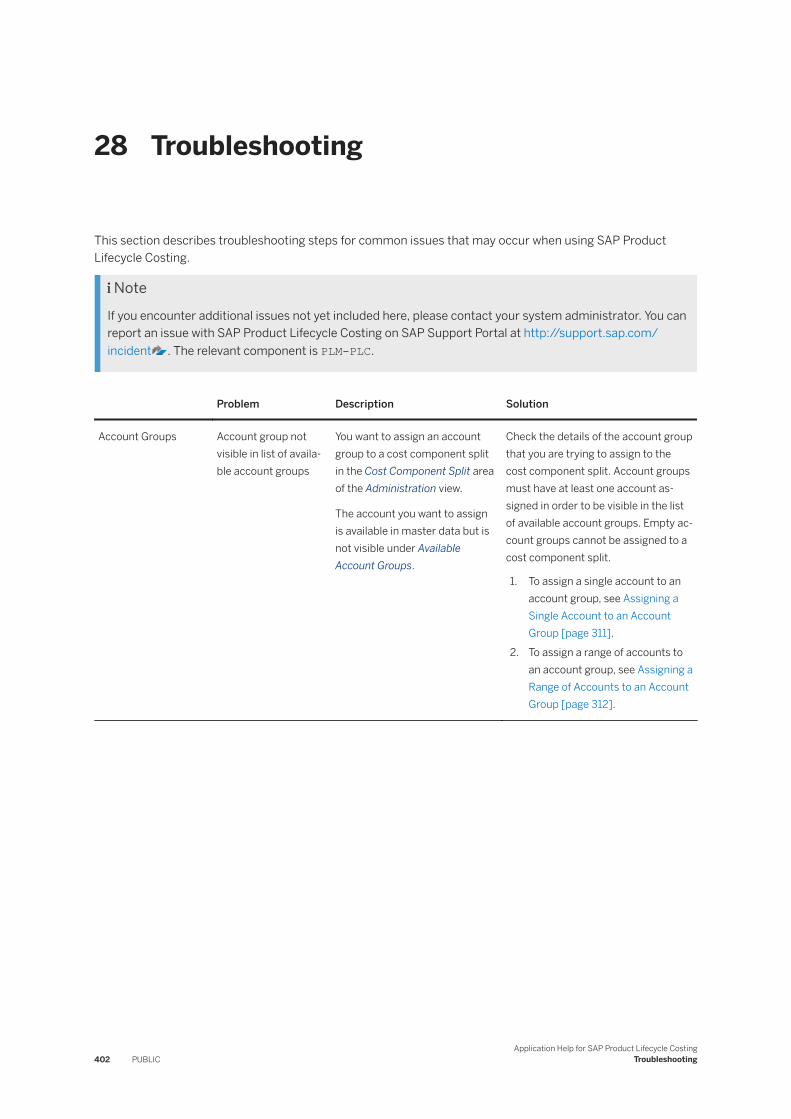
28 Troubleshooting
This section describes troubleshooting steps for common issues that may occur when using SAP Product Lifecycle Costing.
NoteIf you encounter additional issues not yet included here, please contact your system administrator. You can report an issue with SAP Product Lifecycle Costing on SAP Support Portal at http://support.sap.com/incident . The relevant component is PLM-PLC.
Problem Description Solution
Account Groups Account group not visible in list of available account groups
You want to assign an account group to a cost component split in the Cost Component Split area of the Administration view.
The account you want to assign is available in master data but is not visible under Available Account Groups.
Check the details of the account group that you are trying to assign to the cost component split. Account groups must have at least one account assigned in order to be visible in the list of available account groups. Empty account groups cannot be assigned to a cost component split.
1. To assign a single account to an account group, see Assigning a Single Account to an Account Group [page 311].
2. To assign a range of accounts to an account group, see Assigning a Range of Accounts to an Account Group [page 312].
402 PUBLICApplication Help for SAP Product Lifecycle Costing
Troubleshooting

Problem Description Solution
Cockpit Inactive menu items in Cockpit view
When working on a laptop computer, docking and undocking the laptop may cause menu items in the Cockpit view to gray and become inactive.
Known issues:
● the context menu and ribbon buttons are affected in the Cockpit view.
● You can no longer open or perform other actions such as close or delete calculation versions in the Cockpit view. Projects and calculations are likely also affected.
1. If you have unsaved changes in any other view, open the view and save your changes.
2. Close and restart the application.
Application Help for SAP Product Lifecycle CostingTroubleshooting PUBLIC 403
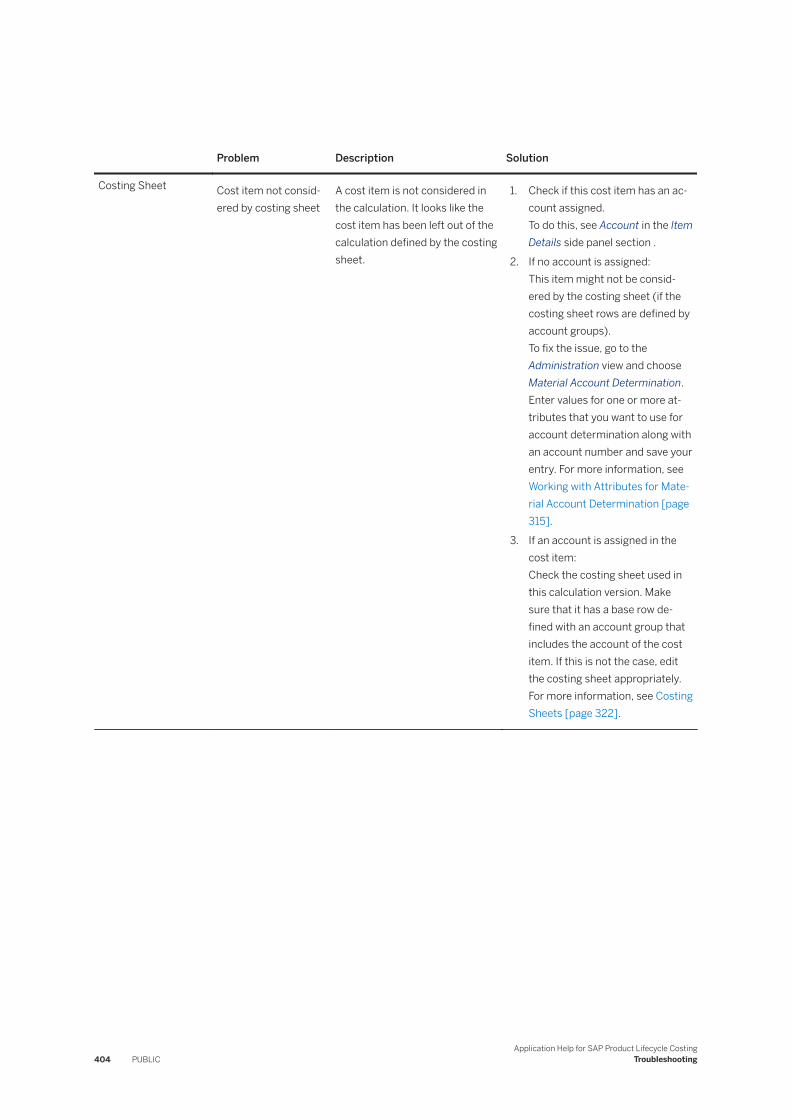
Problem Description Solution
Costing Sheet Cost item not considered by costing sheet
A cost item is not considered in the calculation. It looks like the cost item has been left out of the calculation defined by the costing sheet.
1. Check if this cost item has an account assigned.To do this, see Account in the Item Details side panel section .
2. If no account is assigned:This item might not be considered by the costing sheet (if the costing sheet rows are defined by account groups).To fix the issue, go to the Administration view and choose Material Account Determination. Enter values for one or more attributes that you want to use for account determination along with an account number and save your entry. For more information, see Working with Attributes for Material Account Determination [page 315].
3. If an account is assigned in the cost item:Check the costing sheet used in this calculation version. Make sure that it has a base row defined with an account group that includes the account of the cost item. If this is not the case, edit the costing sheet appropriately. For more information, see Costing Sheets [page 322].
404 PUBLICApplication Help for SAP Product Lifecycle Costing
Troubleshooting
Problem Description Solution
Custom Fields Unable to save custom fields.
ANCESTOR(expr1;expr2;expr2) and PARENT(expr1;expr2) functions prevent saving of custom fields. As a result, calculation versions containing custom fields using formulas with these functions also cannot be saved.
You must change the formula so that it can be saved. There are several possible workarounds:
● Remove the custom fieldYou can remove the custom field or clear the formula for the custom field. Then you can continue working without the custom field causing the issue.
● Disable rollupCheck whether rollup is activated for the custom field. In certain cases, the error is valid because top-down evaluation (from ancestor or parent) and bottom-up evaluation (from rollup) is not possible. If you disable rollup, you should be able to save the custom field and then the affected calculation version.
● Use the MANUAL_VALUE functionIf applicable, (for example, for write-only fields), you can use MANUAL_VALUE in the formula for the referenced custom fields.For example, if you’re using the PARENT function and the formula says PARENT (IS_MATERIAL(); $FOO; 0), then it can be written as PARENT (IS_MATERIAL(); MANUAL_VALUE($FOO); 0). Please note that this will always take the manual value of $FOO.This might not be appropriate for specific calculations, for example, if you need the calculated value is needed.
● Use ShortcutsThis applies for calculation versions and the ANCESTOR function only. For example, if the formula says ANCESTOR(IS_CALCULATIO
Application Help for SAP Product Lifecycle CostingTroubleshooting PUBLIC 405

Problem Description Solution
N_VERSION(); $FOO; 0), you can use the shortcut $version.FOO or #FOO. This is better than using the ANCESTOR function and has a much better performance.After the formula is changed to use the shortcut, the value of $FOO is taken directly from the calculation version item (root item). The ANCESTOR function is no longer used. This allows you to both save the custom field and also create and save calculations.
Import SAP ERP import fails. While importing from SAP ERP you receive the error "Data could not be written to the back end. Please contact your system administrator."
Check if there are invalid document types in the table T_document_type and delete them.
Memory Insufficient memory to complete an operation.
You receive an out-of-memory exception when performing certain operations (such as mass change) for very large calculation versions.
Adjust the maximum runtime allocation in SAP HANA Studio.
1. Open the Administration Console in SAP HANA Studio.
2. In the Configuration tab, open the xsengine.ini file and do the following:1. Create section jsvm, if it
doesn’t already exist.2. Add a new parameter
max_runtime_bytes with the maximum number of bytes.○ The default value is
268435456 bytes (256 * 1024 * 256 = 256 MB).
○ The maximum value is 4294967296 bytes (4096 * 1024 * 1024 = 4 GB).
406 PUBLICApplication Help for SAP Product Lifecycle Costing
Troubleshooting
Problem Description Solution
Performance Application slows down.
In certain cases, the real-time protection of the Windows Defender may significantly slow down the application.
Check whether Windows Defender is causing the performance problem. You can do this by temporarily disabling the Windows Defender, as follows:
1. Open the Windows Start Menu.
2. Search for Windows Defender Settings.
3. Turn the Real-time protection setting to off.
Performance Application slows down.
The chosen power plan may also impact performance.
Ensure that the High Performance power plan is selected, as follows:
1. Open the Windows Start Menu.
2. Search for Choose a power plan.
3. Switch to the High Performance power plan.
Project Lifecycle Lifecycle versions not generated.
You've done the following:
● Created a project● Entered a start date, end
date, and lifecycle valuation date
● Entered quantities for one or more lifecycle periods
● Distributed any one-time costs and created surcharge rules, if applicable
● Configured the project lifecycle to include any one-time costs and surcharges then calculated the project lifecycle
Problem: You expect to find lifecycle versions in the Cockpit view under the calculation for which they were created. No lifecycle versions are visible.
Solution 1:
Refresh the Cockpit view. The lifecycle versions should now be visible.
Solution 2:
Double check that you have entered a quantity for each lifecycle period you want to include in the project lifecycle. Costs are only calculated and lifecycle versions are only generated for lifecycle periods containing quantities greater than zero.
Application Help for SAP Product Lifecycle CostingTroubleshooting PUBLIC 407
Problem Description Solution
Technical Difficulties Application crashes without notice
The application crashes without notice or an error dialog Unknown Hard Error is displayed while navigating between controls or views.
1. Check to see if your laptop or PC is touch-enabled.While your laptop or your PC hardware may be touch-enabled or have components to provide touch input, your Microsoft Windows installation and/or your Microsoft .NET Framework installation might not be complete to support the touch features. This might be the case if you use a standard Windows image on a laptop with touch devices or if you're using an outdated .NET Framework installation.
2. To fix the problem, stop and disable the following services on your Windows machine: Touch Keyboard and Handwriting Panel Service or Tablet PC Input Service.
Technical Difficulties System stops working The server stops responding. You may wait several minutes before any error message is shown.
If the server stops responding, try deleting old or unwanted logs to clean up database space.
CautionFind out what your required retention policy is before deleting any log files.
For more information about deleting audit logs manually, see Data Protection and Privacy in the SAP HANA Administration Guide on SAP Help Portal at http://help.sap.com/hana_platform
408 PUBLICApplication Help for SAP Product Lifecycle Costing
Troubleshooting
Problem Description Solution
Technical Difficulties Application fails to start
You start the application and receive the following message:
The application has failed to start because its side-by-side configuration is incorrect. Please see the application event log or use the command-line sxstrace.exe tool for more detail.
Certain tools or browsers, (for example, Microsoft Edge) may inadvertently change the encoding in the configuration file.
Solution 1:
Ask someone with Administrator's rights to do the following:
1. Go to the installation folder and open the configuration file: ProductLifecycleCosting.exe.config.
2. Edit the configuration file and change the encoding in the first line to:<?xml version=”1.0” encoding=”utf-8”?>.
3. Save your changes and restart the application.
Result: The application should open.
Solution 2:
Ask someone with Administrator’s rights to do the following:
1. Uninstall and then reinstall the application.
2. Edit the configuration file using an editor such as Notepad, Notepad++ and add the systems.
3. Save your changes and restart the application.
Result: The application should open.
Application Help for SAP Product Lifecycle CostingTroubleshooting PUBLIC 409
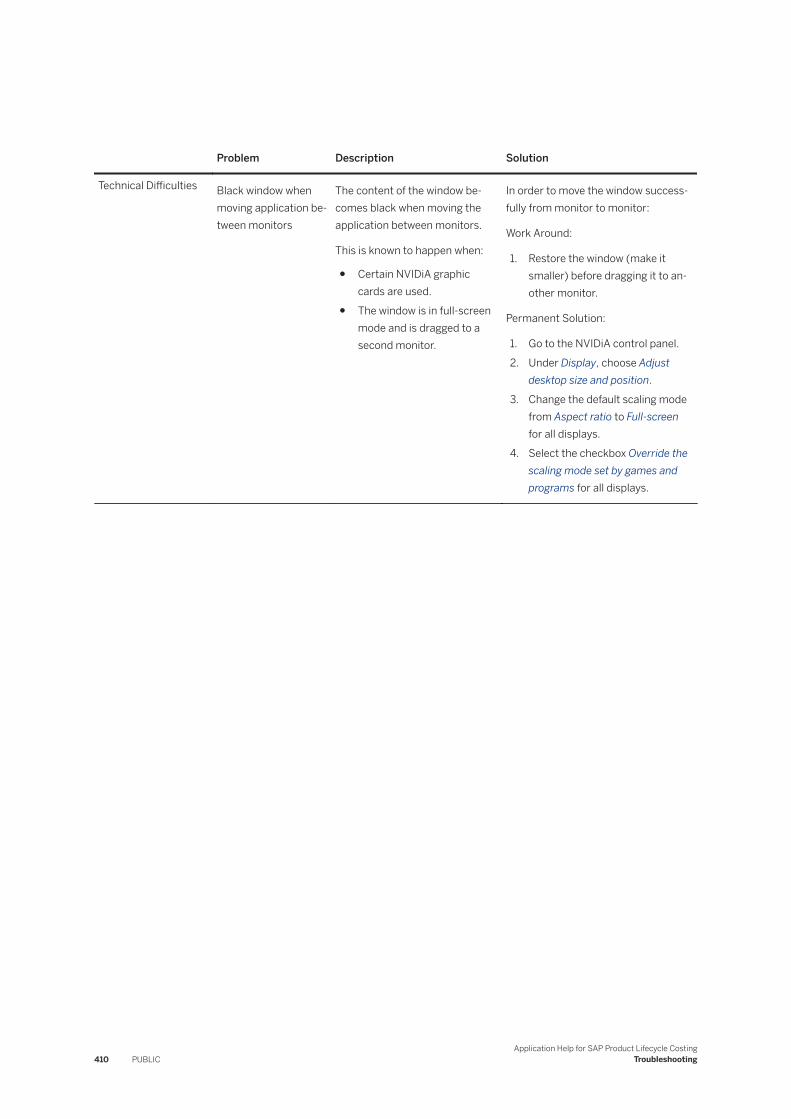
Problem Description Solution
Technical Difficulties Black window when moving application between monitors
The content of the window becomes black when moving the application between monitors.
This is known to happen when:
● Certain NVIDiA graphic cards are used.
● The window is in full-screen mode and is dragged to a second monitor.
In order to move the window successfully from monitor to monitor:
Work Around:
1. Restore the window (make it smaller) before dragging it to another monitor.
Permanent Solution:
1. Go to the NVIDiA control panel.2. Under Display, choose Adjust
desktop size and position.3. Change the default scaling mode
from Aspect ratio to Full-screen for all displays.
4. Select the checkbox Override the scaling mode set by games and programs for all displays.
410 PUBLICApplication Help for SAP Product Lifecycle Costing
Troubleshooting
29 Glossary
The following table lists terms that are essential for working with SAP Product Lifecycle Costing:
Term Definition
account Classification of an organization's valuated consumption of production factors within a controlling area. Every account is assigned to one controlling area.
account determination A procedure that automatically determines an account for an item in a calculation version based on its attributes.
account group An organizational entity that combines accounts that belong together logically. Account groups can serve various purposes. For example, they can be used to define the basis of a costing sheet or the cost component of a component split.
activity price Price for an internal activity. The price in a calculation version can either be set manually or automatically determined based on the master data.
activity type A unit in a controlling area that classifies the activities performed in a cost center.
Example:
Activity types in production cost centers are machine hours or finished units.
add-in Custom code used to extend the standard functionality by further functions that are supported by the add-in framework. For example, add-ins can be created to perform specific plausibility checks or display specific analyses in additional side panel sections.
assembly A set of components of a product that belong together for production purposes.
A product that is defined as an assembly can itself be used as a component in another assembly.
base quantity Specifies the amount used as a basis for calculating an item’s quantity.
base version The calculation version used as the basis for generating lifecycle versions in a project.
Application Help for SAP Product Lifecycle CostingGlossary PUBLIC 411
Term Definition
bill of materials (BOM) A complete, structured list of the components that make up an object. The list contains the description, the quantity, and unit of measure. The components are referred to as items.
business area An organizational unit of financial accounting that represents a separate area of operations or responsibilities within an organization and to which value changes recorded in Financial Accounting can be allocated.
You can create financial statements for business areas, and you can use these statements for various internal reporting purposes.
calculation Represents a product, a quotation, or any other entity for which costs are to be calculated. Each calculation has at least one version which contains the costing structure and costs. A calculation can have an unlimited number of calculation versions. The calculation name and the controlling area are defined for the entire calculation and therefore apply to all versions. All other data (such as total quantity, costing structure, costs) can differ between calculation versions.
calculation version An alternative cost calculation. Versions can represent different drafts of a calculation or different scenarios. Each calculation version contains a variation of the costing structure and costs. Every calculation version belongs to exactly one calculation. Any number of calculation versions can exist in parallel.
company code The smallest organizational unit of Financial Accounting for which a complete self-contained set of accounts can be drawn up for purposes of external reporting.
This includes recording of all relevant transactions and generating all supporting documents required for financial statements.
confidence level Measures the reliability of a cost estimate for an item in a calculation version. The level is measured on a scale of 1 to 5, with 5 expressing the highest level of reliability.
configurable material A material that can have different variants.
For example, a car can have different paint, trim, and engines.
Configurable materials have a super bill of material (BOM) that contains all the components for producing every variant of the material. Similarly, they have a super task list that contains all the operations. When a material is configured, only the components and operations needed for a variant are selected.
412 PUBLICApplication Help for SAP Product Lifecycle Costing
Glossary
Term Definition
controlling area An organizational unit within a company, used to represent a closed system for cost accounting purposes.
A controlling area may include single or multiple company codes that may use different currencies. These company codes must use the same operative chart of accounts.
All internal allocations refer exclusively to objects in the same controlling area.
cost center An organizational unit within a controlling area that represents a defined location of cost incurrence.
The definition can be based on:
● Functional requirements● Allocation criteria● Physical location● Responsibility for costs
cost component A grouping of account groups which is used to analyze the costs, to do the following, for example:
● Make the costs of a material, an activity type, or a business process transparent
● Group the costs of a material according to the requirements for material valuation and profitability analysis
cost component split A breakdown of costs into units called cost components that provide detailed cost information. Cost component splits can, for example, be used to break down the cost of a material, process, or an activity.
cost rollup A process in material costing in which costs at lower production levels are allocated to the highest level.
Costs are rolled up by cost component, assuring that the origin of the costs remains visible after rollup. For example, labor costs in preassembly are rolled up into the cost of goods manufactured of the end product as internal labor costs rather than material costs.
Any costs assigned to cost components that are not rolled up are not included in cost estimates of higher costing levels.
costing sheet Defines the rules that are used for the costing of overheads and sums.
Application Help for SAP Product Lifecycle CostingGlossary PUBLIC 413
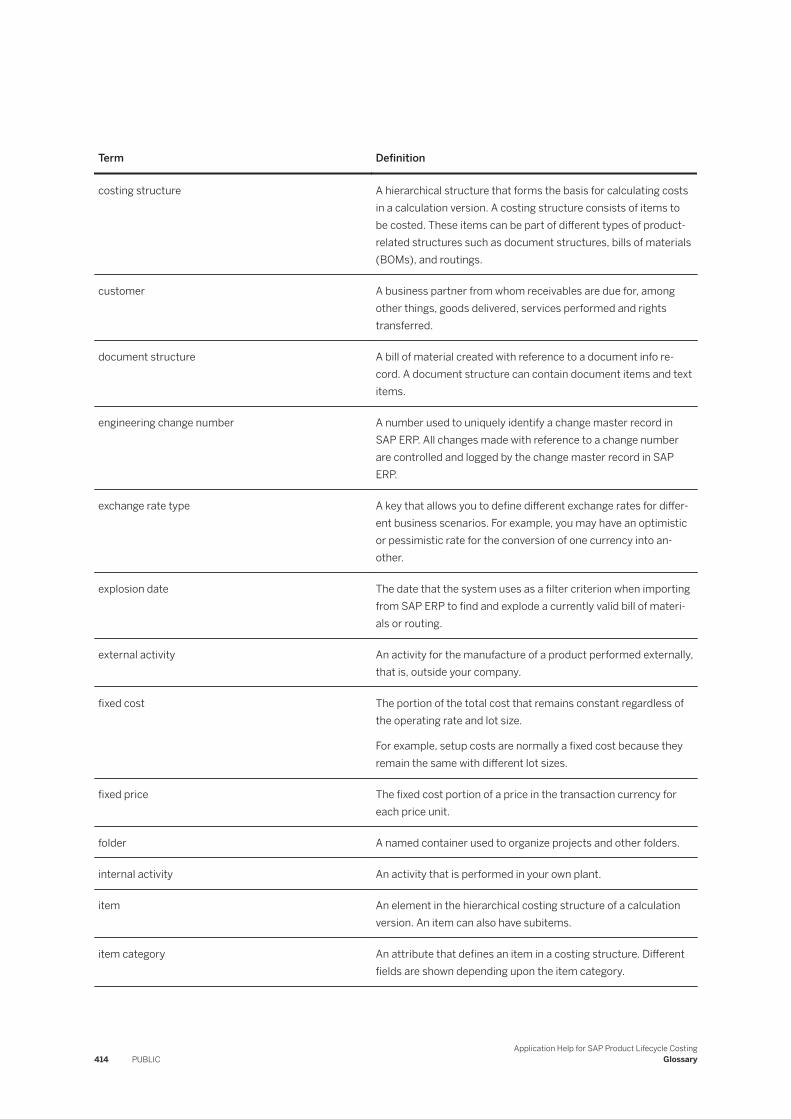
Term Definition
costing structure A hierarchical structure that forms the basis for calculating costs in a calculation version. A costing structure consists of items to be costed. These items can be part of different types of product-related structures such as document structures, bills of materials (BOMs), and routings.
customer A business partner from whom receivables are due for, among other things, goods delivered, services performed and rights transferred.
document structure A bill of material created with reference to a document info record. A document structure can contain document items and text items.
engineering change number A number used to uniquely identify a change master record in SAP ERP. All changes made with reference to a change number are controlled and logged by the change master record in SAP ERP.
exchange rate type A key that allows you to define different exchange rates for differ-ent business scenarios. For example, you may have an optimistic or pessimistic rate for the conversion of one currency into another.
explosion date The date that the system uses as a filter criterion when importing from SAP ERP to find and explode a currently valid bill of materials or routing.
external activity An activity for the manufacture of a product performed externally, that is, outside your company.
fixed cost The portion of the total cost that remains constant regardless of the operating rate and lot size.
For example, setup costs are normally a fixed cost because they remain the same with different lot sizes.
fixed price The fixed cost portion of a price in the transaction currency for each price unit.
folder A named container used to organize projects and other folders.
internal activity An activity that is performed in your own plant.
item An element in the hierarchical costing structure of a calculation version. An item can also have subitems.
item category An attribute that defines an item in a costing structure. Different fields are shown depending upon the item category.
414 PUBLICApplication Help for SAP Product Lifecycle Costing
Glossary
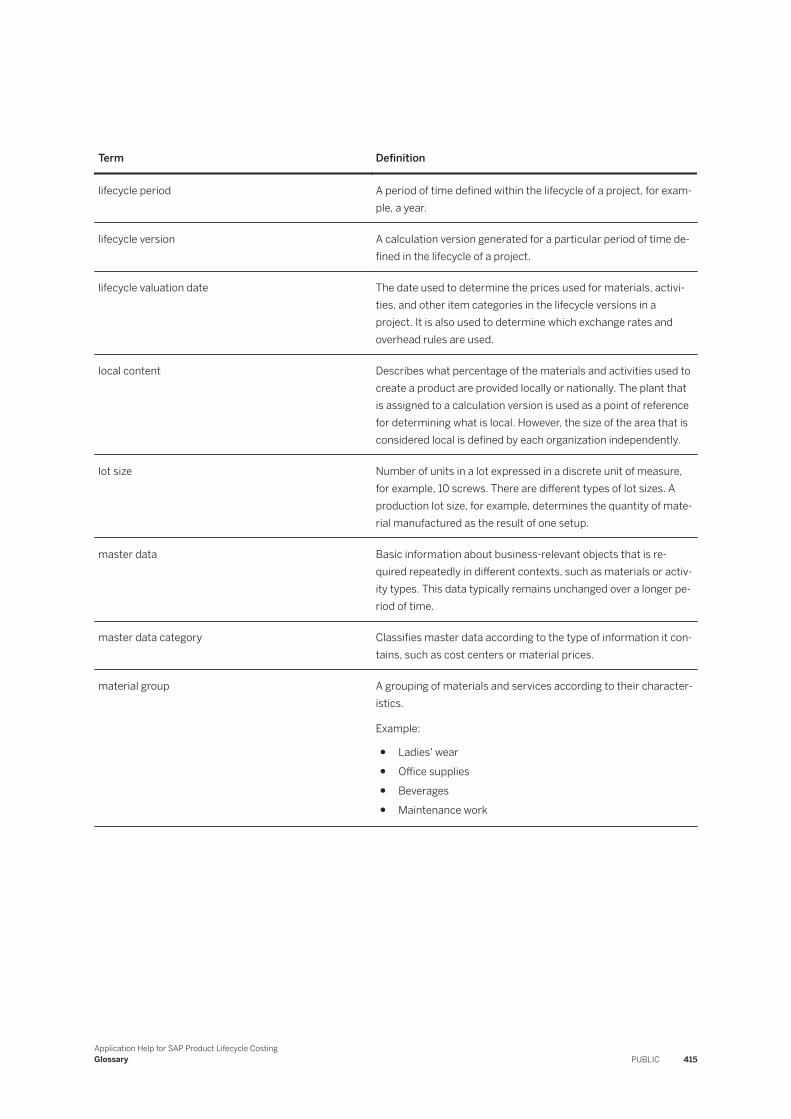
Term Definition
lifecycle period A period of time defined within the lifecycle of a project, for example, a year.
lifecycle version A calculation version generated for a particular period of time defined in the lifecycle of a project.
lifecycle valuation date The date used to determine the prices used for materials, activities, and other item categories in the lifecycle versions in a project. It is also used to determine which exchange rates and overhead rules are used.
local content Describes what percentage of the materials and activities used to create a product are provided locally or nationally. The plant that is assigned to a calculation version is used as a point of reference for determining what is local. However, the size of the area that is considered local is defined by each organization independently.
lot size Number of units in a lot expressed in a discrete unit of measure, for example, 10 screws. There are different types of lot sizes. A production lot size, for example, determines the quantity of material manufactured as the result of one setup.
master data Basic information about business-relevant objects that is required repeatedly in different contexts, such as materials or activity types. This data typically remains unchanged over a longer period of time.
master data category Classifies master data according to the type of information it contains, such as cost centers or material prices.
material group A grouping of materials and services according to their characteristics.
Example:
● Ladies' wear● Office supplies● Beverages● Maintenance work
Application Help for SAP Product Lifecycle CostingGlossary PUBLIC 415
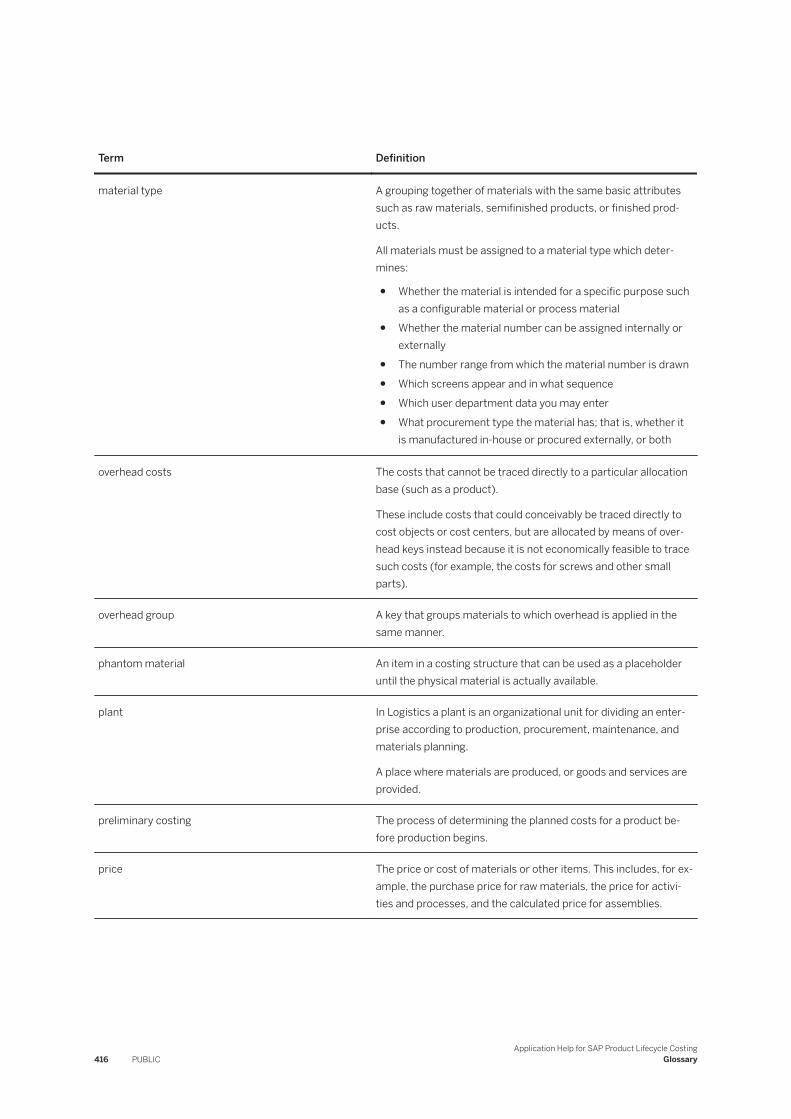
Term Definition
material type A grouping together of materials with the same basic attributes such as raw materials, semifinished products, or finished products.
All materials must be assigned to a material type which determines:
● Whether the material is intended for a specific purpose such as a configurable material or process material
● Whether the material number can be assigned internally or externally
● The number range from which the material number is drawn● Which screens appear and in what sequence● Which user department data you may enter● What procurement type the material has; that is, whether it
is manufactured in-house or procured externally, or both
overhead costs The costs that cannot be traced directly to a particular allocation base (such as a product).
These include costs that could conceivably be traced directly to cost objects or cost centers, but are allocated by means of overhead keys instead because it is not economically feasible to trace such costs (for example, the costs for screws and other small parts).
overhead group A key that groups materials to which overhead is applied in the same manner.
phantom material An item in a costing structure that can be used as a placeholder until the physical material is actually available.
plant In Logistics a plant is an organizational unit for dividing an enterprise according to production, procurement, maintenance, and materials planning.
A place where materials are produced, or goods and services are provided.
preliminary costing The process of determining the planned costs for a product before production begins.
price The price or cost of materials or other items. This includes, for example, the purchase price for raw materials, the price for activities and processes, and the calculated price for assemblies.
416 PUBLICApplication Help for SAP Product Lifecycle Costing
Glossary
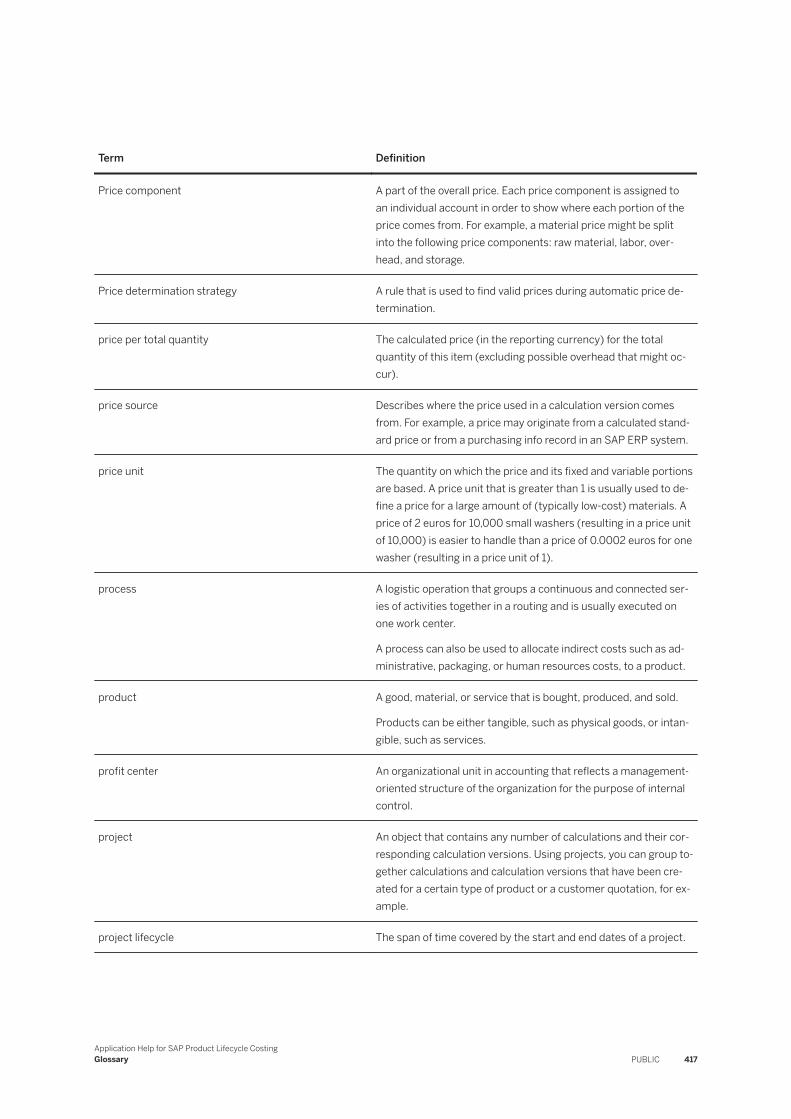
Term Definition
Price component A part of the overall price. Each price component is assigned to an individual account in order to show where each portion of the price comes from. For example, a material price might be split into the following price components: raw material, labor, overhead, and storage.
Price determination strategy A rule that is used to find valid prices during automatic price determination.
price per total quantity The calculated price (in the reporting currency) for the total quantity of this item (excluding possible overhead that might occur).
price source Describes where the price used in a calculation version comes from. For example, a price may originate from a calculated standard price or from a purchasing info record in an SAP ERP system.
price unit The quantity on which the price and its fixed and variable portions are based. A price unit that is greater than 1 is usually used to define a price for a large amount of (typically low-cost) materials. A price of 2 euros for 10,000 small washers (resulting in a price unit of 10,000) is easier to handle than a price of 0.0002 euros for one washer (resulting in a price unit of 1).
process A logistic operation that groups a continuous and connected series of activities together in a routing and is usually executed on one work center.
A process can also be used to allocate indirect costs such as administrative, packaging, or human resources costs, to a product.
product A good, material, or service that is bought, produced, and sold.
Products can be either tangible, such as physical goods, or intangible, such as services.
profit center An organizational unit in accounting that reflects a management-oriented structure of the organization for the purpose of internal control.
project An object that contains any number of calculations and their corresponding calculation versions. Using projects, you can group together calculations and calculation versions that have been created for a certain type of product or a customer quotation, for example.
project lifecycle The span of time covered by the start and end dates of a project.
Application Help for SAP Product Lifecycle CostingGlossary PUBLIC 417
Term Definition
purchasing document A document used by the purchasing department to procure materials or services. For example, this may be a purchase order, a purchasing info record, or a supplier contract.
purchasing group A key for a buyer or group of buyers responsible for certain purchasing activities.
The purchasing group is:
● Internally responsible for the procurement of a material or a class of materials
● The principal channel for a company's dealings with its vendors
referenced calculation version A calculation version that is reused and included in any number of other calculation versions. For example, you may reuse a part that is used in different assemblies and products, or an assembly that is used in different variants of the same product.
reporting currency The currency in which a calculation is performed. All calculated values in a calculation version are displayed using this currency.
routing A description of the production process used to manufacture plant materials or provide services in the manufacturing industry.
sales document A database document that represents a business transaction in the sales department.
A sales document consists of a document header with data applicable to the whole document, as well as any number of document items, with data regarding goods or services required by the customer.
Types of sales document types include:
● Inquiry● Quotation● Sales order● Outline agreement (contracts and scheduling agreements)● Complaints (returns, credit memo requests and debit memo
requests)
sales organization An organizational unit in Logistics that structures the company according to its sales requirements.
A sales organization is responsible for selling materials and services.
sales price The price at which you intend to sell the product calculated in a calculation version to the customer.
418 PUBLICApplication Help for SAP Product Lifecycle Costing
Glossary
Term Definition
SAP PLC analytic view A database view used to analyze certain use scenarios. You can select attributes of a view to create a data cube for reporting purposes.
NoteSAP PLC analytic views are not SAP HANA analytic views.
Status Optional, user-defined label, created and used to classify or track the workflow of a calculation version, for example, Draft, In Review, or Approved.
subcontracting The processing, by an external supplier, of materials provided by a customer.
The result of this processing is the manufacture by the supplier (subcontractor) of an ordered material or product, or performance by the supplier of an ordered service.
Subcontracting is therefore a form of outsourcing.
sum variant Variant in a variant matrix that aggregates the total volume and total costs of the active items in all displayed variants.
surcharge An amount that is added or subtracted from a price. For example, a surcharge may be calculated for an item to reflect an increase in the price of a raw material. Surcharges are applied during lifecycle calculation for a project.
tag A label added to a business object for categorizing, searching, and filtering purposes.
target cost Target set for the cost of an item. You can compare the target cost to the total cost to see if your target is met.
text item An item category that contains text only and does not include any costs. Text items can be used to structure calculations.
total cost Contains all costs for an item (in the reporting currency), including the direct and indirect costs as well as the overhead that is defined in the costing sheet.
total quantity The quantity of an item that is required to produce the overall quantity assigned to a calculation version. If an item is dependent on quantity, the calculation of the total quantity is based on the total quantity of the assembly to which the item belongs.
For example, if a calculation version calculates the cost for the completion of 10 vehicles with four wheels each, then the total quantity of the item wheel is 40.
Application Help for SAP Product Lifecycle CostingGlossary PUBLIC 419
Term Definition
transaction currency The currency used to display the price of an item and its fixed and variable cost portions. Each item in a calculation can have a differ-ent transaction currency. One material can be purchased in euros while a different material is purchased in US dollars.
valuation class An attribute that can be assigned to a material in a specific plant. This makes it possible to group together materials from a finan-cial point of view.
valuation date The date used to determine the prices used for materials, activities, and other item categories in a calculation version. It is also used to determine which exchange rates and overhead rules are used in the calculation.
variable cost A portion of the total cost that varies with the operating rate and the lot size.
variable price The variable cost portion of the price in the transaction currency for each price unit.
variant One configuration of a product created by selecting items from a maximum variant base.
variant base A costing structure that represents the maximum version of a product. This provides the basis for creating variants in the variant matrix for a calculation version.
variant matrix A set of variants created for a calculation version. The matrix allows you to create, calculate, and maintain variants for a configu-rable product.
vendor A business partner from whom materials or services can be procured.
work center Organizational unit that defines where and by whom an operation is performed. The activities performed at or by the work center are valuated by charge rates, which can be determined by cost centers and activity types.
Work centers can be:
● Machines● People● Production lines● Groups of craftsmen
work center category An attribute used to describe a work center in more detail, for example, according to the kind of machine or labor involved.
420 PUBLICApplication Help for SAP Product Lifecycle Costing
Glossary
Important Disclaimers and Legal Information
HyperlinksSome links are classified by an icon and/or a mouseover text. These links provide additional information.About the icons:
● Links with the icon : You are entering a Web site that is not hosted by SAP. By using such links, you agree (unless expressly stated otherwise in your agreements with SAP) to this:
● The content of the linked-to site is not SAP documentation. You may not infer any product claims against SAP based on this information.● SAP does not agree or disagree with the content on the linked-to site, nor does SAP warrant the availability and correctness. SAP shall not be liable for any
damages caused by the use of such content unless damages have been caused by SAP's gross negligence or willful misconduct.
● Links with the icon : You are leaving the documentation for that particular SAP product or service and are entering a SAP-hosted Web site. By using such links, you agree that (unless expressly stated otherwise in your agreements with SAP) you may not infer any product claims against SAP based on this information.
Videos Hosted on External PlatformsSome videos may point to third-party video hosting platforms. SAP cannot guarantee the future availability of videos stored on these platforms. Furthermore, any advertisements or other content hosted on these platforms (for example, suggested videos or by navigating to other videos hosted on the same site), are not within the control or responsibility of SAP.
Beta and Other Experimental FeaturesExperimental features are not part of the officially delivered scope that SAP guarantees for future releases. This means that experimental features may be changed by SAP at any time for any reason without notice. Experimental features are not for productive use. You may not demonstrate, test, examine, evaluate or otherwise use the experimental features in a live operating environment or with data that has not been sufficiently backed up.The purpose of experimental features is to get feedback early on, allowing customers and partners to influence the future product accordingly. By providing your feedback (e.g. in the SAP Community), you accept that intellectual property rights of the contributions or derivative works shall remain the exclusive property of SAP.
Example CodeAny software coding and/or code snippets are examples. They are not for productive use. The example code is only intended to better explain and visualize the syntax and phrasing rules. SAP does not warrant the correctness and completeness of the example code. SAP shall not be liable for errors or damages caused by the use of example code unless damages have been caused by SAP's gross negligence or willful misconduct.
Bias-Free LanguageSAP supports a culture of diversity and inclusion. Whenever possible, we use unbiased language in our documentation to refer to people of all cultures, ethnicities, genders, and abilities.
Application Help for SAP Product Lifecycle CostingImportant Disclaimers and Legal Information PUBLIC 421
www.sap.com/contactsap
© 2021 SAP SE or an SAP affiliate company. All rights reserved.
No part of this publication may be reproduced or transmitted in any form or for any purpose without the express permission of SAP SE or an SAP affiliate company. The information contained herein may be changed without prior notice.
Some software products marketed by SAP SE and its distributors contain proprietary software components of other software vendors. National product specifications may vary.
These materials are provided by SAP SE or an SAP affiliate company for informational purposes only, without representation or warranty of any kind, and SAP or its affiliated companies shall not be liable for errors or omissions with respect to the materials. The only warranties for SAP or SAP affiliate company products and services are those that are set forth in the express warranty statements accompanying such products and services, if any. Nothing herein should be construed as constituting an additional warranty.
SAP and other SAP products and services mentioned herein as well as their respective logos are trademarks or registered trademarks of SAP SE (or an SAP affiliate company) in Germany and other countries. All other product and service names mentioned are the trademarks of their respective companies.
Please see https://www.sap.com/about/legal/trademark.html for additional trademark information and notices.
THE BEST RUN