admin guide
TRANSCRIPT
OceanStor InfraControl
V100R002C01
Admin Guide
Issue 04
Date 2015-02-28
HUAWEI TECHNOLOGIES CO., LTD.
Copyright © Huawei Technologies Co., Ltd. 2015. All rights reserved.
No part of this document may be reproduced or transmitted in any form or by any means without prior writtenconsent of Huawei Technologies Co., Ltd. Trademarks and Permissions
and other Huawei trademarks are trademarks of Huawei Technologies Co., Ltd.All other trademarks and trade names mentioned in this document are the property of their respective holders. NoticeThe purchased products, services and features are stipulated by the contract made between Huawei and thecustomer. All or part of the products, services and features described in this document may not be within thepurchase scope or the usage scope. Unless otherwise specified in the contract, all statements, information,and recommendations in this document are provided "AS IS" without warranties, guarantees or representationsof any kind, either express or implied.
The information in this document is subject to change without notice. Every effort has been made in thepreparation of this document to ensure accuracy of the contents, but all statements, information, andrecommendations in this document do not constitute a warranty of any kind, express or implied.
Huawei Technologies Co., Ltd.Address: Huawei Industrial Base
Bantian, LonggangShenzhen 518129People's Republic of China
Website: http://enterprise.huawei.com
Issue 04 (2015-02-28) Huawei Proprietary and ConfidentialCopyright © Huawei Technologies Co., Ltd.
i
About This Document
PurposeThis document describes the operations on the InfraControl NMS.
Intended AudienceThis document is intended for:
l Installation and Commissioning Engineerl Data Configuration Engineerl System Maintenance Engineer
Symbol ConventionsThe symbols that may be found in this document are defined as follows.
Symbol Description
DANGERIndicates a hazard with a high level or medium level of riskwhich, if not avoided, could result in death or serious injury.
WARNINGIndicates a hazard with a low level of risk which, if notavoided, could result in minor or moderate injury.
CAUTIONIndicates a potentially hazardous situation that, if notavoided, could result in equipment damage, data loss,performance deterioration, or unanticipated results.
TIP Provides a tip that may help you solve a problem or save time.
NOTE Provides additional information to emphasize or supplementimportant points in the main text.
OceanStor InfraControlAdmin Guide About This Document
Issue 04 (2015-02-28) Huawei Proprietary and ConfidentialCopyright © Huawei Technologies Co., Ltd.
ii
Command ConventionsThe command conventions that may be found in this document are defined as follows.
Convention Description
Boldface The keywords of a command line are in boldface.
Italic Command arguments are in italic.
[ ] Items (keywords or arguments) in square brackets [ ] areoptional.
{ x | y | ... } Alternative items are grouped in braces and separated byvertical bars. One is selected.
[ x | y | ... ] Optional alternative items are grouped in square brackets andseparated by vertical bars. One or none is selected.
{ x | y | ... } * Alternative items are grouped in braces and separated byvertical bars. A minimum of one or a maximum of all can beselected.
[ x | y | ... ] * Optional alternative items are grouped in square brackets andseparated by vertical bars. A maximum of all or none can beselected.
GUI ConventionsConvention Description
Boldface Buttons, menus, parameters, tabs, window, and dialog titlesare in boldface. For example, click OK.
> Multi-level menus are in boldface and separated by the ">"signs. For example, choose File > Create > Folder.
Change HistoryUpdates between document versions are cumulative. Therefore, the latest document versioncontains all updates made to previous versions.
Issue 04 (2015-02-28)
The interface descriptions are modified.
OceanStor InfraControlAdmin Guide About This Document
Issue 04 (2015-02-28) Huawei Proprietary and ConfidentialCopyright © Huawei Technologies Co., Ltd.
iii
Issue 03 (2014-09-30)The contexts are modified.
Issue 02 (2014-04-21)The contexts are optimized.
Issue 01 (2013-09-16)This issue is the first official release.
OceanStor InfraControlAdmin Guide About This Document
Issue 04 (2015-02-28) Huawei Proprietary and ConfidentialCopyright © Huawei Technologies Co., Ltd.
iv
Contents
About This Document.....................................................................................................................ii
1 Overview.........................................................................................................................................11.1 InfraControl Overview...................................................................................................................................................21.2 Basic Configuration........................................................................................................................................................31.3 Customizing the Home Panel.........................................................................................................................................31.4 Changing the Current Password.....................................................................................................................................41.5 Viewing the Software Version.......................................................................................................................................41.6 Obtaining Help Information...........................................................................................................................................51.7 Logout.............................................................................................................................................................................5
2 System Management.....................................................................................................................62.1 System Administrators...................................................................................................................................................82.1.1 Introduction to System Administrators........................................................................................................................82.1.2 Configuration Process..................................................................................................................................................82.1.3 Managing Administrators..........................................................................................................................................102.1.4 Managing Administrator Groups...............................................................................................................................172.1.5 Managing Online Administrators..............................................................................................................................192.1.6 Configuring the System Security Policy...................................................................................................................202.1.7 Configuring the Authentication Server......................................................................................................................222.2 System Monitoring.......................................................................................................................................................242.2.1 System performance..................................................................................................................................................242.3 Data Maintenance.........................................................................................................................................................262.3.1 Operation Log Dump.................................................................................................................................................262.3.2 Alarm Dump..............................................................................................................................................................282.3.3 Exporting an Acceptance Report...............................................................................................................................302.4 Log Management..........................................................................................................................................................302.4.1 Viewing System Operation Logs...............................................................................................................................312.5 Task Management.........................................................................................................................................................322.5.1 Managing Background Tasks....................................................................................................................................322.5.2 Viewing Details About Background Task Results....................................................................................................332.6 License Management....................................................................................................................................................342.6.1 Applying for a License..............................................................................................................................................342.6.2 Importing a System License......................................................................................................................................36
OceanStor InfraControlAdmin Guide Contents
Issue 04 (2015-02-28) Huawei Proprietary and ConfidentialCopyright © Huawei Technologies Co., Ltd.
v
2.6.3 Exporting a System License......................................................................................................................................362.6.4 Viewing a System License........................................................................................................................................372.7 Hierarchical Management.............................................................................................................................................382.7.1 Hierarchical NMS......................................................................................................................................................382.7.2 Managing Trap IP Addresses....................................................................................................................................402.7.3 Trap Configuration....................................................................................................................................................412.8 Discovery Management................................................................................................................................................452.8.1 Resources Management.............................................................................................................................................452.8.2 Managing Resource Discovery..................................................................................................................................462.8.3 Managing Resource Groups......................................................................................................................................832.9 Template Management.................................................................................................................................................842.9.1 Managing SNMP Templates.....................................................................................................................................842.10 Server Information......................................................................................................................................................902.10.1 Notification Server..................................................................................................................................................902.10.2 Modifying the SFTP Server.....................................................................................................................................94
3 Managing InfraControl System User.......................................................................................953.1 Default User Information..............................................................................................................................................963.2 Password Changing Rules............................................................................................................................................97
4 Topology Management...............................................................................................................984.1 Physical View...............................................................................................................................................................994.2 User-Defined View.....................................................................................................................................................100
5 Resource Management.............................................................................................................1025.1 Overview....................................................................................................................................................................1045.2 Managing Disk Arrays................................................................................................................................................1055.2.1 Managing All Disk Arrays......................................................................................................................................1055.2.2 Viewing the Summary.............................................................................................................................................1065.2.3 Managing Storage Resources..................................................................................................................................1085.2.4 Managing Mappings................................................................................................................................................1115.2.5 Viewing Free Space.................................................................................................................................................1125.2.6 Managing Current Alarms.......................................................................................................................................1175.3 Managing Fibre Channel Switches.............................................................................................................................1205.3.1 Managing All Fibre Channel Switches....................................................................................................................1205.3.2 Viewing the Summary.............................................................................................................................................1215.3.3 Viewing Port Information........................................................................................................................................1225.3.4 Viewing Zone Information......................................................................................................................................1235.3.5 Managing Current Alarms.......................................................................................................................................1235.4 Managing Ethernet Switches......................................................................................................................................1265.4.1 Managing All Ethernet Switches.............................................................................................................................1265.4.2 Viewing Summary...................................................................................................................................................1275.4.3 Viewing Port Information........................................................................................................................................128
OceanStor InfraControlAdmin Guide Contents
Issue 04 (2015-02-28) Huawei Proprietary and ConfidentialCopyright © Huawei Technologies Co., Ltd.
vi
5.4.4 Viewing VLANs Information..................................................................................................................................1295.4.5 Viewing Trunks Information...................................................................................................................................1295.4.6 Managing Current Alarms.......................................................................................................................................1305.5 Managing Servers.......................................................................................................................................................1325.5.1 Managing All Servers..............................................................................................................................................1325.5.2 Viewing Summary...................................................................................................................................................1335.5.3 Viewing Hardware Information...............................................................................................................................1345.5.4 Viewing Host Path Graph........................................................................................................................................1365.5.5 Viewing Logical Relationship Graph......................................................................................................................1375.5.6 Viewing Free Space.................................................................................................................................................1375.5.7 Managing Current Alarms.......................................................................................................................................1385.6 Managing Virtualization Servers................................................................................................................................1415.6.1 Managing All Virtualization Servers.......................................................................................................................1415.6.2 Viewing Summary...................................................................................................................................................1425.6.3 Viewing Hardware Information...............................................................................................................................1435.6.4 Viewing the Host Path Graph..................................................................................................................................1455.6.5 Viewing Free Space.................................................................................................................................................1465.6.6 Managing Current Alarms.......................................................................................................................................1475.7 Managing Virtual Machines.......................................................................................................................................1505.7.1 Viewing Information About ALL Virtual Machines...............................................................................................1505.7.2 Viewing Summary...................................................................................................................................................1515.7.3 Viewing Hardware Information...............................................................................................................................1525.7.4 Viewing Host Path Graph........................................................................................................................................1545.7.5 Viewing Free Space.................................................................................................................................................1555.7.6 Managing Current Alarms.......................................................................................................................................1565.8 Managing Oracle Instances........................................................................................................................................1595.8.1 Viewing Information About All Oracle Instances...................................................................................................1595.8.2 Viewing Detailed Oracle Instance Information.......................................................................................................1595.9 Managing SQL Server Instances................................................................................................................................1615.9.1 Viewing Information About All SQL Server Instances..........................................................................................1615.9.2 Viewing Detailed Information About a SQL Server Instance.................................................................................162
6 Alarm Management...................................................................................................................1646.1 Overview....................................................................................................................................................................1666.2 Managing Alarms.......................................................................................................................................................1696.2.1 Managing Current Alarms.......................................................................................................................................1696.2.2 Managing Historical Alarms...................................................................................................................................1726.2.3 Managing Events.....................................................................................................................................................1736.2.4 Managing Alarm Filtering ......................................................................................................................................1756.3 Synchronizing the Alarms..........................................................................................................................................1756.3.1 Manual Synchronization..........................................................................................................................................1766.3.2 Automatic Synchronization.....................................................................................................................................177
OceanStor InfraControlAdmin Guide Contents
Issue 04 (2015-02-28) Huawei Proprietary and ConfidentialCopyright © Huawei Technologies Co., Ltd.
vii
6.4 Masking the Alarms....................................................................................................................................................1776.4.1 Creating a Mask Rule..............................................................................................................................................1786.4.2 Modifying a Mask Rule...........................................................................................................................................1806.4.3 Managing Masked Alarms.......................................................................................................................................1816.5 Alarm Notification......................................................................................................................................................1826.5.1 Managing Remote Notification...............................................................................................................................1826.5.2 Configuring the Sound Notification........................................................................................................................1906.6 Threshold Alarms.......................................................................................................................................................191
7 Report Management..................................................................................................................1937.1 Preset Report Management.........................................................................................................................................1947.1.1 Viewing the System Performance Summary...........................................................................................................1947.1.2 Preset Report of a Disk Array..................................................................................................................................1957.1.3 Preset Report of a Heterogeneous Array.................................................................................................................2057.1.4 Preset Report of a Unified Storage System.............................................................................................................2117.2 Custom Report Management......................................................................................................................................2247.2.1 Viewing a User-defined Disk Array Report............................................................................................................2247.2.2 Viewing a User-defined Report for Unified Storage...............................................................................................2557.2.3 Viewing Capacity Trend Prediction Reports...........................................................................................................3027.3 Report Task Management...........................................................................................................................................3037.3.1 Periodic Report Task...............................................................................................................................................3037.3.2 Run Log...................................................................................................................................................................3107.4 Report Configuration Management............................................................................................................................3127.4.1 Configuring Data Collection...................................................................................................................................3127.4.2 Configuring a Resource Group................................................................................................................................315
8 FAQ..............................................................................................................................................3208.1 InfraControl Reports User Account Lockout When Discovering a Device...............................................................3218.2 Firefox Displays an Adobe Flash Plugin Crash When the Firefox Is Used to Open the Topology Management Page ofthe InfraControl................................................................................................................................................................3218.3 There are some mistakes Displayed After a User Enters the IP Address in the Address Box of Internet Explorer andPresses Enter.....................................................................................................................................................................3228.4 Statistical Object Missing in an Exported Report When the Name of NetApp Arrays Contains a #.........................3228.5 InfraControl Report Time Is Different from the Actual Time....................................................................................3238.6 Some URLs Fail to Be Used to Access the Network Management Page...................................................................323
OceanStor InfraControlAdmin Guide Contents
Issue 04 (2015-02-28) Huawei Proprietary and ConfidentialCopyright © Huawei Technologies Co., Ltd.
viii
1 Overview
About This Chapter
This chapter provides a general description of the InfraControl and basic operations on theInfraControl.
1.1 InfraControl OverviewThe InfraControl provides comprehensive functions and complies with the unified interfacestandard. Managing network resources on the InfraControl improves service quality oftransmission network and lowers maintenance costs.
1.2 Basic ConfigurationBefore managing a network element (NE) on the management system, you need to perform basicconfiguration on the NE and the management system. For the detailed configuration proceduresof the automatic discovery function for various network elements (NEs), please see theOceanStor InfraControl V100R002C01 Initial Discovery Configuration Guide 01.
1.3 Customizing the Home PanelYou can select frequently used components to customize the management system home pageand save the home page layout.
1.4 Changing the Current PasswordIt is recommended that you periodically change your password to ensure security. This sectiondescribes how to change your password.
1.5 Viewing the Software VersionThis section explains how to view the software version and support information of themanagement system.
1.6 Obtaining Help InformationThis section describes how to obtain help information of the management system and get toknow basic operations on the management system.
1.7 LogoutLogout enables you to exit the management system or log in to the management system againas another user.
OceanStor InfraControlAdmin Guide 1 Overview
Issue 04 (2015-02-28) Huawei Proprietary and ConfidentialCopyright © Huawei Technologies Co., Ltd.
1
1.1 InfraControl OverviewThe InfraControl provides comprehensive functions and complies with the unified interfacestandard. Managing network resources on the InfraControl improves service quality oftransmission network and lowers maintenance costs.
The InfraControl software is intended for enterprise data centers and used to manage SANnetwork environments in a unified fashion. The software provides the System Manager, SystemReporter, and SAN Insight components. The System Manager is used for centralizedmanagement of Huawei T series, network attached storage (NAS) series, virtual intelligentstorage (VIS) series and virtual tape library (VTL) backup products. The System Managerprovides centralized alarm monitoring, storage capacity management, logical relationship andstatus management of internal system components, and logical management of storage systemsand external hosts. The System Reporter provides built-in capacity reports and performancereports for storage systems. In addition, it provides periodic task report and self-defined reportfunctions, identifying bottlenecks in performance and capacity increase trends based on differentstatistical granularities. The storage area network (SAN) Insight provides end-to-endmanagement of storage, internet small computer system interface (iSCSI) switches, FibreChannel switches, physical hosts (Windows, RedHat Linux, or SUSE Linux), VMware virtualmachines, and applications. It manages both storage systems and storage directories in agraphical user interface (GUI) manner, simplifying management.
The InfraControl focuses on service management and integrates management of networkresources and various applications, providing network administrators with an integrated solutionthat embodies resources management and network service management. It has the followingfunctions:
l Resource ManagementResource management: You can manage and monitor discovered storage devices, switches,hosts/virtual machines, and database applications.
l Alarm ManagementAlarm management: By viewing the current alarms on a network element (NE), you candiscover and handle the NE faults in time.The alarm notification means is user-defined, including mail, short message (SMS), andsound alarm notification means. You can set alarm masking to mask alarms that you donot want to receive. You can also synchronize alarms manually or periodically on amonitored NE.
l 7 Report ManagementPerformance statistics: You can learn about the operating status of a storage device byviewing performance statistics on the InfraControl. This function provides performanceand capacity reports, facilitating quick and periodic checking of the storage systemperformance. The reports show performances of LUNs, ports, controllers, and files systemduring the past 24 hours, 7 days, and 30 days. Detailed performance data of these objectsduring the periods are sorted by input and output operations per second (IOPS), bandwidth,latency, and other factors. Disks, ports, central processing unit (CPU), LUNs, and filesystems ranking the top five are displayed on the report. Capacity usage of file systems,storage pools, and thin LUNs during the 24 hours, 7 days, and 30 days are provided by thecapacity usage report. You can self-define reports and auxiliary period implementationpolicies to periodically generate reports of performance indicators and capacity usage that
OceanStor InfraControlAdmin Guide 1 Overview
Issue 04 (2015-02-28) Huawei Proprietary and ConfidentialCopyright © Huawei Technologies Co., Ltd.
2
you are concerned with. The report will be automatically sent to the specified administrator.The self-defined performance and capacity reports meet tailored user demands. Thisfunction enables you to define all performance indicators and capacity usage of all theobjects in a past period of time you specify in the reports.
l 2 System ManagementSystem management: This function enables you to perform configuration of system securitypolicies, system performance monitoring, data maintenance management, operation logmanagement, task management, license management, hierarchical management,notification server settings, system resource management, Simple Network ManagementProtocol (SNMP) module management, and secure file transfer protocol (SFTP) serversettings.
NOTE
If the description in the online help differs from that on the InfraControl interface, the latter prevails.
1.2 Basic ConfigurationBefore managing a network element (NE) on the management system, you need to perform basicconfiguration on the NE and the management system. For the detailed configuration proceduresof the automatic discovery function for various network elements (NEs), please see theOceanStor InfraControl V100R002C01 Initial Discovery Configuration Guide 01.
1.3 Customizing the Home PanelYou can select frequently used components to customize the management system home pageand save the home page layout.
Context
The management system presets summaries about certain important functions. These summariesserve as components for users to choose.
After selecting Faults and Risks, click . The Details About Faults and Risks dialog box isdisplayed. In the dialog box, you can view fault and risk details about the device. You can alsoclick Send Email to set (add or delete) a recipient's email address. The fault and disk detailswill be sent to the added email address.
After you select the Device Statuscomponent, click the Status Distribution bar chart to go tothe Device Status List dialog box. In the Device Status List dialog box, you can click a devicename to view details about the device status.
Procedure
Step 1 Customizing panel
1. On the menu bar, click Home.
2. Click Customize Panels.The Customize Panels dialog box is displayed.
3. Select the components to be displayed on the management system home page.
OceanStor InfraControlAdmin Guide 1 Overview
Issue 04 (2015-02-28) Huawei Proprietary and ConfidentialCopyright © Huawei Technologies Co., Ltd.
3
4. Click OK, The panel is customized successfully.
Step 2 Saving the layout
1. (Optional) Click the component name, and move the components to proper positions.
2. Click Save Layout, The current layout is saved successfully.
----End
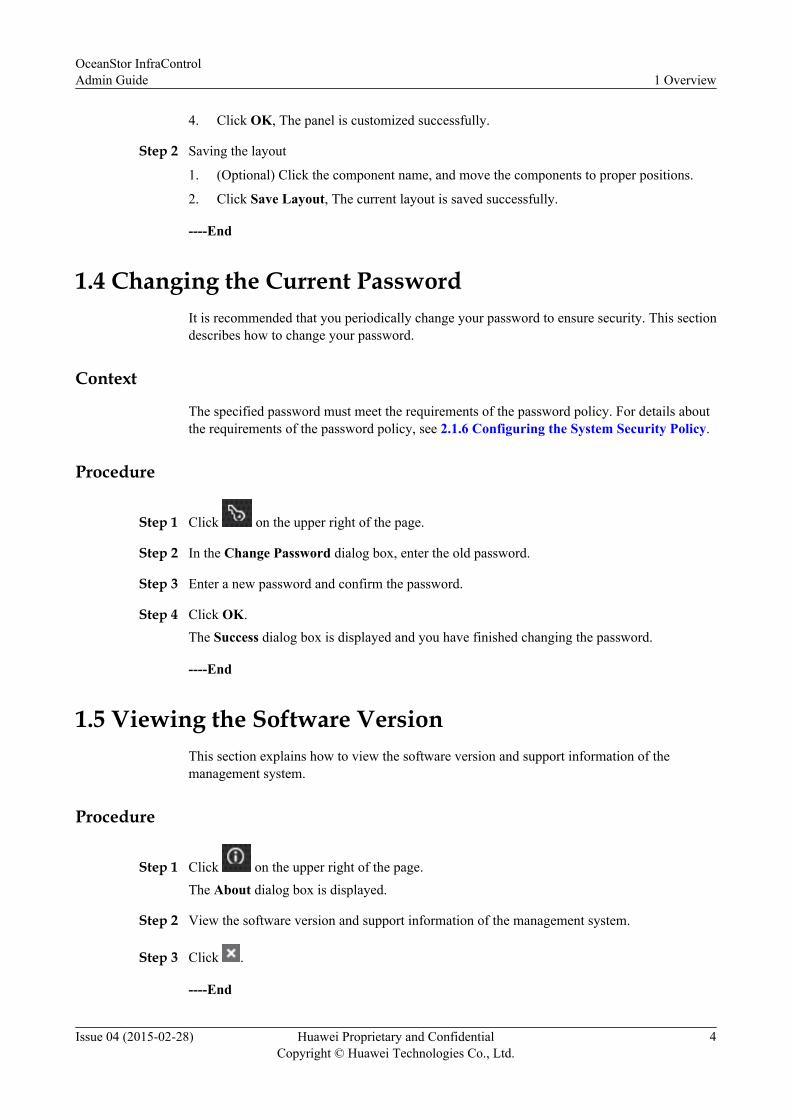
1.4 Changing the Current PasswordIt is recommended that you periodically change your password to ensure security. This sectiondescribes how to change your password.
Context
The specified password must meet the requirements of the password policy. For details aboutthe requirements of the password policy, see 2.1.6 Configuring the System Security Policy.
Procedure
Step 1 Click on the upper right of the page.
Step 2 In the Change Password dialog box, enter the old password.
Step 3 Enter a new password and confirm the password.
Step 4 Click OK.The Success dialog box is displayed and you have finished changing the password.
----End
1.5 Viewing the Software VersionThis section explains how to view the software version and support information of themanagement system.
Procedure
Step 1 Click on the upper right of the page.The About dialog box is displayed.
Step 2 View the software version and support information of the management system.
Step 3 Click .
----End
OceanStor InfraControlAdmin Guide 1 Overview
Issue 04 (2015-02-28) Huawei Proprietary and ConfidentialCopyright © Huawei Technologies Co., Ltd.
4
1.6 Obtaining Help InformationThis section describes how to obtain help information of the management system and get toknow basic operations on the management system.
Procedure
Step 1 Click on the upper right of the page.The management system help information is displayed.
Step 2 Check the help information.
Step 3 Click .
----End
1.7 LogoutLogout enables you to exit the management system or log in to the management system againas another user.
Procedure
Step 1 Click on the upper right of the page.The Warning dialog box is displayed.
Step 2 Carefully read the content in the dialog box and click OK.The management system login page is displayed.
----End
OceanStor InfraControlAdmin Guide 1 Overview
Issue 04 (2015-02-28) Huawei Proprietary and ConfidentialCopyright © Huawei Technologies Co., Ltd.
5
2 System Management
About This Chapter
This chapter describes system management on the management system, including functions suchas system administrators configuration, system monitoring, data maintenance, log management,task management, license management, and hierarchical management. These functions enableyou to configure system security policies, monitor service management and system performance,export and dump system operation logs, manage rights and domains, import and export licenses,and monitor background tasks on the management system.
2.1 System AdministratorsConfiguring the system administrators helps guarantee the management system and datasecurity.
2.2 System MonitoringThis section describes system performance management.
2.3 Data MaintenanceDuring the system operation, operation logs and alarms will be generated, recording operatingconditions of the system. With the data maintenance function on the management system, youcan dump operation logs and alarms and save them to the management system server.
2.4 Log ManagementThis section describes how to manage system operation logs. The system operation logs recordoperations performed by administrators on the management system. The log managementfunction of the management system enables you to query, view, and export operation logs.
2.5 Task ManagementThis chapter describes background task management on the management system.
2.6 License ManagementA license controls application scope, functions, and expiration date of products. This chapterdescribes how to view license information, and import and export license files on themanagement system.
2.7 Hierarchical Management
OceanStor InfraControlAdmin Guide 2 System Management
Issue 04 (2015-02-28) Huawei Proprietary and ConfidentialCopyright © Huawei Technologies Co., Ltd.
6
The hierarchical management function of the InfraControl balances processing capabilitiesamong InfraControl servers. Each InfraControl server can be connected to network elementsdirectly or through a lower-layer InfraControl server.
2.8 Discovery ManagementAfter the NE is discovered, it is automatically displayed in the resource list of the managementsystem. In the case of an NE discovery failure caused by network interruption, you can manuallyadd NEs or stop discovering NEs.
2.9 Template ManagementThe management system provides three default SNMP templates. You can also create newSNMP templates as required.
2.10 Server InformationThis section describes how to manage information about SFTP servers, including protocol types,user names, and passwords.
OceanStor InfraControlAdmin Guide 2 System Management
Issue 04 (2015-02-28) Huawei Proprietary and ConfidentialCopyright © Huawei Technologies Co., Ltd.
7

2.1 System AdministratorsConfiguring the system administrators helps guarantee the management system and datasecurity.
2.1.1 Introduction to System AdministratorsConfiguring the system administrators can implement the configuration of system securitypolicy, permission/domain-specific management of the management system, restriction to theIP addresses that access the management system, and can monitor and manage onlineadministrators in real time.
The system security policy contains the password policy, login policy, and session timeoutduration.
l The password policy defines the minimum length and complexity of the passwords of thesystem administrators.
l The session timeout duration refers to the period in which the session between the systemadministrator and the management system has been interrupted because of timeout. Anyoperations of the system administrator on the management system will clear the sessiontimeout duration and restart the time counting.If the system administrator performs no operation within the timeout duration after loggingin to the management system, the current session will be interrupted because of timeout.When the system administrator wants to perform operations on the management systemagain, the system administrator needs to re-log in to the management system.
l The login policy defines whether the system will be locked after the password has beenentered incorrectly for a certain consecutive times within 10 minutes and when the systemwill be unlocked automatically if the system is locked.
The permission/domain management of the management system and the restriction to the IPaddresses that access the management system are implemented by configuring the administratorgroups and administrators as follows:
l The administrator groups are collections of the operation permissions. You can assign anadministrator group to administrator so that the administrator can have the permission onthis administrator group.
l The system provides the default administrator admin. The default administrator has alloperation permission and can manage all resources. In addition, the default administratorcannot be modified. You can create a new administrator and select an administrator groupand resources for this administrator to implement the permission/domain-specificmanagement of the management system.
l You can select the IP address segments that can access the management system for anadministrator to implement the restriction of IP addresses that access the managementsystem.
2.1.2 Configuration ProcessThe configuration process provides the procedures for configuring the system security policy,administrator groups, and administrators.
OceanStor InfraControlAdmin Guide 2 System Management
Issue 04 (2015-02-28) Huawei Proprietary and ConfidentialCopyright © Huawei Technologies Co., Ltd.
8

Figure 2-1 shows the process for configuring the system administrators.
Figure 2-1 Process for configuring the system administrators
Start
Configure system security polices
Create administrator groups
Mandatory Optional
Create administrators
End
Configure the authentication server
The following table lists the tasks for configuring the system administrators.
Table 2-1 Tasks for configuring the system administrators
Task Description
Configuring the System Security Policy OptionalThe management system provides the defaultsecurity policy. You can modify theconfiguration of the security policy toguarantee the system security.
Creating an Administrator Group OptionalThe management system provides threedefault administrator groups. This task isrequired when the permissions of the defaultadministrator groups cannot meet therequirements on permissions.
Creating an Administrator OptionalThe system provides the default administratoradmin. This task is required when you needto implement permission/domain-specificmanagement of the management system.
OceanStor InfraControlAdmin Guide 2 System Management
Issue 04 (2015-02-28) Huawei Proprietary and ConfidentialCopyright © Huawei Technologies Co., Ltd.
9
Task Description
Configuring the Authentication Server OptionalThis task is required when RADIUSauthentication is adopted for theadministrator.
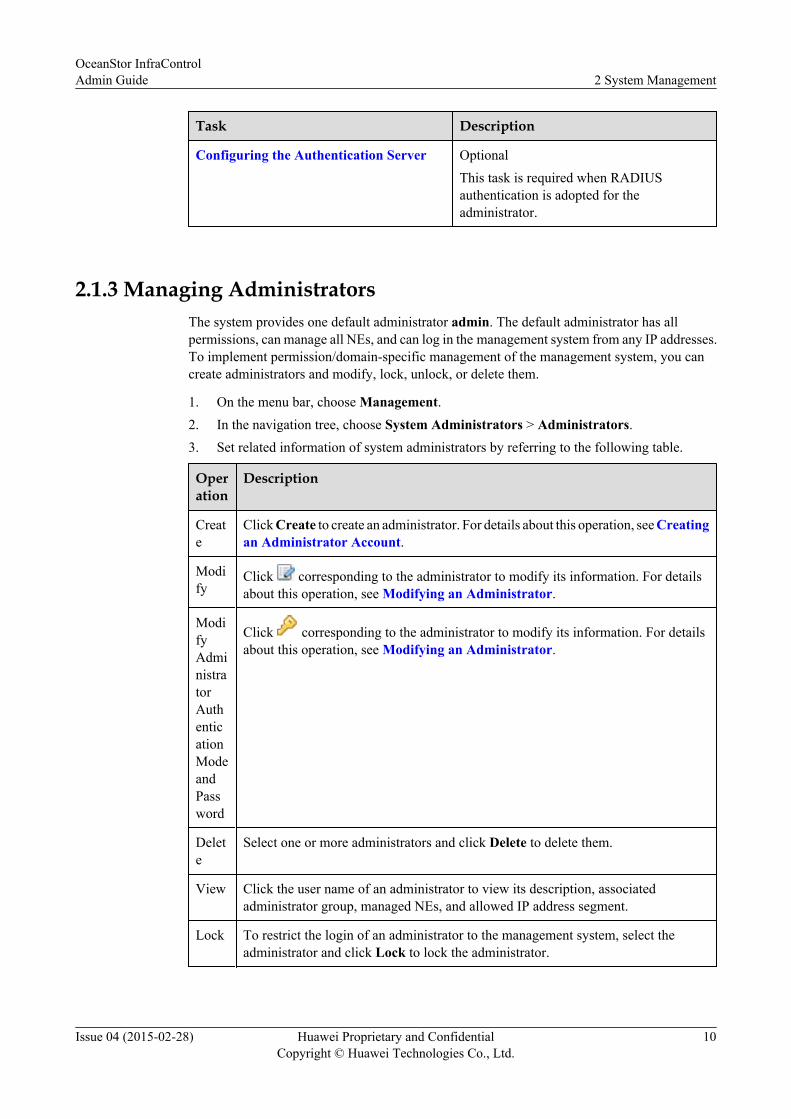
2.1.3 Managing AdministratorsThe system provides one default administrator admin. The default administrator has allpermissions, can manage all NEs, and can log in the management system from any IP addresses.To implement permission/domain-specific management of the management system, you cancreate administrators and modify, lock, unlock, or delete them.
1. On the menu bar, choose Management.2. In the navigation tree, choose System Administrators > Administrators.3. Set related information of system administrators by referring to the following table.
Operation
Description
Create
Click Create to create an administrator. For details about this operation, see Creatingan Administrator Account.
Modify
Click corresponding to the administrator to modify its information. For detailsabout this operation, see Modifying an Administrator.
ModifyAdministratorAuthenticationModeandPassword
Click corresponding to the administrator to modify its information. For detailsabout this operation, see Modifying an Administrator.
Delete
Select one or more administrators and click Delete to delete them.
View Click the user name of an administrator to view its description, associatedadministrator group, managed NEs, and allowed IP address segment.
Lock To restrict the login of an administrator to the management system, select theadministrator and click Lock to lock the administrator.
OceanStor InfraControlAdmin Guide 2 System Management
Issue 04 (2015-02-28) Huawei Proprietary and ConfidentialCopyright © Huawei Technologies Co., Ltd.
10

Operation
Description
Unlock
Select the locked administrator and click Unlock to unlock the administrator.
Creating an Administrator AccountWhen you need to perform the permission/domain specific management on the managementsystem, you can join an administrator group to obtain the permission on this administrator group,select the NEs, and set the IP address segment for logging in to the management system.
PrerequisitesAn administrator group has been created.
Procedure
Step 1 On the menu bar, choose Management.
Step 2 In the navigation tree, choose System Administrators > Administrators.
Step 3 In the function pane, click Create.The Create Administrator dialog box is displayed.
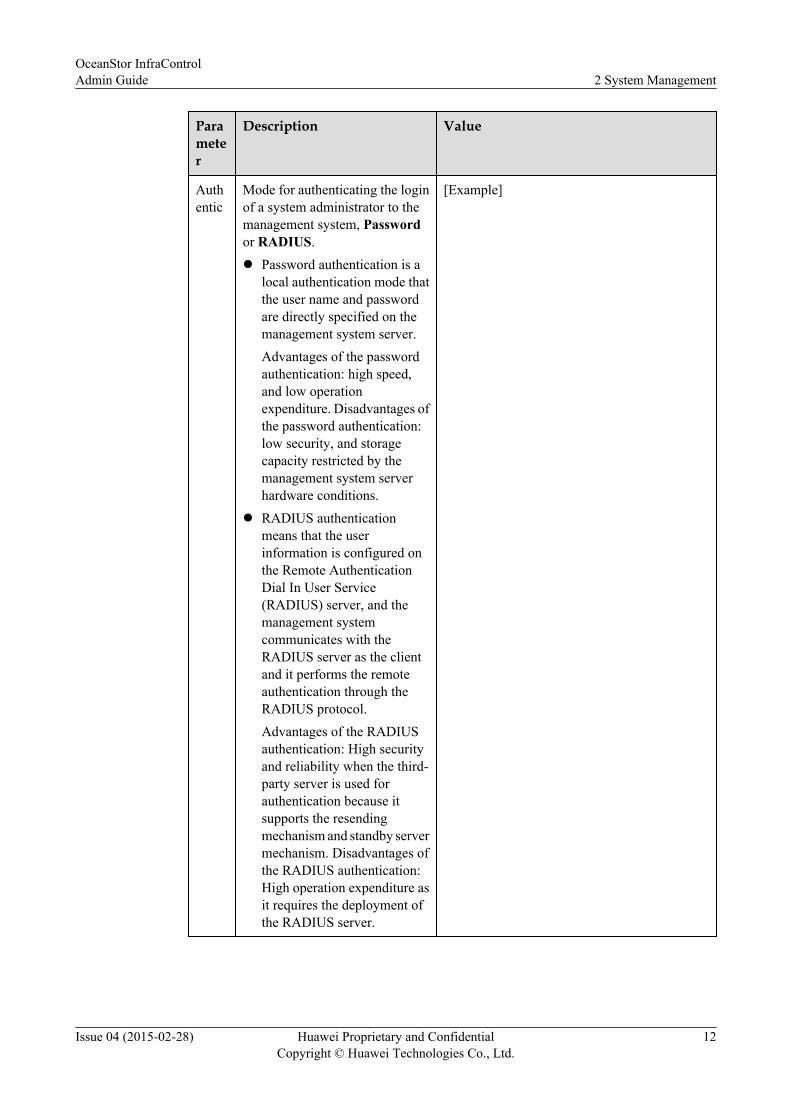
Step 4 Set the parameters of the new administrator. The following table describes the parameters.
Parameter
Description Value
Username
User name for logging in to themanagement system. After anadministrator is created, its username cannot be changed.
[Example]user01
OceanStor InfraControlAdmin Guide 2 System Management
Issue 04 (2015-02-28) Huawei Proprietary and ConfidentialCopyright © Huawei Technologies Co., Ltd.
11
Parameter
Description Value
Authentic
Mode for authenticating the loginof a system administrator to themanagement system, Passwordor RADIUS.l Password authentication is a
local authentication mode thatthe user name and passwordare directly specified on themanagement system server.Advantages of the passwordauthentication: high speed,and low operationexpenditure. Disadvantages ofthe password authentication:low security, and storagecapacity restricted by themanagement system serverhardware conditions.
l RADIUS authenticationmeans that the userinformation is configured onthe Remote AuthenticationDial In User Service(RADIUS) server, and themanagement systemcommunicates with theRADIUS server as the clientand it performs the remoteauthentication through theRADIUS protocol.Advantages of the RADIUSauthentication: High securityand reliability when the third-party server is used forauthentication because itsupports the resendingmechanism and standby servermechanism. Disadvantages ofthe RADIUS authentication:High operation expenditure asit requires the deployment ofthe RADIUS server.
[Example]
OceanStor InfraControlAdmin Guide 2 System Management
Issue 04 (2015-02-28) Huawei Proprietary and ConfidentialCopyright © Huawei Technologies Co., Ltd.
12
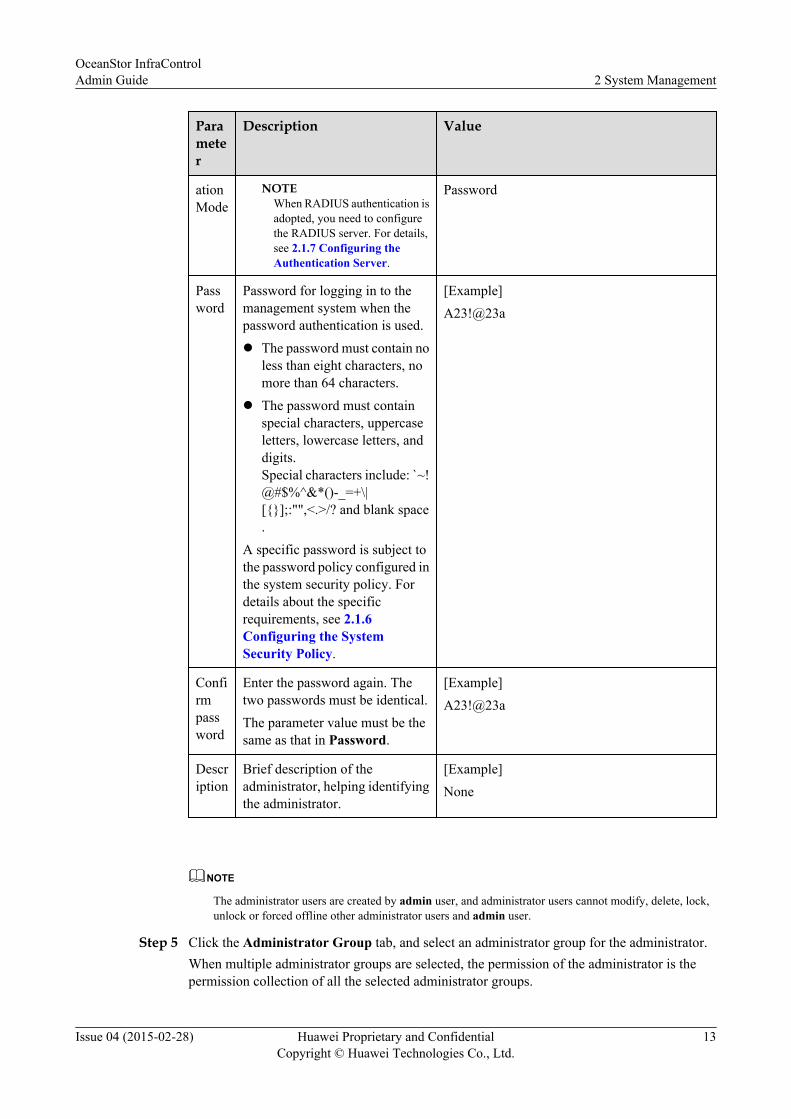
Parameter
Description Value
ationMode
NOTEWhen RADIUS authentication isadopted, you need to configurethe RADIUS server. For details,see 2.1.7 Configuring theAuthentication Server.
Password
Password
Password for logging in to themanagement system when thepassword authentication is used.l The password must contain no
less than eight characters, nomore than 64 characters.
l The password must containspecial characters, uppercaseletters, lowercase letters, anddigits.Special characters include: ̀ ~!@#$%^&*()-_=+\|[{}];:"",<.>/? and blank space.
A specific password is subject tothe password policy configured inthe system security policy. Fordetails about the specificrequirements, see 2.1.6Configuring the SystemSecurity Policy.
[Example]A23!@23a
Confirmpassword
Enter the password again. Thetwo passwords must be identical.The parameter value must be thesame as that in Password.
[Example]A23!@23a
Description
Brief description of theadministrator, helping identifyingthe administrator.
[Example]None
NOTE
The administrator users are created by admin user, and administrator users cannot modify, delete, lock,unlock or forced offline other administrator users and admin user.
Step 5 Click the Administrator Group tab, and select an administrator group for the administrator.When multiple administrator groups are selected, the permission of the administrator is thepermission collection of all the selected administrator groups.
OceanStor InfraControlAdmin Guide 2 System Management
Issue 04 (2015-02-28) Huawei Proprietary and ConfidentialCopyright © Huawei Technologies Co., Ltd.
13
Step 6 Optional: Click the Resource tab, and select manageable NEs.l You can select According to Resource Group to select resources by resource group for the
new administrator to manage.l You can select According to Resource Type to select resources by resource type for the
new administrator to manage.
Step 7 Optional: Click the Login Network Segment tab. Perform the following operations toconfigure the IP address segment list and then select one allowed IP address segment for theadministrator.Perform the following operations to set the IP network segment.
NOTE
The first field of an IP address must be an integer ranging from 1 to 223 (excluding 127), the last field mustnot be 0, and the other fields must be integers ranging from 0 to 255.
l Creating an IP network segment
1. Click Add.The Add Login Network Segment dialog box is displayed.
2. Set Start IP address, End IP address, and Description.3. Click OK.
l Modifying an IP network segment
1. Select an IP network segment and click Modify.The Modify Login Network Segment dialog box is displayed.
2. Set Start IP address, End IP address, and Description3. Click OK.
l Deleting an IP network segment
1. Select an IP network segment and click Delete.The Warning dialog box is displayed.
2. Click OK.
Step 8 Click OK.The Success dialog box is displayed indicating that the operation succeeded.
Step 9 Click OK.
The newly created administrator is displayed in Administrators.
----End
Modifying an AdministratorModifying an administrator includes modifying the authentication mode, password, description,and permission. You can also modify the administrator's domain and permission.
Contextl The default administrator admin can be modified only by itself. Editable information
includes the password, description, and IP network segment for accessing the managementsystem.
OceanStor InfraControlAdmin Guide 2 System Management
Issue 04 (2015-02-28) Huawei Proprietary and ConfidentialCopyright © Huawei Technologies Co., Ltd.
14
l If you forget the password of the default administrator admin, contact technical supportengineers.
l The administrator users cannot modify, delete, lock, unlock or forced offline otheradministrator users and admin user.
Procedure
Step 1 On the menu bar, choose Management.
Step 2 In the navigation tree, choose System Administrators > Administrators.
Step 3 You can modify the administrator's description, domain, and permission.
1. Click corresponding to the administrator to be modified.The Modify Administrator Information dialog box is displayed.
2. Set the parameters of the administrator, as described in Creating an AdministratorAccount.
3. Modify the permission, managed NEs, and allowed IP address segment of the administrator.l Click the Select Administrator Group tab, and select the administrator group as
required from the administrator group list.When multiple administrator groups are selected, the administrator's permission is thecombined permission of all the selected administrator groups.
l On the Select Resource tab page, select NEs to manage.l On the Select Login Network Segment tab page, select an IP address for the
administrator to log in to the management system.
NOTICEThe modification of administrator permission takes effect only after the administrator re-logs in to the management system. The modification of the NE information takes effectimmediately after the modification is performed without requiring relogin.
4. Click OK.The Success dialog box is displayed.
5. Click OK.
Step 4 You can modify the administrator's authentication mode and password.
1. Click corresponding to the administrator to be modified.The Modify Administrator Information dialog box is displayed.
2. Set the parameters of the new administrator. The following table describes the parameters.
OceanStor InfraControlAdmin Guide 2 System Management
Issue 04 (2015-02-28) Huawei Proprietary and ConfidentialCopyright © Huawei Technologies Co., Ltd.
15
Parameter Description Value
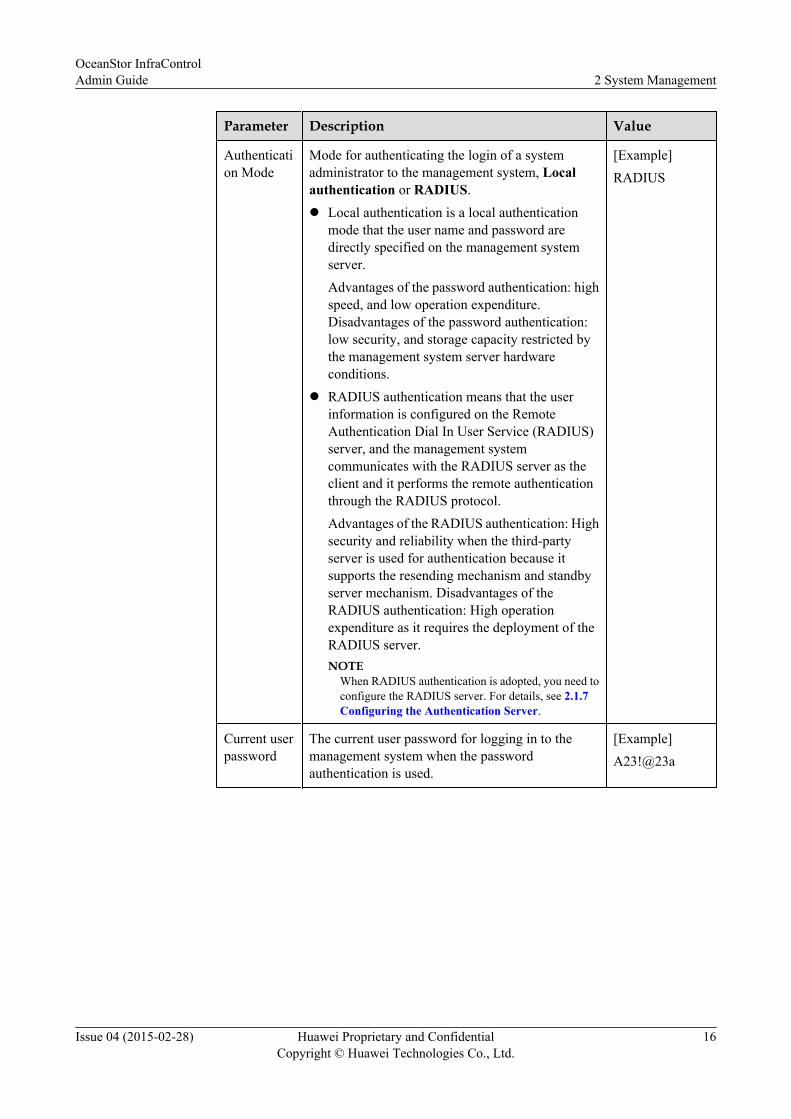
Authentication Mode
Mode for authenticating the login of a systemadministrator to the management system, Localauthentication or RADIUS.l Local authentication is a local authentication
mode that the user name and password aredirectly specified on the management systemserver.Advantages of the password authentication: highspeed, and low operation expenditure.Disadvantages of the password authentication:low security, and storage capacity restricted bythe management system server hardwareconditions.
l RADIUS authentication means that the userinformation is configured on the RemoteAuthentication Dial In User Service (RADIUS)server, and the management systemcommunicates with the RADIUS server as theclient and it performs the remote authenticationthrough the RADIUS protocol.Advantages of the RADIUS authentication: Highsecurity and reliability when the third-partyserver is used for authentication because itsupports the resending mechanism and standbyserver mechanism. Disadvantages of theRADIUS authentication: High operationexpenditure as it requires the deployment of theRADIUS server.NOTE
When RADIUS authentication is adopted, you need toconfigure the RADIUS server. For details, see 2.1.7Configuring the Authentication Server.
[Example]RADIUS
Current userpassword
The current user password for logging in to themanagement system when the passwordauthentication is used.
[Example]A23!@23a
OceanStor InfraControlAdmin Guide 2 System Management
Issue 04 (2015-02-28) Huawei Proprietary and ConfidentialCopyright © Huawei Technologies Co., Ltd.
16
Parameter Description Value
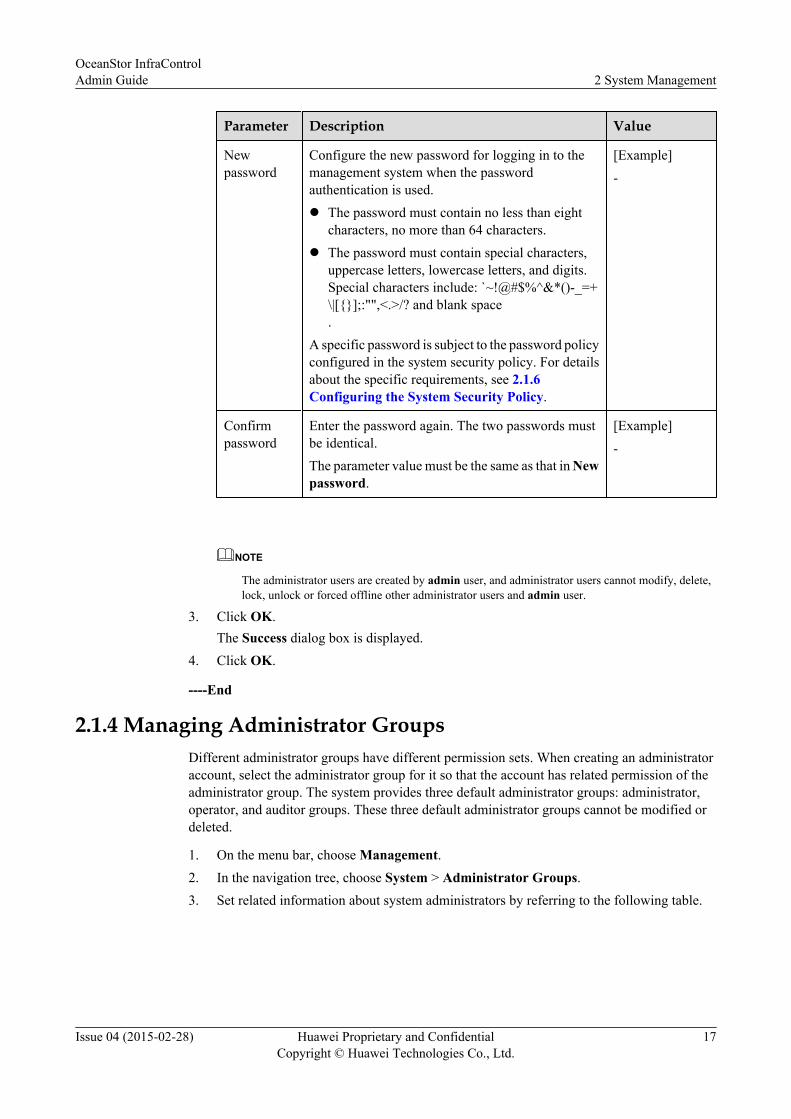
Newpassword
Configure the new password for logging in to themanagement system when the passwordauthentication is used.l The password must contain no less than eight
characters, no more than 64 characters.l The password must contain special characters,
uppercase letters, lowercase letters, and digits.Special characters include: `~!@#$%^&*()-_=+\|[{}];:"",<.>/? and blank space.
A specific password is subject to the password policyconfigured in the system security policy. For detailsabout the specific requirements, see 2.1.6Configuring the System Security Policy.
[Example]-
Confirmpassword
Enter the password again. The two passwords mustbe identical.The parameter value must be the same as that in Newpassword.
[Example]-
NOTE
The administrator users are created by admin user, and administrator users cannot modify, delete,lock, unlock or forced offline other administrator users and admin user.
3. Click OK.The Success dialog box is displayed.
4. Click OK.
----End
2.1.4 Managing Administrator GroupsDifferent administrator groups have different permission sets. When creating an administratoraccount, select the administrator group for it so that the account has related permission of theadministrator group. The system provides three default administrator groups: administrator,operator, and auditor groups. These three default administrator groups cannot be modified ordeleted.
1. On the menu bar, choose Management.2. In the navigation tree, choose System > Administrator Groups.3. Set related information about system administrators by referring to the following table.
OceanStor InfraControlAdmin Guide 2 System Management
Issue 04 (2015-02-28) Huawei Proprietary and ConfidentialCopyright © Huawei Technologies Co., Ltd.
17
Operation
Description
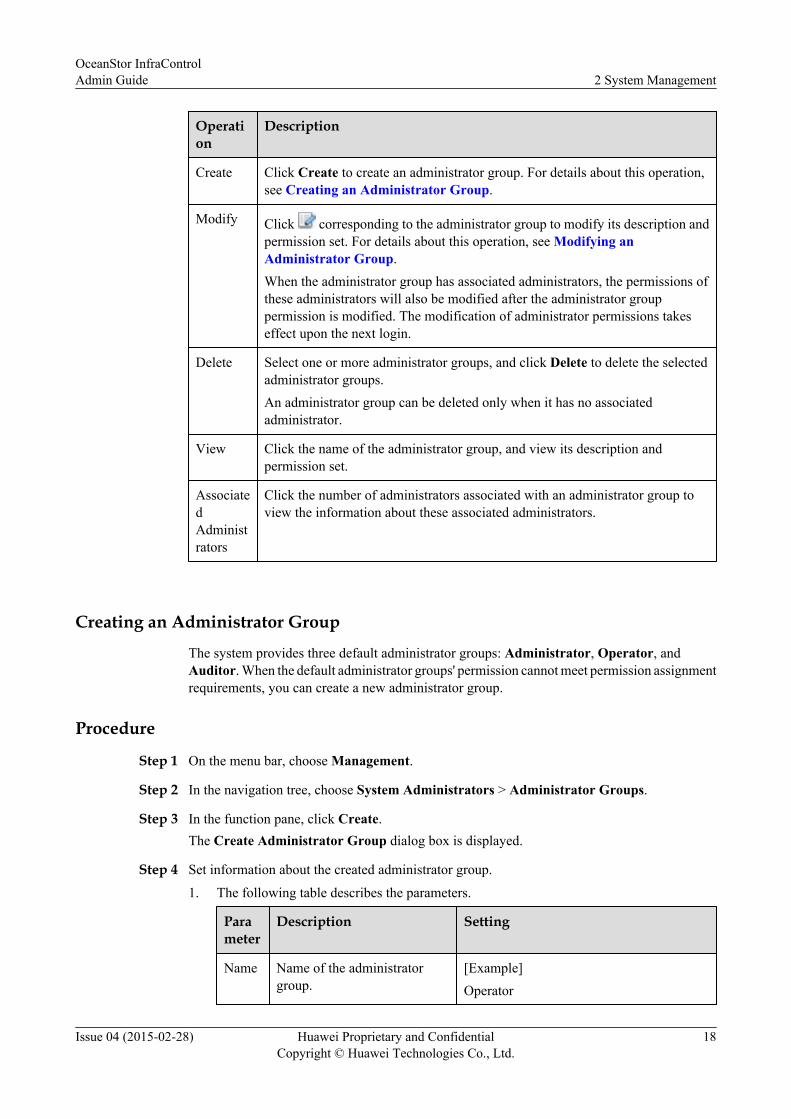
Create Click Create to create an administrator group. For details about this operation,see Creating an Administrator Group.
Modify Click corresponding to the administrator group to modify its description andpermission set. For details about this operation, see Modifying anAdministrator Group.When the administrator group has associated administrators, the permissions ofthese administrators will also be modified after the administrator grouppermission is modified. The modification of administrator permissions takeseffect upon the next login.
Delete Select one or more administrator groups, and click Delete to delete the selectedadministrator groups.An administrator group can be deleted only when it has no associatedadministrator.
View Click the name of the administrator group, and view its description andpermission set.
AssociatedAdministrators
Click the number of administrators associated with an administrator group toview the information about these associated administrators.
Creating an Administrator Group
The system provides three default administrator groups: Administrator, Operator, andAuditor. When the default administrator groups' permission cannot meet permission assignmentrequirements, you can create a new administrator group.
Procedure
Step 1 On the menu bar, choose Management.
Step 2 In the navigation tree, choose System Administrators > Administrator Groups.
Step 3 In the function pane, click Create.The Create Administrator Group dialog box is displayed.
Step 4 Set information about the created administrator group.
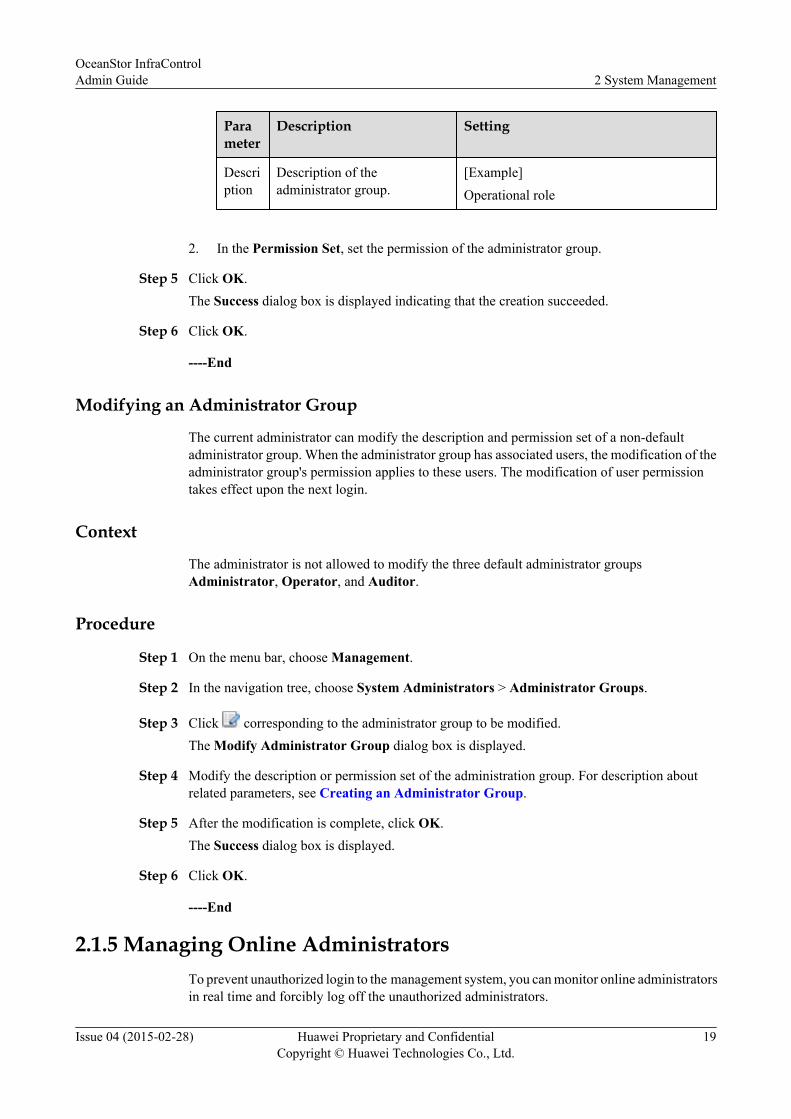
1. The following table describes the parameters.
Parameter
Description Setting
Name Name of the administratorgroup.
[Example]Operator
OceanStor InfraControlAdmin Guide 2 System Management
Issue 04 (2015-02-28) Huawei Proprietary and ConfidentialCopyright © Huawei Technologies Co., Ltd.
18
Parameter
Description Setting
Description
Description of theadministrator group.
[Example]Operational role
2. In the Permission Set, set the permission of the administrator group.
Step 5 Click OK.The Success dialog box is displayed indicating that the creation succeeded.
Step 6 Click OK.
----End
Modifying an Administrator Group
The current administrator can modify the description and permission set of a non-defaultadministrator group. When the administrator group has associated users, the modification of theadministrator group's permission applies to these users. The modification of user permissiontakes effect upon the next login.
Context
The administrator is not allowed to modify the three default administrator groupsAdministrator, Operator, and Auditor.
Procedure
Step 1 On the menu bar, choose Management.
Step 2 In the navigation tree, choose System Administrators > Administrator Groups.
Step 3 Click corresponding to the administrator group to be modified.The Modify Administrator Group dialog box is displayed.
Step 4 Modify the description or permission set of the administration group. For description aboutrelated parameters, see Creating an Administrator Group.
Step 5 After the modification is complete, click OK.The Success dialog box is displayed.
Step 6 Click OK.
----End
2.1.5 Managing Online AdministratorsTo prevent unauthorized login to the management system, you can monitor online administratorsin real time and forcibly log off the unauthorized administrators.
OceanStor InfraControlAdmin Guide 2 System Management
Issue 04 (2015-02-28) Huawei Proprietary and ConfidentialCopyright © Huawei Technologies Co., Ltd.
19
Prerequisitesl To view the online administrators, the current administrator must have the permission to
view the online administrators.l To forcibly log off an online administrator, the current administrator must have the
permission to forcibly log off an online administrator.
ContextSession is the connection set up between the browser and the server. One administrator cangenerate multiple sessions. The forcible logout operation is applicable to only the administratorthat generates the session concerned. For example, administrator user logs in to the same serverfrom clients A and B and generates sessions a and b. When you forcibly log off the administratoruser that generates session a, the administrator user that generates session b will not be affected.
Procedure
Step 1 On the menu bar, choose Management.
Step 2 In the navigation tree, choose System Administrators > Online Administrator.
Step 3 View online administrators and their login information on the Online Administrators page.
Step 4 Forcibly log out an administrator.1. Select an administrator you want to log out and click Force Offline.
The Warning dialog box is displayed.2. Click OK.
----End
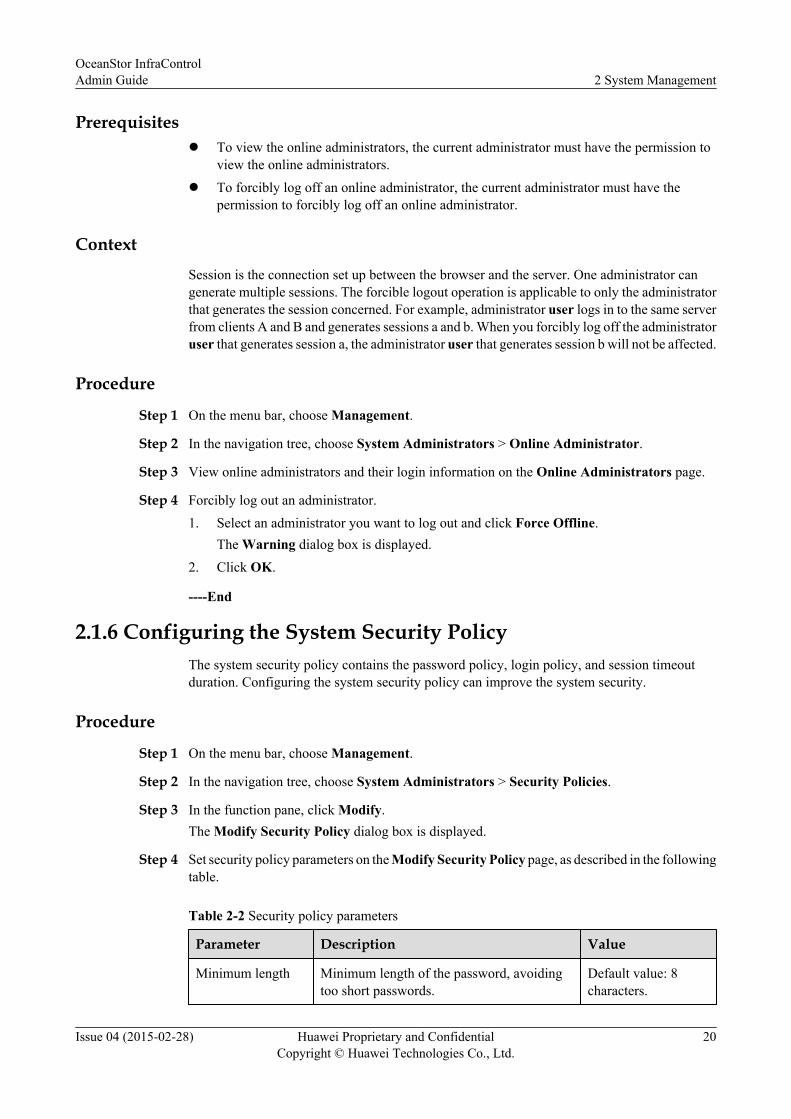
2.1.6 Configuring the System Security PolicyThe system security policy contains the password policy, login policy, and session timeoutduration. Configuring the system security policy can improve the system security.
Procedure
Step 1 On the menu bar, choose Management.
Step 2 In the navigation tree, choose System Administrators > Security Policies.
Step 3 In the function pane, click Modify.The Modify Security Policy dialog box is displayed.
Step 4 Set security policy parameters on the Modify Security Policy page, as described in the followingtable.
Table 2-2 Security policy parameters
Parameter Description Value
Minimum length Minimum length of the password, avoidingtoo short passwords.
Default value: 8characters.
OceanStor InfraControlAdmin Guide 2 System Management
Issue 04 (2015-02-28) Huawei Proprietary and ConfidentialCopyright © Huawei Technologies Co., Ltd.
20
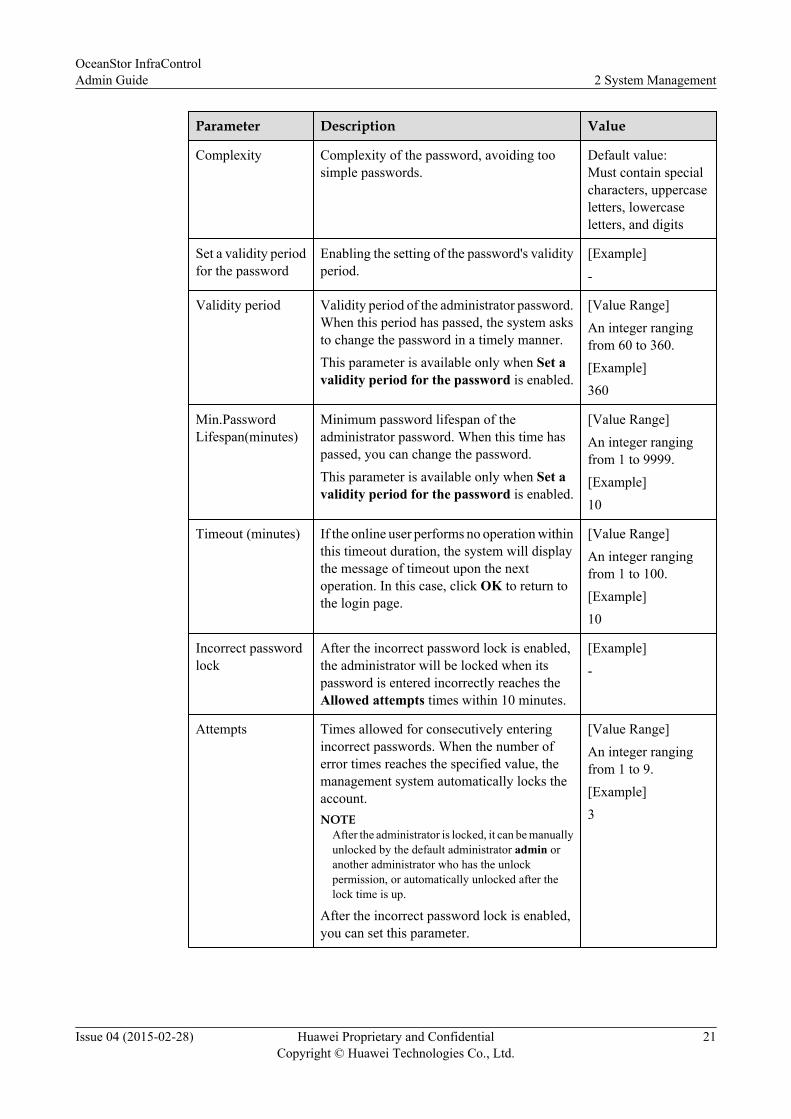
Parameter Description Value
Complexity Complexity of the password, avoiding toosimple passwords.
Default value:Must contain specialcharacters, uppercaseletters, lowercaseletters, and digits
Set a validity periodfor the password
Enabling the setting of the password's validityperiod.
[Example]-
Validity period Validity period of the administrator password.When this period has passed, the system asksto change the password in a timely manner.This parameter is available only when Set avalidity period for the password is enabled.
[Value Range]An integer rangingfrom 60 to 360.[Example]360
Min.PasswordLifespan(minutes)
Minimum password lifespan of theadministrator password. When this time haspassed, you can change the password.This parameter is available only when Set avalidity period for the password is enabled.
[Value Range]An integer rangingfrom 1 to 9999.[Example]10
Timeout (minutes) If the online user performs no operation withinthis timeout duration, the system will displaythe message of timeout upon the nextoperation. In this case, click OK to return tothe login page.
[Value Range]An integer rangingfrom 1 to 100.[Example]10
Incorrect passwordlock
After the incorrect password lock is enabled,the administrator will be locked when itspassword is entered incorrectly reaches theAllowed attempts times within 10 minutes.
[Example]-
Attempts Times allowed for consecutively enteringincorrect passwords. When the number oferror times reaches the specified value, themanagement system automatically locks theaccount.NOTE
After the administrator is locked, it can be manuallyunlocked by the default administrator admin oranother administrator who has the unlockpermission, or automatically unlocked after thelock time is up.
After the incorrect password lock is enabled,you can set this parameter.
[Value Range]An integer rangingfrom 1 to 9.[Example]3
OceanStor InfraControlAdmin Guide 2 System Management
Issue 04 (2015-02-28) Huawei Proprietary and ConfidentialCopyright © Huawei Technologies Co., Ltd.
21
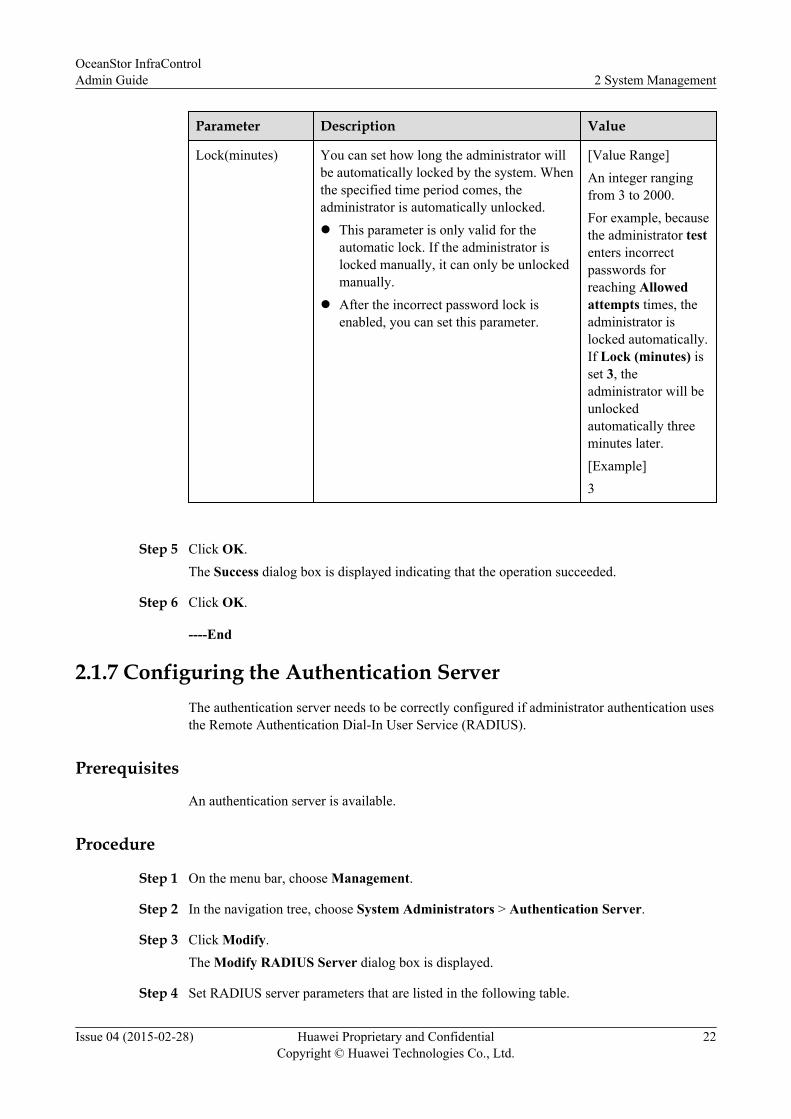
Parameter Description Value
Lock(minutes) You can set how long the administrator willbe automatically locked by the system. Whenthe specified time period comes, theadministrator is automatically unlocked.l This parameter is only valid for the
automatic lock. If the administrator islocked manually, it can only be unlockedmanually.
l After the incorrect password lock isenabled, you can set this parameter.
[Value Range]An integer rangingfrom 3 to 2000.For example, becausethe administrator testenters incorrectpasswords forreaching Allowedattempts times, theadministrator islocked automatically.If Lock (minutes) isset 3, theadministrator will beunlockedautomatically threeminutes later.[Example]3
Step 5 Click OK.The Success dialog box is displayed indicating that the operation succeeded.
Step 6 Click OK.
----End
2.1.7 Configuring the Authentication ServerThe authentication server needs to be correctly configured if administrator authentication usesthe Remote Authentication Dial-In User Service (RADIUS).
Prerequisites
An authentication server is available.
Procedure
Step 1 On the menu bar, choose Management.
Step 2 In the navigation tree, choose System Administrators > Authentication Server.
Step 3 Click Modify.The Modify RADIUS Server dialog box is displayed.
Step 4 Set RADIUS server parameters that are listed in the following table.
OceanStor InfraControlAdmin Guide 2 System Management
Issue 04 (2015-02-28) Huawei Proprietary and ConfidentialCopyright © Huawei Technologies Co., Ltd.
22
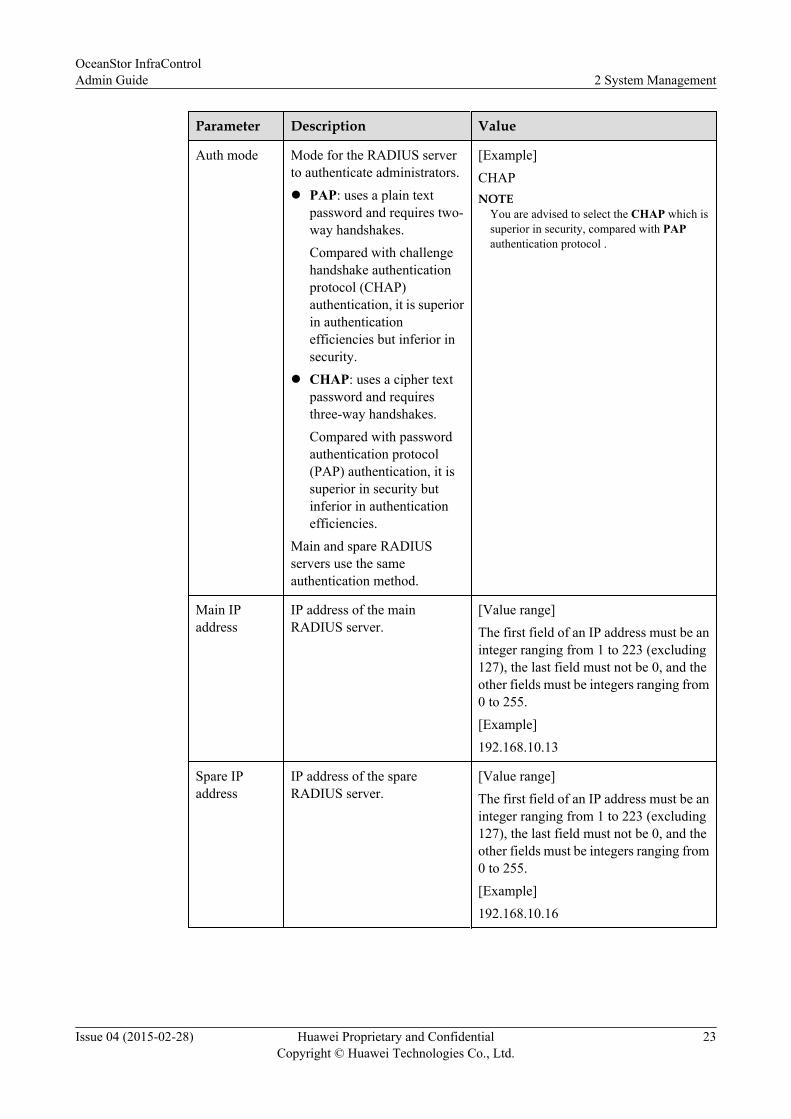
Parameter Description Value
Auth mode Mode for the RADIUS serverto authenticate administrators.l PAP: uses a plain text
password and requires two-way handshakes.Compared with challengehandshake authenticationprotocol (CHAP)authentication, it is superiorin authenticationefficiencies but inferior insecurity.
l CHAP: uses a cipher textpassword and requiresthree-way handshakes.Compared with passwordauthentication protocol(PAP) authentication, it issuperior in security butinferior in authenticationefficiencies.
Main and spare RADIUSservers use the sameauthentication method.
[Example]CHAPNOTE
You are advised to select the CHAP which issuperior in security, compared with PAPauthentication protocol .
Main IPaddress
IP address of the mainRADIUS server.
[Value range]The first field of an IP address must be aninteger ranging from 1 to 223 (excluding127), the last field must not be 0, and theother fields must be integers ranging from0 to 255.[Example]192.168.10.13
Spare IPaddress
IP address of the spareRADIUS server.
[Value range]The first field of an IP address must be aninteger ranging from 1 to 223 (excluding127), the last field must not be 0, and theother fields must be integers ranging from0 to 255.[Example]192.168.10.16
OceanStor InfraControlAdmin Guide 2 System Management
Issue 04 (2015-02-28) Huawei Proprietary and ConfidentialCopyright © Huawei Technologies Co., Ltd.
23
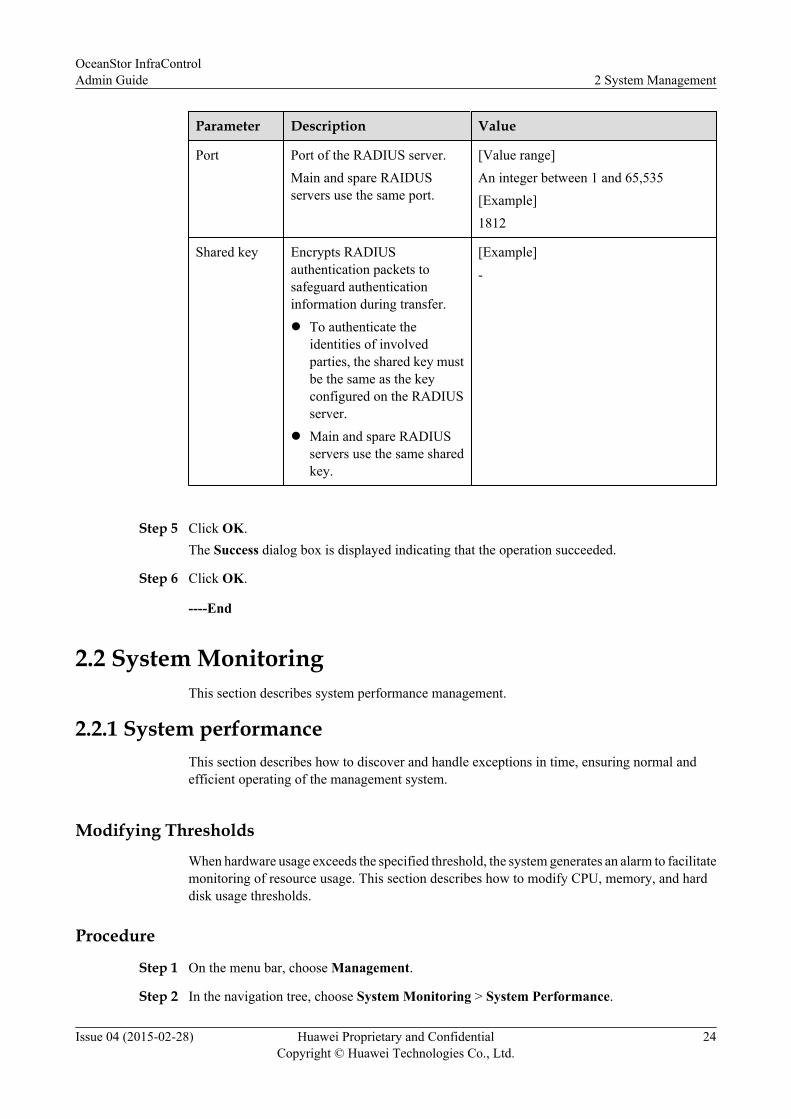
Parameter Description Value
Port Port of the RADIUS server.Main and spare RAIDUSservers use the same port.
[Value range]An integer between 1 and 65,535[Example]1812
Shared key Encrypts RADIUSauthentication packets tosafeguard authenticationinformation during transfer.l To authenticate the
identities of involvedparties, the shared key mustbe the same as the keyconfigured on the RADIUSserver.
l Main and spare RADIUSservers use the same sharedkey.
[Example]-
Step 5 Click OK.The Success dialog box is displayed indicating that the operation succeeded.
Step 6 Click OK.
----End
2.2 System MonitoringThis section describes system performance management.
2.2.1 System performanceThis section describes how to discover and handle exceptions in time, ensuring normal andefficient operating of the management system.
Modifying Thresholds
When hardware usage exceeds the specified threshold, the system generates an alarm to facilitatemonitoring of resource usage. This section describes how to modify CPU, memory, and harddisk usage thresholds.
Procedure
Step 1 On the menu bar, choose Management.
Step 2 In the navigation tree, choose System Monitoring > System Performance.
OceanStor InfraControlAdmin Guide 2 System Management
Issue 04 (2015-02-28) Huawei Proprietary and ConfidentialCopyright © Huawei Technologies Co., Ltd.
24
Step 3 In the function pane, click Modify in the Threshold Setting area.TheModify Threshold dialog box is displayed.
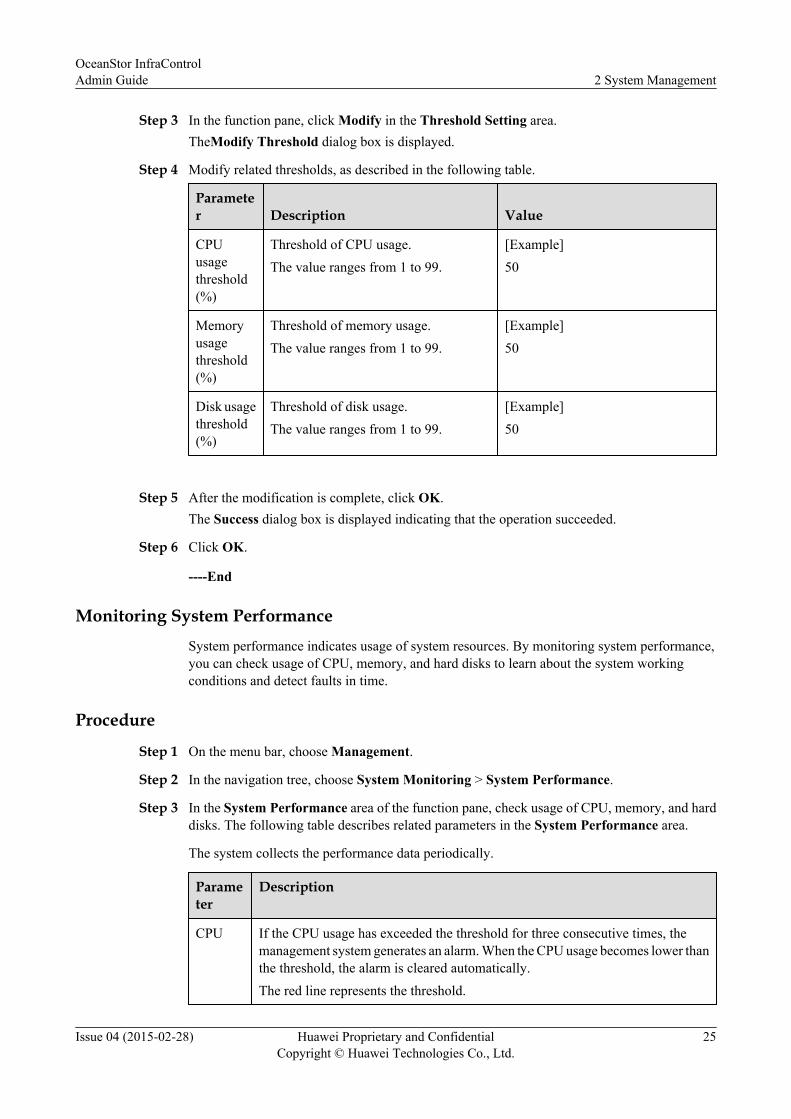
Step 4 Modify related thresholds, as described in the following table.
Parameter Description Value
CPUusagethreshold(%)
Threshold of CPU usage.The value ranges from 1 to 99.
[Example]50
Memoryusagethreshold(%)
Threshold of memory usage.The value ranges from 1 to 99.
[Example]50
Disk usagethreshold(%)
Threshold of disk usage.The value ranges from 1 to 99.
[Example]50
Step 5 After the modification is complete, click OK.The Success dialog box is displayed indicating that the operation succeeded.
Step 6 Click OK.
----End
Monitoring System PerformanceSystem performance indicates usage of system resources. By monitoring system performance,you can check usage of CPU, memory, and hard disks to learn about the system workingconditions and detect faults in time.
Procedure
Step 1 On the menu bar, choose Management.
Step 2 In the navigation tree, choose System Monitoring > System Performance.
Step 3 In the System Performance area of the function pane, check usage of CPU, memory, and harddisks. The following table describes related parameters in the System Performance area.
The system collects the performance data periodically.
Parameter
Description
CPU If the CPU usage has exceeded the threshold for three consecutive times, themanagement system generates an alarm. When the CPU usage becomes lower thanthe threshold, the alarm is cleared automatically.The red line represents the threshold.
OceanStor InfraControlAdmin Guide 2 System Management
Issue 04 (2015-02-28) Huawei Proprietary and ConfidentialCopyright © Huawei Technologies Co., Ltd.
25
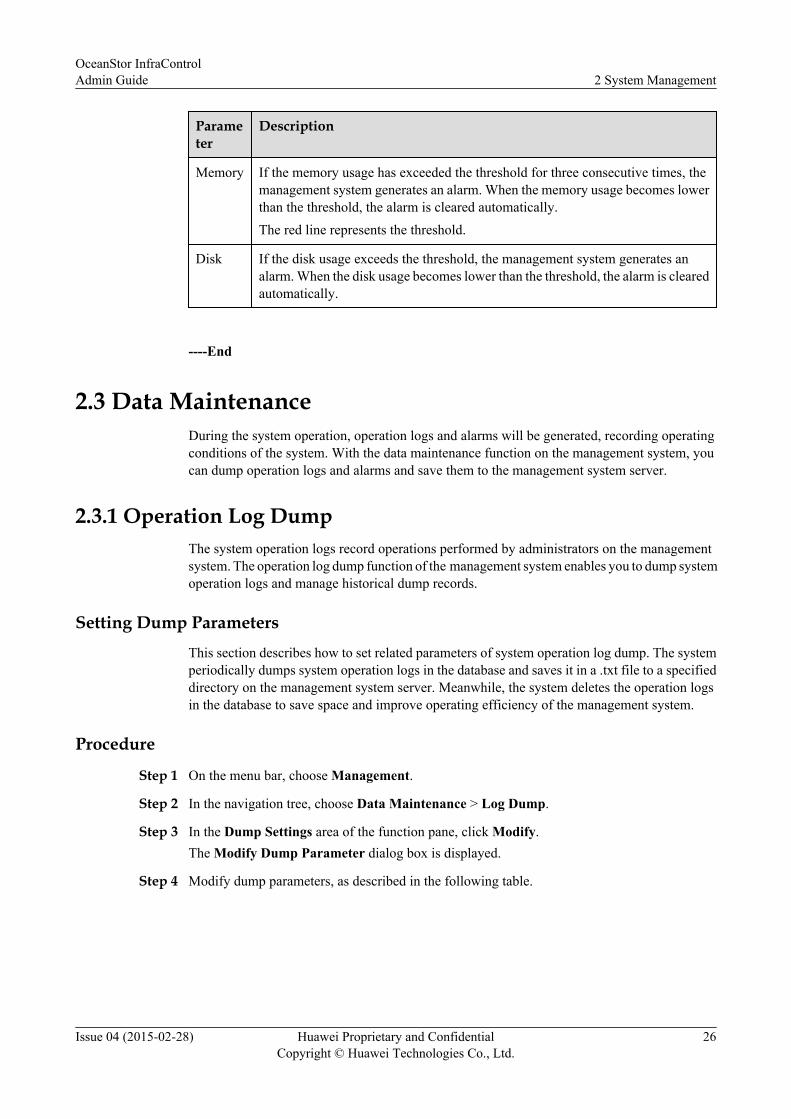
Parameter
Description
Memory If the memory usage has exceeded the threshold for three consecutive times, themanagement system generates an alarm. When the memory usage becomes lowerthan the threshold, the alarm is cleared automatically.The red line represents the threshold.
Disk If the disk usage exceeds the threshold, the management system generates analarm. When the disk usage becomes lower than the threshold, the alarm is clearedautomatically.
----End
2.3 Data MaintenanceDuring the system operation, operation logs and alarms will be generated, recording operatingconditions of the system. With the data maintenance function on the management system, youcan dump operation logs and alarms and save them to the management system server.
2.3.1 Operation Log DumpThe system operation logs record operations performed by administrators on the managementsystem. The operation log dump function of the management system enables you to dump systemoperation logs and manage historical dump records.
Setting Dump ParametersThis section describes how to set related parameters of system operation log dump. The systemperiodically dumps system operation logs in the database and saves it in a .txt file to a specifieddirectory on the management system server. Meanwhile, the system deletes the operation logsin the database to save space and improve operating efficiency of the management system.
Procedure
Step 1 On the menu bar, choose Management.
Step 2 In the navigation tree, choose Data Maintenance > Log Dump.
Step 3 In the Dump Settings area of the function pane, click Modify.The Modify Dump Parameter dialog box is displayed.
Step 4 Modify dump parameters, as described in the following table.
OceanStor InfraControlAdmin Guide 2 System Management
Issue 04 (2015-02-28) Huawei Proprietary and ConfidentialCopyright © Huawei Technologies Co., Ltd.
26
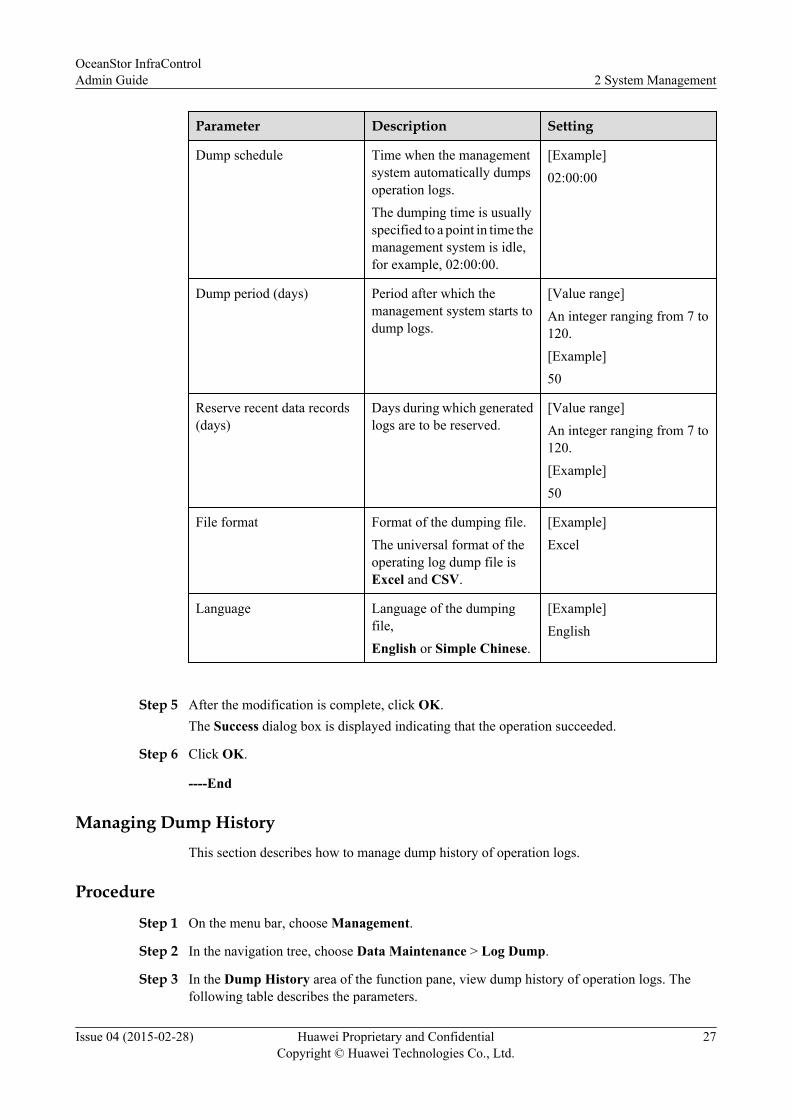
Parameter Description Setting
Dump schedule Time when the managementsystem automatically dumpsoperation logs.The dumping time is usuallyspecified to a point in time themanagement system is idle,for example, 02:00:00.
[Example]02:00:00
Dump period (days) Period after which themanagement system starts todump logs.
[Value range]An integer ranging from 7 to120.[Example]50
Reserve recent data records(days)
Days during which generatedlogs are to be reserved.
[Value range]An integer ranging from 7 to120.[Example]50
File format Format of the dumping file.The universal format of theoperating log dump file isExcel and CSV.
[Example]Excel
Language Language of the dumpingfile,English or Simple Chinese.
[Example]English
Step 5 After the modification is complete, click OK.The Success dialog box is displayed indicating that the operation succeeded.
Step 6 Click OK.
----End
Managing Dump HistoryThis section describes how to manage dump history of operation logs.
Procedure
Step 1 On the menu bar, choose Management.
Step 2 In the navigation tree, choose Data Maintenance > Log Dump.
Step 3 In the Dump History area of the function pane, view dump history of operation logs. Thefollowing table describes the parameters.
OceanStor InfraControlAdmin Guide 2 System Management
Issue 04 (2015-02-28) Huawei Proprietary and ConfidentialCopyright © Huawei Technologies Co., Ltd.
27
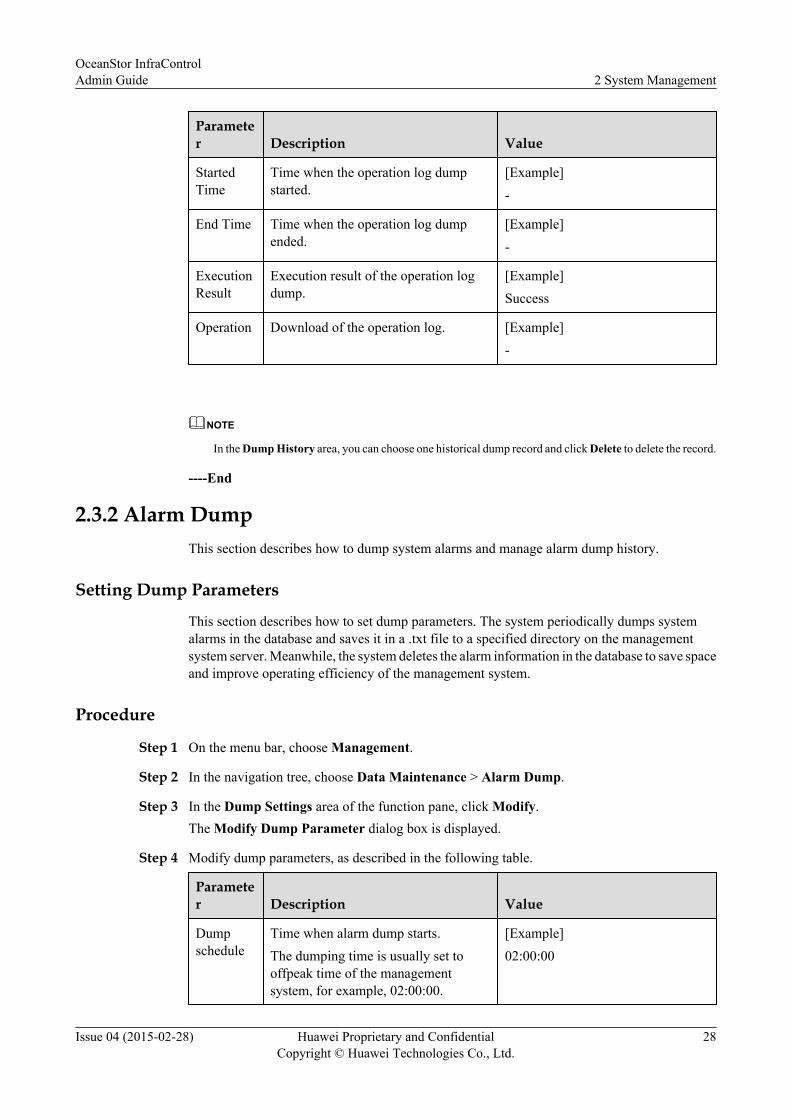
Parameter Description Value
StartedTime
Time when the operation log dumpstarted.
[Example]-
End Time Time when the operation log dumpended.
[Example]-
ExecutionResult
Execution result of the operation logdump.
[Example]Success
Operation Download of the operation log. [Example]-
NOTE
In the Dump History area, you can choose one historical dump record and click Delete to delete the record.
----End
2.3.2 Alarm DumpThis section describes how to dump system alarms and manage alarm dump history.
Setting Dump Parameters
This section describes how to set dump parameters. The system periodically dumps systemalarms in the database and saves it in a .txt file to a specified directory on the managementsystem server. Meanwhile, the system deletes the alarm information in the database to save spaceand improve operating efficiency of the management system.
Procedure
Step 1 On the menu bar, choose Management.
Step 2 In the navigation tree, choose Data Maintenance > Alarm Dump.
Step 3 In the Dump Settings area of the function pane, click Modify.The Modify Dump Parameter dialog box is displayed.
Step 4 Modify dump parameters, as described in the following table.
Parameter Description Value
Dumpschedule
Time when alarm dump starts.The dumping time is usually set tooffpeak time of the managementsystem, for example, 02:00:00.
[Example]02:00:00
OceanStor InfraControlAdmin Guide 2 System Management
Issue 04 (2015-02-28) Huawei Proprietary and ConfidentialCopyright © Huawei Technologies Co., Ltd.
28
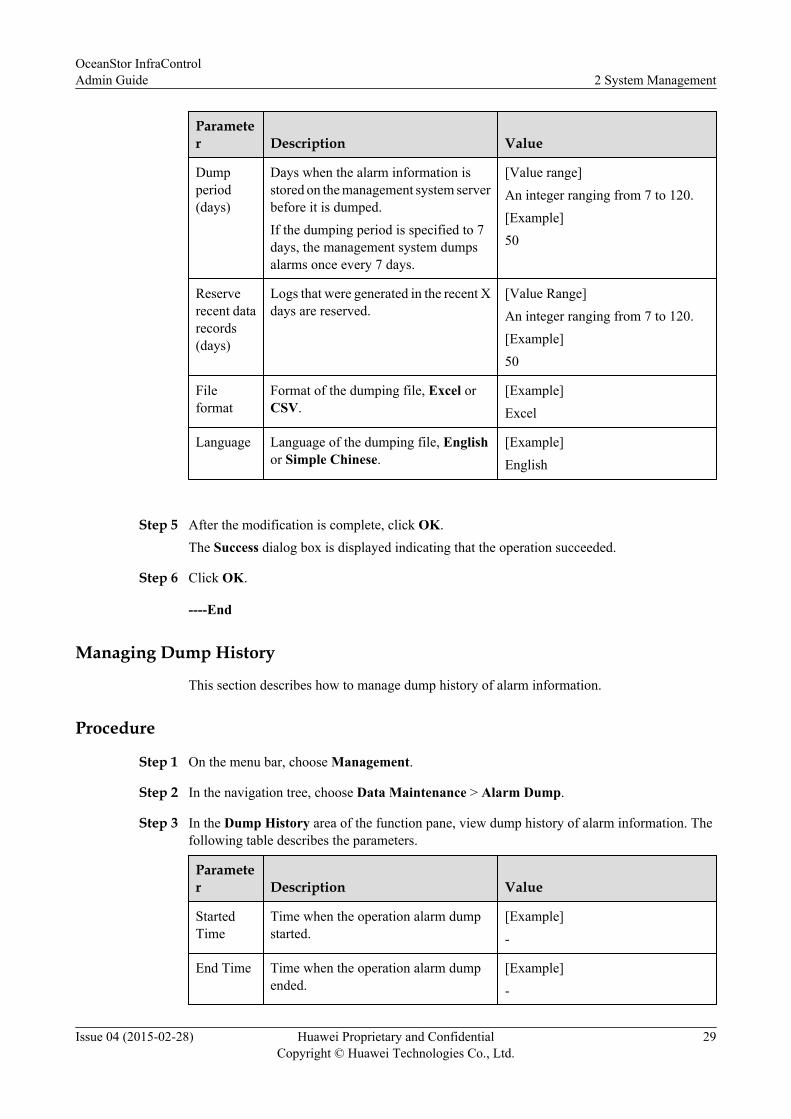
Parameter Description Value
Dumpperiod(days)
Days when the alarm information isstored on the management system serverbefore it is dumped.If the dumping period is specified to 7days, the management system dumpsalarms once every 7 days.
[Value range]An integer ranging from 7 to 120.[Example]50
Reserverecent datarecords(days)
Logs that were generated in the recent Xdays are reserved.
[Value Range]An integer ranging from 7 to 120.[Example]50
Fileformat
Format of the dumping file, Excel orCSV.
[Example]Excel
Language Language of the dumping file, Englishor Simple Chinese.
[Example]English
Step 5 After the modification is complete, click OK.The Success dialog box is displayed indicating that the operation succeeded.
Step 6 Click OK.
----End
Managing Dump History
This section describes how to manage dump history of alarm information.
Procedure
Step 1 On the menu bar, choose Management.
Step 2 In the navigation tree, choose Data Maintenance > Alarm Dump.
Step 3 In the Dump History area of the function pane, view dump history of alarm information. Thefollowing table describes the parameters.
Parameter Description Value
StartedTime
Time when the operation alarm dumpstarted.
[Example]-
End Time Time when the operation alarm dumpended.
[Example]-
OceanStor InfraControlAdmin Guide 2 System Management
Issue 04 (2015-02-28) Huawei Proprietary and ConfidentialCopyright © Huawei Technologies Co., Ltd.
29
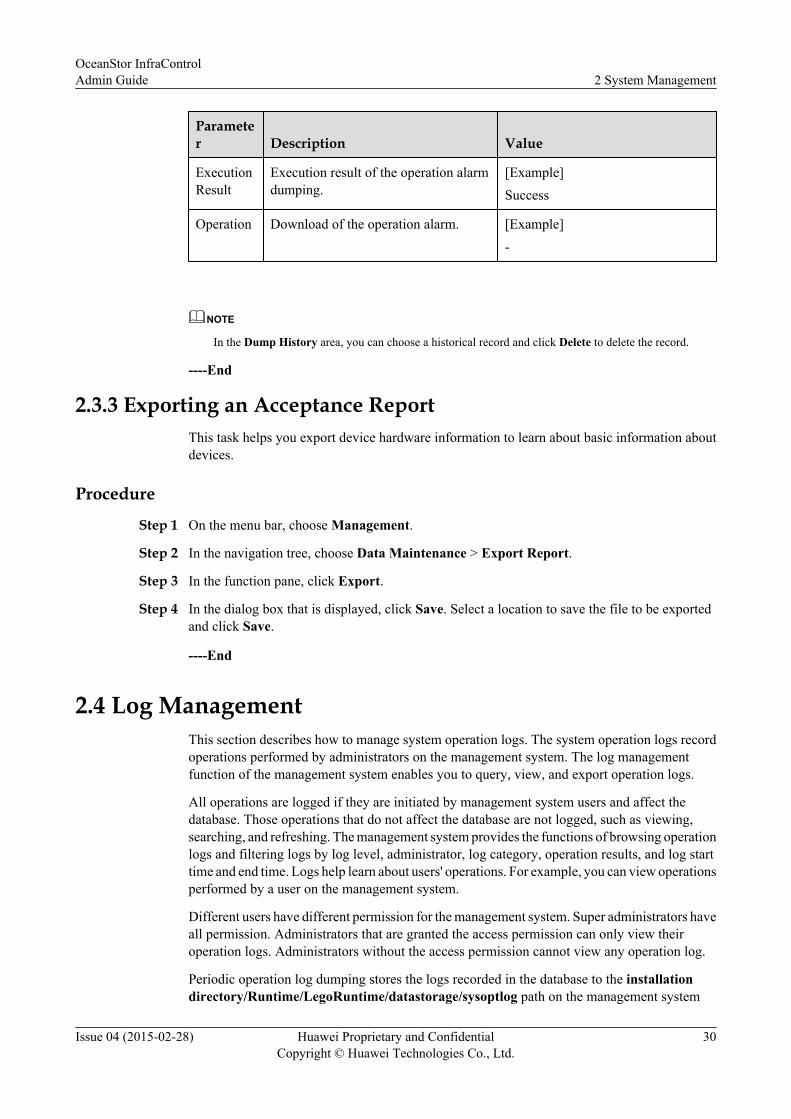
Parameter Description Value
ExecutionResult
Execution result of the operation alarmdumping.
[Example]Success
Operation Download of the operation alarm. [Example]-
NOTE
In the Dump History area, you can choose a historical record and click Delete to delete the record.
----End
2.3.3 Exporting an Acceptance ReportThis task helps you export device hardware information to learn about basic information aboutdevices.
Procedure
Step 1 On the menu bar, choose Management.
Step 2 In the navigation tree, choose Data Maintenance > Export Report.
Step 3 In the function pane, click Export.
Step 4 In the dialog box that is displayed, click Save. Select a location to save the file to be exportedand click Save.
----End
2.4 Log ManagementThis section describes how to manage system operation logs. The system operation logs recordoperations performed by administrators on the management system. The log managementfunction of the management system enables you to query, view, and export operation logs.
All operations are logged if they are initiated by management system users and affect thedatabase. Those operations that do not affect the database are not logged, such as viewing,searching, and refreshing. The management system provides the functions of browsing operationlogs and filtering logs by log level, administrator, log category, operation results, and log starttime and end time. Logs help learn about users' operations. For example, you can view operationsperformed by a user on the management system.
Different users have different permission for the management system. Super administrators haveall permission. Administrators that are granted the access permission can only view theiroperation logs. Administrators without the access permission cannot view any operation log.
Periodic operation log dumping stores the logs recorded in the database to the installationdirectory/Runtime/LegoRuntime/datastorage/sysoptlog path on the management system
OceanStor InfraControlAdmin Guide 2 System Management
Issue 04 (2015-02-28) Huawei Proprietary and ConfidentialCopyright © Huawei Technologies Co., Ltd.
30
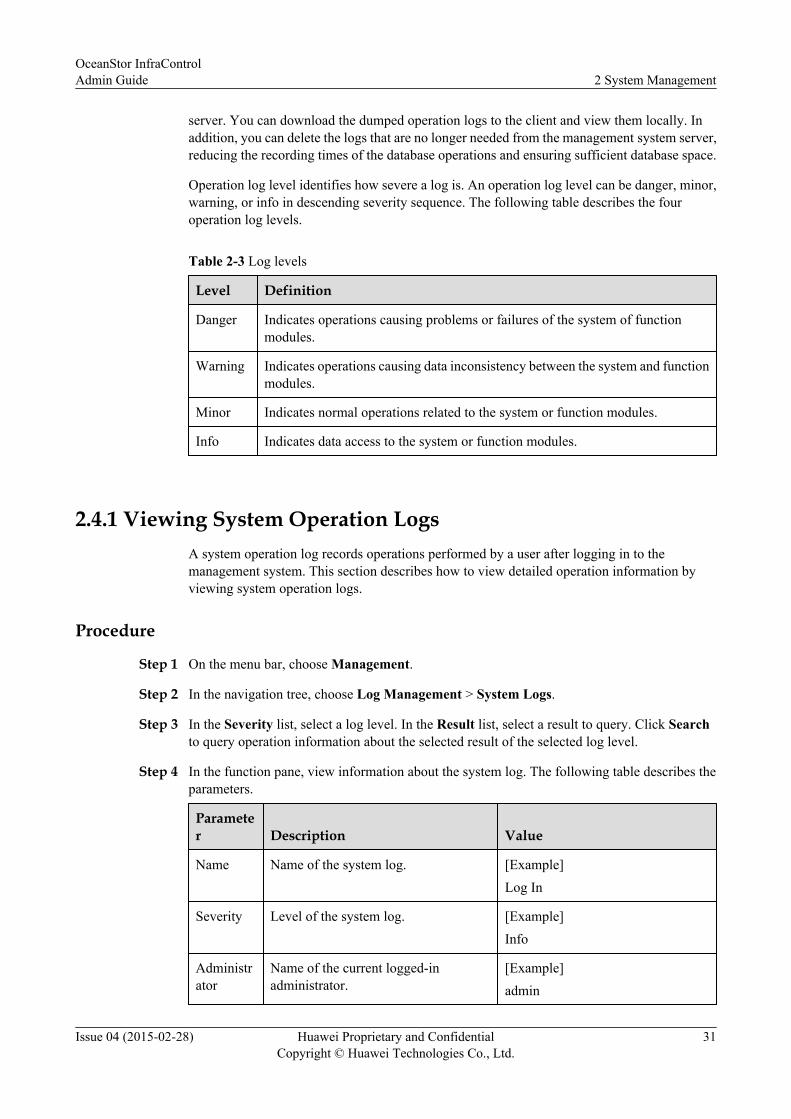
server. You can download the dumped operation logs to the client and view them locally. Inaddition, you can delete the logs that are no longer needed from the management system server,reducing the recording times of the database operations and ensuring sufficient database space.
Operation log level identifies how severe a log is. An operation log level can be danger, minor,warning, or info in descending severity sequence. The following table describes the fouroperation log levels.
Table 2-3 Log levels
Level Definition
Danger Indicates operations causing problems or failures of the system of functionmodules.
Warning Indicates operations causing data inconsistency between the system and functionmodules.
Minor Indicates normal operations related to the system or function modules.
Info Indicates data access to the system or function modules.
2.4.1 Viewing System Operation LogsA system operation log records operations performed by a user after logging in to themanagement system. This section describes how to view detailed operation information byviewing system operation logs.
Procedure
Step 1 On the menu bar, choose Management.
Step 2 In the navigation tree, choose Log Management > System Logs.
Step 3 In the Severity list, select a log level. In the Result list, select a result to query. Click Searchto query operation information about the selected result of the selected log level.
Step 4 In the function pane, view information about the system log. The following table describes theparameters.
Parameter Description Value
Name Name of the system log. [Example]Log In
Severity Level of the system log. [Example]Info
Administrator
Name of the current logged-inadministrator.
[Example]admin
OceanStor InfraControlAdmin Guide 2 System Management
Issue 04 (2015-02-28) Huawei Proprietary and ConfidentialCopyright © Huawei Technologies Co., Ltd.
31
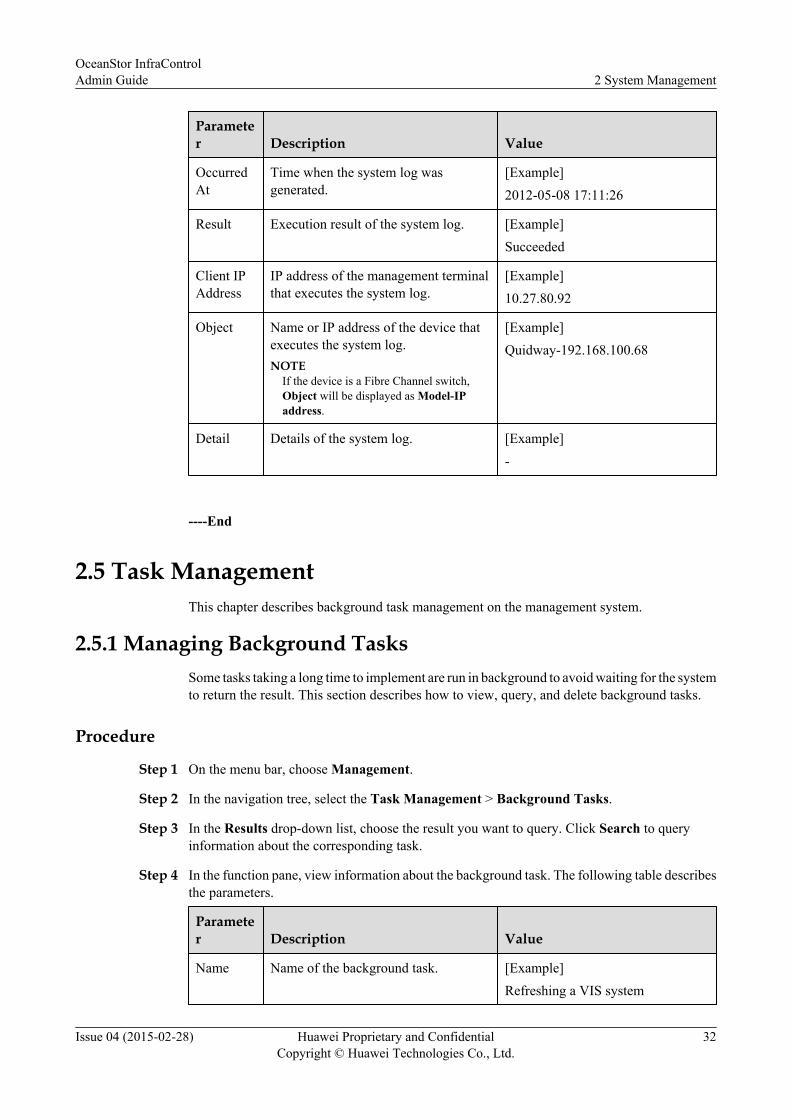
Parameter Description Value
OccurredAt
Time when the system log wasgenerated.
[Example]2012-05-08 17:11:26
Result Execution result of the system log. [Example]Succeeded
Client IPAddress
IP address of the management terminalthat executes the system log.
[Example]10.27.80.92
Object Name or IP address of the device thatexecutes the system log.NOTE
If the device is a Fibre Channel switch,Object will be displayed as Model-IPaddress.
[Example]Quidway-192.168.100.68
Detail Details of the system log. [Example]-
----End
2.5 Task ManagementThis chapter describes background task management on the management system.
2.5.1 Managing Background TasksSome tasks taking a long time to implement are run in background to avoid waiting for the systemto return the result. This section describes how to view, query, and delete background tasks.
Procedure
Step 1 On the menu bar, choose Management.
Step 2 In the navigation tree, select the Task Management > Background Tasks.
Step 3 In the Results drop-down list, choose the result you want to query. Click Search to queryinformation about the corresponding task.
Step 4 In the function pane, view information about the background task. The following table describesthe parameters.
Parameter Description Value
Name Name of the background task. [Example]Refreshing a VIS system
OceanStor InfraControlAdmin Guide 2 System Management
Issue 04 (2015-02-28) Huawei Proprietary and ConfidentialCopyright © Huawei Technologies Co., Ltd.
32
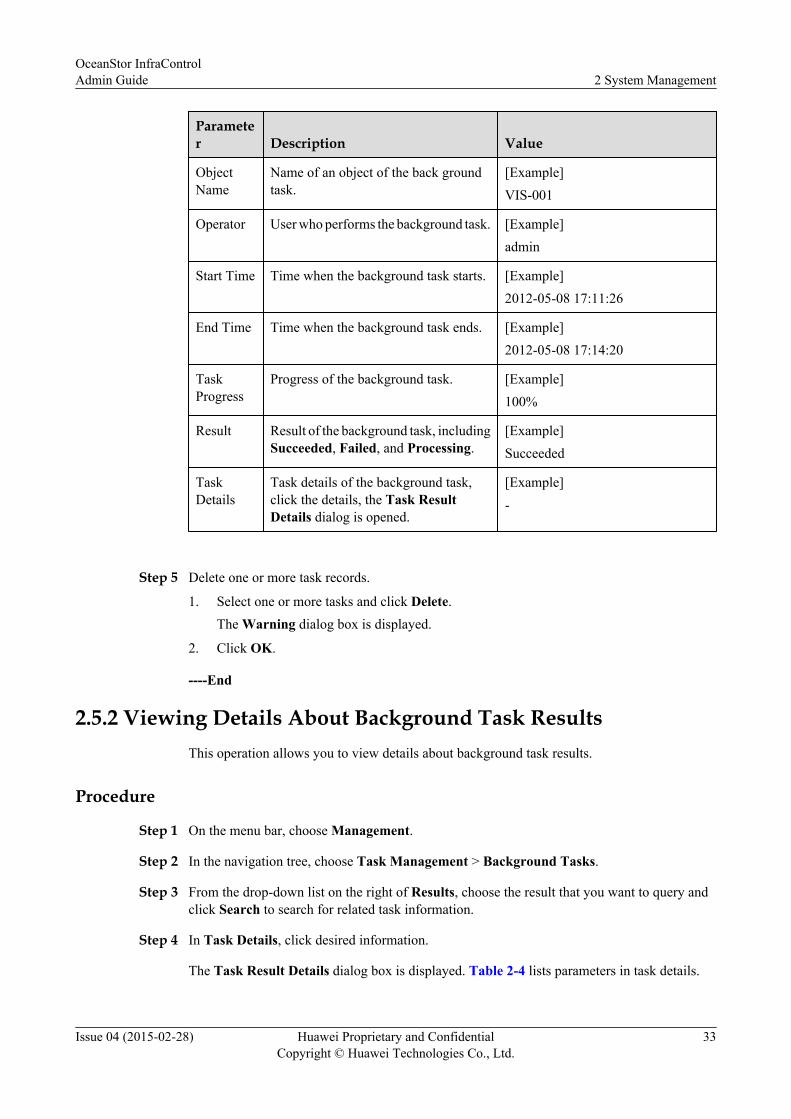
Parameter Description Value
ObjectName
Name of an object of the back groundtask.
[Example]VIS-001
Operator User who performs the background task. [Example]admin
Start Time Time when the background task starts. [Example]2012-05-08 17:11:26
End Time Time when the background task ends. [Example]2012-05-08 17:14:20
TaskProgress
Progress of the background task. [Example]100%
Result Result of the background task, includingSucceeded, Failed, and Processing.
[Example]Succeeded
TaskDetails
Task details of the background task,click the details, the Task ResultDetails dialog is opened.
[Example]-
Step 5 Delete one or more task records.
1. Select one or more tasks and click Delete.The Warning dialog box is displayed.
2. Click OK.
----End
2.5.2 Viewing Details About Background Task ResultsThis operation allows you to view details about background task results.
Procedure
Step 1 On the menu bar, choose Management.
Step 2 In the navigation tree, choose Task Management > Background Tasks.
Step 3 From the drop-down list on the right of Results, choose the result that you want to query andclick Search to search for related task information.
Step 4 In Task Details, click desired information.
The Task Result Details dialog box is displayed. Table 2-4 lists parameters in task details.
OceanStor InfraControlAdmin Guide 2 System Management
Issue 04 (2015-02-28) Huawei Proprietary and ConfidentialCopyright © Huawei Technologies Co., Ltd.
33
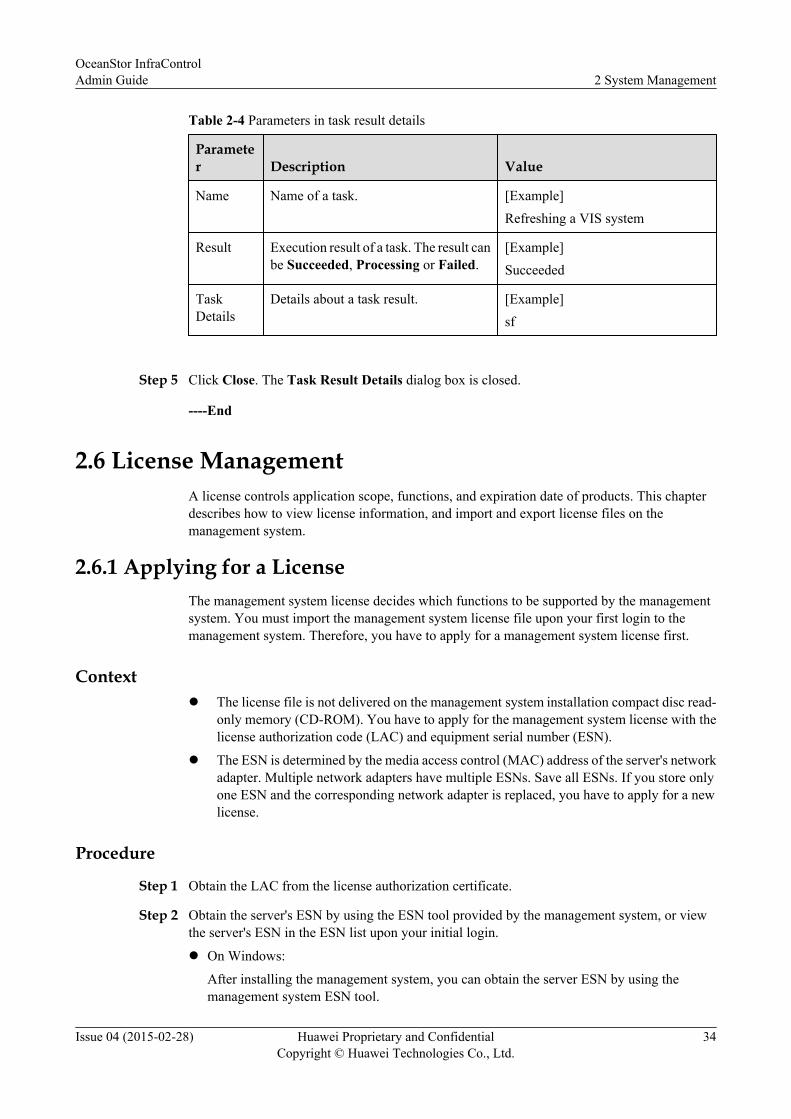
Table 2-4 Parameters in task result details
Parameter Description Value
Name Name of a task. [Example]Refreshing a VIS system
Result Execution result of a task. The result canbe Succeeded, Processing or Failed.
[Example]Succeeded
TaskDetails
Details about a task result. [Example]sf
Step 5 Click Close. The Task Result Details dialog box is closed.
----End
2.6 License ManagementA license controls application scope, functions, and expiration date of products. This chapterdescribes how to view license information, and import and export license files on themanagement system.
2.6.1 Applying for a LicenseThe management system license decides which functions to be supported by the managementsystem. You must import the management system license file upon your first login to themanagement system. Therefore, you have to apply for a management system license first.
Contextl The license file is not delivered on the management system installation compact disc read-
only memory (CD-ROM). You have to apply for the management system license with thelicense authorization code (LAC) and equipment serial number (ESN).
l The ESN is determined by the media access control (MAC) address of the server's networkadapter. Multiple network adapters have multiple ESNs. Save all ESNs. If you store onlyone ESN and the corresponding network adapter is replaced, you have to apply for a newlicense.
Procedure
Step 1 Obtain the LAC from the license authorization certificate.
Step 2 Obtain the server's ESN by using the ESN tool provided by the management system, or viewthe server's ESN in the ESN list upon your initial login.
l On Windows:
After installing the management system, you can obtain the server ESN by using themanagement system ESN tool.
OceanStor InfraControlAdmin Guide 2 System Management
Issue 04 (2015-02-28) Huawei Proprietary and ConfidentialCopyright © Huawei Technologies Co., Ltd.
34
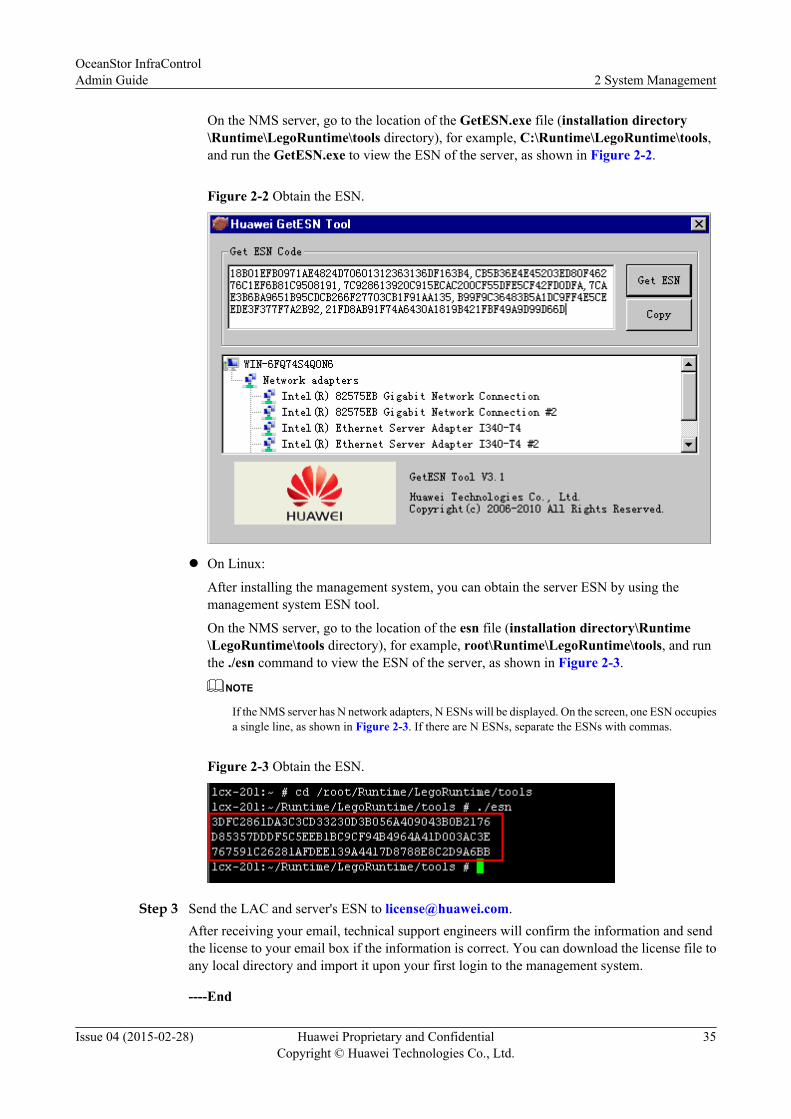
On the NMS server, go to the location of the GetESN.exe file (installation directory\Runtime\LegoRuntime\tools directory), for example, C:\Runtime\LegoRuntime\tools,and run the GetESN.exe to view the ESN of the server, as shown in Figure 2-2.
Figure 2-2 Obtain the ESN.
l On Linux:
After installing the management system, you can obtain the server ESN by using themanagement system ESN tool.
On the NMS server, go to the location of the esn file (installation directory\Runtime\LegoRuntime\tools directory), for example, root\Runtime\LegoRuntime\tools, and runthe ./esn command to view the ESN of the server, as shown in Figure 2-3.
NOTE
If the NMS server has N network adapters, N ESNs will be displayed. On the screen, one ESN occupiesa single line, as shown in Figure 2-3. If there are N ESNs, separate the ESNs with commas.
Figure 2-3 Obtain the ESN.
Step 3 Send the LAC and server's ESN to [email protected] receiving your email, technical support engineers will confirm the information and sendthe license to your email box if the information is correct. You can download the license file toany local directory and import it upon your first login to the management system.
----End
OceanStor InfraControlAdmin Guide 2 System Management
Issue 04 (2015-02-28) Huawei Proprietary and ConfidentialCopyright © Huawei Technologies Co., Ltd.
35
2.6.2 Importing a System LicenseThis section describes how to import a purchased license file to the management system.
Procedure
Step 1 On the menu bar, choose Management.
Step 2 In the navigation tree, choose License Management > System License.
Step 3 In the function pane, click Import.The Import License dialog box is displayed.
Step 4 Click Browse.The Select a License File dialog box is displayed.
Step 5 Select a valid license file and click Open.The Import License dialog box is displayed.
NOTE
The size of a license file cannot exceed 2 MB.
Step 6 Click OK.The license is imported.
----End
2.6.3 Exporting a System LicenseThis section describes how to export a system license file to the local system.
Procedure
Step 1 On the menu bar, choose Management.
Step 2 In the navigation tree, choose License Management > System License.
Step 3 Click Export above the function pane.The File Download dialog box is displayed.
NOTICEThe download means varies with different web browsers. Download by referring to promptedmessages.
Step 4 Click Save.The Save As dialog box is displayed.
Step 5 Click Save to select a path for saving the file.The system indicates the download is complete.
----End
OceanStor InfraControlAdmin Guide 2 System Management
Issue 04 (2015-02-28) Huawei Proprietary and ConfidentialCopyright © Huawei Technologies Co., Ltd.
36

2.6.4 Viewing a System LicenseThis section describes how to view license information and learn about the expiration date of alicense.
Procedure
Step 1 On the menu bar, choose Management.
Step 2 In the navigation tree, choose License Management > System License.
Step 3 In the License Feature Item area of the function pane, query license information. The followingtable describes the parameters.
Parameter Description
Name Name of the license feature item.
Expired On Expiration date of the license feature item.
Step 4 On the lower part of the function pane, click Function Item to query information about a functionlicense. The following table describes the parameters.
Parameter Description
Parameter Setting
FeatureSegment
Information about the license feature. SAN Insight
Function Name of the license function item. SAN Insight-Base License
Step 5 On the lower part of the function pane, click Resource Item to query information about aresource license. The following table describes the parameters.
Parameter Description
Parameter Setting
FeatureSegment
Information about the license feature. System Reporter
ResourceType
Type of the resource that correspondsto the license.
System Reporter-Manage 1 StorageDevice - Base License
UsedResources
Used resources of the license. 7
AvailableResources
Available resources of the license. 93
----End
OceanStor InfraControlAdmin Guide 2 System Management
Issue 04 (2015-02-28) Huawei Proprietary and ConfidentialCopyright © Huawei Technologies Co., Ltd.
37
2.7 Hierarchical ManagementThe hierarchical management function of the InfraControl balances processing capabilitiesamong InfraControl servers. Each InfraControl server can be connected to network elementsdirectly or through a lower-layer InfraControl server.
2.7.1 Hierarchical NMSAfter a hierarchical network management system (NMS) is configured, the InfraControl canmanage the hierarchical NMS and test the connectivity with the hierarchical NMS.
Procedure1. On the menu bar, choose Management.2. In the navigation tree, choose Layered NMS > Layered NMS.
3. Refer to the following table to configure hierarchical NMS.
Operation
Description
Modify Click corresponding to the hierarchical NMS to be modified.
Add Click Add to add a hierarchical NMS. For details, see Adding a HierarchicalNMS.
Delete Select one or more hierarchical NMSs and click Delete to delete the hierarchicalNMS or NMSs.
Enable Select one or more hierarchical NMS whose status is Disabled and clickEnable to enable the hierarchical NMS.
Disable Select one or more hierarchical NMS whose status is Enabled and clickDisable to disable the hierarchical NMS.
Test Click to test the hierarchical NMS.
Modifying the Service Configuration
This task helps you modify the service configuration.
Procedure
Step 1 On the menu bar, choose Management.
Step 2 In the navigation tree, choose Layered NMS > Layered NMS.
Step 3 In the Service Configuration, click Modify.
The Modify Service Configuration dialog box is displayed.
OceanStor InfraControlAdmin Guide 2 System Management
Issue 04 (2015-02-28) Huawei Proprietary and ConfidentialCopyright © Huawei Technologies Co., Ltd.
38
Step 4 Enter the new IP address.
Step 5 Click OK to finish modifying the report configuration.
----End
Adding a Hierarchical NMS
This task helps you add a hierarchical network management system (NMS).You can add ahierarchical NMS only when two or more NMSs are running the InfraControl.
Procedure
Step 1 On the menu bar, choose Management.
Step 2 In the navigation tree, choose Layered NMS > Layered NMS.
Step 3 In the Service Configuration area, click Modify.
The Modify Service Configuration dialog box is displayed.
Step 4 Click Add.
The Add Layered NMS dialog box is displayed.
Step 5 In IP Address, enter the management IP address of the NMS.
NOTE
l A hierarchical NMS can be successfully added only after both its upper-layer and lower-layer NMSsare correctly configured.
l You need to set the actual IP address of the NMS. If the NMS has multiple network adapters, you canchoose one of them and ensure that the network adapter's IP address resides on the same subnet as thepeer hierarchical NMS.
l For an NMS running HA service, set a floating IP address.
Step 6 Set the parameters related to hierarchical NMS.
Parameter
Description
NMSaddress
Address of the NMS to be added. For example, https://192.168.0.1.NOTE
The address must start with https. Add the actual port number if the NMS does not use thedefault port.
Username
User name of the NMS to be added.
Password User password of the NMS to be added.
NMSname
Name of the NMS to be added.
DataReportStatus
Specifies whether to enable the data report function.NOTE
The data report function is also known as the alarm report function.
OceanStor InfraControlAdmin Guide 2 System Management
Issue 04 (2015-02-28) Huawei Proprietary and ConfidentialCopyright © Huawei Technologies Co., Ltd.
39
Parameter
Description
Description
Brief description of the hierarchical NMS.
Step 7 Click OK to complete adding a hierarchical NMS.
----End
2.7.2 Managing Trap IP AddressesAfter you configure a Trap IP address, the other network management systems (NMSs) canreceive alarms from the management system.
Context1. On the menu bar, choose Management.2. In the navigation tree, choose Layered NMS > Trap IP Address Management.3. Set related information about system administrators, as described in the following table.
Operation
Description
Add You can click Add to add a Trap IP address. For details, see Adding a Trap IPAddress.
Modify Click corresponding to a Trap IP address to modify related information. Fordetails, see Modifying a Trap IP Address.
Delete Select one or more Trap IP addresses and click Delete to delete them.
Adding a Trap IP AddressYou can add a Trap IP address to enable the other network management systems (NMSs) toreceive alarms from the management system using the Trap IP address.
Procedure
Step 1 On the menu bar, choose Management.
Step 2 In the navigation tree, choose Layered NMS > Trap IP Address Management.
Step 3 Click Add.
The Add Trap IP Address dialog box is displayed.
Step 4 Set IP address for the other NMSs to receive alarms and Port for accessing an NE.
Step 5 Click OK.
----End
OceanStor InfraControlAdmin Guide 2 System Management
Issue 04 (2015-02-28) Huawei Proprietary and ConfidentialCopyright © Huawei Technologies Co., Ltd.
40
Modifying a Trap IP Address
Modifying a Trap IP address includes modifying the IP address and the port number for receivingalarms.
Procedure
Step 1 On the menu bar, choose Management.
Step 2 In the navigation tree, choose Layered NMS > Trap IP Address Management.
Step 3 Click the corresponding to the Trap IP address.
The Modify Trap IP Address dialog box is displayed.
Step 4 Set the IP address and Port for receiving alarms.
Step 5 Click OK.
----End
2.7.3 Trap ConfigurationTo enable devices to be loaded to the network management system (NMS) by the automaticdiscovery function, configure the NMS northbound Trap reporting parameters and hierarchicalNMS Trap parameters.
Context1. On the menu bar, choose Management.2. In the navigation tree, choose Layered NMS > Trap Configuration.
3. Set related information about Trap, as described in the following table.
Item Description
Northbound Trapreportingparameters
Click or Modify corresponding to a Trap to modify related information. Fordetails, see Modifying Northbound Trap Reporting Parameters.
Click to refresh the information.
Hierarchical NMSTrapparameters
Click or Modify corresponding to a Trap to modify related information. Fordetails, see Modifying Hierarchical NMS Trap Parameters.
Click to refresh the information.
Modifying Northbound Trap Reporting Parameters
To enable devices to be loaded to the network management system (NMS) by the automaticdiscovery function, configure the NMS northbound Trap reporting parameters.
OceanStor InfraControlAdmin Guide 2 System Management
Issue 04 (2015-02-28) Huawei Proprietary and ConfidentialCopyright © Huawei Technologies Co., Ltd.
41
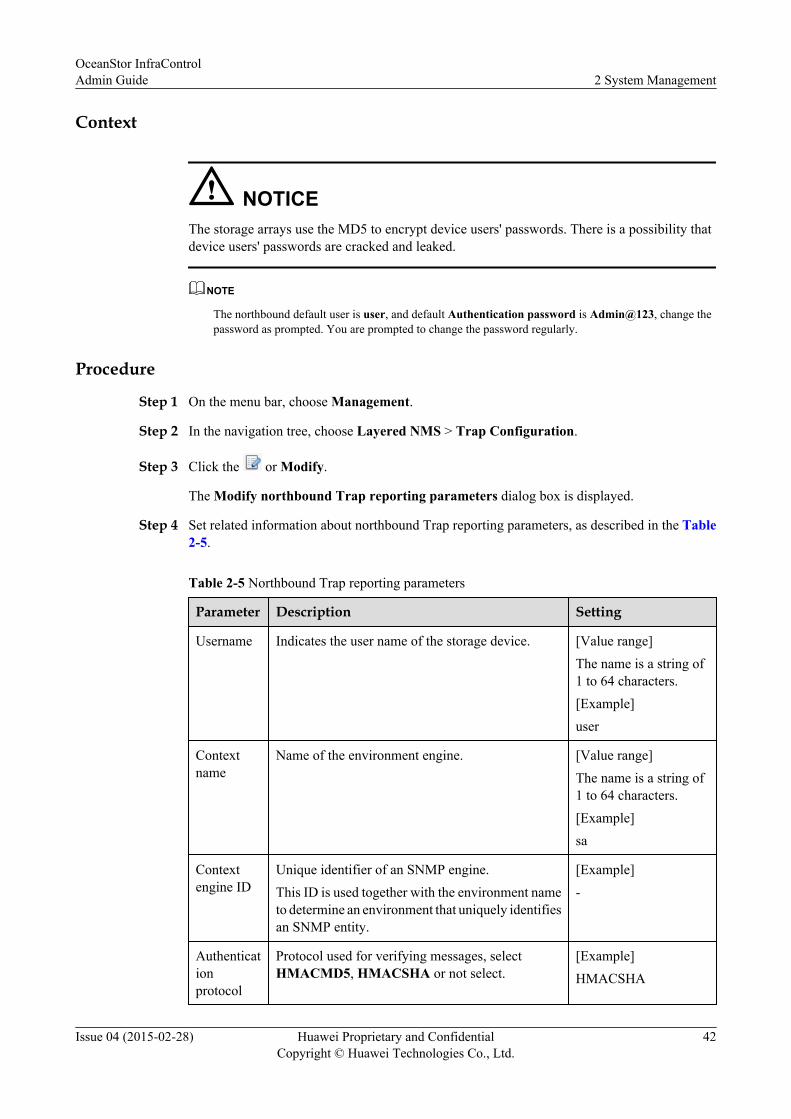
Context
NOTICEThe storage arrays use the MD5 to encrypt device users' passwords. There is a possibility thatdevice users' passwords are cracked and leaked.
NOTE
The northbound default user is user, and default Authentication password is Admin@123, change thepassword as prompted. You are prompted to change the password regularly.
Procedure
Step 1 On the menu bar, choose Management.
Step 2 In the navigation tree, choose Layered NMS > Trap Configuration.
Step 3 Click the or Modify.
The Modify northbound Trap reporting parameters dialog box is displayed.
Step 4 Set related information about northbound Trap reporting parameters, as described in the Table2-5.
Table 2-5 Northbound Trap reporting parameters
Parameter Description Setting
Username Indicates the user name of the storage device. [Value range]The name is a string of1 to 64 characters.[Example]user
Contextname
Name of the environment engine. [Value range]The name is a string of1 to 64 characters.[Example]sa
Contextengine ID
Unique identifier of an SNMP engine.This ID is used together with the environment nameto determine an environment that uniquely identifiesan SNMP entity.
[Example]-
Authenticationprotocol
Protocol used for verifying messages, selectHMACMD5, HMACSHA or not select.
[Example]HMACSHA
OceanStor InfraControlAdmin Guide 2 System Management
Issue 04 (2015-02-28) Huawei Proprietary and ConfidentialCopyright © Huawei Technologies Co., Ltd.
42
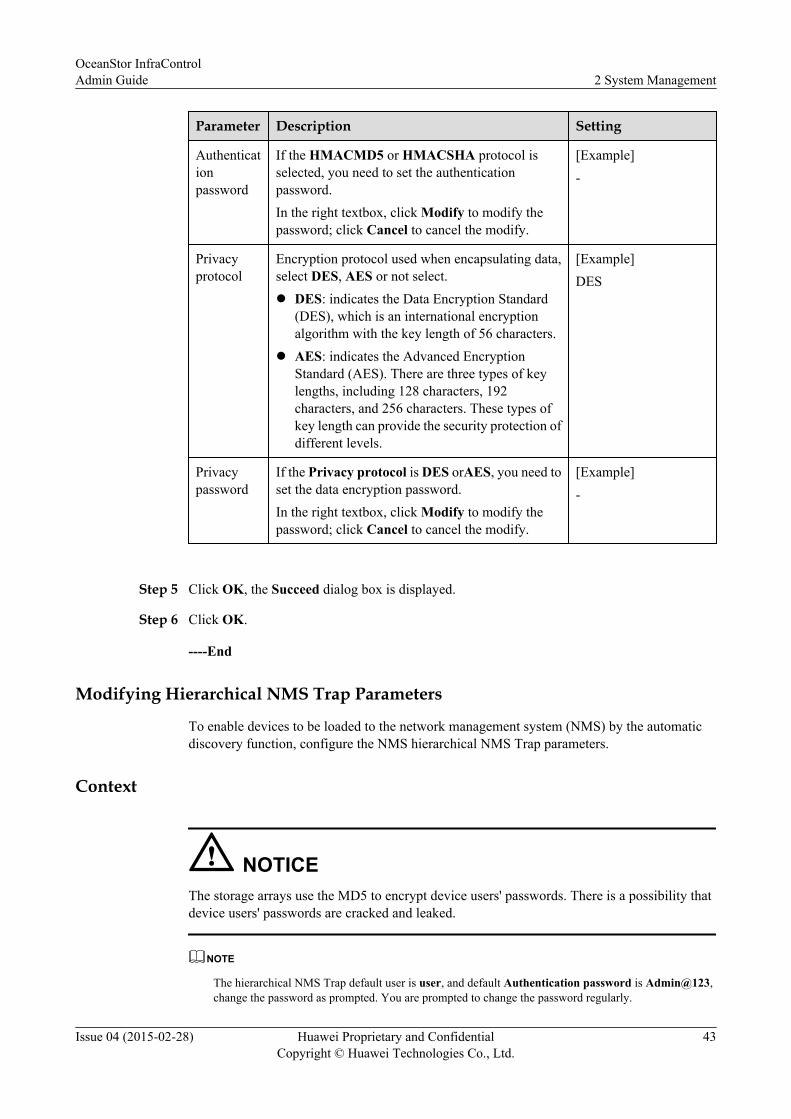
Parameter Description Setting
Authenticationpassword
If the HMACMD5 or HMACSHA protocol isselected, you need to set the authenticationpassword.In the right textbox, click Modify to modify thepassword; click Cancel to cancel the modify.
[Example]-
Privacyprotocol
Encryption protocol used when encapsulating data,select DES, AES or not select.l DES: indicates the Data Encryption Standard
(DES), which is an international encryptionalgorithm with the key length of 56 characters.
l AES: indicates the Advanced EncryptionStandard (AES). There are three types of keylengths, including 128 characters, 192characters, and 256 characters. These types ofkey length can provide the security protection ofdifferent levels.
[Example]DES
Privacypassword
If the Privacy protocol is DES orAES, you need toset the data encryption password.In the right textbox, click Modify to modify thepassword; click Cancel to cancel the modify.
[Example]-
Step 5 Click OK, the Succeed dialog box is displayed.
Step 6 Click OK.
----End
Modifying Hierarchical NMS Trap Parameters
To enable devices to be loaded to the network management system (NMS) by the automaticdiscovery function, configure the NMS hierarchical NMS Trap parameters.
Context
NOTICEThe storage arrays use the MD5 to encrypt device users' passwords. There is a possibility thatdevice users' passwords are cracked and leaked.
NOTE
The hierarchical NMS Trap default user is user, and default Authentication password is Admin@123,change the password as prompted. You are prompted to change the password regularly.
OceanStor InfraControlAdmin Guide 2 System Management
Issue 04 (2015-02-28) Huawei Proprietary and ConfidentialCopyright © Huawei Technologies Co., Ltd.
43
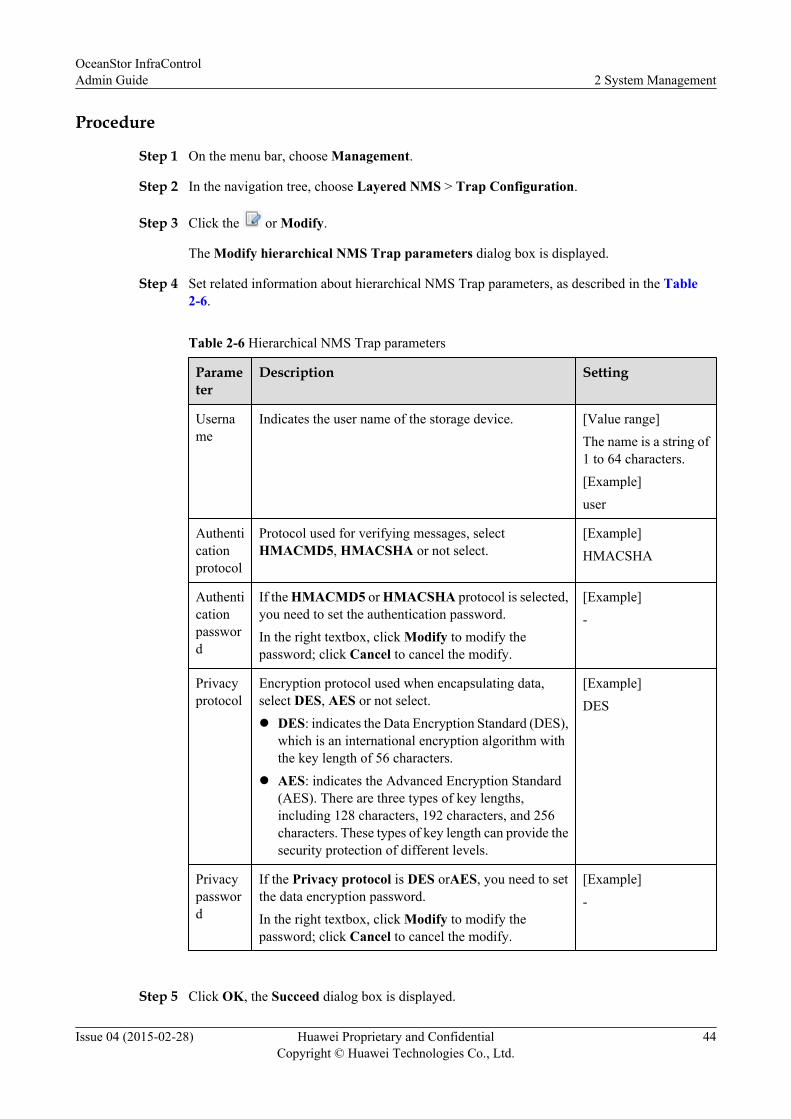
Procedure
Step 1 On the menu bar, choose Management.
Step 2 In the navigation tree, choose Layered NMS > Trap Configuration.
Step 3 Click the or Modify.
The Modify hierarchical NMS Trap parameters dialog box is displayed.
Step 4 Set related information about hierarchical NMS Trap parameters, as described in the Table2-6.
Table 2-6 Hierarchical NMS Trap parameters
Parameter
Description Setting
Username
Indicates the user name of the storage device. [Value range]The name is a string of1 to 64 characters.[Example]user
Authenticationprotocol
Protocol used for verifying messages, selectHMACMD5, HMACSHA or not select.
[Example]HMACSHA
Authenticationpassword
If the HMACMD5 or HMACSHA protocol is selected,you need to set the authentication password.In the right textbox, click Modify to modify thepassword; click Cancel to cancel the modify.
[Example]-
Privacyprotocol
Encryption protocol used when encapsulating data,select DES, AES or not select.l DES: indicates the Data Encryption Standard (DES),
which is an international encryption algorithm withthe key length of 56 characters.
l AES: indicates the Advanced Encryption Standard(AES). There are three types of key lengths,including 128 characters, 192 characters, and 256characters. These types of key length can provide thesecurity protection of different levels.
[Example]DES
Privacypassword
If the Privacy protocol is DES orAES, you need to setthe data encryption password.In the right textbox, click Modify to modify thepassword; click Cancel to cancel the modify.
[Example]-
Step 5 Click OK, the Succeed dialog box is displayed.
OceanStor InfraControlAdmin Guide 2 System Management
Issue 04 (2015-02-28) Huawei Proprietary and ConfidentialCopyright © Huawei Technologies Co., Ltd.
44
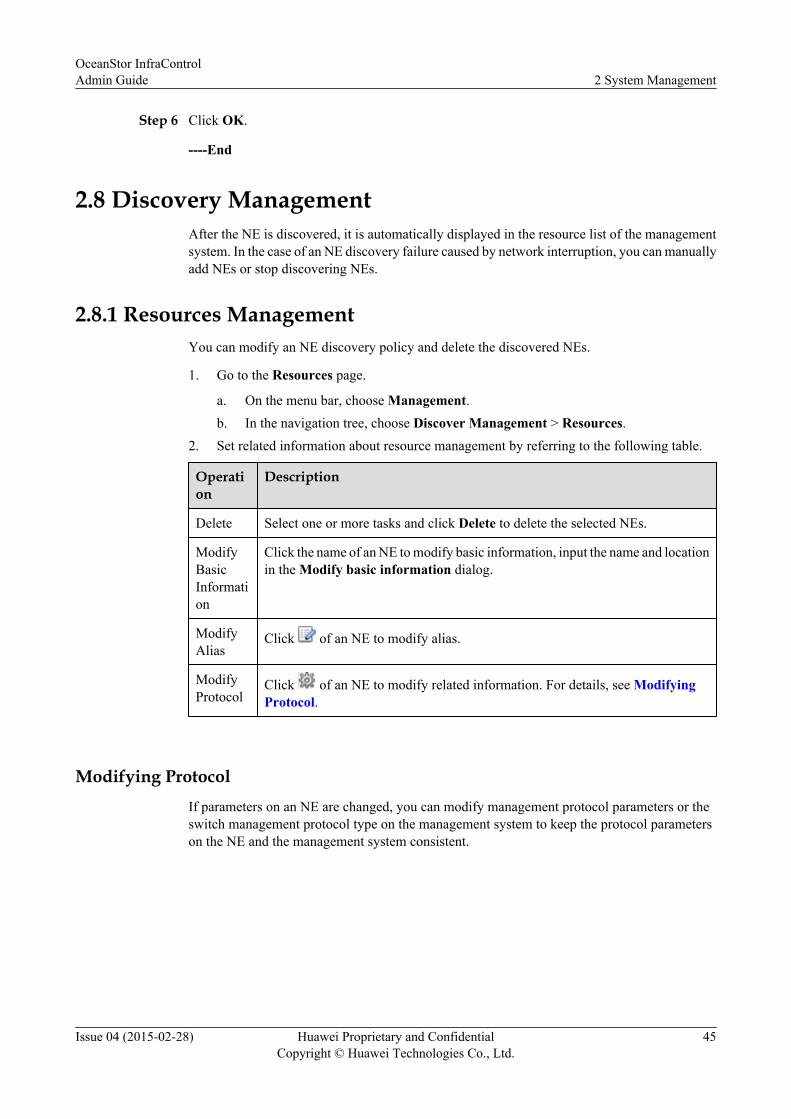
Step 6 Click OK.
----End
2.8 Discovery ManagementAfter the NE is discovered, it is automatically displayed in the resource list of the managementsystem. In the case of an NE discovery failure caused by network interruption, you can manuallyadd NEs or stop discovering NEs.
2.8.1 Resources ManagementYou can modify an NE discovery policy and delete the discovered NEs.
1. Go to the Resources page.
a. On the menu bar, choose Management.b. In the navigation tree, choose Discover Management > Resources.
2. Set related information about resource management by referring to the following table.
Operation
Description
Delete Select one or more tasks and click Delete to delete the selected NEs.
ModifyBasicInformation
Click the name of an NE to modify basic information, input the name and locationin the Modify basic information dialog.
ModifyAlias
Click of an NE to modify alias.
ModifyProtocol
Click of an NE to modify related information. For details, see ModifyingProtocol.
Modifying ProtocolIf parameters on an NE are changed, you can modify management protocol parameters or theswitch management protocol type on the management system to keep the protocol parameterson the NE and the management system consistent.
OceanStor InfraControlAdmin Guide 2 System Management
Issue 04 (2015-02-28) Huawei Proprietary and ConfidentialCopyright © Huawei Technologies Co., Ltd.
45
Context
NOTICEWhen the parameters on an NE are consistent to the management system, if you change themanagement protocol parameters to cause the protocol parameters on the NE and themanagement system not consistent. The modified management protocol parameters take effectwhen InfraControl obtain the connection again.
Procedure
Step 1 On the menu bar, choose Management.
Step 2 In the navigation tree, choose Discover Management > Resources.
Step 3 In the function pane, click next to the resource whose management protocol you want tomodify.The Modify Protocol dialog box is displayed.
Step 4 Modify management protocol parameters.
Step 5 Click OK.
----End
2.8.2 Managing Resource DiscoveryYou can create an NE discovery policy. By implementing a configured discovery policy, youcan discover different types of NEs, and monitor and manage online NEs. All resource discoveryresults are displayed in the discovery result list. You can view and delete the discovery results,and stop the discovery results that are running, and rediscover the NEs based on the presetdiscovery policy.
NOTICEThe storage arrays use the MD5 to encrypt device users' passwords. There is a possibility thatdevice users' passwords are cracked and leaked.
1. Go to the Discover Resources Results page.
a. On the menu bar, choose Management.
b. In the navigation tree, choose Discover Management > Discover Resources.
2. Set the resource management parameters, as described in the following table.
OceanStor InfraControlAdmin Guide 2 System Management
Issue 04 (2015-02-28) Huawei Proprietary and ConfidentialCopyright © Huawei Technologies Co., Ltd.
46
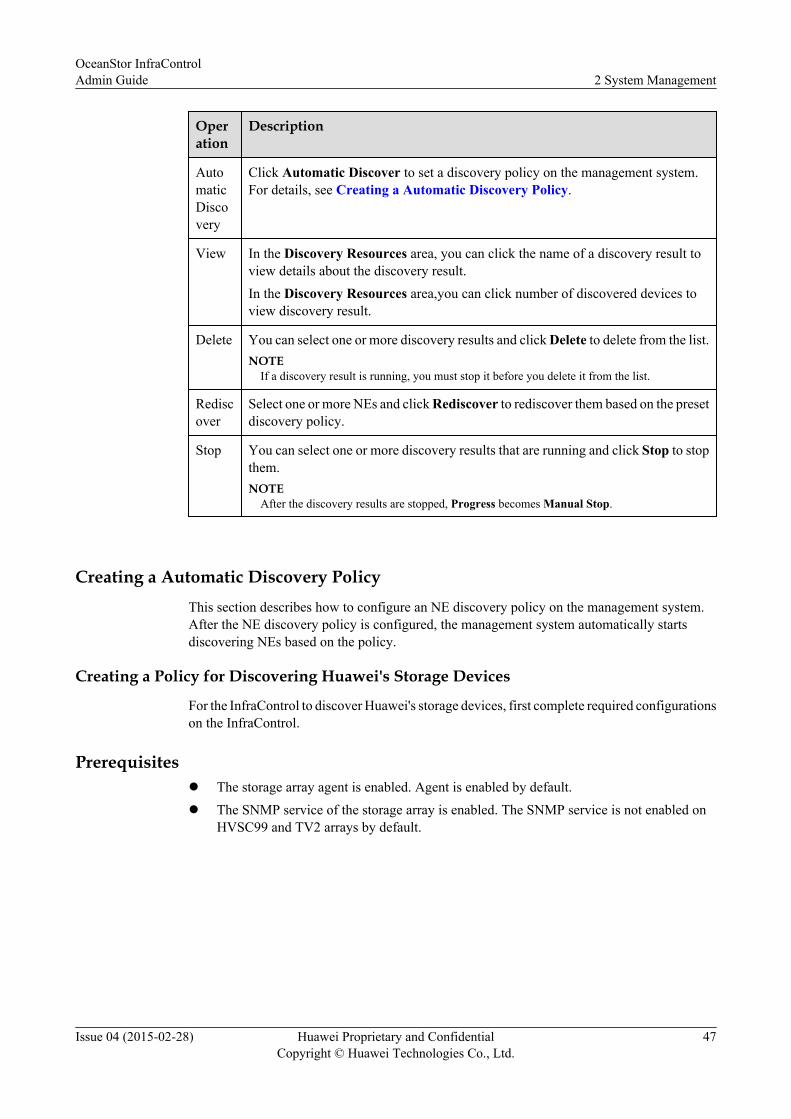
Operation
Description
AutomaticDiscovery
Click Automatic Discover to set a discovery policy on the management system.For details, see Creating a Automatic Discovery Policy.
View In the Discovery Resources area, you can click the name of a discovery result toview details about the discovery result.In the Discovery Resources area,you can click number of discovered devices toview discovery result.
Delete You can select one or more discovery results and click Delete to delete from the list.NOTE
If a discovery result is running, you must stop it before you delete it from the list.
Rediscover
Select one or more NEs and click Rediscover to rediscover them based on the presetdiscovery policy.
Stop You can select one or more discovery results that are running and click Stop to stopthem.NOTE
After the discovery results are stopped, Progress becomes Manual Stop.
Creating a Automatic Discovery PolicyThis section describes how to configure an NE discovery policy on the management system.After the NE discovery policy is configured, the management system automatically startsdiscovering NEs based on the policy.
Creating a Policy for Discovering Huawei's Storage Devices
For the InfraControl to discover Huawei's storage devices, first complete required configurationson the InfraControl.
Prerequisitesl The storage array agent is enabled. Agent is enabled by default.l The SNMP service of the storage array is enabled. The SNMP service is not enabled on
HVSC99 and TV2 arrays by default.
OceanStor InfraControlAdmin Guide 2 System Management
Issue 04 (2015-02-28) Huawei Proprietary and ConfidentialCopyright © Huawei Technologies Co., Ltd.
47
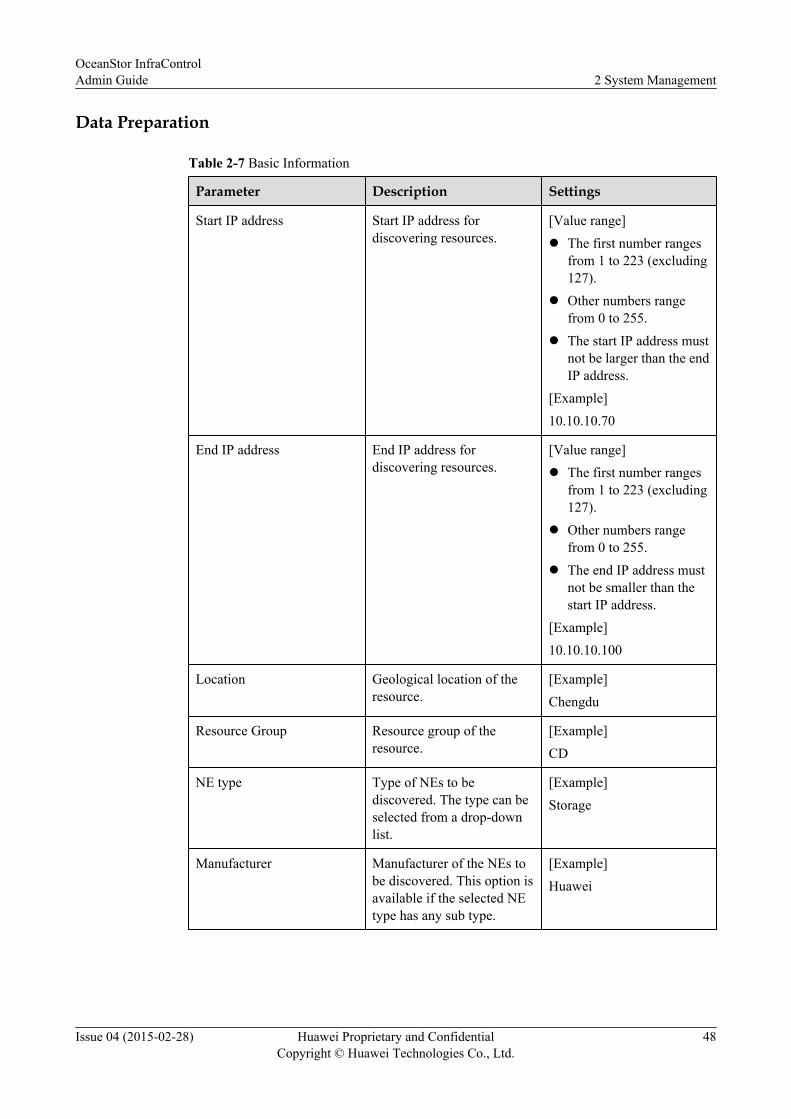
Data Preparation
Table 2-7 Basic Information
Parameter Description Settings
Start IP address Start IP address fordiscovering resources.
[Value range]l The first number ranges
from 1 to 223 (excluding127).
l Other numbers rangefrom 0 to 255.
l The start IP address mustnot be larger than the endIP address.
[Example]10.10.10.70
End IP address End IP address fordiscovering resources.
[Value range]l The first number ranges
from 1 to 223 (excluding127).
l Other numbers rangefrom 0 to 255.
l The end IP address mustnot be smaller than thestart IP address.
[Example]10.10.10.100
Location Geological location of theresource.
[Example]Chengdu
Resource Group Resource group of theresource.
[Example]CD
NE type Type of NEs to bediscovered. The type can beselected from a drop-downlist.
[Example]Storage
Manufacturer Manufacturer of the NEs tobe discovered. This option isavailable if the selected NEtype has any sub type.
[Example]Huawei
OceanStor InfraControlAdmin Guide 2 System Management
Issue 04 (2015-02-28) Huawei Proprietary and ConfidentialCopyright © Huawei Technologies Co., Ltd.
48
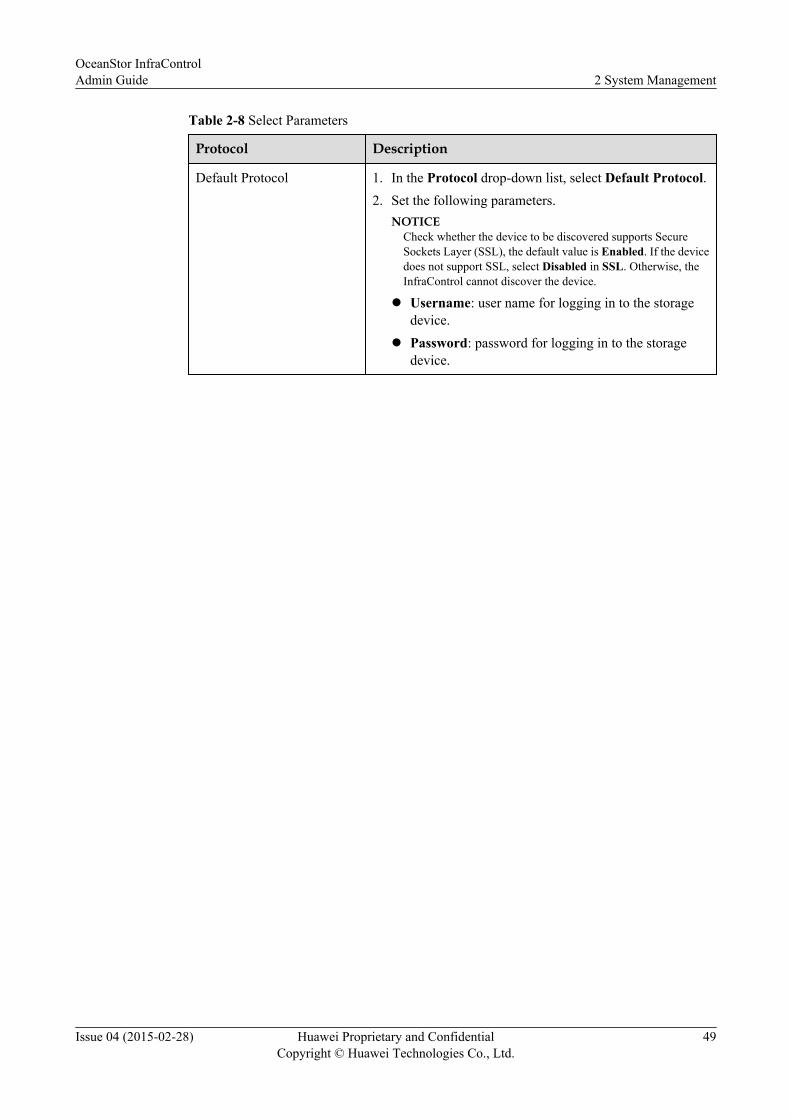
Table 2-8 Select Parameters
Protocol Description
Default Protocol 1. In the Protocol drop-down list, select Default Protocol.2. Set the following parameters.
NOTICECheck whether the device to be discovered supports SecureSockets Layer (SSL), the default value is Enabled. If the devicedoes not support SSL, select Disabled in SSL. Otherwise, theInfraControl cannot discover the device.
l Username: user name for logging in to the storagedevice.
l Password: password for logging in to the storagedevice.
OceanStor InfraControlAdmin Guide 2 System Management
Issue 04 (2015-02-28) Huawei Proprietary and ConfidentialCopyright © Huawei Technologies Co., Ltd.
49
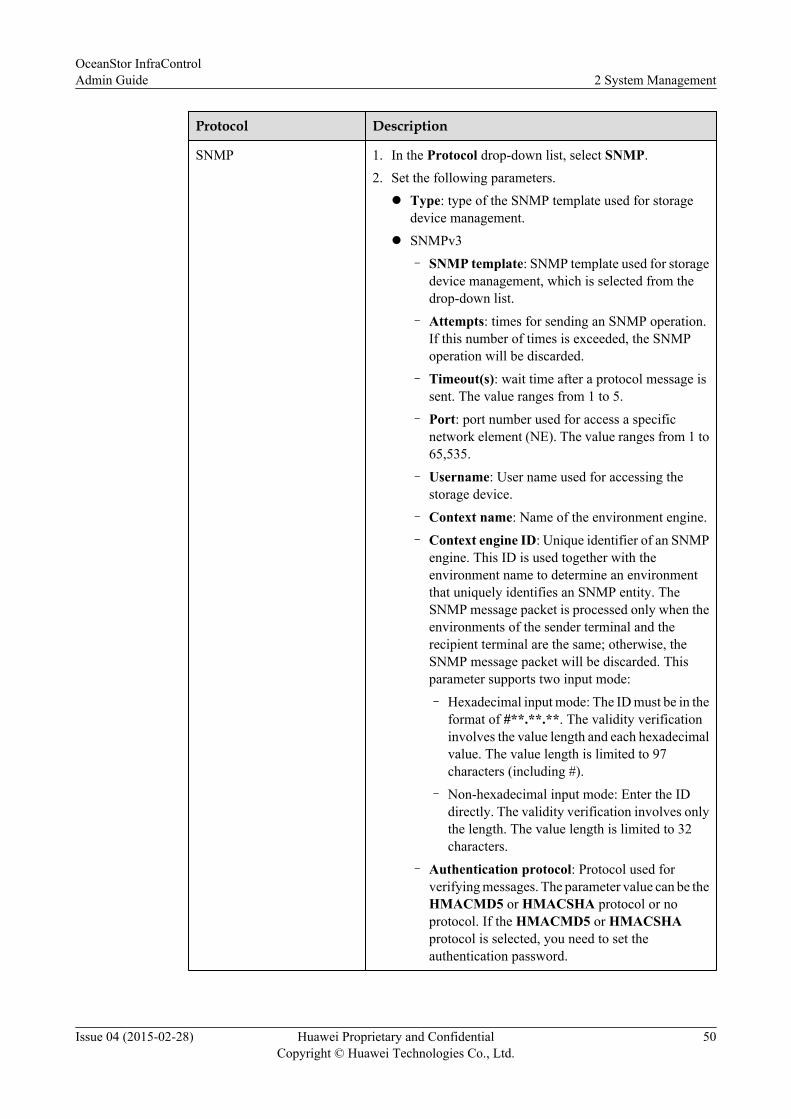
Protocol Description
SNMP 1. In the Protocol drop-down list, select SNMP.2. Set the following parameters.l Type: type of the SNMP template used for storage
device management.l SNMPv3
– SNMP template: SNMP template used for storagedevice management, which is selected from thedrop-down list.
– Attempts: times for sending an SNMP operation.If this number of times is exceeded, the SNMPoperation will be discarded.
– Timeout(s): wait time after a protocol message issent. The value ranges from 1 to 5.
– Port: port number used for access a specificnetwork element (NE). The value ranges from 1 to65,535.
– Username: User name used for accessing thestorage device.
– Context name: Name of the environment engine.
– Context engine ID: Unique identifier of an SNMPengine. This ID is used together with theenvironment name to determine an environmentthat uniquely identifies an SNMP entity. TheSNMP message packet is processed only when theenvironments of the sender terminal and therecipient terminal are the same; otherwise, theSNMP message packet will be discarded. Thisparameter supports two input mode:
– Hexadecimal input mode: The ID must be in theformat of #**.**.**. The validity verificationinvolves the value length and each hexadecimalvalue. The value length is limited to 97characters (including #).
– Non-hexadecimal input mode: Enter the IDdirectly. The validity verification involves onlythe length. The value length is limited to 32characters.
– Authentication protocol: Protocol used forverifying messages. The parameter value can be theHMACMD5 or HMACSHA protocol or noprotocol. If the HMACMD5 or HMACSHAprotocol is selected, you need to set theauthentication password.
OceanStor InfraControlAdmin Guide 2 System Management
Issue 04 (2015-02-28) Huawei Proprietary and ConfidentialCopyright © Huawei Technologies Co., Ltd.
50

Protocol Description
– Authentication password: If the authenticationprotocol is used when verifying messages, youneed to set the authentication password.
– Privacy protocol: Encryption protocol used whenencapsulating data. The parameter value can be theDES or AES encryption protocol or no encryption.If the DES or AES encryption protocol is selected,you need to set the encryption password.
– DES: It indicates the Data Encryption Standard(DES), which is an international encryptionalgorithm with the key length of 56 characters.
– AES: It indicates the Advanced EncryptionStandard (AES). There are three types of keylengths, including 128 characters, 192characters, and 256 characters. These types ofkey length can provide the security protectionof different levels.
– Privacy password: If the encryption algorithm isused when encapsulating data, you need to set thedata encryption password.
l SNMPv2c/SNMPv1
– SNMP template: SNMP template used for storagedevice management, which is selected from thedrop-down list.
– Attempts: times for sending an SNMP operation.If this number of times is exceeded, the SNMPoperation will be discarded.
– Timeout(s): wait time after a protocol message issent. The value ranges from 1 to 5.
– Port: port number used for access a specificnetwork element (NE). The value ranges from 1 to65,535.
– Read community: name of the community that hasread permission.
– Write community: name of the community thathas write permission.
REST 1. In the Protocol drop-down list, select REST.2. Set the following parameters.l Username: user name for logging in to the storage
device.l Password: password for logging in to the storage
device.
OceanStor InfraControlAdmin Guide 2 System Management
Issue 04 (2015-02-28) Huawei Proprietary and ConfidentialCopyright © Huawei Technologies Co., Ltd.
51
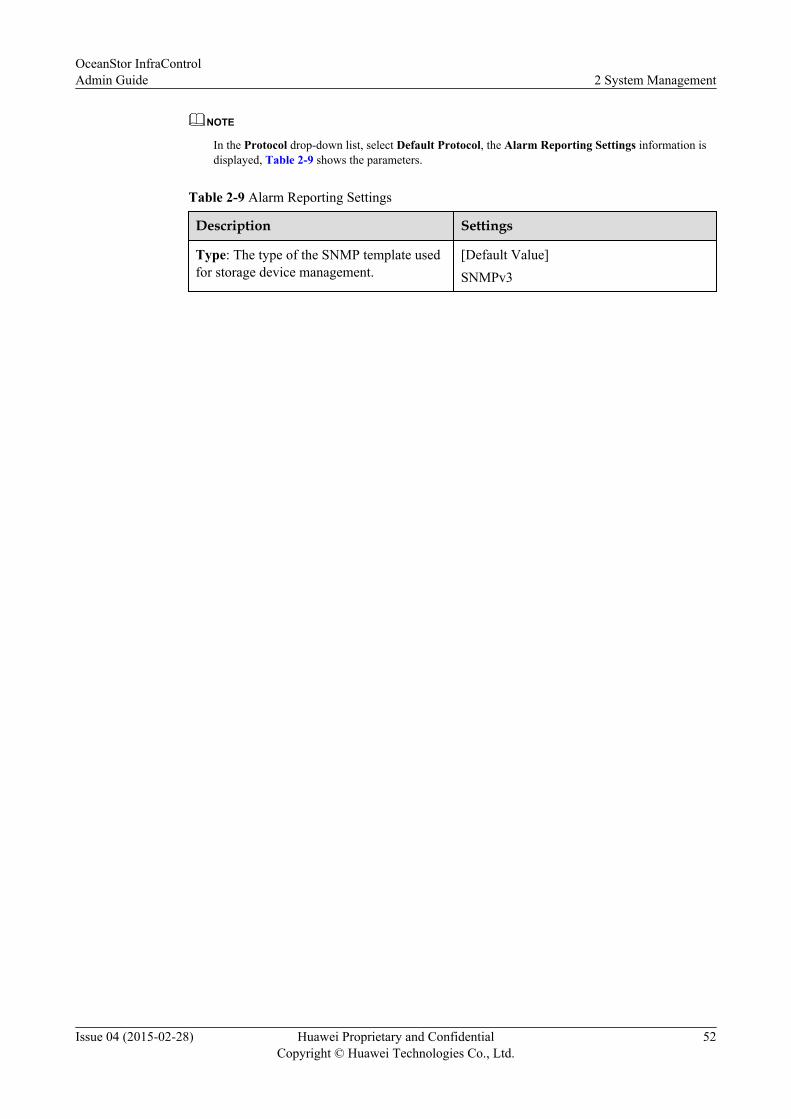
NOTE
In the Protocol drop-down list, select Default Protocol, the Alarm Reporting Settings information isdisplayed, Table 2-9 shows the parameters.
Table 2-9 Alarm Reporting Settings
Description Settings
Type: The type of the SNMP template usedfor storage device management.
[Default Value]SNMPv3
OceanStor InfraControlAdmin Guide 2 System Management
Issue 04 (2015-02-28) Huawei Proprietary and ConfidentialCopyright © Huawei Technologies Co., Ltd.
52
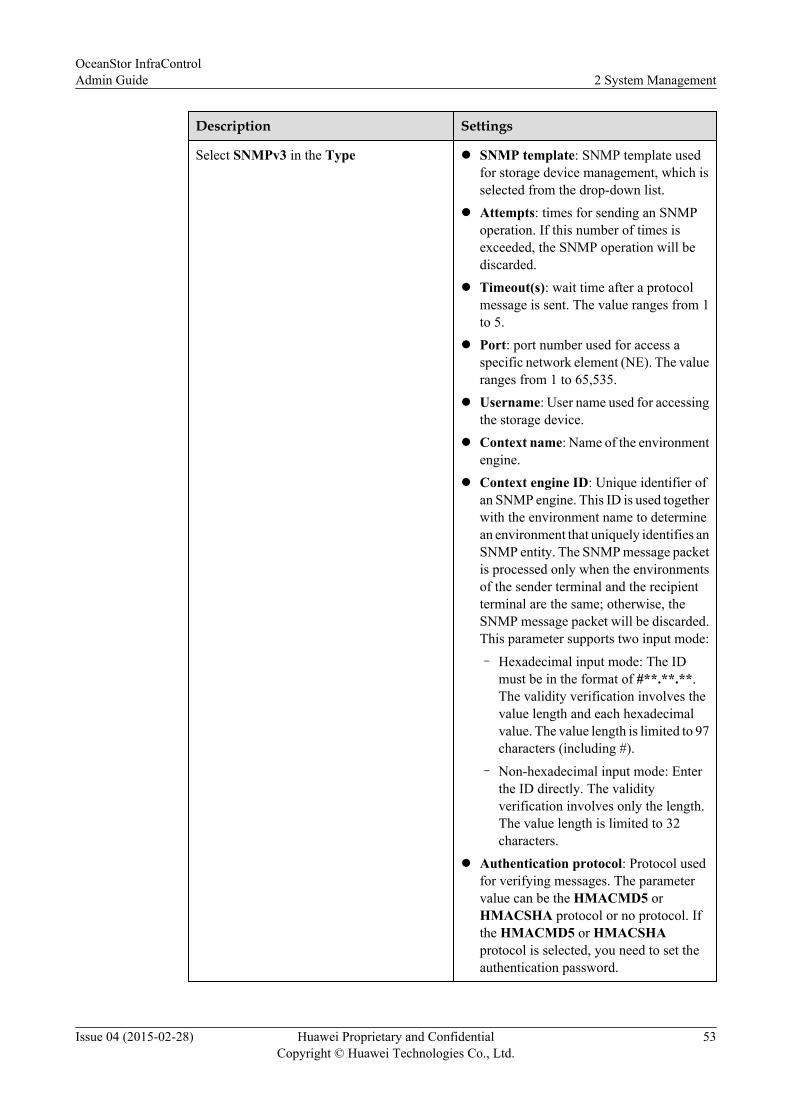
Description Settings
Select SNMPv3 in the Type l SNMP template: SNMP template usedfor storage device management, which isselected from the drop-down list.
l Attempts: times for sending an SNMPoperation. If this number of times isexceeded, the SNMP operation will bediscarded.
l Timeout(s): wait time after a protocolmessage is sent. The value ranges from 1to 5.
l Port: port number used for access aspecific network element (NE). The valueranges from 1 to 65,535.
l Username: User name used for accessingthe storage device.
l Context name: Name of the environmentengine.
l Context engine ID: Unique identifier ofan SNMP engine. This ID is used togetherwith the environment name to determinean environment that uniquely identifies anSNMP entity. The SNMP message packetis processed only when the environmentsof the sender terminal and the recipientterminal are the same; otherwise, theSNMP message packet will be discarded.This parameter supports two input mode:
– Hexadecimal input mode: The IDmust be in the format of #**.**.**.The validity verification involves thevalue length and each hexadecimalvalue. The value length is limited to 97characters (including #).
– Non-hexadecimal input mode: Enterthe ID directly. The validityverification involves only the length.The value length is limited to 32characters.
l Authentication protocol: Protocol usedfor verifying messages. The parametervalue can be the HMACMD5 orHMACSHA protocol or no protocol. Ifthe HMACMD5 or HMACSHAprotocol is selected, you need to set theauthentication password.
OceanStor InfraControlAdmin Guide 2 System Management
Issue 04 (2015-02-28) Huawei Proprietary and ConfidentialCopyright © Huawei Technologies Co., Ltd.
53
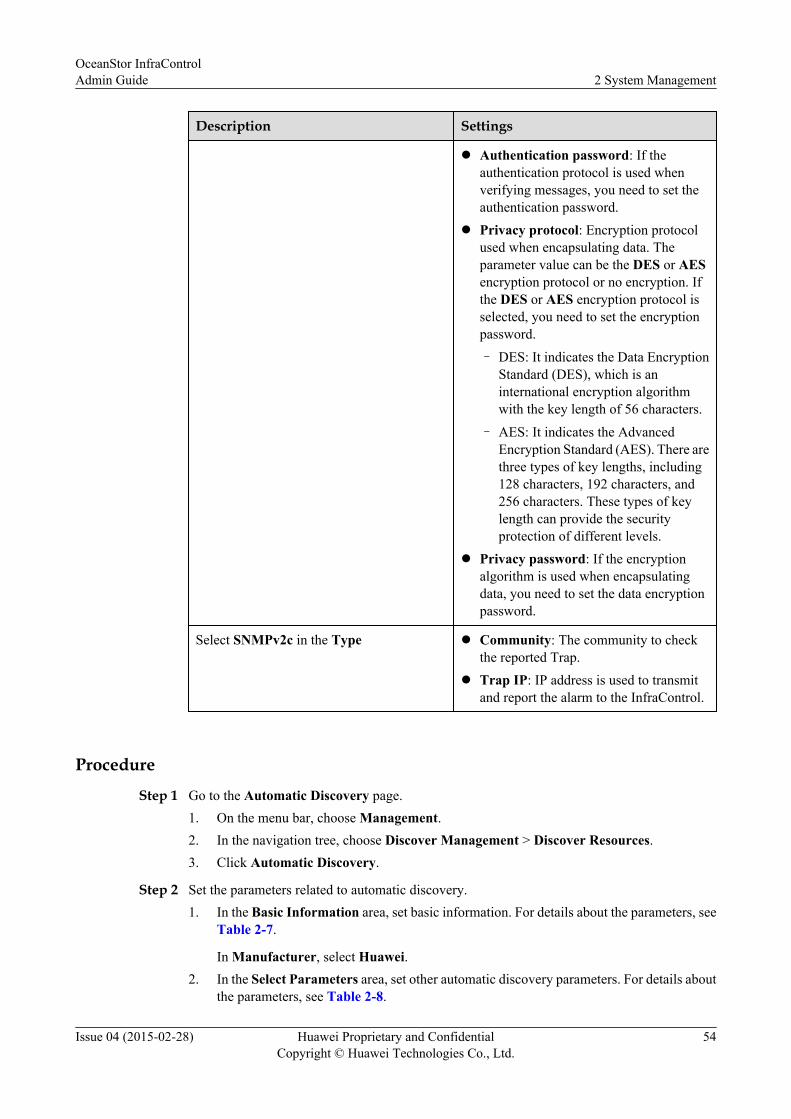
Description Settings
l Authentication password: If theauthentication protocol is used whenverifying messages, you need to set theauthentication password.
l Privacy protocol: Encryption protocolused when encapsulating data. Theparameter value can be the DES or AESencryption protocol or no encryption. Ifthe DES or AES encryption protocol isselected, you need to set the encryptionpassword.
– DES: It indicates the Data EncryptionStandard (DES), which is aninternational encryption algorithmwith the key length of 56 characters.
– AES: It indicates the AdvancedEncryption Standard (AES). There arethree types of key lengths, including128 characters, 192 characters, and256 characters. These types of keylength can provide the securityprotection of different levels.
l Privacy password: If the encryptionalgorithm is used when encapsulatingdata, you need to set the data encryptionpassword.
Select SNMPv2c in the Type l Community: The community to checkthe reported Trap.
l Trap IP: IP address is used to transmitand report the alarm to the InfraControl.
Procedure
Step 1 Go to the Automatic Discovery page.1. On the menu bar, choose Management.2. In the navigation tree, choose Discover Management > Discover Resources.3. Click Automatic Discovery.
Step 2 Set the parameters related to automatic discovery.1. In the Basic Information area, set basic information. For details about the parameters, see
Table 2-7.
In Manufacturer, select Huawei.2. In the Select Parameters area, set other automatic discovery parameters. For details about
the parameters, see Table 2-8.
OceanStor InfraControlAdmin Guide 2 System Management
Issue 04 (2015-02-28) Huawei Proprietary and ConfidentialCopyright © Huawei Technologies Co., Ltd.
54
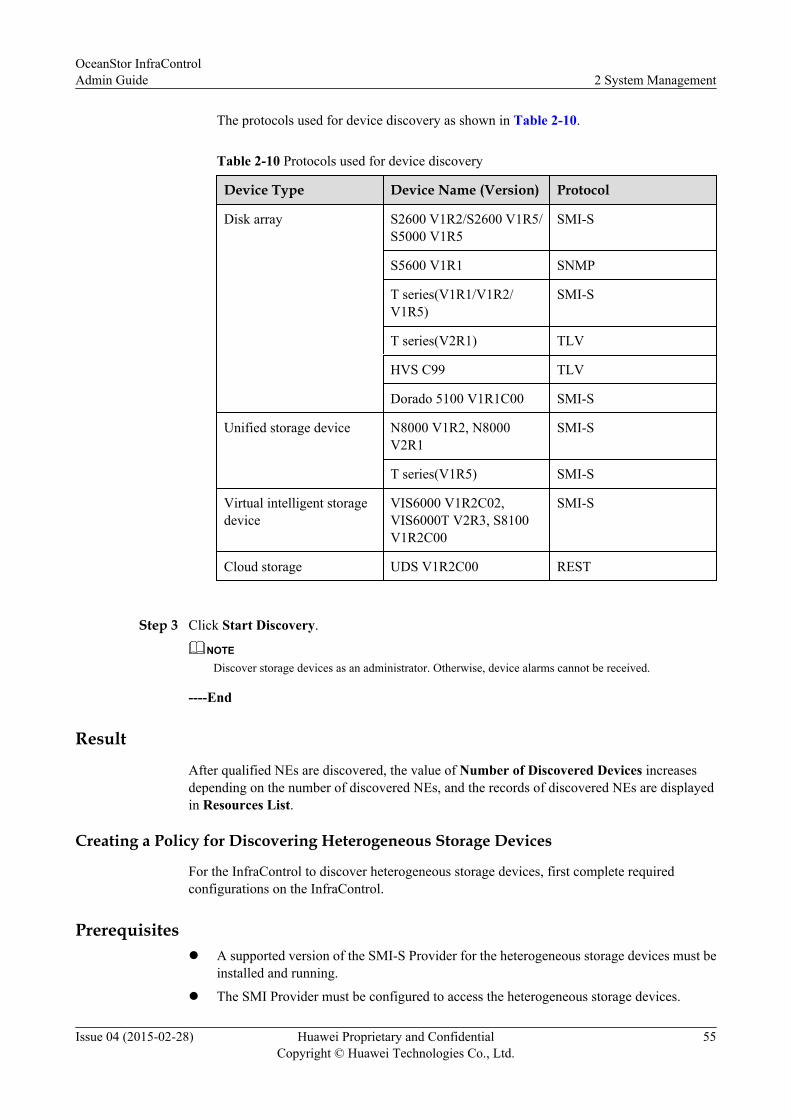
The protocols used for device discovery as shown in Table 2-10.
Table 2-10 Protocols used for device discovery
Device Type Device Name (Version) Protocol
Disk array S2600 V1R2/S2600 V1R5/S5000 V1R5
SMI-S
S5600 V1R1 SNMP
T series(V1R1/V1R2/V1R5)
SMI-S
T series(V2R1) TLV
HVS C99 TLV
Dorado 5100 V1R1C00 SMI-S
Unified storage device N8000 V1R2, N8000V2R1
SMI-S
T series(V1R5) SMI-S
Virtual intelligent storagedevice
VIS6000 V1R2C02,VIS6000T V2R3, S8100V1R2C00
SMI-S
Cloud storage UDS V1R2C00 REST
Step 3 Click Start Discovery.
NOTE
Discover storage devices as an administrator. Otherwise, device alarms cannot be received.
----End
Result
After qualified NEs are discovered, the value of Number of Discovered Devices increasesdepending on the number of discovered NEs, and the records of discovered NEs are displayedin Resources List.
Creating a Policy for Discovering Heterogeneous Storage Devices
For the InfraControl to discover heterogeneous storage devices, first complete requiredconfigurations on the InfraControl.
Prerequisitesl A supported version of the SMI-S Provider for the heterogeneous storage devices must be
installed and running.
l The SMI Provider must be configured to access the heterogeneous storage devices.
OceanStor InfraControlAdmin Guide 2 System Management
Issue 04 (2015-02-28) Huawei Proprietary and ConfidentialCopyright © Huawei Technologies Co., Ltd.
55
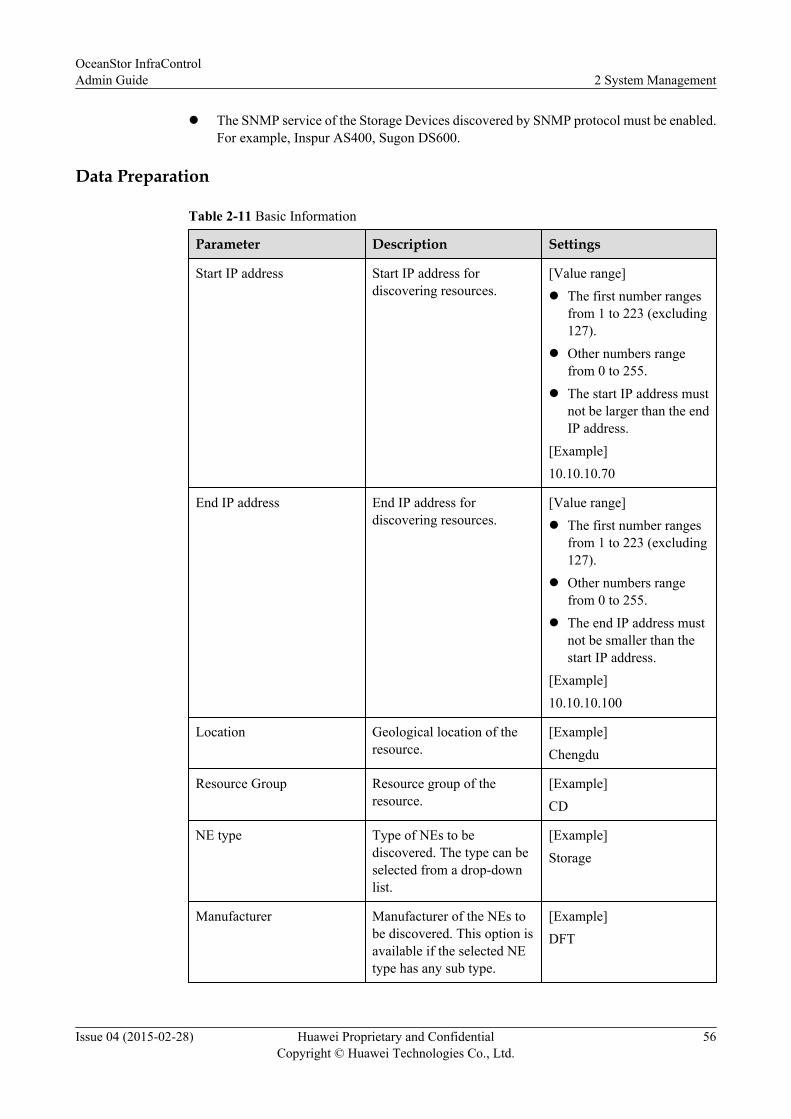
l The SNMP service of the Storage Devices discovered by SNMP protocol must be enabled.For example, Inspur AS400, Sugon DS600.
Data Preparation
Table 2-11 Basic Information
Parameter Description Settings
Start IP address Start IP address fordiscovering resources.
[Value range]l The first number ranges
from 1 to 223 (excluding127).
l Other numbers rangefrom 0 to 255.
l The start IP address mustnot be larger than the endIP address.
[Example]10.10.10.70
End IP address End IP address fordiscovering resources.
[Value range]l The first number ranges
from 1 to 223 (excluding127).
l Other numbers rangefrom 0 to 255.
l The end IP address mustnot be smaller than thestart IP address.
[Example]10.10.10.100
Location Geological location of theresource.
[Example]Chengdu
Resource Group Resource group of theresource.
[Example]CD
NE type Type of NEs to bediscovered. The type can beselected from a drop-downlist.
[Example]Storage
Manufacturer Manufacturer of the NEs tobe discovered. This option isavailable if the selected NEtype has any sub type.
[Example]DFT
OceanStor InfraControlAdmin Guide 2 System Management
Issue 04 (2015-02-28) Huawei Proprietary and ConfidentialCopyright © Huawei Technologies Co., Ltd.
56
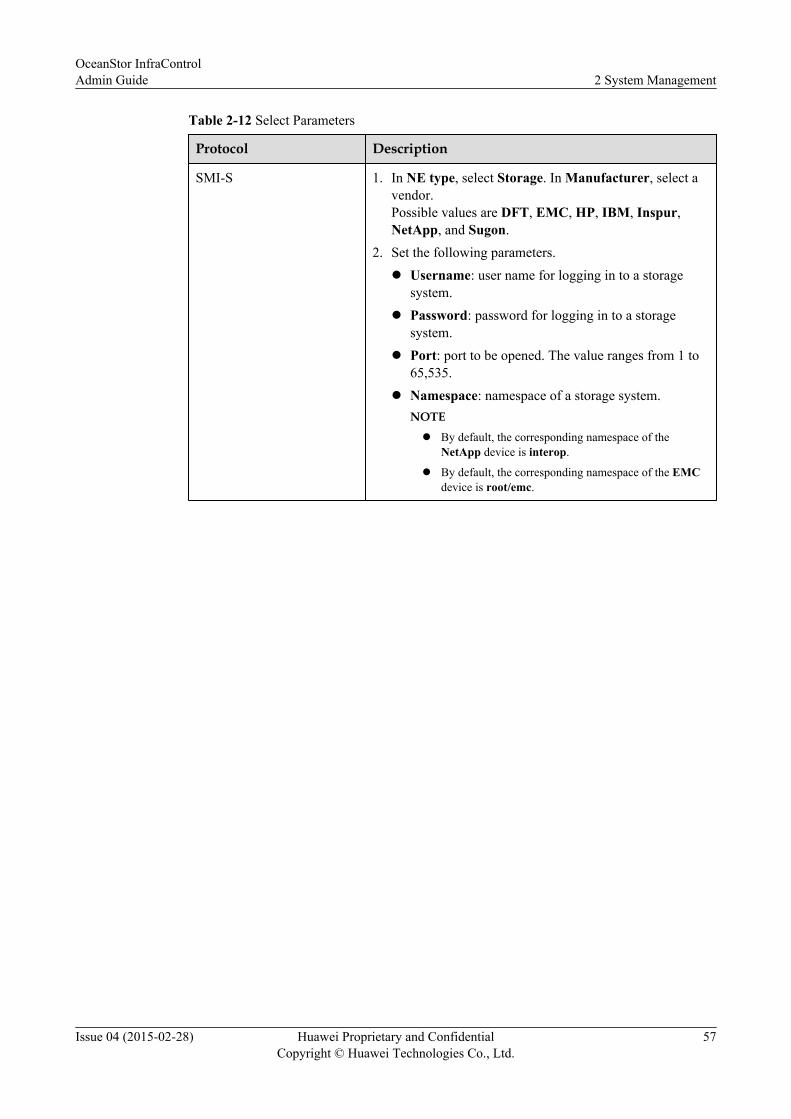
Table 2-12 Select Parameters
Protocol Description
SMI-S 1. In NE type, select Storage. In Manufacturer, select avendor.Possible values are DFT, EMC, HP, IBM, Inspur,NetApp, and Sugon.
2. Set the following parameters.l Username: user name for logging in to a storage
system.l Password: password for logging in to a storage
system.l Port: port to be opened. The value ranges from 1 to
65,535.l Namespace: namespace of a storage system.
NOTE
l By default, the corresponding namespace of theNetApp device is interop.
l By default, the corresponding namespace of the EMCdevice is root/emc.
OceanStor InfraControlAdmin Guide 2 System Management
Issue 04 (2015-02-28) Huawei Proprietary and ConfidentialCopyright © Huawei Technologies Co., Ltd.
57
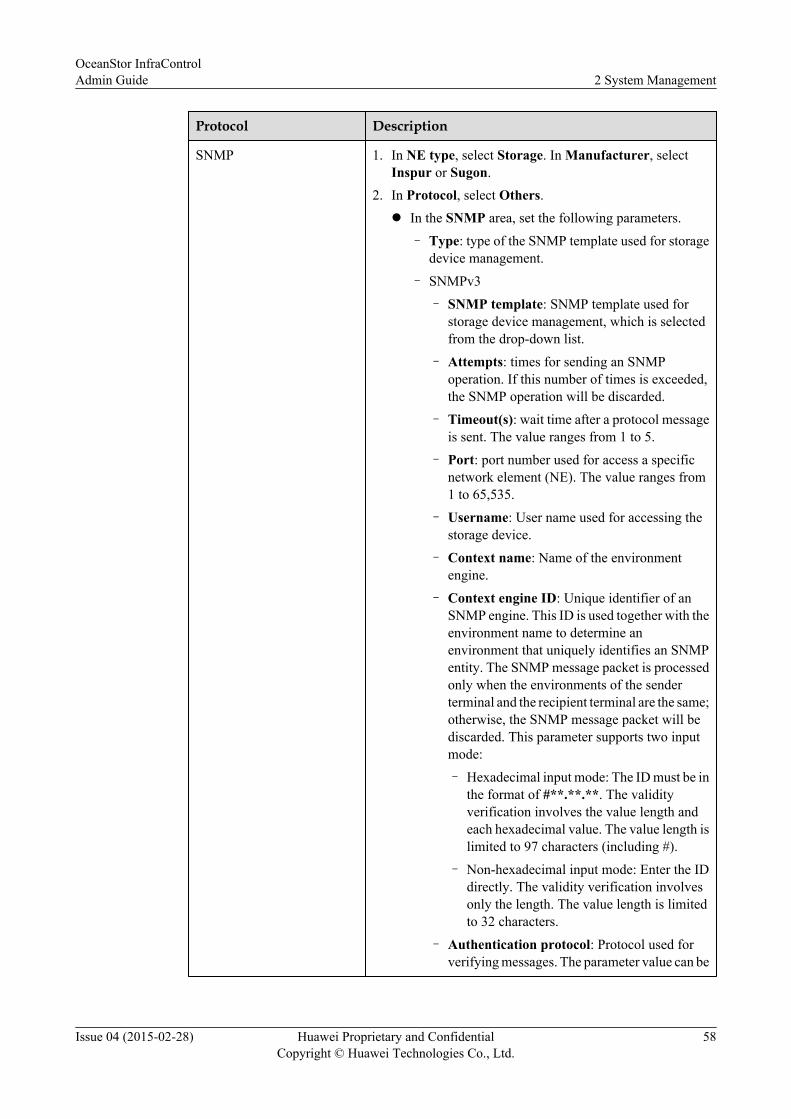
Protocol Description
SNMP 1. In NE type, select Storage. In Manufacturer, selectInspur or Sugon.
2. In Protocol, select Others.l In the SNMP area, set the following parameters.
– Type: type of the SNMP template used for storagedevice management.
– SNMPv3
– SNMP template: SNMP template used forstorage device management, which is selectedfrom the drop-down list.
– Attempts: times for sending an SNMPoperation. If this number of times is exceeded,the SNMP operation will be discarded.
– Timeout(s): wait time after a protocol messageis sent. The value ranges from 1 to 5.
– Port: port number used for access a specificnetwork element (NE). The value ranges from1 to 65,535.
– Username: User name used for accessing thestorage device.
– Context name: Name of the environmentengine.
– Context engine ID: Unique identifier of anSNMP engine. This ID is used together with theenvironment name to determine anenvironment that uniquely identifies an SNMPentity. The SNMP message packet is processedonly when the environments of the senderterminal and the recipient terminal are the same;otherwise, the SNMP message packet will bediscarded. This parameter supports two inputmode:
– Hexadecimal input mode: The ID must be inthe format of #**.**.**. The validityverification involves the value length andeach hexadecimal value. The value length islimited to 97 characters (including #).
– Non-hexadecimal input mode: Enter the IDdirectly. The validity verification involvesonly the length. The value length is limitedto 32 characters.
– Authentication protocol: Protocol used forverifying messages. The parameter value can be
OceanStor InfraControlAdmin Guide 2 System Management
Issue 04 (2015-02-28) Huawei Proprietary and ConfidentialCopyright © Huawei Technologies Co., Ltd.
58
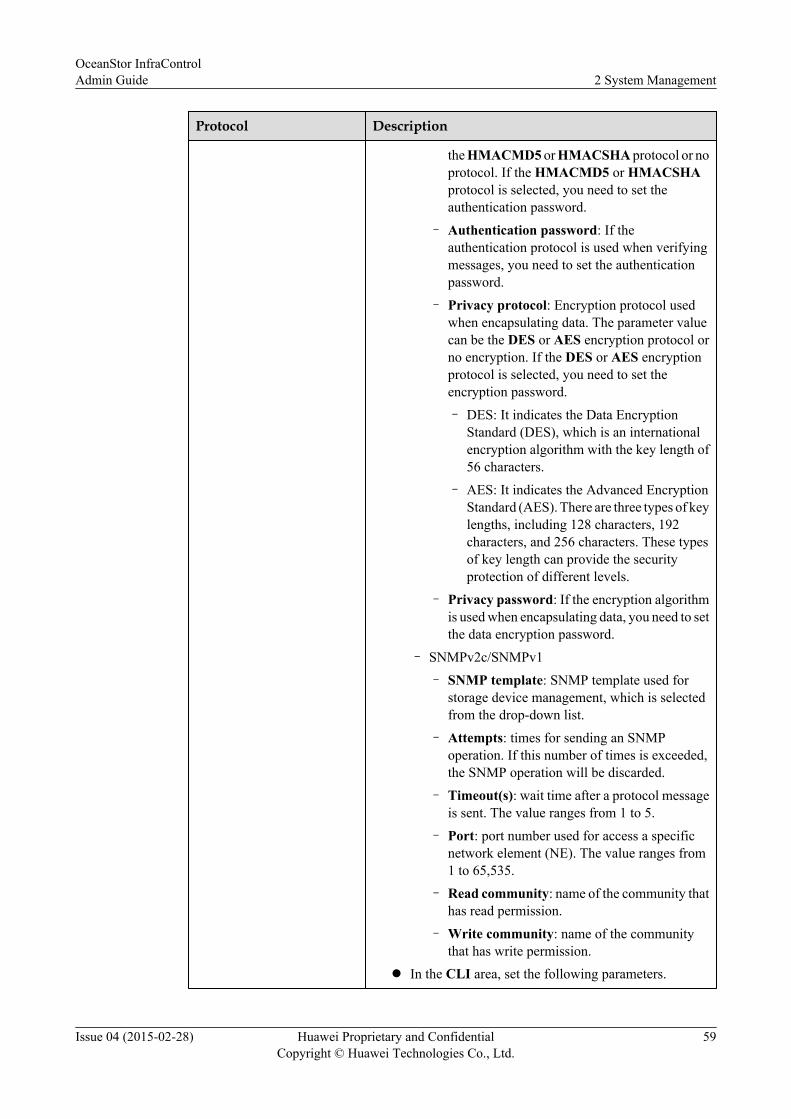
Protocol Description
the HMACMD5 or HMACSHA protocol or noprotocol. If the HMACMD5 or HMACSHAprotocol is selected, you need to set theauthentication password.
– Authentication password: If theauthentication protocol is used when verifyingmessages, you need to set the authenticationpassword.
– Privacy protocol: Encryption protocol usedwhen encapsulating data. The parameter valuecan be the DES or AES encryption protocol orno encryption. If the DES or AES encryptionprotocol is selected, you need to set theencryption password.
– DES: It indicates the Data EncryptionStandard (DES), which is an internationalencryption algorithm with the key length of56 characters.
– AES: It indicates the Advanced EncryptionStandard (AES). There are three types of keylengths, including 128 characters, 192characters, and 256 characters. These typesof key length can provide the securityprotection of different levels.
– Privacy password: If the encryption algorithmis used when encapsulating data, you need to setthe data encryption password.
– SNMPv2c/SNMPv1
– SNMP template: SNMP template used forstorage device management, which is selectedfrom the drop-down list.
– Attempts: times for sending an SNMPoperation. If this number of times is exceeded,the SNMP operation will be discarded.
– Timeout(s): wait time after a protocol messageis sent. The value ranges from 1 to 5.
– Port: port number used for access a specificnetwork element (NE). The value ranges from1 to 65,535.
– Read community: name of the community thathas read permission.
– Write community: name of the communitythat has write permission.
l In the CLI area, set the following parameters.
OceanStor InfraControlAdmin Guide 2 System Management
Issue 04 (2015-02-28) Huawei Proprietary and ConfidentialCopyright © Huawei Technologies Co., Ltd.
59
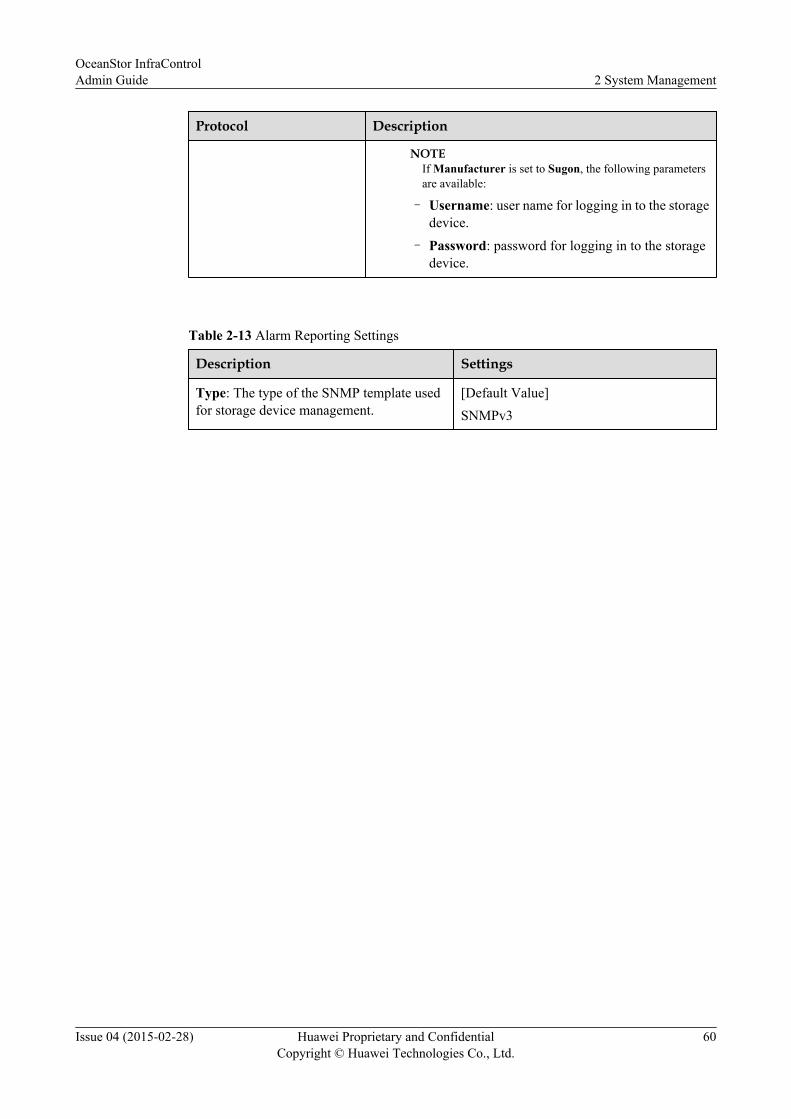
Protocol Description
NOTEIf Manufacturer is set to Sugon, the following parametersare available:
– Username: user name for logging in to the storagedevice.
– Password: password for logging in to the storagedevice.
Table 2-13 Alarm Reporting Settings
Description Settings
Type: The type of the SNMP template usedfor storage device management.
[Default Value]SNMPv3
OceanStor InfraControlAdmin Guide 2 System Management
Issue 04 (2015-02-28) Huawei Proprietary and ConfidentialCopyright © Huawei Technologies Co., Ltd.
60

Description Settings
Select SNMPv3 in the Type l SNMP template: SNMP template usedfor storage device management, which isselected from the drop-down list.
l Attempts: times for sending an SNMPoperation. If this number of times isexceeded, the SNMP operation will bediscarded.
l Timeout(s): wait time after a protocolmessage is sent. The value ranges from 1to 5.
l Port: port number used for access aspecific network element (NE). The valueranges from 1 to 65,535.
l Username: User name used for accessingthe storage device.
l Context name: Name of the environmentengine.
l Context engine ID: Unique identifier ofan SNMP engine. This ID is used togetherwith the environment name to determinean environment that uniquely identifies anSNMP entity. The SNMP message packetis processed only when the environmentsof the sender terminal and the recipientterminal are the same; otherwise, theSNMP message packet will be discarded.This parameter supports two input mode:
– Hexadecimal input mode: The IDmust be in the format of #**.**.**.The validity verification involves thevalue length and each hexadecimalvalue. The value length is limited to 97characters (including #).
– Non-hexadecimal input mode: Enterthe ID directly. The validityverification involves only the length.The value length is limited to 32characters.
l Authentication protocol: Protocol usedfor verifying messages. The parametervalue can be the HMACMD5 orHMACSHA protocol or no protocol. Ifthe HMACMD5 or HMACSHAprotocol is selected, you need to set theauthentication password.
OceanStor InfraControlAdmin Guide 2 System Management
Issue 04 (2015-02-28) Huawei Proprietary and ConfidentialCopyright © Huawei Technologies Co., Ltd.
61

Description Settings
l Authentication password: If theauthentication protocol is used whenverifying messages, you need to set theauthentication password.
l Privacy protocol: Encryption protocolused when encapsulating data. Theparameter value can be the DES or AESencryption protocol or no encryption. Ifthe DES or AES encryption protocol isselected, you need to set the encryptionpassword.
– DES: It indicates the Data EncryptionStandard (DES), which is aninternational encryption algorithmwith the key length of 56 characters.
– AES: It indicates the AdvancedEncryption Standard (AES). There arethree types of key lengths, including128 characters, 192 characters, and256 characters. These types of keylength can provide the securityprotection of different levels.
l Privacy password: If the encryptionalgorithm is used when encapsulatingdata, you need to set the data encryptionpassword.
Select SNMPv2c in the Type l Community: The community to checkthe reported Trap.
l Trap IP: IP address is used to transmitand report the alarm to the InfraControl.
Procedure
Step 1 Go to the Automatic Discovery page.
1. On the menu bar, choose Management.
2. In the navigation tree, choose Discover Management > Discover Resources.
3. Click Automatic Discovery.
Step 2 Set the parameters related to automatic discovery.
1. In the Basic Information area, set basic information.
The storage devices developed by Inspur and Sugon can be discovered based on SimpleNetwork Management Protocol (SNMP). For details about the parameters, see Table2-11.
OceanStor InfraControlAdmin Guide 2 System Management
Issue 04 (2015-02-28) Huawei Proprietary and ConfidentialCopyright © Huawei Technologies Co., Ltd.
62
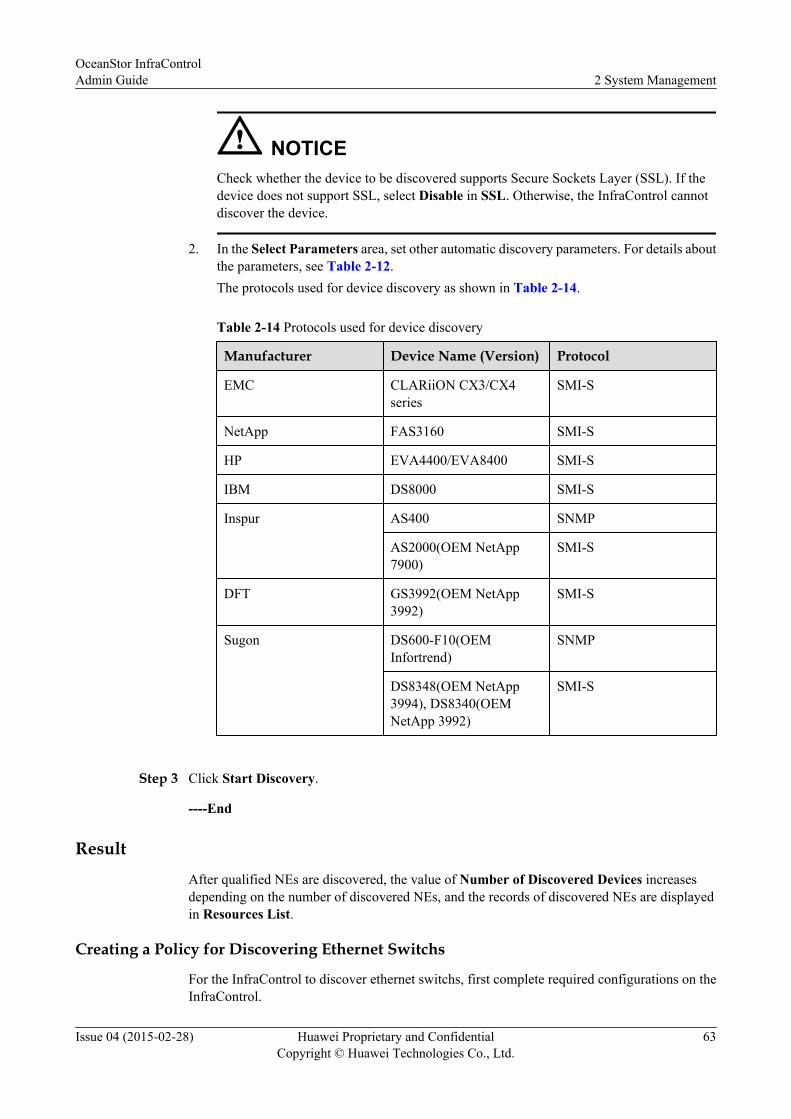
NOTICECheck whether the device to be discovered supports Secure Sockets Layer (SSL). If thedevice does not support SSL, select Disable in SSL. Otherwise, the InfraControl cannotdiscover the device.
2. In the Select Parameters area, set other automatic discovery parameters. For details aboutthe parameters, see Table 2-12.The protocols used for device discovery as shown in Table 2-14.
Table 2-14 Protocols used for device discovery
Manufacturer Device Name (Version) Protocol
EMC CLARiiON CX3/CX4series
SMI-S
NetApp FAS3160 SMI-S
HP EVA4400/EVA8400 SMI-S
IBM DS8000 SMI-S
Inspur AS400 SNMP
AS2000(OEM NetApp7900)
SMI-S
DFT GS3992(OEM NetApp3992)
SMI-S
Sugon DS600-F10(OEMInfortrend)
SNMP
DS8348(OEM NetApp3994), DS8340(OEMNetApp 3992)
SMI-S
Step 3 Click Start Discovery.
----End
Result
After qualified NEs are discovered, the value of Number of Discovered Devices increasesdepending on the number of discovered NEs, and the records of discovered NEs are displayedin Resources List.
Creating a Policy for Discovering Ethernet Switchs
For the InfraControl to discover ethernet switchs, first complete required configurations on theInfraControl.
OceanStor InfraControlAdmin Guide 2 System Management
Issue 04 (2015-02-28) Huawei Proprietary and ConfidentialCopyright © Huawei Technologies Co., Ltd.
63

Data Preparation
Table 2-15 Basic Information
Parameter Description Settings
Start IP address Start IP address fordiscovering resources.
[Value range]l The first number ranges
from 1 to 223 (excluding127).
l Other numbers rangefrom 0 to 255.
l The start IP address mustnot be larger than the endIP address.
[Example]10.10.10.70
End IP address End IP address fordiscovering resources.
[Value range]l The first number ranges
from 1 to 223 (excluding127).
l Other numbers rangefrom 0 to 255.
l The end IP address mustnot be smaller than thestart IP address.
[Example]10.10.10.100
Location Geological location of theresource.
[Example]Chengdu
Resource Group Resource group of theresource.
[Example]CD
NE type Type of NEs to bediscovered. The type can beselected from a drop-downlist.
[Example]Ethernet Switch
Manufacturer Manufacturer of the NEs tobe discovered. This option isavailable if the selected NEtype has any sub type.
[Example]Huawei
OceanStor InfraControlAdmin Guide 2 System Management
Issue 04 (2015-02-28) Huawei Proprietary and ConfidentialCopyright © Huawei Technologies Co., Ltd.
64
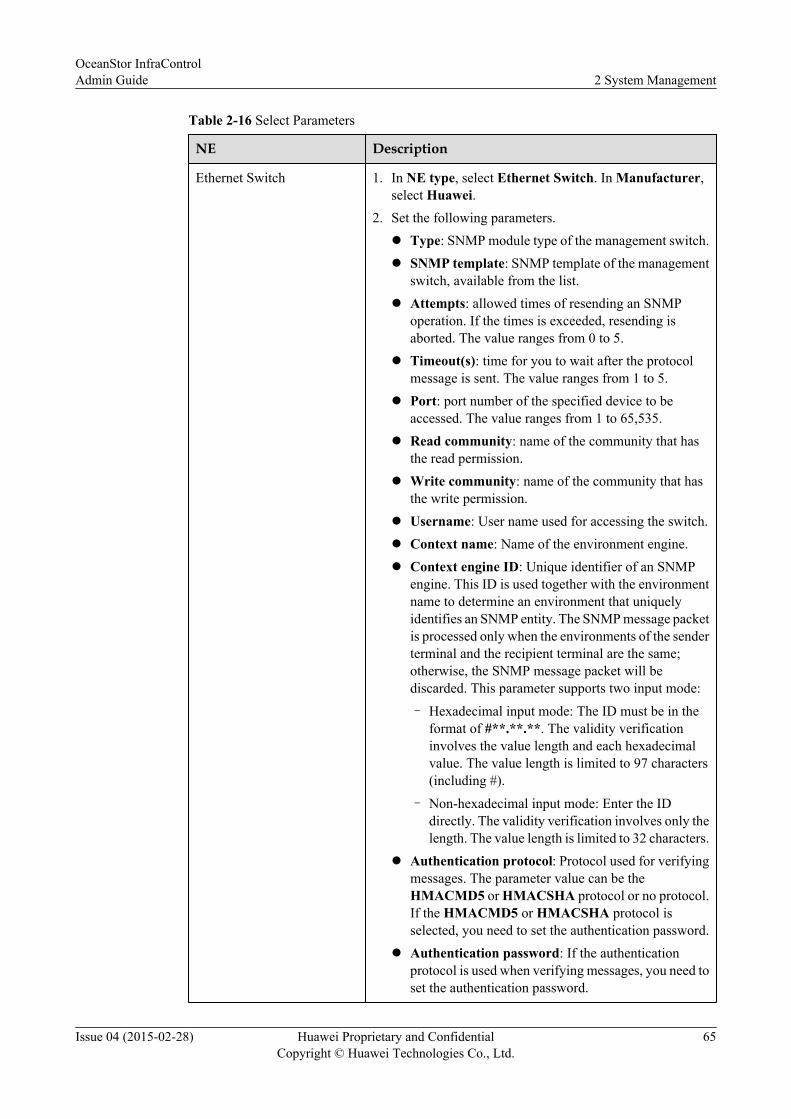
Table 2-16 Select Parameters
NE Description
Ethernet Switch 1. In NE type, select Ethernet Switch. In Manufacturer,select Huawei.
2. Set the following parameters.l Type: SNMP module type of the management switch.l SNMP template: SNMP template of the management
switch, available from the list.l Attempts: allowed times of resending an SNMP
operation. If the times is exceeded, resending isaborted. The value ranges from 0 to 5.
l Timeout(s): time for you to wait after the protocolmessage is sent. The value ranges from 1 to 5.
l Port: port number of the specified device to beaccessed. The value ranges from 1 to 65,535.
l Read community: name of the community that hasthe read permission.
l Write community: name of the community that hasthe write permission.
l Username: User name used for accessing the switch.l Context name: Name of the environment engine.l Context engine ID: Unique identifier of an SNMP
engine. This ID is used together with the environmentname to determine an environment that uniquelyidentifies an SNMP entity. The SNMP message packetis processed only when the environments of the senderterminal and the recipient terminal are the same;otherwise, the SNMP message packet will bediscarded. This parameter supports two input mode:
– Hexadecimal input mode: The ID must be in theformat of #**.**.**. The validity verificationinvolves the value length and each hexadecimalvalue. The value length is limited to 97 characters(including #).
– Non-hexadecimal input mode: Enter the IDdirectly. The validity verification involves only thelength. The value length is limited to 32 characters.
l Authentication protocol: Protocol used for verifyingmessages. The parameter value can be theHMACMD5 or HMACSHA protocol or no protocol.If the HMACMD5 or HMACSHA protocol isselected, you need to set the authentication password.
l Authentication password: If the authenticationprotocol is used when verifying messages, you need toset the authentication password.
OceanStor InfraControlAdmin Guide 2 System Management
Issue 04 (2015-02-28) Huawei Proprietary and ConfidentialCopyright © Huawei Technologies Co., Ltd.
65

NE Description
l Privacy protocol: Encryption protocol used whenencapsulating data. The parameter value can be theDES or AES encryption protocol or no encryption. Ifthe DES or AES encryption protocol is selected, youneed to set the encryption password.
– DES: It indicates the Data Encryption Standard(DES), which is an international encryptionalgorithm with the key length of 56 characters.
– AES: It indicates the Advanced EncryptionStandard (AES). There are three types of keylengths, including 128 characters, 192 characters,and 256 characters. These types of key length canprovide the security protection of different levels.
l Privacy password: If the encryption algorithm is usedwhen encapsulating data, you need to set the dataencryption password.
Procedure
Step 1 Go to the Automatic Discovery page.
1. On the menu bar, choose Management.
2. In the navigation tree, choose Discover Management > Discover Resources.
3. Click Automatic Discovery.
Step 2 Set the parameters related to automatic discovery.
1. In the Basic Information area, set basic information. For details about the parameters, seeTable 2-15.
2. In the Select Parameters area, set other automatic discovery parameters. For details aboutthe parameters, see Table 2-16.
Step 3 Click Start Discovery.
----End
Result
After qualified NEs are discovered, the value of Number of Discovered Devices increasesdepending on the number of discovered NEs, and the records of discovered NEs are displayedin Resources List.
Follow-up Procedure
If the SNMP parameters undergo changes on an NE, click the corresponding in ResourcesList to modify the SNMP parameters on the InfraControl to be consistent with those on the NE.
OceanStor InfraControlAdmin Guide 2 System Management
Issue 04 (2015-02-28) Huawei Proprietary and ConfidentialCopyright © Huawei Technologies Co., Ltd.
66
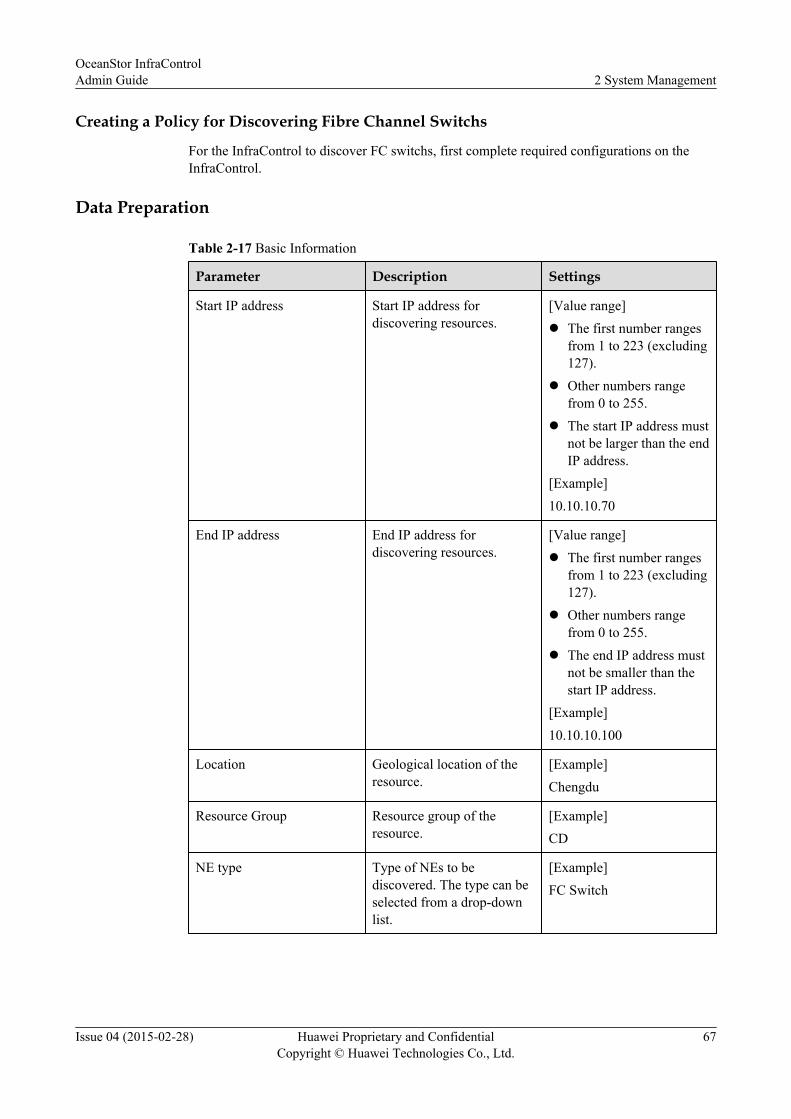
Creating a Policy for Discovering Fibre Channel Switchs
For the InfraControl to discover FC switchs, first complete required configurations on theInfraControl.
Data Preparation
Table 2-17 Basic Information
Parameter Description Settings
Start IP address Start IP address fordiscovering resources.
[Value range]l The first number ranges
from 1 to 223 (excluding127).
l Other numbers rangefrom 0 to 255.
l The start IP address mustnot be larger than the endIP address.
[Example]10.10.10.70
End IP address End IP address fordiscovering resources.
[Value range]l The first number ranges
from 1 to 223 (excluding127).
l Other numbers rangefrom 0 to 255.
l The end IP address mustnot be smaller than thestart IP address.
[Example]10.10.10.100
Location Geological location of theresource.
[Example]Chengdu
Resource Group Resource group of theresource.
[Example]CD
NE type Type of NEs to bediscovered. The type can beselected from a drop-downlist.
[Example]FC Switch
OceanStor InfraControlAdmin Guide 2 System Management
Issue 04 (2015-02-28) Huawei Proprietary and ConfidentialCopyright © Huawei Technologies Co., Ltd.
67
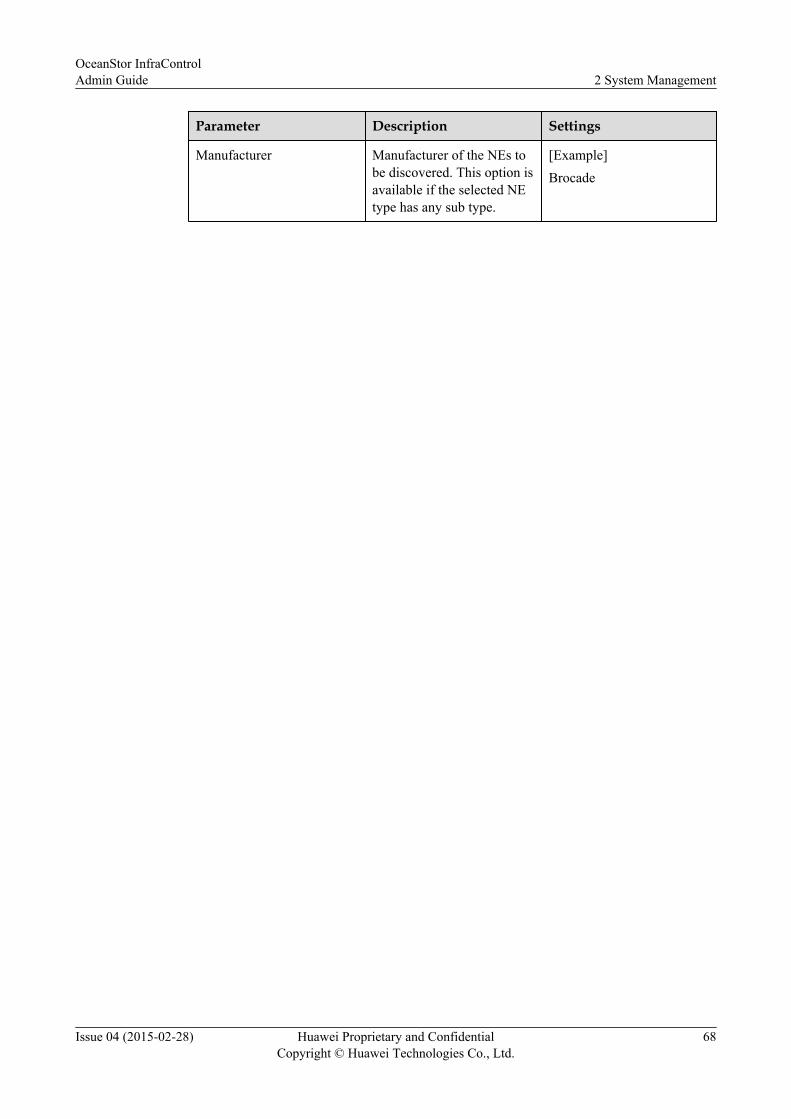
Parameter Description Settings
Manufacturer Manufacturer of the NEs tobe discovered. This option isavailable if the selected NEtype has any sub type.
[Example]Brocade
OceanStor InfraControlAdmin Guide 2 System Management
Issue 04 (2015-02-28) Huawei Proprietary and ConfidentialCopyright © Huawei Technologies Co., Ltd.
68
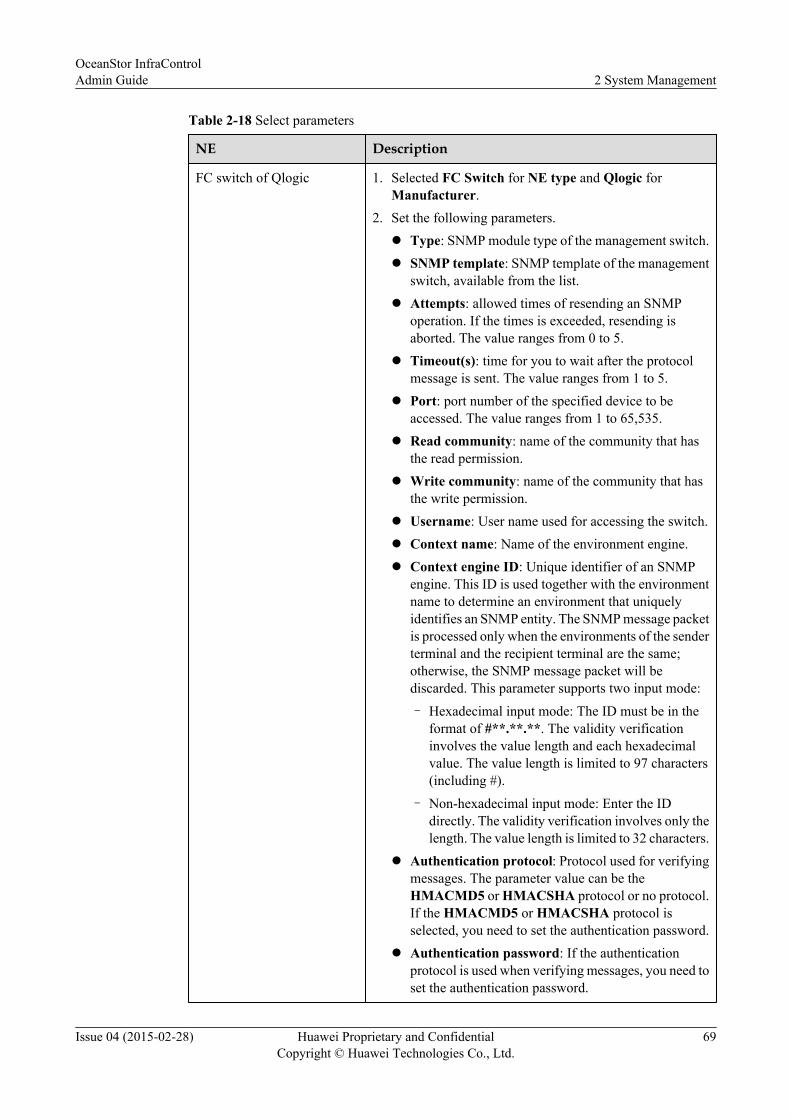
Table 2-18 Select parameters
NE Description
FC switch of Qlogic 1. Selected FC Switch for NE type and Qlogic forManufacturer.
2. Set the following parameters.l Type: SNMP module type of the management switch.l SNMP template: SNMP template of the management
switch, available from the list.l Attempts: allowed times of resending an SNMP
operation. If the times is exceeded, resending isaborted. The value ranges from 0 to 5.
l Timeout(s): time for you to wait after the protocolmessage is sent. The value ranges from 1 to 5.
l Port: port number of the specified device to beaccessed. The value ranges from 1 to 65,535.
l Read community: name of the community that hasthe read permission.
l Write community: name of the community that hasthe write permission.
l Username: User name used for accessing the switch.l Context name: Name of the environment engine.l Context engine ID: Unique identifier of an SNMP
engine. This ID is used together with the environmentname to determine an environment that uniquelyidentifies an SNMP entity. The SNMP message packetis processed only when the environments of the senderterminal and the recipient terminal are the same;otherwise, the SNMP message packet will bediscarded. This parameter supports two input mode:
– Hexadecimal input mode: The ID must be in theformat of #**.**.**. The validity verificationinvolves the value length and each hexadecimalvalue. The value length is limited to 97 characters(including #).
– Non-hexadecimal input mode: Enter the IDdirectly. The validity verification involves only thelength. The value length is limited to 32 characters.
l Authentication protocol: Protocol used for verifyingmessages. The parameter value can be theHMACMD5 or HMACSHA protocol or no protocol.If the HMACMD5 or HMACSHA protocol isselected, you need to set the authentication password.
l Authentication password: If the authenticationprotocol is used when verifying messages, you need toset the authentication password.
OceanStor InfraControlAdmin Guide 2 System Management
Issue 04 (2015-02-28) Huawei Proprietary and ConfidentialCopyright © Huawei Technologies Co., Ltd.
69
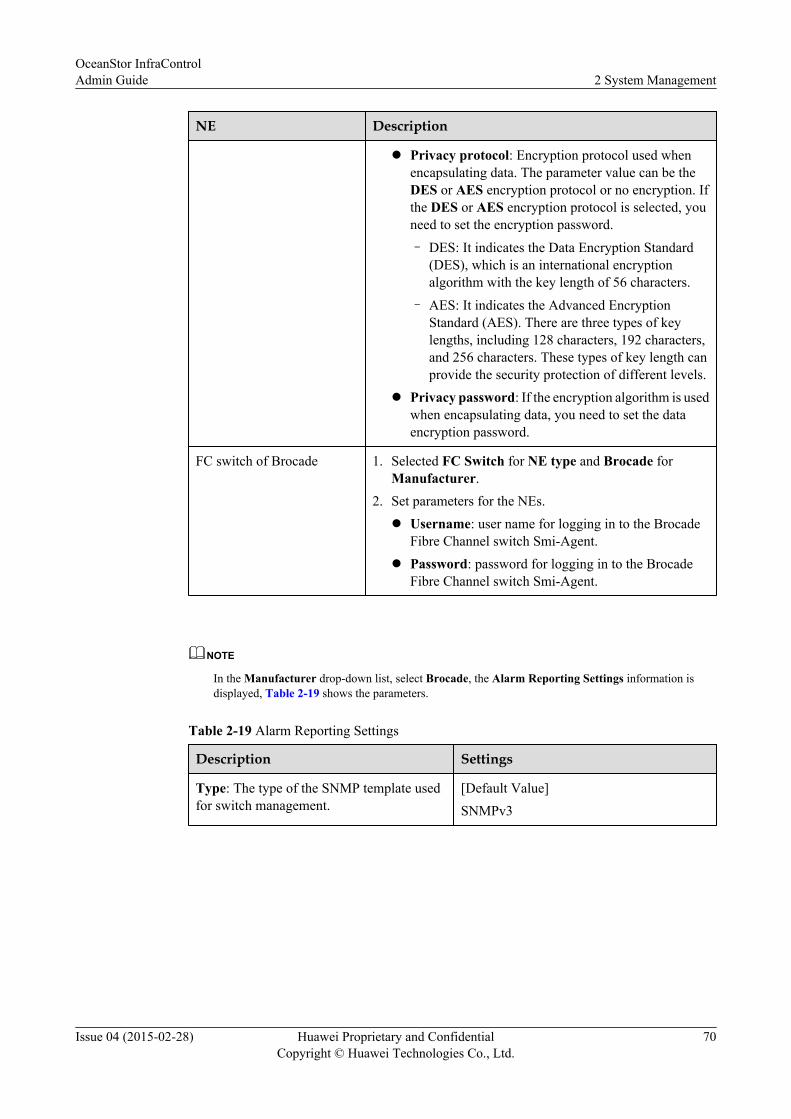
NE Description
l Privacy protocol: Encryption protocol used whenencapsulating data. The parameter value can be theDES or AES encryption protocol or no encryption. Ifthe DES or AES encryption protocol is selected, youneed to set the encryption password.
– DES: It indicates the Data Encryption Standard(DES), which is an international encryptionalgorithm with the key length of 56 characters.
– AES: It indicates the Advanced EncryptionStandard (AES). There are three types of keylengths, including 128 characters, 192 characters,and 256 characters. These types of key length canprovide the security protection of different levels.
l Privacy password: If the encryption algorithm is usedwhen encapsulating data, you need to set the dataencryption password.
FC switch of Brocade 1. Selected FC Switch for NE type and Brocade forManufacturer.
2. Set parameters for the NEs.l Username: user name for logging in to the Brocade
Fibre Channel switch Smi-Agent.l Password: password for logging in to the Brocade
Fibre Channel switch Smi-Agent.
NOTE
In the Manufacturer drop-down list, select Brocade, the Alarm Reporting Settings information isdisplayed, Table 2-19 shows the parameters.
Table 2-19 Alarm Reporting Settings
Description Settings
Type: The type of the SNMP template usedfor switch management.
[Default Value]SNMPv3
OceanStor InfraControlAdmin Guide 2 System Management
Issue 04 (2015-02-28) Huawei Proprietary and ConfidentialCopyright © Huawei Technologies Co., Ltd.
70

Description Settings
Select SNMPv3 in the Type l SNMP template: SNMP template usedfor switch management, which is selectedfrom the drop-down list.
l Attempts: times for sending an SNMPoperation. If this number of times isexceeded, the SNMP operation will bediscarded.
l Timeout(s): wait time after a protocolmessage is sent. The value ranges from 1to 5.
l Port: port number used for access aspecific network element (NE). The valueranges from 1 to 65,535.
l Username: User name used for accessingthe switch.
l Context name: Name of the environmentengine.
l Context engine ID: Unique identifier ofan SNMP engine. This ID is used togetherwith the environment name to determinean environment that uniquely identifies anSNMP entity. The SNMP message packetis processed only when the environmentsof the sender terminal and the recipientterminal are the same; otherwise, theSNMP message packet will be discarded.This parameter supports two input mode:
– Hexadecimal input mode: The IDmust be in the format of #**.**.**.The validity verification involves thevalue length and each hexadecimalvalue. The value length is limited to 97characters (including #).
– Non-hexadecimal input mode: Enterthe ID directly. The validityverification involves only the length.The value length is limited to 32characters.
l Authentication protocol: Protocol usedfor verifying messages. The parametervalue can be the HMACMD5 orHMACSHA protocol or no protocol. Ifthe HMACMD5 or HMACSHAprotocol is selected, you need to set theauthentication password.
OceanStor InfraControlAdmin Guide 2 System Management
Issue 04 (2015-02-28) Huawei Proprietary and ConfidentialCopyright © Huawei Technologies Co., Ltd.
71
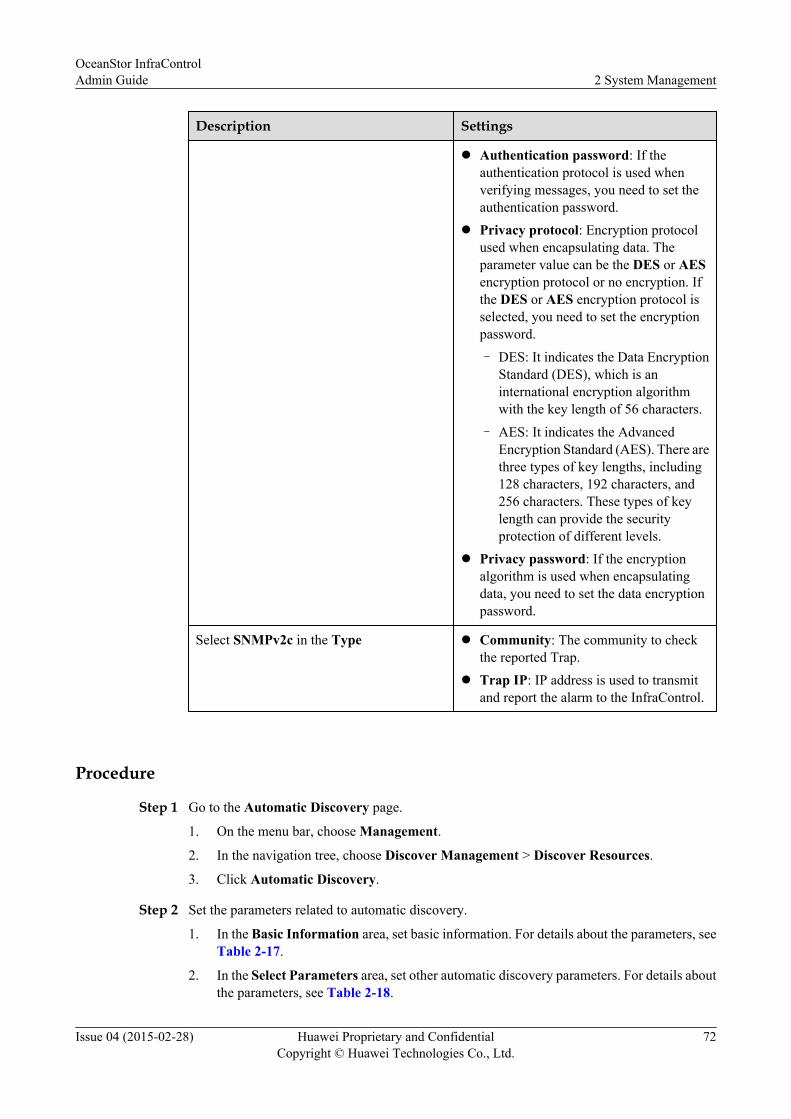
Description Settings
l Authentication password: If theauthentication protocol is used whenverifying messages, you need to set theauthentication password.
l Privacy protocol: Encryption protocolused when encapsulating data. Theparameter value can be the DES or AESencryption protocol or no encryption. Ifthe DES or AES encryption protocol isselected, you need to set the encryptionpassword.
– DES: It indicates the Data EncryptionStandard (DES), which is aninternational encryption algorithmwith the key length of 56 characters.
– AES: It indicates the AdvancedEncryption Standard (AES). There arethree types of key lengths, including128 characters, 192 characters, and256 characters. These types of keylength can provide the securityprotection of different levels.
l Privacy password: If the encryptionalgorithm is used when encapsulatingdata, you need to set the data encryptionpassword.
Select SNMPv2c in the Type l Community: The community to checkthe reported Trap.
l Trap IP: IP address is used to transmitand report the alarm to the InfraControl.
Procedure
Step 1 Go to the Automatic Discovery page.
1. On the menu bar, choose Management.
2. In the navigation tree, choose Discover Management > Discover Resources.
3. Click Automatic Discovery.
Step 2 Set the parameters related to automatic discovery.
1. In the Basic Information area, set basic information. For details about the parameters, seeTable 2-17.
2. In the Select Parameters area, set other automatic discovery parameters. For details aboutthe parameters, see Table 2-18.
OceanStor InfraControlAdmin Guide 2 System Management
Issue 04 (2015-02-28) Huawei Proprietary and ConfidentialCopyright © Huawei Technologies Co., Ltd.
72
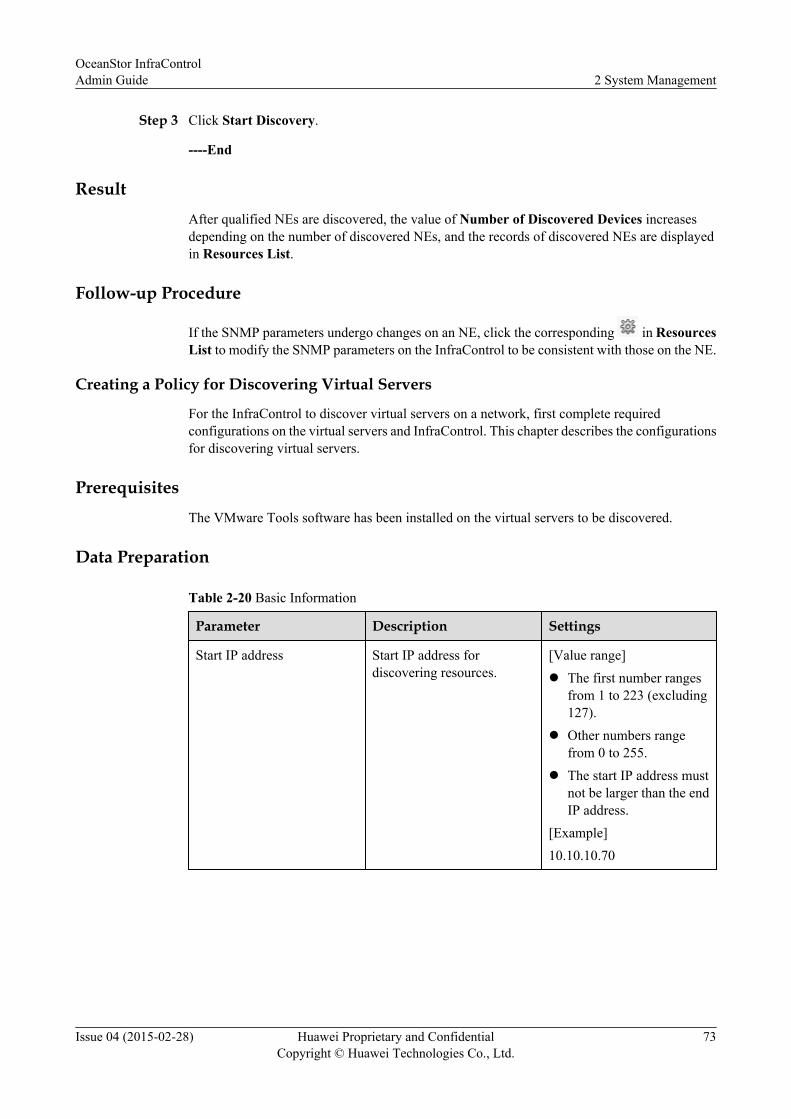
Step 3 Click Start Discovery.
----End
ResultAfter qualified NEs are discovered, the value of Number of Discovered Devices increasesdepending on the number of discovered NEs, and the records of discovered NEs are displayedin Resources List.
Follow-up Procedure
If the SNMP parameters undergo changes on an NE, click the corresponding in ResourcesList to modify the SNMP parameters on the InfraControl to be consistent with those on the NE.
Creating a Policy for Discovering Virtual Servers
For the InfraControl to discover virtual servers on a network, first complete requiredconfigurations on the virtual servers and InfraControl. This chapter describes the configurationsfor discovering virtual servers.
PrerequisitesThe VMware Tools software has been installed on the virtual servers to be discovered.
Data Preparation
Table 2-20 Basic Information
Parameter Description Settings
Start IP address Start IP address fordiscovering resources.
[Value range]l The first number ranges
from 1 to 223 (excluding127).
l Other numbers rangefrom 0 to 255.
l The start IP address mustnot be larger than the endIP address.
[Example]10.10.10.70
OceanStor InfraControlAdmin Guide 2 System Management
Issue 04 (2015-02-28) Huawei Proprietary and ConfidentialCopyright © Huawei Technologies Co., Ltd.
73
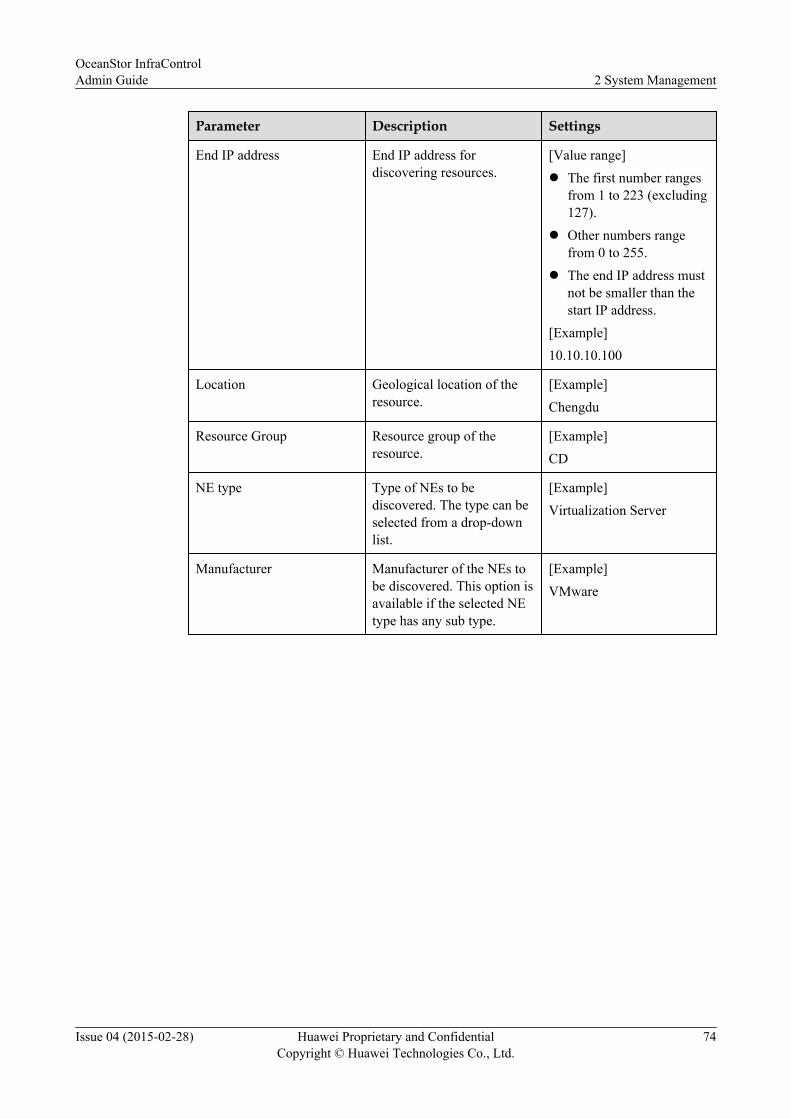
Parameter Description Settings
End IP address End IP address fordiscovering resources.
[Value range]l The first number ranges
from 1 to 223 (excluding127).
l Other numbers rangefrom 0 to 255.
l The end IP address mustnot be smaller than thestart IP address.
[Example]10.10.10.100
Location Geological location of theresource.
[Example]Chengdu
Resource Group Resource group of theresource.
[Example]CD
NE type Type of NEs to bediscovered. The type can beselected from a drop-downlist.
[Example]Virtualization Server
Manufacturer Manufacturer of the NEs tobe discovered. This option isavailable if the selected NEtype has any sub type.
[Example]VMware
OceanStor InfraControlAdmin Guide 2 System Management
Issue 04 (2015-02-28) Huawei Proprietary and ConfidentialCopyright © Huawei Technologies Co., Ltd.
74
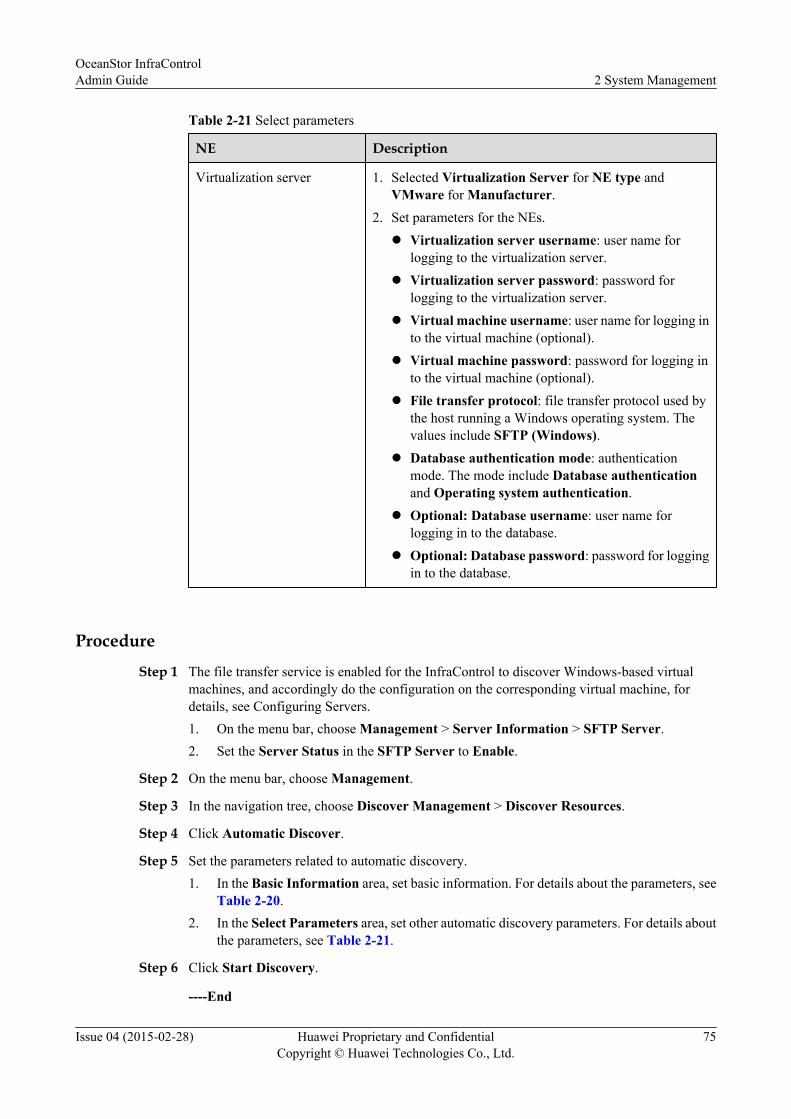
Table 2-21 Select parameters
NE Description
Virtualization server 1. Selected Virtualization Server for NE type andVMware for Manufacturer.
2. Set parameters for the NEs.l Virtualization server username: user name for
logging to the virtualization server.l Virtualization server password: password for
logging to the virtualization server.l Virtual machine username: user name for logging in
to the virtual machine (optional).l Virtual machine password: password for logging in
to the virtual machine (optional).l File transfer protocol: file transfer protocol used by
the host running a Windows operating system. Thevalues include SFTP (Windows).
l Database authentication mode: authenticationmode. The mode include Database authenticationand Operating system authentication.
l Optional: Database username: user name forlogging in to the database.
l Optional: Database password: password for loggingin to the database.
Procedure
Step 1 The file transfer service is enabled for the InfraControl to discover Windows-based virtualmachines, and accordingly do the configuration on the corresponding virtual machine, fordetails, see Configuring Servers.1. On the menu bar, choose Management > Server Information > SFTP Server.2. Set the Server Status in the SFTP Server to Enable.
Step 2 On the menu bar, choose Management.
Step 3 In the navigation tree, choose Discover Management > Discover Resources.
Step 4 Click Automatic Discover.
Step 5 Set the parameters related to automatic discovery.1. In the Basic Information area, set basic information. For details about the parameters, see
Table 2-20.2. In the Select Parameters area, set other automatic discovery parameters. For details about
the parameters, see Table 2-21.
Step 6 Click Start Discovery.
----End
OceanStor InfraControlAdmin Guide 2 System Management
Issue 04 (2015-02-28) Huawei Proprietary and ConfidentialCopyright © Huawei Technologies Co., Ltd.
75
ResultAfter qualified NEs are discovered, the value of Number of Discovered Devices increasesdepending on the number of discovered NEs, and the records of discovered NEs are displayedin Resources List.
Follow-up ProcedureIf you want to find other virtual machines on this virtual server, please do the following.
1. Go to the Modify page.
a. On the menu bar, choose Management.b. In the navigation tree, choose Discover Management > Resources.
c. Click the corresponding to the virtual server.2. Click the Contained Virtual Machine tab.3. Update the virtual machine parameters such as user names and passwords in the list of
virtual machines.4. Click Ok.5. Refresh the virtual server.
a. On the menu bar, choose Resources.b. In the navigation tree, choose Hosts > Virtualization Servers.c. In the function pane, click Refresh corresponding to the virtual server.
Creating a Policy for Discovering Servers
For the InfraControl to discover servers, first complete required configurations on theInfraControl.
PrerequisitesThe file transfer service is enabled for the InfraControl to discover Windows-based servers.
OceanStor InfraControlAdmin Guide 2 System Management
Issue 04 (2015-02-28) Huawei Proprietary and ConfidentialCopyright © Huawei Technologies Co., Ltd.
76
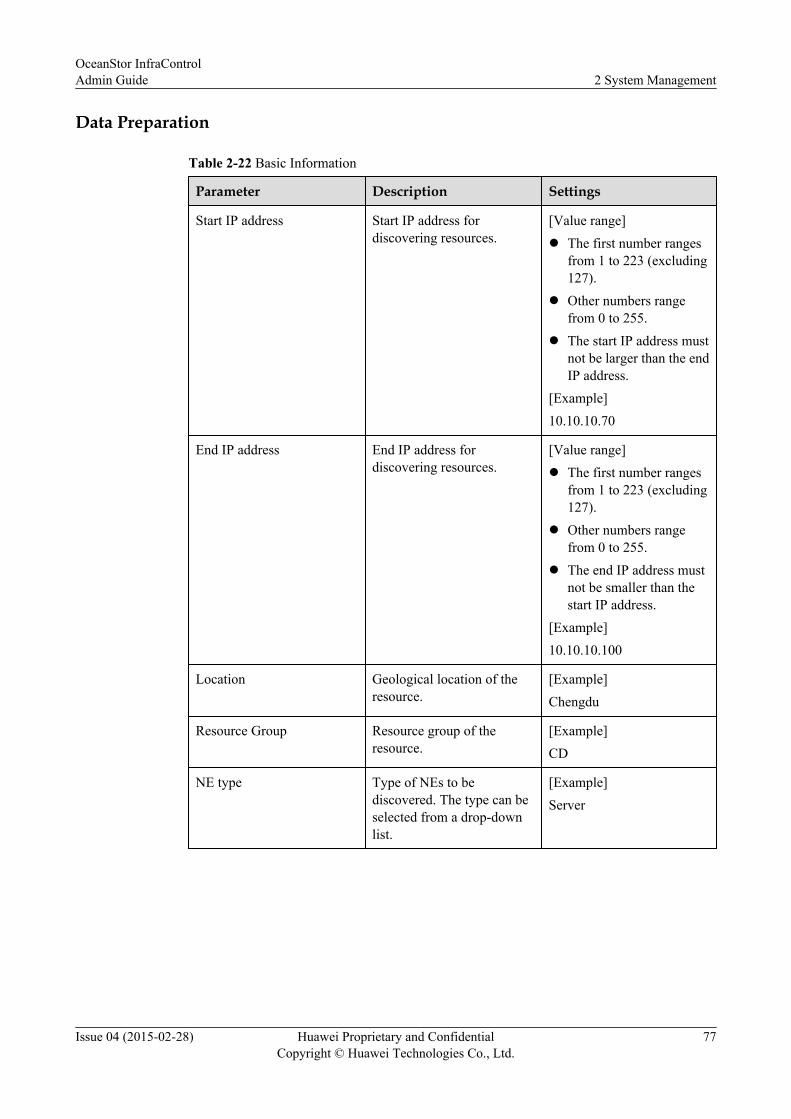
Data Preparation
Table 2-22 Basic Information
Parameter Description Settings
Start IP address Start IP address fordiscovering resources.
[Value range]l The first number ranges
from 1 to 223 (excluding127).
l Other numbers rangefrom 0 to 255.
l The start IP address mustnot be larger than the endIP address.
[Example]10.10.10.70
End IP address End IP address fordiscovering resources.
[Value range]l The first number ranges
from 1 to 223 (excluding127).
l Other numbers rangefrom 0 to 255.
l The end IP address mustnot be smaller than thestart IP address.
[Example]10.10.10.100
Location Geological location of theresource.
[Example]Chengdu
Resource Group Resource group of theresource.
[Example]CD
NE type Type of NEs to bediscovered. The type can beselected from a drop-downlist.
[Example]Server
OceanStor InfraControlAdmin Guide 2 System Management
Issue 04 (2015-02-28) Huawei Proprietary and ConfidentialCopyright © Huawei Technologies Co., Ltd.
77
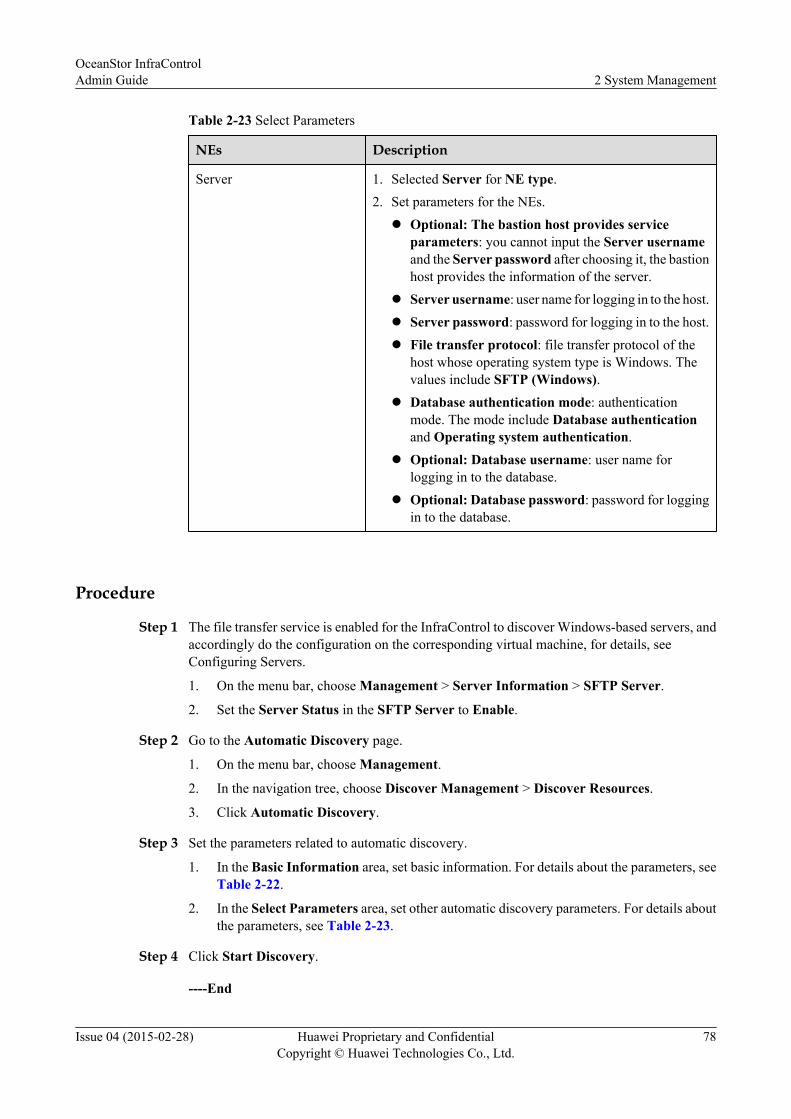
Table 2-23 Select Parameters
NEs Description
Server 1. Selected Server for NE type.2. Set parameters for the NEs.l Optional: The bastion host provides service
parameters: you cannot input the Server usernameand the Server password after choosing it, the bastionhost provides the information of the server.
l Server username: user name for logging in to the host.l Server password: password for logging in to the host.l File transfer protocol: file transfer protocol of the
host whose operating system type is Windows. Thevalues include SFTP (Windows).
l Database authentication mode: authenticationmode. The mode include Database authenticationand Operating system authentication.
l Optional: Database username: user name forlogging in to the database.
l Optional: Database password: password for loggingin to the database.
Procedure
Step 1 The file transfer service is enabled for the InfraControl to discover Windows-based servers, andaccordingly do the configuration on the corresponding virtual machine, for details, seeConfiguring Servers.
1. On the menu bar, choose Management > Server Information > SFTP Server.
2. Set the Server Status in the SFTP Server to Enable.
Step 2 Go to the Automatic Discovery page.
1. On the menu bar, choose Management.
2. In the navigation tree, choose Discover Management > Discover Resources.
3. Click Automatic Discovery.
Step 3 Set the parameters related to automatic discovery.
1. In the Basic Information area, set basic information. For details about the parameters, seeTable 2-22.
2. In the Select Parameters area, set other automatic discovery parameters. For details aboutthe parameters, see Table 2-23.
Step 4 Click Start Discovery.
----End
OceanStor InfraControlAdmin Guide 2 System Management
Issue 04 (2015-02-28) Huawei Proprietary and ConfidentialCopyright © Huawei Technologies Co., Ltd.
78
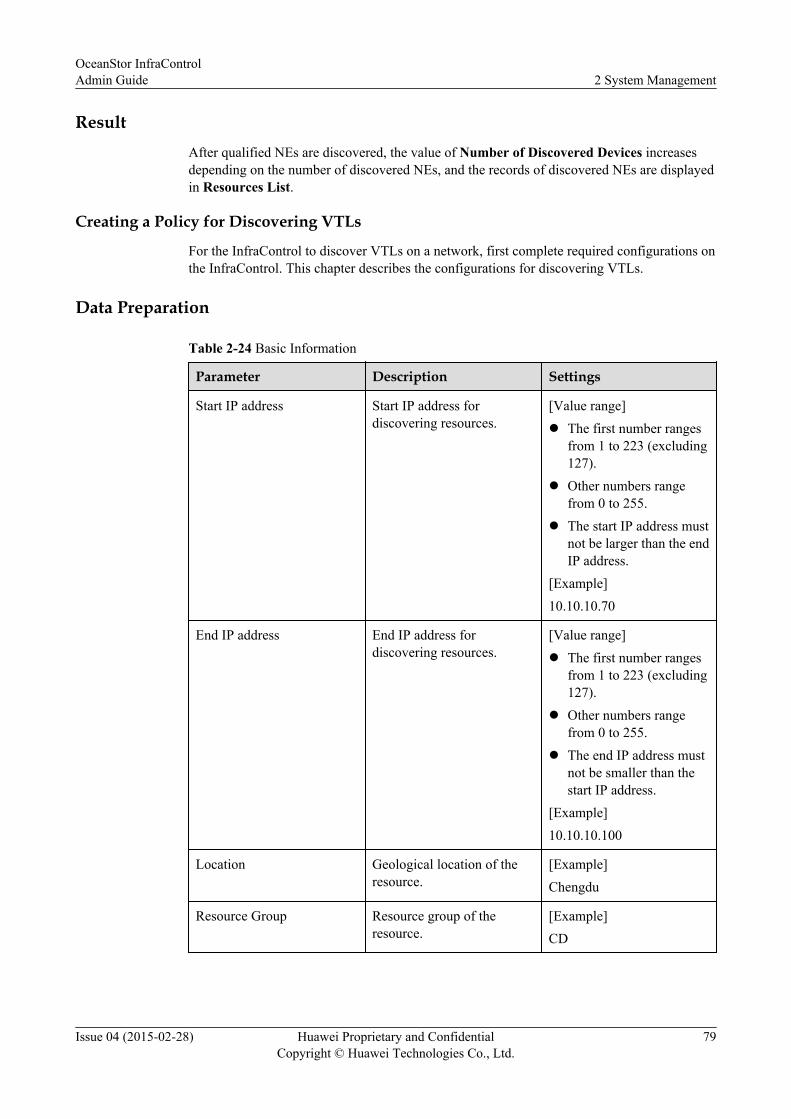
ResultAfter qualified NEs are discovered, the value of Number of Discovered Devices increasesdepending on the number of discovered NEs, and the records of discovered NEs are displayedin Resources List.
Creating a Policy for Discovering VTLs
For the InfraControl to discover VTLs on a network, first complete required configurations onthe InfraControl. This chapter describes the configurations for discovering VTLs.
Data Preparation
Table 2-24 Basic Information
Parameter Description Settings
Start IP address Start IP address fordiscovering resources.
[Value range]l The first number ranges
from 1 to 223 (excluding127).
l Other numbers rangefrom 0 to 255.
l The start IP address mustnot be larger than the endIP address.
[Example]10.10.10.70
End IP address End IP address fordiscovering resources.
[Value range]l The first number ranges
from 1 to 223 (excluding127).
l Other numbers rangefrom 0 to 255.
l The end IP address mustnot be smaller than thestart IP address.
[Example]10.10.10.100
Location Geological location of theresource.
[Example]Chengdu
Resource Group Resource group of theresource.
[Example]CD
OceanStor InfraControlAdmin Guide 2 System Management
Issue 04 (2015-02-28) Huawei Proprietary and ConfidentialCopyright © Huawei Technologies Co., Ltd.
79
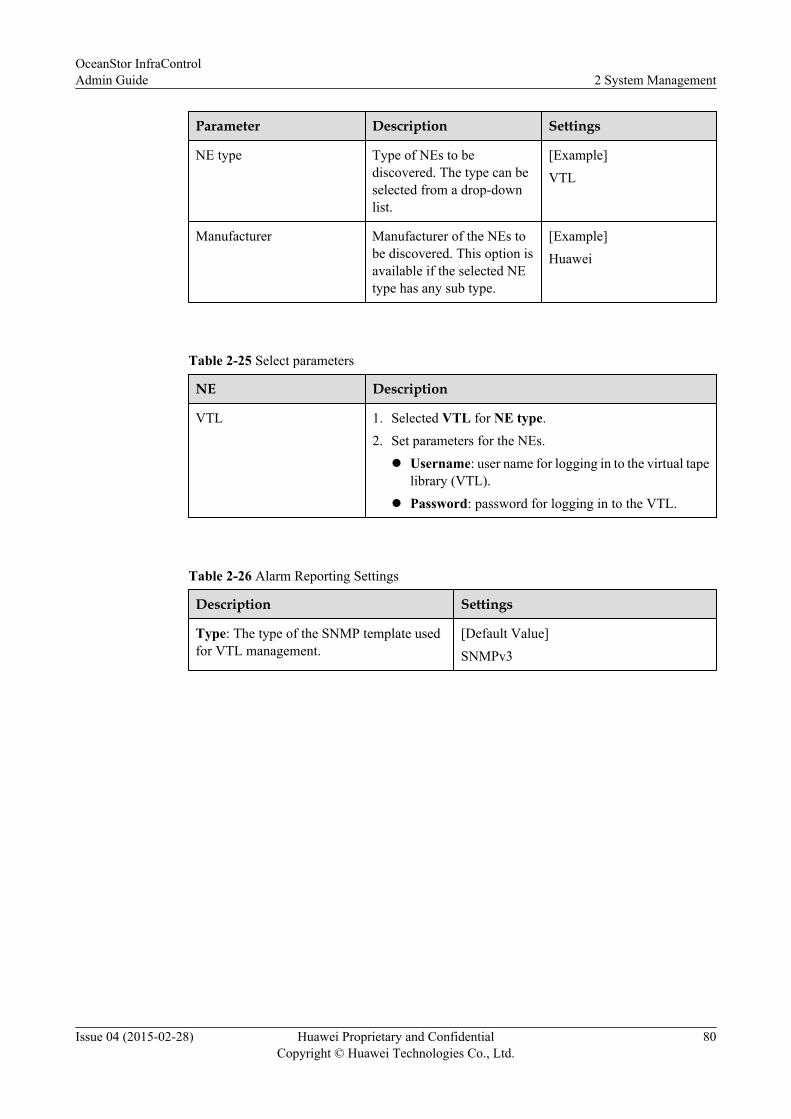
Parameter Description Settings
NE type Type of NEs to bediscovered. The type can beselected from a drop-downlist.
[Example]VTL
Manufacturer Manufacturer of the NEs tobe discovered. This option isavailable if the selected NEtype has any sub type.
[Example]Huawei
Table 2-25 Select parameters
NE Description
VTL 1. Selected VTL for NE type.2. Set parameters for the NEs.l Username: user name for logging in to the virtual tape
library (VTL).l Password: password for logging in to the VTL.
Table 2-26 Alarm Reporting Settings
Description Settings
Type: The type of the SNMP template usedfor VTL management.
[Default Value]SNMPv3
OceanStor InfraControlAdmin Guide 2 System Management
Issue 04 (2015-02-28) Huawei Proprietary and ConfidentialCopyright © Huawei Technologies Co., Ltd.
80
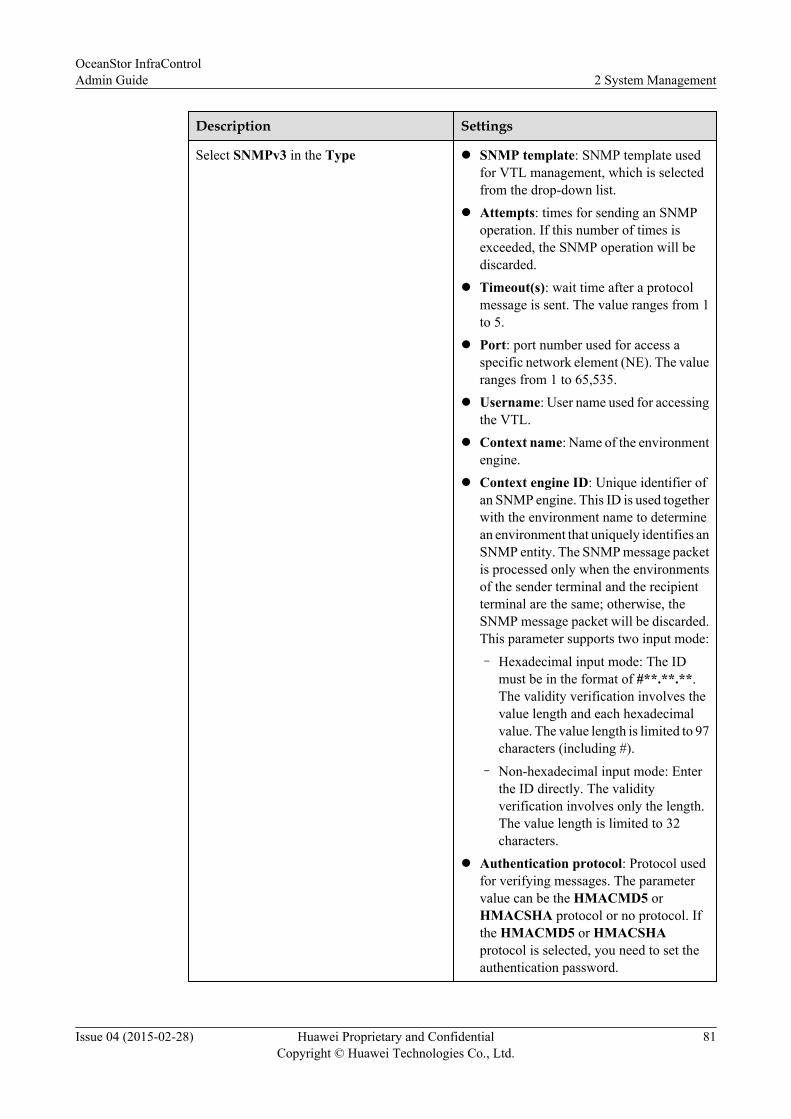
Description Settings
Select SNMPv3 in the Type l SNMP template: SNMP template usedfor VTL management, which is selectedfrom the drop-down list.
l Attempts: times for sending an SNMPoperation. If this number of times isexceeded, the SNMP operation will bediscarded.
l Timeout(s): wait time after a protocolmessage is sent. The value ranges from 1to 5.
l Port: port number used for access aspecific network element (NE). The valueranges from 1 to 65,535.
l Username: User name used for accessingthe VTL.
l Context name: Name of the environmentengine.
l Context engine ID: Unique identifier ofan SNMP engine. This ID is used togetherwith the environment name to determinean environment that uniquely identifies anSNMP entity. The SNMP message packetis processed only when the environmentsof the sender terminal and the recipientterminal are the same; otherwise, theSNMP message packet will be discarded.This parameter supports two input mode:
– Hexadecimal input mode: The IDmust be in the format of #**.**.**.The validity verification involves thevalue length and each hexadecimalvalue. The value length is limited to 97characters (including #).
– Non-hexadecimal input mode: Enterthe ID directly. The validityverification involves only the length.The value length is limited to 32characters.
l Authentication protocol: Protocol usedfor verifying messages. The parametervalue can be the HMACMD5 orHMACSHA protocol or no protocol. Ifthe HMACMD5 or HMACSHAprotocol is selected, you need to set theauthentication password.
OceanStor InfraControlAdmin Guide 2 System Management
Issue 04 (2015-02-28) Huawei Proprietary and ConfidentialCopyright © Huawei Technologies Co., Ltd.
81

Description Settings
l Authentication password: If theauthentication protocol is used whenverifying messages, you need to set theauthentication password.
l Privacy protocol: Encryption protocolused when encapsulating data. Theparameter value can be the DES or AESencryption protocol or no encryption. Ifthe DES or AES encryption protocol isselected, you need to set the encryptionpassword.
– DES: It indicates the Data EncryptionStandard (DES), which is aninternational encryption algorithmwith the key length of 56 characters.
– AES: It indicates the AdvancedEncryption Standard (AES). There arethree types of key lengths, including128 characters, 192 characters, and256 characters. These types of keylength can provide the securityprotection of different levels.
l Privacy password: If the encryptionalgorithm is used when encapsulatingdata, you need to set the data encryptionpassword.
Select SNMPv2c in the Type l Community: The community to checkthe reported Trap.
l Trap IP: IP address is used to transmitand report the alarm to the InfraControl.
Procedure
Step 1 Go to the Automatic Discovery page.
1. On the menu bar, choose Management.
2. In the navigation tree, choose Discover Management > Discover Resources.
3. Click Automatic Discovery.
Step 2 Set the parameters related to automatic discovery.
1. In the Basic Information area, set basic information. For details about the parameters, seeTable 2-24.
2. In the Select Parameters area, set other automatic discovery parameters. For details aboutthe parameters, see Table 2-25.
OceanStor InfraControlAdmin Guide 2 System Management
Issue 04 (2015-02-28) Huawei Proprietary and ConfidentialCopyright © Huawei Technologies Co., Ltd.
82
Step 3 Click Start Discovery.
----End
Result
After qualified NEs are discovered, the value of Number of Discovered Devices increasesdepending on the number of discovered NEs, and the records of discovered NEs are displayedin Resources List.
2.8.3 Managing Resource GroupsYou can centrally manage discovered resources by adding them into a resource group.
1. Go to the resource list page.
a. On the menu bar, choose Management.
b. In the navigation tree, choose Discover Management > Resource Group.
2. Refer to the following table to configure resource management.
Operation
Description
CreateClick to create a resource group, and set the name, description, andresource list for the resource group.
Delete Select one or more resource groups and click to delete the resourcegroup or groups.
Modify Click the corresponding to a resource group to modify the resource group.
Creating a Resource Group
This task helps you create a resource group.
Procedure
Step 1 On the menu bar, choose Management.
Step 2 In the navigation tree, choose Discover Management > Resource Group.
Step 3 In the function pane, click Create.The Create Resource Group dialog box is displayed.
Step 4 Enter a name and description for the resource group. Select the resources that you want to addto this resource group and move them to the selected resource list.
Step 5 Click OK.
----End
OceanStor InfraControlAdmin Guide 2 System Management
Issue 04 (2015-02-28) Huawei Proprietary and ConfidentialCopyright © Huawei Technologies Co., Ltd.
83

2.9 Template ManagementThe management system provides three default SNMP templates. You can also create newSNMP templates as required.
2.9.1 Managing SNMP TemplatesThe management system provides three default SNMP templates:default_SNMPv1_template, default_SNMPv2c_template, anddefault_SNMPv3_template. You can modify but cannot delete the three default parametertemplates. You can create an SNMP parameter template based on SNMP versions supported byan NE. In addition, you can also modify or delete the created template.
ContextOn the menu bar, choose Management > Template Management > SNMP Templates tomanage SNMP templates.
Operation
Description
New Click Create and select a different SNMP version to create an SNMP parametertemplate. For details, see Creating an SNMP Template.
Modify
Click of the parameter template to modify related parameters. For details, seeModifying SNMP Templates.
Delete Select one or more unused parameter templates, click Delete to delete them.If the parameter template to be deleted is in use, you must unbind the discoverypolicy with the template before deletion.
View Click the name of a created SNMP parameter template. The Template Details pageis displayed. You can view information about the template. For details about thisparameter template, see Creating an SNMP Template.
Creating an SNMP TemplateBefore the management system discovers an NE which discovered though SNMP protocol, ituses the SNMP parameter template to match the specified NE. Therefore, you need to create anSNMP parameter template before you perform the NE discovery operation.
PrerequisitesThe SNMP parameters have been configured on the NE.
ContextCurrently, the management system supports SNMPv1, SNMPv2c, and SNMPv3. Thedifferences among these three versions are as follows:
OceanStor InfraControlAdmin Guide 2 System Management
Issue 04 (2015-02-28) Huawei Proprietary and ConfidentialCopyright © Huawei Technologies Co., Ltd.
84
l SNMPv1 uses the community name authentication method to control the access of themanagement system server to the managed NEs. If the community name carried by anSNMP packet is not authenticated by the NEs, the packet will be discarded.
l SNMPv2c also uses the community name authentication method, but it extends thisfunction over SNMPv1. It supports more types of operations and data and provides richerror codes, distinguishing among errors more subtly.
l SNMPv3 uses the user security model-based authentication. You can set the authenticationand encryption functions. The authentication function verifies the validity of the packetsender, blocking accesses from unauthorized users. The encryption function encrypts thepackets transmitted between the management system server and its managed devices,avoiding eavesdropping. SNMPv3 improves the communication security by combining theauthentication and encryption functions.
You can create a parameter template according to the SNMP protocol version supported by theNE.
Procedure
Step 1 On the menu bar, choose Management.
Step 2 In the navigation tree, choose Template Management > SNMP Templates.
Step 3 In the function pane, click Create.The Create SNMP Template dialog box is displayed.
Step 4 Create an SNMP template.1. Select an SNMP template type.
You can select v1, v2c, or v3.
NOTE
The SNMP versions must be the same on the management system and the NE.
l If you select v1 or v2c, write and read communities must be the same on the managementsystem and the NE.
l If you select v3, user names, data encryption protocols and passwords, authorization protocoland passwords must be the same on the management system and the NE.
2. Set SNMP template parameters.l The following table describes v1 and v2c parameters.
OceanStor InfraControlAdmin Guide 2 System Management
Issue 04 (2015-02-28) Huawei Proprietary and ConfidentialCopyright © Huawei Technologies Co., Ltd.
85
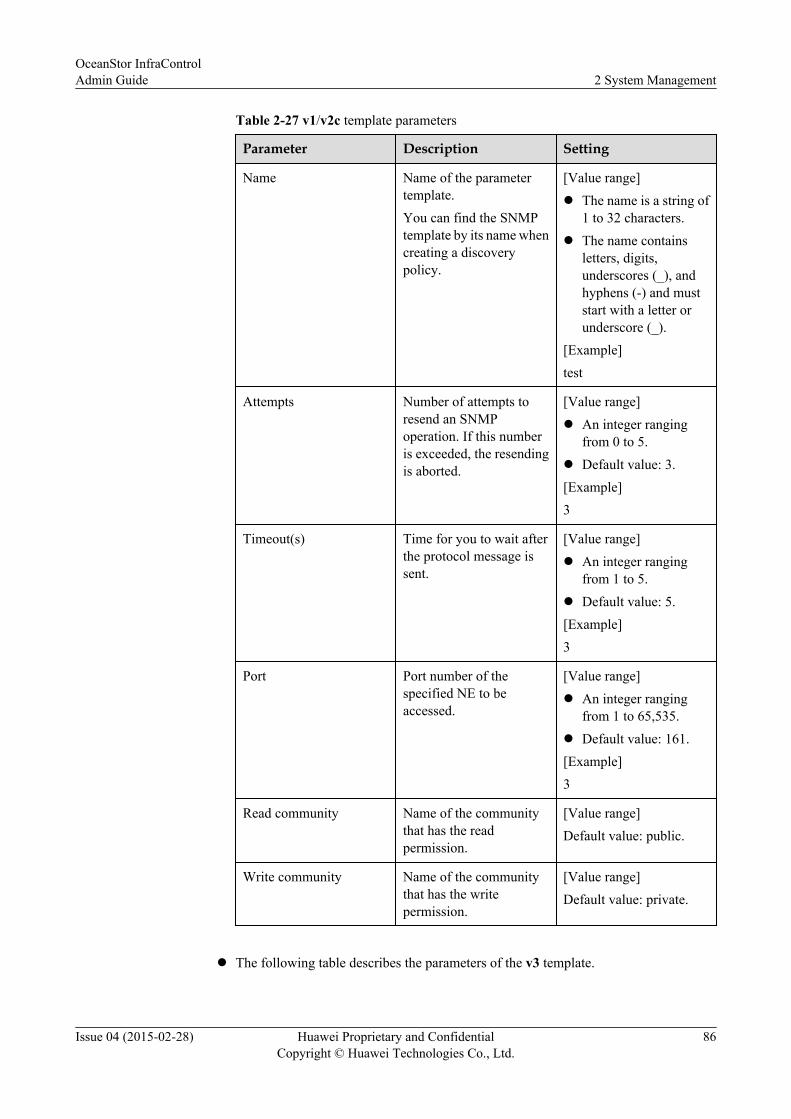
Table 2-27 v1/v2c template parameters
Parameter Description Setting
Name Name of the parametertemplate.You can find the SNMPtemplate by its name whencreating a discoverypolicy.
[Value range]l The name is a string of
1 to 32 characters.l The name contains
letters, digits,underscores (_), andhyphens (-) and muststart with a letter orunderscore (_).
[Example]test
Attempts Number of attempts toresend an SNMPoperation. If this numberis exceeded, the resendingis aborted.
[Value range]l An integer ranging
from 0 to 5.l Default value: 3.[Example]3
Timeout(s) Time for you to wait afterthe protocol message issent.
[Value range]l An integer ranging
from 1 to 5.l Default value: 5.[Example]3
Port Port number of thespecified NE to beaccessed.
[Value range]l An integer ranging
from 1 to 65,535.l Default value: 161.[Example]3
Read community Name of the communitythat has the readpermission.
[Value range]Default value: public.
Write community Name of the communitythat has the writepermission.
[Value range]Default value: private.
l The following table describes the parameters of the v3 template.
OceanStor InfraControlAdmin Guide 2 System Management
Issue 04 (2015-02-28) Huawei Proprietary and ConfidentialCopyright © Huawei Technologies Co., Ltd.
86
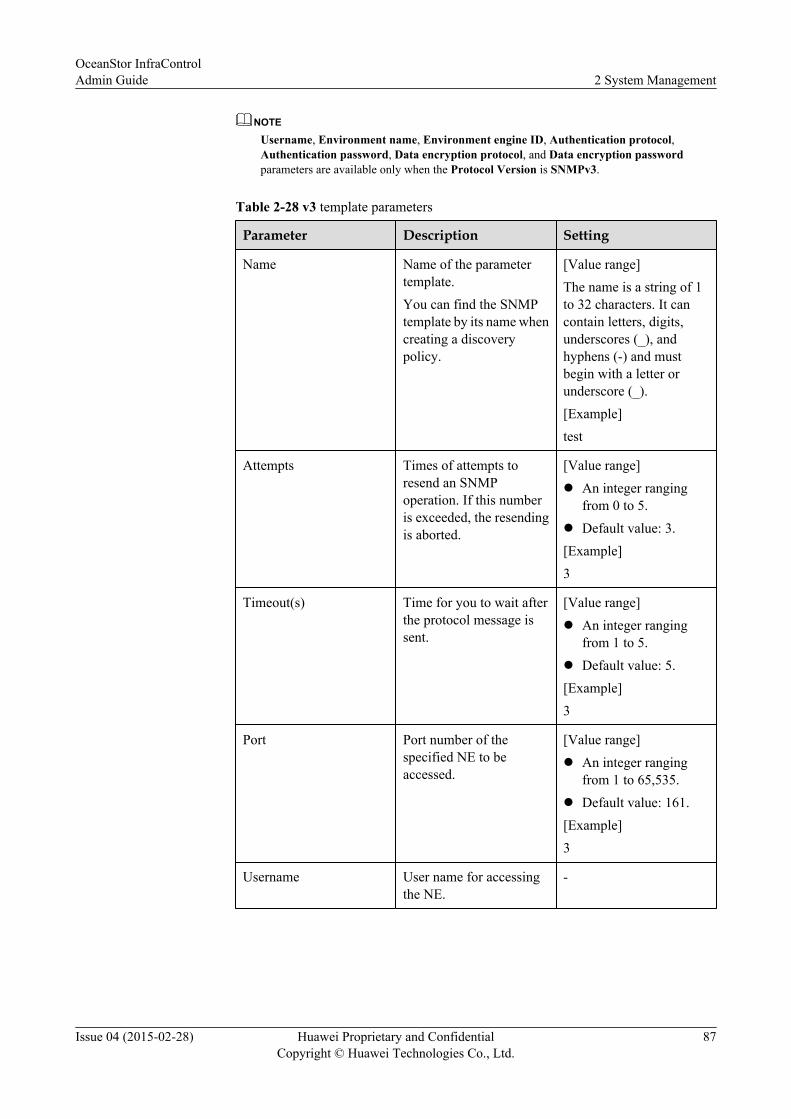
NOTE
Username, Environment name, Environment engine ID, Authentication protocol,Authentication password, Data encryption protocol, and Data encryption passwordparameters are available only when the Protocol Version is SNMPv3.
Table 2-28 v3 template parameters
Parameter Description Setting
Name Name of the parametertemplate.You can find the SNMPtemplate by its name whencreating a discoverypolicy.
[Value range]The name is a string of 1to 32 characters. It cancontain letters, digits,underscores (_), andhyphens (-) and mustbegin with a letter orunderscore (_).[Example]test
Attempts Times of attempts toresend an SNMPoperation. If this numberis exceeded, the resendingis aborted.
[Value range]l An integer ranging
from 0 to 5.l Default value: 3.[Example]3
Timeout(s) Time for you to wait afterthe protocol message issent.
[Value range]l An integer ranging
from 1 to 5.l Default value: 5.[Example]3
Port Port number of thespecified NE to beaccessed.
[Value range]l An integer ranging
from 1 to 65,535.l Default value: 161.[Example]3
Username User name for accessingthe NE.
-
OceanStor InfraControlAdmin Guide 2 System Management
Issue 04 (2015-02-28) Huawei Proprietary and ConfidentialCopyright © Huawei Technologies Co., Ltd.
87
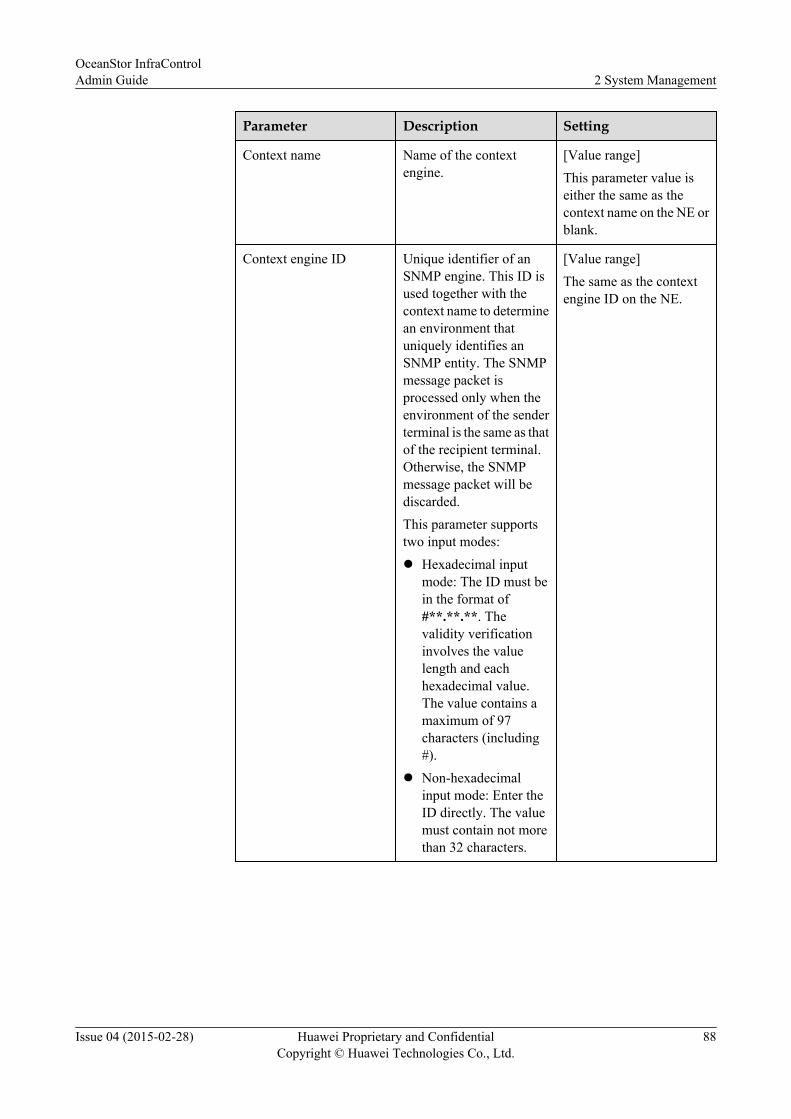
Parameter Description Setting
Context name Name of the contextengine.
[Value range]This parameter value iseither the same as thecontext name on the NE orblank.
Context engine ID Unique identifier of anSNMP engine. This ID isused together with thecontext name to determinean environment thatuniquely identifies anSNMP entity. The SNMPmessage packet isprocessed only when theenvironment of the senderterminal is the same as thatof the recipient terminal.Otherwise, the SNMPmessage packet will bediscarded.This parameter supportstwo input modes:l Hexadecimal input
mode: The ID must bein the format of#**.**.**. Thevalidity verificationinvolves the valuelength and eachhexadecimal value.The value contains amaximum of 97characters (including#).
l Non-hexadecimalinput mode: Enter theID directly. The valuemust contain not morethan 32 characters.
[Value range]The same as the contextengine ID on the NE.
OceanStor InfraControlAdmin Guide 2 System Management
Issue 04 (2015-02-28) Huawei Proprietary and ConfidentialCopyright © Huawei Technologies Co., Ltd.
88
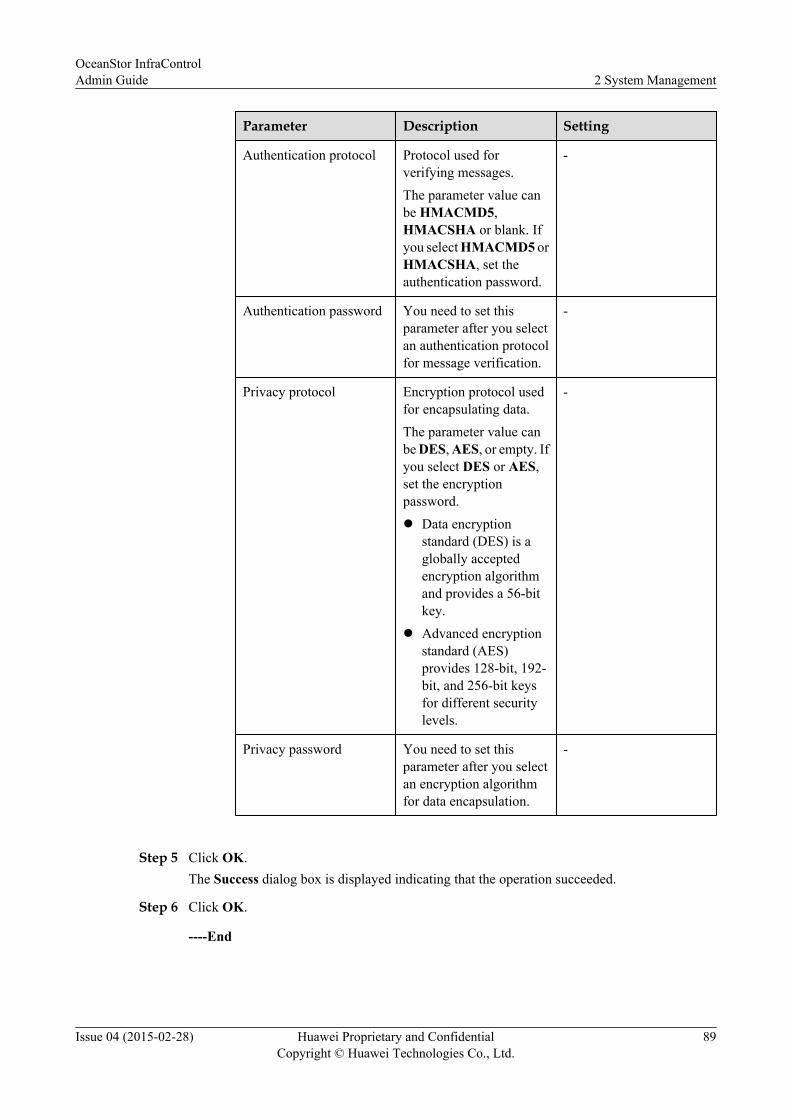
Parameter Description Setting
Authentication protocol Protocol used forverifying messages.The parameter value canbe HMACMD5,HMACSHA or blank. Ifyou select HMACMD5 orHMACSHA, set theauthentication password.
-
Authentication password You need to set thisparameter after you selectan authentication protocolfor message verification.
-
Privacy protocol Encryption protocol usedfor encapsulating data.The parameter value canbe DES, AES, or empty. Ifyou select DES or AES,set the encryptionpassword.l Data encryption
standard (DES) is aglobally acceptedencryption algorithmand provides a 56-bitkey.
l Advanced encryptionstandard (AES)provides 128-bit, 192-bit, and 256-bit keysfor different securitylevels.
-
Privacy password You need to set thisparameter after you selectan encryption algorithmfor data encapsulation.
-
Step 5 Click OK.The Success dialog box is displayed indicating that the operation succeeded.
Step 6 Click OK.
----End
OceanStor InfraControlAdmin Guide 2 System Management
Issue 04 (2015-02-28) Huawei Proprietary and ConfidentialCopyright © Huawei Technologies Co., Ltd.
89
Modifying SNMP Templates
If the SNMP parameters on a network element (NE) undergo changes, you need to modify theparameter template of the specified NE on the management system.
PrerequisitesSNMP parameter templates have been created. For details about how to create an SNMPparameter template, see Creating an SNMP Parameter Template.
Procedure
Step 1 On the menu bar, choose Management.
Step 2 In the navigation tree, choose Template Management > SNMP Templates.
Step 3 Click corresponding to the SNMP parameter template to be modified.The Modify SNMP Template dialog box is displayed.
Step 4 Modify the parameters of the template except its name. For description about the parameters,see Creating an SNMP Template.
Step 5 After the modification is complete, click OK.The Success dialog box is displayed indicating that the modification succeeded.
Step 6 Click OK.
----End
2.10 Server InformationThis section describes how to manage information about SFTP servers, including protocol types,user names, and passwords.
2.10.1 Notification ServerYou can configure the email or short message service (SMS) server to send the alarm informationto the specified email address or mobile phone number.
Modifying the Email Server
This section describes how to send alarm information to a specific mailbox by email on themanagement system.
Procedure
Step 1 On the menu bar, choose Management.
Step 2 In the navigation tree, choose Server Information > Notification Server.
Step 3 In the Email Server area of the function pane, click Modify.
OceanStor InfraControlAdmin Guide 2 System Management
Issue 04 (2015-02-28) Huawei Proprietary and ConfidentialCopyright © Huawei Technologies Co., Ltd.
90
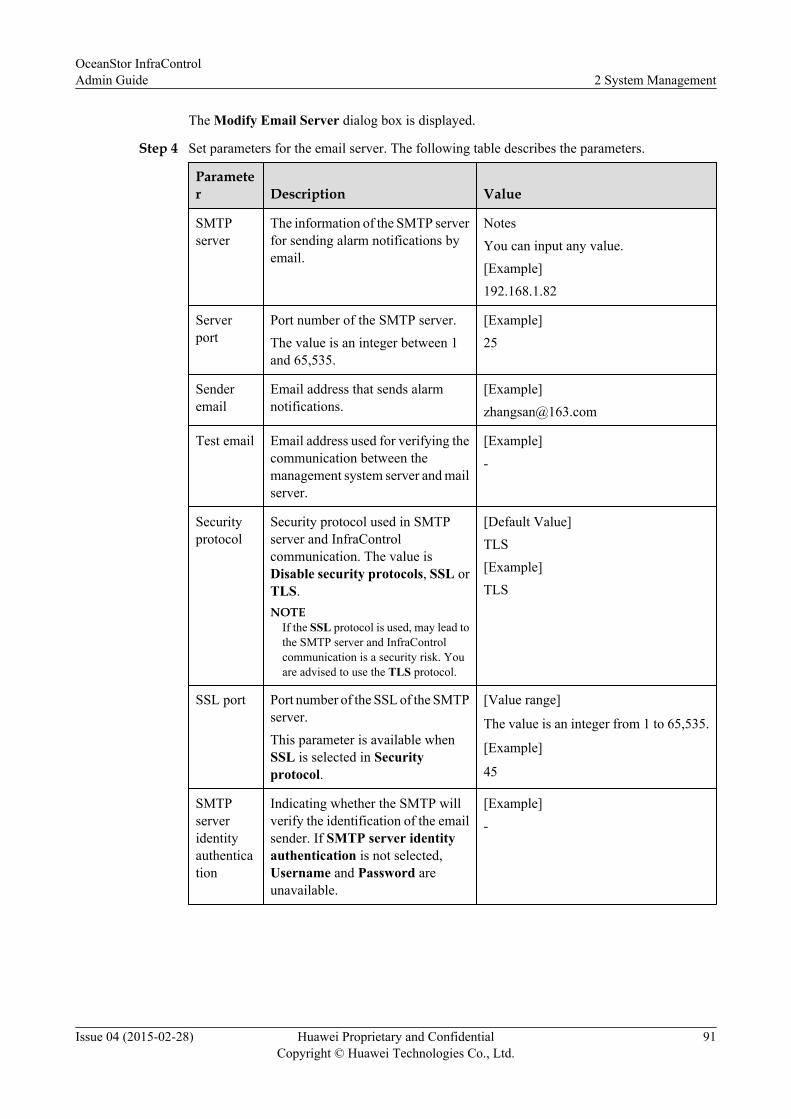
The Modify Email Server dialog box is displayed.
Step 4 Set parameters for the email server. The following table describes the parameters.
Parameter Description Value
SMTPserver
The information of the SMTP serverfor sending alarm notifications byemail.
NotesYou can input any value.[Example]192.168.1.82
Serverport
Port number of the SMTP server.The value is an integer between 1and 65,535.
[Example]25
Senderemail
Email address that sends alarmnotifications.
[Example][email protected]
Test email Email address used for verifying thecommunication between themanagement system server and mailserver.
[Example]-
Securityprotocol
Security protocol used in SMTPserver and InfraControlcommunication. The value isDisable security protocols, SSL orTLS.NOTE
If the SSL protocol is used, may lead tothe SMTP server and InfraControlcommunication is a security risk. Youare advised to use the TLS protocol.
[Default Value]TLS[Example]TLS
SSL port Port number of the SSL of the SMTPserver.This parameter is available whenSSL is selected in Securityprotocol.
[Value range]
The value is an integer from 1 to 65,535.
[Example]
45
SMTPserveridentityauthentication
Indicating whether the SMTP willverify the identification of the emailsender. If SMTP server identityauthentication is not selected,Username and Password areunavailable.
[Example]-
OceanStor InfraControlAdmin Guide 2 System Management
Issue 04 (2015-02-28) Huawei Proprietary and ConfidentialCopyright © Huawei Technologies Co., Ltd.
91
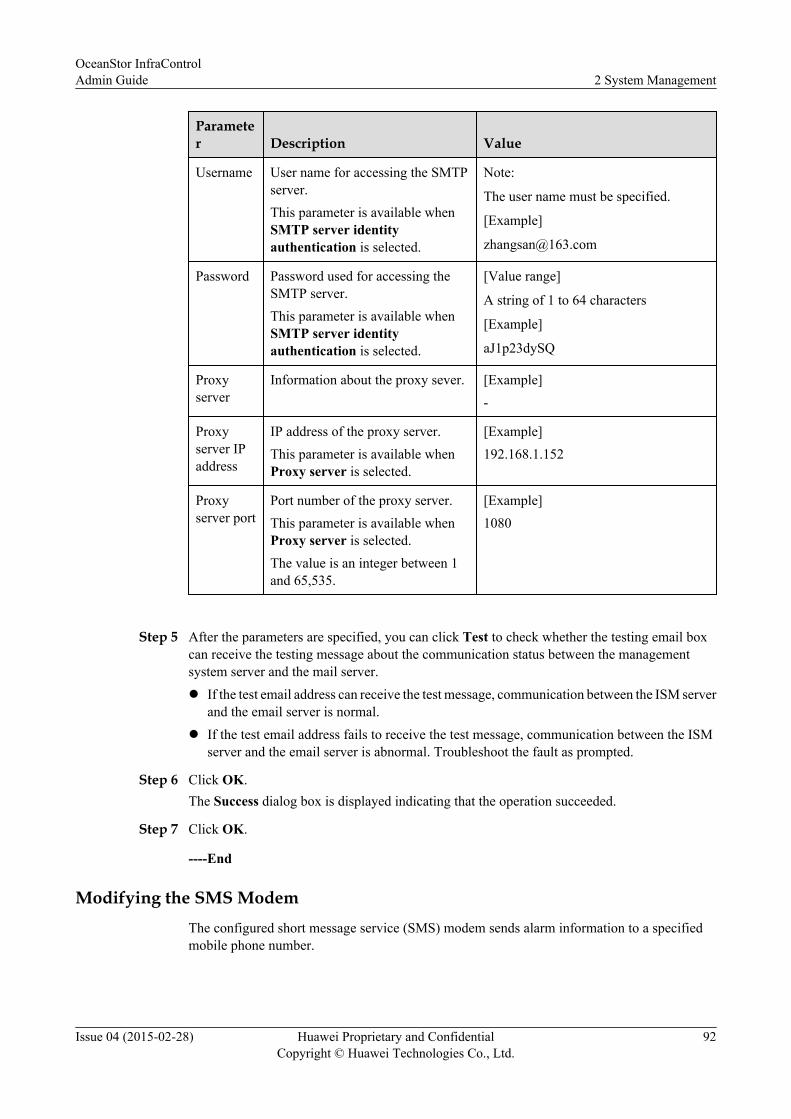
Parameter Description Value
Username User name for accessing the SMTPserver.This parameter is available whenSMTP server identityauthentication is selected.
Note:
The user name must be specified.
[Example]
Password Password used for accessing theSMTP server.This parameter is available whenSMTP server identityauthentication is selected.
[Value range]
A string of 1 to 64 characters
[Example]
aJ1p23dySQ
Proxyserver
Information about the proxy sever. [Example]-
Proxyserver IPaddress
IP address of the proxy server.This parameter is available whenProxy server is selected.
[Example]192.168.1.152
Proxyserver port
Port number of the proxy server.This parameter is available whenProxy server is selected.The value is an integer between 1and 65,535.
[Example]1080
Step 5 After the parameters are specified, you can click Test to check whether the testing email boxcan receive the testing message about the communication status between the managementsystem server and the mail server.l If the test email address can receive the test message, communication between the ISM server
and the email server is normal.l If the test email address fails to receive the test message, communication between the ISM
server and the email server is abnormal. Troubleshoot the fault as prompted.
Step 6 Click OK.The Success dialog box is displayed indicating that the operation succeeded.
Step 7 Click OK.
----End
Modifying the SMS ModemThe configured short message service (SMS) modem sends alarm information to a specifiedmobile phone number.
OceanStor InfraControlAdmin Guide 2 System Management
Issue 04 (2015-02-28) Huawei Proprietary and ConfidentialCopyright © Huawei Technologies Co., Ltd.
92
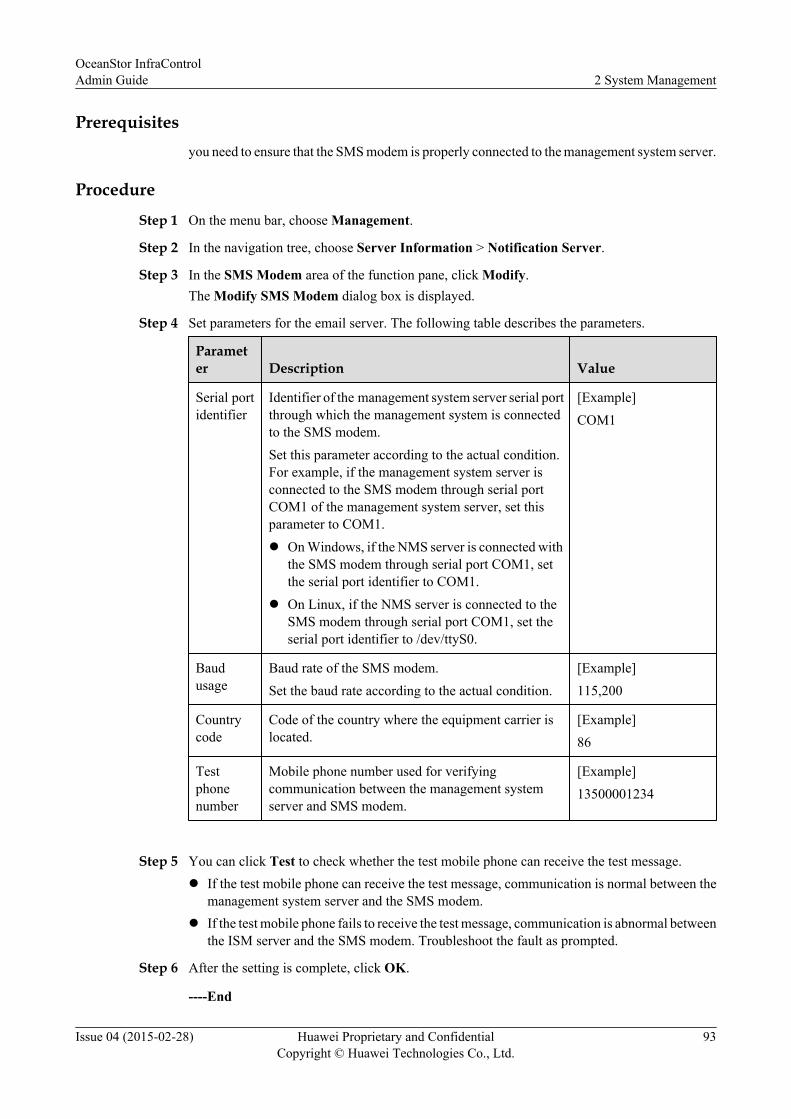
Prerequisitesyou need to ensure that the SMS modem is properly connected to the management system server.
Procedure
Step 1 On the menu bar, choose Management.
Step 2 In the navigation tree, choose Server Information > Notification Server.
Step 3 In the SMS Modem area of the function pane, click Modify.The Modify SMS Modem dialog box is displayed.
Step 4 Set parameters for the email server. The following table describes the parameters.
Parameter Description Value
Serial portidentifier
Identifier of the management system server serial portthrough which the management system is connectedto the SMS modem.Set this parameter according to the actual condition.For example, if the management system server isconnected to the SMS modem through serial portCOM1 of the management system server, set thisparameter to COM1.l On Windows, if the NMS server is connected with
the SMS modem through serial port COM1, setthe serial port identifier to COM1.
l On Linux, if the NMS server is connected to theSMS modem through serial port COM1, set theserial port identifier to /dev/ttyS0.
[Example]COM1
Baudusage
Baud rate of the SMS modem.Set the baud rate according to the actual condition.
[Example]115,200
Countrycode
Code of the country where the equipment carrier islocated.
[Example]86
Testphonenumber
Mobile phone number used for verifyingcommunication between the management systemserver and SMS modem.
[Example]13500001234
Step 5 You can click Test to check whether the test mobile phone can receive the test message.l If the test mobile phone can receive the test message, communication is normal between the
management system server and the SMS modem.l If the test mobile phone fails to receive the test message, communication is abnormal between
the ISM server and the SMS modem. Troubleshoot the fault as prompted.
Step 6 After the setting is complete, click OK.
----End
OceanStor InfraControlAdmin Guide 2 System Management
Issue 04 (2015-02-28) Huawei Proprietary and ConfidentialCopyright © Huawei Technologies Co., Ltd.
93
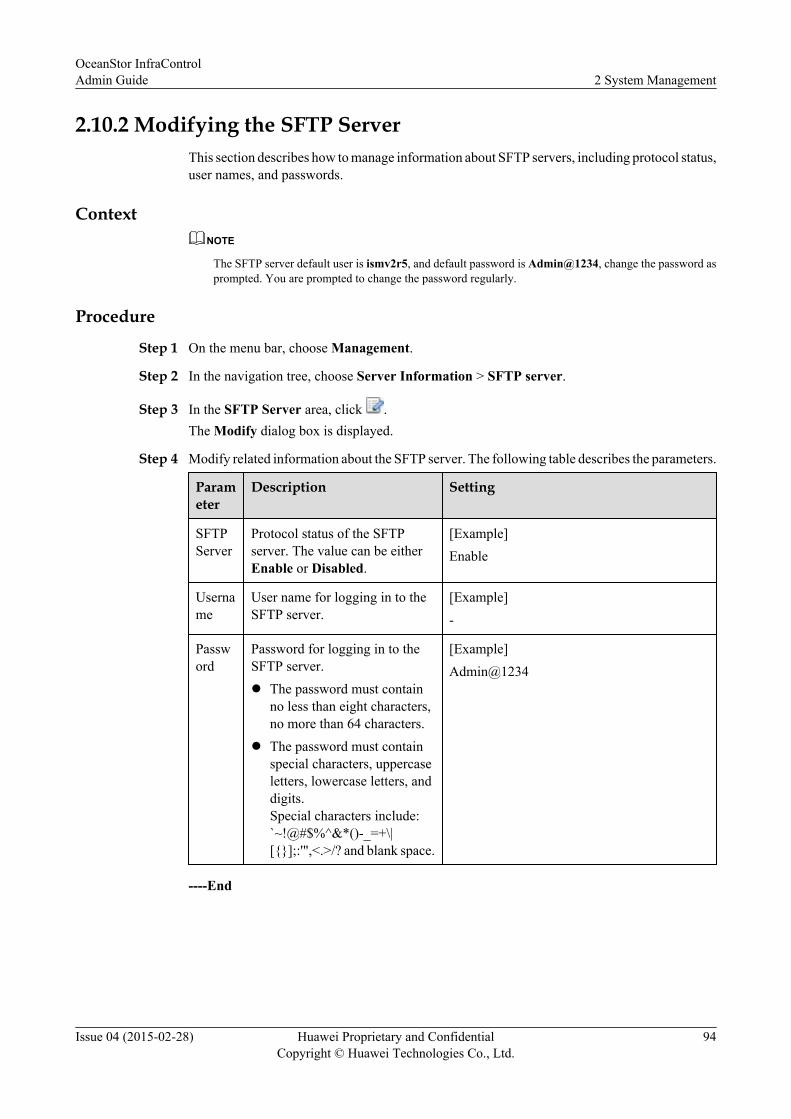
2.10.2 Modifying the SFTP ServerThis section describes how to manage information about SFTP servers, including protocol status,user names, and passwords.
ContextNOTE
The SFTP server default user is ismv2r5, and default password is Admin@1234, change the password asprompted. You are prompted to change the password regularly.
Procedure
Step 1 On the menu bar, choose Management.
Step 2 In the navigation tree, choose Server Information > SFTP server.
Step 3 In the SFTP Server area, click .The Modify dialog box is displayed.
Step 4 Modify related information about the SFTP server. The following table describes the parameters.
Parameter
Description Setting
SFTPServer
Protocol status of the SFTPserver. The value can be eitherEnable or Disabled.
[Example]Enable
Username
User name for logging in to theSFTP server.
[Example]-
Password
Password for logging in to theSFTP server.l The password must contain
no less than eight characters,no more than 64 characters.
l The password must containspecial characters, uppercaseletters, lowercase letters, anddigits.Special characters include:`~!@#$%^&*()-_=+\|[{}];:'",<.>/? and blank space.
[Example]Admin@1234
----End
OceanStor InfraControlAdmin Guide 2 System Management
Issue 04 (2015-02-28) Huawei Proprietary and ConfidentialCopyright © Huawei Technologies Co., Ltd.
94
3 Managing InfraControl System User
About This Chapter
This topic describes default users of the InfraControl system, including OS users, northboundusers. This topic also provides methods of modifying the default user passwords.
3.1 Default User InformationThis topic describes the InfraControl system default users and user passwords.
3.2 Password Changing RulesThis topic describes the InfraControl system default users and user passwords.
OceanStor InfraControlAdmin Guide 3 Managing InfraControl System User
Issue 04 (2015-02-28) Huawei Proprietary and ConfidentialCopyright © Huawei Technologies Co., Ltd.
95
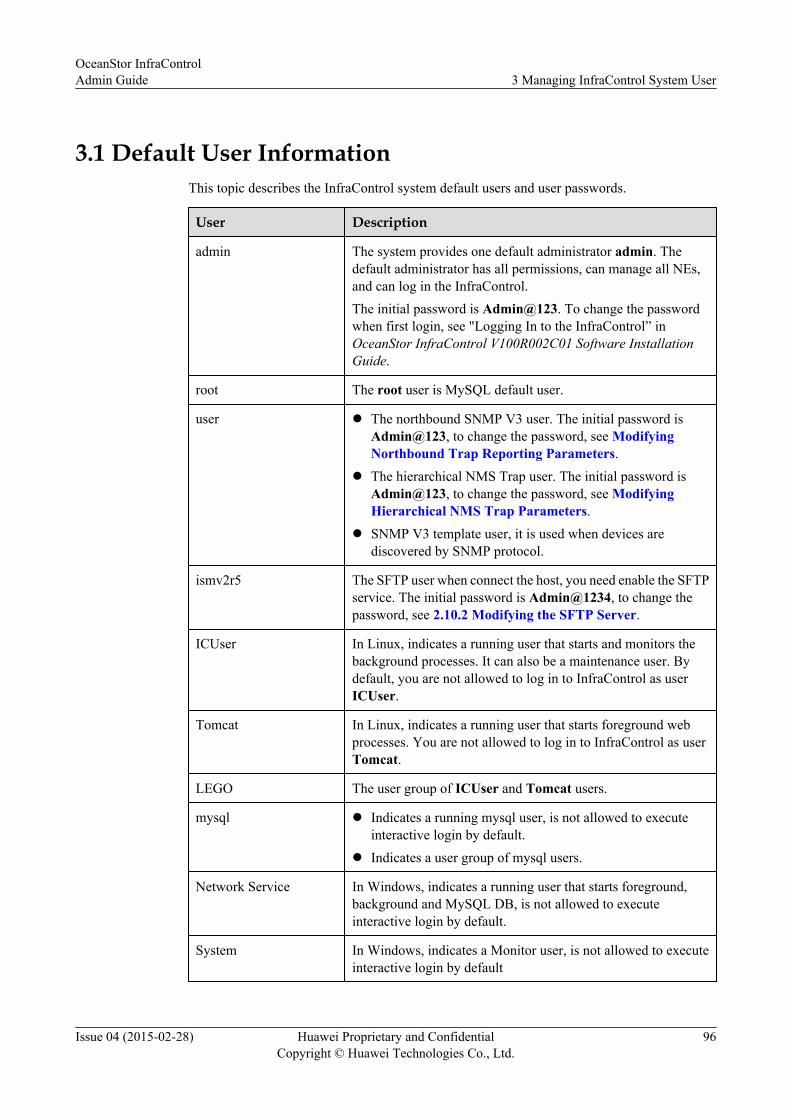
3.1 Default User InformationThis topic describes the InfraControl system default users and user passwords.
User Description
admin The system provides one default administrator admin. Thedefault administrator has all permissions, can manage all NEs,and can log in the InfraControl.The initial password is Admin@123. To change the passwordwhen first login, see "Logging In to the InfraControl” inOceanStor InfraControl V100R002C01 Software InstallationGuide.
root The root user is MySQL default user.
user l The northbound SNMP V3 user. The initial password isAdmin@123, to change the password, see ModifyingNorthbound Trap Reporting Parameters.
l The hierarchical NMS Trap user. The initial password isAdmin@123, to change the password, see ModifyingHierarchical NMS Trap Parameters.
l SNMP V3 template user, it is used when devices arediscovered by SNMP protocol.
ismv2r5 The SFTP user when connect the host, you need enable the SFTPservice. The initial password is Admin@1234, to change thepassword, see 2.10.2 Modifying the SFTP Server.
ICUser In Linux, indicates a running user that starts and monitors thebackground processes. It can also be a maintenance user. Bydefault, you are not allowed to log in to InfraControl as userICUser.
Tomcat In Linux, indicates a running user that starts foreground webprocesses. You are not allowed to log in to InfraControl as userTomcat.
LEGO The user group of ICUser and Tomcat users.
mysql l Indicates a running mysql user, is not allowed to executeinteractive login by default.
l Indicates a user group of mysql users.
Network Service In Windows, indicates a running user that starts foreground,background and MySQL DB, is not allowed to executeinteractive login by default.
System In Windows, indicates a Monitor user, is not allowed to executeinteractive login by default
OceanStor InfraControlAdmin Guide 3 Managing InfraControl System User
Issue 04 (2015-02-28) Huawei Proprietary and ConfidentialCopyright © Huawei Technologies Co., Ltd.
96
3.2 Password Changing RulesThis topic describes the InfraControl system default users and user passwords.
l Password Changing Scenarios
– Changing initial passwords
– Password change after system maintenance handover
– Regular password changeIt is recommended that passwords be changed regularly to ensure system security. Thechange frequency can be customized. The recommended password change frequencyis 90 days.
l Password Complexity Requirements
– The new password contains no less than eight characters.
– The new password must contains special characters, uppercase letters, lowercase letters,and digits.
– Special characters:`~!@#$%^&*()-_=+\|[{}];:"",<.>/? and blank space
OceanStor InfraControlAdmin Guide 3 Managing InfraControl System User
Issue 04 (2015-02-28) Huawei Proprietary and ConfidentialCopyright © Huawei Technologies Co., Ltd.
97

4 Topology Management
About This Chapter
Topology management allows you to build a topology for a network and use it to monitor thewhole network in real time.
4.1 Physical ViewYou can adjust the global topology to generate a clear topology view.
4.2 User-Defined ViewIn user-defined view, You can create,delete and modify topology view.
OceanStor InfraControlAdmin Guide 4 Topology Management
Issue 04 (2015-02-28) Huawei Proprietary and ConfidentialCopyright © Huawei Technologies Co., Ltd.
98
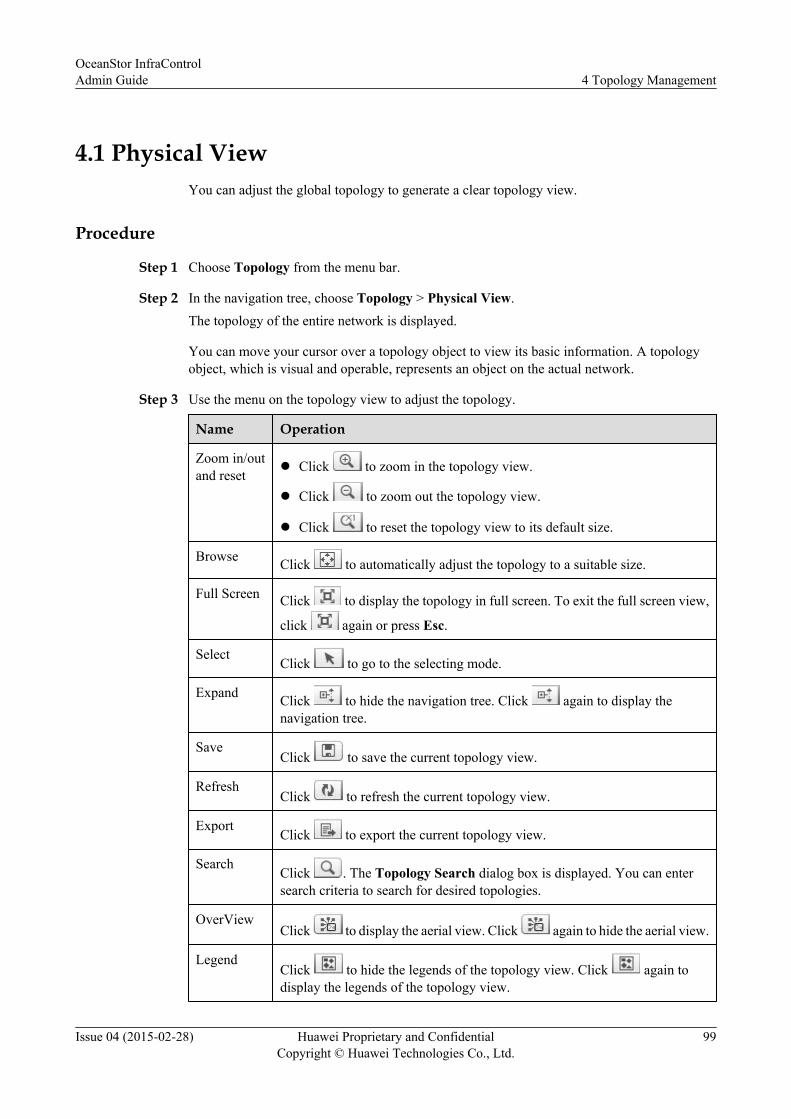
4.1 Physical ViewYou can adjust the global topology to generate a clear topology view.
Procedure
Step 1 Choose Topology from the menu bar.
Step 2 In the navigation tree, choose Topology > Physical View.The topology of the entire network is displayed.
You can move your cursor over a topology object to view its basic information. A topologyobject, which is visual and operable, represents an object on the actual network.
Step 3 Use the menu on the topology view to adjust the topology.
Name Operation
Zoom in/outand reset l Click to zoom in the topology view.
l Click to zoom out the topology view.
l Click to reset the topology view to its default size.
Browse Click to automatically adjust the topology to a suitable size.
Full Screen Click to display the topology in full screen. To exit the full screen view,
click again or press Esc.
SelectClick to go to the selecting mode.
Expand Click to hide the navigation tree. Click again to display thenavigation tree.
SaveClick to save the current topology view.
RefreshClick to refresh the current topology view.
ExportClick to export the current topology view.
SearchClick . The Topology Search dialog box is displayed. You can entersearch criteria to search for desired topologies.
OverViewClick to display the aerial view. Click again to hide the aerial view.
LegendClick to hide the legends of the topology view. Click again todisplay the legends of the topology view.
OceanStor InfraControlAdmin Guide 4 Topology Management
Issue 04 (2015-02-28) Huawei Proprietary and ConfidentialCopyright © Huawei Technologies Co., Ltd.
99
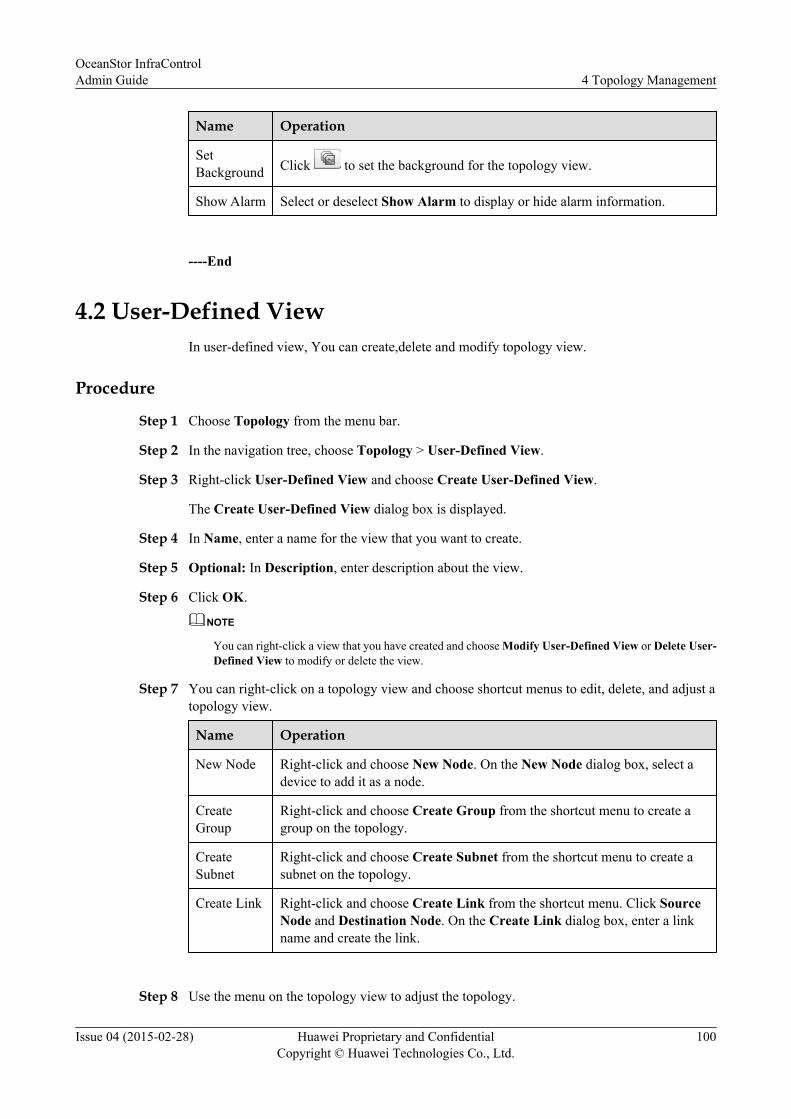
Name Operation
SetBackground Click to set the background for the topology view.
Show Alarm Select or deselect Show Alarm to display or hide alarm information.
----End
4.2 User-Defined ViewIn user-defined view, You can create,delete and modify topology view.
Procedure
Step 1 Choose Topology from the menu bar.
Step 2 In the navigation tree, choose Topology > User-Defined View.
Step 3 Right-click User-Defined View and choose Create User-Defined View.
The Create User-Defined View dialog box is displayed.
Step 4 In Name, enter a name for the view that you want to create.
Step 5 Optional: In Description, enter description about the view.
Step 6 Click OK.
NOTE
You can right-click a view that you have created and choose Modify User-Defined View or Delete User-Defined View to modify or delete the view.
Step 7 You can right-click on a topology view and choose shortcut menus to edit, delete, and adjust atopology view.
Name Operation
New Node Right-click and choose New Node. On the New Node dialog box, select adevice to add it as a node.
CreateGroup
Right-click and choose Create Group from the shortcut menu to create agroup on the topology.
CreateSubnet
Right-click and choose Create Subnet from the shortcut menu to create asubnet on the topology.
Create Link Right-click and choose Create Link from the shortcut menu. Click SourceNode and Destination Node. On the Create Link dialog box, enter a linkname and create the link.
Step 8 Use the menu on the topology view to adjust the topology.
OceanStor InfraControlAdmin Guide 4 Topology Management
Issue 04 (2015-02-28) Huawei Proprietary and ConfidentialCopyright © Huawei Technologies Co., Ltd.
100
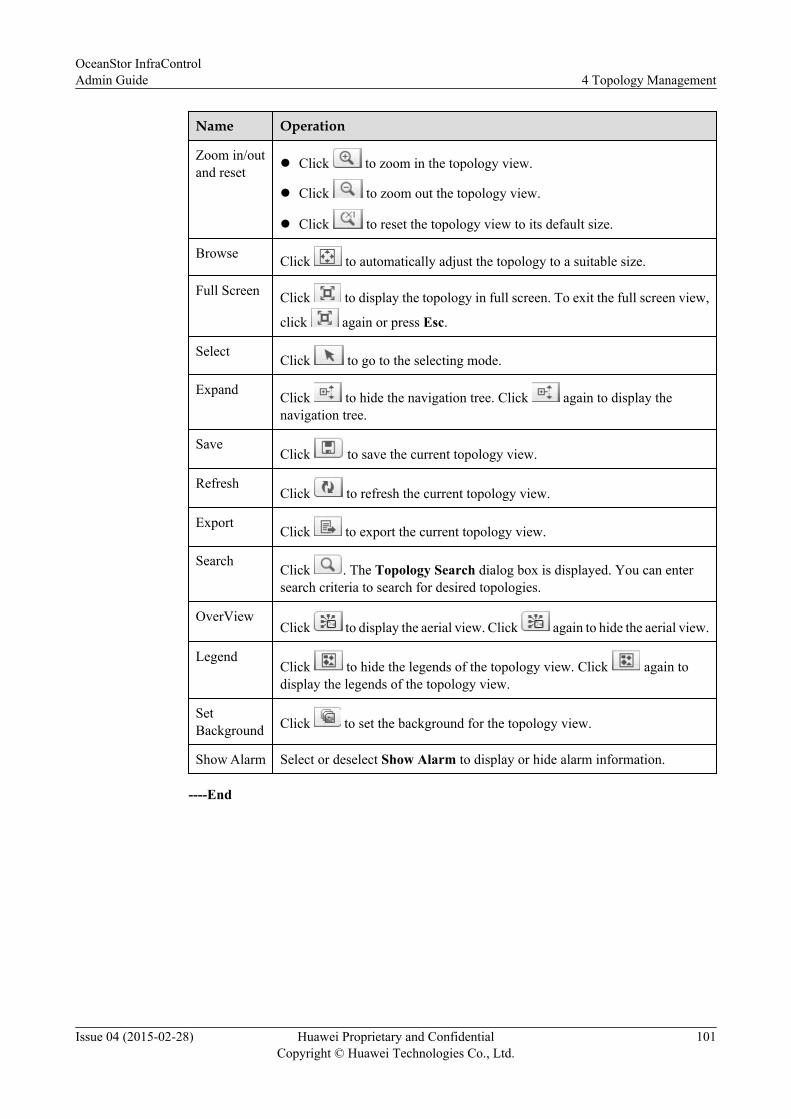
Name Operation
Zoom in/outand reset l Click to zoom in the topology view.
l Click to zoom out the topology view.
l Click to reset the topology view to its default size.
Browse Click to automatically adjust the topology to a suitable size.
Full Screen Click to display the topology in full screen. To exit the full screen view,
click again or press Esc.
SelectClick to go to the selecting mode.
Expand Click to hide the navigation tree. Click again to display thenavigation tree.
SaveClick to save the current topology view.
RefreshClick to refresh the current topology view.
ExportClick to export the current topology view.
SearchClick . The Topology Search dialog box is displayed. You can entersearch criteria to search for desired topologies.
OverViewClick to display the aerial view. Click again to hide the aerial view.
LegendClick to hide the legends of the topology view. Click again todisplay the legends of the topology view.
SetBackground Click to set the background for the topology view.
Show Alarm Select or deselect Show Alarm to display or hide alarm information.
----End
OceanStor InfraControlAdmin Guide 4 Topology Management
Issue 04 (2015-02-28) Huawei Proprietary and ConfidentialCopyright © Huawei Technologies Co., Ltd.
101
5 Resource Management
About This Chapter
You can discover different types of network elements (NEs) by using the configured discoverypolicies. You can monitor and manage the discovered NEs.
5.1 OverviewDifferent types of network elements (NEs) on the network may use different versions of networkmanagement protocols. Therefore, to implement unified and remote visualized management ofNEs, the management system must be compatible with different versions of networkmanagement protocols, and support discovering, managing, and monitoring the networkeddevices by setting resource discovery policies.
5.2 Managing Disk ArraysThis section describes how to view details about a storage device's status and capacity. By doingso, you can optimize and recover storage devices in time for proactive maintenance andprotection.
5.3 Managing Fibre Channel SwitchesThis chapter describes how to viewing the summary, port, and zone information and managecurrent alarms of Fibre Channel switches.
5.4 Managing Ethernet SwitchesThis chapter describes how to view the summary, port, VLAN, and trunk information of Ethernetswitches and manage current alarms on them.
5.5 Managing ServersThis chapter describes how to manage all servers on the management system, including viewingthe summary, hardware information, host path graph, logical relationship graph, free space, andcurrent alarms of servers.
5.6 Managing Virtualization ServersThis chapter describes how to manage all virtualization servers on the management system,including viewing the summary, hardware information, host path graph, free space, and currentalarms of virtualization servers.
5.7 Managing Virtual Machines
OceanStor InfraControlAdmin Guide 5 Resource Management
Issue 04 (2015-02-28) Huawei Proprietary and ConfidentialCopyright © Huawei Technologies Co., Ltd.
102
This section describes how to manage all virtual machines, including viewing the summary,hardware information, host path graph, free space, and current alarms of virtual machines.
5.8 Managing Oracle InstancesThis chapter describes how to manage Oracle instances, including viewing Oracle instanceinformation, tablespace, and file information.
5.9 Managing SQL Server InstancesThis chapter describes how to manage SQL Server instances, including viewing SQL Serverinstances, databases, and files.
OceanStor InfraControlAdmin Guide 5 Resource Management
Issue 04 (2015-02-28) Huawei Proprietary and ConfidentialCopyright © Huawei Technologies Co., Ltd.
103
5.1 OverviewDifferent types of network elements (NEs) on the network may use different versions of networkmanagement protocols. Therefore, to implement unified and remote visualized management ofNEs, the management system must be compatible with different versions of networkmanagement protocols, and support discovering, managing, and monitoring the networkeddevices by setting resource discovery policies.
Discovering an NEYou can create a parameter template based on the NE communication protocol and configurean NE discovery policy. Then the management system can use the template to discovery NEsby IP address or IP address segment.
l The Simple Network Management Protocol (SNMP) is used for communication betweenthe management system server and NEs managed by the management system. Themanagement system can access the NEs using the SNMP. If you manually create an NEdiscovery policy, the management system uses the created SNMP parameter template todiscover specified NEs. When the NE access protocol parameters are changed, you needto modify the access protocol parameters of the specified NE on the management systemto keep consistency. For details, see Creating an SNMP Template.
l Discover online NEs using the discovery policy and manage and monitor the discoveredNEs. For details, see Creating a Discovery Policy.
Managing DevicesThe management system supports monitoring and management of storage systems. Thevisualized interface facilitates device monitoring and management.
Device management includes:l Managing Storage Systems
– Managing disk arrays
– Managing VIS systems
– Managing unified storage systems
– Managing VTLsl Managing switches
– Managing Fibre Channel switches
– Managing Ethernet switchesl Managing hosts
– Managing servers
– Managing virtual servers
– Managing virtual machinesl Managing applications
– Managing Oracle instances
– Managing SQL Server instances
OceanStor InfraControlAdmin Guide 5 Resource Management
Issue 04 (2015-02-28) Huawei Proprietary and ConfidentialCopyright © Huawei Technologies Co., Ltd.
104
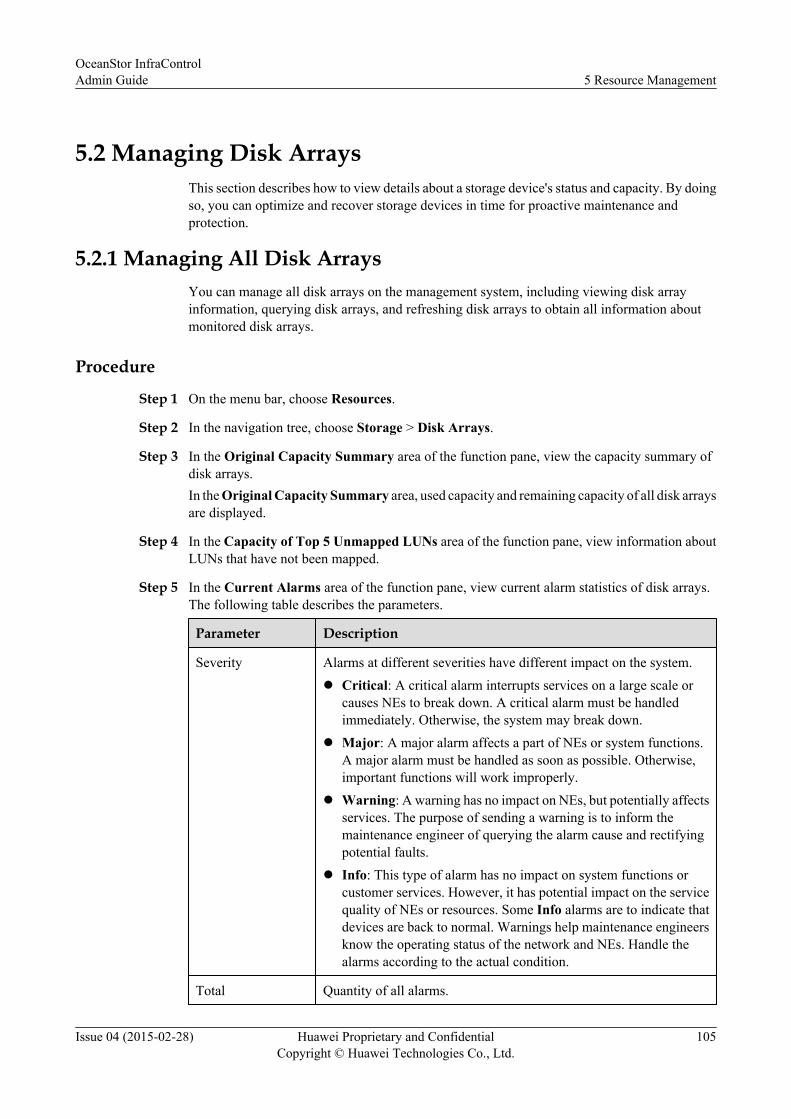
5.2 Managing Disk ArraysThis section describes how to view details about a storage device's status and capacity. By doingso, you can optimize and recover storage devices in time for proactive maintenance andprotection.
5.2.1 Managing All Disk ArraysYou can manage all disk arrays on the management system, including viewing disk arrayinformation, querying disk arrays, and refreshing disk arrays to obtain all information aboutmonitored disk arrays.
Procedure
Step 1 On the menu bar, choose Resources.
Step 2 In the navigation tree, choose Storage > Disk Arrays.
Step 3 In the Original Capacity Summary area of the function pane, view the capacity summary ofdisk arrays.In the Original Capacity Summary area, used capacity and remaining capacity of all disk arraysare displayed.
Step 4 In the Capacity of Top 5 Unmapped LUNs area of the function pane, view information aboutLUNs that have not been mapped.
Step 5 In the Current Alarms area of the function pane, view current alarm statistics of disk arrays.The following table describes the parameters.
Parameter Description
Severity Alarms at different severities have different impact on the system.l Critical: A critical alarm interrupts services on a large scale or
causes NEs to break down. A critical alarm must be handledimmediately. Otherwise, the system may break down.
l Major: A major alarm affects a part of NEs or system functions.A major alarm must be handled as soon as possible. Otherwise,important functions will work improperly.
l Warning: A warning has no impact on NEs, but potentially affectsservices. The purpose of sending a warning is to inform themaintenance engineer of querying the alarm cause and rectifyingpotential faults.
l Info: This type of alarm has no impact on system functions orcustomer services. However, it has potential impact on the servicequality of NEs or resources. Some Info alarms are to indicate thatdevices are back to normal. Warnings help maintenance engineersknow the operating status of the network and NEs. Handle thealarms according to the actual condition.
Total Quantity of all alarms.
OceanStor InfraControlAdmin Guide 5 Resource Management
Issue 04 (2015-02-28) Huawei Proprietary and ConfidentialCopyright © Huawei Technologies Co., Ltd.
105
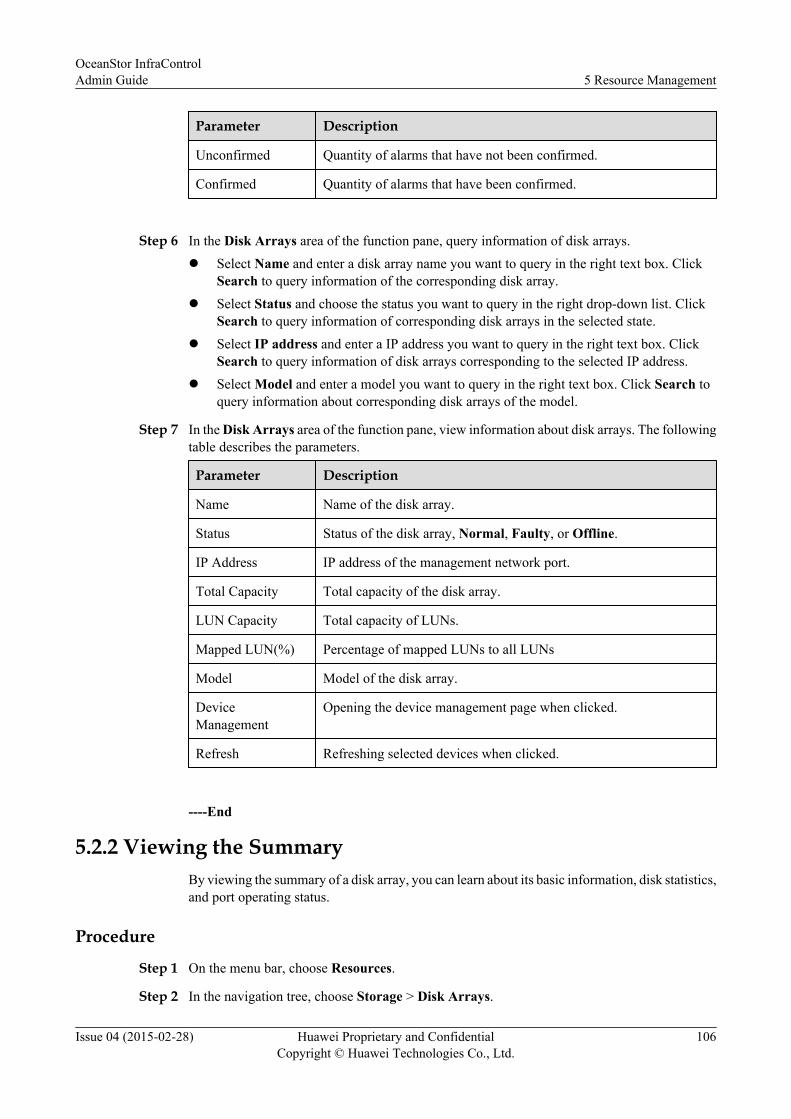
Parameter Description
Unconfirmed Quantity of alarms that have not been confirmed.
Confirmed Quantity of alarms that have been confirmed.
Step 6 In the Disk Arrays area of the function pane, query information of disk arrays.l Select Name and enter a disk array name you want to query in the right text box. Click
Search to query information of the corresponding disk array.l Select Status and choose the status you want to query in the right drop-down list. Click
Search to query information of corresponding disk arrays in the selected state.l Select IP address and enter a IP address you want to query in the right text box. Click
Search to query information of disk arrays corresponding to the selected IP address.l Select Model and enter a model you want to query in the right text box. Click Search to
query information about corresponding disk arrays of the model.
Step 7 In the Disk Arrays area of the function pane, view information about disk arrays. The followingtable describes the parameters.
Parameter Description
Name Name of the disk array.
Status Status of the disk array, Normal, Faulty, or Offline.
IP Address IP address of the management network port.
Total Capacity Total capacity of the disk array.
LUN Capacity Total capacity of LUNs.
Mapped LUN(%) Percentage of mapped LUNs to all LUNs
Model Model of the disk array.
DeviceManagement
Opening the device management page when clicked.
Refresh Refreshing selected devices when clicked.
----End
5.2.2 Viewing the SummaryBy viewing the summary of a disk array, you can learn about its basic information, disk statistics,and port operating status.
Procedure
Step 1 On the menu bar, choose Resources.
Step 2 In the navigation tree, choose Storage > Disk Arrays.
OceanStor InfraControlAdmin Guide 5 Resource Management
Issue 04 (2015-02-28) Huawei Proprietary and ConfidentialCopyright © Huawei Technologies Co., Ltd.
106
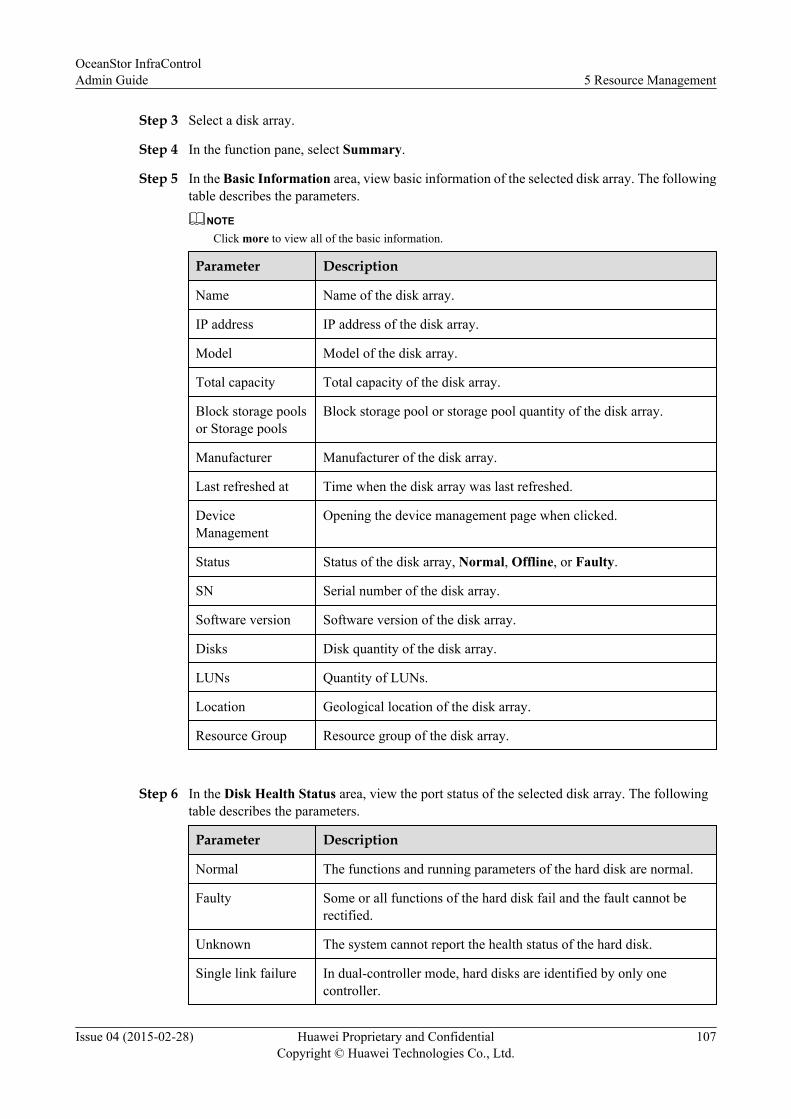
Step 3 Select a disk array.
Step 4 In the function pane, select Summary.
Step 5 In the Basic Information area, view basic information of the selected disk array. The followingtable describes the parameters.
NOTE
Click more to view all of the basic information.
Parameter Description
Name Name of the disk array.
IP address IP address of the disk array.
Model Model of the disk array.
Total capacity Total capacity of the disk array.
Block storage poolsor Storage pools
Block storage pool or storage pool quantity of the disk array.
Manufacturer Manufacturer of the disk array.
Last refreshed at Time when the disk array was last refreshed.
DeviceManagement
Opening the device management page when clicked.
Status Status of the disk array, Normal, Offline, or Faulty.
SN Serial number of the disk array.
Software version Software version of the disk array.
Disks Disk quantity of the disk array.
LUNs Quantity of LUNs.
Location Geological location of the disk array.
Resource Group Resource group of the disk array.
Step 6 In the Disk Health Status area, view the port status of the selected disk array. The followingtable describes the parameters.
Parameter Description
Normal The functions and running parameters of the hard disk are normal.
Faulty Some or all functions of the hard disk fail and the fault cannot berectified.
Unknown The system cannot report the health status of the hard disk.
Single link failure In dual-controller mode, hard disks are identified by only onecontroller.
OceanStor InfraControlAdmin Guide 5 Resource Management
Issue 04 (2015-02-28) Huawei Proprietary and ConfidentialCopyright © Huawei Technologies Co., Ltd.
107
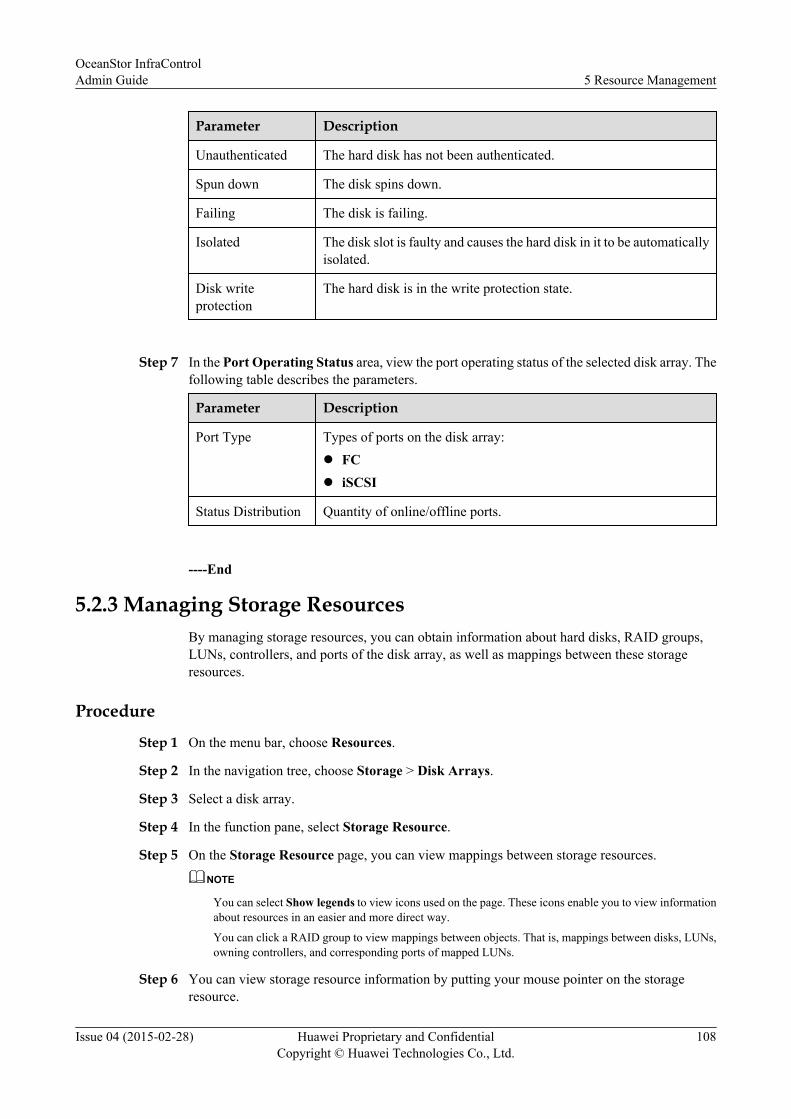
Parameter Description
Unauthenticated The hard disk has not been authenticated.
Spun down The disk spins down.
Failing The disk is failing.
Isolated The disk slot is faulty and causes the hard disk in it to be automaticallyisolated.
Disk writeprotection
The hard disk is in the write protection state.
Step 7 In the Port Operating Status area, view the port operating status of the selected disk array. Thefollowing table describes the parameters.
Parameter Description
Port Type Types of ports on the disk array:l FCl iSCSI
Status Distribution Quantity of online/offline ports.
----End
5.2.3 Managing Storage ResourcesBy managing storage resources, you can obtain information about hard disks, RAID groups,LUNs, controllers, and ports of the disk array, as well as mappings between these storageresources.
Procedure
Step 1 On the menu bar, choose Resources.
Step 2 In the navigation tree, choose Storage > Disk Arrays.
Step 3 Select a disk array.
Step 4 In the function pane, select Storage Resource.
Step 5 On the Storage Resource page, you can view mappings between storage resources.
NOTE
You can select Show legends to view icons used on the page. These icons enable you to view informationabout resources in an easier and more direct way.
You can click a RAID group to view mappings between objects. That is, mappings between disks, LUNs,owning controllers, and corresponding ports of mapped LUNs.
Step 6 You can view storage resource information by putting your mouse pointer on the storageresource.
OceanStor InfraControlAdmin Guide 5 Resource Management
Issue 04 (2015-02-28) Huawei Proprietary and ConfidentialCopyright © Huawei Technologies Co., Ltd.
108
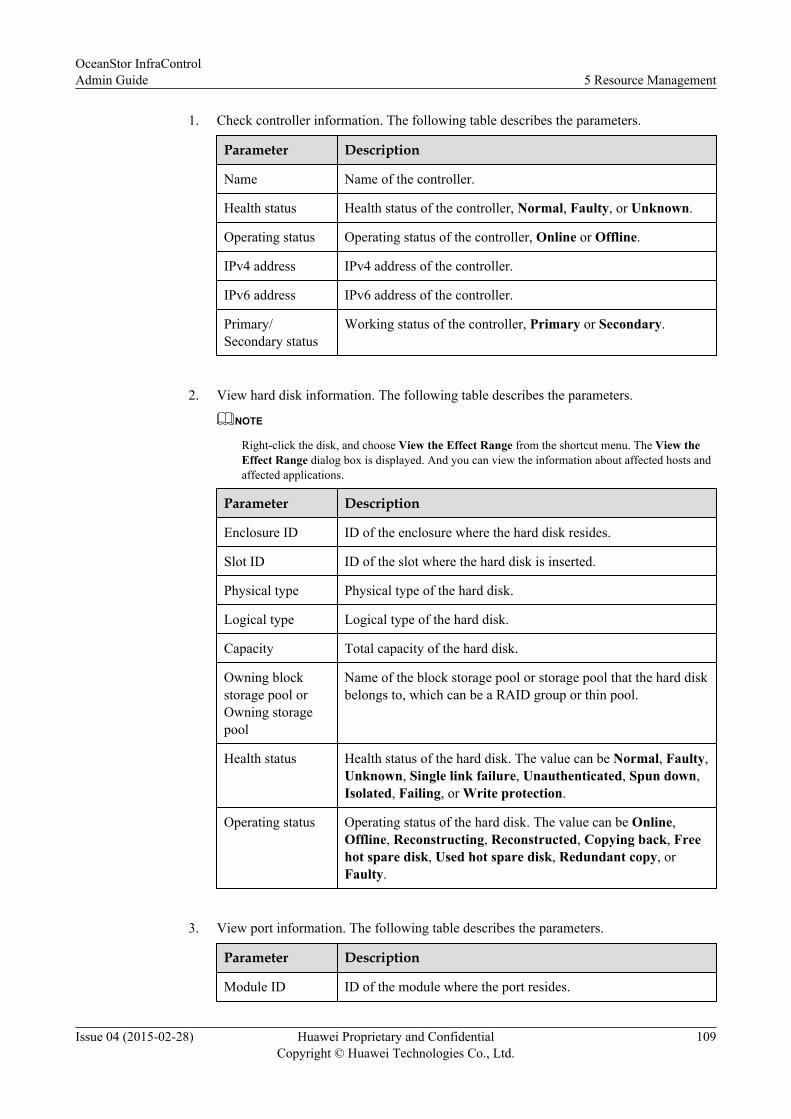
1. Check controller information. The following table describes the parameters.
Parameter Description
Name Name of the controller.
Health status Health status of the controller, Normal, Faulty, or Unknown.
Operating status Operating status of the controller, Online or Offline.
IPv4 address IPv4 address of the controller.
IPv6 address IPv6 address of the controller.
Primary/Secondary status
Working status of the controller, Primary or Secondary.
2. View hard disk information. The following table describes the parameters.
NOTE
Right-click the disk, and choose View the Effect Range from the shortcut menu. The View theEffect Range dialog box is displayed. And you can view the information about affected hosts andaffected applications.
Parameter Description
Enclosure ID ID of the enclosure where the hard disk resides.
Slot ID ID of the slot where the hard disk is inserted.
Physical type Physical type of the hard disk.
Logical type Logical type of the hard disk.
Capacity Total capacity of the hard disk.
Owning blockstorage pool orOwning storagepool
Name of the block storage pool or storage pool that the hard diskbelongs to, which can be a RAID group or thin pool.
Health status Health status of the hard disk. The value can be Normal, Faulty,Unknown, Single link failure, Unauthenticated, Spun down,Isolated, Failing, or Write protection.
Operating status Operating status of the hard disk. The value can be Online,Offline, Reconstructing, Reconstructed, Copying back, Freehot spare disk, Used hot spare disk, Redundant copy, orFaulty.
3. View port information. The following table describes the parameters.
Parameter Description
Module ID ID of the module where the port resides.
OceanStor InfraControlAdmin Guide 5 Resource Management
Issue 04 (2015-02-28) Huawei Proprietary and ConfidentialCopyright © Huawei Technologies Co., Ltd.
109
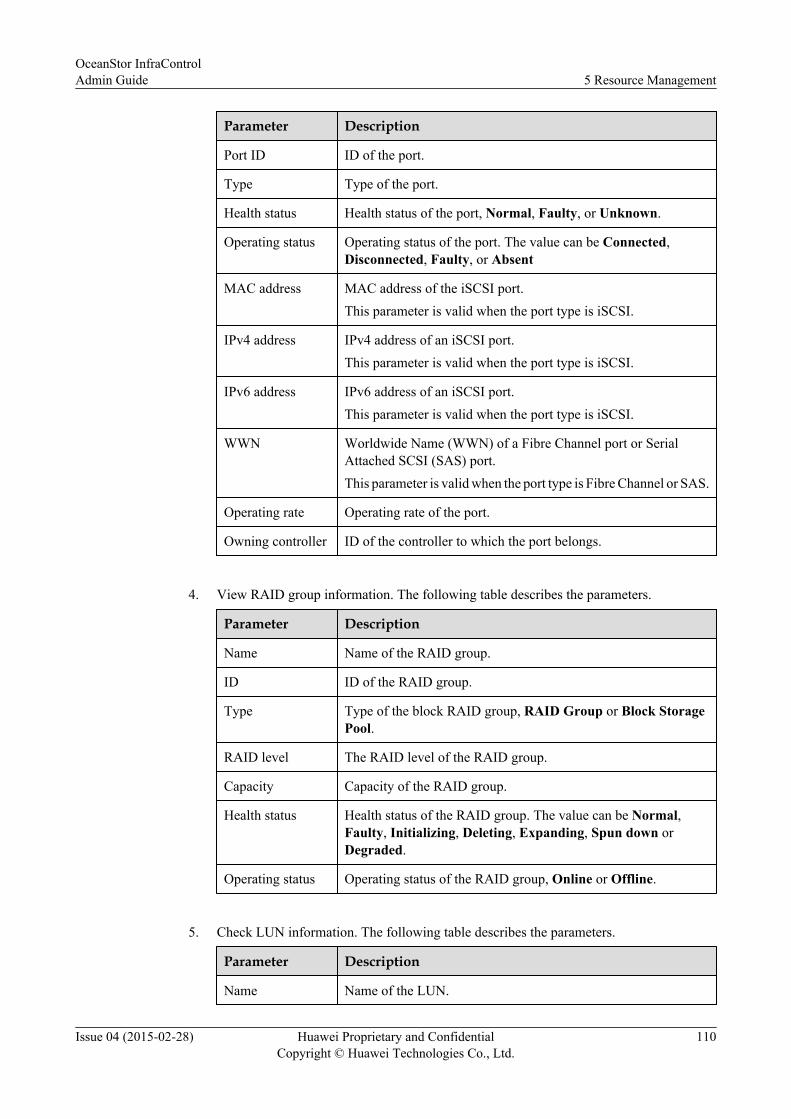
Parameter Description
Port ID ID of the port.
Type Type of the port.
Health status Health status of the port, Normal, Faulty, or Unknown.
Operating status Operating status of the port. The value can be Connected,Disconnected, Faulty, or Absent
MAC address MAC address of the iSCSI port.This parameter is valid when the port type is iSCSI.
IPv4 address IPv4 address of an iSCSI port.This parameter is valid when the port type is iSCSI.
IPv6 address IPv6 address of an iSCSI port.This parameter is valid when the port type is iSCSI.
WWN Worldwide Name (WWN) of a Fibre Channel port or SerialAttached SCSI (SAS) port.This parameter is valid when the port type is Fibre Channel or SAS.
Operating rate Operating rate of the port.
Owning controller ID of the controller to which the port belongs.
4. View RAID group information. The following table describes the parameters.
Parameter Description
Name Name of the RAID group.
ID ID of the RAID group.
Type Type of the block RAID group, RAID Group or Block StoragePool.
RAID level The RAID level of the RAID group.
Capacity Capacity of the RAID group.
Health status Health status of the RAID group. The value can be Normal,Faulty, Initializing, Deleting, Expanding, Spun down orDegraded.
Operating status Operating status of the RAID group, Online or Offline.
5. Check LUN information. The following table describes the parameters.
Parameter Description
Name Name of the LUN.
OceanStor InfraControlAdmin Guide 5 Resource Management
Issue 04 (2015-02-28) Huawei Proprietary and ConfidentialCopyright © Huawei Technologies Co., Ltd.
110
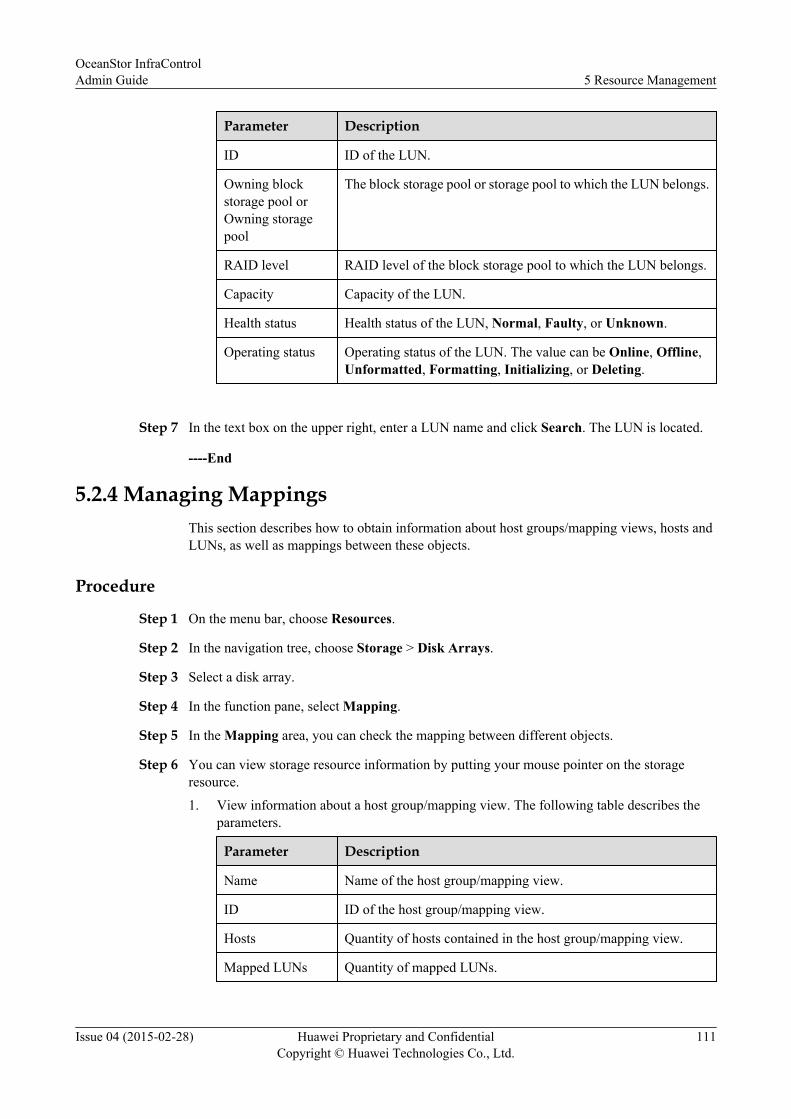
Parameter Description
ID ID of the LUN.
Owning blockstorage pool orOwning storagepool
The block storage pool or storage pool to which the LUN belongs.
RAID level RAID level of the block storage pool to which the LUN belongs.
Capacity Capacity of the LUN.
Health status Health status of the LUN, Normal, Faulty, or Unknown.
Operating status Operating status of the LUN. The value can be Online, Offline,Unformatted, Formatting, Initializing, or Deleting.
Step 7 In the text box on the upper right, enter a LUN name and click Search. The LUN is located.
----End
5.2.4 Managing MappingsThis section describes how to obtain information about host groups/mapping views, hosts andLUNs, as well as mappings between these objects.
Procedure
Step 1 On the menu bar, choose Resources.
Step 2 In the navigation tree, choose Storage > Disk Arrays.
Step 3 Select a disk array.
Step 4 In the function pane, select Mapping.
Step 5 In the Mapping area, you can check the mapping between different objects.
Step 6 You can view storage resource information by putting your mouse pointer on the storageresource.
1. View information about a host group/mapping view. The following table describes theparameters.
Parameter Description
Name Name of the host group/mapping view.
ID ID of the host group/mapping view.
Hosts Quantity of hosts contained in the host group/mapping view.
Mapped LUNs Quantity of mapped LUNs.
OceanStor InfraControlAdmin Guide 5 Resource Management
Issue 04 (2015-02-28) Huawei Proprietary and ConfidentialCopyright © Huawei Technologies Co., Ltd.
111
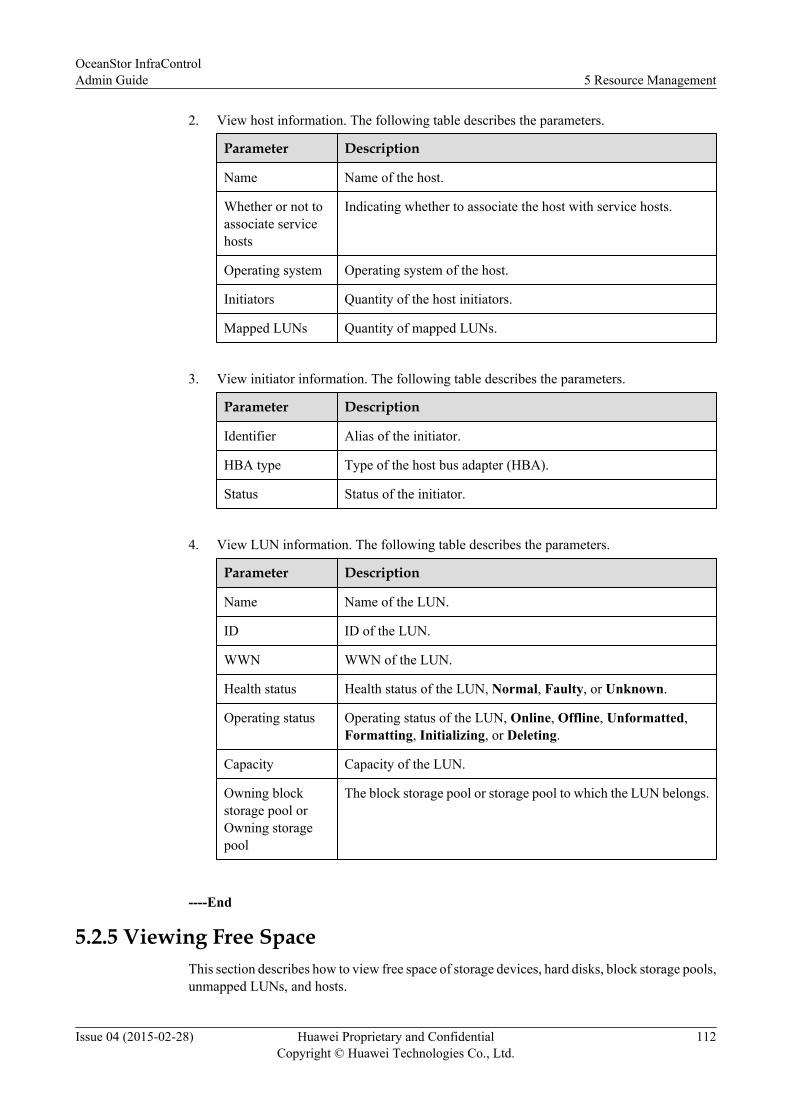
2. View host information. The following table describes the parameters.
Parameter Description
Name Name of the host.
Whether or not toassociate servicehosts
Indicating whether to associate the host with service hosts.
Operating system Operating system of the host.
Initiators Quantity of the host initiators.
Mapped LUNs Quantity of mapped LUNs.
3. View initiator information. The following table describes the parameters.
Parameter Description
Identifier Alias of the initiator.
HBA type Type of the host bus adapter (HBA).
Status Status of the initiator.
4. View LUN information. The following table describes the parameters.
Parameter Description
Name Name of the LUN.
ID ID of the LUN.
WWN WWN of the LUN.
Health status Health status of the LUN, Normal, Faulty, or Unknown.
Operating status Operating status of the LUN, Online, Offline, Unformatted,Formatting, Initializing, or Deleting.
Capacity Capacity of the LUN.
Owning blockstorage pool orOwning storagepool
The block storage pool or storage pool to which the LUN belongs.
----End
5.2.5 Viewing Free SpaceThis section describes how to view free space of storage devices, hard disks, block storage pools,unmapped LUNs, and hosts.
OceanStor InfraControlAdmin Guide 5 Resource Management
Issue 04 (2015-02-28) Huawei Proprietary and ConfidentialCopyright © Huawei Technologies Co., Ltd.
112
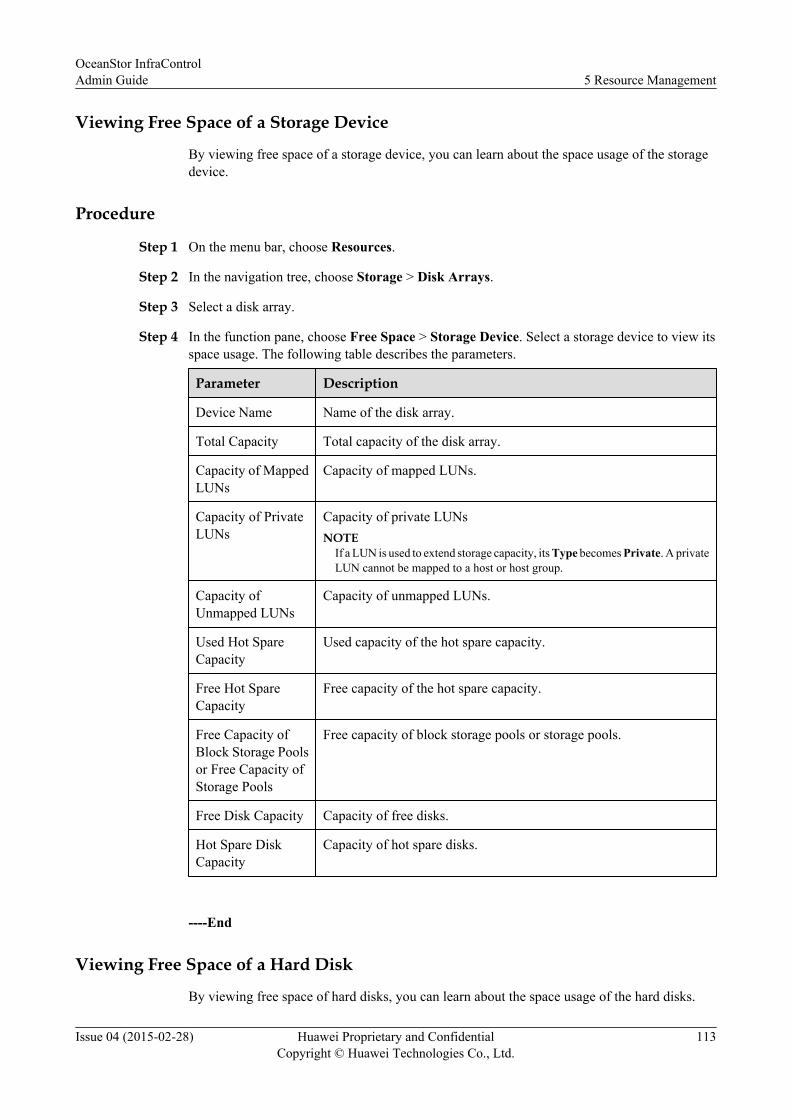
Viewing Free Space of a Storage Device
By viewing free space of a storage device, you can learn about the space usage of the storagedevice.
Procedure
Step 1 On the menu bar, choose Resources.
Step 2 In the navigation tree, choose Storage > Disk Arrays.
Step 3 Select a disk array.
Step 4 In the function pane, choose Free Space > Storage Device. Select a storage device to view itsspace usage. The following table describes the parameters.
Parameter Description
Device Name Name of the disk array.
Total Capacity Total capacity of the disk array.
Capacity of MappedLUNs
Capacity of mapped LUNs.
Capacity of PrivateLUNs
Capacity of private LUNsNOTE
If a LUN is used to extend storage capacity, its Type becomes Private. A privateLUN cannot be mapped to a host or host group.
Capacity ofUnmapped LUNs
Capacity of unmapped LUNs.
Used Hot SpareCapacity
Used capacity of the hot spare capacity.
Free Hot SpareCapacity
Free capacity of the hot spare capacity.
Free Capacity ofBlock Storage Poolsor Free Capacity ofStorage Pools
Free capacity of block storage pools or storage pools.
Free Disk Capacity Capacity of free disks.
Hot Spare DiskCapacity
Capacity of hot spare disks.
----End
Viewing Free Space of a Hard Disk
By viewing free space of hard disks, you can learn about the space usage of the hard disks.
OceanStor InfraControlAdmin Guide 5 Resource Management
Issue 04 (2015-02-28) Huawei Proprietary and ConfidentialCopyright © Huawei Technologies Co., Ltd.
113
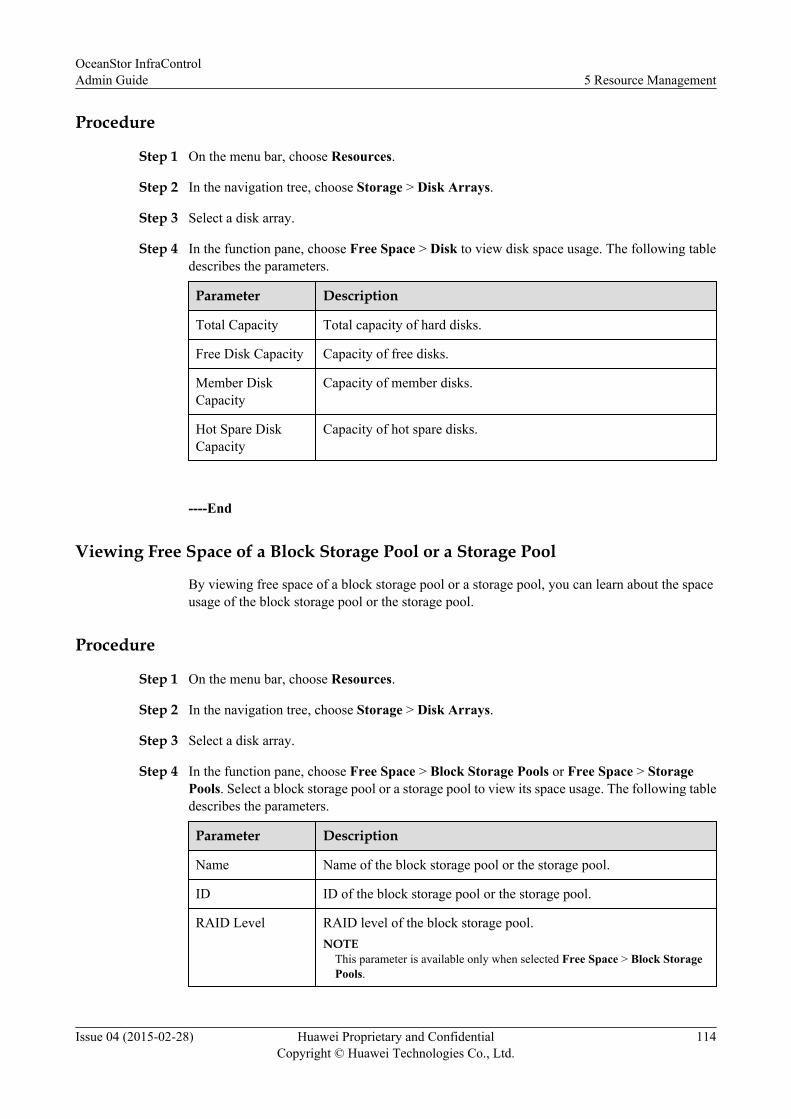
Procedure
Step 1 On the menu bar, choose Resources.
Step 2 In the navigation tree, choose Storage > Disk Arrays.
Step 3 Select a disk array.
Step 4 In the function pane, choose Free Space > Disk to view disk space usage. The following tabledescribes the parameters.
Parameter Description
Total Capacity Total capacity of hard disks.
Free Disk Capacity Capacity of free disks.
Member DiskCapacity
Capacity of member disks.
Hot Spare DiskCapacity
Capacity of hot spare disks.
----End
Viewing Free Space of a Block Storage Pool or a Storage Pool
By viewing free space of a block storage pool or a storage pool, you can learn about the spaceusage of the block storage pool or the storage pool.
Procedure
Step 1 On the menu bar, choose Resources.
Step 2 In the navigation tree, choose Storage > Disk Arrays.
Step 3 Select a disk array.
Step 4 In the function pane, choose Free Space > Block Storage Pools or Free Space > StoragePools. Select a block storage pool or a storage pool to view its space usage. The following tabledescribes the parameters.
Parameter Description
Name Name of the block storage pool or the storage pool.
ID ID of the block storage pool or the storage pool.
RAID Level RAID level of the block storage pool.NOTE
This parameter is available only when selected Free Space > Block StoragePools.
OceanStor InfraControlAdmin Guide 5 Resource Management
Issue 04 (2015-02-28) Huawei Proprietary and ConfidentialCopyright © Huawei Technologies Co., Ltd.
114
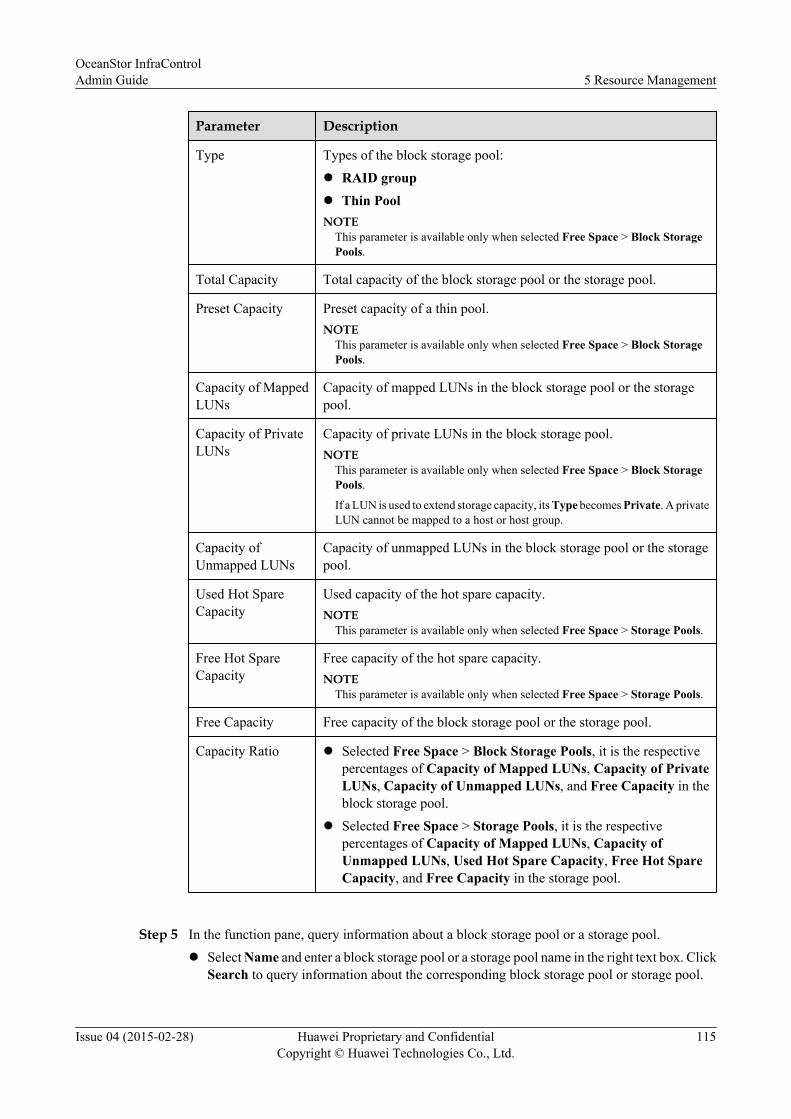
Parameter Description
Type Types of the block storage pool:l RAID groupl Thin PoolNOTE
This parameter is available only when selected Free Space > Block StoragePools.
Total Capacity Total capacity of the block storage pool or the storage pool.
Preset Capacity Preset capacity of a thin pool.NOTE
This parameter is available only when selected Free Space > Block StoragePools.
Capacity of MappedLUNs
Capacity of mapped LUNs in the block storage pool or the storagepool.
Capacity of PrivateLUNs
Capacity of private LUNs in the block storage pool.NOTE
This parameter is available only when selected Free Space > Block StoragePools.
If a LUN is used to extend storage capacity, its Type becomes Private. A privateLUN cannot be mapped to a host or host group.
Capacity ofUnmapped LUNs
Capacity of unmapped LUNs in the block storage pool or the storagepool.
Used Hot SpareCapacity
Used capacity of the hot spare capacity.NOTE
This parameter is available only when selected Free Space > Storage Pools.
Free Hot SpareCapacity
Free capacity of the hot spare capacity.NOTE
This parameter is available only when selected Free Space > Storage Pools.
Free Capacity Free capacity of the block storage pool or the storage pool.
Capacity Ratio l Selected Free Space > Block Storage Pools, it is the respectivepercentages of Capacity of Mapped LUNs, Capacity of PrivateLUNs, Capacity of Unmapped LUNs, and Free Capacity in theblock storage pool.
l Selected Free Space > Storage Pools, it is the respectivepercentages of Capacity of Mapped LUNs, Capacity ofUnmapped LUNs, Used Hot Spare Capacity, Free Hot SpareCapacity, and Free Capacity in the storage pool.
Step 5 In the function pane, query information about a block storage pool or a storage pool.l Select Name and enter a block storage pool or a storage pool name in the right text box. Click
Search to query information about the corresponding block storage pool or storage pool.
OceanStor InfraControlAdmin Guide 5 Resource Management
Issue 04 (2015-02-28) Huawei Proprietary and ConfidentialCopyright © Huawei Technologies Co., Ltd.
115
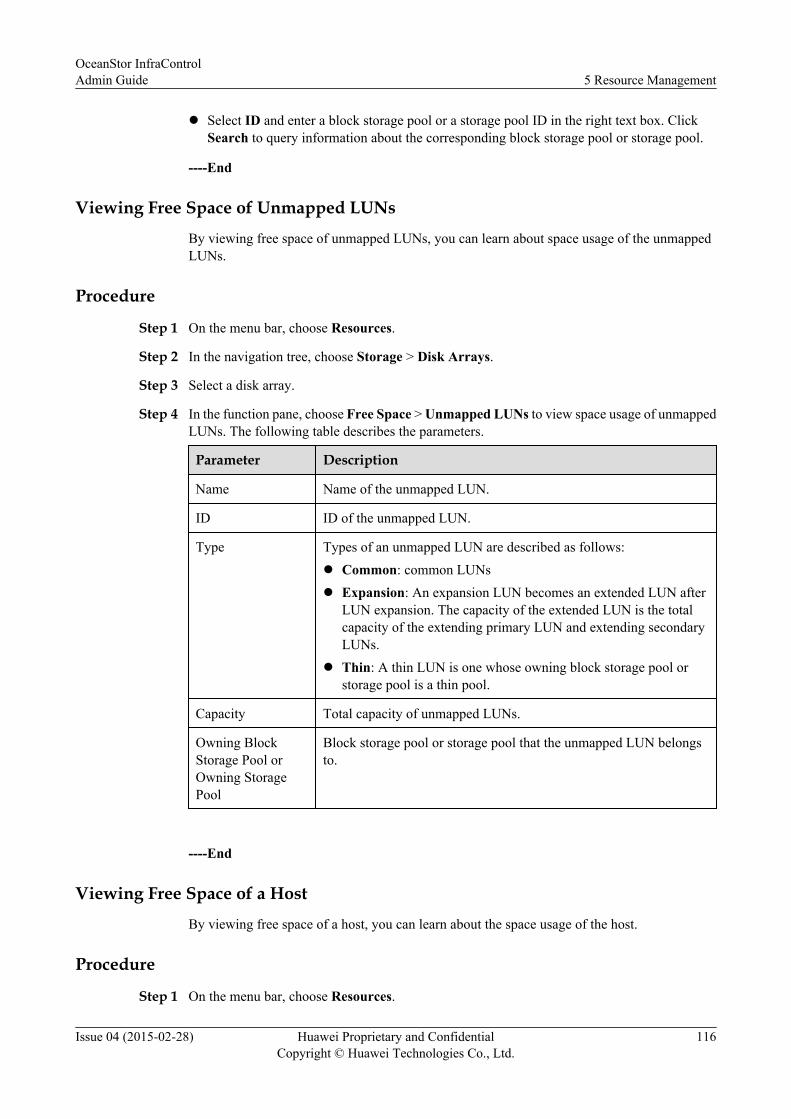
l Select ID and enter a block storage pool or a storage pool ID in the right text box. ClickSearch to query information about the corresponding block storage pool or storage pool.
----End
Viewing Free Space of Unmapped LUNs
By viewing free space of unmapped LUNs, you can learn about space usage of the unmappedLUNs.
Procedure
Step 1 On the menu bar, choose Resources.
Step 2 In the navigation tree, choose Storage > Disk Arrays.
Step 3 Select a disk array.
Step 4 In the function pane, choose Free Space > Unmapped LUNs to view space usage of unmappedLUNs. The following table describes the parameters.
Parameter Description
Name Name of the unmapped LUN.
ID ID of the unmapped LUN.
Type Types of an unmapped LUN are described as follows:l Common: common LUNsl Expansion: An expansion LUN becomes an extended LUN after
LUN expansion. The capacity of the extended LUN is the totalcapacity of the extending primary LUN and extending secondaryLUNs.
l Thin: A thin LUN is one whose owning block storage pool orstorage pool is a thin pool.
Capacity Total capacity of unmapped LUNs.
Owning BlockStorage Pool orOwning StoragePool
Block storage pool or storage pool that the unmapped LUN belongsto.
----End
Viewing Free Space of a Host
By viewing free space of a host, you can learn about the space usage of the host.
Procedure
Step 1 On the menu bar, choose Resources.
OceanStor InfraControlAdmin Guide 5 Resource Management
Issue 04 (2015-02-28) Huawei Proprietary and ConfidentialCopyright © Huawei Technologies Co., Ltd.
116
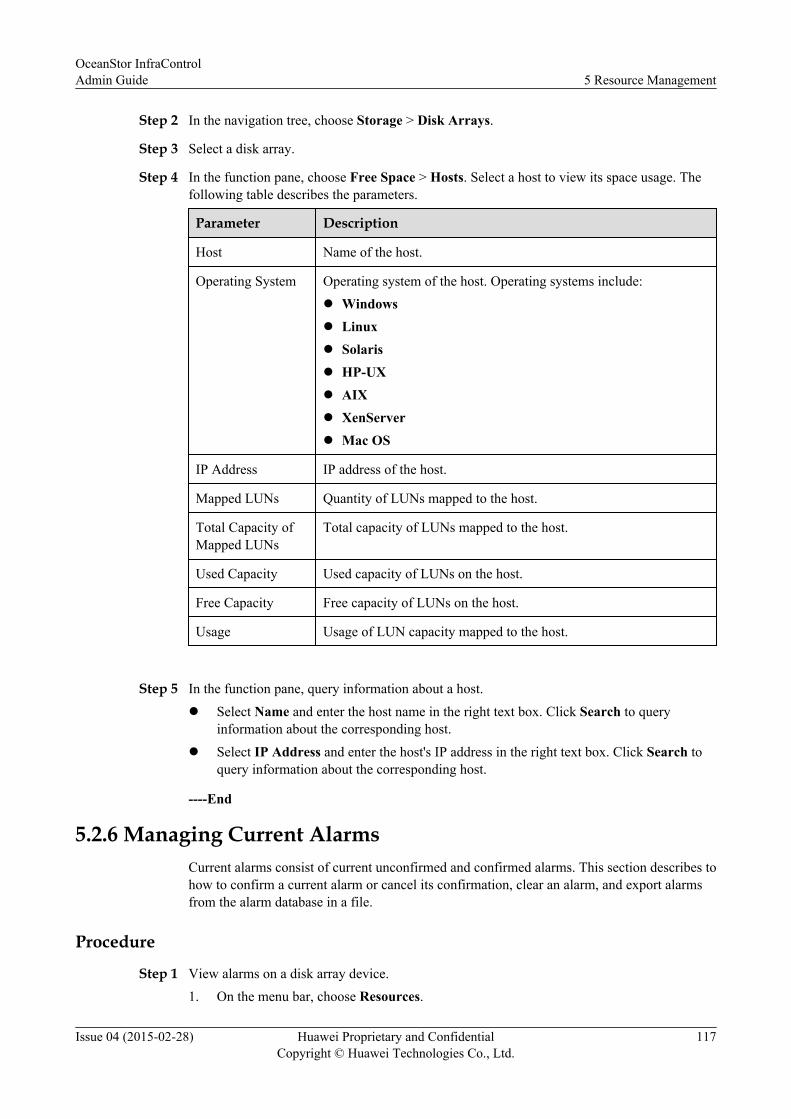
Step 2 In the navigation tree, choose Storage > Disk Arrays.
Step 3 Select a disk array.
Step 4 In the function pane, choose Free Space > Hosts. Select a host to view its space usage. Thefollowing table describes the parameters.
Parameter Description
Host Name of the host.
Operating System Operating system of the host. Operating systems include:l Windowsl Linuxl Solarisl HP-UXl AIXl XenServerl Mac OS
IP Address IP address of the host.
Mapped LUNs Quantity of LUNs mapped to the host.
Total Capacity ofMapped LUNs
Total capacity of LUNs mapped to the host.
Used Capacity Used capacity of LUNs on the host.
Free Capacity Free capacity of LUNs on the host.
Usage Usage of LUN capacity mapped to the host.
Step 5 In the function pane, query information about a host.l Select Name and enter the host name in the right text box. Click Search to query
information about the corresponding host.l Select IP Address and enter the host's IP address in the right text box. Click Search to
query information about the corresponding host.
----End
5.2.6 Managing Current AlarmsCurrent alarms consist of current unconfirmed and confirmed alarms. This section describes tohow to confirm a current alarm or cancel its confirmation, clear an alarm, and export alarmsfrom the alarm database in a file.
Procedure
Step 1 View alarms on a disk array device.1. On the menu bar, choose Resources.
OceanStor InfraControlAdmin Guide 5 Resource Management
Issue 04 (2015-02-28) Huawei Proprietary and ConfidentialCopyright © Huawei Technologies Co., Ltd.
117
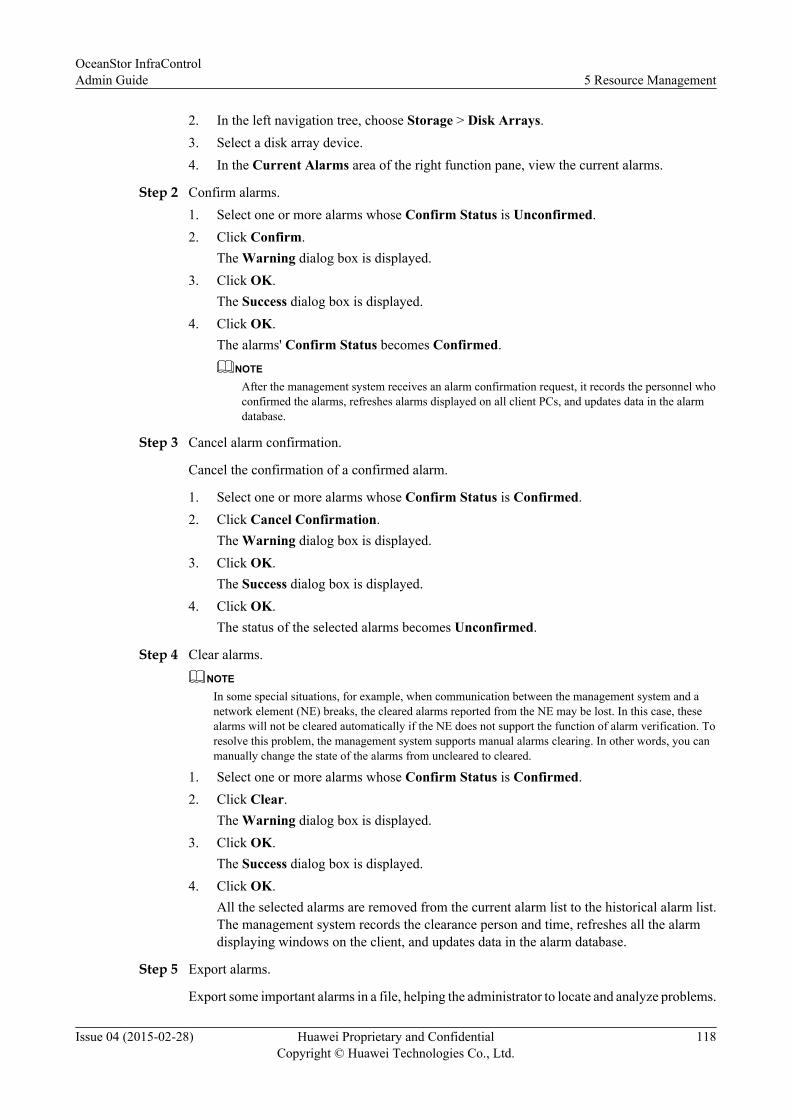
2. In the left navigation tree, choose Storage > Disk Arrays.3. Select a disk array device.4. In the Current Alarms area of the right function pane, view the current alarms.
Step 2 Confirm alarms.1. Select one or more alarms whose Confirm Status is Unconfirmed.2. Click Confirm.
The Warning dialog box is displayed.3. Click OK.
The Success dialog box is displayed.4. Click OK.
The alarms' Confirm Status becomes Confirmed.
NOTE
After the management system receives an alarm confirmation request, it records the personnel whoconfirmed the alarms, refreshes alarms displayed on all client PCs, and updates data in the alarmdatabase.
Step 3 Cancel alarm confirmation.
Cancel the confirmation of a confirmed alarm.
1. Select one or more alarms whose Confirm Status is Confirmed.2. Click Cancel Confirmation.
The Warning dialog box is displayed.3. Click OK.
The Success dialog box is displayed.4. Click OK.
The status of the selected alarms becomes Unconfirmed.
Step 4 Clear alarms.
NOTE
In some special situations, for example, when communication between the management system and anetwork element (NE) breaks, the cleared alarms reported from the NE may be lost. In this case, thesealarms will not be cleared automatically if the NE does not support the function of alarm verification. Toresolve this problem, the management system supports manual alarms clearing. In other words, you canmanually change the state of the alarms from uncleared to cleared.
1. Select one or more alarms whose Confirm Status is Confirmed.2. Click Clear.
The Warning dialog box is displayed.3. Click OK.
The Success dialog box is displayed.4. Click OK.
All the selected alarms are removed from the current alarm list to the historical alarm list.The management system records the clearance person and time, refreshes all the alarmdisplaying windows on the client, and updates data in the alarm database.
Step 5 Export alarms.
Export some important alarms in a file, helping the administrator to locate and analyze problems.
OceanStor InfraControlAdmin Guide 5 Resource Management
Issue 04 (2015-02-28) Huawei Proprietary and ConfidentialCopyright © Huawei Technologies Co., Ltd.
118
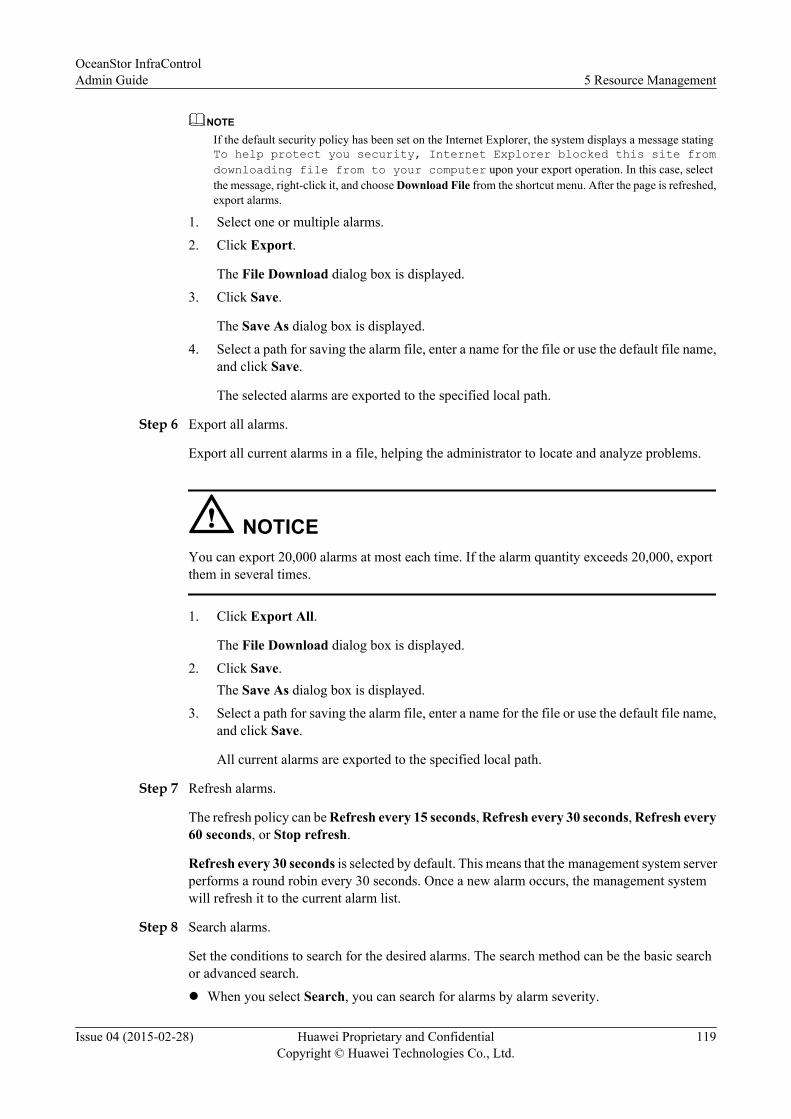
NOTE
If the default security policy has been set on the Internet Explorer, the system displays a message statingTo help protect you security, Internet Explorer blocked this site fromdownloading file from to your computer upon your export operation. In this case, selectthe message, right-click it, and choose Download File from the shortcut menu. After the page is refreshed,export alarms.
1. Select one or multiple alarms.
2. Click Export.
The File Download dialog box is displayed.
3. Click Save.
The Save As dialog box is displayed.
4. Select a path for saving the alarm file, enter a name for the file or use the default file name,and click Save.
The selected alarms are exported to the specified local path.
Step 6 Export all alarms.
Export all current alarms in a file, helping the administrator to locate and analyze problems.
NOTICEYou can export 20,000 alarms at most each time. If the alarm quantity exceeds 20,000, exportthem in several times.
1. Click Export All.
The File Download dialog box is displayed.
2. Click Save.The Save As dialog box is displayed.
3. Select a path for saving the alarm file, enter a name for the file or use the default file name,and click Save.
All current alarms are exported to the specified local path.
Step 7 Refresh alarms.
The refresh policy can be Refresh every 15 seconds, Refresh every 30 seconds, Refresh every60 seconds, or Stop refresh.
Refresh every 30 seconds is selected by default. This means that the management system serverperforms a round robin every 30 seconds. Once a new alarm occurs, the management systemwill refresh it to the current alarm list.
Step 8 Search alarms.
Set the conditions to search for the desired alarms. The search method can be the basic searchor advanced search.
l When you select Search, you can search for alarms by alarm severity.
OceanStor InfraControlAdmin Guide 5 Resource Management
Issue 04 (2015-02-28) Huawei Proprietary and ConfidentialCopyright © Huawei Technologies Co., Ltd.
119
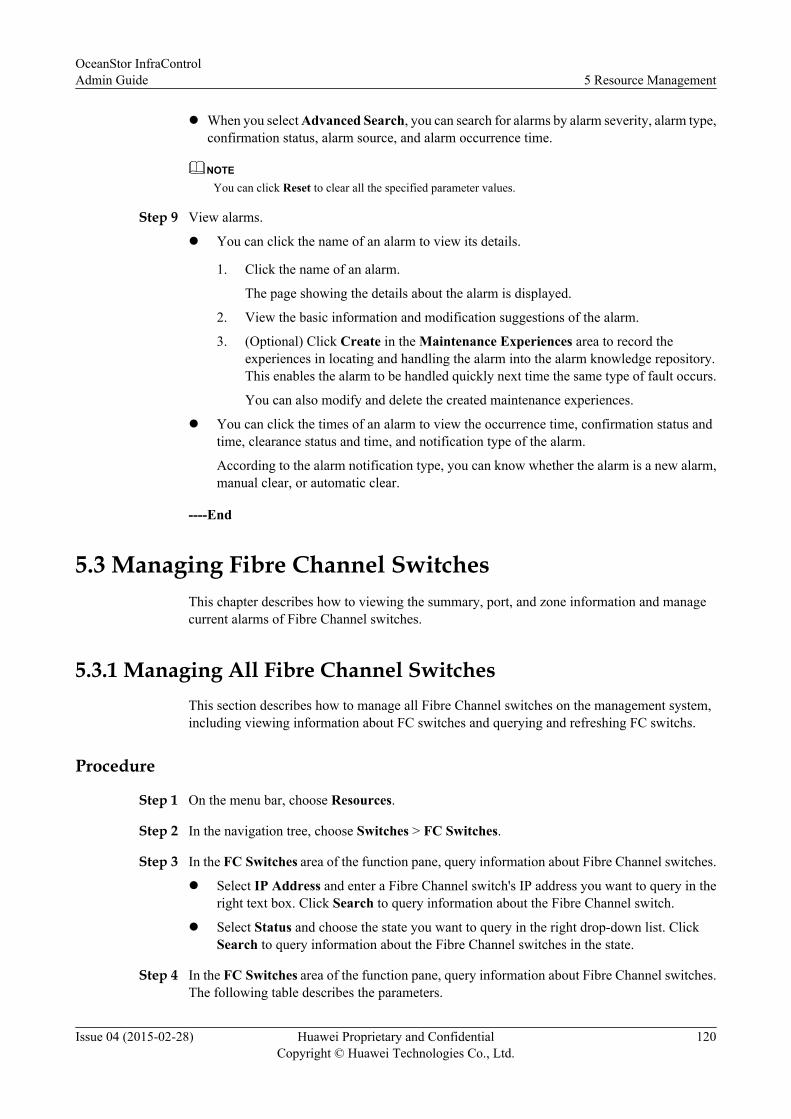
l When you select Advanced Search, you can search for alarms by alarm severity, alarm type,confirmation status, alarm source, and alarm occurrence time.
NOTE
You can click Reset to clear all the specified parameter values.
Step 9 View alarms.
l You can click the name of an alarm to view its details.
1. Click the name of an alarm.
The page showing the details about the alarm is displayed.
2. View the basic information and modification suggestions of the alarm.
3. (Optional) Click Create in the Maintenance Experiences area to record theexperiences in locating and handling the alarm into the alarm knowledge repository.This enables the alarm to be handled quickly next time the same type of fault occurs.
You can also modify and delete the created maintenance experiences.
l You can click the times of an alarm to view the occurrence time, confirmation status andtime, clearance status and time, and notification type of the alarm.
According to the alarm notification type, you can know whether the alarm is a new alarm,manual clear, or automatic clear.
----End
5.3 Managing Fibre Channel SwitchesThis chapter describes how to viewing the summary, port, and zone information and managecurrent alarms of Fibre Channel switches.
5.3.1 Managing All Fibre Channel SwitchesThis section describes how to manage all Fibre Channel switches on the management system,including viewing information about FC switches and querying and refreshing FC switchs.
Procedure
Step 1 On the menu bar, choose Resources.
Step 2 In the navigation tree, choose Switches > FC Switches.
Step 3 In the FC Switches area of the function pane, query information about Fibre Channel switches.
l Select IP Address and enter a Fibre Channel switch's IP address you want to query in theright text box. Click Search to query information about the Fibre Channel switch.
l Select Status and choose the state you want to query in the right drop-down list. ClickSearch to query information about the Fibre Channel switches in the state.
Step 4 In the FC Switches area of the function pane, query information about Fibre Channel switches.The following table describes the parameters.
OceanStor InfraControlAdmin Guide 5 Resource Management
Issue 04 (2015-02-28) Huawei Proprietary and ConfidentialCopyright © Huawei Technologies Co., Ltd.
120
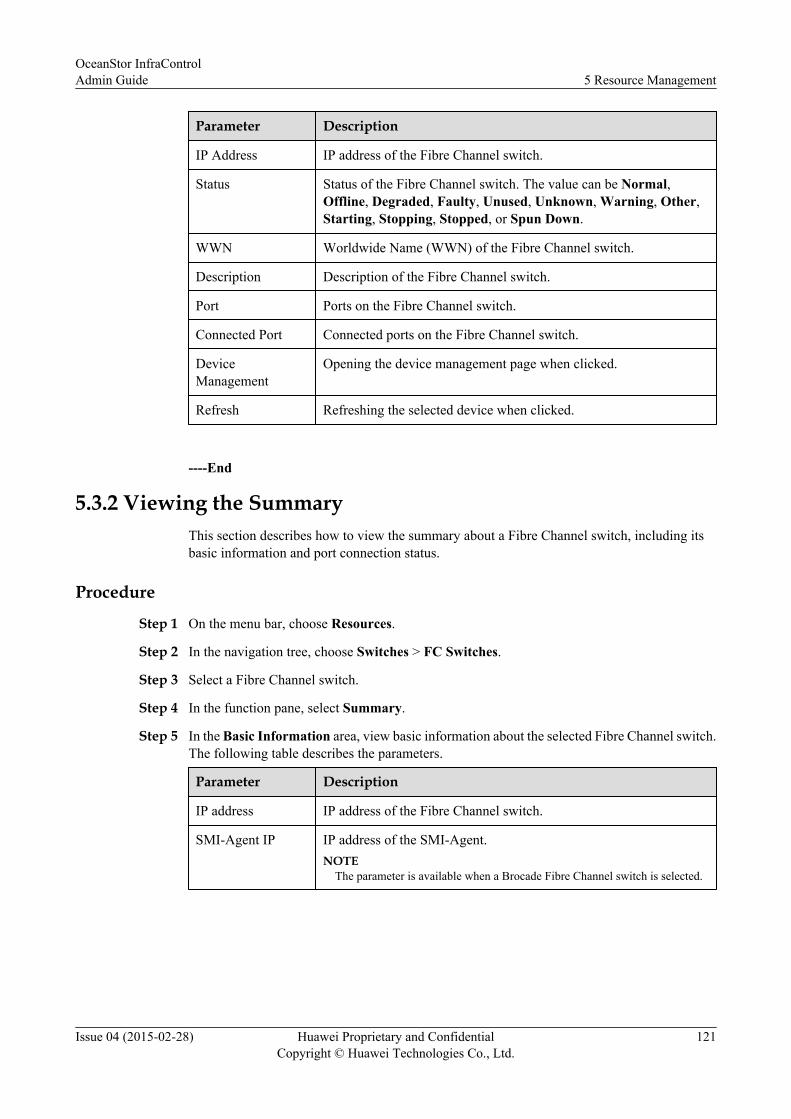
Parameter Description
IP Address IP address of the Fibre Channel switch.
Status Status of the Fibre Channel switch. The value can be Normal,Offline, Degraded, Faulty, Unused, Unknown, Warning, Other,Starting, Stopping, Stopped, or Spun Down.
WWN Worldwide Name (WWN) of the Fibre Channel switch.
Description Description of the Fibre Channel switch.
Port Ports on the Fibre Channel switch.
Connected Port Connected ports on the Fibre Channel switch.
DeviceManagement
Opening the device management page when clicked.
Refresh Refreshing the selected device when clicked.
----End
5.3.2 Viewing the SummaryThis section describes how to view the summary about a Fibre Channel switch, including itsbasic information and port connection status.
Procedure
Step 1 On the menu bar, choose Resources.
Step 2 In the navigation tree, choose Switches > FC Switches.
Step 3 Select a Fibre Channel switch.
Step 4 In the function pane, select Summary.
Step 5 In the Basic Information area, view basic information about the selected Fibre Channel switch.The following table describes the parameters.
Parameter Description
IP address IP address of the Fibre Channel switch.
SMI-Agent IP IP address of the SMI-Agent.NOTE
The parameter is available when a Brocade Fibre Channel switch is selected.
OceanStor InfraControlAdmin Guide 5 Resource Management
Issue 04 (2015-02-28) Huawei Proprietary and ConfidentialCopyright © Huawei Technologies Co., Ltd.
121
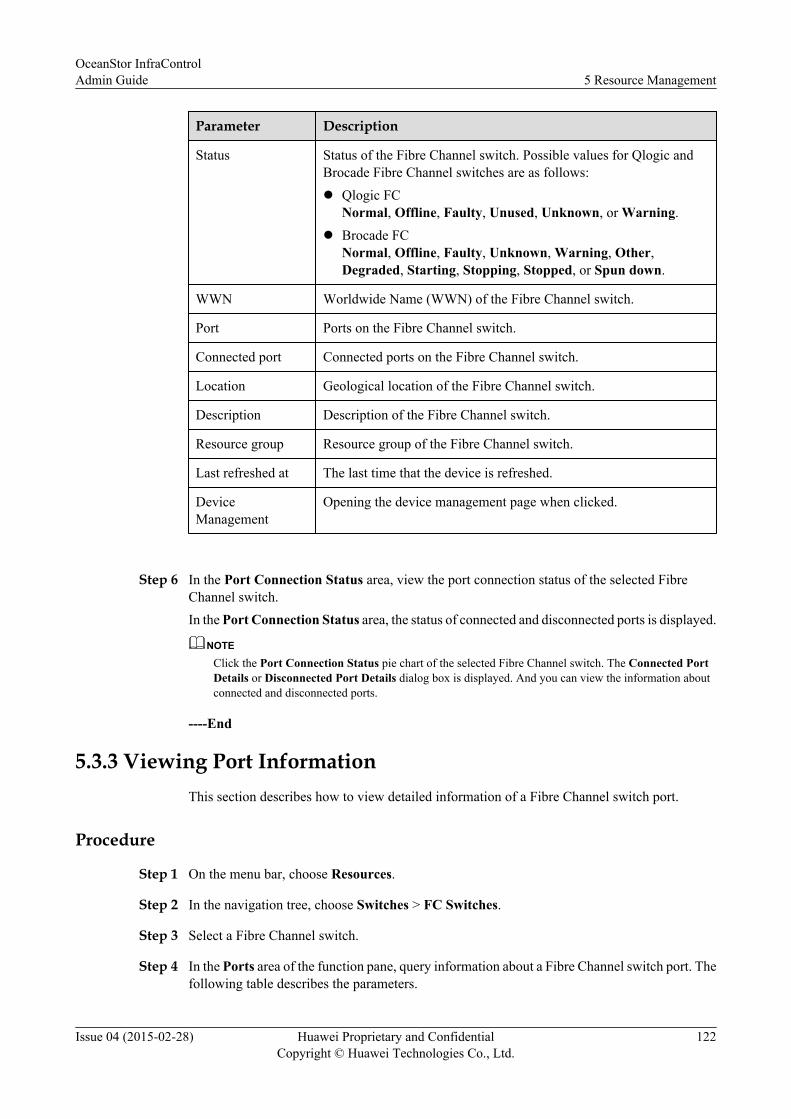
Parameter Description
Status Status of the Fibre Channel switch. Possible values for Qlogic andBrocade Fibre Channel switches are as follows:l Qlogic FC
Normal, Offline, Faulty, Unused, Unknown, or Warning.l Brocade FC
Normal, Offline, Faulty, Unknown, Warning, Other,Degraded, Starting, Stopping, Stopped, or Spun down.
WWN Worldwide Name (WWN) of the Fibre Channel switch.
Port Ports on the Fibre Channel switch.
Connected port Connected ports on the Fibre Channel switch.
Location Geological location of the Fibre Channel switch.
Description Description of the Fibre Channel switch.
Resource group Resource group of the Fibre Channel switch.
Last refreshed at The last time that the device is refreshed.
DeviceManagement
Opening the device management page when clicked.
Step 6 In the Port Connection Status area, view the port connection status of the selected FibreChannel switch.In the Port Connection Status area, the status of connected and disconnected ports is displayed.
NOTE
Click the Port Connection Status pie chart of the selected Fibre Channel switch. The Connected PortDetails or Disconnected Port Details dialog box is displayed. And you can view the information aboutconnected and disconnected ports.
----End
5.3.3 Viewing Port InformationThis section describes how to view detailed information of a Fibre Channel switch port.
Procedure
Step 1 On the menu bar, choose Resources.
Step 2 In the navigation tree, choose Switches > FC Switches.
Step 3 Select a Fibre Channel switch.
Step 4 In the Ports area of the function pane, query information about a Fibre Channel switch port. Thefollowing table describes the parameters.
OceanStor InfraControlAdmin Guide 5 Resource Management
Issue 04 (2015-02-28) Huawei Proprietary and ConfidentialCopyright © Huawei Technologies Co., Ltd.
122
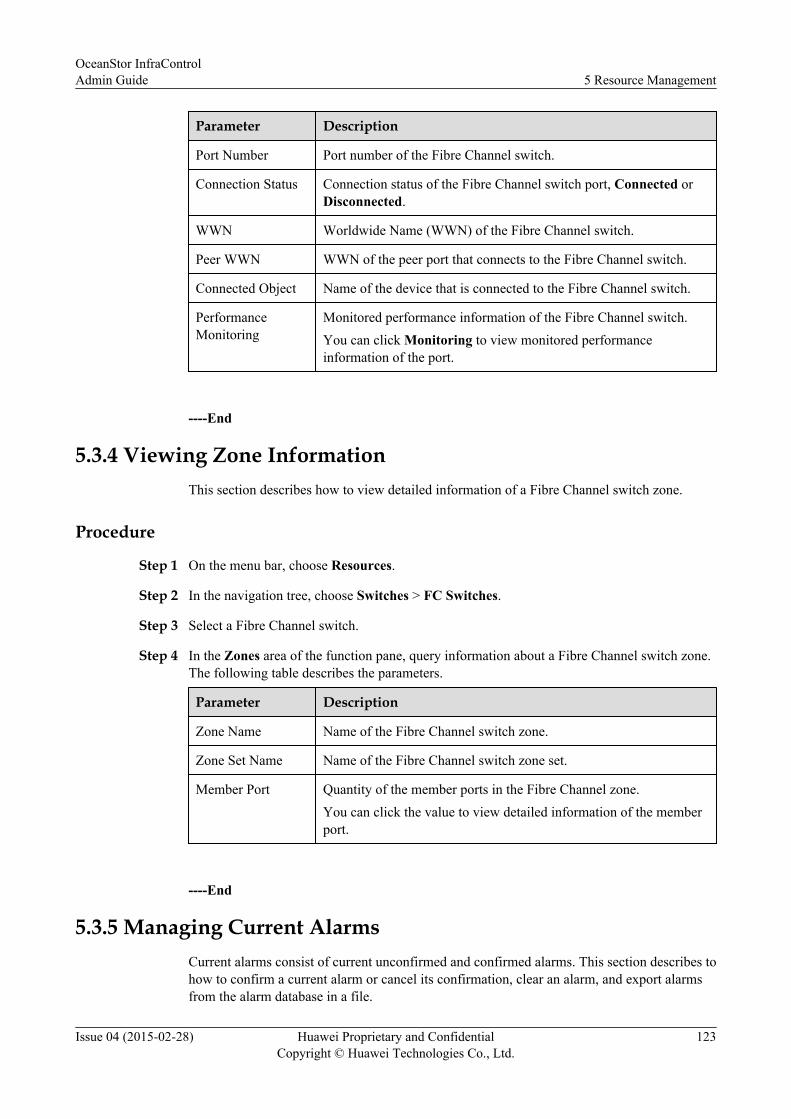
Parameter Description
Port Number Port number of the Fibre Channel switch.
Connection Status Connection status of the Fibre Channel switch port, Connected orDisconnected.
WWN Worldwide Name (WWN) of the Fibre Channel switch.
Peer WWN WWN of the peer port that connects to the Fibre Channel switch.
Connected Object Name of the device that is connected to the Fibre Channel switch.
PerformanceMonitoring
Monitored performance information of the Fibre Channel switch.You can click Monitoring to view monitored performanceinformation of the port.
----End
5.3.4 Viewing Zone InformationThis section describes how to view detailed information of a Fibre Channel switch zone.
Procedure
Step 1 On the menu bar, choose Resources.
Step 2 In the navigation tree, choose Switches > FC Switches.
Step 3 Select a Fibre Channel switch.
Step 4 In the Zones area of the function pane, query information about a Fibre Channel switch zone.The following table describes the parameters.
Parameter Description
Zone Name Name of the Fibre Channel switch zone.
Zone Set Name Name of the Fibre Channel switch zone set.
Member Port Quantity of the member ports in the Fibre Channel zone.You can click the value to view detailed information of the memberport.
----End
5.3.5 Managing Current AlarmsCurrent alarms consist of current unconfirmed and confirmed alarms. This section describes tohow to confirm a current alarm or cancel its confirmation, clear an alarm, and export alarmsfrom the alarm database in a file.
OceanStor InfraControlAdmin Guide 5 Resource Management
Issue 04 (2015-02-28) Huawei Proprietary and ConfidentialCopyright © Huawei Technologies Co., Ltd.
123
Procedure
Step 1 View alarms on an FC switch.
1. On the menu bar, choose Resources.
2. In the left navigation tree, choose Switches > FC Switches.
3. Select an FC switch.
4. In the Current Alarms area of the right function pane, view the current alarms.
Step 2 Confirm alarms.
1. Select one or more alarms whose Confirm Status is Unconfirmed.
2. Click Confirm.The Warning dialog box is displayed.
3. Click OK.The Success dialog box is displayed.
4. Click OK.The alarms' Confirm Status becomes Confirmed.
NOTE
After the management system receives an alarm confirmation request, it records the personnel whoconfirmed the alarms, refreshes alarms displayed on all client PCs, and updates data in the alarmdatabase.
Step 3 Cancel alarm confirmation.
Cancel the confirmation of a confirmed alarm.
1. Select one or more alarms whose Confirm Status is Confirmed.
2. Click Cancel Confirmation.The Warning dialog box is displayed.
3. Click OK.The Success dialog box is displayed.
4. Click OK.The status of the selected alarms becomes Unconfirmed.
Step 4 Clear alarms.
NOTE
In some special situations, for example, when communication between the management system and anetwork element (NE) breaks, the cleared alarms reported from the NE may be lost. In this case, thesealarms will not be cleared automatically if the NE does not support the function of alarm verification. Toresolve this problem, the management system supports manual alarms clearing. In other words, you canmanually change the state of the alarms from uncleared to cleared.
1. Select one or more alarms whose Confirm Status is Confirmed.
2. Click Clear.The Warning dialog box is displayed.
3. Click OK.The Success dialog box is displayed.
4. Click OK.
OceanStor InfraControlAdmin Guide 5 Resource Management
Issue 04 (2015-02-28) Huawei Proprietary and ConfidentialCopyright © Huawei Technologies Co., Ltd.
124

All the selected alarms are removed from the current alarm list to the historical alarm list.The management system records the clearance person and time, refreshes all the alarmdisplaying windows on the client, and updates data in the alarm database.
Step 5 Export alarms.
Export some important alarms in a file, helping the administrator to locate and analyze problems.
NOTE
If the default security policy has been set on the Internet Explorer, the system displays a message statingTo help protect you security, Internet Explorer blocked this site fromdownloading file from to your computer upon your export operation. In this case, selectthe message, right-click it, and choose Download File from the shortcut menu. After the page is refreshed,export alarms.
1. Select one or multiple alarms.
2. Click Export.
The File Download dialog box is displayed.
3. Click Save.
The Save As dialog box is displayed.
4. Select a path for saving the alarm file, enter a name for the file or use the default file name,and click Save.
The selected alarms are exported to the specified local path.
Step 6 Export all alarms.
Export all current alarms in a file, helping the administrator to locate and analyze problems.
NOTICEYou can export 20,000 alarms at most each time. If the alarm quantity exceeds 20,000, exportthem in several times.
1. Click Export All.
The File Download dialog box is displayed.
2. Click Save.The Save As dialog box is displayed.
3. Select a path for saving the alarm file, enter a name for the file or use the default file name,and click Save.
All current alarms are exported to the specified local path.
Step 7 Refresh alarms.
The refresh policy can be Refresh every 15 seconds, Refresh every 30 seconds, Refresh every60 seconds, or Stop refresh.
OceanStor InfraControlAdmin Guide 5 Resource Management
Issue 04 (2015-02-28) Huawei Proprietary and ConfidentialCopyright © Huawei Technologies Co., Ltd.
125
Refresh every 30 seconds is selected by default. This means that the management system serverperforms a round robin every 30 seconds. Once a new alarm occurs, the management systemwill refresh it to the current alarm list.
Step 8 Search alarms.
Set the conditions to search for the desired alarms. The search method can be the basic searchor advanced search.l When you select Search, you can search for alarms by alarm severity.l When you select Advanced Search, you can search for alarms by alarm severity, alarm type,
confirmation status, alarm source, and alarm occurrence time.
NOTE
You can click Reset to clear all the specified parameter values.
Step 9 View alarms.l You can click the name of an alarm to view its details.
1. Click the name of an alarm.The page showing the details about the alarm is displayed.
2. View the basic information and modification suggestions of the alarm.3. (Optional) Click Create in the Maintenance Experiences area to record the
experiences in locating and handling the alarm into the alarm knowledge repository.This enables the alarm to be handled quickly next time the same type of fault occurs.You can also modify and delete the created maintenance experiences.
l You can click the times of an alarm to view the occurrence time, confirmation status andtime, clearance status and time, and notification type of the alarm.According to the alarm notification type, you can know whether the alarm is a new alarm,manual clear, or automatic clear.
----End
5.4 Managing Ethernet SwitchesThis chapter describes how to view the summary, port, VLAN, and trunk information of Ethernetswitches and manage current alarms on them.
5.4.1 Managing All Ethernet SwitchesThis section describes how to manage all Ethernet switches on the management system,including viewing information about Ethernet switches and querying and refreshing Ethernetswitches.
Procedure
Step 1 On the menu bar, choose Resources.
Step 2 In the navigation tree, choose Switches > Ethernet Switches.
Step 3 In the Ethernet Switches area of the function pane, query information about Ethernet switches.
OceanStor InfraControlAdmin Guide 5 Resource Management
Issue 04 (2015-02-28) Huawei Proprietary and ConfidentialCopyright © Huawei Technologies Co., Ltd.
126

l Select IP address and enter an Ethernet switch's IP address you want to query in the righttext box. Click Search to query information about the corresponding Ethernet switch.
l Select Status and choose the state you want to query in the right drop-down list. ClickSearch to query information about Ethernet switches in the state.
Step 4 In the Ethernet Switches area of the function pane, view information about Ethernet switches.The following table describes the parameters.
Parameter Description
IP Address IP address of the Ethernet switch.
Status Status of the Ethernet switch, Normal or Offline.
Description Description of the Ethernet switch.
Port Ports on the Ethernet switch.
Connected Port Connected ports on the Ethernet switch.
DeviceManagement
Opening the device management page when clicked.
Refresh Refreshing the selected device when clicked.
----End
5.4.2 Viewing SummaryThis section describes how to view summary about an Ethernet switch, including its basicinformation and port connection status.
Procedure
Step 1 On the menu bar, choose Resources.
Step 2 In the navigation tree, choose Switches > Ethernet Switches.
Step 3 Select an Ethernet switch.
Step 4 In the function pane, select Summary.
Step 5 In the Basic Information area, view basic information about the selected Ethernet switch. Thefollowing table describes the parameters.
Parameter Description
IP address IP address of the Ethernet switch.
Status Status of the Ethernet switch, Normal or Offline.
Port Ports on the Ethernet switch.
Connected ports Connected ports on the Ethernet switch.
Location Geological location of the Ethernet switch.
OceanStor InfraControlAdmin Guide 5 Resource Management
Issue 04 (2015-02-28) Huawei Proprietary and ConfidentialCopyright © Huawei Technologies Co., Ltd.
127
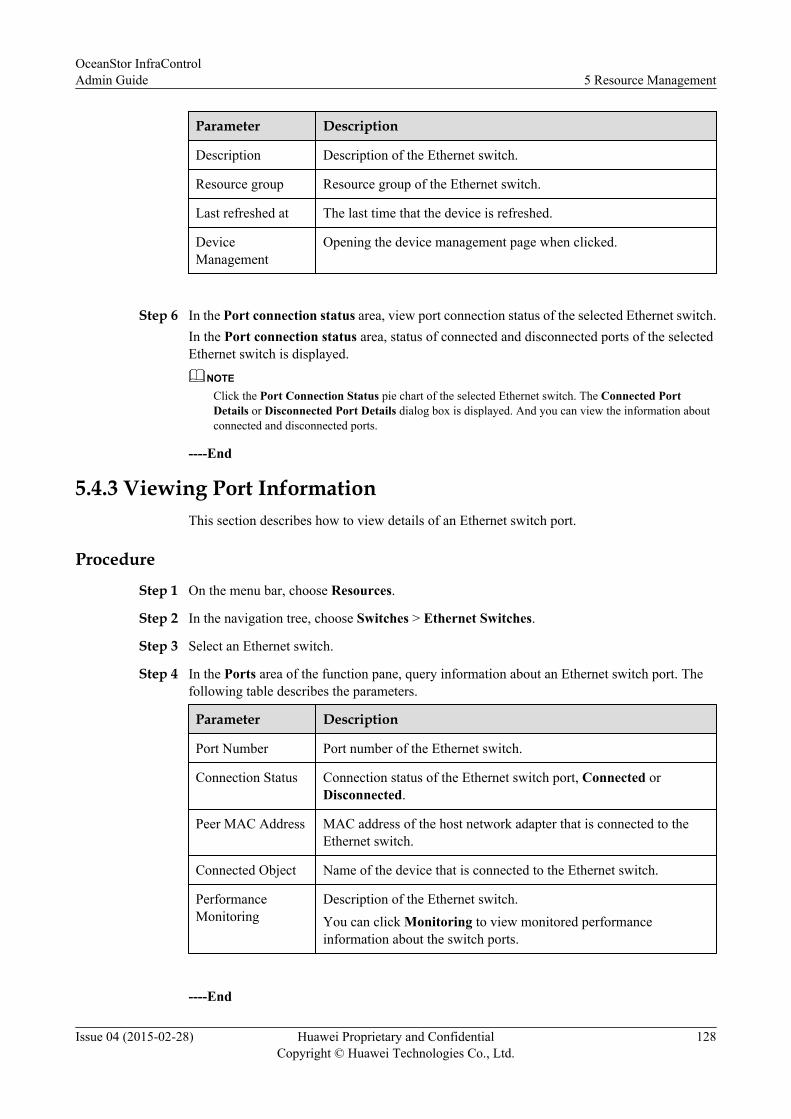
Parameter Description
Description Description of the Ethernet switch.
Resource group Resource group of the Ethernet switch.
Last refreshed at The last time that the device is refreshed.
DeviceManagement
Opening the device management page when clicked.
Step 6 In the Port connection status area, view port connection status of the selected Ethernet switch.In the Port connection status area, status of connected and disconnected ports of the selectedEthernet switch is displayed.
NOTE
Click the Port Connection Status pie chart of the selected Ethernet switch. The Connected PortDetails or Disconnected Port Details dialog box is displayed. And you can view the information aboutconnected and disconnected ports.
----End
5.4.3 Viewing Port InformationThis section describes how to view details of an Ethernet switch port.
Procedure
Step 1 On the menu bar, choose Resources.
Step 2 In the navigation tree, choose Switches > Ethernet Switches.
Step 3 Select an Ethernet switch.
Step 4 In the Ports area of the function pane, query information about an Ethernet switch port. Thefollowing table describes the parameters.
Parameter Description
Port Number Port number of the Ethernet switch.
Connection Status Connection status of the Ethernet switch port, Connected orDisconnected.
Peer MAC Address MAC address of the host network adapter that is connected to theEthernet switch.
Connected Object Name of the device that is connected to the Ethernet switch.
PerformanceMonitoring
Description of the Ethernet switch.You can click Monitoring to view monitored performanceinformation about the switch ports.
----End
OceanStor InfraControlAdmin Guide 5 Resource Management
Issue 04 (2015-02-28) Huawei Proprietary and ConfidentialCopyright © Huawei Technologies Co., Ltd.
128
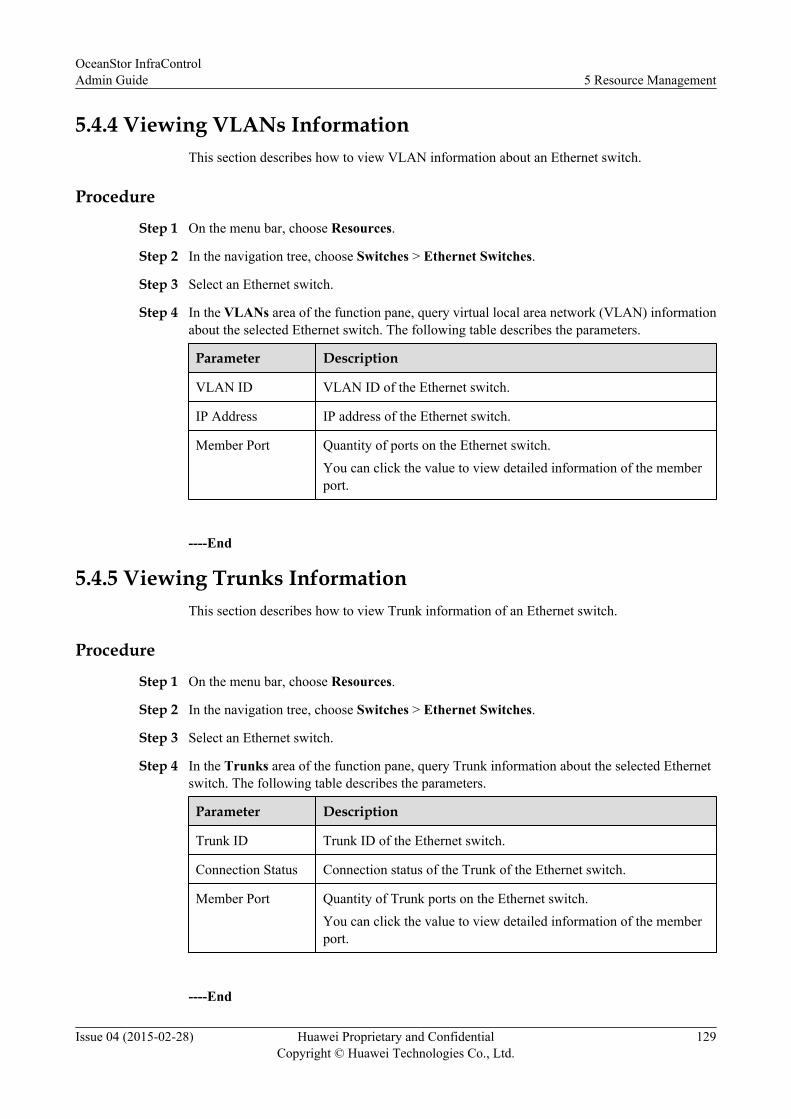
5.4.4 Viewing VLANs InformationThis section describes how to view VLAN information about an Ethernet switch.
Procedure
Step 1 On the menu bar, choose Resources.
Step 2 In the navigation tree, choose Switches > Ethernet Switches.
Step 3 Select an Ethernet switch.
Step 4 In the VLANs area of the function pane, query virtual local area network (VLAN) informationabout the selected Ethernet switch. The following table describes the parameters.
Parameter Description
VLAN ID VLAN ID of the Ethernet switch.
IP Address IP address of the Ethernet switch.
Member Port Quantity of ports on the Ethernet switch.You can click the value to view detailed information of the memberport.
----End
5.4.5 Viewing Trunks InformationThis section describes how to view Trunk information of an Ethernet switch.
Procedure
Step 1 On the menu bar, choose Resources.
Step 2 In the navigation tree, choose Switches > Ethernet Switches.
Step 3 Select an Ethernet switch.
Step 4 In the Trunks area of the function pane, query Trunk information about the selected Ethernetswitch. The following table describes the parameters.
Parameter Description
Trunk ID Trunk ID of the Ethernet switch.
Connection Status Connection status of the Trunk of the Ethernet switch.
Member Port Quantity of Trunk ports on the Ethernet switch.You can click the value to view detailed information of the memberport.
----End
OceanStor InfraControlAdmin Guide 5 Resource Management
Issue 04 (2015-02-28) Huawei Proprietary and ConfidentialCopyright © Huawei Technologies Co., Ltd.
129
5.4.6 Managing Current AlarmsCurrent alarms consist of current unconfirmed and confirmed alarms. This section describes tohow to confirm a current alarm or cancel its confirmation, clear an alarm, and export alarmsfrom the alarm database in a file.
Procedure
Step 1 View alarms on an Ethernet switch.1. On the menu bar, choose Resources.2. In the left navigation tree, choose Switches > Ethernet Switches.3. Select an Ethernet switch.4. In the Current Alarms area of the right function pane, view the current alarms.
Step 2 Confirm alarms.1. Select one or more alarms whose Confirm Status is Unconfirmed.2. Click Confirm.
The Warning dialog box is displayed.3. Click OK.
The Success dialog box is displayed.4. Click OK.
The alarms' Confirm Status becomes Confirmed.
NOTE
After the management system receives an alarm confirmation request, it records the personnel whoconfirmed the alarms, refreshes alarms displayed on all client PCs, and updates data in the alarmdatabase.
Step 3 Cancel alarm confirmation.
Cancel the confirmation of a confirmed alarm.
1. Select one or more alarms whose Confirm Status is Confirmed.2. Click Cancel Confirmation.
The Warning dialog box is displayed.3. Click OK.
The Success dialog box is displayed.4. Click OK.
The status of the selected alarms becomes Unconfirmed.
Step 4 Clear alarms.
NOTE
In some special situations, for example, when communication between the management system and anetwork element (NE) breaks, the cleared alarms reported from the NE may be lost. In this case, thesealarms will not be cleared automatically if the NE does not support the function of alarm verification. Toresolve this problem, the management system supports manual alarms clearing. In other words, you canmanually change the state of the alarms from uncleared to cleared.
1. Select one or more alarms whose Confirm Status is Confirmed.2. Click Clear.
OceanStor InfraControlAdmin Guide 5 Resource Management
Issue 04 (2015-02-28) Huawei Proprietary and ConfidentialCopyright © Huawei Technologies Co., Ltd.
130
The Warning dialog box is displayed.
3. Click OK.The Success dialog box is displayed.
4. Click OK.All the selected alarms are removed from the current alarm list to the historical alarm list.The management system records the clearance person and time, refreshes all the alarmdisplaying windows on the client, and updates data in the alarm database.
Step 5 Export alarms.
Export some important alarms in a file, helping the administrator to locate and analyze problems.
NOTE
If the default security policy has been set on the Internet Explorer, the system displays a message statingTo help protect you security, Internet Explorer blocked this site fromdownloading file from to your computer upon your export operation. In this case, selectthe message, right-click it, and choose Download File from the shortcut menu. After the page is refreshed,export alarms.
1. Select one or multiple alarms.
2. Click Export.
The File Download dialog box is displayed.
3. Click Save.
The Save As dialog box is displayed.
4. Select a path for saving the alarm file, enter a name for the file or use the default file name,and click Save.
The selected alarms are exported to the specified local path.
Step 6 Export all alarms.
Export all current alarms in a file, helping the administrator to locate and analyze problems.
NOTICEYou can export 20,000 alarms at most each time. If the alarm quantity exceeds 20,000, exportthem in several times.
1. Click Export All.
The File Download dialog box is displayed.
2. Click Save.The Save As dialog box is displayed.
3. Select a path for saving the alarm file, enter a name for the file or use the default file name,and click Save.
All current alarms are exported to the specified local path.
Step 7 Refresh alarms.
OceanStor InfraControlAdmin Guide 5 Resource Management
Issue 04 (2015-02-28) Huawei Proprietary and ConfidentialCopyright © Huawei Technologies Co., Ltd.
131
The refresh policy can be Refresh every 15 seconds, Refresh every 30 seconds, Refresh every60 seconds, or Stop refresh.
Refresh every 30 seconds is selected by default. This means that the management system serverperforms a round robin every 30 seconds. Once a new alarm occurs, the management systemwill refresh it to the current alarm list.
Step 8 Search alarms.
Set the conditions to search for the desired alarms. The search method can be the basic searchor advanced search.l When you select Search, you can search for alarms by alarm severity.l When you select Advanced Search, you can search for alarms by alarm severity, alarm type,
confirmation status, alarm source, and alarm occurrence time.
NOTE
You can click Reset to clear all the specified parameter values.
Step 9 View alarms.l You can click the name of an alarm to view its details.
1. Click the name of an alarm.The page showing the details about the alarm is displayed.
2. View the basic information and modification suggestions of the alarm.3. (Optional) Click Create in the Maintenance Experiences area to record the
experiences in locating and handling the alarm into the alarm knowledge repository.This enables the alarm to be handled quickly next time the same type of fault occurs.You can also modify and delete the created maintenance experiences.
l You can click the times of an alarm to view the occurrence time, confirmation status andtime, clearance status and time, and notification type of the alarm.According to the alarm notification type, you can know whether the alarm is a new alarm,manual clear, or automatic clear.
----End
5.5 Managing ServersThis chapter describes how to manage all servers on the management system, including viewingthe summary, hardware information, host path graph, logical relationship graph, free space, andcurrent alarms of servers.
5.5.1 Managing All ServersThis section describes how to view server information and query and refresh servers.
Procedure
Step 1 On the menu bar, choose Resources.
Step 2 In the navigation tree, choose Hosts > Servers.
OceanStor InfraControlAdmin Guide 5 Resource Management
Issue 04 (2015-02-28) Huawei Proprietary and ConfidentialCopyright © Huawei Technologies Co., Ltd.
132
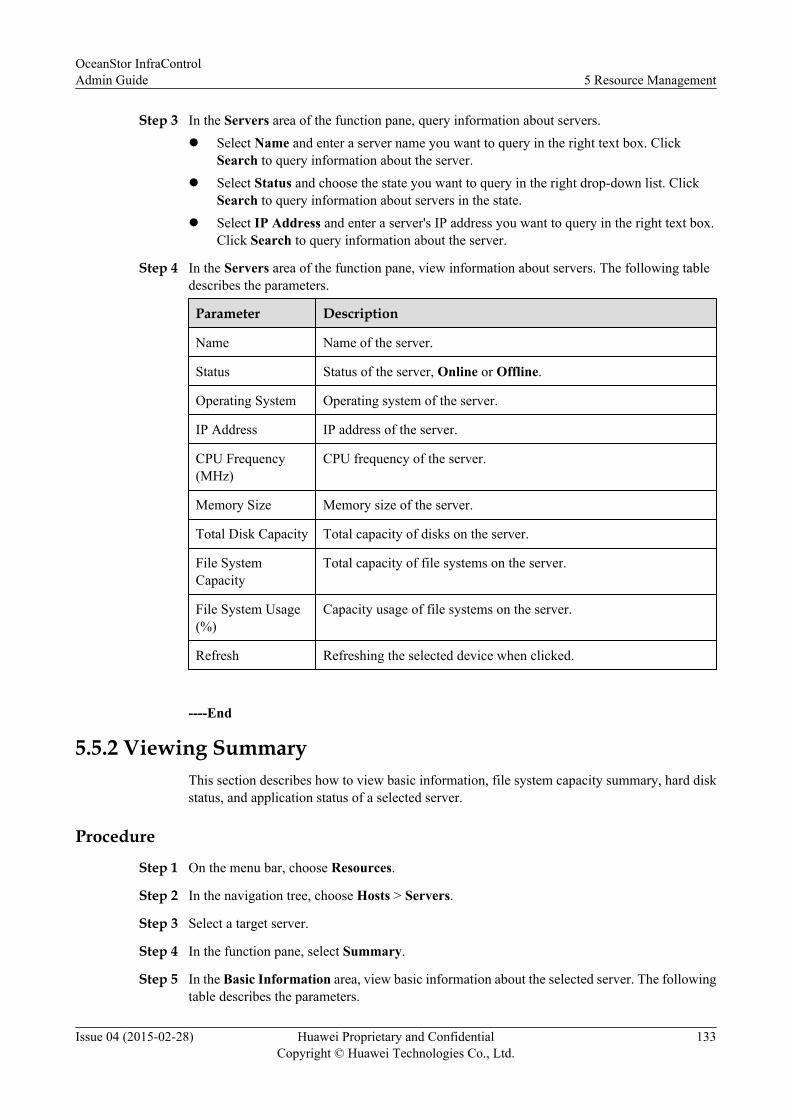
Step 3 In the Servers area of the function pane, query information about servers.l Select Name and enter a server name you want to query in the right text box. Click
Search to query information about the server.l Select Status and choose the state you want to query in the right drop-down list. Click
Search to query information about servers in the state.l Select IP Address and enter a server's IP address you want to query in the right text box.
Click Search to query information about the server.
Step 4 In the Servers area of the function pane, view information about servers. The following tabledescribes the parameters.
Parameter Description
Name Name of the server.
Status Status of the server, Online or Offline.
Operating System Operating system of the server.
IP Address IP address of the server.
CPU Frequency(MHz)
CPU frequency of the server.
Memory Size Memory size of the server.
Total Disk Capacity Total capacity of disks on the server.
File SystemCapacity
Total capacity of file systems on the server.
File System Usage(%)
Capacity usage of file systems on the server.
Refresh Refreshing the selected device when clicked.
----End
5.5.2 Viewing SummaryThis section describes how to view basic information, file system capacity summary, hard diskstatus, and application status of a selected server.
Procedure
Step 1 On the menu bar, choose Resources.
Step 2 In the navigation tree, choose Hosts > Servers.
Step 3 Select a target server.
Step 4 In the function pane, select Summary.
Step 5 In the Basic Information area, view basic information about the selected server. The followingtable describes the parameters.
OceanStor InfraControlAdmin Guide 5 Resource Management
Issue 04 (2015-02-28) Huawei Proprietary and ConfidentialCopyright © Huawei Technologies Co., Ltd.
133
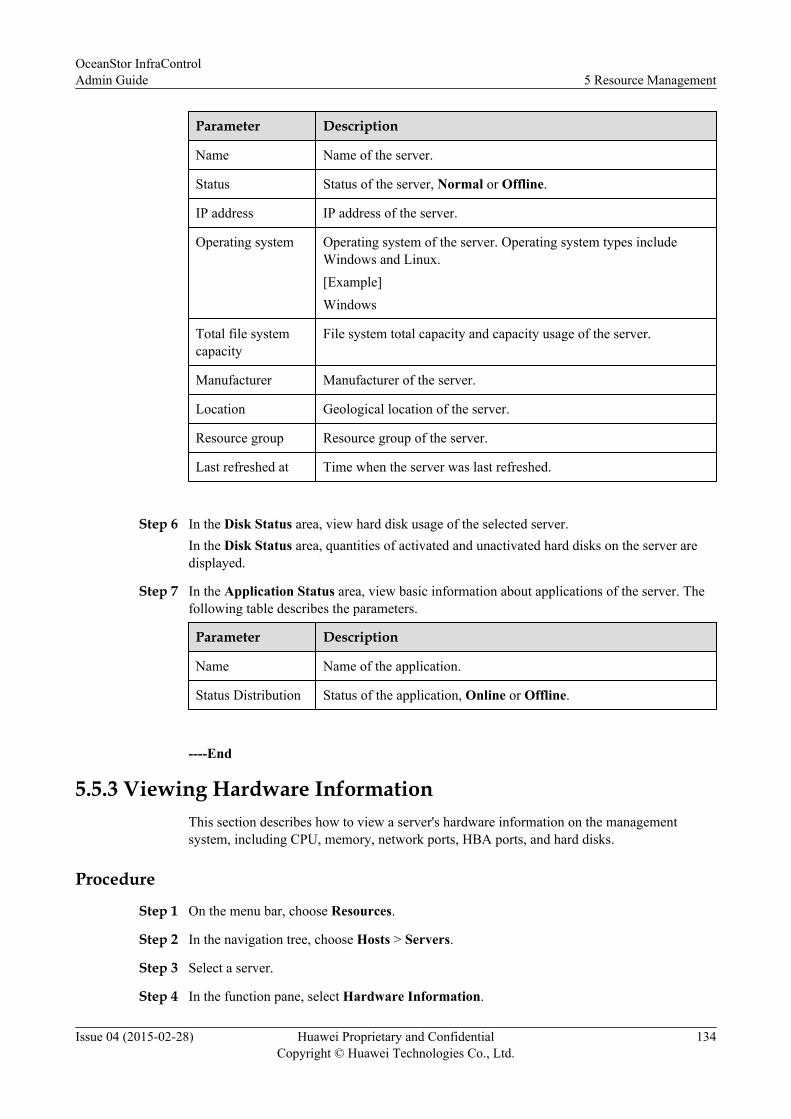
Parameter Description
Name Name of the server.
Status Status of the server, Normal or Offline.
IP address IP address of the server.
Operating system Operating system of the server. Operating system types includeWindows and Linux.[Example]Windows
Total file systemcapacity
File system total capacity and capacity usage of the server.
Manufacturer Manufacturer of the server.
Location Geological location of the server.
Resource group Resource group of the server.
Last refreshed at Time when the server was last refreshed.
Step 6 In the Disk Status area, view hard disk usage of the selected server.In the Disk Status area, quantities of activated and unactivated hard disks on the server aredisplayed.
Step 7 In the Application Status area, view basic information about applications of the server. Thefollowing table describes the parameters.
Parameter Description
Name Name of the application.
Status Distribution Status of the application, Online or Offline.
----End
5.5.3 Viewing Hardware InformationThis section describes how to view a server's hardware information on the managementsystem, including CPU, memory, network ports, HBA ports, and hard disks.
Procedure
Step 1 On the menu bar, choose Resources.
Step 2 In the navigation tree, choose Hosts > Servers.
Step 3 Select a server.
Step 4 In the function pane, select Hardware Information.
OceanStor InfraControlAdmin Guide 5 Resource Management
Issue 04 (2015-02-28) Huawei Proprietary and ConfidentialCopyright © Huawei Technologies Co., Ltd.
134
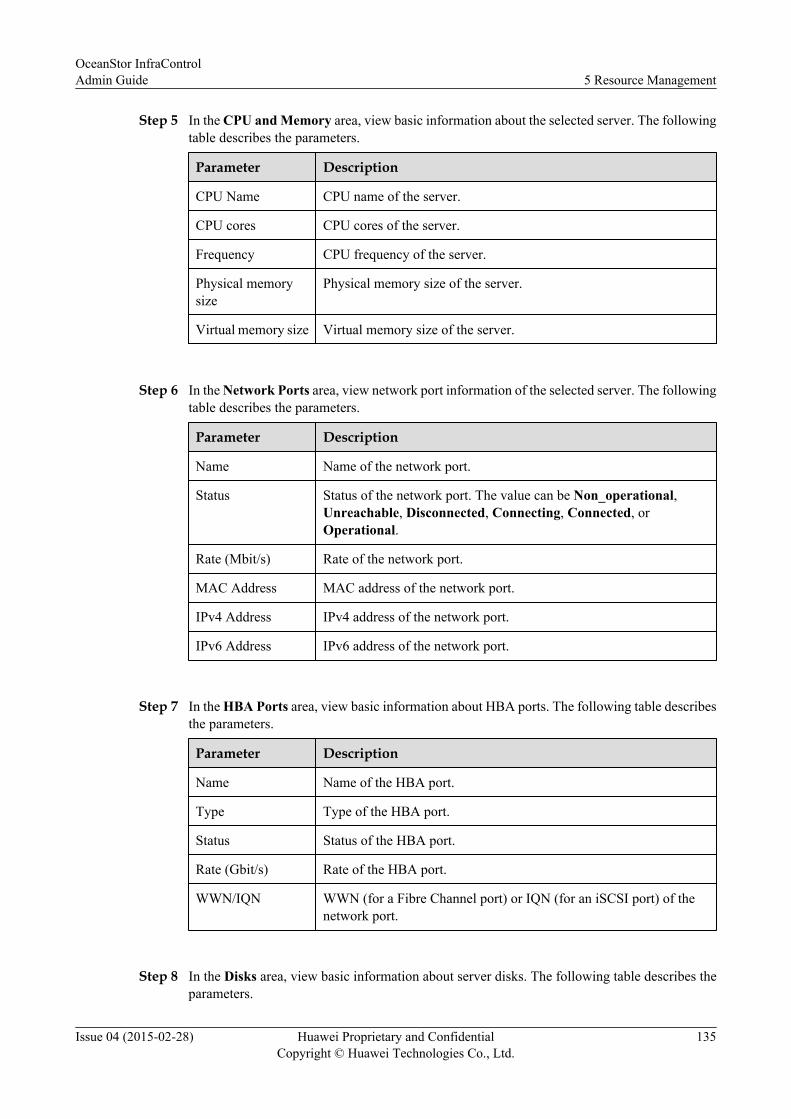
Step 5 In the CPU and Memory area, view basic information about the selected server. The followingtable describes the parameters.
Parameter Description
CPU Name CPU name of the server.
CPU cores CPU cores of the server.
Frequency CPU frequency of the server.
Physical memorysize
Physical memory size of the server.
Virtual memory size Virtual memory size of the server.
Step 6 In the Network Ports area, view network port information of the selected server. The followingtable describes the parameters.
Parameter Description
Name Name of the network port.
Status Status of the network port. The value can be Non_operational,Unreachable, Disconnected, Connecting, Connected, orOperational.
Rate (Mbit/s) Rate of the network port.
MAC Address MAC address of the network port.
IPv4 Address IPv4 address of the network port.
IPv6 Address IPv6 address of the network port.
Step 7 In the HBA Ports area, view basic information about HBA ports. The following table describesthe parameters.
Parameter Description
Name Name of the HBA port.
Type Type of the HBA port.
Status Status of the HBA port.
Rate (Gbit/s) Rate of the HBA port.
WWN/IQN WWN (for a Fibre Channel port) or IQN (for an iSCSI port) of thenetwork port.
Step 8 In the Disks area, view basic information about server disks. The following table describes theparameters.
OceanStor InfraControlAdmin Guide 5 Resource Management
Issue 04 (2015-02-28) Huawei Proprietary and ConfidentialCopyright © Huawei Technologies Co., Ltd.
135
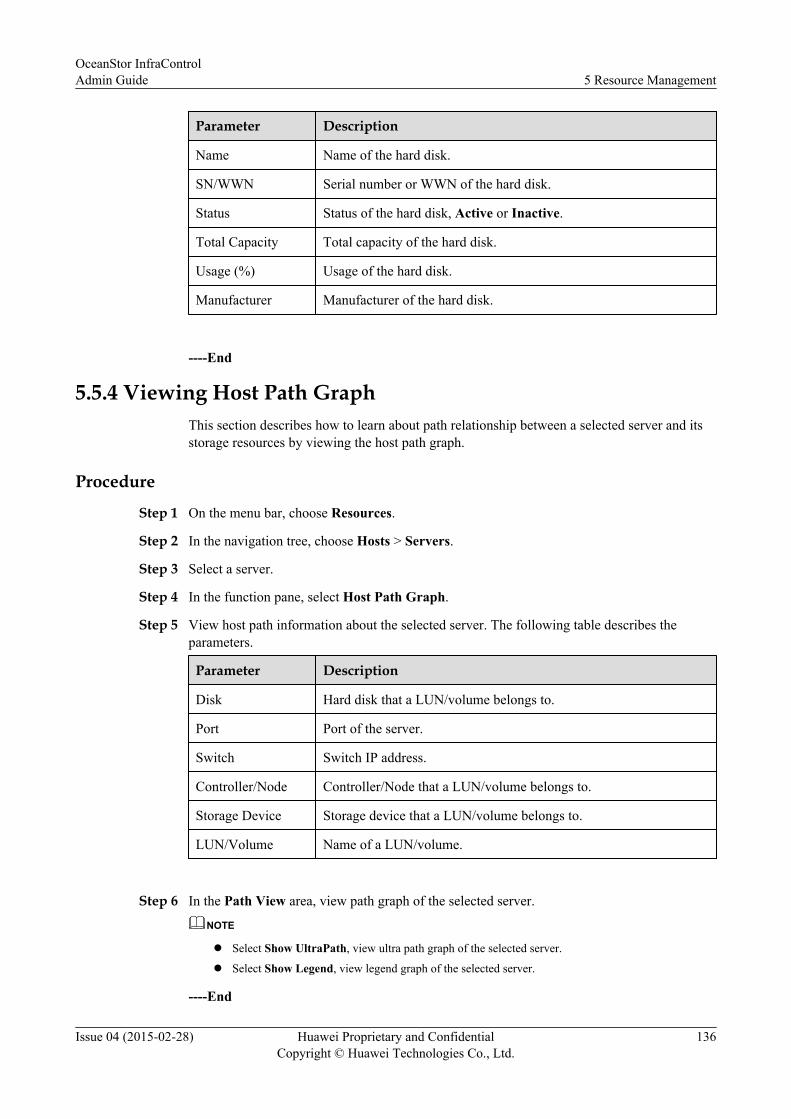
Parameter Description
Name Name of the hard disk.
SN/WWN Serial number or WWN of the hard disk.
Status Status of the hard disk, Active or Inactive.
Total Capacity Total capacity of the hard disk.
Usage (%) Usage of the hard disk.
Manufacturer Manufacturer of the hard disk.
----End
5.5.4 Viewing Host Path GraphThis section describes how to learn about path relationship between a selected server and itsstorage resources by viewing the host path graph.
Procedure
Step 1 On the menu bar, choose Resources.
Step 2 In the navigation tree, choose Hosts > Servers.
Step 3 Select a server.
Step 4 In the function pane, select Host Path Graph.
Step 5 View host path information about the selected server. The following table describes theparameters.
Parameter Description
Disk Hard disk that a LUN/volume belongs to.
Port Port of the server.
Switch Switch IP address.
Controller/Node Controller/Node that a LUN/volume belongs to.
Storage Device Storage device that a LUN/volume belongs to.
LUN/Volume Name of a LUN/volume.
Step 6 In the Path View area, view path graph of the selected server.
NOTE
l Select Show UltraPath, view ultra path graph of the selected server.
l Select Show Legend, view legend graph of the selected server.
----End
OceanStor InfraControlAdmin Guide 5 Resource Management
Issue 04 (2015-02-28) Huawei Proprietary and ConfidentialCopyright © Huawei Technologies Co., Ltd.
136
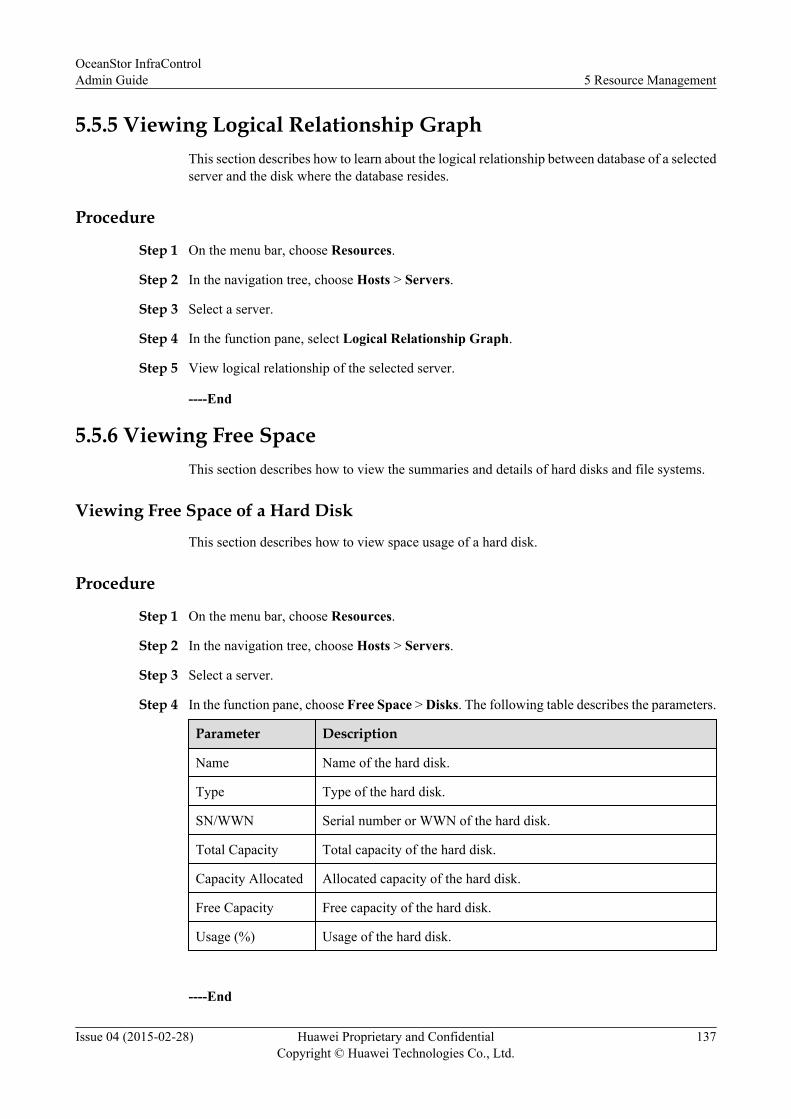
5.5.5 Viewing Logical Relationship GraphThis section describes how to learn about the logical relationship between database of a selectedserver and the disk where the database resides.
Procedure
Step 1 On the menu bar, choose Resources.
Step 2 In the navigation tree, choose Hosts > Servers.
Step 3 Select a server.
Step 4 In the function pane, select Logical Relationship Graph.
Step 5 View logical relationship of the selected server.
----End
5.5.6 Viewing Free SpaceThis section describes how to view the summaries and details of hard disks and file systems.
Viewing Free Space of a Hard Disk
This section describes how to view space usage of a hard disk.
Procedure
Step 1 On the menu bar, choose Resources.
Step 2 In the navigation tree, choose Hosts > Servers.
Step 3 Select a server.
Step 4 In the function pane, choose Free Space > Disks. The following table describes the parameters.
Parameter Description
Name Name of the hard disk.
Type Type of the hard disk.
SN/WWN Serial number or WWN of the hard disk.
Total Capacity Total capacity of the hard disk.
Capacity Allocated Allocated capacity of the hard disk.
Free Capacity Free capacity of the hard disk.
Usage (%) Usage of the hard disk.
----End
OceanStor InfraControlAdmin Guide 5 Resource Management
Issue 04 (2015-02-28) Huawei Proprietary and ConfidentialCopyright © Huawei Technologies Co., Ltd.
137
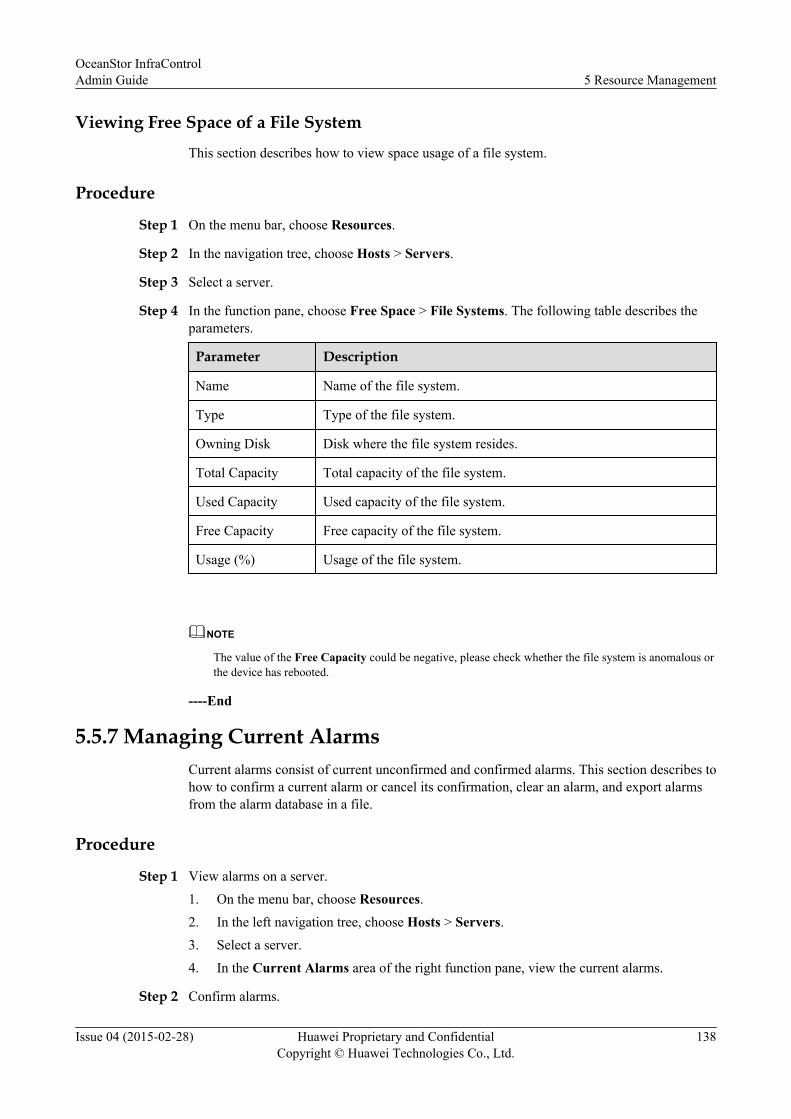
Viewing Free Space of a File System
This section describes how to view space usage of a file system.
Procedure
Step 1 On the menu bar, choose Resources.
Step 2 In the navigation tree, choose Hosts > Servers.
Step 3 Select a server.
Step 4 In the function pane, choose Free Space > File Systems. The following table describes theparameters.
Parameter Description
Name Name of the file system.
Type Type of the file system.
Owning Disk Disk where the file system resides.
Total Capacity Total capacity of the file system.
Used Capacity Used capacity of the file system.
Free Capacity Free capacity of the file system.
Usage (%) Usage of the file system.
NOTE
The value of the Free Capacity could be negative, please check whether the file system is anomalous orthe device has rebooted.
----End
5.5.7 Managing Current AlarmsCurrent alarms consist of current unconfirmed and confirmed alarms. This section describes tohow to confirm a current alarm or cancel its confirmation, clear an alarm, and export alarmsfrom the alarm database in a file.
Procedure
Step 1 View alarms on a server.1. On the menu bar, choose Resources.2. In the left navigation tree, choose Hosts > Servers.3. Select a server.4. In the Current Alarms area of the right function pane, view the current alarms.
Step 2 Confirm alarms.
OceanStor InfraControlAdmin Guide 5 Resource Management
Issue 04 (2015-02-28) Huawei Proprietary and ConfidentialCopyright © Huawei Technologies Co., Ltd.
138
1. Select one or more alarms whose Confirm Status is Unconfirmed.
2. Click Confirm.The Warning dialog box is displayed.
3. Click OK.The Success dialog box is displayed.
4. Click OK.The alarms' Confirm Status becomes Confirmed.
NOTE
After the management system receives an alarm confirmation request, it records the personnel whoconfirmed the alarms, refreshes alarms displayed on all client PCs, and updates data in the alarmdatabase.
Step 3 Cancel alarm confirmation.
Cancel the confirmation of a confirmed alarm.
1. Select one or more alarms whose Confirm Status is Confirmed.
2. Click Cancel Confirmation.The Warning dialog box is displayed.
3. Click OK.The Success dialog box is displayed.
4. Click OK.The status of the selected alarms becomes Unconfirmed.
Step 4 Clear alarms.
NOTE
In some special situations, for example, when communication between the management system and anetwork element (NE) breaks, the cleared alarms reported from the NE may be lost. In this case, thesealarms will not be cleared automatically if the NE does not support the function of alarm verification. Toresolve this problem, the management system supports manual alarms clearing. In other words, you canmanually change the state of the alarms from uncleared to cleared.
1. Select one or more alarms whose Confirm Status is Confirmed.
2. Click Clear.The Warning dialog box is displayed.
3. Click OK.The Success dialog box is displayed.
4. Click OK.All the selected alarms are removed from the current alarm list to the historical alarm list.The management system records the clearance person and time, refreshes all the alarmdisplaying windows on the client, and updates data in the alarm database.
Step 5 Export alarms.
Export some important alarms in a file, helping the administrator to locate and analyze problems.
OceanStor InfraControlAdmin Guide 5 Resource Management
Issue 04 (2015-02-28) Huawei Proprietary and ConfidentialCopyright © Huawei Technologies Co., Ltd.
139

NOTE
If the default security policy has been set on the Internet Explorer, the system displays a message statingTo help protect you security, Internet Explorer blocked this site fromdownloading file from to your computer upon your export operation. In this case, selectthe message, right-click it, and choose Download File from the shortcut menu. After the page is refreshed,export alarms.
1. Select one or multiple alarms.
2. Click Export.
The File Download dialog box is displayed.
3. Click Save.
The Save As dialog box is displayed.
4. Select a path for saving the alarm file, enter a name for the file or use the default file name,and click Save.
The selected alarms are exported to the specified local path.
Step 6 Export all alarms.
Export all current alarms in a file, helping the administrator to locate and analyze problems.
NOTICEYou can export 20,000 alarms at most each time. If the alarm quantity exceeds 20,000, exportthem in several times.
1. Click Export All.
The File Download dialog box is displayed.
2. Click Save.The Save As dialog box is displayed.
3. Select a path for saving the alarm file, enter a name for the file or use the default file name,and click Save.
All current alarms are exported to the specified local path.
Step 7 Refresh alarms.
The refresh policy can be Refresh every 15 seconds, Refresh every 30 seconds, Refresh every60 seconds, or Stop refresh.
Refresh every 30 seconds is selected by default. This means that the management system serverperforms a round robin every 30 seconds. Once a new alarm occurs, the management systemwill refresh it to the current alarm list.
Step 8 Search alarms.
Set the conditions to search for the desired alarms. The search method can be the basic searchor advanced search.
l When you select Search, you can search for alarms by alarm severity.
OceanStor InfraControlAdmin Guide 5 Resource Management
Issue 04 (2015-02-28) Huawei Proprietary and ConfidentialCopyright © Huawei Technologies Co., Ltd.
140
l When you select Advanced Search, you can search for alarms by alarm severity, alarm type,confirmation status, alarm source, and alarm occurrence time.
NOTE
You can click Reset to clear all the specified parameter values.
Step 9 View alarms.
l You can click the name of an alarm to view its details.
1. Click the name of an alarm.
The page showing the details about the alarm is displayed.
2. View the basic information and modification suggestions of the alarm.
3. (Optional) Click Create in the Maintenance Experiences area to record theexperiences in locating and handling the alarm into the alarm knowledge repository.This enables the alarm to be handled quickly next time the same type of fault occurs.
You can also modify and delete the created maintenance experiences.
l You can click the times of an alarm to view the occurrence time, confirmation status andtime, clearance status and time, and notification type of the alarm.
According to the alarm notification type, you can know whether the alarm is a new alarm,manual clear, or automatic clear.
----End
5.6 Managing Virtualization ServersThis chapter describes how to manage all virtualization servers on the management system,including viewing the summary, hardware information, host path graph, free space, and currentalarms of virtualization servers.
5.6.1 Managing All Virtualization ServersThis section describes how to view virtualization server information and query and refreshvirtualization servers.
Procedure
Step 1 On the menu bar, choose Resources.
Step 2 In the navigation tree, choose Hosts > Virtualization Servers.
Step 3 In the Virtualization Servers area of the function pane, view information about virtualizationservers.
l Select Name and enter a virtualization server name you want to query in the right text box.Click Search to query information about the corresponding virtualization server.
l Select Status and choose the state you want to query in the right drop-down list. ClickSearch to query information about corresponding virtualization servers in the state.
l Select IP Address and enter a virtualization server's IP address you want to query in theright text box. Click Search to query information about the corresponding virtualizationserver.
OceanStor InfraControlAdmin Guide 5 Resource Management
Issue 04 (2015-02-28) Huawei Proprietary and ConfidentialCopyright © Huawei Technologies Co., Ltd.
141
Step 4 In the Virtualization Servers area of the function pane, view information about virtualizationservers. The following table describes the parameters.
Parameter Description
Name Name of the virtualization server.
Status Status of the virtualization server, Running, Offline, Standby,Unknown, or Closed.
Software Version Software version of the virtualization server.
IP Address IP address of the virtualization server.
CPU Frequency(MHz)
CPU frequency of the virtualization server.
Memory Size Memory size of the virtualization server.
Total Disk Capacity Total capacity of disks on the virtualization server.
Disk Usage (%) Capacity usage of disks on the virtualization server.
Total Data StorageCapacity
Total capacity of data storage on the virtualization server.
Data Storage Usage(%)
Usage of data storage on the virtualization server.
Refresh Refreshing the selected device when clicked.
----End
5.6.2 Viewing SummaryThis section describes how to view basic information, data storage summary, hard disk status,and virtual machine status of a selected virtualization server.
Procedure
Step 1 On the menu bar, choose Resources.
Step 2 In the navigation tree, choose Hosts > Virtualization Servers.
Step 3 Select a virtualization server.
Step 4 In the function pane, select Summary.
Step 5 In the Basic Information area, view basic information about the selected virtualization server.The following table describes the parameters.
Parameter Description
Name Name of the virtualization server.
OceanStor InfraControlAdmin Guide 5 Resource Management
Issue 04 (2015-02-28) Huawei Proprietary and ConfidentialCopyright © Huawei Technologies Co., Ltd.
142
Parameter Description
Status Status of the virtualization server, Running, Offline, Standby,Unknown, or Closed.
IP address IP address of the virtualization server.
Software version Software version of the virtualization server.
Total data storagecapacity
Total data storage capacity and capacity usage of the virtualizationserver.
Manufacturer Manufacturer of the virtualization server.
Location Geological location of the virtualization server.
Resource group Resource group of the virtualization server.
Last refreshed at Time when the server was last refreshed.
Step 6 In the Disk Status area, view hard disk usage of the selected virtualization server.In the Disk Status area, quantity of disks in different states are displayed.
The state of a disk can be Normal, Closed, Degraded, Error, Inactive, Unknown, orOffline.
Step 7 In the Virtual Machine Status area, view quantities of virtual machines in different states ofthe selected virtualization server.In the Virtual Machine Status area, quantities of virtual machines in different states of theselected virtualization server are displayed.
The state of a virtual machine can be Running, Closed, or Suspended.
----End
5.6.3 Viewing Hardware InformationThis section describes how to view a virtualization server's hardware information on themanagement system, including CPU, memory, network ports, HBA ports, and hard disks.
Procedure
Step 1 On the menu bar, choose Resources.
Step 2 In the navigation tree, choose Hosts > Virtualization Servers.
Step 3 Select a virtualization server.
Step 4 In the function pane, select Hardware Information.
Step 5 In the CPU and Memory area, view basic information about the selected virtualization server.The following table describes the parameters.
OceanStor InfraControlAdmin Guide 5 Resource Management
Issue 04 (2015-02-28) Huawei Proprietary and ConfidentialCopyright © Huawei Technologies Co., Ltd.
143
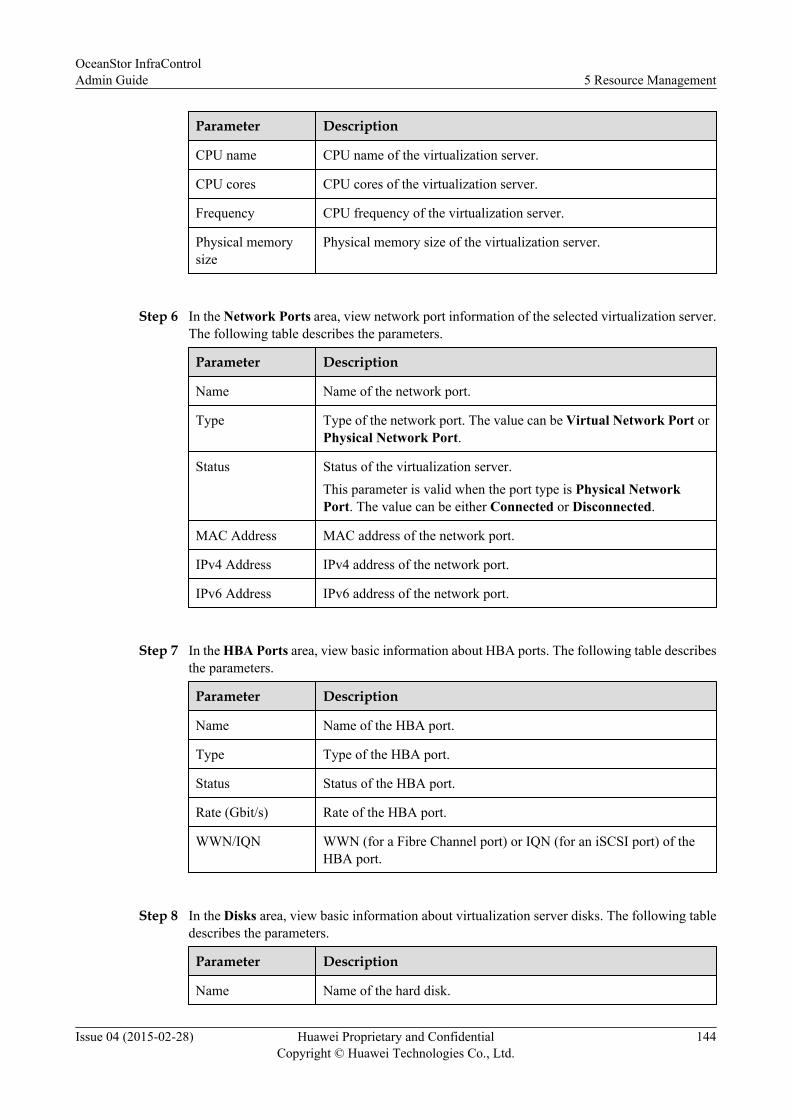
Parameter Description
CPU name CPU name of the virtualization server.
CPU cores CPU cores of the virtualization server.
Frequency CPU frequency of the virtualization server.
Physical memorysize
Physical memory size of the virtualization server.
Step 6 In the Network Ports area, view network port information of the selected virtualization server.The following table describes the parameters.
Parameter Description
Name Name of the network port.
Type Type of the network port. The value can be Virtual Network Port orPhysical Network Port.
Status Status of the virtualization server.This parameter is valid when the port type is Physical NetworkPort. The value can be either Connected or Disconnected.
MAC Address MAC address of the network port.
IPv4 Address IPv4 address of the network port.
IPv6 Address IPv6 address of the network port.
Step 7 In the HBA Ports area, view basic information about HBA ports. The following table describesthe parameters.
Parameter Description
Name Name of the HBA port.
Type Type of the HBA port.
Status Status of the HBA port.
Rate (Gbit/s) Rate of the HBA port.
WWN/IQN WWN (for a Fibre Channel port) or IQN (for an iSCSI port) of theHBA port.
Step 8 In the Disks area, view basic information about virtualization server disks. The following tabledescribes the parameters.
Parameter Description
Name Name of the hard disk.
OceanStor InfraControlAdmin Guide 5 Resource Management
Issue 04 (2015-02-28) Huawei Proprietary and ConfidentialCopyright © Huawei Technologies Co., Ltd.
144
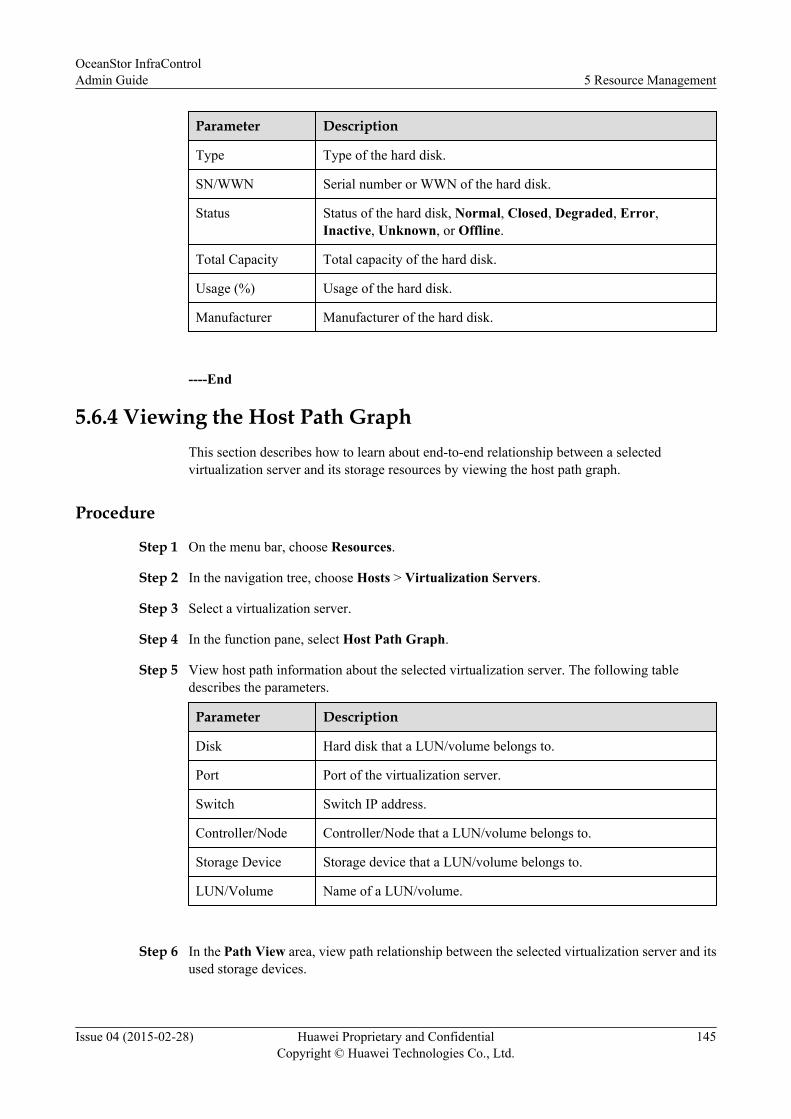
Parameter Description
Type Type of the hard disk.
SN/WWN Serial number or WWN of the hard disk.
Status Status of the hard disk, Normal, Closed, Degraded, Error,Inactive, Unknown, or Offline.
Total Capacity Total capacity of the hard disk.
Usage (%) Usage of the hard disk.
Manufacturer Manufacturer of the hard disk.
----End
5.6.4 Viewing the Host Path GraphThis section describes how to learn about end-to-end relationship between a selectedvirtualization server and its storage resources by viewing the host path graph.
Procedure
Step 1 On the menu bar, choose Resources.
Step 2 In the navigation tree, choose Hosts > Virtualization Servers.
Step 3 Select a virtualization server.
Step 4 In the function pane, select Host Path Graph.
Step 5 View host path information about the selected virtualization server. The following tabledescribes the parameters.
Parameter Description
Disk Hard disk that a LUN/volume belongs to.
Port Port of the virtualization server.
Switch Switch IP address.
Controller/Node Controller/Node that a LUN/volume belongs to.
Storage Device Storage device that a LUN/volume belongs to.
LUN/Volume Name of a LUN/volume.
Step 6 In the Path View area, view path relationship between the selected virtualization server and itsused storage devices.
OceanStor InfraControlAdmin Guide 5 Resource Management
Issue 04 (2015-02-28) Huawei Proprietary and ConfidentialCopyright © Huawei Technologies Co., Ltd.
145
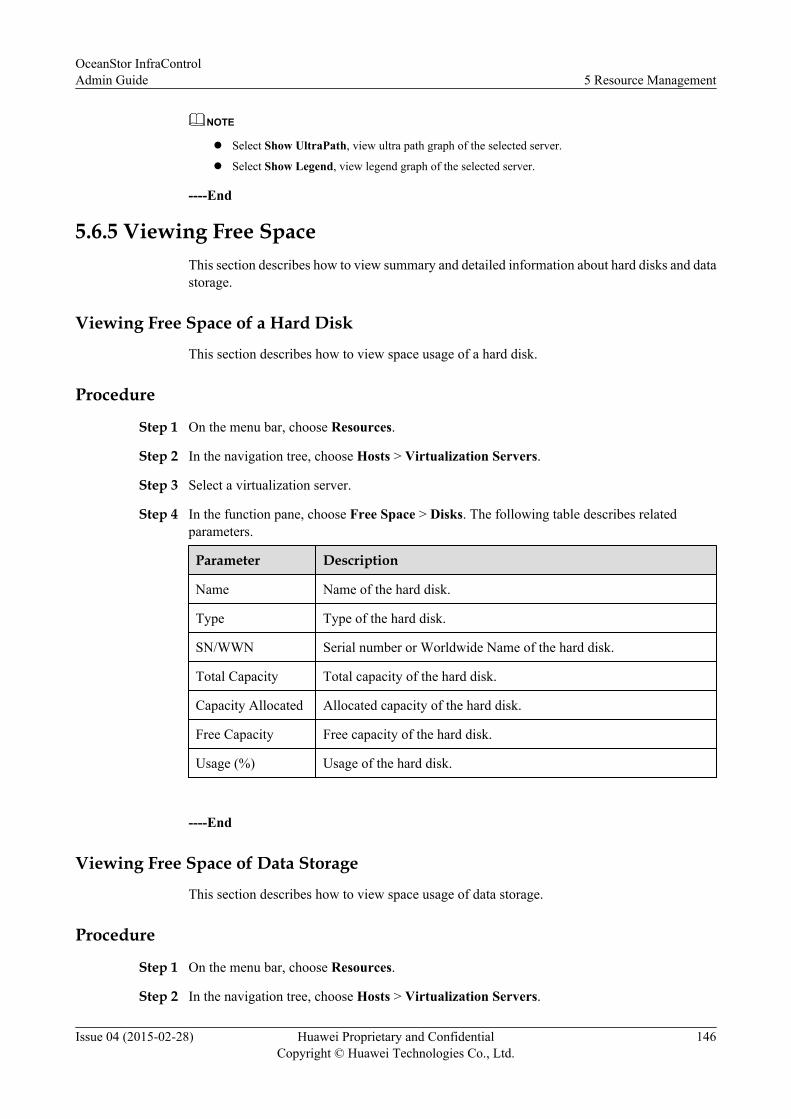
NOTE
l Select Show UltraPath, view ultra path graph of the selected server.
l Select Show Legend, view legend graph of the selected server.
----End
5.6.5 Viewing Free SpaceThis section describes how to view summary and detailed information about hard disks and datastorage.
Viewing Free Space of a Hard Disk
This section describes how to view space usage of a hard disk.
Procedure
Step 1 On the menu bar, choose Resources.
Step 2 In the navigation tree, choose Hosts > Virtualization Servers.
Step 3 Select a virtualization server.
Step 4 In the function pane, choose Free Space > Disks. The following table describes relatedparameters.
Parameter Description
Name Name of the hard disk.
Type Type of the hard disk.
SN/WWN Serial number or Worldwide Name of the hard disk.
Total Capacity Total capacity of the hard disk.
Capacity Allocated Allocated capacity of the hard disk.
Free Capacity Free capacity of the hard disk.
Usage (%) Usage of the hard disk.
----End
Viewing Free Space of Data Storage
This section describes how to view space usage of data storage.
Procedure
Step 1 On the menu bar, choose Resources.
Step 2 In the navigation tree, choose Hosts > Virtualization Servers.
OceanStor InfraControlAdmin Guide 5 Resource Management
Issue 04 (2015-02-28) Huawei Proprietary and ConfidentialCopyright © Huawei Technologies Co., Ltd.
146
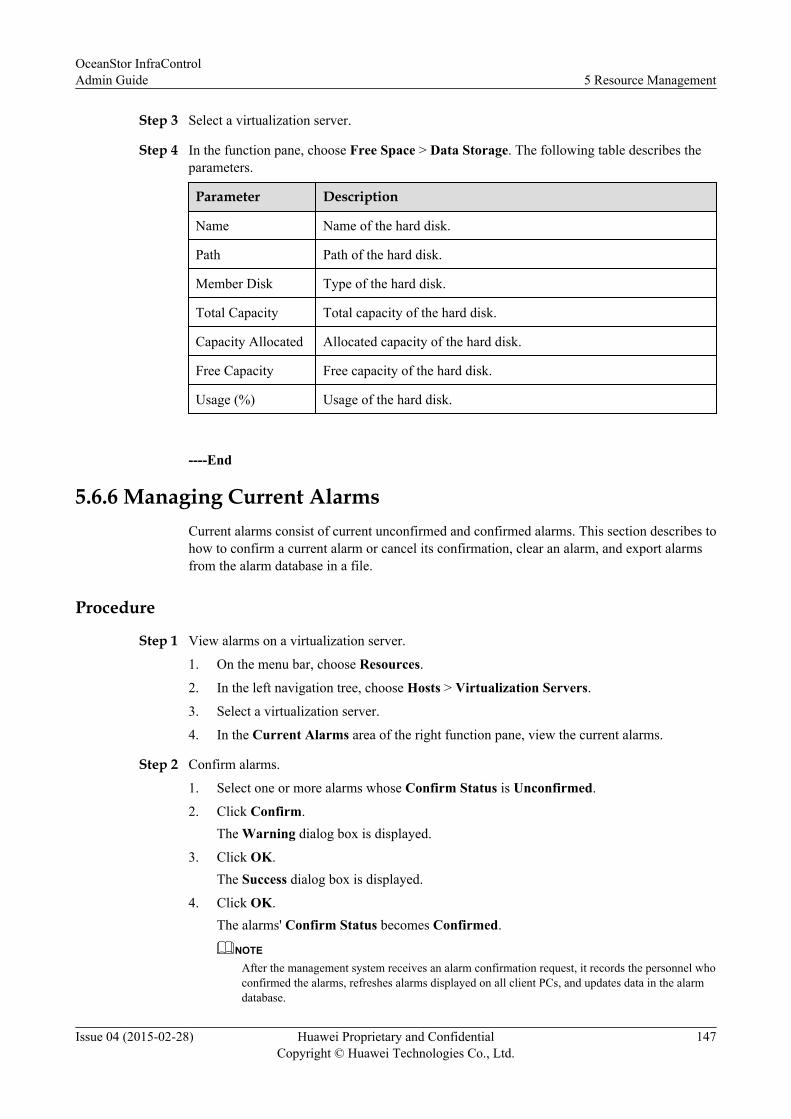
Step 3 Select a virtualization server.
Step 4 In the function pane, choose Free Space > Data Storage. The following table describes theparameters.
Parameter Description
Name Name of the hard disk.
Path Path of the hard disk.
Member Disk Type of the hard disk.
Total Capacity Total capacity of the hard disk.
Capacity Allocated Allocated capacity of the hard disk.
Free Capacity Free capacity of the hard disk.
Usage (%) Usage of the hard disk.
----End
5.6.6 Managing Current AlarmsCurrent alarms consist of current unconfirmed and confirmed alarms. This section describes tohow to confirm a current alarm or cancel its confirmation, clear an alarm, and export alarmsfrom the alarm database in a file.
Procedure
Step 1 View alarms on a virtualization server.
1. On the menu bar, choose Resources.
2. In the left navigation tree, choose Hosts > Virtualization Servers.
3. Select a virtualization server.
4. In the Current Alarms area of the right function pane, view the current alarms.
Step 2 Confirm alarms.
1. Select one or more alarms whose Confirm Status is Unconfirmed.
2. Click Confirm.The Warning dialog box is displayed.
3. Click OK.The Success dialog box is displayed.
4. Click OK.The alarms' Confirm Status becomes Confirmed.
NOTE
After the management system receives an alarm confirmation request, it records the personnel whoconfirmed the alarms, refreshes alarms displayed on all client PCs, and updates data in the alarmdatabase.
OceanStor InfraControlAdmin Guide 5 Resource Management
Issue 04 (2015-02-28) Huawei Proprietary and ConfidentialCopyright © Huawei Technologies Co., Ltd.
147
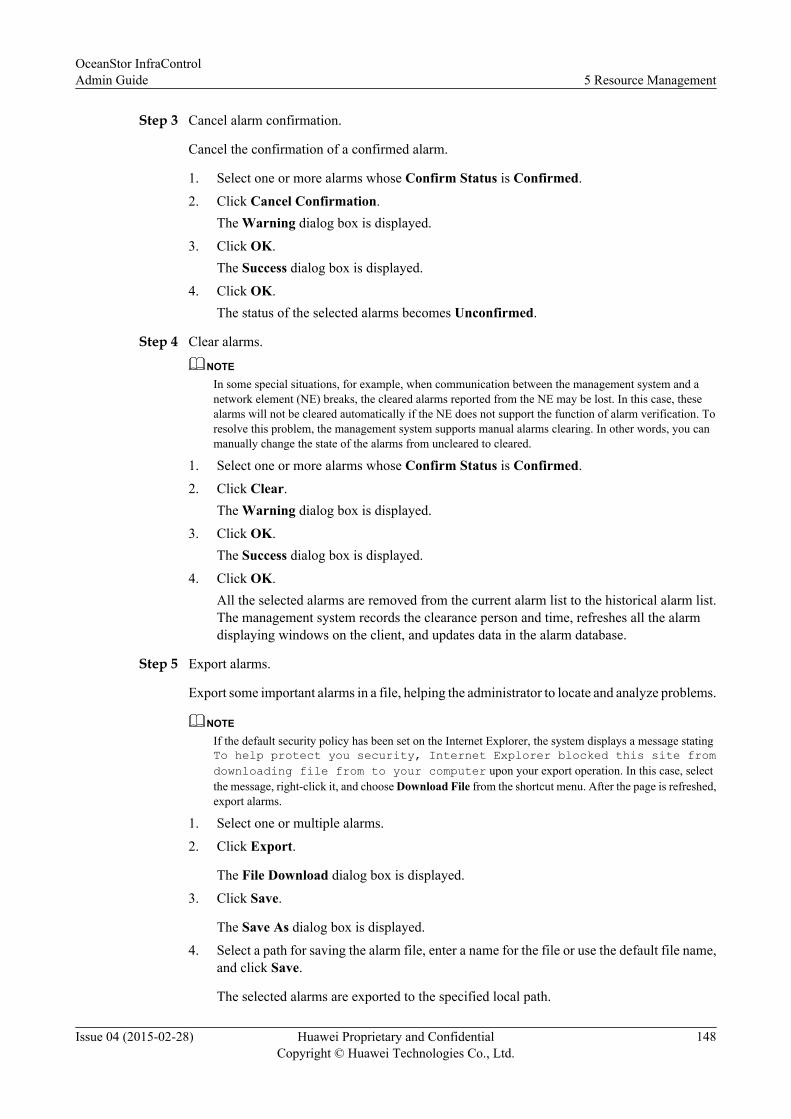
Step 3 Cancel alarm confirmation.
Cancel the confirmation of a confirmed alarm.
1. Select one or more alarms whose Confirm Status is Confirmed.
2. Click Cancel Confirmation.The Warning dialog box is displayed.
3. Click OK.The Success dialog box is displayed.
4. Click OK.The status of the selected alarms becomes Unconfirmed.
Step 4 Clear alarms.
NOTE
In some special situations, for example, when communication between the management system and anetwork element (NE) breaks, the cleared alarms reported from the NE may be lost. In this case, thesealarms will not be cleared automatically if the NE does not support the function of alarm verification. Toresolve this problem, the management system supports manual alarms clearing. In other words, you canmanually change the state of the alarms from uncleared to cleared.
1. Select one or more alarms whose Confirm Status is Confirmed.
2. Click Clear.The Warning dialog box is displayed.
3. Click OK.The Success dialog box is displayed.
4. Click OK.All the selected alarms are removed from the current alarm list to the historical alarm list.The management system records the clearance person and time, refreshes all the alarmdisplaying windows on the client, and updates data in the alarm database.
Step 5 Export alarms.
Export some important alarms in a file, helping the administrator to locate and analyze problems.
NOTE
If the default security policy has been set on the Internet Explorer, the system displays a message statingTo help protect you security, Internet Explorer blocked this site fromdownloading file from to your computer upon your export operation. In this case, selectthe message, right-click it, and choose Download File from the shortcut menu. After the page is refreshed,export alarms.
1. Select one or multiple alarms.
2. Click Export.
The File Download dialog box is displayed.
3. Click Save.
The Save As dialog box is displayed.
4. Select a path for saving the alarm file, enter a name for the file or use the default file name,and click Save.
The selected alarms are exported to the specified local path.
OceanStor InfraControlAdmin Guide 5 Resource Management
Issue 04 (2015-02-28) Huawei Proprietary and ConfidentialCopyright © Huawei Technologies Co., Ltd.
148
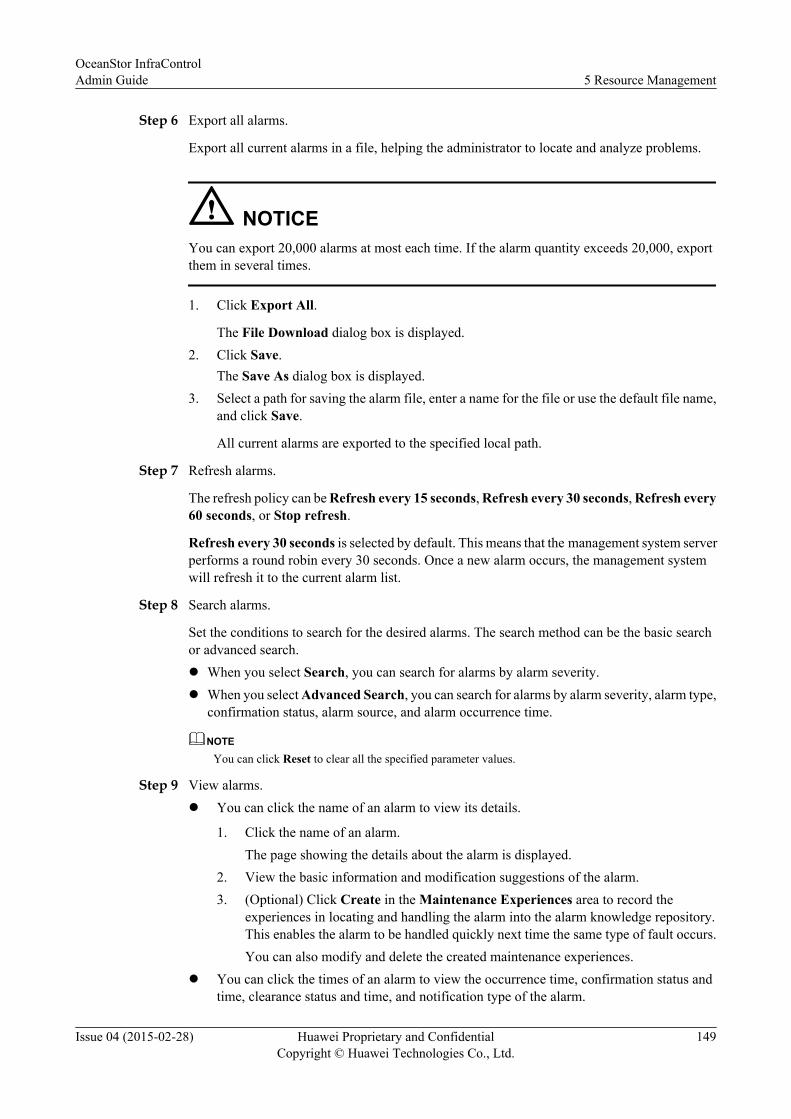
Step 6 Export all alarms.
Export all current alarms in a file, helping the administrator to locate and analyze problems.
NOTICEYou can export 20,000 alarms at most each time. If the alarm quantity exceeds 20,000, exportthem in several times.
1. Click Export All.
The File Download dialog box is displayed.2. Click Save.
The Save As dialog box is displayed.3. Select a path for saving the alarm file, enter a name for the file or use the default file name,
and click Save.
All current alarms are exported to the specified local path.
Step 7 Refresh alarms.
The refresh policy can be Refresh every 15 seconds, Refresh every 30 seconds, Refresh every60 seconds, or Stop refresh.
Refresh every 30 seconds is selected by default. This means that the management system serverperforms a round robin every 30 seconds. Once a new alarm occurs, the management systemwill refresh it to the current alarm list.
Step 8 Search alarms.
Set the conditions to search for the desired alarms. The search method can be the basic searchor advanced search.l When you select Search, you can search for alarms by alarm severity.l When you select Advanced Search, you can search for alarms by alarm severity, alarm type,
confirmation status, alarm source, and alarm occurrence time.
NOTE
You can click Reset to clear all the specified parameter values.
Step 9 View alarms.l You can click the name of an alarm to view its details.
1. Click the name of an alarm.The page showing the details about the alarm is displayed.
2. View the basic information and modification suggestions of the alarm.3. (Optional) Click Create in the Maintenance Experiences area to record the
experiences in locating and handling the alarm into the alarm knowledge repository.This enables the alarm to be handled quickly next time the same type of fault occurs.You can also modify and delete the created maintenance experiences.
l You can click the times of an alarm to view the occurrence time, confirmation status andtime, clearance status and time, and notification type of the alarm.
OceanStor InfraControlAdmin Guide 5 Resource Management
Issue 04 (2015-02-28) Huawei Proprietary and ConfidentialCopyright © Huawei Technologies Co., Ltd.
149
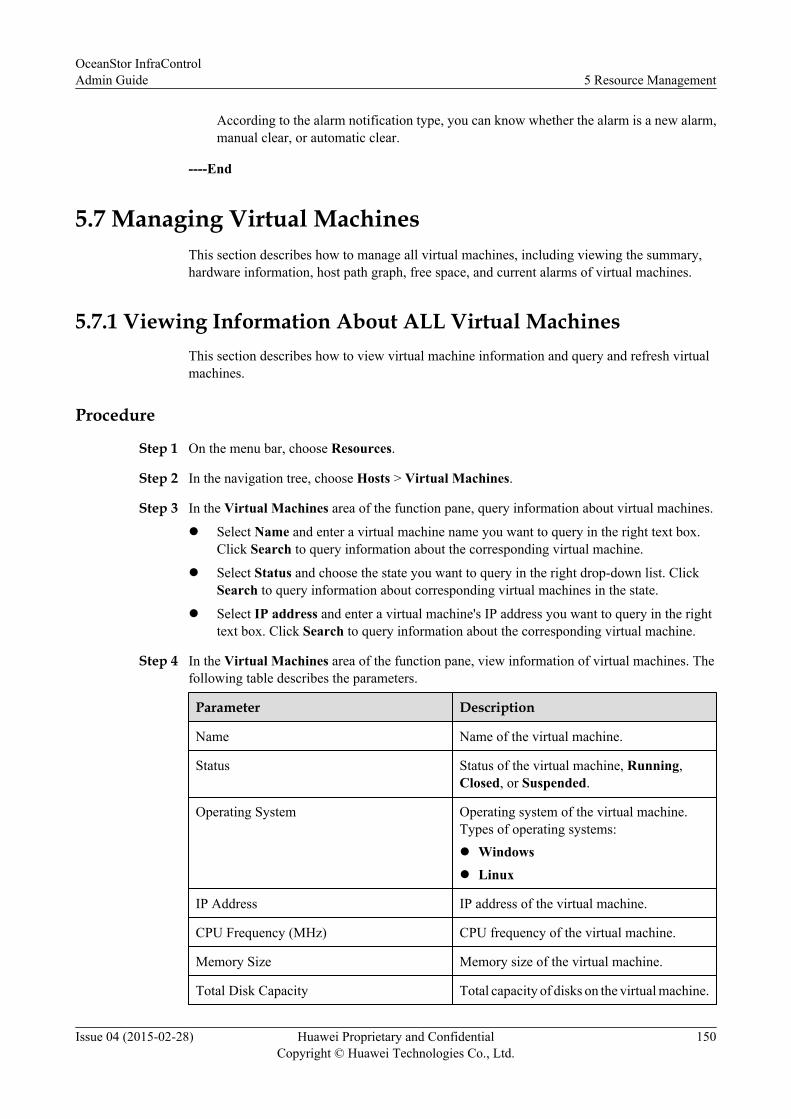
According to the alarm notification type, you can know whether the alarm is a new alarm,manual clear, or automatic clear.
----End
5.7 Managing Virtual MachinesThis section describes how to manage all virtual machines, including viewing the summary,hardware information, host path graph, free space, and current alarms of virtual machines.
5.7.1 Viewing Information About ALL Virtual MachinesThis section describes how to view virtual machine information and query and refresh virtualmachines.
Procedure
Step 1 On the menu bar, choose Resources.
Step 2 In the navigation tree, choose Hosts > Virtual Machines.
Step 3 In the Virtual Machines area of the function pane, query information about virtual machines.
l Select Name and enter a virtual machine name you want to query in the right text box.Click Search to query information about the corresponding virtual machine.
l Select Status and choose the state you want to query in the right drop-down list. ClickSearch to query information about corresponding virtual machines in the state.
l Select IP address and enter a virtual machine's IP address you want to query in the righttext box. Click Search to query information about the corresponding virtual machine.
Step 4 In the Virtual Machines area of the function pane, view information of virtual machines. Thefollowing table describes the parameters.
Parameter Description
Name Name of the virtual machine.
Status Status of the virtual machine, Running,Closed, or Suspended.
Operating System Operating system of the virtual machine.Types of operating systems:l Windowsl Linux
IP Address IP address of the virtual machine.
CPU Frequency (MHz) CPU frequency of the virtual machine.
Memory Size Memory size of the virtual machine.
Total Disk Capacity Total capacity of disks on the virtual machine.
OceanStor InfraControlAdmin Guide 5 Resource Management
Issue 04 (2015-02-28) Huawei Proprietary and ConfidentialCopyright © Huawei Technologies Co., Ltd.
150
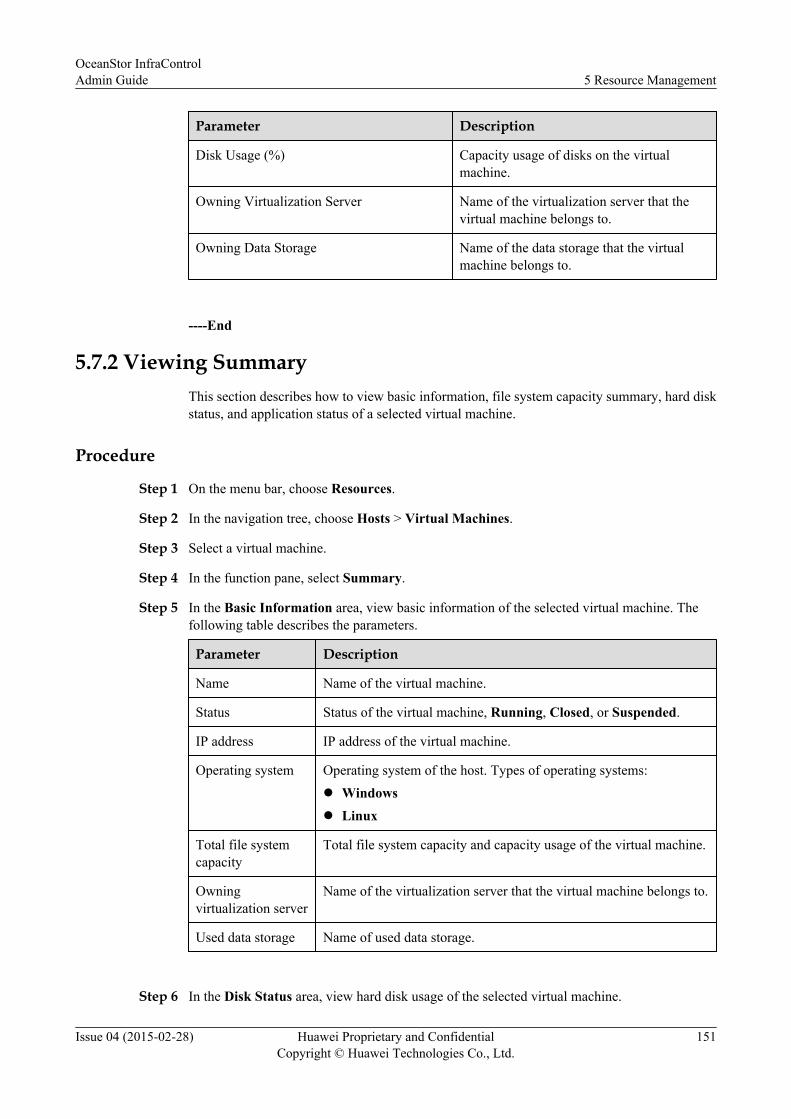
Parameter Description
Disk Usage (%) Capacity usage of disks on the virtualmachine.
Owning Virtualization Server Name of the virtualization server that thevirtual machine belongs to.
Owning Data Storage Name of the data storage that the virtualmachine belongs to.
----End
5.7.2 Viewing SummaryThis section describes how to view basic information, file system capacity summary, hard diskstatus, and application status of a selected virtual machine.
Procedure
Step 1 On the menu bar, choose Resources.
Step 2 In the navigation tree, choose Hosts > Virtual Machines.
Step 3 Select a virtual machine.
Step 4 In the function pane, select Summary.
Step 5 In the Basic Information area, view basic information of the selected virtual machine. Thefollowing table describes the parameters.
Parameter Description
Name Name of the virtual machine.
Status Status of the virtual machine, Running, Closed, or Suspended.
IP address IP address of the virtual machine.
Operating system Operating system of the host. Types of operating systems:l Windowsl Linux
Total file systemcapacity
Total file system capacity and capacity usage of the virtual machine.
Owningvirtualization server
Name of the virtualization server that the virtual machine belongs to.
Used data storage Name of used data storage.
Step 6 In the Disk Status area, view hard disk usage of the selected virtual machine.
OceanStor InfraControlAdmin Guide 5 Resource Management
Issue 04 (2015-02-28) Huawei Proprietary and ConfidentialCopyright © Huawei Technologies Co., Ltd.
151
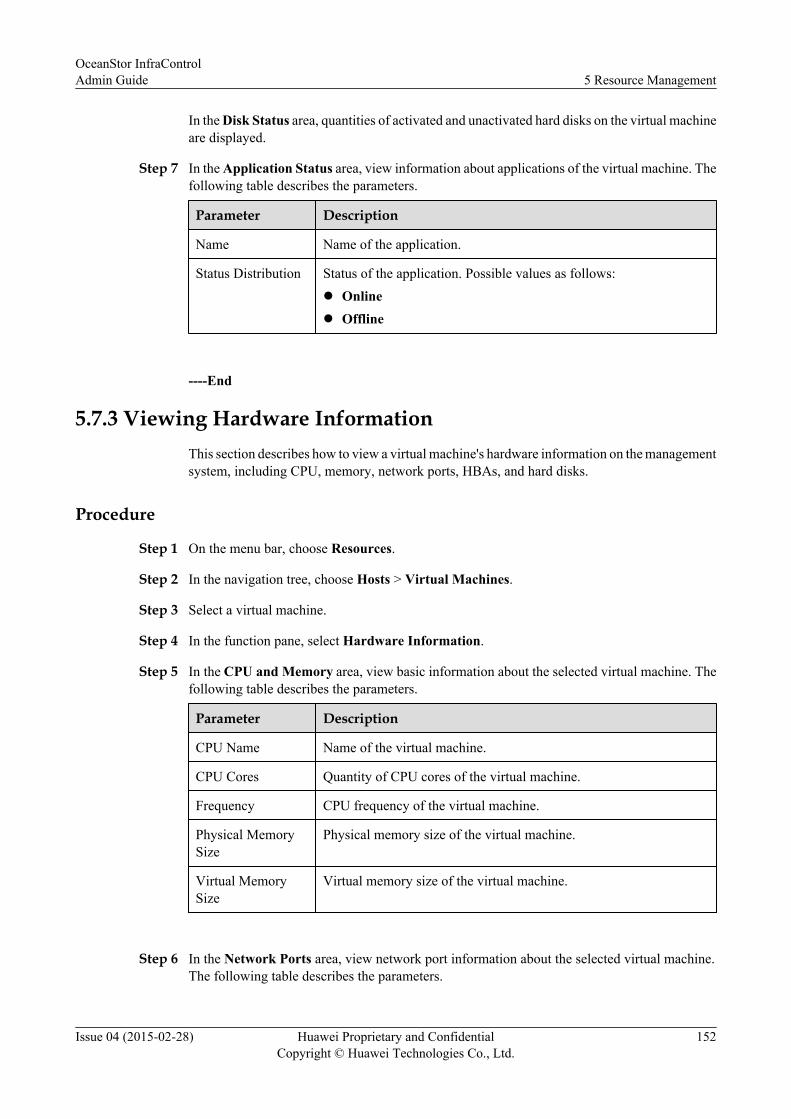
In the Disk Status area, quantities of activated and unactivated hard disks on the virtual machineare displayed.
Step 7 In the Application Status area, view information about applications of the virtual machine. Thefollowing table describes the parameters.
Parameter Description
Name Name of the application.
Status Distribution Status of the application. Possible values as follows:l Onlinel Offline
----End
5.7.3 Viewing Hardware InformationThis section describes how to view a virtual machine's hardware information on the managementsystem, including CPU, memory, network ports, HBAs, and hard disks.
Procedure
Step 1 On the menu bar, choose Resources.
Step 2 In the navigation tree, choose Hosts > Virtual Machines.
Step 3 Select a virtual machine.
Step 4 In the function pane, select Hardware Information.
Step 5 In the CPU and Memory area, view basic information about the selected virtual machine. Thefollowing table describes the parameters.
Parameter Description
CPU Name Name of the virtual machine.
CPU Cores Quantity of CPU cores of the virtual machine.
Frequency CPU frequency of the virtual machine.
Physical MemorySize
Physical memory size of the virtual machine.
Virtual MemorySize
Virtual memory size of the virtual machine.
Step 6 In the Network Ports area, view network port information about the selected virtual machine.The following table describes the parameters.
OceanStor InfraControlAdmin Guide 5 Resource Management
Issue 04 (2015-02-28) Huawei Proprietary and ConfidentialCopyright © Huawei Technologies Co., Ltd.
152
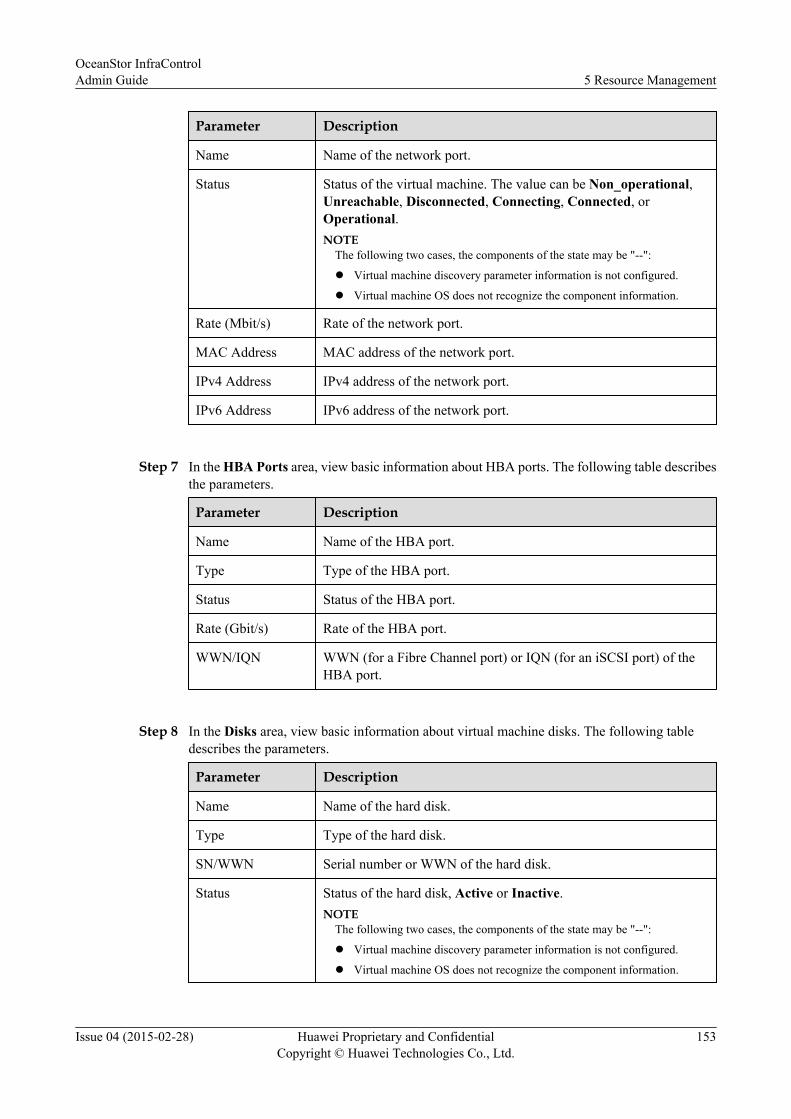
Parameter Description
Name Name of the network port.
Status Status of the virtual machine. The value can be Non_operational,Unreachable, Disconnected, Connecting, Connected, orOperational.NOTE
The following two cases, the components of the state may be "--":
l Virtual machine discovery parameter information is not configured.
l Virtual machine OS does not recognize the component information.
Rate (Mbit/s) Rate of the network port.
MAC Address MAC address of the network port.
IPv4 Address IPv4 address of the network port.
IPv6 Address IPv6 address of the network port.
Step 7 In the HBA Ports area, view basic information about HBA ports. The following table describesthe parameters.
Parameter Description
Name Name of the HBA port.
Type Type of the HBA port.
Status Status of the HBA port.
Rate (Gbit/s) Rate of the HBA port.
WWN/IQN WWN (for a Fibre Channel port) or IQN (for an iSCSI port) of theHBA port.
Step 8 In the Disks area, view basic information about virtual machine disks. The following tabledescribes the parameters.
Parameter Description
Name Name of the hard disk.
Type Type of the hard disk.
SN/WWN Serial number or WWN of the hard disk.
Status Status of the hard disk, Active or Inactive.NOTE
The following two cases, the components of the state may be "--":
l Virtual machine discovery parameter information is not configured.
l Virtual machine OS does not recognize the component information.
OceanStor InfraControlAdmin Guide 5 Resource Management
Issue 04 (2015-02-28) Huawei Proprietary and ConfidentialCopyright © Huawei Technologies Co., Ltd.
153
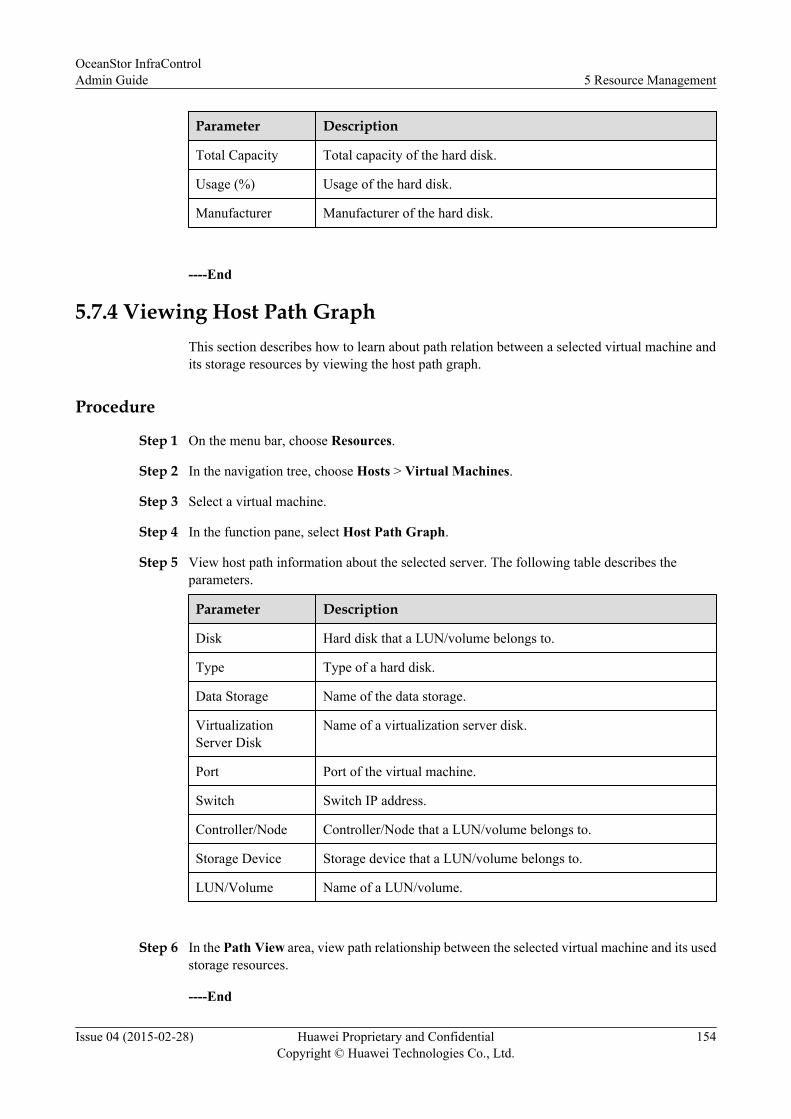
Parameter Description
Total Capacity Total capacity of the hard disk.
Usage (%) Usage of the hard disk.
Manufacturer Manufacturer of the hard disk.
----End
5.7.4 Viewing Host Path GraphThis section describes how to learn about path relation between a selected virtual machine andits storage resources by viewing the host path graph.
Procedure
Step 1 On the menu bar, choose Resources.
Step 2 In the navigation tree, choose Hosts > Virtual Machines.
Step 3 Select a virtual machine.
Step 4 In the function pane, select Host Path Graph.
Step 5 View host path information about the selected server. The following table describes theparameters.
Parameter Description
Disk Hard disk that a LUN/volume belongs to.
Type Type of a hard disk.
Data Storage Name of the data storage.
VirtualizationServer Disk
Name of a virtualization server disk.
Port Port of the virtual machine.
Switch Switch IP address.
Controller/Node Controller/Node that a LUN/volume belongs to.
Storage Device Storage device that a LUN/volume belongs to.
LUN/Volume Name of a LUN/volume.
Step 6 In the Path View area, view path relationship between the selected virtual machine and its usedstorage resources.
----End
OceanStor InfraControlAdmin Guide 5 Resource Management
Issue 04 (2015-02-28) Huawei Proprietary and ConfidentialCopyright © Huawei Technologies Co., Ltd.
154
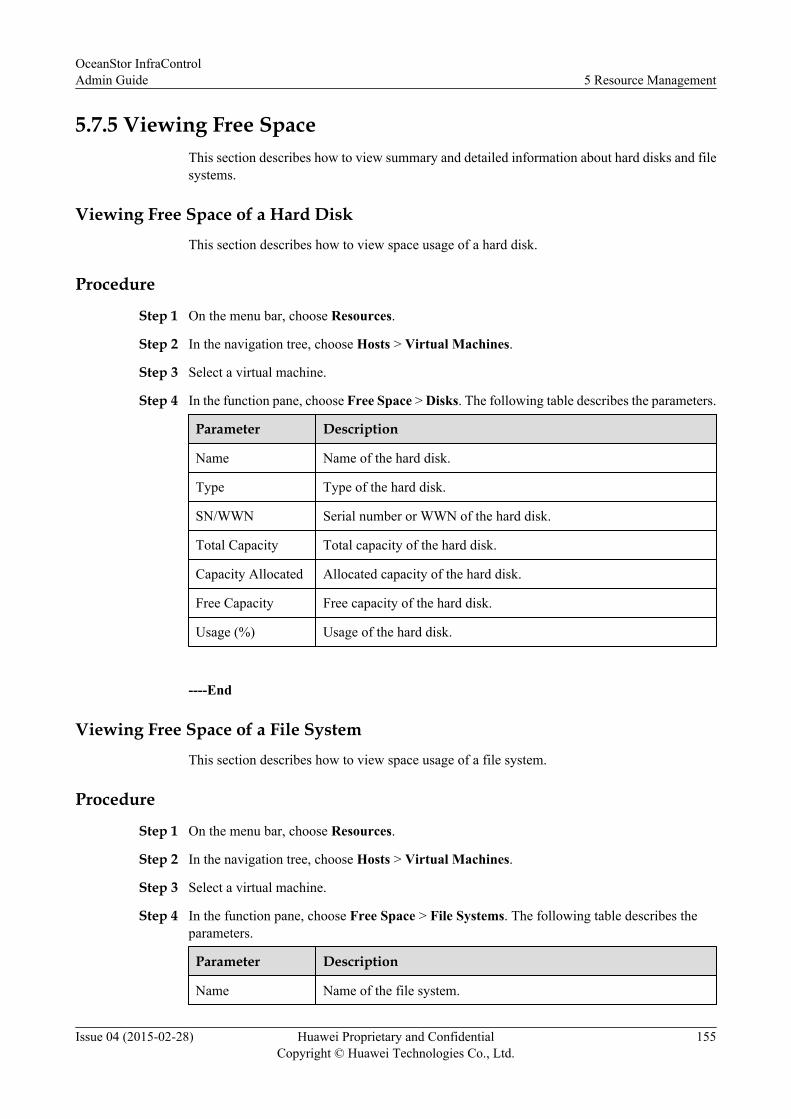
5.7.5 Viewing Free SpaceThis section describes how to view summary and detailed information about hard disks and filesystems.
Viewing Free Space of a Hard DiskThis section describes how to view space usage of a hard disk.
Procedure
Step 1 On the menu bar, choose Resources.
Step 2 In the navigation tree, choose Hosts > Virtual Machines.
Step 3 Select a virtual machine.
Step 4 In the function pane, choose Free Space > Disks. The following table describes the parameters.
Parameter Description
Name Name of the hard disk.
Type Type of the hard disk.
SN/WWN Serial number or WWN of the hard disk.
Total Capacity Total capacity of the hard disk.
Capacity Allocated Allocated capacity of the hard disk.
Free Capacity Free capacity of the hard disk.
Usage (%) Usage of the hard disk.
----End
Viewing Free Space of a File SystemThis section describes how to view space usage of a file system.
Procedure
Step 1 On the menu bar, choose Resources.
Step 2 In the navigation tree, choose Hosts > Virtual Machines.
Step 3 Select a virtual machine.
Step 4 In the function pane, choose Free Space > File Systems. The following table describes theparameters.
Parameter Description
Name Name of the file system.
OceanStor InfraControlAdmin Guide 5 Resource Management
Issue 04 (2015-02-28) Huawei Proprietary and ConfidentialCopyright © Huawei Technologies Co., Ltd.
155
Parameter Description
Type Type of the file system.
Owning Disk Disk where the file system resides.
Total Capacity Total capacity of the file system.
Used Capacity Used capacity of the file system.
Free Capacity Free capacity of the file system.
Usage (%) Usage of the file system.
----End
5.7.6 Managing Current AlarmsCurrent alarms consist of current unconfirmed and confirmed alarms. This section describes tohow to confirm a current alarm or cancel its confirmation, clear an alarm, and export alarmsfrom the alarm database in a file.
Procedure
Step 1 View alarms on a virtual machine.
1. On the menu bar, choose Resources.
2. In the left navigation tree, choose Hosts > Virtual Machines.
3. Select a virtual machine.
4. In the Current Alarms area of the right function pane, view the current alarms.
Step 2 Confirm alarms.
1. Select one or more alarms whose Confirm Status is Unconfirmed.
2. Click Confirm.The Warning dialog box is displayed.
3. Click OK.The Success dialog box is displayed.
4. Click OK.The alarms' Confirm Status becomes Confirmed.
NOTE
After the management system receives an alarm confirmation request, it records the personnel whoconfirmed the alarms, refreshes alarms displayed on all client PCs, and updates data in the alarmdatabase.
Step 3 Cancel alarm confirmation.
Cancel the confirmation of a confirmed alarm.
1. Select one or more alarms whose Confirm Status is Confirmed.
2. Click Cancel Confirmation.
OceanStor InfraControlAdmin Guide 5 Resource Management
Issue 04 (2015-02-28) Huawei Proprietary and ConfidentialCopyright © Huawei Technologies Co., Ltd.
156
The Warning dialog box is displayed.
3. Click OK.The Success dialog box is displayed.
4. Click OK.The status of the selected alarms becomes Unconfirmed.
Step 4 Clear alarms.
NOTE
In some special situations, for example, when communication between the management system and anetwork element (NE) breaks, the cleared alarms reported from the NE may be lost. In this case, thesealarms will not be cleared automatically if the NE does not support the function of alarm verification. Toresolve this problem, the management system supports manual alarms clearing. In other words, you canmanually change the state of the alarms from uncleared to cleared.
1. Select one or more alarms whose Confirm Status is Confirmed.
2. Click Clear.The Warning dialog box is displayed.
3. Click OK.The Success dialog box is displayed.
4. Click OK.All the selected alarms are removed from the current alarm list to the historical alarm list.The management system records the clearance person and time, refreshes all the alarmdisplaying windows on the client, and updates data in the alarm database.
Step 5 Export alarms.
Export some important alarms in a file, helping the administrator to locate and analyze problems.
NOTE
If the default security policy has been set on the Internet Explorer, the system displays a message statingTo help protect you security, Internet Explorer blocked this site fromdownloading file from to your computer upon your export operation. In this case, selectthe message, right-click it, and choose Download File from the shortcut menu. After the page is refreshed,export alarms.
1. Select one or multiple alarms.
2. Click Export.
The File Download dialog box is displayed.
3. Click Save.
The Save As dialog box is displayed.
4. Select a path for saving the alarm file, enter a name for the file or use the default file name,and click Save.
The selected alarms are exported to the specified local path.
Step 6 Export all alarms.
Export all current alarms in a file, helping the administrator to locate and analyze problems.
OceanStor InfraControlAdmin Guide 5 Resource Management
Issue 04 (2015-02-28) Huawei Proprietary and ConfidentialCopyright © Huawei Technologies Co., Ltd.
157
NOTICEYou can export 20,000 alarms at most each time. If the alarm quantity exceeds 20,000, exportthem in several times.
1. Click Export All.
The File Download dialog box is displayed.2. Click Save.
The Save As dialog box is displayed.3. Select a path for saving the alarm file, enter a name for the file or use the default file name,
and click Save.
All current alarms are exported to the specified local path.
Step 7 Refresh alarms.
The refresh policy can be Refresh every 15 seconds, Refresh every 30 seconds, Refresh every60 seconds, or Stop refresh.
Refresh every 30 seconds is selected by default. This means that the management system serverperforms a round robin every 30 seconds. Once a new alarm occurs, the management systemwill refresh it to the current alarm list.
Step 8 Search alarms.
Set the conditions to search for the desired alarms. The search method can be the basic searchor advanced search.l When you select Search, you can search for alarms by alarm severity.l When you select Advanced Search, you can search for alarms by alarm severity, alarm type,
confirmation status, alarm source, and alarm occurrence time.
NOTE
You can click Reset to clear all the specified parameter values.
Step 9 View alarms.l You can click the name of an alarm to view its details.
1. Click the name of an alarm.The page showing the details about the alarm is displayed.
2. View the basic information and modification suggestions of the alarm.3. (Optional) Click Create in the Maintenance Experiences area to record the
experiences in locating and handling the alarm into the alarm knowledge repository.This enables the alarm to be handled quickly next time the same type of fault occurs.You can also modify and delete the created maintenance experiences.
l You can click the times of an alarm to view the occurrence time, confirmation status andtime, clearance status and time, and notification type of the alarm.According to the alarm notification type, you can know whether the alarm is a new alarm,manual clear, or automatic clear.
----End
OceanStor InfraControlAdmin Guide 5 Resource Management
Issue 04 (2015-02-28) Huawei Proprietary and ConfidentialCopyright © Huawei Technologies Co., Ltd.
158
5.8 Managing Oracle InstancesThis chapter describes how to manage Oracle instances, including viewing Oracle instanceinformation, tablespace, and file information.
5.8.1 Viewing Information About All Oracle InstancesThis section describes how to view information about all Oracle instances and query Oracleinstances.
Procedure
Step 1 On the menu bar, choose Resources.
Step 2 In the navigation tree, choose Applications > Oracles.
Step 3 In the Oracle Instances area of the function pane, query information about Oracle instances.
l Select Name and enter an Oracle instance name in the right text box. Click Search to queryinformation about the corresponding Oracle instance.
l Select Status and choose the status you want to query in the right drop-down list. ClickSearch to query information of corresponding Oracle instances in the state.
Step 4 In the Oracle Instance area of the function pane, view information about Oracle instances. Thefollowing table describes the parameters.
Parameter Description
Name Name of the Oracle instance.
Status Status of the Oracle instance, Online or Offline.
Version Version of the Oracle instance.
Owning server/virtual machine
Name of the server/virtual machine where the Oracle instance is.
Owningvirtualization server
Name of the server that the Oracle instance belongs to.
Step 5 Click an Oracle instance name to view detailed information.For details, see 5.8.2 Viewing Detailed Oracle Instance Information.
----End
5.8.2 Viewing Detailed Oracle Instance InformationThis section describes how to view detailed information about a selected Oracle instance,including its basic information, tablespace, and files.
OceanStor InfraControlAdmin Guide 5 Resource Management
Issue 04 (2015-02-28) Huawei Proprietary and ConfidentialCopyright © Huawei Technologies Co., Ltd.
159
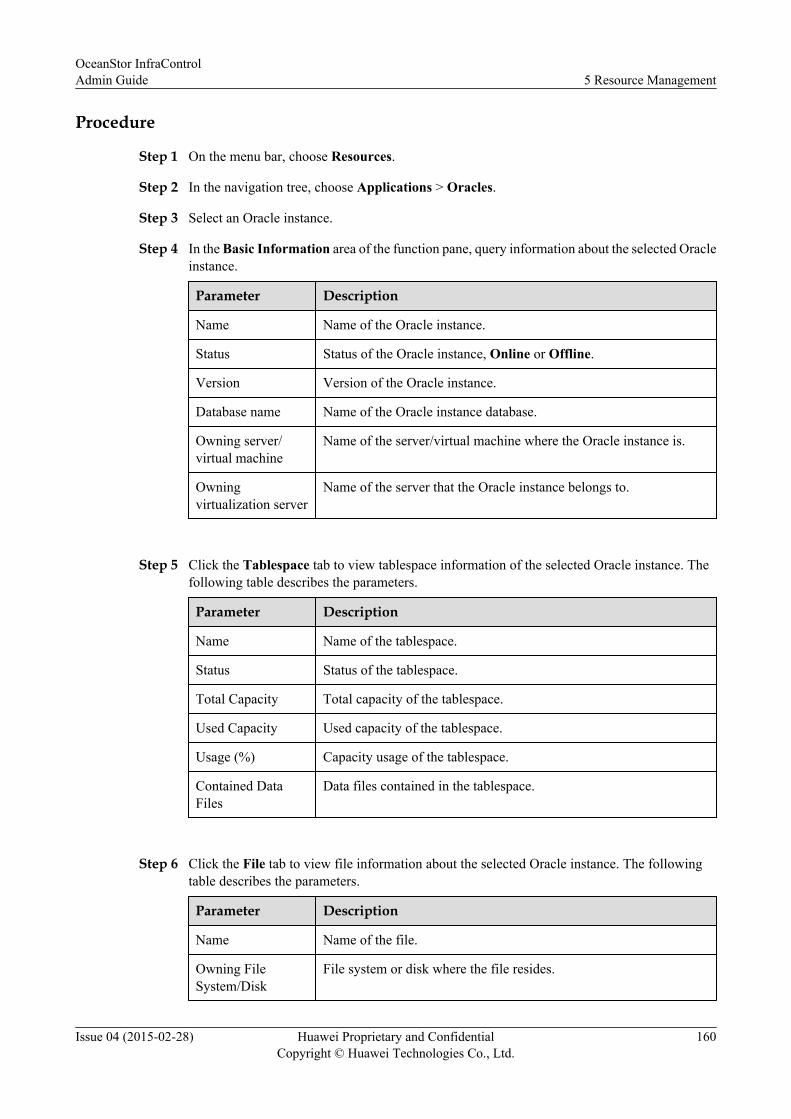
Procedure
Step 1 On the menu bar, choose Resources.
Step 2 In the navigation tree, choose Applications > Oracles.
Step 3 Select an Oracle instance.
Step 4 In the Basic Information area of the function pane, query information about the selected Oracleinstance.
Parameter Description
Name Name of the Oracle instance.
Status Status of the Oracle instance, Online or Offline.
Version Version of the Oracle instance.
Database name Name of the Oracle instance database.
Owning server/virtual machine
Name of the server/virtual machine where the Oracle instance is.
Owningvirtualization server
Name of the server that the Oracle instance belongs to.
Step 5 Click the Tablespace tab to view tablespace information of the selected Oracle instance. Thefollowing table describes the parameters.
Parameter Description
Name Name of the tablespace.
Status Status of the tablespace.
Total Capacity Total capacity of the tablespace.
Used Capacity Used capacity of the tablespace.
Usage (%) Capacity usage of the tablespace.
Contained DataFiles
Data files contained in the tablespace.
Step 6 Click the File tab to view file information about the selected Oracle instance. The followingtable describes the parameters.
Parameter Description
Name Name of the file.
Owning FileSystem/Disk
File system or disk where the file resides.
OceanStor InfraControlAdmin Guide 5 Resource Management
Issue 04 (2015-02-28) Huawei Proprietary and ConfidentialCopyright © Huawei Technologies Co., Ltd.
160
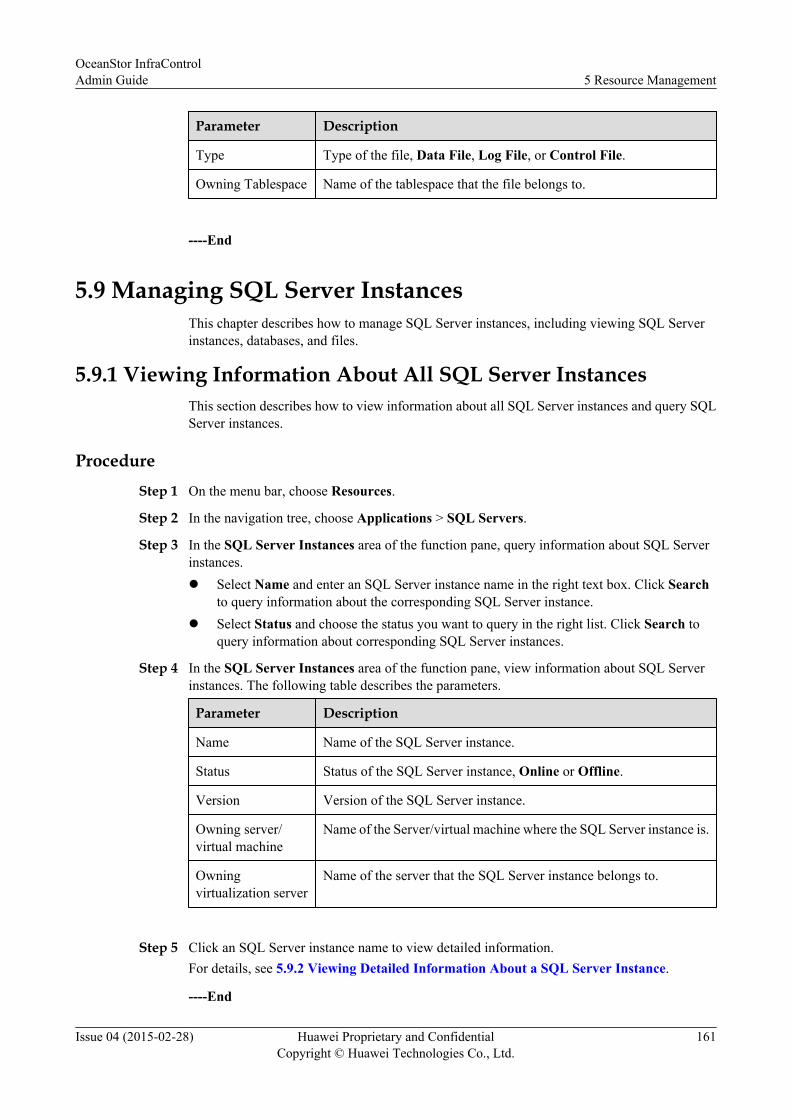
Parameter Description
Type Type of the file, Data File, Log File, or Control File.
Owning Tablespace Name of the tablespace that the file belongs to.
----End
5.9 Managing SQL Server InstancesThis chapter describes how to manage SQL Server instances, including viewing SQL Serverinstances, databases, and files.
5.9.1 Viewing Information About All SQL Server InstancesThis section describes how to view information about all SQL Server instances and query SQLServer instances.
ProcedureStep 1 On the menu bar, choose Resources.
Step 2 In the navigation tree, choose Applications > SQL Servers.
Step 3 In the SQL Server Instances area of the function pane, query information about SQL Serverinstances.l Select Name and enter an SQL Server instance name in the right text box. Click Search
to query information about the corresponding SQL Server instance.l Select Status and choose the status you want to query in the right list. Click Search to
query information about corresponding SQL Server instances.
Step 4 In the SQL Server Instances area of the function pane, view information about SQL Serverinstances. The following table describes the parameters.
Parameter Description
Name Name of the SQL Server instance.
Status Status of the SQL Server instance, Online or Offline.
Version Version of the SQL Server instance.
Owning server/virtual machine
Name of the Server/virtual machine where the SQL Server instance is.
Owningvirtualization server
Name of the server that the SQL Server instance belongs to.
Step 5 Click an SQL Server instance name to view detailed information.For details, see 5.9.2 Viewing Detailed Information About a SQL Server Instance.
----End
OceanStor InfraControlAdmin Guide 5 Resource Management
Issue 04 (2015-02-28) Huawei Proprietary and ConfidentialCopyright © Huawei Technologies Co., Ltd.
161
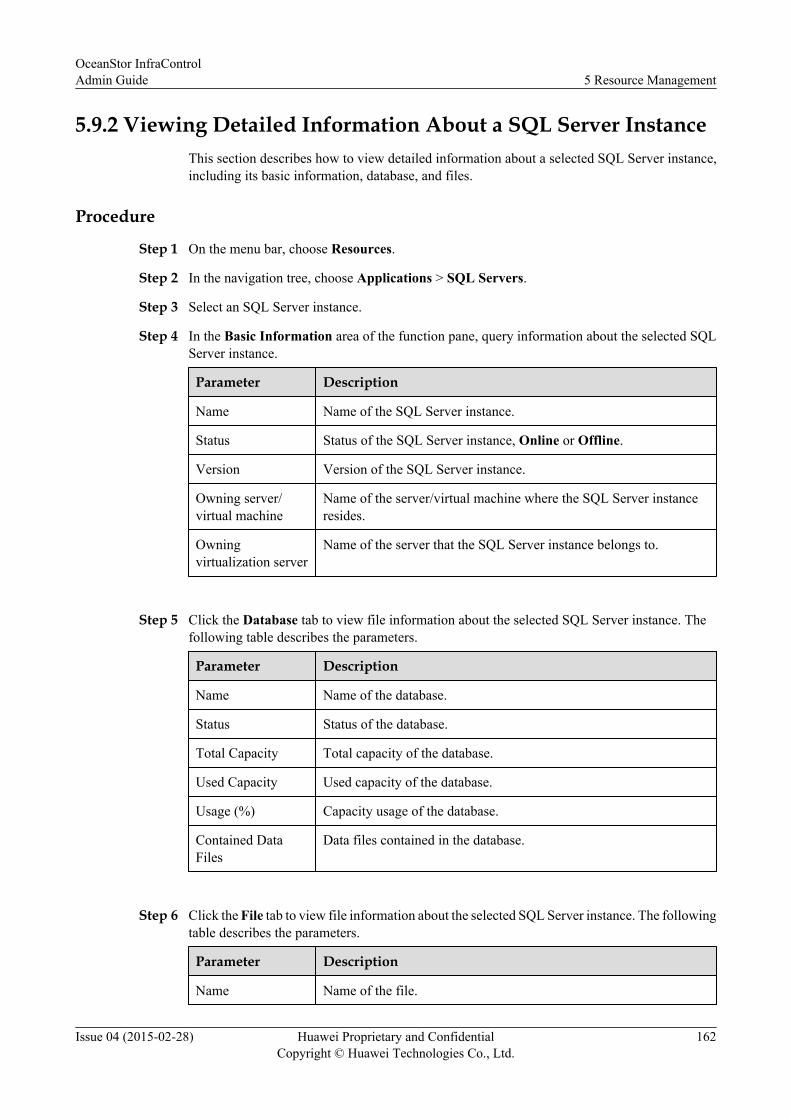
5.9.2 Viewing Detailed Information About a SQL Server InstanceThis section describes how to view detailed information about a selected SQL Server instance,including its basic information, database, and files.
Procedure
Step 1 On the menu bar, choose Resources.
Step 2 In the navigation tree, choose Applications > SQL Servers.
Step 3 Select an SQL Server instance.
Step 4 In the Basic Information area of the function pane, query information about the selected SQLServer instance.
Parameter Description
Name Name of the SQL Server instance.
Status Status of the SQL Server instance, Online or Offline.
Version Version of the SQL Server instance.
Owning server/virtual machine
Name of the server/virtual machine where the SQL Server instanceresides.
Owningvirtualization server
Name of the server that the SQL Server instance belongs to.
Step 5 Click the Database tab to view file information about the selected SQL Server instance. Thefollowing table describes the parameters.
Parameter Description
Name Name of the database.
Status Status of the database.
Total Capacity Total capacity of the database.
Used Capacity Used capacity of the database.
Usage (%) Capacity usage of the database.
Contained DataFiles
Data files contained in the database.
Step 6 Click the File tab to view file information about the selected SQL Server instance. The followingtable describes the parameters.
Parameter Description
Name Name of the file.
OceanStor InfraControlAdmin Guide 5 Resource Management
Issue 04 (2015-02-28) Huawei Proprietary and ConfidentialCopyright © Huawei Technologies Co., Ltd.
162
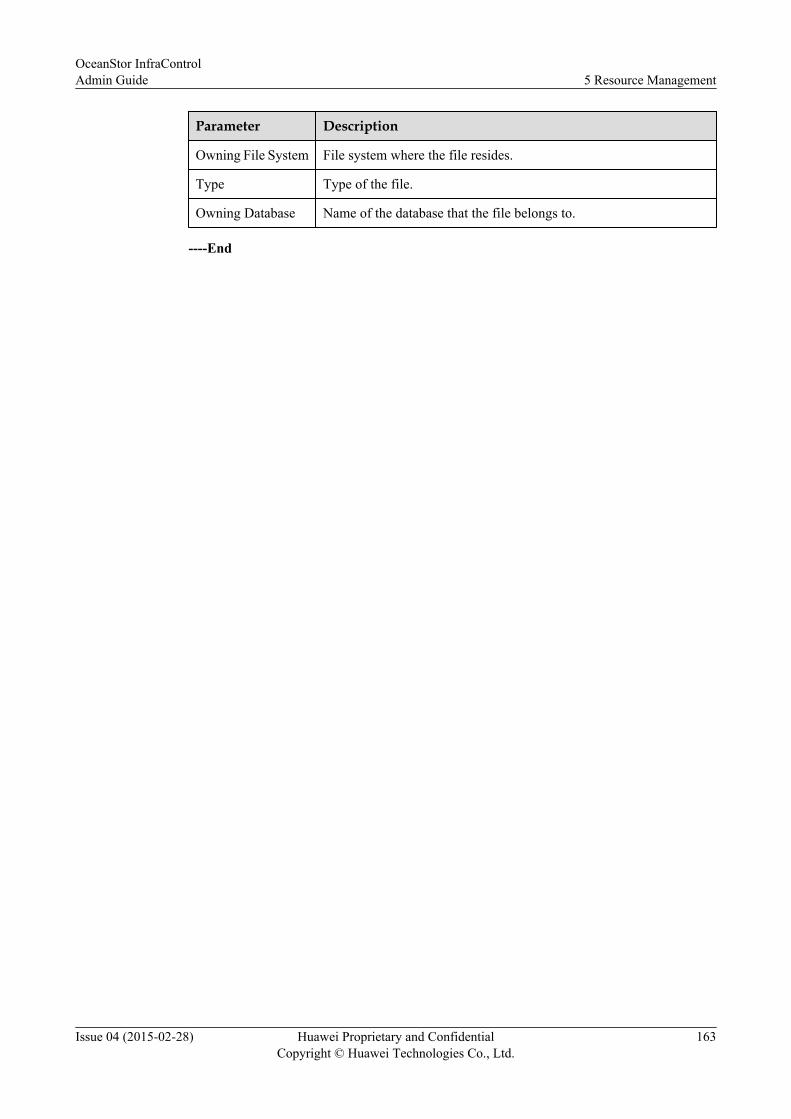
Parameter Description
Owning File System File system where the file resides.
Type Type of the file.
Owning Database Name of the database that the file belongs to.
----End
OceanStor InfraControlAdmin Guide 5 Resource Management
Issue 04 (2015-02-28) Huawei Proprietary and ConfidentialCopyright © Huawei Technologies Co., Ltd.
163
6 Alarm Management
About This Chapter
The alarm management module provides such functions as alarm statistics, alarm notification,alarm synchronization, and alarm masking. By viewing the alarm information, you can monitorthe network exceptions in real time and take measures to recover the network in time.
6.1 OverviewBy viewing the current alarms on a network element (NE), you can discover and handle the NEfaults in time.
6.2 Managing AlarmsThe alarm confirmation mechanism can identify whether a current alarm is handled in time. Inaddition, you can add alarm maintenance experiences to each alarm, facilitating systemmaintenance and sharing experiences.
6.3 Synchronizing the AlarmsThe management system supports the ability to synchronize NE alarms. The synchronizationcan be manual or periodic. In other words, you can manually start the alarm synchronization toa specific NE on the client interface, or configure the periodic synchronization policy. When themanagement system is restarted or its communication with a NE recovers from interruption, themanagement system actively sends the alarm synchronization command to the NE tosynchronize the alarms missed by the management system.
6.4 Masking the AlarmsMasking the alarms means masking the unnecessary or valueless alarms by setting the alarmmask rules. For example, the alarms that are generated during the maintenance and testing periodof the NEs are valueless and can be masked. Masking alarms helps mask unnecessary alarmswhen many NEs are managed.
6.5 Alarm NotificationThe management system provides remote notification (by email and short message) alarms andclient audio alarms to notify maintenance engineers of alarm information of NEs. This ensuresreal-time efficient handling of alarms.
6.6 Threshold Alarms
OceanStor InfraControlAdmin Guide 6 Alarm Management
Issue 04 (2015-02-28) Huawei Proprietary and ConfidentialCopyright © Huawei Technologies Co., Ltd.
164

This section describes how to set thresholds of performance indicators and capacity usage forthe device and its components. If the performance or capacity usage exceeds the specifiedthreshold, an alarm occurs.
OceanStor InfraControlAdmin Guide 6 Alarm Management
Issue 04 (2015-02-28) Huawei Proprietary and ConfidentialCopyright © Huawei Technologies Co., Ltd.
165
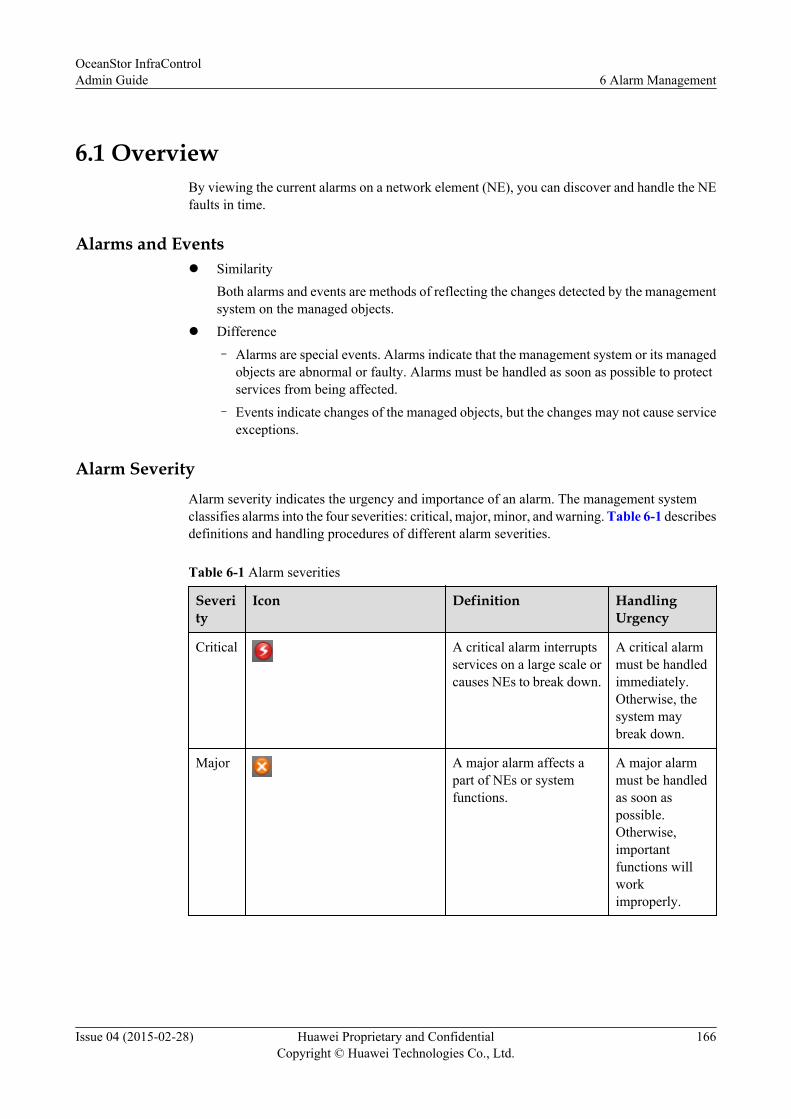
6.1 OverviewBy viewing the current alarms on a network element (NE), you can discover and handle the NEfaults in time.
Alarms and Eventsl Similarity
Both alarms and events are methods of reflecting the changes detected by the managementsystem on the managed objects.
l Difference
– Alarms are special events. Alarms indicate that the management system or its managedobjects are abnormal or faulty. Alarms must be handled as soon as possible to protectservices from being affected.
– Events indicate changes of the managed objects, but the changes may not cause serviceexceptions.
Alarm SeverityAlarm severity indicates the urgency and importance of an alarm. The management systemclassifies alarms into the four severities: critical, major, minor, and warning. Table 6-1 describesdefinitions and handling procedures of different alarm severities.
Table 6-1 Alarm severities
Severity
Icon Definition HandlingUrgency
Critical A critical alarm interruptsservices on a large scale orcauses NEs to break down.
A critical alarmmust be handledimmediately.Otherwise, thesystem maybreak down.
Major A major alarm affects apart of NEs or systemfunctions.
A major alarmmust be handledas soon aspossible.Otherwise,importantfunctions willworkimproperly.
OceanStor InfraControlAdmin Guide 6 Alarm Management
Issue 04 (2015-02-28) Huawei Proprietary and ConfidentialCopyright © Huawei Technologies Co., Ltd.
166
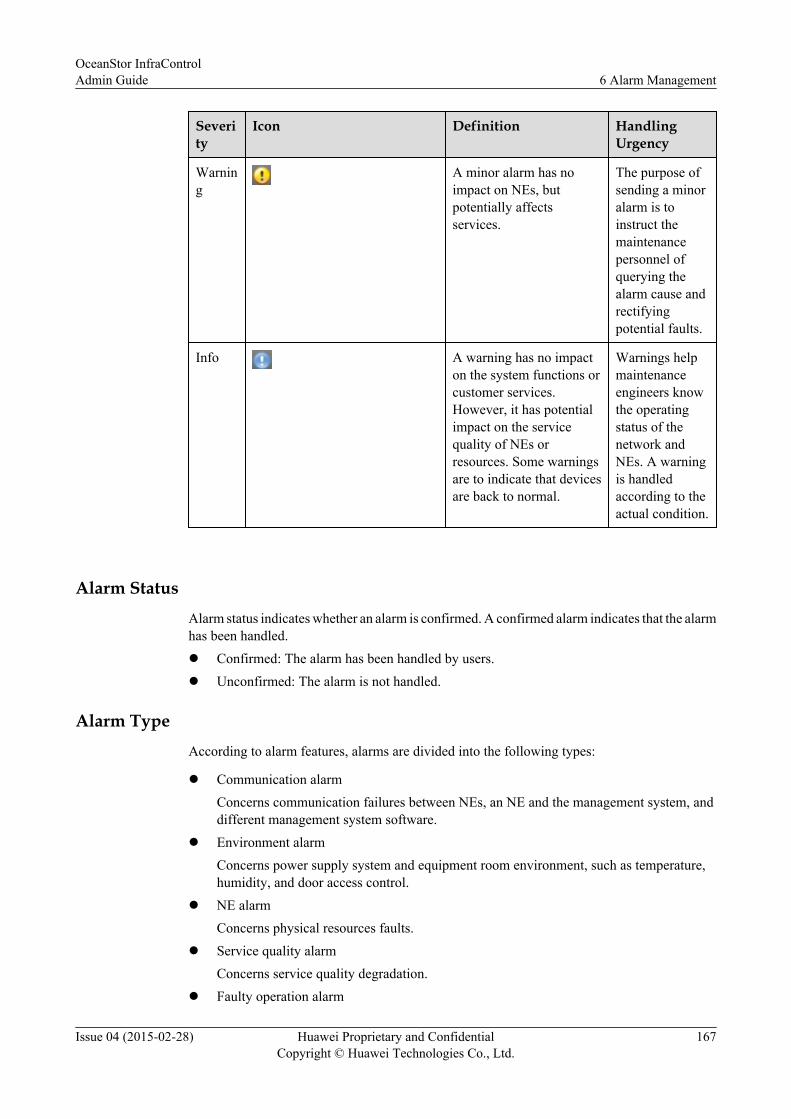
Severity
Icon Definition HandlingUrgency
Warning
A minor alarm has noimpact on NEs, butpotentially affectsservices.
The purpose ofsending a minoralarm is toinstruct themaintenancepersonnel ofquerying thealarm cause andrectifyingpotential faults.
Info A warning has no impacton the system functions orcustomer services.However, it has potentialimpact on the servicequality of NEs orresources. Some warningsare to indicate that devicesare back to normal.
Warnings helpmaintenanceengineers knowthe operatingstatus of thenetwork andNEs. A warningis handledaccording to theactual condition.
Alarm StatusAlarm status indicates whether an alarm is confirmed. A confirmed alarm indicates that the alarmhas been handled.l Confirmed: The alarm has been handled by users.l Unconfirmed: The alarm is not handled.
Alarm TypeAccording to alarm features, alarms are divided into the following types:
l Communication alarmConcerns communication failures between NEs, an NE and the management system, anddifferent management system software.
l Environment alarmConcerns power supply system and equipment room environment, such as temperature,humidity, and door access control.
l NE alarmConcerns physical resources faults.
l Service quality alarmConcerns service quality degradation.
l Faulty operation alarm
OceanStor InfraControlAdmin Guide 6 Alarm Management
Issue 04 (2015-02-28) Huawei Proprietary and ConfidentialCopyright © Huawei Technologies Co., Ltd.
167
Concerns software error or faulty operation.
l Security alarm
Concerns the management system and NE security.
Alarm Management Functionl Alarm statistics
You can search for the current alarms at different severities of all devices on themanagement system, and learn about the experiences in handling the alarms by viewingthe alarm details on the management system.
l Alarm synchronization
The management system provides alarm synchronization to ensure that the alarm data isaccurate and up to date. The alarm synchronization is categorized as manualsynchronization and periodic synchronization.
l Alarm masking
After alarm masking is enabled, the management system will display alarms reported byNEs only in the masked alarm list.
l Alarm notification
The management system provides multiple means for notifying alarms (by short message,email, or sound). The management system sends the alarm information to the specifiedmobile phone or email address, or notifies the maintenance personnel of the alarms throughthe client sound box. This helps ensure timely and efficient troubleshooting.
l Alarm dump
This function dumps the historical alarms in a file to the specified folder, improving themanagement system performance.
l Miscellaneous function
You can use the alarm confirmation mechanism to verify that the current alarm is handledin time. You can manually confirm the specified alarm or cancel the confirmation, and clearthe confirmed alarms from the current alarm list. In addition, you can add maintenanceexperiences to each alarm. That is, you can record experiences in locating, analyzing, andhandling alarms in the alarm knowledge repository, helping other administrators learnabout the operations performed to an alarm and sharing the maintenance experiences.
Alarm Notification
The management system supports remote alarm notification by the following methods:
l Email
In this method, remote alarm notification is sent by email. The alarm information is sentto the specified email address. The maintenance engineer can learn about the alarminformation by viewing the mail message.
l Short message
In this method, remote alarm notification is sent by short message. The alarm informationis sent to the mobile phone number of the maintenance engineer through the SMS serviceprovided by the service provider or the SMS modem connected to the managementsystem server. The maintenance engineer can learn about the alarm information by readingthe short message.
OceanStor InfraControlAdmin Guide 6 Alarm Management
Issue 04 (2015-02-28) Huawei Proprietary and ConfidentialCopyright © Huawei Technologies Co., Ltd.
168
l Sound
In this method, alarm notification is implemented by sound. Once an alarm is generated,the client sound box plays an alarm sound. After hearing the sound, the maintenanceengineer will check alarm information received by the management system server.
6.2 Managing AlarmsThe alarm confirmation mechanism can identify whether a current alarm is handled in time. Inaddition, you can add alarm maintenance experiences to each alarm, facilitating systemmaintenance and sharing experiences.
6.2.1 Managing Current AlarmsCurrent alarms consist of current unconfirmed and confirmed alarms. This section describes tohow to confirm a current alarm or cancel its confirmation, clear an alarm, and export alarmsfrom the alarm database in a file.
Procedure
Step 1 Go to the Current Alarms page in any of the following ways:
l 1. View alarms on all devices.
1. On the menu bar, choose Alarms.
2. In the navigation tree, choose Alarm Management > Current Alarms.
l 2. View alarms on the storage device.
1. On the menu bar, choose Resources.
2. In the navigation tree, choose Storage.
3. Select a storage device.
4. In the function pane, select Current Alarms.
l 3. Viewing alarms on a switch.
1. On the menu bar, choose Resources.
2. In the navigation tree, choose Switches.
3. Select a switch.
4. In the function pane, select Current Alarms.
l 4. Viewing alarms on a host.
1. On the menu bar, choose Resources.
2. In the navigation tree, choose Hosts.
3. Select a host.
4. In the function pane, select Current Alarms.
Step 2 Confirm alarms.
1. Select one or more alarms whose Confirm Status is Unconfirmed.
2. Click Confirm.The Warning dialog box is displayed.
OceanStor InfraControlAdmin Guide 6 Alarm Management
Issue 04 (2015-02-28) Huawei Proprietary and ConfidentialCopyright © Huawei Technologies Co., Ltd.
169
3. Click OK.The Success dialog box is displayed.
4. Click OK.The alarms' Confirm Status becomes Confirmed.
NOTE
After the management system receives an alarm confirmation request, it records the personnel whoconfirmed the alarms, refreshes alarms displayed on all client PCs, and updates data in the alarmdatabase.
Step 3 Cancel alarm confirmation.
Cancel the confirmation of a confirmed alarm.
1. Select one or more alarms whose Confirm Status is Confirmed.
2. Click Cancel Confirmation.The Warning dialog box is displayed.
3. Click OK.The Success dialog box is displayed.
4. Click OK.The status of the selected alarms becomes Unconfirmed.
Step 4 Clear alarms.
NOTE
In some special situations, for example, when communication between the management system and anetwork element (NE) breaks, the cleared alarms reported from the NE may be lost. In this case, thesealarms will not be cleared automatically if the NE does not support the function of alarm verification. Toresolve this problem, the management system supports manual alarms clearing. In other words, you canmanually change the state of the alarms from uncleared to cleared.
1. Select one or more alarms whose Confirm Status is Confirmed.
2. Click Clear.The Warning dialog box is displayed.
3. Click OK.The Success dialog box is displayed.
4. Click OK.All the selected alarms are removed from the current alarm list to the historical alarm list.The management system records the clearance person and time, refreshes all the alarmdisplaying windows on the client, and updates data in the alarm database.
Step 5 Export alarms.
Export some important alarms in a file, helping the administrator to locate and analyze problems.
NOTE
If the default security policy has been set on the Internet Explorer, the system displays a message statingTo help protect you security, Internet Explorer blocked this site fromdownloading file from to your computer upon your export operation. In this case, selectthe message, right-click it, and choose Download File from the shortcut menu. After the page is refreshed,export alarms.
1. Select one or multiple alarms.
OceanStor InfraControlAdmin Guide 6 Alarm Management
Issue 04 (2015-02-28) Huawei Proprietary and ConfidentialCopyright © Huawei Technologies Co., Ltd.
170
2. Click Export.
The File Download dialog box is displayed.3. Click Save.
The Save As dialog box is displayed.4. Select a path for saving the alarm file, enter a name for the file or use the default file name,
and click Save.
The selected alarms are exported to the specified local path.
Step 6 Export all alarms.
Export all current alarms in a file, helping the administrator to locate and analyze problems.
NOTICEYou can export 20,000 alarms at most each time. If the alarm quantity exceeds 20,000, exportthem in several times.
1. Click Export All.
The File Download dialog box is displayed.2. Click Save.
The Save As dialog box is displayed.3. Select a path for saving the alarm file, enter a name for the file or use the default file name,
and click Save.
All current alarms are exported to the specified local path.
Step 7 Refresh alarms.
The refresh policy can be Refresh every 15 seconds, Refresh every 30 seconds, Refresh every60 seconds, or Stop refresh.
Refresh every 30 seconds is selected by default. This means that the management system serverperforms a round robin every 30 seconds. Once a new alarm occurs, the management systemwill refresh it to the current alarm list.
Step 8 Search alarms.
Set the conditions to search for the desired alarms. The search method can be the basic searchor advanced search.l When you select Search, you can search for alarms by alarm severity.l When you select Advanced Search, you can search for alarms by alarm severity, alarm type,
confirmation status, alarm source, and alarm occurrence time.
NOTE
You can click Reset to clear all the specified parameter values.
Step 9 View alarms.l You can click the name of an alarm to view its details.
OceanStor InfraControlAdmin Guide 6 Alarm Management
Issue 04 (2015-02-28) Huawei Proprietary and ConfidentialCopyright © Huawei Technologies Co., Ltd.
171
1. Click the name of an alarm.
The page showing the details about the alarm is displayed.
2. View the basic information and modification suggestions of the alarm.
3. (Optional) Click Create in the Maintenance Experiences area to record theexperiences in locating and handling the alarm into the alarm knowledge repository.This enables the alarm to be handled quickly next time the same type of fault occurs.
You can also modify and delete the created maintenance experiences.
l You can click the times of an alarm to view the occurrence time, confirmation status andtime, clearance status and time, and notification type of the alarm.
According to the alarm notification type, you can know whether the alarm is a new alarm,manual clear, or automatic clear.
----End
6.2.2 Managing Historical AlarmsPast alarms are cleared alarms. You can export one or multiple past alarms.
Procedure
Step 1 On the menu bar, choose Alarms.
Step 2 In the navigation tree, choose Alarm Management > Historical Alarms.
Step 3 You can perform the following operations to manage past alarms:
l Export
This operation exports some important alarms in a file, helping the administrator locate andanalyze problems.
NOTE
If the Internet Explorer executes the default security policy, the To help protect you security, InternetExplorer blocked this site from downloading file from to your computer message is displayed uponan export operation. In this case, right-click the message, and choose Download File from the shortcutmenu. After the ISM is refreshed, export the event information again.
1. Select one or more alarms.
2. Click Export.
The File Download dialog box is displayed.
3. Click Save.
The Save As dialog box is displayed.
4. Select a path for saving the alarm file, enter a name for the file or use the default filename, and click Save.
The selected alarms are exported to the specified local path.
l Export all
Export all past alarms in a file, helping the administrator to locate and analyze problems.
OceanStor InfraControlAdmin Guide 6 Alarm Management
Issue 04 (2015-02-28) Huawei Proprietary and ConfidentialCopyright © Huawei Technologies Co., Ltd.
172
NOTICEYou can export 20,000 alarms at most each time. If the alarm quantity exceeds 20,000, exportthem in several times.
1. Click Export All.
The File Download dialog box is displayed.
2. Click Save.
The Save As dialog box is displayed.
3. Select a path for saving the alarm file, enter a name for the file or use the default filename, and click Save.
All past alarms are exported to the specified local path.
l Search
Set the conditions to search for the desired alarms. The search method can be basic searchor advanced search.
– When you select Search, you can search for alarms by alarm severity.
– When you select Advanced Search, you can search for alarms by alarm severity,confirmation status, alarm source, and alarm occurrence time.
NOTE
You can click Reset to clear all the specified parameter values.
l View
– You can click the name of an alarm to view its details.
1. Click the name of an alarm.
The page showing details about the alarm is displayed.
2. View basic information and modification suggestions of the alarm.
3. (Optional) Click Create in the Maintenance Experiences area to record theexperiences in locating and handling the alarm in the alarm knowledge repository.This enables the alarm to be handled quickly next time the same type of fault occurs.
You can also modify and delete the created maintenance experiences.
– You can click the times of an alarm to view the occurrence time, confirmation status andtime, clearance status and time, and notification type of the alarm.
According to the alarm notification type, you can know whether the alarm is a new alarm,manual clear or automatic clear.
----End
6.2.3 Managing EventsEvent is a general designation for all the situations occurring on the managed objects. Forexample, adding, deleting, and modifying an object and changing the status of an object. Youcan export one or multiple events.
OceanStor InfraControlAdmin Guide 6 Alarm Management
Issue 04 (2015-02-28) Huawei Proprietary and ConfidentialCopyright © Huawei Technologies Co., Ltd.
173
Procedure
Step 1 On the menu bar, choose Alarms.
Step 2 In the navigation tree, choose Alarm Management > Events.
Step 3 You can perform the following operations to manage eventsl Export
This operation exports some important events in a file, helping the administrator to locateand analyze problems.
1. Select one or more events.2. Click Export.
The File Download dialog box is displayed.3. Click Save.
The Save As dialog box is displayed.4. Select a path for saving the event file, enter a name for the file or use the default file
name, and click Save.The selected events are exported to the specified local path.
l Export allThis operation exports all events in a file, helping the administrator to locate and analyzeproblems.
NOTICEYou can export 20,000 alarms at most each time. If the alarm quantity exceeds 20,000, exportthem in several times.
1. Click Export All.The File Download dialog box is displayed.
2. Click Save.The Save As dialog box is displayed.
3. Select a path for saving the event file, enter a name for the file or use the default filename, and click Save.All the events are exported to the specified local path.
l SearchSet the conditions to search for the desired events. The search method can be the basic searchor advanced search.
– When you select Search, you can search for events by event source.
– When you select Advanced Search, you can search for events by event source and eventoccurrence time.
NOTE
You can click Reset to clear all the specified parameter values.
l View
OceanStor InfraControlAdmin Guide 6 Alarm Management
Issue 04 (2015-02-28) Huawei Proprietary and ConfidentialCopyright © Huawei Technologies Co., Ltd.
174
You can click the name of an event to view its details.
1. Click the name of an event.The page showing the details about the event is displayed.
2. View basic information and modification suggestions of the event.
----End
6.2.4 Managing Alarm FilteringAlarm filtering refers to that users filter out the list of alarms on non-Huawei storage devices.You can set alarm filtering rules.
Procedure
Step 1 On the menu bar, choose Alarms.
Step 2 In the navigation tree, choose Alarm Management > Alarm Filtering.
Step 3 You can perform the following operations to manage alarm filterl Setting Filter Rules
1. Click Setting Filtering Rules. The Setting Filtering Rules dialog box is displayed.2. In the Name, input the alarm part name of the non-Huawei storage devices.3. Optional: In the Description, input the alarm information of the heterogeneous storage
devices.
4. Click Add Rule or . The Success dialog box is displayed. Click OK, the alarm filterrule is added.
l Deleting Filter Rules
1. Click Setting Filtering Rules. The Setting Filtering Rules dialog box is displayed.
2. In the Operation list, click . The Warning dialog box is displayed. Click OK, theSuccess dialog box is displayed, the alarm filter is deleted.
----End
6.3 Synchronizing the AlarmsThe management system supports the ability to synchronize NE alarms. The synchronizationcan be manual or periodic. In other words, you can manually start the alarm synchronization toa specific NE on the client interface, or configure the periodic synchronization policy. When themanagement system is restarted or its communication with a NE recovers from interruption, themanagement system actively sends the alarm synchronization command to the NE tosynchronize the alarms missed by the management system.
The following are rules for synchronizing alarms:l If an alarm is cleared on the NE but uncleared on the management system, the management
system clears the alarm.l If an alarm exists on the NE but not on the management system, the management system
adds the alarm.
OceanStor InfraControlAdmin Guide 6 Alarm Management
Issue 04 (2015-02-28) Huawei Proprietary and ConfidentialCopyright © Huawei Technologies Co., Ltd.
175
6.3.1 Manual SynchronizationIf alarms on an NE and in the management system database are inconsistent due to restarting ofthe management system server or other reasons, you can manually synchronize the alarms.
Context
Manual synchronization means that users manually start the alarm synchronization on the NMSclient interface and the management system updates the alarms in the database according to thealarms on the NE.
Procedure
Step 1 On the menu bar, choose Alarms.
Step 2 In the navigation tree, choose Alarm Synchronization > Manual Synchronization.
Step 3 You can manually start a alarm synchronization or delete a synchronization record. Theprocedures are as follows:
l Adding a manual alarm synchronization record
1. Click Add.
2. Select one type of NEs whose alarms need to synchronize from the NE tree on the left.The selected NEs are displayed in the NE list on the right.
3. Select one or more NEs from the NE list.
4. Click OK.
Perform the manual alarm synchronization. The management system starts the alarmsynchronization immediately. After the NE alarms are synchronized successfully, thenumber of synchronized alarms is displayed in the manual alarm synchronization list.You can go to Current Alarms to view the synchronized alarms.
l Re-synchronizing alarms
When you find that the NE alarms have not been synchronized to the NMS interface for along time, you can click Synchronize to restart the alarm synchronization. This guaranteesthat the NE alarms can be reported to the management system interface in time.
l Deleting a manual alarm synchronization record
When alarms on an NE do not need synchronization, you can select the corresponding alarmsynchronization and click Delete to delete the synchronization record from the list.
l Searching for a manual alarm synchronization record
Set the conditions to search for the desired alarm synchronization records. The search methodcan be basic search or advanced search.
– When you select Search, you can search for alarm synchronization records by NE name.
– When you select Advanced Search, you can search for alarm synchronization recordsby NE name, NE IP address, start synchronization time, and end synchronization time.
NOTE
You can click Reset to clear all the specified parameter values.
----End
OceanStor InfraControlAdmin Guide 6 Alarm Management
Issue 04 (2015-02-28) Huawei Proprietary and ConfidentialCopyright © Huawei Technologies Co., Ltd.
176
6.3.2 Automatic SynchronizationAfter you set the alarm synchronization time, the NMS automatically starts the synchronizationof NE alarms from the specified point in time, ensuring that the alarms on the NE and NMS areconsistent.
Contextl Automatic synchronization means that the NMS synchronizes the alarm information
automatically every cycle and updates the data in the database according to the alarm datareported from the NE.
l The automatic alarm synchronization is for NEs that support alarm synchronization.
Procedure
Step 1 On the menu bar, choose Alarms.
Step 2 In the navigation tree, choose Alarm Synchronization > Periodic Synchronization.
Step 3 You can set a new automatic alarm synchronization, or search for an existing one. The proceduresare as follows:l Setting an automatic alarm synchronization
1. Click Periodic Alarm Settings.2. Select Enable.3. Select a start time for the automatic alarm synchronization from the Time drop-down
list box.4. Input a cycle for the automatic alarm synchronization in the Interval(hours).5. Click OK.
NOTE
After setting an automatic alarm synchronization, NEs will auto display in the automaticsynchronization list at the fixed time.
l Searching for an automatic alarm synchronization recordsSet the conditions to search for the desired alarm synchronization records. The search methodcan be the basic search or advanced search.– When you select Search, you can search for alarm synchronization records by NE name.– When you select Advanced Search, you can search for alarm synchronization records
by NE name, NE IP address, start synchronization time, and end synchronization time.
NOTE
You can click Reset to clear all the specified parameter values.
----End
6.4 Masking the AlarmsMasking the alarms means masking the unnecessary or valueless alarms by setting the alarmmask rules. For example, the alarms that are generated during the maintenance and testing periodof the NEs are valueless and can be masked. Masking alarms helps mask unnecessary alarmswhen many NEs are managed.
OceanStor InfraControlAdmin Guide 6 Alarm Management
Issue 04 (2015-02-28) Huawei Proprietary and ConfidentialCopyright © Huawei Technologies Co., Ltd.
177
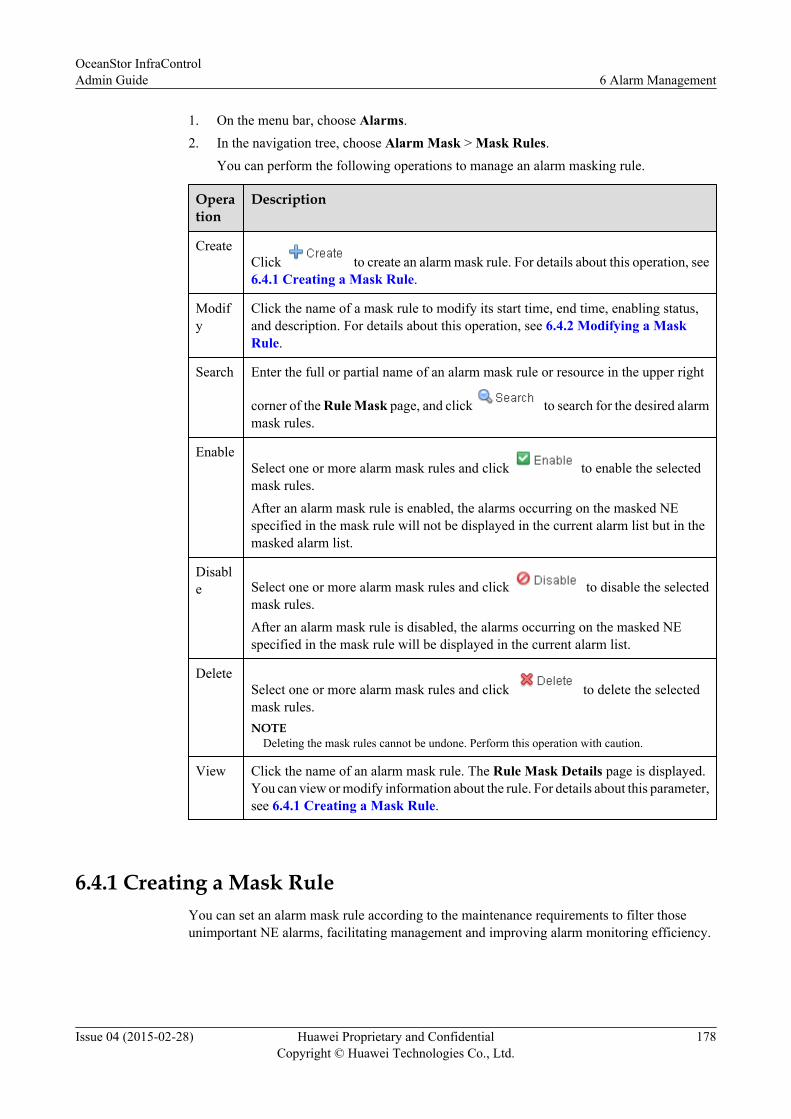
1. On the menu bar, choose Alarms.2. In the navigation tree, choose Alarm Mask > Mask Rules.
You can perform the following operations to manage an alarm masking rule.
Operation
Description
CreateClick to create an alarm mask rule. For details about this operation, see6.4.1 Creating a Mask Rule.
Modify
Click the name of a mask rule to modify its start time, end time, enabling status,and description. For details about this operation, see 6.4.2 Modifying a MaskRule.
Search Enter the full or partial name of an alarm mask rule or resource in the upper right
corner of the Rule Mask page, and click to search for the desired alarmmask rules.
EnableSelect one or more alarm mask rules and click to enable the selectedmask rules.After an alarm mask rule is enabled, the alarms occurring on the masked NEspecified in the mask rule will not be displayed in the current alarm list but in themasked alarm list.
Disable Select one or more alarm mask rules and click to disable the selected
mask rules.After an alarm mask rule is disabled, the alarms occurring on the masked NEspecified in the mask rule will be displayed in the current alarm list.
DeleteSelect one or more alarm mask rules and click to delete the selectedmask rules.NOTE
Deleting the mask rules cannot be undone. Perform this operation with caution.
View Click the name of an alarm mask rule. The Rule Mask Details page is displayed.You can view or modify information about the rule. For details about this parameter,see 6.4.1 Creating a Mask Rule.
6.4.1 Creating a Mask RuleYou can set an alarm mask rule according to the maintenance requirements to filter thoseunimportant NE alarms, facilitating management and improving alarm monitoring efficiency.
OceanStor InfraControlAdmin Guide 6 Alarm Management
Issue 04 (2015-02-28) Huawei Proprietary and ConfidentialCopyright © Huawei Technologies Co., Ltd.
178
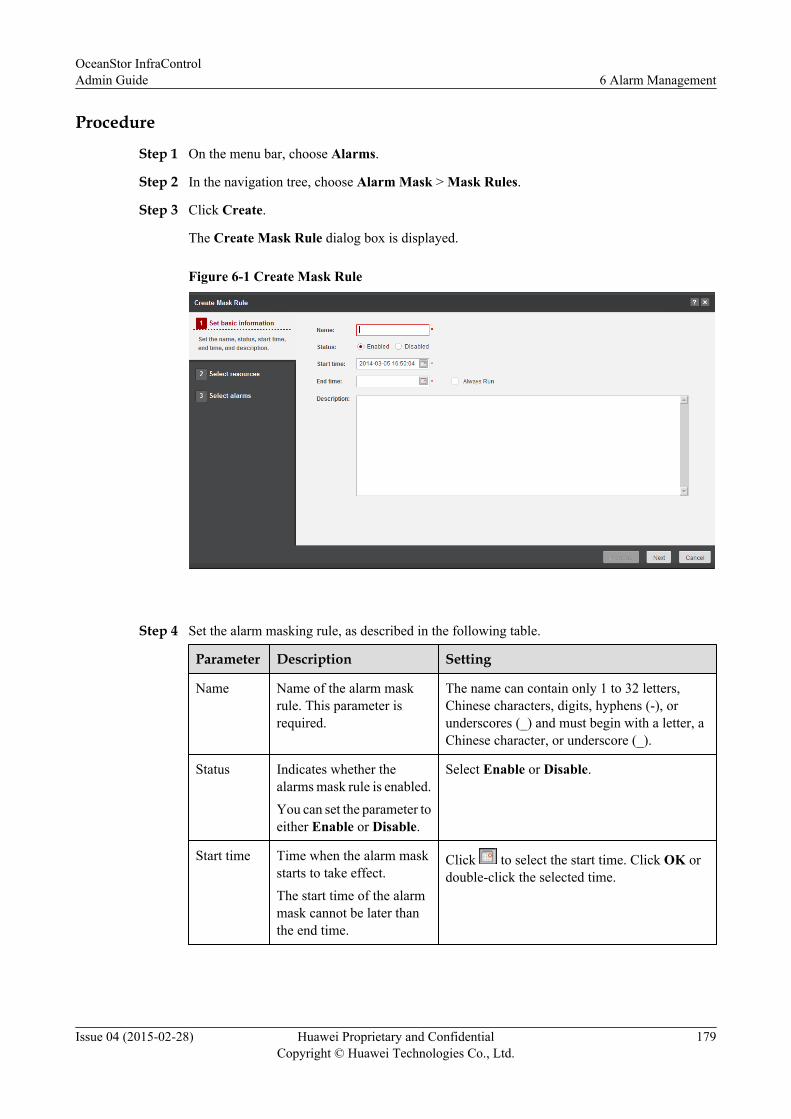
Procedure
Step 1 On the menu bar, choose Alarms.
Step 2 In the navigation tree, choose Alarm Mask > Mask Rules.
Step 3 Click Create.
The Create Mask Rule dialog box is displayed.
Figure 6-1 Create Mask Rule
Step 4 Set the alarm masking rule, as described in the following table.
Parameter Description Setting
Name Name of the alarm maskrule. This parameter isrequired.
The name can contain only 1 to 32 letters,Chinese characters, digits, hyphens (-), orunderscores (_) and must begin with a letter, aChinese character, or underscore (_).
Status Indicates whether thealarms mask rule is enabled.You can set the parameter toeither Enable or Disable.
Select Enable or Disable.
Start time Time when the alarm maskstarts to take effect.The start time of the alarmmask cannot be later thanthe end time.
Click to select the start time. Click OK ordouble-click the selected time.
OceanStor InfraControlAdmin Guide 6 Alarm Management
Issue 04 (2015-02-28) Huawei Proprietary and ConfidentialCopyright © Huawei Technologies Co., Ltd.
179

Parameter Description Setting
End time Time when the validity ofthe alarm mask ends.The end time of the alarmmask cannot be earlier thanthe start time.
Click to select the end time. Click OK ordouble-click the selected time.
AlwaysRun
Indicates whether thealarms mask rule is alwaysrun.
Choose or not choose Always Run.
Description Brief description of thealarm mask rule.
-
Step 5 Click Next. Select the type of NE on which the alarm mask rule will be applied from the NEtree on the left, and select one or more NEs from the NE list on the right.
NOTE
Only one NE type can be selected. In the NE list on the right, you can search for the desired NE by NEname or IP address.
Step 6 Click Next. Select the alarms to mask.You can search for the desired alarms by setting the alarm severity level (critical, major, minor,or warning). Then, select the specific alarms to mask. For example, you can set Warning forthe alarm severity level to search for all the warning alarms on the NE and select thoseunnecessary alarms to mask.
NOTE
This list includes device model has been selected under all alarms, the device under this model may supportdifferent versions of alarms differences.
Step 7 Click Finish.
----End
Resultl If the status of the mask rule is set to Enable, the management system enables the mask
rule immediately when the alarm mask rule is created successfully. Once the alarm that isspecified in the mask rule is reported by the masked NE, the alarm will be displayed in themasked alarm list.
l If the status of the alarm mask rule is set to Disable, you can choose whether to enable themask rule according to the NE status after the alarm mask rule is created successfully.
6.4.2 Modifying a Mask RuleModifying an alarm mask rule enables you to reset basic information about the alarm mask ruleand re-select the alarm NE and alarm information.
Procedure
Step 1 On the menu bar, choose Alarms.
OceanStor InfraControlAdmin Guide 6 Alarm Management
Issue 04 (2015-02-28) Huawei Proprietary and ConfidentialCopyright © Huawei Technologies Co., Ltd.
180
Step 2 In the navigation tree, choose Alarm Mask > Mask Rules.
Step 3 Click the name of an alarm mask rule.
Step 4 Modify basic information about the alarm mask rule.
1. Click in the Basic Information area.2. Modify the information except the name.
For details about how to set the alarm mask rule parameters, see 6.4.1 Creating a MaskRule.
3. Click OK.
Step 5 (Optional) Select the alarm NE.You can do as follows to re-select the alarm NE.
l Click in the Resources area to select the alarm NE.
l Select the NE whose alarms do not need to mask and click to delete the selectedNE from the resource list.
You can also enter the full or partial name of a NE and click to search for theNEs that you want to delete.
Step 6 (Optional) Select the alarms to mask.You can do as follows to re-select the alarms to mask.
l Click in the Alarms area to select the alarms to mask.
l Select the alarms that do not need to mask and click to delete the selected alarmsfrom the alarm list.
You can also select the security from the drop-down box and click to search forthe alarms that you want to delete.
----End
6.4.3 Managing Masked AlarmsMasking the alarms means masking the unnecessary alarms by setting the alarm mask rules. Themanagement system reserves the masked alarms in the masked alarm list for future use.
Procedure
Step 1 On the menu bar, choose Alarms.
Step 2 In the navigation tree, choose Alarm Mask > Masked Alarms.
Step 3 You can perform the following operations to manage masked alarmsl Export
This operation exports some important masked alarms in a file, helping the administratorlocate and analyze problems.
OceanStor InfraControlAdmin Guide 6 Alarm Management
Issue 04 (2015-02-28) Huawei Proprietary and ConfidentialCopyright © Huawei Technologies Co., Ltd.
181
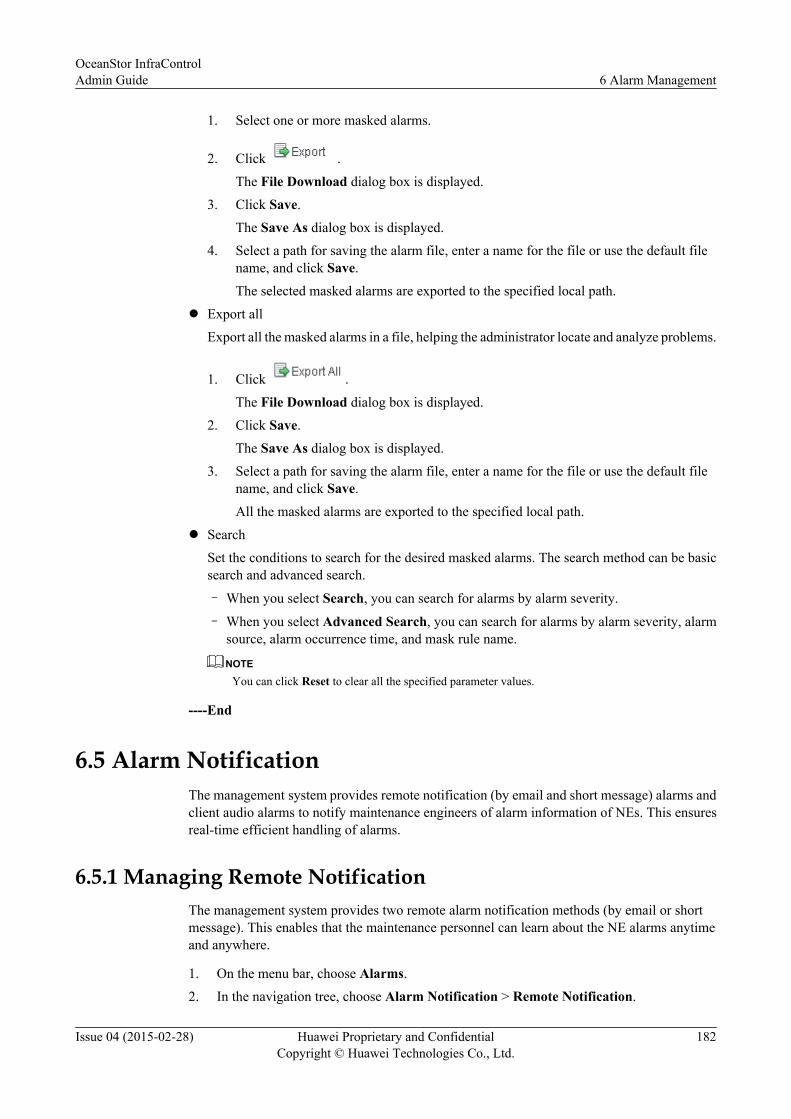
1. Select one or more masked alarms.
2. Click .
The File Download dialog box is displayed.
3. Click Save.
The Save As dialog box is displayed.
4. Select a path for saving the alarm file, enter a name for the file or use the default filename, and click Save.
The selected masked alarms are exported to the specified local path.
l Export all
Export all the masked alarms in a file, helping the administrator locate and analyze problems.
1. Click .
The File Download dialog box is displayed.
2. Click Save.
The Save As dialog box is displayed.
3. Select a path for saving the alarm file, enter a name for the file or use the default filename, and click Save.
All the masked alarms are exported to the specified local path.
l Search
Set the conditions to search for the desired masked alarms. The search method can be basicsearch and advanced search.
– When you select Search, you can search for alarms by alarm severity.
– When you select Advanced Search, you can search for alarms by alarm severity, alarmsource, alarm occurrence time, and mask rule name.
NOTE
You can click Reset to clear all the specified parameter values.
----End
6.5 Alarm NotificationThe management system provides remote notification (by email and short message) alarms andclient audio alarms to notify maintenance engineers of alarm information of NEs. This ensuresreal-time efficient handling of alarms.
6.5.1 Managing Remote NotificationThe management system provides two remote alarm notification methods (by email or shortmessage). This enables that the maintenance personnel can learn about the NE alarms anytimeand anywhere.
1. On the menu bar, choose Alarms.
2. In the navigation tree, choose Alarm Notification > Remote Notification.
OceanStor InfraControlAdmin Guide 6 Alarm Management
Issue 04 (2015-02-28) Huawei Proprietary and ConfidentialCopyright © Huawei Technologies Co., Ltd.
182
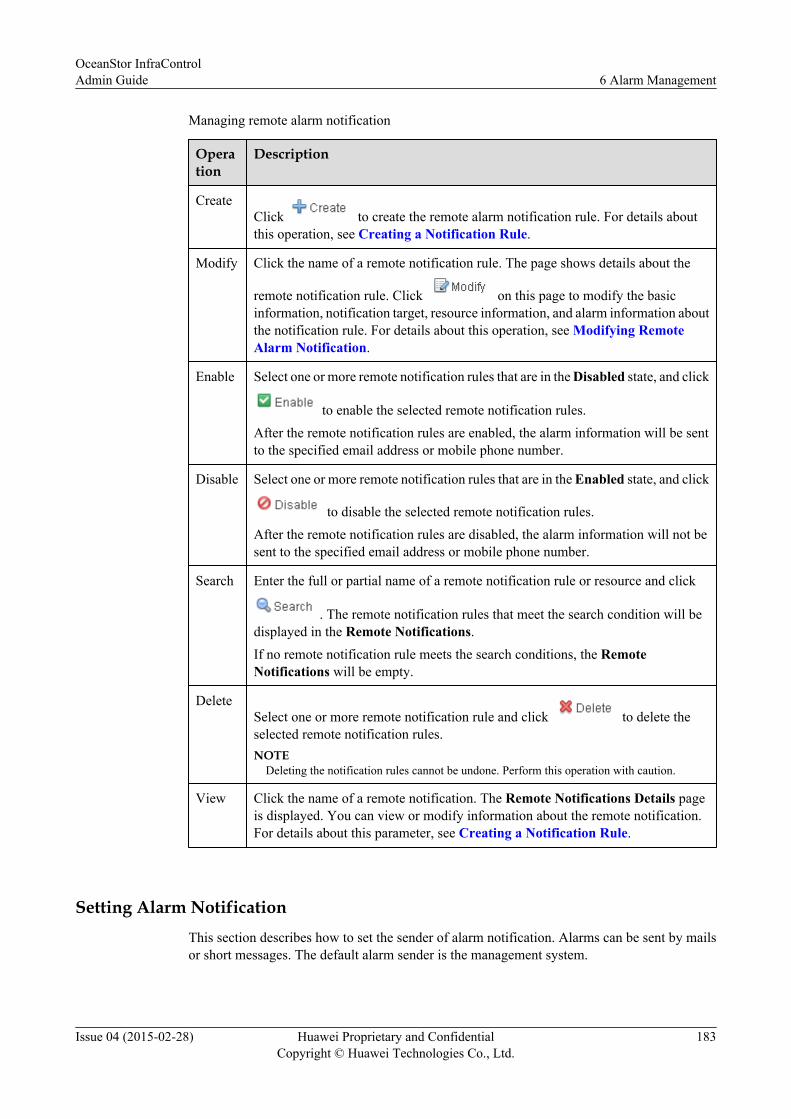
Managing remote alarm notification
Operation
Description
CreateClick to create the remote alarm notification rule. For details aboutthis operation, see Creating a Notification Rule.
Modify Click the name of a remote notification rule. The page shows details about the
remote notification rule. Click on this page to modify the basicinformation, notification target, resource information, and alarm information aboutthe notification rule. For details about this operation, see Modifying RemoteAlarm Notification.
Enable Select one or more remote notification rules that are in the Disabled state, and click
to enable the selected remote notification rules.After the remote notification rules are enabled, the alarm information will be sentto the specified email address or mobile phone number.
Disable Select one or more remote notification rules that are in the Enabled state, and click
to disable the selected remote notification rules.After the remote notification rules are disabled, the alarm information will not besent to the specified email address or mobile phone number.
Search Enter the full or partial name of a remote notification rule or resource and click
. The remote notification rules that meet the search condition will bedisplayed in the Remote Notifications.If no remote notification rule meets the search conditions, the RemoteNotifications will be empty.
DeleteSelect one or more remote notification rule and click to delete theselected remote notification rules.NOTE
Deleting the notification rules cannot be undone. Perform this operation with caution.
View Click the name of a remote notification. The Remote Notifications Details pageis displayed. You can view or modify information about the remote notification.For details about this parameter, see Creating a Notification Rule.
Setting Alarm NotificationThis section describes how to set the sender of alarm notification. Alarms can be sent by mailsor short messages. The default alarm sender is the management system.
OceanStor InfraControlAdmin Guide 6 Alarm Management
Issue 04 (2015-02-28) Huawei Proprietary and ConfidentialCopyright © Huawei Technologies Co., Ltd.
183
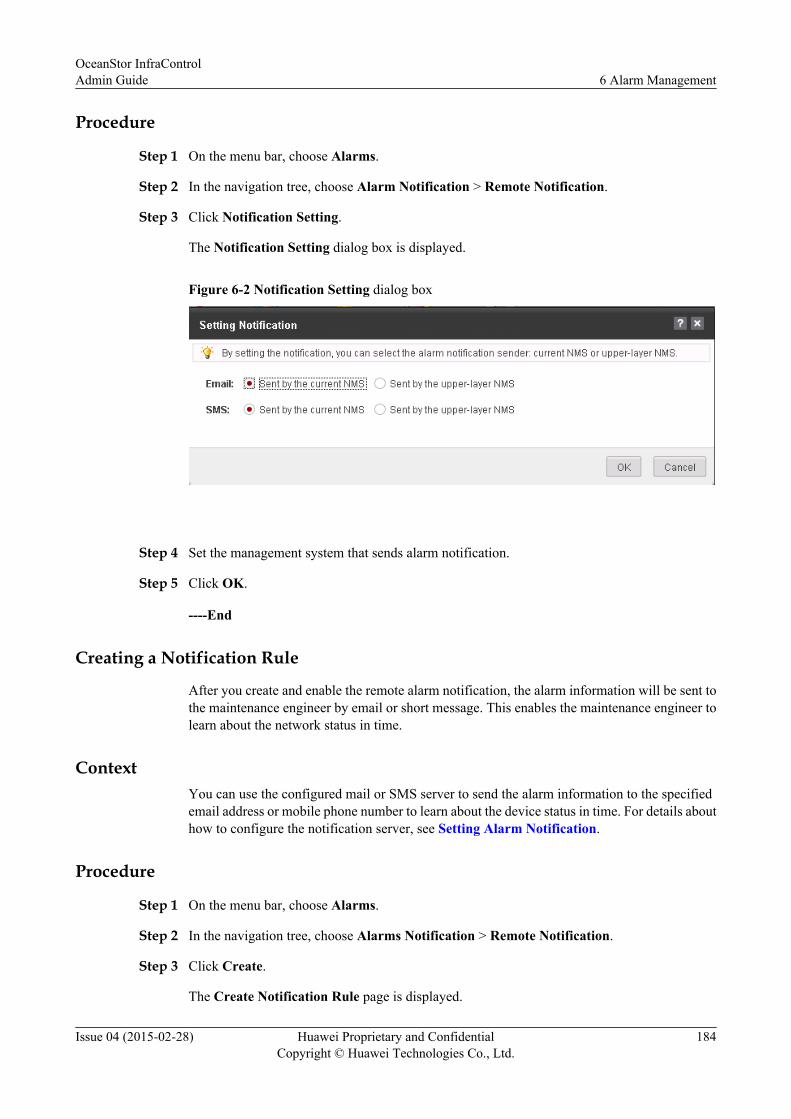
Procedure
Step 1 On the menu bar, choose Alarms.
Step 2 In the navigation tree, choose Alarm Notification > Remote Notification.
Step 3 Click Notification Setting.
The Notification Setting dialog box is displayed.
Figure 6-2 Notification Setting dialog box
Step 4 Set the management system that sends alarm notification.
Step 5 Click OK.
----End
Creating a Notification Rule
After you create and enable the remote alarm notification, the alarm information will be sent tothe maintenance engineer by email or short message. This enables the maintenance engineer tolearn about the network status in time.
ContextYou can use the configured mail or SMS server to send the alarm information to the specifiedemail address or mobile phone number to learn about the device status in time. For details abouthow to configure the notification server, see Setting Alarm Notification.
Procedure
Step 1 On the menu bar, choose Alarms.
Step 2 In the navigation tree, choose Alarms Notification > Remote Notification.
Step 3 Click Create.
The Create Notification Rule page is displayed.
OceanStor InfraControlAdmin Guide 6 Alarm Management
Issue 04 (2015-02-28) Huawei Proprietary and ConfidentialCopyright © Huawei Technologies Co., Ltd.
184
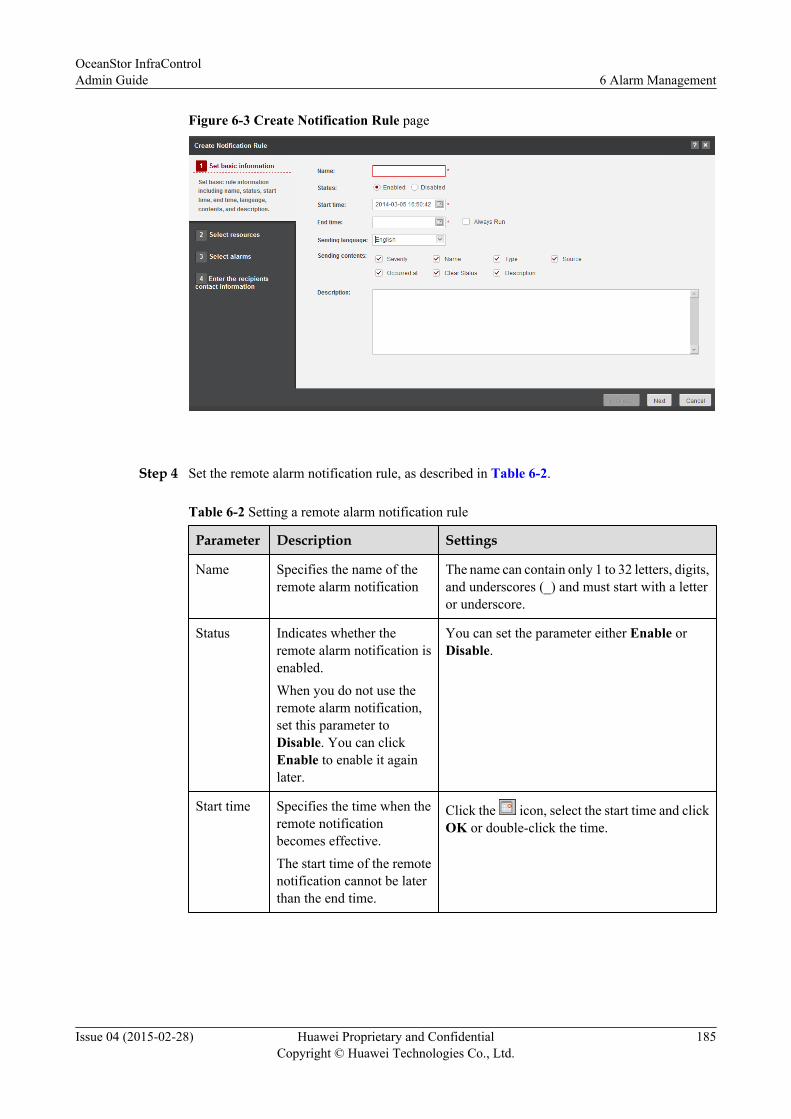
Figure 6-3 Create Notification Rule page
Step 4 Set the remote alarm notification rule, as described in Table 6-2.
Table 6-2 Setting a remote alarm notification rule
Parameter Description Settings
Name Specifies the name of theremote alarm notification
The name can contain only 1 to 32 letters, digits,and underscores (_) and must start with a letteror underscore.
Status Indicates whether theremote alarm notification isenabled.When you do not use theremote alarm notification,set this parameter toDisable. You can clickEnable to enable it againlater.
You can set the parameter either Enable orDisable.
Start time Specifies the time when theremote notificationbecomes effective.The start time of the remotenotification cannot be laterthan the end time.
Click the icon, select the start time and clickOK or double-click the time.
OceanStor InfraControlAdmin Guide 6 Alarm Management
Issue 04 (2015-02-28) Huawei Proprietary and ConfidentialCopyright © Huawei Technologies Co., Ltd.
185
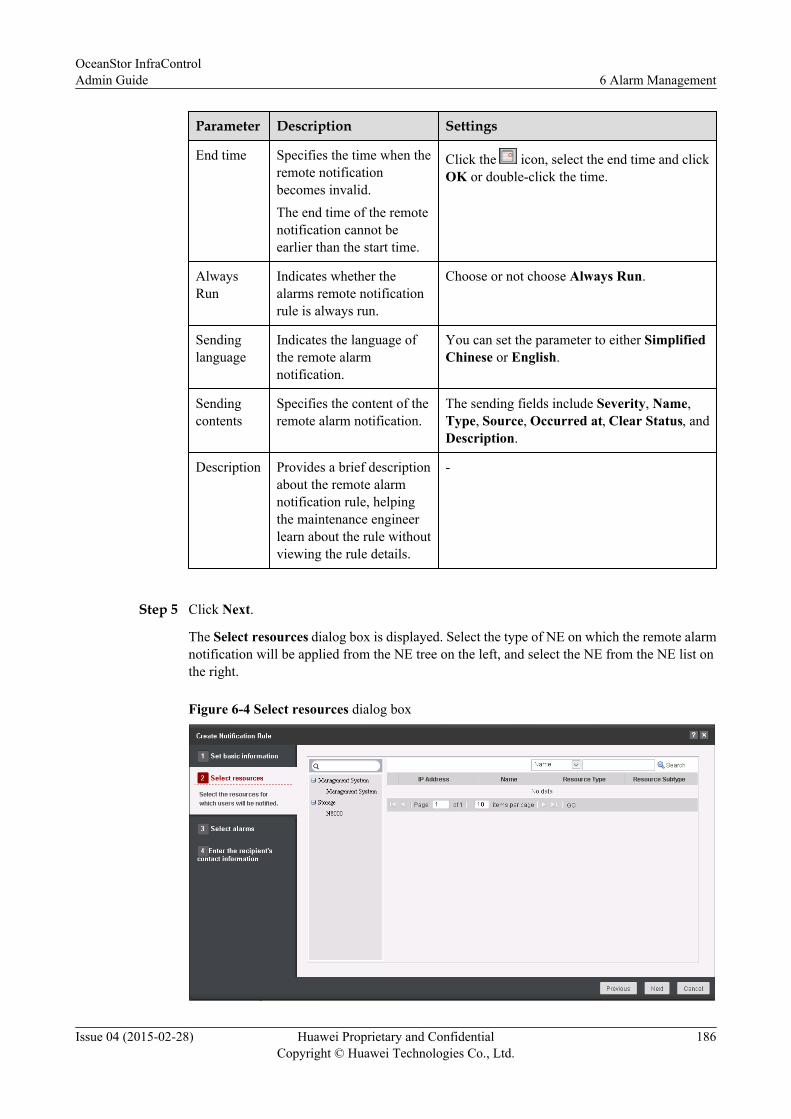
Parameter Description Settings
End time Specifies the time when theremote notificationbecomes invalid.The end time of the remotenotification cannot beearlier than the start time.
Click the icon, select the end time and clickOK or double-click the time.
AlwaysRun
Indicates whether thealarms remote notificationrule is always run.
Choose or not choose Always Run.
Sendinglanguage
Indicates the language ofthe remote alarmnotification.
You can set the parameter to either SimplifiedChinese or English.
Sendingcontents
Specifies the content of theremote alarm notification.
The sending fields include Severity, Name,Type, Source, Occurred at, Clear Status, andDescription.
Description Provides a brief descriptionabout the remote alarmnotification rule, helpingthe maintenance engineerlearn about the rule withoutviewing the rule details.
-
Step 5 Click Next.
The Select resources dialog box is displayed. Select the type of NE on which the remote alarmnotification will be applied from the NE tree on the left, and select the NE from the NE list onthe right.
Figure 6-4 Select resources dialog box
OceanStor InfraControlAdmin Guide 6 Alarm Management
Issue 04 (2015-02-28) Huawei Proprietary and ConfidentialCopyright © Huawei Technologies Co., Ltd.
186
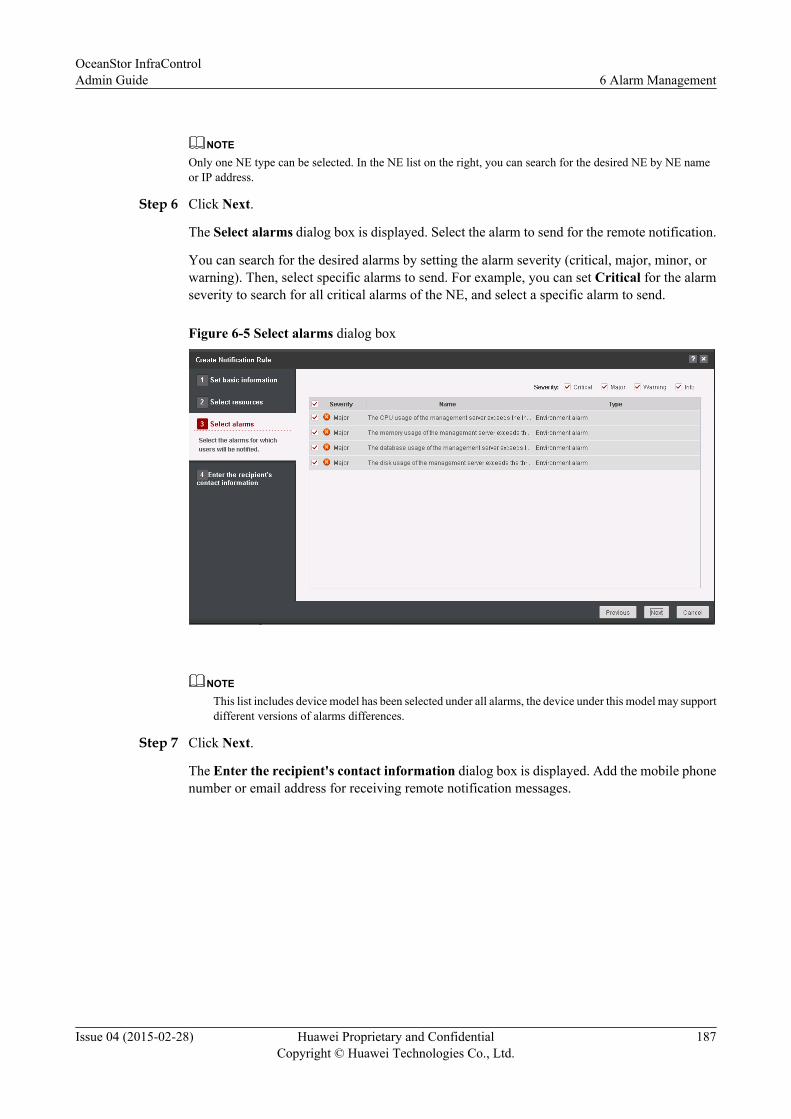
NOTE
Only one NE type can be selected. In the NE list on the right, you can search for the desired NE by NE nameor IP address.
Step 6 Click Next.
The Select alarms dialog box is displayed. Select the alarm to send for the remote notification.
You can search for the desired alarms by setting the alarm severity (critical, major, minor, orwarning). Then, select specific alarms to send. For example, you can set Critical for the alarmseverity to search for all critical alarms of the NE, and select a specific alarm to send.
Figure 6-5 Select alarms dialog box
NOTE
This list includes device model has been selected under all alarms, the device under this model may supportdifferent versions of alarms differences.
Step 7 Click Next.
The Enter the recipient's contact information dialog box is displayed. Add the mobile phonenumber or email address for receiving remote notification messages.
OceanStor InfraControlAdmin Guide 6 Alarm Management
Issue 04 (2015-02-28) Huawei Proprietary and ConfidentialCopyright © Huawei Technologies Co., Ltd.
187
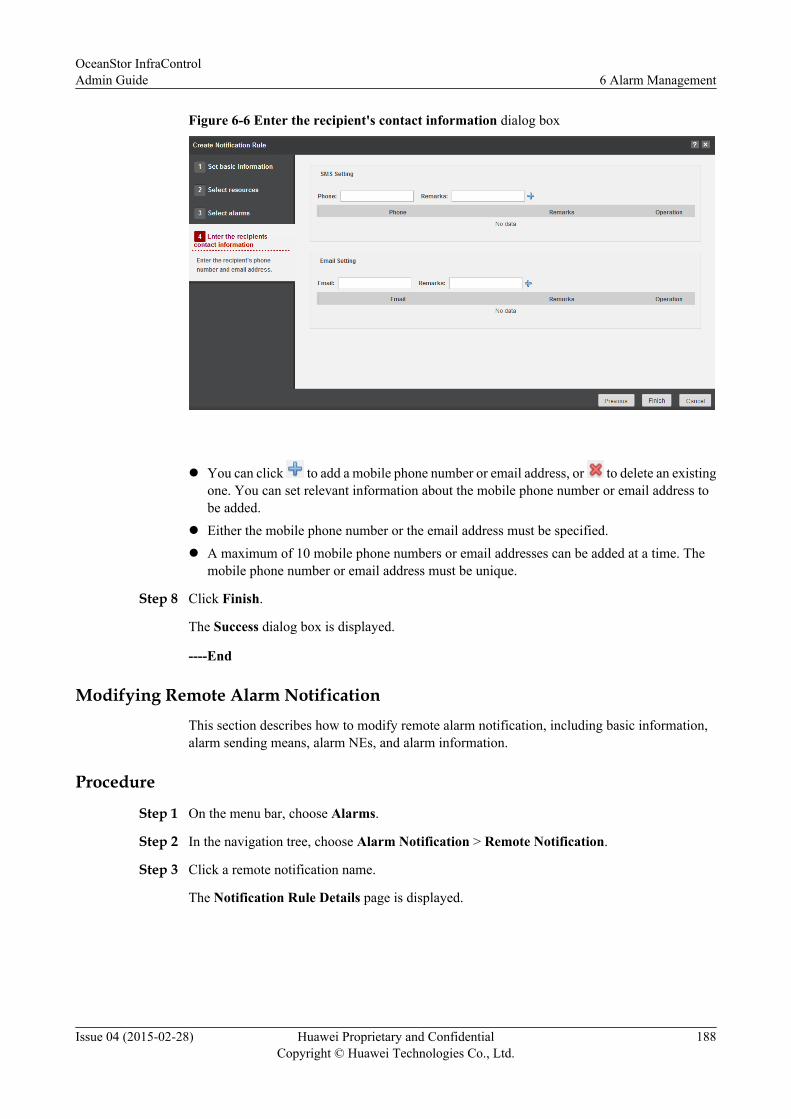
Figure 6-6 Enter the recipient's contact information dialog box
l You can click to add a mobile phone number or email address, or to delete an existingone. You can set relevant information about the mobile phone number or email address tobe added.
l Either the mobile phone number or the email address must be specified.l A maximum of 10 mobile phone numbers or email addresses can be added at a time. The
mobile phone number or email address must be unique.
Step 8 Click Finish.
The Success dialog box is displayed.
----End
Modifying Remote Alarm NotificationThis section describes how to modify remote alarm notification, including basic information,alarm sending means, alarm NEs, and alarm information.
Procedure
Step 1 On the menu bar, choose Alarms.
Step 2 In the navigation tree, choose Alarm Notification > Remote Notification.
Step 3 Click a remote notification name.
The Notification Rule Details page is displayed.
OceanStor InfraControlAdmin Guide 6 Alarm Management
Issue 04 (2015-02-28) Huawei Proprietary and ConfidentialCopyright © Huawei Technologies Co., Ltd.
188
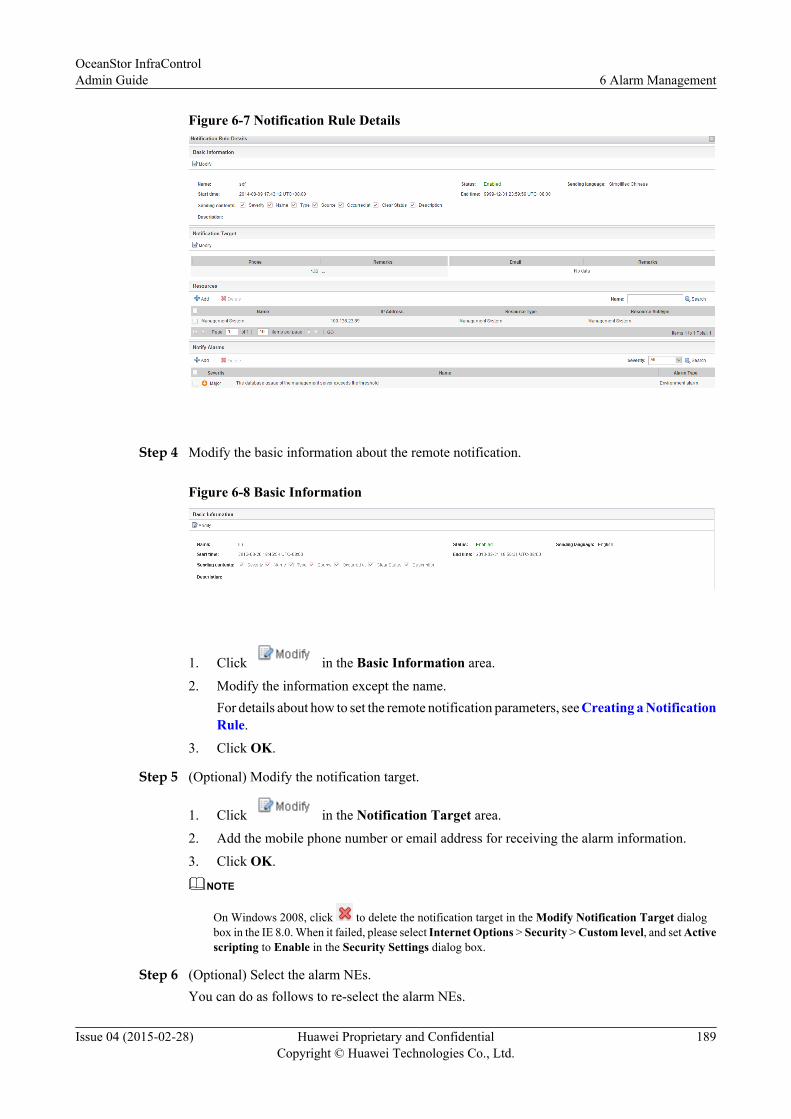
Figure 6-7 Notification Rule Details
Step 4 Modify the basic information about the remote notification.
Figure 6-8 Basic Information
1. Click in the Basic Information area.
2. Modify the information except the name.For details about how to set the remote notification parameters, see Creating a NotificationRule.
3. Click OK.
Step 5 (Optional) Modify the notification target.
1. Click in the Notification Target area.
2. Add the mobile phone number or email address for receiving the alarm information.
3. Click OK.
NOTE
On Windows 2008, click to delete the notification target in the Modify Notification Target dialogbox in the IE 8.0. When it failed, please select Internet Options > Security > Custom level, and set Activescripting to Enable in the Security Settings dialog box.
Step 6 (Optional) Select the alarm NEs.You can do as follows to re-select the alarm NEs.
OceanStor InfraControlAdmin Guide 6 Alarm Management
Issue 04 (2015-02-28) Huawei Proprietary and ConfidentialCopyright © Huawei Technologies Co., Ltd.
189
l Click in the Resources area to select the alarm NEs.
l Select the NEs that do not need the remote alarm notification and click to deletethe selected NEs from the resource list.
You can also enter the full or partial name of a NE and click to search for theNEs that you want to delete.
Step 7 (Optional) Select the alarms to send.You can do as follows to re-select the alarms to send.
l Click in the Alarms area to select the alarms to send.
l Select the alarms that do not need to send and click to delete the selected alarmsfrom the alarm list.
You can also select the security from the drop-down box and click to search forthe alarms that you want to delete.
----End
6.5.2 Configuring the Sound NotificationYou can set different sounds for alarms at different levels. When the NMS receives an alarm,the client host sound box plays the audio notification for the highest level and Uncleared andUnconfirmed alarms.
Contextl The alarm severity level can be critical, major, minor, or warning. The sound can be a
Minor or a Cyclic.
If the sound type is set Minor, the system plays the audio notification per thirteen secondsfor the highest severity and Uncleared and Unconfirmed alarms. If the sound type is setCyclic, the system plays cyclic audio notifications for the Uncleared and Unconfirmedalarms. It is recommended to set Cyclic for critical and major alarms in case that themaintenance personnel is not on site temporarily and cannot hear the alarm sound.
l You can click Restore Defaults to set the alarm sound to the default value. The soundnotification is enabled for the Critical alarms by default.
l There will be no sound notification for the alarms occurring on the masked resources orthe confirmed alarms.
l It is not recommended that sound notification be disabled for all severities of alarms. Thisprevents delayed handling of alarms.
Procedure
Step 1 On the menu bar, choose Alarms.
Step 2 In the navigation tree, choose Alarm Notification > Audible Notification.
OceanStor InfraControlAdmin Guide 6 Alarm Management
Issue 04 (2015-02-28) Huawei Proprietary and ConfidentialCopyright © Huawei Technologies Co., Ltd.
190
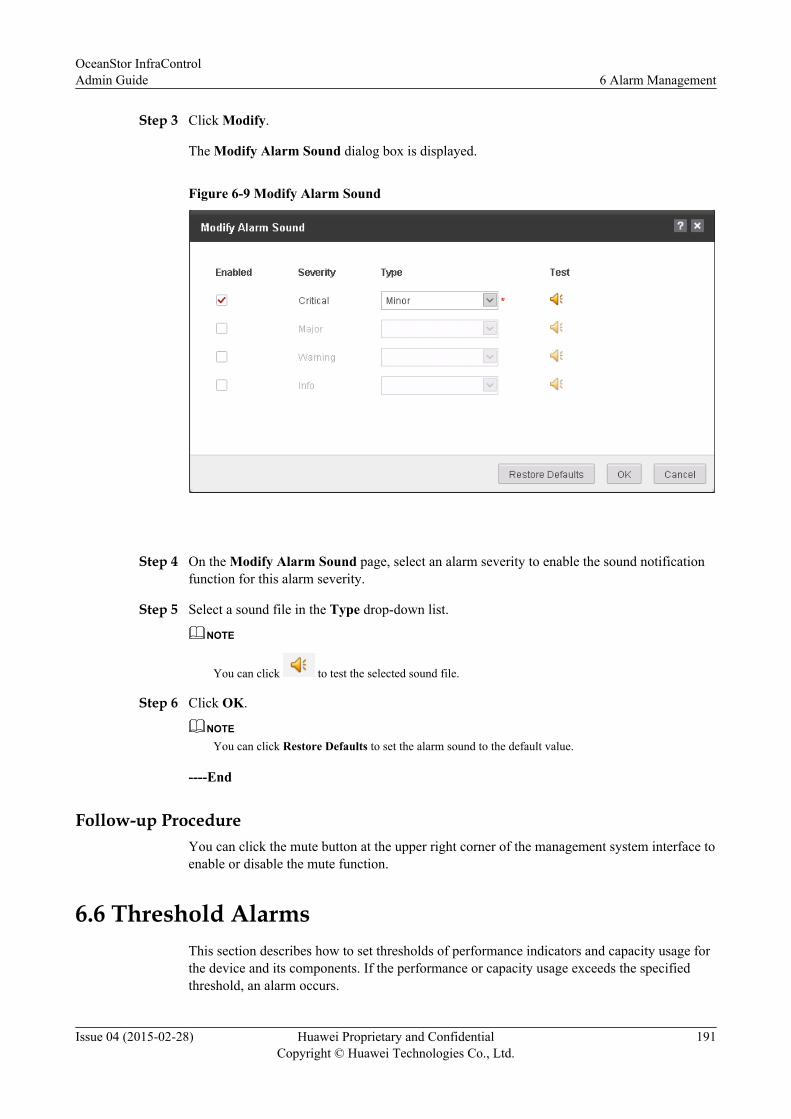
Step 3 Click Modify.
The Modify Alarm Sound dialog box is displayed.
Figure 6-9 Modify Alarm Sound
Step 4 On the Modify Alarm Sound page, select an alarm severity to enable the sound notificationfunction for this alarm severity.
Step 5 Select a sound file in the Type drop-down list.
NOTE
You can click to test the selected sound file.
Step 6 Click OK.
NOTE
You can click Restore Defaults to set the alarm sound to the default value.
----End
Follow-up ProcedureYou can click the mute button at the upper right corner of the management system interface toenable or disable the mute function.
6.6 Threshold AlarmsThis section describes how to set thresholds of performance indicators and capacity usage forthe device and its components. If the performance or capacity usage exceeds the specifiedthreshold, an alarm occurs.
OceanStor InfraControlAdmin Guide 6 Alarm Management
Issue 04 (2015-02-28) Huawei Proprietary and ConfidentialCopyright © Huawei Technologies Co., Ltd.
191

Procedure
Step 1 On the menu bar, choose Alarms.
Step 2 In the navigation tree, choose Alarm Threshold > Alarm Threshold.
Step 3 In the Alarm Threshold area, click next to the device you want to modify.
Step 4 (Optional) Configure the alarm threshold.
Figure 6-10 Threshold
If you do not need to change the threshold, skip the following steps.
Step 5 Set the threshold alarm status.
l You can click to enable the threshold alarm function.
l You can click to disable the threshold alarm function.
Step 6 Click OK.
----End
OceanStor InfraControlAdmin Guide 6 Alarm Management
Issue 04 (2015-02-28) Huawei Proprietary and ConfidentialCopyright © Huawei Technologies Co., Ltd.
192

7 Report Management
About This Chapter
Report management includes managing preset report, custom report, report task, and reportconfiguration. You can use a default report template or define your desired report template.
7.1 Preset Report ManagementThe preset reports provide storage capacity and performance statistics. You can read the presetreports to learn about the device operating status.
7.2 Custom Report ManagementYou can set filter criteria for viewing specific capacity and performance reports.
7.3 Report Task ManagementYou can set periodic reports to obtain periodic system running information.
7.4 Report Configuration ManagementThis section describes how to add a device for statistical collection and perform related settingsfor reports.
OceanStor InfraControlAdmin Guide 7 Report Management
Issue 04 (2015-02-28) Huawei Proprietary and ConfidentialCopyright © Huawei Technologies Co., Ltd.
193
7.1 Preset Report ManagementThe preset reports provide storage capacity and performance statistics. You can read the presetreports to learn about the device operating status.
7.1.1 Viewing the System Performance SummaryThe system performance summary enables you to learn about the performance statistics of diskarrays and unified storage.
Contextl The management system provides the disk array performance statistics collected within the
latest 1 hour and 24 hours. The following uses the 1-hour period as an example.
l The management system provides the storage unit performance statistics collected withinthe latest 1 hour and 24 hours. The following uses the 1-hour period as an example.
Procedure
Step 1 View the disk array performance statistics collected within the latest hour.
1. On the menu bar, choose Report.2. In the navigation tree, choose Preset Report > Disk Arrays Performance > Latest
Hour.
3. In the function pane, click the disk array whose performance statistics you want to view.A dialog box is displayed detailing the LUN bandwidth, LUN IOPS, LUN I/O latency, anddisk array IOPS.
You can export the performance graph to analyze the operating status of the disk array.
l Click to open or save the graph in PDF format.
l Click to open or save the graph in EXCEL format.
l Click to open or save the graph in HTML format.
4. Click Close.
Step 2 View the unified storage performance within the latest hour.
1. On the menu bar, choose Report.2. In the navigation tree, choose Preset Report > Unified Storage Devices Performance >
Latest Hour.
3. In the function pane, click the unified storage system whose performance statistics youwant to view.A dialog box is displayed detailing the LUN bandwidth, LUN IOPS, LUN I/O latency, andunified storage IOPS.
You can export the performance graph to analyze the operating status of the unified storage.
l Click to open or save the graph in PDF format.
OceanStor InfraControlAdmin Guide 7 Report Management
Issue 04 (2015-02-28) Huawei Proprietary and ConfidentialCopyright © Huawei Technologies Co., Ltd.
194
l Click to open or save the graph in EXCEL format.
l Click to open or save the graph in HTML format.4. Click Close.
----End
7.1.2 Preset Report of a Disk ArrayThe preset report of a disk array provides storage capacity and performance statistics of the diskarray. You can read the preset report to learn about the operating status of the disk array.
Disk Array Capacity SummaryThe disk array capacity summary enables you to learn about the usage statistics of the systemcapacity, disk capacity, thin pool capacity, storage pool capacity, and LUN capacity.
PrerequisitesAt least one storage device exists on the management system.
ContextThe management system provides the disk array capacity statistics collected within the latest 30days.
Procedure
Step 1 On the menu bar, choose Report.
Step 2 In the navigation tree, choose Preset Report > Disk Arrays Performance.
Step 3 Under Disk Arrays Performance, select the disk array whose capacity statistics you want toview.
Step 4 Under the selected disk array, choose Capacity Summary > Latest 30 Days.In the function pane, the disk array capacity statistics collected within the latest 30 days aredisplayed.
You can export the capacity graph to analyze the capacity usage trend.
l Click to open or save the graph in PDF format.
l Click to open or save the graph in EXCEL format.
l Click to open or save the graph in HTML format.
l Click to open or save the graph in CSV format.
----End
Top 5 Thin LUN CapacityThe thin LUN capacity statistics help you analyze the usage trend of the thin LUN capacity.
OceanStor InfraControlAdmin Guide 7 Report Management
Issue 04 (2015-02-28) Huawei Proprietary and ConfidentialCopyright © Huawei Technologies Co., Ltd.
195

Prerequisites
At least one storage device exists on the management system.
Context
The management system provides the thin capacity statistics collected within the latest 24 hours,7 days, and 30 days. The following uses the 24-hour period as an example.
Procedure
Step 1 On the menu bar, choose Report.
Step 2 In the navigation tree, choose Preset Report > Disk Arrays Performance.
Step 3 Under Disk Arrays Performance, select the disk array whose capacity statistics you want toview.
Step 4 Under the selected disk array, choose Top 5 Thin LUN Capacity Usage > Latest 24 Hours.In the function pane, the usage of the thin LUN capacity is displayed.You can export the capacity graph to analyze the capacity usage trend.
l Click to open or save the graph in PDF format.
l Click to open or save the graph in EXCEL format.
l Click to open or save the graph in HTML format.
l Click to open or save the graph in CSV format.
NOTE
Opening the detail information web page of the thin LUN when clicked its name.
----End
Top 5 Storage Pool Capacity
The storage pool capacity statistics help you learn about the usage history of the storage poolcapacity, and manage the disk array accordingly.
Prerequisites
At least one storage device exists on the management system.
Context
The management system provides the storage pool capacity statistics collected within the latest7 days and 30 days. The following uses the 7-day period as an example.
Procedure
Step 1 On the menu bar, choose Report.
Step 2 In the navigation tree, choose Preset Report > Disk Arrays Performance.
OceanStor InfraControlAdmin Guide 7 Report Management
Issue 04 (2015-02-28) Huawei Proprietary and ConfidentialCopyright © Huawei Technologies Co., Ltd.
196
Step 3 Under Disk Arrays Performance, select the disk array whose capacity statistics you want toview.
Step 4 Under the selected disk array, choose Top 5 Storage Pool Capacity Usage > Latest 7 Days.In the function pane, the storage pool capacity usage is displayed.You can export the capacity graph to analyze the capacity usage trend.
l Click to open or save the graph in PDF format.
l Click to open or save the graph in EXCEL format.
l Click to open or save the graph in HTML format.
l Click to open or save the graph in CSV format.
NOTE
Opening the detail information web page of the storage pool when clicked its name. And you can view thedata distribution status of storage tiers in the Storage Pool Details.
----End
Top 5 Thin Pool Capacity
A thin pool uses the thin provisioning technology to enable dynamic and on-demand storagespace allocation. The thin pool capacity statistics help you analyze the usage trend of the thinpool capacity and manage the thin pool accordingly.
Prerequisites
At least one storage device exists on the management system.
Context
The management system provides the thin pool capacity statistics collected within the latest 7days and 30 days. The following uses the 7-day period as an example.
Procedure
Step 1 On the menu bar, choose Report.
Step 2 In the navigation tree, choose Preset Report > Disk Arrays Performance.
Step 3 Under Disk Arrays Performance, select the disk array whose capacity statistics you want toview.
Step 4 Under the selected disk array, choose Top 5 Thin Pool Capacity Usage > Latest 7 Days.In the function pane, the usage of the thin pool capacity is displayed.You can export the capacity graph to analyze the capacity usage trend.
l Click to open or save the graph in PDF format.
l Click to open or save the graph in EXCEL format.
l Click to open or save the graph in HTML format.
OceanStor InfraControlAdmin Guide 7 Report Management
Issue 04 (2015-02-28) Huawei Proprietary and ConfidentialCopyright © Huawei Technologies Co., Ltd.
197
l Click to open or save the graph in CSV format.
----End
Top 5 Disk Performance
The disk performance statistics help you analyze the disk performance trend, and locate andtroubleshoot faulty disks accordingly.
Prerequisites
At least one storage device exists on the management system.
Context
The management system provides the disk performance statistics collected within the latest 24hours, 7 days, and 30 days. The following uses the 24-hour period as an example.
Procedure
Step 1 On the menu bar, choose Report.
Step 2 In the navigation tree, choose Preset Report > Disk Arrays Performance.
Step 3 Under Disk Arrays Performance, select the disk array whose capacity statistics you want toview.
Step 4 Under the selected disk array, choose Top 5 Disk Performance > Latest 24 Hours.In the function pane, the disk performance statistics are displayed.
You can export the performance graph to analyze the disk performance trend.
l Click to open or save the graph in PDF format.
l Click to open or save the graph in EXCEL format.
l Click to open or save the graph in HTML format.
----End
Top 5 Storage Pool Performance
The storage pool performance statistics help you learn about the storage pool performancehistory, and locate and troubleshoot faulty storage pools accordingly.
Prerequisites
At least one storage device exists on the management system.
Context
The management system provides the storage pool performance statistics collected within thelatest 24 hours, 7 days, and 30 days. The following uses the 24-hour period as an example.
OceanStor InfraControlAdmin Guide 7 Report Management
Issue 04 (2015-02-28) Huawei Proprietary and ConfidentialCopyright © Huawei Technologies Co., Ltd.
198
Procedure
Step 1 On the menu bar, choose Report.
Step 2 In the navigation tree, choose Preset Report > Disk Arrays Performance.
Step 3 Under Disk Arrays Performance, select the disk array whose capacity statistics you want toview.
Step 4 Under the selected disk array, choose Top 5 Storage Pool Performance > Latest 24 Hours.In the function pane, the storage pool performance history is displayed.
You can export the performance graph to analyze the storage pool performance trend.
l Click to open or save the graph in PDF format.
l Click to open or save the graph in EXCEL format.
l Click to open or save the graph in HTML format.
----End
Top 5 Host Port PerformanceThe host port performance statistics help you analyze the host port performance trend, and locateand troubleshoot faulty host ports accordingly.
PrerequisitesAt least one storage device exists on the management system.
ContextThe management system provides the host port performance statistics collected within the latest24 hours, 7 days, and 30 days. The following uses the 24-hour period as an example.
Procedure
Step 1 On the menu bar, choose Report.
Step 2 In the navigation tree, choose Preset Report > Disk Arrays Performance.
Step 3 Under Disk Arrays Performance, select the disk array whose capacity statistics you want toview.
Step 4 Under the selected disk array, choose Top 5 Host Port Performance > Latest 24 Hours.In the function pane, the host port performance statistics are displayed.
You can export the performance graph to analyze the host port performance trend.
l Click to open or save the graph in PDF format.
l Click to open or save the graph in EXCEL format.
l Click to open or save the graph in HTML format.
----End
OceanStor InfraControlAdmin Guide 7 Report Management
Issue 04 (2015-02-28) Huawei Proprietary and ConfidentialCopyright © Huawei Technologies Co., Ltd.
199
Top 5 LUN Performance
A logical unit number (LUN) is a logical disk provided by a controller to application servers forstorage. LUNs help application servers make better use of storage resources. The LUNperformance statistics help you learn about the LUN performance history and analyze the LUNperformance trend.
Viewing the LUN performance includes the following operations:
Cache
The LUN cache performance statistics help you learn about the read and write cache hit ratiosof each LUN, and monitor LUNs' operating status accordingly.
Prerequisitesl At least one storage device exists on the management system.
l At least one LUN exists on the management system and is running correctly.
Context
The management system provides the LUN cache performance statistics collected within thelatest 24 hours, 7 days, and 30 days. The following uses the 24-hour period as an example.
Procedure
Step 1 On the menu bar, choose Report.
Step 2 In the navigation tree, choose Preset Report > Disk Arrays Performance.
Step 3 Under Disk Arrays Performance, select the disk array whose capacity statistics you want toview.
Step 4 Under the selected disk array, choose Top 5 LUN Performance > Cache in Latest 24Hours.
l In the function pane, the read and write cache hit ratios are displayed.
l In the function pane, the LUN parameters are displayed, as described in the following table:
Parameter Description Value
Name Name of the LUN. [Example]LUN001
Max.Read Cache Hit Ratio(%)
Maximum read cache hitratio of the LUN.
[Example]100
Min.Read Cache Hit Ratio(%)
Minimum read cache hitratio of the LUN.
[Example]40
Max.Write Cache Hit Ratio(%)
Maximum write cache hitratio of the LUN.
[Example]100
OceanStor InfraControlAdmin Guide 7 Report Management
Issue 04 (2015-02-28) Huawei Proprietary and ConfidentialCopyright © Huawei Technologies Co., Ltd.
200
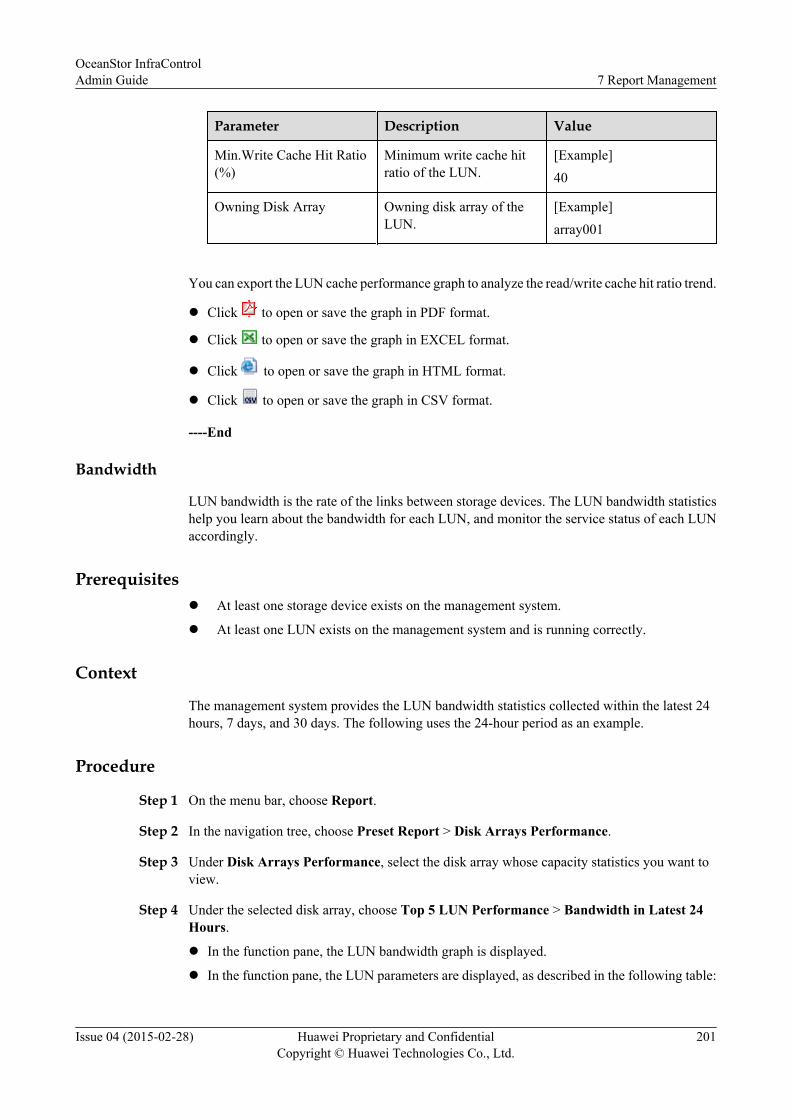
Parameter Description Value
Min.Write Cache Hit Ratio(%)
Minimum write cache hitratio of the LUN.
[Example]40
Owning Disk Array Owning disk array of theLUN.
[Example]array001
You can export the LUN cache performance graph to analyze the read/write cache hit ratio trend.
l Click to open or save the graph in PDF format.
l Click to open or save the graph in EXCEL format.
l Click to open or save the graph in HTML format.
l Click to open or save the graph in CSV format.
----End
Bandwidth
LUN bandwidth is the rate of the links between storage devices. The LUN bandwidth statisticshelp you learn about the bandwidth for each LUN, and monitor the service status of each LUNaccordingly.
Prerequisitesl At least one storage device exists on the management system.
l At least one LUN exists on the management system and is running correctly.
Context
The management system provides the LUN bandwidth statistics collected within the latest 24hours, 7 days, and 30 days. The following uses the 24-hour period as an example.
Procedure
Step 1 On the menu bar, choose Report.
Step 2 In the navigation tree, choose Preset Report > Disk Arrays Performance.
Step 3 Under Disk Arrays Performance, select the disk array whose capacity statistics you want toview.
Step 4 Under the selected disk array, choose Top 5 LUN Performance > Bandwidth in Latest 24Hours.
l In the function pane, the LUN bandwidth graph is displayed.
l In the function pane, the LUN parameters are displayed, as described in the following table:
OceanStor InfraControlAdmin Guide 7 Report Management
Issue 04 (2015-02-28) Huawei Proprietary and ConfidentialCopyright © Huawei Technologies Co., Ltd.
201
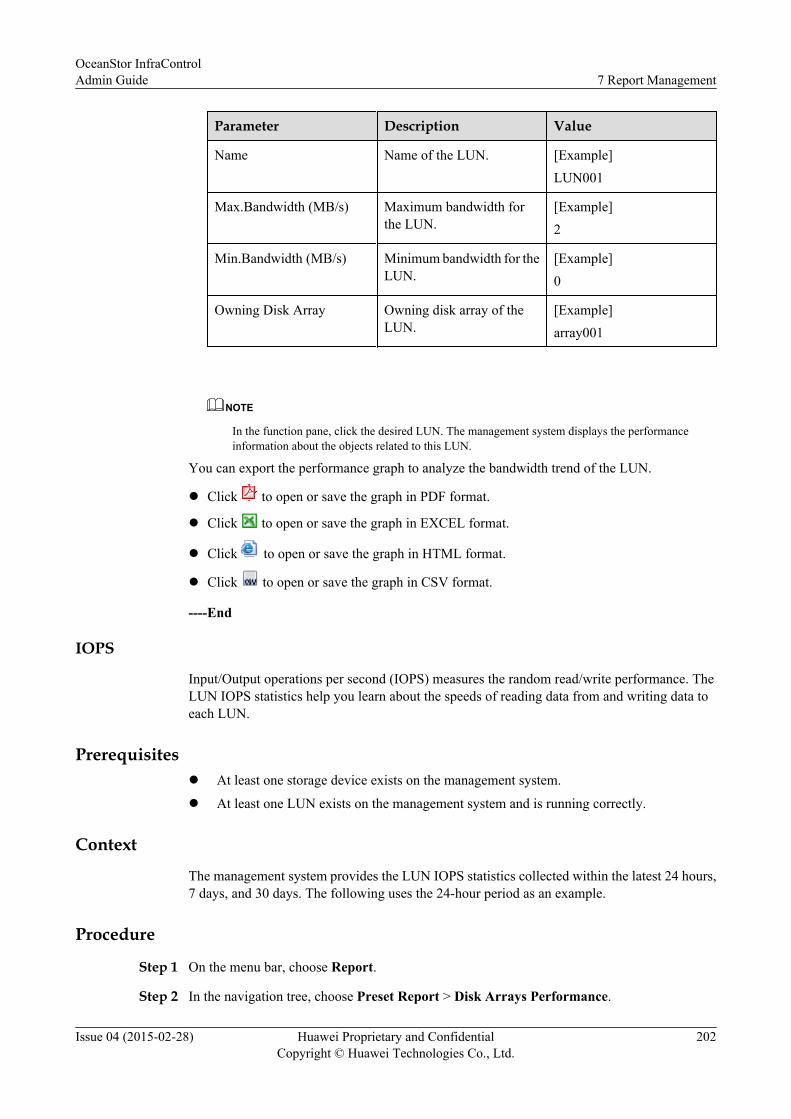
Parameter Description Value
Name Name of the LUN. [Example]LUN001
Max.Bandwidth (MB/s) Maximum bandwidth forthe LUN.
[Example]2
Min.Bandwidth (MB/s) Minimum bandwidth for theLUN.
[Example]0
Owning Disk Array Owning disk array of theLUN.
[Example]array001
NOTE
In the function pane, click the desired LUN. The management system displays the performanceinformation about the objects related to this LUN.
You can export the performance graph to analyze the bandwidth trend of the LUN.
l Click to open or save the graph in PDF format.
l Click to open or save the graph in EXCEL format.
l Click to open or save the graph in HTML format.
l Click to open or save the graph in CSV format.
----End
IOPS
Input/Output operations per second (IOPS) measures the random read/write performance. TheLUN IOPS statistics help you learn about the speeds of reading data from and writing data toeach LUN.
Prerequisitesl At least one storage device exists on the management system.
l At least one LUN exists on the management system and is running correctly.
Context
The management system provides the LUN IOPS statistics collected within the latest 24 hours,7 days, and 30 days. The following uses the 24-hour period as an example.
Procedure
Step 1 On the menu bar, choose Report.
Step 2 In the navigation tree, choose Preset Report > Disk Arrays Performance.
OceanStor InfraControlAdmin Guide 7 Report Management
Issue 04 (2015-02-28) Huawei Proprietary and ConfidentialCopyright © Huawei Technologies Co., Ltd.
202
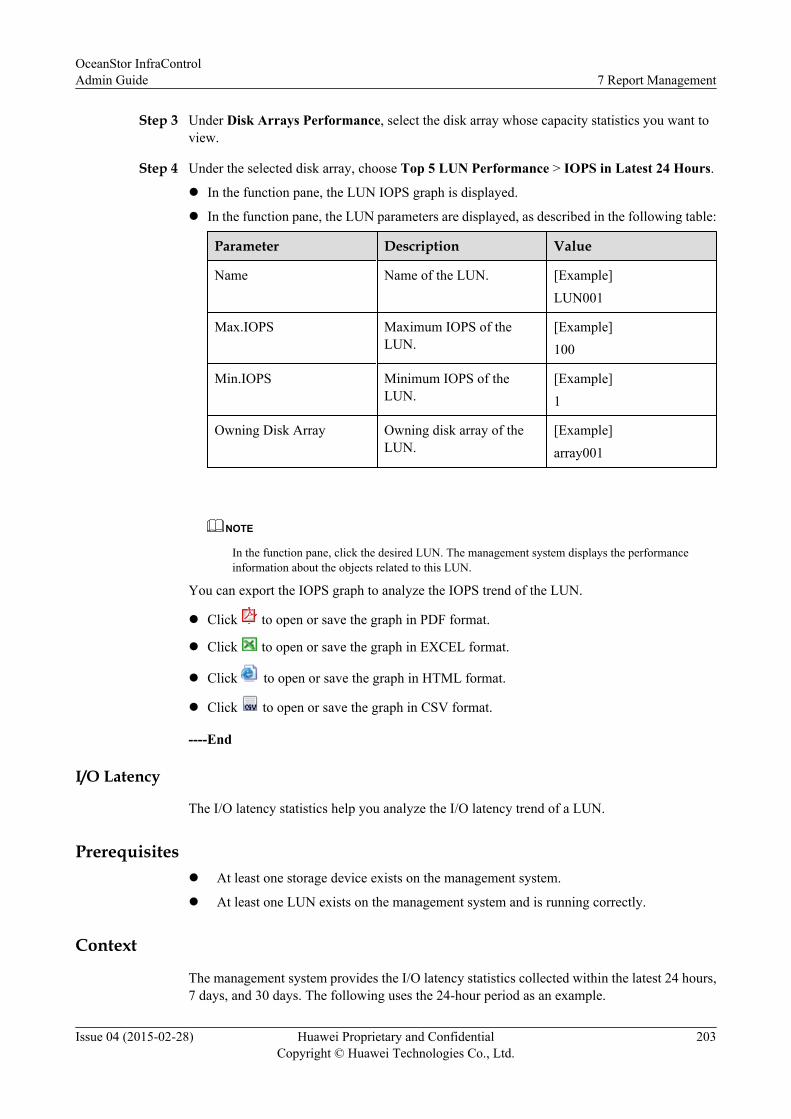
Step 3 Under Disk Arrays Performance, select the disk array whose capacity statistics you want toview.
Step 4 Under the selected disk array, choose Top 5 LUN Performance > IOPS in Latest 24 Hours.
l In the function pane, the LUN IOPS graph is displayed.
l In the function pane, the LUN parameters are displayed, as described in the following table:
Parameter Description Value
Name Name of the LUN. [Example]LUN001
Max.IOPS Maximum IOPS of theLUN.
[Example]100
Min.IOPS Minimum IOPS of theLUN.
[Example]1
Owning Disk Array Owning disk array of theLUN.
[Example]array001
NOTE
In the function pane, click the desired LUN. The management system displays the performanceinformation about the objects related to this LUN.
You can export the IOPS graph to analyze the IOPS trend of the LUN.
l Click to open or save the graph in PDF format.
l Click to open or save the graph in EXCEL format.
l Click to open or save the graph in HTML format.
l Click to open or save the graph in CSV format.
----End
I/O Latency
The I/O latency statistics help you analyze the I/O latency trend of a LUN.
Prerequisitesl At least one storage device exists on the management system.
l At least one LUN exists on the management system and is running correctly.
Context
The management system provides the I/O latency statistics collected within the latest 24 hours,7 days, and 30 days. The following uses the 24-hour period as an example.
OceanStor InfraControlAdmin Guide 7 Report Management
Issue 04 (2015-02-28) Huawei Proprietary and ConfidentialCopyright © Huawei Technologies Co., Ltd.
203
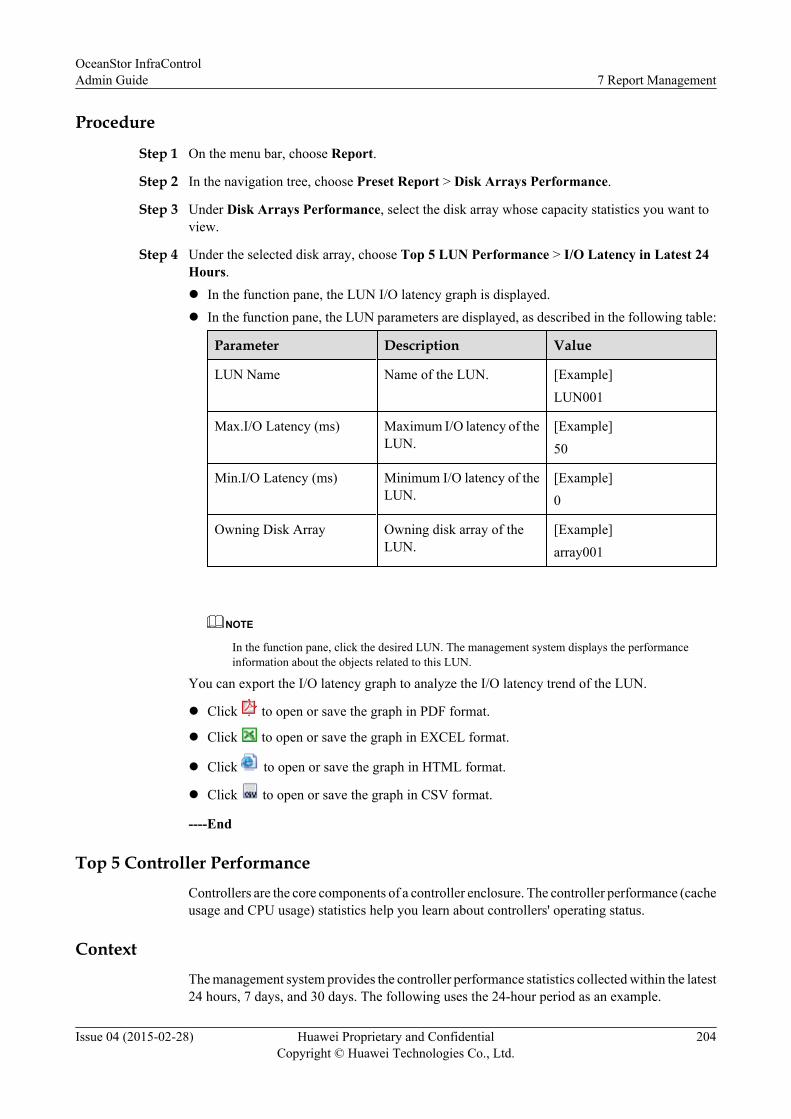
Procedure
Step 1 On the menu bar, choose Report.
Step 2 In the navigation tree, choose Preset Report > Disk Arrays Performance.
Step 3 Under Disk Arrays Performance, select the disk array whose capacity statistics you want toview.
Step 4 Under the selected disk array, choose Top 5 LUN Performance > I/O Latency in Latest 24Hours.l In the function pane, the LUN I/O latency graph is displayed.l In the function pane, the LUN parameters are displayed, as described in the following table:
Parameter Description Value
LUN Name Name of the LUN. [Example]LUN001
Max.I/O Latency (ms) Maximum I/O latency of theLUN.
[Example]50
Min.I/O Latency (ms) Minimum I/O latency of theLUN.
[Example]0
Owning Disk Array Owning disk array of theLUN.
[Example]array001
NOTE
In the function pane, click the desired LUN. The management system displays the performanceinformation about the objects related to this LUN.
You can export the I/O latency graph to analyze the I/O latency trend of the LUN.
l Click to open or save the graph in PDF format.
l Click to open or save the graph in EXCEL format.
l Click to open or save the graph in HTML format.
l Click to open or save the graph in CSV format.
----End
Top 5 Controller PerformanceControllers are the core components of a controller enclosure. The controller performance (cacheusage and CPU usage) statistics help you learn about controllers' operating status.
ContextThe management system provides the controller performance statistics collected within the latest24 hours, 7 days, and 30 days. The following uses the 24-hour period as an example.
OceanStor InfraControlAdmin Guide 7 Report Management
Issue 04 (2015-02-28) Huawei Proprietary and ConfidentialCopyright © Huawei Technologies Co., Ltd.
204
Procedure
Step 1 On the menu bar, choose Report.
Step 2 In the navigation tree, choose Preset Report > Disk Arrays Performance.
Step 3 Under Disk Arrays Performance, select the disk array whose capacity statistics you want toview.
Step 4 Under the selected disk array, choose Top 5 Controller Performance > Latest 24 Hours.In the function pane, the cache usage and the CPU usage are displayed.
You can export the cache and CPU usage graphs to analyze the controller performance.
l Click to open or save the graphs in PDF format.
l Click to open or save the graphs in EXCEL format.
l Click to open or save the graphs in HTML format.
----End
7.1.3 Preset Report of a Heterogeneous ArrayThe preset report of a heterogeneous array provides storage capacity and performance statisticsof the disk array. You can read the preset report to learn about the operating status of theheterogeneous array.
Top 5 Disk PerformanceThe disk performance statistics help you analyze the disk performance trend, and locate andtroubleshoot faulty disks accordingly.
PrerequisitesAt least one storage device exists on the management system.
ContextThe management system provides the disk performance statistics collected within the latest 24hours, 7 days, and 30 days. The following uses the 24-hour period as an example.
Procedure
Step 1 On the menu bar, choose Report.
Step 2 In the navigation tree, choose Preset Report > Disk Arrays Performance.
Step 3 Under Disk Arrays Performance, select the heterogeneous array whose capacity statistics youwant to view.
Step 4 Under the selected heterogeneous array, choose Top 5 Disk Performance > Latest 24 Hours.In the function pane, the disk performance statistics are displayed.
You can export the performance graph to analyze the disk performance trend.
OceanStor InfraControlAdmin Guide 7 Report Management
Issue 04 (2015-02-28) Huawei Proprietary and ConfidentialCopyright © Huawei Technologies Co., Ltd.
205
l Click to open or save the graph in PDF format.
l Click to open or save the graph in EXCEL format.
l Click to open or save the graph in HTML format.
----End
Top 5 Host Port Performance
The host port performance statistics help you analyze the host port performance trend, and locateand troubleshoot faulty host ports accordingly.
Prerequisites
At least one storage device exists on the management system.
Context
The management system provides the host port performance statistics collected within the latest24 hours, 7 days, and 30 days. The following uses the 24-hour period as an example.
Procedure
Step 1 On the menu bar, choose Report.
Step 2 In the navigation tree, choose Preset Report > Disk Arrays Performance.
Step 3 Under Disk Arrays Performance, select the heterogeneous array whose capacity statistics youwant to view.
Step 4 Under the selected heterogeneous array, choose Top 5 Host Port Performance > Latest 24Hours.In the function pane, the host port performance statistics are displayed.
You can export the performance graph to analyze the host port performance trend.
l Click to open or save the graph in PDF format.
l Click to open or save the graph in EXCEL format.
l Click to open or save the graph in HTML format.
----End
Top 5 LUN Performance
A logical unit number (LUN) is a logical disk provided by a controller to application servers forstorage. LUNs help application servers make better use of storage resources. The LUNperformance statistics help you learn about the LUN performance history and analyze the LUNperformance trend.
Viewing the LUN performance includes the following operations:
OceanStor InfraControlAdmin Guide 7 Report Management
Issue 04 (2015-02-28) Huawei Proprietary and ConfidentialCopyright © Huawei Technologies Co., Ltd.
206
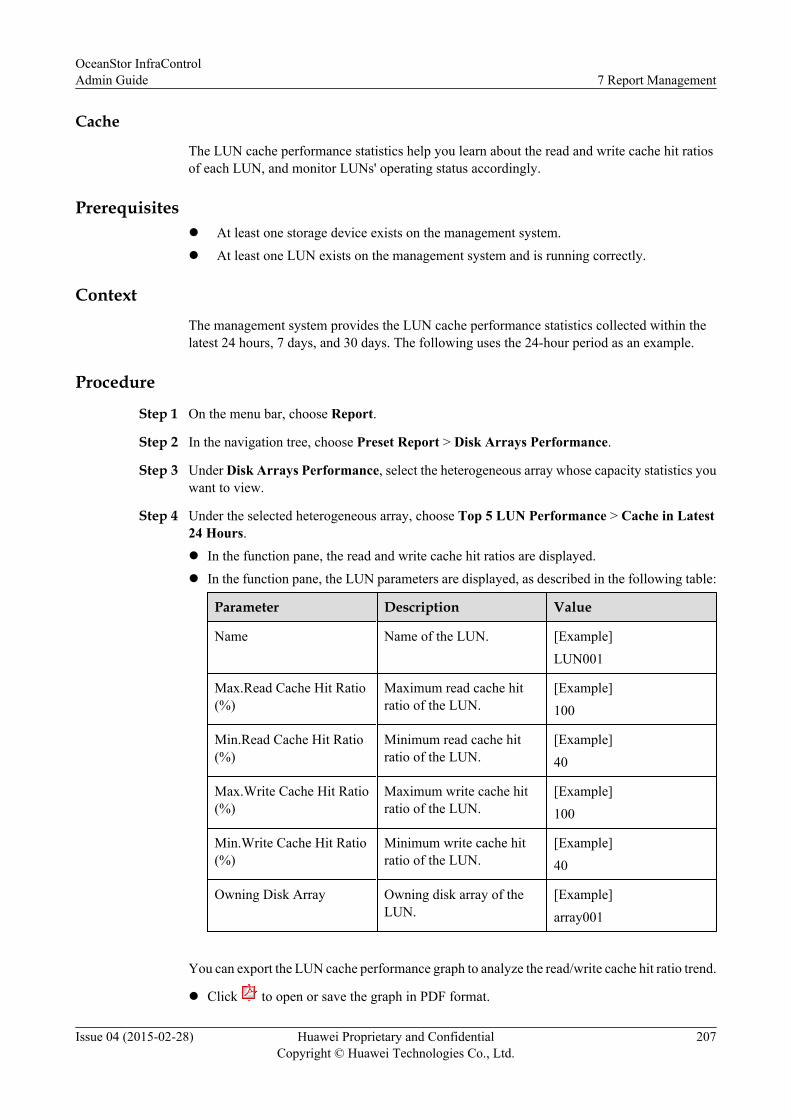
Cache
The LUN cache performance statistics help you learn about the read and write cache hit ratiosof each LUN, and monitor LUNs' operating status accordingly.
Prerequisitesl At least one storage device exists on the management system.l At least one LUN exists on the management system and is running correctly.
ContextThe management system provides the LUN cache performance statistics collected within thelatest 24 hours, 7 days, and 30 days. The following uses the 24-hour period as an example.
Procedure
Step 1 On the menu bar, choose Report.
Step 2 In the navigation tree, choose Preset Report > Disk Arrays Performance.
Step 3 Under Disk Arrays Performance, select the heterogeneous array whose capacity statistics youwant to view.
Step 4 Under the selected heterogeneous array, choose Top 5 LUN Performance > Cache in Latest24 Hours.l In the function pane, the read and write cache hit ratios are displayed.l In the function pane, the LUN parameters are displayed, as described in the following table:
Parameter Description Value
Name Name of the LUN. [Example]LUN001
Max.Read Cache Hit Ratio(%)
Maximum read cache hitratio of the LUN.
[Example]100
Min.Read Cache Hit Ratio(%)
Minimum read cache hitratio of the LUN.
[Example]40
Max.Write Cache Hit Ratio(%)
Maximum write cache hitratio of the LUN.
[Example]100
Min.Write Cache Hit Ratio(%)
Minimum write cache hitratio of the LUN.
[Example]40
Owning Disk Array Owning disk array of theLUN.
[Example]array001
You can export the LUN cache performance graph to analyze the read/write cache hit ratio trend.
l Click to open or save the graph in PDF format.
OceanStor InfraControlAdmin Guide 7 Report Management
Issue 04 (2015-02-28) Huawei Proprietary and ConfidentialCopyright © Huawei Technologies Co., Ltd.
207
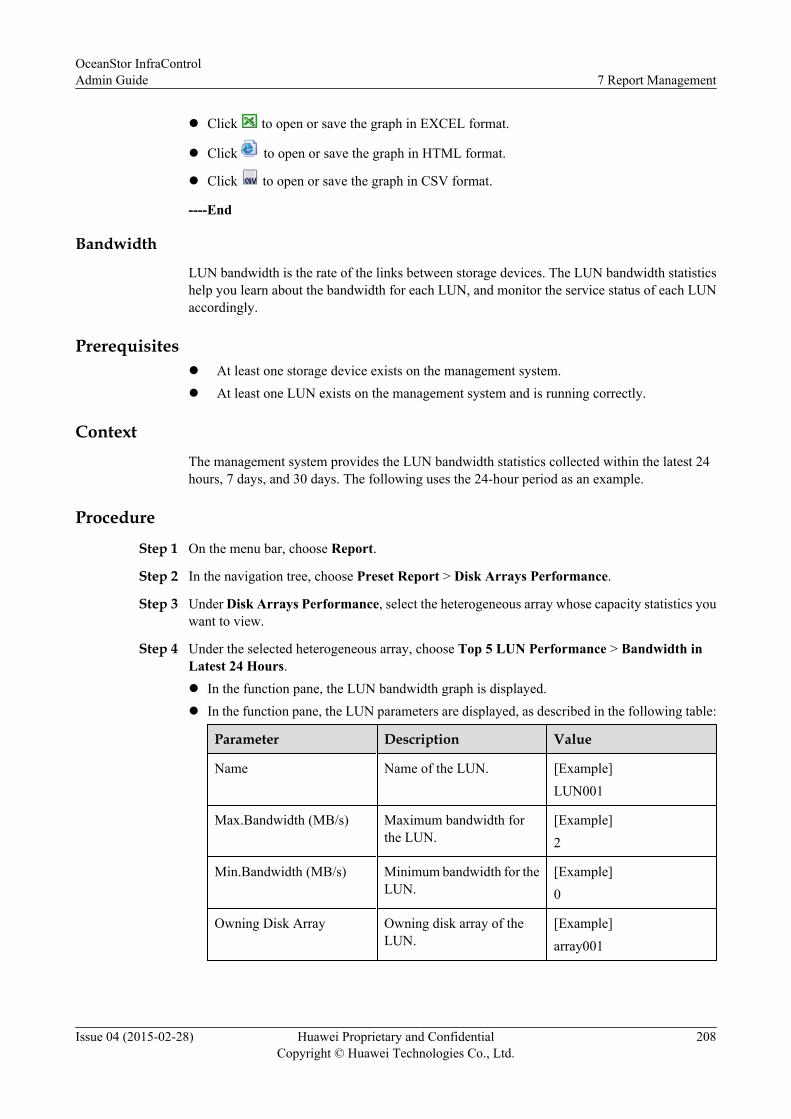
l Click to open or save the graph in EXCEL format.
l Click to open or save the graph in HTML format.
l Click to open or save the graph in CSV format.
----End
Bandwidth
LUN bandwidth is the rate of the links between storage devices. The LUN bandwidth statisticshelp you learn about the bandwidth for each LUN, and monitor the service status of each LUNaccordingly.
Prerequisitesl At least one storage device exists on the management system.l At least one LUN exists on the management system and is running correctly.
ContextThe management system provides the LUN bandwidth statistics collected within the latest 24hours, 7 days, and 30 days. The following uses the 24-hour period as an example.
Procedure
Step 1 On the menu bar, choose Report.
Step 2 In the navigation tree, choose Preset Report > Disk Arrays Performance.
Step 3 Under Disk Arrays Performance, select the heterogeneous array whose capacity statistics youwant to view.
Step 4 Under the selected heterogeneous array, choose Top 5 LUN Performance > Bandwidth inLatest 24 Hours.l In the function pane, the LUN bandwidth graph is displayed.l In the function pane, the LUN parameters are displayed, as described in the following table:
Parameter Description Value
Name Name of the LUN. [Example]LUN001
Max.Bandwidth (MB/s) Maximum bandwidth forthe LUN.
[Example]2
Min.Bandwidth (MB/s) Minimum bandwidth for theLUN.
[Example]0
Owning Disk Array Owning disk array of theLUN.
[Example]array001
OceanStor InfraControlAdmin Guide 7 Report Management
Issue 04 (2015-02-28) Huawei Proprietary and ConfidentialCopyright © Huawei Technologies Co., Ltd.
208
NOTE
In the function pane, click the desired LUN. The management system displays the performanceinformation about the objects related to this LUN.
You can export the performance graph to analyze the bandwidth trend of the LUN.
l Click to open or save the graph in PDF format.
l Click to open or save the graph in EXCEL format.
l Click to open or save the graph in HTML format.
l Click to open or save the graph in CSV format.
----End
IOPS
Input/Output operations per second (IOPS) measures the random read/write performance. TheLUN IOPS statistics help you learn about the speeds of reading data from and writing data toeach LUN.
Prerequisitesl At least one storage device exists on the management system.
l At least one LUN exists on the management system and is running correctly.
Context
The management system provides the LUN IOPS statistics collected within the latest 24 hours,7 days, and 30 days. The following uses the 24-hour period as an example.
Procedure
Step 1 On the menu bar, choose Report.
Step 2 In the navigation tree, choose Preset Report > Disk Arrays Performance.
Step 3 Under Disk Arrays Performance, select the heterogeneous array whose capacity statistics youwant to view.
Step 4 Under the selected heterogeneous array, choose Top 5 LUN Performance > IOPS in Latest24 Hours.
l In the function pane, the LUN IOPS graph is displayed.
l In the function pane, the LUN parameters are displayed, as described in the following table:
Parameter Description Value
Name Name of the LUN. [Example]LUN001
Max.IOPS Maximum IOPS of theLUN.
[Example]100
OceanStor InfraControlAdmin Guide 7 Report Management
Issue 04 (2015-02-28) Huawei Proprietary and ConfidentialCopyright © Huawei Technologies Co., Ltd.
209
Parameter Description Value
Min.IOPS Minimum IOPS of theLUN.
[Example]1
Owning Disk Array Owning disk array of theLUN.
[Example]array001
NOTE
In the function pane, click the desired LUN. The management system displays the performanceinformation about the objects related to this LUN.
You can export the IOPS graph to analyze the IOPS trend of the LUN.
l Click to open or save the graph in PDF format.
l Click to open or save the graph in EXCEL format.
l Click to open or save the graph in HTML format.
l Click to open or save the graph in CSV format.
----End
Top 5 Controller Performance
Controllers are the core components of a controller enclosure. The controller performance (cacheusage and CPU usage) statistics help you learn about controllers' operating status.
Context
The management system provides the controller performance statistics collected within the latest24 hours, 7 days, and 30 days. The following uses the 24-hour period as an example.
Procedure
Step 1 On the menu bar, choose Report.
Step 2 In the navigation tree, choose Preset Report > Disk Arrays Performance.
Step 3 Under Disk Arrays Performance, select the heterogeneous array whose capacity statistics youwant to view.
Step 4 Under the selected heterogeneous array, choose Top 5 Controller Performance > Latest 24Hours.In the function pane, the cache usage and the CPU usage are displayed.
You can export the cache and CPU usage graphs to analyze the controller performance.
l Click to open or save the graphs in PDF format.
l Click to open or save the graphs in EXCEL format.
OceanStor InfraControlAdmin Guide 7 Report Management
Issue 04 (2015-02-28) Huawei Proprietary and ConfidentialCopyright © Huawei Technologies Co., Ltd.
210
l Click to open or save the graphs in HTML format.
----End
7.1.4 Preset Report of a Unified Storage SystemThe preset report of a unified storage system provides storage capacity and performance statisticsof the unified storage system. You can read the preset report to learn about the operating statusof the unified storage system.
Storage Unit Capacity Summary
The storage unit capacity summary helps you learn about the usage history of the systemcapacity, disk capacity, thin pool capacity, storage pool capacity, and LUN capacity.
Prerequisites
At least one storage device exists on the management system.
Context
The management system provides the storage unit capacity statistics collected within the latest30 days.
Procedure
Step 1 On the menu bar, choose Report.
Step 2 In the navigation tree, choose Preset Report > Unified Storage Devices Performance.
Step 3 Under Unified Storage Devices Performance, select a storage unit.
Step 4 Under the selected storage unit, choose Capacity Summary > Latest 30 Days.In the function pane, the storage unit capacity statistics collected within the latest 30 days aredisplayed.
You can export the capacity graph to analyze the capacity usage trend.
l Click to open or save the graph in PDF format.
l Click to open or save the graph in EXCEL format.
l Click to open or save the graph in HTML format.
l Click to open or save the graph in CSV format.
----End
Top 5 Thin LUN Capacity
The thin LUN capacity statistics help you analyze the usage trend of the thin LUN capacity andmanage the disk array accordingly.
OceanStor InfraControlAdmin Guide 7 Report Management
Issue 04 (2015-02-28) Huawei Proprietary and ConfidentialCopyright © Huawei Technologies Co., Ltd.
211
Prerequisites
At least one storage device exists on the management system.
Context
The management system provides the thin capacity statistics collected within the latest 24 hours,7 days, and 30 days. The following uses the 24-hour period as an example.
Procedure
Step 1 On the menu bar, choose Report.
Step 2 In the navigation tree, choose Preset Report > Unified Storage Devices Performance.
Step 3 Under Unified Storage Devices Performance, select a unified storage system.
Step 4 Under the selected unified storage system, choose Top 5 Thin LUN Capacity Usage > Latest24 Hours.In the function pane, the usage of the thin LUN capacity is displayed.You can export the capacity graph to analyze the capacity usage trend.
l Click to open or save the graph in PDF format.
l Click to open or save the graph in EXCEL format.
l Click to open or save the graph in HTML format.
l Click to open or save the graph in CSV format.
----End
Top 5 Thin Pool Capacity
A thin pool uses the thin provisioning technology to enable dynamic and on-demand storagespace allocation. The thin pool capacity statistics help you analyze the usage trend of the thinpool capacity and manage the thin pool accordingly.
Prerequisites
At least one storage device exists on the management system.
Context
The management system provides the thin pool capacity statistics collected within the latest 7days and 30 days. The following uses the 7-day period as an example.
Procedure
Step 1 On the menu bar, choose Report.
Step 2 In the navigation tree, choose Preset Report > Unified Storage Devices Performance.
Step 3 Under Unified Storage Devices Performance, select a unified storage system.
OceanStor InfraControlAdmin Guide 7 Report Management
Issue 04 (2015-02-28) Huawei Proprietary and ConfidentialCopyright © Huawei Technologies Co., Ltd.
212

Step 4 Under the selected unified storage system, choose Top 5 Thin Pool Capacity Usage > Latest7 Days.In the function pane, the usage of the thin pool capacity is displayed.You can export the capacity graph to analyze the capacity usage trend.
l Click to open or save the graph in PDF format.
l Click to open or save the graph in EXCEL format.
l Click to open or save the graph in HTML format.
l Click to open or save the graph in CSV format.
----End
Top 5 Disk PerformanceThe disk performance statistics help you analyze the disk performance trend, and locate andtroubleshoot faulty disks accordingly.
PrerequisitesAt least one storage device exists on the management system.
ContextThe management system provides the disk performance statistics collected within the latest 24hours, 7 days, and 30 days. The following uses the 24-hour period as an example.
Procedure
Step 1 On the menu bar, choose Report.
Step 2 In the navigation tree, choose Preset Report > Unified Storage Devices Performance.
Step 3 Under Unified Storage Devices Performance, select a unified storage system.
Step 4 Under the selected unified storage system, choose Top 5 Disk Performance > Latest 24Hours.In the function pane, the disk performance statistics are displayed.
You can export the performance graph to analyze the disk performance trend.
l Click to open or save the graph in PDF format.
l Click to open or save the graph in EXCEL format.
l Click to open or save the graph in HTML format.
----End
Top 5 Host Port PerformanceThe host port performance statistics help you learn about the host port performance statistics,and locate and troubleshoot faulty host ports accordingly.
OceanStor InfraControlAdmin Guide 7 Report Management
Issue 04 (2015-02-28) Huawei Proprietary and ConfidentialCopyright © Huawei Technologies Co., Ltd.
213
Prerequisites
At least one storage device exists on the management system.
Context
The management system provides the disk performance statistics collected within the latest 24hours, 7 days, and 30 days. The following uses the 24-hour period as an example.
Procedure
Step 1 On the menu bar, choose Report.
Step 2 In the navigation tree, choose Preset Report > Unified Storage Devices Performance.
Step 3 Under Unified Storage Devices Performance, select a unified storage system.
Step 4 Under the selected unified storage system, choose Top 5 Host Port Performance > Latest 24Hours.In the function pane, the host port performance statistics are displayed.
You can export the performance graph to analyze the host port performance trend.
l Click to open or save the graph in PDF format.
l Click to open or save the graph in EXCEL format.
l Click to open or save the graph in HTML format.
----End
Top 5 LUN Performance
A logical unit number (LUN) is a logical disk provided by a controller to application servers forstorage. LUNs help application servers make better use of storage resources. The LUNperformance statistics help you learn about the LUN performance history and analyze the LUNperformance trend.
Viewing the LUN performance includes the following operations:
Cache
The LUN cache performance statistics help you learn about the read and write cache hit ratiosof each LUN, and monitor the LUNs' operating status accordingly.
Prerequisitesl At least one storage device exists on the management system.
l At least one LUN exists on the management system and is running correctly.
Context
The management system provides the LUN cache performance statistics collected within thelatest 24 hours, 7 days, and 30 days. The following uses the 24-hour period as an example.
OceanStor InfraControlAdmin Guide 7 Report Management
Issue 04 (2015-02-28) Huawei Proprietary and ConfidentialCopyright © Huawei Technologies Co., Ltd.
214
Procedure
Step 1 On the menu bar, choose Report.
Step 2 In the navigation tree, choose Preset Report > Unified Storage Devices Performance.
Step 3 Under Unified Storage Devices Performance, select a unified storage system.
Step 4 Under the selected disk array, choose Top 5 LUN Performance > Cache in Latest 24Hours.l In the function pane, the read and write cache hit ratios are displayed.l In the function pane, the LUN parameters are displayed, as described in the following table:
Parameter Description Value
Name Name of the LUN. [Example]LUN001
Max.Read Cache Hit Ratio(%)
Maximum read cache hitratio of the LUN.
[Example]100
Min.Read Cache Hit Ratio(%)
Minimum read cache hitratio of the LUN.
[Example]40
Max.Write Cache Hit Ratio(%)
Maximum write cache hitratio of the LUN.
[Example]100
Min.Write Cache Hit Ratio(%)
Minimum write cache hitratio of the LUN.
[Example]40
Owning Storage Unit Owning storage unit of theLUN.
[Example]array001
You can export the LUN cache performance graph to analyze the read/write cache hit ratio trend.
l Click to open or save the graph in PDF format.
l Click to open or save the graph in EXCEL format.
l Click to open or save the graph in HTML format.
l Click to open or save the graph in CSV format.
----End
Bandwidth
LUN bandwidth is the rate of the links between storage devices. The LUN bandwidth statisticshelp you learn about the bandwidth for each LUN, and monitor the service status of each LUNaccordingly.
Prerequisitesl At least one storage device exists on the management system.
OceanStor InfraControlAdmin Guide 7 Report Management
Issue 04 (2015-02-28) Huawei Proprietary and ConfidentialCopyright © Huawei Technologies Co., Ltd.
215
l At least one LUN exists on the management system and is running correctly.
Context
The management system provides the LUN bandwidth statistics collected within the latest 24hours, 7 days, and 30 days. The following uses the 24-hour period as an example.
Procedure
Step 1 On the menu bar, choose Report.
Step 2 In the navigation tree, choose Preset Report > Unified Storage Devices Performance.
Step 3 Under Unified Storage Devices Performance, select a unified storage system.
Step 4 Under the selected disk array, choose Top 5 LUN Performance > Bandwidth in Latest 24Hours.
l In the function pane, the LUN bandwidth graph is displayed.
l In the function pane, the LUN parameters are displayed, as described in the following table:
Parameter Description Value
Name Name of the LUN. [Example]LUN001
Max.Bandwidth (MB/s) Maximum bandwidth forthe LUN.
[Example]2
Min.Bandwidth (MB/s) Minimum bandwidth for theLUN.
[Example]0
Owning Storage Unit Owning storage unit of theLUN.
[Example]array001
NOTE
In the function pane, click the desired LUN. The management system displays the performanceinformation about the objects related to this LUN.
You can export the performance graph to analyze the bandwidth trend of the LUN.
l Click to open or save the graph in PDF format.
l Click to open or save the graph in EXCEL format.
l Click to open or save the graph in HTML format.
l Click to open or save the graph in CSV format.
----End
OceanStor InfraControlAdmin Guide 7 Report Management
Issue 04 (2015-02-28) Huawei Proprietary and ConfidentialCopyright © Huawei Technologies Co., Ltd.
216
IOPS
Input/output operations per second (IOPS) measures the random read/write performance. TheLUN IOPS statistics help you learn about the speeds of reading data from and writing data toeach LUN.
Prerequisitesl At least one storage device exists on the management system.
l At least one LUN exists on the management system and is running correctly.
Context
The management system provides the LUN IOPS statistics collected within the latest 24 hours,7 days, and 30 days. The following uses the 24-hour period as an example.
Procedure
Step 1 On the menu bar, choose Report.
Step 2 In the navigation tree, choose Preset Report > Unified Storage Devices Performance.
Step 3 Under Unified Storage Devices Performance, select a unified storage system.
Step 4 Under the selected disk array, choose Top 5 LUN Performance > IOPS in Latest 24 Hours.
l In the function pane, the LUN IOPS graph is displayed.
l In the function pane, the LUN parameters are displayed, as described in the following table:
Parameter Description Value
Name Name of the LUN. [Example]LUN001
Max.IOPS Maximum IOPS of theLUN.
[Example]100
Min.IOPS Minimum IOPS of theLUN.
[Example]1
Owning Storage Unit Owning storage unit of theLUN.
[Example]array001
NOTE
In the function pane, click the desired LUN. The management system displays the performanceinformation about the objects related to this LUN.
You can export the IOPS graph to analyze the IOPS trend of the LUN.
l Click to open or save the graph in PDF format.
l Click to open or save the graph in EXCEL format.
OceanStor InfraControlAdmin Guide 7 Report Management
Issue 04 (2015-02-28) Huawei Proprietary and ConfidentialCopyright © Huawei Technologies Co., Ltd.
217
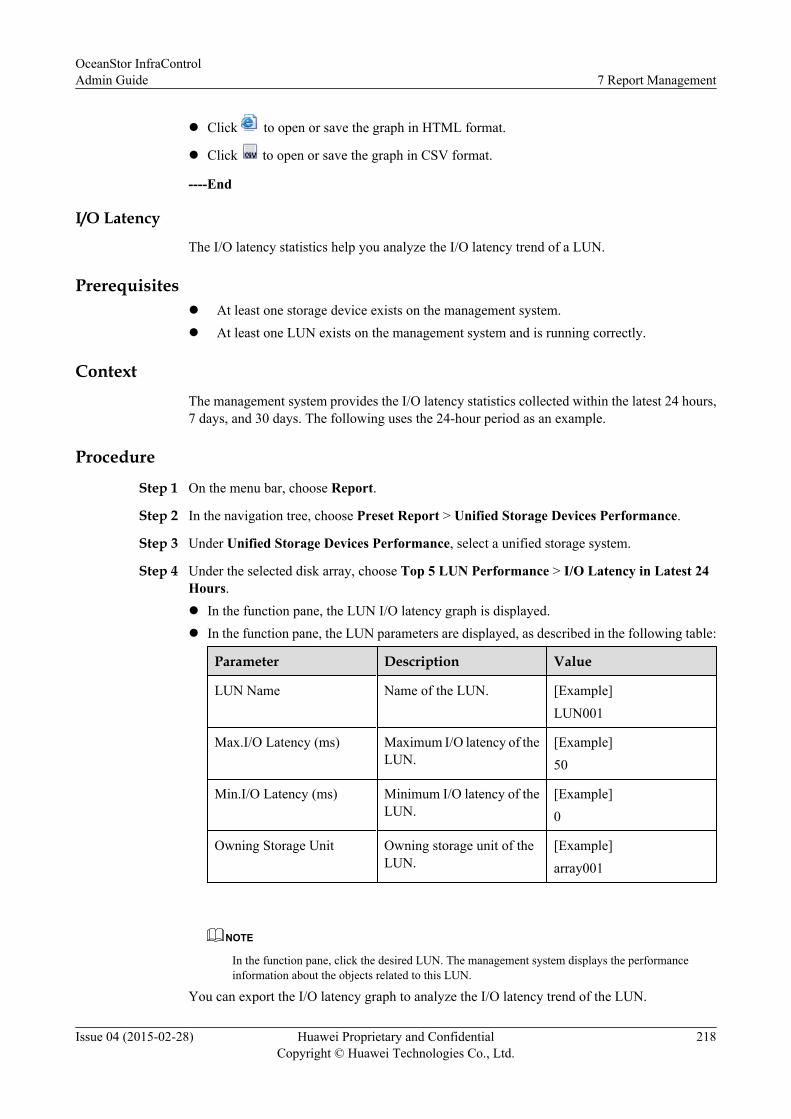
l Click to open or save the graph in HTML format.
l Click to open or save the graph in CSV format.
----End
I/O Latency
The I/O latency statistics help you analyze the I/O latency trend of a LUN.
Prerequisitesl At least one storage device exists on the management system.l At least one LUN exists on the management system and is running correctly.
ContextThe management system provides the I/O latency statistics collected within the latest 24 hours,7 days, and 30 days. The following uses the 24-hour period as an example.
Procedure
Step 1 On the menu bar, choose Report.
Step 2 In the navigation tree, choose Preset Report > Unified Storage Devices Performance.
Step 3 Under Unified Storage Devices Performance, select a unified storage system.
Step 4 Under the selected disk array, choose Top 5 LUN Performance > I/O Latency in Latest 24Hours.l In the function pane, the LUN I/O latency graph is displayed.l In the function pane, the LUN parameters are displayed, as described in the following table:
Parameter Description Value
LUN Name Name of the LUN. [Example]LUN001
Max.I/O Latency (ms) Maximum I/O latency of theLUN.
[Example]50
Min.I/O Latency (ms) Minimum I/O latency of theLUN.
[Example]0
Owning Storage Unit Owning storage unit of theLUN.
[Example]array001
NOTE
In the function pane, click the desired LUN. The management system displays the performanceinformation about the objects related to this LUN.
You can export the I/O latency graph to analyze the I/O latency trend of the LUN.
OceanStor InfraControlAdmin Guide 7 Report Management
Issue 04 (2015-02-28) Huawei Proprietary and ConfidentialCopyright © Huawei Technologies Co., Ltd.
218
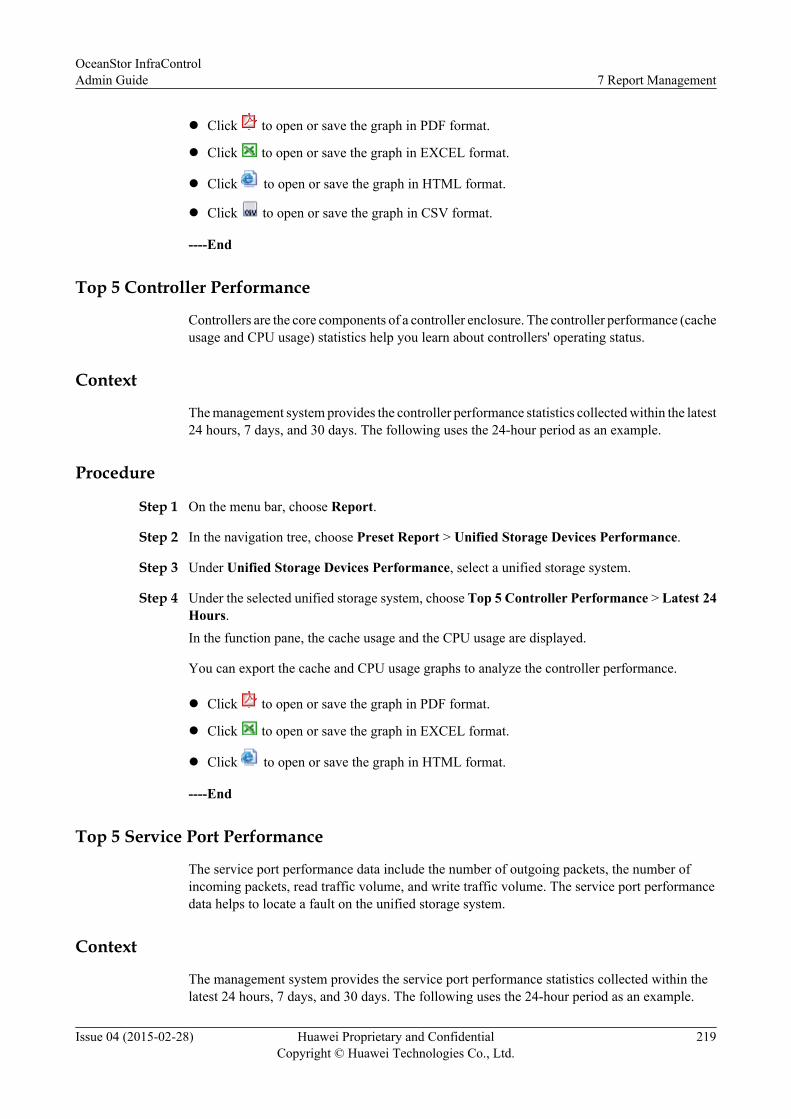
l Click to open or save the graph in PDF format.
l Click to open or save the graph in EXCEL format.
l Click to open or save the graph in HTML format.
l Click to open or save the graph in CSV format.
----End
Top 5 Controller Performance
Controllers are the core components of a controller enclosure. The controller performance (cacheusage and CPU usage) statistics help you learn about controllers' operating status.
Context
The management system provides the controller performance statistics collected within the latest24 hours, 7 days, and 30 days. The following uses the 24-hour period as an example.
Procedure
Step 1 On the menu bar, choose Report.
Step 2 In the navigation tree, choose Preset Report > Unified Storage Devices Performance.
Step 3 Under Unified Storage Devices Performance, select a unified storage system.
Step 4 Under the selected unified storage system, choose Top 5 Controller Performance > Latest 24Hours.In the function pane, the cache usage and the CPU usage are displayed.
You can export the cache and CPU usage graphs to analyze the controller performance.
l Click to open or save the graph in PDF format.
l Click to open or save the graph in EXCEL format.
l Click to open or save the graph in HTML format.
----End
Top 5 Service Port Performance
The service port performance data include the number of outgoing packets, the number ofincoming packets, read traffic volume, and write traffic volume. The service port performancedata helps to locate a fault on the unified storage system.
Context
The management system provides the service port performance statistics collected within thelatest 24 hours, 7 days, and 30 days. The following uses the 24-hour period as an example.
OceanStor InfraControlAdmin Guide 7 Report Management
Issue 04 (2015-02-28) Huawei Proprietary and ConfidentialCopyright © Huawei Technologies Co., Ltd.
219
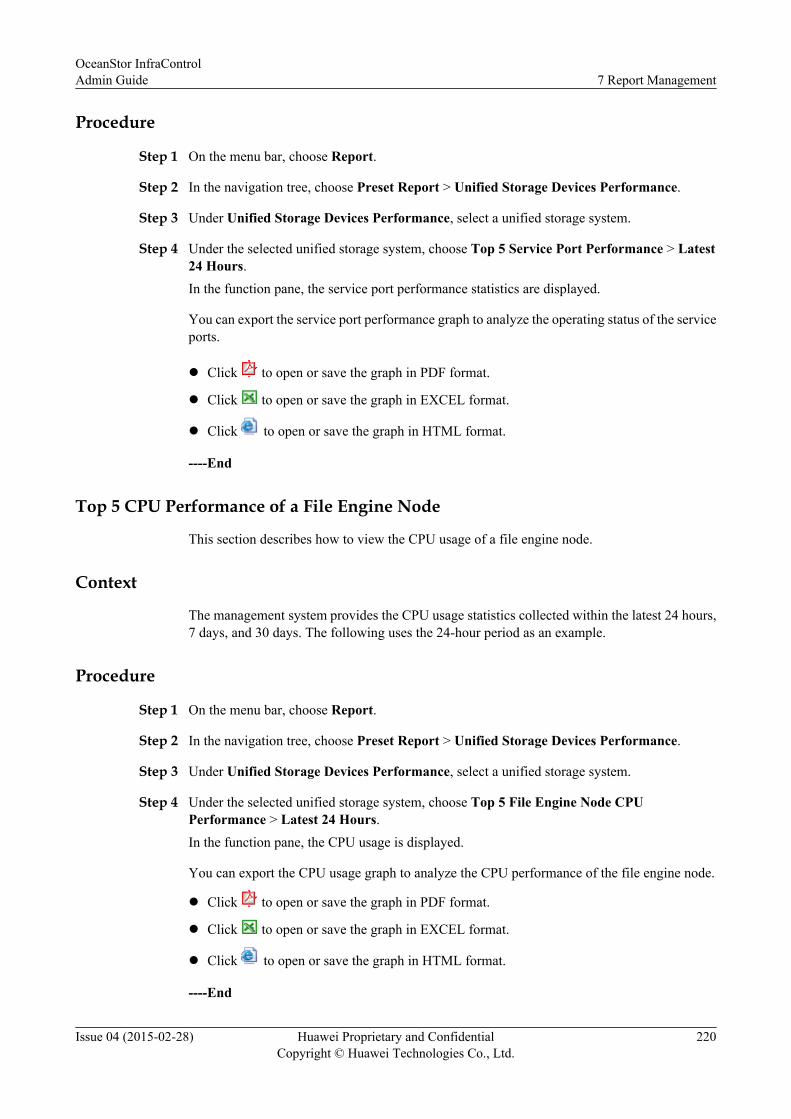
Procedure
Step 1 On the menu bar, choose Report.
Step 2 In the navigation tree, choose Preset Report > Unified Storage Devices Performance.
Step 3 Under Unified Storage Devices Performance, select a unified storage system.
Step 4 Under the selected unified storage system, choose Top 5 Service Port Performance > Latest24 Hours.In the function pane, the service port performance statistics are displayed.
You can export the service port performance graph to analyze the operating status of the serviceports.
l Click to open or save the graph in PDF format.
l Click to open or save the graph in EXCEL format.
l Click to open or save the graph in HTML format.
----End
Top 5 CPU Performance of a File Engine Node
This section describes how to view the CPU usage of a file engine node.
Context
The management system provides the CPU usage statistics collected within the latest 24 hours,7 days, and 30 days. The following uses the 24-hour period as an example.
Procedure
Step 1 On the menu bar, choose Report.
Step 2 In the navigation tree, choose Preset Report > Unified Storage Devices Performance.
Step 3 Under Unified Storage Devices Performance, select a unified storage system.
Step 4 Under the selected unified storage system, choose Top 5 File Engine Node CPUPerformance > Latest 24 Hours.In the function pane, the CPU usage is displayed.
You can export the CPU usage graph to analyze the CPU performance of the file engine node.
l Click to open or save the graph in PDF format.
l Click to open or save the graph in EXCEL format.
l Click to open or save the graph in HTML format.
----End
OceanStor InfraControlAdmin Guide 7 Report Management
Issue 04 (2015-02-28) Huawei Proprietary and ConfidentialCopyright © Huawei Technologies Co., Ltd.
220
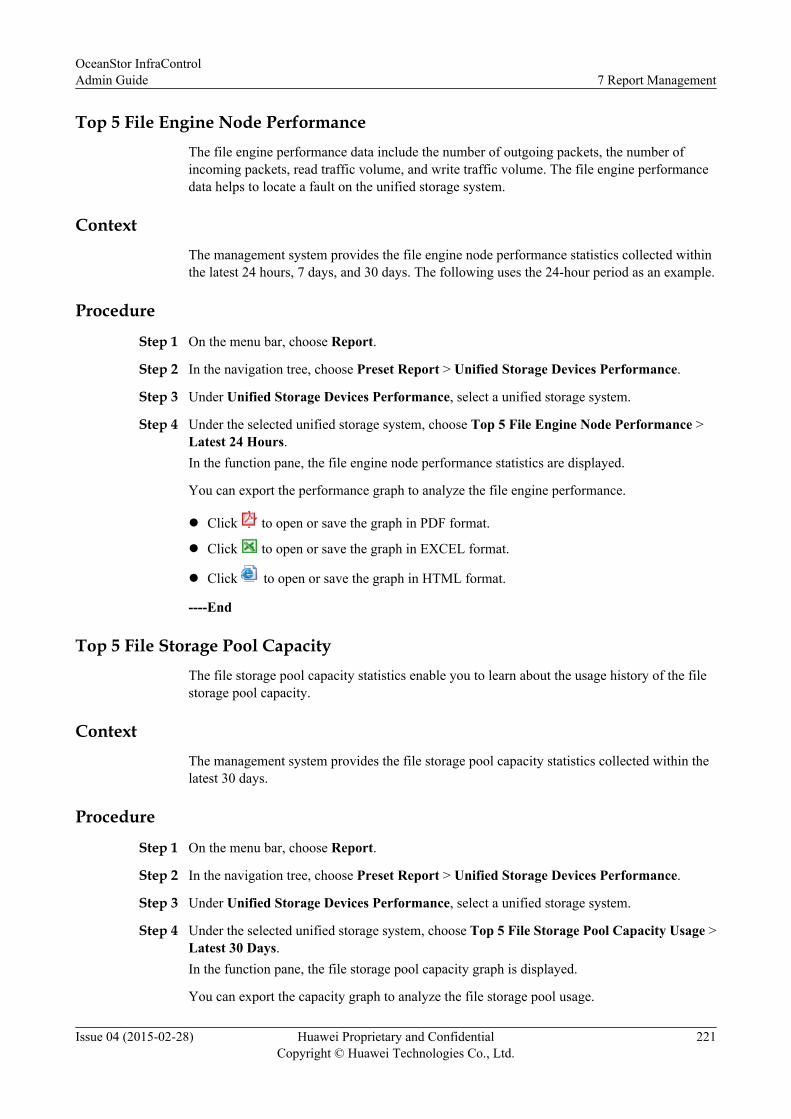
Top 5 File Engine Node PerformanceThe file engine performance data include the number of outgoing packets, the number ofincoming packets, read traffic volume, and write traffic volume. The file engine performancedata helps to locate a fault on the unified storage system.
ContextThe management system provides the file engine node performance statistics collected withinthe latest 24 hours, 7 days, and 30 days. The following uses the 24-hour period as an example.
Procedure
Step 1 On the menu bar, choose Report.
Step 2 In the navigation tree, choose Preset Report > Unified Storage Devices Performance.
Step 3 Under Unified Storage Devices Performance, select a unified storage system.
Step 4 Under the selected unified storage system, choose Top 5 File Engine Node Performance >Latest 24 Hours.In the function pane, the file engine node performance statistics are displayed.
You can export the performance graph to analyze the file engine performance.
l Click to open or save the graph in PDF format.
l Click to open or save the graph in EXCEL format.
l Click to open or save the graph in HTML format.
----End
Top 5 File Storage Pool CapacityThe file storage pool capacity statistics enable you to learn about the usage history of the filestorage pool capacity.
ContextThe management system provides the file storage pool capacity statistics collected within thelatest 30 days.
Procedure
Step 1 On the menu bar, choose Report.
Step 2 In the navigation tree, choose Preset Report > Unified Storage Devices Performance.
Step 3 Under Unified Storage Devices Performance, select a unified storage system.
Step 4 Under the selected unified storage system, choose Top 5 File Storage Pool Capacity Usage >Latest 30 Days.In the function pane, the file storage pool capacity graph is displayed.
You can export the capacity graph to analyze the file storage pool usage.
OceanStor InfraControlAdmin Guide 7 Report Management
Issue 04 (2015-02-28) Huawei Proprietary and ConfidentialCopyright © Huawei Technologies Co., Ltd.
221

l Click to open or save the graph in PDF format.
l Click to open or save the graph in EXCEL format.
l Click to open or save the graph in HTML format.
l Click to open or save the graph in CSV format.
----End
Top 5 Data Disk Capacity
The data disk capacity statistics enable you to learn about the usage history of data disk capacity.
Context
The management system provides the data disk capacity statistics collected within the latest 30days.
Procedure
Step 1 On the menu bar, choose Report.
Step 2 In the navigation tree, choose Preset Report > Unified Storage Devices Performance.
Step 3 Under Unified Storage Devices Performance, select a unified storage system.
Step 4 Under the selected unified storage system, choose Top 5 Data Disk Capacity Usage > Latest30 Days.In the function pane, the data disk capacity graph is displayed.
You can export the capacity graph to analyze the data disk capacity usage.
l Click to open or save the graph in PDF format.
l Click to open or save the graph in EXCEL format.
l Click to open or save the graph in HTML format.
l Click to open or save the graph in CSV format.
----End
Top 5 Shared File System Capacity
The protocols Common Internet File System (CIFS) and Network File System (NFS) can enablefile sharing across the unified storage systems that run different operating systems. You canview the shared file system capacity to learn about how files are shared on a unified storagesystem.
Context
The management system provides the usage of the shared file system capacity within the latest30 days.
OceanStor InfraControlAdmin Guide 7 Report Management
Issue 04 (2015-02-28) Huawei Proprietary and ConfidentialCopyright © Huawei Technologies Co., Ltd.
222
Procedure
Step 1 On the menu bar, choose Report.
Step 2 In the navigation tree, choose Preset Report > Unified Storage Devices Performance.
Step 3 Under Unified Storage Devices Performance, select a unified storage system.
Step 4 Under the selected unified storage system, choose Top 5 Shared File System CapacityUsage > Latest 30 Days.In the function pane, the usage of NFS shared capacity and the usage of CIFS shared capacityare displayed.
You can export the usage graphs to analyze the usage of shared file system capacity.
l Click to open or save the graph in PDF format.
l Click to open or save the graph in EXCEL format.
l Click to open or save the graph in HTML format.
l Click to open or save the graph in CSV format.
----End
Top 5 File System Capacity
You can view the file system capacity of a unified storage system to analyze the capacity usageof the entire file system.
Context
The management system provides the file system capacity statistics collected within the latest30 days.
Procedure
Step 1 On the menu bar, choose Report.
Step 2 In the navigation tree, choose Preset Report > Unified Storage Devices Performance.
Step 3 Under Unified Storage Devices Performance, select a unified storage system.
Step 4 Under the selected unified storage system, choose Top 5 File System Capacity Usage > Latest30 Days.In the function pane, the file system capacity usage is displayed.
You can export the capacity usage graph to analyze the usage of the file system capacity on aunified storage system.
l Click to open or save the graph in PDF format.
l Click to open or save the graph in EXCEL format.
l Click to open or save the graph in HTML format.
OceanStor InfraControlAdmin Guide 7 Report Management
Issue 04 (2015-02-28) Huawei Proprietary and ConfidentialCopyright © Huawei Technologies Co., Ltd.
223
l Click to open or save the graph in CSV format.
----End
7.2 Custom Report ManagementYou can set filter criteria for viewing specific capacity and performance reports.
Custom report involve the following operations:
7.2.1 Viewing a User-defined Disk Array ReportYou can set filter criteria for viewing specific disk array capacity and performance reports.
Viewing a user-defined disk array report includes the following operations:
Storage Device Performance SummaryYou can set filter criteria for viewing the performance summary of a specific storage device.Then you can learn about the operating status of the storage device accordingly.
PrerequisitesAt least one storage device exists on the management system.
Procedure
Step 1 Go to the disk array or storage unit performance summary page by either of the followingmethods:l Method 1: viewing the disk array performance summary
1. On the menu bar, choose Report.2. In the navigation tree, choose Custom Report > Disk Arrays.3. In the function pane, choose Disk array performance summary from the Report
name list.l Method 2: viewing the storage unit performance summary
1. On the menu bar, choose Report.2. In the navigation tree, choose Custom Report > Unified Storage.3. In the function pane, choose Storage unit performance summary from the Report
name list.
Step 2 Set a time range.If you set Time range to Custom, specify the start time and end time.
Step 3 Click Search.In the list on the lower part of the function pane, the storage device performance statistics aredisplayed.
You can export the storage device performance summary graph to analyze the performancetrend.
OceanStor InfraControlAdmin Guide 7 Report Management
Issue 04 (2015-02-28) Huawei Proprietary and ConfidentialCopyright © Huawei Technologies Co., Ltd.
224
l Click to open or save the graph in PDF format.
l Click to open or save the graph in EXCEL format.
l Click to open or save the graph in HTML format.
----End
Controller PerformanceYou can set filter criteria for viewing the performance statistics of a specific controller. Thenyou can learn about the operating status of the controller accordingly.
PrerequisitesAt least one storage device exists on the management system.
Procedure
Step 1 Go to the controller performance page by either of the following methods:l Method 1: viewing the performance of the controllers on a disk array
1. On the menu bar, choose Report.2. In the navigation tree, choose Custom Report > Disk Arrays.3. In the function pane, choose Controller performance from the Report name list.
l Method 2: viewing the performance of the controllers on a unified storage system
1. On the menu bar, choose Report.2. In the navigation tree, choose Custom Report > Unified Storage.3. In the function pane, choose Controller performance from the Report name list.
Step 2 Set a report that you desire. The following table describes the related parameters.
Parameter Description Value
Report view Type of the report view,Tendency or Comparison.
[Example]Tendency
OceanStor InfraControlAdmin Guide 7 Report Management
Issue 04 (2015-02-28) Huawei Proprietary and ConfidentialCopyright © Huawei Technologies Co., Ltd.
225

Parameter Description Value
Object l If the statistical object isSelect object1. In the Object list,
select the objectswhose statistics youwant to view.
2. In Controllers, selectcontrollers and click
to add them toSelected Controllers.In SelectedControllers, selectcontrollers and click
to relocate them toControllers.NOTE
You can also click to add all controllers toSelected Controllers,
or click to relocateall of them toControllers.
l If the statistical object isSelect deviceIn Devices, select devicesand click to add themto Selected Devices. InSelected Devices, selectdevices and click torelocate them to Devices.NOTE
You can also click toadd all devices to Selected
Devices, or click torelocate all of them toDevices.
[Example]S5000T_10_11-A
Key performance indicators Key performance indicators(KPIs) of the user-definedreport.
[Example]Usage
Granularity Granularity of the user-defined report.
[Example]High
OceanStor InfraControlAdmin Guide 7 Report Management
Issue 04 (2015-02-28) Huawei Proprietary and ConfidentialCopyright © Huawei Technologies Co., Ltd.
226

Parameter Description Value
Time range Time range for collectingperformance statistics.NOTE
If you set Time range toCustom, specify the start timeand end time.
[Example]Latest 1 week
Format Method for collectingperformance statistics.
[Example]Average
OceanStor InfraControlAdmin Guide 7 Report Management
Issue 04 (2015-02-28) Huawei Proprietary and ConfidentialCopyright © Huawei Technologies Co., Ltd.
227

Parameter Description Value
Sort Method for sorting the user-defined report.l If you set Sort to
Default, the customreport sorts all objects byeach preset keyperformance indicatorrespectively. Forexample, if you set Keyperformance indicatorsto Usage and IOPS andSort to Default, thecustom report displays allobject information sortedby Usage and IOPSrespectively in tworesults.
l If you set Sort to a keyperformance indicator,the custom reportdisplays key performanceindicators about allobjects sorted by thespecified keyperformance indicator.For example, if you setKey performanceindicators to Usage andIOPS and Sort to Usage,the custom reportdisplays Usage andIOPS information aboutall objects sorted byUsage respectively.
l If TOP is set to n (1 ≤ n≤ 10), the self-definedreport displays amaximum of n statisticsobjects.
– If you selectMaximum orAverage for Format,the top n indicatorvalues are displayed.
– If you selectMinimum for
[Example]
OceanStor InfraControlAdmin Guide 7 Report Management
Issue 04 (2015-02-28) Huawei Proprietary and ConfidentialCopyright © Huawei Technologies Co., Ltd.
228

Parameter Description Value
Format, the smallestn indicator values aredisplayed.
Default
Step 3 Click Search.In the function pane, the preset KPI graph is displayed.You can export the KPI graph to analyze the controller performance.
l Click to open or save the graph in PDF format.
l Click to open or save the graph in EXCEL format.
l Click to open or save the graph in HTML format.
----End
Host Port Performance
You can set filter criteria for viewing the performance statistics of a specific host port. Then youcan learn about the overall host port performance accordingly.
Prerequisites
At least one storage device exists on the management system.
Procedure
Step 1 Go to the host port performance page by either of the following methods:
l Method 1: viewing the performance of the host ports on a disk array
1. On the menu bar, choose Report.
2. In the navigation tree, choose Custom Report > Disk Arrays.
3. In the function pane, choose Host port performance from the Report name list.
l Method 2: viewing the performance of the host ports on a unified storage system
1. On the menu bar, choose Report.
2. In the navigation tree, choose Custom Report > Unified Storage.
3. In the function pane, choose Front-end host port performance from the Reportname list.
Step 2 Set a report that you desire. The following table describes the related parameters.
Parameter Description Value
Report view Type of the report view,Tendency or Comparison.
[Example]Tendency
OceanStor InfraControlAdmin Guide 7 Report Management
Issue 04 (2015-02-28) Huawei Proprietary and ConfidentialCopyright © Huawei Technologies Co., Ltd.
229

Parameter Description Value
Object l If the statistical object isSelect object1. In the Object list,
select the host portswhose statistics youwant to view.
2. In Ports, select hostports and click toadd them to SelectedPorts. In SelectedPorts, select hostports and click torelocate them toPorts.NOTE
You can also click to add all host ports toSelected Ports, or click
to relocate all ofthem to Ports.
l If the statistical object isSelect deviceIn Devices, select devicesand click to add themto Selected Devices. InSelected Devices, selectdevices and click torelocate them to Devices.NOTE
You can also click toadd all devices to Selected
Devices. or click torelocate all of them toDevices.
[Example]S5000T_10_11-A
Key performance indicators Key performance indicators(KPIs) of the user-definedreport.
[Example]Usage
Granularity Granularity of the user-defined report.
[Example]High
OceanStor InfraControlAdmin Guide 7 Report Management
Issue 04 (2015-02-28) Huawei Proprietary and ConfidentialCopyright © Huawei Technologies Co., Ltd.
230

Parameter Description Value
Time range Time range for collectingperformance statistics.NOTE
If you set Time range toCustom, specify the start timeand end time.
[Example]Latest 1 week
Format Method for collectingperformance statistics.
[Example]Average
OceanStor InfraControlAdmin Guide 7 Report Management
Issue 04 (2015-02-28) Huawei Proprietary and ConfidentialCopyright © Huawei Technologies Co., Ltd.
231

Parameter Description Value
Sort Method for sorting the user-defined report.l If you set Sort to
Default, the customreport sorts all objects byeach preset keyperformance indicatorrespectively. Forexample, if you set Keyperformance indicatorsto Usage and IOPS andSort to Default, thecustom report displays allobject information sortedby Usage and IOPSrespectively in tworesults.
l If you set Sort to a keyperformance indicator,the custom reportdisplays key performanceindicators about allobjects sorted by thespecified keyperformance indicator.For example, if you setKey performanceindicators to Usage andIOPS and Sort to Usage,the custom reportdisplays Usage andIOPS information aboutall objects sorted byUsage respectively.
l If TOP is set to n (1 ≤ n≤ 10), the self-definedreport displays amaximum of n statisticsobjects.
– If you selectMaximum orAverage for Format,the top n indicatorvalues are displayed.
– If you selectMinimum for
[Example]
OceanStor InfraControlAdmin Guide 7 Report Management
Issue 04 (2015-02-28) Huawei Proprietary and ConfidentialCopyright © Huawei Technologies Co., Ltd.
232
Parameter Description Value
Format, the smallestn indicator values aredisplayed.
Default
Step 3 Click Search.In the function pane, the preset KPI graph is displayed.You can export the KPI graph to analyze the host port performance.
l Click to open or save the graph in PDF format.
l Click to open or save the graph in EXCEL format.
l Click to open or save the graph in HTML format.
----End
Disk Performance
You can set filter criteria for viewing the performance statistics of a specific disk. Then you canlearn about the overall disk performance, and locate and troubleshoot faulty disks accordingly.
Prerequisites
At least one storage device exists on the management system.
Procedure
Step 1 Go to the disk performance page by either of the following methods:
l Method 1: viewing the performance of the hard disks on a disk array
1. On the menu bar, choose Report.
2. In the navigation tree, choose Custom Report > Disk Arrays.
3. In the function pane, choose Disk performance from the Report name list.
l Method 2: viewing the performance of the hard disks on a unified storage system
1. On the menu bar, choose Report.
2. In the navigation tree, choose Custom Report > Unified Storage.
3. In the function pane, choose Disk performance from the Report name list.
Step 2 Set a report that you desire. The following table describes the related parameters.
Parameter Description Value
Report view Type of the report view,Tendency or Comparison.
[Example]Tendency
OceanStor InfraControlAdmin Guide 7 Report Management
Issue 04 (2015-02-28) Huawei Proprietary and ConfidentialCopyright © Huawei Technologies Co., Ltd.
233
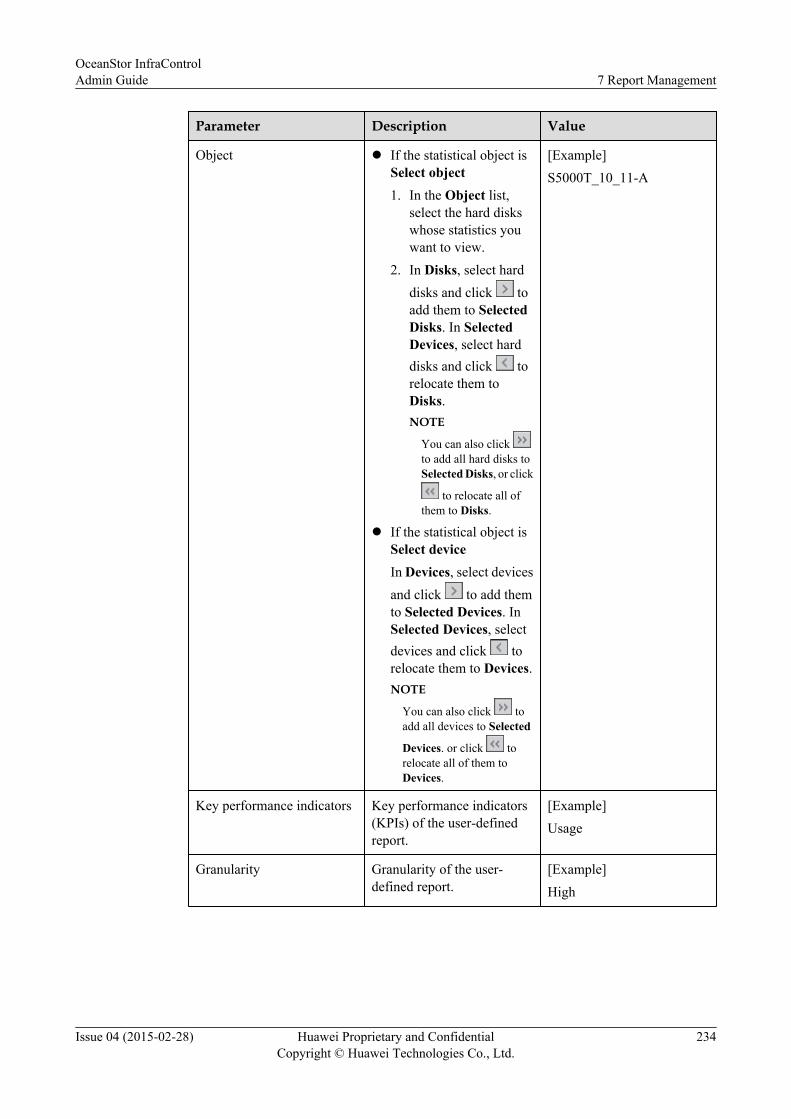
Parameter Description Value
Object l If the statistical object isSelect object1. In the Object list,
select the hard diskswhose statistics youwant to view.
2. In Disks, select harddisks and click toadd them to SelectedDisks. In SelectedDevices, select harddisks and click torelocate them toDisks.NOTE
You can also click to add all hard disks toSelected Disks, or click
to relocate all ofthem to Disks.
l If the statistical object isSelect deviceIn Devices, select devicesand click to add themto Selected Devices. InSelected Devices, selectdevices and click torelocate them to Devices.NOTE
You can also click toadd all devices to Selected
Devices. or click torelocate all of them toDevices.
[Example]S5000T_10_11-A
Key performance indicators Key performance indicators(KPIs) of the user-definedreport.
[Example]Usage
Granularity Granularity of the user-defined report.
[Example]High
OceanStor InfraControlAdmin Guide 7 Report Management
Issue 04 (2015-02-28) Huawei Proprietary and ConfidentialCopyright © Huawei Technologies Co., Ltd.
234

Parameter Description Value
Time range Time range for collectingperformance statistics.NOTE
If you set Time range toCustom, specify the start timeand end time.
[Example]Latest 1 week
Format Method for collectingperformance statistics.
[Example]Average
OceanStor InfraControlAdmin Guide 7 Report Management
Issue 04 (2015-02-28) Huawei Proprietary and ConfidentialCopyright © Huawei Technologies Co., Ltd.
235

Parameter Description Value
Sort Method for sorting the user-defined report.l If you set Sort to
Default, the customreport sorts all objects byeach preset keyperformance indicatorrespectively. Forexample, if you set Keyperformance indicatorsto Usage and IOPS andSort to Default, thecustom report displays allobject information sortedby Usage and IOPSrespectively in tworesults.
l If you set Sort to a keyperformance indicator,the custom reportdisplays key performanceindicators about allobjects sorted by thespecified keyperformance indicator.For example, if you setKey performanceindicators to Usage andIOPS and Sort to Usage,the custom reportdisplays Usage andIOPS information aboutall objects sorted byUsage respectively.
l If TOP is set to n (1 ≤ n≤ 10), the self-definedreport displays amaximum of n statisticsobjects.
– If you selectMaximum orAverage for Format,the top n indicatorvalues are displayed.
– If you selectMinimum for
[Example]
OceanStor InfraControlAdmin Guide 7 Report Management
Issue 04 (2015-02-28) Huawei Proprietary and ConfidentialCopyright © Huawei Technologies Co., Ltd.
236
Parameter Description Value
Format, the smallestn indicator values aredisplayed.
Default
Step 3 Click Search.In the function pane, the preset KPI graph is displayed.You can export the KPI graph to analyze the disk performance.
l Click to open or save the graph in PDF format.
l Click to open or save the graph in EXCEL format.
l Click to open or save the graph in HTML format.
----End
Storage Pool PerformanceYou can set filter criteria for viewing the performance statistics of a specific storage pool.
PrerequisitesAt least one storage device exists on the management system.
Procedure
Step 1 On the menu bar, choose Report.
Step 2 In the navigation tree, choose Custom Report > Disk Arrays.
Step 3 In the function pane, choose Storage pool performance from the Report name list.
Step 4 Set a report that you desire. The following table describes the related parameters.
Parameter Description Value
Report view Type of the report view,Tendency or Comparison.
[Example]Tendency
OceanStor InfraControlAdmin Guide 7 Report Management
Issue 04 (2015-02-28) Huawei Proprietary and ConfidentialCopyright © Huawei Technologies Co., Ltd.
237
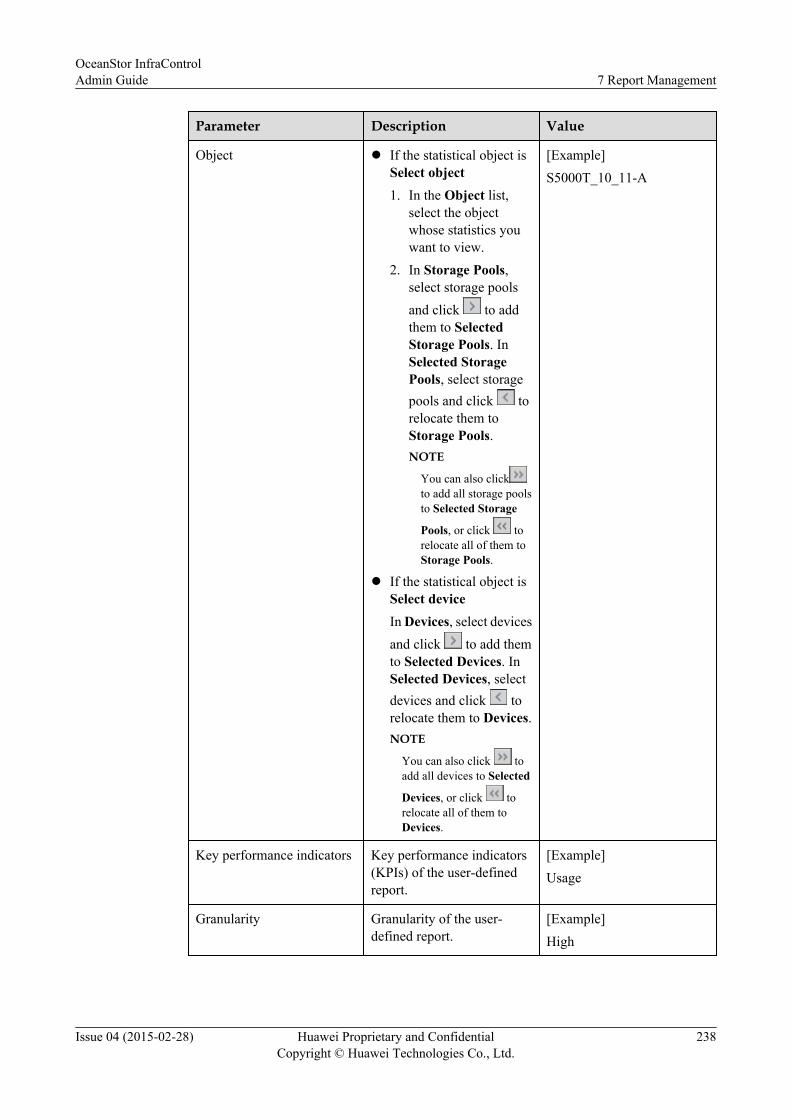
Parameter Description Value
Object l If the statistical object isSelect object1. In the Object list,
select the objectwhose statistics youwant to view.
2. In Storage Pools,select storage poolsand click to addthem to SelectedStorage Pools. InSelected StoragePools, select storagepools and click torelocate them toStorage Pools.NOTE
You can also clickto add all storage poolsto Selected Storage
Pools, or click torelocate all of them toStorage Pools.
l If the statistical object isSelect deviceIn Devices, select devicesand click to add themto Selected Devices. InSelected Devices, selectdevices and click torelocate them to Devices.NOTE
You can also click toadd all devices to Selected
Devices, or click torelocate all of them toDevices.
[Example]S5000T_10_11-A
Key performance indicators Key performance indicators(KPIs) of the user-definedreport.
[Example]Usage
Granularity Granularity of the user-defined report.
[Example]High
OceanStor InfraControlAdmin Guide 7 Report Management
Issue 04 (2015-02-28) Huawei Proprietary and ConfidentialCopyright © Huawei Technologies Co., Ltd.
238
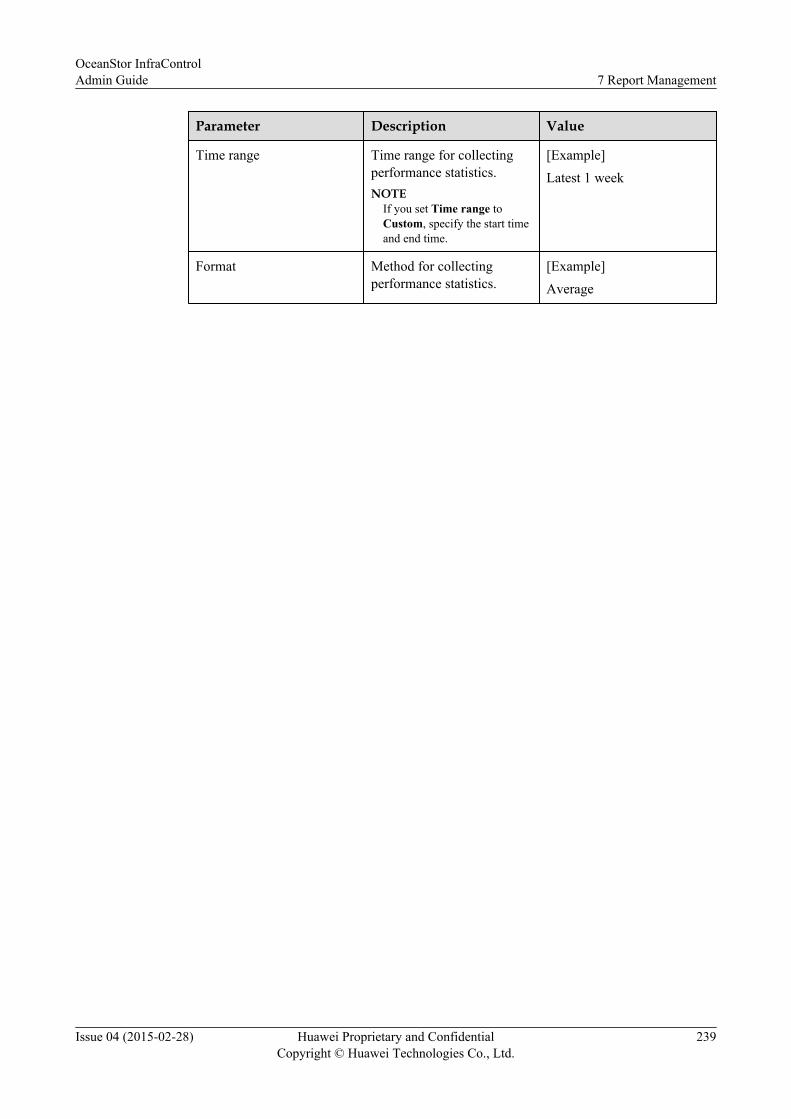
Parameter Description Value
Time range Time range for collectingperformance statistics.NOTE
If you set Time range toCustom, specify the start timeand end time.
[Example]Latest 1 week
Format Method for collectingperformance statistics.
[Example]Average
OceanStor InfraControlAdmin Guide 7 Report Management
Issue 04 (2015-02-28) Huawei Proprietary and ConfidentialCopyright © Huawei Technologies Co., Ltd.
239
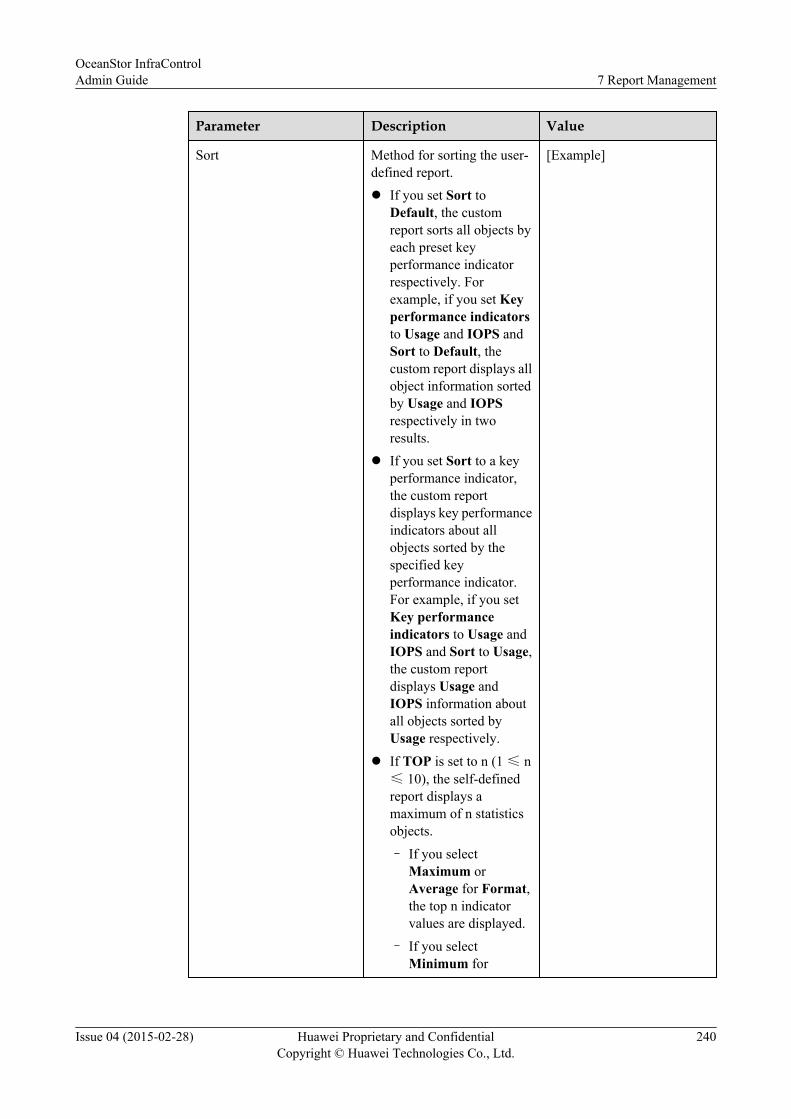
Parameter Description Value
Sort Method for sorting the user-defined report.l If you set Sort to
Default, the customreport sorts all objects byeach preset keyperformance indicatorrespectively. Forexample, if you set Keyperformance indicatorsto Usage and IOPS andSort to Default, thecustom report displays allobject information sortedby Usage and IOPSrespectively in tworesults.
l If you set Sort to a keyperformance indicator,the custom reportdisplays key performanceindicators about allobjects sorted by thespecified keyperformance indicator.For example, if you setKey performanceindicators to Usage andIOPS and Sort to Usage,the custom reportdisplays Usage andIOPS information aboutall objects sorted byUsage respectively.
l If TOP is set to n (1 ≤ n≤ 10), the self-definedreport displays amaximum of n statisticsobjects.
– If you selectMaximum orAverage for Format,the top n indicatorvalues are displayed.
– If you selectMinimum for
[Example]
OceanStor InfraControlAdmin Guide 7 Report Management
Issue 04 (2015-02-28) Huawei Proprietary and ConfidentialCopyright © Huawei Technologies Co., Ltd.
240

Parameter Description Value
Format, the smallestn indicator values aredisplayed.
Default
Step 5 Click Search.In the function pane, the preset KPI graph is displayed.You can export the KPI graph to analyze the storage pool performance.
l Click to open or save the graph in PDF format.
l Click to open or save the graph in EXCEL format.
l Click to open or save the graph in HTML format.
----End
LUN Performance
A logical unit number (LUN) is a logical disk provided by a controller to application servers forstorage. LUNs help application servers make better use of storage resources. You can set filtercriteria for viewing the performance statistics of a specific LUN.
Prerequisites
At least one storage device exists on the management system.
Procedure
Step 1 Go to the LUN performance page by either of the following methods:
l Method 1: viewing the performance of the LUNs on a disk array
1. On the menu bar, choose Report.
2. In the navigation tree, choose Custom Report > Disk Arrays.
3. In the function pane, choose LUN performance from the Report name list.
l Method 2: viewing the performance of the LUNs on a unified storage device
1. On the menu bar, choose Report.
2. In the navigation tree, choose Custom Report > Unified Storage.
3. In the function pane, choose LUN performance from the Report name list.
Step 2 Set a report that you desire. The following table describes the related parameters.
Parameter Description Value
Report view Type of the report view,Tendency or Comparison.
[Example]Tendency
OceanStor InfraControlAdmin Guide 7 Report Management
Issue 04 (2015-02-28) Huawei Proprietary and ConfidentialCopyright © Huawei Technologies Co., Ltd.
241
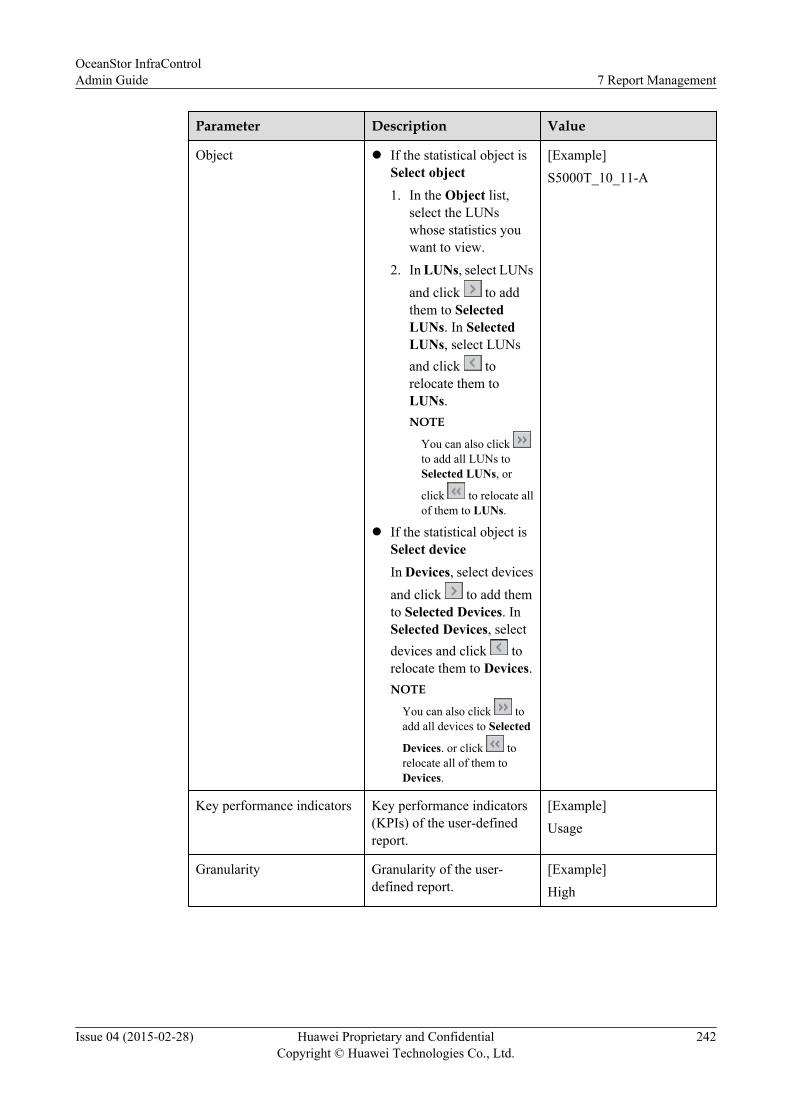
Parameter Description Value
Object l If the statistical object isSelect object1. In the Object list,
select the LUNswhose statistics youwant to view.
2. In LUNs, select LUNsand click to addthem to SelectedLUNs. In SelectedLUNs, select LUNsand click torelocate them toLUNs.NOTE
You can also click to add all LUNs toSelected LUNs, or
click to relocate allof them to LUNs.
l If the statistical object isSelect deviceIn Devices, select devicesand click to add themto Selected Devices. InSelected Devices, selectdevices and click torelocate them to Devices.NOTE
You can also click toadd all devices to Selected
Devices. or click torelocate all of them toDevices.
[Example]S5000T_10_11-A
Key performance indicators Key performance indicators(KPIs) of the user-definedreport.
[Example]Usage
Granularity Granularity of the user-defined report.
[Example]High
OceanStor InfraControlAdmin Guide 7 Report Management
Issue 04 (2015-02-28) Huawei Proprietary and ConfidentialCopyright © Huawei Technologies Co., Ltd.
242

Parameter Description Value
Time range Time range for collectingperformance statistics.NOTE
If you set Time range toCustom, specify the start timeand end time.
[Example]Latest 1 week
Format Method for collectingperformance statistics.
[Example]Average
OceanStor InfraControlAdmin Guide 7 Report Management
Issue 04 (2015-02-28) Huawei Proprietary and ConfidentialCopyright © Huawei Technologies Co., Ltd.
243

Parameter Description Value
Sort Method for sorting the user-defined report.l If you set Sort to
Default, the customreport sorts all objects byeach preset keyperformance indicatorrespectively. Forexample, if you set Keyperformance indicatorsto Usage and IOPS andSort to Default, thecustom report displays allobject information sortedby Usage and IOPSrespectively in tworesults.
l If you set Sort to a keyperformance indicator,the custom reportdisplays key performanceindicators about allobjects sorted by thespecified keyperformance indicator.For example, if you setKey performanceindicators to Usage andIOPS and Sort to Usage,the custom reportdisplays Usage andIOPS information aboutall objects sorted byUsage respectively.
l If TOP is set to n (1 ≤ n≤ 10), the self-definedreport displays amaximum of n statisticsobjects.
– If you selectMaximum orAverage for Format,the top n indicatorvalues are displayed.
– If you selectMinimum for
[Example]
OceanStor InfraControlAdmin Guide 7 Report Management
Issue 04 (2015-02-28) Huawei Proprietary and ConfidentialCopyright © Huawei Technologies Co., Ltd.
244
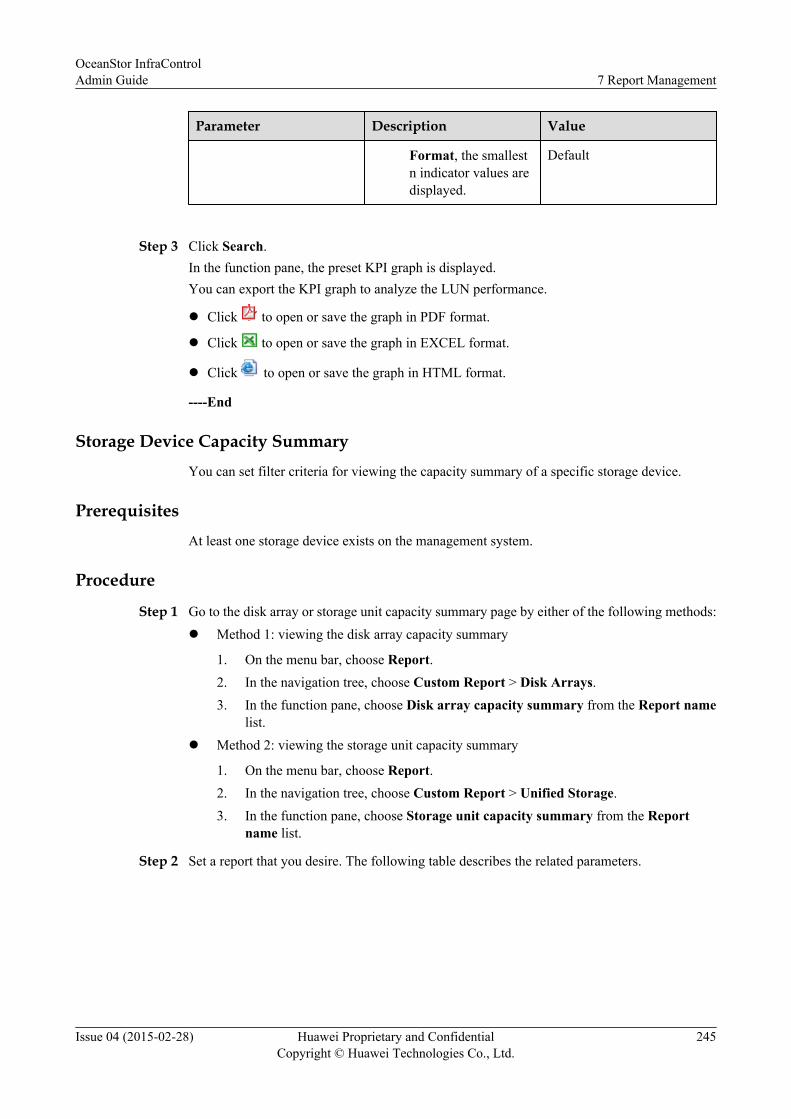
Parameter Description Value
Format, the smallestn indicator values aredisplayed.
Default
Step 3 Click Search.In the function pane, the preset KPI graph is displayed.You can export the KPI graph to analyze the LUN performance.
l Click to open or save the graph in PDF format.
l Click to open or save the graph in EXCEL format.
l Click to open or save the graph in HTML format.
----End
Storage Device Capacity SummaryYou can set filter criteria for viewing the capacity summary of a specific storage device.
PrerequisitesAt least one storage device exists on the management system.
Procedure
Step 1 Go to the disk array or storage unit capacity summary page by either of the following methods:l Method 1: viewing the disk array capacity summary
1. On the menu bar, choose Report.2. In the navigation tree, choose Custom Report > Disk Arrays.3. In the function pane, choose Disk array capacity summary from the Report name
list.l Method 2: viewing the storage unit capacity summary
1. On the menu bar, choose Report.2. In the navigation tree, choose Custom Report > Unified Storage.3. In the function pane, choose Storage unit capacity summary from the Report
name list.
Step 2 Set a report that you desire. The following table describes the related parameters.
OceanStor InfraControlAdmin Guide 7 Report Management
Issue 04 (2015-02-28) Huawei Proprietary and ConfidentialCopyright © Huawei Technologies Co., Ltd.
245
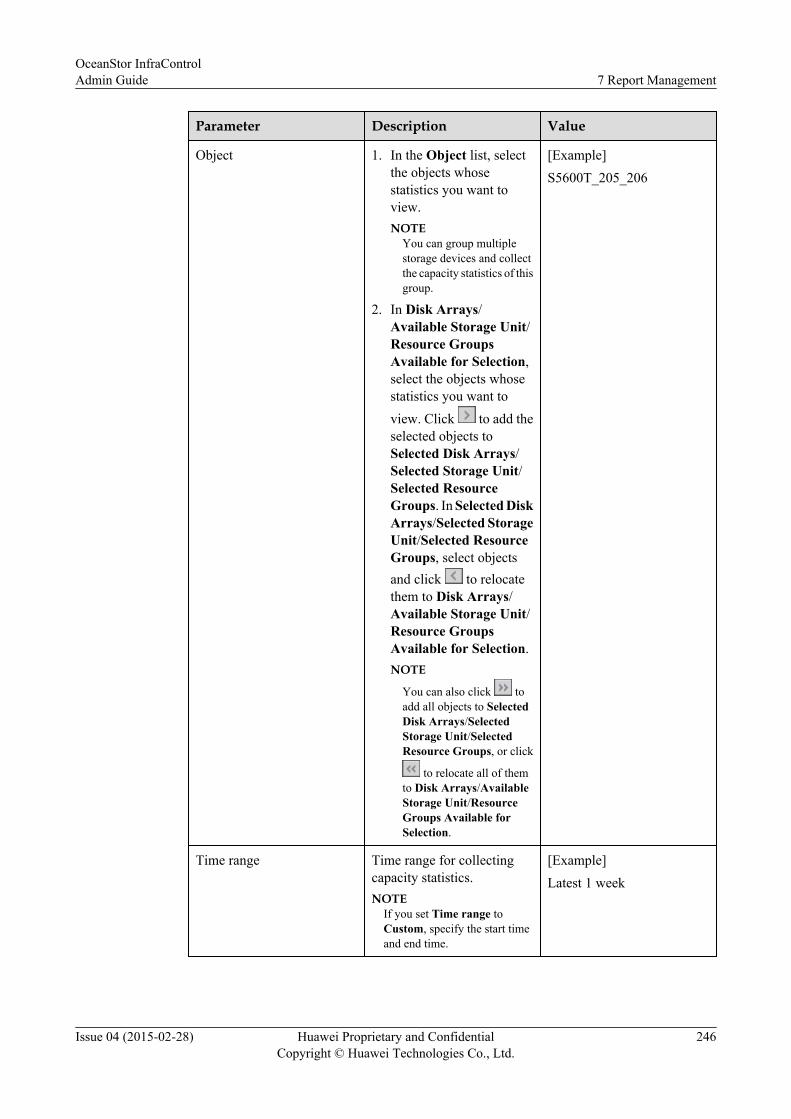
Parameter Description Value
Object 1. In the Object list, selectthe objects whosestatistics you want toview.NOTE
You can group multiplestorage devices and collectthe capacity statistics of thisgroup.
2. In Disk Arrays/Available Storage Unit/Resource GroupsAvailable for Selection,select the objects whosestatistics you want toview. Click to add theselected objects toSelected Disk Arrays/Selected Storage Unit/Selected ResourceGroups. In Selected DiskArrays/Selected StorageUnit/Selected ResourceGroups, select objectsand click to relocatethem to Disk Arrays/Available Storage Unit/Resource GroupsAvailable for Selection.NOTE
You can also click toadd all objects to SelectedDisk Arrays/SelectedStorage Unit/SelectedResource Groups, or click
to relocate all of themto Disk Arrays/AvailableStorage Unit/ResourceGroups Available forSelection.
[Example]S5600T_205_206
Time range Time range for collectingcapacity statistics.NOTE
If you set Time range toCustom, specify the start timeand end time.
[Example]Latest 1 week
OceanStor InfraControlAdmin Guide 7 Report Management
Issue 04 (2015-02-28) Huawei Proprietary and ConfidentialCopyright © Huawei Technologies Co., Ltd.
246
Step 3 Click Search.In the function pane, the preset capacity graph is displayed.You can export the capacity graph to analyze the storage capacity usage.
l Click to open or save the graph in PDF format.
l Click to open or save the graph in EXCEL format.
l Click to open or save the graph in HTML format.
l Click to open or save the graph in CSV format.
----End
Storage Device CapacityYou can set filter criteria for viewing the capacity usage of a specific storage device.
PrerequisitesAt least one storage device exists on the management system.
Procedure
Step 1 Go to the disk array or storage unit capacity usage page by either of the following methods:l Method 1: viewing the disk array capacity usage
1. On the menu bar, choose Report.2. In the navigation tree, choose Custom Report > Disk Arrays.3. In the function pane, choose Disk array capacity from the Report name list.
l Method 2: viewing the storage unit capacity usage
1. On the menu bar, choose Report.2. In the navigation tree, choose Custom Report > Unified Storage.3. In the function pane, choose Storage unit capacity from the Report name list.
Step 2 Set a report that you desire. The following table describes the related parameters.
OceanStor InfraControlAdmin Guide 7 Report Management
Issue 04 (2015-02-28) Huawei Proprietary and ConfidentialCopyright © Huawei Technologies Co., Ltd.
247
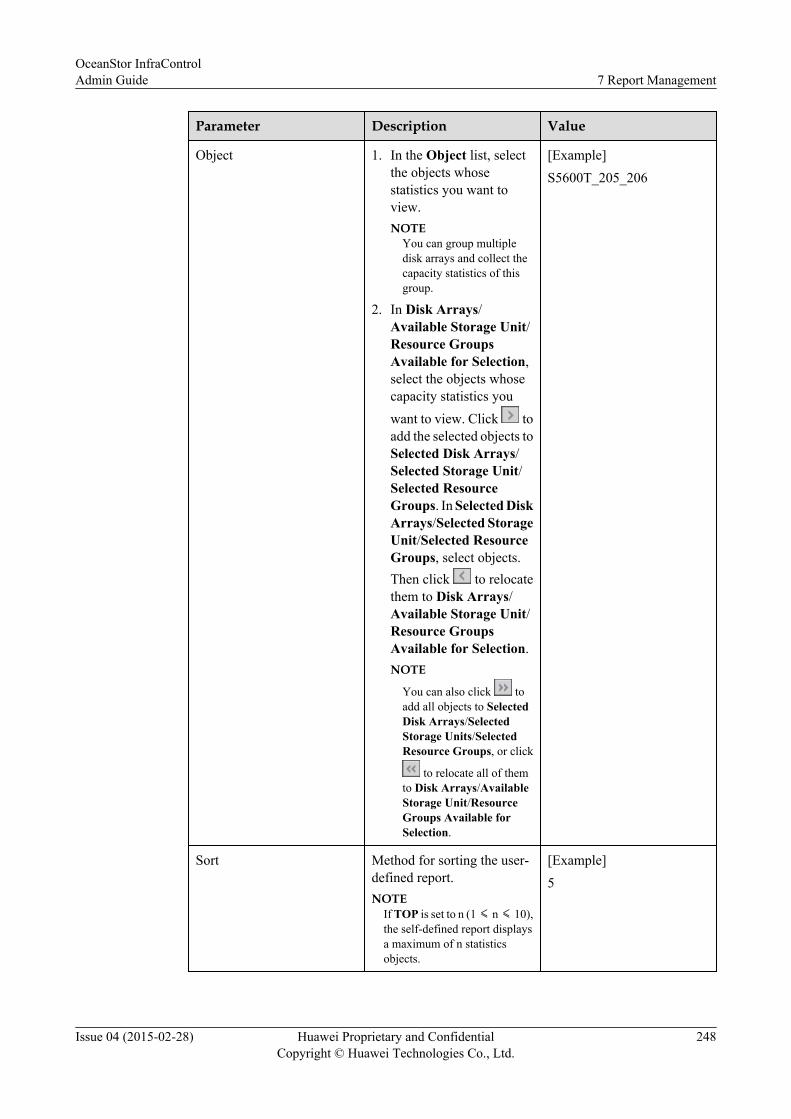
Parameter Description Value
Object 1. In the Object list, selectthe objects whosestatistics you want toview.NOTE
You can group multipledisk arrays and collect thecapacity statistics of thisgroup.
2. In Disk Arrays/Available Storage Unit/Resource GroupsAvailable for Selection,select the objects whosecapacity statistics youwant to view. Click toadd the selected objects toSelected Disk Arrays/Selected Storage Unit/Selected ResourceGroups. In Selected DiskArrays/Selected StorageUnit/Selected ResourceGroups, select objects.Then click to relocatethem to Disk Arrays/Available Storage Unit/Resource GroupsAvailable for Selection.NOTE
You can also click toadd all objects to SelectedDisk Arrays/SelectedStorage Units/SelectedResource Groups, or click
to relocate all of themto Disk Arrays/AvailableStorage Unit/ResourceGroups Available forSelection.
[Example]S5600T_205_206
Sort Method for sorting the user-defined report.NOTE
If TOP is set to n (1 ≤ n ≤ 10),the self-defined report displaysa maximum of n statisticsobjects.
[Example]5
OceanStor InfraControlAdmin Guide 7 Report Management
Issue 04 (2015-02-28) Huawei Proprietary and ConfidentialCopyright © Huawei Technologies Co., Ltd.
248
Parameter Description Value
Time range Time range for collectingcapacity statistics.NOTE
If you set Time range toCustom, specify the start timeand end time.
[Example]Latest 1 week
Step 3 Click Search.In the function pane, the preset capacity graph is displayed.You can export the capacity graph to analyze the storage capacity usage.
l Click to open or save the graph in PDF format.
l Click to open or save the graph in EXCEL format.
l Click to open or save the graph in HTML format.
l Click to open or save the graph in CSV format.
----End
Storage Pool CapacityYou can set filter criteria for viewing the capacity statistics of a specific storage pool.
PrerequisitesAt least one storage device exists on the management system.
Procedure
Step 1 On the menu bar, choose Report.
Step 2 In the navigation tree, choose Custom Report > Disk Arrays.
Step 3 In the function pane, choose Storage pool capacity from the Report name list.
Step 4 Set a report that you desire. The following table describes the related parameters.
OceanStor InfraControlAdmin Guide 7 Report Management
Issue 04 (2015-02-28) Huawei Proprietary and ConfidentialCopyright © Huawei Technologies Co., Ltd.
249
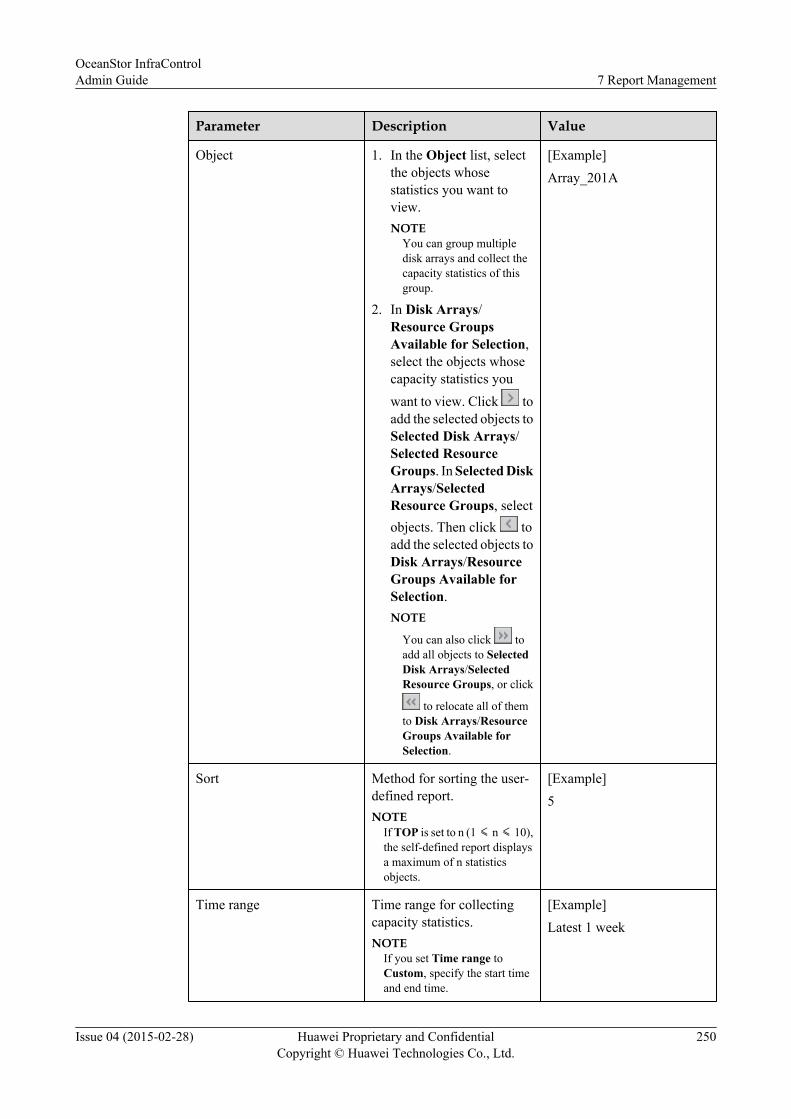
Parameter Description Value
Object 1. In the Object list, selectthe objects whosestatistics you want toview.NOTE
You can group multipledisk arrays and collect thecapacity statistics of thisgroup.
2. In Disk Arrays/Resource GroupsAvailable for Selection,select the objects whosecapacity statistics youwant to view. Click toadd the selected objects toSelected Disk Arrays/Selected ResourceGroups. In Selected DiskArrays/SelectedResource Groups, selectobjects. Then click toadd the selected objects toDisk Arrays/ResourceGroups Available forSelection.NOTE
You can also click toadd all objects to SelectedDisk Arrays/SelectedResource Groups, or click
to relocate all of themto Disk Arrays/ResourceGroups Available forSelection.
[Example]Array_201A
Sort Method for sorting the user-defined report.NOTE
If TOP is set to n (1 ≤ n ≤ 10),the self-defined report displaysa maximum of n statisticsobjects.
[Example]5
Time range Time range for collectingcapacity statistics.NOTE
If you set Time range toCustom, specify the start timeand end time.
[Example]Latest 1 week
OceanStor InfraControlAdmin Guide 7 Report Management
Issue 04 (2015-02-28) Huawei Proprietary and ConfidentialCopyright © Huawei Technologies Co., Ltd.
250
Step 5 Click Search.In the function pane, the preset storage pool capacity graph is displayed.You can export the capacity graph to analyze the storage pool capacity usage.
l Click to open or save the graph in PDF format.
l Click to open or save the graph in EXCEL format.
l Click to open or save the graph in HTML format.
l Click to open or save the graph in CSV format.
NOTE
Opening the detail information web page of the storage pool when clicked its name. And you can view thedata distribution status of storage tiers in the Storage Pool Details.
----End
Thin LUN CapacityA thin logical unit number (LUN) is a logical storage unit created in a thin pool. It is a logicaldisk accessible to hosts, and allocates storage space to users based on the actual capacity demand.You can set filter criteria for viewing the capacity statistics of a specific thin LUN.
PrerequisitesAt least one storage device exists on the management system.
Procedure
Step 1 Go to the thin LUN capacity page by either of the following methods:l Method 1: viewing the statistics of a thin LUN on a disk array
1. On the menu bar, choose Report.2. In the navigation tree, choose Custom Report > Disk Arrays.3. In the function pane, choose Thin LUN capacity from the Report name list.
l Method 2: viewing the statistics of a thin LUN on a unified storage system
1. On the menu bar, choose Report.2. In the navigation tree, choose Custom Report > Unified Storage.3. In the function pane, choose Thin LUN capacity from the Report name list.
Step 2 Set a report that you desire. The following table describes the related parameters.
OceanStor InfraControlAdmin Guide 7 Report Management
Issue 04 (2015-02-28) Huawei Proprietary and ConfidentialCopyright © Huawei Technologies Co., Ltd.
251
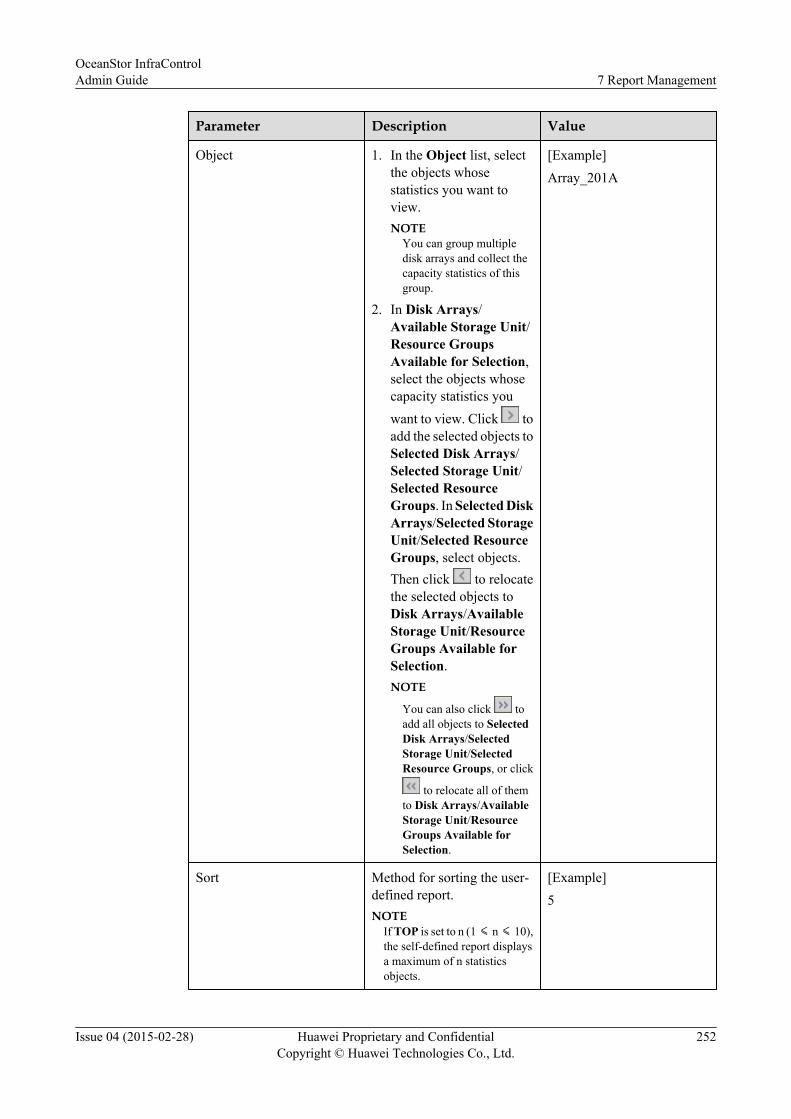
Parameter Description Value
Object 1. In the Object list, selectthe objects whosestatistics you want toview.NOTE
You can group multipledisk arrays and collect thecapacity statistics of thisgroup.
2. In Disk Arrays/Available Storage Unit/Resource GroupsAvailable for Selection,select the objects whosecapacity statistics youwant to view. Click toadd the selected objects toSelected Disk Arrays/Selected Storage Unit/Selected ResourceGroups. In Selected DiskArrays/Selected StorageUnit/Selected ResourceGroups, select objects.Then click to relocatethe selected objects toDisk Arrays/AvailableStorage Unit/ResourceGroups Available forSelection.NOTE
You can also click toadd all objects to SelectedDisk Arrays/SelectedStorage Unit/SelectedResource Groups, or click
to relocate all of themto Disk Arrays/AvailableStorage Unit/ResourceGroups Available forSelection.
[Example]Array_201A
Sort Method for sorting the user-defined report.NOTE
If TOP is set to n (1 ≤ n ≤ 10),the self-defined report displaysa maximum of n statisticsobjects.
[Example]5
OceanStor InfraControlAdmin Guide 7 Report Management
Issue 04 (2015-02-28) Huawei Proprietary and ConfidentialCopyright © Huawei Technologies Co., Ltd.
252
Parameter Description Value
Time range Time range for collectingcapacity statistics.NOTE
If you set Time range toCustom, specify the start timeand end time.
[Example]Latest 1 week
Step 3 Click Search.In the function pane, the preset thin LUN capacity graph is displayed.You can export the capacity graph to analyze the thin LUN capacity usage.
l Click to open or save the graph in PDF format.
l Click to open or save the graph in EXCEL format.
l Click to open or save the graph in HTML format.
l Click to open or save the graph in CSV format.
----End
Thin Pool Capacity
A thin pool uses the thin provisioning technology to enable dynamic and on-demand storagespace allocation. You can set filter criteria for viewing the capacity statistics of a specific thinpool.
Prerequisites
At least one storage device exists on the management system.
Procedure
Step 1 Go to the thin pool capacity page by either of the following methods:
l Method 1: viewing the statistics of a thin pool on a disk array
1. On the menu bar, choose Report.
2. In the navigation tree, choose Custom Report > Disk Arrays.
3. In the function pane, choose Thin pool capacity from the Report name list.
l Method 2: viewing the statistics of a thin pool on a unified storage system
1. On the menu bar, choose Report.
2. In the navigation tree, choose Custom Report > Unified Storage.
3. In the function pane, choose Thin pool capacity from the Report name list.
Step 2 Set a report that you desire. The following table describes the related parameters.
OceanStor InfraControlAdmin Guide 7 Report Management
Issue 04 (2015-02-28) Huawei Proprietary and ConfidentialCopyright © Huawei Technologies Co., Ltd.
253
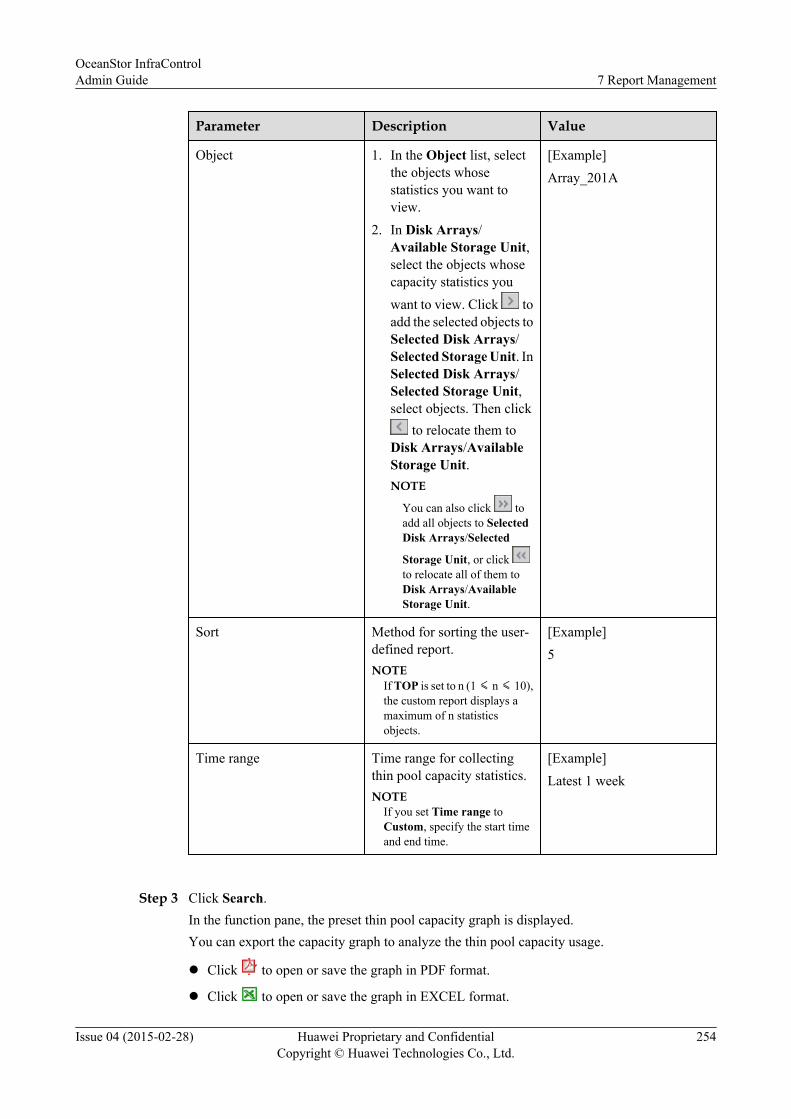
Parameter Description Value
Object 1. In the Object list, selectthe objects whosestatistics you want toview.
2. In Disk Arrays/Available Storage Unit,select the objects whosecapacity statistics youwant to view. Click toadd the selected objects toSelected Disk Arrays/Selected Storage Unit. InSelected Disk Arrays/Selected Storage Unit,select objects. Then click
to relocate them toDisk Arrays/AvailableStorage Unit.NOTE
You can also click toadd all objects to SelectedDisk Arrays/Selected
Storage Unit, or click to relocate all of them toDisk Arrays/AvailableStorage Unit.
[Example]Array_201A
Sort Method for sorting the user-defined report.NOTE
If TOP is set to n (1 ≤ n ≤ 10),the custom report displays amaximum of n statisticsobjects.
[Example]5
Time range Time range for collectingthin pool capacity statistics.NOTE
If you set Time range toCustom, specify the start timeand end time.
[Example]Latest 1 week
Step 3 Click Search.In the function pane, the preset thin pool capacity graph is displayed.You can export the capacity graph to analyze the thin pool capacity usage.
l Click to open or save the graph in PDF format.
l Click to open or save the graph in EXCEL format.
OceanStor InfraControlAdmin Guide 7 Report Management
Issue 04 (2015-02-28) Huawei Proprietary and ConfidentialCopyright © Huawei Technologies Co., Ltd.
254
l Click to open or save the graph in HTML format.
l Click to open or save the graph in CSV format.
----End
7.2.2 Viewing a User-defined Report for Unified StorageYou can set filter criteria for viewing the performance reports for a specific unified storagesystem.
Viewing a user-defined report for unified storage includes the following operations:
Storage Unit Performance Summary
You can set filter criteria for viewing the performance summary of a specific storage unit. Thenyou can learn about the running status of the storage unit accordingly.
Prerequisites
At least one storage device exists on the management system.
Procedure
Step 1 Go to the disk array or storage unit performance summary page by either of the followingmethods:
l Method 1: viewing the disk array performance summary
1. On the menu bar, choose Report.2. In the navigation tree, choose Custom Report > Disk Arrays.
3. In the function pane, choose Disk array performance summary from the Reportname list.
l Method 2: viewing the storage unit performance summary
1. On the menu bar, choose Report.2. In the navigation tree, choose Custom Report > Unified Storage.
3. In the function pane, choose Storage unit performance summary from the Reportname list.
Step 2 Set a time range.If you set Time range to Custom, specify the start time and end time.
Step 3 Click Search.In the list on the lower part of the function pane, the storage device performance statistics aredisplayed.
You can export the storage device performance summary graph to analyze the performancetrend.
l Click to open or save the graph in PDF format.
l Click to open or save the graph in EXCEL format.
OceanStor InfraControlAdmin Guide 7 Report Management
Issue 04 (2015-02-28) Huawei Proprietary and ConfidentialCopyright © Huawei Technologies Co., Ltd.
255

l Click to open or save the graph in HTML format.
----End
Controller PerformanceYou can set filter criteria for viewing the performance statistics of a specific controller. Thenyou can learn about the running status of the controller accordingly.
PrerequisitesAt least one storage device exists on the management system.
Procedure
Step 1 Go to the controller performance page by either of the following methods:l Method 1: viewing the performance of the controllers on a disk array
1. On the menu bar, choose Report.2. In the navigation tree, choose Custom Report > Disk Arrays.3. In the function pane, choose Controller performance from the Report name list.
l Method 2: viewing the performance of the controllers on a unified storage system
1. On the menu bar, choose Report.2. In the navigation tree, choose Custom Report > Unified Storage.3. In the function pane, choose Controller performance from the Report name list.
Step 2 Set a report that you desire. The following table describes the related parameters.
Parameter Description Value
Report view Type of the report view,Tendency or Comparison.
[Example]Tendency
OceanStor InfraControlAdmin Guide 7 Report Management
Issue 04 (2015-02-28) Huawei Proprietary and ConfidentialCopyright © Huawei Technologies Co., Ltd.
256
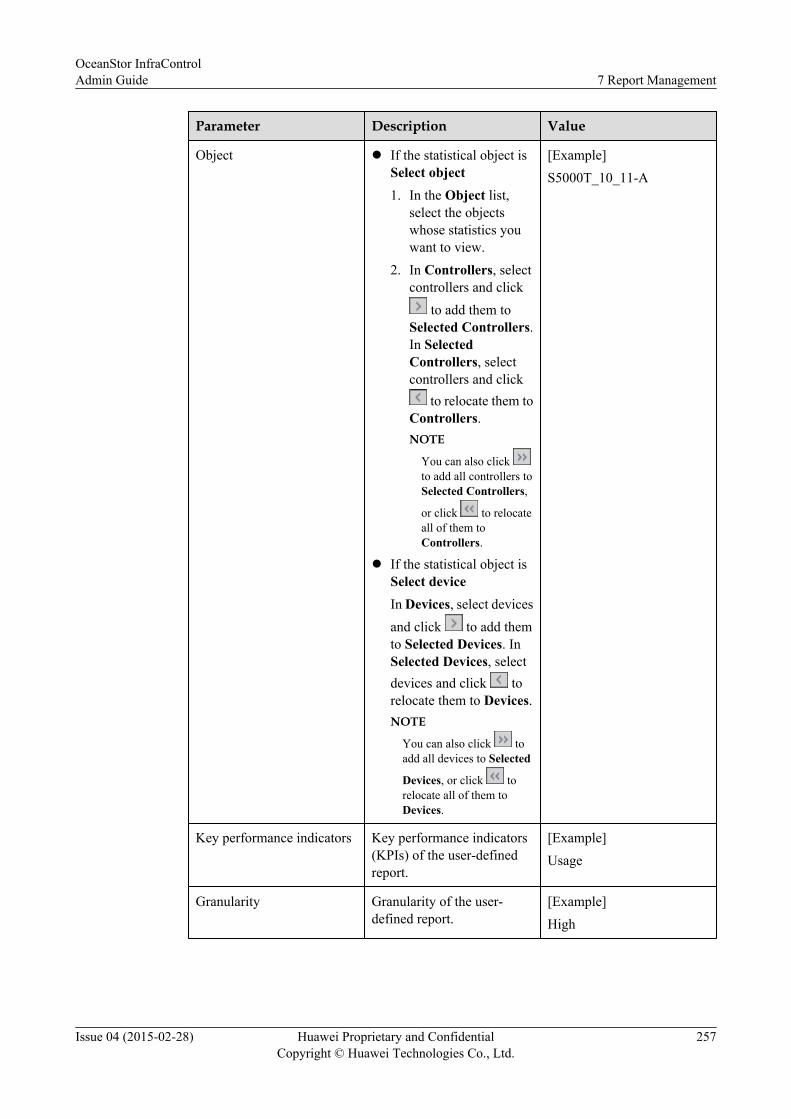
Parameter Description Value
Object l If the statistical object isSelect object1. In the Object list,
select the objectswhose statistics youwant to view.
2. In Controllers, selectcontrollers and click
to add them toSelected Controllers.In SelectedControllers, selectcontrollers and click
to relocate them toControllers.NOTE
You can also click to add all controllers toSelected Controllers,
or click to relocateall of them toControllers.
l If the statistical object isSelect deviceIn Devices, select devicesand click to add themto Selected Devices. InSelected Devices, selectdevices and click torelocate them to Devices.NOTE
You can also click toadd all devices to Selected
Devices, or click torelocate all of them toDevices.
[Example]S5000T_10_11-A
Key performance indicators Key performance indicators(KPIs) of the user-definedreport.
[Example]Usage
Granularity Granularity of the user-defined report.
[Example]High
OceanStor InfraControlAdmin Guide 7 Report Management
Issue 04 (2015-02-28) Huawei Proprietary and ConfidentialCopyright © Huawei Technologies Co., Ltd.
257

Parameter Description Value
Time range Time range for collectingperformance statistics.NOTE
If you set Time range toCustom, specify the start timeand end time.
[Example]Latest 1 week
Format Method for collectingperformance statistics.
[Example]Average
OceanStor InfraControlAdmin Guide 7 Report Management
Issue 04 (2015-02-28) Huawei Proprietary and ConfidentialCopyright © Huawei Technologies Co., Ltd.
258

Parameter Description Value
Sort Method for sorting the user-defined report.l If you set Sort to
Default, the customreport sorts all objects byeach preset keyperformance indicatorrespectively. Forexample, if you set Keyperformance indicatorsto Usage and IOPS andSort to Default, thecustom report displays allobject information sortedby Usage and IOPSrespectively in tworesults.
l If you set Sort to a keyperformance indicator,the custom reportdisplays key performanceindicators about allobjects sorted by thespecified keyperformance indicator.For example, if you setKey performanceindicators to Usage andIOPS and Sort to Usage,the custom reportdisplays Usage andIOPS information aboutall objects sorted byUsage respectively.
l If TOP is set to n (1 ≤ n≤ 10), the self-definedreport displays amaximum of n statisticsobjects.
– If you selectMaximum orAverage for Format,the top n indicatorvalues are displayed.
– If you selectMinimum for
[Example]
OceanStor InfraControlAdmin Guide 7 Report Management
Issue 04 (2015-02-28) Huawei Proprietary and ConfidentialCopyright © Huawei Technologies Co., Ltd.
259
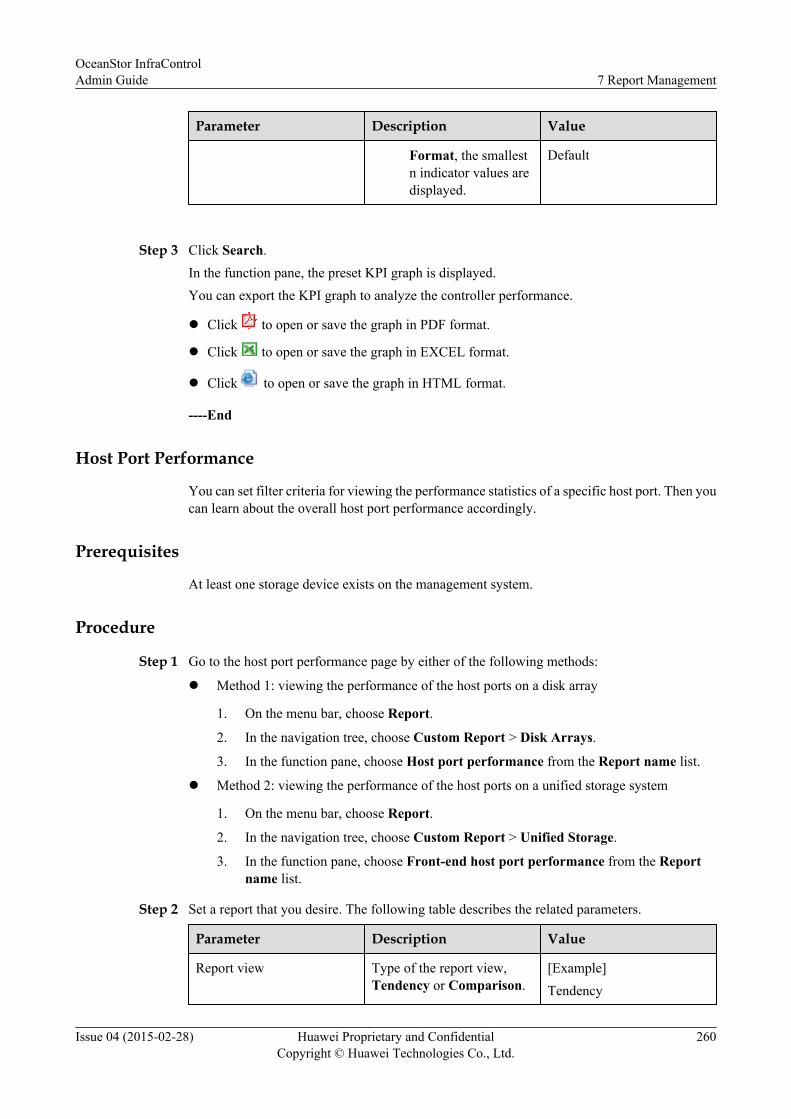
Parameter Description Value
Format, the smallestn indicator values aredisplayed.
Default
Step 3 Click Search.In the function pane, the preset KPI graph is displayed.You can export the KPI graph to analyze the controller performance.
l Click to open or save the graph in PDF format.
l Click to open or save the graph in EXCEL format.
l Click to open or save the graph in HTML format.
----End
Host Port Performance
You can set filter criteria for viewing the performance statistics of a specific host port. Then youcan learn about the overall host port performance accordingly.
Prerequisites
At least one storage device exists on the management system.
Procedure
Step 1 Go to the host port performance page by either of the following methods:
l Method 1: viewing the performance of the host ports on a disk array
1. On the menu bar, choose Report.
2. In the navigation tree, choose Custom Report > Disk Arrays.
3. In the function pane, choose Host port performance from the Report name list.
l Method 2: viewing the performance of the host ports on a unified storage system
1. On the menu bar, choose Report.
2. In the navigation tree, choose Custom Report > Unified Storage.
3. In the function pane, choose Front-end host port performance from the Reportname list.
Step 2 Set a report that you desire. The following table describes the related parameters.
Parameter Description Value
Report view Type of the report view,Tendency or Comparison.
[Example]Tendency
OceanStor InfraControlAdmin Guide 7 Report Management
Issue 04 (2015-02-28) Huawei Proprietary and ConfidentialCopyright © Huawei Technologies Co., Ltd.
260

Parameter Description Value
Object l If the statistical object isSelect object1. In the Object list,
select the host portswhose statistics youwant to view.
2. In Ports, select hostports and click toadd them to SelectedPorts. In SelectedPorts, select hostports and click torelocate them toPorts.NOTE
You can also click to add all host ports toSelected Ports, or click
to relocate all ofthem to Ports.
l If the statistical object isSelect deviceIn Devices, select devicesand click to add themto Selected Devices. InSelected Devices, selectdevices and click torelocate them to Devices.NOTE
You can also click toadd all devices to Selected
Devices. or click torelocate all of them toDevices.
[Example]S5000T_10_11-A
Key performance indicators Key performance indicators(KPIs) of the user-definedreport.
[Example]Usage
Granularity Granularity of the user-defined report.
[Example]High
OceanStor InfraControlAdmin Guide 7 Report Management
Issue 04 (2015-02-28) Huawei Proprietary and ConfidentialCopyright © Huawei Technologies Co., Ltd.
261

Parameter Description Value
Time range Time range for collectingperformance statistics.NOTE
If you set Time range toCustom, specify the start timeand end time.
[Example]Latest 1 week
Format Method for collectingperformance statistics.
[Example]Average
OceanStor InfraControlAdmin Guide 7 Report Management
Issue 04 (2015-02-28) Huawei Proprietary and ConfidentialCopyright © Huawei Technologies Co., Ltd.
262
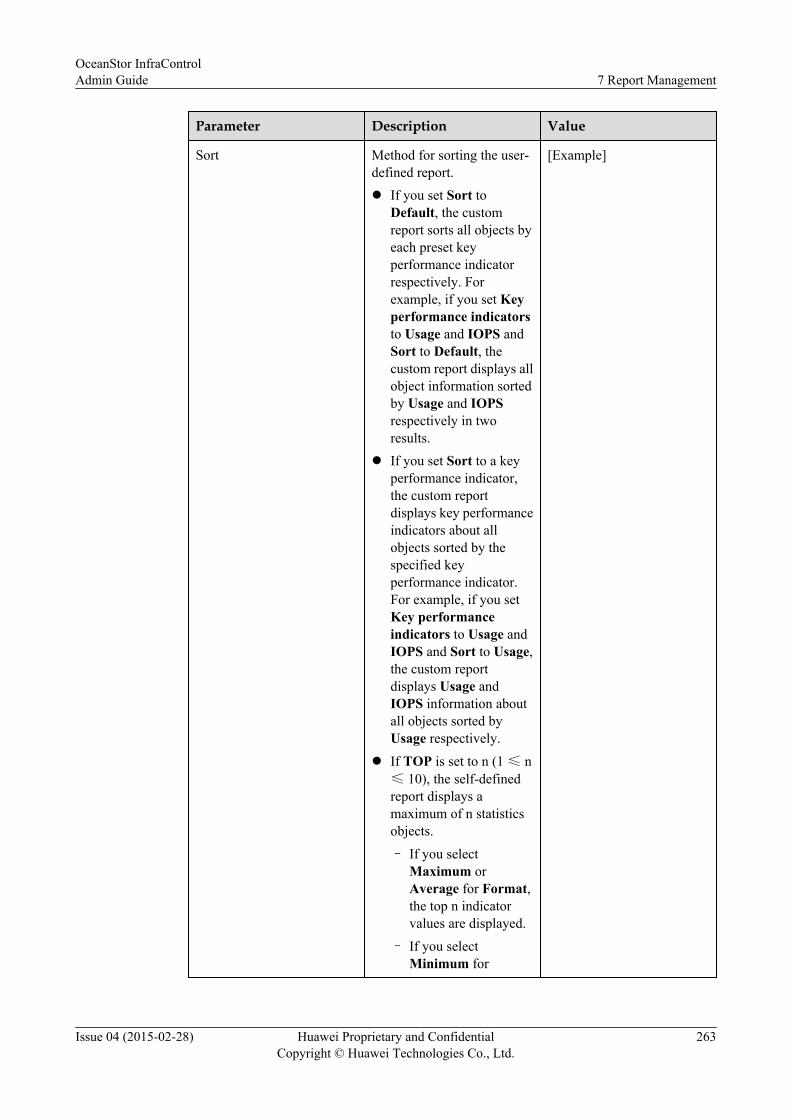
Parameter Description Value
Sort Method for sorting the user-defined report.l If you set Sort to
Default, the customreport sorts all objects byeach preset keyperformance indicatorrespectively. Forexample, if you set Keyperformance indicatorsto Usage and IOPS andSort to Default, thecustom report displays allobject information sortedby Usage and IOPSrespectively in tworesults.
l If you set Sort to a keyperformance indicator,the custom reportdisplays key performanceindicators about allobjects sorted by thespecified keyperformance indicator.For example, if you setKey performanceindicators to Usage andIOPS and Sort to Usage,the custom reportdisplays Usage andIOPS information aboutall objects sorted byUsage respectively.
l If TOP is set to n (1 ≤ n≤ 10), the self-definedreport displays amaximum of n statisticsobjects.
– If you selectMaximum orAverage for Format,the top n indicatorvalues are displayed.
– If you selectMinimum for
[Example]
OceanStor InfraControlAdmin Guide 7 Report Management
Issue 04 (2015-02-28) Huawei Proprietary and ConfidentialCopyright © Huawei Technologies Co., Ltd.
263

Parameter Description Value
Format, the smallestn indicator values aredisplayed.
Default
Step 3 Click Search.In the function pane, the preset KPI graph is displayed.You can export the KPI graph to analyze the host port performance.
l Click to open or save the graph in PDF format.
l Click to open or save the graph in EXCEL format.
l Click to open or save the graph in HTML format.
----End
Disk Performance
You can set filter criteria for viewing the performance statistics of a specific disk. Then you canlearn about the overall disk performance, and locate and troubleshoot faulty disks accordingly.
Prerequisites
At least one storage device exists on the management system.
Procedure
Step 1 Go to the disk performance page by either of the following methods:
l Method 1: viewing the performance of the hard disks on a disk array
1. On the menu bar, choose Report.
2. In the navigation tree, choose Custom Report > Disk Arrays.
3. In the function pane, choose Disk performance from the Report name list.
l Method 2: viewing the performance of the hard disks on a unified storage system
1. On the menu bar, choose Report.
2. In the navigation tree, choose Custom Report > Unified Storage.
3. In the function pane, choose Disk performance from the Report name list.
Step 2 Set a report that you desire. The following table describes the related parameters.
Parameter Description Value
Report view Type of the report view,Tendency or Comparison.
[Example]Tendency
OceanStor InfraControlAdmin Guide 7 Report Management
Issue 04 (2015-02-28) Huawei Proprietary and ConfidentialCopyright © Huawei Technologies Co., Ltd.
264

Parameter Description Value
Object l If the statistical object isSelect object1. In the Object list,
select the hard diskswhose statistics youwant to view.
2. In Disks, select harddisks and click toadd them to SelectedDisks. In SelectedDevices, select harddisks and click torelocate them toDisks.NOTE
You can also click to add all hard disks toSelected Disks, or click
to relocate all ofthem to Disks.
l If the statistical object isSelect deviceIn Devices, select devicesand click to add themto Selected Devices. InSelected Devices, selectdevices and click torelocate them to Devices.NOTE
You can also click toadd all devices to Selected
Devices. or click torelocate all of them toDevices.
[Example]S5000T_10_11-A
Key performance indicators Key performance indicators(KPIs) of the user-definedreport.
[Example]Usage
Granularity Granularity of the user-defined report.
[Example]High
OceanStor InfraControlAdmin Guide 7 Report Management
Issue 04 (2015-02-28) Huawei Proprietary and ConfidentialCopyright © Huawei Technologies Co., Ltd.
265

Parameter Description Value
Time range Time range for collectingperformance statistics.NOTE
If you set Time range toCustom, specify the start timeand end time.
[Example]Latest 1 week
Format Method for collectingperformance statistics.
[Example]Average
OceanStor InfraControlAdmin Guide 7 Report Management
Issue 04 (2015-02-28) Huawei Proprietary and ConfidentialCopyright © Huawei Technologies Co., Ltd.
266

Parameter Description Value
Sort Method for sorting the user-defined report.l If you set Sort to
Default, the customreport sorts all objects byeach preset keyperformance indicatorrespectively. Forexample, if you set Keyperformance indicatorsto Usage and IOPS andSort to Default, thecustom report displays allobject information sortedby Usage and IOPSrespectively in tworesults.
l If you set Sort to a keyperformance indicator,the custom reportdisplays key performanceindicators about allobjects sorted by thespecified keyperformance indicator.For example, if you setKey performanceindicators to Usage andIOPS and Sort to Usage,the custom reportdisplays Usage andIOPS information aboutall objects sorted byUsage respectively.
l If TOP is set to n (1 ≤ n≤ 10), the self-definedreport displays amaximum of n statisticsobjects.
– If you selectMaximum orAverage for Format,the top n indicatorvalues are displayed.
– If you selectMinimum for
[Example]
OceanStor InfraControlAdmin Guide 7 Report Management
Issue 04 (2015-02-28) Huawei Proprietary and ConfidentialCopyright © Huawei Technologies Co., Ltd.
267
Parameter Description Value
Format, the smallestn indicator values aredisplayed.
Default
Step 3 Click Search.In the function pane, the preset KPI graph is displayed.You can export the KPI graph to analyze the disk performance.
l Click to open or save the graph in PDF format.
l Click to open or save the graph in EXCEL format.
l Click to open or save the graph in HTML format.
----End
LUN Performance
A logical unit number (LUN) is a logical disk provided by a controller to application servers forstorage. LUNs help application servers make better use of storage resources. You can set filtercriteria for viewing the performance statistics of a specific LUN.
Prerequisites
At least one storage device exists on the management system.
Procedure
Step 1 Go to the LUN performance page by either of the following methods:
l Method 1: viewing the performance of the LUNs on a disk array
1. On the menu bar, choose Report.
2. In the navigation tree, choose Custom Report > Disk Arrays.
3. In the function pane, choose LUN performance from the Report name list.
l Method 2: viewing the performance of the LUNs on a unified storage device
1. On the menu bar, choose Report.
2. In the navigation tree, choose Custom Report > Unified Storage.
3. In the function pane, choose LUN performance from the Report name list.
Step 2 Set a report that you desire. The following table describes the related parameters.
Parameter Description Value
Report view Type of the report view,Tendency or Comparison.
[Example]Tendency
OceanStor InfraControlAdmin Guide 7 Report Management
Issue 04 (2015-02-28) Huawei Proprietary and ConfidentialCopyright © Huawei Technologies Co., Ltd.
268

Parameter Description Value
Object l If the statistical object isSelect object1. In the Object list,
select the LUNswhose statistics youwant to view.
2. In LUNs, select LUNsand click to addthem to SelectedLUNs. In SelectedLUNs, select LUNsand click torelocate them toLUNs.NOTE
You can also click to add all LUNs toSelected LUNs, or
click to relocate allof them to LUNs.
l If the statistical object isSelect deviceIn Devices, select devicesand click to add themto Selected Devices. InSelected Devices, selectdevices and click torelocate them to Devices.NOTE
You can also click toadd all devices to Selected
Devices. or click torelocate all of them toDevices.
[Example]S5000T_10_11-A
Key performance indicators Key performance indicators(KPIs) of the user-definedreport.
[Example]Usage
Granularity Granularity of the user-defined report.
[Example]High
OceanStor InfraControlAdmin Guide 7 Report Management
Issue 04 (2015-02-28) Huawei Proprietary and ConfidentialCopyright © Huawei Technologies Co., Ltd.
269

Parameter Description Value
Time range Time range for collectingperformance statistics.NOTE
If you set Time range toCustom, specify the start timeand end time.
[Example]Latest 1 week
Format Method for collectingperformance statistics.
[Example]Average
OceanStor InfraControlAdmin Guide 7 Report Management
Issue 04 (2015-02-28) Huawei Proprietary and ConfidentialCopyright © Huawei Technologies Co., Ltd.
270

Parameter Description Value
Sort Method for sorting the user-defined report.l If you set Sort to
Default, the customreport sorts all objects byeach preset keyperformance indicatorrespectively. Forexample, if you set Keyperformance indicatorsto Usage and IOPS andSort to Default, thecustom report displays allobject information sortedby Usage and IOPSrespectively in tworesults.
l If you set Sort to a keyperformance indicator,the custom reportdisplays key performanceindicators about allobjects sorted by thespecified keyperformance indicator.For example, if you setKey performanceindicators to Usage andIOPS and Sort to Usage,the custom reportdisplays Usage andIOPS information aboutall objects sorted byUsage respectively.
l If TOP is set to n (1 ≤ n≤ 10), the self-definedreport displays amaximum of n statisticsobjects.
– If you selectMaximum orAverage for Format,the top n indicatorvalues are displayed.
– If you selectMinimum for
[Example]
OceanStor InfraControlAdmin Guide 7 Report Management
Issue 04 (2015-02-28) Huawei Proprietary and ConfidentialCopyright © Huawei Technologies Co., Ltd.
271
Parameter Description Value
Format, the smallestn indicator values aredisplayed.
Default
Step 3 Click Search.In the function pane, the preset KPI graph is displayed.You can export the KPI graph to analyze the LUN performance.
l Click to open or save the graph in PDF format.
l Click to open or save the graph in EXCEL format.
l Click to open or save the graph in HTML format.
----End
Service Port PerformanceYou can set filter criteria for viewing performance statistics of a specific service port. Then youcan learn about the overall service port performance, and locate and troubleshoot faulty serviceports accordingly.
PrerequisitesAt least one unified storage system exists on the management system.
Procedure
Step 1 On the menu bar, choose Report.
Step 2 In the navigation tree, choose Custom Report > Unified Storage.
Step 3 In the function pane, choose Service port performance from the Report name list.
Step 4 Set a report that you desire. The following table describes the related parameters.
Parameter Description Value
Report view Type of the report view,Tendency or Comparison.
[Example]Tendency
OceanStor InfraControlAdmin Guide 7 Report Management
Issue 04 (2015-02-28) Huawei Proprietary and ConfidentialCopyright © Huawei Technologies Co., Ltd.
272
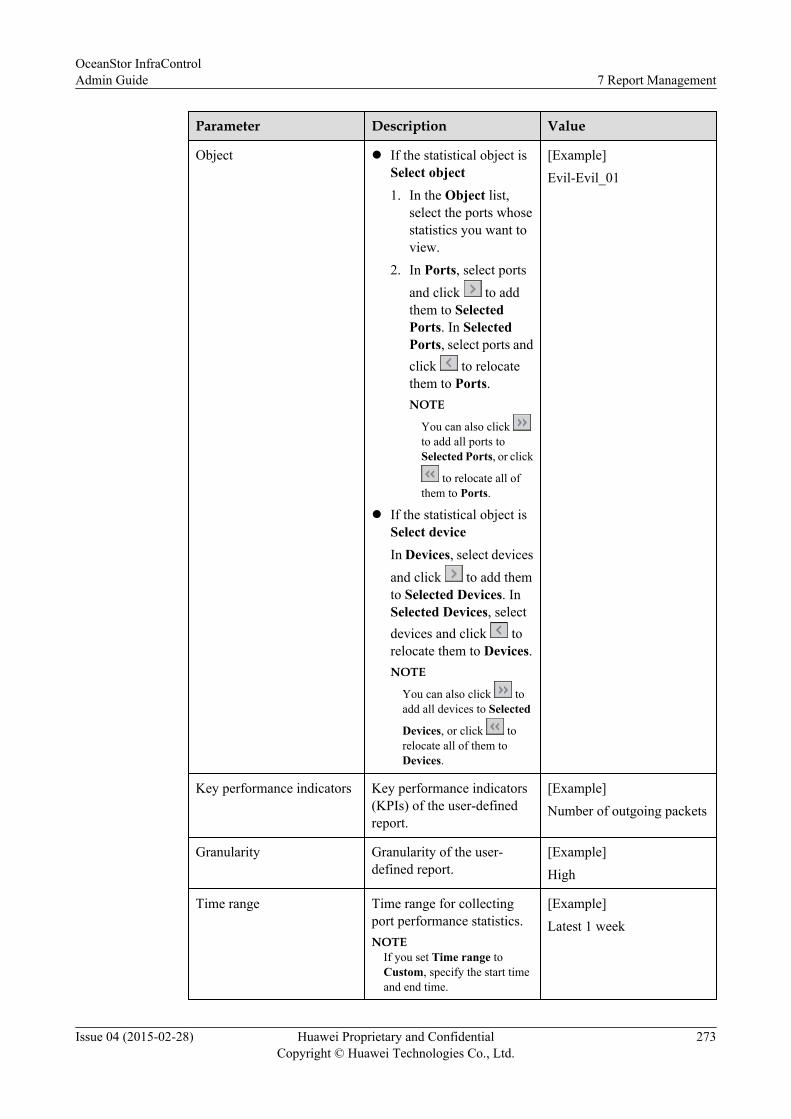
Parameter Description Value
Object l If the statistical object isSelect object1. In the Object list,
select the ports whosestatistics you want toview.
2. In Ports, select portsand click to addthem to SelectedPorts. In SelectedPorts, select ports andclick to relocatethem to Ports.NOTE
You can also click to add all ports toSelected Ports, or click
to relocate all ofthem to Ports.
l If the statistical object isSelect deviceIn Devices, select devicesand click to add themto Selected Devices. InSelected Devices, selectdevices and click torelocate them to Devices.NOTE
You can also click toadd all devices to Selected
Devices, or click torelocate all of them toDevices.
[Example]Evil-Evil_01
Key performance indicators Key performance indicators(KPIs) of the user-definedreport.
[Example]Number of outgoing packets
Granularity Granularity of the user-defined report.
[Example]High
Time range Time range for collectingport performance statistics.NOTE
If you set Time range toCustom, specify the start timeand end time.
[Example]Latest 1 week
OceanStor InfraControlAdmin Guide 7 Report Management
Issue 04 (2015-02-28) Huawei Proprietary and ConfidentialCopyright © Huawei Technologies Co., Ltd.
273
Parameter Description Value
Format Data format of the user-defined report.
[Example]Average
OceanStor InfraControlAdmin Guide 7 Report Management
Issue 04 (2015-02-28) Huawei Proprietary and ConfidentialCopyright © Huawei Technologies Co., Ltd.
274

Parameter Description Value
Sort Method for sorting the user-defined report.l If you set Sort to
Default, the customreport sorts all objects byeach preset keyperformance indicatorrespectively. Forexample, if you set Keyperformance indicatorsto Usage and IOPS andSort to Default, thecustom report displays allobject information sortedby Usage and IOPSrespectively in tworesults.
l If you set Sort to a keyperformance indicator,the custom reportdisplays key performanceindicators about allobjects sorted by thespecified keyperformance indicator.For example, if you setKey performanceindicators to Usage andIOPS and Sort to Usage,the custom reportdisplays Usage andIOPS information aboutall objects sorted byUsage respectively.
l If TOP is set to n (1 ≤ n≤ 10), the self-definedreport displays amaximum of n statisticsobjects.
– If you selectMaximum orAverage for Format,the top n indicatorvalues are displayed.
– If you selectMinimum for
[Example]
OceanStor InfraControlAdmin Guide 7 Report Management
Issue 04 (2015-02-28) Huawei Proprietary and ConfidentialCopyright © Huawei Technologies Co., Ltd.
275
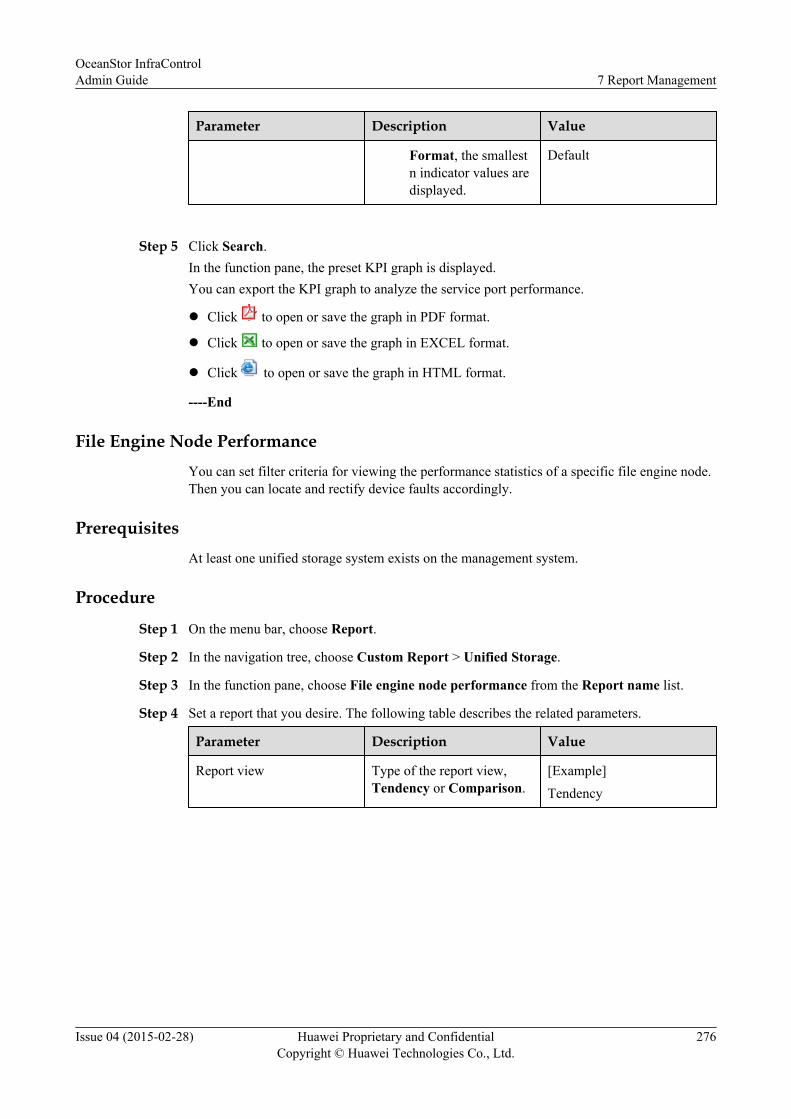
Parameter Description Value
Format, the smallestn indicator values aredisplayed.
Default
Step 5 Click Search.In the function pane, the preset KPI graph is displayed.You can export the KPI graph to analyze the service port performance.
l Click to open or save the graph in PDF format.
l Click to open or save the graph in EXCEL format.
l Click to open or save the graph in HTML format.
----End
File Engine Node PerformanceYou can set filter criteria for viewing the performance statistics of a specific file engine node.Then you can locate and rectify device faults accordingly.
PrerequisitesAt least one unified storage system exists on the management system.
Procedure
Step 1 On the menu bar, choose Report.
Step 2 In the navigation tree, choose Custom Report > Unified Storage.
Step 3 In the function pane, choose File engine node performance from the Report name list.
Step 4 Set a report that you desire. The following table describes the related parameters.
Parameter Description Value
Report view Type of the report view,Tendency or Comparison.
[Example]Tendency
OceanStor InfraControlAdmin Guide 7 Report Management
Issue 04 (2015-02-28) Huawei Proprietary and ConfidentialCopyright © Huawei Technologies Co., Ltd.
276
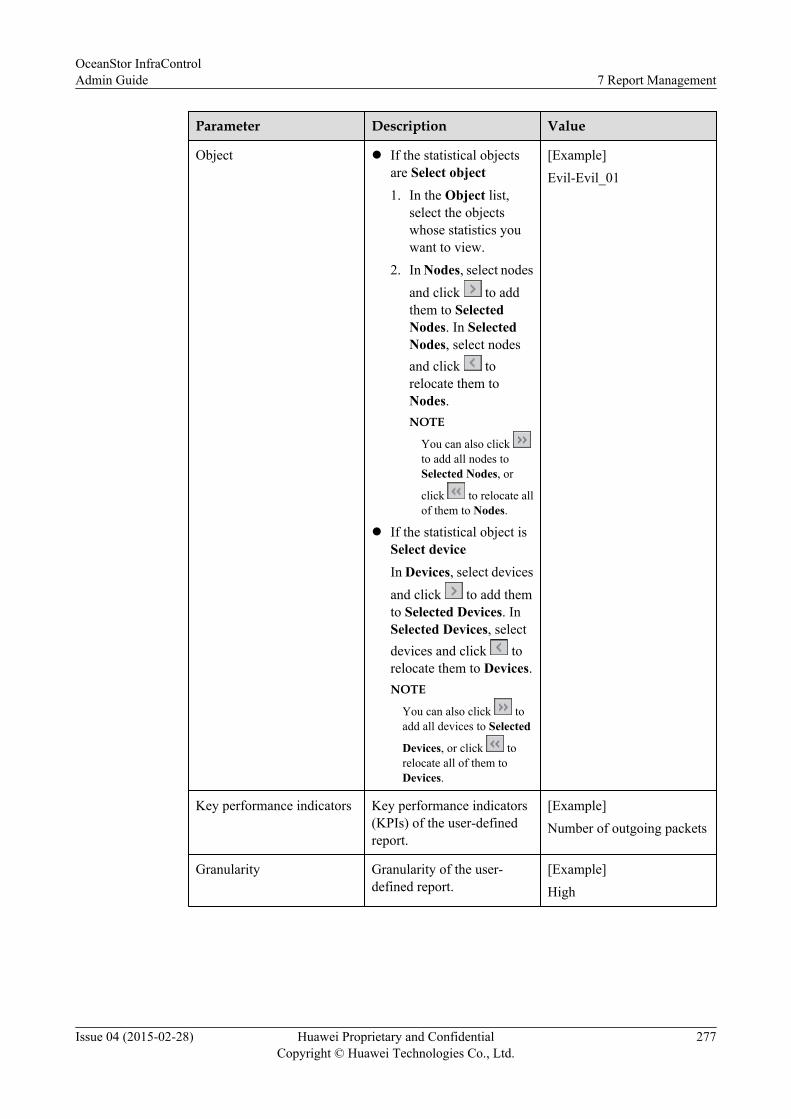
Parameter Description Value
Object l If the statistical objectsare Select object1. In the Object list,
select the objectswhose statistics youwant to view.
2. In Nodes, select nodesand click to addthem to SelectedNodes. In SelectedNodes, select nodesand click torelocate them toNodes.NOTE
You can also click to add all nodes toSelected Nodes, or
click to relocate allof them to Nodes.
l If the statistical object isSelect deviceIn Devices, select devicesand click to add themto Selected Devices. InSelected Devices, selectdevices and click torelocate them to Devices.NOTE
You can also click toadd all devices to Selected
Devices, or click torelocate all of them toDevices.
[Example]Evil-Evil_01
Key performance indicators Key performance indicators(KPIs) of the user-definedreport.
[Example]Number of outgoing packets
Granularity Granularity of the user-defined report.
[Example]High
OceanStor InfraControlAdmin Guide 7 Report Management
Issue 04 (2015-02-28) Huawei Proprietary and ConfidentialCopyright © Huawei Technologies Co., Ltd.
277

Parameter Description Value
Time range Time range for collecting fileengine performancestatistics.NOTE
If you set Time range toCustom, specify the start timeand end time.
[Example]Latest 1 week
Format Data format of the user-defined report.
[Example]Average
OceanStor InfraControlAdmin Guide 7 Report Management
Issue 04 (2015-02-28) Huawei Proprietary and ConfidentialCopyright © Huawei Technologies Co., Ltd.
278

Parameter Description Value
Sort Method for sorting the user-defined report.l If you set Sort to
Default, the customreport sorts all objects byeach preset keyperformance indicatorrespectively. Forexample, if you set Keyperformance indicatorsto Usage and IOPS andSort to Default, thecustom report displays allobject information sortedby Usage and IOPSrespectively in tworesults.
l If you set Sort to a keyperformance indicator,the custom reportdisplays key performanceindicators about allobjects sorted by thespecified keyperformance indicator.For example, if you setKey performanceindicators to Usage andIOPS and Sort to Usage,the custom reportdisplays Usage andIOPS information aboutall objects sorted byUsage respectively.
l If TOP is set to n (1 ≤ n≤ 10), the self-definedreport displays amaximum of n statisticsobjects.
– If you selectMaximum orAverage for Format,the top n indicatorvalues are displayed.
– If you selectMinimum for
[Example]
OceanStor InfraControlAdmin Guide 7 Report Management
Issue 04 (2015-02-28) Huawei Proprietary and ConfidentialCopyright © Huawei Technologies Co., Ltd.
279

Parameter Description Value
Format, the smallestn indicator values aredisplayed.
Default
Step 5 Click Search.In the function pane, the preset KPI graph is displayed.You can export the KPI graph to analyze the file engine performance.
l Click to open or save the graph in PDF format.
l Click to open or save the graph in EXCEL format.
l Click to open or save the graph in HTML format.
----End
CPU Performance of a File Engine NodeYou can set filter criteria for viewing the CPU performance of a specific file engine node.
PrerequisitesAt least one unified storage system exists on the management system.
Procedure
Step 1 On the menu bar, choose Report.
Step 2 In the navigation tree, choose Custom Report > Unified Storage.
Step 3 In the function pane, choose File engine node CPU performance from the Report name list.
Step 4 Set a report that you desire. The following table describes the related parameters.
Parameter Description Value
Report view Type of the report view,Tendency or Comparison.
[Example]Tendency
OceanStor InfraControlAdmin Guide 7 Report Management
Issue 04 (2015-02-28) Huawei Proprietary and ConfidentialCopyright © Huawei Technologies Co., Ltd.
280
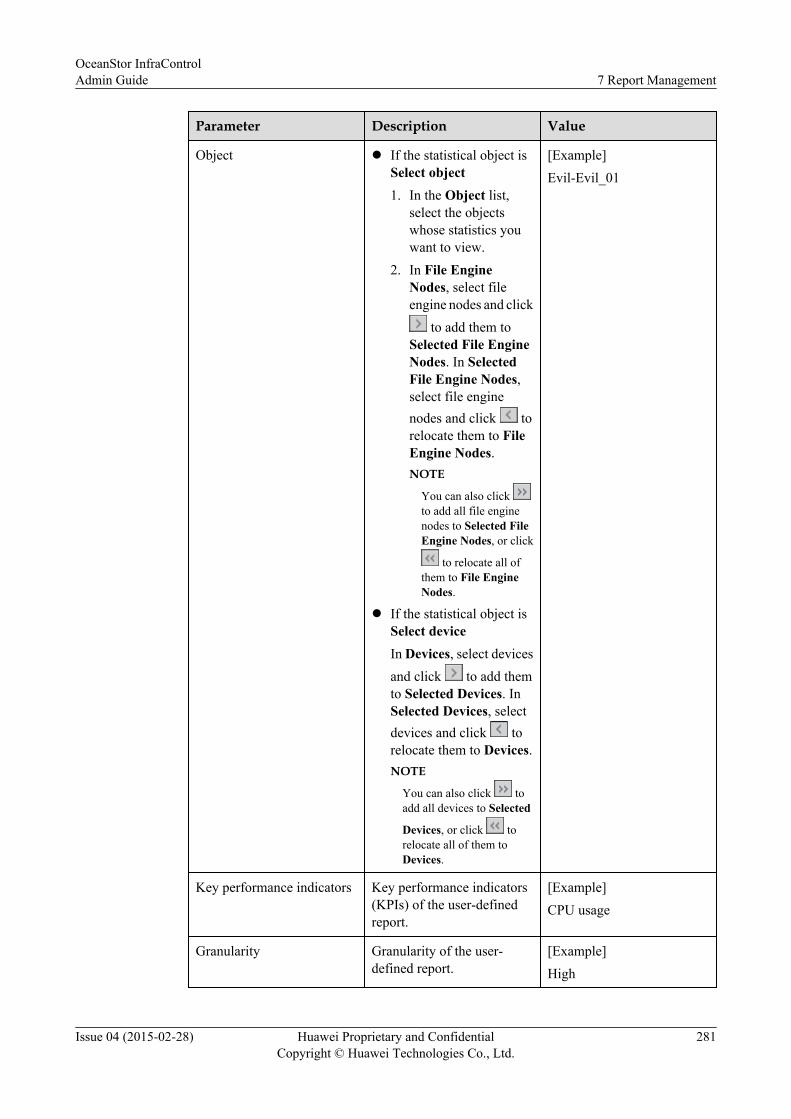
Parameter Description Value
Object l If the statistical object isSelect object1. In the Object list,
select the objectswhose statistics youwant to view.
2. In File EngineNodes, select fileengine nodes and click
to add them toSelected File EngineNodes. In SelectedFile Engine Nodes,select file enginenodes and click torelocate them to FileEngine Nodes.NOTE
You can also click to add all file enginenodes to Selected FileEngine Nodes, or click
to relocate all ofthem to File EngineNodes.
l If the statistical object isSelect deviceIn Devices, select devicesand click to add themto Selected Devices. InSelected Devices, selectdevices and click torelocate them to Devices.NOTE
You can also click toadd all devices to Selected
Devices, or click torelocate all of them toDevices.
[Example]Evil-Evil_01
Key performance indicators Key performance indicators(KPIs) of the user-definedreport.
[Example]CPU usage
Granularity Granularity of the user-defined report.
[Example]High
OceanStor InfraControlAdmin Guide 7 Report Management
Issue 04 (2015-02-28) Huawei Proprietary and ConfidentialCopyright © Huawei Technologies Co., Ltd.
281
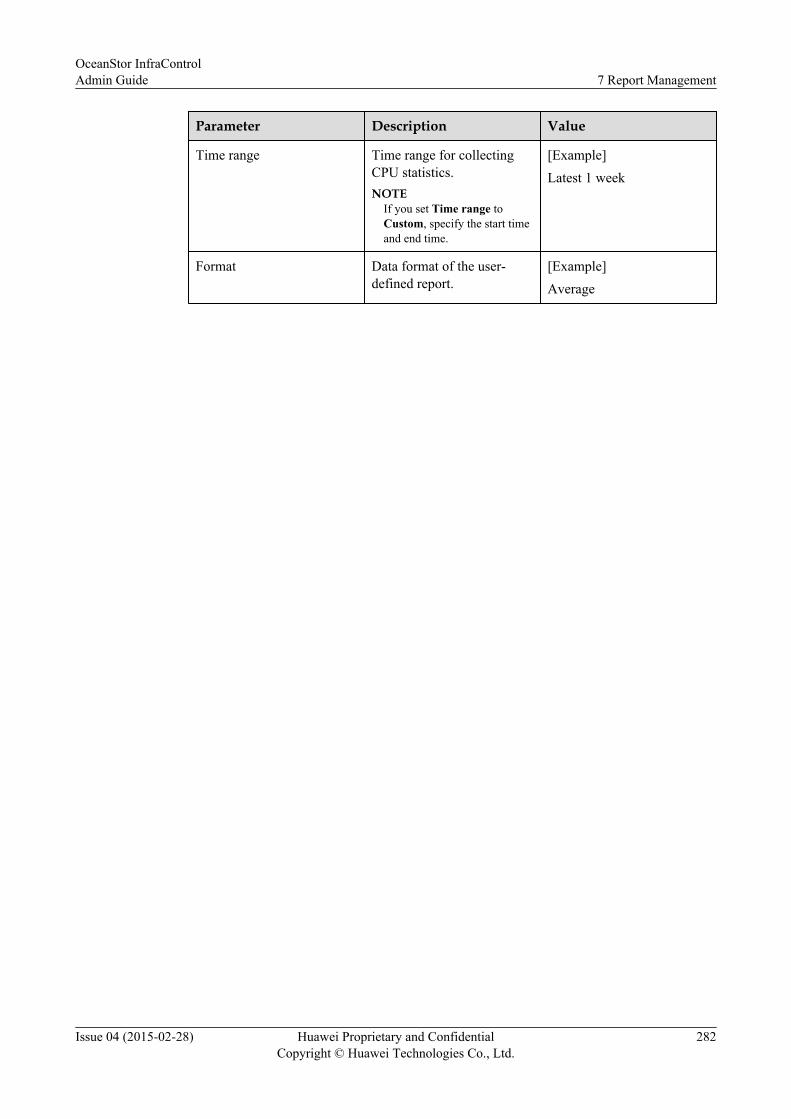
Parameter Description Value
Time range Time range for collectingCPU statistics.NOTE
If you set Time range toCustom, specify the start timeand end time.
[Example]Latest 1 week
Format Data format of the user-defined report.
[Example]Average
OceanStor InfraControlAdmin Guide 7 Report Management
Issue 04 (2015-02-28) Huawei Proprietary and ConfidentialCopyright © Huawei Technologies Co., Ltd.
282

Parameter Description Value
Sort Method for sorting the user-defined report.l If you set Sort to
Default, the customreport sorts all objects byeach preset keyperformance indicatorrespectively. Forexample, if you set Keyperformance indicatorsto Usage and IOPS andSort to Default, thecustom report displays allobject information sortedby Usage and IOPSrespectively in tworesults.
l If you set Sort to a keyperformance indicator,the custom reportdisplays key performanceindicators about allobjects sorted by thespecified keyperformance indicator.For example, if you setKey performanceindicators to Usage andIOPS and Sort to Usage,the custom reportdisplays Usage andIOPS information aboutall objects sorted byUsage respectively.
l If TOP is set to n (1 ≤ n≤ 10), the self-definedreport displays amaximum of n statisticsobjects.
– If you selectMaximum orAverage for Format,the top n indicatorvalues are displayed.
– If you selectMinimum for
[Example]
OceanStor InfraControlAdmin Guide 7 Report Management
Issue 04 (2015-02-28) Huawei Proprietary and ConfidentialCopyright © Huawei Technologies Co., Ltd.
283
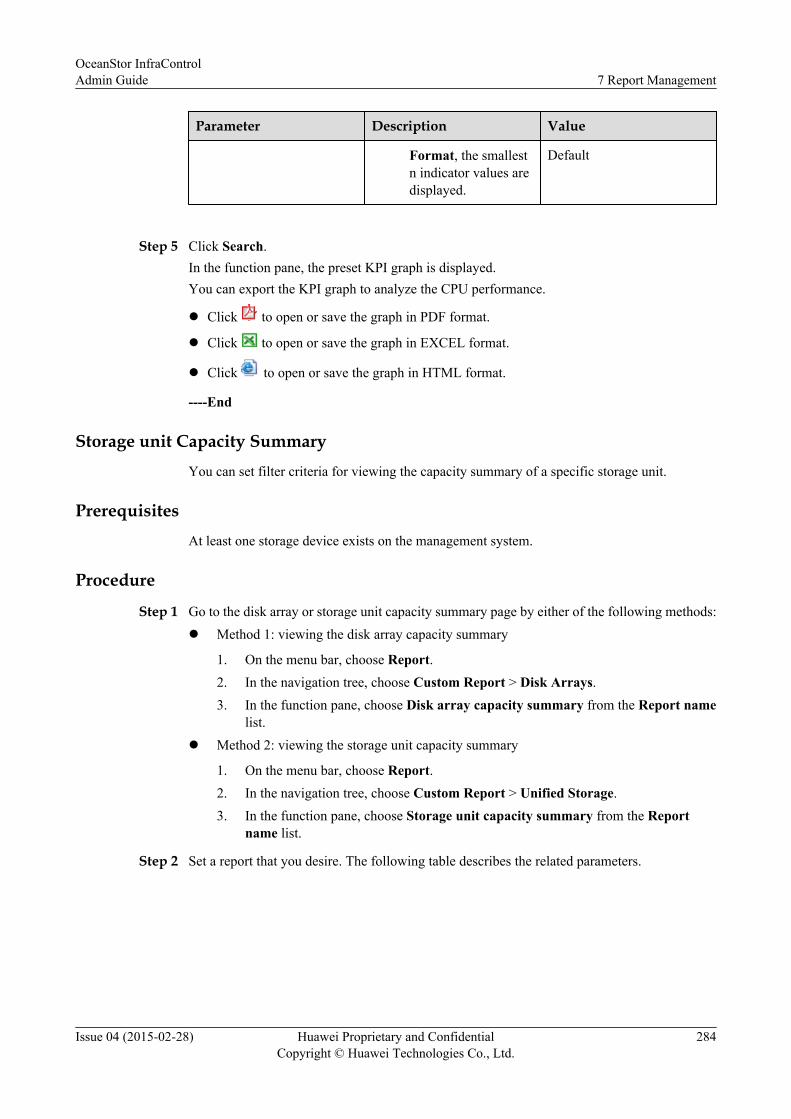
Parameter Description Value
Format, the smallestn indicator values aredisplayed.
Default
Step 5 Click Search.In the function pane, the preset KPI graph is displayed.You can export the KPI graph to analyze the CPU performance.
l Click to open or save the graph in PDF format.
l Click to open or save the graph in EXCEL format.
l Click to open or save the graph in HTML format.
----End
Storage unit Capacity SummaryYou can set filter criteria for viewing the capacity summary of a specific storage unit.
PrerequisitesAt least one storage device exists on the management system.
Procedure
Step 1 Go to the disk array or storage unit capacity summary page by either of the following methods:l Method 1: viewing the disk array capacity summary
1. On the menu bar, choose Report.2. In the navigation tree, choose Custom Report > Disk Arrays.3. In the function pane, choose Disk array capacity summary from the Report name
list.l Method 2: viewing the storage unit capacity summary
1. On the menu bar, choose Report.2. In the navigation tree, choose Custom Report > Unified Storage.3. In the function pane, choose Storage unit capacity summary from the Report
name list.
Step 2 Set a report that you desire. The following table describes the related parameters.
OceanStor InfraControlAdmin Guide 7 Report Management
Issue 04 (2015-02-28) Huawei Proprietary and ConfidentialCopyright © Huawei Technologies Co., Ltd.
284

Parameter Description Value
Object 1. In the Object list, selectthe objects whosestatistics you want toview.NOTE
You can group multiplestorage devices and collectthe capacity statistics of thisgroup.
2. In Disk Arrays/Available Storage Unit/Resource GroupsAvailable for Selection,select the objects whosestatistics you want toview. Click to add theselected objects toSelected Disk Arrays/Selected Storage Unit/Selected ResourceGroups. In Selected DiskArrays/Selected StorageUnit/Selected ResourceGroups, select objectsand click to relocatethem to Disk Arrays/Available Storage Unit/Resource GroupsAvailable for Selection.NOTE
You can also click toadd all objects to SelectedDisk Arrays/SelectedStorage Unit/SelectedResource Groups, or click
to relocate all of themto Disk Arrays/AvailableStorage Unit/ResourceGroups Available forSelection.
[Example]S5600T_205_206
Time range Time range for collectingcapacity statistics.NOTE
If you set Time range toCustom, specify the start timeand end time.
[Example]Latest 1 week
OceanStor InfraControlAdmin Guide 7 Report Management
Issue 04 (2015-02-28) Huawei Proprietary and ConfidentialCopyright © Huawei Technologies Co., Ltd.
285

Step 3 Click Search.In the function pane, the preset capacity graph is displayed.You can export the capacity graph to analyze the storage capacity usage.
l Click to open or save the graph in PDF format.
l Click to open or save the graph in EXCEL format.
l Click to open or save the graph in HTML format.
l Click to open or save the graph in CSV format.
----End
Storage Unit CapacityYou can set filter criteria for viewing the capacity usage of a specific storage unit.
PrerequisitesAt least one storage device exists on the management system.
Procedure
Step 1 Go to the disk array or storage unit capacity usage page by either of the following methods:l Method 1: viewing the disk array capacity usage
1. On the menu bar, choose Report.2. In the navigation tree, choose Custom Report > Disk Arrays.3. In the function pane, choose Disk array capacity from the Report name list.
l Method 2: viewing the storage unit capacity usage
1. On the menu bar, choose Report.2. In the navigation tree, choose Custom Report > Unified Storage.3. In the function pane, choose Storage unit capacity from the Report name list.
Step 2 Set a report that you desire. The following table describes the related parameters.
OceanStor InfraControlAdmin Guide 7 Report Management
Issue 04 (2015-02-28) Huawei Proprietary and ConfidentialCopyright © Huawei Technologies Co., Ltd.
286

Parameter Description Value
Object 1. In the Object list, selectthe objects whosestatistics you want toview.NOTE
You can group multipledisk arrays and collect thecapacity statistics of thisgroup.
2. In Disk Arrays/Available Storage Unit/Resource GroupsAvailable for Selection,select the objects whosecapacity statistics youwant to view. Click toadd the selected objects toSelected Disk Arrays/Selected Storage Unit/Selected ResourceGroups. In Selected DiskArrays/Selected StorageUnit/Selected ResourceGroups, select objects.Then click to relocatethem to Disk Arrays/Available Storage Unit/Resource GroupsAvailable for Selection.NOTE
You can also click toadd all objects to SelectedDisk Arrays/SelectedStorage Units/SelectedResource Groups, or click
to relocate all of themto Disk Arrays/AvailableStorage Unit/ResourceGroups Available forSelection.
[Example]S5600T_205_206
Sort Method for sorting the user-defined report.NOTE
If TOP is set to n (1 ≤ n ≤ 10),the self-defined report displaysa maximum of n statisticsobjects.
[Example]5
OceanStor InfraControlAdmin Guide 7 Report Management
Issue 04 (2015-02-28) Huawei Proprietary and ConfidentialCopyright © Huawei Technologies Co., Ltd.
287
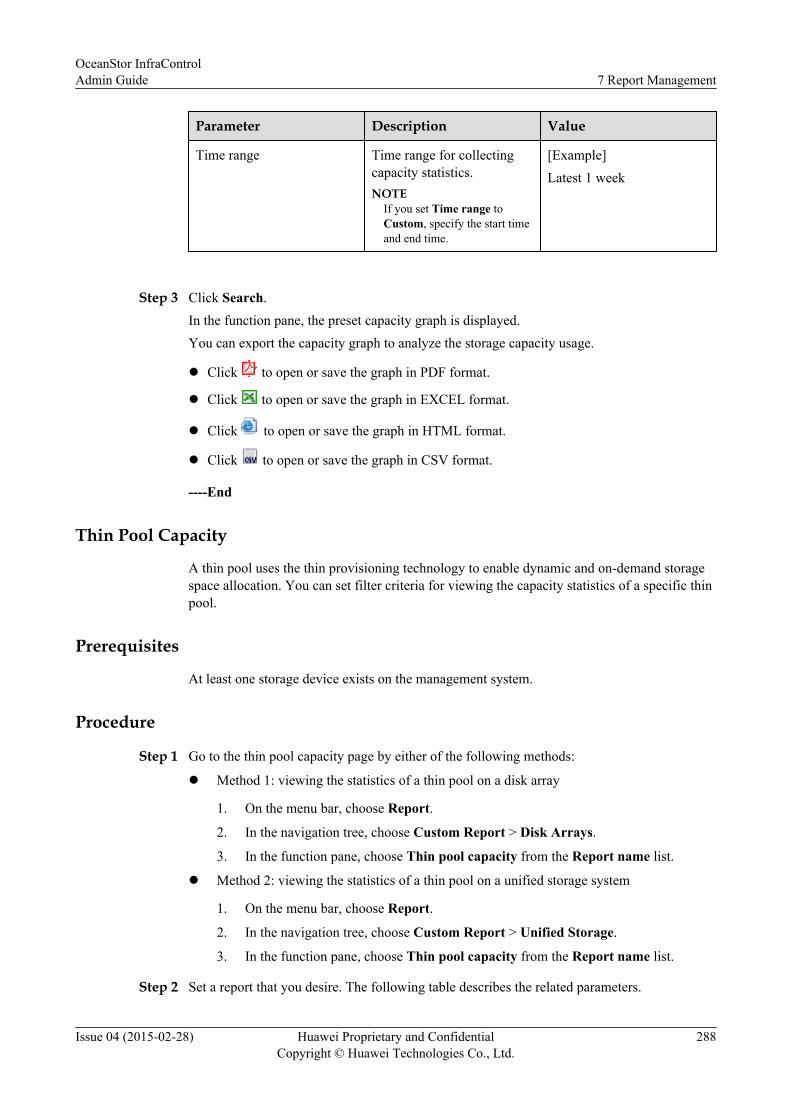
Parameter Description Value
Time range Time range for collectingcapacity statistics.NOTE
If you set Time range toCustom, specify the start timeand end time.
[Example]Latest 1 week
Step 3 Click Search.In the function pane, the preset capacity graph is displayed.You can export the capacity graph to analyze the storage capacity usage.
l Click to open or save the graph in PDF format.
l Click to open or save the graph in EXCEL format.
l Click to open or save the graph in HTML format.
l Click to open or save the graph in CSV format.
----End
Thin Pool Capacity
A thin pool uses the thin provisioning technology to enable dynamic and on-demand storagespace allocation. You can set filter criteria for viewing the capacity statistics of a specific thinpool.
Prerequisites
At least one storage device exists on the management system.
Procedure
Step 1 Go to the thin pool capacity page by either of the following methods:
l Method 1: viewing the statistics of a thin pool on a disk array
1. On the menu bar, choose Report.
2. In the navigation tree, choose Custom Report > Disk Arrays.
3. In the function pane, choose Thin pool capacity from the Report name list.
l Method 2: viewing the statistics of a thin pool on a unified storage system
1. On the menu bar, choose Report.
2. In the navigation tree, choose Custom Report > Unified Storage.
3. In the function pane, choose Thin pool capacity from the Report name list.
Step 2 Set a report that you desire. The following table describes the related parameters.
OceanStor InfraControlAdmin Guide 7 Report Management
Issue 04 (2015-02-28) Huawei Proprietary and ConfidentialCopyright © Huawei Technologies Co., Ltd.
288

Parameter Description Value
Object 1. In the Object list, selectthe objects whosestatistics you want toview.
2. In Disk Arrays/Available Storage Unit,select the objects whosecapacity statistics youwant to view. Click toadd the selected objects toSelected Disk Arrays/Selected Storage Unit. InSelected Disk Arrays/Selected Storage Unit,select objects. Then click
to relocate them toDisk Arrays/AvailableStorage Unit.NOTE
You can also click toadd all objects to SelectedDisk Arrays/Selected
Storage Unit, or click to relocate all of them toDisk Arrays/AvailableStorage Unit.
[Example]Array_201A
Sort Method for sorting the user-defined report.NOTE
If TOP is set to n (1 ≤ n ≤ 10),the custom report displays amaximum of n statisticsobjects.
[Example]5
Time range Time range for collectingthin pool capacity statistics.NOTE
If you set Time range toCustom, specify the start timeand end time.
[Example]Latest 1 week
Step 3 Click Search.In the function pane, the preset thin pool capacity graph is displayed.You can export the capacity graph to analyze the thin pool capacity usage.
l Click to open or save the graph in PDF format.
l Click to open or save the graph in EXCEL format.
OceanStor InfraControlAdmin Guide 7 Report Management
Issue 04 (2015-02-28) Huawei Proprietary and ConfidentialCopyright © Huawei Technologies Co., Ltd.
289
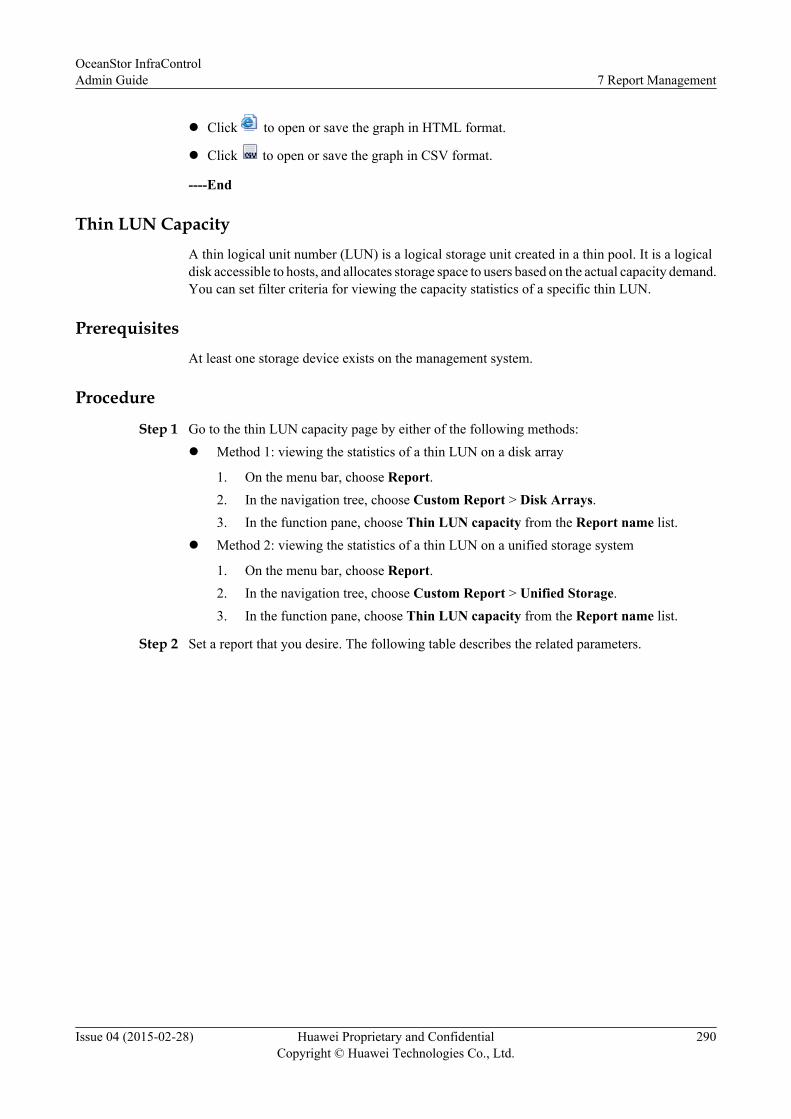
l Click to open or save the graph in HTML format.
l Click to open or save the graph in CSV format.
----End
Thin LUN CapacityA thin logical unit number (LUN) is a logical storage unit created in a thin pool. It is a logicaldisk accessible to hosts, and allocates storage space to users based on the actual capacity demand.You can set filter criteria for viewing the capacity statistics of a specific thin LUN.
PrerequisitesAt least one storage device exists on the management system.
Procedure
Step 1 Go to the thin LUN capacity page by either of the following methods:l Method 1: viewing the statistics of a thin LUN on a disk array
1. On the menu bar, choose Report.2. In the navigation tree, choose Custom Report > Disk Arrays.3. In the function pane, choose Thin LUN capacity from the Report name list.
l Method 2: viewing the statistics of a thin LUN on a unified storage system
1. On the menu bar, choose Report.2. In the navigation tree, choose Custom Report > Unified Storage.3. In the function pane, choose Thin LUN capacity from the Report name list.
Step 2 Set a report that you desire. The following table describes the related parameters.
OceanStor InfraControlAdmin Guide 7 Report Management
Issue 04 (2015-02-28) Huawei Proprietary and ConfidentialCopyright © Huawei Technologies Co., Ltd.
290

Parameter Description Value
Object 1. In the Object list, selectthe objects whosestatistics you want toview.NOTE
You can group multipledisk arrays and collect thecapacity statistics of thisgroup.
2. In Disk Arrays/Available Storage Unit/Resource GroupsAvailable for Selection,select the objects whosecapacity statistics youwant to view. Click toadd the selected objects toSelected Disk Arrays/Selected Storage Unit/Selected ResourceGroups. In Selected DiskArrays/Selected StorageUnit/Selected ResourceGroups, select objects.Then click to relocatethe selected objects toDisk Arrays/AvailableStorage Unit/ResourceGroups Available forSelection.NOTE
You can also click toadd all objects to SelectedDisk Arrays/SelectedStorage Unit/SelectedResource Groups, or click
to relocate all of themto Disk Arrays/AvailableStorage Unit/ResourceGroups Available forSelection.
[Example]Array_201A
Sort Method for sorting the user-defined report.NOTE
If TOP is set to n (1 ≤ n ≤ 10),the self-defined report displaysa maximum of n statisticsobjects.
[Example]5
OceanStor InfraControlAdmin Guide 7 Report Management
Issue 04 (2015-02-28) Huawei Proprietary and ConfidentialCopyright © Huawei Technologies Co., Ltd.
291
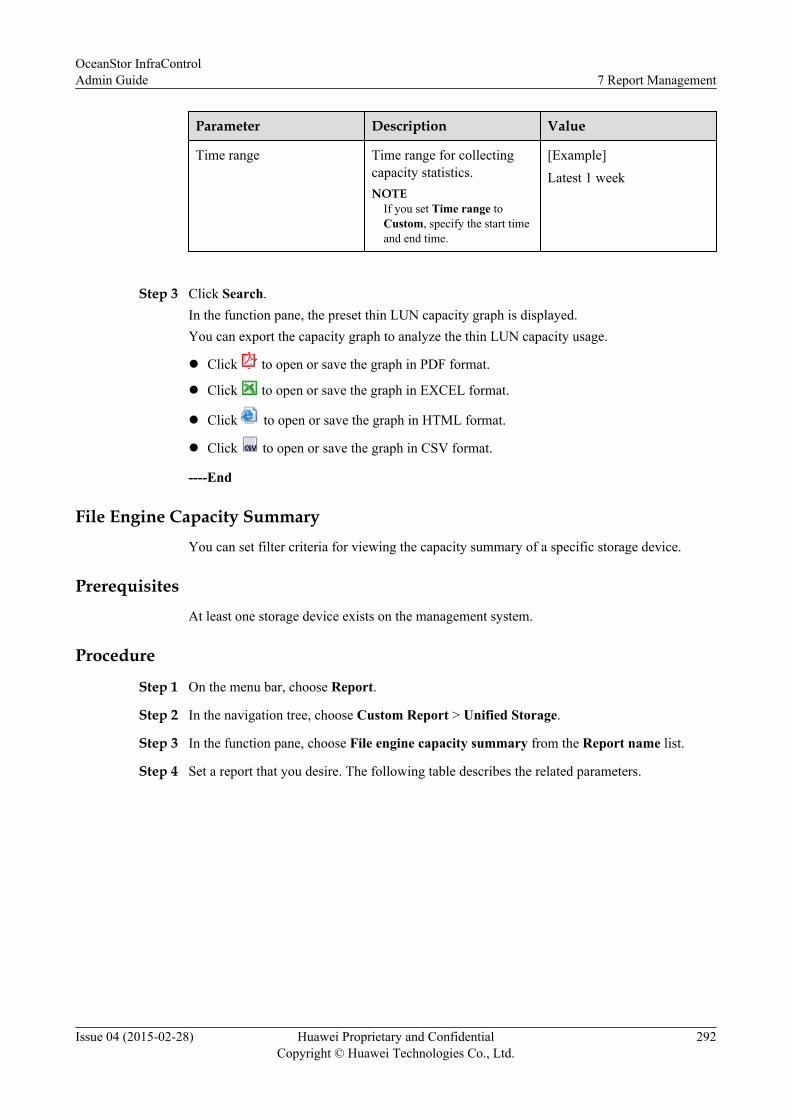
Parameter Description Value
Time range Time range for collectingcapacity statistics.NOTE
If you set Time range toCustom, specify the start timeand end time.
[Example]Latest 1 week
Step 3 Click Search.In the function pane, the preset thin LUN capacity graph is displayed.You can export the capacity graph to analyze the thin LUN capacity usage.
l Click to open or save the graph in PDF format.
l Click to open or save the graph in EXCEL format.
l Click to open or save the graph in HTML format.
l Click to open or save the graph in CSV format.
----End
File Engine Capacity SummaryYou can set filter criteria for viewing the capacity summary of a specific storage device.
PrerequisitesAt least one storage device exists on the management system.
Procedure
Step 1 On the menu bar, choose Report.
Step 2 In the navigation tree, choose Custom Report > Unified Storage.
Step 3 In the function pane, choose File engine capacity summary from the Report name list.
Step 4 Set a report that you desire. The following table describes the related parameters.
OceanStor InfraControlAdmin Guide 7 Report Management
Issue 04 (2015-02-28) Huawei Proprietary and ConfidentialCopyright © Huawei Technologies Co., Ltd.
292
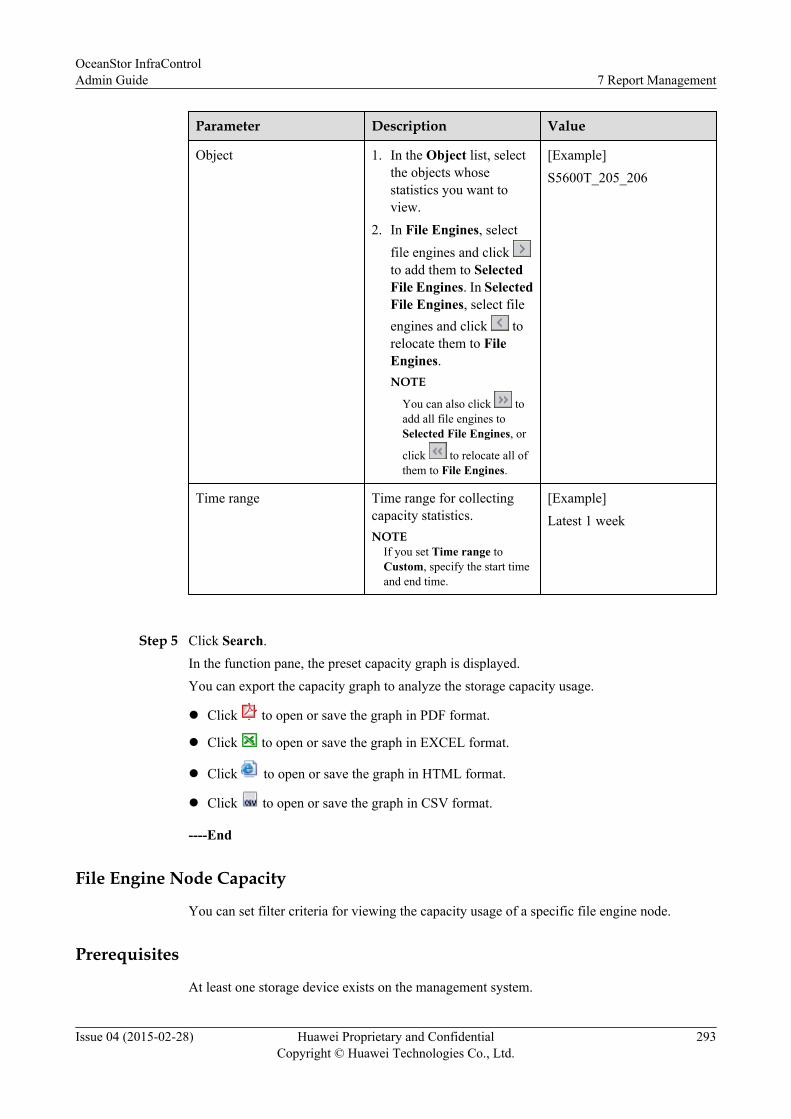
Parameter Description Value
Object 1. In the Object list, selectthe objects whosestatistics you want toview.
2. In File Engines, selectfile engines and click to add them to SelectedFile Engines. In SelectedFile Engines, select fileengines and click torelocate them to FileEngines.NOTE
You can also click toadd all file engines toSelected File Engines, or
click to relocate all ofthem to File Engines.
[Example]S5600T_205_206
Time range Time range for collectingcapacity statistics.NOTE
If you set Time range toCustom, specify the start timeand end time.
[Example]Latest 1 week
Step 5 Click Search.In the function pane, the preset capacity graph is displayed.You can export the capacity graph to analyze the storage capacity usage.
l Click to open or save the graph in PDF format.
l Click to open or save the graph in EXCEL format.
l Click to open or save the graph in HTML format.
l Click to open or save the graph in CSV format.
----End
File Engine Node Capacity
You can set filter criteria for viewing the capacity usage of a specific file engine node.
Prerequisites
At least one storage device exists on the management system.
OceanStor InfraControlAdmin Guide 7 Report Management
Issue 04 (2015-02-28) Huawei Proprietary and ConfidentialCopyright © Huawei Technologies Co., Ltd.
293
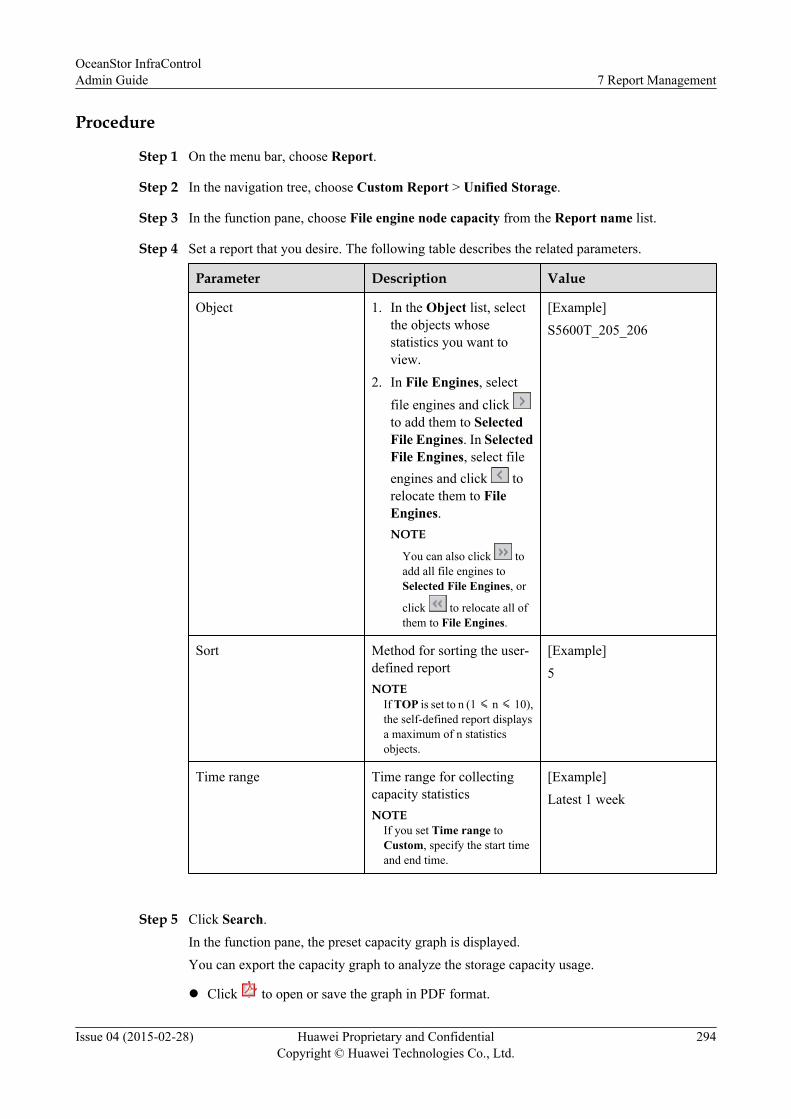
Procedure
Step 1 On the menu bar, choose Report.
Step 2 In the navigation tree, choose Custom Report > Unified Storage.
Step 3 In the function pane, choose File engine node capacity from the Report name list.
Step 4 Set a report that you desire. The following table describes the related parameters.
Parameter Description Value
Object 1. In the Object list, selectthe objects whosestatistics you want toview.
2. In File Engines, selectfile engines and click to add them to SelectedFile Engines. In SelectedFile Engines, select fileengines and click torelocate them to FileEngines.NOTE
You can also click toadd all file engines toSelected File Engines, or
click to relocate all ofthem to File Engines.
[Example]S5600T_205_206
Sort Method for sorting the user-defined reportNOTE
If TOP is set to n (1 ≤ n ≤ 10),the self-defined report displaysa maximum of n statisticsobjects.
[Example]5
Time range Time range for collectingcapacity statisticsNOTE
If you set Time range toCustom, specify the start timeand end time.
[Example]Latest 1 week
Step 5 Click Search.In the function pane, the preset capacity graph is displayed.You can export the capacity graph to analyze the storage capacity usage.
l Click to open or save the graph in PDF format.
OceanStor InfraControlAdmin Guide 7 Report Management
Issue 04 (2015-02-28) Huawei Proprietary and ConfidentialCopyright © Huawei Technologies Co., Ltd.
294
l Click to open or save the graph in EXCEL format.
l Click to open or save the graph in HTML format.
l Click to open or save the graph in CSV format.
----End
File Storage Pool CapacityA file storage pool is used to create file systems. You can set filter criteria for viewing the capacityusage of a specific file storage pool.
PrerequisitesAt least one unified storage system exists on the management system.
Procedure
Step 1 On the menu bar, choose Report.
Step 2 In the navigation tree, choose Custom Report > Unified Storage.
Step 3 In the function pane, choose File storage pool capacity from the Report name list.
Step 4 Set a report that you desire. The following table describes the related parameters.
OceanStor InfraControlAdmin Guide 7 Report Management
Issue 04 (2015-02-28) Huawei Proprietary and ConfidentialCopyright © Huawei Technologies Co., Ltd.
295

Parameter Description Value
Object 1. In the Object list, selectthe objects whosestatistics you want toview.
2. In File Engines/Resource GroupsAvailable for Selection,select file engines andclick to add them toSelected File Engines/Selected ResourceGroups. In Selected FileEngines/SelectedResource Groups, selectfile engines and click to relocate them to FileEngines/ResourceGroups Available forSelection.NOTE
You can also click toadd all file engines toSelected File Engines/Selected Resource
Groups, or click torelocate all of them to FileEngines/ResourceGroups Available forSelection.
[Example]Evil-Evil_01
Sort Method for sorting the user-defined report.NOTE
If TOP is set to n (1 ≤ n ≤ 10),the self-defined report displaysa maximum of n statisticsobjects.
[Example]5
Time range Time range for collecting theperformance statistics ofunified storage systems.NOTE
If you set Time range toCustom, specify the start timeand end time.
[Example]Latest 1 week
Step 5 Click Search.In the function pane, the preset file storage pool capacity graph is displayed.
OceanStor InfraControlAdmin Guide 7 Report Management
Issue 04 (2015-02-28) Huawei Proprietary and ConfidentialCopyright © Huawei Technologies Co., Ltd.
296
You can export the capacity graph to analyze the file storage pool capacity usage.
l Click to open or save the graph in PDF format.
l Click to open or save the graph in EXCEL format.
l Click to open or save the graph in HTML format.
l Click to open or save the graph in CSV format.
----End
Data Disk CapacityYou can set filter criteria for viewing the capacity usage of a specific data disk on a unifiedstorage system.
PrerequisitesAt least one unified storage system exists on the management system.
Procedure
Step 1 On the menu bar, choose Report.
Step 2 In the navigation tree, choose Custom Report > Unified Storage.
Step 3 In the function pane, choose Data disk capacity from the Report name list.
Step 4 Set a report that you desire. The following table describes the related parameters.
OceanStor InfraControlAdmin Guide 7 Report Management
Issue 04 (2015-02-28) Huawei Proprietary and ConfidentialCopyright © Huawei Technologies Co., Ltd.
297

Parameter Description Value
Object 1. In the Object list, selectthe objects whosestatistics you want toview.
2. In File Engines/Resource GroupsAvailable for Selection,select objects and click
to add them toSelected File Engines/Selected ResourceGroups. In Selected FileEngines/SelectedResource Groups, selectobjects and click torelocate them to FileEngines/ResourceGroups Available forSelection.NOTE
You can also click toadd all objects to SelectedFile Engines/SelectedResource Groups, or click
to relocate all of themto File Engines/ResourceGroups Available forSelection.
[Example]Evil-Evil_01
Sort Method for sorting the user-defined report.NOTE
If TOP is set to n (1 ≤ n ≤ 10),the self-defined report displaysa maximum of n statisticsobjects.
[Example]5
Time range Time range for collecting theperformance statistics ofunified storage systems.NOTE
If you set Time range toCustom, specify the start timeand end time.
[Example]Latest 1 week
Step 5 Click Search.In the function pane, the preset data disk capacity graph is displayed.You can export the capacity graph to analyze the data disk capacity usage.
OceanStor InfraControlAdmin Guide 7 Report Management
Issue 04 (2015-02-28) Huawei Proprietary and ConfidentialCopyright © Huawei Technologies Co., Ltd.
298
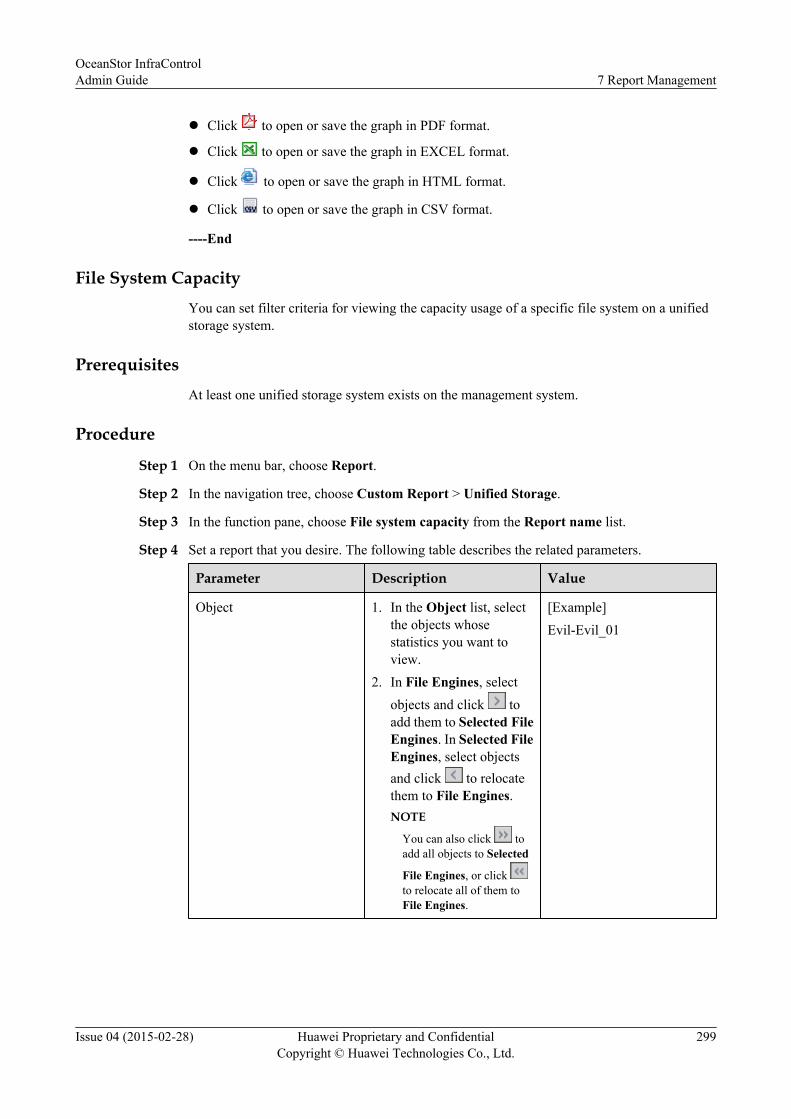
l Click to open or save the graph in PDF format.
l Click to open or save the graph in EXCEL format.
l Click to open or save the graph in HTML format.
l Click to open or save the graph in CSV format.
----End
File System CapacityYou can set filter criteria for viewing the capacity usage of a specific file system on a unifiedstorage system.
PrerequisitesAt least one unified storage system exists on the management system.
Procedure
Step 1 On the menu bar, choose Report.
Step 2 In the navigation tree, choose Custom Report > Unified Storage.
Step 3 In the function pane, choose File system capacity from the Report name list.
Step 4 Set a report that you desire. The following table describes the related parameters.
Parameter Description Value
Object 1. In the Object list, selectthe objects whosestatistics you want toview.
2. In File Engines, selectobjects and click toadd them to Selected FileEngines. In Selected FileEngines, select objectsand click to relocatethem to File Engines.NOTE
You can also click toadd all objects to Selected
File Engines, or click to relocate all of them toFile Engines.
[Example]Evil-Evil_01
OceanStor InfraControlAdmin Guide 7 Report Management
Issue 04 (2015-02-28) Huawei Proprietary and ConfidentialCopyright © Huawei Technologies Co., Ltd.
299
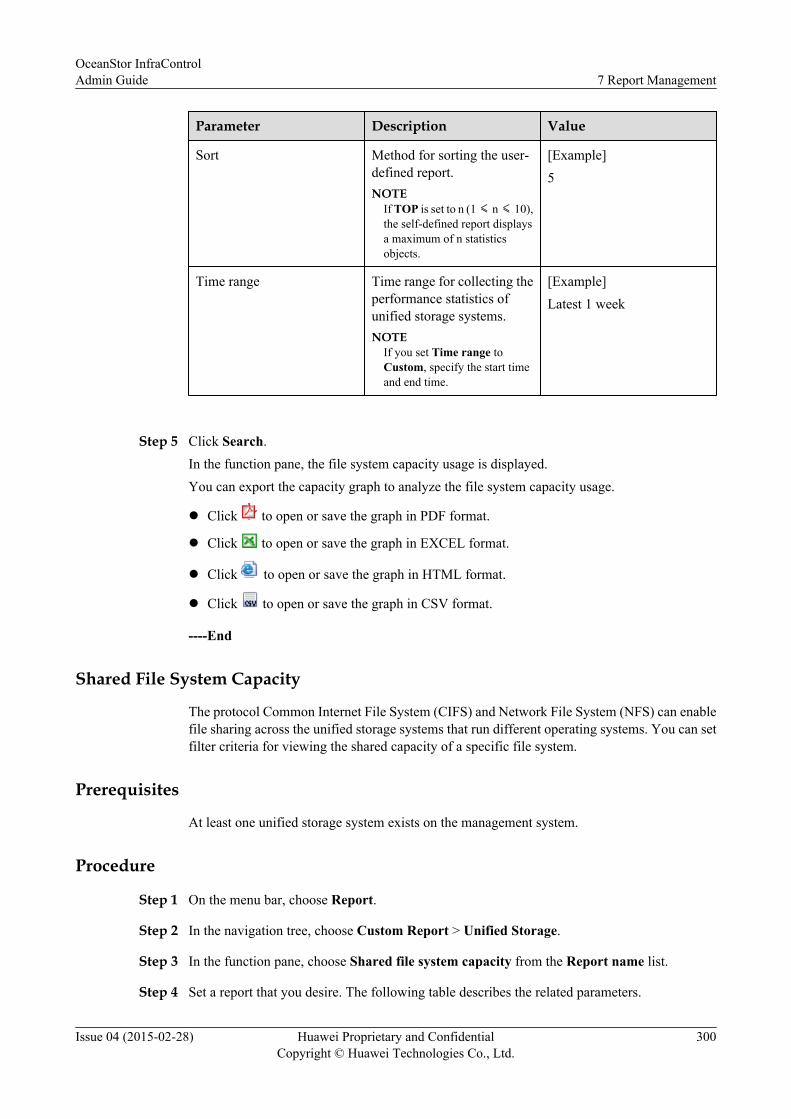
Parameter Description Value
Sort Method for sorting the user-defined report.NOTE
If TOP is set to n (1 ≤ n ≤ 10),the self-defined report displaysa maximum of n statisticsobjects.
[Example]5
Time range Time range for collecting theperformance statistics ofunified storage systems.NOTE
If you set Time range toCustom, specify the start timeand end time.
[Example]Latest 1 week
Step 5 Click Search.In the function pane, the file system capacity usage is displayed.You can export the capacity graph to analyze the file system capacity usage.
l Click to open or save the graph in PDF format.
l Click to open or save the graph in EXCEL format.
l Click to open or save the graph in HTML format.
l Click to open or save the graph in CSV format.
----End
Shared File System Capacity
The protocol Common Internet File System (CIFS) and Network File System (NFS) can enablefile sharing across the unified storage systems that run different operating systems. You can setfilter criteria for viewing the shared capacity of a specific file system.
Prerequisites
At least one unified storage system exists on the management system.
Procedure
Step 1 On the menu bar, choose Report.
Step 2 In the navigation tree, choose Custom Report > Unified Storage.
Step 3 In the function pane, choose Shared file system capacity from the Report name list.
Step 4 Set a report that you desire. The following table describes the related parameters.
OceanStor InfraControlAdmin Guide 7 Report Management
Issue 04 (2015-02-28) Huawei Proprietary and ConfidentialCopyright © Huawei Technologies Co., Ltd.
300
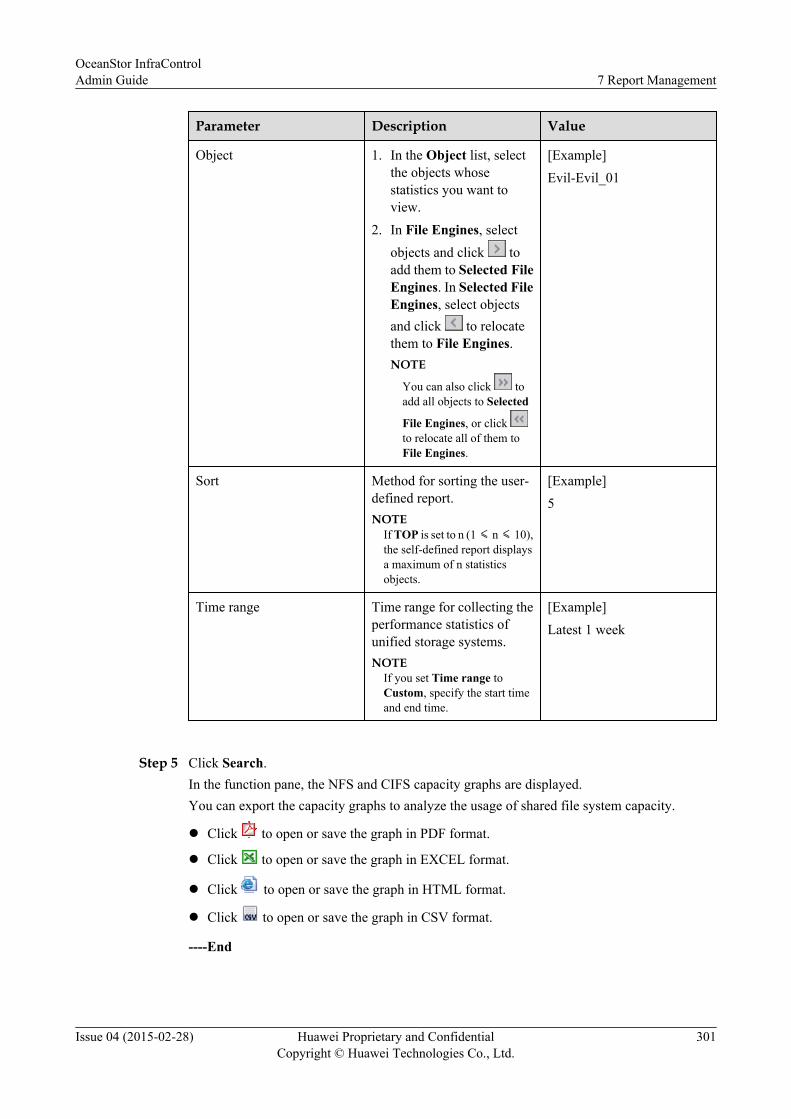
Parameter Description Value
Object 1. In the Object list, selectthe objects whosestatistics you want toview.
2. In File Engines, selectobjects and click toadd them to Selected FileEngines. In Selected FileEngines, select objectsand click to relocatethem to File Engines.NOTE
You can also click toadd all objects to Selected
File Engines, or click to relocate all of them toFile Engines.
[Example]Evil-Evil_01
Sort Method for sorting the user-defined report.NOTE
If TOP is set to n (1 ≤ n ≤ 10),the self-defined report displaysa maximum of n statisticsobjects.
[Example]5
Time range Time range for collecting theperformance statistics ofunified storage systems.NOTE
If you set Time range toCustom, specify the start timeand end time.
[Example]Latest 1 week
Step 5 Click Search.In the function pane, the NFS and CIFS capacity graphs are displayed.You can export the capacity graphs to analyze the usage of shared file system capacity.
l Click to open or save the graph in PDF format.
l Click to open or save the graph in EXCEL format.
l Click to open or save the graph in HTML format.
l Click to open or save the graph in CSV format.
----End
OceanStor InfraControlAdmin Guide 7 Report Management
Issue 04 (2015-02-28) Huawei Proprietary and ConfidentialCopyright © Huawei Technologies Co., Ltd.
301
7.2.3 Viewing Capacity Trend Prediction ReportsThis task helps you view customized capacity trend prediction reports of disk arrays and storagepools.
Viewing capacity trend prediction reports include:
Disk Array Capacity ReportA customized disk array capacity report allows you to analyze the capacity usage of a disk arraybased on the capacity trend prediction of the disk array.
PrerequisitesDisk arrays have been discovered.
Procedure
Step 1 Go to the Capacity Trend Prediction page.1. On the menu bar, choose Report.2. In the navigation tree, choose Custom Report > Capacity Trend Prediction.
Step 2 Select the disk array that you want to query.1. In the function pane, select Disk Array Capacity in the Report name drop-down list.
2. In the Available Disk Arrays list, select a disk array and click .3. In the Selected Disk Arrays list, select the disk array that you want to query.
Step 3 Set the time range.Possible values of Time range are Latest 24 hours, Latest 1 week, and Latest 1 month.
Step 4 Click Search.l View the capacity trend prediction of the disk array in the Disk Array Capacity Utilization
Usage area.You can export the detailed information about the capacity trend prediction to facilitatecapacity usage analysis of the disk array.
– Click to open or save the figure as a PDF file.
– Click to open or save the figure as an EXCEL file.
– Click to open or save the figure as an HTML file.l You can view the detailed information about disk arrays in the Counted Disk Arrays area.
The information of a disk array includes Name, SN, IP Address, Total Capacity, UsedCapacity, and Usage (%).
----End
Storage Pool Capacity ReportA customized storage pool capacity report allows you to analyze the capacity usage of a storagepool based on the capacity trend prediction of the storage pool.
OceanStor InfraControlAdmin Guide 7 Report Management
Issue 04 (2015-02-28) Huawei Proprietary and ConfidentialCopyright © Huawei Technologies Co., Ltd.
302
Prerequisitesl Disk arrays have been discovered.l The selected disk array has storage pools.
Procedure
Step 1 Go to the Capacity Trend Prediction page.1. On the menu bar, choose Report.2. In the navigation tree, choose Custom Report > Capacity Trend Prediction.
Step 2 Select the storage pool that you want to query.1. In the function pane, select Storage Pool Capacity Report in the Report name drop-down
list.
2. In the Available Disk Arrays list, select a disk array and click .3. In the Selected Disk Arrays list, select a disk array. The storage pool list of the selected
disk array is displayed in Available Storage Pools.4. Select the storage pool that you want to query.
Step 3 Set the time range.Possible values of Time range are Latest 24 hours, Latest 1 week, and Latest 1 month.
Step 4 Click Search.View the capacity trend prediction of the storage pool in the Storage Pool Capacity TrendPrediction area.
You can export the detailed information about the capacity trend prediction to facilitate capacityusage analysis of the storage pool.
l Click to open or save the figure as a PDF file.
l Click to open or save the figure as an EXCEL file.
l Click to open or save the figure as an HTML file.
----End
7.3 Report Task ManagementYou can set periodic reports to obtain periodic system running information.
7.3.1 Periodic Report TaskA periodic report task generates periodic reports on the management system. You can view thoseperiodic reports to learn about the operating status of the storage system.
Periodic report tasks involve the following operations:
Creating a Periodic Report TaskYou can create a periodic report task to collect the statistics of device performance and capacityreports, and to send statistical results to specified email addresses.
OceanStor InfraControlAdmin Guide 7 Report Management
Issue 04 (2015-02-28) Huawei Proprietary and ConfidentialCopyright © Huawei Technologies Co., Ltd.
303
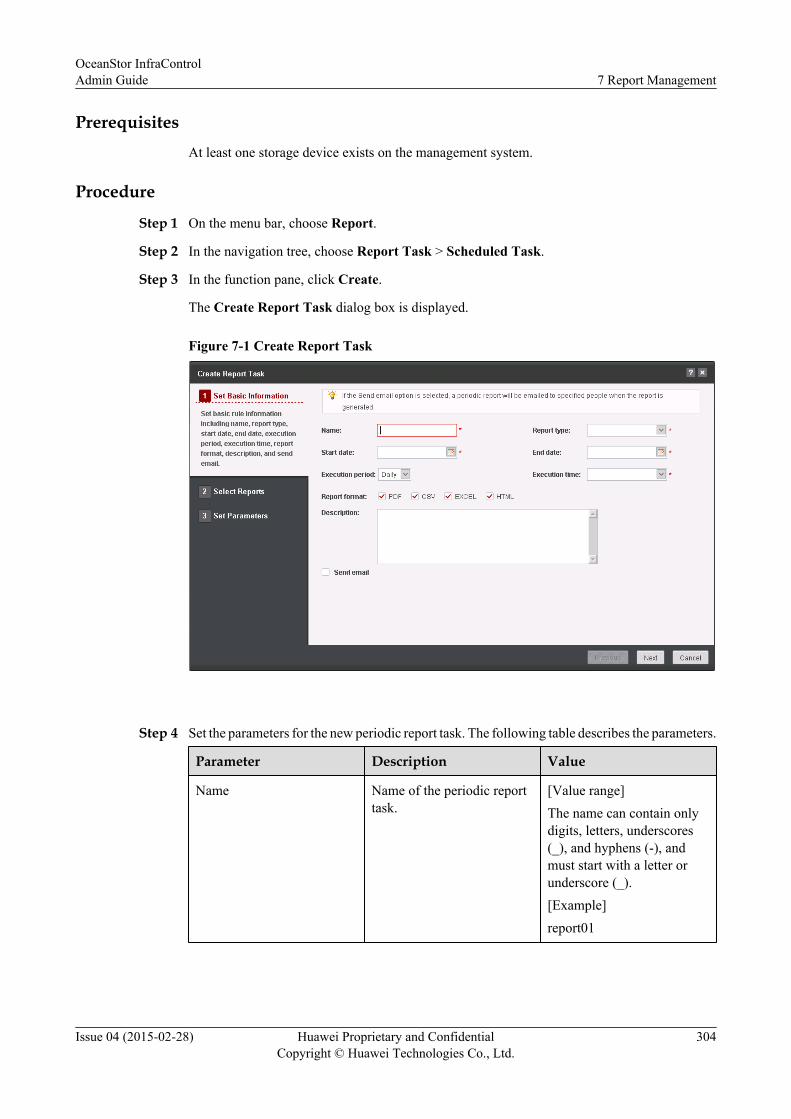
PrerequisitesAt least one storage device exists on the management system.
Procedure
Step 1 On the menu bar, choose Report.
Step 2 In the navigation tree, choose Report Task > Scheduled Task.
Step 3 In the function pane, click Create.
The Create Report Task dialog box is displayed.
Figure 7-1 Create Report Task
Step 4 Set the parameters for the new periodic report task. The following table describes the parameters.
Parameter Description Value
Name Name of the periodic reporttask.
[Value range]The name can contain onlydigits, letters, underscores(_), and hyphens (-), andmust start with a letter orunderscore (_).[Example]report01
OceanStor InfraControlAdmin Guide 7 Report Management
Issue 04 (2015-02-28) Huawei Proprietary and ConfidentialCopyright © Huawei Technologies Co., Ltd.
304
Parameter Description Value
Report type Type of the periodic reporttask, Performance orCapacity.
[Example]Capacity
Start date Date when the periodic report
task will start. Click toselect a date.The start date cannot be laterthan the end date.
[Example]2014-04-04
End date Date when the periodic report
task will stop. Click toselect a date.
[Example]2014-05-05
Execution period Frequency for the periodicreport task, Daily, Weekly,Monthly, or Yearly.
[Example]Daily
Execution time Time when the periodicreport task will start. Select atime from the Executiontime list.
[Example]01:00:00
Report format Format of periodic reports,PDF, CSV, EXCEL, orHTML.NOTE
To select a format, select thecheck box for it.
[Example]PDF
Description Description of the periodicreport task.
[Example]-
Send email Recipient mailbox forperiodic reports.NOTE
Select Send email and enter anemail address in Email. Add adescription for this emailaddress in Remarks. Thenclick Add to add this emailaddress to the email addressarea.
[Example][email protected]
Step 5 Click Next.
Step 6 On the right of the dialog box that is displayed, select the periodic report task that you want toadd and click Next.
Step 7 Click and set the parameters of the periodic report task.
OceanStor InfraControlAdmin Guide 7 Report Management
Issue 04 (2015-02-28) Huawei Proprietary and ConfidentialCopyright © Huawei Technologies Co., Ltd.
305
NOTE
If you have selected two or more periodic report tasks, you can select Consolidate all to consolidate theselected periodic report tasks.
Step 8 Click Finish.The Success dialog box is displayed.
Step 9 Click OK.
----End
Deleting a Periodic Report TaskYou can delete a periodic report task that is no longer useful or has become invalid.
PrerequisitesAt least one periodic report task exists on the management system and can be deleted.
Procedure
Step 1 On the menu bar, choose Report.
Step 2 In the navigation tree, choose Report Task > Scheduled Task.
Step 3 Under Tasks in the function pane, select periodic report tasks and click Delete.The Warning dialog box is displayed.
Step 4 Click OK.The Success dialog box is displayed.
Step 5 Click OK.
----End
Enabling a Periodic Report TaskYou can enable a disabled periodic report task for this task to continue.
PrerequisitesAt least one disabled periodic report task exists on the management system.
Procedure
Step 1 On the menu bar, choose Report.
Step 2 In the navigation tree, choose Report Task > Scheduled Task.
Step 3 Under Tasks in the function pane, select periodic report tasks and click Enable.The Warning dialog box is displayed.
Step 4 Click OK.The Success dialog box is displayed.
OceanStor InfraControlAdmin Guide 7 Report Management
Issue 04 (2015-02-28) Huawei Proprietary and ConfidentialCopyright © Huawei Technologies Co., Ltd.
306
Step 5 Click OK.
----End
Disabling a Periodic Report Task
You can disable an ongoing periodic report task for this task to stop.
Prerequisites
At least one enabled periodic report task exists on the management system.
Procedure
Step 1 On the menu bar, choose Report.
Step 2 In the navigation tree, choose Report Task > Scheduled Task.
Step 3 Under Tasks in the function pane, select periodic report tasks and click Disable.The Warning dialog box is displayed.
Step 4 Click OK.The Success dialog box is displayed.
Step 5 Click OK.
----End
Viewing and Modifying a Periodic Report Task
You can view the details about a periodic report task, and modify the periodic report as required.
Prerequisites
At least one periodic report task exists on the management system.
Procedure
Step 1 On the menu bar, choose Report.
Step 2 In the navigation tree, choose Report Task > Scheduled Task.
Step 3 From the periodic report task list in the function pane, click the task that you want to view ormodify.The management system displays the task details, including the basic information, email address,and report list.
l To modify the basic information about the task, perform Step 4 to Step 6.
l To modify the email address, perform Step 7 to Step 9.
l To modify the report list, perform Step 10 to Step 13.
Step 4 In the Basic Information area, click Modify.The Modify the Basic Information dialog box is displayed.
OceanStor InfraControlAdmin Guide 7 Report Management
Issue 04 (2015-02-28) Huawei Proprietary and ConfidentialCopyright © Huawei Technologies Co., Ltd.
307
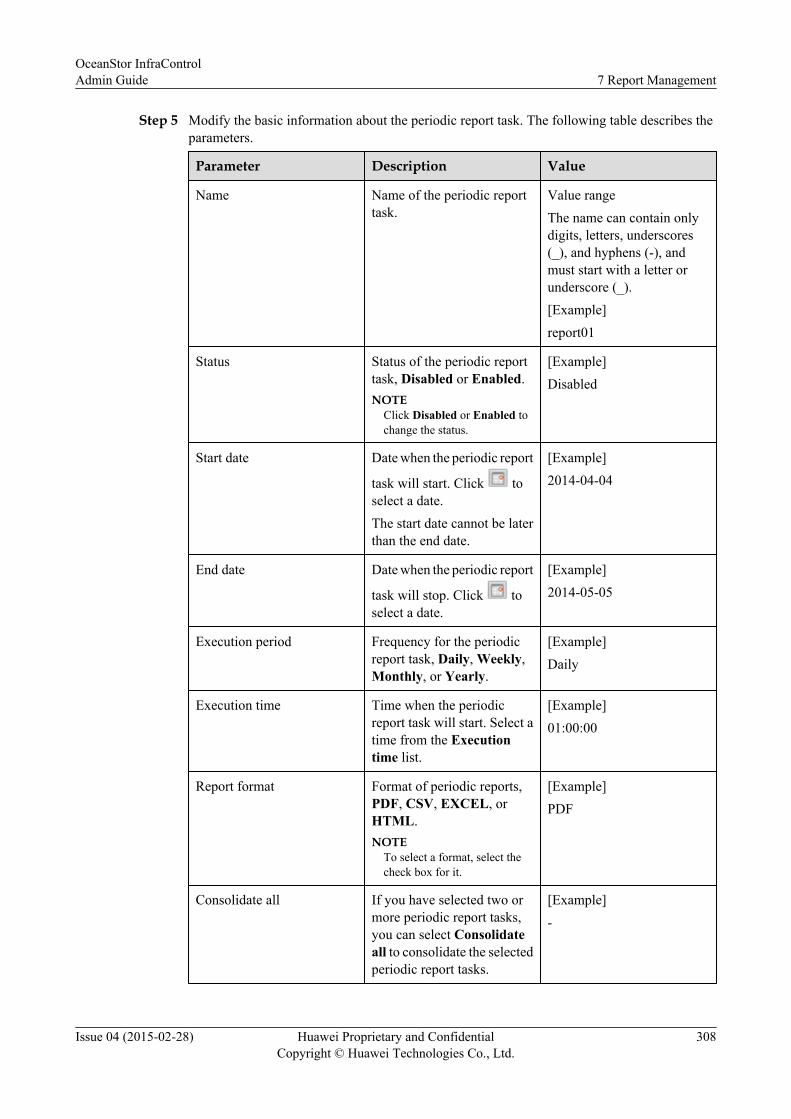
Step 5 Modify the basic information about the periodic report task. The following table describes theparameters.
Parameter Description Value
Name Name of the periodic reporttask.
Value rangeThe name can contain onlydigits, letters, underscores(_), and hyphens (-), andmust start with a letter orunderscore (_).[Example]report01
Status Status of the periodic reporttask, Disabled or Enabled.NOTE
Click Disabled or Enabled tochange the status.
[Example]Disabled
Start date Date when the periodic report
task will start. Click toselect a date.The start date cannot be laterthan the end date.
[Example]2014-04-04
End date Date when the periodic report
task will stop. Click toselect a date.
[Example]2014-05-05
Execution period Frequency for the periodicreport task, Daily, Weekly,Monthly, or Yearly.
[Example]Daily
Execution time Time when the periodicreport task will start. Select atime from the Executiontime list.
[Example]01:00:00
Report format Format of periodic reports,PDF, CSV, EXCEL, orHTML.NOTE
To select a format, select thecheck box for it.
[Example]PDF
Consolidate all If you have selected two ormore periodic report tasks,you can select Consolidateall to consolidate the selectedperiodic report tasks.
[Example]-
OceanStor InfraControlAdmin Guide 7 Report Management
Issue 04 (2015-02-28) Huawei Proprietary and ConfidentialCopyright © Huawei Technologies Co., Ltd.
308
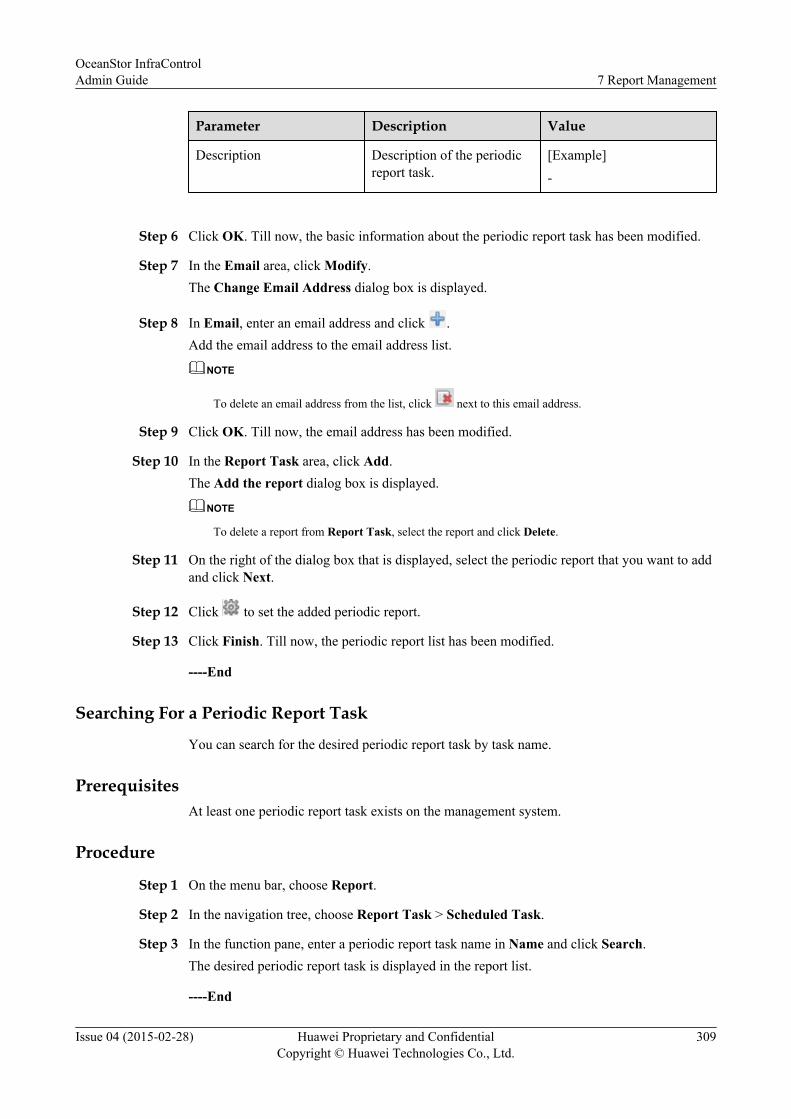
Parameter Description Value
Description Description of the periodicreport task.
[Example]-
Step 6 Click OK. Till now, the basic information about the periodic report task has been modified.
Step 7 In the Email area, click Modify.The Change Email Address dialog box is displayed.
Step 8 In Email, enter an email address and click .Add the email address to the email address list.
NOTE
To delete an email address from the list, click next to this email address.
Step 9 Click OK. Till now, the email address has been modified.
Step 10 In the Report Task area, click Add.The Add the report dialog box is displayed.
NOTE
To delete a report from Report Task, select the report and click Delete.
Step 11 On the right of the dialog box that is displayed, select the periodic report that you want to addand click Next.
Step 12 Click to set the added periodic report.
Step 13 Click Finish. Till now, the periodic report list has been modified.
----End
Searching For a Periodic Report Task
You can search for the desired periodic report task by task name.
PrerequisitesAt least one periodic report task exists on the management system.
Procedure
Step 1 On the menu bar, choose Report.
Step 2 In the navigation tree, choose Report Task > Scheduled Task.
Step 3 In the function pane, enter a periodic report task name in Name and click Search.The desired periodic report task is displayed in the report list.
----End
OceanStor InfraControlAdmin Guide 7 Report Management
Issue 04 (2015-02-28) Huawei Proprietary and ConfidentialCopyright © Huawei Technologies Co., Ltd.
309
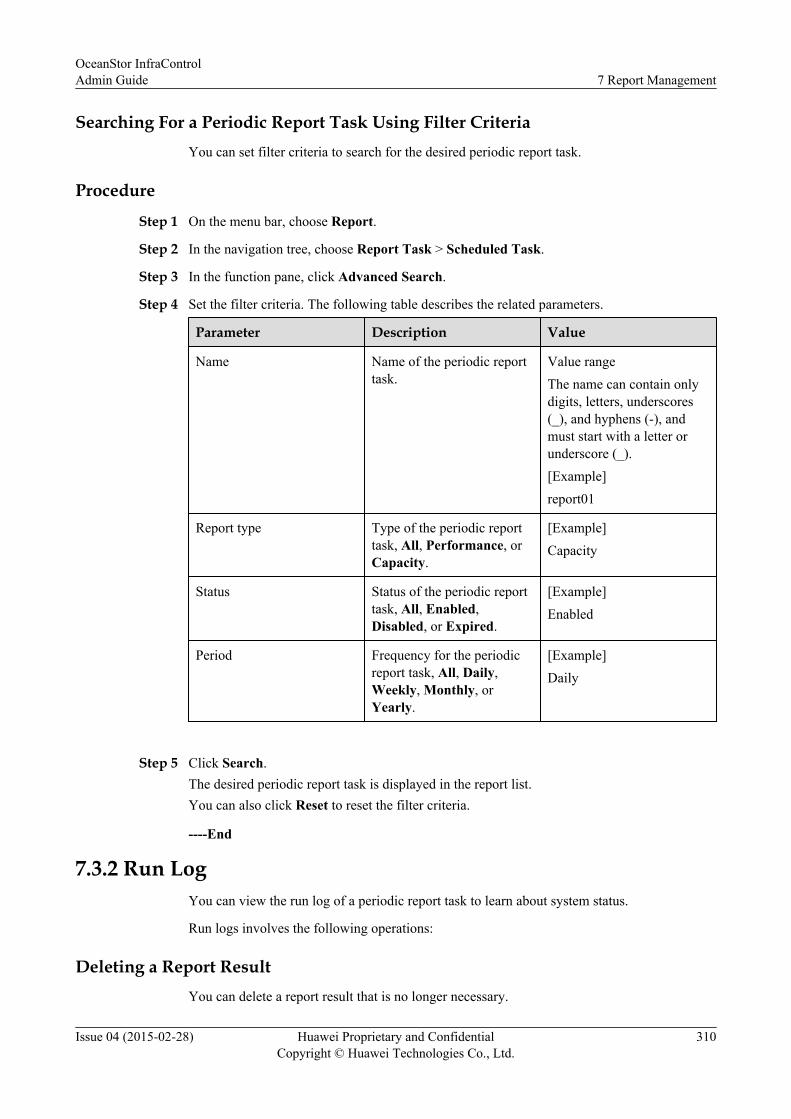
Searching For a Periodic Report Task Using Filter CriteriaYou can set filter criteria to search for the desired periodic report task.
Procedure
Step 1 On the menu bar, choose Report.
Step 2 In the navigation tree, choose Report Task > Scheduled Task.
Step 3 In the function pane, click Advanced Search.
Step 4 Set the filter criteria. The following table describes the related parameters.
Parameter Description Value
Name Name of the periodic reporttask.
Value rangeThe name can contain onlydigits, letters, underscores(_), and hyphens (-), andmust start with a letter orunderscore (_).[Example]report01
Report type Type of the periodic reporttask, All, Performance, orCapacity.
[Example]Capacity
Status Status of the periodic reporttask, All, Enabled,Disabled, or Expired.
[Example]Enabled
Period Frequency for the periodicreport task, All, Daily,Weekly, Monthly, orYearly.
[Example]Daily
Step 5 Click Search.The desired periodic report task is displayed in the report list.You can also click Reset to reset the filter criteria.
----End
7.3.2 Run LogYou can view the run log of a periodic report task to learn about system status.
Run logs involves the following operations:
Deleting a Report ResultYou can delete a report result that is no longer necessary.
OceanStor InfraControlAdmin Guide 7 Report Management
Issue 04 (2015-02-28) Huawei Proprietary and ConfidentialCopyright © Huawei Technologies Co., Ltd.
310
Procedure
Step 1 On the menu bar, choose Report.
Step 2 In the navigation tree, choose Report Task > Running Log.
Step 3 Under Task log in the function pane, select a report result and click Delete.The Warning dialog box is displayed.
Step 4 Click OK.The Success dialog box is displayed.
Step 5 Click OK.
----End
Downloading a Report ResultYou can download the result of a periodic report task, and then read the result to learn aboutsystem status.
Procedure
Step 1 On the menu bar, choose Report.
Step 2 In the navigation tree, choose Report Task > Running Log.
Step 3 Under Task log in the function pane, click next to a report result and download the reportresult.
----End
Searching For a Report ResultYou can search for the desired report result by report result name.
Procedure
Step 1 On the menu bar, choose Report.
Step 2 In the navigation tree, choose Report Task > Running Log.
Step 3 In the function pane, enter a report result name in Name and click Search.The desired report result is displayed in the result list.
----End
Searching For a Periodic Report Result Using Filter CriteriaYou can set filter criteria to search for the desired periodic report result.
Procedure
Step 1 Choose Report > Report Task > Running Log.
OceanStor InfraControlAdmin Guide 7 Report Management
Issue 04 (2015-02-28) Huawei Proprietary and ConfidentialCopyright © Huawei Technologies Co., Ltd.
311
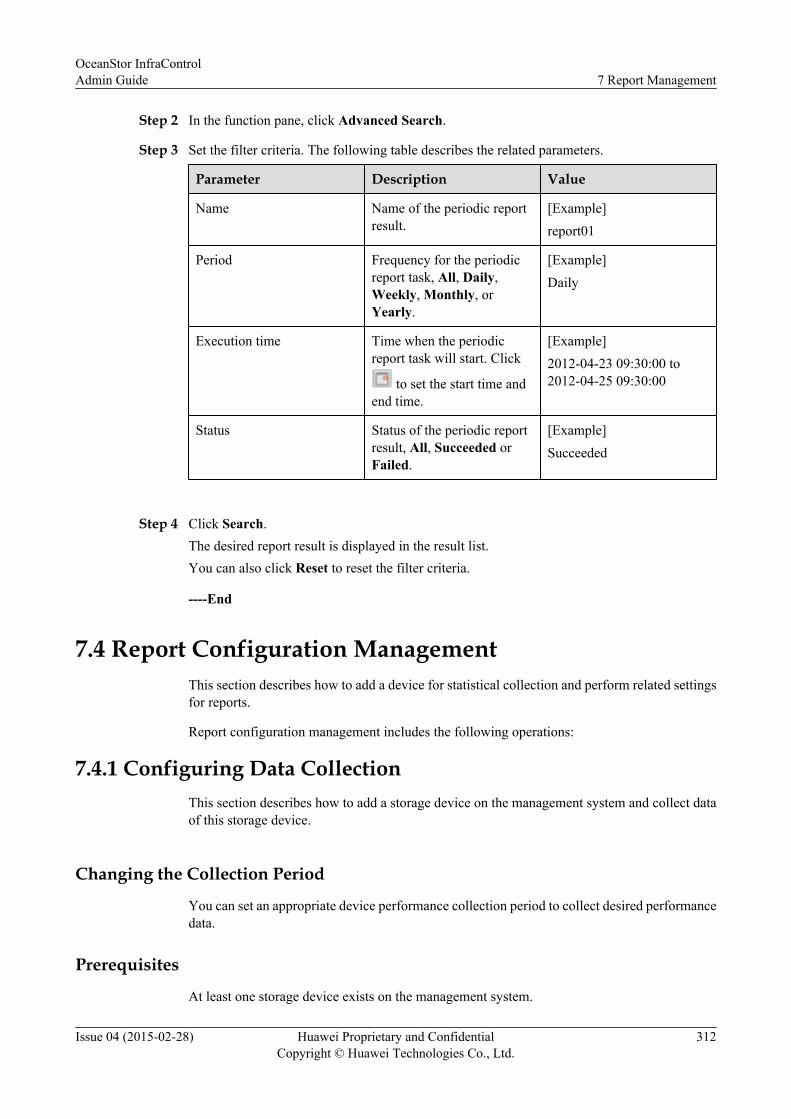
Step 2 In the function pane, click Advanced Search.
Step 3 Set the filter criteria. The following table describes the related parameters.
Parameter Description Value
Name Name of the periodic reportresult.
[Example]report01
Period Frequency for the periodicreport task, All, Daily,Weekly, Monthly, orYearly.
[Example]Daily
Execution time Time when the periodicreport task will start. Click
to set the start time andend time.
[Example]2012-04-23 09:30:00 to2012-04-25 09:30:00
Status Status of the periodic reportresult, All, Succeeded orFailed.
[Example]Succeeded
Step 4 Click Search.The desired report result is displayed in the result list.You can also click Reset to reset the filter criteria.
----End
7.4 Report Configuration ManagementThis section describes how to add a device for statistical collection and perform related settingsfor reports.
Report configuration management includes the following operations:
7.4.1 Configuring Data CollectionThis section describes how to add a storage device on the management system and collect dataof this storage device.
Changing the Collection Period
You can set an appropriate device performance collection period to collect desired performancedata.
Prerequisites
At least one storage device exists on the management system.
OceanStor InfraControlAdmin Guide 7 Report Management
Issue 04 (2015-02-28) Huawei Proprietary and ConfidentialCopyright © Huawei Technologies Co., Ltd.
312
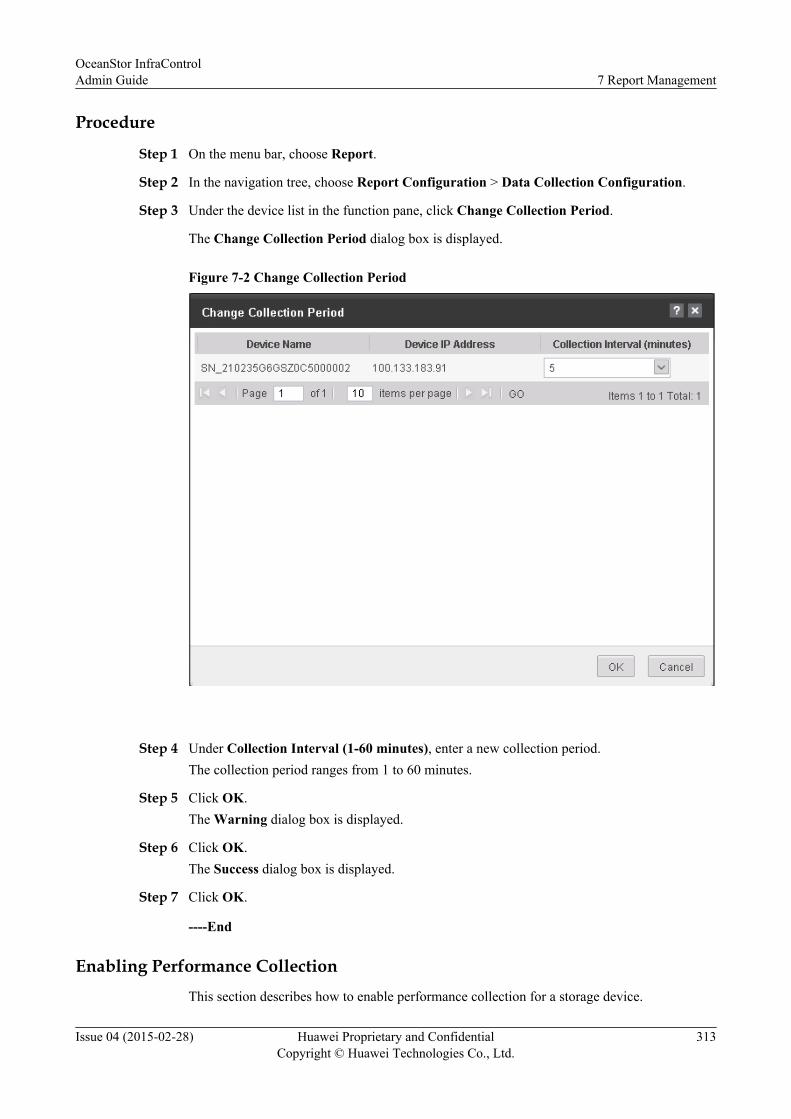
Procedure
Step 1 On the menu bar, choose Report.
Step 2 In the navigation tree, choose Report Configuration > Data Collection Configuration.
Step 3 Under the device list in the function pane, click Change Collection Period.
The Change Collection Period dialog box is displayed.
Figure 7-2 Change Collection Period
Step 4 Under Collection Interval (1-60 minutes), enter a new collection period.The collection period ranges from 1 to 60 minutes.
Step 5 Click OK.The Warning dialog box is displayed.
Step 6 Click OK.The Success dialog box is displayed.
Step 7 Click OK.
----End
Enabling Performance CollectionThis section describes how to enable performance collection for a storage device.
OceanStor InfraControlAdmin Guide 7 Report Management
Issue 04 (2015-02-28) Huawei Proprietary and ConfidentialCopyright © Huawei Technologies Co., Ltd.
313
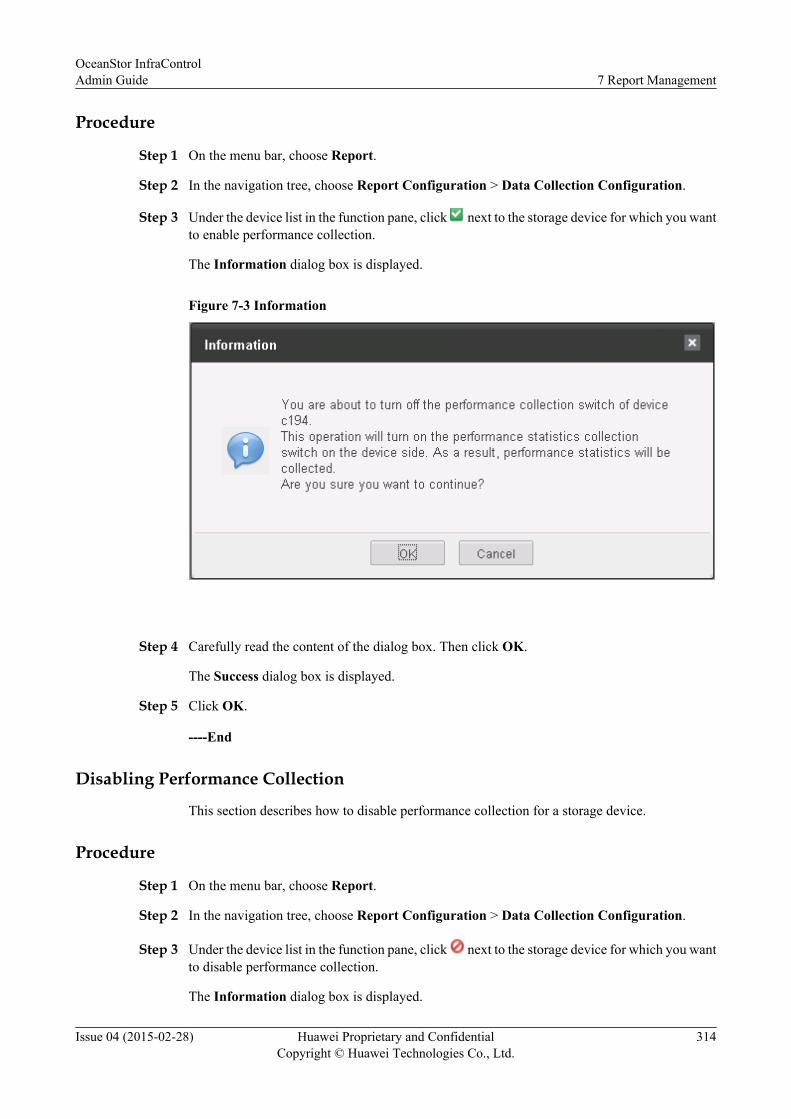
Procedure
Step 1 On the menu bar, choose Report.
Step 2 In the navigation tree, choose Report Configuration > Data Collection Configuration.
Step 3 Under the device list in the function pane, click next to the storage device for which you wantto enable performance collection.
The Information dialog box is displayed.
Figure 7-3 Information
Step 4 Carefully read the content of the dialog box. Then click OK.
The Success dialog box is displayed.
Step 5 Click OK.
----End
Disabling Performance Collection
This section describes how to disable performance collection for a storage device.
Procedure
Step 1 On the menu bar, choose Report.
Step 2 In the navigation tree, choose Report Configuration > Data Collection Configuration.
Step 3 Under the device list in the function pane, click next to the storage device for which you wantto disable performance collection.
The Information dialog box is displayed.
OceanStor InfraControlAdmin Guide 7 Report Management
Issue 04 (2015-02-28) Huawei Proprietary and ConfidentialCopyright © Huawei Technologies Co., Ltd.
314
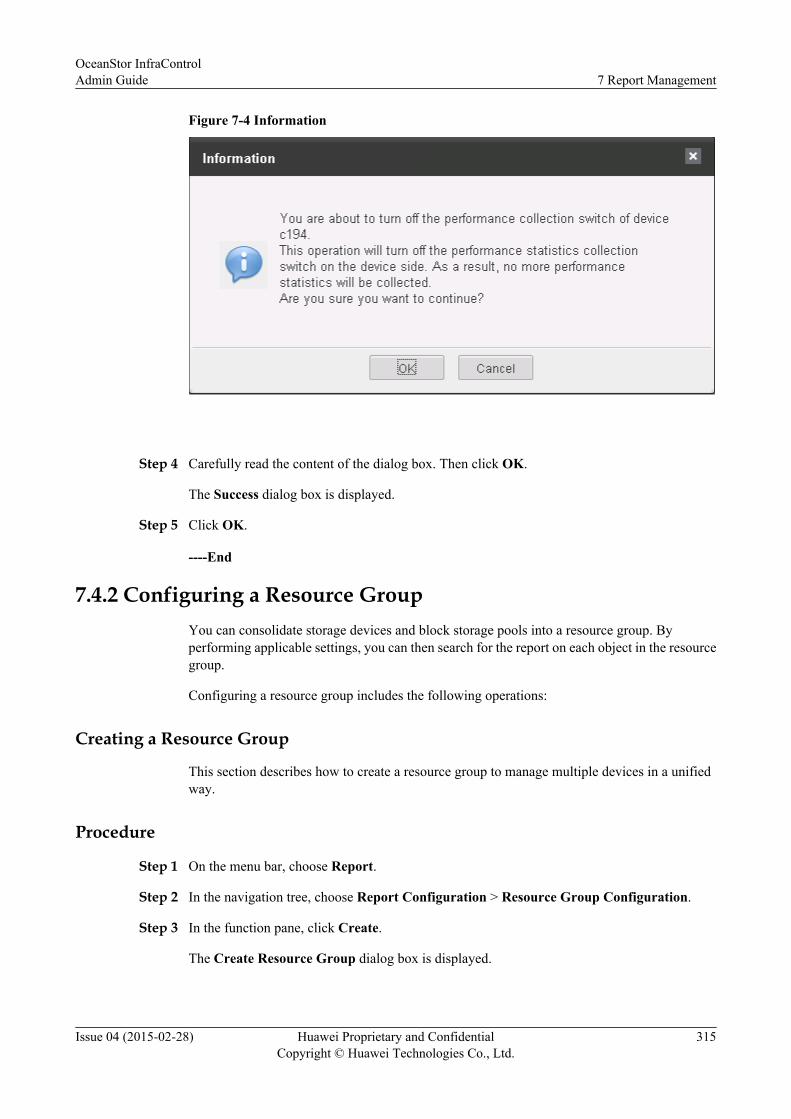
Figure 7-4 Information
Step 4 Carefully read the content of the dialog box. Then click OK.
The Success dialog box is displayed.
Step 5 Click OK.
----End
7.4.2 Configuring a Resource GroupYou can consolidate storage devices and block storage pools into a resource group. Byperforming applicable settings, you can then search for the report on each object in the resourcegroup.
Configuring a resource group includes the following operations:
Creating a Resource Group
This section describes how to create a resource group to manage multiple devices in a unifiedway.
Procedure
Step 1 On the menu bar, choose Report.
Step 2 In the navigation tree, choose Report Configuration > Resource Group Configuration.
Step 3 In the function pane, click Create.
The Create Resource Group dialog box is displayed.
OceanStor InfraControlAdmin Guide 7 Report Management
Issue 04 (2015-02-28) Huawei Proprietary and ConfidentialCopyright © Huawei Technologies Co., Ltd.
315
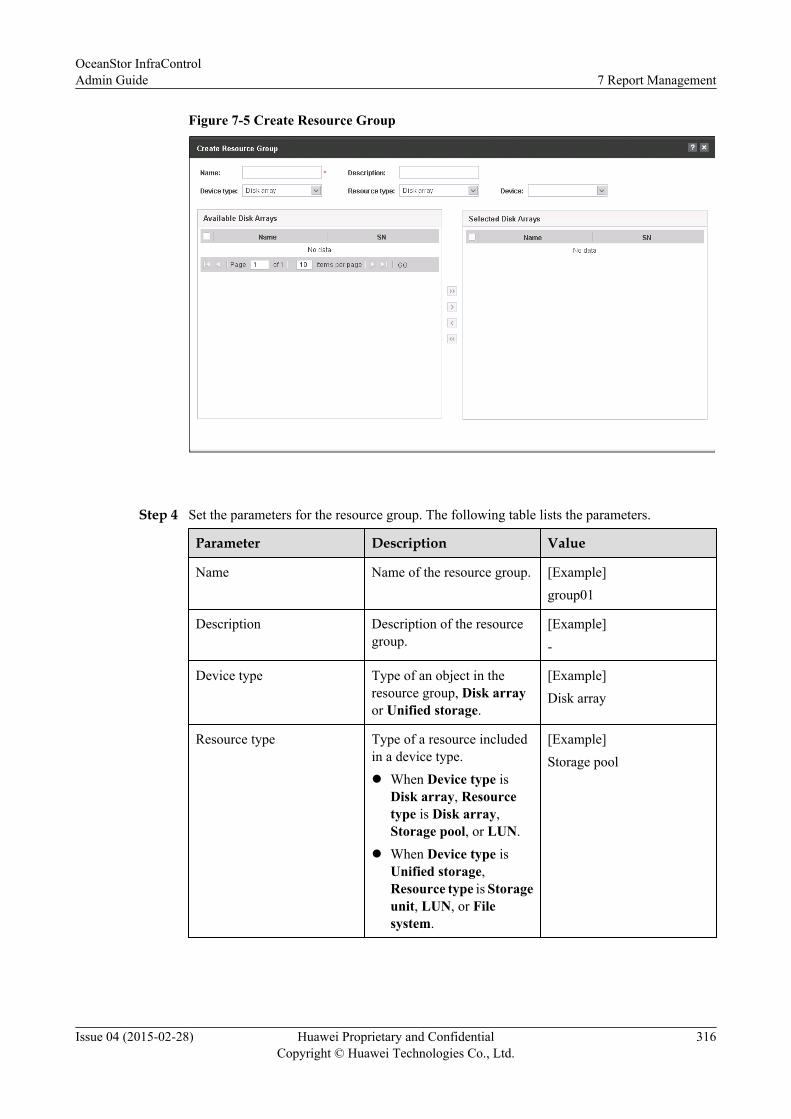
Figure 7-5 Create Resource Group
Step 4 Set the parameters for the resource group. The following table lists the parameters.
Parameter Description Value
Name Name of the resource group. [Example]group01
Description Description of the resourcegroup.
[Example]-
Device type Type of an object in theresource group, Disk arrayor Unified storage.
[Example]Disk array
Resource type Type of a resource includedin a device type.l When Device type is
Disk array, Resourcetype is Disk array,Storage pool, or LUN.
l When Device type isUnified storage,Resource type is Storageunit, LUN, or Filesystem.
[Example]Storage pool
OceanStor InfraControlAdmin Guide 7 Report Management
Issue 04 (2015-02-28) Huawei Proprietary and ConfidentialCopyright © Huawei Technologies Co., Ltd.
316
Parameter Description Value
Device Name of the device.l This parameter is editable
when Device type is Diskarray and Resourcetype is Storage pool orLUN.
l This parameter is editablewhen Device type isUnified storage andResource type is LUN orFile system.
[Example]array
Step 5 Select objects for the new resource group.
l Select objects and click or to move them in the specified direction.
l Click or to move all objects in the specified direction.
Step 6 Click OK.The Success dialog box is displayed.
Step 7 Click OK.
----End
Viewing Details About a Resource Group
This section describes how to view details about a resource group.
Prerequisites
At least one resource group exists on the management system.
Procedure
Step 1 On the menu bar, choose Report.
Step 2 In the navigation tree, choose Report Configuration > Resource Group Configuration.
Step 3 Under Resource Group Configuration in the function pane, details about the resource groupare displayed.
l Select Name and enter a disk array name in the text box on the right. Then click Searchto view details about the found disk array.
l Select Type. Select a state from the drop-down list on the right. Then click Search to viewdetails about the resource groups in the selected state.
Step 4 On the resource group list in the function pane, click the resource group whose details you wantto view.
OceanStor InfraControlAdmin Guide 7 Report Management
Issue 04 (2015-02-28) Huawei Proprietary and ConfidentialCopyright © Huawei Technologies Co., Ltd.
317
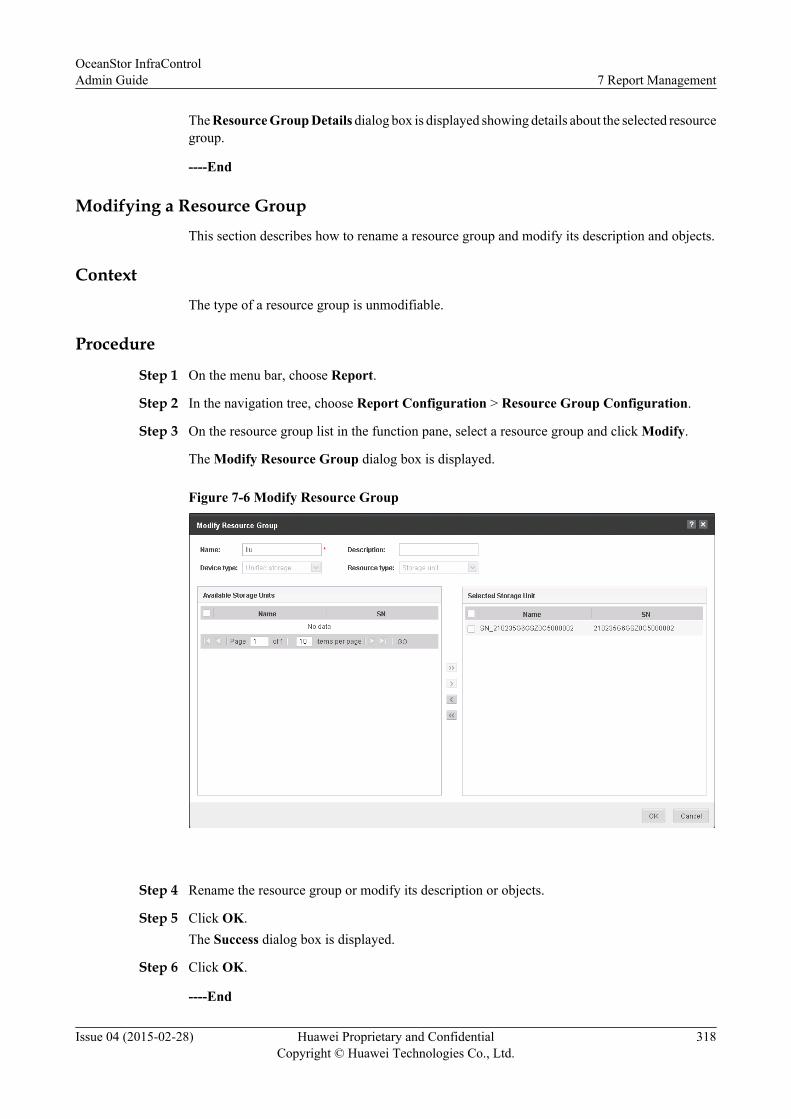
The Resource Group Details dialog box is displayed showing details about the selected resourcegroup.
----End
Modifying a Resource GroupThis section describes how to rename a resource group and modify its description and objects.
ContextThe type of a resource group is unmodifiable.
Procedure
Step 1 On the menu bar, choose Report.
Step 2 In the navigation tree, choose Report Configuration > Resource Group Configuration.
Step 3 On the resource group list in the function pane, select a resource group and click Modify.
The Modify Resource Group dialog box is displayed.
Figure 7-6 Modify Resource Group
Step 4 Rename the resource group or modify its description or objects.
Step 5 Click OK.The Success dialog box is displayed.
Step 6 Click OK.
----End
OceanStor InfraControlAdmin Guide 7 Report Management
Issue 04 (2015-02-28) Huawei Proprietary and ConfidentialCopyright © Huawei Technologies Co., Ltd.
318
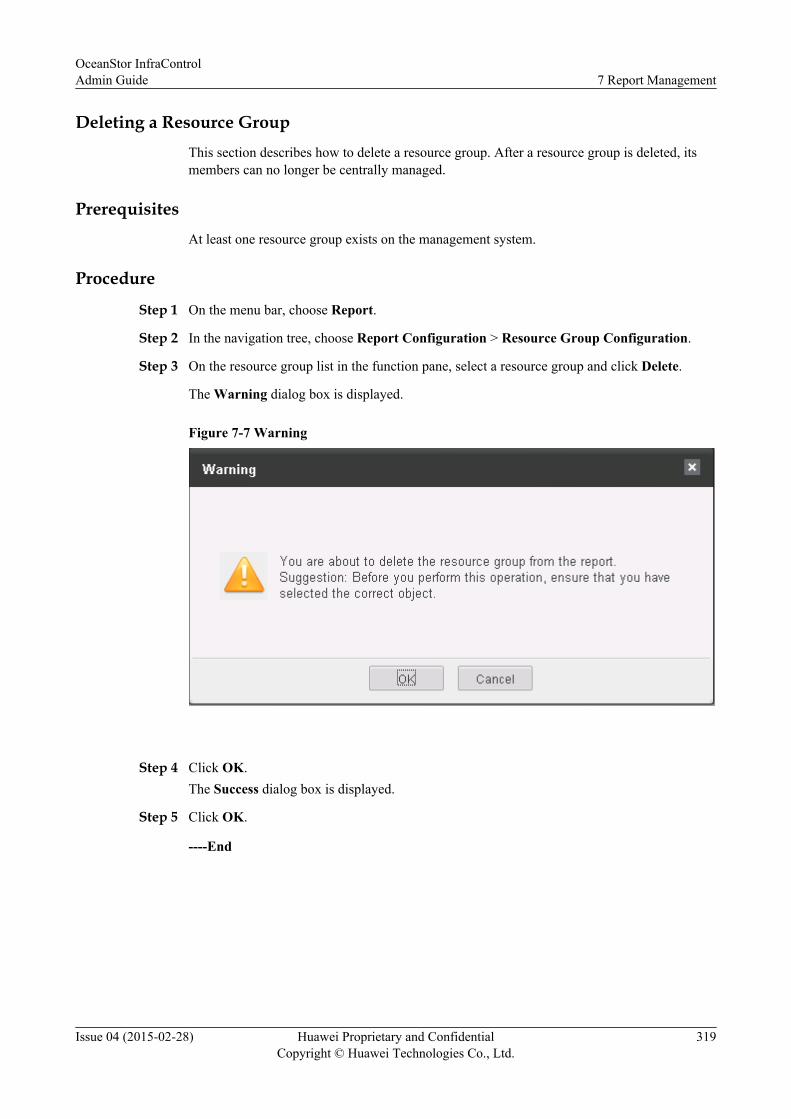
Deleting a Resource GroupThis section describes how to delete a resource group. After a resource group is deleted, itsmembers can no longer be centrally managed.
PrerequisitesAt least one resource group exists on the management system.
Procedure
Step 1 On the menu bar, choose Report.
Step 2 In the navigation tree, choose Report Configuration > Resource Group Configuration.
Step 3 On the resource group list in the function pane, select a resource group and click Delete.
The Warning dialog box is displayed.
Figure 7-7 Warning
Step 4 Click OK.The Success dialog box is displayed.
Step 5 Click OK.
----End
OceanStor InfraControlAdmin Guide 7 Report Management
Issue 04 (2015-02-28) Huawei Proprietary and ConfidentialCopyright © Huawei Technologies Co., Ltd.
319
8 FAQ
About This Chapter
This chapter describes the frequently asked questions (FAQs) about the InfraControl installationand solutions to these questions.
8.1 InfraControl Reports User Account Lockout When Discovering a Device
8.2 Firefox Displays an Adobe Flash Plugin Crash When the Firefox Is Used to Open theTopology Management Page of the InfraControl
8.3 There are some mistakes Displayed After a User Enters the IP Address in the Address Boxof Internet Explorer and Presses Enter
8.4 Statistical Object Missing in an Exported Report When the Name of NetApp Arrays Containsa #
8.5 InfraControl Report Time Is Different from the Actual Time
8.6 Some URLs Fail to Be Used to Access the Network Management Page
OceanStor InfraControlAdmin Guide 8 FAQ
Issue 04 (2015-02-28) Huawei Proprietary and ConfidentialCopyright © Huawei Technologies Co., Ltd.
320
8.1 InfraControl Reports User Account Lockout WhenDiscovering a Device
SymptomAfter discovering a device, the InfraControl reports "The user account has been locked. Pleasetry later.".
Possible Causes1. An incorrect user name or password has been used to scan for devices.2. The device is discovered, but the user's password for logging in to the device is changed.
Procedure
Step 1 If an administrator attempts to discover a device using an incorrect user name or password, thedevice locks the user name for 15 minutes. In that case, the administrator has to wait 15 minutesuntil the device unlocks the user account. The administrator can then enter the correct user nameand password to discover the device.
Step 2 A password change on the device also leads to user account lockout. In that case, chooseManagement > Discover Management > Resources to find the device and clicks Modify tochange the user account, password, and SSL. Then wait 15 minutes for the device to unlock theuser account.
----End
8.2 Firefox Displays an Adobe Flash Plugin Crash When theFirefox Is Used to Open the Topology Management Page ofthe InfraControl
SymptomFirefox Displays an Adobe Flash Plugin Crash When the Firefox Is Used to Open the TopologyManagement Page of the InfraControl.
Possible CausesIn some circumstances, Adobe Flash 11.3 or later has sandbox enabled and is therefore likelyto crash.
Procedure
Step 1 Disable the Flash sandbox according to the instructions at Adobe.com and restart the Firefox. Itis often an effective measure.
Step 2 Download a Flash Installer from Adobe.com to update Flash.
OceanStor InfraControlAdmin Guide 8 FAQ
Issue 04 (2015-02-28) Huawei Proprietary and ConfidentialCopyright © Huawei Technologies Co., Ltd.
321
Step 3 If updating Flash to the latest version does not resolve the problem, you can try downgradingthe Flash version to 10.3.
----End
8.3 There are some mistakes Displayed After a User Entersthe IP Address in the Address Box of Internet Explorer andPresses Enter
SymptomThere are some mistakes Displayed After a User Enters the IP Address in the Address Box ofInternet Explorer and Presses Enter.
Possible Causes
The access request is blocked by the Internet Explorer.
Procedure
Step 1 Open the Internet Explorer and choose Tools > Internet.
The Internet dialog box is displayed.
Step 2 Click the Security tab. In Select a zone to view or change security settings, select TrustedSites and click Sites.
The Trusted Sites dialog box is displayed.
Step 3 Add the APM's IP address to trusted sites.
----End
8.4 Statistical Object Missing in an Exported Report Whenthe Name of NetApp Arrays Contains a #
SymptomStatistical Object Missing in an Exported Report When the Name of NetApp Arrays Containsa #.
Possible Causes
The # is a key character that is used inside the arrays. The problem occurs because the reportsoftware does not support devices whose names contain the #.
OceanStor InfraControlAdmin Guide 8 FAQ
Issue 04 (2015-02-28) Huawei Proprietary and ConfidentialCopyright © Huawei Technologies Co., Ltd.
322
Procedure
Step 1 It is recommended that you delete the # in the device name using device management software.
----End
8.5 InfraControl Report Time Is Different from the ActualTime
SymptomThe time in an InfraControl report is different from the actual time.
Possible Causesl The system time of the client is incorrect.l The system time of the InfraControl server is incorrect.l The system time zone of the client is different from that of the InfraControl server.
Procedure
Step 1 Check whether the system time of the client is correct. If the time is incorrect, set it to a correcttime.
Step 2 Check whether the system time of the InfraControl server is correct. If the time is incorrect, setit to a correct time.
Step 3 Check whether the system time zone of the client is the same as that of the InfraControl server.If they are different, set them to the same time zone.
----End
8.6 Some URLs Fail to Be Used to Access the NetworkManagement Page
SymptomThe following URLs cannot be used to access the network management page.
l http://ipaddress/wsl http://ipaddress/ws/nbiservice?wsdll http://ipaddress/ws/WsNmsService?wsdl
Possible CausesThe preceding URLs serve as interfaces of the web service inside the network managementsystem but cannot be used to access the network management page.
l http://ipaddress/ws indicates the portal to the web service.
OceanStor InfraControlAdmin Guide 8 FAQ
Issue 04 (2015-02-28) Huawei Proprietary and ConfidentialCopyright © Huawei Technologies Co., Ltd.
323

l http://ipaddress/ws/nbiservice?wsdl and http://ipaddress/ws/WsNmsService?wsdlindicate the portal to the web service for northbound communications inside the networkmanagement system.
OceanStor InfraControlAdmin Guide 8 FAQ
Issue 04 (2015-02-28) Huawei Proprietary and ConfidentialCopyright © Huawei Technologies Co., Ltd.
324