creo parametric - advanced primer basic creo parametric display, orientation, and selection options....
TRANSCRIPT

Creo Parametric - Advanced Primer
Exercise Guide
Authored and published using

Copyright © 2009 Parametric Technology Corporation. All Rights Reserved.
Copyright for PTC software products is with Parametric Technology Corporation, itssubsidiary companies (collectively “PTC”), and their respective licensors. This softwareis provided under written license agreement, contains valuable trade secrets andproprietary information, and is protected by the copyright laws of the United States andother countries. It may not be copied or distributed in any form or medium, disclosed tothird parties, or used in any manner not provided for in the software licenses agreementexcept with written prior approval from PTC.
UNAUTHORIZED USE OF SOFTWARE OR ITS DOCUMENTATION CAN RESULT INCIVIL DAMAGES AND CRIMINAL PROSECUTION.
User and training guides and related documentation from PTC is subject to the copyrightlaws of the United States and other countries and is provided under a license agreementthat restricts copying, disclosure, and use of such documentation. PTC hereby grants tothe licensed software user the right to make copies in printed form of this documentationif provided on software media, but only for internal/personal use and in accordancewith the license agreement under which the applicable software is licensed. Any copymade shall include the PTC copyright notice and any other proprietary notice providedby PTC. Training materials may not be copied without the express written consent ofPTC. This documentation may not be disclosed, transferred, modified, or reduced toany form, including electronic media, or transmitted or made publicly available by anymeans without the prior written consent of PTC and no authorization is granted to makecopies for such purposes.
Information described herein is furnished for general information only, is subject tochange without notice, and should not be construed as a warranty or commitment byPTC. PTC assumes no responsibility or liability for any errors or inaccuracies that mayappear in this document.
For Important Copyright, Trademark, Patent and Licensing Information seebackside of this guide.

About the PTC Academic Program
3D CAD, Collaboration and Calculation Management Softwarefor High Schools, Colleges & Universities
The PTC Education Program began in 1999, as a way to help teachers andprofessors bridge the gap between education and industry. We know thattechnology and innovation are keys to success in the global marketplace; andthat companies look for students with the most up-to-date skills. For thatreason, PTC is actively working with industry, secondary school teachers anduniversity professors to develop a complete education solution - from thesecondary school all the way to the college/university level. PTC is committedto building a new generation of "technological thinkers" and helping studentsgain access to technology education programs and innovative skills for thefuture.
Today, more than 35,000 schools and ten million students are usingPTC solutions. In addition, our software has been incorporated in over1800 universities globally, including 50 of the top mechanical engineeringuniversities in the United States. The number of schools and universitiescontinues to grow every year. We're proud to be part of a technologicalliteracy movement that seeks to help bridge the academic gap and inspireall students to design the products of the future, because the designers ofthe future are our future too.
With PTC's School & University Program, students can:• Build technological literacy
• Learn to work collaboratively in teams
• Develop communication, interpersonal and social skills
• Improve critical thinking and strategic thinking skills
• Increase confidence
• Experience project-based problem solving
• Become familiar with advanced design processes
• Prepare for real-world careers in technology

Contact Information – PTC Academic Program
General PTC Academic Program Questions• Email: [email protected]
Creo Parametric for Schools• Email: [email protected]
• Web: www.ptcschools.com
DOD STARBASE• Email: [email protected]
• STARBASE Support Pages
– www.starbasedod.org
– www.ptcmissioncontrol.com
FIRST Robotics• Email: [email protected]
• FIRST Support Pages
– www.ptc.com/go/first
– www.ptc.com/go/firstregistration
– www.ptc.com/go/firstgettingstarted
– www.chiefdelphi.com/forums/index.php
RWDC - Real World Design Challenge• Email: [email protected]
• RWDC Support Pages
– www.realworlddesignchallenge.org
– www.ptc.com/go/rwdc/rwdcgettingstarted
Scalextric4Schools• UK: www.scalextric4schools.org
• US: www.scalextric4schools.us

Training Agenda
Day 1Module 01 ― The Interface and Basic Concepts
Module 02 ― Basic Part Modeling
Day 2Module 03 ― Basic Drawing Creation
Module 04 ― Basic Assembly Modeling
Module 05 ― Advanced Modeling and Design
Module 06 ― Photorealistic Rendering

Table of Contents
Creo Parametric - Advanced PrimerThe Interface and Basic Concepts. . . . . . . . . . . . . . . . . . . . . . . . . . . . . 1-1
Configuring Creo for the Advanced Primer . . . . . . . . . . . . . . . . . . . . 1-2
Downloading Model Files for the Advanced Primer . . . . . . . . . . . . . . 1-8
Understanding Solid Modeling Concepts . . . . . . . . . . . . . . . . . . . . . . 1-9
Understanding Feature-Based Concepts . . . . . . . . . . . . . . . . . . . . . 1-10
Understanding Parametric Concepts . . . . . . . . . . . . . . . . . . . . . . . . 1-11
Understanding Assembly Concepts . . . . . . . . . . . . . . . . . . . . . . . . . 1-13
Understanding Associative Concepts . . . . . . . . . . . . . . . . . . . . . . . 1-14
Understanding Model-Centric Concepts . . . . . . . . . . . . . . . . . . . . . 1-16
Understanding the Creo Parametric Interface . . . . . . . . . . . . . . . . . 1-17
Working Directories and Saving your Work . . . . . . . . . . . . . . . . . . . 1-20
Understanding Datum Display Options . . . . . . . . . . . . . . . . . . . . . . 1-22
Understanding Display Style Options. . . . . . . . . . . . . . . . . . . . . . . . 1-27
Using Spin, Pan, Zoom and Named Views . . . . . . . . . . . . . . . . . . . 1-31
Selecting Items using Direct Selection. . . . . . . . . . . . . . . . . . . . . . . 1-36
Selecting Items using Query Selection . . . . . . . . . . . . . . . . . . . . . . 1-38
Understanding Selection Filters . . . . . . . . . . . . . . . . . . . . . . . . . . . . 1-43
Using the Smart Selection Filter. . . . . . . . . . . . . . . . . . . . . . . . . . . . 1-44
Managing Files in Creo Parametric . . . . . . . . . . . . . . . . . . . . . . . . . 1-49
Understanding the Basics of Sketcher . . . . . . . . . . . . . . . . . . . . . . . 1-57
Basic Part Modeling . . . . . . . . . . . . . . . . . . . . . . . . . . . . . . . . . . . . . . . . 2-1
Basic Part Modeling . . . . . . . . . . . . . . . . . . . . . . . . . . . . . . . . . . . . . . 2-2
Basic Drawing Creation . . . . . . . . . . . . . . . . . . . . . . . . . . . . . . . . . . . . . 3-1
Basic Drawing Creation . . . . . . . . . . . . . . . . . . . . . . . . . . . . . . . . . . . 3-2
Basic Assembly Modeling . . . . . . . . . . . . . . . . . . . . . . . . . . . . . . . . . . . 4-1
Basic Assembly Modeling . . . . . . . . . . . . . . . . . . . . . . . . . . . . . . . . . 4-2
Advanced Modeling and Design . . . . . . . . . . . . . . . . . . . . . . . . . . . . . . 5-1
Advanced Modeling and Design . . . . . . . . . . . . . . . . . . . . . . . . . . . . 5-2
Photorealistic Rendering . . . . . . . . . . . . . . . . . . . . . . . . . . . . . . . . . . . . 6-1
Photorealistic Rendering . . . . . . . . . . . . . . . . . . . . . . . . . . . . . . . . . . 6-2

Module 1The Interface and Basic Concepts
Module OverviewIn this module, you will learn about basic concepts and benefits of solidmodeling using Creo Parametric.
This module also introduces you to the main user interface and defines eacharea and how you will use it. You will gain an understanding of basic skillsincluding setting the working directory and saving and opening files. You willlearn basic Creo Parametric display, orientation, and selection options.
Finally in this module, you will also learn the basics of using the sketcher andhow to create a simple part model.
ObjectivesAfter completing this module, you will be able to:
• Configure Creo Parametric for this course.
• Download the model files used in this course.
• Understand solid modeling concepts.
• Understand feature-based concepts.
• Understand parametric concepts.
• Understand assembly concepts
• Understand associative concepts.
• Understand model-centric concepts.
• Understand Creo Parametric's main interface.
• Use Working Directories and Save your Work.
• Use spin, pan, zoom, and predefined named views to orient models.
• Understand basic display options including model display and datumdisplay.
• Select models, features, and model geometry using your mouse.
• Understand the basics of sketcher and sketcher orientation.
© 2009 PTC Module 1 | Page 1

Configuring Creo for the Advanced Primer
Before starting any of the Advanced Primer exercises, makesure your installation of Creo Parametric is configured properly.
The Advanced Primer Configuration:
Unit System
• Length - Millimeter
• Mass - Kilogram
• Time - Second
Drawing Standard – ASME
Template Models – Academic Program
Configuration Batch Files Folders in “creo_standards”
PTC Academic Program – Creo StandardsTo help configure your installation of Creo Parametric, the PTC AcademicProgram provides a special folder named creo_standards. This standardsfolder mimics the methods used by many commercial customers to configuretheir installations of Creo Parametric.
The creo_standards folder is located inside the Common Files folder of yourCreo Parametric installation (C:\Program Files\PTC\Creo 1.0\Common Files).
Inside the creo_standards folder, are a set of files and folders that are usedto configure Creo Parametric. The batch files in the folder are used to quicklyand automatically configure Creo Parametric to use selected unit systemsand drawing standards.
The Creo Advanced Primer ConfigurationThe batch file used to configure Creo Parametric for the Creo AdvancedPrimer is “configure_for_asme_mmks.bat”. This batch file will configureCreo Parametric as follows:
• Unit System
– Length - Millimeter
– Mass - Kilogram
– Time - Second
• Drawing Standard – ASME
• Template Models – Academic Program (mmks)
Module 1 | Page 2 © 2009 PTC

PROCEDURE - Configuring Creo for the AdvancedPrimer
ScenarioThe Creo Parametric Advanced Primer was developed using a specificAcademic Program configuration of Creo Parametric. In this topic you willcheck to see if your installation of Creo Parametric is configured using thesame configuration. If it is not, you will learn how to configure your installationfor the course.
Step 1: Check to see which date code of Creo Parametric you are usingand if your installation is configured properly.
In this step you will check to see which date code of CreoParametric you are using and if it is configured properly for thiscourse.
1. If necessary, start Creo Parametric.
2. Click File > Help > About Creo Parametric.
• If you are using a Date Code that is earlier than M030 (such asF000 or M020), click Close and move on to Step 2.
• If you are using a Date Code that is M030 or higher (such as M040or M050), click Close and continue with task 3 below.
3. Click New from the QuickAccess toolbar or the Home tab.
4. Disable the check-box for Usedefault template and click OK.
© 2009 PTC Module 1 | Page 3

5. If solid_start_part_mmks islisted as the default templatemodel in the New File Optionsdialog box, your installationis configured correctly for thiscourse.
Continue to the next topic in thecourse, “Downloading ModelFiles for the Advanced Primer”.
6. If it is not listed as the defaulttemplate model, skip Step 2 andmove to Step 3 .
Step 2: Download and move the latest creo_standards folder into position.
In this step you will download, extract and then move the latestversion of the creo_standards folder into position.
1. If necessary, exit Creo Parametric.
2. In Windows Explorer, browse to C:\Program Files\PTC\Creo1.0\Common Files\M030\ and if you see a creo_standards folder,delete it.
If you do not see the M030 folder, use the folder signifying thelatest available date code on your computer, such as F000,M020, M040, M050 and so on. You will then use that folder namein place of M030 throughout the rest of this document.
3. Download the latest creo_standards folder fromhttp://apps.ptc.com/schools/creo_standards.zip.
• Unzip (extract) the zip file.
• Copy the extracted creo_standards folder to C:\ProgramFiles\PTC\Creo 1.0\Common Files\M030\.
4. With the new creo_standardsfolder in place, continue to Step3 .
Module 1 | Page 4 © 2009 PTC

Step 3: Before configuring, see if you have full control of the CommonFiles folder.
Check to see if you have full control of the Common Files folder.This is required to configure your installation using the batch files.The procedure for changing permissions on a folder will varydepending on the operating system you are using. The followinginstructions are based on the Windows 7 operating system.
1. If necessary, exit Creo Parametric.
2. In Windows Explorer, browse to the folder C:\ProgramFiles\PTC\Creo 1.0\.
3. Right-click the Common Filesfolder and select Propertiesfrom the pop-up menu.
4. Select the Security tab and clickto select your user name.
5. If Allow is checked for Fullcontrol, then you have fullcontrol over this folder and youcan continue to Step 5.
6. If Allow is not checked forFull control, you will need tochanges permissions so thatyou have Full control of theCommon Files folder and all ofits subfolders. Continue to Step4 below.
Step 4: Give yourself full control of the Common Files folder.
To change access permission on the Common Files folder, youwill most likely need administrator access to your computer.If you are an administrator setting the computer up for otherusers, you do not have to open up permissions for all users,only yourself.The procedure for changing permissions on a folder will varydepending on the operating system you are using. The followinginstructions are based on the Windows 7 operating system.
© 2009 PTC Module 1 | Page 5

1. Click Edit from the CommonFiles Properties dialog box.
2. In the Permissions for CommonFiles dialog box:
• Click Add.
• In the new dialog box, type theword Everyone and then clickOK.
• Select Everyone from theGroup or user names list.
• Enable the Full control checkbox to Allow full control.
• Click OK.
3. Click OK from the Common FilesProperties dialog box.
4. If necessary, enable the Applychanges to this folder,subfolders and files.
5. Click OK from the ConfirmAttribute Changes dialog box.
The new access permissions will now be applied to the CommonFiles folder and all of its contents.
Step 5: Run a configuration batch file to configure your installation.
The batch files contained in the creo_standards folder enableyou to easily configure your installation of Creo Parametric to usedifferent unit systems and drawing standards.
1. If necessary, exit Creo Parametric.
2. In Windows Explorer, browse to the folder C:\ProgramFiles\PTC\Creo 1.0\Common Files\M030\creo_standards.
3. Double-click the batch file named configure_for_asme_mmks.bat.This will configure your install for the Advanced Primer:
• Length - Millimeter
• Mass - Kilogram
• Time - Second
• Drawing Standard – ASME
Module 1 | Page 6 © 2009 PTC

4. Go back to Step 1, Task 3 and check to see if your installation is nowconfigured properly for the Creo Parametric Advanced Primer.
The batch files the can be used to configure your installationfor the following unit systems and drawing standards.Note that there is also a batch file that will configure CreoParametric to work with the PTC University courses you willfind when using the Schools PLMS:
Batch File Name Unit System andDrawing Standard
configure_default_inlbs.bat The default “out of the box”Creo ASME drawings andINLBS unit system.
configure_default_mmns.bat The default “out of the box”Creo ISO drawings andMMNS unit system. Usethis configuration whenyou are taking a coursefrom PLMS.
configure_for_asme_inlbs.bat ASME drawings with INLBSunit system
configure_for_asme_mmks.bat ASME drawings with MMKSunit system
configure_for_bs_mmks.bat BS8888 drawings and anMMKS unit system
configure_for_iso_mmks.bat ISO drawings and an MMKSunit system (1st AngleProjection & Commas)
configure_for_iso_mmks_3rd.bat ISO drawings and an MMKSunit system (3rd AngleProjection & Commas)
configure_for_iso_mmks.bat Advanced users can editedthis to create their owncustom setup.
This completes the procedure.
© 2009 PTC Module 1 | Page 7

Downloading Model Files for the AdvancedPrimer
Before beginning this course, download and extract the CreoParametric model files that you will be using.
Download and Extract the Model Files:
• Download Creo_Adv_Primer.zip.
• Move Creo_Adv_Primer.zip to your Documents folder.
• Extract (unzip) the zip to create the folder Creo_Adv_Primer.
Creo_Adv_Primer.zip Folder Creo_Adv_Primer
Downloading Model Files for this CourseThe models used to complete this course are packaged in a zip file namedCreo_Adv_Primer.zip. Before beginning the exercises, you must downloadthis file and extract its contents.
1. Download Creo_Adv_Primer.zip fromhttp://apps.ptc.com/schools/Creo_Adv_Primer.zip.
2. If necessary, move the downloaded Creo_Adv_Primer.zip file to yourDocuments folder (this folder may be named My Documents on somecomputers).
3. Extract (unzip) the Creo_Adv_Primer.zip file. This will create a foldernamed Creo_Adv_Primer. You will use the models in this folder as youwork through the course.
Module 1 | Page 8 © 2009 PTC

Understanding Solid Modeling Concepts
Creo Parametric enables you to create solid representations ofyour part and assembly designs.
Solid Models:
• Are realistic visual representation of designs.
• Contain properties such as mass, volume, and center of gravity.
• Can be used to check for interferences in an assembly.
Interference Check Mass Properties
Understanding Solid Modeling ConceptsCreo Parametric enables you to create realistic solid representations ofyour part and assembly designs. These virtual design models can be usedto easily visualize and evaluate your design before costly prototypes aremanufactured.
The models contain material properties such as mass, volume, center ofgravity, and surface area. As features are added or removed from the model,these properties update. For example, if you add a hole to a model, thenthe mass of the model decreases.
In addition, solid models enable tolerance analysis and clearance/interferencechecking when placed into assemblies.
© 2009 PTC Module 1 | Page 9

Understanding Feature-Based Concepts
Creo Parametric is a feature-based product development tool.
With Feature-Based Modeling:
• You build one simple feature at a time.
• Each new feature can reference previous features.
Wheel Features
Understanding Feature-Based ConceptsCreo Parametric is a feature-based product development tool. The modelsare constructed using a series of easy to understand features rather thanconfusing mathematical shapes and entities.
The geometric definition of a model is defined by the type of features usedand by the order in which each feature is placed. Each feature builds uponthe previous feature and can reference any of the preceding features; thisenables design intent to be built into the model.
Individually, each feature is typically simple but as they are added togetherthey form complex parts and assemblies.
In this example, we have a wheel showing the first six stages of its creation:
• First, an extrusion is created, which forms the initial shape and size ofthe model.
• An additional extrusion is created to add material to the middle of the model.
• A third extrusion is created to remove material from the model.
• A fourth extrusion is created to add a hub inside the model.
• A coaxial hole is created on the previous extrusion.
• A chamfer is created on the edge of the hole.
Module 1 | Page 10 © 2009 PTC

Understanding Parametric Concepts
The parametric nature and feature-to-feature relationships inCreo Parametric enable you to easily capture design intent andmake design changes.
Parametric:
• Model geometry is defined by features.
• Features are defined by parameters, references and dimensions.
• When you modify dimension values, relevant geometry is automaticallyupdated.
Parent/Child Relationships:
• Features referenced during creation become parents.
• If parent features change, child features accordingly and predictivelychange as well.
Parametric Feature Relationships
Understanding Parametric ConceptsCreo Parametric models are value driven, using dimensions and parametersto define the size and location of features within the model. If you change thevalue of a feature dimension, that feature will update according to the change.The change then automatically propagates through to related features inthe model, updating the entire part.
Parent/Child RelationshipsRelationships between features in Creo Parametric provide a powerful tool forcapturing design intent. During the modeling process, design intent is addedas one feature is created with reference to another.
When creating a new feature, any feature referenced during its creationbecomes a parent of the new feature. The new feature referencing the parentis referred to as a child of the parent. If the parent feature is updated, anychildren of the parent update accordingly. These relationships are referred toas parent/child relationships.
This example shows a piston model intersected with a hole feature. In themiddle figure, the piston height is modified from 18.5 to 25. Notice that thehole moves upward as the piston height increases. The design intent of thepiston is to have the hole located a specified distance from the top of the
© 2009 PTC Module 1 | Page 11

piston. The hole will maintain that distance no matter how tall the pistonbecomes. This intent was added by dimensioning the hole to the top surfaceof the piston.
Alternatively, if the intent of the design is to have the hole located a specifieddistance from the bottom of the piston, the hole would be dimensioned fromthe bottom surface of the piston, yielding a different result when the height ofthe piston is modified.
The right most figure shows modifications made to the location and diameterof the hole.
Best PracticesWhen creating features in your model, try to reference features and geometrythat are robust, will likely not be deleted, and provide the desired designintent. While this is not always possible, striving to do so will help you buildrobust, easy to modify models.
Module 1 | Page 12 © 2009 PTC

Understanding Assembly Concepts
An assembly is a collection of parts and other sub-assembliesthat you bring together using constraints.
• Capture assembly design intent using constraints.
• Create assembly constraints.
An Assembly Model that is Comprised of Parts
Understanding Assembly TheoryThere are multiple methods to assemble components using Creo Parametric.Assembling components with constraints is one of the primary methods usedto create Creo Parametric assemblies.
After you create and name the new assembly, you can begin adding partsto the assembly. Similar to part models having design intent, assembliesalso contain design intent. Assembly design intent is based upon whichcomponent is assembled first, and the constraints that you use during theassembly process. Design intent is important because it means that yourassembly updates in a predictable manner when edited and regenerated.
All characteristics that hold true for assemblies also hold true forsub-assemblies. In fact, a sub-assembly is nothing more than an assemblythat is assembled into another assembly.
Creo Parametric has several types of constraints, such as Coincident,Distance, Angle Offset and Parallel. Use of these constraints is madeeasier by using the Automatic option, which enables Creo Parametric toautomatically determine the constraint type based upon the orientation andposition of the component and the references you select.
Every assembled component has a Placement node in the modeltree that can be expanded to view the constraints used in thatcomponent's placement.
Assembling with component interfaces is a second method when assemblingcomponents. This method is especially useful when assembling commoncomponents because it can significantly cut the number of selections that youmake when constraining a component. By using component interfaces, yousave the referenced interfaces on the common part. Then, when you placethe common part, you only need to select the assembly references.
© 2009 PTC Module 1 | Page 13

Understanding Associative Concepts
Creo Parametric is a bi-directionally associative productdevelopment tool.
Bi-directional Associativity
Understanding Associative ConceptsBi-directional associativity means that all changes made to an object in anymode of Creo Parametric are automatically reflected in every related mode.
For example, a change made in a drawing is reflected in the part beingdocumented in the drawing. That same change is also reflected in everyassembly using that part model.
It is important to understand that the associativity between different modes ispossible because the part shown in a drawing is not copied into the drawing,but rather associatively linked to the drawing. Likewise, an assembly is nota large file containing copies of every part in the assembly, but rather a filecontaining associative links to every model used in the assembly.
Best PracticesBecause drawing and assembly files have associative links to the modelscontained in them, these objects cannot be opened without the models theycontain being present.
In other words, you cannot send your colleague only a drawing file to open,he or she must have the drawing file along with any model referenced in the
Module 1 | Page 14 © 2009 PTC

drawing. For an assembly, he or she must have the assembly file and allmodels used in the assembly.
The best method for acquiring all files required for a drawing orassembly is to use the Backup function. With the required top-leveldrawing or assembly open, click File > Save As > Save a Backupand back the files up to a new folder. This will place all the filesrequired to open that top-level drawing or assembly into the newfolder.
© 2009 PTC Module 1 | Page 15

Understanding Model-Centric Concepts
In Creo Parametric, the model is the center of all downstreamdeliverables such as drawings, assemblies, molds, analysis,and manufacturing.
Model-Centric
• Assemblies reference the models being assembled.
• The drawing references the model being documented.
• The Finite Element Mesh model references the model being analyzed.
• The mold tool references the model being molded.
Model-Centric
Understanding Model-Centric ConceptsIn a model-centric product development tool, the design model is the commonsource for all deliverables making use of that design model. This meansthat all downstream deliverables point directly to a common design model.The model is referenced as components in assemblies, views in a drawing,the cavity of a mold, geometry meshed in a Finite Element Mesh model,and so on.
Examples of downstream deliverables are:
• Slot car assemblies the wheel is used in, almost every car has wheels.
• The drawing used to document the wheel design, each view is generatedfrom the wheel part.
• The mold tool uses the wheel part to define the geometry of the mold cavity.
• A Finite Element Mesh (FEM) model is created from the wheel part.Engineers use this FEM model to determine the strength of the part, theflow properties of the molded part, and so on.
The benefit of using a model-centric development tool is that a changemade to the design model will automatically update all related downstreamdeliverables.
Module 1 | Page 16 © 2009 PTC

Understanding the Creo Parametric Interface
The Main Interface includes the following areas:
• Graphics Area
• Quick Access toolbar
• Ribbon
• Dashboard
• Status bar
• Message Log
• Dialog Boxes
• Graphics toolbar
• Menu Manager
The Main Interface
Understanding the Main InterfaceThere are many different areas of the Creo Parametric user interface that youuse when creating models. The areas of the interface displayed depend uponthe function being performed. Areas of the main interface include:
• Graphics Area — The workingarea of Creo Parametric in whichyou view, create, and modify CreoParametric models such as parts,assemblies, and drawings.
© 2009 PTC Module 1 | Page 17

• Graphics toolbar — Located at the top of the graphics area, the Graphicstoolbar contains commonly used tools and filters for the graphics areadisplay. You can customize the tools and filters displayed in the Graphicstoolbar.
• Quick Access toolbar — The Quick Access toolbar is located at the topof the interface. It contains a commonly used set of commands thatare independent of the tab currently displayed in the ribbon. Thesecommands are available regardless of the specific mode or ribbon tab inwhich you are working. You can customize the Quick Access toolbar toadd additional commands.
• Ribbon — A context-sensitive menu across the top of the interface thatcontains the majority of the commands you use in Creo Parametric. Theribbon arranges commands into logical tasks through tabs and groups.
• Dashboard — Locked at the top of the user interface, the Dashboardappears when you create or edit the definition of a feature.
– The Dashboard provides you with controls, inputs, status, andguidance for carrying out a task, such as creating or editing a feature.
– Various dashboard tabs are available with additional feature options.
– Dashboard icons on the left include feature controls while the Pause,Preview, Create Feature, and Cancel Feature options are on the right.
Module 1 | Page 18 © 2009 PTC

• Dialog Boxes—Content-sensitivewindows which display andprompt you for additionalinformation.
• Status bar — Located at the bottom of the interface, the status barcontains icons for toggling the model tree and Web browser panes onand off. It also contains the message log, regeneration manager, 3Dbox selector, and selection filter.
• Message Log — Located at thebottom of the graphics area,the message log provides youwith prompts, feedback, andmessages from Creo Parametric.
• Menu Manager — A cascadingmenu that appears on the farright during the use of certainfunctions and modes within CreoParametric.
In general you work from top tobottom in this menu; however,the workflow for clicking “Done”moves from the bottom to top ofthe menu.
Bold menu options will beautomatically selected if themiddle mouse button is clicked.
© 2009 PTC Module 1 | Page 19

Working Directories and Saving your Work
The Working Directory is the location for opening files from andsaving new files to.
Setting your Working Directory:
• Creo Parametric starts in a start-in folder on your computer, by default,this is your working directory.
• A working directory is the folder you open files from and save files to.
• The working directory is selected before every session. When you exitCreo Parametric, it does not remember the working directory for thenext session.
Open Files - The File Open dialog box looks to the working directory.
Save Files - Files are saved to the folder they were opened from, this isnot always the working directory.
Working Directory TheoryThe working directory is the designated location for opening and saving files.The default working directory is the “Start in” location defined in the CreoParametric start icon, typically the “My Documents” folder.
If you are not using PTC’s Windchill PDMLink to manage your CreoParametric data, it is best practice to organize your work by creating a folderfor each project. Each time you start Creo Parametric, you should set theworking directory to the folder you plan to work in.
There are four methods to set your working directory, use the method youare most comfortable with:
• From the Home tab - When Creo Parametric first opens; click Select
Working Directory from the Data group of the Home tab.This is the easiest and most straight forward method.
• From the File menu - If the Home tab is not available, click File > ManageSession > Select Working Directory.
• From the Creo Parametric Folder Tree or Browser - Right-click thefolder that is to be the new working directory and select Set WorkingDirectory from the pop-up menu.
Module 1 | Page 20 © 2009 PTC

• From the Creo Prametric File Open dialog box - Right-click the folderthat is to be the new working directory and select Set Working Directoryfrom the pop-up menu.
You can browse directly to the working directory at any time by
selecting from the Common Folder list in theNavigator or File Open dialog box.
Opening FilesAfter you have set your working directory, you will see the files in that folder
each time you click Open in Creo Parametric.
You can use any of the following methods to open a file:
• Click File > Open from the main menu, click Open from the Quick
Access toolbar, or click Open from the Home tab. Then, in the FileOpen dialog box, you either double-click the file you want to open or selectthe file and click Open.
• Browse to the desired folder using the Navigator (either with CommonFolders or through the Folder Tree) to display its contents in the browser.Then, you can either double-click the file in the file list, or right-click the fileand select Open from the pop-up menu.
• You can also drag the file from browser into the graphics area.
The File Open dialog box is the equivalent of the Navigator andBrowser combination in the main interface.
Saving FilesBy default, files are saved to the folder they were opened from. A new part,assembly, or drawing will be saved to the folder that is active when you clickOK from the Save Object dialog box.
You can use any of the following methods to save a file:
• Click File > Save from the main menu.
• Click Save from the Quick Access toolbar.
• Use the CTRL + S keyboard shortcut.
Saving a Copy of FilesYou can also save a copy of an existing file. Saving a copy enables you tocreate an exact copy of a file, but with a different name. When saving acopy of an assembly, you must also decide what to do about its dependentcomponents. You can do nothing, or save a copy of them also and eitherrename them with a suffix or give them all new names.
© 2009 PTC Module 1 | Page 21

Understanding Datum Display Options
You can independently control the display of datum entities anddatum tags in the graphics area.
Datum Display Options
• Datum entities include:
– Datum Axes
– Datum Points
– Coordinate Systems
– Datum Planes
• Datum tags include:
– Axis Tag Display
– Point Tag Display
– Csys Tag Display
– Plane Tag Display
Datum Tag Display
Setting Datum DisplayDatum entities are 3-D reference geometry that you use for building featuregeometry, orienting models, dimensioning, measuring, and assembling.
There are four main datum types:
• Datum Axes
• Datum Points
• Coordinate Systems
• Datum Planes
The display of each of these datum types is controlled independently usingthe following icons from either the Show group of the View tab or from theGraphics toolbar:
• Axis Display — Enable/Disable datum axis display.
• Point Display — Enable/Disable datum point display.
• Csys Display — Enable/Disable datum coordinate system display.
• Plane Display — Enable/Disable datum plane display.
Module 1 | Page 22 © 2009 PTC

Setting Datum Tag DisplayEach datum entity has a name associated with it, for example, datum planeFRONT. Using the Academic Program configuration of Creo Parametric,datum names are displayed in both the model tree and in the graphics area.
The display of each datum tag type can be controlled independently usingicons from the Show group of the View tab.
• Axis Tag Display — Enable/disable display of datum axis tags.
• Point Tag Display — Enable/disable display of datum point tags.
• Csys Tag Display — Enable/disable display of datum coordinatesystem tags.
• Plane Tag Display — Enable/disable display of datum plane tags.
© 2009 PTC Module 1 | Page 23

PROCEDURE - Understanding Datum Display Options
ScenarioEdit the datum feature displays.
Step 1: Set your working directory.
1. If necessary, start Creo Parametric.
2. Click Select Working Directory from the Data group of theHome tab.
3. In the Select Working Directory dialog box:
• Navigate to the folder Creo_Adv_Primer.
• Double-click the folder Module_01.
• Double-click the folder Datum_Display.
• Click OK to set the folder as your working directory.
Step 2: Open TIRE.PRT and edit the datum display.
1. Click Open from the Data group of the Home tab or the QuickAccess toolbar.
2. In the File Open dialog box, select TIRE.PRT and then click Open.
3. If necessary, click Datum Display Filters from the Graphicstoolbar and enable the display of all datum features.
Module 1 | Page 24 © 2009 PTC

4. Click Datum Display Filters from the Graphics toolbar andenable the display of only datum axis.
5. Click Datum Display Filters from the Graphics toolbar andenable the display of only datum points.
6. Click Datum Display Filters from the Graphics toolbar andenable the display of only coordinate systems.
© 2009 PTC Module 1 | Page 25

7. Click Datum Display Filters from the Graphics toolbar andenable the display of only datum planes.
8. Click Datum Display Filters from the Graphics toolbar anddisable the display of all datum features.
9. Click File > Manage Session > Erase Current.
10. Click Yes from the Erase Confirm dialog box.
This completes the procedure.
Module 1 | Page 26 © 2009 PTC

Understanding Display Style Options
You can modify the display style of models in the graphics area.
• Display style options:
– Shading With Edges
– Shading With Reflections
– Shading
– No Hidden
– Hidden Line
– Wireframe
• Repaint – Redraws orrefreshes the graphics area.
Shading with Edges & Shading withReflections
Shading & No Hidden Hidden Line & Wireframe
Understanding Display Style OptionsThere are six different display style options in the graphics area. Theseoptions can be selected from the Graphics toolbar.:
• Shading With Edges — The model is shaded and its edges arehighlighted.
• Shading With Reflections — Shadows and a reflection are laced onan imaginary floor directly below the model.
• Shading — The model is shaded without edges highlighted.
• No hidden — Hidden lines in the model are not displayed.
• Hidden line — Hidden lines in the model are displayed, by default, in aslightly darker color than visible lines.
• Wireframe — Hidden lines are displayed as regular lines. That is, alllines in the front or back of the model have the same color and weight.
Repainting the Graphics AreaYou can repaint a view to remove all temporarily displayed information.
Repainting redraws or refreshes the graphics area, and is performed by
clicking Repaint from the Graphics toolbar.
© 2009 PTC Module 1 | Page 27

PROCEDURE - Understanding Display Style Options
ScenarioEdit the model display style options.
Step 1: Set your working directory.
1. If necessary, start Creo Parametric.
2. Click Select Working Directory from the Data group of theHome tab.
3. In the Select Working Directory dialog box:
• Navigate to the folder Creo_Adv_Primer.
• Double-click the folder Module_01.
• Double-click the folder Display_Style.
• Click OK to set the folder as your working directory.
Step 2: Open DISPLAY_STYLE.ASM and edit the datum display.
1. Click Open from the Datagroup of the Home tab or theQuick Access toolbar.
2. In the File Open dialog box,select DISPLAY_STYLE.ASMand then click Open.
3. If necessary, click Datum
Display Filters from theGraphics toolbar and disable thedisplay of all datum features.
Module 1 | Page 28 © 2009 PTC

Step 3: Edit the display style of the model.
1. If necessary, select Shading
With Edges from the displaystyle drop-down menu in theGraphics toolbar.
This is the default displaytype for the Creo Parametriceducation edition. Themodel is shaded and modeledges are highlighted inblack.
2. Select Shading With
Reflections from thedisplay style drop-down menu inthe Graphics toolbar.
Llighting has been applied tothe model and it is reflectedin the floor.
3. Select Shading from thedisplay style drop-down menu inthe Graphics toolbar.
The model is shaded but theedges are not highlighted.
4. Select No hidden from thedisplay style drop-down menu inthe Graphics toolbar.
The model is not shadedand hidden edges are notdisplayed.
© 2009 PTC Module 1 | Page 29

5. Select Hidden line from thedisplay style drop-down menu inthe Graphics toolbar.
Hidden edges are displayedin a lighter gray color tosignify they are hiddenbehind geometry.
6. Select Wireframe from thedisplay style drop-down menu inthe Graphics toolbar.
All lines are displayed usinga wireframe display.
7. Click Close Window from the Quick Access toolbar to close theDISPLAY_STYLE.ASM window.
8. Click Erase Not Displayed from the Data group of the Hometab.
9. Click OK from the Erase Not Displayed dialog box.
This completes the procedure.
Module 1 | Page 30 © 2009 PTC

Using Spin, Pan, Zoom and Named Views
Manipulate the 3-D orientation of your design models in the CreoParametric graphics area.
Orientations using the Keyboard and Mouse
Keyboard/MouseOrientation:
• Spin
• Pan
• Zoom
• Turn
• Wheel Zoom
Graphics ToolbarOptions:
• Previous
• Refit
• Named View List
• Spin Center
The Spin Center
Orientation using Keyboard and Mouse CombinationsTo view a model in a specific orientation, you can spin, pan, and zoomthe model using a combination of keyboard and mouse functions. Foreach orientation, you press and hold a key while pressing and holding theappropriate mouse button, as shown in the following table.
Orientation Keyboard and Mouse Selection
Spin
Pan
Zoom
Turn
© 2009 PTC Module 1 | Page 31

Cursor over the area of interest before zooming in. The zoom function usesthe cursor position as its area of focus. You can also zoom by using the scrollwheel. To control the level of zoom, press a designated key while using thescroll wheel, as shown in the following table:
Zoom Level Keyboard and Mouse Selection
Zoom
Fine Zoom
Coarse Zoom
Graphics Toolbar and View Tab Orientation OptionsIn addition to using keyboard and mouse combinations, the followingadditional model orientation options are available:
• Previous - Revert the model to the previously displayed orientation
by clicking Previous from the Orientation group of the View tab.
• Refit — Refit the entire model in the graphics area.
• Named View List — Display a list of saved view orientations availablefor a given model. Select the name of the desired saved view, and themodel reorients to the selected view. The Academic Program templatemodels come with the following saved views:
– Standard Orientation — The initial 3-D orientation which cannot bealtered.
– Default Orientation — Similar to the Standard Orientation, but itsorientation can be redefined to a different orientation.
– BACK, BOTTOM, FRONT, ISOMETRIC, LEFT, RIGHT, TOP andTRIMETRIC.
• Spin Center — Enables and disables the spin center. When enabled,the model spins about the location of the spin center. When disabled, themodel spins about the cursor location. Disabling the spin center can beuseful when orienting a long model, like a shaft.
Module 1 | Page 32 © 2009 PTC

PROCEDURE - Using Spin, Pan, Zoom and Named Views
ScenarioPractice orienting a model in the graphics area using saved views, the spincenter, and basic keyboard and mouse model orientation.
Step 1: Set your working directory.
1. If necessary, start Creo Parametric.
2. Click Select Working Directory from the Data group of theHome tab.
3. In the Select Working Directory dialog box:
• Navigate to the folder Creo_Adv_Primer.
• Double-click the folder Module_01.
• Double-click the folder Spin.
• Click OK to set the folder as your working directory.
Step 2: Open CHASSIS.ASM, disable datum display and orient the model.
1. Click Open from the Datagroup of the Home tab or theQuick Access toolbar.
2. In the File Open dialog box,select CHASSIS.ASM and thenclick Open.
3. If necessary, click Datum
Display Filters from theGraphics toolbar and disable thedisplay of all datum features.
4. Click Named View List fromthe Graphics toolbar and selectTOP.
© 2009 PTC Module 1 | Page 33

5. Click Named View List andselect LEFT.
6. Click Named View List andselect Default Orientation.
Step 3: Orient with the spin center on and then off.
1. Middle-click and drag to spin the assembly.
2. Spin the assembly again in a different direction.
3. Spin the assembly in a third direction.
The assembly is spinning about the spin center.
4. Click Named View List andselect Standard Orientation.
5. Click Spin Center from theGraphics toolbar to disable it.
6. Cursor over the front portion theassembly and spin the assembly.
7. In the ribbon, select the View tab.
8. Click Previous from the Orientation group.
9. Cursor over the back of theassembly and spin the assembly.Notice that the center of rotationis the cursor location.
10. Click Spin Center from theGraphic toolbar to enable it.
Module 1 | Page 34 © 2009 PTC

Step 4: Pan the assembly.
1. Press and hold SHIFT, thenmiddle-click and drag to pan theassembly.
2. Click Named View List andselect Standard Orientation.
Step 5: Zoom in and out of the assembly.
1. Press and hold CTRL, then middle-click and drag upward to zoom out.
2. Press and hold CTRL, then middle-click and drag downward to zoomin.
3. If your mouse is equipped with a wheel:
• Roll the mouse wheel away from you to zoom out.
• Roll the mouse wheel towards you to zoom in.
• Press and hold CTRL, then roll the mouse wheel away from you tocoarsely zoom out.
• Press and hold SHIFT, then roll the mouse wheel towards you tofinely zoom in.
The zoom function uses the cursor position as the center offocus. Because of this, be sure to place your cursor over thearea of the model you wish to zoom in to.
4. Click Named View List andselect Standard Orientation.
5. Cursor over the motor, thenpress and hold CTRL while youmiddle-click and drag downwardto zoom in on the motor.
6. Click Refit from the Graphictoolbar to refit the model.
7. Click File > Manage Session > Erase Current.
8. In the Erase dialog box, click Select All , then click OK to eraseall components of the assembly.
This completes the procedure.
© 2009 PTC Module 1 | Page 35

Selecting Items using Direct Selection
Direct selection occurs when you place the mouse cursor over acomponent, feature or geometry and click to select.
You can direct select:
• Components
• Features
• Geometry (by pressing ALT)
Perform direct selection in:
• The graphics area
• The model tree
Select multiple items using CTRL.
Select a range of items using SHIFT.
Select Components in ModelTree or Graphics Area
Select Features in Model Treeor Graphics Area
Press ALT and select surfaces,edges and vertices directly
Selecting Items using Direct SelectionAfter selecting components, features or geometry in a model, assembly, ordrawing, you are able to preform actions on those selected items.
Direct selection occurs when you place your cursor over a component,feature or geometry and click to select it. Some key factors about directselection include:
• You can perform direct selection of components in an assembly, andfeatures or geometry of a part.
• You can perform direct selection in both the graphics area and in the modeltree. When you initially cursor over a model in the graphics area, thecomponent or feature highlights in a transparent green color. When youselect the item, it becomes highlighted in green wireframe.The selected item is dependent on whether you have a part or assemblyopen. If you have a part open, a selected feature highlights in a greenwireframe. If you have an assembly open, the selected componenthighlights in a green wireframe.
• In a part or assembly, you can select surfaces, edges or vertices directlyby pressing ALT when selecting. The selected geometry will highlight in agreen wireframe.
Module 1 | Page 36 © 2009 PTC
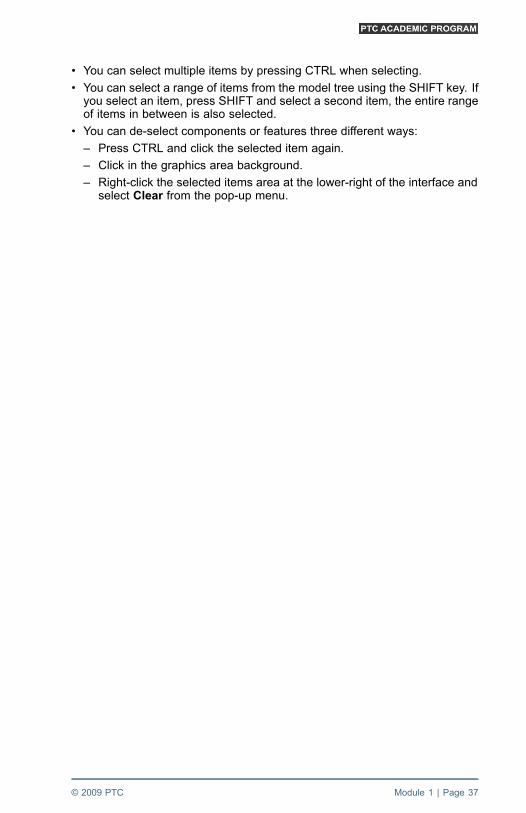
• You can select multiple items by pressing CTRL when selecting.
• You can select a range of items from the model tree using the SHIFT key. Ifyou select an item, press SHIFT and select a second item, the entire rangeof items in between is also selected.
• You can de-select components or features three different ways:
– Press CTRL and click the selected item again.
– Click in the graphics area background.
– Right-click the selected items area at the lower-right of the interface andselect Clear from the pop-up menu.
© 2009 PTC Module 1 | Page 37

Selecting Items using Query Selection
Query selection enables selection of features, geometry, orcomponents that are hidden beneath another item.
Query Selection:
• Select by querying the model.
• Select using the Pick From List.
Pick From List
Original Model, Cursor Over to Highlight, Query to Highlight, Select
Selecting Items using Query SelectionQuery selection enables you to select features, geometry, or components thatare hidden beneath another feature or model.
For example, in the figure shown, you may want to select the screw but theother models are obstructing your attempts to select it. In this situation, youcan easily query and select the screw.
Query the ModelUse the following steps to query through components of an assembly orfeatures of a part:
• Move your cursor over a component or feature in the graphics area andit will turn a transparent green color, highlighting the preselected item.Preselected means that if you click at that moment, that is what will beselected (and turn to a green wireframe highlight).
• Right-click (tap your right mouse button) the preselected model or featureto query directly through the initial model or feature to the next model orfeature under the cursor. You can continue to right-click to query the nextmodel or feature.
Module 1 | Page 38 © 2009 PTC

• When you have queried to the desired model or feature, you then clickto select it.
Remember – Cursor over to highlight, right-click to query, andclick to select.
Pick From ListThe Pick From List is similar to querying the model, except that all of thequery possibilities are listed in the Pick From List dialog box. This method ismost useful in very large assemblies or complicated parts.
• Activate Pick From List by moving your cursor over the location you want toquery, then right-click and select Pick From List from the pop-up menu.
• As you select items in the Pick From List dialog box, they will be highlightedin the graphics area.
• Select the item you want to select from the Pick From List dialog box, thenselect OK to make the selection.
© 2009 PTC Module 1 | Page 39

PROCEDURE - Selecting Items using Query Selection
ScenarioUse query selection in an assembly and part model.
Step 1: Set your working directory and open QUERY.ASM.
1. If necessary, start Creo Parametric.
2. Click Select Working Directory from the Data group of theHome tab.
3. In the Select Working Directory dialog box:
• Navigate to the folder Creo_Adv_Primer.
• Double-click the folder Module_01.
• Double-click the folder Query.
• Click OK to set the folder as your working directory.
4. Click Open from the Data group of the Home tab or the QuickAccess toolbar.
5. In the File Open dialog box, select QUERY.ASM, and then click Open.
Step 2: Use query to select the screw hidden behind other components.
1. If necessary, click Datum
Display Filters from theGraphics toolbar and disable thedisplay of all datum features.
2. Cursor over the center ofassembly.
Module 1 | Page 40 © 2009 PTC

3. Right-click to query (tap your right-mouse button) untilSCREW_NO2_SHLDR.PRT highlights, and then left-click to select it.
4. With the screw selected,right-click in the graphics areaand select Open from the pop-upmenu.
It is necessary for youto right-click and hold todisplay pop-up menus.
5. Click Close Window fromthe Quick Access toolbar to closethe SCREW_NO2_SHLDR.PRTwindow.
Step 3: Use Pick From List to select a feature hidden behind geometryin a model.
1. Cursor over SG_SLOT.PRT andclick to select it.
Query is not required hereas you have easy access toselecting the part.
2. With SG_SLOT.PRT selected,right-click in the graphics areaand select Open from the pop-upmenu.
© 2009 PTC Module 1 | Page 41

3. Cursor over the top cylindricalsurface as shown.
4. Right-click and select Pick FromList from the pop-up menu.
5. In the Pick From List dialog box,select F33(REVOLVE_4).
6. Click OK from the Pick From Listdialog box.
7. Click in an empty spot in thegraphics area to de-select thefeature.
Step 4: Use query to select the same feature F33(REVOLVE_4).
1. Cursor over the area at the topof the cylindrical surface wherethe F33(REVOLVE_4) feature islocated.
2. Right-click (tap the right-mousebutton) to query the model untilthe F33(REVOLVE_4) featurehighlights, and then left-click toselect it.
3. Notice that the selected featurealso highlights in the model tree.
4. Click Close Window from the Quick Access toolbar to close theSG_SLOT.PRT window.
5. Click File > Manage Session > Erase Current.
6. In the Erase dialog box, click Select All , then click OK to eraseall components of the assembly.
This completes the procedure.
Module 1 | Page 42 © 2009 PTC

Understanding Selection Filters
The selection filter provides various filters to help you selectitems.
Filters include:
• Parts
• Features
• Geometry
• Datums
• Quilts
• Annotation
• SmartThe Selection Filter
Understanding Selection FiltersEach filter in the selection filter narrows the item types that you can select,enabling you to easily select the item you are looking for. All filters arecontext-sensitive, so that only those filters that are valid for the geometricalcontext are available.
For example, the Parts filter would not be available while working in a part;rather it would be available while working in an assembly. Creo Parametricautomatically selects the best filter according to the context. However, youcan always change the filter by simply selecting it from the selection filterdrop-down menu.
The following filters are available in Part mode and Assembly mode:
• Parts — Available in Assembly mode only, enables you to only selectcomponents in the assembly.
• Features — Enables you to only select features in a part or componentin the assembly.
• Geometry — Enables you to only select geometry, such as edges,surfaces, and vertices.
• Datums — Enables you to only select datum features, including datumplanes, datum axes, datum points, and coordinate systems.
• Quilts — Enables you to only select surface quilts.
• Annotation — Enables you to only select annotation features.
• Smart — Enables you to select features, geometry, or components using anested selection process.
© 2009 PTC Module 1 | Page 43

Using the Smart Selection Filter
The smart filter enables you to select the most common types ofitems that are valid for the current geometrical context.
Smart Filter:
• The selection of features, geometry, or components is a nested process.
• Select specific items of interest after the initial selection.
Smart filter selection levels:
• Feature/Component level.
• Geometry level (surfaces, edges, or vertices).
– You may need to zoom in for surface selection.
– Press ALT to automatically go to the Geometry selection level.
Example of Smart Filter Selection Levels
Using the Smart Selection FilterCreo Parametric automatically uses the Smart selection filter. When using theSmart selection filter, the selection of features, geometry, or components is anested process. This means you can select specific items of interest after theinitial selection. There are two levels of selection when using the Smart Filter:
• Feature/Component Level – The features that comprise a part orcomponents that comprise the assembly.
• Geometry Level – The surfaces, edges, and vertices (endpoints of edges)that comprise the model geometry.
When selecting a part in the graphics area, your initial selection highlightsa feature in a green wirefame. The Smart selection filter then automaticallynarrows the selection scope, enabling you to select specific items on thatfeature that you wish to either modify or use to create another feature.
For example, you can select an edge where you wish to add a chamfer.
If you press and hold the ALT key, you are automatically moved tothe geometry level filter. This is new behavior in Creo Parametric 1.0.
The three specific geometric entities that you may wish to select highlightdifferently, as shown in the figure. Selected surfaces highlight as greenshaded items; selected edges highlight in bold green; and selected verticeshighlight in green. The entire filtering process occurs automatically.
Module 1 | Page 44 © 2009 PTC

Assemblies have a similar selection scheme. Components are selectedinitially, followed by geometry such as surfaces, edges, and vertices.
Selection of items usually occurs easier if you zoom in on that areaof the model first.
© 2009 PTC Module 1 | Page 45

PROCEDURE - Using the Smart Selection Filter
ScenarioUse the smart selection filter in an assembly and part model.
Step 1: Set your working directory and open SMART.ASM.
1. If necessary, start Creo Parametric.
2. Click Select Working Directory from the Data group of theHome tab.
3. In the Select Working Directory dialog box:
• Navigate to the folder Creo_Adv_Primer.
• Double-click the folder Module_01.
• Double-click the folder Smart.
• Click OK to set the folder as your working directory.
4. Click Open from the Data group of the Home tab or the QuickAccess toolbar.
5. In the File Open dialog box, select SMART.ASM, and then click Open.
Step 2: Use the smart selection filter in an assembly.
1. If necessary, click Datum
Display Filters from theGraphics toolbar and disable thedisplay of all datum features.
2. In the graphics area, select component CHASSIS_SIDE-GEARS.PRT.
Module 1 | Page 46 © 2009 PTC

3. Zoom in to the hole in theupper-left area of the part.
4. Select the planar surface closestto you.
5. Select the cylindrical surface inthe hole.
6. Select the edge of the hole.
7. Select the vertex on the edge ofthe hole.
8. Click in an empty space of thegraphics area to de-select thevertex.
© 2009 PTC Module 1 | Page 47

Step 3: Use the smart selection filter in a part model.
1. Press CTRL + D to orient the assembly to the standard orientation.
2. In the graphics area, select the M4–MACH_SCREW.PRT model, thenright-click, and select Open from the pop-up menu.
3. Select the top extrude feature.
4. Select the front cylindricalsurface of the top extrudefeature.
5. Press and hold the ALT key, thenselect the top edge of the slottedextrude feature.
Pressing and holding theALT key automaticallymoves you to the geometrylevel selection filter.
6. Click in an empty space of thegraphics area to de-select theedge.
7. Click Close Window from the Quick Access toolbar to close theM4–MACH_SCREW.PRT window.
8. Click File > Manage Session > Erase Current.
9. In the Erase dialog box, click Select All , then click OK to eraseall components of the assembly.
This completes the procedure.
Module 1 | Page 48 © 2009 PTC

Managing Files in Creo Parametric
Understanding Creo Parametric’s file types and how they areused will help you manage your design.
Common File Extensions
• .prt – Part Files
• .asm – Assembly Files
• .drw – Drawing Files
Memory Management
• An open object is In Session.
• Erasing Memory (RAM)
Version Numbers and Deleting
• Version Numbers increase by oneeach time you save.
• Delete All or Old Versions
Renaming Models
• Rename On Disk and In Session
• Rename In Session
In Session
Saved Version Numbers
Common File ExtensionsThe following are three file extensions used to identify three common CreoParametric object types; parts, assemblies, and drawings.
• .prt — This extension represents a part object.
• .asm— This extension represents an assembly object. An assembly filecontains pointers and instructions that identify and position a collection ofparts and subassemblies.
• .drw— This extension represents a 2-D drawing. The drawing file containspointers, instructions, and detail items for documenting part and assemblymodels in a drawing.
Version Numbers and DeletingEvery time you save an object, you write it to disk. Rather than overwritingthe current file, Creo Parametric creates a new version of the file on disk andgives it a version number that increments each time the file is saved. This isalso known as a “dot number”, and can be seen in the figure above.
To see all versions of an object in the File Open dialog box, click Tools andselect All Versions from the drop-down list.
Deleting files permanently removes them from the working directory on yourhard drive or network storage area. Be careful when deleting files; youcannot undo deleted files.
© 2009 PTC Module 1 | Page 49

There are two different methods to delete models:
• Old Versions— Deletes all but the latest version of the given file.
• All Versions — Deletes all versions of the given file.
Memory ManagementCreo Parametric is a memory-based system, which means that files youcreate and open are temporarily kept in system memory (RAM). It is importantto remember that until you save your files, you risk losing them if there is apower outage or system crash.
When a model is in system memory, it is referred to as being In Session.Models are kept In Session (in system memory or RAM) until you either erasethem or exit Creo Parametric.
When you close the window that contains a model, the model is still openIn Session.
There are two different methods to erase models from session:
• Erase Current — Only the model in the current window is erased fromsystem memory (and the window closed). You can click File > ManageSession > Erase Current from the main menu to erase the currentwindow's contents from memory.
• Erase Not Displayed— Only erases from memory those models that arenot open in any Creo Parametric windows. You can click File > ManageSession > Erase Not Displayed from the main menu or Erase Not
Displayed from the Data group of the Home tab.
Erasing models does not delete them from the hard drive or network storagearea; it only removes them from session.
Renaming ModelsIf you need to change the name of any model, you can rename it directlywithin Creo Parametric.
To rename a file, click File > Manage File > Rename, then in the Renamedialog box, choose one of the two different methods:
• On Disk and In Session — The system renames the file both in systemmemory and on the hard drive.
• In Session — The system renames the file only in system memory.
Problems can result if you rename a file on disk and then retrievea model (not already in session) that depends on the previous filename.For example, if you rename a part, any assemblies that the part isused in will no longer be able to find it, unless those assemblieswere open when the part was renamed and then saved after itwas renamed.
Module 1 | Page 50 © 2009 PTC

PROCEDURE - Managing Files in Creo Parametric
ScenarioErase files from memory and rename a part.
Step 1: Set your working directory.
1. If necessary, start Creo Parametric.
2. Click Select Working Directory from the Data group of theHome tab.
3. In the Select Working Directory dialog box:
• Navigate to the folder Creo_Adv_Primer.
• Double-click the folder Module_01.
• Double-click the folder Workdir.
• Click OK to set the folder as your working directory.
4. Click Open from the Data group of the Home tab or the QuickAccess toolbar.
5. In the address bar at the top of the File Open dialog box, clickCreo_Adv_Primer to look in that folder. Browse into any folder youchoose but do not open any files.
6. In the Common Folders list of the File Open dialog box, clickWorkingDirectory to return to your working directory.
Notice file extensions .prt, .asm, .drw and .frm displayed for therespective parts, assembly, drawing and format files.
© 2009 PTC Module 1 | Page 51

Step 2: Open, save and observe the version number changes.
1. In the File Open dialog box:
• Click Tools and enable All Versions in the drop-down list.
• Observe the different version numbers associated with each file.Note that the part WHEEL.PRT has been saved three times.
• Click Tools and disable All Versions.
• Select WHEEL.PRT and click Open to open the latest version ofthe wheel.
2. If necessary, click Datum
Display Filters from theGraphics toolbar and disable thedisplay of all datum features.
Module 1 | Page 52 © 2009 PTC

3. Click Save from the Quick Access toolbar.
4. Click Open from the Quick Access toolbar.
5. In the File Open dialog box:
• Click Tools and enable All Versions in the drop-down list.
• Observe that a new version of the wheel has been added,WHEEL.PRT.4.
• Click Cancel to close the dialog box.
Step 3: Edit the model and then erase it from session.
1. In the model tree, right-click andhold your mouse down on theExtrude 1 feature, then selectEdit from the pop-up menu.
2. Double click the dimension value17.6, edit the value to 25 andpress ENTER.
3. Click Regenerate from theOperations group of the Modeltab.
© 2009 PTC Module 1 | Page 53

4. Click Open from the Quick Access toolbar.
5. In the File Open dialog box:
• Click In Session from the Common Folders list.
• Observe that WHEEL.PRT is the only model in session (or inmemory).
6. Click Close Window from the Quick Access toolbar.
7. Click Open from the Quick Access toolbar.
8. In the File Open dialog box:
• Click In Session from the Common Folders list.
• Observe that WHEEL.PRT is still in session (or in memory).
• Click Cancel to close the dialog box.
You have just proved that closing a window does not erase themodel from memory, only from display.
9. Click File > Manage Session > Erase Not Displayed.
10. Click OK from the Erase Not Displayed dialog box.
11. Click Open from the Quick Access toolbar or Home tab.
Module 1 | Page 54 © 2009 PTC

12. In the File Open dialog box:
• Click In Session from theCommon Folders list.
• Observe that WHEEL.PRT isno longer in session.
• Click Working Directoryfrom the Common Folders list.
• Double-click WHEEL.PRT toopen the last saved version ofthe wheel.
The change you previously made to the wheel is longer visiblebecause you erased that version of the model from memorywithout first saving it. You are now looking at WHEEL.PRT.4which was saved to disk before the change was made.
Step 4: Rename WHEEL.PRT to be WHEEL-NEW.PRT.
1. Click Open from the QuickAccess toolbar.
2. In the File Open dialog box,select WHEEL.ASM and thenclick Open.
3. In the model tree, notice thatWHEEL.PRT and TIRE.PRTare listed as members of theassembly.
4. From the Quick Access toolbar,
click Windows and enable1 WHEEL.PRT from thedrop-down menu to activate it.
5. Click File > Manage File >Rename:
• Type wheel-new in the NewName text box.
• Click OK to complete therename.
© 2009 PTC Module 1 | Page 55

6. From the Quick Access toolbar, click Windows and enable 2WHEEL.ASM from the drop-down menu to activate it.
7. In the model tree, notice that the renamed model WHEEL-NEW.PRTis now listed as a component of the assembly.
Before renaming the wheel, it was important that WHEEL.ASMwas open (In Session). Had it not been open, it would not haveknown that the name of the wheel had changed. It is alsoimportant that WHEEL.ASM be saved with this new information.
8. Click Save from the Quick Access toolbar.
9. Click Open from the Quick Access toolbar.
10. In the File Open dialog box:
• Observe that WHEEL.PRT has been renamed toWHEEL-NEW.PRT.
• Click Tools and enable All Versions from the drop-down list.
• Observe that because you saved the assembly, the latest versionsis now WHEEL.ASM.3.
• Click Cancel to close the dialog box.
11. Click Close Window from the Quick Access toolbar to close theWHEEL.ASM window.
12. Click Close Window again, this time to close theWHEEL-NEW.PRT window.
13. Click File > Manage Session > Erase Not Displayed.
14. Click OK from the Erase Not Displayed dialog box.
This completes the procedure.
Module 1 | Page 56 © 2009 PTC

Understanding the Basics of Sketcher
A good understanding of sketcher concepts such as sketchplane, orientation, and references will make you a better CreoParametric user.
Section Orientation:
• Set horizontal reference
• Set vertical reference
• Flip section orientation
• Flip sketching plane
Click Sketch Setup from the Setup group.
Sketch Dialog Box
Sketcher References:
• Sketcher Geometry Snaps to References
• Any Model Geometry Selected in Sketcher
Adding Additional References
• Click References from the Setup group.
• Press the ALT key.References Dialog Box
Section OrientationA sketch is most commonly used to define the shape of an extrude or revolvefeature. In those features, the sketch defines the shape you will extrude orrevolve.
Before you can start sketching a shape, you must first select the plane youwill sketch on, this plane is called the Sketch Plane.
• Sketch Plane— You can select any datum plane or planar surface to beyour sketch plane. In the 2-D sketch view, the sketch plane will be orientedparallel to your screen. You can select the sketch plane before or afteryou start the extrude or revolve tool.
• Section Orientation — Based on the current orientation of your model,Creo Parametric will automatically define a 2-D sketch view for the sketch.To reorient the 2-D sketch view, right-click in the graphics area and selectone of the following options from the pop-up menu:
– Set horizontal reference — Select a reference on the model to beoriented horizontally.
– Set vertical reference — Select a reference on the model to beoriented vertically.
– Flip section orientation — Rotates the model 180 degrees, normalto the sketch plane.
© 2009 PTC Module 1 | Page 57

– Flip sketching plane — Rotates the model 180 degrees about thehorizontal.
Sketch Setup
You can open the Sketch dialog box by clicking Sketch Setup from theSetup group. From the Sketch dialog box, you can select a new sketch planeand/or reorient the sketch view:
• Sketch Plane— You can select a new sketch plane.
• Orientation— The orientation direction that the Reference faces is eitherTop, Bottom, Left or Right.
• Flip— The Flip button will reorient your sketch so that you are viewing itfrom the other side. The view is rotated 180 degrees about a vertical axis.
• Use Previous— The Use Previous button is a big time saver when youare creating multiple features on the same sketch plane. Clicking it enablesyou to use the sketch plane and orientation of the previous sketch.
Sketcher ReferencesYou use sketch reference to snap sketch geometry to. For example ifyou want the center of a circle on the edge of a model, you snap to thatedge rather than dimensioning the circle to the edge. This eliminates extradimension and adds intent to your design.
Sketch references are also used by the system for creating the initial weakdimensions and constraints applied when you sketch geometry.
Sketch references appear as blue, dashed entities in sketcher. Typically, thesystem automatically creates a vertical and horizontal reference using thedefault datum planes in the model.
Adding Additional ReferenceAny time you are in sketcher, you can add additional references:
• To open the References dialog box, click References from the Setupgroup of the Sketch tab.
• With a sketcher tool such as Rectangle or Circle active, you can press theALT key and select a reference from the model.
Module 1 | Page 58 © 2009 PTC

PROCEDURE - Understanding the Basics of Sketcher
ScenarioA sketch is most commonly used to define the shape of an extrude or revolvefeature. It defines the shape you will extrude or revolve. In this exerciseyou will learn to select and orient a sketch plane and then select sketcherreferences to help define your sketch.
Step 1: Set your working directory and open SKETCH.PRT.
1. If necessary, start Creo Parametric.
2. Click Select Working Directory from the Data group of theHome tab.
3. In the Select Working Directory dialog box:
• Navigate to the folder Creo_Adv_Primer.
• Double-click the folder Module_01.
• Double-click the folder Sketch.
• Click OK to set the folder as your working directory.
4. Click Open from the Datagroup of the Home tab or theQuick Access toolbar.
5. In the File Open dialog box,select SKETCH.PRT and thenclick Open.
6. If necessary, click Datum
Display Filters from theGraphics toolbar and disablethe display of all datum featuresexcept datum planes.
© 2009 PTC Module 1 | Page 59

Step 2: Start the Extrude tool, then select and orient the sketch plane.
1. If necessary, press CTRL + D toreorient the model to its defaultorientation.
2. Start the Extrude Tool fromthe Shapes group of the Modeltab.
3. In the graphics area, click toselect the front surface of themodel as your sketch plane(highlighted in green)
This selected surface will be your sketch plane, think of it asthe piece of paper you will be sketching on. Immediately afterselecting it, the Sketch tab will open, presenting you with avariety of sketching tools.
4. You can sketch in a 3-Dorientation, however, forbeginners it is often easier tosketch with the sketch planeoriented parallel to your screenin a 2-D sketch view:
• Click Sketch View fromthe Graphics toolbar.
After clicking Sketch View , the sketch plane of the part wasreoriented parallel to the screen. To further control the orientationof the model, datum plane TOP was oriented so that it faces thetop of the screen. To see the model reorient to the sketch view
again, press CTRL + D and then click Sketch View .
5. It is often easier to sketch when shading has been disabled:
• Select Hidden line from the display style drop-down menu inthe Graphics toolbar.
Module 1 | Page 60 © 2009 PTC

6. Click Datum Display Filters
from the Graphics toolbarand disable the display of alldatum features.
Step 3: Change the orientation of the sketch view.
1. The orientation of the 2-D sketch view can be edited using thefollowing options:
• Set horizontal reference — Select a reference on the model tobe oriented horizontally.
• Set vertical reference — Select a reference on the model to beoriented vertically.
• Flip section orientation — Rotates the model 180 degrees,normal to the sketch plane.
• Flip sketching plane — Rotates the model 180 degrees aboutthe horizontal.
2. Rotate the sketch view soit is 180 degrees about thehorizontal:
• Right-click in the graphicsarea and select SectionOrientation > Flip sketchingplane from the pop-up menu.
© 2009 PTC Module 1 | Page 61

Step 4: Sketch a 7 by 25 rectangle in the upper-left corner of the part.
1. Sketch a rectangle attached to the upper-left corner of the part:
• Click Rectangle from the Sketching group.
– In the graphics area, cursor over the blue horizontal and verticalreference lines. Notice the cursor snaps as you pass over thereference lines.
– Click at X1 to snap the start point of the rectangle to theintersection of the reference lines.
– Drag your mouse and click at X2 to complete the rectangle. Notethat the actual size of your rectangle is not important at this pointbecause you can use dimensions to change its size at any time.
– Drag your mouse away from the rectangle and then middle-clickat X3 to release the rectangle tool.
Light blue “soft” dimensions are automatically created when yousketch a shape. If you edited the dimension values, they willchange color and became a “strong” dimension.
Module 1 | Page 62 © 2009 PTC

2. Resize the rectangle:
• Click and drag the edges of therectangle to change its size.
• Notice that only two of therectangle edges will move.This is because the other twoare constrained to the bluereference lines.
• double-click the value of thevertical dimension, edit it to 7 ,and press ENTER.
• double-click the value of thehorizontal dimension, edit it to25 , and press ENTER.
Step 5: Re-sketch the rectangle using references to define its size.
1. In the Quick Access toolbar, click Undo a few times, until therectangle is gone.
2. Click Rectangle from the Sketching group.
3. Select two sketcher references as shown:
• Press ALT and select the vertex at the end of the hidden line shownat X1.
• Release the ALT key.
• Press ALT and select the horizontal edge shown at X2.
• Release the ALT key.
© 2009 PTC Module 1 | Page 63

4. Sketch and size a rectangle using the new references:
• With the Rectangle tool still active:
– Click at X1 to snap the start point of the rectangle to theintersection of the reference lines.
– Drag your mouse down and to the right.
– Click to place the endpoint of the rectangle when it is snappedto both the vertex reference shown at X2 and the horizontalreference shown at X3.
– Drag your mouse away from the rectangle and then middle-clickat X4 to release the rectangle tool.
If done correctly, the rectangle will have no soft dimensionsbecause its size is defined by the selected references. If this didnot work for you, Undo a few times an try again.
5. When finished sketching, click OK from the Close group.
Step 6: Define additional options to complete the definition of the extrude.
1. Press CTRL + D to placethe model back into a defaultorientation.
2. Select Shading With Edgesfrom the display style drop-downmenu in the Graphics toolbar.
3. Middle-click and drag to spin themodel so that you can see thebottom of the part as shown.
Module 1 | Page 64 © 2009 PTC

4. Click and drag the depth draghandle (small white square) intothe model so that it will removematerial from the model.
Whether or not a featureadds or removes materialfrom the model can alsobe defined by toggling the
Remove Material iconin the dashboard.
5. In the extrude dashboard, abovethe graphics area:
• Click Blind and thenselect Through All fromthe drop-down menu.
• Click Complete Feature tocomplete the feature.
By using the Through All depth option, you have addeddesign intent to your part. No matter how wide the part becomes,the extrude will always intersect the entire depth of the part.
Step 7: Move the sketch plane to datum plane FRONT.
1. Press CTRL + D to reorient the model.
2. In the model tree, right-click Extrude 4, then select Edit Definitionfrom the pop-up menu.
3. Right-click in the graphics area and select Edit Internal Sketch fromthe pop-up menu to open the Sketch tab.
4. Click Sketch Setup from the Setup group of the Sketch tab:
• In the model tree, select datum plane FRONT.
• Notice in the Sketch dialog box that the sketch plane is now datumplane FRONT.
• Click Sketch to close the dialog box.
© 2009 PTC Module 1 | Page 65

5. Middle-click and drag to spinthe model so you can see thatthe sketch has moved from thefront face of the model to datumplane FRONT in the center ofthe model.
6. Click OK from the Closegroup.
7. Middle-click and drag to spinthe model so you can see howExtrude 4 has changed.
8. Click Complete Feature tocomplete the feature.
9. In the model tree, right-clickExtrude 3, and select Edit fromthe pop-up menu.
10. Click and drag the lowersketched edge of the rectangledown, so that the vertical lengthof the sketch increases from 7 toapproximately 16.
Because the sketch in Extrude 4 is referenced to the edge ofExtrude 3, its size changes as the size of Extrude 3 changes.
Module 1 | Page 66 © 2009 PTC

11. Click in the graphics area tocomplete the edit.
12. Middle-click and drag to spin themodel so you can see how it haschanged.
13. Click File > Manage Session > Erase Current.
14. Click Yes from the Erase Confirm dialog box.
This completes the procedure.
© 2009 PTC Module 1 | Page 67

Module 1 | Page 68 © 2009 PTC

Module 2Basic Part Modeling
Module OverviewIn this module, you will begin the creation of a wheel used in the Aston Martinslot car. The exercise will take you through the steps used to create the partmodel in Creo Parametric.
ObjectivesAfter completing this module, you will be able to:
• Create new Creo Parametric parts.
• Understand basic sketcher theory and tools.
• Use sketcher to define an extruded shape.
• Create extrude features.
• Create hole features.
• Create datum planes.
© 2009 PTC Module 2 | Page 1

Basic Part Modeling
The typical part model is created using four fundamentalelements:
1. Default Datums 2. Base Feature
3. Extrude is a Sketched Feature 4. Hole is an Engineering Feature
New PartEach new part you create in Creo Parametric will contain a default set ofdatum planes and a coordinate system that are copied in from a templatemodel. Think of these default datums as the foundation that you build yourpart on.
Unlike solid geometry, reference geometry such as datum planes andcoordinate systems have no mass, surface area, or size. Datum featuresare references used to sketch on, dimension to, assemble to, and so on.Their uses and benefits will become more apparent as you learn to use CreoParametric.
Base FeatureThe first solid feature you create is referred to as the “base” feature. It istypically an extrude or revolve feature placed at the center of the default
Module 2 | Page 2 © 2009 PTC

datum planes. After the base feature, additional features are added to furtherdefine the shape, size and function of your part. It is the combination of thesefeatures that will define the geometry of your part.
Sketched FeaturesExtrude and Revolve are the most commonly used “sketched” features. Theyare referred to as sketched features because the shape that is extruded orrevolved is defined by a sketch. You will find sketched features in the Shapesgroup of the Model tab. Other, not so commonly used sketched features aresweeps, blends, and variable section sweeps.
Engineering FeaturesEngineering features are sometimes called “direct” or “pick & place” typefeatures as they are applied directly to the model without the need for asketch. Examples of Engineering type features are rounds, chamfers, holes,draft features, and so on. The shape of an Engineering type features isdefined by the feature type, dimensions values, and references they areapplied to. For example, a round feature is defined by the edge it is placed onand the radius value entered.
© 2009 PTC Module 2 | Page 3

PROCEDURE - Basic Part Modeling
ScenarioYou will begin modeling a wheel that will be used in the Aston Martin slotcar. You will start by creating a new part that will initially contain only defaultdatum features copied from the template model. You will then add simplefeatures to define the basic shape and functional geometry of the wheel.
In subsequent exercises, you will document the wheel design in a drawing,create a wheel assembly that is assembled to the slot car and then, improvethe wheel design by adding additional, more advanced features. Finally, youwill create a photo realistic rendering of the completed design.
Step 1: Set your working directory and create a new part named wheel.
1. If necessary, start Creo Parametric.
2. Click Select Working Directory from the Data group of theHome tab.
3. In the Select Working Directory dialog box:
• Navigate to the folder Creo_Adv_Primer.
• Double-click the folder Module_02-06.
• Double-click the folder Part.
• Click OK to set the folder as your working directory.
The wheel part you create will be saved to and opened from this“working directory”.
4. Create the new wheel partmodel:
• Click New from the QuickAccess toolbar or the Hometab.
• In the New dialog box, noticethe default object Type is Partand Sub-type is Solid, theseare the correct selections forcreating a solid part.
• Type wheel in the Name fieldand click OK.
Module 2 | Page 4 © 2009 PTC

5. If necessary, click Datum
Display Filters from theGraphics toolbar and disablethe display of all datum featuresexcept datum planes.
The datum planes FRONT, RIGHT and TOP represent the 3-Dspace of your model. Think of these datums as the foundationyour wheel will be built on.
Step 2: Start the Extrude tool and sketch a circle to define the shape ofthe wheel.
Begin the wheel design by creating a 2-D circular sketch feature.You will select datum plane FRONT as your sketch plane andthen sketch a circle with a diameter of 17.6.
1. If necessary, press CTRL + D toreorient the model to its defaultorientation.
2. Start the Extrude Tool fromthe Shapes group of the Modeltab.
3. In the graphics area, click toselect datum plane FRONT asyour sketch plane.
Datum plane FRONT will be your sketch plane, think of it asthe piece of paper you will be sketching on. Immediately afterselecting it, the Sketch tab will open, presenting you with avariety of sketching tools.
© 2009 PTC Module 2 | Page 5

4. To reorient the model into its 2-Dsketch view, click Sketch View
from the Graphics toolbar.
You are now viewing themodel from the 2-D sketchview orientation. The sketchplane FRONT is parallelto the screen, oriented bydatum plane TOP facing thetop of the screen.
5. Sketch the circle:
• Click Center and Point Circle from the Sketching group.
– In the graphics area, cursor over the blue horizontal and verticalreference lines. Notice the cursor snaps as you pass over thereference lines.
– Click at X1 to snap the center of the circle to the intersectionof the reference lines.
– Drag your mouse and click at X2 to complete the circle. Notethat the actual size of your circle is not important at this point.
– Drag your mouse away from the circle and then middle-clickat X3 to release the circle tool.
Light blue colored “soft” dimensions are automatically createdeach time you sketch a shape. When you edited the value ofa soft dimension, its color changes and it becomes a “strong”dimension. Soft dimensions are Creo Parametric’s guess as tohow the sketch should be dimensioned.
Module 2 | Page 6 © 2009 PTC

6. Edit the size of the circle:
• Double-click the value of thesoft diameter dimension (thenumerical value at the end ofthe leader).
• Edit the value to 17.6 andpress ENTER.
• Click OK from the Closegroup.
When learning to sketch, it can be helpful to use the Undoand Redo buttons in the Quick Access toolbar. There is noneed to cancel the sketch and start over.
Step 3: Define additional options to complete the extruded cylinder.
1. Press CTRL + D to place themodel in a default orientation.
You can see the featureis automatically previewedusing default extrudeoptions. You will use thedashboard to edit thosedefault options to createa solid cylinder that isextruded a depth of 4.5 mm,symmetrically about thesketch plane FRONT.
2. Click Datum Display Filters
from the Graphics toolbarand disable the display of alldatum features.
© 2009 PTC Module 2 | Page 7

3. In the extrude dashboard locatedabove the graphics area:
• Click Blind and thenselect Symmetric from thedepth drop-down menu.
• Edit the depth to 4.5 and pressENTER.
• Click Complete Feature .
4. If necessary, click Refit fromthe Graphic toolbar.
Step 4: Use the Extrude tool to create a second solid cylinder.
Use the Extrude tool to create a second solid cylinder that isextruded a depth of 9.2 mm, symmetrically about the sketchplane FRONT. A sketch of a 15.6 diameter circle will define theshape of the extrude.
1. If necessary, press CTRL + D to reorient the model to its defaultorientation.
2. Start the Extrude Tool from the Shapes group of the Model tab.
3. In the model tree, select datum plane FRONT as your sketch plane.
Rather than reorienting the model into the 2-D sketch view, youwill sketch this circle in the 3-D orientation.
4. Click Center and Point Circle
:
• Click at X1 to snap the centerof the circle to the intersectionof the reference lines.
• Drag your mouse and click atX2 to complete the circle.
• Drag your mouse away fromthe circle and then middle-clickat X3 to release the circle tool.
Module 2 | Page 8 © 2009 PTC

5. Edit the size of the circle:
• Double-click the value of thediameter dimension.
• Edit the value to 15.6 andpress ENTER.
• Click OK from the Closegroup, to complete the sketch.
Because the sketch plane FRONT is in the middle of the model,Creo Parametric has automatically edited this extrude to removematerial.
6. In the extrude dashboard:
• Click Remove Material todisable it.
• Click Blind and thenselect Symmetric from thedepth drop-down menu.
• Edit the depth value to 9.2 andpress ENTER.
• Click Complete Feature .
Step 5: Use the Extrude tool to remove material from the part.
Use the Extrude tool to remove material from the model. Thesketched shape will be a circle that is offset .75 from the innermodel edge. To meet the engineering team’s requirements, thedepth of this extrude feature will be defined using a differentdepth option on each side of the sketch plane.
1. If necessary, press CTRL + D to place the model in a defaultorientation.
2. Start the Extrude Tool from the Shapes group.
3. From the model tree, select datum plane FRONT as the sketch plane.
4. Click Sketch View from the Graphics toolbar.
© 2009 PTC Module 2 | Page 9

5. Click Center and Point Circle
:
• Click at X1 to snap the centerof the circle to the intersectionof the reference lines.
• Drag your mouse and click atX2 to complete the circle.
6. Click Normal Dimensionfrom the Dimension group:
• Select the sketched circle atX1.
• Select the inner circular modeledge at X2.
• Middle-click at X3 to place thedimension.
• Type .75 and press ENTER.
7. Click OK to complete thesketch.
8. Select Standard Orientation
from the Named View Listdrop-down menu in the Graphicstoolbar.
9. In the dashboard, select theOptions tab:
• Edit the Side 1 blind depthvalue to 1.5 and press ENTER.
• From the Side 2 drop-downmenu, click None and then
select Through All fromthe drop-down menu.
Module 2 | Page 10 © 2009 PTC

The extrude will removematerial a depth of 1.5 onSide 1 of the sketch planeand though the entire modelon Side 2.
10. Middle-click and drag to spin themodel so you can see how thematerial will be removed fromthe model.
11. Select Right from the Named
View List drop-down menuin the Graphics toolbar.
To meet designrequirements of the wheel,the engineering teaminsisted the depth of thiscut be defined by a blinddepth, 1.5 mm forward fromdatum plan FRONT andthrough the entire model inthe other direction. This wasaccomplished using both
depth options Blind
and Through All . Withexperience, you will learnto create models using yourdesign intent rather thansimply excepting the defaultoptions presented to you.
12. Press CTRL + D to place the model in a default orientation.
13. Click Complete Feature .
14. Click Save from the Quick Access toolbar and then click OK toverify that the model will be saved in your working directory.
Step 6: Create a datum plane and use it as your sketch plane.
Create a datum plane that is offset 5 mm from the back of thewheel. You will use this new datum plane as the sketch plane forthe next extrude feature. After completing the extrude feature,embed the datum plane into the extrude feature.
© 2009 PTC Module 2 | Page 11

1. Click Datum Display Filters
from the Graphics toolbarand enable the display of datumplanes.
2. Middle-click and drag to spin themodel until you can view theback of the model.
3. Start the Plane Tool fromthe Datum group of the Modeltab.
4. From the selection filter inthe lower-right corner of theinterface, click All and selectSurface from the drop-downmenu.
5. Click to select the back surfaceof the model highlighted in green.
The datum plane will be offsetfrom this surface.
6. Edit the offset value to 5 (awayfrom the model) by editing theTranslation field or moving thedrag handle.
7. Click OK from the Datum Planedialog box to complete thefeature.
8. With the new datum plane still selected, start the Extrude Tool .
Because DTM1 was selected before you started the Extrude
Tool , it was automatically used as the sketch plane.
Module 2 | Page 12 © 2009 PTC

9. Click Center and Point Circle
from the Sketching group.
• Sketch a circle at the center ofthe blue reference lines.
10. Middle-click to release the circletool.
11. Edit the circle’s diameterdimension to 4.25 and pressENTER.
12. Click OK to complete thesketch.
13. In the graphics area, click thepink direction arrow so that theextrude direction is down, intothe model.
14. In the dashboard, click Blind
and then select To Nextfrom the drop-down menu.
15. Click Complete Feature .
16. In the model tree, select anddrag datum plane DTM1 ontoExtrude 4 and then release yourmouse.
17. Click the arrow to expandExtrude 4 and see that DTM1is now embedded in the featureand also hidden.
18. Click Datum Display Filters
and disable the display ofall datum features.
© 2009 PTC Module 2 | Page 13

19. In the model tree, right-clickExtrude 4 and then select Editfrom the pop-up menu.
20. Double-click the dimension value5, edit it to 1 and press ENTER.
21. Click Regenerate from theQuick Access toolbar to updatethe model using the new offsetvalue.
22. Click Save from the QuickAccess toolbar.
Because DTM1 is embedded in Extrude 4, the offset dimensionfor DTM1 is now displayed when Extrude 4 is edited. To keepyour model organized and easy to understand, it is best practiceto embed datum features referenced by a specific feature.
Step 7: Create a coaxial type hole.
Use the Hole tool to create a coaxial hole on the axis of the axlehub. The hole will be 2.33 in diameter and have a blind depth of6. The car axel will be inserted into the hole when assembled.
1. Click Datum Display Filters
and enable the datum axisdisplay.
2. If necessary, middle-click anddrag to spin the model until youcan view the back of the model.
Module 2 | Page 14 © 2009 PTC

3. Start the Hole Tool from theEngineering group:
• In the graphics area, click toselect axis A_1 to position thehole.
• Press and hold CTRL whileyou click to select theplacement surface shownin green.
• Edit the hole diameter to 2.33and depth to 6.
• Click Complete Feature .
Because axis A_1 and the placement surface were selected asreferences, this hole was automatically created as a coaxial typehole. Other hole types available are Linear, Radial and Diameter.
4. Click Datum Display Filters
and disable the display ofall datum features.
5. Press CTRL + D.
6. Click Save from the QuickAccess toolbar.
7. Click File > Manage Session >Erase Current.
8. Click Yes from the Erase Confirmdialog box.
This completes the procedure.
© 2009 PTC Module 2 | Page 15

Module 2 | Page 16 © 2009 PTC

Module 3Basic Drawing Creation
Module OverviewIn this module, you will begin the creation of a 2-D drawing documenting yourwheel design. The exercise will take you through the basic steps used tocreate a 2-D drawing in Creo Parametric.
ObjectivesAfter completing this module, you will be able to:
• Understand drawing concepts and theory.
• Create new drawings using drawing templates.
• Understand the drawing ribbon user interface.
• Edit the drawing scale.
• Edit the properties of drawing views.
• Create a cross-section view.
• Show and manipulate annotations in your drawing views.
• Save your drawing as a PDF file.
© 2009 PTC Module 3 | Page 1

Basic Drawing Creation
Drawing creation can be summarized in four basic steps:
1. Create a New Drawing 2. Add and Manipulate Views
3. Show and Create Annotations 4. Manipulate Annotations
Drawings TheoryPart and assembly designs are typically documented in a 2-D drawing. Whilenot always required, the 2-D drawing is the traditional final design deliverableat many companies. The released 2-D drawing in conjunction with the 3-Dmodel geometry is then used to create and inspect the completed design.
A 2-D drawing contains parametric views of the 3-D design model,dimensions, and a title block. The drawing may also contain notes, tables,and further design information.
A Creo Parametric drawing is bi-directional. If a change is made to thedesign model, the drawing that displays that model automatically updatesto reflect the change. Conversely, if a change is made in the drawing, thedesign model automatically updates accordingly.
Creating a New DrawingThere are three methods for creating a drawing:
• Use template - A template drawing is used to automatically create adrawing containing predefined views, format, and possibly annotations.
• Empty with format - A drawing is created based on a selected format size.All views of the design model must be added manually.
Module 3 | Page 2 © 2009 PTC

• Empty - A drawing is created based on a selected drawing size. The viewsand format must be added manually.
In this exercise we will create a drawing using a template. A template doesnot give you a perfectly completed drawing but it does give you a head startby automatically placing views and the drawing format.
Add and Manipulate ViewsEven when a drawing is created using a template, additional views aretypically required to properly document a design. The following view typescan be added to a drawing:
• General - You define the orientation of this view.
• Projection - This view is automatically projected from an existing view.
• Detailed - A detailed close up view of a selected area on another view.
• Auxiliary - A view projected from selected geometry of an existing view.
• Revolved - A revolved section view.
Each view has a set of properties that can be edited to change the viewtype, display, scale, and other options.
Show and Create AnnotationsYou can show the dimensions and notes that are in your part or assembly,in your drawing. This means you are not required to recreate dimensions todocument your design.
If required, you can also create “driven” dimensions in a drawing. Unlikedimensions shown from the model, driven dimensions will not drive yourmodel design. Driven dimensions will update when your model changes.
Notes and datum annotations can also be shown or created in a drawing.
Manipulate AnnotationsDrawing annotations can be manipulated to create a clean and standardcompliant drawing. Annotations can be moved, tolerances added, textsize changed, and so on. Anything needed to create a standard compliantdrawing is possible in Creo Parametric.
© 2009 PTC Module 3 | Page 3

PROCEDURE - Basic Drawing Creation
Scenario
Complete this module to learn how to document your design in a2-D drawing. If drawing creation and drafting principles are nottaught in your program, skip to Module 4.
Now that you have started the design of the wheel, you will begindocumenting the design in a 2-D drawing. After you create a new drawingusing a template, you will edit properties of the drawing views. You will thenshow and manipulate dimensions in the drawing.
In subsequent exercises, you will create a wheel assembly that is assembledto the slot car and then, improve the wheel design by adding additional, moreadvanced features. Finally, you will create a photo realistic rendering of thecompleted design.
Step 1: Begin documenting the wheel design in a 2-D drawing.
Beginning the documentation of your design before it is complete,promotes concurrent design and provides an additional tool forassessing your design early in the process.In this step, create a drawing using the A3 size drawing template.
1. If necessary, start Creo Parametric.
2. Click Select Working Directory from the Data group of theHome tab.
3. In the Select Working Directory dialog box:
• Navigate to the folder Creo_Adv_Primer.
• Double-click the folder Module_02-06.
• Double-click the folder Drawing.
• Click OK to set the folder as your working directory.
The drawing you create will be saved to and opened from this“working directory”.
Module 3 | Page 4 © 2009 PTC

4. Click New from the QuickAccess toolbar or the Home tab,
5. In the New dialog box:
• Select Drawing as the Type.
• Type wheel in the Name fieldand then click OK.
6. From the New Drawing dialogbox:
• If the Default Model hasnot already been set toWHEEL.PRT, click Browse,select WHEEL.PRT and thenclick Open to set the drawing’sdefault model.
• Select a3_drawing from thelist of drawing templates.
• Click OK and a drawing willautomatically be created.
An A3 drawing is 297 X 420 mm, similar in size to an ANSI Bsize which is 11 X 17 inches.
7. If necessary, click Datum
Display Filters from theGraphics toolbar and disable thedisplay of all datum features.
8. Click Repaint from theGraphics toolbar to update thedisplay.
© 2009 PTC Module 3 | Page 5

9. Browse through some of the drawing tabs to observe the functionalityfound in each:
• Layout – Sheets, formats, views, display settings and drawingobjects are controlled from this tab.
• Table – Tables are created and edited using tools in this tab.
• Annotate – Dimensions, notes and tolerances are shown, createdand controlled using tools in this tab.
• Sketch – 2-D draft entities can be sketched using tools in this tab.
• Legacy Migration – Tools used for importing and working withdrawings created in other systems are found in this tab.
• Analysis – Tools for measuring and analyzing drawing entities andmodels are found in this tab.
• Review – Update your drawing, compare different versions, queryfor information and take measurements using tools in this tab.
• Tools – Miscellaneous tools for investigation, adding model intent,along with various utilities and applications are found in this tab.
• View – View controls for the drawing such as layers, orientation andmodel display are found in this tab.
Module 3 | Page 6 © 2009 PTC
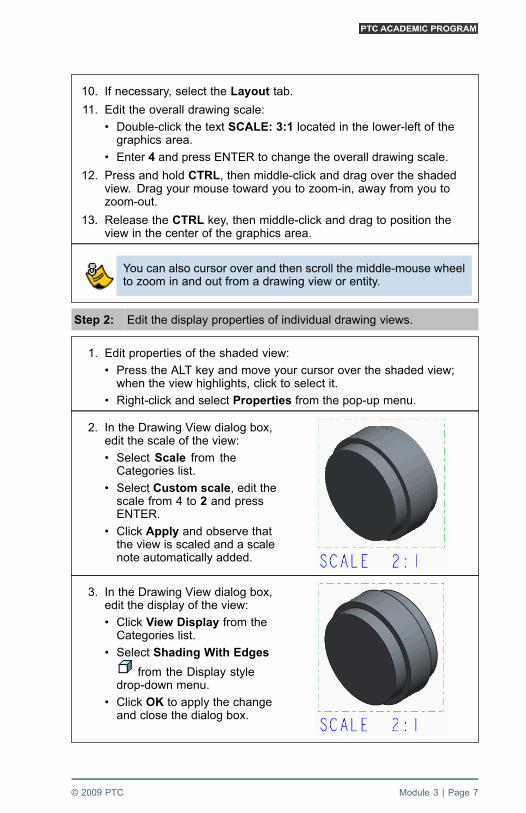
10. If necessary, select the Layout tab.
11. Edit the overall drawing scale:
• Double-click the text SCALE: 3:1 located in the lower-left of thegraphics area.
• Enter 4 and press ENTER to change the overall drawing scale.
12. Press and hold CTRL, then middle-click and drag over the shadedview. Drag your mouse toward you to zoom-in, away from you tozoom-out.
13. Release the CTRL key, then middle-click and drag to position theview in the center of the graphics area.
You can also cursor over and then scroll the middle-mouse wheelto zoom in and out from a drawing view or entity.
Step 2: Edit the display properties of individual drawing views.
1. Edit properties of the shaded view:
• Press the ALT key and move your cursor over the shaded view;when the view highlights, click to select it.
• Right-click and select Properties from the pop-up menu.
2. In the Drawing View dialog box,edit the scale of the view:
• Select Scale from theCategories list.
• Select Custom scale, edit thescale from 4 to 2 and pressENTER.
• Click Apply and observe thatthe view is scaled and a scalenote automatically added.
3. In the Drawing View dialog box,edit the display of the view:
• Click View Display from theCategories list.
• Select Shading With Edges
from the Display styledrop-down menu.
• Click OK to apply the changeand close the dialog box.
© 2009 PTC Module 3 | Page 7

4. To select a note or dimension, with the Layout tab open, you haveto press the ALT key while selecting. Alternatively, you can open theAnnotate tab and then select annotations without using ALT:
• Click in an empty area of the graphics area to deselect the view.
• Press ALT and then click to select the view note SCALE 2:1, agreen selection box will be displayed around the note.
The ALT key works as a filter enabling you to select variousdrawing entities no matter which drawing tab is open. Thedrawing tabs work as filters, without pressing ALT, annotationscannot be selected when the Layout tab is open and viewproperties cannot be edited when the Annotate tab is selected.A good rule of thumb is when in doubt, press the ALT key toselect an entity.
5. With the view note selected,right-click and select Edit Valuefrom the pop-up menu.
6. Edit the scale from 2 to 3 andpress ENTER.
7. Click and drag the note so that itis centered under the view.
8. Click Refit from the Graphicstoolbar.
9. Edit the top view to show hidden lines:
• Ensure that the Layout tab is still open.
• Click an empty area of the drawing to deselect any selected entities.
• Move your cursor over the top view, when the view highlights, clickto select it.
• Right-click and select Properties from the pop-up menu.
– Click View Display from the Categories list.
– Select Hidden from the Display style drop-down list.
– Click OK to close the dialog box.
Module 3 | Page 8 © 2009 PTC

10. If necessary, click Refit from the Graphics toolbar.
11. Edit the right view to be a x-section view named A-A:
• Move your cursor over the right view, when the view highlights,click to select it.
• Right-click and select Properties from the pop-up menu.
• Click Sections from the Categories list.
• Select 2D cross-sections from the Section options area.
• Click Add Section and then Done from the menu manager inthe lower-right.
• Type A as the cross-section name and press ENTER.
• Click to select datum plane RIGHT from the model tree.
• Click OK to close the dialog box.
12. With the right view still selected, right-click and select Add Arrowsfrom the pop-up menu, then click the front view to place the cut arrows.
Step 3: Show the model’s dimensions and axis in the drawing.
1. If necessary, click Refit .
2. If necessary, click an empty area of the drawing to deselect thesection view A-A.
3. In the ribbon, select the Annotate tab and click Show Model
Annotations :
4. In the model tree:
• Select Extrude 1.
• Press and hold Shift while you select Hole 1.
© 2009 PTC Module 3 | Page 9

5. In the Show Model Annotations dialog box:
• Click Select All to show all dimension from the selectedfeatures.
• Select the Datums Tab and in the Show column:
– Click Select All to enable the display of axis A_1 in eachviews.
– Disable the check-box that controls the display of the axis in the3-D shaded view.
• Click OK to close the dialog box.
6. Right-click in the graphics area and select Cleanup Dimensionsfrom the pop-up menu:
• Disable Create Snap Lines.
• Edit the Offset value from 12.5 to 8 and press ENTER.
• Click Apply and then click Close.
7. Click in the graphics area to deselect the dimensions.
8. Click Repaint .
Step 4: Manipulate drawing annotations.
Move and manipulate dimensions so your drawing looks like theimage below. Your drawing does not have to match exactly, it isonly important that you learn how to manipulate the annotations.
Module 3 | Page 10 © 2009 PTC

1. If necessary, click Refit .
2. With the Annotate tab open, press ALT and select any dimension,axis, or note you want to manipulate. Multiple items can be selectedusing the CTRL key or pick-box selection.
3. Use the following methods to manipulate the selected annotations:
• To move the dimension and text, or a note, click and drag thehandle at the center of the text.
• To move only the dimension’s text, click and drag the handles ateither side of the text.
• To move the entire dimension, click and drag handles at the arrowhead tips.
• To clip the dimension witness lines, click and drag the handle atthe end of each extension line.
• To flip dimension arrows, right-click and select Flip Arrows.
• To resize an axis, drag the handle at either end of the selected axis.
• To move a dimension from one view to another, right-click and selectMove Item to View, then click the view you want the item moved to.
4. To move a view, select the view you want to move, then right-clickand deselect the Lock View Movement, then drag the view to a newlocation.
© 2009 PTC Module 3 | Page 11

Step 5: Add model parameters in the drawing format and print the drawing.
1. Pan to and then zoom in on the title block area of the drawing, locatedin the lower-right corner of the drawing.
No Title or Project names are displayed. The parametric formatused in the drawing reads this information from the model andthat information has not been entered yet.
2. In the model tree, right-click WHEEL.PRT and select Open from thepop-up menu.
3. Select the Tools tab and in the Model Intent group, click Parameters
.
4. In the Parameters dialog box:
• Edit the Value of the DESCRIPTION parameter to PTC ASTONMARTIN WHEEL DESIGN.
• Edit the Value of the PROJECT parameter to PTC SLOT CAR.
• Click OK.
5. Click Windows from the Quick Access toolbar and selectWHEEL.DRW to activate the drawing.
The parametric format read the parameters from the model!
Module 3 | Page 12 © 2009 PTC

6. Click Refit .
7. Click File > Save As > Quick Export to create a PDF of the drawing.
8. Click Save from the Quick Access toolbar and then click OK toverify that the drawing will be saved in your working directory.
9. Click Close Window from the Quick Access toolbar to close theWHEEL.DRW window.
10. Click Close Window to close the WHEEL.PRT window.
11. Click Erase Not Displayed from the Data group of the Hometab.
12. Click OK from the Erase Not Displayed dialog box.
This completes the procedure.
© 2009 PTC Module 3 | Page 13

Module 3 | Page 14 © 2009 PTC

Module 4Basic Assembly Modeling
Module OverviewIn this module, you will create a wheel assembly, containing the wheel partyou have started to design along with an already complete tire part.
After you have completed the wheel subassembly, you will add it to thefront and rear axle assemblies. The exercise will take you through thebasic assembly steps. After placing the wheel assembly into the front axleassembly the first time, you will use copy and paste to save time placing threeadditional instances of the subassembly.
ObjectivesAfter completing this module, you will be able to:
• Create new Creo Parametric assembly.
• Assemble the first component of an assembly using the Default constraint.
• Use the 3-D Dragger to orient a component being assembled.
• Assemble components using the Automatic option to create Coincidentconstraints.
• Use copy and paste functionality to assemble components.
© 2009 PTC Module 4 | Page 1

Basic Assembly Modeling
The basic assembly modeling process can be summarized infour steps:
1. Default Assembly Datums 2. Placement of First Component
3. Orient Added Components 4. Constrain Components
New AssemblyEach new assembly you create in Creo Parametric will contain a default setof datum planes and a coordinate system, copied in from a template model.Think of these default datums as the foundation that you begin assemblingcomponents to.
Unlike solid geometry, reference geometry such as datum planes andcoordinate systems have no mass, surface area, or size. Assembly datumfeatures are often used as assembly references.
Default Placement of the First Component
To place the first component in your assembly, click Assemble from theComponent group of the Model tab. In the Open dialog box, select thecomponent you want to assemble and click Open, then click to position themodel anywhere in the graphics area.
Unless you require a specific orientation, the first component of an assemblyis typically placed using the Default Constraint. Apply the DefaultConstraint using one of the following methods:
• Right-click in the graphics area and select Default Constraint from thepop-up menu.
Module 4 | Page 2 © 2009 PTC

• In the assembly dashboard at the top of the graphics area, click Automaticand select Default from the drop–down menu.
If necessary, constraints such as Coincident , Parallel ,
Distance can also be used to position the first component ofyour assembly.
Orient Added Components
Additional components are placed in the assembly using the Assembletool. As subsequent components are added to the assembly, it is often helpfulto reorient the component inside the assembly, before constraints are applied.
As with any model in Creo Parametric, if you middle-click and drag, the entireassembly will spin. To reorient only the component being assembled, use the3-D Dragger or one of the following keyboard and mouse combinations:
3-D Dragger – The color coded 3-D dragger is used to orient thecomponent being assembled within the assembly. As constraints areadded and the degrees of freedom are reduced, you will notice that thosecorresponding portions of the dragger are grayed out.
• The shaded arcs of the dragger controlrotation about the three axes.
• The shaded arrows translate the componentalong those axes.
• These small translucent quadrants move thecomponent in a 2-D plane.
• The small sphere at the center is used to panthe component in any direction.
Operation Keyboard and Mouse Selection
Spin – The component will spinwithin the assembly. Partiallyconstrained components only spinin unconstrained directions. + +
Pan - The component will panabout the assembly. Partiallyconstrained components only pan inunconstrained directions. + +
Component Drag – The componentwill spin and pan about theassembly. Partially constrainedcomponents can only be dragged inunconstrained directions.
+ +
© 2009 PTC Module 4 | Page 3

Constrain ComponentsAfter you have placed and oriented a component it is important that you addassembly constraints to define its final design position. Using the wheel andtire assembly shown:
• A Coincident constraint is applied to cylindrical surface of each part.This constraint type makes the center axis of each model coincident.
• A second Coincident constraint is applied to datum planes FRONTof each model. Making the two planes coincident, centers the tire on thewheel.
• There is actually one degree of freedom remaining, the wheel can still spinabout the center axis of the wheel. An additional constraint could be addedbut by default, Creo Parametric assumes it is fully constrained. This isdone to save time because often, the remaining degree of freedom is notrequired to position a component with coincident axes.
Constraints such as Coincident , Parallel , Distance andso on can be explicitly selected from the constraint drop-down menu inthe dashboard under Automatic, however, it is often easier to let CreoParametric select them based on the references you select. In this case,selecting the two cylindrical surfaces caused a Coincident constraint tobe automatically applied. If the planes were farther apart when selected, a
Distance constraint may have been applied.
Module 4 | Page 4 © 2009 PTC

PROCEDURE - Basic Assembly Modeling
ScenarioYou will start by creating a new assembly model into which you will assembleyour wheel and then an existing tire model. After the wheel assembly iscomplete you will assemble it to the front and rear axle assemblies.
To save time, after assembling the wheel subassembly the first time, you willuse Copy and Paste to assemble the remaining three instances. Finally, youwill open the Aston Martin assembly to see how the new wheels look onthe car.
In subsequent exercises, you will improve the wheel design by addingadditional, more advanced features and then finally, you will create a photorealistic rendering of the completed design.
Step 1: Create an assembly containing WHEEL.PRT and TIRE.PRT .
1. If necessary, start Creo Parametric.
2. Click Select Working Directory from the Data group of theHome tab.
3. In the Select Working Directory dialog box:
• Navigate to the folder Creo_Adv_Primer.
• Double-click the folder Module_02-06.
• Double-click the folder Assembly.
• Click OK to set the folder as your working directory.
The assembly you create will be saved to and opened from this“working directory”.
4. Create the new wheel partmodel:
• Click New from the QuickAccess toolbar or the Hometab.
• Select Assembly as the Type.
• Type wheel in the Name fieldand click OK.
© 2009 PTC Module 4 | Page 5
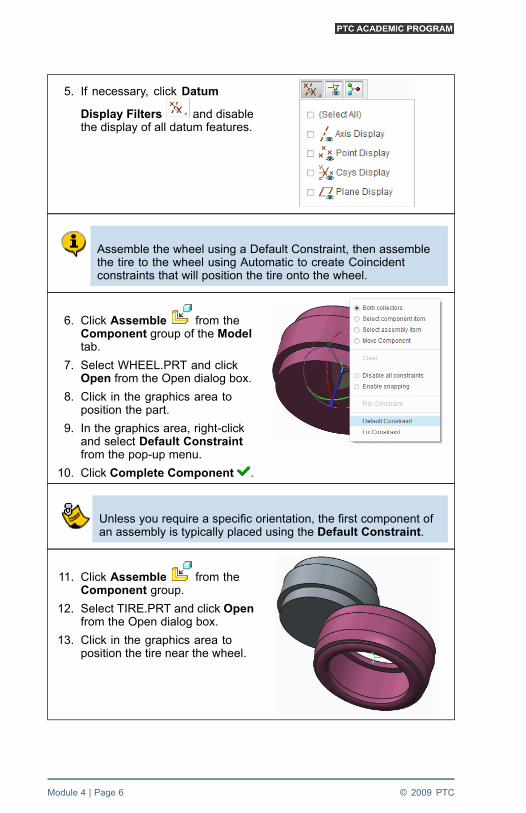
5. If necessary, click Datum
Display Filters and disablethe display of all datum features.
Assemble the wheel using a Default Constraint, then assemblethe tire to the wheel using Automatic to create Coincidentconstraints that will position the tire onto the wheel.
6. Click Assemble from theComponent group of the Modeltab.
7. Select WHEEL.PRT and clickOpen from the Open dialog box.
8. Click in the graphics area toposition the part.
9. In the graphics area, right-clickand select Default Constraintfrom the pop-up menu.
10. Click Complete Component .
Unless you require a specific orientation, the first component ofan assembly is typically placed using the Default Constraint.
11. Click Assemble from theComponent group.
12. Select TIRE.PRT and click Openfrom the Open dialog box.
13. Click in the graphics area toposition the tire near the wheel.
Module 4 | Page 6 © 2009 PTC

14. Select the first set of assemblyreferences:
• Click to select the innercylindrical surface ofTIRE.PRT.
• Click to select the outercylindrical surface ofWHEEL.PRT.
Notice in the dashboardthat a Coincident typeconstraint was automaticallycreated.
15. Click Datum Display Filters
and enable the display ofdatum planes.
16. Select the second set ofassembly references:
• Cursor over datum planeFRONT from TIRE.PRT andwhen it highlights in green,click to select it .
• Cursor over datum planeFRONT from WHEEL.PRTand when it highlights in green,click to select it .
• Ensure that the offset typeshown in the dashboard isCoincident and not
Distance .
If you select the wrong reference when assembling components,you can use the Undo button to backup and re-select. Thereis no need to cancel the component placement and start over.
© 2009 PTC Module 4 | Page 7

17. In the dashboard, select the Placement tab.
Notice that a constraint set containing two Coincident typeconstraints was created based on the references you selected toposition TIRE.PRT.
18. Click Complete Component .
19. Click Datum Display Filters
and disable the display ofdatum planes.
20. Middle-click to spin the assemblyand observe the assembledcomponents.
21. If necessary, press CTRL + D toreorient the model.
22. Click Save from the QuickAccess toolbar and then click OKto verify that the model will besaved in your working directory.
Step 2: Assemble the WHEEL.ASM to AXLE_FRONT.ASM.
You will now assemble your wheel assembly to both the frontand rear axle assemblies.
1. Click Open from the Quick Access toolbar.
2. Select AXLE_FRONT.ASM and click Open.
3. Click Assemble from the Component group.
4. Select WHEEL.ASM and click Open.
If you do not see the WHEEL.ASM model listed in the Opendialog box, this means you forgot to save it in the step above. To
select the unsaved model from session, click In Sessionfrom the Common Folders list in the Open dialog box.
Module 4 | Page 8 © 2009 PTC

5. Click in the graphics area toposition the WHEEL.ASM.
6. Use the 3-D Dragger to reorientthe wheel assembly:
• Click and drag the greenshaded arc to rotate theWHEEL.ASM so that you cansee the back of the wheel.
7. Select the first set of assemblyreferences:
• Click to select the cylindricalsurface of AXLE.PRT.
• Click to select the cylindricalsurface of the hole inWHEEL.PRT.
8. Flip the orientation of the wheel:
• Right-click in the graphics areaand select Flip Constraintfrom the pop-up menu.
© 2009 PTC Module 4 | Page 9

9. Move the WHEEL.ASM awayfrom the axle:
• Middle-click and drag tospin the assembly so thatyou can see the back of theWHEEL.ASM.
• Click and drag the blue arrowon the 3-D Dragger to movethe WHEEL.ASM away fromaxel.
• Middle-click and drag to spinuntil you can see the bottom ofthe hole in WHEEL.PRT.
10. Select the second set of assembly references:
• Click to select the circular surface at the bottom of the hole inWHEEL.PRT.
• Middle-click and drag to spin until you can see the end surfaceof AXLE.PRT.
• Click to select the circular surface at the end of AXLE.PRT.
• Ensure that the constraint type shown in the dashboard is
Coincident and not Distance .
The end of the axle should now be coincident to the bottom ofthe hole.Rather than spinning the model to select the circular surface ofthe axle, you could have used your Query Select skills (discussedin Module 1) to select it. If you want to try, click Undo and tryagain, without spinning the model.
Module 4 | Page 10 © 2009 PTC

11. Press CTRL + D.
12. Click Complete Component .
13. Copy and paste a secondinstance of WHEEL.ASM intothe assembly:
• In the model tree, selectWHEEL.ASM.
• Press CTRL + C to copy.
• Press CTRL + V to paste.
• Click in the graphics area toposition WHEEL.ASM.
• Middle-click and drag to spinuntil you can see the endsurface of AXLE.PRT.
Creo Parametric remembers the references selected inWHEEL.ASM the first time you assemble it. The second time,you will only have to select references from AXLE.PRT.
14. Select assembly references fromAXLE.PRT:
• Click to select the cylindricalsurface of AXLE.PRT as theCoincident reference.
• If necessary, use the 3-DDragger to move theWHEEL.ASM away fromAXLE.PRT.
• Click to select the circular endsurface of AXLE.PRT as theCoincident reference.
• Right-click and select FlipConstraint from the pop-upmenu.
© 2009 PTC Module 4 | Page 11

15. Click Complete Component .
16. Press CTRL + D.
17. Click Save from the QuickAccess toolbar.
Step 3: Assemble the WHEEL.ASM to AXLE_REAR.ASM.
1. Click Open .
2. Select AXLE_REAR.ASM andclick Open.
3. Paste WHEEL.ASM into theAXLE_REAR.ASM:
• Press CTRL + V to paste.
• Click in the graphics area toposition WHEEL.ASM.
If your WHEEL.ASM is pasted into the graphics area with theback of the wheel facing you, this is because you copied thesecond instance of WHEEL.ASM from AXLE_FRONT.ASM,rather than the first. You can either work your way through it or goback to the AXLE_FRONT.ASM and copy the first WHEEL.ASM.
4. Click to select the cylindricalsurface of AXLE.PRT as theCoincident reference.
Module 4 | Page 12 © 2009 PTC

5. Select the Coincident referencefrom AXLE.PRT:
• If necessary, use the3-D Dragger to move theWHEEL.ASM.
• Click to select the circular endsurface of AXLE.PRT.
6. Click Complete Component .
7. Middle-click to spin the assemblyand observe the assembledcomponents.
8. Press CTRL + D.
9. Paste the second instance ofWHEEL.ASM into the assembly:
• Press CTRL + V to paste thecomponent.
• Click in the graphics area toposition WHEEL.ASM.
• Middle-click and drag to spinuntil you can see the endsurface of AXLE.PRT.
10. Click to select the cylindricalsurface of AXLE.PRT as theCoincident reference.
11. Select the Coincident referencefrom AXLE.PRT:
• IF necessary, use the3-D Dragger to move theWHEEL.ASM.
• Click to select the circular endsurface of AXLE.PRT.
• Right-click and select FlipConstraint from the pop-upmenu.
© 2009 PTC Module 4 | Page 13

12. Click Complete Component .
13. Middle-click to spin the assemblyand observe the assembledcomponents.
14. Press CTRL + D.
15. Click Save from the QuickAccess toolbar.
Step 4: Open the Aston Martin assembly to see how the new wheels look.
1. Click Open .
2. Select ASTON_MARTIN.ASM and click Open.
Your new wheels look a little dull on such a hot car, don’t youthink? In the next module, you will add some details to make itlook much better.
3. Click Close Window a few times until you have closed all theopen Creo Parametric windows.
4. Click File > Manage Session > Erase Not Displayed.
5. Click OK from the Erase Not Displayed dialog box.
This completes the procedure.
Module 4 | Page 14 © 2009 PTC
Module 5Advanced Modeling and Design
Module OverviewIn this module, you will complete the wheel design by adding additionalfeatures and then by making edits based on your evaluation of the design.
You will first add additional features to make the wheel more estheticallypleasing. Next, you will cut a cross-section through the wheel assembly andtake measurement to evaluate its fit to the tire.
Finally you will make edits to the design and observe that changes made inone mode are automatically updated in every other mode of Creo Parametric.For example, a change made in the drawing is automatically propagated tothe part and assembly models.
ObjectivesAfter completing this module, you will be able to:
• Create a revolve feature.
• Use geometry tools within sketcher.
• Mirror sketcher geometry.
• Create an axial pattern.
• Create an extrude with taper.
• Create a multi-set round feature.
• Create an reference patterns.
• Create an chamfer feature.
• Apply real time rendering to your model.
• Cut and display a cross-section.
• Use measure tools to evaluate your models.
© 2009 PTC Module 5 | Page 1

Advanced Modeling and Design
To complete the wheel design, you will use a variety of advancedfeatures and design tools.
Advanced Features
• Revolve
• Round
• Extrude with Taper
• Chamfer
Patterns
• Axis Pattern
• Reference Pattern
Cross-Sections
Measuring Tools
Bi-directional Associativity Advanced Features
Cross-Sections Measure Tools
Advanced FeaturesTo complete the wheel design, you will use some features you have not yettried.
• Revolve - A sketched feature in which the sketch is revolved about acenterline or axis in order to add or remove material.
• Extrude with Taper- Used to apply slope to the side walls of an extrudefeature. Typically used to enable mold or cast parts to be removed fromthe tool they are created in.
• Round - Add or remove material by creating smooth, usually radialtransitions on an edge or between surfaces.
• Chamfer - Add or remove material by creating a beveled surface on anedge or between surfaces.
Module 5 | Page 2 © 2009 PTC

PatternsThe Pattern tool enables you to quickly duplicate a feature within your model.In this exercise, you will learn to pattern about an axis using the Axis typepattern. You will also use the Reference pattern to create patterns where afeature follows the pattern of a feature it references.
Cross-SectionsYou will cut a cross-section through the wheel assembly so that you canvisually inspect the fit of the tire to the wheel. The display of Cross-sectionscan be toggled on and off in the in the part, assembly or drawing.
Measuring ToolsYou will use Creo Parametric’s measuring tools to analyze the size and fit ofyour models. Values obtained from the measuring tools to edit the wheel sothat it fits the tire correctly.
Bi-directional AssociativityYou will make edits to your design in both the part and drawing modes. Youwill then observe that because of bi-directional associativity, a change madeanywhere is updated everywhere.
© 2009 PTC Module 5 | Page 3

PROCEDURE - Advanced Modeling and Design
ScenarioThe marketing group called and they said your wheel is too plain to be put ontheir Aston Martin slot car. They have a point, it’s ugly!
In this exercise you will add additional features to improve on the look andfeel of the design. You will cut a cross-section through the wheel assembly sothat you can verify the fit and function of the design both visually and usingthe measurement tools. Based on measurements taken, you will edit yourdesign so that it not only looks better but functions better.
In the subsequent exercise, you will create a photo realistic rendering ofthe completed design.
Step 1: Open the Aston Martin assembly.
1. If necessary, start Creo Parametric.
2. Click Select Working Directory from the Data group of theHome tab.
3. In the Select Working Directory dialog box:
• Navigate to the folder Creo_Adv_Primer.
• Double-click the folder Module_02-06.
• Double-click the folder Advanced.
• Click OK to set the folder as your working directory.
4. Click Open from the Datagroup of the Home tab or theQuick Access toolbar.
5. Select ASTON_MARTIN.ASMand click Open.
6. If necessary, click Datum
Display Filters and disablethe display of datum planes.
Lets add some details to make wheel look better.
Module 5 | Page 4 © 2009 PTC

Step 2: Remove material using the Revolve tool.
1. In the graphics area, clickto select any one of theWHEEL.PRT models fromASTON_MARTIN.ASM.
2. With WHEEL.PRT selected,right-click and select Open fromthe pop-up menu.
3. Start the Revolve Tool fromthe Shapes group of the Modeltab.
4. Select and orient the sketch plane:
• In the model tree, select datum plane TOP as the sketch plane.
• To reorient the model into its 2-D sketch view, click Sketch View
from the Graphics toolbar.
• In the graphics area, right-click and select Section Orientation >Flip section orientation.
5. Click Datum Display Filters
and enable the display ofdatum axes.
6. Select Hidden line from thedisplay style drop-down menu inthe Graphics toolbar.
© 2009 PTC Module 5 | Page 5

7. Click Zoom In from the Graphics toolbar to zoom in to the upperleft corner of the model:
• Click at X1 to define the upper-left corner of the zoom box.
• Click at X2 to define the lower-right corner of the zoom box.
• Middle-click to release the zoom in tool.
8. Start the Centerline tool from the Sketching group of the Sketchtab.
• Click at X1 to place the start point of the centerline.
• Click at X2 to place the endpoint of the horizontal centerline.
• Middle-click to release the centerline tool.
Module 5 | Page 6 © 2009 PTC

9. Start the 3-Point / Tangent End Arc from the Sketching group:
• Click below the centerline at X1 to place the start point of the arcon the vertical reference.
• Click on the center line at X2 to place the endpoint of the arc onthe centerline.
• Move your cursor to size the arc, then click at X3 to place the arc.
• Middle-click to release the arc tool.
10. Unless it was automatically created when you sketched the arc, add aTangent constraint between the arc and centerline:
• Click Tangent from the Constrain group.
• Select the arc and then the horizontal centerline.
• Notice a T is now displayed at the end of the arc, signifying it asbeing tangent to the horizontal centerline.
Do not forget, you can use Undo and Redo at the top ofthe interface if you make a mistake while learning to use sketcher.
© 2009 PTC Module 5 | Page 7

11. Click Normal Dimension from the Dimension group:
12. Place and edit a dimension defining the centerline’s position:
• Select the top edge of the wheel at X1.
• Select the centerline at X2.
• Middle-click at X3 to place the dimension.
• Edit the value of the dimension to .5 and press ENTER.
13. Double-click the radius dimension, edit it to 25, and press ENTER.
You may have to zoom out in order to see the radius dimension.
14. Start the Line from the Sketching group:
• Click to snap the start point of the line to the endpoint of the arc,shown as X1.
• Click to snap the endpoint along the blue reference line at the top ofthe wheel, at approximately a 45° angle, shown as X2.
• Middle-click to release the line tool.
The blue reference line was created when that edge of the modelwas selected to create the dimension to the centerline. If it hadnot been, you could have added a reference while sketching theline by pressing ALT and selecting the edge.
Module 5 | Page 8 © 2009 PTC

15. Click Normal Dimensionfrom the Dimension group:
16. Place and edit dimensiondefining the upper endpoint ofthe line:
• Select the vertical edge shownat X1.
• Select the upper endpoint ofthe line shown at X2.
• Middle-click at X3 to place thedimension.
• Edit the value of the dimensionto .3 and press ENTER.
17. Place and edit the dimensiondefining the lower endpoint ofthe line:
• Select the vertical edge shownat X1.
• Select the lower endpoint ofthe line shown at X2.
• Middle-click at X3 to place thedimension.
• Edit the value of the dimensionto .5 and press ENTER.
18. Click OK from the Close group.
19. Press CTRL + D to place the model in a default orientation.
20. Select Shading With Edges from the display style drop-downmenu in the Graphics toolbar.
21. In the graphics area, selectdatum axis A_1 as the Rotate
axis.
22. If necessary, click the pinkmaterial side arrow so that itis pointing out, away from themodel.
23. In the dashboard, click Remove
Material .
24. Click Complete Feature .
© 2009 PTC Module 5 | Page 9

If you forgot to change the material side of the feature in step 22,right-click Revolve 1, and select Edit Definition from the pop-upmenu. This will open the dashboard for that feature enablingyou to correct it.
25. Click Datum Display Filters
and disable the display ofdatum axes.
26. Middle-click to spin the part andobserve the new feature.
27. Press CTRL + D.
28. Click Save from the QuickAccess toolbar.
Step 3: Extrude and pattern spokes in the wheel.
1. Start the Extrude Tool , then in the model tree, select datumplane FRONT.
2. Click Sketch View from the Graphics toolbar.
3. Click Project from theSketching group.
4. Move your cursor just below theinner edge of the revolve featureas shown, then click to selectthe hidden edge highlighted ingreen.
This is an edge of Extrude3 on the other side of themodel.
Module 5 | Page 10 © 2009 PTC

5. Start the Centerline toolfrom the Sketching group of theSketch tab.
• Click at X1 to snap the startpoint of the centerline to thevertical reference.
• Click at X2 to snap theendpoint to the verticalreference.
• Middle-click to release thecenterline tool.
6. Start the Center and Point
Circle tool:
• Click at X1 to snap the centerof the circle to the center ofthe model.
• Drag your cursor and click atX2 to complete the circle.
• Middle-click to release thecircle tool.
7. Double-click the diameterdimension, edit the value to 5and press ENTER.
8. Start the Line :
• Click at X1 to snap the startpoint of the line to the centerof the model.
• Click at X2 to snap theendpoint of the line to theupper arc.
• Middle-click to release the linetool.
9. With the new line still selected,
click Mirror from theEditing group, then select thevertical centerline as the mirrorreference.
© 2009 PTC Module 5 | Page 11

10. Delete extra sketcher geometry, leaving only the two sketched linesand arcs to be extruded:
• Click Trim/Delete Segment from the Editing group.
• In the graphics area, select each line and arc by an X.
After the extra entities are deleted, the sketch will be a closed loopas shown below.
Note that you can also hold down the left mouse button and dragthe cursor over all the entities to be trimmed away, releasingwhen you are done.
11. Verify that the remaining sketchentities form a single closed loop:
• Middle-click to release thetrim tool and see the shadedclosed loop.
If the sketch doesnot shade, this mostlikely means you havemissed an entity or twowhile trimming. To fixthe problem, zoom outand trim away any ofthese extra entities.
Module 5 | Page 12 © 2009 PTC

12. Click Normal Dimensionfrom the Dimension group:
• Select each angled line, X1and X2.
• Middle-click between the linesat X3 to place the dimension.
• Edit the angle dimensionsvalue to 25 and press ENTER.
13. Click OK from the Closegroup.
14. Press CTRL + D to reorient themodel.
15. In the graphics area:
• Right-click and select RemoveMaterial from the pop-upmenu.
• Right-click on the depth draghandle (small white box) andselect Through All from thepop-up menu.
As you can see from the steps above, many of the options youhave been selecting in the dashboard are also accessible usingright–click pop-up menus in the graphics area.
16. Click Complete Feature .
17. Click Datum Display Filters
and enable the display ofdatum axes.
© 2009 PTC Module 5 | Page 13

18. With Extrude 5 still selected, start the Pattern Tool from theEditing group.
19. In the pattern dashboard:
• Click Dimension and select Axis from the drop-down menu.
• Click to select axis A_1 from the model.
• Edit the number of pattern instances from 4 to 6.
• Click Equal Spacing to evenly space the distance betweeninstances of the pattern.
20. Click Datum Display Filters
and disable the display ofdatum axes.
21. Click Complete Feature .
22. Middle-click to spin the part andobserve the new features.
Step 4: Add an outer hub to the wheel using an extrude feature.
1. Press CTRL + D to reorient themodel.
2. Start the Extrude Tool .
3. Move your cursor over the thincircular surface that is closest toyou, when it highlights, click toselect it as the sketch plane.
Module 5 | Page 14 © 2009 PTC

4. Start the Center and Point
Circle tool:
• Sketch a circle at the center ofthe blue reference lines.
• Middle-click to release thecircle tool.
• Edit the diameter to 2 andpress ENTER.
• Click OK .
5. Define the feature’s direction andenable taper:
• Click the pink direction arrowto flip the extrude directionback into the model.
• Right-click and enable AddTaper from the pop-up menu.
• Drag the taper drag handle(small white box) and expandthe taper to 30.
You can also enable taper and edit the taper value from theOptions tab in the dashboard.
6. Define the feature’s depth fromthe graphics area:
• Right-click the depth draghandle and select To Nextfrom the pop-up menu.
7. Click Complete Feature .
8. Press CTRL + D.
9. Click Save .
Taper can also be appliedto a model geometry as aseparate feature, using the
Draft Tool .
Attributes of a feature such as direction, depth and taper can alsobe defined using the buttons, pull-down menus and tabs in thedashboard. Experienced users typically use a combination ofcommands from both the dashboard and graphics area whenworking in Creo Parametric.
© 2009 PTC Module 5 | Page 15

Step 5: Round the edges of the wheel spokes.
1. In the model tree, expand Pattern 1 of Extrude 5 and select Extrude5[1] to identify the first instance of the pattern. This is where youwill place the next round feature.
2. Middle-click and drag to spinthe model until you can see theupper surface of the first spoke.
3. Start the Round Tool fromthe Engineering group.
4. Move your cursor over the edgeshown as X1 and click to selectit.
5. Press and hold CTRL while youselect the edge shown as X2.
6. Edit the radius value to .75 andpress ENTER.
7. Press CTRL + D.
8. Move your cursor over the edgeshown as X1 and click to selectit.
9. Press and hold CTRL while youselect the edge shown as X2.
10. Edit the radius value to .6 andpress ENTER.
11. In the round dashboard:
• Select the Sets tab.
• Click Set 1 and then Set 2 to observe the two round sets you havedefined within the one round feature.
• Click Complete Feature .
Module 5 | Page 16 © 2009 PTC

12. With Round 1 still selected,right-click in an empty place inthe graphics area and selectPattern from the pop-up menu.
The default pattern typeis now Reference. Thispattern will reference thepattern of the spokes.
13. Click Complete Feature .
14. Middle-click to spin the part andobserve the new features.
15. Press CTRL + D .
If Pattern was not available in the pop-up menu, you may havenot added the rounds to Extrude 5[1], the first instance of thepatterned spokes.
16. If necessary, in the model tree, expand Pattern 1 of Extrude 5 andclick Extrude 5[1] to identify the first instance of the pattern. This iswhere you will place the next round feature.
17. Start the Round Tool fromthe Engineering group.
• Click to select the edge shown.
• Edit the radius value to .3 andpress ENTER.
• Click Complete Feature .
18. With Round 2 still selected,right-click in the graphics areaand select Pattern from thepop-up menu.
19. Click Complete Feature .
© 2009 PTC Module 5 | Page 17

Step 6: Add a two edge round feature in the hub area.
1. If necessary, press CTRL + D.
2. Start the Round Tool :
• Press and hold CTRL whileyou select the two edgesshown.
• If necessary, edit the radius to.3 and press ENTER.
• Click Complete Feature .
Step 7: Add a round along the inner edge of the wheel.
1. Start the Round Tool :
• Zoom in as required and selectthe edge shown.
• If necessary, edit the radius to.3 and press ENTER.
• Click Complete Feature .
Step 8: Add a chamfer to break the edge of the axle hole.
1. Middle-click and drag to spin themodel until you can view theback of the model.
2. Start the Edge Chamfer Tool
from the Engineering group:
• Select the inner edge of thehole as shown.
• If necessary, edit the chamferD value to .3 and press ENTER
• Click Complete Feature .
Module 5 | Page 18 © 2009 PTC

3. Select Shading With
Reflections from thedisplay style drop-down menu inthe Graphics toolbar.
4. Middle-click and drag to spin andadmire your work.
5. Press CTRL + D.
6. Click Save .
7. Click Open from the QuickAccess toolbar.
8. Select ASTON_MARTIN.ASMand click Open.
9. Middle-click and drag to spin thecar assembly.
Now that you have added the additional details, your wheel looksa lot better on the Aston Martin!
10. Select Shading With Edges from the display style drop-downmenu in the Graphics toolbar.
Step 9: Create a cross section to verify the fit between the wheel and tire.
1. In the graphics area, clickto select any of the fourWHEEL.PRT models.
2. With WHEEL.PRT selected,right-click and select SelectParent from the pop-up menu.This will select the parentassembly WHEEL.ASM.
3. With WHEEL.ASM selected,right-click and select Open.
© 2009 PTC Module 5 | Page 19

4. Click View Manager fromthe Graphics toolbar.
5. From the View Manager dialogbox:
• Select the Xsec tab and clickNew.
• Type A as the cross sectionname and press ENTER.
• Click Done from the MenuManager in the lower-right ofthe interface.
• In the model tree, select datumplane ASM_RIGHT.
• Double-click cross section Afrom the Names list.
• Click Close.
6. Click Named View List fromthe Graphics toolbar and selectRight from the drop-down menu.
It appears that you have a few design issues. The diameter of thewheel is too big and the outer cylinder of the wheel is not wideenough. Lets go investigate and fix the issues.
7. In the ribbon, select the Analysistab:
• Click Length .
• Click to select the inner edgeof the tire as shown.
This measurement showsthat the width of the outerwheel cylinder should beedited to 7.
Module 5 | Page 20 © 2009 PTC

8. Click Diameter , then cursorover the surface of the tireshown. When it highlights, clickto select it.
This measurement showsthat the minor diameter ofthe wheel should be editedto 15.15.
9. Click Cancel to close theDiameter dialog box.
Step 10: Edit the wheel to fit the tire.
1. Press CTRL + D.
2. In the model tree, expand theWHEEL.PRT node:
• Right-click Extrude 1 andselect Edit from the pop-upmenu.
• Move your cursor over the4.5 dimension value, when ithighlights, double-click it.
• Type the new value 7 andpress ENTER
• Click Regenerate Modelfrom the Quick Access toolbar.
3. In the model tree with theWHEEL.PRT node stillexpanded:
• Right-click Extrude 2 andselect Edit from the pop-upmenu.
• Double-click the 15.6dimension value, edit it to15.15 and press ENTER.
• Click Regenerate Modelfrom the Quick Access toolbar.
© 2009 PTC Module 5 | Page 21

You have received info from the marketing team, they think thewheel needs more spokes. Also, the engineering team thinks thewheel is be too heavy.
4. Click View Manager fromGraphics toolbar.
5. From the Xsec tab of the ViewManager dialog box:
• Right-click No Cross Sectionfrom the Names list.
• Select Set Active from thepop-up menu.
• Click Close.
You can set cross sections active by double-clicking or selectingSet Active from the pop-up menu.
6. In the model tree with theWHEEL.PRT node stillexpanded:
• Right-click Pattern 1 ofExtrude 5 and select Editfrom the pop-up menu.
• Double-click the pattern value6, shown as 6 EXTRUDES.
• Edit the value to 9 and pressENTER.
• Click Regenerate Modelto update the model.
7. From the Quick Access toolbar,
click Windows and selectASTON_MARTIN.ASM toactivate the window.
8. Click Named View List fromthe Graphics toolbar and selectFront from the drop-down menu.
Module 5 | Page 22 © 2009 PTC

Our engineers are worried that the wheel base looks a little toonarrow, lets go fix that.
Step 11: Edit the length of the wheel hub from the drawing.
1. Click Open from the Quick Access toolbar.
2. Double-click WHEEL.DRW.
Because Creo Parametric is bi-directionally associative, alledits made in WHEEL.PRT are automatically updated in thedrawing. Just as you have seen edits automatically updated inthe ASTON_MARTIN.ASM.
3. Locate the dimension value 1used to offset the sketch planeof Extrude 4.
4. Press ALT and click thedimension 1 to select it.
5. With the dimension selected,right-click and select ModifyNominal Value from the pop-upmenu.
6. Edit the value to 4 and pressENTER.
7. Click Regenerate Modelfrom the Quick Access toolbar.
© 2009 PTC Module 5 | Page 23

All views of the drawing have updated according to your edit.
8. From the Quick Access toolbar, click Windows and selectASTON_MARTIN.ASM.
9. Click Regenerate Model from the Quick Access toolbar.
10. Click Save .
11. Click Close Window until you have closed all of the openwindows.
12. Click Erase Not Displayed from the Data group of the Hometab.
13. Click OK from the Erase Not Displayed dialog box.
Congratulations! You have completed the design of the Aston Matinwheel. In the next module, you will create a photorealistic image ofthe car using render capabilities within Creo Parametric.
This completes the procedure.
Module 5 | Page 24 © 2009 PTC

Module 6Photorealistic Rendering
Module OverviewPhotorealistic images are a great way to let others see and evaluate theesthetics of your design. Images rendered from models in Creo Parametriccan also be used in catalogs or marketing materials.
In this module, you will learn to assign material specific appearances to amodel, place that mode in a room and defined scene. Finally you will learn torender and output the photorealistic image you create.
ObjectivesAfter completing this module, you will be able to:
• Assign an appearance or color to a model.
• Define the scene and room that a model will be rendered in
• Render a photorealistic image of a model.
• Output a rendered image to a graphics file.
© 2009 PTC Module 6 | Page 1

Photorealistic Rendering
There are four basic steps to creating a photorealistic image inCreo Parametric:
1 - Assign Appearances 2 - Define the Scene
3 - Render Setup 4 - Render the Scene
The Render TabIn the Render tab, you can assign appearances to your model, set yourmodel in a scene, apply perspective and create photorealistic renderings ofyour design models.
Assign AppearancesThe Appearance Gallery dialog box allows you to view, search, and assignavailable appearances to a model. You can assign or set appearances to anentire part, individual surfaces or quilts. In the assembly mode, you canassign an appearance to the entire assembly, active individual componentsor parts in the assembly.
Module 6 | Page 2 © 2009 PTC

Define the SceneA scene file is a collection of render settings applied to a model. Thesesettings include lights, rooms, and environment effects.
You can save only one scene with the model. When you reload the modelfrom its location, the scene that is saved with the model is activated.
Room and lights within the scenes scale parametrically, depending on thesize of the model to which the scene is applied. The room is automaticallyre-sized or the position of the lights change making the scene reusable withany kind of geometry.
Render SetupVarious rendering parameters can be defined in the Render Setup dialog box.
The quality of the render can be set in the Render Setup dialog box. Thedefault option is Draft but the quality should be set to High or Maximum forquality outputs.
As you increase the quality of the render, you also increase thetime required to complete the render. Setting the quality level toMaximum will create an even higher quality image, however, it maytake too long to complete on some lower-end computers.
By default, Creo Parametric will render to the Full Window of the graphicsarea. Other outputs types such as Tiff, RGB, JPEG, and so on can be setas the render output.
You can set and save the output type of a rendered model from the RenderSetup dialog box.
Render the SceneAfter appearances have been applied, the scene defined, and the output
type set, you can render a model by clicking Render Window fromthe Render tab.
© 2009 PTC Module 6 | Page 3

PROCEDURE - Photorealistic Rendering
ScenarioNow that the design of your wheel is complete, it’s time to create photorealisticimages you can send to the marketing group!
In this exercise you will assign material specific appearances to both thewheel and time. You will then create a photorealistic rendering of the wheelassembly. Finally, you will create a photorealistic rendering of the top levelAston Martin slot car assembly.
Step 1: Set your working directory and open WHEEL.ASM.
1. If necessary, start Creo Parametric.
2. Click Select Working Directory from the Data group of theHome tab.
3. In the Select Working Directory dialog box:
• Navigate to the folder Creo_Adv_Primer.
• Double-click the folder Module_02-06.
• Double-click the folder Render.
• Click OK to set the folder as your working directory.
4. Click Open from the Datagroup of the Home tab or theQuick Access toolbar.
5. Select WHEEL.ASM and clickOpen.
6. If necessary, click Datum
Display Filters and disablethe display of datum planes.
7. Select Shading With
Reflections from thedisplay style drop-down menu inthe Graphics toolbar.
Module 6 | Page 4 © 2009 PTC

Step 2: Apply a chrome appearance to WHEEL.PRT .
The wheel model was created using the default Creo Parametricgray color. It will look much better in the final rendering if youapply a chrome appearance from the appearance gallery.
1. Select Shading With Edgesfrom the display style drop-downmenu in the Graphics toolbar.
2. In the model tree, right-clickWHEEL.PRT and select Openfrom the pop-up menu.
3. In the ribbon, select the View tab.
4. In the Model Display group, click the down-arrow and text directly
under the Appearance Gallery color ball.
5. In the Library section of theAppearance dialog box, selectadv-metal-chrome.dmt fromthe Metals folder of the PhotoluxLibrary:
• Click std-metals.dmt.
• Ensure the Photolux Libraryfolder is open.
• Click to expand the Metalsfolder node.
• Scroll as required and selectadv-metal-chrome.dmt.
6. Click to select adv-chrom-platefrom the Library section of theAppearance dialog box.
The Appearance Gallerywill close, the color balldisplay will change toadv-chrom-plate and thecursor will change to a
Paintbrush .
© 2009 PTC Module 6 | Page 5

7. Select the name WHEEL.PRT atthe top of the model tree.
8. Middle-click or click OK fromthe Select dialog to apply theappearance.
The true chrome shinewill be displayed when themodel is rendered.
Step 3: Apply a matted black rubber appearance to TIRE.PRT.
The tire looks a little light and shiny. Apply a matted black rubberappearance from the appearance gallery.
1. Click Close Window from the Quick Access toolbar.
2. In the model tree, right-click TIRE.PRT and select Open from thepop-up menu.
3. In the ribbon, select the View tab.
4. In the Model Display group, click the down-arrow and text directly
under the Appearance Gallery color ball.
5. In the Library section of theAppearance dialog box, selectadv-rubber.dmt from the Miscfolder of the Photolux Library..
• Click adv-metal-chrome.dmt.
• Ensure the Photolux Libraryfolder is open.
• Click to expand theMisc foldernode.
• Scroll as required and selectadv-rubber.dmt.
Module 6 | Page 6 © 2009 PTC

6. Click to selectadv-rubber-matte-black.
The Appearance Gallerywill close, the color balldisplay will change toadv-rubber-matte-blackand the cursor will change
to a Paintbrush .
7. Select the name TIRE.PRT atthe top of the model tree.
8. Middle-click or click OK fromthe Select dialog to apply theappearance.
9. Click Close Window fromthe Quick Access toolbar.
© 2009 PTC Module 6 | Page 7

Step 4: Set the wheel assembly into a scene and room.
1. In the ribbon, select the Rendertab.
2. Click Scene from the Scenegroup.
3. In the Scene Gallery section ofthe Scene tab:
• Click to select the scenePhotolux-Studio-Soft.
• Right-clickPhotolux-Studio-Soft andselect Activate from thepop-up menu.
4. With the Scenes dialog box still open, select the Room tab.
• In the Size section of the tab, click Align Floor Against Model
.
The floor is now snapped tothe lowest geometry on themodel.
5. Zoom out until you can see theround floor of the room.
• Press and hold CTRL, thenmiddle-click and drag upwardto zoom out.
6. Use spin, pan, and zoom toolsto orient your model to anorientation you want to render:
• Middle-click and drag to spin.
• Press and hold SHIFT, thenmiddle-click and drag to pan.
• Press and hold CTRL, thenmiddle-click and drag to zoom.
7. Click Close from the Scenesdialog box.
Module 6 | Page 8 © 2009 PTC

Step 5: Render the wheel assembly.
1. Click Render Window fromthe Render group.
By default, the wheel isrendered using the Draftquality settings.
2. After the model has finishedrendering, click Render Setup
from the Setup group.
3. In the Render Setup dialog box:
• Click the Quality setting Draftand select High from thedrop-down list.
• Click Close.
4. Click Render Window .
As you increase the quality of the render, you also increase thetime required to complete the render. Setting the quality level toMaximum will create an even higher quality image, however, itmay take too long to complete on some lower-end computers.
5. Click Save .
6. Click Close Window untilyou have closed all of the openwindows.
© 2009 PTC Module 6 | Page 9

Step 6: Set the Aston Martin assembly into a scene and render it.
1. Click Open and double-clickASTON_MARTIN.ASM.
2. Select Shading from thedisplay style drop-down menu inthe Graphics toolbar.
3. In the model tree, right-clickon SLOT_GUIDE.ASM andselect Set Representation to >Exclude.
We have temporarily excluded SLOT_GUIDE.ASM so thatwhen we setup the render scene, the floor of the room will beautomatically moved to the bottom of the tires rather than thebottom of the slot guide.
4. In the ribbon, select the Rendertab.
5. Click Scene from the Scenegroup.
6. In the Scene Gallery section ofthe Scene tab:
• Click to select the scenePhotolux-Studio-Soft.
• Right-clickPhotolux-Studio-Soft andselect Activate from thepop-up menu.
Module 6 | Page 10 © 2009 PTC

7. With the Scenes dialog box still open, select the Room tab.
• In the Size section of the tab, click Align Floor Against Model
.
The floor is now snapped to the bottom of the tires.
8. Zoom out until you can see the round floor of the room.
9. Use spin, pan, and zoom tools to orient your model to an orientationyou want to render:
• Middle-click and drag to spin.
• Press and hold SHIFT, then middle-click and drag to pan.
• Press and hold CTRL, then middle-click and drag to zoom.
10. Click Close from the Scenes dialog box.
© 2009 PTC Module 6 | Page 11

The last time you rendered the wheel assembly, the output qualitywas set to High. Unless you have restarted Creo Parametricsince that time, the quality is still set at High. If your computer hada hard time rendering the wheel assembly at the higher quality,you may want to set it back to Draft before you render the car.
11. Click Render Window .
Step 7: Save the rendered image and then save and close the models.
1. Click File > Save As > Save a Copy to open the Save a Copy dialogbox:
• Browse to the folder Module_02-06.
• Click JPEG (*.jpg) from the Type drop-down list.
• Click OK to save the JPEG file.
Module 6 | Page 12 © 2009 PTC

2. Click Save .
3. Click Close Window until you have closed all of the openwindows.
4. Click Erase Not Displayed from the Data group of the Hometab.
5. Click OK from the Erase Not Displayed dialog box.
Congratulations! You have completed the rendering exercise forthe Aston Martin slot car.
This completes the procedure.
© 2009 PTC Module 6 | Page 13

Copyright
Creo Parametric - Advanced PrimerCopyright © 2011 Parametric Technology Corporation. All Rights Reserved.User and training guides and related documentation from Parametric Technology Corporation and itssubsidiary companies (collectively “PTC”) is subject to the copyright laws of the United States andother countries and is provided under a license agreement that restricts copying, disclosure, and useof such documentation. PTC hereby grants to the licensed software user the right to make copies inprinted form of this documentation if provided on software media, but only for internal/personal useand in accordance with the license agreement under which the applicable software is licensed. Anycopy made shall include the PTC copyright notice and any other proprietary notice provided by PTC.Training materials may not be copied without the express written consent of PTC. This documentationmay not be disclosed, transferred, modified, or reduced to any form, including electronic media, ortransmitted or made publicly available by any means without the prior written consent of PTC and noauthorization is granted to make copies for such purposes.Information described herein is furnished for general information only, is subject to change withoutnotice, and should not be construed as a warranty or commitment by PTC. PTC assumes noresponsibility or liability for any errors or inaccuracies that may appear in this document.The software described in this document is provided under written license agreement, containsvaluable trade secrets and proprietary information, and is protected by the copyright laws of theUnited States and other countries. It may not be copied or distributed in any form or medium,disclosed to third parties, or used in any manner not provided for in the software licenses agreementexcept with written prior approval from PTC.UNAUTHORIZED USE OF SOFTWARE OR ITS DOCUMENTATION CAN RESULT IN CIVILDAMAGES AND CRIMINAL PROSECUTION. PTC regards software piracy as the crime it is,and we view offenders accordingly. We do not tolerate the piracy of PTC software products, andwe pursue (both civilly and criminally) those who do so using all legal means available, includingpublic and private surveillance resources. As part of these efforts, PTC uses data monitoring andscouring technologies to obtain and transmit data on users of illegal copies of our software. Thisdata collection is not performed on users of legally licensed software from PTC and its authorizeddistributors. If you are using an illegal copy of our software and do not consent to the collectionand transmission of such data (including to the United States), cease using the illegal version, andcontact PTC to obtain a legally licensed copy.For Important Copyright, Trademark, Patent, and Licensing Information:For Windchill products, select About Windchill at the bottom of the product page. For InterCommproducts, on the Help main page, click the link for Copyright 20xx. For other products, click Help >About on the main menu of the product.Registered Trademarks of PTCAdvanced Surface Design, Advent, Arbortext, Behavioral Modeling, CADDS, CalculationManagement Suite, CoCreate, Computervision, CounterPart, Create Collaborate Control, Designate,EPD, EPD.Connect, Epic Editor, Expert Machinist, GRANITE, HARNESSDESIGN, Info*Engine,InPart, InterComm, IsoCompose, IsoDraw, IsoView, ITEDO, Mathcad, Mathsoft, MECHANICA,NetRegulus, NetRM, the NetRegulus logo, Optegra, OneSpace, Parametric Technology, ParametricTechnology Corporation, PartSpeak, PHOTORENDER, ProductPoint, Pro/DESKTOP, Pro/E,Pro/ENGINEER, Pro/HELP, Pro/INTRALINK, Pro/MECHANICA, Pro/TOOLKIT, Product First,Product Development Means Business, Product Makes the Company, PTC, the PTC logo,PT/Products, Shaping Innovation, Simple Powerful Connected, StudyWorks, The ProductDevelopment Company, The Way to Product First, Wildfire, Windchill, Windchill DynamicDesignLink,Windchill MPMLink, Windchill PartsLink, Windchill PDMLink..Trademarks of PTC3B2, 3DPAINT, Arbortext Editor, Arbortext Content Manager, Arbortext Contributor, ArbortextCompanion for Word®, Arbortext Advanced Print Publisher, Arbortext Publishing Engine, ArbortextDynamic Link Manager, Arbortext Styler, Arbortext Architect, Arbortext Digital Media Publisher,Arbortext CSDB for S1000D®, Arbortext IETP Viewer for S1000D®, Arbortext Reviewer forS1000D®, Arbortext Authoring Interface for S1000D®, Arbortext Editor for S1000D®, ArbortextPublisher for S1000D®, Arbortext Provisioning Manager, Arbortext Provisioning Reviewer, ArbortextProvisioning Transaction Manager, Arbortext Parts Catalog Manager for S1000D®, ArbortextLearning Content Manager for S1000D®, Arbortext Learning Management System, ArbortextReviewer for EAGLE, Arbortext LSA Interface, Associative Topology Bus, AutobuildZ, AutoRound, CDRS, CoCreate Modeling, CoCreate Drafting, CoCreate Model Manager, CoCreateDrawing Manager, CV, CVact, CVaec, CVdesign, CV DORS, CVMAC, CVNC, CVToolmaker,Create Collaborate Control Communicate, ECAD Compare, EDAcompare, EDAconduit,DataDoctor, DesignSuite, DIMENSION III, Distributed Services Manager, DIVISION, e/ENGINEER,eNC Explorer, Expert Framework, Expert MoldBase, Expert Toolmaker, FlexPDM, FlexPLM,Harmony, Import Data Doctor, InSight, InterComm Expert, InterComm EDAcompare, InterComm

EDAconduit, collective creativity, ISSM, KDiP, Knowledge Discipline in Practice, Knowledge SystemDriver, ModelCHECK, MoldShop, NC Builder, PDS Workbench, POLYCAPP, Pro/ANIMATE,Pro/ASSEMBLY, Pro/CABLING, Pro/CASTING, Pro/CDT, Pro/CMM, Pro/COLLABORATE,Pro/COMPOSITE, Pro/CONCEPT, Pro/CONVERT, Pro/DATA for PDGS, Pro/DESIGNER,Pro/DETAIL, Pro/DIAGRAM, Pro/DIEFACE, Pro/DRAW, Pro/ECAD, Pro/ENGINE, Pro/FEATURE,Pro/FEM POST, Pro/FICIENCY, Pro/FLY THROUGH, Pro/HARNESS, Pro/INTERFACE,Pro/LANGUAGE, Pro/LEGACY, Pro/LIBRARYACCESS, Pro/Manikin, Pro/MESH, Pro/Model.View,Pro/MOLDESIGN, Pro/NC ADVANCED, Pro/NC CHECK, Pro/NC MILL, Pro/NC POST, Pro/NCSHEETMETAL, Pro/NC TURN, Pro/NC WEDM, Pro/NC Wire EDM, Pro/NETWORK ANIMATOR,Pro/NOTEBOOK, Pro/PDM, Pro/PHOTORENDER, Pro/PIPING, Pro/PLASTIC ADVISOR,Pro/PLOT, Pro/POWER DESIGN, Pro/PROCESS, Pro/REPORT, Pro/REVIEW, Pro/SCAN TOOLS,Pro/SHEETMETAL, Pro/SURFACE, Pro/TABLE, Pro/TOOLMAKER, Pro/VERIFY, Pro/Web.Link,Pro/Web.Publish, Pro/WELDING, ProductView, ProductView ECAD Compare, ProductViewValidate, PTC Precision, PTC DesignQuest, PTC Channel Advantage, Realized Value Platform,Routed Systems Designer, Shrinkwrap, Validation Manager, Warp, Windchill ProjectLink, WindchillSupplyLink, Windchill RequirementsLink, and Windchill Supplier Management..Patents of Parametric Technology Corporation or a SubsidiaryRegistration numbers and issue dates follow. Additionally, equivalent patents may be issued orpending outside of the United States. Contact PTC for further information. 5,771,392/23-June-1998;(EP)0240557/02-October-1986; 5,423,023/05-June-1990; 4,956,771/11-September-1990;5,058,000/15-October-1991; 5,140,321/18-August-1992; 5,297,053/22-March-1994;5,428,772/27-June-1995; 5,469,538/21-Nov-1995; 5,469,538/21-November-1995;5,506,950/09-April-1996; 4,310,614/30-April-1996; 5,513,316/30-April-1996;5,526,475/11-June-1996; 5,561,747/01-October-1996; 5,526,475/6-November-1996;5,557,176/09-November-1996; 5,680,523/21-October-1997; 5,689,711/18-November-1997;5,771,392/23-June-1998; 5,838,331/17-November-1998; 5,844,555/01-Dec-1998;5,844,555/1-December-1998; 5,850,535/15-December-1998; 4,310,615/21-December-1998;4,310,614/22-April-1999; 6,275,866/14-Aug-2001; 6,275,866/14-August-2001;6,308,144/23-October-2001; 6,447,223B1/10-Sept-2002; 6,473,673B1/29-October-2002;PCT 03/05061/13-Feb-2003; 6,545,671B1/08-April-2003; GB2354683B/04-June-2003;GB2354683B/04-June-2003; 6,580,428B1/17-June-2003; GB2354685B/18-June-2003;GB2354684B/02-July-2003; 6,608,623B1/19-August-2003; 6,608,623B1/19-August-2003;6,625,607B1/23-September-2003; GB2354924/24-September-2003; GB2384125/15-October-2003;GB2354686/15-October-2003; GB2353376/05-November-2003; GB2354096/12-November-2003;GB2353115/10-December-2003; 6,665,569B1/16-December-2003; (KO)415475/6-January-2004;GB2388003B/21-January-2004; GB2365567/10-March-2004; EU0812447/26-May-2004;GB2363208/25-August-2004; GB2366639B/13-October-2004; 7,006,956/28-February-2006;7,013,246B1/14-March-2006; 7,013,468/14-March-2006; (JP)3,962,109/25-May-2007;7,464,007B2/09-December-2008.Third-Party TrademarksAdobe, Acrobat, Adobe LiveCycle PDF Generator, Distiller, FrameMaker and the Acrobat logo aretrademarks of Adobe Systems Incorporated. ANSYS is a registered trademark of ANSYS Inc. IRun and ISOGEN are registered trademarks of Alias Ltd. TeX is a trademark of the AmericanMathematical Society. Apple, Mac, Mac OS, Panther, and Tiger are trademarks or registeredtrademarks of Apple Computer, Inc. AutoCAD, Autodesk Inventor, and RealDWG are trademarksor registered trademarks of Autodesk, Inc. Baan is a registered trademark of Baan Company. BEAWebLogic Server and BEA WebLogic Platform are trademarks of BEA Systems, Inc. CATIA andCADAM are registered trademarks of Dassault Systemes, S.A. The Sigma Check icon, CETOL,CETOL 6 Sigma are trademarks of Sigmetrix, LLC. MEDUSA and STHENO are trademarks ofCAD Schroer GmbH. Allegro, Cadence, and Concept are registered trademarks of CadenceDesign Systems, Inc. Cognos is a registered trademark of Cognos Corporation. CYA, iArchive,HOTbackup, and Virtual StandBy are trademarks or registered trademarks of CYA Technologies,Inc. DataDirect Connect is a registered trademark of DataDirect Technologies. Documentumis a registered trademark of EMC Corporation. PDGS is a registered trademark of Ford MotorCompany. JAWS is a registered trademark of Freedom Scientific BLV Group, LLC in the UnitedStates and other countries. Geomagic is a registered trademark of Geomagic, Inc. 2D DCM,3D DCM, CDM and AEM are trademarks of D-Cubed Ltd. HP, Hewlett-Packard, and HP-UX areregistered trademarks of Hewlett-Packard Company. IBM, DB2, DOORS, AIX, and WebSphereare registered trademarks of IBM Corporation. Advanced ClusterProven, ClusterProven, theClusterProven design, Rational Rose, and Rational ClearCase are trademarks or registeredtrademarks of International Business Machines in the United States and other countries and areused under license. IBM Corporation does not warrant and is not responsible for the operation ofthis software product. Intel is a registered trademark of Intel Corporation. OrbixWeb is a registeredtrademark of IONA Technologies PLC. Feature-Following Anti-Aliasing is a trademark of LightWorkDesign. Linux is a registered trademark of Linus Torvalds. 3Dconnexion is a registered trademark ofLogitech International S.A. MSC.NASTRAN is a registered trademark of MSC Software Corporation.MainWin and Mainsoft are trademarks of Mainsoft Corporation. MatrixOne is a trademark ofMatrixOne, Inc. Mentor Graphics and Board Station are registered trademarks and 3D Design,

AMPLE, and Design Manager are trademarks of Mentor Graphics Corporation. Helix is a trademarkof Microcadam, Inc. Microsoft, ActiveX, Excel, JScript, Vista, Windows, the Windows logo, VisualBasic, the Visual Basic logo, SharePoint, and Active Accessibility are trademarks or registeredtrademarks of Microsoft Corporation in the United States and/or other countries. Moldflow is aregistered trademark of Moldflow Corporation. Mozilla and Firefox are registered trademarks of theMozilla Foundation. FLEXnet, FLEXnet Publisher, InstallShield, and InstallAnywhere are trademarksor registered trademarks of Acresso Software Inc. Netscape, Netscape Navigator, NetscapeCommunicator, and the Netscape N and Ship's Wheel logos are registered trademarks or servicemarks of Netscape Communications Corporation in the U.S. and other countries. OSF/Motif andMotif are trademarks of the Open Software Foundation, Inc. Oracle and interMedia are registeredtrademarks of Oracle Corporation. Palm Computing, Palm OS, Graffiti, HotSync, and Palm Modemare registered trademarks, and Palm III, Palm IIIe, Palm IIIx, Palm V, Palm Vx, Palm VII, Palm,More connected, Simply Palm, the Palm Computing platform logo, all Palm logos, and HotSynclogo are trademarks of Palm, Inc. or its subsidiaries. PANTONE is a registered trademark andPANTONE CALIBRATED is a trademark of Pantone, Inc. Proximity and Linguibase are registeredtrademarks of Proximity Technology, Inc. Elan License Manager and Softlock are trademarks ofRainbow Technologies, Inc. RAND is a trademark of RAND Worldwide. RosettaNet is a trademarkand Partner Interface Process and PIP are registered trademarks of RosettaNet, a nonprofitorganization. SAP and R/3 are registered trademarks of SAP AG Germany. IRIX is a registeredtrademark of Silicon Graphics, Inc. S1000D (R) is a registered trademark of ASD. SolidWorksand eDrawings are trademarks or registered trademarks of SolidWorks Corporation. SPARC is aregistered trademark and SPARCStation is a trademark of SPARC International, Inc. (Productsbearing the SPARC trademarks are based on an architecture developed by Sun Microsystems,Inc.) All SPARC trademarks are used under license and are trademarks or registered trademarks ofSPARC International, Inc. in the United States and in other countries. Sun, Sun Microsystems, theSun logo, Solaris, UltraSPARC, Java and all Java based marks, and "The Network is the Computer"are trademarks or registered trademarks of Sun Microsystems, Inc. in the United States and inother countries. Symbolics, CLOE Runtime, and Minima are trademarks, and CLOE, Genera, andZetalisp are registered trademarks of Symbolics, Inc. UNIX is a registered trademark of The OpenGroup. TIBCO is a registered trademark and TIBCO ActiveEnterprise, TIBCO Designer, TIBCOEnterprise Message Service, TIBCO Rendezvous, and TIBCO BusinessWorks are trademarks orregistered trademarks of TIBCO Software Inc. in the United States and other countries. I-DEAS,Metaphase, Parasolid, SHERPA, Solid Edge, TeamCenter, UG NX, and Unigraphics are trademarksor registered trademarks of UGS Corp., a Siemens group company. Galaxy Application Environmentis a licensed trademark of Visix Software, Inc. WebEx is a trademark of WebEx Communications,Inc. API Tookit is a trademark of InterCAP Graphics Systems, Inc. BEA andWebLogic are registeredtrademarks of BEA Systems, Inc. X Window System is a trademark of X Consortium, Inc.
VERICUT is copyrighted software and a registered trademark of CGTech. Product may containRealDWG technology by Autodesk, Inc., Copyright 1998-2006 Autodesk, Inc. All rights reserved(www.autodesk.com/autodeskrealdwg). File Filters © 1986-2002 Circle Systems, Inc. Certainbusiness intelligence reporting functionality is powered by Cognos. DFORMD.DLL is copyrightedsoftware from Compaq Computer Corporation and may not be distributed. Pro/TOOLMAKERcontains licensed third-party technology: 5AXMSURF is copyrighted software of ModuleWorksGmbH. Certain 3D Read CAD data exchange tools are copyrighted software of Datakit SRL.Hyphenologist Copyright 1986-1999, Computer Hyphenation Ltd. All rights reserved. RetrievalWareis copyrighted software of Convera Corporation. DataDirect Connect is copyrighted software ofDataDirect Technologies. PStill and PSRaster software is copyright © Dipl.- Ing. Frank Siegert,1996 to present. FAST InStream is copyright © of Fast Search & Transfer, Inc. Portions of theMathcad Solver © 1990-2002 by Frontline Systems, Inc. Exceed and Exceed 3D are copyrightedsoftware of Hummingbird Ltd., a division of Open Text Corporation. Rational Rose and RationalClearCase are copyrighted software of IBM Corp. IBM Corporation does not warrant and is notresponsible for the operation of this software product. G POST is copyrighted software and aregistered trademark of Austin NC. Xdriver and 3dxsrv are copyrighted software of 3Dconnexion,Inc, a Logitech International S.A. company. Larson CGM Engine 9.4, Copyright © 1992-2006 LarsonSoftware Technology, Inc. All rights reserved. LightWork Libraries are copyrighted by LightWorkDesign 1990–2001. MainWin Dedicated Libraries are copyrighted software of Mainsoft Corporation.Microsoft Jet, Microsoft XML, Technology "Powered by Groove", Microsoft SQL Server 2005, VisualBasic for Applications, Internet Explorer and Portions compiled from Microsoft Developer NetworkRedistributable Sample Code, including Microsoft DLL redistributables, are all copyrighted softwareof Microsoft Corporation. Pro/PLASTIC ADVISOR is powered by Moldflow technology. FatigueAdvisor nCode libraries from nCode International. NuTCRACKER Server Operating Environment iscopyrighted software of MKS Inc.
Oracle 8i run time, Oracle 9i run time, and Oracle 10g run time are Copyright 2002–2004Oracle Corporation. Oracle programs provided herein are subject to a restricted use licenseand can only be used in conjunction with the PTC software they are provided with. PDFlibsoftware is copyright © 1997-2005 PDFlib GmbH. All rights reserved. Proximity LinguisticTechnology provides Spelling Check/Thesaurus portions of certain software products, including:The Proximity/Bertelsmann Lexikon Verlag Database. Copyright © 1997 Bertelsmann Lexikon

Verlag. Copyright © 1997, All Rights Reserved, Proximity Technology, Inc.; The Proximity/C.A.Strombertg AB Database. Copyright © 1989 C.A. Strombertg AB. Copyright © 1989, All RightsReserved, Proximity Technology, Inc.; The Proximity/Editions Fernand Nathan Database. Copyright© 1984 Editions Fernand Nathan. Copyright © 1989, All Rights Reserved, Proximity Technology,Inc.; The Proximity/Espasa-Calpe Database. Copyright © 1990 Espasa-Calpe. Copyright ©1990, All Rights Reserved, Proximity Technology, Inc.; The Proximity/Dr. Lluis de Yzaguirrei Maura Database. Copyright © 1991 Dr. Lluis de Yzaguirre i Maura Copyright © 1991, AllRights Reserved, Proximity Technology, Inc.; The Proximity/Franklin Electronic Publishers, Inc.Database. Copyright © 1994 Franklin Electronic Publishers, Inc. Copyright © 1994, All RightsReserved, Proximity Technology, Inc.; The Proximity/Hachette Database. Copyright © 1992Hachette. Copyright © 1992, All Rights Reserved, Proximity Technology, Inc.; The Proximity/IDEa.s. Database. Copyright © 1989, 1990 IDE a.s. Copyright © 1989, 1990, All Rights Reserved,Proximity Technology, Inc.; The Proximity/Merriam-Webster, Inc. Database. Copyright © 1984, 1990Merriam-Webster, Inc. Copyright © 1984, 1990, All Rights Reserved, Proximity Technology, Inc.;The Proximity/Merriam-Webster, Inc./Franklin Electronic Publishers, Inc. Database. Copyright ©1990 Merriam-Webster Inc. Copyright © 1994 Franklin Electronic Publishers, Inc. Copyright © 1994,All Rights Reserved, Proximity Technology, Inc.; The Proximity/Munksgaard International PublishersLtd. Database. Copyright © 1990 Munksgaard International Publishers Ltd. Copyright © 1990, AllRights Reserved, Proximity Technology, Inc.; The Proximity/S. Fischer Verlag Database. Copyright© 1983 S. Fischer Verlag. Copyright © 1997, All Rights Reserved, Proximity Technology, Inc.; TheProximity/Van Dale Lexicografie by Database. Copyright © 1995, 1997 Van Dale Lexicografie by.Copyright © 1996, 1997, All Rights Reserved, Proximity Technology, Inc.; The Proximity/WilliamCollins Sons & Co. Ltd. Database. Copyright © 1984, 1990 William Collins Sons & Co. Ltd.Copyright © 1988, 1990, All Rights Reserved, Proximity Technology, Inc.; The Proximity/ZanichelliDatabase. Copyright © 1989 Zanichelli. Copyright © 1989, All Rights Reserved, ProximityTechnology, Inc. Certain license management is based on Elan License Manager © 1989-1999Rainbow Technologies, Inc. All rights reserved. PDEFIT © 1995-2002 Dr. Klaus Schittkowski.
MuPAD OEM kernel, version 3.2.1 (Mathsoft Kernel) © 2005 by SciFace Software GmbH & Co.KG. TetMesh GHS3D provided by Simulog Technologies, a business unit of Simulog S.A. HOOPSgraphics system is a proprietary software product of, and is copyrighted by, Tech Soft America,Inc. TECHNOMATIX is copyrighted software and contains proprietary information of TechnomatixTechnologies Ltd. TIBCO ActiveEnterprise, TIBCO Designer, TIBCO Enterprise Message Service,TIBCO Rendezvous, and TIBCO BusinessWorks are provided by TIBCO Software Inc. Parasolidis copyrighted software of UGS Corp, a Siemens group company. VisTools library is copyrightedsoftware of Visual Kinematics, Inc. (VKI) containing confidential trade secret information belongingto VKI Technology "Powered by WebEx" is provided by WebEx Communications, Inc. Certaingraphics-handling portions are based on the following technologies: GIF: Copyright 1989, 1990 KirkL. Johnson. The author disclaims all warranties with regard to this software, including all impliedwarranties of merchantability and fitness. In no event shall the author be liable for any special,indirect, or consequential damages or any damages whatsoever resulting from loss of use, dataor profits, whether in an action of contract, negligence, or other tortious action, arising out of or inconnection with the use or performance of this software. JPEG: This software is based in part onthe work of the Independent JPEG Group. PNG: Copyright 2004-2006 Glenn Randers-Pehrson.TIFF: Copyright 1988-1997 Sam Leffler, Copyright © 1991-1997 Silicon Graphics, Inc. Thesoftware is provided AS IS and without warranty of any kind, express, implied, or otherwise,including without limitation, any warranty of merchantability or fitness for a particular purpose. Inno event shall Sam Leffler or Silicon Graphics be liable for any special, incidental, indirect, orconsequential damages of any kind, or any damages whatsoever resulting from loss of use, dataor profits, whether or not advised of the possibility of damage, or on any theory of liability, arisingout of or in connection with the use or performance of this software. XBM, Sun Raster, and SunIcon: Copyright, 1987, Massachusetts Institute of Technology. Sentry Spelling-Checker Enginecopyright © 1994-2003 Wintertree Software, Inc. Portions of software documentation are usedwith the permission of the World Wide Web Consortium. Copyright © 1994–2006 World Wide WebConsortium, (Massachusetts Institute of Technology, European Research Consortium for Informaticsand Mathematics, Keio University). All Rights Reserved. http://www.w3.org/Consortium/Legal.Such portions are indicated at their points of use. Copyright and ownership of certain softwarecomponents is with YARD SOFTWARE SYSTEMS LIMITED, unauthorized use and copying ofwhich is hereby prohibited. YARD SOFTWARE SYSTEMS LIMITED 1987. (Lic. #YSS:SC:9107001)KCL (Kyoto Common Lisp) (C) Taiichi Yuasa and Masami Hagiya, 1984. 2D DCM, 3D DCM, CDM,AEM Copyright D-Cubed Ltd. 2006. BCGControlBar library (C) BCGSoft. Portions of this softwarecopyright Geometric Software Solutions Company Limited, 2004-2005. PDFNet SDK is copyrightPDFTron Systems Inc., 2001-2006, and distributed by CoCreate Software GmbH under license.All rights reserved. FE Analysis: Portions of this software copyright The MacNeal-SchwendlerCorporation 1996-2006. GOelan V4 is a registered trademark of CN Industries. Portions ofthis software copyright LightWork Design Limited 1990 - 2005, 2006. Cabling copyright MIPLtd http://www.mip-group.com. PartLibrary copyright TECHSOFT Datenverarbeitung GmbH(http://www.techsoft.at).

LAPACK libraries used are freely available at http://www.netlib.org (authors are Anderson, E.and Bai, Z. and Bischof, C. and Blackford, S. and Demmel, J. and Dongarra, J. and Du Croz, J.and Greenbaum, A. and Hammarling, S. and McKenney, A. and Sorensen, D.). Certain softwarecomponents licensed in connection with the Apache Software Foundation and/or pursuant tothe Apache Software License Agreement (version 2.0 or earlier) or similar style license. Allrights are reserved by the Licensor of such works, and use is subject to the terms and limitations(and license agreement) at http://www.apache.org. This software is provided by its ContributorsAS IS, WITHOUT WARRANTIES OR CONDITIONS OF ANY KIND, and any expressed orimplied warranties, including, but not limited to, the implied warranties of title non-infringement,merchantability and fitness for a particular purpose are disclaimed. In no event shall the ApacheSoftware Foundation or its Contributors be liable for any direct, indirect, incidental, special,exemplary, or consequential damages (including, but not limited to, procurement of substitutegoods or services; loss of use, data, or profits; or business interruption) however caused and onany theory of liability, whether in contract, strict liability, or tort (including negligence or otherwise)arising in any way out of the use of this software, even if advised of the possibility of such damage.Software includes: Apache Server, Axis, Ant, Tomcat, Xalan, Xerces, Batik, Jakarta, Apache POI,Jakarta Regular Expression, Commons-FileUpload, Solr, Tika, and XMLBeans IBM XML Parserfor Java Edition, the IBM SaxParser and the IBM Lotus XSL Edition DITA-OT - Apache LicenseVersion IzPack: Java-based Software Installers Generator (http://www.izforge.com/izpack/start)Jakarta–ORO NekoHTML and CyberNeko Pull Parser software developed by Andy Clark© Copyright Andy Clark. All rights reserved. Lucene (http://lucene.apache.org) Quartz(scheduler) Copyright 2004-20xx OpenSymphony (http://www.opensymphony.com/quartz/)Jetty Copyright Mortbay.Org (http://www.mortbay.com/mbindex.html) Google Web Toolkit,Google Web Toolkit (GWT) Incubator, and GWTx; Copyright Google U3D Library Copyright1999 - 2006 Intel Corporation MyFaces (http://myfaces.apache.org/index.html) JDBCAppender(http://www.dankomannhaupt.de/projects/index.html) EHcache Copyright 2003-2007Luck Consulting Pty Ltd (http://ehcache.sourceforge.net/) cglib Copyright 2002-2004(http://cglib.sourceforge.net/) LOG4PLSQL Copyright 2002 The LOG4PLSQL project team. All rightsreserved (http://log4plsql.sourceforge.net) Log4cxx (http://logging.apache.org/log4cxx/index.html)SPRING - See www.springframework.org. HttpComponents project software(http://hc.apache.org/) Commons Codec (http://commons.apache.org/codec/) Apache Log4net(http://logging.apache.org/log4net/) Beans Scripting Framework (BSF) Copyright 2002-2006The Apache Software Foundation - includes software developed at The Apache SoftwareFoundation (http://www.apache.org/) WebFX Coolbar 2 (http://webfx.eae.net) WebFX CrossBrowser tree Widget 1.17 (http://webfx.eae.net) PCRE 7.2 (http://www.pcre.org/) JDOMCopyright 2000-2004 Jason Hunter & Brett McLaughlin. All rights reserved. This softwareconsists of voluntary contributions made by many individuals on behalf of the JDOM Project(http://www.jdom.org/) The Ajax Control Toolkit (including compiled, object code and source codeversions) are licensed only pursuant to the Microsoft Public License (Ms-PL) which can be foundat http://www.codeplex.com/AjaxControlToolkit. Microsoft Ajax Library provided pursuant to theMicrosoft Software Supplemental License Terms for Microsoft ASP.NET 2.0 AJAX Extensions. TheBoost Library - Misc. C++ software from http://www.boost.org; Provided pursuant to: Boost SoftwareLicense http://www.boost.org/more/license_info.html and http://www.boost.org/LICENSE_1_0.txt.AspectJ (http://www.eclipse.org/aspectj/) and Eclipse SWT (http://www.eclipse.org/swt/);Copyright 20xx The Eclipse Foundation are distributed under the Eclipse Public License (EPL)(http://www.eclipse.org/org/documents/epl-v10.php) and is provided AS IS by authors with nowarranty therefrom and any provisions which differ from the EPL are offered by PTC. Upon request,PTC will provide the source code for such software for a charge no more than the cost of performingthis distribution. Command Line Argument Parser. Author [email protected] is licensedpursuant to the Shared Source License for Command Line Parser Library and is provided by theauthor "as is" with no warranties (none whatsoever). This means no express, implied, or statutorywarranty, including without limitation, warranties of merchantability or fitness for a particularpurpose, or any warranty of title or noninfringement. No contributor to the Software will be liablefor any of those types of damages known as indirect, special, consequential, or incidental relatedto the Software to the maximum extent the law permits, no matter what legal theory it’s basedon. The following software is incorporated pursuant to the "BSD License" (Berkeley SoftwareDistribution) or a similar style license: iCal4j is Copyright © 2005, Ben Fortuna, All rights reserved.Dojo – Copyright 2005, The Dojo Foundation, All rights reserved. Jaxen (shipped as part of dom4j)Copyright 2003-2006 The Werken Company. All Rights Reserved. XMP (eXtensible MetadataPlatform) technology from Adobe - Copyright © 1999 - 2007, Adobe Systems Incorporated. Allrights reserved. Groovy Copyright 2003 James Strachan and Bob McWhirter. All Rights Reserved.Firebug Copyright 2007, Parakey Inc. JMSN (http://sourceforge.net/projects/jmsn/) Thumb PlugTGA Copyright 1991-2003 Echidna, Inc. All rights reserved. ASM Copyright 2000-2005 INRIA,France Telecom. All rights reserved. PDFBox Copyright 2002-2007, www.pdfbox.org. All rightsreserved. BerkeleyDB (as used with OpenDS); Copyright 1990-20xx Oracle Corporation. All rightsreserved.
MiGLayout - The Java Layout Manager for Swing & SWT; Copyright 2004, Mikael Grev, MiGInfoCom AB. ([email protected]). All rights reserved. PCRE - Perl Compatible Regular

Expressions – Basic Library Functions written by: Philip Hazel, Email local part: ph10, Emaildomain: cam.ac.uk, University of Cambridge Computing Service, Cambridge, England. Copyright1997-2008 University of Cambridge. All rights reserved. SIMILE Copyright The SIMILE Project2006. All rights reserved. Note that JQuery: Copyright 2008 John Resig (www.jquery.com) isincluded in the Ajax section of this distribution and is covered under the MIT LICENSE (see below).Launch4j (http://launch4j.sourceforge.net/). The head subproject (the code which is attached to thewrapped jars) is licensed under the MIT license. Launch4j may be used for wrapping closed source,commercial applications. JempBox Java XMP Library: Copyright 2006-2007, www.jempbox.org.All rights reserved. FontBox - Copyright 2003-2005, www.fontbox.org. All rights reserved. ANTLRCopyright 2003-2008, Terence Parr. All rights reserved. Provided pursuant to ANTLR 3 License.(http://www.antlr.org/license.html) NativeCall Java Toolkit (http://sourceforge.net/projects/nativecall/)Redistribution and use of the above in source and binary forms, with or without modification,is permitted provided that the following conditions are met: (i) Redistributions of source codemust retain the above copyright notice, this list of conditions, and the following disclaimer; (ii)Redistributions in binary form must reproduce the above copyright notice, this list of conditions, andthe following disclaimer in the documentation and/or other materials provided with the distribution;and (iii) Neither the name of the copyright holder nor the names of any other contributors maybe used to endorse or promote products derived from this software without specific prior writtenpermission. THE ABOVE SOFTWARE IS PROVIDED BY THE COPYRIGHT HOLDERS ANDCONTRIBUTORS AS IS AND ANY EXPRESS OR IMPLIED WARRANTIES, INCLUDING,BUT NOT LIMITED TO, THE IMPLIED WARRANTIES OF MERCHANTABILITY AND FITNESSFOR A PARTICULAR PURPOSE ARE DISCLAIMED. IN NO EVENT SHALL THE COPYRIGHTOWNER OR CONTRIBUTORS BE LIABLE FOR ANY DIRECT, INDIRECT, INCIDENTAL,SPECIAL, EXEMPLARY, OR CONSEQUENTIAL DAMAGES (INCLUDING, BUT NOT LIMITEDTO, PROCUREMENT OF SUBSTITUTE GOODS OR SERVICES; LOSS OF USE, DATA, ORPROFITS; OR BUSINESS INTERRUPTION) HOWEVER CAUSED AND ON ANY THEORY OFLIABILITY, WHETHER IN CONTRACT, STRICT LIABILITY, OR TORT (INCLUDING NEGLIGENCEOR OTHERWISE) ARISING IN ANY WAY OUT OF THE USE OF THIS SOFTWARE, EVEN IFADVISED OF THE POSSIBILITY OF SUCH DAMAGE. The Java Getopt.jar file, copyright 19871997 Free Software Foundation, Inc. #ZipLib GNU software is developed for the Free SoftwareFoundation, Inc. 59 Temple Place, Suite 330, Boston, MA 02111-1307 USA, copyright © 1989,1991. PTC hereby disclaims all copyright interest in the program #ZipLib written by Mike Krueger.#ZipLib licensed free of charge and there is no warranty for the program, to the extent permittedby applicable law. Except when otherwise stated in writing the copyright holders and/or otherparties provide the program AS IS without warranty of any kind, either expressed or implied,including, but not limited to, the implied warranties of merchantability and fitness for a particularpurpose. The entire risk as to the quality and performance of the program is with you. Should theprogram prove defective, you assume the cost of all necessary servicing, repair, or correction.The following software is incorporated pursuant to the "MIT License" (or a similar license): SLF4Jsource code and binaries Copyright 2004-20xx QOS.ch. All rights reserved. Script.aculo.us (builton "prototype.conio.net"). Copyright 2005 Thomas Fuchs (http://script.aculo.us, http://mir.aculo.us).ICU4J software Copyright 1995-2003 International Business Machines Corporation and others.All rights reserved. Except as contained in this notice, the name of a copyright holder shall notbe used in advertising or otherwise to promote the sale, use or other dealings in this Softwarewithout prior written authorization of the copyright holder. json library: Copyright 2002 JSON.org.XPM Copyright 1989-95 GROUPE BULL. DynamicToolbar FCKEditor plugin, v1.1 (080810);Copyright 2008, Gonzalo Perez de la Ossa (http://dense13.com/). JQuery Copyright 2008 JohnResig (www.jquery.com) NATIVECALL (C) 2002–2008 Johann Burkard. All rights reserved.(http://johannburkard.de/software/nativecall/) The above software is used and redistributed underthe following permissions: Permission is hereby granted, free of charge, to any person obtaining acopy of this software and associated documentation files (the "Software"), to deal in the Softwarewithout restriction, including without limitation the rights to use, copy, modify, merge, publish,distribute, sublicense, and/or sell copies of the Software, and to permit persons to whom theSoftware is furnished to do so, subject to the following conditions: The above copyright noticeand this permission notice shall be included in all copies or substantial portions of the Software.THE SOFTWARE IS PROVIDED "AS IS", WITHOUT WARRANTY OF ANY KIND, EXPRESSOR IMPLIED, INCLUDING BUT NOT LIMITED TO THE WARRANTIES OF MERCHANTABILITY,FITNESS FOR A PARTICULAR PURPOSE AND NONINFRINGEMENT. IN NO EVENT SHALL THEAUTHORS OR COPYRIGHT HOLDERS BE LIABLE FOR ANY CLAIM, DAMAGES OR OTHERLIABILITY, WHETHER IN AN ACTION OF CONTRACT, TORT OR OTHERWISE, ARISING FROM,OUT OF OR IN CONNECTION WITH THE SOFTWARE OR THE USE OR OTHER DEALINGS INTHE SOFTWARE. The Java™ Telnet Applet (StatusPeer.java, TelnetIO.java, TelnetWrapper.java,TimedOutException.java), Copyright © 1996, 97 Mattias L. Jugel, Marcus Meißner, is redistributedunder the GNU General Public License. This license is from the original copyright holder and theApplet is provided WITHOUT WARRANTY OF ANY KIND. You may obtain a copy of the sourcecode for the Applet at http://www.mud.de/se/jta (for a charge of no more than the cost of physicallyperforming the source distribution), by sending e mail to [email protected] or [email protected]—youare allowed to choose either distribution method. Said source code is likewise provided under the

GNU General Public License. The following software, which may be called by certain PTC softwareproducts, is licensed under the GNU General Public License (http://www.gnu.org/licenses/gpl.txt)and if used by the customer is provided AS IS by the authors with no warranty therefrom withouteven the implied warranty of MERCHANTABILITY or FITNESS FOR A PARTICULAR PURPOSE(see the GNU GPL for more details). Upon request PTC will provide the source code for suchsoftware for a charge no more than the cost of performing this distribution: The PJA (Pure JavaAWT) Toolkit library (http://www.eteks.com/pja/en). The following unmodified libraries are likewisedistributed under the GNU-GPL: libstdc and #ziplib (each are provided pursuant to an exceptionthat permits use of the library in proprietary applications with no restrictions provided that thelibrary is not modified). The following products are licensed with the Classpath exception (Linkingthis library statically or dynamically with other modules is making a combined work based onthis library. Thus, the terms and conditions of the GNU General Public License cover the wholecombination. As a special exception, the copyright holders of this library give you permission tolink this library with independent modules to produce an executable, regardless of the licenseterms of these independent modules, and to copy and distribute the resulting executable underterms of your choice, provided that you also meet, for each linked independent module, theterms and conditions of the license of that module. An independent module is a module whichis not derived from or based on this library.): javax.media.j3d package; Copyright 1996-2008Sun Microsystems, Inc., 4150 Network Circle, Santa Clara, CA 95054, USA. All rights reserved.The source code is licensed under the GNU Public License, version 2. This project contains thefollowing third-party source code that is provided under separate licensing terms (These terms arefound in the THIRDPARTY-LICENSE-*.txt files in the top-level directory of this project. See theREADME-FIRST.txt for more information.). 3D Graphics API for the Java Platform 1.6.0 Pre-Releaselicensed under the GNU Public License, version 2, with the Classpath Exception. #ziplib(SharpZipLib, formerly NZipLib), a Zip, GZip, Tar and BZip2 library, Copyright 2000-20xx IC#Code.All rights reserved. #ZipLib was originally developed by Mike Krueger ([email protected]) withthe following attributions: (i) Zip/Gzip implementation (a Java version of the zlib) originally createdby the Free Software Foundation (FSF); (ii) zlib authors Jean-loup Gailly ([email protected]), MarkAdler ([email protected]) and its other contributors; (iii) Julian R Seward for the bzip2implementation; (iv) the Java port done by Keiron Liddle, Aftex Software ([email protected]);(v) tar implementation by Timothy Gerard Endres ([email protected]); and (vi) Christoph Wille forbeta testing, suggestions, and the setup of the Web site. The following is distributed under GNULesser General Public License (LGPL) which is at http://www.gnu.org/copyleft/lesser.html andis provided AS IS by authors with no warranty therefrom without even the implied warranty ofMERCHANTABILITY or FITNESS FOR A PARTICULAR PURPOSE (see the GNU LGPL formore details). Upon request, PTC will provide the source code for such software for a chargeno more than the cost of performing this distribution: eXist, an Open Source Native XMLDatabase. You may obtain a copy of the source code at http://exist.sourceforge.net/index.html.The source code is likewise provided under the GNU LGPL. GTK+ - The GIMP Toolkit. You mayobtain a copy of the source code at http://www.gtk.org/, which is likewise provided under theGNU LGPL. Java Port copyright 1998 by Aaron M. Renn ([email protected]). You mayobtain a copy of the source code at http://www.urbanophile.com/arenn/hacking/download.html.The source code is likewise provided under the GNU LGPL. JFreeChart is licensed underthe GNU LGPL and can be found at http://www.jfree.org. OmniORB Libraries (OmniOrb isdistributed under the terms and conditions of the GNU General Public License). The genericAIM library provided pursuant to the JAIMBot project (http://jaimbot.sourceforge.net/). JAIMBotis a modular architecture for providing services through an AIM client. It contains a genericAIM library and a Bot that uses this library to provide such services as Offline Messagingand Weather. PTC does not use the Bot. JExcelApi (http://jexcelapi.sourceforge.net/).7-Zip Copyright 1999-2006 Igor Pavlov (http://www.7-zip.org). libiconv Copyright 1991Free Software Foundation, Inc. (http://www.gnu.org/software/libiconv/). NHibernate ©200x, Red Hat Middleware, LLC. All rights reserved (http://www.hibernate.org/343.html).MPXJ © 2000-2008, Packwood Software (http://mpxj.sourceforge.net/). Java ServerFaces V3.0.1 (http://java.sun.com/javaee/javaserverfaces/). DevlL Image Lib 0.1.6.7(http://openil.sourceforge.net/). Zip Master Component Lib 1.79 (http://www.delphizip.org). ExadelRichFaces 3.0.1 (http://www.exadel.com). Jfree / Jfree Chart 1.0.0 (http://www.jfree.org/). MemoryDLLLoading code 0.0.1 (http://www.dsplayer.de/open source probjects/BTMemoryModule.zip).May include Jena Software © Copyright 2000, 2001, 2002, 2003, 2004, 2005 Hewlett-PackardDevelopment Company, LP. THIS SOFTWARE IS PROVIDED BY THE AUTHOR "AS IS'' ANDANY EXPRESS OR IMPLIED WARRANTIES, INCLUDING, BUT NOT LIMITED TO, THE IMPLIEDWARRANTIES OF MERCHANTABILITY AND FITNESS FOR A PARTICULAR PURPOSE AREDISCLAIMED. IN NO EVENT SHALL THE AUTHOR BE LIABLE FOR ANY DIRECT, INDIRECT,INCIDENTAL, SPECIAL, EXEMPLARY, OR CONSEQUENTIAL DAMAGES (INCLUDING,BUT NOT LIMITED TO, PROCUREMENT OF SUBSTITUTE GOODS OR SERVICES; LOSSOF USE, DATA, OR PROFITS; OR BUSINESS INTERRUPTION) HOWEVER CAUSED ANDON ANY THEORY OF LIABILITY, WHETHER IN CONTRACT, STRICT LIABILITY, OR TORT(INCLUDING NEGLIGENCE OR OTHERWISE) ARISING IN ANY WAY OUT OF THE USE OF

THIS SOFTWARE, EVEN IF ADVISED OF THE POSSIBILITY OF SUCH DAMAGE. Jena includes:Jakarta–ORO software developed by the Apache Software Foundation (described above).
ICU4J software Copyright © 1995-2003 International Business Machines Corporation and others Allrights reserved. Software is used under the MIT license described above. Except as contained inthis notice, the name of a copyright holder shall not be used in advertising or otherwise to promotethe sale, use or other dealings in this Software without prior written authorization of the copyrightholder. CUP Parser Generator Copyright ©1996-1999 by Scott Hudson, Frank Flannery, C. ScottAnanian–used by permission. The authors and their employers disclaim all warranties with regardto this software, including all implied warranties of merchantability and fitness. In no event shallthe authors or their employers be liable for any special, indirect or consequential damages, or anydamages whatsoever resulting from loss of use, data or profits, whether in an action of contract,negligence or other tortious action arising out of or in connection with the use or performance of thissoftware. ImageMagick software is Copyright © 1999-2005 ImageMagick Studio LLC, a nonprofitorganization dedicated to making software imaging solutions freely available. ImageMagickis freely available without charge and provided pursuant to the following license agreement:http://www.imagemagick.org/script/license.php. Info-Zip and UnZip (© 1990 2001 Info ZIP, AllRights Reserved) is provided AS IS and WITHOUT WARRANTY OF ANY KIND. For the completeInfo ZIP license see http://www.info-zip.org/doc/LICENSE. "Info-ZIP" is defined as the following setof individuals: Mark Adler, John Bush, Karl Davis, Harald Denker, Jean-Michel Dubois, Jean-loupGailly, Hunter Goatley, Ed Gordon, Ian Gorman, Chris Herborth, Dirk Haase, Greg Hartwig, RobertHeath, Jonathan Hudson, Paul Kienitz, David Kirschbaum, Johnny Lee, Onno van der Linden, IgorMandrichenko, Steve P. Miller, Sergio Monesi, Keith Owens, George Petrov, Greg Roelofs, KaiUwe Rommel, Steve Salisbury, Dave Smith, Steven M. Schweda, Christian Spieler, Cosmin Truta,Antoine Verheijen, Paul von Behren, Rich Wales, and Mike White. ICU Libraries (InternationalComponents for Unicode) Copyright 1995-2001 International Business Machines Corporation andothers, All rights reserved. Libraries are provided pursuant to the ICU Project (notice is set forthabove) at http://www-306.ibm.com/software/globalization/icu/index.jsp. The Independent JPEGGroup's JPEG software. This software is Copyright © 1991-1998, Thomas G. Lane. All RightsReserved. This software is based in part on the work of the Independent JPEG Group. iText Library- Copyright © 1999-2006 by Bruno Lowagie and Paulo Soares. All Rights Reserved – sourcecode and further information available at http://www.lowagie.com/iText. jpeg-6b.zip - JPEG imagecompression library, version 6.2. Used to create images for HTML output; Provided pursuant to:http://www.faqs.org/faqs/jpeg-faq/part2. Pop up calendar components Copyright © 1998 NetscapeCommunications Corporation. All Rights Reserved. METIS, developed by George Karypis and VipinKumar at the University of Minnesota, can be researched at http://www.cs.umn.edu/~karypis/metis.Mozilla Japanese localization components are subject to the Netscape Public License Version 1.1(at http://www.mozilla.org/NPL). Software distributed under the Netscape Public License (NPL) isdistributed on an AS IS basis, WITHOUT WARRANTY OF ANY KIND, either expressed or implied(see the NPL for the rights and limitations that are governing different languages). The OriginalCode is Mozilla Communicator client code, released March 31, 1998 and the Initial Developer ofthe Original Code is Netscape Communications Corporation. Portions created by Netscape areCopyright © 1998 Netscape Communications Corporation. All Rights Reserved. Contributors:Kazu Yamamoto ([email protected]), Ryoichi Furukawa ([email protected]), Tsukasa Maruyama([email protected]), Teiji Matsuba ([email protected]). The following components are subjectto the Mozilla Public License Version 1.0 or 1.1 at http://www.mozilla.org/MPL (the MPL) andsaid software is distributed on an AS IS basis, WITHOUT WARRANTY OF ANY KIND, eitherexpressed or implied and all warranty, support, indemnity or liability obligations under PTC’ssoftware license agreements are provided by PTC alone (see the MPL for the specific languagegoverning rights and limitations the source code and modifications thereto are available under theMPL and are available upon request): Gecko and Mozilla components Spidermonkey CharsetDetector Saxon-B (http://www.saxonica.com/documentation/conditions/intro.html). Office PartnerComponents 1.64 (http://sourceforge.net/projects/tpofficepartner/). Rhino JavaScript engine,distributed with a form of the Mozilla Public License (MPL). tiff-v3.4-tar.gz - Libtiff File IO Libraryversion 3.4: (see also http://www.libtiff.org ftp://ftp.sgi.com/graphics/tiff) Used by the image EFIlibrary; Provided pursuant to: http://www.libtiff.org/misc.html. The DITA standards, includingDITA DTDs, DITA Schemas, and portions of the DITA specification used in online help; copyright2005-2009 OASIS Open. All rights reserved. This product includes software developed by theOpenSSL Project for use in the OpenSSL Toolkit. (http://www.openssl.org/): Copyright © 19982004 The OpenSSL Project. All rights reserved. This product includes cryptographic softwarewritten by Eric Young ([email protected]) WHICH IS PROVIDED BY ERIC YOUNG ''AS IS''AND ANY EXPRESS OR IMPLIED WARRANTIES, INCLUDING, BUT NOT LIMITED TO, THEIMPLIED WARRANTIES OF MERCHANTABILITY AND FITNESS FOR A PARTICULAR PURPOSEARE DISCLAIMED. IN NO EVENT SHALL THE AUTHOR OR CONTRIBUTORS BE LIABLEFOR ANY DIRECT, INDIRECT, INCIDENTAL, SPECIAL, EXEMPLARY, OR CONSEQUENTIALDAMAGES (INCLUDING, BUT NOT LIMITED TO, PROCUREMENT OF SUBSTITUTE GOODS ORSERVICES; LOSS OF USE, DATA, OR PROFITS; OR BUSINESS INTERRUPTION) HOWEVERCAUSED AND ON ANY THEORY OF LIABILITY, WHETHER IN CONTRACT, STRICT LIABILITY,OR TORT (INCLUDING NEGLIGENCE OR OTHERWISE) ARISING IN ANY WAY OUT OF THE

USE OF THIS SOFTWARE, EVEN IF ADVISED OF THE POSSIBILITY OF SUCH DAMAGE. Thisproduct also includes software written by Tim Hudson ([email protected]). pcre-4.3-2-src.zip -Perl Compatible Regular Expression Library version 4.3. http://www.pcre.org; Provided pursuantto: PCRE License. lpng120.zip - PNG image library version 1.2.0. http://www.ijg.org; Providedpursuant to: http://www.libpng.org/pub/png/src/libpng-LICENSE.txt. libpng, Copyright © 2004 GlennRanders-Pehrson, which is distributed according to the disclaimer and license (as well as the list ofContributing Authors) at http://www.libpng.org/pub/png/src/libpng-LICENSE.txt. METIS is © 1997Regents of the University of Minnesota.
Curl software, Copyright ©1996 - 2005, Daniel Stenberg, All rights reserved. Software is usedunder the following permissions: Permission to use, copy, modify, and distribute this software forany purpose with or without fee is hereby granted, provided that the above copyright notice andthis permission notice appear in all copies. THE SOFTWARE IS PROVIDED AS IS, WITHOUTWARRANTY OF ANY KIND, EXPRESS OR IMPLIED, INCLUDING BUT NOT LIMITED TOTHE WARRANTIES OF MERCHANTABILITY, FITNESS FOR A PARTICULAR PURPOSE ANDNONINFRINGEMENT OF THIRD PARTY RIGHTS. IN NO EVENT SHALL THE AUTHORS ORCOPYRIGHT HOLDERS BE LIABLE FOR ANY CLAIM, DAMAGES OR OTHER LIABILITY,WHETHER IN AN ACTION OF CONTRACT, TORT OR OTHERWISE, ARISING FROM, OUT OFOR IN CONNECTION WITH THE SOFTWARE OR THE USE OR OTHER DEALINGS IN THESOFTWARE. Except as contained in this notice, the name of a copyright holder shall not be used inadvertising or otherwise to promote the sale, use, or other dealings. Java Advanced Imaging (JAI)is provided pursuant to the Sun Java Distribution License (JDL) at http://www.jai.dev.java.net. Theterms of the JDL shall supersede any other licensing terms for PTC software with respect to JAIcomponents. Regular expression support is provided by the PCRE library package, which is opensource software, written by Philip Hazel, and copyright by the University of Cambridge, England.This software is based in part on the work of the Independent JPEG Group. Regular Expressionssupport was derived from copyrighted software written by Henry Spencer, Copyright © 1986 byUniversity of Toronto. SGML parser: Copyright © 1994, 1995, 1996, 1997, 1998 James Clark,1999 Matthias Clasen. XML parser and XSLT processing was developed using Libxml and Libxsltby Daniel Veillard, Copyright © 2001. libWWW (W3C's implementation of HTTP) can be found at:http://www.w3.org/Library; Copyright © 1994-2000 World Wide Web Consortium, (MassachusettsInstitute of Technology, Institut National de Recherche en Informatique et en Automatique, KeioUniversity). All Rights Reserved. This program is distributed under the W3C's Software IntellectualProperty License at: http://www.w3.org/Consortium/Legal/2002/copyright-software-20021231.This program is distributed in the hope that it will be useful, but WITHOUT ANY WARRANTY;without even the implied warranty of MERCHANTABILITY or FITNESS FOR A PARTICULARPURPOSE. See W3C License http://www.w3.org/Consortium/Legal for more details. Copyright© 1995 CERN. "This product includes computer software created and made available by CERN.This acknowledgment shall be mentioned in full in any product which includes the CERN computersoftware included herein or parts thereof." Perl support was developed with the aid of Perl Kit,Version 5.0. Copyright © 1989-2002, Larry Wall. All rights reserved. The cad2eda programutilizes wxWidgets (formerly wxWindows) libraries for its cross-platform UI API, which is licensedunder the wxWindows Library License at http://www.wxwindows.org. ZLib - Compression library;Copyright 1995-2005 Jean-loup Gailly and Mark Adler; Provided pursuant to ZLib License athttp://www.zlib.net/zlib_license.html. ATLPort copyright 1999, 2000 Boris Fomitchev is provided bythe copyright holder "as is" with absolutely no warranty expressed or implied. Permission to useor copy this software for any purpose is granted without fee, provided the foregoing notices areretained on all copies. Permission to modify the code and to distribute modified code is granted,provided the above notices are retained and a notice that the code was modified is included with theabove copyright notice. PTC reserves the right to modify this code and may do so without furthernotice. OpenCASCADE software is subject to the Open CASCADE Technology Public LicenseVersion 6.2 (the "License"). This software may only be used in compliance with the License.A copy of the License may be obtained at http://www.opencascade.org. The Initial Developerof the Original Code is Open CASCADE S.A.S., with main offices at 15 bis, rue Ernest Renan92136, Issy Les Moulineaux, France. The Original Code is copyright © Open CASCADE S.A.S.,2001. All rights reserved. "The Original Code” and all software distributed under the Licenseare distributed by OpenCASCADE on an "AS IS" basis, without warranty of any kind, and theInitial Developer hereby disclaims all such warranties, including without limitation, any warrantiesof merchantability, fitness for a particular purpose, or noninfringement (please see the Licensefor the specific terms and conditions governing rights and limitations under the License). PTCproduct warranties are provided solely by PTC. Certain Pro/TOOLMAKER functions/libraries areas follows: CSubclassWnd version 2.0 - Misc. C++ software; Copyright © 2000 NEWare Software.STLPort - C++ templates; ©1999,2000 Boris Fomitchev; Provided pursuant to: STLPort Licensehttp://stlport.sourceforge.net/License.shtml. Zip32 - Compression library; Copyright © 1990-2007.Info-ZIP; Provided pursuant to: Info-ZIP License http://www.info-zip.org/pub/infozip/license.html.Inno Setup - Installer package; Copyright 1997-2007 Jordan Russell; Provided pursuant to InnoSetup License http://www.jrsoftware.org/files/is/license.txt. 7-Zip - Compression package; Copyright1999-2007 Igor Pavlov; Provided pursuant to 7-Zip License http://www.7-zip.org/license.txt. Theimplementation of the loop macro in CoCreate Modeling is based on code originating from MIT

and Symbolics, Inc. Portions of LOOP are Copyright 1986 by the Massachusetts Institute ofTechnology and Portions of LOOP are Copyright 1989, 1990, 1991, 1992 by Symbolics, Inc. AllRights Reserved. Used under license pursuant to which permission to use, copy, modify anddistribute this software and its documentation for any purpose and without fee is granted, providedthat the copyright holder’s copyright notice appear in all copies and that both that copyrightnotice and this permission notice appear in supporting documentation. The names "M.I.T." and"Massachusetts Institute of Technology" and "Symbolics" may not be used in advertising or publicitypertaining to distribution of the software without specific, written prior permission. Notice mustbe given in supporting documentation that copying distribution is by permission of the copyrightholders. The copyright holders make no representations about the suitability of this software forany purpose. It is provided "as is" without express or implied warranty. ORACLE, ODBC, andDB2/CLI Template Library, Version 4.0.126, Copyright Sergei Kuchin, 1996, 20xx. This libraryis free software. Permission to use, copy, modify and redistribute it for any purpose is herebygranted without fee, provided that the preceding copyright statement appears in all copies. (seehttp://otl.sourceforge.net/) The following items are used and licensed pursuant to the CommonDevelopment and Distribution License (CDDL). See https://mq.dev.java.net/LICENSE.txt. MetroWeb Services Stack, Copyright Sun Microsystems. The copyright holders of this library givepermission to link this library with independent modules to produce an executable, regardless of thelicense terms of these independent modules, and to copy and distribute the resulting executableunder differing terms, provided that, for each linked independent module, the terms and conditionsof the license of that module are met. Source Code for Metro will be provided upon request and islicensed under the terms of the CDDL. Open MQ – In addition, this project uses Mozilla NetworkSecurity Services and Network Security Portable Runtime (NSS / NSPR) which are licensed underthe Mozilla Public License. OpenDS uses BerkeleyDB which is described above.
The following components are licensed pursuant to the Common Public License (CPL). All warrantiesand awarded damage relief from use of the technology as provided by PTC are provided solely byPTC and same is disclaimed by other contributors. Source code for the program is available uponrequest under the terms of the CPL: WIX Installer Toolkit, copyright Microsoft Corp. NSIS (NullsoftScriptable Install System), Copyright 1995-20xx, all Contributors. Includes zlib/libpng, bzip2, andlzma compression modules with licensing information at http://nsis.sourceforge.net/License. Certainsoftware is Copyright 2000 - 2008 The Legion Of The Bouncy Castle (http://www.bouncycastle.org).Permission is hereby granted, free of charge, to any person obtaining a copy of this software andassociated documentation files (the "Software"), to deal in the Software without restriction, includingwithout limitation the rights to use, copy, modify, merge, publish, distribute, sublicense, and/or sellcopies of the Software, and to permit persons to whom the Software is furnished to do so, subjectto the following conditions. The above copyright notice and this permission notice shall be includedin all copies or substantial portions of the Software. THE SOFTWARE IS PROVIDED "AS IS",WITHOUT WARRANTY OF ANY KIND, EXPRESS OR IMPLIED, INCLUDING BUT NOT LIMITEDTO THE WARRANTIES OF MERCHANTABILITY, FITNESS FOR A PARTICULAR PURPOSEAND NONINFRINGEMENT. IN NO EVENT SHALL THE AUTHORS OR COPYRIGHT HOLDERSBE LIABLE FOR ANY CLAIM, DAMAGES OR OTHER LIABILITY, WHETHER IN AN ACTION OFCONTRACT, TORT OR OTHERWISE, ARISING FROM, OUT OF OR IN CONNECTION WITH THESOFTWARE OR THE USE OR OTHER DEALINGS IN THE SOFTWARE.
UNITED STATES GOVERNMENT RESTRICTED RIGHTS LEGEND
This document and the software described herein are Commercial Computer Documentation andSoftware, pursuant to FAR 12.212(a)-(b) (OCT’95) or DFARS 227.7202-1(a) and 227.7202-3(a)(JUN’95), and are provided to the US Government under a limited commercial license only. Forprocurements predating the above clauses, use, duplication, or disclosure by the Governmentis subject to the restrictions set forth in subparagraph (c)(1)(ii) of the Rights in Technical Dataand Computer Software Clause at DFARS 252.227 7013 (OCT’88) or Commercial ComputerSoftware-Restricted Rights at FAR 52.227 19(c)(1)-(2) (JUN’87), as applicable. 05222009
Parametric Technology Corporation, 140 Kendrick Street, Needham, MA 02494 USA
PRINTING HISTORY
Document No. Date Description
Exercise Guide 08/27/2009 Initial Printing of:Creo Parametric - Advanced Primer
Order Number DT-Exercise GuidePrinted in the U.S.A