combining multiple objects - apache openoffice · changes can be carried out to the group, ......
TRANSCRIPT
Combining Multiple Objects:
Title: Combining Multiple Objects: Version: 1.0First edition: November 2004


Contents
Overview..........................................................................................................................................ii
Copyright and trademark information.........................................................................................ii
Feedback..................................................................................................................................... ii
Acknowledgments.......................................................................................................................ii
Modifications and updates.......................................................................................................... ii
Grouping and Combining Objects................................................................................................... 1
Grouping Functions.....................................................................................................................1
Combination Functions............................................................................................................... 3
Shape Merge Functions...............................................................................................................4
Aids for Object Positioning............................................................................................................. 8
Aligning Objects......................................................................................................................... 8
Distribution of Objects..............................................................................................................10
Managing Object Arrangement................................................................................................. 12
Combining Multiple Objects i
Overview
Overview
This document describes the tools and functions that let you combine several objects togetherso that changes can be carried out to the group, or new objects can be created from the group.
Copyright and trademark informationThe contents of this Documentation are subject to the Public Documentation License,Version 1.0 (the "License"); you may only use this Documentation if you comply with theterms of this License. A copy of the License is available at:http://www.openoffice.org/licenses/PDL.rtf
The Original Documentation is Combining Multiple Objects. The Initial Writer(s) of theOriginal Documentation is/are Linda Worthington © 2004. All Rights Reserved. (InitialWriter contact(s):[email protected]. The Initial Writer contact(s) is to report errors inthe documentation. For questions regarding how to use the software, subscribe to the UsersMail List and post your question there: http://support.openoffice.org/index.html.)
Portions created by: original French document written by Michel Pinquier, translated toEnglish by Alex Thurgood and previous content revised by Jim Taylor. All trademarks withinthis guide belong to legitimate owners.
FeedbackPlease direct any comments or suggestions about this document to:[email protected].
AcknowledgmentsThanks to Daniel Carrera, Carol Leather and Jean Hollis Weber for reviewing this chapter.
Modifications and updates
Version Date Description of Change
1.0 20 November 2004 First published edition
Combining Multiple Objects ii
Grouping and Combining Objects
Grouping and Combining Objects
Draw contains a number of mechanisms that let you combine several objects together so thatchanges can be carried out to the group, or new objects can be created from the group
Grouping lets you temporarily combine objects to carry out global changes to them. A groupcan always be undone and the objects that make up the group can always be manipulatedseparately.
A combination is a permanent fusion of objects leading to a new object. The initial objectsare no longer available as individual entities and the operation is therefore irreversible (unlessyou use the Edit/Undo function which is dependent on the number of undo steps set underOptions).
Whatever you decide to do, several objects need to be selected for these functions to work.Just a quick reminder on how to select multiple objects: click on each object while holdingdown the Shift key or draw a rectangle around the objects that you wish to include in theselection.
Grouping Functions
Group by common selection
When several objects are selected, any operations you carry out are applied to all of theobjects. For example, you can rotate a group of objects in its entirety. Groups obtainedthrough common selection of several objects are undone as soon as you click outside thegroup. However, there is also a way to group objects and keep those selected objects groupedtogether.
Maintaining groups and group dissociation
To group selected objects, you can right-click and choose Group from the context menu.You can also use the keyboard shortcut Control + Shift + G. It is also possible to go via themain menu Modify > Group.
When objects are grouped, all of the editing operations carried out on that group are appliedto all members of the group. If you click on one of the members of the group, the whole ofthe group will be selected. This method is thus safer than direct selection, which is best left tosimple drawings.
As indicated at the beginning of the chapter, the objects of a group maintain theirindividuality and it is possible to undo a group via the context menu (Ungroup) or using thekeyboard shortcut Alt + Control + Shift + G or even the main menu Modify > Ungroup.
Editing individual objects in a group
The objects in a group keep all of their properties, and it is always possible to edit each objectindividually without breaking the group. To do this, you need to use the function Entergroup that is available through the right-click menu or the F3 key. You can also enter agroup by double-clicking on it, and then click on the desired individual object.
Combining Multiple Objects 1

Grouping and Combining Objects
Once you have entered this mode, you can click on and edit each object separately.
To leave this mode, use the function Exit group or keyboard shortcut Control + F3. You canalso double-click anywhere outside of the group.
When you work inside a group, the objects that are not within the group can no longer beselected and appear grayed out.
Here's an example of the use of this function.
The 2D shapes above form part of a group. The 3D sphere is not part of the group. When thegroup is selected (as above) and you press the F3 key, you get the following:
The sphere moves out of focus to indicate that it isn't part of the group and that you can'tselect it. In this mode, you can select any one of the objects in the group and edit itindividually.
Combining Multiple Objects 2

Grouping and Combining Objects
In the example given, we are going to rotate the straight rectangle. After you rotate therectangle, you can press Control + F3 to leave the group, and the sphere will becomeavailable for selection once again.
Notice that you can create nested groups, or groups of groups. In this case, OpenOffice.orgkeeps the initial group hierarchy. If you ungroup a group made of other groups, you will beleft with individual groups that you can then ungroup further.
Combination Functions
In contrast to grouping functions, combinations create a new object. To use this function:choose all of the objects that you want to combine, then right-click and choose the optionCombine from the context menu. The keyboard shortcut is Control + Shift + K.
Combining Multiple Objects 3

Grouping and Combining Objects
The result of the combination is given in the following illustration:
At first glance, this can seem rather surprising. Fortunately, once you have understood therules governing combination in OpenOffice.org, it will become clear:
• The attribute of the resulting object is the attribute of the object that is the furthest backfrom the viewer. In our example, it is the circle. The resulting drawing has the same color,line thickness, etc., as the circle.
• The result of the combination is a Bezier curve.
• Where the objects overlap, the overlapping zones will be represented as a filled or emptyzone depending on the number of overlaps. When there is an even number of overlaps,you get an empty space (represented by a 'hole') in the drawing. When the overlaps are oddin number, you get a filled area. In our example, we can count the number ofsuperpositions:
Shape Merge FunctionsThe functions Merge, Subtract, and Intersect, can be reached though the group's contextmenu, under the heading Shapes.
Merge
The result of applying the Merge function to the shapes corresponds to the greatest surfacesof the selected objects being merged into one object (also known as a union).
Combining Multiple Objects 4
1
1
132
2
2

Grouping and Combining Objects
Subtract
Subtraction will take away from the lowermost layered object the area corresponding to theoverlap from the uppermost object, and the uppermost object will disappear:
Combining Multiple Objects 5

Grouping and Combining Objects
Intersect
Intersecting two objects leads to an object that just represents the area of overlap between thetwo selected objects.
Combining Multiple Objects 6
Grouping and Combining Objects
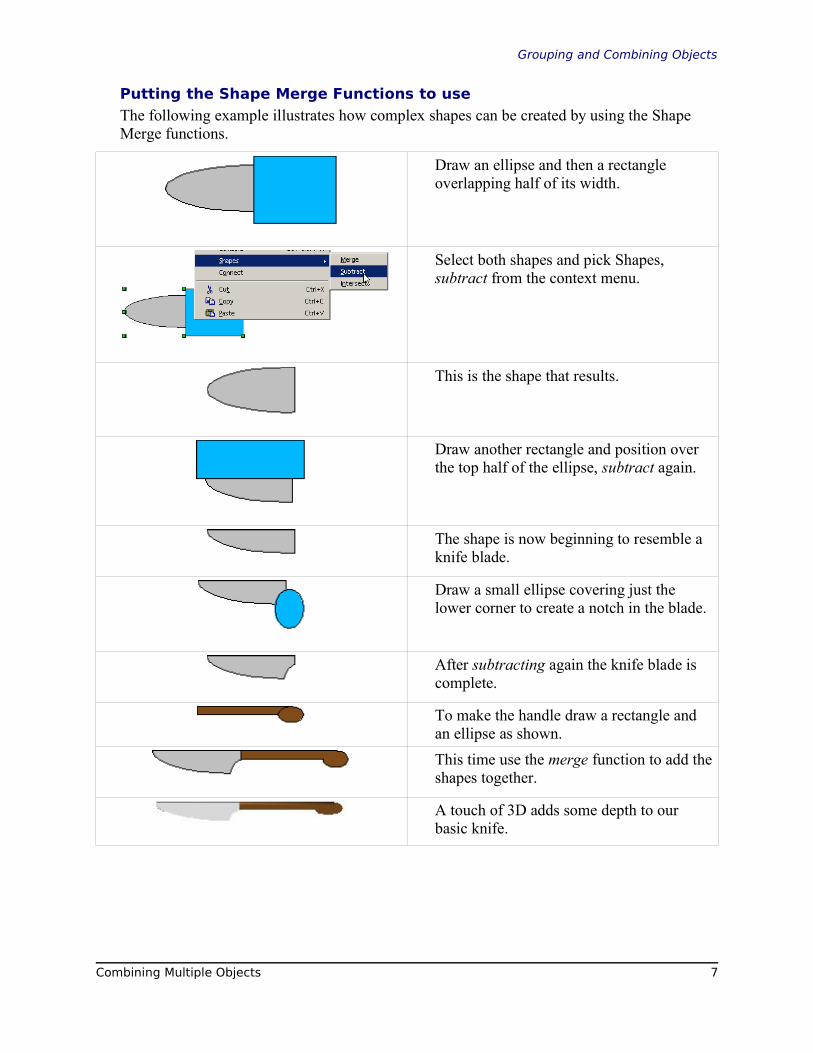
Putting the Shape Merge Functions to use
The following example illustrates how complex shapes can be created by using the ShapeMerge functions.
Draw an ellipse and then a rectangleoverlapping half of its width.
Select both shapes and pick Shapes,subtract from the context menu.
This is the shape that results.
Draw another rectangle and position overthe top half of the ellipse, subtract again.
The shape is now beginning to resemble aknife blade.
Draw a small ellipse covering just thelower corner to create a notch in the blade.
After subtracting again the knife blade iscomplete.
To make the handle draw a rectangle andan ellipse as shown.This time use the merge function to add theshapes together.
A touch of 3D adds some depth to ourbasic knife.
Combining Multiple Objects 7

Aids for Object Positioning
Aids for Object Positioning
The Draw module has various tools that are designed to help in the positioning of objects, inorder to change the alignment of objects and the relative “front to back” ordering of objects.These tools can be reached through two icons in the left hand toolbar.
This button gives you access to the object alignment toolbar.
This button gives you access to the object layering toolbar.
Aligning ObjectsThe alignment toolbar has six buttons as shown below:
This toolbar can be detached from the main lefthand toolbar and remain visible in theworkspace. The buttons become active when objects are selected. The toolbar lets you alignany selected objects in a certain way.
To show what can be done, let's start from the following two objects:
Combining Multiple Objects 8

Aids for Object Positioning
All of the objects are aligned on their left side.
All of the objects are centered vertically.
All of the objects are aligned on their right side.
All of the objects are aligned on their upper side.
Combining Multiple Objects 9
Aids for Object Positioning
All of the objects are horizontally centered.
All of the objects are aligned on the lower side.
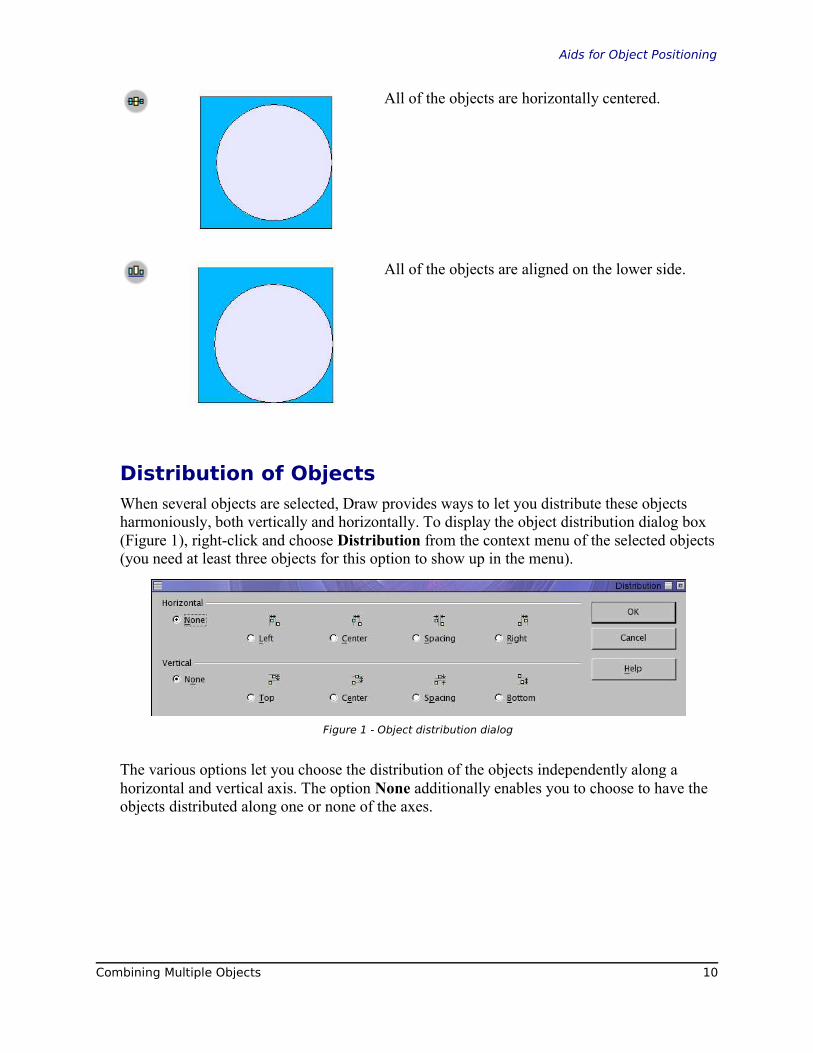
Distribution of ObjectsWhen several objects are selected, Draw provides ways to let you distribute these objectsharmoniously, both vertically and horizontally. To display the object distribution dialog box(Figure 1), right-click and choose Distribution from the context menu of the selected objects(you need at least three objects for this option to show up in the menu).
The various options let you choose the distribution of the objects independently along ahorizontal and vertical axis. The option None additionally enables you to choose to have theobjects distributed along one or none of the axes.
Combining Multiple Objects 10
Figure 1 - Object distribution dialog

Aids for Object Positioning
The objects are distributed horizontally from their left side.
The objects are distributed horizontally from their middle (in reality it is themiddle of the selection rectangle around each object).
The objects are distributed by introducing the same horizontal spacingbetween two objects.
The objects are distributed horizontally from their right side.
The objects are distributed vertically from their upper side.
The objects are distributed vertically from their middle.
The objects are distributed by introducing the same vertical space betweenthem.
The objects are distributed vertically from their lower side.
Combining Multiple Objects 11

Aids for Object Positioning
Managing Object ArrangementThe toolbar for object arrangement is as shown below. The toolbar lets you manage therelative superposition of objects. This toolbar can be detached.
The examples given below should help you understand the principles behind the idea.
This is the original group of objects.
The square was selected.
This button brings the selected object to the top ofthe pile of objects. As shown in the drawingopposite, the square is now on top of the pile.
Combining Multiple Objects 12
Figure 2. Original group ofobjects
Figure 3 - Bring to Front

Aids for Object Positioning
The square was selected.
This button brings the selected object forward onelayer. The square has been moved in front of thetriangle, but is still behind the circle.
The circle was selected.
This button moves an object back one layer. In thedrawing opposite, the circle has been movedbehind the triangle, but is still in front of thesquare.
The circle was selected.
This button will send the selected object to thebottom of the pile. This is what happened to thecircle in the drawing opposite.
This button moves one object in front of anotherchosen object.
The object to be moved is selected first (in this casethe triangle).
After you click on the button, the mouse cursorturns into a hand to designate the object in front ofwhich the selected object will be placed (in thiscase the circle).
Combining Multiple Objects 13
Figure 4 - Bring forward
Figure 5 - Send backward
Figure 6 - Send to back
Figure 7 - In front of object

Aids for Object Positioning
The result of the arrangement is shown on the left.
Figure 9 - Invert arrangement
For this button to work, you need to have at leasttwo objects selected. The order of the selectedobjects is inverted in the pile of objects. In theexample opposite, the square and the circle thatwere selected have had their positions inverted.
Combining Multiple Objects 14
Figure 8 - Result of the 'infront' arrangement