citidirect be file services - banking with citi | citi.com · download import run results to a file...
TRANSCRIPT

Treasury and Trade Solutions
CitiDirect BE® File ServicesUser Guide
August 2015
2
CitiDirect BE File Services | User Guide
Table of Contents
File Services .....................................................................................3
Overview .......................................................................................3
Online Help ..................................................................................3
Application Basics ..........................................................................4
Customize a Summary Grid .....................................................4
Search for Data in a Summary Grid ......................................10
Print the Data in a Summary Grid .........................................12
Save the Data in a Summary Grid ..........................................14
File Services .....................................................................................20
Export File Template .................................................................20
Create an Export File Template..........................................20
Modify/Repair an Export File Template ...........................29
Authorize or Reject an Export File Template .................34
Delete an Export File Template ..........................................38
View an Export File Template .............................................42
Export Data ..................................................................................46
Run a File Export ....................................................................46
Download an Export Run .....................................................49
View the Details of an Export File Template ...................54
Export Custom Format .............................................................58
Create an Export Custom Format ......................................58
Modify an Export Custom Format .....................................65
Delete an Export Custom Format ......................................70
View an Export Custom Format .........................................75
Import File Template .................................................................79
Create an Import File Template .........................................79
Modify/Repair an Import File Template ...........................86
Authorize or Reject an Import File Template .................90
Delete an Import File Template ..........................................96
View the Details of an Import File Template ...................100
Import Transactions ..................................................................104
Test an Import File Template ..............................................104
View Import File Template Details.....................................114
Run a Trial Run File Import ..................................................118
Run a File Import....................................................................124
View Import Run Details ......................................................130
View an Import Log ...............................................................138
Download an Import Log .....................................................143
View Last Run .........................................................................149
Download Import Run Results to a File ............................153
Authorize or Reject a File Import Run..............................157
Release or Reject a File Import Run .................................164
Delete an Import Run ............................................................168
Schedule Files and Report .......................................................170
Create a Schedule for an Event ..........................................170
Modify/Repair a Scheduled Event .....................................177
Authorize, Send to Repair, or Reject a Scheduled Event ...............................................181
Delete a Scheduled Event ....................................................185
View a Schedule for an Event .............................................189
Run a Schedule (Run Now) ..................................................192
S/MIME ..........................................................................................195
Download a Citibank Certificate ........................................195
View the Details of a Security Certificate .......................201
Delete a Security Certificate ...............................................204
Create a Security Certificate ..............................................207
File Services Libraries ...................................................................211
Create a Straight Through Reconciliation Library Record ................................................211
Create a Delivery Option for Scheduled Files and Reports ..................................................217
Create a File Export Transaction Details Configuration Library Record ...................................233
Create a File Export Account Output Format Library Record ...............................................242
Create a File Export BAI, ISO, Swift Code Library Record ......................................................245
Create a File Export InfoPool BAI Type Code Mapping Library Record ..............................248
Create a File Export LatAm AsoBancaria Type Code Library Record ..............................252
Create a File Import Map Definition Rule Set Library Record .......................................254
Copy a Library Record ..............................................................256
Modify/Repair a Library Record.............................................258
Authorize, Send to Repair, or Reject a Library Record ......................................................260
Delete a Library Record ...........................................................266
View the Details of a Library Record ....................................268
3
CitiDirect BE File Services | User Guide
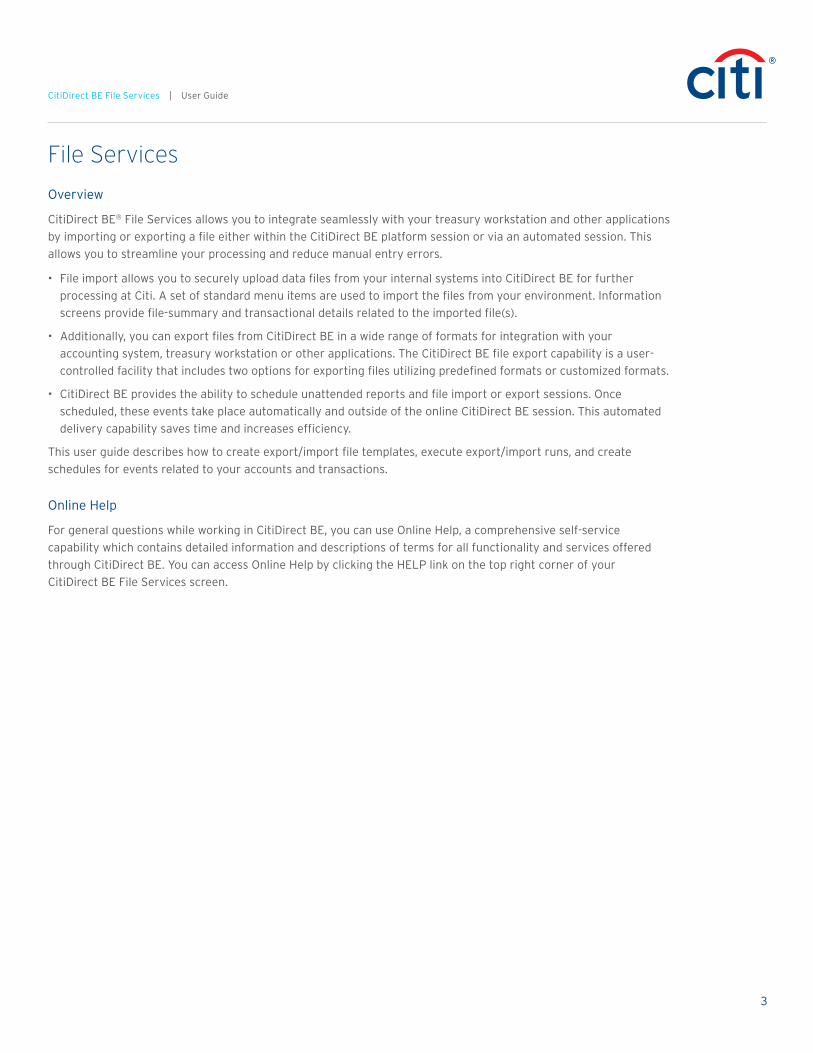
File Services
Overview
CitiDirect BE® File Services allows you to integrate seamlessly with your treasury workstation and other applications by importing or exporting a file either within the CitiDirect BE platform session or via an automated session. This allows you to streamline your processing and reduce manual entry errors.
• File import allows you to securely upload data files from your internal systems into CitiDirect BE for further processing at Citi. A set of standard menu items are used to import the files from your environment. Information screens provide file-summary and transactional details related to the imported file(s).
• Additionally, you can export files from CitiDirect BE in a wide range of formats for integration with your accounting system, treasury workstation or other applications. The CitiDirect BE file export capability is a user-controlled facility that includes two options for exporting files utilizing predefined formats or customized formats.
• CitiDirect BE provides the ability to schedule unattended reports and file import or export sessions. Once scheduled, these events take place automatically and outside of the online CitiDirect BE session. This automated delivery capability saves time and increases efficiency.
This user guide describes how to create export/import file templates, execute export/import runs, and create schedules for events related to your accounts and transactions.
Online Help
For general questions while working in CitiDirect BE, you can use Online Help, a comprehensive self-service capability which contains detailed information and descriptions of terms for all functionality and services offered through CitiDirect BE. You can access Online Help by clicking the HELP link on the top right corner of your CitiDirect BE File Services screen.
4
CitiDirect BE File Services | User Guide
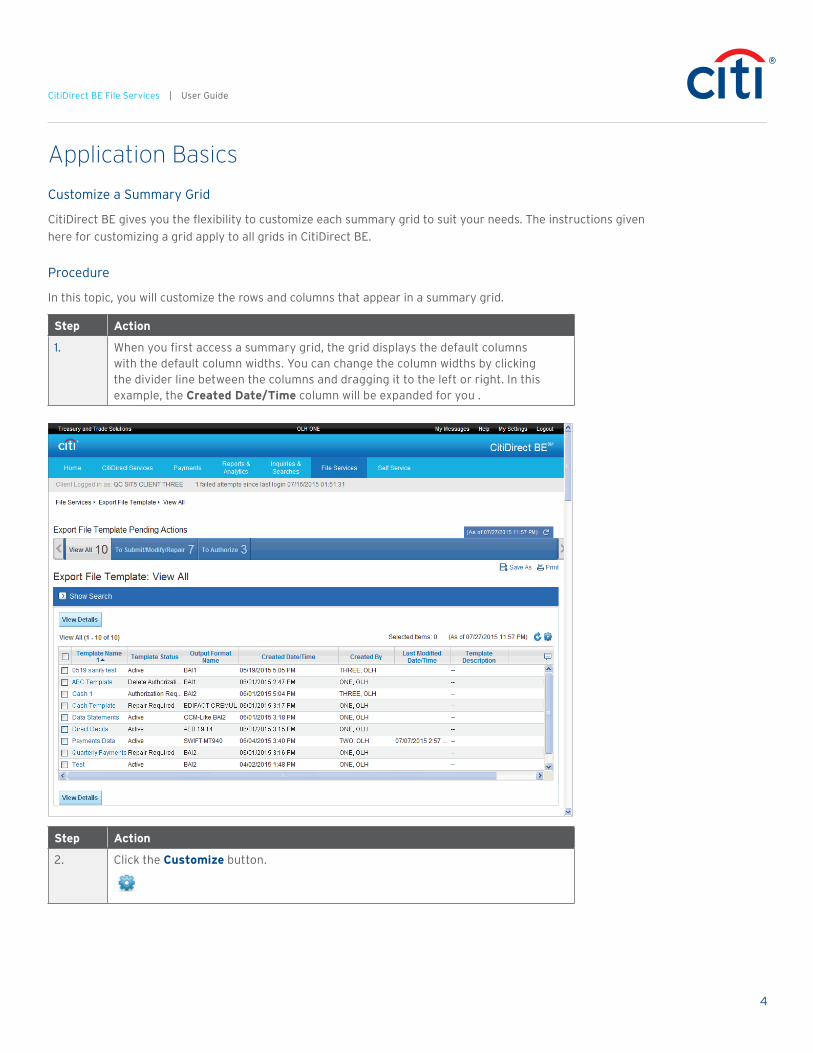
Application Basics
Customize a Summary Grid
CitiDirect BE gives you the flexibility to customize each summary grid to suit your needs. The instructions given here for customizing a grid apply to all grids in CitiDirect BE.
Procedure
In this topic, you will customize the rows and columns that appear in a summary grid.
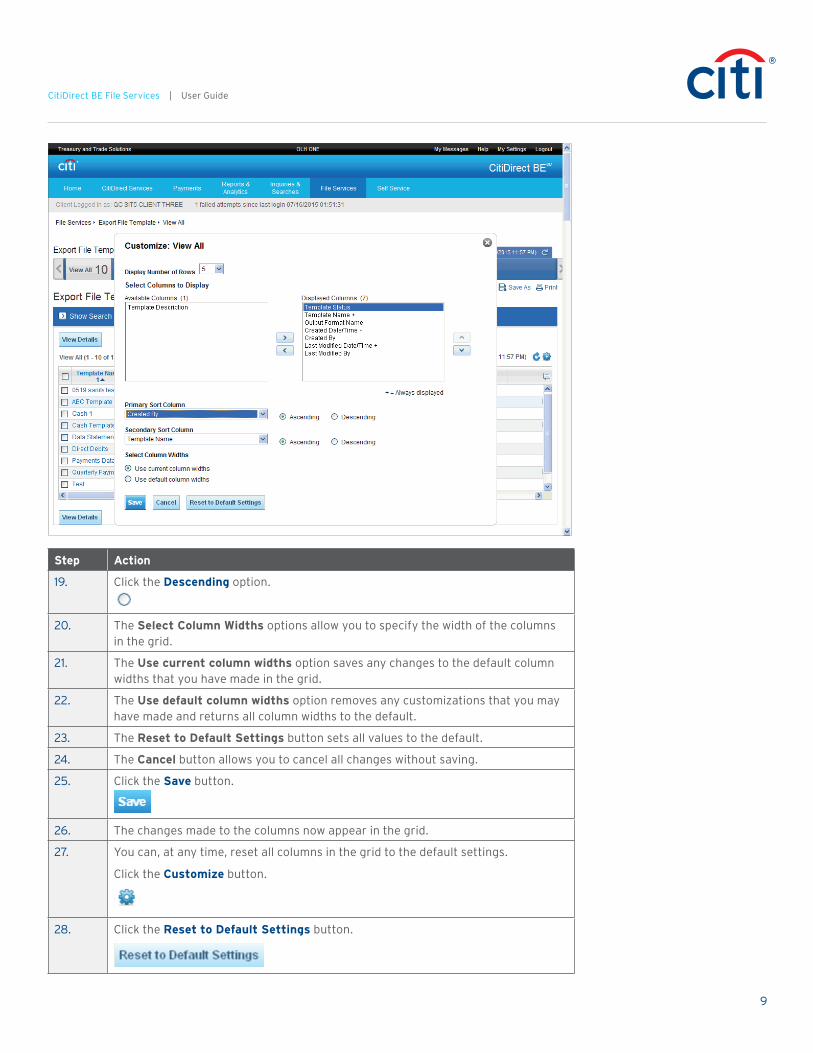
Step Action
1. When you first access a summary grid, the grid displays the default columns with the default column widths. You can change the column widths by clicking the divider line between the columns and dragging it to the left or right. In this example, the Created Date/Time column will be expanded for you .
Step Action
2. Click the Customize button.

5
CitiDirect BE File Services | User Guide
Step Action
3. Your first option for customizing a grid is specifying how many rows of data should be displayed.
Click the Display Number of Rows button.

6
CitiDirect BE File Services | User Guide
Step Action
4. Select the desired number of rows. In this example, click 5.
5. The Available Columns list displays columns that are available for display, but are currently not included in the grid.
6. The Displayed Columns list shows the columns that are currently displayed in the grid and the order in which they are displayed.
7. The Add Columns and Remove Columns buttons allow you to move columns between the Available and Displayed lists.
8. The Move Up and Move Down buttons allow you to specify the order in which the columns are displayed.

7
CitiDirect BE File Services | User Guide
Step Action
9. Select the desired available column. In this example, click Last Modified By.
10. Click the Add Columns button.
11. Select the desired displayed column. In this example, click Template Description.
12. Click the Remove Columns button.
13. Select the desired displayed column. In this example, click Template Status.
14. Click the Move Up button.
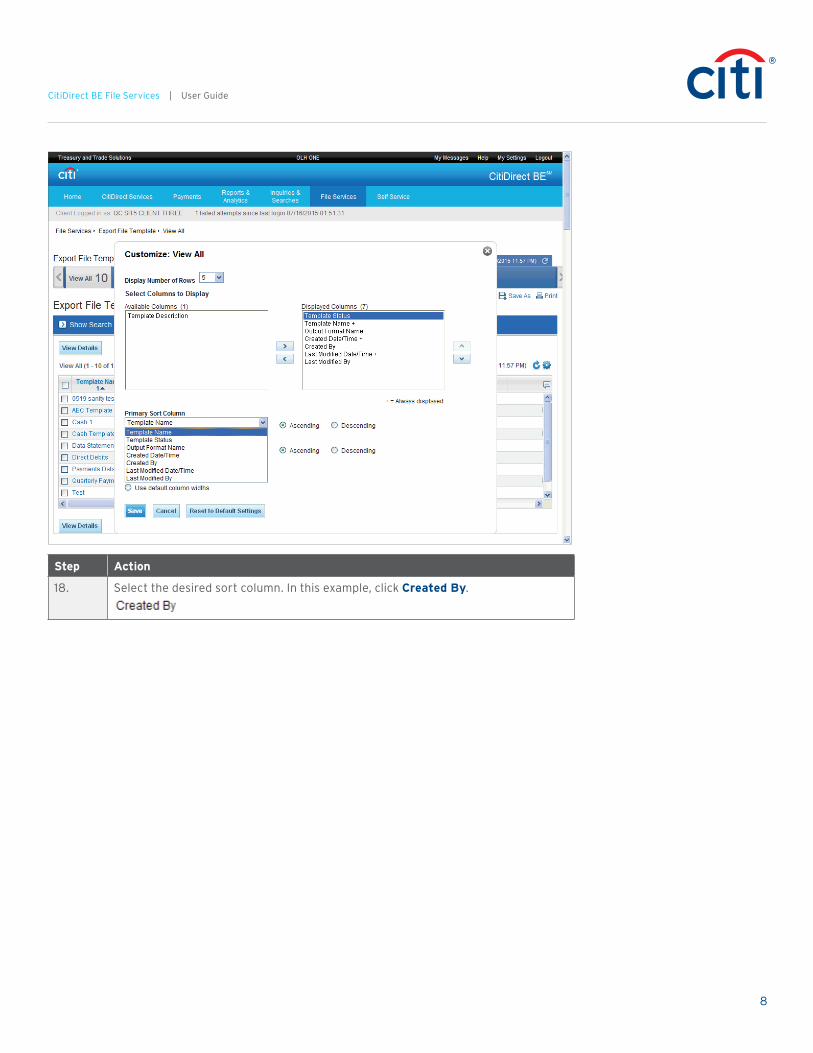
15. Data in the grid can be sorted by two criteria, Primary Sort and Secondary Sort. These two fields can be used in combination.
16. Each sort criterion may be sorted in Ascending (A-Z) or Descending (Z-A) order.
17. Click the Primary Sort Column button.
8
CitiDirect BE File Services | User Guide
Step Action
18. Select the desired sort column. In this example, click Created By.
9
CitiDirect BE File Services | User Guide
Step Action
19. Click the Descending option.
20. The Select Column Widths options allow you to specify the width of the columns in the grid.
21. The Use current column widths option saves any changes to the default column widths that you have made in the grid.
22. The Use default column widths option removes any customizations that you may have made and returns all column widths to the default.
23. The Reset to Default Settings button sets all values to the default.
24. The Cancel button allows you to cancel all changes without saving.
25. Click the Save button.
26. The changes made to the columns now appear in the grid.
27. You can, at any time, reset all columns in the grid to the default settings.
Click the Customize button.
28. Click the Reset to Default Settings button.
10
CitiDirect BE File Services | User Guide
Step Action
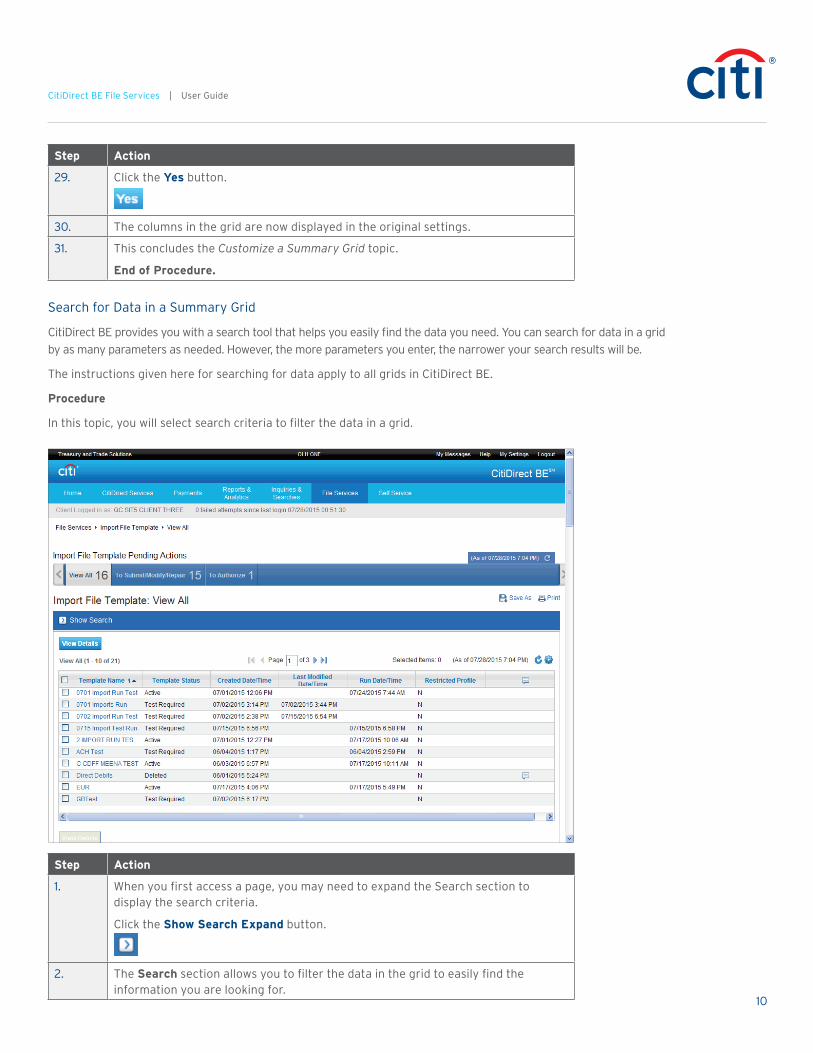
29. Click the Yes button.
30. The columns in the grid are now displayed in the original settings.
31. This concludes the Customize a Summary Grid topic.
End of Procedure.
Search for Data in a Summary Grid
CitiDirect BE provides you with a search tool that helps you easily find the data you need. You can search for data in a grid by as many parameters as needed. However, the more parameters you enter, the narrower your search results will be.
The instructions given here for searching for data apply to all grids in CitiDirect BE.
Procedure
In this topic, you will select search criteria to filter the data in a grid.
Step Action
1. When you first access a page, you may need to expand the Search section to display the search criteria.
Click the Show Search Expand button.
2. The Search section allows you to filter the data in the grid to easily find the information you are looking for.
11
CitiDirect BE File Services | User Guide
Step Action
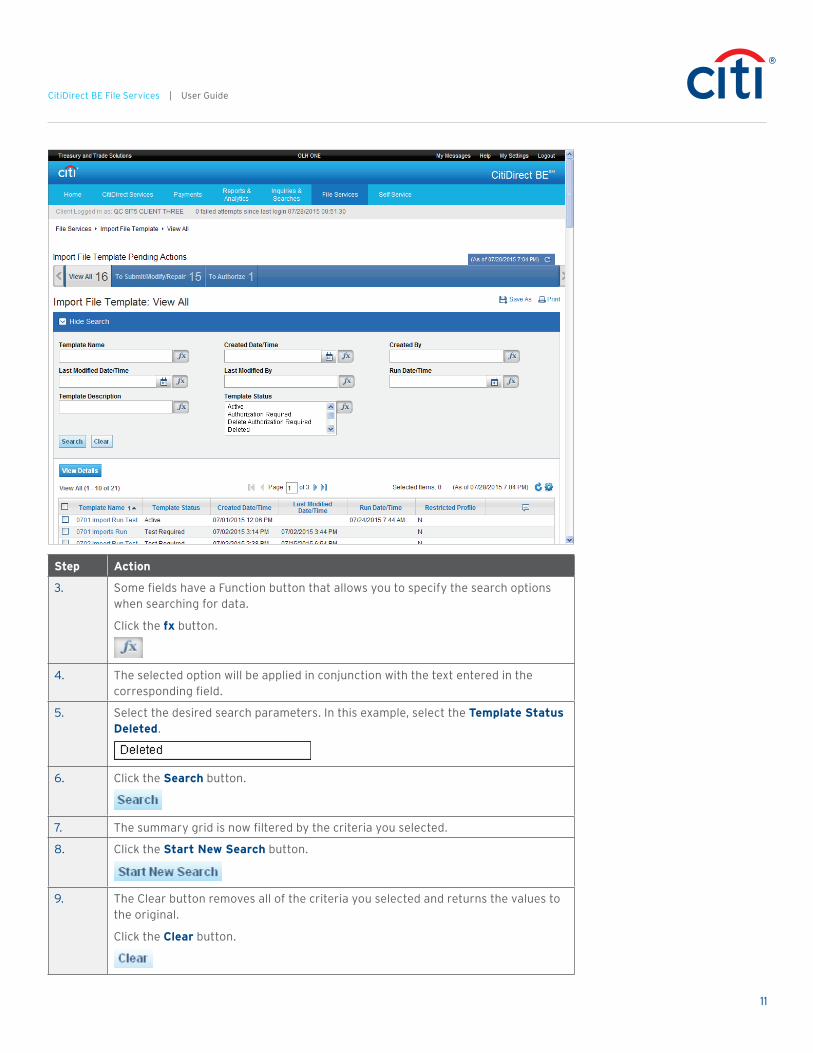
3. Some fields have a Function button that allows you to specify the search options when searching for data.
Click the fx button.
4. The selected option will be applied in conjunction with the text entered in the corresponding field.
5. Select the desired search parameters. In this example, select the Template Status Deleted.
6. Click the Search button.
7. The summary grid is now filtered by the criteria you selected.
8. Click the Start New Search button.
9. The Clear button removes all of the criteria you selected and returns the values to the original.
Click the Clear button.
12
CitiDirect BE File Services | User Guide
Step Action
10. Click the Search button.
11. The search parameters are cleared and the grid returns to its original state.
12. This concludes the Search for Data in a Summary Grid topic.
End of Procedure.
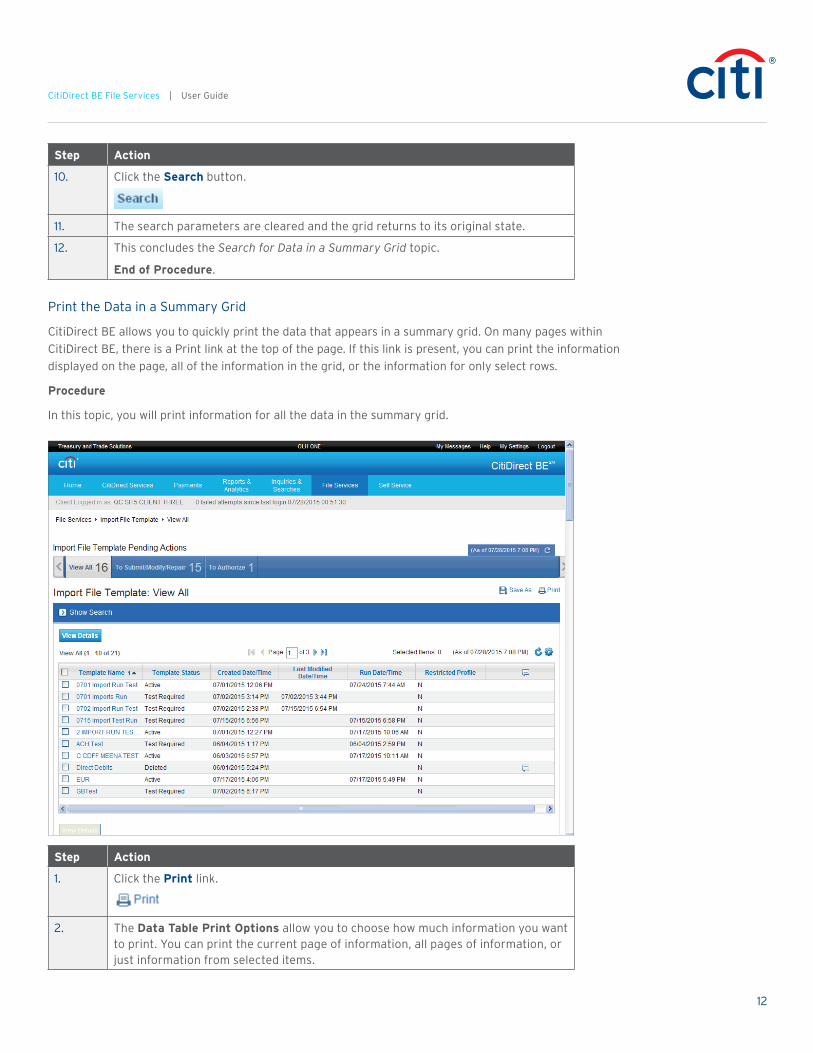
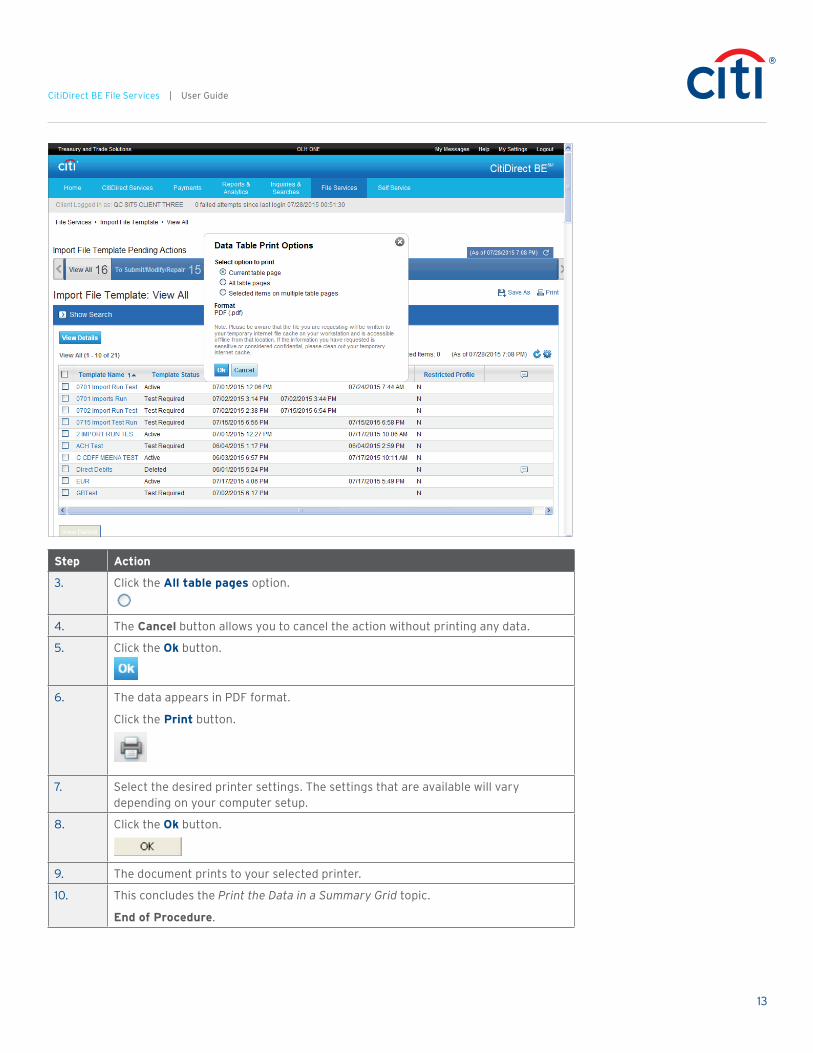
Print the Data in a Summary Grid
CitiDirect BE allows you to quickly print the data that appears in a summary grid. On many pages within CitiDirect BE, there is a Print link at the top of the page. If this link is present, you can print the information displayed on the page, all of the information in the grid, or the information for only select rows.
Procedure
In this topic, you will print information for all the data in the summary grid.
Step Action
1. Click the Print link.
2. The Data Table Print Options allow you to choose how much information you want to print. You can print the current page of information, all pages of information, or just information from selected items.
13
CitiDirect BE File Services | User Guide
Step Action
3. Click the All table pages option.
4. The Cancel button allows you to cancel the action without printing any data.
5. Click the Ok button.
6. The data appears in PDF format.
Click the Print button.
7. Select the desired printer settings. The settings that are available will vary depending on your computer setup.
8. Click the Ok button.
9. The document prints to your selected printer.
10. This concludes the Print the Data in a Summary Grid topic.
End of Procedure.
14
CitiDirect BE File Services | User Guide
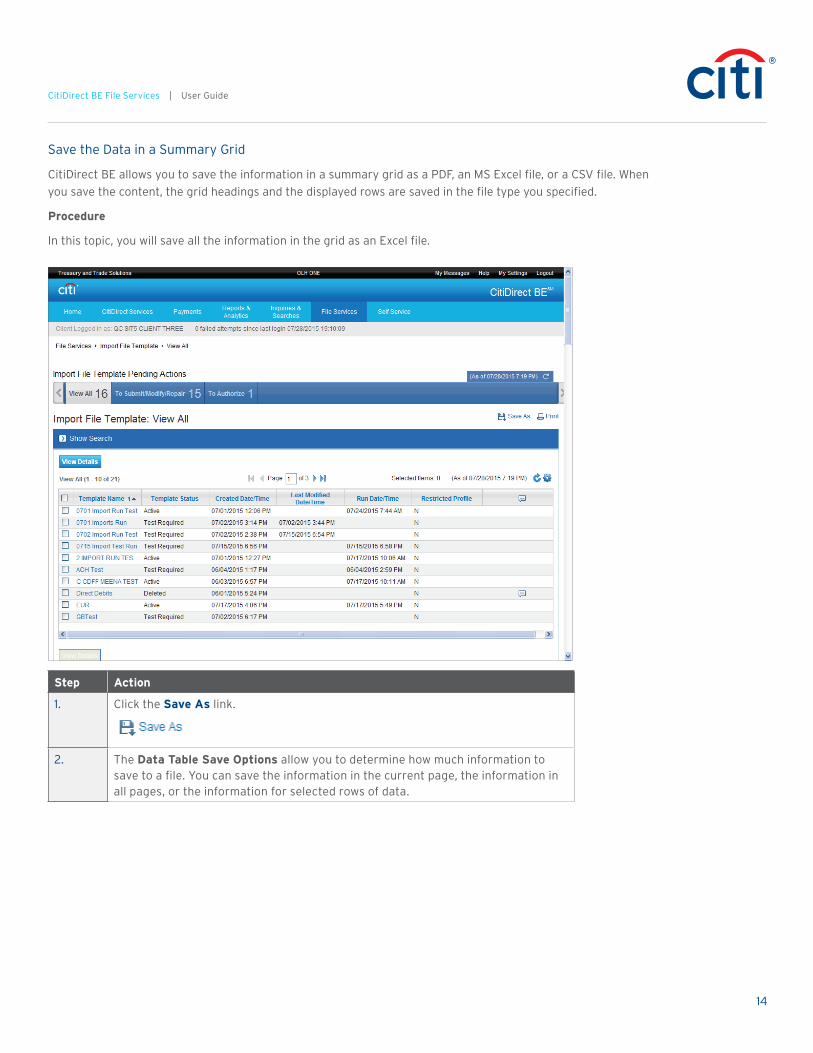
Save the Data in a Summary Grid
CitiDirect BE allows you to save the information in a summary grid as a PDF, an MS Excel file, or a CSV file. When you save the content, the grid headings and the displayed rows are saved in the file type you specified.
Procedure
In this topic, you will save all the information in the grid as an Excel file.
Step Action
1. Click the Save As link.
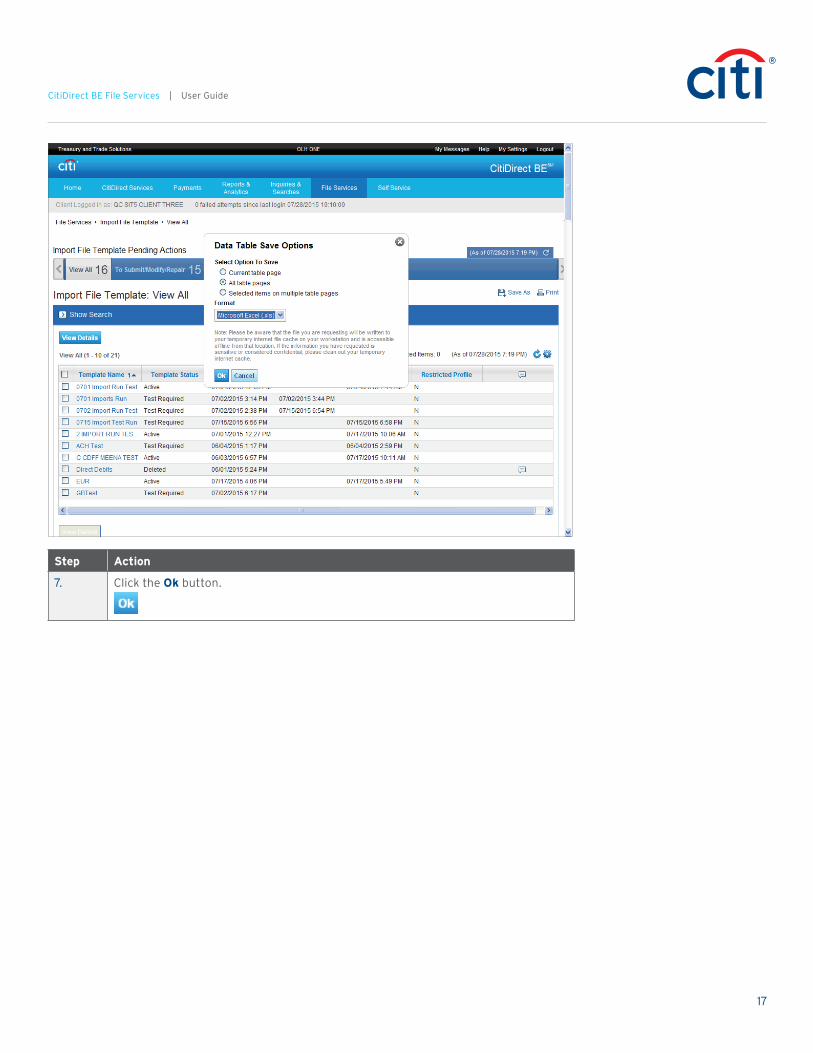
2. The Data Table Save Options allow you to determine how much information to save to a file. You can save the information in the current page, the information in all pages, or the information for selected rows of data.

15
CitiDirect BE File Services | User Guide
Step Action
3. Select the desired option. In this example, click All table pages.
4. Click the Format button.

16
CitiDirect BE File Services | User Guide
Step Action
5. Select the desired format. You can save the data in the grid as a Microsoft Excel (.xls) file, a PDF (.pdf), or as a CSV (.csv) file.
In this example, click Microsoft Excel (.xls).
6. The Cancel button allows you to cancel the action without saving the data.
17
CitiDirect BE File Services | User Guide
Step Action
7. Click the Ok button.

18
CitiDirect BE File Services | User Guide
Step Action
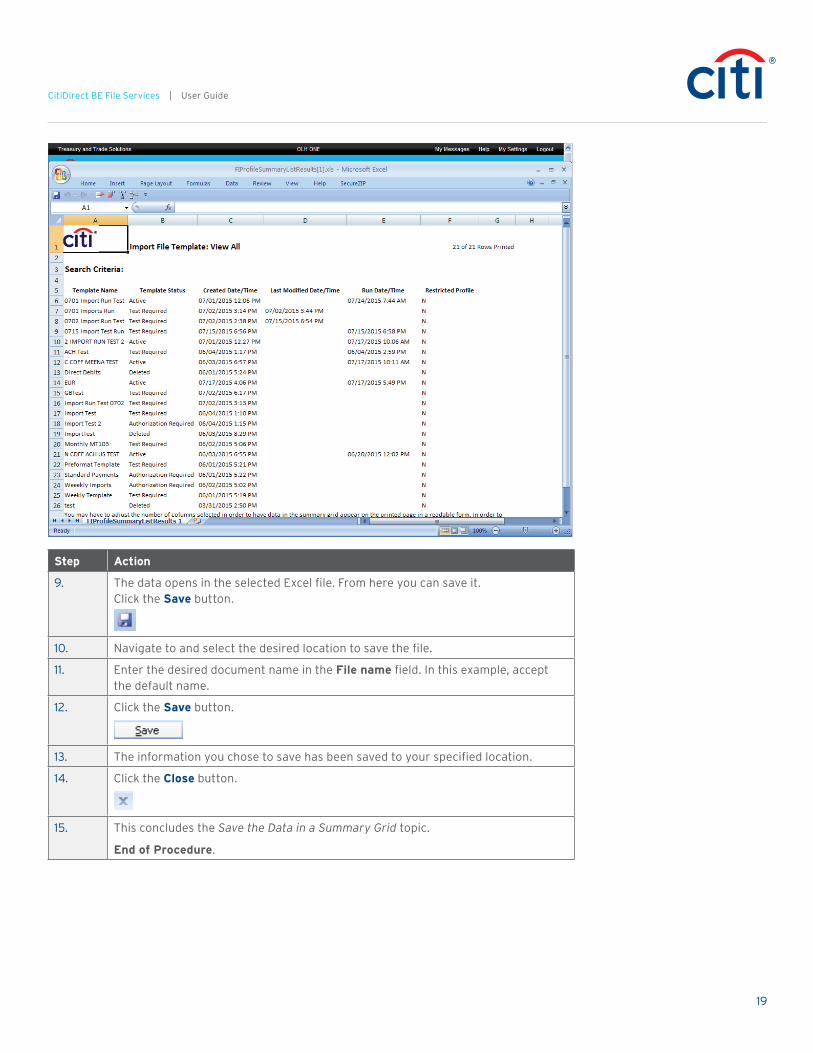
8. You can open the file first and then save it or save it directly. In this example, click Open.
19
CitiDirect BE File Services | User Guide
Step Action
9. The data opens in the selected Excel file. From here you can save it. Click the Save button.
10. Navigate to and select the desired location to save the file.
11. Enter the desired document name in the File name field. In this example, accept the default name.
12. Click the Save button.
13. The information you chose to save has been saved to your specified location.
14. Click the Close button.
15. This concludes the Save the Data in a Summary Grid topic.
End of Procedure.

20
CitiDirect BE File Services | User Guide
File Services
Export File Template
Create an Export File Template
Export template allows you to save a set of preferred output criteria to use with each export run. This prevents you from having to re-enter the criteria each time you need to export data.
Your entitlements determine whether you can create Export File Templates.
Procedure
In this topic, you will create a template for an export file.
Step Action
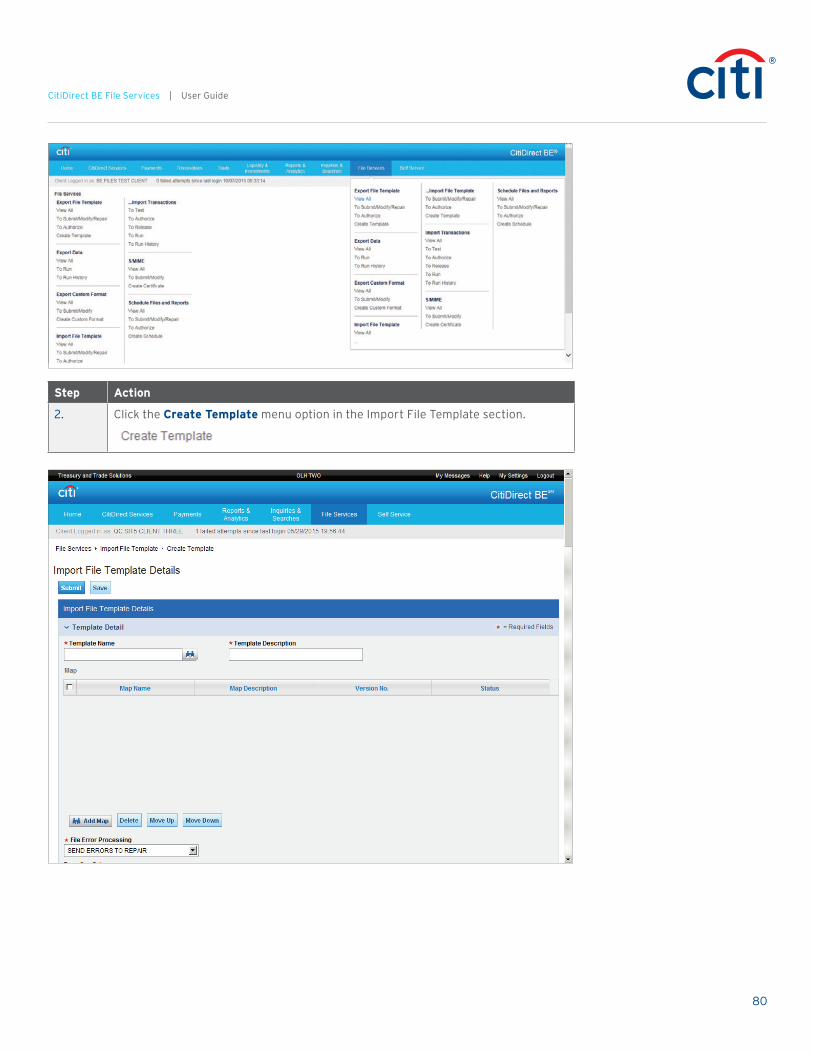
1. Point to the File Services menu heading.

21
CitiDirect BE File Services | User Guide
Step Action
2. Click the Create Template menu option in the Export File Template section.
Step Action
3. Click in the Template Name field.
4. Enter the desired information into the Template Name field. Enter “Daily Statement Data”.
22
CitiDirect BE File Services | User Guide
Step Action
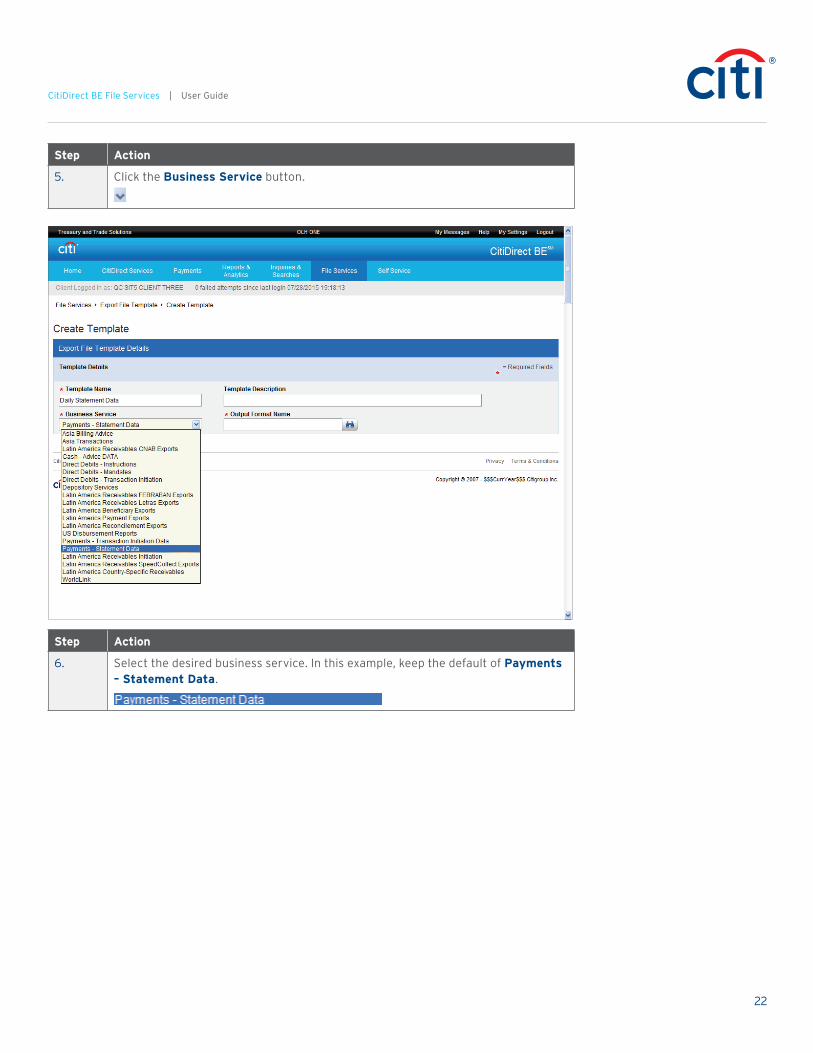
5. Click the Business Service button.
Step Action
6. Select the desired business service. In this example, keep the default of Payments – Statement Data.
23
CitiDirect BE File Services | User Guide
Step Action
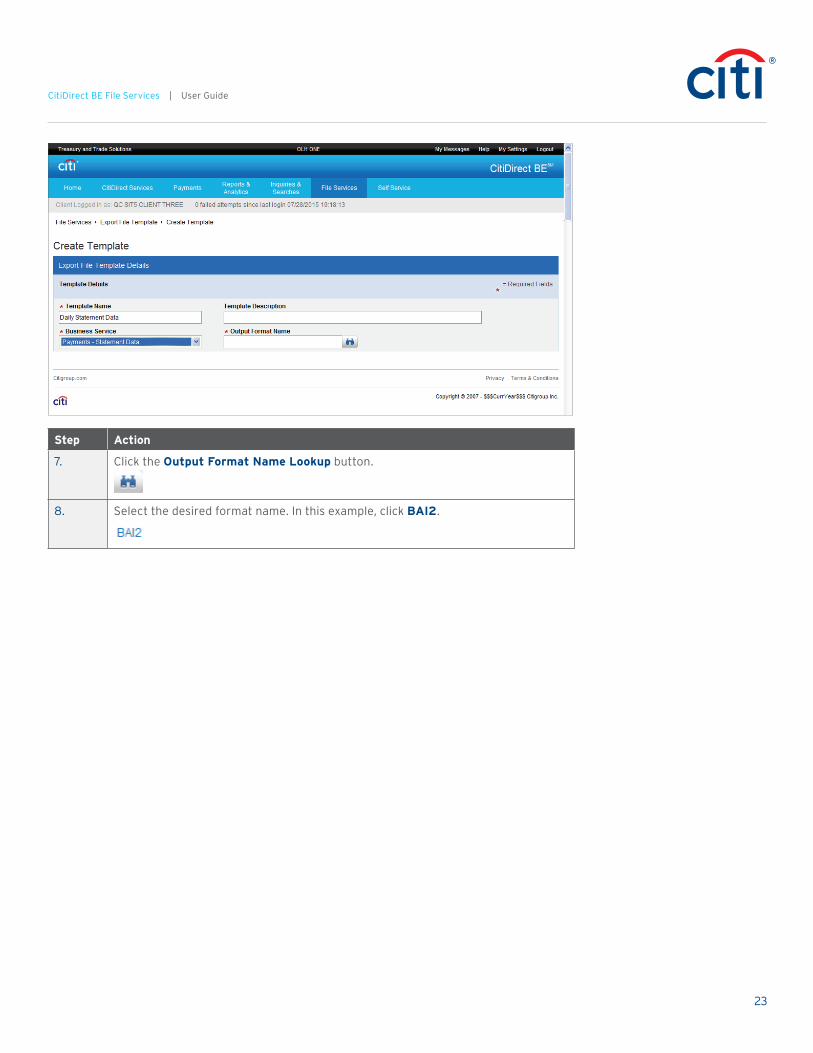
7. Click the Output Format Name Lookup button.
8. Select the desired format name. In this example, click BAI2.
24
CitiDirect BE File Services | User Guide
Step Action
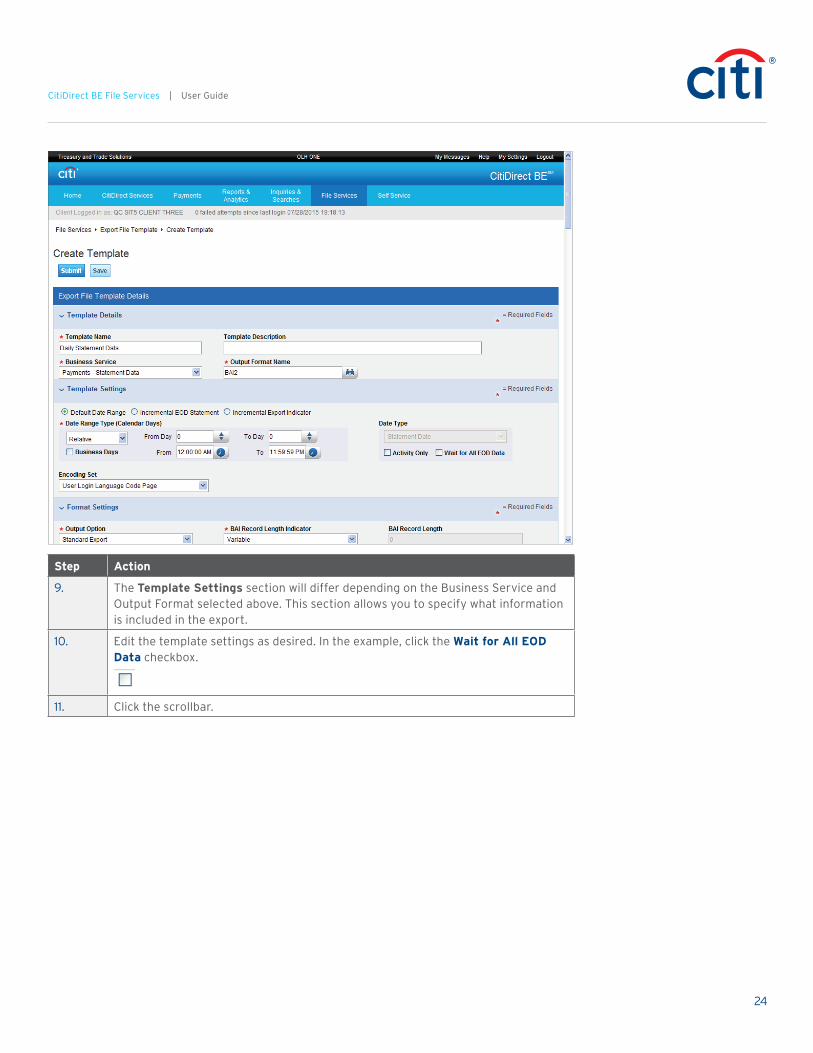
9. The Template Settings section will differ depending on the Business Service and Output Format selected above. This section allows you to specify what information is included in the export.
10. Edit the template settings as desired. In the example, click the Wait for All EOD Data checkbox.
11. Click the scrollbar.
25
CitiDirect BE File Services | User Guide
Step Action
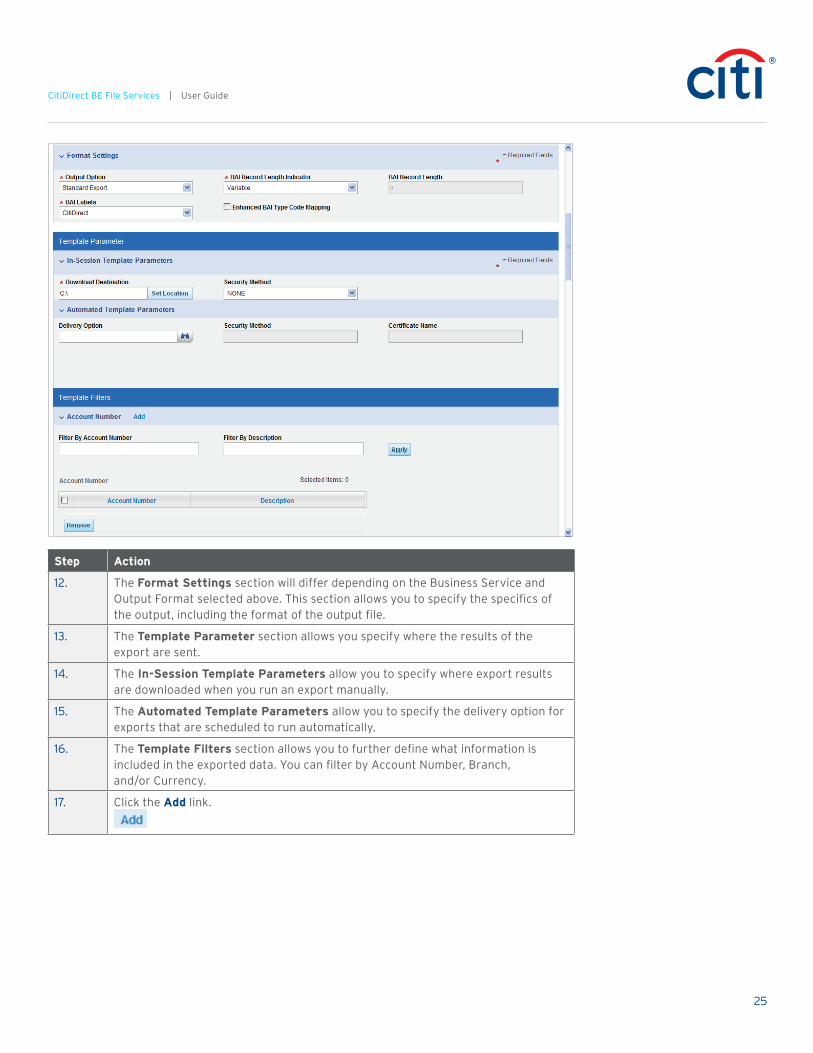
12. The Format Settings section will differ depending on the Business Service and Output Format selected above. This section allows you to specify the specifics of the output, including the format of the output file.
13. The Template Parameter section allows you specify where the results of the export are sent.
14. The In-Session Template Parameters allow you to specify where export results are downloaded when you run an export manually.
15. The Automated Template Parameters allow you to specify the delivery option for exports that are scheduled to run automatically.
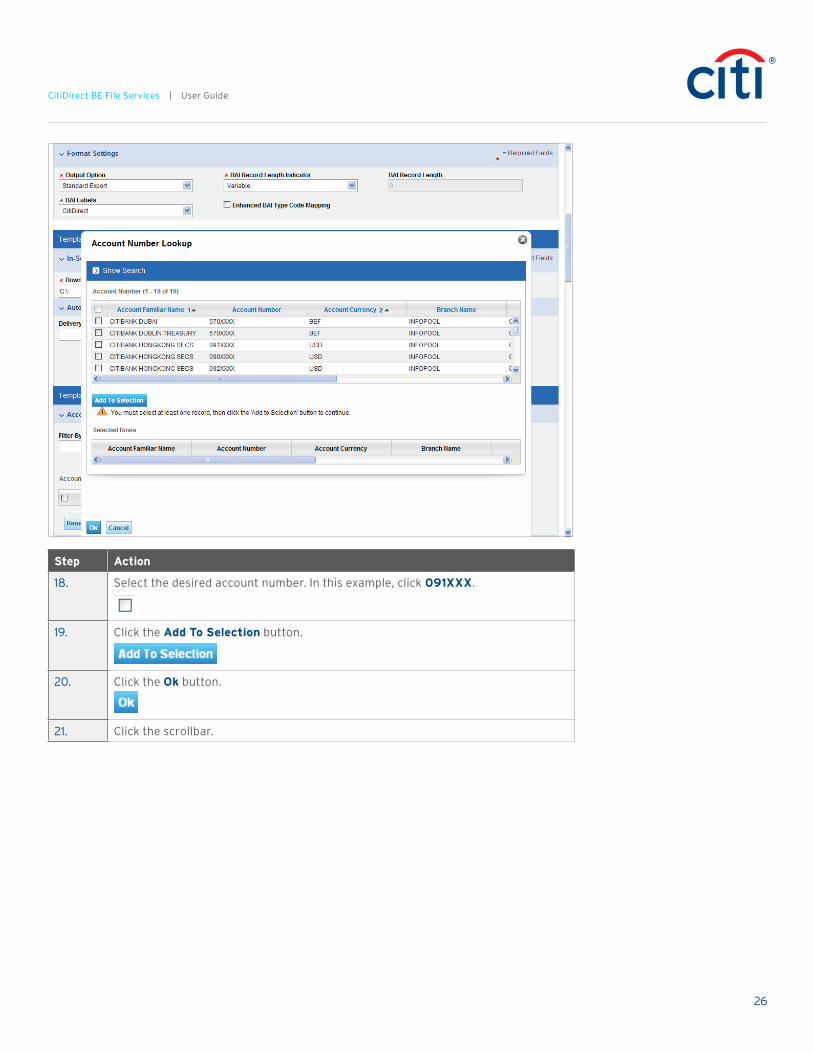
16. The Template Filters section allows you to further define what information is included in the exported data. You can filter by Account Number, Branch, and/or Currency.
17. Click the Add link.
26
CitiDirect BE File Services | User Guide
Step Action
18. Select the desired account number. In this example, click 091XXX.
19. Click the Add To Selection button.
20. Click the Ok button.
21. Click the scrollbar.

27
CitiDirect BE File Services | User Guide
Step Action
22. Click the Bank Branch Expand button.
23. Click the Currency Expand button.
24. Both the Bank Branch and the Currency sections work in the same manner as the Account section.

28
CitiDirect BE File Services | User Guide
Step Action
25. The Save button allows you to save the template as a draft to be submitted at a later time.
26. Click the Submit button.
27. The record moves to the next step of the operational process and, depending on the flow maintenance, the template may require authorizing.
28. This concludes the Create an Export File Template topic.
End of Procedure.

29
CitiDirect BE File Services | User Guide
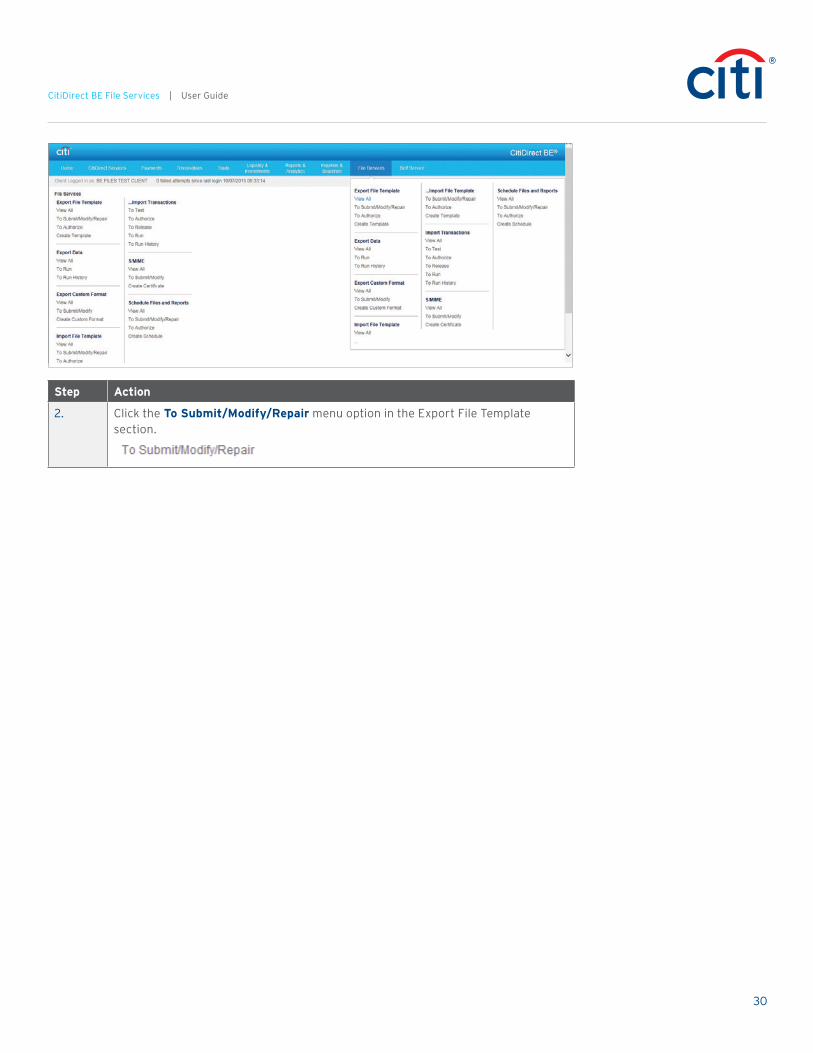
Modify/Repair an Export File Template
All templates except for those that have been deleted can be modified and updated. Once modified and resubmitted, the template may have to be authorized before it can be used again, depending on your flow maintenance.
Procedure
In this topic, you will modify an existing export file template and resubmit it for processing.
Step Action
1. Point to the File Services menu heading.
30
CitiDirect BE File Services | User Guide
Step Action
2. Click the To Submit/Modify/Repair menu option in the Export File Template section.

31
CitiDirect BE File Services | User Guide
Step Action
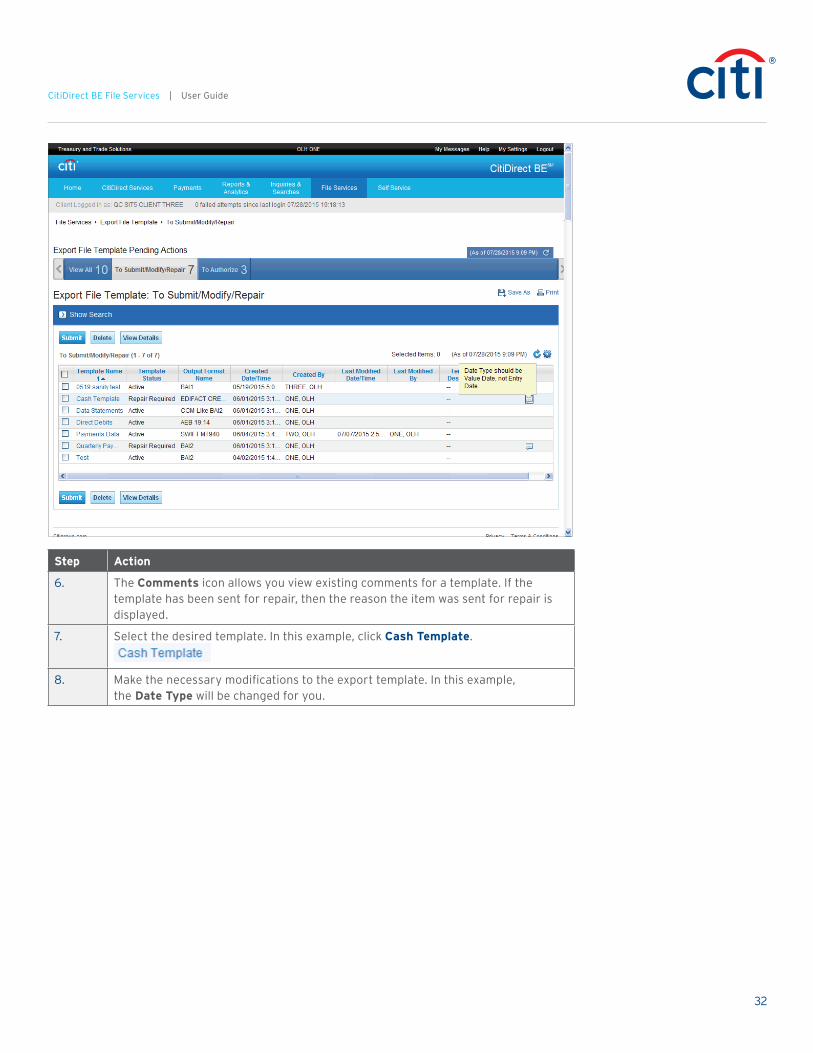
3. The carousel at the top of the page allows you to navigate between worklists.
4. The number displayed on each tab indicates the number of pending actions on each worklist. The number on the View All tab is the total for all pending actions.
5. Point to comments icon.
32
CitiDirect BE File Services | User Guide
Step Action
6. The Comments icon allows you view existing comments for a template. If the template has been sent for repair, then the reason the item was sent for repair is displayed.
7. Select the desired template. In this example, click Cash Template.
8. Make the necessary modifications to the export template. In this example, the Date Type will be changed for you.
33
CitiDirect BE File Services | User Guide
Step Action
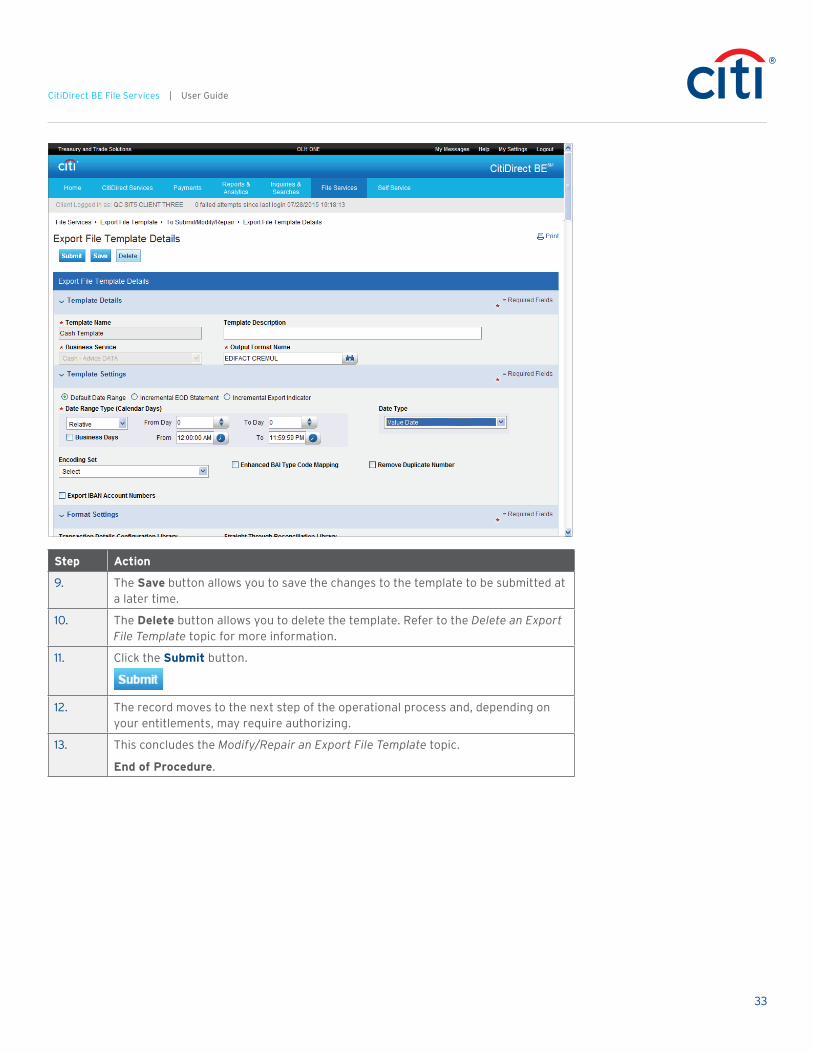
9. The Save button allows you to save the changes to the template to be submitted at a later time.
10. The Delete button allows you to delete the template. Refer to the Delete an Export File Template topic for more information.
11. Click the Submit button.
12. The record moves to the next step of the operational process and, depending on your entitlements, may require authorizing.
13. This concludes the Modify/Repair an Export File Template topic.
End of Procedure.
34
CitiDirect BE File Services | User Guide
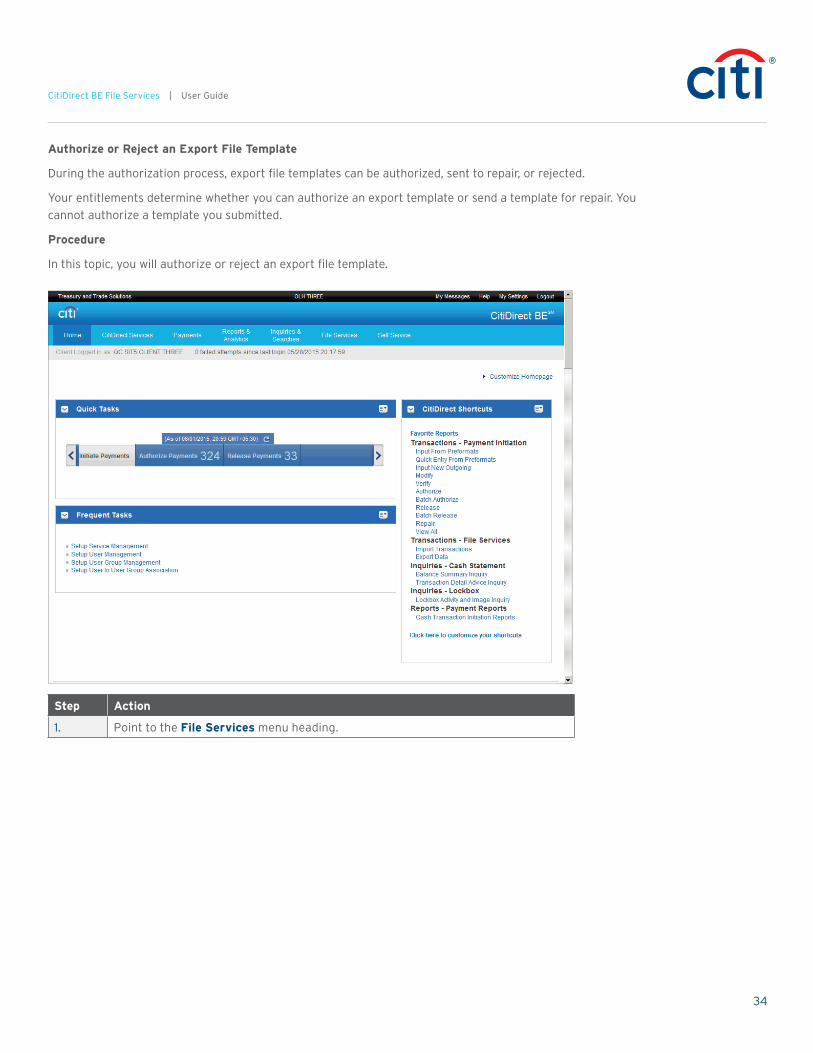
Authorize or Reject an Export File Template
During the authorization process, export file templates can be authorized, sent to repair, or rejected.
Your entitlements determine whether you can authorize an export template or send a template for repair. You cannot authorize a template you submitted.
Procedure
In this topic, you will authorize or reject an export file template.
Step Action
1. Point to the File Services menu heading.

35
CitiDirect BE File Services | User Guide
Step Action
2. Click the To Authorize menu option in the Export File Template section.

36
CitiDirect BE File Services | User Guide
Step Action
3. The carousel at the top of the page allows you to navigate between worklists.
4. The number displayed on each tab indicates the number of pending actions on each worklist. The number on the View All tab is the total for all pending actions.
5. The columns displayed in the To Authorize grid are the default columns for the grid. Your view may differ depending on your customizations.
6. Select the desired template. In this example, click Cash Template.

37
CitiDirect BE File Services | User Guide
Step Action
7. Process the template using one of the following options.
Authorize — the template is accurate and can be authorized. Reject — the template should be rejected.
8. Decision: Please make a selection from the options listed below.
• Authorize Go to step 9
• Reject Go to step 12
9. Click the Authorize button.
10. The template is authorized and can now be used to export data.
11. This concludes the Authorize or Reject an Export File Template topic.
End of Procedure. Remaining steps apply to other paths.
12. Click the Reject button.
13. Enter the desired information into the Reason field. Enter “Template is not needed”.
38
CitiDirect BE File Services | User Guide
Step Action
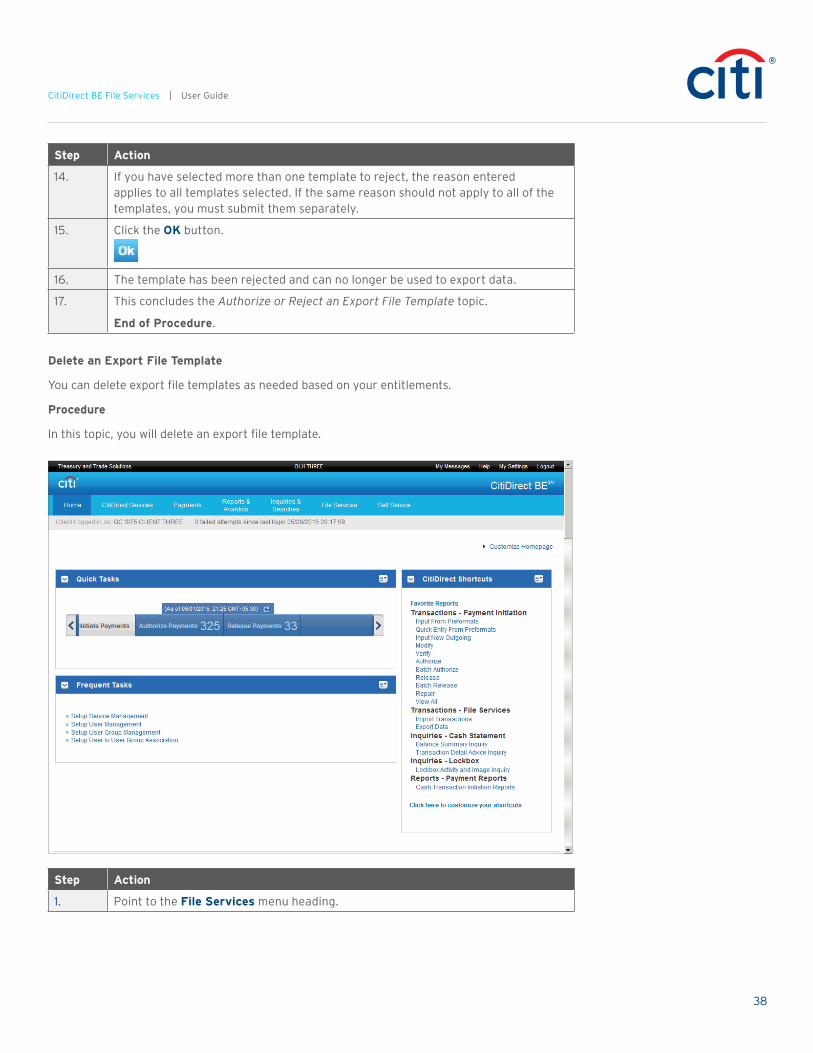
14. If you have selected more than one template to reject, the reason entered applies to all templates selected. If the same reason should not apply to all of the templates, you must submit them separately.
15. Click the OK button.
16. The template has been rejected and can no longer be used to export data.
17. This concludes the Authorize or Reject an Export File Template topic.
End of Procedure.
Delete an Export File Template
You can delete export file templates as needed based on your entitlements.
Procedure
In this topic, you will delete an export file template.
Step Action
1. Point to the File Services menu heading.
39
CitiDirect BE File Services | User Guide
Step Action
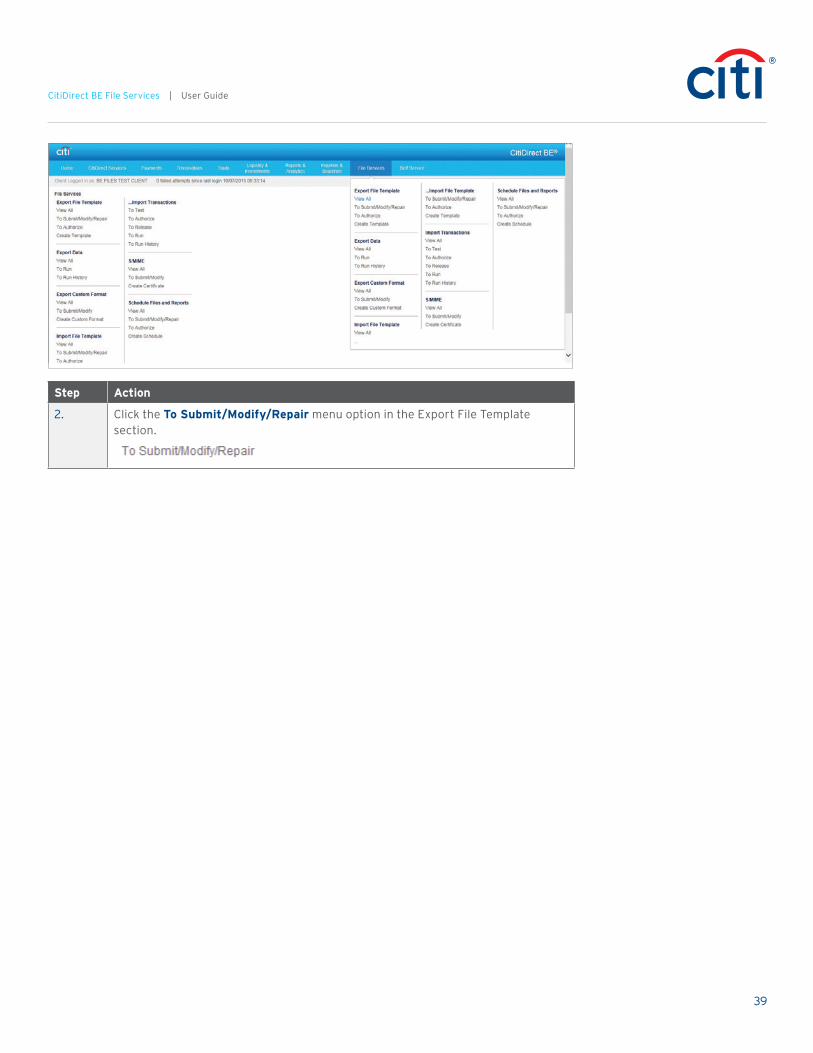
2. Click the To Submit/Modify/Repair menu option in the Export File Template section.

40
CitiDirect BE File Services | User Guide
Step Action
3. The carousel at the top of the page allows you to navigate between worklists.
4. The number displayed on each tab indicates the number of pending actions on each worklist. The number on the View All tab is the total for all pending actions.
5. Select the desired template. In this example, click ABC Template.
6. Click the Delete button.
7. Enter the desired information into the Reason field. Enter “Template is a duplicate”.

41
CitiDirect BE File Services | User Guide
Step Action
8. If you selected more than one template to delete, the reason entered applies to all templates selected. If the same reason shouldn’t apply to all templates, you must submit them separately.
9. Click the OK button.
10. The status of the template is changed to Deleted and it can no longer be used to export data.
11. This concludes the Delete an Export File Template topic.
End of Procedure.

42
CitiDirect BE File Services | User Guide
View an Export File Template
CitiDirect BE allows you to view all export file templates that you are entitled to, regardless of status.
Procedure
In this topic, you will view the details of an export file template.
Step Action
1. Point to the File Services menu heading.

43
CitiDirect BE File Services | User Guide
Step Action
2. Click the View All menu option in the Export File Template section.
Step Action
3. The carousel at the top of the page allows you to navigate between worklists.
4. The number displayed on each tab indicates the number of pending actions on each worklist. The number on the View All tab is the total for all pending actions.
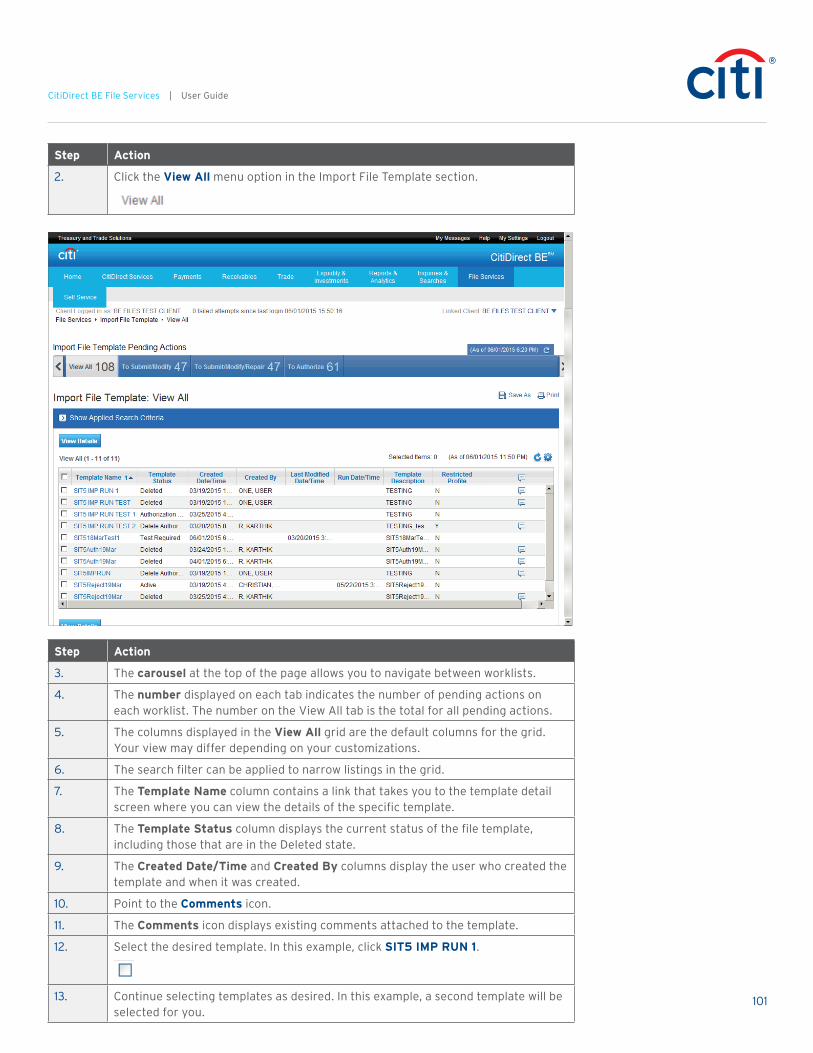
5. The View Details grid below shows the default columns from the initial setup. Your grid may differ depending on your customizations. Refer to the Customize a Grid topic for more information.
6. The Template Name column contains a link that takes you to the template detail screen where you can view the details of the specific template.
7. The Created By and Created Date/Time columns display the user who created the template and when it was created.
Similarly the Last Modified By and Last Modified Date/Time columns display the user who modified the template and when it was created.
8. The Comments icon allows you to view existing comments for a template.
9. Select the desired template. In this example, click ABC Template.
10. Continue selecting templates as needed. In this example, an additional template will be selected for you.

44
CitiDirect BE File Services | User Guide
Step Action
11. Click the View Details button.
Step Action
12. The Export File Template Details page displays detailed information about the selected template.
13. The Navigation buttons at the top of the page allow you to view additional formats without returning to the View All grid.
Note: These buttons are only available if you selected multiple templates from the View All grid.
14. The Template Details section displays the Template Name, Description, Business Service, and Output Format Name.
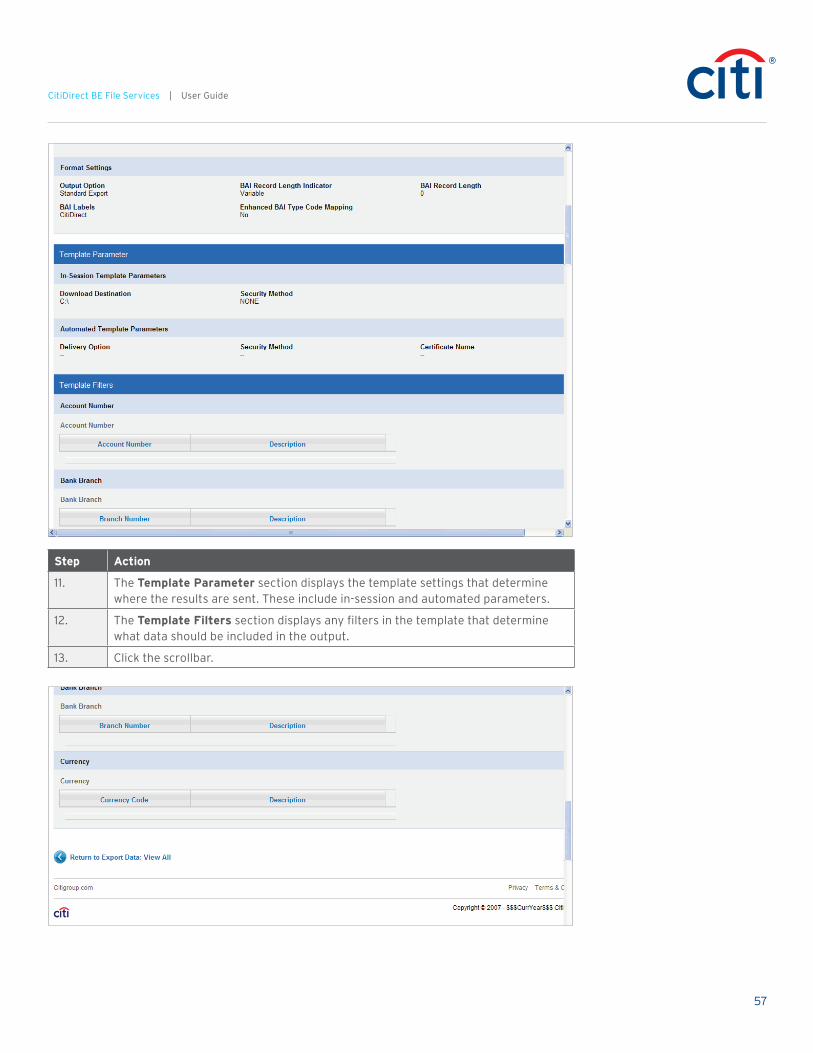
15. The Format Settings section displays the specifics of the output, including the format of the output file.
16. Click the scrollbar.

45
CitiDirect BE File Services | User Guide
Step Action
17. The Template Parameters section displays the In Session template and Automated Template parameters with details of the settings defined during this Template creation.
18. The Template Filters section displays the criteria used to filter the data included in the output.
19. Click the scrollbar.

46
CitiDirect BE File Services | User Guide
Step Action
20. Click the Return to Export File Template: View All button.
21. This concludes the View an Export File Template topic.
End of Procedure.
Export Data
Run a File Export
The export data process allows you to export End of Day and Intra-Day Statements to a data file using an export file template. An Export “Run” executes the query to fetch statement data as defined in an active Export File Template which is submitted for processing and assigned with a unique Run ID. Once submitted, the Run Status is set to Submitted.
When a run has been submitted, the export file template cannot be submitted again until the first run is complete.
Procedure
In this topic, you will run a file export.
47
CitiDirect BE File Services | User Guide
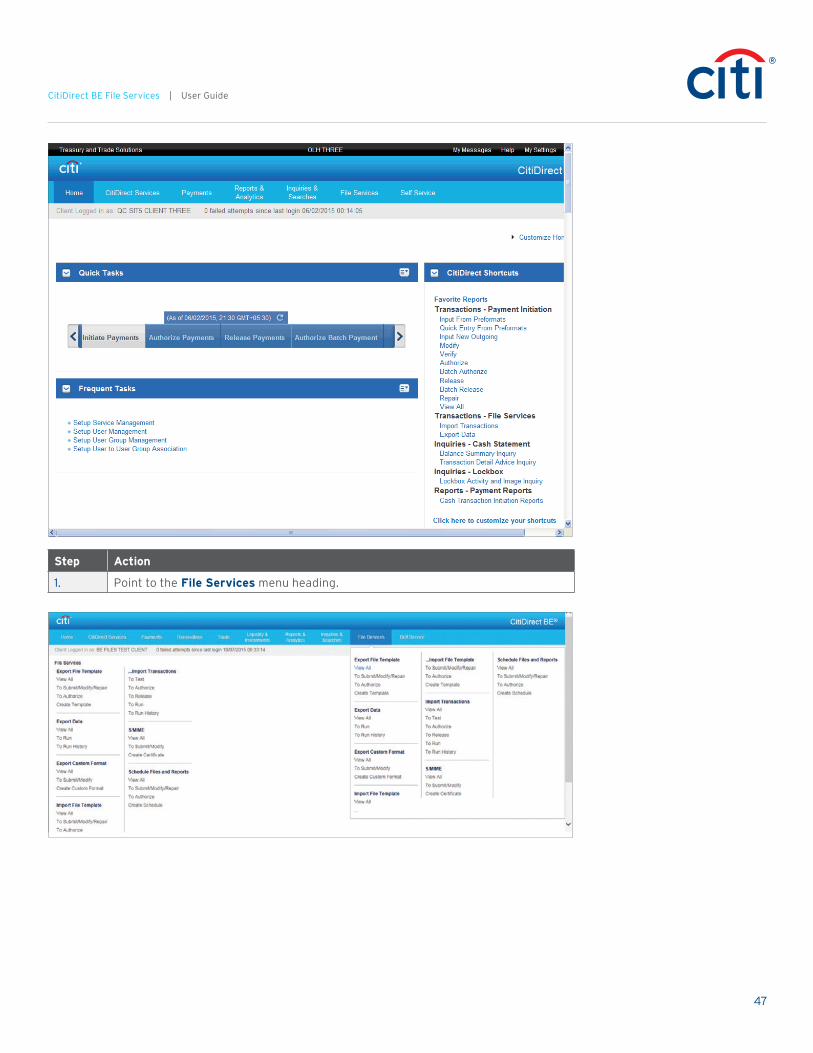
Step Action
1. Point to the File Services menu heading.
48
CitiDirect BE File Services | User Guide
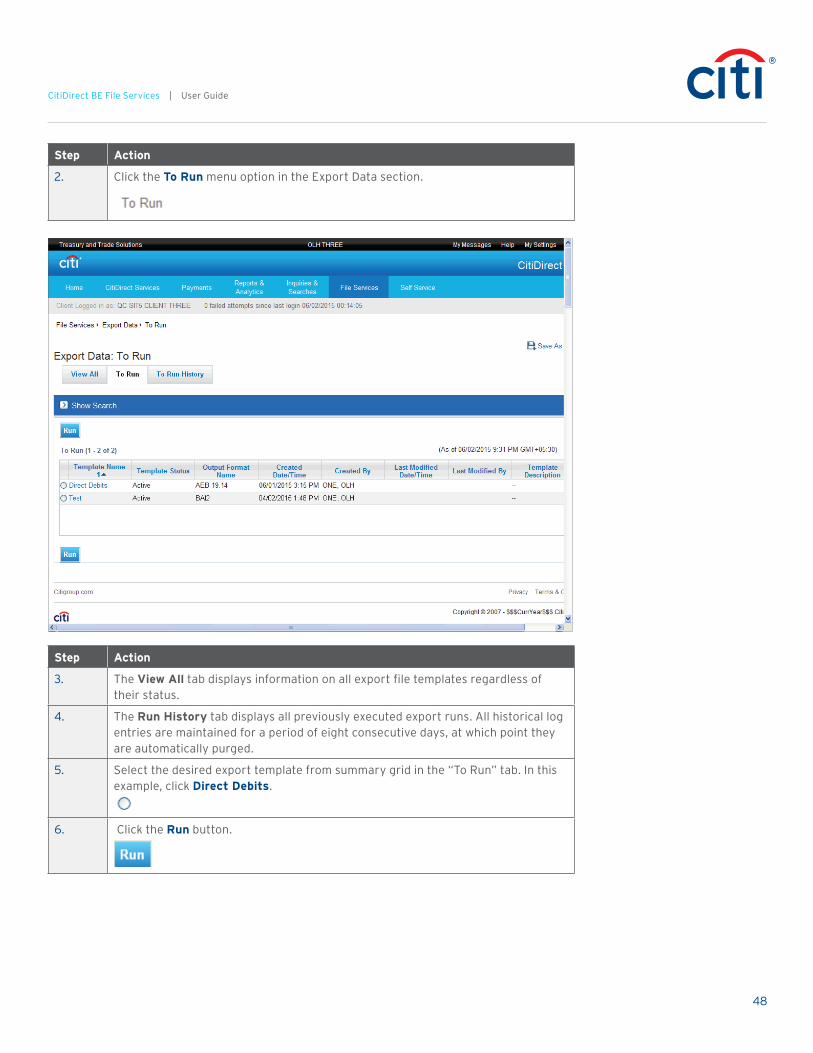
Step Action
2. Click the To Run menu option in the Export Data section.
Step Action
3. The View All tab displays information on all export file templates regardless of their status.
4. The Run History tab displays all previously executed export runs. All historical log entries are maintained for a period of eight consecutive days, at which point they are automatically purged.
5. Select the desired export template from summary grid in the “To Run” tab. In this example, click Direct Debits.
6. Click the Run button.

49
CitiDirect BE File Services | User Guide
Step Action
7. Click the OK button.
8. The export is submitted. The status can be viewed on the To Run History tab.
9. This concludes the Run a File Export topic.
End of Procedure.
Download an Export Run
The download process allows you to save the data details from a selected export run event to a specified location. You are entitled to see only exports that you have run.
Downloads may be executed only for run events in a Completed or Downloaded status, and you may download only one export run at a time. There is no multi-select capability for downloading.
Procedure
In this topic, you will download details of an export run.

50
CitiDirect BE File Services | User Guide
Step Action
1. Point to the File Services menu heading.

51
CitiDirect BE File Services | User Guide
Step Action
2. Click the To Run History menu option in the Export Data section.
Step Action
3. The View All tab displays information on all export file templates regardless of their status.
4. The To Run tab lists all export file templates that have a status of Active. From this tab, you can select the individual templates to run the file export.
5. The Download button allows you to download the selected export profile run to a specified location. Downloads may be executed only against run events in a Completed or Downloaded status.
6. Select the desired Run ID. In this example, click 6010566.
7. Click the Download button.
52
CitiDirect BE File Services | User Guide
Step Action
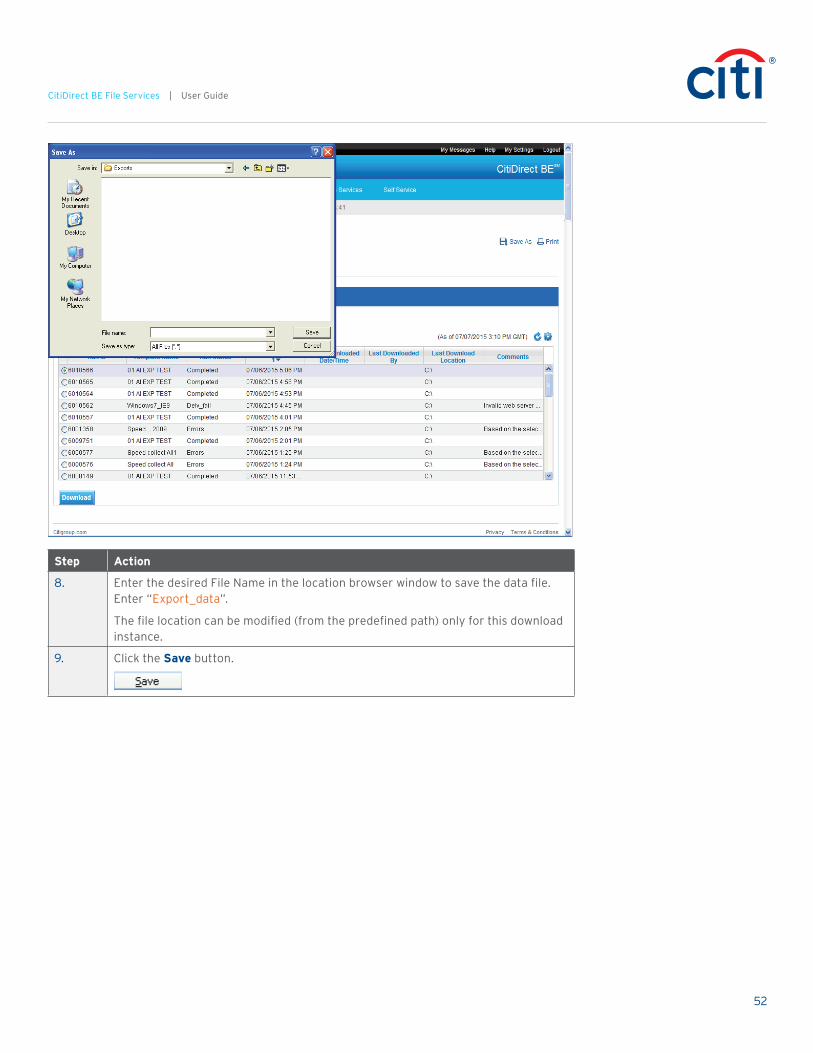
8. Enter the desired File Name in the location browser window to save the data file. Enter “Export_data”.
The file location can be modified (from the predefined path) only for this download instance.
9. Click the Save button.
53
CitiDirect BE File Services | User Guide
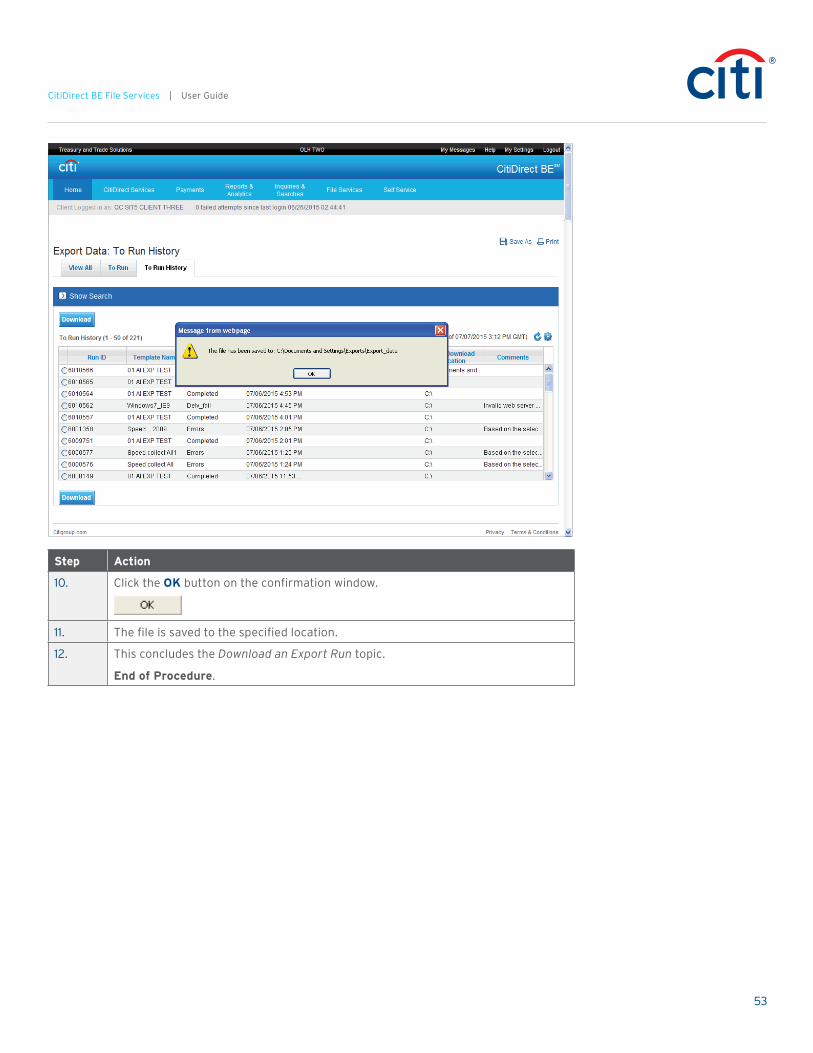
Step Action
10. Click the OK button on the confirmation window.
11. The file is saved to the specified location.
12. This concludes the Download an Export Run topic.
End of Procedure.

54
CitiDirect BE File Services | User Guide
View the Details of an Export File Template
With CitiDirect BE you can view the details of all export file templates that you have access to. All templates, regardless of status, are displayed on the Export Data: View All page.
Procedure
In this topic, you will view the details of an export file template.
Step Action
1. Point to the File Services menu heading.

55
CitiDirect BE File Services | User Guide
Step Action
2. Click the View All menu option in the Export Data section.
Step Action
3. The To Run tab lists all export file templates that have a status of Active. From this tab, you can select the individual templates to run the file export.
4. The To Run History tab displays all previously executed export runs. All historical log entries are maintained for a period of eight consecutive days, at which point they are automatically purged.
5. Select the desired template. In this example, click ABC Template.
6. Continue selecting templates as needed. In this example an additional template will be added for you.
7. Click the View Details button.
56
CitiDirect BE File Services | User Guide
Step Action
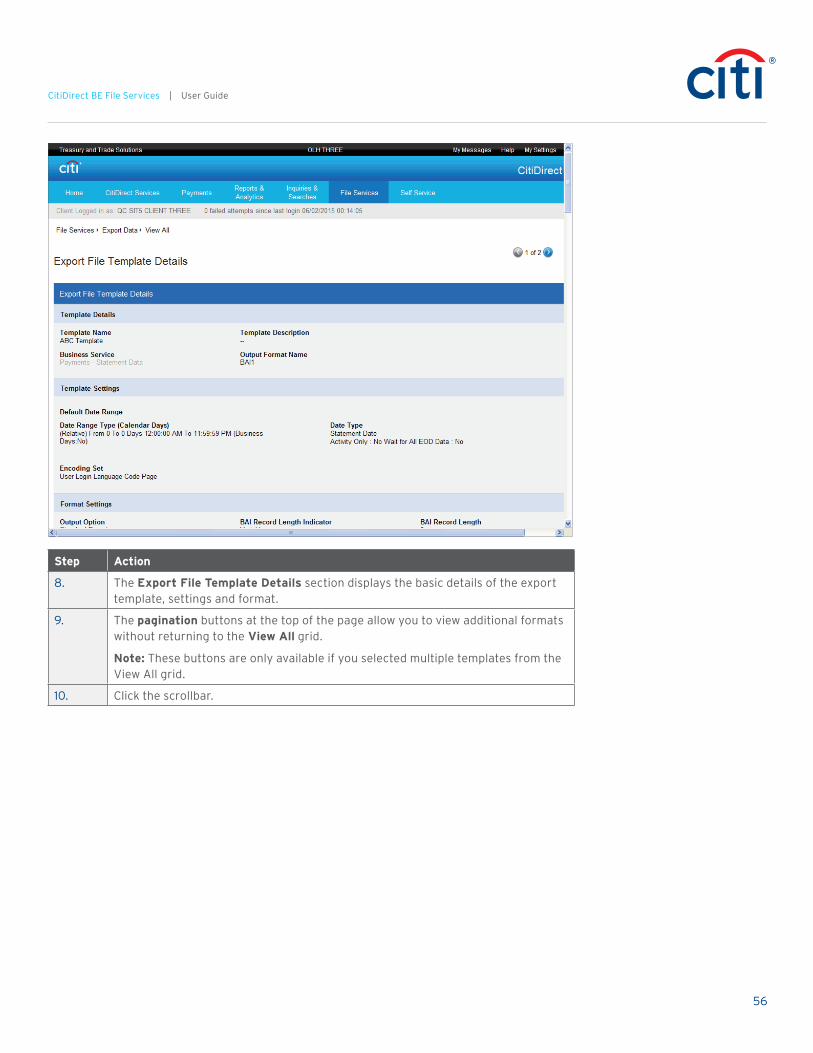
8. The Export File Template Details section displays the basic details of the export template, settings and format.
9. The pagination buttons at the top of the page allow you to view additional formats without returning to the View All grid.
Note: These buttons are only available if you selected multiple templates from the View All grid.
10. Click the scrollbar.
57
CitiDirect BE File Services | User Guide
Step Action
11. The Template Parameter section displays the template settings that determine where the results are sent. These include in-session and automated parameters.
12. The Template Filters section displays any filters in the template that determine what data should be included in the output.
13. Click the scrollbar.
58
CitiDirect BE File Services | User Guide
Step Action
14. Click the Return to Export Data: View All button.
15. This concludes the View the Details of an Export File Template topic.
End of Procedure.
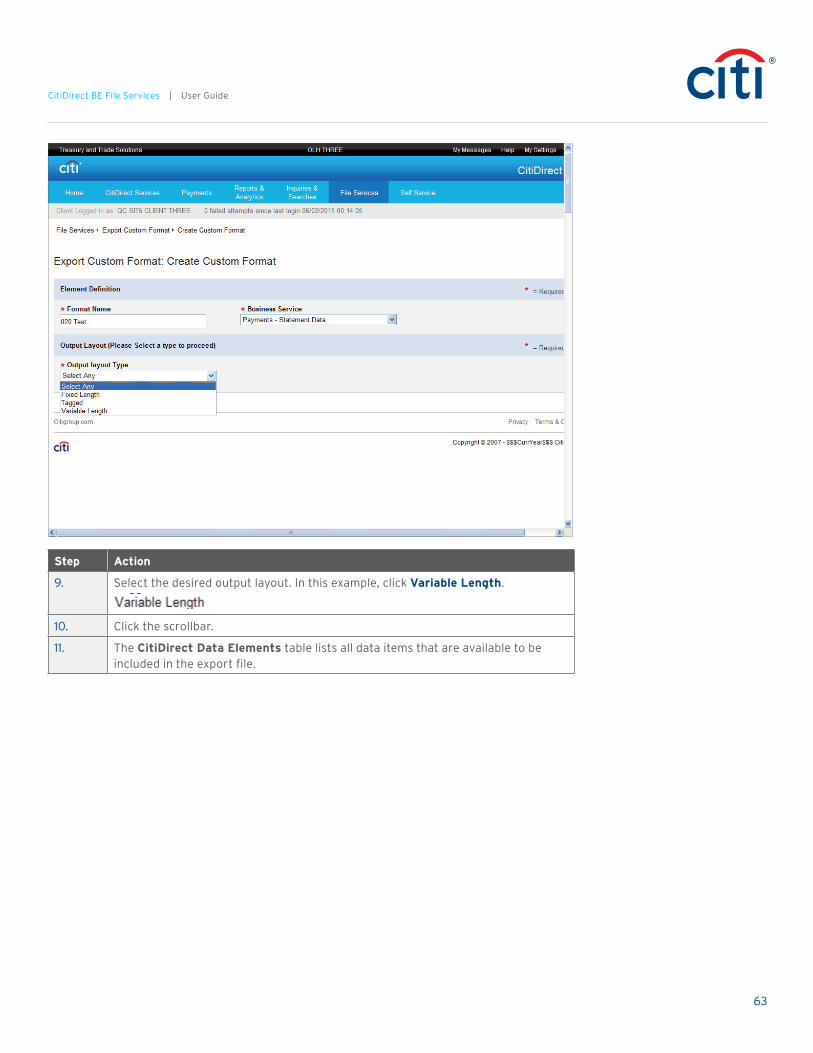
Export Custom Format
Create an Export Custom Format
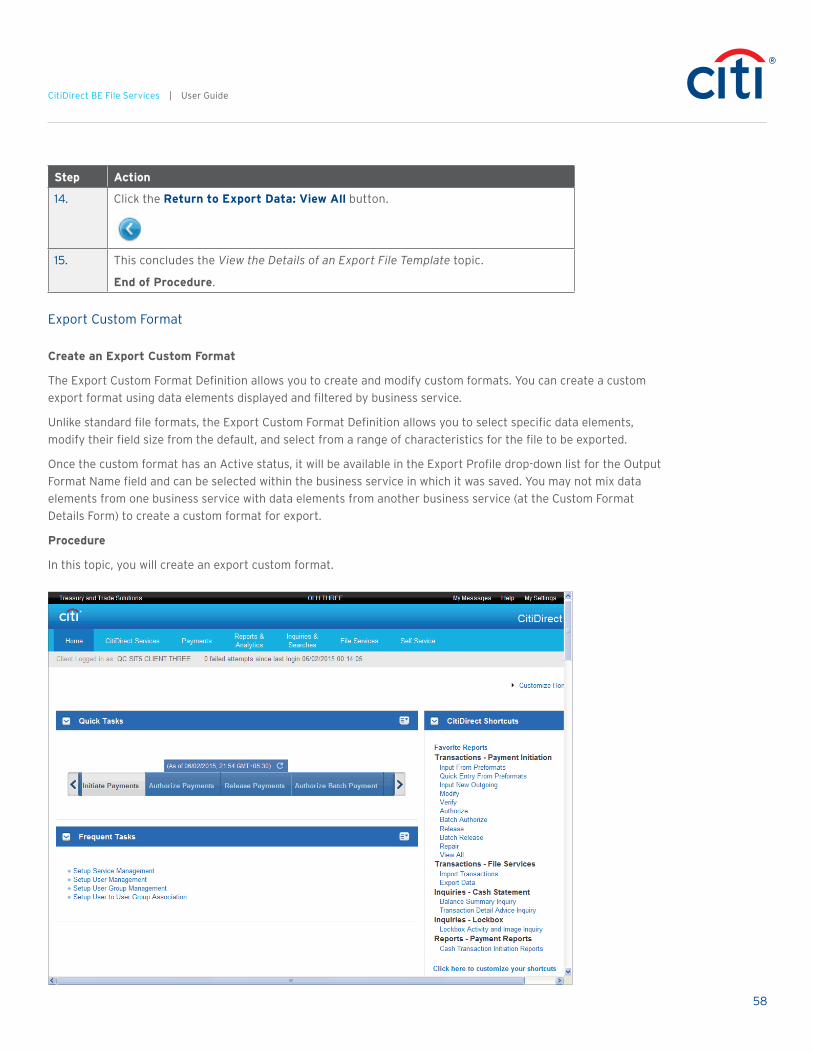
The Export Custom Format Definition allows you to create and modify custom formats. You can create a custom export format using data elements displayed and filtered by business service.
Unlike standard file formats, the Export Custom Format Definition allows you to select specific data elements, modify their field size from the default, and select from a range of characteristics for the file to be exported.
Once the custom format has an Active status, it will be available in the Export Profile drop-down list for the Output Format Name field and can be selected within the business service in which it was saved. You may not mix data elements from one business service with data elements from another business service (at the Custom Format Details Form) to create a custom format for export.
Procedure
In this topic, you will create an export custom format.

59
CitiDirect BE File Services | User Guide
Step Action
1. Point to the File Services menu heading.
Step Action
2. Click the Create Custom Format menu option in the Export Custom Format section.
60
CitiDirect BE File Services | User Guide
Step Action
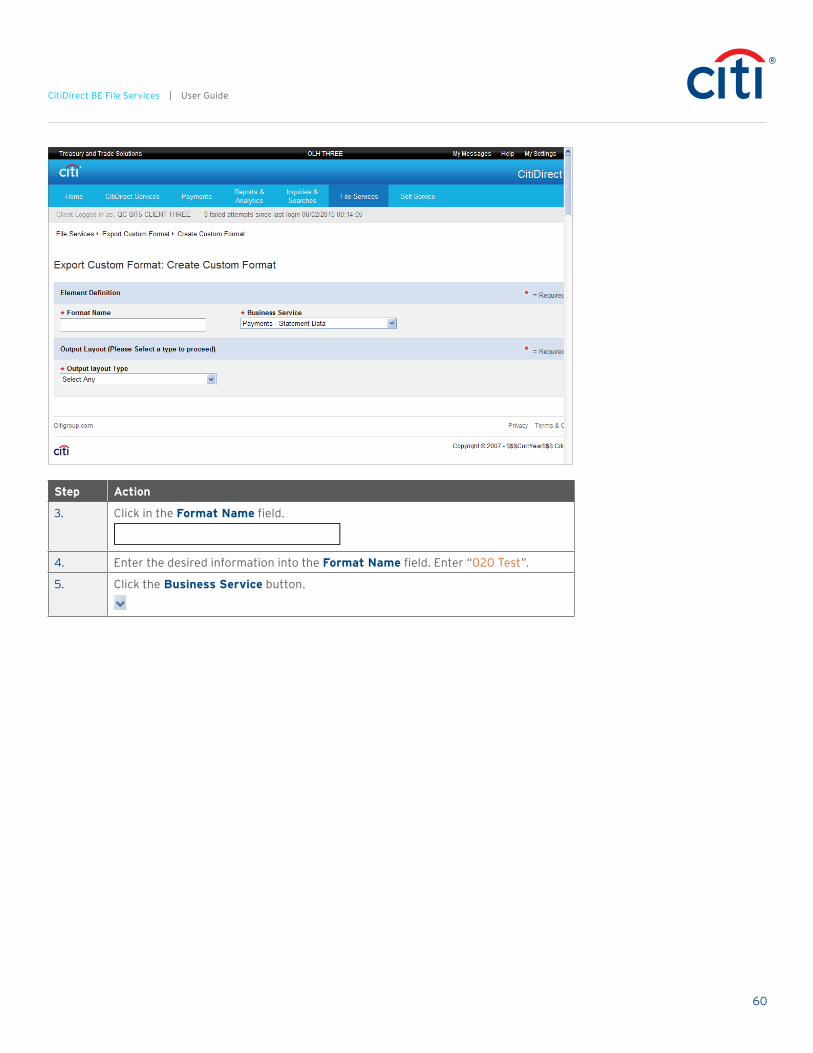
3. Click in the Format Name field.
4. Enter the desired information into the Format Name field. Enter “020 Test”.
5. Click the Business Service button.

61
CitiDirect BE File Services | User Guide
Step Action
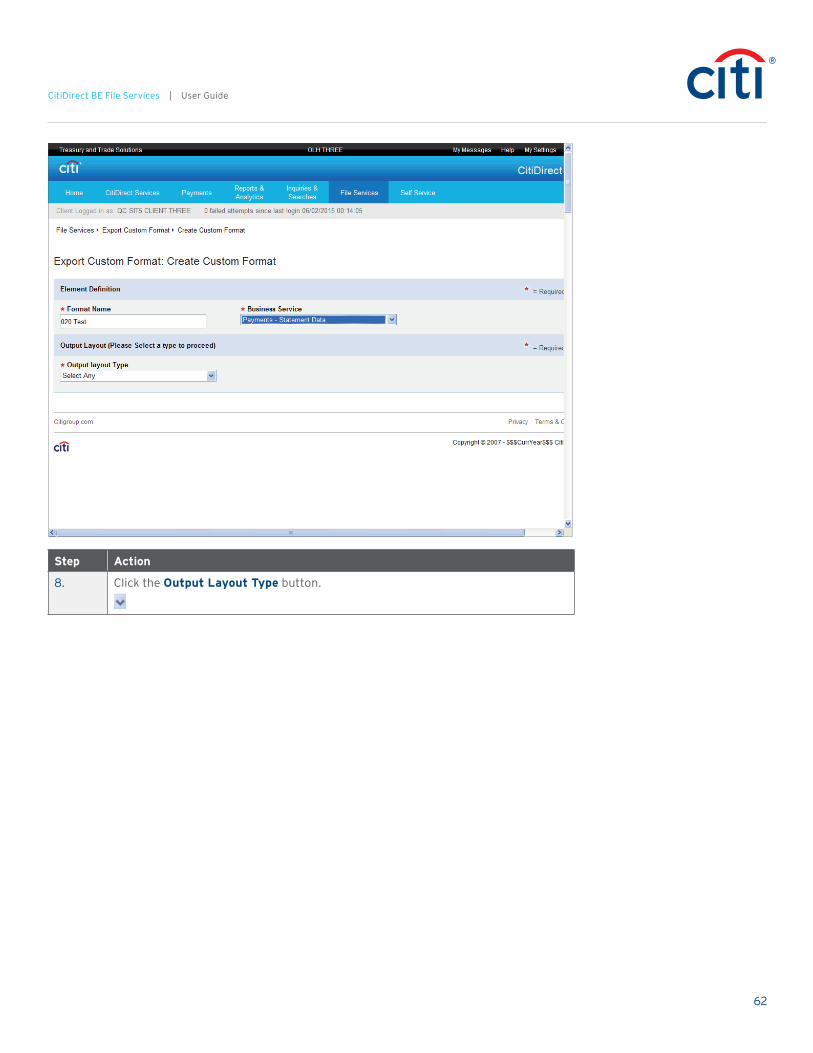
6. Select the desired service. In this example, click Payments — Statement Data.
7. The Output Layout section allows you to specify the specific layout of the export and what data elements from CitiDirect are included in the export.
62
CitiDirect BE File Services | User Guide
Step Action
8. Click the Output Layout Type button.
63
CitiDirect BE File Services | User Guide
Step Action
9. Select the desired output layout. In this example, click Variable Length.
10. Click the scrollbar.
11. The CitiDirect Data Elements table lists all data items that are available to be included in the export file.

64
CitiDirect BE File Services | User Guide
Step Action
12. Select the desired element. In this example, click Account Name.
13. The Add and Remove buttons allow you to move data elements between the two tables.
14. Click the Add button.
15. The File Export Elements table displays those items that you have selected to include in the export.
16. In this example, additional data elements will be added for you.
17. The Move Up and Move Down buttons allow you to set the order in which the data elements will appear in the export.
18. Select the desired element. In this example, click Account Number.
19. Click the Move up button.
20. The element moves up in the list order.
21. Click the scrollbar.
65
CitiDirect BE File Services | User Guide
Step Action
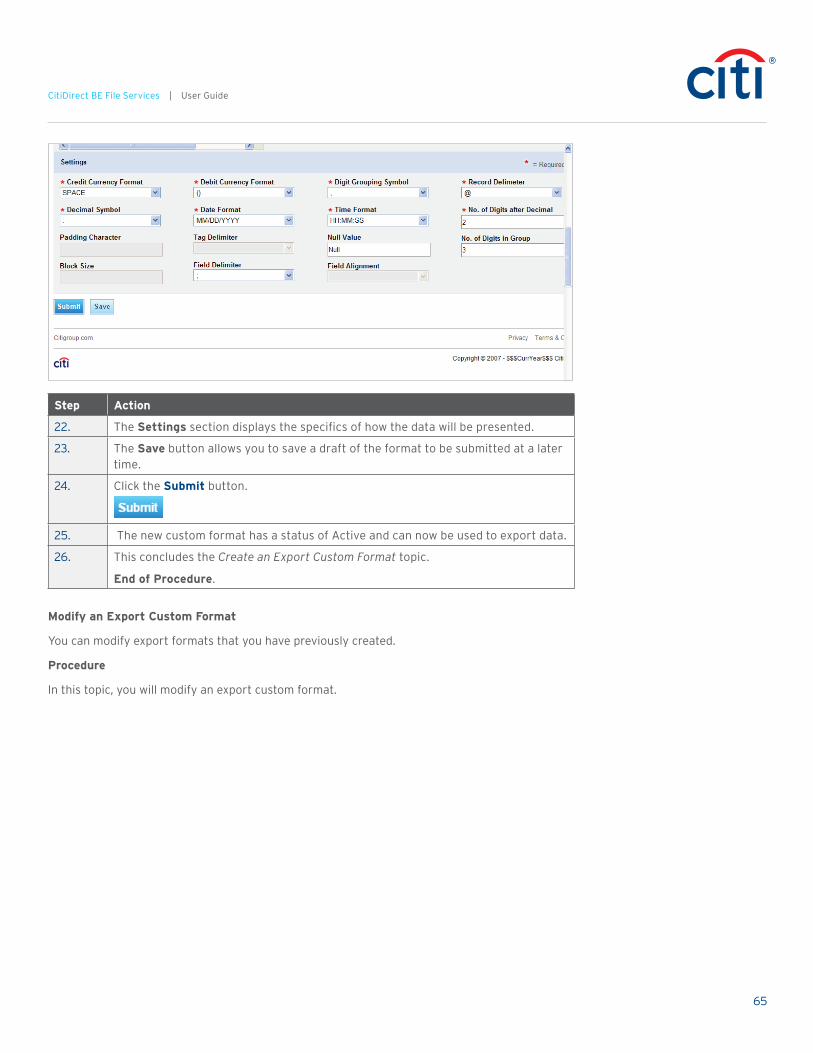
22. The Settings section displays the specifics of how the data will be presented.
23. The Save button allows you to save a draft of the format to be submitted at a later time.
24. Click the Submit button.
25. The new custom format has a status of Active and can now be used to export data.
26. This concludes the Create an Export Custom Format topic.
End of Procedure.
Modify an Export Custom Format
You can modify export formats that you have previously created.
Procedure
In this topic, you will modify an export custom format.

66
CitiDirect BE File Services | User Guide
Step Action
1. Point to the File Services menu heading.
67
CitiDirect BE File Services | User Guide
Step Action
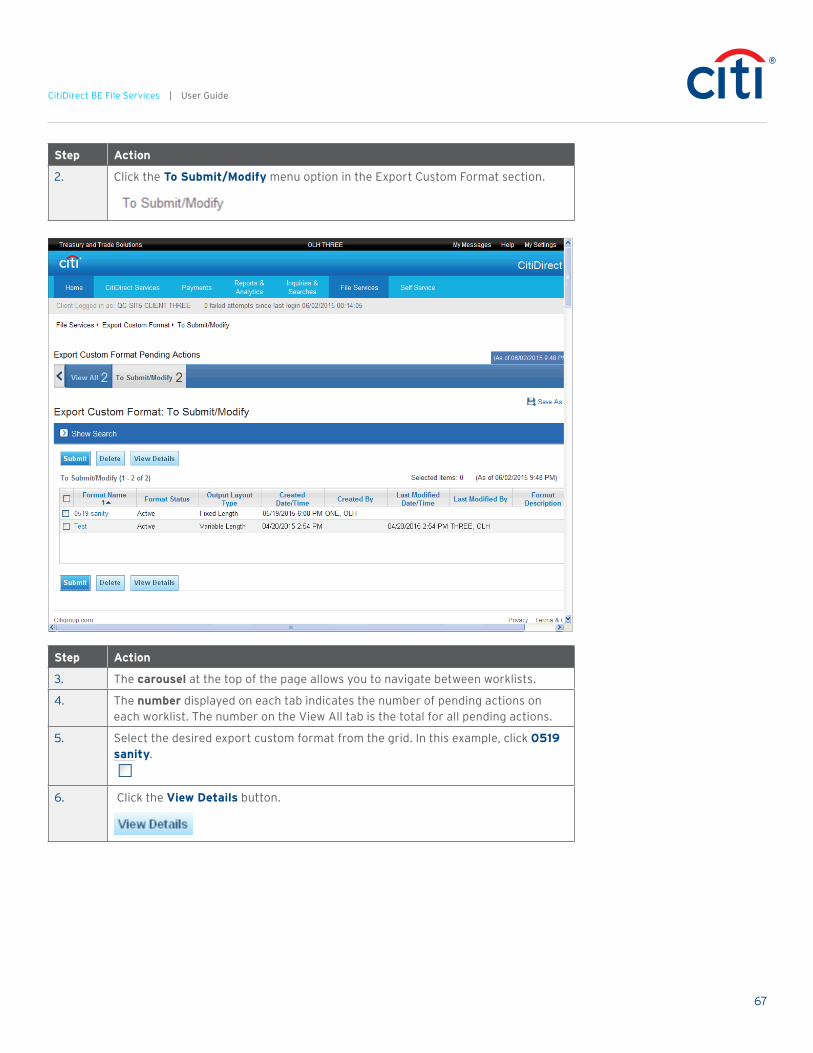
2. Click the To Submit/Modify menu option in the Export Custom Format section.
Step Action
3. The carousel at the top of the page allows you to navigate between worklists.
4. The number displayed on each tab indicates the number of pending actions on each worklist. The number on the View All tab is the total for all pending actions.
5. Select the desired export custom format from the grid. In this example, click 0519 sanity.
6. Click the View Details button.

68
CitiDirect BE File Services | User Guide
Step Action
7. Click the scrollbar.

69
CitiDirect BE File Services | User Guide
Step Action
8. Make the necessary changes.
In this example, you will update the Debit Currency Format.
9. Click the Debit Currency Format button.
10. Select the desired debit currency format. In this example, click the dash icon.
11. The Save As button allows you to create a copy of the format and save it as a draft.
12. The Delete button allows you to delete the format so it can no longer be used. Refer to the Delete an Export Custom Format topic for more information.
Step Action
13. Click the Submit button.
14. The custom export format is updated and can now be used to export data with the new information.
15. This concludes the Modify an Export Custom Format topic.
End of Procedure.

70
CitiDirect BE File Services | User Guide
Delete an Export Custom Format
You can delete export custom formats as needed in CitiDirect BE.
Procedure
In this topic, you will delete an export custom format.
Step Action
1. Point to the File Services menu heading.

71
CitiDirect BE File Services | User Guide
Step Action
2. Click the To Submit/Modify menu option in the Export Custom Format section.
72
CitiDirect BE File Services | User Guide
Step Action
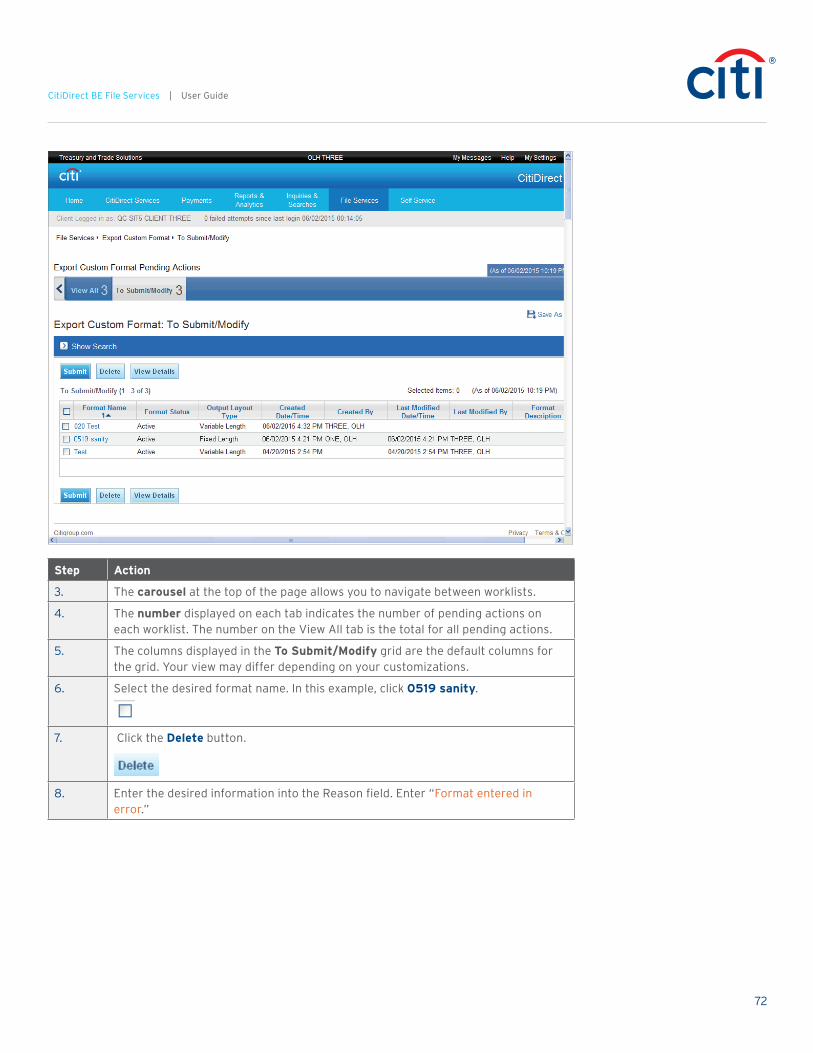
3. The carousel at the top of the page allows you to navigate between worklists.
4. The number displayed on each tab indicates the number of pending actions on each worklist. The number on the View All tab is the total for all pending actions.
5. The columns displayed in the To Submit/Modify grid are the default columns for the grid. Your view may differ depending on your customizations.
6. Select the desired format name. In this example, click 0519 sanity.
7. Click the Delete button.
8. Enter the desired information into the Reason field. Enter “Format entered in error.”

73
CitiDirect BE File Services | User Guide
Step Action
9. Click the OK button to delete the selected record.

74
CitiDirect BE File Services | User Guide
Step Action
10. Click the OK button.
11. The custom export format is removed from the system and can no longer be used to export data.
12. This concludes the Delete an Export Custom Format topic.
End of Procedure.

75
CitiDirect BE File Services | User Guide
View an Export Custom Format
CitiDirect BE allows you to view all export custom formats that you are entitled to, regardless of status.
Procedure
In this topic, you will view an export custom format.
Step Action
1. Point to the File Services menu heading.

76
CitiDirect BE File Services | User Guide
Step Action
2. Click the View All menu option in the Export Custom Format section.
Step Action
3. The carousel at the top of the page allows you to navigate between worklists.
4. The number displayed on each tab indicates the number of pending actions on each worklist. The number on the View All tab is the total for all pending actions.
5. The columns displayed in the View All grid are the default columns for the grid. Your view may differ depending on your customizations.
6. The View All grid displays all export custom formats you are entitled to regardless of status.
7. The Format Name column contains a link that takes you to the detail page where you can view the details of the specific export format.
8. The Output Layout Type column contains the type of layout used in the custom format.
9. The Created Date/Time and Created By columns display the user who created the export format and when it was created.
10. The Last Modified Date/Time and Last Modified By columns display the date and time the format was last modified and the user who modified it.
11. Select the desired format from the grid. In this example, click 0519 sanity.

77
CitiDirect BE File Services | User Guide
Step Action
12. Continue adding formats as needed. In this example, an additional format will be added for you.
13. Click the View Details button.
Step Action
14. The details displayed vary depending on the selected format.
15. The pagination buttons at the top of the page allow you to view additional formats without returning to the View All grid.
Note: These buttons are only available if you selected multiple templates from the View All grid.
16. The Element Definition section displays the basic details of the format, including the Format Name and Business Service.
17. The Output Layout section displays what information is included in the format and how it is sorted.

78
CitiDirect BE File Services | User Guide
Step Action
18. Click the scrollbar.
19. The Settings section displays the specifics of how the data will be presented.

79
CitiDirect BE File Services | User Guide
Step Action
20. Click the Return to Export Custom Format: View All button.
21. This concludes the View an Export Custom Format topic.
End of Procedure.
Import File Template
Create an Import File Template
Import templates allow you to save a set of criteria to use with each import run. This prevents you from having to re-enter the criteria each time you need to import transactions.
Your entitlements determine whether or not you can create Import File Templates.
Procedure
In this topic, you will create an import file template.
Step Action
1. Point to the File Services menu heading.
80
CitiDirect BE File Services | User Guide
Step Action
2. Click the Create Template menu option in the Import File Template section.

81
CitiDirect BE File Services | User Guide
Step Action
3. Click in the Template Name field.
4. Enter the desired information into the Template Name field. Enter “Monthly MT103”.
5. Click in the Template Description field.
6. Enter the desired information into the Template Description field. Enter “MT103 imports”.
Step Action
7. Click the Add Map button.

82
CitiDirect BE File Services | User Guide
Step Action
8. Select the desired map. In this example, click 0C DFT KAZAKH 1.
9. The selected map now appears in the grid. You can only select one map per template.
10. The Delete button allows you to delete the selected map.
11. The Move Up and Move Down buttons allow you to change the order of the maps in the import template.
12. Click the File Error Processing button.

83
CitiDirect BE File Services | User Guide
Step Action
13. Select the file error processing. In this example, click ABORT ALL ON THRESHOLD.
14. Click in the Error Threshold field.
15. Enter the desired information into the Error Threshold field. Enter “10”.
16. Select the desired Encoding Set for your template. In this example, accept the default setting.
17. The Restricted Profile checkbox, when selected, disables the Import Log Delivery Option from selection, regardless of whether the View Log Indicator checkbox is selected or not.
18. Click the scrollbar.
19. The In-Session Template Parameters section allows you to specify the location where the import files are saved and indicates what security method is to be used when importing.

84
CitiDirect BE File Services | User Guide
Step Action
20. Click the scrollbar.
Step Action
21. The Automated Template Parameters section allows you to set the file template to be run automatically on a schedule. A delivery option is required to run a file template automatically.
22. The Import Log Delivery Option section allows you to set the import log to be delivered automatically using the indicated delivery option.
23. If the View Log Indicator checkbox is selected an Import Log will be available.
24. Click the View Log Indicator option.
25. When the Show Errors and Summary Only checkbox is selected, the import log will only include rejections.

85
CitiDirect BE File Services | User Guide
Step Action
26. The Import Log Format field allows you to select which format you want the log created in. Options are Standardized Fields — Text, Standardized Fields — CSV, Business Service Fields — Text, and Business Service Fields — CSV.
27. The Save button allows you to save a draft of the import template to be submitted at a later time.
28. Click the Submit button.
29. The import template moves to the next stage in the process per your flow control requirements.
30. This concludes the Create an Import File Template topic.
End of Procedure.
86
CitiDirect BE File Services | User Guide
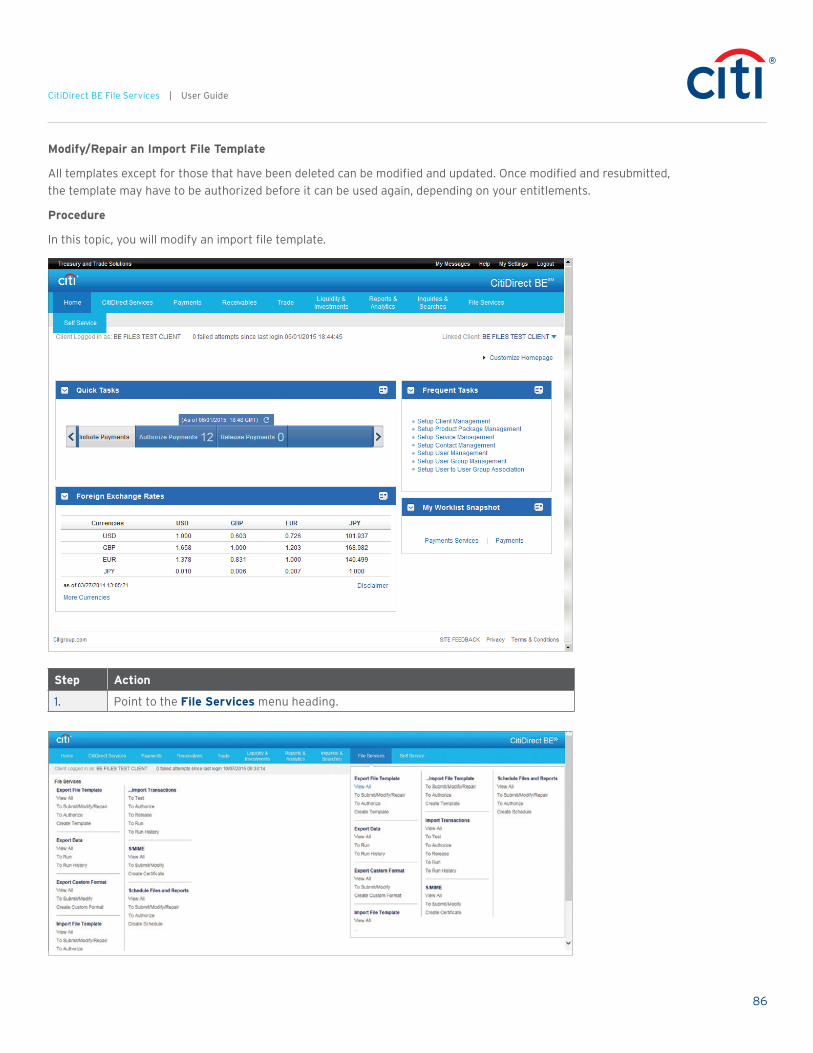
Modify/Repair an Import File Template
All templates except for those that have been deleted can be modified and updated. Once modified and resubmitted, the template may have to be authorized before it can be used again, depending on your entitlements.
Procedure
In this topic, you will modify an import file template.
Step Action
1. Point to the File Services menu heading.
87
CitiDirect BE File Services | User Guide
Step Action
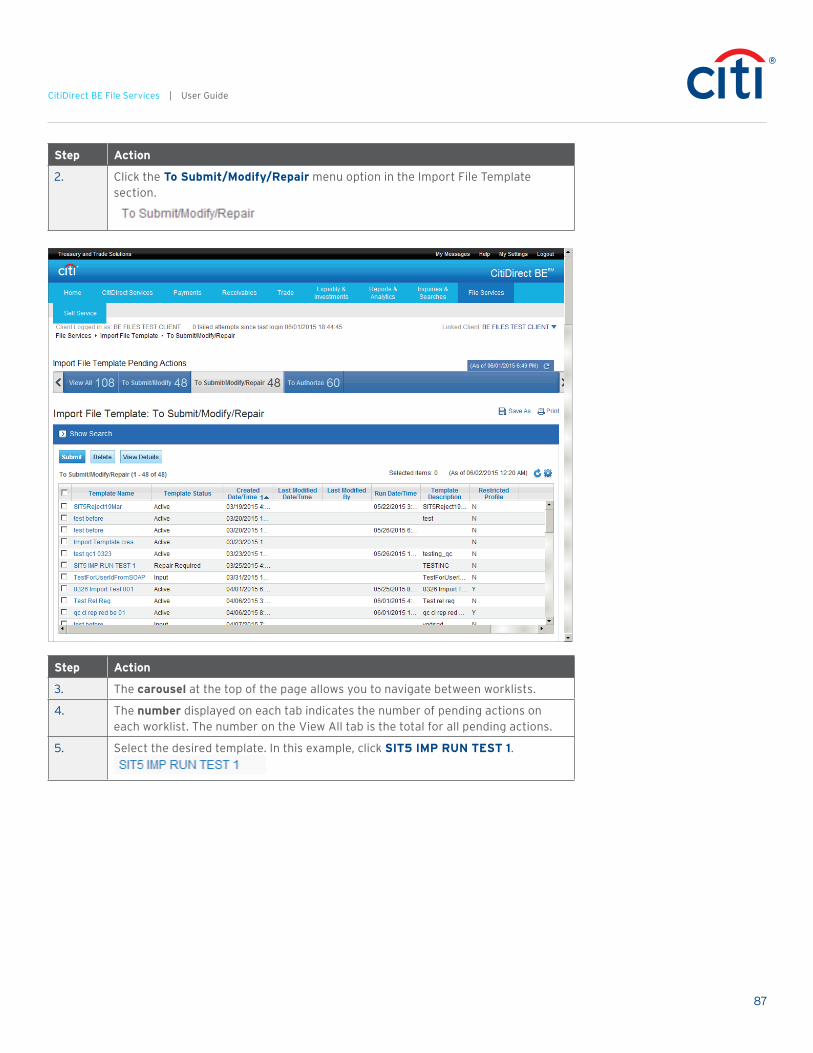
2. Click the To Submit/Modify/Repair menu option in the Import File Template section.
Step Action
3. The carousel at the top of the page allows you to navigate between worklists.
4. The number displayed on each tab indicates the number of pending actions on each worklist. The number on the View All tab is the total for all pending actions.
5. Select the desired template. In this example, click SIT5 IMP RUN TEST 1.

88
CitiDirect BE File Services | User Guide
Step Action
6. Click the scrollbar.
89
CitiDirect BE File Services | User Guide
Step Action
7. Make the necessary modifications to the import template. In this example, the template will be modified to a restricted profile.
8. Click the Restricted Profile option.
9. The Save button allows you to save the changes to the template to be submitted at a later time.
10. The Save As button allows you to save a copy of the template under another name.
11. The Delete button allows you to delete the template. Refer to the Delete an Import File Template topic for more information.
12. Click the Submit button.
13. The template is resubmitted and, depending on your flow maintenance, may require authorizing.
14. This concludes the Modify/Repair an Import File Template topic.
End of Procedure.

90
CitiDirect BE File Services | User Guide
Authorize or Reject an Import File Template
During the authorization process, import file templates can be authorized or rejected.
Your entitlements determine whether or not you can authorize an import template. You cannot authorize a template you submitted.
Procedure
In this topic, you will authorize or reject an import file template.
Step Action
1. Point to the File Services menu heading.

91
CitiDirect BE File Services | User Guide
Step Action
2. Click the To Authorize menu option in the Import File Template section.
Step Action
3. The carousel at the top of the page allows you to navigate between worklists.
4. The number displayed on each tab indicates the number of pending actions on each worklist. The number on the View All tab is the total for all pending actions.
5. The columns displayed in the To Authorize grid are the default columns for the grid. Your view may differ depending on your customizations.
6. The search filter can be applied to narrow listings in the grid.
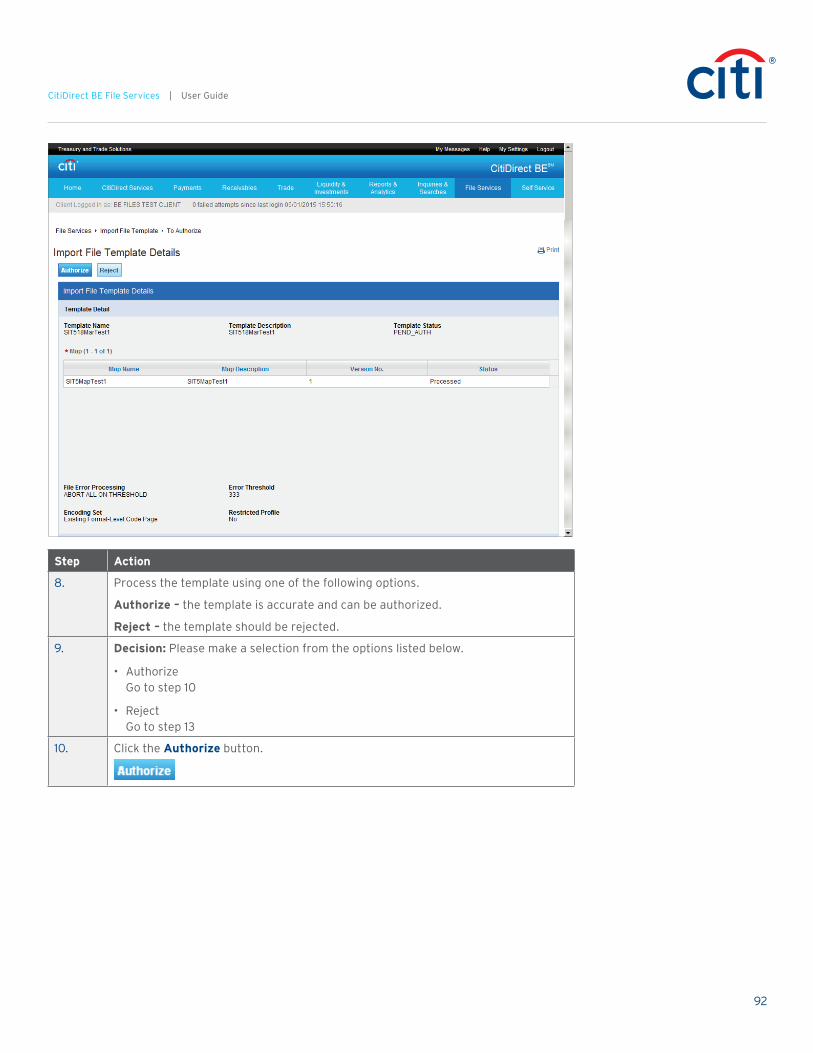
7. Select the desired template. In this example, click SIT518MarTest1.
92
CitiDirect BE File Services | User Guide
Step Action
8. Process the template using one of the following options.
Authorize – the template is accurate and can be authorized.
Reject – the template should be rejected.
9. Decision: Please make a selection from the options listed below.
• Authorize Go to step 10
• Reject Go to step 13
10. Click the Authorize button.

93
CitiDirect BE File Services | User Guide
Step Action
11. The template is authorized and can now be used to import data.
12. This concludes the Authorize or Reject an Import File Template topic.
End of Procedure. Remaining steps apply to other paths.

94
CitiDirect BE File Services | User Guide
Step Action
13. Click the Reject button.
14. Enter the desired information into the Reason field. Enter “Profile should be restricted”.
95
CitiDirect BE File Services | User Guide
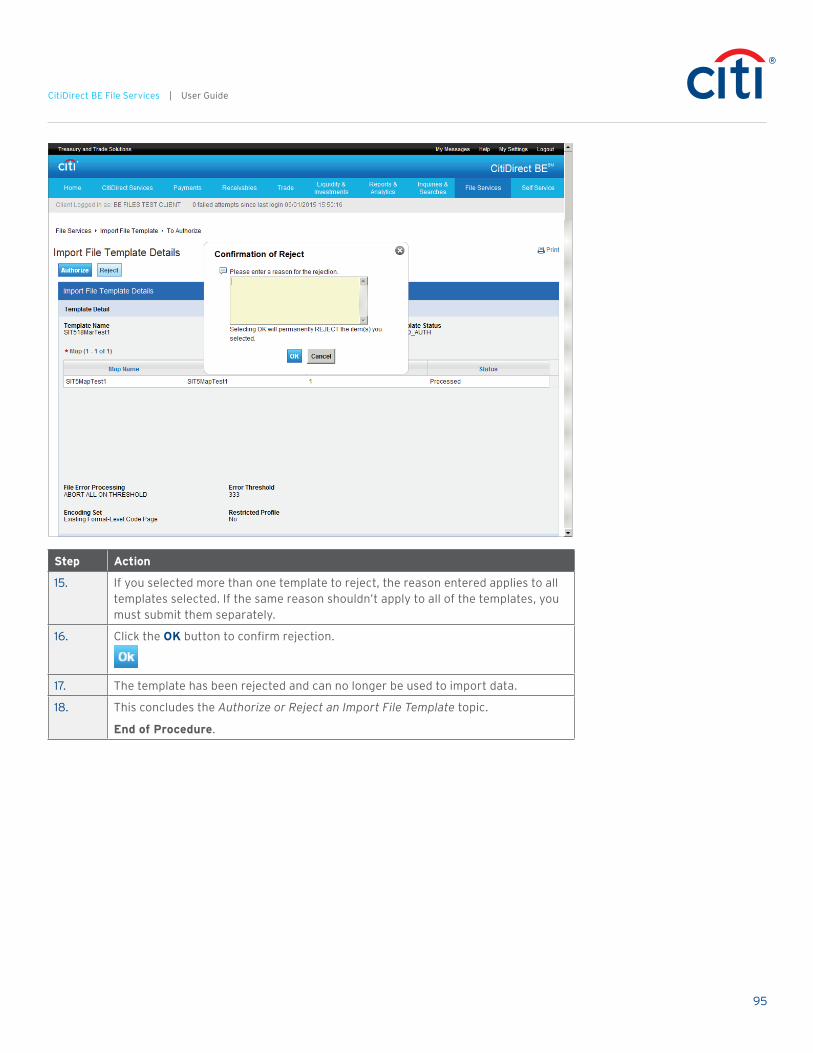
Step Action
15. If you selected more than one template to reject, the reason entered applies to all templates selected. If the same reason shouldn’t apply to all of the templates, you must submit them separately.
16. Click the OK button to confirm rejection.
17. The template has been rejected and can no longer be used to import data.
18. This concludes the Authorize or Reject an Import File Template topic.
End of Procedure.
96
CitiDirect BE File Services | User Guide
Delete an Import File Template
You can delete import file templates as needed based on your entitlements.
Procedure
In this topic, you will delete an import file template that is no longer needed.
Step Action
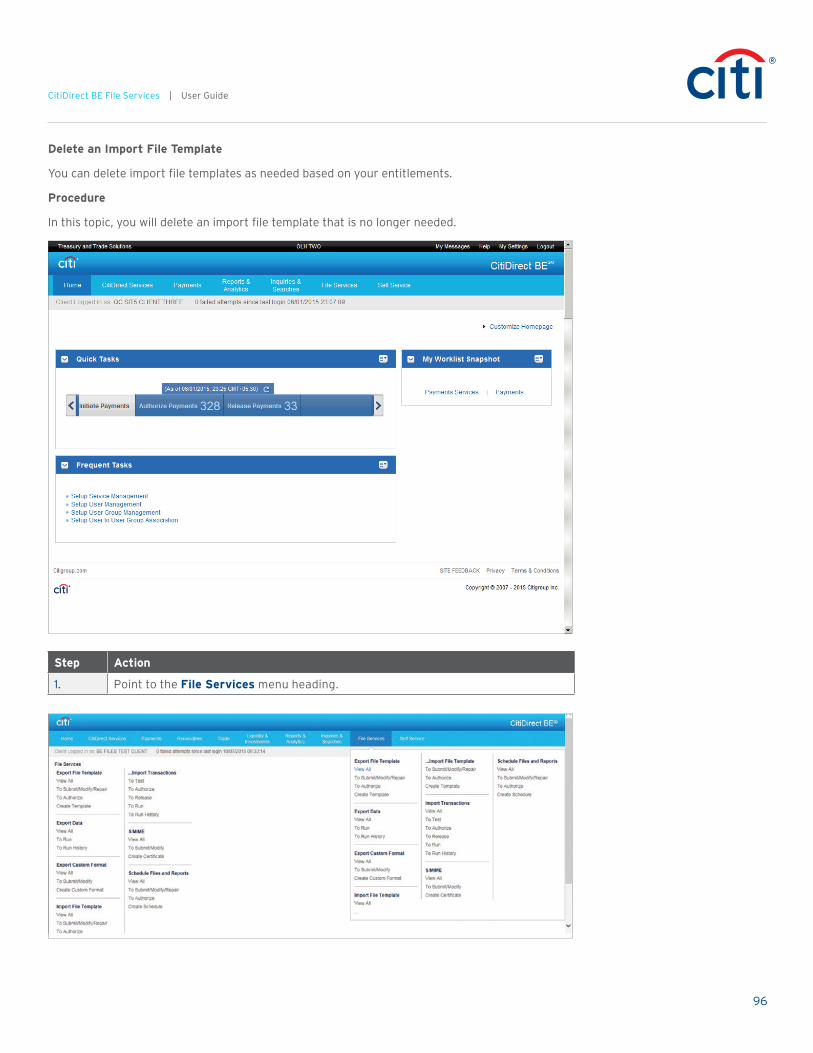
1. Point to the File Services menu heading.

97
CitiDirect BE File Services | User Guide
Step Action
2. Click the To Submit/Modify/Repair menu option in the Import File Template section.
Step Action
3. The carousel at the top of the page allows you to navigate between worklists.
4. The number displayed on each tab indicates the number of pending actions on each worklist. The number on the View All tab is the total for all pending actions.
5. The search filter can be applied to narrow listings in the grid.
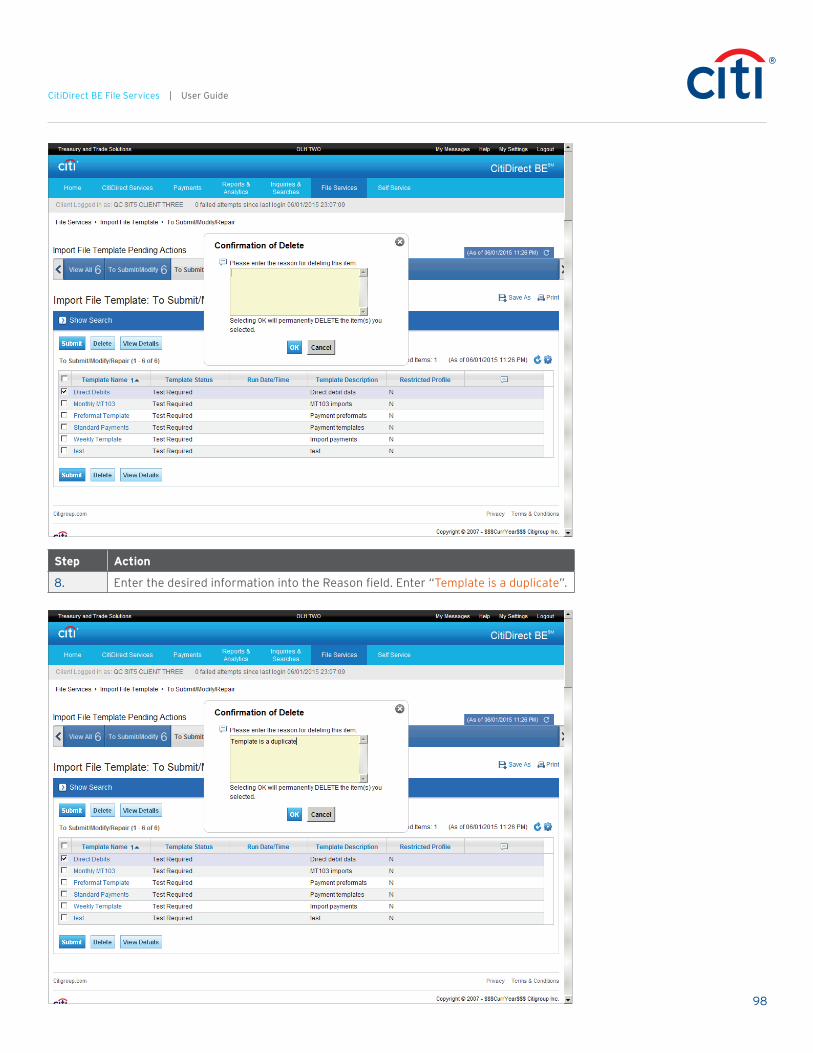
6. Select the desired template. In this example, click Direct Debits.
7. Click the Delete button.
98
CitiDirect BE File Services | User Guide
Step Action
8. Enter the desired information into the Reason field. Enter “Template is a duplicate”.

99
CitiDirect BE File Services | User Guide
Step Action
9. If you selected more than one template to delete, the reason entered applies to all templates selected. If the same reason shouldn’t apply to all templates, you must submit them separately.
10. Click the OK button to confirm delete action.
Step Action
11. Click the OK button on successful deletion.
12. The status of the template is changed to Deleted and it can no longer be used to import data.
13. This concludes the Delete an Import File Template topic.
End of Procedure.

100
CitiDirect BE File Services | User Guide
View the Details of an Import File Template
CitiDirect BE allows you to view all import file templates that you are entitled to, regardless of status.
There are multiple ways to navigate to the Import File Template Details. This topic covers the navigation from the Import File Template menu.
Procedure
In this topic, you will view the details of an import file template.
Step Action
1. Point to the File Services menu heading.
101
CitiDirect BE File Services | User Guide
Step Action
2. Click the View All menu option in the Import File Template section.
Step Action
3. The carousel at the top of the page allows you to navigate between worklists.
4. The number displayed on each tab indicates the number of pending actions on each worklist. The number on the View All tab is the total for all pending actions.
5. The columns displayed in the View All grid are the default columns for the grid. Your view may differ depending on your customizations.
6. The search filter can be applied to narrow listings in the grid.
7. The Template Name column contains a link that takes you to the template detail screen where you can view the details of the specific template.
8. The Template Status column displays the current status of the file template, including those that are in the Deleted state.
9. The Created Date/Time and Created By columns display the user who created the template and when it was created.
10. Point to the Comments icon.
11. The Comments icon displays existing comments attached to the template.
12. Select the desired template. In this example, click SIT5 IMP RUN 1.
13. Continue selecting templates as desired. In this example, a second template will be selected for you.
102
CitiDirect BE File Services | User Guide
Step Action
14. Click the scrollbar.
15. Click the View Details button.
Step Action
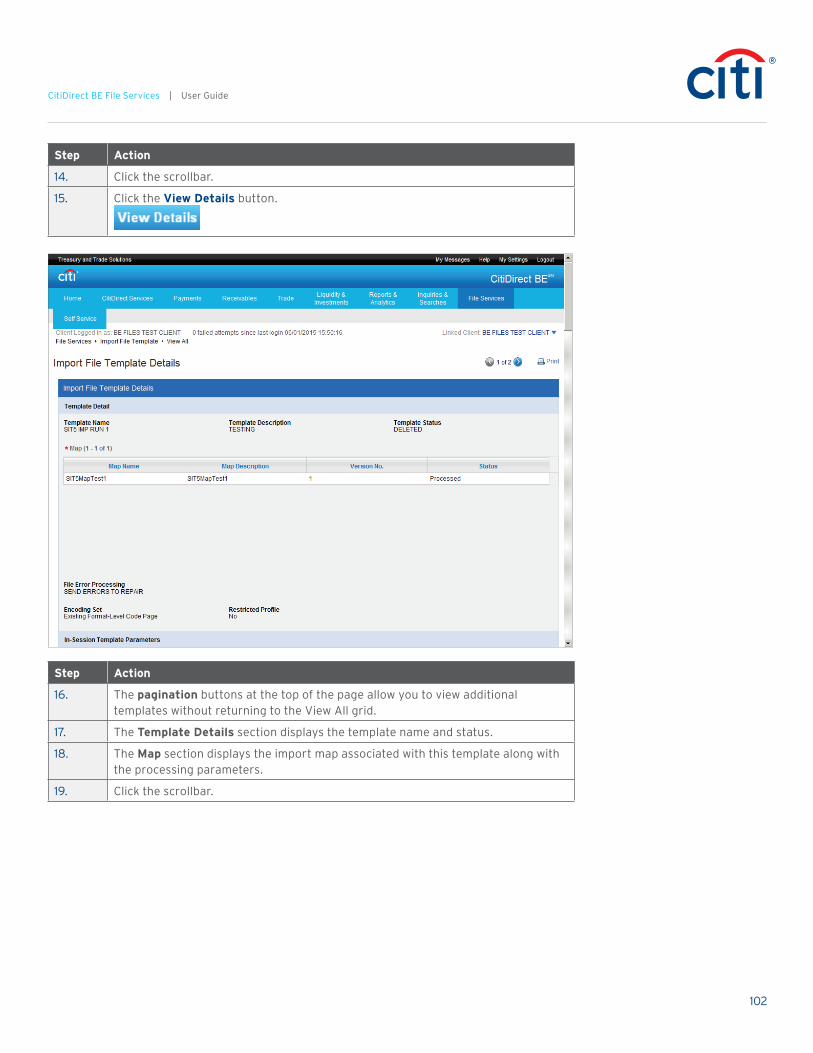
16. The pagination buttons at the top of the page allow you to view additional templates without returning to the View All grid.
17. The Template Details section displays the template name and status.
18. The Map section displays the import map associated with this template along with the processing parameters.
19. Click the scrollbar.
103
CitiDirect BE File Services | User Guide
Step Action
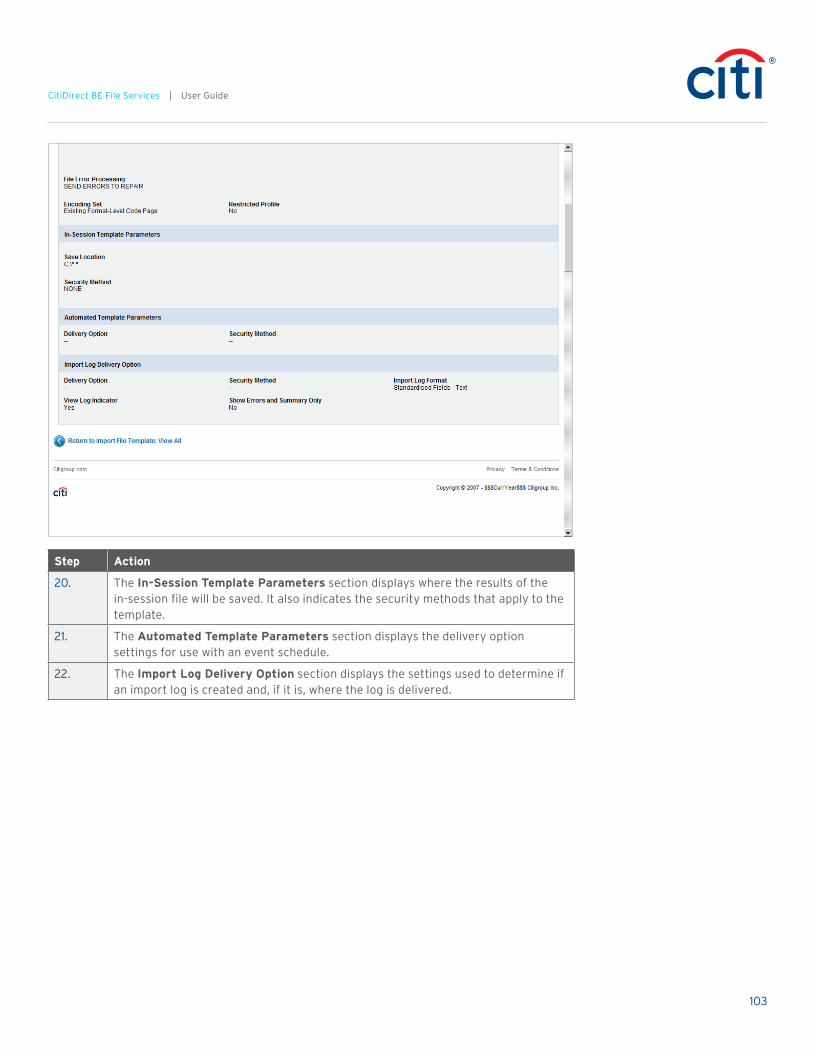
20. The In-Session Template Parameters section displays where the results of the in-session file will be saved. It also indicates the security methods that apply to the template.
21. The Automated Template Parameters section displays the delivery option settings for use with an event schedule.
22. The Import Log Delivery Option section displays the settings used to determine if an import log is created and, if it is, where the log is delivered.
104
CitiDirect BE File Services | User Guide
Step Action
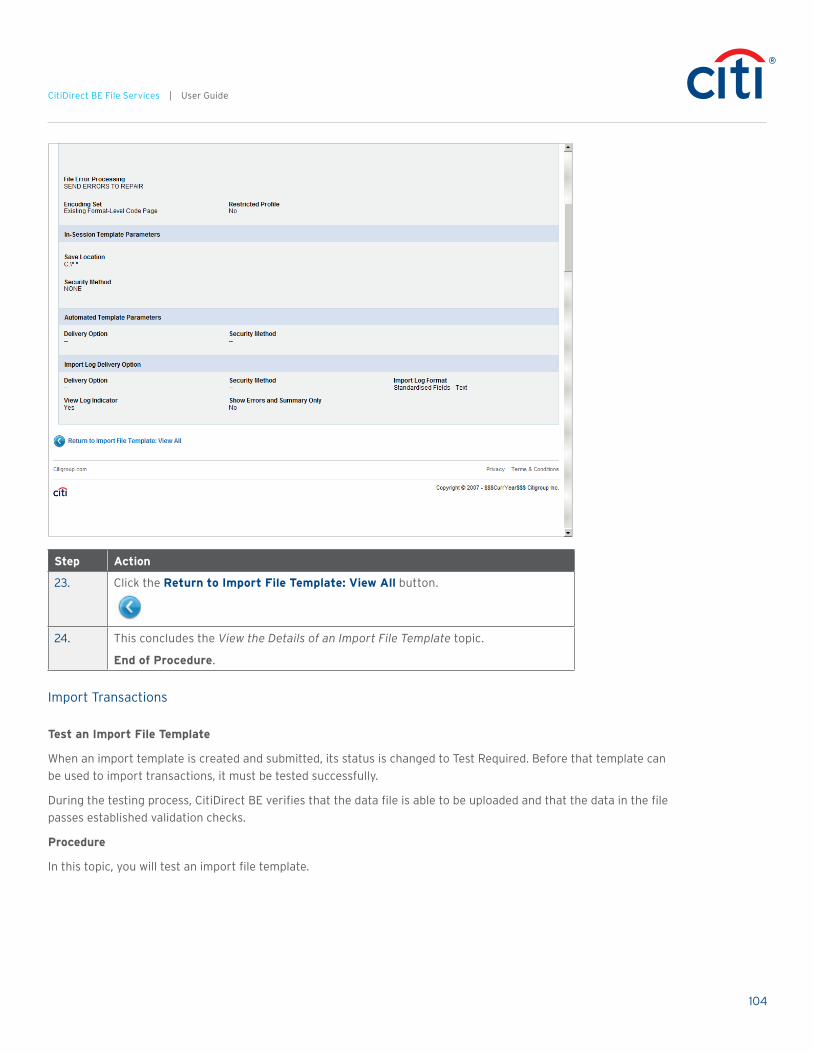
23. Click the Return to Import File Template: View All button.
24. This concludes the View the Details of an Import File Template topic.
End of Procedure.
Import Transactions
Test an Import File Template
When an import template is created and submitted, its status is changed to Test Required. Before that template can be used to import transactions, it must be tested successfully.
During the testing process, CitiDirect BE verifies that the data file is able to be uploaded and that the data in the file passes established validation checks.
Procedure
In this topic, you will test an import file template.

105
CitiDirect BE File Services | User Guide
Step Action
1. Point to the File Services menu heading.
106
CitiDirect BE File Services | User Guide
Step Action
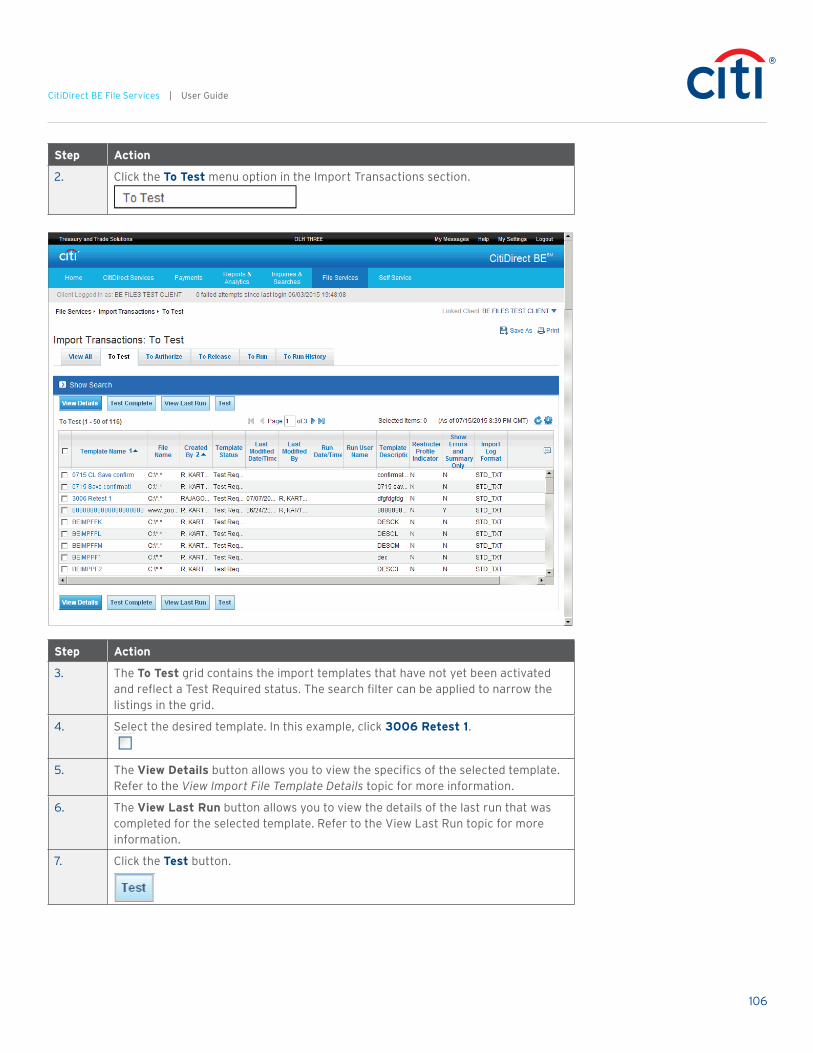
2. Click the To Test menu option in the Import Transactions section.
Step Action
3. The To Test grid contains the import templates that have not yet been activated and reflect a Test Required status. The search filter can be applied to narrow the listings in the grid.
4. Select the desired template. In this example, click 3006 Retest 1.
5. The View Details button allows you to view the specifics of the selected template. Refer to the View Import File Template Details topic for more information.
6. The View Last Run button allows you to view the details of the last run that was completed for the selected template. Refer to the View Last Run topic for more information.
7. Click the Test button.

107
CitiDirect BE File Services | User Guide
Step Action
8. Click the No button to select a single file.
108
CitiDirect BE File Services | User Guide
Step Action
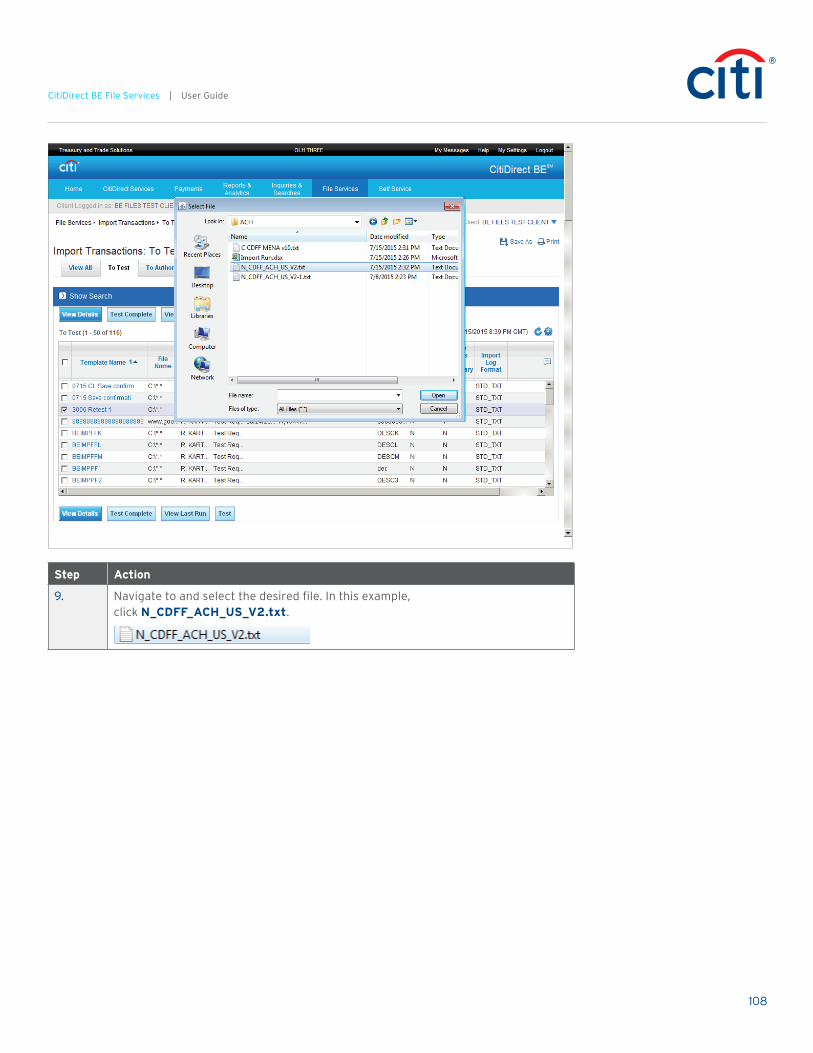
9. Navigate to and select the desired file. In this example, click N_CDFF_ACH_US_V2.txt.

109
CitiDirect BE File Services | User Guide
Step Action
10. Click the Open button.

110
CitiDirect BE File Services | User Guide
Step Action
11. Click the Yes button.

111
CitiDirect BE File Services | User Guide
Step Action
12. Click the Ok button.
13. Click the Run History button to check the results of the test.

112
CitiDirect BE File Services | User Guide
Step Action
14. Click the Refresh icon to load the latest data.
15. The final status of the test import template is displayed. The status options are Completed or Completed with Errors.
16. If your test run has a status of Completed with Errors, correct the errors and run the test again.
Once the status is Completed, you can complete the test run.
17. Click the To Test tab.
18. Select the desired template. In this example, click 3006 Retest 1.
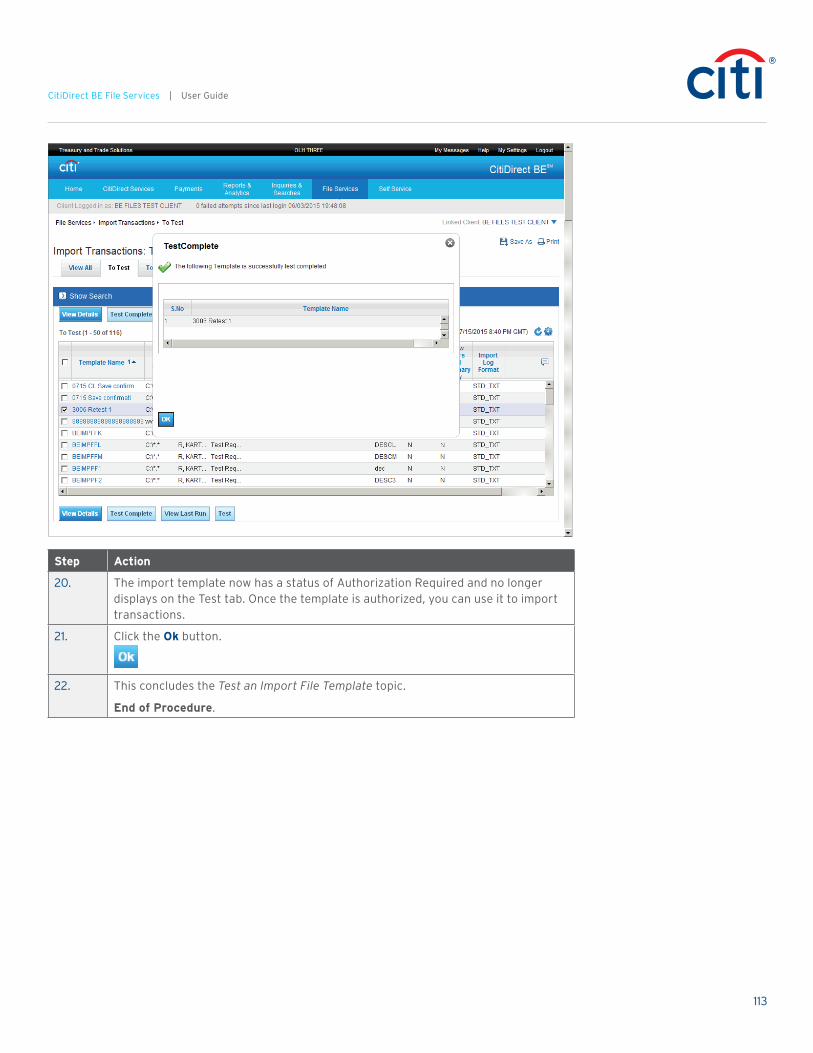
19. Click the Test Complete button.
113
CitiDirect BE File Services | User Guide
Step Action
20. The import template now has a status of Authorization Required and no longer displays on the Test tab. Once the template is authorized, you can use it to import transactions.
21. Click the Ok button.
22. This concludes the Test an Import File Template topic.
End of Procedure.

114
CitiDirect BE File Services | User Guide
View Import File Template Details
CitiDirect BE allows you to view all import file templates that you are entitled to, regardless of status.
There are multiple ways to navigate to the Import File Template Details. This topic covers the navigation from the Import Transactions menu.
Procedure
In this topic, you will view the details of an import file template.
Step Action
1. Point to the File Services menu heading.
115
CitiDirect BE File Services | User Guide
Step Action
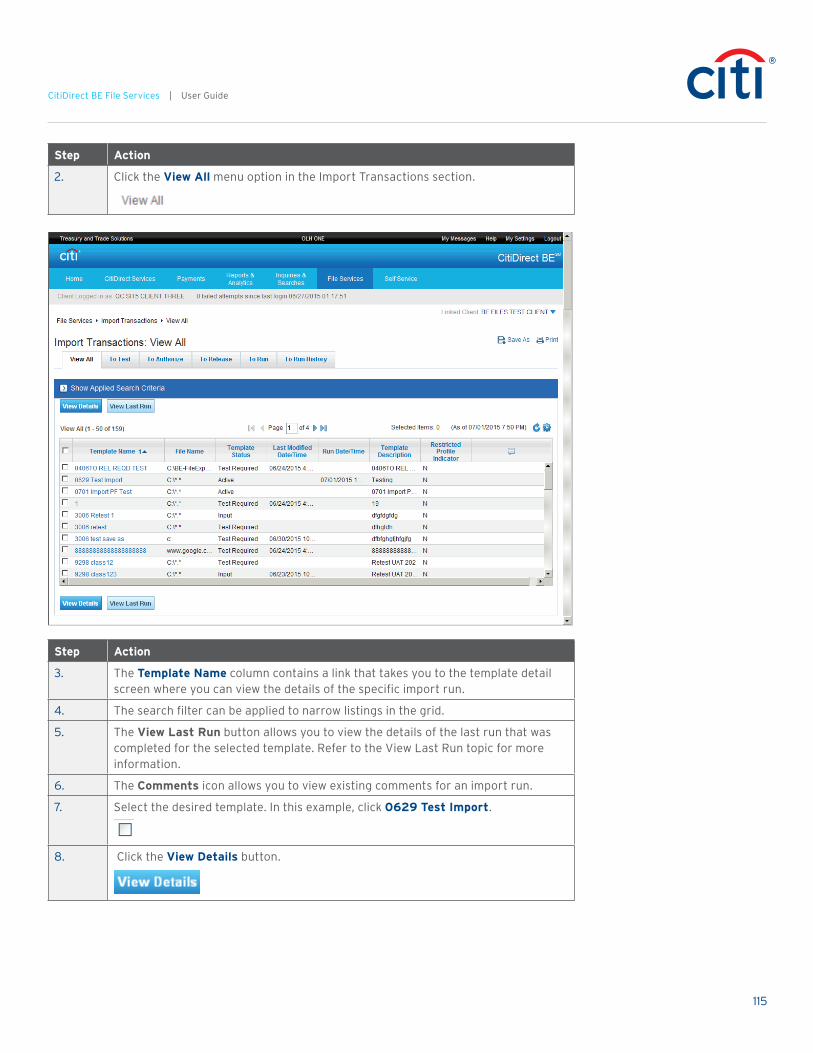
2. Click the View All menu option in the Import Transactions section.
Step Action
3. The Template Name column contains a link that takes you to the template detail screen where you can view the details of the specific import run.
4. The search filter can be applied to narrow listings in the grid.
5. The View Last Run button allows you to view the details of the last run that was completed for the selected template. Refer to the View Last Run topic for more information.
6. The Comments icon allows you to view existing comments for an import run.
7. Select the desired template. In this example, click 0629 Test Import.
8. Click the View Details button.
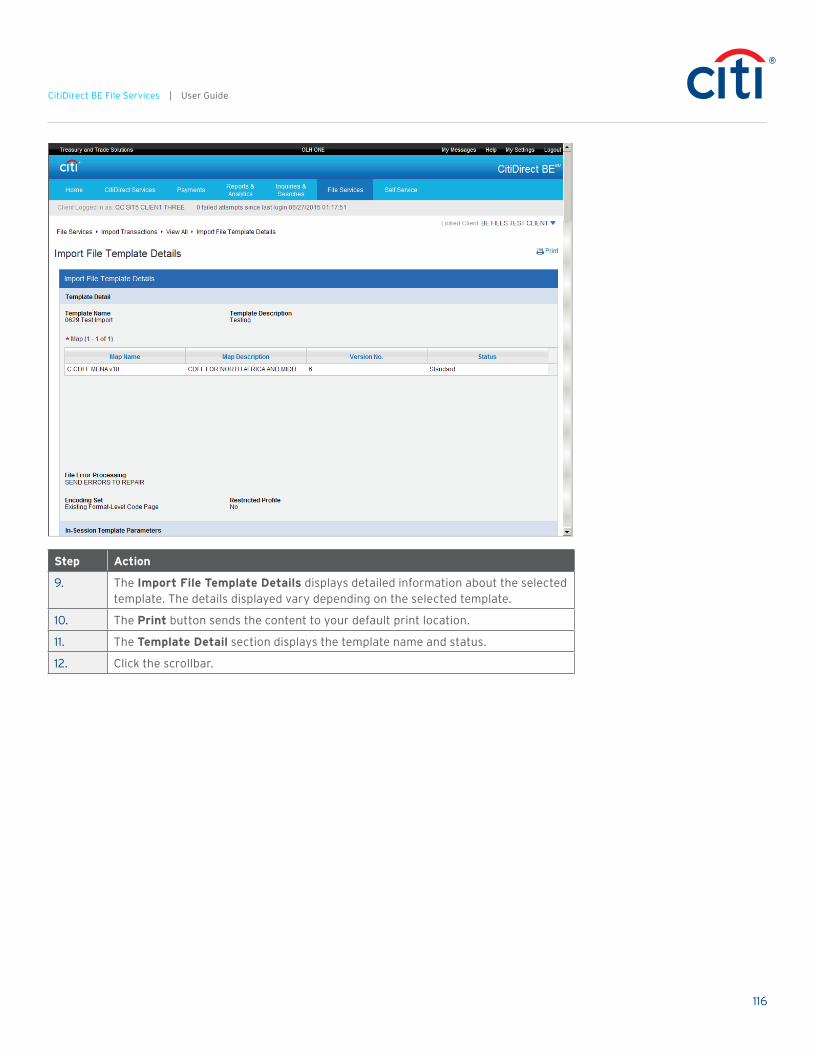
116
CitiDirect BE File Services | User Guide
Step Action
9. The Import File Template Details displays detailed information about the selected template. The details displayed vary depending on the selected template.
10. The Print button sends the content to your default print location.
11. The Template Detail section displays the template name and status.
12. Click the scrollbar.

117
CitiDirect BE File Services | User Guide
Step Action
13. The Template Parameters sections display the high-level details for the template.
14. Click the Return to Import Transactions: View All button.
15. This concludes the View Import File Template Details topic.
End of Procedure.

118
CitiDirect BE File Services | User Guide
Run a Trial Run File Import
The Trial Run process allows you to run an import profile with an Active status in the test mode. In a trial run, imported data is not submitted for processing.
During the testing process, CitiDirect BE verifies that the file is able to be uploaded and that the data passes established validation checks.
Procedure
In this topic, you will run a trial run file import.
Step Action
1. Point to the File Services menu heading.

119
CitiDirect BE File Services | User Guide
Step Action
2. Click the To Run menu option in the Import Transactions section.
3. The To Run grid displays all import templates that have a status of Active. The search filter can be applied to narrow the listings in the grid.
Step Action
4. Select the desired import template. In this example, click 0705 AI MAPS TEST.
5. The View Details button allows you to view the specifics of the selected template. Refer to the View Import File Template Details topic for more information.
6. The Run button allows you to run the import template in the Live mode. Refer to the Run a File Import topic for more information.
7. The View Last Run button allows you to view the details of the last run that was completed for the selected template. Refer to the View Last Run topic for more information.
8. Click the Trial Run button.

120
CitiDirect BE File Services | User Guide
Step Action
9. Click the No button to select a single file.
121
CitiDirect BE File Services | User Guide
Step Action
10. Navigate to and select the desired file. In this example, click N_CDFF_ACH_US_V2.txt.
11. Click the Open button.

122
CitiDirect BE File Services | User Guide
Step Action
12. Click the Yes button.
123
CitiDirect BE File Services | User Guide
Step Action
13. Click the Ok button.
14. Click the To Run History tab.

124
CitiDirect BE File Services | User Guide
Step Action
15. Click the Refresh icon to load the latest data.
16. If your trial run has a status of Completed with Errors, correct the errors and run the test again.
17. The trial run is complete when the status updates to Completed.
18. This concludes the Run a Trial Run File Import topic.
End of Procedure.
Run a File Import
The import process allows you to import transactions from a data file using an import file template. Only import file templates that have been successfully tested and have a status of Active can be submitted to run.
Depending on how the import file template was set up, you can submit a single file or files within a specified directory. If the template was set up to process files within a directory and there is more than one file in that directory, you can choose which files to process.
Once submitted, the run is assigned a Run ID and the Run Status is set to Submitted.
Procedure
In this topic, you will run a file import.
125
CitiDirect BE File Services | User Guide
Step Action
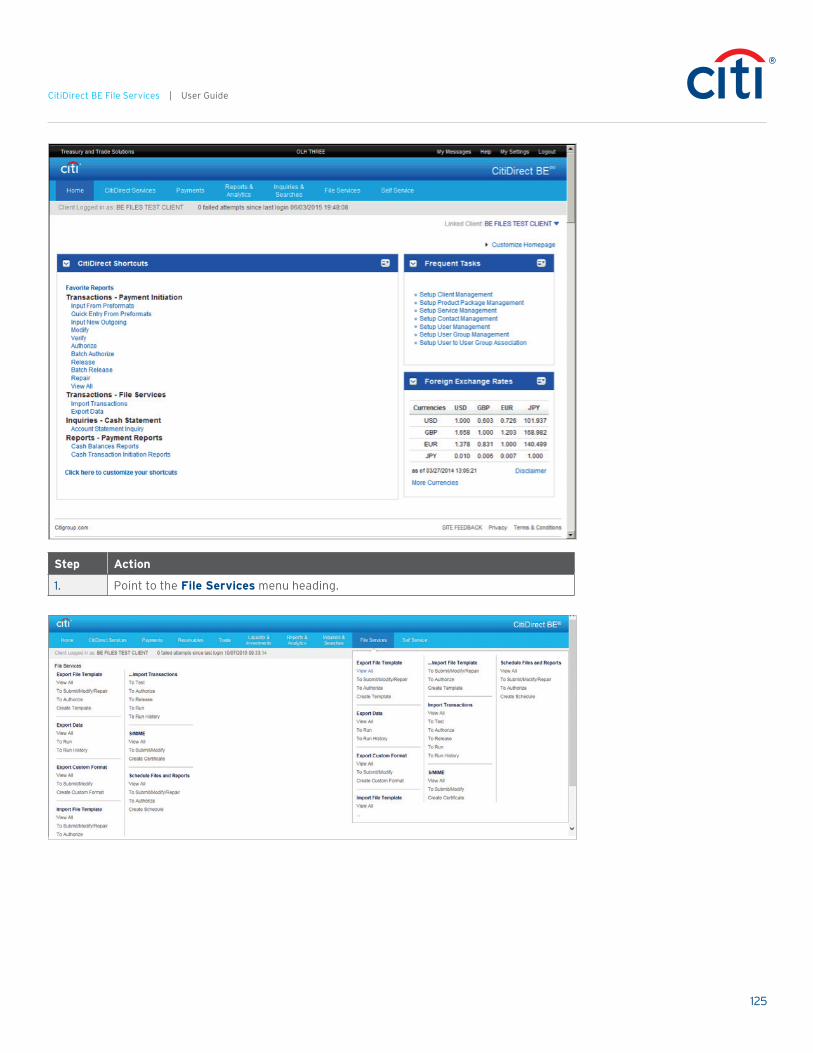
1. Point to the File Services menu heading.
126
CitiDirect BE File Services | User Guide
Step Action
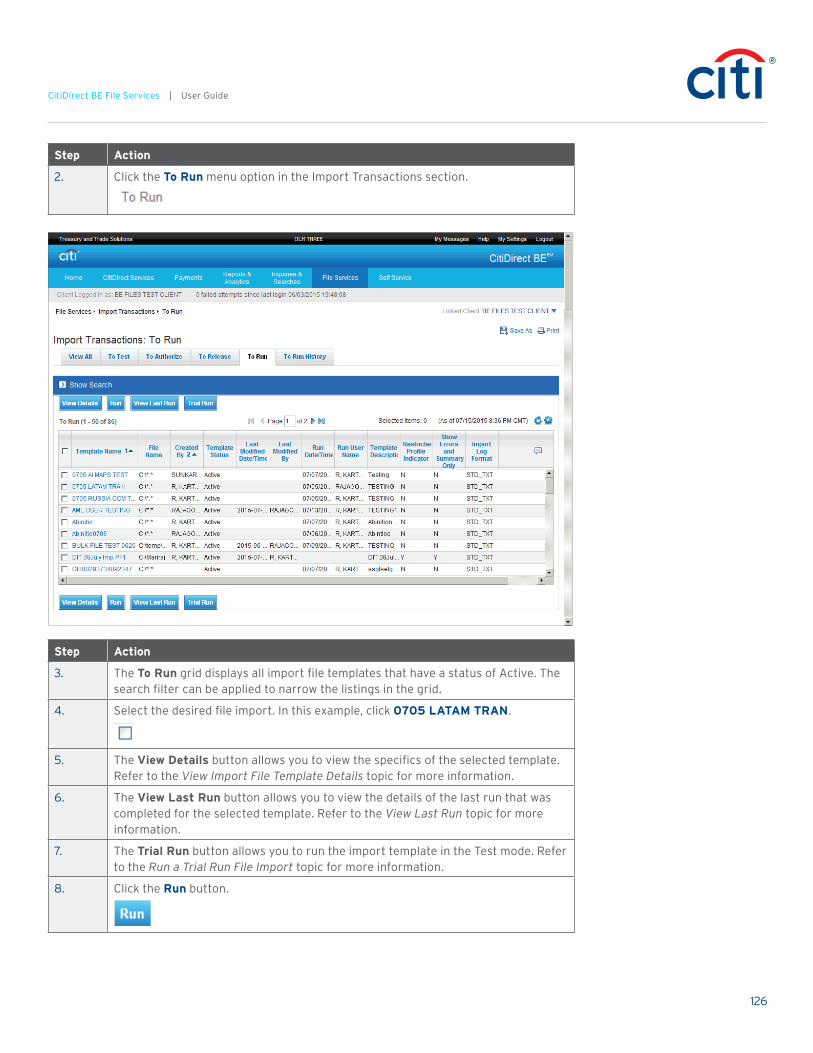
2. Click the To Run menu option in the Import Transactions section.
Step Action
3. The To Run grid displays all import file templates that have a status of Active. The search filter can be applied to narrow the listings in the grid.
4. Select the desired file import. In this example, click 0705 LATAM TRAN.
5. The View Details button allows you to view the specifics of the selected template. Refer to the View Import File Template Details topic for more information.
6. The View Last Run button allows you to view the details of the last run that was completed for the selected template. Refer to the View Last Run topic for more information.
7. The Trial Run button allows you to run the import template in the Test mode. Refer to the Run a Trial Run File Import topic for more information.
8. Click the Run button.

127
CitiDirect BE File Services | User Guide
Step Action
9. Click the No button to select a single file.

128
CitiDirect BE File Services | User Guide
Step Action
10. Navigate to and select the desired file. In this example, click N_CDFF_ACH_US_V2.txt.
11. Click the Open button.
129
CitiDirect BE File Services | User Guide
Step Action
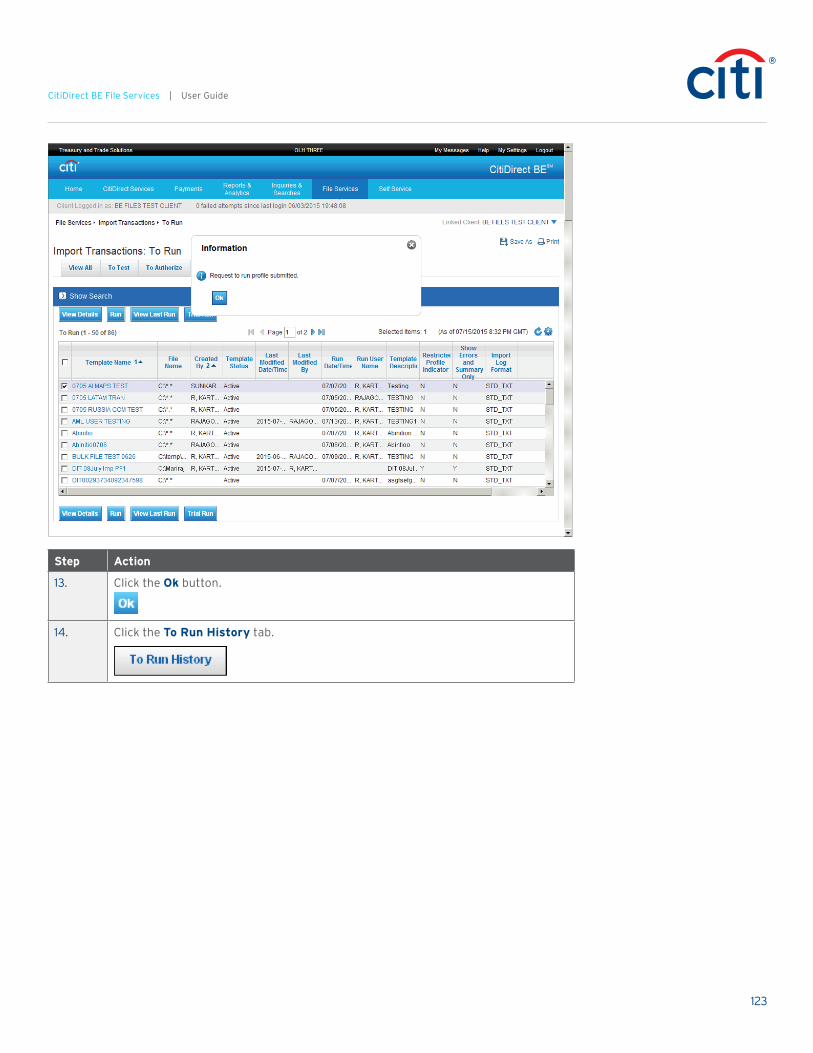
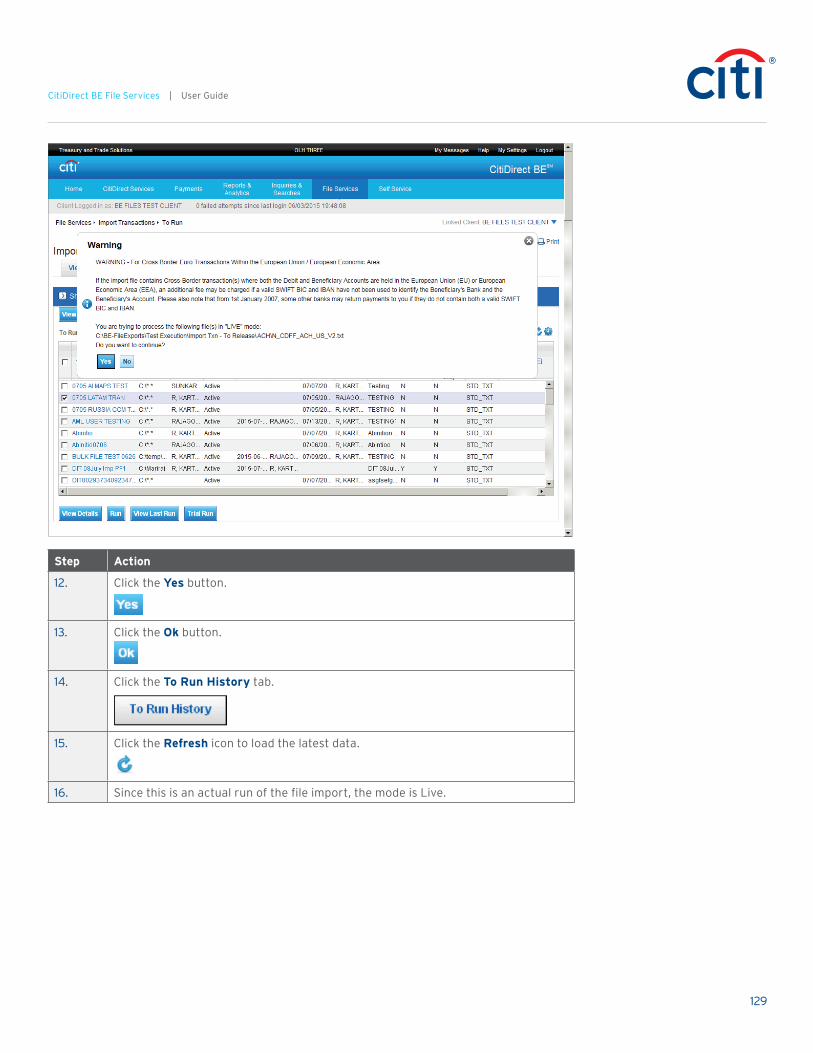
12. Click the Yes button.
13. Click the Ok button.
14. Click the To Run History tab.
15. Click the Refresh icon to load the latest data.
16. Since this is an actual run of the file import, the mode is Live.
130
CitiDirect BE File Services | User Guide
Step Action
17. Once the run is complete, the final status varies depending on your organization’s validation rules. Status options are Completed, Completed with Errors, Authorization Required, or Release Required.
18. The Run ID is used to identify the particular import run. For error resolution, search for the run using this ID.
19. This concludes the Run a File Import topic.
End of Procedure.
View Import Run Details
When working with file imports, CitiDirect BE provides you with many options for viewing the details of a run. The details you can view include the specifics of the run, the import log, errors, run results, and the specific import map used.
Procedure
In this topic, you will view the details of an Import file run.
Step Action
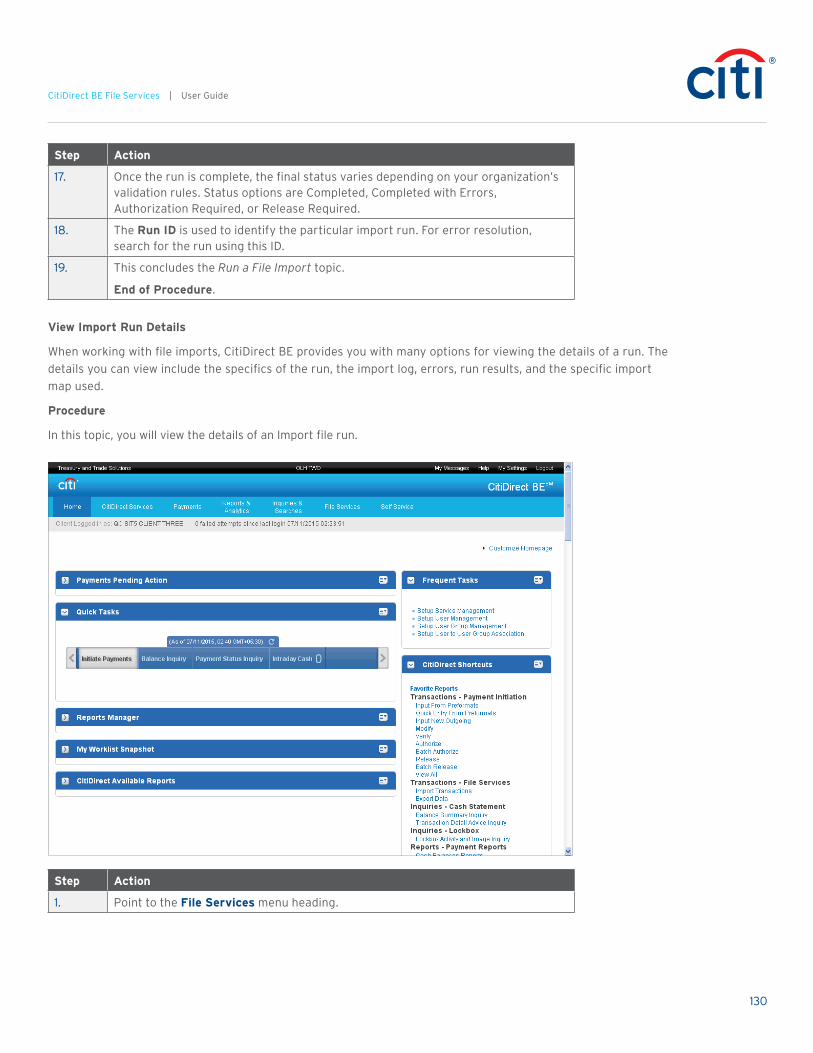
1. Point to the File Services menu heading.

131
CitiDirect BE File Services | User Guide
Step Action
2. Click the View All menu option in the Import Transactions section.
132
CitiDirect BE File Services | User Guide
Step Action
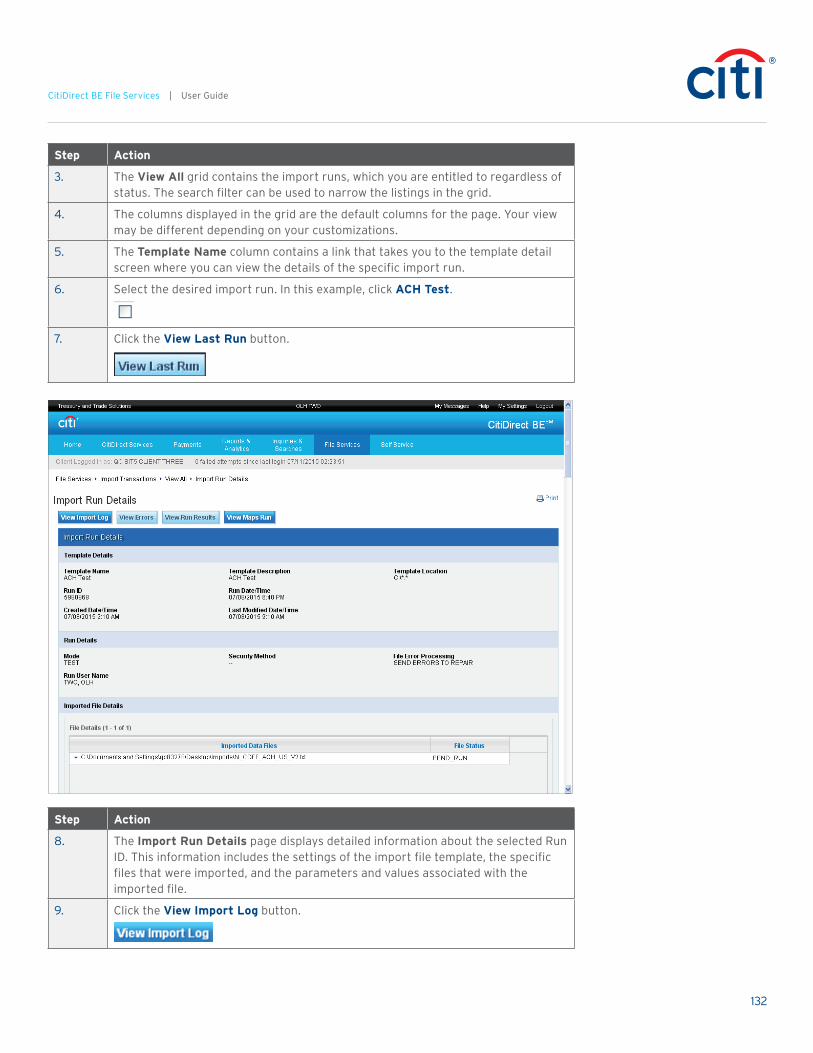
3. The View All grid contains the import runs, which you are entitled to regardless of status. The search filter can be used to narrow the listings in the grid.
4. The columns displayed in the grid are the default columns for the page. Your view may be different depending on your customizations.
5. The Template Name column contains a link that takes you to the template detail screen where you can view the details of the specific import run.
6. Select the desired import run. In this example, click ACH Test.
7. Click the View Last Run button.
Step Action
8. The Import Run Details page displays detailed information about the selected Run ID. This information includes the settings of the import file template, the specific files that were imported, and the parameters and values associated with the imported file.
9. Click the View Import Log button.
133
CitiDirect BE File Services | User Guide
Step Action
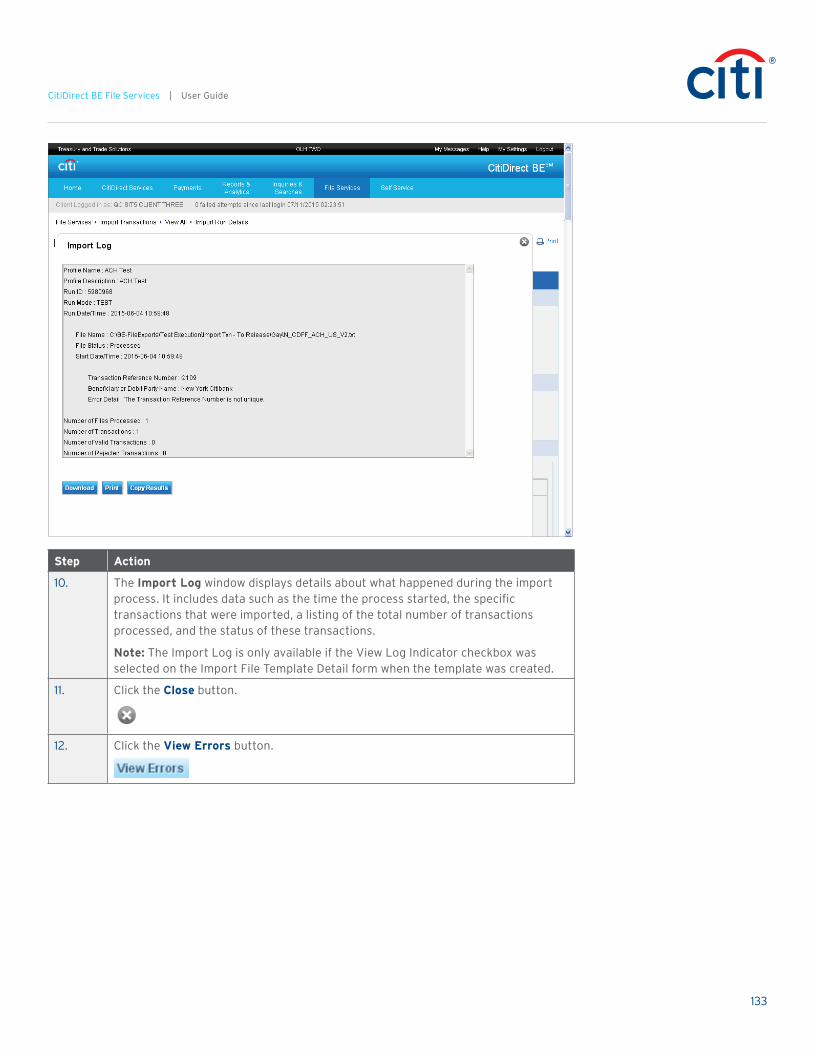
10. The Import Log window displays details about what happened during the import process. It includes data such as the time the process started, the specific transactions that were imported, a listing of the total number of transactions processed, and the status of these transactions.
Note: The Import Log is only available if the View Log Indicator checkbox was selected on the Import File Template Detail form when the template was created.
11. Click the Close button.
12. Click the View Errors button.

134
CitiDirect BE File Services | User Guide
Step Action
13. The Error window shows the details of all errors generated for the selected data file.
The Transaction Number corresponds to the transaction that encountered an error.
14. The Print button allows you to print the error information.
15. Click the Close button.
16. Click the View Run Results button.

135
CitiDirect BE File Services | User Guide
Step Action
17. The Run Results window displays the result of the mapping process.
This information allows you to verify the validity of the import map and import file template settings for diagnostic purposes.
18. The Download button allows you to download the results of the run to a file. Refer to the Download Import Run Results to a File topic for more information.
19. The Print button allows you to print the results of the run to your selected printer.
20. The Copy Results button allows you to copy the results to your clipboard. You can then paste the results into another document.
21. Click the Close button.
22. Click the View Maps Run button.
136
CitiDirect BE File Services | User Guide
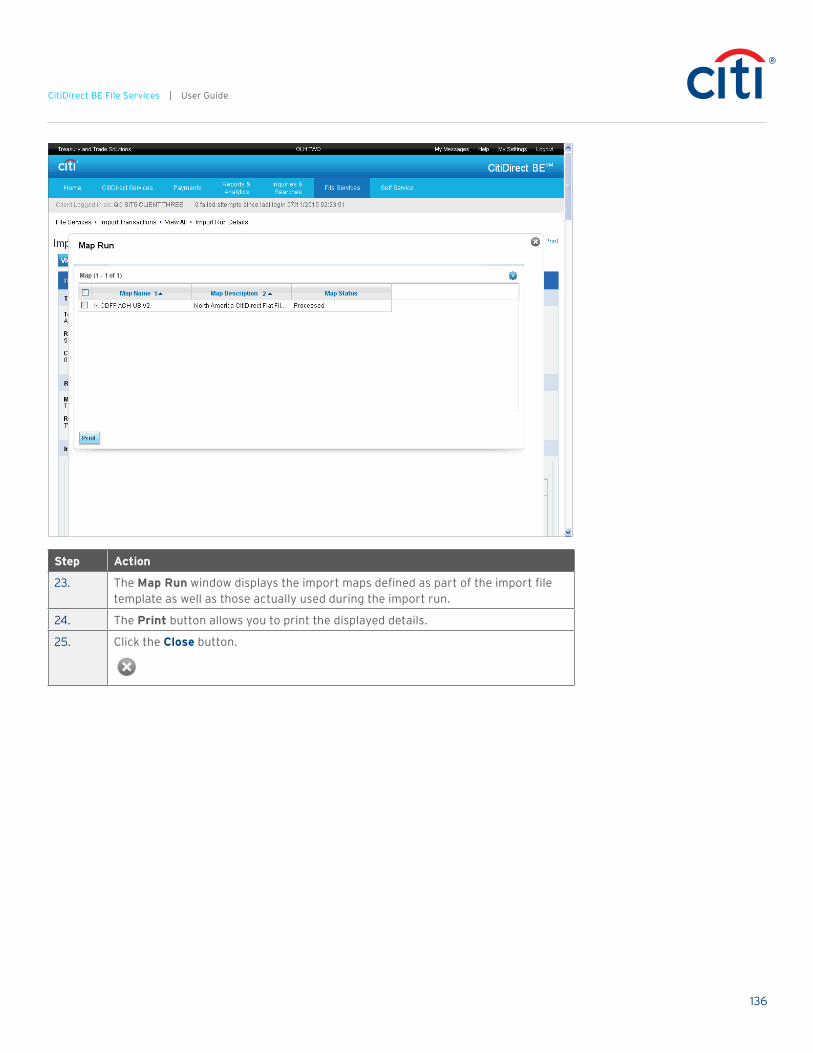
Step Action
23. The Map Run window displays the import maps defined as part of the import file template as well as those actually used during the import run.
24. The Print button allows you to print the displayed details.
25. Click the Close button.

137
CitiDirect BE File Services | User Guide
Step Action
26. Click the scrollbar.

138
CitiDirect BE File Services | User Guide
Step Action
27. Click the Return to Import Transactions: View All button.
28. This concludes the View Import Run Details topic.
End of Procedure.
View an Import Log
When working with file imports, CitiDirect BE allows you to view the import log, containing the details about what happened during the import process.
Procedure
In this topic, you will view the details of an Import file run.
Step Action
1. Point to the File Services menu heading.

139
CitiDirect BE File Services | User Guide
Step Action
2. Click the To Run History menu option in the Import Transactions section.

140
CitiDirect BE File Services | User Guide
Step Action
3. The To Run History grid contains the import runs, which you are entitled to regardless of status. The search filter can be used to narrow the listings in the grid.
4. The Run ID column contains a link that takes you to the Import Run Details page where you can view the details of the specific import run.
5. The Comments icon allows you to view existing comments for an import run.
6. Select the desired template. In this example, click 5980968.
7. Click the View Details button.
141
CitiDirect BE File Services | User Guide
Step Action
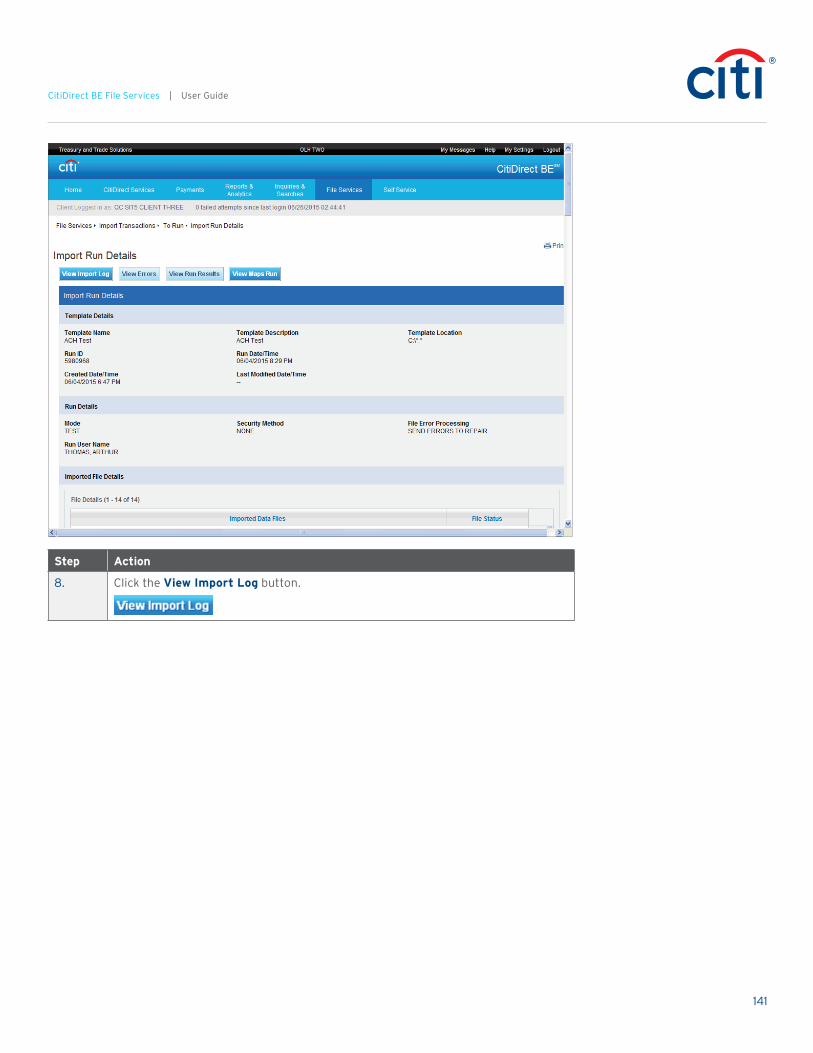
8. Click the View Import Log button.
142
CitiDirect BE File Services | User Guide
Step Action
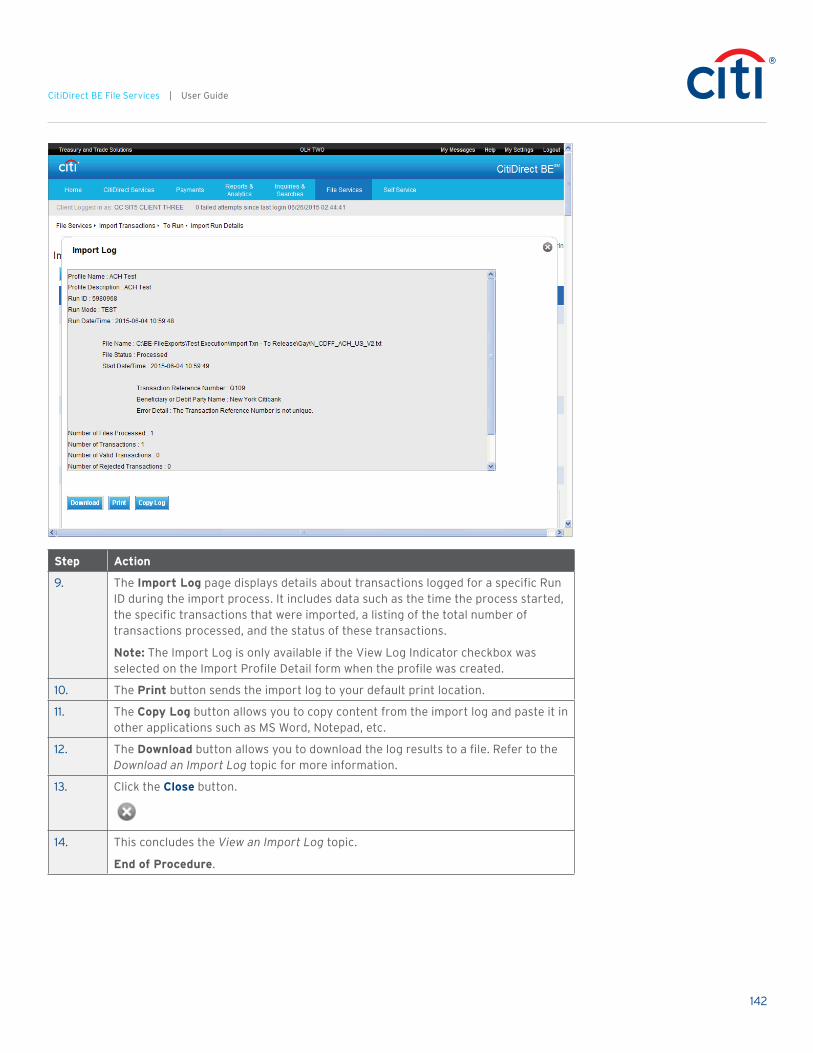
9. The Import Log page displays details about transactions logged for a specific Run ID during the import process. It includes data such as the time the process started, the specific transactions that were imported, a listing of the total number of transactions processed, and the status of these transactions.
Note: The Import Log is only available if the View Log Indicator checkbox was selected on the Import Profile Detail form when the profile was created.
10. The Print button sends the import log to your default print location.
11. The Copy Log button allows you to copy content from the import log and paste it in other applications such as MS Word, Notepad, etc.
12. The Download button allows you to download the log results to a file. Refer to the Download an Import Log topic for more information.
13. Click the Close button.
14. This concludes the View an Import Log topic.
End of Procedure.
143
CitiDirect BE File Services | User Guide
Download an Import Log
CitiDirect BE allows you to view an import log online. You also have the option to download the results to a text file.
Procedure
In this topic, you will download an import log.
Step Action
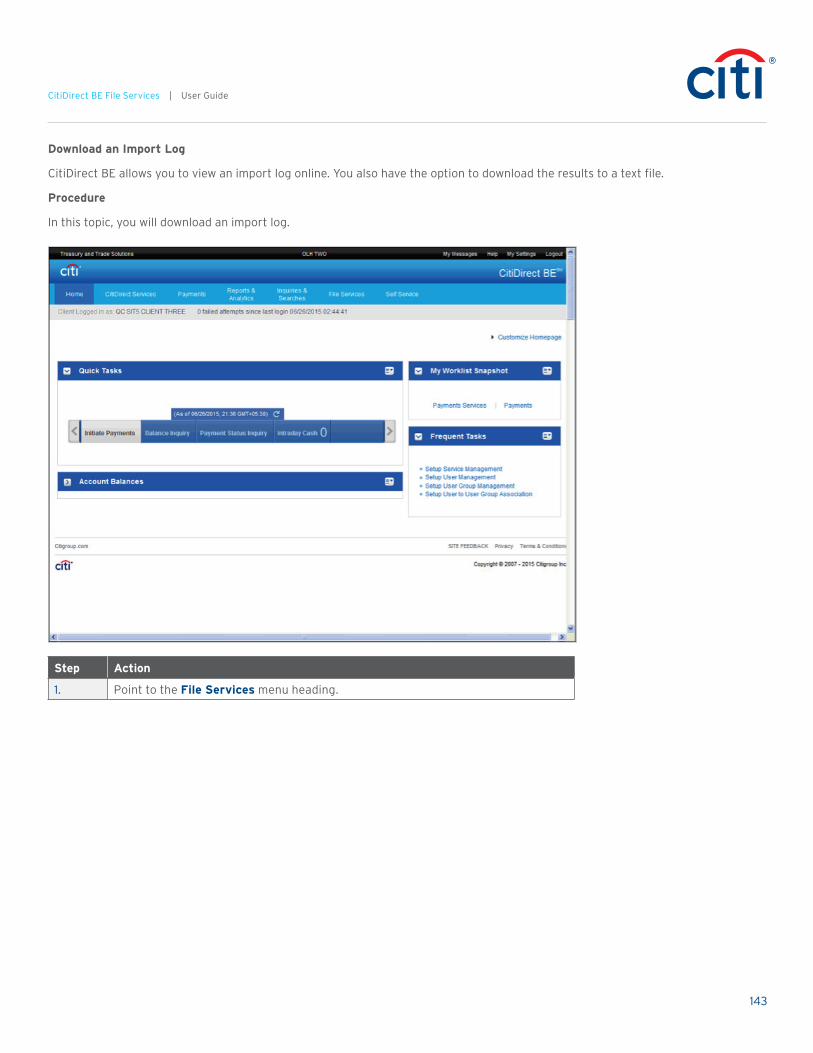
1. Point to the File Services menu heading.
144
CitiDirect BE File Services | User Guide
Step Action
2. Click the To Run History menu option in the Import Transactions section.
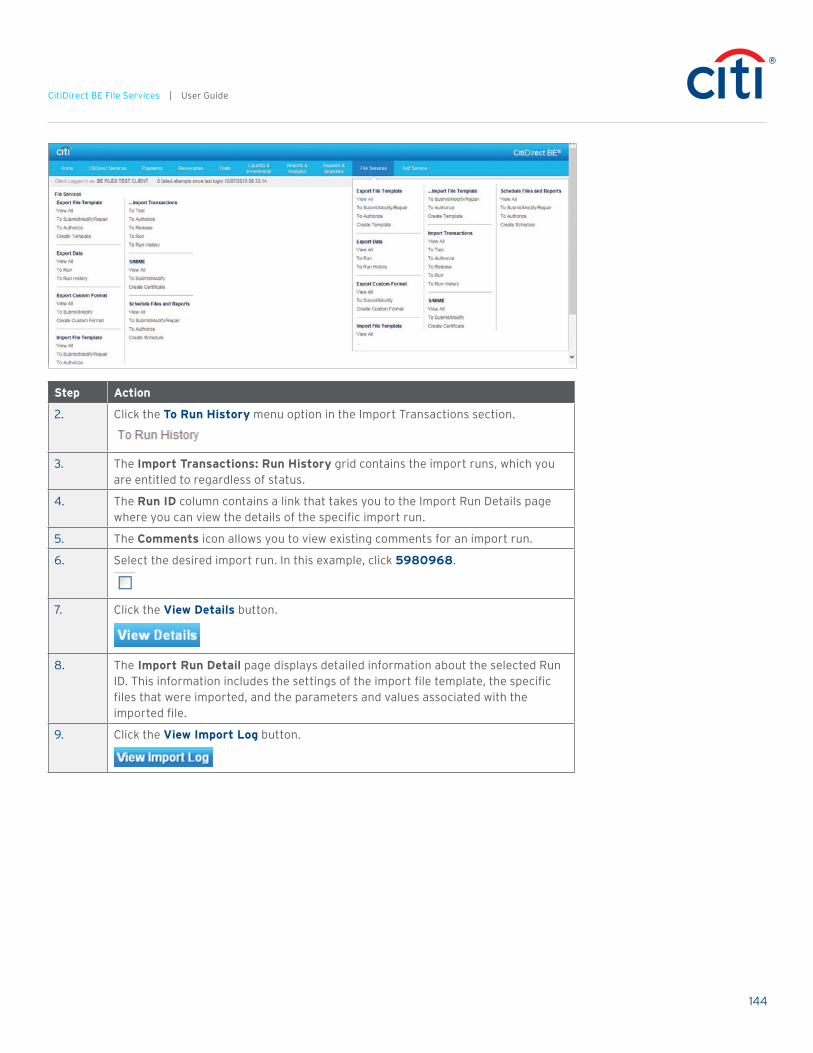
3. The Import Transactions: Run History grid contains the import runs, which you are entitled to regardless of status.
4. The Run ID column contains a link that takes you to the Import Run Details page where you can view the details of the specific import run.
5. The Comments icon allows you to view existing comments for an import run.
6. Select the desired import run. In this example, click 5980968.
7. Click the View Details button.
8. The Import Run Detail page displays detailed information about the selected Run ID. This information includes the settings of the import file template, the specific files that were imported, and the parameters and values associated with the imported file.
9. Click the View Import Log button.

145
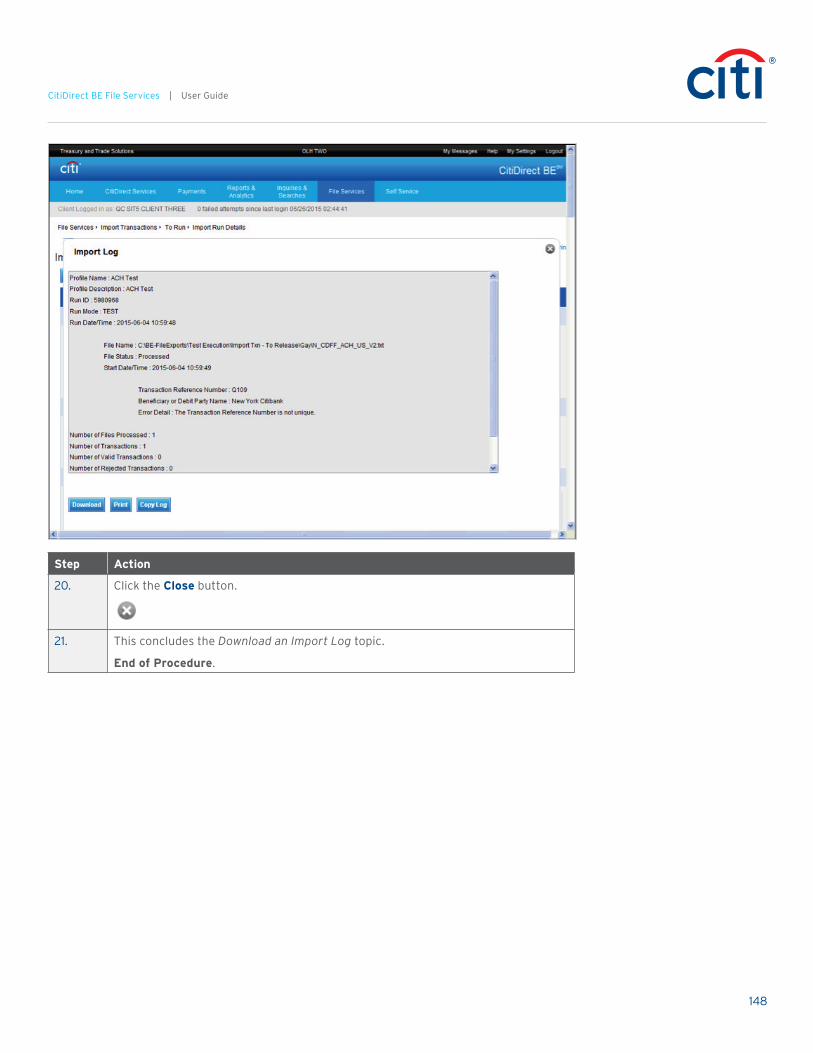
CitiDirect BE File Services | User Guide
Step Action
10. The Import Log page displays details about transactions logged for a specific Run ID during the import process. It includes data such as the time the process started, the specific transactions that were imported, a listing of the total number of transactions processed, and the status of these transactions.
Note: The Import Log is only available if the View Log Indicator checkbox was selected on the Import File Template Detail form when the template was created.
11. The Print button sends the import log to your default print location.
12. The Copy Log button allows you to copy content from the import log and paste it in other applications such as MS Word, Notepad, etc.
13. Click the Download button.

146
CitiDirect BE File Services | User Guide
Step Action
14. Click the Save button.

147
CitiDirect BE File Services | User Guide
Step Action
15. From the Save In list, select the drive and/or folder in which you want to save the file. In this example, click downloaded import logs.
16. Click in the File name field.
17. Enter the desired information into the File name field. Enter “Test Run Results”.
18. Click the Save button.
19. The file is saved as a text file to the location you specified.
148
CitiDirect BE File Services | User Guide
Step Action
20. Click the Close button.
21. This concludes the Download an Import Log topic.
End of Procedure.

149
CitiDirect BE File Services | User Guide
View Last Run
CitiDirect BE allows you to view the last run for an import template.
Procedure
In this topic, you will view the last run details of an import file template.
Step Action
1. Point to the File Services menu heading.
150
CitiDirect BE File Services | User Guide
Step Action
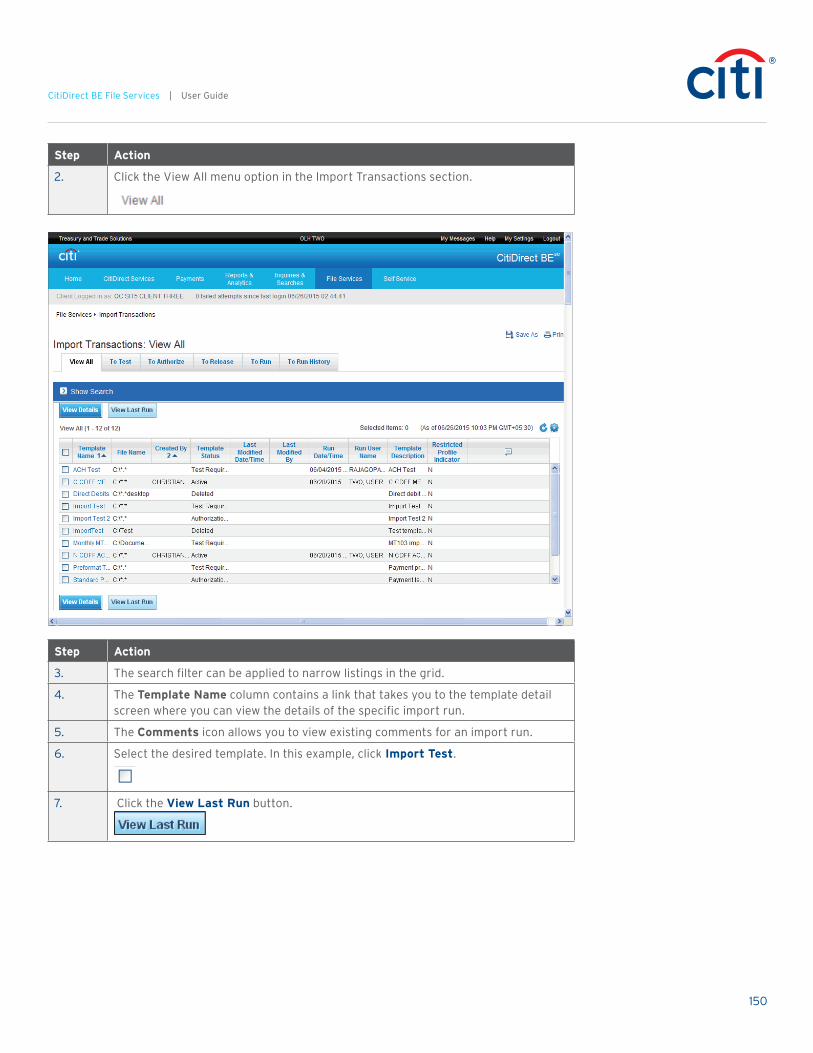
2. Click the View All menu option in the Import Transactions section.
Step Action
3. The search filter can be applied to narrow listings in the grid.
4. The Template Name column contains a link that takes you to the template detail screen where you can view the details of the specific import run.
5. The Comments icon allows you to view existing comments for an import run.
6. Select the desired template. In this example, click Import Test.
7. Click the View Last Run button.

151
CitiDirect BE File Services | User Guide
Step Action
8. The Import Run Details page displays detailed information about the selected run.
9. The View Import Log button opens the window where you can view the details about what happened during the import process.
10. The View Errors button opens the window where you can view the details of all errors generated for the selected data file.
11. The View Run Results button opens the window where you can view the result of the mapping process.
12. The View Maps Run button opens the window where you can view the import maps defined as part of the import file template as well as those actually used during the import run.
13. The Print button sends the last run details to your default print location.
14. Click the scrollbar.

152
CitiDirect BE File Services | User Guide
Step Action
15. Click the Return to Import Transactions: View All button.
16. This concludes the View Last Run topic.
End of Procedure.

153
CitiDirect BE File Services | User Guide
Download Import Run Results to a File
The download process allows you to save the data details from a selected export run event to a specified location. You are entitled to see only exports that you have run.
Downloads may be executed only for run events in a Completed or Downloaded status, and you may download only one export run at a time. There is no multi-select capability for downloading.
Procedure
In this topic, you will download run results to a file.
Step Action
1. Point to the File Services menu heading.
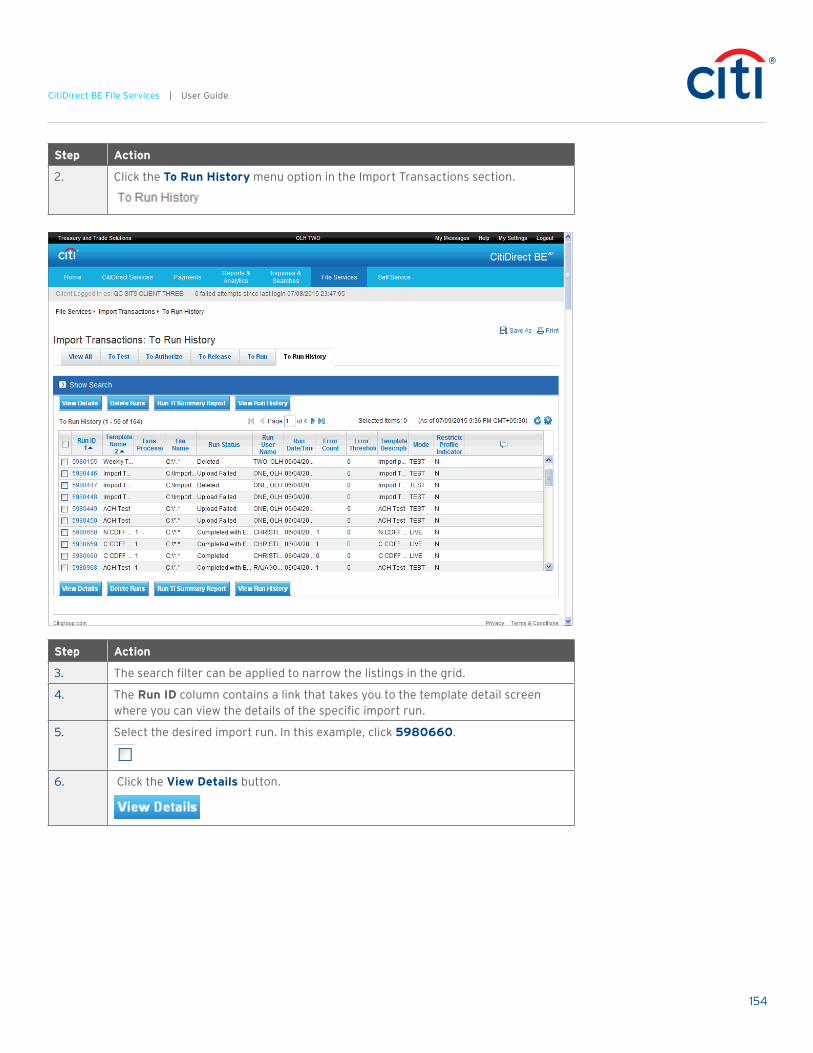
154
CitiDirect BE File Services | User Guide
Step Action
2. Click the To Run History menu option in the Import Transactions section.
Step Action
3. The search filter can be applied to narrow the listings in the grid.
4. The Run ID column contains a link that takes you to the template detail screen where you can view the details of the specific import run.
5. Select the desired import run. In this example, click 5980660.
6. Click the View Details button.

155
CitiDirect BE File Services | User Guide
Step Action
7. The Print button sends the run results to your default print location.
8. Click the View Run Results button.
9. Click the Download button.

156
CitiDirect BE File Services | User Guide
Step Action
10. Click the Save button.
11. Select the desired drive and/or folder in which you want to save the file. In this example, click downloaded files.
12. Click in the File Name field.
13. Enter the desired information into the File Name field. Enter “Test Run Results”.

157
CitiDirect BE File Services | User Guide
Step Action
14. Click the Save button.
15. The file is saved as a text file to the location you specified.
16. This concludes the Download Import Run Results to a File topic.
End of Procedure.
Authorize or Reject a File Import Run
Depending on your organization’s policies, file import runs may need to be authorized before they can be released. CitiDirect BE has the ability to require up to nine levels of authorization.
When authorizing an import run, you can authorize it and send it on to the next stage of the process flow, or you can reject it and end the import process.
As a security measure, you cannot authorize import runs you submitted.
Procedure
In this topic, you will authorize or reject a file import run.
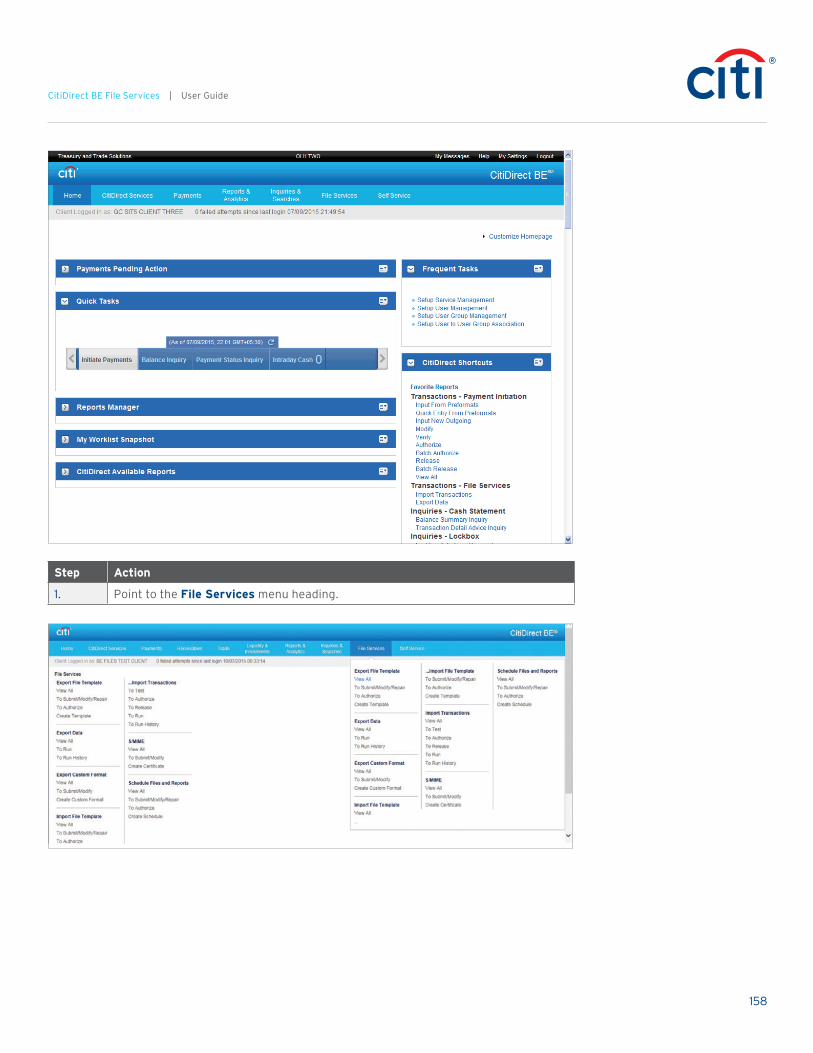
158
CitiDirect BE File Services | User Guide
Step Action
1. Point to the File Services menu heading.
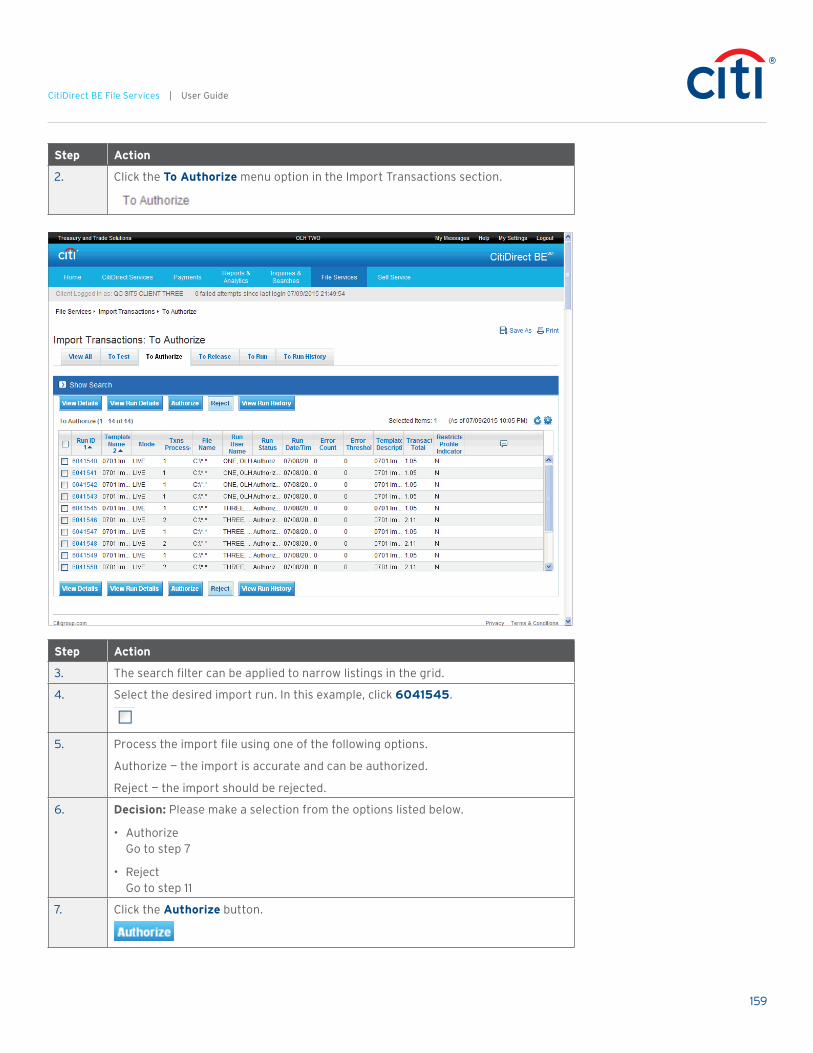
159
CitiDirect BE File Services | User Guide
Step Action
2. Click the To Authorize menu option in the Import Transactions section.
Step Action
3. The search filter can be applied to narrow listings in the grid.
4. Select the desired import run. In this example, click 6041545.
5. Process the import file using one of the following options.
Authorize — the import is accurate and can be authorized.
Reject — the import should be rejected.
6. Decision: Please make a selection from the options listed below.
• Authorize Go to step 7
• Reject Go to step 11
7. Click the Authorize button.
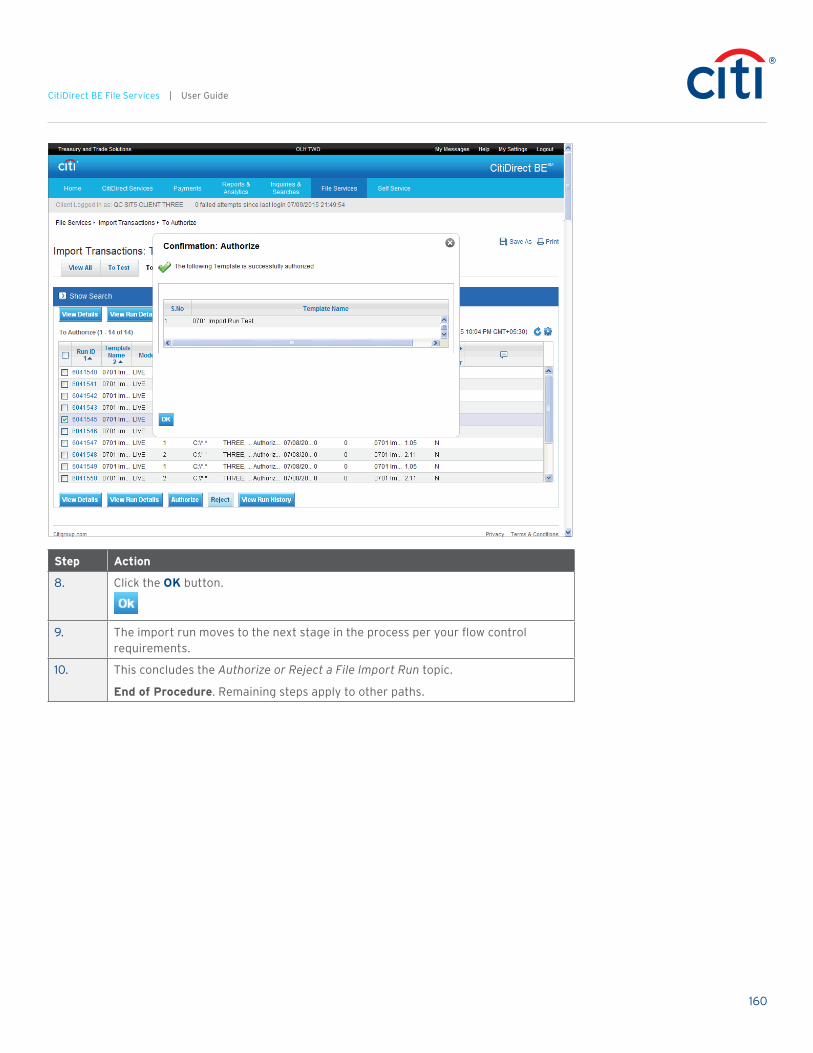
160
CitiDirect BE File Services | User Guide
Step Action
8. Click the OK button.
9. The import run moves to the next stage in the process per your flow control requirements.
10. This concludes the Authorize or Reject a File Import Run topic.
End of Procedure. Remaining steps apply to other paths.
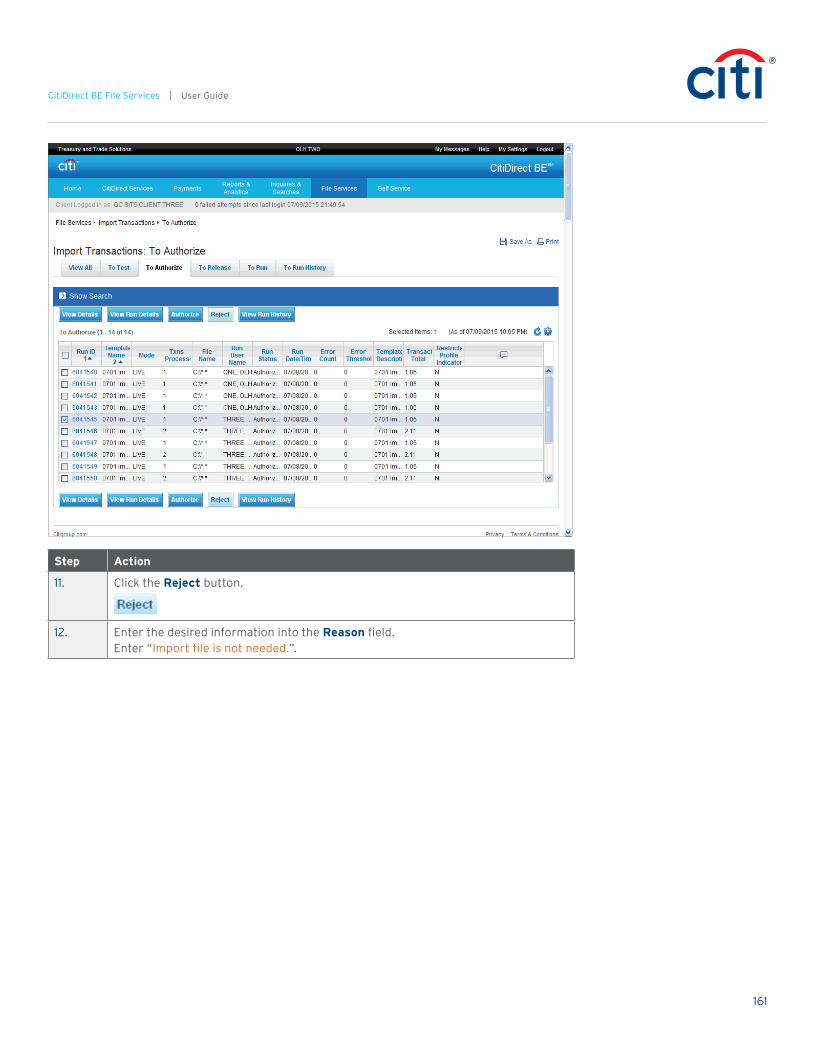
161
CitiDirect BE File Services | User Guide
Step Action
11. Click the Reject button.
12. Enter the desired information into the Reason field. Enter “Import file is not needed.”.
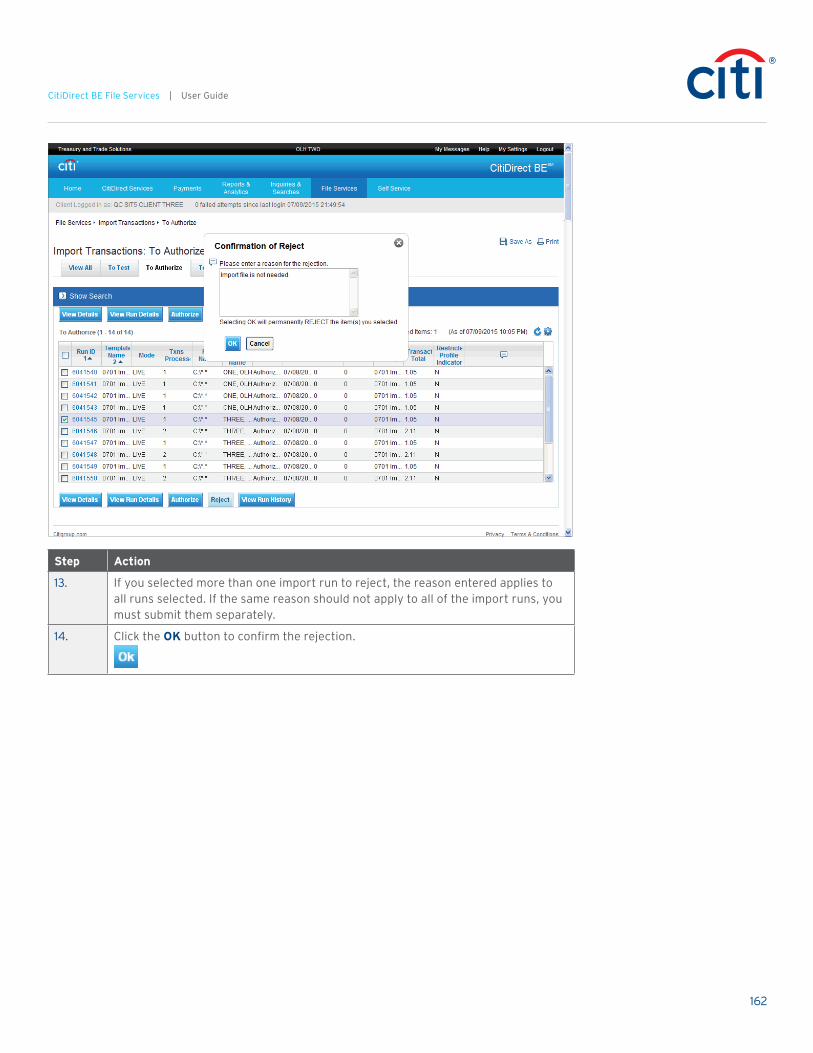
162
CitiDirect BE File Services | User Guide
Step Action
13. If you selected more than one import run to reject, the reason entered applies to all runs selected. If the same reason should not apply to all of the import runs, you must submit them separately.
14. Click the OK button to confirm the rejection.

163
CitiDirect BE File Services | User Guide
Step Action
15. Click the Ok button for successful rejection.
16. The import run moves to the Run History tab with a status of Rejected and the import run is not completed.
17. This concludes the Authorize or Reject a File Import Run topic.
End of Procedure.
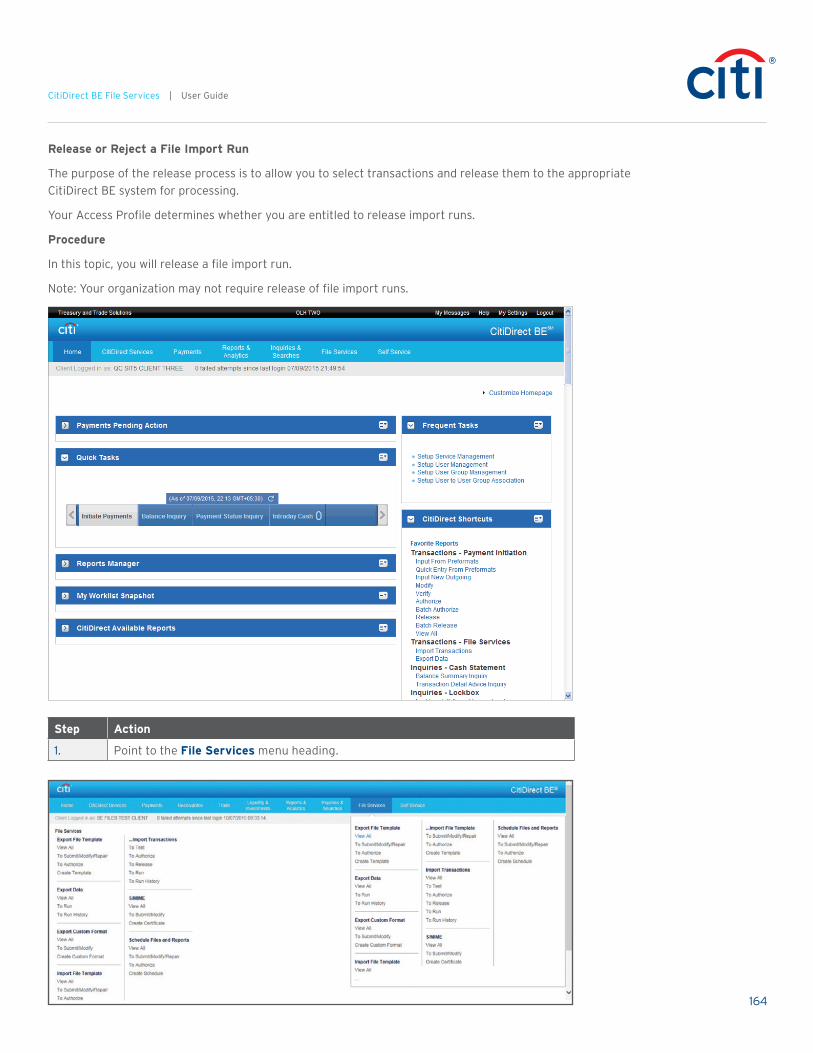
164
CitiDirect BE File Services | User Guide
Release or Reject a File Import Run
The purpose of the release process is to allow you to select transactions and release them to the appropriate CitiDirect BE system for processing.
Your Access Profile determines whether you are entitled to release import runs.
Procedure
In this topic, you will release a file import run.
Note: Your organization may not require release of file import runs.
Step Action
1. Point to the File Services menu heading.

165
CitiDirect BE File Services | User Guide
Step Action
2. Click the To Release menu option in the Import Transactions section.
Step Action
3. The search filter can be applied to narrow the listings in the grid.
4. The Run ID column contains a link that takes you to the template detail screen where you can view the details of the specific import run.
5. Select the desired import run. In this example, click 6041539.
6. Process the import run using one of the following options:
Release — the import run data is accurate and can be released.
Reject — the import run contains an error and must be rejected.
7. Decision: Please make a selection from the options listed below.
• Release Go to step 8
• Reject Go to step 12
8. Click the Release button.
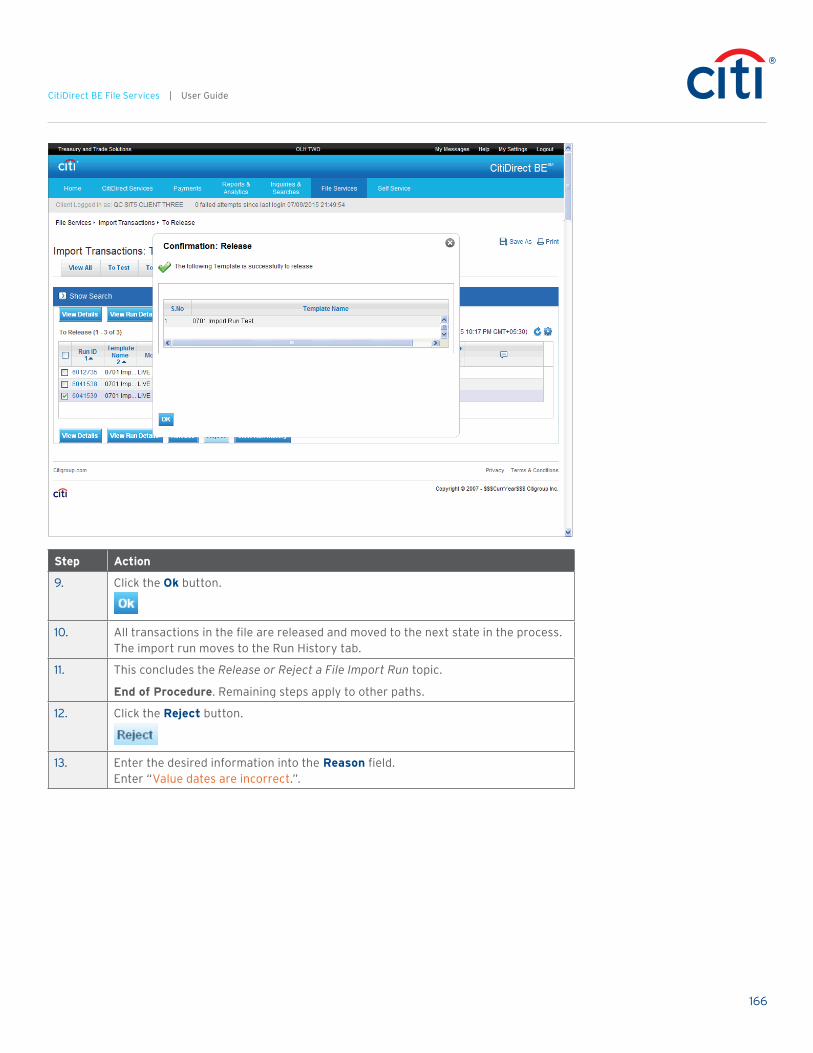
166
CitiDirect BE File Services | User Guide
Step Action
9. Click the Ok button.
10. All transactions in the file are released and moved to the next state in the process. The import run moves to the Run History tab.
11. This concludes the Release or Reject a File Import Run topic.
End of Procedure. Remaining steps apply to other paths.
12. Click the Reject button.
13. Enter the desired information into the Reason field. Enter “Value dates are incorrect.”.
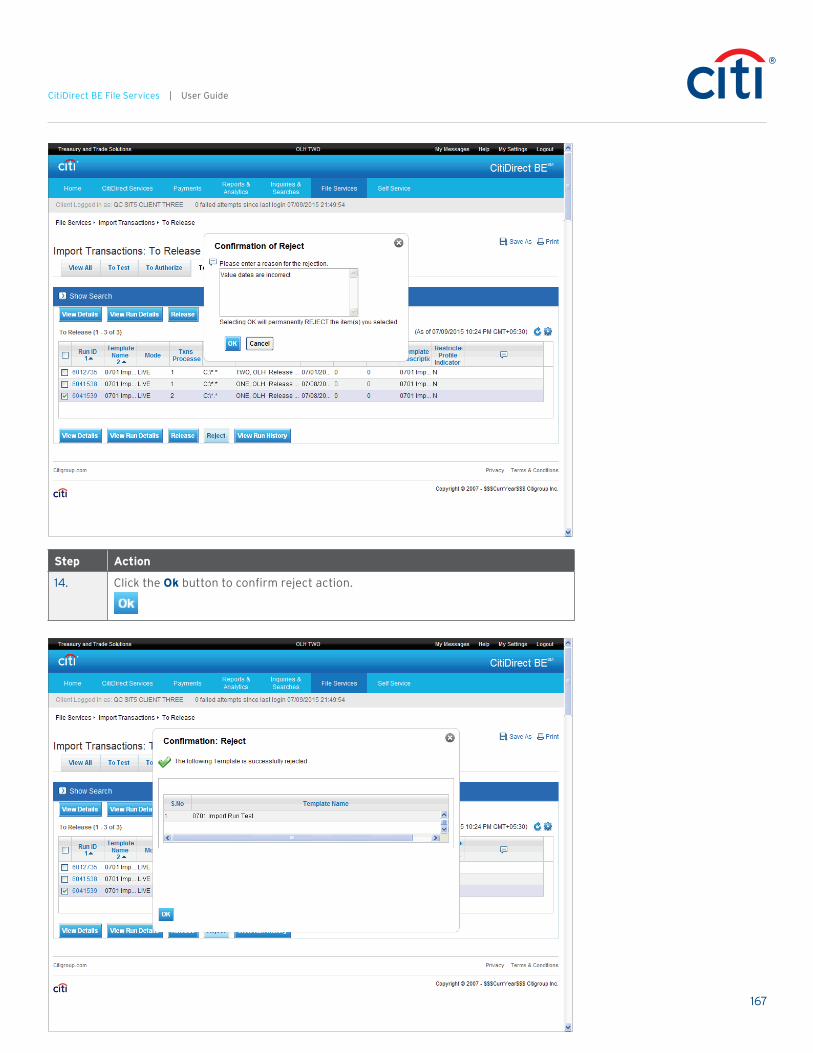
167
CitiDirect BE File Services | User Guide
Step Action
14. Click the Ok button to confirm reject action.
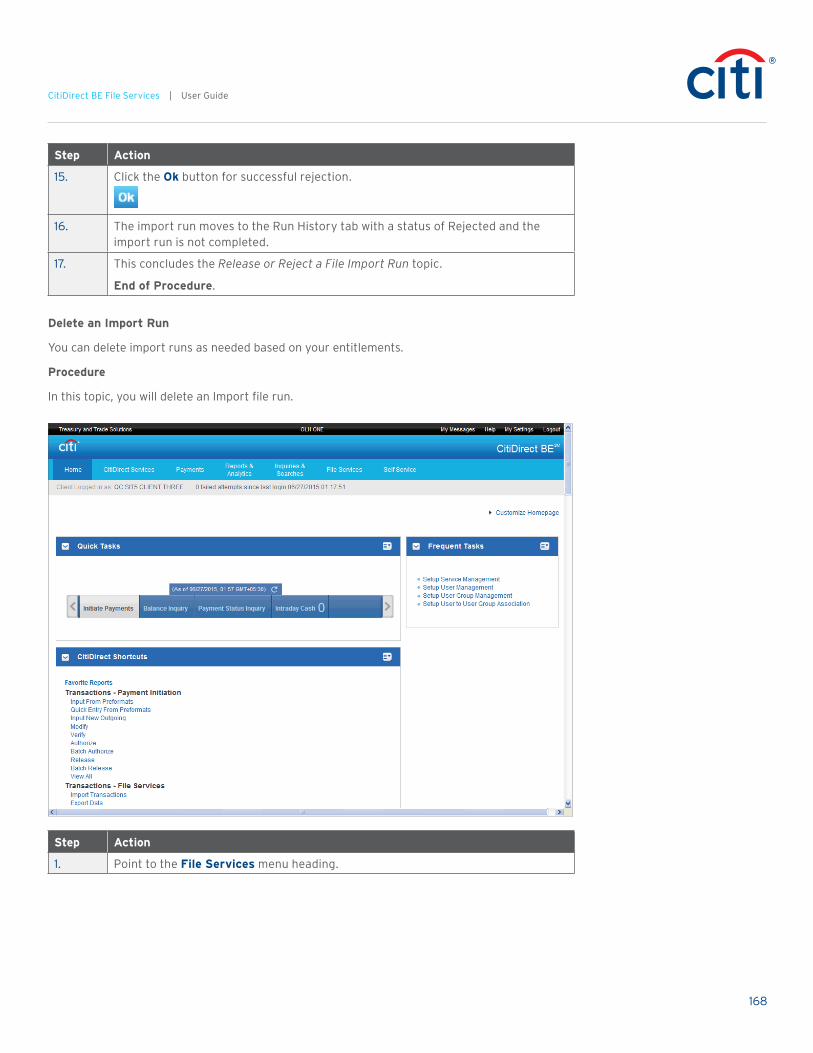
168
CitiDirect BE File Services | User Guide
Step Action
15. Click the Ok button for successful rejection.
16. The import run moves to the Run History tab with a status of Rejected and the import run is not completed.
17. This concludes the Release or Reject a File Import Run topic.
End of Procedure.
Delete an Import Run
You can delete import runs as needed based on your entitlements.
Procedure
In this topic, you will delete an Import file run.
Step Action
1. Point to the File Services menu heading.
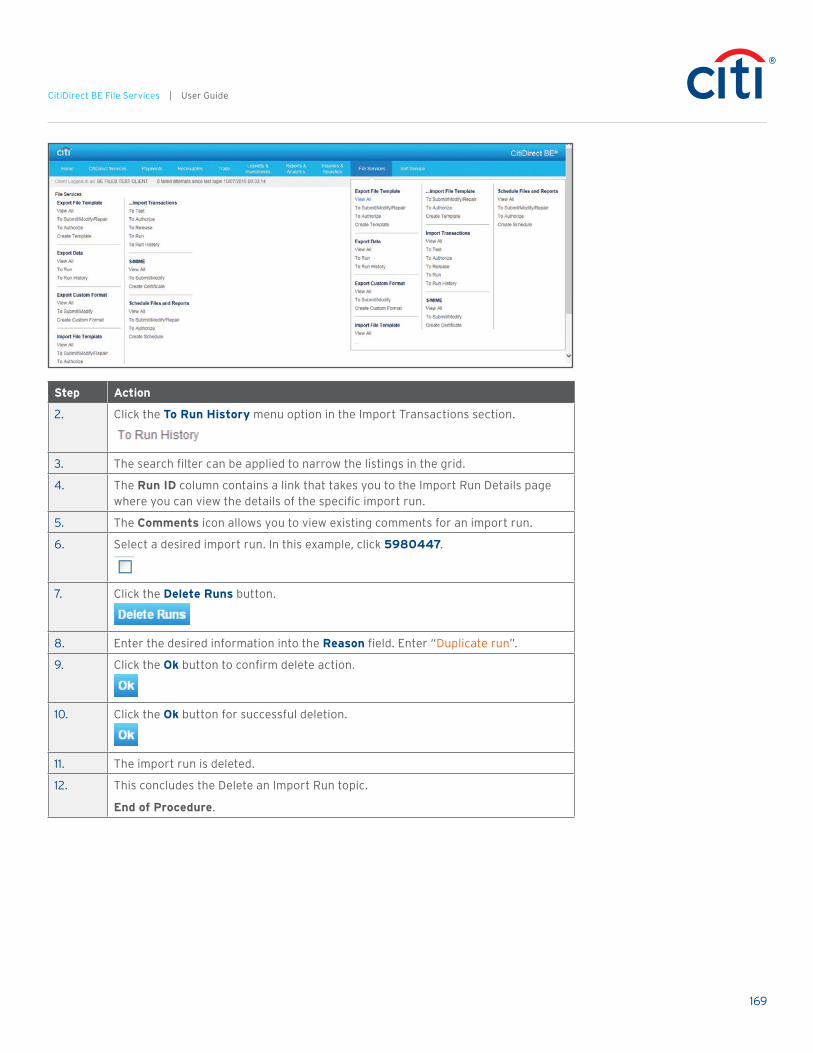
169
CitiDirect BE File Services | User Guide
Step Action
2. Click the To Run History menu option in the Import Transactions section.
3. The search filter can be applied to narrow the listings in the grid.
4. The Run ID column contains a link that takes you to the Import Run Details page where you can view the details of the specific import run.
5. The Comments icon allows you to view existing comments for an import run.
6. Select a desired import run. In this example, click 5980447.
7. Click the Delete Runs button.
8. Enter the desired information into the Reason field. Enter “Duplicate run”.
9. Click the Ok button to confirm delete action.
10. Click the Ok button for successful deletion.
11. The import run is deleted.
12. This concludes the Delete an Import Run topic.
End of Procedure.

170
CitiDirect BE File Services | User Guide
Schedule Files and Report
Create a Schedule for an Event
Schedules allow you to run Reports, File Imports or File Exports at a time and date you specify. You can run the events on a one-time only or recurring basis.
Procedure
In this topic, you will create a schedule for recurring file export.
Step Action
1. Point to the File Services menu heading.

171
CitiDirect BE File Services | User Guide
Step Action
2. Click the Create Schedule menu option in the Schedule Files and Reports section.
Step Action
3. Click in the Schedule Name field.
4. Enter the desired information into the Schedule Name field. Enter “Weekly File Export Schedule”.

172
CitiDirect BE File Services | User Guide
Step Action
5. Click the Event Type Lookup button.
Step Action
6. Select the desired event type. In this example, click Export Profile.
7. Click the Event Name Lookup button.
8. Select the desired event. In this example, click Direct Debits.

173
CitiDirect BE File Services | User Guide
Step Action
9. Click the Schedule Interval button.
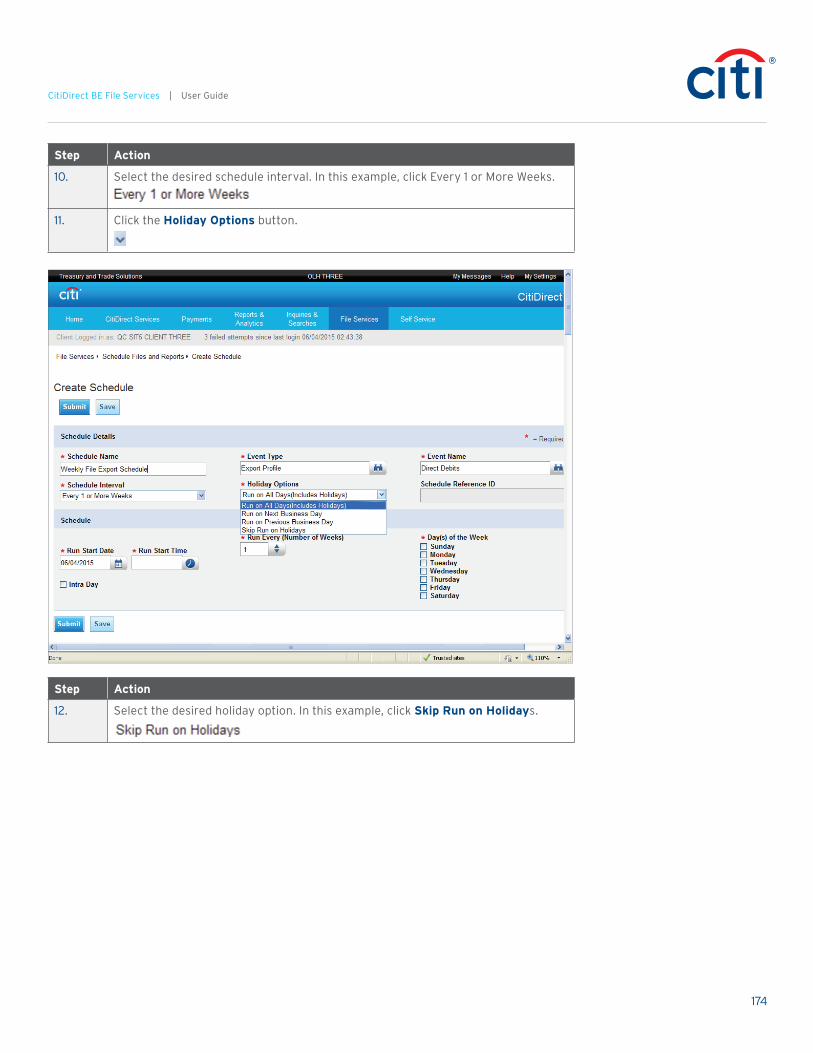
174
CitiDirect BE File Services | User Guide
Step Action
10. Select the desired schedule interval. In this example, click Every 1 or More Weeks.
11. Click the Holiday Options button.
Step Action
12. Select the desired holiday option. In this example, click Skip Run on Holidays.
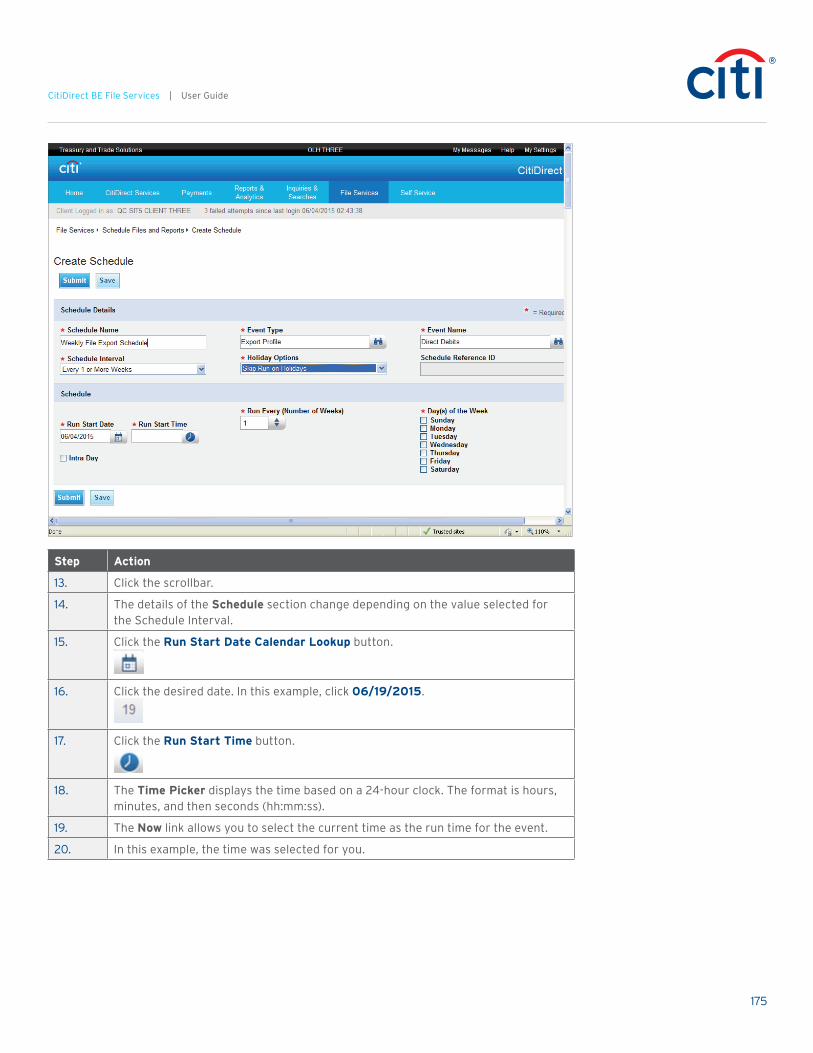
175
CitiDirect BE File Services | User Guide
Step Action
13. Click the scrollbar.
14. The details of the Schedule section change depending on the value selected for the Schedule Interval.
15. Click the Run Start Date Calendar Lookup button.
16. Click the desired date. In this example, click 06/19/2015.
17. Click the Run Start Time button.
18. The Time Picker displays the time based on a 24-hour clock. The format is hours, minutes, and then seconds (hh:mm:ss).
19. The Now link allows you to select the current time as the run time for the event.
20. In this example, the time was selected for you.

176
CitiDirect BE File Services | User Guide
Step Action
21. To select the value you entered, click anywhere outside the time picker.
22. Click the Run Every (Number of Weeks) button.
23. Select the days of the week. In this example, click Monday.
24. The Intra Day checkbox, when selected, allows you to select an intra-day interval and end time.
25. The Save button allows you to save a draft of the schedule to be submitted at a later time.
26. Click the Submit button.
27. The schedule moves to the next stage in the process per your flow control requirements.
28. This concludes the Create a Schedule for an Event topic.
End of Procedure.

177
CitiDirect BE File Services | User Guide
Modify/Repair a Scheduled Event
You can modify scheduled events as needed in CitiDirect BE.
If you attempt to modify an existing scheduled event, the event remains in its current state until the modification is authorized. Once authorized, the new scheduled event replaces the original.
Procedure
In this topic, you will modify a scheduled event.
Step Action
1. Point to the File Services menu heading.

178
CitiDirect BE File Services | User Guide
Step Action
2. Click the To Submit/Modify/Repair menu option in the Schedule Files and Reports section.
Step Action
3. The carousel at the top of the page allows you to navigate between worklists.
4. The number displayed on each tab indicates the number of pending actions on each worklist. The number on the View All tab is the total for all pending actions.
5. The columns displayed in the To Submit/Modify/Repair grid are the default columns for the grid. Your view may differ depending on your customizations.
6. Select the desired scheduled event. In this example, click Fidelity 1700 incremental.
7. Click the View Details button.

179
CitiDirect BE File Services | User Guide
Step Action
8. Make the necessary modifications. In this example, you will update the schedule interval.
9. Click the Schedule Interval button.

180
CitiDirect BE File Services | User Guide
Step Action
10. Select the desired interval. In this example, click Every 1 or More Weeks.

181
CitiDirect BE File Services | User Guide
Step Action
11. Select the day of the week to run the scheduled event.
Click the Wednesday option.
12. Click the Submit button.
13. The modified record moves to the next stage in the process per your flow control requirements.
14. This concludes the Modify/Repair a Schedule for an Event topic.
End of Procedure.
Authorize, Send to Repair, or Reject a Scheduled Event
When scheduled events are ready for authorization, they are listed in the To Authorize worklist. During the authorization process, schedules can be authorized, sent for repair, or rejected.
Your Access Profile determines whether or not you can authorize a scheduled event. You cannot authorize scheduled events you submitted.
Procedure
In this topic, you will authorize, send to repair, or reject a scheduled event.

182
CitiDirect BE File Services | User Guide
Step Action
1. Click the File Services menu option.
Step Action
2. Click the To Authorize menu option in the Schedule Files and Reports section.
3. The carousel at the top of the page allows you to navigate between worklists.
4. The number displayed on each tab indicates the number of pending actions on each worklist. The number on the View All tab is the total for all pending actions.
5. The search filter can be applied to narrow listings in the grid.
6. Select the desired scheduled event. For this example, click 5565_PDF.
7. Process the schedule using one of the following options:
Authorize — the scheduled event is accurate and can be authorized.
Send to Repair — the scheduled event contains an error and must be corrected before it can be authorized.
Reject — the scheduled event contains an error and must be rejected.
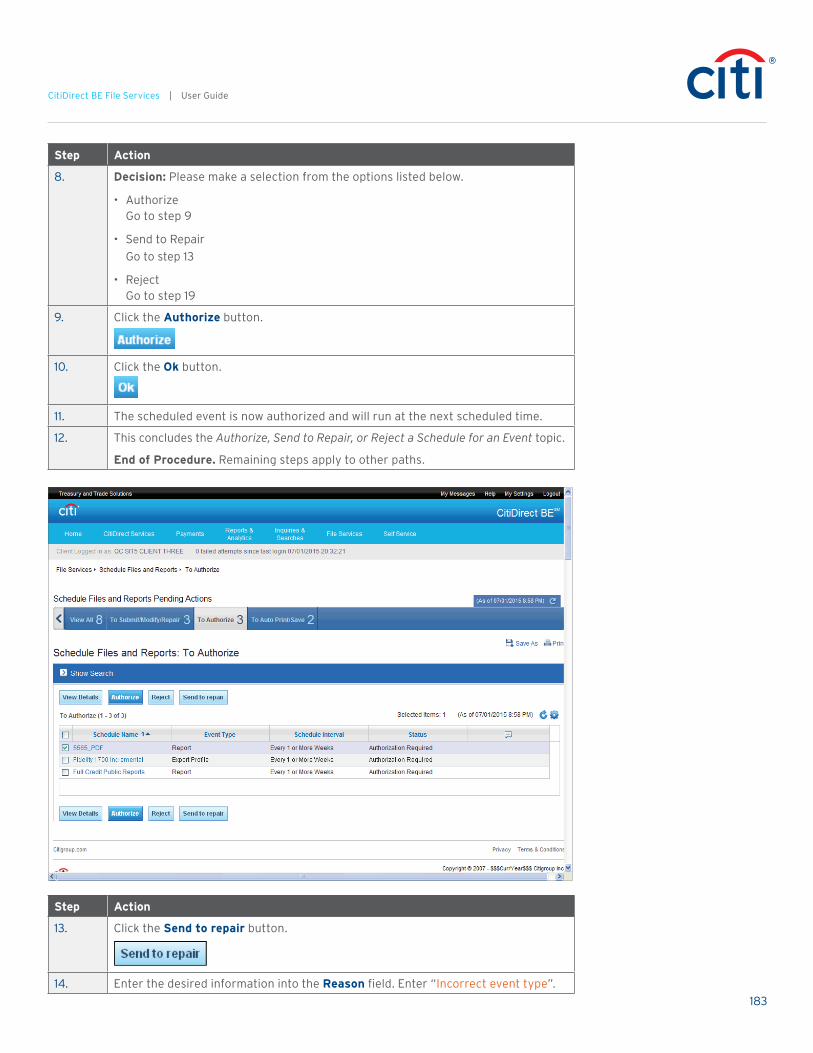
183
CitiDirect BE File Services | User Guide
Step Action
8. Decision: Please make a selection from the options listed below.
• Authorize Go to step 9
• Send to Repair Go to step 13
• Reject Go to step 19
9. Click the Authorize button.
10. Click the Ok button.
11. The scheduled event is now authorized and will run at the next scheduled time.
12. This concludes the Authorize, Send to Repair, or Reject a Schedule for an Event topic.
End of Procedure. Remaining steps apply to other paths.
Step Action
13. Click the Send to repair button.
14. Enter the desired information into the Reason field. Enter “Incorrect event type”.

184
CitiDirect BE File Services | User Guide
Step Action
15. Click the Ok button to confirm send to repair action.
16. Click the Ok button for successful sent to repair.
17. The scheduled event is sent to the repair queue with a status of Repair Required.
18. This concludes the Authorize, Send to Repair, or Reject a Schedule for an Event topic.
End of Procedure. Remaining steps apply to other paths.
Step Action
19. Click the Reject button.
20. Enter the desired information into the Reason field. Enter “Duplicate event type”.
21. Click the Ok button to confirm reject action.
22. Click the Ok button for successful rejection.

185
CitiDirect BE File Services | User Guide
Step Action
23. If you reject a new scheduled event, it is deleted from CitiDirect BE.
If you reject a modified scheduled event, the pending authorization version of the scheduled event is deleted from CitiDirect BE, but the original scheduled event remains in its original state.
24. This concludes the Authorize, Send to Repair, or Reject a Schedule for an Event topic.
End of Procedure.
Delete a Scheduled Event
You can delete scheduled events as needed in CitiDirect BE.
If you delete a scheduled event with a status of Input, Invalid, or Expired, the event is removed from the application. If your flow controls require, when you delete a scheduled event with a status of Scheduled, it is moved to the authorization queue with a status of Authorization Required for Delete.
Deleted scheduled events cannot be recovered.
Procedure
In this topic, you will delete a scheduled event.
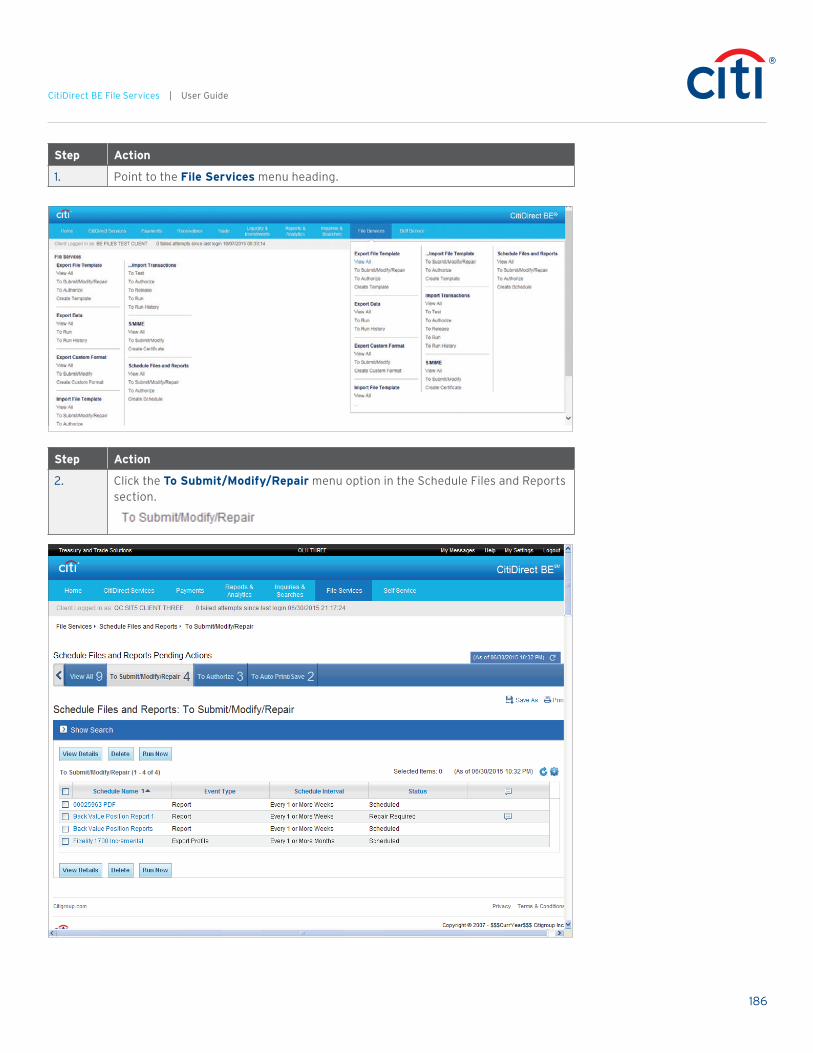
186
CitiDirect BE File Services | User Guide
Step Action
1. Point to the File Services menu heading.
Step Action
2. Click the To Submit/Modify/Repair menu option in the Schedule Files and Reports section.

187
CitiDirect BE File Services | User Guide
Step Action
3. The carousel at the top of the page allows you to navigate between worklists.
4. The number displayed on each tab indicates the number of pending actions on each worklist. The number on the View All tab is the total for all pending actions.
5. The columns displayed in the To Submit/Modify/Repair grid are the default columns for the grid. Your view may differ depending on your customizations.
6. The search filter can be applied to narrow listings in the grid.
7. Select the desired event. In this example, click Back Value Position Report 1.
8. Click the Delete button.
9. Enter the desired information into the Reason field. Enter “Duplicate event”.
Step Action
10. Click the Ok button to confirm delete action.
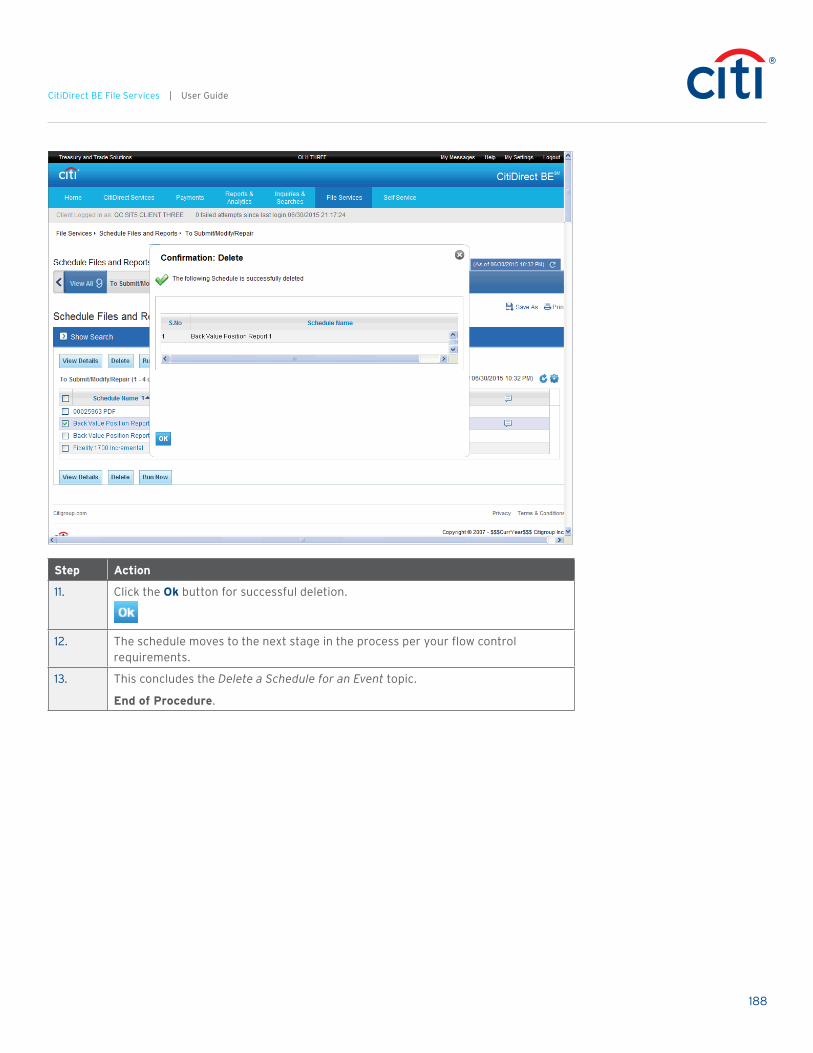
188
CitiDirect BE File Services | User Guide
Step Action
11. Click the Ok button for successful deletion.
12. The schedule moves to the next stage in the process per your flow control requirements.
13. This concludes the Delete a Schedule for an Event topic.
End of Procedure.
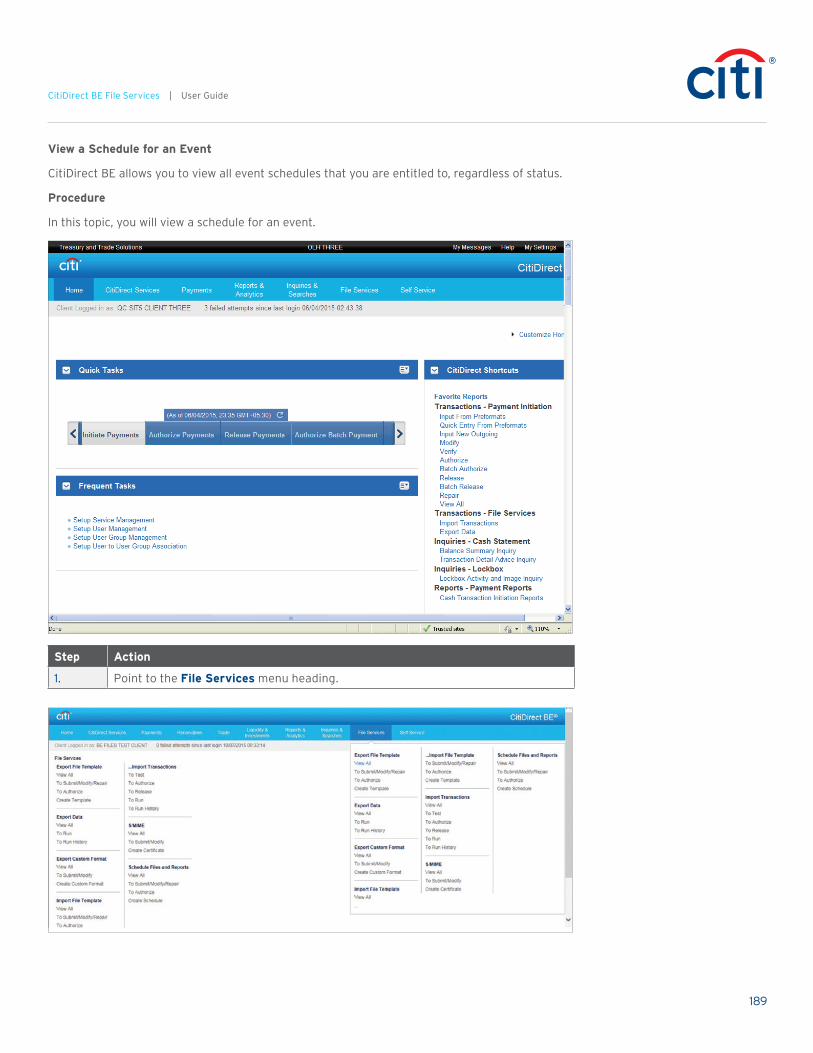
189
CitiDirect BE File Services | User Guide
View a Schedule for an Event
CitiDirect BE allows you to view all event schedules that you are entitled to, regardless of status.
Procedure
In this topic, you will view a schedule for an event.
Step Action
1. Point to the File Services menu heading.

190
CitiDirect BE File Services | User Guide
Step Action
2. Click the View All menu option in the Schedule Files and Reports section.
Step Action
3. The carousel at the top of the page allows you to navigate between worklists.
4. The number displayed on each tab indicates the number of pending actions on each worklist. The number on the View All tab is the total for all pending actions.
5. The columns displayed in the Schedule Files and Reports: View All grid is the default column for the grid. Your view may differ depending on your customizations.
6. The Schedule Name column contains a link that takes you to the detail screen where you can view the details of the specific schedule.
7. The Schedule Interval column displays the frequency that the schedule is run.
8. The search filter can be applied to narrow listings in the grid.
9. Select the desired schedule. In this example, click 00025963 PDF.
10. Click the View Details button.
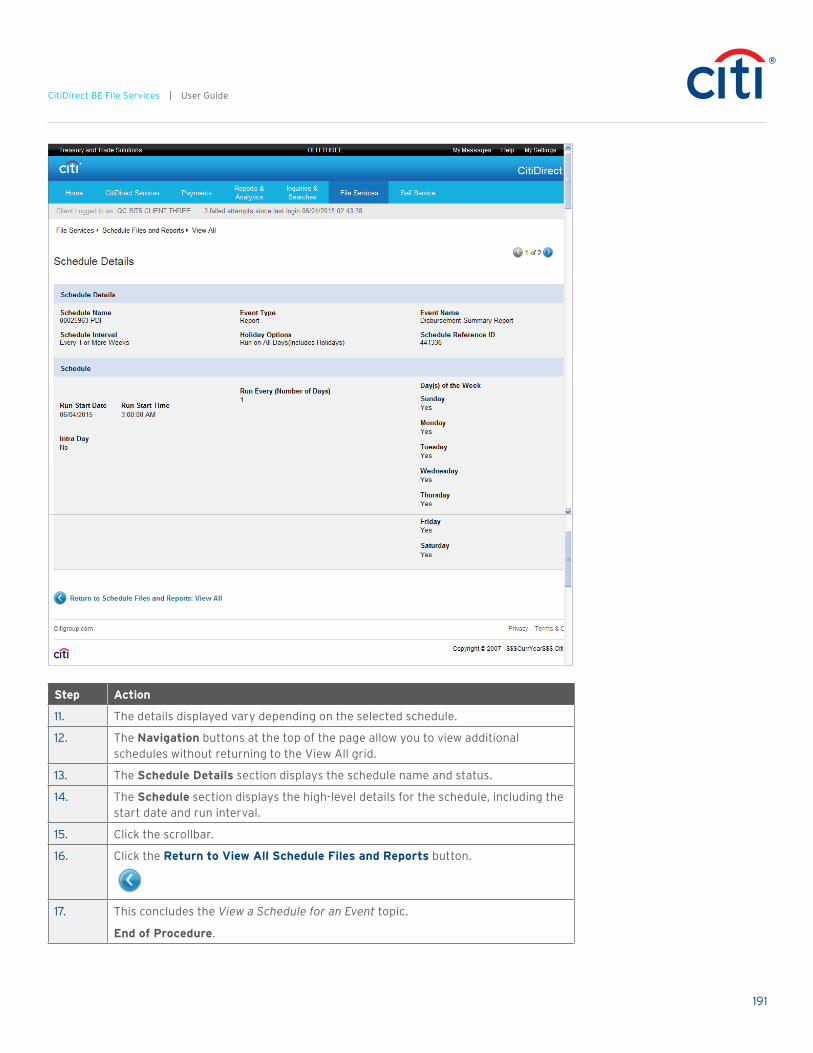
191
CitiDirect BE File Services | User Guide
Step Action
11. The details displayed vary depending on the selected schedule.
12. The Navigation buttons at the top of the page allow you to view additional schedules without returning to the View All grid.
13. The Schedule Details section displays the schedule name and status.
14. The Schedule section displays the high-level details for the schedule, including the start date and run interval.
15. Click the scrollbar.
16. Click the Return to View All Schedule Files and Reports button.
17. This concludes the View a Schedule for an Event topic.
End of Procedure.
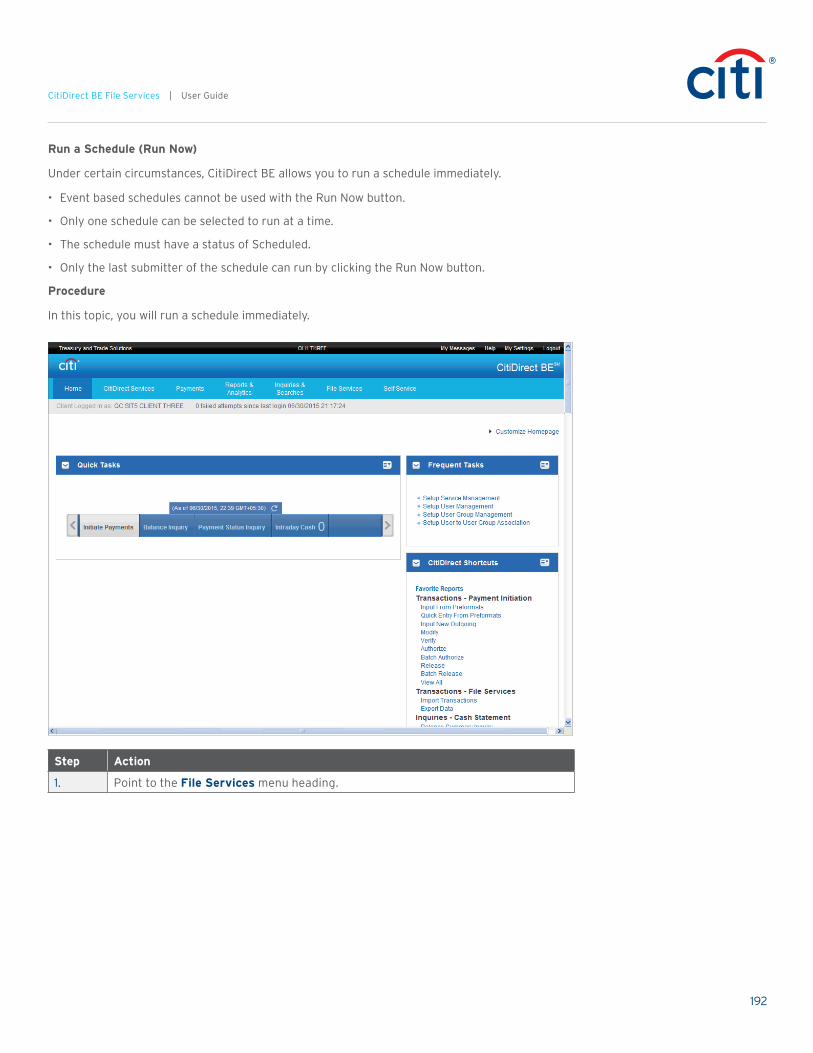
192
CitiDirect BE File Services | User Guide
Run a Schedule (Run Now)
Under certain circumstances, CitiDirect BE allows you to run a schedule immediately.
• Event based schedules cannot be used with the Run Now button.
• Only one schedule can be selected to run at a time.
• The schedule must have a status of Scheduled.
• Only the last submitter of the schedule can run by clicking the Run Now button.
Procedure
In this topic, you will run a schedule immediately.
Step Action
1. Point to the File Services menu heading.
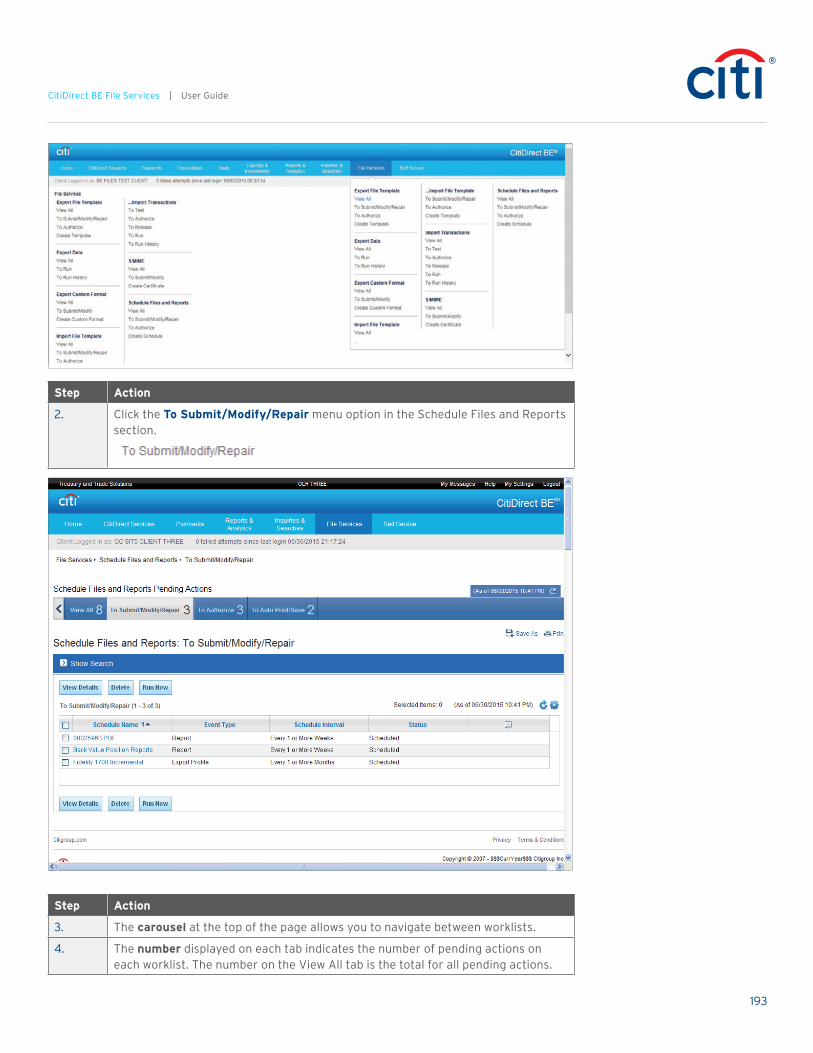
193
CitiDirect BE File Services | User Guide
Step Action
2. Click the To Submit/Modify/Repair menu option in the Schedule Files and Reports section.
Step Action
3. The carousel at the top of the page allows you to navigate between worklists.
4. The number displayed on each tab indicates the number of pending actions on each worklist. The number on the View All tab is the total for all pending actions.

194
CitiDirect BE File Services | User Guide
Step Action
5. The columns displayed in the To Submit/Modify/Repair grid are the default columns for the grid. Your view may differ depending on your customizations.
6. The search filter can be applied to narrow listings in the grid.
7. Select the desired schedule. In this example, click Fidelity 1700 incremental.
8. Click the Run Now button.
Step Action
9. Click the Ok button.
10. The schedule is run immediately and results will be delivered to the designated printer/file location in the schedule.
11. This concludes the Run a Schedule (Run Now) topic.
End of Procedure.

195
CitiDirect BE File Services | User Guide
S/MIME
Download a Citibank Certificate
You can download Citibank Certificates and specify the download location and format.
Procedure
In this topic, you will download a Citibank certificate.
Step Action
1. Point to the File Services menu heading.
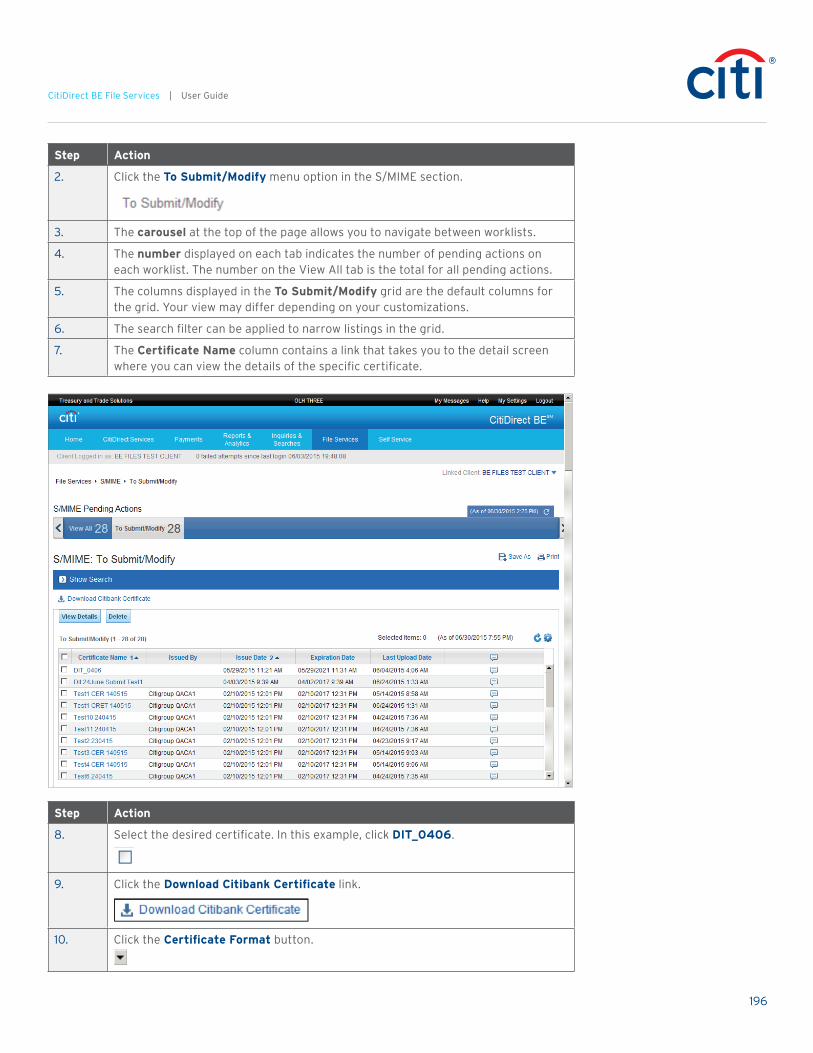
196
CitiDirect BE File Services | User Guide
Step Action
2. Click the To Submit/Modify menu option in the S/MIME section.
3. The carousel at the top of the page allows you to navigate between worklists.
4. The number displayed on each tab indicates the number of pending actions on each worklist. The number on the View All tab is the total for all pending actions.
5. The columns displayed in the To Submit/Modify grid are the default columns for the grid. Your view may differ depending on your customizations.
6. The search filter can be applied to narrow listings in the grid.
7. The Certificate Name column contains a link that takes you to the detail screen where you can view the details of the specific certificate.
Step Action
8. Select the desired certificate. In this example, click DIT_0406.
9. Click the Download Citibank Certificate link.
10. Click the Certificate Format button.

197
CitiDirect BE File Services | User Guide
Step Action
11. Select the desired format. In this example, click PKCS7(.p7c).
12. Click the Ok button.
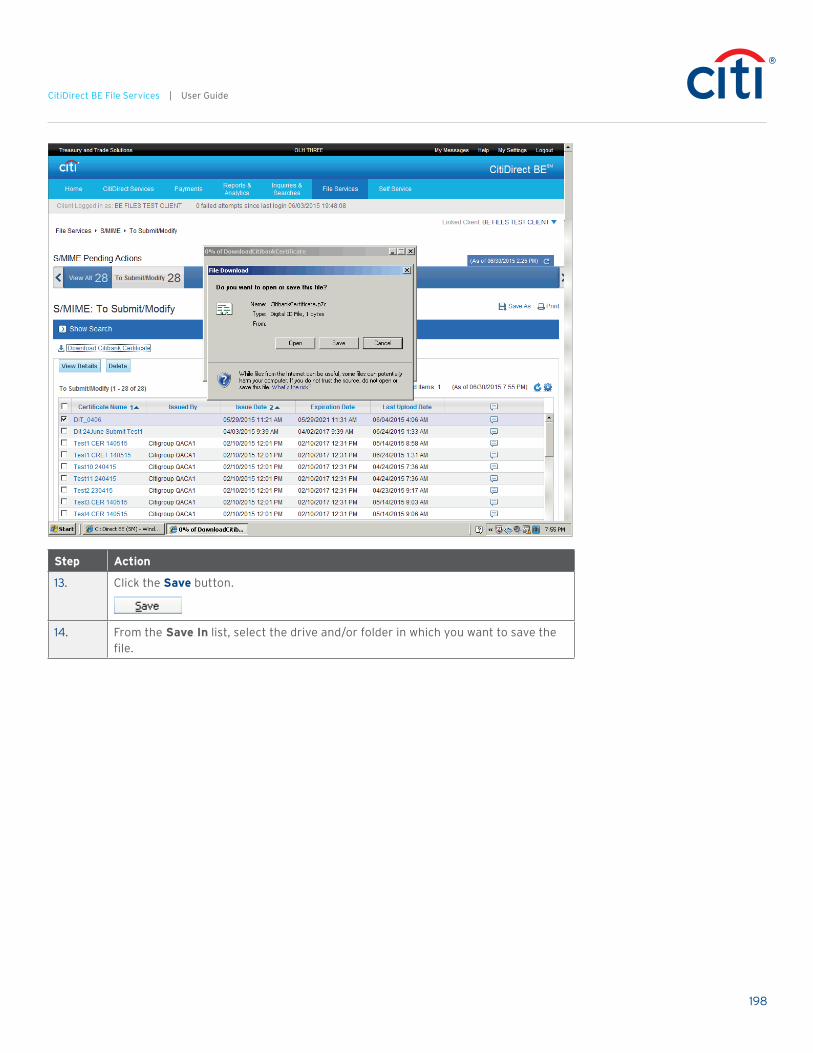
198
CitiDirect BE File Services | User Guide
Step Action
13. Click the Save button.
14. From the Save In list, select the drive and/or folder in which you want to save the file.
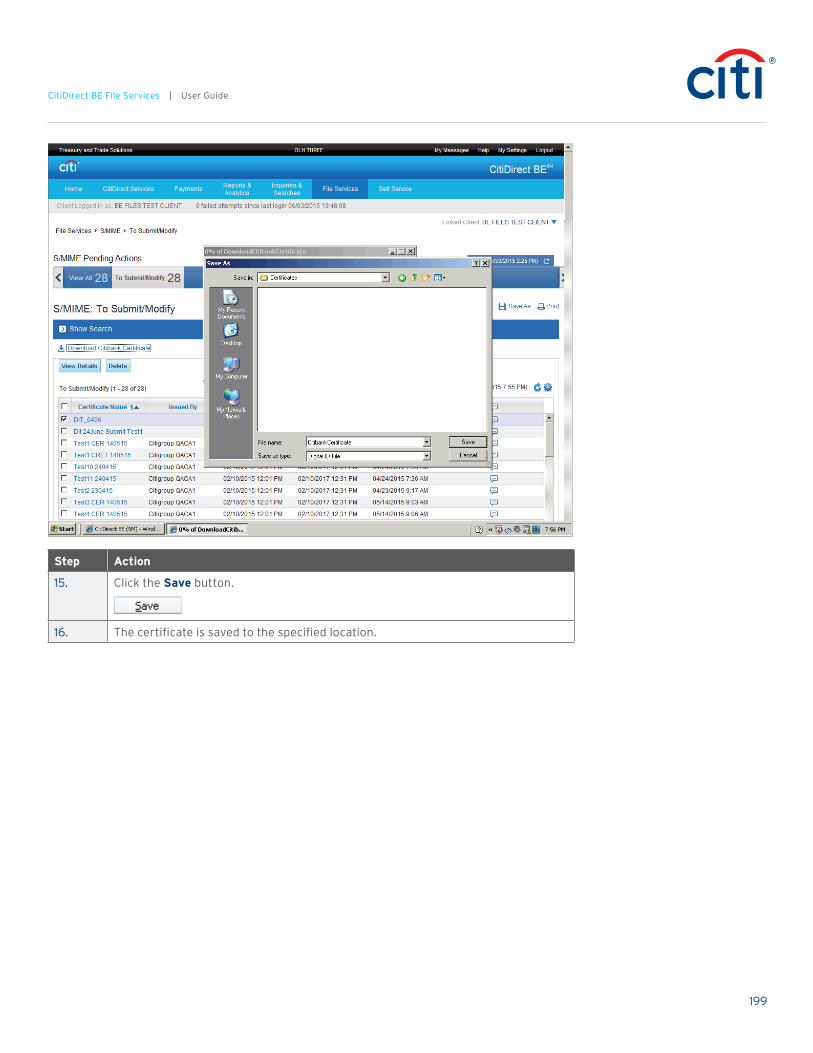
199
CitiDirect BE File Services | User Guide
Step Action
15. Click the Save button.
16. The certificate is saved to the specified location.

200
CitiDirect BE File Services | User Guide
Step Action
17. Click the Close button.
18. This concludes the Download a Citibank Certificate topic.
End of Procedure.

201
CitiDirect BE File Services | User Guide
View the Details of a Security Certificate
CitiDirect BE allows you to view the details of security certificates that you have access to.
Procedure
In this topic, you will view the details of a security certificate.
Step Action
1. Point to the File Services menu heading.

202
CitiDirect BE File Services | User Guide
Step Action
2. Click the View All menu option in the S/MIME section.
Step Action
3. The carousel at the top of the page allows you to navigate between worklists.
4. The number displayed on each tab indicates the number of pending actions on each worklist. The number on the View All tab is the total for all pending actions.
5. The columns displayed in the View All grid are the default columns for the grid. Your view may differ depending on your customizations.
6. The search filter can be applied to narrow listings in the grid.
7. The Certificate Name column contains a link that takes you to the detail screen where you can view the details of the specific certificate.
8. Select the desired certificate. In this example, click SSB621 Security Cert.
9. Click the View Details button.
10. The S/MIME Security Detail page displays detailed information about the selected certificate.
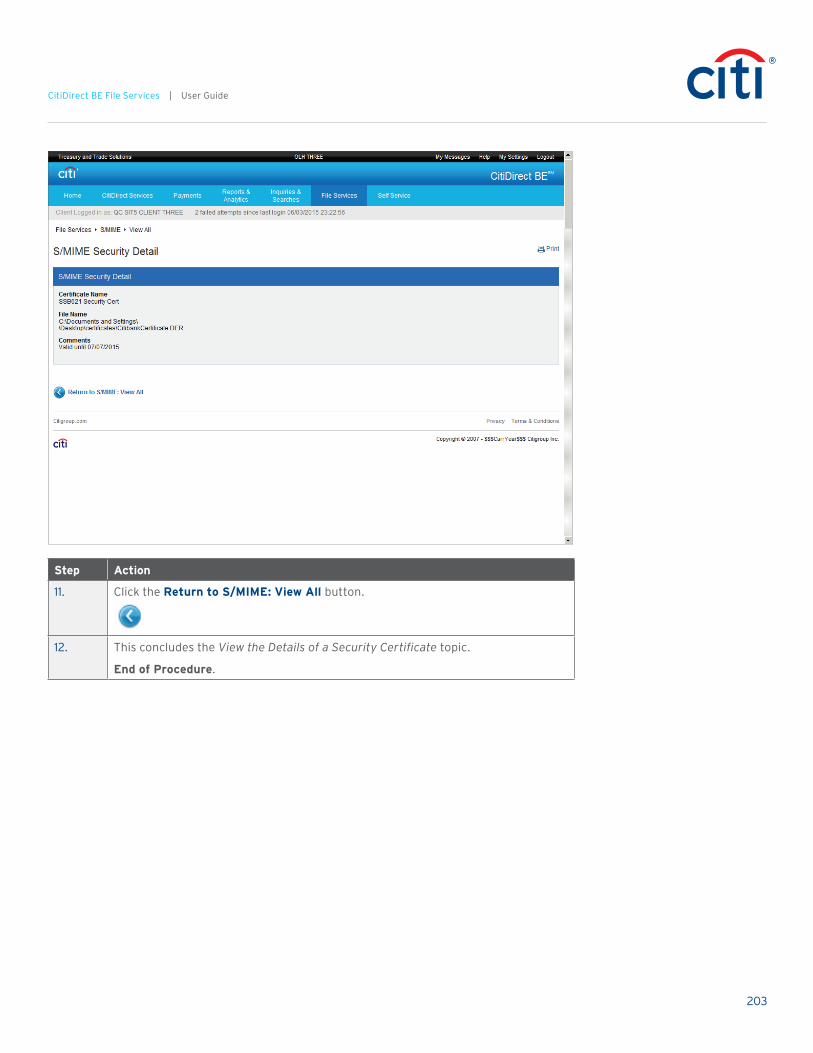
203
CitiDirect BE File Services | User Guide
Step Action
11. Click the Return to S/MIME: View All button.
12. This concludes the View the Details of a Security Certificate topic.
End of Procedure.

204
CitiDirect BE File Services | User Guide
Delete a Security Certificate
CitiDirect BE allows you to delete security certificates based on your entitlements.
Procedure
In this topic, you will delete a security certificate.
Step Action
1. Point to the File Services menu heading.
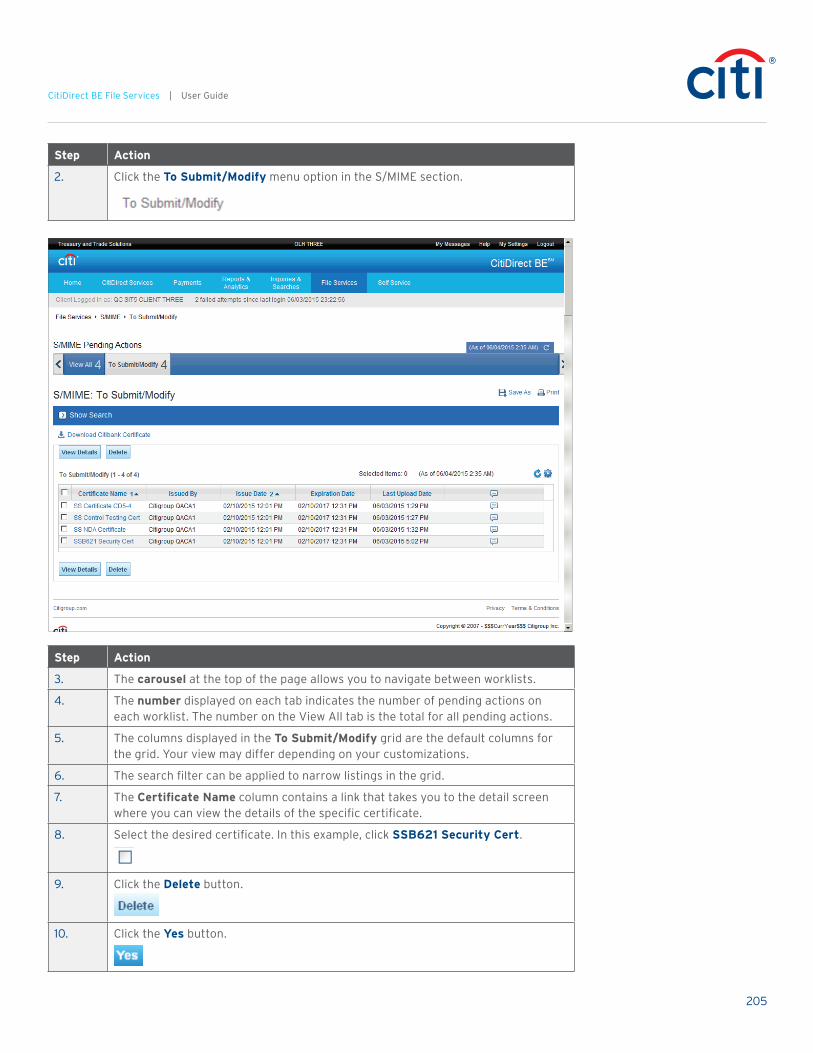
205
CitiDirect BE File Services | User Guide
Step Action
2. Click the To Submit/Modify menu option in the S/MIME section.
Step Action
3. The carousel at the top of the page allows you to navigate between worklists.
4. The number displayed on each tab indicates the number of pending actions on each worklist. The number on the View All tab is the total for all pending actions.
5. The columns displayed in the To Submit/Modify grid are the default columns for the grid. Your view may differ depending on your customizations.
6. The search filter can be applied to narrow listings in the grid.
7. The Certificate Name column contains a link that takes you to the detail screen where you can view the details of the specific certificate.
8. Select the desired certificate. In this example, click SSB621 Security Cert.
9. Click the Delete button.
10. Click the Yes button.
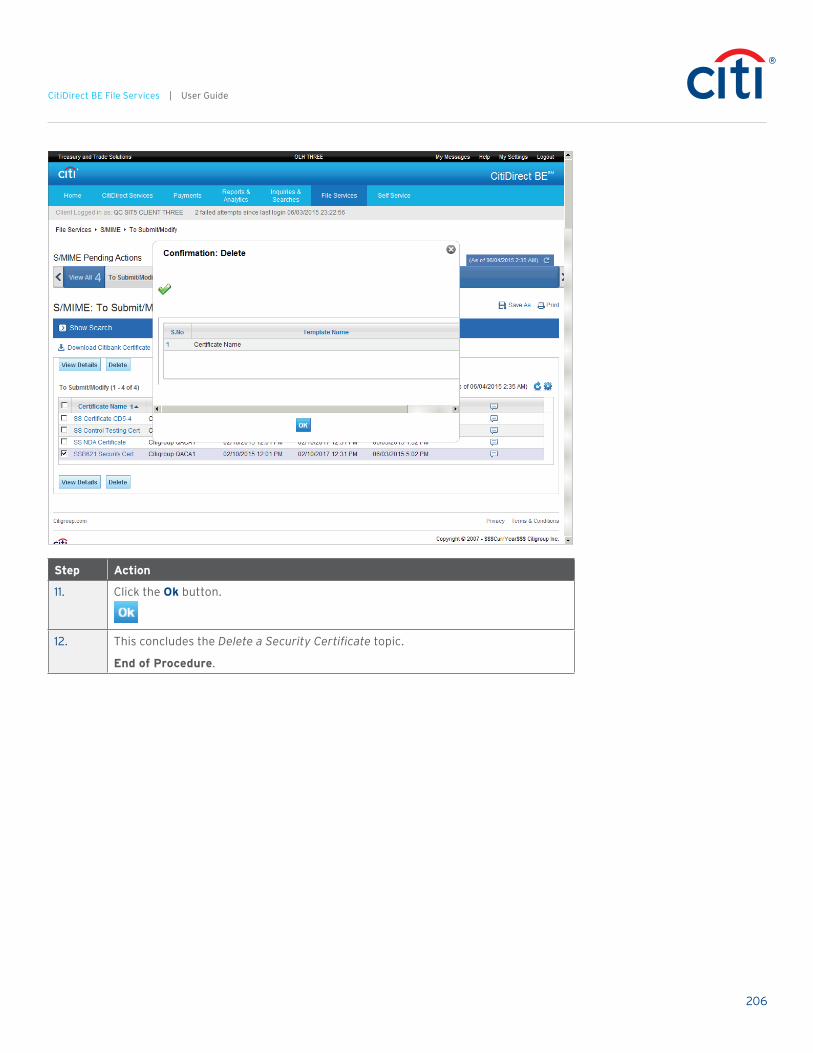
206
CitiDirect BE File Services | User Guide
Step Action
11. Click the Ok button.
12. This concludes the Delete a Security Certificate topic.
End of Procedure.

207
CitiDirect BE File Services | User Guide
Create a Security Certificate
CitiDirect BE allows you to create security certificates when needed.
Procedure
In this topic, you will create a security certificate.
Step Action
1. Point to the File Services menu heading.

208
CitiDirect BE File Services | User Guide
Step Action
2. Click the Create Certificate menu option in the S/MIME section.
Step Action
3. Click in the Certificate Name field.
4. Enter the desired information into the Certificate Name field. Enter “SSB621 Security Cert”.
5. Click the Browse button.
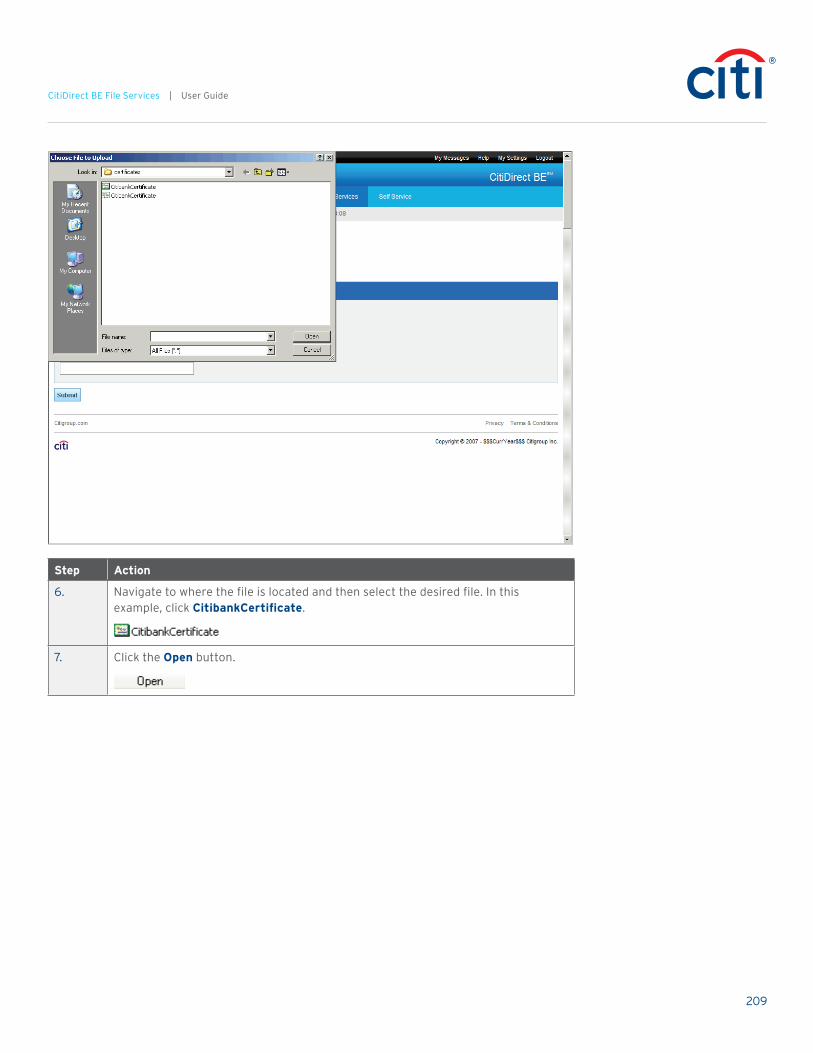
209
CitiDirect BE File Services | User Guide
Step Action
6. Navigate to where the file is located and then select the desired file. In this example, click CitibankCertificate.
7. Click the Open button.

210
CitiDirect BE File Services | User Guide
Step Action
8. Click in the Comments field.
9. Enter the desired information into the Comments field. Enter “Valid until 07/07/2015”.
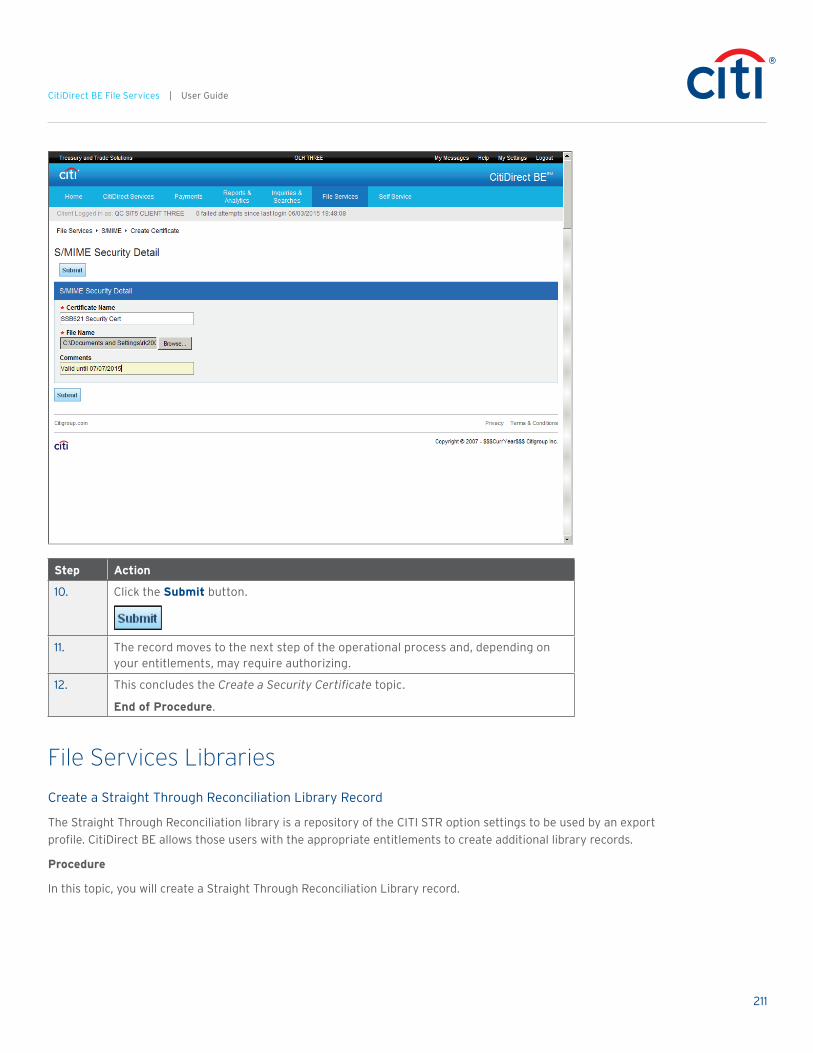
211
CitiDirect BE File Services | User Guide
Step Action
10. Click the Submit button.
11. The record moves to the next step of the operational process and, depending on your entitlements, may require authorizing.
12. This concludes the Create a Security Certificate topic.
End of Procedure.
File Services Libraries
Create a Straight Through Reconciliation Library Record
The Straight Through Reconciliation library is a repository of the CITI STR option settings to be used by an export profile. CitiDirect BE allows those users with the appropriate entitlements to create additional library records.
Procedure
In this topic, you will create a Straight Through Reconciliation Library record.

212
CitiDirect BE File Services | User Guide
Step Action
1. Point to the Self Service menu heading.
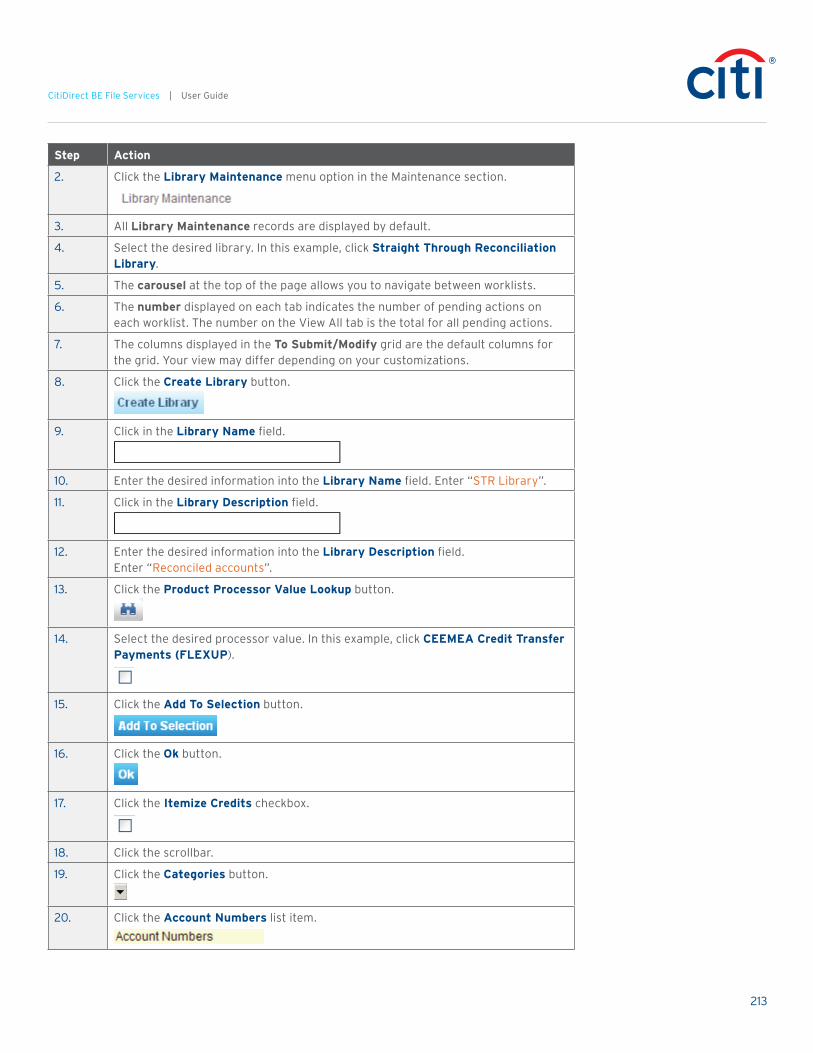
213
CitiDirect BE File Services | User Guide
Step Action
2. Click the Library Maintenance menu option in the Maintenance section.
3. All Library Maintenance records are displayed by default.
4. Select the desired library. In this example, click Straight Through Reconciliation Library.
5. The carousel at the top of the page allows you to navigate between worklists.
6. The number displayed on each tab indicates the number of pending actions on each worklist. The number on the View All tab is the total for all pending actions.
7. The columns displayed in the To Submit/Modify grid are the default columns for the grid. Your view may differ depending on your customizations.
8. Click the Create Library button.
9. Click in the Library Name field.
10. Enter the desired information into the Library Name field. Enter “STR Library”.
11. Click in the Library Description field.
12. Enter the desired information into the Library Description field. Enter “Reconciled accounts”.
13. Click the Product Processor Value Lookup button.
14. Select the desired processor value. In this example, click CEEMEA Credit Transfer Payments (FLEXUP).
15. Click the Add To Selection button.
16. Click the Ok button.
17. Click the Itemize Credits checkbox.
18. Click the scrollbar.
19. Click the Categories button.
20. Click the Account Numbers list item.

214
CitiDirect BE File Services | User Guide
Step Action
21. Click the Account/Branch Numbers Lookup button.
Step Action
22. Select the desired account. In this example, click INXXXX.
23. Click the Add to Selection button.
24. Click the Ok button.

215
CitiDirect BE File Services | User Guide
Step Action
25. Click the scrollbar.
26. Click in the Comments field.
27. Enter the desired information into the Comments field. Enter “STR Settings”.
28. The Print Row icon allows you to print the library record settings for the selected row.
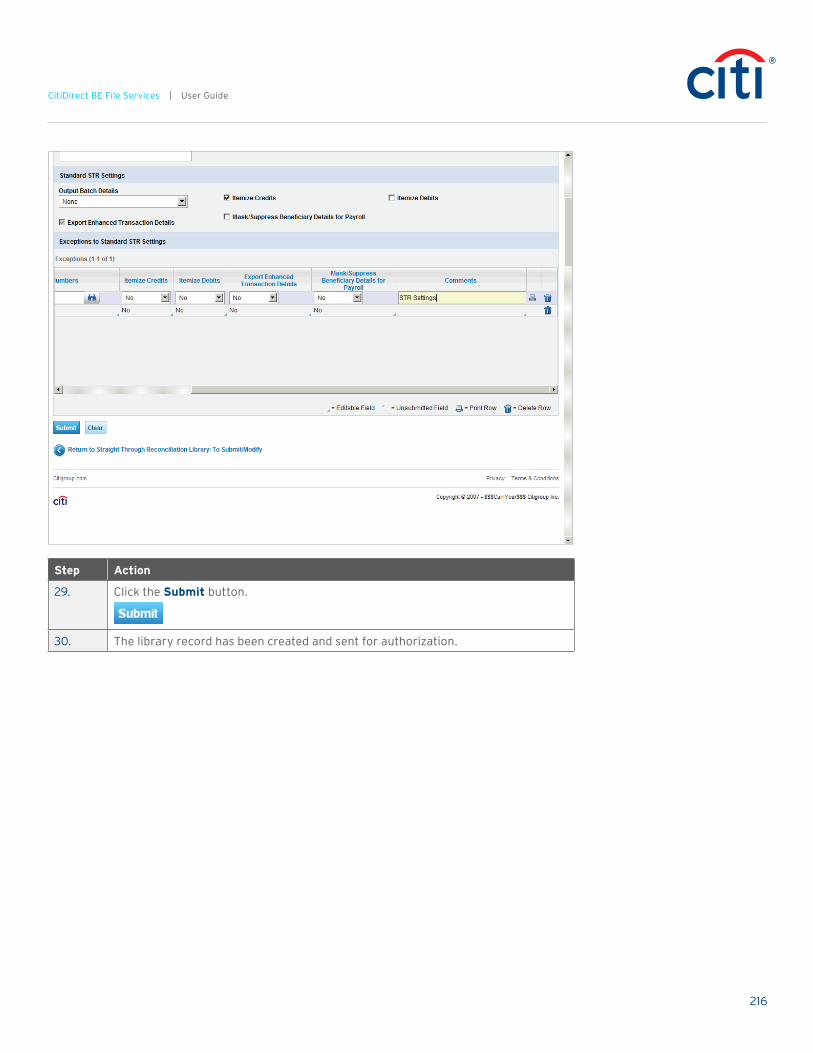
216
CitiDirect BE File Services | User Guide
Step Action
29. Click the Submit button.
30. The library record has been created and sent for authorization.
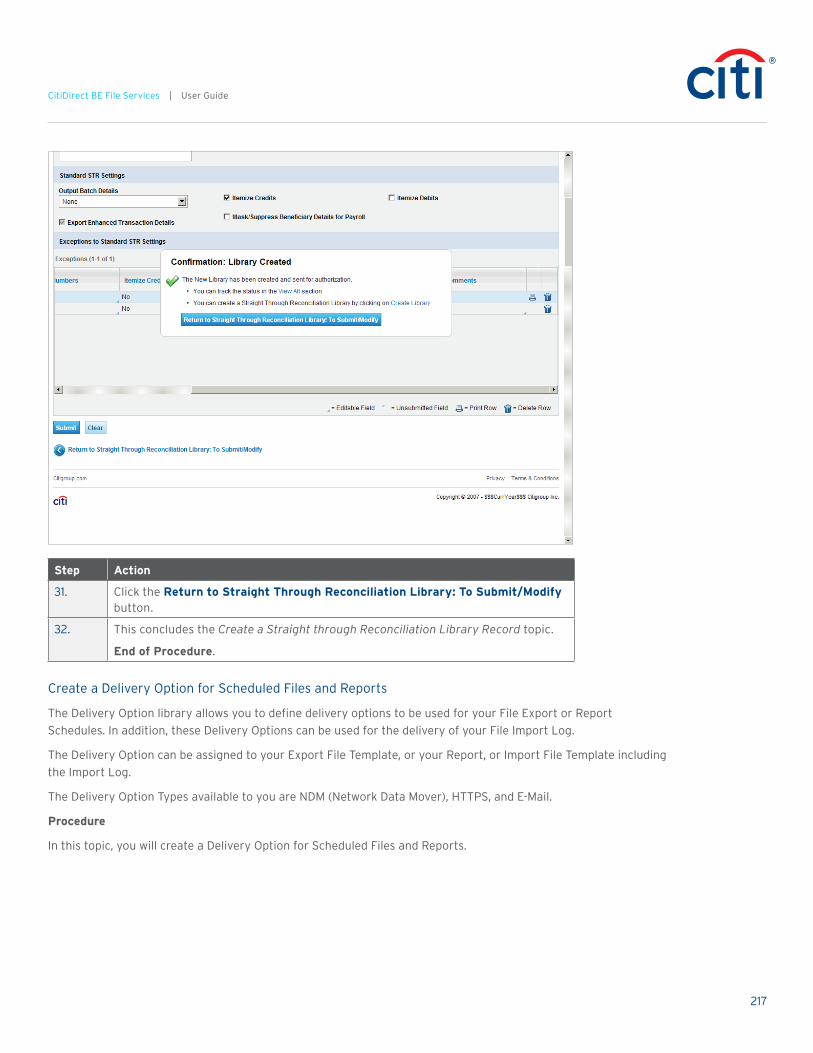
217
CitiDirect BE File Services | User Guide
Step Action
31. Click the Return to Straight Through Reconciliation Library: To Submit/Modify button.
32. This concludes the Create a Straight through Reconciliation Library Record topic.
End of Procedure.
Create a Delivery Option for Scheduled Files and Reports
The Delivery Option library allows you to define delivery options to be used for your File Export or Report Schedules. In addition, these Delivery Options can be used for the delivery of your File Import Log.
The Delivery Option can be assigned to your Export File Template, or your Report, or Import File Template including the Import Log.
The Delivery Option Types available to you are NDM (Network Data Mover), HTTPS, and E-Mail.
Procedure
In this topic, you will create a Delivery Option for Scheduled Files and Reports.
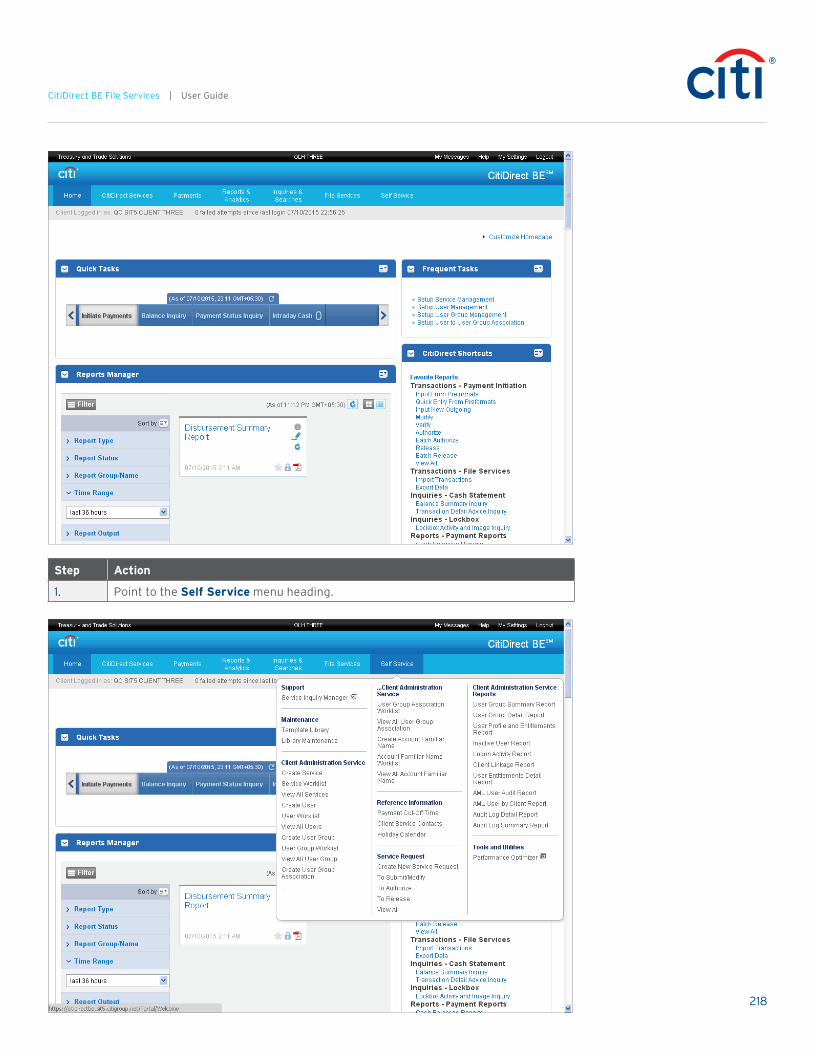
218
CitiDirect BE File Services | User Guide
Step Action
1. Point to the Self Service menu heading.
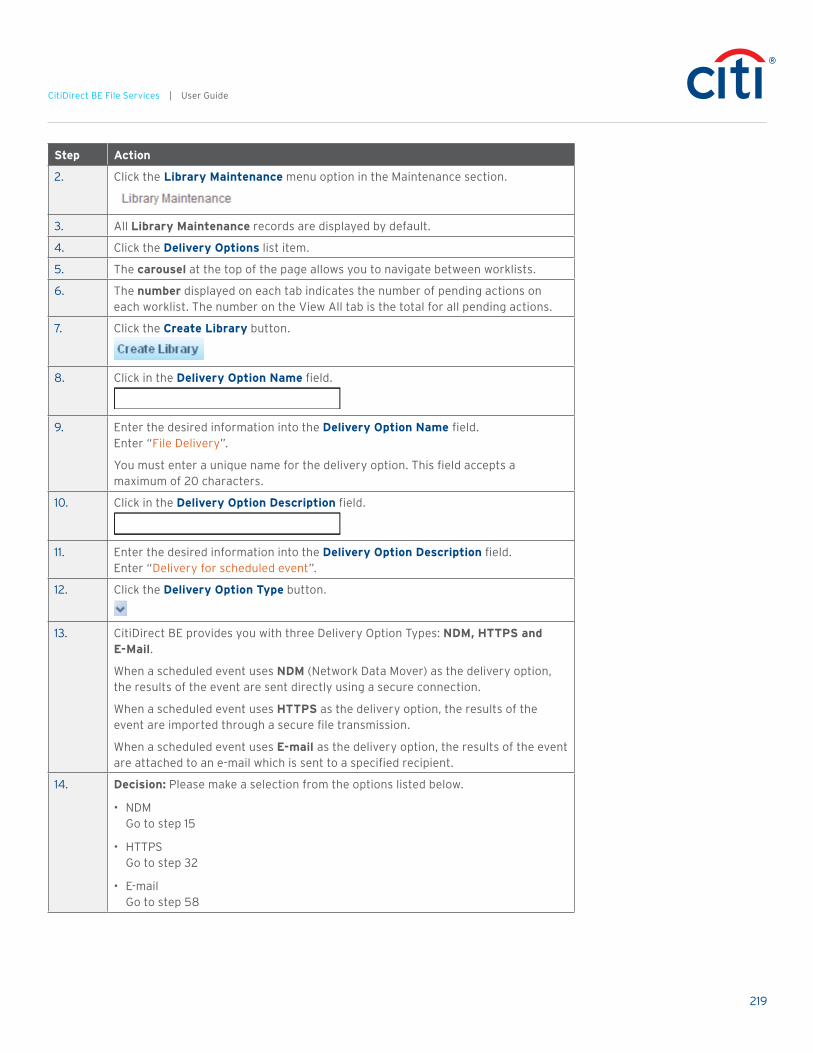
219
CitiDirect BE File Services | User Guide
Step Action
2. Click the Library Maintenance menu option in the Maintenance section.
3. All Library Maintenance records are displayed by default.
4. Click the Delivery Options list item.
5. The carousel at the top of the page allows you to navigate between worklists.
6. The number displayed on each tab indicates the number of pending actions on each worklist. The number on the View All tab is the total for all pending actions.
7. Click the Create Library button.
8. Click in the Delivery Option Name field.
9. Enter the desired information into the Delivery Option Name field. Enter “File Delivery”.
You must enter a unique name for the delivery option. This field accepts a maximum of 20 characters.
10. Click in the Delivery Option Description field.
11. Enter the desired information into the Delivery Option Description field. Enter “Delivery for scheduled event”.
12. Click the Delivery Option Type button.
13. CitiDirect BE provides you with three Delivery Option Types: NDM, HTTPS and E-Mail.
When a scheduled event uses NDM (Network Data Mover) as the delivery option, the results of the event are sent directly using a secure connection.
When a scheduled event uses HTTPS as the delivery option, the results of the event are imported through a secure file transmission.
When a scheduled event uses E-mail as the delivery option, the results of the event are attached to an e-mail which is sent to a specified recipient.
14. Decision: Please make a selection from the options listed below.
• NDM Go to step 15
• HTTPS Go to step 32
• E-mail Go to step 58
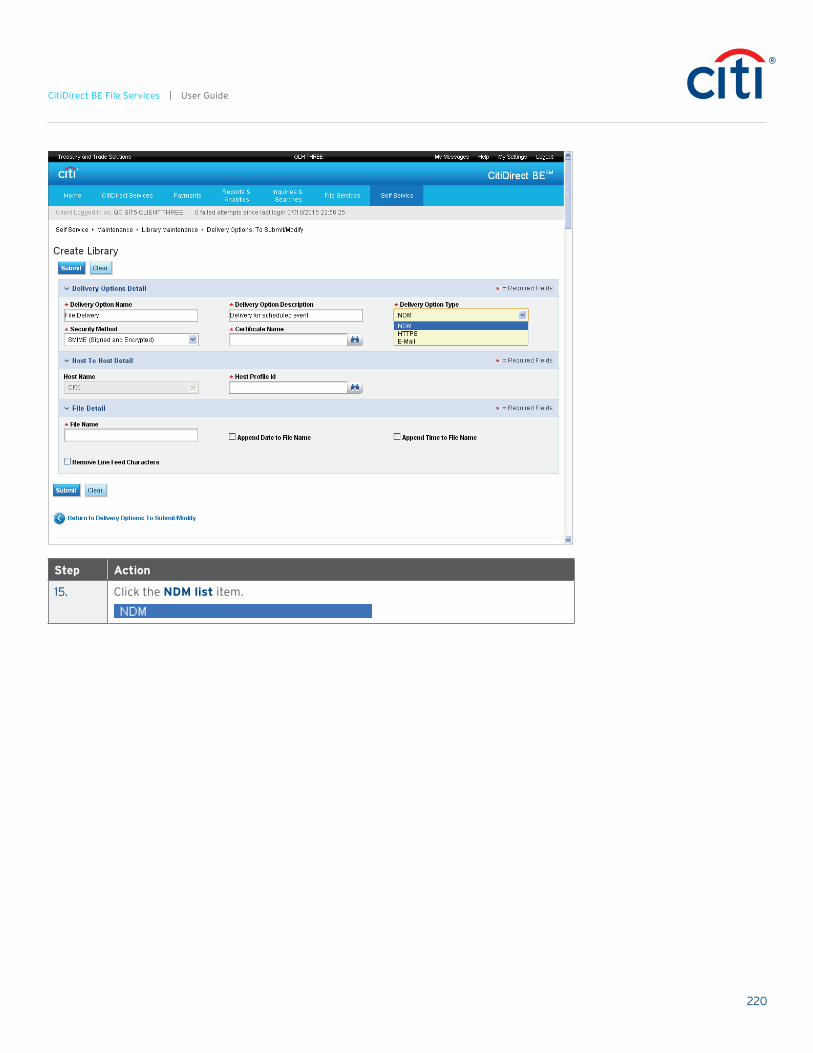
220
CitiDirect BE File Services | User Guide
Step Action
15. Click the NDM list item.

221
CitiDirect BE File Services | User Guide
Step Action
16. Click the Security Method button.
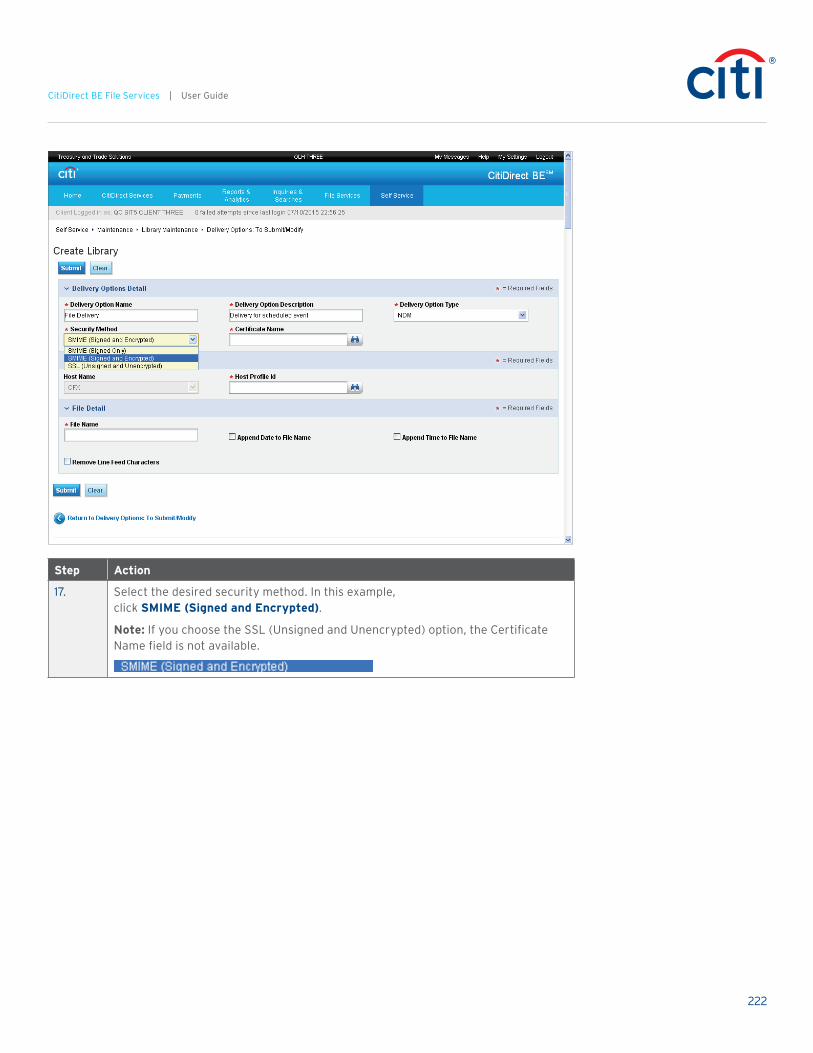
222
CitiDirect BE File Services | User Guide
Step Action
17. Select the desired security method. In this example, click SMIME (Signed and Encrypted).
Note: If you choose the SSL (Unsigned and Unencrypted) option, the Certificate Name field is not available.

223
CitiDirect BE File Services | User Guide
Step Action
18. Click the Certificate Name Lookup button.
19. Select the certificate you want to use to encrypt the data to be delivered. The certificate does not need to be a Citibank certificate.
20. Select the desired certificate. In this example, click SS Certificate CD5-4.
21. Click the Host Profile ID Lookup button.
22. Select the desired host profile. In this example, click 41067.

224
CitiDirect BE File Services | User Guide
Step Action
23. Click in the File Name field.
24. Enter the desired information into the File Name field. Enter “NDM_event”.
25. The Append Date to File Name checkbox, when selected, adds the date to the end of the file name in the YYYYMMDD format. This is not valid for file imports.
26. The Append Time to File Name checkbox, when selected, adds the time to the end of the file name in the HH:MM military format. This is not valid for file imports.
27. The Clear button clears all data on the page so you can start over.
28. Click the Submit button.
29. The library has been created and sent for authorization.
30. Click the Return to Delivery Options: To Submit/Modify button.
31. This concludes the Create a Delivery Option for Scheduled Files and Reports topic.
End of Procedure. Remaining steps apply to other paths.
Step Action
32. Click the HTTPS list item.

225
CitiDirect BE File Services | User Guide
Step Action
33. Click the Security Method button.
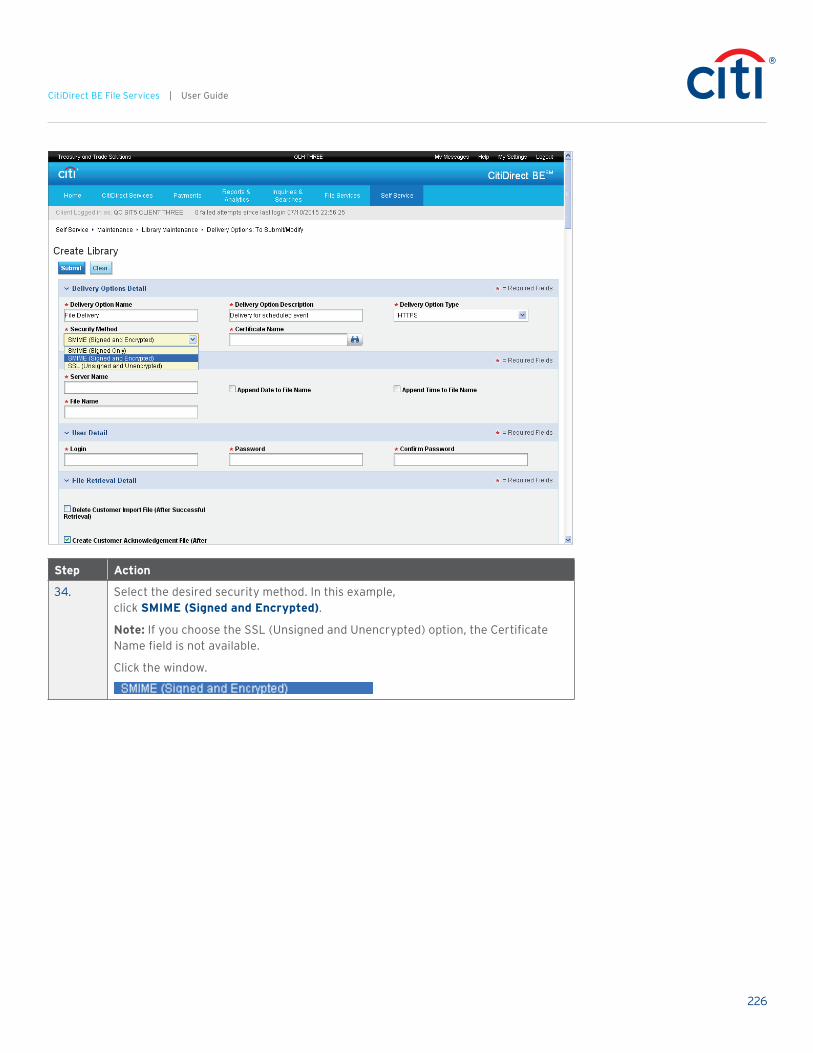
226
CitiDirect BE File Services | User Guide
Step Action
34. Select the desired security method. In this example, click SMIME (Signed and Encrypted).
Note: If you choose the SSL (Unsigned and Unencrypted) option, the Certificate Name field is not available.
Click the window.
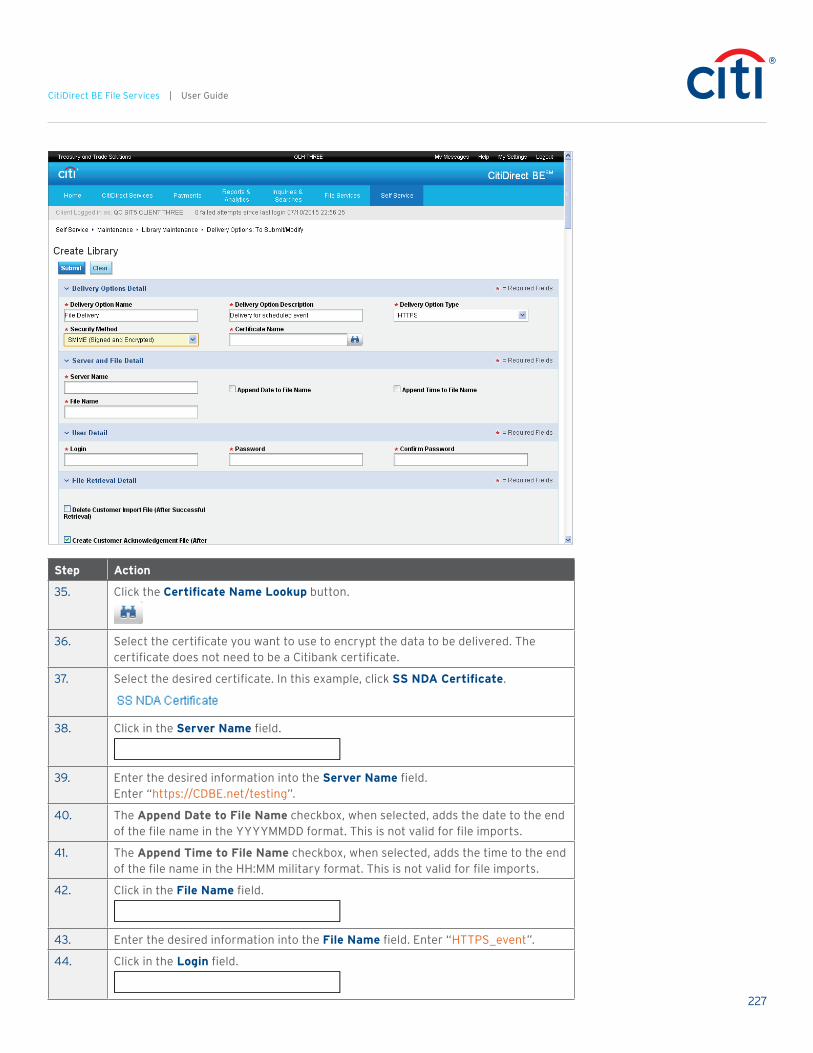
227
CitiDirect BE File Services | User Guide
Step Action
35. Click the Certificate Name Lookup button.
36. Select the certificate you want to use to encrypt the data to be delivered. The certificate does not need to be a Citibank certificate.
37. Select the desired certificate. In this example, click SS NDA Certificate.
38. Click in the Server Name field.
39. Enter the desired information into the Server Name field. Enter “https://CDBE.net/testing”.
40. The Append Date to File Name checkbox, when selected, adds the date to the end of the file name in the YYYYMMDD format. This is not valid for file imports.
41. The Append Time to File Name checkbox, when selected, adds the time to the end of the file name in the HH:MM military format. This is not valid for file imports.
42. Click in the File Name field.
43. Enter the desired information into the File Name field. Enter “HTTPS_event”.
44. Click in the Login field.
228
CitiDirect BE File Services | User Guide
Step Action
45. Enter the desired information into the Login field. Enter “Test User”.
46. Click in the Password field.
47. Enter the desired information into the Password field. Enter “12345”.
48. Click in the Confirm Password field.
49. Enter the desired information into the Confirm Password field. Enter “12345”.
50. Click the scrollbar.
51. The Delete Customer Import File (After Successful Retrieval) checkbox, when selected, deletes the import file once it has been successfully retrieved by CitiDirect BE from the Customer’s web server. This is valid for file imports only.
52. The Create Customer Acknowledgement File (After Successful Retrieval) checkbox, when selected, creates an acknowledgement each time a file is retrieved by CitiDirect BE. This file will not contain any data.
53. The Clear button clears all data on the page so you can start over.
54. Click the Submit button.
55. The library has been created and sent for authorization.
56. Click the Return to Delivery Options: To Submit/Modify button.
57. This concludes the Create a Delivery Option for Scheduled Files and Reports topic.
End of Procedure. Remaining steps apply to other paths.

229
CitiDirect BE File Services | User Guide
Step Action
58. Click the E-Mail list item.

230
CitiDirect BE File Services | User Guide
Step Action
59. Click the Security Method button.
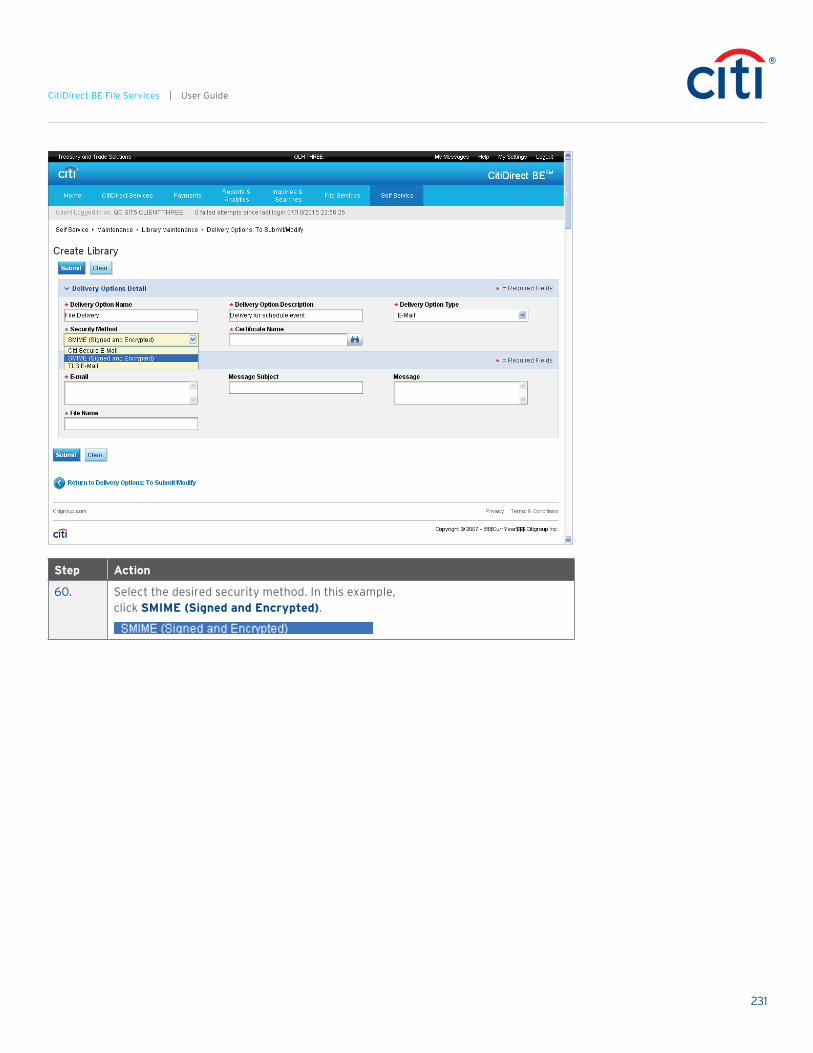
231
CitiDirect BE File Services | User Guide
Step Action
60. Select the desired security method. In this example, click SMIME (Signed and Encrypted).
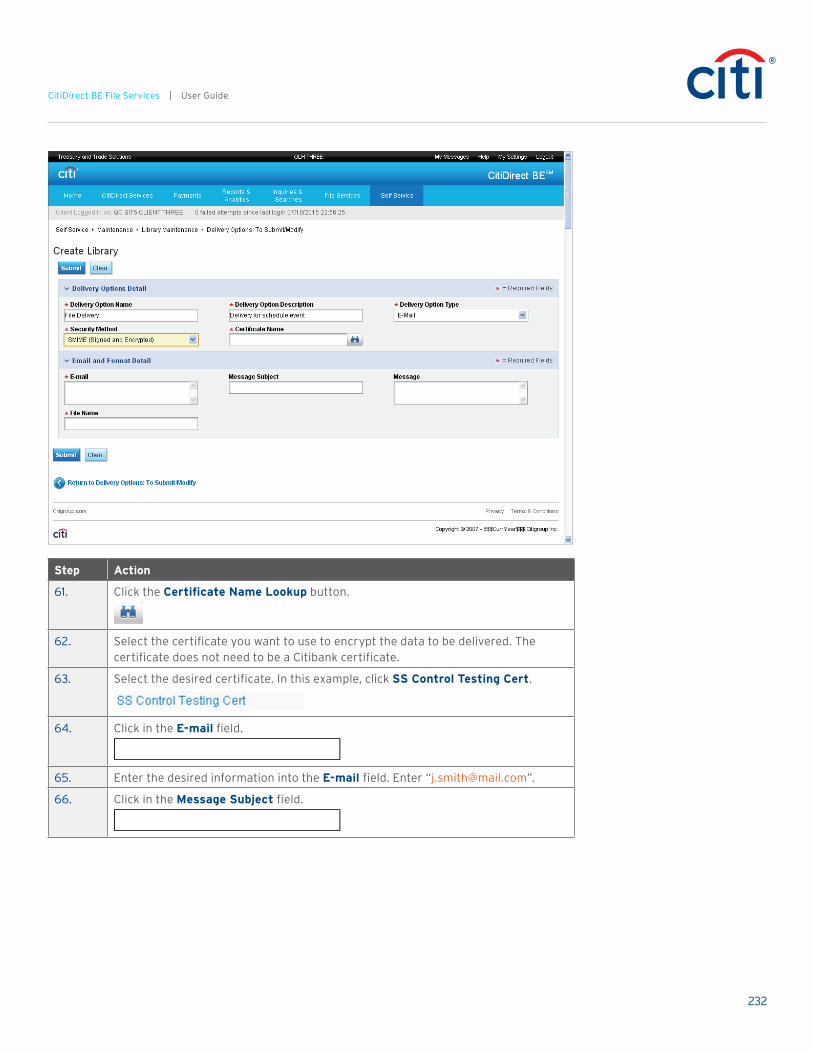
232
CitiDirect BE File Services | User Guide
Step Action
61. Click the Certificate Name Lookup button.
62. Select the certificate you want to use to encrypt the data to be delivered. The certificate does not need to be a Citibank certificate.
63. Select the desired certificate. In this example, click SS Control Testing Cert.
64. Click in the E-mail field.
65. Enter the desired information into the E-mail field. Enter “[email protected]”.
66. Click in the Message Subject field.
233
CitiDirect BE File Services | User Guide
Step Action
67. Enter the desired information into the Message Subject field. Enter “Scheduled files”.
68. You can enter message text if desired. The Message field accepts a maximum of 4,000 characters.
Note: Message text will not be encrypted.
69. Click in the File Name field.
70. Enter the desired information into the File Name field. Enter “File_export”.
71. The file name displays in the body of the e-mail. This is the name for the e-mail attachment that is sent to you via AFRD. The File Name field accepts a maximum of 30 characters.
Note: The original file name extension for the attachment will be retained.
72. The Clear button clears all data on the page so you can start over.
73. Click the Submit button.
74. The library has been created and sent for authorization.
75. Click the Return to Delivery Options: To Submit/Modify button.
76. This concludes the Create a Delivery Option for Scheduled Files and Reports topic.
End of Procedure.
Create a File Export Transaction Details Configuration Library Record
The File Export Transaction Details Configuration Library allows an entitled user to select and organize the desired transaction attributes that will appear on statements.
Procedure
In this topic, you will create a file export transaction details configuration library for the BAI Export.

234
CitiDirect BE File Services | User Guide
Step Action
1. Point to the Self Service menu heading.
235
CitiDirect BE File Services | User Guide
Step Action
2. Click the Library Maintenance menu option in the Maintenance section.
3. All Library Maintenance records are displayed by default.
4. Click the File Export Transaction Details Configuration Library list item.
5. The carousel at the top of the page allows you to navigate between worklists.
6. The number displayed on each tab indicates the number of pending actions on each worklist. The number on the View All tab is the total for all pending actions.
7. The columns displayed in the To Submit/Modify grid are the default columns for the grid. Your view may differ depending on your customizations.
8. Click the Create Library button.
9. Click in the Library Name field.
10. Enter the desired information into the Library Name field. Enter “Export Details Configuration”.
You must enter a unique name for the library. This field accepts a maximum of 20 characters.
11. Click in the Library Description field.
12. Enter the desired information into the Library Description field. Enter “Transaction details configuration”.
13. The Add Default Transaction Details checkbox, when selected, adds all the standard (default) codewords to the Transaction Details Record Configuration grid. The order of the codewords that appear in the grid is the same as the ‘Default Flow’ codewords order.
14. Click the Format Name button.

236
CitiDirect BE File Services | User Guide
Step Action
15. Select the desired format name. In this example, click BAI.
16. The remaining fields update based on the selected format.

237
CitiDirect BE File Services | User Guide
Step Action
17. Click the BAI Label Type button.

238
CitiDirect BE File Services | User Guide
Step Action
18. Select the desired label type. In this example, click No Label.
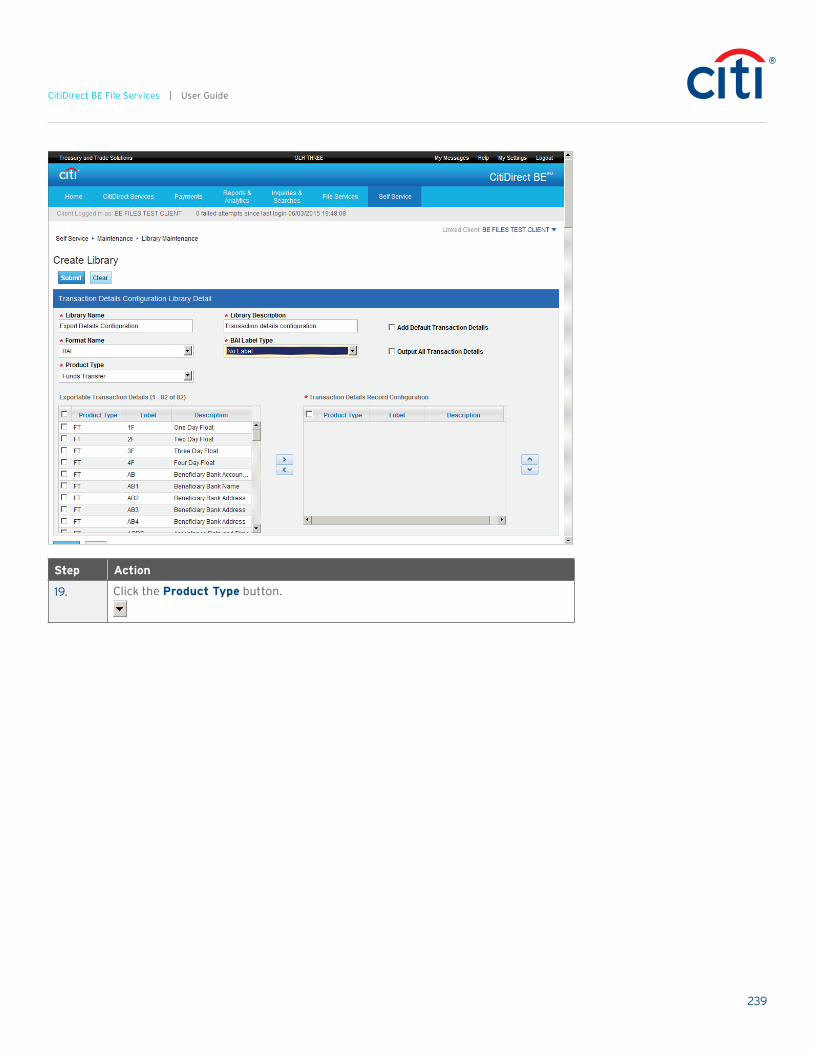
239
CitiDirect BE File Services | User Guide
Step Action
19. Click the Product Type button.

240
CitiDirect BE File Services | User Guide
Step Action
20. Select the desired product type. In this example, click Bills Information.
21. The Exportable Transaction Details grid displays a list of exportable labels available to populate the Transaction Details Record Configuration grid.
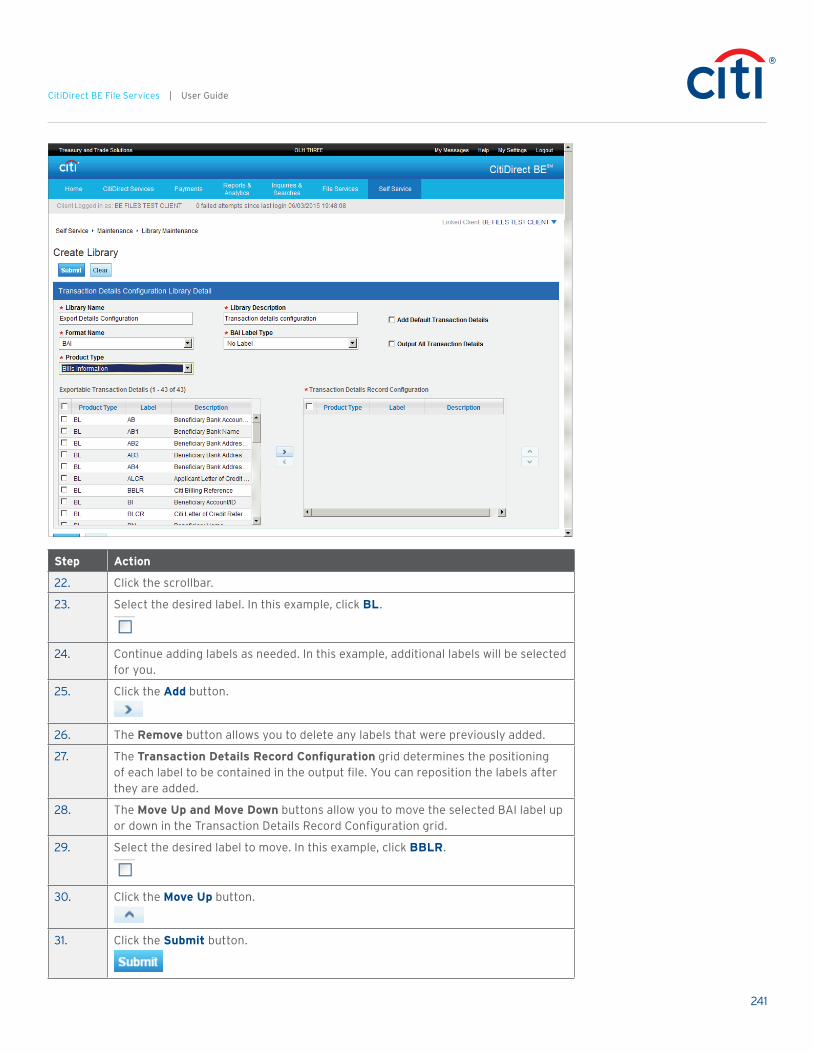
241
CitiDirect BE File Services | User Guide
Step Action
22. Click the scrollbar.
23. Select the desired label. In this example, click BL.
24. Continue adding labels as needed. In this example, additional labels will be selected for you.
25. Click the Add button.
26. The Remove button allows you to delete any labels that were previously added.
27. The Transaction Details Record Configuration grid determines the positioning of each label to be contained in the output file. You can reposition the labels after they are added.
28. The Move Up and Move Down buttons allow you to move the selected BAI label up or down in the Transaction Details Record Configuration grid.
29. Select the desired label to move. In this example, click BBLR.
30. Click the Move Up button.
31. Click the Submit button.
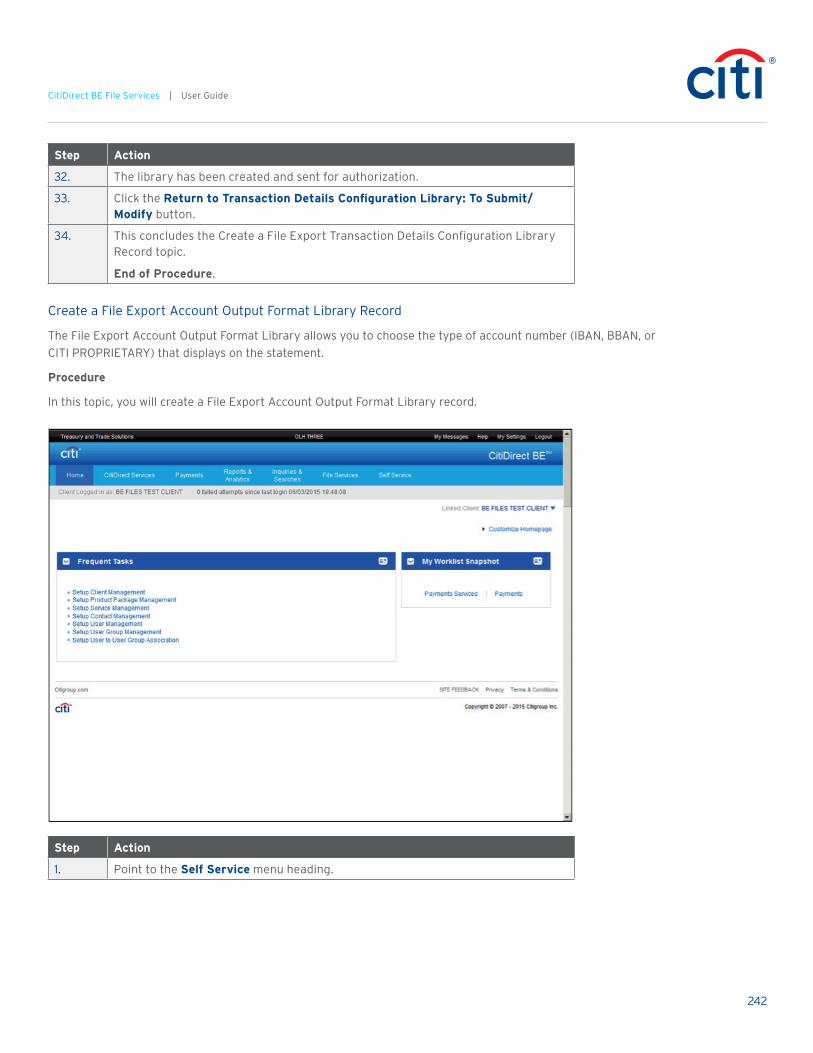
242
CitiDirect BE File Services | User Guide
Step Action
32. The library has been created and sent for authorization.
33. Click the Return to Transaction Details Configuration Library: To Submit/Modify button.
34. This concludes the Create a File Export Transaction Details Configuration Library Record topic.
End of Procedure.
Create a File Export Account Output Format Library Record
The File Export Account Output Format Library allows you to choose the type of account number (IBAN, BBAN, or CITI PROPRIETARY) that displays on the statement.
Procedure
In this topic, you will create a File Export Account Output Format Library record.
Step Action
1. Point to the Self Service menu heading.

243
CitiDirect BE File Services | User Guide
Step Action
2. Click the Library Maintenance menu option in the Maintenance section.
3. All Library Maintenance records are displayed by default.
4. Select the desired library. In this example, click File Export Account Output Format Library.
5. The carousel at the top of the page allows you to navigate between worklists.
6. The number displayed on each tab indicates the number of pending actions on each worklist. The number on the View All tab is the total for all pending actions.
7. The columns displayed in the To Submit/Modify grid are the default columns for the grid. Your view may differ depending on your customizations.
8. Click the Create Library button.
9. Click in the Library Name field.
10. Enter the desired information into the Library Name field. Enter “Account Exports”.
11. Press [Tab].
12. Enter the desired information into the Library Description field. Enter “Output for weekly file exports”.
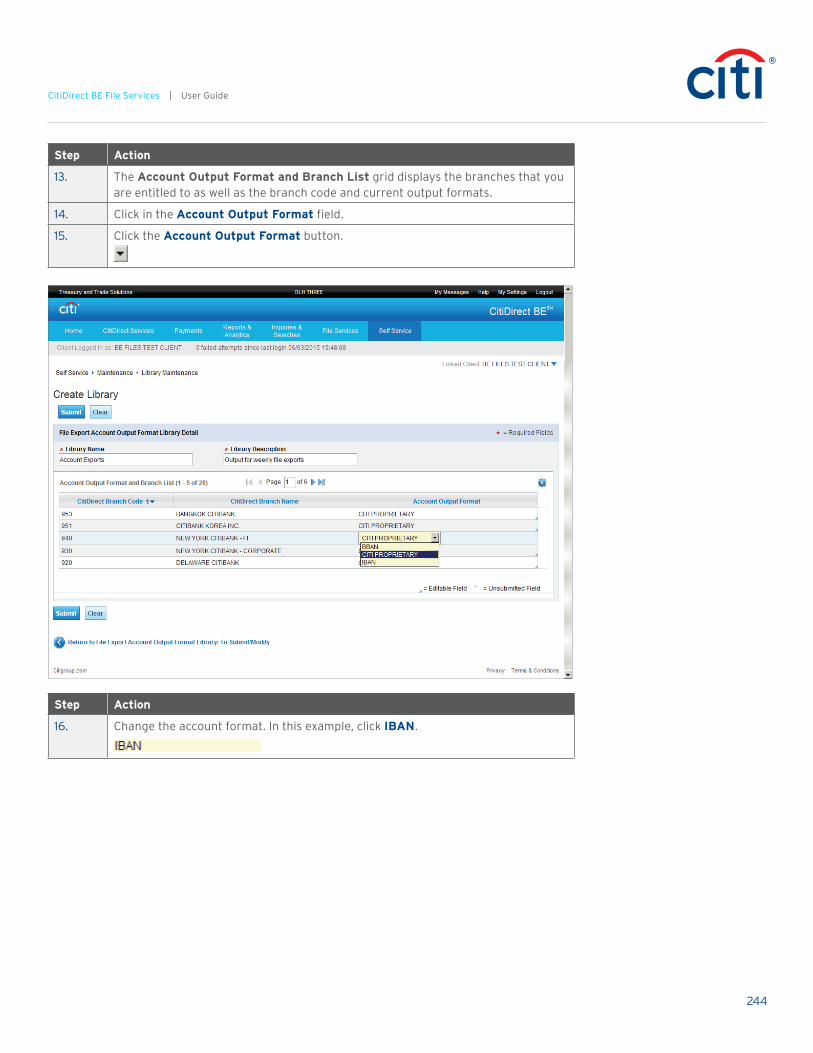
244
CitiDirect BE File Services | User Guide
Step Action
13. The Account Output Format and Branch List grid displays the branches that you are entitled to as well as the branch code and current output formats.
14. Click in the Account Output Format field.
15. Click the Account Output Format button.
Step Action
16. Change the account format. In this example, click IBAN.

245
CitiDirect BE File Services | User Guide
Step Action
17. Click the Submit button.
18. The library record has been created and sent for authorization.
19. Click the Return to File Export Account Output Format Library: To Submit/Modify button.
20. This concludes the Create a File Export Account Output Format Library Record topic.
End of Procedure.
Create a File Export BAI, ISO, SWIFT Code Library Record
The File Export BAI, ISO, SWIFT Code library derives ISO transaction codes. The output codes are based on the internal Citibank branch codes and transaction codes.
Procedure
In this topic, you will create a new record for the File Export BAI, ISO, SWIFT Code Library.
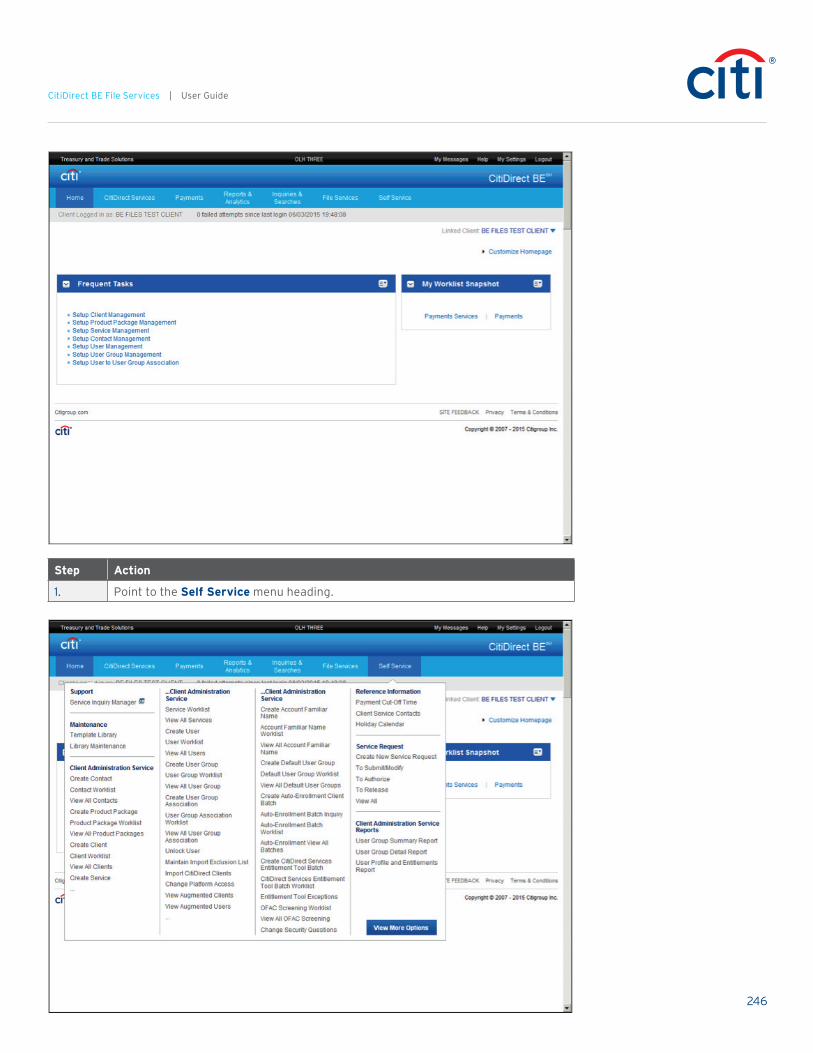
246
CitiDirect BE File Services | User Guide
Step Action
1. Point to the Self Service menu heading.
247
CitiDirect BE File Services | User Guide
Step Action
2. Click the Library Maintenance menu option in the Maintenance section.
3. All Library Maintenance records are displayed by default.
4. Select the desired library. In this example, click File Export BAI, ISO, and SWIFT Code Library.
5. The carousel at the top of the page allows you to navigate between worklists.
6. The number displayed on each tab indicates the number of pending actions on each worklist. The number on the View All tab is the total for all pending actions.
7. The columns displayed in the To Submit/Modify grid are the default columns for the grid. Your view may differ depending on your customizations.
8. Click the Create Library button.
9. Click the Branch Code Lookup button.
10. Select the desired branch code. In this example, click CITIBANK A.S..
11. The Branch Name auto-populates.
12. Click the CTC Code Lookup button.
13. Select the desired CTC code. In this example, click 100.
14. The Transaction Code Description auto-populates.
15. Click the SWIFT Transaction Type CR Lookup button.
16. Select the desired transaction type code. In this example, click CHK.
17. Click the SWIFT Transaction Type DR Lookup button.
18. Select the desired transaction type code. In this example, click CHK.
19. The Clear button clears all data on the page so you can start over.
20. Click the Submit button.
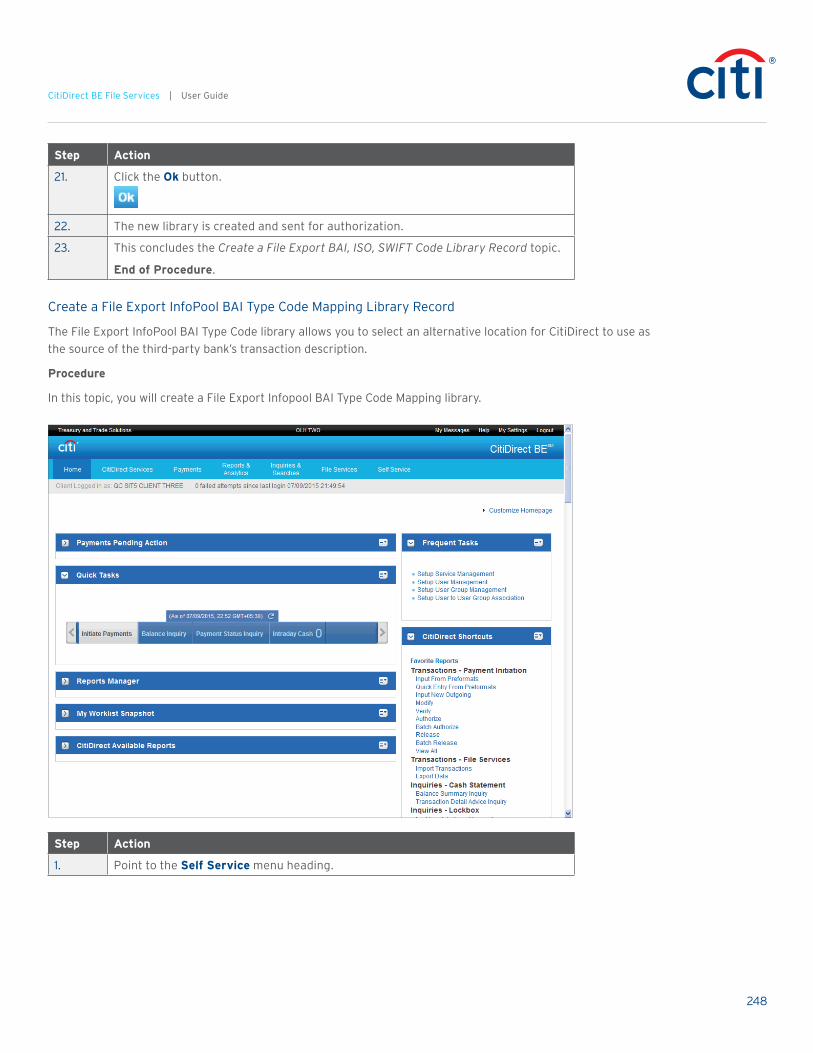
248
CitiDirect BE File Services | User Guide
Step Action
21. Click the Ok button.
22. The new library is created and sent for authorization.
23. This concludes the Create a File Export BAI, ISO, SWIFT Code Library Record topic.
End of Procedure.
Create a File Export InfoPool BAI Type Code Mapping Library Record
The File Export InfoPool BAI Type Code library allows you to select an alternative location for CitiDirect to use as the source of the third-party bank’s transaction description.
Procedure
In this topic, you will create a File Export Infopool BAI Type Code Mapping library.
Step Action
1. Point to the Self Service menu heading.

249
CitiDirect BE File Services | User Guide
Step Action
2. Click the Library Maintenance menu option in the Maintenance section.
3. All Library Maintenance records are displayed by default.
4. Click the File Export Infopool BAI Type Code Mapping Library list item.
5. The carousel at the top of the page allows you to navigate between worklists.
6. The number displayed on each tab indicates the number of pending actions on each worklist. The number on the View All tab is the total for all pending actions.
7. Click the Create Library button.
8. Click the Bank Routing ID Lookup button.
9. Select the desired bank name. In this example, click CITIGROUP GLOBAL MARKETS....
10. Click the MT940 Subfield Location button.
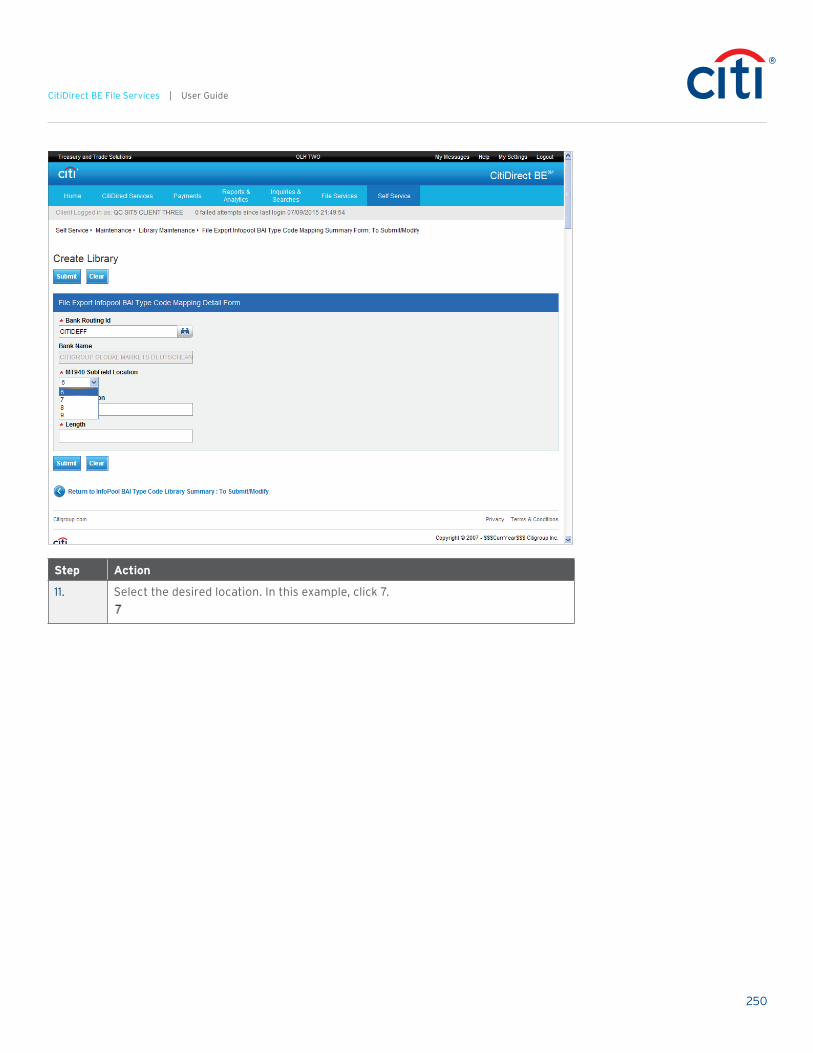
250
CitiDirect BE File Services | User Guide
Step Action
11. Select the desired location. In this example, click 7.
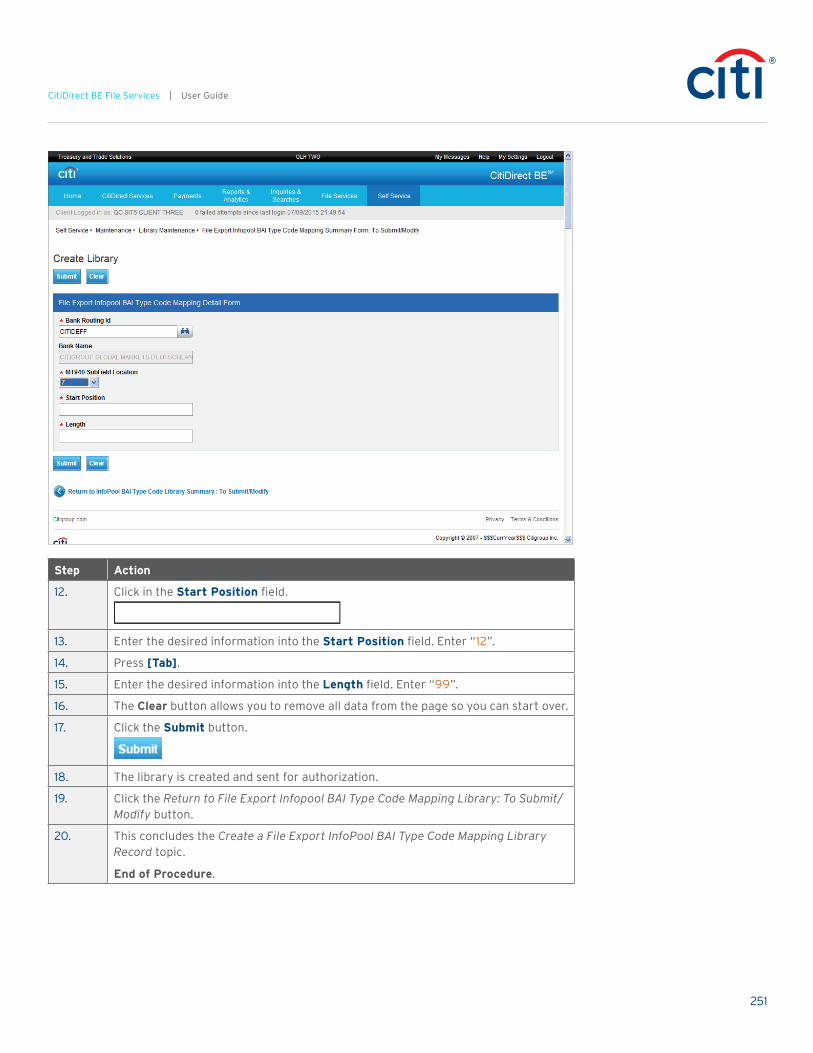
251
CitiDirect BE File Services | User Guide
Step Action
12. Click in the Start Position field.
13. Enter the desired information into the Start Position field. Enter “12”.
14. Press [Tab].
15. Enter the desired information into the Length field. Enter “99”.
16. The Clear button allows you to remove all data from the page so you can start over.
17. Click the Submit button.
18. The library is created and sent for authorization.
19. Click the Return to File Export Infopool BAI Type Code Mapping Library: To Submit/Modify button.
20. This concludes the Create a File Export InfoPool BAI Type Code Mapping Library Record topic.
End of Procedure.
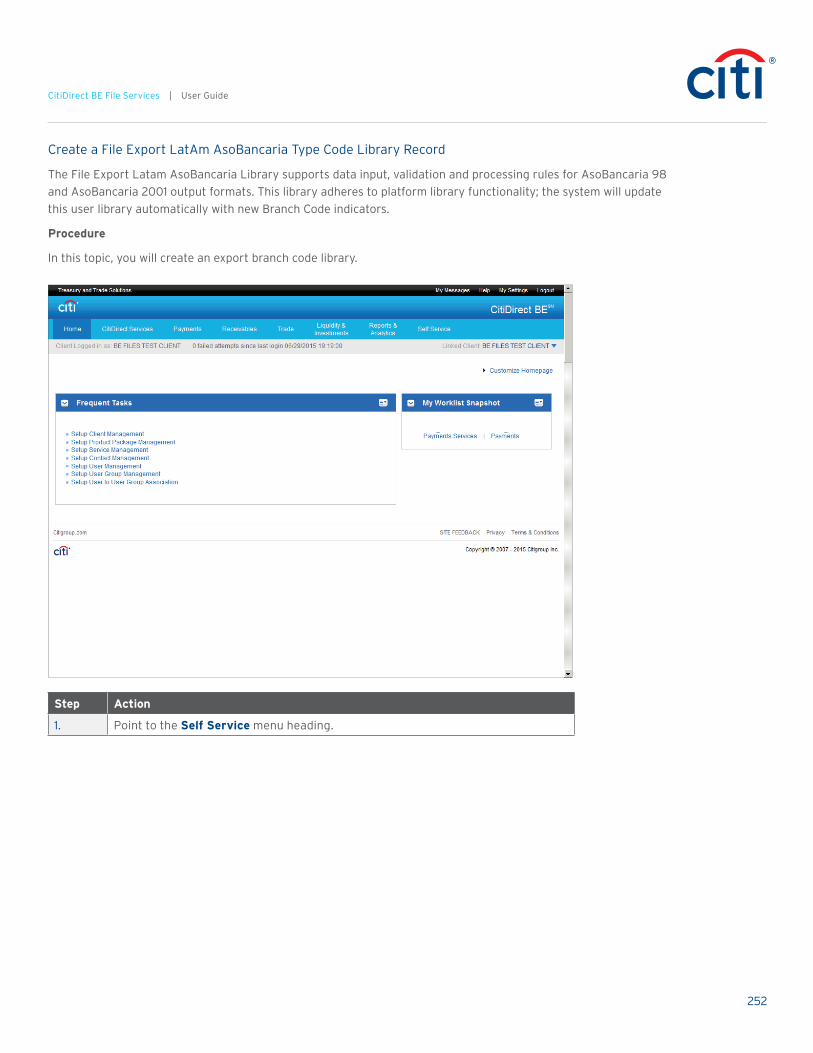
252
CitiDirect BE File Services | User Guide
Create a File Export LatAm AsoBancaria Type Code Library Record
The File Export Latam AsoBancaria Library supports data input, validation and processing rules for AsoBancaria 98 and AsoBancaria 2001 output formats. This library adheres to platform library functionality; the system will update this user library automatically with new Branch Code indicators.
Procedure
In this topic, you will create an export branch code library.
Step Action
1. Point to the Self Service menu heading.
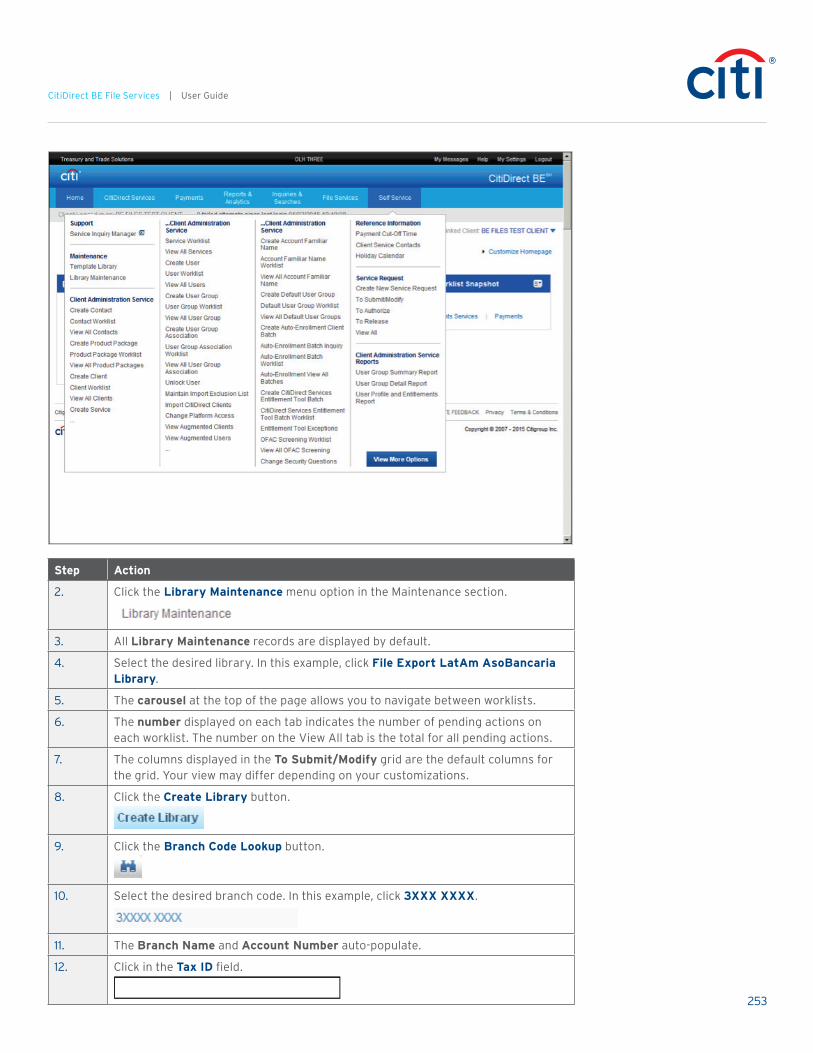
253
CitiDirect BE File Services | User Guide
Step Action
2. Click the Library Maintenance menu option in the Maintenance section.
3. All Library Maintenance records are displayed by default.
4. Select the desired library. In this example, click File Export LatAm AsoBancaria Library.
5. The carousel at the top of the page allows you to navigate between worklists.
6. The number displayed on each tab indicates the number of pending actions on each worklist. The number on the View All tab is the total for all pending actions.
7. The columns displayed in the To Submit/Modify grid are the default columns for the grid. Your view may differ depending on your customizations.
8. Click the Create Library button.
9. Click the Branch Code Lookup button.
10. Select the desired branch code. In this example, click 3XXX XXXX.
11. The Branch Name and Account Number auto-populate.
12. Click in the Tax ID field.

254
CitiDirect BE File Services | User Guide
Step Action
13. Enter the desired information into the Tax ID field. Enter “13425678”.
14. Press [Tab].
15. Enter the desired information into the EAN field. Enter “90876854”.
16. Click the Submit button.
17. The library is created and sent for authorization.
18. This concludes the Create a File Export LatAm AsoBancaria Type Code Library Record topic.
End of Procedure.
Create a File Import Map Definition Rule Set Library Record
The File Import Map Definition Rule Set Library is used to set rules for conversion values. This library can be linked to Target Definition fields (to convert data/code values during import map creation) available under Import Map Management service class.
Procedure
In this topic, you will create a file import map definition rule set library record.
Step Action
1. Point to the Self Service menu heading.
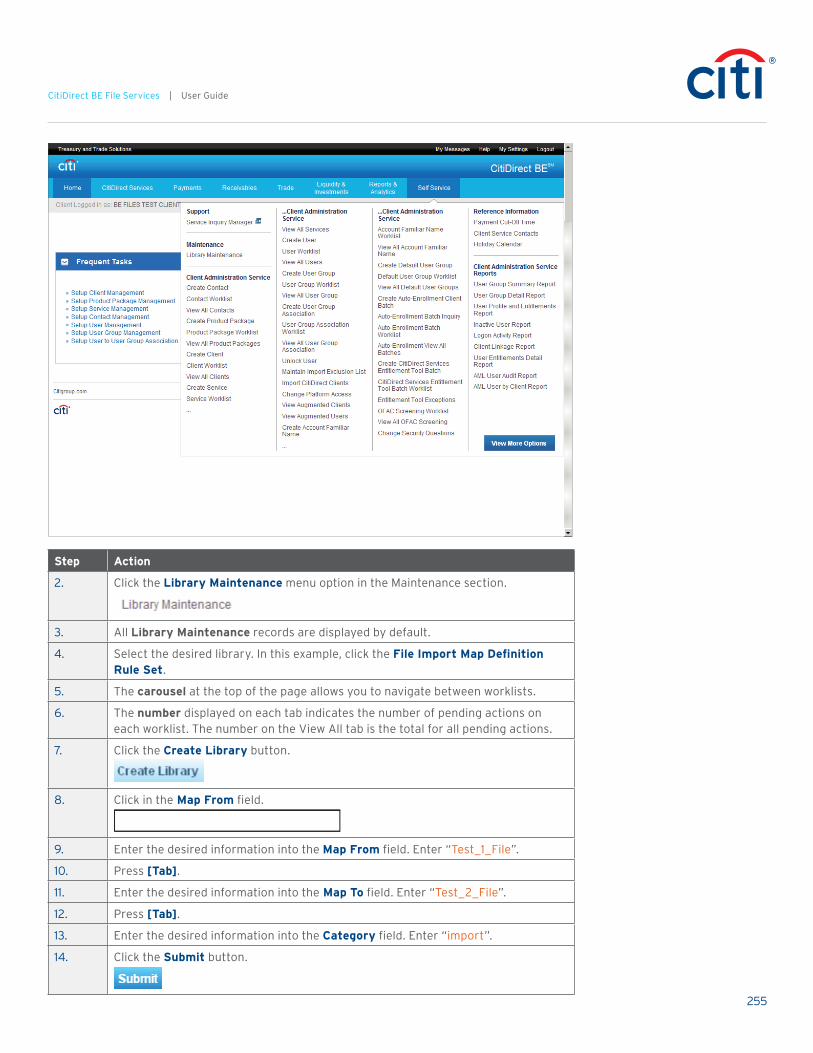
255
CitiDirect BE File Services | User Guide
Step Action
2. Click the Library Maintenance menu option in the Maintenance section.
3. All Library Maintenance records are displayed by default.
4. Select the desired library. In this example, click the File Import Map Definition Rule Set.
5. The carousel at the top of the page allows you to navigate between worklists.
6. The number displayed on each tab indicates the number of pending actions on each worklist. The number on the View All tab is the total for all pending actions.
7. Click the Create Library button.
8. Click in the Map From field.
9. Enter the desired information into the Map From field. Enter “Test_1_File”.
10. Press [Tab].
11. Enter the desired information into the Map To field. Enter “Test_2_File”.
12. Press [Tab].
13. Enter the desired information into the Category field. Enter “import”.
14. Click the Submit button.
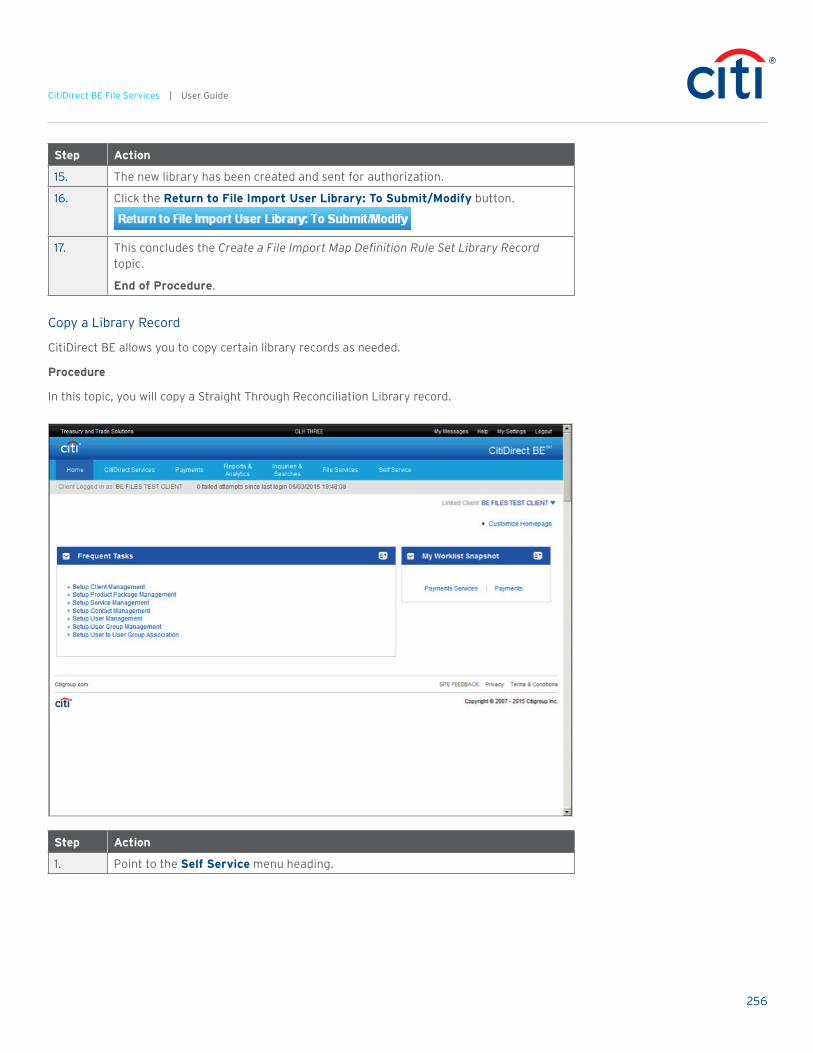
256
CitiDirect BE File Services | User Guide
Step Action
15. The new library has been created and sent for authorization.
16. Click the Return to File Import User Library: To Submit/Modify button.
17. This concludes the Create a File Import Map Definition Rule Set Library Record topic.
End of Procedure.
Copy a Library Record
CitiDirect BE allows you to copy certain library records as needed.
Procedure
In this topic, you will copy a Straight Through Reconciliation Library record.
Step Action
1. Point to the Self Service menu heading.

257
CitiDirect BE File Services | User Guide
Step Action
2. Click the Library Maintenance menu option in the Maintenance section.
3. All Library Maintenance records are displayed by default.
4. Click the Straight Through Reconciliation Library link.
5. The carousel at the top of the page allows you to navigate between worklists.
6. The number displayed on each tab indicates the number of pending actions on each worklist. The number on the View All tab is the total for all pending actions.
7. The columns displayed in the To Submit/Modify grid are the default columns for the grid. Your view may differ depending on your customizations.
8. Select the desired library. In this example, click 1706 create.
9. Click the Copy button.
10. Make the necessary modifications to the library record. In this example, the following fields will be updated for you: Library Name and Library Description.
11. Click the Submit button.
12. The library record has been created and sent for authorization.
13. This concludes the Copy a Library Record topic.
End of Procedure.
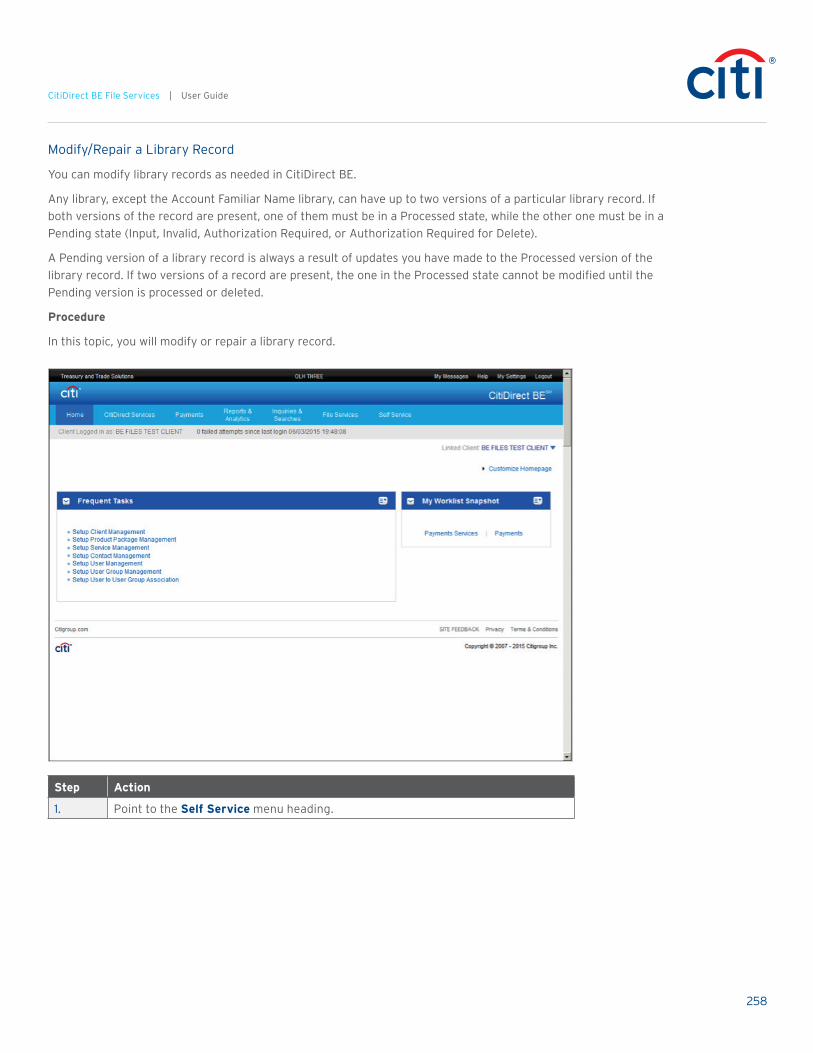
258
CitiDirect BE File Services | User Guide
Modify/Repair a Library Record
You can modify library records as needed in CitiDirect BE.
Any library, except the Account Familiar Name library, can have up to two versions of a particular library record. If both versions of the record are present, one of them must be in a Processed state, while the other one must be in a Pending state (Input, Invalid, Authorization Required, or Authorization Required for Delete).
A Pending version of a library record is always a result of updates you have made to the Processed version of the library record. If two versions of a record are present, the one in the Processed state cannot be modified until the Pending version is processed or deleted.
Procedure
In this topic, you will modify or repair a library record.
Step Action
1. Point to the Self Service menu heading.

259
CitiDirect BE File Services | User Guide
Step Action
2. Click the Library Maintenance menu option in the Maintenance section.
3. All Library Maintenance records are displayed by default.
4. Select the desired library. In this example, click Straight Through Reconciliation Library.
5. The carousel at the top of the page allows you to navigate between worklists.
6. The number displayed on each tab indicates the number of pending actions on each worklist. The number on the View All tab is the total for all pending actions.
7. The columns displayed in the To Submit/Modify grid are the default columns for the grid. Your view may differ depending on your customizations.
8. Select the desired record you want to modify. In this example, click TESTJUN12_SIT5.
9. Click the View Details button.
10. Make the necessary modifications. In this example, you will update the output format.
11. Click the Output Batch Details button.

260
CitiDirect BE File Services | User Guide
Step Action
12. Select the desired output batch details. In this example, click Multiple Batch Reference — ISO XML Only.
13. Click the Submit button.
14. The library record moves to the next stage in the process per your flow control requirements.
15. This concludes the Modify/Repair a Library Record topic.
End of Procedure.
Authorize, Send to Repair, or Reject a Library Record
When library records are ready for authorization, they are listed on the To Authorize tab, where they can be selected and authorized by an entitled user. During the authorization process, library records can be authorized, sent for repair, or deleted.
Your access profile determines whether or not you are entitled to authorize library records. If you created the library record, you cannot authorize it.
Procedure
In this topic, you will authorize, send to repair, or reject a library record.

261
CitiDirect BE File Services | User Guide
Step Action
1. Point to the Self Service menu heading.
Step Action
2. Click the Library Maintenance menu option in the Maintenance section.
3. Select the desired library. In this example, click Delivery Options.
4. The carousel at the top of the page allows you to navigate between worklists.
5. The number displayed on each tab indicates the number of pending actions on each worklist. The number on the View All tab is the total for all pending actions.
6. The columns displayed in the To Submit/Modify grid are the default columns for the grid. Your view may differ depending on your customizations.
7. Click the To Authorize tab.
8. The search filter can be applied to narrow listings in the grid.
9. Select the desired library record. In this example, click 8946-1sit1.

262
CitiDirect BE File Services | User Guide
Step Action
10. Process the library record using one of the following options:
Authorize — the library record is accurate and can be authorized.
Send to Repair — the library record contains an error and must be corrected before it can be authorized.
Reject — the library record contains an error and must be rejected.
11. Decision: Please make a selection from the options listed below.
• Authorize Go to step 12
• Send to Repair Go to step 15
• Reject Go to step 21
12. Click the Authorize button.
13. After a library record is authorized, it is removed from the list. The status of the library entry is changed to Processed.
14. This concludes the Authorize, Send to Repair, or Reject a Library Record topic.
End of Procedure. Remaining steps apply to other paths.

263
CitiDirect BE File Services | User Guide
Step Action
15. Click the Send to Repair button.
16. Enter the desired information into the Reason field. Enter “Change security method”.
17. Click the Ok button to confirm Send to Repair action.
Step Action
18. Click the Ok button.
19. The library entry will be returned to the Input queue with a status of To Repair.
20. This concludes the Authorize, Send to Repair, or Reject a Library Record topic.
End of Procedure. Remaining steps apply to other paths.
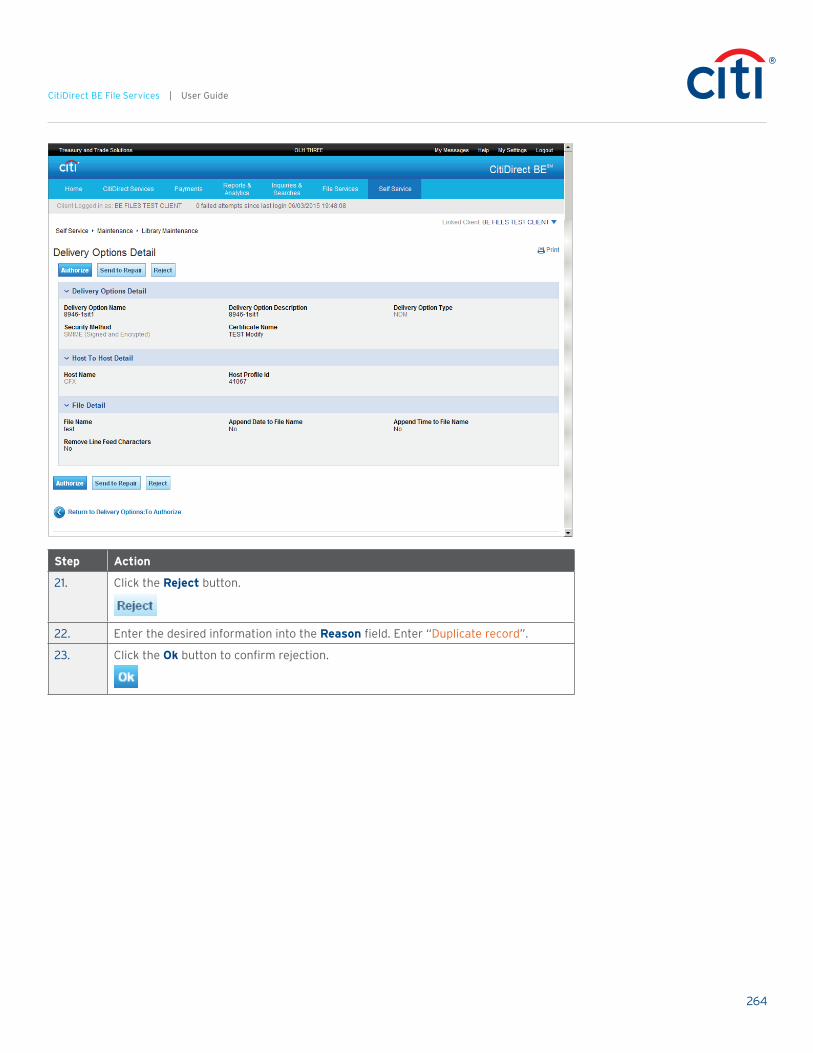
264
CitiDirect BE File Services | User Guide
Step Action
21. Click the Reject button.
22. Enter the desired information into the Reason field. Enter “Duplicate record”.
23. Click the Ok button to confirm rejection.

265
CitiDirect BE File Services | User Guide
Step Action
24. Click the Ok button.
25. If the record is a new entry, rejecting it immediately deletes the entry.
If the record has a status of Processed, rejecting the entry will return the entry to the Input tab.
26. This concludes the Authorize, Send to Repair, or Reject a Library Record topic.
End of Procedure.
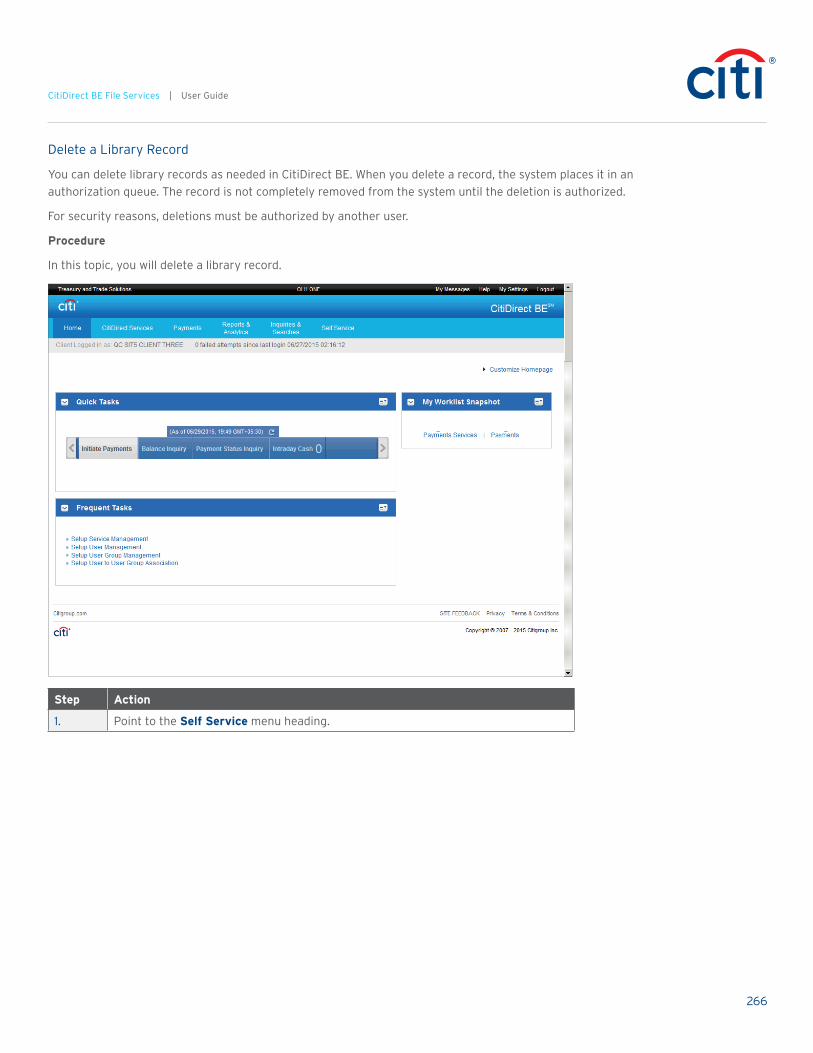
266
CitiDirect BE File Services | User Guide
Delete a Library Record
You can delete library records as needed in CitiDirect BE. When you delete a record, the system places it in an authorization queue. The record is not completely removed from the system until the deletion is authorized.
For security reasons, deletions must be authorized by another user.
Procedure
In this topic, you will delete a library record.
Step Action
1. Point to the Self Service menu heading.

267
CitiDirect BE File Services | User Guide
Step Action
2. Click the Library Maintenance menu option in the Maintenance section.
3. All Library Maintenance records are displayed by default.
4. Select the desired library to delete. In this example, click Delivery Options.
5. The carousel at the top of the page allows you to navigate between worklists.
6. The number displayed on each tab indicates the number of pending actions on each worklist. The number on the View All tab is the total for all pending actions.
7. The columns displayed in the To Submit/Modify grid are the default columns for the grid. Your view may differ depending on your customizations.
8. The search filter can be applied to narrow listings in the grid.
9. Select the desired library. In this example, click test.
10. Click the Delete button.
11. Enter the desired information into the Reason field. Enter “Record entered by mistake”.
12. Click the Ok button to confirm delete action.
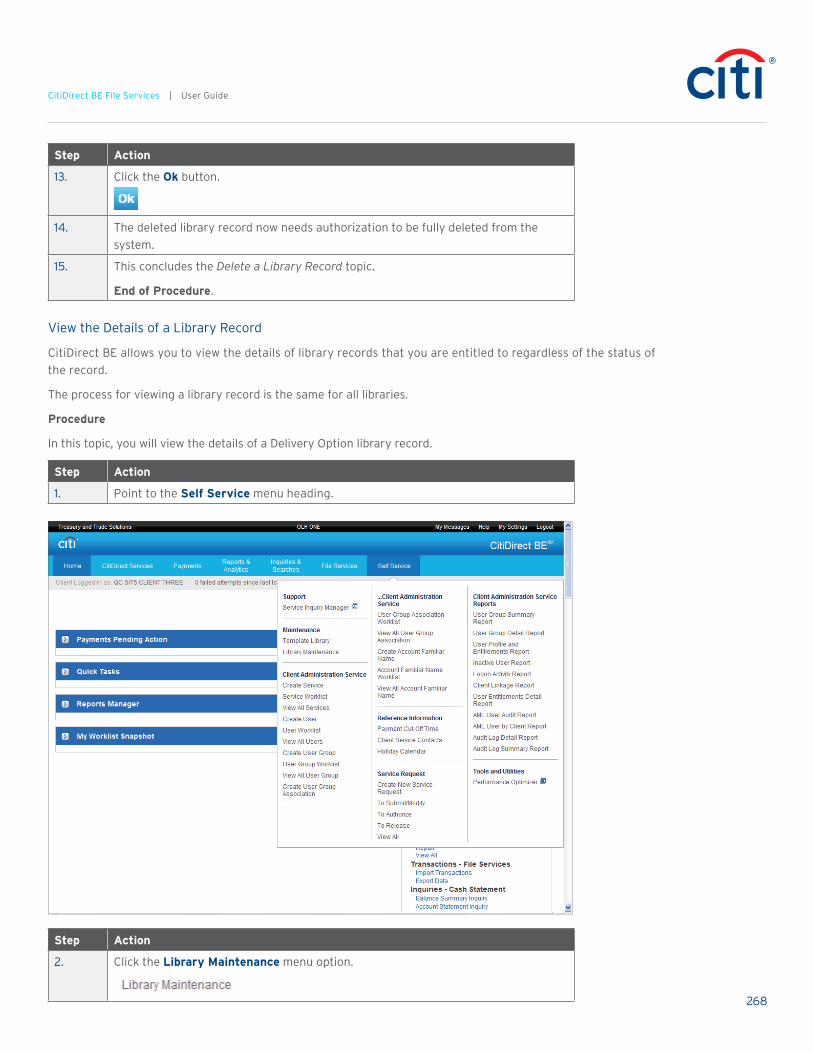
268
CitiDirect BE File Services | User Guide
Step Action
13. Click the Ok button.
14. The deleted library record now needs authorization to be fully deleted from the system.
15. This concludes the Delete a Library Record topic.
End of Procedure.
View the Details of a Library Record
CitiDirect BE allows you to view the details of library records that you are entitled to regardless of the status of the record.
The process for viewing a library record is the same for all libraries.
Procedure
In this topic, you will view the details of a Delivery Option library record.
Step Action
1. Point to the Self Service menu heading.
Step Action
2. Click the Library Maintenance menu option.
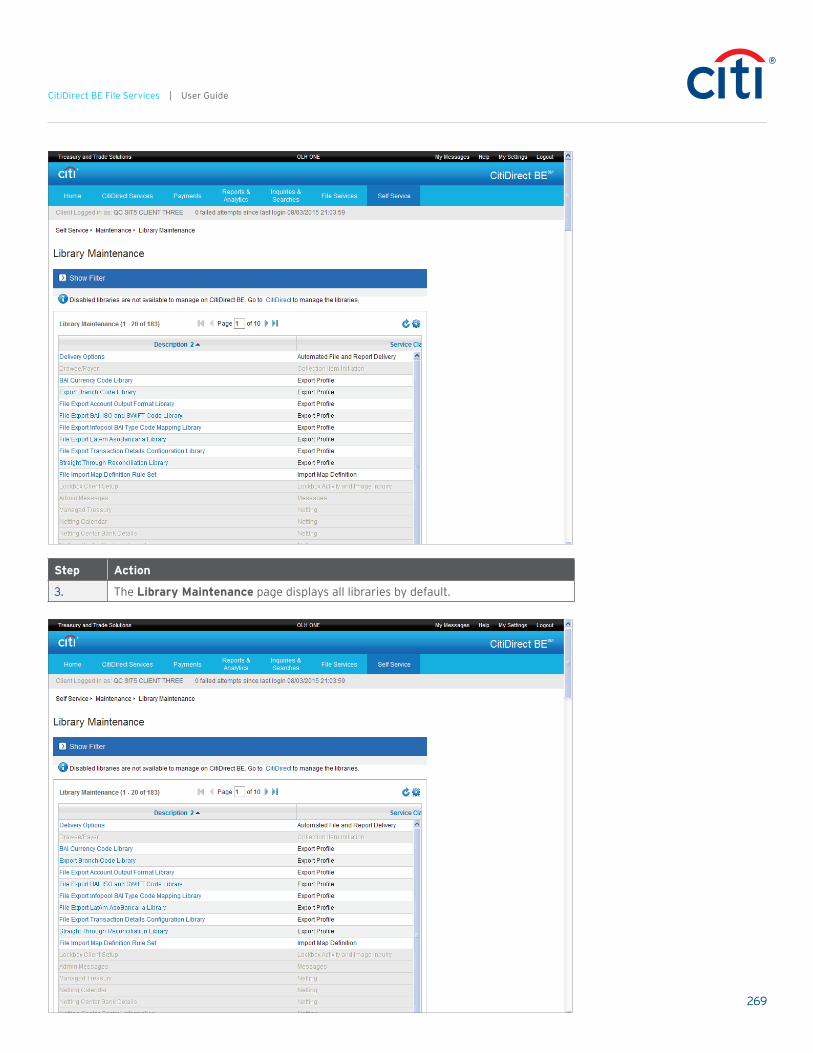
269
CitiDirect BE File Services | User Guide
Step Action
3. The Library Maintenance page displays all libraries by default.

270
CitiDirect BE File Services | User Guide
Step Action
4. Select the desired library. In this example, click the Delivery Options link.
Step Action
5. The carousel at the top of the page allows you to navigate between worklists.

271
CitiDirect BE File Services | User Guide
Step Action
6. The number displayed on each tab indicates the number of pending actions on each worklist. The number on the View All tab is the total for all pending actions.
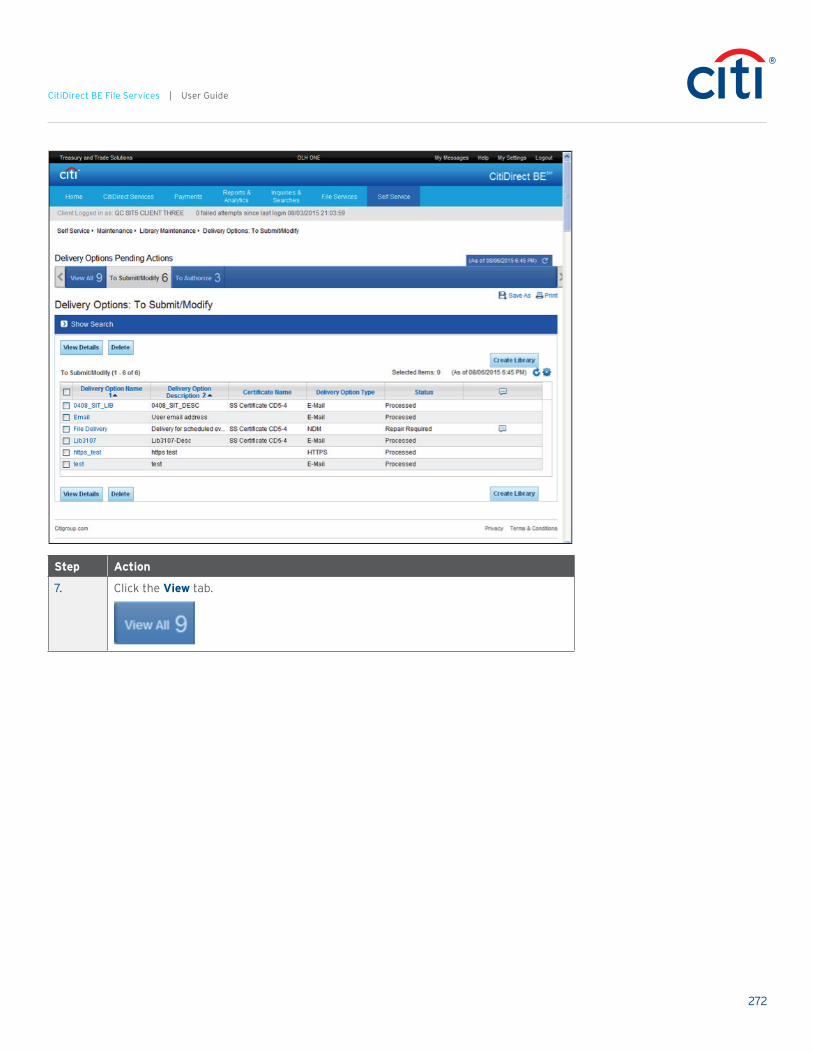
272
CitiDirect BE File Services | User Guide
Step Action
7. Click the View tab.
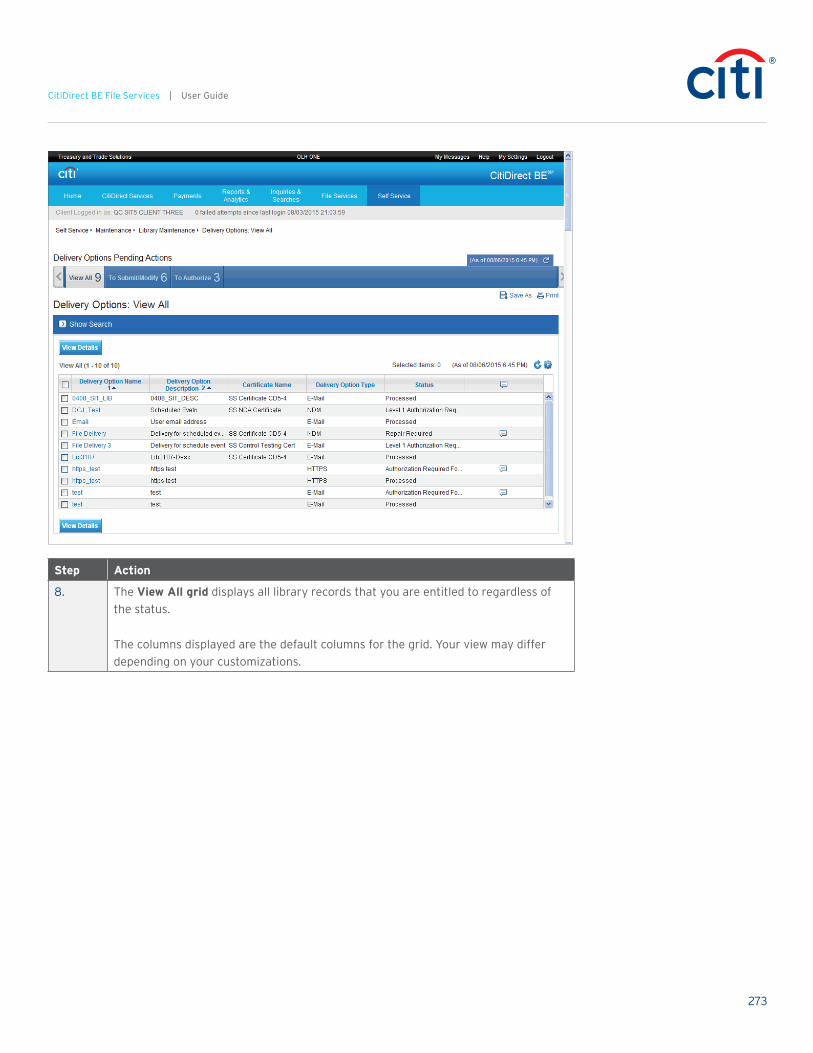
273
CitiDirect BE File Services | User Guide
Step Action
8. The View All grid displays all library records that you are entitled to regardless of the status.
The columns displayed are the default columns for the grid. Your view may differ depending on your customizations.

274
CitiDirect BE File Services | User Guide
Step Action
9. The Library Name column contains a hyperlink that takes you to the detail page for the specific record. This column may be labeled differently depending on the library you are viewing.

275
CitiDirect BE File Services | User Guide
Step Action
10. The Status column displays the current status of the library record.

276
CitiDirect BE File Services | User Guide
Step Action
11. The Comments column will contain an icon for any record that has a comment attached to it.

277
CitiDirect BE File Services | User Guide
Step Action
12. Point to the Comments icon.
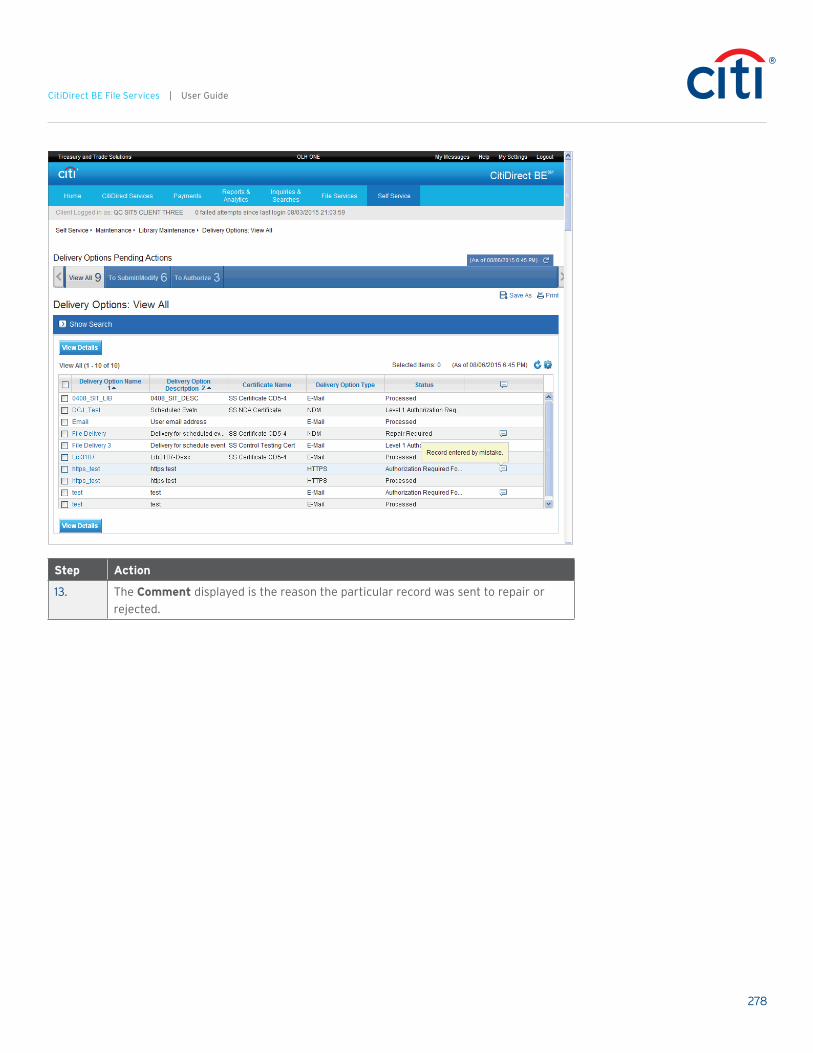
278
CitiDirect BE File Services | User Guide
Step Action
13. The Comment displayed is the reason the particular record was sent to repair or rejected.

279
CitiDirect BE File Services | User Guide
Step Action
14. Select the desired library record. In this example, click the File Delivery option.
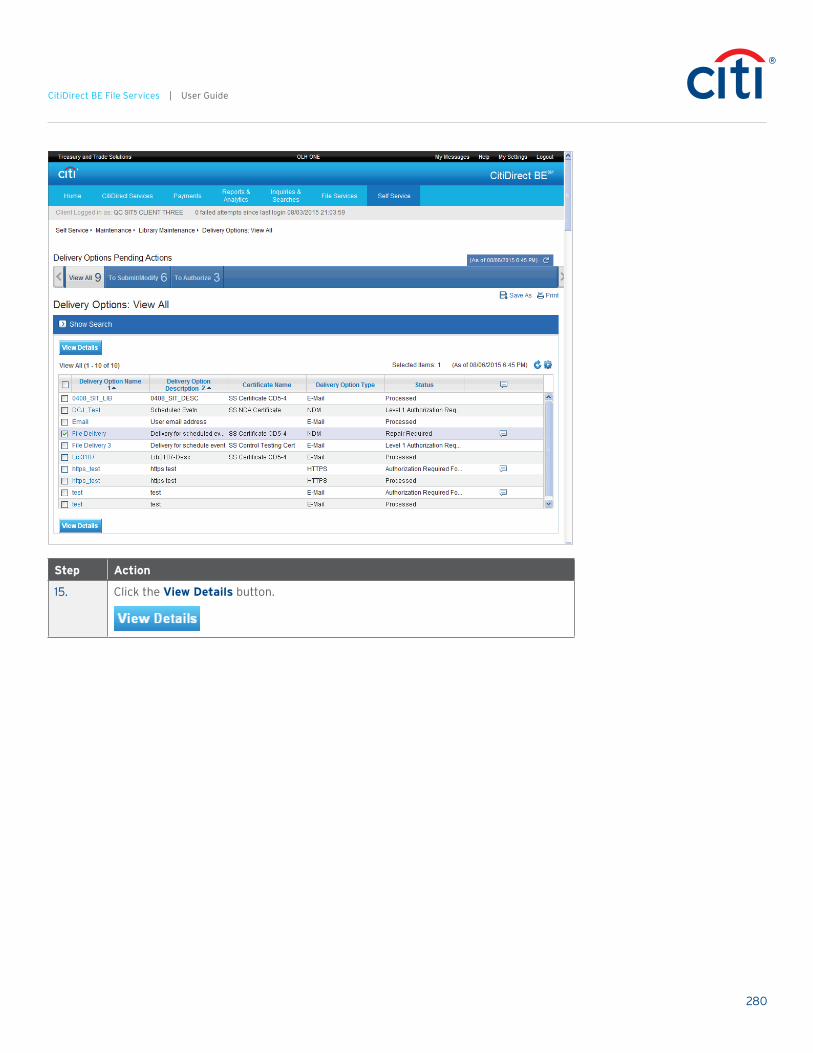
280
CitiDirect BE File Services | User Guide
Step Action
15. Click the View Details button.

281
CitiDirect BE File Services | User Guide
Step Action
16. The Detail page displays all of the details for the selected record. The content of this page will differ depending on the library selected.
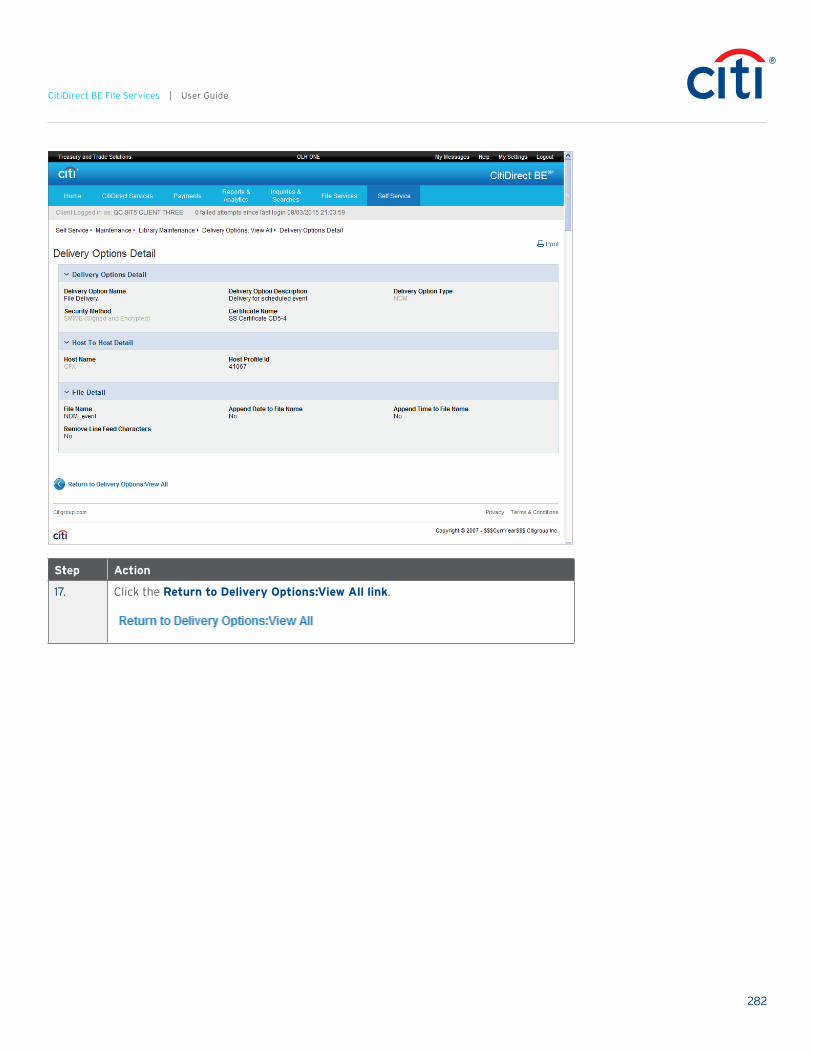
282
CitiDirect BE File Services | User Guide
Step Action
17. Click the Return to Delivery Options:View All link.
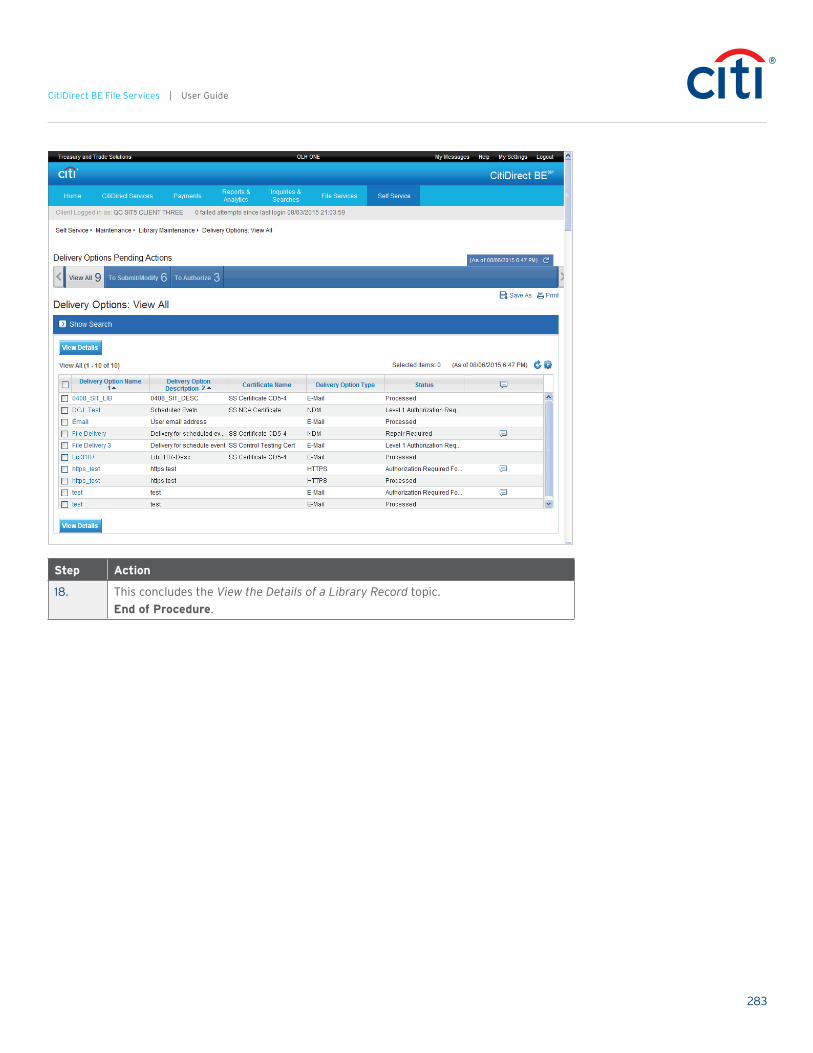
283
CitiDirect BE File Services | User Guide
Step Action
18. This concludes the View the Details of a Library Record topic. End of Procedure.

Treasury and Trade Solutionsciti.com/treasuryandtradesolutions
© 2015 Citibank, N.A. All rights reserved. Citi and Arc Design is a registered service mark of Citigroup Inc.CitiDirect BE is a register mark of Citigroup Inc.1351284 GTS26532 10/15