citidirect be portal export - citibank · citidirect be portal export citiservice citidirect be...
TRANSCRIPT

www.citihandlowy.pl
Bank Handlowy w Warszawie S.A.
®
CitiDirect BE PortalExport
CitiServiceCitiDirect BE Helpdesk
Tel: 801 343 978, +48 22 690 15 21Monday to Friday, 8:00 a.m. to 5 p.m.

www.citihandlowy.pl Bank Handlowy w Warszawie S.A.
®
2 Nowy serwis informacyjny citidirect.pl
Table of Contents1. Introduction 3
2. Creating an Export Profile 3
3. Initiating Export 8
4. Creating a Customized Export Format 10

www.citihandlowy.pl Bank Handlowy w Warszawie S.A.
®
3 New information service at citidirect.pl
1. Introduction
Export is a tool that enables the user to generate from CitiDirect BE statements as electronic data sets in a selected or defined
format. Such a statement may be later imported to a financial and accounting system.
Preparing data export consists of 2 stages:
1. Create a profile
At this stage, the user defines such criteria as time span, accounts and data format.
2. Run
At this stage, the file with the statement is generated and downloaded.
2. Creating an Export Profile
In order to create an export profile, place the cursor on the File Services tab in the top menu, next choose the option Create
Template under Export File Template.

www.citihandlowy.pl Bank Handlowy w Warszawie S.A.
®
4 New information service at citidirect.pl
The screen will display the view as shown below.
Although the template has many parameters, only a few are required to be modified.
Begin with entering a Template Name and choosing an Output Format Name.
1) Template name
A profile may have any name, provided that it is unique, i.e. when creating several profiles, you must ensure each of them has
a different name.
2) Output format name
In this field, you should define the data format. Click on the Lookup (binoculars) button to begin searching the list of data formats for
export. Next, choose the Output Format name, which you would like to use to build the export profile, e.g.

www.citihandlowy.pl Bank Handlowy w Warszawie S.A.
®
5 New information service at citidirect.pl
3) Date Range Type
Absolute – actual dates are to be chosen from the calendar. This type of dates is useful when you want to download a statement for
a specific period, e.g. previous month. The fields From Day and To Day will change their format into calendar and you need to set the
required date range in them.
Relative – this date range is defined by reference to the export run date. You should select it when you want to use the profile on
a regular basis to generate statements that is not defined by calendar dates, e.g. yesterday, last week. In From Day and To Day
fields specify the number of days to be covered by the statement. For example, if you want to generate, every day, a statement for
yesterday, set ‘-1’ in both fields. If you additionally check the Business Days option when choosing the date range, the program will
skip all holidays while selecting the time span. For example, on Monday the prior day will mean Friday.
4) Download destination
Enter the location and the file name under which the exported statement will be saved. You may use Browse. When downloading
a statement, the system will automatically open the folder that is entered here and suggest you to save the statement under the
given name. If this field is left blank, you will need to select the directory and enter the file name for each download.
5) Template filters
These functions are used to select accounts or groups of accounts. You should select one of the three available Categories: Account
Number, Bank Branch, Currency. Next, click on Add in the Filters Table to see the list of items that can be chosen.
• Use the Account Number category if you wish to select one or more accounts from the list of all accounts that are available to
you.
• Currency is useful when you want, for example, to generate a statement that covers all EUR accounts, but you do not want to
choose them.
• Bank Branch category is only useful for Clients who have accounts with more than one branch of Citi.

www.citihandlowy.pl Bank Handlowy w Warszawie S.A.
®
6 New information service at citidirect.pl
Template Filters are not mandatory. If no selection is made after starting the profile, the system will export a file containing
statements to all accounts available to the user that initiated such export.
If the following fields have been filled out, in order to complete template creation, press Submit.
The newly created template is Active and you may use it immediately.

www.citihandlowy.pl Bank Handlowy w Warszawie S.A.
®
7 New information service at citidirect.pl
The template should be visible on the template list in the Export data tab.
If, however the template did not show up on the list, this indicates that it requires further authorization by another user. Authorization may be
made by any user who is entitled to create export profiles. A given profile must not be authorized by the person who submitted it.
The Bank may disable the Authorization Required option for export profiles upon demand expressed by phone.
In order to authorize, place the cursor over File Services in the top menu, and next choose the option To Authorize under the section
Export File Template. Select the chosen template and press Authorize.
Authorization is the last step of the profile creation stage. Once the authorization is complete, the profile is Active and may be used
to generate statements.
www.citihandlowy.pl Bank Handlowy w Warszawie S.A.
®
8 New information service at citidirect.pl
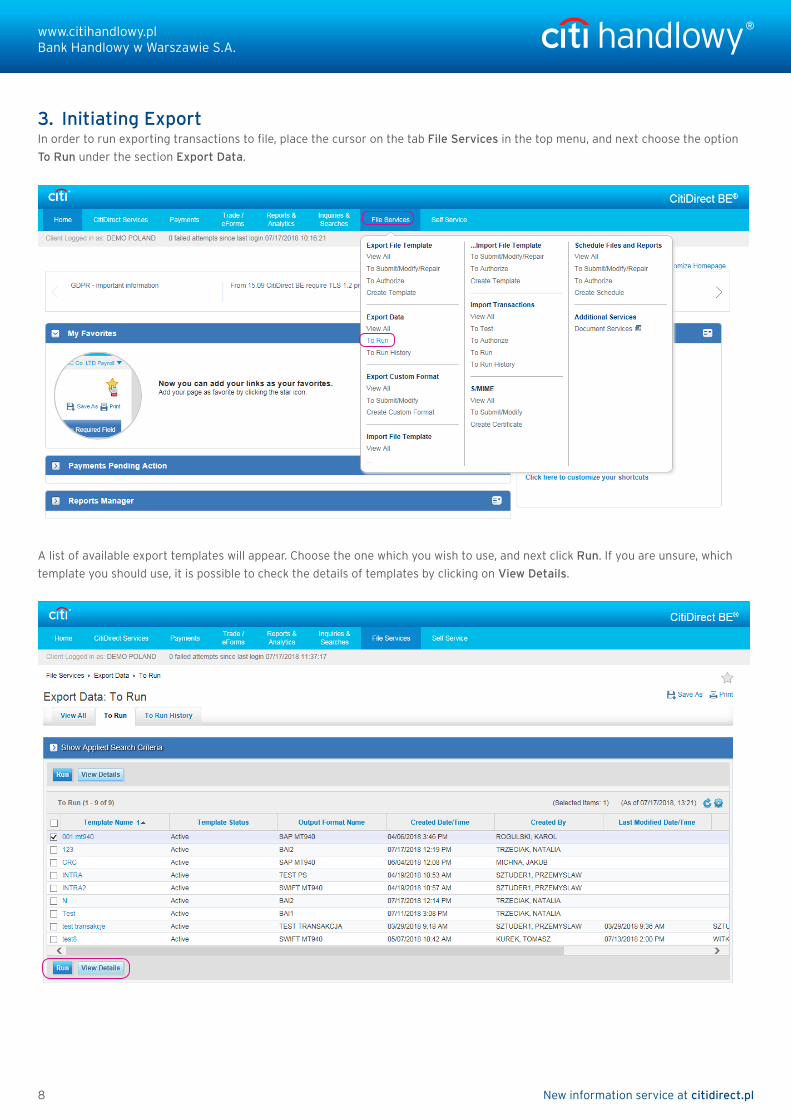
3. Initiating Export In order to run exporting transactions to file, place the cursor on the tab File Services in the top menu, and next choose the option
To Run under the section Export Data.
A list of available export templates will appear. Choose the one which you wish to use, and next click Run. If you are unsure, which
template you should use, it is possible to check the details of templates by clicking on View Details.

www.citihandlowy.pl Bank Handlowy w Warszawie S.A.
®
9 New information service at citidirect.pl
The profile initiation message will show. Click on OK.
Go to the To Run History tab. You will see the one-row statement that confirms that the report is generated.
Run Status should be completed. If it is not, press the Update Screen button – which is located on the right side of the panel above
the list of To Run history.
The Run status should change within a few seconds.
The Run Status may change to Errors. The most frequent reasons are:
• Lack of access to the accounts defined in the export profile criteria,
• No operations on the selected accounts were carried out in the period defined in the import profile.
In order to download a statement, click on Download. The standard save-file dialogue will open. The file location and name will be
recommended in accordance with the settings in the export profile. The user may select a different location and change the file name
before it is saved.

www.citihandlowy.pl Bank Handlowy w Warszawie S.A.
®
10 New information service at citidirect.pl
4. Creating a Customized Export Format
If the embedded formats (SWIFT MT940 or SAP MT940) are not appropriate for your financial and accounting system, you may
define your own statement format.
On the top menu place the cursor over File Services and choose the option Create Custom Format under the section Export
Custom Format.
The screen will display the screen shown below. Enter a Format Name, and choose a Business Service (shows as Payments by default).

www.citihandlowy.pl Bank Handlowy w Warszawie S.A.
®
11 New information service at citidirect.pl
In the field Output Layout Type, select one of the options::
• Tagged – with a defined tag before each field.
• Fixed Length – all fields of the same length.
• Variable Length – fields have different lengths, depending on data length.
A new screen will be displayed with export format details:
The Available Data window contains a list of all the fields which can be added to your personalized format. Select the appropriate
field, and next press the arrow symbol on the right. The selected field will be moved over to the right window Added Data.
In the Added Data window the fields will arrange themselves in the order in which they were added, and the same order will follow in
the exported file. You may change the order with the use of the buttons on the right side.
The table below includes the fields that are most frequently used:
LP Field title Type Number of characters Field Description
1 NULL NULL 5 Blank Field
2 BRANCH NAME AN 105 BRANCH NAME (WARSAW CITIBANK)
3 BRANCH CODE AN 5 BARNCH CODE
4 ACCOUNT NAME AN 35 ACCOUNT NAME
5 ACCOUNT NUMBER AN 35 ACCOUNT NUMBER
6 STATEMENT DATE DATA 12 STATEMENT DATE
7 OPENING LEDGER BALANCE N 22 OPENING LEDGER BALANCE
8 CLOSING AVAILABLE BALANCE N 22 CLOSING AVAILABLE BALANCE
9 CLOSING LEDGER BALANCE N 22 CLOSING LEDGER BALANCE
10 TRANSACTION POST DATE DATA 12 TRANSACTION POST DATE

www.citihandlowy.pl Bank Handlowy w Warszawie S.A.
®
12 New information service at citidirect.pl
11 VALUE DATE DATA 12 VALUE DATE
12 CUSTOMER REFERENCE (TRANSACTION REF) AN 35 CUSTOMER REFERENCE (TRANSACTION REF)
13 BANK REFERENCE AN 16 BANK REFERENCE
14 CURRENCY AN 3 CURRENCY
15 CREDIT/DEBIT INDICATOR A 2 CREDIT/DEBIT INDICATOR
16 TRANSACTION AMOUNT N 22 TRANSACTION AMOUNT
17 TOTAL CREDIT AMOUNT N 22 TOTAL CREDIT AMOUNT
18 TOTAL DEBIT AMOUNT N 22 TOTAL DEBIT AMOUNT
19 BY ORDER OF NAME AN 35 BY ORDER OF NAME
20 PAYMENT DETAILS AN 140 PAYMENT DETAILS
21 TRANSACTION DESCRPTION AN 140 TRANSACTION DESCRIPTION
N- numeric field, AN – alphanumeric field, DATA – date field.
After adding all the information that is to be included in the output field, go to Settings.
Setup:
Field Delimiter – end of field mark.
Record Delimiter – end of record mark. If you select CRLF in this field, particular records will be displayed in separate lines.
Credit Currency Format – determination of the incoming amount (+, -, space…). \
Debit Currency Format – determination of the charge amount (+, -, space…).
Decimal Symbol – separator between the integer and decimal part.
No. of Digits after Decimal – thousands separator.
Digit Grouping Symbol – symbol of thousands separation
Date Format and Time Format
Having defined the settings, press on Submit.
The export format you have defined will be on the select-from list while creating the export profile.

www.citihandlowy.pl
Bank Handlowy w Warszawie S.A.
®
Citi and Citi Handlowy are registered trademarks of Citigroup Inc., used under license. Citigroup Inc. and its subsidiaries are also entitled to rights to certain other trademarks contained herein. Bank Handlowy w Warszawie S.A. with its registered office in Warsaw at ul. Senatorska 16, 00-923 Warszawa, entered in the Register of Entrepreneurs of the National Court Register by the District Court for the capital city of Warsaw in Warsaw, 12th Commercial Division of the National Court Register, under KRS No. 000 000 1538; NIP 526-030-02-91; the share capital is PLN 522,638,400, fully paid-up.