citidirect be mobile - citibank · treasury and trade solutions citidirect be® mobile user guide....
TRANSCRIPT

Treasury and Trade Solutions
CitiDirect BE® Mobile
User Guide

1
CitiDirect BE Mobile | Table of Contents
Table of Contents
CitiDirect BE® Mobile — Introduction ..............................................2
How to use CitiDirect BE Mobile — For Entitled Users ...............4
1. Web address for CitiDirect BE Mobile ...........................4
2. Security Overview ..............................................................4
3. Logging onto CitiDirect BE Mobile .................................4
4. Language settings ..............................................................7
5. System inactivity ................................................................7
6. Transaction display on mobile devices and pending payment authorization and/or release notification ............................................................8
7. Main Menu ............................................................................8
8. Payment Authorization .....................................................9
9. Payment Release ..............................................................13
10. Sending Payments Back to Repair ............................... 16
11. Batch Payment Authorization ...................................... 22
12. Batch Payment Release ................................................. 25
13. Batch Payment Deletion ................................................ 28
14. Batch Payment Creation ................................................. 31
15. Imported File Authorization ......................................... 33
16. Imported File Rejection...................................................37
17. File Payment Authorization .......................................... 42
18. Refine (Filter) Worklist ...................................................44
19. Funding WorldLink® FX Payments ...............................48
20. Initiate Payments ............................................................. 57
21. User Management on CitiDirect BE Mobile............... 62
22. Payment Status Inquiry .................................................66
23. WorldLink Funding Details Inquiry .............................. 70
24. Intraday Cash Position ................................................... 75
25. Client Linkage ................................................................... 83
26. Payments visible on CitiDirect BE Mobile .................84
27. Confirmation of payment authorization, release and repair completion .....................................84
28. Viewing payments on the page ....................................85
29. Number of total payments in CitiDirect BE Mobile vs. CitiDirect Online Banking .................................................................85
30. CitiDirect BE Mobile Help ............................................. 85
31. SMS notifications ............................................................. 87
32. Logging out of CitiDirect BE Mobile ...........................88
How to set up a new CitiDirect BE Mobile user — For Security Managers ....................................................................89
1. Access Profile — Onboarding ........................................89
2. Entitling Client Security Manager — Onboarding ........................................................................ 91
3. Entitling Users — Client Security Manager ................ 93

2
CitiDirect BE Mobile | Introduction
CitiDirect BE® Mobile — IntroductionCitiDirect BE® Mobile core functionalities:
• A mobile browser based application that allows clients to view, authorize and release payments remotely using a mobile device. This functionality is currently available for all payment types that are supported by CitiDirect BE®. Users are able to create, authorize, release and delete batch payments as well as authorize and reject imported files.
• CitiDirect BE Mobile enables clients to initiate preformatted payments for domestic and international funds transfers. Clients can search for a preformat and initiate a payment from their mobile device. This functionality is available for accounts in select countries and will be extended in the future.
• CitiDirect BE Mobile allows clients to run account balance, and payment status inquiries. Clients can search for account balance summaries and view payment statuses in the same way they would on CitiDirect BE.
• WorldLink® clients can also fund cross-border WorldLink payments on CitiDirect BE Mobile. Utilize existing contracts or book new FX contracts using CitiDirect BE’s Online Rates (OLR).
• In addition, WorldLink clients can view their funding amounts due and funding dates by account with WorldLink Funding Details Inquiry.
• On CitiDirect BE Mobile, Security Managers can authorize, send to repair or reject changes made to user profiles.
• SMS notification to a mobile device extends the event notification functionality currently available in CitiDirect BE. The SMS message will not contain any private or confidential information and the user will not be able to respond to SMS. Once the SMS notification arrives, CitiDirect BE Mobile expects the current user to launch the application using a browser to perform the authorization or release activity.
• On CitiDirect BE Mobile, clients have the ability to view balance aggregation of accounts by groups, currency and country for real-time intraday cash position.
• CitiDirect BE Mobile also supports file authorizations received via CitiConnect full service, enabling CitiConnect users to authorize and release payments on their mobile devices.
• Additionally, users can access payment features across all client definitions through Client Linkage.• Payment Advisor on CitiDirect BE Mobile provides up-to-the-minute payment status for Funds
Transfer activity.• CitiDirect BE Mobile also supports Citi Supplier Finance, enabling suppliers to check the status
of their supply chain payments from a mobile device.• With Trade Advisor, CitiDirect BE Mobile users can enjoy the same trade transaction inquiry
service that is available on CitiDirect BE — now on the go.• Moreover, approvers can also authorize and send to repair trade transactions on-the-go through
CitiDirect BE Mobile’s Trade Authorization function.
CitiDirect BE Mobile characteristics:
• CitiDirect BE Mobile’s security features are an extension of CitiDirect BE — it leverages the same secure authentication methods (Challenge/Response and SMS/Voice One Time Code) and entitlement engine as the desktop channel. You will receive the benefit of these security features by ensuring that the person making the authorization has full responsibility of his/her actions while using a mobile device.
• CitiDirect BE Mobile will enhance the current Security Manager’s administrative tools by allowing them to entitle users and configure their settings with the information needed to deliver SMS notifications to the user’s phone. Again, this setting will be identical to the existing system in CitiDirect BE, so the learning process for the Security Manager should be minimized.

3
CitiDirect BE Mobile | Introduction
• CitiDirect BE Mobile solution synchronizes with CitiDirect BE as a server that processes the payment. Therefore, the activities that you perform on your mobile devices will be recorded through the existing reporting system of CitiDirect BE. This streamlines all treasury activity into one central location which is an important component of the vision of Citi’s Banking Evolution.
• CitiDirect BE Mobile is available in Bahasa Indonesia, Bulgarian, Chinese (simplified and traditional), Czech, English, French, Hebrew, Hungarian, Japanese, Korean, Polish, Portuguese, Romanian, Russian, Slovak, Spanish, Turkish and Vietnamese. CitiDirect BE Mobile will default to the language setting on your mobile device. If the language you are using is not supported at this time, the application will display in English. Please note: The payment content entered using a language other than English should still be displayed correctly.
• These new mobile-enabled functionalities will certainly improve clients’ experience using CitiDirect BE and provide greater customer flexibility and mobility in accessing information on CitiDirect BE.
Please note that this release of CitiDirect BE Mobile is not representative of the full suite of capabilities offered on CitiDirect. Additional functionality will be rolled out in subsequent releases.
For more information on CitiDirect BE Mobile’s Trade functionalities, please refer to the Trade User Guide.

4
CitiDirect BE Mobile | How to use CitiDirect BE Mobile — For Entitled Users
How to use CitiDirect BE Mobile — For Entitled UsersPlease note that users must be entitled in CitiDirect to authorize payments.
1. Web address for CitiDirect BE Mobile
Enter https://m.citidirectbe.com in your browser in order to access CitiDirect BE mobile login screen.
2. Security Overview
• CitiDirect BE Mobile takes a multilayered approach to ensuring the application is secure. The following elements comprise the security of the application and user session:
• Authentication. CitiDirect BE Mobile uses the same secure multi-factor authentication methods as the desktop application, CitiDirect BE: SafeWord® card, MobilePASSTM soft token, and SMS/Voice One Time Code (in select countries).
• Browser. An obfuscated cookie is used as a session token; this token is time limited and if no interaction occurs within five minutes, it expires. CitiDirect BE Mobile does not store personal identifiable information on the client browser cache.Additionally, cross-frame and site scripting protects by implementing a mechanism that prevents the application from being loaded by a third-party web page with the intention to capture accounts and authentication information. The application ensures that it is loaded by the browser directly accessing the URL and not through an embedded iframe or other mechanism.Malicious requests and code injection attacks are guarded against fraud by implementing a request filter and only accepting verbs and actions that are registered by the application on startup. Any other attempt to tamper with the application will reset any activity that is under way. Simply put, reject everything first and allow later.
• Transport and Infrastructure. SSL is used to communicate between the user’s phone and the Citi data centers.
• The CitiDirect BE Mobile application has undergone and passed third-party Vulnerability Assessment testing.
3. Logging onto CitiDirect BE Mobile
• Enter https://m.citidirectbe.com into your browser.• Depending on the entitlements assigned to you by your Security Manager, you can log in using
one or more of the below login methods: — Challenge Response: Select this to log in using your SafeWord card or Safenet’s MobilePASS application, which you have downloaded onto your mobile device. To generate a Response, first enter your Personal Identification Number (“PIN”) into the SafeWord card and/or MobilePASS app. Then, enter the Challenge provided by CitiDirect BE Mobile into the card/app. Lastly, enter the code generated by the card/app into CitiDirect BE Mobile’s “Response” field and “Submit.”
— SMS One Time Code: Select this to log in using SMS One Time Code. You will be required to first enter your static password, which generates an SMS text message containing your one time code. Enter this code when prompted by the screen below and “Submit.”
— Voice One Time Code: Select this to log in using Voice One Time Code. You will be required to first enter your static password, which generates an automated voice call containing your one time code. Enter this code when prompted by the screen above and “Submit.”

5
CitiDirect BE Mobile | How to use CitiDirect BE Mobile — For Entitled Users
One Time Code Screen
• Click Submit. Upon successful verification of the Challenge/Response or One Time Code, you will be granted access to the system.
Login Screens
• Please note: For countries where Multi-factor Authentication (MFA) is required, select “Challenge Response,” and please enter your static password when prompted (as shown in the MFA screen below).
— For first time users, you must complete your registration on CitiDirect BE (https://portal.citidirect.com) before logging into CitiDirect BE Mobile with MFA.
— To register, login to CitiDirect BE using the temporary password sent to you from [email protected]. During login, you will be prompted to change this temporary password. For more details, please refer to the CitiDirect BE User Guide. Upon registration, you may begin using CitiDirect BE Mobile.

6
CitiDirect BE Mobile | How to use CitiDirect BE Mobile — For Entitled Users
Multi-factor Authentication Screen
• CitiDirect BE Mobile now supports Trade Advisor, which enables the same trade inquiry service available on CitiDirect Online (CDOL). Click on the Trade Advisor tab located at the bottom of the logon screen to open this application.
• CitiDirect BE Mobile also supports Citi Supplier Finance, an inquiry tool that enables suppliers to get real-time status of payment and discount requests. Click on the Supplier Finance tab located at the bottom of the logon screen to open this application.
Note: If the user account has been locked out or an incorrect SafeWord ID is entered, you will receive the following error: “Access Denied. Try again or please contact your security manager.”
Note: If an incorrect “Response” is entered the screen will be refreshed and a new challenge will be displayed.
Note: If you encounter a JavaScript error message, you will need to enable JavaScript on your smartphone using the following steps. Go to Browser, select Options ▶ Browser Configuration ▶ Scroll down ▶ Enable “Support JavaScript” ▶ Save Options.
Note: Our mobile Internet site is developed with the highest level of security, which includes the latest security standard from VeriSign: VeriSign Class 3 certificates. If your BlackBerry uses a corporate or telecom provider BlackBerry Enterprise Server, your BlackBerry service administrator will need to download an update to this standard, otherwise an “Access Denied: insecure SSL Request” error will appear. Please check with your BlackBerry provider for information on upgrades to include the VeriSign Class 3 certificate in your BlackBerry Enterprise Server keystore. You can work around this issue by using a different browser other than the default browser on your BlackBerry.

7
CitiDirect BE Mobile | How to use CitiDirect BE Mobile — For Entitled Users
4. Language settings
CitiDirect BE Mobile is available in Bahasa Indonesia, Bulgarian, Chinese (simplified and traditional), Czech, English, French, Hebrew, Hungarian, Japanese, Korean, Polish, Portuguese, Romanian, Russian, Slovak, Spanish, Turkish and Vietnamese.
• To change the language settings, click on the “Settings” button displayed at the bottom of the logon screen or Main Menu.
• Once the screen opens, you will view all the languages currently available for CitiDirect BE Mobile.• To change the language, click on the desired language.• You will then be redirected back to the previous screen you were on prior to accessing the
language settings.
5. System inactivity
As a security precaution, CitiDirect BE Mobile will automatically log out after five minutes if there is no activity. If the timeout has been exceeded, the application will force your browser to redirect back to the logon screen. This is to ensure that no sensitive information will be visible if the phone is lost or stolen.

8
CitiDirect BE Mobile | How to use CitiDirect BE Mobile — For Entitled Users
6. Transaction display on mobile devices and pending payment authorization and/or release notification
CitiDirect BE Mobile is a new mobile front end for CitiDirect Online Banking. Therefore, payments will be displayed by value date, and will follow the current processes and workflow currently employed on CitiDirect Online Banking.
If you have been set up with the new SMS Payment Authorization or Release Notification, you will receive an SMS to the Mobile number you entered during the entitlement process. The SMS is processed and sent once the payment arrives in the users Authorize Payments or Release Payments Worklist.
7. Main Menu
The Main Menu is the home screen for CitiDirect BE Mobile. Once logged in, the entitled user will be directed to the Main Menu.
A fully entitled user can select from CitiDirect BE Mobile’s rich capabilities, which are intuitively grouped by product and function.
Payments• Authorize
— View, authorize or send to repair individual (Single) or Multiple payments — View, authorize or delete Batch payments — View and authorize File Payments — Search, view and select Imported Files to authorize or reject
• WorldLink Fund FX — Fund individual (Single) or Multiple cross-border WorldLink FX payments using Online Rates (OLR)
• Release — View, release or send to repair individual (Single) or Multiple payments — View, release or delete Batch payments
• Initiate — Initiate pre-formatted payments
Inquiry• Balance
— View specific account balances• Intraday Cash Position
— View real-time aggregated balances, and drill into accounts by group, currency and country• Payment Status
— Search for and view details of specific transactions
• WorldLink Funding Details — View funding amounts due and funding dates by account. Drill into account and payment-level details for specific WorldLink companies.
Trade• Authorize
— View, authorize or send to repair a variety of trade transactions. For more information on CitiDirect BE Mobile’s Trade functionalities, please refer to the Trade User Guide
From the Main Menu, the entitled user can also change Settings, access Mobile Help and Logout.
Users• Authorize
— Authorize, Send to Repair, or Reject changes made to user profiles. — Search for Users

9
CitiDirect BE Mobile | How to use CitiDirect BE Mobile — For Entitled Users
8. Payment Authorization
You have three options when authorizing payments within CitiDirect BE Mobile:
1. Worklist Single Payment Authorization
2. Worklist Multipayment Authorizations
3. Payment Details Single Payment Authorization

10
CitiDirect BE Mobile | How to use CitiDirect BE Mobile — For Entitled Users
1. Worklist Single Payment Authorization
Figure 1
Figure 2
To authorize a payment, follow the instructions below:
On the Main Menu, select “Payments” then Authorize “Single/Multi,” which will bring you to the Payment Authorization Worklist.
1. From the Worklist, select the payment you wish to authorize by clicking on the checkbox situated to the left of each payment (Figure 1).
2. Scroll to the end of the page and click on the “Authorize” button which will bring you to a confirmation screen.
3. Once “Authorize” has been clicked, you will be directed to a confirmation screen, which will show a summarized view of the payment you have requested to authorize.
4. On the confirmation screen (Figure 2) you have two options:
• Confirm: This will submit your authorization to CitiDirect Online Banking where the payment will follow the CitiDirect Online Banking process. You will also be redirected back to the Worklist allowing you to perform additional actions.
• Cancel: This will end the authorization request and redirect you back to the Worklist.
Figure 3
If you wish to confirm any aspect of the payment including its audit trail, you can log into CitiDirect.com (NOT MOBILE) and run an Audit Log Detail Report. Payments authorized on mobile devices will be marked as MOBILE-AUTHORIZE in the Reference Details Section (Figure 3).

11
CitiDirect BE Mobile | How to use CitiDirect BE Mobile — For Entitled Users
2. Worklist Multipayment Authorizations
Figure 1
To authorize multiple payments, follow the instructions below:
1. On the Main Menu, select “Payments” then Authorize “Single/Multi,” which will bring you to the Payment Authorization Worklist.
2. From the Worklist, select the payments you wish to authorize by clicking on the checkbox situated to the left of each payment.
• Alternatively, if you wish to authorize all payments on the page, click on the checkbox situated in the heading above the first payment. At this point, you have the option to select as many payments as you wish across multiple pages (Figure 1).
3. Once all payments have been selected, scroll to the end of the current page and click on the “Authorize” button which will bring you to a confirmation screen.
4. The confirmation screen will show a summarized view of the payments you have requested to authorize. This view is grouped by currency, displaying the number of payments and total payments per currency.
Figure 2
5. On the confirmation screen (Figure 2), you have two options:
a. Confirm: This will submit your authorization to CitiDirect Online Banking where the payments will follow the CitiDirect Online Banking process. You will also be redirected back to the Worklist allowing you to perform additional actions.
b. Cancel: This will end the authorization operation and redirect you back to the Worklist.

12
CitiDirect BE Mobile | How to use CitiDirect BE Mobile — For Entitled Users
3. Payment Details Single Payment Authorization
Figure 1
Payment Details Single Payment Authorization.
To authorize a payment from the details screen, follow the instructions below:
1. On the Main Menu, select “Payments” then Authorize “Single/Multi,” which will bring you to the Payment Authorization Worklist.
2. From the Worklist, select the payment you wish to authorize by clicking on the Beneficiary Name field of the payment.
3. This will display the details associated with this payment (Figure 1).
4. Scroll to the end of the page where you will see an “Authorize” button.
5. Click on “Authorize” and you will be directed to a confirmation screen, which will show a summarized view of the payment you have requested to authorize.
Figure 2
6. On the confirmation screen (Figure 2), you have two options:
a. Confirm: This will submit your authorization to CitiDirect Online Banking where the payments will follow the CitiDirect Online Banking process. You will also be redirected back to the Worklist allowing you to perform additional actions.
b. Cancel: This will end the authorization operation and redirect you back to the Worklist.

13
CitiDirect BE Mobile | How to use CitiDirect BE Mobile — For Entitled Users
9. Payment Release
You have three options when releasing payments within CitiDirect BE Mobile:
1. Worklist Single Payment Release
2. Worklist Multipayment Release
3. Payment Details Single Payment Release
1. Worklist Single Payment Release
Figure 1
Figure 2
To release a payment, follow the instructions below:
1. On the Main Menu, select “Payments” then Release “Single/Multi,” which will bring you to the Payment Release Worklist.
2. From the Worklist, select the payment you wish to release by clicking on the checkbox situated to the left of each payment (Figure 1).
3. Scroll to the end of the page and click on the “Release” button which will bring you to a confirmation screen.
4. The confirmation screen will show a summarized view of the payment you have requested to release.
5. On the confirmation screen (Figure 2) you have two options:
a. Confirm: This will submit your release to CitiDirect Online Banking where the payment will follow the CitiDirect Online Banking process. You will also be redirected back to the Worklist allowing you to perform additional actions.
b. Cancel: This will end the release request and redirect you back to the Worklist.
Figure 3
If you wish to confirm any aspect of the payment including its audit trail, you can log in to CitiDirect.com (NOT MOBILE) and run an Audit Log Detail Report. Payments authorized on mobile devices will be marked as MOBILE-RELEASE in the Reference Details Section (Figure 3).

14
CitiDirect BE Mobile | How to use CitiDirect BE Mobile — For Entitled Users
2. Worklist Multi-Payment Releases
Figure 1
To release multiple payments, follow the instructions below:
1. On the Main Menu, select “Payments” then Release “Single/Multi,” which will bring you to the Payment Release Worklist.
2. From the Worklist, select the payments you wish to release by clicking on the checkbox situated to the left of each payment.
• Alternatively, if you wish to release all payments on the page, click on the checkbox situated in the heading above the first payment. At this point, you have the option to select as many payments as you wish across multiple pages (Figure 1).
3. Once all payments have been selected, scroll to the end of the current page and click on the “Release” button which will bring you to a confirmation screen.
4. Once “Release” has been clicked, you will be directed to a confirmation screen, which will show a summarized view of the payments you have requested to release. This view is grouped by currency, displaying the number of payments and total payments per currency.
Figure 2
5. On the confirmation screen (Figure 2), you have two options:
a. Confirm: This will submit your release to CitiDirect Online Banking where the payments will follow the CitiDirect Online Banking process. You will also be redirected back to the Worklist allowing you to perform additional actions.
b. Cancel: This will end the release operation and redirect you back to the Worklist.

15
CitiDirect BE Mobile | How to use CitiDirect BE Mobile — For Entitled Users
3. Payment Details Single Payment Release
Figure 1
Payment Details Single Payment Release.
To release a payment from the details screen, follow the instructions below:
1. On the Main Menu, select “Payments” then Release “Single/Multi,” which will bring you to the Payment Release Worklist.
2. From the Worklist, select the payment you wish to release by clicking on the Beneficiary Name field of the payment.
3. This will display the details associated with this payment (Figure 1).
4. Scroll to the end of the page where you will see a “Release” button.
5. Click on “Release” and you will be directed to a confirmation screen, which will show a summarized view of the payment you have requested to release.
Figure 2
6. Once on the confirmation screen (Figure 2), you have two options:
a. Confirm: This will submit your request to CitiDirect Online Banking where the payment will follow the same process as if you had released the payment within CitiDirect Online Banking. You will also be redirected back to the Worklist allowing you to perform additional actions.
b. Cancel: This will end the release operation and redirect you back to the Worklist.

16
CitiDirect BE Mobile | How to use CitiDirect BE Mobile — For Entitled Users
10. Sending Payments Back to Repair
You have three options when sending payments to repair within CitiDirect BE Mobile:
1. Worklist Single Payment Send to Repair
2. Worklist Multi-Payment Send to Repair
3. Payment Details Single Payment Send to Repair
1. Worklist Single Payment Send to Repair
Figure 1
To “Send to Repair” a payment from a Worklist, follow the instructions below:
1. On the Main Menu, select “Payments” then Release or Authorize “Single/Multi,” this will bring you to the Payment Authorization or Release Worklist.
2. From the Worklist, select the payment you wish to “Send to Repair” by clicking on the checkbox situated to the left of each payment (Figure 1).
3. Scroll to the end of the page where you will see a “Send to Repair” action button.
4. Click on “Send to Repair” and you will be directed to a confirmation screen, which will show a summarized view of the payment you have requested to “Send to Repair.”

17
CitiDirect BE Mobile | How to use CitiDirect BE Mobile — For Entitled Users
Figure 2
5. On the confirmation screen, you must select from a predefined list of reasons for “Sending to Repair” (Figure 2). Please note: You will not be allowed to proceed without selecting a reason.
6. Once a reason has been selected, you have two options:
a. Confirm: This will submit your request to CitiDirect Online Banking where the payment will follow the CitiDirect Online Banking process. You will also be redirected back to the Worklist allowing you to perform additional actions.
b. Cancel: This will end the action and redirect you back to the Worklist.
Figure 3
If you wish to confirm any aspect of the payment including its audit trail, you can log into CitiDirect.com (NOT MOBILE) and run an Audit Log Detail Report. Payments sent to repair on mobile devices will be marked as MOBILE-SEND TO REPAIR in the Reference Details Section (Figure 3).

18
CitiDirect BE Mobile | How to use CitiDirect BE Mobile — For Entitled Users
2. Worklist Multi-Payment Send to Repair
Figure 1
To “Send to Repair” multiple payments from the Worklist, follow the instructions below:
1. On the Main Menu, select “Payments” then Authorize or Release “Single/Multi.”
2. From the Worklist, select the payments you wish to “Send to Repair” by clicking on the checkbox situated to the left of each payment. (Figure 1).
• Alternatively if you wish to “Send to Repair” all payments on the current page, click on the checkbox situated in the heading above the first payment. At this point, you have the option to select as many payments you wish to repair.
3. After all payments have been selected, scroll to the end of the current page where you will see an action button named “Send to Repair.”
4. Once “Send to Repair” has been clicked, you will be directed to a confirmation screen, which will show a summarized view of the payments you have requested to “Send to Repair.” This view is grouped by currency, displaying the number of payments and total payment per currency.

19
CitiDirect BE Mobile | How to use CitiDirect BE Mobile — For Entitled Users
Figure 2
5. On the confirmation screen, you must choose one of a predefined list of reasons for “Sending to Repair” (Figure 2). Please note: You will not be allowed to proceed without selecting a reason for this list.
6. Once a reason has been selected, you have two options:
a. Confirm: This will submit your request to CitiDirect Online Banking where the payments will follow the CitiDirect Online Banking process. You will also be redirected back to the Worklist allowing you to perform additional actions.
b. Cancel: This will end the “Send to Repair” operation and redirect you back to the Worklist.

20
CitiDirect BE Mobile | How to use CitiDirect BE Mobile — For Entitled Users
3. Payment Details Single Payment Send to Repair
Figure 1
To “Send to Repair” a payment from the details screen, you can do so by following the below steps:
1. On the Main Menu, select “Payments” then Authorize or Release “Single/Multi,” this will bring you to the Payment Authorization or Release Worklist.
2. From the Worklist, select the payment you wish to “Send to Repair” by clicking on the Beneficiary Name field of the payment.
3. This will display the details associated with this payment (Figure 1).
4. Scroll to the end of the page where you will see a “Send to Repair” action button.
5. Once “Send to Repair” has been clicked, you will be directed to a confirmation screen, which will show a summarized view of the payment you have requested to “Send to Repair.”

21
CitiDirect BE Mobile | How to use CitiDirect BE Mobile — For Entitled Users
Figure 2
6. On the confirmation screen, you must select from a predefined list of reasons for “Sending to Repair” (Figure 2). Please Note: You will not be allowed to proceed without selecting a reason.
7. Once a reason has been selected, you have two options:
a. Confirm: This will submit your request to CitiDirect Online Banking where the payment will follow the same process as if you had performed this action within CitiDirect Online Banking. You will also be redirected back to the Worklist allowing you to perform additional actions.
b. Cancel: This will end the action and redirect you back to the Worklist.

22
CitiDirect BE Mobile | How to use CitiDirect BE Mobile — For Entitled Users
11. Batch Payment Authorization
You have three options when authorizing batch payments within CitiDirect BE Mobile:
1. Worklist Single Batch Payment Authorization
2. Worklist Multi Batch Payment Authorizations
3. Payment Details Single Batch Payment Authorization
1. Worklist Single Batch Payment Authorization
Figure 1
Figure 2
To authorize a batch payment, follow the instructions below:
1. On the Main Menu, select “Payments” then Authorize “Batch,” which will bring you to the Batch Payment Authorization Worklist.
2. From the Worklist, select the batch payment you wish to authorize by clicking on the check box situated to the left of each payment (Figure 1).
3. Scroll to the end of the page and click on the “Authorize” button which will bring you to a confirmation screen.
4. Once “Authorize” has been clicked, you will be directed to a confirmation screen, which will show a summarized view of the batch payment you have requested to authorize.
5. On the confirmation screen (Figure 2) you have two options:
a. Confirm: This will submit your authorization to CitiDirect Online Banking where the batch payment will follow the CitiDirect Online Banking process. You will also be redirected back to the Worklist allowing you to perform additional actions.
b. Cancel: This will end the batch payment authorization request and redirect you back to the Worklist.
Figure 3
If you wish to confirm any aspect of the payment including its audit trail, you can log into CitiDirect.com (NOT MOBILE) and run an Audit Log Detail Report. Batch payments authorized on mobile devices will be marked as BATCH-AUTHORIZE in the Reference Details Section (Figure 3).

23
CitiDirect BE Mobile | How to use CitiDirect BE Mobile — For Entitled Users
2. Worklist Multi-Batch Payment Authorizations
Figure 1
To authorize multiple batch payments, follow the instructions below:
1. On the Main Menu, select “Payments” then Authorize “Batch,” which will bring you to the Batch Payment Authorization Worklist.
2. From the Worklist, select the batch payments you wish to authorize by clicking on the checkbox situated to the left of each payment.
• Alternatively, if you wish to authorize all the batch payments on the page, click on the checkbox situated in the heading above the first payment. At this point, you have the option to select as many batch payments as you wish across multiple pages (Figure 1).
3. Once all batch payments have been selected, scroll to the end of the current page and click on the “Authorize” button which will bring you to a confirmation screen.
4. The confirmation screen will show a summarized view of the batch payments you have requested to authorize. This view is grouped by currency, displaying the number of payments and total payments per currency.
Figure 2
5. On the confirmation screen (Figure 2), you have two options:
a. Confirm: This will submit your authorization to CitiDirect Online Banking where the batch payments will follow the CitiDirect Online Banking process. You will also be redirected back to the Worklist allowing you to perform additional actions.
b. Cancel: This will end the batch authorization operation and redirect you back to the Worklist.

24
CitiDirect BE Mobile | How to use CitiDirect BE Mobile — For Entitled Users
3. Payment Details Single Batch Payment Authorization
Figure 1
Payment Details Single Batch Payment Authorization.
To authorize a batch payment from the details screen, follow the instructions below:
1. On the Main Menu, select “Payments” then Authorize “Batch,” which will bring you to the Batch Payment Authorization Worklist.
2. From the Worklist, select the batch payment you wish to authorize by clicking anywhere on the batch’s row.
3. This will display the details associated with this batch payment (Figure 1).
4. Scroll to the end of the page where you will see an “Authorize” button.
5. Click on “Authorize” and you will be directed to a confirmation screen, which will show a summarized view of the batch payment you have requested to authorize.
Figure 2
6. On the confirmation screen (Figure 2), you have two options:
a. Confirm: This will submit your request to CitiDirect Online Banking where the batch payment will follow the same process as if you had authorized the batch payment within CitiDirect Online Banking. You will also be redirected back to the Worklist allowing you to perform additional actions.
b. Cancel: This will end the batch authorization operation and redirect you back to the Worklist.

25
CitiDirect BE Mobile | How to use CitiDirect BE Mobile — For Entitled Users
12. Batch Payment Release
You have three options when releasing batch payments within CitiDirect BE Mobile:
1. Worklist Single Batch Payment Release
2. Worklist Multi-Batch Payment Release
3. Payment Details Single Batch Payment Release
1. Worklist Single Batch Payment Release
Figure 1
Figure 2
To release a batch payment, follow the instructions below:
1. On the Main Menu, select “Payments” then Release “Batch,” which will bring you to the Batch Payment Release Worklist.
2. From the Worklist, select the batch payment you wish to release by clicking on the checkbox situated to the left of each payment (Figure 1).
3. Scroll to the end of the page and click on the “Release” button which will bring you to a confirmation screen.
4. Once “Release” has been clicked, you will be directed to a confirmation screen, which will show a summarized view of the batch payment you have requested to release.
5. On the confirmation screen (Figure 2) you have two options:
a. Confirm: This will submit your release to CitiDirect Online Banking where the batch payment will follow the CitiDirect Online Banking process. You will also be redirected back to the Worklist allowing you to perform additional actions.
b. Cancel: This will end the batch payment release request and redirect you back to the Worklist.
Figure 3
If you wish to confirm any aspect of the payment including its audit trail, you can log into CitiDirect.com (NOT MOBILE) and run an Audit Log Detail Report. Batch payments released on mobile devices will be marked as BATCH-RELEASE in the Reference Details Section (Figure 3).

26
CitiDirect BE Mobile | How to use CitiDirect BE Mobile — For Entitled Users
2. Worklist Multi-Batch Payment Releases
Figure 1
Figure 2
To release multiple batch payments, follow the instructions below:
1. On the Main Menu, select “Payments” then Release “Batch,” which will bring you to the Batch Payment Release Worklist.
2. From the Worklist, select the batch payments you wish to release by clicking on the checkbox situated to the left of each payment.
• Alternatively, if you wish to release all the batch payments on the page, click on the checkbox situated in the heading above the first payment. At this point, you have the option to select as many batch payments as you wish across multiple pages (Figure 1).
3. Once all batch payments have been selected, scroll to the end of the current page and click on the “Release” button which will bring you to a confirmation screen.
4. The confirmation screen will show a summarized view of the batch payments you have requested to release. This view is grouped by currency, displaying the number of payments and total payments per currency.
5. On the confirmation screen (Figure 2), you have two options:
a. Confirm: This will submit your release to CitiDirect Online Banking where the batch payments will follow the CitiDirect Online Banking process. You will also be redirected back to the Worklist allowing you to perform additional actions.
b. Cancel: This will end the batch release operation and redirect you back to the Worklist.

27
CitiDirect BE Mobile | How to use CitiDirect BE Mobile — For Entitled Users
3. Payment Details Single Batch Payment Release
Figure 1
Figure 2
Payment Details Single Batch Payment Release.
To release a batch payment from the details screen, follow the instructions below:
1. On the Main Menu, select “Payments” then Release “Batch,” which will bring you to the Batch Payment Release Worklist.
2. From the Worklist, select the batch payment you wish to release by clicking anywhere on the batch’s row.
3. This will display the details associated with this batch payment (Figure 1).
4. Scroll to the end of the page where you will see a “Release” button.
5. Click on “Release” and you will be directed to a confirmation screen, which will show a summarized view of the batch payment you have requested to release.
6. On the confirmation screen (Figure 2), you have two options:
a. Confirm: This will submit your release to CitiDirect Online Banking where the batch payments will follow the CitiDirect Online Banking process. You will also be redirected back to the Worklist allowing you to perform additional actions.
b. Cancel: This will end the batch release operation and redirect you back to the Worklist.

28
CitiDirect BE Mobile | How to use CitiDirect BE Mobile — For Entitled Users
13. Batch Payment Deletion
You have three options when deleting batch payments within CitiDirect BE Mobile:
3. Worklist Single Batch Payment Deletion
4. Worklist Multi-Batch Payment Deletion
5. Payment Details Single Batch Payment Deletion
Please Note: You can delete a batch payment from the Batch Payment Authorization or Release Worklist.
1. Worklist Single Batch Payment Deletion
Figure 1
Figure 2
To delete a batch payment, follow the instructions below:
1. On the Main Menu, select “Payments” then Authorize or Release “Batch,” which will bring you to the Batch Payment Worklist.
2. From the Worklist, select the batch payment you wish to delete by clicking on the checkbox situated to the left of each payment (Figure 1).
3. Scroll to the end of the page and click on the “Delete” button which will bring you to a confirmation screen.
4. Once “Delete” has been clicked, you will be directed to a confirmation screen, which will show a summarized view of the batch payment you have requested to delete.
5. On the confirmation screen (Figure 2) you have two options:
a. Confirm: This will submit your deletion to CitiDirect Online Banking where the payment will follow the CitiDirect Online Banking process. You will also be redirected back to the Worklist allowing you to perform additional actions.
b. Cancel: This will end the batch payment deletion request and redirect you back to the Worklist.
Figure 3
If you wish to confirm any aspect of the payment including its audit trail, you can log into CitiDirect.com (NOT MOBILE) and run an Audit Log Detail Report. Payments deleted on mobile devices will be marked as BATCH-DELETE in the Reference Details Section (Figure 3).

29
CitiDirect BE Mobile | How to use CitiDirect BE Mobile — For Entitled Users
2. Worklist Multi-Batch Payment Deletion
Figure 1
To delete multiple batch payments, follow the instructions below:
1. On the Main Menu, select “Payments” then Authorize or Release “Batch,” which will bring you to the Batch Payment Worklist.
2. From the Worklist, select the batch payments you wish to delete by clicking on the checkbox situated to the left of each payment.
• Alternatively, if you wish to delete all the batch payments on the page, click on the checkbox situated in the heading above the first payment. At this point, you have the option to select as many batch payments as you wish across multiple pages (Figure 1).
3. Once all batch payments have been selected, scroll to the end of the current page and click on the “Delete” button which will bring you to a confirmation screen.
4. The confirmation screen will show a summarized view of the batch payments you have requested to delete. This view is grouped by currency, displaying the number of payments and total payments per currency.
Figure 2
5. On the confirmation screen (Figure 2), you have two options:
a. Confirm: This will submit your deletion to CitiDirect Online Banking where the payments will follow the CitiDirect Online Banking process. You will also be redirected back to the Worklist allowing you to perform additional actions.
b. Cancel: This will end the batch deletion operation and redirect you back to the Worklist.

30
CitiDirect BE Mobile | How to use CitiDirect BE Mobile — For Entitled Users
3. Payment Details Single Batch Payment Deletion
Figure 1
Payment Details Single Batch Payment Deletion
To delete a batch payment from the details screen, follow the instructions below:
1. On the Main Menu, select “Payments” then Authorize or Release “Batch,” which will bring you to the Batch Payment Worklist.
2. From the Worklist, select the batch payment you wish to delete by clicking anywhere on the batch’s row.
3. This will display the details associated with this batch payment (Figure 1).
4. Scroll to the end of the page where you will see a “Delete” button.
5. Click on “Delete” and you will be directed to a confirmation screen, which will show a summarized view of the batch payment you have requested to delete.
Figure 2
6. On the confirmation screen (Figure 2), you have two options:
a. Confirm: This will submit your request to CitiDirect Online Banking where the payment will follow the same process as if you had authorized the payment within CitiDirect Online Banking. You will also be redirected back to the Worklist allowing you to perform additional actions.
b. Cancel: This will end the batch deletion operation and redirect you back to the Worklist.

31
CitiDirect BE Mobile | How to use CitiDirect BE Mobile — For Entitled Users
14. Batch Payment Creation
You can create a batch payment to authorize or release. To complete either of these actions, you must select the respective header from the Main Menu. If you want to create a batch payment to authorize, then click “Authorize Batch Payment.” If you want to create a batch payment to release, then click “Release Batch Payment.”
Figure 1
Figure 2
Figure 3
1. On the Main Menu, select “Payments” then Authorize or Release “Batch,” which will bring you to the respective Batch Payment Worklist.
2. Then click on the “Create New Batch” text located on the top right-hand corner of the screen to begin the Batch Payment Creation process (Figure 1).
3. You will be directed to the New Batch Creation screen (Figure 2). When creating a batch payment, you are presented with four (4) criteria fields by which to create a batch payment.
• File Run ID• Account Number• Payment Currency• Value Date Range
File Run ID
Enter the File ID manually or search the files associated with a specific Run ID.
a. To perform a search for a specific Run ID, click on the Lookup icon ( )
b. Enter your Run ID, and click on the Lookup icon ( ) (Figure 3)c. If successful, you will be presented with a list of search results
which you can click to selectd. The value will be returned to the File Run ID field on the New Batch
Creation screen

32
CitiDirect BE Mobile | How to use CitiDirect BE Mobile — For Entitled Users
Figure 4
Account Number
Enter the account number manually or use the Lookup icon ( ) to browse
a. To perform a search for a specific Account Number, click on the Lookup icon ( )
b. Select the account(s), then click “Return Selection” (Figure 4)c. Click “Cancel” if you wish to cancel your current selection and
return to the New Batch Creation screen
Please Note: Only six (6) account numbers can be displayed within the Account Number field. If more than six have been selected, you will see a message below the Account Number field stating the number of additional accounts that have been selected.
Figure 5
Figure 6
Payment Currency
Enter the payment currency in manually using ISO formatting (e.g., USD) or use the Lookup icon ( ) to browse available currencies.
a. To perform a search for a specific currency, click on the Lookup icon ( )
b. Select a currency or currencies, then click “Return Selection” (Figure 5) and you will see the currencies you selected added to the currency field on the New Batch Creation screen
c. Click “Cancel” if you wish to cancel your current selection and return to the New Batch Creation screen
Please Note: Only six (6) account numbers can be displayed within the Account Number field. If more than six have been selected, you will see a message below the Account Number field stating the number of additional accounts that have been selected.
Value Date Range
To enter the “Value Date Range” field, click on the calendar icons ( ), where you can select the desired “From” and “To” date criteria. Click on “Confirm” to confirm your date range selection (Figure 6).
4. With all the fields filled in you are presented with two options.
a. “Submit”: This will create your batch payment from the fields entered. Your batch payment will be submitted for processing and it may take a short time before the results are available for viewing in the Batch Payment Worklist.
b. “Clear”: This will take you back to the Batch Payment Worklist and your batch payment will not be created.

33
CitiDirect BE Mobile | How to use CitiDirect BE Mobile — For Entitled Users
15. Imported File Authorization
You have three options when authorizing imported file within CitiDirect BE Mobile:
1. Worklist Single Imported File Authorization
2. Worklist Multi-Imported File Authorizations
3. Payment Details Single Imported File Authorization
Please Note: Imported Files must first be imported through CitiDirect Online (CDOL) via desktop or laptop computer through the Import Transaction menu. From there, the Imported File can be authorized on CitiDirect BE Mobile. From there, the imported file will then follow the same user-defined process as CDOL.
1. Worklist Single Imported File Authorization
Figure 1
To authorize an imported file, follow the instructions below:
1. On the Main Menu, select “Payments” then Authorize “Imported File.” This will direct you to a Search Screen.
Search Screen
2. You must enter the following criteria to search for a specific file to authorize (Figure 1):
• Run ID• Profile Name• File Name• Run User Name
34
CitiDirect BE Mobile | How to use CitiDirect BE Mobile — For Entitled Users
Figure 2
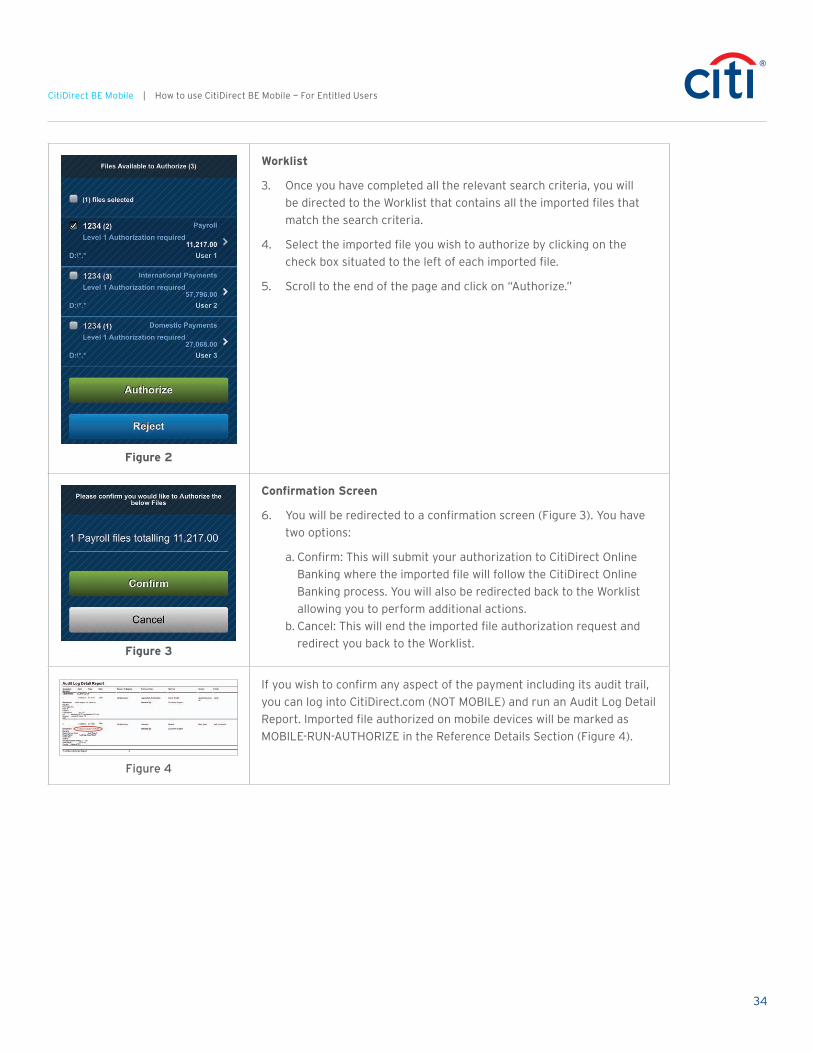
Worklist
3. Once you have completed all the relevant search criteria, you will be directed to the Worklist that contains all the imported files that match the search criteria.
4. Select the imported file you wish to authorize by clicking on the check box situated to the left of each imported file.
5. Scroll to the end of the page and click on “Authorize.”
Figure 3
Confirmation Screen
6. You will be redirected to a confirmation screen (Figure 3). You have two options:
a. Confirm: This will submit your authorization to CitiDirect Online Banking where the imported file will follow the CitiDirect Online Banking process. You will also be redirected back to the Worklist allowing you to perform additional actions.
b. Cancel: This will end the imported file authorization request and redirect you back to the Worklist.
Figure 4
If you wish to confirm any aspect of the payment including its audit trail, you can log into CitiDirect.com (NOT MOBILE) and run an Audit Log Detail Report. Imported file authorized on mobile devices will be marked as MOBILE-RUN-AUTHORIZE in the Reference Details Section (Figure 4).

35
CitiDirect BE Mobile | How to use CitiDirect BE Mobile — For Entitled Users
2. Worklist Multi-Imported File Authorizations
Figure 1
Figure 2
To authorize multiple imported file, follow the instructions below:
1. On the Main Menu, select “Payments” then Authorize “Imported File.” This will direct you to a Search Screen.
Search Screen
2. You must enter the following criteria to search for a specific imported file to authorize:
• Run ID• Profile Name• File Name• Run User Name• Worklist
3. Once you have completed all the relevant search criteria, you will be directed to the Worklist (Figure 1) that contains all the imported file that match the search criteria.
4. Select the imported files you wish to authorize by clicking on the checkbox situated to the left of each file.
• Alternatively, if you wish to authorize all imported files on the page being viewed, you can click on the checkbox situated in the heading above the first imported file. At this point, you will have the option to select as many imported files as you wish across multiple pages.
5. Scroll to the end of the page and click on “Authorize.”
Confirmation Screen
6. You will be redirected to a confirmation screen (Figure 2). You have two options:
a. Confirm: This will submit your authorization to CitiDirect Online Banking where the imported files will follow the CitiDirect Online Banking process. You will also be redirected back to the Worklist allowing you to perform additional actions.
b. Cancel: This will end the imported file authorization request and redirect you back to the Worklist.

36
CitiDirect BE Mobile | How to use CitiDirect BE Mobile — For Entitled Users
3. Payment Details Single Imported File Authorization
Figure 1
To authorize an imported file from the details screen, follow the instructions below:
1. On the Main Menu, select “Payments” then Authorize “Imported File.” This will direct you to a Search Screen.
Search Screen
2. You must enter the following criteria to search for a specific imported file to authorize:
• Run ID• Profile Name• File Name• Run User Name
Worklist
3. Once you have completed all the relevant search criteria, you will be directed to the Worklist that contains all the imported files that match the search criteria.
4. Select the imported file you wish to authorize by clicking on the imported file located in the Worklist.
Details Screen
5. You will be brought to a Details Screen (Figure 1), which will display the details of the imported file selected.
6. Scroll to the end of the page and click on “Authorize.”
Figure 2
Confirmation Screen
7. You will be redirected to a confirmation screen (Figure 2). You have two options:
a. Confirm: This will submit your authorization to CitiDirect Online Banking where the imported file will follow the CitiDirect Online Banking process. You will also be redirected back to the Worklist allowing you to perform additional actions.
b. Cancel: This will end the imported file authorization request and redirect you back to the Worklist.

37
CitiDirect BE Mobile | How to use CitiDirect BE Mobile — For Entitled Users
16. Imported File Rejection
You have three options when rejecting imported files within CitiDirect BE Mobile
1. Worklist Single Imported File Rejection
2. Worklist Multi-Imported File Rejections
3. Payment Details Single Imported File Rejection
Please Note: Imported Files must first be imported through CitiDirect Online (CDOL) via desktop or laptop computer through the Import Transaction menu. From there, the Imported File can be rejected on CitiDirect BE Mobile. From there, the imported file will then follow the same user-defined process as CDOL.
1. Worklist Single Imported File Rejection
Figure 1
To reject an imported file, follow the instructions below:
1. On the Main Menu, select “Payments” then Authorize “Imported File.” This will direct you to a Search Screen.
Search Screen
2. You must enter the following criteria to search for a specific imported file to reject (Figure 1):
• Run ID• Profile Name• File Name• Run User Name

38
CitiDirect BE Mobile | How to use CitiDirect BE Mobile — For Entitled Users
Figure 2
Worklist
3. Once you have completed all the relevant search criteria, you will be directed to the Worklist (Figure 2) that contains all the imported files that match the search criteria.
4. Select the imported file you wish to reject by clicking on the check box situated to the left of each imported file.
5. Scroll to the end of the page and click on “Reject.”

39
CitiDirect BE Mobile | How to use CitiDirect BE Mobile — For Entitled Users
Figure 3
Confirmation Screen
6. On the confirmation screen, you must select from a predefined list of reasons for rejection (Figure 3). Please Note: You will not be allowed to proceed without selecting a reason.
7. Once a reason has been selected, you have two options:
a. Confirm: This will submit your rejection to CitiDirect Online Banking where the imported file will follow the CitiDirect Online Banking process. You will also be redirected back to the Worklist allowing you to perform additional actions.
b. Cancel: This will end the imported file rejection request and redirect you back to the Worklist.
Figure 4
If you wish to confirm any aspect of the payment including its audit trail, you can log into CitiDirect.com (NOT MOBILE) and run an Audit Log Detail Report. Imported files rejected on mobile devices will be marked as MOBILE-RUN-REJECT in the Reference Details Section (Figure 4).

40
CitiDirect BE Mobile | How to use CitiDirect BE Mobile — For Entitled Users
2. Worklist Multi-Imported File Rejections
Figure 1
Figure 2
To reject multiple imported files, follow the instructions below:
1. On the Main Menu, select “Payments” then Authorize “Imported File.” This will direct you to a Search Screen.
Search Screen
2. You must enter the following criteria to search for a specific imported file to reject:
• Run ID• Profile Name• File Name• Run User Name
Worklist
3. Once you have completed all the relevant search criteria, you will be directed to the Worklist (Figure 1) that contains all the imported files that match the search criteria.
4. Select the imported files you wish to reject by clicking on the check box situated to the left of each imported file.
• Alternatively, if you wish to reject all imported files on the page being viewed, you can click on the check box situated in the heading above the first imported file. At this point, you will have the option to select as many imported files as you wish across multiple pages.
5. Scroll to the end of the page and click on “Reject.”
Confirmation Screen
6. On the confirmation screen, you must select from a predefined list of reasons for rejection (Figure 2). Please Note: You will not be allowed to proceed without selecting a reason.
7. Once a reason has been selected, you have two options:
a. Confirm: This will submit your rejection to CitiDirect Online Banking where the imported files will follow the CitiDirect Online Banking process. You will also be redirected back to the Worklist allowing you to perform additional actions.
b. Cancel: This will end the imported file rejection request and redirect you back to the Worklist.

41
CitiDirect BE Mobile | How to use CitiDirect BE Mobile — For Entitled Users
3. Payment Details Single Imported File Rejection
Figure 1
Figure 2
To reject an imported file from the details screen, follow the instructions below:
1. On the Main Menu, select “Payments” then Authorize “Imported File.” This will direct you to a Search Screen.
Search Screen
2. You must enter the following criteria to search for a specific imported file to reject:
• Run ID• Profile Name• File Name• Run User Name• Worklist
3. Once you have completed all the relevant search criteria, you will be directed to the Worklist that contains all the imported files that match the search criteria.
4. Select the imported file you wish to reject by clicking on the imported file located in the Worklist.
Details Screen
5. You will be brought to a Details Screen, which will display the details of the imported file you selected (Figure 1).
6. Scroll to the end of the page and click on “Reject.”
Confirmation Screen
7. On the confirmation screen, you must select from a predefined list of reasons for rejection (Figure 2). Please Note: You will not be allowed to proceed without selecting a reason.
8. Once a reason has been selected, you have two options:
a. Confirm: This will submit your rejection to CitiDirect Online Banking where the imported file will follow the CitiDirect Online Banking process. You will also be redirected back to the Worklist allowing you to perform additional actions.
b. Cancel: This will end the imported file rejection request and redirect you back to the Worklist.

42
CitiDirect BE Mobile | How to use CitiDirect BE Mobile — For Entitled Users
17. File Payment Authorization
Depending on your Client Definition setups, you will be directed to either Default File Authorization screens or High Volume User File Authorization screens.
1. Default File Payment Authorization
2. High Volume User File Payment Authorization
1. Default File Payment Authorization
Figure 1
Figure 2
To authorize File payments, follow the instructions below:
1. On the Main Menu, select “Payments” then Authorize “File,” which will bring you to the File Payment Authorization Worklist.
2. From the Worklist, select single or multiple files you wish to authorize by clicking on the checkbox situated to the left of each payment file batches (Figure 1).
Alternatively, if you wish to authorize all files on the page, click on the checkbox situated in the heading. At this point, you have the option to select as many payments file batches as you wish across multiple pages.
3. Scroll to the end of the page and click on the “Authorize” button which will bring you to a confirmation screen.
4. Once “Authorize” has been clicked, you will be directed to a confirmation screen, which will show a summarized view of the File/Files you have requested to authorize.
5. On the confirmation screen (Figure 2) you have two options:
a. Confirm: This will submit your authorization. You will also be redirected to the Worklist allowing you to perform additional actions.
b. Cancel: This will end the authorization request and redirect you back to the Worklist.

43
CitiDirect BE Mobile | How to use CitiDirect BE Mobile — For Entitled Users
2. High Volume User File Payment Authorization
Figure 1
Figure 2
To authorize File payments, follow the instructions below:
1. On the Main Menu, select “Payments” then Authorize “File,” which will bring you to the “Select a File” screen (Figure 1) where you will see a list of files grouped by different Run IDs.
2. Select the Run ID you wish to authorize and you will be directed to the File Authorization Worklist (Figure 2) where you can select a single or multiple file batches from that Run ID list.
3. Select the file you wish to approve by clicking on the check box situated to the left of each file.
Alternatively, if you wish to authorize all files on the page, click on the checkbox situated in the heading. At this point, you have the option to select as many payments as you wish across multiple pages.
4. Scroll to the end of the page where you will see an “Authorize” button.
5. Once “Authorize” has been clicked you will be redirected to a confirmation screen, which will show a summarized view of the file you have requested to authorize.
Figure 3
6. On the confirmation screen (Figure 3) you have two options:
a. Confirm: This will submit your authorization. You will also be redirected to the Worklist allowing you to perform additional actions.
b. Cancel: This will end the authorization request and redirect you back to the Worklist.

44
CitiDirect BE Mobile | How to use CitiDirect BE Mobile — For Entitled Users
18. Refine (Filter) Worklist
Filtering is used to refine the Payment Authorization and Release Worklists in order to find specific payments.
1. Below the Send to Repair buttons on the Payment Authorization and Payment Release worklists, a “Refine Worklist” section is displayed.
2. To quickly access this section, click on the “Refine Worklist” text in the top right-hand corner of the Worklist, or simply scroll down to the middle of the screen.
3. Within the Refine section you will have the criteria below with which to filter your Worklist:
a. Payment Currency b. Payment Methodc. Payment Debit Account Numberd. Payment Debit Account Namee. Value Date Range
Each Refine option will appear as expandable panels, as illustrated below. To expand each panel, click anywhere along it.
Figure 1
a. Payment Currency: Click on this panel to display all the payment currencies associated with your Worklist. Beside each currency is the number of payments associated with that specific currency.
b. Payment Method: Click on this panel to display all the payment methods associated with your Worklist. Beside each payment method is the number of payments associated with that specific payment method.
c. Payment Debit Account Number: Click on this panel to display all the debit account numbers associated with your Worklist. Beside each account number is the number of payments associated with that specific account.
d. Payment Debit Account Name: Click on this panel to display all the debit account names associated with your Worklist. Beside each account name is the number of payments associated with that specific account.
e. Value Date Range: Click on this panel to display the “From” and “To” date fields. Select your desired value date range by clicking on the calendar icon ( ). The date range selected is inclusive.

45
CitiDirect BE Mobile | How to use CitiDirect BE Mobile — For Entitled Users
3. Using the Refine Worklist:
a. Go to the item/s you wish to filter use as part of your filter. b. Check the box to the left of the item.c. Scroll to the bottom of the page and press “Apply Filter.” As illustrated below, a Summary of all the
filter criteria selected will be displayed at the top of the Refine Worklist section.d. The screen will refresh with a refined Worklist, displaying only the payments associated with the
selected filters.
Please Note: If you have only used one filter option to reduce your payments, additional filter options will be available to you within the other three filter selections, e.g., if currency “USD” is used to refine your Worklist, then the Payment Method, Debit Account Number, Debit Account Name, and Value Date sections will have been reduced to only show values associated with the Refined Worklist.

46
CitiDirect BE Mobile | How to use CitiDirect BE Mobile — For Entitled Users
Select “Value Date Range”
Figure 2
Figure 3
a. Expand the “Value Date Range” filter panel by clicking anywhere along the panel.
b. The “From” and “To” fields are mandatory in defining the desired Value Date Range.
c. To select the “From” and “To” dates, click on the calendar icon ( ).d. An interactive calendar will appear. Click on the desired date to
select. The drop down boxes and arrows can be used to easily select the month and year.

47
CitiDirect BE Mobile | How to use CitiDirect BE Mobile — For Entitled Users
Summary of Filter Criteria
Figure 4
a. When you “Apply Filter,” a Summary of the selected filter criteria will be displayed at the top of the Refine Worklist section.
b. The screen will refresh with a refined Worklist, displaying only the payments associated with the selected filters.

48
CitiDirect BE Mobile | How to use CitiDirect BE Mobile — For Entitled Users
19. Funding WorldLink® FX Payments
The WorldLink® Fund FX Payment feature on CitiDirect BE® Mobile is an extension of “Fund FX Payments” >> “Get FX Rates” on CitiDirect BE®. This is available only for WorldLink clients.
Note: Only WorldLink payments, for which online rates (OLR) are available, can be funded on CitiDirect BE Mobile. For manual contract input, please visit CitiDirect BE to complete your transaction.
You have three options when funding WorldLink FX Payments within CitiDirect BE Mobile:
1. Worklist Single FX Payment Funding
2. Worklist Multi FX Payments Funding
3. Payment Details Single FX Payment Funding
1. Worklist Single FX Payment Funding
Figure 1
To fund a WorldLink FX Payment, follow the instructions below:
On the Main Menu, select “Payments, then WorldLink Fund FX “Single/Multi,” which will bring you to the WorldLink FX Payment Worklist.
1. Select the payment you wish to fund by clicking on the check box situated to the left of the payment (Figure 1). Note: Only payments with Online Rates (OLR) are supported for funding. For payments that require manual contract input, please visit CitiDirect BE.
2. Scroll to the end of the page, where you will see the “Get FX” button.
3. Once “Get FX” has been clicked, you will be directed to the Contract Details Screen.

49
CitiDirect BE Mobile | How to use CitiDirect BE Mobile — For Entitled Users
Figure 2
Note: Depending on your CitiDirect BE client preference settings, you may be first routed to the Rate Contract Prompt, where you have three options: (Figure 2).
a. Yes: To use existing FX contract balancesb. No: To book a new FX contractc. Cancel: To return to the Worklist
Contract Details Screen: Existing Contract
4. On the Existing Contract Details Screen, the details of your existing contract will be displayed (Figure 3):
• Payment Currency • Account Currency • Debit Account Number• Company Name• Number of payments selected
Upon review, you have two options:
a. Accept: Submits your funding request, where the payment will then follow the CitiDirect BE process. Once selected, the contract will be booked and you will be directed to the Confirmation screen (Figure 5a).
b. Cancel: Ends your funding request and returns you to the Worklist
Figure 3

50
CitiDirect BE Mobile | How to use CitiDirect BE Mobile — For Entitled Users
Figure 4
Contract Details Screen: New Contract
5. On the New Contract Details Screen, the details of your new contract will be displayed (Figure 4):
• Payment Currency and Amount • FX Rate • Account Currency • Payment Equivalent Amount • Debit Account Number • Company Name• Number of payments selected
Upon review, you have three options:
a. Accept: Submits your funding request, where the payment will then follow the CitiDirect BE process. Once selected, the contract will be booked and you will be directed to the Confirmation screen (Figure 5b).
b. New Rate: Refreshes your FX rates. You must select this option if the current rates have expired (after 90 seconds).
c. Cancel: Ends your funding request and returns you to the Worklist
6. On the Confirmation screen (Figure 5a, 5b) you must click “OK” to return to the Worklist.
Figure 5a
Figure 5b

51
CitiDirect BE Mobile | How to use CitiDirect BE Mobile — For Entitled Users
2. Worklist Multi FX Payments Funding
Figure 1
To fund multiple WorldLink FX Payments, follow the instructions below:
On the Main Menu, select “Payments,” then WorldLink Fund FX “Single/Multi,” which will bring you to the WorldLink FX Payments Worklist.
1. Select the payments you wish to fund by clicking on the check boxes situated to the left of the payments. To select all payments on the current page, click on the check box situated in the heading above the first payment. (Figure 1). Note: Only payments with Online Rates (OLR) are supported for funding. For payments that require manual contract input, please visit CitiDirect BE.
2. Once “Get FX” has been clicked, you will be directed to the Contract Details Screen. Note: As with CitiDirect BE, you can only “Get FX” for payments with the same WorldLink ID at a time.
Figure 2
Note: Depending on your CitiDirect BE client preference settings, you may be first routed to the Rate Contract Prompt, where you have three options: (Figure 2).
a. Yes: To use existing FX contract balancesb. No: To book a new FX contractc. Cancel: To return to the Worklist
Contract Details Screen: Existing Contracts
3. On the Existing Contract Details Screen, the details of your existing contracts will be displayed (Figure 3):
• Payment Currency • Account Currency • Debit Account Number • WorldLink Company Name • Number of payments selected

52
CitiDirect BE Mobile | How to use CitiDirect BE Mobile — For Entitled Users
Figure 3
Upon review, you have two options:
a. Accept: Submits your funding request, where the payment will then follow the CitiDirect BE process. Once selected, the contract will be booked and you will be directed to the Confirmation screen (Figure 5a) Note: To select multiple contracts, click on their associated check boxes before accepting
b. Cancel: Ends your funding request and returns you to the Worklist
Figure 4
Contract Details Screen: New Contracts
4. On the New Contract Details Screen, the details of your new contract will be displayed (Figure 4):
• Payment Currency and Amount • FX Rate • Account Currency • Payment Equivalent Amount • Debit Account Number • WorldLink Company Name • Number of payments selected
5. Select the contract you wish to use by clicking on corresponding checkbox.
Upon review, you have three options:
a. Accept: Submits your funding request, where the payments will then follow the CitiDirect BE process. Once selected, the contracts will be booked and you will be directed to the Confirmation screen (Figure 5b) Note: To select multiple contracts, click on their associated check boxes before accepting
b. New Rate: Refreshes your FX rates. You must select this option if the current rates have expired (after 90 seconds)
c. Cancel: Ends your funding request and returns you to the Worklist

53
CitiDirect BE Mobile | How to use CitiDirect BE Mobile — For Entitled Users
Figure 5a
6. On the Confirmation screen (Figure 5a, 5b) you must click “OK” to return to the Worklist.
Figure 5b

54
CitiDirect BE Mobile | How to use CitiDirect BE Mobile — For Entitled Users
3. Payment Details Single FX Payment Funding
Figure 1
To fund a WorldLink FX Payment from the details screen, follow the instructions below:
On the Main Menu, select “Payments,” then WorldLink Fund FX “Single/Multi,” which will bring you to the WorldLink FX Payment Worklist.
1. Select the payment you wish to fund by clicking anywhere on its row in the Worklist.
2. This will display the details associated with this payment (Figure 1)
3. Scroll to the end of the page, where you will see the “Get FX” button.
4. Once “Get FX” has been clicked, you will be directed to the Contract Details Screen.
Figure 2
Note: Depending on your CitiDirect BE client preference settings, you may be first routed to the Rate Contract Prompt, where you have three options: (Figure 2)
a. Yes: To use existing FX contract balancesb. No: To book a new FX contractc. Cancel: To return to the Worklist
Contract Details Screen: Existing Contract(s)
5. On the Existing Contract Details Screen, the details of your existing contract(s) will be displayed (Figure 3):
• Payment Currency• Account Currency• Debit Account Number• WorldLink Company Name• Number of payments selected

55
CitiDirect BE Mobile | How to use CitiDirect BE Mobile — For Entitled Users
Figure 3
Upon review, you have two options:
a. Accept: Submits your funding request, where the payment will then follow the CitiDirect BE process. Once selected, the contract will be booked and you will be directed to the Confirmation screen. (Figure 5a)
b. Cancel: Ends your funding request and returns you to the Worklist
Figure 4
Contract Details Screen: Existing Contract(s)
6. On the New Contract Details Screen, the details of your new contract will be displayed (Figure 4):
• Payment Currency and Amount• FX Rate• Account Currency• Payment Equivalent Amount• Debit Account Number• WorldLink Company Name• Number of payments selected
Upon review, you have three options:
a. Accept: Submits your funding request, where the payment will then follow the CitiDirect BE process. Once selected, the contract will be booked and you will be directed to the Confirmation screen (Figure 5b).
b. New Rate: Refreshes your FX rates. You must select this option if the current rates have expired (after 90 seconds).
c. Cancel: Ends your funding request and returns you to the Worklist

56
CitiDirect BE Mobile | How to use CitiDirect BE Mobile — For Entitled Users
Figure 5a
7. On the Confirmation screen (Figure 5a, 5b) you must click “OK” to return to the Worklist.
Figure 5b

57
CitiDirect BE Mobile | How to use CitiDirect BE Mobile — For Entitled Users
20. Initiate Payments on CitiDirect BE Mobile
The Payment Initiation process consists of four screens: Search, Search Results, Data Entry and Confirmation.
Please Note: At this time, Payment Initiation is only available for full-limited modifications pre-formats for domestic and international funds transfers. It is enabled for debit accounts in a limited number of countries. Additional payment methods and countries will be available in later releases of CitiDirect BE Mobile. For a complete list of available countries and payment methods, please see the CitiDirect BE Mobile FAQ document.
Search
1. On the Main Menu, select “Payments” then Initiate “Preformat.”
2. You can then search for a preformat by completing at least one of the following search fields.
a. Preformat Code: This is a free enter field. A minimum of four characters must be entered before continuing.
b. Beneficiary Name: This is a free enter field. A minimum of four characters must be entered before continuing.
c. Payment CCY: This field requires the payment currency in the three character ISO code format, e.g., USD. The value can be entered manually.
d. Payment Method: Click on the look-up icon ( ) to the right of the field. You will be directed to a list of available options.
3. After all the relevant fields have been completed, click on “Search.” This will direct you to the Search Results screen, which will display the search results.
4. To clear all search fields, click “Clear.” This will restore all fields to their default values.

58
CitiDirect BE Mobile | How to use CitiDirect BE Mobile — For Entitled Users
Search Results
5. The Search Results screen will provide you with a list of all the pre-formats, which meet the criteria entered in the Search screen.
Sort
a. You have the option to re-sort the values returned during the search. This can be done by clicking on the “Sort” icon ( ), located on the top right corner of the page.
b. You will be directed to a screen allowing you to select the primary and secondary sort. Select the fields you wish to re-sort the records by.
c. Once your selection has been made, click “Apply” and the application will re-sort the results in the selected options.
6. To select a preformat to initiate, click on the pre-format code and this will direct you to the Payment Entry screen.
Payment Entry
7. On the Payment Entry screen you will be presented with all the fields which are available for entry. Below are fields you will see:
a. Transaction Reference: Depending on your client setup this may not be available for update.
b. Value Date: Requiredc. Payment Amount: Requiredd. Payment Details: Not required
Please Note: All normal CitiDirect BE validations are performed on the data entered prior to submitting payment for authorization.
8. Once you have completed the relevant fields, click “Submit” to proceed.
9. If you wish to return to the Search Results, click on the “Back” button located at the bottom of the screen.

59
CitiDirect BE Mobile | How to use CitiDirect BE Mobile — For Entitled Users
Confirmation Screen
10. On the confirmation screen, you have two options:
a. To proceed, click on the “Confirm” button.b. If you wish to make a change or cancel the payment request,
click “Cancel.”
Please Note: After clicking “Confirm,” you will be directed back to the Search Results screen unless CitiDirect BE finds an issue with the data entered. If this occurs, you will be redirected back to the Payment Entry screen with the appropriate error message displayed.

60
CitiDirect BE Mobile | How to use CitiDirect BE Mobile — For Entitled Users
Figure 1
Figure 2
1. From the Main Menu, select the “Inquiries,” then “Balance.”
2. You will see a summary of your entitled accounts and their corresponding balance, currency and statement date (Figure 1)
3. To view more details on an account, click on it. This will bring you to the Account Details screen (Figure 2), which displays:• Account Balance information• Today’s 10 Most Recent Transactions.

61
CitiDirect BE Mobile | How to use CitiDirect BE Mobile — For Entitled Users
Figure 3
Figure 4
Refining Your Account Balance Worklist
1. To find specific accounts, select “Refine List” in the top right-hand corner of the Worklist (Figure 1).
2. You will be brought to a screen (Figure 3) that allows you to refine (filter) by one or more of the following criteria:
• Account Currency: Select the desired currency by clicking on the lookup icon ( ) to the right of the field. You will be directed to a list of available options.
• Account Branch Code & Name: Select the desired value by clicking on the lookup icon ( ) to the right of the field. You will be directed to a list of available options.
• Customer number: To filter by customer number, you must enter at least the first four digits.
• Account number: To filter by account number, you must enter at least the first four digits.
3. Click “Apply Filter” to filter your Worklist based on the criteria selected. The screen will be refreshed with a refined Worklist based on the filters.
4. A summary of your selected filters will be displayed above your Worklist. To modify or clear your filters, select “Modify” or “Clear” respectively from the top section of the Worklist (Figure 4).

62
CitiDirect BE Mobile | How to use CitiDirect BE Mobile — For Entitled Users
21. User Management on CitiDirect BE Mobile
Security Managers can now perform the following actions for user profiles on CitiDirect BE Mobile:
• Authorize changes• Send to Repair changes• Reject changes• Search for Users
Note: Users must have the System Admin entitlements to be able to view the “Users” option.
Users can Authorize, Reject or Send to Repair changes to user profiles in two ways:
1. From Summary Worklist
2. From User Details Screen
1. Summary Worklist
Figure 1
To Authorize, Reject or Send to Repair Changes to User Profiles from the Worklist, you can do the following:
1. On the Main Menu, under “Users” select “Single/Multi” under Authorize. (Figure 1)
2. This will bring you to the Authorize Users Summary Worklist screen. Select one or more users you would like to authorize/reject/send to repair by selecting the checkbox to the left of the user name. (Figure 2)
To Authorize or Reject:
3. Select “Authorize” or “Reject”. Review the confirmation page showing the selected users. (Figure 3)
Please note: If you process more than 15 users at a time, only the number of users being actioned will be displayed.
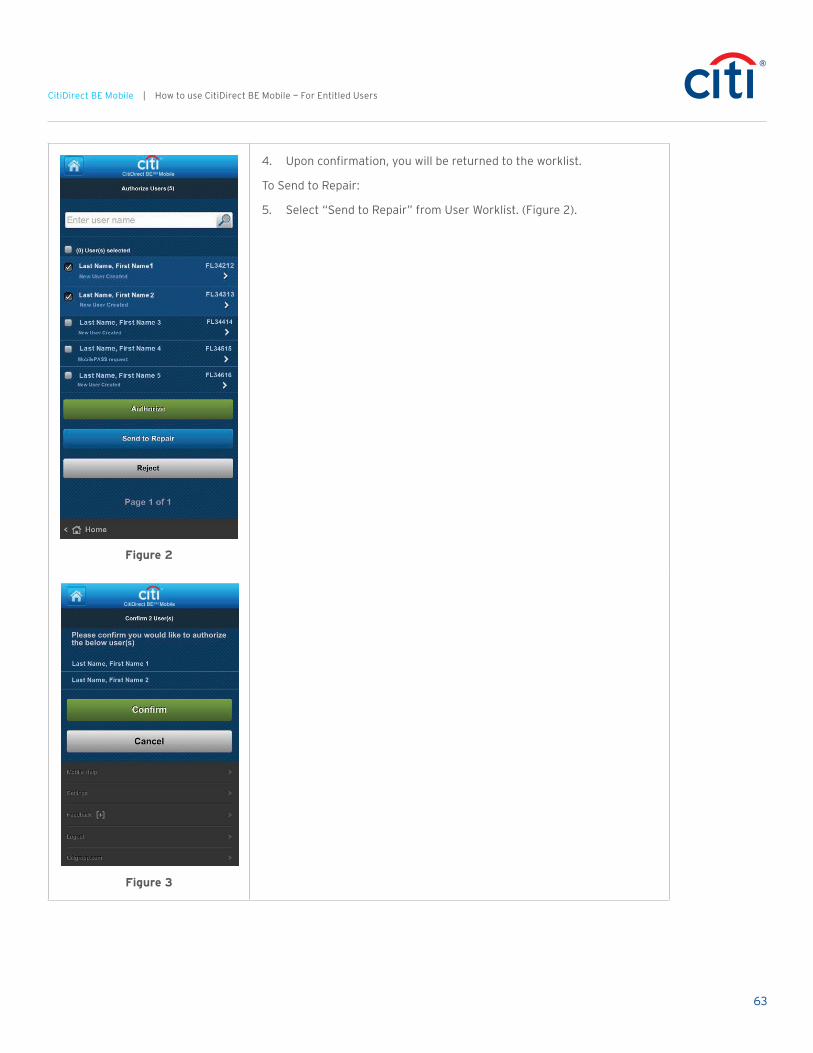
63
CitiDirect BE Mobile | How to use CitiDirect BE Mobile — For Entitled Users
Figure 2
4. Upon confirmation, you will be returned to the worklist.
To Send to Repair:
5. Select “Send to Repair” from User Worklist. (Figure 2).
Figure 3

64
CitiDirect BE Mobile | How to use CitiDirect BE Mobile — For Entitled Users
Figure 4
6. You can choose to select one or more of the available reasons, or provide comments on why the changes are being Sent to Repair (optional). (Figure 4)
Please note: For the following reasons, you will not be able to send the User Profile change(s) to repair, but will only be able to Authorize or Reject the change(s):
• Delete in CD• Resend last Email• Resent Last Payment Transaction Date/Time• Reset User
7. Upon confirmation, you will be returned to the worklist.

65
CitiDirect BE Mobile | How to use CitiDirect BE Mobile — For Entitled Users
2. User Details Screen
Figure 5
To Authorize, Reject or Send to Repair changes from User Details Screen, you can do the following:
1. On the Main Menu, under Users, select “Single/Multi” under Authorize. This will take you to the Authorize Users Worklist. (Figure 1)
2. Select the specific user from the worklist by clicking on the row. (Figure 2)
3. On the User Details Screen, review change(s) made to the user profile, grouped by category (if applicable) (Figure 5)
• User Information• Credential Type• User Entitlement Association• Access Profile Association
4. As previously explained, you can Authorize, Reject or Send to Repair changes made to the User Profile.
5. Upon Confirmation, you will be returned to the worklist.

66
CitiDirect BE Mobile | How to use CitiDirect BE Mobile — For Entitled Users
22. Payment Status Inquiry on CitiDirect BE Mobile
Payment Status Inquiry will return the Status and Sub-Status of payments that appear in the “View All” Payments section within CitiDirect BE.
To view these payments, navigate to “Inquiries” on the Main Menu, then select “Payment Status.”
Payment Status Inquiry provides three simple viewing options:
1. “Most Recent”: (default view, Figure 1) View the 10 most recent payments in the past 3 days. For example, if today were 21-Aug-2014, this will show the 10 most recent payments by input date from 19-Aug-2014 to present. Click on individual payments to view further details.
2. “Largest”: View the 10 largest payments in the past 3 days. Click on individual payments to view further details. (Figure 2)
3. “Search”: Search for specific payments in the past 18 months. (Figure 3)
Figure 1 Figure 2 Figure 3

67
CitiDirect BE Mobile | How to use CitiDirect BE Mobile — For Entitled Users
Search
To search for a specific payment in the past 18 months, you must enter a date range, or a default range will be applied. Please note that searches are restricted to a maximum 90 day period.
Figure 4
Figure 5
1. From the Main Menu, select “Inquiry” then “Payment Status.”
2. Navigate to “Search” (Figure 3)
3. Specify whether you would like to search by “Value Date” or “Input Date” by using the toggle controls.
4. Select the desired date range by clicking on the calendar icon ( ). Please note that this search criterion is mandatory. (Figure 4)
5. To further refine your search, click to expand the “More Search Options” panel. This allows you to search by the additional search criteria listed below (Figure 5):
• Payment Currency: Use the lookup icon ( ) to select the 3-character ISO code.
• Payment Amount: Enter the amount range by providing either the “From” or “To” fields, or both. For example: “From” 200.50 and “To” 220.20; or “From” 200.50; or “To” 220.20.
• Beneficiary Name: Enter either the full or partial beneficiary name. Only one name can be searched at a time.
• Debit Account Number: Enter either the full or partial debit account number. Only one account number can be searched at a time
• Transaction Reference Number: Enter either the full or partial transaction reference number. Only one reference can be searched at a time
6. Click “Search” once the relevant fields have been completed. You will be directed to the Search Results screen, which displays all the payments that meet your criteria. To reset all the fields back to their default values, select “Reset.”
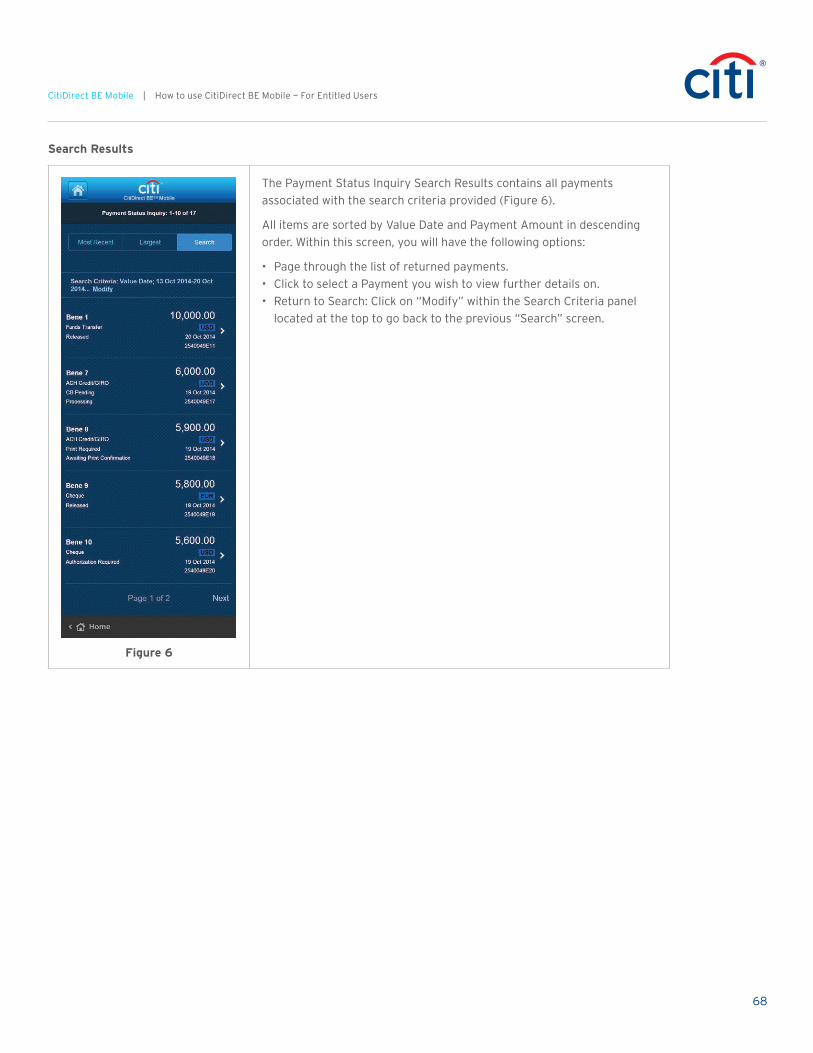
68
CitiDirect BE Mobile | How to use CitiDirect BE Mobile — For Entitled Users
Search Results
Figure 6
The Payment Status Inquiry Search Results contains all payments associated with the search criteria provided (Figure 6).
All items are sorted by Value Date and Payment Amount in descending order. Within this screen, you will have the following options:
• Page through the list of returned payments.• Click to select a Payment you wish to view further details on. • Return to Search: Click on “Modify” within the Search Criteria panel
located at the top to go back to the previous “Search” screen.

69
CitiDirect BE Mobile | How to use CitiDirect BE Mobile — For Entitled Users
Payment Status Inquiry Details
Figure 7
To view the details of a Payment, simply click on the desired transaction from the “Most Recent,” “Largest” or Search Results worklist.
The Payment Status Details screen displays the Status and Sub-Status (where applicable) of the payment you have selected, in addition to other details. Within this screen you will be able to return to the previous results screen using the “Back” button located at the bottom. (Figure 7)

70
CitiDirect BE Mobile | How to use CitiDirect BE Mobile — For Entitled Users
23. WorldLink Funding Details Inquiry
WorldLink Funding Details Inquiry provides visibility into the funding obligations for your WorldLink payments. It is an interactive view of information contained within “WorldLink Funding Detail” Reports on CitiDirect BE, including funding amounts and dates due.
1. To view your WorldLink funding information, navigate to “Inquiries” on the Main Menu, then select “WorldLink Funding Details.”
Figure 1

71
CitiDirect BE Mobile | How to use CitiDirect BE Mobile — For Entitled Users
2. For your convenience, recent payments released within the past three days (including today) are shown by default in the landing page. Simply use the toggle to switch dates. The information for each date is organized by WorldLink® Company Name.
Figure 2 Figure 3

72
CitiDirect BE Mobile | How to use CitiDirect BE Mobile — For Entitled Users
3. Click a Company Name to view its Account Summary Worklist. The following information for each funding account will be displayed:
• Currency and funding amounts due• Number of payments and associated contracts
Figure 4
You can also filter your Account Summary Worklist by clicking on “Refine Worklist” located in the top right corner of the screen. This allows you to filter your accounts by Account Name, Account Number and Account Currency.
4. To further view its Transaction Details, click on any Account in the Account Summary Worklist. The details of each payment are displayed, including its Amount and Equivalent Amount, Status, Value Date, FX Rate and Contract Number.
Figure 5
To return to the previous screen, click “Back” located at the screen footer. To return to the “Inquiries” menu, select “Home.”

73
CitiDirect BE Mobile | How to use CitiDirect BE Mobile — For Entitled Users
Search
You may search for the funding information of other WorldLink® payments that have been released within the past 18 months.
Figure 6
Figure 7
1. From the Main Menu, select “Inquiry” then “WorldLink Funding Details.”
2. Click on “Search Dates” located in the top right corner of the WorldLink Funding Details Inquiry landing page (Figure 6).
3. Select the desired Release Date by clicking on the calendar icon ( ) and click “Search.” (Figure 7)
4. The screen will refresh with the Search Results.

74
CitiDirect BE Mobile | How to use CitiDirect BE Mobile — For Entitled Users
Search Results
Figure 8
The WorldLink Funding Details Inquiry Search Results displays funding information pertaining to WorldLink payments released on the selected date (Figure 8). The results are grouped by Company Name in ascending order. Within this screen you will have the following options:
• View more: Page through the list of returned results• Review Details: Click anywhere along a row to drill down into specific
Account and/or Transaction details.• Return to Search: Click on “Modify” within the Search Criteria panel
located at the top, to return to the previous “Search” screen.

75
CitiDirect BE Mobile | How to use CitiDirect BE Mobile — For Entitled Users
24. Intraday Cash Position on CitiDirect BE Mobile
Main Screen
Intraday Cash Position is designed to bring total aggregated positions of all the accounts a user is entitled to via a single client definition currency. In addition, Intraday Cash Position offers the ability to filter based on currency, country and CitiDirect groups to show your total net positions according to the filters you have chosen. Currency groups are shown in either client base currency or local currency. It displays the aggregation of the latest and greatest Current Available Balance of your accounts converted using FX rate fed from CitiDirect BE. This is currently not available in CitiDirect Online Banking.
To view your aggregated intraday cash position balances, follow the instructions below.
On the Main Menu, click on “Intraday Cash Position.” This will bring you to the Intraday Cash Position main screen.

76
CitiDirect BE Mobile | How to use CitiDirect BE Mobile — For Entitled Users
Intraday Cash Position Main Screen
Figure 1
The Intraday Cash Position main screen contains three sections:
• Total aggregation of all accounts• Currency buttons• Sub-aggregations per currency group
Total aggregation of all accounts
The total aggregations of all accounts is displayed with the following information:
Total available balance: # Account (s) — This is the total number of accounts being aggregated determined by a user’s entitlement. (Please note this number will change if using filters.)
Current
• Current as of: Date Time Stamp — This is the “as of” date for the current available balance date time. This is the most recent date across all accounts.
• Currency Symbol ###.## — This is the sum total of all current available balances contained in the view. All amounts have been converted to the base currency of the client definition before being summed
Opening
• Opening as of: Date — This is the as at date for the opening available balance date time. This is the most recent date across all accounts.
• Currency Symbol ###.## — This is the sum total of all opening available balances contained in the view. All amounts have been converted to your base currency before being summed.

77
CitiDirect BE Mobile | How to use CitiDirect BE Mobile — For Entitled Users
Figure 2
Currency Buttons
Below the aggregated totals, you will see two buttons — base currency symbol and “LCY.” These buttons allow you to change the values in the Sub-aggregations per currency group list. Client base currency is the default (as shown in Figure 1). The “LCY” button will change all the balances to display the totals in the relevant account currency (as shown in Figure 2).
Sub-aggregations per currency group
Below the currency buttons, you will see the aggregated totals per account currency group displayed with the following information:
• Currency Group: Currency Symbol — This displays the currency being grouped.
• # Account (s) — This is the number of accounts contained in the currency group.
• Currency Symbol ###.## — This is the summed total of all current available balances within the specific currency group. (Please note this number changes depending on whether you have clicked on the base currency button or the “LCY” button.)
• Date — This is the as of date for the current available balance. This is the most recent date across all accounts within the specific currency grouping.
• FX Rate: #.## — This will display as the rate used to convert from Account Currency to Base and vice versa. The rate is fed from CitiDirect BE.
10 is the maximum sub-aggregations per currency group shown per page.
To view details of a specific account currency group, click on a currency group box and you will be redirected to the Account Currency Group Details screen for that particular account currency group.
If you wish to return to the Main Menu screen, click on the home button ( ) located at the top of the screen.

78
CitiDirect BE Mobile | How to use CitiDirect BE Mobile — For Entitled Users
Account Currency Group Details Screen
Figure 1
The Account Currency Group Details screen contains three sections:
• Currency buttons• Total aggregation of all accounts• Totals per account
Currency Buttons
At the top of the screen, you will see two buttons — base currency symbol and “LCY.” These buttons allow you to change the balances in the Sub-aggregations per currency group list. Client base currency is the default (as shown in Figure 1). The “LCY” button will change all the balances to display the totals in the relevant account currency (as shown in Figure 2).
Total aggregation of all accounts
The total aggregation of all accounts is displayed with the following information:
FX Rate: #.## — This will display as the rate used to convert from Account Currency to Base and vice versa. The rate is fed from CitiDirect BE.

79
CitiDirect BE Mobile | How to use CitiDirect BE Mobile — For Entitled Users
Figure 2
Current
• Current as of: Date Time Stamp — This is the “as of” date for the current available balance date time. This is the most recent date across all accounts.
• Currency Symbol ###.## — This is the sum total of all current available balances contained in this view. All amounts have been converted to the base currency of the client definition before being summed.
Opening
• Opening as of: Date — This is the as at date for the opening available balance date time. This is the most recent date across all accounts.
• Currency Symbol ###.## — This is the sum total of all opening available balances contained in the view. All amounts have been converted to your base currency before being summed.
Totals per account
• Below the aggregated totals of all the accounts, there are the totals per account. In this section the following fields are displayed:
• Account number: …#### — Only the last four digits of the account number are displayed.
• Balance as of: Date — This is the value as of date for the current available balance. This is the most recent date across all accounts within the specific currency group.
• Currency Symbol ###.## — This is the total of the current available balance. (Please note this number changes when you click the currency buttons.)
• 10 is the maximum accounts per currency group shown per page.• To drill into a specific account, click on it and you will be redirected to
the Account Balance details screen. This displays details of the account, including account balances, and the day’s 10 most recent transactions for that account (Figure 3).
• If you wish to return to the Main Menu screen, click on the home button ( ) located at the bottom and top of the screen.
Figure 3

80
CitiDirect BE Mobile | How to use CitiDirect BE Mobile — For Entitled Users
Figure 4
Filtering Screen
Filtering is used to refine the Account Currency Groups List and Account Currency Group Details List in order to find specific accounts via currencies, countries or CitiDirect groups.
1. On the Intraday Cash Position main screen, the “Refine above list” button will appear at the bottom of the account currency groups list right above “Currency” (Figure 4).
a. Also, if you wish to go to the filter section directly, click on the Filter icon ( ) in the top right corner of the screen.
2. Within the Filter section you will have the below fields to refine your work list:
a. Account Currencyb. Account Countryc. CitiDirect Groups
Each Refine option will appear as follows:
1. Account Currency: Only the top six currencies will appear on the Worklist screen. These are defined based on the number of accounts in your list associated with the currency. If the currency you are looking for does not appear and you have more than six currencies in your Worklist, you will get the option to “View All...”. This will show all currencies that appear in your Worklist. Beside each currency is the number of accounts associated with that specific currency.
2. Account Country: Only the top four account countries will appear on the Worklist screen. These are defined based on the number of accounts in your Worklist associated with the country. If the account country you are looking for does not appear and you have more than four countries in your Worklist, you will get the option to “View All...”. This will show all countries that appear in your Worklist. Beside each country is the number of accounts associated with that specific country.
3. CitiDirect Groups: Only the top four CitiDirect Groups will appear on the Worklist screen. These are defined based on the number of accounts in your list associated with the group. If the group you are looking for does not appear and you have more than four groups in your list, you will get the option to “View All...”. This will show all groups which appear in your list. Beside each group is the number of accounts associated with that specific group.

81
CitiDirect BE Mobile | How to use CitiDirect BE Mobile — For Entitled Users
Using refine from the Worklist:
1. Go to the item/s you wish to use as part of your filter.
2. Check the box to the left of the item.
3. Scroll to the bottom of the page and press “Apply Filter.”
4. The screen will refresh and just display the accounts associated with the requested filter criteria.
5. Note that if you have only used one filter option to reduce your accounts, additional filter options will be available to you within the other two filter selections, e.g., If currency “USD” is used to refine your Worklist. Then both the account country and CitiDirect Groups number section will have been reduced to only show values associated with the Refined Worklist
**For more information on how to create a Group in CitiDirect BE, please refer to the below instructions and also to the CitiDirect BE User Guide.
To add a profile to the Account Grouping library on CitiDirect Online Banking:
1. Launch CitiDirect Services. In the navigation bar, click on Library Maintenance under Tools & Preferences. The Library Maintenance Summary Form will appear. All libraries to which you are entitled are listed by service class.
2. Select Payments Account Grouping library, and then click OK. The Account Grouping Summary Form appears. Note: To find the Account Grouping library quickly, click Search.

82
CitiDirect BE Mobile | How to use CitiDirect BE Mobile — For Entitled Users
3. On the Account Grouping Summary page, click the Input Tab on the top left, and then click the New button at the bottom of the screen to create a new account group.
4. On the Account Grouping Detail form, enter the following fields:
a. In the Account Group field, enter a unique code to identify the new account group.b. In the Account Group Description field, enter a description for the new account group.c. In the Account List field, click the Library Look-Up button and select an account number
to include in the account grouping from the library list. To select multiple accounts, drag the cursor down sequential lines or hold the CTRL key as you select lines that are not sequential.
5. After entering the above information, click on the Submit button at the bottom of the screen to save and submit the library profile for validation.

83
CitiDirect BE Mobile | How to use CitiDirect BE Mobile — For Entitled Users
25. Client Linkage on CitiDirect BE Mobile
Client Linkage on CitiDirect® Online Banking
Client Linkage in CitiDirect® Online Banking provides users with the ability to perform functions across clients with different client configurations and definitions. Thus, the key advantages of Client Linkage are twofold:
• More flexible security management• Cross-client interaction between related entities
As a gateway between related clients, Client Linkage can be one directional or multidirectional depending on the client interrelationship. Client Linkage facilitates the movement of users across related CitiDirect client entities without the need for multiple sign-ons or multiple sets of security credentials. Since Security Managers may have different privileges, Client Linkage expands the security administration functionality in order to support a customer’s need for centralized or decentralized security management.
For more information on Client Linkage, please refer to the CitiDirect Online Banking Client Linkage User Guide (Client Linkage is set up within the CitiDirect platform).

84
CitiDirect BE Mobile | How to use CitiDirect BE Mobile — For Entitled Users
Client Linkage on CitiDirect BE Mobile
If you have access to multiple clients with your profile, Client Linkage gives you the ability to change the current client without logging out of the application.
Figure 1
Figure 2
To change the client, follow these instructions:
1. On the Main Menu, select the “Change Client Context” bar located in the screen footer. You will be redirected to the Client Linkage Screen.
2. The Client Linkage screen shows a list of all clients you have access to view (Figure 2). You have two options on this screen:
a. Select the client name you wish to view. You will be redirected to the main screen where all the entitlements will have been changed to only show information related to the specific client you have selected.
b. Cancel: If you have clicked on the Client Linkage icon in error, you are able to cancel the operation by scrolling to the bottom and pressing Cancel.
26. Payments visible on CitiDirect BE Mobile
On the Worklists, entitled users will only see payments that require their authorization or release; once authorized or released they will no longer be visible on the mobile device.
27. Confirmation of payment authorization, release and repair completion
Once you have authorized payments or returned the payment for repair, the payments screen will refresh and the payment (authorized, released or sent to repair) will no longer be visible.

85
CitiDirect BE Mobile | How to use CitiDirect BE Mobile — For Entitled Users
28. Viewing payments on the page
You will be able to see ten payments per page within the Authorize and Release Worklists. Within CitiDirect BE Mobile you have the option to increase or decrease the number of payments, which are being returned for each page. To increase this, do the following:
1. From the Authorize/Release Worklist screens, click on “Settings,” located at the bottom of the page within the footer.
2. This will open a “Page Settings” screen. Within this screen, you will have the option to increase the number of payments in 10’s up to a maximum of 50 payments.
3. To make a change, click on arrow next to your desired choice and you will be redirected back to the Worklist.
4. Otherwise, press “Cancel” if you do not want to change the settings.
29. Number of total payments in CitiDirect BE Mobile vs. CitiDirect Online Banking
CitiDirect Online Banking, the online portal, returns a three-month view of pending payments and allows users to search beyond that time frame. CitiDirect BE Mobile provides the complete list of payments. To search for a specific transaction, users have access to 18 months of transaction history, just as they would on CitiDirect Online Banking.
30. CitiDirect BE Mobile Help
Similarly to the CitiDirect BE portal, the CitiDirect BE Mobile application has its own self-contained help screens. This is accessible by clicking on “Mobile Help” located at the bottom of each screen.

86
CitiDirect BE Mobile | How to use CitiDirect BE Mobile — For Entitled Users
The following content is available:
• Prior to logging on, if “Mobile Help” is accessed the user will be presented with the following: — Logging on to CitiDirect BE Mobile — Contact Us
• Post logging on, if “Mobile Help” is accessed the user will be presented with the following: — Logging on to CitiDirect BE Mobile — Changing application language — CitiDirect BE Mobile Landing page — Authorizing payment from Worklist — Releasing payment from Worklist — Sending a payment to repair from Worklist — Filtering a payment list — Changing the number of payments per page — Authorizing payment from Details screen — Releasing payment from Details screen — Sending a payment to repair from Details screen — Payment Initiation — Authorizing Batches from Worklist — Deleting Batches from Worklist — Authorizing a Batch from the Details screen — Deleting a Batch from the Details screen — Create Batch — Releasing a Batch from the Details screen — Releasing Batches from Worklist — Funding a WorldLink Fund FX Payment from Worklist — Funding a WorldLink Fund FX Payment from Details Screen — Accepting a Contract — Confirming a FX Funding Contract — Running Balance Inquiry — Using Account Balance Search Results screen — Using Account Balance Details screen — Running Payment Status Inquiry — Running WorldLink® Funding Details Inquiry — Authorize & Reject Changes to User Profiles from the Worklist — Review Changes to User Profiles — Send to Repair Changes to User Profiles — Search for Users — Using Payment Status Inquiry Search Results screen — Using Payment Status Inquiry Details screen — Authorize Imported File Search — Authorize Imported File Worklist — Authorize Imported File Details — Using Intraday Cash Position — Account Currency Group screen — Using Intraday Cash Position — Account Currency Group Details screen — Client change screen — Filtering a Payment list — Authorize a File — Default — Authorize a File — High Volume User — Contact Us
Note: “Mobile Help” topics may appear different for Trade users

87
CitiDirect BE Mobile | How to use CitiDirect BE Mobile — For Entitled Users
31. SMS notifications
Please Note: SMS notifications are only available in countries that support this functionality.
OPT-IN
• When you are properly assigned/configured for CitiDirect BE Mobile SMS notifications, you will receive the following SMS notification test message from Citi: “CitiDirect BE: Enter code T4o4T4w6 (example) in citidirect.com. Msg freq based on payment activities. *Reply STOP to cancel & HELP for help. Msg&Data Rates May Apply.” *Please Note: The actual message will vary depending on the country. For example: In the United States, “CitiDirect BE: Enter code T4o4T4w6 (example) in citidirect.com. Msg freq based on payment activities. *Reply STOP to cancel & HELP for help. Msg&Data Rates May Apply.”
• This is the SMS message you will receive if you reply “STOP” on your mobile device: “Citi — You have been removed from CitiDirect BE SMS Notifications service. Contact your security manager or visit www.citidirect.com, Msg&Data Rates May Apply.”
• This is the SMS message you will receive if you reply “HELP” on your mobile device: “Citi — CitiDirect BE SMS Notifications. For help, visit www.citidirect.com or contact your security manager. Msg&Data Rates May Apply. Text STOP to cancel.”
• Log into https://portal.citidirect.com, launch CitiDirect Services, and click on Tools & Preferences. Select OPT-IN — SMS Notifications.
• Enter the PIN you received via SMS notification. Then click Submit.

88
CitiDirect BE Mobile | How to use CitiDirect BE Mobile — For Entitled Users
OPT-OUT
There are three different ways you can OPT-OUT of SMS notifications:
1. Log onto CitiDirect Online Banking and follow the directions below.
2. Ask your Security Manager to remove SMS notifications from your setup.
3. Reply STOP on your mobile device to the first SMS message you received. Note: This only works for countries with a short code.
• Go to https://portal.citidirect.com and click on Tools & Preferences. Select OPT-OUT — SMS Notifications.
• Check OPT-OUT and click on Submit to confirm the OPT-OUT process.• This is the SMS message you will receive after you check OPT-OUT and click Submit:
“Citi — You have been removed from CitiDirect BE SMS Notifications service. Contact your security manager or visit www.citidirect.com, Msg&Data Rates May Apply.”
• This is the monthly SMS reminder message:“Citi — Monthly reminder — CitiDirect BE SMS Notification service is continued. Msg&Data rates may apply. Reply HELP for help. STOP to cancel.”
• Please Note: The actual message will vary depending on country requirements.
32. Logging out of CitiDirect BE Mobile
You may log out of CitiDirect BE Mobile portal at any time by scrolling to the bottom of any page within the site and clicking on “Log Out” located at the bottom right hand corner. By clicking on this, your session with CitiDirect BE will be ended and you will be redirected back to the Logon screen.

89
CitiDirect BE Mobile | How to set up a new CitiDirect BE Mobile user — For Security Managers
How to set up a new CitiDirect BE Mobile user — For Security ManagersWhen setting up users to user the new CitiDirect BE Mobile offering you will need to follow the below steps:
Please Note: For those clients for whom Citi acts as a security manager, please contact your Citi representative to set up a new user.
1. Access Profile — Onboarding:
• From CitiDirect BE Portal (https://portal.citidirect.com), launch CitiDirect Services.• In the navigation bar, click on Access Profile under User Administration.• Click on “New” located at the bottom of the Access Profile summary screen.
• Scroll to “Mobile & Tablet User Management” and click on “processes.” Within the library lookup dialog, select all three processes and press “Ok.”

90
CitiDirect BE Mobile | How to set up a new CitiDirect BE Mobile user — For Security Managers
• Scroll to “User Profile” and click on “processes.” Within the library lookup dialog, select all three processes and press “Ok.”
• Once the above steps have been completed click the “Submit” button located on the bottom of the Access Profile Detail screen. Within the dialog enter the name you wish to save the profile as. Please take note of this name as it will be used in a later step.

91
CitiDirect BE Mobile | How to set up a new CitiDirect BE Mobile user — For Security Managers
2. Entitling Client Security Manager — Onboarding:
• When entitling your Security Manager, there is no need to log out of the CitiDirect BE portal. Entitlements are automatically saved.
• Once the access profile has been created you must add it to the client Security Managers user profiles. Go to User entitlements located at Access Management ▶ User Entitlements.
• Once the New button has been clicked the User Library Look Up Dialog popup box will be displayed. Select Client Security Manager. Note: If the Security Manager already has an existing profile, this step does not apply. The Search functionality is available to select Client Security Managers from the list of existing profiles.

92
CitiDirect BE Mobile | How to set up a new CitiDirect BE Mobile user — For Security Managers
• Within the User Entitlements Detail screen click on “Add” button located on the bottom of Access Profile window.
• In the “Library Look Up Dialog” select the new Access Profile created as part of step 2 above and press Ok.
• Click on the “Submit” button located on the bottom of the User Entitlement screen to save the changes.

93
CitiDirect BE Mobile | How to set up a new CitiDirect BE Mobile user — For Security Managers
3. Entitling Users — Client Security Manager
• Log out of the portal before entitling new users.• Upon logging back in, click on Mobile & Tablet User Management under User Administration in
the CitiDirect Services navigation bar.
• Please Note: In the Mobile User Management Summary page, it is possible to select multiple users on the Input/Modify, Authorization Req’d and View tabs in order to improve the efficiency of granting and adjusting user entitlements. Highlight multiple users and select “Go to details.” It will be possible to click “Next” at the bottom of the screen, which will save changes and move to the next selected user.

94
CitiDirect BE Mobile | How to set up a new CitiDirect BE Mobile user — For Security Managers
• Once the client has been selected click “New” to select the user and set up Mobile Channel access and/or Notification and/or Event Notification.
• On opening the screen user screen will be prepopulated with the following data from the users profile:
— First Name, Middle Name, Last Name

95
CitiDirect BE Mobile | How to set up a new CitiDirect BE Mobile user — For Security Managers
• The Security Manager will be required to complete the required fields within the screen: — E-mail address: Required for all mobile users. Please Note: It is possible to add two e-mail addresses by separating the two e-mail addresses with a semicolon.
— Select a language preference for E-mail from the dropdown menu. — To entitle users for Mobile Access (to CitiDirect BE Mobile): Check the box labeled “Mobile Access Enabled.” To remove mobile access, simply uncheck the box.
• To set up new notifications preferences for Payments and Event Notification: please click on the New button on the summary grid. The popup page below will open.
— SMS Country Code/Phone Number: Required for users who wish to be enabled for SMS Notifications or Event Notifications.

96
CitiDirect BE Mobile | How to set up a new CitiDirect BE Mobile user — For Security Managers
• Use the “Services” dropdown to choose either Event Notification, Payments or File.
• If you choose Event Notification: The “Process” dropdown defaults to “All.” SMS is the only available method. Citi suggests you maintain the system’s default limit of ten SMSs a day.
• When you are finished, click “Save.”
• You could choose Payment Notification: This will enable the user to receive notifications of payments pending. Use the “Process” dropdown to specify if the user will receive notifications for payments pending Authorization, Release or All.
• Then, select the method of notification by clicking on the checkboxes. You can select E-mail, SMS or both.
• If you select SMS Notification, enter a Daily SMS Limit. Citi suggests keeping the default value at ten. If you select E-mail Notification, then enter a monetary threshold. The default is e-mail notifications for all payments pending over 1,000,000 in client’s base currency. Please Note: The monetary range fields are set in the client’s base currency.
• You could also choose File Notification: This will enable the user to receive notifications of pending imported file transactions. The “Process” will drop down and will automatically default to authorization.
• Then, select the method of notification by clicking on the checkboxes. You can select E-mail, SMS or both.

97
CitiDirect BE Mobile | How to set up a new CitiDirect BE Mobile user — For Security Managers
• If you select SMS Notification, enter a Daily SMS Limit. Citi suggests keeping the default value at 2. If you select E-mail Notification, there is no default. You will be notified via e-mail for every imported file transaction pending authorization.
• When the Security Manager has completed all the notification profiles they wish to entitle the user with, click Submit.

98
CitiDirect BE Mobile | How to set up a new CitiDirect BE Mobile user — For Security Managers
• Once the user has been created it must be authorized from the Mobile User Management section — “Authorization Req’d” screen. Please Note: The creator cannot authorize their own changes.
• Security Manager clicks the Authorize button to complete the user setup.• Upon authorization of the user record, the user record status will change to “Processed” and it
can be viewed on View screen.

99
CitiDirect BE Mobile | How to set up a new CitiDirect BE Mobile user — For Security Managers
Note:
• Only CD Security Administrators can set up new CitiDirect BE Mobile users.• All CitiDirect BE Mobile users should have SafeWord cards.• Users should have e-mail address set up in setup screen.

Treasury and Trade Solutions citi.com/treasuryandtradesolutions
© 2016 Citibank, N.A. All rights reserved. Citi and Arc Design is a registered service mark of Citigroup Inc.CitiDirect BE is a service mark of Citigroup Inc. All other trademarks are the property of their respective owners.1491271 GTS25681 10/16
Developed by Citi Innovation Lab Dublin