bomb - lthummuslthummus.com/modmanual.pdf · a bomb will explode when its countdown timer reaches...
TRANSCRIPT

BOMBDEFUSAL
MANUAL
Version 1
Verification Code: 241
Revision 3
Welcome to the dangerous and challenging world of bomb defusing.
Study this manual carefully; you are the expert. In these pages you will find
everything you need to know to defuse even the most insidious of bombs.
And remember — One small oversight and it could all be over!
Keep Talking and Nobody Explodes v. 1 Introduction
Page 2 of 23

Strike
Indicator
Defusing Bombs
A bomb will explode when its countdown timer reaches 0:00 or when too many
strikes have been recorded. The only way to defuse a bomb is to disarm all of its
modules before its countdown timer expires.
Example Bomb
Front Side
Modules
Each bomb will include up to 11 modules that must be disarmed. Each module is
discrete and can be disarmed in any order.
Instructions for disarming modules can be found in Section 1. "Needy" modules
present a special case and are described in Section 2.
Strikes
When the Defuser makes a mistake the bomb will record a strike
which will be displayed on the indicator above the countdown
timer. Bombs with a strike indicator will explode upon the third
strike. The timer will begin to count down faster after a strike
has been recorded.
If no strike indicator is present above the countdown timer, the
bomb will explode upon the first strike, leaving no room for error.
Gathering Information
Some disarming instructions will require specific information about the bomb,
such as the serial number. This type of information can typically be found on
the top, bottom, or sides of the bomb casing. See Appendix A, B, and C for
identification instructions that will be useful in disarming certain modules.
Keep Talking and Nobody Explodes v. 1 Defusing Bombs
Page 3 of 23

Section 1: Modules
Modules can be identified by an LED in the top right corner.
When this LED is lit green the module has been disarmed.
All modules must be disarmed to defuse the bomb.
Keep Talking and Nobody Explodes v. 1 Section 1: Modules
Page 4 of 23

On the Subject of Wires
Wires are the lifeblood of electronics! Wait, no, electricity is the lifeblood.
Wires are more like the arteries. The veins? No matter…
A wire module can have 3-6 wires on it.
Only the one correct wire needs to be cut to disarm the
module.
Wire ordering begins with the first on the top.
3 wires:
If there are no red wires, cut the second wire.
Otherwise, if the last wire is white, cut the last wire.
Otherwise, if there is more than one blue wire, cut the last blue wire.
Otherwise, cut the last wire.
4 wires:
If there is more than one red wire and the last digit of the serial number is
odd, cut the last red wire.
Otherwise, if the last wire is yellow and there are no red wires, cut the first
wire.
Otherwise, if there is exactly one blue wire, cut the first wire.
Otherwise, if there is more than one yellow wire, cut the last wire.
Otherwise, cut the second wire.
5 wires:
If the last wire is black and the last digit of the serial number is odd, cut the
fourth wire.
Otherwise, if there is exactly one red wire and there is more than one yellow
wire, cut the first wire.
Otherwise, if there are no black wires, cut the second wire.
Otherwise, cut the first wire.
6 wires:
If there are no yellow wires and the last digit of the serial number is odd, cut
the third wire.
Otherwise, if there is exactly one yellow wire and there is more than one
white wire, cut the fourth wire.
Otherwise, if there are no red wires, cut the last wire.
Otherwise, cut the fourth wire.
Keep Talking and Nobody Explodes v. 1 Wires
Page 5 of 23
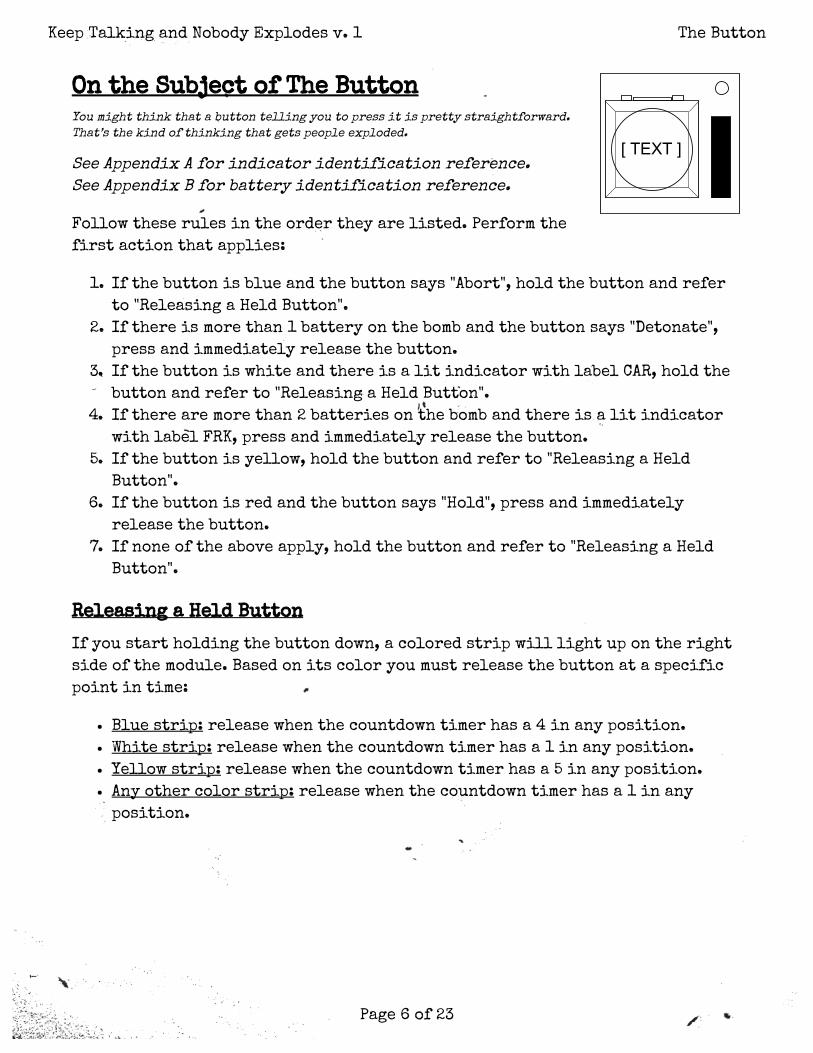
On the Subject of The Button
You might think that a button telling you to press it is pretty straightforward.
That’s the kind of thinking that gets people exploded.
See Appendix A for indicator identification reference.
See Appendix B for battery identification reference.
Follow these rules in the order they are listed. Perform the
first action that applies:
1. If the button is blue and the button says "Abort", hold the button and refer
to "Releasing a Held Button".
2. If there is more than 1 battery on the bomb and the button says "Detonate",
press and immediately release the button.
3. If the button is white and there is a lit indicator with label CAR, hold the
button and refer to "Releasing a Held Button".
4. If there are more than 2 batteries on the bomb and there is a lit indicator
with label FRK, press and immediately release the button.
5. If the button is yellow, hold the button and refer to "Releasing a Held
Button".
6. If the button is red and the button says "Hold", press and immediately
release the button.
7. If none of the above apply, hold the button and refer to "Releasing a Held
Button".
Releasing a Held Button
If you start holding the button down, a colored strip will light up on the right
side of the module. Based on its color you must release the button at a specific
point in time:
Blue strip: release when the countdown timer has a 4 in any position.
White strip: release when the countdown timer has a 1 in any position.
Yellow strip: release when the countdown timer has a 5 in any position.
Any other color strip: release when the countdown timer has a 1 in any
position.
Keep Talking and Nobody Explodes v. 1 The Button
Page 6 of 23
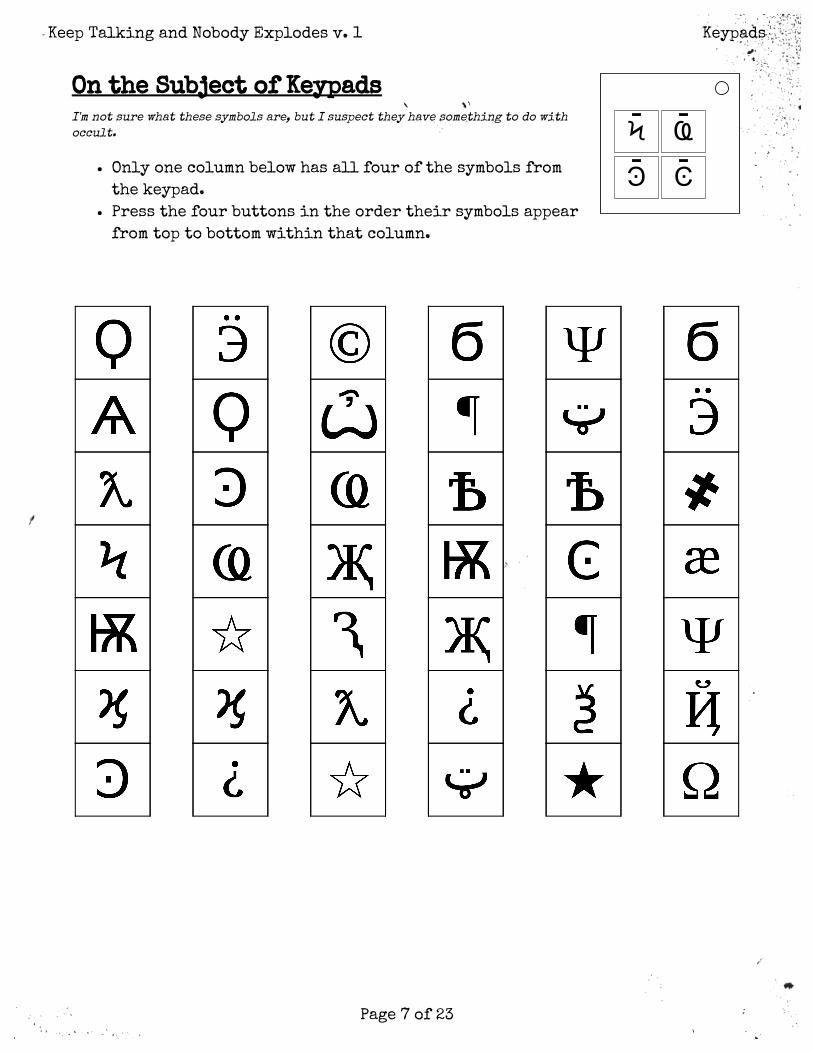
On the Subject of Keypads
I'm not sure what these symbols are, but I suspect they have something to do with
occult.
Only one column below has all four of the symbols from
the keypad.
Press the four buttons in the order their symbols appear
from top to bottom within that column.
Keep Talking and Nobody Explodes v. 1 Keypads
Page 7 of 23

On the Subject of Simon Says
This is like one of those toys you played with as a kid where you have to match the
pattern that appears, except this one is a knockoff that was probably purchased at
a dollar store.
1. One of the four colored buttons will flash.
2. Using the correct table below, press the button with the
corresponding color.
3. The original button will flash, followed by another. Repeat this sequence
in order using the color mapping.
4. The sequence will lengthen by one each time you correctly enter a sequence
until the module is disarmed.
If the serial number contains a vowel:
Red
Flash
Blue
Flash
Green
Flash
Yellow
Flash
Button to press:
No Strikes Blue Red Yellow Green
1 Strike Yellow Green Blue Red
2 Strikes Green Red Yellow Blue
If the serial number does not contain a vowel:
Red
Flash
Blue
Flash
Green
Flash
Yellow
Flash
Button to press:
No Strikes Blue Yellow Green Red
1 Strike Red Blue Yellow Green
2 Strikes Yellow Green Blue Red
Keep Talking and Nobody Explodes v. 1 Simon Says
Page 8 of 23

On the Subject of Who’s on First
This contraption is like something out of a sketch comedy routine, which might
be funny if it wasn't connected to a bomb. I’ll keep this brief, as words only
complicate matters.
1. Read the display and use step 1 to determine which
button label to read.
2. Using this button label, use step 2 determine which
button to push.
3. Repeat until the module has been disarmed.
Step 1:
Based on the display, read the label of a particular button and proceed to step 2:
YES FIRST DISPLAY OKAY SAYS NOTHING
BLANK NO LED LEAD READ
RED REED LEED HOLD ON YOU YOU ARE
YOUR YOU'RE UR THERE THEY'RE THEIR
THEY ARE SEE C CEE
Keep Talking and Nobody Explodes v. 1 Who's on First
Page 9 of 23
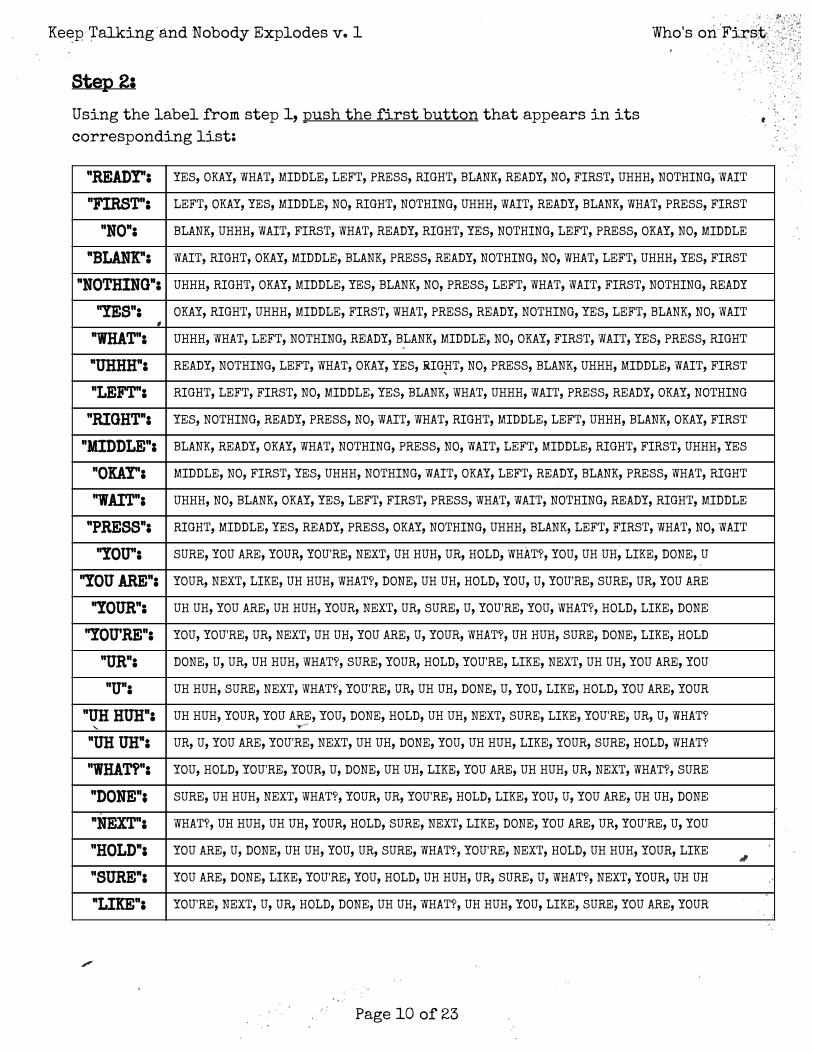
Step 2:
Using the label from step 1, push the first button that appears in its
corresponding list:
"READY": YES, OKAY, WHAT, MIDDLE, LEFT, PRESS, RIGHT, BLANK, READY, NO, FIRST, UHHH, NOTHING, WAIT
"FIRST": LEFT, OKAY, YES, MIDDLE, NO, RIGHT, NOTHING, UHHH, WAIT, READY, BLANK, WHAT, PRESS, FIRST
"NO": BLANK, UHHH, WAIT, FIRST, WHAT, READY, RIGHT, YES, NOTHING, LEFT, PRESS, OKAY, NO, MIDDLE
"BLANK": WAIT, RIGHT, OKAY, MIDDLE, BLANK, PRESS, READY, NOTHING, NO, WHAT, LEFT, UHHH, YES, FIRST
"NOTHING": UHHH, RIGHT, OKAY, MIDDLE, YES, BLANK, NO, PRESS, LEFT, WHAT, WAIT, FIRST, NOTHING, READY
"YES": OKAY, RIGHT, UHHH, MIDDLE, FIRST, WHAT, PRESS, READY, NOTHING, YES, LEFT, BLANK, NO, WAIT
"WHAT": UHHH, WHAT, LEFT, NOTHING, READY, BLANK, MIDDLE, NO, OKAY, FIRST, WAIT, YES, PRESS, RIGHT
"UHHH": READY, NOTHING, LEFT, WHAT, OKAY, YES, RIGHT, NO, PRESS, BLANK, UHHH, MIDDLE, WAIT, FIRST
"LEFT": RIGHT, LEFT, FIRST, NO, MIDDLE, YES, BLANK, WHAT, UHHH, WAIT, PRESS, READY, OKAY, NOTHING
"RIGHT": YES, NOTHING, READY, PRESS, NO, WAIT, WHAT, RIGHT, MIDDLE, LEFT, UHHH, BLANK, OKAY, FIRST
"MIDDLE": BLANK, READY, OKAY, WHAT, NOTHING, PRESS, NO, WAIT, LEFT, MIDDLE, RIGHT, FIRST, UHHH, YES
"OKAY": MIDDLE, NO, FIRST, YES, UHHH, NOTHING, WAIT, OKAY, LEFT, READY, BLANK, PRESS, WHAT, RIGHT
"WAIT": UHHH, NO, BLANK, OKAY, YES, LEFT, FIRST, PRESS, WHAT, WAIT, NOTHING, READY, RIGHT, MIDDLE
"PRESS": RIGHT, MIDDLE, YES, READY, PRESS, OKAY, NOTHING, UHHH, BLANK, LEFT, FIRST, WHAT, NO, WAIT
"YOU": SURE, YOU ARE, YOUR, YOU'RE, NEXT, UH HUH, UR, HOLD, WHAT?, YOU, UH UH, LIKE, DONE, U
"YOU ARE": YOUR, NEXT, LIKE, UH HUH, WHAT?, DONE, UH UH, HOLD, YOU, U, YOU'RE, SURE, UR, YOU ARE
"YOUR": UH UH, YOU ARE, UH HUH, YOUR, NEXT, UR, SURE, U, YOU'RE, YOU, WHAT?, HOLD, LIKE, DONE
"YOU'RE": YOU, YOU'RE, UR, NEXT, UH UH, YOU ARE, U, YOUR, WHAT?, UH HUH, SURE, DONE, LIKE, HOLD
"UR": DONE, U, UR, UH HUH, WHAT?, SURE, YOUR, HOLD, YOU'RE, LIKE, NEXT, UH UH, YOU ARE, YOU
"U": UH HUH, SURE, NEXT, WHAT?, YOU'RE, UR, UH UH, DONE, U, YOU, LIKE, HOLD, YOU ARE, YOUR
"UH HUH": UH HUH, YOUR, YOU ARE, YOU, DONE, HOLD, UH UH, NEXT, SURE, LIKE, YOU'RE, UR, U, WHAT?
"UH UH": UR, U, YOU ARE, YOU'RE, NEXT, UH UH, DONE, YOU, UH HUH, LIKE, YOUR, SURE, HOLD, WHAT?
"WHAT?": YOU, HOLD, YOU'RE, YOUR, U, DONE, UH UH, LIKE, YOU ARE, UH HUH, UR, NEXT, WHAT?, SURE
"DONE": SURE, UH HUH, NEXT, WHAT?, YOUR, UR, YOU'RE, HOLD, LIKE, YOU, U, YOU ARE, UH UH, DONE
"NEXT": WHAT?, UH HUH, UH UH, YOUR, HOLD, SURE, NEXT, LIKE, DONE, YOU ARE, UR, YOU'RE, U, YOU
"HOLD": YOU ARE, U, DONE, UH UH, YOU, UR, SURE, WHAT?, YOU'RE, NEXT, HOLD, UH HUH, YOUR, LIKE
"SURE": YOU ARE, DONE, LIKE, YOU'RE, YOU, HOLD, UH HUH, UR, SURE, U, WHAT?, NEXT, YOUR, UH UH
"LIKE": YOU'RE, NEXT, U, UR, HOLD, DONE, UH UH, WHAT?, UH HUH, YOU, LIKE, SURE, YOU ARE, YOUR
Keep Talking and Nobody Explodes v. 1 Who's on First
Page 10 of 23

On the Subject of Memory
Memory is a fragile thing but so is everything else when a bomb goes off, so pay
attention!
Press the correct button to progress the module to the
next stage. Complete all stages to disarm the module.
Pressing an incorrect button will reset the module back
to stage 1.
Button positions are ordered from left to right.
Stage 1:
If the display is 1, press the button in the second position.
If the display is 2, press the button in the second position.
If the display is 3, press the button in the third position.
If the display is 4, press the button in the fourth position.
Stage 2:
If the display is 1, press the button labeled "4".
If the display is 2, press the button in the same position as you pressed in stage 1.
If the display is 3, press the button in the first position.
If the display is 4, press the button in the same position as you pressed in stage 1.
Stage 3:
If the display is 1, press the button with the same label you pressed in stage 2.
If the display is 2, press the button with the same label you pressed in stage 1.
If the display is 3, press the button in the third position.
If the display is 4, press the button labeled "4".
Stage 4:
If the display is 1, press the button in the same position as you pressed in stage 1.
If the display is 2, press the button in the first position.
If the display is 3, press the button in the same position as you pressed in stage 2.
If the display is 4, press the button in the same position as you pressed in stage 2.
Stage 5:
If the display is 1, press the button with the same label you pressed in stage 1.
If the display is 2, press the button with the same label you pressed in stage 2.
If the display is 3, press the button with the same label you pressed in stage 4.
If the display is 4, press the button with the same label you pressed in stage 3.
Keep Talking and Nobody Explodes v. 1 Memory
Page 11 of 23
How to Interpret
1. A short flash represents a dot.
2. A long flash represents a dash.
3. There is a long gap between letters.
4. There is a very long gap before the word repeats.
U
V
W
X
Y
Z
A
B
C
D
E
F
G
H
I
J
K
L
M
N
O
Q
P
R
S
T
1
2
3
4
5
6
7
8
9
0
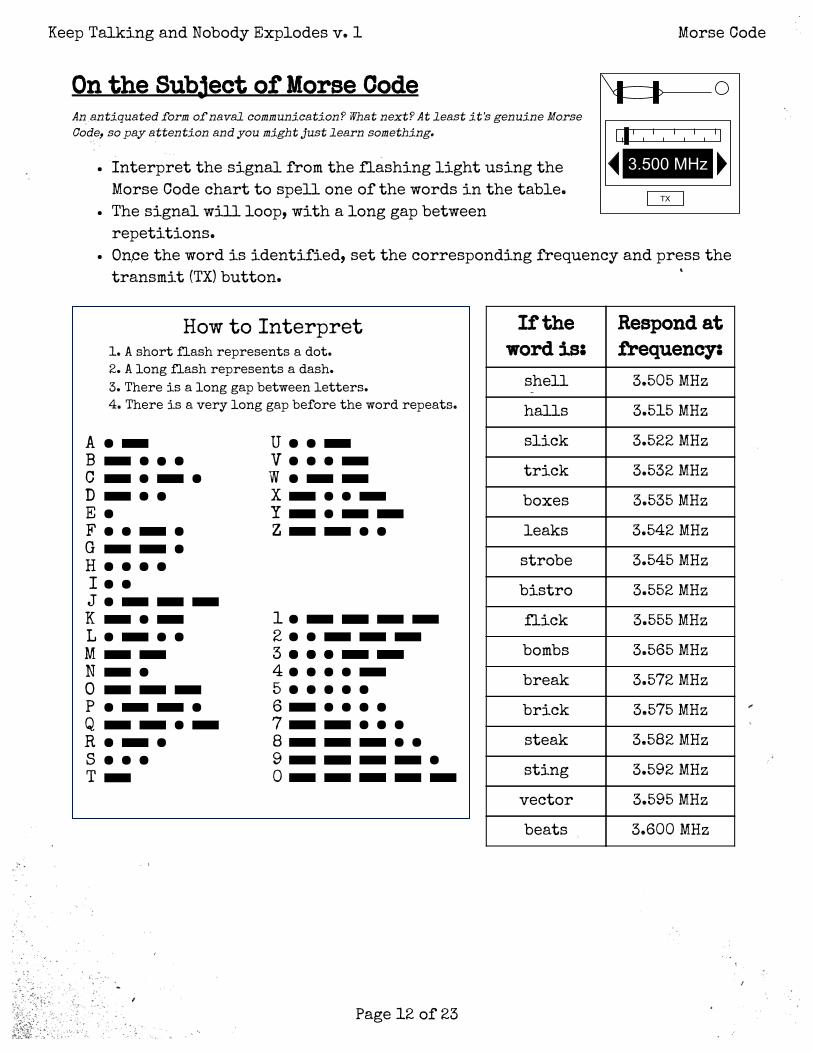
On the Subject of Morse Code
An antiquated form of naval communication? What next? At least it's genuine Morse
Code, so pay attention and you might just learn something.
Interpret the signal from the flashing light using the
Morse Code chart to spell one of the words in the table.
The signal will loop, with a long gap between
repetitions.
Once the word is identified, set the corresponding frequency and press the
transmit (TX) button.
If the
word is:
Respond at
frequency:
shell 3.505 MHz
halls 3.515 MHz
slick 3.522 MHz
trick 3.532 MHz
boxes 3.535 MHz
leaks 3.542 MHz
strobe 3.545 MHz
bistro 3.552 MHz
flick 3.555 MHz
bombs 3.565 MHz
break 3.572 MHz
brick 3.575 MHz
steak 3.582 MHz
sting 3.592 MHz
vector 3.595 MHz
beats 3.600 MHz
Keep Talking and Nobody Explodes v. 1 Morse Code
Page 12 of 23
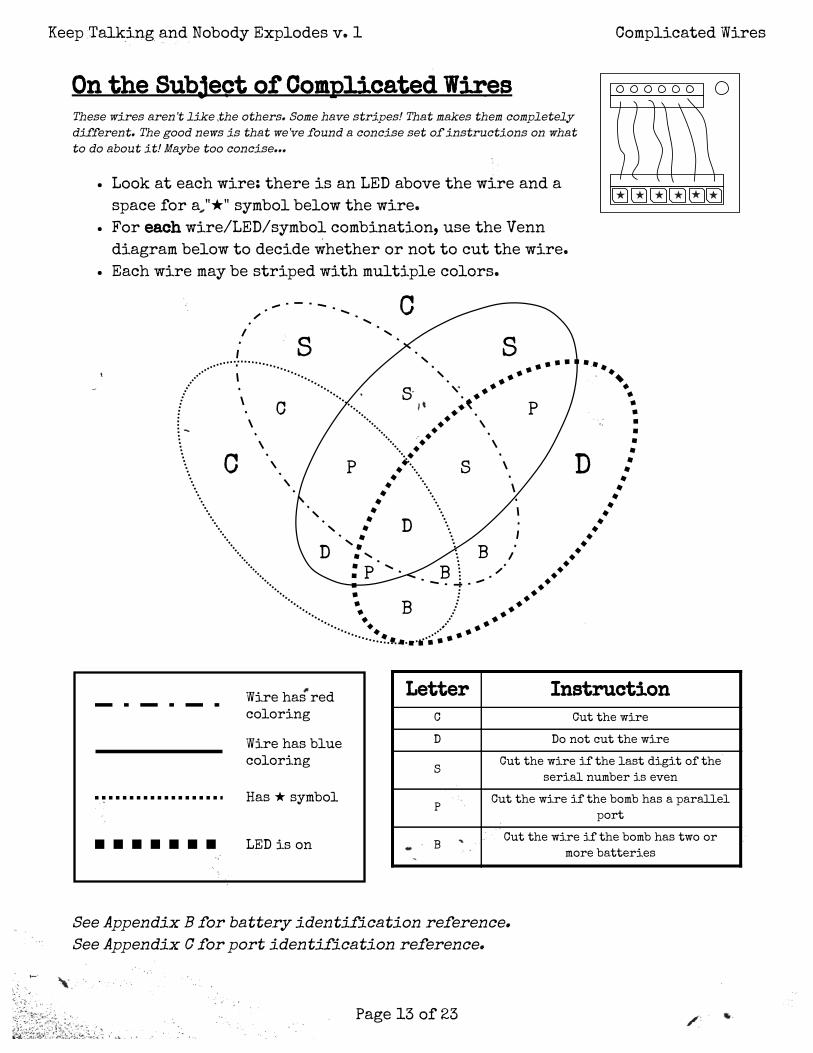
On the Subject of Complicated Wires
These wires aren't like the others. Some have stripes! That makes them completely
different. The good news is that we've found a concise set of instructions on what
to do about it! Maybe too concise...
Look at each wire: there is an LED above the wire and a
space for a "★" symbol below the wire.
For each wire/LED/symbol combination, use the Venn
diagram below to decide whether or not to cut the wire.
Each wire may be striped with multiple colors.
Keep Talking and Nobody Explodes v. 1 Complicated Wires
Page 13 of 23
S S
C D
CS
P
B
D B
P S
P B
D
C
Wire has red
coloring
Wire has blue
coloring
Has ★ symbol
LED is on
Letter Instruction
C Cut the wire
D Do not cut the wire
SCut the wire if the last digit of the
serial number is even
PCut the wire if the bomb has a parallel
port
BCut the wire if the bomb has two or
more batteries
See Appendix B for battery identification reference.
See Appendix C for port identification reference.
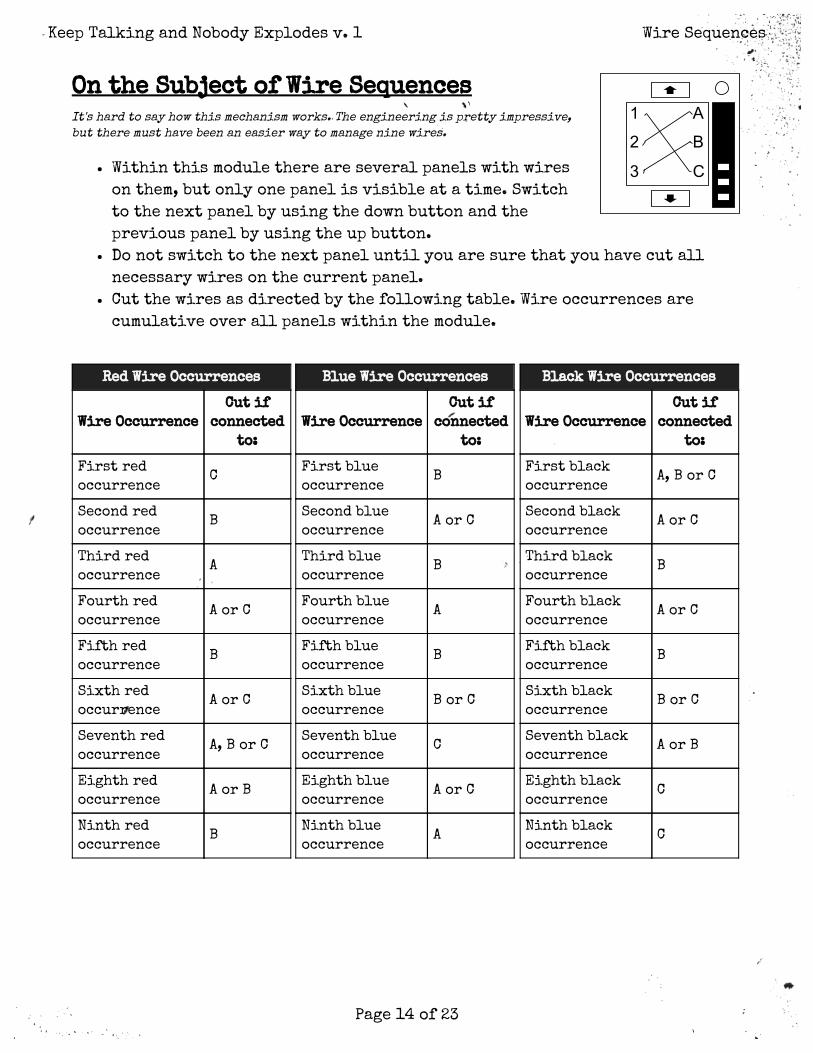
On the Subject of Wire Sequences
It's hard to say how this mechanism works. The engineering is pretty impressive,
but there must have been an easier way to manage nine wires.
Within this module there are several panels with wires
on them, but only one panel is visible at a time. Switch
to the next panel by using the down button and the
previous panel by using the up button.
Do not switch to the next panel until you are sure that you have cut all
necessary wires on the current panel.
Cut the wires as directed by the following table. Wire occurrences are
cumulative over all panels within the module.
Red Wire Occurrences
Wire Occurrence
Cut if
connected
to:
First red
occurrenceC
Second red
occurrenceB
Third red
occurrenceA
Fourth red
occurrenceA or C
Fifth red
occurrenceB
Sixth red
occurrenceA or C
Seventh red
occurrenceA, B or C
Eighth red
occurrenceA or B
Ninth red
occurrenceB
Blue Wire Occurrences
Wire Occurrence
Cut if
connected
to:
First blue
occurrenceB
Second blue
occurrenceA or C
Third blue
occurrenceB
Fourth blue
occurrenceA
Fifth blue
occurrenceB
Sixth blue
occurrenceB or C
Seventh blue
occurrenceC
Eighth blue
occurrenceA or C
Ninth blue
occurrenceA
Black Wire Occurrences
Wire Occurrence
Cut if
connected
to:
First black
occurrenceA, B or C
Second black
occurrenceA or C
Third black
occurrenceB
Fourth black
occurrenceA or C
Fifth black
occurrenceB
Sixth black
occurrenceB or C
Seventh black
occurrenceA or B
Eighth black
occurrenceC
Ninth black
occurrenceC
Keep Talking and Nobody Explodes v. 1 Wire Sequences
Page 14 of 23

On the Subject of Mazes
This seems to be some kind of maze, probably stolen off of a restaurant placemat.
Find the maze with matching circular markings.
The defuser must navigate the white light to the red
triangle using the arrow buttons.
Warning: Do not cross the lines shown in the maze. These
lines are invisible on the bomb.
Keep Talking and Nobody Explodes v. 1 Mazes
Page 15 of 23
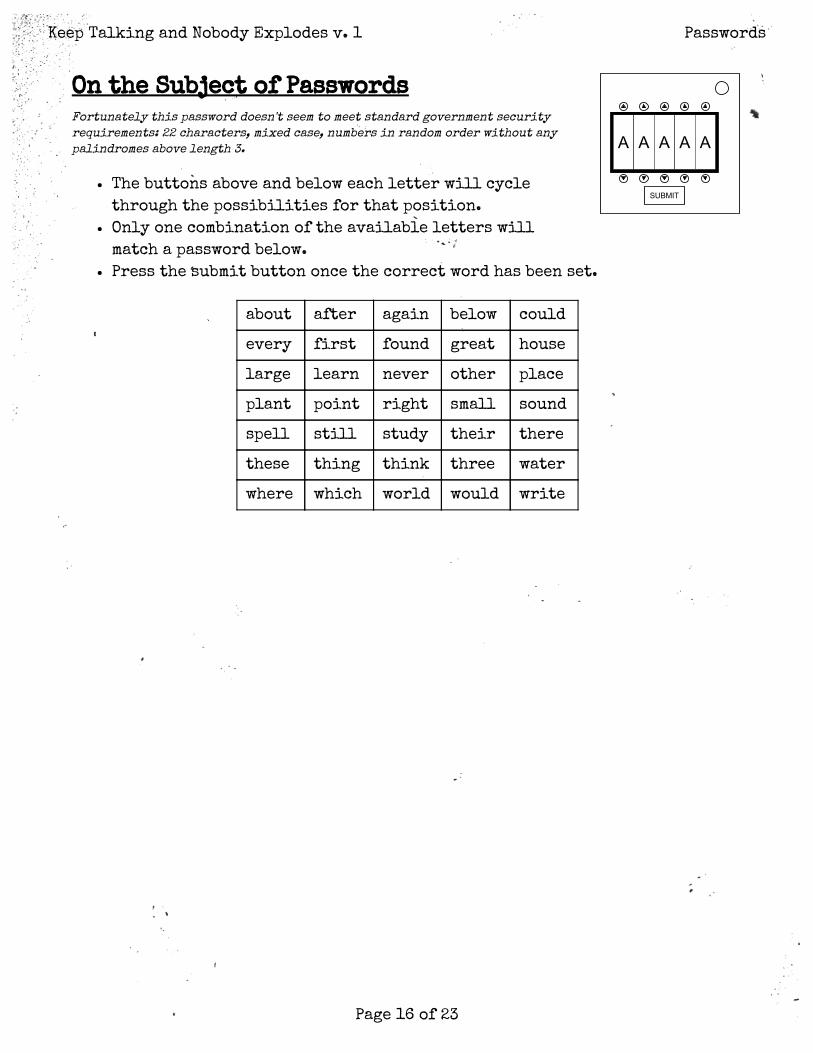
On the Subject of Passwords
Fortunately this password doesn't seem to meet standard government security
requirements: 22 characters, mixed case, numbers in random order without any
palindromes above length 3.
The buttons above and below each letter will cycle
through the possibilities for that position.
Only one combination of the available letters will
match a password below.
Press the submit button once the correct word has been set.
about after again below could
every first found great house
large learn never other place
plant point right small sound
spell still study their there
these thing think three water
where which world would write
Keep Talking and Nobody Explodes v. 1 Passwords
Page 16 of 23

On the Subject of Switches
A yes or no choice isn't too bad. Unfortunately you have to make ⤀唀ve of them and
any of them could be your last.
Switches need to be 䀯䂀ipped to match the lit indicators
either above or below them.
Avoid the following switch states:
Keep Talking and Nobody Explodes Mod Switches Module

On the Subject of Semaphore
This module demands attention from the sea - unlucky for you the bomb's bone dry.
See the next page for semaphore reference.
A semaphore module will present with a previous button,
a next button, an OK button and a semaphore indicator.
Use the previous and next buttons to navigate through
the semaphore sequence, starting from the left-most
semaphore character to the right-most semaphore
character.
The semaphore sequence will contain some characters from the serial
number on the bomb, but also includes one other character not present in
the serial number.
Navigate to the one and only character that is missing from the serial
number, and then press the OK button.
Control characters, such as 'Numerals', 'Letters', 'Error', 'Rest' and 'Cancel' are
not considered as a valid answer.
Keep Talking and Nobody Explodes Mod Semaphore

Semaphore Reference
Numbers are signalled by 曌㴦rst signalling 'Numerals', then the numbers.
Similarly, letters are signalled by 曌㴦rst signalling 'Letters', then the letters.
Use the following graphics as a reference to how to interpret semaphore
characters.
Rest / Space NumeralsError /
AttentionA or 1 B or 2
C or 3 D or 4 E or 5 F or 6 G or 7
H or 8 I or 9 J or Letters K or 0 L
M N O P Q
R S T U V
W X Y ZCancel /
Annul
(All images by Denelson83
(https://commons.wikimedia.org/wiki/User:Denelson83), used under CC-BY-SA-3.0
(http://creativecommons.org/licenses/by-sa/3.0/), via Wikimedia Commons
(https://commons.wikimedia.org/))
Keep Talking and Nobody Explodes Mod Semaphore
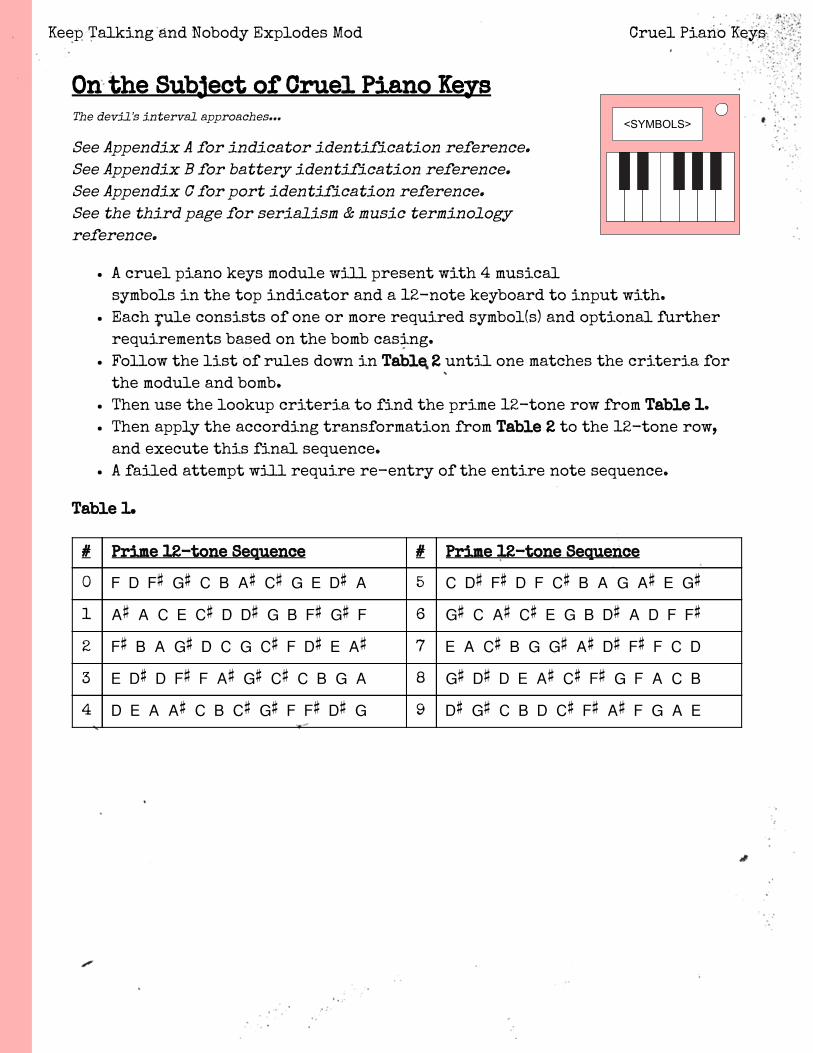
On the Subject of Cruel Piano Keys
The devil's interval approaches...
See Appendix A for indicator identi熺斾cation reference.
See Appendix B for battery identi熺斾cation reference.
See Appendix C for port identi熺斾cation reference.
See the third page for serialism & music terminology
reference.
A cruel piano keys module will present with 4 musical
symbols in the top indicator and a 12-note keyboard to input with.
Each rule consists of one or more required symbol(s) and optional further
requirements based on the bomb casing.
Follow the list of rules down in Table 2 until one matches the criteria for
the module and bomb.
Then use the lookup criteria to 熺斾nd the prime 12-tone row from Table 1.
Then apply the according transformation from Table 2 to the 12-tone row,
and execute this 熺斾nal sequence.
A failed attempt will require re-entry of the entire note sequence.
Table 1.
# Prime 12-tone Sequence # Prime 12-tone Sequence
0 F D F# G# C B A# C# G E D# A 5 C D# F# D F C# B A G A# E G#
1 A# A C E C# D D# G B F# G# F 6 G# C A# C# E G B D# A D F F#
2 F# B A G# D C G C# F D# E A# 7 E A C# B G G# A# D# F# F C D
3 E D# D F# F A# G# C# C B G A 8 G# D# D E A# C# F# G F A C B
4 D E A A# C B C# G# F F# D# G 9 D# G# C B D C# F# A# F G A E
Keep Talking and Nobody Explodes Mod Cruel Piano Keys

Table 2.
Required
Symbol(s)Further Requirements Lookup Index Transformation
and 2 or more indiciators
(lit or unlit)
Left-most digit in
serial numberRI
or An empty port plateNumber of battery
holders
P, transpose down
by 'x' semitones,
where 'x' = number
of minutes
remaining
or 2 or more of a certain
type of port
Least signi熺斾cant
digit of number of
completed modules
I
and 2 or more port plates9 minus the number of
unlit indicatorsR
or Serial contains 1 or
more vowels
Least signi熺斾cant
digit of number of
strikes
R, transpose down
by 3 semitones
or Even number of
batteries
DVI-D present: 7
Otherwise: 3
P, transpose up by
'x' semitones,
where 'x' = number
of ports
or An indicator with no
vowels in the label8 I
or Less than 2 ports 4 R
or (No other
requirements)5 P
If none of these rules apply, revert back to the Normal Piano Keys ruleset and
play the given note sequence normally.
Notes:
: The Stereo RCA port does not count as 2 separate ports; the Red & White
connectors are part of the same singular port.
Keep Talking and Nobody Explodes Mod Cruel Piano Keys
*
*

Serialism & Music Terminology
To clarify, the note below a C would be a B, and similarly, the note after a Bwould be a C. The 12 tones on the piano essentially wrap around.
The Prime sequence (or 'P' for short), is the original or base form of the 12-tone
row. No transformation takes place.
The Retrograde sequence (or 'R' for short), takes the Prime sequence, but executes
it in reverse order. For example, the Retrograde of the Prime row A B C D Ewould be E D C B A.
The Inverse sequence (or 'I' for short), takes the Prime sequence, but the
intervals between the notes are inverted. For example, take the interval from Ato B; the interval is +2 semitones, as it takes you 2 semitones to get from A to B (Agoes to A# then B). The inversion of this interval would be -2 semitones.
Therefore, the inverted sequence would be A then G, as G is -2 semitones away
from A (A goes to G# then G).
As an extended example, the Inversion of the Prime row A B C D E would be A GF# E D; the 熺斾rst note always remains the same, and all the other notes get
inverted relative to that note.
The Retrograde Inverse sequence (or 'RI' for short), takes the Inverse sequence in
Retrograde. For example, the Retrograde Inverse of the Prime row A B C D Ewould take the Inverse 熺斾rst (which is A G F# E D), and then the Retrograde of
this Inverse would be D E F# G A.
Transpositions apply a translation of the tone row up or down by a given number
of semitones. For example, the Prime row A B C D E transposed up by 1 semitone
would be A# C C# D# F.
An Interval is the tonal distance between two distinct notes and is usually
measured in semitones. For example, the interval from G to B is up 4 semitones.
Keep Talking and Nobody Explodes Mod Cruel Piano Keys
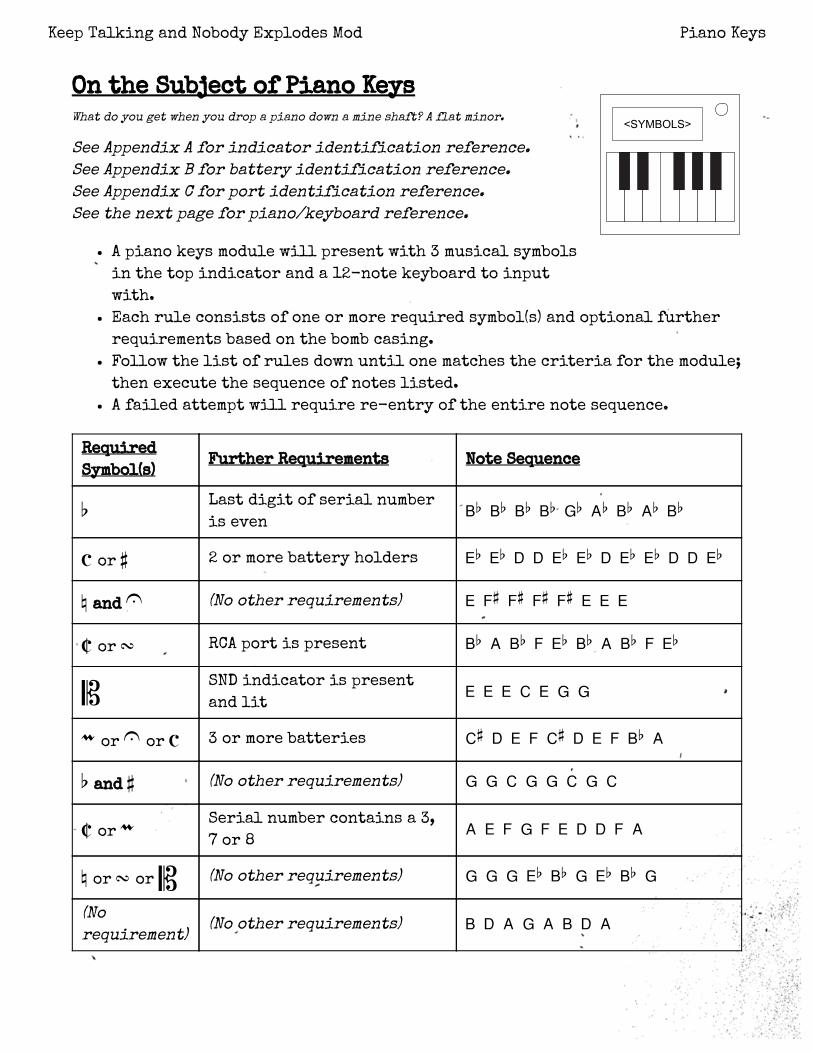
On the Subject of Piano Keys
What do you get when you drop a piano down a mine shaft? A �at minor.
See Appendix A for indicator identi�cation reference.
See Appendix B for battery identi�cation reference.
See Appendix C for port identi�cation reference.
See the next page for piano/keyboard reference.
A piano keys module will present with 3 musical symbols
in the top indicator and a 12-note keyboard to input
with.
Each rule consists of one or more required symbol(s) and optional further
requirements based on the bomb casing.
Follow the list of rules down until one matches the criteria for the module;
then execute the sequence of notes listed.
A failed attempt will require re-entry of the entire note sequence.
Required
Symbol(s)Further Requirements Note Sequence
Last digit of serial number
is evenBb Bb Bb Bb Gb Ab Bb Ab Bb
or 2 or more battery holders Eb Eb D D Eb Eb D Eb Eb D D Eb
and (No other requirements) E F# F# F# F# E E E
or RCA port is present Bb A Bb F Eb Bb A Bb F Eb
SND indicator is present
and litE E E C E G G
or or 3 or more batteries C# D E F C# D E F Bb A
and (No other requirements) G G C G G C G C
or Serial number contains a 3,
7 or 8A E F G F E D D F A
or or (No other requirements) G G G Eb Bb G Eb Bb G
(No
requirement)(No other requirements) B D A G A B D A
Keep Talking and Nobody Explodes Mod Piano Keys

Piano/Keyboard Reference
Use the following graphic as a reference to how tones are mapped onto a standard
12-note piano/keyboard.
Keep Talking and Nobody Explodes Mod Piano Keys

On the Subject of Flashing Colors
It's easy to identify colors. Red, Blue, Green, etc. Turns out it's a bit harder when
you display a word color in a different color though...
A color ⤀ᰈash module will repeatedly ⤀ᰈash a sequence of
8 different words representing colors in different
colors.
The possible colors are Red, Yellow, Green, Blue, Magenta
and White.
There is also a Yes button and a No button on the module.
Only one of the Yes and No buttons need to be pressed to disarm the module,
but must be pressed at the correct time according to the rules below.
The color of the last word in the sequence determines which set of rules to
follow below.
Follow the rules down from the top-most rule, down to the bottom-most rule
for the block that applies to your module.
The color of the last word in the sequence is Red:
If Green is used as the word at least three times in the sequence, press Yes on
the third time Green is used as either the word or the color of the word in the
sequence.
Otherwise, if Blue is used as the color of the word exactly once, press No when
the word Magenta is shown.
Otherwise, press Yes the last time White is either the word or the color of the
word in the sequence.
The color of the last word in the sequence is Yellow:
If the word Blue is shown in Green color, press Yes on the ⤀唈rst time Green is
used as the color of the word.
Otherwise, if the word White is shown in either White or Red color, press Yes
on the second time in the sequence where the color of the word does not match
the word itself.
Otherwise, count the number of times Magenta is used as either the word or the
color of the word in the sequence (the word Magenta in Magenta color only
counts as one), and press No on the color in the total's position (e.g. a total of
4 means the fourth color in sequence).
The color of the last word in the sequence is Green:
If a word occurs consecutively with different colors, press No on the ⤀唈fth
entry in the sequence.
If Magenta is used as the word as least three times in the sequence, press No on
the ⤀唈rst time Yellow is used as either the word or the color of the word in the
sequence.
Otherwise, press Yes on any color where the color of the word matches the word
itself.
Keep Talking and Nobody Explodes Mod Flashing Colors

Continuation of previous table...
The color of the last word in the sequence is Blue:
If the color of the word does not match the word itself three times or more in
the sequence, press Yes on the ⤀唈rst time in the sequence where the color of the
word does not match the word itself.
If the word Red is shown in Yellow color, or the word Yellow is shown in White
color, press No when the word White is shown in Red color.
Otherwise, press Yes the last time Green is either the word or the color of the
word in the sequence.
The color of the last word in the sequence is Magenta:
If a color occurs consecutively with different words, press Yes on the third
entry in the sequence.
If the number of times the word Yellow appears is greater than the number of
times that the color of the word is Blue, press No the last time the word Yellow
is in the sequence.
Otherwise, press No on the ⤀唈rst time in the sequence where the color of the
word matches the word of the seventh entry in the sequence.
The color of the last word in the sequence is White:
If the color of the third word matches the word of the fourth word or ⤀唈fth
word, press No the ⤀唈rst time that Blue is used as the word or the color of the
word in the sequence.
If the word Yellow is shown in Red color, press Yes on the last time Blue is
used as the color of the word.
Otherwise, press No.
Keep Talking and Nobody Explodes Mod Flashing Colors
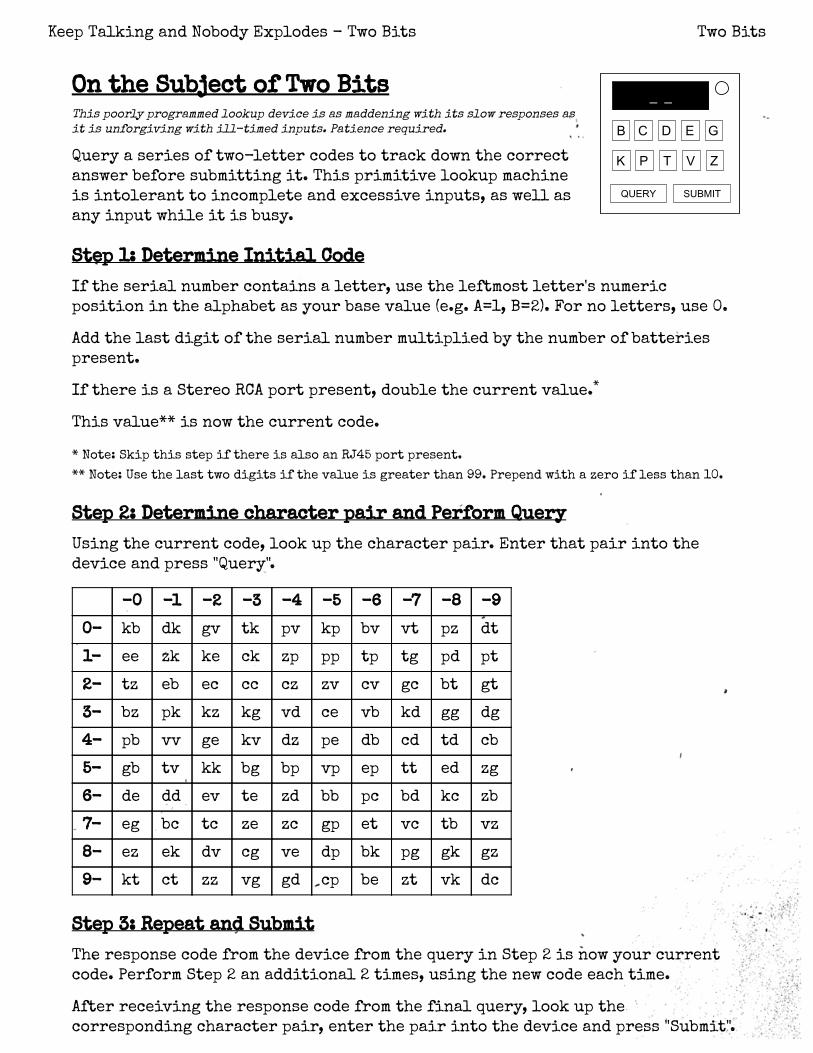
On the Subject of Two Bits
This poorly programmed lookup device is as maddening with its slow responses as
it is unforgiving with ill-timed inputs. Patience required.
Query a series of two-letter codes to track down the correct
answer before submitting it. This primitive lookup machine
is intolerant to incomplete and excessive inputs, as well as
any input while it is busy.
Step 1: Determine Initial Code
If the serial number contains a letter, use the leftmost letter's numeric
position in the alphabet as your base value (e.g. A=1, B=2). For no letters, use 0.
Add the last digit of the serial number multiplied by the number of batteries
present.
If there is a Stereo RCA port present, double the current value.
This value** is now the current code.
* Note: Skip this step if there is also an RJ45 port present.
** Note: Use the last two digits if the value is greater than 99. Prepend with a zero if less than 10.
Step 2: Determine character pair and Perform Query
Using the current code, look up the character pair. Enter that pair into the
device and press "Query".
-0 -1 -2 -3 -4 -5 -6 -7 -8 -9
0- kb dk gv tk pv kp bv vt pz dt
1- ee zk ke ck zp pp tp tg pd pt
2- tz eb ec cc cz zv cv gc bt gt
3- bz pk kz kg vd ce vb kd gg dg
4- pb vv ge kv dz pe db cd td cb
5- gb tv kk bg bp vp ep tt ed zg
6- de dd ev te zd bb pc bd kc zb
7- eg bc tc ze zc gp et vc tb vz
8- ez ek dv cg ve dp bk pg gk gz
9- kt ct zz vg gd cp be zt vk dc
Step 3: Repeat and Submit
The response code from the device from the query in Step 2 is now your current
code. Perform Step 2 an additional 2 times, using the new code each time.
After receiving the response code from the final query, look up the
corresponding character pair, enter the pair into the device and press "Submit".
Keep Talking and Nobody Explodes - Two Bits Two Bits
*

G B P
U S D
1 2 3
On the Subject of Foreign ExchangeOn the Subject of Foreign Exchange
RatesRatesIf bombs were stock brokers...
Defusing this module requires the expert to have a device
that can connect to the World Wide Web.
This module has the ability to connect to the internet and query the state of
foriegn exchange rates. There should be a three times three grid of keys, each
with a light emitting diode. DO NOT PRESS ANY KEY ON THIS MODULE WHILE THE
LIGHT EMITTING DIODES ARE FLASHING IN SEQUENCE.
The keys are grouped by rows:
Top row: ISO 4217 alphabetic code for the base currency.[1][2]
Middle row: ISO 4217 alphabetic code for the target currency.[1][2]
Bottom row: Value of currency to convert.
All light emitting diodes have turned green:All light emitting diodes have turned green:
Enter the following uniform resource locator into your internet capable
device:
http://api.fixer.io/latest?base=XXX&symbols=YYY
Replace XXX with the ISO 4217 alphabetic code for the base currency.
Replace YYY with the ISO 4217 alphabetic code for the target currency.
You will receive data in a Javascript object notation format, look for {"YYY":
NUMBER}, where NUMBER will be the exchange rate. Using the exchange rate,
convert the number in the bottom row to the target currency, round that number
down and take note of the 2nd digit from the left[4]. Press the Nth key where N is
the noted number (count keys from left to right, top to bottom)[5].
All light emitting diodes have turned red:All light emitting diodes have turned red:
In this case the module failed to query today's currecy rates. Get the ISO 4217
numeric code for the target currency's country and take note the 2nd digit from
the right. Press the Nth key where N is the noted number (count keys from left to
right, top to bottom)[5].
[1]: If there is more than one battery on the bomb, the base currency code and
target currecy code is swapped.
[2]: This may instead be the ISO 4217 numeric code.
[3]: Note the currency rates are updated around 4PM CET.
[4]: In the case the converted currency is less than 10, the noted number is 0.
[5]: In the case the noted number is 0, press the top left key.
Keep Talking and Nobody Explodes Mod Foreign Exchange Rates

[Display]
[Input]
On the Subject of Sword
These letters are confusing. I think they're in the wrong order.
The display shows a scrambled word. Decipher the word and
punch it in to solve this module.
Keep Talking and Nobody Explodes Mod Word Scramble

[Display]
[Input]
On the Subject of Anagrams
Randomly punching in the letters will eventually give me another word. One of
the arrangements must work, right?
The display shows a word. Rearrange the letters to form
another word. It's got to work. It just has to.
Note that the status light is on the top left of the module.
Keep Talking and Nobody Explodes Mod Anagrams

On the Subject of Emoji Math
Math is easy. But is it easy when the numbers are in another language? Let's �nd
out.
Decipher the characters on the display into numbers and solve the answer to the
question. Enter the answer with the keypad and press '=' to submit it. Use '-' to
toggle the negative sign for negative answers. There's no delete button so press
those buttons carefully!
For example: =(+=( translates to 1+1
The answer to enter is 2.
Character Number
:) 0
=( 1
(: 2
)= 3
:( 4
): 5
=) 6
(= 7
:| 8
|: 9
Keep Talking and Nobody Explodes Mod Math

On the Subject of Astrology
Sometimes, the stars have it out for you. Is this bomb a good or a poor omen?
Your fortune reading consists of the alchemical symbols
of a classical element, a celestial body, and a zodiac
sign.
Calculate the Omen score of this reading:
For each pair of symbols, look up their relationship value in the tables
below, and add to the Omen score.
For each symbol, if the english name of the symbol has a letter in common
with the serial number of the bomb, add 1 to the Omen score.
Subtract 1 from the Omen score for each symbol without a letter in common
with the serial number.
If the Omen score is positive, press GOOD OMEN anytime the number of the
Omen score is a digit in the timer.
If the Omen score is negative, press POOR OMEN anytime the number of the
Omen score is a digit in the timer.
If the Omen score is 0, press NO OMEN at any time.
0 0 1 -1 0 1 -2 2 0 -1
-2 0 -1 0 2 0 -2 2 0 1
-1 -1 0 -1 1 2 0 2 1 -2
-1 2 -1 0 -2 -1 0 2 -2 2
Keep Talking and Nobody Explodes Mod Astrology

1 0 -1 0 0 2 2 0 1 0 1 0
2 2 -1 2 -1 -1 -2 1 2 0 0 2
-2 -1 0 0 1 0 1 2 -1 -2 1 1
1 1 -2 -2 2 0 -1 1 0 0 -1 -1
-1 -1 2 0 -1 0 -1 1 0 0 -2 -2
-2 0 1 0 2 0 -1 1 2 0 1 0
-2 -2 -1 -1 1 -1 0 -2 0 0 -1 1
-2 2 -2 0 0 1 -1 0 2 -2 -1 1
-2 0 -1 -2 -2 -2 -1 1 1 1 0 -1
-1 -2 1 -1 0 0 0 1 0 -1 2 0
-1 -1 0 0 1 1 0 0 0 0 -1 -1
-1 2 0 0 1 -2 1 0 2 -1 1 0
1 0 2 1 -1 1 1 1 0 -2 2 0
-1 0 0 -1 -2 1 2 1 1 0 0 -1
Keep Talking and Nobody Explodes Mod Astrology

Symbol Element Symbol Planet Symbol Planet
Fire Sun Jupiter
Water Moon Saturn
Earth Mercury Uranus
Air Venus Neptune
Mars Pluto
Symbol Zodiac Symbol Zodiac Symbol Zodiac
Aries Leo Sagittarius
Taurus Virgo Capricorn
Gemini Libra Aquarius
Cancer Scorpio Pisces
Keep Talking and Nobody Explodes Mod Astrology

[9]
< > Reset
On the Subject of Combination Locks
This looks like a combination lock. I thought I was disarming this bomb, not
unlocking it.
See Appendix B of original manual for battery
identification reference.
See Appendix Two Factor for two factor identification
reference.
Like a typical combination lock, this requires 3 numbers to unlock. Turn the
dial to the right to the first number. Then turn it to the left for the second
number. Finally, turn it to the right for the last number. That will unlock it!
If sequential numbers in the code are the same, perform a full revolution back to
the same number.
How to decode the combination:
Each number ranges from 0-19. Refer to the table to determine each number. Be
careful if there are two factor codes present because they change periodically!
First number:
1. Add the least significant digit of each two factor code together.
2. If there are no two factor codes, use the last digit of the serial number
plus the number of solved modules.
3. Add the number of batteries.
4. Subtract 20 if the result is over 19.
Second number:
1. Add the most significant digit of each two factor code together.
2. If there are no two factor codes, use the number of modules on the bomb
(including needy modules).
3. Add the number of solved modules.
4. Subtract 20 if the result is over 19.
Third number:
1. Add the first two numbers together.
2. Subtract 20 if the result is over 19.
Keep Talking and Nobody Explodes Mod Combination Locks

Taxi Dispatch &&&**
Cow &$#$&
Extractor Fan $#$*&
Train Station #$$**
Arcade $#$#*
Casino **$*#
Supermarket #$$&*
Soccer Match ##*$*
Tawny Owl $#*$&
Sewing Machine #&&*#
Thrush Nightingale **#**
Car Engine &#**&
Reloading Glock 19 $&**#
Oboe &#$$#
Saxaphone $&&**
Tuba #&$##
Marimba &*$*$
Phone Ringing &$$&*
Tibetan Nuns #&&&&
Throat Singing **$$$
Beach *&*&&
Dial-up Internet *#&*&
Police Radio Scanner **###
Censorship Bleep &&$&*
Medieval Weapons &$**&
Door Closing #$#&$
Chainsaw &#&&#
Compressed Air $$*$*
Servo Motor $&#$$
Waterfall &**$$
Tearing Fabric $&&*&
Zipper &$&##
Vacuum Cleaner #&$*&
Ballpoint Pen Writing $*$**
Rattling Iron Chain *#$&&
Book Page Turning ###&$
Table Tennis *$$&$
Squeeky Toy $*&##
Helicopter #&$&&
Firework Exploding $&$$*
Glass Shattering *$*$*
On the Subject of ListeningOn the Subject of Listening"Why did we send a deaf person to defuse a bomb?" - Person who is no longer alive.
Press the play button to play a sound clip through the
speaker. Each sound clip has a corresponding code that
contains any of the four symbols $ * & #. Match the sound clip
to the table below and enter the code via the four button
keypad.
Note: pressing play also clears whatever code you have entered.
Keep Talking and Nobody Explodes Mod Listening

On the Subject of OrientationOn the Subject of OrientationIf the bomb doesn't kill us a brain haemorrhage will.
In order to diffuse this part of the bomb you will need good
3D orientation skills. A virtual cube needs to be rotated
into a specific orientation using the four keys along the
bottom. Unfortunately there is no display to indicate the
current orientation of the virtual cube so you will have to
imagine the state of the cube yourself.
The two keys in the bottom left will yaw the cube clockwise or anti-clockwise,
respective to looking at the cube from the top.
The two keys in the bottom right will roll the cube clockwise or anti-clockwise,
respective to the virtual observer. The virtual observer's position is indicated
on the module as an eye. NOTE: The virtual observer's position may change.
For example, if the eye is at the bottom then it is facing the 'FRONT' face.
Pressing 'Roll clockwise' will place the 'LEFT' face where the 'TOP' face is.
If the serial number on the bomb contains the letter R:If the serial number on the bomb contains the letter R:
Rotate the cube so that the initial left face is in the same position as the
initial top face, then press the SET button.
Otherwise, if the bomb has a lit indicator with the label TRN or has itOtherwise, if the bomb has a lit indicator with the label TRN or has it
has a lit/unlit indicator with the label CAR:has a lit/unlit indicator with the label CAR:
Rotate the cube so that the initial bottom face is in the same position as the
initial right face, then press the SET button.
Otherwise, if the bomb has a PS2 port or there have been one or moreOtherwise, if the bomb has a PS2 port or there have been one or more
strikes:strikes:
Rotate the cube so that the initial bottom face is in the same position as the
initial front face and the initial left face is in the same position as the
initial bottom face, then press the SET button.
Otherwise, if the serial number on the bomb contains either the numberOtherwise, if the serial number on the bomb contains either the number
7 or 8:7 or 8:
Keep Talking and Nobody Explodes Mod Orientation Cube
Rotate the cube so that the initial right face is in the same position as the
initial bottom face and the initial back face is in the same position as the
initial front face, then press the SET button.
Otherwise, if there are more than two batteries on the bomb or theOtherwise, if there are more than two batteries on the bomb or the
virtual observer's initial position is facing the initial left face:virtual observer's initial position is facing the initial left face:
Rotate the cube so that the initial top face is in the same position as the
initial bottom face, then press the SET button.
Otherwise:Otherwise:
Rotate the cube so that the initial top face is in the same position as the
initial left face, then press the SET button.
On a strike:On a strike:
If you get strike then the virtual cube will be reset to the initial position, be
aware you may need to select a new rule if the obersever is now in a different
position.
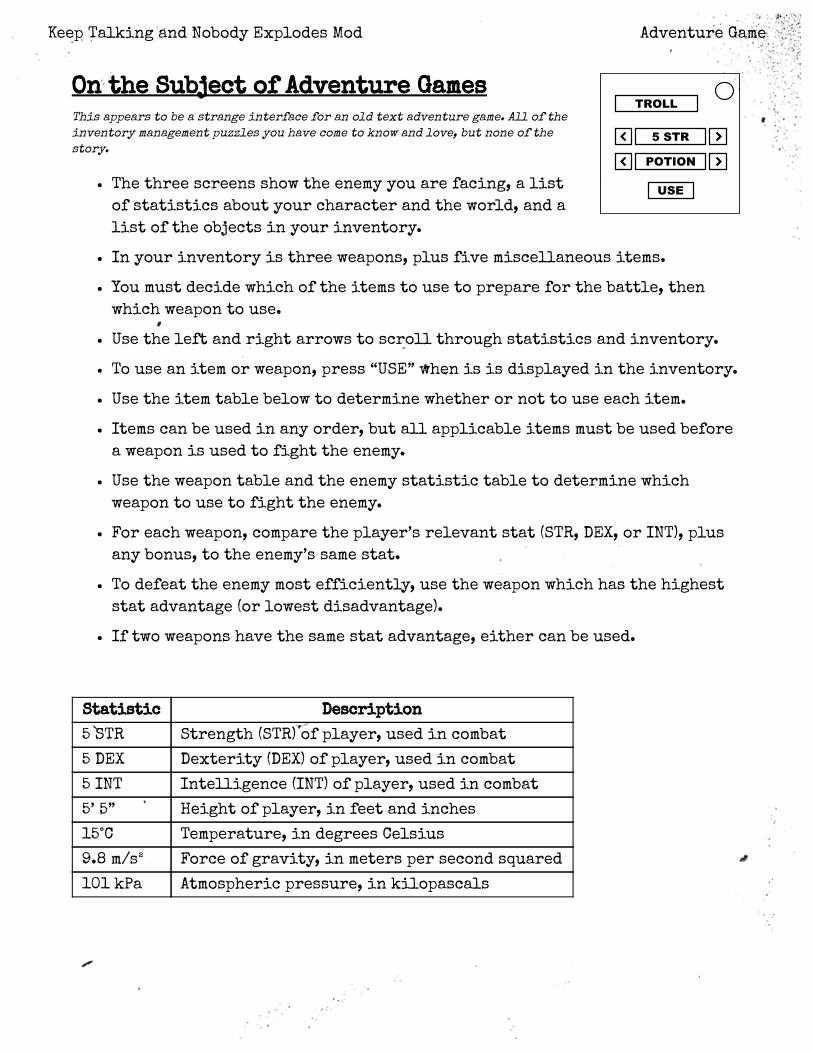
On the Subject of Adventure Games
This appears to be a strange interface for an old text adventure game. All of the
inventory management puzzles you have come to know and love, but none of the
story.
The three screens show the enemy you are facing, a list
of statistics about your character and the world, and a
list of the objects in your inventory.
In your inventory is three weapons, plus five miscellaneous items.
You must decide which of the items to use to prepare for the battle, then
which weapon to use.
Use the left and right arrows to scroll through statistics and inventory.
To use an item or weapon, press “USE” when is is displayed in the inventory.
Use the item table below to determine whether or not to use each item.
Items can be used in any order, but all applicable items must be used before
a weapon is used to fight the enemy.
Use the weapon table and the enemy statistic table to determine which
weapon to use to fight the enemy.
For each weapon, compare the player’s relevant stat (STR, DEX, or INT), plus
any bonus, to the enemy’s same stat.
To defeat the enemy most efficiently, use the weapon which has the highest
stat advantage (or lowest disadvantage).
If two weapons have the same stat advantage, either can be used.
Statistic Description
5 STR Strength (STR) of player, used in combat
5 DEX Dexterity (DEX) of player, used in combat
5 INT Intelligence (INT) of player, used in combat
5’ 5” Height of player, in feet and inches
15°C Temperature, in degrees Celsius
9.8 m/s² Force of gravity, in meters per second squared
101 kPa Atmospheric pressure, in kilopascals
Keep Talking and Nobody Explodes Mod Adventure Game
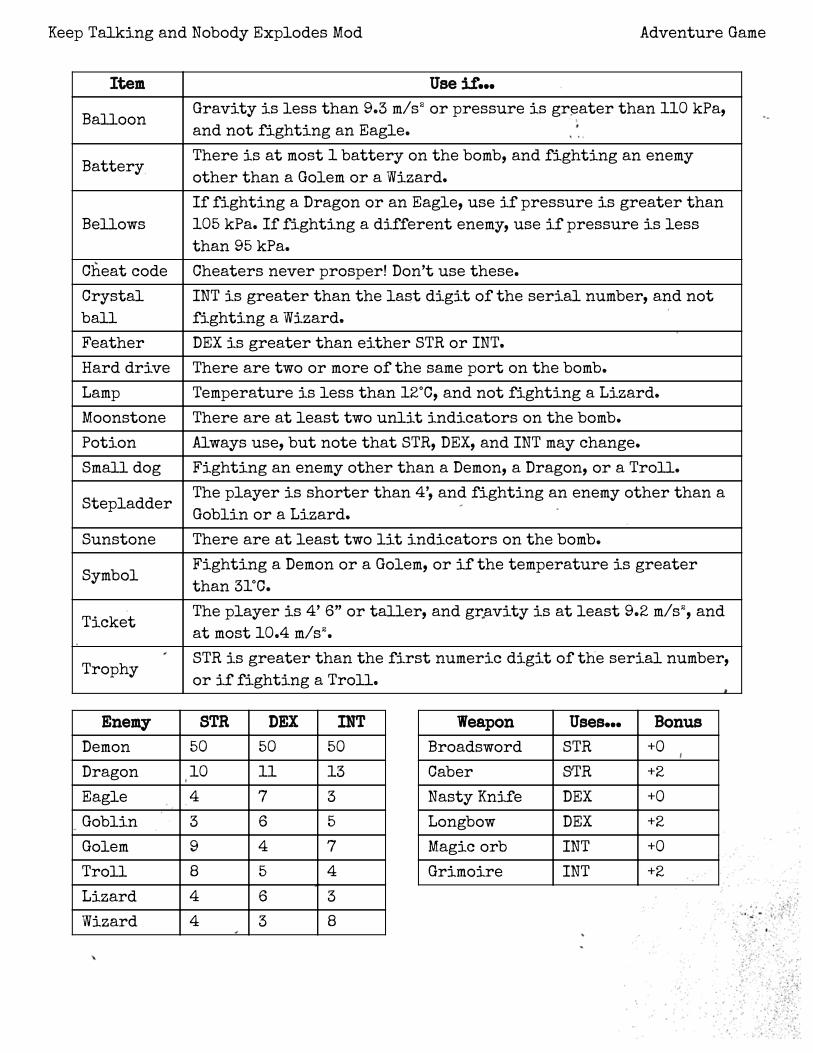
Enemy STR DEX INT
Demon 50 50 50
Dragon 10 11 13
Eagle 4 7 3
Goblin 3 6 5
Golem 9 4 7
Troll 8 5 4
Lizard 4 6 3
Wizard 4 3 8
Weapon Uses... Bonus
Broadsword STR +0
Caber STR +2
Nasty Knife DEX +0
Longbow DEX +2
Magic orb INT +0
Grimoire INT +2
Item Use if...
BalloonGravity is less than 9.3 m/s² or pressure is greater than 110 kPa,
and not fighting an Eagle.
BatteryThere is at most 1 battery on the bomb, and fighting an enemy
other than a Golem or a Wizard.
Bellows
If fighting a Dragon or an Eagle, use if pressure is greater than
105 kPa. If fighting a different enemy, use if pressure is less
than 95 kPa.
Cheat code Cheaters never prosper! Don’t use these.
Crystal
ball
INT is greater than the last digit of the serial number, and not
fighting a Wizard.
Feather DEX is greater than either STR or INT.
Hard drive There are two or more of the same port on the bomb.
Lamp Temperature is less than 12°C, and not fighting a Lizard.
Moonstone There are at least two unlit indicators on the bomb.
Potion Always use, but note that STR, DEX, and INT may change.
Small dog Fighting an enemy other than a Demon, a Dragon, or a Troll.
StepladderThe player is shorter than 4’, and fighting an enemy other than a
Goblin or a Lizard.
Sunstone There are at least two lit indicators on the bomb.
SymbolFighting a Demon or a Golem, or if the temperature is greater
than 31°C.
TicketThe player is 4’ 6” or taller, and gravity is at least 9.2 m/s², and
at most 10.4 m/s².
TrophySTR is greater than the first numeric digit of the serial number,
or if fighting a Troll.
Keep Talking and Nobody Explodes Mod Adventure Game

Display Action
← ← → ← → → 5/4
1 3 2 4 3/2
LEFT ARROW LEFT WORD RIGHT ARROW
LEFT WORD RIGHT ARROW RIGHT WORD5/8
BLANK 1/3
LITERALLY BLANK 1/5
FOR THE LOVE OF ALL THAT IS GOOD AND
HOLY PLEASE FULLSTOP FULLSTOP.9/0
AN ACTUAL LEFT ARROW LITERAL PHRASE 5/3
FOR THE LOVE OF - THE DISPLAY JUST
CHANGED, I DIDN'T KNOW THIS MOD COULD
DO THAT. DOES IT MENTION THAT IN THE
MANUAL?
8/7
ALL WORDS ONE THREE TO FOR FOR AS IN
THIS IS FOR YOU4/0
LITERALLY NOTHING 1/4
NO, LITERALLY NOTHING 2/5
THE WORD LEFT 7/0
HOLD ON IT'S BLANK 1/9
SEVEN WORDS FIVE WORDS THREE WORDS
THE PUNCTUATION FULLSTOP0/5
THE PHRASE THE WORD STOP TWICE 9/1
THE FOLLOWING SENTENCE THE WORD
NOTHING2/7
ONE THREE TO FOR 3/9
THREE WORDS THE WORD STOP 7/3
DISREGARD WHAT I JUST SAID. FOUR
WORDS, NO PUNCTUATION. ONE THREE 2 4.3/1
1 3 2 FOR 1/0
DISREGARD WHAT I JUST SAID. TWO WORDS
THEN TWO DIGITS. ONE THREE 2 4.0/8
WE JUST BLEW UP 4/2
Display Action
NO REALLY. 5/2
← LEFT → LEFT → RIGHT 5/6
ONE AND THEN 3 TO 4 4/7
STOP TWICE 7/6
LEFT 6/9
.. 8/5
PERIOD PERIOD 8/2
THERE ARE THREE WORDS NO
PUNCTUATION READY? STOP DOT PERIOD5/0
NOVEBMER OSCAR SPACE, LIMA INDIGO
TANGO ECHO ROMEO ALPHA LIMA LIMA
YANKEE SPACE NOVEMBER OSCAR TANGO
HOTEL INDEGO NOVEMBER GOLF
2/9
FIVE WORDS THREE WORDS THE
PUNCTUATION FULLSTOP1/9
THE PHRASE: THE PUNCTUATION FULLSTOP 9/3
EMPTY SPACE 1/6
ONE THREE TWO FOUR 3/7
IT'S SHOWING NOTHING 2/3
LIMA ECHO FOXTROT TANGO SPACE ALPHA
ROMEO ROMEO OSCAR RISKY SPACE SIERRA
YANKEE MIKE BRAVO OSCAR LIMA
1/2
ONE 3 2 4 3/4
STOP. 7/4
.PERIOD 8/1
NO REALLY STOP 5/1
1 3 TOO 4 2/0
PERIOD TWICE 8/3
...On the Subject of Crazy Talk
Nothing. Literally nothing. Blank. Nada.
1. Text will appear on a display.
2. Find the exact match and the action in the table below.
3. Flip the switch down when the bomb timer has the number
before the forward slash in the seconds column.
4. Flip the switch back up when the bomb timer has the
number after the forward slash in the seconds column.
Keep Talking and Nobody Explodes Mod Crazy Talk
Display Action
1 3 TOO WITH 2 OHS FOUR 4/2
1 3 TO 4 3/0
STOP DOT PERIOD 5/0
LEFT LEFT RIGHT LEFT RIGHT RIGHT 6/7
IT LITERALLY SAYS THE WORD ONE AND
THEN THE NUMBERS 2 3 44/5
ONE IN LETTERS 3 2 4 IN NUMBERS 3/5
WAIT FORGET EVERYTHING I JUST SAID,
TWO WORDS THEN TWO SYMBOLS THEN TWO
WORDS: ← ← RIGHT LEFT → →1/6
1 THREE TWO FOUR 3/6
PERIOD 7/9
.STOP 7/8
NOVEBMER OSCAR SPACE, LIMA INDIA
TANGO ECHO ROMEO ALPHA LIMA LIMA
YANKEE SPACE NOVEMBER OSCAR TANGO
HOTEL INDIA NOVEMBER GOLF
0/7
LIMA ECHO FOXTROT TANGO SPACE ALPHA
ROMEO ROMEO OSCAR WHISKEY SPACE
SIERRA YANKEE MIKE BRAVO OSCAR LIMA
6/5
NOTHING 1/2
THERE'S NOTHING 1/8
STOP STOP 7/5
RIGHT ALL IN WORDS STARTING NOW ONE
TWO THREE FOUR4/9
THE PHRASE THE WORD LEFT 7/1
LEFT ARROW SYMBOL TWICE THEN THE
WORDS RIGHT LEFT RIGHT THEN A RIGHT
ARROW SYMBOL
5/9
LEFT LEFT RIGHT ← RIGHT → 5/7
NO COMMA LITERALLY NOTHING 2/4
HOLD ON CRAZY TALK WHILE I DO THIS
NEEDY2/1
Display Action
THIS ONE IS ALL ARROW SYMBOLS NO
WORDS2/8
← 6/3
THE WORD STOP TWICE 9/4
← ← RIGHT LEFT → → 6/1
THE PUNCTUATION FULLSTOP 9/2
1 3 TOO WITH TWO OS 4 4/1
THREE WORDS THE PUNCTUATION
FULLSTOP9/9
OK WORD FOR WORD LEFT ARROW SYMBOL
TWICE THEN THE WORDS RIGHT LEFT
RIGHT THEN A RIGHT ARROW SYMBOL
6/0
DOT DOT 8/6
LEFT ARROW 6/8
AFTER I SAY BEEP FIND THIS PHRASE
WORD FOR WORD BEEP AN ACTUAL LEFT
ARROW
7/2
ONE THREE 2 WITH TWO OHS 4 4/3
LEFT ARROW SYMBOL 6/4
AN ACTUAL LEFT ARROW 6/2
THAT'S WHAT IT'S SHOWING 2/1
THE PHRASE THE WORD NOTHING 2/6
THE WORD ONE AND THEN THE NUMBERS 3
2 44/8
ONE 3 2 FOUR 3/8
ONE WORD THEN PUNCTUATION. STOP STOP. 0/9
THE WORD BLANK 0/1
FULLSTOP FULLSTOP 8/4
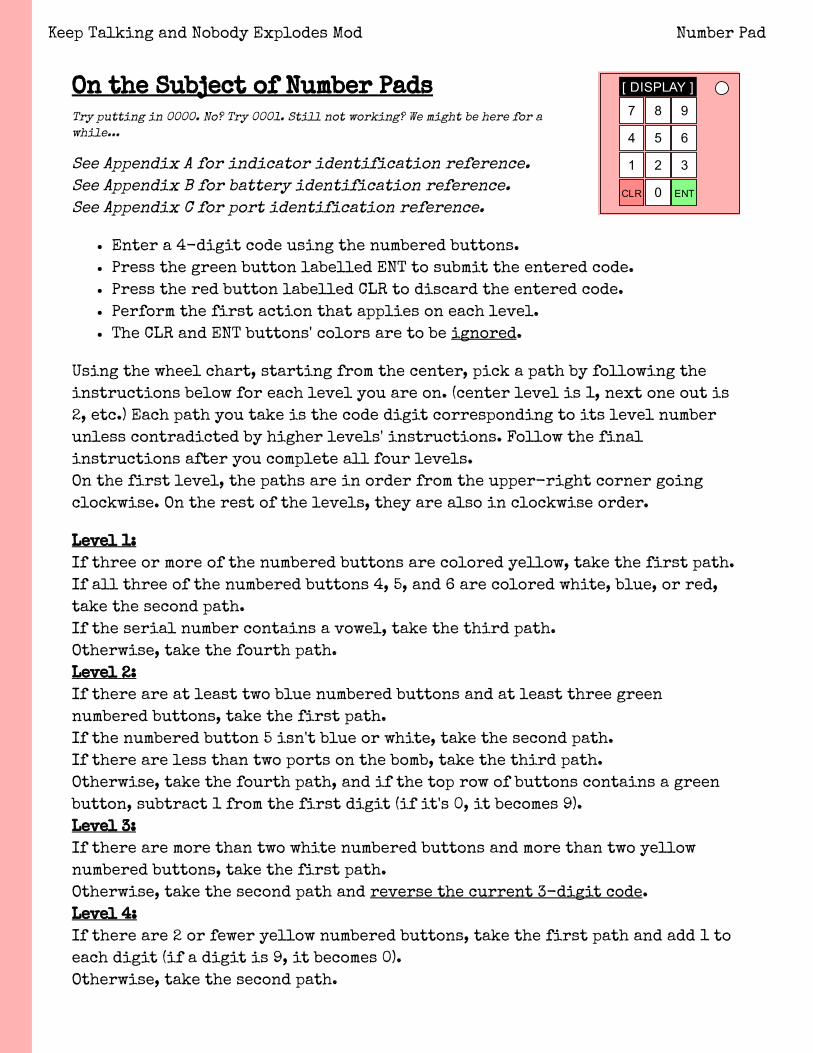
[ DISPLAY ]
7 8 9
4 5 6
1 2 3
CLR 0 ENT
On the Subject of Number Pads
Try putting in 0000. No? Try 0001. Still not working? We might be here for a
while...
See Appendix A for indicator identification reference.
See Appendix B for battery identification reference.
See Appendix C for port identification reference.
Enter a 4-digit code using the numbered buttons.
Press the green button labelled ENT to submit the entered code.
Press the red button labelled CLR to discard the entered code.
Perform the first action that applies on each level.
The CLR and ENT buttons' colors are to be ignored.
Using the wheel chart, starting from the center, pick a path by following the
instructions below for each level you are on. (center level is 1, next one out is
2, etc.) Each path you take is the code digit corresponding to its level number
unless contradicted by higher levels' instructions. Follow the final
instructions after you complete all four levels.
On the first level, the paths are in order from the upper-right corner going
clockwise. On the rest of the levels, they are also in clockwise order.
Level 1:
If three or more of the numbered buttons are colored yellow, take the first path.
If all three of the numbered buttons 4, 5, and 6 are colored white, blue, or red,
take the second path.
If the serial number contains a vowel, take the third path.
Otherwise, take the fourth path.
Level 2:
If there are at least two blue numbered buttons and at least three green
numbered buttons, take the first path.
If the numbered button 5 isn't blue or white, take the second path.
If there are less than two ports on the bomb, take the third path.
Otherwise, take the fourth path, and if the top row of buttons contains a green
button, subtract 1 from the first digit (if it's 0, it becomes 9).
Level 3:
If there are more than two white numbered buttons and more than two yellow
numbered buttons, take the first path.
Otherwise, take the second path and reverse the current 3-digit code.
Level 4:
If there are 2 or fewer yellow numbered buttons, take the first path and add 1 to
each digit (if a digit is 9, it becomes 0).
Otherwise, take the second path.
Keep Talking and Nobody Explodes Mod Number Pad

Final Instructions:
(follow all instructions in this order)
If the last digit of the serial number is even, swap the first and third digits.
If there are an odd number of batteries, swap the second and third digits.
If both criteria above are not met, swap the first and fourth digits.
Finally, if the sum of all the digits in the code is even, reverse the code.
Wheel Chart
528
79
06
2
0
93
213
6
9
0
27
4
4 78
22
6
4
6
9
7
9
04
93432
63
2
9
0
6
9
0
0
85
18 9
9 2 89
06
0
6
5
8
5
3
7
1
3
0
0
4
9
8
9
8
7
9
6
31
53
1865383
60
9
6
7
0
9
2
1
6
5
7
3
0
4
3
2
8
0
6
3
85
88
0 4 1
Keep Talking and Nobody Explodes Mod Number Pad

On the Subject of ProbingNot that kind of probing...
This modules has six wires and two crocodile clips. Eachwire carries three alternating currents (AKA 3-phasecurrent), each phase a different frequency. The possiblefrequencies are 10Hz, 22Hz, 50Hz and 60Hz.
In order to probe the circuit you need to connect the red clip to a wire and theblue clip to a different wire. Common frequencies in both wires will cancel outand the display will show the remaining frequencies, in order from lowest tohighest.
If the red and white wire contains a 50Hz current connect the red clip to thewire with the frequencies 10Hz, 22Hz and 60Hz, otherwise if the red and yellowwire does not contain a 10Hz current connect the red clip to the wire with thefrequencies 22Hz, 50Hz and 60Hz, otherwise connect the red clip to the wire withthe frequences 10Hz, 22Hz and 50Hz.
If the yellow and red wire contains a 10Hz current connect the blue clip to thewire with the frequencies 10Hz, 50Hz and 60Hz otherwise connect the blue clip tothe wire that contains the frequencies 10Hz, 22Hz and 50Hz.
Leave the clips connected for at least six seconds to defuse. Leaving theincorrect wires connected for more than six seconds will cause a strike.
NOTE: Be aware that each time a strike is gained the frequencies in each wire may change.
Keep Talking and Nobody Explodes Mod Probing
...
KEEP
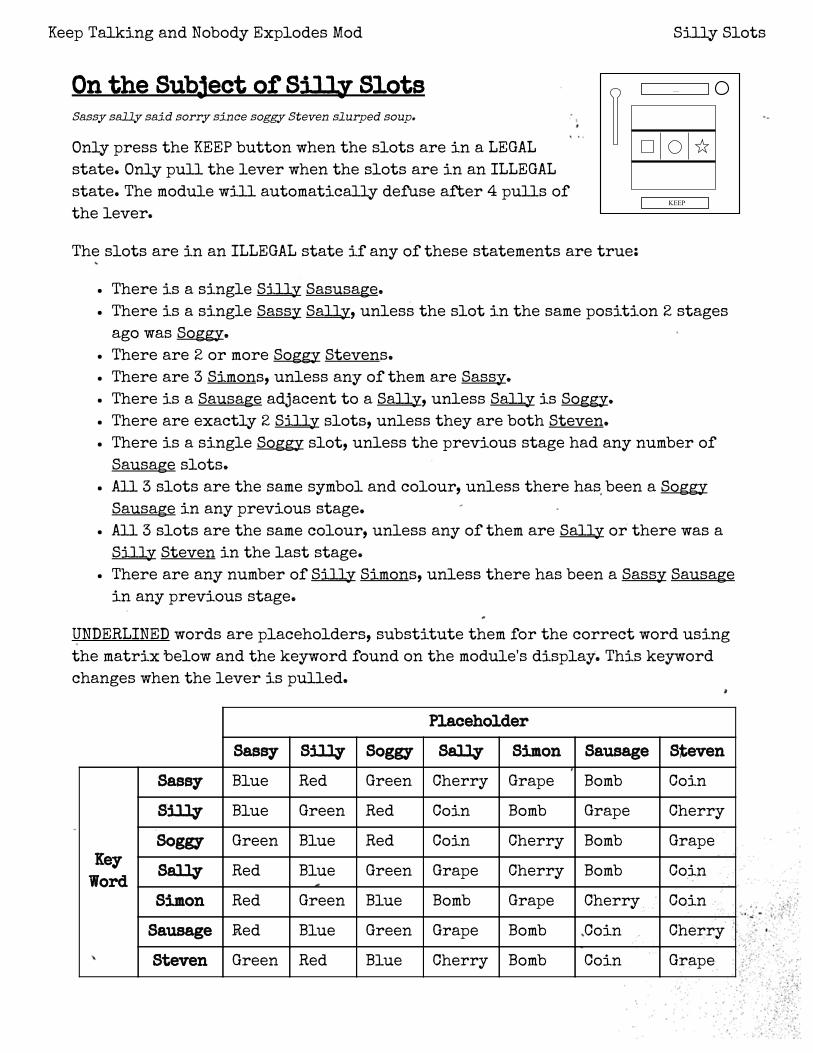
On the Subject of Silly Slots
Sassy sally said sorry since soggy Steven slurped soup.
Only press the KEEP button when the slots are in a LEGAL
state. Only pull the lever when the slots are in an ILLEGAL
state. The module will automatically defuse after 4 pulls of
the lever.
The slots are in an ILLEGAL state if any of these statements are true:
There is a single Silly Sasusage.
There is a single Sassy Sally, unless the slot in the same position 2 stages
ago was Soggy.
There are 2 or more Soggy Stevens.
There are 3 Simons, unless any of them are Sassy.
There is a Sausage adjacent to a Sally, unless Sally is Soggy.
There are exactly 2 Silly slots, unless they are both Steven.
There is a single Soggy slot, unless the previous stage had any number of
Sausage slots.
All 3 slots are the same symbol and colour, unless there has been a Soggy
Sausage in any previous stage.
All 3 slots are the same colour, unless any of them are Sally or there was a
Silly Steven in the last stage.
There are any number of Silly Simons, unless there has been a Sassy Sausage
in any previous stage.
UNDERLINED words are placeholders, substitute them for the correct word using
the matrix below and the keyword found on the module's display. This keyword
changes when the lever is pulled.
Placeholder
Sassy Silly Soggy Sally Simon Sausage Steven
Key
Word
Sassy Blue Red Green Cherry Grape Bomb Coin
Silly Blue Green Red Coin Bomb Grape Cherry
Soggy Green Blue Red Coin Cherry Bomb Grape
Sally Red Blue Green Grape Cherry Bomb Coin
Simon Red Green Blue Bomb Grape Cherry Coin
Sausage Red Blue Green Grape Bomb Coin Cherry
Steven Green Red Blue Cherry Bomb Coin Grape
Keep Talking and Nobody Explodes Mod Silly Slots

A B
C D
CLEAROn the Subject of Resistors“It is easier to resist at the beginning than at the end.”
― Leonardo da Vinci, on procrastination
The module contains 2 input pins (A and B), 2 resistors, and 2
output pins (C and D). Follow the rules to make the correct
connections. To make a connection, click one pin and then
another. Press CLEAR to remove all connections.
1. Take the �rst digit of the bomb's serial number (or 0 if there are no digits).
The primary input is A if even, B if odd.
2. Take the last digit of the bomb's serial number (or 0 if there are no digits).
The primary output is C if even, D if odd.
3. The target resistance in Ω is calculated as follows:
1. Take the �rst two digits of the bomb's serial number.
e.g. 2E7X19 → 27, ZJ3MLN → 3, ABCDEF → 0
2. For each battery present on the bomb (up to a max of 6), multiply by 10.
4. Connect the primary input to the primary output, with the target
resistance.
Note: all resistance values are checked to be within 5% accuracy.
5. If a lit FRK indicator is present, also connect the primary input to the
other (secondary) output, with the target resistance.
Note: this means C and D will also be connected with some non-in�nite
resistance. This value is not checked as part of your solution, and so can be
anything.
6. If step 5 did not apply and at least 1 D cell battery is present, connect the
secondary input to the secondary output, with 0Ω resistance.
7. Press CHECK when �nished to check the solution. All input/output pairs
not mentioned should be disconnected.
Consult the following page to learn how to produce the target resistance.
Keep Talking and Nobody Explodes Mod Resistors
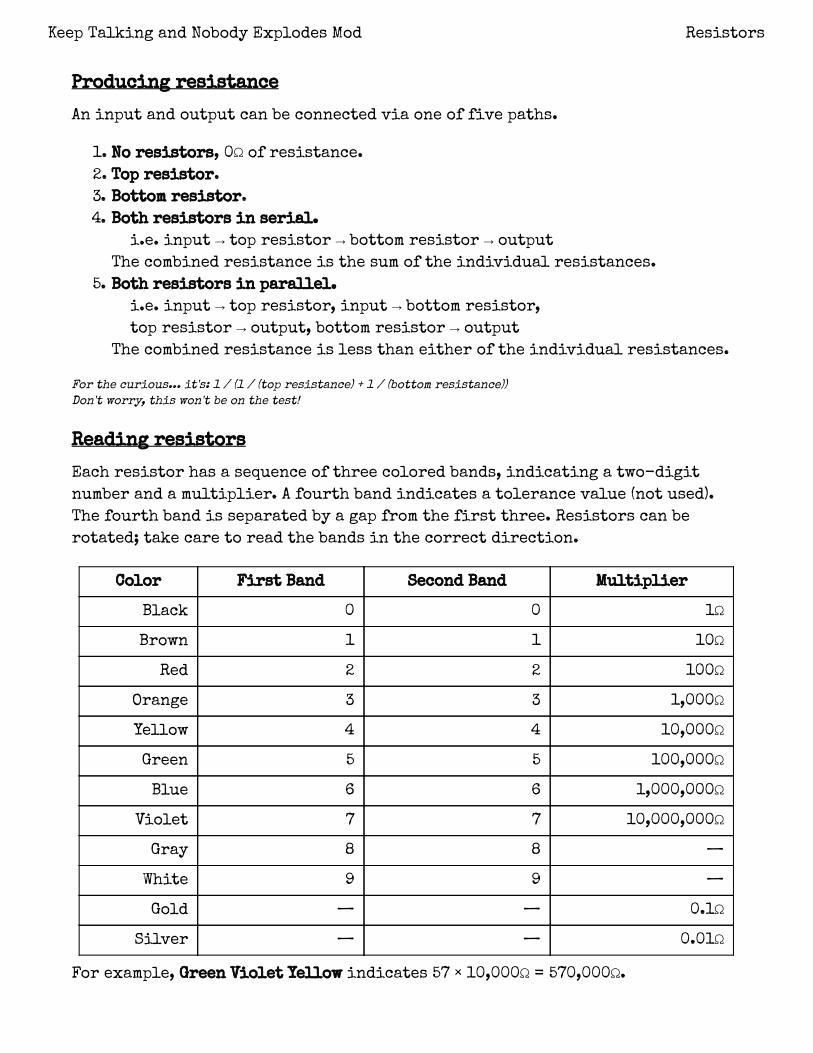
Producing resistance
An input and output can be connected via one of �ve paths.
1. No resistors, 0Ω of resistance.
2. Top resistor.
3. Bottom resistor.
4. Both resistors in serial.
i.e. input → top resistor → bottom resistor → output
The combined resistance is the sum of the individual resistances.
5. Both resistors in parallel.
i.e. input → top resistor, input → bottom resistor,
top resistor → output, bottom resistor → output
The combined resistance is less than either of the individual resistances.
For the curious... it's: 1 / (1 / (top resistance) + 1 / (bottom resistance))
Don't worry, this won't be on the test!
Reading resistors
Each resistor has a sequence of three colored bands, indicating a two-digit
number and a multiplier. A fourth band indicates a tolerance value (not used).
The fourth band is separated by a gap from the �rst three. Resistors can be
rotated; take care to read the bands in the correct direction.
Color First Band Second Band Multiplier
Black 0 0 1Ω
Brown 1 1 10Ω
Red 2 2 100Ω
Orange 3 3 1,000Ω
Yellow 4 4 10,000Ω
Green 5 5 100,000Ω
Blue 6 6 1,000,000Ω
Violet 7 7 10,000,000Ω
Gray 8 8 —
White 9 9 —
Gold — — 0.1Ω
Silver — — 0.01Ω
For example, Green Violet Yellow indicates 57 × 10,000Ω = 570,000Ω.
Keep Talking and Nobody Explodes Mod Resistors

A B
C D
On the Subject of Alphabet
Can you speak English? Do you know the alphabet? Then you should be okay.
1. Use the four lettered buttons to spell a word from the
word bank below.
2. Spell the longest word with the letters given by
pressing the lettered buttons.
3. A letter can only be used once to spell a word.
4. If multiple words can be spelled, spell the word that comes first in
alphabetical order, then the next one if there are enough remaining
letters.
5. If no more words can be spelled, press the remaining buttons in
alphabetical order.
Word Bank:
JQXZ QEW AC ZNY TJL
OKBV DFW YKQ LXE GS
VSI PQJS VCN JR IRNM
OP QYDX HDU PKD ARGF
Keep Talking and Nobody Explodes Mod Alphabet

On the Subject of Chess
Under pressure, chess can feel more like a game of battleships.
This module is based on a 6x6 chessboard (referenced on the
following page) and all 가관gures follow the standard FIDE
movement rules.
The chess module will present with a display and two rows of
six buttons each.
There are six unique coordinates that represent six positions on the
chessboard.
Use the numbered keys in the bottom row to browse through the different
coordinates. A green LED below the button will indicate the position of the
currently selected coordinate.
Using the reference table below, each position can be assigned a certain
chess 가관gure.
The chess 가관gures will cover 35 of the 36 possible 가관elds with their
combined movesets.
All chess 가관gures are colorless but can block each other's movement.
Find the one 가관eld that isn't covered by any of the chess 가관gures and enter
the coordinate to defuse the module.
To enter the coordinate, press the letter 가관rst, then the number. The LEDs
will turn red to con가관rm the input of a solution.
Use this table as reference to determine the correct 가관gure for each position:
Position #1: Monarchy vs Theocracy
Occupied by a king if Position #5 is occupied by a queen.
Otherwise, the 가관eld is occupied by a bishop.
Position #2: Commander of the Army
Occupied by a rook if the last digit of the serial number is odd.
Otherwise, the 가관eld is occupied by a knight.
Position #3: A Matter of Regents
Occupied by a queen if there are less than two rooks on the board.
Otherwise, the 가관eld is occupied by a king.
Position #4: The Iron Tower
Always occupied by a rook.
"Neither of two evils must thy strike claim; Instead smite the darkness between the same."
Position #5: Con꼀글ict between Good and Evil
Occupied by a queen if the 가관eld is white.
Otherwise, the 가관eld is occupied by a rook.
Position #6: The Scepter, the Sword and the Crosier
Occupied by a queen if there are no other queens on the board.
Otherwise, occupied by a knight if there are no other knights on the board.
Otherwise, the 가관eld is occupied by a bishop.
Keep Talking and Nobody Explodes Mod Chess
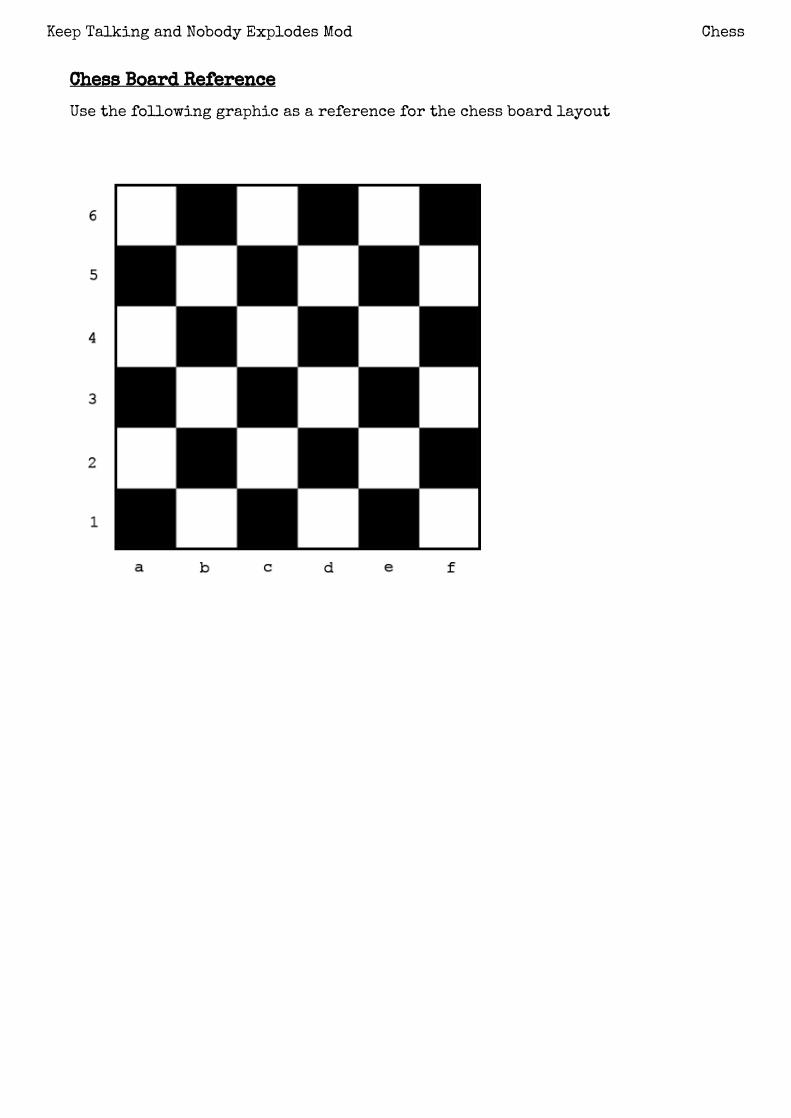
Chess Board Reference
Use the following graphic as a reference for the chess board layout
Keep Talking and Nobody Explodes Mod Chess

∩ ∩ F
FSUBMIT
U U
On the Subject of Logic
Logic, logic. That’s an easy stuff but with the complexity of this bomb this may be
harder than you think.
Each row displays 3 letters. Each letter represents a
statement.
If ALL statements in the top row are true, that row is
true.
If ANY statement in the bottom row is true, that row is true.
Use the T/F button to the right to select True/False.
Press “Submit” when done.
See Appendix A for indicator identification reference.
See Appendix B for battery identification reference.
See Appendix C for port identification reference.
Letter This letter is true if: Letter This letter is true if:
A More than 2 batteries. N Exactly 1 battery.
B Has Serial port. O No battery.
C Has Parallel port. P Has RJ-45 port.
D Serial number has vowel. Q Has DVI-D port.
ESerial number doesn't have
vowel.R More than 5 batteries.
F Has Stereo RCA port. SHas SIG and CAR lit
indicators.
G Has CLR lit indicator. THas at least 2 batteries and
PS/2 port.
H Has IND lit indicator. U Has serial and parallel port.
I Less than 1 battery. V Has BOB lit indicator.
J Has MSA lit indicator. W No letter in serial number.
KLast digit of serial number
is odd.X Has at least 4 port types.
LLast digit of serial number
is even.Y No lit indicator.
M Has FRK lit indicator. ZHas RJ-45 port and Serial
port.
Keep Talking and Nobody Explodes Mod Logic
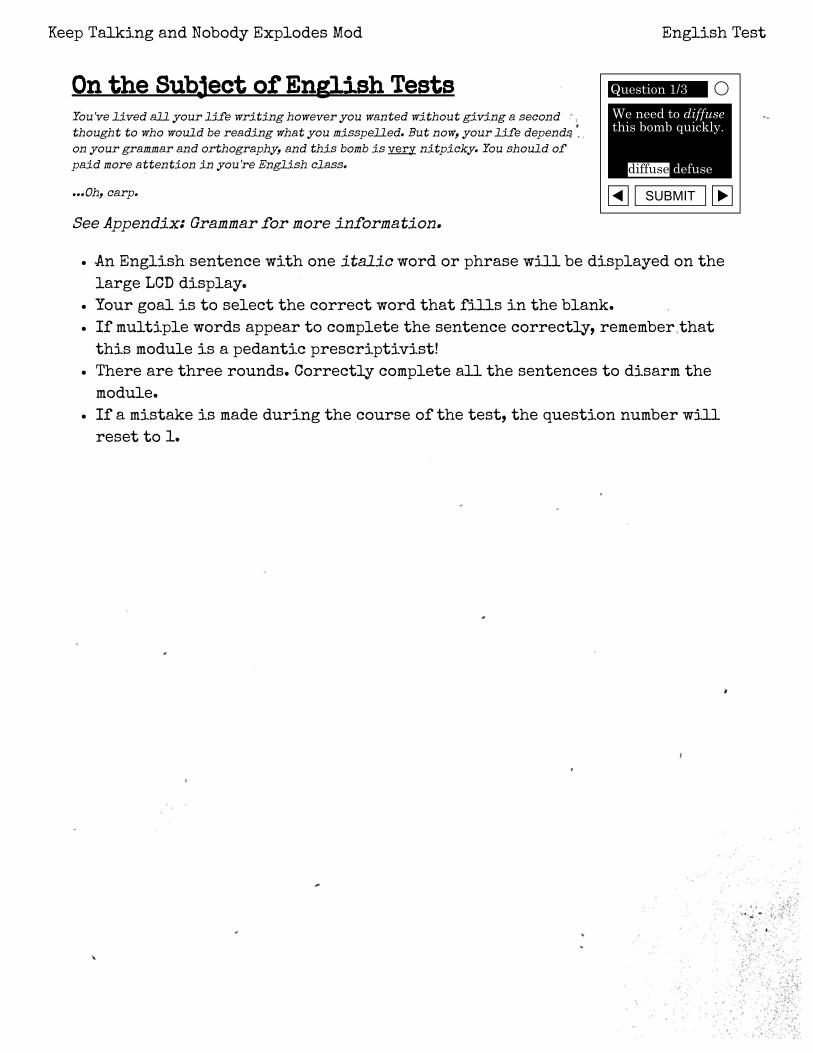
On the Subject of English Tests
You've lived all your life writing however you wanted without giving a second
thought to who would be reading what you misspelled. But now, your life depends
on your grammar and orthography, and this bomb is very nitpicky. You should of
paid more attention in you're English class.
...Oh, carp.
See Appendix: Grammar for more information.
An English sentence with one italic word or phrase will be displayed on the
large LCD display.
Your goal is to select the correct word that �lls in the blank.
If multiple words appear to complete the sentence correctly, remember that
this module is a pedantic prescriptivist!
There are three rounds. Correctly complete all the sentences to disarm the
module.
If a mistake is made during the course of the test, the question number will
reset to 1.
Keep Talking and Nobody Explodes Mod English Test
On the Subject of Follow the Leader
Child’s play. Just follow the leader. Only if you fail to follow, the penalty is
somewhat more explosive.
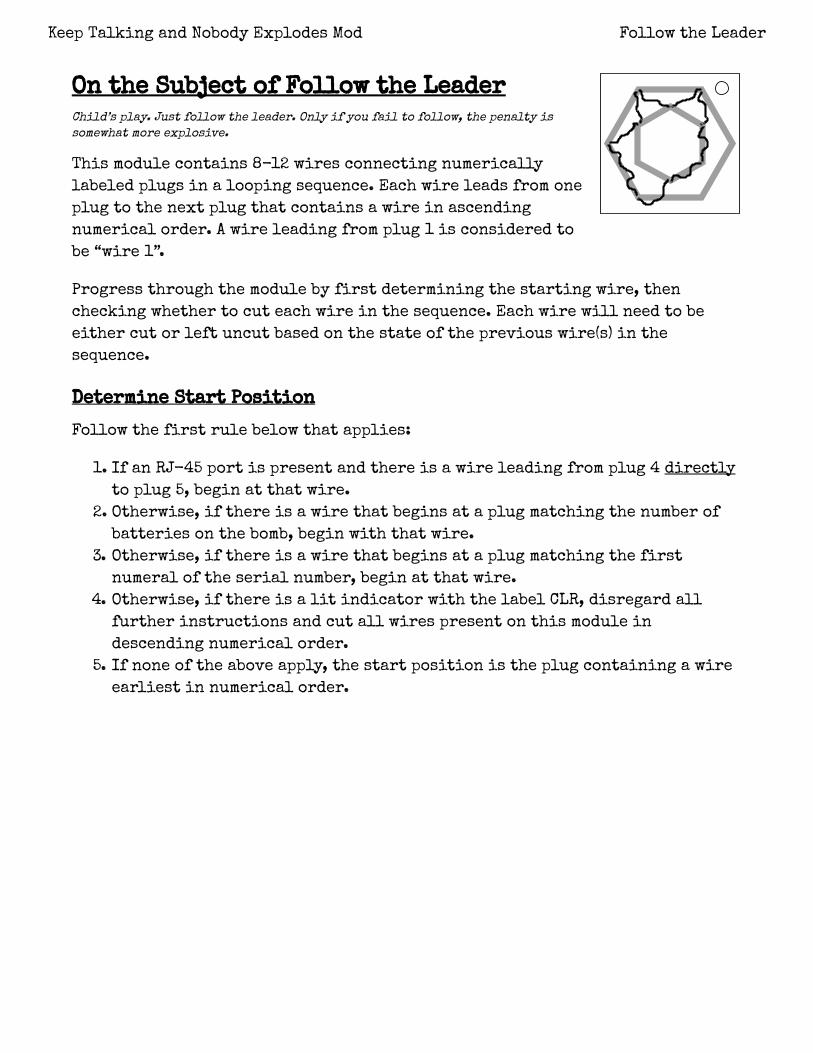
This module contains 8-12 wires connecting numerically
labeled plugs in a looping sequence. Each wire leads from one
plug to the next plug that contains a wire in ascending
numerical order. A wire leading from plug 1 is considered to
be “wire 1”.
Progress through the module by first determining the starting wire, then
checking whether to cut each wire in the sequence. Each wire will need to be
either cut or left uncut based on the state of the previous wire(s) in the
sequence.
Determine Start Position
Follow the first rule below that applies:
1. If an RJ-45 port is present and there is a wire leading from plug 4 directly
to plug 5, begin at that wire.
2. Otherwise, if there is a wire that begins at a plug matching the number of
batteries on the bomb, begin with that wire.
3. Otherwise, if there is a wire that begins at a plug matching the first
numeral of the serial number, begin at that wire.
4. Otherwise, if there is a lit indicator with the label CLR, disregard all
further instructions and cut all wires present on this module in
descending numerical order.
5. If none of the above apply, the start position is the plug containing a wire
earliest in numerical order.
Keep Talking and Nobody Explodes Mod Follow the Leader
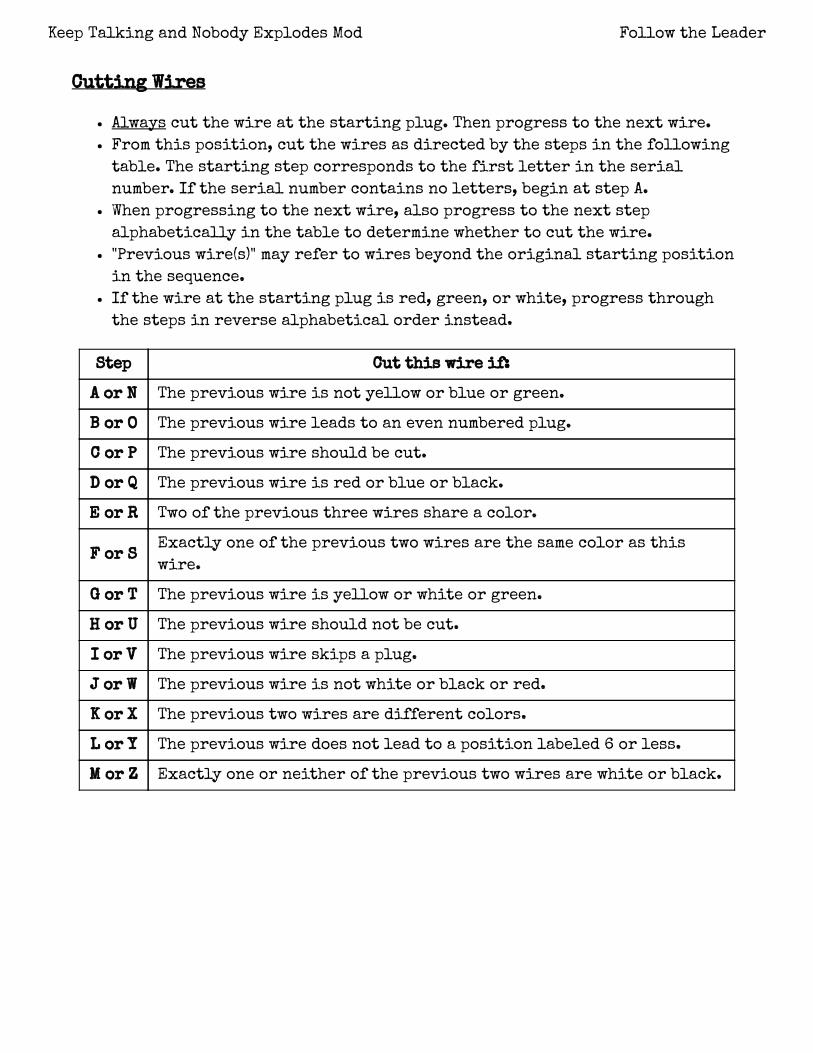
Cutting Wires
Always cut the wire at the starting plug. Then progress to the next wire.
From this position, cut the wires as directed by the steps in the following
table. The starting step corresponds to the first letter in the serial
number. If the serial number contains no letters, begin at step A.
When progressing to the next wire, also progress to the next step
alphabetically in the table to determine whether to cut the wire.
"Previous wire(s)" may refer to wires beyond the original starting position
in the sequence.
If the wire at the starting plug is red, green, or white, progress through
the steps in reverse alphabetical order instead.
Step Cut this wire if:
A or N The previous wire is not yellow or blue or green.
B or O The previous wire leads to an even numbered plug.
C or P The previous wire should be cut.
D or Q The previous wire is red or blue or black.
E or R Two of the previous three wires share a color.
F or SExactly one of the previous two wires are the same color as this
wire.
G or T The previous wire is yellow or white or green.
H or U The previous wire should not be cut.
I or V The previous wire skips a plug.
J or W The previous wire is not white or black or red.
K or X The previous two wires are different colors.
L or Y The previous wire does not lead to a position labeled 6 or less.
M or Z Exactly one or neither of the previous two wires are white or black.
Keep Talking and Nobody Explodes Mod Follow the Leader

First Subcommand
x is prime ▲▲▼▼
x = 12n ▲A◀◀a+b = 10 AND last digit of
serial number is oddAB◀▶
x = 6n + 3 OR x = 10n + 5 ▼◀A▶
x = 7n AND y ≠ 7n ◀◀▲B
x = c × d A▲◀◀
x is a perfect square ▶▶A▼x = 3n – 1 OR bomb has unlit
ind. labeled SND▶AB▲
60 ≤ x < 90 AND bomb has no
batteriesBB▶◀
x = 6n ABA▶
x = 4n ▼▼◀▲
else A◀B▶
Second Subcommand
y is prime ◀▶◀▶
y = 8n ▼▶B▲c-d = 4 AND bomb has a
Stereo RCA▶A▼▼
y = 4n + 2 OR bomb has lit
ind. labeled FRQB▲▶A
y = 7n AND x ≠ 7n ◀◀▼A
y is a perfect square ▲▼B▶
y = a × b A▲◀▼y = 4n – 1 OR bomb has a
PS/2 port▲BBB
c > d AND bomb has 2 or more
batteriesAA▲▼
y = 5n BAB◀
y = 3n ▶▲▲◀
else B▲A▼
On the Subject of the Gamepad
Oh, the layout of the buttons on this thing takes me back to my childhood! Except I
didn't expect to see that on a time bomb, even. Play time is over, I suppose.
See Appendix MathConcepts: Mathematical Concepts for more
information.
Two 2-digit numbers will appear on the top LCD display.
The bottom has eight keys: the input keys (◀▲▼▶AB), Return, and Backspace.
Determine the correct command, made of two subcommands, to input, depending
on the properties of the two numbers. Use the ቀ䨀rst match.
The two numbers are notated x and y. Individual digits are notated as abcd. A
number followed by n means a multiple of that number.
Global Overrides If x = 11n, switch the ቀ䨀rst keypress with the
second, and the ቀ䨀fth with the seventh.
If a = 1 + d, switch the third and fourth
keypresses, as well as the sixth and eighth.
If x or y is a highly composite number,
switch the order of the subcommands.
If x and y are perfect squares, 䀰낰ip the
entire sequence.
Apply all matches after
determining the two
commands.
Keep Talking and Nobody Explodes Mod Gamepad
SUBMIT SUBMIT
THIS ONE BOMBDVID SUBMIT
WIRE THING BOBBOOM SWITCH SEA
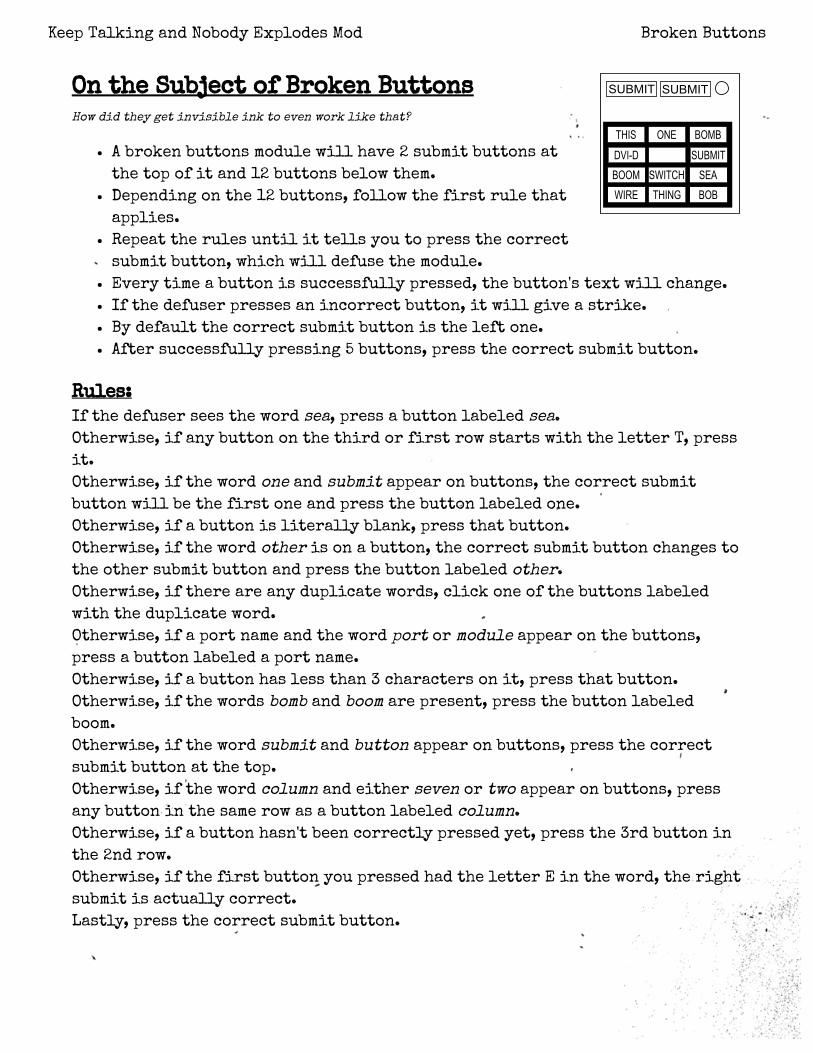
On the Subject of Broken Buttons
How did they get invisible ink to even work like that?
A broken buttons module will have 2 submit buttons at
the top of it and 12 buttons below them.
Depending on the 12 buttons, follow the 䕝rst rule that
applies.
Repeat the rules until it tells you to press the correct
submit button, which will defuse the module.
Every time a button is successfully pressed, the button's text will change.
If the defuser presses an incorrect button, it will give a strike.
By default the correct submit button is the left one.
After successfully pressing 5 buttons, press the correct submit button.
Rules:
If the defuser sees the word sea, press a button labeled sea.
Otherwise, if any button on the third or 䕝rst row starts with the letter T, press
it.
Otherwise, if the word one and submit appear on buttons, the correct submit
button will be the 䕝rst one and press the button labeled one.
Otherwise, if a button is literally blank, press that button.
Otherwise, if the word other is on a button, the correct submit button changes to
the other submit button and press the button labeled other.
Otherwise, if there are any duplicate words, click one of the buttons labeled
with the duplicate word.
Otherwise, if a port name and the word port or module appear on the buttons,
press a button labeled a port name.
Otherwise, if a button has less than 3 characters on it, press that button.
Otherwise, if the words bomb and boom are present, press the button labeled
boom.
Otherwise, if the word submit and button appear on buttons, press the correct
submit button at the top.
Otherwise, if the word column and either seven or two appear on buttons, press
any button in the same row as a button labeled column.
Otherwise, if a button hasn't been correctly pressed yet, press the 3rd button in
the 2nd row.
Otherwise, if the 䕝rst button you pressed had the letter E in the word, the right
submit is actually correct.
Lastly, press the correct submit button.
Keep Talking and Nobody Explodes Mod Broken Buttons

On the Subject of Round Keypads
I think someone tried to make this module look really cool, but failed.
The circular keypad contains 8 symbols from the columns
below.
Find the column below that contains the most symbols
from the keypad.
If two or more columns have the most symbols, use the
right-most column.
Press all buttons that have a symbol not present on the correct column.
Keep Talking and Nobody Explodes Mod Round Keypad
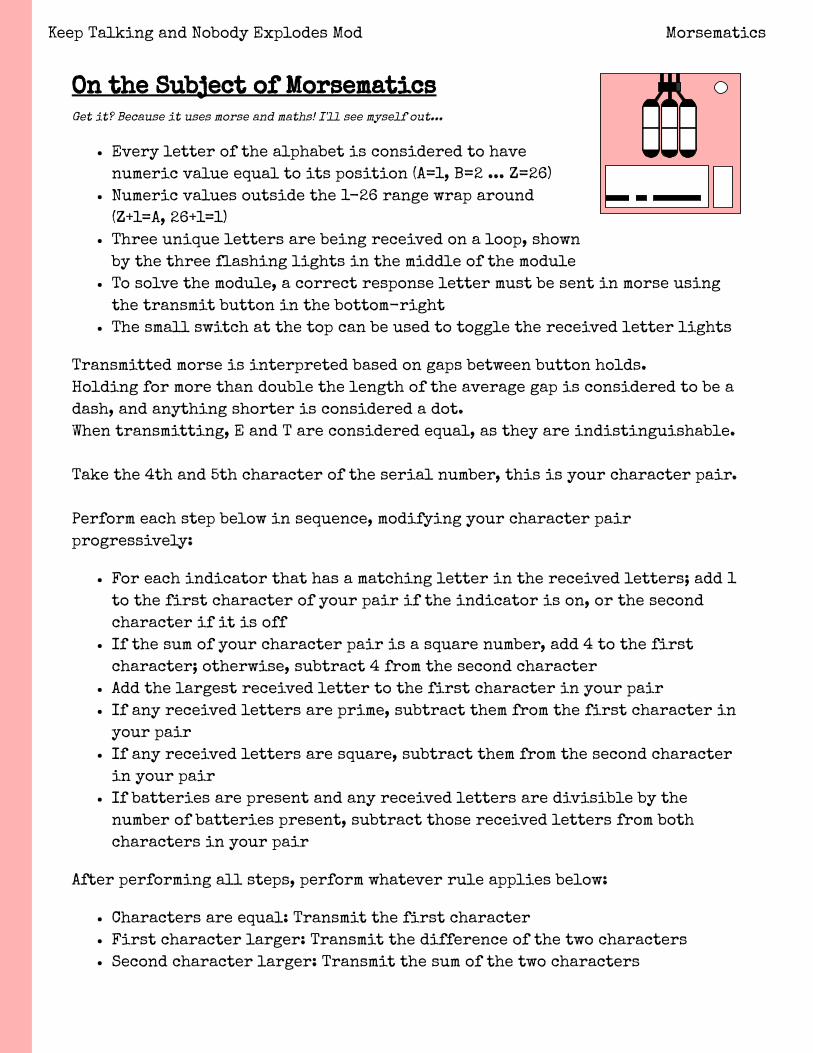
On the Subject of Morsematics
Get it? Because it uses morse and maths! I'll see myself out...
Every letter of the alphabet is considered to have
numeric value equal to its position (A=1, B=2 ... Z=26)
Numeric values outside the 1-26 range wrap around
(Z+1=A, 26+1=1)
Three unique letters are being received on a loop, shown
by the three flashing lights in the middle of the module
To solve the module, a correct response letter must be sent in morse using
the transmit button in the bottom-right
The small switch at the top can be used to toggle the received letter lights
Transmitted morse is interpreted based on gaps between button holds.
Holding for more than double the length of the average gap is considered to be a
dash, and anything shorter is considered a dot.
When transmitting, E and T are considered equal, as they are indistinguishable.
Take the 4th and 5th character of the serial number, this is your character pair.
Perform each step below in sequence, modifying your character pair
progressively:
For each indicator that has a matching letter in the received letters; add 1
to the first character of your pair if the indicator is on, or the second
character if it is off
If the sum of your character pair is a square number, add 4 to the first
character; otherwise, subtract 4 from the second character
Add the largest received letter to the first character in your pair
If any received letters are prime, subtract them from the first character in
your pair
If any received letters are square, subtract them from the second character
in your pair
If batteries are present and any received letters are divisible by the
number of batteries present, subtract those received letters from both
characters in your pair
After performing all steps, perform whatever rule applies below:
Characters are equal: Transmit the first character
First character larger: Transmit the difference of the two characters
Second character larger: Transmit the sum of the two characters
Keep Talking and Nobody Explodes Mod Morsematics
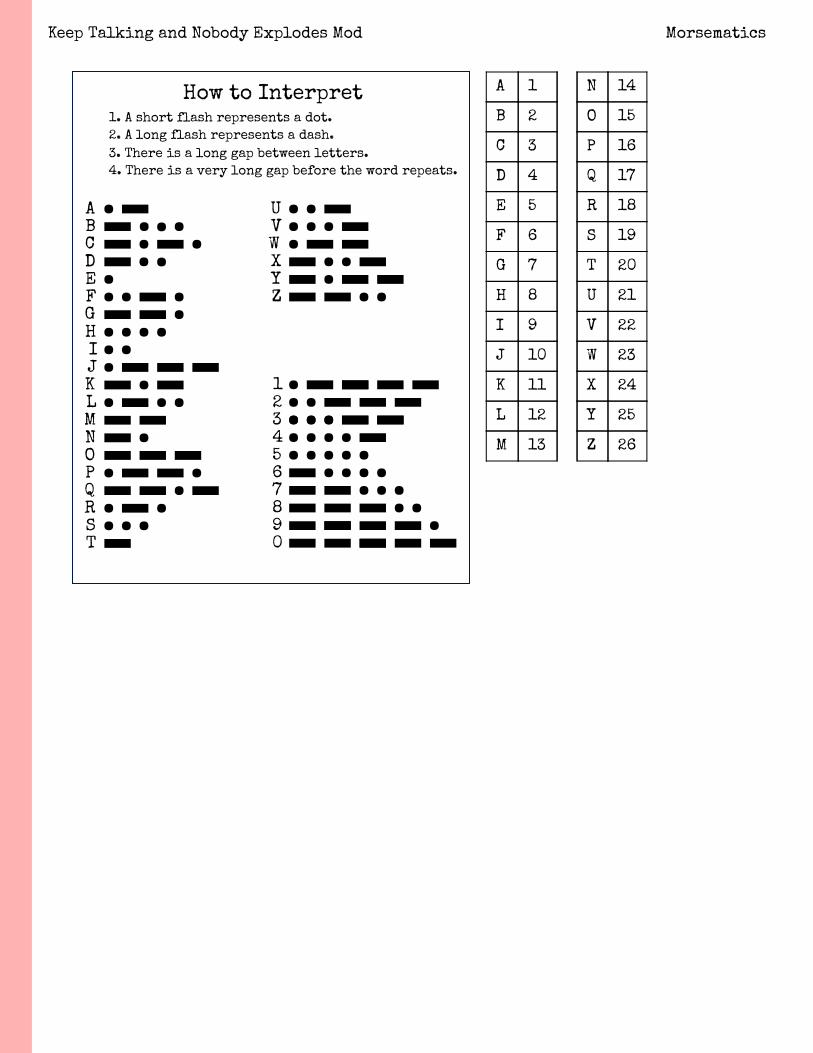
How to Interpret
1. A short flash represents a dot.
2. A long flash represents a dash.
3. There is a long gap between letters.
4. There is a very long gap before the word repeats.
U
V
W
X
Y
Z
A
B
C
D
E
F
G
H
I
J
K
L
M
N
O
Q
P
R
S
T
1
2
3
4
5
6
7
8
9
0
A 1 N 14
B 2 O 15
C 3 P 16
D 4 Q 17
E 5 R 18
F 6 S 19
G 7 T 20
H 8 U 21
I 9 V 22
J 10 W 23
K 11 X 24
L 12 Y 25
M 13 Z 26
Keep Talking and Nobody Explodes Mod Morsematics
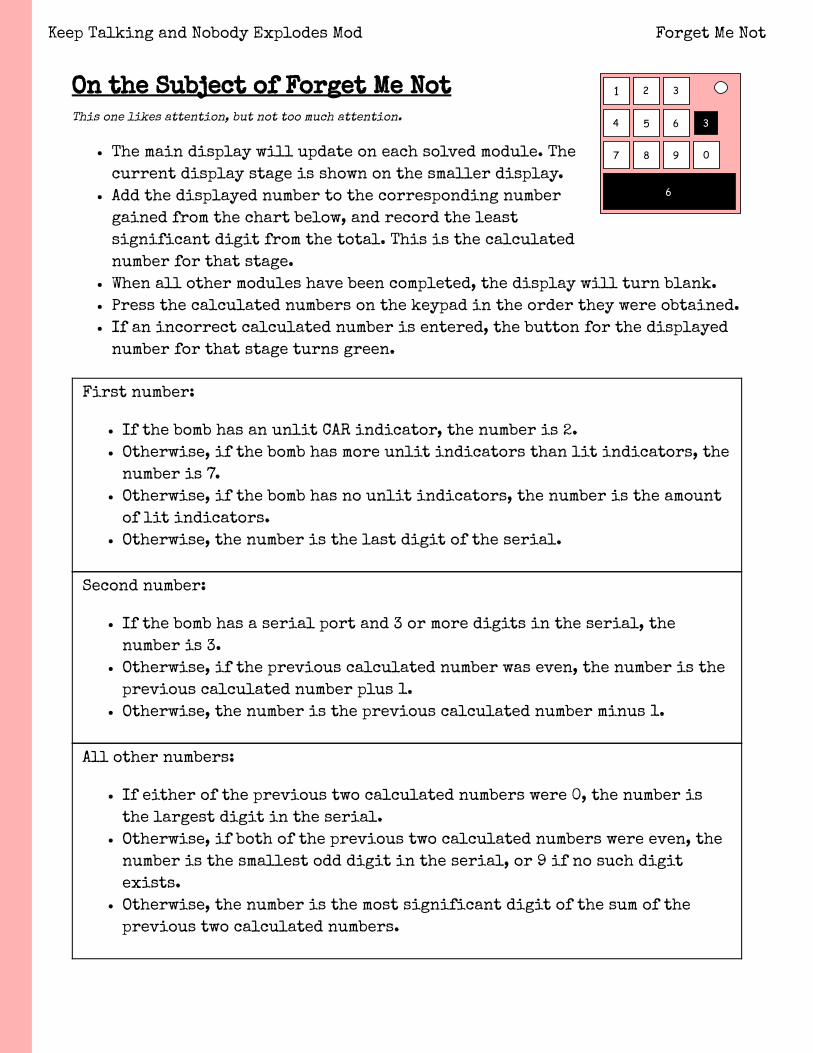
1 2 3
4 5 6
7 8 9 0
6
3
On the Subject of Forget Me Not
This one likes attention, but not too much attention.
The main display will update on each solved module. The
current display stage is shown on the smaller display.
Add the displayed number to the corresponding number
gained from the chart below, and record the least
significant digit from the total. This is the calculated
number for that stage.
When all other modules have been completed, the display will turn blank.
Press the calculated numbers on the keypad in the order they were obtained.
If an incorrect calculated number is entered, the button for the displayed
number for that stage turns green.
First number:
If the bomb has an unlit CAR indicator, the number is 2.
Otherwise, if the bomb has more unlit indicators than lit indicators, the
number is 7.
Otherwise, if the bomb has no unlit indicators, the number is the amount
of lit indicators.
Otherwise, the number is the last digit of the serial.
Second number:
If the bomb has a serial port and 3 or more digits in the serial, the
number is 3.
Otherwise, if the previous calculated number was even, the number is the
previous calculated number plus 1.
Otherwise, the number is the previous calculated number minus 1.
All other numbers:
If either of the previous two calculated numbers were 0, the number is
the largest digit in the serial.
Otherwise, if both of the previous two calculated numbers were even, the
number is the smallest odd digit in the serial, or 9 if no such digit
exists.
Otherwise, the number is the most significant digit of the sum of the
previous two calculated numbers.
Keep Talking and Nobody Explodes Mod Forget Me Not

CHECKOn the Subject of Plumbing
I'd wash your hands after this one...
The module has 4 input pipes (left) and 4 output pipes
(right). At least one input pipe and one output pipe will
be active.
The defuser must connect all active input pipes to all
active output pipes, whilst taking care not to connect
inactive pipes, using the 6 by 6 grid of pipes. Clicking on a pipe in the 6 by
6 grid will rotate it.
All pipes connected to an active pipe must also correctly connect to other
pipes. Any pipe with a connection not going into another pipe (or going
into an inactive in/out pipe) will cause a strike upon checking the
solution.
Once the solution has been entered, press "CHECK" to verify the solution. An
incorrect solution will cause a strike.
Active input and output pipes are determined using the table below. If the
pipe has more points for it than against, it is active.
Keep Talking and Nobody Explodes Mod Plumbing

Red Input
For: Serial contains a '1'
For: Exactly 1 RJ45 port
Against: Any duplicate ports
Against: Any duplicate serial
characters
Yellow Input
For: Serial contains a '2'
For: One or more Stereo RCA ports
Against: No duplicate ports
Against: Serial contains a '1' or 'L'
Green Input
For: Serial contains 3 or more
numbers
For: One or more DVI-D ports
Against: Red Input is inactive
Against: Yellow Input is
inactive
Blue Input
Note: Always active if all other
inputs are inactive
For: At least 4 port types
For: At least 4 batteries
Against: No ports
Against: No batteries
Red Output
For: One or more Serial ports
For: Exactly one battery
Against: Serial contains more
than 2 numbers
Against: More than 2 inputs
are active
Yellow Output
For: Any duplicate ports
For: Serial contains a '4' or '8'
Against: Serial doesn't contain a '2'
Against: Green Input is active
Green Output
For: Exactly 3 inputs are
active
For: Exactly 3 ports are
present
Against: Less than 3 ports are
present
Against: Serial contains more
than 3 numbers
Blue Output
Note: Always active if all other
outputs are inactive
For: All inputs are active
For: Any other output is inactive
Against: Less than 2 batteries
Against: No Parallel port
Keep Talking and Nobody Explodes Mod Plumbing

On the Subject of the Safety Safe
This safe either contains immense riches, or is empty.
All 6 dials must be oriented correctly to solve the
module.
Each dial has a tell, where it clicks louder. This is the
starting location for each dial.
Follow the rules below to determine how far to rotate
each dial after the starting location.
Turn the lever to check the solution. Any correct dials are indicated with a
green light, and any incorrect dials are indicated with a red light.
Starting at 0, add the number of port types on the bomb, multiplied by 7.
Add the number of lit indicators with a matching letter in the serial,
multiplied by 5.
Add the number of unlit indicators with a matching letter in the serial.
For the first five dials, add the number obtained from the table on the next
page, using both the location of the dial and the serial number as
reference.
For the last dial, add the sum of the numbers in the last column using all
characters in the serial number as a reference.
Note: A full rotation takes 12 turns.
Keep Talking and Nobody Explodes Mod Safety Safe

Dial
Top Bottom
Left Middle Right Left Middle Right
Serial
First Second Third Fourth Fifth All
A 8 3 4 8 9 0
B 10 1 3 7 3 8
C 2 1 1 5 3 6
D 11 6 11 11 7 7
E 0 5 5 8 2 1
F 4 2 7 7 1 5
G 7 4 4 2 10 5
H 8 3 6 6 6 5
I 0 11 0 0 9 10
J 2 11 8 0 5 6
K 5 2 5 1 0 4
L 1 9 8 11 11 11
M 1 7 9 5 6 2
N 9 5 1 4 4 9
O 5 9 8 10 2 8
P 3 10 9 1 9 7
Q 4 10 6 1 4 8
R 8 0 4 0 6 11
S 9 4 0 6 3 10
T 7 6 7 11 5 3
U 11 9 6 3 11 1
V 11 11 2 8 1 0
W 6 0 11 6 11 2
X 4 2 7 2 8 10
Y 10 7 10 10 8 9
Z 3 7 1 10 0 4
0 7 0 3 5 8 6
1 9 10 10 9 1 2
2 2 5 11 7 7 3
3 10 8 10 4 10 4
4 6 8 0 3 5 0
5 6 3 3 3 0 11
6 1 1 5 2 7 3
7 0 6 2 4 2 1
8 5 4 9 9 10 7
9 3 8 2 9 4 9
Keep Talking and Nobody Explodes Mod Safety Safe
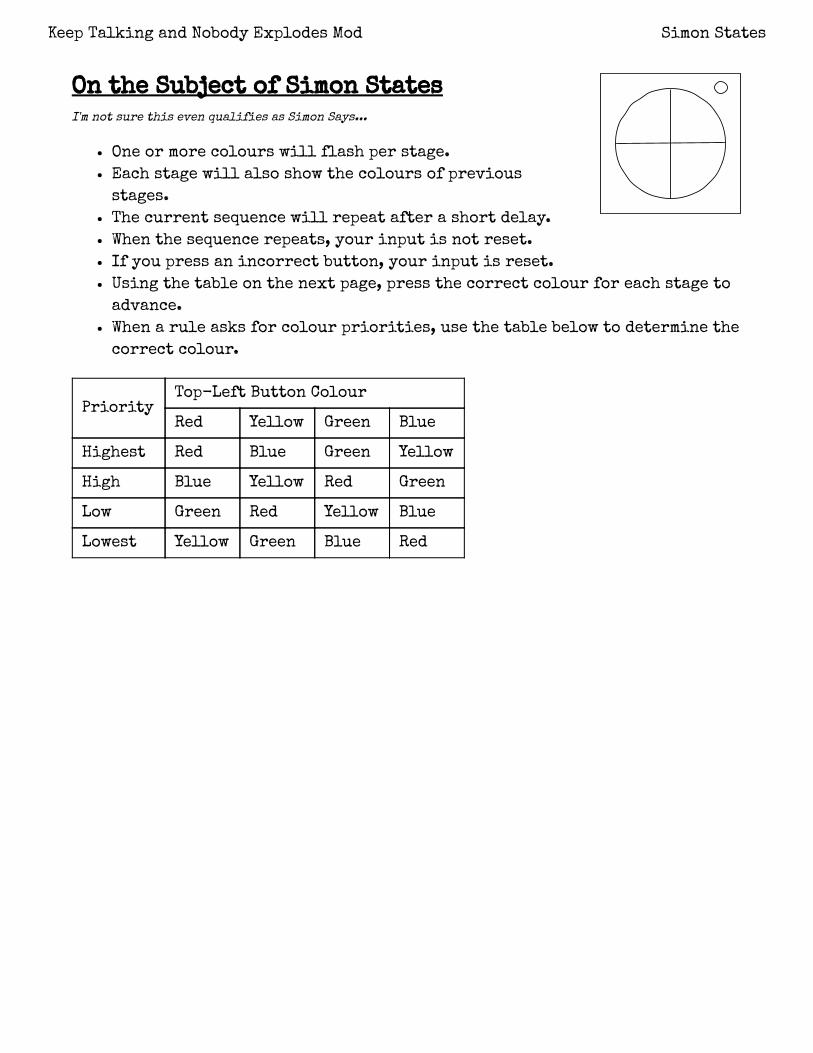
On the Subject of Simon States
I'm not sure this even qualifies as Simon Says...
One or more colours will flash per stage.
Each stage will also show the colours of previous
stages.
The current sequence will repeat after a short delay.
When the sequence repeats, your input is not reset.
If you press an incorrect button, your input is reset.
Using the table on the next page, press the correct colour for each stage to
advance.
When a rule asks for colour priorities, use the table below to determine the
correct colour.
Priority
Top-Left Button Colour
Red Yellow Green Blue
Highest Red Blue Green Yellow
High Blue Yellow Red Green
Low Green Red Yellow Blue
Lowest Yellow Green Blue Red
Keep Talking and Nobody Explodes Mod Simon States

Stage 1
If one colour flashed, press that colour.
Otherwise, if two colours flashed and one was blue, press the highest
priority colour that flashed.
Otherwise, if two colours flashed, press blue.
Otherwise, if three colours flashed including red, press the lowest
priority colour that flashed.
Otherwise, if three colours flashed, press red.
Otherwise, press the second highest priority colour.
Stage 2
If only red and blue flashed, press the highest priority colour that
didn't flash.
Otherwise, if two colours flashed, press the lowest priority colour that
didn't flash.
Otherwise, if one colour flashed and it was not blue, press blue.
Otherwise, if one colour flashed, press yellow.
Otherwise, if all colours flashed, press the same colour as stage 1.
Otherwise, press the colour that didn't flash.
Stage 3
If three colours flashed and at least one was pressed in a previous stage,
press the highest priority colour that flashed and hasn't been pressed.
Otherwise, if three colours flashed, press the highest priority colour
that flashed.
Otherwise, if two colours flashed and both have been pressed, press the
lowest priority colour that didn't flash.
Otherwise, if two colours flashed, press the same colour as stage 1.
Otherwise, if one colour flashed, press that colour.
Otherwise, press the second lowest priority colour.
Stage 4
If three unique colours have been pressed, press the fourth colour.
Otherwise, if three colours flashed and exactly one hasn't been pressed,
press that colour.
Otherwise, if at least three colours flashed, press the lowest priority
colour.
Otherwise, if one colour flashed, press that colour.
Otherwise, press green.
Keep Talking and Nobody Explodes Mod Simon States
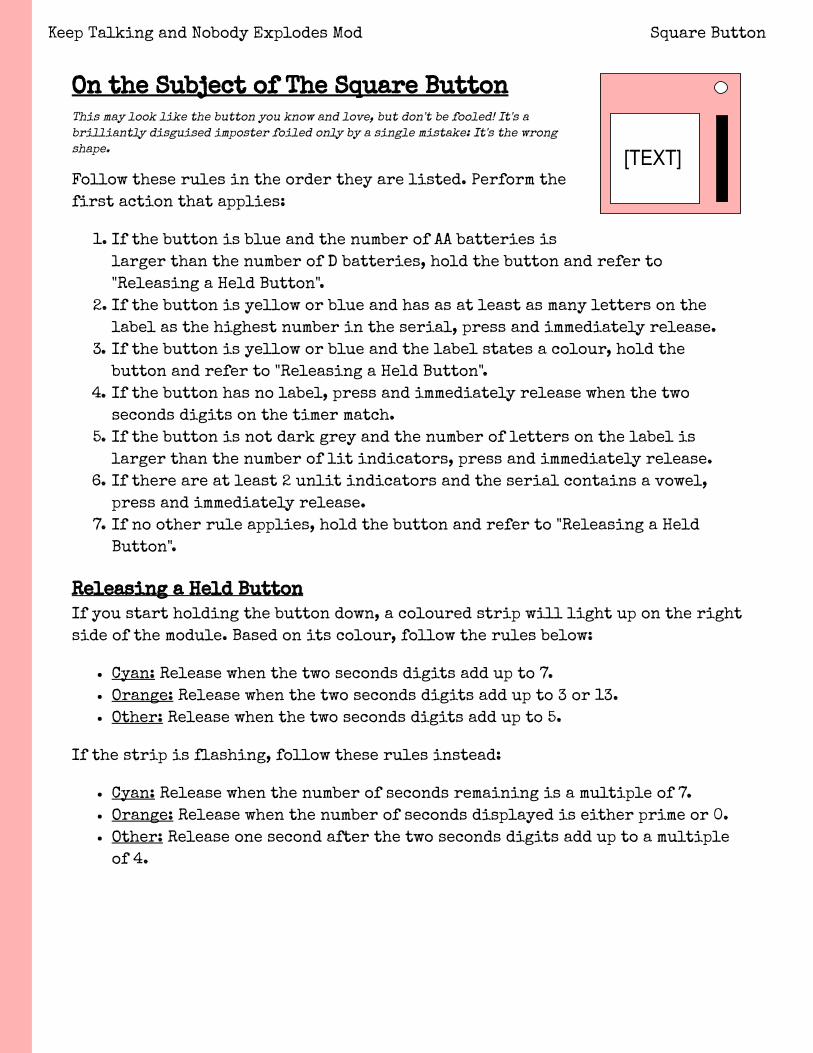
[TEXT]
On the Subject of The Square Button
This may look like the button you know and love, but don't be fooled! It's a
brilliantly disguised imposter foiled only by a single mistake: It's the wrong
shape.
Follow these rules in the order they are listed. Perform the
first action that applies:
1. If the button is blue and the number of AA batteries is
larger than the number of D batteries, hold the button and refer to
"Releasing a Held Button".
2. If the button is yellow or blue and has as at least as many letters on the
label as the highest number in the serial, press and immediately release.
3. If the button is yellow or blue and the label states a colour, hold the
button and refer to "Releasing a Held Button".
4. If the button has no label, press and immediately release when the two
seconds digits on the timer match.
5. If the button is not dark grey and the number of letters on the label is
larger than the number of lit indicators, press and immediately release.
6. If there are at least 2 unlit indicators and the serial contains a vowel,
press and immediately release.
7. If no other rule applies, hold the button and refer to "Releasing a Held
Button".
Releasing a Held Button
If you start holding the button down, a coloured strip will light up on the right
side of the module. Based on its colour, follow the rules below:
Cyan: Release when the two seconds digits add up to 7.
Orange: Release when the two seconds digits add up to 3 or 13.
Other: Release when the two seconds digits add up to 5.
If the strip is flashing, follow these rules instead:
Cyan: Release when the number of seconds remaining is a multiple of 7.
Orange: Release when the number of seconds displayed is either prime or 0.
Other: Release one second after the two seconds digits add up to a multiple
of 4.
Keep Talking and Nobody Explodes Mod Square Button
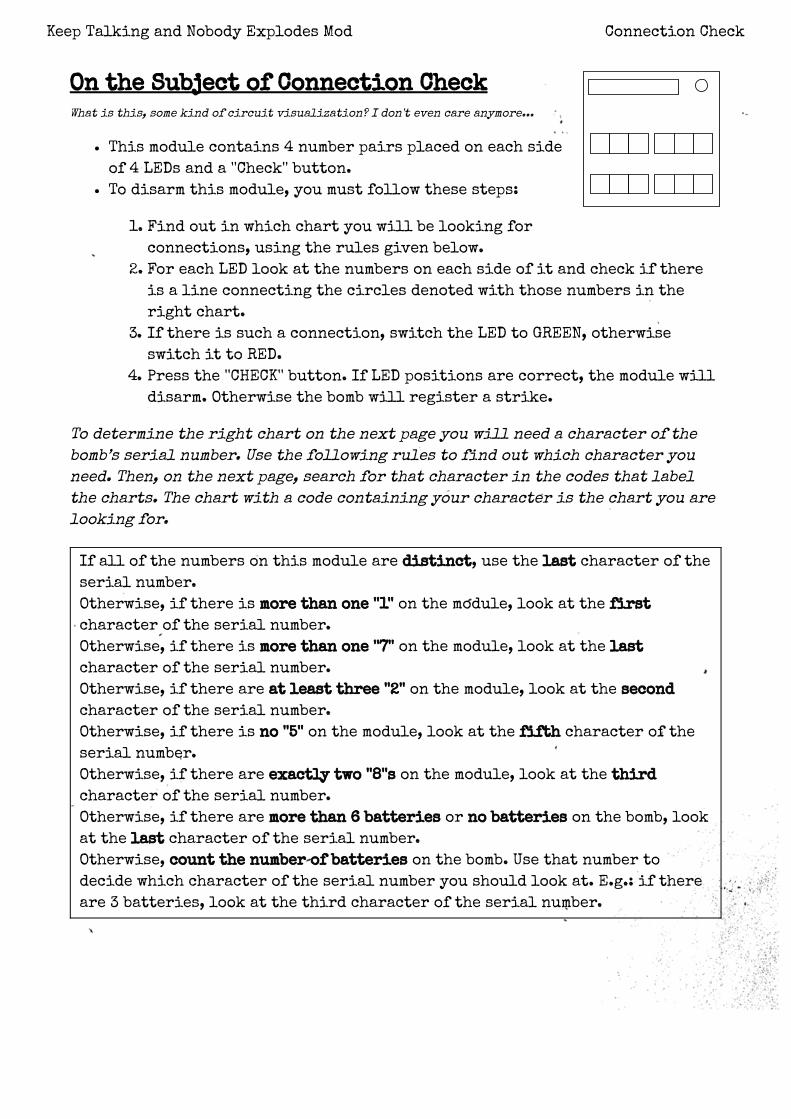
On the Subject of Connection Check
What is this, some kind of circuit visualization? I don't even care anymore...
This module contains 4 number pairs placed on each side
of 4 LEDs and a ''Check'' button.
To disarm this module, you must follow these steps:
1. Find out in which chart you will be looking for
connections, using the rules given below.
2. For each LED look at the numbers on each side of it and check if there
is a line connecting the circles denoted with those numbers in the
right chart.
3. If there is such a connection, switch the LED to GREEN, otherwise
switch it to RED.
4. Press the ''CHECK'' button. If LED positions are correct, the module will
disarm. Otherwise the bomb will register a strike.
To determine the right chart on the next page you will need a character of the
bomb’s serial number. Use the following rules to ႀnd out which character you
need. Then, on the next page, search for that character in the codes that label
the charts. The chart with a code containing your character is the chart you are
looking for.
If all of the numbers on this module are distinct, use the last character of the
serial number.
Otherwise, if there is more than one ''1'' on the module, look at the ႀrst
character of the serial number.
Otherwise, if there is more than one ''7'' on the module, look at the last
character of the serial number.
Otherwise, if there are at least three ''2'' on the module, look at the second
character of the serial number.
Otherwise, if there is no ''5'' on the module, look at the ႀfth character of the
serial number.
Otherwise, if there are exactly two ''8''s on the module, look at the third
character of the serial number.
Otherwise, if there are more than 6 batteries or no batteries on the bomb, look
at the last character of the serial number.
Otherwise, count the number of batteries on the bomb. Use that number to
decide which character of the serial number you should look at. E.g.: if there
are 3 batteries, look at the third character of the serial number.
Keep Talking and Nobody Explodes Mod Connection Check
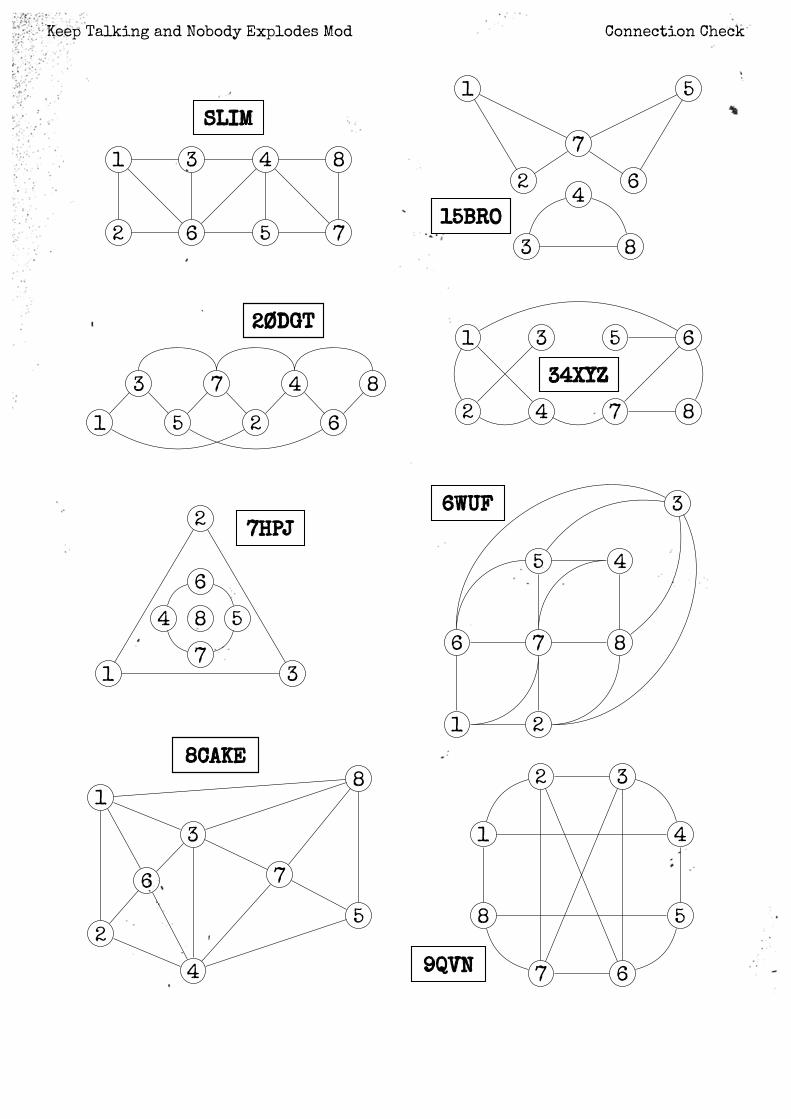
SLIM
34XYZ
2ØDGT
15BRO
7HPJ
6WUF
8CAKE
9QVN
1
2
3
6
4
5
8
7
1 5
7
2 64
3 8
3 7 4 8
6251
2
6
4 8 5
7
1 3
1 3 5 6
2 4 7 8
3
5 4
6 7 8
1 2
1
8
3
6 7
2
4
5
2 3
1 4
8 5
7 6
Keep Talking and Nobody Explodes Mod Connection Check

[ TEXT ]
On the Subject of Sea Shells
Clear communication is crucial when defusing bombs. One can only assume that
this module doesn't want to be defused.
The Sea Shells module consists of a display and ⫒�ve
buttons.
The display shows a phrase. The ⫒�rst two words of the
phrase refer to a row of Table 1. The third and fourth
words refer to a column of Table 1. The remainder of the phrase refers to
Table 2.
Table 1 will give a code, and Table 2 will provide a key to turn the code
into a sequence of words.
The buttons must be used to input the sequence of words. Pressing an
incorrect button will result in a strike and reset the current stage of the
module.
Inputting a correct sequence three times will disarm the module.
Table 1:
SEA SHELLS SHE SHELLS SEA SELLS SHE SELLS
SHE SELLS BDABDAB ACEEAC EACEACE DAABDAB
SHE SHELLS BEEBBE CDCCDB EAEAEA BEEDA
SEA SHELLS ABABA EAAEEA DBEAC ABDBAA
SEA SELLS ACACEAC DBAEC EBDADAB CECEC
Table 2:
ON THE SEA SHOREA = shoe
D = sit
B = shih tzu
E = sushi
C = she
ON THE SHE SOREA = can
D = 2
B = toucan
E = cancan
C = tutu
ON THE SHE SUREA = witch
D = twitch
B = switch
E = stitch
C = itch
ON THE SEESAWA = burglar alarm
D = burger
B = Bulgaria
E = llama
C = armour
Keep Talking and Nobody Explodes Mod Sea Shells

On the Subject of Modules Against Humanity
Some of these modules are really inhumane. What should you do then? Just laugh in
their faces.
This module includes two sets of cards, 10 cards in each set.
The first two cards that you see (one black, one white) are
referred to as initial cards and they both are considered to
be set at number 1. Each card can be set to a number between 1
and 10.
To get the secondary cards:
If you can spell the word POOP from the letters of one of the initial cards,
set that card (or both, if applicable) to number 2.
Otherwise, the secondary black card’s position is determined by number of
unlit indicators + number of ports; and the secondary white card’s
position is determined by number of lit indicators + number of batteries.
Keep Talking and Nobody Explodes Mod Modules Against Humanity
To get the final cards:
If only the secondary black card refers to a module that you have on the
bomb, adjust the secondary white card by +2.
If only the secondary white card refers to a module that you have on the
bomb, adjust the secondary black card by +1.
If both secondary cards refer to modules that you have on the bomb, adjust
the secondary black card by +4 and the secondary white card by +3.
If neither of the secondary cards refers to a module that you have on the
bomb:
• If the serial number contains M, A or H, adjust both secondary cards by
-2;
• Otherwise, if the black card is on the left, the final black card's
position is number of unique ports and the final white card's position is
number of indicators;
• Otherwise, the final black card's position is number of modules on the
bomb and the final white card remains at the secondary position.
Once you have the final cards, press the submit button.
Notes:
Black cards have black background and white letters; white cards have
white background and black letters.
Adjusting by a positive value means cycling the card to the right by the
specified number. Adjusting by a negative value means cycling the card
to the left by the specified number.
If the number of a card value is 0, set the card to the number 10. If it is
above 10, subtract 10. If it is less than 1, add 10.
Pressing the reset button will return the module to the initial state.
Pressing the reset button will not cause a strike.
Upon a strike, the module will reset itself to the initial state. All the
cards on the module will remain the same.
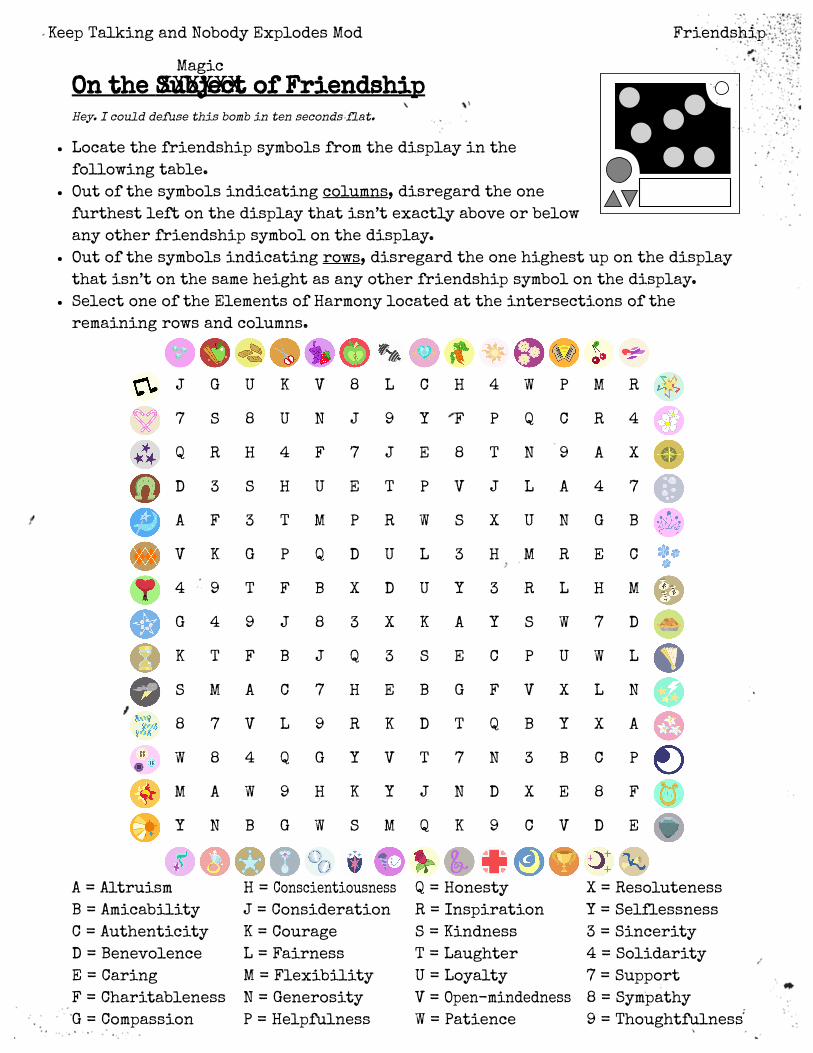
On the Subject of Friendship
Hey. I could defuse this bomb in ten seconds flat.
Locate the friendship symbols from the display in the
following table.
Out of the symbols indicating columns, disregard the one
furthest left on the display that isn’t exactly above or below
any other friendship symbol on the display.
Out of the symbols indicating rows, disregard the one highest up on the display
that isn’t on the same height as any other friendship symbol on the display.
Select one of the Elements of Harmony located at the intersections of the
remaining rows and columns.
J G U K V 8 L C H 4 W P M R
7 S 8 U N J 9 Y F P Q C R 4
Q R H 4 F 7 J E 8 T N 9 A X
D 3 S H U E T P V J L A 4 7
A F 3 T M P R W S X U N G B
V K G P Q D U L 3 H M R E C
4 9 T F B X D U Y 3 R L H M
G 4 9 J 8 3 X K A Y S W 7 D
K T F B J Q 3 S E C P U W L
S M A C 7 H E B G F V X L N
8 7 V L 9 R K D T Q B Y X A
W 8 4 Q G Y V T 7 N 3 B C P
M A W 9 H K Y J N D X E 8 F
Y N B G W S M Q K 9 C V D E
A = Altruism
B = Amicability
C = Authenticity
D = Benevolence
E = Caring
F = Charitableness
G = Compassion
H =
H =
J = Consideration
K = Courage
L = Fairness
M = Flexibility
N = Generosity
P = Helpfulness
Q = Honesty
R = Inspiration
S = Kindness
T = Laughter
U = Loyalty
V =
W = Patience
X = Resoluteness
Y = Selflessness
3 = Sincerity
4 = Solidarity
7 = Support
8 = Sympathy
9 = Thoughtfulness
Keep Talking and Nobody Explodes Mod Friendship
XXXXXX
Magic
Conscientiousness
Open-mindedness

UP NEXT:
PASS
On the Subject of Tic-Tac-Toe
All those years of getting ties in Tic-Tac-Toe might finally pay off.
To defuse this module, all nine buttons must be filled with
“X”s and “O”s.
The display labeled “Up Next:” shows either an “X” or an “O”.
The keypad displays some numbers between 1 and 9 and some
already placed “X”s and “O”s. After placing a piece, the displays go blank.
The numbers in the chart on the following page indicate the location on the
keypad where each piece should be placed.
Use the rules below to determine the starting row:
1. If the last digit of the serial number is even, the starting row is either
5, 6, 7, 8, or 9. Otherwise, the starting row is either 1, 2, 3, or 4.
2. If there is at least one parallel port, use the even values. Otherwise, use
the odd values.
3. If there are more unlit indicators than lit indicators, the starting row is
the lowest remaining value from rule 2.
4. If there are more lit indicators than unlit indicators, the starting row is
the highest value remaining from rule 2.
5. If there are an equal number of lit and unlit indicators, the starting row
is the average of the remaining values from rule 2.
In the chart, determine the appropriate placement column based on the relative
number of “X”s and “O”s already on the board. Begin at the starting row and move
down your selected column until you reach a number that corresponds to an
unfilled spot on the keypad. If you pass row 9, continue at row 1.
If placing the piece in this location would result in a tic-tac-toe, you MUST
press “PASS” and continue in the same row; otherwise, place the piece by pressing
the location on the keypad and then move to the next row in the chart.
Two consecutive passes will result in a piece being placed (and displayed) in
one of the available spaces. This may result in a tic-tac-toe but will not incur
a strike.
Upon a strike, the row resets to the initial starting row and the keypad displays
the placed pieces and remaining numbers. All previous placements remain until
the module is defused.
Keep Talking and Nobody Explodes Mod Tic-Tac-Toe
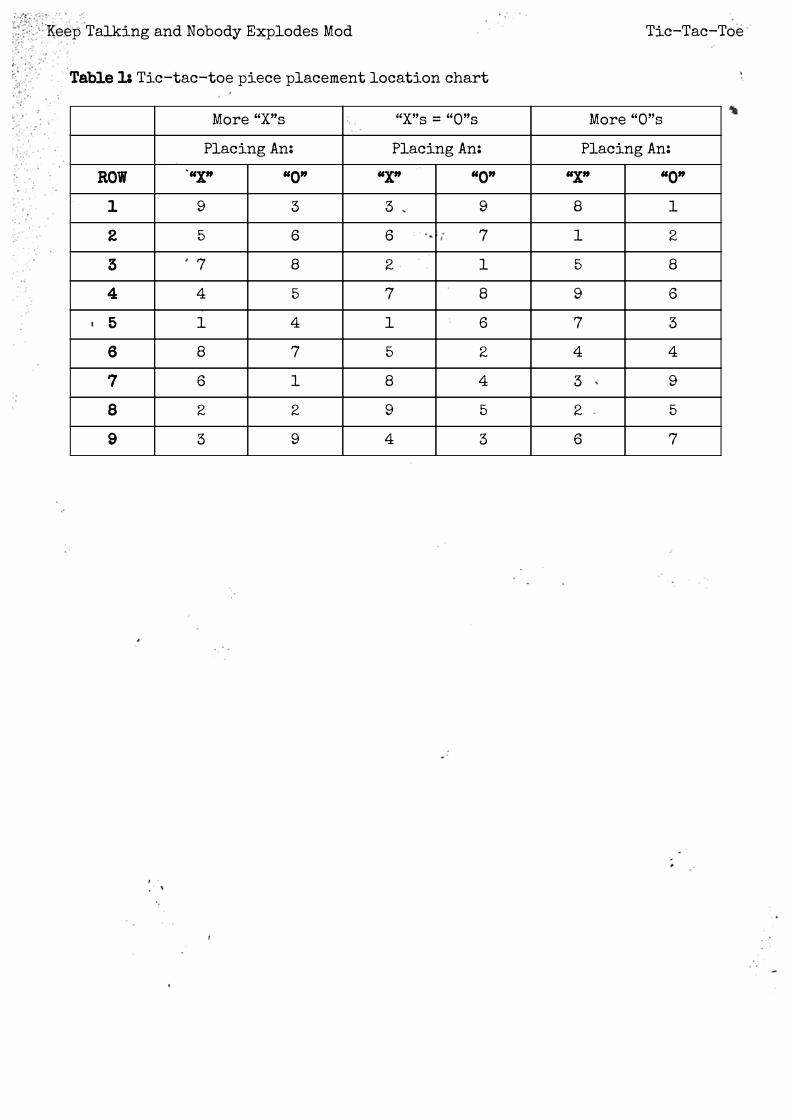
Table 1: Tic-tac-toe piece placement location chart
More “X”s “X”s = “O”s More “O”s
Placing An: Placing An: Placing An:
ROW “X” “O” “X” “O” “X” “O”
1 9 3 3 9 8 1
2 5 6 6 7 1 2
3 7 8 2 1 5 8
4 4 5 7 8 9 6
5 1 4 1 6 7 3
6 8 7 5 2 4 4
7 6 1 8 4 3 9
8 2 2 9 5 2 5
9 3 9 4 3 6 7
Keep Talking and Nobody Explodes Mod Tic-Tac-Toe
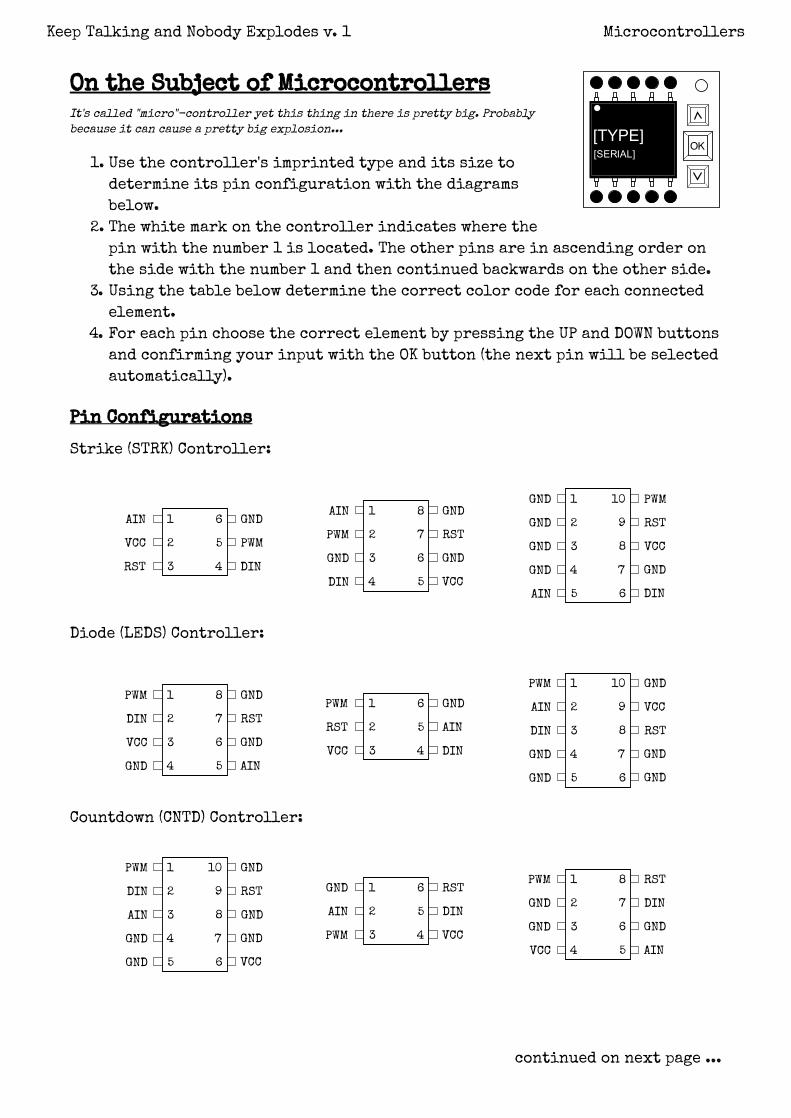
[TYPE][SERIAL]
OK
On the Subject of Microcontrollers
It's called "micro"-controller yet this thing in there is pretty big. Probably
because it can cause a pretty big explosion...
1. Use the controller's imprinted type and its size to
determine its pin configuration with the diagrams
below.
2. The white mark on the controller indicates where the
pin with the number 1 is located. The other pins are in ascending order on
the side with the number 1 and then continued backwards on the other side.
3. Using the table below determine the correct color code for each connected
element.
4. For each pin choose the correct element by pressing the UP and DOWN buttons
and confirming your input with the OK button (the next pin will be selected
automatically).
Pin Configurations
Strike (STRK) Controller:
1
2
3 4
5
6AIN
RST
VCC PWM
GND
DIN
1
2
3
4 5
8
7
6
AIN
PWM
GND
DIN
GND
RST
GND
VCC
1
2
3
4
5
10
9
8
7
6
GND
GND
GND
GND GND
VCC
RST
PWM
AIN DIN
Diode (LEDS) Controller:
1
2
3
4 5
8
7
6
PWM
DIN
VCC
GND
GND
RST
GND
AIN
1
2
3 4
5
6PWM
VCC
RST AIN
GND
DIN
1
2
3
4
5
10
9
8
7
6
PWM
AIN
DIN
GND GND
RST
VCC
GND
GND GND
Countdown (CNTD) Controller:
1
2
3
4
5
10
9
8
7
6
PWM
DIN
AIN
GND GND
GND
RST
GND
GND VCC
1
2
3 4
5
6GND
PWM
AIN DIN
RST
VCC
1
2
3
4 5
8
7
6
PWM
GND
GND
VCC
GND
DIN
RST
AIN
continued on next page ...
Keep Talking and Nobody Explodes v. 1 Microcontrollers

Explosion (EXPL) Controller:
1
2
3 4
5
6PWM
RST
VCC DIN
GND
AIN
1
2
3
4
5
10
9
8
7
6
RST
DIN
VCC
GND AIN
GND
PWM
GND
GND GND
1
2
3
4 5
8
7
6
AIN
GND
RST
GND
GND
DIN
PWM
VCC
Component Color Codes
Input
Voltage
(VCC)
Analog
Input
(AIN)
Digital
Input
(DIN)
Pulse
Width
Modulation
(PWM)
Reset
(RST)
If the last digit of
the controller's
serial number is
1 or 4
Yellow Magenta Green Blue Red
Otherwise, if there is
a lit indicator "SIG"
or a RJ-45 port
Yellow Red Magenta Green Blue
Otherwise, if the
bomb's serial number
contains
C, L, R, X, 1 or 8
Red Magenta Green Blue Yellow
Otherwise, if the
second numerical
digit of the
controller's serial
number matches the
number of batteries
on the bomb
Red Blue Yellow Green Magenta
Otherwise Green Red Yellow Blue Magenta
Note: Ground (GND) is always coded with white.

On the Subject of The Bulb
How many bomb defusal experts does it take to screw in a light bulb?
This module has two buttons labeled I and O and a light bulb,
which is either see-through (translucent) or opaque, and is
one of six colors: blue, green, purple, red, white or yellow.
If you incur a strike because you pushed a wrong button,
ignore it and continue.
If you incur a strike because you unscrewed or screwed in the bulb at an
incorrect time, you must undo that and then continue.
Begin at step 1.
Step 1 If the light is on and the bulb is see-through, press I and go to Step 2.
If the light is on and the bulb is opaque, press O and go to Step 3.
Otherwise, unscrew the bulb and go to Step 4.
Step 2 If the bulb is red, press I, then unscrew it and go to Step 5.
If the bulb is white, press O, then unscrew it and go to Step 6.
Otherwise, unscrew the bulb and go to Step 7.
Step 3 If the bulb is green, press I, then unscrew it and go to Step 6.
If the bulb is purple, press O, then unscrew it and go to Step 5.
Otherwise, unscrew the bulb and go to Step 8.
Step 4 If the bomb has any of the following indicators: CAR, IND, MSA or SND,
press I and go to Step 9.
Otherwise, press O and go to Step 10.
Step 5 If the light went off at Step 1, press the same button again, then screw
the bulb back in.
Otherwise, press the button you haven’t yet pressed, then screw the
bulb back in.
Step 6 If the bulb went off when you pressed I, press the button that you
pressed in Step 1, then screw the bulb back in.
Otherwise, press the button that you pressed in Step 2 or 3, then screw
the bulb back in.
Keep Talking and Nobody Explodes Mod The Bulb

Step 7 If the bulb is green, press I, remember SIG and go to Step 11.
If the bulb is purple, press I, then screw it back in and go to Step 12.
If the bulb is blue, press O, remember CLR and go to Step 11.
Otherwise, press O, then screw the bulb back in and go to Step 13.
Step 8 If the bulb is white, press I, remember FRQ and go to Step 11.
If the bulb is red, press I, then screw it back in and go to Step 13.
If the bulb is yellow, press O, remember FRK and go to Step 11.
Otherwise, press O, then screw the bulb back in and go to Step 12.
Step 9 If the bulb is blue, press I and go to Step 14.
If the bulb is green, press I, then screw it back in and go to Step 12.
If the bulb is yellow, press O and go to Step 15.
If the bulb is white, press O, then screw it back in and go to Step 13.
If the bulb is purple, screw it back in, then press I and go to Step 12.
Otherwise, screw the bulb back in, then press O and go to Step 13.
Step 10 If the bulb is purple, press I and go to Step 14.
If the bulb is red, press I, then screw it back in and go to Step 13.
If the bulb is blue, press O and go to Step 15.
If the bulb is yellow, press O, then screw it back in and go to Step 12.
If the bulb is green, screw it back in, then press I and go to Step 13.
Otherwise, screw the bulb back in, then press O and go to Step 12.
Step 11 If the bomb has the remembered indicator, press I, then screw the bulb
back in.
Otherwise, press O, then screw the bulb back in.
Step 12 If the light is now on, press I.
Otherwise, press O.
Step 13 If the light is now on, press O.
Otherwise, press I.
Step 14 If the bulb is opaque, press I, then screw the bulb back in.
Otherwise, press O, then screw the bulb back in.
Step 15 If the bulb is see-through, press I, then screw the bulb back in.
Otherwise, press O, then screw the bulb back in.
Keep Talking and Nobody Explodes Mod The Bulb

...
KEEP
On the Subject of Silly Slots
Sassy Sally said sorry since soggy Steven slurped soup.
Only press the KEEP button when the slots are in a LEGAL
state. Only pull the lever when the slots are in an ILLEGAL
state. The module will automatically defuse after 4 pulls of
the lever.
The slots are in an ILLEGAL state if any of these statements are true:
There is a single Silly Sasusage.
There is a single Sassy Sally, unless the slot in the same position 2 stages
ago was Soggy.
There are 2 or more Soggy Stevens.
There are 3 Simons, unless any of them are Sassy.
There is a Sausage adjacent to a Sally, unless Sally is Soggy.
There are exactly 2 Silly slots, unless they are both Steven.
There is a single Soggy slot, unless the previous stage had any number of
Sausage slots.
All 3 slots are the same symbol and color, unless there has been a Soggy
Sausage in any previous stage.
All 3 slots are the same color, unless any of them are Sally or there was a
Silly Steven in the last stage.
There are any number of Silly Simons, unless there has been a Sassy Sausage
in any previous stage.
UNDERLINED words are placeholders, substitute them for the correct word using
the matrix below and the keyword found on the module's display. This keyword
changes when the lever is pulled.
Placeholder
Sassy Silly Soggy Sally Simon Sausage Steven
Key
Word
Sassy Blue Red Green Cherry Grape Bomb Coin
Silly Blue Green Red Coin Bomb Grape Cherry
Soggy Green Blue Red Coin Cherry Bomb Grape
Sally Red Blue Green Grape Cherry Bomb Coin
Simon Red Green Blue Bomb Grape Cherry Coin
Sausage Red Blue Green Grape Bomb Coin Cherry
Steven Green Red Blue Cherry Bomb Coin Grape
Keep Talking and Nobody Explodes Mod Silly Slots

1
2
3
4
A B C D
On the Subject of Wire Placement
Sometimes, the wire may look like a face, calming you down... and then you
explode.
This module contains a grid of wires.
There are always 8 wires on it.
Wires can be red, blue, yellow, black or white.
In the following table, use only the column
corresponding to the color of the wire connected to C3.
Cut a wire if it is a specific color and is connected to a specific spot on
the grid as indicated in the table.
Wire connected to C3 is
Black Blue Red White Yellow
Cut if color is connected to:
Yellow D2 D1 D2 A2 D1
Blue A2 C4 A1 C4 D4
White D3 D2 D4 B3 B2
White B2 C1 B4 A1 C1
Red A1 B3 C4 B2 B3
Blue C3 C2 C1 D3 B1
Black B1 D4 A4 D2 B4
Red C4 D3 B1 C1 C2
Yellow A3 C3 A2 A4 A3
Yellow D1 A1 B2 B4 A4
Keep Talking and Nobody Explodes Mod Wire Placement
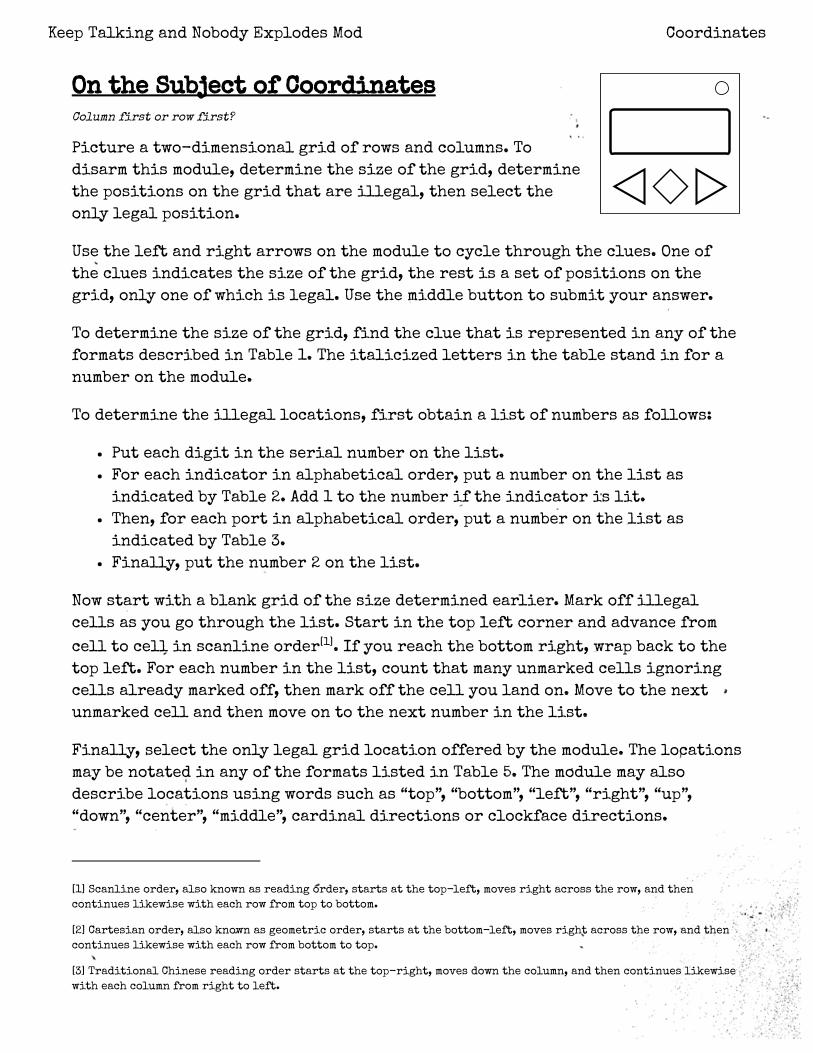
On the Subject of Coordinates
Column first or row first?
Picture a two-dimensional grid of rows and columns. To
disarm this module, determine the size of the grid, determine
the positions on the grid that are illegal, then select the
only legal position.
Use the left and right arrows on the module to cycle through the clues. One of
the clues indicates the size of the grid, the rest is a set of positions on the
grid, only one of which is legal. Use the middle button to submit your answer.
To determine the size of the grid, find the clue that is represented in any of the
formats described in Table 1. The italicized letters in the table stand in for a
number on the module.
To determine the illegal locations, first obtain a list of numbers as follows:
Put each digit in the serial number on the list.
For each indicator in alphabetical order, put a number on the list as
indicated by Table 2. Add 1 to the number if the indicator is lit.
Then, for each port in alphabetical order, put a number on the list as
indicated by Table 3.
Finally, put the number 2 on the list.
Now start with a blank grid of the size determined earlier. Mark off illegal
cells as you go through the list. Start in the top left corner and advance from
cell to cell in scanline order[1]
. If you reach the bottom right, wrap back to the
top left. For each number in the list, count that many unmarked cells ignoring
cells already marked off, then mark off the cell you land on. Move to the next
unmarked cell and then move on to the next number in the list.
Finally, select the only legal grid location offered by the module. The locations
may be notated in any of the formats listed in Table 5. The module may also
describe locations using words such as “top”, “bottom”, “left”, “right”, “up”,
“down”, “center”, “middle”, cardinal directions or clockface directions.
Keep Talking and Nobody Explodes Mod Coordinates
[1] Scanline order, also known as reading order, starts at the top-left, moves right across the row, and then
continues likewise with each row from top to bottom.
[2] Cartesian order, also known as geometric order, starts at the bottom-left, moves right across the row, and then
continues likewise with each row from bottom to top.
[3] Traditional Chinese reading order starts at the top-right, moves down the column, and then continues likewise
with each column from right to left.

Table 2
BOB 5 FRQ 2 SIG 4
CAR 4 IND 0 SND 1
CLR 2 MSA 3 TRN 3
FRK 1 NSA 0
Table 3
DVI-D 5 RJ-45 3
Parallel 2 Serial 1
PS/2 0 Stereo RCA 4
Table 4
一 1 六 6
二 2 七 7
三 3 八 8
四 4 九 9
五 5 十 10
Table 1
Format How to interpret
xThe number x is a product of two primes. The grid’s width is the
larger prime, the height the smaller.
(x) Same as x, but width and height are swapped.
x×y x is the width, y the height of the grid.
x by y x is the height, y the width of the grid.
x*y x is the total size of the grid, y the height.
x : y x is the total size of the grid, y the width.
Table 5
[x,y] Column, then row; top-left is [0,0].
letter number Column, then row; top-left is A1.
<x, y> Row, then column; top-left is <0, 0>.
x, y Row, then column; top-left is 1, 1.
(x,y) Column, then row; bottom-left is (0,0).
letter-number Column, then row; bottom-left is A-1.
“x, y” Row, then column; bottom-left is “0, 0”.
x/y Row, then column; bottom-left is 1/1.
[x] Cell number in scanline order[1]
; top-left is [0].
xth Cell number in scanline order[1]
; top-left is 1st.
#x Cell number in Cartesian order[2]
; bottom-left is #1.
四十七
Cell number in Chinese reading order[3]
; top-right is 一. See
Table 4 for Chinese numerals reference. The example shown
here represents the number 47.
Keep Talking and Nobody Explodes Mod Coordinates

On the Subject of Light Cycle
The name “blinkenlights” was taken.
There are six colored LEDs in a row which continuously flash
in sequence from left to right. To disarm this module,
determine a sequence of colors, then input that sequence by
pressing the button when each color is lit. (For example, to
enter the color red, press the button when the red LED is lit.)
Determine the correct sequence of colors as follows:
Start with the order of the LEDs on the module. This is a sequence of six
colors.
Take the first and last character of the serial number, then the second and
second-last, etc. up to the last and first character.
For each such pair of characters, look up the information in the following
table. Use the first in the pair for the row, the second for the column. A
letter in the table refers to a color (R = red, Y = yellow, G = green, B = blue,
M = magenta, W = white), while a number refers to a position in your
sequence (1 through 6). Swap those two of the colors in your sequence.
The correct sequence is what you are left with after those six swaps.
Keep Talking and Nobody Explodes Mod Light Cycle

A, B, C D, E, F G, H, I J, K, L M, N, O P, Q, R S, T, U V, W, X Y, Z, 0 1, 2, 3 4, 5, 6 7, 8, 9
A 5/B B/R M/G Y/5 4/1 R/W 6/4 1/6 2/3 3/M G/Y W/2
B 2/R 6/M 4/3 5/B R/5 Y/2 1/G M/Y W/6 3/4 B/W G/1
C M/Y 2/4 Y/R 3/5 W/2 G/B 1/W R/3 5/G 4/6 B/M 6/1
D 5/6 6/3 1/4 M/2 R/Y 2/M W/R B/G Y/W 3/B G/1 4/5
E B/R W/2 2/3 1/4 M/B 5/6 Y/W R/M G/Y 6/G 3/5 4/1
F R/Y 2/G 1/M Y/5 5/R W/B 6/3 B/1 M/4 G/6 3/2 4/W
G Y/1 5/4 2/W R/Y 1/R B/3 6/G G/6 M/B W/5 4/2 3/M
H 3/5 W/Y G/2 2/B 5/G M/R B/3 1/4 4/6 Y/M 6/W R/1
I R/M 4/5 5/W B/1 M/6 3/2 W/B G/Y Y/R 1/4 6/G 2/3
J W/B R/6 5/Y 4/1 2/5 Y/3 M/W 3/2 B/G G/M 1/R 6/4
K 6/4 B/2 W/G R/5 G/1 2/Y Y/R M/B 1/6 3/W 5/3 4/M
L 6/4 B/5 W/6 1/G R/2 4/R G/W 3/M 2/B Y/3 5/Y M/1
M W/3 3/G 2/4 Y/M M/2 R/5 6/R B/6 G/Y 5/B 1/W 4/1
N 1/Y 6/M 2/1 G/R 3/G 5/B R/4 4/3 W/2 Y/W B/5 M/6
O R/5 3/G 2/3 W/4 B/2 1/M 5/6 M/1 4/Y G/B 6/R Y/W
P 1/4 4/B 6/2 3/W M/R Y/6 B/Y 2/G 5/M G/5 R/3 W/1
Q 5/G M/B 4/W Y/2 R/M W/4 6/1 3/6 B/Y 1/5 G/R 2/3
R M/G 5/6 G/M W/5 Y/2 R/4 B/1 1/B 2/R 4/3 6/W 3/Y
S R/Y 6/5 5/G G/B W/M 4/3 1/W B/1 3/6 2/4 Y/2 M/R
T G/3 B/2 6/W M/B 1/5 Y/4 5/M W/R 4/6 3/Y 2/G R/1
U 5/1 W/3 4/5 3/4 Y/W 1/Y B/G 6/2 M/6 G/R 2/M R/B
V M/6 6/B 1/G 3/5 W/R B/4 G/M R/1 2/W 5/2 4/Y Y/3
W Y/M B/1 5/3 2/G 3/2 R/5 1/4 W/6 4/W G/R M/Y 6/B
X 4/2 R/B W/5 Y/M 2/Y 5/1 B/R G/3 M/G 3/6 6/W 1/4
Y G/Y 1/R 5/4 4/G 3/B M/6 2/5 Y/2 R/1 W/3 B/W 6/M
Z G/B B/G 1/5 M/1 3/M R/3 Y/W 6/Y 5/2 4/6 W/R 2/4
0 2/R R/B 5/G W/2 Y/1 4/Y 3/5 1/M B/W G/6 6/4 M/3
1 R/4 W/6 3/2 2/W 4/Y 6/5 B/R 5/G Y/B G/M M/1 1/3
2 4/B B/3 6/4 W/1 M/Y R/6 G/5 Y/W 5/2 2/R 3/G 1/M
3 B/6 M/3 4/B 1/4 2/5 Y/1 G/Y R/W W/G 5/2 6/M 3/R
4 M/R 2/B W/5 6/Y B/3 4/2 G/1 Y/6 5/G 3/M R/W 1/4
5 Y/1 5/6 1/W W/4 B/G G/5 4/M 2/B 3/R 6/3 M/2 R/Y
6 3/4 W/B Y/G 5/M R/1 G/W 1/2 6/Y B/R M/6 4/3 2/5
7 4/G 6/5 Y/4 G/B 3/1 M/Y 5/3 1/M 2/R R/2 B/W W/6
8 Y/B R/2 W/R 5/3 1/W 3/5 B/M G/4 6/Y 4/G 2/1 M/6
9 G/Y 3/1 5/M R/2 6/W M/B Y/6 2/4 4/G B/5 1/R W/3
Keep Talking and Nobody Explodes Mod Light Cycle

Section 2: Needy Modules
Needy modules cannot be disarmed, but pose a recurrent
hazard.
Needy modules can be identified as a module with a small
2‑digit timer in the top center. Interacting with the bomb
may cause them to become activated. Once activated, these
needy modules must be tended to regularly before their timer
expires in order to prevent a strike.
Stay observant: needy modules may reactivate at any time.
Keep Talking and Nobody Explodes v. 1 Section 2: Needy Modules
Page 17 of 23
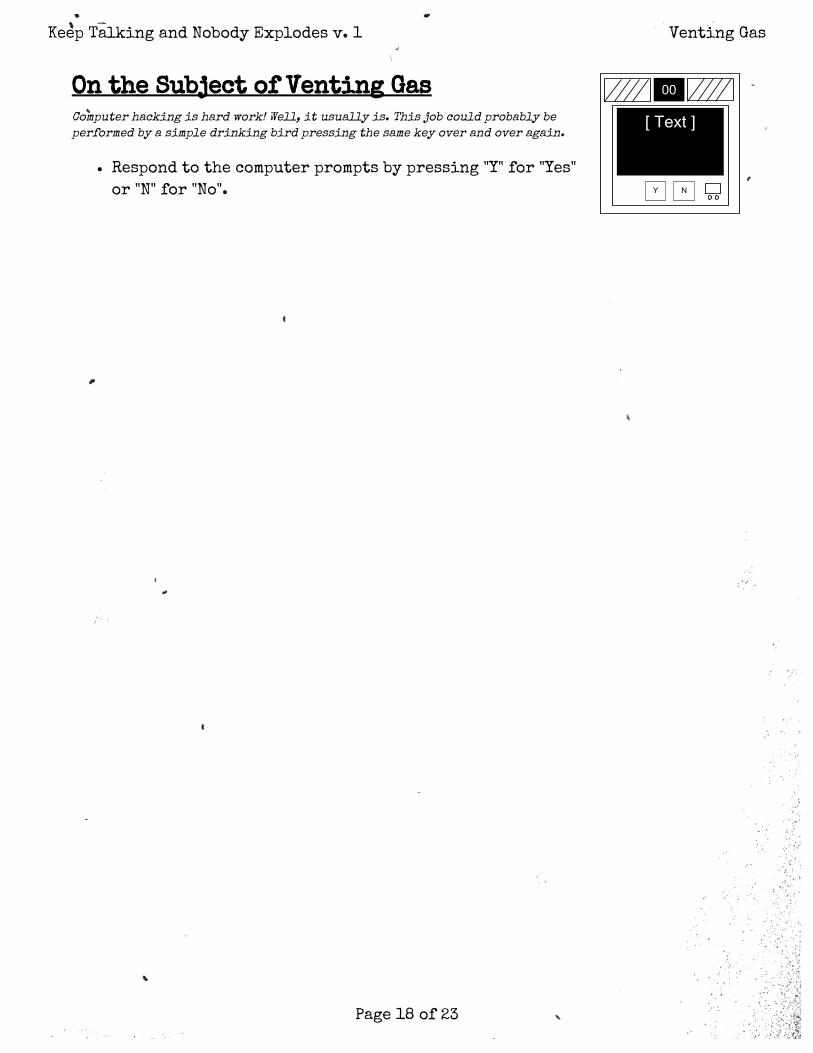
On the Subject of Venting Gas
Computer hacking is hard work! Well, it usually is. This job could probably be
performed by a simple drinking bird pressing the same key over and over again.
Respond to the computer prompts by pressing "Y" for "Yes"
or "N" for "No".
Keep Talking and Nobody Explodes v. 1 Venting Gas
Page 18 of 23

On the Subject of Capacitor Discharge
I'm going to guess that this is just meant to occupy your attention, because
otherwise this is some shoddy electronics work.
Discharge the capacitor before it overloads by holding
down the lever.
Keep Talking and Nobody Explodes v. 1 Capacitor Discharge
Page 19 of 23
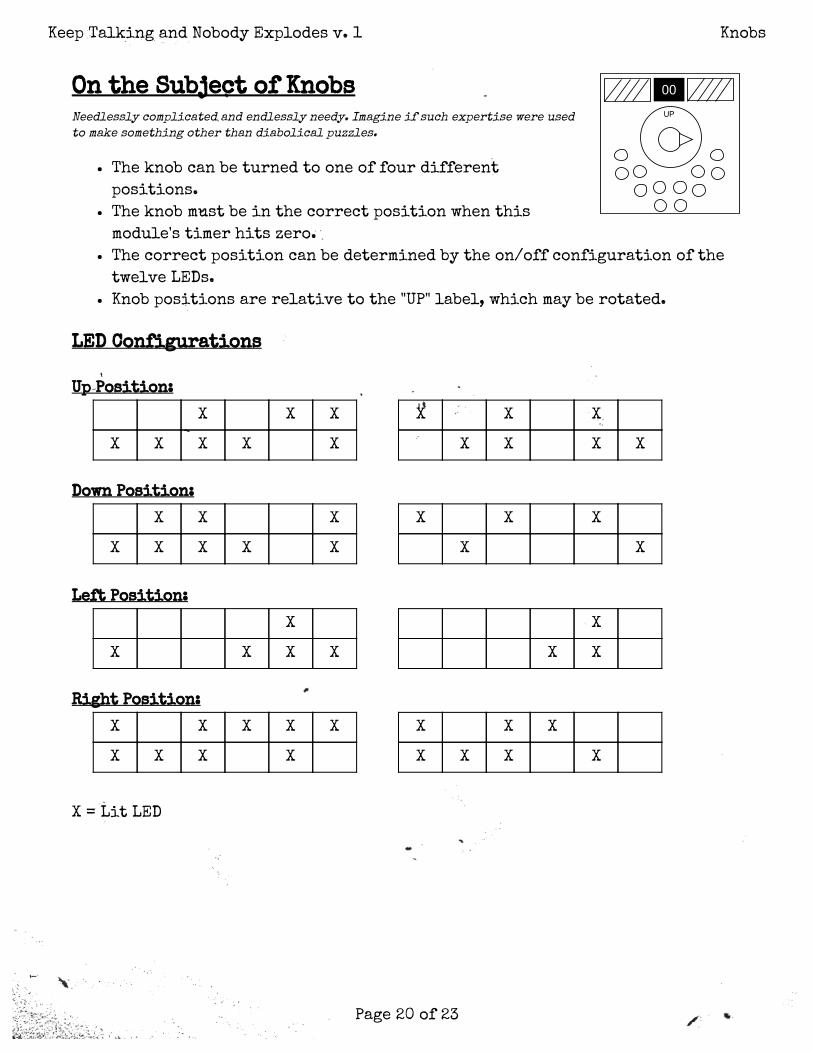
On the Subject of Knobs
Needlessly complicated and endlessly needy. Imagine if such expertise were used
to make something other than diabolical puzzles.
The knob can be turned to one of four different
positions.
The knob must be in the correct position when this
module's timer hits zero.
The correct position can be determined by the on/off configuration of the
twelve LEDs.
Knob positions are relative to the "UP" label, which may be rotated.
LED Configurations
Up Position:
X X X
X X X X X
X X X
X X X X
Down Position:
X X X
X X X X X
X X X
X X
Left Position:
X
X X X X
X
X X
Right Position:
X X X X X
X X X X
X X X
X X X X
X = Lit LED
Keep Talking and Nobody Explodes v. 1 Knobs
Page 20 of 23
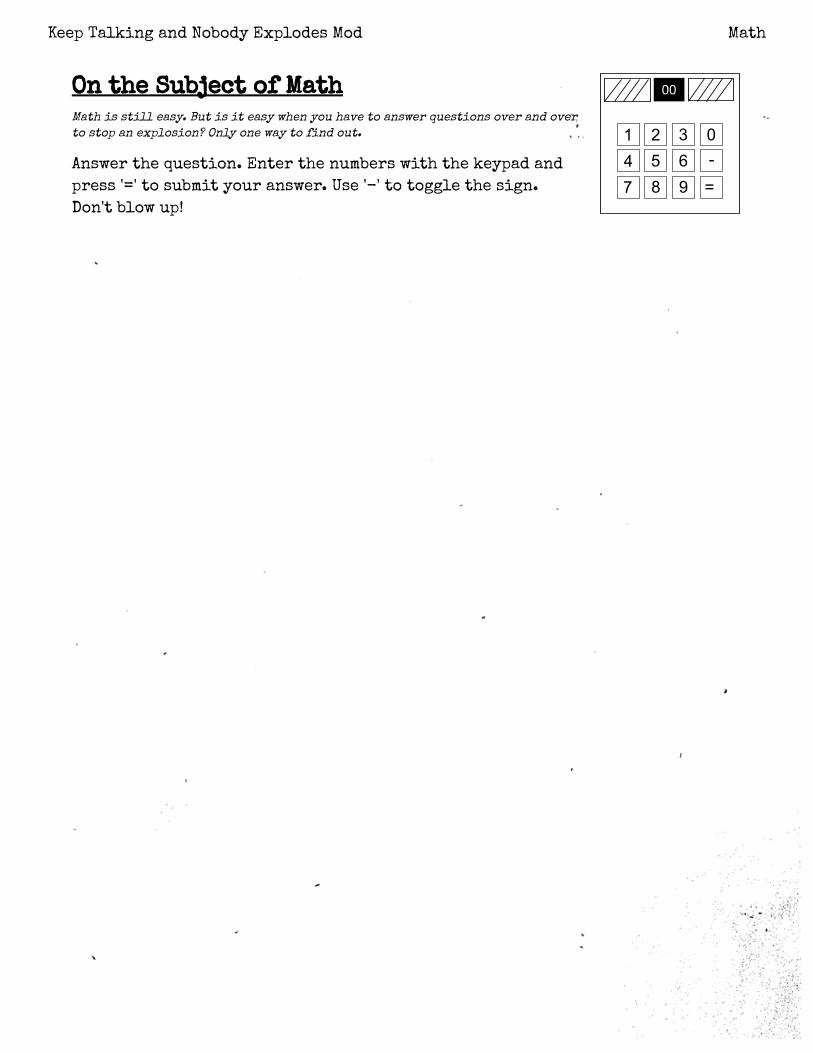
1 2 3 04 5 67 8 9 =
On the Subject of Math
Math is still easy. But is it easy when you have to answer questions over and over
to stop an explosion? Only one way to �nd out.
Answer the question. Enter the numbers with the keypad and
press '=' to submit your answer. Use '-' to toggle the sign.
Don't blow up!
Keep Talking and Nobody Explodes Mod Math
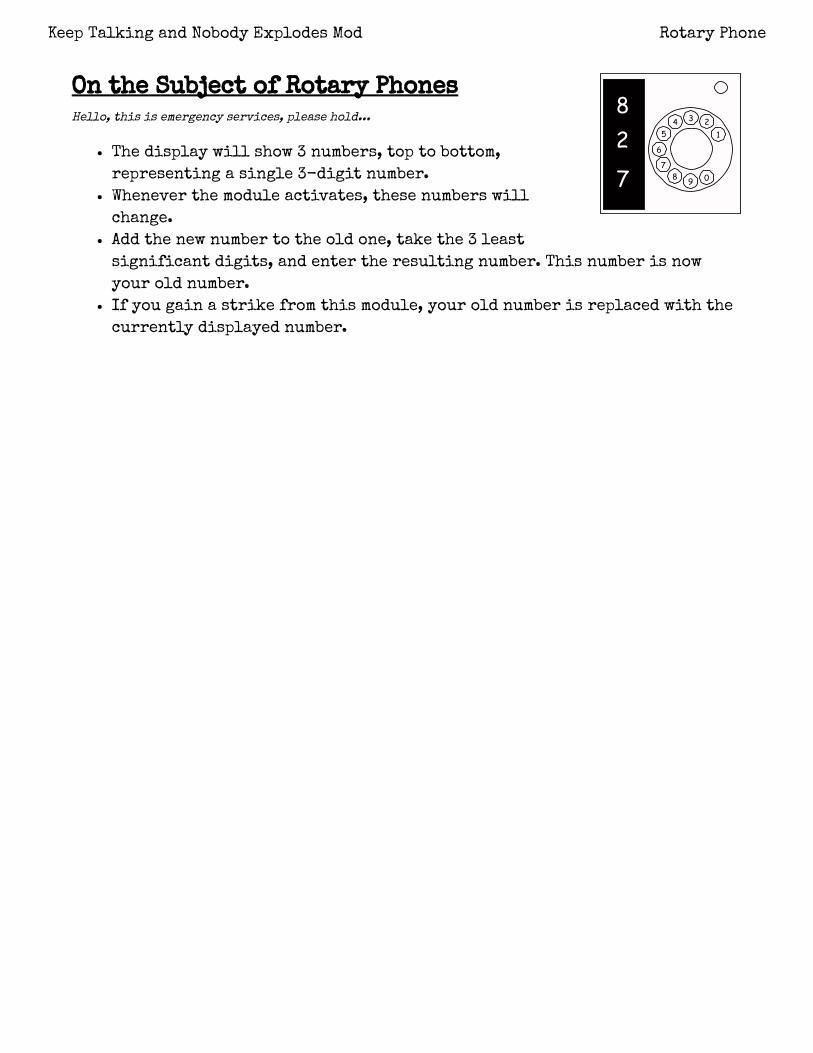
82
7
3
124
5
6
78 9 0
On the Subject of Rotary Phones
Hello, this is emergency services, please hold...
The display will show 3 numbers, top to bottom,
representing a single 3-digit number.
Whenever the module activates, these numbers will
change.
Add the new number to the old one, take the 3 least
signi⤀唈cant digits, and enter the resulting number. This number is now
your old number.
If you gain a strike from this module, your old number is replaced with the
currently displayed number.
Keep Talking and Nobody Explodes Mod Rotary Phone

On the Subject of Answering Questions
I hope you studied, it's quiz night!
Respond to the computer prompts by pressing "Y" for "Yes"
or "N" for "No".
Keep Talking and Nobody Explodes Mod Answering Questions
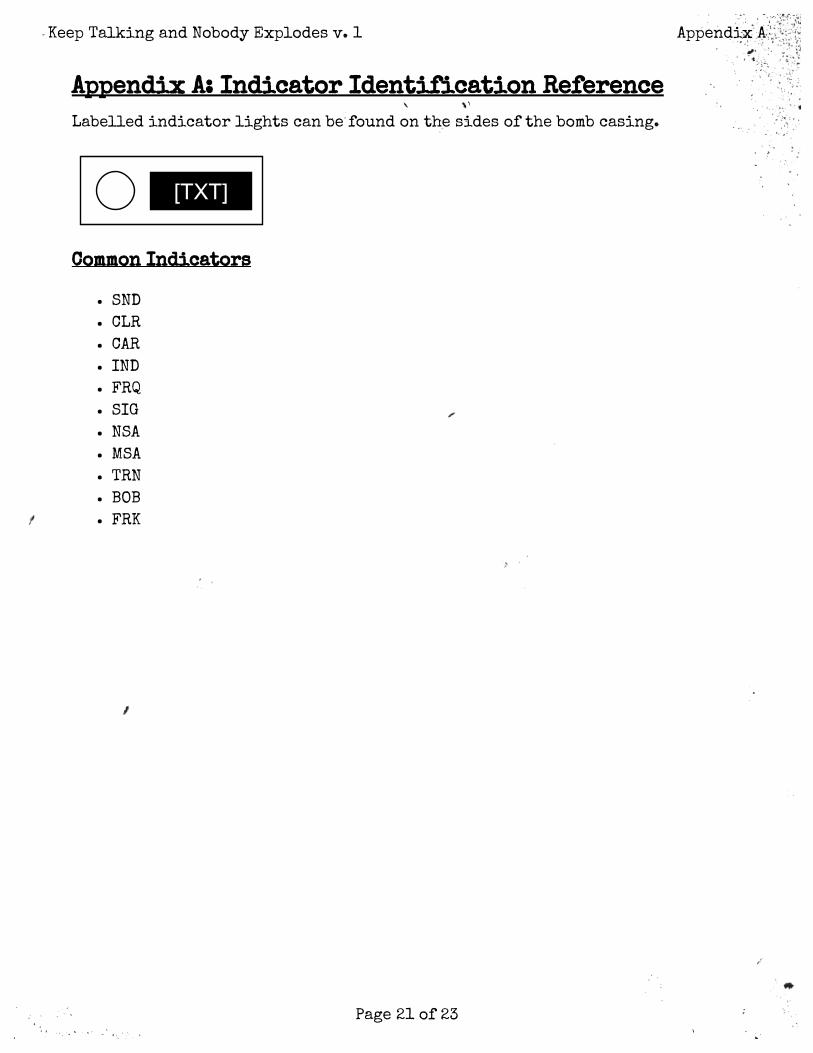
Appendix A: Indicator Identification Reference
Labelled indicator lights can be found on the sides of the bomb casing.
Common Indicators
SND
CLR
CAR
IND
FRQ
SIG
NSA
MSA
TRN
BOB
FRK
Keep Talking and Nobody Explodes v. 1 Appendix A
Page 21 of 23
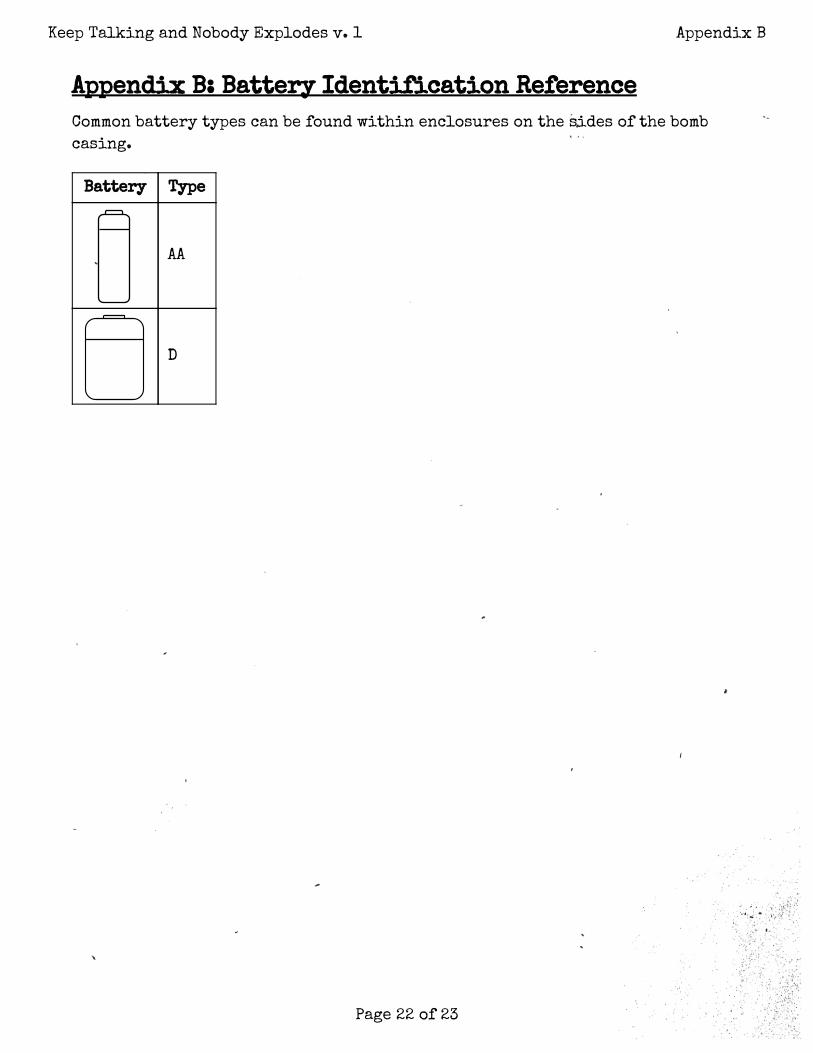
Appendix B: Battery Identification Reference
Common battery types can be found within enclosures on the sides of the bomb
casing.
Battery Type
AA
D
Keep Talking and Nobody Explodes v. 1 Appendix B
Page 22 of 23
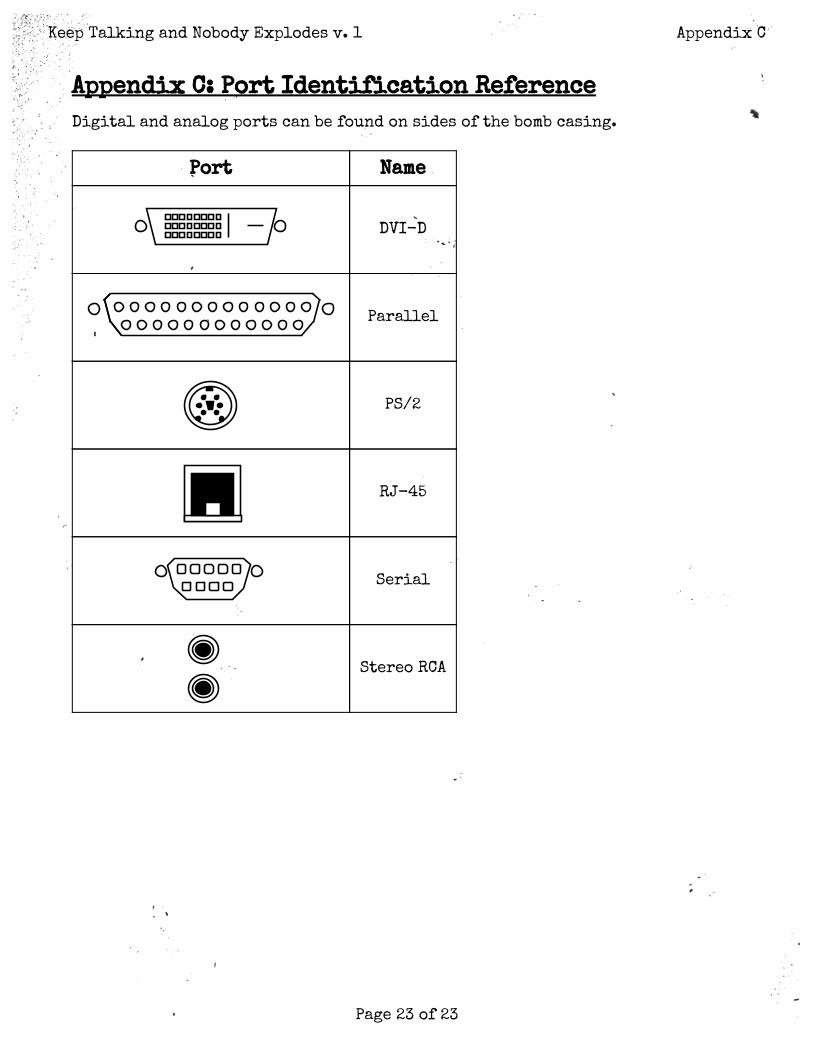
Appendix C: Port Identification Reference
Digital and analog ports can be found on sides of the bomb casing.
Port Name
DVI-D
Parallel
PS/2
RJ-45
Serial
Stereo RCA
Keep Talking and Nobody Explodes v. 1 Appendix C
Page 23 of 23

Appendix Two Factor: Two Factor Identification
Reference
Digital displays can be found on sides of the bomb casing showing a serial
number.
The display shows up to a six digit number for two factor authentication. The
number rotates every 60 seconds for security. When the serial number changes,
three audio tones will sound.
Keep Talking and Nobody Explodes Mod Appendix Two Factor

Appendix: Grammar
for use with the English Test module
This appendix contains a brief overview of some grammatical distinctions used
in the English Test module and Needy English Test module.
The subject is what is doing the action, and the object is what is receiving the
action. e.g. In “I buy milk.” I is the subject and milk is the object.
their: belonging to them; there: that place; they're: they are
your: belonging to you; you're: you are
I, he, she, we, they: used in subjects; me, him, her, us, them: used in objects
less: used with uncountable nouns; fewer: used with countable nouns
who: used in subjects; whom: used in objects
deantly: rebelliously; denitely: without doubt
lead: the metal or the present tense; led: the past tense and past participle
cite: declare a quoted source; site: location; sight: a view or vision
When you don't lay something else down, you lie down.
The past tense of lay is laid. Confusingly, the past tense of lie is lay!
Literally means word for word. If you had “literally died” watching a video, your
family and friends would be crying at your funeral about now.
If you write “should of”, “could of”, “would of”, or “might of”, no educated gentleman
will take you seriously.
Remember, “I do” is to “I have done” as “I could do” is to “I could have done”.
(Exceptions apply, but very very rarely!)
its: belonging to it; it's: it is
capital: main city in a territory, money you put up to borrow something, or THIS KIND
OF LETTER; capitol: big building, usually in a capital
affect: usually a verb, but noun when it means “display of emotion”; effect: almost
always a noun; impact: physical force
i.e.: short for Latin id est, or “that is”; e.g.: short for Latin exemplī grātiā, or “for
example”
peak: summit; peek: sneak a look; pique: excite (usually interest)
allot: partition; a lot: very much; alot: (never correct)
lose: opposite of gain; loose: opposite of tight
than: (used to compare two things); then: at the time, or right after that
complement: when two parts complete each other; compliment: You look good today!
farther: physical distance; further: gurative distance
number: used for countable nouns; amount: used for uncountable nouns
Keep Talking and Nobody Explodes Mod Appendix: Grammar

Appendix: Grammar (Cont'd)
to: used in innitives or destination; too: as well, or overly; two: 2
accept: This is ne; except: One of these things is not like the others
threw: past tense of “throw”; through: in at one side/end and out at the other
defuse: stop a bomb; diffuse: light softening out. Use "defuse" for tension.
statue: monument; stature: body height; statute: code of law
stationary: completely still; stationery: writing utensils
by: beside, from the mind of, etc.; buy: trade money for goods; bye: see you later
breath: the noun; breathe: the verb
drink: present tense; drank: past tense; drunk: past participle and adjective
discreet: secret or carefully subtle; discrete: separate
seas: plural of sea; sees: a form of “to see”; seize: to grab or take by force; C’s: more
than one C
weather: condition of the outside air; whether: if it is or if it isn't
raise: to make something go up; rays: narrow beams of light; raze: get rid of hair with
a razor, or similarly destroy a wide area
wander: frolic; wonder: ponder
die: stop living, or a small cube for randomness; dice: more than one die
meat: �esh; meet: to see someone else; mete: to deal out something unpleasant
palate: roof of your mouth; palette: board to mix paint on, or a combination of colors;
pallet: plates that cargo gets placed on
In this module, racket: a loud noise; racquet: a netted stick or paddle with which to
hit a ball. (Especially in US English, racket can be used for both senses.)
perfect: 100% good or correct; prefect: person in a position of power, like an ofcial
or a heir
Other pairs/sets of words include: ad/add, aloud/allowed, altar/alter, arc/ark,
baited/bated, base/bass, blew/blue, brake/break, carat/caret/carrot/karat,
ceiling/sealing, cent/scent/sent, cereal/serial, choral/coral/corral,
coarse/course, creak/creek, dear/deer, discussed/disgust, elicit/illicit,
everyday/every day, faint/feint, faze/phase, nd/ned, �air/�are, �ea/�ee,
gait/gate, idle/idol/idyll, lighting/lightning/lightening, loan/lone/lend,
oar/or/ore, pail/pale, pair/pare/pear, poor/pore/pour, praise/prays/preys,
precedence/precedents/presidents, right/rite/wright/write, road/rode/rowed,
ring/wring, role/roll, seam/seem, stairs/stares, steal/steel, straight/strait,
though/thought/through/thorough, vain/vane/vein, vary/very, wait/weight,
and weak/week.
For lack of space, the differences for these words have been omitted, but they
should be fairly common knowledge to most English speakers.
Keep Talking and Nobody Explodes Mod Appendix: Grammar
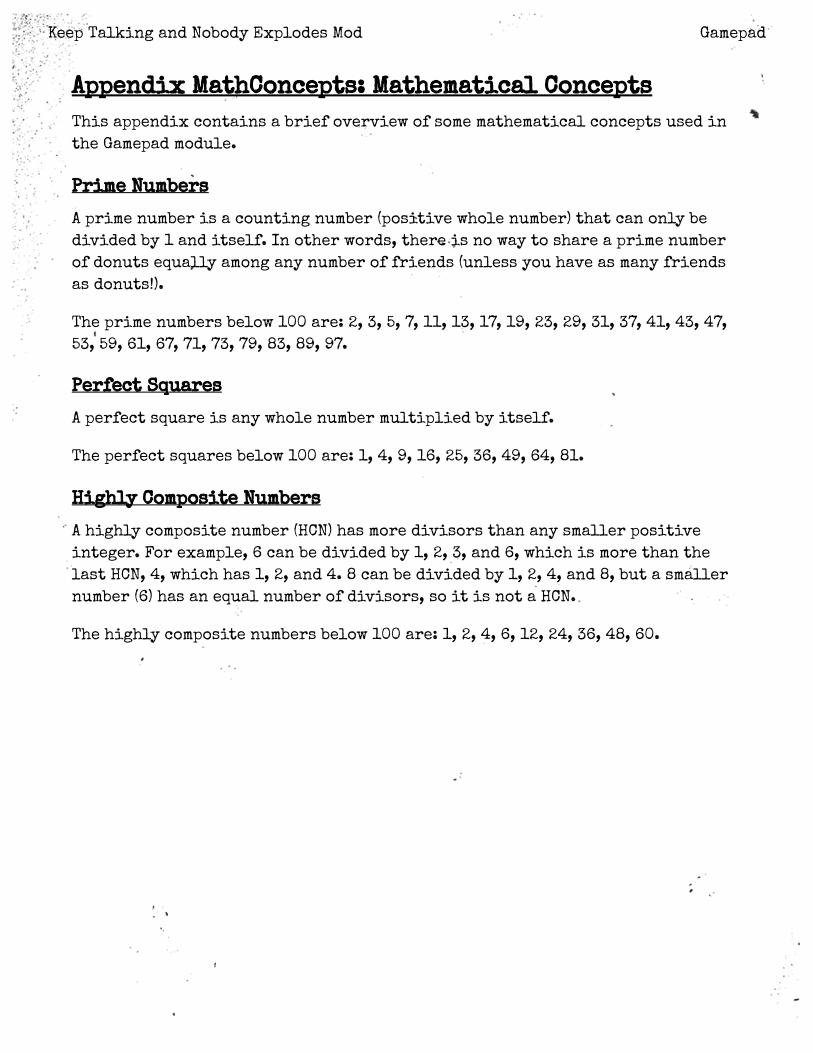
Appendix MathConcepts: Mathematical Concepts
This appendix contains a brief overview of some mathematical concepts used in
the Gamepad module.
Prime Numbers
A prime number is a counting number (positive whole number) that can only be
divided by 1 and itself. In other words, there is no way to share a prime number
of donuts equally among any number of friends (unless you have as many friends
as donuts!).
The prime numbers below 100 are: 2, 3, 5, 7, 11, 13, 17, 19, 23, 29, 31, 37, 41, 43, 47,
53, 59, 61, 67, 71, 73, 79, 83, 89, 97.
Perfect Squares
A perfect square is any whole number multiplied by itself.
The perfect squares below 100 are: 1, 4, 9, 16, 25, 36, 49, 64, 81.
Highly Composite Numbers
A highly composite number (HCN) has more divisors than any smaller positive
integer. For example, 6 can be divided by 1, 2, 3, and 6, which is more than the
last HCN, 4, which has 1, 2, and 4. 8 can be divided by 1, 2, 4, and 8, but a smaller
number (6) has an equal number of divisors, so it is not a HCN.
The highly composite numbers below 100 are: 1, 2, 4, 6, 12, 24, 36, 48, 60.
Keep Talking and Nobody Explodes Mod Gamepad