a&p 1 skeletal lab guide #5 - appendicular skeleton...
TRANSCRIPT

1
A&P 1 Skeletal Lab Guide #5 -
Appendicular Skeleton & Joints Pre-lab Exercises Have someone in your group read the following out loud, while the others read along:
In this "Lab Exercise Guide", we will be looking at the important features found in the Appendicular Skeleton. There is a lab in you lab book...FIND IT! Also use these sections in your lecture book:
Appendicular Skeleton Chapter: Pectoral Girdle Appendicular Chapter: Pelvic Girdle Articulations Chapter: Classification Articulations Chapter: Parts of a Synovial Joint (not in lab book; see image in textbook) Articulations Chapter: Elbow, Shoulder, Hip and Knee.
Have someone in your group read the following out loud, while the others read along:
Opening Paragraph (we'll be referring to this later)
These bony features are most often accommodations for where muscles attach to bones, or where 2 bones articulate. Let's examine this concept. Let's take a look at this image to the right. Locate the bones and joints on the drawing. We see 3 bones, connected by 2 articulations.
Continued on next page
Read Me

2
The muscles move a joint when they contract. The articulations are places where the skeleton can move! In order to make them move, muscles CROSS THE JOINTS, attaching to the bones via tendons. Find this on the drawing to the right. What will happen if we contract the muscle? Bone "C" will move towards bone "B" around joint "2":" Find this on the image to the right. Many of the processes you will be looking at are places for these tendons to attach.
Continued on next page
Read Me
Read Me
3
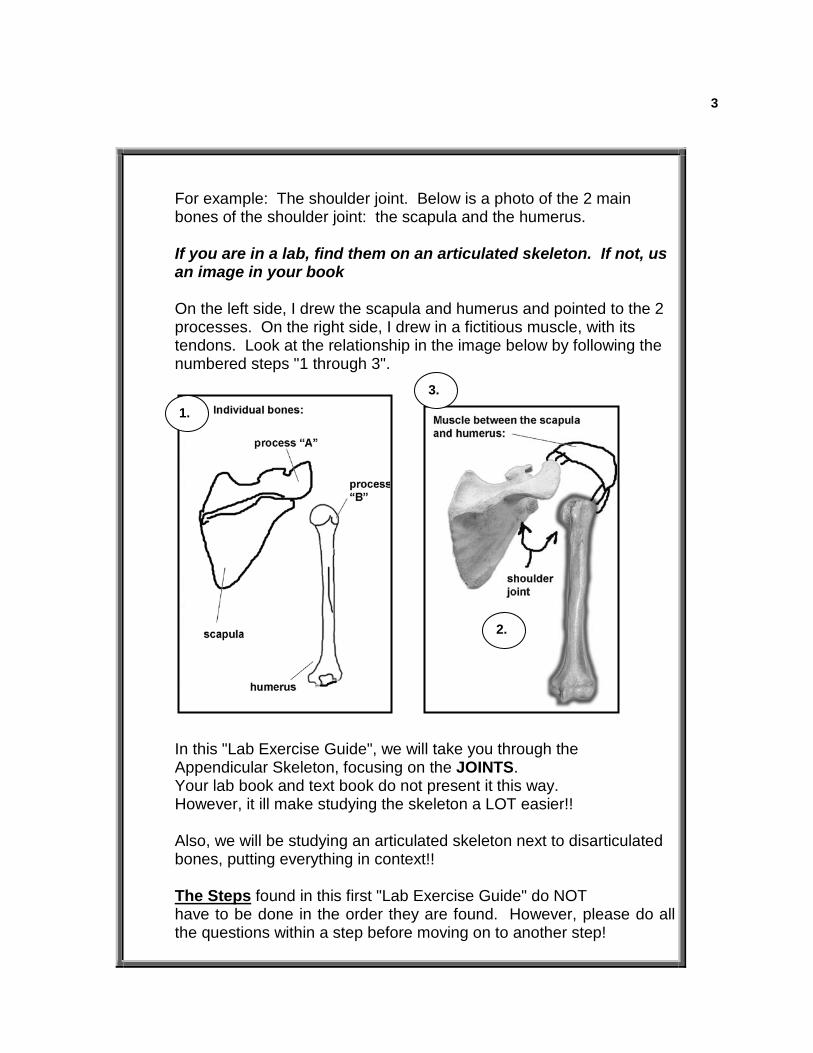
For example: The shoulder joint. Below is a photo of the 2 main bones of the shoulder joint: the scapula and the humerus. If you are in a lab, find them on an articulated skeleton. If not, us an image in your book On the left side, I drew the scapula and humerus and pointed to the 2 processes. On the right side, I drew in a fictitious muscle, with its tendons. Look at the relationship in the image below by following the numbered steps "1 through 3". In this "Lab Exercise Guide", we will take you through the Appendicular Skeleton, focusing on the JOINTS. Your lab book and text book do not present it this way. However, it ill make studying the skeleton a LOT easier!! Also, we will be studying an articulated skeleton next to disarticulated bones, putting everything in context!! The Steps found in this first "Lab Exercise Guide" do NOT have to be done in the order they are found. However, please do all the questions within a step before moving on to another step!
1.
2.
3.

4
Step 1. Important concepts Have someone in your group read the following out loud, while the others read along: This step assumes you have either read the book, or watched the Online Lab Videos covering the skeleton. If not, do so before taking this step. You can come ack to it later!
Q1. What is the name of the superior-most girdle? Q2. Name the limb bones, moving PROXIMAL to DISTAL: "Shoulder Blade": "Upper Arm Bone": "Forearm Bone, Thumb-side": "Forearm Bone, Pinkie-side": "Wrist Bones (group name)": "Palm Bones (group name)": "Finger Bones (group name)":
Read Me

5 Q3. What is the name of the inferior-most girdle? Q4. Name the limb bones, moving PROXIMAL to DISTAL: "Entire Hip Bone": "The 3 individual hip bones": "Upper Leg Bone": "Lower Leg Bone, Lateral": "Lower Leg, Medial": "Ankle Bones (group name)": "Sole of Foot Bones (group name)": "Toe Bones (group name)":
Have someone in your group read the following out loud, while the others read along:
In the lab we will study the hands, wrist, fingers and toes ARTICULATED ONLY! You do not have to know the bones "disarticulated"!! In these guides, we will not concern ourselves with the names of the individual carpal, metacarpal, or phalangeal bones. If you instructor wants you to know any of those, you should include those names in the blank below:
ALSO NOTE: For the most part, we will study the ankle and foot as we studied the hand and wrist: articulated, and focusing on group names (tarsal, metatarsal, and phalangeal bones). However, there are 2 exceptions: we will look at these 2 tarsal bones disarticulated in lab:
Calcaneus
Tarsus
If your instructor wants you to know any other individual tarsal bones, write them in the blank below:
Read Me
Read Me

6
Q 5. Terms referring to joints. We want to make sure everyone understands these terms before moving on. Please define:
Fibrous Joint: Cartilaginous Joint: Synovial Joint
Q6. Terms referring to movements. We want to make sure everyone understands these terms before moving on. Please list the movement terms: Q7. Identify the Girdles.
On the image, please locate the 2 girdles.

7
Step 2. Identify the Pectoral Girdle, and its associated structures
Q8. Name the bones involved in the pectoral girdle and the upper limb that your instructor wants you to know by name (this may differ slightly from instructor to instructor): If you are in a lab, remove these bones from the disarticulated skeleton box. If you are at home, use the following image. Q9. Label the bones below. Label both the articulated and disarticulated images. You may use images from the lab book or lecture book: Bones (label these on both the articulated and disarticulated image; indicate with arrows)
Scapula, Clavicle, Humerus, Radius, Ulna, Carpals, Metacarpals, Phalanges
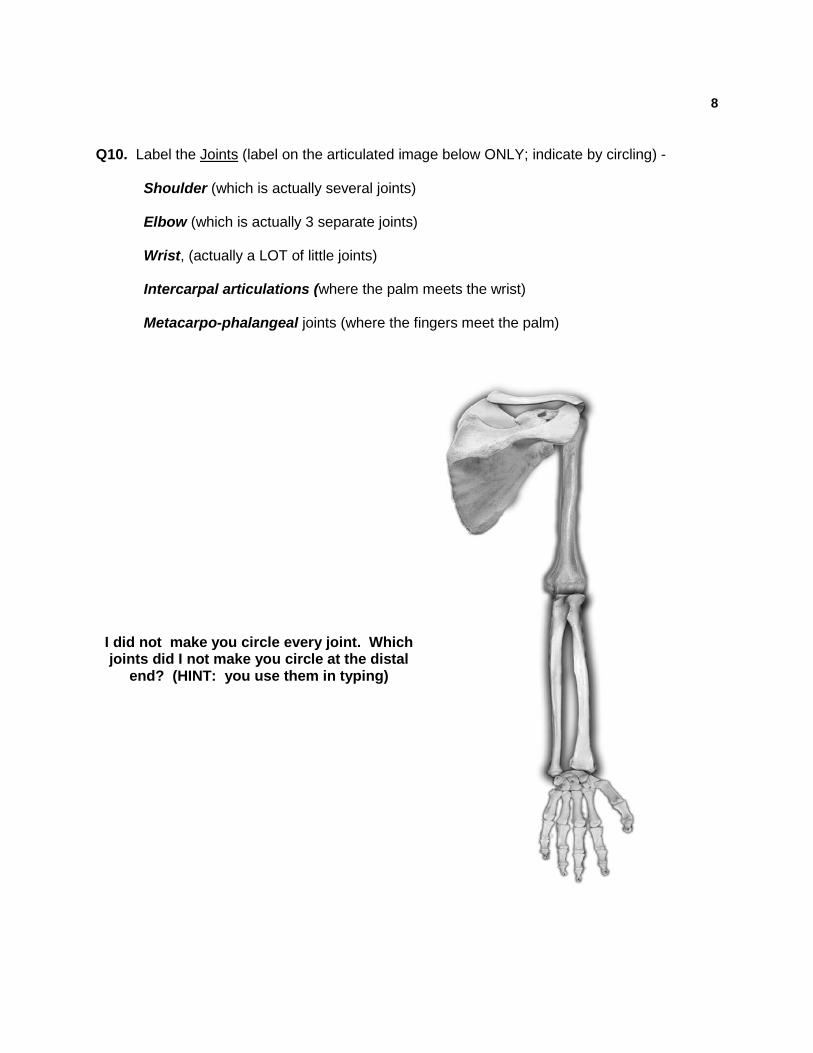
8 Q10. Label the Joints (label on the articulated image below ONLY; indicate by circling) -
Shoulder (which is actually several joints) Elbow (which is actually 3 separate joints) Wrist, (actually a LOT of little joints) Intercarpal articulations (where the palm meets the wrist) Metacarpo-phalangeal joints (where the fingers meet the palm)
I did not make you circle every joint. Which joints did I not make you circle at the distal
end? (HINT: you use them in typing)

9 Q 4. Your instructor wants you to know some features associated with the individual bones of the pectoral girdle and upper limb. Highlight them or underline them on the images in your lab or lecture book! At the same time, list them below, writing "none" if you do not have to know any off a specific bone. If you are not sure if a feature is associated with a joint, put it in the "other features" category. You are not being graded on your ability to analyze the joints; we are simply making you look! You can change your mind later, when you study the muscles! Scapula - Features associated with the shoulder joint: Other Features: Clavicle - Sternal End: Acromial End: Humerus - Features associated with the shoulder joint: Features associated with the elbow joint: Other Features: Radius - Features associated with the elbow joint: Features associated with the wrist joint: Other Features: Ulna - Features associated with the elbow joint: Features associated with the wrist joint: Other Features: (hand & wrist will be done later, under their own section!)
10
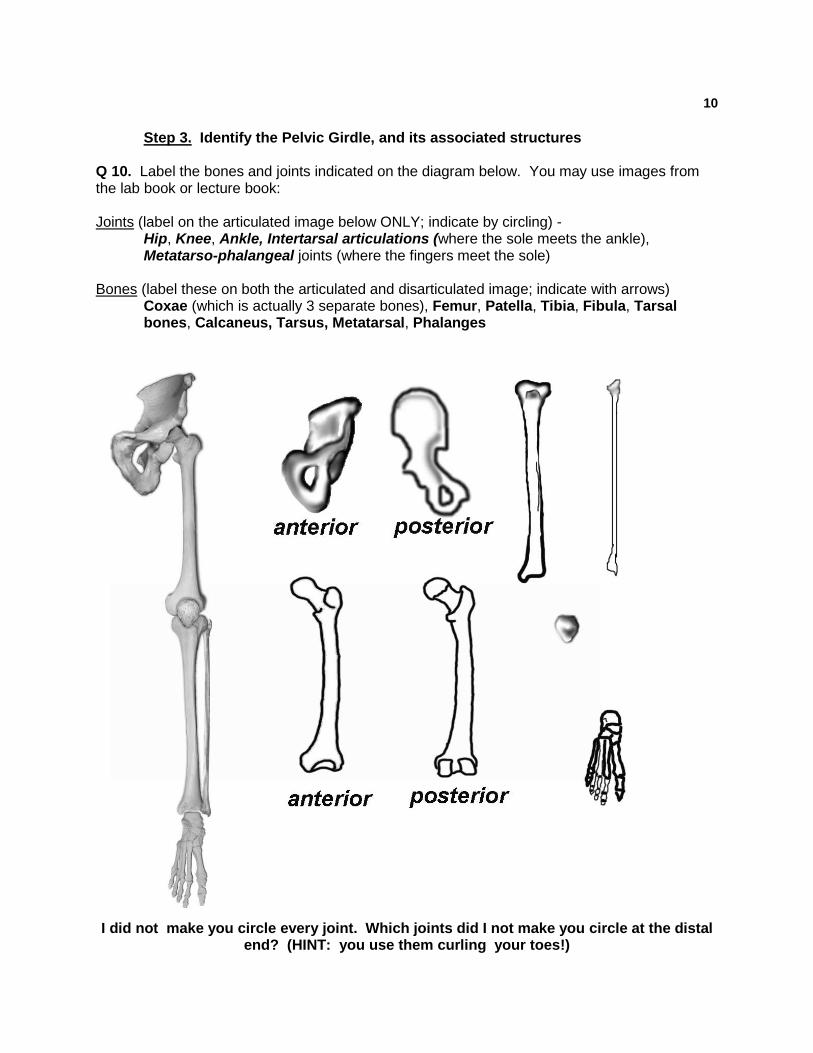
Step 3. Identify the Pelvic Girdle, and its associated structures
Q 10. Label the bones and joints indicated on the diagram below. You may use images from the lab book or lecture book: Joints (label on the articulated image below ONLY; indicate by circling) -
Hip, Knee, Ankle, Intertarsal articulations (where the sole meets the ankle), Metatarso-phalangeal joints (where the fingers meet the sole)
Bones (label these on both the articulated and disarticulated image; indicate with arrows)
Coxae (which is actually 3 separate bones), Femur, Patella, Tibia, Fibula, Tarsal bones, Calcaneus, Tarsus, Metatarsal, Phalanges
I did not make you circle every joint. Which joints did I not make you circle at the distal end? (HINT: you use them curling your toes!)