access ch02 more skills13.qxd 5/22/08 10:31 am page 1 chapter 2...
TRANSCRIPT

� A multiple items form displays records in rows and columns in the same manner as a datasheet.
� A multiple items form provides more formatting options than a datasheet.
To complete this database, you will need the following file:� a02_Cypress_Employees
You will save your files as:� a02_Cypress_Employees_Your_Name� a02_Cypress_Employees_Snip_Your_Name
1. Start Access, and then open a02_Cypress_Employees. Save the database in your AccessChapter 2 folder as a02_Cypress_Employees_Your_Name If the Security Warning bardisplays, enable the content.
2. In the Navigation Pane, select the Employees table. Display the Create tab, and then in theForms group, click the Multiple Items button. Compare your screen with Figure 1.
A multiple items form based on the Employees table displays in Layout view.
AccessCHAPTER 2
Copyright © 2009 by Pearson Education, Inc. All rights reserved.From Skills for Success with Microsoft® Office 2007 by Kris Townsend
More Skills 13 Create a Multiple Items Form
Microsoft Access | Chapter 2 - Building a Relational Database and Creating Forms More Skills: SKILL 13 | Page 1 of 5
Multiple items form
Figure 1
Access CH02 More Skills13.qxd 5/22/08 10:31 AM Page 1
3. Click Save , and then in the displayed Save As dialog box, click OK. Close theNavigation Pane.
4. In the Controls group, click the Date and Time button.
5. In the displayed Date and Time dialog box, be sure that Include Date is selected, and thenunder Include Date, click the middle option button. Be sure that Include Time is selected,and then under Include Time, click the middle option button. Click OK to apply thechanges and close the dialog box.
6. Apply the Metro AutoFormat—the third style in the third row.
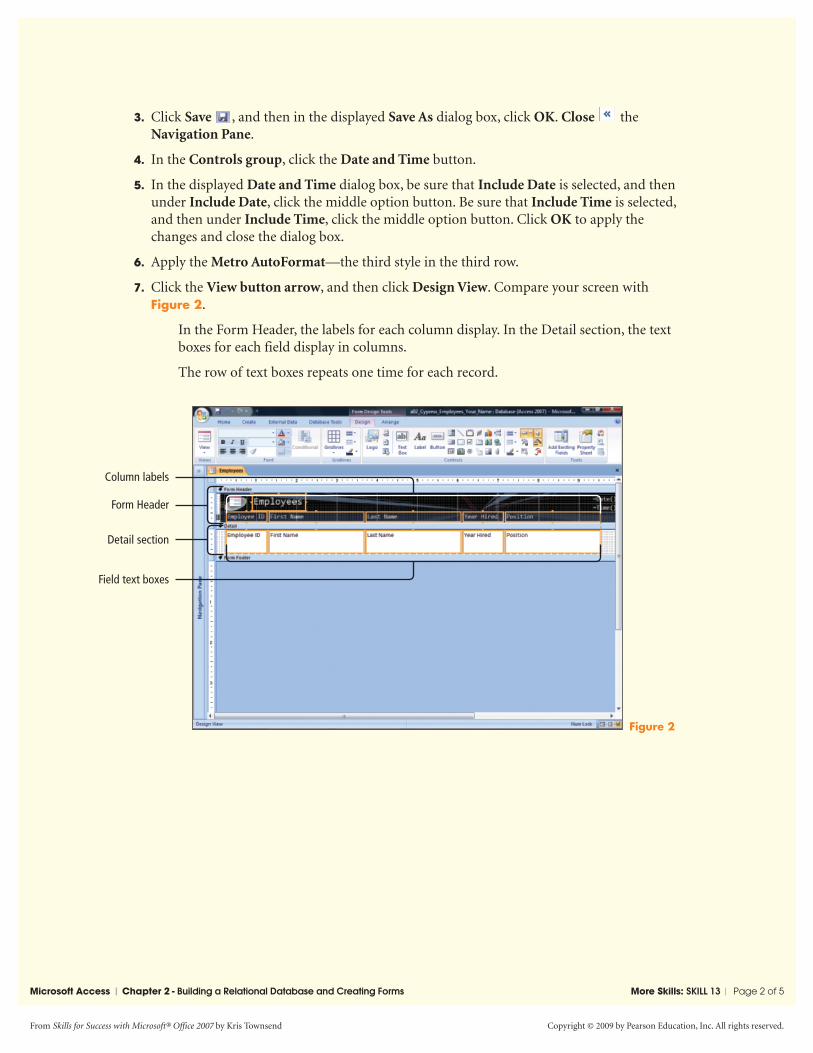
7. Click the View button arrow, and then click Design View. Compare your screen withFigure 2.
In the Form Header, the labels for each column display. In the Detail section, the textboxes for each field display in columns.
The row of text boxes repeats one time for each record.
Copyright © 2009 by Pearson Education, Inc. All rights reserved.From Skills for Success with Microsoft® Office 2007 by Kris Townsend
Microsoft Access | Chapter 2 - Building a Relational Database and Creating Forms More Skills: SKILL 13 | Page 2 of 5
Form Header
Column labels
Detail section
Field text boxes
Figure 2
Access CH02 More Skills13.qxd 5/22/08 10:31 AM Page 2

8. In the Detail section, click any blank area, and then click the Employee ID text box to selectthe control.
9. In the Tools group, click Property Sheet. If necessary, in the Property Sheet, display theFormat tab.
10. In the Property Sheet Height box, change the value to .25" and then press J. Notice thatall of the text box heights are changed.
11. In the form, click the blue Detail bar, and then compare your screen with Figure 3.
The Detail section is selected and its properties display in the Property sheet.
Copyright © 2009 by Pearson Education, Inc. All rights reserved.From Skills for Success with Microsoft® Office 2007 by Kris Townsend
Microsoft Access | Chapter 2 - Building a Relational Database and Creating Forms More Skills: SKILL 13 | Page 3 of 5
Properties for Detail section
Detail section selected
Figure 3
12. In the Property Sheet Height box, change the value to 0.3"
13. Press J two times to select the Alternate Back Color box. Click the displayed Build button, and then click Purple 2—under Standard Colors, the eighth color in the third row.
Access CH02 More Skills13.qxd 5/22/08 10:31 AM Page 3

15. In the Property Sheet, click in the Caption box, and then type Cypress Sun Employees
16. Close the Property Sheet. Click Save , and then in View group, click the View buttonto switch to Form view. Compare your screen with Figure 5.
The form’s caption—Cypress Sun Employees—displays in the form’s tab instead of theform’s name—Employees.
Copyright © 2009 by Pearson Education, Inc. All rights reserved.From Skills for Success with Microsoft® Office 2007 by Kris Townsend
Microsoft Access | Chapter 2 - Building a Relational Database and Creating Forms More Skills: SKILL 13 | Page 4 of 5
Form selected
Form properties display
Figure 4
Caption
Figure 5
14. Click the small square in the upper left corner of the form, and then compare your screenwith Figure 4.
In the upper left corner, the black square indicates that the form is selected. The form’sproperties display in the Property Sheet.
Access CH02 More Skills13.qxd 5/22/08 10:31 AM Page 4

17. In the first record, change the First Name and Last Name values to your own name.
18. Click Start , and then click All Programs. Click to open the Accessories folder, and thenclick Snipping Tool.
19. In the displayed Snipping Tool program window, click the New button arrow, and thenclick Full-screen Snip.
20. On the toolbar, click the Save Snip button . In the Save As dialog box, navigate to yourAccess Chapter 2 folder. In the File name box, type a02_Cypress_Employees_Snip_Your_Name and then click the Save Snip button. Close the Snipping Tool window.
If you do not have the Snipping Tool, which is available in Windows Vista HomePremium edition, press p, and then paste the screen into a Word document.
21. Close the form, Open the Navigation Pane, and then Exit Access.
22. Print a02_Cypress_Employees_Snip_Your_Name or submit your files electronically asdirected by your instructor.
� You have completed More Skills 13
Copyright © 2009 by Pearson Education, Inc. All rights reserved.From Skills for Success with Microsoft® Office 2007 by Kris Townsend
Microsoft Access | Chapter 2 - Building a Relational Database and Creating Forms More Skills: SKILL 13 | Page 5 of 5
Access CH02 More Skills13.qxd 5/22/08 10:31 AM Page 5