xpertrak quick start guide
TRANSCRIPT
XPERTrak 4.0Quick Start Guide for Administrators

XPERTrak Quick Start Guide22127801, Rev. 006 June 20202
NoticeEvery effort was made to ensure that the information in this manual was accurate at the time of printing. However, information is subject to change without notice, and VIAVI reserves the right to provide an addendum to this manual with information not available at the time that this manual was created.
Copyright/Trademarks© Copyright 2020 VIAVI Solutions Inc. All rights reserved. No part of this guide may be reproduced or transmitted, electronically or otherwise, without written permission of the publisher. VIAVI Solutions and the VIAVI logo are trademarks of VIAVI Solutions Inc. (“Viavi”). All other trademarks and registered trademarks are the property of their respective owners.
Copyright releaseReproduction and distribution of this guide is authorized for US Government purposes only.
Ordering informationThis guide is a product of the VIAVI Technical Publications Department, issued as part of the product. The catalog number for a published guide is Catalog Number - printed. The catalog number for an electronic guide on USB is Catalog Number - electronic.
Terms and conditionsSpecifications, terms, and conditions are subject to change without notice. The provision of hardware, services, and/or software are subject to VIAVI standard terms and conditions, available at www.viavisolutions.com/en/terms-and-conditions.

XPERTrak Quick Start Guide22127801, Rev. 006June 2020 3
Before you beginThank you for purchasing XPERTrak™. This guide provides installation and setup instructions to get you up and running with the software as soon as possible.
Technical assistanceIf you require technical assistance, call 1-844-GO-VIAVI / 1.844.468.4284.
For the latest TAC information, visit https://www.viavisolutions.com/en-us/services-and-support/support/technical-assistance
XPERTrak Quick Start Guide22127801, Rev. 006 June 20204
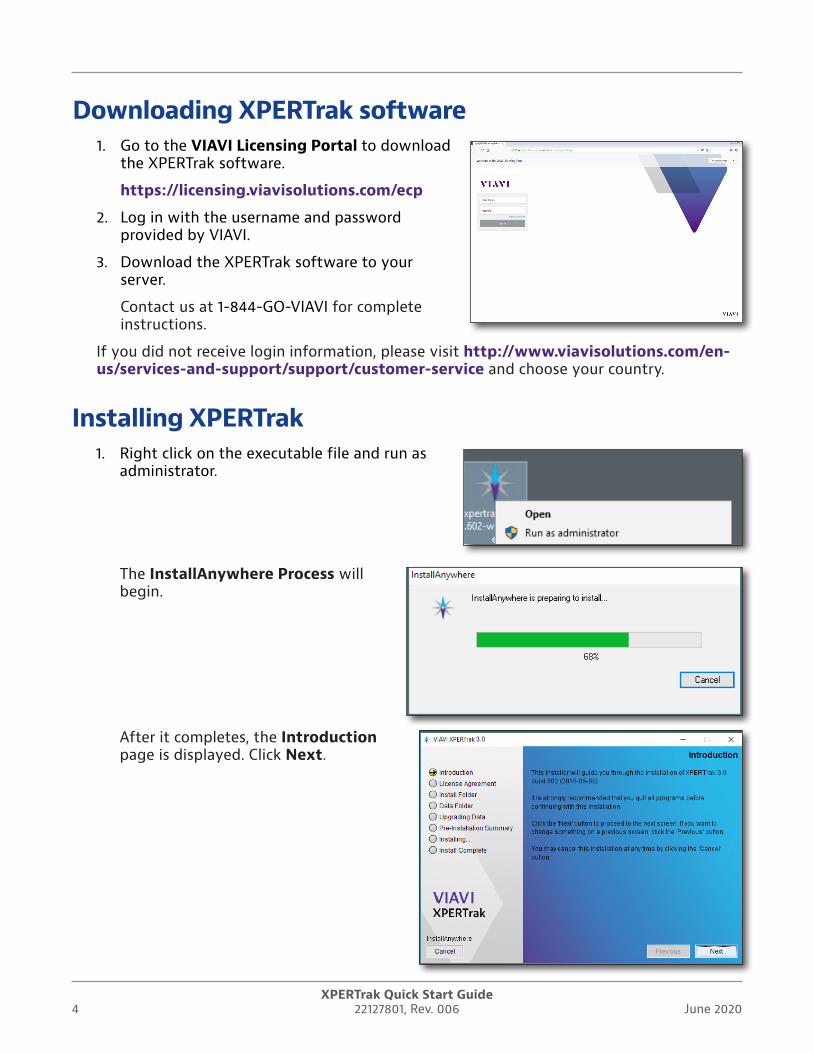
After it completes, the Introduction page is displayed. Click Next.
Installing XPERTrak1. Right click on the executable file and run as
administrator.
The InstallAnywhere Process will begin.
Downloading XPERTrak software1. Go to the VIAVI Licensing Portal to download
the XPERTrak software.
https://licensing.viavisolutions.com/ecp
2. Log in with the username and password provided by VIAVI.
3. Download the XPERTrak software to your server.
Contact us at 1-844-GO-VIAVI for complete instructions.
If you did not receive login information, please visit http://www.viavisolutions.com/en-us/services-and-support/support/customer-service and choose your country.
3.0
3.0

XPERTrak Quick Start Guide22127801, Rev. 006June 2020 5
3. A locking code will then be generated by the system. Copy this code (including the asterisk) for the next step.
The locking code is like a "fingerprint" of the host machine and is used to uniquely tie the software license to the specific host machine.
2. Accept the license agreement and click Next.
4. Next, go back to the VIAVI Licensing Portal to activate and obtain your license file.
The XPERTrak installation requires a valid license file to proceed with an upgrade installation. For a new installation, a license file may be added afterwards.
5. Log in again, if necessary.
6. Use the locking code you copied from the XPERTrak installer and activate your license. Your license file will be emailed to you shortly.
7. Save the license file to your XPERTrak server.
Contact us at 1-844-GO-VIAVI for complete instructions.
3.0
3.0
Locking Code
3.0

XPERTrak Quick Start Guide22127801, Rev. 006 June 20206
8. Back on the License File screen, select Choose and browse to the license that you downloaded to your XPERTrak server.
9. Select the license file and then select Open.
10. The License File screen should now update with the path to the file. Click Next.
3.0
3.0

XPERTrak Quick Start Guide22127801, Rev. 006June 2020 7
11. The Install Folder screen displays the path where the XPERTrak files will install onto your server. Click Next.
12. The Data Folder screen displays the path where all the data is stored. Please first refer to the XPERTrak server specifications before selecting a path or drive.
After a drive or path has been selected, click Next.
13. Review the Pre-Installation Summary, then click Install.
3.0
3.0
3.0
3.0
3.0
3.0
3.0
3.0
XPERTrak Quick Start Guide22127801, Rev. 006 June 20208
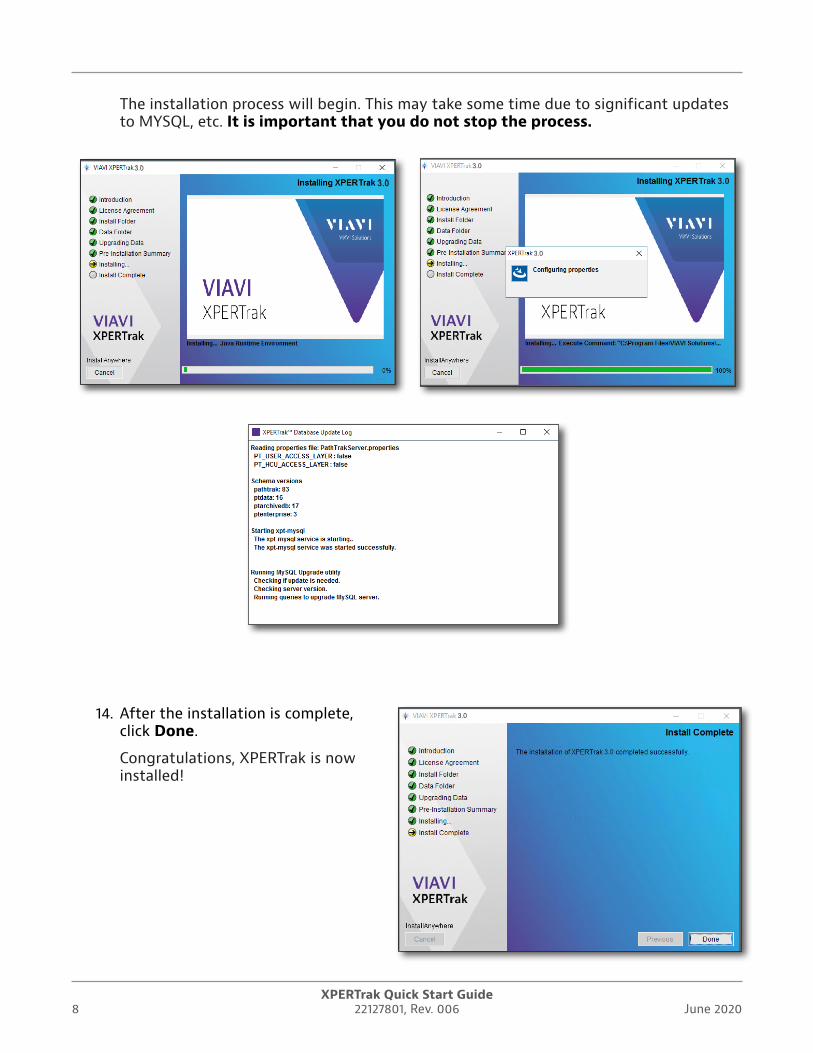
The installation process will begin. This may take some time due to significant updates to MYSQL, etc. It is important that you do not stop the process.
14. After the installation is complete, click Done.
Congratulations, XPERTrak is now installed!
3.0
3.0 3.0
3.0
3.0
3.0
3.0
XPERTrak Quick Start Guide22127801, Rev. 006June 2020 9
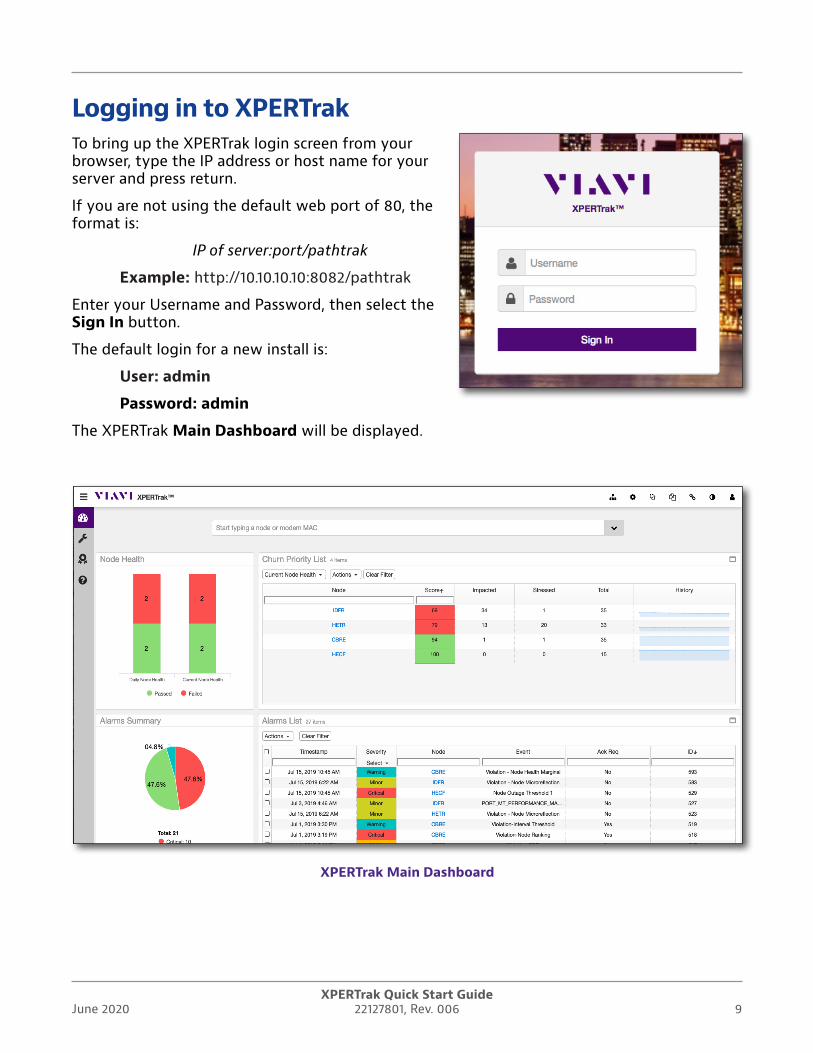
Logging in to XPERTrakTo bring up the XPERTrak login screen from your browser, type the IP address or host name for your server and press return.
If you are not using the default web port of 80, the format is:
IP of server:port/pathtrak
Example: http://10.10.10.10:8082/pathtrak
Enter your Username and Password, then select the Sign In button.
The default login for a new install is:
User: admin
Password: admin
The XPERTrak Main Dashboard will be displayed.
XPERTrak Main Dashboard
XPERTrak Quick Start Guide22127801, Rev. 006 June 202010
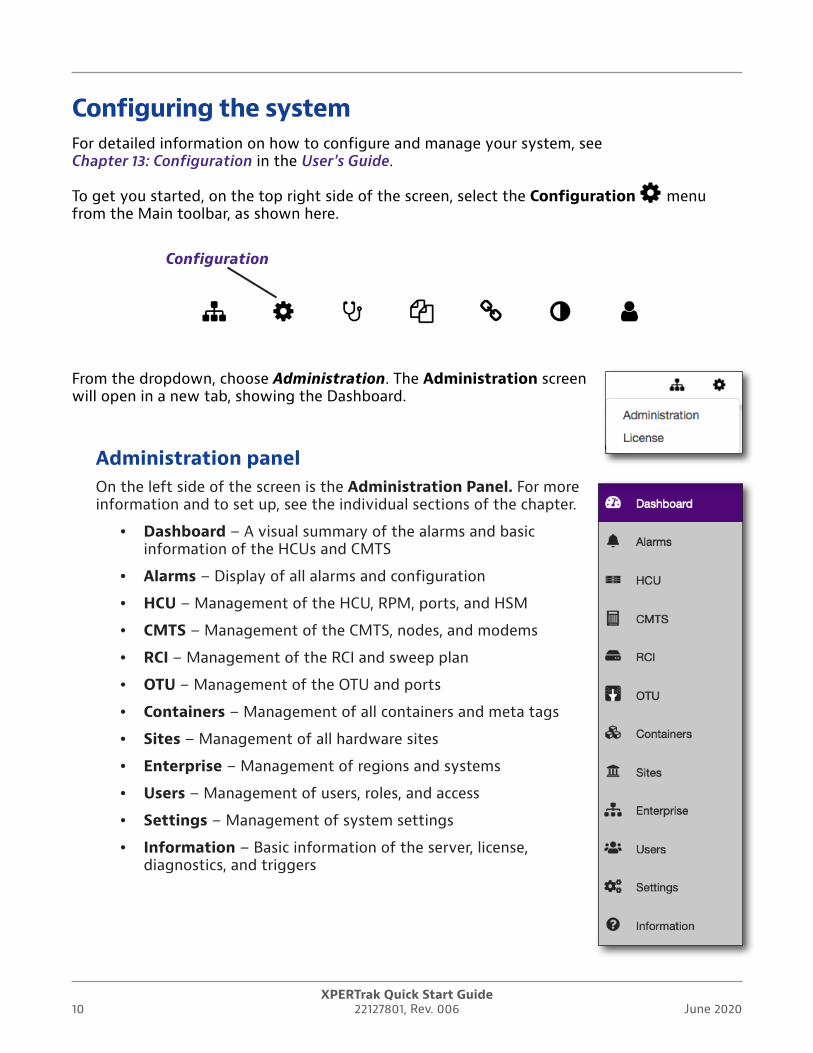
Configuring the systemFor detailed information on how to configure and manage your system, see Chapter 13: Configuration in the User's Guide.
To get you started, on the top right side of the screen, select the Configuration menu from the Main toolbar, as shown here.
From the dropdown, choose Administration. The Administration screen will open in a new tab, showing the Dashboard.
Administration panelOn the left side of the screen is the Administration Panel. For more information and to set up, see the individual sections of the chapter.
y Dashboard – A visual summary of the alarms and basic information of the HCUs and CMTS
y Alarms – Display of all alarms and configuration
y HCU – Management of the HCU, RPM, ports, and HSM
y CMTS – Management of the CMTS, nodes, and modems
y RCI – Management of the RCI and sweep plan
y OTU – Management of the OTU and ports
y Containers – Management of all containers and meta tags
y Sites – Management of all hardware sites
y Enterprise – Management of regions and systems
y Users – Management of users, roles, and access
y Settings – Management of system settings
y Information – Basic information of the server, license, diagnostics, and triggers
Configuration
XPERTrak Quick Start Guide22127801, Rev. 006June 2020 11
LicensingBefore you can set up or use any advanced features in XPERTrak (RCI, OTU, etc.), you may need to enter your licensing information.
Select Information and the License Information tab to get started.
See Chapter 13: Configuration, Information in the User's Guide.
Creating sitesOnce you start configuring your XPERTrak system, one of the first things you'll want to do is create your site locations to differentiate them easily (North, South, Central, etc).
Select Sites to get started.
See Chapter 13: Configuration, Sites in the User's Guide.
Creating an enterpriseNext, you may want to set up an enterprise to manage configurations for the regions and systems inside the enterprise.
Select Enterprise to get started.
See Chapter 13: Configuration, Enterprise in the User's Guide.
Creating containersNext you'll want to start building containers to put your network elements into (CMTSs, HCUs, HSMs, RPM cards, RPM ports, etc). Containers allow you to limit what users can access and what data is visible to them or their group.
Select Containers to get started.
See Chapter 13: Configuration, Containers in the User's Guide.
Adding a CMTSNow that you have your sites and containers in place, you can add your CMTSs.
Select CMTS to get started.
See Chapter 13: Configuration, CMTS in the User's Guide.
Adding an HCUAdding an HCU is a similar process to adding a CMTS.
Select HCU to get started.
See Chapter 13: Configuration, Headend Controller Unit (HCU) in the User's Guide.

XPERTrak Quick Start Guide22127801, Rev. 006 June 202012
Exporting system dataFrom the Actions dropdown on many of the Configuration sections, you can export the list or table of the device information to a CSV Excel file.
See Chapter 13: Configuration for each admin section in the User's Guide.
Upgrading firmwareYour XPERTrak server will periodically check for new firmware for any of the hardware. You should always make certain all of your PathTrak hardware has been updated with the latest firmware to ensure you have the latest fixes and patches, utilizing all of the most recent features and capabilities.
From the Actions dropdown in the HCU section, choose Firmware Upgrade.
See Chapter 13: Configuration, Headend Controller Unit (HCU) in the User's Guide.
Adding an RCINext you can add an RCI to configure remote PHY controllers and sweep plans.
Select RCI to get started.
See Chapter 13: Configuration, RCI in the User's Guide.
Adding an OTUNext you can add an OTU to configure fiber monitoring and testing.
Select OTU to get started.
See Chapter 13: Configuration, OTU in the User's Guide.
Creating users and groupsNow that you have your entire system built in XPERTrak, you can start creating users, groups, and assign roles and access.
Select Users to get started.
See Chapter 13: Configuration, Users in the User's Guide. Creating users and groups
Editing propertiesSelect the edit button to the right of the element name (Node, HCU, RCI, OTU, etc.). Edit the information as needed, and click the Save button.
See Chapter 13: Configuration for each admin section in the User's Guide.

XPERTrak Quick Start Guide22127801, Rev. 006June 2020 13
Editing monitoring plansYou can edit and copy monitoring plans through the Ports tab of the HCU section.
From the Actions dropdown in the HCU section, choose Copy or Edit Monitoring Plan.
See Chapter 13: Configuration, Headend Controller Unit (HCU) in the User's Guide.
Configuring alarmsYou can configure alarms based on when certain events are triggered. Devices you can configure for alarms include: HCUs, RPMs, HSMs, ports, CMTSs, nodes, network elements (amplifiers, splitters, taps), RCIs, CMTS upstream ports, OTUs, or OTU ports.
Select Alarms and the Alams Configuration tab to get started.
See Chapter 13: Configuration, Alarms in the User's Guide.
Importing topology and street alarms viewsYou can import plant topology and street alarm data to get the full picture of the health of your network via API and CSV formats. These features require the corresponding licensing.
See Chapter 14: Appendix, Topology import in the User's Guide.
Configuring system settingsFinally, you'll want to customize the XPERTrak system settings, defaults, and advanced features, including measurement units, language, map overlays, events, alarms, and thresholds.
Select Settings to get started.
See Chapter 13: Configuration, Settings in the User's Guide.

XPERTrak Quick Start Guide22127801, Rev. 006 June 202014
Running reportsFor detailed information on how to create reports, see Chapter 12: Reports in the User's Guide.
You can run reports in XPERTrak for detailed analysis, including node ranking and modem summaries. Only admins have access to the feature.
To get you started, on the top right side of the screen, select the Reports menu from the Main toolbar, as shown below.
From the dropdown, choose Reports. The Reports Dashboard will open in a new tab.
You can also run pre-configured reports from here. See the User's Guide for more information.
Select the Generate Report button on the right side to bring up the Report Type section.
Reports
XPERTrak Quick Start Guide22127801, Rev. 006June 2020 15
Additional informationFor more detailed information, contact us at [email protected] for these additional documents.
User's Guide
Application Notes
Software Release notes (including system requirements and OIDs)
API Developer's Guide
RCI Software Installation Guide
Backup and Restore Processes
Server Configuration Instructions
Database Schema

VIAVI SolutionsNorth America: 1.844.GO VIAVI / 1.844.468.4284Latin America +52 55 5543 6644EMEA +49 7121 862273APAC +1 512 201 6534All Other Regions: viavisolutions.com/contacts email [email protected]
22127801
Rev. 006, June 2020
English