xp 1 microsoft office excel developing a professional-looking worksheet
TRANSCRIPT

XP
1
Microsoft Office Excel
Developing a Professional-Looking Worksheet

XP
2
Open the Format Cells dialog box
• Formatting is the process of changing the appearance of your workbook.
• A properly formatted workbook can be easier to read, appear more professional, and help draw attention to important points.
• The formatting toolbar is the fastest way to format your worksheet.
• With buttons on this toolbar, you can apply a comma format, adjust the number of decimal places in a number, apply Currency and Percent formats and even quickly copy formats.
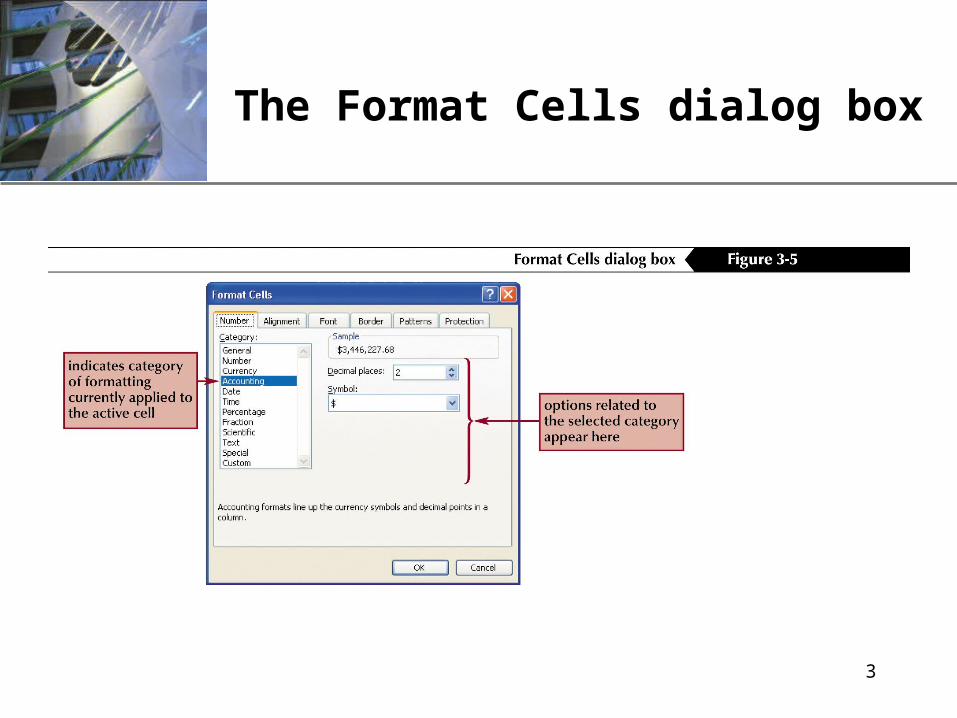
• If you select a cell or range, click Format on the menu bar and then click Cells, the Format Cells dialog box opens.
XP
3
The Format Cells dialog box

XP
4
Format data using different fonts, sizes and font styles
• A font is the design applied to letters, characters and punctuation marks. Each font is identified by a font name or type face.
• Fonts can be displayed in various sizes and you can even change the color of the font or the background color in the cell.
• These options are available in the Format Cells dialog box and there are also buttons available for the formatting toolbar to make formatting faster.

XP
5
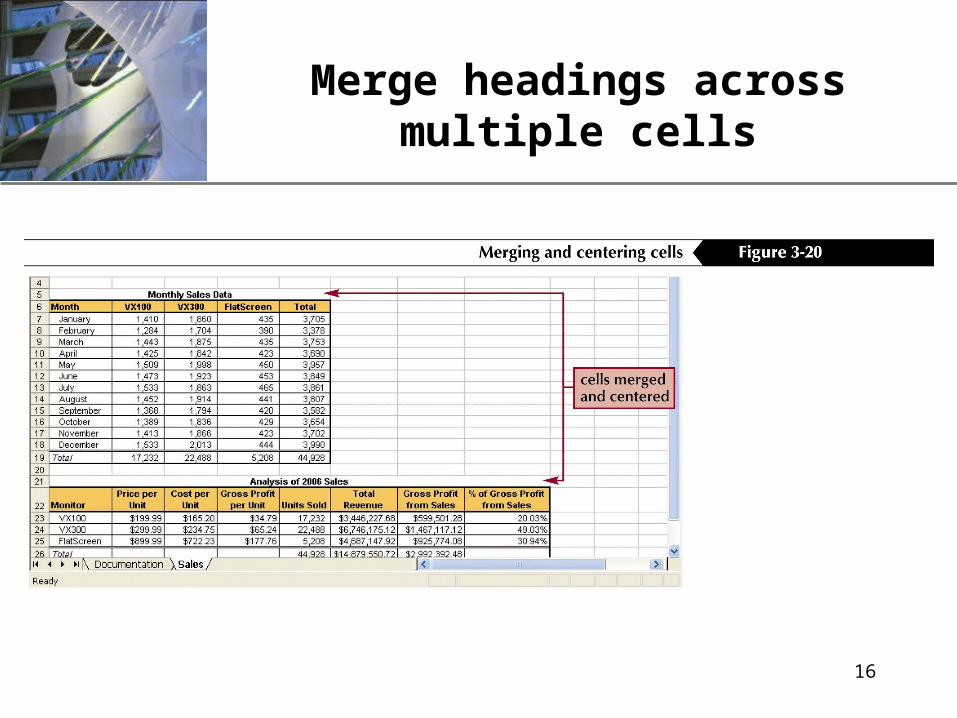
Align using Merge and Center
• Another option available for alignment in the Format Cells dialog box and on the Format toolbar is the Merge and Center option, which centers text in one cell across a range of cells.
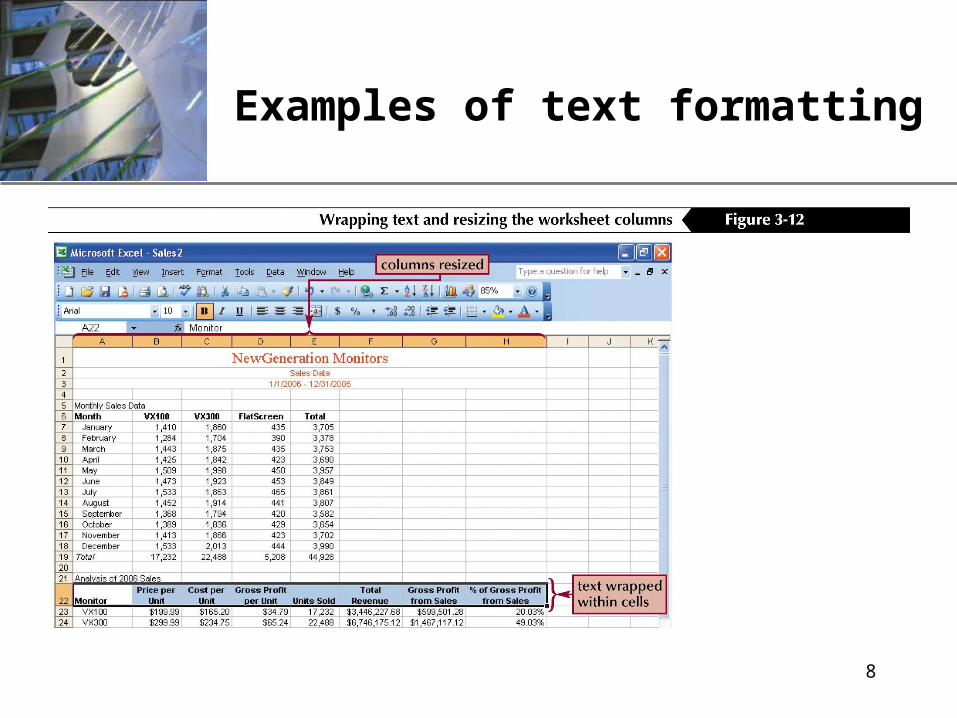
• If you want to fit a lot of text within a cell but without having to expand the column width to be very large, you can use the text wrapping option on the Alignment tab, or even choose to indent text.
• You can also have Excel shrink the text to fit within the given column width you have chosen or even rotate text from -90 to +90 degrees.

XP
6
Align cell contents
• When you enter numbers and formulas into a cell, Excel automatically aligns them with the cell's right edge and bottom border, while text entries are aligned with the left edge and bottom border.
• You can control the alignment of data within a cell horizontally and vertically.
• Left, Right and Center alignments can be selected using their respective alignment buttons on the Formatting toolbar.
• To align the cell's contents vertically, open the Format Cells dialog box and choose the vertical alignment options on the Alignment tab.

XP
7
The Alignment tab of the Format Cells dialog box
XP
8
Examples of text formatting

XP
9
Add cell borders and backgrounds
• Excel provides a range of tools to format not only the contents of a cell, but also the cells themselves.
• The gridlines you see in Excel in a new worksheet are not displayed on printed pages.
• You can add a border to a cell using either the Borders button on the Formatting toolbar or the options on the Border tab in the Format Cells dialog box.

XP
10
The Border tab of the Format Cells dialog box

XP
11
Add patterns or colors to cells
• Patterns and colors can be used to enhance the appearance of spreadsheet cells.
• The fastest way to apply background color to cells in the worksheet is by clicking the list arrow of the Fill color button and choosing a color from the palette.
• To apply a fill pattern to cells, use the Patterns tab on the Format Cells dialog box.

XP
12
The Patterns tab of the Format Cells dialog box

XP
13
A worksheet with formatting applied

XPFormat Painter
To quickly copy formatting from one part of a sheet to another, or to another sheet in the same workbook, use the Format Painter ( in the Home tab)
Select the cell(s) which has some formatting.
Click on the Format Painter icon on the Home tab
4.Click on the cell that you want to copy the formatting to and the source formatting will be copied.

XP
15
Merge a range of cells
• To merge a range of cells into a single cell:– Use the Merge option on the Alignment tab in the
Format Cells dialog box– Click the Merge and Center button on the Formatting
toolbar
• To split a merged cell back into individual cells:– Select the merged cell – Click the Merge and Center button again– Or uncheck the Merge Cells check box on the
Alignment tab in the Format Cells dialog box
XP
16
Merge headings across multiple cells
XP
17
Hide rows and/or columns
• You can hide rows or columns, which does not affect the data stored there, nor does it affect any cell that might have a formula reference to a cell within the hidden row or column.
• To hide a row or column:– Select the row or column and then choose Hide from either the
Row or Column option of the Format menu, or, from the shortcut menu that pops up when you right click the row or column heading
• To unhide a row or column:– Select the headings of the rows or columns that border the hidden
area, then choose Unhide from either the Row or Column option of the Format menu, or, from the shortcut menu that pops up when you right click the row or column heading

XP
18
Worksheet with hidden cells

XP
19
Format the worksheet background and sheet tabs
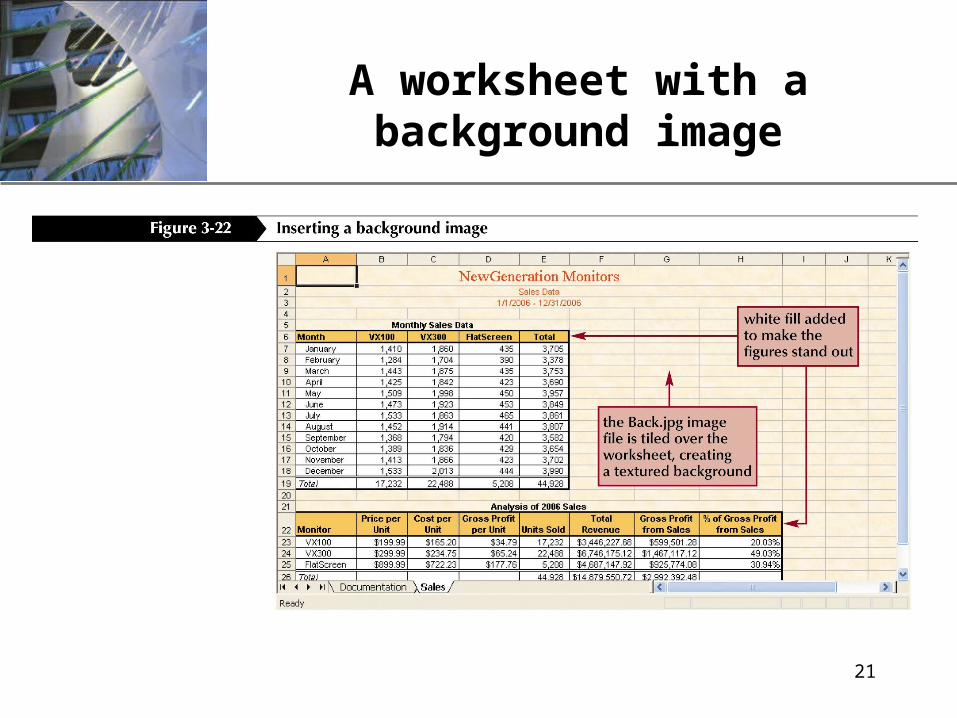
• You can use an image file as a background for a worksheet.
• Images can be used to give the background a textured appearance, like that of granite, wood, or fibered paper.
• The background image does not affect the format or content of any cell in the worksheet, and if you have already defined a background color for a cell, Excel displays the color on top, hiding that portion of the image.
• You cannot apply a background image to all the sheets of the workbook at the same time.
XP
20
Insert a background image and change a worksheet tab color
• To add a background image to a worksheet:– Click “Background” in “Page layout” tab. Locate and select an
image from your hard drive, floppy drive, network, etc., and click the Insert button
XP
21
A worksheet with a background image
XP
22
Find and replace formats within a worksheet
• The Undo button on the Standard toolbar is very useful for removing formatting choices you have decided you do not want to use.
• You can also clear the formatting of selected cells, returning them to their initial, unformatted appearance. – To clear formatting, select a cell or range, click Edit on
the menu bar, point to Clear and then click Formats

XP
23
Use Find and Replace to change formats
• Click Edit on the menu bar and then click Replace. • When the Find and Replace dialog box opens, click the
Options >> button to expand the box and display additional find and replace options.
• Click on the Replace tab and then click the topmost Format button to open a Find Format dialog box, select the format combinations you want to search for, then click the OK button.
• Click the lower Format button and when the dialog box opens, select the options you want to use for replacing the formatting.
• Click the OK button and then the Replace All button to quickly change all the cells that meet your Find Format criteria.

XP
24
Dialog boxes used for Find and Replace operations