xepersian doc
TRANSCRIPT

Dedication
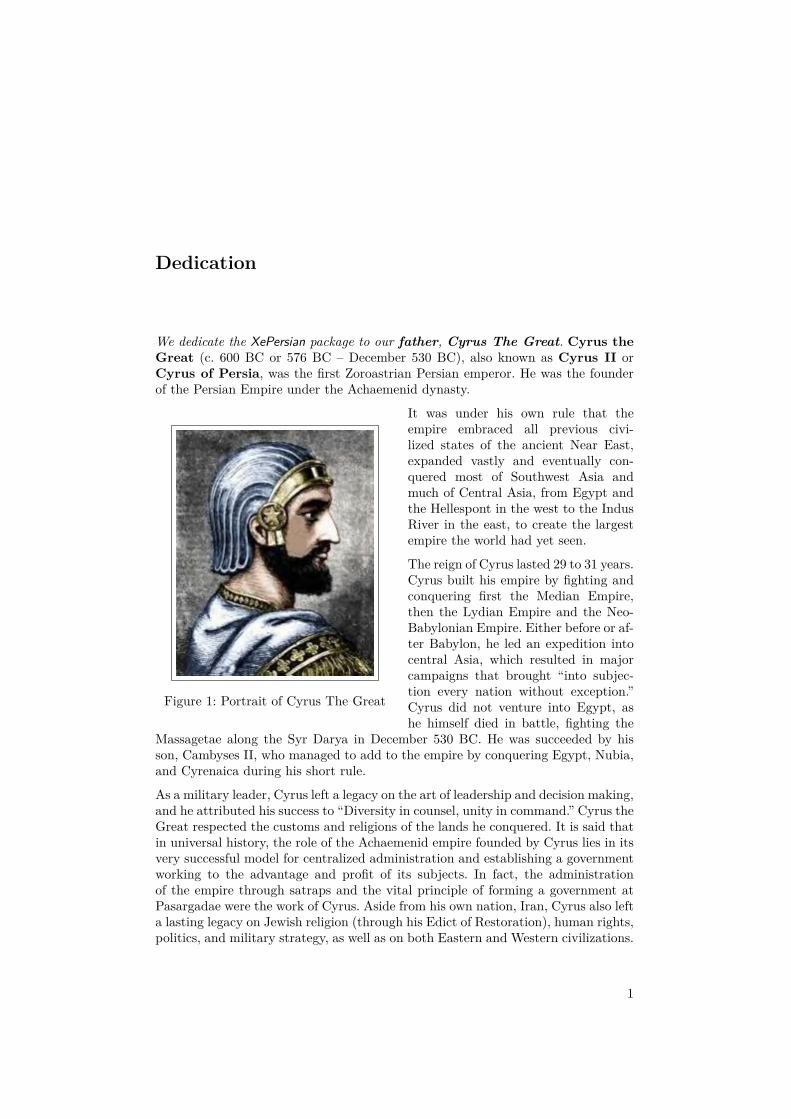
We dedicate the XePersian package to our father, Cyrus The Great. Cyrus theGreat (c. 600 BC or 576 BC – December 530 BC), also known as Cyrus II orCyrus of Persia, was the first Zoroastrian Persian emperor. He was the founderof the Persian Empire under the Achaemenid dynasty.
Figure 1: Portrait of Cyrus The Great
It was under his own rule that theempire embraced all previous civi-lized states of the ancient Near East,expanded vastly and eventually con-quered most of Southwest Asia andmuch of Central Asia, from Egypt andthe Hellespont in the west to the IndusRiver in the east, to create the largestempire the world had yet seen.
The reign of Cyrus lasted 29 to 31 years.Cyrus built his empire by fighting andconquering first the Median Empire,then the Lydian Empire and the Neo-Babylonian Empire. Either before or af-ter Babylon, he led an expedition intocentral Asia, which resulted in majorcampaigns that brought “into subjec-tion every nation without exception.”Cyrus did not venture into Egypt, ashe himself died in battle, fighting the
Massagetae along the Syr Darya in December 530 BC. He was succeeded by hisson, Cambyses II, who managed to add to the empire by conquering Egypt, Nubia,and Cyrenaica during his short rule.
As a military leader, Cyrus left a legacy on the art of leadership and decision making,and he attributed his success to “Diversity in counsel, unity in command.” Cyrus theGreat respected the customs and religions of the lands he conquered. It is said thatin universal history, the role of the Achaemenid empire founded by Cyrus lies in itsvery successful model for centralized administration and establishing a governmentworking to the advantage and profit of its subjects. In fact, the administrationof the empire through satraps and the vital principle of forming a government atPasargadae were the work of Cyrus. Aside from his own nation, Iran, Cyrus also lefta lasting legacy on Jewish religion (through his Edict of Restoration), human rights,politics, and military strategy, as well as on both Eastern and Western civilizations.
1

Contents
1 Introduction 41.1 Important Notes 41.2 XePersian Info On The Terminal and In The Log File 42 Basics 62.1 Loading The Package 62.2 Commands for Version number, Mercurial commit number and
Date of The Package 72.3 Options of The Package 72.3.1 Kashida Option 72.3.2 localise Option 82.4 A Sample Input TEX File 202.5 Font Commands 202.5.1 Basic Font Commands 202.5.2 Defining Extra Persian and Latin Fonts 212.5.3 Choosing Persian Sans Font 222.5.4 Choosing Persian Mono Font 222.5.5 Choosing Persian Iranic Font 222.5.6 Choosing Persian Navar Font 222.5.7 Choosing Persian Pook Font 222.5.8 Choosing Persian Sayeh Font 222.5.9 Choosing Latin Sans Font 222.5.10 Choosing Latin Mono Font 222.6 Latin and Persian Environment 222.7 Latin and Persian Commands 232.8 Short Latin and Persian Texts 232.9 Miscellaneous Commands 232.10 Additional Counters 232.11 Things To Know About \setdigitfont 232.12 Bilingual Captions 242.13 Support For Various Packages 242.13.1 Things You Should Know about Support For enumerate
Package 242.14 Index Generation 242.15 Converting Your FarsiTEX Files To XePersian or Unicode 253 Extra Packages And Classes 263.1 Magazine Typesetting 263.1.1 Introduction 263.1.2 Usage 263.1.3 Front Page 263.1.4 Inside 28
2

3.1.5 Customization 303.1.6 Class Options 333.2 Typesetting Multiple-choice Questions 333.2.1 Introduction 333.2.2 Usage 333.2.3 Important Note 353.2.4 Customising The Package 35
3

Chapter 1
Introduction
XePersian is a package for typesetting Persian/English documents with XeLATEX.The package includes adaptations for use with many other commonly-used packages.
1.1 Important Notes� The XePersian package only works with XeTEX engine.� Before reading this documentation, you should have read the documentation
of the version 1.1.4 of bidi package. The XePersian package automaticallyloads bidi package with RTLdocument option enabled and hence any com-mands that bidi package offers, is also available in XePersian package. Here,in this documentation, we will not repeat any of bidi package’s commands.
� In previous versions (≤ 1.0.3) of XePersian, a thesis class provided for type-setting thesis. As of version 1.0.4, I no longer provide this class because Iam not familiar with specification of a thesis in Iran and even if I was,the specifications are different from University to University. XePersian is ageneral package like LATEX and should not provide any class for typesettingthesis. So if you really want to have a class file for typesetting thesis, thenyou should ask your University/department to write one for you.
� To get help, please explore http://forum.parsilatex.com and ask yourquestion there.
1.2 XePersian Info On The Terminal and In The Log FileIf you use XePersian package to write any input TEX document, and then runxelatex on your document, in addition to what bidi package writes to the terminaland to the log file, the XePersian package also writes some information about itselfto the terminal and to the log file, too. The information is something like:
xepersian package (Persian for LaTeX over XeTeX)Description: The package supports Persiantypesetting, using fonts provided in the distribution.Copyright © 2008-2010 Vafa Khalighiv1.0.9a, <commit 26>, 2010/07/25License: LaTeX Project Public License, version 1.3c or higher (your choice
)
4

Home: http://bitbucket.org/vafa/xepersianLocation on CTAN: /macros/xetex/latex/xepersian
5

Chapter 2
Basics
2.1 Loading The PackageYou can load the package in the ordinary way;
\usepackage [Options] {xepersian}
Where options of the package are explained later in section 2.3.When loading the package, it is important to know that:Ê xepersian should be the last package that you load, because otherwise you
are certainly going to overwrite bidi and XePersian package’s definitions andconsequently, you will not get the expected output.
Ë In fact, in addition to bidi, XePersian also makes sure that some specificpackages are loaded before bidi and XePersian; these are those packagesthat bidi and XePersian modifies them for bidirectional and Persian/Englishtypesetting.If you load XePersian before any of these packages, then you will get anerror saying that you should load XePersian or bidi as your last package.When it says that you should load bidi package as your last package, itreally means that you should load XePersian as your last package as bidipackage is loaded automatically by XePersian package.For instance, consider the following minimal example:
1 \documentclass{minimal}2 \usepackage{xepersian}3 \usepackage{enumerate}4 \settextfont{XB Niloofar}5 \begin{document}6 است آزمایش ی فقط این7 \end{document}
Where enumerate is loaded after XePersian. If you run xelatex on thisdocument, you will get an error which looks like this:
! Package xepersian Error: Oops! you have loaded package enumerateafter xepers
ian package. Please load package enumerate before xepersian package, and then t
6

ry to run xelatex on your document again.
See the xepersian package documentation for explanation.Type H <return> for immediate help....
l.5 \begin{document}
2.2 Commands for Version number, Mercurial commitnumber and Date of The Package
\xepersianversion \xepersiancommit \xepersiandate
� \xepersianversion gives the current version of the package.� \xepersiancommit gives the current Mercurial commit number of the pack-
age.� \xepersiandate gives the current date of the package.
1 \documentclass{article}2 \usepackage{xepersian}3 \settextfont{XB Niloofar}4 \begin{document}5 \begin{latin}6 This is typeset by \textsf{\XePersian} package,7 \xepersianversion, \xepersiancommit, \xepersiandate.8 \end{latin}9 \end{document}
2.3 Options of The PackageThere are two options:
2.3.1 Kashida Option
If you pass Kashida option to the package, you will use Kashida for stretchingwords for better output quality and getting rid of underfull or overfull \hbox mes-sages. Please note that X series fonts of IRMUG (Iranian Mac Users Group) have This is the font
issue not XePer-sian’s bug
absolutely super poor quality and if you use any of these fonts with Kashida optionenabled, the result on the PDF viewed on the monitor is the ugliest of any kind,however the print may look fine. Hence if you are going to enable Kashida option, then you are advised to use either “Adobe Arabic” or “Scheherazade” fonts.
Note that you can not use Kashida option when you are using Nastaliq-like font(well, you still can use Kashida option when you use any Nastaliq-like font, but Ican not guarantee high quality output!).
7

2.3.2 localise Option
If you enable localise option, then you can use most frequently-used LATEX com-mands and environments in Persian, almost like what TEX-e-Parsi offers. This isstill work in progress and we wish to add lots more Persian equivalents of LATEXand TEX commands and environments. The Persian equivalents of LATEX and TEXcommands are shown in Table 2.1 and Persian equivalents of LATEX environmentsare shown in Table 2.2.
Please note that the Persian equivalents of LATEX and TEX commands and environ-ments are only available after loading xepersian package with localise option en-abled. This means that even if you enable localise option, you still have to write allcommands or environments that come before \usepackage [localise] {xepersian},in its original form, i.e. \documentclass.
When you enable the localise option, not only you can use Persian equivalentsof LATEX and TEX commands and environments, but still original LATEX and TEXcommands and environments work too.
The TEX and LATEX commands and environments and their Persian equivalentslisted in Table 2.1 and Table 2.2 is not the whole story; If any command andenvironment in Table 2.1 and Table 2.2 have a starred version, their starred versionalso work. For example in Table 2.1, the Persian equivalent of \chapter is .\فصل Iknow that \chapter has a starred version, so this means \فصل* is also the Persianequivalent of \chapter*. Is that clear?
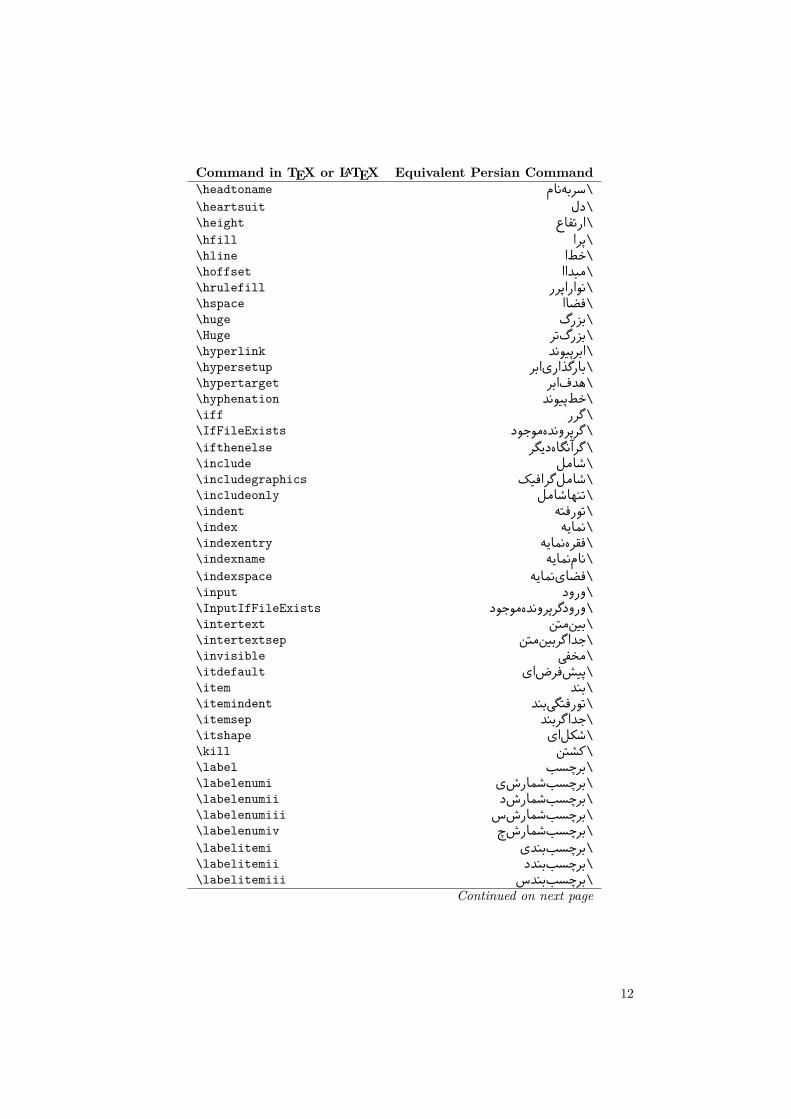
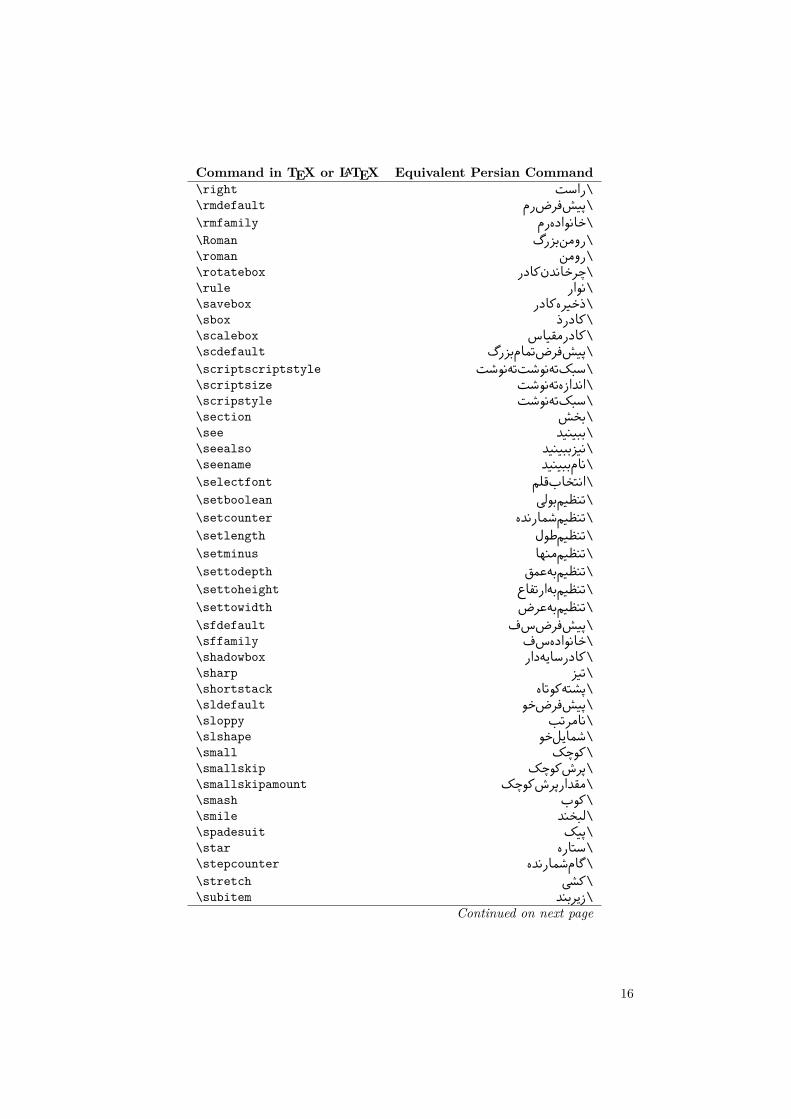
Table 2.1: The Equivalent LATEX and TEX Commands
Command in TEX or LATEX Equivalent Persian Command\abovedisplayshortskip \پرش�کوتاه�باالی�نمایش\abovedisplayskip \پرش�باالی�نمایش\abstractname \نام�چیده\addcontentsline \بیفزاخط�فهرست\address \آدرس\addtocontents \بیفزابرفهرست\addtocounter \بیفزابرشمارنده\addtolength \بیفزابرطول\addvspace \بیفزافاصله�ع\aleph \الف\allowdisplaybreaks \شست�نمایش�مجاز\Alph \حروف�ب\alph \حروف�ک\alsoname \نام�همچنین\and \و\angle \زاویه\appendixname \نام�پیوست\approx \تقریب\arabic عرب\\arg \آرگ\arraycolsep \جداگرستون�آرایه
Continued on next page
8

Command in TEX or LATEX Equivalent Persian Command\arrayrulewidth \عرض�نوارآرایه\arraystretch \کشیدگ�آرایه\AtBeginDocument \درشروع�نوشتار\AtEndDocument \درپایان�نوشتار\AtEndOfClass \درپایان�کالس\AtEndOfPackage \درپایان�بسته\author \نویسنده\backmatter \مطلب�پشت\backslash \شاف�پشت\bar \میله\baselineskip پرش�خط�کرس\\baselinestretch خط�کرس�کشیدگ\\begin \شروع\belowdisplayshortskip \پرش�کوتاه�زیرنمایش\belowdisplayskip \پرش�زیرنمایش\bfdefault \پیش�فرض�سیاه\bfseries \سری�سیاه\bibitem \بندکتاب�نامه\bibliography \کتاب�نامه\bibliographystyle \سب�کتاب�نامه\bibname \نام�کتاب�نامه\bigskip \پرش�بزرگ\bigskipamount \مقدارپرش�بزرگ\botfigrule \نوارپای�عس\bottomfraction \کسرپایین\bullet \گلوله\caption \شرح\cc \رونوشت\ccname \نام�رونوشت\cdot \نقطه�وسط\cdots \نقاط�وسط\centering \وسط�چین\centerline \خط�وسط\chapter \فصل\chaptername \نام�فصل\cite \سند\ClassError \خطای�کالس\ClassInfo \اطالعات�کالس\ClassWarning \هشدارکالس\ClassWarningNoLine \هشدارکالس�بدون�خط\cleardoublepage \دوصفحه�پاک\clearpage \صفحه�پاک\cline \خط�س\closing \بستن
Continued on next page
9

Command in TEX or LATEX Equivalent Persian Command\clubsuit \خاج\color رن\\colorbox کادررن\\columnsep \جداگرستون\columnseprule \نوارجداگرستون\contentsline \خط�فهرست\contentsname \نام�فهرست\copyright \حق�تالیف\CurrentOption \گزینه�جاری\dashbox \کادربینابین\dashv \بینابین�ع\date \تاریخ\dblfigrule \نوارشل�دوال\dblfloatpagefraction \کسرصفحه�شناوردوال\dblfloatsep \جداگرشناوردوال\dbltextfloatsep \جداگرشناورمتن�دوال\dbltopfraction \کسرباالدوال\DeclareGraphicsExtensions اعالم�پسوندگرافی\\DeclareGraphicsRule اعالم�دستورگرافی\\DeclareOption \اعالم�گزینه\DeclareRobustCommand \اعالم�فرمان�قوی\definecolor رن�معرف\\deg \درجه\depth \عمق\diamondsuit \خشت\dim \بعد\discretionary احتیاط\\displaybreak \شست�نمایش\displaystyle \سب�نمایش\documentclass \کالس�نوشتار\dot \نقطه\doteq \نقطه�مساوی\dotfill \پرنقطه\dots \نقاط\doublebox \کادردوال\doublerulesep \جداگرنواردوال\downarrow \فلش�پایین\em \تا\emph \تاکید\emptyset مجموعه�ته\\end \پایان\endfirsthead \پایان�اولین�سر\endfoot \پایان�پا\endhead \پایان�سر
Continued on next page
10

Command in TEX or LATEX Equivalent Persian Command\endlastfoot \پایان�آخرین�پا\enlargethispage \گسترش�این�صفحه\eqref \ارجاع�فر\euro \یورو\evensidemargin \حاشیه�طرف�راست\ExecuteOptions \اجرای�گزینه�ها\extracolsep جداگرستون�اضاف\\fancypage صفحه�تجمل\\fbox \کادرف\fboxrule \نوارکادرف\fboxsep \جداگرکادرف\fcolorbox کادرف�رن\\figurename \نام�شل\fill \پرر\flat \پهن\floatpagefraction \کسرصفحه�شناور\floatsep \جداگرشناور\flushbottom \تنظیم�پایین\fnsymbol \نمادپن\fontfamily \خانواده�قلم\fontseries \سری�قلم\fontshape \شل�قلم\fontsize \اندازه�قلم\LTRfootnote \پانوشت�چبر\footnote \پانوشت\footnotemark \نشان�پانوشت\footnoterule \نوار�پانوشت\footnotesep \جداگرپانوشت\footnotesize \اندازه�پانوشت\footnotetext \متن�پانوشت\footskip \پرش�پا\frame \فریم\framebox \کادرفریم\frenchspacing \فاصله�گذاری�فرانسوی\frontmatter \مطلب�پیش\glossary فرهن\\glossaryentry فقره�فرهن\\graphpaper \کاغذگراف\guillemotleft \گیومه�چپ\guillemotright \گیومه�راست\guilsinglleft \گیومه�ت�چپ\guilsinglright \گیومه�ت�راست\headheight \ارتفاع�سر\headsep \جداگرسر
Continued on next page
11
Command in TEX or LATEX Equivalent Persian Command\headtoname \سربه�نام\heartsuit \دل\height \ارتفاع\hfill \پرا\hline \خط�ا\hoffset \مبداا\hrulefill \نواراپرر\hspace \فضاا\huge \بزرگ\Huge \بزرگ�تر\hyperlink \ابرپیوند\hypersetup \بارگذاری�ابر\hypertarget \هدف�ابر\hyphenation \خط�پیوند\iff \گرر\IfFileExists \گرپرونده�موجود\ifthenelse \گرآناه�دیر\include \شامل\includegraphics شامل�گرافی\\includeonly \تنها�شامل\indent \تورفته\index \نمایه\indexentry \فقره�نمایه\indexname \نام�نمایه\indexspace \فضای�نمایه\input \ورود\InputIfFileExists \ورودگرپرونده�موجود\intertext \بین�متن\intertextsep \جداگربین�متن\invisible مخف\\itdefault \پیش�فرض�ای\item \بند\itemindent \تورفت�بند\itemsep \جداگربند\itshape \شل�ای\kill \کشتن\label \برچسب\labelenumi \برچسب�شمارش�ی\labelenumii \برچسب�شمارش�د\labelenumiii \برچسب�شمارش�س\labelenumiv \برچسب�شمارش�چ\labelitemi \برچسب�بندی\labelitemii \برچسب�بندد\labelitemiii \برچسب�بندس
Continued on next page
12

Command in TEX or LATEX Equivalent Persian Command\labelitemiv \برچسب�بندچ\labelsep \جداگربرچسب\labelwidth \عرض�برچسب\language \زبان\large \درشت\Large \درشت�تر\LARGE \درشت�درشت\LaTeX الت\\LaTeXe \الت�ای\ldots \نقاط�خ\left \چپ\leftmargin \حاشیه�چپ\line \خط\linebreak \شست�خط\linethickness \ضخامت�خط\linewidth \عرض�خط\listfigurename \نام�لیست�شل\listfiles \لیست�پرونده�ها\listoffigures \لیست�شل�ها\listoftables \لیست�لوح�ها\listparindent \تورفت�پارلیست\listtablename \نام�لیست�جدول\LoadClass \بارگذاری�کالس\LoadClassWithOptions \بارگذاری�کالس�باگزینه�ها\location \مان\mainmatter مطلب�اصل\\makebox \ساخت�کادر\makeglossary ساخت�فرهن\\makeindex \ساخت�نمایه\makelabel \ساخت�برچسب\makelabels \ساخت�برچسب�ها\MakeLowercase ساخت�حروف�کوچ\\maketitle \ساخت�عنوان\MakeUppercase \ساخت�حروف�بزرگ\marginpar \حاشیه�پار\marginparsep \جداگرحاشیه�پار\marginparwidth \عرض�جداگرپار\markboth \نشان�هردو\markright \نشان�راست\mbox \س�کادر\medskip \پرش�متوسط\medskipamount \مقدارپرش�متوسط\medspace \فضای�متوسط\MessageBreak \شست�پیام
Continued on next page
13

Command in TEX or LATEX Equivalent Persian Command\multicolumn چندستون\\name \نام\natural طبیع\\nearrow باری\\NeedsTeXFormat نیازبه�فرم�ت\\neg منف\\negmedspace فضای�متوسط�منف\\negthickspace فضای�ضخیم�منف\\negthinspace فضای�نازک�منف\\newboolean \بول�نو\newcommand \فرمان�نو\newcounter \شمارنده�نو\newenvironment \محیط�نو\newfont \قلم�نو\newlength \طول�نو\newline \خط�نو\newpage \صفحه�نو\newsavebox \کادرذخیره�نو\newtheorem \قضیه�نو\nocite \بدون�سند\nofiles \بدون�پرونده\noindent بدون�تورفت\\nolimits \بدون�حد\nolinebreak \بدون�شست�خط\nonfrenchspacing \فاصله�گذاری�غیرفرانسوی\nonumber \بدون�شماره\nopagebreak \بدون�شست�صفحه\normalcolor \رن�نرمال\normalfont \قلم�نرمال\normalmarginpar \حاشیه�پارنرمال\normalsize \اندازه�نرمال\notag \بدون�اتیت\numberwithin \شماره�مطابق\oddsidemargin \حاشیه�سمت�چپ\onecolumn \ی�ستون\onlynotes \تنها�یادداشت�ها\onlyslides \تنهااسالیدها\OptionNotUsed \گزینه�استفاده�نشد\PackageError \خطای�بسته\PackageInfo \اطالعات�بسته\PackageWarning \هشداربسته\PackageWarningNoLine \هشداربسته�بدون�خط\pagebreak \شست�صفحه\pagecolor \رن�صفحه
Continued on next page
14

Command in TEX or LATEX Equivalent Persian Command\pagename \نام�صفحه\pagenumbering \شماره�گذاری�صفحه\pageref \ارجاع�صفحه\pagestyle \سب�صفحه\paperheight \ارتفاع�برگ\paperwidth \عرض�برگ\par \پار\paragraph \پاراگراف\parallel \موازی\parbox \کادرپار\parindent \تورفت�پار\parsep \جداگرپار\parskip \پرش�پار\part \قسمت\partname \نام�قسمت\partopsep \جداگرباالی�پار\PassOptionToClass \پاس�گزینه�به�کالس\PassOptionToPackage \پاس�گزینه�به�بسته\path \مسیر\printindex \چاپ�نمایه\ProcessOptions \پردازش�گزینه�ها\protect \حمایت\providecommand \تهیه�فرمان\ProvidesClass \تهیه�کالس\ProvidesFile \تهیه�پرونده\ProvidesPackage \تهیه�بسته\raggedbottom \تنظیم�پایین\raggedleft \تنظیم�چپ\raggedright \تنظیم�راست\raisebox \ترفیع�کادر\raisetag \ترفیع�اتیت\rangle \زاویه�ر\rceil \سقف�ر\ref \رجوع\reflectbox \انعاس�کادر\refname \نام�رجوع\refstepcounter \گام�رجوع�شمارنده\renewcommand \فرمان�ازنو\renewenvironment \محیط�ازنو\RequirePackage \نیازبه�بسته\RequirePackageWithOptions \نیازبه�بسته�باگزینه\resizebox \اندازه�ازنوکادر\reversemarginpar \حاشیه�پارمعوس\rfloor \کف�ر
Continued on next page
15
Command in TEX or LATEX Equivalent Persian Command\right \راست\rmdefault \پیش�فرض�رم\rmfamily \خانواده�رم\Roman \رومن�بزرگ\roman \رومن\rotatebox \چرخاندن�کادر\rule \نوار\savebox \ذخیره�کادر\sbox \کادرذ\scalebox \کادرمقیاس\scdefault \پیش�فرض�تمام�بزرگ\scriptscriptstyle \سب�ته�نوشت�ته�نوشت\scriptsize \اندازه�ته�نوشت\scripstyle \سب�ته�نوشت\section \بخش\see \ببینید\seealso \نیزببینید\seename \نام�ببینید\selectfont \انتخاب�قلم\setboolean تنظیم�بول\\setcounter \تنظیم�شمارنده\setlength \تنظیم�طول\setminus \تنظیم�منها\settodepth \تنظیم�به�عمق\settoheight \تنظیم�به�ارتفاع\settowidth \تنظیم�به�عرض\sfdefault \پیش�فرض�س�ف\sffamily \خانواده�س�ف\shadowbox \کادرسایه�دار\sharp \تیز\shortstack \پشته�کوتاه\sldefault \پیش�فرض�خو\sloppy \نامرتب\slshape \شمایل�خو\small کوچ\\smallskip پرش�کوچ\\smallskipamount مقدار�پرش�کوچ\\smash \کوب\smile \لبخند\spadesuit پی\\star \ستاره\stepcounter \گام�شمارنده\stretch کش\\subitem \زیربند
Continued on next page
16

Command in TEX or LATEX Equivalent Persian Command\subparagraph \زیرپاراگراف\subsection \زیربخش\substack \زیرپشته\subsubitem \زیرزیربند\subsubsection \زیرزیربخش\subset \زیرمجموعه\subseteq \زیرمجموعه�مس\tabbingsep \جداگرجدول�بندی\tabcolsep \جداگرستون�جدول\tableofcontents \فهرست�مطالب\tablename \نام�لوح\tabularnewline \خط�نوجدول\tag \اتیت\telephone \تلفن\TeX ت\\text متن\\textbullet گلوله�متن\\textemdash ام�دش�متن\\textendash ان�دش�متن\\textexclamdown تعجب�وارونه�متن\\textperiodcentered نقطه�وسط�متن\\textquestiondown سوال�وارونه�متن\\textquotedblleft \نقل�چپ�متن�دوال\textquotedblright \نقل�راست�متن�دوال\textquoteleft \نقل�متن�چپ\textquoteright \نقل�متن�راست\textvisiblespace فضای�نمایان�متن\\textbackslash افت�پشت�متنش\\textbar میله�متن\\textgreater بزرگ�تر�متن\\textless کمتر�متن\\textbf \متن�سیاه\textcircled مدور�متن\\textcolor \رن�متن\textcompwordmark \نشان�کلمه�مرکب�متن\textfloatsep \جداگرشناورمتن\textfraction \کسرمتن\textheight \ارتفاع�متن\textit متن�ایتالی\\textmd \متن�نازک\textnormal \متن�نرمال\textregistered متن�ثبت\\textrm \متن�رومن\textsc \متن�تمام�بزرگ
Continued on next page
17

Command in TEX or LATEX Equivalent Persian Command\textsf \متن�سانزسریف\textsl \متن�خوابیده\textstyle متن�سب\\textsuperscript باالنویس�متن\\texttrademark عالمت�تجاری�متن\\texttt \متن�تایپ\textup \متن�باال\textwidth \عرض�متن\thanks \تشر\thicklines \خط�هاضخیم\thickspace \فضاضخیم\thinlines \خط�هانازک\thinspace \فضانازک\thisfancypage این�صفحه�تجمل\\thispagestyle \سب�این�صفحه\tilde \مد\tiny \ریز\times \ضرب\title \عنوان\to \به\today \امروز\top \باال\topfigrule \نوارباالی�شل\topfraction \کسر�باال\topmargin \حاشیه�باال\topsep \جداگرباال\topskip \پرش�باال\totalheight ارتفاع�کل\\triangle \مثلث\ttdefault \پیش�فرض�تایپ\ttfamily \خانواده�تایپ\twocolumn \دوستون\underline \زیرخط\updefault \پیش�فرض�ایستاده\usebox \استفاده�کادر\usecounter \استفاده�شمارنده\usefont \استفاده�فونت\usepackage \استفاده�بسته\value \ارزش\verb کب\\vfill \پررع\visible \نمایان\vline \خط�ع\voffset \مبداع
Continued on next page
18

Command in TEX or LATEX Equivalent Persian Command\vpageref \ارجاع�صفحه�ع\vref \ارجاع�ع\vspace \فضای�ع\whiledo \مادام�بن\widehat \کاله�پهن\widetilde \مدپهن\width \عرض
Table 2.2: The Equivalent LATEX Environments
Environment in LATEX Equivalent Persian Environmentabstract چیدهappendix پیوستarray آرایهcenter وسطdescription توضیحdocument نوشتارenumerate شماره�بندیfigure شلfilecontents محتویات�پروندهflushleft چپ�چینflushright راست�چینitemize بنددارletter نامهlist لیستlongtable جدول�درازlrbox کادررچmath ریاضmatrix ماتریسminipage صفحه�کوچmulticols چندستون�هاmultline چندخطnote یادداشتoverlay انباشتنpicture تصویرquotation اقتباسquote نقلslide اسالیدsloppypar پارنامرتبsplit شافتنsubarray زیرآرایهtabbing جدول�بندیtable لوحtabular جدولthebibliography محتوای�کتاب�نامهtheindex محتوای�نمایه
Continued on next page
19
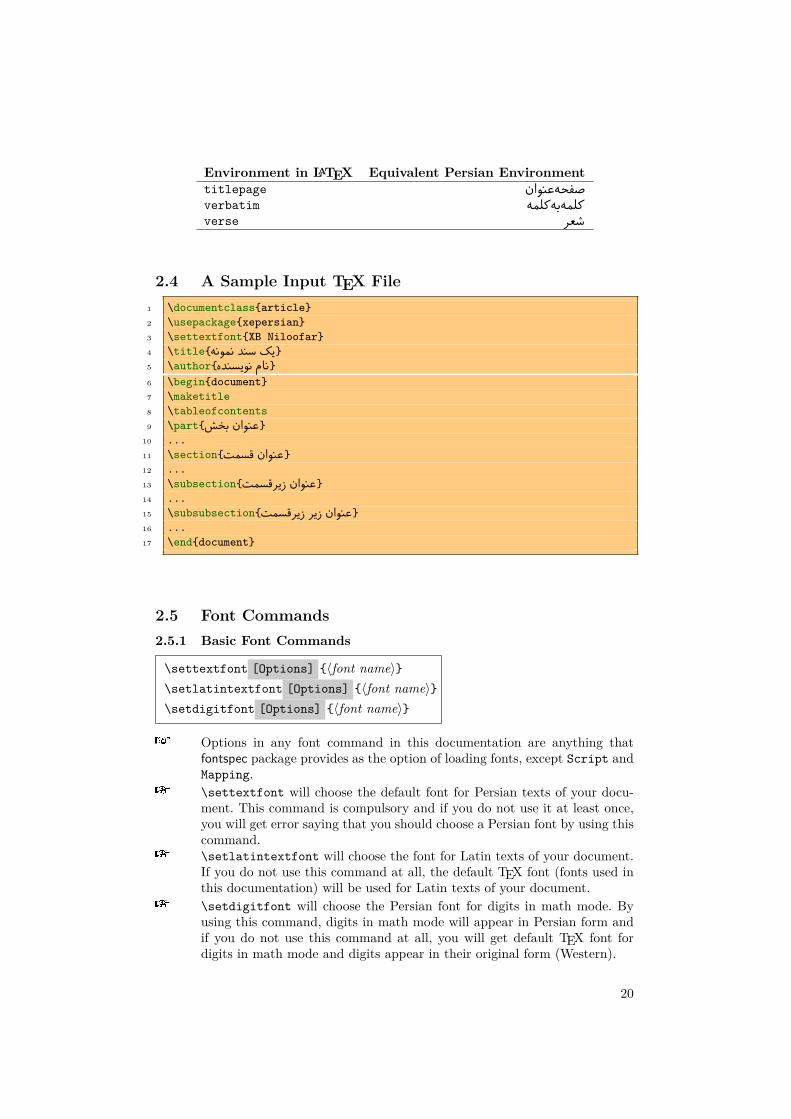
Environment in LATEX Equivalent Persian Environmenttitlepage صفحه�عنوانverbatim کلمه�به�کلمهverse شعر
2.4 A Sample Input TEX File1 \documentclass{article}2 \usepackage{xepersian}3 \settextfont{XB Niloofar}4 \title{نمونه سند ی}5 \author{نویسنده {نام6 \begin{document}7 \maketitle8 \tableofcontents9 \part{بخش {عنوان
10 ...11 \section{قسمت {عنوان12 ...13 \subsection{زیرقسمت {عنوان14 ...15 \subsubsection{زیرقسمت زیر {عنوان16 ...17 \end{document}
2.5 Font Commands2.5.1 Basic Font Commands
\settextfont [Options] {⟨font name⟩}\setlatintextfont [Options] {⟨font name⟩}\setdigitfont [Options] {⟨font name⟩}
� Options in any font command in this documentation are anything thatfontspec package provides as the option of loading fonts, except Script andMapping.
� \settextfont will choose the default font for Persian texts of your docu-ment. This command is compulsory and if you do not use it at least once,you will get error saying that you should choose a Persian font by using thiscommand.
� \setlatintextfont will choose the font for Latin texts of your document.If you do not use this command at all, the default TEX font (fonts used inthis documentation) will be used for Latin texts of your document.
� \setdigitfont will choose the Persian font for digits in math mode. Byusing this command, digits in math mode will appear in Persian form andif you do not use this command at all, you will get default TEX font fordigits in math mode and digits appear in their original form (Western).
20

2.5.2 Defining Extra Persian and Latin Fonts
\defpersianfont\CS [Options] {⟨font name⟩}\deflatinfont\CS [Options] {⟨font name⟩}
� With \defpersianfont, you can define extra Persian fonts.
\defpersianfont\Nastaliq[Scale=1]{IranNastaliq}
In this example, we define \Nastaliq to stand for Nastaliq font.
� With \deflatinfont, you can define extra Latin fonts.
\deflatinfont\junicode[Scale=1]{Junicode}
In this example, we define \Junicode to stand for Junicode font.
21

2.5.3 Choosing Persian Sans Font
\setpersiansansfont [Options] {⟨font name⟩}\persiansffamily \textpersiansf{⟨text⟩}
2.5.4 Choosing Persian Mono Font
\setpersianmonofont [Options] {⟨font name⟩}\persianttfamily \textpersiantt{⟨text⟩}
2.5.5 Choosing Persian Iranic Font
\setiranicfont [Options] {⟨font name⟩}\iranicfamily \textiranic{⟨text⟩}
2.5.6 Choosing Persian Navar Font
\setnavarfont [Options] {⟨font name⟩}\navarfamily \textnavar{⟨text⟩}
2.5.7 Choosing Persian Pook Font
\setpookfont [Options] {⟨font name⟩}\pookfamily \textpook{⟨text⟩}
2.5.8 Choosing Persian Sayeh Font
\setsayehfont [Options] {⟨font name⟩}\sayehfamily \textsayeh{⟨text⟩}
2.5.9 Choosing Latin Sans Font
\setlatinsansfont [Options] {⟨font name⟩}\sffamily \textsf{⟨text⟩}
2.5.10 Choosing Latin Mono Font
\setlatinmonofont [Options] {⟨font name⟩}\ttfamily \texttt{⟨text⟩}
2.6 Latin and Persian Environment\begin{latin} ⟨text⟩ \end{latin}\begin{persian} ⟨text⟩ \end{persian}
� latin environment both changes direction of the paragraphs to LTR andfont to Latin font.
� persian environment both changes direction of the Paragraphs to RTL andfont to Persian font.
22

2.7 Latin and Persian Commands\Latin \Persian
� \Latin command both changes direction of the paragraphs to LTR and fontto Latin font.
� \Persian command both changes direction of the Paragraphs to RTL andfont to Persian font.
2.8 Short Latin and Persian Texts\lr{⟨text⟩} \rl{⟨text⟩}
� With \lr command, you can typeset short LTR texts.� With \rl command, you can typeset short RTL texts.
2.9 Miscellaneous Commands\today \latintoday \twocolumnstableofcontents \XePersian\plq \prq
� \today typesets current Persian date and \latintoday typesets currentLatin date.
� \twocolumnstableofcontents typesets table of contents in two columns.This requires that you have loaded multicol package before XePersian pack-age, otherwise an error will be issued.
� \XePersian typesets XePersian’s logo.� \plq and \prq typeset Persian left quote and Persian right quote respec-
tively.
2.10 Additional CountersXePersian defines several additional counters to what already LATEX offers. Thesecounters are harfi, adadi, and tartibi.
2.11 Things To Know About \setdigitfont
\DefaultMathsDigits \PersianMathsDigits \AutoMathsDigits
� As we discussed before, \setdigitfont will choose the Persian font fordigits in math mode. By using this command, digits in math mode willappear in Persian form and if you do not use this command at all, you willget default TEX font for digits in math mode and digits appear in theiroriginal form (Western).If you use \setdigitfont, you should the know that:
23

� By default, \AutoMathsDigits is active, which means that in Persianmode, you get Persian digits in math mode and in Latin mode, youget TEX’s default font and digits in math mode.
� If you use \PersianMathsDigits anywhere, you will overwrite XePer-sian’s default behaviour and you will always get Persian digits in mathmode.
� If you use \DefaultMathsDigits anywhere, again you will overwriteXePersian’s default behaviour and you will always get TEX’s defaultfont and digits in math mode.
2.12 Bilingual CaptionsXePersian sets caption bilingually. This means if you are in RTL mode, you getPersian caption and if you are in LTR mode, you get English caption.
2.13 Support For Various PackagesIn addition to what bidi package supports, XePersian also support a few packages.This support is more about language aspect rather than directionality. These pack-ages are algorithmic, algorithm,enumerate, and backref packages.
2.13.1 Things You Should Know about Support For enumerate Package
The enumerate package gives the enumerate environment an optional argumentwhich determines the style in which the counter is printed.
An occurrence of one of the tokens A, a, I, i, or 1 produces the value of the counterprinted with (respectively) \Alph, \alph, \Roman, \roman or \arabic.
In addition with the extra support that XePersian provides, an occurrence of one ofthe tokens ,ا ,ی or ت produces the value of the counter printed with (respectively)\harfi, \adadi, or \tartibi.
These letters may be surrounded by any strings involving any other TEX expressions,however the tokens A, a, I, i, 1, ,ا ,ی ت must be inside a {} group if they are notto be taken as special.
To see an Example, please look at enumerate package documentation.
2.14 Index GenerationFor generating index, you are advised to use xindy program, any other program suchas makeindex is not recommended.
24

2.15 Converting Your FarsiTEX Files To XePersian orUnicode
There is a python program written by Mostafa Vahedi that enables you to convertFarsiTEX files to XePersian or unicode. This program can be found in doc folderwith the name ftxe-0.11.py. To convert your FarsiTEX files to XePersian, putftxe-0.11.py in the same directory that your FarsiTEX file is, and then open aterminal/command prompt and do the following:
python ftxe-0.11.py file.ftx file.tex
This will convert your file.ftx (FarsiTEX file) to file.tex (XePersian file).
The general syntax syntax of using the python script is as follow:
python ftxe-0.11.py [-r] [-s] [-x] [-u] input-filename1 input-filename2
Where-r (DEFAULT) recursively consider files included in the given files-s do not recursively consider files-x (DEFAULT) insert XePersian related commands-u only convert to unicode (and not to XePersian)Please note that the python script will not work with versions of python later than2.6. So you are encouraged to use version 2.6 of python to benefit from this pythonscript.
25

Chapter 3
Extra Packages And Classes
3.1 Magazine Typesetting3.1.1 Introductionxepersian-magazine class allows you to create magazines, newspapers and any othertypes of papers. The output document has a front page and as many inner pagesas desired. Articles appear one after another, telling the type, number of columns,heading, subheading, images, author and so forth. It is possible to change the as-pect of (almost) everything therefore it is highly customisable. Commands to adddifferent titles, headings and footers are also provided.
3.1.2 UsageTo create1 a magazine just load the class as usual2, with
\documentclass [Options] {xepersian-magazine}
at the beginning of your source file. The class options are described in subsection 3.1.6.From this point it is possible to include packages and renew class commands de-scribed in subsection 3.1.5.
3.1.3 Front PageAs every magazine, xepersian-magazine has its own front page. It includes main head-ings, an index, the magazine logo and other useful information. This environmentshould be the first you use within xepersian-magazine class but it is not mandatory.
\firstimage \firstarticle
The first two commands you can use inside the frontpage environment are \firstimageand \firstarticle which include, respectively, the main image and the main head-
1. For a sample file, please look at magazine-sample.tex in the doc folder2. You also need to load graphicx, xunicode and xepersian packages respectively, after loading thedocument class and choose fonts for the main text, Latin text and digits in maths formulas. Formore detail see chapter 2 of the documentation.
26
ing in the front page. The first one takes two arguments ⟨image⟩ and ⟨description⟩.Notice that second argument is optional and it declares the image caption; ⟨image⟩defines the relative path to the image. In order to include the first piece of articleuse
\firstarticle{⟨title⟩}{⟨opening⟩}{⟨time⟩}
first two arguments are mandatory and represent heading and the opening para-graph. Last argument is optional (you can leave it blank) and indicates the timewhen article happened.
\secondarticle
The second piece of article is included using the command \secondarticle justas the first article. The main difference are that this second piece has two morearguments and it does not include an image.
\secondarticle{⟨title⟩}{⟨subtitle⟩}{⟨opening⟩}{⟨pagesof ⟩}{⟨time⟩}
The new arguments ⟨subtitle⟩ and ⟨pagesof ⟩ define a subtitle and the name of thesection for this piece of article.
\thirdarticle
The third piece of article is the last one in the xepersian-magazine front page. Itworks like the \secondarticle.
\thirdarticle{⟨title⟩}{⟨subtitle⟩}{⟨opening⟩}{⟨pagesof ⟩}{⟨time⟩}
The arguments meaning is the same as \secondarticle command.
The front page includes three information blocks besides the news: indexblockwhich contains the index, authorblock which includes information about the authorand a weatherblock containing a weather forecast. All these three environmentsare mostly a frame in the front page therefore they can be redefined to fit yourpersonal wishes but I kept them to give an example and to respec the originalxepersian-magazine format.
\indexitem
The indexblock environment contains a manually editted index of xepersian-magazine.It takes one optional argument ⟨title⟩ and places a title over the index block. Toadd entries inside the index just type
27

\indexitem{⟨title⟩}{⟨reference⟩}
inside the environment. The ⟨title⟩ is the index entry text and the ⟨reference⟩points to a article inside xepersian-magazine. It will be more clear when you readsubsection 3.1.4. In order to get a correct output, it is necessary to leave a blankline between index items.
The authorblock environment can include whatever you would like. I called itauthorblock because I think it is nice to include some author reference in the frontpage: who you are, why are you doing this... This environment creates a frame boxin the bottom right corner of the front page with your own logo at the top.
\weatheritem
Finally, the weatherblock lets you include a weather forecast. It takes one optionalargument ⟨title⟩ that places a title over the weather block. It can fit up to threeweather icons with maximum and minimum temperatures, description and name.To add each of the weather entries type the following
\weatheritem{⟨image⟩}{⟨day-name⟩}{⟨max⟩}{⟨min⟩}{⟨short-des⟩}
The first argument includes the path to the weather icon (i.e. sunny or rainy), ⟨day-name⟩ like Monday, ⟨max⟩ and ⟨min⟩ are the highest and lowest day temperaturesand ⟨short-des⟩ is a brief description of the weather condition: partly cloudy, sunnyand windy . . .
3.1.4 Inside
Once we have created the front page we should include all articles inside our maga-zine. xepersian-magazine arranges all articles one after each other, expanding head-ings all over the page and splitting the article text in the number of columns wewish. There are three different environments to define a piece of article: the articleenvironment described in section 3.1.4, the editorial environment section 3.1.4 foropinion articles and the shortarticle environment explained in section 3.1.4.
The article environment
The main environment to include a piece of article is called article. It takes fourarguments that set up the headings and structure of the article.
\begin{article}{⟨num-of-columns⟩}{⟨title⟩}{⟨subtitle⟩}{⟨pagesof ⟩}{⟨label⟩}. . . ⟨text⟩. . .\end{article}
The first argument ⟨num-of-columns⟩ sets the number of columns the article willbe divided whereas ⟨label⟩ is used when pointing an article from the index in thefront page. The rest of the arguments are easy to understand.
28

Inside the article environment, besides the main text of the article, it is possibleto include additional information using several class commands.
\authorandplace \timestamp
The \authorandplace{⟨author⟩}{⟨place⟩} inserts the name of the editor and theplace where the article happened in the way many magazines do. Another usefulcommand is \timestamp{⟨time⟩} which includes the time and a separator just be-fore the text. These two commands should be used before the text because theytype the text as the same place they are executed.
\image
To include images within the text of an article, xepersian-magazine provides an\image command. Since multicol package does not provide any float support forits multicols environment, I created a macro that includes an image only if that ispossible, calculating if there is enough space for the image.It is not the best solutionbut it works quite well and I could not find a better one. To include an image usethe command and its two arguments: the relative path to the image and a shortdescription.
\image{⟨image⟩}{⟨description⟩}
\columntitle \expandedtitle
Within the text of the article, it is possible to add column and expanded titles.The main difference between them is that the first one keeps inside the width of anarticle column whereas the second expands all over the width of the page, breakingall the columns. Their use is analogous, as follows
\columntitle{⟨type⟩}{⟨text⟩}\expandedtitle{⟨type⟩}{⟨text⟩}
These two commands use fancybox package features. That is why there are fivedifferent types of titles which correspond mainly with fancybox ones: shadowbox,doublebox, ovalbox, Ovalbox and lines.
The editorial environment
In addition to the editorial article environment, one can use the editorial environ-ment to create editorial or opinion texts. The main feature is that it transforms thestyle of the heading. Although this environment accepts all the commands articletakes, it does not make any sense to use the \authorandplace command within itsince it includes an author argument. To create an editorial text use
29

\begin{editorial}{⟨num-of-columns⟩}{⟨title⟩}{⟨author⟩}{⟨label⟩}. . . ⟨text⟩. . .\end{editorial}
All arguments have the same meaning as article environment (see section 3.1.4).
The shortarticle environment
The shortarticle environment creates a block of short article. Althought it has itsown title and subtitle, each piece of article within it may have a title. To use it justtype:
\begin{shortarticle}{⟨num-of-columns⟩}{⟨title⟩}{⟨subtitle⟩}{⟨label⟩}. . . ⟨text⟩. . .\shortarticleitem{⟨title⟩}{⟨text⟩}. . .\end{shortarticle}
You can also specify the number of columns of the block like editorial and article en-vironments. To add a piece of article inside the shortarticle use the \shortarticleitem,indicating a title and the text of the issue.
Commands between articles
\articlesep \newsection
There are two commands you can use among the articles inside xepersian-magazine:\articlesep and \newsection. The first one does not take any parameter and justdraws a line between two articles. The second changes the content of \xepersian@sectionto the new ⟨section name⟩. From the point it is used, all articles which follow willbe grouped within the new section.
\newsection{⟨section name⟩}
3.1.5 Customization
xepersian-magazine includes many commands which can be used to customize itsaspect, from the front page to the last page. I will list them grouped so it is easyto find them. Treat them as standard LATEX commands, using \renewcommand tochange their behaviour.
Front Page
\customlogo \customminilogo \custommagazinename
When creating a magazine, everyone wants to show its own logo instead of xepersian-magazine default heading. To achieve this, you need to put the following commandat the preamble of your document:
30

\customlogo{⟨text⟩}\customminilogo{⟨text⟩}\custommagazinename{⟨text⟩}
\edition \editionformat
The edition text has to be declared in the preamble of the document. One importantthing to know is that \author, \date and \title have no effect inside xepersian-magazine since the magazine date is taken from \today command and the othertwo are only for the title page (if using \maketitle).
\indexFormat \indexEntryFormat \indexEntryPageTxt\indexEntryPageFormat \indexEntrySeparator
When defining the index in the front page, there are several commands to customizethe final index style. \indexFormat sets the format of the title; \indexEntryFormat,the format of each index entry; \indexEntryPageTxt and \indexEntryPageFormatlets you define which is the text that goes with the page number and its format. Fi-nally, xepersian-magazine creates a thin line between index entries, you can redefineit using \indexEntrySeparator. To get the index with \xepersian@indexwidthis provided.
\weatherFormat \weatherTempFormat \weatherUnits
Relating to the weather block, the title format can be changed redefining \weatherFormat.In order to customize the format of the temperature numbers and their units it isnecessary to redefine \weatherTempFormat and \weatherUnits respectively.
\*TitleFormat \*SubtitleFormat \*TextFormat
The main article that appear in the front page can change their formats. To obtainthat there are three standard commands to modify the title, subtitle and text style.You just have to replace the star (*) with first, second or third depending on whicharticle you are editing. Note that first piece of article has no subtitle therefore itdoes not make any sense to use the non-existent command \firstSubtitleFormat.
\pictureCaptionFormat \pagesFormat
Two other elements to configure are the picture captions and the pages or section for-mat in the entire document. To proceed just redefine the macros \pictureCaptionFormatand \pagesFormat.
31

Inside The Magazine
\innerTitleFormat \innerSubtitleFormat \innerAuthorFormat\innerPlaceFormat
The articles inside xepersian-magazine may have a different format from the ones inthe front page. To change their title or subtitle format redefine \innerTitleFormatand \innerSubtitleFormat. The article text format matches the document generaldefinition. When using the \authorandplace command, you might want to changethe default style. Just renew \innerAuthorFormat and \innerPlaceFormat to getthe results.
\timestampTxt \timestampSeparator \timestampFormat
The \timestamp command described in section 3.1.4 lets you introduce the timeof the event before the article text. You can configure its appearance by alter-ing several commands: \timestampTxt which means the text after the timestamp;\timestampSeparator which defines the element between the actual timestampand the beginning of the text and, finally, \timestampFormat to change the entiretimestamp format.
\innerTextFinalMark
xepersian-magazine puts a small black square at the end of the article. As I wanted tocreate a highly customizable LATEX class I added the macro \innerTextFinalMarkto change this black square. This item will appear always following the last characterof the text with the ˜ character.
\minraggedcols \raggedFormat
The \minraggedcols counter is used to tell xepersian-magazine when article textshould be ragged instead of justified. The counter represents the minimum num-ber of columns that are needed in order to use ragged texts. For example, if\minraggedcols is set to 3, all articles with 3 columns or more will be ragged.Articles with 1, 2 columns will have justified text. By default, \minraggedcols isset to 4.
The \raggedFormat macro can be redefined to fit user ragged style. Default valueis \RaggedLeft.
\heading \foot
xepersian-magazine includes package fancyhdr for changing headings and footers.Although it is possible to use its own commands to modify xepersian-magazine style,there are two commands to change headings and foot appearance. Place them inthe preamble of your xepersian-magazine document.
32

\heading{⟨left⟩}{⟨center⟩}{⟨right⟩}\foot{⟨left⟩}{⟨center⟩}{⟨right⟩}
If you still prefer to use fancyhdr macros, use them after the frontpage environ-ment.
xepersian-magazine by default places no headers and footers. If you want headers andfoooters, then after loading xepersian package, you should write \pagestyle{fancy}at the preamble of your document.
3.1.6 Class Options
The xepersian-magazine class is in itself an alteration of the standard article class,thus it inherits most of its class options but twoside, twocolumn, notitlepage anda4paper. If you find problems when loading other article features, please let meknow to fix it. There are also five own options that xepersian-magazine implements.a3paper (false) This option makes xepersian-magazine 297 mm width by 420 mm
height. This option is implemented because the standard article class doesnot allow this document size.
9pt (false) Allows the 9pt font size that article class does not include (default is10pt).
columnlines columnlines (false) Adds lines between columns in the entire xepersian-magazine. The default line width is 0.1pt but it is possible to change thisby setting length \columnlines in the preamble.
showgrid (false) This option is only for developing purposes. Because the front pagehas a personal design using the textpos package, I created this grid to makeeasier the lay out.
3.2 Typesetting Multiple-choice Questions3.2.1 Introduction
xepersian-multiplechoice is a package for making multiple choices questionnaires un-der LATEX. A special environment allows you to define questions and possible an-swers. You can specify which answers are correct and which are not. xepersian-multiplechoice not only formats the questions for you, but also generates a “form”(a grid that your students will have to fill in), and a “mask” (the same grid, onlywith correct answers properly checked in). You can then print the mask on a slideand correct the questionnaires more easily by superimposing the mask on top ofstudents’ forms.
3.2.2 Usage
Here we now explain the usage of this package, however there are four example files,namely test-question-only.tex, test-solution-form.tex, test-empty-form.texand test-correction.tex, available in doc folder that you may want to look at.
33

Loading The Package
You can load the package as usual by:
\usepackage [Options] {xepersian-multiplechoice}
The available options are described along the text, where appropriate.
Creating Questions
Here’s a simple example demonstrating how to produce a new question:
1 \begin{question}{سؤال}2 \false ١ جواب3 \true ٢ جواب4 \false ٣ جواب5 \false ۴ جواب6 \end{question}7 \begin{correction}8 هست واقع جواب جواب، این اینه علت و واقع جواب9 \end{correction}
The question Environment
The question environment allows you to insert questions into your document.It takes one mandatory argument which specifies the actual question’s text. Thequestion will be displayed in a frame box, the size of the line.
\true \false
The proposed answers are displayed below the question in a list fashion (the questionenvironment is a list-based one). Instead of using \item however, use either \trueor \false to insert a possible answer.
Question Numbers
The question environment is associated with a LATEX counter named question.This counter stores the number of the next (or current) question. It is initialized to1, and automatically incremented at the end of question environments. You mightwant to use it to format question titles. For instance, you could decide that eachquestion belongs to a subsection in the article class, and use something like thisbefore each question: \subsection*{Question \thequestion}
The Form and the Mask
\makeform \makemask
Based on the questions appearing in your document, xepersian-multiplechoice hasthe ability to generate a “form” (a grid that your students will have to fill in), and
34

a “mask” (the same grid, only with correct answers properly checked in). This canmake the correction process easier.To generate a form and a mask, use the macros \makeform and \makemask. xepersian-multiplechoice uses two auxiliary files to build them. These files have respectivelyan extension of frm and msk. If you use these macros, you will need two passes ofLATEX in order to get a correctly formatted document.
Typesetting correctionsThe “correction” mode allows you to automatically typeset and distribute correc-tions to your students. These corrections are slightly modified versions of yourquestionnaire: each possible answer is prefixed with a small symbol (a visual clue)indicating whether the answer was correct or wrong. In addition, you can typesetexplanations below each question.To activate the correction mode, use the correction option. It is off by default.To typeset explanations below the questions, use the correction environment (noargument). The contents of this environment is displayed only in correction mode.In normal mode, it is simply discarded.In addition, note that xepersian-multiplechoice cancels the actions performed by\makeform and \makemask in correction mode. This is to avoid further edition ofthe source when typesetting a correction.
3.2.3 Important NoteCurrently, xepersian-multiplechoice requires that you provide a constant numberof proposed answers across all questions in your xepersian-multiplechoice. This issomething natural when you want to build forms, but this might me too restrictiveotherwise, I’m not sure, so it is possible that this restriction will be removed infuture versions.Currently, there is a built-in mechanism for checking that the number of proposedanswers remains constant: when xepersian-multiplechoice encounters the first occur-rence of the question environment, it remembers the number of proposed answersfrom there. Afterwards, any noticed difference in subsequent occurrences will gen-erate an error. As a consequence, you never have to tell xepersian-multiplechoiceexplicitly what that number is.
3.2.4 Customising The PackageThe question environment
\questionspace \answerstitlefont \answernumberfont
\questionspace is the amount of extra vertical space to put under the question,before the list of proposed answers. This is a LATEX length that defaults to 0pt.Before the list of possible answers, a short title is displayed (for English, it reads“Possible answers:”). The \answerstitlefont macro takes one mandatory argu-ment which redefines the font to use for the answers title. By default, \bfseries isused.
35

Each proposed answer in the list is numbered automatically (and alphabetically).The \answernumberfont macro takes one mandatory argument which redefines thefont to use for displaying the answer number. By default, \bfseries is used.
The Form and the Mask
\headerfont \X
The \headerfont macro takes one mandatory argument which redefines the fontto use for the headers (first line and first column) of the form and mask arrays. Bydefault, \bfseries is used.
In the mask, correct answers are checked in by filling the corresponding cell with an“X” character. If you want to change this, call the \X macro with one (mandatory)argument.
The correction
\truesymbol \falsesymbol
In correction mode, labels in front of answers are modified to give a visual clueabout whether the answer was correct or wrong. By default, a cross and a smallarrow are used. You can change these symbols by using the \truesymbol and
\falsesymbol macros. For instance, you could give a fancier look to your correctionby using the pifont package and issuing:
\truesymbol{\ding{'063}˜}\falsesymbol{\ding{'067}˜}
\correctionstyle
The appearance of the contents of the correction environment can be adjusted byusing the \correctionstyle macro. By default, \itshape is used.
36