wildlife specimen collection, preservation, and shipment · wildlife specimen collection,...
TRANSCRIPT
Wildlife Specimen Collection, Preservation, and Shipment
Chapter 4 ofSection C, Techniques in Disease Surveillance and InvestigationBook 15, Field Manual of Wildlife Diseases
U.S. Department of the InteriorU.S. Geological Survey
Techniques and Methods 15–C4


Techniques and Methods 15–C4
U.S. Department of the InteriorU.S. Geological Survey
Wildlife Specimen Collection, Preservation, and Shipment
By C. LeAnn White and Robert J. Dusek
U.S. Geological Survey, U.S. Fish and Wildlife Service, and National Park Service
Techniques and Methods 15–C4
Chapter 4 of Section C, Techniques in Disease Surveillance and InvestigationBook 15, Field Manual of Wildlife DiseasesEdited by J. Christian Franson, Milton Friend, Samantha E.J. Gibbs, and Margaret A. Wild

U.S. Department of the InteriorSALLY JEWELL, Secretary
U.S. Geological SurveySuzette M. Kimball, Acting Director
U.S. Geological Survey, Reston, Virginia: 2015
For more information on the USGS—the Federal source for science about the Earth, its natural and living resources, natural hazards, and the environment, visit http://www.usgs.gov or call 1–888–ASK–USGS.
For an overview of USGS information products, including maps, imagery, and publications, visit http://www.usgs.gov/pubprod.
To order this and other USGS information products, visit http://store.usgs.gov.
Any use of trade, firm, or product names is for descriptive purposes only and does not imply endorsement by the U.S. Government.
Although this information product, for the most part, is in the public domain, it also may contain copyrighted materials as noted in the text. Permission to reproduce copyrighted items must be secured from the copyright owner.
Suggested citation:White, C.L. and Dusek, R.J., 2015, Wildlife specimen collection, preservation, and shipment, in Franson, J.C., Friend, M., Gibbs, S.E.J., and Wild, M.A., eds., Field manual of wildlife diseases: U.S. Geological Survey Techniques and Methods 15–C4, 24 p., http://dx.doi.org/10.3133/tm15c4. ISSN 2328–7055 (online)
iii
Contents
Factors to Consider Before Specimen Collection ....................................................................................1Biosafety in the Field ...........................................................................................................................3
Collection and Preservation of Carcasses ................................................................................................4Birds, Mammals, and Reptiles ............................................................................................................4Amphibians ............................................................................................................................................4
Collection of Tissues, Blood, and Noninvasive Samples ........................................................................5Collection of Tissues.............................................................................................................................5Collection of Blood................................................................................................................................6Collection of Swab Samples ..............................................................................................................9Collection of Other Common Noninvasive Specimens .................................................................10
Labeling Specimens ....................................................................................................................................10Decontamination/Disinfection of Field Equipment .................................................................................10Disposal of Carcasses.................................................................................................................................11Specimen Shipment.....................................................................................................................................13
Preventing Breakage and Leakage .................................................................................................14Containing Specimens .......................................................................................................................14Cooling and Refrigeration ..................................................................................................................14Federal Shipping Regulations for Packaging
and Labeling ...........................................................................................................................15Commercial Carriers...........................................................................................................................15
References Cited..........................................................................................................................................15Glossary ........................................................................................................................................................17Appendix 1. Animal Dissection Resources ..........................................................................................20Appendix 2. USGS–National Wildlife Health Center .........................................................................21
Figures 1. Photo showing example of a basic necropsy kit that can be packed into a small
day pack .........................................................................................................................................2 2. Illustration showing example of using a plastic bag to protect hands from direct
contact with animal tissues during the collection of specimens if plastic or other waterproof gloves are not available ..........................................................................................3
3. Illustration showing tissue sample collection for microscopic examination .....................5 4. Photos showing blood can be drawn from a variety of sites and not jeopardize
the well-being of birds when properly trained investigators utilize appropriate techniques and equipment for the task ....................................................................................7
5. Photos showing A, Blood collection from the femoral vein of a prairie dog using a needle and syringe. B, Blood collection from the femoral vein of a small rodent using a capillary tube ...................................................................................................................8
6. Photos showing A, Fuel sources such as charcoal doused with lighter fluid often form a good base for in-trench incineration of carcasses. B, Wood found at the site can be used to form a burn platform to allow sufficient air flow under the carcasses ..............................................................................................................................11
iv
7. Illustration showing A, Example of correct layering of carcasses for burning. B, Example of incorrect layering of carcasses for burning .................................................12
8. Illustration showing example of a simple composting bin for waterfowl carcasses. Litter, straw, and carcasses are added proportionally to achieve the appropriate moisture content and carbon to nitrogen ratio ......................................................................12
9. Illustration showing basic specimen-shipment supplies.....................................................13 10. Illustration showing example of proper packing to prevent foam coolers from
becoming crushed during transit .............................................................................................14
Tables 1. Examples of samples collected from wildlife for disease investigations ...........................1
Conversion Factors[Inch-pound to International System of Units (SI)]
Multiply By To obtain
Length
inch (in) 2.54 centimeter (cm)
inch (in) 25.4 millimeter (mm)
foot (ft) 0.3048 meter (m)
[International System of Units (SI) to inch-pound]
Multiply By To obtain
Length
centimeter (cm) 0.3937 inch (in)
millimeter (mm) 0.03937 inch (in)
Mass
gram (g) 0.03527 ounce, avoirdupois (oz)
kilogram (kg) 2.205 pound avoirdupois (lb)
Supplemental InformationTemperature in degrees Celsius (°C) may be converted to degrees Fahrenheit (°F) as follows:
°F=(1.8×°C)+32
mL, milliliter
The first use of a word defined in the glossary is shown in bold type (not including headings, words in illustrations, and table column headings).
Wildlife Specimen Collection, Preservation, and Shipment
By C. LeAnn White and Robert J. Dusek
Factors to Consider Before Specimen Collection
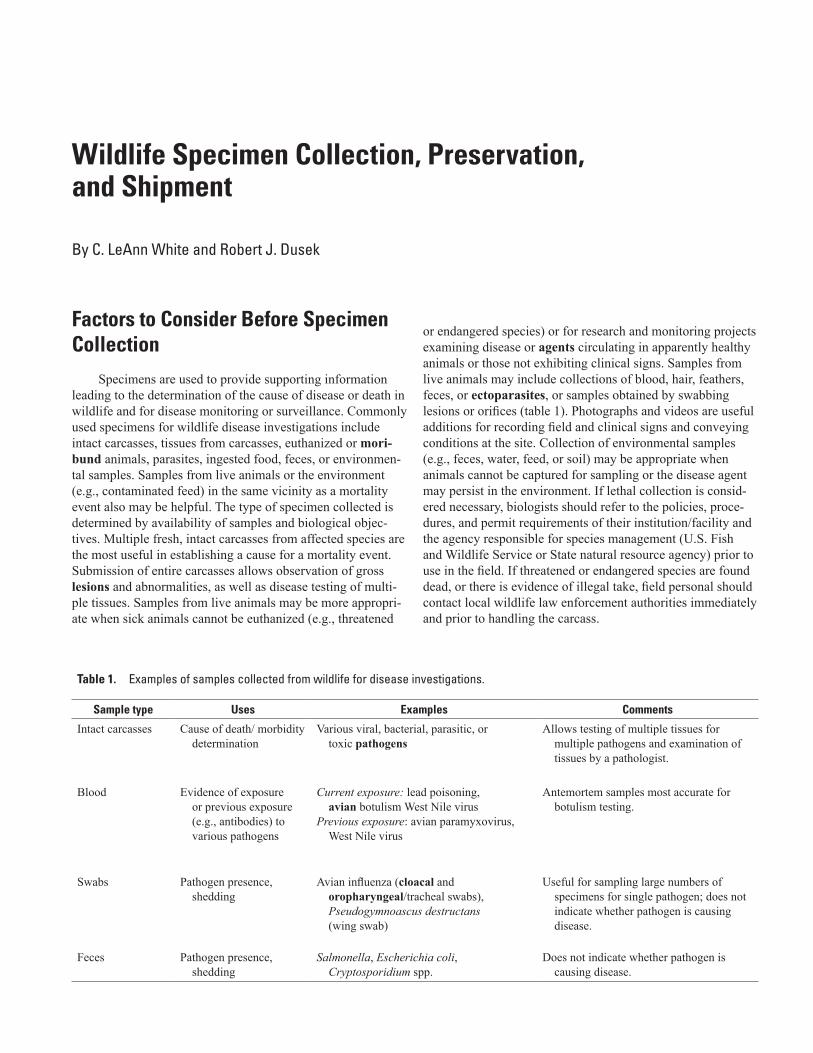
Specimens are used to provide supporting information leading to the determination of the cause of disease or death in wildlife and for disease monitoring or surveillance. Commonly used specimens for wildlife disease investigations include intact carcasses, tissues from carcasses, euthanized or mori-bund animals, parasites, ingested food, feces, or environmen-tal samples. Samples from live animals or the environment (e.g., contaminated feed) in the same vicinity as a mortality event also may be helpful. The type of specimen collected is determined by availability of samples and biological objec-tives. Multiple fresh, intact carcasses from affected species are the most useful in establishing a cause for a mortality event. Submission of entire carcasses allows observation of gross lesions and abnormalities, as well as disease testing of multi-ple tissues. Samples from live animals may be more appropri-ate when sick animals cannot be euthanized (e.g., threatened
or endangered species) or for research and monitoring projects examining disease or agents circulating in apparently healthy animals or those not exhibiting clinical signs. Samples from live animals may include collections of blood, hair, feathers, feces, or ectoparasites, or samples obtained by swabbing lesions or orifices (table 1). Photographs and videos are useful additions for recording field and clinical signs and conveying conditions at the site. Collection of environmental samples (e.g., feces, water, feed, or soil) may be appropriate when animals cannot be captured for sampling or the disease agent may persist in the environment. If lethal collection is consid-ered necessary, biologists should refer to the policies, proce-dures, and permit requirements of their institution/facility and the agency responsible for species management (U.S. Fish and Wildlife Service or State natural resource agency) prior to use in the field. If threatened or endangered species are found dead, or there is evidence of illegal take, field personal should contact local wildlife law enforcement authorities immediately and prior to handling the carcass.
Table 1. Examples of samples collected from wildlife for disease investigations.
Sample type Uses Examples Comments
Intact carcasses Cause of death/ morbidity determination
Various viral, bacterial, parasitic, or toxic pathogens
Allows testing of multiple tissues for multiple pathogens and examination of tissues by a pathologist.
Blood Evidence of exposure or previous exposure (e.g., antibodies) to various pathogens
Current exposure: lead poisoning, avian botulism West Nile virus
Previous exposure: avian paramyxovirus, West Nile virus
Antemortem samples most accurate for botulism testing.
Swabs Pathogen presence, shedding
Avian influenza (cloacal and oropharyngeal/tracheal swabs), Pseudogymnoascus destructans (wing swab)
Useful for sampling large numbers of specimens for single pathogen; does not indicate whether pathogen is causing disease.
Feces Pathogen presence, shedding
Salmonella, Escherichia coli, Cryptosporidium spp.
Does not indicate whether pathogen is causing disease.

2 Wildlife Specimen Collection, Preservation, and Shipment
Prior to collecting samples, it is important to determine the capabilities and submission criteria of the laboratory receiving the samples. Some laboratories may specialize in a limited number of tests, be equipped to accept only certain types of tissues (instead of entire carcasses), or specialize in particular species or group of animals (e.g., reptiles, birds, mammals). Diagnostic laboratories have specific requirements regarding preparation, labeling, and shipping of samples. Adherence to these requirements helps ensure the usefulness of any submitted specimens. Although laboratories may vary
in the cost and turnaround times for diagnostic tests, some laboratories may be able to prioritize samples and accom-modate accelerated time frames if communicated at the time of submission. Keeping a prepacked kit with basic carcass-collection supplies (fig. 1), including a paper copy of the specimen history form (available for download from the Web sites of most diagnostic laboratories), in the office or vehicle will decrease the chances of forgetting an essential item and decrease response time for arriving at an event.
Figure 1. Example of a basic necropsy kit that can be packed into a small day pack. Clockwise, from top of photo: Data recording: field notebook, tags, pencils, markers. Protective apparel: rubber gloves, disposable shoe covers and coveralls, mask. Necropsy equipment: disinfectant for cleaning instruments, scrub brush, heavy shears, forceps, scissors, scalpel handle and blades. Measuring equipment: hanging scale and ruler. Sampling materials: microscope slides, syringes, needles, swabs, blood tubes, aluminum foil, plastic bags, wide mouth plastic jars. Preservatives: ethanol for parasites, formalin for tissue samples.
Phot
o co
urte
sy o
f Jam
es R
unni
ngen
Factors to Consider Before Specimen Collection 3
Biosafety in the Field
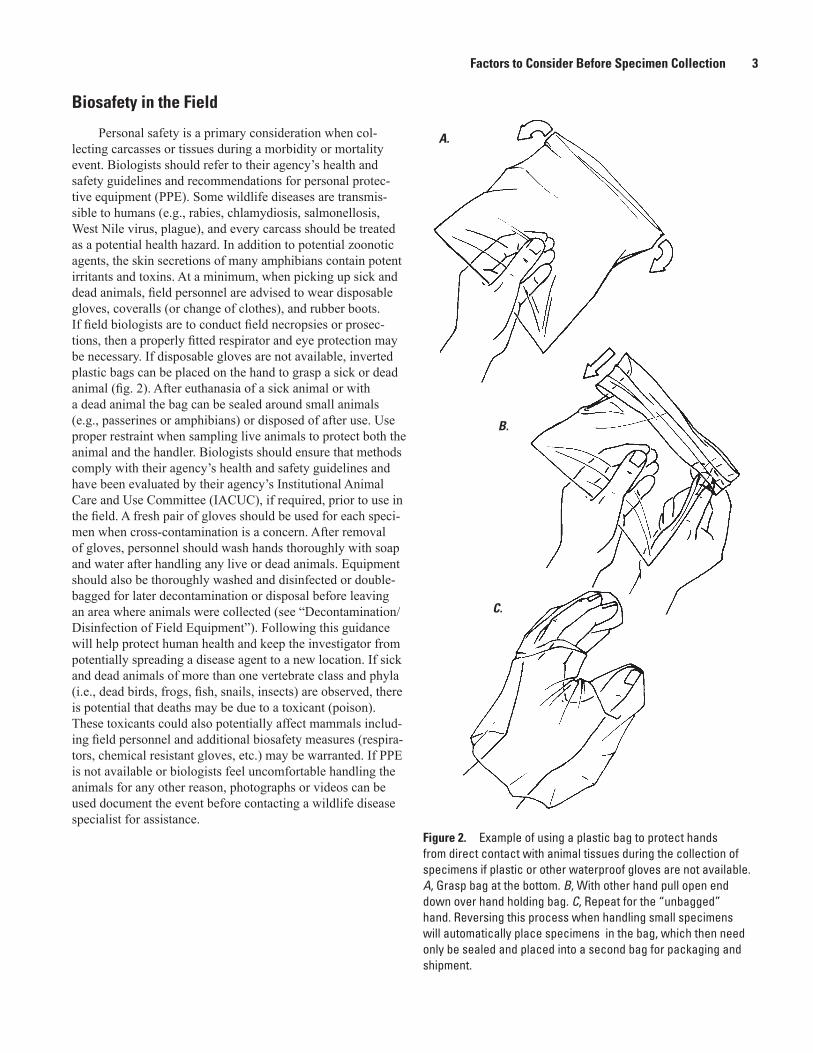
Personal safety is a primary consideration when col-lecting carcasses or tissues during a morbidity or mortality event. Biologists should refer to their agency’s health and safety guidelines and recommendations for personal protec-tive equipment (PPE). Some wildlife diseases are transmis-sible to humans (e.g., rabies, chlamydiosis, salmonellosis, West Nile virus, plague), and every carcass should be treated as a potential health hazard. In addition to potential zoonotic agents, the skin secretions of many amphibians contain potent irritants and toxins. At a minimum, when picking up sick and dead animals, field personnel are advised to wear disposable gloves, coveralls (or change of clothes), and rubber boots. If field biologists are to conduct field necropsies or prosec-tions, then a properly fitted respirator and eye protection may be necessary. If disposable gloves are not available, inverted plastic bags can be placed on the hand to grasp a sick or dead animal (fig. 2). After euthanasia of a sick animal or with a dead animal the bag can be sealed around small animals (e.g., passerines or amphibians) or disposed of after use. Use proper restraint when sampling live animals to protect both the animal and the handler. Biologists should ensure that methods comply with their agency’s health and safety guidelines and have been evaluated by their agency’s Institutional Animal Care and Use Committee (IACUC), if required, prior to use in the field. A fresh pair of gloves should be used for each speci-men when cross-contamination is a concern. After removal of gloves, personnel should wash hands thoroughly with soap and water after handling any live or dead animals. Equipment should also be thoroughly washed and disinfected or double-bagged for later decontamination or disposal before leaving an area where animals were collected (see “Decontamination/Disinfection of Field Equipment”). Following this guidance will help protect human health and keep the investigator from potentially spreading a disease agent to a new location. If sick and dead animals of more than one vertebrate class and phyla (i.e., dead birds, frogs, fish, snails, insects) are observed, there is potential that deaths may be due to a toxicant (poison). These toxicants could also potentially affect mammals includ-ing field personnel and additional biosafety measures (respira-tors, chemical resistant gloves, etc.) may be warranted. If PPE is not available or biologists feel uncomfortable handling the animals for any other reason, photographs or videos can be used document the event before contacting a wildlife disease specialist for assistance.
Figure 2. Example of using a plastic bag to protect hands from direct contact with animal tissues during the collection of specimens if plastic or other waterproof gloves are not available. A, Grasp bag at the bottom. B, With other hand pull open end down over hand holding bag. C, Repeat for the “unbagged” hand. Reversing this process when handling small specimens will automatically place specimens in the bag, which then need only be sealed and placed into a second bag for packaging and shipment.
A.
B.
C.
4 Wildlife Specimen Collection, Preservation, and Shipment
Collection and Preservation of Carcasses
Birds, Mammals, and Reptiles
Generally, a combination of sick animals that were eutha-nized (after clinical signs were observed and recorded) and the freshest available carcasses are ideal specimens for diagnostic evaluation in support of mortality event investigations. More than one pathogen may be simultaneously affecting a wildlife population, and the chances of detecting multiple diseases will be maximized if both sick and dead animals are collected. Sick animals should be euthanized as quickly as possible if they are going to be submitted for diagnostic evaluation. Refer to the most recent edition of the American Veterinary Medical Association guidelines for the euthanasia of animals (Leary and others, 2013). Submitted specimens should be representa-tive of the species affected; collect two to three specimens of each species.
The following general criteria can be used for selecting the freshest carcasses for diagnostic evaluation: eyes are intact (preferably not sunken or cloudy), feathers/hair does not pull out easily, no noticeable smell, and no apparent scavenging. In rare instances, bone marrow may be a testable sample, but the usefulness of skeletal remains should be discussed with the laboratory prior to submission. While wearing proper PPE, label individual carcasses (see “Labeling Specimens”) and place each in plastic bags before leaving the site. When picking up carcasses, be careful not to spread infectious fluids from the carcasses into the environment (e.g., animals with suspect avian cholera should be picked up head first) and clean and disinfect all field gear that may have come into contact with both carcasses and the environment.
Euthanized sick animals are the preferred specimens if the majority of carcasses are unsuitable owing to decomposi-tion or scavenging. Biologists should consider which tests may need to be performed before selecting a euthanasia method. For example, gunshot or stunning to heads should not be used on animals that may need to be tested for rabies; lethal injection of chemicals can affect diagnostic tests that use live animal bioassays such as avian botulism. Animals from rehabilitation centers typically are not ideal specimens during a wildlife disease investigation because treatments other than supportive care can interfere with diagnostic test results.
Chilling carcasses as soon as possible after collection will help slow the decomposition process. Decomposition inter-feres with a variety of diagnostic tests because of the break-down of tissues and proliferation of bacteria that may interfere with detection of pathogenic organisms. Decomposition processes also are accelerated at higher temperatures; there-fore, it is particularly important during warmer months to use a cooler with ice or ice packs to transport carcasses from the collection site. Freezing carcasses can cause cell membrane rupture and interfere with the interpretation of tissue damage
caused by a pathogen (histology). Freezing does not, however, interfere with most tests for pathogen detection including bacterial, viral, and fungal cultures; chemical residues; poly-merase chain reaction (PCR) tests; and parasite identifica-tion. Therefore, if carcasses cannot be shipped within 48 hours of collection, freezing is generally recommended until samples can be shipped to the diagnostic laboratory.
Amphibians
Live and sick amphibians. Amphibians decompose rapidly and usually will have large numbers of bacteria and fungi throughout their body by the time they arrive at a diag-nostic laboratory. Therefore, live, sick amphibians are gener-ally considered the best diagnostic specimens from which to obtain meaningful bacterial cultures and most types of fungal cultures. In addition, blood for various tests can be obtained only from live amphibians. In addition to sick native amphib-ians, live introduced or exotic amphibians from the disease event site should be submitted if possible, even if they appear healthy or unaffected, because invasive species can be the vectors of infectious diseases (e.g., African clawed frogs can carry chytrid fungus in the absence of clinical signs). Not-ing the presence of endemic amphibians, fish, or reptiles at the outbreak site also may provide useful epidemiological information into the cause of the disease event. Make sure the diagnostic laboratory has protocols and approvals in place to handle live amphibian specimens before collecting.
Dead or euthanized amphibians. Dead amphibians may be suitable for virus cultures, histology (microscopic exami-nation), and toxicological tests, if promptly and properly preserved. Many amphibian die-offs occur very quickly, and affected animals should be collected the day they are found. Plans to return to the outbreak site the next day to collect sick amphibians and carcasses often fail owing to highly effi-cient scavengers and rapid autolysis of carcasses. More than one lethal disease may simultaneously affect a population, so submission of multiple animals (two to three) is always encouraged.
If live, sick amphibians are present but cannot be sub-mitted (e.g., animals are unlikely to survive until shipment, diagnostic laboratory cannot accept live animals, or animals are to be euthanized for other aspects of the study), the behav-ior of the animals should be observed and recorded to provide information about effects to the host’s system (respiratory, neurological, etc.). Blood also should be collected and saved prior to euthanasia (Leary and others, 2013). If the euthanized amphibians will be preserved in a fixative, swabs for bacterial, viral, and fungal cultures from the mouth, vent, skin, and skin abnormalities (lesions) should be collected prior to immersion of the animal in the fixative. About one-half of the freshest amphibian carcasses should be promptly preserved in 10 per-cent buffered formalin or 70–75 percent ethanol (for histol-ogy). Prior to immersing the carcass in fixative, slit open the body cavity along the ventral midline to assure rapid fixation

Collection of Tissues, Blood, and Noninvasive Samples 5
of internal organs. For the first 3 to 4 days of fixation, the vol-ume of fixative to volume of carcasses should be at least 10:1. After 3 to 4 days of fixation, the carcasses may be transferred to a minimal amount of fresh fixative, which prevents drying of the specimen.
The other half of the carcasses should be promptly frozen. The preferred freezing temperature is –40 degrees Celsius (ºC), but any freezing temperature is preferable to a chilled amphibian carcass. Amphibians should NOT be frozen in water. Frozen carcasses can be used for virus cultures, toxi-cological examinations, and molecular (DNA) tests. Frozen carcasses typically are not suitable for bacterial and fungus cultures owing to rapid decomposition; generally, bacterial and fungus cultures will be attempted only on live amphibians.
Collection of Tissues, Blood, and Noninvasive Samples
Collection of Tissues
If it is not possible to submit an entire carcass for diagno-sis (e.g., it is too large to ship or store chilled or frozen or it is located in a remote area with no ability to chill or freeze speci-mens until submission), then tissue samples from appropriate organs should be removed to use for diagnostics. Consult with a disease specialist first, if possible, to discuss methods of dis-secting and preserving tissues and parasites as well as appro-priate PPE. Resources for dissection protocols and guidelines for multiple taxa also are listed in appendix 1.
Before dissecting an animal, be sure to do a thorough external evaluation making note of, and photographing if pos-sible, any abnormality. Photographing external and internal lesions can provide a record of the color, location, and appear-ance of lesions. Include in the photograph a coin or another readily recognized indicator of actual size for scale. Explain what photographs were taken on the history form submitted with the specimens.
The basic supplies and equipment to include in a field kit for tissue collection will vary with the species being sampled and types of laboratory analyses. Having a prepacked kit with basic sampling supplies (fig. 1) stored with carcass-collection kits (see “Collection and Preservation of Carcasses”) in the office or vehicle will decrease the chances of forgetting an essential item and decrease response time for arriving at an event.
Small leak-proof plastic bags make inexpensive contain-ers for tissue specimens. Specimen identification should be written directly on the bag with an indelible marker. If lesions are noted, collect separate tissue samples for each analysis. Each sample for microbiology and virology should be about 1 gram (g). Approximately 2 g of tissue is usually sufficient for toxicology tests but 5–10 g may be needed if multiple toxicol-ogy tests will be performed. For histology, sections should be no more than 1 centimeter (cm) thick to allow for fixative to
penetrate the tissue. The margin between healthy and affected tissue also is important for histology. Using a scalpel blade or sharp knife, and taking care not to crush the tissue around the lesion, take a sample that includes all or portions of the lesion and adjacent apparently healthy tissue (fig. 3).
Tissues samples should be promptly chilled or, if to be held for >48 hours, frozen. Preservation in l0 percent buff-ered formalin (95 percent ethanol also may be used, except for amphibians where 70–75 percent ethanol is required) should be used for histology samples. Some pathogens also can be detected by molecular techniques on samples stored in 10 percent formalin solution (or ethanol); however, to ensure usefulness of the sample, the laboratory performing the analysis should be contacted prior to fixation. Samples should
Figure 3. Tissue sample collection for microscopic examination. A, Tissue sample should include lesion, such as spots in liver, plus some apparently healthy tissue. The sample must be no thicker than 1 centimeter to ensure adequate chemical fixation by preservative. Use as sharp an instrument as possible (scalpel, knife, razor) for a clean cut. B, Place tissue sample into container of 10 percent buffered formalin or other suitable fixative or preservative. The volume of formalin or other suitable fixative or preservative should be about 10 times the amount of tissue sample. C, Complete the process by securing the lid and properly labeling the container.
A. B.
C.

6 Wildlife Specimen Collection, Preservation, and Shipment
be placed in a volume preservation solution equal to at least 10 times the tissue volume to ensure adequate preservation. Formalin is classified as hazardous; take appropriate measures to prevent skin contact or vapor inhalation. Jars, such as pint or quart canning jars can be used as containers for preservation of tissues, but wide-mouth plastic bottles eliminate the poten-tial breakage problems. Note that some plastics and metal containers may contain substances that interfere with chemi-cal analysis, so it is prudent to contact the laboratory before collection if these analyses may be needed. After 2 or 3 days in 10 percent formalin, tissues can be transferred to leak-proof plastic bags that contain enough formalin to keep the tissues wet. Write the specimen identification with indelible marker or pencil on a piece of index card, place the card inside the bag, and write the information directly on the bag with indelible marker. Bags should be stored in a manner that prevents tis-sues from being crushed.
Collection of Blood
Only properly trained individuals proficient in the required techniques should attempt to take blood samples from live animals. Collection of blood requires proper animal restraint to avoid traumatic injuries to the animal and to the investigator taking the samples. Use of anesthetics may be necessary when the sample procedure will cause more than slight or momentary pain or distress. Blood-collection and anesthesia procedures also may need to be evaluated by an IACUC prior to use in the field.
Blood is the most common tissue sampled from live ani-mals and can be used for a variety of analyses including health screening, pathogen detection or exposure (e.g., antibodies), and contaminants analysis. Diagnostic tests can range from the relatively simple determination of packed cell volume (PCV) for anemia and preparation of blood smears to examine blood parasite presence to the more complex PCR analysis for the detection of pathogen RNA and virus-isolation techniques. While numerous tests are available on various blood com-ponents, some of the more common sample types are hema-tocrit, thin blood films/smears, blood serum, blood plasma, preservation of DNA or RNA of both pathogens and hosts, and whole blood.
The number and types of tests to be performed as well as the size of the animal determines the volume of blood needed as well as the handling and preservation techniques that are needed to obtain an accurate result. For birds and mammals, a conservative rule to follow is that the amount of blood drawn at one time from a healthy animal should be ≤1 percent of its body weight. The blood volume to weight ratio for reptiles is slightly lower and blood draws should be limited to 0.5–0.8 percent of body weight of healthy animals (Campbell, 1996). The blood-collection site should be clean prior to collect-ing blood. For mammals and birds, diluted isopropyl alco-hol applied with a squirt bottle or gauze pad are commonly used. For reptiles, a surgical scrub may be needed to remove
ground-in dirt from the scales prior to cleaning with alco-hol. In amphibians, any type of chemical may be too easily absorbed through the skin and sterile water often is advised.
Capillary tubes or needle and syringe are the most com-mon instruments used for the collection of blood samples. To use a capillary tube for blood collection, an investigator would lance the blood sampling location (e.g., brachial vein on a small bird) with a sterile needle and as the blood wells up on the surface of the skin the capillary tube is used to draw up the blood. If blood is to be held in the tube it is usually capped on one end with clay, otherwise the blood can be transferred into a cryovial or other storage tube. Appropriately sized capillary tubes also are used for retro-orbital blood sampling in small rodents.
Both the size of the needle and syringe should be consid-ered when using this combination to collect blood. To select the appropriately sized needle, consider the following: the method to be employed, the size of the animal, and the volume of blood to be obtained. The selected needle size also needs to accommodate the syringe size. When the needle is too small for the syringe a vacuum may occur in the syringe when the plunger is pulled and pushed (i.e., evacuating the syringe) and cause blood to move through the needle too quickly resulting in breakage of cells. If the needle draws too much blood too quickly it can cause the vein to collapse, preventing blood flow to the syringe. When the needle is too large it can tear the vein and result in a hematoma, excessive clot times, significant injury, or death. When obtaining small volume blood samples, a syringe with small graduations, such as a 0.3 milliliter (mL) tuberculin syringes with increments of 0.01 mL allows for more precise measurements of collected blood. An additional benefit is that the permanently affixed needle prevents lost blood at the connection with the syringe, which is important when collecting small blood volumes.
The most common bleeding sites for birds are the right jugular vein of the neck, medial-metatarsal vein of the leg, and brachial vein of the wing (fig 4.; Fair and others, 2010; Owen, 2011). Not all sites are appropriate for all species or sexes. For example, the jugular vein is an appropriate location for most birds because of its accessibility, size, and relative ease of collection for large samples. However, the feather ornamenta-tion around the neck of some birds, such as male sage-grouse, makes finding the jugular vein very difficult. The medial-metatarsal is not recommended for use in raptors because of the potential for personnel to come into contact with talons. The brachial vein in large birds such as cranes is not recom-mended owing to the risk of wing injury to the bird. When collecting blood from a feathered location, alcohol can be used to smooth feathers; feathers should never be plucked to locate the veins.
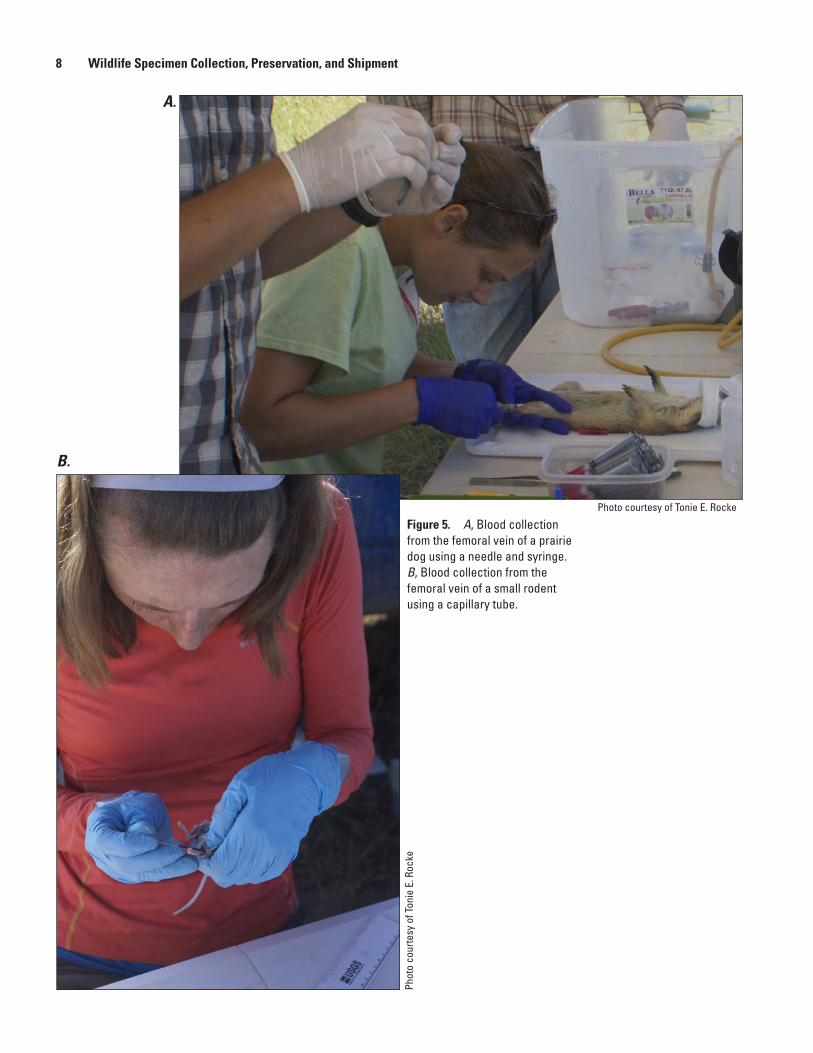
The most common bleeding sites for mammals include the jugular, saphenous, cephalic, and femoral veins (fig. 5). Other locations have been used successfully for specific groups of animals such as the marginal ear vein in rabbits or the orbital sinus for small rodents. Blood collection in free-ranging mammals usually requires specific methods of

Collection of Tissues, Blood, and Noninvasive Samples 7
Figure 4. Blood can be drawn from a variety of sites and not jeopardize the well-being of birds when properly trained investigators utilize appropriate techniques and equipment for the task. A, For large birds such as this double-crested cormorant, the handler supports the body weight and restrains the wings by cradling the bird against his body while controlling the head with his other hand. B, Proper restraint for jugular bleeding of small birds is shown and is best accomplished by the person doing the bleeding. C, Bleeding from the brachial vein. Care must be exercised so as not to apply excessive torque to the wing.
A.
B.
C.
Phot
o co
urte
sy o
f. Le
Ann
Whi
tePh
oto
cour
tesy
of E
rik K
. Hof
mei
ster
Phot
o co
urte
sy o
f Erik
K. H
ofm
eist
er
8 Wildlife Specimen Collection, Preservation, and Shipment
Figure 5. A, Blood collection from the femoral vein of a prairie dog using a needle and syringe. B, Blood collection from the femoral vein of a small rodent using a capillary tube.
A.
B.
Phot
o co
urte
sy o
f Ton
ie E
. Roc
ke
Photo courtesy of Tonie E. Rocke
Collection of Tissues, Blood, and Noninvasive Samples 9
restraint and often requires anesthesia to prevent injury to the animal and the biologist.
A variety of anatomic sites have been used to bleed chelonians including the jugular vein, dorsal coccygeal venous sinus, heart, scapular vein, brachial vein or artery, and orbital sinus (Bennet, 1986; Branch, 1978; Frye, 1991; Jacobson, 1993; Vos-Maas and Zwart, 1976). The palatine vein is commonly used for snakes, and the ventral coccygeal vein is a commonly used site for both snakes and lizards (Esra and others, 1975; Frye, 1991; Jacobson, 1993). In anurans, frogs and toads, blood may be obtained from the femoral vein, the lingual vein, and the ventral abdominal vein (Whitaker and Wright, 2001). The cephalic vein in anuran species with hypertrophied arms also has been found to be useful (Tapley and others, 2011), and the maxillary vein can be used for collection of blood drops for Ranavirus testing (Forzan and Wood, 2013). In salamanders, the ventral tail vein is often used (Whitaker and Wright, 2001).
Toe-clipping is not an acceptable way to obtain blood samples from small mammals and should be of limited use in other taxa (e.g., when toe-clipping serves another primary purpose in the study). In some small animals, decapitation has been used to obtain a blood sample (to collect trunk blood directly from the neck), but there is little information avail-able fully describing this technique and it should be used only when an animal is under anesthesia. In reptiles and amphibians, decapitation should be used only on anesthetized animals, and the brain should be destroyed immediately after the procedure (e.g., by pithing; Leary and others, 2013). Nail clipping in birds has been used to collect small volume blood samples (i.e., drop of blood for DNA testing).
Once a blood sample is collected, it can be placed into a variety of storage containers for future use. The intended use will dictate whether whole blood, plasma, or serum is needed as well as the post-collection handling, processing, and storage method. Plasma is the clear-yellowish liquid part of the blood that still contains clotting factors whereas serum has had clot-ting factors removed. As mentioned previously, capillary tubes can be used to hold blood (with one end sealed with clay) until the tube can be centrifuged. This technique allows determina-tion of PCV, collection of very small amounts of serum or plasma and red blood cells, and also may be examined for blood parasites of the genus Trypanosoma. Tubes and vials that can be centrifuged are most commonly used for storage of larger amounts of blood. In some cases, using tubes with a serum separator mechanism in the tube also can allow for freezing without transferring the serum to another storage tube once the sample is centrifuged. These tubes also can contain a variety of different additives to fit the investigator’s needs. These can promote or prevent clotting or provide additional additives needed for specific testing to be performed on the samples. Investigators should always be aware of any addi-tives in storage tubes as these also may inhibit some kinds of testing. Tubes with an anticoagulant such as ethylenediami-netetraacetic acid (EDTA) are typically used to collect blood used for hematologic studies (e.g., complete blood counts).
However, EDTA can cause hemolysis of red blood cells for some reptiles such as chelonians, and alternative anticoagu-lants such as lithium heparin should be used. Additionally, EDTA chelates metals and therefore can reduce the detected concentration of chemicals in blood. Plasma obtained from blood with anticoagulents can be used for plasma biochemis-tries. Some studies have shown that serum and plasma provide interchangeable results (Siev and others, 2011); however, not all tests have been validated for both and therefore it best to know which is preferred for the test(s) that will be performed.
The length of storage, testing to be completed, and sample processing following collection dictate the storage conditions for blood samples. Similar to carcass storage, refrigeration or freezing is critical to prevent degradation of the sample either by heat or bacterial growth. Once dry, blood smears generally can be stored at room temperature. Serum and red blood cells generally are stored frozen until delivery to the laboratory; < −70 ºC is the preferred temperature if there is an interest in isolating virus or other organisms. Dry blood spots on filter paper strips preferably should be stored frozen, but at least refrigerated until testing. With the correct preservatives for testing, some samples can be stored at room temperature.
Collection of Swab Samples
Swabs are an extremely valuable tool for sampling large numbers of dead or live animals for the presence of some specific pathogens. Tracheal (typically used on dead birds), oral pharyngeal, cloacal swabs, and nasal swabs are frequently used to determine mucosal shedding of a pathogen. Fecal and environmental swabs are frequently used to examine persis-tence of a pathogen in the environment or when direct swabs of animals are not available. One of the most well-known examples of swabbing for disease surveillance was the use of tracheal/oral pharyngeal and cloacal swabs to sample migra-tory birds throughout the United States for highly pathogenic avian influenza. More recently, scientists have begun to use swabbing to sample the skin of bats and caves to detect the presence of Pseudogymnoascus (formerly Geomyces) destruc-tans, the causative agent of white-nose syndrome.
Having an understanding of what type of pathogen may be involved and its mode of transmission (respiratory secre-tions, feces, etc.) also is important. For example, oral swabs may be appropriate for detection of viruses transmitted in respiratory secretions but may not be appropriate for detec-tion of bacteria involved in an oral infection because random swabbing of the oral cavity would likely yield a mixture of common oral and environmental bacteria. Although swabs are convenient, they often provide the poorest conditions for the survival of microbes during transit to a diagnostic laboratory. Appropriate collection devices, specimen containers, culture media, and storage must be used to ensure optimal recovery of microorganisms (Koneman and others, 1997). Improper col-lection can lead to false results.
10 Wildlife Specimen Collection, Preservation, and Shipment
Collection of Other Common Noninvasive Specimens
Other commonly collected noninvasive specimens used to assess health in wildlife include hair, feathers, feces, and urine. Hair and feathers have been used to examine a variety of questions including the nutritional status, stress, and the relation of an animal with its habitat and environmental factors (Bechert, 2012; Cherel and others, 2005; Docherty and others, 2004; Farmer and Leonard, 2011; Macbeth and others, 2010; Jankowski and others, 2014). The collection technique, time of collection, section of hair or feathers (hair shafts, hair fol-licles, feather barbs, feather pulp) will be dependent upon the analytic technique and study question.
Fecal samples can be used to determine presence of viruses or bacteria, gastrointestinal parasites, nutritional and reproductive status, and stress (Bechert, 2012; Leendertz and others, 2006; Waits and Paetkau, 2005). Urine also has been used to detect pathogens and examine reproductive status, uri-nary function, and stress in wildlife (Bechert, 2012; Cameron and others, 2008; Leendertz and others, 2006). Collection and storage techniques will depend upon the study application and type of analysis to be performed (Palme and others, 2005).
Labeling SpecimensProper labeling, maintaining label readability, and pre-
venting label separation from specimens is as critical as proper specimen selection and preservation. The label should be as close to the specimen as possible; for example, a label should be attached to a carcass, tube of blood, or jar of preserved specimen/tissue or placed in the vial with a preserved parasite. Attaching labels to the carcasses as they are collected will prevent accidental mix-ups particularly if carcasses are being collected from multiple locations and (or) are being stored with other carcasses until shipment. Double labeling, or plac-ing a label on the outside of a plastic bag holding the specimen is recommended whenever practical. Double labeling prevents confusion and potential errors in specimen records at the diag-nostic laboratory when specimens are received from multiple carcasses.
Each tag or container should be clearly labeled with, at minimum, the submitter’s name, collection site (including global positioning system (GPS) location or as specific as possible), date of collection, species, whether the animals were found dead or euthanized (include method of euthanasia), and identification of liquid in any containers (water, forma-lin, ethanol). Additional specimen history information can be included on the back of the tag or in a separate document included in the shipment.
Manila-colored paper tags attached by wire or string can be used on carcasses, but care should be used to prevent their exposure to large amounts of fluids that may destroy the tag; tag destruction can be reduced by using tags with high
rag content or waterproof paper. To prevent streaking, use a soft lead pencil or waterproof ink on these tags; do not use ballpoint pen, nonpermanent ink, or hard lead pencil. The most durable tag is made of soft metal, such as copper or aluminum, and can be inscribed with ballpoint pen, pencil, or another instrument that leaves an impression on the tag. If tags are not available, a 3 by 5 inch (in.) card can be used and placed in a plastic bag before placing in the inner bag with the carcass.
When a specimen is in a plastic bottle, jar, or tube, wrap a piece of adhesive or masking tape entirely around the con-tainer and use an indelible marker or pencil to write on the tape. List the type of animal from which the sample was taken, the kind of tissue, and the date the sample was taken. When plastic bags are used as the first containers for tissues, they should be labeled with the same information that is written directly on the bag. Do not insert tags inside containers with tissues and organs collected for microbiological or chemical analyses because the tag or the ink may contaminate the speci-men. For fixed specimens, label the outside of the container or if chemically resistant tags are available, insert the tags into the container. Labels written in pencil are preferred for any containers containing ethanol because ethanol causes most ink to streak during freezing and thawing.
Decontamination/Disinfection of Field Equipment
Before leaving an area where carcasses are being col-lected, double-bag used gloves and coveralls, and disinfect boots and the outside of plastic bags with a commercial disinfectant or a 10 percent (1 part bleach to 9 parts water) solution of household chlorine bleach (sodium hypochlorite). Specimens should be double-bagged (individually labeled and bagged specimens can be put together in a second larger bag) before removing them from the area. These precautions will help protect the people in the field and minimize transmission of disease to unaffected wildlife populations. All specimens should be individually labeled (see “Labeling Specimens”).
It is important to wash and disinfect all field equip-ment that came into contact with animals and surfaces at the disease-event site (boots, rubber gloves, nets, minnow traps, tripods, water-quality instruments, etc.); this also may include tires and wheel wells of vehicles that drove through an affected site or boats used to access a site. Washing involves the use of a solvent (water) or soap (preferably biodegradable) to clean off chunks of mud and debris or vegetation. Never discard soaps or detergents into surface water; many are toxic to amphibians, fish, and invertebrates.
Disinfection involves use of a chemical to kill micro-organisms. However, disinfectants cannot penetrate chunks of mud and debris and should be used only after the objects have been washed. A 10 percent solution of household bleach is one of the most commonly used disinfectants because of its effectiveness, availability, and rapid decomposition in the
Disposal of Carcasses 11
environment. Objects free of mud and debris should be com-pletely immersed in the disinfectant solution or completely wetted with the solution. Bleach solutions require a 10-minute contact time with surfaces to complete disinfection.
Disposal of CarcassesThe primary goal of carcass disposal is to prevent spread
of the disease agent to other animals through environmental contamination. Incineration, burying, rendering, and com-posting are the four basic disposal methods. Incineration is generally the preferred method for disposing of carcasses and contaminated materials associated with wildlife disease outbreaks. However, air-quality standards often preclude open burning, even for disease emergencies. Consider purchasing or
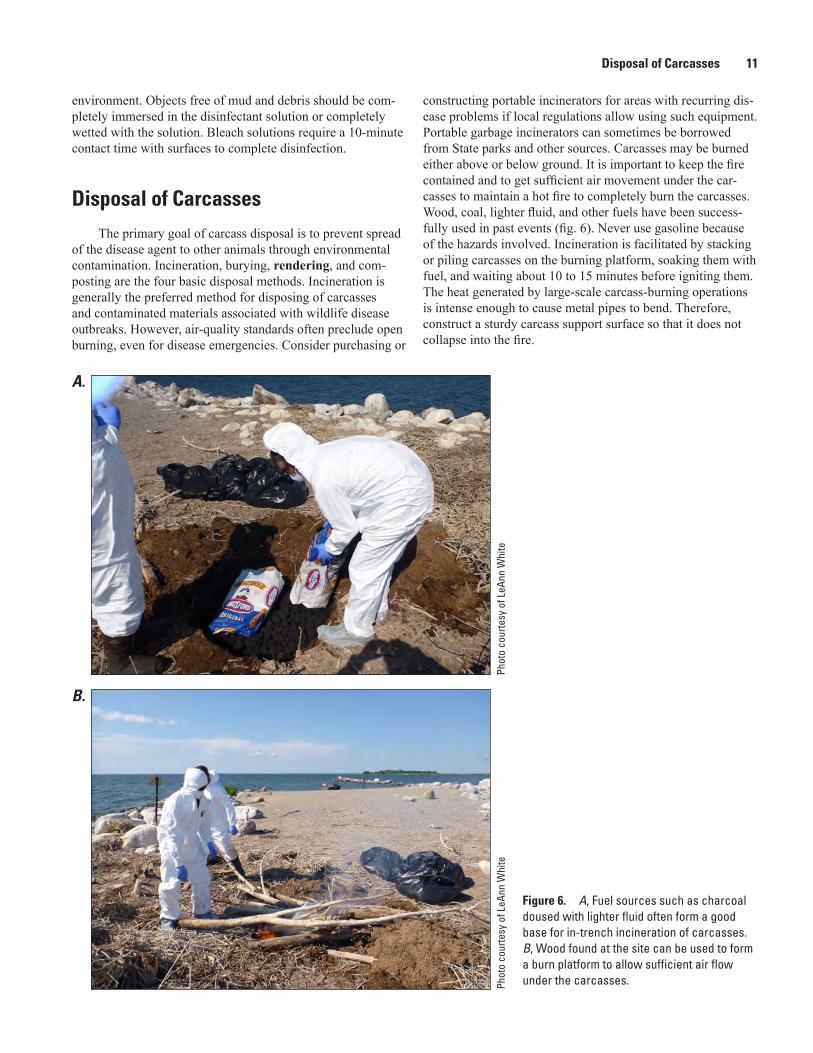
constructing portable incinerators for areas with recurring dis-ease problems if local regulations allow using such equipment. Portable garbage incinerators can sometimes be borrowed from State parks and other sources. Carcasses may be burned either above or below ground. It is important to keep the fire contained and to get sufficient air movement under the car-casses to maintain a hot fire to completely burn the carcasses. Wood, coal, lighter fluid, and other fuels have been success-fully used in past events (fig. 6). Never use gasoline because of the hazards involved. Incineration is facilitated by stacking or piling carcasses on the burning platform, soaking them with fuel, and waiting about 10 to 15 minutes before igniting them. The heat generated by large-scale carcass-burning operations is intense enough to cause metal pipes to bend. Therefore, construct a sturdy carcass support surface so that it does not collapse into the fire.
Figure 6. A, Fuel sources such as charcoal doused with lighter fluid often form a good base for in-trench incineration of carcasses. B, Wood found at the site can be used to form a burn platform to allow sufficient air flow under the carcasses.
A.
B.
Phot
o co
urte
sy o
f LeA
nn W
hite
Phot
o co
urte
sy o
f LeA
nn W
hite
12 Wildlife Specimen Collection, Preservation, and Shipment
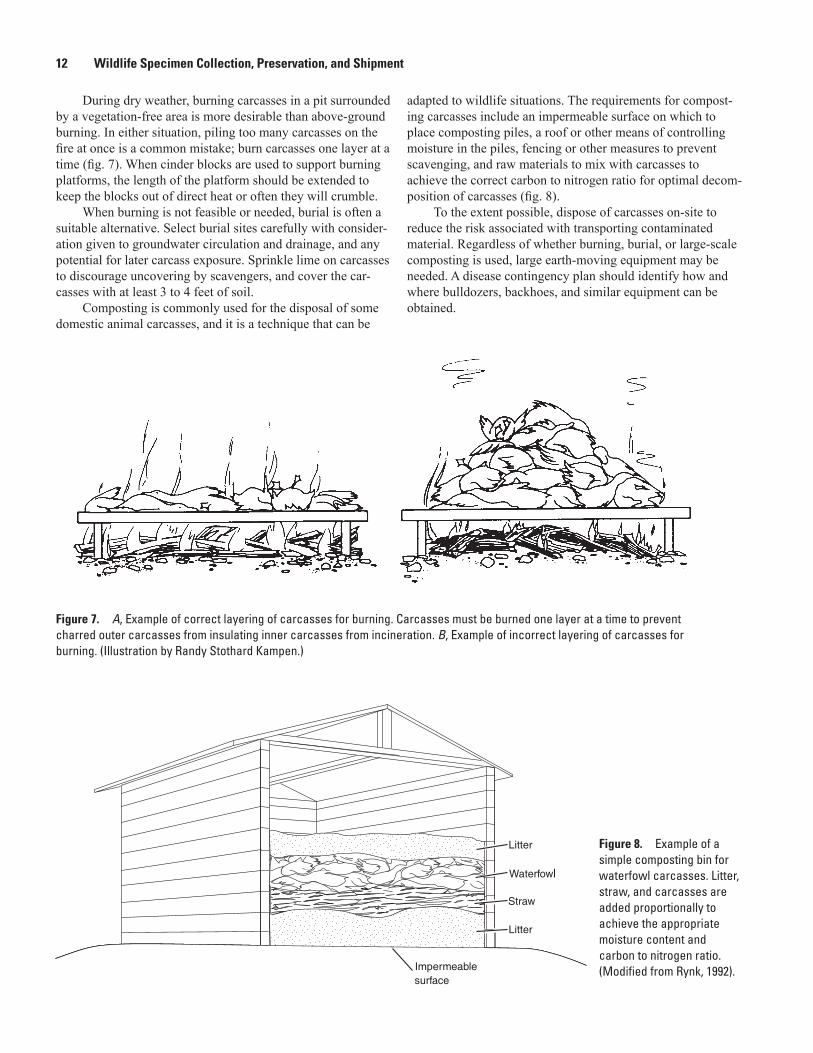
During dry weather, burning carcasses in a pit surrounded by a vegetation-free area is more desirable than above-ground burning. In either situation, piling too many carcasses on the fire at once is a common mistake; burn carcasses one layer at a time (fig. 7). When cinder blocks are used to support burning platforms, the length of the platform should be extended to keep the blocks out of direct heat or often they will crumble.
When burning is not feasible or needed, burial is often a suitable alternative. Select burial sites carefully with consider-ation given to groundwater circulation and drainage, and any potential for later carcass exposure. Sprinkle lime on carcasses to discourage uncovering by scavengers, and cover the car-casses with at least 3 to 4 feet of soil.
Composting is commonly used for the disposal of some domestic animal carcasses, and it is a technique that can be
adapted to wildlife situations. The requirements for compost-ing carcasses include an impermeable surface on which to place composting piles, a roof or other means of controlling moisture in the piles, fencing or other measures to prevent scavenging, and raw materials to mix with carcasses to achieve the correct carbon to nitrogen ratio for optimal decom-position of carcasses (fig. 8).
To the extent possible, dispose of carcasses on-site to reduce the risk associated with transporting contaminated material. Regardless of whether burning, burial, or large-scale composting is used, large earth-moving equipment may be needed. A disease contingency plan should identify how and where bulldozers, backhoes, and similar equipment can be obtained.
Figure 7. A, Example of correct layering of carcasses for burning. Carcasses must be burned one layer at a time to prevent charred outer carcasses from insulating inner carcasses from incineration. B, Example of incorrect layering of carcasses for burning. (Illustration by Randy Stothard Kampen.)
Figure 8. Example of a simple composting bin for waterfowl carcasses. Litter, straw, and carcasses are added proportionally to achieve the appropriate moisture content and carbon to nitrogen ratio. (Modified from Rynk, 1992).
Litter
Waterfowl
Straw
Litter
Impermeablesurface
Specimen Shipment 13
Specimen ShipmentProcedures for shipping specimens can vary with differ-
ent disease diagnostic laboratories and regulatory requirements but most have instructions available online. Following the laboratory’s shipping instructions will facilitate the process-ing of specimens when they reach the laboratory and assure that the quality of specimens is not compromised. Time spent on field investigation, specimen collection, and obtaining an adequate history will be of little value if specimens become contaminated, decomposed, or otherwise spoiled during ship-ping to the diagnostic laboratory. Pay attention to whether the
laboratory requires notification prior to shipment as this will ensure proper handling and facilitate processing once they arrive.
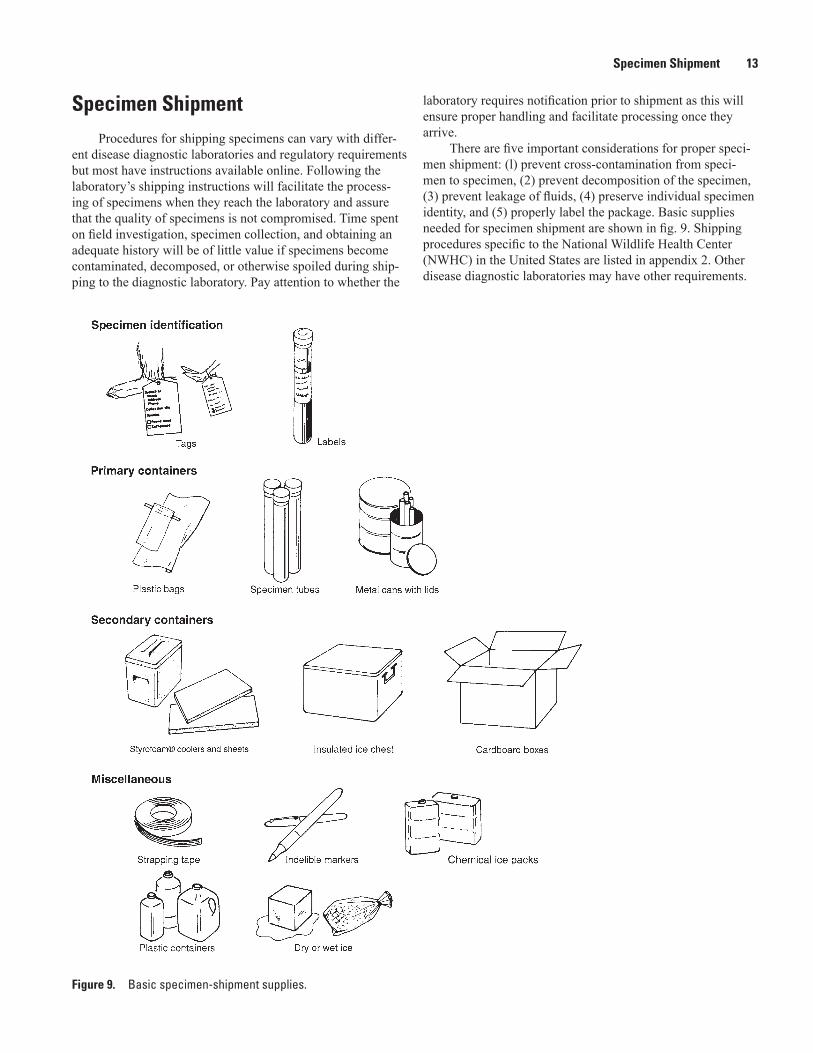
There are five important considerations for proper speci-men shipment: (l) prevent cross-contamination from speci-men to specimen, (2) prevent decomposition of the specimen, (3) prevent leakage of fluids, (4) preserve individual specimen identity, and (5) properly label the package. Basic supplies needed for specimen shipment are shown in fig. 9. Shipping procedures specific to the National Wildlife Health Center (NWHC) in the United States are listed in appendix 2. Other disease diagnostic laboratories may have other requirements.
Figure 9. Basic specimen-shipment supplies.
14 Wildlife Specimen Collection, Preservation, and Shipment
Preventing Breakage and Leakage
Isolate individual specimens from one another by enclos-ing them in separate packages, such as rugged plastic bags. Protect specimens from direct contact with any coolant used (e.g., ice packs or dry ice). Contain all materials in a third waterproof barrier (i.e., plastic bag) to prevent leakage if there is breakage (e.g., blood tubes) or thawing. Include absorbent materials if liquid is present or if animals or ice packs may thaw. Do not use foam peanuts.
Containing Specimens
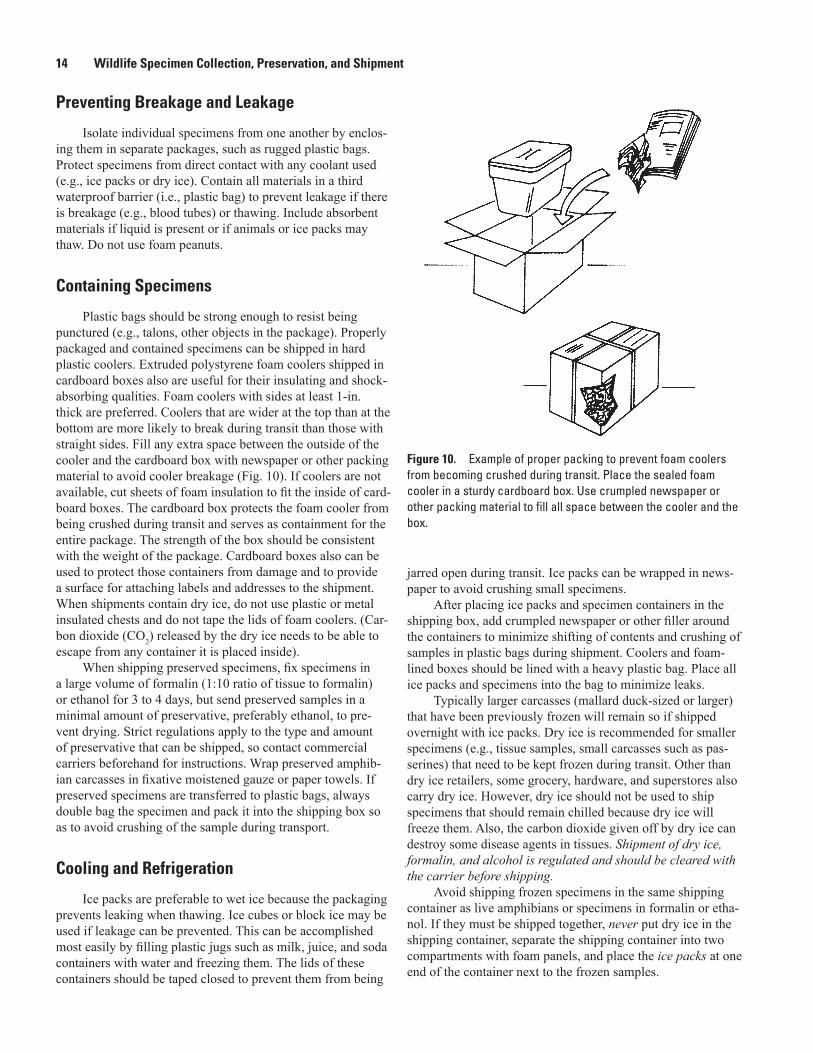
Plastic bags should be strong enough to resist being punctured (e.g., talons, other objects in the package). Properly packaged and contained specimens can be shipped in hard plastic coolers. Extruded polystyrene foam coolers shipped in cardboard boxes also are useful for their insulating and shock-absorbing qualities. Foam coolers with sides at least 1-in. thick are preferred. Coolers that are wider at the top than at the bottom are more likely to break during transit than those with straight sides. Fill any extra space between the outside of the cooler and the cardboard box with newspaper or other packing material to avoid cooler breakage (Fig. 10). If coolers are not available, cut sheets of foam insulation to fit the inside of card-board boxes. The cardboard box protects the foam cooler from being crushed during transit and serves as containment for the entire package. The strength of the box should be consistent with the weight of the package. Cardboard boxes also can be used to protect those containers from damage and to provide a surface for attaching labels and addresses to the shipment. When shipments contain dry ice, do not use plastic or metal insulated chests and do not tape the lids of foam coolers. (Car-bon dioxide (CO2) released by the dry ice needs to be able to escape from any container it is placed inside).
When shipping preserved specimens, fix specimens in a large volume of formalin (1:10 ratio of tissue to formalin) or ethanol for 3 to 4 days, but send preserved samples in a minimal amount of preservative, preferably ethanol, to pre-vent drying. Strict regulations apply to the type and amount of preservative that can be shipped, so contact commercial carriers beforehand for instructions. Wrap preserved amphib-ian carcasses in fixative moistened gauze or paper towels. If preserved specimens are transferred to plastic bags, always double bag the specimen and pack it into the shipping box so as to avoid crushing of the sample during transport.
Cooling and Refrigeration
Ice packs are preferable to wet ice because the packaging prevents leaking when thawing. Ice cubes or block ice may be used if leakage can be prevented. This can be accomplished most easily by filling plastic jugs such as milk, juice, and soda containers with water and freezing them. The lids of these containers should be taped closed to prevent them from being
jarred open during transit. Ice packs can be wrapped in news-paper to avoid crushing small specimens.
After placing ice packs and specimen containers in the shipping box, add crumpled newspaper or other filler around the containers to minimize shifting of contents and crushing of samples in plastic bags during shipment. Coolers and foam-lined boxes should be lined with a heavy plastic bag. Place all ice packs and specimens into the bag to minimize leaks.
Typically larger carcasses (mallard duck-sized or larger) that have been previously frozen will remain so if shipped overnight with ice packs. Dry ice is recommended for smaller specimens (e.g., tissue samples, small carcasses such as pas-serines) that need to be kept frozen during transit. Other than dry ice retailers, some grocery, hardware, and superstores also carry dry ice. However, dry ice should not be used to ship specimens that should remain chilled because dry ice will freeze them. Also, the carbon dioxide given off by dry ice can destroy some disease agents in tissues. Shipment of dry ice, formalin, and alcohol is regulated and should be cleared with the carrier before shipping.
Avoid shipping frozen specimens in the same shipping container as live amphibians or specimens in formalin or etha-nol. If they must be shipped together, never put dry ice in the shipping container, separate the shipping container into two compartments with foam panels, and place the ice packs at one end of the container next to the frozen samples.
Figure 10. Example of proper packing to prevent foam coolers from becoming crushed during transit. Place the sealed foam cooler in a sturdy cardboard box. Use crumpled newspaper or other packing material to fill all space between the cooler and the box.

References Cited 15
Federal Shipping Regulations for Packaging and Labeling
To conform to the Code of Federal Regulations (CFR) 50 CFR Part 14, specimen packages should be conspicuously marked with the word “Wildlife” or the common names of the species contained within the package. To meet International Air Transport Association regulations, packages containing carcasses of animals that died of unknown causes or blood and tissue samples from dead or sick animals should be marked on the outer most container with the words “Biological Sub-stance Category B, UN3373.” Blood and tissue samples from apparently healthy animals should be marked “Exempt Animal Specimens.”
An invoice or packing list should accompany the ship-ment that states the name and address of the consignee and shipper and accurately states the number of each species con-tained in the shipment. In addition, the interstate shipment of diagnostic specimens is subject to applicable packaging, label-ing, and shipping requirements for disease-causing etiologic agents (42 CFR Part 72). These regulations do not require you to identify diagnostic specimens as etiologic agents when the disease agent is not known or is only suspected. You can meet packaging requirements under 42 CFR Part 72 by enclos-ing specimens within two containers before enclosing them within the package and following the recommendations in appendix 2.
Hazardous Materials Regulations of the U.S. Department of Transportation apply whenever dry ice is contained within the shipping container (49 CFR Parts 172, 173, and 175). Always call the carrier ahead of time for the current shipping and package labeling requirements. Currently (2014), the fol-lowing must be clearly visible on containers with dry ice: DRY ICE 9, UN1845, weight of dry ice (kilograms), a hazardous materials miscellaneous 9 sticker, and the complete addresses of the shipper and recipient. The dry ice labeling should go on the side of the container, so it is visible if something is stacked on top of it. Label containers with permanent markers, if pos-sible. Check with the courier regarding current requirements or restrictions for shipment of formalin.
Commercial Carriers
Specimens should be shipped by carriers that can guarantee 24-hour delivery to the location of the diagnostic laboratory. For many locations, commercial delivery services will pick up packages at the point of origin. When shipping arrangements have been made, contact the testing laboratory again and provide the tracking number and estimated time of arrival. This information is needed to allow prompt tracking of shipments that may not arrive on schedule and to schedule work at the laboratory.
References Cited
Bechert, Ursula, 2012, Noninvasive techniques to assess health and ecology of wildlife populations, in Miller, R.E., and Fowler, M.E., eds., Fowler’s zoo and wild animal medi-cine—Current therapy: St. Louis, Mo., Elsevier Saunders, p. 60–70.
Bennet, J.M., 1986, A method for sampling blood from hatch-ling Loggerhead turtles: Herpetological Review, v. 17, p. 43.
Branch, W.R., 1978, A technique for the serological and chromosomal material from small reptiles: Herpetological Review, v. 9, p. 91.
Cameron, C.E., and others, 2008, Detection of pathogenic Leptospira bacteria in pinniped populations via PCR and identification of a source of transmission for zoonotic Leptospirosis in the marine environment: Journal of Clinical Microbiology, v. 46, p. 1728–1733.
Campbell, T.W., 1996, Clinical pathology, in Mader, D.R., ed., Reptile medicine and surgery: Philadelphia, Penn., W.B. Sanders Company, p. 248–257.
Cherel, Yves; Hobson, K.A.; Bailleul, Frédéric; and Groscolas, René, 2005, Nutrition, physiology, and stable isotopes—New information from fasting and molting penguins: Ecology, v. 86, p. 2881–2888.
Docherty, D.E., Long, R.R., Griffin, K.M., and Saito, E.K., 2004, Corvidae feather pulp and West Nile virus detection: Emerging Infectious Diseases, v. 10, p. 907–909.
Esra, G.N., Benirschke, K., and Griner, L.A., 1975, Blood collecting technique in lizards: Journal of the American Veterinary Medical Association, v. 167, p. 555–556.
Fair, J.M., Paul, E., Jones, J., Clark, A.B., Davie, C., and Kai-ser, G. 2010, Guidelines to the use of wild birds in research (3d ed.): Washington, D.C., Ornithological Council, accessed August 18, 2014, at www.nmnh.si.edu/BIRDNET/guide/.
Farmer, R.G., and Leonard, M.L., 2011, Long-term feeding ecology of great black-backed gulls (Larus marinus) in the northwest Atlantic—110 years of feather isotope data: Canadian Journal of Zoology, v. 89, p. 123–133.
Forzan, M.J., and Wood, J., 2013, Low detection of ranavirus DNA in wild postmetamorphic green frogs, Rana (Litho-bates) clamitans, despite previous or concurrent tadpole mortality: Journal of Wildlife Diseases, v. 49, p. 879–886.
Frye, F.L., 1991, Hematology as applied to clinical reptile medicine, in Frye, F.L., ed., Biomedical and surgical aspects of captive reptile husbandry: Melbourne, Fla., Krieger Pub-lishing Company, p. 209–277.

16 Wildlife Specimen Collection, Preservation, and Shipment
Jacobson, E.R., 1993, Blood collection techniques in rep-tiles—Laboratory investigations, in Fowler, M.E., ed., Zoo and wildlife animal medicine—Current therapy: Philadel-phia, Penn., W.B. Saunders, p. 144–152.
Jankowski, M.D., Russell, R.E., Franson, J.C., Dusek, R.J., Hines, M.K., Gregg, M., and Hofmeister, E.K., 2014, Corti-costerone metabolite concentrations in greater sage-grouse are positively associated with the presence of cattle grazing: Rangeland Ecology & Management, v. 67, p. 237–246.
Koneman, E.W., Allen, S.D., Janda, W.M., Schreckenberger, P.C., and Winn, W.C., Jr., eds., 1997, Color atlas and text-book of diagnostic microbiology (5th ed.): Hagerstown, Md., Lipincott Williams & Wilkins, 1,488 p.
Leary, Steven; Underwood, Wendy; Anthony, Raymond; Cartner, Samuel; Corey, Douglas; Grandin, Temple; Greenacre, Cheryl; Gwaltney-Bran, Sharon; McCrackin, Mary Ann; Meyer, Robert; Miller, David; Shearer, Jan; and Yanong, Roy, 2013, AVMA guidelines for the euthanasia of animals—2013 edition, accessed Apil 30, 2014, at https://www.avma.org/kb/policies/documents/euthanasia.pdf.
Leendertz, F.H., Pauli, G., Maetz-Rensing, K., Boardman, W., Nunn, C., Ellerbrok, H., Jensen, S.A,, Junglen, S., and Boesch, C., 2006, Pathogens as drivers of population declines—The importance of systematic monitoring in great apes and other threatened mammals: Biological Conserva-tion, v. 131, p. 325–337.
Macbeth, B.J., Cattet, M.R.L., Stenhouse, G.B., Gibeau, M.L., and Janz, D.M., 2010, Hair cortisol concentration as a noninvasive measure of long-term stress in free-ranging grizzly bears (Ursus arctos)—Considerations with implica-tions for other wildlife: Canadian Journal of Zoology, v. 88, p. 935–949.
Owen, J.C., 2011, Collecting, processing, and storing avian blood—A review: Journal of Field Ornithology, v. 82, p. 339–354.
Palme, R., Rettenbacher, S., Touma, C., El‐Bahr, S.M., and Möstl, E., 2005, Stress hormones in mammals and birds—Comparative aspects regarding metabolism, excretion, and noninvasive measurement in fecal samples: Annals of the New York Academy of Sciences, v. 1040, p. 162–171.
Rynk, Robert, ed., 1992, On-farm composting handbook: Ithaca, N.Y., Northeast Regional Agricultural Engineering Service, 186 p.
Siev, Micheal; Yu, Xian; Prados-Rosales, Rafael; Martiniuk, F.T.; Casadevall, Arturo; and Achkar, J.M., 2011, Correla-tion between serum and plasma antibody titers to mycobac-terial antigens: Clinical and Vaccine Immunology, v. 18, p. 173–175.
Tapley, Benjamin, Acosta-Galvis, A.R., and Lopez, Javier, 2011, A field method for sampling blood of male anurans with hypertrophied limbs: Phyllomedusa, v. 10, p. 75–77.
Vos-Maas, M.G., and Zwart, P., 1976, A technique for intra-venous injection in the red-eared slider (Pseudemys scripta elegans): Lab Animal, v. 10, p. 399.
Waits, L.P., and Paetkau, D., 2005, Noninvasive genetic sam-pling tools for wildlife biologists—A review of applications and recommendations for accurate data collection: Journal of Wildlife Management, v. 69, p. 1419–1433.
Whitaker, B.R., and Wright, K.M., 2001, Clinical techniques, in Wright, K.M., and Whitaker, B.R., eds., Amphibian medi-cine and captive husbandry: Malabar, Fla., Krieger Publish-ing Company, p. 89–110.

agent (infectious) A living organism capable of invading another. For example, a bacterium or virus. 17
moribund A visible, debilitated state resulting from disease; appearing to be suffering from disease and close to death.mucosa A mucous membrane.mucosal Pertaining to the mucosa. See mucosa.necropsy The methodical examination of the internal organs and tissues of an animal after death to determine the cause of death or to observe and record pathological changes.orophyaryngeal Pertaining to the mouth and the pharynx. See pharyngeal.passerines Perching birds belonging to the Order Pas-seriformes; primarily includes songbirds requiring extended parental care after hatching (altricial). Examples include fly-catcher, swallows, waxwings, warblers, finches, and thrushes.pathogenic The ability to cause disease.pathogens Typically microorganisms capable of inducing disease, but broadly includes all disease-inducing agents.PCR (polymerase chain reaction) A laboratory technique used to amplify exponentially a single or few copies of a selected sequence of DNA using enzymatic replication of the DNA in order to generate millions or more copies of a particu-lar DNA sequence. See DNA.pharyngeal Pertaining to the pharynx, the musculomembra-nous passage between the mouth and the larynx and esopha-gus.phylum (plural phyla) The primary subdivision of a taxo-nomic kingdom, grouping together all classes of organisms that have the same body plan. rendering A process by which animal carcasses are con-verted into fats and fertilizer.RNA (ribonucleic acid) A nucleic acid found mainly in the cytoplasm of cells that functions principally in the produc-tion of proteins. It differs from DNA by having a single chain rather than a double chain of nucleotides and containing the sugar ribose instead of deoxyribose.species A population of organisms whose members are able to breed among themselves and produce fertile offspring. More precise determinations of species are based on similarity of DNA. vertebrates All animals having spinal columns; mammals, birds, reptiles, amphibians, and boney and cartilaginous fishes.zoonosis Infectious disease transmissible between animals and humans, and vice versa.zoonotic Pertaining to a zoonosis.
Glossary
agent (infectious) A living organism capable of invading another. For example, a bacterium or virus.
antibody A specialized serum protein produced by the immune system in response to an antigen in an attempt to counteract the effects of the antigen; antibodies in the blood indicate exposure to specific antigens or disease agents.anurans Frogs and toads.autolysis Breakdown of all or part of a cell or tissue by self-produced enzymes.avian Pertaining to birds.chelating chemical A chemical that combines with a metal ion in a firm, ringlike band and prevents the metallic ion from having any further biochemical effect.chelonian Turtle. cloaca A common passage for the fecal, urinary, and repro-ductive discharges of most lower vertebrates (birds, reptiles, and amphibians).culture The growing of bacteria, other microorganisms, or cells in a specially prepared nutrient medium.DNA (deoxyribonucleic acid) A nucleic acid found mainly in the chromosomes that contains the hereditary information of organisms and some viruses.ectoparasite A parasite that lives on the external surface, or in the integument, of its host. endemic Disease that commonly is present within a human population or a geographical area.epidemiological Pertaining to epidemiology. See epidemiol-ogy.epidemiology The study of the causes, occurrence, and con-trol of disease in populations.fixative A substance used to fix living tissue. hematocrit Ratio of the volume of red blood cells to the total volume of blood as determined by separation of red blood cells from the plasma usually by centrifugation.hematoma A mass of usually clotted blood that forms in a tissue, organ, or body space as a result of a broken blood ves-sel.histology The study of the microscopic structure of tissues.lesion An abnormal change in tissue or an organ owing to disease or injury.microbe Minute, microscopic living organisms that perform various biological functions essential for life processes (i.e., digestion); some microbes are referred to as germs because of their capacity to cause disease and include various forms of bacteria, fungi, protozoa (single-cell parasites), and viruses.

Appendix 19
Appendixes
Appendix 1. Animal Dissection Resources
Appendix 2. USGS–National Wildlife Health Center
Instructions for Collection and Shipment of Avian and Mammalian Carcasses

20 Wildlife Specimen Collection, Preservation, and Shipment
Appendix 1. Animal Dissection Resources
Birds
Rae, M.A., 2003, Practical avian necropsy: Seminars in Avian and Exotic Pet Medicine, v. 12, no., 2, p. 62–70.
Roffe, T.J., Friend, M., and Locke, L.N., 1994, Evaluation of causes of wildlife mortality, in Bookhout, T.A., ed., Research and management techniques for wildlife and habitats (5th ed.): Bethesda, Md., The Wildlife Society, p. 324–348.
Work, T.M. 2000, Avian necropsy manual for biologists in remote refuges: U.S. Geological Sur-vey, National Wildlife Health Center, Hawaii Field Station, 30 p.
Mammals
Feldman, D.B., and Seely, J.C., 1988, Necropsy guide—Rodents and the rabbit: Boca Raton, Fla., CRC Press LLC, 176 p.
Mason, G.L., and Madden, D.J., 2007, Performing the field necropsy examination: Veterinary Clinics of North America, Food Animal Practice, v. 23, p. 503–526.
Pugliares, K.R., Bogomoini, A.L., Touhey, K.M., Herzig, S.M., Harry, C.T., and Moore, M.J., 2007, Marine mammal necropsy—An introductory guide for stranding responders and field biologists: Woods Hole, Mass., Woods Hole Oceanographic Institution, WHOI-2007-06, 131 p.
Roffe, T.J., Friend, M., and Locke, L.N., 1994, Evaluation of causes of wildlife mortality, in Bookhout, T.A., ed., Research and management techniques for wildlife and habitats (5th ed.): Bethesda, Md., The Wildlife Society, p. 324–348.
Reptiles
Cooper, J.E., 1992, Postmortem examination, in Beynon, P.H., Lawton, P.C., and Cooper, J.E., eds., Manual of reptiles: Gloucestershire, England, British Small Animal Veterinary Associa-tion, p. 40–49.
Frye, F.L., 1984, Euthanasia, necropsy techniques and comparative histology of reptiles, in Hoff, G.L., Frye, F.L., and Jacobson, E.R., eds., Diseases of amphibians and reptiles: New York, Plenum Press, p. 703–755.
Jacobson, E.R., 1978, Reptile necropsy protocol: Journal of Zoo Animal Medicine, v. 9, p. 7–13.
Jacobson, E.R., 1984, Immobilization, blood sampling, necropsy techniques and diseases of crocodilians—A review: Journal of Zoo Animal Medicine, v. 15, p. 38–45.
Mader, D.R., 1996, Euthanasia and necropsy, in Mader, D.R., ed., Reptile medicine and surgery: Philadelphia, Penn.,W.B. Saunders Company, p. 277–281.

Appendix 2. USGS–NWHC Instructions for Collection and Shipment of Avian and Mammalian Carcasses 21
Appendix 2. USGS–National Wildlife Health Center Instructions for Collection and Shipment of Avian and Mammalian Carcasses
These shipping procedures are specific to the National Wildlife Health Center (NWHC), and other disease diagnostic laboratories may require minor variations.
Freezing/thawing impedes isolation of some pathogens and damages tissues. The NWHC prefers unfrozen specimens if they can be sent within 24 to 36 hours of collection or death. Guidance on freezing samples will be provided on a case-by-case basis. As a general guideline, if you cannot call or ship the animal(s) within 24 to 36 hours, the animal(s) should be frozen.
• Contact the NWHC to get shipping approval and discuss shipping arrangements. Typi-cally, specimens are shipped by 1-day (overnight) service, Monday through Wednes-day, to guarantee arrival at the NWHC before the weekend. If specimens are fresh and need to be shipped on Thursday or Friday, special arrangements can be made.
• Email/fax history and tracking number to the NWHC. Packages will not be opened if history does not arrive first!
• Use rubber, vinyl, or nitrile gloves when picking up sick or dead animals. If you do not have gloves, insert your hand into a plastic bag.
• More than one disease may be affecting the population simultaneously. When possible, collect both sick and dead animals. Note behavior of sick animals before euthanizing.
• Collect specimens that are representative of all species and geographic areas affected.
• Collect the freshest dead specimens. Decomposed or scavenged carcasses are usually of limited diagnostic value. If you plan to collect animals in the field, take along a cooler containing ice to immediately chill carcasses.
• Contact the NWHC for assistance when collecting samples from animals that are too large to ship.
• Collect animals under the assumption that an infectious disease or toxin is involved and other animals may be at risk. Protect yourself as some diseases and toxins are hazardous to humans.
Immediately attach a leg tag to each animal with the following information written in pencil or waterproof ink:
• Date collected
• Location (specific site, town, county, State)
• Collector (name/address/phone)
• Species
• Found dead or euthanized
• Your reference #
• Place each animal in a plastic bag and close/seal the bag. Cover zipper-bag closure with strapping or duct tape after sealing zipper. Twist nonzipper bags closed, fold over on itself, and secure with package strapping or duct tape.
22 Wildlife Specimen Collection, Preservation, and Shipment
• Place the first bag inside a second bag; close and seal. More than one individually bagged animal can be placed in the second bag. This prevents cross-contamination of individual specimens and leaking shipping containers.
• Tag the outside of the second bag with number and type of animals, collection date, collection location, and name of collector. Reminder order: TAG, BAG, BAG, TAG.
• Use a hard-sided cooler in good condition for shipment. Close the drain plug of the cooler and place tape over the inside opening. Line cooler with a thick bag (1 mil thickness, third layer of bags).
• Place absorbent material (newspaper, paper towels, cotton batting or balls) in the third plastic bag to absorb any liquids that might leak during shipping. DO NOT use shred-ded paper or packing peanuts.
• Pack the individually bagged animal(s) that are contained within the second sealed bag into the third bag with enough FROZEN ICE PACKS or similar coolant to keep car-casses cold. Use enough coolant to keep samples chilled if there is a delay in delivery. Wet ice can be used if sealed in plastic container (i.e., soda or water bottle). DO NOT USE DRY ICE.
• Seal the third bag using the same methods described for the first bag.
• Place the completed specimen history and return shipping label in a zippered bag and tape to the inside lid of the cooler (if you want the cooler returned). The NWHC CAN-NOT PAY FOR RETURN SHIPPING.
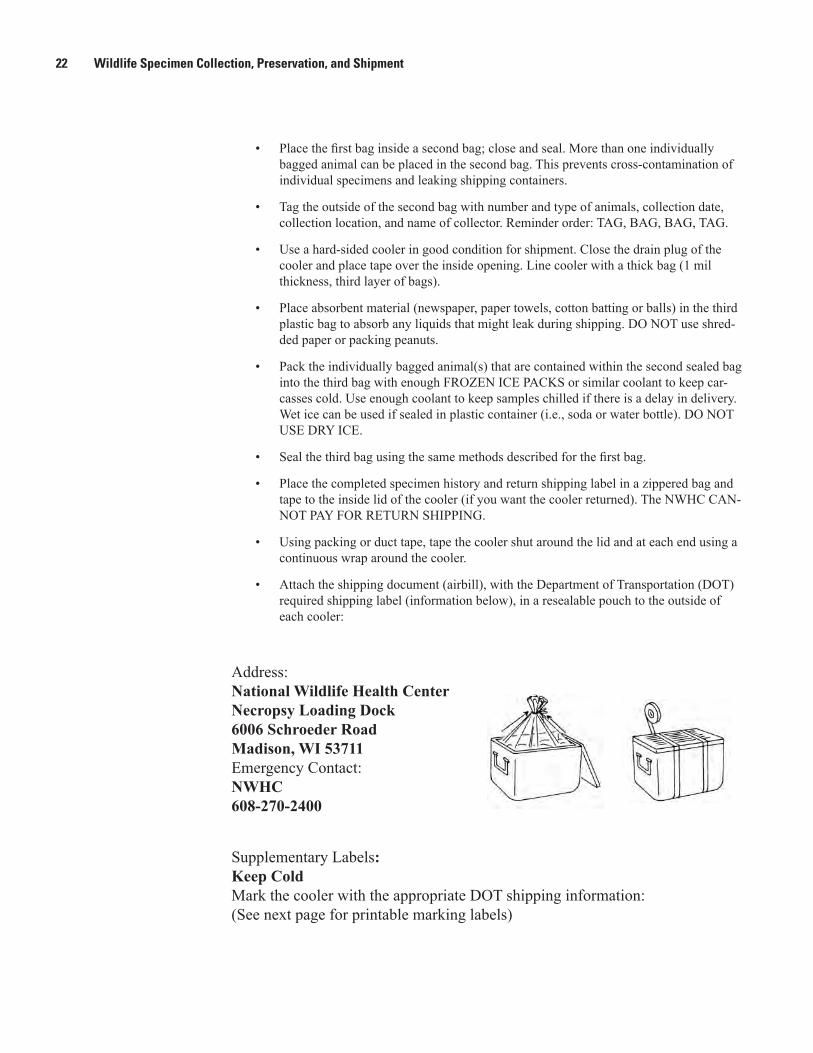
• Using packing or duct tape, tape the cooler shut around the lid and at each end using a continuous wrap around the cooler.
• Attach the shipping document (airbill), with the Department of Transportation (DOT) required shipping label (information below), in a resealable pouch to the outside of each cooler:
Address: National Wildlife Health CenterNecropsy Loading Dock6006 Schroeder RoadMadison, WI 53711Emergency Contact:NWHC608-270-2400
Supplementary Labels:Keep ColdMark the cooler with the appropriate DOT shipping information:(See next page for printable marking labels)

Appendix 23
• Carcasses of animals that died of unknown causes: or Blood and tissue samples from dead or sick animals: WILDLIFE, BIOLOGICAL SUBSTANCE, CATEGORY B and UN 3373.
• Blood and tissue samples from apparently healthy animals (hunter-killed, live captured): WILDLIFE, EXEMPT ANIMAL SPECIMENS.
• Note the tracking number in case packages are delayed.
• These instructions cover Federal shipping regulations for commercial carriers.
WILDLIFE, BIOLOGICAL SUBSTANCE, CATEGORY B
WILDLIFE, EXEMPT ANIMAL SPECIMENS
UN3373


White and Dusek—
Wildlife Specim
en Collection, Preservation, and Shipment—
Techniques and Methods 15–C4
ISSN 2328–7055 (online)http://dx.doi.org/10.3133/tm15c4