white paper - step-by-step basic installation guide for ... -by step basic installation guide for 4...
TRANSCRIPT

White Paper
Abstract
This white paper contains information and basic instructions required to install and upgrade EMC Documentum Content Server 6.6 on UNIX-based platforms such as Linux, HP-UX, Solaris, and AIX systems, with relational database management systems such as Oracle, Sybase, DB2, and SQL Server. The paper explains the decisions the user must make, and requirements the user must meet before installing Content Server. February 2013
STEP-BY-STEP BASIC INSTALLATION GUIDE FOR EMC® DOCUMENTUM® CONTENT SERVER 6.6 ON THE UNIX PLATFORM
2 Step-by-Step Basic Installation Guide for Content Server 6.6 on the UNIX Platform
Copyright © 2013 EMC Corporation. All Rights Reserved. EMC believes the information in this publication is accurate of its publication date. The information is subject to change without notice. The information in this publication is provided “as is.” EMC Corporation makes no representations or warranties of any kind with respect to the information in this publication, and specifically disclaims implied warranties of merchantability or fitness for a particular purpose. Use, copying, and distribution of any EMC software described in this publication requires an applicable software license. For the most up-to-date listing of EMC product names, see EMC Corporation Trademarks on EMC.com. VMware is a registered trademark of VMware, Inc. All other trademarks used herein are the property of their respective owners. Part Number H11581
3 Step-by-Step Basic Installation Guide for Content Server 6.6 on the UNIX Platform
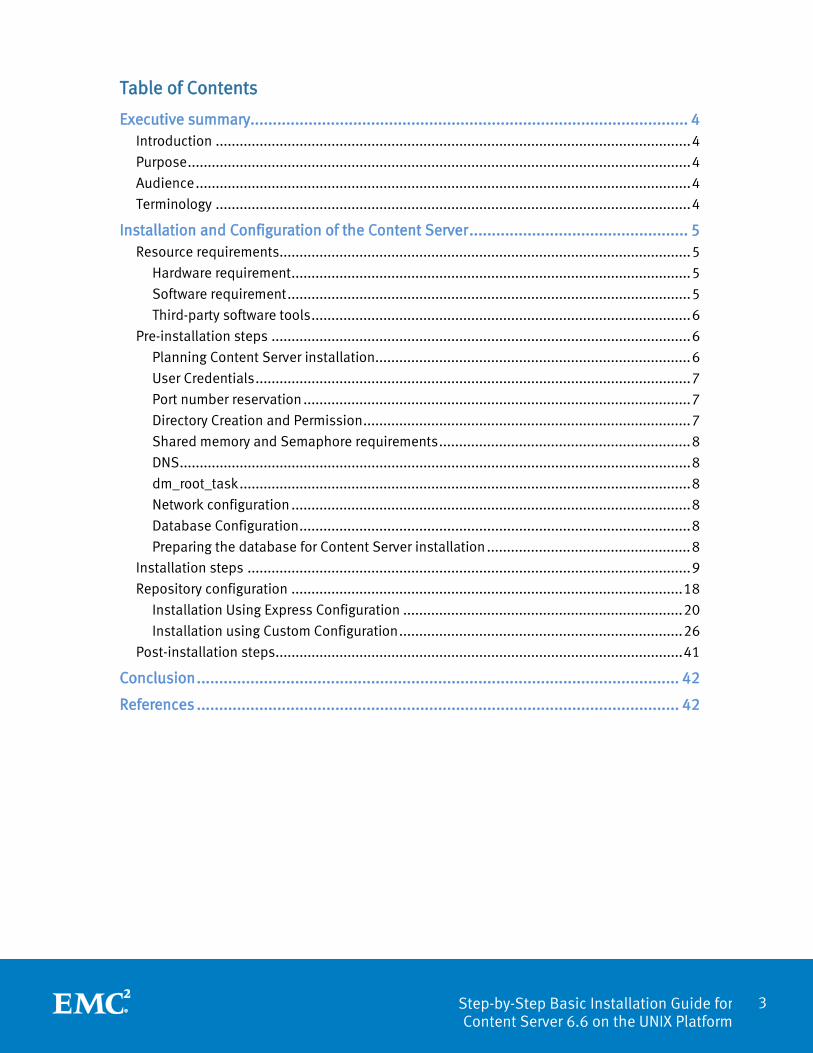
Table of Contents
Executive summary.................................................................................................. 4 Introduction ....................................................................................................................... 4 Purpose .............................................................................................................................. 4 Audience ............................................................................................................................ 4 Terminology ....................................................................................................................... 4
Installation and Configuration of the Content Server ................................................. 5 Resource requirements ....................................................................................................... 5
Hardware requirement .................................................................................................... 5 Software requirement ..................................................................................................... 5 Third-party software tools ............................................................................................... 6
Pre-installation steps ......................................................................................................... 6 Planning Content Server installation ............................................................................... 6 User Credentials ............................................................................................................. 7 Port number reservation ................................................................................................. 7 Directory Creation and Permission .................................................................................. 7 Shared memory and Semaphore requirements ............................................................... 8 DNS ................................................................................................................................ 8 dm_root_task ................................................................................................................. 8 Network configuration .................................................................................................... 8 Database Configuration .................................................................................................. 8 Preparing the database for Content Server installation ................................................... 8
Installation steps ............................................................................................................... 9 Repository configuration .................................................................................................. 18
Installation Using Express Configuration ...................................................................... 20 Installation using Custom Configuration ....................................................................... 26
Post-installation steps ...................................................................................................... 41
Conclusion ............................................................................................................ 42
References ............................................................................................................ 42
4 Step-by-Step Basic Installation Guide for Content Server 6.6 on the UNIX Platform
Executive summary This white paper provides detailed basic steps for preparing and installing Documentum Content Server 6.6 on UNIX-based platforms.
Introduction
Content Server is the core of the EMC Documentum content management platform. Content Server governs the content repository and enables a rich set of content management services for controlling both content and processes throughout distributed enterprises. Documentum Content Server allows you to store, manage, and deploy all types of content, including HTML and XML, graphics, and multimedia.
Content Server provides services such as integrated workflow, lifecycle, and process automation; version control, robust security, and a data dictionary for capturing and configuring business rules.
To summarize briefly:
• Content Servers manage the documents in the repositories and respond to client requests
• Repositories store content files, metadata associated with the content files, and other objects used by Content Server
• Connection brokers provide repository connection information to client applications
Purpose
The purpose of this document is to explain the process of quickly getting started with basic install of Content Server 6.6 on a UNIX system, successfully.
This document does not replace the CS Installation Guide. Instead, this should be used in conjunction with CS Guide to accelerate the installation process.
Audience
This white paper is intended for internal and external users of Documentum.
Terminology
ECAG Enterprise Customer Advocacy Group
CMA Content Management and Archiving
JDK Java Development Kit
SP Service Pack
OS Operating System
RDBMS / DB Relational Database Management System
CS Content Server
5 Step-by-Step Basic Installation Guide for Content Server 6.6 on the UNIX Platform
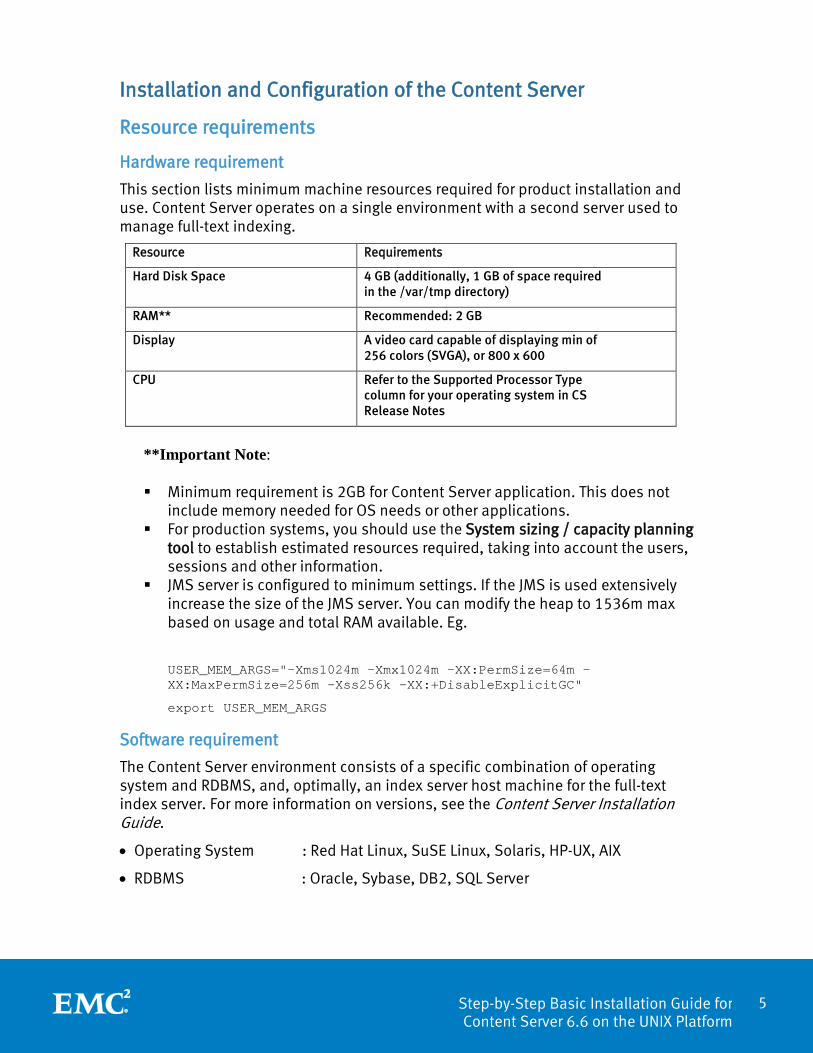
Installation and Configuration of the Content Server
Resource requirements
Hardware requirement
This section lists minimum machine resources required for product installation and use. Content Server operates on a single environment with a second server used to manage full-text indexing.
Resource Requirements
Hard Disk Space 4 GB (additionally, 1 GB of space required in the /var/tmp directory)
RAM** Recommended: 2 GB
Display A video card capable of displaying min of 256 colors (SVGA), or 800 x 600
CPU Refer to the Supported Processor Type column for your operating system in CS Release Notes
**Important Note: Minimum requirement is 2GB for Content Server application. This does not
include memory needed for OS needs or other applications. For production systems, you should use the System sizing / capacity planning
tool to establish estimated resources required, taking into account the users, sessions and other information.
JMS server is configured to minimum settings. If the JMS is used extensively increase the size of the JMS server. You can modify the heap to 1536m max based on usage and total RAM available. Eg.
USER_MEM_ARGS="-Xms1024m -Xmx1024m -XX:PermSize=64m -XX:MaxPermSize=256m -Xss256k -XX:+DisableExplicitGC"
export USER_MEM_ARGS
Software requirement
The Content Server environment consists of a specific combination of operating system and RDBMS, and, optimally, an index server host machine for the full-text index server. For more information on versions, see the Content Server Installation Guide.
• Operating System : Red Hat Linux, SuSE Linux, Solaris, HP-UX, AIX
• RDBMS : Oracle, Sybase, DB2, SQL Server
6 Step-by-Step Basic Installation Guide for Content Server 6.6 on the UNIX Platform
Third-party software tools
• Putty / Telnet
• XWindows GUI installer (XManager, Exceed Hummingbird, Cygwin)
• WinSCP / FileZilla (for FTP)
Pre-installation steps Prior to installing Content Server, the specified hardware and software requirements must be met.
Planning Content Server installation 1. Content Server supports the following operating system and database
combinations:
• Windows with Oracle, DB2, SQL Server, and Sybase
• Solaris with Oracle, DB2, and Sybase
• HP-UX with Oracle
• AIX with Oracle and DB2
• Linux with Oracle and Sybase
2. A properly-configured relational database management system must be available locally or remotely. The RDBMS may be installed on a different machine from Content Server.
3. Default port for Connection Broker is 1489. If multiple connection brokers must be configured, each broker must be assigned a unique port. You need to state sequential non-secure and secure port numbers for docbroker.
For example,
dmdocbroker 1489/tcp # dmdocbroker
dmdocbroker 1489/udp # dmdocbroker
dmdocbroker_s 1490/tcp # dmdocbroker secure
4. Multiple Content Servers can be run against one repository, with multiple servers on the repository host or on other hosts.
5. Content Server requires a properly-configured TCP/IP network that supports the required number of user and sufficient capacity for client connections.
6. The System sizing / capacity planning tool will be very useful for determining an optimum performance setup.
7. Multiple installations can be created on a specific host, including installations of different server versions.
7 Step-by-Step Basic Installation Guide for Content Server 6.6 on the UNIX Platform
User Credentials
1. The installation owner will need ‘root’ access during some of the steps in install/configure. Make sure to get root access from the UNIX admin prior to install.
2. For DB, the UNIX Administrator will have to create an installation owner and group account for you in the dba group. It should have read/execute rights to database client.
Port number reservation
1. Use consecutive port numbers for non-secure and secure ports for docbroker and docbase.
2. Default port number for docbroker is 1489. However, we have not reserved any other numbers with Internet Assigned Numbers Authority (IANA). Hence, check etc/services file with extreme care before using any number for specifying port.
3. For example, ports that may be used by some Application vendors are
- Insitu-conf Translation application : 1490 (needed for docbroker_s)
- Groove GLRPC : 9080 (needed for JMS/ACS/admin 9080-9087)
- Mosaic syssvc1 : 1235 (needed for XHive)
4. If possible, stay away from using the ephemeral port range listed below as they are used by the OS.
• Solaris: 32768-65535
• AIX: 32768-65535
• HP: 49152 - 65535
• LINUX: 32768-61000
• Windows2003: 1024-4999
• Windows2008: 49152-65535
Directory Creation and Permission
1. Use sizing guide to determine estimated system resources. Optimum disk configuration would be two partitions (one for Documentum binaries and other for data storage location)
2. Optionally, SAN or local disk array can be used for better performance data location.
3. Work with your UNIX admin to get the disk configured before installation.
4. Installation owner should have full permission to both locations and also read/execute permission for the database client.

8 Step-by-Step Basic Installation Guide for Content Server 6.6 on the UNIX Platform
5. Restricted characters for CS directory names
• The name of the directory in which Content Server is installed can only contain ASCII characters. Additionally, do not use the following characters in path names accessed by EMC Documentum product installers: ! \ / : * ? " < > |
• Do not use spaces in the name of the product installation directory. For example, do not use ‘c:\Documentum Products\’ or ‘/Documentum Products’ as the name of the installation directory.
Shared memory and Semaphore requirements
1. This must be done by someone with root access.
2. Content Server’s shared memory and semaphore requirements are:
• Configure the host with at least 2 MB of shared memory for Content Server.
• Content Server uses a semaphore. Ensure that semaphores are enabled on the host.
DNS
1. Test fully qualified name and host name against DNS server.
2. Use nslookup to test if it is configured.
dm_root_task
User must enter root password during install or skip and run $DOCUMENTUM/dba/dm_root_task before trying to install the docbase. This task must be done as root with no exceptions.
Network configuration
We are expecting host name to be bound to an IP and not the local loopback
Database Configuration
This is done by the Database Administrator. See the Install Guide for Requirements for all databases. There are specific steps for installing Database with Content Server.
Preparing the database for Content Server installation
• Ensure that the database is up and running before starting the installation process.
• For remote database installations, verify whether the database can be accesses for connection, using a database client from the system where Content Server is installed.
• For local database installations, verify whether the system path includes the installation directory for the database. For example, run the command illustrated in Figure 1, to connect to the database using the client:

9 Step-by-Step Basic Installation Guide for Content Server 6.6 on the UNIX Platform
Figure 1. Command to connect to the database using the client
• Ensure that you have the database administrator’s user name and password required for installing Content Server
• Set the <DB>_HOME and TNS_ADMIN in the installation owner’s environment.
• Install the Oracle client software on the Content Server host.
• Ensure the Oracle Listener process is running on the machine where the Oracle database resides.
• Verify whether the Oracle RDBMS can be accessed for connection using SQL*Plus from the system where Content Server will be installed.
• Ensure that the minimum repository size is set aside for database repositories. For example, the size of Oracle-based repositories is as follows:
Small repository = 100MB
Medium repository = 180MB
Large repository = 250 MB
Installation steps Content Server installation is performed in two stages:

10 Step-by-Step Basic Installation Guide for Content Server 6.6 on the UNIX Platform
1. The Content Server software installation media is copied to the correct directories on the Content Server host machine.
2. Content Server is started and the repositories are configured.
To install Content Server:
1. Download the installers from the EMC product download center, based on the <OS-RDBMS> combination.
2. Save the .tar file to your local system.
3. In the UNIX system, create a new folder under the user’s default working directory, for storing the installer. For example, create the /home/ecagblr/software folder.
4. Using the FTP command or GUI-based FTP tools such as WinSCP or FileZilla, transfer the installer from the local system to the UNIX system.
5. From the user’s default home directory on the UNIX system, give all permissions to all files to the user.
Example: chmod -R 770 *
6. Navigate to the directory where the tar file is saved, and ensure that the file has the ‘execute’ permission for the installation owner.
Example:
[ecagblr@RHEL5 software]$ pwd
/home/ecagblr/software
[ecagblr@RHEL5 software]$ ls -ltr
total 843540
-rwxrwxrwx 1 ecagblr root 862935040 Mar 21 13:07 Content_Server_6[1].6_linux_oracle.tar
7. Unzip the tar file by executing the following command: tar -xvf Content_Server_6\[1\].6_linux_oracle.tar
8. When the unzipping of tar the file has completed successfully, remove the tar file using the following command (to save space): rm Content_Server_6\[1\].6_linux_oracle.tar
9. Create the ‘documentum’, ‘documentum/product’, ‘documentum/product/6.6’, and ‘documentum/shared’ directories in the installation owner’s home directory using the following command: mkdir –p documentum/product/6.6
mkdir documentum/shared (optional)
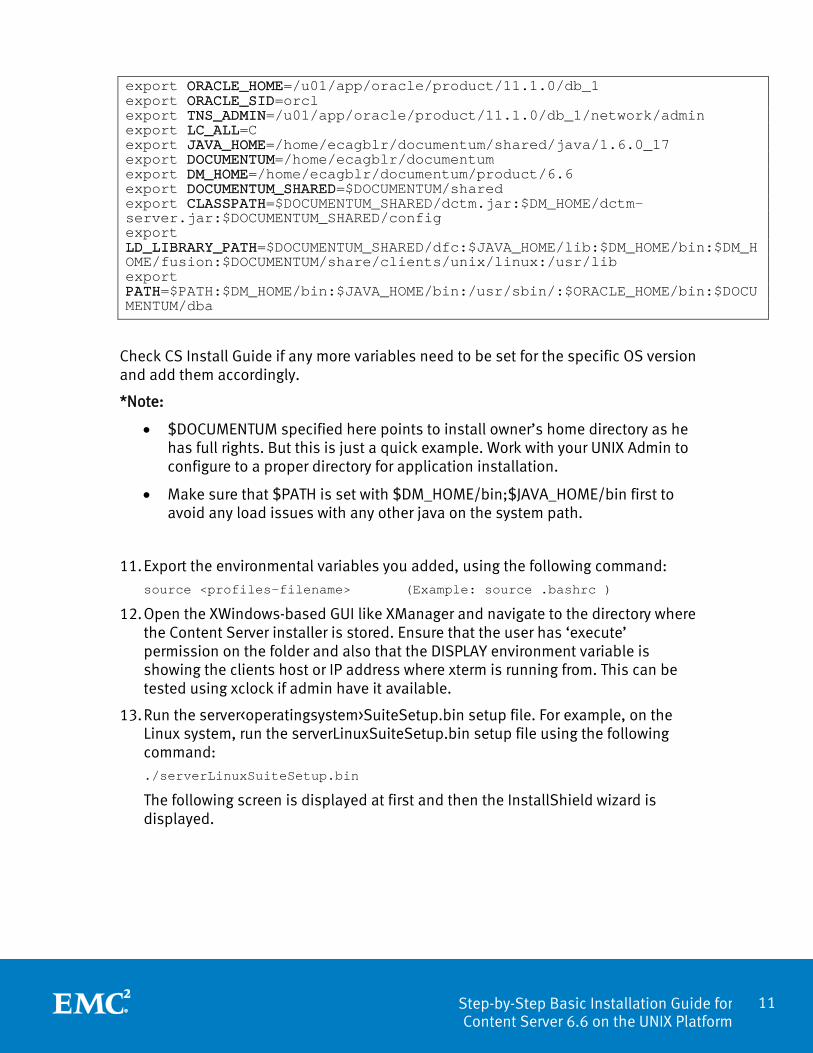
10. Add the following lines in the environmental variables of the installation owner’s environment.
Example: in the .bashrc file under the user’s working directory, add the following lines:
11 Step-by-Step Basic Installation Guide for Content Server 6.6 on the UNIX Platform
export ORACLE_HOME=/u01/app/oracle/product/11.1.0/db_1 export ORACLE_SID=orcl export TNS_ADMIN=/u01/app/oracle/product/11.1.0/db_1/network/admin export LC_ALL=C export JAVA_HOME=/home/ecagblr/documentum/shared/java/1.6.0_17 export DOCUMENTUM=/home/ecagblr/documentum export DM_HOME=/home/ecagblr/documentum/product/6.6 export DOCUMENTUM_SHARED=$DOCUMENTUM/shared export CLASSPATH=$DOCUMENTUM_SHARED/dctm.jar:$DM_HOME/dctm-server.jar:$DOCUMENTUM_SHARED/config export LD_LIBRARY_PATH=$DOCUMENTUM_SHARED/dfc:$JAVA_HOME/lib:$DM_HOME/bin:$DM_HOME/fusion:$DOCUMENTUM/share/clients/unix/linux:/usr/lib export PATH=$PATH:$DM_HOME/bin:$JAVA_HOME/bin:/usr/sbin/:$ORACLE_HOME/bin:$DOCUMENTUM/dba
Check CS Install Guide if any more variables need to be set for the specific OS version and add them accordingly.
*Note:
• $DOCUMENTUM specified here points to install owner’s home directory as he has full rights. But this is just a quick example. Work with your UNIX Admin to configure to a proper directory for application installation.
• Make sure that $PATH is set with $DM_HOME/bin;$JAVA_HOME/bin first to avoid any load issues with any other java on the system path.
11. Export the environmental variables you added, using the following command: source <profiles-filename> (Example: source .bashrc )
12. Open the XWindows-based GUI like XManager and navigate to the directory where the Content Server installer is stored. Ensure that the user has ‘execute’ permission on the folder and also that the DISPLAY environment variable is showing the clients host or IP address where xterm is running from. This can be tested using xclock if admin have it available.
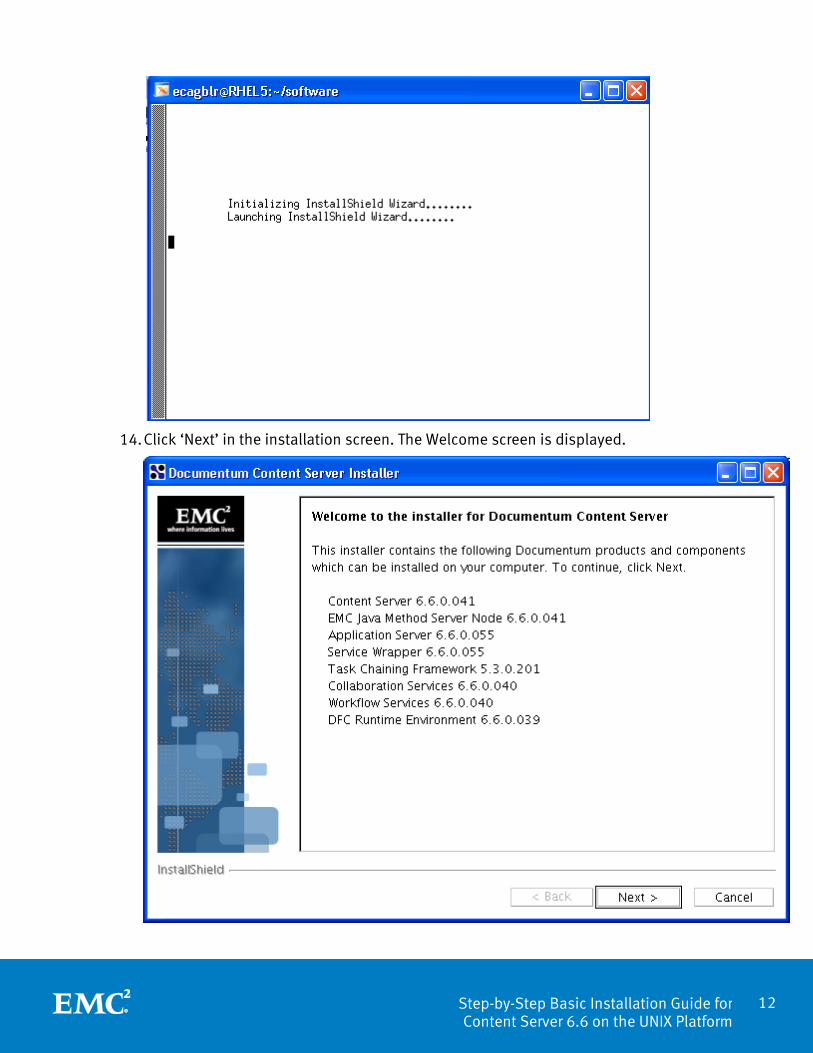
13. Run the server<operatingsystem>SuiteSetup.bin setup file. For example, on the Linux system, run the serverLinuxSuiteSetup.bin setup file using the following command: ./serverLinuxSuiteSetup.bin
The following screen is displayed at first and then the InstallShield wizard is displayed.
12 Step-by-Step Basic Installation Guide for Content Server 6.6 on the UNIX Platform
14. Click ‘Next’ in the installation screen. The Welcome screen is displayed.

13 Step-by-Step Basic Installation Guide for Content Server 6.6 on the UNIX Platform
15. Click ‘Next’ and accept the terms of License agreement.
16. Select whether Developer documentation should be installed. You can choose not to install it.
14 Step-by-Step Basic Installation Guide for Content Server 6.6 on the UNIX Platform
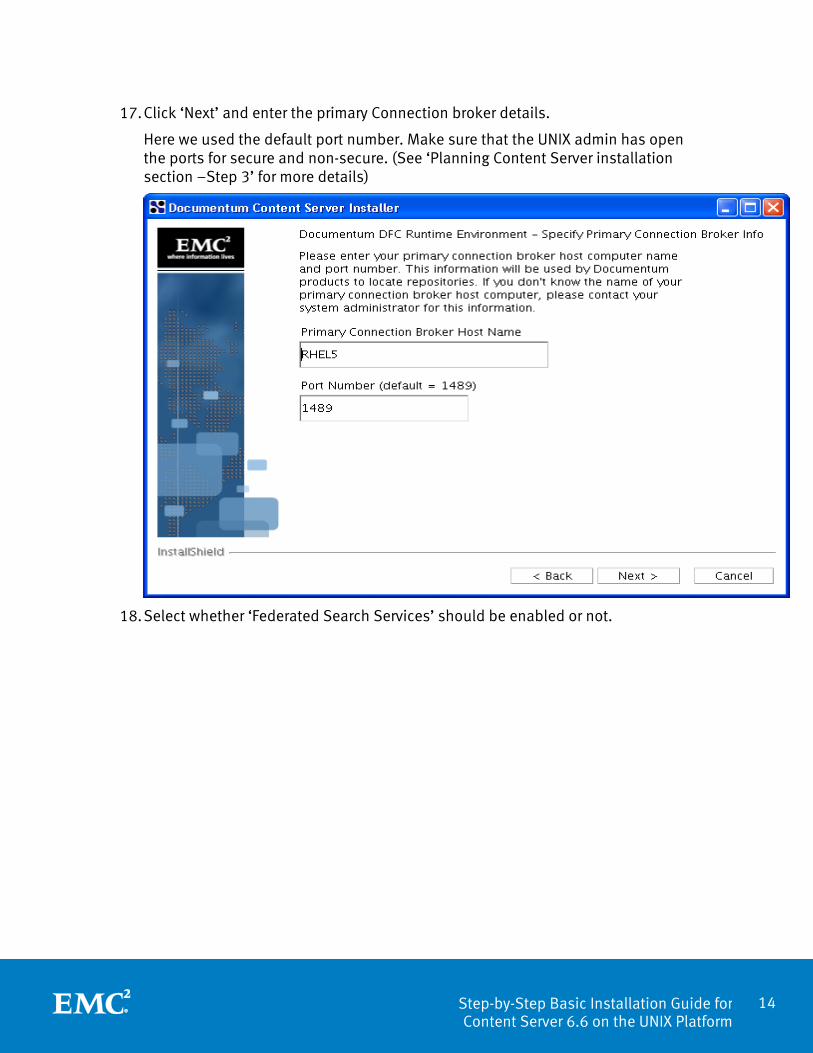
17. Click ‘Next’ and enter the primary Connection broker details.
Here we used the default port number. Make sure that the UNIX admin has open the ports for secure and non-secure. (See ‘Planning Content Server installation section –Step 3’ for more details)
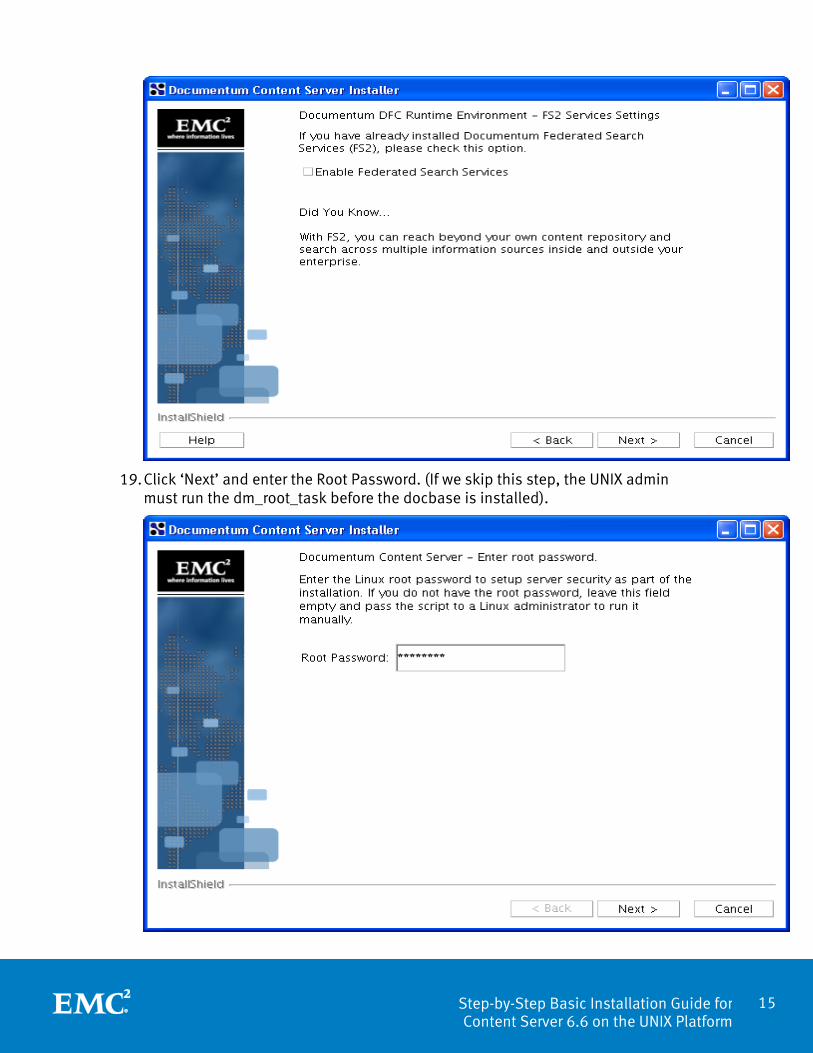
18. Select whether ‘Federated Search Services’ should be enabled or not.
15 Step-by-Step Basic Installation Guide for Content Server 6.6 on the UNIX Platform
19. Click ‘Next’ and enter the Root Password. (If we skip this step, the UNIX admin must run the dm_root_task before the docbase is installed).
16 Step-by-Step Basic Installation Guide for Content Server 6.6 on the UNIX Platform
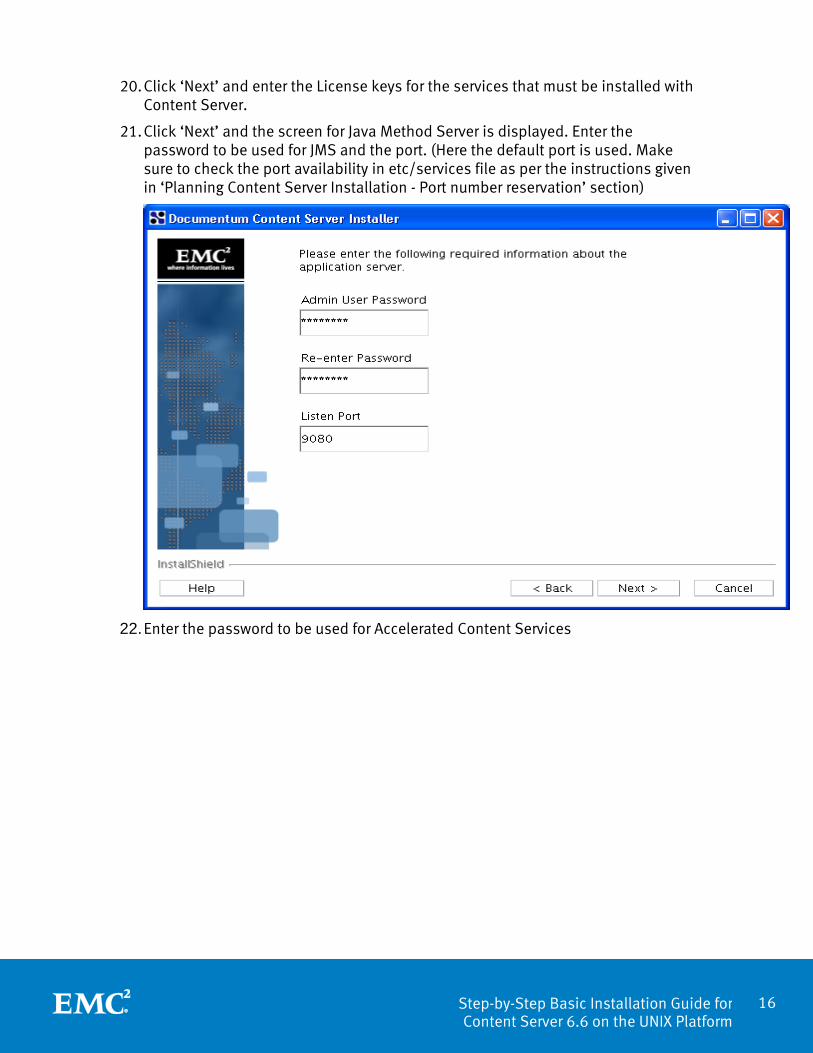
20. Click ‘Next’ and enter the License keys for the services that must be installed with Content Server.
21. Click ‘Next’ and the screen for Java Method Server is displayed. Enter the password to be used for JMS and the port. (Here the default port is used. Make sure to check the port availability in etc/services file as per the instructions given in ‘Planning Content Server Installation - Port number reservation’ section)
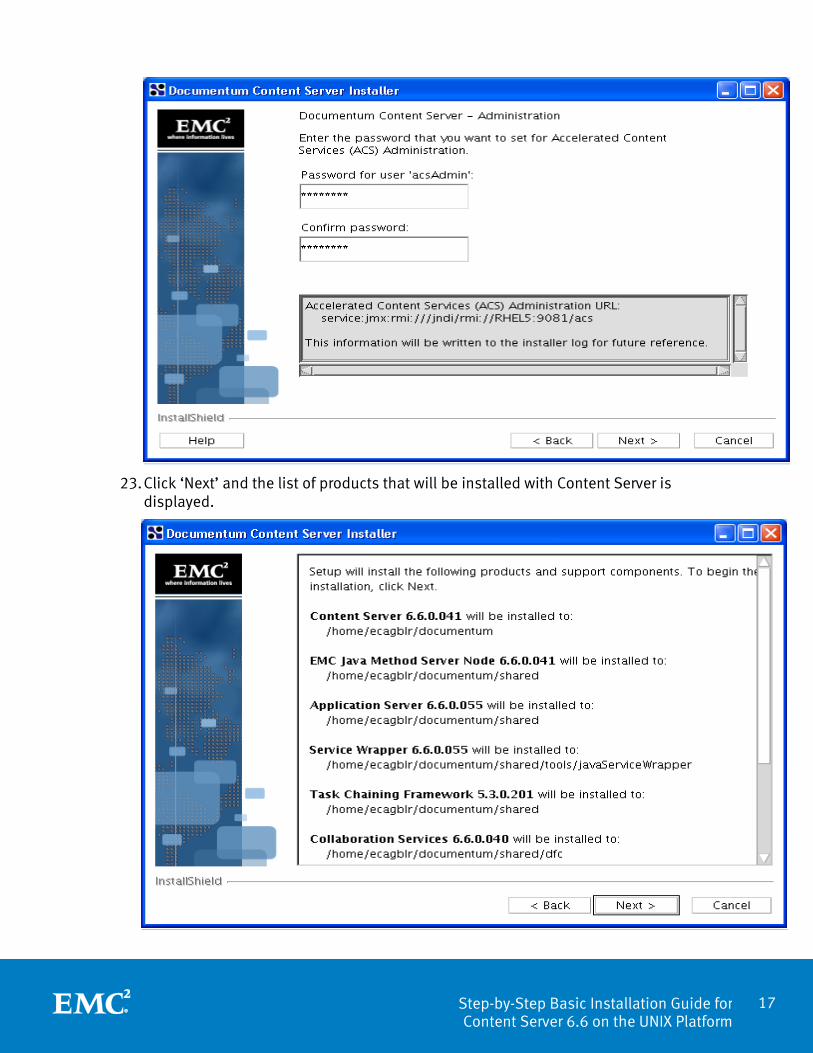
22. Enter the password to be used for Accelerated Content Services
17 Step-by-Step Basic Installation Guide for Content Server 6.6 on the UNIX Platform
23. Click ‘Next’ and the list of products that will be installed with Content Server is displayed.
18 Step-by-Step Basic Installation Guide for Content Server 6.6 on the UNIX Platform
24. Click ‘Next’ and if the wizard prompts you to run the ‘dm_root_task’, specify the root password. Optionally, this script can be skipped here and run after the Content Server installation is completed. (Refer to ‘Planning Content Server Installation – dm_root_task’ section for more details).
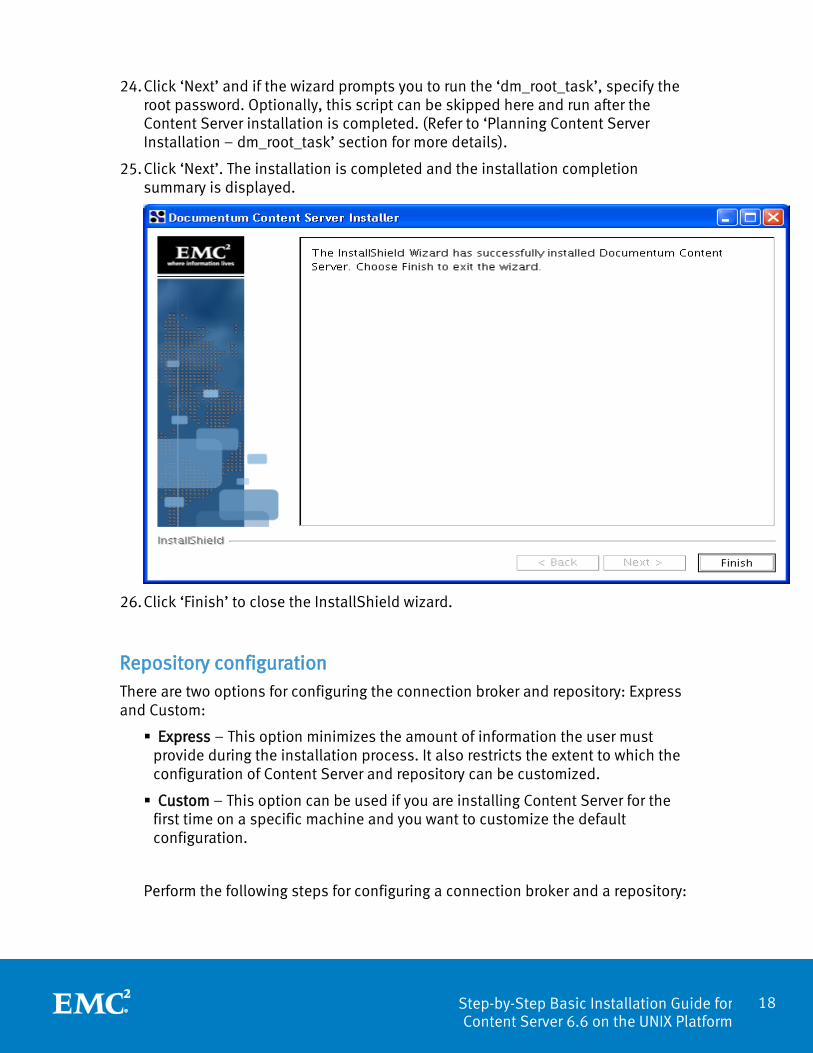
25. Click ‘Next’. The installation is completed and the installation completion summary is displayed.
26. Click ‘Finish’ to close the InstallShield wizard.
Repository configuration There are two options for configuring the connection broker and repository: Express and Custom:
Express – This option minimizes the amount of information the user must provide during the installation process. It also restricts the extent to which the configuration of Content Server and repository can be customized.
Custom – This option can be used if you are installing Content Server for the first time on a specific machine and you want to customize the default configuration.
Perform the following steps for configuring a connection broker and a repository:
19 Step-by-Step Basic Installation Guide for Content Server 6.6 on the UNIX Platform
1. Add Service entries, including secure connection, in the /etc/services file, by logging in as a root user. Make sure the selected port does not conflict with the port number of any existing service in the file.
An example entry is as follows:
ecagblr 49000/tcp # 6.6 Repository
ecagblr_s 49001/tcp # 6.6 Secure Repository
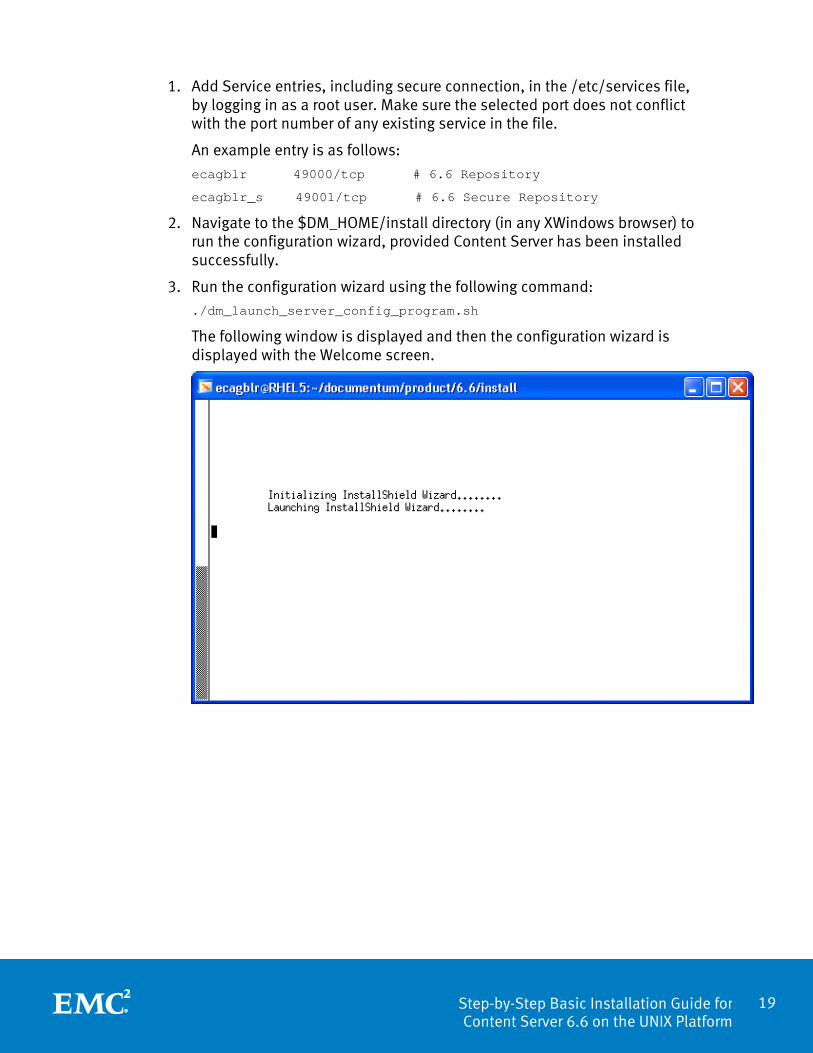
2. Navigate to the $DM_HOME/install directory (in any XWindows browser) to run the configuration wizard, provided Content Server has been installed successfully.
3. Run the configuration wizard using the following command:
./dm_launch_server_config_program.sh
The following window is displayed and then the configuration wizard is displayed with the Welcome screen.

20 Step-by-Step Basic Installation Guide for Content Server 6.6 on the UNIX Platform
4. Click ‘Next’. The screen that allows you to select the Configuration type is displayed. Choose either ‘Express’ or ‘Custom’ and follow the corresponding section notes given below.
Installation Using Express Configuration
5. If you want to use Express option for configuration, select ‘Express’ checkbox and click Next.
Note: Express install does not allow the capability of setting directory paths. This should not be used if you are creating an alternate directory for Data storage location.
21 Step-by-Step Basic Installation Guide for Content Server 6.6 on the UNIX Platform
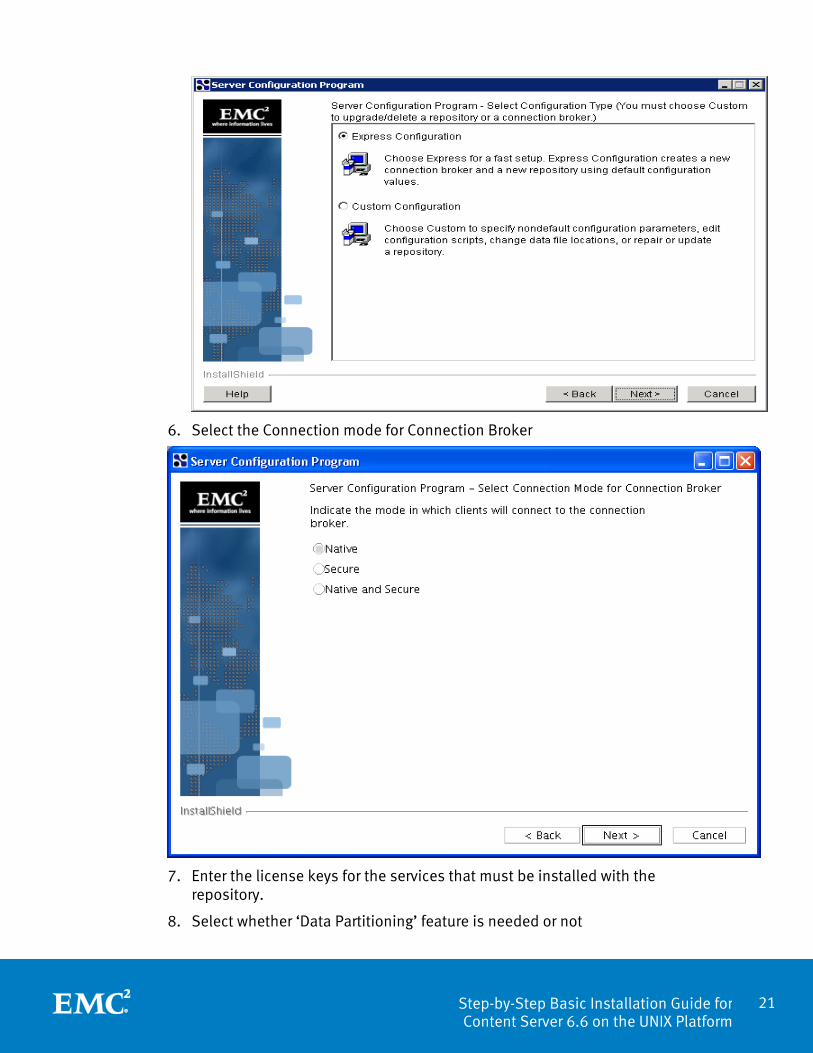
6. Select the Connection mode for Connection Broker
7. Enter the license keys for the services that must be installed with the repository.
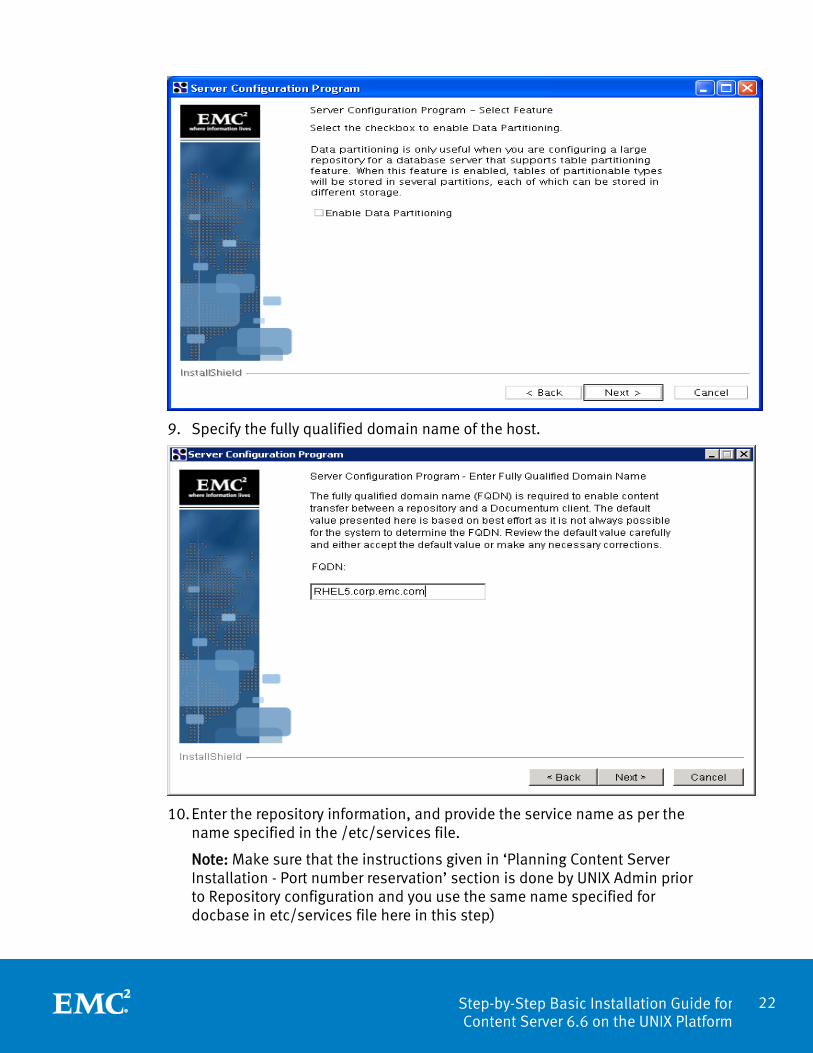
8. Select whether ‘Data Partitioning’ feature is needed or not
22 Step-by-Step Basic Installation Guide for Content Server 6.6 on the UNIX Platform
9. Specify the fully qualified domain name of the host.
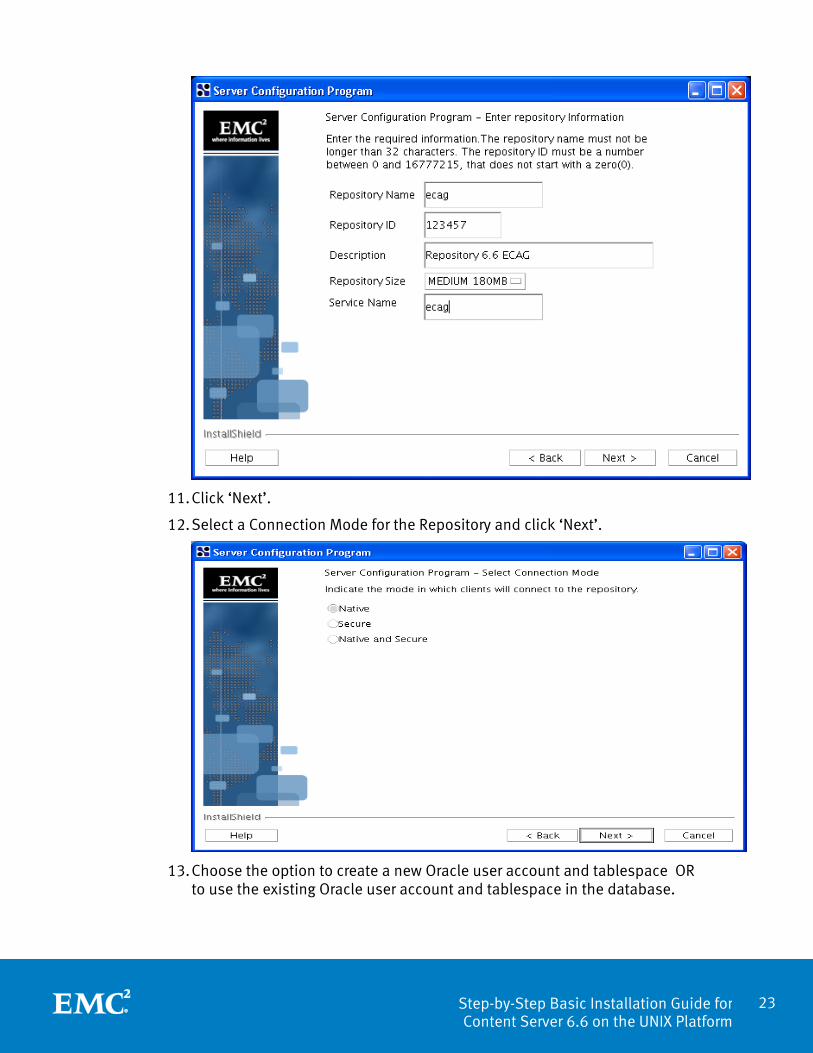
10. Enter the repository information, and provide the service name as per the name specified in the /etc/services file.
Note: Make sure that the instructions given in ‘Planning Content Server Installation - Port number reservation’ section is done by UNIX Admin prior to Repository configuration and you use the same name specified for docbase in etc/services file here in this step)
23 Step-by-Step Basic Installation Guide for Content Server 6.6 on the UNIX Platform
11. Click ‘Next’.
12. Select a Connection Mode for the Repository and click ‘Next’.
13. Choose the option to create a new Oracle user account and tablespace OR to use the existing Oracle user account and tablespace in the database.
24 Step-by-Step Basic Installation Guide for Content Server 6.6 on the UNIX Platform
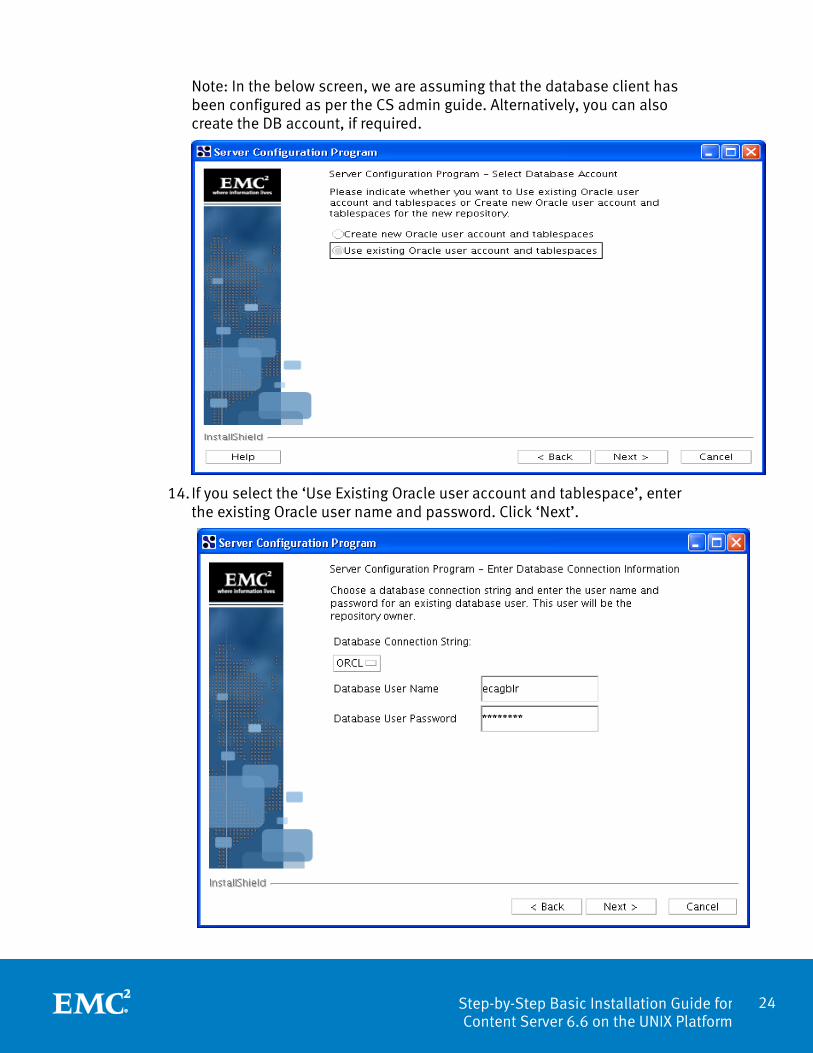
Note: In the below screen, we are assuming that the database client has been configured as per the CS admin guide. Alternatively, you can also create the DB account, if required.
14. If you select the ‘Use Existing Oracle user account and tablespace’, enter the existing Oracle user name and password. Click ‘Next’.

25 Step-by-Step Basic Installation Guide for Content Server 6.6 on the UNIX Platform
After this step, the database gets configured and other configuration scripts are executed implicitly. This may take some time to execute, displaying the progress bar.
15. If the configuration is successful, a confirmation message is displayed in the next screen. Click ‘Next’.
16. Select whether to enable XML Store for the repository

26 Step-by-Step Basic Installation Guide for Content Server 6.6 on the UNIX Platform
If checkbox is selected, the path to install XML store is displayed in next screen. User can modify the value if needed. Click ‘Next’.
17. Finally the Java Method Server gets started.
18. In the last stage, a list of repositories and the new connection broker with their details is displayed.
19. Click ‘Finish’ to close the wizard.
Installation using Custom Configuration
1. This option gives more flexibility in specifying your options while configuring the repository.
27 Step-by-Step Basic Installation Guide for Content Server 6.6 on the UNIX Platform
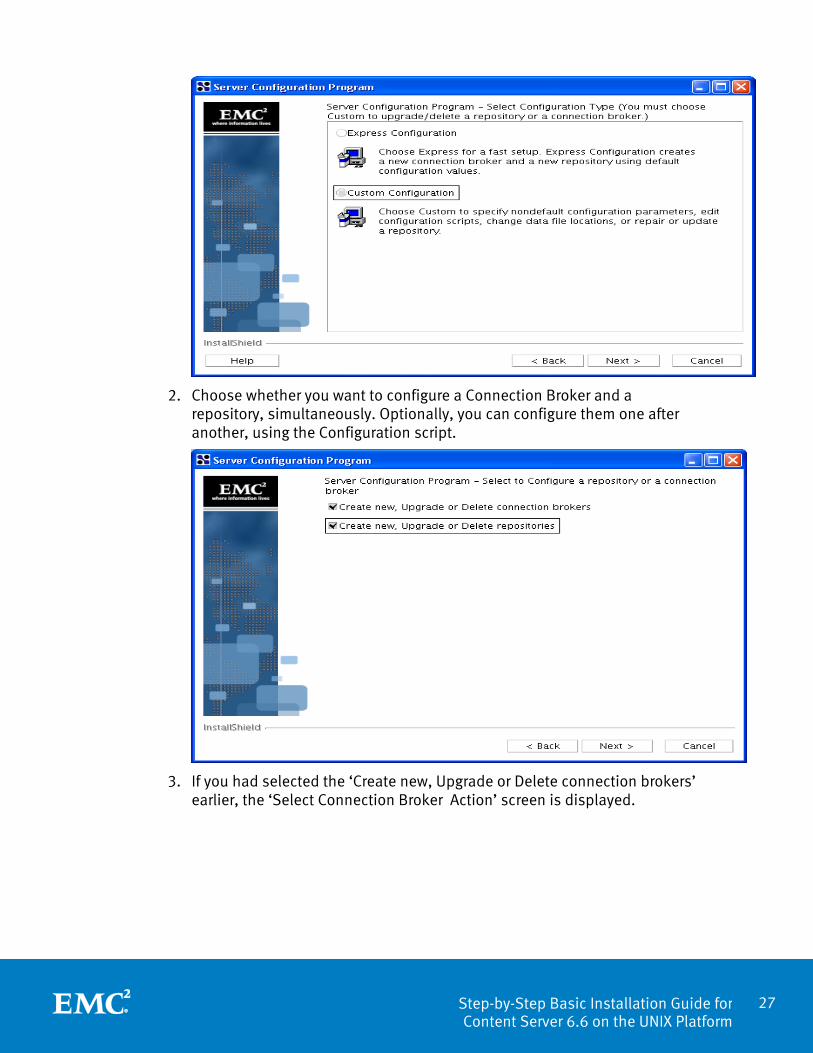
2. Choose whether you want to configure a Connection Broker and a repository, simultaneously. Optionally, you can configure them one after another, using the Configuration script.
3. If you had selected the ‘Create new, Upgrade or Delete connection brokers’ earlier, the ‘Select Connection Broker Action’ screen is displayed.
28 Step-by-Step Basic Installation Guide for Content Server 6.6 on the UNIX Platform
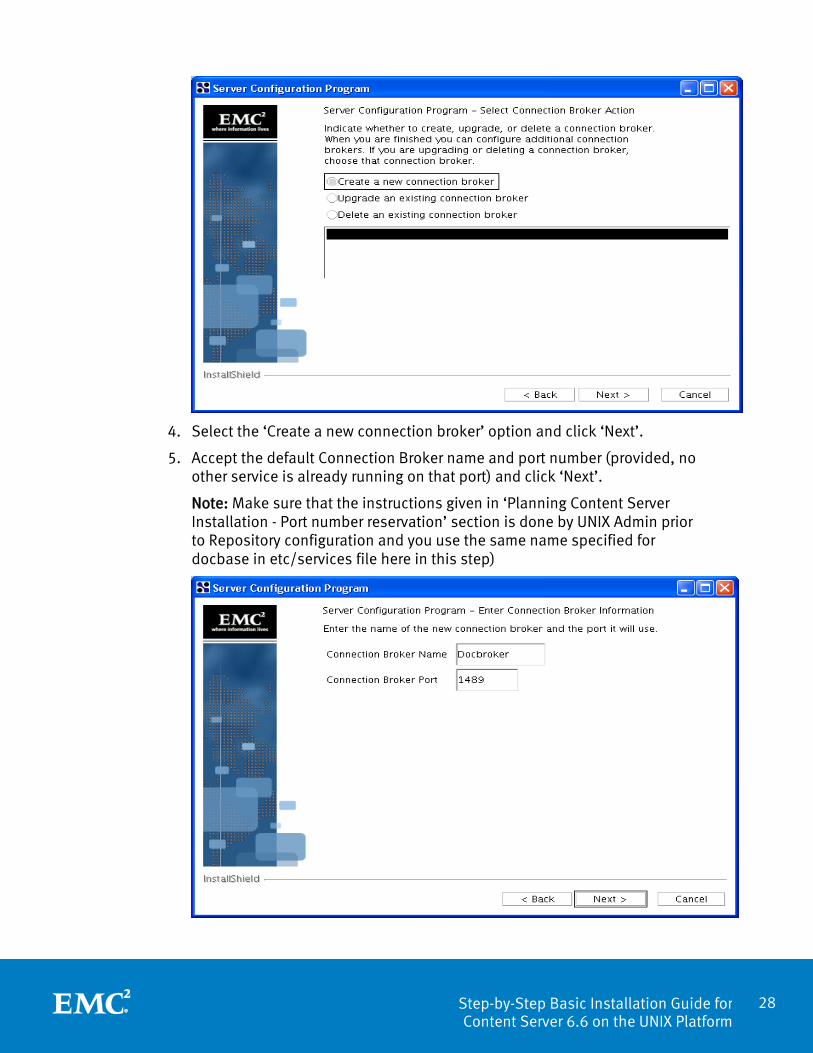
4. Select the ‘Create a new connection broker’ option and click ‘Next’.
5. Accept the default Connection Broker name and port number (provided, no other service is already running on that port) and click ‘Next’.
Note: Make sure that the instructions given in ‘Planning Content Server Installation - Port number reservation’ section is done by UNIX Admin prior to Repository configuration and you use the same name specified for docbase in etc/services file here in this step)
29 Step-by-Step Basic Installation Guide for Content Server 6.6 on the UNIX Platform
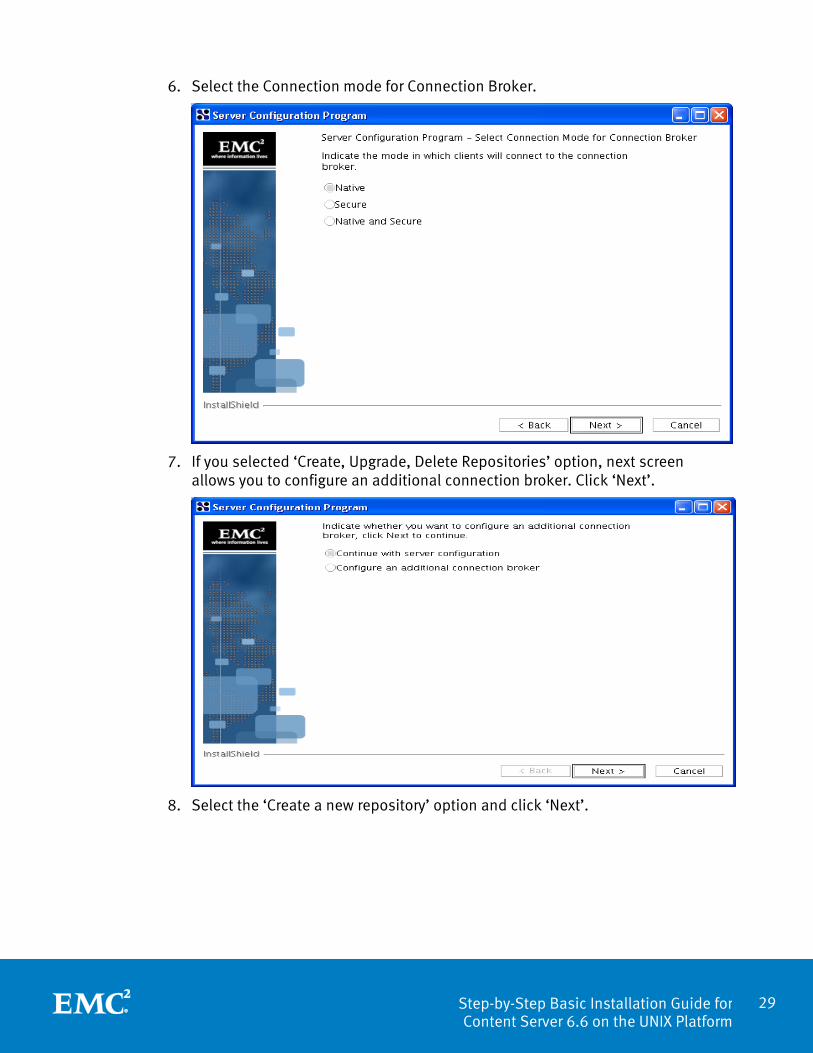
6. Select the Connection mode for Connection Broker.
7. If you selected ‘Create, Upgrade, Delete Repositories’ option, next screen allows you to configure an additional connection broker. Click ‘Next’.
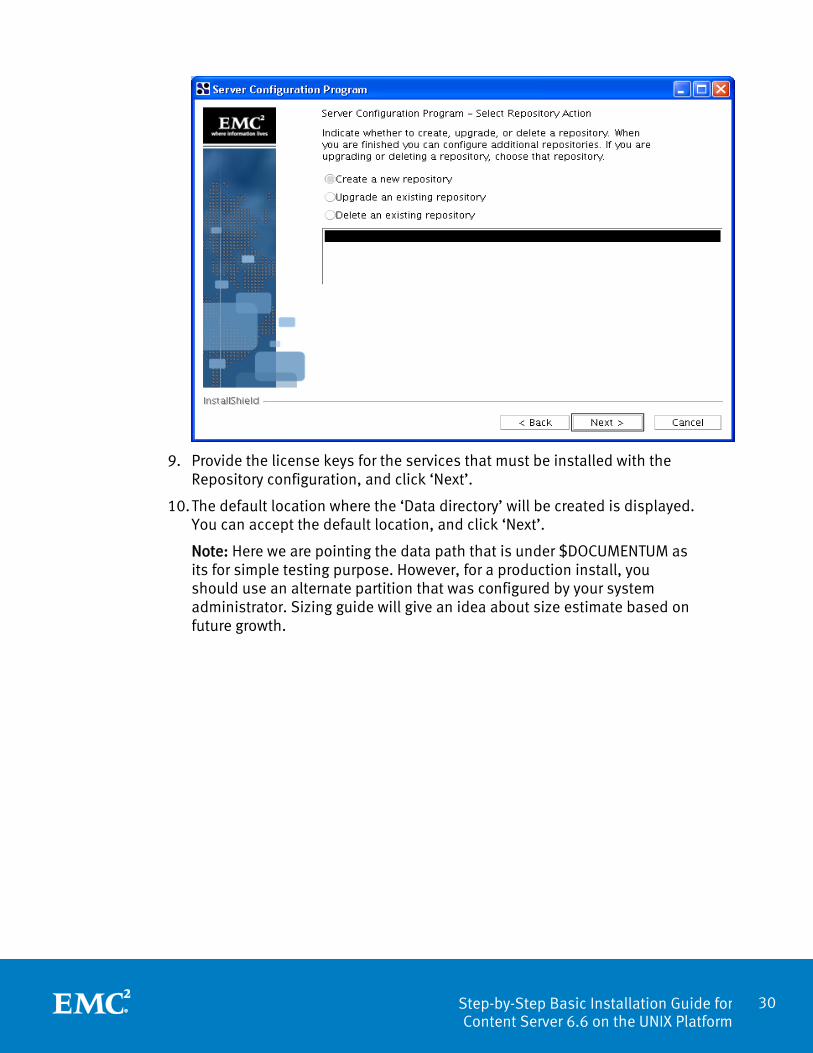
8. Select the ‘Create a new repository’ option and click ‘Next’.
30 Step-by-Step Basic Installation Guide for Content Server 6.6 on the UNIX Platform
9. Provide the license keys for the services that must be installed with the Repository configuration, and click ‘Next’.
10. The default location where the ‘Data directory’ will be created is displayed. You can accept the default location, and click ‘Next’.
Note: Here we are pointing the data path that is under $DOCUMENTUM as its for simple testing purpose. However, for a production install, you should use an alternate partition that was configured by your system administrator. Sizing guide will give an idea about size estimate based on future growth.

31 Step-by-Step Basic Installation Guide for Content Server 6.6 on the UNIX Platform
11. The default ‘share directory’ is displayed. Click ‘Next’.
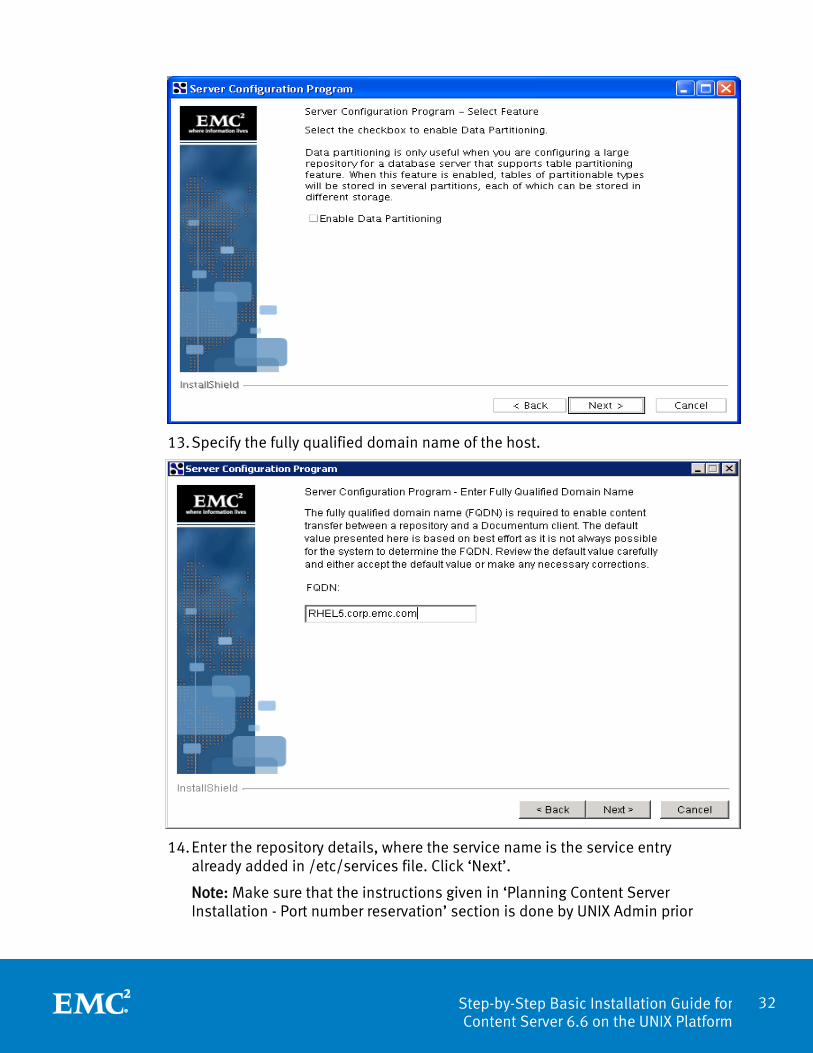
12. Select whether ‘Data Partitioning’ feature is needed or not
32 Step-by-Step Basic Installation Guide for Content Server 6.6 on the UNIX Platform
13. Specify the fully qualified domain name of the host.
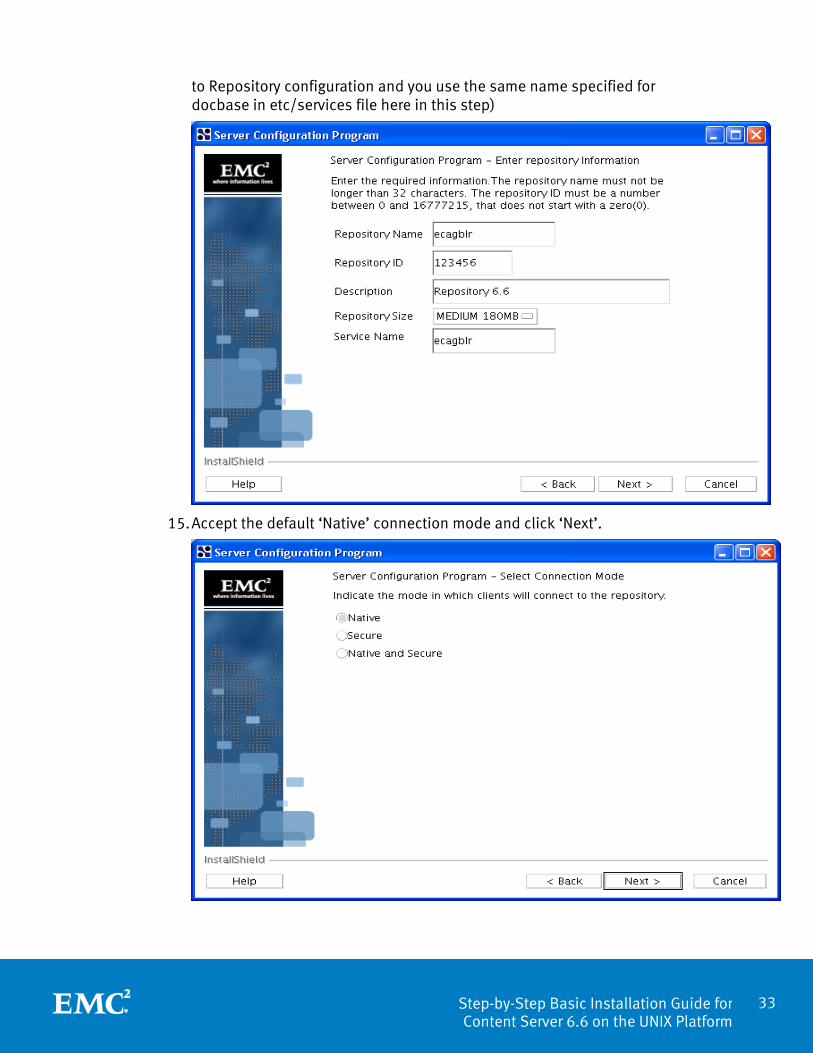
14. Enter the repository details, where the service name is the service entry already added in /etc/services file. Click ‘Next’.
Note: Make sure that the instructions given in ‘Planning Content Server Installation - Port number reservation’ section is done by UNIX Admin prior
33 Step-by-Step Basic Installation Guide for Content Server 6.6 on the UNIX Platform
to Repository configuration and you use the same name specified for docbase in etc/services file here in this step)
15. Accept the default ‘Native’ connection mode and click ‘Next’.
34 Step-by-Step Basic Installation Guide for Content Server 6.6 on the UNIX Platform
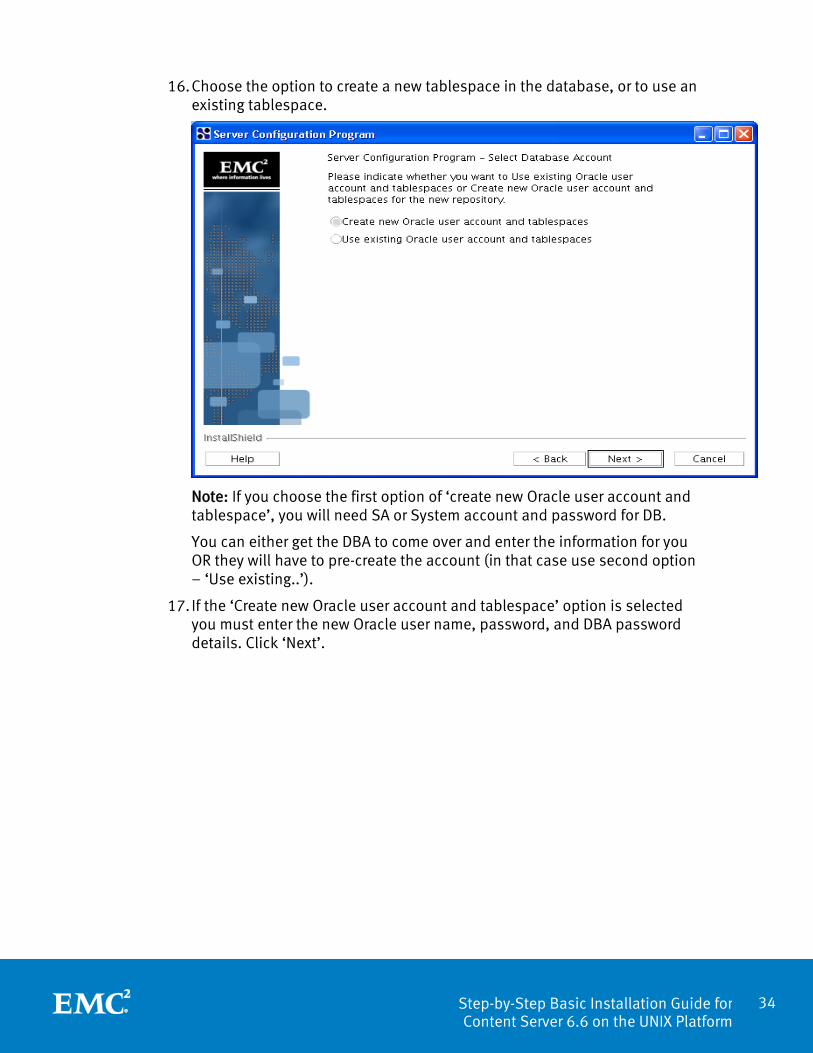
16. Choose the option to create a new tablespace in the database, or to use an existing tablespace.
Note: If you choose the first option of ‘create new Oracle user account and tablespace’, you will need SA or System account and password for DB.
You can either get the DBA to come over and enter the information for you OR they will have to pre-create the account (in that case use second option – ‘Use existing..’).
17. If the ‘Create new Oracle user account and tablespace’ option is selected you must enter the new Oracle user name, password, and DBA password details. Click ‘Next’.

35 Step-by-Step Basic Installation Guide for Content Server 6.6 on the UNIX Platform
18. The location of the repository files is displayed in the next screen. Click ‘Next’.
19. The next screen displays the script for creating a tablespace. Click ‘Next’.

36 Step-by-Step Basic Installation Guide for Content Server 6.6 on the UNIX Platform
20. The ‘Server Initialization’ screen is displayed. Click ‘Next’.
This script takes some time to execute, showing the progress bar. You must wait for the configuration to complete.
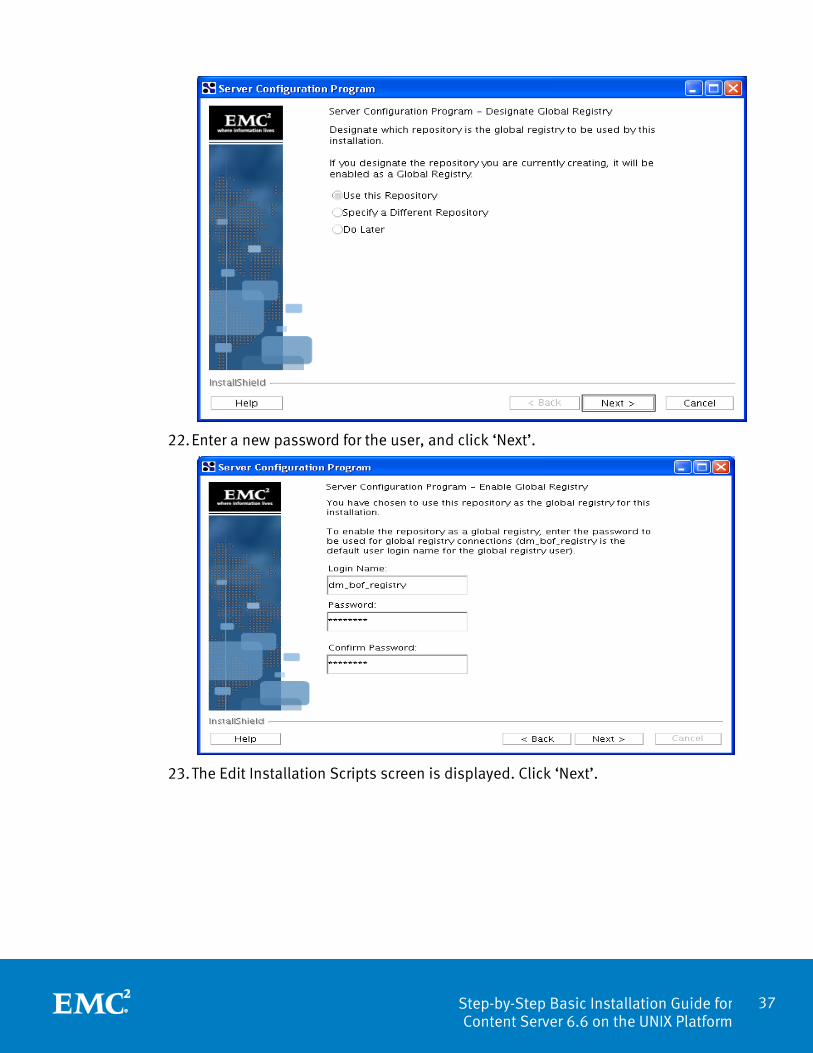
21. The Designate Global Registry screen is displayed. Accept the default selection, and click ‘Next’.
37 Step-by-Step Basic Installation Guide for Content Server 6.6 on the UNIX Platform
22. Enter a new password for the user, and click ‘Next’.
23. The Edit Installation Scripts screen is displayed. Click ‘Next’.

38 Step-by-Step Basic Installation Guide for Content Server 6.6 on the UNIX Platform
This script takes some time to execute, showing the progress bar.
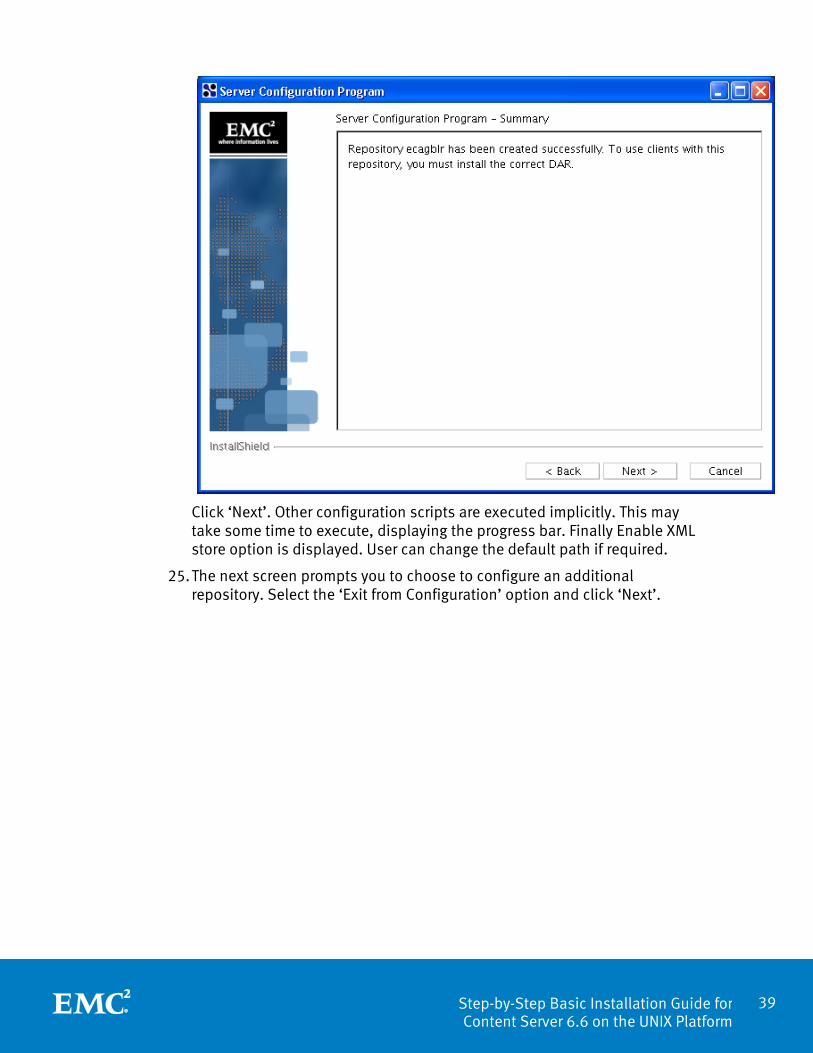
24. If there are no errors during the execution of the script, the next screen indicates that the new repository was created successfully. Click ‘Next’.
39 Step-by-Step Basic Installation Guide for Content Server 6.6 on the UNIX Platform
Click ‘Next’. Other configuration scripts are executed implicitly. This may take some time to execute, displaying the progress bar. Finally Enable XML store option is displayed. User can change the default path if required.
25. The next screen prompts you to choose to configure an additional repository. Select the ‘Exit from Configuration’ option and click ‘Next’.

40 Step-by-Step Basic Installation Guide for Content Server 6.6 on the UNIX Platform
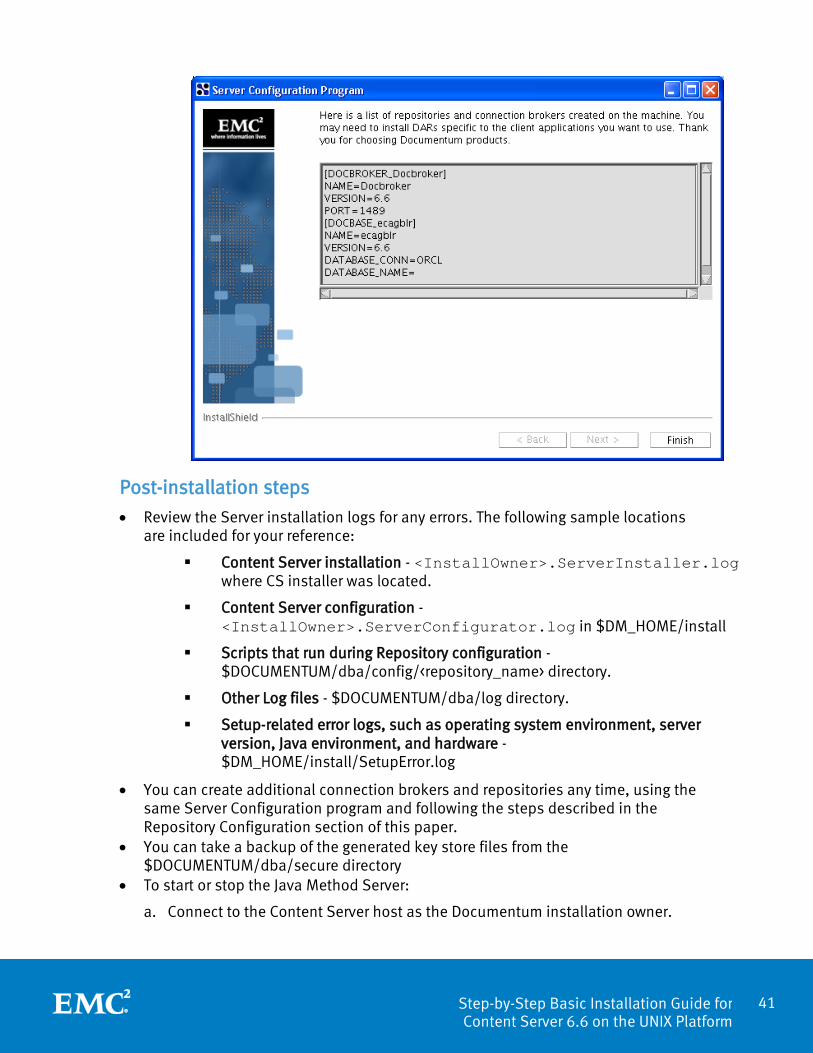
26. Finally the Java Method Server gets started.
27. The summary screen is displayed indicating the details of the configuration. Click ‘Finish’.
41 Step-by-Step Basic Installation Guide for Content Server 6.6 on the UNIX Platform
Post-installation steps
• Review the Server installation logs for any errors. The following sample locations are included for your reference:
Content Server installation - <InstallOwner>.ServerInstaller.log where CS installer was located.
Content Server configuration - <InstallOwner>.ServerConfigurator.log in $DM_HOME/install
Scripts that run during Repository configuration - $DOCUMENTUM/dba/config/<repository_name> directory.
Other Log files - $DOCUMENTUM/dba/log directory.
Setup-related error logs, such as operating system environment, server version, Java environment, and hardware - $DM_HOME/install/SetupError.log
• You can create additional connection brokers and repositories any time, using the same Server Configuration program and following the steps described in the Repository Configuration section of this paper.
• You can take a backup of the generated key store files from the $DOCUMENTUM/dba/secure directory
• To start or stop the Java Method Server:
a. Connect to the Content Server host as the Documentum installation owner.

42 Step-by-Step Basic Installation Guide for Content Server 6.6 on the UNIX Platform
b. Navigate to $DOCUMENTUM_SHARED/<application_server>/server
c. Run the startMethodServer.sh or stopMethodServer.sh script.
• To start or stop the Connection Broker, navigate to the $DOCUMENTUM/dba directory and run the scripts:
Command to start the connection broker - dm_launch_Docbroker
Command to stop the connection broker - dm_stop_Docbroker
• To start or stop a repository, navigate to the $DOCUMENTUM/dba directory and run the scripts:
Command to start a repository - dm_start_<repository-name>
Command to stop a repository - dm_shutdown_<repository-name>
Conclusion This white paper provides most of the details and procedures required to quickly get started with the process of installing Documentum Content Server 6.6 on a UNIX system.
References You can refer to the following documents for more information on installing upgrading, or uninstalling Documentum Content Server:
• Documentum Content Server Installation Guide, 6.6 • Documentum Content Server Release Notes, Version 6.6 • Documentum Content Server Fundamentals Guide, Version 6.6
You can access the above documents at the following locations
• EMC Documentum product download site
https://emc.subscribenet.com/
• EMC Power link
http://powerlink.emc.com/