basic principle and step-by-step procedure of abdominal ... · the surgery journal vol. 5 suppl....
TRANSCRIPT

Basic Principle and Step-by-Step Procedure ofAbdominal Hysterectomy: Part 2Ikuo Konishi, MD, PhD1
1National Hospital Organization, Kyoto Medical Center, Kyoto, Japan
Surg J 2019;5(suppl S1):S11–S21.
Address for correspondence Ikuo Konishi, MD, PhD, National HospitalOrganization, Kyoto Medical Center, Fukakusa Mukaihata-cho, Fushimi-ku,Kyoto 612-8555, Japan (e-mail: [email protected]).
Preoperative Evaluation
Clinical conference before surgery is very important for thepatient and the doctors. All ofmedical staffs, not only gynecol-ogists but also radiologists and pathologists if possible, shouldgather and discuss the precise diagnosis and the operativeprocedure.1 In case of uterinefibroids, the preoperative assess-ment is especially important, because the clinical diagnosis isnot pathological but just presumable. In fact, 5% of the casesdiagnosed preoperatively as benign are pathologically notusual leiomyomabut tumors of otherhistology such as cellularleiomyoma, dissecting leiomyoma, intravenous leiomyomato-sis, endometrial stromal sarcoma, smooth muscle tumor ofuncertain malignant potential, and leiomyosarcoma.
Thus, it is very important to confirm again the current caseasbenign leiomyomausingmagnetic resonance imaging (MRI)findings.2 IfMRI image shows that the tumorhas uniform low-intensity in T2-weighted image and well demarcated, it isabsolutely benign leiomyoma (►Fig. 1). Low-intensity withseveral furrow-likehigh-intensity stringsalso indicatesbenign(►Fig. 2). In MRI, however, T2-weighted image with hetero-geneous high-intensity and fine granular shadow representshigher cellularityof tumorcells.High-intensity inT1-weightedimage suggests the presence of intratumoral bleeding. Defectin contrast-enhanced image indicates the necrosis in thetumor. These MRI findings strongly suggest that this tumoris not usual leiomyoma butmay be leiomyosarcoma (►Fig. 3).When considering the possibility of sarcoma, the attitude ofsurgeon must change at hysterectomy. Especially, in case
planning myomectomy or planning laparoscopic surgery, itis much more serious for both careful explanation to thepatient and careful surgery with “non-touch” technique forthe tumor.
In addition, the direction of myoma growing is extremelyvarious, such as submucosal, subserosal, pedunculated, andretroperitoneal. This variation strongly influences the opera-tive procedure. In case of huge cervical myoma, the risk ofureteral injury increases significantly. Therefore, preoperativeplanning of the surgery along with looking at MRI findings isessential for the safe and reliable operation for the patient.
Surgical Steps
1. Opening Abdomen and Exploration↓
2. Round Ligament and Peritoneum↓
3. Infundibulopelvic Ligament and Adnexa↓
4. Mobilization of Bladder↓
5. Cardinal Ligament↓
6. Amputation and Closure of Vagina↓
7. Closing Abdomen
Keywords
► abdominalhysterectomy
► standard procedure► uterine fibroids► MRI
Abstract Abdominal hysterectomy is the ultimate standard operation among various gyneco-logic surgeries. However, the actual procedure for a patient varies substantiallyaccording to the morphological changes of the uterus and adnexa. Therefore, it isimportant to assess the deviation from standard and the difficulties in the procedureand to plan the modification of the operation at the preoperative conference. In thischapter, a standard step-by-step procedure for abdominal hysterectomy is described.
DOI https://doi.org/10.1055/s-0038-1676467.ISSN 2378-5128.
Copyright © 2019 by Thieme MedicalPublishers, Inc., 333 Seventh Avenue,New York, NY 10001, USA.Tel: +1(212) 584-4662.
THIEME
Precision Surgery in Obstetrics and Gynecology S11
Published online: 26.12.2018

Explanation of Procedures
Abdominal hysterectomy has been indicated frequently foruterine fibroids. Due to great variation in size and shapeof the uterus due to the various development of leiomyo-
mata, the surgical procedure often deviates from thestandard. However, gynecologic surgeon should havesome standard plan, and then modify it according to theanatomical variation. Here, a standard operation techniqueis presented.
Fig. 1 Magnetic resonance imaging (MRI) findings of typical benign leiomyomas. If MRI image shows that the tumor has uniform low-intensity inT2-weighted image and well demarcated, it is absolutely benign leiomyoma. (A) T1-weighted image. (B) T2-weighted image. (C) Hysterectomyspecimen of multiple benign leiomyomas.
Fig. 2 Magnetic resonance imaging findings of usual benign leiomyoma. Low-intensity in T2 with several furrow-like high-intensity strings alsoindicates benign leiomyoma. (A) T1-weighted image. (B) T2-weighted image. (C) Cut section of typical benign leiomyoma.
Fig. 3 Magnetic resonance imaging (MRI) findings of leiomyosarcoma. T2-weighted image with heterogeneous high-intensity and fine granularshadow represents higher cellularity of tumor cells. High-intensity in T1-weighted image suggests the presence of intratumoral bleeding. TheseMRI findings strongly suggest that this tumor is not usual leiomyoma but leiomyosarcoma. (A) T1-weighted image. (B) T2-weighted image.(C) Cut section of typical leiomyosarcoma.
The Surgery Journal Vol. 5 Suppl. S1/2019
Basic Principle and Step-by-Step Procedure of Abdominal Hysterectomy KonishiS12

Opening Abdomen and ExplorationPatient is laid in the supine position and urethral catheter isinserted for continuous bladder drainage. Keeping the blad-der empty is very important for safe operation. Trendelen-burg position is not adopted in the standard. The vaginalcavity is prepared by povidone-iodine before startingsurgery.
Usually, the primary operator stands on the left side ofpatient. The assistant or supervisor stands on the right sideand in front of the operator, and plays an important role bothin appropriate traction of the uterus and in showing clearlythe operative field.
The operator incises the abdominal wall longitudinallyfrom the pubis toward the umbilicus, then the fascia, and theperitoneum. The midline and longitudinal incision is thegolden standard for pelvic surgery to facilitate the surgicalprocedure and to avoid injury to vital structures, even in themodern era of laparoscopic surgery. Only if the uterus is notso large, transverse incision is preferred.
The intestines are softly put upward andmaintained withlarge gauze/sponge, and an appropriate operative field isobtained by the self-retaining retractor.
Before starting surgery, the operator should examine theuterus, adnexae, and the surrounding organs, and checkwhether unexpected abnormalities and/or adhesions existor not. If present, restoration of pelvic anatomy by release ofadhesions is mandatory for safer operation, except in thesurgery for malignancy where the cancer cells exist withinthe adhesion. If needed, the ascetic fluid is presented topathology laboratory for cytological examination.
Throughout the surgical procedure, the uterus is alwaysmaintained in the appropriate traction by the assistant.Usually so that, a pair of long and straight Kocher clampsare placed between the uterus and the adnexa. The tip ofclamp should be at the avascular and transparent space of
anterior and posterior of broad ligaments, and should notreach to the uterine vessels below. In the figures of thischapter, however, the clampwas not used and the uteruswastreated directly by the hand of assistant.
Round Ligament and PeritoneumSince gynecologic surgery is essentially the operation in theretroperitoneum, it is necessary for the operator to enter andexplore the retroperitoneal cavity. To do so, the operatormust identify the entrance most easy to access, that is, theround ligament. Even in case with distorted anatomy, roundligament can be identified easily. Therefore, hysterectomyusually begins with the round ligament.
The operator grasps and lifts the right-sided round liga-ment using the forceps, finds the transparent area beneaththe ligament, and inserts twice the needle with No. 1–0absorbable sutures. Then, tie and cut between the ligationswith the Cooper scissors. When cutting the ligaments orvessels, it is usually important to put the scissors vertically tothe ligament (►Fig. 4) After the cut, air will enter into theretroperitoneal cavity, the loose connective tissues fall down,and the cavity can be seen.
Tips and Warnings
There are two kinds of surgical procedure for the treat-ment of ligament. The standard is the clamp/cut first andthen ligate, and another is suture/ligation first and thencut. For treatment of the round and infundibulopelvicligaments, the latter method is usually employed due toits simplicity. In this case, however, the operator shouldnote that the suture tends to be loosen so that doubleligation is needed.
Fig. 4 Ligation and cut of round ligament. (Reproduced with permission from Konishi I. Basic procedure 2. In: Hiramatsu Y, Konishi I, Sakuragi N,Takeda S, eds. Mastering the Essential Surgical Procedures OGS NOW, No.2 Total Abdominal Hysterectomy (Japanese). Tokyo: Medical View;2010:56–73. Copyright © Medical View).
The Surgery Journal Vol. 5 Suppl. S1/2019
Basic Principle and Step-by-Step Procedure of Abdominal Hysterectomy Konishi S13
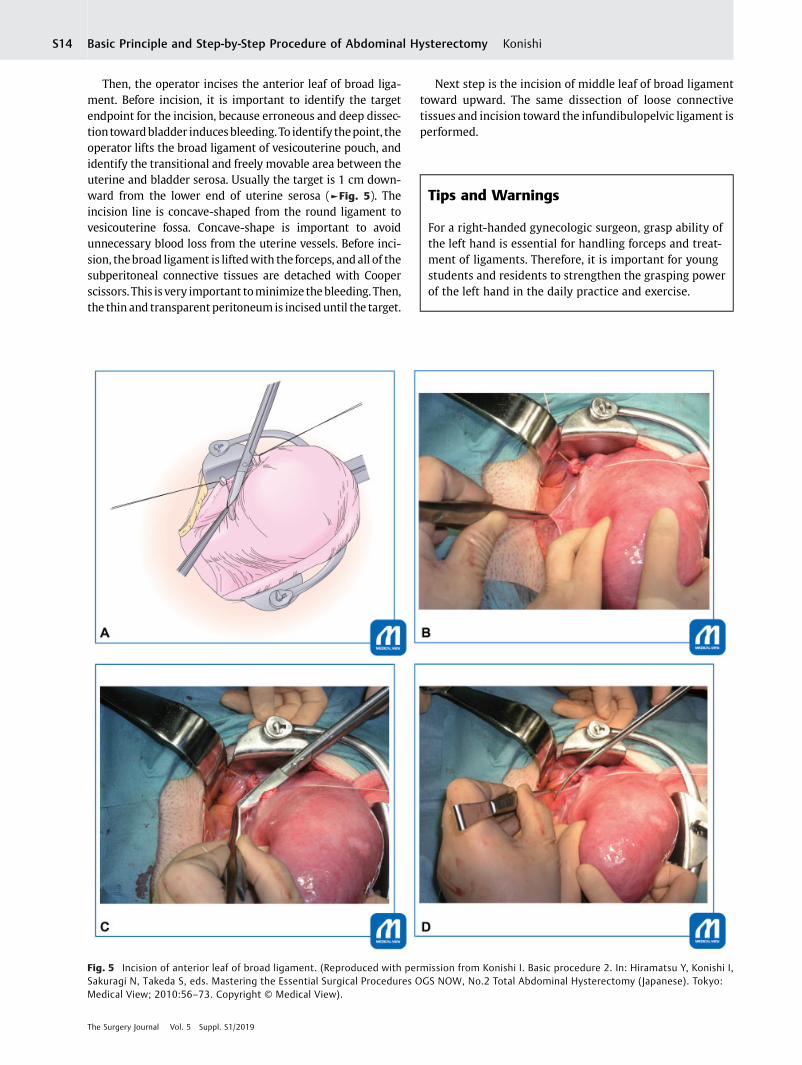
Then, the operator incises the anterior leaf of broad liga-ment. Before incision, it is important to identify the targetendpoint for the incision, because erroneous and deep dissec-tion towardbladder inducesbleeding. To identify thepoint, theoperator lifts the broad ligament of vesicouterine pouch, andidentify the transitional and freely movable area between theuterine and bladder serosa. Usually the target is 1 cm down-ward from the lower end of uterine serosa (►Fig. 5). Theincision line is concave-shaped from the round ligament tovesicouterine fossa. Concave-shape is important to avoidunnecessary blood loss from the uterine vessels. Before inci-sion, thebroad ligament is liftedwith the forceps, and all of thesubperitoneal connective tissues are detached with Cooperscissors. This is very important tominimize thebleeding. Then,the thin and transparent peritoneum is inciseduntil the target.
Next step is the incision of middle leaf of broad ligamenttoward upward. The same dissection of loose connectivetissues and incision toward the infundibulopelvic ligament isperformed.
Tips and Warnings
For a right-handed gynecologic surgeon, grasp ability ofthe left hand is essential for handling forceps and treat-ment of ligaments. Therefore, it is important for youngstudents and residents to strengthen the grasping powerof the left hand in the daily practice and exercise.
Fig. 5 Incision of anterior leaf of broad ligament. (Reproduced with permission from Konishi I. Basic procedure 2. In: Hiramatsu Y, Konishi I,Sakuragi N, Takeda S, eds. Mastering the Essential Surgical Procedures OGS NOW, No.2 Total Abdominal Hysterectomy (Japanese). Tokyo:Medical View; 2010:56–73. Copyright © Medical View).
The Surgery Journal Vol. 5 Suppl. S1/2019
Basic Principle and Step-by-Step Procedure of Abdominal Hysterectomy KonishiS14

Tips and Warnings
For peritoneal incision, the operator should tract theperitoneum intensively and then attach the scissorsalmost vertically to the peritoneum, push slightly, andscrape down all of the connective tissues beneath theperitoneum. Only a thin and transparent peritoneumremains and can be incisedwithout bleeding (O [good]). Ifthe connective tissues are incompletely detached, theveins and capillaries remain in the peritoneal side, and sothe incision results in bleeding (X [bad]). Such procedureis also important in case of detachment of ureter, bladder,and rectum from the neighboring tissues (►Fig. 6).
Tips and Warnings
For identification of the right ureter, the operator shoulduse the left hand, first insert the index finger in theretroperitoneal side, andattach thethumbtotheperitonealside of the posterior leaf of broad ligament.When touch theureter by these fingers, the operator feels the “snapping”sensation, being characteristic to ureter (►Fig. 7). Theoperator shouldpalpate theposterior leafofbroad ligamentusing his fingers, and confirm the ureter running 2 to 4 cmapart from the ovarian artery and vein. Then, insert thesuture needle apart from the ureter (►Fig. 8).
Infundibulopelvic Ligament and AdnexaIf the hysterectomy will be done along with salpingo-oophor-ectomy, the infundibulopelvic ligament shallbe cut.Here is the
first important point to identify the running of ureter toprevent the ureteral injury. The operator should palpate theposterior leaf of broad ligament using his fingers, and confirmthe ureter running 2 to 4 cm apart from the ovarian artery andvein. The ligament is ligated using 1–0 absorbable sutures, andis cut with Cooper scissors. Then, the upper stump of theligament should be again ligated for safety. To prevent post-operative bleeding, double ligation of the infundibulopelvicligament is always necessary in all gynecologic surgeries.
Fig. 6 Incision of peritoneum. (Reproduced with permission fromKonishi I. Basic procedure 2. In: Hiramatsu Y, Konishi I, Sakuragi N,Takeda S, eds. Mastering the Essential Surgical Procedures OGS NOW,No.2 Total Abdominal Hysterectomy (Japanese). Tokyo: Medical View;2010:56–73. Copyright © Medical View).
Fig. 8 Ligation and cut of infundibulopelvic ligament. (Reproduced withpermission from Konishi I. Basic procedure 2. In: Hiramatsu Y, Konishi I,Sakuragi N, Takeda S, eds. Mastering the Essential Surgical Procedures OGSNOW, No.2 Total Abdominal Hysterectomy (Japanese). Tokyo: MedicalView; 2010:56–73. Copyright © Medical View).
Fig. 7 Identification of the right ureter. (Reproduced with permissionfrom Konishi I. Basic procedure 2. In: Hiramatsu Y, Konishi I, SakuragiN, Takeda S, eds. Mastering the Essential Surgical Procedures OGSNOW, No.2 Total Abdominal Hysterectomy (Japanese). Tokyo:Medical View; 2010:56–73. Copyright © Medical View).
The Surgery Journal Vol. 5 Suppl. S1/2019
Basic Principle and Step-by-Step Procedure of Abdominal Hysterectomy Konishi S15

Tips and Warnings
For identification of the right ureter, the operator shoulduse the left hand, first insert the index finger in the retro-peritoneal side, and attach the thumb to the peritoneal sideof the posterior leaf of broad ligament. When touch theureter by these fingers, the operator feels the “snapping”sensation, being characteristic to ureter. Thus, the operatorcan identify the ureter running, and confirm the insertionpoint of the suture needle is apart from the ureter.
If the adnexal organs are to be conserved, both the ovarianligament and the tube are clampedwith the two forceps, cut,and then ligated with the 8-figure sutures. Double ligation isalso needed here, since thefirst suture tends to slide off fromthe stump of ligament. Recently, only salpingectomy isfrequently performed considering the possible tubal originof ovarian cancer. In this case, mesosalpinx is clampedseveral times, cut, and ligated.
Then, the posterior part of broad ligament is incised. Here,it is also important to determine the target endpoint ofincision, that is the uterine origin of sacrouterine ligament.The operator should tract the peritoneum intensively andthen attach the scissors almost vertically to the peritoneum,push slightly, and scrape down all of the connective tissuesbeneath the peritoneum. Sometimes, the operator can seehere the running of the ureter (►Fig. 9).
Tips and Warnings
While incising the peritoneum, the operator should tract itintensively and then attach the scissors almost vertically tothe peritoneum, push slightly, and scrape down all of theconnective tissues beneath theperitoneum.Only a thin andtransparent peritoneum remains and can be incisedwithoutbleeding. If theconnective tissues are incompletelydetached, the veins and capillaries remain in theperitonealside, and so the incision results in bleeding. Such procedureis also important in case of detachment of ureter, bladder,and rectum from the neighboring tissues.
All of the above procedures are done for the left-sidedround ligament, broad ligament, and infundibulopelvic liga-ment or adnexa. Now, all of the peritoneal surface except thecul-de-sac peritoneum are incised, and the uterus is nowalmost free from the serosa. From now, the surgical proce-dures in the retroperitoneal space start.
Mobilization of BladderIt is important to start the bladder mobilization at themidline of cervix, to prevent bleeding from the lateral-sidedvesicouterine ligaments. Before the start of mobilization ofbladder, therefore, the operator should palpate the cervixfrom both anterior and posterior sides of uterus to confirmthe position of the cervix. This is because the cervix fre-quently deviates laterally due to fibroids or adhesion(►Fig. 10). Palpation is also essential to assess the heightof lower end of cervix or vaginal fornix.
Fig. 9 Incision of posterior leaf of broad ligament. (Reproduced with permission from Konishi I. Basic procedure 2. In: Hiramatsu Y, Konishi I,Sakuragi N, Takeda S, eds. Mastering the Essential Surgical Procedures OGS NOW, No.2 Total Abdominal Hysterectomy (Japanese). Tokyo:Medical View;2010:56–73. Copyright © Medical View).
Fig. 10 Palpation of uterine cervix. (Reproduced with permissionfrom Konishi I. Basic procedure 2. In: Hiramatsu Y, Konishi I, SakuragiN, Takeda S, eds. Mastering the Essential Surgical Procedures OGSNOW, No.2 Total Abdominal Hysterectomy (Japanese). Tokyo:Medical View; 2010:56–73. Copyright © Medical View).
The Surgery Journal Vol. 5 Suppl. S1/2019
Basic Principle and Step-by-Step Procedure of Abdominal Hysterectomy KonishiS16

When the operator lifts the cut-end of anterior leaf of broadligament, the connective tissues in the vesicouterine pouchspontaneously sink,where thefirst incision should bemade inthe center of cervix. Pushing the Cooper scissors vertically tocervix and cutting the connective tissues will disclose thesurface of cervix, which is white, smooth, and shining. Then,the connective tissues and the bladder are dissected down-ward using the scissors from the cervix completely until theportion of lower end of cervix (►Fig. 11). Then, the operatorwill treat the lateral vesicouterine ligaments. Loose connectivetissueson thesurfaceof ligaments are carefully removed. Sinceit is rich in vasculature, the dissection should not be donedeeply to avoid bleeding. The bladder is nowmobilized to theappropriate level of height, �1 cm below the vaginal fornix.
The L-shaped retractor is placed at the detached portion,pushing the bladder downward (►Fig. 12).
Usually, mobilization of rectum from the uterus is notnecessary, because the operator can directly approach theposterior wall of vagina through the cul-de-sac peritoneum.In the case complicated with endometriosis, however, thecul-de-sac is closed and the rectum is adhered to the vaginaand cervix. In such case, the dissection of the rectum fromthe cervix is needed. Before this procedure, the operatorshould identify the sacrouterine ligament for anatomicalunderstanding, and the ligaments are cut and ligated beforehysterectomy. Cutting the sacrouterine ligament will alwaysfacilitate the movability of uterus for easier hysterectomy.
Cardinal LigamentNow,it isthetimeforclampingandcuttingtheuterinevesselsofcardinal ligament.Beforethat, it isnecessarytocarefullydissectandremovethelooseconnectivetissueontheuterinearteryandvein. Removal of the connective tissues on the vesicouterineligament is also important for prevention of ureteral injury.Thus,theascendingbranchoftheuterinearteryandveinswillbeskeletonized (►Fig. 13). To avoid the ureteral injury, it is veryimportant, by the assistant, to keep the uterus in the tractionupward and to push the bladder downward using L-shapedretractor. And then, the operator should palpate the ureterrunning along the posterior leaf of broad ligament, to identify
thelevelofureterenteringthecardinalligament1to3cmlateralfrom the cervix and 2 to 4 cmbelow the uterine artery.
In general, the cardinal ligament including uterine artery andveinswill be cut twotimesuntil reaching thevaginal fornix (two-steps clamping for cardinal ligament). Thefirst clamp is placed atan angle of 45° for the upper half of the cervix, so that the tip ofclampreaching1cmbelow theheightof internal os of theuterus.At clamping, it is desirable to have the clamp slide off the surfaceof the cervix, to all of vessels be completely clamped (►Fig. 14).When the first clamp is placed, the operator is asked to palpateagain theureter, andwill confirm thedistancebetween the tip ofclamp and the ureter, that is usually 2 to 3 cm apart. Anotherupperclampisthenplacedtopreventbackflowbleedingfromtheuterus. Then, the upper half of ligament is cut with Cooperscissors, needled, and ligated with 1–0 absorbable suture. Thecut-end of uterine artery needs double ligation (►Fig. 15).
Fig. 11 Mobilizationof bladder. To prevent bleeding from the lateral vesicouterine ligaments, it is important to start the dissection at themidline of cervix.When lifting the anterior leaf of broad ligament in the center, the connective tissues in the vesicouterine pouch sink. Pushing theCooper scissors vertically tocervix and cutting the sinking tissues will disclose the surface of cervix. Then, the connective tissues and the bladder are dissected downward using thescissors. (Reproducedwithpermission fromKonishi I. Basic procedure2. In: HiramatsuY, Konishi I, SakuragiN, Takeda S, eds.Mastering the Essential SurgicalProcedures OGS NOW, No.2 Total Abdominal Hysterectomy (Japanese). Tokyo: Medical View; 2010:56–73. Copyright © Medical View).
Fig. 12 Application of L-shaped retractor. (Reproduced with per-mission from Konishi I. Basic procedure 2. In: Hiramatsu Y, Konishi I,Sakuragi N, Takeda S, eds. Mastering the Essential Surgical ProceduresOGS NOW, No.2 Total Abdominal Hysterectomy (Japanese). Tokyo:Medical View; 2010:56–73. Copyright © Medical View).
The Surgery Journal Vol. 5 Suppl. S1/2019
Basic Principle and Step-by-Step Procedure of Abdominal Hysterectomy Konishi S17

Fig. 13 Dissection of connective tissues on cardinal ligament. (Reproduced with permission from Konishi I. Basic procedure 2. In: Hiramatsu Y,Konishi I, Sakuragi N, Takeda S, eds. Mastering the Essential Surgical Procedures OGS NOW, No.2 Total Abdominal Hysterectomy (Japanese).Tokyo: Medical View; 2010:56–73. Copyright © Medical View).
Fig. 14 Cutand ligationofcardinal ligament. Cardinal ligament includinguterineartery andveins is cut twotimesuntil reaching thevaginal fornix (two-stepclamping). First, the operator should palpate the ureter running. Then, the first clamp is placed at an angle of 45° for the upper half of the cervix, so that thetip of clamp reaches 1 cm below the height of internal os of uterus. At clamping, it is desirable to have the clamp slide off the surface of the cervix, to all ofvessels be completely clamped. Another upper clamp is placed to prevent backflow bleeding from the uterus. The operator is asked to palpate again theureter, and confirm the distance between the tip of clamp and the ureter, that is usually 2 to 3 cm apart. Then, the upper half of ligament is cut with Cooperscissors. (Reproducedwithpermission fromKonishi I. Basic procedure2. In: HiramatsuY, Konishi I, SakuragiN, Takeda S, eds.Mastering the Essential SurgicalProcedures OGS NOW, No.2 Total Abdominal Hysterectomy (Japanese). Tokyo: Medical View; 2010:56–73. Copyright © Medical View).
The Surgery Journal Vol. 5 Suppl. S1/2019
Basic Principle and Step-by-Step Procedure of Abdominal Hysterectomy KonishiS18

Then the second clamp is placed along the cervix forhemostasis from small veins from the ligament. The tip ofclampreaches the level of thevaginal fornix, and then the lowerhalf of cardinal ligament is cut and sutured (►Fig. 16). Duringcutting the cardinal ligament here, the operator can recognizethe plane demarcating the cervix from the ligament. Whenentered this true plane, especially near the sacrouterine liga-ment, the operator feels very easy and smooth for the cutting.The cutting has finally reached the level of vaginal fornix. It isimportant to avoid too deep cutting into the paracolpium,which results in the substantial amount of bleeding.
After the same procedure is done for the left side, it is thetime to proceed the final step for hysterectomy. Usually, it isnot necessary to cut the sacrouterine ligament, whichwill becut simultaneously during the amputation of vagina.
Tips and Warnings
To avoid injury of the ureter during the ligation of cardinalligament, such “two-steps clamping” is essential. Eachstep eventually moves the ureter laterally apart from thecervix and vagina, and so this is safer comparedwith one-step clamping. In case of longer cervix, three-stepsclamping shall be considered.
However, too many steps of clamp and ligation forcardinal ligament tend to produce the bleeding betweenmany cut-ends of ligament. Thus, two or three clampsmight be ideal for the treatment of cardinal ligament.
The operator can palpate the running ureter anytimeduring the surgical procedure, and should confirm thedistance between the ligation and the ureter.
When severe endometriosis or cervical myoma liftsthe ureter running close to the uterus, the operator shoulddenude and isolate the ureter from the posterior leaf ofbroad ligament, and mark it using yellow-colored tape.
Amputation and Closure of VaginaA large gauze is placed in the Douglas pouch, and thetransitional area between the cervix and vagina is againpalpated. Then, the sharp scalpel will be inserted verticallyinto the uppermost portion of the anterior wall of vagina(►Fig. 17). The portio and vagina are prepared by povidone-iodine, and a gauze is inserted into the vaginal cavity. Thelong straight Kocher clamps are sequentially placed onthe cut-end of vaginal wall for hemostasis (►Fig. 18). Thesacrouterine ligament is simultaneously cut and clampedtogether with vaginal wall. If the curved Kelly clamp is placedalong the vaginal fornix as landmark, it is easier to cut thevagina with the scalpel or scissors along the curve ofclamp. The vaginal vault is closed with Z-figure sutures(►Figs. 19 and 20).
Tips and Warnings
The most frequent point with ureteral injury is duringhemostasis against the bleeding from surrounding thevaginal vault. Condition of traction for uterus has goneafter hysterectomy, and without traction, the vaginalvault has come very close to the ureter running. Thus,hemostatic sutures without traction of the vaginal vault,near the cut-ends of cardinal ligament, tend to involve theureteral injury. Therefore, to prevent the injury, theoperator should restore the condition of traction; tractagain the vaginal vault upward and push the bladderdownward. This procedure will move the ureter laterallyagain. Then, the operator should identify the small pointof bleeding and place the superficial hemostatic suture.The operator should not suture deeply into the ligament.
Fig. 15 Cut and ligation of the first clamp for cardinal ligament. (Reproduced with permission from Konishi I. Basic procedure 2. In: Hiramatsu Y,Konishi I, Sakuragi N, Takeda S, eds. Mastering the Essential Surgical Procedures OGS NOW, No.2 Total Abdominal Hysterectomy (Japanese).Tokyo: Medical View; 2010:56–73. Copyright © Medical View).
The Surgery Journal Vol. 5 Suppl. S1/2019
Basic Principle and Step-by-Step Procedure of Abdominal Hysterectomy Konishi S19

Fig. 16 Cut and ligation of the second clamp for cardinal ligament. (Reproduced with permission from Konishi I. Basic procedure 2. In:Hiramatsu Y, Konishi I, Sakuragi N, Takeda S, eds. Mastering the Essential Surgical Procedures OGS NOW, No.2 Total Abdominal Hysterectomy(Japanese). Tokyo: Medical View; 2010:56–73. Copyright © Medical View).
Fig. 17 Incision of vaginal wall. (Reproduced with permission fromKonishi I. Basic procedure 2. In: Hiramatsu Y, Konishi I, Sakuragi N,Takeda S, eds. Mastering the Essential Surgical Procedures OGS NOW,No.2 Total Abdominal Hysterectomy (Japanese). Tokyo: Medical View;2010:56–73. Copyright © Medical View).
Fig. 18 Placing clamp along vaginal fornix. (Reproduced with permissionfrom Konishi I. Basic procedure 2. In: Hiramatsu Y, Konishi I, Sakuragi N,Takeda S, eds. Mastering the Essential Surgical Procedures OGS NOW,No.2 Total Abdominal Hysterectomy (Japanese). Tokyo: Medical View;2010:56–73. Copyright © Medical View).
The Surgery Journal Vol. 5 Suppl. S1/2019
Basic Principle and Step-by-Step Procedure of Abdominal Hysterectomy KonishiS20

Closing AbdomenThe retroperitoneal space is washed by warm saline, and isconfirmed for no bleedings and no foreign bodies. Countingthe number of gauze is completed. Pelvic peritoneum issuturedwith 2–0 continuous sutures, and completely closed.The cut-ends of ligaments are placed retroperitoneally. Caremust be taken not to injure the ureter during the continuoussuture.
The retractor and intraperitoneal sponge-gauze areremoved, and the intestines are restored to normal position.The abdomen is closed with each suture for the peritoneum,fascia, and skin.
Tips and WarningsThe author always tells the students, “When bleedingoccurs, do not immediately stop the bleeding withpanicking clamp or self-missing suture.” Prompt clamp orsuture tends to involve the neighboring organs, resultingin the postsurgical complications such as injury or fistulaof the urinary tract or the intestinal tract. Therefore, first,push the gauze to the bleeding area, maintain transientlythe hemostatic condition, and wait a little bit. During thewait, the operator can escape from the panicking time andwill consider the most appropriate recovery. Smallbleeding may stop and only the major bleeding remains.Sometimes, further dissection of surrounding tissues isneeded along with keeping gauze pushing for thebleeding. Thus, the operator can easily find the bleedingpoint or vessels, and can perform the proper hemostasisusing the pin-point clamp or suturewithout involving theneighboring organs. This is the most important forgynecologic surgeons treating the pelvic organs havingmany dilated vessels.
Conflict of InterestNone.
References1 Konishi I. Basic procedure 2. In: Hiramatsu Y, Konishi I, Sakuragi
N, Takeda S, eds. Mastering the Essential Surgical Procedures OGSNOW, No.2 Total Abdominal Hysterectomy. Tokyo: Medical View;2010:56–73
2 Koyama T, Togashi K, Konishi I, et al. MR imaging of endometrialstromal sarcoma: correlation with pathologic findings. AJR Am JRoentgenol 1999;173(03):767–772
3 Kido A, Togashi K, Koyama T, Yamaoka T, Fujiwara T, Fujii S.Diffusely enlarged uterus: evaluation with MR imaging. Radio-graphics 2003;23(06):1423–1439
Fig. 19 Suture of vaginalwall. The sacrouterine ligament is simultaneouslycut and clamped together with vaginal wall. Careful suture is important atthe lateral end of vagina, close to the stump of cardinal ligament.(Reproduced with permission from Konishi I. Basic procedure 2. In:Hiramatsu Y, Konishi I, Sakuragi N, Takeda S, eds. Mastering the EssentialSurgical Procedures OGS NOW, No.2 Total Abdominal Hysterectomy(Japanese). Tokyo: Medical View; 2010:56–73. Copyright © Medical View).
Fig. 20 Closure of vagina. The vaginal vault is closedwith Z-figure sutures.(Reproduced with permission from Konishi I. Basic procedure 2. In:Hiramatsu Y, Konishi I, Sakuragi N, Takeda S, eds. Mastering the EssentialSurgical Procedures OGS NOW, No.2 Total Abdominal Hysterectomy(Japanese). Tokyo: Medical View; 2010:56–73. Copyright © Medical View).
The Surgery Journal Vol. 5 Suppl. S1/2019
Basic Principle and Step-by-Step Procedure of Abdominal Hysterectomy Konishi S21