webwise workflow pages - highjump...exercise 1: what are workflow pages? 8 what looks like an edit...
TRANSCRIPT

WebWise Workflow Pages
Lab Exercises
Version 11.5
March 2012


Advantage System Administration
Table of Contents i
© 2009 HighJump Software Inc. All Rights Reserved.
This document and the software it describes are copyrighted properties of HighJump Software Inc. with all rights reserved. Neither this information nor the software may be copied in whole or in part without the prior written consent of the copyright owner. This document was created in the United States of America.
HighJump is a trademark of HighJump Software Inc. All other marks are the property of their respective owners.
HighJump Software Inc. warrants the software covered by this document only as stated in a legally binding End User Agreement between a customer and HighJump Software Inc. or one of its current or historic subsidiaries or affiliates.
This document is subject to change at the sole discretion of HighJump Software Inc.
If this document and the software it describes are being acquired by or for the Federal Government, or by any prime contractor or subcontractor (at any tier) under any prime contract, grant, cooperative agreement, or other transaction agreement with the Federal Government, the following provisions apply: By accepting delivery of this software and information, the Federal Government, prime contractor or subcontractor hereby agrees that this software qualifies as "commercial computer software" within the meaning of the applicable Federal Government procurement or financial assistance regulations. The terms and conditions set forth above shall apply to the Federal Government's use, duplication and disclosure of this document and the software it describes, and shall supersede any conflicting terms and conditions. If these terms and conditions fail to meet the Federal Government's needs or are inconsistent in any respect with Federal law, the Federal Government agrees to return this document and the software it describes, unused, to HighJump Software Inc.

Advantage System Administration
Table of Contents ii
Table of Contents
Exercise 1: What are Workflow Pages? ........................................................... 3
Introduction ......................................................................................................................... 3
Background Information ..................................................................................................... 3
Activity 1: Are you setup to run Workflow Pages? ...................................................... 4
Activity 2: Explore an existing Workflow Page and Process Object............................ 7
Exercise 2: Creating a Workflow Page ........................................................... 19
Introduction ....................................................................................................................... 19
Background Information ................................................................................................... 19
Activity 1: Create a Report Page ................................................................................ 20
Activity 2: Create a Workflow Page ........................................................................... 24
Activity 3: Create a Process Object ............................................................................ 27
Activity 4: Link up the Pages and Process object then test ........................................ 37
Exercise 1:
What are Workflow Pages? 3
Exercise 1: What are Workflow Pages?
Introduction
This exercise consists of the following activities:
1. Background information - Overview of Workflow Pages
2. Setup of Workflow Pages
Background Information
Of the four types of pages available in WebWise, Workflow pages are the most powerful because they allow the user to exercise the functionality of the platform from the WebWise user interface.
WebWise Workflow Pages go far beyond the functionality of single Report, Search, and Edit pages of WebWise that run one SQL statement. The Workflow page is designed to trigger process objects to perform complex work within the platform and to have results presented back to the user. These results can be as simple as a pass/fail message displayed to the WebWise runtime user.
A Workflow page can do more than just trigger a process object. Working storage field values can be passed to triggered process objects from a Workflow page and returned from a process object to the user. Those values can also be displayed to the user or any message and/or returned as a parameter to a new WebWise page. The only time Workflow pages should not be utilized is when dialogue actions are required in the process. Dialogue actions wait for a human response/input in the midst of a process and therefore would defeat the purpose of Workflow pages.
The following is a summary of how Workflow pages perform:
1. Search or Edit page in WebWise calls a Workflow page 2. Workflow page calls a process object and passes parameters to the process object. 3. Process object performs complex work 4. Process object reports back to the Workflow page with parameters/messages. 5. Depending on a Pass or Fail from the process object, the Workflow page calls other WebWise
pages or displays a message to the user.
Typically, Workflow pages and their corresponding process object are custom built based on the need of the customer. However, there are some already built in the base application for you to explore in order to gain a better understanding.

Exercise 1:
What are Workflow Pages? 4
Activity 1: Are you setup to run Workflow Pages?
Workflow web pages use the Advantage Workflow web service to communicate with the platform in order to execute the process object. In order to use workflow pages in WebWise, the Workflow Web service must be installed with the platform.
During installation of the HighJump Platform, the following dialogue allows you to install the workflow web service with the platform.
Ensure that the workflow web service checkbox is checked when you install the platform. To see if the workflow web services already installed on your machine, perform the following procedures:
Open the Internet Information Services (IIS) Manager (All Programs/Administrative tools/Internet
Information Services) and verify a virtual directory called: AdvWorkflowRequest. If you don’t see this
virtual directory, Workflow pages won’t work.

Exercise 1:
What are Workflow Pages? 5
Now launch Page Editor (All Programs/HighJump Software/Advantage Platform/WebWise Page
Editor) and select the following DSN:
Click the Publish Configurations button in Page Editor.

Exercise 1:
What are Workflow Pages? 6
The workflow Web service is typically located at local host as shown below:
The server name can be changed from local host to point to a different server if the web service is not running locally.
Now that you have verified the service is set up. It’s time to explore an existing Workflow page.

Exercise 1:
What are Workflow Pages? 7
Activity 2: Explore an existing Workflow Page and Process Object
Several Workflow pages already exist in the base installation of Warehouse Advantage. These were the results of working with 3PLs and HighJump customers. Before trying to create a new Workflow page, take some time to explore the following existing Workflow.
Open Internet Explorer (open it within the Vlab, NOT from your host computer)
Enter http://localhost/SupplyChainAdvantage in the address bar.
a. The login credentials are located in a folder located on the Vlab desktop labeled Training/Misc. Use the Webwise Runtime #1 section of the login.txt file.
Expand the Advantage Dashboard | Receiving | Inbound Orders nodes.
Click on Search Inbound Orders and then click the Query button on the Search page.
Click the #1 edit link on the Inbound Orders page that appears.

Exercise 1:
What are Workflow Pages? 8
What looks like an Edit page appears. In reality, this is a Search page that calls a Workflow Page which is designed to do far more than a regular Edit page was designed to accomplish. Normal Edit pages update a single record in a single table, this Workflow page is designed to perform sophisticated checks and updates as well as report back to the user. Remember, the idea is to provide an easy to use interface for the user while complex actions are taking place behind the scenes.
Make note of the Runtime page number. It is found in the lower right corner.
Leave the WebWise Runtime open for now and let’s explore the setup and logic in Page Editor. Launch Page Editor (All Programs/HighJump Software/Advantage Platform/WebWise Page Editor) and select the following DSN:
Exercise 1:
What are Workflow Pages? 9
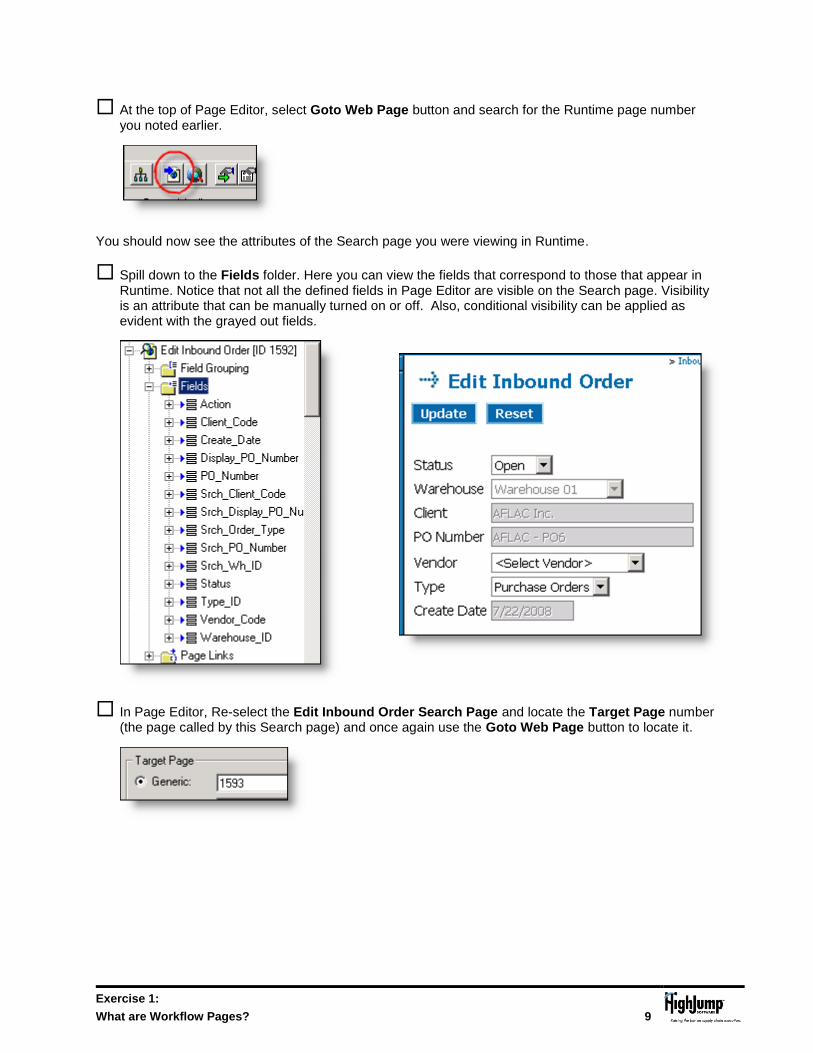
At the top of Page Editor, select Goto Web Page button and search for the Runtime page number you noted earlier.
You should now see the attributes of the Search page you were viewing in Runtime.
Spill down to the Fields folder. Here you can view the fields that correspond to those that appear in Runtime. Notice that not all the defined fields in Page Editor are visible on the Search page. Visibility is an attribute that can be manually turned on or off. Also, conditional visibility can be applied as evident with the grayed out fields.
In Page Editor, Re-select the Edit Inbound Order Search Page and locate the Target Page number (the page called by this Search page) and once again use the Goto Web Page button to locate it.
Exercise 1:
What are Workflow Pages? 10
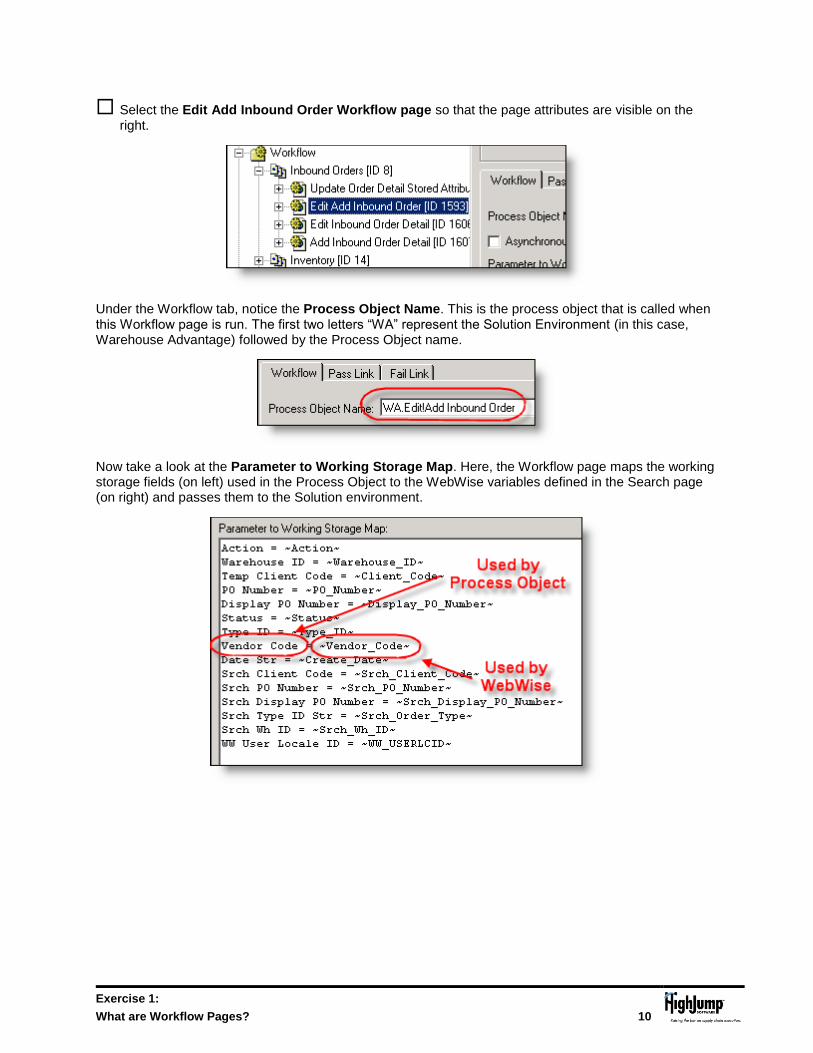
Select the Edit Add Inbound Order Workflow page so that the page attributes are visible on the right.
Under the Workflow tab, notice the Process Object Name. This is the process object that is called when this Workflow page is run. The first two letters “WA” represent the Solution Environment (in this case, Warehouse Advantage) followed by the Process Object name.
Now take a look at the Parameter to Working Storage Map. Here, the Workflow page maps the working storage fields (on left) used in the Process Object to the WebWise variables defined in the Search page (on right) and passes them to the Solution environment.
Exercise 1:
What are Workflow Pages? 11
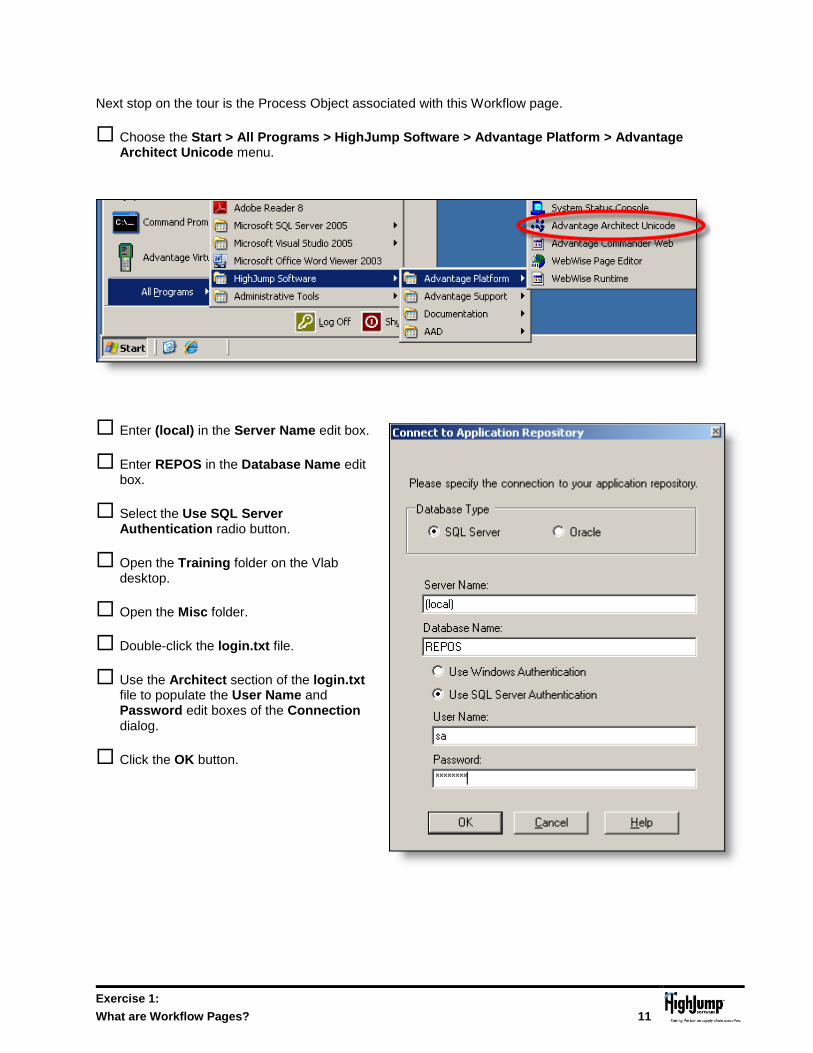
Next stop on the tour is the Process Object associated with this Workflow page.
Choose the Start > All Programs > HighJump Software > Advantage Platform > Advantage Architect Unicode menu.
Enter (local) in the Server Name edit box.
Enter REPOS in the Database Name edit box.
Select the Use SQL Server Authentication radio button.
Open the Training folder on the Vlab desktop.
Open the Misc folder.
Double-click the login.txt file.
Use the Architect section of the login.txt file to populate the User Name and Password edit boxes of the Connection dialog.
Click the OK button.
Exercise 1:
What are Workflow Pages? 12
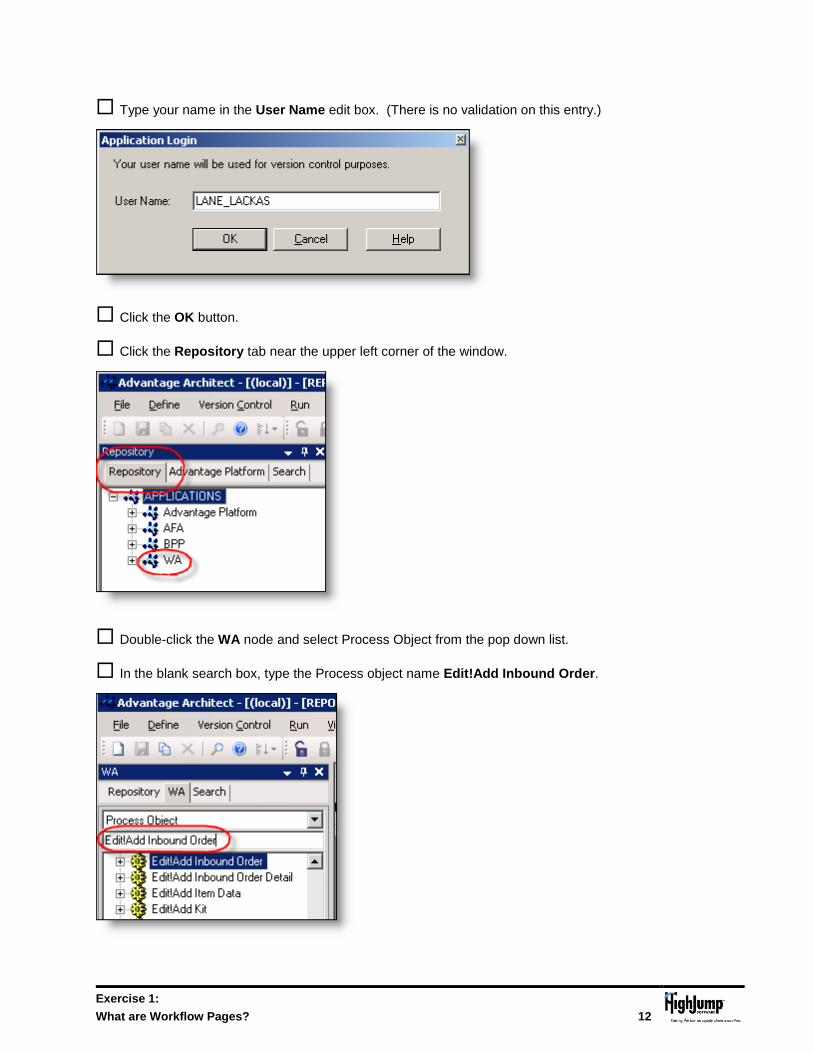
Type your name in the User Name edit box. (There is no validation on this entry.)
Click the OK button.
Click the Repository tab near the upper left corner of the window.
Double-click the WA node and select Process Object from the pop down list.
In the blank search box, type the Process object name Edit!Add Inbound Order.
Exercise 1:
What are Workflow Pages? 13
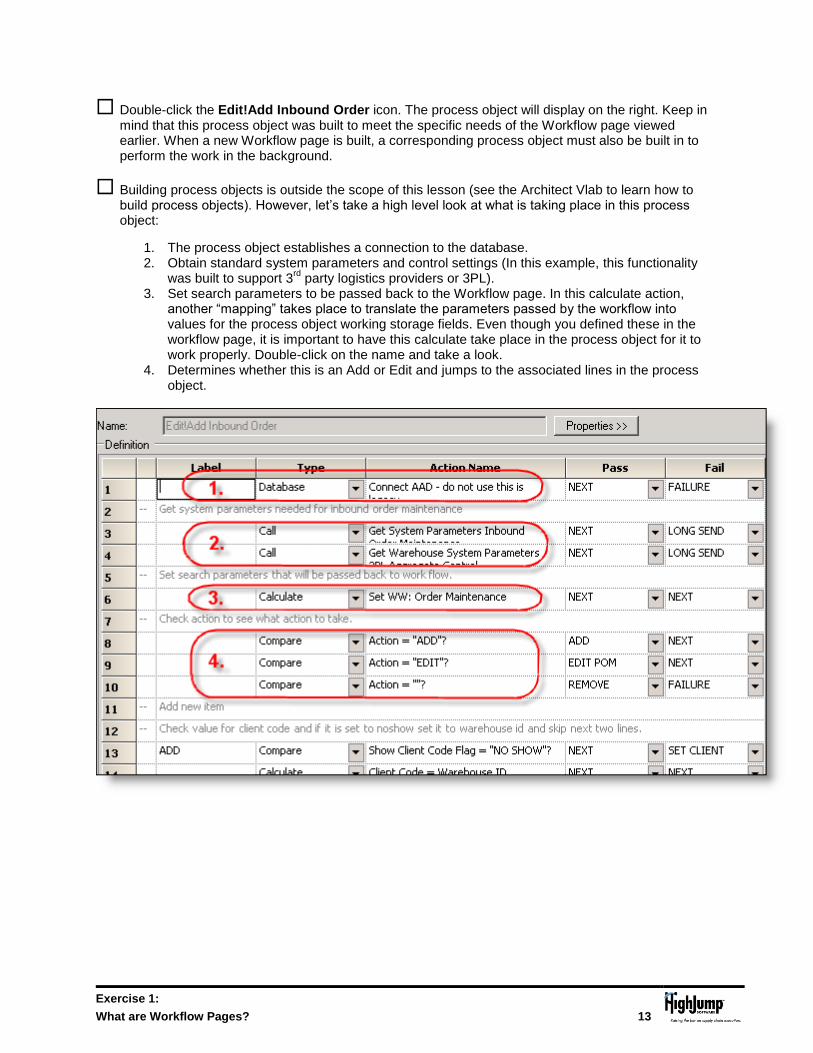
Double-click the Edit!Add Inbound Order icon. The process object will display on the right. Keep in mind that this process object was built to meet the specific needs of the Workflow page viewed earlier. When a new Workflow page is built, a corresponding process object must also be built in to perform the work in the background.
Building process objects is outside the scope of this lesson (see the Architect Vlab to learn how to build process objects). However, let’s take a high level look at what is taking place in this process object:
1. The process object establishes a connection to the database. 2. Obtain standard system parameters and control settings (In this example, this functionality
was built to support 3rd
party logistics providers or 3PL). 3. Set search parameters to be passed back to the Workflow page. In this calculate action,
another “mapping” takes place to translate the parameters passed by the workflow into values for the process object working storage fields. Even though you defined these in the workflow page, it is important to have this calculate take place in the process object for it to work properly. Double-click on the name and take a look.
4. Determines whether this is an Add or Edit and jumps to the associated lines in the process object.

Exercise 1:
What are Workflow Pages? 14
5. If all actions succeed, the process object branches to SUCCESS. 6. The process object is instructed to disconnect from the database and return a PASS to the
Workflow page. The PASS message is configured back at the Workflow page. 7. If any action fails, the process object disconnects from the database and returns a FAIL
message to the Workflow page.
Whether PASS or FAIL occurs, control is given back to the Workflow page.
Leave Architect open and go back to WebWise Page Editor.
In Page Editor, select the Edit Add Inbound Order Workflow page so that the page attributes are visible on the right.
Select the Pass Link tab. If the process object returns a PASS, the Workflow page is configured to display page 1170 to the user.
Exercise 1:
What are Workflow Pages? 15
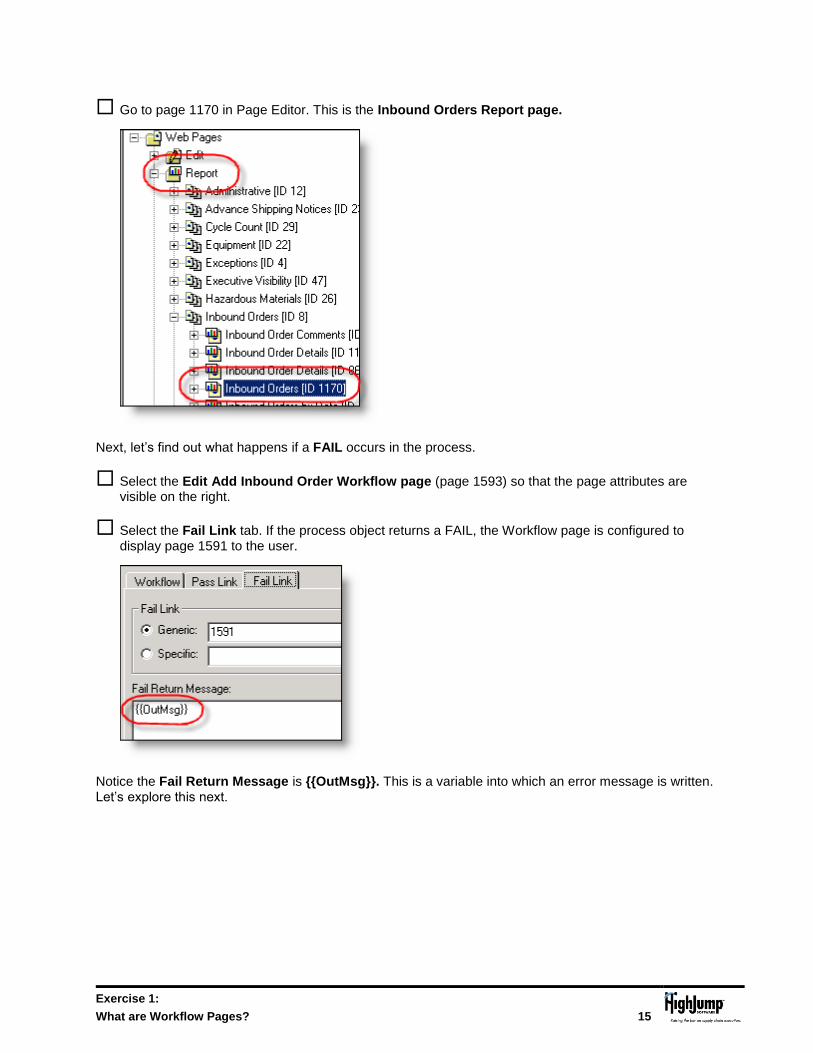
Go to page 1170 in Page Editor. This is the Inbound Orders Report page.
Next, let’s find out what happens if a FAIL occurs in the process.
Select the Edit Add Inbound Order Workflow page (page 1593) so that the page attributes are visible on the right.
Select the Fail Link tab. If the process object returns a FAIL, the Workflow page is configured to display page 1591 to the user.
Notice the Fail Return Message is {{OutMsg}}. This is a variable into which an error message is written. Let’s explore this next.
Exercise 1:
What are Workflow Pages? 16
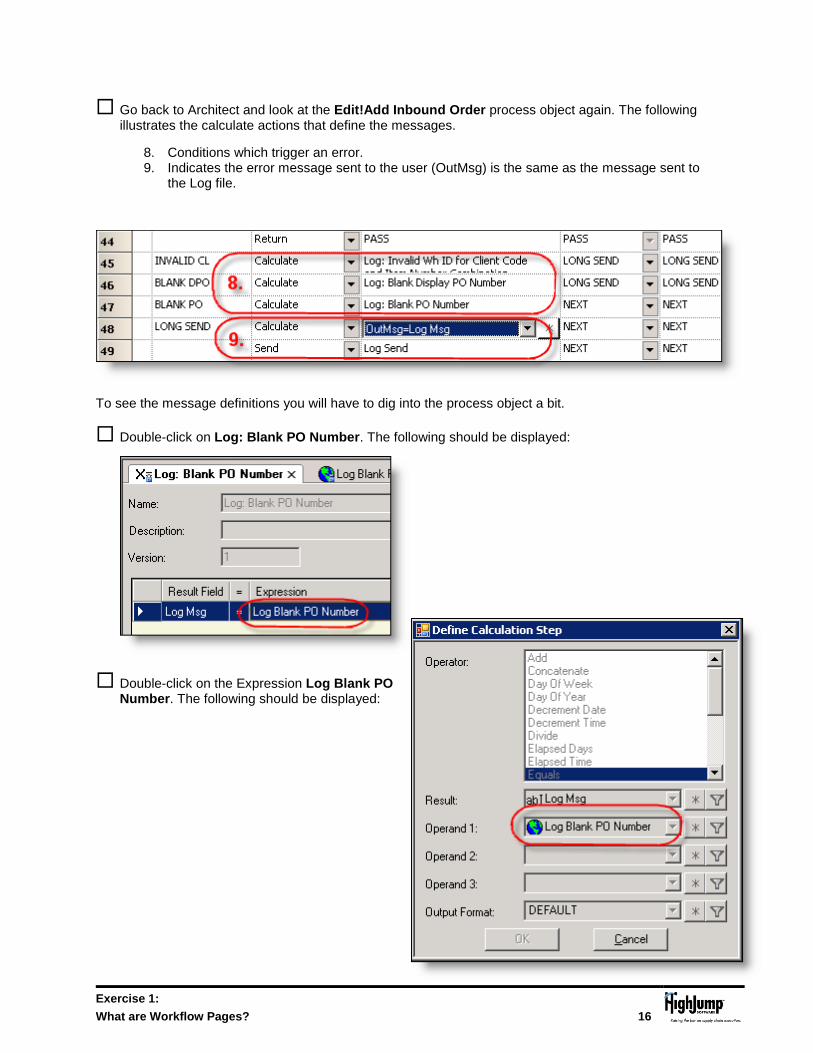
Go back to Architect and look at the Edit!Add Inbound Order process object again. The following illustrates the calculate actions that define the messages.
8. Conditions which trigger an error. 9. Indicates the error message sent to the user (OutMsg) is the same as the message sent to
the Log file.
To see the message definitions you will have to dig into the process object a bit.
Double-click on Log: Blank PO Number. The following should be displayed:
Double-click on the Expression Log Blank PO Number. The following should be displayed:

Exercise 1:
What are Workflow Pages? 17
Double-click on Operand 1: Log Blank PO Number. The following should be displayed:
Here is the human readable error message that will be returned to the user (via the OutMsg variable) should someone leave the PO number blank.
Wow! Let’s summarize:
1. Search page calls a Workflow page 2. Workflow page calls a process object and passes parameters to the PO. 3. Process object performs the work (in this case, an addition or edit of the inbound order) 4. Process object reports back to the Workflow page with parameters/messages. 5. Depending on a Pass or Fail from the process object, the Workflow page calls other
WebWise pages or displays a message to the user.
Let’s see what all of this looks like to the user in WebWise.
Minimize Page Editor and Architect.
Use the Advantage Workflow Engine Service Manager to start all the solution environments (All Programs / HighJump Software / Advantage Platform / Advantage Workflow Engine Service Manager).
In WebWise runtime, go back to the Edit Inbound Order search page (see previous instructions), and select a different Vendor (you may have timed out by now and will need to log back in).
Exercise 1:
What are Workflow Pages? 18
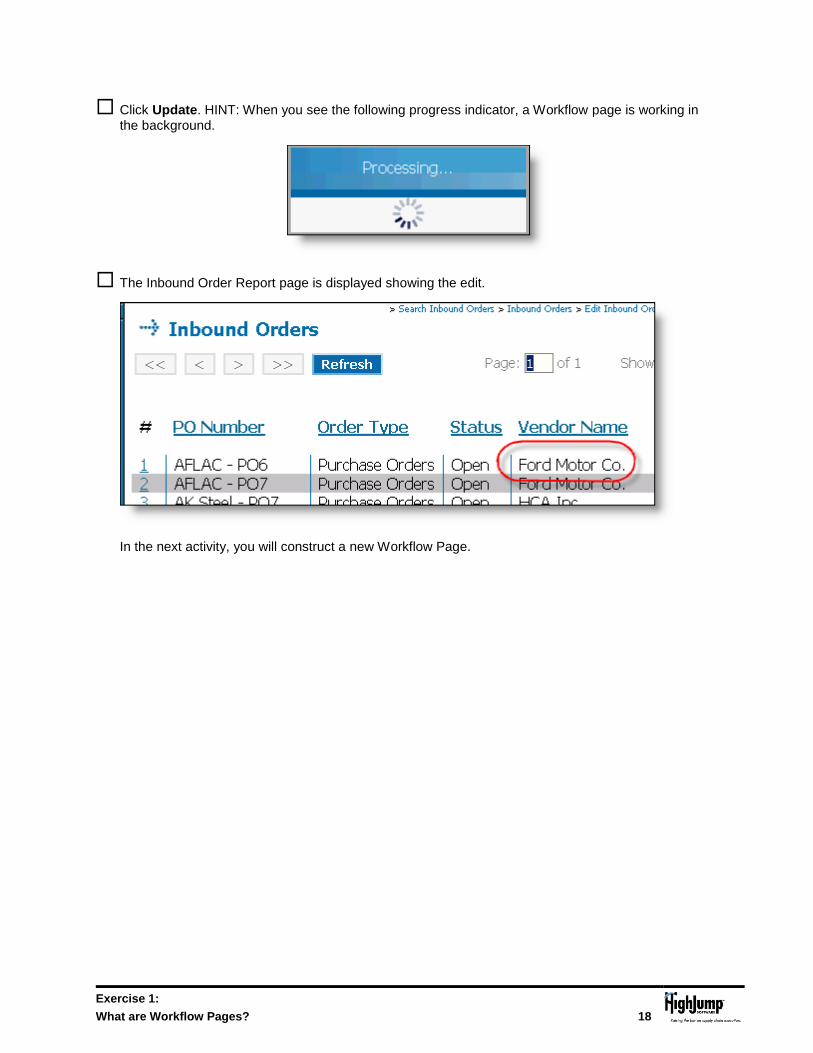
Click Update. HINT: When you see the following progress indicator, a Workflow page is working in the background.
The Inbound Order Report page is displayed showing the edit.
In the next activity, you will construct a new Workflow Page.

Exercise 2:
Creating a Workflow Page 19
Exercise 2: Creating a Workflow Page
Introduction
WebWise Workflow Pages go far beyond the functionality of single Report, Search, and Edit pages of WebWise that run one SQL statement. The Workflow page is designed to trigger process objects to perform complex work within the platform and to have results presented back to the user.
Before beginning this exercise, you should complete the following prerequisites:
WebWise VLab or Instructor-led class
Architect VLab or Instructor-led class
Background Information
A customer has two warehouses. They would like to consolidate all their items into one warehouse. Both warehouses have identical items, locations, etc. The material handlers are doing the physical move but the customer needs the data in the WMS to reflect the new totals now available in the single Warehouse.
Your job will be to create a Workflow page with associated WebWise pages and process objects to accomplish this task.
This exercise consists of the following activities:
1. Create a Report page in which to display the contents of Warehouse 02 2. Create a Workflow page 3. Define a process object to do the work. 4. Link up all the pages and process object:
a. Modify the report page to include a field link to call the Workflow page b. Define the Workflow page to call the process object to perform the move and report back

Exercise 2:
Creating a Workflow Page 20
Activity 1: Create a Report Page
Launch Page Editor (All Programs/HighJump Software/Advantage Platform/WebWise Page Editor)
and select the following DSN:
Spill down the Report pages folder until you see the Inventory category. This is where you will
create the Report page. Instead of creating a new Report page from scratch, it may save time to
modify an existing page. The Inventory by Lot report page is a good candidate.
Right-click on the Inventory by Lot report page and select Copy Web Page.
Rename the page Inventory to Move and click OK. The page should appear in the Inventory
category.
Select the Inventory to Move page and replace the query with the following:

Exercise 2:
Creating a Workflow Page 21
This query was designed to collect the item, the lot, the location, the quantity, and the stored attribute ID.
This combination makes each item unique and removes duplication in the report. We will order by
location ID since Location ID will be our field link parameter. It also helps when locating and modifying a
process object later on.
Spill open the Inventory to Move page until you see the contents of the Fields folder (you may
receive a warning to save changes to the database. Select Yes).
Delete the following Fields:
a. client_code
b. display_item_number
c. fifo_date
d. hu
e. status
f. trans
g. type
h. unavailable_quantity
Add the following Field (Give it an appropriate name and make it visible):
a. stored_attribute_id
Save your work.
Before moving on, be sure to assign User groups to the new page. Spill down the Inventory to Move
page, Right-click on the User Groups Assignments Node and select Assign User Groups.
The User Groups may already be assigned from copying an existing page. If not, select Add All and
click OK.

Exercise 2:
Creating a Workflow Page 22
The next step is to make the new Report page visible to these users in the WebWise runtime menu.
Spill down the Menus node until the Inventory category is visible under Menu Level Manager.
Right-click on Inventory and select New Menu Item.
Title the new link: Inventory to Move.
Since this is a page and not a menu, select Generic and type in the number of the new Report page.
Then click OK.
Exercise 2:
Creating a Workflow Page 23
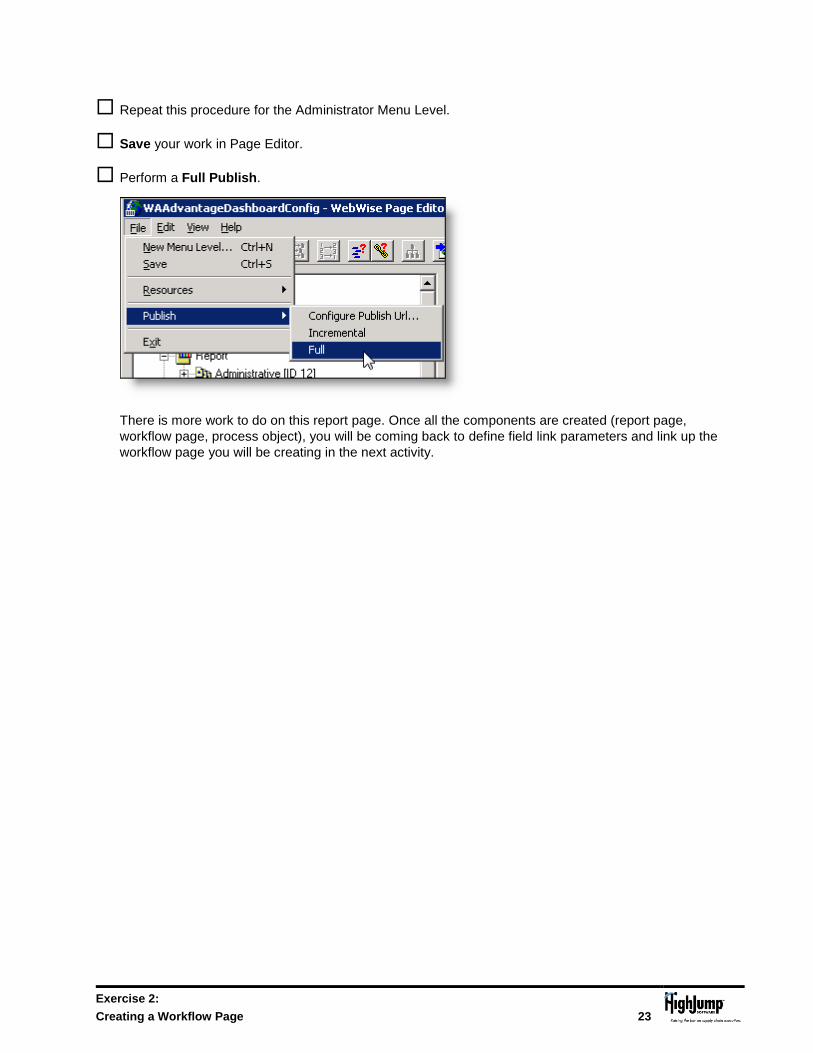
Repeat this procedure for the Administrator Menu Level.
Save your work in Page Editor.
Perform a Full Publish.
There is more work to do on this report page. Once all the components are created (report page,
workflow page, process object), you will be coming back to define field link parameters and link up the
workflow page you will be creating in the next activity.
Exercise 2:
Creating a Workflow Page 24
Activity 2: Create a Workflow Page
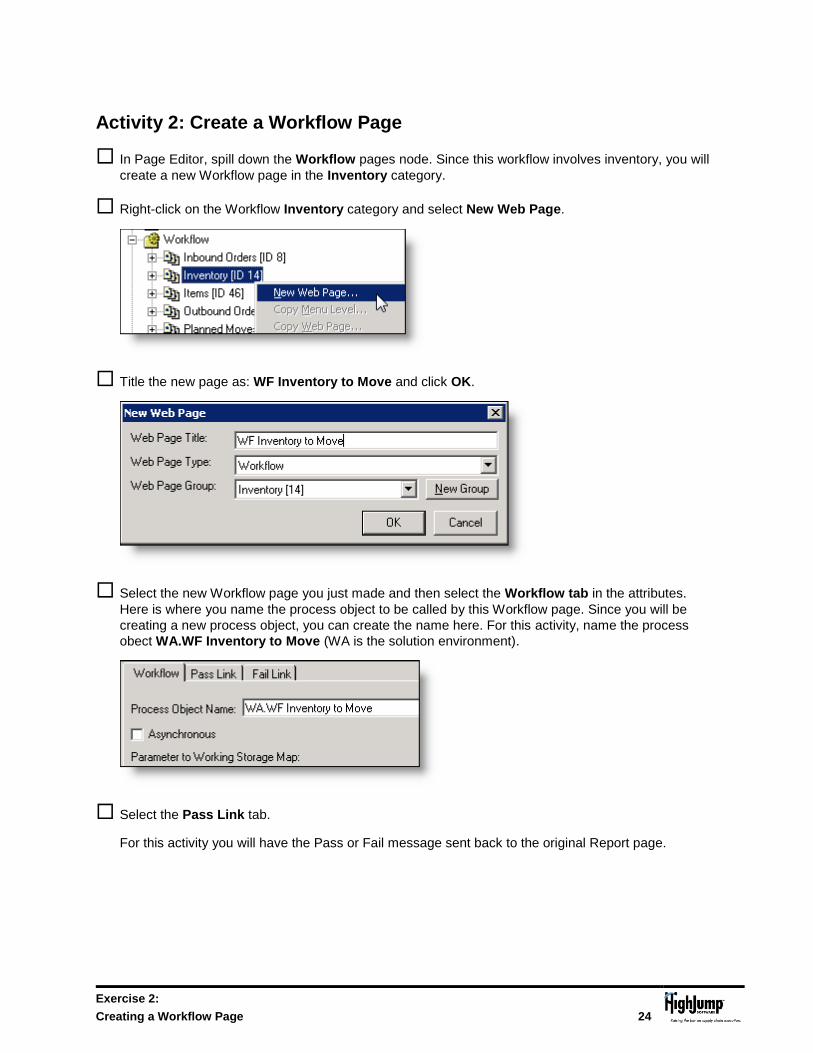
In Page Editor, spill down the Workflow pages node. Since this workflow involves inventory, you will
create a new Workflow page in the Inventory category.
Right-click on the Workflow Inventory category and select New Web Page.
Title the new page as: WF Inventory to Move and click OK.
Select the new Workflow page you just made and then select the Workflow tab in the attributes.
Here is where you name the process object to be called by this Workflow page. Since you will be
creating a new process object, you can create the name here. For this activity, name the process
obect WA.WF Inventory to Move (WA is the solution environment).
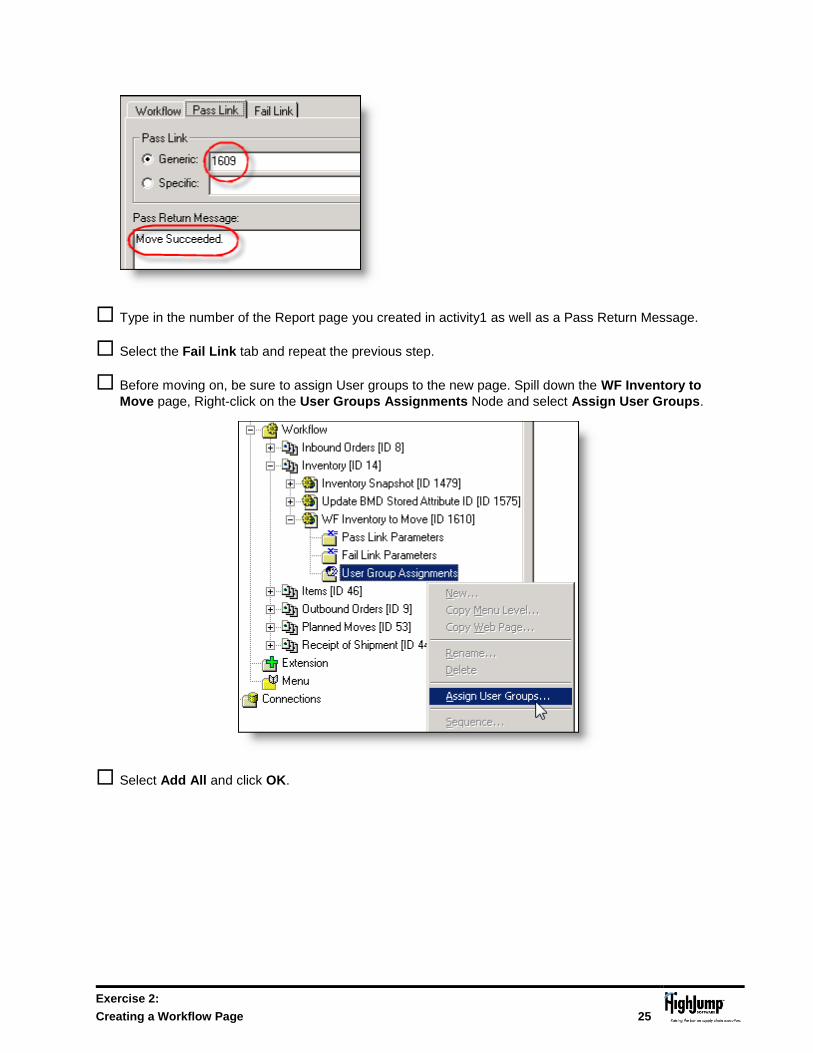
Select the Pass Link tab.
For this activity you will have the Pass or Fail message sent back to the original Report page.
Exercise 2:
Creating a Workflow Page 25
Type in the number of the Report page you created in activity1 as well as a Pass Return Message.
Select the Fail Link tab and repeat the previous step.
Before moving on, be sure to assign User groups to the new page. Spill down the WF Inventory to
Move page, Right-click on the User Groups Assignments Node and select Assign User Groups.
Select Add All and click OK.

Exercise 2:
Creating a Workflow Page 26
Save your work in Page Editor.
The next step is to create the process object.

Exercise 2:
Creating a Workflow Page 27
Activity 3: Create a Process Object
Instead of creating a process object from scratch, it will save you time if you copy and modify an existing
process object. Since the goal of this workflow is to process items and locations, you should look for
existing process objects that perform similar functions. In this case, we will copy the process object
DBGen Tran for All Loc Items. On the simplest level, this was picked for the following reasons:
1. Starting with a defined location, the process object finds an inventory item in a defined location.
2. Performs work on the item.
3. Finds the next item in that location and starts over.
The first step is to make a copy of this process object and rename it.
Launch Architect and locate and the process object DBGen Tran for All Loc Items (it is located in
the WA repository).
With the process object selected, perform a Save As and rename the process object to WF
Inventory to Move (the same name used in the workflow).
Change the Sub Type to Triggered.

Exercise 2:
Creating a Workflow Page 28
In order to help other developers understand what you have created. Type the following in the
Comments section:
DESCRIPTION: Moved predetermined inventory from one warehouse location to another
warehouse.
ON PASS: Everything Worked.
ON FAIL: DB updates failed. Return fail to workflow.
REQUIRED: Location
MODIFICATIONS: Today’s date here followed by your initials.
Save your work.
Now it is time to start modifying the process object!
Click the Properties>> button to see the list of defined objects and actions.
Since this process object will not be utilizing RF devices that connect to the database at logon, we must
first instruct the process object to connect to the AAD database.
Insert a line before line one and define a new Database action called CONNECT AAD.

Exercise 2:
Creating a Workflow Page 29
Insert a line after line one and define a new Calculate action that sets the Location variable we are
passing in to Location. Please refer to the Architect online course if you don’t remember how to
create a Calculate action.
Lines 3 - 6: Leave these calculate actions alone.
Since we want to move items located in Warehouse 2, insert a line after line six and define a new
Calculate action that sets Warehouse ID = ‘Warehouse2’.

Exercise 2:
Creating a Workflow Page 30
Lines 9 – 11 are used for transaction logging and should be left alone. At this point, the process
object should look like the following illustration:
Line 13 can be left alone.
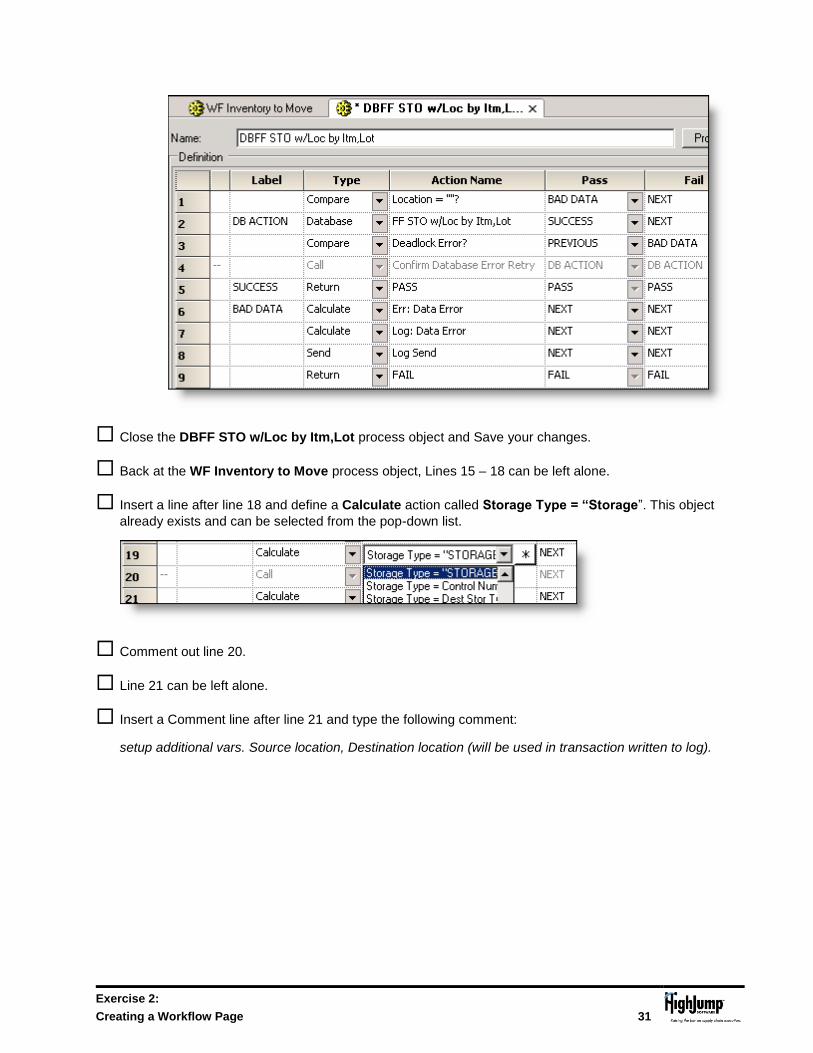
Line 14: Calls a process object (DBFF STO w/Loc by Itm,Lot) to locate the first inventory item in the
Location (Loc) in Warehouse 02. Open up this called process object and make the following changes
(be sure it is checked out):
a. In line 3 change the Fail branch to BAD DATA
b. Comment out line 4
c. The called process object should look like the following illustration:
Exercise 2:
Creating a Workflow Page 31
Close the DBFF STO w/Loc by Itm,Lot process object and Save your changes.
Back at the WF Inventory to Move process object, Lines 15 – 18 can be left alone.
Insert a line after line 18 and define a Calculate action called Storage Type = “Storage”. This object
already exists and can be selected from the pop-down list.
Comment out line 20.
Line 21 can be left alone.
Insert a Comment line after line 21 and type the following comment:
setup additional vars. Source location, Destination location (will be used in transaction written to log).

Exercise 2:
Creating a Workflow Page 32
At this point, the process object should look like the following illustration:
Change Line 23 to a Calculate action called Source WH ID = “Warehouse2”. Be sure to set the
FAIL branch to NEXT.
Change Line 24 to a Calculate action called Destination WH ID = “01”. Be sure to set the PASS and
FAIL branches to NEXT.
Insert a line after Line 24 and define a Calculate action called Source Location = Location.
Insert a line after Line 25 and define a Calculate action called Destination Location = Location.
Insert a Comment line after line 26 and type the following comment:
Start processing current item.
At this point, the WF Inventory to Move process object should look like the following illustration:
Insert a line after Line 27 and define a Calculate action called Warehouse ID = Destination WH.

Exercise 2:
Creating a Workflow Page 33
At this point you will be drilling down and modifying some database actions so hang on to your hat!
Insert a line after Line 28 and call a process object called DB!Upd STO Sts w/STO,Loc,Itm,L
Double-click the name of the process object so that it is visible in the workspace.
With the process object selected, perform a File/Save As and rename the new process object
DB!Upd STO +Qty w/Typ,Loc,Itm
Close the original process object (reduce screen clutter) and Save your work.
On line 29 call the new process object you just made (DB!Upd STO +Qty w/Typ,Loc,Itm) and set
the FAIL branch to BAD DATA.
With the process object DB!Upd STO +Qty w/Typ,Loc,Itm visible, perform the following:
In line 3, change the action to Storage Type = “”? using the pop down list.
In line 4 select the database action Upd STO +Qty w/Typ,Loc,Itm,It from the pop down list.
On Line 5 set the FAIL branch to BAD DATA.
Save your work.
Back at the WF Inventory to Move process object, insert a line after Line 29 and define a Calculate
action called Destination Location = Location.
Insert a line after Line 30.
Exercise 2:
Creating a Workflow Page 34
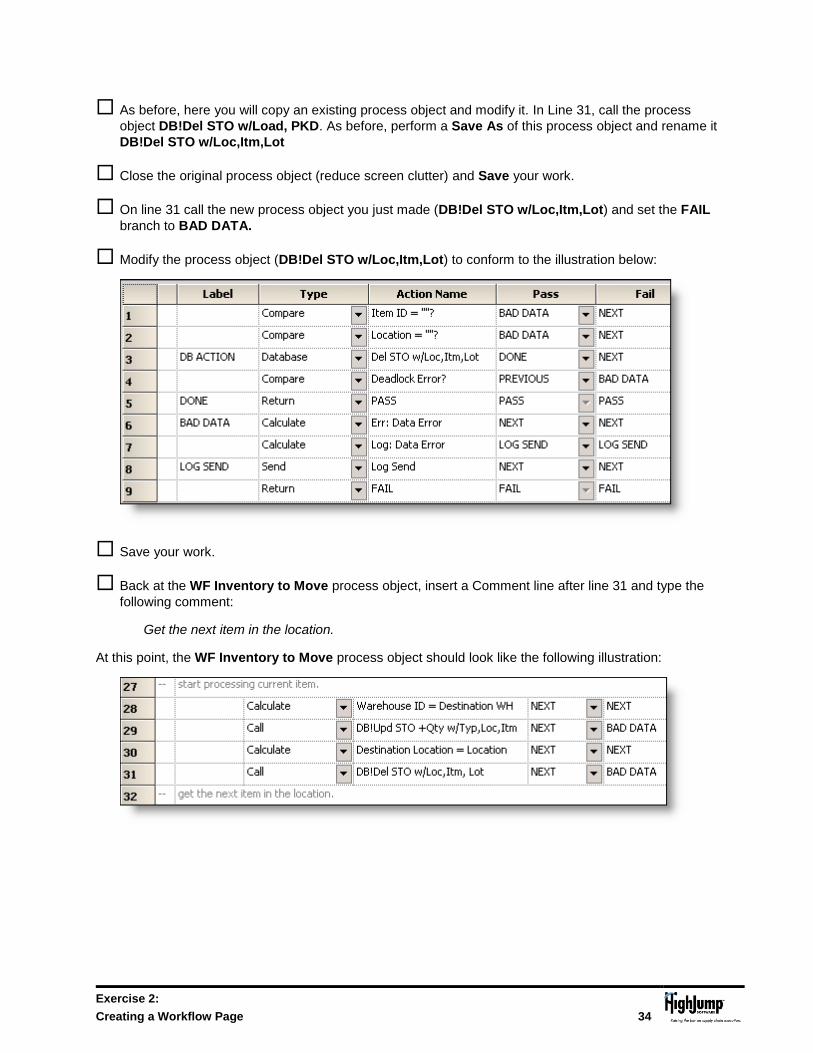
As before, here you will copy an existing process object and modify it. In Line 31, call the process
object DB!Del STO w/Load, PKD. As before, perform a Save As of this process object and rename it
DB!Del STO w/Loc,Itm,Lot
Close the original process object (reduce screen clutter) and Save your work.
On line 31 call the new process object you just made (DB!Del STO w/Loc,Itm,Lot) and set the FAIL
branch to BAD DATA.
Modify the process object (DB!Del STO w/Loc,Itm,Lot) to conform to the illustration below:
Save your work.
Back at the WF Inventory to Move process object, insert a Comment line after line 31 and type the
following comment:
Get the next item in the location.
At this point, the WF Inventory to Move process object should look like the following illustration:
Exercise 2:
Creating a Workflow Page 35
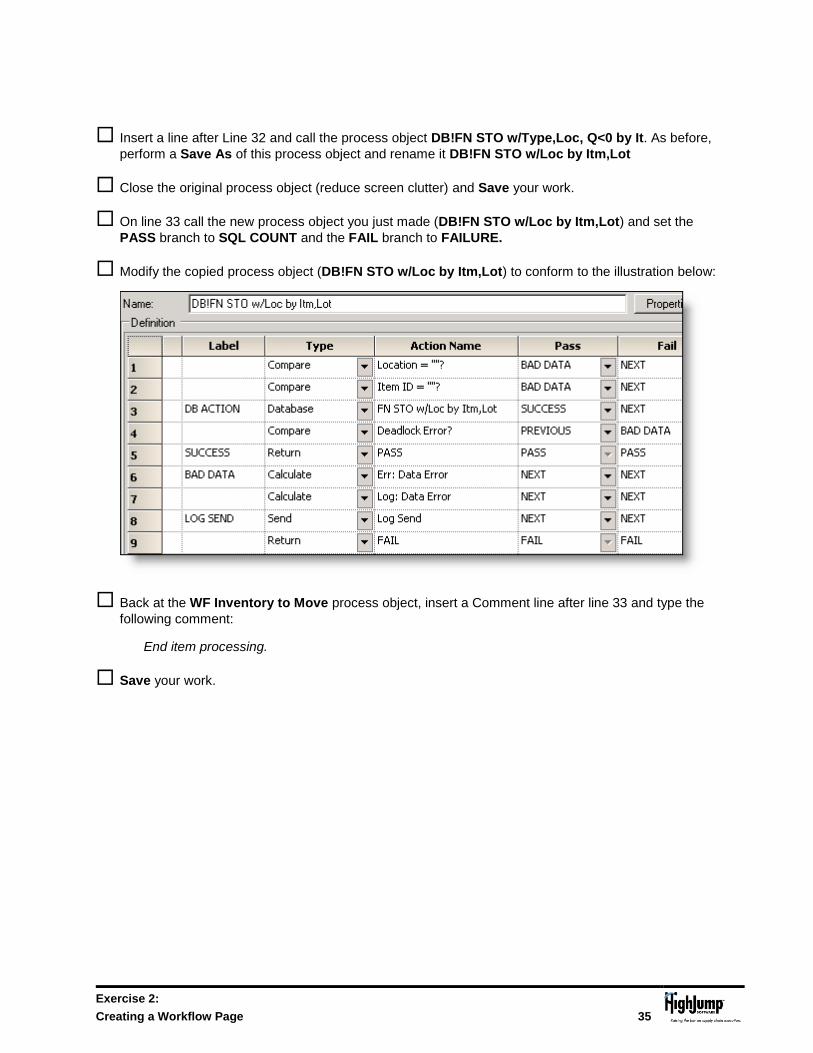
Insert a line after Line 32 and call the process object DB!FN STO w/Type,Loc, Q<0 by It. As before,
perform a Save As of this process object and rename it DB!FN STO w/Loc by Itm,Lot
Close the original process object (reduce screen clutter) and Save your work.
On line 33 call the new process object you just made (DB!FN STO w/Loc by Itm,Lot) and set the
PASS branch to SQL COUNT and the FAIL branch to FAILURE.
Modify the copied process object (DB!FN STO w/Loc by Itm,Lot) to conform to the illustration below:
Back at the WF Inventory to Move process object, insert a Comment line after line 33 and type the
following comment:
End item processing.
Save your work.
Exercise 2:
Creating a Workflow Page 36
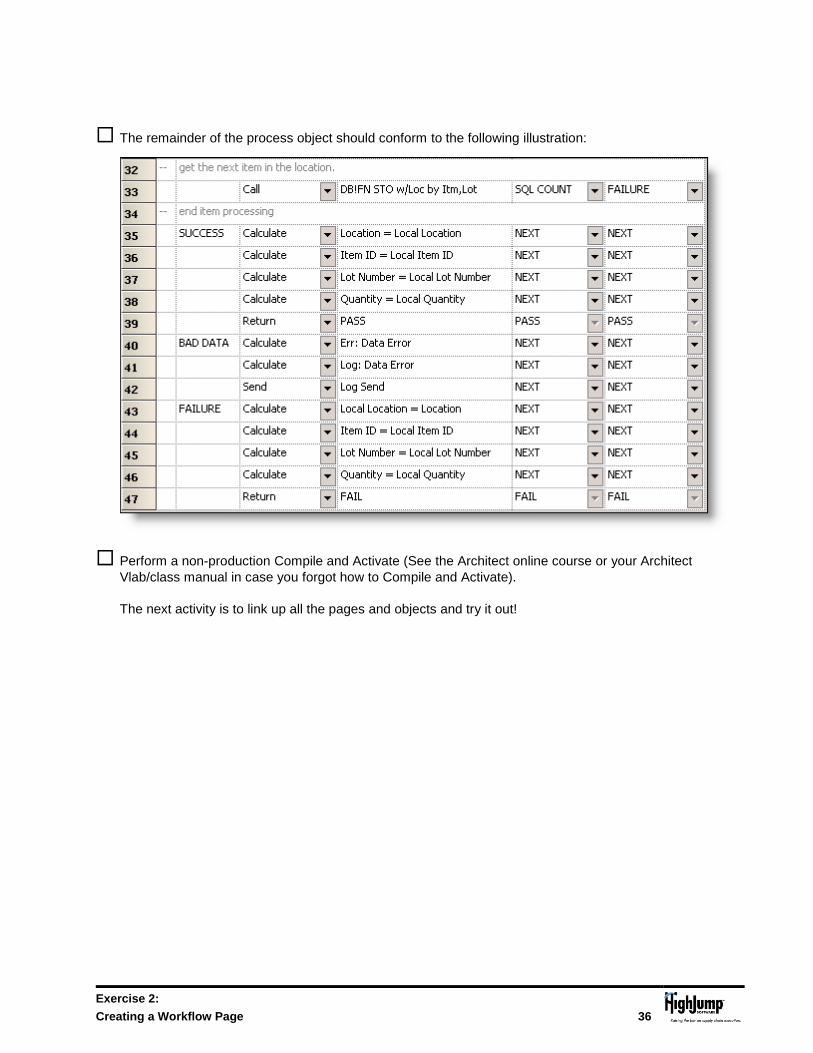
The remainder of the process object should conform to the following illustration:
Perform a non-production Compile and Activate (See the Architect online course or your Architect
Vlab/class manual in case you forgot how to Compile and Activate).
The next activity is to link up all the pages and objects and try it out!

Exercise 2:
Creating a Workflow Page 37
Activity 4: Link up the Pages and Process object then test
In this activity, you will go back to the pages you have created and make certain they will properly
communicate with each other.
In Page Editor, spill down the Workflow pages node and locate the WF Inventory to Move workflow
page you created in exercise 2.
With the page selected, enter the following Parameter to Working Storage Map:
Save your changes.
Next, locate the Report page called Inventory to Move (use the Goto Webpage function if you know
the page number).
Select the location_id field and enter the number of the Workflow page you created.

Exercise 2:
Creating a Workflow Page 38
Define the fields and Field Link Parameters as shown on the following graphic:
Save your work in Page Editor.
Perform a Full Publish.
The moment has arrived. It is time to see if it all works!
Open WebWise runtime.
Open Internet Explorer (open it within the Vlab, NOT from your host computer)
Enter http://localhost/SupplyChainAdvantage in the address bar.
a. The login credentials are located in a folder located on the Vlab desktop labeled Training/Misc. Use the Webwise Runtime #1 section of the login.txt file.
From the main menu, spill down Advantage Dashboard and then Inventory. You should see the
new menu item you created called Inventory to Move.
Exercise 2:
Creating a Workflow Page 39
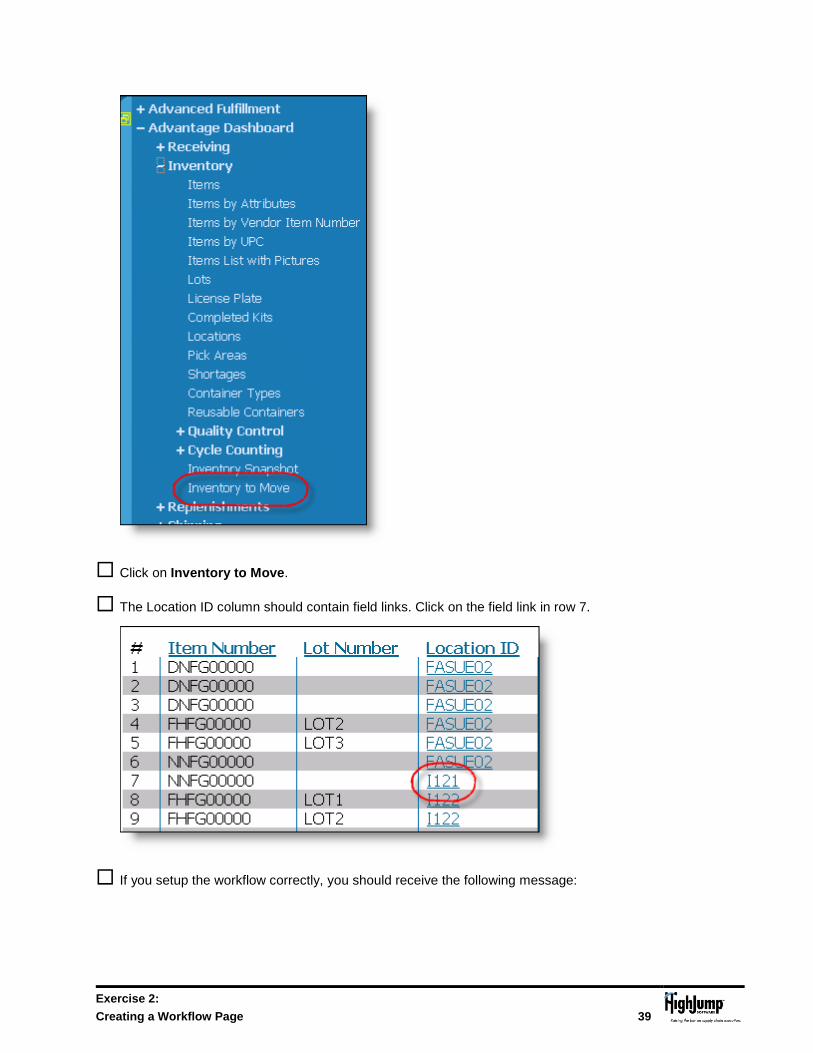
Click on Inventory to Move.
The Location ID column should contain field links. Click on the field link in row 7.
If you setup the workflow correctly, you should receive the following message:

Exercise 2:
Creating a Workflow Page 40
If the move succeeded, congratulations!
You just performed the following:
1. Create a Report page in which to display the contents of Warehouse 02 2. Create a Workflow page 3. Define a process object to do the work. 4. Link up all the pages and process object:
a. Modify the report page to include a field link to call the Workflow page b. Define the Workflow page to call the process object to perform the move and report back
If you received a message that the move failed, go over the procedures and check for any steps you
may have missed.