purchase order workflow setupcdnedge.viewpointcs.com/lms/skillbuilders/po/job aids/po...
TRANSCRIPT
P a g e | 1
© 2012 Coaxis, Inc. dba Viewpoint Construction Software. All Rights Reserved.
Purchase Order Workflow
Setup
P a g e | 2
© 2012 Coaxis, Inc. dba Viewpoint Construction Software. All Rights Reserved.
Table of Contents
The PO Workflow Process Setup ................................................................................................................................3
Set Up a PO Process Workflow ...............................................................................................................................3
Create Roles in HQ Roles ....................................................................................................................................3
Notification Preferences .....................................................................................................................................4
Security ...............................................................................................................................................................5
Create Workflow Process ...................................................................................................................................6
Assign Workflow Process ....................................................................................................................................9
P a g e | 3
© 2012 Coaxis, Inc. dba Viewpoint Construction Software. All Rights Reserved.
The PO Workflow Process Setup The PO Process Workflow feature is used to force purchase orders that meet a defined criteria to follow a
specific approval/review process.
For example if all PO items greater than $25,000 need to be reviewed before they are sent to accounting, you
can set up the application to enforce that workflow/approval process.
Set Up a PO Process Workflow
The steps below provide detailed information about setting up the Process Workflow feature. It is
recommended that you test this feature in a test environment or test company before implementing it. This is
to verify that the workflow processes are set up correctly and functioning like expected before they are
implemented.
If the setup is already complete and you are ready to start using the PO Workflow Process, you can skip ahead to
the Processing section of this job aid.
Create Roles in HQ Roles
Every user entering purchase orders should have a role in HQ Roles. These roles are not company-specific, which
means the roles you create using this form can be used in any company.
Example:
If project managers are going to be entering POs, and the CFO is going to approve them, you need to
create roles for each of them. Those roles and their spending limits will apply in any company to which
they have access.
1. From the Headquarters module’s Programs folder, open the HQ Roles form.
2. In the Role field, enter the role of your choice, up to 20 characters.
3. Give the role a Description.
4. Mark the Active checkbox.
5. Move to the Spending Limits tab.
6. In the Type field, select PO-Purchase Order from the drop-down menu.
7. In the Sub Type field, select from the following options: Job, Inventory, Expense, Equipment, or All. The
option you select determines what documents the spending limit applies to.
8. Enter a Spending Limit for the role. A spending limit is the maximum amount that a user can spend
before a workflow will apply.
9. If you want to allow the role to go over the spending limit by a certain percentage, enter a Threshold.
Example:
P a g e | 4
© 2012 Coaxis, Inc. dba Viewpoint Construction Software. All Rights Reserved.
If the spending limit is $50,000 and the threshold is 2.00%, the role will be able to spend $51,000. This
means that if a purchase order were written for $48,000 but taxes, freight, and additional charges
pushed the total cost to $50,500, the workflow would not apply to the PO because it is within the
threshold.
10. Move to the Users tab.
11. Assign users to this role. Press F4 for a list of available users. These users are pulled from the VA User
Profile form. Alternately, you can assign roles to users in the VA User Profile form.
12. If a user should have a spending limit other than the role’s default spending limit, click the User
Spending Overrides button.
13. On the HQ User Spending Overrides form, complete the fields using steps 6-9 and then Save and Close
the form.
14. When your roles are complete, Save and Close the HQ Roles form.
Notification Preferences
The system will send a message to reviewers when a PO is ready to be reviewed/approved, and to initiators
when the PO they entered is rejected. These messages are sent using either email or VP Message. You must
define for your users which method the system should use.
Emails are sent from the V6 server using SMTP, so you do not have to use MS Outlook to use this feature.
To set email as a user’s preferred notification method,
1. From the Viewpoint Administration module’s Programs folder, open the VA User Profile form.
2. In the User Name field, enter the user name or press F4 to select the user from a list.
3. In the Email Address field, enter the user’s email address.
4. Move to the Notification Prefs tab.
5. In the Source field, enter Workflow or press F4 to select it from the list of available message sources.
6. Select 0-Email from the Destination drop-down list.
7. Save and Close the form.
VP Message
VP Messages are messages sent through the Viewpoint application and viewed using the VA Messages form.
To set VP Messages as a user’s preferred notification method,
P a g e | 5
© 2012 Coaxis, Inc. dba Viewpoint Construction Software. All Rights Reserved.
1. From the Viewpoint Administration module’s Programs folder, open the VA User Profile form.
2. In the User Name field, enter the user name or press F4 to select the user from a list.
3. Move to the Notification Prefs tab.
4. In the Source field, enter Workflow or press F4 to select it from the list of available message sources.
5. Select 1-VP Message from the Destination drop-down list.
6. Save and Close the form.
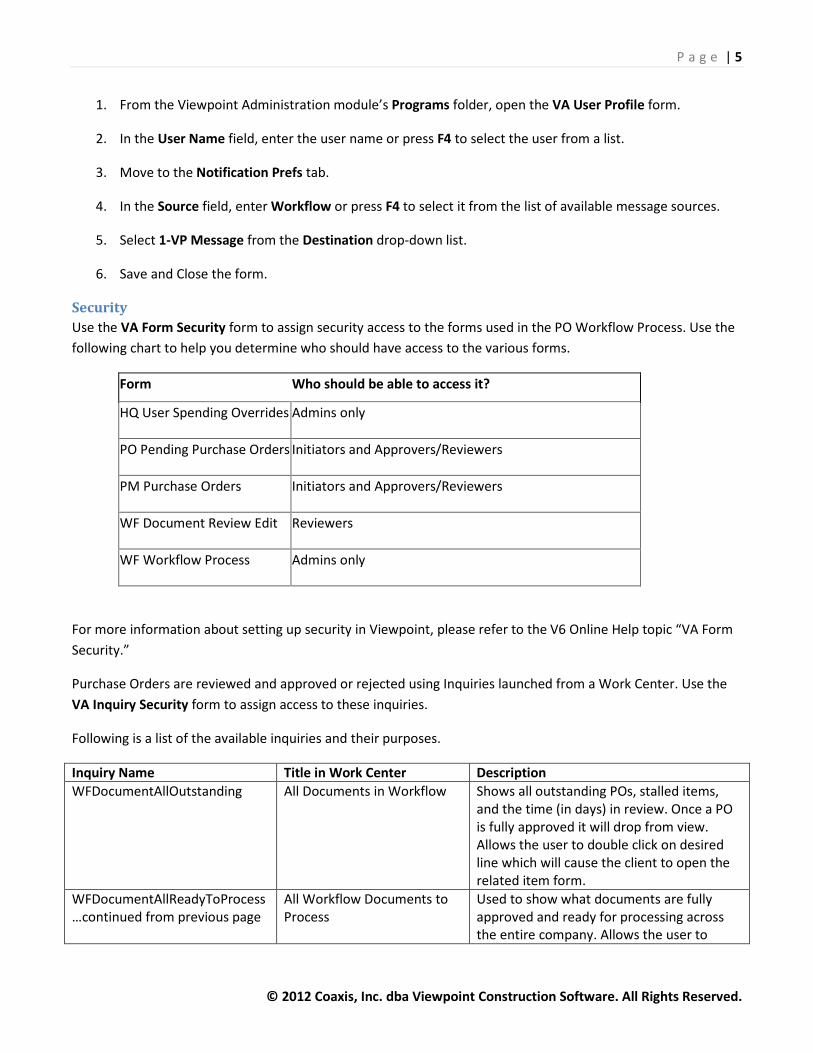
Security
Use the VA Form Security form to assign security access to the forms used in the PO Workflow Process. Use the
following chart to help you determine who should have access to the various forms.
Form Who should be able to access it?
HQ User Spending Overrides Admins only
PO Pending Purchase Orders Initiators and Approvers/Reviewers
PM Purchase Orders Initiators and Approvers/Reviewers
WF Document Review Edit Reviewers
WF Workflow Process Admins only
For more information about setting up security in Viewpoint, please refer to the V6 Online Help topic “VA Form
Security.”
Purchase Orders are reviewed and approved or rejected using Inquiries launched from a Work Center. Use the
VA Inquiry Security form to assign access to these inquiries.
Following is a list of the available inquiries and their purposes.
Inquiry Name Title in Work Center Description
WFDocumentAllOutstanding All Documents in Workflow Shows all outstanding POs, stalled items,
and the time (in days) in review. Once a PO
is fully approved it will drop from view.
Allows the user to double click on desired
line which will cause the client to open the
related item form.
WFDocumentAllReadyToProcess
…continued from previous page
All Workflow Documents to
Process
Used to show what documents are fully
approved and ready for processing across
the entire company. Allows the user to
P a g e | 6
© 2012 Coaxis, Inc. dba Viewpoint Construction Software. All Rights Reserved.
double click on a desired line, which will
cause the client to open the related item
form.
WFDocumentApproval
My Documents to Review Shows all documents that are ready for
workflow review assigned to your
username.
WFDocumentComments Workflow Comments Displays the comments entered by each
approver. Each approver displays on a
unique line. This inquiry is commonly used
as a drill down from the primary workflow
queries.
WFDocumentItemApproval My Items to Review Shows all document items that are ready for
workflow review assigned to your
username.
WFDocumentMyOutstanding My Documents in Workflow Shows all outstanding POs, stalled item, and
time (in days) in review created by the user
running the query. Once a PO is fully
approved it will drop from view. Allows the
user to double click on desired line which
will cause the client to open the related
item form.
WFDocumentMyReadyToProcess My Workflow Documents to
Process
Used to show what documents are fully
approved and ready for processing for the
user running the query. Allows the user to
double click on a desired line, which will
cause the client to open the related item
form.
TIP: If your user already has a work center, you can add these inquiries manually (right-click>Add Inquiry) or you
can delete and add a new work center. When adding a new work center, these inquiries will display
automatically.
For more information on adding a work center, refer to the V6 Online Help topic “Work Center Setup.”
Create Workflow Process
Use the WF Workflow Process form to create a workflow process for your purchase orders. Once the workflows
have been created, they can be assigned to specific modules, document types, and companies using the
Assigned Companies tab.
NOTE: Changes to workflow processes using this form will affect all documents where the workflow process is
currently applied - for example if you change a workflow process that currently applies to a purchase order, the
workflow on that PO will change when you make changes to the workflow process using this form.
Follow the steps below to create a new workflow approval process. If a similar approval process already exists,
you can save time if you copy the existing process and then modify the copy using the Copy feature located in
the Tasks toolbar.
P a g e | 7
© 2012 Coaxis, Inc. dba Viewpoint Construction Software. All Rights Reserved.
1. From the WF module’s Programs folder open the WF Workflow Process form.
2. Click the New Record icon in the toolbar at the top of the form.
3. In the Process field enter a name for the new process.
4. Enter a description of the process in the Description field.
5. Set the Document Type to PO-Purchase Order.
6. The Approval limit is based off of document total box determines whether approval and spending limits
are based on the PO total or each PO item.
7. Leave the Active box checked if this is an active approval/review process.
8. Move to the Workflow Steps tab. This is where you define the specific steps of the process, and which
roles/users are involved in each step.
9. Click the New Record icon in the toolbar at the top of the form. This will automatically create a new
record and populate the Sequence field with the next available number.
10. The Approver Type field allows you to create a step for either a role, or a specific user.
11. Once you have selected an approver type, use the User Name or Role field to define which user or role
will review/approve the PO. You can press F4 in these fields to select a user or role from a list.
� User - If you assign a specific user to an approval/review step, only that user will
review/approve the PO item.
� Role - If you assign a role to an approval/review step, all of the users associated with
that role will be included in the review/approval. If only specific users associated with
that role should approve/review the PO, you can assign those users to specific
jobs/projects, locations, or departments using the Roles tab on the PM Projects/JC Job
Master, EM Departments, IN Location Master.
For example if you have several Project Managers, you can assign them to the specific jobs that they
manage using the Roles tab on the JC Job Master or PM Projects forms. This means that when a PO item
associated with a job needs to be approved, only the Project Manager of that job is the
reviewer/approver, not all of the users associated with the Project Manager role.
� Users cannot approve their own purchase orders. This means the user creating the PO is
automatically removed from the workflow and the workflow will start with the next
step.
� Each role or user can only be used once in the process - for example you cannot have
the Job Superintendent role on multiple steps of the same approval/review process.

P a g e | 8
© 2012 Coaxis, Inc. dba Viewpoint Construction Software. All Rights Reserved.
� Roles are created and maintained using the HQ Roles form, and users can be assigned
specific roles using either the Users tab on the HQ Roles form, or the Roles tab on the
VA User Profile form.
12. The Step field allows you to break the approval process into distinct steps.
13. Enter the maximum amount that the role/user associated with the step can approve in the
Approval Limit field.
14. Check the Not Required box if the approver/reviewer is not required.
15. Click Save in the toolbar at the top of the form when complete to save your changes, and then
repeat the steps above to create more steps if necessary.
Consider the following when setting up approval steps:
� If a user is entering a PO item that needs to be processed in a workflow, the workflow
process has multiple steps, and the user is an approver/reviewer on a step in that
workflow, the PO item will automatically jump to the step after the one where the user
is set up as an approver/reviewer.
� If a user is associated with multiple roles and more than one of those roles is associated
with a step in a workflow, the user will be added to the workflow process multiple
times.
16. Move to the Assigned Companies tab.
� This tab is where you restrict the approval process to specific modules, companies, and
document types (as of v6.5, POs only). For example if the workflow should be used on all
purchase orders created in the PM module for company 1.
17. Click the New Record icon.
18. Press F4 in the Module field and select the module that the approval process applies to.
19. Enter a company number in the Company field or press F4 to select it from a list.
20. Select PO in the Document Type drop down field.
21. Leave the Active box checked.
22. Click Save in the toolbar at the top of the form to save your changes.
NOTE: Workflows can be set up in several places in the application and the system uses a hierarchy to determine
which one will be applied.
Each module/company/document type combination set up on this tab can only be set up once - it has to be
unique to all of the approval processes set up using the WF Workflow Process form. This applies even if the

P a g e | 9
© 2012 Coaxis, Inc. dba Viewpoint Construction Software. All Rights Reserved.
module/company/document type is not active on another approval process (the Active box on the Assigned
Companies tab is not checked).
You can also set this up using the Workflows tab on the company parameters forms in several modules. Changes
made using the Workflow tabs on the company parameters forms will update the records here on the Assigned
Companies tab.
Assign Workflow Process
Once the workflow processes are created, assign them using the Workflow tab on several forms in the
application. Assigning the workflows determines when the workflow will apply. For example should a workflow
apply to all PO items created in the application for company "1", or just to the PO items created in company "1"
that are associated with a JC/PM project.
Since you can assign the workflows in several places, the system uses a hierarchy to determine which workflow
will apply. The diagram below outlines the hierarchy and lists the forms where the workflows can be assigned.
The following diagram outlines the hierarchy in even more detail.
P a g e | 10
© 2012 Coaxis, Inc. dba Viewpoint Construction Software. All Rights Reserved.
If you assigned a role to an approval/review step using the Workflow Steps tab on the WF Workflow Process
form, all of the users associated with that role will be included in the review/approval. If only specific users
associated with that role should approve/review the PO, you can assign those users to specific jobs/projects,
locations, or departments. When PO items are created for those jobs, locations, or departments, only the users
associated with them will review/approve the PO item.
For example if you have several Project Managers, you can assign them to the specific jobs that they manage
using the Roles tab on the JC Job Master or PM Projects forms. This means that when a PO item associated with
a job needs to be approved, only the Project Manager of that job is the reviewer/approver, not all of the users
associated with the Project Manager role.
To assign a user to a specific role on a job,
1. From the Job Cost module’s Programs folder, open the JC Job Master form.
2. Enter a job in the Job field or press F4 to select it from a lookup.
3. Move to the Roles tab.
4. In the Job Role field, press F4 to select the role you want to assign to the job.
5. In the User Name field, press F4 to select the user, associated with that role, that you want
assigned to the job.
� Users can only be associated with a role that they have been set up with using the HQ
Roles form.
� Users can be assigned to more than one role - for example a single user can have
multiple roles.
� Roles can be used more than once.