using cimtool - ucaiugcimug.ucaiug.org/meetings/oslo2014/supporting... · cimtool projects each...
TRANSCRIPT

Systems Integration Specialists Company, Inc.
The Standards Based Integration Company
© Copyright 2008 SISCO, Inc.
Using CIMTool
Margaret Goodrich, Manager, Systems Engineering SISCO, Inc. 6605 19½ Mile Road Sterling Heights, MI 48314 USA Tel: +1-903-477-7176 Fax: +1-903-489-0063 E-Mail: [email protected]
© Copyright 2008 SISCO, Inc. 2
Introduction
The purpose of this presentation is to describe the use of CIMTool
Some of the uses of CIMTool include: Definition of information exchange profiles – messages or
files
Development of XSD Schemas
Development of RDF Schemas
Validation of full CIM XML instance files
Validation of incremental CIM XML files

© Copyright 2008 SISCO, Inc. 3
Contents
1. CIMTool Installation 2. Creating a CIMTool Project 3. Importing a Schema 4. Creating and Editing a Profile 5. Importing a Profile (Several Methods) 6. Generating XSD Schemas 7. Generating RDF Schemas 8. Importing a Model 9. Validating a Model 10. Importing and Validating an Incremental Model 11. Updating a Schema 12. Miscellaneous

© Copyright 2008 SISCO, Inc. 4
CIMTool Installation

© Copyright 2008 SISCO, Inc. 5
What is CIMTool?
CIMTool is an Eclipse plugin It provides the means to:
Define profiles from a UML model
Import profiles from a spreadsheet
Validate profiles
Validate instance files against a profile
Validate incremental files against an instance file and a profile
Generate XSD schemas from a profile
Generate RDF schemas from a profile
… and more

© Copyright 2008 SISCO, Inc. 6
Preparation for Installation
You should have a PC running a recent version of Windows, Linux or Mac OS, with at least 1GB memory
Recommend at least 2GB free disk space (much more is recommended if you will be working with large CIM network models)
You need an internet connection, noting that there may be 200MB of downloads required for installation
You need a Java runtime environment (JRE) Java 5 JRE is currently recommended
If you don’t have one you can download from http://java.com

© Copyright 2008 SISCO, Inc. 7
CIMTool Installation
Go to http://cimtool.org Version 1.8.1 is currently available for download Download a zip file with Eclipse and CIMTool (full
installation package)
Following the directions on the screen

© Copyright 2008 SISCO, Inc. 8
Starting CIMTool
Click on the Eclipse icon The Eclipse startup dialog will
appear Define a ‘workspace’ directory
when prompted The workbench view will then
appear
© Copyright 2008 SISCO, Inc. 9
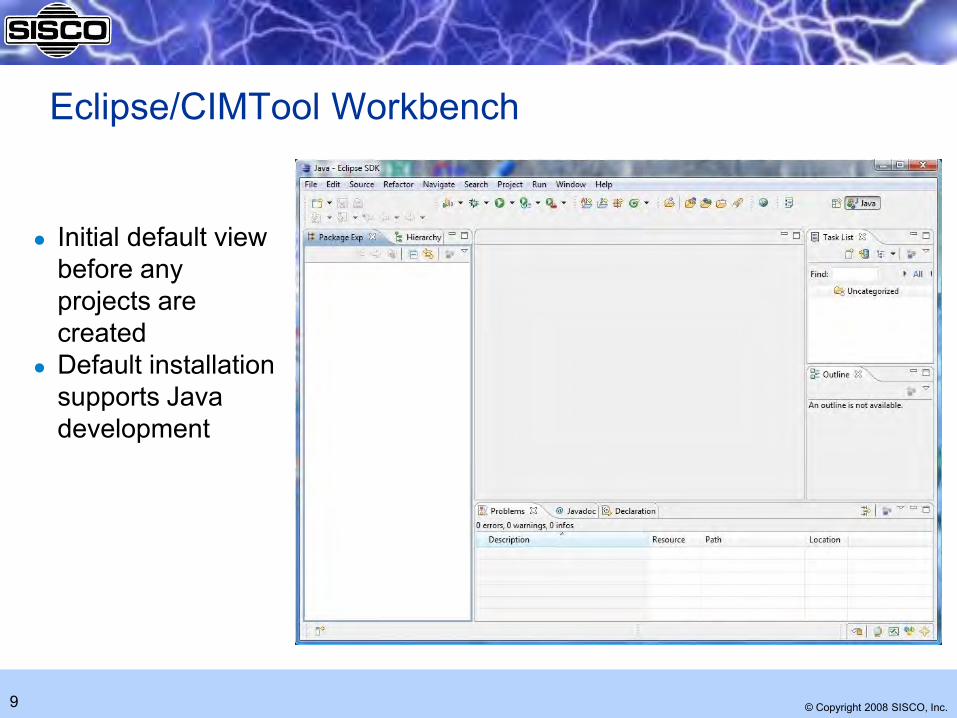
Eclipse/CIMTool Workbench
Initial default view before any projects are created
Default installation supports Java development

© Copyright 2008 SISCO, Inc. 10
CIMTool/Eclipse Hints and Tips
Files, Packages and Workspaces: It is important that you never add, modify or delete anything inside
a workspace directory with tools other than Eclipse
If there is ever a ‘resource out of sync’ problem, you can usually correct by using the ‘refresh’ option
Other problems may be corrected using the Project>Clean option
You may however safely read files directly from the workspace folder if needed

© Copyright 2008 SISCO, Inc. 11
Creating a CIMTool Project

© Copyright 2008 SISCO, Inc. 12
CIMTool Projects Each project has a named folder in the workspace directory Each CIMTool project will have four sub-folders:
Incremental: for CIM XML incremental files in RDF format with a .xml extension
Instances: for CIM XML instance files in RDF format with a .xml extension
Profiles: for profile definitions, where Profile definitions are stored in an XSD, OWL & RDFS formats Log files, which may identify errors, are text files with a .log extension Depending upon the usage of CIMTool, there may also be HTML, XML and
XSD files Schema: for the CIM model in XMI format with a .xmi extension
(Generated using the UML model from the EA Tool) Folders and files that have errors may include a red X on their
associated icon

© Copyright 2008 SISCO, Inc. 13
Creating a New CIMTool Project
Select ‘File > New > Project’
Select ‘CIMTool Project’ option
Click ‘Next’
© Copyright 2008 SISCO, Inc. 14
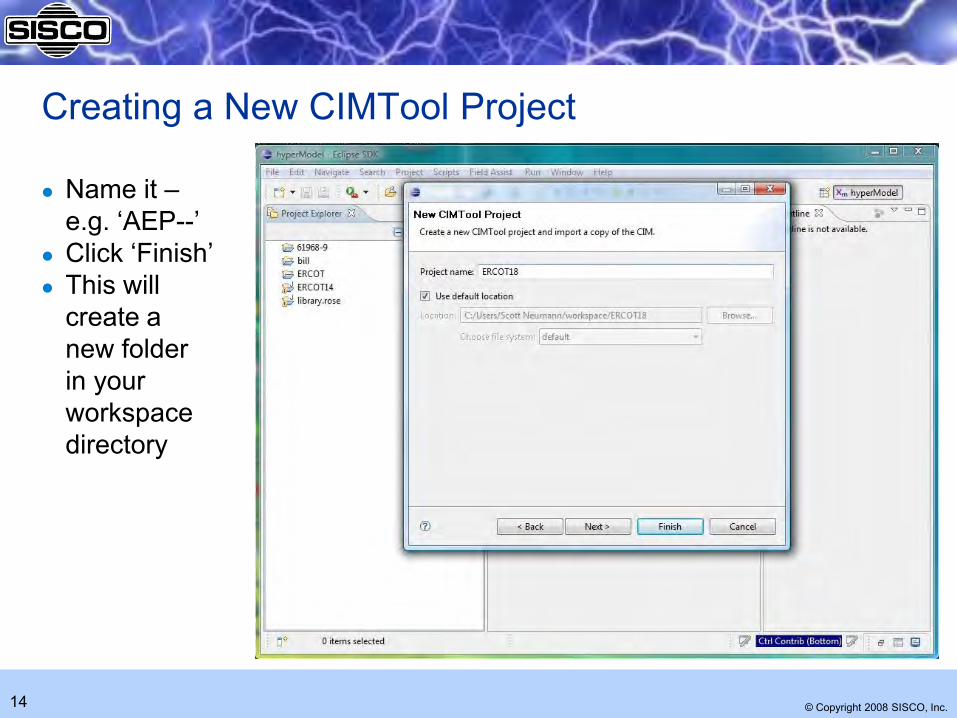
Creating a New CIMTool Project
Name it – e.g. ‘AEP--’
Click ‘Finish’ This will
create a new folder in your workspace directory

© Copyright 2008 SISCO, Inc. 15
Browsing the Project
Click on arrow to the left of the desired project name in the Project Explorer to expand it
See that project has the 4 set of folders
Expand sub-folders to see contents

© Copyright 2008 SISCO, Inc. 16
Importing a Schema

© Copyright 2008 SISCO, Inc. 17
Importing a Schema
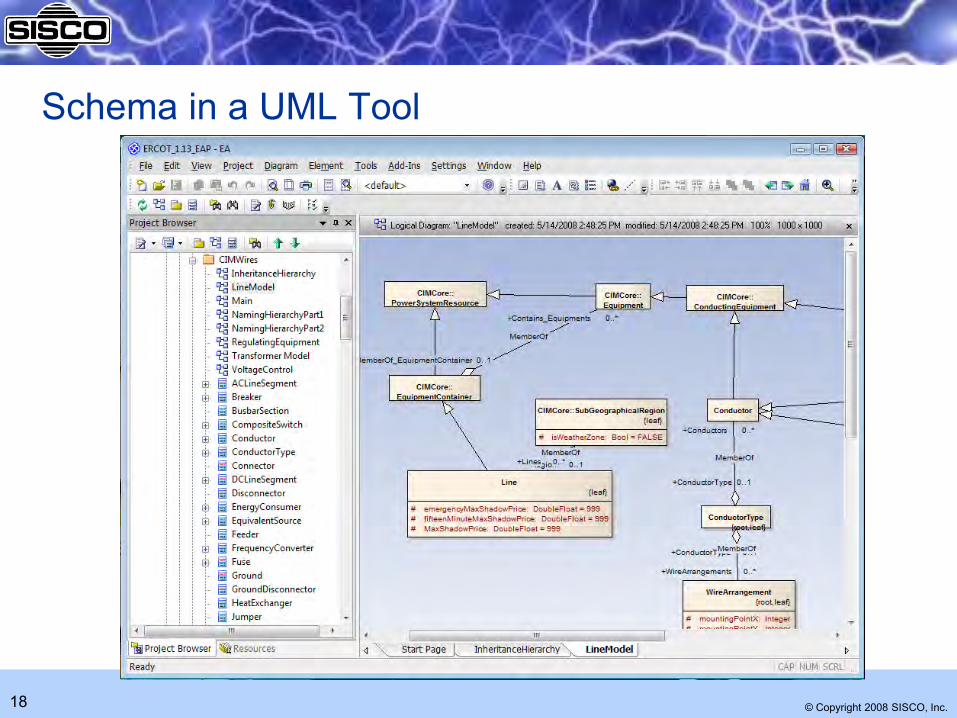
Schemas describe the classes, attributes and relationships defined by a UML model
Anything defined by a profile MUST be described within the UML model
Schemas must be in a suitable XMI format for import The XMI files are typically generated from the CIM UML
model created/maintained using Enterprise Architect Schemas will be stored in the ‘Schema’ folder of the
project There is typically one schema for a project, although
there are cases where there may be more than one
© Copyright 2008 SISCO, Inc. 18
Schema in a UML Tool
18

© Copyright 2008 SISCO, Inc. 19
Exporting UML Model as XMI In Enterprise
Architect select the top-level package
Select Project > Import/Export > Export Package to XMI

© Copyright 2008 SISCO, Inc. 20
Exporting XMI from UML Tool
Use export options shown
Export as UML 1.4
Unselect ‘Enable full EA Roundtrip’
Select ‘Unisys/Rose format’ option
Enter file name for XMI file
Click on Export button

© Copyright 2008 SISCO, Inc. 21
Schema Import within CIMTool
Schemas are imported when creating a new CIMTool project
Schemas can also be added to supplement an existing schema
Schemas can also replace an existing schema, as in the case of a new CIM version

© Copyright 2008 SISCO, Inc. 22
Initial Schema Import
1. Select ‘File > Import’ 2. Note the different import options under
CIMTool
3. Select ‘Import Schema’ option 4. Click ‘Next’

© Copyright 2008 SISCO, Inc. 23
Initial Schema Import
Browse to find the XMI file to import
Check the project for the import
Don’t edit the Namespace
Click “Finish”
© Copyright 2008 SISCO, Inc. 24
Creating and Editing a Profile

© Copyright 2008 SISCO, Inc. 25
Creating a New Profile
There are four ways to create a new profile: 1. Create it from scratch within CIMTool
2. Import an OWL profile previously constructed using CIMTool
3. Import the profile from a data dictionary spreadsheet
4. Copy and paste an existing profile within CIMTool Once created, profiles are stored in the ‘Profiles’ folder of
the project A project may have many profiles Each profile will have a namespace This following slides describe the creation of a new profile
using the edit capabilities within CIMTool
© Copyright 2008 SISCO, Inc. 26
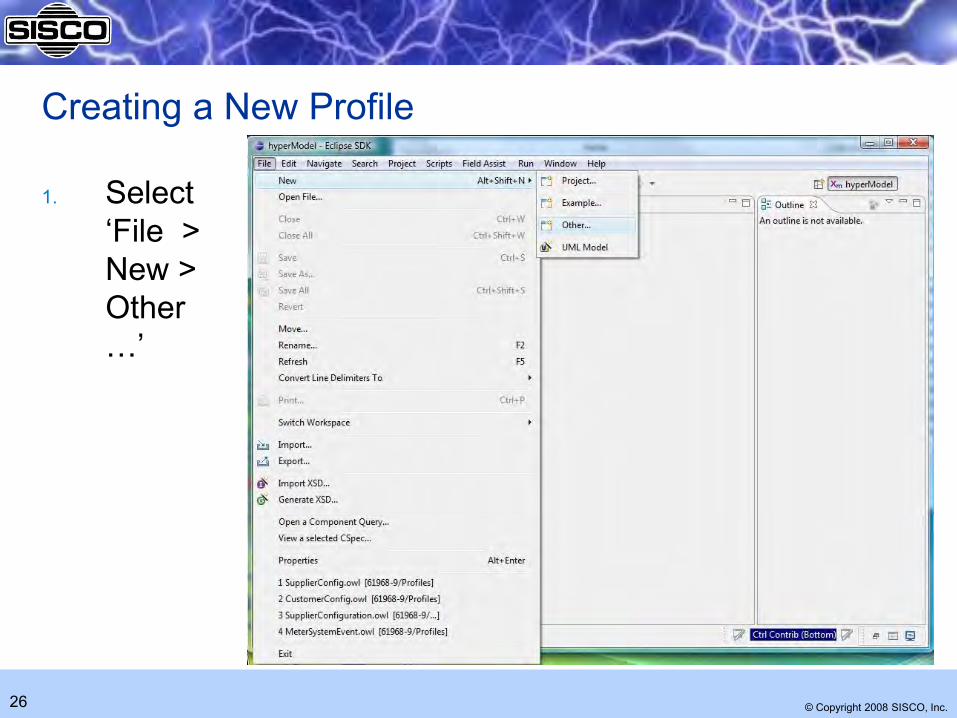
Creating a New Profile
1. Select ‘File > New > Other …’
© Copyright 2008 SISCO, Inc. 27
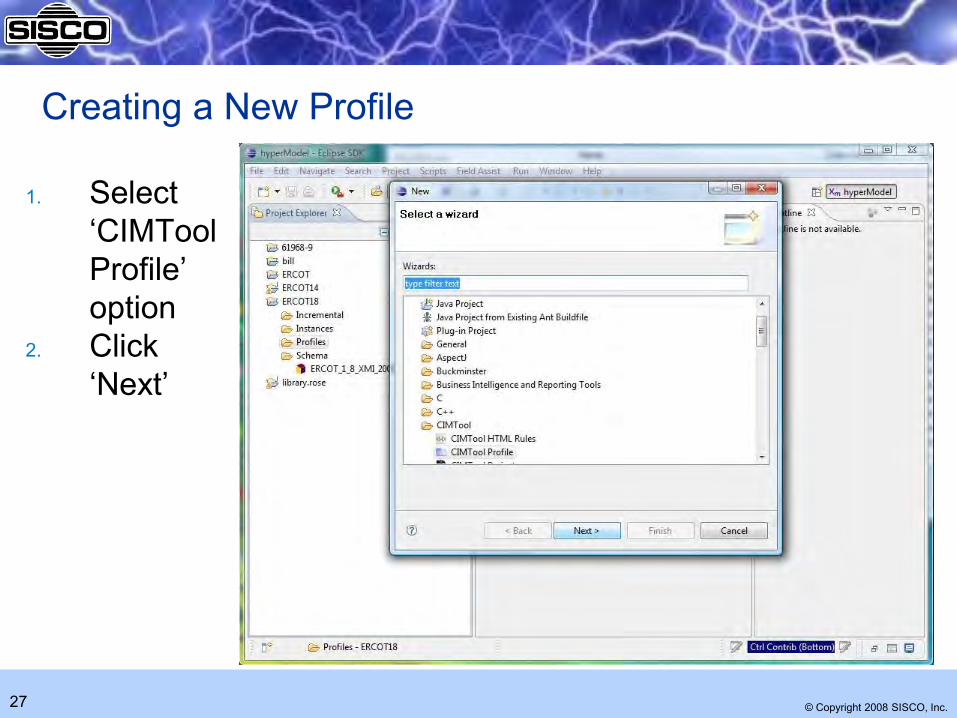
Creating a New Profile
1. Select ‘CIMTool Profile’ option
2. Click ‘Next’

© Copyright 2008 SISCO, Inc. 28
Creating a New Profile
Click on checkbox for the desired project
Determine a unique name for the profile that will not conflict with other profile names, then using the name: Set the profile name
Set namespace URI
Set envelope element name
Click ‘Finish’

© Copyright 2008 SISCO, Inc. 29
Browsing the Project
Click on arrows in Project Explorer to expand folders
Double click on the .owl profile file name in the to open it
Click on the profile name in the Outline window
In the Project Explorer frame you can always right click on a file name to see options

© Copyright 2008 SISCO, Inc. 30
Adding Classes to Profile
Browse through model on the right side of Add/Remove tab
Select one or more classes on right side Add/remove tab
Classes are moved by clicking on <

© Copyright 2008 SISCO, Inc. 31
Adding a Property (Attribute) to Profile
Click on a class in the Outline
Properties are shown on the right side of the Profile Add/Remove tab
Click on property name on right side
Click on ‘<‘ to move property to left side
© Copyright 2008 SISCO, Inc. 32
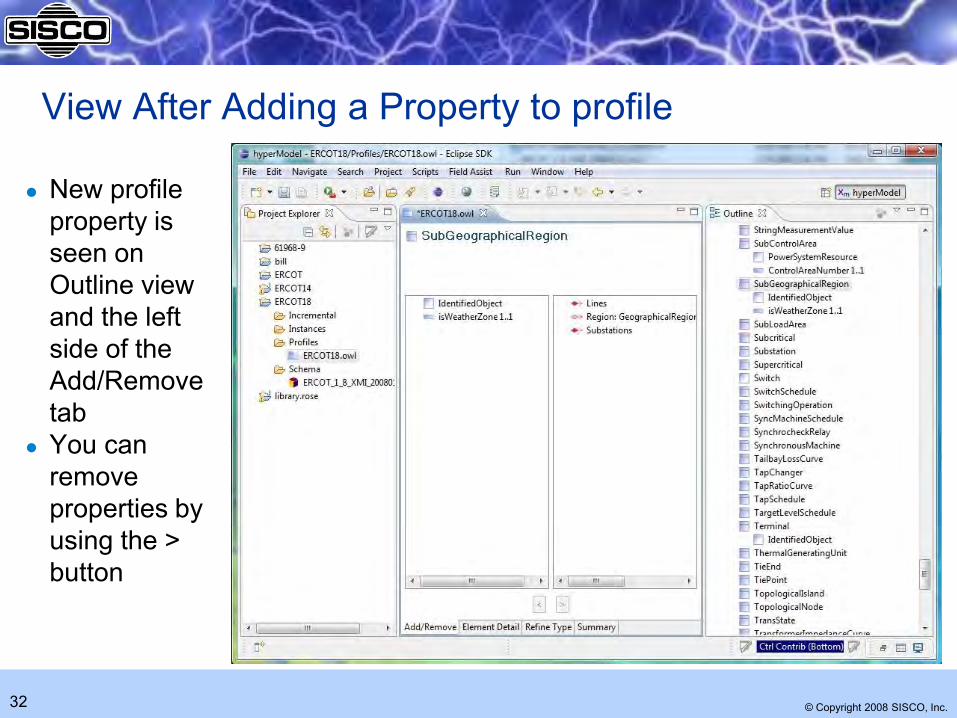
View After Adding a Property to profile
New profile property is seen on Outline view and the left side of the Add/Remove tab
You can remove properties by using the > button

© Copyright 2008 SISCO, Inc. 33
Adding Properties to Profile
Can move more than one property at a time

© Copyright 2008 SISCO, Inc. 34
Importing a Profile

© Copyright 2008 SISCO, Inc. 35
Importing a Profile
Sometimes it is desirable to use another profile definition as a starting point for a profile definition
CIMTool saves profile definitions in an OWL format Profile definitions from another project or
workspace can be imported to create new profiles

© Copyright 2008 SISCO, Inc. 36
Importing Profiles into CIMTool
Select ‘File > Import’ Note the different import
options under CIMTool
On ‘Import’ dialog select ‘CIMTool – Import Profile’ option
Check the project to import into
Browse to find the file to import
Click ‘Next’

© Copyright 2008 SISCO, Inc. 37
Importing Profile from Data Dictionary

© Copyright 2008 SISCO, Inc. 38
Importing Profiles
Some products can generate a Data Dictionary in the form of an Excel spreadsheet
The spreadsheet can define one or more profiles Note that the spreadsheet can be maintained
independently of any particular product The Data Dictionary defines the classes, attributes and
relationships that comprise one or more profiles This can be imported into CIMTool to define a profile

© Copyright 2008 SISCO, Inc. 39
Data Dictionary
An Excel spreadsheet that describes the contents of one or more profiles
Tabs exist for Classes, Attributes, Associations, Data types, Enumerations and Units
© Copyright 2008 SISCO, Inc. 40
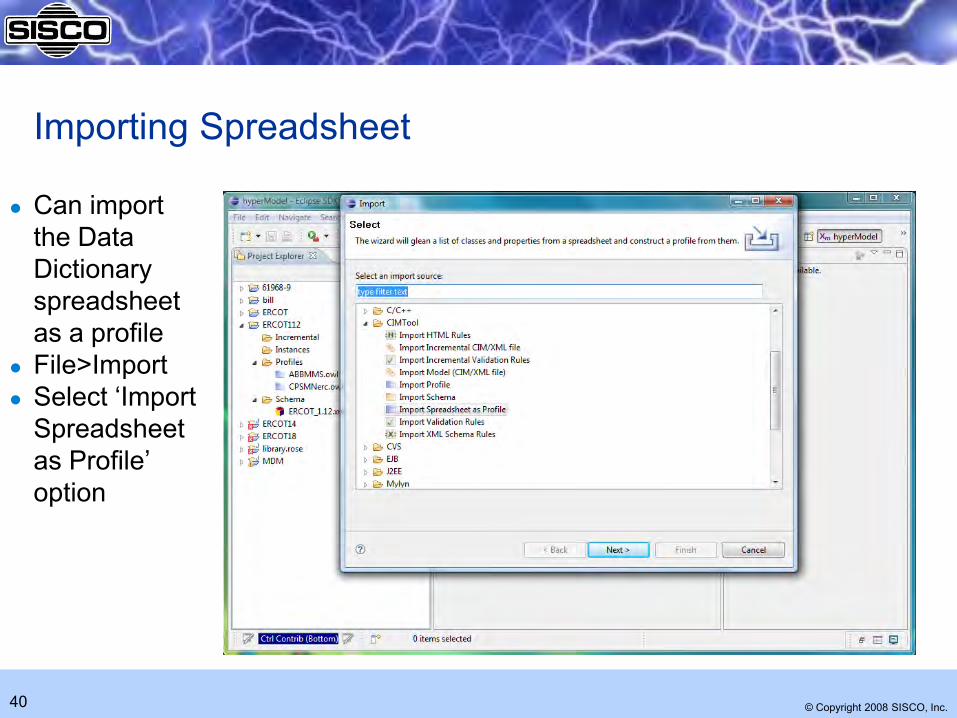
Importing Spreadsheet
Can import the Data Dictionary spreadsheet as a profile
File>Import Select ‘Import
Spreadsheet as Profile’ option

© Copyright 2008 SISCO, Inc. 41
Importing Spreadsheet
The spreadsheet may identify one or more profiles
Can select which profiles to construct
Can only construct one at a time
© Copyright 2008 SISCO, Inc. 42
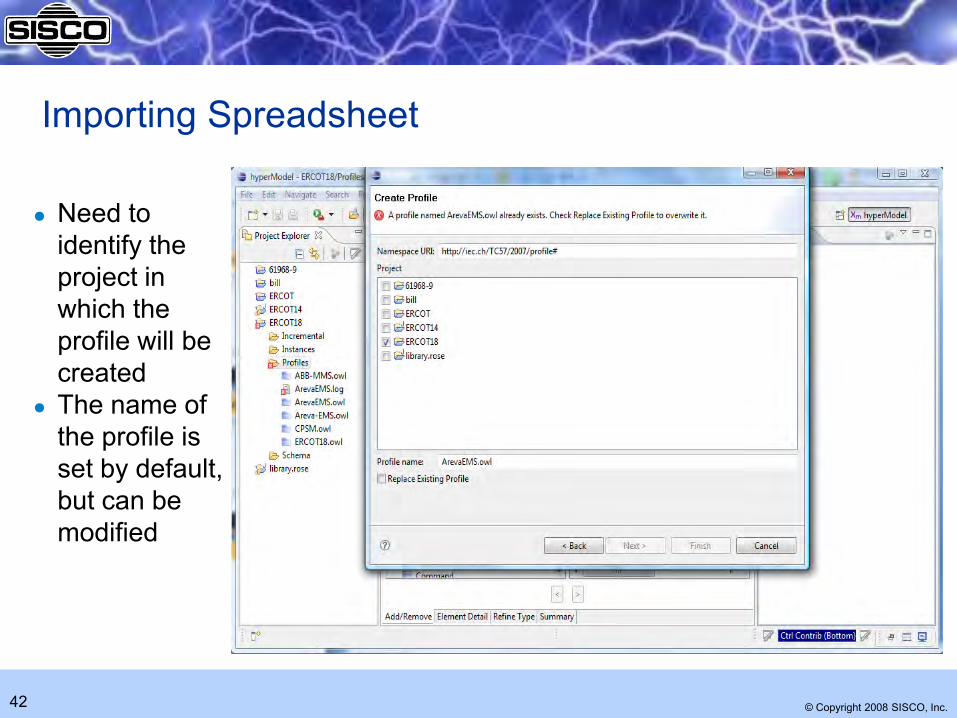
Importing Spreadsheet
Need to identify the project in which the profile will be created
The name of the profile is set by default, but can be modified

© Copyright 2008 SISCO, Inc. 43
Importing Spreadsheet
New profile (.owl file) is created if there are no fatal errors
A log file is created that identifies any errors

© Copyright 2008 SISCO, Inc. 44
Importing Spreadsheet
A log file (.log) is generated with the profile to identify errors, if any
The log file identifies what could not be found for inclusion into the profile definition

© Copyright 2008 SISCO, Inc. 45
Extending the Spreadsheet
You can also create a new profile definition in the spreadsheet for import into CIMTool using the following steps:
1. Insert new profile columns into the ‘Classes’, ‘Attributes’ and ‘Associations’ tabs
2. Provide the same profile name on row one of each of the added columns
3. Set the value of each new cell to ‘TRUE’ or ‘FALSE’ 4. Run the spreadsheet import process as described previously 5. Look for errors in the log file

© Copyright 2008 SISCO, Inc. 46
Creating a Profile using the Copy/Paste Function
© Copyright 2008 SISCO, Inc. 47
Create a Profile Using Copy/Paste
Select the Profile you wish to copy Right click on the .Owl file and select ‘Copy’ Right click again and select ‘Paste’ Enter the name of the new Profile to be created in the
Dialog The set of Profile files will be generated Right click on the new .Owl file and select Properties Enter the new Profile namespace in the dialog This method will be demonstrated after the
presentation

© Copyright 2008 SISCO, Inc. 48
Generating RDF Schemas

© Copyright 2008 SISCO, Inc. 49
Generating RDF Schemas
Load the desired profile
Select the ‘Summary’ tab

© Copyright 2008 SISCO, Inc. 50
Generating RDF Schemas
Check ‘Builder for legacy-rdfs’
Check any other desired builder options
Click on ‘File>Save’

© Copyright 2008 SISCO, Inc. 51
Generated RDF Schema
To view the actual RDFS, right click file name in Project Explorer
Then select ‘Open With > Text Editor’ option
© Copyright 2008 SISCO, Inc. 52
XML Schema Design

© Copyright 2008 SISCO, Inc. 53
XML Schema Options
XML Schemas are key to message-based integration IEC 61968 leverages the CIM for message-based
integration Given a profile definition, there are a variety of options that
may be used to control the generation of an XML Schema: Envelope name for the profile
Definition of ‘concrete’ classes (to generate an XML element)
Restrictions on cardinalities
Associations implemented either ‘by value’ or ‘by reference’ Also can create a stylesheet to customize the format of
generated XSDs
© Copyright 2008 SISCO, Inc. 54
Associations
Associations may be realized either nested inline ‘by value’, or ‘by reference’
Default is ‘by value’ A check box is used to select ‘by reference’ option
on the Add/Remove tab In the ‘by reference’ case a ‘ref’ attribute is
generated to point to an instance elsewhere in the XML
Typically an mRID value should be used for the value of the ‘ref’ attribute
© Copyright 2008 SISCO, Inc. 55
Associations ‘By Reference’
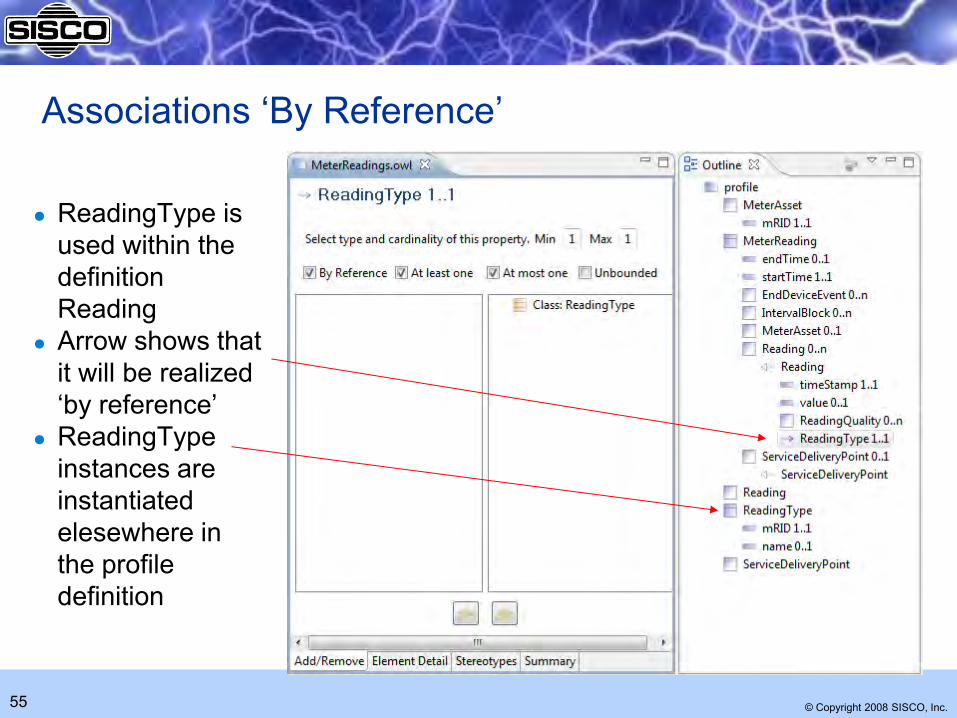
ReadingType is used within the definition Reading
Arrow shows that it will be realized ‘by reference’
ReadingType instances are instantiated elesewhere in the profile definition

© Copyright 2008 SISCO, Inc. 56
Selecting XSD Generation
XSD generation must be selected on the Summary tab for the profile
Other options such as HTML generation may be selected concurrently
© Copyright 2008 SISCO, Inc. 57
Eclipse XSD Editor

© Copyright 2008 SISCO, Inc. 58
XML Schema Editors
Altova XML Spy has been a dominant XML Schema editor and is certainly a great tool, setting a ‘gold standard’ for comparison of other XML tools
As a consequence of the strong adoption of XML Schema, many other good and typically lower cost products now exist
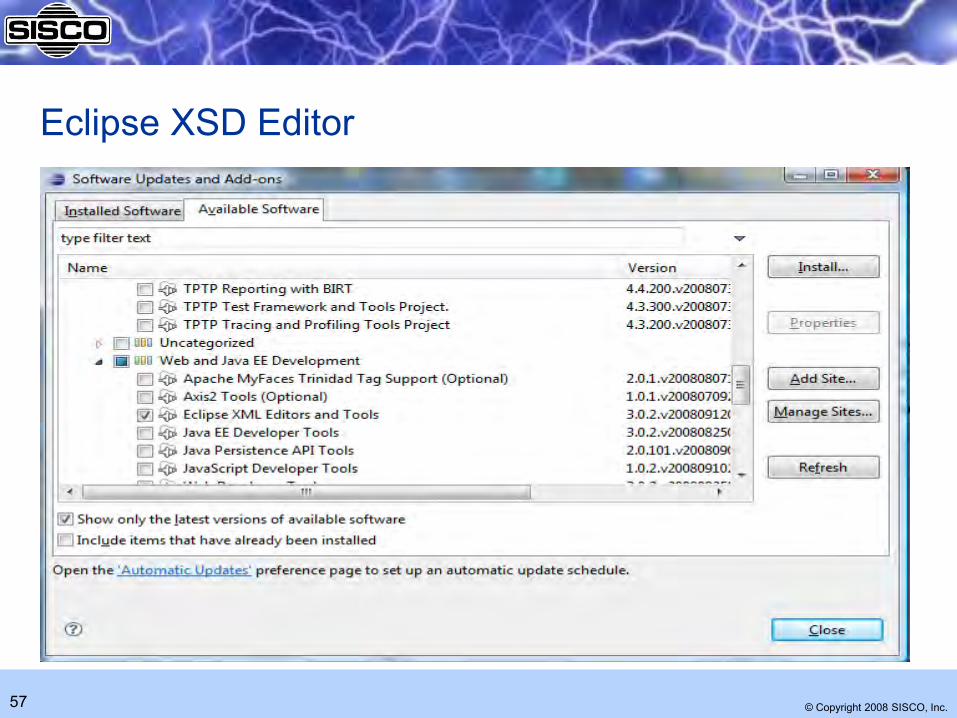
Eclipse has a free XML Schema editor To install Eclipse XML editor:
In Eclipse, select ‘Help->Software Updates’
Select ‘Available Software’ tab
Find ‘Web and Java EE Development’ category
Look for ‘Eclipse XML Editors and Tools’
Click appropriate check box and install

© Copyright 2008 SISCO, Inc. 59
Generated XSD Example

© Copyright 2008 SISCO, Inc. 60
XML Schema Rules
Used to control XSD generation
Create using: File > New > XML Schema Rules
Select project and profile
A default <profile>.xsd-xslt file is generated
File may be edited to control XSD generation for the profile

© Copyright 2008 SISCO, Inc. 61
Stylesheets for XSD Generation
Use Eclipse editor to edit Schema Rules: File->Open with-> Text Editor
Common actions: Use different
namespaces
Force attributes to be created in certain cases
Remove or revise documentation and annotations

© Copyright 2008 SISCO, Inc. 62
Editing XML Schema Rules
Above example shows how to modify XSLT so that documentation is not included in XSDs (e.g. for brevity)

© Copyright 2008 SISCO, Inc. 63
Generating XSD Schemas

© Copyright 2008 SISCO, Inc. 64
Generating XSD Schemas
Load the desired profile
Select the ‘Summary’ tab

© Copyright 2008 SISCO, Inc. 65
Generating XSD Schemas
Check ‘Builder for XSD’
Check any other desired builder options
Click on ‘File>Save’

© Copyright 2008 SISCO, Inc. 66
Generated XSD Schema
To view the actual XSD Schema, right click file name in Project Explorer
Then select ‘Open With > Text Editor’ option

© Copyright 2008 SISCO, Inc. 67
CIMTool Output Options CIMTool can generate several ‘styles’ of outputs for profile definitions,
including: XSD
SQL
XML
HTML CIMTool can generate several ‘styles’ of RDF or OWL as outputs for
profile definitions, including: Legacy RDFS (currently the most commonly used)
Legacy nested RDFS
Simple OWL
Simple nested OWL CIMTool can also generate Java Both the form of XSDs and HTML generated can be controlled by
stylesheets

© Copyright 2008 SISCO, Inc. 68
HTML Documentation
HTML option generates a single HTML file with description of all classes
Hyperlinks allow navigation between class descriptions and type definitions
Free tools exist for HTML to Word conversion

© Copyright 2008 SISCO, Inc. 69
Importing a Model
© Copyright 2008 SISCO, Inc. 70
Importing a Model
In order to validate a model, it must first be imported Model files to be imported are in a CIM/XML RDF
format with a .xml extension Model files can be very large, as much as 2GB in size The import process can take many minutes The resulting model is placed in the ‘Instances’ folder
of the project

© Copyright 2008 SISCO, Inc. 71
Importing a Model Select ‘File > Import’ On ‘Import’ dialog select
‘Import Model (CIM/XML file)’ option
Click ‘Next’ Check the project to import
into Browse to find the file to
import Select an appropriate
profile Click ‘Next’ OR Select the Model Import
ICON on the toolbar and complete the screen shown

© Copyright 2008 SISCO, Inc. 72
Importing a Model That Already Exists
Change the file name if you wish to save to a different sub folder
Check ‘Replace existing model’ if you wish to overwrite
Click ‘Finish’ Wait for the import to
complete, as it may take several minutes (up to an hour for a very large model)
Watch the progress icon at the bottom of CIMTool where it says ‘Importing model …’

© Copyright 2008 SISCO, Inc. 73
Imported Model
The imported RDF model is stored within the Instances folder of the project
Errors are recorded in log files A folder is created to store the model in typically many
smaller files that have a .ttl extension The .ttl files are in Terse RDF Triple Language format
(more compact than CIM XML)

© Copyright 2008 SISCO, Inc. 74
Validating a Model

© Copyright 2008 SISCO, Inc. 75
Validating a Model
Validation of the model occurs when a model is imported
Errors are identified in log files in the ‘Instances’ folder of the project with a name in the form <profile>.log
If errors exist, a diagnostic file is created which can be browsed
CIMTool has a default set of validation rules, where the rule file is named <profile>.split-rules
Rules can be edited and extended
© Copyright 2008 SISCO, Inc. 76
Example Validation Errors
Undefined classes Undefined properties Instantiation of abstract classes Illegal cardinality on an association (e.g. more or less
associations than expected) Range violation for a data item Illegal domain of a property Base voltages for conducting equipment connected at a
connectivity node do not agree Isolated nodes Untyped objects Missing or extra terminal Duplicate properties Unexpected loop

© Copyright 2008 SISCO, Inc. 77
Browsing Diagnostic File
77

© Copyright 2008 SISCO, Inc. 78
Importing and Validating an Incremental Model
© Copyright 2008 SISCO, Inc. 79
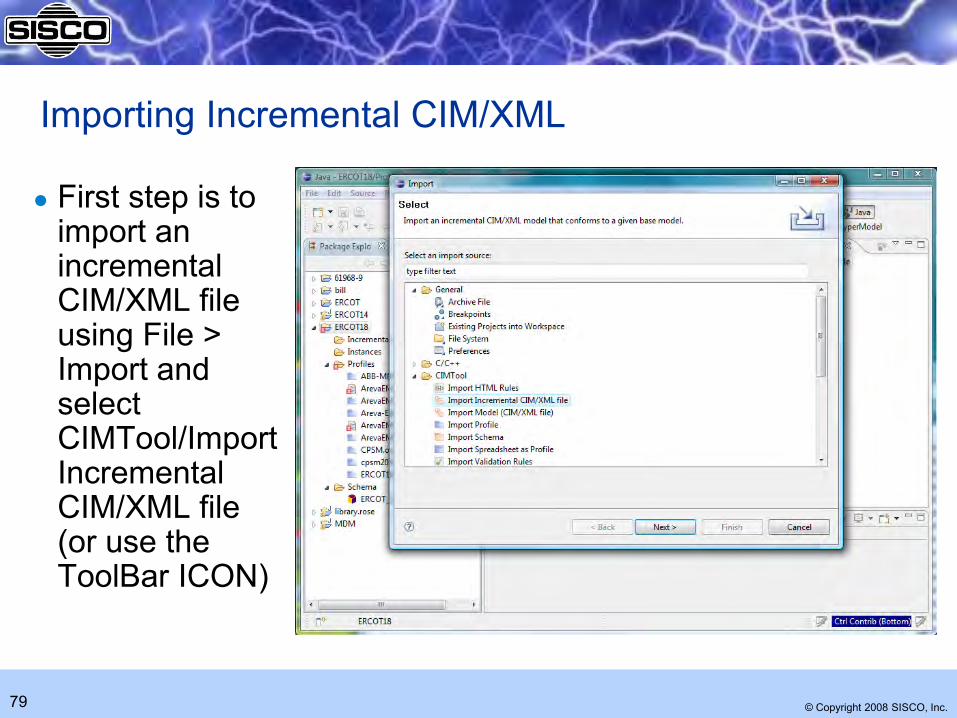
Importing Incremental CIM/XML
First step is to import an incremental CIM/XML file using File > Import and select CIMTool/Import Incremental CIM/XML file (or use the ToolBar ICON)
© Copyright 2008 SISCO, Inc. 80
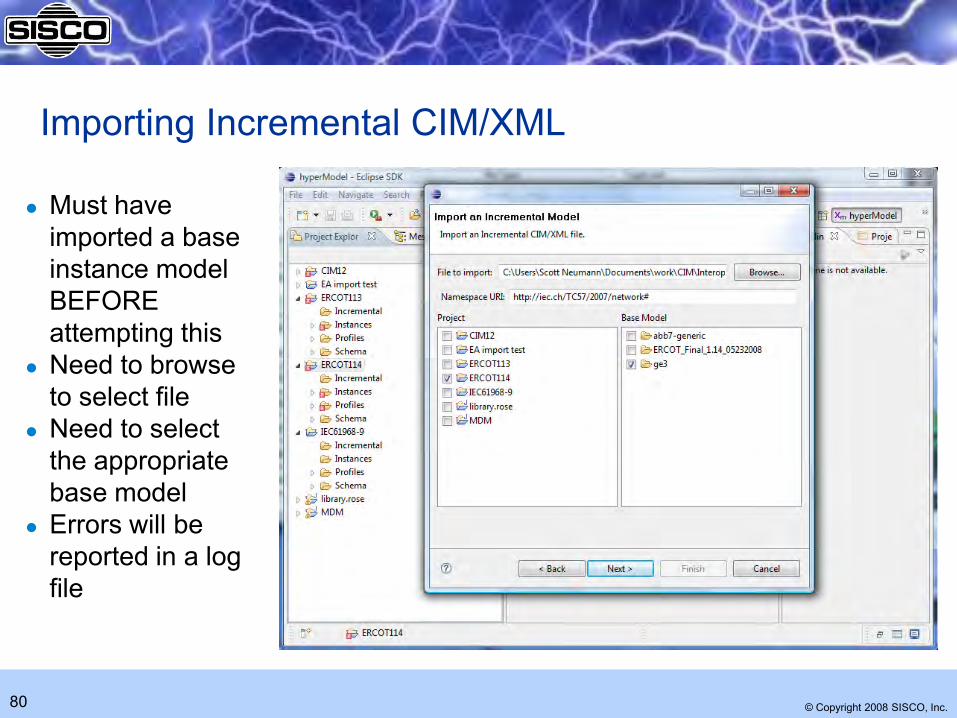
Importing Incremental CIM/XML
Must have imported a base instance model BEFORE attempting this
Need to browse to select file
Need to select the appropriate base model
Errors will be reported in a log file

© Copyright 2008 SISCO, Inc. 81
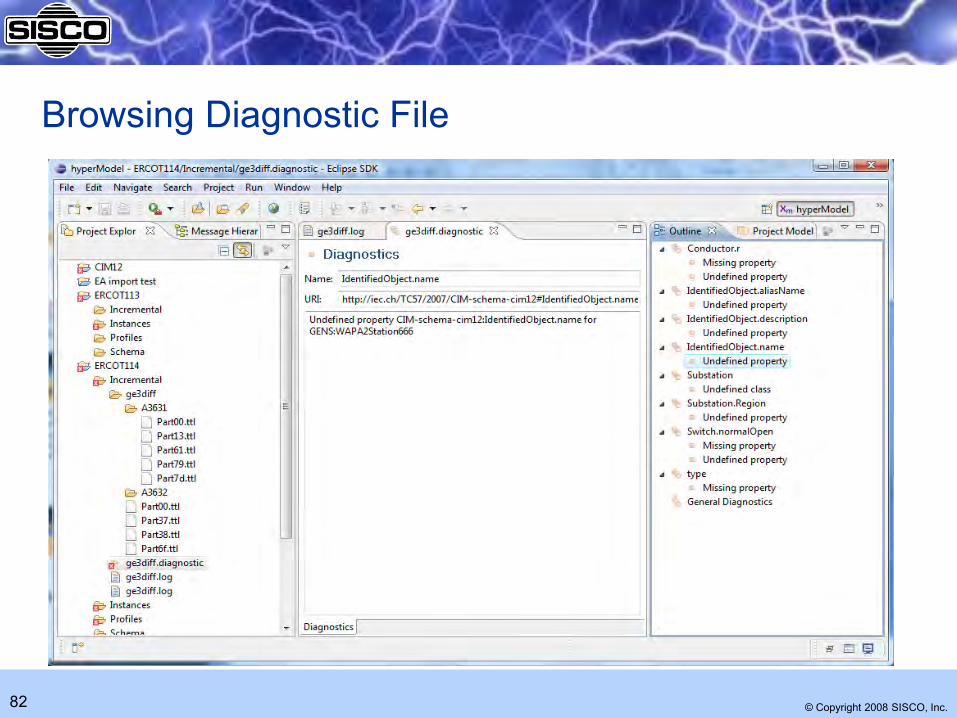
Validating an Incremental Model
Validation occurs when the model is imported Errors are identified in log files in the ‘Incremental’
folder of the project with a name in the form <profile>.log
If errors exist, a diagnostic file is created which can be browsed
© Copyright 2008 SISCO, Inc. 82
Browsing Diagnostic File

© Copyright 2008 SISCO, Inc. 83
Updating a Schema

© Copyright 2008 SISCO, Inc. 84
Updating a Schema in CIMTool
From time to time, there may be updates to the UML model. These updates will result in a revised XMI file
You should not directly replace a file in the CIMTool workspace directory
You should instead, using CIMTool File menu options: 1. Delete the old schema
2. Import the new schema Be sure that the correct namespace is entered Profiles with errors will be flagged with a red X
84

© Copyright 2008 SISCO, Inc. 85
Namespaces
A commonly used namespace is http://iec.ch/TC57/CIM-generic#
If namespaces do not match between schema, profiles and the model files errors may be encountered
Default namespaces to be used by CIMTool can be changed using Window > Preferences and selecting CIMTool option
Most problems encountered in CIMTool surround the namespace.
It is best to use the default (defined above) for all project files
85

© Copyright 2008 SISCO, Inc. 86
Changing Namespaces
Namespaces can be changed by right clicking on a file name in the Project Explorer and then selecting ‘properties’
The namespace is shown on the CIMTool property dialog
Namespaces can be changed as desired
Note that this may impact existing profile definitions

© Copyright 2008 SISCO, Inc. 87
Miscellaneous
© Copyright 2008 SISCO, Inc. 88
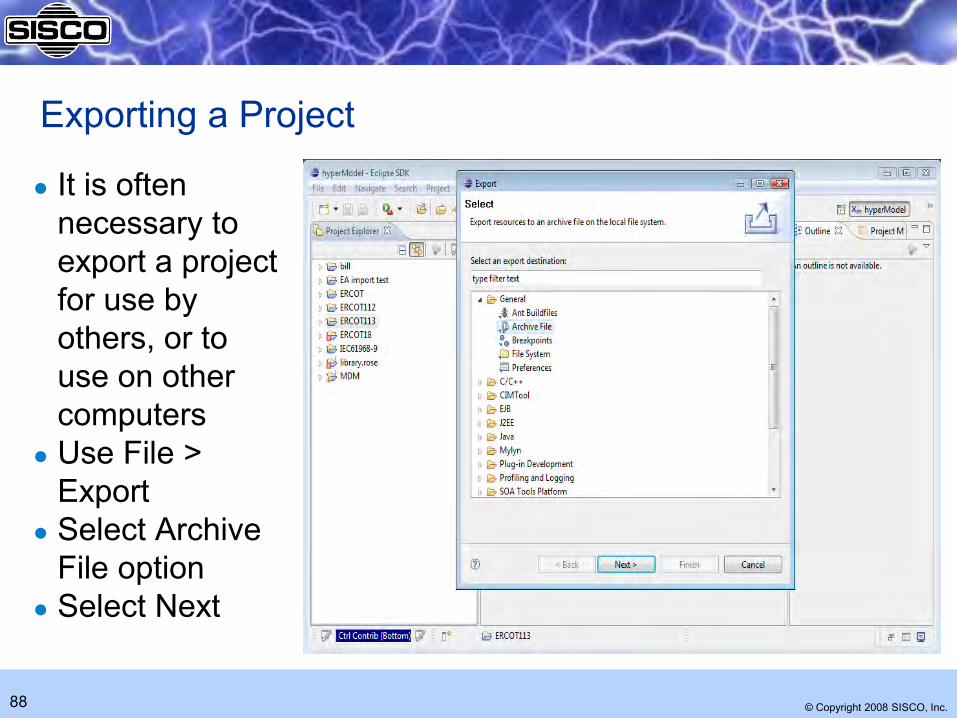
Exporting a Project
It is often necessary to export a project for use by others, or to use on other computers
Use File > Export
Select Archive File option
Select Next

© Copyright 2008 SISCO, Inc. 89
Exporting a Project
Need to select output format, ZIP is usually best
Need to select output file name
Project can be later imported back into Eclipse using File > Import

© Copyright 2008 SISCO, Inc. 90
Switching Workspaces Sometimes it is
necessary to move or change the location of your workspace folder, or use multiple workspaces
To point Eclipse to the new workspace folder use File > Switch Workspace
Select the desired workspace folder
The settings will be updated and Eclipse will restart

© Copyright 2008 SISCO, Inc. 91
Renaming Resources
Sometimes it is necessary to rename projects, folders within a project or files within a folder
It is important to do this using Eclipse, instead of directly making changes to the resource outside of Eclipse
To rename, right click on the desired resource in the Project Explorer and select ‘Rename’
Now you can change the name of the resource
© Copyright 2008 SISCO, Inc. 92
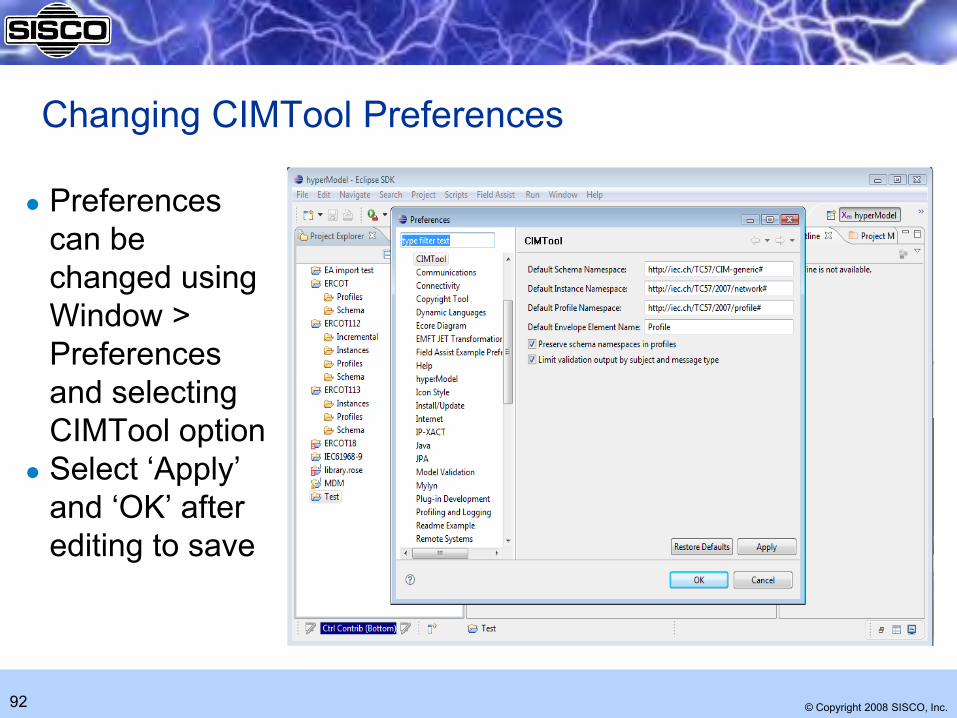
Changing CIMTool Preferences
Preferences can be changed using Window > Preferences and selecting CIMTool option
Select ‘Apply’ and ‘OK’ after editing to save

© Copyright 2008 SISCO, Inc. 93
Diagnostics
Errors will be written to ‘.diagnostic’ files These are often the consequence of changes in the CIM that
have eliminated used classes, relationships or attributes Profiles can then be edited to correct the problems

© Copyright 2008 SISCO, Inc. 94
Backing Up a Project
Easy way … Easiest way to back up a project directory is to use WinZip or
a similar archive tool
Using WinZip (or similar tool), simply create an archive file of the project folder within the workspace
Using a source repository … Many commercial source repositories options exist that
integrate with Eclipse
Plugins can be found for: CVS Visual Source Safe Clear Case

© Copyright 2008 SISCO, Inc. 95
Importing a Project
Select File > Import > To import projects into Workspace
Click Next Browse to
identify a project directory
Can use ‘Copy projects into workspace’ to make a copy of the directory instead of working directly out of the chosen directory

© Copyright 2008 SISCO, Inc. 96
Deleting a Project
Right click on name of project in the Project Explorer
Files will only be deleted if the ‘Also delete contents under …’ option is selected
Click ‘Yes’

© Copyright 2008 SISCO, Inc. 97
CIMTool Updates
TO obtain updates to Eclipse and CIMTool
Use Help > Software Updates > CIMTool
Select ‘Search for New Features to Install’ option

© Copyright 2008 SISCO, Inc. 98
Where Do I Get …
CIMTool and Eclipse: http://eclipse.org
http://cimtool.org CIM:
http://www.ucaiug.org/CIMug IEC Standards:
http://www.iec.ch

© Copyright 2008 SISCO, Inc. 99
Acknowledgements
Not possible without the efforts of Arnold DeVos, the developer of CIMTool
Thanks to those companies that also helped to fund CIMTool development
Thanks to the CIM model managers that have helped to advance the CIM: Kurt Hunter, Siemens (WG13) Kendall Demaree, Areva (WG13) Lars-Ola Osterlund, ABB (WG13) Tatjana Kostic, ABB (WG14) Margaret Goodrich, SISCO (WG16)

© Copyright 2008 SISCO, Inc. 100
More Information
Eclipse web site: http://eclipse.org CIMTool web site: http://cimtool.org E-mail: [email protected]
Screen Shots Compliments of UISOL and Scott
Neumann