unit 6: groups, teams, and managing users - agiloft, inc. · groups and teams unit overview • in...
TRANSCRIPT

Unit 6: Groups, Teams, and Managing Users
1
■fr
>*-*ÿ
qrc—
O«h-r'.4—
OL-O,—
CompanyO ’U

Questions Covered
• What is the difference between a group and a team?
• How are groups and teams created and managed?
• What are the special elements of the Team wizard and how do we customize the Teams table?
• What is the difference between a power user (also called a staff user) and an end user?
• How do we set up new users and control their permissions and what they see?
2

Groups and Teams Unit Overview
• In this unit, we will be learning how to use group and team membership in order to define user experience within the system.
• While we will refer to groups and group permissions as a matter of necessity, we will not go into detail on setting up group permissions until Unit 14. Generally, defining group permissions is done late in the setup process when all tables and fields have been finished.
3

What is a Group?
• Groups have permissions defining which tables, records and fields a user can view, edit, and create within the system.
• Saved searches are available and visible based on a user’s group membership.
• The menu elements visible on action bars and the tables shown in the left pane also depend on the user’s group permissions.
• Dashboards (collections of charts and reports) are accessible based on group, as are certain reports.
• Users can belong to multiple groups and will enjoy the superset of their groups’ permissions.
• If a user belongs to one group with permission to view a field and to another group without that access, they will have permission to view the field.
• Groups have a type – they are either a staff user or an end user group. This has licensing implications.
4

Group Types—Staff (Power) Users vs. End Users
• Staff users (also referred to as assigned or floating power users):
Belong to at least one group that is defined as a staff group.
Require a staff license.
Work on other people’s records.
Need access to staff interface functionality, such as reports, charts and dashboards.
• End users:
Belong only to a group defined as a customer group.
May be employees, customers, vendors, etc.
Access the system through the End User Interface (EUI).
Use an unlimited end user license.
Are not permitted to edit “other people’s” records.
5

Setting Up Groups
• Setting up group permissions is the most time-consuming task that we do in Agiloft.
• Because group permissions include permissions down to the field level for every table, and there can be a lot of tables, there are a lot of choices to be made.
• To reduce duplication of effort, we save group setup until as close to the end as possible. It is preferable to be sure all tables and fields are added before creating or editing every group so that it only has to be done once.
• However, if you are just adding a few new fields to a table that is already set up, then it is wise to copy permissions from existing fields as you go, because this may allow you to avoid having to go through every group individually.
• Since we are working in a new table, we will save looking at group permissions setup in detail until a later unit.
6

What is a Team?
• Teams serve different functions for staff users and end users:
Staff teams are used primarily to identify functional units to whom records can be assigned, emailed, etc.
Customer teams are used primarily to enable distinct branding in the End User Interface (EUI). Customers on different teams can be set up to see different color schemes and logos in the EUI.
• Two fields in the Person tables control team membership: Primary Team and Teams. Primary Team holds a single team value, while Teams is a multi-choicefield.
• You will need a staff team for each set of users to whom records can be assigned or to whom emails are sent as a group.
• You will need a new end user team only for each distinctly branded EUI. Otherwise the default, built-in teams for customers can be used: the Customer Team (for external users) or Internal Customer Team (for internal employees).
7

What do Teams Control?
• The Primary Team determines a user’s:
Default Look and Feel scheme
Default view and action bar for each table
Default Date and Time field formats
• The Primary Team and Teams values together are used to filter the accessible:
Languages
Staff Home Pages and Home Page Widgets
Table views
Elements in the Custom EUI
8

Managing Teams—The Teams Table
• The Teams table is a system table with several special, hard-coded fields, though additional fields may also be added and customized. It has a special wizard for creating and editing Teams.
When adding new fields to the Teams table, placing these fields on the layout will add them to the Custom Fields tab of the Team wizard.
• Adding users to a team and viewing team members can be done by:
Navigating to Setup > Access > Manage Teams, editing the team and navigating to the Custom Fields tab.
Editing a user’s Primary Team and Teams fields directly in their user record.
Editing a team directly from the Teams table on the left pane (this table may not be displayed by default)
We recommend that you always include a user’s Primary Team value in the Teamsfield so that searches can be performed on just that field to find all users on a team.
9

Teams Wizard—General Tab
• To access the Teams Table wizard, navigate to Setup > Access > Manage Teams, and select New. You may want to follow along with this discussion of the tabs of the Team wizard.
• General tab: Defines the Team Name, Parent Team, Team Leader, Team Description, and Message and Table View Refresh Rates.
• Teams are hierarchical, and the Parent Team defines the hierarchy. An email sent to a team that is a parent team will also be sent to its children, their children, and so on, down through the hierarchy.
It is important never to use the Company Team or any other internal team as the parent team of a Customer Team, or an email sent to the Company Team will inadvertently go to all customers!
10

Team Wizard—General Tab (continued)
• The Message Refresh Rate is relevant only when using chat and sending broadcast messaging.
The Table View Refresh Rate should typically be set to Never unless you are running a time-sensitive support operation. Its effect is to refresh the table view at the set interval. If users are working actively in the system, the table view will refresh every time they edit or create a record anyway. The downside of setting a value here is that the user will never be perceived as inactive, since their browser will keep sending a refresh message to the server. The user will never be automatically timed out by the system. This is especially important if they are using a floating license, as the license will not be freed up unless the user actively logs out.
11

Team Wizard—Working Hours Tab
• Events tab: Manages calendar events for the team. This is not typically used.
• Working Hours tab: Defines the working hours for the team.
Hours are expressed in the KB Time and they may span overnight, e.g. 20:00 to 4:00 on Thursday will be from 8pm Thursday to 4am Friday.
The hours may be set up for just one team and then copied for all other teams using the first option Same hours as {team name] Team.
• Rules can be defined to run only during a team’s working hours.
• Elapsed Time fields can exclude the non-working hours of a team.
• Time filters in a search can count only working or non-working hours.
12
Working HoursSame hours as Admin Team 0]As defined below
Sun —sj- 0-- No Hours
Mon 00:00 [7] - 24:00 HK- 24 Hours
Tue 00:00 0 ' 24:00 0Wed 08:00 [7] ' 17:00 0Thu 20:00 [7] ' 04:00 i
_Hours spanning aday - 8pm to 4am
Fri 08:00 [7] ' 17:00 0Sat S'|- 0]

Team Wizard—Languages and Formats Tabs
• Languages tab: Defines which languages are available to the team. This controls the Languages drop-down list in the interface. The default language does not need to be selected.
• Formats tab: Defines date and time formats displayed to primary members of this team. The default for a new team is to show dates/time with this format: Jan 15 2014 17:00:00.
We usually turn off the display of seconds, and the default teams have this turned off, so the built-in teams have the display of Jan 15 2014 17:00.
The options shown to the right will result in a display of 01/15/14 17:00.
13

Teams Wizard—Custom Fields Tab
• Custom Fields tab: Contains custom fields added to the Teams table. By default, this includes the Backup Team Leader, Include Team in Assigned Team Dropdowns, Team Pager, and related tables showing people for whom the Team is their Primary Team and those for whom it is one of their teams.
• New fields in the Teams table added to the layout will appear here. This is the only tab of the Team wizard whose layout can be edited.
• It is often advisable to give general staff users only permission to access/edit the Custom Fields tab of the Team wizard – there is a special permission to de-select on the General tab of the Group Permissions wizard:
The Include Team in Assigned Team Dropdowns field is used in linked field filters on various tables to determine which teams to show. When you add a new team, be sure to check the boxes for tables where you want the team to appear.
Looking up and adding a user to the Primary Team Members related table here removes them from whatever primary team they had before. Adding them to the Team Members related table appends this team to the Teams field in their user record.
14
|ÿ1Allow userto see full team wizard
-9-
-9-

Create a New Team
• To access the Teams Table wizard, navigate to Setup > Access > Manage Teams, and select New. Or, if the Teams table is visible in the left pane, click on Teams, then New.
• Team Name = Project Manager Team.
• Parent Team = Company Team.
• Team Leader = None.
• Team Description = “Will be assigned to projects.”
• Message Refresh Rate = Every 5 Minutes.
• Table View Refresh Rate = Never.
• Click on the Working Hours tab (we are not setting up any calendar events). Set the Working Hours to M-F 8:00 to 17:00 and no work on Sat/Sun.
• Navigate to the Formats tab (we are not changing the language defaults).
Practice
15

Create a New Team (continued)
• Set the formats to:
24 hours.
Do not display seconds.
First 3 Characters for Month.
4 digits for Year.
Month Day Year Order for Date.
Click Next to navigate to the Custom Fields tab.
• In the Include Team in Assigned Team Dropdowns, check the Tasksbox.
• Click Save to save your new team.
Practice
16
Edit an Existing Team
• The process is the same as creating the team—simply click the Editicon next to the team.
• From here, you can change the name or description of the team, add calendar items, change working hours, update any custom fields, add/remove users on the team.
• Let’s edit the Professional Services Team so that their working hours and time/date formats match those of the Project Manager Team you just created.
• Add Tasks to the Include Team in Assigned Team Dropdowns.
• Click Save in order to save your changes.
Practice
17

Update the Company Team Working Hours
• The elapsed time field we created in our Task table excluded the Non-Working Hours of the Company Team.
• Let’s edit the Company Team and fix its working hours. If Sun and Sat are set to 00:00 to 00:00, this should be changed to ------- :
• Otherwise, they will be considered to be working 24 hours on the weekend!
18
(ÿi As defined below
Sun 00:00 T' 00:00 T
Mon 03:00 T ' 17:00 T
Tue 03:00 T ' 17:00 T
Wed| 08:00 T' 17:00 T
Thu 03:00 W ' 17:00 W
Fri 03:00 T' 17:00 T
Sat 00:00 T' 00:00 T
* As defined below
Sun T|- TI IMon 03:00 ’*r|"( 17:00 T
Tue 03:00 T|"[ 17:00 T
Wed| 03:00 T |_ [17:00 W
Thu 03:00 ▼| "[ 17:00 W
Fri 03:00 w |-( 17:00 T
Sat Tl- TlI I

Setting Up Users
• By default, the system has a People table, with two sub-tables: Employees and External Users. Typically the People table is used as a container, and contacts are actually created in the two sub-tables.
• To set up a new user, hover over the New drop-down in thePeople table:
• From this point, depending on your permissions, you can choose to add the user as a person, employee, or external user.
Each option has a different field layout with different fields visible.
The person record does not have a login or password and a person cannot login to the system.
The Employee table is the table that synchronizes with LDAP or AD if you use them for authentication. It is typically used for all internal employees.
The External User table is for people outside your company. The records do have a login and password, but there is no requirement to actually tell these users that they have a login.
Why might you put contacts in this table if you don’t want them to login?
19
New u} T Mass Edit (jÿf
HiNew Person
A New Employee
J& New External User
E

Login vs. No Login for Email Handling
• Records with a login (employees/external users) are treated differently than records without a login (people) when it comes to email integration.
• When records are created by inbound email or updates are received by email, the system matches the “from address” to a record in the People table hierarchy. If it finds a record with a login, then it identifies the updater by their name, login, and team. If it finds a record without a login (or no record), it uses the “Anonymous” user as the updater, and that is what is shown in history and in any append-only fields that are updated.
• If you plan to carry on email communication with external contacts and want to see who updated a ticket by email, it is best to put them into the External Users table, even if you don’t want them to actually login directly.
• When a new external user is created, you can have a rule that sets a login by default to their email address and sets a password to a random string or field combination. And you can even choose not to put them in a group so they can never actually login. But by giving them a login, you allow the system to better process their inbound emails.
20

More on the Anonymous User
• The default system user named “Anonymous” is used in outbound emails in specific circumstances.
Do not delete this user.
• The Anonymous user is used when the system sends an email that contains a hyperlink allowing the user to login to view/update a record to an email address that is not associated with a user login in the system.
• Since the system does not have a real user to use for the login, it will use the Anonymous user in the hyperlink.
• If you send email links to people who are not users, then you should put the Anonymous user in a group that will have the right to view or edit “other people’s” records, so if they click the link, they can see/edit the record.
• Keep in mind that the Anonymous user will use an assigned power or floating power license if it is put in a staff group.
21
A

Create an External User
• Navigate to the People table.
• Select New > New External User.
• Fill out the Login and Password fields as you wish.
• Check that the Groups field is set to Customer. Note that if you didn’t want this user to be able to login, you could blank out either the Groups field or the Primary Team field. Both fields must have a value for a user to actually login.
• Select Customer Team as the Primary Team.
• Click Save to save your record.
Practice
22

Create a New Employee
• Select New > New Employee.
• On the Contact Information tab, you may fill out the Employee Information section as you choose.
• Fill out the Login and Password fields as you wish.
• Put the user in the Internal Customer Team, but we will change this on the following slide through the Teams table.
• Change the Groups field to Professional Services.
Please note: this Professional Services Group is not the Professional Services Team you just edited. Remember, groups and teams serve different purposes.
• Fill out the remainder of the Contact Information tab as you wish.
• Click Save to save your record.
Practice
23
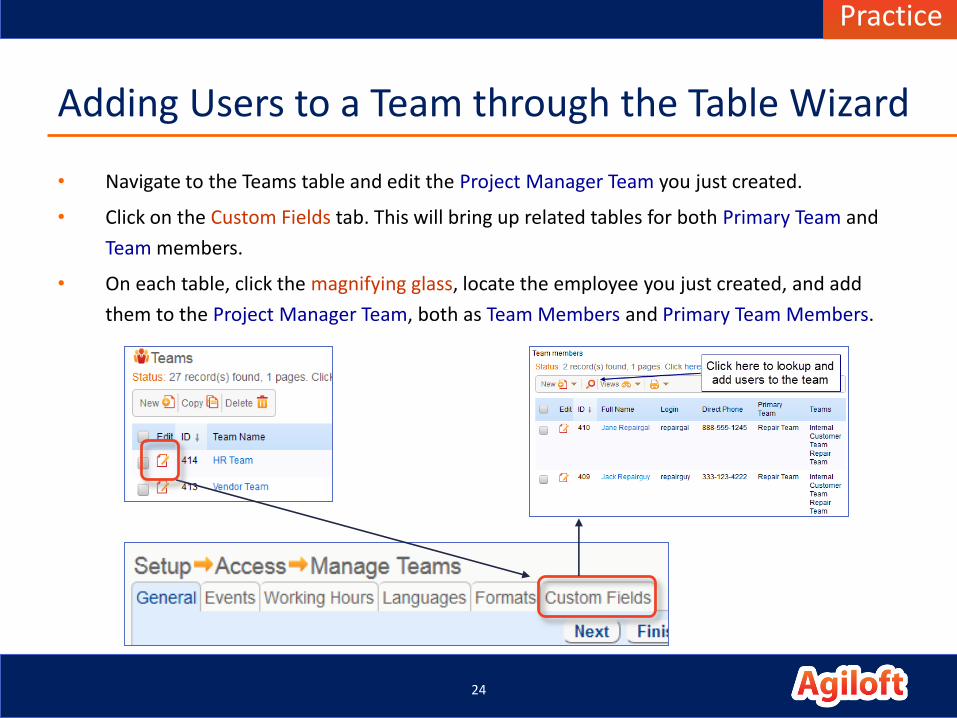
Adding Users to a Team through the Table Wizard
• Navigate to the Teams table and edit the Project Manager Team you just created.
• Click on the Custom Fields tab. This will bring up related tables for both Primary Team and
Team members.
• On each table, click the magnifying glass, locate the employee you just created, and add
them to the Project Manager Team, both as Team Members and Primary Team Members.
Practice
24

Check the User
• Go back to the People table and edit the user to see what has changed.
• Their Primary Team and Teams field should both have been updated. The Primary Team field is overwritten with the Project Manager Team. If you had entered a value in the Teams field, the Project Manager Team will be appended to that field since it can hold multiple values.
Practice
25

Groups, Teams, and Users Conclusion
• We have learned the differences between groups and teams.
• We have learned the differences between staff user and end
user groups and the licenses they use.
• We have learned about the custom Team wizard and some of
the attributes available for teams.
• We have created a team, and added both an external user
and an employee.
26