tutorial 7 introduction to airbag folding
TRANSCRIPT
8/10/2019 Tutorial 7 Introduction to Airbag Folding
http://slidepdf.com/reader/full/tutorial-7-introduction-to-airbag-folding 1/12
Tutorial 7: Introduction to airbag folding
Case description:
Part I: Thin fold
Part II: Tuck fold / Thick fold
Part III: Thin fold / Spiral fold
Files required:
airbag coarse.zip,airbag_fine.zip
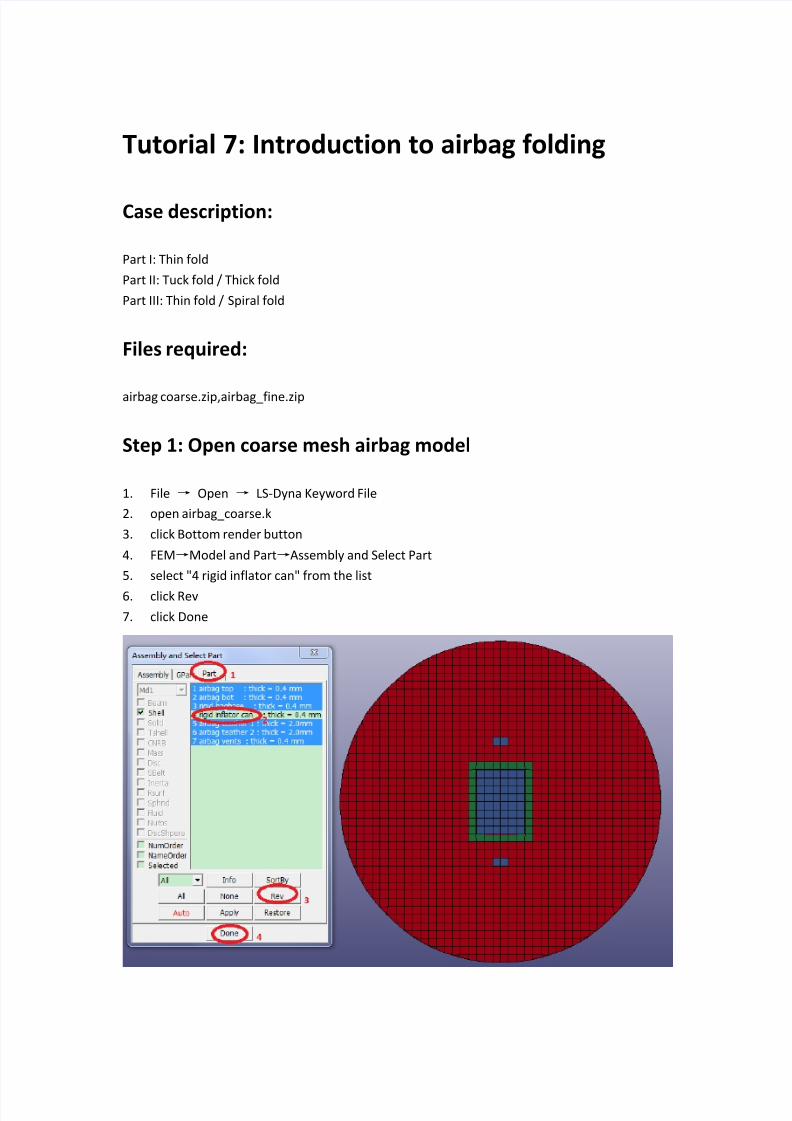
Step 1: Open coarse mesh airbag model
1. File → Open → LS-Dyna Keyword File
2.
open airbag_coarse.k
3.
click Bottom render button
4.
FEM→Model and Part→Assembly and Select Part
5. select "4 rigid inflator can" from the list
6.
click Rev
7.
click Done

8/10/2019 Tutorial 7 Introduction to Airbag Folding
http://slidepdf.com/reader/full/tutorial-7-introduction-to-airbag-folding 2/12
Step 2: Identify fold defining nodes
1.
FEM→element Tools→Identify
2. click Top render button
3.
click +10 render button (changes to -10)
4.
click Rx render button 3 times
5.
enter Key in ID=1:30
6. press Enter on keyboard
7. click Done
Step 3: Create Thin fold definition #1
1.
Application→Airbag Folding
2. for N1, pick node ID 1 from graphics window
3. for N2, pick node ID 2 from graphics window
4. for Active, pick node ID 3 from graphics window
5.
select Up
6.
click Apply

8/10/2019 Tutorial 7 Introduction to Airbag Folding
http://slidepdf.com/reader/full/tutorial-7-introduction-to-airbag-folding 3/12
Step 4:Create Thin fold definitions #2-9
1.
N1=4, N2=5, Active=6, select Down
2.
click Apply
3. N1=7, N2=8, Active=9, select Up
4. click Apply
5.
N1=10, N2=11, Active=12, select Up
6.
click Apply
7. N1=13, N2=14, Active=15, select Down
8. click Apply
9. N1=16, N2=17, Active=18, select Up
10.
click Apply
11.
N1=19, N2=20, Active=21, select Down12. click Apply
13. N1=22, N2=23, Active=24, select Up
14.
click Apply
15.
N1=25, N2=26, Active=27, select Down
16.
click Apply
17. N1=28, N2=29, Active=30, select Up
18. activate Ignore
19. click Apply

8/10/2019 Tutorial 7 Introduction to Airbag Folding
http://slidepdf.com/reader/full/tutorial-7-introduction-to-airbag-folding 4/12
Step 5:Preview folds, accept, and save model
1.
click Step 10 times
2.
click Reset
3.
click Fold
4. click Back render button
5. File → Save Keyword
6.
enter Filename: thinfolded.k
7.
click Save

8/10/2019 Tutorial 7 Introduction to Airbag Folding
http://slidepdf.com/reader/full/tutorial-7-introduction-to-airbag-folding 5/12
Step 6 :Open original model
1. File → Exit
2. Open new session of LS-PrePost
3. File → Open → LS-Dyna Keyword File
4.
open airbag_coarse.k
5.
FEM→Model and Part→Assembly and Select Part

8/10/2019 Tutorial 7 Introduction to Airbag Folding
http://slidepdf.com/reader/full/tutorial-7-introduction-to-airbag-folding 6/12
6. select "4 rigid inflator can" from the list
7.
click Rev
8.
FEM→Element Tools→Identify
9. enter Key in ID=1:3,10:12,22:24,28:30
10. press Enter on keyboard
11. click +10 render button
12.
click Rx render button 5 times
Step 7: Create Tuck fold definitions #1 and #2
1. Application→Airbag Folding
2.
select Fold Type: Tuck fold
3.
N1=1, N2=2, Active=3
4. click Apply
5. N1=10, N2=11, Active=12
6. click Apply

8/10/2019 Tutorial 7 Introduction to Airbag Folding
http://slidepdf.com/reader/full/tutorial-7-introduction-to-airbag-folding 7/12
Step 8:Create Thick fold definitions #3 and #4
1.
select Fold Type: Thick fold
2.
N1=22, N2=23, Active=24
3.
click Apply
4. N1=28, N2=29, Active=30
5. click Apply

8/10/2019 Tutorial 7 Introduction to Airbag Folding
http://slidepdf.com/reader/full/tutorial-7-introduction-to-airbag-folding 8/12
Step 9:Perform folding and save model
1. click Step 4 times
2. click Back render button
3.
click Clear All render button
4. File → Save Keyword
5.
enter Filename: tuck_thick.k
6. click Save
Step 10:Open fine mesh airbag model
1.
File → Exit
2. Open new session of LS-PrePost
3. File → Open → LS-Dyna Keyword File
4.
open airbag_fine.k
5.
FEM→Model and Part→Assembly and Select Part
6.
select "4 rigid inflator can" from the list
7. click Rev
8. FEM→Element Tools→Identify
9. enter Key in ID=1:18,9400,8548,9403,7487,6621,7490
10.
press Enter on keyboard
11.
click +10 render button12. click Rx render button 3 times

8/10/2019 Tutorial 7 Introduction to Airbag Folding
http://slidepdf.com/reader/full/tutorial-7-introduction-to-airbag-folding 9/12
Step 11:Create Thin fold definition #1-6
1.
Application→Seatbelt Fitting
2.
N1=1, N2=2, Active=3, select Up
3. click Apply
4. N1=4, N2=5, Active=6, select Down
5. click Apply
6.
N1=7, N2=8, Active=9, select Up
7.
click Apply
8.
N1=10, N2=11, Active=12, select Up
9. click Apply
10. N1=13, N2=14, Active=15, select Down
11.
click Apply
12.
N1=16, N2=17, Active=18, select Up
13. click Apply

8/10/2019 Tutorial 7 Introduction to Airbag Folding
http://slidepdf.com/reader/full/tutorial-7-introduction-to-airbag-folding 10/12
Step 12: Create Spiral fold definitions #7 and #8
1.
select Fold Type: Spiral fold
2.
N1=9400, N2=8548, Active=9403, select Up
3. enter Radius=40
4. click Apply
5.
N1=7487, N2=6621, Active=7490, select Up
6.
click Apply

8/10/2019 Tutorial 7 Introduction to Airbag Folding
http://slidepdf.com/reader/full/tutorial-7-introduction-to-airbag-folding 11/12
Step 13: Perform folding and save model
1. click Step 8 times
2.
click Clear All render button
3.
click Back render button
4.
File → Save Keyword
5. enter Filename: spiral.k
6. click Save

8/10/2019 Tutorial 7 Introduction to Airbag Folding
http://slidepdf.com/reader/full/tutorial-7-introduction-to-airbag-folding 12/12