traktor kontrol s4 manual english - ferrispark.com kontrol s4 manual... · table of contents 1...
TRANSCRIPT

Manual

The information in this document is subject to change without notice and does not represent acommitment on the part of Native Instruments GmbH. The software described by this docu-ment is subject to a License Agreement and may not be copied to other media. No part of thispublication may be copied, reproduced or otherwise transmitted or recorded, for any purpose,without prior written permission by Native Instruments GmbH, hereinafter referred to as NativeInstruments.
“Native Instruments”, “NI” and associated logos are (registered) trademarks of Native Instru-ments GmbH.
Mac, Mac OS, GarageBand, Logic, iTunes and iPod are registered trademarks of Apple Inc.,registered in the U.S. and other countries.Windows, Windows Vista and DirectSound are registered trademarks of Microsoft Corporationin the United States and/or other countries.All other trade marks are the property of their respective owners and use of them does not im-ply any affiliation with or endorsement by them.
Document authored by: Native Instruments GmbH
Software version: 2.5 (05/2012)
Special thanks to the Beta Test Team, who were invaluable not just in tracking down bugs, butin making this a better product.
Disclaimer

Germany
Native Instruments GmbHSchlesische Str. 29-30D-10997 BerlinGermanywww.native-instruments.de
USA
Native Instruments North America, Inc.6725 Sunset Boulevard5th FloorLos Angeles, CA 90028USAwww.native-instruments.com
© Native Instruments GmbH, 2012. All rights reserved.
Contact

Table of Contents1 Welcome to the World of TRAKTOR KONTROL S4! ........................................................11
1.1 What Is TRAKTOR KONTROL S4? .................................................................................................. 11
1.2 The TRAKTOR KONTROL S4 Documentation ................................................................................. 11
1.2.1 Where To Start ........................................................................................................... 11
1.2.2 In This Manual ........................................................................................................... 14
1.2.3 Manual Conventions .................................................................................................. 15
1.3 System Requirements ................................................................................................................. 16
2 TRAKTOR KONTROL S4 Overview ................................................................................17
3 Importing Your Music ................................................................................................20
3.1 What Is the Track Collection? ..................................................................................................... 20
3.2 Importing Music Folders ............................................................................................................. 21
3.3 Tracks Managed by iTunes ......................................................................................................... 22
3.3.1 Playing Tracks Managed by iTunes ............................................................................ 22
3.3.2 Importing a Selection of Tracks from iTunes .............................................................. 24
3.3.3 Importing iTunes Playlists ......................................................................................... 24
4 Tutorials ...................................................................................................................25
4.1 Playing Your First Track .............................................................................................................. 25
4.1.1 Quick Loading a Track ............................................................................................... 26
4.1.2 Playing the Track ....................................................................................................... 28
4.1.3 If You Don’t Hear the Track ........................................................................................ 29
4.2 Mixing In a Second Track ............................................................................................................ 31
4.2.1 Pre-listening a Second Track Directly from the Browser ............................................ 32
4.2.2 Loading and Playing the Second Track ...................................................................... 33
4.2.3 Using Headphones to Prepare the Mix ....................................................................... 33
4.2.4 Synchronizing the Second Track ................................................................................ 34
4.2.5 Setting a Cue Point as Starting Point ........................................................................ 35
Table of Contents
TRAKTOR KONTROL S4 - Manual - 4

4.2.6 Interlude: In Case the Left Track Is Over .................................................................... 37
4.2.7 Mixing In the Track by Using the Channel EQ and Filter ............................................ 37
4.2.8 Doing Everything by Hand .......................................................................................... 38
4.3 Adjusting Levels ......................................................................................................................... 41
4.3.1 The Theory ................................................................................................................. 41
4.3.2 The Practice ............................................................................................................... 42
4.4 Looping and Cueing .................................................................................................................... 45
4.4.1 Playing with Loops ..................................................................................................... 45
4.4.2 Using Hotcues ........................................................................................................... 48
4.5 Using Samples in Your Mix ......................................................................................................... 50
4.5.1 Loading a Sample from the Collection ....................................................................... 51
4.5.2 Triggering the Sample ............................................................................................... 52
4.5.3 Capturing a Sample From a Track Deck ..................................................................... 54
4.5.4 Unloading a Sample .................................................................................................. 56
4.5.5 Getting More Controls Over the Samples ................................................................... 56
4.6 Adding FX ................................................................................................................................... 57
4.6.1 Group Mode ............................................................................................................... 58
4.6.2 Getting the FX Unit Ready .......................................................................................... 58
4.6.3 Assigning Decks to the FX Unit and Bringing In the FX .............................................. 59
4.6.4 Controlling the FX Unit .............................................................................................. 60
4.6.5 Single Mode ............................................................................................................... 61
4.6.6 Storing a Snapshot .................................................................................................... 61
4.7 Using the Loop Recorder ............................................................................................................. 62
4.7.1 Choosing a Source ..................................................................................................... 63
4.7.2 Recording a Loop ....................................................................................................... 64
4.7.3 Overdubbing .............................................................................................................. 66
4.7.4 Further Uses of the Recorded Loop ............................................................................ 66
4.8 Synchronization .......................................................................................................................... 67
Table of Contents
TRAKTOR KONTROL S4 - Manual - 5

4.8.1 Introduction ............................................................................................................... 67
4.8.2 Who’s the Master? ..................................................................................................... 69
4.8.3 Other Useful Tools for Synching ................................................................................. 72
4.8.4 In Conclusion ............................................................................................................. 73
5 Hardware Reference ..................................................................................................74
5.1 Areas and Concepts .................................................................................................................... 74
5.1.1 Decks ......................................................................................................................... 74
5.1.2 Mixer .......................................................................................................................... 78
5.1.3 FX Units ..................................................................................................................... 79
5.1.4 Loop Recorder ............................................................................................................ 80
5.1.5 Front and Rear Panels ............................................................................................... 81
5.2 Types of Control Elements .......................................................................................................... 81
5.2.1 Buttons ...................................................................................................................... 81
5.2.2 Knobs ........................................................................................................................ 82
5.2.3 Encoders .................................................................................................................... 83
5.2.4 Jog Wheels ................................................................................................................. 83
5.2.5 Faders ....................................................................................................................... 84
5.2.6 Displays, Meters and Indicators ................................................................................ 84
5.2.7 Switches .................................................................................................................... 85
5.2.8 Sockets ...................................................................................................................... 86
5.3 The Decks ................................................................................................................................... 86
5.3.1 Deck Flavors and Structure ........................................................................................ 86
5.3.2 SHIFT Buttons: Accessing Secondary Functions ......................................................... 88
5.3.3 Deck Assign Buttons: Switching Deck Focus .............................................................. 88
5.3.4 Deck Display: Informed at a Glance ........................................................................... 89
5.3.5 LOAD Button .............................................................................................................. 91
5.3.6 Jog Wheel ................................................................................................................... 92
5.3.7 Tempo Fader and Tempo Offset Buttons .................................................................... 93
Table of Contents
TRAKTOR KONTROL S4 - Manual - 6
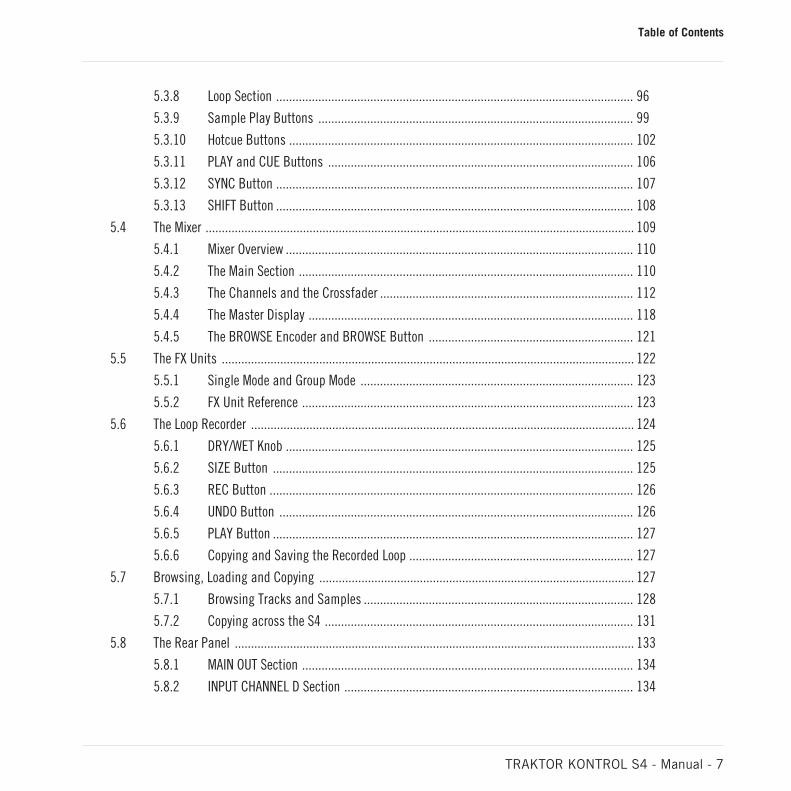
5.3.8 Loop Section .............................................................................................................. 96
5.3.9 Sample Play Buttons ................................................................................................. 99
5.3.10 Hotcue Buttons .......................................................................................................... 102
5.3.11 PLAY and CUE Buttons .............................................................................................. 106
5.3.12 SYNC Button .............................................................................................................. 107
5.3.13 SHIFT Button .............................................................................................................. 108
5.4 The Mixer .................................................................................................................................... 109
5.4.1 Mixer Overview ........................................................................................................... 110
5.4.2 The Main Section ....................................................................................................... 110
5.4.3 The Channels and the Crossfader .............................................................................. 112
5.4.4 The Master Display .................................................................................................... 118
5.4.5 The BROWSE Encoder and BROWSE Button ............................................................... 121
5.5 The FX Units ............................................................................................................................... 122
5.5.1 Single Mode and Group Mode .................................................................................... 123
5.5.2 FX Unit Reference ...................................................................................................... 123
5.6 The Loop Recorder ...................................................................................................................... 124
5.6.1 DRY/WET Knob ........................................................................................................... 125
5.6.2 SIZE Button ............................................................................................................... 125
5.6.3 REC Button ................................................................................................................ 126
5.6.4 UNDO Button ............................................................................................................. 126
5.6.5 PLAY Button ............................................................................................................... 127
5.6.6 Copying and Saving the Recorded Loop ..................................................................... 127
5.7 Browsing, Loading and Copying ................................................................................................. 127
5.7.1 Browsing Tracks and Samples ................................................................................... 128
5.7.2 Copying across the S4 ............................................................................................... 131
5.8 The Rear Panel ........................................................................................................................... 133
5.8.1 MAIN OUT Section ...................................................................................................... 134
5.8.2 INPUT CHANNEL D Section ......................................................................................... 134
Table of Contents
TRAKTOR KONTROL S4 - Manual - 7

5.8.3 INPUT CHANNEL C Section ......................................................................................... 135
5.8.4 POWER Section .......................................................................................................... 136
5.9 The Front Panel ........................................................................................................................... 136
5.10 TRAKTOR KONTROL S4 Modes ..................................................................................................... 137
5.10.1 Native Traktor Mode ................................................................................................... 137
5.10.2 MIDI Mode .................................................................................................................. 137
6 Customizing TRAKTOR KONTROL S4 ............................................................................140
6.1 The Preferences Window ............................................................................................................. 140
6.2 Settings and Preferences for the S4 Control Elements ................................................................ 141
6.3 S4 Control Options ...................................................................................................................... 143
6.3.1 Restore Default .......................................................................................................... 148
6.3.2 Calibration ................................................................................................................ 149
6.4 Other Settings of Interest ........................................................................................................... 149
6.4.1 Switching the Deck Flavors ........................................................................................ 150
6.4.2 Adjusting the Input Routing ...................................................................................... 150
6.4.3 Using Four FX Units ................................................................................................... 153
6.5 The Setup Wizard ........................................................................................................................ 154
7 The S4 Audio Interface and Control Panel ...................................................................161
7.1 Settings on Mac OS X ................................................................................................................. 161
7.2 Settings on Windows: The Control Panel ..................................................................................... 162
7.2.1 Opening the Control Panel ......................................................................................... 162
7.2.2 Audio Settings Page .................................................................................................. 163
7.2.3 Diagnostics Page ....................................................................................................... 166
7.3 Using the S4 Audio Interface with Other Music Applications ...................................................... 167
7.4 Using the S4 as your Default Audio Interface ............................................................................. 168
7.4.1 Windows XP ............................................................................................................... 168
7.4.2 Windows Vista and 7 ................................................................................................. 168
7.4.3 Mac OS X ................................................................................................................... 168
Table of Contents
TRAKTOR KONTROL S4 - Manual - 8

8 Troubleshooting and Help ..........................................................................................170
8.1 TRAKTOR Won’t Start .................................................................................................................. 170
8.2 Hardware-related Problems ........................................................................................................ 170
8.2.1 Basics ....................................................................................................................... 170
8.2.2 USB and Driver Issues ............................................................................................... 171
8.2.3 Update the Driver ...................................................................................................... 172
8.2.4 USB-related Power Issues .......................................................................................... 172
8.2.5 Using the TRAKTOR KONTROL S4 with a Laptop ......................................................... 173
8.3 Loose Jog Wheel Top Plate .......................................................................................................... 173
8.4 TRAKTOR Crashes ....................................................................................................................... 174
8.5 Getting Help ............................................................................................................................... 174
8.5.1 Knowledge Base / Readme / Online Support .............................................................. 174
8.5.2 Forum ........................................................................................................................ 175
8.6 Updates ...................................................................................................................................... 175
9 Appendix A – Common Setups ....................................................................................176
9.1 TRAKTOR KONTROL S4 Basic Setup ............................................................................................ 176
9.2 Adding a Microphone .................................................................................................................. 186
9.3 Using a Master Mixer .................................................................................................................. 189
9.4 TRAKTOR KONTROL S4 with Turntables or CD Decks ................................................................... 189
9.5 TRAKTOR KONTROL S4 with Slave Mixer ...................................................................................... 193
10 Appendix B – Technical Information ...........................................................................195
10.1 Technical Specifications ............................................................................................................. 195
10.2 Block Diagram ............................................................................................................................ 199
11 Appendix C – Quick References ..................................................................................200
11.1 Track Deck Quick Reference ........................................................................................................ 200
11.2 Remix Deck Quick Reference ....................................................................................................... 203
11.3 Mixer Quick Reference ................................................................................................................ 207
11.3.1 Main Section Quick Reference ................................................................................... 207
Table of Contents
TRAKTOR KONTROL S4 - Manual - 9

11.3.2 Channel and Crossfader Quick Reference .................................................................. 208
11.3.3 Master Display Quick Reference ................................................................................ 209
11.4 FX Unit Quick Reference ............................................................................................................. 209
11.5 Loop Recorder Quick Reference ................................................................................................... 210
11.6 Browsing, Loading and Copying Quick Reference ....................................................................... 211
Index ........................................................................................................................212
Table of Contents
TRAKTOR KONTROL S4 - Manual - 10

1 Welcome to the World of TRAKTOR KONTROL S4!
We are delighted that you have chosen TRAKTOR KONTROL S4!
1.1 What Is TRAKTOR KONTROL S4?
TRAKTOR KONTROL S4 is the first fully integrated hardware and software DJ performancesystem created by the makers of TRAKTOR. TRAKTOR KONTROL S4 fuses the full-featuredTRAKTOR KONTROL S4 hardware controller with the state-of-the-art TRAKTOR software.
The all-in-one TRAKTOR KONTROL S4 controller offers you an ergonomic DJ mixer, a built-in24-bit/96 kHz audio interface, and a high-resolution control surface perfectly tailored forTRAKTOR. All controls needed for live performances now are at your fingertips!
— The TRAKTOR team at Native Instruments.
1.2 The TRAKTOR KONTROL S4 Documentation
1.2.1 Where To Start
TRAKTOR KONTROL S4 provides you with many information sources. The main sources aremeant to be read in the following sequence:
Setup Guide
TRAKTOR KONTROL S4 Manual (this document) and video tutorials
TRAKTOR 2 Getting Started Guide
Additionally, an overview poster and keyboard shortcut overview card will help you in your ev-eryday work with TRAKTOR KONTROL S4. Finally, the Controller Editor Reference Manualdeals specifically with the Controller Editor (see below).
Hereafter is a quick description of each of these documentation sources.
Welcome to the World of TRAKTOR KONTROL S4!What Is TRAKTOR KONTROL S4?
TRAKTOR KONTROL S4 - Manual - 11

Some of these documents (Setup Guide, Overview Poster and Keyboard Shortcut OverviewCard) are available in printed form in the product box. The whole documentation is alsoavailable in PDF format and located within the TRAKTOR KONTROL S4 installation folderon your hard drive. You can also access these documents from the application’s Helpmenu.
Your First Stop: the Setup Guide
A printed Setup Guide is included in the product box. It will guide you through the softwareand hardware installation of your TRAKTOR KONTROL S4 system, from the very beginning tothe first sound coming through your speakers. This should be your first stop in learning TRAK-TOR KONTROL S4.
First read the Setup Guide. Then proceed with this TRAKTOR KONTROL S4 Manual to getmore familiar with TRAKTOR KONTROL S4!
TRAKTOR KONTROL S4 Manual
After having read the Setup Guide and followed its instructions, your TRAKTOR KONTROL S4system should be up and running. The next step is to read this TRAKTOR KONTROL S4 Man-ual. The TRAKTOR KONTROL S4 Manual first gives you a practical approach to TRAKTORKONTROL S4. Then, it provides you with a detailed reference of your TRAKTOR KONTROL S4hardware controller along with extra information (solving common issues, specifications, etc.).The next section will give you an overview of the manual content.
Video Tutorials
The Native Instruments website provides you with a bunch of video tutorials that give you ahands-on approach to many sides of the TRAKTOR KONTROL S4 workflow. To see them, pointyour favorite browser to following URL:
http://www.native-instruments.com/s4tutorials.
TRAKTOR 2 Getting Started Guide
The Getting Started guide gives you a practical approach to the TRAKTOR software. Here youwill learn about additional features of TRAKTOR that extend beyond the TRAKTOR KONTROLS4 controller.
Welcome to the World of TRAKTOR KONTROL S4!The TRAKTOR KONTROL S4 Documentation
TRAKTOR KONTROL S4 - Manual - 12

TRAKTOR 2 Manual
For in-depth information on all features provided by the TRAKTOR software, please refer to theTRAKTOR 2 Manual. It is available as a PDF file in the Documentation subfolder of the TRAK-TOR 2 installation folder.
Overview Poster
In the product box, you will also find a double-sided overview poster depicting the top panel ofyour TRAKTOR KONTROL S4 hardware controller: on one side, you will find an overview of themain areas and their functionality; on the other side, you will find a description of every controlelement to be found on the Decks, the FX Units, the Loop Recorder and the rear and front pan-els of your controller. This poster can be used as a quick reference when using your TRAKTORKONTROL S4, saving you from opening the manual each time you feel uncertain about a par-ticular control element.
Keyboard Shortcut Overview Card
A keyboard shortcut overview card is included in the product box. It gives you the dedicatedkeyboard mappings for the TRAKTOR software.
Controller Editor Reference Manual
Beside of using your TRAKTOR KONTROL S4 hardware controller together with the TRAKTORsoftware, you can also use it as a powerful and highly versatile MIDI controller to pilot any oth-er MIDI-capable application or device. This is made possible by the Controller Editor software,a little application that allows you to precisely define all MIDI assignments for your TRAKTORKONTROL S4 controller. The Controller Editor should have been installed during the TRAKTORKONTROL S4 installation procedure. For more info on this, please refer to the Controller EditorReference Manual available as a PDF file in the Documentation subfolder of the Controller Edi-tor installation folder on your hard disk.
The Jog Wheel Calibration Guide
The jog wheels of the S4 where designed to recalibrate themselves dynamically during the useof the controller; however, there is one situation in which manual recalibration of the jogwheels can be necessary. If you accidentally turn the controller upside-down while it is connect-ed to your computer, the jog wheel sensors might lose track of the position of the jog wheels'top plates. As a result, the jog wheels may not respond as expected when you turn it back to
Welcome to the World of TRAKTOR KONTROL S4!The TRAKTOR KONTROL S4 Documentation
TRAKTOR KONTROL S4 - Manual - 13

the normal position. If this occurs, the easiest way to resolve this is to switch the unit off andon again. Alternatively you can recalibrate the jog wheels manually in TRAKTOR. Please referto the separate Jog Wheel Calibration Guide in the Documentation subfolder of the TRAKTOR 2program folder.
1.2.2 In This Manual
What you are reading now is the TRAKTOR KONTROL S4 Manual. This manual is structured asfollows:
The first part is this introduction.
Chapter ↑2, TRAKTOR KONTROL S4 Overview quickly introduces you to the TRAKTORKONTROL S4 user interface and its main areas, both on the hardware side and softwareside.
Chapter ↑3, Importing Your Music shows you how to import your own music into the pow-erful Track Collection of TRAKTOR, so that you can use all TRAKTOR KONTROL S4 fea-tures with your own tracks.
Chapter ↑4, Tutorials is a selection of tutorials focused on your controller. They will letyou progressively discover how to use the various tools provided by TRAKTOR KON-TROL S4. These practical examples will simplify the learning process and get you quicklystarted with computer-based DJing.
Chapter ↑5, Hardware Reference is an extensive reference of all hardware control ele-ments to be found on your TRAKTOR KONTROL S4 hardware controller. Whenever youare unsure about the functionality of a particular control element, you will find here allthe necessary information.
Chapter ↑6, Customizing TRAKTOR KONTROL S4 shows you how to customize TRAKTORKONTROL S4 in order to make it fit your particular needs.
Chapter ↑7, The S4 Audio Interface and Control Panel describes the on-board audio inter-face of the TRAKTOR KONTROL S4 hardware controller.
Chapter ↑8, Troubleshooting and Help provides you with a list of most common problemsand their solutions, along with info on how to get help.
Finally, three appendixes provide you with useful additional information:
Welcome to the World of TRAKTOR KONTROL S4!The TRAKTOR KONTROL S4 Documentation
TRAKTOR KONTROL S4 - Manual - 14

Appendix A shows you how to integrate TRAKTOR KONTROL S4 to your studio or livesetup in various configurations.
Appendix B gives you the technical specifications of the TRAKTOR KONTROL S4 con-troller.
Appendix C provides you with Quick Reference tables for all control elements on yourcontroller. Should you have any doubt about a particular control element, you will findhere a useful reminder!
1.2.3 Manual Conventions
This section introduces you to the signage and text highlighting used in this manual. This man-ual uses particular formatting to point out special facts and to warn you of potential issues.The icons introducing these notes let you see what kind of information is to be expected:
Whenever this exclamation mark icon appears, you should read the corresponding notecarefully and follow the instructions and hints given there if applicable.
This light bulb icon indicates that a note contains useful extra information. This informa-tion may often help you to solve a task more efficiently, but does not necessarily apply tothe setup or operating system you are using; however, it's always worth a look.
Furthermore, the following formatting is used:
Text appearing in (drop-down) menus (such as Open…, Save as… etc.) and paths to loca-tions on your hard drive or other storage devices is printed in italics.
Text appearing elsewhere (labels of buttons, controls, text next to checkboxes etc.) isprinted in blue. Whenever you see this formatting applied, you will find the same text ap-pearing somewhere on the screen.
Important names and concepts are printed in bold.
Single instructions are introduced by this play button type arrow.
→ Results of actions are introduced by this smaller arrow.
Welcome to the World of TRAKTOR KONTROL S4!The TRAKTOR KONTROL S4 Documentation
TRAKTOR KONTROL S4 - Manual - 15

Pet Names for Software and Hardware
Throughout the documentation, we will refer to the TRAKTOR KONTROL S4 hardware control-ler either as “TRAKTOR KONTROL S4” or simply “S4.”
Likewise, the TRAKTOR software will often be referred as “TRAKTOR PRO” or simply “TRAK-TOR.”
Hence, a sentence like “TRAKTOR KONTROL S4 is a highly integrated DJ system allowing youto control TRAKTOR from your S4” shouldn’t sound weird to you.
1.3 System Requirements
For the minimum system requirements your computer needs to meet, see the TRAKTOR speci-fications section of the Native Instruments website:
http://www.native-instruments.com/#/en/products/dj/traktor-pro-2/specifications/?page=2050
To check the compatibility with several operating systems, please have a look at: http://www.native-instruments.com/compatibility
Welcome to the World of TRAKTOR KONTROL S4!System Requirements
TRAKTOR KONTROL S4 - Manual - 16

2 TRAKTOR KONTROL S4 Overview
This mini-chapter will quickly introduce you to TRAKTOR KONTROL S4’s main areas and con-cepts, both on your TRAKTOR KONTROL S4 hardware controller and in the TRAKTOR soft-ware.
Take the time to read these few pages, as they will familiarize you with the way TRAKTORKONTROL S4 works and let you catch sight of the power of its design. If you're familiarwith importing music files in TRAKTOR, you can skip ↑3, Importing Your Music and startright away with the tutorials in chapter ↑4, Tutorials after having read this chapter.
TRAKTOR KONTROL S4 Overview
TRAKTOR KONTROL S4 - Manual - 17

Hardware controller and software side by side
(1) Decks: TRAKTOR KONTROL S4 provides you with four virtual Decks. The Decks arethe place where tracks, Samples and live input are played back. The Decks can be seenas the virtual equivalent to the good old vinyl or CD decks—just with a bunch of powerfuladditional features and the flexibility of a computer-based system. The two Decks on yourS4 hardware controller allow you to control the four software Decks (labeled A, B, C andD) available in TRAKTOR: The left Deck on your S4 can control Decks A and C in the soft-ware. The right Deck on your S4 can control Decks B and D in the software.
TRAKTOR KONTROL S4 Overview
TRAKTOR KONTROL S4 - Manual - 18

(2) FX Units: The signals coming from the Decks can be further processed by two FX Unitslocated at the top of your hardware and software interface. You can even activate two ad-ditional FX Units in the software, allowing you to process each Deck individually. The FXUnits give you access to the whole collection of high-quality FX included in TRAKTOR:The left FX Unit on your S4 can control the left FX Unit(s) in the software. The right FX Uniton your S4 can control the right FX Unit(s) in the software.
(3) Mixer: Sitting in the middle of your TRAKTOR KONTROL S4 controller and of TRAK-TOR’s window, the Mixer receives on its four channels the audio signals coming from thefour Decks described above. There is one channel for each Deck. As any DJ mixer, theMixer’s purpose basically is to adjust the relative level of each channel, to control thechannels’ frequency content, possibly feeding them into the FX Units before sending theoverall result to the Main section at its top — and in the end, to generate the mix that issent to your audience.
You will find a more detailed presentation at the beginning of chapter ↑5, Hardware Refer-ence, followed by a thorough description of each control element to be found on yourTRAKTOR KONTROL S4 controller. For an in-depth explanation of each and every function-ality provided by the TRAKTOR software, please refer to the separate TRAKTOR 2 Manual.It is available as a PDF file in the Documentation subfolder of the TRAKTOR 2 installationfolder.
TRAKTOR KONTROL S4 Overview
TRAKTOR KONTROL S4 - Manual - 19

3 Importing Your Music
Most likely you already have a collection of music files on your computer. For those of you whocan’t wait for mixing their own tracks, this chapter is for you! You will learn here how to quicklyimport your music into the powerful Track Collection of TRAKTOR.
If you prefer to start learning how to use TRAKTOR KONTROL S4 right away, skip thischapter and go on with the tutorials in chapter ↑4, Tutorials, which make use of the demotracks provided with TRAKTOR KONTROL S4. You can always come back here at a laterpoint.
3.1 What Is the Track Collection?
The Track Collection (or simply “Collection”) represents the whole music that you have used,that you are using or that you plan to use in TRAKTOR.
Based on the music files on your computer, the Track Collection is just another way to displaythem. The Collection makes it easy to organize, tag, and prepare your tracks for being integrat-ed into your mix.
Worth to note is that the Track Collection doesn’t care about the actual file structure on yourhard disk, nor will it alter this structure in any way (as long as you don’t delete your files fromwithin TRAKTOR).
The Track Collection is:
A database storing numerous information about your music files.
A convenient way to represent and search your music files, according to many of theircharacteristics (tags) like title, artist name, BPM, genre, length, etc.
The place where TRAKTOR-specific information about your tracks is stored.
The basis on which you can create your Playlists.
The Track Collection is not:
Moving, copying nor converting any audio file to some secret location.
Modifying in any way the hierarchic structure of your files on your hard disk.
Importing Your MusicWhat Is the Track Collection?
TRAKTOR KONTROL S4 - Manual - 20
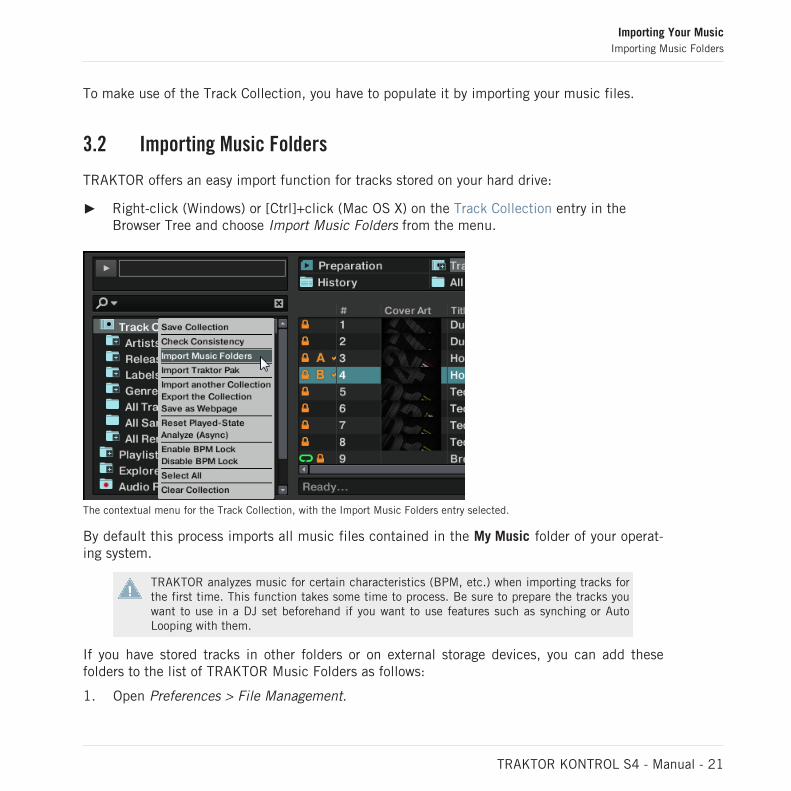
To make use of the Track Collection, you have to populate it by importing your music files.
3.2 Importing Music Folders
TRAKTOR offers an easy import function for tracks stored on your hard drive:
Right-click (Windows) or [Ctrl]+click (Mac OS X) on the Track Collection entry in theBrowser Tree and choose Import Music Folders from the menu.
The contextual menu for the Track Collection, with the Import Music Folders entry selected.
By default this process imports all music files contained in the My Music folder of your operat-ing system.
TRAKTOR analyzes music for certain characteristics (BPM, etc.) when importing tracks forthe first time. This function takes some time to process. Be sure to prepare the tracks youwant to use in a DJ set beforehand if you want to use features such as synching or AutoLooping with them.
If you have stored tracks in other folders or on external storage devices, you can add thesefolders to the list of TRAKTOR Music Folders as follows:
1. Open Preferences > File Management.
Importing Your MusicImporting Music Folders
TRAKTOR KONTROL S4 - Manual - 21

2. Click Add… at the bottom of the Music Folders section.3. Navigate to a folder you want to add.4. Confirm with OK.Repeat to add all of your Music Folders.
Subfolders are automatically included in the scan. Hence, you don’t need to add them tothis list.
3.3 Tracks Managed by iTunes
If you have organized your music collection with iTunes, TRAKTOR KONTROL S4 offers directaccess to your iTunes Library and your iTunes playlists.
3.3.1 Playing Tracks Managed by iTunes
You can browse your iTunes Library and playlists directly from your TRAKTOR KONTROL S4.By the way, this will be the opportunity to introduce you to browsing and loading from yourhardware controller. For this, we will use following control elements:
Any of the jog wheels:
Importing Your MusicTracks Managed by iTunes
TRAKTOR KONTROL S4 - Manual - 22

Any of the LOOP MOVE encoders, located below each jog wheel:
The CUE buttons, located on each channel of the Mixer, and the BROWSE button in <be-tween:
Please do the following:
1. Push the BROWSE button to enter Browse mode. On your computer screen, the Browserfills up the whole TRAKTOR window.
2. Turn the LOOP MOVE encoders to scroll through the Browser Tree until the iTunes icongets selected, then push the encoder to open that node.
3. Browse through the iTunes Library and playlists in the same manner: turn the LOOPMOVE encoder to scroll within the iTunes node and push the encoder to expand/collapsethe selected node.
4. Once the desired playlist is selected in the Browser Tree, select a track from the list byspinning the jog wheel.
5. To load the selected track on to the left or right Deck, press the flashing CUE button onthe corresponding channel of the Mixer (A or B).
6. Repeat steps 3-5 to load a track on the other Deck.7. When you are done, press the BROWSE button again to leave the Browse mode.
The iTunes tree node represents a read-only view on your iTunes Library and playlists. Edit-ing functions are not available in this view.
Software Equivalent
Of course, you can do all this from the TRAKTOR user interface too:
Importing Your MusicTracks Managed by iTunes
TRAKTOR KONTROL S4 - Manual - 23

1. Click the iTunes icon in the Browser Tree to open that node.2. Browse through the Library and playlists as you would do in iTunes.3. Load a track into a Deck as you would do from a normal TRAKTOR Playlist—for example
by dragging the track onto that Deck.
3.3.2 Importing a Selection of Tracks from iTunes
You can import a selection of tracks from your iTunes Library into the Track Collection via theTRAKTOR user interface:
1. Click the iTunes icon in the Browser Tree to open that node.2. Select the tracks to import into the Track Collection.3. Drag the selection onto the Track Collection icon in the Browser Tree.4. Alternatively right-click (Windows) or [Ctrl]-click (Mac OS X) on the selection and choose
Import to Collection in the contextual menu.
3.3.3 Importing iTunes Playlists
You can directly import iTunes playlists as TRAKTOR Playlists via the TRAKTOR user interface:
1. Click the iTunes icon in the Browser Tree to open that node.2. Select the playlist to be imported.3. Drag the playlist onto the Playlists icon.4. Alternatively right-click (Windows) or [Ctrl]-click (Mac OS X) on the playlist and choose
Import to Playlists in the contextual menu.
Importing Your MusicTracks Managed by iTunes
TRAKTOR KONTROL S4 - Manual - 24

4 Tutorials
This chapter will guide you through the most common tasks that you will encounter during yourwork with TRAKTOR KONTROL S4.
The tutorials are workflow-oriented. They start with the simplest tasks and progressively leadyou to more complex operation, helping you to get more and more familiar with your TRAKTORKONTROL S4 system. After reading this, you should have the basic know-how allowing you tomix with TRAKTOR KONTROL S4.
The tutorials presented here and in the following chapter make use of the included demotracks, which were copied to your hard disk during the TRAKTOR KONTROL S4 installationprocedure. Thus, you can follow these tutorials even if you haven’t imported your own mu-sic yet into the Track Collection. For more info on how to import your music into the Collec-tion, please refer to chapter ↑3, Importing Your Music above.
4.1 Playing Your First Track
This first tutorial will show you how to load and play a track, how to check the needed audiooutputs and how to quickly troubleshoot your system if no music can be heard.
Prerequisites
We assume here that your TRAKTOR KONTROL S4 system is already up and running. If it’snot the case, please follow first the instructions in the separate Setup Guide and comeback here when you’re done!
In case you already changed some settings in TRAKTOR KONTROL S4 before you start withthese tutorials, we strongly recommend you to reset your TRAKTOR KONTROL S4 system tothe factory settings by doing the following:
1. In the TRAKTOR software, click the Help menu in the menu bar at the top of your screen(on Mac OS X) or at the top of the window (on Windows), and select Help > Start SetupWizard.
2. In the window that opens, just click Finish at the bottom right corner without touchinganything else.
TutorialsPlaying Your First Track
TRAKTOR KONTROL S4 - Manual - 25

→ Your TRAKTOR KONTROL S4 is now reset to the factory settings.
The tutorials presented here assume that TRAKTOR KONTROL S4 is in its default factorystate. If it’s not the case, we cannot guarantee that you will experience what we describehere, and you might miss important things to know!
4.1.1 Quick Loading a Track
Let’s load the track “Techno 1” from the included demo tracks on to Deck A.
Since Deck A is sitting in the left part of the TRAKTOR window, we will use the left Deck onyour S4. You can check this by looking at the left Deck’s display: you should see a lit blueindicator reading “DECK A”:
The Deck Display with a lit DECK A indicator
To select and load the track, we will use three control elements on your S4:
Any of the two SHIFT buttons (one at the bottom of each Deck):
The BROWSE encoder (in the top center of the Mixer):
The left Deck’s LOAD button (above the jog wheel):
TutorialsPlaying Your First Track
TRAKTOR KONTROL S4 - Manual - 26

While looking at the TRAKTOR window, do the following:
1. Hold SHIFT and turn the BROWSE encoder to select the Demo Tracks Favorite (Favoritesare customizable shortcuts sitting at the top of the Browser in TRAKTOR’s window).The tracks of the “Demo Tracks” Playlist appear below:
Release SHIFT and turn the BROWSE encoder to scroll through the Playlist and navigateto the track Techno 1.
2. Once the track is highlighted, press the LOAD button on the left Deck to load that trackon to Deck A.
TutorialsPlaying Your First Track
TRAKTOR KONTROL S4 - Manual - 27
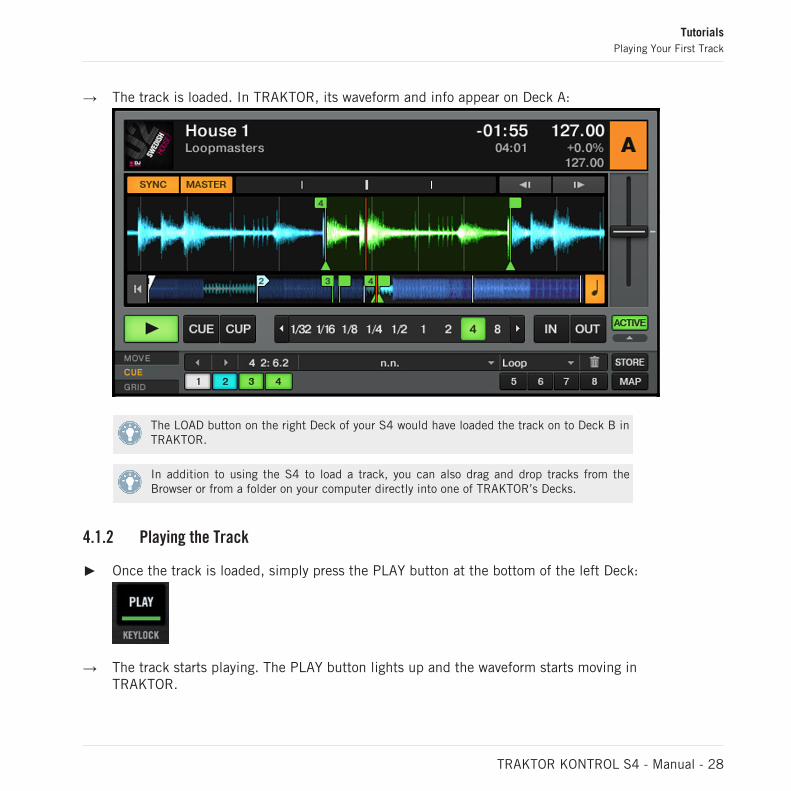
→ The track is loaded. In TRAKTOR, its waveform and info appear on Deck A:
The LOAD button on the right Deck of your S4 would have loaded the track on to Deck B inTRAKTOR.
In addition to using the S4 to load a track, you can also drag and drop tracks from theBrowser or from a folder on your computer directly into one of TRAKTOR’s Decks.
4.1.2 Playing the Track
Once the track is loaded, simply press the PLAY button at the bottom of the left Deck:
→ The track starts playing. The PLAY button lights up and the waveform starts moving inTRAKTOR.
TutorialsPlaying Your First Track
TRAKTOR KONTROL S4 - Manual - 28

Again, pressing the PLAY button on the right Deck would have started the playback onDeck B.
To Each Deck Its Own Channel
The audio playing on each Deck can be further shaped by the controls on the correspondingchannel of the Mixer. Since the track is loaded on Deck A, you can control its sound on chan-nel A (showing a lit blue “A” letter):
The Channel A
At this point you will probably hear some audio coming through your speakers or PA. If not,please check the following section.
4.1.3 If You Don’t Hear the Track
If the track is playing on the Deck but the audio coming through your amplification systemsounds too low, or if there is no sound at all, check the following:
TutorialsPlaying Your First Track
TRAKTOR KONTROL S4 - Manual - 29
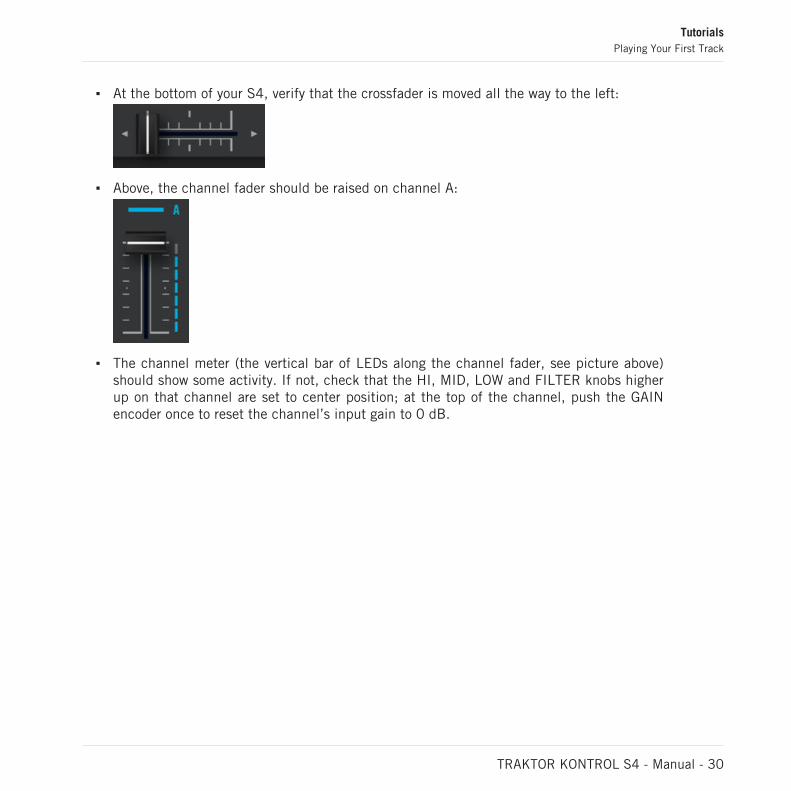
At the bottom of your S4, verify that the crossfader is moved all the way to the left:
Above, the channel fader should be raised on channel A:
The channel meter (the vertical bar of LEDs along the channel fader, see picture above)should show some activity. If not, check that the HI, MID, LOW and FILTER knobs higherup on that channel are set to center position; at the top of the channel, push the GAINencoder once to reset the channel’s input gain to 0 dB.
TutorialsPlaying Your First Track
TRAKTOR KONTROL S4 - Manual - 30

At the top center of the Mixer, the MAIN LEVEL knob should be turned at least part of theway to the right. You should see the MAIN LEVEL meters going up and down:
If not, at the top center of the TRAKTOR window, check that the MAIN knob is raised:
If you see some activity on the MAIN LEVEL meters of your S4 but don’t hear any sound, thendouble-check the connection starting with the cable going from the S4’s Main Outputs to yourPA.
4.2 Mixing In a Second Track
Now that you have learned how to quickly load and play tracks using the TRAKTOR KON-TROL S4 (see the previous tutorial), let’s see how to mix in a second track. On the way, youwill learn a few basic mixing tasks that every digital DJ needs to know: how to pre-listen tracks,synchronize tracks, start the playback at the right position, and mix the tracks together usingthe crossfader.
Prerequisites
We assume here that you already followed the instructions in the previous tutorial (see ↑4.1,Playing Your First Track). TRAKTOR KONTROL S4 now is in the following state:
The track “Techno 1” is loaded on Deck A. The track is playing and audible.
TutorialsMixing In a Second Track
TRAKTOR KONTROL S4 - Manual - 31

The crossfader is all the way to the left.
4.2.1 Pre-listening a Second Track Directly from the Browser
Before we load another track, we will use TRAKTOR KONTROL S4’s Preview Player to pre-lis-ten the track in the headphones directly from the Browser.
The PHONES socket and headphones controls on the front panel
1. If it’s not already done, plug in a pair of headphones to the PHONES socket on the frontpanel of your S4.
2. On the right of the PHONES socket, turn the CUE VOL knob fully down and put on yourheadphones.
3. Next to the PHONES socket, Turn the CUE MIX knob fully counter-clockwise.4. On the top panel of your S4, turn the BROWSE encoder to select any track in the Playlist.5. Now press the BROWSE encoder.
The selected track is loaded into the Preview Player, as indicated by the Preview Play(headphones) indicator in the top right corner of the Master Display in the middle of yourS4:
6. On the front panel, turn up the CUE VOL knob to a suitable level.You should hear the track playing in the Preview Player.
7. By turning the BROWSE encoder, you can seek through the track and pre-listen otherparts of the track.
8. To unload the track from the Preview Player, press the BROWSE encoder again.
TutorialsMixing In a Second Track
TRAKTOR KONTROL S4 - Manual - 32

→ You get back to the list browsing. You can select another track for pre-listening or loadthe desired track on a Deck.
4.2.2 Loading and Playing the Second Track
We will choose the track “Techno 2” and load it on Deck B, as we did on Deck A in the previ-ous tutorial:
1. Turn the BROWSE encoder to select the track Techno 2 in the Playlist.2. Press the LOAD button on the right Deck to load the track on to Deck B.
In the TRAKTOR window, the track info and waveform appear on Deck B.3. Press the PLAY button on the right Deck to start the playback.
→ The track starts playing. The PLAY button lights up and the waveform starts moving onTRAKTOR’s Deck.
We don’t hear anything from Deck B through the speakers yet because we have set the cross-fader on the S4 all the way to the left—our plan is to slowly mix in the track on Deck B.
You can already give it a try: by slowly moving the crossfader to the right, you should hear thetrack on Deck B fade in, whereas the track on Deck A progressively fades out as you move thecrossfader further to the right. Obviously, our mix is not satisfying at all yet: before mixing inthe second track, we first have to beat-match it to the track playing on Deck A. So for now,pull the crossfader all the way back to the left.
If you don’t hear any sound coming from Deck B even with the crossfader all the way to theright, check the few troubleshooting guidelines in section ↑4.1.3, If You Don’t Hear theTrack above.
4.2.3 Using Headphones to Prepare the Mix
From now on, let’s get used to preparing our mix with headphones until the next track (here onDeck B) is ready to be mixed in.
TutorialsMixing In a Second Track
TRAKTOR KONTROL S4 - Manual - 33

The CUE button on channel B
On your S4, press the CUE button on the channel B.
→ The button lights up, indicating that Deck B is now sent to the Cue channel, which youwill hear in your headphones.
At any time, use the CUE MIX knob nearby to adjust the balance between the cued track (DeckB) and the main mix (Deck A) in your headphones: turn it counter-clockwise when you want toconcentrate on the cued track; turn it clockwise when you want to hear more of the main mix.
You are now ready to work on the track playing on Deck B without interfering with the mainmix sent to your audience. Regardless of the mix that you’re hearing in your headphones, themain mix is still controlled by the crossfader and channel faders.
4.2.4 Synchronizing the Second Track
Before mixing in the track playing on Deck B, we will use TRAKTOR’s automatic Sync featureto adjust its tempo to that of Deck A. This is done in just one step via the SYNC button:
The SYNC button on the right Deck
TutorialsMixing In a Second Track
TRAKTOR KONTROL S4 - Manual - 34

Press the SYNC button on the right Deck to synchronize its tempo and phase with thoseof Deck A.
→ The SYNC button lights up. Now the two tracks are in perfect sync.
By slowly turning the CUE MIX knob on the front panel, you will hear the second track comeinto the mix in sync with Deck A.
Note that you should always adjust the tempo of the track that is not audible to the audi-ence!
4.2.5 Setting a Cue Point as Starting Point
You will probably want to have more control over which particular part of the track you mix in.For example, most of the time, not only the tempos but also the downbeats of both tracksshould match. Using a particular point in a track (for mixing in, triggering, etc.) is called “cue-ing.”
TRAKTOR KONTROL S4 lets you mark points for cueing—we call them Cue Points. This nota-bly allows you to re-use these points at a later stage, or in a later session.
The four unlit Hotcue buttons
On the right Deck, whether or not the track is playing, simply press one of the unlit Hot-cue buttons on a downbeat—let’s say the Hotcue button 1.
→ The Hotcue button lights up in blue: you’ve just stored a Cue Point that you can return tosimply by pressing the same Hotcue button again.
The first Hotcue button is now lit in blue.
TutorialsMixing In a Second Track
TRAKTOR KONTROL S4 - Manual - 35

Snapping to the Beats
You don’t have to worry about dropping a Hotcue directly on a beat: by default, TRAKTOR willmake sure this happens automatically. This is because the so-called Snap mode is on, as youcan see by the lit SNAP indicator on the Master Display, located in the middle of the Mixer:
The SNAP button and indicator on the Master Display
With Snap mode on, any point you set in the track will snap to the closest beat, thus ensuringthat you get directly to that beat next time that you jump to that point.
Aligning the Tracks
Aligning both tracks is straightforward:
1. Make sure that Deck B is playing (its PLAY button must be lit).2. When you hear a downbeat in the other track, press the Hotcue button you just used to
store the downbeat position.
→ The playback position on Deck B jumps to the stored Cue Point (as you can see in theTRAKTOR window), and the playback continues from there. Both tracks now are perfectlyaligned, ready to be mixed.
Sticking to the Beats
Again, you don’t have to worry about pressing the lit Hotcue button exactly on the beat: by de-fault, TRAKTOR will make sure that the beats of both tracks stick together and that the jumpdoesn’t ruin the beat matching. This is because the so-called Quantize mode is on, as you cansee by the lit QUANT indicator on the Master Display (see picture above).
With Quantize mode on, whenever you jump through the track (e.g. by pressing a Hotcue but-ton), the playback jumps to the nearest position that preserves the beat matching, thus ensur-ing that the current sync doesn’t get lost when you jump through the track.
TutorialsMixing In a Second Track
TRAKTOR KONTROL S4 - Manual - 36

4.2.6 Interlude: In Case the Left Track Is Over
The track “Techno 1” on Deck A has been playing since we started with the tutorials, and itmight happen that the playback reaches the end of the track. In this case, just do the follow-ing:
On the left Deck, press SHIFT + CUE to skip back to the beginning of the track.
You can then resume from where you left off.
4.2.7 Mixing In the Track by Using the Channel EQ and Filter
Now would be a great time to audition some of TRAKTOR KONTROL S4’s EQs and filters:
The EQ and FILTER knobs on channel B
Turn any of the EQ or FILTER knob on channel B to hear the effect on the cued track.
TutorialsMixing In a Second Track
TRAKTOR KONTROL S4 - Manual - 37

The EQs and filters are excellent tools for making adjustments to tracks before mixing them inso that you get the smoothest transition possible. The most common technique is to filter thebassline out of the incoming track—having 2 basslines running rarely sounds good. Do the fol-lowing:
We will now carry out a first version of the mix “for real”. Thus, turn the CUE MIX knobfully clockwise to hear the main mix in your headphones (or put off your phones and listento your mix coming through your amplification system).
→ You just did your first mix with TRAKTOR KONTROL S4!
4.2.8 Doing Everything by Hand
You can also do your mix manually instead of using TRAKTOR’s sync and cueing facilities.
Most probably, you won’t do everything by hand in your everyday DJ work. Nevertheless, it is agood idea to get familiar with the “handcrafted” way:
It can be necessary when synching to a playing vinyl record or to the previous DJ.
You can combine it with TRAKTOR’s advanced features, thus further developing your ownmixing style.
To show this, let’s mix a new track on Deck A with the one we just mixed in on Deck B.
From now on, the track on Deck B is “on air,” i.e. it is heard by your audience. Hence, wewill now exclusively work on the left Deck, which controls Deck A in the software.
First Steps
1. First check that the crossfader is at full right.2. With the track on Deck B still playing, load the track “House 1” onto Deck A (reminder:
turn the BROWSE encoder to select the track in the list, then push LOAD on the leftDeck).
At first, it may help to select a track with a similar BPM.
3. Press PLAY on the left Deck to start the playback of the new track.4. On the same Deck, make sure the SYNC button is off.
TutorialsMixing In a Second Track
TRAKTOR KONTROL S4 - Manual - 38

5. On the Mixer, deactivate the CUE button above channel B’s fader and activate that ofchannel A to hear the new track in the headphone mix (you might need to adjust the CUEMIX knob accordingly).
Adjusting the Tempo
The tempo for each Deck can be manually controlled via the TEMPO fader:
Use the TEMPO fader to adjust the Deck’s tempo.
Adjust the TEMPO fader on the left Deck until the track’s BPM either “sounds right,” ordirectly matches the value of the other track’s BPM, which is displayed at the top of DeckB in TRAKTOR.
Manually Cueing with the Jog Wheel
You can use the jog wheel to manually seek through the track and find a nice bring-in point:
TutorialsMixing In a Second Track
TRAKTOR KONTROL S4 - Manual - 39

Use the jog wheel to manually seek through the track.
1. On the left Deck, press and spin the jog wheel’s top plate to seek through the track. (Youcan also fast seek through the track by holding the SHIFT button at the bottom of theDeck while spinning the jog wheel.)
2. Once you have found an interesting point for cueing (let’s say a downbeat), keep pressingthe top plate and release it when a downbeat arrives in the other track.Deck A starts playing from that point.
Note that you could also stop the playback (by pressing the PLAY button) before you seek aninteresting point with the jog wheel. Once you have found the point, you can release the jogwheel—since the Deck is not playing, you won’t lose the point. When a downbeat arrives in theother track, press PLAY again on the left Deck.
Aligning the Beats
In case you still hear a slight offset between both tracks, you can use the outer rim of the jogwheel to adjust the track’s phase and cancel the offset:
On the left Deck, move the jog wheel’s outer rim in the desired direction to temporarilybend the tempo and adjust the phase in order to cancel any minor offset.
→ Your tracks now perfectly match.
TutorialsMixing In a Second Track
TRAKTOR KONTROL S4 - Manual - 40

Note that this can also be useful when using TRAKTOR’s Sync feature. Indeed, in somesituations, the automatic beat detection might need a slight correction: for example, intracks with unusual low frequency content, the beat “feeling” might occur slightly after thebeat as detected by TRAKTOR. If you couldn’t make it to manually correct the Beatgrid ofyour track before you go on stage, you can cancel the offset on the fly with the jog wheel’souter rim.
Mixing In the New Track
When you’re ready, you can bring the crossfader over from Deck B and slowly mix in thetrack in Deck A.
→ You just did your first handmade mix with TRAKTOR KONTROL S4!
Don’t expect to be capable of manually matching beats right away, though—this requires in-tensive training and can’t be fully explained here in detail. Practice makes perfect!
4.3 Adjusting Levels
Before going any further, we would like you to be aware of how important it is to have your mixat the right level. We provide you here with a few simple hints in order to get the best soundout of your mix.
Even if this section might look a bit technical, please take the time to read these few pa-ges, as they can save you a lot of trouble, especially in a live situation!
4.3.1 The Theory
By mixing, you blend together signals coming from different sources (and possibly processthem on the way).
The basic rule is: you need to ensure that no signal is clipping, while simultaneously trying touse the full dynamic range available. Just to keep it short, there are two reasons behind this:
By using the full dynamic range available, you keep the noise level low relative to yourmix. As a result, all the details of your music are better rendered.
TutorialsAdjusting Levels
TRAKTOR KONTROL S4 - Manual - 41

When a signal is clipping, it is not getting louder, just worse. The loud parts (typically thebeats) are cut, which both reduces the dynamic range and introduces distortion in yourmix. The speakers will suffer from this—and so will your audience! (Be also prepared forsome angered sound technician or club owner coming down on you.)
Hence, you should always make sure that your signals stay at levels that satisfy these two re-quirements.
4.3.2 The Practice
To assist you in adjusting levels, the Mixer of your S4 is equipped with various level metersand controls. Each level meter consists of a bar of blue LEDs indicating the signal level, alongwith an orange LED at the top indicating the clipping.
A channel meter
The rule mentioned above can thus be translated as follows:
Best practices when adjusting levels: Ensure that the displayed levels go high enough inthe blue areas but don’t reach the orange LEDs, or only rarely.
Letting your levels go “in the red” (or orange in this case) and using signal clipping to letyour mix sound dirtier is definitely not recommended: to do this, make use of the great FXselection of TRAKTOR KONTROL S4 instead!
Checking the Level on Each Channel
Each channel on the Mixer provides you with a vertical channel meter next to the fader. Thismeter shows you the pre-fader level of the signal on that channel, i.e. the level of the signalbefore it is adjusted by the channel fader. To adjust this level, use the GAIN encoder at thevery top of the channel:
TutorialsAdjusting Levels
TRAKTOR KONTROL S4 - Manual - 42

A GAIN encoder sits at the top of each channel
Adjust the channel’s GAIN encoder so that the level displayed on the channel meter staysin the upper part of the blue area without reaching the orange clipping LED.
Note that the channel’s EQ and filter settings also affect the signal level, as well as the possi-ble FX Unit(s) it is assigned to. Hence, when modifying any of these, you might need to re-adjust the GAIN encoder accordingly.
Of course, the artistic side of your tracks should not be overlooked: for tracks with a varia-ble average level over time (e.g. a track starting with a soft intro), you should consider theloudest parts of the track when adjusting the channel level.
Matching Levels Between Channels
Moreover, in order to avoid any level jump when crossfading between two channels, the aver-age channel levels should match:
Before mixing in a cued channel, adjust its GAIN encoder so that its channel meter activ-ity roughly matches that of the channel currently on air.
TRAKTOR already does this for you by automatically setting the level for each newly loadedtrack to a satisfying value. This so-called “Autogain” feature relies on the gain values ex-tracted from your tracks. Nevertheless, depending on the particular EQ, filter and FX ap-plied to the cued track, you might have to double-check the level consistency before youmix in the track. Moreover, what is important here is the average level of the specific partof the track that you’re about to mix in.
Checking the Main Level
The signals coming from all channels are mixed together according to the relative levels set bythe channel faders and by the crossfader. This mix is then sent from TRAKTOR’s main outputto the Main section:
TutorialsAdjusting Levels
TRAKTOR KONTROL S4 - Manual - 43

The Main section on your S4
In this section, the MAIN LEVEL meters show you the (left and right) overall level of your mixbefore it is adjusted by the MAIN LEVEL knob. These meters actually mirror the MAIN meter inthe Header of TRAKTOR. To adjust this level, use the MAIN knob right below in TRAKTOR’sMaster panel:
The MAIN meter and knob in TRAKTOR
Adjust the MAIN knob in TRAKTOR’s Master panel so that the values on your S4’s MAINLEVEL meters stay in the upper part of the blue areas without reaching the orange clip-ping LEDs.
By default, a limiter is enabled on TRAKTOR’s main output. With this limiter enabled, theMAIN LEVEL meters’ clipping LEDs don’t indicate clipping anymore, but instead they indi-cate when the limiter kicks in. While the limiter virtually cancels any distortion that mightoccur, the resulting contraction of the dynamic range, though, cannot be undone. There-fore, even with the limiter enabled, ensure that the clipping LEDs don’t light up too often!
When the orange clipping LEDs light up, turning down the MAIN LEVEL knob on your S4 is ofno use: indeed, changing the level of the already distorted or shrinked signal coming fromTRAKTOR won’t repair it!
Should the level stay low on the MAIN LEVEL meters, check also the channel faders—theyare probably set too low as well!
TutorialsAdjusting Levels
TRAKTOR KONTROL S4 - Manual - 44

4.4 Looping and Cueing
Now that you have learned the basic mixing tasks, we will focus on one of TRAKTOR KON-TROL S4’s great features: its looping facilities.
Prerequisites
As always, we assume here that you already followed the instructions in the previous tutorials.TRAKTOR KONTROL S4 now is in the following state:
The track “House 1” is loaded on Deck A. The track is playing and audible.
The crossfader is all the way to the left.
4.4.1 Playing with Loops
On your S4, each Deck is equipped with dedicated loop controls, located in the Loop section,right under the Deck Display:
The Loop section, from left to right: LOOP MOVE encoder, LOOP IN and LOOP OUT buttons, and LOOP SIZE encoder.
Setting a Loop with a Predefined Size
Let’s add a Loop to the track on Deck A.
The LOOP SIZE encoder
To engage a loop on a playing track, just push down the LOOP SIZE encoder.
TutorialsLooping and Cueing
TRAKTOR KONTROL S4 - Manual - 45

→ This will automatically add a loop at that position in the track.
The loop size will correspond to the number on the Deck Display just above the LOOP SIZEencoder:
The Loop Size Display
To change the size of the Loop, just turn the same LOOP SIZE encoder until the displayreads the number of beats you’d like the Loop to be.
Note that you can adjust the loop size either before or after you’ve set the Loop! When do-ing it beforehand, it will affect the next Loops you set.
Setting a Loop Manually
You can also manually set loop start and loop end points. To do this, use the LOOP IN and LOOP OUT buttons in the Loop section:
The LOOP IN and LOOP OUT buttons
1. Press the LOOP IN button to set the Loop In Point.2. Press the LOOP OUT button to set the Loop Out Point.
As soon as you hit the LOOP OUT button, a Loop is set and the track will start looping.We already introduced the Snap mode in the previous tutorial (see ↑4.2.5, Setting a Cue Pointas Starting Point). This mode also affects the Loop In and Loop Out Points, so that they willautomatically be positioned directly on the beat.
Of course, you can also change the size of manually set Loops via the LOOP SIZE encoderas described above.
TutorialsLooping and Cueing
TRAKTOR KONTROL S4 - Manual - 46

When setting a Loop manually, the Loop Size Display (above the LOOP SIZE encoder)might not always match the actual loop size.
Moving a Loop
You can also quickly move the active Loop across your track by using the LOOP MOVE encod-er, at the left of the Loop section:
The LOOP MOVE encoder
To move the Loop, turn the LOOP MOVE encoder.
The size of the move also corresponds to the loop size that is currently set, as displayed abovethe LOOP SIZE encoder.
Turning the LOOP MOVE encoder when there is no Loop currently active lets you jumpbackward/forward through the track by the same loop size. See section ↑5.3.8, Loop Sec-tion for more info.
Storing a Loop
In the previous tutorial, we looked at how to store Cue Points. This is as simple as pressing anunlit Hotcue button.
An unlit Hotcue button
Storing Loops works similar:
To store the active Loop, press an unlit Hotcue button.
TutorialsLooping and Cueing
TRAKTOR KONTROL S4 - Manual - 47

→ The Hotcue button lights up, this time in green: you’ve just stored a Loop that you canreturn to simply by pressing the same Hotcue button again.
The same Hotcue button lit in green
Deactivating Looping
If you want to deactivate the current Loop, do the following:
To deactivate looping, push either of the LOOP MOVE or LOOP SIZE encoder.
→ The playback continues after the Loop.
By pushing the LOOP MOVE encoder when there is no Loop currently active, you activatelooping: the next Loop in the track will be activated.
4.4.2 Using Hotcues
In this tutorial and in the previous one, we already used Hotcues to store Cue Points andLoops. We want to show you here a few more details on their use.
Hotcue buttons with various assignments
As already explained, when pressing an unlit Hotcue button, if there is no Loop active youstore a Cue Point at the current playback position (the Hotcue button turns blue), and if thereis a Loop active you store this Loop (the Hotcue button turns green).
On the waveform of the software Deck, you can see that a line with the same color appears inthe track at the corresponding position. Moreover, a little number at the top reminds you whichbutton you should use to jump to that Cue Point or Loop:
TutorialsLooping and Cueing
TRAKTOR KONTROL S4 - Manual - 48

A waveform with a Cue Point stored as Hotcue 2 and a Loop stored as Hotcue 3.
If you make a mistake, or just decide you no longer want a particular Hotcue, you can quickly clear it:
To clear a Hotcue, hold down the SHIFT button and press the corresponding Hotcue but-ton.
→ You can see that the button is no longer lit.
Creative Uses of Hotcues
Hotcues aren’t just bookmarks to particular sections of a track—they can also be used for crea-tive techniques such as remixing parts of a song, beat juggling effects, etc.
As an example, we will show you here how you can quickly make use of a Loop stored in aHotcue slot to introduce the track you’re about to mix in. By the way, this will allow us to sumup what we’ve learned until now.
Provided that you carefully followed the instructions in the previous tutorials, the track “Tech-no 2” is still loaded on Deck B. Let’s say that the track on Deck A is on air (crossfader at fullleft) and you want to prepare the track on Deck B for mixing in:
1. Start the playback of the next track and send it to your headphones by activating the CUEbutton on the corresponding channel.
2. Find an interesting Loop near the beginning of the track by using the controls in the Loopsection of the right Deck.
3. Once you have a nice Loop running, store it by pressing an unlit Hotcue button and leaveit playing.
4. Now start to bring this Loop in your mix, for example by implementing the lowcut we ex-plained in the previous tutorial (see ↑4.2.7, Mixing In the Track by Using the Channel EQand Filter).
TutorialsLooping and Cueing
TRAKTOR KONTROL S4 - Manual - 49

5. When you’re about to fade out the previous track completely, release the Loop on the newtrack, and you’re done.
4.5 Using Samples in Your Mix
The Remix Decks are a great way to add Samples to your set, or capture Samples from TrackDecks for on-the-fly remixing.
The Remix Deck C with a Sample loaded in the upper Sample Cell of the first Sample Slot.
You can also use the Remix Decks to build new tracks on the fly, layering One-shot Samplesand Loops on top of each other. Now let’s find out how to control the Remix Decks with yourS4.
In case you were using Sample Decks in an earlier TRAKTOR version, don't panic! All for-mer Sample Slot functionality stays preserved.
Prerequisites
As always, we assume here that you already followed the instructions in the previous tutorials.TRAKTOR KONTROL S4 now is in the following state:
TutorialsUsing Samples in Your Mix
TRAKTOR KONTROL S4 - Manual - 50
The track “Techno 2” is loaded on Deck B. The track is playing and audible. By the way,from now on we will use “Track Deck” to describe Decks that play tracks, so that we caneasily distinguish Track Decks from Remix Decks. In TRAKTOR, you can see that the twoupper Decks (A and B) are Track Decks, whereas the two lower Decks (C and D) are RemixDecks.
The Deck A is stopped (if it’s not the case, press the PLAY button on the left Deck).
The crossfader is all the way to the right.
4.5.1 Loading a Sample from the Collection
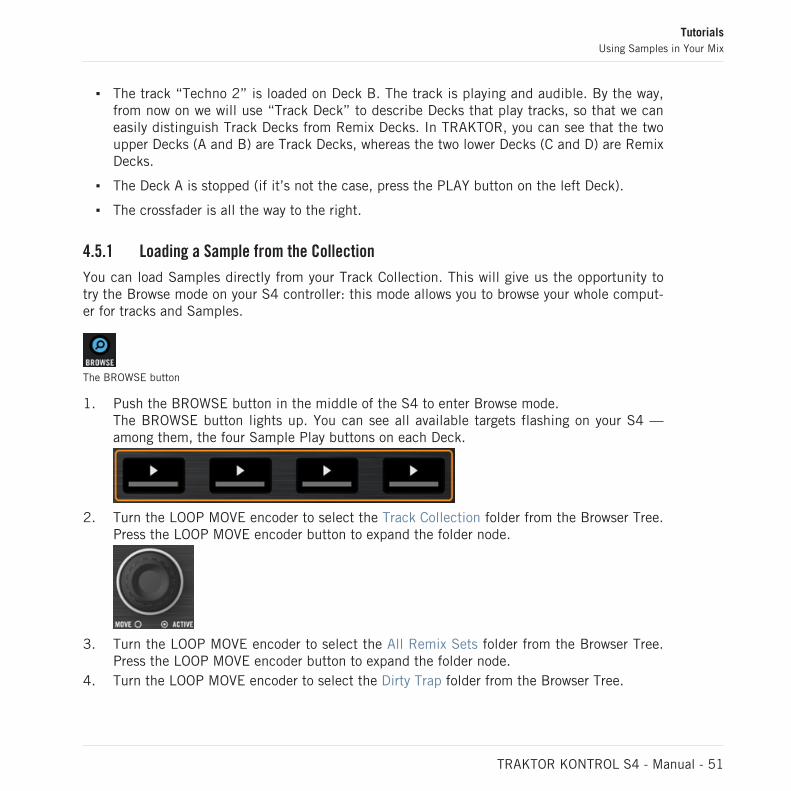
You can load Samples directly from your Track Collection. This will give us the opportunity totry the Browse mode on your S4 controller: this mode allows you to browse your whole comput-er for tracks and Samples.
The BROWSE button
1. Push the BROWSE button in the middle of the S4 to enter Browse mode.The BROWSE button lights up. You can see all available targets flashing on your S4 —among them, the four Sample Play buttons on each Deck.
2. Turn the LOOP MOVE encoder to select the Track Collection folder from the Browser Tree.Press the LOOP MOVE encoder button to expand the folder node.
3. Turn the LOOP MOVE encoder to select the All Remix Sets folder from the Browser Tree.Press the LOOP MOVE encoder button to expand the folder node.
4. Turn the LOOP MOVE encoder to select the Dirty Trap folder from the Browser Tree.
TutorialsUsing Samples in Your Mix
TRAKTOR KONTROL S4 - Manual - 51

5. Turn the BROWSE encoder to highlight the Sample “C3 Bells #1” in the Playlist.
6. On the left Deck, press one of the flashing Sample Play buttons (let’s say the first one) toload the Sample into that particular Sample Slot.
7. Push the BROWSE button again to leave Browse mode.
You can do this in the software too: simply drag and drop the Sample from the list onto aSample Cell of a Sample Slot.
The Sample is now loaded and ready to play:
In TRAKTOR, the Remix Deck C now holds the Sample in the upper Sample Cell of thefirst Sample Slot.
On your S4, the corresponding Sample Play button is now dimmed, indicating that theSample Slot holds a Sample which is not audible (yet).
4.5.2 Triggering the Sample
Triggering the Sample is as simple as pressing the dimmed Sample Play button:
1. Press the dimmed Sample Play button to trigger the Sample.2. Press the button again to mute the relevant Sample Slot. Press once more to unmute it.3. Press SHIFT + the Sample Play button to stop the Sample and skip back to start the next
time it is activated.The Sample is looped. This is because the Sample is in Loop mode, which is indicated by theloop symbol on the left side of the Sample Cell:
TutorialsUsing Samples in Your Mix
TRAKTOR KONTROL S4 - Manual - 52

The Sample "C3 Bells #1" in Loop mode.
To change the Play Type of the Sample to One-shot mode, the Advanced Panel of the RemixDeck needs to be opened. Double-click repeatedly on the upper border of the Deck to cyclethrough the Deck Layouts until the Advanced Panel becomes visible.
The Remix Deck C with the Advanced Panel on bottom. On the lower right you can see the cursor pointing on the Play Typebutton, which switches the Sample Cell from One-shot to Loop mode and vice versa.
Click on the Play Type button in the lower right of the Advanced Panel (see screenshotabove) to switch the Sample to One-shot mode if you wish.
In One-shot mode, pressing the relevant Sample Play button when a Sample is playing resultsin the Sample Slot being stopped.
Pressing SHIFT + Sample Play button once more after stopping Sample playback will clearthe Sample Slot from the Sample.
TutorialsUsing Samples in Your Mix
TRAKTOR KONTROL S4 - Manual - 53

In case you don’t hear the playing (unmuted) Sample, check that channel C’s fader israised in the TRAKTOR software.
4.5.3 Capturing a Sample From a Track Deck
We have seen how you can load Samples directly into one of the Remix Decks using TRAK-TOR’s Browser, but here’s an even cooler performance feature:
1. Check that the track “Techno 2” is still playing on the right Deck (Deck B in TRAKTOR).If not, start its playback by pressing PLAY. If the playback has reached the end of thetrack, press SHIFT + CUE to skip back to start.
2. Set a Loop on this track using the controls in the Loop section.3. On the same Deck, press an unlit Sample Play button — let’s say the Sample Play button
1.
→ This automatically captures the current Loop playing on Track Deck B, and copies it intothe upper Sample Cell of the first Sample Slot on Remix Deck D:
TutorialsUsing Samples in Your Mix
TRAKTOR KONTROL S4 - Manual - 54

We just exported the active Loop from Deck B to the upper Sample Cell of Deck D's first Sample Slot.
The loop is now ready to play in Remix Deck D. Furthermore, provided that Snap mode andSYNC are active, the loop is in perfect sync with the Track Deck B above.
The Sample Play buttons offer you the same playback controls as described earlier (press tounmute/mute the Sample, SHIFT+ press to stop it and skip to start next time it's activated,SHIFT + press again to unload).
As previously described, you can switch the Sample Play Type between Loop and One-shotmode (see ↑4.5.2, Triggering the Sample).
Now you can load a different track onto Deck B, but you will still have the Sample loop fromthe original song stored on the Remix Deck D to be retriggered at any time. It’s great for cap-turing loops on the fly and using them to build an alternate mix.
TutorialsUsing Samples in Your Mix
TRAKTOR KONTROL S4 - Manual - 55

If the Deck that you captured from wasn’t playing a Loop when you pressed the SamplePlay button, it will still capture audio from the source Deck, but will instead take it fromthe current playback position. The loop will automatically be cut to the length of the cur-rent Loop size (as displayed in TRAKTOR).
Capture a few Samples from various places in the track on Deck B and play around to getused to the basic playback controls that we described above (triggering, muting etc.).
4.5.4 Unloading a Sample
If at any time you’d like to clear the contents in one of the Sample Cells, hold the SHIFT but-ton and press the corresponding Sample Play button to stop the Sample, then repeat the sameaction to clear the Sample Cell. The Sample Play button turns back off.
4.5.5 Getting More Controls Over the Samples
Once you have a Sample loaded in one of the Remix Decks, you have many more controls overthe Sample at your disposal. To access them, we need to switch the focus of the right Deck onyour S4 to the lower Remix Deck D in TRAKTOR:
Press the DECK D button to switch the right Deck focus to Deck D.
→ The button lights up. All other elements on the right Deck now control the Sample Slotson Deck D in TRAKTOR.
We won’t describe all of the functions here (refer to ↑5.3, The Decks and the TRAKTOR 2Manual also), but at least show you some of the available functions:
The jog wheel allows tempo bending (outer rim) and scratching (top plate) of the RemixDeck including all Sample Slots.
The Hotcue button under each Sample Play button will also function as a Play and Cap-ture button. As a shortcut, if the Sample is already playing, the Hotcue button will retrig-ger the Sample.
For any playing Sample, the Hotcue button’s brightness follows the Sample’s rhythm.
TutorialsUsing Samples in Your Mix
TRAKTOR KONTROL S4 - Manual - 56

It is also possible, to skip through a Sample Slot's Sample Cells by pressing SHIFT + aHotcue button; however, this is dependent on whether the Hotcue buttons are set to Re-mix or Legacy mode in TRAKTOR's preferences. See ↑6.3, S4 Control Options for furtherinformation.
For a more in-depth description of the Remix Deck and its capabilities, please refer to theTRAKTOR 2 Manual.
4.6 Adding FX
Now that we have seen the basics of playing tracks and Samples on the Decks and mixingthem together, let’s see how to add effects—or “FX” in the TRAKTOR terminology.
TRAKTOR has an extremely powerful effect section. By default, there are two different FXUnits in TRAKTOR, which can be assigned to any of the Decks. These FX Units are directlymirrored on your S4 above each Deck:
An FX Unit in TRAKTOR
An FX Unit on the S4
TutorialsAdding FX
TRAKTOR KONTROL S4 - Manual - 57

Prerequisites
As always, we assume here that you already followed the instructions in the previous tutorials.TRAKTOR KONTROL S4 now is in the following state:
The track “Techno 2” is loaded on Deck B. The track is playing and audible.
The Deck A is stopped (if it’s not the case, press the PLAY button on the left Deck).
The crossfader is all the way to the right.
4.6.1 Group Mode
First we’ll look at Group mode. This mode allows up to three different FX to be used simultane-ously in a single FX Unit.
We’ll focus here on the left FX Unit (labeled FX1) of your S4—but the same applies to theright FX Unit as well.
The MODE button
Press the MODE button to put the unit into Group mode (the button must be lit).In TRAKTOR, you see three different FX slots stacked on top of each other in the corre-sponding FX Unit (see picture above).
4.6.2 Getting the FX Unit Ready
Let’s load the three default effects and activate the FX Unit:
1. Hold the SHIFT button and press the FX On button (at the far left of the FX Unit) to loadthe three default effects:
You now have the Delay, the Reverb, and the Filter loaded.
TutorialsAdding FX
TRAKTOR KONTROL S4 - Manual - 58

2. Choose which of the three loaded effects you want to activate by pressing the correspond-ing FX Buttons 1-3. Of course, you can use all three effects together—simply activate allthree buttons:
The FX Buttons light up to indicate the activated effects.
3. As additional step, turn the DRY/WET knob fully counter-clockwise—we will use this knoblater to progressively bring in the effects:
→ Your FX Unit is now ready to process whatever you will send to it!
4.6.3 Assigning Decks to the FX Unit and Bringing In the FX
Now we need to assign this FX Unit to a Deck. To do this, we use the FX Assign buttons at thetop of each channel on the Mixer, below the GAIN encoder:
The FX Assign buttons on each channel
Let’s assign the FX Unit 1 to Deck B:
1. Press the left FX Assign button (labeled “1”) on channel B to assign Deck B to the FXUnit 1.
2. Slowly turn the DRY/WET knob clockwise to bring in the FX.
→ You now hear the track on Deck B being processed by the FX Unit 1.
You can assign other channels to the same FX Unit. For example, if you also want to applythese FX to the Samples loaded on Deck C or D, simply press the FX Assign button “1” onthe corresponding channel(s).
TutorialsAdding FX
TRAKTOR KONTROL S4 - Manual - 59

4.6.4 Controlling the FX Unit
You can control each FX in this FX Unit by turning the respective FX Knob 1-3:
The FX Knobs 1-3
Play around with the FX Knobs 1-3 and listen to the result on the audio. You can alsoactivate/deactivate each FX individually by pressing the corresponding FX Buttons 1-3 be-low.
Changing the FX in a Slot
You can load another FX in each slot. Let’s switch the first FX slot to the Gater:
1. Hold SHIFT and press the FX Button 1 repeatedly to scroll through all available FX untilthe Gater is selected in the first slot of the FX Unit 1 in TRAKTOR.
2. If the first FX slot is currently deactivated, press the FX Button 1 to activate it (the buttonmust be lit).
→ You hear the Gater cutting the audio at regular intervals.
You might want to deactivate the FX Buttons 2 and 3 in order to better hear how the Gateraffects the audio.
Tempo-synchronized FX
Now try the following:
Set the FX Knob 1 to various positions and listen to the resulting effect on the audio.
→ You’ll notice that the gating effect stays synchronized to the beat! Among other things,this can be very useful to temporarily emphasize the rhythm, e.g. by transitions betweentracks.
TutorialsAdding FX
TRAKTOR KONTROL S4 - Manual - 60

You can check this by moving the TEMPO fader on the right Deck: by pulling the faderdownwards, you hear the track playing faster… and the Gater following.
4.6.5 Single Mode
You can also switch each FX Unit to Single mode. Instead of multiple FX with one parametereach, Single mode will give you one FX but with much more control over its parameters.
This time, we will do it on the right FX Unit (labeled FX2) of your S4:
1. Check that the FX Mode button (MODE) is off. If it’s on, press it to switch that FX Unit toSingle mode.
2. Press SHIFT + FX On button for the FX Unit to load an FX. You can hold SHIFT depressedand continue to press the FX On button to cycle through all the available FX until you seein the software one FX you’d like to try.
3. Press the same FX On button (this time without SHIFT) to turn on the FX Unit globally.The FX On button lights up.
4. On channel B, press the right FX Assign button (labeled “2”) to assign Deck B to this FXUnit as well. You can deactivate the left FX Assign button on that channel if you want tohear the new FX more distinctly.
The FX Knobs 1-3 and the FX Buttons 2 and 3 will give you access to each of the advancedparameters for that FX. At any time, you can press the FX Button 1 to reset the parameters totheir default value.
As for Group mode, the DRY/WET knob allows you to adjust the balance between the un-processed (dry) signal and the processed (wet) signal.
4.6.6 Storing a Snapshot
If you find yourself making the same settings to the FX each time and would like to set a de-fault state for the FX parameters, simply do the following:
1. Adjust the FX Knobs and Buttons to your liking.2. Press SHIFT + MODE to store these settings as snapshot.
→ The next time you press the FX Button 1 with this FX loaded, its parameters will assumethe values you stored.
TutorialsAdding FX
TRAKTOR KONTROL S4 - Manual - 61

It’s now time to check another new feature introduced in TRAKTOR KONTROL S4: the LoopRecorder.
4.7 Using the Loop Recorder
Earlier we saw how you can use Remix Decks as a means for triggering one-shot and loopedSamples. But this is how to work with existing material; the Loop Recorder, on the other hand,allows you to record new material on the fly.
The Loop Recorder on your S4
You could, for example, capture the signal from the microphone input on the S4, record yourscratching in real time, or just record a few bars of a particular track while tweaking the FXsettings.
Prerequisites
One more time, we assume here that you already followed the instructions in the previous tuto-rials. TRAKTOR KONTROL S4 now is in the following state:
The track “Techno 2” is still loaded on Deck B. The track is playing and audible (remem-ber: if the track is over, press SHIFT + CUE on the right Deck to skip back to the begin-ning).
The Deck A is stopped (if it’s not the case, press the PLAY button on the left Deck).
TutorialsUsing the Loop Recorder
TRAKTOR KONTROL S4 - Manual - 62

The crossfader is all the way to the right.
FX Unit 2 is in Single mode and loaded with your favorite FX.
None of the FX Units are assigned to channel B (both FX Assign button on channel Bmust be off).
4.7.1 Choosing a Source
The Loop Recorder can capture the input from several sources. In TRAKTOR, you can choosethe desired source by clicking on the Source menu—the drop-down menu directly under theLoop Recorder’s DRY/WET knob:
The Loop Recorder’s Source menu in TRAKTOR
In this menu, you have following choices:
Main will record TRAKTOR’s overall signal.
Cue will record any channels whose Headphones Cue button is on.
Ext will record from the Input FX Send.
Aux will pick up the signal assigned to TRAKTOR’s Aux channel—typically the S4’s mi-crophone input (for more info on how to use a microphone with your S4, please see ↑9.2,Adding a Microphone).
For our example, we’ll capture the main output:
Select Main in the Source menu.
Selecting the source is the only action that must be done in the software. Everything else willbe done from your S4 controller.
TutorialsUsing the Loop Recorder
TRAKTOR KONTROL S4 - Manual - 63

4.7.2 Recording a Loop
Let’s now record a loop.
Adjusting the Loop Size
Before we start recording, we need to specify the size of the loop we are going to record:
Press the SIZE button on the S4 repeatedly to cycle through loop record sizes (in bars).
You can see the current loop size in the software at the top of the Loop Recorder. For our ex-ample, we’ll choose a loop of 4 bars:
The selected loop size is displayed in the software.
Starting the Recording
Now do the following:
1. Cut the low and mid frequencies on channel B by turning the LOW and MID knobs fullycounter-clockwise.
2. Turn the DRY/WET knob of the Loop Recorder fully clockwise.3. When you’re ready, press the REC button.
→ The Loop Recorder will punch in (REC button lit), automatically punch out according tothe selected loop size (REC button back off), and then begin playing (PLAY button lit).That’s all there is to it!
You can hear that our adjustments to the EQ are now part of the recording.
You’ll notice that the loop automatically started playing when it finished recording. If youdon’t want this to happen, just push the PLAY button during recording. Now the loop willonly trigger when you explicitly tell it to.
Playing with the Recorded Loop
You can control the balance between the looped recording and the main output using the LoopRecorder’s DRY/WET knob:
TutorialsUsing the Loop Recorder
TRAKTOR KONTROL S4 - Manual - 64
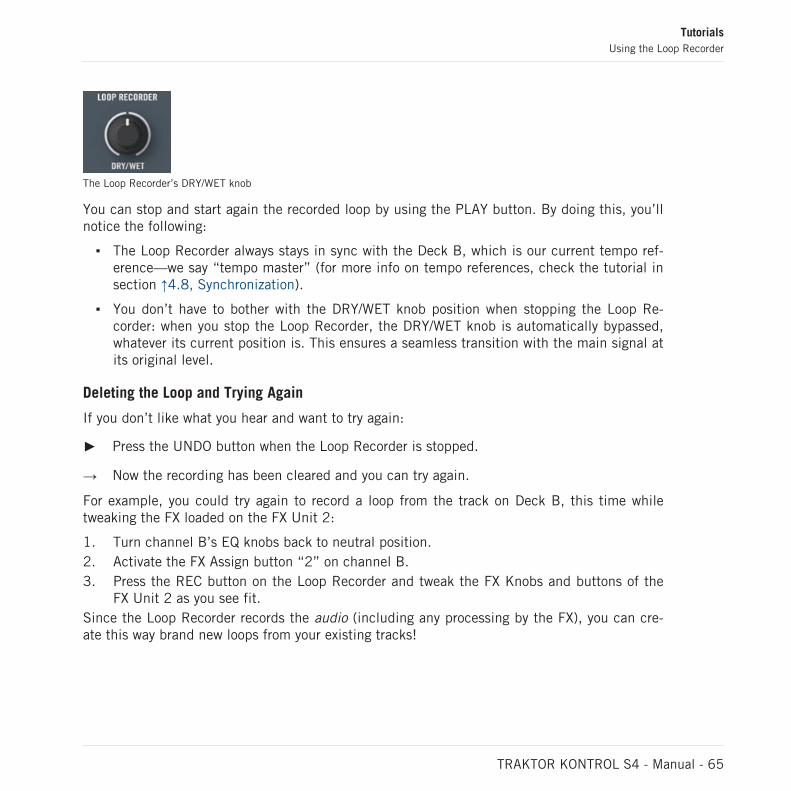
The Loop Recorder’s DRY/WET knob
You can stop and start again the recorded loop by using the PLAY button. By doing this, you’llnotice the following:
The Loop Recorder always stays in sync with the Deck B, which is our current tempo ref-erence—we say “tempo master” (for more info on tempo references, check the tutorial insection ↑4.8, Synchronization).
You don’t have to bother with the DRY/WET knob position when stopping the Loop Re-corder: when you stop the Loop Recorder, the DRY/WET knob is automatically bypassed,whatever its current position is. This ensures a seamless transition with the main signal atits original level.
Deleting the Loop and Trying Again
If you don’t like what you hear and want to try again:
Press the UNDO button when the Loop Recorder is stopped.
→ Now the recording has been cleared and you can try again.
For example, you could try again to record a loop from the track on Deck B, this time whiletweaking the FX loaded on the FX Unit 2:
1. Turn channel B’s EQ knobs back to neutral position.2. Activate the FX Assign button “2” on channel B.3. Press the REC button on the Loop Recorder and tweak the FX Knobs and buttons of the
FX Unit 2 as you see fit.Since the Loop Recorder records the audio (including any processing by the FX), you can cre-ate this way brand new loops from your existing tracks!
TutorialsUsing the Loop Recorder
TRAKTOR KONTROL S4 - Manual - 65

4.7.3 Overdubbing
You can also dub over the current recorded loop, building additional recorder layers on the fly.To do this:
1. Press the REC button while the Loop Recorder is already playing an existing loop, andpress REC again to exit overdubbing.The new audio will then be added to the existing loop.
2. If you don’t like the overdub, just hit UNDO and it will clear your last overdub and youcan try it again.
3. If you hit UNDO once more, it will act as a “redo” and bring back the overdub.4. If you want to completely clear all the contents of the Loop Recorder, just press UNDO
while the Loop Recorder is stopped.
4.7.4 Further Uses of the Recorded Loop
One of the great things about the Loop Recorder is that you can use it to record loops that youcan then transfer to the Remix Decks. To do this, we will use the Copy mode on the S4:
1. Hold down the BROWSE button to enter Copy mode.You will see the PLAY button on the Loop Recorder start flashing, letting you know that itcontains a loop ready to be copied.
2. While holding the BROWSE button, press the PLAY or REC button on the Loop Recorderto select it as source.
3. Still holding the BROWSE button, press any flashing Sample Play button in the RemixDecks to select it as target.
→ Now the loop has been stored in a Sample Slot, and you can record a new loop into theLoop Recorder if you like. Moreover, your loop now has access to all Sample-related fea-tures provided by the Remix Deck. Last but not least, as already mentioned, the loop isautomatically added to your Collection!
TutorialsUsing the Loop Recorder
TRAKTOR KONTROL S4 - Manual - 66

4.8 Synchronization
It is now time to give a closer look at the advanced synchronization features offered by TRAK-TOR. Once you will get more familiar with them, you will be able to use these powerful tools tobuild rich and complex mixes.
4.8.1 Introduction
In the previous tutorials, we have already seen TRAKTOR’s synchronization facilities manytimes in action:
We synchronized a track to the previous one before we mixed it in (see ↑4.2, Mixing In aSecond Track).
We played with Loops and jumped to Cue Points whithout losing the beat (see ↑4.4, Loop-ing and Cueing).
We captured a Sample from a track and it played in sync with the track (see ↑4.5, UsingSamples in Your Mix).
We noticed that the Gater FX was synchronized to the track it was processing (see ↑4.6,Adding FX).
We recorded a loop in the Loop Recorder and it played in sync with the track (see ↑4.7,Using the Loop Recorder).
The Tempo Master
For all this to work, TRAKTOR needs both a tempo and beat reference it can synchronizethings with. We call this the tempo master. The tempo master doesn’t have to be the samethroughout your mix, but there is always one tempo master—and only one.
For example, by activating SYNC on a Track Deck, you say to TRAKTOR: “Synchronize thetrack on this Deck with the current tempo master.” Samples playing in Looped mode on aRemix Deck, as well as loops recorded in the Loop Recorder, always play in sync with thecurrent tempo master.
In TRAKTOR, the Clock or any Track Deck can be the tempo master:
TRAKTOR’s Clock can provide a tempo and a tick.
TutorialsSynchronization
TRAKTOR KONTROL S4 - Manual - 67

A Track Deck can provide the tempo and the beats from the track that is currently play-ing.
The Beatgrid
So that a Track Deck can provide reliable tempo and beats, these must be precisely deter-mined in the loaded track—if not, the “reference” wouldn’t make any sense. Therefore, tracksmust first be analyzed beforehand by TRAKTOR in order to determine the BPM as well as theposition of the beats. The result of this analysis is the so-called Beatgrid. There is a specificBeatgrid for each of your tracks:
A track's waveform with Grid Marker (1) and the Beatgrid (indicated by the white vertical segments, 2).
The track’s Beatgrid is not only important when a Track Deck is set as tempo master, but alsowhen you want this Track Deck to be synchronized with the current tempo master, whichever itmay be.
The included demo tracks used in the tutorials were previously analyzed, therefore they al-ready have a reliable Beatgrid. Before you can effectively use the synchronization facilitieson your own tracks, you will have to analyze them. By default, this is done automaticallywhen you import your music into the Track Collection. For more info on how to do this, seechapter ↑3, Importing Your Music. For all the details on the Beatgrid, the Analysis and theTrack Collection, please refer to the separate TRAKTOR 2 Manual.
What Is Synched and What Is Not?
Basically, time-evolving FX are always automatically synched to the current tempo master.
On the other hand, for each Track Deck you can decide whether to use the automatic Sync ornot — for example if you want to beat match the track manually (see tutorial in ↑4.2, MixingIn a Second Track), or if you don’t want any beat matching at all for that track.
TutorialsSynchronization
TRAKTOR KONTROL S4 - Manual - 68

4.8.2 Who’s the Master?
You can build your mix using various Deck setups: you can mix with two Track Decks only, ormake use of the lower Remix Decks (default setup), or even replace the Remix Decks with an-other two Track Decks.
Depending on your preferred way of DJing and Deck setup, you will have different needs andperspectives for choosing your tempo master. We will describe here the various use cases.
Letting TRAKTOR Decide for You: the Auto Mode
Let’s first give a look at TRAKTOR’s Clock:
In TRAKTOR, click on the metronome icon at the top left of the window to show the Clock panel:
The Clock panel in TRAKTOR
In this Clock panel, you see the activated AUTO button, meaning that we are in Auto mode.
The Auto mode is activated by default, and this the mode we used in all the previous tutori-als.
With AUTO activated, TRAKTOR automatically switches the tempo master between TrackDecks when needed—that is to say, when the Track Deck set as tempo master is stopped orwhen you load a new track onto it. This way, you don’t have to worry about setting the tempomaster yourself.
Should there be no other Track Deck playing, the Clock would become the tempo master,thus keeping in sync any FX still on air!
You can check this by doing the following:
TutorialsSynchronization
TRAKTOR KONTROL S4 - Manual - 69

1. Stop any playing Deck.On the Master Display of your S4, the MASTER button and indicator light up, indicatingthat the Clock currently is the tempo master:
2. Load two tracks on Deck A and B.3. Start the playback on Deck A.
Deck A now is the tempo master: the MASTER indicator in the Master Display turns backoff, whereas the MASTER indicator on the left Deck Display lights up:
4. Start the playback on Deck B and beat match the track on Deck B with that on Deck A(whether manually or via automatic Sync).
5. Stop Deck A.
→ Deck B now is the tempo master: the MASTER indicator on the left Deck Display turnsoff, whereas that of the right Deck lights up:
If you play sets with two Decks only, or if you prefer to do your beat matching manually, theAuto mode might be for you: it guarantees that each new track in the mix sets the tempo refer-ence, and all FX will synchronize to it correctly — without being constrained to a single tempo.
If you’d like to do a combination of manual and synched beat matching, again leave the AUTObutton engaged, and enable the SYNC button for individual Decks on your S4 as needed:
If SYNC is enabled, the new Deck inherits the tempo from the previous tempo master.
If SYNC is disabled, the new track sets the current tempo master.
Note that you can also manually set a particular Deck as tempo master:
TutorialsSynchronization
TRAKTOR KONTROL S4 - Manual - 70

To manually set a Track Deck as tempo master, press SHIFT + SYNC on that Deck.
Using the Clock as Tempo Master
If you run beat-mixed sets with more than 2 Decks, you should use the Clock as tempo master.The clock will always give you a solid tempo reference that will not change. Also, if you intendto only do beat-synced transitions, and would like to stay within the same general BPM rangethroughout your set, this is the ideal mode to use. To set it up, do as follows:
1. In TRAKTOR’s Clock panel, deactivate the AUTO button.2. Set the Clock as tempo master, whether by activating the MASTER button in the Clock
panel, or by pressing the MASTER button on the Master Display of your S4 (in the middleof the Mixer).The Clock panel should now looks like this:
The Master Display on your S4 should now look like this:
3. On your S4, activate SYNC on all Decks by pressing the respective SYNC buttons.This way, all Decks will instantly follow the Clock’s tempo. You can then set the Clock’s tempoto the tempo you intend to play your set via the numeric field to the right of the MASTER but-ton (see picture above):
Change the Clock’s tempo by clicking the displayed BPM value and dragging your mousevertically while holding the mouse button depressed.
→ You can see the tempos on every Deck changing accordingly.
As in Auto mode, you can change the tempo master at any time from your S4 by pressingSHIFT + SYNC on the desired Deck or by pressing MASTER again in the Master Display.
TutorialsSynchronization
TRAKTOR KONTROL S4 - Manual - 71

4.8.3 Other Useful Tools for Synching
Lastly, we would like to quickly mention here three other interesting features related to syn-chronization: the Snap and Quantize modes, and the Keylock function.
Snap and Quantize Modes
As you probably remember, we already mentioned the Snap and Quantize modes in the tutorialin section ↑4.2, Mixing In a Second Track. They are other important tools that can help withsynchronizing your tracks:
The Snap mode ensures that any Loop or Cue Point you set in a track will snap to theclosest beat.
The Quantize mode ensures that any jump you make within the track will retain the phasesync—may you jump to a Loop, a Cue Point or a beat.
Both Snap and Quantize modes can be enabled/disabled directly from your S4 by pressing thecorresponding buttons in the Master Display, on either side of the MASTER button:
The SNAP and QUANT buttons allow you to activate/deactivate Snap and Quantize mode, respectively.
Depending on what you are about to do, you can decide to enable or disable them at any time.Here are a few examples:
If you want to set a Loop starting directly on a beat, activate SNAP and press the LOOPSIZE encoder around the desired beat.
On the contrary, should you wish to set a Cue Point at the beginning of some backing vo-cals that don’t necessarily start on the beat, deactivate SNAP before pressing an unlitHotcue button.
If you’re about to mix in a synched track and want the downbeats of both tracks to per-fectly match, activate the QUANT button before you press PLAY (or some Hotcue button).
TutorialsSynchronization
TRAKTOR KONTROL S4 - Manual - 72

On the other hand, if you want to jam around with a Sample loaded on a Remix Deck andmake some stutter-like effects by pressing the corresponding Hotcue button repeatedly,you might prefer to deactivate QUANT to create repetitions shorter than a beat.
Etc.
Locking the Key of Your Tracks
When synchronizing tracks, you alter their tempo, and consequently their pitch (or key). Forsmall tempo adjustments, this is not really serious; but when the tempo is changed morefrankly, the resulting pitch might get problematic: kick sounds would lose their power, vocalswould sound silly, etc.
To avoid this, TRAKTOR KONTROL S4 provides you with a Keylock feature that uncouples thetone and the tempo of a track:
1. Load two tracks with quite different tempos on Deck A and B.2. Start the playback on both Decks and synchronize Deck B to Deck A.
You can clearly hear how the tone of the track on Deck B changed.3. Now press SHIFT + PLAY on the right Deck of your S4. This activates the Keylock on that
Deck.
→ The tone of the track gets back to its original value, thus preserving most of its acousticfeeling. In the Deck Display, the KEYLOCK indicator lights up to remind you that theKeylock is active on that Deck:
4.8.4 In Conclusion
There is no “correct” sync setting: it all depends on your DJ style and the kind of music yoursets will consist of. Regardless of which setting you choose, you can see all necessary info onyour S4 and pilot your DJ set accordingly.
TutorialsSynchronization
TRAKTOR KONTROL S4 - Manual - 73

5 Hardware Reference
This chapter details all you can do with your TRAKTOR KONTROL S4 controller.
After a quick introduction to the main areas on your S4 and to their underlying concepts, wewill give a thorough description of each and every control element on your S4.
In this chapter, we describe actions on the TRAKTOR KONTROL S4. Of course, every ac-tion on your S4 is instantly mirrored in TRAKTOR! For an in-depth explanation of all fea-tures provided by the TRAKTOR software, please refer to the TRAKTOR 2 Manual.
Quick References
You will find in ↑6.5, The Setup Wizard a series of Quick Reference tables summing up thebasic functionality of each control element on your S4.
5.1 Areas and Concepts
This first section will give you an overview of TRAKTOR KONTROL S4’s main areas, both onyour TRAKTOR KONTROL S4 hardware controller and in the TRAKTOR software. On the way,we will describe some important concepts that together build the TRAKTOR KONTROL S4 sys-tem.
You will continuously encounter these concepts in your work with TRAKTOR KONTROL S4.Previous chapter ↑4, Tutorials proposes a practical approach of how these concepts are im-plemented.
5.1.1 Decks
TRAKTOR KONTROL S4 provides you with four virtual Decks. The Decks are the place wheretracks, Samples and live input are played back. The Decks can be seen as the virtual equiva-lent to the good old vinyl or CD decks—just with a bunch of powerful additional features andthe flexibility of a computer-based system.
Hardware ReferenceAreas and Concepts
TRAKTOR KONTROL S4 - Manual - 74

A Deck on your TRAKTOR KONTROL S4 hardware controller
Hardware ReferenceAreas and Concepts
TRAKTOR KONTROL S4 - Manual - 75

The equivalent control elements on a Track Deck in TRAKTOR
The two Decks on your TRAKTOR KONTROL S4 allow you to control the four software Decks(labeled A, B, C and D) available in TRAKTOR:
The left Deck on your S4 can control the upper Deck A and lower Deck C in the software.
The right Deck on your S4 can control the upper Deck B and lower Deck D in the soft-ware.
On your TRAKTOR KONTROL S4 controller, each Deck provides you with a multi-function jogwheel with advanced transport functionality via its top plate (1) and outer rim (2), a TEMPO fad-er (3) to adjust the playback’s speed, a Deck Display (4) giving you various information aboutthe Deck’s state, a Loop section (5), Sample Play buttons (6) and Hotcue buttons (7) with differ-ent functionality according to the Deck type (Track Deck or Remix Deck, see below), the tradi-tional PLAY and CUE buttons (8), along with a few other useful control elements. Of course, youwill find equivalent features in the TRAKTOR software.
Hardware ReferenceAreas and Concepts
TRAKTOR KONTROL S4 - Manual - 76

Both left and right Decks also provide a SHIFT button (9): when held depressed, this buttonmodifies the function of many other control elements (see section ↑5.3.2, SHIFT Buttons: Ac-cessing Secondary Functions for more info).
Many control elements on the Decks can have their function customized in order to fit yourspecific needs and habits! For more info on this, please refer to chapter ↑6, CustomizingTRAKTOR KONTROL S4.
Three Types of Audio Material – Three Deck Flavors
Your Decks can handle three different types of audio material, each of them leading to a spe-cific Deck Flavor:
Tracks: A track is a song stored in digital format stored on your hard disk. For instance,the traditional way-of-DJing consists in playing back a particular sequence of tracks—aso-called Playlist. Decks handling tracks are called Track Decks.
Samples: A Sample is a small piece of audio material. If its physical content does notreally differ from a track’s content (it’s all about audio stored in digital format on yourhard disk), the difference between them is both in their size and purpose: in general, aSample is much shorter than a track, and it is aimed to be added to (or blended into) yourmain mix. Notably, Samples are perfect material for live remixing! Decks handling Sam-ples are called Remix Decks. Each Remix Deck provides you with four Sample Slots con-taining 16 Sample Cells each.
Audio input: Whereas the two aforementioned audio material types are played back fromyour hard disk, Decks C and D can also be switched to Live Inputs, in which case theytransfer audio signals coming from the outside world to TRAKTOR’s audio processing andmixing facilities. Whether it’s a microphone, a turntable, a keyboard or anything else, itgets directly inserted in TRAKTOR’s signal flow.
Deck Configurations
In TRAKTOR KONTROL S4, the upper Decks A and B are always Track Decks. The lower DecksC and D are Remix Decks by default, but you can switch them to Track Decks or Live Inputs—or even deactivate them.
You will find a detailed description of every control element in the Decks in ↑5.3, The Decks.
Hardware ReferenceAreas and Concepts
TRAKTOR KONTROL S4 - Manual - 77

5.1.2 Mixer
The Mixer is sitting in the middle of your TRAKTOR KONTROL S4 controller and of TRAK-TOR’s window.
The Mixer on the S4 controller and in TRAKTOR
The Mixer receives on its four channels (1) the audio signals coming from the four Decks de-scribed above. There is one channel for each Deck. Hence, channels are labeled from A to Daccording to their corresponding Deck.
Hardware ReferenceAreas and Concepts
TRAKTOR KONTROL S4 - Manual - 78

As any DJ mixer, the Mixer’s purpose basically is to adjust the relative level of each channel, tocontrol the channels’ frequency content, possibly feeding them into the FX Units (see section↑5.1.3, FX Units below) before sending the overall result to the Main section (2)—and in theend, to generate the mix that is sent to your audience. Of course, the Mixer also provides youwith a crossfader (3), which allows you to make seamless transitions between various channels.
The Mixer of your TRAKTOR KONTROL S4 hardware controller has a few additional featuresnot to be found on usual DJ mixers, though. For example, it includes a BROWSE encoder (4) forquickly browsing your Playlist content, along with a set of indicators and switches in the MasterDisplay (5) that give you quick access to vital information and options, and last but not least,the Loop Recorder (6), presented in more details below.
You will find a detailed description of every control element on the Mixer in section ↑5.4, TheMixer.
Mixer-related controls dealing with the physical inputs and outputs of your TRAKTOR KON-TROL S4 are also to be found on the front and rear panels of your S4 (see section ↑5.1.5,Front and Rear Panels below).
5.1.3 FX Units
Adding effects to playing audio can tremendously expand the sonic possibilities of your mix.For that purpose, TRAKTOR provides you with a great selection of high-quality FX. These FXcan be loaded into the so-called FX Units.
The FX Unit 1 on the TRAKTOR KONTROL S4
The FX Unit 1 in TRAKTOR
Hardware ReferenceAreas and Concepts
TRAKTOR KONTROL S4 - Manual - 79

By default, two FX Units are active. Both FX Unit 1 and FX Unit 2 can be freely assigned toany of the channels A-D.
On the hardware side, the TRAKTOR KONTROL S4 also provides you with two FX Units (la-beled FX1 and FX2 on your controller), which allow you to control the corresponding FX Unitsin the software.
You will find a detailed description of every control element in the FX Units in section ↑5.5,The FX Units.
You can activate two additional FX Units in the Preferences of TRAKTOR. Using four FXUnits instead of two implies a few changes in the FX routing scheme. Please refer to sec-tion ↑6.4.3, Using Four FX Units for more info.
5.1.4 Loop Recorder
The Loop Recorder is another powerful tool for live remixing your tracks.
The Loop Recorder on your S4
The Loop Recorder in TRAKTOR
Hardware ReferenceAreas and Concepts
TRAKTOR KONTROL S4 - Manual - 80

The Loop Recorder allows you to instantly create loops whether coming from the Mixer’s mas-ter signal, from a particular Deck or from a physical audio input. As soon as the loop is record-ed, it is automatically triggered. You can then blend between the loop playing in the Loop Re-corder and your main mix. Moreover, you can save the recorded loop to your hard disk or bet-ter, transfer it directly to any relevant location in TRAKTOR KONTROL S4 — typically a Sam-ple Slot on a Remix Deck!
You will find a detailed description of every control element in the Loop Recorder in section↑5.6, The Loop Recorder.
5.1.5 Front and Rear Panels
The front and rear panel of your TRAKTOR KONTROL S4 contain controls and connectors re-lated to the physical inputs and outputs of your controller. They are extensively described in sec-tion ↑5.8, The Rear Panel and ↑5.9, The Front Panel.
5.2 Types of Control Elements
Your TRAKTOR KONTROL S4 holds various types of control elements, which we will quicklydescribe here.
5.2.1 Buttons
A button on your S4
Buttons are spread everywhere over your TRAKTOR KONTROL S4. They can have three Flavors:
Some buttons trigger a function when they’re pressed (“trigger” action), e.g. the Hotcuebuttons: hit one of the Hotcue buttons, this triggers the playback to continue from there.
Hardware ReferenceAreas and Concepts
TRAKTOR KONTROL S4 - Manual - 81

Some buttons switch to another state until they are pressed again (“toggle” action), e.g.the PLAY button: hit it once and it starts the playback, press it a second time and theplayback stops.
A few buttons activate a certain state for the time they are held depressed (“gate” or“hold” action). Notably, this is the case of the SHIFT buttons (see below).
All buttons of your TRAKTOR KONTROL S4 are equipped with LEDs that give you various info.Basically, the LED indicates the button’s current state, but its exact meaning varies for eachbutton—for more info, please refer to the description of each button later in this referencechapter.
The SHIFT Buttons
Instead of triggering any function themselves, the SHIFT buttons (one on each Deck) modify thebehavior of other control elements on your TRAKTOR KONTROL S4, giving you access to somesecondary functions.
For more info on the SHIFT buttons, please refer to section ↑5.3.2, SHIFT Buttons: Ac-cessing Secondary Functions.
5.2.2 Knobs
A knob on your S4
Knobs are rotary potentiometers with limited range—this is indicated by the limited white ringaround them. By turning them, you can dial an absolute value for the parameter. The smallwhite line on their top indicates the current value of the parameter within the defined range.Depending on their purpose, most of them have a center detent at the middle (default) posi-tion, which is shown by the little notch on their ring.
Hardware ReferenceTypes of Control Elements
TRAKTOR KONTROL S4 - Manual - 82

5.2.3 Encoders
An encoder on your S4
Encoders are endless rotary potentiometers—this is indicated by the full white ring aroundthem. By turning them, you can dial a value for the parameter relatively to its current value inthe software. All encoders have a step-by-step movement.
Additionally, encoders have a “push” action available: pushing the encoder can trigger someother function.
5.2.4 Jog Wheels
A jog wheel on your S4
Functionally speaking, the two jog wheels are quite similar to the encoders described above:they have an endless rotary movement (here continuous) and an additional push action availa-ble on their top plate. The main difference (beside their size) is that, on the jog wheel, the
Hardware ReferenceTypes of Control Elements
TRAKTOR KONTROL S4 - Manual - 83

push movement is very tiny and is rather used for detecting whether you put your hand on thetop plate or on the outer rim when spinning the jog wheel. Hence, this leads to two differentrotation controls:
You can spin the jog wheel’s outer rim.
You can spin the jog wheel by (pressing and) turning its top plate.
This makes the jog wheel a versatile element that gives you a very precise control, e.g. forscratching, seeking in a track, or browsing in lists.
5.2.5 Faders
A fader on your S4
Faders are linear control elements with limited range. All of them set absolute values, with thepossible exception of the TEMPO faders (see ↑5.3.7, Tempo Fader and Tempo Offset Buttons).
5.2.6 Displays, Meters and Indicators
A Display with various indicators
Hardware ReferenceTypes of Control Elements
TRAKTOR KONTROL S4 - Manual - 84

A meter
Displays, indicators and meters are single- or multi-LED elements that provide you with real-time feedback about various states and levels in the TRAKTOR KONTROL S4 system.
5.2.7 Switches
A switch
Switches are only available on the rear panel. They control a few basic options needed whensetting your TRAKTOR KONTROL S4 up.
Hardware ReferenceTypes of Control Elements
TRAKTOR KONTROL S4 - Manual - 85

5.2.8 Sockets
The RCA main output sockets on the rear panel of your S4
Sockets are to be found on the rear and front panels only. They allow you to plug various typesof cables (USB, audio, MIDI, etc.) into your TRAKTOR KONTROL S4.
5.3 The Decks
This section describes the handling of the Decks on your TRAKTOR KONTROL S4. After anoverview of the general structure and the Deck Flavors in TRAKTOR, we will describe the indi-vidual areas and elements of the Decks on your S4.
5.3.1 Deck Flavors and Structure
As described in section ↑5.1.1, Decks, TRAKTOR's software Decks can have three differentFlavors, depending on the type of audio material you want them to handle: Track Deck, RemixDeck or Live Input.
By default, Decks A and B are Track Decks when TRAKTOR is configured for use withTRAKTOR KONTROL S4.
Decks C and D are Remix Decks then.
2 Track Decks + 2 Remix Decks is the intended layout when TRAKTOR is configured foruse with the S4. See also ↑6.5, The Setup Wizard for further information on configuringTRAKTOR using the Setup Wizard; however, you are not restricted to use this configuration,both Decks on the S4 can control Track Decks and Remix Decks in TRAKTOR.
Hardware ReferenceTypes of Control Elements
TRAKTOR KONTROL S4 - Manual - 86

Selecting Deck Flavors
For TRAKTOR KONTROL S4, it is recommended to use the Track Deck Flavor for Decks A andB, and the Remix Deck Flavor for Decks C and D; however, you can control any Deck Flavorwith the S4's Decks. To change the Flavor of a Deck:
Select the Flavor in the TRAKTOR Preferences via the settings in Preferences > Decks >Deck Flavor.
Or click on the Deck letter in a Deck's upper right corner and select a Flavor from thedrop-down menu:
The Decks on your TRAKTOR KONTROL S4
The two Decks on your TRAKTOR KONTROL S4 allow you to control all four Decks in TRAK-TOR:
The left Deck on your S4 can control both Decks on the left of the TRAKTOR window: theupper Deck A and the lower Deck C.
The right Deck on your S4 can control both Decks on the right of the TRAKTOR window:the upper Deck B and the lower Deck D.
At any time, each S4 Deck controls a particular Deck in the software: we say that the focus ofthe S4 Deck is on that particular software Deck. You can switch the focus of an S4 Deck be-tween two software Decks (e.g., between A and C). This is done via the Deck Assign buttons,see section ↑5.3.3, Deck Assign Buttons: Switching Deck Focus below.
Depending on the Flavor of your Decks in TRAKTOR (Track Decks, Remix Decks or Live Input),the Deck’s control elements have slightly differing functions on your S4. These differences willbe pointed out at the relevant places in the subsequent chapters.
Hardware ReferenceThe Decks
TRAKTOR KONTROL S4 - Manual - 87

Using a Deck as Live Input
When a Deck is switched to Live Input, the Deck simply forwards audio signals coming fromyour S4’s physical audio inputs to its corresponding channel on the Mixer. As a consequence,all control elements for this Deck are deactivated. On your S4, you cannot put the focus on asoftware Deck working as Live Input. For an in-depth description of the Live Input, please referto the separate TRAKTOR 2 Manual.
5.3.2 SHIFT Buttons: Accessing Secondary Functions
The SHIFT buttons have an overall purpose, regardless of the Deck Flavor (Remix Deck orTrack Deck).
A SHIFT button
The SHIFT buttons (one on each S4 Deck) act as “modifiers” for other control elements onyour TRAKTOR KONTROL S4, they allow you to access a secondary function when using othercontrol elements simultaneously—much like the [Shift] key on your computer keyboard.
To access the secondary function of any control element, hold SHIFT depressed when us-ing that control element.
For the Deck and FX Unit control elements, SHIFT operates locally, which means that youcannot use the SHIFT button on the opposite side of your S4 to access the secondaryfunctions of a Deck or FX Unit.
For the Mixer, the SHIFT button on either side can be used to access the secondary func-tions.
On Track Decks, the SHIFT button additionally allows you to define the Deck tempo. Seesection ↑5.3.13, SHIFT Button for further information.
5.3.3 Deck Assign Buttons: Switching Deck Focus
The Deck Assign buttons have an overall purpose, regardless of the Deck Flavor (Remix Deck,Track Deck or Live Input).
Hardware ReferenceThe Decks
TRAKTOR KONTROL S4 - Manual - 88

Both Deck Assign buttons (one on each Deck)
The Deck Assign button (labeled DECK C on the left Deck and DECK D on the right Deck) al-lows you to switch the focus of your S4 Deck between the two Decks it can control in theTRAKTOR software.
On the left Deck, press DECK C to switch the focus between Deck A and Deck C.
On the right Deck, press DECK D to switch the focus between Deck B and Deck D.
→ When the focus is on the lower Deck (Deck C or D), the Deck Assign button lights up.Simultaneously, the DECK C (or DECK D) indicator lights up instead of the DECK A (orDECK B) indicator in the Deck Display (see ↑5.3.4, Deck Display: Informed at a Glancebelow), along with the Deck Assignment indicator in the corresponding channel of theMixer (see ↑5.4.3, The Channels and the Crossfader).
Secondary Function: Switching Between Layouts
The Deck Assign buttons also allow you to switch between Layouts in TRAKTOR.
On the left Deck, press SHIFT + DECK C to switch to another Layout in TRAKTOR.
On the right Deck, press SHIFT + DECK D to switch to another Layout in TRAKTOR.
You can customize the Layouts that will be activated when pressing each Deck Assign buttonby going to Preferences > Traktor Kontrol S4 > S4 Control Options. Please refer to section↑6.3, S4 Control Options for more info on this.
For more info on what a Layout is, please refer to the separate TRAKTOR 2 Manual.
5.3.4 Deck Display: Informed at a Glance
The Deck Display holds six indicators along with the Loop Size Display:
Hardware ReferenceThe Decks
TRAKTOR KONTROL S4 - Manual - 89

The Deck Display
Indicators in the Deck Display
The six indicators in the Deck Display provide various Deck-related information:
ON AIR indicator: lights up when the Deck is audible on the TRAKTOR KONTROL S4 mainoutputs. This indicator takes the crossfader position as well as the corresponding channelfader position into account in order to decide whether the Deck is “on air” or not. In anutshell: When the ON AIR indicator is lit, think twice before starting or pausing theDeck!
SAMPLES indicator: lights up if the lower Deck is a Remix Deck. This notably allows you toknow that the Sample Play buttons of the upper Track Deck are controlling the SampleSlots of the Deck below (provided that you didn’t change their assignments—see the de-scription of the Sample Play buttons in section ↑5.3.9, Sample Play Buttons).
DECK A (or DECK B) indicator: lights up in blue when the Deck on your S4 is focused on theupper Deck (Deck A on the left, Deck B on the right) in TRAKTOR.
DECK C (or DECK D) indicator: lights up in white when the Deck on your S4 is focused onthe lower Deck (Deck C on the left, Deck D on the right) in TRAKTOR.
KEYLOCK indicator: lights up when the Keylock is active on that Deck. Note that Keylockcan be activated on Track Decks only. For more info on the Keylock feature of TRAKTOR,please refer to the tutorial in section ↑4.8, Synchronization and to the TRAKTOR 2 Man-ual.
MASTER indicator: Lights up when the Deck is the tempo master. This information is cru-cial when synchronizing tracks. Note that only Track Decks can be set as tempo master.To set a Track Deck as tempo master, use SHIFT + SYNC (see section ↑5.3.12, SYNCButton). For more info on synchronization, please refer to the tutorial in section ↑4.8,Synchronization and to the TRAKTOR 2 Manual.
Hardware ReferenceThe Decks
TRAKTOR KONTROL S4 - Manual - 90

Loop Size Display
The Loop Size Display
At the far right of the Deck Display, the Loop Size Display shows the currently selected loop size(measured in beats). You can change the selected Loop size and create Loops with this size viathe LOOP SIZE encoder (see section ↑5.3.8, Loop Section).
5.3.5 LOAD Button
The LOAD button
The LOAD button allows you to load/unload a track / Remix Set to / from the Deck when usingQuick Loading. It is used in conjunction with the BROWSE encoder, which allows you to quick-ly browse the Playlist you’re currently in:
1. Turn the BROWSE encoder to select the desired track in the currently opened Playlist inthe Browser. Hold SHIFT and turn the BROWSE encoder to scroll through your Favorites.
2. Press LOAD to load that track / Remix Set to the Deck.
By pressing SHIFT + LOAD, you unload the track from the Deck.
You will find more info on browsing and loading in section ↑5.7.1, Browsing Tracks and Sam-ples.
Moreover, the LOAD button lights up when you push the jog wheel’s top plate (e.g. for scratch-ing, see ↑5.3.6, Jog Wheel).
The LOAD button can be switched to an alternate assignment in which it activates a spe-cial Jog mode for the jog wheel. Please refer to section ↑6.3, S4 Control Options for moreinfo.
Hardware ReferenceThe Decks
TRAKTOR KONTROL S4 - Manual - 91

5.3.6 Jog Wheel
The jog wheel (right Deck pictured)
The jog wheel has several functions dealing with the playback of your Deck:
Tempo bending: By spinning the jog wheel’s outer rim, you temporarily raise or lower theDeck tempo. When you stop spinning the rim, the Deck tempo returns to its original val-ue.
Scratch: By pressing and spinning the jog wheel’s top plate, you fully take over manualcontrol for cueing up a beat, back spinning or for scratching. Also this can be very usefulto precisely locate any particular point in your track / Remix Set. When you release the topplate, the Deck returns to its previous playback state (playing or paused).
Seek: By additionally pressing SHIFT when spinning the jog wheel’s top plate, you canfast seek through your track / Remix Set.
When you press the jog wheel’s top plate, the LOAD button above lights up to indicate thatyou are manually controlling the playback position.
The jog wheel also provides additional features:
Inside an active Loop, while holding the LOOP IN or LOOP OUT button depressed, use thejog wheel to adjust the Loop In Point or Loop Out Point, respectively. See section ↑5.3.8,Loop Section for more info on this.
Hardware ReferenceThe Decks
TRAKTOR KONTROL S4 - Manual - 92

In Browse mode, you can use the jog wheel to scroll through the selected Playlist. Seesection ↑5.7, Browsing, Loading and Copying for more info on this.
Your jog wheel can also be switched to a special Jog mode providing you with advancedfeatures like FX control or filter control. Please refer to section ↑6.3, S4 Control Optionsfor more info.
5.3.7 Tempo Fader and Tempo Offset Buttons
The TEMPO fader and Tempo Offset buttons
The TEMPO fader and the OFFSET buttons provide you with extended controls over the Decktempo.
The TEMPO fader controls the tempo of the focused Deck: Pulling the TEMPO fader down-wards/upwards increases/decreases the tempo, respectively. By default, the range of the TEM-PO fader is ±6 %.
You can change this range in Preferences > Transport > Tempo. Both the tempo fader inthe software Deck and the TEMPO fader on your S4 are affected by this setting.
Hardware ReferenceThe Decks
TRAKTOR KONTROL S4 - Manual - 93

Absolute Mode
By default, the TEMPO fader is in Absolute mode. In this mode, whenever you move the TEM-PO fader on your S4, its position is transmitted 1:1 to the tempo fader on the software Deck—which in the end controls the tempo of the software Deck.
Therefore, the software Deck’s tempo matches the TEMPO fader position on your S4, unlessyou have somehow changed the software Deck’s tempo by other means such as:
Activating SYNC on that Deck to sync it to another tempo, thus modifying the tempo onthe software Deck. As long as SYNC is on and the relevant Deck is not the tempo master,the Deck tempo cannot be manually controlled via the faders (they are deactivated bothon the software and hardware Deck).
Switching the Deck focus on your S4 to the alternate software Deck, in which the tempofader may have another position.
Moving the tempo fader in the software.
For all these situations, the Tempo Offset buttons come into play and help you to keep track (!)of the Deck tempo.
Tempo Offset Buttons
The Tempo Offset buttons
The Tempo Offset buttons (labeled OFFSET and showing little up and down arrows) are equip-ped with LEDs that indicate you the offset between the TEMPO fader on your S4 and the tem-po fader of the focused Deck in TRAKTOR:
Down-arrow lit: The tempo fader position on the software Deck is below the TEMPO faderposition on your S4 (the software plays faster than indicated by the fader on the S4).
Up-arrow lit: The tempo fader position on the software Deck is above the TEMPO faderposition on your S4 (the software plays slower than suggested by the fader on the S4).
You can cancel the offset shown by the OFFSET buttons in various ways:
Hardware ReferenceThe Decks
TRAKTOR KONTROL S4 - Manual - 94

Hold SHIFT while moving the TEMPO fader: This disconnects the hardware fader from thesoftware fader and allows a soft takeover. While holding SHIFT depressed, find the faderposition at which the lit OFFSET button turns off and the other one lights up: This posi-tion roughly corresponds to the software fader position. Release SHIFT and move theTEMPO fader: the tempo jump will be negligible.
Press either OFFSET button to reset the software’s tempo fader to the position of theTEMPO fader on your S4. This can lead to a substantial tempo jump.
In Absolute mode, slightly moving the TEMPO fader on your S4 also resets the softwarefader to the position of the hardware fader.
Additionally, both OFFSET buttons light up dimmed to indicate that the TEMPO fader is near0 %.
Locking the Tempo
In case you don’t use the TEMPO fader at all and play the Deck at its exact original speed, youcan lock the tempo and disable the fader on your S4 to avoid moving it by accident. To lockthe tempo to its original value:
Press both OFFSET buttons simultaneously (provided that none of them is lit).
→ The tempo of the focused Deck is reset to 0 % and the TEMPO fader is deactivated. BothOFFSET buttons light up simultaneously to indicate the tempo locking.
Tempo locking is only possible if SYNC is deactivated on the relevant Deck.
To enable the TEMPO fader again, press either (or both) OFFSET button(s).
Relative Mode
You can also switch the TEMPO faders to Relative mode. In this mode, each TEMPO fader onyour S4 affects the tempo fader of the software Deck relatively to its current position, even ifthis position does not match the position of the TEMPO fader on your S4. This notably resolvespossible conflicts between the TEMPO fader and the Deck synchronization or Deck switching.To activate the Relative mode, open Preferences > Traktor Kontrol S4 > Tempo Faders. Pleaserefer to section ↑6.3, S4 Control Options for more info in this.
Hardware ReferenceThe Decks
TRAKTOR KONTROL S4 - Manual - 95

5.3.8 Loop Section
The Loop section
The Loop section holds all necessary controls for setting and modifying Loops in your tracks /Remix Sets. The Loop section consists of two buttons in the middle and two push encoders onthe sides. From left to right, you find the following controls: LOOP MOVE encoder, LOOP INbutton, LOOP OUT button, and LOOP SIZE encoder.
LOOP IN and LOOP OUT Buttons
The LOOP IN and LOOP OUT buttons
The LOOP IN and LOOP OUT buttons allow you to manually define a Floating Loop in the play-ing Track Deck / Remix Deck.
Pressing the LOOP IN button sets a Floating Cue Point at the current playback position. ThisFloating Cue Point will serve as Loop In Point as soon as you press the LOOP OUT button.
Hint: The LOOP IN button is the perfect tool for setting a Floating Cue Point without stop-ping the playback, whether you set a Loop Out Point later or not!
Pressing the LOOP OUT button sets a Loop Out Point at the current playback position and acti-vates a Floating Loop between the previously set Floating Cue Point and this Loop Out Point.
You can reuse the same Loop In Point for several Loops: simply set a new Loop Out Point,and the previous Loop In Point will be used for the new Floating Loop!
Hardware ReferenceThe Decks
TRAKTOR KONTROL S4 - Manual - 96

The LOOP IN and LOOP OUT buttons also act as indicator: they light up simultaneously to in-dicate that a Loop is running. If looping is active but the playback position is outside anyLoop, only the LOOP OUT lights up.
When a Loop is running, you can fine-tune its Loop In and Loop Out Points by holding the cor-responding button depressed and using the jog wheel:
Hold the LOOP IN or LOOP OUT button depressed and spin the jog wheel to adjust theLoop In or Loop Out Point of the running Loop.
Bear in mind that all your actions affect a Floating Loop (and not the original Stored Loop,if any). Hence, if you plan to use the modified Loop later, don’t forget to store it! For exam-ple, you can do this by assigning the Loop to a Hotcue slot (see section ↑5.3.10, HotcueButtons). Storing Loops to a Hotcue slot is only available for Track Decks.
The LOOP IN and LOOP OUT buttons can also have alternate functions when switched toAuto Loop mode. You can do this in Preferences > Traktor Kontrol S4 > S4 Control Op-tions. See section ↑6.3, S4 Control Options for more info.
LOOP MOVE Encoder
The LOOP MOVE encoder
The LOOP MOVE encoder allows you to activate/deactivate looping, move the Loop and jump inthe track:
LOOP MOVE encoder No Loop active Loop active
Turn Beatjumps by the current loop size (asdisplayed in the Loop Size Display).
Moves the Loop by the current loop size(as displayed in the Loop Size Display).
SHIFT + Turn Beatjumps by 1-beat steps. Moves the Loop by 1-beat steps.
Push Activates looping (current or next Loopin track will be looped).
Deactivates looping.
Hardware ReferenceThe Decks
TRAKTOR KONTROL S4 - Manual - 97

Bear in mind that all your actions affect a Floating Loop (and not the original Stored Loop,if any). Hence, if you plan to use the modified Loop later, don’t forget to store it! For exam-ple, you can do this by pressing an unlit Hotcue button (see section ↑5.3.10, Hotcue But-tons). Storing Loops to a Hotcue slot is only available for Track Decks.
LOOP SIZE Encoder
The LOOP SIZE encoder
The LOOP SIZE encoder allows you to select/adjust the loop size and to set a Floating Loopwith the selected size:
LOOP SIZE encoder No Loop active Loop active
Turn Selects a loop size (in beats) for the nextFloating Loop that you will set. The se-lected loop size is displayed in the LoopSize Display above the encoder.
Halves/doubles the Loop’s size.
Push Sets and activates a new Floating Loopat the current playback position with theselected loop size.
Deactivates looping.
You may have noticed that pushing either of the LOOP MOVE and LOOP SIZE encoders ac-tivates/deactivates looping. The only difference when activating looping via the LOOP SIZEencoder is that you additionally set a new Floating Loop at the current position.
Bear in mind that all your actions affect a Floating Loop (and not the original Stored Loop,if any). Hence, if you plan to use the modified Loop later, don’t forget to store it! For exam-ple, you can quickly do this by assigning the Loop to a Hotcue slot (see section ↑5.3.10,Hotcue Buttons). Storing Loops to a Hotcue slot is only available for Track Decks.
Hardware ReferenceThe Decks
TRAKTOR KONTROL S4 - Manual - 98

5.3.9 Sample Play Buttons
The Sample Play buttons
By default, the Sample Play buttons control the Sample Cells of a Remix Deck:
In case the upper Deck is a Track Deck, and the lower Deck is a Remix Deck, the SamplePlay buttons will control the Remix Deck's Sample Cells.
In case the upper Deck is a Remix Deck, the Sample Play buttons will control the upperRemix Deck's Sample Cells.
The Sample Play buttons allow you to load and play Samples. Each Sample Play button repre-sents a Sample Cell in one of the four Sample Slots of a Remix Deck.
If you don’t want to use Samples at all, or if you don’t want to mix Track Deck controls andRemix Deck controls, you can activate alternate functions for these Sample Play buttons inPreferences > Traktor Kontrol S4 > S4 Control Options. For example, they can be used asBeatjump buttons or as additional Hotcue buttons. Please refer to section ↑6.3, S4 ControlOptions for more info.
Sample Slot States
The LED of each Sample Play button indicates the current state of the Sample Slot:
Sample Play button Sample Slot’s state
Unlit Empty Sample Slot.
Dimmed Sample loaded but stopped or muted.
Lit Sample loaded and playing.
Hardware ReferenceThe Decks
TRAKTOR KONTROL S4 - Manual - 99

Capturing a Sample from another Deck
If a track is currently loaded into a Track Deck, you can directly export a Sample from thattrack by pressing an unlit Sample Play button. Select the Deck to be captured from with theCapture Source selection drop-down menu in the Remix Deck's Header.
The Capture Source selection drop-down menu in the Deck's Header
Once you press an unlit Sample Play button, a Sample is copied from the current playback po-sition to the Sample Slot:
If the current playback position is within an active Loop, the Sample is a copy of theLoop.
If the current playback position is outside any active Loop, the Sample starts at the cur-rent playback position and its size is defined by the selected loop size (as displayed bythe Loop Size Display).
The Sample Play button now lights up dimmed to indicate that the Sample is loaded but notaudible, because it is either muted or stopped.
To tell whether the Sample is stopped or muted, have a look at the TRAKTOR software: Ifthe Sample is muted, its waveform in the Sample Slot is dimmed, while the lit/unlit Sam-ple Play button indicates whether or not the Sample is playing.
When importing a Sample from the loaded track, as soon as the Sample is played live threetimes in the main mix, the Sample is automatically saved to the Collection for later use!
Quick Loading a Sample from a Playlist
By holding SHIFT and pressing an unlit Sample Play button, you load the currently selectedSample from the currently active Playlist into the relevant Sample Slot.
Hardware ReferenceThe Decks
TRAKTOR KONTROL S4 - Manual - 100

Other Methods for Loading a Sample
You can also copy a Sample from other Sample Slots or from the Loop Recorder by using theCopy mode, or load a Sample from the Browser by using the Browse mode. Both modes areexplained in detail in section ↑5.7, Browsing, Loading and Copying.
Playback Controls in Loop and One-shot Mode
Once a Sample is loaded into a Sample Slot, the Sample Play button controls its playback. Itsfunctionality depends on the Sample’s Play Type (Loop or One-shot), which is indicated by thePlay Type indicator to the left of a Sample Cell; it either depicts a loop or an arrow symbol.
To change the Play Type of the Sample, the Advanced Panel of the Remix Deck needs to beopened. Double-click repeatedly on the upper border of the Deck to cycle through the DeckLayouts until the Advanced Panel becomes visible below the Deck ( as shown in the screenshotbelow).
The Remix Deck C with the Advanced Panel on bottom. On the lower right you can see the cursor pointing on the Play Typebutton, which switches the Sample Cell from One-shot to Loop mode and vice versa.
Click on the Play Type button in the lower right of the Advanced Panel (see screenshotabove) to switch the Sample to One-shot mode if you wish.
In Loop mode, the Sample will be played back looped. The Sample Play button acts as follows:
Hardware ReferenceThe Decks
TRAKTOR KONTROL S4 - Manual - 101
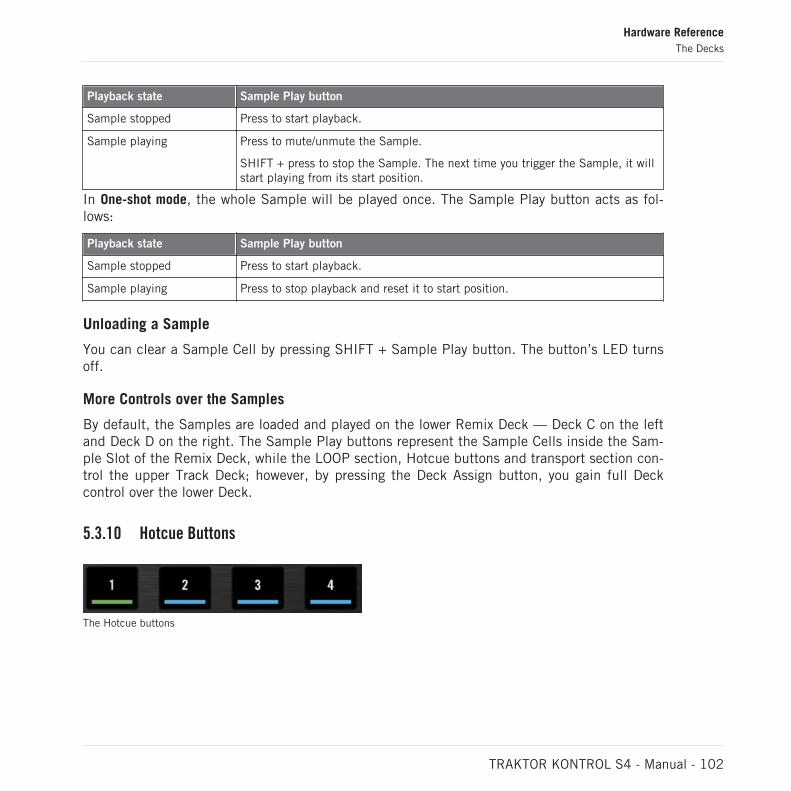
Playback state Sample Play button
Sample stopped Press to start playback.
Sample playing Press to mute/unmute the Sample.
SHIFT + press to stop the Sample. The next time you trigger the Sample, it willstart playing from its start position.
In One-shot mode, the whole Sample will be played once. The Sample Play button acts as fol-lows:
Playback state Sample Play button
Sample stopped Press to start playback.
Sample playing Press to stop playback and reset it to start position.
Unloading a Sample
You can clear a Sample Cell by pressing SHIFT + Sample Play button. The button’s LED turnsoff.
More Controls over the Samples
By default, the Samples are loaded and played on the lower Remix Deck — Deck C on the leftand Deck D on the right. The Sample Play buttons represent the Sample Cells inside the Sam-ple Slot of the Remix Deck, while the LOOP section, Hotcue buttons and transport section con-trol the upper Track Deck; however, by pressing the Deck Assign button, you gain full Deckcontrol over the lower Deck.
5.3.10 Hotcue Buttons
The Hotcue buttons
Hardware ReferenceThe Decks
TRAKTOR KONTROL S4 - Manual - 102

The Hotcue buttons (labeled “1” to “4”) have different functions, depending on whether thecontrolled Deck is a Track Deck or a Remix Deck. For a Track Deck, they represent the firstfour Hotcue slots of the Deck. Hotcues allow you to quickly jump to the stored Cue Points andLoops they are assigned to. Using Hotcues is only available for Track Decks.
If the Deck in focus is a Remix Deck, the Hotcue buttons control the Sample Slots of theRemix Deck. See also section "Hotcue Buttons in a Remix Deck Context" at the end of thischapter.
Hotcue Slot States
The LED on each Hotcue button indicates the current state of the slot:
Hotcue button Hotcue slot’s state
Unlit Empty Hotcue slot.
Blue Hotcue slot contains a Cue Point.
Green Hotcue slot contains a Loop.
Storing a Cue Point or a Loop into a Hotcue Slot
You can directly store the current playback position into a Hotcue slot by pressing an unlit Hot-cue button (empty slot) during playback. A Cue Point or a Loop will be stored, depending onthe current playback position:
If the playback position is outside any active Loop, a Cue Point will be stored. The Hotcuebutton lights up in blue.
If playback is within an active Loop, this Loop will be stored. The Hotcue button lights upin green.
If you want to store a Cue Point while the playback position is within an active Loop, deac-tivate looping first—for example by pushing the LOOP MOVE encoder.
Jumping to Predefined Hotcues
Pressing a lit Hotcue button jumps to that Cue Point / Loop. On a playing Deck, playback con-tinues after the jump; on a paused Deck, the track is played from that Cue Point / Loop as longas the Hotcue button is held depressed. Upon release, playback stops and skips back to thatpoint.
Hardware ReferenceThe Decks
TRAKTOR KONTROL S4 - Manual - 103

Deleting a Hotcue Slot
To delete the content of a Hotcue slot, press SHIFT + desired Hotcue button. The button’sLED turns off.
By deleting a Hotcue slot, you also delete the Cue Point or Loop it contained.
Hotcue Buttons in a Remix Deck Context
When the Deck in focus is a Remix Deck, the Hotcue buttons provide advanced functions forthe Sample Slots instead of triggering Hotcues. The functions then depend on the Hotcue But-tons setting in the Traktor Kontrol S4 section of the TRAKTOR Preferences.
The Hotcue Buttons drop-down menu from the Preferences
Hardware ReferenceThe Decks
TRAKTOR KONTROL S4 - Manual - 104

The following settings are available:
Legacy Mode: In Legacy mode, the Hotcue buttons will behave as they did for the formerSample Decks:
Pressing an unlit Hotcue button will capture a Sample from the capture source Deck /start playback.
Pressing SHIFT + a Hotcue button will enter Edit mode for the Sample Slot, in whichthe LOOP MOVE and the LOOP SIZE encoders control the volume and filter settings,respectively. The Hotcue buttons flashes when Edit mode is activated for a SampleSlot.
Remix Mode: in Remix mode, the Hotcue buttons have the following functions:
Pressing an unlit Hotcue button will capture a Sample from the capture source Deck /start playback.
Pressing SHIFT + a Hotcue button will activate the next Sample Cell in the SampleSlot.
The Hotcue buttons' LEDs also provide feedback on the state of the Sample Slot.
Hotcue button – LED state Sample Slot’s state
Unlit Empty Sample Slot.
Dimmed Sample loaded but stopped.
Blue Sample Cell is set to One-shotmode
Green Sample Cell is set to Loop mode
Flashing Edit mode is activated for theSample Slot (only in Legacymode)
Hardware ReferenceThe Decks
TRAKTOR KONTROL S4 - Manual - 105

5.3.11 PLAY and CUE Buttons
The CUE and PLAY buttons
At the bottom of the Deck, the PLAY and CUE buttons are the usual transport controls for theDeck.
PLAY Button
The PLAY button starts/stops the playback of the Deck. The button is lit when the Deck is play-ing.
Pressing SHIFT + PLAY activates/deactivates the Keylock on the Deck. When the Keylock isactivated, the KEYLOCK indicator lights up in the Deck Display (see ↑5.3.4, Deck Display: In-formed at a Glance for more info).
CUE Button
The CUE button functions as follows:
When the Deck is playing, pressing CUE skips to the Floating Cue Point and stops theplayback.
When the Deck is paused, pressing CUE sets a new Floating Cue Point (which replacesthe previous Floating Cue Point). The track is played back from that Floating Cue Point aslong as the CUE button is held depressed. Upon release, playback stops and skips back tothe Floating Cue Point.
Pressing SHIFT + CUE skips back to the beginning of the track. The playback state (playing orpaused) is left untouched.
Hardware ReferenceThe Decks
TRAKTOR KONTROL S4 - Manual - 106

5.3.12 SYNC Button
The SYNC button
The SYNC button activates/deactivates the synchronization of the Deck to the current tempomaster (another Deck or the Clock). The button is lit when synchronization is activated.
Activating the synchronization disables the TEMPO fader if it is in the default Absolutemode. See section ↑5.3.7, Tempo Fader and Tempo Offset Buttons for more info.
Pressing SHIFT + SYNC sets the Deck to tempo master—the Deck tempo then serves as temporeference for all other synched Decks and FX. When the Deck is set as tempo master, the MAS-TER indicator lights up in the Deck Display (see ↑5.3.4, Deck Display: Informed at a Glancefor more info).
For more details on the synchronization concepts in TRAKTOR KONTROL S4, see the tuto-rial in section ↑4.8, Synchronization.
Adjusting the Beatgrid with the S4
The SYNC button can also be used to adjust the Beatgrid of a track.
The Beatgrid, which serves to synchronize playback of tracks, may not have been correctly setby the automatic beat detection. In this case you must adjust it manually to the beats of thetrack.
Most commonly, Beatgrids do have the correct tempo but are shifted relatively to the beats ofthe track. To correct such an offset proceed as follows:
1. Play a reference track with a correct Beatgrid in Deck B and set Deck B to tempo master(via SHIFT + SYNC on Deck B).
2. Play the track with the incorrect Beatgrid in Deck A and activate SYNC on Deck A.3. Use the outer rim of the jog wheel to tempo bend Deck A until the beats match the beats
of Deck B.
Hardware ReferenceThe Decks
TRAKTOR KONTROL S4 - Manual - 107
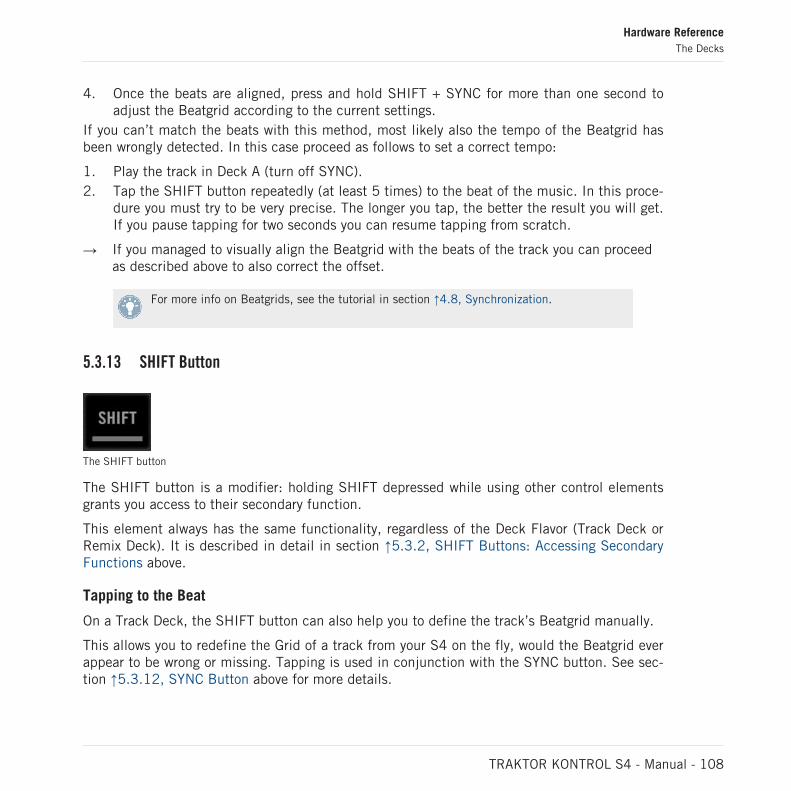
4. Once the beats are aligned, press and hold SHIFT + SYNC for more than one second toadjust the Beatgrid according to the current settings.
If you can’t match the beats with this method, most likely also the tempo of the Beatgrid hasbeen wrongly detected. In this case proceed as follows to set a correct tempo:
1. Play the track in Deck A (turn off SYNC).2. Tap the SHIFT button repeatedly (at least 5 times) to the beat of the music. In this proce-
dure you must try to be very precise. The longer you tap, the better the result you will get.If you pause tapping for two seconds you can resume tapping from scratch.
→ If you managed to visually align the Beatgrid with the beats of the track you can proceedas described above to also correct the offset.
For more info on Beatgrids, see the tutorial in section ↑4.8, Synchronization.
5.3.13 SHIFT Button
The SHIFT button
The SHIFT button is a modifier: holding SHIFT depressed while using other control elementsgrants you access to their secondary function.
This element always has the same functionality, regardless of the Deck Flavor (Track Deck orRemix Deck). It is described in detail in section ↑5.3.2, SHIFT Buttons: Accessing SecondaryFunctions above.
Tapping to the Beat
On a Track Deck, the SHIFT button can also help you to define the track’s Beatgrid manually.
This allows you to redefine the Grid of a track from your S4 on the fly, would the Beatgrid everappear to be wrong or missing. Tapping is used in conjunction with the SYNC button. See sec-tion ↑5.3.12, SYNC Button above for more details.
Hardware ReferenceThe Decks
TRAKTOR KONTROL S4 - Manual - 108

5.4 The Mixer
The Mixer, in the middle of your S4
This section describes the general handling of the Mixer on your TRAKTOR KONTROL S4.
You will find in ↑11.2, Remix Deck Quick Reference a Quick Reference table summing upthe basic functionality of each control element on the Mixer.
Hardware ReferenceThe Mixer
TRAKTOR KONTROL S4 - Manual - 109

5.4.1 Mixer Overview
The Mixer is equipped with four channels, each of them controlling the signal coming from oneparticular Deck: channel A, B, C, and D control the signals coming from Deck A, B, C, and D,respectively.
Thanks to the logical layout of the channels on the Mixer, you can quickly see what goeswhere:
Channels on the left (A and C) control the signals from left Decks in the software.
Channels on the right (B and D) control the signals from right Decks in the software.
Channels in the middle (A and B) control the signals from the upper Decks in the soft-ware.
Channels on the sides (C and D) control the signals from the lower Decks in the software.
5.4.2 The Main Section
The Mixer's Main section
The Main section allows you to both monitor and adjust the overall output level of your mix,i.e. the level of the signal sent to the Main Outputs on your S4. This is the last step for control-ling the level on your S4, before your mix is sent to the outside world.
The Main section holds two elements: the MAIN LEVEL knob and the MAIN LEVEL meters:
Hardware ReferenceThe Mixer
TRAKTOR KONTROL S4 - Manual - 110

Control element Function
MAIN LEVEL knob Adjusts the level of the signal sent to the Main Outputs of the S4.
MAIN LEVEL meters Give a visual feedback on the pre-knob level of your mix.
Orange LEDs light up when the signal is clipping or when the limiterkicks in on the software side.
Worth to note is that the MAIN LEVEL meters show you the level of your mix at the output ofthe TRAKTOR software—thus after it has been adjusted by the MAIN knob in TRAKTOR’s Mas-ter panel, but before the signal reaches the MAIN LEVEL knob on your S4. Hence, if the or-ange LEDs tend to light up too often, you should turn down the MAIN knob in the Master panelof TRAKTOR.
For more info on how to set your levels correctly, see the tutorial in section ↑4.3, AdjustingLevels.
Hardware ReferenceThe Mixer
TRAKTOR KONTROL S4 - Manual - 111

5.4.3 The Channels and the Crossfader
A channel on the Mixer (channel C pictured)
The channels and the crossfader make up the core of the mixing scheme.
Signal Flow
As a rule of thumb: the signal coming from a Deck arrives at the top of the channel (GAIN en-coder) and goes down to the bottom (channel fader). The only exception to that rule is the pairof FX Assign buttons: although they are sitting right under the GAIN encoders, they actuallytap the signal after the EQ and FILTER knobs and before the channel fader.
Hardware ReferenceThe Mixer
TRAKTOR KONTROL S4 - Manual - 112

GAIN Encoder
The GAIN encoder
The GAIN encoder controls the input level of the signal coming from the corresponding Deck.
Turn the GAIN encoder to adjust the channel input gain.
This notably affects the resulting level as shown by the channel meter at the bottom: If thechannel meter indicates that the signal is clipping, turn down the GAIN encoder. For moreinfo on how to set your levels correctly, see the tutorial in section ↑4.3, Adjusting Levels.
Push the GAIN encoder to reset the channel input gain to 0 dB.
FX Assign Buttons
The FX Assign buttons
The FX Assign buttons (labeled “1” and “2”) allow you to assign the channel and its corre-sponding Deck both to the desired FX Units (normal layer) and to a particular side of the cross-fader (Shift layer).
For the FX Unit assignment, press the left or right button to assign this channel to the FX Unit 1or 2, respectively. The button lights up when the channel is routed to the corresponding FXUnit. When activating both buttons on the same channel, FX Unit 1 and FX Unit 2 will processthe channel’s signal in series.
For a description of the FX Units on your S4, please refer to section ↑5.5, The FX Units.
Hardware ReferenceThe Mixer
TRAKTOR KONTROL S4 - Manual - 113

You can activate two additional FX Units in the Preferences of TRAKTOR. Using four FXUnits instead of two implies a few changes in the FX routing scheme. Please refer to sec-tion ↑6.4.3, Using Four FX Units for more info.
For the crossfader assignment, press SHIFT when using the buttons. This allows you to choosethe crossfader’s side to which the current channel is assigned (and thus, its correspondingDeck too):
Press SHIFT + FX Assign 1 or 2 to assign the channel to the left or right side of thecrossfader, respectively.
The resulting assignment is shown by the Crossfader Assignment indicator (the little arrows), atthe bottom of each channel (see description at the end of this section).
You can also unlink a channel from the crossfader by pressing SHIFT and the FX Assignbutton corresponding to the side it is currently assigned to. This way, that channel won’t beaffected by the crossfader position.
EQ and FILTER Knobs
The EQ and FILTER knobs
Each channel boards an EQ section with the three usual knobs HI, MID and LOW for controllinghigh, medium and low frequency content of the signal, respectively.
Hardware ReferenceThe Mixer
TRAKTOR KONTROL S4 - Manual - 114

Turn each EQ knob clockwise to emphasize the corresponding frequency band, and coun-ter-clockwise to attenuate this band. At center detent position, the knob does not alterthe signal.
TRAKTOR provides you with various types of EQ, each of them having its own “personali-ty.” You can choose the EQ type in Preferences > Mixer > EQ Selection. For more info,please refer to the TRAKTOR 2 Manual.
Below the EQ, the FILTER knob allows you to adjust the channel’s on-board bipolar filter. Fromthe center detent position, turning the knob clockwise activates a high-pass filter, whereasturning it counter-clockwise activates a low-pass filter. On left and right end, the filter almostacts as a high frequency and low frequency killer, respectively.
From its center detent position, turn the FILTER knob clockwise to cut low and mid fre-quencies and counter-clockwise to cut high and mid frequencies.
TRAKTOR provides you with two different types of bipolar filters. You can choose the filtertype in the Preferences > Mixer > Filter Selection. For more info, please refer to the TRAK-TOR 2 Manual.
Headphones Cue Button
The Headphones Cue button
The Headphones Cue button (CUE) allows you to send the channel’s signal to the cue channel—in other words, to your headphones. This is a basic feature for DJing, since it allows you topre-listen the audio playing on that channel before using it in your mix.
Press the CUE button to send the channel’s signal to your headphones.
The Headphones Cue button lights up when activated, i.e. when the corresponding channel issent to the cue channel.
In Browse mode, the Headphones Cue button is used to load the selected track on to thecorresponding Deck (Track Decks only). See section ↑5.7, Browsing, Loading and Copyingfor more info on the Browse mode.
Hardware ReferenceThe Mixer
TRAKTOR KONTROL S4 - Manual - 115
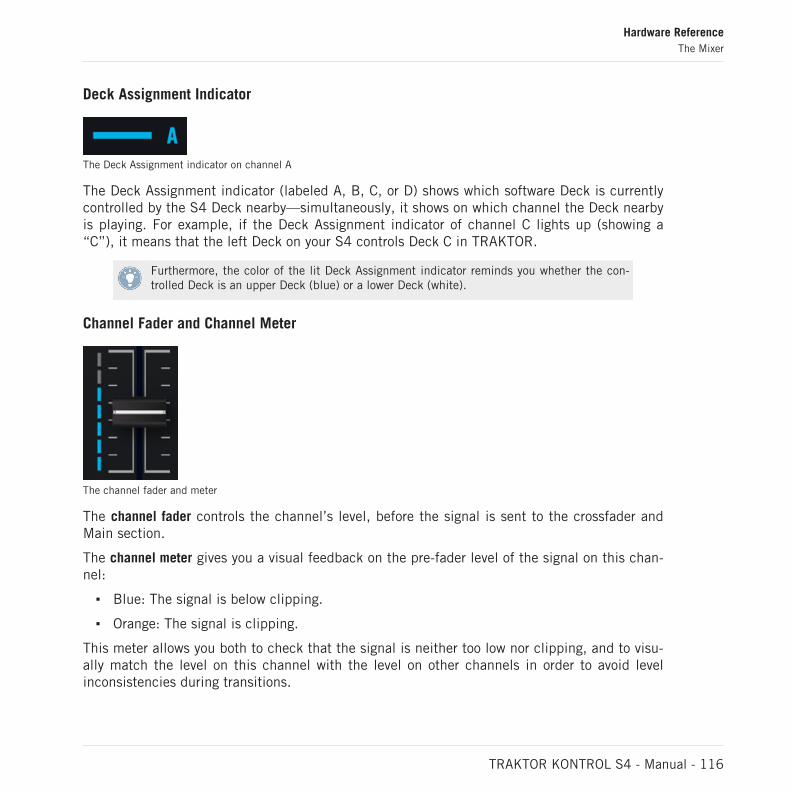
Deck Assignment Indicator
The Deck Assignment indicator on channel A
The Deck Assignment indicator (labeled A, B, C, or D) shows which software Deck is currentlycontrolled by the S4 Deck nearby—simultaneously, it shows on which channel the Deck nearbyis playing. For example, if the Deck Assignment indicator of channel C lights up (showing a“C”), it means that the left Deck on your S4 controls Deck C in TRAKTOR.
Furthermore, the color of the lit Deck Assignment indicator reminds you whether the con-trolled Deck is an upper Deck (blue) or a lower Deck (white).
Channel Fader and Channel Meter
The channel fader and meter
The channel fader controls the channel’s level, before the signal is sent to the crossfader andMain section.
The channel meter gives you a visual feedback on the pre-fader level of the signal on this chan-nel:
Blue: The signal is below clipping.
Orange: The signal is clipping.
This meter allows you both to check that the signal is neither too low nor clipping, and to visu-ally match the level on this channel with the level on other channels in order to avoid levelinconsistencies during transitions.
Hardware ReferenceThe Mixer
TRAKTOR KONTROL S4 - Manual - 116

To correct the channel level, adjust the GAIN encoder at the very top of the channel. Formore info on how to set your levels correctly, see the tutorial in section ↑4.3, AdjustingLevels.
Crossfader Assignment Indicator
The Crossfader Assignment indicator
The Crossfader Assignment indicator shows you the side of the crossfader the channel is as-signed to.
To change the crossfader assignment, hold SHIFT and press the desired FX Assign buttons(see above, at the beginning of this section).
Crossfader
The crossfader
The crossfader controls the mix between the signal(s) assigned to its left and right side. At thecenter position, the crossfader has no effect: channel levels are then only defined by the re-spective channel faders (see above). At each crossfader’s end, the opposite signals are totallycut.
You can customize the fading curve of the crossfader in TRAKTOR’s Preferences. Pleaserefer to the TRAKTOR 2 Manual for more info.
Hardware ReferenceThe Mixer
TRAKTOR KONTROL S4 - Manual - 117

You can quickly see which channels are assigned to each side of the crossfader by looking atthe Crossfader Assignment indicators right above (the pairs of little arrows). You can changethe crossfader assignments via SHIFT + FX Assign buttons. For more info on these control ele-ments, see above in this section.
If you rather use the channel faders instead of the crossfader for mixing, you can deactivatethe crossfader in order to avoid unwanted level inconsistencies between channels. To dothis, deactivate all crossfader assignments by SHIFT-pressing the corresponding FX Assignbuttons.
You can customize the fading curve of the Crossfader in Preferences > Mixer > Crossfader.Please refer to the TRAKTOR 2 Manual for more info.
5.4.4 The Master Display
The Master Display
The Master Display provides you with some vital information and controls for your TRAKTORKONTROL S4 system.
Alert Indicator
The Alert indicator
Hardware ReferenceThe Mixer
TRAKTOR KONTROL S4 - Manual - 118

The Alert indicator basically informs you that something might go wrong with your TRAKTORKONTROL S4 system: the indicator flashes if the Main Volume knob or the Headphones Vol-ume knob is too low in TRAKTOR, if the CPU meter is too high, or if the power supply of yourlaptop is disconnected.
USB Indicator
The USB indicator
The USB indicator gives you information about the status of the USB connection between yourS4 and your computer. The indicator should be continuously lit. If it flashes, there is no con-nection to the computer or a problem with the driver.
Check that the USB indicator is continuously lit before going any further with your S4.
Preview Play Indicator
The Preview Play indicator
The Preview Play indicator lights up if a track is loaded into the Preview Player.
For more info on the Preview Player, see section ↑5.7.1, Browsing Tracks and Samples.
Hardware ReferenceThe Mixer
TRAKTOR KONTROL S4 - Manual - 119

SNAP Button and Indicator
The SNAP button and indicator
The SNAP button allows you to activate/deactivate the Snap mode. With Snap active, everyCue Point that you set will snap to the closest beat (see the tutorials in section ↑4.2, Mixing Ina Second Track and ↑4.8, Synchronization for more info on this).
The Snap option affects both Cue Points and Loops.
When the Snap option is active, both the button and the indicator light up.
Clock Master Button and Indicator (MASTER)
The Clock Master button and indicator
The Clock Master button allows you to set TRAKTOR’s Clock as tempo master.
When the Clock is set as tempo master, both the button and the indicator light up.
For more info on the whole synchronization concept in TRAKTOR KONTROL S4, please re-fer to the tutorial in section ↑4.8, Synchronization.
Hardware ReferenceThe Mixer
TRAKTOR KONTROL S4 - Manual - 120

Quantize Button and Indicator (QUANT)
The Quantize button and indicator
The Quantize button allows you to activate/deactivate the Quantize mode. With Quantize ac-tive, all skips within audio (Hotcues, Beatjumps, etc.) are beat-accurate: for example, if youtrigger a jump before a beat, the playback jumps at the equivalent position before the targetbeat. This way, your track always stays in sync, allowing a perfect real-time remixing.
When the Quantize option is active, both the button and the indicator light up.
See the tutorials in section ↑4.2, Mixing In a Second Track and ↑4.8, Synchronization for moreinfo on this)
5.4.5 The BROWSE Encoder and BROWSE Button
The BROWSE encoder
The BROWSE button
Hardware ReferenceThe Mixer
TRAKTOR KONTROL S4 - Manual - 121

The BROWSE encoder and BROWSE button are used to browse and copy tracks or Samples inTRAKTOR KONTROL S4. You will find a description of these control elements in section ↑5.7,Browsing, Loading and Copying.
BROWSE Button: Switching between Native Traktor Mode and MIDI Mode
Pressing SHIFT + BROWSE switches your TRAKTOR KONTROL S4 between native Traktormode and MIDI mode. For more info on both modes, see section ↑5.10.2, MIDI Mode.
5.5 The FX Units
The FX Units 1 and 2 on your S4 allow you to control the FX Units in TRAKTOR. All controls ofthe FX Units in the software are mirrored on your S4.
The left FX Unit on your S4
(1) FX On button
(2) FX DRY/WET knob
(3) FX Knob 1
(4) FX Knob 2
(5) FX Knob 3
(6) FX Button 1
(7) FX Button 2
Hardware ReferenceThe FX Units
TRAKTOR KONTROL S4 - Manual - 122

(8) FX Button 3
(9) FX Mode button (MODE)
5.5.1 Single Mode and Group Mode
In TRAKTOR, each FX Unit can work in two different modes:
Group mode: Each FX Unit boards three different FX chained in series. Each FX can becontrolled by one knob and one button.
Single mode: Each FX Unit boards a single FX, which can be fine-tuned via the threeknobs and three buttons of the FX Unit.
As a consequence, the control elements on an FX Unit will have different functions, dependingon the current mode of this FX Unit.
You can switch between both modes from your S4 via the FX Mode button (see below).
5.5.2 FX Unit Reference
The following table sums up the functionality of each control element in the FX Unit.
Control element Single mode Group mode
FX On button Normal: activates/deactivates FX Unitglobally (lit when activated).
SHIFT: selects next FX from FX list (asset in Preferences > Effects > FX Pre-Selection).
Normal: not used.
SHIFT: loads a set of three predefined FX(as set in Preferences > Traktor Kontrol S4> S4 Control Options > Direct FX 1-3).
FX DRY/WET knob Adjusts the ratio between unprocessed (dry) signal and processed (wet) signal.
FX Knob 1-3 FX parameter 1-3 (FX-dependent). Parameter for 1st, 2nd, and 3rd FX.
Hardware ReferenceThe FX Units
TRAKTOR KONTROL S4 - Manual - 123

Control element Single mode Group mode
FX Button 1-3 FX Button 1: resets all FX parametersto their default value.
FX Buttons 2 and 3: FX-dependent (litwhen activated).
SHIFT + button: loads a predefined FX(as set in Preferences > Traktor KontrolS4 > S4 Control Options > Direct FX1-3).
Activates/deactivates FX slot 1-3 (lit whenslot activated).
SHIFT + button: loads in this slot the nextFX from FX list (as set in Preferences > Ef-fects > FX Pre-Selection).
FX Mode button(MODE)
Normal: switches the FX Unit between Single mode and Group mode (lit whenGroup mode activated).
SHIFT: saves current settings as default settings (“snapshot”). These settings willthen be recalled the next time you load this FX, or by pressing the FX Button 1(Single mode only).
Assigning FX Units to Channels
The FX Units can be assigned to any number of channels in order to process the signals com-ing from the corresponding Decks. To do this, use the FX Assign buttons on the desired chan-nels. See section ↑5.4.3, The Channels and the Crossfader for more info.
You can activate two additional FX Units in the Preferences of TRAKTOR. Using four FXUnits instead of two implies a few changes in the FX routing scheme. Please refer to sec-tion ↑6.4.3, Using Four FX Units for more info.
5.6 The Loop Recorder
The Loop Recorder allows you to seamlessly record a piece of audio material coming from vari-ous sources and directly blend it into your mix. Furthermore, it allows you to record many lay-ers on the same loop (overdubbing).
Hardware ReferenceThe Loop Recorder
TRAKTOR KONTROL S4 - Manual - 124

The Loop Recorder on your S4
The recording source for the Loop Recorder can be selected via the Loop Recorder’s Sourcemenu in TRAKTOR. Please refer to the TRAKTOR 2 Manual for more info.
You will find in ↑11.4, FX Unit Quick Reference a Quick Reference table summing up thebasic functionality of each control element on the Loop Recorder.
5.6.1 DRY/WET Knob
The DRY/WET knob controls the mix between the main output of TRAKTOR KONTROL S4 andthe output of the Loop Recorder. As soon as some audio material recorded into the Loop Re-corder is played back, you can blend it into your main mix.
As long as the Loop Recorder is stopped (or empty), the DRY/WET knob is disabled. Hence,you don’t have to bother with the position of this knob as long as you’re not playing a loopon the Loop Recorder.
5.6.2 SIZE Button
The SIZE button allows you to define the size of the loop you plan to record.
Press SIZE repeatedly to select the desired loop size.
Hardware ReferenceThe Loop Recorder
TRAKTOR KONTROL S4 - Manual - 125

The selected loop size cannot be seen on your S4; for this, you have to look at the LoopRecorder in the TRAKTOR window on your computer screen.
5.6.3 REC Button
The REC button starts/stops recording a loop or additional overdub layers.
If no loop has been recorded yet, pressing the REC button starts recording a loop with a prede-fined size (previously selected via the SIZE button). The recording always starts on the nextbeat. As soon as the loop is recorded, it starts playing (at the level defined by the DRY/WETknob).
If a loop has already been recorded, pressing the REC button activates/deactivates overdub-bing. Overdubbing adds incremental layers on top of the recorded loop. Unlike the first record-ing, overdubbing starts right away instead of waiting for the next beat. Moreover, overdubbingstays engaged until you explicitly stop it by pressing REC again (possibly going on more thanone loop cycle). This allows you to add as many layers as you want to your original loop by re-peatedly activating/deactivating overdubbing.
Whatever the number and duration of the overdub layers, the size of the loop itself stays atthe predefined size of the first recording.
5.6.4 UNDO Button
The UNDO button allows you to delete the recorded loop or to undo/redo the last overdub layer:
When the Loop Recorder is stopped, pressing UNDO deletes the recorded loop and all itsoverdub layers, if any.
When the Loop Recorder is playing, pressing UNDO undoes the last overdub layer only.Pressing UNDO again redoes this last layer. This is useful if you don’t like the last layerthat you recorded. It can also be used for “punching” the last layer in and out during yourlive performance.
Hardware ReferenceThe Loop Recorder
TRAKTOR KONTROL S4 - Manual - 126

5.6.5 PLAY Button
The PLAY button starts/stops the playback of the Loop Recorder—provided of course thatsomething has been recorded into it. When playback is stopped, the playback position skipsback to the loop beginning.
Playback is also automatically triggered while overdubbing: the currently recorded material isplayed while a new layer is being recorded.
5.6.6 Copying and Saving the Recorded Loop
Once you have recorded a loop, you sure can leave it in the Loop Recorder and mix it with yourmain mix using the DRY/WET knob as described above. But you can also copy it to any freeslot on a Remix Deck and use all Sample-related features on your recorded loop.
To do this, use the Copy mode described in section ↑5.7.2, Copying across the S4.
5.7 Browsing, Loading and Copying
Your S4 offers various ways for finding tracks and Samples and loading them on to the desiredDecks or Sample Slots:
You can quickly load tracks and Samples from the currently selected Playlist or from yourFavorites.
You can browse the entire content of your Track Collection for tracks and Samples via theBrowse mode.
You can copy a Sample directly from the track loaded on the upper Deck.
You can copy a track or Sample from one location to another on your S4 via the Copymode.
You will find in ↑11.5, Loop Recorder Quick Reference a Quick Reference table summingup the basic functionality of each control element needed for browsing, loading and copy-ing.
Hardware ReferenceThe Loop Recorder
TRAKTOR KONTROL S4 - Manual - 127

5.7.1 Browsing Tracks and Samples
Quick Loading Tracks and Samples
You can quickly select tracks and Samples for loading via the BROWSE encoder, located at thetop of the Mixer:
The BROWSE encoder, at the top of the Mixer
1. Hold SHIFT and turn the BROWSE encoder to scroll through your Favorites.2. Turn the BROWSE encoder to scroll through the selected Playlist.You can see the items being scrolled in the TRAKTOR Browser:
Hardware ReferenceBrowsing, Loading and Copying
TRAKTOR KONTROL S4 - Manual - 128

By turning the BROWSE encoder, you scroll the Playlist that is currently selected.
For more info on the Browser, the Playlists and the Favorites, please refer to the TRAK-TOR 2 Manual.
At any time, you can load and pre-listen the selected item into the Preview Player by push-ing the BROWSE encoder (see below).
To load the selected track or Sample, press LOAD on the desired Deck:
If the focus is on a Remix Deck, the Sample will be loaded into the first empty SampleSlot. Only audio with a maximum length of 48 seconds can be loaded into Sample Slots.
For Samples, you can also press SHIFT + the Sample Play button of an empty Sample Slotto load the selected Sample into that Sample Slot. Please refer to section ↑5.3.9, SamplePlay Buttons for more info on this.
Hardware ReferenceBrowsing, Loading and Copying
TRAKTOR KONTROL S4 - Manual - 129

Pre-listening in the Preview Player
TRAKTOR KONTROL S4 allows you to pre-listen your tracks and Samples in the Preview Playerbefore you load them:
Push the BROWSE encoder to load the selected track/Sample into the Preview Player.You can see that something is loaded in the Preview Player via the lit Preview Play indi-cator in the Master Display (see section ↑5.4.4, The Master Display):
While a track or Sample is loaded into the Preview Player, the BROWSE encoder serves as seekcontrol. You can load this track or Sample as usual, depending on whether you are using QuickLoading (see above) or Browse mode (see below).
Pushing the BROWSE encoder while an item is loaded into the Preview Player unloads it fromthe Preview Player and re-assigns the BROWSE encoder to list browsing.
Using the Browse Mode
The Browse mode allows you to browse your entire Collection directly from your S4 controller.
To activate the Browse mode, press the BROWSE button in the middle of the Mixer:
When Browse mode is active, all available targets start flashing and act as load buttons: theHeadphones Cue buttons (CUE) on the Mixer for tracks, and the Sample Play buttons on theDecks for Samples.
Hardware ReferenceBrowsing, Loading and Copying
TRAKTOR KONTROL S4 - Manual - 130

Browse through your tracks and Samples by using the jog wheels and encoders as follows:
Action Function
BROWSE encoder As usual:
Turn: scrolls through the Playlist.
SHIFT + turn: scrolls through the Favorites.
Push: loads/unloads selected item in the Preview Player. When an itemis loaded into the Preview Player, turning BROWSE seeks through theloaded item.
Jog wheels Scrolls through the Playlist.
LOOP MOVE encoders Turn: scrolls through the Browser Tree.
Push: expands/collapses node in the Browser Tree.
LOOP SIZE encoders Turn: scrolls through the Favorites.
Press a flashing target to load the selected track or Sample.
After a target has been selected, the Browse mode stays active, allowing you to load items toother locations (Track Decks or Sample Slots).
When you are finished, press the BROWSE button again to deactivate the Browse mode.
While in Browse mode, you cannot control the Decks.
5.7.2 Copying across the S4
Direct Copy for Samples
You can directly export a Sample from the current track by pressing an unlit Sample Play but-ton (empty slot). Please refer to section ↑5.3.9, Sample Play Buttons for further information onthis.
Hardware ReferenceBrowsing, Loading and Copying
TRAKTOR KONTROL S4 - Manual - 131

Using the Copy Mode
The Copy mode allows you to copy a track or a Sample from one location to another on yourS4.
To activate Copy mode, press and hold the BROWSE button in the middle of the Mixer:
While the BROWSE button is held depressed, all available copy sources are flashing: the Head-phones Cue buttons (CUE) on the Mixer for tracks, the Sample Play buttons on the Decks forSamples, and the PLAY button in the Loop Recorder for the recorded loop (if any).
Press a source to select it.
→ The selected source stops flashing and remains continuously lit.
After a source has been selected, all potential targets start flashing: the Sample Play buttonson the Decks; the Headphones Cue buttons (CUE) on the Mixer.
If the Loop Recorder’s PLAY button is not selected as source, it stops flashing because itcannot be selected as target.
Press a target to select it.
→ The source is copied to the target.
Copying a track triggers a track duplicate so that the track is loaded on to the target Deckplaying from the same position as the source Deck.
After a target has been selected, sources start flashing again, in case you want to copy othersources to other targets.
When you are finished, release the BROWSE button to deactivate Copy mode.
Hardware ReferenceBrowsing, Loading and Copying
TRAKTOR KONTROL S4 - Manual - 132

5.8 The Rear Panel
This section describes all sockets and controls available on the rear panel of your TRAKTORKONTROL S4. Together with the front panel, it provides you with the necessary elements forusing other equipment with the TRAKTOR KONTROL S4 (headphones, microphone, turntable,etc.) and setting your system up.
The rear panel of the TRAKTOR KONTROL S4
(1) Kensington lock slot: Attach your Kensington lock here to protect your device againsttheft.
(2) Ground terminal: When using a turntable, attach its earth lead here.
(3) MAIN OUT section: Sockets for connecting the TRAKTOR KONTROL S4 to your mainmixer or amplification system. See section ↑5.8.1, MAIN OUT Section below.
(4) INPUT CHANNEL D section: See section ↑5.8.2, INPUT CHANNEL D Section below.
(5) INPUT CHANNEL C section: See section ↑5.8.3, INPUT CHANNEL C Section below.
(6) FOOTSWITCH socket: This port can be used to attach any type of foot switch. This footswitch can be used to trigger the record/overdub control of the Loop Recorder (see ↑5.6,The Loop Recorder for more info).
(7) MIDI IN/OUT sockets: Your TRAKTOR KONTROL S4 is also a MIDI interface. Connectyour external MIDI devices here.
(8) POWER section: See section ↑5.8.4, POWER Section below.
Hardware ReferenceThe Rear Panel
TRAKTOR KONTROL S4 - Manual - 133

5.8.1 MAIN OUT Section
The MAIN OUT section holds sockets for the main outputs of your TRAKTOR KONTROL S4controller.
The MAIN OUT section on the rear panel
(1) Main Outputs 1/2 RCA sockets (1/2): main outputs of TRAKTOR KONTROL S4 (line lev-el, unbalanced). Use these sockets to connect your TRAKTOR KONTROL S4 to an ampli-fication system (or master mixer) with unbalanced inputs.
(2) Main Outputs 1/2 1/4" sockets (1/2): main outputs of TRAKTOR KONTROL S4 (line lev-el, balanced). Use these sockets to connect your TRAKTOR KONTROL S4 to an amplifica-tion system (or master mixer) with balanced inputs.
5.8.2 INPUT CHANNEL D Section
The INPUT CHANNEL D section allows you to route external signals to the TRAKTOR software.
The INPUT CHANNEL D section on the rear panel
(1) Thru Gain knob (GAIN): Adjust here the input gain for the Thru mode (see below).
Hardware ReferenceThe Rear Panel
TRAKTOR KONTROL S4 - Manual - 134

(2) THRU/USB switch: Select here between Thru mode and USB mode. In Thru mode, In-puts 3/4 are additionally routed to the Main Outputs without going through TRAKTOR. InUSB mode, Inputs 3/4 are only routed to TRAKTOR.
(3) LINE/PHONO switch: Choose here the appropriate level (line or phono) for the sourceconnected at Inputs 3/4.
(4) Line/Phono Inputs 3/4 RCA sockets (IN 3/4): Connect here an external audio source(turntable, CD deck, etc.).
(5) Microphone Gain knob (GAIN): Adjust here the input gain for the connected microphone(see below).
(6) Microphone socket (MIC): Connect your microphone here. The Microphone input andthe Line/Phono 3/4 inputs are mutually exclusive: When you connect a microphone to theMIC socket, the IN 3/4 sockets are deactivated.
5.8.3 INPUT CHANNEL C Section
The INPUT CHANNEL C section allows you to route external signals to the TRAKTOR software.
The INPUT CHANNEL C section on the rear panel
(1) LINE/PHONO switch: Choose here the appropriate level (line or phono) for the sourceconnected at Inputs 1/2.
(2) Line/Phono Inputs 1/2 RCA sockets (IN 1/2): Connect here an external audio source(turntable, CD deck, etc.).
Hardware ReferenceThe Rear Panel
TRAKTOR KONTROL S4 - Manual - 135

5.8.4 POWER Section
The POWER section holds the sockets for the connection of your S4 to your computer and tothe power, along with the ON/OFF switch.
The POWER section on the rear panel
(1) USB socket: Connect here your S4 to your computer with the included USB cable.
(2) Power Supply connector: Connect here the power cord.
(3) ON/OFF switch: Engage the switch to turn on your device.
5.9 The Front Panel
This section describes all sockets and controls available on the front panel of your TRAKTORKONTROL S4. The front panel of your S4 holds the elements you might need during your mix.
The front panel of the TRAKTOR KONTROL S4
Hardware ReferenceThe Rear Panel
TRAKTOR KONTROL S4 - Manual - 136

(1) Headphones socket (PHONES): Cue channel stereo output (jack 1/4"). Connect yourheadphones here.
(2) Headphones Volume knob (CUE VOL): Adjusts the volume in your headphones.
(3) Headphones Mix knob (CUE MIX): Adjusts the mix between master output and cue chan-nel in your headphones.
(4) Microphone Volume knob (MIC VOL): Adjusts the AUX knob in TRAKTOR, typically usedfor the microphone plugged in the Microphone socket of the INPUT CHANNEL D on therear panel (see ↑5.8.2, INPUT CHANNEL D Section above).
All knobs on the front panel are retractable: by pushing them softly, you can hide themwithin the body of your controller to protect them against shocks during transport!
5.10 TRAKTOR KONTROL S4 Modes
Your TRAKTOR KONTROL S4 controller can be used in two modes: TRAKTOR mode and MIDImode.
5.10.1 Native Traktor Mode
This is the mode that you will be normally using with TRAKTOR, which gives you access to allthe features explained in this manual.
In Native Traktor mode, your TRAKTOR KONTROL S4 will communicate directly with TRAK-TOR over USB using the Native Instruments proprietary NHL protocol, which features high res-olution translation of the TRAKTOR KONTROL S4 knobs superior to MIDI.
5.10.2 MIDI Mode
The MIDI mode allows you to use your TRAKTOR KONTROL S4 as a normal MIDI controller.
In MIDI mode, the TRAKTOR KONTROL S4 will transmit only MIDI data via the virtual MIDIport that the TRAKTOR KONTROL S4 driver will provide to the host computer’s operating sys-tem.
Hardware ReferenceTRAKTOR KONTROL S4 Modes
TRAKTOR KONTROL S4 - Manual - 137

To switch your TRAKTOR KONTROL S4 between TRAKTOR mode and MIDI mode, holdSHIFT and press the BROWSE button.
Press SHIFT + BROWSE to switch between TRAKTOR mode and MIDI mode.
When your S4 is in MIDI Mode, the BROWSE button is lit.
To customize the S4’s MIDI properties, such as MIDI channel or CC numbers of its individualcontrols, Native Instruments has included the Controller Editor. The Controller Editor shouldhave been installed during the TRAKTOR KONTROL S4 installation procedure. If you cannotfind the Controller Editor on your computer, you can install it from the TRAKTOR KON-TROL S4 installation disc.
TRAKTOR mode and MIDI mode may be used simultaneously, for example you can controlTRAKTOR in TRAKTOR mode, then hold SHIFT and press BROWSE to switch to MIDImode to control other software or hardware over MIDI.
Hardware ReferenceTRAKTOR KONTROL S4 Modes
TRAKTOR KONTROL S4 - Manual - 138

For more information on how to use your TRAKTOR KONTROL S4 as a MIDI controller, pleaserefer to the Controller Editor Reference Manual, provided on the installation disc.
Hardware ReferenceTRAKTOR KONTROL S4 Modes
TRAKTOR KONTROL S4 - Manual - 139

6 Customizing TRAKTOR KONTROL S4
TRAKTOR KONTROL S4 is a highly customizable DJ system. Many of its features can be modi-fied so that it best suits your preferred way of DJing: customizable features include audio con-figuration, Decks, Mixer, transport controls, overall software layout, FX, Browser, file manage-ment, to mention a few.
Since the customization of TRAKTOR KONTROL S4 is not supposed to take place in a live sit-uation, these settings are found in the software only. This also ensures you against accidentalmodification of the settings while playing.
6.1 The Preferences Window
Most customization options in TRAKTOR KONTROL S4 occur in the Preferences window.
The Preferences button, at the top right of TRAKTOR's window
Click the Preferences button, located in the right part of the Header (at the very top ofTRAKTOR’s window) to open the Preferences of TRAKTOR.
Alternatively, you can select Preferences… in the File menu of the Application Menu Bar.
In the Preferences window, the settings are organized into various pages, each of them dealingwith a specific part of your system:
Customizing TRAKTOR KONTROL S4The Preferences Window
TRAKTOR KONTROL S4 - Manual - 140
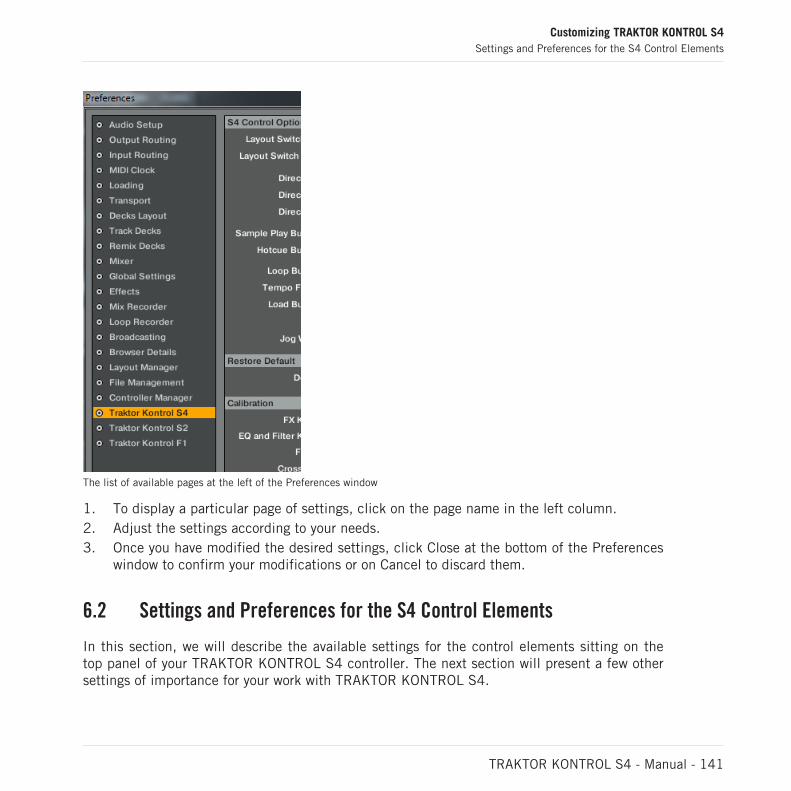
The list of available pages at the left of the Preferences window
1. To display a particular page of settings, click on the page name in the left column.2. Adjust the settings according to your needs.3. Once you have modified the desired settings, click Close at the bottom of the Preferences
window to confirm your modifications or on Cancel to discard them.
6.2 Settings and Preferences for the S4 Control Elements
In this section, we will describe the available settings for the control elements sitting on thetop panel of your TRAKTOR KONTROL S4 controller. The next section will present a few othersettings of importance for your work with TRAKTOR KONTROL S4.
Customizing TRAKTOR KONTROL S4Settings and Preferences for the S4 Control Elements
TRAKTOR KONTROL S4 - Manual - 141

For a detailed description of all settings available in the Preferences window, please referto the TRAKTOR 2 Manual.
In the Preferences window, the settings for the S4 have their dedicated page, judiciouslycalled Traktor Kontrol S4.
In the Preferences window, click Traktor Kontrol S4 at the bottom of the left column todisplay the page of settings for your TRAKTOR KONTROL S4 controller.
The settings for your TRAKTOR KONTROL S4 controller in the TRAKTOR Preferences.
Customizing TRAKTOR KONTROL S4Settings and Preferences for the S4 Control Elements
TRAKTOR KONTROL S4 - Manual - 142
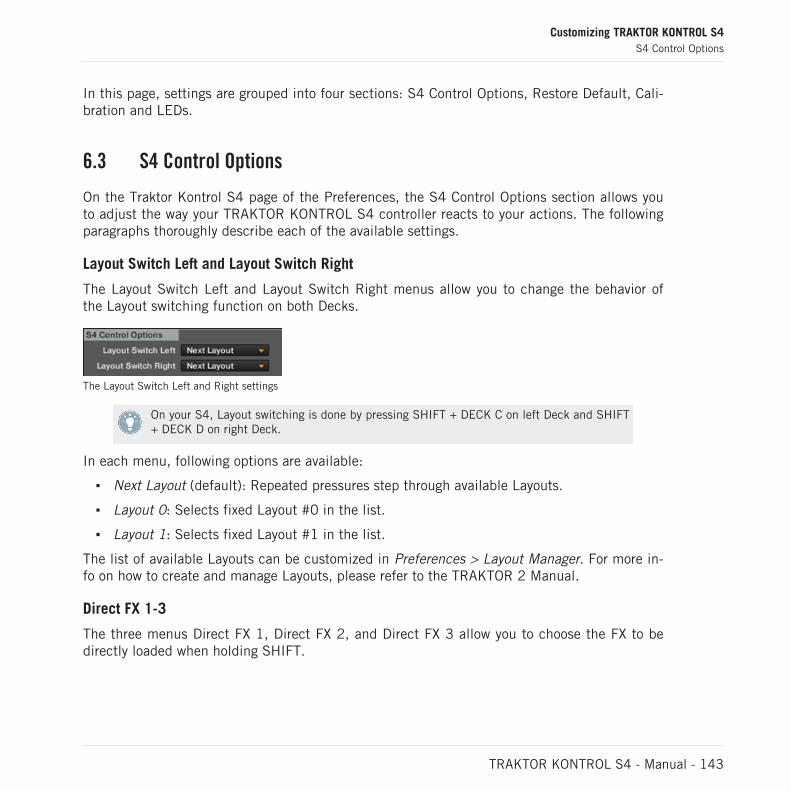
In this page, settings are grouped into four sections: S4 Control Options, Restore Default, Cali-bration and LEDs.
6.3 S4 Control Options
On the Traktor Kontrol S4 page of the Preferences, the S4 Control Options section allows youto adjust the way your TRAKTOR KONTROL S4 controller reacts to your actions. The followingparagraphs thoroughly describe each of the available settings.
Layout Switch Left and Layout Switch Right
The Layout Switch Left and Layout Switch Right menus allow you to change the behavior ofthe Layout switching function on both Decks.
The Layout Switch Left and Right settings
On your S4, Layout switching is done by pressing SHIFT + DECK C on left Deck and SHIFT+ DECK D on right Deck.
In each menu, following options are available:
Next Layout (default): Repeated pressures step through available Layouts.
Layout 0: Selects fixed Layout #0 in the list.
Layout 1: Selects fixed Layout #1 in the list.
The list of available Layouts can be customized in Preferences > Layout Manager. For more in-fo on how to create and manage Layouts, please refer to the TRAKTOR 2 Manual.
Direct FX 1-3
The three menus Direct FX 1, Direct FX 2, and Direct FX 3 allow you to choose the FX to bedirectly loaded when holding SHIFT.
Customizing TRAKTOR KONTROL S4S4 Control Options
TRAKTOR KONTROL S4 - Manual - 143
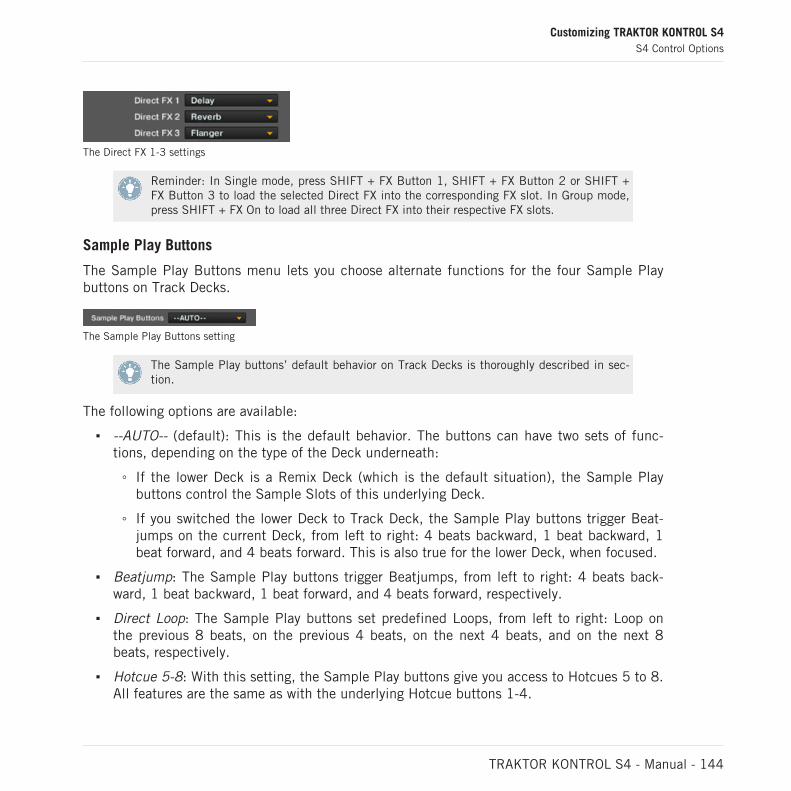
The Direct FX 1-3 settings
Reminder: In Single mode, press SHIFT + FX Button 1, SHIFT + FX Button 2 or SHIFT +FX Button 3 to load the selected Direct FX into the corresponding FX slot. In Group mode,press SHIFT + FX On to load all three Direct FX into their respective FX slots.
Sample Play Buttons
The Sample Play Buttons menu lets you choose alternate functions for the four Sample Playbuttons on Track Decks.
The Sample Play Buttons setting
The Sample Play buttons’ default behavior on Track Decks is thoroughly described in sec-tion.
The following options are available:
--AUTO-- (default): This is the default behavior. The buttons can have two sets of func-tions, depending on the type of the Deck underneath:
If the lower Deck is a Remix Deck (which is the default situation), the Sample Playbuttons control the Sample Slots of this underlying Deck.
If you switched the lower Deck to Track Deck, the Sample Play buttons trigger Beat-jumps on the current Deck, from left to right: 4 beats backward, 1 beat backward, 1beat forward, and 4 beats forward. This is also true for the lower Deck, when focused.
Beatjump: The Sample Play buttons trigger Beatjumps, from left to right: 4 beats back-ward, 1 beat backward, 1 beat forward, and 4 beats forward, respectively.
Direct Loop: The Sample Play buttons set predefined Loops, from left to right: Loop onthe previous 8 beats, on the previous 4 beats, on the next 4 beats, and on the next 8beats, respectively.
Hotcue 5-8: With this setting, the Sample Play buttons give you access to Hotcues 5 to 8.All features are the same as with the underlying Hotcue buttons 1-4.
Customizing TRAKTOR KONTROL S4S4 Control Options
TRAKTOR KONTROL S4 - Manual - 144

Hotcue Buttons
The Hotcue Buttons menu lets you choose between a Legacy mode, where the Hotcue buttonsbehave as with TRAKTOR's former Sample Decks, and a Remix mode, where there was newfunctionality added to control TRAKTOR's Remix Decks.
This setting is only relevant in a Remix Deck context, i.e., when the Deck is set to control aRemix Deck.
The Hotcue Buttons menu
The following options are available:
Legacy Mode (default): In Legacy mode, when pressing SHIFT + a Hotcue button, thecontroller will activate Edit mode for a Sample Slot, where the LOOP MOVE encoder andthe LOOP SIZE encoder control the filter and volume controls of one or multiple SampleSlots. Pressing SHIFT + Hotcue button again will deactivate Edit mode for the relevantSample Slot.
Remix Mode: In Remix mode, pressing SHIFT + a Hotcue button will select the next Sam-ple Cell in a Sample Slot.
Loop Buttons
The Loop Buttons setting lets you choose alternate functions for the LOOP IN and LOOP OUTbuttons on Track Decks.
The Loop Buttons setting
The Loop section allows you to manipulate Loops in your track.
Following options are available:
Manual Looping (default): When this option is selected, the buttons have manual loopingfunctions:
When no Loop is active, the LOOP IN button sets a Floating Cue Point, whereas theLOOP OUT button sets a Loop Out Point and activates a Floating Loop between theFloating Cue Point (acting as Loop In Point) and this Loop Out Point.
Customizing TRAKTOR KONTROL S4S4 Control Options
TRAKTOR KONTROL S4 - Manual - 145

When a Loop is active, holding one of these buttons while spinning the jog wheel al-lows you to move the corresponding Loop In Point or Loop Out Point.
Auto Loop: When this option is selected, the buttons have auto looping functions:
When no Loop is active, the LOOP IN and LOOP OUT buttons set and activate a 4-beat and an 8-beat Floating Loop, respectively.
When a Loop is active, the LOOP IN button halves the Loop’s size while the LOOPOUT button doubles it.
Tempo Faders
The Tempo Faders setting allows you to switch the TEMPO faders between Absolute mode andRelative mode.
The Tempo Faders setting
Absolute (default): The tempo fader in the software Deck directly mirrors the TEMPO fad-er position on your S4.
Relative: The TEMPO fader on your S4 affects the tempo fader on the software Deck rela-tively to its current position, even if this position does not match the position of the TEM-PO fader on your hardware. This has the benefit of solving all possible offset-related is-sues occurring when you change the software Deck’s tempo by any other means (e.g. syn-chronizing the Deck to another tempo, switching the Deck focus, or moving the tempofader in the software):
There is no more risk of any tempo jump when you touch the TEMPO fader.
The Tempo Offset buttons have the same functionality as in Absolute mode (indicat-ing any offset between software and hardware faders, among other things). Additional-ly, they allow you to shift the range of the TEMPO fader: pressing a Tempo Offset but-ton when both are unlit moves the range down/up by half range (e.g. by 6 % for thedefault range ±6 %). The tempo fader in the software Deck jumps accordingly.
Like in Absolute mode, you can move the handle of the TEMPO fader to another posi-tion without altering the software Deck’s tempo by holding SHIFT depressed whilemoving the fader. This is not only useful to cover the whole range of the tempo faderin the software (should there be any offset between hardware and software faders), but
Customizing TRAKTOR KONTROL S4S4 Control Options
TRAKTOR KONTROL S4 - Manual - 146

it also allows you to go beyond this range and change the Deck tempo within ±100 %while preserving the current fader accuracy (as defined by the range set in Preferen-ces > Transport > Tempo). Obviously, beyond the range of the software tempo fader,this fader does not represent the Deck tempo anymore. By moving the software faderwith your mouse, though, the Deck tempo jumps back to the software fader position.
Load Buttons
The Load Buttons setting allows you to choose an alternate function for the LOAD buttons onyour Decks.
The Load Buttons setting
Following options are available:
Load Track (default): Pressing LOAD loads the selected track on the Deck when usingQuick Loading; pressing SHIFT + LOAD unloads the track from the Deck.
Jog Mode: Pressing LOAD activates/deactivates a special Jog mode for the jog wheel. Youcan choose from two different Jog modes in the underlying Jog Mode Select menu:
FX: The jog wheel controls the FX parameter 3 in Hold mode in the FX Unit rightabove: when releasing the jog wheel, the parameter snaps back to its previous value.
Filter: The jog wheel controls the channel’s FILTER knob in Hold mode: when releas-ing the jog wheel, the filter snaps back to its previous value.
FX: The jog wheel controls the FX parameter 3 in Hold mode in the FX Unit right above: when releasing the jog wheel, theparameter snaps back to its previous value.
If a Jog mode is activated, you can still load a track on the Deck by pressing SHIFT +LOAD (of course, you can also load tracks via the Browse mode).
Customizing TRAKTOR KONTROL S4S4 Control Options
TRAKTOR KONTROL S4 - Manual - 147

Jog Wheel
The Disable Jog Wheel Push option will defeat the touch-sensitivity of the KONTROL S4 jogwheels when checked. If this option is checked, you will not be able to perform normalscratching techniques because TRAKTOR will no longer check if you’re pressing the jog wheelor not. The wheel will then behave as a pitch bend at all times (like when rotating the wheelfrom its outside edge).
By default, this option is unchecked.
6.3.1 Restore Default
The Restore Default section holds only one element: the Restore button.
The Restore button
This button recalls all default factory settings for TRAKTOR KONTROL S4 and lets you chooseits basic Deck configuration via the Setup Wizard.
To carry out the restoration procedure, do the following:
1. Click the Restore button. The following message appears:
2. Upon confirmation, the default control settings and audio routing is set accordingly. Youare now ready to start again with a fresh TRAKTOR KONTROL S4.
Customizing TRAKTOR KONTROL S4S4 Control Options
TRAKTOR KONTROL S4 - Manual - 148

6.3.2 Calibration
The Calibration section allows you to perform the calibration for various knobs, faders, and jogwheels on your S4 in order to correct potential inaccuracies of both center position (for theknobs) and range of the control elements.
The Calibration section
The calibration can be done separately for four groups of control elements, each of them pro-posing its own Recalibrate button:
FX Knobs: for recalibrating the FX DRY/WET knob and FX Knobs 1-3 on both FX Units.
EQ and Filter Knobs: for recalibrating EQ’s and FILTER knobs on all channels of the Mix-er.
Faders: for recalibrating the TEMPO and channel faders.
Crossfader: for recalibrating the crossfader on the Mixer.
Jogwheel: for calibrating the touch-sensitivity of the jog wheels. The left and right wheelsare calibrated independently. For more information on the manual calibration routine,please refer to the separate Jog Wheel Calibration guide from the Traktor 2 documentationfolder.
6.4 Other Settings of Interest
This section describes a few other settings of the TRAKTOR Preferences that affect the wayyour TRAKTOR KONTROL S4 reacts.
Customizing TRAKTOR KONTROL S4S4 Control Options
TRAKTOR KONTROL S4 - Manual - 149
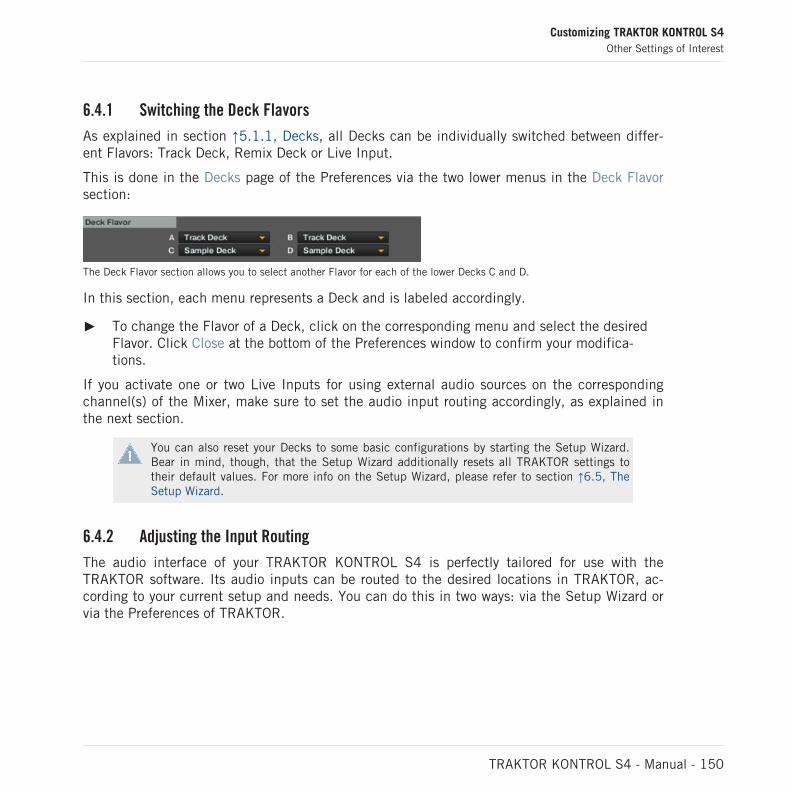
6.4.1 Switching the Deck Flavors
As explained in section ↑5.1.1, Decks, all Decks can be individually switched between differ-ent Flavors: Track Deck, Remix Deck or Live Input.
This is done in the Decks page of the Preferences via the two lower menus in the Deck Flavorsection:
The Deck Flavor section allows you to select another Flavor for each of the lower Decks C and D.
In this section, each menu represents a Deck and is labeled accordingly.
To change the Flavor of a Deck, click on the corresponding menu and select the desiredFlavor. Click Close at the bottom of the Preferences window to confirm your modifica-tions.
If you activate one or two Live Inputs for using external audio sources on the correspondingchannel(s) of the Mixer, make sure to set the audio input routing accordingly, as explained inthe next section.
You can also reset your Decks to some basic configurations by starting the Setup Wizard.Bear in mind, though, that the Setup Wizard additionally resets all TRAKTOR settings totheir default values. For more info on the Setup Wizard, please refer to section ↑6.5, TheSetup Wizard.
6.4.2 Adjusting the Input Routing
The audio interface of your TRAKTOR KONTROL S4 is perfectly tailored for use with theTRAKTOR software. Its audio inputs can be routed to the desired locations in TRAKTOR, ac-cording to your current setup and needs. You can do this in two ways: via the Setup Wizard orvia the Preferences of TRAKTOR.
Customizing TRAKTOR KONTROL S4Other Settings of Interest
TRAKTOR KONTROL S4 - Manual - 150

Using the Setup Wizard
When setting up TRAKTOR KONTROL S4, the easiest way is to start the Setup Wizard. Thisallows you to choose from a set of basic Deck configurations and to forget about any audiorouting settings—these will be automatically configured according to the selected Deck config-uration!
Bear in mind, though, that the Setup Wizard additionally resets all TRAKTOR settings totheir default values. For more info on the Setup Wizard, please refer to section ↑6.5, TheSetup Wizard.
Using the Preferences
In some circumstances, you might prefer to manually set the correct routing for incoming au-dio signals in TRAKTOR depending on your specific needs. This is notably the case in the fol-lowing situations:
You already customized TRAKTOR and don’t want to lose all your particular settings.
Your desired configuration is not proposed by the Setup Wizard.
You can directly configure the audio routing options via the Input Routing page of the Prefer-ences:
Customizing TRAKTOR KONTROL S4Other Settings of Interest
TRAKTOR KONTROL S4 - Manual - 151

Input Routing page in the Preferences panel
In this page, you can choose the physical inputs to be used for each virtual input channel inTRAKTOR.
For example, let’s say that you are currently using the default Deck configuration (two TrackDecks and two Remix Decks) and want to use an external audio source plugged on channel D.Here is the way to go:
1. In Preferences > Decks > Deck Flavor, select Live Input in the D menu (as described insection ↑6.4.1, Switching the Deck Flavors above).
2. In Preferences > Input Routing > Input Channel D, select 3: In: Ch D left and 4: In: Ch Dright in the L (Mono) and R menu, respectively:
Customizing TRAKTOR KONTROL S4Other Settings of Interest
TRAKTOR KONTROL S4 - Manual - 152

3. Click Close at the bottom of the window to confirm your modifications.
→ Your external audio source is now sent to Deck D, which acts as Live Input and forwardsthe signal to channel D on the Mixer.
6.4.3 Using Four FX Units
TRAKTOR KONTROL S4 provides you with a total of four FX Units. By default, the first two FXUnits are activated. You can activate the other two FX Units in the Effects page of the Prefer-ences via the FX Unit Selector in the FX Unit Routing section:
The FX Unit Selector in the FX Unit Routing section
To activate all four FX Units, click 4 FX Units in the FX Unit Selector.
4-FX Routing Scheme
With the four FX Units 1-4 activated, channels are differently routed to the FX Units. Eachchannel and its dedicated Deck have their own FX Unit: FX Unit 1, 2, 3, and 4 are assigned tochannel (and Deck) A, B, C, and D, respectively. This routing cannot be changed, only activat-ed/deactivated.
Controlling Four FX Units from your S4
When the four FX Units 1-4 are activated in TRAKTOR, the FX Units on your S4 follow the Deckfocus of the Decks underneath:
Depending on whether the left Deck focus is on Deck A or C, FX Unit 1 on your S4 isassigned to FX Unit 1 or 3 in TRAKTOR, respectively.
Depending on whether the right Deck focus is on Deck B or D, FX Unit 2 on your S4 isassigned to the FX Unit 2 or 4 in TRAKTOR, respectively.
This way, each FX Unit on your S4 always controls the software FX Unit needed for the Deck infocus below.
Customizing TRAKTOR KONTROL S4Other Settings of Interest
TRAKTOR KONTROL S4 - Manual - 153

Due to the different FX routing scheme, the FX Assign buttons work differently:
FX Assign button Function with four FX Units
FX Assign 1 Channel A: Assigns the channel to FX Unit 1.
Channel B: unused.
Channel C: Assigns the channel to FX Unit 3.
Channel D: unused.
FX Assign 2 Channel A: unused.
Channel B: Assigns the channel to FX Unit 2.
Channel C: unused.
Channel D: Assigns the channel to FX Unit 4.
For more info on the FX Assign buttons, please refer to section ↑5.4.3, The Channels andthe Crossfader.
Note that if you switched a Deck to Live Input, it cannot be focused from your S4 (see↑5.3.1, Deck Flavors and Structure). Hence, with four FX Units activated, you cannot ac-cess the Live Input’s dedicated FX Unit from your S4. Of course, you can still control thisFX Unit in the software.
6.5 The Setup Wizard
The Setup Wizard lets you configure TRAKTOR in a few simple steps. It also is a convenientway to restart with a fresh out-of-the-box setup. The Setup Wizard does two things:
It lets you choose from a few basic audio, MIDI, and general setup configurations and au-tomatically sets the available options accordingly.
It resets all other TRAKTOR settings to their default values.
You can start the Setup Wizard in two ways:
Customizing TRAKTOR KONTROL S4The Setup Wizard
TRAKTOR KONTROL S4 - Manual - 154

Select Start Setup Wizard in the Help menu of the Application Menu Bar (to see this bar,Fullscreen mode must be deactivated).
Or click the Setup Wizard button at the bottom left corner of the Preferences window.
Setup Wizard Walk-through
Let's walk you through the S4 configuration using the Setup Wizard:
Customizing TRAKTOR KONTROL S4The Setup Wizard
TRAKTOR KONTROL S4 - Manual - 155

1. On the welcome screen, click Next to confirm you have connected TRAKTOR KON-TROL S4 to your computer via USB.
Customizing TRAKTOR KONTROL S4The Setup Wizard
TRAKTOR KONTROL S4 - Manual - 156

2. The Wizard asks whether you want to use TRAKTOR with a MIDI controller. Select Nohere as TRAKTOR is already pre-configured for use with the S4.
Customizing TRAKTOR KONTROL S4The Setup Wizard
TRAKTOR KONTROL S4 - Manual - 157

3. The Wizard asks whether you want to use an external DJ mixer in your setup. Select Yesand confirm with Next. In case of TRAKTOR SCRATCH PRO, this screen is skipped andexternal mixing is auto-selected.
Customizing TRAKTOR KONTROL S4The Setup Wizard
TRAKTOR KONTROL S4 - Manual - 158

4. Select a basic setup for your Decks (how many Decks and what Deck Flavors to use). Se-lect 2 Track Decks + 2 Remix Decks from the drop-down menu and confirm with Next.
5. The last screen of the Setup Wizard sums up your selection of options: four Decks (twoTrack Decks and two Remix Decks); an external DJ mixer; your TRAKTOR KONTROL S4controller; the keyboard layout (derived from the system settings).You can click Back tochange the settings made, Cancel to cancel the Setup Wizard completely, or Finish,which confirms your selections.
Customizing TRAKTOR KONTROL S4The Setup Wizard
TRAKTOR KONTROL S4 - Manual - 159

→ TRAKTOR starts with the selected settings and a matching interface layout, e.g., if youselected to use an external DJ mixer, TRAKTOR's software mixer will be hidden. You canalways change the Layout of the user interface with the Layout selection menu in TRAK-TOR's header.
To change the Deck Flavors, click on the Deck letter in a Deck's upper right corner andselect a Flavor from the drop-down menu:
Customizing TRAKTOR KONTROL S4The Setup Wizard
TRAKTOR KONTROL S4 - Manual - 160

7 The S4 Audio Interface and Control Panel
Your TRAKTOR KONTROL S4 is equipped with a high-end 24-bit/96 kHz audio interface. Youcan adjust the audio interface settings to your needs and computer performance.
Depending on whether you work on Windows or Mac OS X, you can adjust these settings in dif-ferent ways.
7.1 Settings on Mac OS X
On Mac OS X, you can adjust the settings for the S4 audio interface from within each musicapplication. In TRAKTOR:
Open Preferences > Audio Setup to access the settings for the S4 audio interface.
There, you can adjust the audio interface settings of the TRAKTOR KONTROL S4. You havetwo settings:
Sample Rate: Choose a sample rate that is compatible with your music application andsuited to your computing power. A higher sample rate improves the audio quality, but alsocauses higher CPU load. Per default, the sample rate is set to 44100 Hz (CD quality).
The sample rate defines how many samples are played/recorded per one second of sound.A higher sample rate results in higher audio quality; however, 44100 Hz (as used for re-cording audio CDs) is a common setting and absolutely sufficient for most tasks. If your fi-nal destination is CD you should use this setting or a multiple of it (88200 Hz). For a bet-ter understanding: 48000 Hz is used by DAT recorders, and for DVD (films) recording.96000 Hz is typical for DVD, HD DVD, and Blue-ray Disc audio recording. You should beaware that a higher sample rate also causes higher CPU load.
Latency: Lower the latency value for a quicker response of your computer to TRAKTORcontroller and software actions.
The S4 Audio Interface and Control PanelSettings on Mac OS X
TRAKTOR KONTROL S4 - Manual - 161

When converting audio information to digital and vice versa, the audio driver needs to storethe data in buffer packages (audio buffers) which are then sent to and processed by theCPU. The higher the buffer size, the longer it takes for a signal to finally arrive at the out-put as audio. You might experience this as late response in between hitting a key on a con-troller which controls music software on your computer, and hearing sound at the output.This delay is called latency. You should start off with a higher latency value, and graduallydecrease it until you find the perfect balance between playability and audio quality for yoursystem. If you experience crackling at the audio output, the latency value is very likely tobe too low for your computer’s CPU to cope with, as lower latency values cause a higherload on the CPU.
7.2 Settings on Windows: The Control Panel
On Windows, the settings for the TRAKTOR KONTROL S4 audio interface are accessed via alittle tool called Traktor Kontrol S4 Control Panel. The Control Panel was installed togetherwith the drivers for your S4 controller during the TRAKTOR KONTROL S4 installation proce-dure.
This section describes the Traktor Kontrol S4 Control Panel user interface.
7.2.1 Opening the Control Panel
You can open the Control Panel in various ways:
From within TRAKTOR: Go to Preferences > Audio Setup and click the Settings button,located at the right of the Latency slider and display:
From your desktop: Go to Start > Programs > Native Instruments > Traktor Kontrol S4Driver > Traktor Kontrol S4 Control Panel.
The S4 Audio Interface and Control PanelSettings on Windows: The Control Panel
TRAKTOR KONTROL S4 - Manual - 162

If you cannot find the Control Panel, the driver is most likely not installed at all. In thiscase, please re-install the driver as described in the separate Setup Guide.
Here is what you get when opening the Control Panel:
The Control Panel
On the left side, you find two tabs: Audio Settings and Diagnostics.
Click on the tabs at the left to open the corresponding page of the Control Panel.
7.2.2 Audio Settings Page
The Audio Settings page allows you to adjust the settings of the audio interface.
The S4 Audio Interface and Control PanelSettings on Windows: The Control Panel
TRAKTOR KONTROL S4 - Manual - 163

The Control Panel with Audio Settings page opened
The Audio Settings page consists of two sections:
Audio Processing: settings for the analog-to-digital/digital-to-analog conversion done byyour audio interface.
Device Monitor: displays information about the audio interface's processing status andyour system's output latency.
Audio Processing Section
The Audio Processing section holds two menus and one display:
Sample Rate: Choose a sample rate that is compatible with your music application andsuited to your computing power. A higher sample rate improves the audio quality, but alsocauses higher CPU load. By default, the sample rate is set to 44100 Hz (CD quality).
The sample rate defines how many samples are played/recorded per one second of sound.A higher sample rate results in higher audio quality; however, 44100 Hz (as used for re-cording audio CDs) is a common setting and absolutely sufficient for most tasks. If your fi-nal destination is CD you should use this setting or a multiple of it (88200 Hz). For a bet-ter understanding: 48000 Hz is used by DAT recorders, and for DVD (films) recording.96000 Hz is typical for DVD, HD DVD, and Blue-ray Disc audio recording. You should beaware that a higher sample rate also causes higher CPU load.
The S4 Audio Interface and Control PanelSettings on Windows: The Control Panel
TRAKTOR KONTROL S4 - Manual - 164

Process Buffer: Lower the buffer size value for a quicker response of your computer toTRAKTOR controller and software actions.
When converting audio information to digital and vice versa, the audio driver needs to storethe data in buffer packages (audio buffers) which are then sent to and processed by theCPU. The higher the buffer size, the longer it takes for a signal to finally arrive at the out-put as audio. You might experience this as late response in between hitting a key on a con-troller which controls music software on your computer, and hearing sound at the output.This delay is called latency. A rule of thumb is: lower buffer size results in lower latency.However, there are more factors to latency than buffer size alone (e.g., CPU speed andRAM size). You should start off with a higher buffer size setting, and gradually decrease thevalue until you find the perfect balance between playability and audio quality for your sys-tem. If you experience crackling at the audio output, the buffer size is very likely to be toolow for your computer’s CPU to cope with, as lower buffer size causes higher CPU load.
USB Buffer: Use this menu in case you cannot achieve satisfactory Latency settings withthe Process Buffer menu. Lower the USB buffer size for smaller USB buffer packaging,which should further reduce the audible latency. If you notice any audio interruptions, youshould raise the buffer size until you have a clear sound, free of dropouts.
Device Monitor Section
The Device Monitor section holds two displays:
Processing State: The processing state monitor provides feedback on the current status ofthe device. There are three possible status messages:
Idle: controller is connected, but no audio data is being streamed.
Streaming: driver is working and processing audio data.
Panic: driver stopped streaming. Too many USB I/O errors occurred in the interfacecommunication.
Output Latency: displays your system’s output latency in milliseconds.
Notice there is also an input latency when working with the TRAKTOR KONTROL S4. Theoutput latency value does not represent the overall latency, from pressing a button on thecontroller to hearing the resulting effect at the output. The overall latency is about twice aslong as the output latency.
The S4 Audio Interface and Control PanelSettings on Windows: The Control Panel
TRAKTOR KONTROL S4 - Manual - 165

7.2.3 Diagnostics Page
The Diagnostics page allows for monitoring the controller’s performance and for detecting er-rors.
The Control Panel with Diagnostics page opened
The information provided in the Diagnostics page might be more of interest to advanced users;however, in case of problems, you should always have a look at this page.
The Diagnostics page consists of three sections:
Drop-Out Detection: displays USB I/O errors and buffer underruns when detected.
Connection Monitor: displays client-to-driver connections and USB data errors when de-tected.
Information: displays information on driver and firmware version. There is also a link tothe Troubleshooting Guide here.
The S4 Audio Interface and Control PanelSettings on Windows: The Control Panel
TRAKTOR KONTROL S4 - Manual - 166

Drop-Out Detection Section
The Drop-Out Detection section holds two displays and a button:
USB I/O Errors: counts USB input/output errors. A high USB I/O Errors count points toyour system being overloaded.
Buffer Underruns: Buffer underruns occur when your computer isn’t able to process anaudio buffer in time. Reasons for underruns can be too many ongoing background tasks orhigh CPU usage within a music program that uses the device as audio driver.
Reset: A click on this button resets the error count.
Connection Monitor Section
The Connection Monitor section holds two displays and a button:
Number of Clients: displays the number of clients connected to the interface. MultipleASIO applications are counted separately, WDM and WASAPI increase the number byone, no matter how many WDM/WASAPI applications play audio.
USB Data Errors: counts USB data errors. Poor quality or long cables as well as irradiationcan be the source of data errors on the USB bus.
Reset: A click on this button resets the error count.
Information Section
The Information section holds two displays and a button:
Driver Version: See the currently installed driver version here.
Firmware Version: See the currently installed firmware version here.
Troubleshooting Guide: Click Show to open the Troubleshooting Guide.
7.3 Using the S4 Audio Interface with Other Music Applications
The use of the S4’s on-board audio interface is not limited to the TRAKTOR KONTROL S4 sys-tem: you can use it with any other music applications installed on your computer. To do this,you need to configure your music applications accordingly: most of the time, you will find a
The S4 Audio Interface and Control PanelUsing the S4 Audio Interface with Other Music Applications
TRAKTOR KONTROL S4 - Manual - 167

setting in the options or preferences of your music applications allowing you to select theTRAKTOR KONTROL S4 as audio interface. For more info, please refer to the documentationof your music applications.
7.4 Using the S4 as your Default Audio Interface
If you want to use the TRAKTOR KONTROL S4 for playback of all audio applications on yourcomputer (not only for music software), you have to set it as your default audio interface.
7.4.1 Windows XP
For Windows XP, you can define the TRAKTOR KONTROL S4 as your default audio interface asfollows:
1. Open Start > Control Panel > Sounds and Audio Devices.2. Select the Audio tab.3. In the Sound playback and Sound recording sections, click the Default Device menu, and
then select Traktor Kontrol S4.4. Click OK to close the Sounds and Audio Devices dialog.
7.4.2 Windows Vista and 7
For Windows Vista and 7, you can define the TRAKTOR KONTROL S4 as your default audiointerface as follows:
1. Open Start > Control Panel > Hardware and Sound > Sound.2. Select the Playback tab.3. In the device list, select Traktor Kontrol S4 and click Set Default.4. Select the Recording tab.5. In the device list, select Traktor Kontrol S4 and click Set Default.6. Click OK to close the dialog.
7.4.3 Mac OS X
For Mac OS X, you can define the TRAKTOR KONTROL S4 as your default audio interface asfollows:
The S4 Audio Interface and Control PanelUsing the S4 as your Default Audio Interface
TRAKTOR KONTROL S4 - Manual - 168

1. From the Apple menu, select System Preferences.2. In the panel that opens, click Sound.3. On the Sound Effects tab, select Traktor Kontrol S4 in the Play alerts and sound effects
through menu.4. Click the Output tab, and select Traktor Kontrol S4 from the Choose a device for sound
output list.5. Click the Input tab, and select Traktor Kontrol S4 from the Choose a device for sound in-
put list.6. Close the window to confirm your changes.
The S4 Audio Interface and Control PanelUsing the S4 as your Default Audio Interface
TRAKTOR KONTROL S4 - Manual - 169

8 Troubleshooting and Help
This chapter covers the most common issues. Most of what can go wrong when setting up andusing TRAKTOR KONTROL S4 should be listed here along with some tried-and-tested ways tosolve these issues.
8.1 TRAKTOR Won’t Start
1. Check the system requirements for TRAKTOR KONTROL S4. The minimum requirementsare the very least you can get by with, and are often not enough for advanced use (i.e.Keylock, FX). Increasing your RAM may save you a lot of trouble.
2. Make sure you have the most recent TRAKTOR version installed.3. Make sure that you have not clicked an outdated application alias/shortcut.4. Try to restart your computer. Disconnect any other audio interfaces and computer periph-
erals like printers, scanners, and the like.5. Try to rename the file collection.nml in the TRAKTOR 2 Root folder to restart TRAKTOR
with a clean Collection, and then re-import the renamed Collection. For more info on theRoot folder, please refer to the TRAKTOR 2 Manual.
8.2 Hardware-related Problems
This section lists the points that you shall check when something seems to be wrong with yourTRAKTOR KONTROL S4 controller.
8.2.1 Basics
This might sound obvious, but the first things to check are following:
Make sure that the TRAKTOR KONTROL S4 is connected to the computer via the includ-ed USB cable.
Check that the controller is turned on (ON/OFF switch on the rear panel must be engag-ed).
Troubleshooting and HelpTRAKTOR Won’t Start
TRAKTOR KONTROL S4 - Manual - 170

8.2.2 USB and Driver Issues
Once your TRAKTOR KONTROL S4 is connected and turned on, wait a few seconds and give alook at the USB indicator located in the Master Display, in the middle of your device:
The USB indicator in the Master Display
If the USB indicator is flashing, there is no connection to the computer or there is a problemwith the driver. Please check the following points:
The TRAKTOR KONTROL S4 is a USB 2.0 device and will not work on a USB 1.0/1.1port.
A bad USB cable can be responsible for connectivity problems. Try using a different cablebearing the official USB logo, in some cases using a shorter cable might help.
Check that the driver is correctly installed. You can do this for example by looking for theTRAKTOR KONTROL S4 Control Panel (see ↑7.2.1, Opening the Control Panel for moreinfo). If you cannot find the Control Panel, the driver is most likely not installed at all. Inthis case, please re-install the driver from the TRAKTOR KONTROL S4 installation disc asdescribed in the separate Setup Guide.
Driver Installation Note in Windows
As any other USB device, the driver installs exactly for one USB port. If you connect the TRAK-TOR KONTROL S4 to another port, a standard Windows dialog opens in which you can installthe driver to that port.
If you have previously installed the driver on your computer once, Windows will find theright drivers itself.
If you did not install the drivers on your computer, Windows will install the wrong drivers.Please disconnect the TRAKTOR KONTROL S4 and follow the installation procedure de-scribed in the separate Setup Guide.
Troubleshooting and HelpHardware-related Problems
TRAKTOR KONTROL S4 - Manual - 171

If you do not know whether or not you have previously installed the drivers of the TRAK-TOR KONTROL S4 to your computer, it is advisable to start again the stand-alone installa-tion (setup) program of the TRAKTOR KONTROL S4 available on the TRAKTOR KON-TROL S4 installation disc. If the setup program states that it will first uninstall the driv-ers, you already have installed the drivers on your computer! In this case you can connectthe device to any other USB port, and Windows will find the right driver for it.
8.2.3 Update the Driver
Check NI Service Center regularly for driver updates.
8.2.4 USB-related Power Issues
We strongly recommend you to use an external power supply with your S4 via the includedpower supply unit. Although operation is also possible when your S4 is powered via the USBconnection, you then have following limitations: the headphones output level is lower, and allLEDs light darker.
If for any reason you cannot make use of any external power supply, you should check the fol-lowing points:
The port needs to fulfill the minimum power specification for a USB 2.0 port (500 mA).On certain computers, the USB 2.0 ports do not meet the official USB 2.0 power specifi-cation. In this case, you may see a message, saying that there is not enough power availa-ble to operate your device. The TRAKTOR KONTROL S4 may produce crackles or may notwork at all.
In case of failures, it is useful to check if TRAKTOR KONTROL S4 works if you discon-nect any other USB device from the computer.
If your computer is unable to supply the necessary amount of bus power, try connectingyour TRAKTOR KONTROL S4 to a USB 2.0 hub with external power supply. Avoid con-necting other devices to the hub, as each bus-powered device takes its share from the to-tal amount of power available.
Once again, the best way to avoid any power-related issue with your S4 is to connect the in-cluded external power supply unit!
Troubleshooting and HelpHardware-related Problems
TRAKTOR KONTROL S4 - Manual - 172

8.2.5 Using the TRAKTOR KONTROL S4 with a Laptop
Please check if your computer is suited for handling real-time audio processing without drop-outs. The TRAKTOR KONTROL S4 Control Panel provides you with a useful tool to achievethis. See chapter ↑7.2.2, Audio Settings Page for more info.
In general, it is not recommended to use laptops with shared-memory graphic cards. You willneed all the memory and processing power available for your audio software.
There are some steps to optimize your laptop’s audio performance:
It is not recommended to run the laptop on battery, as power management might slow theclock rate of the CPU down, to save battery.
Disconnect all unused hardware (e.g. printer, scanner). This will increase the amount ofprocessing power available for your music software.
Laptops often are equipped with built-in devices that disturb audio processing, most com-monly a network adapter or a wireless LAN card. You might need to disable these deviceswhile working with the TRAKTOR KONTROL S4.
8.3 Loose Jog Wheel Top Plate
The flat, round, push-sensitive surface of the jog wheels on your TKS4 was designed to beeasily replaceable. Due to heavy shocks or extreme vibration during travelling, in some rarecases a jog wheel top plate might become loose or detached from the controller.
It can easily be reattached to the base of the jog wheel. To do this:
1. Align the connector pins on the bottom of the top plate with the corresponding clips onthe jog wheel base.
2. Hold the rubber rim of the wheel steady with one hand.3. Use the other hand to push the plate down into the round central area of the jog wheel
and twist the plate around to the left (anti-clockwise) until the pins click back into theclips on the base (you may hear a clicking sound).
Troubleshooting and HelpHardware-related Problems
TRAKTOR KONTROL S4 - Manual - 173

Once the plate has clicked back into place, it should be securely fastened to the unit. If it isstill loose, try running through the procedure again. Although it may not be necessary for opti-mum use, we recommend recalibrating your jog wheels after detaching and reattaching the jogwheel top plate. For further details on jog wheel calibration, please refer to the separate JogWheel Calibration Guide in the TRAKTOR 2 documentation folder.
8.4 TRAKTOR Crashes
In case of a crash during runtime, please contact the Native Instruments technical supportteam and send them your crash log. You will find the crashlog in the following folders:
Windows: \My Documents\Native Instruments\Traktor 2\Crashlogs\
Mac OS X: Users/~/Library/Logs/CrashReporter/
8.5 Getting Help
8.5.1 Knowledge Base / Readme / Online Support
Open the Service Center application and click on the Support button in the upper rightcorner. Here you will find direct links to the Native Instruments Online Knowledge Baseand the Online Support Form.
The Online Knowledge Base gathers useful information about your Native Instruments productand can be of great help to solve possible issues you may encounter when working with NativeInstruments products.
If no Knowledge Base entry matches your problem, or if the matching entry does not solve theproblem, you can use the Online Support Form to contact the Technical Support team with Na-tive Instruments. The Online Support Form will ask you to enter information about your hard-ware and software setup. This information is essential for our support team to be able to pro-vide you with quality assistance.
Troubleshooting and HelpTRAKTOR Crashes
TRAKTOR KONTROL S4 - Manual - 174

When communicating with the Native Instruments support team, keep in mind that the moredetails you can provide about your hardware, your operating system, the version of the softwareyou are running, and the problem you are experiencing, the better they will be able to help you.In your description, you should mention:
How to reproduce the problem
What you have already tried to fix the problem
A description of your setup, including all hardware
The brand and specifications of your computer
When installing new software or software updates, a Readme file is included that containslate breaking news and new information that was not yet included in the documentation.Please open and read this Readme file before contacting Technical Support.
8.5.2 Forum
In the Native Instruments User Forum you can discuss product features directly with otherusers and with experts moderating the forum.
http://www.native-instruments.com/forum
8.6 Updates
Whenever you encounter problems, it is recommended that you first download and install anyavailable software updates. Updates are released regularly to fix known problems and to con-tinuously improve the software. The version number of your software is displayed in the Aboutdialog for any Native Instruments application. This dialog can be opened by clicking on the NIlogo in the upper right corner of the user interface. Alternatively, you can find the version num-bers of all installed Native Instruments applications when showing the details for an applica-tion within the Overview page of the Service Center. Updates are available on the Update pagein Service Center or on our website under:
http://www.native-instruments.com/updates
Troubleshooting and HelpGetting Help
TRAKTOR KONTROL S4 - Manual - 175

9 Appendix A – Common Setups
This appendix shows you how to connect your TRAKTOR KONTROL S4 with your other gears invarious setups.
For a reference of each socket or control element to be found on the rear and front panel of theTRAKTOR KONTROL S4, please refer to section ↑5.8, The Rear Panel and ↑5.9, The FrontPanel, respectively.
It goes without saying that all setups require that TRAKTOR KONTROL S4 was correctly in-stalled on your computer beforehand! For more info on the installation procedure, pleaserefer to the separate Setup Guide.
We will first describe the most basic setup. Then, we will show you some interesting add-ons.
9.1 TRAKTOR KONTROL S4 Basic Setup
This setup is the most common. It is also described in the Setup Guide and used in most ofthe tutorials.
Let’s start with the fundamentals: the S4, your computer, your headphones, and an amplifica-tion system.
Appendix A – Common SetupsTRAKTOR KONTROL S4 Basic Setup
TRAKTOR KONTROL S4 - Manual - 176

Connect the Power Supply
1. Connect the included power supply to a power outlet using the appropriate adapter foryour region.
Appendix A – Common SetupsTRAKTOR KONTROL S4 Basic Setup
TRAKTOR KONTROL S4 - Manual - 177

2. Connect the power cord plug to the Power Supply connector (labeled POWER) on the rearpanel of your S4.
We strongly recommend you to use an external power supply with your S4 via the includedpower supply unit. Although operation is also possible when your S4 is powered via theUSB connection, you then have following limitations: the headphones output level is lower,and all LEDs light darker. Moreover, your device might then be subject to USB power-relat-ed issues, as explained in section ↑8.2.4, USB-related Power Issues.
Appendix A – Common SetupsTRAKTOR KONTROL S4 Basic Setup
TRAKTOR KONTROL S4 - Manual - 178

Connect the S4 to Your Computer via USB
Before connecting the controller to your computer, make sure it is in a stable playing posi-tion. Turning the controller on its head while it is connected to your computer can causedecalibration of the jog wheels, which is indicated by constantly flashing Load buttons.Placing the device back in the upright position and switching it on and off will reset the jogwheels to the correct state. In the unlikely event that the jog wheels still do not respond asexpected after power cycling, recalibrating the jog wheels manually might become necessa-ry. For further info on calibration, please refer to the separate Jog Wheel Calibration Guidein the Documentation subfolder of the TRAKTOR 2 program folder.
Appendix A – Common SetupsTRAKTOR KONTROL S4 Basic Setup
TRAKTOR KONTROL S4 - Manual - 179

Connect one end of the included USB 2.0 cable to the USB socket on the rear panel ofyour S4, and the other end to an available USB 2.0 port on your computer.
The TRAKTOR KONTROL S4 is a USB 2.0 device and will not work on a USB 1.0/1.1 port.
If possible, do always use the USB cable provided with the S2 box to operate your unit.Longer or lower quality USB cables may not transfer sufficient power to the S2, which maylead to performance issues. For proper operation, it is also advised to always connect thepower supply.
Appendix A – Common SetupsTRAKTOR KONTROL S4 Basic Setup
TRAKTOR KONTROL S4 - Manual - 180

Turn Down All Volume Controls
Before you plug any audio cable, make sure to turn down all volume controls, both onyour S4 and on your amplification system. This will avoid any possible audio artifacts thatcould damage your speakers and your ears!
Appendix A – Common SetupsTRAKTOR KONTROL S4 Basic Setup
TRAKTOR KONTROL S4 - Manual - 181

Connect the Main Outputs to Your Amplification System
On the rear panel of your S4, connect the Main Output 1/2's 1/4" sockets (balanced) orthe RCA sockets (unbalanced) to your amplification system, depending on the type of in-puts supported by your amplifier or active speakers.
Appendix A – Common SetupsTRAKTOR KONTROL S4 Basic Setup
TRAKTOR KONTROL S4 - Manual - 182

Connect your Headphones to the PHONES Socket (Front Panel)
On the front panel of your S4, plug your headphones into the Headphones socket(PHONES).
Before putting on headphones, always make sure the headphone volume knob (CUE VOL) isset to minimum! To set the headphone volume to minimum, turn the CUE VOL knob coun-ter-clockwise until it reaches its end stop. Then, while playing music, slowly increase theheadphone volume by turning the CUE VOL knob clockwise until it reaches the desired lis-tening level.
Appendix A – Common SetupsTRAKTOR KONTROL S4 Basic Setup
TRAKTOR KONTROL S4 - Manual - 183

Turn On Your S4
On the rear panel of your S4, engage the ON/OFF switch to turn on the device.
→ Look at the top panel of your controller: after a quick LED animation, the USB indicatorin the Master Display might flash for a few seconds, then it should stay lit. This confirmsthat your S4 is correctly recognized by your computer.
If the USB indicator stays flashing, there is a problem with your USB connection and/ordriver. Please refer to section ↑8.2, Hardware-related Problems for more info on how tosolve this issue.
Start TRAKTOR
Start the TRAKTOR software, for example by double-clicking on its alias/shortcut on your desk-top. The TRAKTOR window opens up.
Appendix A – Common SetupsTRAKTOR KONTROL S4 Basic Setup
TRAKTOR KONTROL S4 - Manual - 184

Set the Deck Flavors in TRAKTOR
Instead of setting the Deck Flavor manually as described here, you can also use the SetupWizard: choose 2 Track Decks + 2 Remix Decks in the menu, click Finish, and let the Wiz-ard set everything for you. Bear in mind, though, that the Setup Wizard additionally resetsall TRAKTOR settings to their default values. For more info on the Setup Wizard, pleaserefer to section ↑6.5, The Setup Wizard.
In the TRAKTOR software, we set the lower Decks C and D to Remix Decks:
1. Open the Preferences window by clicking on the Preferences button in TRAKTOR’s Head-er:
2. Go to Preferences > Decks > Deck Flavor and select Remix Deck in the C and D menus:
3. Click Close at the bottom of the Preferences window to confirm your modifications.
Notes
The MAIN LEVEL knob and meters at the top middle of your S4’s top panel allow you toadjust and monitor the overall output level:
Appendix A – Common SetupsTRAKTOR KONTROL S4 Basic Setup
TRAKTOR KONTROL S4 - Manual - 185

The CUE VOL and CUE MIX knobs on the S4 front panel respectively control the volumeand the mix between the cued signal and the master signal in your headphones:
9.2 Adding a Microphone
Starting from the basic setup, we add here a microphone and show you how to use it on theAux channel of TRAKTOR.
Before you proceed, please follow the steps for the basic setup described in section ↑9.1,TRAKTOR KONTROL S4 Basic Setup.
Connect Your Microphone to the MIC Socket
The MIC socket and its dedicated GAIN knob
On the rear panel of your S4, plug your microphone into the Microphone socket (MIC) locatedin the INPUT CHANNEL D section.
Before you connect your microphone, make sure that the GAIN knob next to the MIC socketis turned fully down!
Appendix A – Common SetupsAdding a Microphone
TRAKTOR KONTROL S4 - Manual - 186

Set the THRU/USB Switch to USB
Set the THRU/USB switch to USB.
On that same INPUT CHANNEL D, set the THRU/USB switch to USB to ensure that the micro-phone signal is routed through TRAKTOR.
Set the Input Routing in TRAKTOR and Adjust the Microphone Input Level
If you have configured the basic setup via the Setup Wizard, the audio input routing is al-ready set for your microphone and you can skip this section.
Otherwise, set the input routing as follows:
1. Open the Preferences window by clicking on the Preferences button in TRAKTOR’s Head-er:
2. Go to Preferences > Input Routing > Input Aux and select 3: In: Ch D left and 4: In: Ch Dright in the L (Mono) and R menu, respectively:
3. While keeping an eye on the small level meters to the right of the L (Mono) and R menus,sing something in your microphone at the loudness at which you will sing during your per-formance, and adjust the Microphone Gain knob (GAIN) located next to the Microphonesocket (MIC) on your S4 until the level meters on your screen show a satisfying level (toadjust the microphone input gain, you can follow the guidelines described in section↑4.3, Adjusting Levels).
Appendix A – Common SetupsAdding a Microphone
TRAKTOR KONTROL S4 - Manual - 187

4. When the meters show a satisfying level, click Close at the bottom of the Preferences win-dow to confirm your modifications.
For more info on the input routing, see section ↑6.4.2, Adjusting the Input Routing.
Once the microphone input gain is set, don’t touch this GAIN knob anymore. To control thevolume of your microphone within your mix, use the MIC VOL knob on the S4’s front panelinstead (see below).
Once the microphone input gain is set, don’t touch this GAIN knob anymore. To control thevolume of your microphone within your mix, use the MIC VOL knob on the S4’s front panelinstead (see below).
Notes
Your microphone signal is now sent to the Aux channel in TRAKTOR. This has following inter-esting consequences:
The volume of the microphone is controlled by the MIC VOL knob on the front panel ofyour S4:
You can also control the microphone volume via the AUX knob at the right of the crossfad-er in TRAKTOR:
You can select the microphone signal for use in the Loop Recorder by choosing Aux in theLoop Recorder’s Source menu:
Appendix A – Common SetupsAdding a Microphone
TRAKTOR KONTROL S4 - Manual - 188

By having assigned the microphone signal to the Aux channel, you still have four internalDecks at your disposal (Track Decks or Remix Decks).
9.3 Using a Master Mixer
In some situations, you might want to use other audio devices independently from the TRAK-TOR KONTROL S4 system, like an additional setup with turntables and mixer. A solution con-sists in using this other mixer as master mixer. This mixer will receive the mix coming fromTRAKTOR KONTROL S4 and thus act as middleman on the way to your amplification system.Starting from the basic setup, you only need to change the connections at the Main Outputs ofyour S4.
Before you proceed, please follow the steps for the basic setup described in section ↑9.1,TRAKTOR KONTROL S4 Basic Setup.
Connect the Main Outputs of the S4 to Available Inputs on Your Master Mixer
On the rear panel of your S4, unplug the cables connecting the Main Outputs of your S4to your amplification system, and connect the Main Outputs 1/2 1/4" (balanced) or RCA(unbalanced) sockets to an available stereo input channel on your master mixer, depend-ing on the type of inputs supported by your master mixer.
On the master mixer, make sure that the input channel receiving the TRAKTOR KON-TROL S4 signal is set to line level.
Connect the Outputs of Your Master Mixer to Your Amplification System
Don’t forget to connect the outputs of your master mixer to your amplification system andmake the necessary level adjustments on your master mixer.
9.4 TRAKTOR KONTROL S4 with Turntables or CD Decks
With this setup, you can plug turntables or CD decks (or any other line level source) to the twostereo inputs available on your TRAKTOR KONTROL S4 and use them in your mix on two dif-ferent channels.
Appendix A – Common SetupsUsing a Master Mixer
TRAKTOR KONTROL S4 - Manual - 189
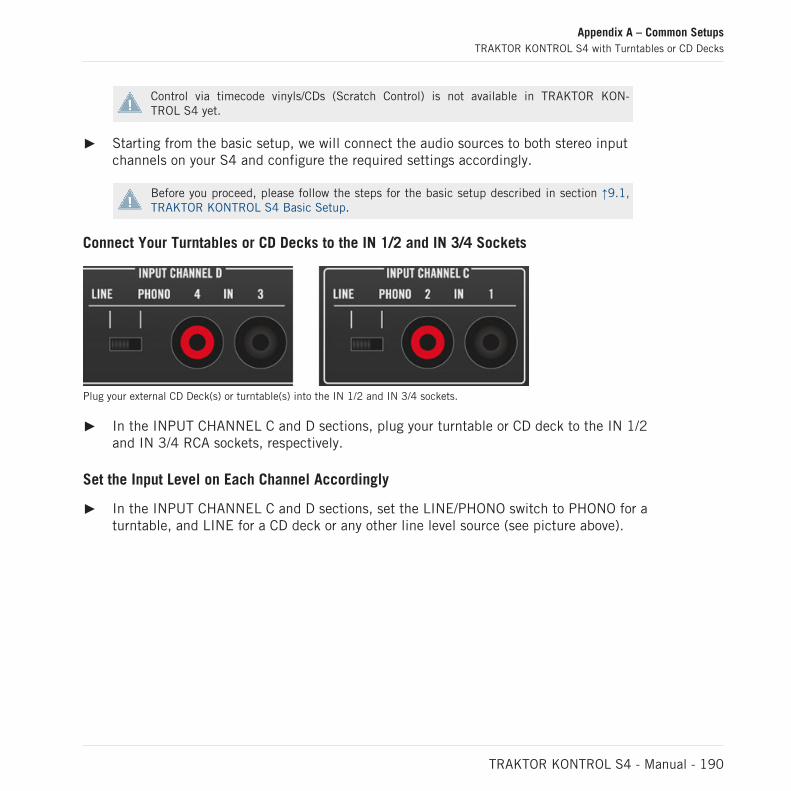
Control via timecode vinyls/CDs (Scratch Control) is not available in TRAKTOR KON-TROL S4 yet.
Starting from the basic setup, we will connect the audio sources to both stereo inputchannels on your S4 and configure the required settings accordingly.
Before you proceed, please follow the steps for the basic setup described in section ↑9.1,TRAKTOR KONTROL S4 Basic Setup.
Connect Your Turntables or CD Decks to the IN 1/2 and IN 3/4 Sockets
Plug your external CD Deck(s) or turntable(s) into the IN 1/2 and IN 3/4 sockets.
In the INPUT CHANNEL C and D sections, plug your turntable or CD deck to the IN 1/2and IN 3/4 RCA sockets, respectively.
Set the Input Level on Each Channel Accordingly
In the INPUT CHANNEL C and D sections, set the LINE/PHONO switch to PHONO for aturntable, and LINE for a CD deck or any other line level source (see picture above).
Appendix A – Common SetupsTRAKTOR KONTROL S4 with Turntables or CD Decks
TRAKTOR KONTROL S4 - Manual - 190

Turntables Only: Connect the Earth Lead(s)
The Ground terminal screw
When using turntables, attach their earth leads to the Ground terminal screw on the rearpanel of your S4.
Set the THRU/USB Switch to USB
The THRU to USB switch.
On the INPUT CHANNEL D, set the THRU/USB switch to USB to route the audio sourceto TRAKTOR.
You cannot use a microphone together with another audio source plugged in the INPUTCHANNEL D. Since we want to use an audio source connected to the Inputs 3 and 4 ofthis channel, we need to unplug any connected microphone.
Appendix A – Common SetupsTRAKTOR KONTROL S4 with Turntables or CD Decks
TRAKTOR KONTROL S4 - Manual - 191

Set the Input Routing and Deck Flavors in TRAKTOR
Instead of setting the input routing options and Deck Flavors manually as described here,you can also use the Setup Wizard: choose 2 Track Decks + 2 Live Inputs in the menu,click Finish, and let the Wizard set everything for you. Bear in mind, though, that the SetupWizard additionally resets all TRAKTOR settings to their default values. For more info onthe Setup Wizard, please refer to section ↑6.5, The Setup Wizard.
In the TRAKTOR software, we need to route the inputs of your S4 to the virtual input channelsC and D, and to set the lower Decks C and D to Live Input:
1. Open the Preferences window by clicking on the Preferences button in TRAKTOR’s Head-er:
2. Go to Preferences > Input Routing > Input Channel C and select 1: In: Ch C left and 2:In: Ch C right in the L (Mono) and R menus, respectively:
3. Go to Preferences > Input Routing > Input Channel D and select 3: In: Ch D left and 4:In: Ch D right in the L (Mono) and R menus, respectively:
4. Go to Preferences > Decks > Deck Flavor and select Live Input in the C and D menus.5. Click Close at the bottom of the Preferences window to confirm your modifications.
→ Deck C and D will now transmit the signals coming from your external audio sources tochannel C and D on the Mixer, respectively.
For more info on the input routing, see section ↑6.4.2, Adjusting the Input Routing
Appendix A – Common SetupsTRAKTOR KONTROL S4 with Turntables or CD Decks
TRAKTOR KONTROL S4 - Manual - 192
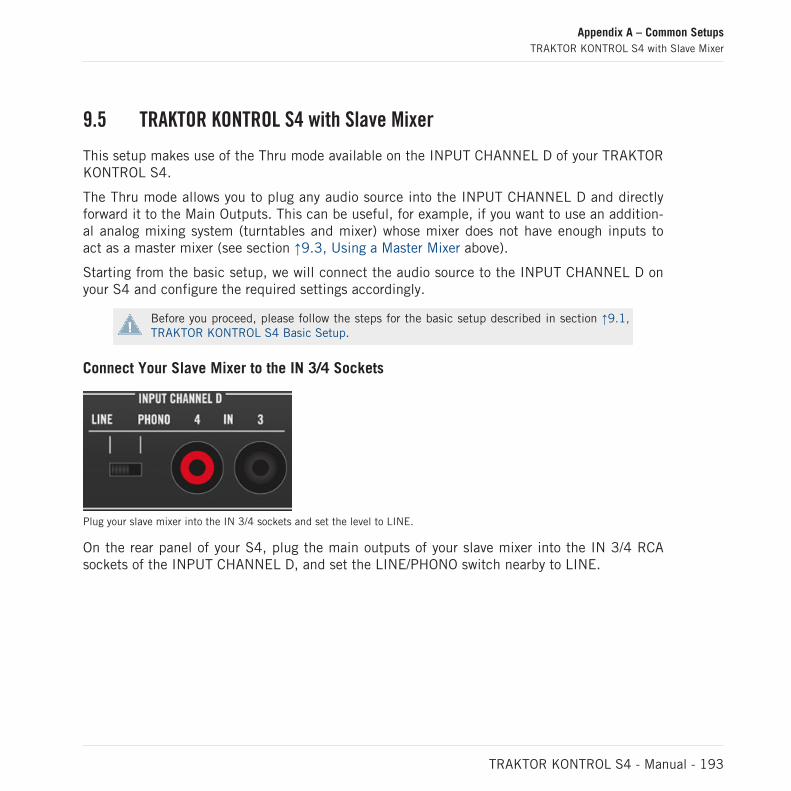
9.5 TRAKTOR KONTROL S4 with Slave Mixer
This setup makes use of the Thru mode available on the INPUT CHANNEL D of your TRAKTORKONTROL S4.
The Thru mode allows you to plug any audio source into the INPUT CHANNEL D and directlyforward it to the Main Outputs. This can be useful, for example, if you want to use an addition-al analog mixing system (turntables and mixer) whose mixer does not have enough inputs toact as a master mixer (see section ↑9.3, Using a Master Mixer above).
Starting from the basic setup, we will connect the audio source to the INPUT CHANNEL D onyour S4 and configure the required settings accordingly.
Before you proceed, please follow the steps for the basic setup described in section ↑9.1,TRAKTOR KONTROL S4 Basic Setup.
Connect Your Slave Mixer to the IN 3/4 Sockets
Plug your slave mixer into the IN 3/4 sockets and set the level to LINE.
On the rear panel of your S4, plug the main outputs of your slave mixer into the IN 3/4 RCAsockets of the INPUT CHANNEL D, and set the LINE/PHONO switch nearby to LINE.
Appendix A – Common SetupsTRAKTOR KONTROL S4 with Slave Mixer
TRAKTOR KONTROL S4 - Manual - 193

Set the THRU/USB Switch to THRU
Set the THRU/USB switch to THRU.
On the INPUT CHANNEL D, set the THRU/USB switch to THRU to route the slave mixer di-rectly to the Main Outputs of the S4.
You cannot use a microphone together with another audio source plugged in the INPUTCHANNEL D. Since we want to use an audio source connected to the Inputs 3 and 4 ofthis channel, we need to unplug any connected microphone.
Adjust the Source Input Level
To adjust the input level of the source before it is sent to the Main Outputs, do the following:
1. From your audio source (e.g. slave mixer), send some audio at the maximum volume thatyou plan to use during your performance.
2. Adjust the Thru Gain knob (GAIN) located next to the THRU/USB switch on your S4 (seepicture above).
Appendix A – Common SetupsTRAKTOR KONTROL S4 with Slave Mixer
TRAKTOR KONTROL S4 - Manual - 194

10 Appendix B – Technical Information
You will find here the technical specifications and the block diagram for the audio interface ofyour TRAKTOR KONTROL S4.
10.1 Technical Specifications
Jacks and Sockets
4 input jacks (IN 1/2 and IN 3/4) for mono RCA plugs
1 input jack (MIC) for mono 6.3 mm (1/4 inch) phone plug
2 output jacks (MAIN OUT 1/2) for 6.3 mm (1/4 inch) TRS (balanced) phone plugs
2 output jacks (MAIN OUT 1/2) for mono (unbalanced) RCA plugs
1 headphones jack for stereo 6.3 mm (1/4 inch) phone plug
1 external footswitch input jack for 6.3 mm (1/4 inch) TRS phone plug
2 MIDI (IN/OUT) 5-pin DIN circular connectors
1 ground terminal screw
1 Kensington lock slot
1 USB 2.0 Type B
1 power supply connector
Audio Specifications
Audio Inputs (A/D)
Channels 4
Sample rate 44.1, 48, 88.2, 96 kHz
Bit resolution 16, 24
Converter Cirrus Logic
Appendix B – Technical InformationTechnical Specifications
TRAKTOR KONTROL S4 - Manual - 195

Line Inputs
Input impedance 47 kΩ
Cross talk -83 dBu
Full scale level 16 dBu
SNR (weighted) 98.5 dBu
THD+N 0.01 %
Frequency response ±1 dBu 20 Hz – 40 kHz
Dynamic range codec 105 dBu
Microphone Input
Input impedance 5.2 kΩ
Full scale level @ 1 kHz -32 dBu
SNR (weighted) @ 1 kHz 92 dBu
THD+N @ 1 kHz 0.01 %
Frequency response ±1 dBu 20 Hz – 40 kHz
Dynamic range codec 105 dBu
Phono Inputs
Input impedance 47 kΩ
Full scale level @ 1 kHz -19 dBu
SNR (weighted) @ 1 kHz 85.5 dBu
THD+N @ 1 kHz 0.026 %
Appendix B – Technical InformationTechnical Specifications
TRAKTOR KONTROL S4 - Manual - 196

Audio Outputs (D/A)
Channels 4
Sample rate 44.1, 48, 88.2, 96 kHz
Bit resolution 16, 24
Converter Cirrus Logic
Line Outputs
Output impedance (1/4" balanced / RCA unbalanced) 164 Ω / 82 Ω
Max output level 13 dBu
SNR (weighted) 99.5 dBu
THD+N 0.01 %
Frequency response ±1 dBu 20 Hz – 40 kHz
Dynamic range codec 105 dBu
Headphones Outputs
Load impedance 16 Ω – 600 Ω
Max output level (100 Ω load) 7 dBu
SNR (weighted) under load condition 93 dBu
THD+N 0.02 %
Frequency response ±1 dBu 20 Hz – 40 kHz
Power Supply
In: 100-240V - 60/50Hz - 0.4A
Out: 9V 1200mA 10.8VA
Dimensions and Weight
Depth: 32.2cm / 12.7''
Appendix B – Technical InformationTechnical Specifications
TRAKTOR KONTROL S4 - Manual - 197

Height: 5.2cm / 2''
Width: 50cm / 19.7''
Weight: 3.4kg / 7.5lbs
Environmental Specifications
Operating temperature: +5 to +35 °C (41 to 95 °F), max 85% non-condensing humidity
Storage temperature: 0 to 40 °C (32 to 104 °F), max 85% non-condensing humidity
Do not install this unit in locations exposed to high humidity or direct sunlight.
Appendix B – Technical InformationTechnical Specifications
TRAKTOR KONTROL S4 - Manual - 198

10.2 Block Diagram
TRAKTOR KONTROL S4’s audio inputs/outputs block diagram
On this diagram, wires carry stereo signals.
Appendix B – Technical InformationBlock Diagram
TRAKTOR KONTROL S4 - Manual - 199

11 Appendix C – Quick References
This appendix provides you with you Quick Reference tables summing up the basic functionali-ty of each control element on your TRAKTOR KONTROL S4. This gives you a quick and con-cise overview of all basic functions of your controller. For more info on each control element,please refer to the descriptions in chapter ↑5, Hardware Reference.
11.1 Track Deck Quick Reference
Deck controls for when the Deck in focus is a Track Deck.
See section ↑5.3, The Decks for more details on these control elements.
Control element Function
DECK C or DECK D button Normal: switches the focus of your S4 Deck between upper and lower Deckin TRAKTOR. Lit when lower Deck focused.
SHIFT: switches the Layout in TRAKTOR.
LOAD button Normal: loads selected track on the Deck when using Quick Loading.
SHIFT: unloads the track from the Deck (i.e. it clears the Deck).
Lights up when you press the jog wheel’s top plate.
Jog wheel Outer rim: tempo bending.
Top plate: scratch control (direct control on playback position).
SHIFT + top plate: seek through track (fast forward / rewind).
In Loop: hold LOOP IN / LOOP OUT and spin the jog wheel to fine-tune theLoop In Point / Loop Out Point.
ON AIR indicator Lit when the focused Deck is audible on the TRAKTOR KONTROL S4 mainoutputs.
SAMPLES indicator Lit when the lower Deck is a Remix Deck.
DECK A or DECK B indicator Lit when your S4 Deck is focused on the upper Deck (Deck A or Deck B).
Appendix C – Quick ReferencesTrack Deck Quick Reference
TRAKTOR KONTROL S4 - Manual - 200

Control element Function
DECK C or DECK D indicator Lit when your S4 Deck is focused on the lower Deck (Deck C or Deck D).
KEYLOCK indicator Lit when Keylock is active.
MASTER indicator Lit when the Deck is the tempo master.
Loop Size Display Shows the loop size selected via the LOOP SIZE encoder.
TEMPO fader Increases/decreases Deck tempo.
Hold SHIFT to move the fader without altering the tempo.
Tempo Offset buttons up/down(OFFSET)
Lit button indicates offset between tempo fader in the software and TEMPOfader on the S4. Pressing either button resets the tempo to the TEMPO fad-er position.
Press both buttons simultaneously to lock the tempo to 0 % (the TEMPOfader is then disabled). Both buttons light up to indicate the tempo locking.Press either button to unlock the tempo.
Both buttons light up dimmed when the TEMPO fader is near 0 %.
LOOP IN button Sets a Floating Cue Point at current playback position without stopping theplayback. This Floating Cue Point will serve as Loop In Point when you pressthe LOOP OUT button (see below).
Lights up together with LOOP OUT when playback is within an active Loop.
In Loop: Hold to adjust Loop In Point with jog wheel.
LOOP OUT button Sets a Loop Out Point at current playback position and activates a FloatingLoop between the previously set Floating Cue Point and this Loop Out Point.
Looping active: Lights up together with LOOP IN when playback is withinthe active Loop, lights up alone when playback is outside the active Loop.
In Loop: Hold to adjust Loop Out Point with jog wheel.
LOOP MOVE encoder Push: activates/deactivates looping.
Loop active: Loop move controls. Turn to move the Loop by the selectedloop size (as displayed in the Loop Size Display). SHIFT + turn to move theLoop by 1-beat steps.
No Loop active: Beatjump controls. Turn to jump by the selected loop size(as displayed in the Loop Size Display). SHIFT + Turn to jump by 1-beatsteps.
Appendix C – Quick ReferencesTrack Deck Quick Reference
TRAKTOR KONTROL S4 - Manual - 201

Control element Function
LOOP SIZE encoder Push: activates/deactivates looping. Activating looping automatically sets aFloating Loop at current playback position with the selected loop size.
Turn (no active Loop): selects a loop size (in beats) for the next FloatingLoop that will be set. The selected loop size is displayed in the Loop SizeDisplay above.
Turn (Loop active): halves/doubles the size of the current Loop.
Sample Play buttons Unlit: empty slot. Press to export a Sample from the track loaded on thatDeck at current playback position (if playback is within an active Loop, theLoop is copied). The Sample is loaded in Looped mode and with the sameplayback state as the track (muted if playing). Press SHIFT + button to loadthe Sample selected in the Playlist.
Dimmed: Sample loaded but stopped or muted.
Lit: Sample playing.
Sample in Looped mode: Press to start/mute/unmute the Sample. Press andhold for one second to stop playback and reset it to start position.
Sample in One-shot mode: Press to start playback. Press again to stop play-back and reset it to start position.
SHIFT + dimmed/lit button: unloads Sample from Sample Slot (button turnsback off).
Hotcue buttons 1-4 Unlit: empty slot. Press outside any active Loop to store a Cue Point at cur-rent playback position. Press within an active Loop to store this Loop.
LED color: blue for Cue Point, green for Loop.
Lit: When the Deck is playing, press to jump to that Cue Point / Loop. Whenthe Deck is stopped, press & hold to trigger the playback from that point.Upon release, playback stops and skips back to that point.
SHIFT + lit button: deletes Cue Point / Loop stored in Hotcue slot (buttonturns back off).
PLAY button Starts/stops playback. Button lights up when playing.
SHIFT + PLAY: activates/deactivates Keylock (KEYLOCK indicator lights upin the Deck Display).
Appendix C – Quick ReferencesTrack Deck Quick Reference
TRAKTOR KONTROL S4 - Manual - 202

Control element Function
CUE button Deck playing: jumps to Floating Cue Point and stops playback.
Deck paused: sets a new Floating Cue Point. Track is played back from thatFloating Cue Point as long as CUE is held depressed. Upon release, play-back stops and jumps back to Floating Cue Point.
SHIFT + CUE: skips back to start of track (playback state left untouched).
SYNC button Activates/deactivates synchronization to tempo master (lit when sync acti-vated).
SHIFT + SYNC: sets Deck as tempo master (MASTER indicator lights up inDeck Display).
Pressing and holding SHIFT + SYNC for more than one second moves theBeatgrid to match beats of current sync reference.
SHIFT button Press and hold: gives access to secondary functions of other control ele-ments.
Tap at least 5 times to redefine the track’s Beatgrid.
11.2 Remix Deck Quick Reference
Deck controls for when the Deck in focus is a Remix Deck.
See section ↑5.3, The Decks for more details on these control elements.
Control element Function
Deck Assign button (DECKC or DECK D)
Switches the focus of your S4 Deck between upper and lower Deck in TRAK-TOR.
SHIFT + button: switches the Layout in TRAKTOR.
LOAD button Loads the currently selected Sample into the first empty Sample Cell of a Sam-ple Slot when using Quick Loading.
Lights up when you press the jog wheel’s top plate.
Jog wheel Outer rim: tempo bending.*
Top plate: scratch (direct control on playback position).*
Appendix C – Quick ReferencesRemix Deck Quick Reference
TRAKTOR KONTROL S4 - Manual - 203

Control element Function
ON AIR indicator Lit when the Deck is audible on the TRAKTOR KONTROL S4 main output.
SAMPLES indicator Lit (showing that this Deck is a Remix Deck).
DECK A or DECK B indica-tor
Unlit.
DECK C or DECK D indica-tor
Lit (showing that your S4 Deck is focused on the lower Deck C or D in TRAK-TOR).
KEYLOCK indicator Not used (no Keylock on Remix Decks).
MASTER indicator Not used (Remix Decks stay always synchronized to another tempo master).
Loop Size Display Shows the loop size selected via the LOOP SIZE encoder.
TEMPO fader Increases/decreases Deck tempo.
Hold SHIFT to move the fader without altering the tempo.
Tempo Offset buttons up/down
Lit button indicates offset between tempo fader in the software and TEMPOfader on the S4. Pressing either button resets the tempo to the TEMPO faderposition.
Press both buttons simultaneously to lock the tempo to 0 % (the TEMPO faderis then disabled). Both buttons light up to indicate the tempo locking. Press ei-ther button to unlock the tempo.
Both buttons light up dimmed when the TEMPO fader is near 0 %.
LOOP IN button Sets a Floating Cue Point at current playback position without stopping theplayback. This Floating Cue Point will serve as Loop In Point when you pressthe LOOP OUT button (see below).
Lights up together with LOOP OUT when playback is within an active Loop.
LOOP OUT button Sets a Loop Out Point at current playback position and activates a FloatingLoop between the previously set Floating Cue Point and this Loop Out Point.
Looping active: Lights up together with LOOP IN when playback is within theactive Loop, lights up alone when playback is outside the active Loop.
Appendix C – Quick ReferencesRemix Deck Quick Reference
TRAKTOR KONTROL S4 - Manual - 204

Control element Function
LOOP MOVE encoder In Remix mode
Push: activates/deactivates looping.
Loop active: Loop move controls. Turn to move the Loop by the selected loopsize (as displayed in the Loop Size Display). SHIFT + turn to move the Loop by1-beat steps.
No Loop active: Beatjump controls. Turn to jump by the selected loop size (asdisplayed in the Loop Size Display). SHIFT + Turn to jump by 1-beat steps.
In Legacy mode
Turn: adjusts the volume of Sample Slots when Sample Slots are in Edit mode.
See also the "Hotcue Buttons" section in ↑6.3, S4 Control Options for informa-tion on Remix and Legacy mode.
LOOP SIZE encoder In Remix mode
Push: activates/deactivates looping. Activating looping automatically sets aFloating Loop at current playback position with the selected loop size.
Turn (no active Loop): selects a loop size (in beats) for the next Floating Loopthat will be set. The selected loop size is displayed in the Loop Size Displayabove.
Turn (Loop active): halves/doubles the size of the current Loop.
In Legacy mode
Turn: adjusts the volume of Sample Slots when Sample Slots are in Edit mode.
See also the "Hotcue Buttons" section in ↑6.3, S4 Control Options for informa-tion on Remix and Legacy mode.
Appendix C – Quick ReferencesRemix Deck Quick Reference
TRAKTOR KONTROL S4 - Manual - 205

Control element Function
Sample Play buttons Unlit: empty Sample Slot. Press to load a Sample from the capture source atcurrent playback position (if playback is within an active Loop, the Loop is cop-ied).
Press SHIFT + button to load the Sample selected in the Playlist.
Dimmed: Sample loaded but stopped or muted.
Lit: Sample playing.
Sample in Loop mode: Press to start/mute/unmute the Sample. Press and holdfor one second to stop playback and reset it to start position.
Sample in One-shot mode: Press to start playback. Press again to stop playbackand reset it to start position.
SHIFT + dimmed/lit button: unloads Sample from Sample Slot (button turnsback off).
Hotcue buttons 1-4 Unlit: empty Sample Slot. Press to load a Sample from the track at currentplayback position, in Loop mode and stopped.
LED color: green for Looped mode, blue for One-shot mode.
Dimmed: Sample loaded and stopped. Press & hold to trigger the Sample. Uponrelease, playback stops and skips back to start.
Lit: Sample playing (LED’s brightness follows Sample level). Press to retriggerthe Sample.
In Legacy mode
SHIFT + lit/dimmed button: activate Edit mode for Sample Slot (button startsflashing), where you can use the LOOP MOVE and LOOP SIZE encoders to con-trol volume and filter settings for the Sample. Press SHIFT + button again todeactivate Edit mode.
In Remix mode
SHIFT + lit/dimmed button: selects the next Sample Cell in the Sample Slot.
See also the "Hotcue Buttons" section in ↑6.3, S4 Control Options for informa-tion on Remix and Legacy mode.
PLAY button Press to start playback of Sample Slots. Press again to stop playback and resetit to start position.*
Appendix C – Quick ReferencesRemix Deck Quick Reference
TRAKTOR KONTROL S4 - Manual - 206

Control element Function
CUE button Stopped Samples: Press & hold to trigger Sample Slots. Upon release, playbackstops and skips back to start.
Playing Samples: Press to retrigger Samples.*
SYNC button Re-synchronizes Samples in Looped mode with the current tempo master. *
SHIFT button Press and hold: gives access to secondary functions of other control elements.
11.3 Mixer Quick Reference
See section ↑5.4, The Mixer for more details on these control elements.
The BROWSE encoder and BROWSE button are covered in ↑11.5, Loop Recorder QuickReference below. The Loop Recorder is covered in ↑11.4, FX Unit Quick Reference below.
11.3.1 Main Section Quick Reference
Control element Function
MAIN LEVEL knob Adjusts the level of the signal sent to the Main Outputs of the S4.
MAIN LEVEL meters Give a visual feedback on the pre-knob level of your mix.
Orange LEDs light up when the signal is clipping or when the limiterkicks in on the software side.
Appendix C – Quick ReferencesMixer Quick Reference
TRAKTOR KONTROL S4 - Manual - 207

11.3.2 Channel and Crossfader Quick Reference
Control element Function
GAIN encoder Turn: adjusts input gain level for that channel.
Push: resets input gain level to 0 dB.
FX Assign buttons 1 and 2 Normal: assigns the channel to FX Unit 1 and 2, respectively.
(For use with four FX Units, see detailed description.)
SHIFT: assigns the channel to the left and right side of the crossfader,respectively. The Crossfader Assignment indicator lights up accordingly.
High-frequency knob (HI) Adjusts the high-frequency content of the signal.
Mid-frequency knob (MID) Adjusts the mid-frequency content of the signal.
Low-frequency knob (LOW) Adjusts the low-frequency content of the signal.
FILTER knob Adjusts the on-board bipolar filter.
Headphone Cue button (CUE) Sends the pre-fader signal to the cue channel (headphones).
Deck Assignment indicator (A/B/C/D)
Lights up when corresponding software Deck is currently under focus onthe S4.
Channel fader Controls the channel’s level.
Channel meter Gives a visual feedback on the channel’s pre-fader level.
Blue: signal below clipping.
Orange: signal clipping.
Crossfader Assignment indicator Left arrow lit: channel assigned to the left side of the crossfader.
Right arrow lit: channel assigned to the right side of the crossfader.
Crossfader Controls the mix between signals assigned to its both sides.
Appendix C – Quick ReferencesMixer Quick Reference
TRAKTOR KONTROL S4 - Manual - 208

11.3.3 Master Display Quick Reference
Control element Function
Alert indicator Flashes when there is something wrong: Main Volume knob or Head-phones Volume knob too low in the software, CPU load too high, laptoppower supply disconnected.
USB indicator Lit if the driver is up and running.
Flashing if there is no connection to the computer or a problem with thedriver.
Preview Play indicator Lit when a track is loaded into the Preview Player.
SNAP button Activates the Snap option (lit when Snap is active).
SNAP indicator Lit when Snap is active.
Clock Master button Sets the Clock as tempo master (lit when Clock is set as master).
Clock Master indicator (MASTER) Lit when the Clock is set as tempo master.
Quantize button Activates the Quantize option (lit when Quantize is active).
Quantize indicator (QUANT) Lit when Quantize is active.
11.4 FX Unit Quick Reference
See section ↑5.5, The FX Units for more details on these control elements.
Control element Single mode Group mode
FX On button Normal: activates/deactivates FX Unitglobally (lit when activated).
SHIFT: selects next FX from FX list (asset in Preferences > Effects > FX Pre-Selection).
Normal: not used.
SHIFT: loads a set of three predefined FX(as set in Preferences > Traktor Kontrol S4> S4 Control Options > Direct FX 1-3).
FX DRY/WET knob Adjusts the ratio between unprocessed (dry) signal and processed (wet) signal.
FX Knob 1-3 FX parameter 1-3 (FX-dependent). Parameter for 1st, 2nd, and 3rd FX.
Appendix C – Quick ReferencesMixer Quick Reference
TRAKTOR KONTROL S4 - Manual - 209

Control element Single mode Group mode
FX Button 1-3 FX Button 1: resets all FX parametersto their default value.
FX Buttons 2 and 3: FX-dependent (litwhen activated).
SHIFT + button: loads a predefined FX(as set in Preferences > Traktor KontrolS4 > S4 Control Options > Direct FX1-3).
Activates/deactivates FX slot 1-3 (lit whenslot activated).
SHIFT + button: loads in this slot the nextFX from FX list (as set in Preferences > Ef-fects > FX Pre-Selection).
FX Mode button(MODE)
Normal: switches the FX Unit between Single mode and Group mode (lit whenGroup mode activated).
SHIFT: saves current settings as default settings (“snapshot”). These settings willthen be recalled the next time you load this FX, or by pressing the FX Button 1(Single mode only).
11.5 Loop Recorder Quick Reference
See section ↑5.6, The Loop Recorder for more details on these control elements.
Control element Function
DRY/WET knob Adjusts the mix between master output and Loop Recorder output.
SIZE button Selects the size of the loop to be recorded.
REC button No loop stored: Starts/stops recording a loop.
Loop stored: Starts/stops overdub recording.
UNDO button No loop playing: Deletes the whole loop (and all its layers).
Loop playing: Undoes/redoes the last overdub layer.
PLAY button Starts/stops playback of the recorded loop.
Appendix C – Quick ReferencesLoop Recorder Quick Reference
TRAKTOR KONTROL S4 - Manual - 210

11.6 Browsing, Loading and Copying Quick Reference
See section ↑5.7, Browsing, Loading and Copying for more details on these control ele-ments.
Control element Function
BROWSE encoder Turn: scrolls through the Playlist.
SHIFT + turn: scrolls through the Favorites.
Push: loads/unloads selected item in the Preview Player. When an item is load-ed into the Preview Player, turning BROWSE seeks through the loaded item.
(When Browse mode is not active, load the selected track by pressing LOAD onthe desired Deck; load the selected Sample by pressing the desired SamplePlay button.)
BROWSE button Press & release: activates/deactivates Browse mode (see below).
Press & hold: activates Copy mode.
Browse mode
BROWSE encoder Usual functions (see above).
Jog wheels Scrolls through the Playlist.
LOOP MOVE encoders Turn: scrolls through the Browser Tree.
Push: expands/collapses node in the Browser Tree.
LOOP SIZE encoders Turn: scrolls through the Favorites.
Flashing control elements Press to load the selected item on to this location.
Copy mode
Flashing control elements While holding the BROWSE button depressed, press any flashing source andthen any flashing target to copy the corresponding track or Sample.
Appendix C – Quick ReferencesBrowsing, Loading and Copying Quick Reference
TRAKTOR KONTROL S4 - Manual - 211

IndexAAbsolute (prefs) [146]
Absolute mode [94]
Adjusting levels [41]
Alert indicator [119]
Aligning tracks [36]
Analysis [21] [68]
Assigning FX to channels [59] [113]
Audience [42]
Audio input [77] [88]
Audio interface [161]
Audio Processing (Control Panel) [164]
Audio Settings (Control Panel) [164]
AUTO button [69]
Auto Loop (prefs) [146]
Auto mode (tempo master) [69]
AUX knob (software) [188]
BBasic setup [176]
Beat matching
manually [38]
quantized [36]
Beatgrid [68]
adjusting on the fly [107]
Beatjump (prefs) [144]
Beatjumps [97]
Beats
manually aligning [40]
BPM [71]
BROWSE button [51] [66] [130] [132] [138]
BROWSE encoder [26] [130]
pre-listening a track [32]
Quick Loading [128]
Browse mode [51] [130]
Browser [32]
Browsing from your S4 [127]
Quick Reference [211]
Buttons [81]
Index
TRAKTOR KONTROL S4 - Manual - 212
CCalibration [149]
CD deck [189]
Changing the size of a Loop [46]
Channel [19] [29] [78] [112]
Crossfader Assignment indicator [117]
CUE button [34] [39] [115]
Deck Assignment indicator [116]
fader [30] [42] [116]
FILTER knob [30] [115]
FX Assign buttons [59] [113]
GAIN encoder [30] [42] [113]
HI knob [30] [114]
LOW knob [30] [114]
meter [30] [42] [116]
MID knob [30] [114]
signal flow [112]
Channel fader [30] [116]
Channel meter [30] [42] [116]
Clearing a Hotcue [49]
Clipping [41] [44]
Clock [67] [69]
panel [69]
setting as tempo master [70] [71]
setting the Clock’s tempo (BPM) [71]
Clock Master button and indicator [70] [71][120]
Collection [20] [68]
Common setups [176]
Compatibility [16]
Concepts [74]
Connection Monitor (Control Panel) [167]
Control Panel [162]
Audio Settings page [163]
Diagnostics page [166]
Controller Editor [13] [138]
Controller overview [17]
Copy mode [66] [132]
Copying from your S4 [127]
Quick Reference [211]
Crossfader [30] [112] [117]
assignment [114]
Crossfader Assignment indicator [117]
CUE button (Deck)
on Track Decks [37] [106]
CUE button (Mixer) [34] [39] [115]
Cue channel [34]
CUE MIX knob [32] [34] [39] [137]
Cue Points
Floating Cue Point [96]
Index
TRAKTOR KONTROL S4 - Manual - 213

setting and storing [35]
storing [103]
CUE VOL knob [32] [137]
Cueing [35] [45]
Customizing TRAKTOR KONTROL S4 [140]
DDeactivating looping [48]
Deck [18] [74]
flavor [77] [86] [150]
focus [87] [88]
overview [86]
DECK A indicator [26]
DECK A-D indicators [90]
Deck Assign buttons [56] [88]
Deck Assignment indicator [116]
DECK C button [88]
DECK D button [56] [88]
Deck Display [89]
DECK A indicator [26]
DECK A-D indicators [90]
KEYLOCK indicator [73] [90]
Loop Size Display [46] [91]
MASTER indicator [70] [90]
ON AIR indicator [90]
SAMPLES indicator [90]
Default FX [58]
Delay (FX) [58]
Device Monitor (Control Panel) [165]
Direct FX 1-3 (prefs) [143]
Direct Loop (prefs) [144]
Index
TRAKTOR KONTROL S4 - Manual - 214

Displays [85]
Distortion [42] [44]
Documentation [11]
Driver issues [171]
Drop-Out Detection (Control Panel) [167]
DRY/WET knob (FX Unit) [59] [61]
DRY/WET knob (Loop Recorder) [63] [125]
Dynamic range [41]
EEffects [19] [57] [79]
Encoders [83]
EQs [30] [43] [114]
using when mixing in a track [37]
External audio input [77] [88]
FFaders [84]
channel [30] [116]
TEMPO [39] [93]
Favorites [27] [128]
Filter (FX) [58]
FILTER knob [30] [43] [115]
for mixing in a track [37]
Flavor (Deck) [77] [86] [150]
Floating Cue Point [96]
Floating Loop [96]
Focus [87] [88]
FOOTSWITCH socket [133]
Front panel [136]
Headphones socket (PHONES) [137]
Headphones Volume knob (CUE VOL) [137]
Microphone Volume knob (MIC VOL) [137]
FX [57]
default [58]
loading (Group mode) [60]
loading (Single mode) [61]
synchronization [68]
tempo-synched [60]
FX Assign buttons [59] [113] [154]
FX Buttons 1-3 [59] [61]
Index
TRAKTOR KONTROL S4 - Manual - 215

FX Knobs 1-3 [60] [61]
FX On button [58] [61]
FX Unit [19] [43] [57] [79]
assigning to channels [59]
Assigning to channels [113]
controlling [60]
DRY/WET knob [59] [61]
FX Buttons 1-3 [59] [61]
FX Knobs 1-3 [60] [61]
FX On button [58] [61]
Group mode [58] [123]
MODE button [58] [61]
Quick Reference [209]
reference [122]
Single mode [61] [123]
snapshot [61]
using four FX Units [153]
GGAIN encoder [30] [42] [113]
Gater (FX) [60]
Ground terminal [133] [191]
Group mode [58] [123]
adjusting FX Dry/Wet balance [61]
HHardware Reference [74]
Headphones [32]
Headphones Cue button [37] [39] [115]
Headphones Mix knob (CUE MIX) [32] [34] [39][137]
Headphones socket (PHONES) [32] [137] [183]
Headphones Volume knob (CUE VOL) [32] [137]
HI knob [30] [114]
Hotcue 5-8 (prefs) [144]
Hotcue buttons [35] [47]
on Remix Decks [56]
on Track Decks [103]
Hotcue Buttons (prefs) [145]
Hotcues [48]
clearing [49]
deleting [104]
storing [35] [47] [103]
Index
TRAKTOR KONTROL S4 - Manual - 216

IImporting music [20]
Importing your music [68]
Indicators [85]
Information (Control Panel) [167]
INPUT CHANNEL C section [135]
INPUT CHANNEL D section [134]
Input routing [150]
iTunes [22]
JJog mode [147]
Jog wheel [83]
on Remix Decks [56]
on Track Decks [39] [92]
outer rim [40]
top plate [40]
KKensington lock slot [133]
Keyboard Shortcut Overview Card [13]
Keylock [73]
KEYLOCK indicator [73] [90]
Knobs [82]
Knowledge Base [174]
LLatency [161] [165]
Layout Switch Left and Right (prefs) [143]
Layouts [89] [143]
Level meters [42]
Levels
adjusting [41]
Library
iTunes [22]
Limiter [44]
Line/Phono Inputs 1/2 RCA sockets (IN 1/2)[135]
Line/Phono Inputs 3/4 RCA sockets (IN 3/4)[135]
LINE/PHONO switch [135] [190] [193]
Live Input [77] [88]
LOAD button [26] [91]
Jog mode [147]
Load Buttons (prefs) [147]
Loading
Samples [51]
tracks [25]
Loading from your S4 [127]
Quick Reference [211]
Locking the tempo on a Track Deck [95]
Index
TRAKTOR KONTROL S4 - Manual - 217

Loop Buttons (prefs) [145]
LOOP IN button
on Track Decks [46] [96]
Loop mode [52]
LOOP MOVE encoder
on Track Decks [47] [48] [97]
LOOP OUT button
on Track Decks [46] [96]
Loop Out Point [96]
Loop Recorder [62] [80]
adjusting the loop size [64]
deleting a recorded loop [65]
DRY/WET knob [63] [125]
overdubbing [66] [126]
PLAY button [64] [127]
Quick Reference [210]
REC button [64] [66] [126]
recording a loop [64]
reference [124]
SIZE button [64] [125]
Source menu (software) [63] [188]
transfering a recorded loop to a SampleSlot [66]
UNDO button [65] [66] [126]
Loop section
on Track Decks [45] [96]
Loop Size Display [46] [91]
LOOP SIZE encoder
on Track Decks [45] [48] [98]
Looped mode [101]
Looping [45]
Loops
activating/deactivating [48] [97]
adjusting the size [46] [96] [98]
Floating Loop [96]
moving [47] [96]
setting in a track [45] [46] [96]
storing [47] [103]
LOW knob [30] [114]
Index
TRAKTOR KONTROL S4 - Manual - 218

MMAIN knob (software) [31] [44] [111]
Main level [43]
MAIN LEVEL knob [31] [44] [110]
MAIN LEVEL meters [31] [44] [110]
MAIN meter (software) [44]
MAIN OUT section [134]
Main Outputs 1/2 [182]
Main section [19] [43] [79] [110]
Manual Looping (prefs) [145]
Manually cueing [39]
MASTER button and indicator [70] [71] [120]
Master Display [36] [118]
Alert indicator [119]
MASTER button and indicator [70] [71] [120]
Preview Play indicator [119]
QUANT button and indicator [36] [72] [121]
SNAP button and indicator [36] [72] [120]
USB indicator [119] [171]
MASTER indicator (Deck Display) [70] [90]
MASTER indicator (Master Display) [70]
Meters [85]
channel [30] [116]
Metronome icon [69]
MIC VOL knob [137] [188]
Microphone [186]
Microphone Gain knob (GAIN) [135]
Microphone socket (MIC) [135] [186]
Microphone Volume knob (MIC VOL) [137] [188]
MID knob [30] [114]
MIDI IN/OUT sockets [133]
MIDI mode [13] [137]
Mixer [19] [78]
channel [29] [78] [112]
Main section [43] [79] [110]
Master Display [36] [118]
Quick Reference [207]
reference [109]
Mixing
by hand [38]
using automatic sync [31]
MODE button [58] [61]
Moving a Loop [47] [96]
Music files [20]
Music folders [21]
NNavigate
track by selected Loop size [47]
Noise level [41]
Index
TRAKTOR KONTROL S4 - Manual - 219

OOffset
manually correcting [40]
OFFSET (Tempo Offset buttons) [94]
ON AIR indicator [90]
ON/OFF switch [136] [184]
One-shot mode [52] [102]
Online Support Form [174]
Output Latency [165]
Overdubbing [66] [126]
Overview [17]
Overview Poster [13]
PPhase offset (correcting) [40]
PHONES socket [32] [137] [183]
Pitch (tracks) [73]
PLAY button (Deck)
on Track Decks [28] [106]
PLAY button (Loop Recorder) [64] [127]
Playing a track [25]
Playlist [27] [77] [128]
in iTunes [22]
Poster [13]
POWER section [136]
Power supply [177]
Power Supply connector [136] [178]
Preferences [140]
Audio Setup page (Mac OS X) [161]
Audio Setup page (Windows) [162]
Decks page [150]
Effects page [153]
Input Routing page [151]
Traktor Kontrol S4 page [141]
Preferences button [140]
Pre-listening a track in the Browser [32] [130]
Preparing the mix using headphones [33]
Preview Play indicator [119]
Index
TRAKTOR KONTROL S4 - Manual - 220

Preview Player [32] [130]
Process Buffer (Control Panel) [165]
Processing State (Control Panel) [165]
QQUANT button and indicator [36] [72] [121]
Quantize mode [36] [72] [121]
Quick Loading
samples [100] [128]
tracks [26] [128]
Quick References [200]
RRear panel [133]
INPUT CHANNEL C section [135]
INPUT CHANNEL D section [134]
MAIN OUT section [134]
POWER section [136]
REC button [64] [66] [126]
Recalibrating your S4 [149]
Recording a loop [64]
Relative (prefs) [146]
Relative mode [146]
Remix Deck [50]
concept [77]
Quick Reference [203]
Restoring the default settings [148]
Reverb (FX) [58]
Index
TRAKTOR KONTROL S4 - Manual - 221

SSample Play buttons [52] [66] [99]
Sample Play Buttons (prefs) [144]
Sample Rate
Mac OS X [161]
Windows [164]
Sample Slot [77] [99]
Samples [77]
capturing from a track [54]
grabbing from a track [100] [131]
loading [51]
playback mode [52] [101]
playing [52]
Quick Loading [100]
stopping & skipping back to start [52]
triggering [52]
unloading [56] [102]
SAMPLES indicator [90]
Scratching
on a track [92]
Seeking through a track [92]
Selecting
track [26]
Service Center [174]
Setting a Loop in a track [45] [96]
Settings button (prefs) [162]
Setup Guide [11] [12]
Setup Wizard [148] [154]
SHIFT button [88]
tapping [108]
Signal flow in channels [112]
Single mode [61] [123]
SIZE button [64] [125]
Skipping back to start of track [37]
SNAP button and indicator [72] [120]
SNAP indicator & button [36]
Snap mode [36] [46] [55] [72] [120]
Snapshot (FX Unit) [61]
Sockets [86]
FOOTSWITCH [133]
IN 1/2 [135]
IN 3/4 [135]
MAIN OUT 1/2 1/4 [134]
MAIN OUT 1/2 RCA [134]
MIC [135] [186]
MIDI IN/OUT [133]
PHONES [137] [183]
USB [136]
Source menu (Loop Recorder, software) [188]
Storing a Cue Point [35] [103]
Index
TRAKTOR KONTROL S4 - Manual - 222

Storing a Hotcue [35] [47]
Storing a Loop [47] [103]
Switches [85]
Switching between Deck flavors [150]
SYNC button
on Track Decks [34] [70] [107]
Synchronization [67]
Synchronizing tracks
by hand [38]
using automatic sync [34]
System requirements [16]
TTechnical Specs [195]
Tempo
adjusting manually [39]
automatically adjusting (Sync) [34]
Tempo bending
on Track Decks [40] [92]
TEMPO fader [39] [93]
TEMPO Fader
Absolute mode [94]
Relative mode [146]
Tempo Faders (prefs) [146]
Tempo master [67]
setting a Track Deck as [71] [107]
setting the Clock as [71]
Tempo Offset buttons (OFFSET) [93]
in Relative mode [146]
Thru Gain knob (GAIN) [134]
THRU/USB switch [135] [187] [191] [194]
Track
info [28]
loading [25]
playing [25]
Track Collection [20] [68]
browsing [51]
Index
TRAKTOR KONTROL S4 - Manual - 223

Track Deck [51] [67]
concept [77]
Quick Reference [200]
Tracks [77]
TRAKTOR Clock [67] [69]
setting as tempo master [70] [71]
TRAKTOR KONTROL S4 controller [17]
main areas [74]
TRAKTOR KONTROL S4 Manual [11] [12]
TRAKTOR mode [137]
TRAKTOR 2 Manual [13]
Troubleshooting [170]
no audio [29]
Turntable [189]
Tutorials [25]
video [11] [12]
UUNDO button [65] [66] [126]
Updates [175]
USB indicator [119] [171]
USB issues [171]
USB socket [136] [180]
User Forum [175]
Using a master mixer [189]
Using a slave mixer [193]
Using four FX Units [153]
Using the S4 as default audio interface [168]
Using the S4 audio interface with other musicapplications [167]
Using the S4 with a laptop [173]
Using turntables and/or CD decks [189]
VVideo tutorials [11] [12]
WWaveform [28] [48]
Index
TRAKTOR KONTROL S4 - Manual - 224