toonz paperless workflow - digital video | home · the material can be used with both toonz...
TRANSCRIPT

ToonzPaperlessWorkflowfor Toonzharlequin
& ToonzBravo!

© 2007 Digital Video S.p.A.
All rights reserved.
Intuitive vector handling technique using adaptive dynamic control points and adaptive fill feature are Patent protected.Toonz, Toonz Harlequin and Toonz Bravo! are a trademark of Digital Video S.p.A.
Macromedia, Flash, and Macromedia Flash are trademarks or registered trademarks of Macromedia Inc. in the United States and internationally.
QuickTime and the QuickTime logo are trademarks used under license. The QuickTime logo is registered in the U.S. and other countries.
All other product names mentioned in this guide may be trademarks or registered trademarks of their respective companies and are hereby acknowledged.
This document is protected under copyright law. The contents of this document may not be copied or duplicated in any form, in whole or in part, without the express written permission of Digital Video S.p.A. This document is supplied as a guide for the Toonz product. Reasonable care has been taken in preparing the information it contains. However, this document may contain omissions, technical inaccuracies, or typographical errors. Digital Video S.p.A. do not accept responsibility of any kind for customers’ losses due to the use of this document.
Special thanks to Sara Arcieri.
Printed in Italy.
Rev 1.1

Tutorial
Before StartingThis tutorial guides you through the steps of a paperless production, starting from the creation of puppets, to the layout and the final compositing of a scene.
The tutorial material is stored in a folder named Paperless Tutorial. This folder contains different projects for the different steps of the workflow. The material can be used with both Toonz Harlequin and Toonz Bravo.
To use the material copy the Paperless Tutorial folder in the PROJECTROOT defined during the Toonz installation (for details see the Setup Guide).
Creating a LibraryDrawing a PuppetThe drawings needed to create a character puppet usually are based on the character model sheet, that can be sketched either in Toonz or on paper.
The model sheet should be analyzed to understand which is the best way to split a character in sections in order to allow the puppet to perform all the actions needed for the animation. Animators that are going to use the characters’ puppets may be involved and give advice in this process.
Usually once the sections a character’s puppet is made of are defined, the same structure will be used for other characters as well, in order to simplify and uniform the creation of library elements.
The model sheet can be traced directly in Toonz. In case the model includes different points of views, such as front, back, side and three-quarter views, you can draw one view at the time in separate drawings. In case a full turn-around puppet is needed, of course only half turn-around has to be drawn, for example front to left side to back, as the puppet can easily be mirrored.
If while proceeding with the storyboard examination some sections need new drawings, for example the arm need a special animation, they can always be added later in the related animation level of the library puppet.
15Tutorial

You can start tracing each section on a separate layer from the beginning, or you can trace all the sections on the same drawing, intersecting one another, and later on cutting and pasting the sections into separate layers.
Before starting to draw, set the 01 Library project in the Paperless Tutorial folder as your current project.
When your drawing session is completed, save your work by saving the scene file in the 01 Library\scenes folder: the drawing will be automatically saved.
If you want to check the final result of the drawing process you can load the scene Mozart drawing.tnz.
To draw the front view of the puppet:1.Load and import the model sheet Mozart Model.jpg available in the Paperless Tutorial\Library\Models folder. To have an idea of how the character should look, see the Mozart Sketch.jpg available in the same folder
Note: The Mozart model contains details about the sections and joints the puppet has to be made. This work can also be done directly in Toonz by using some sketches a reference.
2.Scale and move the model image so that the sketch of the front view is placed at the center of the work area.
3.Select an empty column in the xsheet and start tracing the drawing considering the following guidelines:
•Set a similar thickness for the Brush and Geometric tools, so that lines done with the tools will have similar appearance.
•Trace irregular shapes with the Brush tool.
•Trace more regular shapes with the Geometric tool.
The exploded view of the Mozart puppet, showing all the sections it is made of. Some outlines are made with a transparent color (such as the upper part of the arms) so that the area can be filled while the outline is invisible.
16 Toonz Paperless Workflow

• Especially in limb sections draw circles whose center is where joint points are supposed to be: they will help you to set the hook positions later on.
• Model the lines you drawn with the Pinch and the Control Point Editor tool.
• Connect as many open lines as possible with the Autoclose tool to define closed shape that will be easier to paint.
• Draw all the lines needed so that puppet sections can be separated on different layers, and once separated they are still made of closed shapes that can be painted.
To draw the other views of the puppet:1. Create some guides in the work area as reference to align the different views of the turn-around, so that the vertical axes of the body will remain the same.
2. Move the model sheet so that the sketch of another view is placed at the center of the work area.
3. Select the following cell of the column where you drawn the previous view, and trace the drawing. In this way you will have a level containing all the view of the character.
To split a view in several levels:1. Select the lines you want to use as a new drawing, for instance the ones defining the character’s hand, and cut them.
2. Select a cell in the xsheet.
3. Paste the cut selection: automatically a new drawing will be created containing only the cut selection.
4. To better manage the puppet during the animation, consider the following guidelines:
• Create one animation level for each section, containing all the views of that section. For example use a level named arm that contains as frames all the drawings for the different view of the right arm. In this way it will
17Tutorial

be easier to retrieve the appropriate drawing when needed for the animation.
• If different mouth drawings are required, create a separate animation level for the mouth.
• If different face expression are required, create a separate animation level for the eyeballs, the sockets and the eyebrows.
Note: You can also use Cells > Clone to clone the turn-around puppet, and preserve only the needed sections in the cloned level.
Painting the Puppet SectionsTo paint the puppet sections, first you have to create colors in each section palette. Colors can be picked from a color model, or from a palette stored in the studio palette in order to assure consistency in the puppet.
Once the sections are painted, and therefore become opaque, you may need to rearrange the column order in the xsheet, or to split a column into two different column, to have the right layering of the different sections in the turn-around. For example for the Mozart character the right arm cuff has to be in front of the body in the front view, but has be behind the body for the other views.
Before starting to paint, set the 01 Library project in the Paperless Tutorial folder as your current project, and load the scene you saved after the drawing session.
The Mozart head is an animation level containing all the head views as frames.
18 Toonz Paperless Workflow

When your painting session is completed, save your work by saving the scene file in the 01 Library\scenes folder: the painted drawing will be automatically saved.
If you want to check the final result of the painting process you can load the scene Mozart painted.tnz.
To paint the character’s sections:1. Load in the scene the file Mozart Color Model.tif available in the Paperless Tutorial\Library\Models folder.
2. Select the section you want to paint, and add the number of colors you need in the palette.
3. Use the Pick RGB tool ( ) to pick colors from the color model you loaded.
The color for the Mozart’s jacket being picked from the loaded color model.
19Tutorial

4. Use the Fill tool ( ) to paint the section drawings.
Note: It is also possible to load the image as color model and create automatically a palette containing all the character’s color, then save the palette in the studio palette, from where needed colors can be retrieved with standard copy and paste operations.
Defining a PuppetThere are two ways to connect the character’s sections: by using the column centers, or by using hooks.
A puppet based on column centers is simpler to create: it has some limitations, because the pivot points positions in the skeleton are fixed, but it is suitable for most of the cases of cutout animation.
A puppet based on hooks requires one step more for its definition, i.e. setting the hook position, but it is more versatile: the pivot points can follow the animation of puppet whose sections are animated levels themselves.
In this tutorial you will use hook as the Mozart character has full turn-around views, and column centers would not fit this kind of puppet.
Defining Hooks PositionsHooks have to be placed for all the puppet sections; they will be used to set the pivot points and the joints of the puppet. For example, a trunk may have five hooks, one for the head, two for the arms and two for the legs; a forearm may have two hooks, one that will be the pivot point for the elbow, and one for the wrist.
In some case you may need to add ghost elements, that is to say element that are not visible but useful to create a more versatile puppet skeleton. For example for the Mozart character hooks are created for a puppet split in an upper part (whose parent section is the trunk) and a lower part (whose parent section is the pelvis), that are connected by a ghost element. In this way it is possible to animate the two main parts independently, for example to squash the upper part without involving the lower part.
If you have drawn the puppet sections in place, and you want to keep that position, it is very important that hooks that have to be linked, for example the upper hook of the right arm, and the right hook of the body, are overlapping. In this way the puppet will maintain its appearance with no section being shifted, and the puppet definition will be easier.
20 Toonz Paperless Workflow

Before starting to create hooks, set the 01 Library project in the Paperless Tutorial folder as your current project, and load the scene you saved after the painting session.
When the hook definition is completed, save your work by saving the scene file in the 01 Library\scenes folder: the hook information will be automatically saved.
If you want to check the final result of the hook definition process you can load the scene Mozart hooks.tnz.
Note: For the Mozart character hooks are created for a puppet that is planned to be split in an upper part (whose parent section is the trunk) and a lower part (whose parent section is the pelvis), that are connected by a using a ghost element. In this way it is possible to animate the two main parts independently, for example to squash the upper part without involving the lower part.
To set hooks on the character’s section:1. Select the section you want to define the hooks for, and use the Hook tool ( ) to define the hooks where you want the puppet pivot points and joints to be. For example for the level of the Mozart body five hooks have to be set: one to join the jacket, one for the tie, two for the two arms, and one for the head.
2. For the other view of the same section, correct the hooks position for the different drawings in the different frames by dragging them to where
Hook position for the right hand, forearm and arm.
21Tutorial

the pivot points and joints are supposed to be. In this way the puppet will be consistent even if drawings change during the animation.
Setting up the PuppetOnce the puppet sections are drawn and the hooks are put in place, you can define the puppet skeleton by using the Skeleton tool ( ). For each section you have to define the pivot point, and the parent section to which it is linked.
Usually it is simpler to start working from the parent section, in this case Mozart’s body, then link the other sections one by one, following one limb at the time.
If the position you defined for the hooks that have to be linked is overlapping, the puppet definition is very easy, because a special button labeled Link is displayed letting you link automatically the related sections with a single click.
If the hook position is not overlapping, you first have to set a hook as the pivot point for the selected puppet section, then link it to another section. In this case when the pivot point is set, the section shifts to the center of the area; when the link is set the section shifts so that the two linked hooks are overlapping.
Before starting to create the puppet, set the 01 Library project in the Paperless Tutorial folder as your current project, and load the scene you saved after the hook positioning.
Hook positions for the first and second drawing of the body level: hook 1 is used for the jacket, hook 2 for the head, hook 3 for the right arm, hook 4 for the left arm and hook 5 for the tie.
22 Toonz Paperless Workflow

When the puppet is completed, save your work by saving the scene file in the 01 Library\scenes folder.
If you want to check the final result of the linking process you can load the scene Mozart final.tnz.
Note: The hook number (H1, H2, etc.) is just a label to identify hooks, and it is not relevant when performing links.
To link a section to another section having overlapping hooks:1. Select the Skeleton tool ( ).
2. Select the section you want to link by clicking it: the hooks you created for that section are highlighted, and any hook overlapping a hook of another section has a button labeled Link.
3. Click the Link button displayed close to the overlapping hooks you want to link.
Building the right arm skeleton with overlapping hooks: select the arm (1), and click the link button on the shoulder (2); select the forearm (3)...
23Tutorial

To link a section to another section not having overlapping hooks:1. Select the Skeleton tool ( ).
2. Select the section you want to link by clicking it: the hooks you created for that section are highlighted.
3. Click the label of the hook you want to be the pivot point: the section shifts to the center of the work area, centered on the hook you clicked.
4. Click and drag the dot at the top of the handle to the section you want to be parent: the section you drag to is highlighted by displaying its bounding box and all its hooks.
5. Drag toward the hooks you want to link the section to: the hook is highlighted by displaying an external circle.
...and click the Link button on the elbow (4); select the hand (5) and click the link button on the wrist (6).
24 Toonz Paperless Workflow

6. Release to set the link: the section shifts so that the two hooks are now overlapping.
Building the right arm skeleton without overlapping hooks: select the arm, and click the H1 button to set it as pivot point(1); the arm shifts to the center (2)...
...click and drag the dot at the top of the handle towards the hook H3 of the right shoulder on the body (3) and release to set the link (4).
25Tutorial

To break the link between the selected section and its parent:Click the grey dot at the middle of the graphical link between the linked section and the parent one.
Animating a PuppetWhen the puppet is defined, is a good practice to do an animation test to check if the puppet fits the requested animation. In this case you will define a side walking cycle for the Mozart character.
The first step is to define key positions for the action the character has to perform. These key positions can be figured out by sketching on paper how you want the movement to be.
Usually the first element to be animated is the puppet parent section, that is to say the part of the puppet to which all the other sections are linked. Key positions are defined for all the frames the animation has to last and the speed of the interpolated movement is controlled with the curves in the function editor.
For example if the trunk of a character is the element from which the whole skeleton depends, it will be animated first. Then the legs, arms and head will be animated considering the key positions of the trunk.
With the Skeleton tool ( ) you can select and set positions for the puppet sections.You can also activate the Inverse Kinematics option to move the puppet considering the skeleton articulations, so that if you
The final skeleton and the related stage schematic.
26 Toonz Paperless Workflow
want to move the end of a limb to a particular position, all the rest of the sections belonging to that limb will move consequently.
Every time a position for a section is set, a key position is automatically generated for the xsheet column where that section is exposed, at the current frame. Keys and interpolations you define in this way are displayed in xsheet columns, where they can be managed directly, and in the function editor.
Before starting to define the animation, set the 01 Library project in the Paperless Tutorial folder as your current project, and load the scene you saved after the puppet definition.
When your animation is completed, save your work by saving the scene file in the 01 Library\scenes folder.
If you want to check the final result of the puppet creation process you can load the scene Mozart animation.tnz.
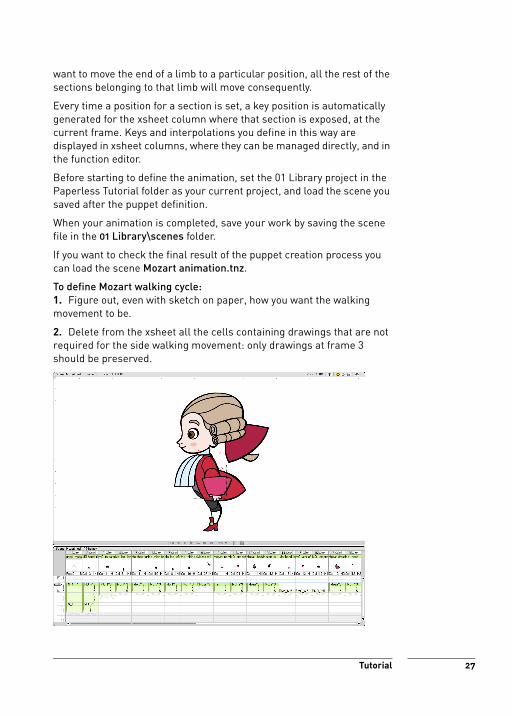
To define Mozart walking cycle:1. Figure out, even with sketch on paper, how you want the walking movement to be.
2. Delete from the xsheet all the cells containing drawings that are not required for the side walking movement: only drawings at frame 3 should be preserved.
27Tutorial

3. Repeat all the cells for all the frames you want the animation cycle to last.
4. Select the Mozart parent section, that is the ghost element to which the upper and lower part of the body are linked, and use the Edit tool ( ) to set the key positions at the different frames the animation. Usually these key positions define an up-and-down waving movement. After using the Edit tool, in each key frame click the set key button ( ) at the bottom of the viewer in order to set a key for all the object transformations (i.e. position, rotation, size and shear), and not only to the one you are editing. In this way this reference animation will maintain its consistency even when new keys are added when editing it in a real scene production.
5. Go to the first frame and with the Skeleton tool ( ) set a key position for all the puppet sections. Every time you set a position, click the set
28 Toonz Paperless Workflow

key button ( ) at the bottom of the viewer in order to set a key for all the object transformations.
6. Move to the other frames where keys were defined for the parent section, and set key position for the other sections as well.
7. Scrub the current frame cursor or use the Play button to check the animation.
To use the inverse kinematics when animating:1. Select the Skeleton tool ( ) and activate the Inverse Kinematics option.
2. Click the center of the section you want to stay fixed: it turns from round to square to indicate it is fixed.
3. Click any point of any section (but the fixed one), and drag to the final position.
To refine the animation:Consider the following guidelines:
• Limit the number of key positions you define, as it is better to control the movement by calibrating the interpolation speed, than by defining too many keys. Note that the Mozart animation.tnz scene is 27 frames long and contains only 7 key positions.
• Set the key positions for the sections at the same frames of the parent sections keys. You can also shift keys one or two frames up or down in
29Tutorial

order to create a small delay in specific sections movement that makes the animation more natural.
• Activate the onion skin to check how the key positions are interpolated. You can also extend the onion skin to all the puppet sections by right clicking the current frame cursor and selecting Extend Onion Skin to Scene from the menu that opens.
• Calibrate the key interpolation by moving the arrowheads between key icons in xsheet. In this way you can control the movement speed, and avoid sudden changes of movement at key positions, for all the section transformations in the same way and at the same time (i.e. rotation, squash, position, etc.).
• Calibrate the key interpolation by modelling curves in the function editor. In this way you can control the movement speed and avoid sudden changes of movement at key position for each single transformation, independently from the others.
• In case during the movement a change of view is needed, for example the character has to turn from the front to a side view, switch drawings where a key position is: in this way the abrupt passage from one view to another, based only on one or two drawings, will look more natural.
• Use the guides in the work area as reference to align movements and animations.
LayoutA scene layout is created by importing all required elements from the library. Usually the storyboard sketch related to the scene is loaded as reference for positioning elements and guiding the camera movements.
Backgrounds and props are put in place, and puppets are cleaned up from drawings not necessary in that specific scene. For example if the character has to run to the right, leave only the drawings for the puppet facing right.
As concerning the xsheet, the following should be arranged in order to achieve the animation requested from the storyboard:
• The scene timing has to be taken from the storyboard.
• The layering order of the scene elements has to be set: for example if a character has to move in front and at the back of a prop, the related levels are exposed in the column under the prop, then in those on the top.
• Some rough masks can be created if some elements have to be hidden.
30 Toonz Paperless Workflow

• Poses for the different characters involved in the scene are defined in order to give an idea of how the animation will take place. Poses usually are not interpolated, but just exposed as they are for all the required frames.
Before starting to define the animation layout, set the 02 Layout project in the Paperless Tutorial folder as your current project, and create a new scene.
When the layout scene is completed, save it in the 02 Layout\scenes folder.
If you want to check the final result of the layout process you can load the scene sc_N2_layout.tnz available in the 02 Layout\scenes folder.
Importing Backgrounds and Props from the LibraryYou can start loading the storyboard sketch referring to this scene, and the needed background and props, that can be positioned according to the sketch.
To load the storyboard sketch, the background and props:1. Navigate with a browser to Library project by using the Load Level command.
2. Load the image sc_N2_sb1.jpg available in the Storyboard Sketches folder; when prompted, choose to import the sketch that will be saved in the extras default folder of the Layout project.
3. Load the image sc_N2_bkg.tif available in the Location folder; when prompted, choose to import the background that will be saved in the extras default folder of the Layout project.
4. Load the levels piano.pli, stool.pli, stand.pli and score.pli available in the Props folder; when prompted, choose to import the images that will be saved in the drawings default folder of the Layout project.
Importing Character PuppetsThe Mozart puppet now can be imported in the scene as a sub-xsheet. You can also load the puppets for Mozart’s father and sister, and animate them, or you can load the scenes sister animation.tnz and father animation.tnz containing the two puppets already performing the action requested in this scene.
To load the Mozart puppet:1. Navigate with a browser to Library project by using the Load Level command
2. Load the scene Mozart final.tnz available in the scenes folder as sub-xsheet; when prompted, choose to import the scene whose
31Tutorial

drawings will be saved in the drawings default folder of the Layout project.
Note: If in the Preferences the Create Sub-folder when Importing Sub-xsheet is activated, the drawings will be saved in a sub-folder named Mozart final in the drawings default folder of the Layout project.
Note: If you saved your own Mozart puppet, you can load it as well.
Creating the Scene LayoutIn this scene the Mozart character has to be sitting on the stool at the piano, and play some music.
First the puppet has to be optimized, so that only necessary drawings are preserved, then it has to be posed on the stool as if playing the piano. Therefore the piano and the stool will be moved inside the Mozart sub-xsheet so that you can check how the puppet interacts with the props.
To clean up the puppet from unnecessary drawings:1. Enter in the puppet sub-xsheet.
2. Put the frame cursor at the frame displaying the puppet with the side view; in case of the Mozart final.tnz puppet, it is frame 3.
32 Toonz Paperless Workflow

3. Select the cells in all the column at any frame but frame 3 and delete them.
Note: If any drawing is required later on, it can be retrieved from the level strip of the related level.
4. Delete any empty column resulting from the clean up process, and move the remaining cells from frame 3 to frame 1.
To move the stool and the piano inside the xsheet:1. Move to the main xsheet and cut the columns where the stool, the piano, the stand and the score are exposed.
2. Enter in the puppet sub-xsheet and paste the copied columns.
Note: You can copy the storyboard sketch as well to use it as reference inside the sub-xsheet.
3. As the puppet is facing left, flip the props with the Edit tool ( ) by setting an horizontal scale of -100, as if the storyboard sketch was flipped, and arrange them.
To set poses for the puppet:1. Repeat the cells for as many as the poses you are going to define. In this case for 8 frames, even if we will create only 3 poses.
2. Select frame 1 to define the first pose.
33Tutorial

3. Right-click the Mozart character, and choose the puppet parent section ghost-mozart (the one before the Peg2 item) from the menu that opens.
4. Use the Edit ( ) to move the character on the stool by moving the parent section.
5. Use the Skeleton tool ( )to select the skeleton section and rotate them to the desired pose, considering the following guidelines:
• To select a section click on it with the Skeleton tool ( ); to rotate it, click and drag anywhere.
• To select any element in the puppet, right-click a drawing to select an item from the list of the objects hierarchically linked to the column containing the drawing, from the first one up to the table and current camera.
• To select hidden sections, for example the right arm, hide the columns where upper sections are exposed by using the camera stand toggle ( ).
• If you want to move a limb as a whole, for instance an arm, activate the Inverse Kinematics option, and click and drag the section at the end of the limb.
34 Toonz Paperless Workflow

6. Select frame 4 to define the second pose, then frame 8 for the third pose. The puppet positions in the inbetween frames will be automatically interpolated.
To expose the poses in the main xsheet:1. Close the sub-xsheet, and delete all cells from the sub-xsheet column, but the first one.
2. Flip the sub-xsheet with the Edit tool ( ) by setting an horizontal scale of -100, so that it matches the storyboard sketch.
3. Repeat the sub-xsheet cell numbered 1 for as many frames as you want the first pose to be repeated.
4. Double click the cell where you want the second pose to start being exposed, and type 2: the second sub-xsheet frame will be displayed in the work.
5. Repeat the sub-xsheet cell numbered 2 for as many frames as you want it to be repeated.
6. Do the same with the remaining frames. If you want to create a cycle, select the cells defining the cycle and repeat them.
35Tutorial

To finalize the scene:1. With the Edit tool ( ) resize the sub-xsheet, the background and the camera so that they fits the storyboard sketch.
2. Select the cell where the background is exposed, and repeat it for all the required frames.
AnimationWhen the layout is completed all the elements of the scene are in place, and the animator can start redefining the scene animation.
For each character or element that has to be animated, the animator starts from scratch to set new key positions using the layout poses as reference. In case the character or element to be animated is a sub-xsheet, the animation is done inside the sub-xsheet and then is exposed in the main xsheet.
The animation technique is basically the one used also to achieve test animations, and the guidelines provided in Animating a Puppet on page 26 apply also in this case.
Apart from defining key positions for animated puppets and elements, the most important job of the animator is defining the way key positions are interpolated by using curves and key icons on xsheet columns. The richest and more natural animations usually are achieved more by controlling properly the interpolation than by setting a lot of keys.
Poses defined in the layout usually are not reused, but are taken only as reference for the final animation. They can also be preserved at the top of the xsheet to be retrieved or checked at any moment, and the animator starts working not at the first frame, but some frames after the ones where layout poses are exposed.
Before starting to define the animation, set the 03 Animation project in the Paperless Tutorial folder as your current project. As a starting point, import the layout scene from the 02 Layout project.
When the scene is completed, save it in the 03 Animation\scenes folder.
If you want to check the final result of the animation process you can load the scene sc_N2_animation.tnz available in the 03 Animation\scenes folder.
To setup the animation for the Mozart puppet:1. Enter in the puppet sub-xsheet.
2. Analyze the layout poses and figure out, even with sketch on paper, how you want the animation to be.
36 Toonz Paperless Workflow

3. Copy all the cells at frame 1, and paste them in another frame, for instance frame 10. In this way the layout poses are always available for reference.
4. Repeat all the cells for all the frames you want the animation to last.
5. Follow the guidelines provided in Animating a Puppet on page 26 to define the puppet animation.
To retrieve different drawing for puppet’s sections:1. Choose the Skeleton tool ( ) and select the section you want to change the drawing for.
2. Click the label with the level name close to the Skeleton tool handle, and drag up or down to flip through following and previous frames. For example, click on the hand section label to flip through the different hand drawings.
37Tutorial
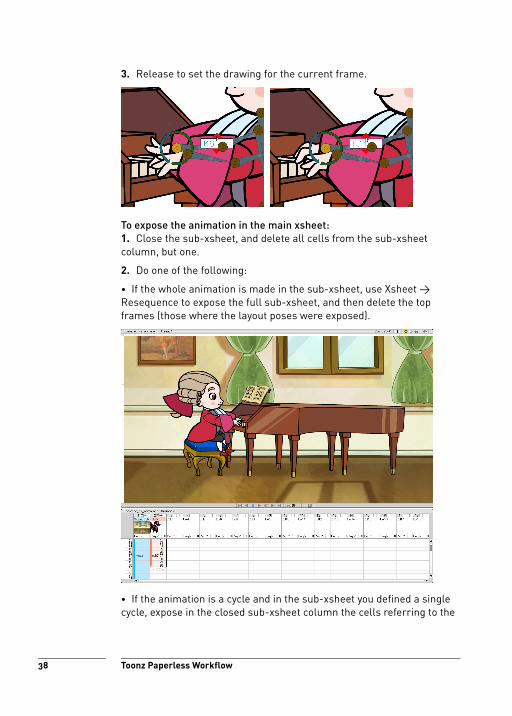
3. Release to set the drawing for the current frame.
To expose the animation in the main xsheet:1. Close the sub-xsheet, and delete all cells from the sub-xsheet column, but one.
2. Do one of the following:
• If the whole animation is made in the sub-xsheet, use Xsheet > Resequence to expose the full sub-xsheet, and then delete the top frames (those where the layout poses were exposed).
• If the animation is a cycle and in the sub-xsheet you defined a single cycle, expose in the closed sub-xsheet column the cells referring to the
38 Toonz Paperless Workflow

cycle, then repeat them with Cells > Repeat, or with copy and paste operations.
• If the animation needs different references to the sub-xsheet content, for example you want the character to stay still for a certain number of frame, edit the sequence of cells of the closed sub-xsheet column as if it was a standard column.
Saving an Animation in the LibraryAn animation defined for a character in a specific scene may be needed for reuse in other scenes as well. For this reason it is possible to save an animation contained in a sub-xsheet as an independent xsheet that later on can be imported in other scenes.
As usually the library is a Toonz project different from the one where final animation scenes are saved, the sub-xsheet has to be saved in the animation project first, and then imported in the library project.
To save the sub-xsheet animation in the library:1. Enter in the sub-xsheet you want to save.
2. Use the Xsheet > Save Sub-xsheet As to save the sub-xsheet in the scenes folder of the current project.
3. Set the library project as the current one.
4. Load the saved scene from the other project, automatically importing it in the library.
Applying Special FXEven if the animation is complete, the scene can still be enriched by adding special FX, for example to add light effects, or doing color correction for some elements.
Special FX may be already planned in the storyboard, but in some cases it is the special FX operator, according to his experience and skill, that decide how to intervene in a scene.
Usually during this step the scene can also be cleaned up from unused elements, and its elements may be rearranged in order to apply special FX properly, for example a mask may be redrawn in order to be more precise, or some elements may be duplicated to create effects like reflections or shadows.
In this scene you will change the lighting by adding some dark shapes, and you will add some body shadows to the characters in order to achieve a better atmosphere.
39Tutorial

Before starting to add special FX, set the 04 Special FX project in the Paperless Tutorial folder as your current project. As a starting point, import the animation scene from the 03 Animation project.
When the scene is completed, save it in the 04 Special FX\scenes folder.
If you want to check the final result of the special FX process you can load the scene sc_N2_specialFX.tnz available in the 04 Special FX\scenes folder.
To change the lighting of the scene:1. Insert an empty column over the background column, and select the first cell.
2. Use the Geometric tool ( ) to draw a polygonal shape on the left top angle and another on the right bottom angle of the shot. Draw also some ellipses under the characters. Fill the areas with the black color, as they will be used to simulate some shadows in the background.
3. In the FX schematic select the column containing the dark shapes. Right-click and choose Insert FX from the menu that opens to see the FX list.
40 Toonz Paperless Workflow

4. Go in the Blur folder, select the Blur effect, and click the Insert button. The blur effect will smooth the shape outline.
5. Go in the Layer Blending folder, select the Transparency effect, and click the Insert button; then select the Multiply effect, and click the Insert button. The transparency effect will make the shape semi-transparent, while the multiply effect will allow the background to become darker without loosing the original hues.
6. Double-click the Blur node you inserted, and in the FX Settings set a blur value. Use the preview area to check the result.
7. Double-click the Transparency node you inserted, and in the FX Settings set a transparency value. Use the preview area to check the result.
8. Link to the down input port of the Multiply node the node of the background image.
9. Activate the preview in the work area, and calibrate the different special FX to optimize the result.
10.Repeat the cell with the dark areas for all the frames of the animation.
41Tutorial

To insert body shadow to the scene characters:1. In the FX schematic select the column containing the Mozart puppet. Right-click and choose Insert FX from the menu that opens to see the FX list.
2. Go in the Light folder, select the Body Highlight effect, and click the Insert button. The body highlight effect will be used to create a body shadow.
3. Double-click the Body Highlight node you inserted, and in the FX Settings set the following values:
• Set the Color to black, so that the highlight will be dark, that is to say a shadow.
• Set a negative X and Y Offset, as the light is coming from the top right corner of the shot.
• Increase the Blur value to have a smoother shadow.
4. Right-click the Body Highlight node you just defined and choose twice Duplicate from the menu that opens. Link the Mozart father and sister nodes to the duplicated effect nodes: the other two puppets will have the same body shadow.
42 Toonz Paperless Workflow

5. Activate the preview in the work area, and calibrate any body highlight effect to change the shadows on the three characters, and optimize the result.
Rendering the SceneWhen the scene is completed and approved, it is ready to be rendered out according to production settings.
A final check concerns the output settings, then the rendering can be performed directly while the scene is loaded, or in batch mode.
Before starting to define the animation, set the 04 Special FX project in the Paperless Tutorial folder as your current project. As a starting point, load the special FX scene from the 04 Special FX\scenes folder.
If you want to check the final result of the rendering process you can load the clip sc_N2_render.mov available in the 04 Special FX\scenes\sc_N2_specialFX\out folder.
To define the scene output settings:Choose File > Output Settings, and set the location, name, file format and render frame range of the current scene rendering.
Note: if the location is +outputs, the render will be saved in 04 Special FX\scenes\sc_N2\out, that is the default output folder for the current project Special FX.
To render the scene:Do one of the following:
• Choose File > Render to render directly the current scene according to the Output Settings.
• Submit the scene to the batch list in order to run a queue of tasks in background while you perform other works on your computer. For details see Toonz Harlequin or Toonz Bravo User Guide.
43Tutorial