harlequin multirip colorpro users guide · release, harlequin rip genesis release, harlequin...
TRANSCRIPT
ColorMate (ColorProTM )User’s GuideVersion 10.0
June 2013
AG45129 Rev. 10

Copyright and TrademarksHarlequin ColorProHarlequin MultiRIP v10.0r0June 2013Part number: HMR‐ColorPro‐v10.0‐OEMDocument issue: 124Copyright ¬© 2013 Global Graphics Software Ltd. All rights reserved.Certificate of Computer Registration of Computer Software. Registration No. 2006SR05517No part of this publication may be reproduced, stored in a retrieval system, or transmitted, in any form or by any means, electronic, mechanical, photocopying, recording, or otherwise, without the prior written permission of Global Graphics Software Ltd.The information in this publication is provided for information only and is subject to change without notice. Glo‐bal Graphics Software Ltd and its affiliates assume no responsibility or liability for any loss or damage that may arise from the use of any information in this publication. The software described in this book is furnished under license and may only be used or copied in accordance with the terms of that license.Harlequin is a registered trademark of Global Graphics Software Ltd.The Global Graphics Software logo, the Harlequin at Heart Logo, Cortex, Harlequin RIP, Harlequin ColorPro, EasyTrap, FireWorks, FlatOut, Harlequin Color Management System (HCMS), Harlequin Color Production Solu‐tions (HCPS), Harlequin Color Proofing (HCP), Harlequin Error Diffusion Screening Plugin 1‐bit (HEDS1), Har‐lequin Error Diffusion Screening Plugin 2‐bit (HEDS2), Harlequin Full Color System (HFCS), Harlequin ICC Profile Processor (HIPP), Harlequin Standard Color System (HSCS), Harlequin Chain Screening (HCS), Harle‐quin Display List Technology (HDLT), Harlequin Dispersed Screening (HDS), Harlequin Micro Screening (HMS), Harlequin Precision Screening (HPS), HQcrypt, Harlequin Screening Library (HSL), ProofReady, Scalable Open Architecture (SOAR), SetGold, SetGoldPro, TrapMaster, TrapWorks, TrapPro, TrapProLite, Harlequin RIP Eclipse Release, Harlequin RIP Genesis Release, Harlequin MultiRIP, Harlequin Parallel Pages and Harlequin VariData are all trademarks of Global Graphics Software Ltd.Protected by U.S. Patents 5,579,457; 5,808,622; 5,784,049; 5,862,253; 6,343,145; 6,330,072; 6,483,524; 6,380,951; 6,755,498; 6,624,908; 6,809,839.Other U.S. Patents PendingProtected by European Patents 0 803 160; 0 772 934; 0 896 771; 672 29 760.8‐08.Portions licensed under U.S. Patent No. 5,212,546; 4,941,038.TrueType is a registered trademark of Apple Computer, Inc. The ECI and FOGRA ICC color profiles supplied with this Harlequin RIP are distributed with the kind permis‐sion of the ECI (European Color Initiative) and FOGRA respectively, and of Heidelberger Druckmaschinen AG (HEIDELBERG).The IFRA ICC profiles supplied with this Global Graphics Software are distributed with the kind permission of IFRA and of GretagMacbeth.International Cooperation for Integration of Processes in Prepress, Press and Postpress, CIP4, Job Definition For‐mat, JDF and the CIP4 logo are trademarks of CIP4.Adobe, Adobe Photoshop, Adobe Type Manager, Acrobat, Display PostScript, Adobe Illustrator, PostScript, Dis‐tiller and PostScript 3 are either registered trademarks or trademarks of Adobe Systems Incorporated in the United States and/or other countries which may be registered in certain jurisdictions.Global Graphics Software Ltd is a licensee of Pantone, Inc. PANTONE¬Æ Colors generated by ScriptWorks are four‐color process simulations and may not match PANTONE‐identified solid color standards. Consult current PANTONE Color Publications for accurate color. PANTONE¬Æ, Hexachrome¬Æ, and PANTONE CALIBRATED‚Ñ¢ are trademarks of Pantone, Inc. ¬© Pantone, Inc., 1991.Other brand or product names are the registered trademarks or trademarks of their respective holders.
Contents
Chapter 1– Introduction . . . . . . . . . . . . . . . . . . . . . . . . . . . . . . . . . . . . . . . . . . . . . . . . . . . . . . . . . . . . . . . 51.1 What is ColorPro? . . . . . . . . . . . . . . . . . . . . . . . . . . . . . . . . . . . . . . . . . . . . . . . . . . . . . . . . . . . . . 51.2 Getting started with ColorPro . . . . . . . . . . . . . . . . . . . . . . . . . . . . . . . . . . . . . . . . . . . . . . . . . . . . 51.3 Harlequin ColorPro features . . . . . . . . . . . . . . . . . . . . . . . . . . . . . . . . . . . . . . . . . . . . . . . . . . . . . 61.4 What’s new in Harlequin ColorPro? . . . . . . . . . . . . . . . . . . . . . . . . . . . . . . . . . . . . . . . . . . . . . . . 61.5 Color and calibration . . . . . . . . . . . . . . . . . . . . . . . . . . . . . . . . . . . . . . . . . . . . . . . . . . . . . . . . . . . 61.6 Color mapping styles used in ColorPro . . . . . . . . . . . . . . . . . . . . . . . . . . . . . . . . . . . . . . . . . . . . . 6
Chapter 2– ColorPro workflows . . . . . . . . . . . . . . . . . . . . . . . . . . . . . . . . . . . . . . . . . . . . . . . . . . . . . . . 102.1 Introduction . . . . . . . . . . . . . . . . . . . . . . . . . . . . . . . . . . . . . . . . . . . . . . . . . . . . . . . . . . . . . . . . . 102.2 CMYK‚ analog matching. . . . . . . . . . . . . . . . . . . . . . . . . . . . . . . . . . . . . . . . . . . . . . . . . . . . . . . 102.3 CMYK‚ press proofing . . . . . . . . . . . . . . . . . . . . . . . . . . . . . . . . . . . . . . . . . . . . . . . . . . . . . . . . 112.4 RGB Proofing, ICC model. . . . . . . . . . . . . . . . . . . . . . . . . . . . . . . . . . . . . . . . . . . . . . . . . . . . . . 132.5 RGB Proofing‚ SetGoldPro and Harlequin ColorPro models . . . . . . . . . . . . . . . . . . . . . . . . . . . 152.6 Multiple color space proofing . . . . . . . . . . . . . . . . . . . . . . . . . . . . . . . . . . . . . . . . . . . . . . . . . . . 162.7 Emulation workflow details. . . . . . . . . . . . . . . . . . . . . . . . . . . . . . . . . . . . . . . . . . . . . . . . . . . . . 18
Chapter 3– Using ColorPro . . . . . . . . . . . . . . . . . . . . . . . . . . . . . . . . . . . . . . . . . . . . . . . . . . . . . . . . . . . 193.1 Get ready to use Harlequin ColorPro. . . . . . . . . . . . . . . . . . . . . . . . . . . . . . . . . . . . . . . . . . . . . . 203.2 Enabling ColorPro . . . . . . . . . . . . . . . . . . . . . . . . . . . . . . . . . . . . . . . . . . . . . . . . . . . . . . . . . . . . 213.3 ColorPro overview. . . . . . . . . . . . . . . . . . . . . . . . . . . . . . . . . . . . . . . . . . . . . . . . . . . . . . . . . . . . 213.4 Install ICC profiles. . . . . . . . . . . . . . . . . . . . . . . . . . . . . . . . . . . . . . . . . . . . . . . . . . . . . . . . . . . . 213.5 Define color rendering intents . . . . . . . . . . . . . . . . . . . . . . . . . . . . . . . . . . . . . . . . . . . . . . . . . . . 263.6 Define color setups using ColorPro . . . . . . . . . . . . . . . . . . . . . . . . . . . . . . . . . . . . . . . . . . . . . . . 293.7 Customize page setups using new color setups . . . . . . . . . . . . . . . . . . . . . . . . . . . . . . . . . . . . . . 393.8 Print using new page setup . . . . . . . . . . . . . . . . . . . . . . . . . . . . . . . . . . . . . . . . . . . . . . . . . . . . . 40
Appendix A – UCR and Black Generation . . . . . . . . . . . . . . . . . . . . . . . . . . . . . . . . . . . . . . . . . . . . . . . 42A.1 The Harlequin MultiRIP without ColorPro . . . . . . . . . . . . . . . . . . . . . . . . . . . . . . . . . . . . . . . . . 42A.2 The Harlequin MultiRIP with ColorPro enabled. . . . . . . . . . . . . . . . . . . . . . . . . . . . . . . . . . . . . 42
Appendix B – Creating a Logo. . . . . . . . . . . . . . . . . . . . . . . . . . . . . . . . . . . . . . . . . . . . . . . . . . . . . . . . . 44
Appendix C – Jobs Containing Color Management Data . . . . . . . . . . . . . . . . . . . . . . . . . . . . . . . . . . . 45C.1 PostScript-language jobs and image files . . . . . . . . . . . . . . . . . . . . . . . . . . . . . . . . . . . . . . . . . . 45C.2 Page setup uses a color management option . . . . . . . . . . . . . . . . . . . . . . . . . . . . . . . . . . . . . . . . 45C.3 Summary of options. . . . . . . . . . . . . . . . . . . . . . . . . . . . . . . . . . . . . . . . . . . . . . . . . . . . . . . . . . . 46C.4 Embedding ICC profiles in Photoshop images . . . . . . . . . . . . . . . . . . . . . . . . . . . . . . . . . . . . . . 47C.5 PDF color management . . . . . . . . . . . . . . . . . . . . . . . . . . . . . . . . . . . . . . . . . . . . . . . . . . . . . . . . 47
Appendix D – Overprinting options . . . . . . . . . . . . . . . . . . . . . . . . . . . . . . . . . . . . . . . . . . . . . . . . . . . . 48D.1 Overprinting. . . . . . . . . . . . . . . . . . . . . . . . . . . . . . . . . . . . . . . . . . . . . . . . . . . . . . . . . . . . . . . . . 48D.2 Drop white objects . . . . . . . . . . . . . . . . . . . . . . . . . . . . . . . . . . . . . . . . . . . . . . . . . . . . . . . . . . . . 49
AG45129 REV. 10 3
COLORMATE ( COLOR PRO ) USER’S GUIDE
Appendix E – Supplied Profiles . . . . . . . . . . . . . . . . . . . . . . . . . . . . . . . . . . . . . . . . . . . . . . . . . . . . . . . . 51E.1 CMYK Input Profiles. . . . . . . . . . . . . . . . . . . . . . . . . . . . . . . . . . . . . . . . . . . . . . . . . . . . . . . . . . 51E.2 RGB Input Profiles . . . . . . . . . . . . . . . . . . . . . . . . . . . . . . . . . . . . . . . . . . . . . . . . . . . . . . . . . . . 53E.3 CMYK Output Profiles (for Printing Press) . . . . . . . . . . . . . . . . . . . . . . . . . . . . . . . . . . . . . . . . 53
Appendix F – Seeing Color . . . . . . . . . . . . . . . . . . . . . . . . . . . . . . . . . . . . . . . . . . . . . . . . . . . . . . . . . . . . 54F.1 Perception of color. . . . . . . . . . . . . . . . . . . . . . . . . . . . . . . . . . . . . . . . . . . . . . . . . . . . . . . . . . . . 54F.2 Additional reading . . . . . . . . . . . . . . . . . . . . . . . . . . . . . . . . . . . . . . . . . . . . . . . . . . . . . . . . . . . . 54
Appendix G – Printing Color . . . . . . . . . . . . . . . . . . . . . . . . . . . . . . . . . . . . . . . . . . . . . . . . . . . . . . . . . . 55G.1 Issues in color printing. . . . . . . . . . . . . . . . . . . . . . . . . . . . . . . . . . . . . . . . . . . . . . . . . . . . . . . . . 55G.2 Color management. . . . . . . . . . . . . . . . . . . . . . . . . . . . . . . . . . . . . . . . . . . . . . . . . . . . . . . . . . . . 55G.3 Color gamuts . . . . . . . . . . . . . . . . . . . . . . . . . . . . . . . . . . . . . . . . . . . . . . . . . . . . . . . . . . . . . . . . 55G.4 Device-independent and device-dependent color . . . . . . . . . . . . . . . . . . . . . . . . . . . . . . . . . . . . 57G.5 Mapping between gamuts . . . . . . . . . . . . . . . . . . . . . . . . . . . . . . . . . . . . . . . . . . . . . . . . . . . . . . 58
AG45129 REV. 10 4
Chapter 1–Introduction
1.1 What is ColorPro?Welcome to ColorPro, a full feature color solution for the Harlequin MultiRIP.
ColorPro together with SetGoldPro profile making software is Global Graphics’ color science solution for ensuring color quality and accuracy for proofing and emulation. ColorPro provides the largest realizable color gamuts for the final print market and allows greater accuracy than would be possible using standard profiles.
Harlequin ColorPro embraces open systems, industry standards and device-independent color science, and is able to make full use of them. If you have ICC profiles with which you already achieve good results, you can use these profiles with ColorPro. You should however be aware that ColorPro contains color science that is opti-mized for the Harlequin MultiRIP and is easily utilized with the introduction of SetGoldPro.
Note: The ICC profile format is specified by the International Color Consortium (http://www.color.org/), estab-lished in 1993, has the charter for creating and promoting the standardization of open, vendor-neutral, cross-platform color management systems.
One of the unique features of ColorPro is that you can mix and match SetGoldPro profiles and ICC compliant profiles within ColorPro setups, if that is what produces the best results for you.
ColorPro solves real-world color reproduction problems for the graphic arts market and is available as a pass-word protected option in the Harlequin MultiRIP.
Global Graphics Software (GGS) supplies a range of device profiles for commonly used color standards. These profiles are available for immediate use and incorporate linearization data for output devices.
Some graphics applications include color management information in images or jobs that they produce; Adobe Photoshop is one such application. When processing jobs from these applications, you can choose to use either the color management information contained in the jobs or the more detailed controls provided by a ColorPro option. Jobs can contain color management information in several forms: as an embedded ICC profile; a color space array (CSA); or as specified by UseCIEColor. See Appendix C, “Jobs Containing Color Management Data”, for details.
1.2 Getting started with ColorProThis section provides a map of this document so you can quickly get your system installed, configured and working. This document provides the following information:
• Chapter 1, “Introduction” (this chapter) provides you with information about what ColorPro is and how it is different to previous Harlequin MultiRIP color software.
• Chapter 2, “ColorPro workflows”, provides several examples of workflows and how you should configure them in ColorPro. You may find a workflow example in this chapter that you can use as a starting point for configuring your own workflow.
• Chapter 3, “Using ColorPro”, shows you how to activate ColorPro and provides full details on all the options available including: Installing ICC profiles, configuring a color setup and how to use that setup with your page setup.
• The various appendices provide extra related information.
AG45129 REV. 10 5
COLORMATE ( COLOR PRO ) USER’S GUIDE
1.3 Harlequin ColorPro featuresHarlequin ColorPro is a complete and accurate color reproduction solution. It is a device-independent, cross-platform color management system developed to control color in today’s digital printing and publishing environ-ments. ColorPro manages all aspects of color print reproduction and is fully compatible with accepted industry standards.
ColorPro offers a technology-independent solution. Unlike most systems, which force you to compensate for color before you know how a job will be printed, ColorPro works without regard to the input and output devices used. In other words, you do not need to specify which devices will be used at the time the PostScript job is cre-ated. At run-time, ColorPro applies the proper transformations.
ColorPro allows you to specify different gamut-mapping algorithms in the reproduction of a page. For example, you can simultaneously specify Absolute colorimetric to reproduce some elements of the page and yet specify Perceptual to reproduce the photographs. The end result is that, on a single page, the color for photographs is calculated without affecting other elements on the page.
Harlequin ColorPro allows processing of colors in page data using SetGoldPro profiles or ICC profiles produced by OEMs, third parties, or end-users using third party characterization and profiling tools. Profiles specify a translation between two color spaces. Each profile is prepared for a specific set of imaging conditions. One device may have more than one profile. The profiles may correspond to running the device with different combi-nations of resolutions, inks, and paper.
New profiles can be easily added to ColorPro, and previously installed profiles can be selected without the need to reinstall each time a profile is used. An option to install and uninstall ICC profiles is provided.
In addition, ColorPro allows the use of profiles prepared in the Harlequin MultiRIP format. Global Graphics supplies a number of profiles for commonly used systems. See Appendix E, “Supplied Profiles”, for details.
1.4 What’s new in Harlequin ColorPro?The following have changes have been made to ColorPro:
• The Use late color management option is changed to Overprint preview.
• The Image only black option is deprecated and should not be used.
1.5 Color and calibrationTo ensure high color accuracy, make sure you calibrate your output device. See the chapter on Calibration in the RIPMate for Windows Manual.
1.6 Color mapping styles used in ColorProVarious color mapping strategies are available with ColorPro. The standard strategies are:
• Default Absolute Colorimetric
• Default Relative Colorimetric
• Default Perceptual
• Default Saturation
These rendering intents use the values from an installed ICC profile together with settings from the Color Setup dialog box to generate a CRD at run time.
The information in this section also applies to the rendering intents that appear when ICC profiles are selected and when using the ->Default option. For example:
• ->ICC colorimetric
AG45129 REV. 10 6
COLORMATE ( COLOR PRO ) USER’S GUIDE
• ->ICC perceptual
• ->ICC saturation
The ->ICC rendering intents use CRD’s installed in the RIP, and appear when an ICC profile has been installed and selected as either an Output Profile, (when emulation is not selected), or as an Emulation Profile.
Harlequin ColorPro can use these strategies from both ICC and Harlequin profiles. You are also able to modify these strategies and save them as new, named, strategies for later use.
The difference between the Harlequin derived and ICC rendering intents is that you are able to customize the Harlequin rendering intents using the Rendering Intent Manager see “Custom rendering intents” on page 26 for more information.
The names, Absolute colorimetric, Relative colorimetric, Perceptual and Saturation are the conventional terms for these color mapping strategies (rendering intents), and the Harlequin MultiRIP uses these names for render-ing intents derived from Harlequin profiles.
The names that appear for rendering intents derived from ICC profiles are slightly different; there is only one colorimetric intent‚ but all the same styles are available to the Harlequin MultiRIP, provided that an ICC profile contains them. ICC and Harlequin rendering intents are not same but they do produce similar results.
The different naming scheme makes it easier for the best rendering intent to be selected by ColorPro so that it best suits the other choices you have made when creating a color setup.
Section 1.6.1 through Section 1.6.4 fully describe these options.
Appendix G, “Printing Color”, has further details on absolute colorimetric mapping and perceptual mapping.
1.6.1 Absolute colorimetricAny color the device can reproduce (with the intended setup and viewing conditions) is reproduced exactly. Col-ors outside the device gamut are mapped onto a nearby point in the gamut. There are various ways in which a color might be out of gamut. For example, it could be too saturated, lighter than the paper color, or darker than the darkest imageable patch.
Colorimetric reproduction is appropriate where an exact color match is required. For example, you may choose a colorimetric strategy when you are reproducing a logo in corporate colors.
Note: Absolute and relative colorimetric styles are closely related. For simplicity, ColorPro displays just the sin-gle name ICC colorimetric but internally it is able to use either style where it is appropriate.
1.6.2 Relative colorimetricThis style aims to reproduce colors exactly, except that the luminance (how light or dark a color is) is scaled so that the darkest possible color is mapped to the darkest imageable color, and the lightest possible color to the paper white. This style may change the hue (degree of redness, blueness, and so on) of any color, and is almost certain to affect the luminance of most colors.
Some scanners and applications produce data that has been adjusted so that the lightest and darkest point are encoded as maximum and minimum lightness. For interpreting this kind of image, the relative colorimetric style is appropriate.
1.6.3 PerceptualThis style maps the entire device-independent color space onto the gamut of the printer by compressing the range of in-gamut colors to make room for out-of-gamut colors. It is appropriate for rendering photographs and similar reproductions of natural scenes.
Note: This strategy was named Photorealistic in early Harlequin MultiRIP color management systems.
AG45129 REV. 10 7
COLORMATE ( COLOR PRO ) USER’S GUIDE
1.6.4 Saturation This style specifies that the saturation of the colors in the image is preserved, perhaps at the expense of accuracy in hue and lightness.
Note: This strategy was named Business Graphics in early Harlequin MultiRIP color management systems.
1.6.5 Paper simulationColorPro allows you to reproduce the paper color of the input job in the output from the Harlequin MultiRIP. This option is an important feature because, for example, some proofing stocks are very blue and contain optical brighteners which are not typical of papers that are run through presses (at least presses running inks). Thus paper simulation can help in proofing.
Paper simulation is controlled by the Simulate paper color of job check box in the Input Document Controls sec-tion of the New Color Setup dialog box. ColorPro processes other colors on the page to match the chosen back-ground, so this setting implies absolute and relative modes. This could be a problem if the chosen rendering intent made a conflicting choice of absolute or relative rendering.
If the Simulate paper color of job check box is selected when using the ->ICC colorimetric intent option, the color is absolute. When the check box is not selected the color is relative. This means that there cannot be a con-flict, but allows full access to the rendering intents.
To clarify, if the Simulate paper color of job check box is selected when using the ICC colorimetric intent option, it changes the ->ICC colorimetric option to absolute and the background color of the paper would appear on the proof. That is, if the background color of the paper is yellow, the proof would appear more yellow.
If the Simulate paper color of job check box is not checked, the ->ICC colorimetric option becomes relative and the background color of the paper would not appear on the proof.
If the selected ICC intent is perceptual, saturation or one of the Harlequin derived intents, the RIP attempts to simulate the background.
Note: It is possible for a conflict to arise for the Harlequin derived rendering intents, because the Simulate paper color of job option only sorts things out for ICC rendering intents.
1.6.6 Rendering intent selection for emulationIn the ColorPro dialog there is no option for selecting a proofer rendering intent when an emulation profile is selected. When a profile is selected from the Output Emulation menu, the rendering intents selected in the Output Rendering Intents section apply to this profile. (It is not possible to select a rendering intent for the pro-file selected in the Output profile option.)
The Harlequin MultiRIP automatically selects a rendering intent for the output profile in the following way:
1. If the Output Profile has any ICC output profiles associated with it, the RIP uses a Colorimetric profile if one exists.
2. If there is not a colorimetric profile, the RIP attempts to use a Relative colorimetric profile.
3. If a Relative colorimetric profile does not exist, the RIP uses the first profile it finds in the list of output profiles associated with the ICC profile.
4. If the Output profile has no associated ICC output profiles, the RIP generates a CRD with the CRD genera-tor plugin. In this case the rendering intent used is Absolute colorimetric.
For information on how to choose these options see Table 3.8, page 36.
AG45129 REV. 10 8

COLORMATE ( COLOR PRO ) USER’S GUIDE
1.6.7 ICC auto-switchingGenerally, rendering intents are manually assigned using the various options available within ColorPro. How-ever, if you select an ICC output profile, ICC auto-switching becomes an available option in the Output Rendering Intents.
ICC auto-switching intelligently assigns different rendering intents based on the image types within a file.
• CMYK images are set to ICC colorimetric.
• RGB images are set to ICC perceptual.
AG45129 REV. 10 9
Chapter 2–ColorPro workflows
2.1 IntroductionThis section describes some useful workflows and how to configure them using the Harlequin MultiRIP and ColorPro. These workflows are intended as examples to demonstrate practical solutions to common workflow configurations. The workflows are shown first with the most straightforward and becoming increasingly more complex. It is hoped that you find a workflow that closely matches your system requirements and, with a few minor adjustments, quickly get your system up and running.
There are several dialog boxes shown in this section with various options selected. Explanations are given where useful but full descriptions of every option are not given. For full descriptions of all the available options in the dialogs, see “Using ColorPro” on page 19.
In this section the following workflows are described:
• CMYK analog matching, see “CMYK‚ analog matching” on page 10.
• CMYK press proofing, see “CMYK‚ press proofing” on page 11.
• RGB Profiling‚ ICC model, see “RGB Proofing, ICC model” on page 13.
• RGB Proofing‚ SetGoldPro and Harlequin Pro models, see “RGB Proofing‚ SetGoldPro and Harlequin ColorPro models” on page 15.
• Multiple color space proofing, see “Multiple color space proofing” on page 16.
• For a discussion on emulation workflows, see “Emulation workflow details” on page 18.
2.2 CMYK‚ analog matchingIt is often required that your proofs are matched against an analog proofing system. In this scenario you would need ColorPro activated to create a custom color setup.
Harlequin ColorPro is supplied with a representative group of input profiles, pre-configured and ready for use, which are based on many of the traditional analog proofing systems.
AG45129 REV. 10 10
COLORMATE ( COLOR PRO ) USER’S GUIDE
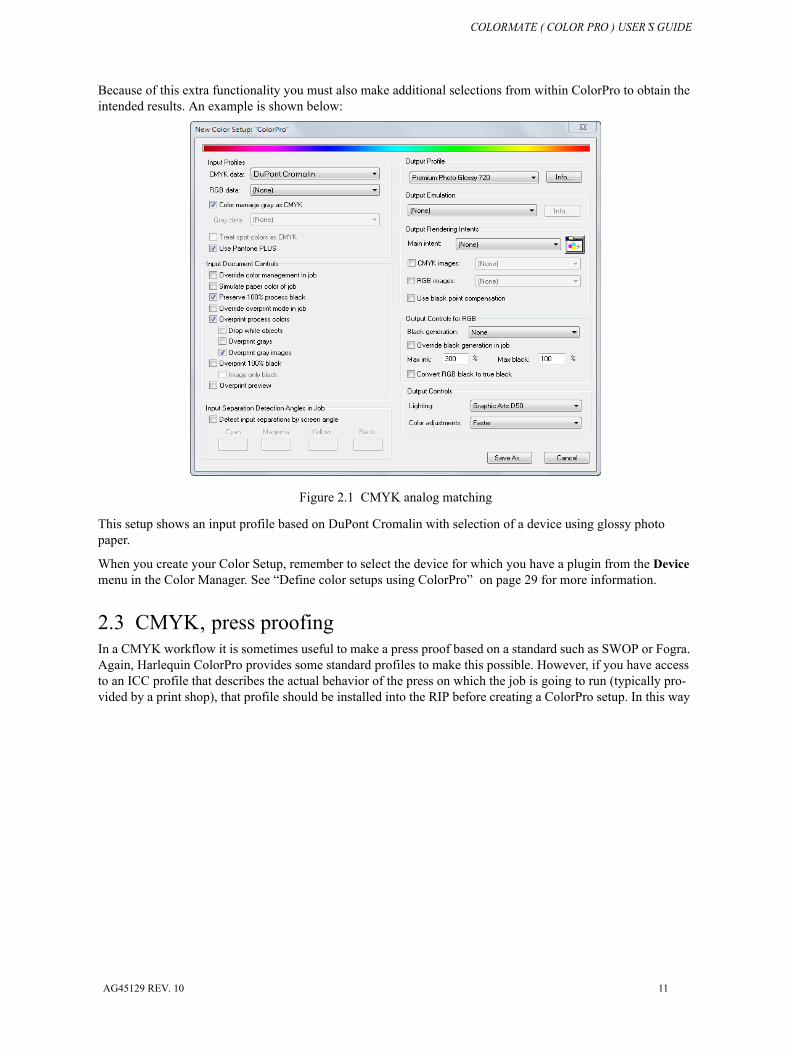
Because of this extra functionality you must also make additional selections from within ColorPro to obtain the intended results. An example is shown below:
Figure 2.1 CMYK analog matching
This setup shows an input profile based on DuPont Cromalin with selection of a device using glossy photo paper.
When you create your Color Setup, remember to select the device for which you have a plugin from the Device menu in the Color Manager. See “Define color setups using ColorPro” on page 29 for more information.
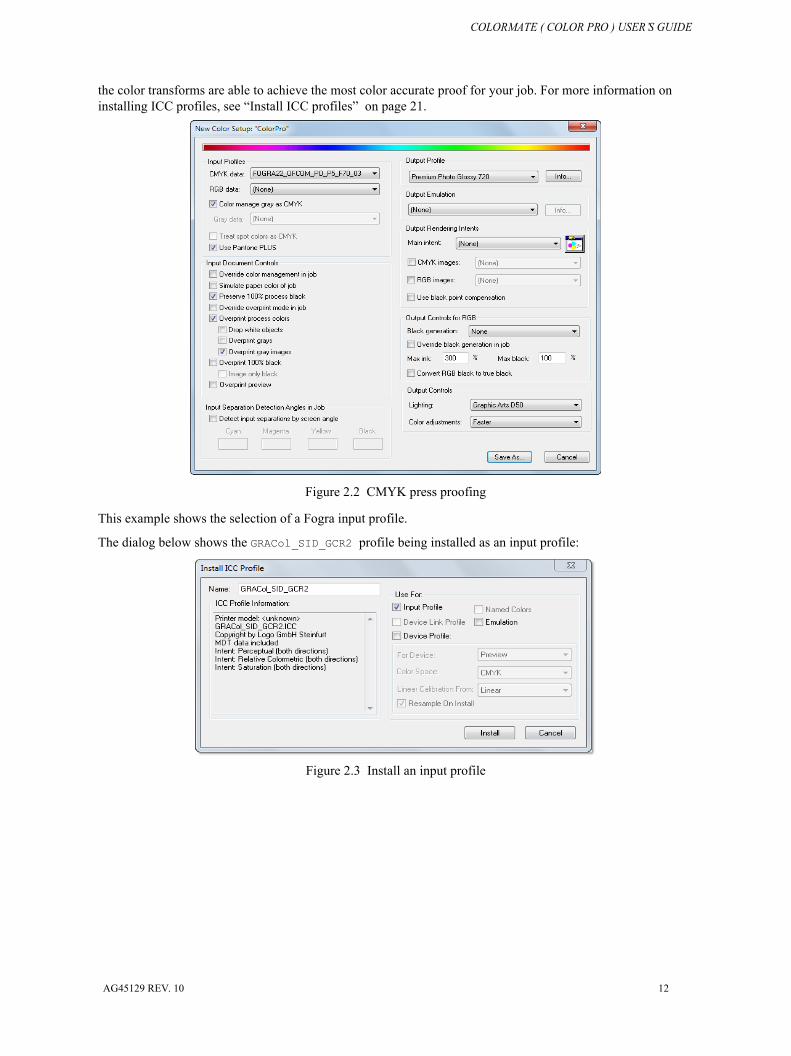
2.3 CMYK‚ press proofingIn a CMYK workflow it is sometimes useful to make a press proof based on a standard such as SWOP or Fogra. Again, Harlequin ColorPro provides some standard profiles to make this possible. However, if you have access to an ICC profile that describes the actual behavior of the press on which the job is going to run (typically pro-vided by a print shop), that profile should be installed into the RIP before creating a ColorPro setup. In this way
AG45129 REV. 10 11
COLORMATE ( COLOR PRO ) USER’S GUIDE
the color transforms are able to achieve the most color accurate proof for your job. For more information on installing ICC profiles, see “Install ICC profiles” on page 21.
Figure 2.2 CMYK press proofing
This example shows the selection of a Fogra input profile.
The dialog below shows the GRACol_SID_GCR2 profile being installed as an input profile:
Figure 2.3 Install an input profile
AG45129 REV. 10 12
COLORMATE ( COLOR PRO ) USER’S GUIDE
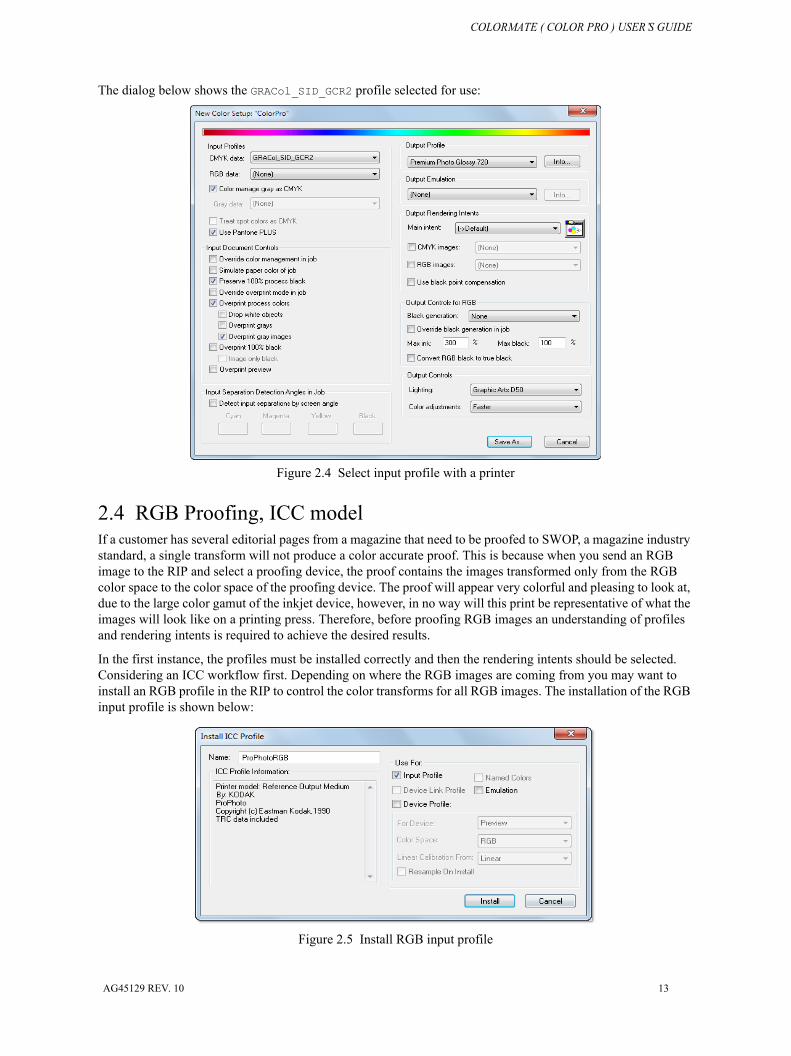
The dialog below shows the GRACol_SID_GCR2 profile selected for use:
Figure 2.4 Select input profile with a printer
2.4 RGB Proofing, ICC modelIf a customer has several editorial pages from a magazine that need to be proofed to SWOP, a magazine industry standard, a single transform will not produce a color accurate proof. This is because when you send an RGB image to the RIP and select a proofing device, the proof contains the images transformed only from the RGB color space to the color space of the proofing device. The proof will appear very colorful and pleasing to look at, due to the large color gamut of the inkjet device, however, in no way will this print be representative of what the images will look like on a printing press. Therefore, before proofing RGB images an understanding of profiles and rendering intents is required to achieve the desired results.
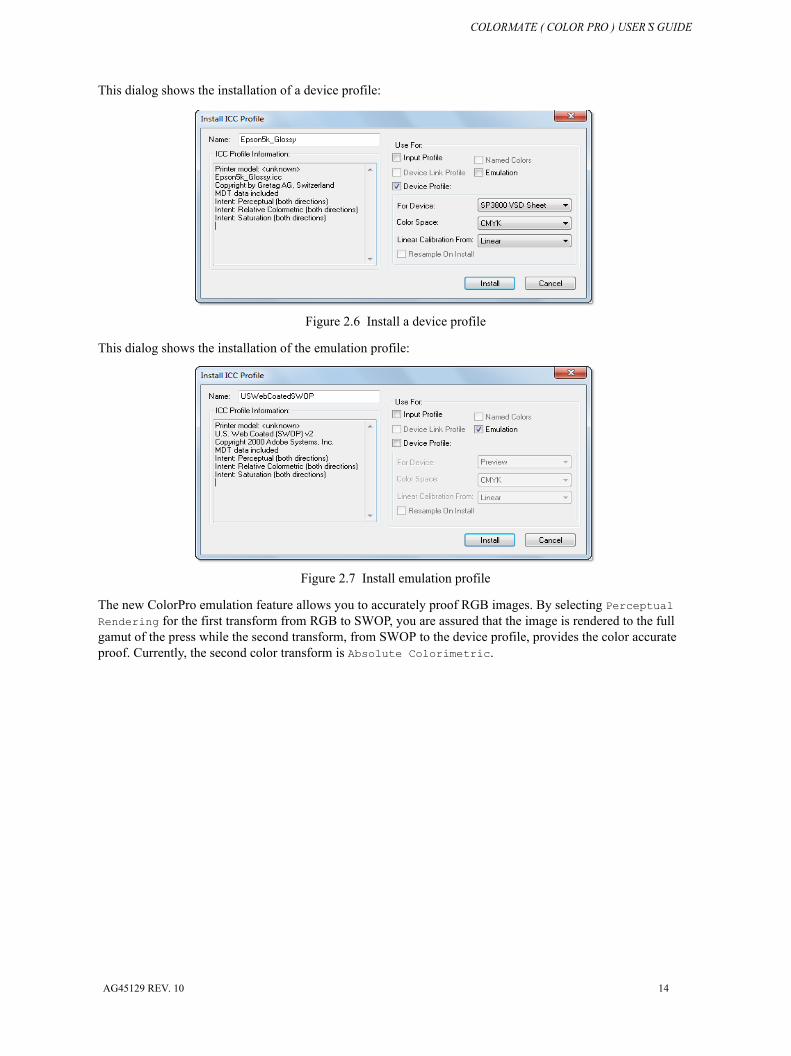
In the first instance, the profiles must be installed correctly and then the rendering intents should be selected. Considering an ICC workflow first. Depending on where the RGB images are coming from you may want to install an RGB profile in the RIP to control the color transforms for all RGB images. The installation of the RGB input profile is shown below:
Figure 2.5 Install RGB input profile
AG45129 REV. 10 13
COLORMATE ( COLOR PRO ) USER’S GUIDE
This dialog shows the installation of a device profile:
Figure 2.6 Install a device profile
This dialog shows the installation of the emulation profile:
Figure 2.7 Install emulation profile
The new ColorPro emulation feature allows you to accurately proof RGB images. By selecting Perceptual Rendering for the first transform from RGB to SWOP, you are assured that the image is rendered to the full gamut of the press while the second transform, from SWOP to the device profile, provides the color accurate proof. Currently, the second color transform is Absolute Colorimetric.
AG45129 REV. 10 14
COLORMATE ( COLOR PRO ) USER’S GUIDE
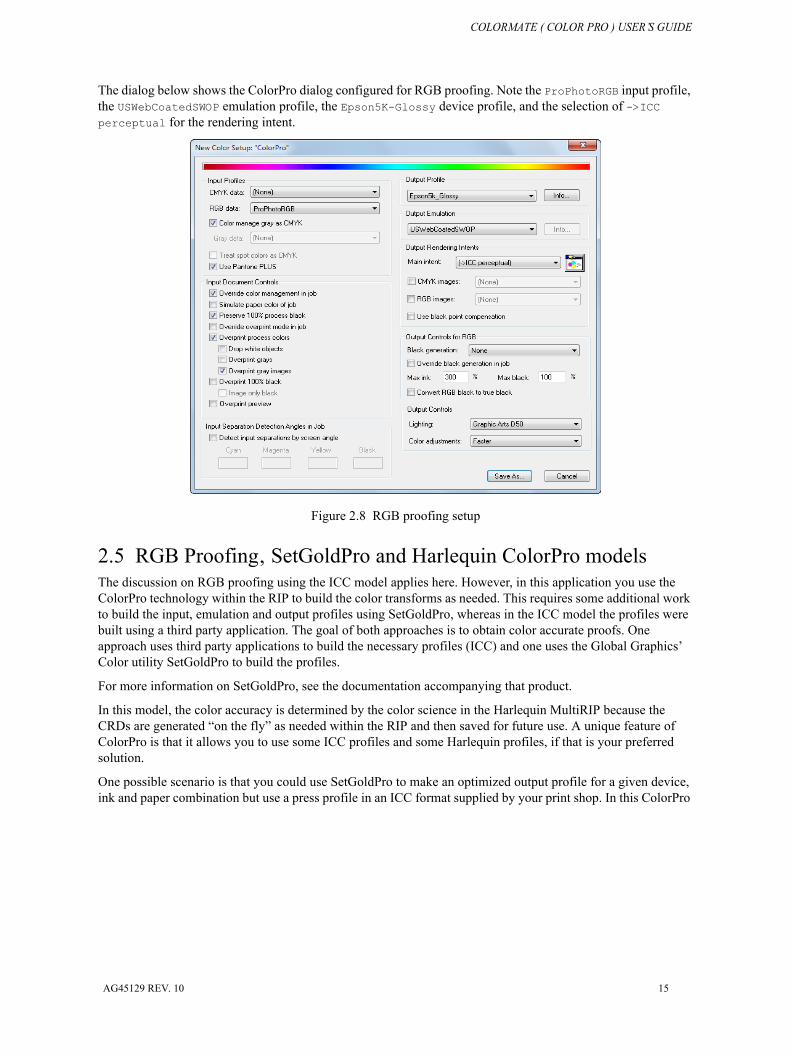
The dialog below shows the ColorPro dialog configured for RGB proofing. Note the ProPhotoRGB input profile, the USWebCoatedSWOP emulation profile, the Epson5K-Glossy device profile, and the selection of ->ICC perceptual for the rendering intent.
Figure 2.8 RGB proofing setup
2.5 RGB Proofing‚ SetGoldPro and Harlequin ColorPro modelsThe discussion on RGB proofing using the ICC model applies here. However, in this application you use the ColorPro technology within the RIP to build the color transforms as needed. This requires some additional work to build the input, emulation and output profiles using SetGoldPro, whereas in the ICC model the profiles were built using a third party application. The goal of both approaches is to obtain color accurate proofs. One approach uses third party applications to build the necessary profiles (ICC) and one uses the Global Graphics’ Color utility SetGoldPro to build the profiles.
For more information on SetGoldPro, see the documentation accompanying that product.
In this model, the color accuracy is determined by the color science in the Harlequin MultiRIP because the CRDs are generated “on the fly” as needed within the RIP and then saved for future use. A unique feature of ColorPro is that it allows you to use some ICC profiles and some Harlequin profiles, if that is your preferred solution.
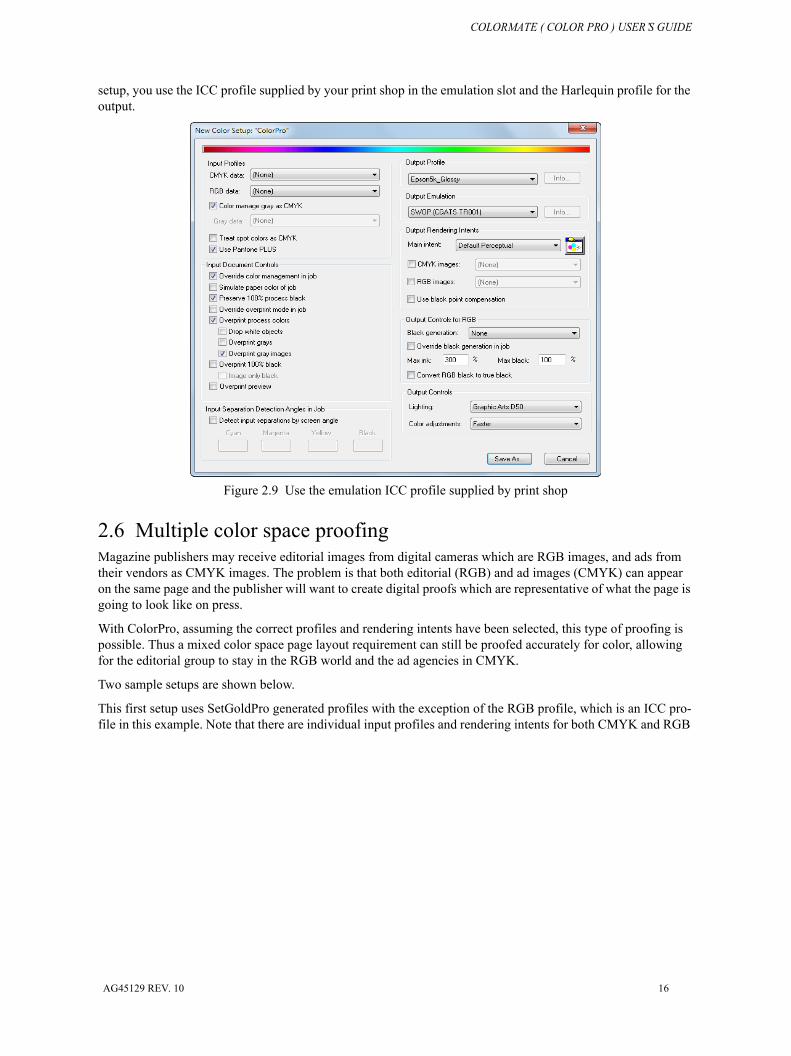
One possible scenario is that you could use SetGoldPro to make an optimized output profile for a given device, ink and paper combination but use a press profile in an ICC format supplied by your print shop. In this ColorPro
AG45129 REV. 10 15
COLORMATE ( COLOR PRO ) USER’S GUIDE
setup, you use the ICC profile supplied by your print shop in the emulation slot and the Harlequin profile for the output.
Figure 2.9 Use the emulation ICC profile supplied by print shop
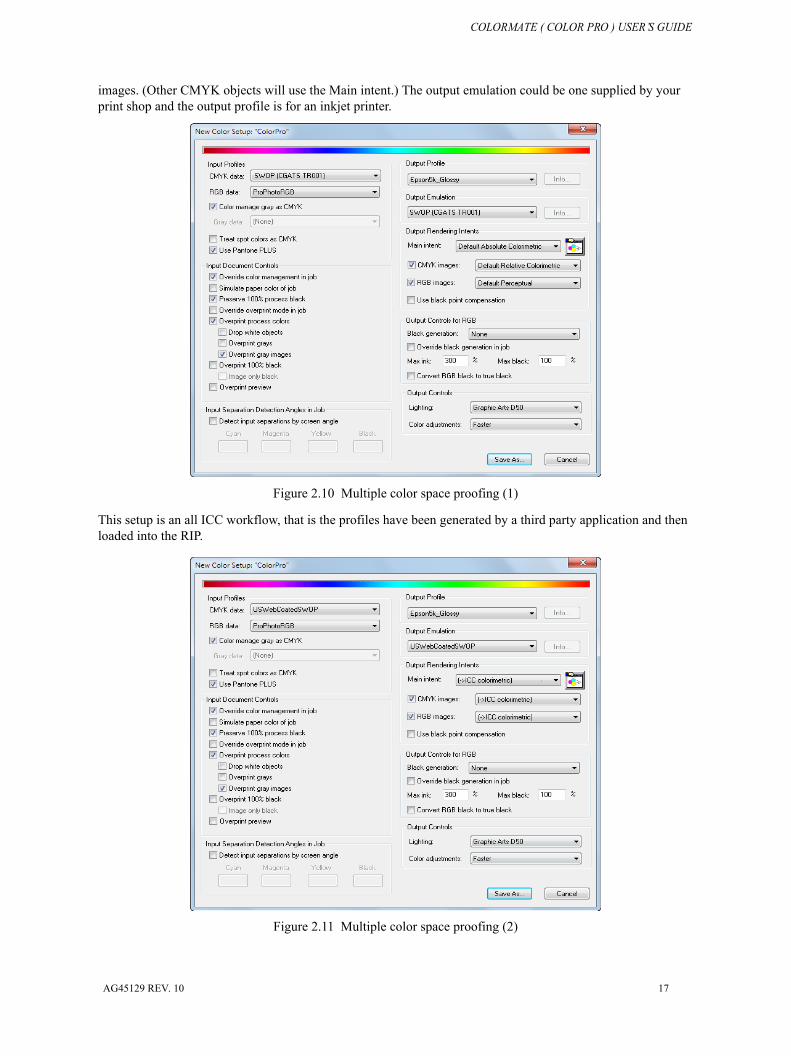
2.6 Multiple color space proofingMagazine publishers may receive editorial images from digital cameras which are RGB images, and ads from their vendors as CMYK images. The problem is that both editorial (RGB) and ad images (CMYK) can appear on the same page and the publisher will want to create digital proofs which are representative of what the page is going to look like on press.
With ColorPro, assuming the correct profiles and rendering intents have been selected, this type of proofing is possible. Thus a mixed color space page layout requirement can still be proofed accurately for color, allowing for the editorial group to stay in the RGB world and the ad agencies in CMYK.
Two sample setups are shown below.
This first setup uses SetGoldPro generated profiles with the exception of the RGB profile, which is an ICC pro-file in this example. Note that there are individual input profiles and rendering intents for both CMYK and RGB
AG45129 REV. 10 16
COLORMATE ( COLOR PRO ) USER’S GUIDE
images. (Other CMYK objects will use the Main intent.) The output emulation could be one supplied by your print shop and the output profile is for an inkjet printer.
Figure 2.10 Multiple color space proofing (1)
This setup is an all ICC workflow, that is the profiles have been generated by a third party application and then loaded into the RIP.
Figure 2.11 Multiple color space proofing (2)
AG45129 REV. 10 17
COLORMATE ( COLOR PRO ) USER’S GUIDE
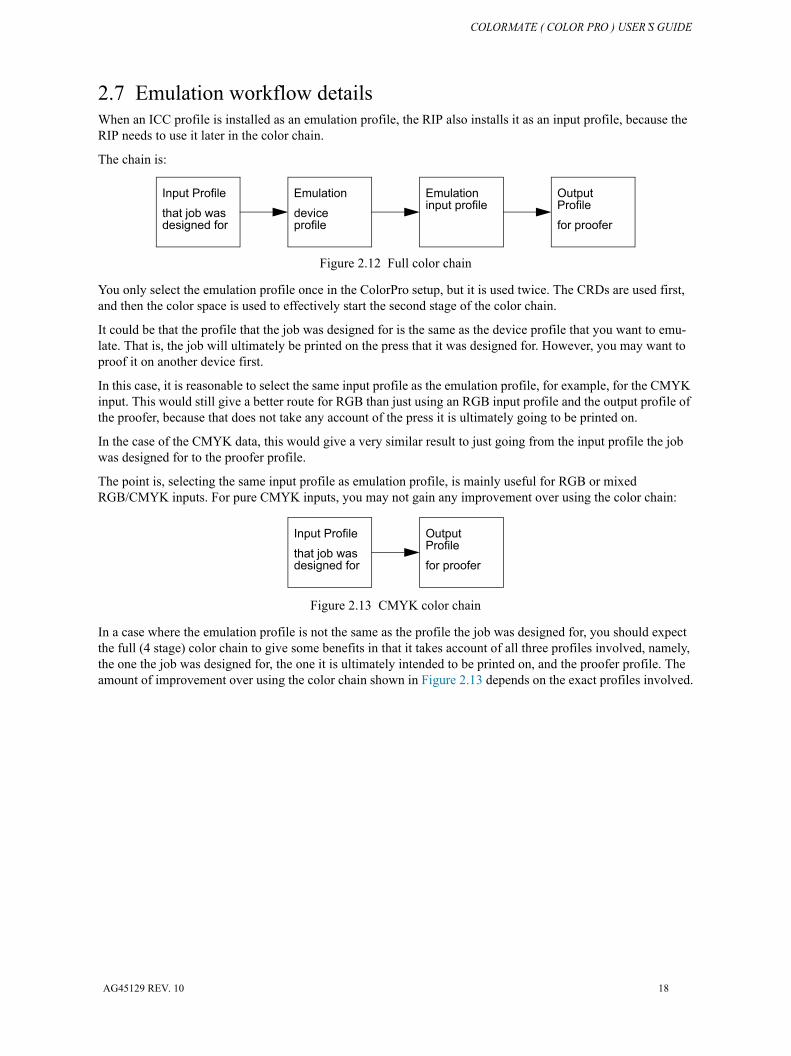
2.7 Emulation workflow detailsWhen an ICC profile is installed as an emulation profile, the RIP also installs it as an input profile, because the RIP needs to use it later in the color chain.
The chain is:
Figure 2.12 Full color chain
You only select the emulation profile once in the ColorPro setup, but it is used twice. The CRDs are used first, and then the color space is used to effectively start the second stage of the color chain.
It could be that the profile that the job was designed for is the same as the device profile that you want to emu-late. That is, the job will ultimately be printed on the press that it was designed for. However, you may want to proof it on another device first.
In this case, it is reasonable to select the same input profile as the emulation profile, for example, for the CMYK input. This would still give a better route for RGB than just using an RGB input profile and the output profile of the proofer, because that does not take any account of the press it is ultimately going to be printed on.
In the case of the CMYK data, this would give a very similar result to just going from the input profile the job was designed for to the proofer profile.
The point is, selecting the same input profile as emulation profile, is mainly useful for RGB or mixed RGB/CMYK inputs. For pure CMYK inputs, you may not gain any improvement over using the color chain:
Figure 2.13 CMYK color chain
In a case where the emulation profile is not the same as the profile the job was designed for, you should expect the full (4 stage) color chain to give some benefits in that it takes account of all three profiles involved, namely, the one the job was designed for, the one it is ultimately intended to be printed on, and the proofer profile. The amount of improvement over using the color chain shown in Figure 2.13 depends on the exact profiles involved.
Input Profile
that job was designed for
Emulation
device profile
Emulation input profile
Output Profile
for proofer
Input Profile
that job was designed for
Output Profile
for proofer
AG45129 REV. 10 18
Chapter 3–Using ColorPro
Harlequin ColorPro offers fully customizable color management capabilities based on the device, image compo-nents, and the color reproduction process used. When you enable Harlequin ColorPro you can use SetGoldPro profiles, ICC profiles and supplied profiles delivered with each device plugin or a combination of these if needed.
Figure 3.14 shows the whole process from installing a profile through defining custom color rendering intents to printing a job.
Note: SetGold profiles cannot be imported into ColorPro because they are not ICC profiles.
ICC profiles may be produced by OEMs or by end users with third party characterization and profiling tools. Once you have installed the ICC profiles in your system, you can use any combination of them to create custom-ized setups. The Harlequin MultiRIP can also use an ICC profile embedded in an image.
In addition, Harlequin ColorPro provides features that allow control over parameters used in creating color set-ups. These unique features include:
• Customizable color rendering intents. You can control exactly the way you want to reproduce different objects on a page by defining custom rendering intents and specifying which types of objects the intents should affect. For example, on the same page, you can simultaneously reproduce images using a percep-tual rendering intent (photorealistically) and the other elements of the page using absolute colorimetry. See “Custom rendering intents” on page 26 for more information.
• Color reproduction that is adjustable based on viewing conditions. Viewing conditions available include Graphic Arts D50, Monitor D65, Daylight, and Home and Office. See Table 3.10 for more information.
• Calibrated and configurable reproduction of named PANTONE colors from the PANTONE MATCHING SYSTEM.
• Manual override capability.
AG45129 REV. 10 19

COLORMATE ( COLOR PRO ) USER’S GUIDE
Figure 3.14 Overview of Harlequin ColorPro
3.1 Get ready to use Harlequin ColorProBefore creating color setups using ColorPro, you must set up access to the application:
• If you are using Sentinel LDK security you will need a new product key. For more information see the Sentinel LDK security document.
• If you are using the Harlequin License Server (HLS) you must have a password that enables Harlequin ColorPro. See below.
The Harlequin MultiRIP can read the password from a file if the installation process for a plugin or other option supplied one. If the Harlequin MultiRIP reads a password file, which it does when next starting up, it displays a dialog box with a message like this:
Imported password file Passwords/1234-56-7654321.pwd
This message only appears the first time the RIP is started.
Click OK to dismiss this dialog box. You can still use the manual procedures as described below as a way of enabling or checking options.
Select ColorPro ProfilesExisting
Supplied
Create Color Setup
CMYK Input RGB Input Gray InputDevice/OutputRendering
IntentsEmulationLighting
Create Page Setup
Color Setup
PrintJob
Page Setup
Define Color Rendering Intents
Default styleBlack generation Maximum ink Manual control
This is an optional step.
Install ICC Profiles
InputDevice/OutputEmulationDevice Link
AG45129 REV. 10 20
COLORMATE ( COLOR PRO ) USER’S GUIDE
3.2 Enabling ColorProIf you are using Sentinel LDK security you should order a new product key to enable ColorPro. For details on how to perform an upgrade see the Sentinel LDK security document.
If you are using the Harlequin License Server (HLS) you will have been provided with a ColorPro password. Use the following procedure o enable ColorPro when using HLS:
1. Start the RIP and select Harlequin RIP > Configure RIP, to open the Configure RIP dialog.
2. Click the Extras button to open the Configure RIP Extras window.
3. From the list of RIP extras, select ColorPro and click Add.
4. In the Enable Feature dialog that appears enter your ColorPro password and click OK.
5. Click OK to close the Configure RIP Extras dialog, and OK to close the Configure RIP dialog.
You can now begin to setup the features available with ColorPro. If you have access to device profiles and vari-ous output devices, you can start using ColorPro.
For more information on HLS see the Harlequin License Server document.
3.3 ColorPro overviewColorPro is designed so that you can quickly create a color setup that suits your needs. There are several steps to creating a setup; some you may or may not need. The various stages are shown below:
• Install any ICC profiles you may need. See “Install ICC profiles” on page 21. If you do not have any ICC profiles to install, this step can be skipped.
• Define any color or custom rendering intents you wish to use. See “Define color rendering intents” on page 26. If you intend to use the default rendering intents you can skip this section.
• Configure your ColorPro setup. See “Define color setups using ColorPro” on page 29. The ColorPro setup dialog is divided into several areas. The left side of the dialog handles the input and the right side handles the output. For help in deciding how to configure you workflow, see Chapter 2, “ColorPro workflows” for more information.
3.4 Install ICC profiles Before you create color setups, you may install any ICC profiles that you expect to use. Identify the types of pro-files you need and then install them.
3.4.1 Types of profilesICC profiles vary in how much information they contain. From a suitable ICC profile, you can install an input profile, a device (or output) profile, an emulation profile, or all three. The profile installation dialog box shows you the options and you must explicitly choose how you want to install an ICC profile (as an input profile, out-put profile, and so on), in order to use the profile to define a color setup.
For example, if you want to use the same ICC profile as an emulating profile in one color setup and as a device profile in another color setup, you must install the ICC profile as both an emulating profile and a device profile, by selecting both check boxes. You can, at any time, make additions to how you want to use an ICC profile. If you want to use an ICC profile (that is currently defined as an input profile only), as a device profile in a color setup, you can reinstall the ICC profile as a device profile.
Note: When a profile is installed as an emulation profile, it is automatically installed as an input profile for the appropriate color space.
AG45129 REV. 10 21
COLORMATE ( COLOR PRO ) USER’S GUIDE
You can get started using one input profile. However, Harlequin ColorPro can use various types of profiles. GGS supplies some commonly used profiles. For more information see Appendix E, “Supplied Profiles”.
Input profiles for CMYK and RGB are pre-installed. If you do not have suitable profiles for your system, you must make available at least one from each of these types:
• Input CMYK profile. Install at least one ICC profile as a CMYK input profile or a device link profile. An input profile colorimetrically transforms color data from a device-dependent color space to a device-independent color space, where ColorPro options can process the data and supply it to an output profile, which you can choose separately to suit your output device. A device link profile maps colors between two device-dependent color spaces. In this case, the color data bypasses ColorPro color management to pass with a predefined transformation directly between the input device and the output device.
• Input RGB profile. Install at least one ICC profile as an RGB input profile or a device link profile. The RGB input profile translates the input to a device-independent color space so that the resulting colors match the colors that can be produced on a monitor. The device link RGB profile bypasses ColorPro color management to map the RGB colors directly to the output device.
Note: Most ICC profiles are suitable for installation as either input or output profiles. The same profile, however, cannot be used as both a CMYK and an RGB input profile. Before you create any color setups in ColorPro make sure you have available at least one CMYK and one RGB input profile.
• Device (or output) profile. Install at least one ICC profile as a device (or output) profile. This profile must be an ICC output profile that is appropriate for the printer to be used. This profile does the opposite of what an input profile does. Based on information about the output device and imaging conditions, the output profile transforms the device-independent color space back into a device-dependent color space.
Note: Before you import an ICC profile into the Harlequin MultiRIP, you should make sure that you have set up the profile correctly for the given device type in the ICC profiling package. Understanding the correct use of ICC profiles for a given device type is essential to successful color proofing.
Note: You are not able to install an ICC profile which is created for a device that has a different number of colo-rants to your device. For example, a six color ICC profile cannot be installed if you device only supports four colors. In addition, the colorant names must match. That is, at least one of the alternative colorant names for each device colorant must match one of the colorant names in the profile.
3.4.1.1 Calibration and output profilesIt is possible to construct color profiles starting from the different states of the output device being profiled. Two of the most common starting states are:
• The uncalibrated or raw state of the device.
• The device after adjustment of the individual channels for linearity, and usually with some balancing of the channels to produce a gray-balanced or neutral state; this is known as the reference or golden state. In fact, there are as many reference states as there are combinations of device, resolution, media and ink.
When you install an ICC profile as a device profile, it is important to know what calibration profile was used to print the color characterization target used in the output profile making process. On import to the RIP of the ICC profile, this calibration (SetGold profile) profile must be the same as described above and selected in the Linear Calibration From option pull down menu to make the link between the Golden State of the device, contained in the SetGold profile, and the devices ICC color profile.
AG45129 REV. 10 22
COLORMATE ( COLOR PRO ) USER’S GUIDE
3.4.2 Install ICC profilesWhen you have configured access to Harlequin ColorPro, you can begin installing ICC profiles.
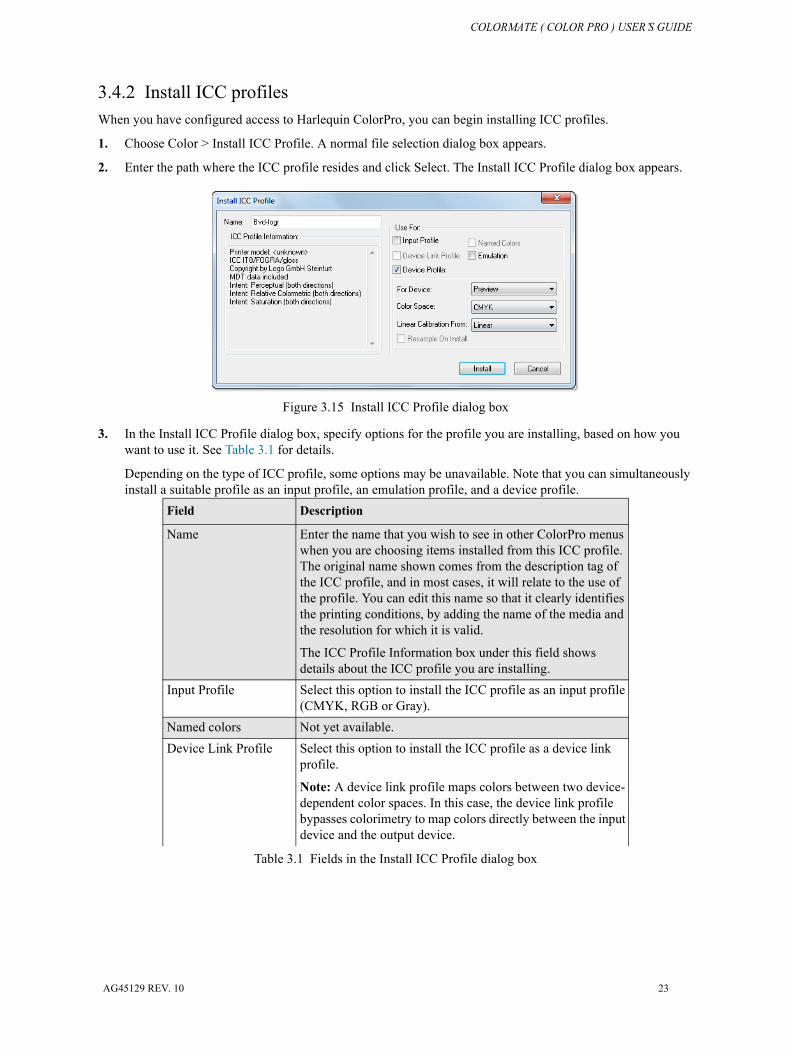
1. Choose Color > Install ICC Profile. A normal file selection dialog box appears.
2. Enter the path where the ICC profile resides and click Select. The Install ICC Profile dialog box appears.
Figure 3.15 Install ICC Profile dialog box
3. In the Install ICC Profile dialog box, specify options for the profile you are installing, based on how you want to use it. See Table 3.1 for details.
Depending on the type of ICC profile, some options may be unavailable. Note that you can simultaneously install a suitable profile as an input profile, an emulation profile, and a device profile.
Field Description
Name Enter the name that you wish to see in other ColorPro menus when you are choosing items installed from this ICC profile. The original name shown comes from the description tag of the ICC profile, and in most cases, it will relate to the use of the profile. You can edit this name so that it clearly identifies the printing conditions, by adding the name of the media and the resolution for which it is valid.
The ICC Profile Information box under this field shows details about the ICC profile you are installing.
Input Profile Select this option to install the ICC profile as an input profile (CMYK, RGB or Gray).
Named colors Not yet available.Device Link Profile Select this option to install the ICC profile as a device link
profile.
Note: A device link profile maps colors between two device-dependent color spaces. In this case, the device link profile bypasses colorimetry to map colors directly between the input device and the output device.
Table 3.1 Fields in the Install ICC Profile dialog box
AG45129 REV. 10 23
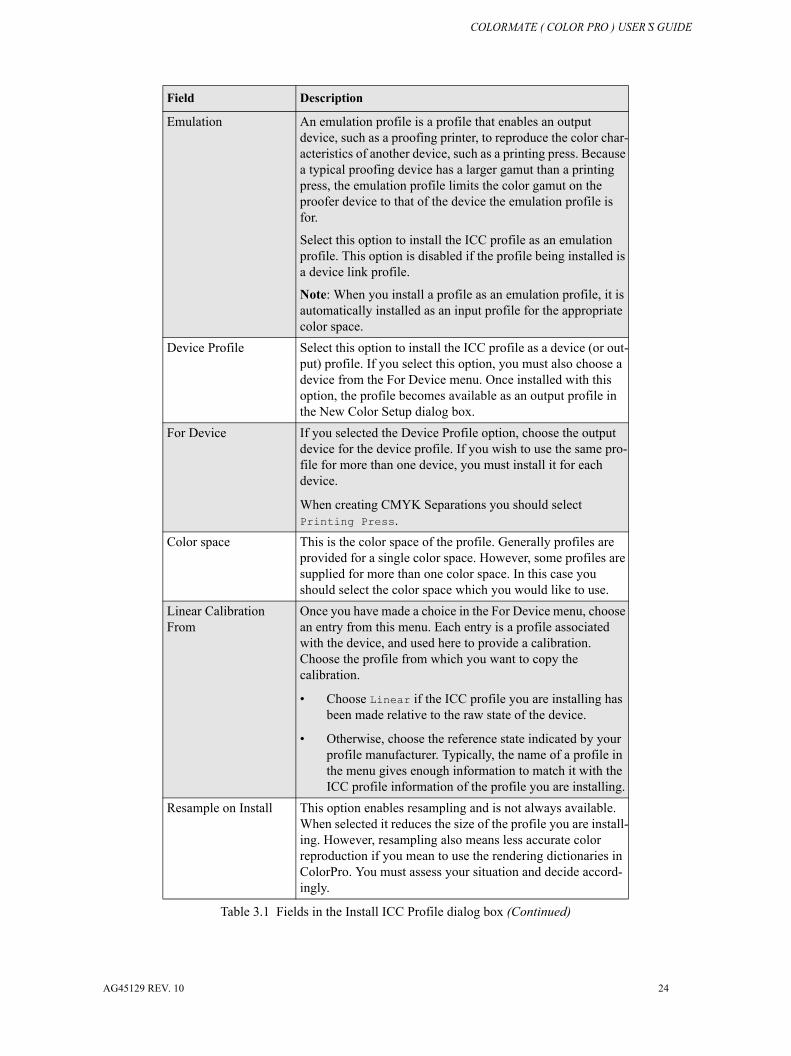
COLORMATE ( COLOR PRO ) USER’S GUIDE
Emulation An emulation profile is a profile that enables an output device, such as a proofing printer, to reproduce the color char-acteristics of another device, such as a printing press. Because a typical proofing device has a larger gamut than a printing press, the emulation profile limits the color gamut on the proofer device to that of the device the emulation profile is for.
Select this option to install the ICC profile as an emulation profile. This option is disabled if the profile being installed is a device link profile.
Note: When you install a profile as an emulation profile, it is automatically installed as an input profile for the appropriate color space.
Device Profile Select this option to install the ICC profile as a device (or out-put) profile. If you select this option, you must also choose a device from the For Device menu. Once installed with this option, the profile becomes available as an output profile in the New Color Setup dialog box.
For Device If you selected the Device Profile option, choose the output device for the device profile. If you wish to use the same pro-file for more than one device, you must install it for each device.
When creating CMYK Separations you should select Printing Press.
Color space This is the color space of the profile. Generally profiles are provided for a single color space. However, some profiles are supplied for more than one color space. In this case you should select the color space which you would like to use.
Linear Calibration From
Once you have made a choice in the For Device menu, choose an entry from this menu. Each entry is a profile associated with the device, and used here to provide a calibration. Choose the profile from which you want to copy the calibration.
• Choose Linear if the ICC profile you are installing has been made relative to the raw state of the device.
• Otherwise, choose the reference state indicated by your profile manufacturer. Typically, the name of a profile in the menu gives enough information to match it with the ICC profile information of the profile you are installing.
Resample on Install This option enables resampling and is not always available. When selected it reduces the size of the profile you are install-ing. However, resampling also means less accurate color reproduction if you mean to use the rendering dictionaries in ColorPro. You must assess your situation and decide accord-ingly.
Field Description
Table 3.1 Fields in the Install ICC Profile dialog box (Continued)
AG45129 REV. 10 24
COLORMATE ( COLOR PRO ) USER’S GUIDE
Note to OEMs: You may need to alter the second bullet point in the description of Linear Calibration From, to match what you supply to your users. If you have a new combination of device, resolution, media, ink, or other parameters that affect your imaging characteristics, you can make your own reference state, as indi-cated in technical note Hqn042 and the document aimvalue.pdf, supplied with the Extensions Manual for the Harlequin RIP. If you use an output plugin cre-ated by GGS and supply your users with the installed profiles supplied by GGS, then the naming of the profiles shown in the Linear Calibration From menu indicates the device, media and resolution. If you supply additional ICC pro-files, one simple option is to create each ICC profile by printing an ICC target using the appropriate Harlequin profile and following a similar naming policy for the resulting ICC profile.
To resume the process, follow these steps:
4. Click Install to install the profile.
The Harlequin MultiRIP runs a short job to do this, typically taking under 10 seconds. This job produces no output but does display an activity icon in the status area of the RIP tool bar.
5. Repeat this procedure from step 1 to install any other ICC profiles that you wish to use. Unless you are using device link profiles, ColorPro must have available one of each of these three profile types: input CMYK profile, input RGB profile, and a device (or output) profile.
3.4.3 Uninstall ICC profilesA method is provided to uninstall ICC profiles.
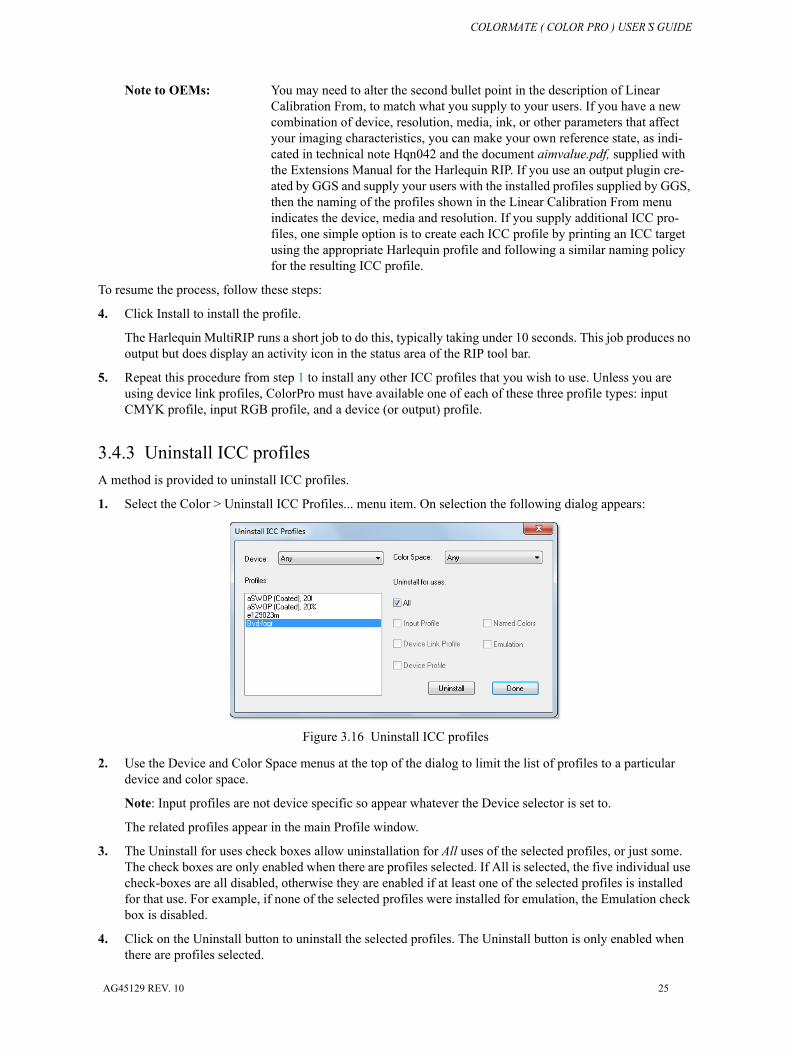
1. Select the Color > Uninstall ICC Profiles... menu item. On selection the following dialog appears:
Figure 3.16 Uninstall ICC profiles
2. Use the Device and Color Space menus at the top of the dialog to limit the list of profiles to a particular device and color space.
Note: Input profiles are not device specific so appear whatever the Device selector is set to.
The related profiles appear in the main Profile window.
3. The Uninstall for uses check boxes allow uninstallation for All uses of the selected profiles, or just some. The check boxes are only enabled when there are profiles selected. If All is selected, the five individual use check-boxes are all disabled, otherwise they are enabled if at least one of the selected profiles is installed for that use. For example, if none of the selected profiles were installed for emulation, the Emulation check box is disabled.
4. Click on the Uninstall button to uninstall the selected profiles. The Uninstall button is only enabled when there are profiles selected.
AG45129 REV. 10 25
COLORMATE ( COLOR PRO ) USER’S GUIDE
5. To close the dialog click the Done button. The dialog is not automatically closed after clicking Uninstall.
Note: You are unable to uninstall ICC profiles that are being used by color setups. If an attempt is made to uninstall such a profile a message is displayed:
Unable to uninstall the profile <profile name> because it is used by the color setup <color setup name>
For example;
Unable to uninstall the profile Bvd-fogr because it is used by the color setup bvd
Note: If the same profile is used by several setups, the error message shows only one setup at a time, and not all the setups the profile is used for.
To identify a profile which you have created, you should add, (for example), "%%Creator: <OEM name>".
3.5 Define color rendering intentsIf you are building a color setup for a new device, custom rendering intents are useful for optimizing the color and quality of the proof based on the ink, paper, resolution and screening combination. Custom rendering intents are used to optimize the CRDs when making color setups for a new device. They are then used a second time to globally adjust the color to satisfy customer requirements.
When ColorPro is enabled you can define custom color rendering intents, but this is not essential at first use of Harlequin ColorPro because you can get good results using the default rendering intents.
ColorPro is supplied with default rendering intents that you can use immediately. Each default rendering intent has a name that closely matches the style on which it is based, and the styles correspond to, but are independent of, the names of intents supplied in ICC profiles. For example, the Default Perceptual rendering intent uses the Perceptual style.
If you want to use only default rendering intents or rendering intents derived from ICC profiles, see “Install ICC profiles” on page 21 or “Define color setups using ColorPro” on page 29. You can return to the remainder of this section if you want to go ahead and create a custom rendering intent.
Note: The ->Default rendering intent cannot be edited using the Rendering Intent Manager. This is because it is already a CRD created with specific settings.
3.5.1 Custom rendering intentsYou define a custom color rendering intent by specifying combinations of settings to be used with a style.
Some settings allow you to achieve the intention of the style in a way that best suits the technology of a particu-lar output device without having a significant visual effect. For example, you can alter the black generation strat-egy. Other settings allow you to modify the visual appearance of the result, but move away from being strictly colorimetric.
Custom rendering intents are used in combination with SetGoldPro output profiles when building profiles for a new device and to adjust color to meet customer requirements.
Follow these steps to create customized intents.
1. Choose Color > Color Rendering Intent Manager. The Color Rendering Intent Manager dialog box appears.
AG45129 REV. 10 26
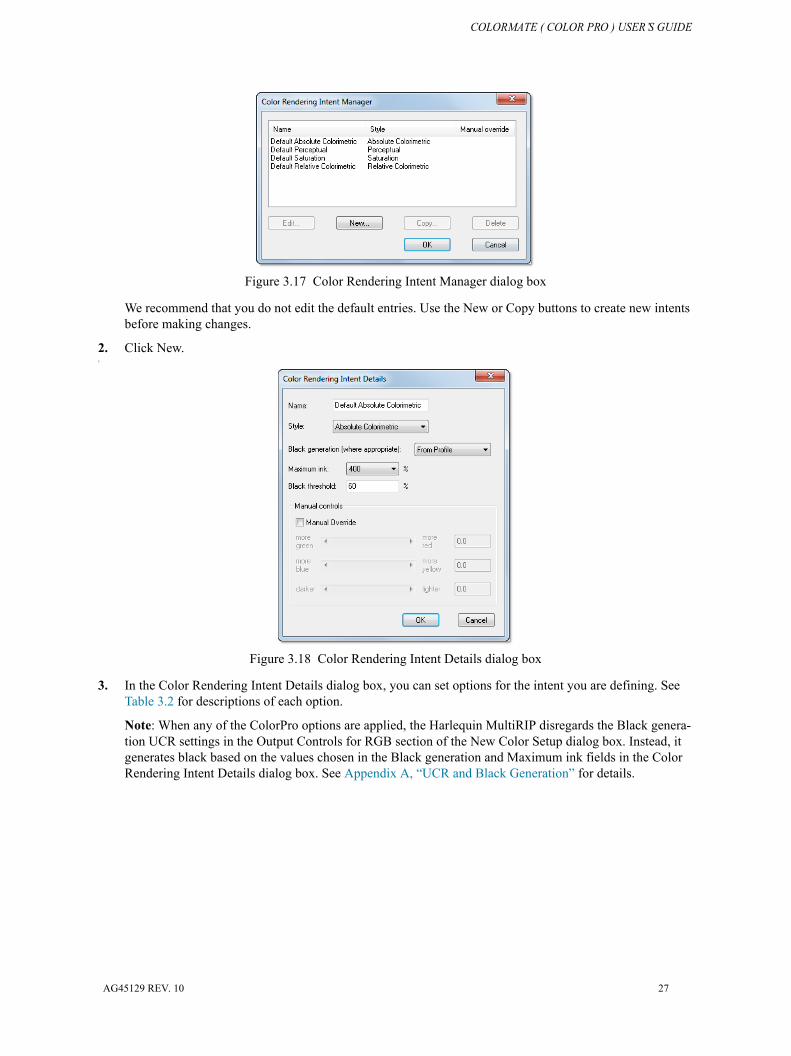
COLORMATE ( COLOR PRO ) USER’S GUIDE
Figure 3.17 Color Rendering Intent Manager dialog box
We recommend that you do not edit the default entries. Use the New or Copy buttons to create new intents before making changes.
2. Click New.C
Figure 3.18 Color Rendering Intent Details dialog box
3. In the Color Rendering Intent Details dialog box, you can set options for the intent you are defining. See Table 3.2 for descriptions of each option.
Note: When any of the ColorPro options are applied, the Harlequin MultiRIP disregards the Black genera-tion UCR settings in the Output Controls for RGB section of the New Color Setup dialog box. Instead, it generates black based on the values chosen in the Black generation and Maximum ink fields in the Color Rendering Intent Details dialog box. See Appendix A, “UCR and Black Generation” for details.
AG45129 REV. 10 27
COLORMATE ( COLOR PRO ) USER’S GUIDE
4. Click OK after you have set options for the intent you are defining. The Color Rendering Intent Manager dialog box displays the intent you defined. You can also copy, edit, or delete intents from the Color Render-ing Intent Manager dialog box.
5. Click OK to close the Color Rendering Intent Manager dialog box.
Field Description
Name Enter any name for the intent you are defining. Choose a meaningful name.
Style Select a style from the menu. Choose one of the follow-ing:
Absolute Colorimetric - Applies absolute colorimet-ric rendering.
Perceptual - Applies photorealistic rendering and is especially suitable for contone images.
Relative Colorimetric - Applies relative colorimet-ric rendering when absolute colorimetric rendering cannot be achieved (due to output device limitations).
Saturation - Applies highly saturated eye-catching col-ors. Suitable for charts, presentations, and business graphics.
See “Color mapping styles used in ColorPro” on page 6 for detailed descriptions of these styles.
Black generation (where appropriate)
This option determines how much black ink should be used to reproduce colors. Select Minimum, Light, Medium, Heavy, or Maximum from the menu.
The From Profile option allows black generation to be defined in the profile.
Maximum ink This option sets a limit on the amount of ink. Select from 200% to 400% in 20% steps from the menu.
Black threshold Value range should be 0-100% with decimals not neces-sary (95.5% defaults to 96%).
Leaving black threshold at its default value of 60% means black starts at a 60% tone value within the image.
Black generation must be set at least to Light, for Black threshold to have an effect.
Manual Override This allows you to apply customized color corrections. You are redefining the rendering intent by using the slider to make the image more green or red; more blue or yellow and lighter or darker. For each type of correction, use the slider or enter a value in the range of -100 to +100.
Note: Using this option without adequate knowledge can result in distorted output.
Table 3.2 Color Rendering Intent Details dialog box
AG45129 REV. 10 28
COLORMATE ( COLOR PRO ) USER’S GUIDE
3.6 Define color setups using ColorProYou can use any ICC profiles or Harlequin derived profiles with any suitable rendering intents, (ICC, Default Absolute Colorimetric, and so on, or customized intents) to define color setups in ColorPro. Follow these steps to create a customized color setup. Note that a color setup corresponds to a particular device and color space.
1. Choose Color > Color Setup Manager. The Color Setup Manager dialog appears.
Figure 3.19 Color Setup Manager dialog box
2. In the Color Setup Manager dialog box, select the device for which you want to create a color setup. If you are creating a color setup for CMYK Separations you should select Printing Press.
3. If necessary, select the color space for which you want to create this color setup. Note that when you create a page setup, the separations style you choose determines the color space of the page setup.
4. At this point you have the option to select either, New : No Color Management setup, details of which you can find under the Color Setup heading in Section 12 of the RIPMate manual (because it is available to all), or New : ColorPro setup (only available by use of a password) which is detailed here.
Figure 3.20 New Color Setup “ColorPro” dialog box
AG45129 REV. 10 29
COLORMATE ( COLOR PRO ) USER’S GUIDE
5. The options on the left side of this dialog handle the input and the options on the right side handle the out-put. The following tables describe the options available in this dialog. Choose the options for the color setup you are defining. We recommend that you select the Output Profile first; it can affect choices in other fields.
Unless you have a device link profile selected as an input profile, you must specify options in the Output Profile and the Rendering Intents menus before saving this color setup.
Note: The options shown in this dialog box always take effect for jobs that do not contain color manage-ment information. If the job contains color management, you must select the Override color management in job check box if you want to use the RIP color management options.
The following table describes the Input Profiles section of the New Color Setup dialog box:Fields Description
CMYK Data From the menu, select an input or device link profile for all CMYK data including scanned images, line art, text, and graph-ics. The list includes (None), all Harlequin-produced profiles (such as DuPont Cromalin and 3M Matchprint), and any installed ICC profiles. Device link profiles display a double-sided arrow ( <-> ) next to the device link name.
Appendix E.1, “CMYK Input Profiles” describes all supplied CMYK input profiles.
If you select (None), CMYK colors are treated as device-depen-dent color and subject to the PostScript Level 1 rules for conver-sions.
RGB Data From the menu, select an input or device link profile for all RGB data including scanned images, line art, text, and graphics. The list includes (None) for device-dependent color, all Harlequin-produced profiles (including Trinitron, Office Graphics RGB and sRGB), and any installed ICC profiles.
Appendix E.2, “RGB Input Profiles” describes all supplied RGB input profiles.
Color manage gray as CMYK
By selecting this option, monochrome (gray) data uses the input profile selected in the CMYK data field and is color managed as CMYK. When this option is selected the Gray data menu becomes unavailable.
If this option is unchecked, the selection in the Gray data field is used.
Gray data From the menu, select either None or any gray profile you have installed. Incoming gray data uses the selected profile unless you choose None, in which case gray data does not have any color management.
Gray ICC profiles can be created from Photoshop v6.5, exported and then installed into the RIP.
Table 3.3 Input Profiles
AG45129 REV. 10 30
COLORMATE ( COLOR PRO ) USER’S GUIDE
The following table describes all the options available in the Input Document Controls section of the New Color Setup dialog box.
Treat spot colors as CMYK
When an input profile has been selected in the CMYK data field, this option becomes available. Checking this option makes any spot color in the job use the input profile specified in the CMYK data field.
When this checkbox is disabled, spot colors will always be treated as CMYK.
If this option is not selected, the Pantone color is chosen using the XYZ Pantone lookup table (within the RIP), which in turn gives the proof a best match for the Pantone color but is not indicative of what the color will look like on press.
See “Overprint preview” on page 33 for more information.Use Pantone PLUS Support for Pantone PLUS, which is an extension to the pre-
existing Pantone color sets.
The Pantone PLUS option is checked by default. Setups migrated from previous versions should uncheck this option to maintain previous behavior.
Fields Description
Override color management in job
Select this check box to override any color management supplied in the job and use the options set in this dialog box.
If you do not select this check box, the Harlequin MultiRIP searches the job for a color space array, embedded ICC profile, or a color space resource. If there is such an element, the Harlequin MultiRIP uses it to transform the relevant object on the page and then treats the object as defined in device-independent color. See Appendix C, “Jobs Containing Color Management Data” for details.
Note: A PDF/X-3 file containing an OutputIntents dictionary will normally be color managed using the OutputIntents profile. If instead, it is desired to color manage using some other profile, it is necessary to set the Override color management in job option. Using this override for PDF/X-3 files is unlikely to be appropriate unless the ColorPro input profile is a devicelink.
Simulate paper color of job
Select this check box if you want the output device to lay down a background which matches the paper base color of the input. If you do not select this check box, colors are adjusted so that the white base is mapped to the (final) printer’s paper color.
Note: This check box determines the rendering style the Harle-quin MultiRIP uses with the ICC colorimetric intent. It is absolute colorimetric when this box is selected, relative when de-selected.
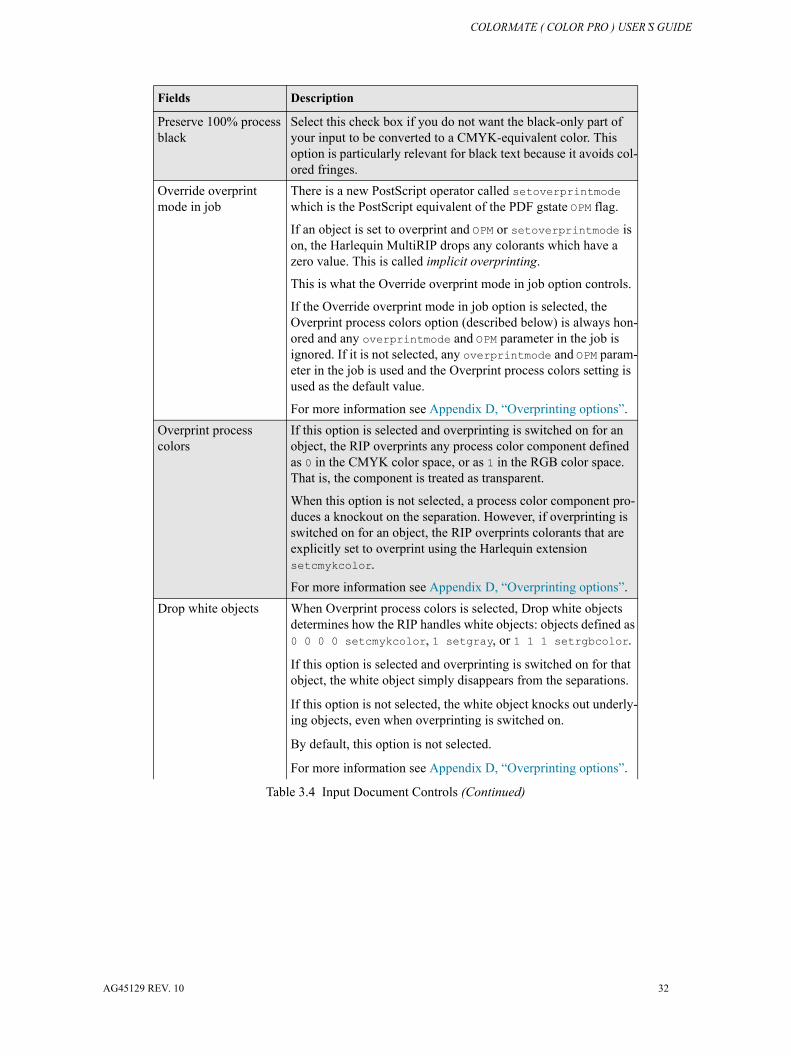
Table 3.4 Input Document Controls
Fields Description
Table 3.3 Input Profiles
AG45129 REV. 10 31
COLORMATE ( COLOR PRO ) USER’S GUIDE
Preserve 100% process black
Select this check box if you do not want the black-only part of your input to be converted to a CMYK-equivalent color. This option is particularly relevant for black text because it avoids col-ored fringes.
Override overprint mode in job
There is a new PostScript operator called setoverprintmode which is the PostScript equivalent of the PDF gstate OPM flag.
If an object is set to overprint and OPM or setoverprintmode is on, the Harlequin MultiRIP drops any colorants which have a zero value. This is called implicit overprinting.
This is what the Override overprint mode in job option controls.
If the Override overprint mode in job option is selected, the Overprint process colors option (described below) is always hon-ored and any overprintmode and OPM parameter in the job is ignored. If it is not selected, any overprintmode and OPM param-eter in the job is used and the Overprint process colors setting is used as the default value.
For more information see Appendix D, “Overprinting options”.Overprint process colors
If this option is selected and overprinting is switched on for an object, the RIP overprints any process color component defined as 0 in the CMYK color space, or as 1 in the RGB color space. That is, the component is treated as transparent.
When this option is not selected, a process color component pro-duces a knockout on the separation. However, if overprinting is switched on for an object, the RIP overprints colorants that are explicitly set to overprint using the Harlequin extension setcmykcolor.
For more information see Appendix D, “Overprinting options”.Drop white objects When Overprint process colors is selected, Drop white objects
determines how the RIP handles white objects: objects defined as 0 0 0 0 setcmykcolor, 1 setgray, or 1 1 1 setrgbcolor.
If this option is selected and overprinting is switched on for that object, the white object simply disappears from the separations.
If this option is not selected, the white object knocks out underly-ing objects, even when overprinting is switched on.
By default, this option is not selected.
For more information see Appendix D, “Overprinting options”.
Fields Description
Table 3.4 Input Document Controls (Continued)
AG45129 REV. 10 32
COLORMATE ( COLOR PRO ) USER’S GUIDE
Notes on Overprint preview
The Overprint preview option overcomes problems with color managing blended colors. In this context, blended colors means both the compositing of transparency in PDF jobs, and also the overprinting of opaque objects in PostScript language and PDF files.
In order to color manage blending correctly, the blending must be performed in the same color space that the designer worked in when creating the job. For example, SWOP with a range of Pantone colors. In theory, if this type of job is printed on a SWOP press that supports all the Pantone colors present in the job, the rendering of the blends will be correct.
Problems arise when the job is printed to a device with different characteristics to the color space the designer worked in. A typical usage is the need to color manage the job when printing to a proofing device. In this case, to reproduce the blending the designer intended, the blending should be performed in SWOP with the result then
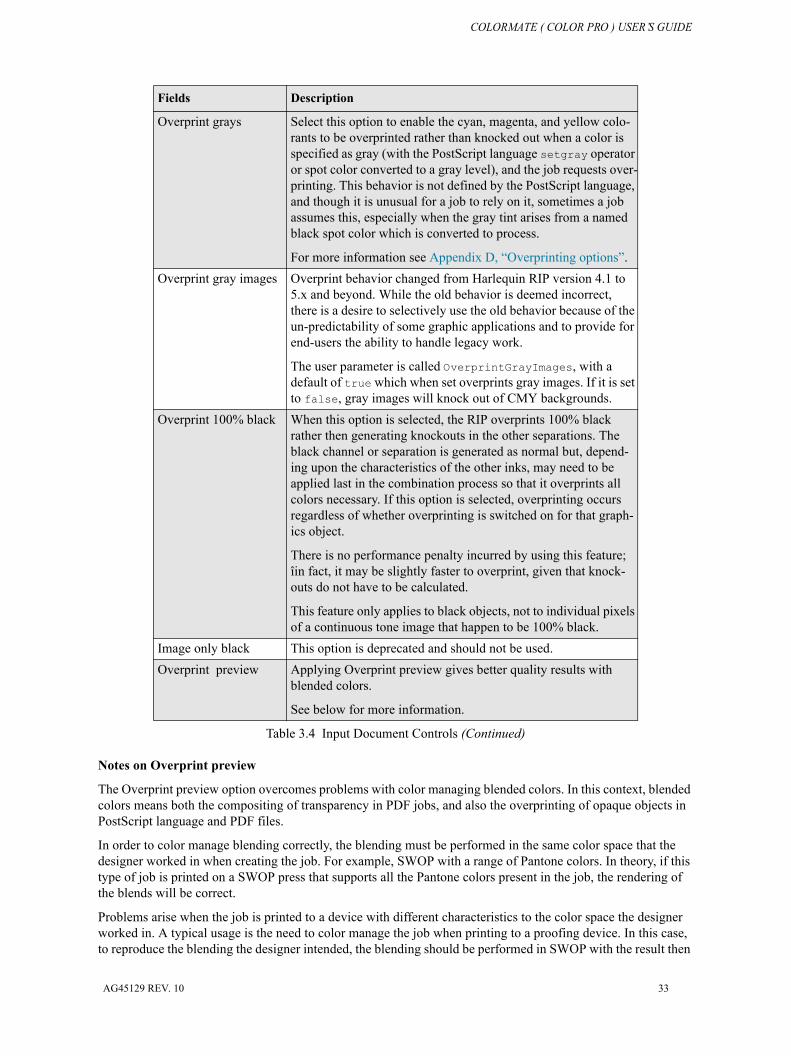
Overprint grays Select this option to enable the cyan, magenta, and yellow colo-rants to be overprinted rather than knocked out when a color is specified as gray (with the PostScript language setgray operator or spot color converted to a gray level), and the job requests over-printing. This behavior is not defined by the PostScript language, and though it is unusual for a job to rely on it, sometimes a job assumes this, especially when the gray tint arises from a named black spot color which is converted to process.
For more information see Appendix D, “Overprinting options”.Overprint gray images Overprint behavior changed from Harlequin RIP version 4.1 to
5.x and beyond. While the old behavior is deemed incorrect, there is a desire to selectively use the old behavior because of the un-predictability of some graphic applications and to provide for end-users the ability to handle legacy work.
The user parameter is called OverprintGrayImages, with a default of true which when set overprints gray images. If it is set to false, gray images will knock out of CMY backgrounds.
Overprint 100% black When this option is selected, the RIP overprints 100% black rather then generating knockouts in the other separations. The black channel or separation is generated as normal but, depend-ing upon the characteristics of the other inks, may need to be applied last in the combination process so that it overprints all colors necessary. If this option is selected, overprinting occurs regardless of whether overprinting is switched on for that graph-ics object.
There is no performance penalty incurred by using this feature; îin fact, it may be slightly faster to overprint, given that knock-outs do not have to be calculated.
This feature only applies to black objects, not to individual pixels of a continuous tone image that happen to be 100% black.
Image only black This option is deprecated and should not be used.Overprint preview Applying Overprint preview gives better quality results with
blended colors.
See below for more information.
Fields Description
Table 3.4 Input Document Controls (Continued)
AG45129 REV. 10 33
COLORMATE ( COLOR PRO ) USER’S GUIDE
color managed to the proofing device. Historically, this has been difficult to do accurately without using a form of double pass RIP processing. That is, the job is RIP processed once to (for example) TIFF, in which the blend-ing is in SWOP. The second RIP pass then color converts the TIFF and outputs the result to the proofing device.
When the Overprint preview option is off, the Harlequin MultiRIP will perform color management of colors in the job before overprints. The RIP performs blending by using the available information to make a “best guess” at the blended colors, but at a late stage in the RIP process and without full knowledge of the color values and other graphics state attributes. This method usually makes the blended regions visible, although they are not cor-rectly color managed. And if spot colorants are converted to process colors, overprinting of these objects is dis-abled by default.
When the Overprint preview option is selected, color managed blending is performed in a single pass of RIP processing with its obvious efficiency benefits. The Overprint preview option is available on both ColorPro and No color management color setups.
The option is available in No color management setups to achieve better rendering of overprinted spot colors. For accurate proofing of jobs containing transparency and/or overprints, it is recommended that the Overprint preview option is used.
Please note the following points when using Overprint preview:
• The definitions of tint transforms of spot colors in the job (which are used to derive the CMYK equiva-lents) will only be used to derive the CMYK equivalent of the 100% color value. Tints will be rendered with CMYK values derived from the 100% spot. Note: If the Treat spot colors as CMYK option in a ColorPro setup is off (the default), the RIP attempts to find the equivalent from the spot color databases in preference to using the tint transform. That is long-standing ColorPro behavior. See Table 3.3 for more information.
• If a job contains multiple color spaces of the same spot color, and where there are multiple definitions of the tint transform, only the first tint transform encountered will be used; as above.
• Overprint preview is forced on when used with recombine.
• Overprint preview may affect performance either positively or negatively since it is difficult to predict how individual jobs will be affected.
The following table describes all the options available in the Input Separation Detection Angles in Job section of the New Color Setup dialog box.
The following table describes the Output Profile option of the New Color Setup dialog box.
Fields Description
Cyan
Magenta
Yellow
Black
The angles specified in these fields help the ColorPro application detect the individual plates within a job. The default angles usu-ally work.
If you do change one of these values, for example Cyan to 30¬×, and the incoming job has Cyan at 15¬×, you will encounter prob-lems.
Table 3.5 Input Separation Detection Angles in Job
Fields Description
Output Profile From the menu, select an output profile for your device. All GGS supplied profiles and installed ICC profiles for the selected device are displayed. After you select an output profile, you can click the Info button to display the characteristics of the output profile. Verify that you have chosen the appropriate profile.
Table 3.6 Output Profile
AG45129 REV. 10 34
COLORMATE ( COLOR PRO ) USER’S GUIDE
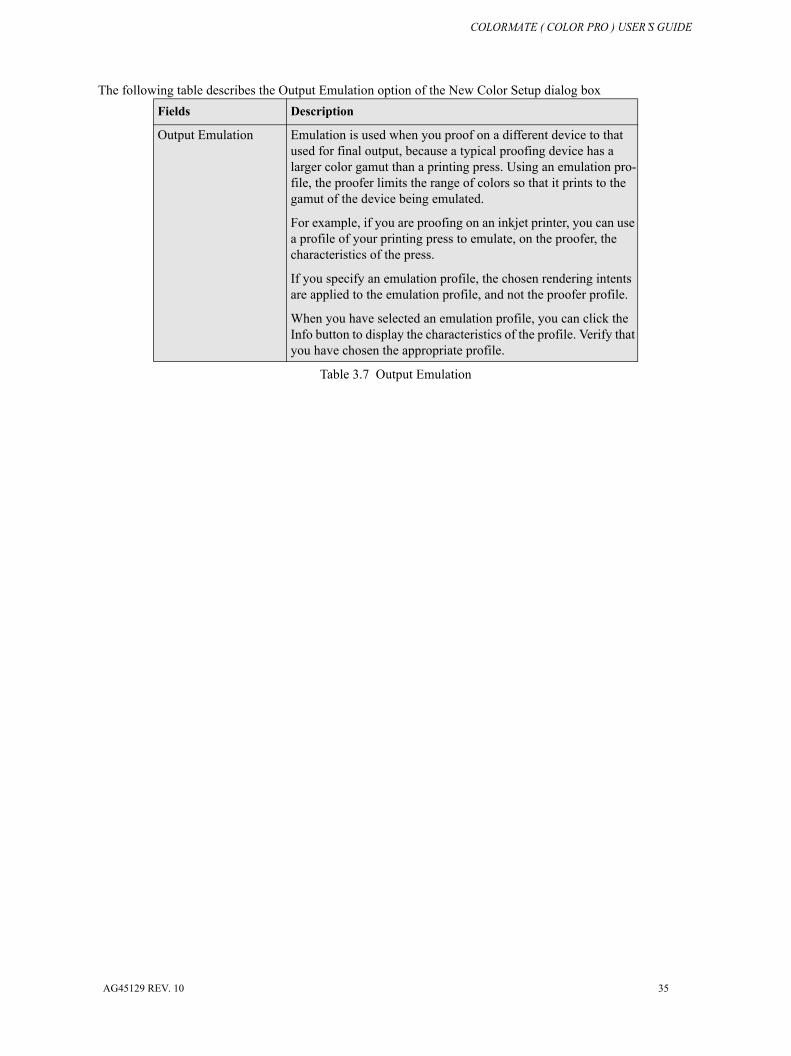
The following table describes the Output Emulation option of the New Color Setup dialog box Fields Description
Output Emulation Emulation is used when you proof on a different device to that used for final output, because a typical proofing device has a larger color gamut than a printing press. Using an emulation pro-file, the proofer limits the range of colors so that it prints to the gamut of the device being emulated.
For example, if you are proofing on an inkjet printer, you can use a profile of your printing press to emulate, on the proofer, the characteristics of the press.
If you specify an emulation profile, the chosen rendering intents are applied to the emulation profile, and not the proofer profile.
When you have selected an emulation profile, you can click the Info button to display the characteristics of the profile. Verify that you have chosen the appropriate profile.
Table 3.7 Output Emulation
AG45129 REV. 10 35
COLORMATE ( COLOR PRO ) USER’S GUIDE
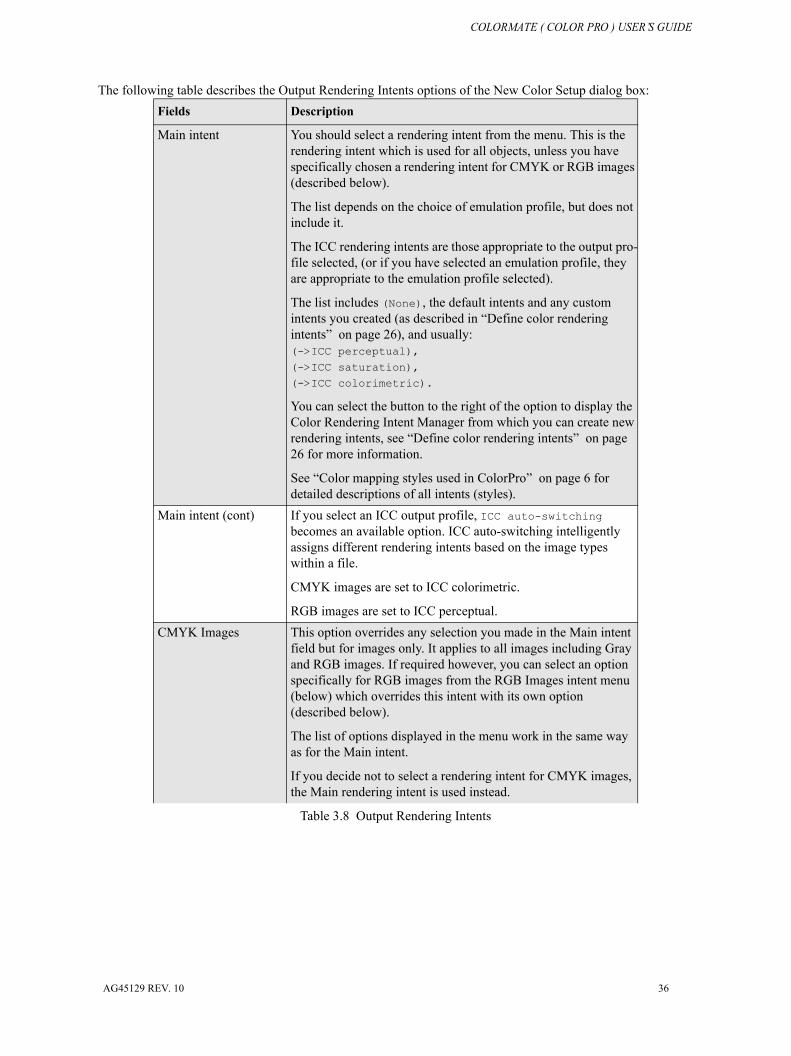
The following table describes the Output Rendering Intents options of the New Color Setup dialog box:Fields Description
Main intent You should select a rendering intent from the menu. This is the rendering intent which is used for all objects, unless you have specifically chosen a rendering intent for CMYK or RGB images (described below).
The list depends on the choice of emulation profile, but does not include it.
The ICC rendering intents are those appropriate to the output pro-file selected, (or if you have selected an emulation profile, they are appropriate to the emulation profile selected).
The list includes (None), the default intents and any custom intents you created (as described in “Define color rendering intents” on page 26), and usually:(->ICC perceptual), (->ICC saturation), (->ICC colorimetric).
You can select the button to the right of the option to display the Color Rendering Intent Manager from which you can create new rendering intents, see “Define color rendering intents” on page 26 for more information.
See “Color mapping styles used in ColorPro” on page 6 for detailed descriptions of all intents (styles).
Main intent (cont) If you select an ICC output profile, ICC auto-switching becomes an available option. ICC auto-switching intelligently assigns different rendering intents based on the image types within a file.
CMYK images are set to ICC colorimetric.
RGB images are set to ICC perceptual.CMYK Images This option overrides any selection you made in the Main intent
field but for images only. It applies to all images including Gray and RGB images. If required however, you can select an option specifically for RGB images from the RGB Images intent menu (below) which overrides this intent with its own option (described below).
The list of options displayed in the menu work in the same way as for the Main intent.
If you decide not to select a rendering intent for CMYK images, the Main rendering intent is used instead.
Table 3.8 Output Rendering Intents
AG45129 REV. 10 36
COLORMATE ( COLOR PRO ) USER’S GUIDE
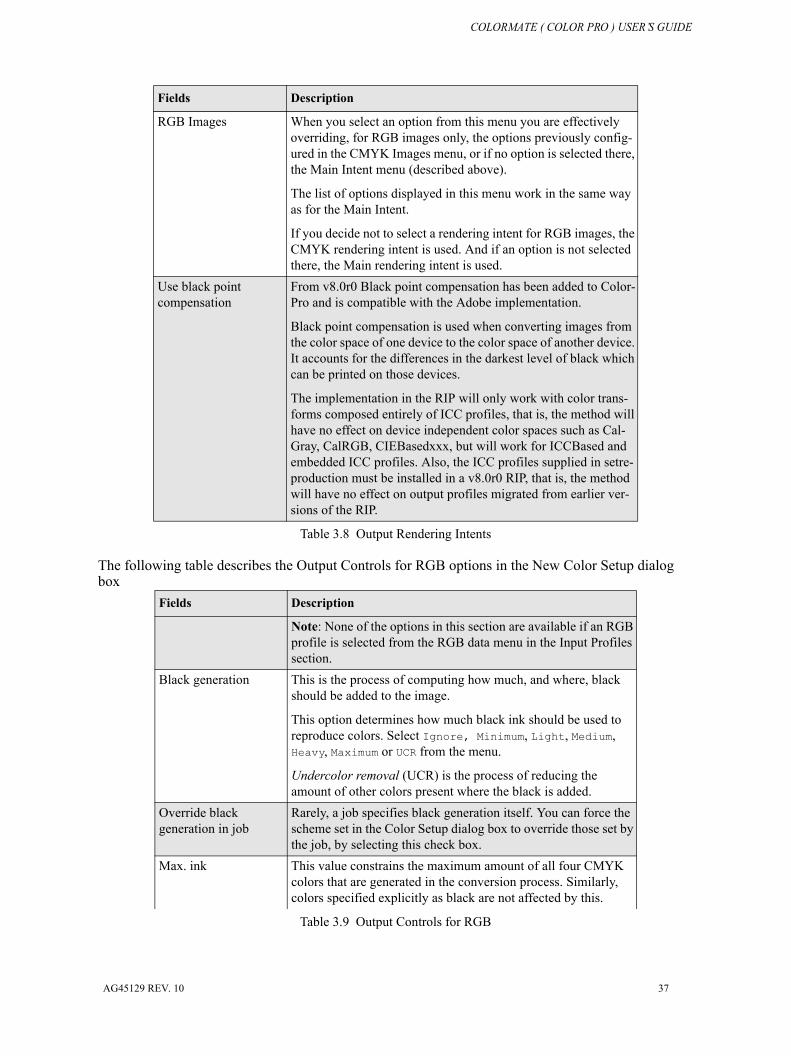
The following table describes the Output Controls for RGB options in the New Color Setup dialog box
RGB Images When you select an option from this menu you are effectively overriding, for RGB images only, the options previously config-ured in the CMYK Images menu, or if no option is selected there, the Main Intent menu (described above).
The list of options displayed in this menu work in the same way as for the Main Intent.
If you decide not to select a rendering intent for RGB images, the CMYK rendering intent is used. And if an option is not selected there, the Main rendering intent is used.
Use black point compensation
From v8.0r0 Black point compensation has been added to Color-Pro and is compatible with the Adobe implementation.
Black point compensation is used when converting images from the color space of one device to the color space of another device. It accounts for the differences in the darkest level of black which can be printed on those devices.
The implementation in the RIP will only work with color trans-forms composed entirely of ICC profiles, that is, the method will have no effect on device independent color spaces such as Cal-Gray, CalRGB, CIEBasedxxx, but will work for ICCBased and embedded ICC profiles. Also, the ICC profiles supplied in setre-production must be installed in a v8.0r0 RIP, that is, the method will have no effect on output profiles migrated from earlier ver-sions of the RIP.
Fields Description
Note: None of the options in this section are available if an RGB profile is selected from the RGB data menu in the Input Profiles section.
Black generation This is the process of computing how much, and where, black should be added to the image.
This option determines how much black ink should be used to reproduce colors. Select Ignore, Minimum, Light, Medium, Heavy, Maximum or UCR from the menu.
Undercolor removal (UCR) is the process of reducing the amount of other colors present where the black is added.
Override black generation in job
Rarely, a job specifies black generation itself. You can force the scheme set in the Color Setup dialog box to override those set by the job, by selecting this check box.
Max. ink This value constrains the maximum amount of all four CMYK colors that are generated in the conversion process. Similarly, colors specified explicitly as black are not affected by this.
Table 3.9 Output Controls for RGB
Fields Description
Table 3.8 Output Rendering Intents
AG45129 REV. 10 37
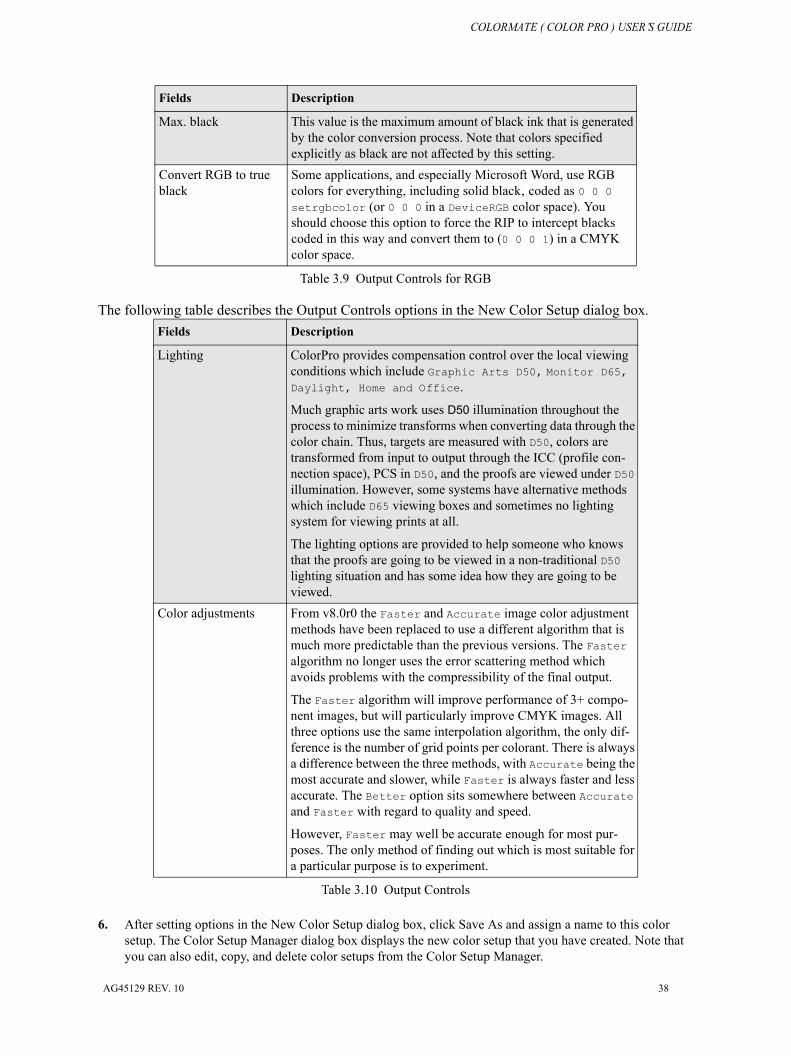
COLORMATE ( COLOR PRO ) USER’S GUIDE
The following table describes the Output Controls options in the New Color Setup dialog box.
6. After setting options in the New Color Setup dialog box, click Save As and assign a name to this color setup. The Color Setup Manager dialog box displays the new color setup that you have created. Note that you can also edit, copy, and delete color setups from the Color Setup Manager.
Max. black This value is the maximum amount of black ink that is generated by the color conversion process. Note that colors specified explicitly as black are not affected by this setting.
Convert RGB to true black
Some applications, and especially Microsoft Word, use RGB colors for everything, including solid black‚ coded as 0 0 0 setrgbcolor (or 0 0 0 in a DeviceRGB color space). You should choose this option to force the RIP to intercept blacks coded in this way and convert them to (0 0 0 1) in a CMYK color space.
Fields Description
Lighting ColorPro provides compensation control over the local viewing conditions which include Graphic Arts D50, Monitor D65, Daylight, Home and Office.
Much graphic arts work uses D50 illumination throughout the process to minimize transforms when converting data through the color chain. Thus, targets are measured with D50, colors are transformed from input to output through the ICC (profile con-nection space), PCS in D50, and the proofs are viewed under D50 illumination. However, some systems have alternative methods which include D65 viewing boxes and sometimes no lighting system for viewing prints at all.
The lighting options are provided to help someone who knows that the proofs are going to be viewed in a non-traditional D50 lighting situation and has some idea how they are going to be viewed.
Color adjustments From v8.0r0 the Faster and Accurate image color adjustment methods have been replaced to use a different algorithm that is much more predictable than the previous versions. The Faster algorithm no longer uses the error scattering method which avoids problems with the compressibility of the final output.
The Faster algorithm will improve performance of 3+ compo-nent images, but will particularly improve CMYK images. All three options use the same interpolation algorithm, the only dif-ference is the number of grid points per colorant. There is always a difference between the three methods, with Accurate being the most accurate and slower, while Faster is always faster and less accurate. The Better option sits somewhere between Accurate and Faster with regard to quality and speed.
However, Faster may well be accurate enough for most pur-poses. The only method of finding out which is most suitable for a particular purpose is to experiment.
Table 3.10 Output Controls
Fields Description
Table 3.9 Output Controls for RGB
AG45129 REV. 10 38

COLORMATE ( COLOR PRO ) USER’S GUIDE
7. Click OK to confirm all the changes you have made in the Color Setup Manager and New Color Setup dialog boxes.
The OK button saves the changes you have made and closes the Color Setup Manager. If you opened the Color Setup Manager from the Edit Page Setup dialog box, you can also save the changes by clicking the Select button. In addition to saving the changes, the Select button displays the selected color setup in the Edit Page Setup dialog box. The changes made to the color setup are still saved even if you cancel the changes to the page setup. To discard all changes, click Cancel in the Color Setup dialog box.
You should however note that a color setup cannot be deleted from within the Page Setup dialog box. If you attempt this the following message appears:
Deleting a color setup from within the page setup dialog is not supported. Use Color -> Color Setup Manager to complete task.
3.7 Customize page setups using new color setupsHaving created your color setups, you are now ready to use them to customize page setups in the Harlequin Mul-tiRIP.
Note: You do not need to produce a color setup before you create a page setup. You can also open the Color Setup Manager from within the New Page Setup dialog box by clicking the Color Setup Manager icon.
When you open the Color Setup Manager in this way, the Harlequin MultiRIP selects the device and color space of the current page setup. The procedure is otherwise as described in “Define color setups using ColorPro” on page 29.
1. Choose Harlequin MultiRIP > Page Setup Manager.
2. In the Page Setup Manager dialog box, click New.
3. In the New Page Setup dialog box, select the appropriate Device.
AG45129 REV. 10 39
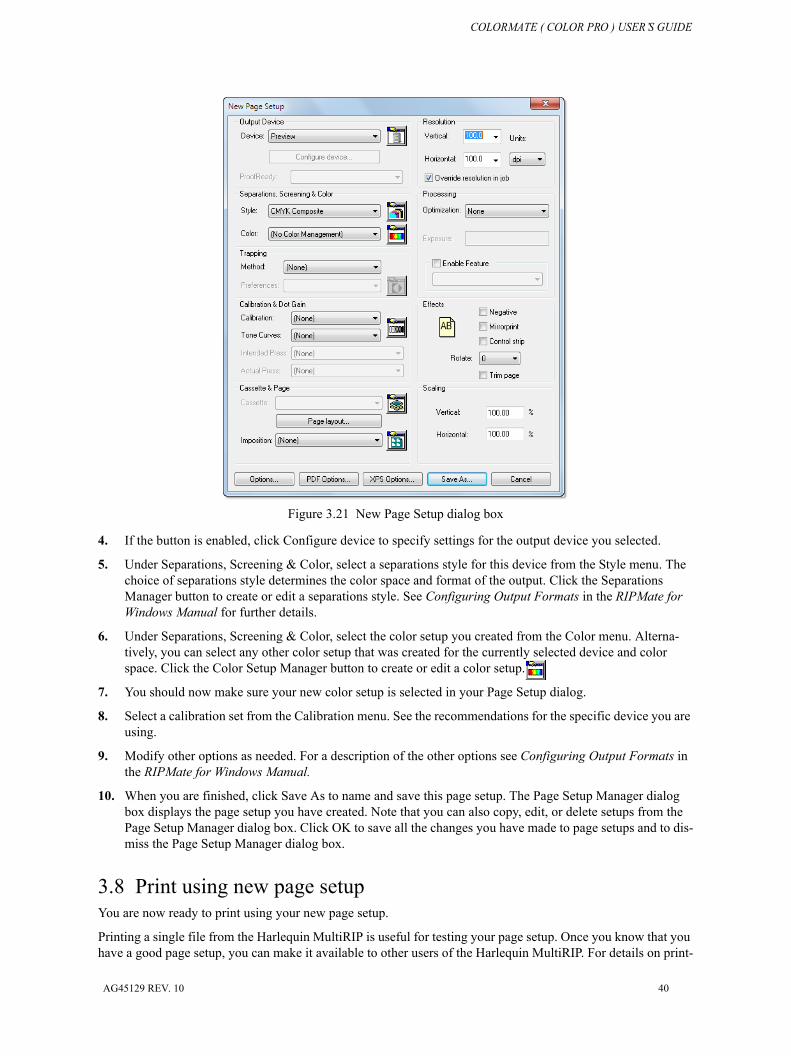
COLORMATE ( COLOR PRO ) USER’S GUIDE
Figure 3.21 New Page Setup dialog box
4. If the button is enabled, click Configure device to specify settings for the output device you selected.
5. Under Separations, Screening & Color, select a separations style for this device from the Style menu. The choice of separations style determines the color space and format of the output. Click the Separations Manager button to create or edit a separations style. See Configuring Output Formats in the RIPMate for Windows Manual for further details.
6. Under Separations, Screening & Color, select the color setup you created from the Color menu. Alterna-tively, you can select any other color setup that was created for the currently selected device and color space. Click the Color Setup Manager button to create or edit a color setup.
7. You should now make sure your new color setup is selected in your Page Setup dialog.
8. Select a calibration set from the Calibration menu. See the recommendations for the specific device you are using.
9. Modify other options as needed. For a description of the other options see Configuring Output Formats in the RIPMate for Windows Manual.
10. When you are finished, click Save As to name and save this page setup. The Page Setup Manager dialog box displays the page setup you have created. Note that you can also copy, edit, or delete setups from the Page Setup Manager dialog box. Click OK to save all the changes you have made to page setups and to dis-miss the Page Setup Manager dialog box.
3.8 Print using new page setupYou are now ready to print using your new page setup.
Printing a single file from the Harlequin MultiRIP is useful for testing your page setup. Once you know that you have a good page setup, you can make it available to other users of the Harlequin MultiRIP. For details on print-
AG45129 REV. 10 40
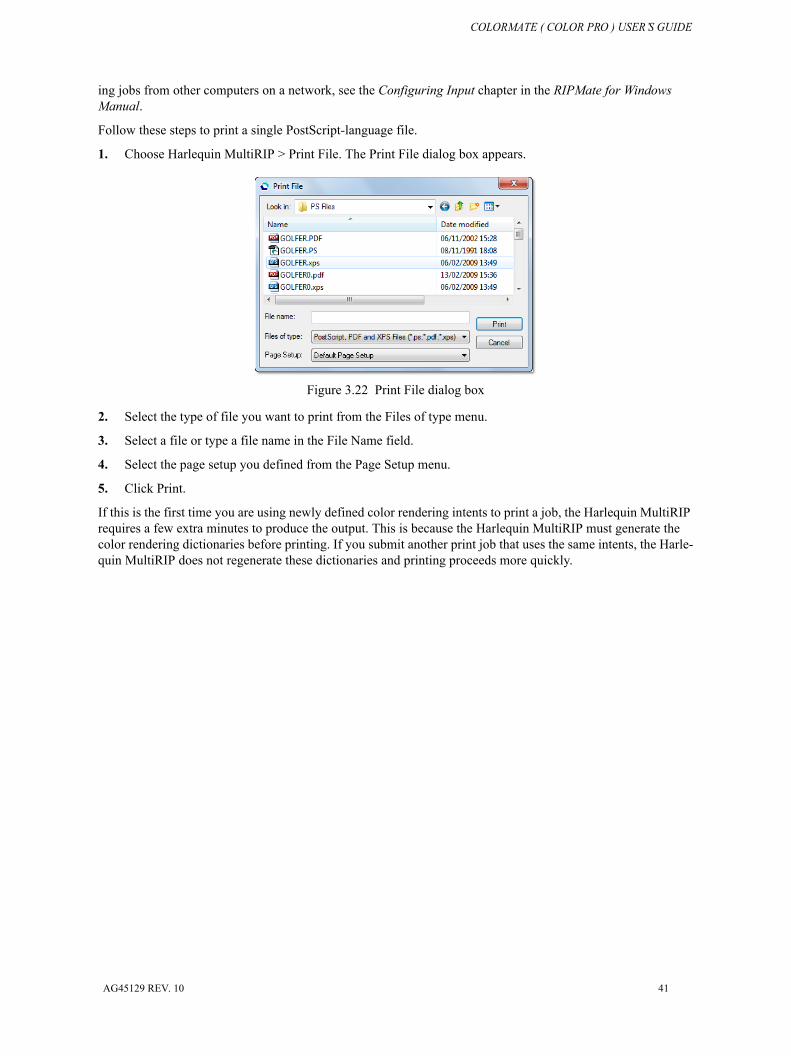
COLORMATE ( COLOR PRO ) USER’S GUIDE
ing jobs from other computers on a network, see the Configuring Input chapter in the RIPMate for Windows Manual.
Follow these steps to print a single PostScript-language file.
1. Choose Harlequin MultiRIP > Print File. The Print File dialog box appears.
Figure 3.22 Print File dialog box
2. Select the type of file you want to print from the Files of type menu.
3. Select a file or type a file name in the File Name field.
4. Select the page setup you defined from the Page Setup menu.
5. Click Print.
If this is the first time you are using newly defined color rendering intents to print a job, the Harlequin MultiRIP requires a few extra minutes to produce the output. This is because the Harlequin MultiRIP must generate the color rendering dictionaries before printing. If you submit another print job that uses the same intents, the Harle-quin MultiRIP does not regenerate these dictionaries and printing proceeds more quickly.
AG45129 REV. 10 41
Appendix A – UCR and Black Generation
It is always desirable to use the full capabilities of an output device. This often means processing a supplied 3-color definition so that it uses all colors of a 4-color output device. There are various techniques for achieving this. Undercolor removal (UCR), gray component replacement (GCR), and black generation are some of these techniques.
Whether ColorPro color management is in use or not, you can see controls that apply these techniques in the Output Controls for RGB section of the Color Setup dialog box. This appendix describes the circumstance where each control has an effect.
A.1 The Harlequin MultiRIP without ColorProIn the Harlequin MultiRIP without ColorPro enabled, UCR and black generation follow the settings in the Output Controls for RGB section of the Color Setup dialog box. You can select this from Color > Color Setup Manager > New : No Color Management Setup, or by clicking the Color Setup Manger icon from the tool bar or the Separations, Screening & Color section of the Edit Page Setup dialog.
It is worth stressing that this black generation affects only RGB color inputs, and only when RGB is expressed in a device-dependent way. CMYK and device-independent RGB are not affected by these settings.
See Color Separation in the RIPMate for Windows Manual for details.
A.2 The Harlequin MultiRIP with ColorPro enabledIn the Harlequin MultiRIP with ColorPro enabled and suitable profiles installed there are several possibilities:
• ColorPro and an ICC profileThe black generation is defined in the output profile and cannot be altered.
• ColorPro and a device link profileThe color transformation is specified in the device link profile and cannot be altered.
• ColorPro with the RGB input profile set to (None)In this case, UCR and black generation follow the settings in the Output controls for RGB section of the Color Setup dialog box. See the “Output Controls for RGB” on page 37 for details.
• ColorPro and a Harlequin profileThe black generation is defined in the rendering intent. If you are using ColorPro, you can influence this by choosing values for Black generation and Maximum ink in the Color Rendering Intent Details dialog box. See page 28 for details.
When the ColorPro option is enabled, that option processes all device-independent color inputs. The information in the job is overridden by ColorPro if you select the Override color management in job check box in the Color Setup dialog box. If you leave this box unselected, Appendix C, “Jobs Containing Color Management Data” describes the rules used to decide how the data in the job takes effect.
Some common sources of device-independent RGB are calibrated color from applications such as Adobe Photo-Shop, and PDF jobs.
AG45129 REV. 10 42

COLORMATE ( COLOR PRO ) USER’S GUIDE
AG45129 REV. 10 43

Appendix B – Creating a Logo
ColorPro cannot guess when a graphic is a logo; it must be explicitly told.
To identify a logo, use the setcolorrenderingintent operator (a Harlequin extension to the PostScript lan-guage). For example, if an EPS file is to be treated as a logo, the line
/Logo setcolorrenderingintent
should appear at the start of the file.
The only way to insert this line is to edit the file by hand.
AG45129 REV. 10 44
Appendix C – Jobs Containing Color Management Data
Settings within the Harlequin MultiRIP, in the PostScript-language or PDF job, and in the images themselves can all control the processing of images in a job.This appendix describes the settings that influence this processing and explains which setting takes precedence in each particular case. “Summary of options” on page 46 shows a summary in tabular form.
Note: Some options apply only to EPS files produced by Adobe Photoshop.
In addition, “Embedding ICC profiles in Photoshop images” on page 47 describes how to select the correct ICC profile for embedding in Photoshop 5.0 images and higher.
“PDF color management” on page 47 describes the cases specific to PDF jobs.
C.1 PostScript-language jobs and image filesThe Harlequin MultiRIP checks the following when processing jobs containing Photoshop EPS images or TIFF/JPEG images containing embedded ICC profiles:
• Does the current page setup use a color management option?
• Is the Override color management in job check box selected in the Color Setup dialog box?
• Does the image contain a PostScript color space array? (Photoshop EPS files only.)
• Does the image contain an embedded ICC profile?
• Is the UseCIEColor parameter set to true in the job?
C.2 Page setup uses a color management optionIf the current page setup uses a ColorPro setup or No Color Management setup or both and the Override color management in job check box is selected in the Color Setup dialog box, the Harlequin MultiRIP uses the settings in the Color setup. It treats the job as CMYK or RGB.
If the current page setup uses a Color Setup but the Override color management in job check box is not selected in the Color Setup dialog box, the Harlequin MultiRIP checks for color management information in the image and the job. It uses the color management information in the following strict order:
• If the image contains a PostScript color space array (Photoshop EPS files only):The Harlequin MultiRIP uses the color space array (CSA) to transform the image. It treats the image as a device-independent color image.
• Otherwise, if the image contains an embedded ICC profile:The Harlequin MultiRIP uses the ICC profile to transform the image. It treats the image as a device-inde-pendent color image.
• Otherwise, if the UseCIEColor parameter set to true in the job:The Harlequin MultiRIP uses the DefaultGray, DefaultRGB or DefaultCMYK color space resources to transform the image colors. It treats the image as a device-independent color image.
• Otherwise, if there is no color management information in the job:The Harlequin MultiRIP uses the settings in the color setup. It treats the job as CMYK or RGB.
AG45129 REV. 10 45
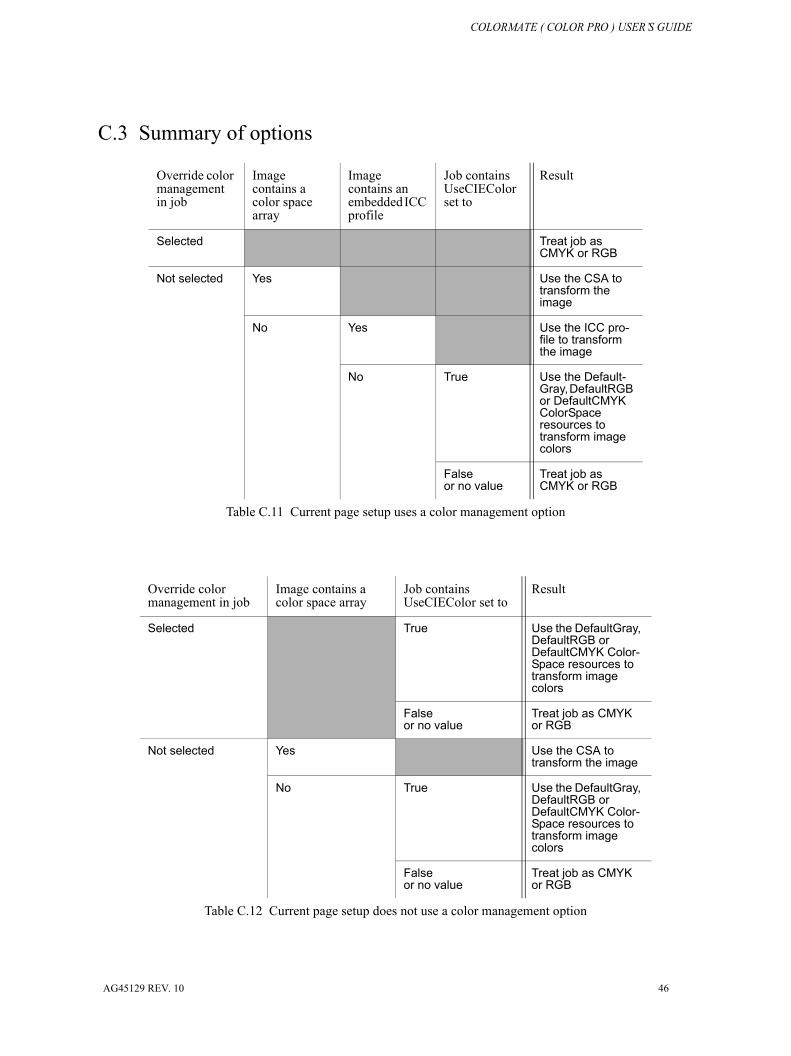
COLORMATE ( COLOR PRO ) USER’S GUIDE
C.3 Summary of options
Override color managementin job
Image contains a color space array
Image contains an embedded ICC profile
Job contains UseCIEColorset to
Result
Selected Treat job as CMYK or RGB
Not selected Yes Use the CSA to transform the image
No Yes Use the ICC pro-file to transform the image
No True Use the Default-Gray, DefaultRGB or DefaultCMYK ColorSpace resources to transform image colors
False or no value
Treat job as CMYK or RGB
Table C.11 Current page setup uses a color management option
Override color management in job
Image contains a color space array
Job contains UseCIEColor set to
Result
Selected True Use the DefaultGray, DefaultRGB or DefaultCMYK Color-Space resources to transform image colors
False or no value
Treat job as CMYK or RGB
Not selected Yes Use the CSA to transform the image
No True Use the DefaultGray, DefaultRGB or DefaultCMYK Color-Space resources to transform image colors
Falseor no value
Treat job as CMYK or RGB
Table C.12 Current page setup does not use a color management option
AG45129 REV. 10 46
COLORMATE ( COLOR PRO ) USER’S GUIDE
C.4 Embedding ICC profiles in Photoshop imagesThis section describes how to select the correct ICC profile for embedding in Photoshop 5.0 images and higher. There are number of dialog boxes that relate to ICC profiles in Photoshop. Here we explain how to set the options in these Photoshop dialog boxes.
• File > Color Settings > Profile Setup In this dialog box you indicate which types of images should have profiles embedded (RGB, CMYK, Gray-scale, and Lab). Also in this dialog box, you can select Assumed Profiles. Note that these assumed profiles are not the profiles that are embedded.
• File > Color Settings > RGB SetupFile > Color Settings > Grayscale Setup These dialog boxes do not contain an explicit ICC Profile option. However, for RGB and Gray images, Photoshop converts the set of parameters selected in this dialog box to ICC profiles, and it is these profiles that are embedded. You can create ICC profiles directly using the Save... option in this dialog box.Note that tandard ICC profiles are not supported in Photoshop 5.0 for RGB or grayscale images.
• File > Color Settings > CMYK Setup You select ICC profiles and also the Color Management Module using this dialog box. It is these profiles that are embedded.
C.5 PDF color managementPDF jobs can use a variety of color spaces, including device-dependent spaces such as DeviceCMYK.
Typically, when using device-independent color spaces, PDF version 1.2 files use the CalGray and CalRGB color spaces and PDF version 1.3 files use the ICCBased color space but these usages are under the control of the creating applications‚ see the Job Options dialog box: for the Advanced tab in Distiller 3.0; for the Color tab in Distiller 4.0.
Full use of device-independent color requires ColorPro to be enabled.
AG45129 REV. 10 47
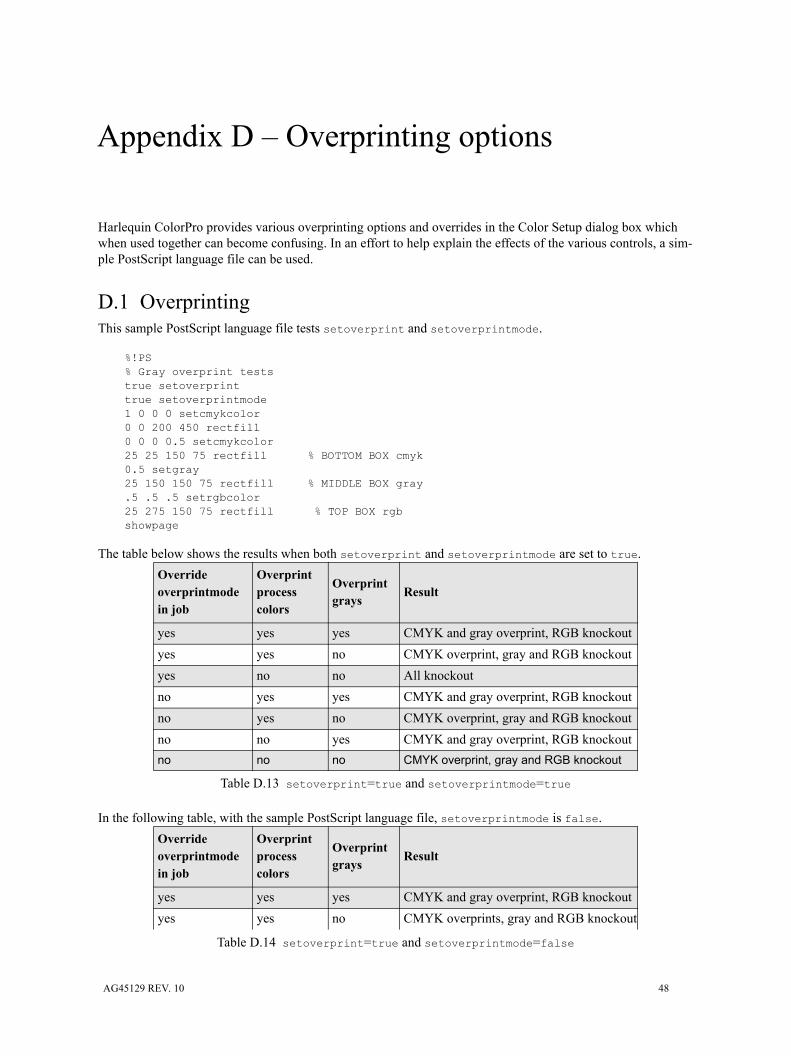
Appendix D – Overprinting options
Harlequin ColorPro provides various overprinting options and overrides in the Color Setup dialog box which when used together can become confusing. In an effort to help explain the effects of the various controls, a sim-ple PostScript language file can be used.
D.1 OverprintingThis sample PostScript language file tests setoverprint and setoverprintmode.
%!PS% Gray overprint teststrue setoverprinttrue setoverprintmode1 0 0 0 setcmykcolor0 0 200 450 rectfill0 0 0 0.5 setcmykcolor25 25 150 75 rectfill % BOTTOM BOX cmyk0.5 setgray25 150 150 75 rectfill % MIDDLE BOX gray.5 .5 .5 setrgbcolor25 275 150 75 rectfill % TOP BOX rgbshowpage
The table below shows the results when both setoverprint and setoverprintmode are set to true.
In the following table, with the sample PostScript language file, setoverprintmode is false.
Override overprintmode in job
Overprint process colors
Overprint grays
Result
yes yes yes CMYK and gray overprint, RGB knockoutyes yes no CMYK overprint, gray and RGB knockoutyes no no All knockoutno yes yes CMYK and gray overprint, RGB knockoutno yes no CMYK overprint, gray and RGB knockoutno no yes CMYK and gray overprint, RGB knockoutno no no CMYK overprint, gray and RGB knockout
Table D.13 setoverprint=true and setoverprintmode=true
Override overprintmode in job
Overprint process colors
Overprint grays
Result
yes yes yes CMYK and gray overprint, RGB knockoutyes yes no CMYK overprints, gray and RGB knockout
Table D.14 setoverprint=true and setoverprintmode=false
AG45129 REV. 10 48
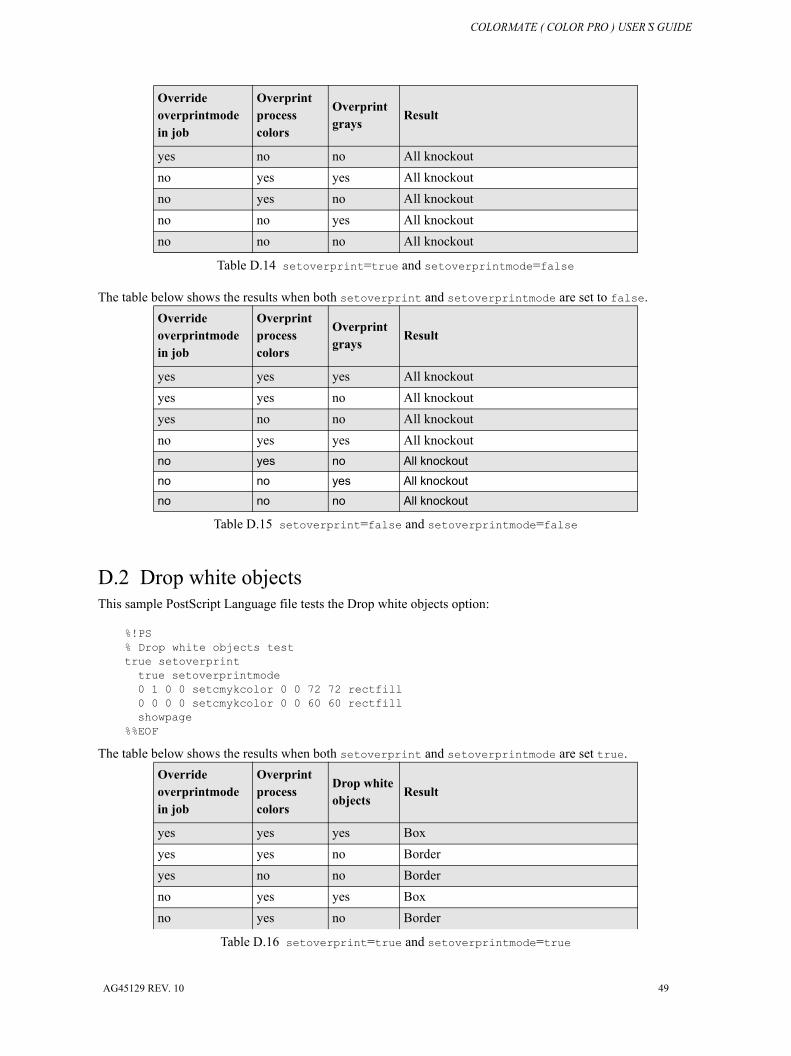
COLORMATE ( COLOR PRO ) USER’S GUIDE
The table below shows the results when both setoverprint and setoverprintmode are set to false.
D.2 Drop white objectsThis sample PostScript Language file tests the Drop white objects option:
%!PS% Drop white objects testtrue setoverprinttrue setoverprintmode0 1 0 0 setcmykcolor 0 0 72 72 rectfill0 0 0 0 setcmykcolor 0 0 60 60 rectfillshowpage
%%EOF
The table below shows the results when both setoverprint and setoverprintmode are set true.
yes no no All knockoutno yes yes All knockoutno yes no All knockoutno no yes All knockoutno no no All knockout
Override overprintmode in job
Overprint process colors
Overprint grays
Result
yes yes yes All knockoutyes yes no All knockoutyes no no All knockoutno yes yes All knockoutno yes no All knockout
no no yes All knockout
no no no All knockout
Table D.15 setoverprint=false and setoverprintmode=false
Override overprintmode in job
Overprint process colors
Drop white objects
Result
yes yes yes Boxyes yes no Borderyes no no Borderno yes yes Boxno yes no Border
Table D.16 setoverprint=true and setoverprintmode=true
Override overprintmode in job
Overprint process colors
Overprint grays
Result
Table D.14 setoverprint=true and setoverprintmode=false
AG45129 REV. 10 49
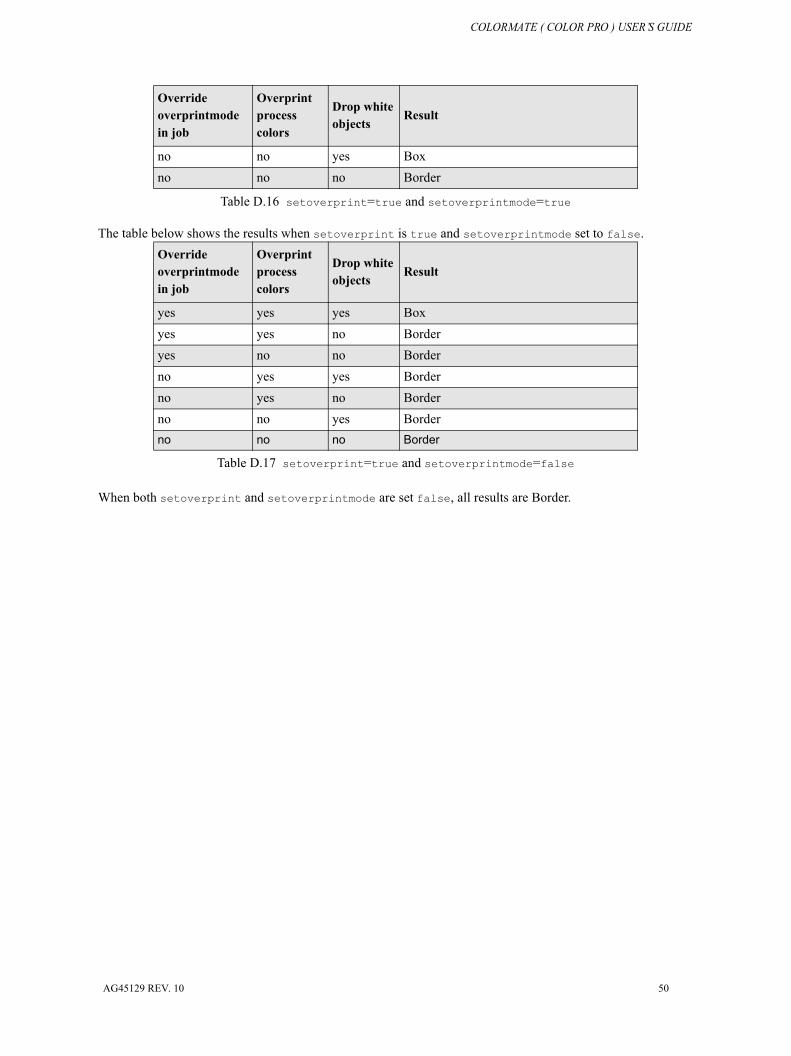
COLORMATE ( COLOR PRO ) USER’S GUIDE
The table below shows the results when setoverprint is true and setoverprintmode set to false.
When both setoverprint and setoverprintmode are set false, all results are Border.
no no yes Boxno no no Border
Override overprintmode in job
Overprintprocess colors
Drop white objects
Result
yes yes yes Boxyes yes no Borderyes no no Borderno yes yes Borderno yes no Borderno no yes Borderno no no Border
Table D.17 setoverprint=true and setoverprintmode=false
Override overprintmode in job
Overprint process colors
Drop white objects
Result
Table D.16 setoverprint=true and setoverprintmode=true
AG45129 REV. 10 50
Appendix E – Supplied Profiles
Global Graphics supplies the following profiles with the Harlequin MultiRIP. The systems represented have a significant variation in color characteristics, so you should consider these profiles as being representative of the systems rather than being an exact match to any single system.
These profiles are listed alphabetically in separate sections for:
• CMYK input profiles. See “CMYK Input Profiles” on page 51.
• RGB input profiles. See “RGB Input Profiles” on page 53.
• CMYK output profiles. See “CMYK Output Profiles (for Printing Press)” on page 53.
E.1 CMYK Input ProfilesAgfa Pressmatch (Commercial)
Profile to simulate the film based Agfa Pressmatch proofing system using Agfa’s commercial stock proofing substrate.
Agfa Pressmatch Commercial color spaceProfile of a proofing system designed to match Euro standard printing inks on a commercial base. This matches a standard dot gain (22-17%) printing process. Tone value rendition of 2-98%.
3M MatchprintProfile of a proofing system designed to match European printing inks using a publication base. This matches a low-gain (12%-14%) printing process.
3M Matchprint (Standard)Profile of a proofing system designed to match European printing inks using a publication base. This matches a standard gain (24%) printing process.
BVD-FOGRA positive glossProfile of a European commercial/speciality and heat-set web offset printing press conforming to ISO 12647 as specified by BVD/FOGRA. This specifica-tion is 60 lines per centimeter (lpcm), positive plates, gloss-coated, wood-free, 115 grams per square meter (gsm).
BVD-FOGRA positive LWCProfile of a European commercial/speciality and heat-set web offset printing press conforming to ISO 12647 as specified by BVD/FOGRA. (60 lpcm, posi-tive plates, gloss-coated web, 70 gsm).
BVD-FOGRA positive mattProfile of a European commercial/speciality and heat-set web offset printing press conforming to ISO 12647 as specified by BVD/FOGRA. (60 lpcm, posi-tive plates, matt-coated, wood-free, 115 gsm).
AG45129 REV. 10 51
COLORMATE ( COLOR PRO ) USER’S GUIDE
BVD-FOGRA positive uncoatedProfile of a European commercial/speciality and heat-set web offset printing press conforming to ISO 12647 as specified by BVD/FOGRA. (60 lpcm, posi-tive plates, uncoated white paper, 120 gsm).
Commercial AProfile of a Heidelberg MO printing press using standard European printing inks and a coated commercial paper stock.
DuPont CromalinProfile of a proofing system designed to match a typical European low gain commercial printing press.
DuPont Cromalin (ES-96)Profile of a proofing system designed to match a typical European standard gain commercial printing press.
DuPont WaterProof CommercialProfile of a proofing system designed to match a typical US printing press with between 17% and 20% dot gain on 'Commercial' paper base.
DuPont WaterProof PublicationProfile of a proofing system designed to match a typical US printing press with between 17% and 20% dot gain on 'Publication' paper base.
Fuji ColorArt Commercial CR-T3 GlossProfile of a proofing system designed to match typical US printing [Commer-cial CR-T3 Gloss base].
Fuji ColorArt Publication CR-T3 MMatteProfile of a proofing system designed to match typical US printing [Publication CR-T3 Medium Matte base].
Fogra 39LIs for printing conditions in conformance with ISO 12647-2:2004 / Amd 1, and is to be used in preference to FOGRA27. Fogra 39 data sets are available for this 1485-patch target, and also for an extended version with a total of 1617 patches. In the FOGRA 39 data sets these larger targets are labelled L.
Fogra 43LThis characterization data set defines printing conditions for sheetfed offset printing with non-periodic screening (FM): FOGRA43 (offset printing on gloss or matt coated white paper).
IFRA 26LFor printing processes that conform to ISO/DIS 12647-3:2004 (newspaper printing) for a screen frequency of 40 lines/cm. These are for processes with a tone value increase of 26%, regardless of how the plates are produced.
IFRA 30LFor printing processes that conform to ISO/DIS 12647-3:2004 (newspaper printing) for a screen frequency of 40 lines/cm. These are for processes with a tone value increase of 30%, regardless of how the plates are produced.
AG45129 REV. 10 52
COLORMATE ( COLOR PRO ) USER’S GUIDE
SWOP (CGATS TR001)Profile of a printing press configured by CGATS to meet the specifications for SWOP printing.
SWAP (CGATS TR002)Profile of a printing press configured by CGATS to meet the specifications for SWOP printing.
SWOP (CGATS TR003)Profile of a printing press configured by CGATS to meet the specifications for SWOP printing.
SWOP (CGATS TR005)Profile of a printing press configured by CGATS to meet the specifications for SWOP printing.
E.2 RGB Input ProfilessRGB
Profile of a color space proposed by Hewlett Packard and Microsoft which is designed to be used as a basis for color management of World Wide Web images.
Office Graphics RGBThis profile is based on cool white flourescent tubes at a brightness level found in a typical office.
TrinitronProfile of a monitor using Trinitron phosphors and set up in a standard way.
E.3 CMYK Output Profiles (for Printing Press)Commercial A
Profile of a Heidelberg MO printing press using standard European printing inks and a coated commercial paper stock.
SWOP (CGATS TR001)Profile of a printing press configured by CGATS to meet the specifications for SWOP printing.
AG45129 REV. 10 53
Appendix F – Seeing Color
This appendix gives a brief description of the perception and measurement of color. It forms an introduction to understanding the issues in color printing, listed in Appendix G, “Printing Color”.
F.1 Perception of colorThe perception of color is both biological and psychological. The biological aspect is the eye’s detection of cer-tain wavelengths of light. The psychological aspect is the way the sensation of color is processed by the mind. For hundreds of years, researchers have tried to express the human perception of color in objective and quantifi-able terms. But since all people vary in how they process color, this has been a formidable task.
From a purely physical point of view, seeing color requires the presence of three elements: a light source, an object that interacts with the light, and a receiver (the eye). An object has a color because it absorbs some wave-lengths and reflects or transmits others. For example, a tomato appears red because it absorbs green and blue light and reflects red light.
Light, a form of electromagnetic energy, can be described as waves. The length of a wave is its wavelength. Wavelengths are measured in nanometers (nm), that is, one millionth of a millimeter. Wavelengths between 400 and 700 nm are visible to the human eye Red, Green, and other colors are names assigned to a certain range of wavelength.
F.2 Additional readingBillmeyer Jr., Fred W. and Max Saltzman. Principles of Color Technology, 2nd edition. John Wiley and Sons, 1981
Hunt, R.W.G. The Reproduction of Color in Photography, Printing, and Television, 4th edition. Fountain Press, 1987
Hunt, R.W.G. Measuring Color, 2nd edition. Ellis Horwood, 1992
Judd, D.B. and Wyszecki, Gunter. Color in Business, Science and Industry, 3rd edition. John Wiley and Sons, 1975
X-Rite Inc. Understanding Color Communication
X-Rite Inc. Understanding Graphic Arts Densitometry
AG45129 REV. 10 54
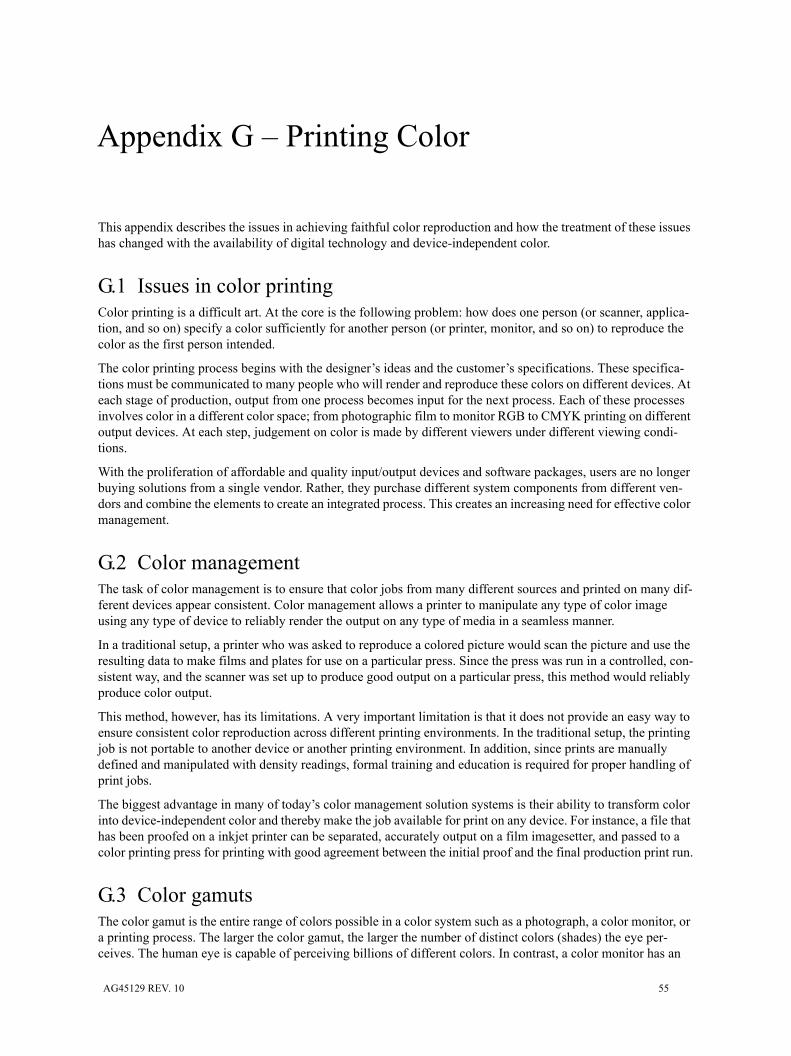
Appendix G – Printing Color
This appendix describes the issues in achieving faithful color reproduction and how the treatment of these issues has changed with the availability of digital technology and device-independent color.
G.1 Issues in color printingColor printing is a difficult art. At the core is the following problem: how does one person (or scanner, applica-tion, and so on) specify a color sufficiently for another person (or printer, monitor, and so on) to reproduce the color as the first person intended.
The color printing process begins with the designer’s ideas and the customer’s specifications. These specifica-tions must be communicated to many people who will render and reproduce these colors on different devices. At each stage of production, output from one process becomes input for the next process. Each of these processes involves color in a different color space; from photographic film to monitor RGB to CMYK printing on different output devices. At each step, judgement on color is made by different viewers under different viewing condi-tions.
With the proliferation of affordable and quality input/output devices and software packages, users are no longer buying solutions from a single vendor. Rather, they purchase different system components from different ven-dors and combine the elements to create an integrated process. This creates an increasing need for effective color management.
G.2 Color managementThe task of color management is to ensure that color jobs from many different sources and printed on many dif-ferent devices appear consistent. Color management allows a printer to manipulate any type of color image using any type of device to reliably render the output on any type of media in a seamless manner.
In a traditional setup, a printer who was asked to reproduce a colored picture would scan the picture and use the resulting data to make films and plates for use on a particular press. Since the press was run in a controlled, con-sistent way, and the scanner was set up to produce good output on a particular press, this method would reliably produce color output.
This method, however, has its limitations. A very important limitation is that it does not provide an easy way to ensure consistent color reproduction across different printing environments. In the traditional setup, the printing job is not portable to another device or another printing environment. In addition, since prints are manually defined and manipulated with density readings, formal training and education is required for proper handling of print jobs.
The biggest advantage in many of today’s color management solution systems is their ability to transform color into device-independent color and thereby make the job available for print on any device. For instance, a file that has been proofed on a inkjet printer can be separated, accurately output on a film imagesetter, and passed to a color printing press for printing with good agreement between the initial proof and the final production print run.
G.3 Color gamutsThe color gamut is the entire range of colors possible in a color system such as a photograph, a color monitor, or a printing process. The larger the color gamut, the larger the number of distinct colors (shades) the eye per-ceives. The human eye is capable of perceiving billions of different colors. In contrast, a color monitor has an
AG45129 REV. 10 55
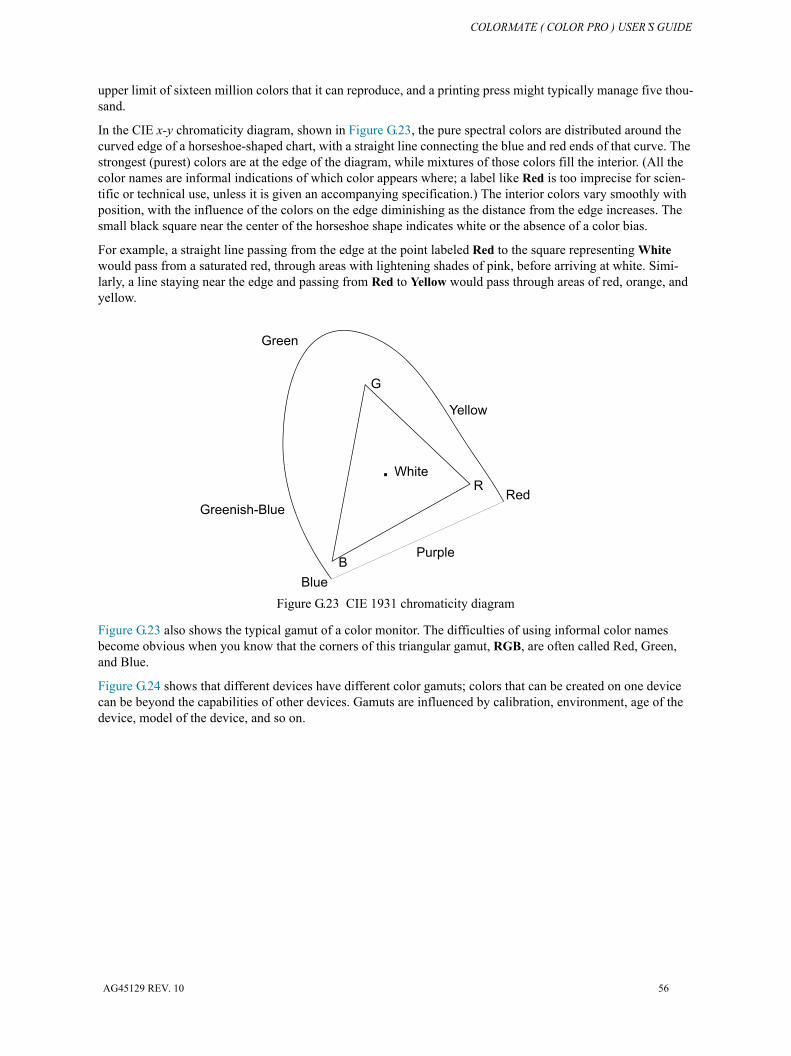
COLORMATE ( COLOR PRO ) USER’S GUIDE
upper limit of sixteen million colors that it can reproduce, and a printing press might typically manage five thou-sand.
In the CIE x-y chromaticity diagram, shown in Figure G.23, the pure spectral colors are distributed around the curved edge of a horseshoe-shaped chart, with a straight line connecting the blue and red ends of that curve. The strongest (purest) colors are at the edge of the diagram, while mixtures of those colors fill the interior. (All the color names are informal indications of which color appears where; a label like Red is too imprecise for scien-tific or technical use, unless it is given an accompanying specification.) The interior colors vary smoothly with position, with the influence of the colors on the edge diminishing as the distance from the edge increases. The small black square near the center of the horseshoe shape indicates white or the absence of a color bias.
For example, a straight line passing from the edge at the point labeled Red to the square representing White would pass from a saturated red, through areas with lightening shades of pink, before arriving at white. Simi-larly, a line staying near the edge and passing from Red to Yellow would pass through areas of red, orange, and yellow.
Figure G.23 CIE 1931 chromaticity diagram
Figure G.23 also shows the typical gamut of a color monitor. The difficulties of using informal color names become obvious when you know that the corners of this triangular gamut, RGB, are often called Red, Green, and Blue.
Figure G.24 shows that different devices have different color gamuts; colors that can be created on one device can be beyond the capabilities of other devices. Gamuts are influenced by calibration, environment, age of the device, model of the device, and so on.
Blue
Red
Green
Greenish-Blue
Purple
Yellow
WhiteR
G
B
AG45129 REV. 10 56
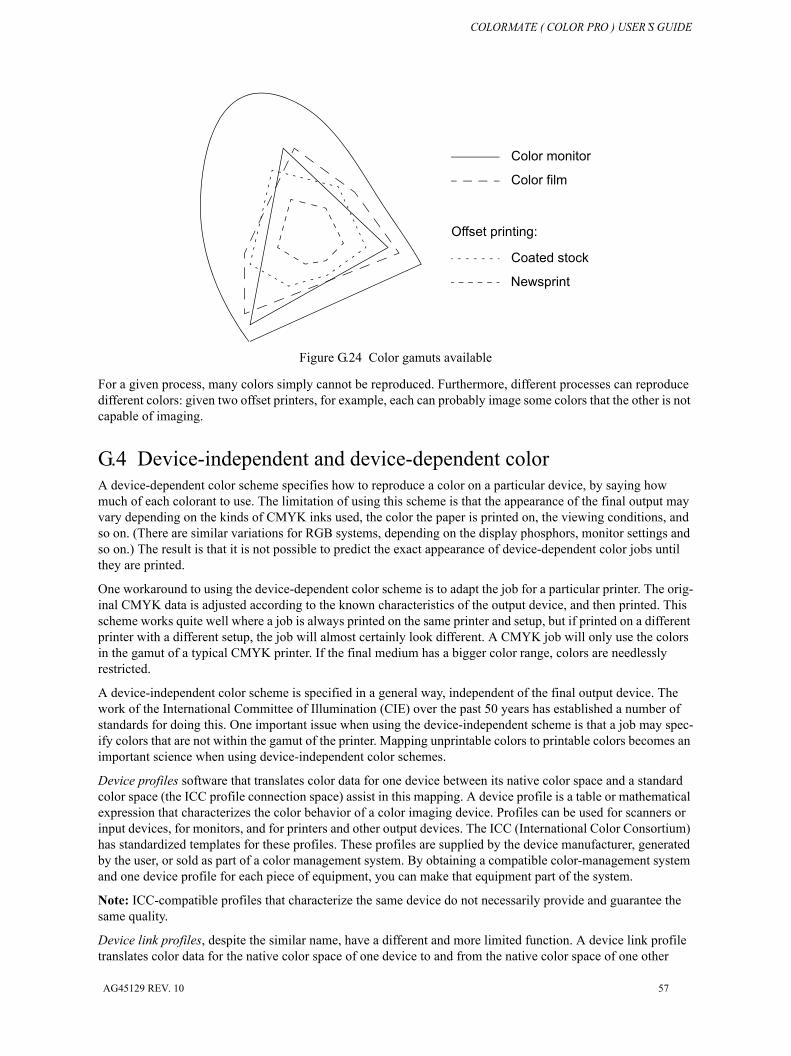
COLORMATE ( COLOR PRO ) USER’S GUIDE
Figure G.24 Color gamuts available
For a given process, many colors simply cannot be reproduced. Furthermore, different processes can reproduce different colors: given two offset printers, for example, each can probably image some colors that the other is not capable of imaging.
G.4 Device-independent and device-dependent colorA device-dependent color scheme specifies how to reproduce a color on a particular device, by saying how much of each colorant to use. The limitation of using this scheme is that the appearance of the final output may vary depending on the kinds of CMYK inks used, the color the paper is printed on, the viewing conditions, and so on. (There are similar variations for RGB systems, depending on the display phosphors, monitor settings and so on.) The result is that it is not possible to predict the exact appearance of device-dependent color jobs until they are printed.
One workaround to using the device-dependent color scheme is to adapt the job for a particular printer. The orig-inal CMYK data is adjusted according to the known characteristics of the output device, and then printed. This scheme works quite well where a job is always printed on the same printer and setup, but if printed on a different printer with a different setup, the job will almost certainly look different. A CMYK job will only use the colors in the gamut of a typical CMYK printer. If the final medium has a bigger color range, colors are needlessly restricted.
A device-independent color scheme is specified in a general way, independent of the final output device. The work of the International Committee of Illumination (CIE) over the past 50 years has established a number of standards for doing this. One important issue when using the device-independent scheme is that a job may spec-ify colors that are not within the gamut of the printer. Mapping unprintable colors to printable colors becomes an important science when using device-independent color schemes.
Device profiles software that translates color data for one device between its native color space and a standard color space (the ICC profile connection space) assist in this mapping. A device profile is a table or mathematical expression that characterizes the color behavior of a color imaging device. Profiles can be used for scanners or input devices, for monitors, and for printers and other output devices. The ICC (International Color Consortium) has standardized templates for these profiles. These profiles are supplied by the device manufacturer, generated by the user, or sold as part of a color management system. By obtaining a compatible color-management system and one device profile for each piece of equipment, you can make that equipment part of the system.
Note: ICC-compatible profiles that characterize the same device do not necessarily provide and guarantee the same quality.
Device link profiles, despite the similar name, have a different and more limited function. A device link profile translates color data for the native color space of one device to and from the native color space of one other
Color monitor
Color film
Offset printing:
Coated stock
Newsprint
AG45129 REV. 10 57
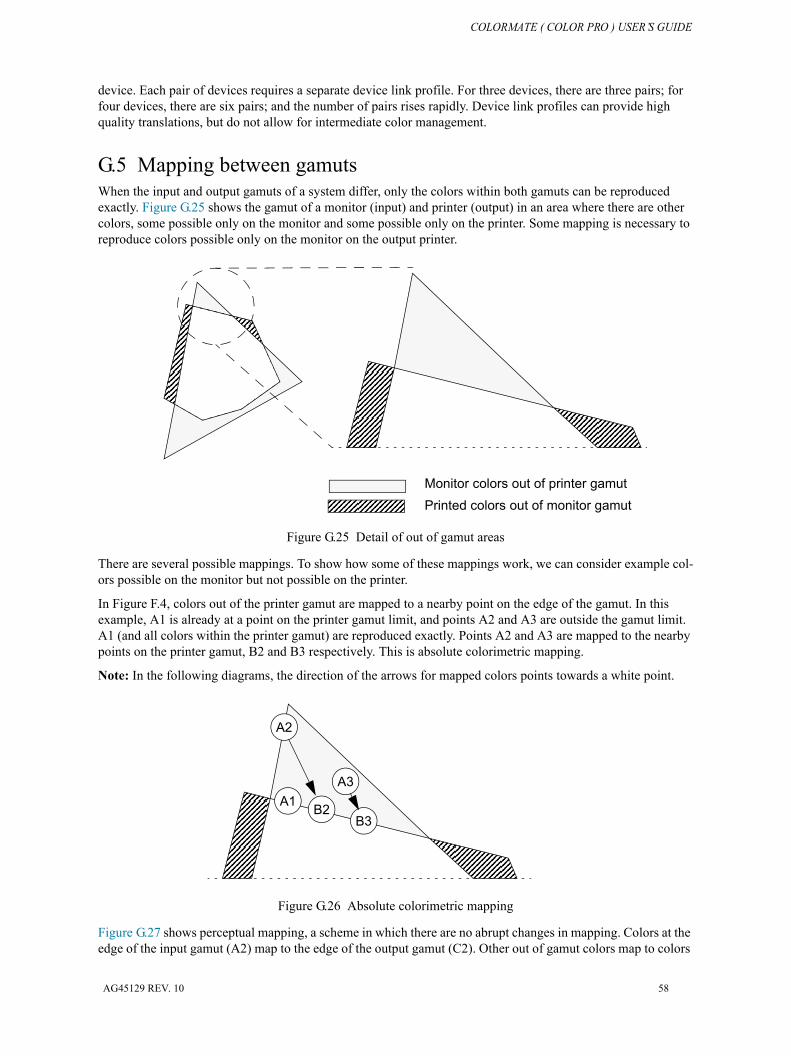
COLORMATE ( COLOR PRO ) USER’S GUIDE
device. Each pair of devices requires a separate device link profile. For three devices, there are three pairs; for four devices, there are six pairs; and the number of pairs rises rapidly. Device link profiles can provide high quality translations, but do not allow for intermediate color management.
G.5 Mapping between gamutsWhen the input and output gamuts of a system differ, only the colors within both gamuts can be reproduced exactly. Figure G.25 shows the gamut of a monitor (input) and printer (output) in an area where there are other colors, some possible only on the monitor and some possible only on the printer. Some mapping is necessary to reproduce colors possible only on the monitor on the output printer.
Figure G.25 Detail of out of gamut areas
There are several possible mappings. To show how some of these mappings work, we can consider example col-ors possible on the monitor but not possible on the printer.
In Figure F.4, colors out of the printer gamut are mapped to a nearby point on the edge of the gamut. In this example, A1 is already at a point on the printer gamut limit, and points A2 and A3 are outside the gamut limit. A1 (and all colors within the printer gamut) are reproduced exactly. Points A2 and A3 are mapped to the nearby points on the printer gamut, B2 and B3 respectively. This is absolute colorimetric mapping.
Note: In the following diagrams, the direction of the arrows for mapped colors points towards a white point.
Figure G.26 Absolute colorimetric mapping
Figure G.27 shows perceptual mapping, a scheme in which there are no abrupt changes in mapping. Colors at the edge of the input gamut (A2) map to the edge of the output gamut (C2). Other out of gamut colors map to colors
Monitor colors out of printer gamut Printed colors out of monitor gamut
A1
A2
B2
A3
B3
AG45129 REV. 10 58

COLORMATE ( COLOR PRO ) USER’S GUIDE
just inside the output gamut map. Even colors within the printer gamut are mapped, to a degree that depends on their distance from the edge of the printer gamut.
Figure G.27 Perceptual mapping
There are other possible mappings, but these are harder to show in the chromaticity diagram.
A1
A2
C2
A3
C3
C2
AG45129 REV. 10 59
COLORMATE ( COLOR PRO ) USER’S GUIDE
A
absolute colorimetric 28description of 7
B
black generation 28, 42Black point compensation 37black preservation 32business graphics
See saturationBVD-FOGRA
input profile 51
C
calibration 6, 40CGATS TR001
input profile 53CIE 57CMYK
image data in ColorPro 30input profiles, description of 22input profiles, supplied 51output profiles, supplied 53printing 55
colorcorrection 28device-dependent 57device-independent 57gamuts 55management 55mapping styles 6perception of 54printing 55seeing 54
Color Rendering Intent Details dialog 27Color Rendering Intent Manager dialog 26Color Setup Manager dialog 29colorimetric
See absolute colorimetricColorPro
black generation 28black preservation 32calibration 40CMYK data 30color setup manager 29features 19intent details 27intent manager 26maximum ink 28output profile 34page setup 39password 20printing 40RGB data 30simulate paper color of jobs 31
Commercial Ainput profile 52
AG45129 REV. 10 60
COLORMATE ( COLOR PRO ) USER’S GUIDE
output profile 53correction, color 28
D
D50 19, 38D65 19, 38definitions
ICC profiles 19device link profile
description of 22device profile 34
description of 22installing 24
device-dependent colorintroduction 57
device-independent colorin PDF jobs 47in Photoshop and PostScript jobs 45introduction 57
dialogs for ColorProColor Rendering Intent Details 27Color Rendering Intent Manager 26Color Setup Manager 29Install ICC Profile 23New Page Setup 39Page Setup Manager 39Print File 41
DuPont Cromalininput profile 52
DuPont WaterProofinput profile 52
E
Emulationrendering intent selection 8
F
features 19Fogra 39L profile
supplied 52Fogra 43L profile
supplied 52Fuji ColorArt
input profile 52
G
gamuts, color 55Graphic Arts D50 19, 38
I
ICC
AG45129 REV. 10 61
COLORMATE ( COLOR PRO ) USER’S GUIDE
introduction to the organization 5profile connection space 57web site 5
ICC absolute colorimetric 36description of 7
ICC auto-switching 9, 36ICC perceptual 36
description ofICC profiles
definition 6, 19description of 57device link profiles 22device profile, installing 24device profiles, description of 22input profiles 22installing 23named colors profile 23output profile, installing 24output profiles, description of 22resample on install 24supplied 51types of 21uninstalling 25
ICC relative colorimetricdescription of 7
ICC saturation 36description of 8
IFRA 26L profilesupplied 52
IFRA 30L profilesupplied 52
input profiledescription of 22supplied 51, 53
Install ICC Profile dialog 23installing ICC profiles 21, 23
L
lightingD50 19, 38D65 19, 38Graphic Arts D50 19, 38Monitor D65 19, 38
M
Main intents 36managing color 55manual override 28mapping styles
absolute colorimetric 7business graphics 8perceptual 7photorealistic 7relative colorimetric 7saturation 8
maximum ink 28Monitor D65 19, 38
AG45129 REV. 10 62
COLORMATE ( COLOR PRO ) USER’S GUIDE
N
named colors profile, installing 23New Page Setup dialog 39
O
output profile 34description of 22installing 24supplied 53
Overprint preview 33override option 28
P
page setup 39Page Setup dialog 39Page Setup Manager dialog 39passwords 20PDF jobs
color management in 47perception of color 54perceptual 28
description of 7photorealistic
See perceptualPhotoshop images
processing jobs containing 45selecting profiles for embedding 47
Print File dialog 41printing 40
CMYK 55in color 55RGB 55
ProofingMultiple color space proofing 16RGB proofing, SetGoldPro and Harlequin ColorPro models 15
R
relative colorimetric 28description of 7
Rendering intent selectionemulation 8ICC auto-switching 9
rendering intents 36resample on install 24RGB
image data in ColorPro 30input profiles, description of 22input profiles, supplied 53printing 55
AG45129 REV. 10 63
COLORMATE ( COLOR PRO ) USER’S GUIDE
S
saturation 28description of 8
seeing color 54simulate paper color of jobs 31sRGB profile 30
supplied 53styles, mapping 6supplied profiles 51
input, CMYK 51input, RGB 53output, CMYK 53
SWOPinput profile 53output profile 53
T
Trinitron profile 30supplied 53
U
UCR 37, 42undercolor removal 37, 42uninstalling ICC profiles 25
W
WorkflowMultiple color space proofing 16RGB proofing SetGoldPro and Harlequin Color Pro models 15
AG45129 REV. 10 64