the raiser's edge for windows installation guide
TRANSCRIPT

Title Page

012303
2003 Blackbaud, Inc. This publication, or any part thereof, may not be reproduced or transmitted in any form or by any means, electronic or mechanical, including photocopying, recording, storage in an information retrieval system, or otherwise, without the prior written permission of Blackbaud, Inc.
The information in this manual has been carefully checked and is believed to be accurate. Blackbaud, Inc., assumes no responsibility for any inaccuracies, errors, or omissions in this manual. In no event will Blackbaud, Inc., be liable for direct, indirect, special, incidental, or consequential damages resulting from any defect or omission in this manual, even if advised of the possibility of damages.
In the interest of continuing product development, Blackbaud, Inc., reserves the right to make improvements to this manual and the products it describes at any time, without notice or obligation.
Microsoft is a registered trademark, and Windows, Windows for Workgroups, Windows 95, Windows 98, Windows NT, and Windows 2000 are trademarks of Microsoft Corporation.
All other products and company names mentioned herein are trademarks of their respective holders.
RE-IG-012303

The Raiser’s Edge Installation Guide iii
T H E R A I S E R ’ S E D G E F O R W I N D O W S I N S T A L L A T I O N G U I D E
Table of Contents ABOUT THIS INSTALLATION GUIDE.........................................................................1 GENERAL RECOMMENDATIONS...............................................................................1 PRE-INSTALLATION CONSIDERATIONS....................................................................1
General Considerations ................................................................................1 Migrating Considerations .............................................................................2 Windows Networks ........................................................................................3 Novell NetWare Networks .............................................................................3
INSTALLING THE RAISER'S EDGE FOR WINDOWS ....................................................4 MIGRATING AN EXISTING DATABASE ...................................................................11 POST INSTALLATION CHECKLIST ..........................................................................13 DATABASE SERVICE MANAGER ............................................................................14
Installing the Service Manager ...................................................................14 Configuring the Service Manager ...............................................................15 Understanding the Service Manager...........................................................18
SETTING DATABASE STARTUP PARAMETERS ........................................................22 STARTING UP AND SHUTTING DOWN THE DATABASE...........................................26
Manual Startup and Shutdown....................................................................26 Automatic Startup and Shutdown................................................................27
BACKING UP THE SQL ANYWHERE DATABASE ....................................................31 COMMON QUESTIONS AND TROUBLESHOOTING TIPS............................................33 APPENDIX A: AUTO INSTALLATION................................................................... A-1

iv The Raiser’s Edge Installation Guide
The Raiser’s Edge Installation Guide 1
About this Installation Guide This guide contains complete instructions for installing your Blackbaud software. Additional information about your Blackbaud software is available online at www.blackbaud.com, on your Installation CD, and also from the software after your successful installation. If you are installing multiple Blackbaud Systems, please refer to Appendix A of The Raiser’s Edge for Windows Administrator’s Guide in your Online Manual after you install The Raiser’s Edge for Windows (The Raiser’s Edge).
General Recommendations We recommend you close any alternate desktops, anything other than Explorer or Program Manager, while installing Blackbaud Windows programs.
We strongly recommend the Windows operating system be installed locally on each workstation. This configuration allows for easier installation and better performance.
You must completely back up all workstations and servers before installing any new software.
We recommend you install the latest drivers and updates for the network and desktop operating systems used by your organization.
Pre-Installation Considerations
General Considerations
You should:
Fully understand and ensure system requirements are met. Hardware requirements are subject to change and updated as necessary. We recommend visiting www.blackbaud.com for the most recent hardware requirements.

2 The Raiser’s Edge Installation Guide
Have a complete backup of the server and each workstation before installation.
Have a CD-ROM drive at the server or on a workstation with network access. Files can be copied to and run from a network drive if the server does not have a CD-ROM drive.
Map a drive from all workstations to the location of your database before installing the software. A mapped drive is required to install and operate this software.
Exit all Windows applications on the server and workstations where The Raiser’s Edge will be installed.
Close any virus scan programs on the server and workstations. Virus detection programs can mistakenly interpret the setup/upgrade process of a program as contamination of existing files on the disk.
Close any screen saver programs on the server and workstations. Screen savers can cause memory conflicts.
Close the Microsoft Office toolbar, if present. The Microsoft Office toolbar may interfere with the installation of some files.
If you are migrating from an existing Raiser’s Edge Jet, Oracle, or DOS database, or migrating from Fund-Master Review the Conversion Guide if migrating from DOS or Fund-Master.
Make sure all users have exited from all Raiser’s Edge modules.
Ensure you are running The Raiser’s Edge for Windows version 6.2 or higher.
Compact all Raiser’s Edge databases if using the Jet version.
Write down your preferences. A new .INI file is created and your current preferences do not convert to the new version.
The Raiser’s Edge Installation Guide 3
For Windows 95, Windows 98, Windows NT Server 3.51 or higher, or Windows 2000 Server Network In addition to completing the General Checklist, you should:
Be logged on as Administrator.
Install the latest Service Pack for your version of Windows.
Have the TCP/IP protocol stack installed correctly on both the server and all workstations running Blackbaud programs. To verify this information:
1. On the Windows NT server, Windows 2000 server, or any Windows NT 3.51 or NT 4.0 workstation, type IPCONFIG at a DOS prompt or from the Run command. OR On Windows 95 or Windows 98 workstations, type WINIPCFG at a DOS prompt or from the Run command.
2. If the TCP/IP protocol is installed correctly, you will receive a return similar to the one below.
Token Ring Adapter ProNET1: IP Address……………….:172.20.2.116 Subnet Mask…………….:255.255.0.0 Default Gateway……….:172.20.0.2
3. Test the TCP/IP connection between all workstations and the database server using the “Ping” utility and the IP address of the server.
Reboot your server.
For Novell NetWare (Version 3.2, 4.2, or 5) Network
In addition to completing the General Checklist, you should:
Have supervisor rights to the server.
Install the latest Novell updates from www.novell.com.

4 The Raiser’s Edge Installation Guide
Install the Microsoft Client for NetWare or the latest Novell Intranetware Client for Windows on the Windows 95, Windows 98, Windows NT, or Windows 2000 workstations accessing The Raiser’s Edge database on a Novell NetWare server. We recommend using Novell Intranetware Client.
Install and properly configure TCP/IP or IPX/SPX on both the server and workstations that access The Raiser’s Edge. TCP/IP is the recommended database communication protocol for all network and workstation operating systems.
Not attempt to run your database in Protected mode on NetWare 5. SQL Anywhere databases are not supported in Protected mode in NetWare 5.
When installing on a Novell NetWare server, you must map a drive from the workstation to the SYS volume on the server. If you are installing data to a volume other than SYS, you must map a drive to that volume.
Reboot your server. We recommend temporarily disabling additional processes in the AUTOEXEC.NCF during the installation process.
Installing The Raiser’s Edge for Windows 1. Insert the Blackbaud CD into the CD-ROM drive.
2. From Windows 95, Windows 98, Windows NT 4.0, or Windows 2000, select Run from the Start button on the taskbar. Type D:\REWIN\SETUP.EXE, where D represents the location of (or complete path to) the CD-ROM drive.
OR
From Windows 3.11 or Windows NT 3.51, select File, Run from the Program Manager. Type D:\REWIN\SETUP.EXE, where D represents the location of (or complete path to) the CD-ROM drive.

The Raiser’s Edge Installation Guide 5
3. The Welcome screen appears with a final warning to exit all Windows programs before running the setup program. Click Next to continue.
4. Enter your Name and Organization name on the Registration screen. Click Next to continue.
5. On the Select Configuration screen, mark the Multi-User Network Version option if you are installing on a network. If you are installing a Standalone Version, mark this option and proceed to Step 7. Click Next to continue.
6. The Multi-User Setup screen appears. Mark the Install/Migrate Database Components on File Server option. Click Next to continue.
7. The Select Database to Install screen appears.
8. On this screen, you can choose to:
• Create New Database – Mark this option if you would like to install a new Raiser’s Edge database. The new database is the one you use to enter your organization’s data, as it contains no records.
• Install Sample Database – Mark this option if you would like to install a “practice” database. The sample database should be used for training purposes only. If you install a sample database, you must go through the installation process again and select Create New Database before you begin entering you own data.

6 The Raiser’s Edge Installation Guide
• Upgrade Database – Mark this option to upgrade a current Raiser’s Edge database from an earlier version to version 6.41.
• Migrate Existing Database – Mark this option if you are migrating from The Raiser’s Edge Jet, Oracle, or DOS version, or if you are migrating from Fund-Master. When you select to migrate an existing database, your current Jet, Oracle, DOS, or Fund-Master database is copied into the new Raiser’s Edge SQL Anywhere database. This is the database you use to enter your organization’s data.
9. Click Next to continue. If you are installing a Standalone version, proceed to Step 15.
10. The Select Server screen appears. Select your network environment.
• If you mark either of the NetWare options, NetWare 3.2 or NetWare 4.2 or Higher, click Next and go to the next step.
OR
• If you mark the Windows 95/98/NT/2000 option, click Next and go to step 15.
Note: NetWare 4.11 users should select the NetWare 4.2 or Higher option. However, Blackbaud tests its applications only on NetWare version 4.2 or higher.

The Raiser’s Edge Installation Guide 7
11. The Server Install for NetWare screen appears.
12. On the Server Install for NetWare screen:
• Specify where the Novell NetWare system directory is on your network. Use Browse to select the drive you mapped to the SYS volume on your NetWare server.
• Browse to the directory where you want to install the database. The default database directory is \REWIN. You can choose the volume for the directory, but we strongly recommend using \REWIN as the directory name.
• Specify the volume where the database will be installed. The default is SYS. You can choose a new volume if necessary. If you choose to install data to a volume other than SYS, enter the volume name here.
13. Click Next to begin copying the SQL Anywhere files.

8 The Raiser’s Edge Installation Guide
14. During the process, the Autoexec.ncf screen appears. If you want The Raiser’s Edge database to start automatically when the server is started, click Yes. This adds a command line to the AUTOEXEC.NCF file. Click Yes.
Note: If you click No, the database must be manually loaded using the REWSTART.NCF file each time the server is rebooted. No workstations can access The Raiser’s Edge until the database is started.
Proceed to step 16.
15. The Database Installation Directory screen appears. Specify the directory where the database will be installed. The default is C:\REWIN. Use Browse, if necessary, to specify the location. Click Next. If you are installing a Standalone version, skip ahead to step 9 in the “Installing Workstation Components” procedure.
16. The setup program copies the files and creates a program group for The Raiser’s Edge database.
17. If you are migrating an existing Raiser’s Edge or Fund-Master database, perform the additional steps described in the “Migrating an Existing Database” section of this guide.
18. A message appears confirming the installation completed successfully. Click OK to exit the setup program.
19. Reboot the server.
20. Start the SQL Anywhere database. For more information on starting the database, see the “Starting Up and Shutting Down the Database” section of this guide.
21. Complete the Installing Workstation Components procedure on all workstations that access The Raiser’s Edge.

The Raiser’s Edge Installation Guide 9
Installing workstation components
Note: The workstation must have a drive permanently mapped to the database location on the server. For consistency, we recommend you map each workstation to the server using the same drive letter.
1. Make sure the SQL Anywhere Database engine is started on the server.
2. Insert the Blackbaud CD into the CD-ROM drive.
3. From Windows 95, Windows 98, Windows NT 4.0, or Windows 2000, select Run from the Start button on the taskbar. Type D:\REWIN\SETUP.EXE, where D represents the location of (or complete path to) the CD-ROM drive.
OR
From Windows 3.11 or Windows NT 3.51, select File, Run from the Program Manager. Type D:\REWIN\SETUP.EXE, where D represents the location of (or complete path to) the CD-ROM drive.
4. The Welcome screen appears giving you a final warning to exit all Windows programs before running the setup program. Click Next to continue.
5. The Registration screen appears. Enter your complete name and organization name to register your copy of The Raiser’s Edge. Click Next to continue.
6. The Select Configuration screen appears. Mark the Multi-User Network Version option. Click Next to continue.
7. The Multi-User Setup screen appears. Mark the Install Workstation Components to this Machine option. Click Next to continue.
8. The Select Database Directory screen appears. Specify where The Raiser’s Edge database is on your network. If necessary, you can use Browse to find the drive that is mapped to the database location on the server. Click Next to continue.

10 The Raiser’s Edge Installation Guide
9. The Install Program Files/Crystal Reports screen appears. These components are installed on the workstation. The installation and Crystal Reports directories default for you. Use Browse, if necessary, to select a new location. Click Next to continue.
10. The Select Program Installation Options screen appears.
11. Select the components to be installed. By default, all components are
selected and installed. An estimate of the disk Space Required and disk Space Available is given. Verify the Space Available exceeds the Space Required. Click Next to continue.
Note: We strongly recommend you install the Help Files and Online Manual so you have access to all Raiser’s Edge documentation.
12. The Start Copying Files screen appears. Verify the current settings and click Next.
13. At about 80% completion, the Acrobat Reader 5.0.5 Setup screen appears. To install Acrobat Reader, click Next. The Choose Destination Location screen appears.
14. To continue with the installation, click Next. Depending on the workstation configuration, either the Setup Complete screen or Information screen appears.

The Raiser’s Edge Installation Guide 11
If the Setup Complete screen appears, to return to the Blackbaud setup program, mark No, I will restart my computer later, and click Finish.
Note: Do not reboot your computer after Adobe Acrobat 5.0.5 installs. Select the reboot later option and reboot your computer after The Raiser’s Edge is completely installed.
If the Adobe Information screen appears, to return to the Blackbaud setup program, click OK.
You return to the Blackbaud setup program, and the Raiser’s Edge installation completes.
15. A message appears confirming the installation completed successfully. Click OK to exit the setup program.
16. Reboot the workstation.
Migrating an Existing Database If you selected the Migrate Existing Database option during installation, the Blackbaud Database Setup Wizard starts after server files are installed. To migrate a Fund-Master or Raiser’s Edge DOS database, follow the conversion procedure in your online The Raiser’s Edge Conversion Guide.
Note: Remember, if you are accessing your database from a network, after you migrate the database, you must install workstation components on each workstation that uses the database. A standalone installation installs database and workstation components together on one machine only.
Running the Blackbaud Database Setup Wizard
1. The Welcome screen appears. Click Next to continue.
FOR A JET DATABASE MIGRATION
2. The Locate Existing Database screen appears. The setup program attempts to locate the The Raiser’s Edge for Windows Jet database directory. If the setup program is unable to locate the database directory, use Browse to specify the correct path. Click Next to continue and proceed to step 3.
FOR AN ORACLE DATABASE MIGRATION

12 The Raiser’s Edge Installation Guide
Note: The Oracle Database must be running and you must have SQL*NET connectivity to your Oracle Database from this computer before you begin the migration.
2a. The Migration program needs to attach to your existing Oracle Database tables. Click Next to continue.
2b. Select the name of The Raiser’s Edge for Windows Oracle Database to migrate. Click OK to continue. You see the progress of attaching to the database.
Note: This process may take some time and should not be interrupted.
2c. Click Next to continue.
3. The Analyzing Database screen appears. Click Next and the setup program analyzes your existing database.
4. After the database analysis is complete, the Migrate Data screen appears. Click Next to begin the database migration process.
5. A status screen displays during the migration giving you information on the migration process. Please note this process may take some time and should not be interrupted. Once the migration process is finished, click Finish to exit the setup program.
6. Reboot the server or workstation.
7. Start your Raiser’s Edge SQL Anywhere database. For more information on starting the database, see the “Starting Up and Shutting Down the Database” section of this guide.
8. If you are installing the network version of The Raiser’s Edge, start your Raiser’s Edge SQL Anywhere database and complete the Installing Workstation Components procedure on all workstations that access The Raiser’s Edge.
Note: The Raiser’s Edge SQL Anywhere database must be running before you install workstation components.

The Raiser’s Edge Installation Guide 13
Post-Installation Checklist Note: Once The Raiser’s Edge for Windows has been installed, the
default password for Supervisor is set to “Admin”. For security reasons, make sure you change the password.
Set your database cache at the server. For more information, see the “Setting Database Startup Parameters” section of this guide.
On Novell NetWare, when the database is started, it may auto-detect the need for updated files from Novell. Take note of any such messages and install the necessary updates. For more information, see the pre-installation recommendations for Novell NetWare.
After you install The Raiser’s Edge, make sure you access the software on each server and workstation.
Understand the process of starting up and shutting down the database. For more information, see the “Starting Up and Shutting Down the Database” section of this guide.
Implement a reliable backup procedure for database files. For more information, see the “Backing up the SQL Anywhere Database” section of this guide.

14 The Raiser’s Edge Installation Guide
Database Service Manager Available for Windows NT and Windows 2000 servers only, the Blackbaud Database Service Manager (hereafter referred to as Service Manager) is a utility you can use to start your SQL Anywhere databases as a service. You can also use the Service Manager to edit the startup parameters (configure the database command line) for your SQL Anywhere databases. Why use the Service Manager? The Service Manager runs your SQL Anywhere databases as a service, instead of as an application. A service runs independently of any user account. A user does not have to be logged on to run the service, which means the computer does not pose a security risk. You can also set your SQL Anywhere databases to automatically start and stop. Finally, the Service Manager is an easy way to change settings in the database command line and to configure multiple databases.
Installing the Service Manager Installing the Service Manager for Windows NT or Windows 2000
You must be at the server logged on as Administrator. Close all other applications.
1. Insert the Blackbaud CD into the CD-ROM drive.
2. From Windows NT 4.0 or Windows 2000, click Run from the Start button on the taskbar. Type D:\BBSERVICE20\SETUP.EXE, where D represents the location of (or complete path to) the CD-ROM drive.
OR
From Windows NT 3.51, select File, Run from the Program Manager. Type D:\BBSERVICE20\SETUP.EXE, where D represents the location of (or complete path to) the CD-ROM drive.

The Raiser’s Edge Installation Guide 15
3. A Welcome screen appears. Click Next to continue.
4. The Select Directory screen appears. Select the directory where the Service Manager files will be installed. The default directory is C:\BLACKBAUD. Use Browse, if necessary, to select a new location. Click Next to continue.
5. After the setup program copies the files and creates the Service Manager program group, the Setup complete screen appears. Click Finish.
Note: If the Setup Incomplete screen appears, reboot the computer.
6. To start the database, click the Start button on the taskbar and select Programs, Blackbaud Service Manager v2.
Configuring the Service Manager This section shows you how to quickly set up the Service Manager so you can start managing your Blackbaud SQL Anywhere databases. The next section, “Understanding the Service Manager,” explains each tab in detail so you can configure the Service Manager to meet your specific needs.
Configuring the Blackbaud Database Service Manager
1. From the Start button on the taskbar, select Programs, Blackbaud Service Manager v2 and click the shortcut.

16 The Raiser’s Edge Installation Guide
2. Select the Databases tab. On this tab, you specify the name and location of all Blackbaud SQL Anywhere databases you want to manage using the Service Manager. The database must be on this server.
3. In the Server Name field, enter the name of your SQL Anywhere
Database engine. The default is BLACKBAUD32, but you should change this to the name of your SQL Anywhere server/engine name. For example, if you are running The Raiser’s Edge and no other Blackbaud products on the server, you should enter REWIN_BLACKBAUD instead.
4. Add the database files to the Service Manager. If you are adding a new database file to the Service Manager, click Add. If you are using an existing database file in the Service Manager, click Modify.
• After you click Add or Modify, a screen appears. In the Database File Name field, browse to the database file. You can recognize The Raiser’s Edge database file from the RE.DB name.
• If you are adding multiple database files, you need to add an alias (a unique name) for each database. For example, if you are adding two Raiser’s Edge databases, you can name the first database DATABASE1 and the second database DATABASE2. See Appendix B in the Online Raiser’s Edge Administrator’s Guide for information on configuring multiple Raiser’s Edge databases.

The Raiser’s Edge Installation Guide 17
Note: You can delete a database from the service by highlighting the database file and clicking Delete.
5. Select the Protocol Options tab. On this tab, you specify the protocol the Service Manager uses to communicate with your SQL Anywhere databases. Selected protocols include TCP/IP, NetBios, and IPX. TCP/IP is the recommended database communication protocol for Windows servers.
6. Select the protocol by marking the TCP/IP, NETBIOS, and/or
IPX/SPX checkboxes. You can specify more than one protocol, but it is better to select fewer protocols.
7. Click Update to save your changes.
8. To run the Service Manager as a service, click Start. For more information on running the databases as a service, see the “Understanding the Service Manager” section of this guide.
9. Click Quit to exit Service Manager.

18 The Raiser’s Edge Installation Guide
Understanding the Service Manager This section explains the Service Manager’s general controls and then takes you through each tab of the Service Manager. You should first complete the Configuring the Blackbaud Database Service Manager procedure.
General Controls
The general controls are available from any tab in the Service Manager. These controls allow you to start, stop, and update the service according to the information you specify on the various tabs.
Once you configure the Service Manager to meet your needs, click Start to start the service. A message appears confirming the successful startup.
• Click Stop to stop the service and all databases controlled by the service.
• Click Update after you make changes to any tabs in the Service Manager. This control updates the command line used when starting your service. The changes take effect the next time the service is started.
• Click Use Defaults to remove the options you selected on the tabs and return the Service Manager to the original default selections.
• Click Show Command to review the options you have already set. When you click Show Command, the database command line appears.
• Click Quit to exit the Service Manager.
Databases Tab
You use the Databases tab to specify the name and location of all SQL Anywhere databases you want to manage using the Service Manager.
• In the Server Name field, enter the name of your SQL Anywhere server/engine. For The Raiser’s Edge, the default server/engine name is REWIN_BLACKBAUD.

The Raiser’s Edge Installation Guide 19
• Click Add to add a database to the service. After you click Add, a screen appears. In the Database File Name field, browse to the database file. If you are adding multiple database files, you need to add an alias (a unique name) for each database.
• Click Modify to change the name, location, or alias of a database already listed in the service.
• Click Delete to remove a database from the service.
• On the Add/Modify Database screen, you can mark the Disable this database checkbox to prevent the data file from starting when SQL Anywhere is started. This is a useful option if you configure multiple databases and you need to recover a database using the -f switch. When you use this switch, only one database can be started, so all other databases must be disabled.
Protocol Options Tab
You use the Protocol Options tab to select the protocol(s) you want the SQL Anywhere components to use. Supported protocols include TCP/IP, IPX/SPX, and NetBios. You can specify more than one protocol. TCP/IP is the preferred protocol for all network operating systems.
• If you mark the TCP/IP checkbox, you can Enable advanced TCP/IP features. You can use these options to manually configure TCP/IP for your SQL Anywhere database components.
Note: Advanced TCP/IP settings are not normally necessary for successful implementation of TCP/IP on a network.
Broadcast: Specifies the IP address used by your SQL Anywhere server.
Receive buffer size and Send buffer size: Allocates memory in the protocol stack for receiving TCP/IP packets going to the SQL Anywhere client or server.

20 The Raiser’s Edge Installation Guide
Start Parameters Tab
You use the Start Parameters tab to specify startup settings.
• To start the database automatically each time your Windows NT or Windows 2000 server boots up, mark the AutoStart database when NT server starts checkbox. We recommend this option for standalone systems and for network systems where the server is regularly restarted.
• Set the size of your database cache by sliding the cache indicator to the appropriate amount. We recommend setting the cache to 20% of the total size of all your Blackbaud SQL Anywhere databases. For example, if your Raiser’s Edge database is 100 MB, set the cache to 20 MB (20% of 100 MB is 20 MB).
Note: Do not set your database cache higher than 75% of available memory because it may adversely affect the performance of your Windows NT or Windows 2000 server.
Advanced Tab
You use the Advanced tab to tune your SQL Anywhere databases. We strongly recommend you contact Customer Support before changing the defaults on this tab. The Additional Switches field is usually the only field you need to use on this tab.
• Mark the Disable engine/server dual threading checkbox if you want to force the database to never use more than one processor of a multi-processor machine.
• Mark the Truncate the transaction log after checkpoint checkbox if you want to delete the transaction log either at shutdown or as a result of a checkpoint scheduled by the server. This provides a way to limit the growth of the transaction log.
Note: When you select the Truncate the transaction log after checkpoint option, you have no protection against media failure on the device containing the database files.

The Raiser’s Edge Installation Guide 21
• Mark the Disable asynchronous I/O checkbox if you want to force the program to use synchronous I/O instead of asynchronous I/O. Asynchronous I/O is the preferred option.
• Mark the Display debugging information checkbox if you want to display additional connectivity information during startup of the database and workstation components. This information is useful for troubleshooting problems in these areas.
• Mark the Use buffered disk I/O checkbox if you want to enable the operating system disk cache in addition to the database cache. While the operating system disk cache may improve performance in some cases, better performance is generally obtained without this option (in other words, by using the database cache only).
• Mark the Hide message window checkbox if you want to hide the server screen display for standalone installations.
• Set the Database process priority class to the appropriate level. Level must be Idle, Normal, High, or Maximum. The priority process class determines the order of processes completed on your computer. Setting the process priority class to maximum may interfere with the server’s other processes.
• Mark the Log message window to file checkbox if you want to print all server message output to a file in addition to displaying on screen.
• Mark the Override network packet size checkbox if you want to set the maximum size of communication packets. The default size is 512 bytes. The minimum size is 200 bytes.
Note: If this option is used, the -p switch must also be placed in the ODBC.INI file on each installed workstation. Failure to set the corresponding packet size on all client machines may result in software communication problems.
• Mark the Override default timeout settings checkbox if you want to specify how long a field remains active before the computer automatically shuts down a communication connection. Client idle time before shutdown: Disconnects connections that have not
submitted a request for the number of minutes specified. The default is 240 minutes (4 hours).

22 The Raiser’s Edge Installation Guide
Client liveliness timeout: For TCP/IP or IPX communication protocols, a liveliness packet is sent periodically to confirm that a connection is still intact. If the server runs for the liveliness timeout specified without detecting a liveliness packet, the communication is disconnected.
Active request termination: An active request and connection is terminated if the server does not receive a retransmit within the specified number of seconds.
Setting Database Startup Parameters You can influence the performance of your SQL Anywhere database by setting a memory cache allocation parameter for starting the database. This parameter is set on the database command line. Cache allocation determines the amount of RAM the SQL Anywhere database can use for processing. The cache defaults to 8 MB of RAM when you install The Raiser’s Edge for Windows SQL Anywhere database. We recommend you adjust the cache to approximately 20% of the total size of the SQL Anywhere database. For example, if your SQL Anywhere database (the RE.DB file) amounts to 100 MB of data stored on the hard drive, you should set the cache parameter to 20 MB. If you are running multiple Blackbaud databases, you should set the database cache to 20% of the size of the sum of all databases. The 20% rule allows the SQL Anywhere database to achieve optimum performance. To set the memory cache allocation for your SQL Anywhere database, you must edit the -c parameter in the database command line. If you use an icon to start your SQL Anywhere database (in other words, you are running SQL Anywhere as an application), you must edit the properties of the database icon. This icon is found in The Raiser’s Edge database program group on the machine installed with The Raiser’s Edge server components. If you are running SQL Anywhere as a service on a Windows NT or Windows 2000 server, you make the cache adjustment on the Start Parameters tab of the Blackbaud Database Service Manager. For more information on the Service Manager, see the “Understanding the Service Manager” section of this guide.
SQL Anywhere database icon

The Raiser’s Edge Installation Guide 23
If your SQL Anywhere database is on a NetWare server, the edits are made in the REWSTART.NCF file. Follow the instructions in this section for the network operating in your environment. For changes to take affect, the database must first be stopped and restarted.
Windows NT 4.0 and Windows 2000 Setting the memory cache allocation of the SQL Anywhere database
installed as an application
1. Right click the Start button on the taskbar.
2. Select Open All Users. The Start Menu screen appears.
3. Double click the Programs folder.
4. Double click The Raiser’s Edge for Windows Database folder.
5. Right click the icon and select Properties.
6. Select the Shortcut tab.
7. Edit the Target line and find the parameter -c8MB.
8. Change the 8 to the appropriate number, based on the 20% rule described on the previous page. 8 MB is the default cache size.
9. Click Apply.
10. Click OK. The new cache setting takes effect the next time the database is started.
Setting the memory cache allocation of the SQL Anywhere database installed as a service
1. Select Programs, Blackbaud Service Manager v2 from the Start button on the taskbar. The Service Manager appears.
2. On the Start Parameters tab, make the appropriate adjustment to the cache by sliding the cache indicator to at least 20% of the total size of the SQL Anywhere database. See the beginning of this section for cache information.
3. Click Update. The new cache setting takes effect the next time the database is started.

24 The Raiser’s Edge Installation Guide
Windows 95 or Windows 98
Setting the memory cache allocation of the SQL Anywhere database
1. Right click the Start button on the taskbar.
2. Select Open.
3. Double click the Programs folder.
4. Double click The Raiser’s Edge for Windows Database folder.
5. Right click the icon and select Properties.
6. Select the Program tab.
7. Edit the Target line and find the parameter -c8MB.
8. Change the 8 to the appropriate number, based on the 20% rule described at the beginning of this section.
9. Click Apply.
10. Click OK. The new cache setting takes effect the next time the database is started.

The Raiser’s Edge Installation Guide 25
Windows NT 3.51
Setting the memory cache allocation of the SQL Anywhere database
1. In Program Manager, maximize The Raiser’s Edge for Windows database program group.
2. Highlight the icon and select File, Properties from the menu bar.
3. Edit the Command line and find the parameter -c8MB.
4. Change the 8 to the appropriate number, based on the 20% rule described at the beginning of this section.
5. Click OK. The new cache setting takes effect the next time the database is started.
Novell NetWare
Setting the memory cache allocation of the SQL Anywhere database from a Windows workstation:
Note: You will need to map a drive to the Novell NetWare SYS volume where you installed the SQL Anywhere database.
1. Right click Start on the taskbar and select Explore. Windows Explorer appears.
2. Locate the drive mapped to the SYS volume of the Novell NetWare server.
3. Open the System folder. 4. Double click the REWSTART.NCF file. This opens the file in Wordpad
or Notepad. 5. Find the -c8MB parameter. 6. Change the 8 to the appropriate number, based on the 20% rule described
at the beginning of this section. 7. Save the file and exit. The new cache setting takes effect the next time
the database is started.

26 The Raiser’s Edge Installation Guide
Setting the memory cache allocation of the SQL Anywhere database from the Novell NetWare server:
Note: You will need to map a drive to the Novell NetWare SYS volume where you installed the SQL Anywhere database.
1. At the NetWare system server prompt, type LOAD EDIT SYS:\SYSTEM\REWSTART.NCF
2. Edit the Database Command line and find the parameter -c8MB. 3. Change the 8 to the appropriate number, based on the 20% rule described
at the beginning of the “Setting Database Startup Parameters” section. 4. Save the changes by pressing ESCAPE, highlighting Yes, and pressing
ENTER. The next time you start your database by typing REWSTART at the NetWare system console prompt, SQL Anywhere will use the figure you entered for the memory cache allocation.
Starting Up and Shutting Down the Database
The SQL Anywhere database must be started before any workstation can access the information within the database. The database is implemented on Novell as a Novell NetWare Loadable Module and on Windows NT and Windows 2000 as a compiled executable file.
Manual Startup and Shutdown Novell NetWare Starting the SQL Anywhere database
1. Type the command REWSTART at the system console prompt. 2. The database starts.
Shutting down the SQL Anywhere database 1. Press ALT + F. 2. Press the down arrow and choose Exit 3. The database shuts down.

The Raiser’s Edge Installation Guide 27
Note: Shutting down the database with users connected automatically closes those connection(s) and may result in lost data. You will be warned if there are any open connections.
Blackbaud does not recommend unloading the DBSRV50.NLM to shut the database down on a Novell NetWare Server. Windows 95, Windows 98, Windows NT, or Windows 2000
For information on starting and stopping the database as a service, see the “Understanding the Service Manager” section of this guide.
Starting the database as an application
1. Double click the icon/shortcut in The Raiser’s Edge database program group. This icon, automatically created on the file server machine during the database setup, references the \\%windows%\system\DBSRV50.EXE program file.
2. The database starts.
Stopping the database
1. Select File, Exit on the SQL Anywhere database engine monitor.
2. The database shuts down.
Note: Shutting down the database with users connected automatically closes those connection(s) and may result in lost data. You will be warned if there are any open connections.
Automatic Startup and Shutdown To properly back up the SQL Anywhere database, the database MUST BE SHUT DOWN while the backup executes. SQL Anywhere includes a switch option (the -tq switch) to specify a quit time for the database.

28 The Raiser’s Edge Installation Guide
Novell NetWare If you did not do so during the setup program, you can place the REWSTART command in the AUTOEXEC.NCF on your file server if you would like to start The Raiser’s Edge database each time the file server is started. You can then add a -tq switch to the REWSTART.NCF file you created to automatically shut down the database.
Setting up an automatic database startup
1. To automatically start the SQL Anywhere database, we recommend a third-party utility to automatically run REWSTART.NCF at a specific time. One such utility is CRON.NLM. You can download this utility free from Novell’s web site, or you can log onto Blackbaud’s web site at www.blackbaud.com. Go to Customer Support then choose the Grab Bag option, Other Web Links, Downloads, and Novell’s CRON.NLM.
2. At the Novell site, you can download a file called CRON5.EXE. Double click this self-extracting zip file to access CRON.NLM and CRON5.TXT, which gives you complete instructions for installing and using CRON.NLM.
Note: While the CRON utility provides a solution for starting a SQL Anywhere database after a timed backup, we do not endorse the CRON utility. We are not a vendor of the CRON utility; therefore, we do not support the download, installation, setup, configuration, or troubleshooting issues that may result from CRON5.EXE or similar files. Contact the CRON vendor with any problems or questions regarding this utility.
Setting up an automatic database shutdown
When you installed The Raiser’s Edge on your Novell NetWare server, a REWSTART.NCF file was added to your SYS:\System directory. This file contains the SQL Anywhere database command line that has the parameters needed to start your database. A typical database command line found in the REWSTART.NCF file looks like this: Load DBSRV50 -nREWIN_BLACKBAUD SYS:\rewin\re.db -c8mb -tl0 -ti0 -ta0 -tr0

The Raiser’s Edge Installation Guide 29
To shutdown the database automatically, you must add a -tq switch and a time. Load DBSRV50 -nREWIN_BLACKBAUD SYS:\rewin\re.db -c8mb -tl0
-ti0 -ta0 -tr0 -tq19:00
In this example, the -tq19:00 will shut down the database at 7:00 p.m. (24-hour clock) on any day the database is running.
To add the -tq switch, you can:
1. Edit the REWSTART.NCF file from Windows Explorer at a workstation (you will need to map a drive to the Sys:\System directory on your Novell server).
OR
Use Edit at the NetWare server as follows:
1. At the NetWare system console prompt, type LOAD EDIT SYS:\SYSTEM\REWSTART.NCF
2. Go to the end of the database command line and add a space, -tq, and the time (24-hour clock) to shut down the database each night.
3. Press ESCAPE to save the changes, highlight Yes, and press ENTER.
Windows NT or Windows 2000 After you install the Service Manager on your Windows NT or Windows 2000 server and set up the SQL Anywhere database to run as a service, you can configure your SQL Anywhere database engine to start and stop automatically by using Windows NT scheduling tools.
Creating a “start” batch file
1. Open Notepad.
2. Type the following: Net Start “Blackbaud Database Service for SQL Anywhere”
Note: This line is case sensitive and MUST appear exactly as above for this process to work.
3. Save the file as C:\SQLSTART.BAT.

30 The Raiser’s Edge Installation Guide
Creating a “stop” batch file
1. Open Notepad.
2. Type the following. Net Stop “Blackbaud Database Service for SQL Anywhere”
Note: This line is case sensitive and MUST appear exactly as above for this process to work.
3. Save the file as C:\SQLSTOP.BAT.
Setting the Windows NT or Windows 2000 Schedule Service to run automatically
1. Go to Control Panel, Services.
2. Set the Schedule Service to run automatically. Make sure the service is started before continuing.
Setting the Windows NT or Windows 2000 Schedule Service to run the “start” batch file
1. At the command prompt, type the following. AT 6:30 /INTERACTIVE /EVERY:M,T,W,TH,F,S,SU C:\SQLSTART.BAT
where 6:30 equals the time (24-hour clock) when you want the database to start. Include the days of the week that apply.
2. When the command is accepted and the Schedule Service is set to run, you should see the message: “Added a new job with ID #”
The service will now be started automatically by the Windows NT Schedule Service.
Setting the Windows NT or Windows 2000 Schedule Service to run the “stop” batch file
1. At the command prompt, type the following. AT 22:30 /INTERACTIVE /EVERY:M,T,W,TH,F,S,SU C:\SQLSTOP.BAT
where 22:30 equals the time (24-hour clock) when you want the database to stop. Include the days of the week that apply.
2. When the command is accepted and the Schedule Service is set to run, you should see the message:

The Raiser’s Edge Installation Guide 31
“Added a new job with ID #”
The service will now be stopped automatically by the Windows NT Schedule Service.
Checking the Windows NT or Windows 2000 Schedule Service for accuracy
1. At the command prompt, type the following. AT
2. If the process is set correctly, you should see a message similar to the following. Status ID Day Time Command Line 0 Each M T W Th F S Su 6:30 AM c:\sqlstart.bat 1 Each M T W Th F S Su 10:30 PM c:\sqlstop.bat
Note: To delete a scheduled item from the Windows NT Schedule Service, after the items have been listed, type:
AT # /d
where # is the ID number of the scheduled item.
You should delete a scheduled item only when errors were made during setup, or when you need to modify scheduled times or days.
Backing Up the SQL Anywhere Database
Backing up your Blackbaud data is an important part of your daily routine. Frequent backups are your best protection against data loss. We strongly recommend the purchase and scheduled use of a tape or archival backup solution. Back up nightly and prior to any global change or import.
Before backing up your Blackbaud SQL Anywhere database, you MUST successfully shut down the database. Shutting down the database closes all open tables and files, enabling the backup procedure to archive your data correctly.

32 The Raiser’s Edge Installation Guide
Blackbaud does not recommend or condone the use of open-file backup ("hot backup") solutions. We have had many unfortunate experiences with clients whose backup software claimed to be able to successfully archive database files while they were in use, only to find in their moment of need that the hot backups had failed. Blackbaud urges you to shut down the SQL Anywhere database before attempting to back up your data, and to frequently test your backups.
The database can be shut down manually or automatically. For information on shutting down the database see the “Starting Up and Shutting Down the Database” section of this guide.
A backup is a copy or duplication of the files found on the hard disk onto another media such as a tape, CD, or Zip/Jaz disk. It is a replica of your data, which can be stored and protected for later use. We can send you a replacement copy of the program, but your data is irreplaceable. We recommend that you not span your data across a series of floppy disks. Floppy disks hold a tiny amount of data and are unreliable.
We suggest that you make three sets of daily backups and three sets of weekly backups for all logical drives. Keep one set of backup tapes off-site, preferably in a fireproof safe. This ensures the survival of your data should anything happen to your office. Do not make a backup on top of data you backed up the night before; rotate your backup media.
It is critically important that you test your backup to insure that your backup system is operating properly.
Testing your backup
1. Shut down your SQL Anywhere database engine.
2. Rename the RE.DB and RE.LOG files that are in the REWIN directory on your server.
3. Copy your backup RE.DB into the REWIN directory on your server.
4. Start the SQL Anywhere database engine and access The Raiser's Edge.

The Raiser’s Edge Installation Guide 33
Common Questions & Troubleshooting Tips
Problem: I have completed my installation successfully. I tried to open a module and it is asking for a password for the username Supervisor. What is the password?
Solution: The password is Admin.
Problem: I have a multi-user system, but I can only log into the system on one machine at a time. What can I do to fix this?
Solution: This problem occurs if you are trying to log in multiple times using the username of Supervisor. You can log into the system as one user on only one machine at a time. You should create new users with their own passwords in the Configuration module.
Problem: My workstation installation stops at 65%. Why?
Solution: The SQL Anywhere database engine on the server is not started. Refer to the Starting Up and Shutting Down the Database section of this chapter for information.
Problem: Now that I have The Raiser’s Edge installed and running, are there any special steps that need to be taken to perform a data backup?
Solution: Yes. To perform a data backup on your SQL Anywhere database, the database must be shut down. Refer to the corresponding section in this guide for more information.
Problem: I purchased the optional module RE:Tribute, but when I am in Constituent Management, the Hon/Mem tab is disabled. How do I activate it?
Solution: On the Bio 1 tab, you can mark a checkbox to indicate a constituent is an Honor/Memorial. Once you select this checkbox, the tab will be available and Honor/Memorial information can be entered. See your online RE:Tribute manual for more information about this optional module.

34 The Raiser’s Edge Installation Guide
Problem: My data was migrated to the SQL Anywhere version successfully. What do I need to do with my Jet data?
Solution: If you do not need to access the Jet data, you can remove RE.MDB, COMMON.MDB, REMEDIA.MDB, and REQUERY.MDB. We highly recommend a backup be done for your archives. The \REWIN shared directory on the server must not be deleted. Files in this directory are needed by the program.
Problem: Can I start the database as a service on my Windows NT or Windows 2000 network?
Solution: Yes. Refer to the sections in this guide on installing and using the Blackbaud Database Service Manager for Windows NT or Windows 2000.
Problem: When trying to start the database on my Novell NetWare file server, I am getting the message “A known NetWare bug has been detected. A work-around for this will be used: however, extending database and log files will be slower. Please obtain a new NLM to correct the problem.”
Solution: Refer to the Pre-Installation Considerations for Novell NetWare section of this guide for more information.
Problem: Starting the database on a Novell NetWare 3.2 or 4.x server results in the error “SYS\path\DBSRV50 not found”.
Solution: The server to which you installed the Blackbaud program(s) has a 16-bit operating system and does not support long file names; the database has been installed to a directory with a name longer than eight characters. Delete the server installation and re-install to a directory with a name that is not more the eight characters long. Or you can contact Novell for the appropriate NLM updates that allow support of long file names.
Problem: I have implemented all my hardware and software according to the guidelines you provided, but still find Raiser’s Edge for Windows runs slowly.
Solution: Reset your memory cache allocation for the SQL Anywhere database to help it use more memory while processing. The cache defaults to 8 MB when you install The Raiser’s Edge SQL Anywhere database. We recommend you adjust the cache to at

The Raiser’s Edge Installation Guide 35
least 20% of the total size of the SQL Anywhere database. To do this, edit the properties of the database icon and change the parameters from -c8M to the number based on the 20% rule. For more information on this rule, see the “Setting Database Startup Parameters” section of this guide.

36 The Raiser’s Edge Installation Guide

The Raiser’s Edge Installation Guide A-1
A P P E N D I X A
The Raiser’s Edge for Windows Auto Installation
About Auto Installation This appendix contains information for automatically updating the installation of your Raiser’s Edge software. When you follow these procedures, your users need only click Setup and the update installation can run from start to finish with no additional input. In addition, the software can be configured to notify users that an updated version of the program is available on your network.
Whenever you update your Raiser’s Edge software, follow the general recommendations listed in the beginning of this guide. We strongly recommend the Windows operating system be installed locally on each workstation. This configuration allows for easier installation and better performance. Auto install is used only for a multi-user network. You will not see the Configuration screen or the Multi-User Setup screen.
Setting Up the Auto Install Use the following information to set up the auto installation for updating The Raiser’s Edge.
• Copy the install CD to a network directory accessible by all workstations.
• Create a file named ADMIN.INI in that directory. This file contains the settings the update program uses so you can bypass screens in the update. Be sure to use MS-DOS file naming conventions when specifying file names in your INI settings. That is, a file name should be no more than eight characters with a three-character file extension.

A-2 The Raiser’s Edge Installation Guide
For example, assume your server name is BLACKBAUD, the database name is RE, and the RE.DB file is located in G:\REWIN\SERVER. For the auto install to run without a user seeing any screens during the process, your file would look like this: [General] CommandLineParams = srvr=BLACKBAUD db=RE ShowWelcomeScreen = No ShowRegistrationScreen = No DatabaseDirectory = G:\REWIN\SERVER ProgramFilesInstallationDirectory = D:\REWIN CrystalReportsInstallationDirectory = D:\REWIN\REPWRITE InstallCrystalReports = No ShowInstallationOptionsScreen = No ShowStartCopyingScreen = No ShowCompleteMessage = No CreateSetupIcon = Yes CreateAutoInstallINISetting = Yes
Remember that your ADMIN.INI settings for the server name and database name take precedence over settings users enter in the Run command line.
Note: If you omit a setting in the ADMIN.INI file, the Auto Install reads it as an invalid value, and the screen for that setting appears. For example, if you omit the ShowWelcomeScreen setting, the Welcome screen appears.

The Raiser’s Edge Installation Guide A-3
ShowWelcomeScreen
ShowWelcomeScreen. Use this setting to specify whether the program displays the Welcome screen during installation. Valid values are as follows:
No = Do not display screen.
{anything else} = Display screen.
For example, if you do not want the program to display the Welcome screen during setup, use ShowWelcomeScreen = No.

A-4 The Raiser’s Edge Installation Guide
ShowRegistrationScreen
ShowRegistrationScreen. Use this setting to specify whether the program displays the Registration screen during installation. Valid values are as follows:
No = Do not display screen.
{anything else} = Display screen.
For example, if you do not want the program to display the Registration screen during setup, use ShowRegistrationScreen = No.
Note: The Name and Company fields are filled in from the Win.INI file on the workstation. If either of these fields cannot be populated, the Registration screen appears regardless of the value of ShowRegistrationScreen.
The Raiser’s Edge Installation Guide A-5
DatabaseDirectory
DatabaseDirectory. Use this setting to specify the location of the database for a workstation so you do not see the Select Database Directory screen during installation. Be sure to use a valid path to the RE.DB in your setting.
For example, to specify the REWIN database path on a server, use DatabaseDirectory = G:\REWIN\SERVER.
Note: If the specified path is not valid or if it does not contain an RE.DB file, the Select Database Directory screen appears.

A-6 The Raiser’s Edge Installation Guide
ProgramFilesInstallionDirectory
ProgramFilesInstallionDirectory. Use this setting to determine the installation paths for program files on a workstation so you do not see the Install Program Files/Crystal Reports screen during installation. A valid value is any valid path you want to use for program files.
For example, to specify the REWIN path, use ProgramFilesInstallionDirectory = C:\REWIN.
Note: If the specified path does not exist, the program creates the path. If you leave the ProgramFilesInstallionDirectory setting blank, the auto install reads the blank as a path that cannot be created. A message alerts you to this, and the Install Program Files screen appears.
Note: If you leave the ProgramFilesInstallionDirectory setting blank, but set InstallCrystalReports to No, the Install Program Files screen still appears, but the Crystal Reports Installation Directory frame is not visible. For more information, see pg. A-8.
The Raiser’s Edge Installation Guide A-7
CrystalReportsInstallationDirectory
CrystalReportsInstallationDirectory. Use this setting to determine the installation path for Crystal Reports on a workstation so you do not see the Install Program Files/Crystal Reports screen during installation. A valid value is any valid path you want to use for the installation of the Crystal Reports files.
For example, to specify the REWIN path, use CrystalReportsInstallationDirectory = C:\REWIN\REPWRITE.
Note: If the specified path does not exist, the program creates the path. If it cannot be created, a message alerts you and the Install Program Files/Crystal Reports screen appears. If you leave the ProgramFilesInstallDirectory setting blank, the auto install reads the blank as a path that cannot be created. A message alerts you to this, and the Install Program Files/Crystal Reports screen appears.
A-8 The Raiser’s Edge Installation Guide
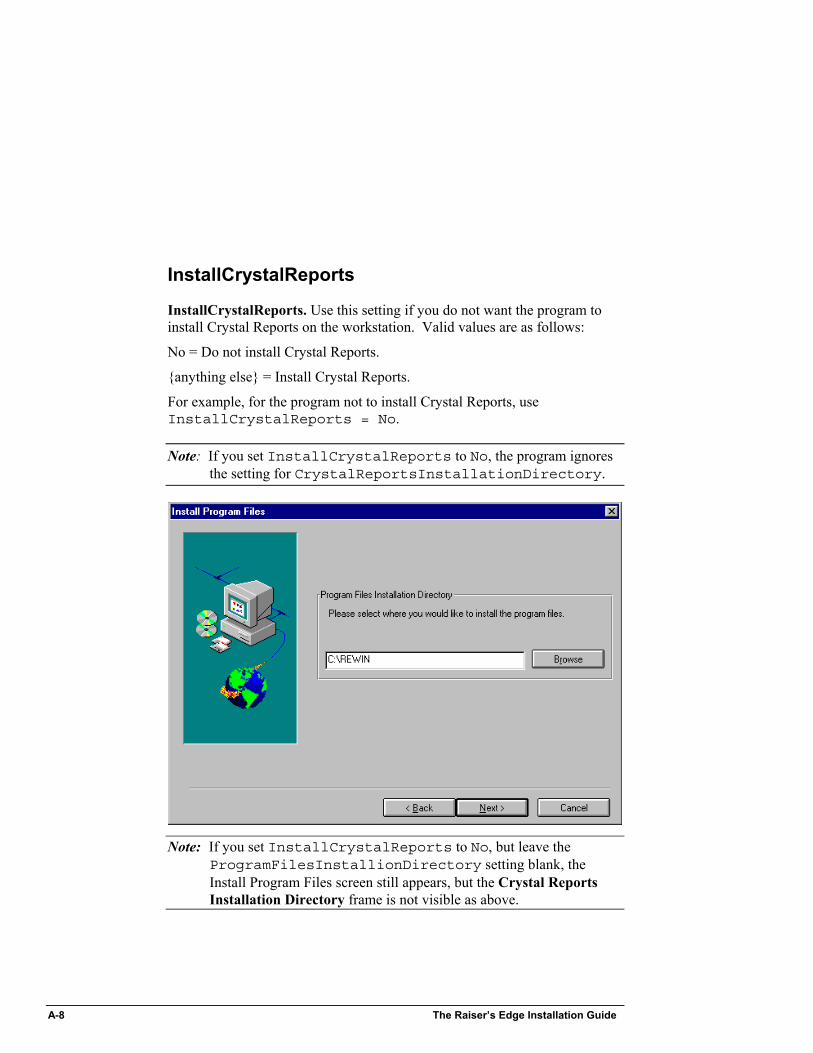
InstallCrystalReports
InstallCrystalReports. Use this setting if you do not want the program to install Crystal Reports on the workstation. Valid values are as follows:
No = Do not install Crystal Reports.
{anything else} = Install Crystal Reports.
For example, for the program not to install Crystal Reports, use InstallCrystalReports = No.
Note: If you set InstallCrystalReports to No, the program ignores the setting for CrystalReportsInstallationDirectory.
Note: If you set InstallCrystalReports to No, but leave the ProgramFilesInstallionDirectory setting blank, the Install Program Files screen still appears, but the Crystal Reports Installation Directory frame is not visible as above.
The Raiser’s Edge Installation Guide A-9
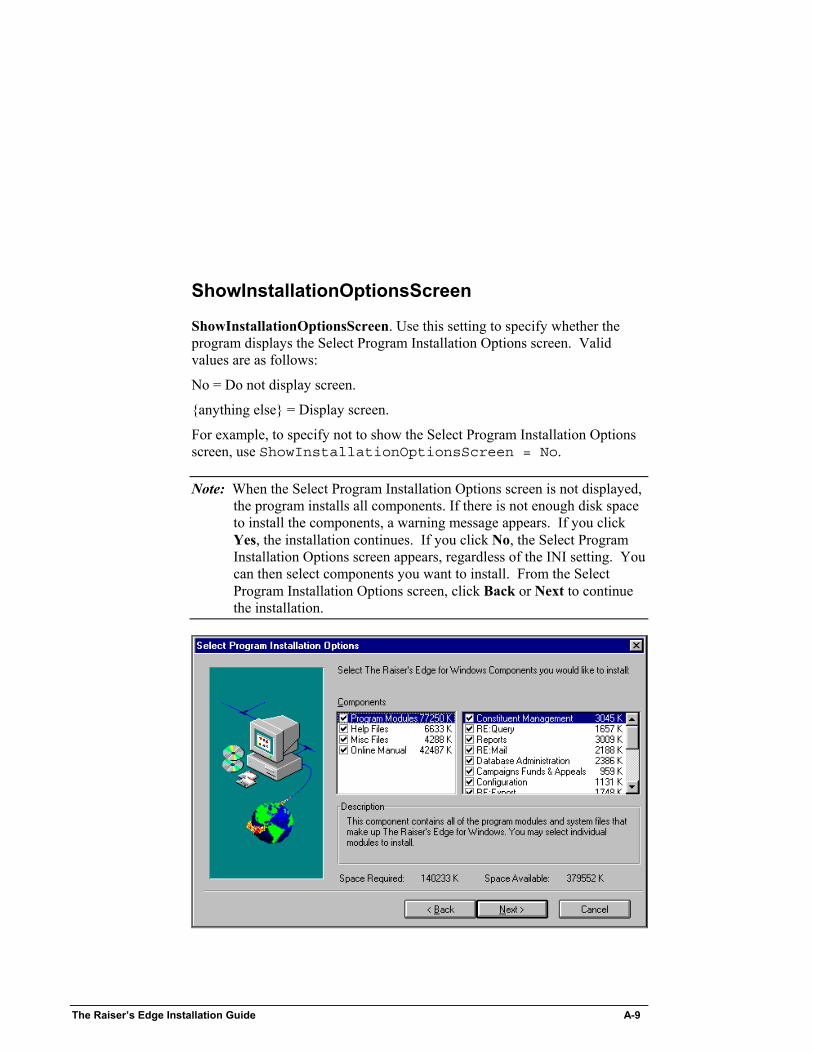
ShowInstallationOptionsScreen
ShowInstallationOptionsScreen. Use this setting to specify whether the program displays the Select Program Installation Options screen. Valid values are as follows:
No = Do not display screen.
{anything else} = Display screen.
For example, to specify not to show the Select Program Installation Options screen, use ShowInstallationOptionsScreen = No.
Note: When the Select Program Installation Options screen is not displayed, the program installs all components. If there is not enough disk space to install the components, a warning message appears. If you click Yes, the installation continues. If you click No, the Select Program Installation Options screen appears, regardless of the INI setting. You can then select components you want to install. From the Select Program Installation Options screen, click Back or Next to continue the installation.

A-10 The Raiser’s Edge Installation Guide
ShowStartCopyingScreen
ShowStartCopyingScreen. Use this setting to specify whether the program should display the Start Copying Files screen during installation. Valid values are as follows:
No = Do not display screen.
{anything else} = Display screen.
For example, to specify not to display the Start Copying Files screen, use ShowStartCopyingScreen = No.

The Raiser’s Edge Installation Guide A-11
ShowCompleteMessage
ShowCompleteMessage. Use this setting to specify whether the program should display the Information message upon completion of the installation. Valid values are as follows:
No = Do not display message.
{anything else} = Display message.
For example, to specify not to display the Information message, use ShowCompleteMessage = No.

A-12 The Raiser’s Edge Installation Guide
CreateSetupIcon
CreateSetupIcon. Use this setting to specify whether the program creates an icon to use for running the Setup program. Valid values are as follows:
Yes = Create the icon.
{anything else} = Do not create the icon.
For example, to specify that the program create a setup icon, use CreateSetupIcon = Yes.
Note: If the value is anything other than Yes, or if you omit the CreateSetupIcon setting from the ADMIN.INI file, the program deletes the icon if it already exists.

The Raiser’s Edge Installation Guide A-13
CreateAutoInstallINISetting
CreateAutoInstallINISetting. Use this setting to specify whether the program creates a setting specifying the location of the installation files in the RE.INI file. This setting is available only on workstations using Auto Install. When this setting is set to Yes, the program checks for an updated version of the software whenever you open a module. If a newer version of the program is on your network, a message appears telling you to run Setup. You must install the updated software before you can open any modules from your workstation. Valid values are as follows:
Yes = Create the setting.
{anything else} = Do not create the setting.
For example, to specify that the program create the setting, use CreateAutoInstallINISetting = Yes.
Note: If you create the setting, an AutoInstallDirectory setting is added to the RE.INI file on the workstation. A message appears reminding you to update The Raiser’s Edge when a newer version is detected at the location specified in the RE.INI file. We recommend you set CreateSetupIcon to Yes if you set CreateAutoInstallINI

A-14 The Raiser’s Edge Installation Guide