testanytime user manual (imaging) -...
TRANSCRIPT

1
TestAnyTime
User Manual (Imaging) English Version

2
User Manual Notes & Notices
Thank you for choosing TestAnyTime. This quick start guide will teach you the basics and
have you up & running in a few minutes.
NOTE: A NOTE indicates important information that helps you make
better use of your computer.
PURPLE BOX: Highlighted area that displays key areas of action that
maybe required.
TIPS: Indicates a quicker or more efficient method of using a software
feature
Information in this document is subject to change without notice.
©2016 Datacap Computer Solutions Limited. All rights reserved.
Reproduction in any manner whatsoever without the written permission of Datacap Computer Solutions
Limited is strictly forbidden.
Trademarks used in this text: Datacap, the Datacap logo, and TestAnyTime are trademarks of Datacap
Computer Solutions Limitied. Microsoft and Windows are registered trademarks of Microsoft Corporation.
Other trademarks and trade names may be used in this document to refer to either the entities claiming
the marks and names or their products.
Datacap Computer Solutions Limited disclaims any proprietary interest in trademarks and trade names
other than its own.

3
Table of Contents
1. Software Overview .................................................................................................... P.4
1.1. TestAnyTime Software ...................................................................................... P.4
1.2. Getting to Know Your Software ........................................................................ P.5
2. User Manual Keywords ............................................................................................. P.6
3. User Software Main Icons ......................................................................................... P.7
4. System Requirements ................................................................................................ P.8
5. Installation (Windows 8.1 & 10) ................................................................................ P.9
6. Form Design ............................................................................................................ P.11
7. Form Template .......................................................................................................... P.12
7.1. Create New Form.............................................................................................. P.12
7.2. Registration Marks (Auto Alignment) ............................................................... P.12
7.3. Optical Mark Zones .......................................................................................... P.16
7.4. Data Zone ......................................................................................................... P.18
8. Create New Test ........................................................................................................ P.19
9. Scan Model Answer ................................................................................................... P.12
9.1. Scan Model Answer .......................................................................................... P.22
9.2. Import Model Answer ...................................................................................... P.24
9.3. Export Model Template .................................................................................... P.26
10. Scan Test Form ........................................................................................................ P.27
11. Image Finder ........................................................................................................... P.29
12. Report Generator .................................................................................................... P.30
13. Export Data .............................................................................................................. P.33
14. Export Image (with Annotations) ............................................................................ P.38
15. Export Image (with Excel) ........................................................................................ P.40
16. Save Test As ............................................................................................................. P.43
17. Remove Test ............................................................................................................ P.44
18. Report Samples ....................................................................................................... P.45
19. Define Parameters ................................................................................................... P.64
20. Remove Records ...................................................................................................... P.66
21. Link Up Database ..................................................................................................... P.68
22. Test Design .............................................................................................................. P.73
22.1. Test Design (Options) ...................................................................................... P.73
22.2. Test Design (Grading) ...................................................................................... P.74
23. Utility ....................................................................................................................... P.75
24. Remote Support ...................................................................................................... P.77
25. Contact Us ............................................................................................................... P.78

4
1. Software Overview 1.1. TestAnyTime Software TestAnyTime is a software solution created to capture data from marks (bubbles, circles) on
OMR forms. The software works together with a document scanner to collect the data. The
software then processes and analyses that and produces reports and export formats.
TestAnyTime is often used to score exams or tests and analyze a range of
surveys/questionnaires. TestAnyTime consists of 4 simple steps:
Before using TestAnyTime, below are several elements to consider.
1. Imaging Forms
To ensure that users are using Imaging forms that are compatible with our
software and scanner, DataCap provides sample forms to download from the
website: http://www.datacap.hk/sample
2. Document Scanner
TestAnyTime works with common Document Scanners. Please confirm that the
scanner is connected and relevant drivers are installed and updated.
3. Export Formats
TestAnyTime features export data to numerous different formats. Please check
that you have Microsoft Office 2000 and above installed and relevant addition
applications that can open the export formats mentioned in the specification list
here: www.datacap.hk/product/testanytime
This user manual is designed to provide information about the features of the TestAnyTime
software, as well as hints, tips and guidelines for using the software. In order to develop a
better understanding of the software and reference guidance, there are simple steps and
descriptions to follow. Areas of the software have been extracted to this manual, such as
menus, buttons, dropdown lists to provide an instructional context.

5
1. Software Overview 1.2. Getting to Know Your Software When you first open TestAnyTime, the main menu interface will appear. The main feature
icons will be located across the top which will blink, meaning that these are the areas that
you will need to start/finish to proceed to the next step in the process (which are often
greyed out)
TestAnyTime consists of 3 basic parts:
1. The Test Template (Define Image Zones / DataCap 3.0)
2. Scan Process
3. Report & Analysis
Each area of the software has a similar layout relation to the main menu. Alternatively to
the using the main icons on the main menu, you may wish to use the toolbar (drop down
menus) and shortcut keys to navigate around the software. Once a project is created or
open, on the right hand side a panel will appear with a project summary information e.g.
total records, total questions, question status etc.
TestAnyTime supports basic Windows functions that you see in most desktop applications,
e.g. Cut, Copy, Paste, File, Save, Save As etc.

6
2. User Manual Keywords
Software Terms To help you understand the features of the TestAnyTime User Manual (Imaging), below is a
glossy of keywords that will be used within the software, with their descriptions.
Software
Keyword What is it?
Template TestAnyTime requires users to create (define) a template for each form they would
like to process in the software
Test (Project) Test means file that corresponds to your scanning project e.g. English Exam
Define Image Zone
(DataCap 3.0)
Define Image Zone is the location where the template for the test will be created
and the zone layout for where the data will be capture will be set (‘defined’)
Test Design
Test Design feature allows the user to use a add, edit and change question’s text,
score, arrangement, type from the template created. There are also project options
such as allowing (or not allowing) scoring, multiple, missing, and duplicate records
Optical Mark Zone Optical Mark Zones are areas where single or multiple choice answers will be
captured. This can be row of MC answers or respondent information.
Group Zone Group zone combines several rows of Optical Mark Zone together to form a string
number e.g. Candidate Number, Student ID, Serial Number etc.
Barcode Zone Barcode Zone is the area allocated on the template to capture barcodes
Identification Zone Identification Zone is the area allocated on the template to capture ‘Form ID’
Scan Model
Answer Scan Model Answers, scans the projects correct, master, answer key
Scan Test Forms Scan Test Forms, scans the project’s respondent forms.

7
3. Software Main Icons TestAnyTime Menu Icons To get users familiar with the software’s key icons layout, please refer to the table below.
Icon Name What is it for?
New Test
This is where the user can create a new test project, for exams, tests, surveys,
questionnaires, etc. (the file format for each test is: .dat)
Open Test This is where the user will open an existing test project.
Define
Image Zone
This is where the user will create your test template and setup the zones where
data will be captured by the scanner.
Test Design
This is where the user can add, edit and select options for your test. Such as:
grading, scoring, showing particular questions, validation etc.
Scan Model
Answer
This is where the user can scan the model answer (or answer key). You will be
able to import and export the model answer.
Scan Test
Forms
This is where the user can scan the forms by the respondents. Live scanning
information will appear and an option to scan via batches.
Image
Finder
This is where the user can view the data you have just scanned before
exporting; Users here can do checking and manual data entry.
Manual Key
Enter
This is where the user can do manual data entry or create blank records.
Report
Generator
This is where the user can generate reports from a range of samples for their
scanned data. There are filter and custom options to generate the right report.
Export Data
This is where the user will export the data to external formats, such as MS
Excel, ASCII etc. Users can export via filters and different options.
Question
Bank
This is where the user can use the existing question bank to create their
questions.
User
Information
This is where the user can create and set different user level access rights and
passwords.
Configure
Scanner
This is where the user can setup and configure their scanner. Such as the scan
settings, print settings, barcode settings, form testing and diagnostic.
Remote
Support
This is where the user can, one click to activate a quick support tool to access
technical support from our staff remotely.
About
TestAnyTime
This is where the user view the current software information, privacy
information and also developer/company contact information

8
4. System Requirements TestAnyTime Requirements TestAnyTime is installed on a Windows based computer. Once installed the software will be
a trial version till a license is activated via USB Keyport or through online activation. If you
wish to uninstall the software you may choose to do so via the Windows Control Panel.
Compatible Operating Systems:
Windows Vista, Windows 7, Windows 8, Windows 8.1, and Windows 10
Workstation Specification
CPU: Intel i3 Processor or above
RAM : 2 GB RAM (4GB RAM recommended
Hard Disk : 10 GB Free Space
USB Port : USB 2.0
Display : Colour SuperVGA (1024 x 768)
Mouse : Windows supported
Network Card : Windows supported
Server Specification
CPU: Intel Core i5 or above
RAM : 4 GB or above
Hard Disk : 500 GB Free Space
USB Port : USB 2.0
Display : Colour SuperVGA (1024 x 768) or above
Mouse : Windows supported
Network Card : Windows supported

9
5. Installation Windows 8.1 & 10 1. Double click ‘TestAnyTime.msi’
2. When install TestAnyTime 8.1 setup wizard appears click ‘Next’.
3. Next to install location folder press ‘Next’.

10
Installation Windows 8.1 & 10
4. ‘Next’ to install TestAnyTime
5. Complete Installation press ‘Close’
NOTE: TestAnyTime is supports English, Traditional Chinese and Simplified Chinese
languages.

11
6. Form Design
Form Design 1. Design registration mark to corners (with approx. 1cm clearance of other marks)

12
7. Form Template 7.1. Create New Form 1. Open TestAnyTime
2. Click Test on Toolbar > Select New Test
NOTE: To enable the use of all features, the license manager application needs to
be running before opening TestAnyTime.
13
7. Form Template
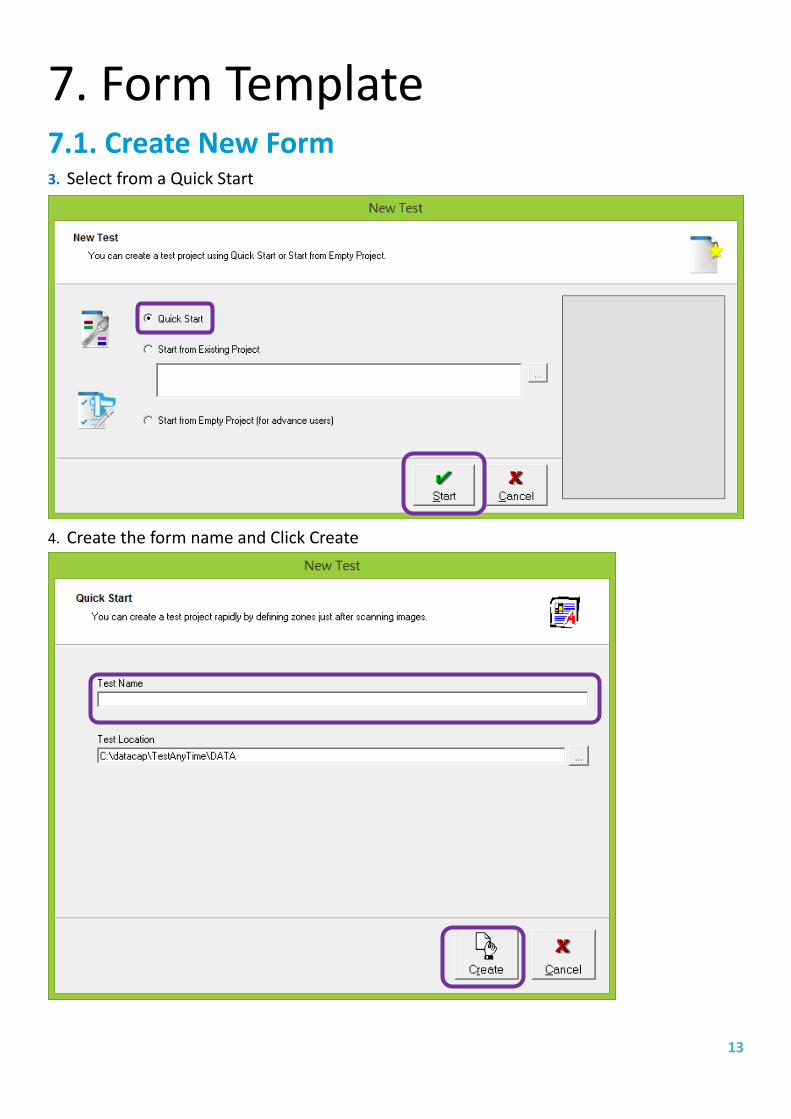
7.1. Create New Form 3. Select from a Quick Start
4. Create the form name and Click Create

14
7. Form Template
7.1. Create New Form 5. Right click Page 1 > Select Import Image > From File
6. Choice of New Form Image > Open

15
7. Form Template
7.2. Registration Marks 7. Use Tools 1 Registration Zone Select the Triangle

16
7. Form Template
7.3. Optical Mark Zones 8. Use the Optical Mark Zone > Select the Bubbles

17
7. Form Template
7.3. Optical Mark Zones 9. Right click selected > Bubbles Slice
10. Choice Horizontal > Set the Name > Advance Set Value
18
7. Form Template
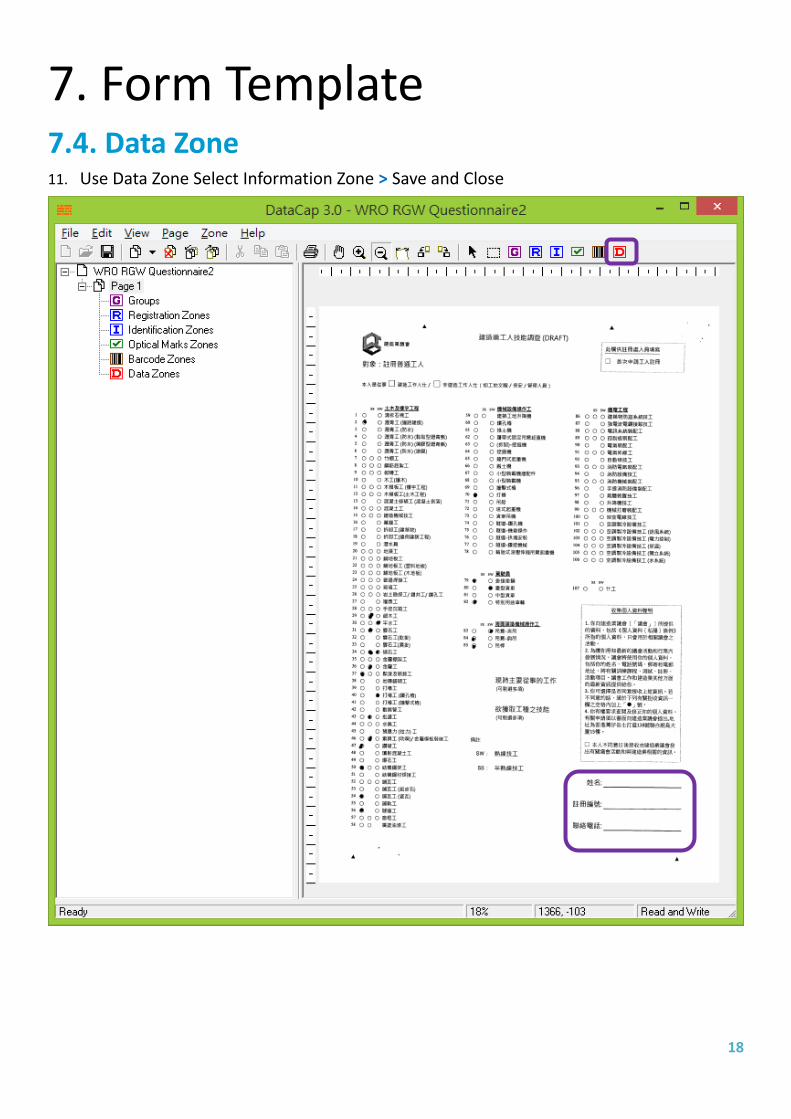
7.4. Data Zone 11. Use Data Zone Select Information Zone > Save and Close

19
8. Create New TestCreate New Test
1. Open TestAnyTime
2. Click Test on Toolbar > Select New Test
NOTE: To enable the use of all features, the license manager application needs to
be running before opening TestAnyTime.

20
8. Create New TestCreate New Test
3. Select from an existing file (Start from Existing Project)
Browse the existing project > Click Open > Click Start

21
8. Create New Test Create New Test
4. Select save location > Click Save

22
9. Scan Model AnswerScan Model Answer
5. Click Test > Select Scan Model Answer
6. Select Model Answer from Scanner or Image File > Click Acquire

23
9. Scan Model Answer 9.1. Scan Model Answer
7. Check Model Answer > Click Save
8. Model Answer Saved > Click OK Exit to Main Menu > Click Yes

24
9. Scan Model Answer 9.2. Import model answer 1. Go to Scan Model Answer > Click Import Model Answer
2. Choice model answer export file click open

25
9. Scan Model Answer 9.2. Import model answer 3. check model answer then save model answer

26
9. Scan Model Answer 9.3. Export model answer 1. Go to scan model answer > click export model answer
2. Choice save location then save

27
10. Scan Test Form Scan Test Form
1. Click Test > Select Scan Test Form
2. Click Start to scan form

28
10. Scan Test Form Scan Test Form 3. Select the image to Selected > click Scan to input the image
After scanning forms is complete >Click Stop > Click Exit to leave

29
11. Image Finder Image Finder
4. Click Test > Select Image Finder
5. Check if information needs to be edited

30
12. Report Generator Report Generator
1. Click Analysis > Select Report Generator
2. Select Report > Double Click

31
12. Report Generator Report Generator
3. Click Next > Selection > Filter > Contents > Options > Click Preview
32
12. Report Generator Report Generator
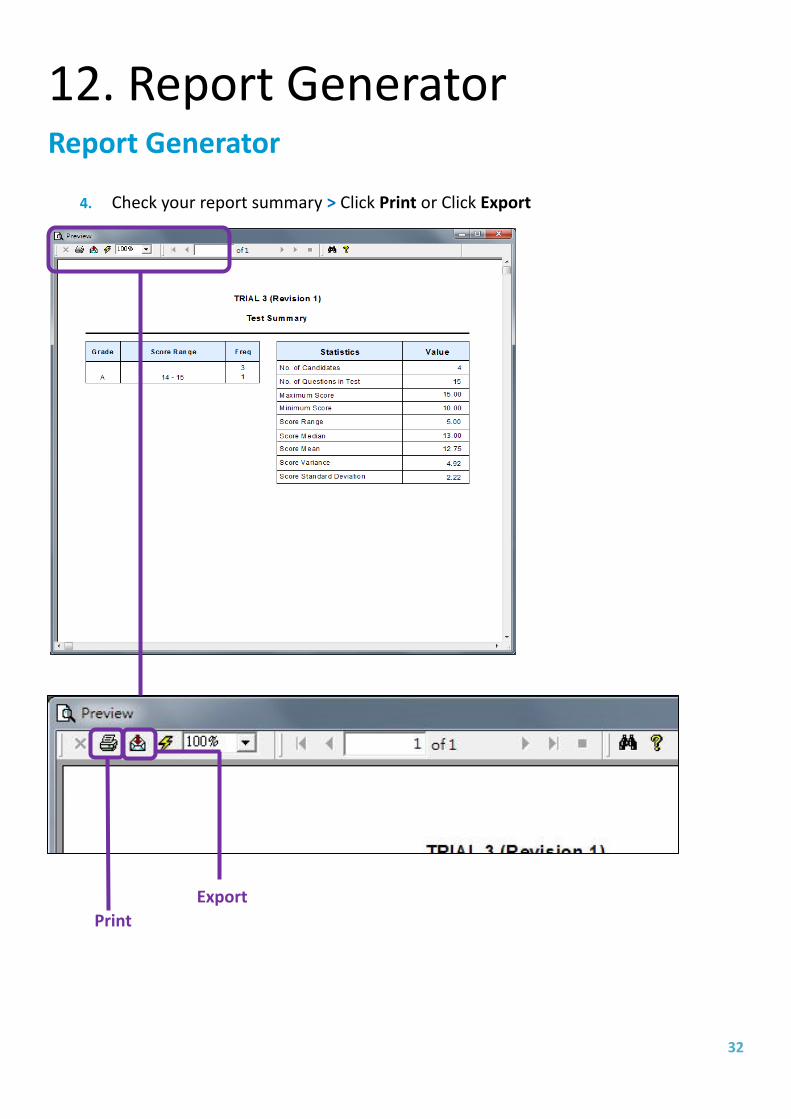
4. Check your report summary > Click Print or Click Export
Export

33
13. Export Data Export Data
1. Click Test > Select Export Data

34
13. Export Data Export Data NOTE: Users can select either By Revision or By Filter
2. Select Export Mode
3. Select Filter > Add Filter > Click Apply

35
13. Export Data Export Data
4. Select File Type > Select Export File Information > Select Export Criteria
File Information
File Type
Export Criteria
NOTE: Users can select from a range of options above to customise what they want in their
exported data file.

36
13. Export Data Export Data
5. Click Export Options
6. Click Apply to accept changes.
37
13. Export Data Export Data
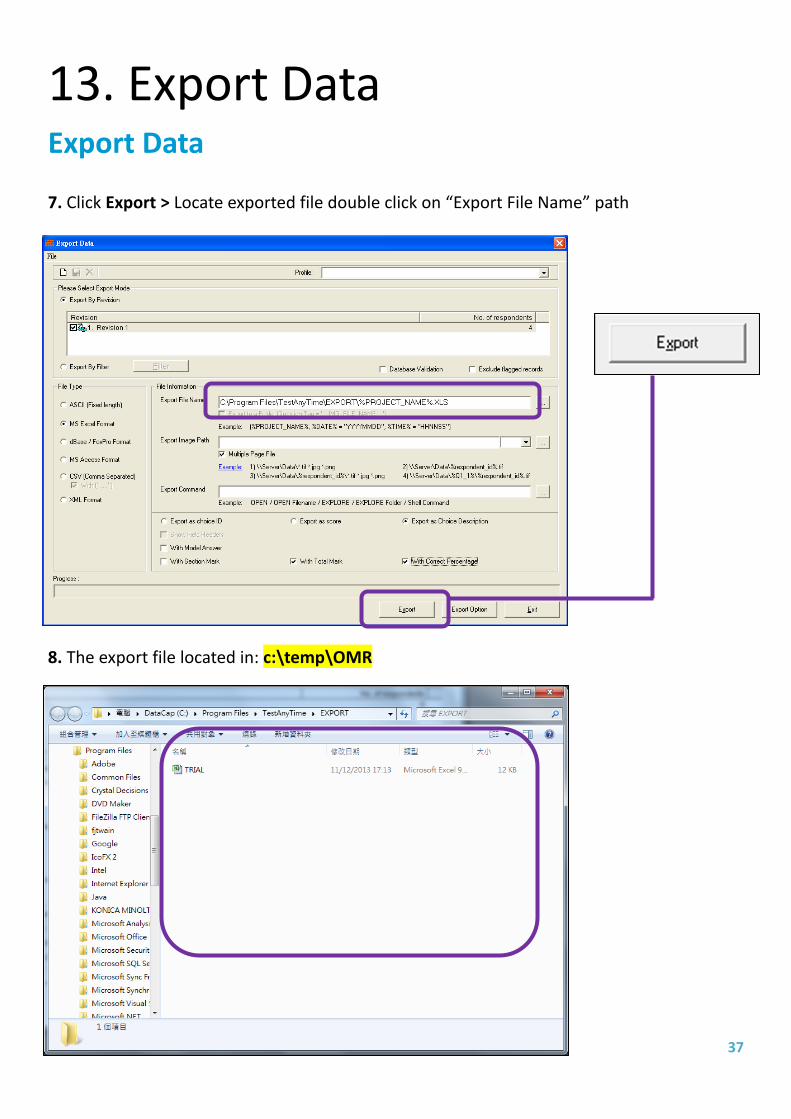
7. Click Export > Locate exported file double click on “Export File Name” path
8. The export file located in: c:\temp\OMR

38
14. Export Image (Annotations) Export Image 1. Select ‘Revision 1’, select ‘Color Image File’ and file type you want to export in.
2. Click ‘Export
3. The files will be located in Export folder.

39

40
15. Export Image (with Excel)
Export data include image 1. Click Test > Select Export Data
2. Click Export Option

41
15. Export Image (with Excel)
Export data include image 1. Choice include question image > click comment > Apply

42
15. Export Image (with Excel)
Export data include image 2. Click Export
3. When hold the image will show the full size.

43
16. Save Test As
Save Test as 1. Click Test Save Test As > select save location > rename the test > save

44
17. Remove Test
Remove Test
1.Test > Remove Test > OK

45
18. Report Samples Report Sample
Summary Distribution Report

46
18. Report Samples Report Sample
Ranking Report

47
18. Report Samples Report Sample
Table Analysis Report

48
18. Report Samples Report Sample
Comments Listing Report

49
18. Report Samples Report Sample
Pie Chart Report

50
18. Report Samples Report Sample
Bar Chart Report

51
18. Report Samples Report Sample
Line Chart Report

52
18. Report Samples Report Sample
Question Summary By Free Test Report

53
18. Report Samples Report Sample
Revision Comparison Report

54
18. Report Samples Report Sample
Multiple Answer Summary Report

55
18. Report Samples Report Sample
Test Result Report

56
18. Report Samples Report Sample
Test Questions Analysis Report

57
18. Report Samples Report Sample
Test Results of Candidates Report

58
18. Report Samples Report Sample
Ranking Report with Passing Mark Report

59
18. Report Samples Report Sample
Test Ranking Analysis Report

60
18. Report Samples Report Sample
Test Question Statistic Report

61
18. Report Samples Report Sample
Test Summary Report

62
18. Report Samples Report Sample
Test Score Listing Report

63
18. Report Samples Report Sample
Revision Comparison Report

64
19. Define Parameters Define Parameters
1. Test > Define Image Zones

65
19. Define Parameters
Define Parameters
2. Right click Page Info > Parameters > OMR Lower Threshold

66
20. Remove Records
Data Flagging and Cleaning – Removes Records
1. Click ‘Test’, select ‘Data Flagging and Cleaning’
2. Click Show Result

67
20. Remove Records Data Flagging and Cleaning – Remove Records
3. Click Clean Respondent > Choice the Clean Record > OK

68
21. Link Up Database
Link up Database
1. Test > Test Design
2. Question > Right click Question > Edit Question

69
21. Link Up Database
Link up Database
3. Database > click Check Database > Click Database

70
21. Link Up Database
Link up Database 4. Choice of Database Location > change database type to Excel > Click open
Database
5. Select the Excel Table > Select the link up field > OK

71
21. Link Up Database
Link up Database 6. Right click section > New Question
7. Create Question Tag name > Question Text > Question check to Text(Fixed
length) > Max Length to 200 > Database

72
21. Link Up Database
Link up Database
8. Click Check Database > Select Get answer from database field > Select Link Question > Select show the field > OK

73
22. Test Design
22.1. Test Design – Options TestAnyTime provides a range of options for your scanning projects. Users can select
options for scoring or not scoring questions, to allowing multiple answers or not allowing
missing answers etc. Below is a table which highlights the range of options available:
Option Function
Question Tag Quick edit the question tag
Score Option to count questions with score or no score
(Usually disable for information questions e.g. candidate number)
Multiple Validation check option for questions with multiple answers
Missing Validation check option for questions with missing answers
Print Not for OMR Mode
Duplicate Validation check option for questions with duplicate data
Export Option to choose if a particular question is exported or not

74
22. Test Design
22.2. Test Design - Grading TestAnyTime features a grading system which can be set depending on the score range. For example if the score is between 41 to 50, it represents an A Grade. Users can set their own types of grades in the ‘Grade Description’ box.
NOTE: Assigning specific scores for each question or each section can be done
under the ‘Question Tab’ in ‘Test Design Window’. Users can set scoring for:
Correct Score Factor
Default Wrong Score
Single Answer MC
o Missing Score
o Multiple Score

75
23. Utility
Backup Database
1. Go to Utility > Backup Database
2. Click OK to Backup

76
23. Utility
Restore Database
Go to Utility > Restore Database
1. Select Restore the date > Click OK to Restore

77
24. Remote Support
Remote Support
1. Click the support > remote support
2. Call and provide us with your TeamViewer id and password

78
25. Contact Us
Contact Us
For technical support and further assistance with this TestAnyTime, please
contact us below:
Office Hours:
Monday to Friday: 09:00 A.M. – 06:00 P.M.
Saturday: 09:00 A.M. – 01:00 P.M.
Contact Details:
Tel: (+852) 2121 0868
Fax: (+852) 2121 0735
Email: [email protected]
For more information please visit: www.datacap.com.hk
Datacap Computer Solutions Limited
“data collection made easy”