tanning bed instruction manual - recdirect … · tanning bed instruction manual ... week 1 week 2...
TRANSCRIPT
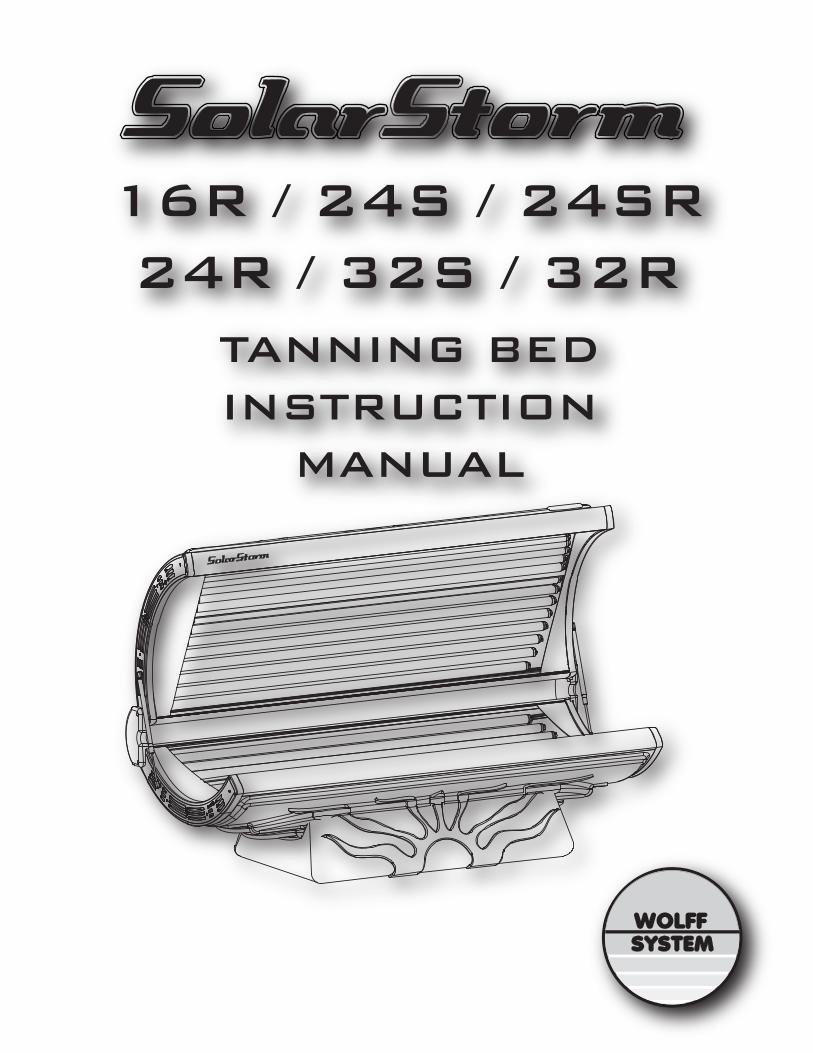
TANNING BEDINSTRUCTION
MANUAL
16R / 24S / 24SR24R / 32S / 32R
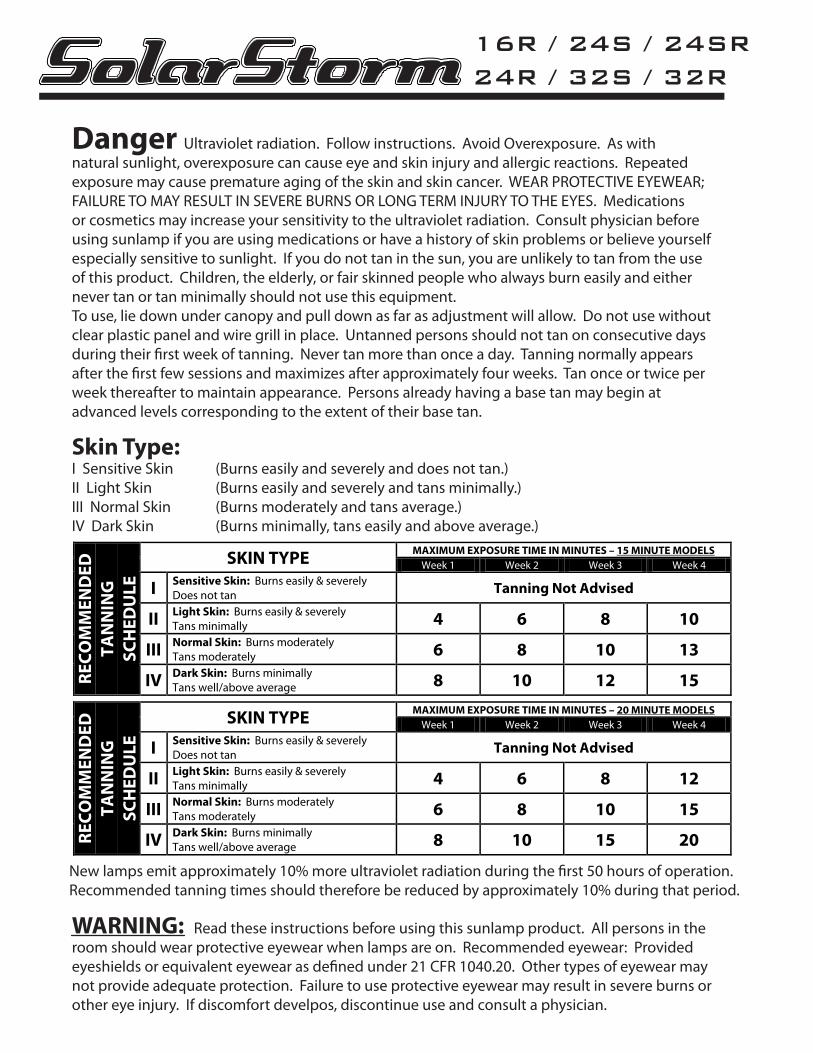
Skin Type:I Sensitive Skin (Burns easily and severely and does not tan.)II Light Skin (Burns easily and severely and tans minimally.)III Normal Skin (Burns moderately and tans average.)IV Dark Skin (Burns minimally, tans easily and above average.)
Danger Ultraviolet radiation. Follow instructions. Avoid Overexposure. As with natural sunlight, overexposure can cause eye and skin injury and allergic reactions. Repeatedexposure may cause premature aging of the skin and skin cancer. WEAR PROTECTIVE EYEWEAR;FAILURE TO MAY RESULT IN SEVERE BURNS OR LONG TERM INJURY TO THE EYES. Medicationsor cosmetics may increase your sensitivity to the ultraviolet radiation. Consult physician beforeusing sunlamp if you are using medications or have a history of skin problems or believe yourselfespecially sensitive to sunlight. If you do not tan in the sun, you are unlikely to tan from the useof this product. Children, the elderly, or fair skinned people who always burn easily and eithernever tan or tan minimally should not use this equipment.To use, lie down under canopy and pull down as far as adjustment will allow. Do not use withoutclear plastic panel and wire grill in place. Untanned persons should not tan on consecutive daysduring their �rst week of tanning. Never tan more than once a day. Tanning normally appearsafter the �rst few sessions and maximizes after approximately four weeks. Tan once or twice perweek thereafter to maintain appearance. Persons already having a base tan may begin at advanced levels corresponding to the extent of their base tan.
New lamps emit approximately 10% more ultraviolet radiation during the �rst 50 hours of operation.Recommended tanning times should therefore be reduced by approximately 10% during that period.
WARNING: Read these instructions before using this sunlamp product. All persons in theroom should wear protective eyewear when lamps are on. Recommended eyewear: Providedeyeshields or equivalent eyewear as de�ned under 21 CFR 1040.20. Other types of eyewear maynot provide adequate protection. Failure to use protective eyewear may result in severe burns orother eye injury. If discomfort develpos, discontinue use and consult a physician.
RECO
MM
END
ED
TAN
NIN
G
SCH
EDU
LE
SKIN TYPE MAXIMUM EXPOSURE TIME IN MINUTES – 15 MINUTE MODELS Week 1 Week 2 Week 3 Week 4
I Sensitive Skin: Burns easily & severely Does not tan Tanning Not Advised
II Light Skin: Burns easily & severely Tans minimally 4 6 8 10
III Normal Skin: Burns moderately Tans moderately 6 8 10 13
IV Dark Skin: Burns minimally Tans well/above average 8 10 12 15
RECO
MM
END
ED
TAN
NIN
G
SCH
EDU
LE
SKIN TYPE MAXIMUM EXPOSURE TIME IN MINUTES – 20 MINUTE MODELS Week 1 Week 2 Week 3 Week 4
I Sensitive Skin: Burns easily & severely Does not tan Tanning Not Advised
II Light Skin: Burns easily & severely Tans minimally 4 6 8 12
III Normal Skin: Burns moderately Tans moderately 6 8 10 15
IV Dark Skin: Burns minimally Tans well/above average 8 10 15 20
16R / 24S / 24SR24R / 32S / 32R

The following lamps have been certi�ed for use in the Solar Storm 16R, 24S, 24SR, 24R, 32S or 32R models:
2645 Inferno Wol� lamps (15 minute) 1704 FT LSI lamps (20 minute)2393 CC 5.0 Wol� lamps (20 minute) 1705 BT LSI lamps (20 minute)
Electrical RequirementsYour sunbed operates from a 120V or 220V AC source. For 120V models, you should have a standard electrical outlet on a dedicated 20 Amp Circuit Breaker. For 220V models, you should have a NEMA 6-20R Electrical outlet on a dedicated 20 Amp Circuit Breaker installed in the room in which you will use the unit.For SS32R models, 30 Amp service will need to be hard-wired to the bed. We recommend installationby a professional electrician. The outlet must be earth grounded.
DANGER Shock hazard.
Disconnect power before servicing or removing any protective covers.
Do not operate this device near water or while you are wet.
DANGER Some medications may increase your sensitivity to ultraviolet light. It is recommended that you consult a physician before using this sunbed if taking any medication or if you suspect that your skin might be especially sensitive to sunlight.
WARNING Wear protective eyewear. Failure to may result in severe burns or long term injury to the eyes.
CAUTION Air from the room is used to cool the sunbed. Maximum ambient room temperature should be 80oF. Place your sunbed no closer than 6" from any wall. Make sure nothing obstructs the air�ow into the sunbed's endcaps or out of the fan openings. A poorly ventilated room may cause the unit to become hot and cause discomfort to the user.
Unpacking and InspectionYour sunbed comes in two cardboard cartons. Pull back the plastic sheet and, with a helper, graspthe bench and pull it from the carton bottom, leaving the plastic wrap and the carton packaging.Do not try to lift the unit with the plastic still on as it may slip. Do the same with the canopy.The canopy box contains the canopy and a pair of gas springs. The bench box contains the bench, assembly hardware and stand legs. Inspect the items and make sure they are free from any visibledamage. Report the extent of any damage to the transportation company.
Hardware Inventory
! !
!
!
Allen-head Bolt 5/16 X 1”Quantity 6
5/16” Metal WasherQuantity 10
Allen-head Bolt 5/16 X 1.5”Quantity 4
Hinge Brackets(1) Left, (1) Right
Hex (Allen) WrenchQuantity 1
Safety GogglesQuantity 1
Standard 120V NEMA 6-20(220V)
120V/240V Outlets

Turn bench over. Install hingebrackets to ends of bench.Secure using 5/16” X 1.5” Allen-head bolts and 5/16” metalwashers. Tighten bolt snug, then an additional half turn.
3
Using six 5/16” X 1” bolts and six 5/16” washers, fasten thelegs to the bench as shown, with the two small skirtmounting holes toward the back, by installing thecenter bolt �rst. You may have to gently push the sidesof the legs in to align holes. Tighten with the allenwrench.
2
Lay the bench upside down on the �oor. Locate the two stand legs.1Assembly Procedures
Lift the canopy and hold itbetween the hinge brackets.4 Insert 5/16” X 1.5” bolts
with 5/16” washers into bothhinge brackets. Tighten boltsinto the endcap threaded insertsuntil snug, then an additional half turn. Do not overtightento avoid damaging threaded inserts.
5
Long Bolt
The gas springs havea locking mechanism.Pry back the locking clipwith a �atscrewdriver.
6 With a helper holding the canopy open, align ends of gas spring ball jointswith pivot studs and push into place. Be sure rod end is down as shown.7
DO NOT lower canopy until bothgas springs are engaged!
Lift and lower the canopy a few times to lubricategas springs for optimum performance.8Plug the three-prong power cord into the properdedicated outlet. 32R models are to be hard-wired.(*See Electrical Requirements.)
9
CAUTION Voltage for 120V beds mustbe between105-125 VAC.Voltage for 220V beds mustbe between215-230 VAC orwill void warranty.
!CAUTION
Failure to engage locking clips mayresult in the ball joints working loose,allowing the canopy to fall, which mayresult in damage to the unit and injury.
!

Using Your SunbedBefore using your sunbed, please note the following:
•Your skin should be free of cosmetics, tanning oils, or other body lotions prior to tanning except for those speci�cally made for use with tanning devices. However, do not remove natural body oils by bathing or showering immediately before tanning.
•Keep treated hair from contacting sunbed surfaces. Many hair products can damage the sunbed acrylic. Wear a shower cap or towel if you use gels, mousses, sprays or other hair products.
•Your sunbed is designed for individual use. Always wear the safety goggles supplied with your sunbed or another approved pair of goggles, as defined under 21 CFR 1040.20. Regular sunglasses do not provide adequate protection from ultraviolet light.
Exposure TimesFollow the guidelines for skin type and exposure times according to your model as shown in thetables below. Untanned persons should not tan on consecutive days during their first week of tanning. Never tan more than once a day. Tanning normally appears after the first few sessions and maximizes after approximately four weeks. Tan once or twice per week thereafter to maintain apearance. Persons already having a base tan may begin at advanced levels corresponding to the extent of their base tan.
Skin Type:I Sensitive Skin (Burns easily and severely and does not tan.)II Light Skin (Burns easily and severely and tans minimally.)III Normal Skin (Burns moderately and tans average.)IV Dark Skin (Burns minimally, tans easily and above average.)
RECO
MM
END
ED
TAN
NIN
G
SCH
EDU
LE
SKIN TYPE MAXIMUM EXPOSURE TIME IN MINUTES – 15 MINUTE MODELS Week 1 Week 2 Week 3 Week 4
I Sensitive Skin: Burns easily & severely Does not tan Tanning Not Advised
II Light Skin: Burns easily & severely Tans minimally 4 6 8 10
III Normal Skin: Burns moderately Tans moderately 6 8 10 13
IV Dark Skin: Burns minimally Tans well/above average 8 10 12 15
RECO
MM
END
ED
TAN
NIN
G
SCH
EDU
LE
SKIN TYPE MAXIMUM EXPOSURE TIME IN MINUTES – 20 MINUTE MODELS Week 1 Week 2 Week 3 Week 4
I Sensitive Skin: Burns easily & severely Does not tan Tanning Not Advised
II Light Skin: Burns easily & severely Tans minimally 4 6 8 12
III Normal Skin: Burns moderately Tans moderately 6 8 10 15
IV Dark Skin: Burns minimally Tans well/above average 8 10 15 20
Timer OverviewThe LT1 Timer is ideal for controlling residential tanning beds.
SpecificationsDepth Width Height Current Draw Relay Spec. Configuration1.408" 4.10" 2.1" 40mA 120VAC@5A SPST Form A
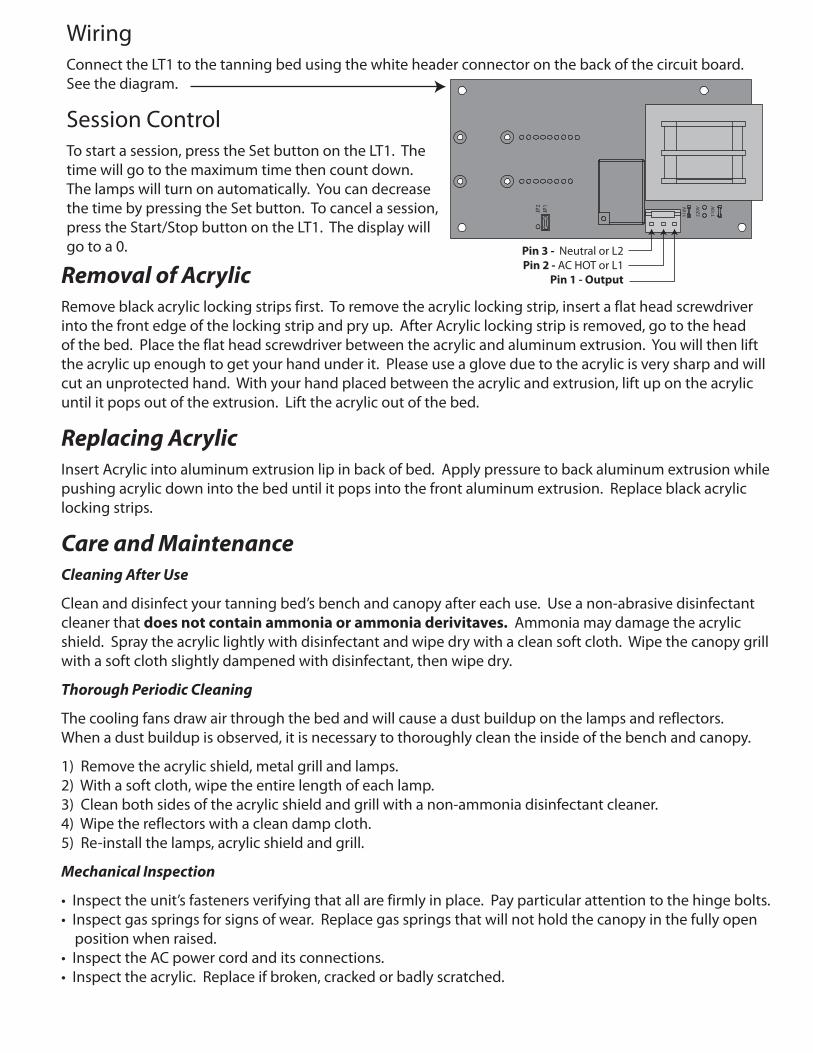
WiringConnect the LT1 to the tanning bed using the white header connector on the back of the circuit board.See the diagram.
Session ControlTo start a session, press the Set button on the LT1. Thetime will go to the maximum time then count down. The lamps will turn on automatically. You can decrease the time by pressing the Set button. To cancel a session, press the Start/Stop button on the LT1. The display will go to a 0.
JP2
JP1
Pin 3 - Neutral or L2Pin 2 - AC HOT or L1
Pin 1 - Output
110V
110V
220V
Removal of AcrylicRemove black acrylic locking strips first. To remove the acrylic locking strip, insert a flat head screwdriver into the front edge of the locking strip and pry up. After Acrylic locking strip is removed, go to the head of the bed. Place the flat head screwdriver between the acrylic and aluminum extrusion. You will then liftthe acrylic up enough to get your hand under it. Please use a glove due to the acrylic is very sharp and willcut an unprotected hand. With your hand placed between the acrylic and extrusion, lift up on the acrylic until it pops out of the extrusion. Lift the acrylic out of the bed.
Replacing AcrylicInsert Acrylic into aluminum extrusion lip in back of bed. Apply pressure to back aluminum extrusion whilepushing acrylic down into the bed until it pops into the front aluminum extrusion. Replace black acrylic locking strips.
Care and MaintenanceCleaning After Use
Clean and disinfect your tanning bed’s bench and canopy after each use. Use a non-abrasive disinfectantcleaner that does not contain ammonia or ammonia derivitaves. Ammonia may damage the acrylic shield. Spray the acrylic lightly with disinfectant and wipe dry with a clean soft cloth. Wipe the canopy grillwith a soft cloth slightly dampened with disinfectant, then wipe dry.
Thorough Periodic Cleaning
The cooling fans draw air through the bed and will cause a dust buildup on the lamps and reflectors. When a dust buildup is observed, it is necessary to thoroughly clean the inside of the bench and canopy.
1) Remove the acrylic shield, metal grill and lamps.2) With a soft cloth, wipe the entire length of each lamp.3) Clean both sides of the acrylic shield and grill with a non-ammonia disinfectant cleaner.4) Wipe the reflectors with a clean damp cloth.5) Re-install the lamps, acrylic shield and grill.
Mechanical Inspection
• Inspect the unit’s fasteners verifying that all are firmly in place. Pay particular attention to the hinge bolts.• Inspect gas springs for signs of wear. Replace gas springs that will not hold the canopy in the fully open position when raised.• Inspect the AC power cord and its connections.• Inspect the acrylic. Replace if broken, cracked or badly scratched.
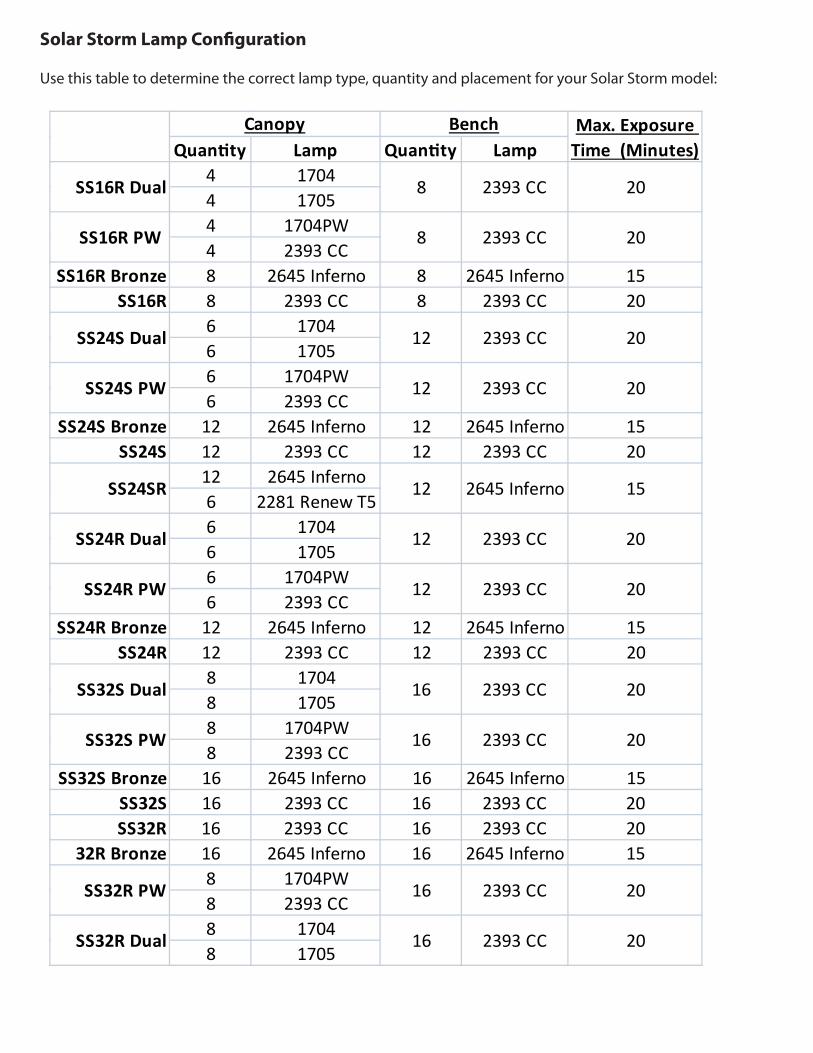
Solar Storm Lamp Con�guration
Use this table to determine the correct lamp type, quantity and placement for your Solar Storm model:
Quantity Lamp Quantity Lamp4 17044 17054 1704PW4 2393 CC
SS16R Bronze 8 2645 Inferno 8 2645 Inferno 15SS16R 8 2393 CC 8 2393 CC 20
6 17046 17056 1704PW6 2393 CC
SS24S Bronze 12 2645 Inferno 12 2645 Inferno 15SS24S 12 2393 CC 12 2393 CC 20
12 2645 Inferno6 2281 Renew T56 17046 17056 1704PW6 2393 CC
SS24R Bronze 12 2645 Inferno 12 2645 Inferno 15SS24R 12 2393 CC 12 2393 CC 20
8 17048 17058 1704PW8 2393 CC
SS32S Bronze 16 2645 Inferno 16 2645 Inferno 15SS32S 16 2393 CC 16 2393 CC 20SS32R 16 2393 CC 16 2393 CC 20
32R Bronze 16 2645 Inferno 16 2645 Inferno 158 1704PW8 2393 CC8 17048 1705
SS32R PW 16 2393 CC 20
SS32R Dual 16 2393 CC 20
20
20
20
2393 CC
20
20
20
20
15
2393 CC
Canopy Bench
2393 CC
2393 CC
20
2393 CC
SS16R Dual
SS16R PW
SS24S PW
SS24S Dual
8
8
12
12
Max. Exposure Time (Minutes)
16 2393 CC
16 2393 CC
SS24SR
SS24R Dual
SS24R PW
SS32S Dual
SS32S PW
12 2645 Inferno
12 2393 CC
12

Solar Storm16R / 24S / 24SR / 24R / 32S / 32R
Manufactured by
1044 Fordtown Road - Kingsport, TN 37663423-349-2900
,Form# F-922-001