t9i treadmill - images-na.ssl-images-amazon.com · this entire operation manual and all...
TRANSCRIPT

T9i Treadmilloperat ion manual

1
LIFE FITNESS ASIA PACIFIC LTDRoom 2610, Miramar Tower132 Nathan RoadTsimshatsui, KowloonHONG KONGTelephone: (+852) 2891.6677FAX: (+852) 2575.6001
LIFE FITNESS ATLANTIC BVLIFE FITNESS BENELUXBijdorpplein 25-312992 LB BarendrechtTHE NETHERLANDSTelephone: (+31) 180.646.666FAX: (+31) 180.646.699
LIFE FITNESS BENELUX NVParc Industriel de Petit-Rechain4800 VerviersBELGIUMTelephone: (+32) 87.300.942FAX: (+32) 87.300.943
LIFE FITNESS DO BRAZILAv. Dr. Dib Sauaia Neto 1478 Alphaville, Barueri, SP06465-140 BRAZILTelephone (+55) 11.4193.8282FAX: (+55) 11.4193.8283
LIFE FITNESS AUSTRIAVertriebs GmbHHintschiggasse 11100 ViennaAUSTRIATelephone: (+43) 1.61 57 198FAX: (+43) 1.61 57 198.20
LIFE FITNESS IBERIAPol. Ind. Molí dels Frares. c/C, nº 1208620 Sant Vicenç dels Horts (Barcelona)EspañaTelephone: (+34) 93.672.4660FAX: (+34) 93.672.4670
LIFE FITNESS EUROPE GMBHSiemensstrasse 385716 UnterschleissheimGERMANYTelephone: (+49) 89.31 77 51.0FAX: (+49) 89.31 77 51.99
LIFE FITNESS ITALIA S.R.L.Via San Pieretto37010 AFFI (Verona)ITALYTelephone: (+39) 045.7238204FAX: (+39) 045.7238197
LIFE FITNESS LATIN AMERICAand CARIBBEAN10601 West Belmont AvenueFranklin Park, Illinois 60131U.S.A.Telephone: (+1) 847.288.3300FAX:(+1) 847.288.3762
LIFE FITNESS UK LTDQueen AdelaideEly, Cambs CB7 4UBUNITED KINGDOMTelephone: (+44) 1.353.666 017FAX: (+44) 1.353.666 018
LIFE FITNESS JAPANNippon Brunswick Bldg., #8F5-27-7 SendagayaShibuya-Ku, TokyoJapan 151-0051Telephone: (+81) 3.3359.4309FAX: (+81) 3.3359.4307
M051-00K60-A06107/04
CORPORATE HEADQUARTERS5100 River Road
Schiller Park, Illinois 60176 • U.S.A.847.288.3300 • FAX: 847.288.3703
800.735.3867 (Toll-free within U.S.A., Canada)
INTERNATIONAL OFFICES

Before using this product, it is essential to readthis ENTIRE operation manual and ALL installation instructions.
It describes equipment setup and instructsmembers on how to use it correctly and safely.
Avant d'utiliser ce produit, il est indispensable de lire ce manuel d'utilisation dans sonINTÉGRALITÉ, ainsi que TOUTES les instructions d'installations.
Ce manuel explique comment installer l'équipement et commentl'utiliser correctement et sans danger.
Class HB (Home): Domestic use.
CAUTION: Any changes or modifications to this equipment could void the product warranty.
Mise en garde : tout changement ou toute modification de ce matériel peutannuler la garantie du produit.
Any service, other than cleaning or user maintenance, must be performed by an authorized ser-vice representative. There are no user serviceable parts.
2

TABLE OF CONTENTS
Section Description Page1. Getting Started . . . . . . . . . . . . . . . . . . . . . . . . . . . . . . . . . . . . . . . . . . . . . . . . . . . . . . . .61.1 Important Safety Instructions . . . . . . . . . . . . . . . . . . . . . . . . . . . . . . . . . . . . . . . . . . . . . .61.2 Setup . . . . . . . . . . . . . . . . . . . . . . . . . . . . . . . . . . . . . . . . . . . . . . . . . . . . . . . . . . . . . . .10
Electrical Power RequirementsGrounding InstructionsHow to Position and Stabilize the Life Fitness TreadmillPower SwitchCentering the BeltService Access PortPower Cord Routing
2. The Display Console . . . . . . . . . . . . . . . . . . . . . . . . . . . . . . . . . . . . . . . . . . . . . . . . . . .142.1 Display Console Overview . . . . . . . . . . . . . . . . . . . . . . . . . . . . . . . . . . . . . . . . . . . . . . .142.2 Display Console Descriptions . . . . . . . . . . . . . . . . . . . . . . . . . . . . . . . . . . . . . . . . . . . . .142.3 Reading Rack and Accessory Trays . . . . . . . . . . . . . . . . . . . . . . . . . . . . . . . . . . . . . . . .163. Heart Rate Zone Training® Exercise . . . . . . . . . . . . . . . . . . . . . . . . . . . . . . . . . . . . . . .173.1 Why Heart Rate Zone Training Exercise ? . . . . . . . . . . . . . . . . . . . . . . . . . . . . . . . . . . .173.2 Heart Rate Monitoring . . . . . . . . . . . . . . . . . . . . . . . . . . . . . . . . . . . . . . . . . . . . . . . . . .18
The LifepulseTM SystemThe Optional Heart Rate Chest Strap
4. The Workouts . . . . . . . . . . . . . . . . . . . . . . . . . . . . . . . . . . . . . . . . . . . . . . . . . . . . . . . .194.1 Workout Overviews . . . . . . . . . . . . . . . . . . . . . . . . . . . . . . . . . . . . . . . . . . . . . . . . . . . .194.2 Using the Workouts . . . . . . . . . . . . . . . . . . . . . . . . . . . . . . . . . . . . . . . . . . . . . . . . . . . .204.3 Workout Descriptions . . . . . . . . . . . . . . . . . . . . . . . . . . . . . . . . . . . . . . . . . . . . . . . . . . .22
Go System Quick Start,ManualRandomFat BurnCardioHillMy Workouts
Using a Workout Saved Under My WorkoutsEditing Settings For Workouts Saved Under My WorkoutsChange Settings For A Stored Workout:Change A Workout Name Or User NameAccess a Workout or User Statistics
Personal Trainer WorkoutsDistance GoalCalories GoalTime in Zone GoalSport TrainingTM
5K, 10K, Time BasedZone Training +
Heart Rate HillTM, Heart Rate IntervalTM, Extreme Heart RateTM
Fitness TestsLife Fitness Fit Test, Army PFT, Navy PRT, Marines PFT, Airforce PRT, Gerkin, PEB
3

4.4 Maximizing Workouts on a Life Fitness Treadmill . . . . . . . . . . . . . . . . . . . . . . . . . . . . . .34
Selecting a LevelUsing the InstaPaceTM FeedbackUsing ZerOutTM Speed ControlCool-DownDimming
5. User Menu . . . . . . . . . . . . . . . . . . . . . . . . . . . . . . . . . . . . . . . . . . . . . . . . . . . . . . . . . . .36
5.1 Entering and Using “User Menu” . . . . . . . . . . . . . . . . . . . . . . . . . . . . . . . . . . . . . . . . . .36
5.2 User Menu Items . . . . . . . . . . . . . . . . . . . . . . . . . . . . . . . . . . . . . . . . . . . . . . . . . . . . . .36
User StatisticsMy ConfigurationProgramming Custom WorkoutsUsing the Start Message SetupCreating/Changing a Start MessageSaving a Start MessageErasing a Start Message
5.3 User Menu Settings . . . . . . . . . . . . . . . . . . . . . . . . . . . . . . . . . . . . . . . . . . . . . . . . . . . .39
6. Service and Technical Data . . . . . . . . . . . . . . . . . . . . . . . . . . . . . . . . . . . . . . . . . . . . . .40
6.1 Preventive Maintenance Tips . . . . . . . . . . . . . . . . . . . . . . . . . . . . . . . . . . . . . . . . . . . . .40
6.2 Preventive Maintenance Schedule . . . . . . . . . . . . . . . . . . . . . . . . . . . . . . . . . . . . . . . . .41
6.3 Troubleshooting the Treadmill . . . . . . . . . . . . . . . . . . . . . . . . . . . . . . . . . . . . . . . . . . . .42
6.4 Troubleshooting the Heart Rate Chest Strap . . . . . . . . . . . . . . . . . . . . . . . . . . . . . . . . . .45
6.5 How to Adjust and Tension the Striding Belt . . . . . . . . . . . . . . . . . . . . . . . . . . . . . . . . . .46The Belt Tensioning BoltsTracking (Centering) a Striding Belt Tensioning an Existing Striding Belt
6.6 How to Obtain Product Service . . . . . . . . . . . . . . . . . . . . . . . . . . . . . . . . . . . . . . . . . . . .487. Specifications . . . . . . . . . . . . . . . . . . . . . . . . . . . . . . . . . . . . . . . . . . . . . . . . . . . . . . . . .497.1 Life Fitness T9i Treadmill Specifications . . . . . . . . . . . . . . . . . . . . . . . . . . . . . . . . . . . . .49
4
© 2004 Life Fitness, a division of Brunswick Corporation. All rights reserved. Life Fitness, Lifecycle, FlexDeck, and ZoneTraining are registered trademarks, and Sport Training, Heart Rate Hill, Heart Rate Interval, Extreme Heart Rate, InstaPace,ZerOut, Lifepulse, MagnaDrive, and Lifespring are trademarks of Brunswick Corporation. Polar is a registered trademark ofPolar Electro, Inc. Any use of these trademarks, without the express written consent of Life Fitness or the correspondingcompanies is forbidden.

This Operation Manual describes the functions of the Life Fitness T9i Treadmill.
See "Specifications" in this manual for product specific features.
Statement of Purpose: The treadmill is an exercise machine that enables users to walk or run, inplace, on a moving surface.
Life Fitness STRONGLY recommends seeing a physician for a complete medical exam beforeundertaking an exercise program, particularly if the user has a family history of high blood pres-sure or heart disease, or is over the age of 45, or smokes, has high cholesterol, is obese, or hasnot exercised regularly in the past year.
If, at any time while exercising, the user experiences faintness, dizziness, pain, or shortness ofbreath, he or she must stop immediately.
Life Fitness recommande FORTEMENT de consulter un médecin pour subir un examen médicalcomplet avant de commencer tout programme d'exercice, et tout particulièrement si l'utilisateura des antécédents familiaux d'hypertension ou de troubles cardiaques, s'il a plus de 45 ans, s'ilfume, s'il a du cholestérol, s'il est obèse ou n'a pas fait d'exercice régulièrement depuis un an.
Si, pendant l'utilisation de l'appareil, l'utilisateur ressent un malaise, des vertiges, des douleursou des difficultés à respirer, il doit s'arrêter immédiatement.
5

1 GETTING STARTED
1.1 IMPORTANT SAFETY INSTRUCTIONSRead all instructions before using the treadmill.
• DANGER: To reduce the risk of electrical shock, always unplug this Life Fitnessproduct before cleaning or attempting any maintenance activity.
• WARNING: To reduce the risk of burns, fire, electric shock, or injury, it is impera-tive to connect each product to a properly grounded electrical outlet.
• WARNING: Keep the area six feet (two meters) by three feet (one meter) behindthe treadmill clear of any obstructions, including walls, furniture, and other equipment.
• WARNING: Be sure the emergency stop lanyard is clipped to the user and in prop-er position on the treadmill before beginning any workout.
• To disconnect, turn power OFF at the ON/OFF switch, then remove plug from electrical outlet.
• Never operate a Life Fitness product if it has a damaged power cord or electrical plug, or if ithas been dropped, damaged, or even partially immersed in water. Contact Life FitnessCustomer Support Services.
• Position this product so that the power cord plug is accessible to the user.
• Keep the power cord away from heated surfaces. Do not pull the equipment by the powercord or use the cord as a handle. Do not run the power cord on the floor under or along theside of the treadmill. Refer to Section 1.2 for proper power cord routing.
• If the electrical supply cord is damaged, it must be replaced by the manufacturer, an autho-rized service agent, or a similarly qualified person to avoid a hazard.
• Do not use this product in areas where aerosol spray products are being used or where oxygen is being administered. Such substances create the danger of combustion and explosion.
• Always follow the console instructions for proper operation.
• Close supervision is necessary when used near children, invalids or disabled persons.
• Do not use this product outdoors, near swimming pools or in areas of high humidity.
• Never operate a Life Fitness product with the air openings blocked. Keep air openings freeof lint, hair, or any obstructing material.
• Never insert objects into any opening in this product. If an object should drop inside, turn offthe power, unplug the power cord from the outlet, and carefully retrieve it. If the item cannotbe reached, contact Life Fitness Customer Support Services.
• Never place liquids of any type directly on the unit, except in an accessory tray or holder.Containers with lids are recommended.
6

• Do not use this product in bare feet. Always wear shoes. Wear shoes with rubber or high-traction soles. Do not use shoes with heels, leather soles, cleats or spikes. Make sure nostones are embedded in the soles.
• Keep all loose clothing, shoelaces, and towels away from moving parts.
• Do not reach into, or underneath, the unit or tip it on its side during operation.
• Handrails may be held to enhance stability as needed, but are not for continuous use.
• Never mount or dismount the treadmill while the striding belt is moving. Use the handrailswhenever additional stability is required. In case of an emergency, such as tripping, graspthe handrails, and place the feet on the side platforms.
• Never walk or jog backwards on the treadmill.
• When it is necessary to immobilize the treadmill, set the display to read SELECT WORK-OUT. (Press the CLEAR key twice if not already there.) Then hold down the SPEED DOWNkey and press the PAUSE key. The treadmill now displays “IMMOBILIZED”. In this state, thetreadmill cannot be operated. The main motor and incline are disabled. The treadmill willremain in this state across resets, power cycles, etc. To restore normal operation, repeat thesame key sequence: hold down the SPEED DOWN key, and press the PAUSE key. Thetreadmill will display “SELECT WORKOUT” again.
• Use this appliance only for its intended use as described in this manual. Do not use attach-ments that have not been recommended by the manufacturer.
SAVE THESE INSTRUCTIONSFOR FUTURE REFERENCE.
7

1 DÉMARRAGE
1.1 CONSIGNES DE SÉCURITÉ IMPORTANTESLire toutes les instructions avant d'utiliser le tapis roulant.
• DANGER: Pour réduire les risques de décharge électrique, toujours débrancher cetappareil Life Fitness avant le nettoyage ou toute mesure d'entretien.
• AVERTISSEMENT: Pour réduire les risques de brûlures, d'incendies, dedécharges électriques ou de blessures, chaque appareil doit absolument être branché surune prise électrique correctement mise à la terre.
• AVERTISSEMENT: Conserver une zone de 2 m sur 1 m libre de touteobstruction derrière le tapis roulant (aucun mur, meuble ou autre appareil).
• AVERTISSEMENT: S'assurer que la dragonne d'arrêt d'urgence est attachéeà l'utilisateur et fixée adéquatement au tapis roulant avant de commercer un exercice.
• Pour débrancher, mettre l'appareil hors tension au niveau de l'interrupteur d'alimentation,puis retirer la fiche de la prise électrique.
• Ne jamais faire fonctionner un produit Life Fitness dont la fiche ou le cordon d'alimentationest endommagé, ni aucun appareil qui serait tombé ou aurait été endommagé ou mêmepartiellement plongé dans l'eau. Appeler le service clientèle de Life Fitness.
• Placer ce produit de manière à ce que l'utilisateur puisse accéder à la fiche du cordon d'ali-mentation.
• Tenir le cordon d'alimentation à l'écart de toute surface chauffée. Ne pas tirer l'appareil parle cordon d'alimentation; ne pas utiliser le cordon comme poignée. Ne pas faire passer lecordon sur le sol, sous le tapis roulant, ni le long de l'appareil. Se reporter à la section 1.2pour la disposition adéquate du cordon d'alimentation.
• Si le cordon d'alimentation électrique est endommagé, il doit être remplacé par le fabricant,par un réparateur agréé ou par une personne qualifiée afin d'éviter tout danger.
• Ne pas utiliser ce produit dans des salles où des vaporisateurs aérosols sont employés oubien où de l'oxygène est administré. Ces substances créent des risques de combustion etd'explosion.
• Les instructions de la console doivent toujours être suivies pour obtenir un fonctionnementcorrect.
• Une surveillance étroite est nécessaire si l'appareil est utilisé près d'enfants ou de person-nes invalides ou handicapées.
• Ne pas utiliser ce produit à l'extérieur, près d'une piscine ou dans des endroits très humides.
• Ne jamais faire fonctionner d'appareil Life Fitness dont les orifices d'aération seraient blo-qués. Les garder exempts de peluches, de cheveux ou de toute obstruction.
8

• Ne jamais rien insérer dans les ouvertures de cet appareil. Si un objet tombe à l'intérieur del'appareil, couper l'alimentation électrique, débrancher le cordon de la prise et le récupéreravec précaution. S'il est impossible de l'atteindre, communiquer avec le service à la clien-tèle de Life Fitness.
• Ne jamais placer aucun liquide directement sur l'appareil, sauf dans le plateau pour acces-soires ou un support prévu à cet effet. Il est recommandé d'utiliser des conteneurs munis decouvercles.
• Ne pas utiliser cet appareil pieds nus. Toujours porter des chaussures. Porter des chaus-sures avec des semelles en caoutchouc ou fournissant une très bonne adhérence. Ne pasutiliser de chaussures à talons, à semelles en cuir ou munies de crampons. S'assurerqu'aucun caillou n'est incrusté dans les semelles.
• Éloigner les vêtements lâches, les lacets et les serviettes des pièces en mouvement.
• Ne pas placer les mains sous l'appareil ou dans l'appareil, et ne pas le renverser sur le côtépendant le fonctionnement.
• Les rampes latérales peuvent servir à rétablir son équilibre, mais ne sont pas destinées àun usage continu.
• Ne jamais monter sur le tapis de course et ne pas en descendre jamais pendant qu'iltourne. Utiliser les rampes latérales afin de ne pas perdre l'équilibre. En cas d'urgence, parexemple, en cas de trébuchement ou de faux pas, saisir les barres latérales et placer lespieds sur les plates-formes latérales.
• Ne jamais marcher ni courir à reculons sur le tapis roulant.
• S'il est nécessaire d'immobiliser le tapis roulant, régler l'afficheur sur SELECT WORKOUT(SÉLECTIONNER EXERCICE). (Appuyer deux fois sur la touche REMISE À ZÉRO si l'af-ficheur n'en est pas déjà à ce point.) Maintenir ensuite la touche SPEED DOWN (RALEN-TISSEMENT) enfoncée et appuyer sur la touche PAUSE. L'appareil affiche désormaisIMMOBILIZED (Immobilisé). Il ne peut alors plus fonctionner, Le moteur principal et lemoteur en ligne et le cireur sont désactivés. Car le moteur principal et la pente sont désac-tivés. Le tapis roulant restera immobilisé, même s'il est réinitialisé, mis hors tension, puisremis sous tension, etc. Le mode de fonctionnement normal ne peut être rétabli qu'aumoyen de la même séquence de touches : maintenir la touche SPEED DOWN (RALEN-TISSEMENT) enfoncée et appuyer sur PAUSE. L'appareil affichera SELECT WORKOUT(SÉLECTIONNER EXERCICE) à nouveau.
• Cet appareil ne doit être employé que pour l'usage auquel il est destiné, conformément auxdirectives du manuel. Ne pas utiliser d'accessoires qui ne sont pas recommandés par lefabricant.
CONSERVER CES INSTRUCTIONSPOUR TOUT USAGE ULTÉRIEUR.
9

1.2 SETUPRead the Operation Manual before setting up the Life Fitness Treadmill. Place the treadmill where itwill be used before beginning the setup procedure.
ELECTRICAL POWER REQUIREMENTS
The Life Fitness Treadmill requires a non-dedicated electrical line according to the configurationslisted in the chart below.
NOTE: Do not modify the plug provided with this product. If the plug does not fit into an availableelectrical outlet, have a proper outlet installed by a qualified electrician.
GROUNDING INSTRUCTIONS
This Life Fitness product must be properly grounded. If the unit malfunctions or breaks down, propergrounding provides a path of least resistance for the electric current, which reduces the risk of shockto anyone touching or using the equipment. Each unit is equipped with an electrical cord, whichincludes an equipment grounding conductor and a grounding plug. The plug must be inserted into anoutlet that has been properly installed and grounded in accordance with all local codes and ordi-nances.
An adapter MUST NOT BE USED to connect this plug to a two-pole receptacle in NorthAmerica. If a properly grounded, 15-amp outlet is not available, one must be installed by aqualified electrician. IL EST ABSOLUMENT INTERDIT d'employer un adaptateur pour brancher cette fiche surune prise bipolaire en Amérique du Nord. Si aucune prise de 15 A correctement mise à laterre n'est disponible, en faire installer une par un électricien qualifié.
DANGER: A risk of electrical shock may result from improper connection of theequipment-grounding conductor. Check with a qualified electrician if in doubt as to propergrounding technique. DO NOT modify the plug provided with the product. If it will not fitan electrical outlet, have a proper outlet installed by a qualified electrician. Any modifica-tion to the electrical plug will result in a voided warranty.Un branchement incorrect du conducteur de mise à la terre peut entraîner des risques dedécharge électrique. Consulter un électricien si des doutes subsistent quant à la technique demise à la terre. NE PAS MODIFIER la fiche fournie avec l'appareil. Si elle ne s'adapte pas à uneprise, faire installer une prise correcte par un électricien qualifié. Toute modification à la ficheannule la garantie.
10

HOW TO POSITION AND STABILIZE THE LIFE FITNESS TREADMILL
Following all safety instructions in Section 1.1, move the treadmill to thelocation in which it will be used. See Section 7, titled Specifications, forthe dimensions of the footprint. Allow a distance of eight inches, or 21centimeters, between the treadmill and other units on either side. Allow adistance of six feet, or two meters, from the rear of the treadmill to anyobject or surface.
After placing the unit where it will be used, check its stability. If there is even a slight rocking motionor the unit is not stable, determine which stabilizing leg is not resting on the floor. To adjust, loosenthe JAM NUT (A), and turn the STABILIZING LEG (B) until the rocking motion ceases, and both sta-bilizing legs rest firmly on the floor. Retighten the JAM NUT.
NOTE: It is extremely important that the stabilizing leg be correctly adjusted for proper operation. Anunbalanced unit may cause striding belt misalignment. A bubble level is recommended to ensureproper leveling.
POWER SWITCH
Located on the front panel at the base of the treadmill, the ON/OFF switch has two positions: "I" (one) for ON and "0" (zero) for OFF.
CENTERING THE BELT
After installing and levelling the treadmill, check the belt to ensure that it is tracking properly. First,plug the power cord into an appropriate outlet. See Electrical Requirements at the beginning of thissection for details. Then, turn the treadmill ON.
Have one person stand on the platforms on either side of the treadmill frame. Do not stand on thebelt at this time. Press the QUICK START key, and increase the speed to 4.0 miles per hour (MPH),or 6.4 kilometers per hour (KPH), using the SPEED UP arrow.
If the striding belt moves to the right while it is running, have a second person turn the right tensionbolt a quarter-turn clockwise, and then turn the left tension bolt (A) a quarter-turn counter-clockwise.See the illustration below. This action sets the striding belt tracking back to center of the roller.
If the striding belt moves to the left, turn the left tension bolt a quarter-turn clockwise and then turnthe right tension bolt a quarter-turn counter-clockwise to start the striding belt tracking back to centerof roller.
Repeat these adjustments until striding belt appears centered. Allow the belt to continue running forseveral minutes to be sure that the tracking is stabilized.
NOTE: Do not exceed one full turn of the adjusting screws in either direction. If, after one full turn,the belt does not track properly, contact Customer Support Services. The phone numbers are listed inSection 6.6, titled How to Obtain Product Service.
11

SERVICE ACCESS PORT
The two interchangeable type RJ45 networking ports (A) are located on the back of the displayconsole. These network ports, located behind the display console rear access door, allow forconsole software updates.
POWER CORD ROUTING
The power cord can be run straight from the treadmill, shortened and exited out the user-frontleft side, or run under the frame using the power cord clips and exited out the user right-rearside of the treadmill.
For efficient cord management, the following routing options are recommended:
With the power cord unplugged, insert the clips in the appropriate holes. See the illustrationbelow. Use Hole Pattern 1 or 2 to locate the clips and secure the power cord with the clips, taking up any slack between clips.
NOTE: It may be necessary to tip the treadmill to route the power cord properly.
To plug the power cord into an outlet in front of the treadmill, use Hole Pattern 1 for outletslocated at the front of the machine.
NOTE: To accomodate treadmill incline, at least two feet (24”) of power cord is requiredbetween the outlet and the last power cord clip for outlets in front of the treadmill.
A
12

To plug the power cord into an outlet in rear of the treadmill, use Hole Pattern 2 for outlets locat-ed at the rear of the machine.
WARNING: Make sure that there is a 6-foot clearance behind the treadmill.
WARNING: Insure that the power cord (A) does not contact the striding belt orget pinched between the frame (C), lift arm (B) or the wheel; failure to follow thiswarning may result in serious injury.
AVERTISSEMENT : S'assurer que le cordon d'alimentation n'entre pas en contactavec le tapis et ne soit pas pincé entre le cadre, le bras de levage ou la roue. Lenon-respect de cet avertissement peut provoquer de graves blessures.
NOTE: When using Pattern 1, it is extremely important to route the power cord BETWEEN thelift frame and the main frame.
13

2 THE DISPLAY CONSOLE
2.1 DISPLAY CONSOLE OVERVIEWThe computerized display console on the treadmill allows the user to tailor a workout to personal fitness abilities and goals and to monitor progress. With this easy-to-use console, the user can track fitness improvement from one workout to the next.
2.2 DISPLAY CONSOLE DESCRIPTIONS
A WORKOUT PROFILE WINDOW: During a workout, variations in incline simulate intervalhills and valleys. They appear as rows of lights stacked in columns. The height of each col-umn of lights corresponds to the percentage of incline, or level of difficulty, across a workoutprofile. The left-most column of lights represents the current incline, or level.
B MESSAGE CENTER: This window displays step-by-step instructions for setting up a work-out. During a workout, it displays calories, distance, time, incline, speed and heart rate.Additionally, the MESSAGE CENTER displays calories per hour, METS, Watts, pace in min-utes per mile/kilometer, and distance climbed, if enabled to do so in “User Menu.” SeeSection 5.1, titled Entering and Using the User Menu.
14

C TIME, INCLINE, and SPEED ARROW keys: Press these keys to increase or decrease theworkout time, the incline of the treadmill deck, or the striding belt speed respectively. The MES-SAGE CENTER displays the input data in sections located just above the keys. Additionally,any of these keys may be pressed to set up a workout or to change “User Menu” settings.
D NUMERIC keypad: Use NUMERIC keys to enter exercise time, difficulty level, belt speed,weight, distance, goal selection, gender, and target heart rate.
CLEAR key: Press this key once to clear data not yet entered. Press it twice in succession,while programming, to reset the treadmill and restart the programming sequence.
ENTER key: Press this key to confirm entries of workout setup values, as displayed in theMESSAGE CENTER.
E WORKOUT SELECTION keys: Press any of these keys to select the program identified onthe given key’s label. These programs include: FAT BURN, CARDIO, HILL, RANDOM,MANUAL, ZONE TRAINING +, FITNESS TESTS, PERSONAL TRAINER, and MY WORK-OUTS.
F. ENTER WEIGHT key: Press this key to enter a user weight during a QUICK START work-out. Use the TIME ARROW keys or the NUMERIC keypad to enter a weight value.
G GO SYSTEM QUICK START keys: Press any of the Walk, Jog, or Run keys to begin amanual workout immediately, without having to select a workout program. Once the workoutis in progress, use the ARROW keys or the NUMERIC keypad to change the intensity levelor workout duration as desired.
H COOL DOWN key: Press this key to begin an automatically customized workout cool-down.
I PAUSE key: Press this key to stop the belt and hold the current workout. Continue the work-out by pressing the PAUSE key a second time or by pressing the ENTER key.
J A circular-shaped STOP button is located on the right side of the panel below the displayconsole. Press the button to stop the striding belt and end the current workout.
15
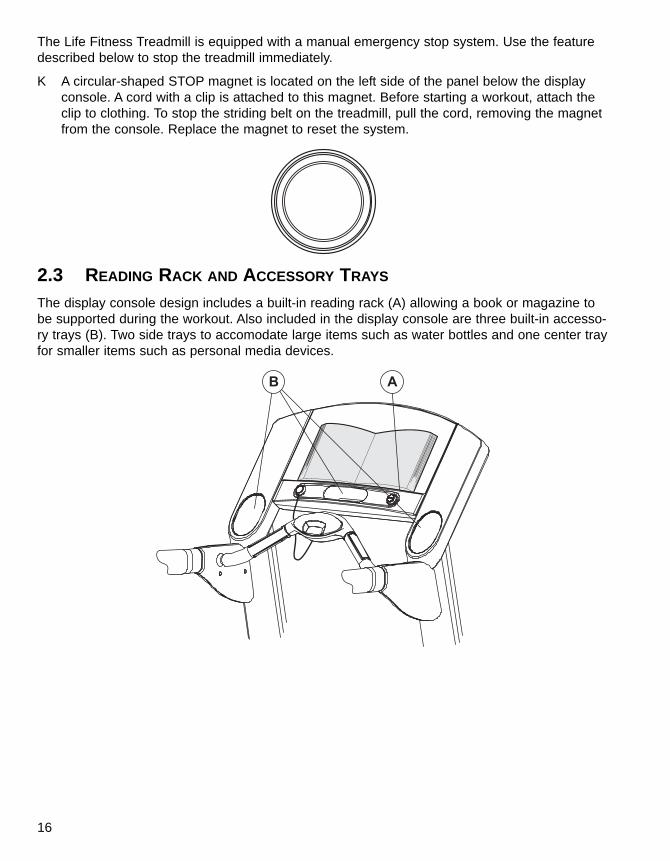
The Life Fitness Treadmill is equipped with a manual emergency stop system. Use the featuredescribed below to stop the treadmill immediately.
K A circular-shaped STOP magnet is located on the left side of the panel below the displayconsole. A cord with a clip is attached to this magnet. Before starting a workout, attach theclip to clothing. To stop the striding belt on the treadmill, pull the cord, removing the magnetfrom the console. Replace the magnet to reset the system.
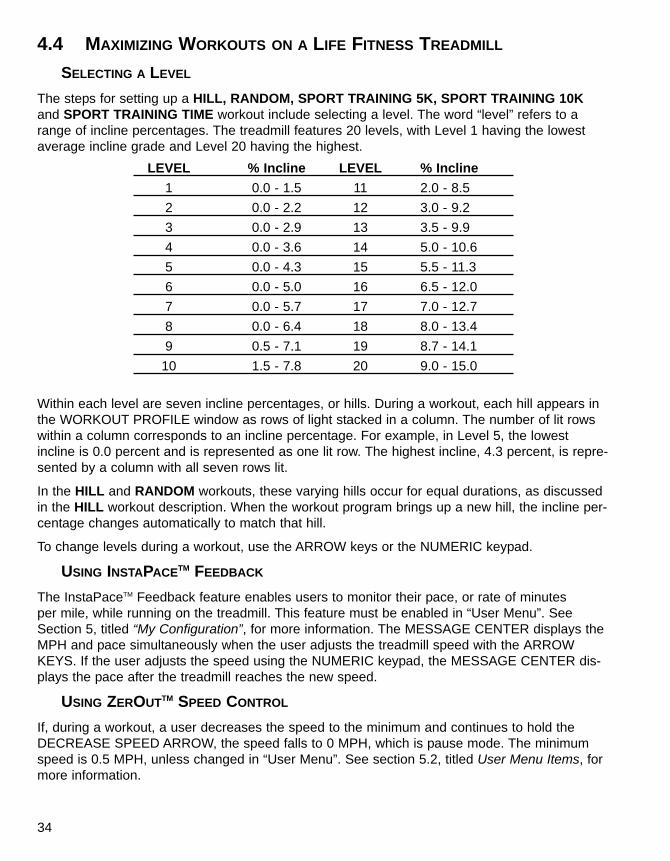
2.3 READING RACK AND ACCESSORY TRAYS
The display console design includes a built-in reading rack (A) allowing a book or magazine tobe supported during the workout. Also included in the display console are three built-in accesso-ry trays (B). Two side trays to accomodate large items such as water bottles and one center trayfor smaller items such as personal media devices.
AB
16

3 HEART RATE ZONE TRAINING® EXERCISE
3.1 WHY HEART RATE ZONE TRAINING® EXERCISE?Research shows that maintaining a specific heart rate while exercising is the optimal way tomonitor the intensity of a workout and to achieve maximum results. That is the idea behind theLife Fitness Heart Rate Zone Training® approach to exercise.
Zone Training identifies an exerciser's ideal heart rate range, or zone, for burning fat or increasing cardiovascular fitness. The zone is a percentage of the theoretical maximum†
(HRmax), and its value depends on the workout. The Life Fitness Treadmill features five exclu-sive workouts designed to take full advantage of the benefits of Heart Rate Zone Training+ exer-cise:
• FAT BURN • HEART RATE HILLTM • EXTREME HEART RATETM
• CARDIO • HEART RATE INTERVALTM
Each workout offers different benefits, as discussed in Section 4, titled The Workouts.
NOTE: Consulting a fitness trainer is recommended for defining specific fitness goals anddesigning a workout program.
To change the target heart rate during a workout, simply enter anew target heart rate using the NUMERIC keypad.
To switch between programs during a workout, use the WORK-OUT SELECTION keys.
The Heart Rate Zone Training® workout programs measure heartrate. Wear the telemetry chest strap, or grip the LifepulseTM sen-sors, to enable the treadmill’s on-board computer to monitor theheart rate during a workout. The computer automatically adjuststhe incline level to maintain the target heart rate based on theactual heart rate.
† Defined by the American College of Sports Medicine's "Guidelines for Exercise Testing and Prescription" as equal to220 minus an individual’s age.
17

3.2 HEART RATE MONITORING
THE LIFEPULSETM SYSTEM
To use the treadmill’s LifepulseTM system to check the heart rate during a workout, grasp the stainlesssteel sensors on the ErgoTM front handlebar. Two sensors are located on each of the handlebars.Contact must be maintained with all four sensors to obtain a heart rate. The console displays a heartrate within 20 to 30 seconds of contact with the sensors.
Do not attempt to grasp the sensors at speeds above 4.5 MPH, or 7.2 KPH. For these speeds, theuse of a heart rate chest strap is recommended.
THE HEART RATE CHEST STRAP
The Life Fitness Treadmill is equipped with Polar® telemetry, a heart rate monitoring system in whichelectrodes, pressed against the skin, transfer heart rate signals to the treadmill console. These electrodesare attached to a chest strap that the user wears during the workout.
See the diagram below for correct positioning of the strap. The electrodes (A), which are the twogrooved surfaces on the underside of the strap, must remain wet to transmit accurately the electricalimpulses of the heart back to the receiver. Moisten the electrodes. Then, secure the strap as highunder the chest muscles as possible. The strap should be snug, but comfortable enough to allow fornormal breathing.
The transmitter strap delivers its most accurate heart rate reading when the electrodes are in directcontact with bare skin. However, it will function with a slightly less accurate heart rate reading througha thin layer of wet clothing.
If it becomes necessary to re-moisten the chest strap electrodes, grasp the center of the strap, pull itaway from the chest to expose the two electrodes, and re-moisten them.
During the setup of a heart rate zone training workout, the user will be required to enter a start-upspeed. If a heart rate chest strap is not detected, the maximum allowable speed is 4.5 mph. If a heartrate chest strap is detected, the maximum speed is 12 mph.
A A
18

4 THE WORKOUTS
4.1 WORKOUT OVERVIEWSThe following workouts are preprogrammed for the Life Fitness Treadmill.
GO SYSTEM QUICK START is the fastest way to begin exercising. After the WALK, JOG, or RUNkey is pressed, a MANUAL workout begins immediately at the pre-programmed speed for therespective key pressed. While in this MANUAL workout, the user may, at any time, toggle betweenthe three pre-programmed speeds.
MANUAL is a constant effort workout in which the user can change resistance level or speed atany time.
RANDOM is an interval training workout of constantly changing intensity levels that occur in noregular pattern or progression.
HILL is an interval training workout. Intervals are periods of intense aerobic exercise separatedby regular periods of lower-intensity exercise.
PERSONAL TRAINER workouts are accessed through the PERSONAL TRAINER key. Theseinclude DISTANCE GOAL, CALORIES GOAL, TIME IN ZONE GOAL and SPORT TRAININGworkouts, as well as up to six custom workouts, which may be programmed by user.
DISTANCE GOAL is a distance based workout.
CALORIES GOAL is a calorie expenditure based workout.
TIME IN ZONE GOAL is a time spent at Target Heart Rate (65 percent of the theoretical max-imum†)based workout.
SPORT TRAININGTM (5K) is a distance-goal workout that simulates an actual terrain withvarying incline levels. It is designed to assist runners in training for a 5-kilometer, or 3.1-mile, race. Accessible through the PERSONAL TRAINER workouts key.
SPORT TRAININGTM (10K) is a distance-goal workout that simulates an actual terrain with vary-ing incline levels. It is designed to assist runners in training for a 10-kilometer, or 6.2-mile, race.Accessible through the PERSONAL TRAINER workouts key.
SPORT TRAININGTM (Time) is a time-based sport training workout. Accessible through thePERSONAL TRAINER workouts key.
19
† Defined by the American College of Sports Medicine's "Guidelines for Exercise Testing and Prescription" as equal to220 minus an individual’s age.* Target Heart Rate (THR) is a percentage of the theoretical maximum (HRmax). A 40-year-old user's recommended THRfor the HEART RATE HILL workout is 144, or 80 percent of the maximum; so the equation would be (220-40)*.80=144.

ZONE TRAINING + Zone Training workouts target specific ranges, or zones, for maintaining aheart rate to achieve maximum exercise results.
HEART RATE HILLTM takes the user through three different hills based on the target heartrate*. The user wears a heart rate chest strap, or grasps the LifepulseTM sensors continuously.
HEART RATE INTERVALTM alternates between a hill and a valley based on the target heartrate*. The user wears a heart rate chest strap, or grasps the LifepulseTM sensors continuously.
EXTREME HEART RATE TM is an intense workout for more experienced users. It isdesigned to get the heart rate up and down as quickly as possible. The user wears a heartrate chest strap, or grasps the LifepulseTM sensors continuously.
FAT BURN is a low-intensity workout for burning the body’s fat reserves. The user wears a heart ratechest strap, or grasps the LifepulseTM sensors continuously. The program adjusts the intensity levelthrough changing the incline (elevation), based on the actual heart rate, to maintain the rate at 65percent of the theoretical maximum†.
CARDIO is a higher intensity workout for more fit users, emphasizing cardiovascular benefitsand maximum fat burning. The user wears a heart rate chest strap, or grasps the LifepulseTM
sensors continuously. The program adjusts the intensity level, based on the actual heart rate, tomaintain the rate at 80 percent of the theoretical maximum.
FITNESS TESTS
LIFE FITNESS FIT TEST measures cardiovascular fitness and can be used to monitorimprovements and endurance every 4-6 weeks.
ADDITIONAL FITNESS TESTS are similar to the FIT TEST workout, except that these pro-grams are based upon specific predefined protocols. The available tests are:
• ARMY PHYSICAL FITNESS TEST (PFT) - (U.S. MILITARY)• NAVY PHYSICAL READINESS TEST (PRT) - (U.S. MILITARY)• MARINES PHYSICAL FITNESS TEST (PFT) - (U.S. MILITARY)• AIR FORCE FITNESS TEST (PRT) - (U.S. MILITARY)• GERKIN PROTOCOL - (INTERNATIONAL ASSOCIATION OF FIRE FIGHTERS)• PHYSICAL EFFICIENCY BATTERY (PEB) - (U.S. FEDERAL LAW ENFORCEMENT)
4.2 USING THE WORKOUTS
Select a workout using the Workout Selection or Go System Quick Start keys. The following chartlists the steps for setting up each workout.
Use the NUMERIC keypad to enter the values when prompted by the MESSAGE CENTER; or use TIME, INCLINE, or SPEED ARROW keys to scroll to desired values displayed on theMESSAGE CENTER. Press ENTER to confirm each selection. These entered values can bechanged during all workouts, except for those found under the FIT TEST key.
20
* Target Heart Rate (THR) is a percentage of the theoretical maximum (HRmax). For example, a 40-year-old user's recommend-ed THR for the FAT BURN workout is 117. The FAT BURN workout targets 65 percent of the maximum, so the equation would be(220-40)*.65=117.

LIFE FITNESS TREADMILL WORKOUT SETUP STEPS
GO SYSTEM QUICK STARTPress WALK, JOG or RUNBegin workout
MANUALPress MANUALEnter weightEnter timeEnter inclineEnter speedBegin workout
RANDOMPress RANDOMEnter weightEnter timeEnter levelEnter speedBegin workout
FAT BURN**Press FAT BURNEnter weightEnter timeEnter ageEnter THR*Enter speedBegin workout
CARDIO**Press CARDIOEnter weightEnter timeEnter ageEnter THR*Enter speedBegin workout
HILLPress HILLEnter weightEnter timeEnter levelEnter speedBegin workout
PERSONAL TRAINERWORKOUTSPress PERSONAL TRAINER
repeatedly until the desiredworkout appears; pressENTER
Select the desired workoutnumber, from 1 to 6; pressENTER
Begin workout
DISTANCE GOALPress PERSONAL TRAINER
repeatedly until DISTANCE GOAL appears;press ENTER
Enter weightEnter distanceEnter inclineEnter speedBegin workout
CALORIES GOALPress PERSONAL TRAINER
repeatedly until CALORIES GOAL appears;press ENTER
Enter weightEnter caloriesEnter inclineEnter speedBegin workout
TIME IN ZONE GOALPress PERSONAL TRAINER
repeatedly until TIME IN ZONE GOALappears; press ENTER
Enter weightEnter timeSelect Fat Burn or CardioEnter ageEnter THR*Enter speedBegin workout
SPORT TRAININGTM
Press PERSONAL TRAINERrepeatedly until SPORT TRAINING 5K orSPORT TRAINING 10K orSPORT TRAINING TIMEappears; press ENTER
Enter weightEnter time (Time based only)Enter levelEnter speedBegin workout
HEART RATE HILLTM **Press ZONE TRAINING+
repeatedly until HR HILL appears; pressENTER
Enter weightEnter timeEnter ageEnter THR*Enter speedBegin workout
HEART RATE INTERVALTM **Press ZONE TRAINING+
repeatedly until HR INTERVAL appears;press ENTER
Enter weightEnter timeEnter ageEnter THR*Enter speedBegin workout
EXTREME HEART RATETM **Press ZONE TRAINING+
repeatedly until EXTREME HR appears;press ENTER
Enter weightEnter timeEnter ageEnter THR*Enter walk speedEnter jog speedBegin workout
LIFE FITNESS FIT TEST** Press FIT TEST
repeatedly until FIT TEST appears; pressENTER
Enter weightEnter ageEnter genderEnter speedBegin workout
ARMY PFT Press FIT TEST
repeatedly until ARMY PRTappears; press ENTER
Enter weightEnter ageEnter genderEnter speedBegin workout
NAVY PRT Press FIT TEST
repeatedly until NAVY PRTappears; press ENTER
Enter YES or NO to question: ELEVATION LESS THAN5000 FEET ABOVE SEALEVEL?
Enter weightEnter ageEnter genderEnter speedBegin workout
MARINES PFT Press FIT TEST
repeatedly until MARINESPFT appears; pressENTER
Enter YES or NO to question: ELEVATION LESS THAN4500 FEET ABOVE SEALEVEL?
Enter weightEnter genderEnter speedBegin workout
AIR FORCE PFT Press FIT TEST
repeatedly until AIRFORCE PRT appears;press ENTER
Enter weightEnter ageEnter genderEnter speedBegin workout
GERKIN PROTOCOL**Press FIT TEST
repeatedly until GERKINPROTOCOL appears;press ENTER
Enter weightEnter ageEnter THR*Begin workout
PEB TESTPress FIT TEST repeatedly
until PEB TEST appears;press ENTER
Enter weightEnter ageEnter genderEnter speedBegin workout
MY WORKOUTSPress MY WORKOUTSSelect workout nameProgram workout or press
Enter to begin workout
* Target Heart Rate (THR) is a percentage of the theoretical maximum (HRmax). For example, a 40-year-old user's recommend-ed THR for the FAT BURN workout is 117. The FAT BURN workout targets 65 percent of the maximum, so the equation would be(220-40)*.65=117.** This workout requires the user to wear the telemetry chest strap or grasp the LifepulseTM sensors.
21

4.3 WORKOUT DESCRIPTIONS
GO SYSTEM QUICK START
GO SYSTEM QUICK START is the fastest way to begin exercising. After the WALK, JOG, or RUNkey is pressed, a MANUAL workout begins immediately at the pre-programmed speed for therespective key pressed. For accurate caloric expenditure, enter weight using the ENTER WEIGHTkey. The incline level is set to zero by default. Change the level using the INCLINE ARROW key.Change the speed using the SPEED key, up or down as desired, or use the NUMERIC keypad toenter a new speed value. The table below lists the preset speed for each key followed a range ofpossible alternate speeds for that key.
English Default Units Metric Default Units
WALK 3.0 mph 5,0 kph
JOG 5.0 mph 8,0 kph
RUN 7.0 mph 11,0 kph
To change a preset speed, enter any non-FIT TEST workout. Press the SPEED ARROW keysand adjust the speed value displayed in the MESSAGE CENTER. Then, press and hold downthe WALK, JOG, or RUN key until the console beeps twice, indicating that the new speed hasbeen programmed. When the WALK, JOG, and RUN keys are used to change speed, press thedesired key momentarily. consequently the MESSAGE CENTER will display the new speed.
NOTE: All changed preset values are preserved when the treadmill is turned off.NOTE: It is possible to program the WALK, JOG, and RUN speed values per pre-pro-grammed workouts (MY WORKOUTS) - each workout may have a different speed settingfor the three Go System Quick Start keys.
MANUAL
The MANUAL program is a constant effort workout in which the user can change resistancelevel or speed at any time.
RANDOM
The RANDOM program creates a terrain of hills and valleys that varies with each workout. Morethan one million different patterns are possible.
FAT BURN
The FAT BURN workout is designed to maintain a user’s heart rate at 65 percent of the theoreticalmaximum† (HRmax) for optimal results. Throughout the workout, the user wears a chest strap orgrasps the LifepulseTM sensors. If the user is not wearing a chest strap, the WORKOUT PROFILEWINDOW displays a heart shape, and the MESSAGE CENTER displays a prompt to grasp thesensors. The console continuously monitors and displays the heart rate, adjusting the intensity levelof the treadmill to reach and maintain the target*. This system eliminates over- and under-training,and it maximizes the aerobic benefits of exercise by using the body's fat stores for fuel.
NOTE: The intensity level is changed by incline. Speed can be only changed by the user
22
† Defined by the American College of Sports Medicine's "Guidelines for Exercise Testing and Prescription" as equal to220 minus an individual’s age.* Target Heart Rate (THR) is a percentage of the theoretical maximum (HRmax). For example, a 40-year-old user's rec-ommended THR for the FAT BURN workout is 117, or 65 percent of the maximum, so the equation would be (220-40)*.65 = 117.

CARDIO
The CARDIO workout is virtually identical to FAT BURN; however the target heart rate is calcu-lated at 80 percent of the theoretical maximum† (HRmax)**. The higher target promotes cardio-vascular improvement by placing a heavier workload on the heart muscle.
NOTE: The intensity level is changed by incline. Speed can be only changed by the user.
NOTE: Change the target heart rate at any time by using the NUMERIC KEYPAD.
HILL
The Life Fitness-patented HILL workout offers a variety of configurations for interval training. Intervalsare periods of intense cardiovascular exercise separated by regular periods of lower-intensity exer-cise. The WORKOUT PROFILE window represents these high and low intervals as columns of illumi-nated LEDs, which together have the appearance of hills and valleys. The computerized intervaltraining workout has been scientifically demonstrated to promote greater cardiorespiratory improve-ment than steady-pace training. The HILL workout goes through four phases, each marked by different intensity levels. The WORK-OUT PROFILE window displays the progress of these phases. As noted in the descriptions below,the heart rate should be measured at two stages in the workout to gauge its effectiveness. Wear thechest strap or continuously grip the LifepulseTM handles. The MESSAGE CENTER does not display arequest for a heart rate measurement, as it does with CARDIO, FAT BURN and the HEART RATEZONE TRAINING programs.1 Warm-up is a phase of low, gradually rising resistance, which brings the heart rate into the
lower end of the target zone and increases respiration and blood flow to working muscles.2 Plateau increases the intensity slightly, and keeps it steady, to bring the heart rate to the low
end of the target zone. Check the heart rate at the end of this phase.3 Interval Training is a series of increasingly steeper hills, alternating with valleys, or stints of
recovery. The heart rate should rise to the high end of the target zone. Check the heart rateat the end of this phase.
4 Cool-down is a low-intensity phase that allows the body to begin removing lactic acid, andother exercise by-products, which build up in muscles and contribute to soreness.
23
† Defined by the American College of Sports Medicine's "Guidelines for Exercise Testing and Prescription" as equal to220 minus an individual’s age.
** Target Heart Rate (THR) is a percentage of the theoretical maximum (HRmax). A 40-year-old user's recommended THRfor the CARDIO workout is 144, or 80 percent of the maximum; so the equation would be (220-40)*.80 = 144.

Each column, as seen in the WORKOUT PROFILE WINDOW and the chart above, representsone interval. The overall duration of the workout determines the length of each interval. Eachworkout is made up of 20 intervals, so the duration of each interval is equal to the duration ofthe entire workout divided by 20.
1 to 9 minutes: A workout with a duration of less than 10 minutes is insufficient for the HILLprogram to complete all four phases adequately. The program, therefore, condenses a workoutof this duration at various stages.
10 to 19 minutes: The interval durations initially are set at 30 seconds for a 10-minute workout.For every minute over 10, each interval increases by three seconds. A 15-minute workout consists of 20 intervals at 45 seconds each.
20 to 99 minutes: All intervals last 60 seconds. If the user adds minutes to the pre-set durationwhile the workout is in progress, the program adds hills and valleys that are identical to the firsteight intervals of the Interval Training phase. This pattern repeats until the workout is completed.
MY WORKOUTS
The my workouts feature on this treadmill makes it possible to pre-set up to seven workouts withpersonal setup information, such as age and desired speed, and then store the workouts in theconsole memory. These workouts are accessed with the MY WORKOUTS key. Any workout can be pre-set and stored, including FAT BURN, CARDIO, HEART RATE HILL,HEART RATE INTERVAL, EXTREME HR, 5K SPORT TRAINING, 10K SPORT TRAINING,TIME SPORT TRAINING, HILL, RANDOM, and MANUAL.
USING A WORKOUT SAVED UNDER MY WORKOUTS
Press the my workouts key. Scroll through the names displayed in the MESSAGE CENTER,either by pressing the my workouts key or by pressing the ARROW keys. When the desiredname appears, press ENTER. The workout then begins.All seven workouts are set to the same, default, manual workout program "out of the box." Byfactory default, the workouts are stored under the names WORKOUT 1 through WORKOUT 7.See the following section for steps to change workouts stored under MY WORKOUTS.
EDITING SETTINGS FOR WORKOUTS SAVED UNDER MY WORKOUTS
Use the following steps to change settings for a stored workout or to change a workout name.1. Press the MY WORKOUTS key.2. Scroll through the user names displayed in the MESSAGE CENTER, by repeatedly
pressing the MY WORKOUTS key.3. When the desired name appears, press and hold the ENTER key until the console
beeps twice.4. The MESSAGE CENTER displays the prompt, "PRESS FIT TEST KEY TO REPRO-
GRAM WORKOUT OR PRESS MY WORKOUT KEY TO EDIT YOUR NAME". At thisprompt, change the workout settings, or change the workout name.
24

TO CHANGE SETTINGS FOR A STORED WORKOUT:1. Follow steps 1 through 4 under “Editing Settings For Workouts Saved Under My
Workouts.”2. Press the FIT TEST key.3. The MESSAGE CENTER displays a prompt, "REPROGRAM WORKOUT MODE -
SELECT WORKOUT NOW." Scroll through the workouts displayed in the MESSAGECENTER by repeatedly pressing the FIT TEST key. When the desired workout appears,press ENTER.
4. Enter setup information as prompted by the MESSAGE CENTER. Use the ARROWkeys to adjust displayed values, or use the numeric keypad, and press ENTER to con-firm the desired value. Once all information is entered, the MESSAGE CENTER dis-plays WORKOUT SAVED.
To exit the "reprogramming" mode at any time without saving the workout changes, press theCLEAR key twice.
TO CHANGE A WORKOUT NAME OR USER NAME
1. Follow steps 1 through 4 under “Editing Settings For Workouts Saved Under MyWorkouts.”
2. Press the MY WORKOUT key.3. The MESSAGE CENTER displays the prompt, "SELECT LETTER USING INCLINE
ARROW KEYS AND CHANGE LETTERS USING SPEED ARROW KEYS." The workoutname appears in the MESSAGE CENTER, with the first letter blinking. Scroll to thedesired letter or number using the SPEED ARROW keys. When the desired characterappears, press the UP INCLINE ARROW key to move to the next letter. Repeat thisstep for all characters.
4. Press ENTER to save the new name. The MESSAGE CENTER displays, "USER NAMESAVED."
To exit this mode without saving the name change, press the CLEAR key.TIP: The User Statistics feature, which stores workout statistics, identifies each stored workoutas a "User Name." By factory default, the workouts are stored under the names WORKOUT 1through WORKOUT 7. It may be desirable to assign user names to the workouts. See Section5, titled “User Menu”, for more information.
25

PERSONAL TRAINER
1) CUSTOM WORKOUTS
The treadmill console stores up to six custom workouts. For information on creating these work-outs, see the topic titled Programming Custom Workouts in Section 5, titled “User Menu”.
To use custom workouts, press the PERSONAL TRAINER key repeatedly until the MESSAGECENTER displays “PERSONAL TRAINER WORKOUTS”. Then, press ENTER. The MESSAGECENTER displays a prompt to select a custom workout number, ranging from 1 to 6. Using theARROW keys or the NUMERIC keypad, select the number and press ENTER. If a workout hasnot been created for that number, the MESSAGE CENTER simply scrolls to the next number. Ifa workout has been been created for the selected number, the MESSAGE CENTER displayssuccessive prompts to enter the weight and choose a speed. After these entries are provided,the workout begins.
2) DISTANCE GOAL
This workout is designed to build endurance. The objective is to cover a certain distance inmiles. Once the objective is met, the workout automatically goes into a cool-down phase, andends afterward.
3) CALORIES GOAL
This workout is designed to promote weight loss and weight control. The objective is to burn a certain number of calories in the selected time duration. Once the objective is met, the workoutautomatically goes into a cool-down phase, and ends afterward.
NOTE: When a user sets this goal with the TIME ARROW keys, the console displays thevalues in .10-mile increments.
4) TIME IN ZONE GOAL
The Time in Zone Goal program, a feature of Heart Rate Zone Training®, enhances FAT BURN andCARDIO workouts by setting a duration for staying within the target zone as the workout goal. Oncethe duration objective is met, the workout goes into a cool-down phase.
5) SPORT TRAININGTM
This distance-goal workout is designed for runners training for races. The program creates realisticterrains by setting different incline levels throughout the course. Incline grades depend on the diffi-culty levels selected during the workout setup. A 1.5 percent incline grade, which is the baselinelevel, simulates a flat running surface. A zero percent grade simulates running downhill. Incline durations range between 30 and 60 seconds. The course ends when the distance goal is met. Two Sport TrainingTM programs are available on the treadmill:
• SPORT TRAININGTM (5K) is a 5-kilometer, or 3.1-mile, course.
• SPORT TRAININGTM (10K) is a 10-kilometer, or 6.2-mile, course
• SPORT TRAININGTM (TIME) is a time-based training workout.
26

ZONE TRAINING +Zone Training workouts target specific ranges, or zones, for maintaining a heart rate to achievemaximum exercise results.
1) HEART RATE HILLTM
This program combines the standard HILL workout profile with the concept of Heart Rate ZoneTraining. The default target heart rate* is calculated as 80 percent of the theoretical maximum†
(HRmax), but the user can adjust the target rate during the workout setup. All hills and valleysare percentages of HRmax. The workout consists of three hills that target three heart rate goals:The first hill brings the heart rate to 70 percent of HRmax. The second hill increases the rate to75 percent of HRmax. The third hill matches the Target Heart Rate brining the heart rate to 80percent of HRmax. The valley always is defined as 65 percent of HRmax.
After a standard three-minute warm-up, the workout progresses toward the first hill and heart rategoal. Once the user reaches 70 percent of HRmax, the hill continues for one minute. When theminute expires, the level decreases into a valley. Once the user's heart rate falls to 65 percent ofHRmax, the valley continues for one minute. Then, the next hill begins with its corresponding heartrate goal. After the user completes the third hill/valley pair, the program returns to the first hill andrepeats the cycle as long as the duration allows. At the end of the duration, the workout goes into acool-down phase. If the heart rate goes above the theoretical maximum for more then 45 seconds,the treadmill automatically goes into pause mode. If the user does not reach a heart rate goal afterfive minutes, the MESSAGE CENTER displays a prompt to increase or decrease speed, dependingon whether the workout is in a hill or valley phase. The program does not proceed to a new heartrate goal until the user reaches the current goal.
117 BPM
85% THR65% HRmax
70% HRmax
75% HRmax
HEART RATE HILL Workout Profile
80% HRmax
Hill
Hill
Hill
Valley Valley Valley
65% HRmax 65% HRmax65% HRmax
117 BPM 117 BPM 117 BPM
127 BPM
135 BPM
User Example: 80 (40 year old / 144 recommended BPM)percent of theoretical maximum (HR )max
144 BPM
27
† Defined by the American College of Sports Medicine's "Guidelines for Exercise Testing and Prescription" as equal to220 minus an individual’s age.* Target Heart Rate (THR) is a percentage of the theoretical maximum (HRmax). A 40-year-old user's recommended THRfor the HEART RATE HILL workout is 144, or 80 percent of the maximum; so the equation would be (220-40)*.80 = 144.

2) HEART RATE INTERVALTM
This program also combines the standard HILL workout profile with the concept of Heart RateZone Training. The default target heart rate* is calculated as 80 percent of the theoretical maxi-mum† (HRmax), but the user can adjust the target rate during the workout setup. The workoutalternates between a hill, which brings the heart rate up to the target rate of 80 percent of HRmax,and a valley, which brings the heart rate down to 65 percent of HRmax. After a standard three-minutewarm-up, the workout progresses toward the first hill and heart rate goal. Once the goal is reached,the hill continues for three minutes. Then, the level decreases into a valley. Once the 65 percent ofHRmax goal is reached, the valley continues for three minutes, after which the next hill begins. Theuser's fitness level determines the number of hills and valleys encountered within the duration. At theend of the duration, the workout goes into a cool-down phase. If the heart rate goes above the the-oretical maximum† for more then 45 seconds, the treadmill automatically goes into pause mode.If the user does not reach a heart rate goal after five minutes, the MESSAGE CENTER displays aprompt to increase or decrease speed, depending on whether the workout is in a hill or valley phase.The program does not proceed to a new heart rate goal until the user reaches the current goal.
Warm-up 65% HRmax
HEART RATE INTERVAL Workout Profile
80% HRmaxHill
Hill
Valley Valley Valley
Hill
65% HRmax
80% HRmax
65% HRmax
80% HRmax
117 BPM 117 BPM 117 BPM
User Example: 80 (40 year old / 144 recommended BPM)percent of theoretical maximum (HR )max
144 BPM144 BPM144 BPM
117 BPM
28
† Defined by the American College of Sports Medicine's "Guidelines for Exercise Testing and Prescription" as equal to220 minus an individual’s age.* Target Heart Rate (THR) is a percentage of the theoretical maximum (HRmax). A 40-year-old user's recommended THR forthe HEART RATE INTERVAL workout is 144, or 80 percent of the maximum; so the equation would be (220-40)*.80 = 144.

3) EXTREME HEART RATE TM
This intense, varied workout is designed to help more experienced users to break through fitnessimprovement plateaus. The workout alternates between two target heart rates* as quickly as possi-ble. The effect is similar to that of running sprints. The user must wear a chest strap or grip theLifepulseTM sensors throughout the workout.
NOTE: It is recommended that users who run at speeds faster than 4.5 MPH wear the cheststrap and do not use the LifepulseTM sensors.
When setting up the workout, the user enters a target heart rate and selects a walk speed and ajog speed. After a standard three-minute warm-up, the treadmill accelerates to the jog speed,and the incline increases, until the user reaches the target heart rate goal of 85 percent of thetheoretical maximum† (HRmax). That target rate is maintained for a stabilizing period. Then, theincline is reduced to 0 percent, and the treadmill slows to the walk speed. When the heart ratefalls to the 65 percent of HRmax goal, it is maintained there for a stabilizing period. The programrepeats the alternating of speeds and incline levels, continuing this pattern throughout the dura-tion.
If the user does not reach a heart rate goal after five minutes, the MESSAGE CENTER displaysa prompt to increase or decrease speed, depending on whether the workout is in a hill or valleyphase. The program does not proceed to a new heart rate goal until the user reaches the cur-rent goal.
Cool Down
118 BPM
65% HRmax
118 BPM
65% HRmax
118 BPM
Jog
Speed
Walk
Speed Jog
Speed
Walk
Speed Jog
Speed
Walk
Speed
Jog
Speed
Walk
Speed Jog
Speed
Walk
Speed Jog
Speed
Walk
Speed
User Example (40 year old / 153 recommended BPM)85 percent of theoretical maximum (HR )max
EXTREME HEART RATE Workout Profile
85% HRmaxStabilizing Period
Stabilizing Period
Stabilizing Period
Stabilizing Period
Stabilizing Period
Stabilizing Period153 BPM
85% HRmax
153 BPM
85% HRmax
153 BPM
Warm-up
118 BPM
29
† Defined by the American College of Sports Medicine's "Guidelines for Exercise Testing and Prescription" as equal to220 minus an individual’s age.
* Target Heart Rate (THR) is a percentage of the theoretical maximum (HRmax). For example, a 40-year-old user's rec-ommended THR for the EXTREME HEART RATETM WORKOUT is 153. The workout program targets a standard 85 per-cent of the maximum, so the equation would be (220-40)*.85 = 153.

FITNESS TESTS
1) LIFE FITNESS FIT TEST
The treadmill Fit Test program is another exclusive feature of this versatile treadmill. The Fit Test workoutmeasures cardiovascular fitness and can be used to monitor improvements in endurance every four to sixweeks. The user must grasp the hand sensors (if equipped) when prompted or wear a heart rate cheststrap, as the test score calculation is based on a heart rate reading. The workout duration will be five min-utes at a 5% incline. Immediately afterward, the console will take the user's heart rate reading, calculate afitness score, and display the score in the MESSAGE CENTER.
The Fit Test is considered to be a submax VO2 (volume of oxygen) test. It gauges how well the heart sup-plies oxygenated blood to the exercising muscles, and how efficiently those muscles receive oxygen fromthe blood. Physicians and exercise physiologists generally regard this test as a good measure of aerobiccapacity.
To set up the Fit Test:
Press the FIT TEST key repeatedly until the FIT TEST option appears in the message center. PressENTER to select the FIT TEST option.
The message center will prompt for a user weight (ENTER WEIGHT). Use the NUMERIC KEYS orUP/DOWN ARROW KEYS to input your weight. Press ENTER to accept the weight.
The message center will next prompt for a user age (ENTER AGE). Use the NUMERIC KEYS orUP/DOWN ARROW KEYS to input your age. Press ENTER to accept the age.
The message center will next prompt for a user gender (SELECT GENDER). Using the UP/DOWNARROW KEYS, select a gender. Press ENTER to accept the gender selection.
The message center will next prompt for a workout level (ENTER SPEED)(2-4.5 mph). Consult thefollowing recommended fit test level chart for an appropriate effort level based on your age, genderand activity level. Use the NUMERIC KEYS or UP/DOWN SPEED ARROW KEYS to enter the cor-responding level.
After the five-minute FIT TEST is completed, a FIT TEST score will be displayed.
FIT TEST PROGRAM SUGGESTED EXERTION LEVELS
Inactive Active Very Active
Treadmill Fit Test Level 2-3 mph 3-4 mph 3.5-4.5 mph
3.2-4.8 kph 4.8-6.4 kph 5.6-7.2 kph
NOTE: Treadmill will incline to 5% after a one minute warm-up.
Suggested exertion levels should be used as a guideline for setting up the Fit Test program. The goal is toelevate the user's heart rate to a level that is between 60%-85% of their theoretical maximum heart rate(220-age).
30

Within each suggested range, these additional guidelines can be used:
Lower Half of Range Upper Half of Range
higher age lower age
lower weight higher weight*
shorter taller
* In cases of excessive weight, use lower half of range
The computer will not accept:
heart rates less than 52 or greater than 200 beats per minute
body weights less than 75 pounds (34 kg) or greater than 400 pounds (181 kg)
ages below 10 or over 99 years
data input that exceeds human potential
If you make an error when entering any Fit Test data, you can correct it by pressing CLEAR, inputting thecorrect information, and pressing ENTER.
It is important for you to take the Fit Test under similar circumstances each time. Your heart rate is depen-dent on many factors, including:
amount of sleep the previous night (at least seven hours is recommended)
time of day
time you last ate (two to four hours after the last meal is recommended)
time since you last drank a liquid containing caffeine or alcohol, or smoked a cigarette (at least fourhours is recommended)
time since you last exercised (at least six hours is recommended)
For the most accurate Fit Test results, you should perform the Fit Test on three consecutive days and aver-age the three scores.
NOTE: To receive a proper Fit Test score, the work done must be within a training heart rate zone that is60 percent to 85 percent of the theoretical maximum heart rate (HRmax). This rate is defined by theAmerican College of Sports Medicine's "Guidelines for Exercise Testing and Prescription" as equal to 220minus an individual's age.
31

The tables below list fit test results.
RELATIVE FITNESS CLASSIFICATION FOR MEN
Men Estimated VO2 Max (ml/kg/min) Per Age Category
Rating 20-29 30-39 40-49 50-59 60+
Elite 52+ 51+ 48+ 45+ 42+
Excellent 50-51 48-50 46-47 42-44 39-41
Very Good 47-49 45-47 43-45 40-41 36-38
Above Average 44-46 42-44 40-42 37-39 33-35
Average 41-43 39-41 37-39 34-36 30-32
Below Average 38-40 36-38 34-36 31-33 27-29
Low 35-37 33-35 31-33 28-30 24-26
Very Low <35 <33 <31 <28 <24
RELATIVE FITNESS CLASSIFICATION FOR WOMEN
Women Estimated VO2 Max (ml/kg/min) Per Age Category
Rating 20-29 30-39 40-49 50-59 60+
Elite 44+ 42+ 39+ 35+ 34+
Excellent 42-43 40-41 37-38 33-34 32-33
Very Good 39-41 37-39 35-36 31-32 30-31
Above Average 37-38 35-36 32-34 29-30 28-29
Average 34-36 32-34 30-31 27-28 25-27
Below Average 31-33 29-31 27-29 25-26 23-24
Low 28-30 27-28 25-26 22-24 20-22
Very Low <28 <27 <25 <22 <20
Life Fitness developed this rating scale based on VO2 max percentile distributions referenced in AmericanCollege of Sports Medicine's "Guidelines for Exercise Testing and Prescription" (6th Ed. 2000). It isdesigned to provide a qualitative description of a user's VO2 max estimation, and a means of assessinginitial fitness level and tracking improvement.
32

2) ADDITIONAL FITNESS TESTS
The Life Fitness Treadmill features fitness tests based upon specific predefined protocols.
• ARMY PFT: 2.0 milesThe U.S. Army Physical Fitness Test is a physical performance test used to assess mus-cular endurance and cardiorespiratory fitness.
• NAVY PRT: 1.5 milesThe running portion of the U.S. Navy Physical Readiness Test is a distance goal testbased on the time needed to complete the required distance and is used by the U.S. Navyand Naval academies to measure aerobic capacity.
• MARINES PFT: 3.0 milesThe U.S. Marines Physical Fitness Test is a physical performance test used to assessmuscular endurance and cardiorespiratory fitness.
• AIR FORCE PRT: 1.5 milesThe U.S. Air Force Physical Readiness Test is a physical performance test used to assessmuscular endurance and cardiorespiratory fitness.
• GERKIN: Submaximal VO2The Gerkin Protocol is a graded submaximal VO2 test used by the InternationalAssociation of Fire Fighters to determine fitness for fire department duty.
• PHYSICAL EFFICIENCY BATTERY: 1.5 milesThe Physical Efficiency Battery is used by U.S. Federal Law Enforcement, U.S. FederalBureau of Investigation, and other federal organizations for the hiring and maintenance offederal jobs.
Scores for these tests are based on finishing time, age, and gender.
To set up one of these tests, press the FIT TEST key repeatedly, until the MESSAGE CENTERdisplays the name of the desired test. Then, press ENTER. If the selected test is either the NAVYor MARINES test, the MESSAGE CENTER displays a question as to whether the test is takingplace below a certain altitude. For the NAVY test, the altitude is 5,000 feet above sea level; and forthe MARINES test, the altitude is 4,500 feet above sea level. Using the ARROW KEYS, select theanswer “ABOVE 5,000 FEET”(NAVY) / “ABOVE 4,500 FEET”(MARINES) or “BELOW 5,000FEET”(NAVY) / “BELOW 4,500 FEET”(MARINES) by toggling between these words displayed inthe MESSAGE CENTER. Press Enter.
At the MESSAGE CENTER prompts, enter the weight, age, gender, and desired speed, using theARROW keys or the NUMERIC keypad. Press ENTER after each entry. Then, begin the workout. Toensure an accurate test score, do not change these entries once the workout begins.
For all FITNESS TESTS except GERKIN, after the distance goal is reached, the workout programgoes into a cool-down. The duration of this phase depends on the amount of time taken to completethe test. For less than five minutes, the cool-down is one minute. For five to 15 minutes, the cool-down is three minutes. For longer times, the cool-down is five minutes. The user can abort the cool-down by pressing the STOP button or the CLEAR key. After the cool-down is aborted or completed,the MESSAGE CENTER displays the finishing time and a point score for the PEB, Army, andMarines tests; or a qualititative score, such as EXCELLENT, for the Navy test.
For the Gerkin test, the time at which the heart rate reached the target heart rate and is maintainedfor 15 seconds, and a converted VO2 MAX value will be shown in the MESSAGE CENTER duringthe workout summary.
33
4.4 MAXIMIZING WORKOUTS ON A LIFE FITNESS TREADMILL
SELECTING A LEVEL
The steps for setting up a HILL, RANDOM, SPORT TRAINING 5K, SPORT TRAINING 10Kand SPORT TRAINING TIME workout include selecting a level. The word “level” refers to arange of incline percentages. The treadmill features 20 levels, with Level 1 having the lowestaverage incline grade and Level 20 having the highest.
LEVEL % Incline LEVEL % Incline1 0.0 - 1.5 11 2.0 - 8.52 0.0 - 2.2 12 3.0 - 9.23 0.0 - 2.9 13 3.5 - 9.94 0.0 - 3.6 14 5.0 - 10.65 0.0 - 4.3 15 5.5 - 11.36 0.0 - 5.0 16 6.5 - 12.07 0.0 - 5.7 17 7.0 - 12.78 0.0 - 6.4 18 8.0 - 13.49 0.5 - 7.1 19 8.7 - 14.1
10 1.5 - 7.8 20 9.0 - 15.0
Within each level are seven incline percentages, or hills. During a workout, each hill appears inthe WORKOUT PROFILE window as rows of light stacked in a column. The number of lit rowswithin a column corresponds to an incline percentage. For example, in Level 5, the lowestincline is 0.0 percent and is represented as one lit row. The highest incline, 4.3 percent, is repre-sented by a column with all seven rows lit.
In the HILL and RANDOM workouts, these varying hills occur for equal durations, as discussedin the HILL workout description. When the workout program brings up a new hill, the incline per-centage changes automatically to match that hill.
To change levels during a workout, use the ARROW keys or the NUMERIC keypad.
USING INSTAPACETM FEEDBACK
The InstaPaceTM Feedback feature enables users to monitor their pace, or rate of minutes per mile, while running on the treadmill. This feature must be enabled in “User Menu”. SeeSection 5, titled “My Configuration”, for more information. The MESSAGE CENTER displays theMPH and pace simultaneously when the user adjusts the treadmill speed with the ARROWKEYS. If the user adjusts the speed using the NUMERIC keypad, the MESSAGE CENTER dis-plays the pace after the treadmill reaches the new speed.
USING ZEROUTTM SPEED CONTROL
If, during a workout, a user decreases the speed to the minimum and continues to hold theDECREASE SPEED ARROW, the speed falls to 0 MPH, which is pause mode. The minimumspeed is 0.5 MPH, unless changed in “User Menu”. See section 5.2, titled User Menu Items, formore information.
34

COOL-DOWN
Life Fitness' unique Cool-Down Protocol automatically customizes every cool-down based oneach user's workout performance. Workout performance factors, such as speed, incline, duration,and heart rate, determine the duration and intensity of the cool-down.
DIMMING
The dimming feature controls the brightness of the treadmill console display. To change thedefault brightness setting, press the PERSONAL TRAINER key repeatedly until the MESSAGECENTER displays “DIMMING,” and press ENTER. Then, use the ARROW keys to increase ordecrease the brightness to the desired setting, and press ENTER to save the new setting; orpress CLEAR to revert to the default brightness setting.
If a new brightness setting is selected for a workout, that setting remains in place until it is manu-ally changed, or the workout concludes. When a new workout begins, the brightness reverts tothe default setting.
35

5 USER MENU
5.1 ENTERING AND USING THE USER MENUEnter the USER MENU by using one of two procedures:Press the CLEAR key twice, and then hold down the ENTER key. The unit goes through a "warm" resetand beeps three times, indicating that the USER MENU has been activated. OR, hold down the ENTER key, and turn the treadmill on. The message "USER MENU" will appear. Afterabout one second, the MESSAGE CENTER displays the first menu item. Use the ENTER key to scroll forward through the menu items. Use the CLEAR key to scroll backwards.There are two ways to exit the menu: Press the CLEAR key continuously to return to the beginning of themenu; OR switch off the treadmill. Doing so causes all settings to be saved.
5.2 USER MENU ITEMS
USER STATISTICS
The User Statistics mode is used to display the current, accumulated statistics of the workouts storedunder the My Workouts personal programs feature.To access statistics for a specific stored workout, press the MY WORKOUTS key repeatedly until the nameof that stored workout appears in the MESSAGE CENTER. Then, press ENTER. When the desired nameappears, press ENTER. Use the TIME ARROW keys to scroll backward and forward through the statistics. If the value for any sta-tistical item is greater than the listed maximum, the MESSAGE CENTER displays dashes, "----". To clear statistics to zero: Press the SPEED UP ARROW key. The MESSAGE CENTER displays, "PRESSSPEED DOWN ARROW KEY TO CLEAR STATS". Press the SPEED DOWN ARROW key. The statisticsare cleared, and the MESSAGE CENTER displays, "STATS CLEAR". If any other key is pressed after theSPEED UP ARROW is pressed, the console cancels the clearing of the statistics. To re-activate the clear-ing process, press the SPEED UP ARROW key again.
MY CONFIGURATION
The values for the settings can be adjusted and saved. Cycle through the settings using the TIME ARROWkeys. Use the INCLINE or SPEED ARROW keys to change the settings. Any adjustments are saved auto-matically. Revert a setting back to its factory default value by pressing the COOL DOWN key
SOFTWARE VERSION NUMBERS
Use any of the UP and DOWN ARROW keys to toggle between displays of the current software version forthe console, and for the Motor Controller. The MESSAGE CENTER displays the Console Software Versionnumber as "CONSOLE VER=XX.X', where xx.x is the version number. For the Motor Controller, the MES-SAGE CENTER displays "MOTOR VER = XX.X".
36

PROGRAMMING CUSTOM WORKOUTS
After entering “My Configuration”, use the TIME ARROW keys to scroll through the list of config-uration options, or allow the MESSAGE CENTER to scroll automatically through the options.When “CUSTOM WORKOUT ENTRY” appears, press ENTER to select this option.
The custom workouts are identified as numbers, from 1 to 6. Enter the desired number on theNUMERIC keypad, or use the ARROW keys to scroll through the displayed numbers. PressENTER to confirm the number selection. If a workout does not already exist for that number, theMESSAGE CENTER displays a request to begin creating the workout.
If a workout does exist for the number in question, the MESSAGE CENTER displays a statementto that effect, followed by the option to modify the existing workout. The steps for modifying a work-out are the same as those for creating a new workout:
Using the TIME ARROW keys or the NUMERIC keypad, select a workout duration time in min-utes, and press ENTER.
Next, select the interval type. Use the arrow keys to toggle between the displayed options, andpress the ENTER key to select the desired interval type. Options are:
• Speed/Incline, in which a treadmill speed and/or incline grade is selected for each interval
• Target Heart Rate, in which a maximum target heart rate is selected for each interval.
The number of intervals is always 30, so the length of each interval equals the selected durationdivided by 30. Each interval is identified by the time at which it occurs during the workout.
If Speed/Incline is selected, the MESSAGE CENTER displays each interval, identified as thetime at which the interval occurs. For each displayed interval, enter a speed using the SPEEDARROW keys, and/or enter an incline grade using the INCLINE ARROW keys. Press Enter toconfirm each selection. After values are selected for all 30 intervals, the MESSAGE CENTERdisplays the statement, “CUSTOM WORKOUT COMPLETED”, followed by a prompt to create aworkout for the next number.
If Target Heart Rate is selected, the MESSAGE CENTER displays each interval, identified as anumeral from 1 to 30. For each displayed interval, enter a target heart rate using the ARROWkeys. Press Enter to confirm each selection. After values are selected for all 30 intervals, theMESSAGE CENTER displays the statement, “CUSTOM WORKOUT COMPLETED”, followed bya prompt to create a workout for the next number.
USING THE START MESSAGE SETUP
This configuration allows for a custom start-up message to be displayed before the default“Select Workout or Press Quick Start” message. The custom message can contain up to 52characters.
37

CREATING/CHANGING A START MESSAGE
After entering “My Configuration”, scroll to the START MESSAGE SETUP option and pressENTER. Use the SPEED ARROW keys to select an available letter, number or special charac-ter. Use the INCLINE ARROW keys to move forward or backward throughout the message, orinsert spaces, one character at a time. The current character will blink until the position is movedwith the INCLINE ARROW keys.
SAVING A START MESSAGE
To save the START MESSAGE, press ENTER. “MESSAGE SAVED” will appear in the messagecenter confirming the message has been saved. To exit the start message setup without saving,press the clear key twice. “MESSAGE NOT SAVED” will appear in the message center confirm-ing the message has not been saved.
ERASING A START MESSAGE
After entering “My Configuration”, scroll to the START MESSAGE SETUP option and pressENTER. Press enter to enter the current START MESSAGE. Press the COOL DOWN key toerase the current START MESSAGE. “MESSAGE ERASED” will appear in the message centerstating the message has been erased.
38
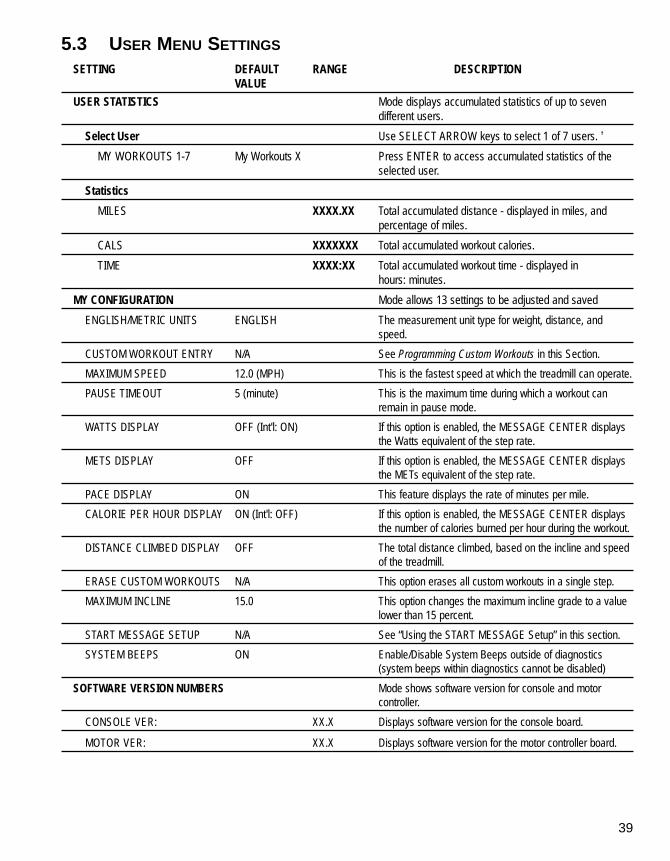
5.3 USER MENU SETTINGSSETTING DEFAULT RANGE DESCRIPTION
VALUEUSER STATISTICS Mode displays accumulated statistics of up to seven
different users.Select User Use SELECT ARROW keys to select 1 of 7 users. †
MY WORKOUTS 1-7 My Workouts X Press ENTER to access accumulated statistics of theselected user.
StatisticsMILES XXXX.XX Total accumulated distance - displayed in miles, and
percentage of miles.CALS XXXXXXX Total accumulated workout calories.TIME XXXX:XX Total accumulated workout time - displayed in
hours: minutes.MY CONFIGURATION Mode allows 13 settings to be adjusted and saved
ENGLISH/METRIC UNITS ENGLISH The measurement unit type for weight, distance, and speed.
CUSTOM WORKOUT ENTRY N/A See Programming Custom Workouts in this Section.MAXIMUM SPEED 12.0 (MPH) This is the fastest speed at which the treadmill can operate. PAUSE TIMEOUT 5 (minute) This is the maximum time during which a workout can
remain in pause mode.WATTS DISPLAY OFF (Int'l: ON) If this option is enabled, the MESSAGE CENTER displays
the Watts equivalent of the step rate.METS DISPLAY OFF If this option is enabled, the MESSAGE CENTER displays
the METs equivalent of the step rate.PACE DISPLAY ON This feature displays the rate of minutes per mile.CALORIE PER HOUR DISPLAY ON (Int'l: OFF) If this option is enabled, the MESSAGE CENTER displays
the number of calories burned per hour during the workout.DISTANCE CLIMBED DISPLAY OFF The total distance climbed, based on the incline and speed
of the treadmill.ERASE CUSTOM WORKOUTS N/A This option erases all custom workouts in a single step.MAXIMUM INCLINE 15.0 This option changes the maximum incline grade to a value
lower than 15 percent.START MESSAGE SETUP N/A See “Using the START MESSAGE Setup” in this section.SYSTEM BEEPS ON Enable/Disable System Beeps outside of diagnostics
(system beeps within diagnostics cannot be disabled)SOFTWARE VERSION NUMBERS Mode shows software version for console and motor
controller.CONSOLE VER: XX.X Displays software version for the console board.
MOTOR VER: XX.X Displays software version for the motor controller board.
39

6 SERVICE AND TECHNICAL DATA
6.1 PREVENTIVE MAINTENANCE TIPS
The Life Fitness Treadmill is backed by the engineering excellence and reliability of Life Fitnessand is one of the most rugged and trouble-free pieces of exercise equipment on the markettoday. Life Fitness Treadmills are among the most popular of aerobic trainers.
NOTE: Safety of the equipment can be maintained only if the equipment is examined regularlyfor damage or wear. Keep the equipment out of use until defective parts are repaired orreplaced. Pay special attention to parts that are subject to wear, as outlined below.
REMARQUE : pour conserver un matériel sûr, il convient de l'inspecter régulièrement afin dedéceler tout signe d'usure ou d'endommagement. N'utilisez pas l'appareil tant que les piècesdéfectueuses n'ont pas été réparées ou remplacées. Portez une attention toute particulière auxpièces qui s'usent, comme indiqué ci-dessous..
The following preventive maintenance tips will keep the Life Fitness Treadmill operating at peakperformance:
• Clean the display console and all exterior surfaces regularly with mild soap and water ora mild household cleaner. Use only a soft cotton cloth. Apply cleaner to the cotton clothand before cleaning.
DO NOT use ammonia or acid based cleaners. DO NOT use abrasive cleaners. DONOT use paper towels, DO NOT apply cleaners directly to equipment surfaces.*
• Check operation of the emergency stop system once a week.
• Check the operation of the stop button once a week.
• Inspect and vacuum the area directly surrounding and under the unit regularly.
• Vacuum around the striding belt regularly to keep debris from accumulating.
• Inspect exterior parts regularly for wear, particularly the striding belt, deck and line cord.
• Check to make sure the unit is properly leveled.
• Check the position (centering) of the striding belt.
The optimum operating position of the striding belt is from 1.5 inches (38 mm) to 2.0 inches (51 mm) from either side of the frame. If the striding belt travels beyond this position, see sec-tion 6.5, titled How to Adjust and Tension the Striding Belt, or contact Life Fitness CustomerSupport Services, for proper alignment instructions, 1-800-351-3737 (USA).
*NOTE: When cleaning the exterior of the unit, a non-abrasive cleaner and soft cotton cloth arestrongly recommended. At no time should cleaner be applied directly to any part of the equipment;use non-abrasive cleaner on a soft cloth and then wipe the unit. Contact Life Fitness CustomerSupport Services for more details (See Section 6.6 - “How to Obtain Product Service”).
40

6.2 PREVENTIVE MAINTENANCE SCHEDULE
Follow the schedule below to ensure proper operation of the product.
ITEM WEEKLY MONTHLY QUARTERLY BI-ANNUAL ANNUAL
DISPLAY CONSOLE ASSEMBLY
Hardware InspectOverlay Clean InspectAccessory Cups Clean InspectStop Switch Clean InspectEmergency Clean InspectSwitch/Magnet
HANDLEBAR ASSEMBLYHardware InspectErgoTM Front Handlebar Clean InspectSide Hand Rails Clean InspectLifepulse Sensors Clean/Inspect
FRAME ASSEMBLYHardware InspectMotor Cover CleanMotor Electronic Vacuum Clean InspectCompartmentDrive Belt InspectDrive Belt Anti-Static InspectBracketAnti-Static InspectCordsLeg Levelers Inspect/AdjustFront Roller InspectRear Roller InspectSide Step Area Clean Inspect
GENERALMachine Level *InspectStriding Belt InspectCenteredFrame, Toe Guards, Visual InspectEndcapsTinsel Visually Inspect if Treadmill has been Moved
Replace Tinsel if Changing Belt and Deck*Use bubble level to inspect
41
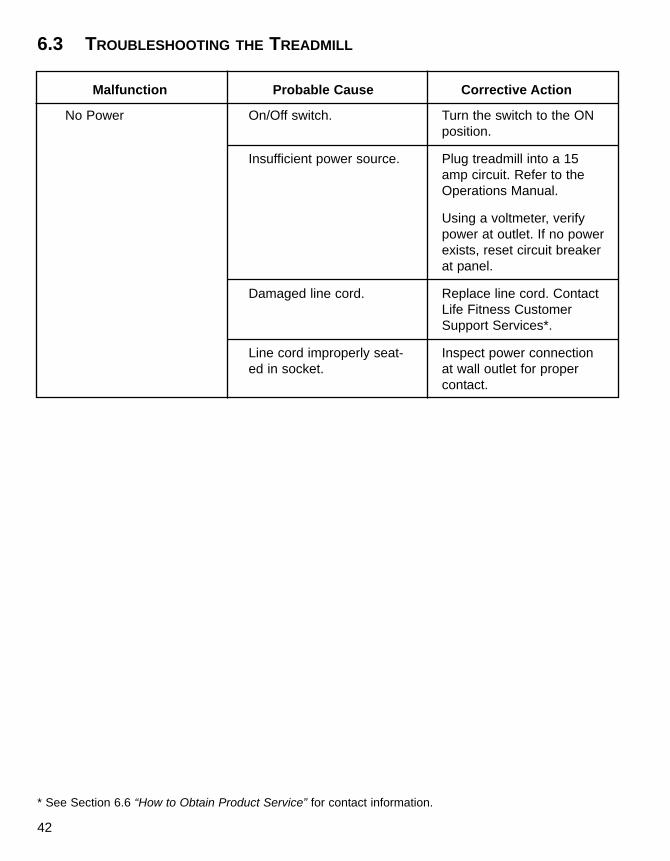
6.3 TROUBLESHOOTING THE TREADMILL
Malfunction
No Power
Probable Cause
On/Off switch.
Insufficient power source.
Damaged line cord.
Line cord improperly seat-ed in socket.
Corrective Action
Turn the switch to the ONposition.
Plug treadmill into a 15amp circuit. Refer to theOperations Manual.
Using a voltmeter, verifypower at outlet. If no powerexists, reset circuit breakerat panel.
Replace line cord. ContactLife Fitness CustomerSupport Services*.
Inspect power connectionat wall outlet for propercontact.
42
* See Section 6.6 “How to Obtain Product Service” for contact information.

Malfunction
Striding Belt slips off-center
Maximum speed is reduced
Rubbing sound from underneathmachine
Display does not illuminate whenmachine is powered on
Probable Cause
Uneven floor surface.
User is pushing striding belt.This occurs when the runner isrunning faster than the stridingbelt will travel, with the result ofthe striding belt being pushedwith the runner’s feet.
User is stalling striding belt.This will occur with heavier usersat lower striding belt speeds. Thestriding belt will “stall” if the useris traveling slower than the strid-ing belt speed.
Striding belt/deck malfunction.The deck laminate worn throughor the underside of striding beltglazed over (hard, glossy).
Insufficient power source.
Foreign objects may be stuckunderneath the machine.
Tinsel is installed incorrectly.
Insufficient power source.
Loose 10 pin connection at display console or wax/lift controlboard.
Corrective Action
Check levelers and level tread-mill.
Check striding belt & re-tensionas necessary. Refer to Section6.5 “How to Adjust and Tensionthe Striding Belt.”
Instruct users not to push stridingbelt in either direction.
Replace belt and deck.
Plug treadmill into a 15 amp. cir-cuit.
Inspect underneath striding beltand machine. Remove any debrisor objects that may cause inter-ference with the treadmill.
Reposition tinsel on the outsideof the striding belt.
Plug treadmill into a dedicatedamp circuit.
Check all electrical connectionsfor proper attachment.
Contact Life Fitness CustomerSupport Services*.
43
* See Section 6.6 “How to Obtain Product Service” for contact information.
TROUBLESHOOTING THE TREADMILL (CONTINUED)

TROUBLESHOOTING THE TREADMILL (CONTINUED)
44
Malfunction
Unit resets randomly orpauses
Probable Cause
Insufficient power source.
Damaged ground prong online cord.
Line cord improperly seated inelectrical outlet.
Emergency stop magnet notengaged.
Towel or other item may bemaking contact with stopswitch while user is running.
Towel or other item may becovering the Smart StopSensor.
Stop switch is activated withvery light pressure or returnsslowly after being pressed.
Stop switch cable not makingproper contact.
Pinched main wire harness.
Open ground path.
Corrective Action
Plug treadmill into a 15 ampcircuit.
Replace line cord.
Inspect power connection atelectrical outlet and atmachine (Internation Only) forproper contact.
Re-engage the emergencystop magnet.
Move all possible obstructionsoff display console andhandlebar.
Move all possible obstructionsoff display console andhandlebar.
Contact Life FitnessCustomer Support Services*.
Contact Life FitnessCustomer Support Services*.
Contact Life FitnessCustomer Support Services*.
Contact Life FitnessCustomer Support Services*.
* See Section 6.6 “How to Obtain Product Service” for contact information.

45
MalfunctionHeart rate reading is erratic orabsent entirely
Abnormally elevated heart ratereadings
Probable Cause
Chest strap transmitter electrodesare not wet enough to pick upaccurate heart rate readings.
Chest strap transmitter electrodesare not laying flat against the skin.
Chest strap transmitter needscleaning.
Chest strap transmitter is not with-in 3 feet (one meter) of the heartrate receiver.
Chest strap battery is depleted.
Electromagnetic interference fromtelevision sets and/or antennas.
Electromagnetic interference fromcell phones.
Electromagnetic interference fromCD players.
Electromagnetic interference fromcomputers.
Electromagnetic interference fromcars.
Electromagnetic interference fromhigh voltage power lines.
Electromagnetic interference frommotor driven exercise equipment.
Electromagnetic interference fromanother heart rate transmitter with-in three feet (one meter).
Corrective Action
Wet the chest strap transmitterelectrodes (see section 3.2).
Ensure the chest strap transmitterelectrodes are laying flat againstthe skin (see section 3.2).
Wash the chest strap transmitterwith mild soap and water.
Make sure the chest strap trans-mitter is within three feet (onemeter) of the heart rate receiver.
Contact Life Fitness CustomerSupport Services* for instructionson how to have the chest strapreplaced.
Move the treadmill a few inchesaway from the probable cause, ormove the probable cause a fewinches away from the treadmill,until the heart rate readings areaccurate.
* See Section 6.6 “How to Obtain Product Service” for contact information.
6.4 TROUBLESHOOTING THE HEART RATE CHEST STRAP
HEART RATE READING IS ERRATIC OR ABSENT ENTIRELY

6.5 HOW TO ADJUST AND TENSION THE STRIDING BELT
Do not move treadmill or place hands under treadmill while it is plugged into an electrical outlet!
THE BELT TENSIONING BOLTS
A 5/16-inch hex key wrench is required for this task. The Life Fitness Treadmill has access holesin the rear roller guards which allow access to the tensioning bolts. These tensioning bolts makeit possible to adjust the tracking and centering of the striding belt (A) without removing theguards.
NOTE: It is extremely important that the treadmill be correctly leveled prior to any trackingadjustments. An unstable unit may cause striding belt misalignment. See the topic titled "How ToStabilize the Life Fitness Treadmill" in the Section 1.2, titled Set Up, prior to attempting any rearroller adjustments.
Before proceeding, it is helpful to visualize the REAR ROLLER (B) pivot point (C). Each adjust-ment made to one side of the ROLLER must be met with an equal and opposite adjustment (D)to the other side of the ROLLER to maintain an ideal belt tension at the pivot point.
TRACKING (CENTERING) A STRIDING BELT
Two people are needed to perform this procedure.
1 Locate the two access holes to the belt tensioning bolts on each of the rear roller guards.
2 One person stands on the side rails of the treadmill and straddles the belt. This personpresses the MANUAL workout and sets the belt speed to 2.5 MPH (4.0 KPH).
3 If the striding belt has moved to the right, the second person turns the right tension bolt aquarter-turn clockwise and then turns the left tension bolt a quarter-turn counter-clockwise tomake the striding belt track back to the center of the roller.
If the striding belt has moved to the left, turn the left tension bolt a quarter-turn clockwiseand then turn the right tension bolt a quarter-turn counter-clockwise to make the striding belttrack back to the center of the roller.
4 Repeat the adjustments until the striding belt appears centered. Allow the machine to contin-ue running for several minutes at 4.0 MPH. (6.4 KPH) to observe if tracking remainsstabilized.
NOTE: Do not exceed one full turn of the adjusting screws in either direction. If after one fullturn the belt does not track properly, contact Customer Support Services. The phone numbersare listed in Section 6.6, titled How to Obtain Product Service.
46

TENSIONING AN EXISTING STRIDING BELT
1 Enter the Manual workout and operate the treadmill for five minutes at 5.0 MPH (8.0 KPH).
NOTE: DO NOT RUN OR WALK ON BELT.
2 Reduce the speed to 2.0 MPH (3.2 KPH). Walk on the treadmill. Tightly grip the handrailsand apply force with feet on the striding belt near the motor cover against the moving beltdirection. If the belt slips, continue to Step 3. If it does not slip, the tension is correct.
3 Using the STOP button, stop the treadmill. Turn the belt tensioning bolts a quarter-turnclockwise for each side.
4 Repeat STEPS 2 and 3 until the belt no longer slips. Do not exceed one full turn (four quar-ter turns) per side when adjusting the belt tensioning bolts.
5 Enter the MANUAL workout and operate the treadmill at 2.0 MPH (3.2 KPH) check to insureproper tracking (See Section 6.5 “How to Adjust and Tension the Striding Belt”). If the strid-ing belt drifts to the left or right see the topic titled Tracking (Centering) an Existing or NewStriding Belt on the previous page.
Do not over-tighten the tensioning bolts while making belt adjustments. Over-tightening of boltsmay over stretch and damage the striding belt or roller bearings. Do not exceed one full turn ofeither bolt in either direction.
47

6.6 HOW TO OBTAIN PRODUCT SERVICE
1. Verify the symptom and review the operating instructions. The problem may be unfamiliaritywith the product and its features and workouts.
2. Locate and write down the serial number of the unit, which is located on a plate near thepower switch.
3. Contact the nearest Life Fitness Customer Support Services group:
48
For Product Service within the United States and Canada:
Telephone: (+1) 847.451.0036FAX: (+1) 847.288.3702Toll-free telephone: 800.351.3737
For Product Service Internationally:
Life Fitness Europe GmbH (Germany)Telephone: (+49) 089.317.751.66FAX: (+49) 089.317.751.38
Life Fitness (UK) LTDTelephone: (+44) 1353.665.507FAX: (+44) 1353.666.719
Life Fitness Atlantic BV (Europe, MiddleEast & Africa, except local LF offices)Life Fitness BeneluxTelephone: +31 180.646.666FAX: +31 180.646.699
Life Fitness Italia S.R.L.Telephone: 800.438.836FAX: (+39) 0457.238.197
Life Fitness Austria Vertriebs GmbHTelephone: (+43) 1615.7198FAX: (+43) 1615.7198.20
Life Fitness Asia Pacific Ltd (Asia &Australia, except local LF offices)Telephone: (+852) 2891.6677FAX: (+852) 2575.6001
Life Fitness Latin America and Caribbean
Telephone: (+1) 847.288.3964FAX: (+1) 847 288.3886
Life Fitness BrazilTelephone: (+55) 11.4193.8282FAX: (+55) 11.4193.8283
Life Fitness JapanTelephone: (+81) 3.3359.4309FAX: (+81) 3.3359.4307Life Fitness Iberia (Spain)Telephone: (+34) 93.672.4660FAX: (+34) 93.672.4670

7 SPECIFICATIONS
7.1 LIFE FITNESS T9I TREADMILL SPECIFICATIONSDesigned use: ConsumerMaximum user weight: 400 pounds / 181 kilogramsSpeed range: 0.5 - 12.0 MPH (0.8 - 20 KPH) in 0.1 incrementsElevation range: 0%-15% (in 0.1% increments)Drive train: AC motor with MagnaDrive™ motor controllerMotor type: Variable Speed ACMotor size: 4.0 HP continuous dutyPower requirements: 120 volt, 15 amp (U.S.). See Electrical Requirements for requirements
outside the United States.Rollers: 3.5 inch / 9 centimeter diameter, precision-crowned, front and backStriding Belt: 60" Length x 20" Width (152 cm Length x 51 cm Width), pre-lubricated,
multi-plyDeck type: 3/4" medium density reversible fiberboardShock Absorbtion System: Patented FlexDeck® Shock Absorption System with LifepringsTM
ErgoTM Front Handrail: Ergonomically shaped, overmolded elastomeric gripsSide handrails: 26" (66 cm) long, flared, cantilevered, overmolded elastomeric gripsStop systems: Red and Yellow magnetic lanyard emergency stop system, SmartStopTM,
and Session Stop Push Switch raised and prominently positionedWorkouts: Fat Burn, Cardio, Hill, Random, Manual, Custom (6 customizable work-
outs), Life Fitness Fit Test, Army PFT, Navy PRT, Air Force PRT, MarinesPFT, Gerkin, Physical Efficiency Battery (PEB), Sport TrainingTM (5K 10Kand Time), Calories Goal, Distance Goal, Time in Zone Goal, Heart RateHillTM, Heart Rate IntervalTM, Extreme Heart RateTM, My Workouts (7 pre-set workouts)
Levels: 20 (Hill, Random, 5K and 10K workouts)Heart rate monitoring systems: Patented Lifepulse™ digital contact heart rate and Polar® telemetry-com-
patible heart rate monitoring systemConsole displays: Elapsed time, total distance, total calories burned, Watts, METS, calories
burned per hour, speed, incline, heart rate, distance climbed, time inzone, and Profile Window
Ports (2): Type RJ45, interchangeable
PHYSICAL DIMENSIONS:Length: 83 inches / 211 centimetersWidth: 37 inches / 94 centimetersHeight: 63.5 inches / 161 centimetersWeight: 431 pounds / 195 kilogramsStep-Up Height 11” / 28 centimeters
SHIPPING DIMENSIONS:Length: 86.25 inches / 219 centimetersWidth: 42.5 inches / 108 centimetersHeight: 26.5 inches / 67 centimetersWeight: 506 pounds / 230 kilograms
49

50

Life Fitness World Headquarters5100 North River RoadSchiller Park, IL 60176
M051-00K60-A061